In part 1 of this series, we saw how to deploy atwo-node ONTAP Select cluster in a VMware vSphere environment using the ONTAP Select Deploy appliance. The focus was on the initial setup, including the deployment of the Deploy utility and the automated provisioning of the ONTAP Select nodes.
In this part, we prepare the ONTAP Select cluster for data services (CIFS/SMB and NFS) by creating the first data aggregates, volumes, and SVMs, and finally configuring and exporting NFS exports and CIFS shares.
Preparing ONTAP Select for the Data Services (CIFS/SMB and NFS)
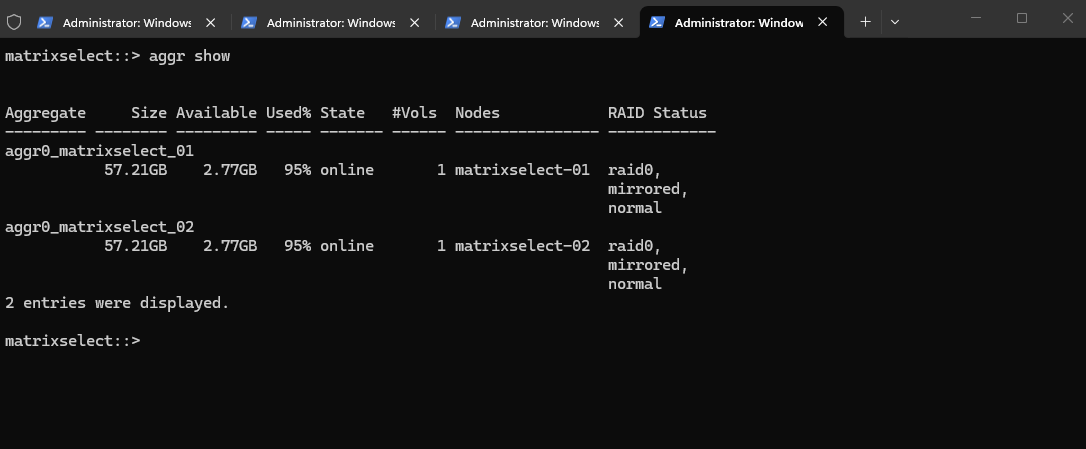
After deploying the two-node ONTAP Select cluster, the system initially only provides the root aggregates required for ONTAP itself.
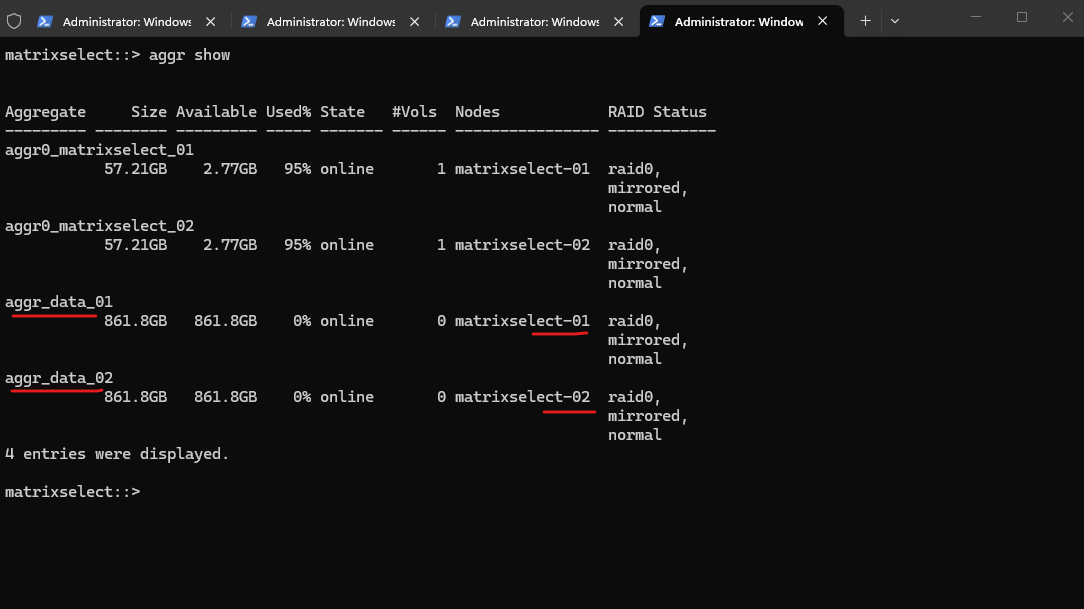
matrixselect::> aggr show
To serve client data using CIFS and NFS, a dedicated data aggregate must first be created from the available spare disks.
Since I already cover the creation of aggregates, SVMs, volumes, CIFS shares, and NFS exports in detail in my other ONTAP posts, I will keep this part brief and only show the basics.
Verify System Status and Health
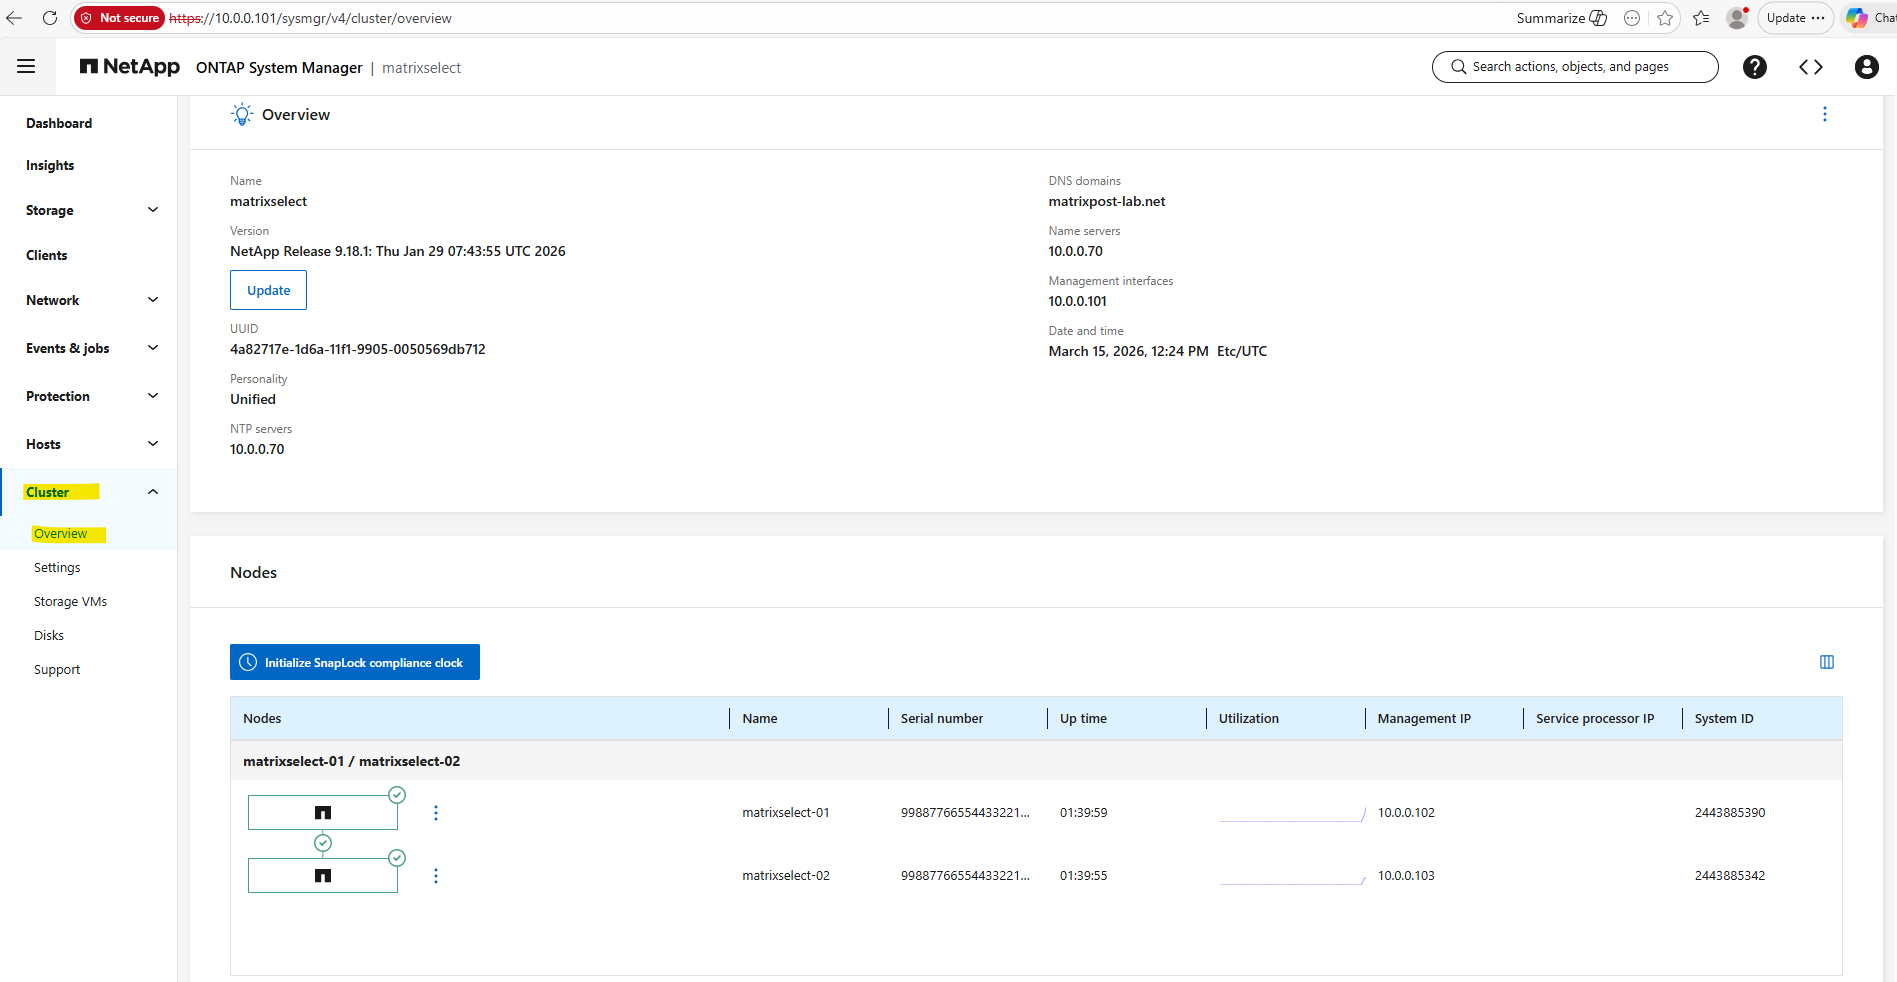
After the ONTAP Select system has started, the first step is to verify that the cluster is healthy and fully operational.
This can be done from the ONTAP CLI or directly in ONTAP System Manager, where both nodes should report a healthy state and the HA relationship should be active.
It’s important to ensure that no warnings are present and that all cluster services are running before proceeding with volume creation or data services configuration.
matrixselect::> cluster show
matrixselect::> node show
matrixselect::> storage failover show
matrixselect::> system node show -fields health,uptime
By using the ONTAP System Manager within Cluster -> Overview as shown below.
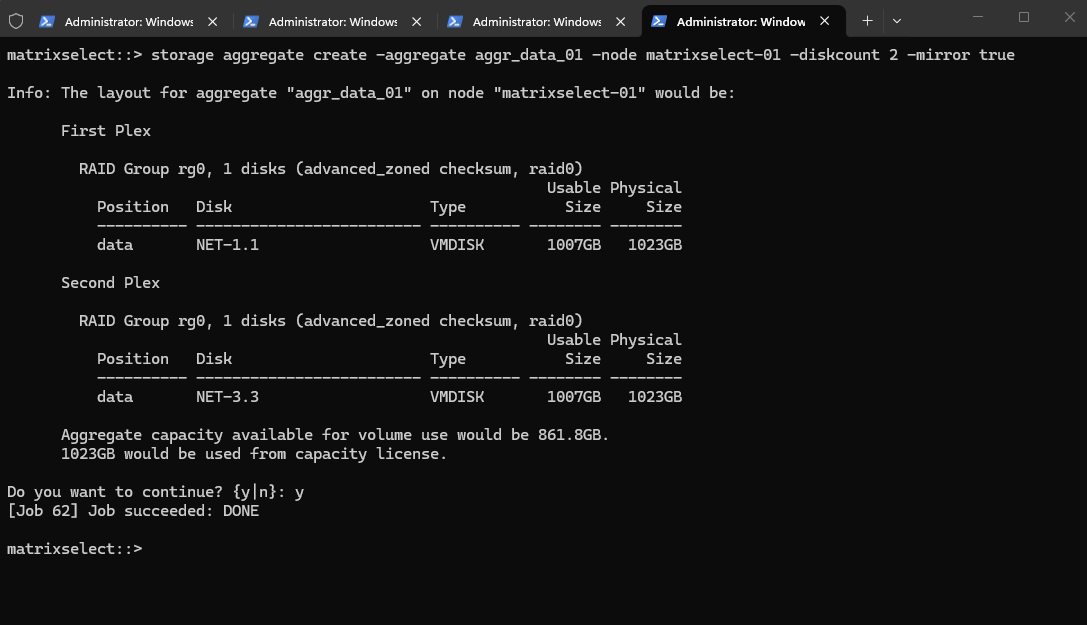
Creating the first Data Aggregate
The first step now is to create the first data aggregate, which will provide the usable storage capacity for hosting volumes and serving data.
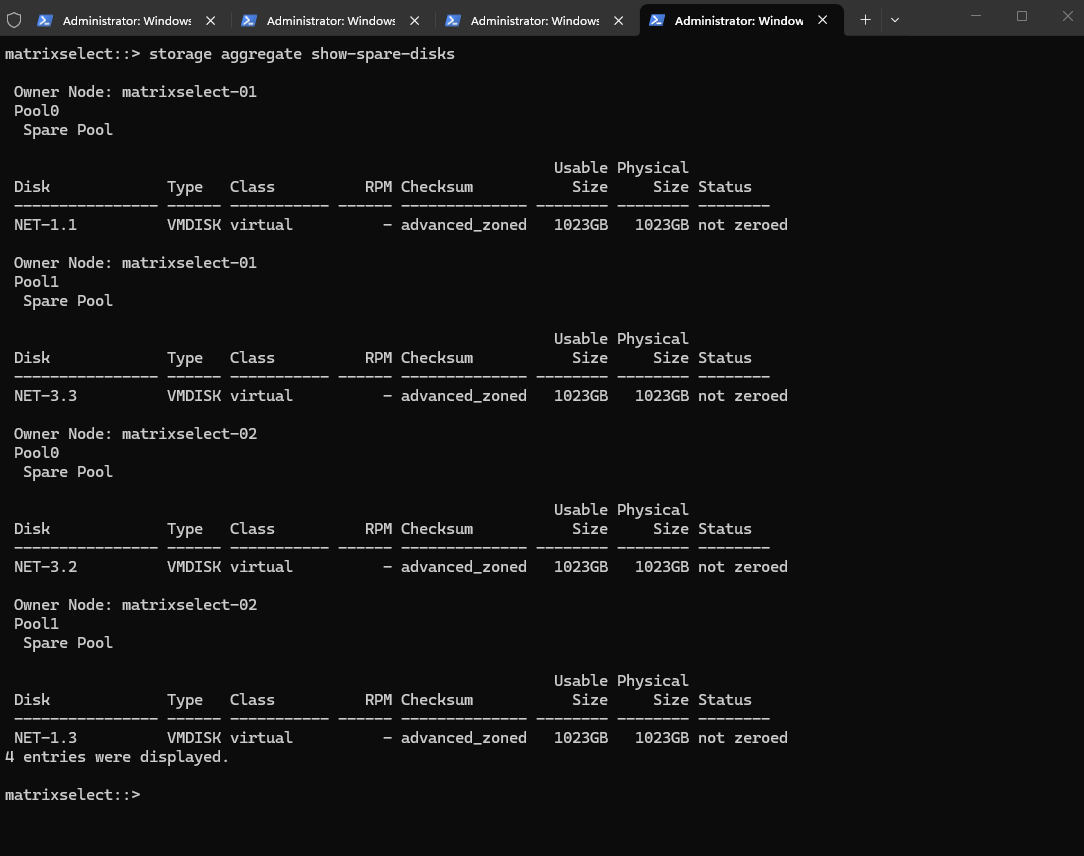
Before creating the first data aggregate, it is a good idea to first check which spare disks are currently available in the cluster.
In my case, the output shows four available 1 TB VMDISK spare disks, distributed across Pool0 and Pool1 and owned by both nodes of the HA pair, which can now be used to create a mirrored data aggregate.
The output now confirms that, in addition to the two root aggregates, both mirrored data aggregatesaggr_data_01 and aggr_data_02 were created successfully and are online, each providing about 861.8 GB of usable capacity on their respective node.
matrixselect::> aggr show
In System Manager the aggregates are shown as Storage Tiers under Storage -> Tiers.
Preparing ONTAP Select Storage for CIFS
Create a Storage Virtual Machine (SVM) for CIFS/SMB Shares
Before creating any volumes, we must first create a Storage Virtual Machine (SVM). The SVM acts as the logical container for storage and defines which protocols (NFS, SMB, iSCSI) are available, along with networking, security, and access settings.
Only after an SVM exists can you create volumes, as volumes always belong to an SVM and inherit its protocol and access configuration.
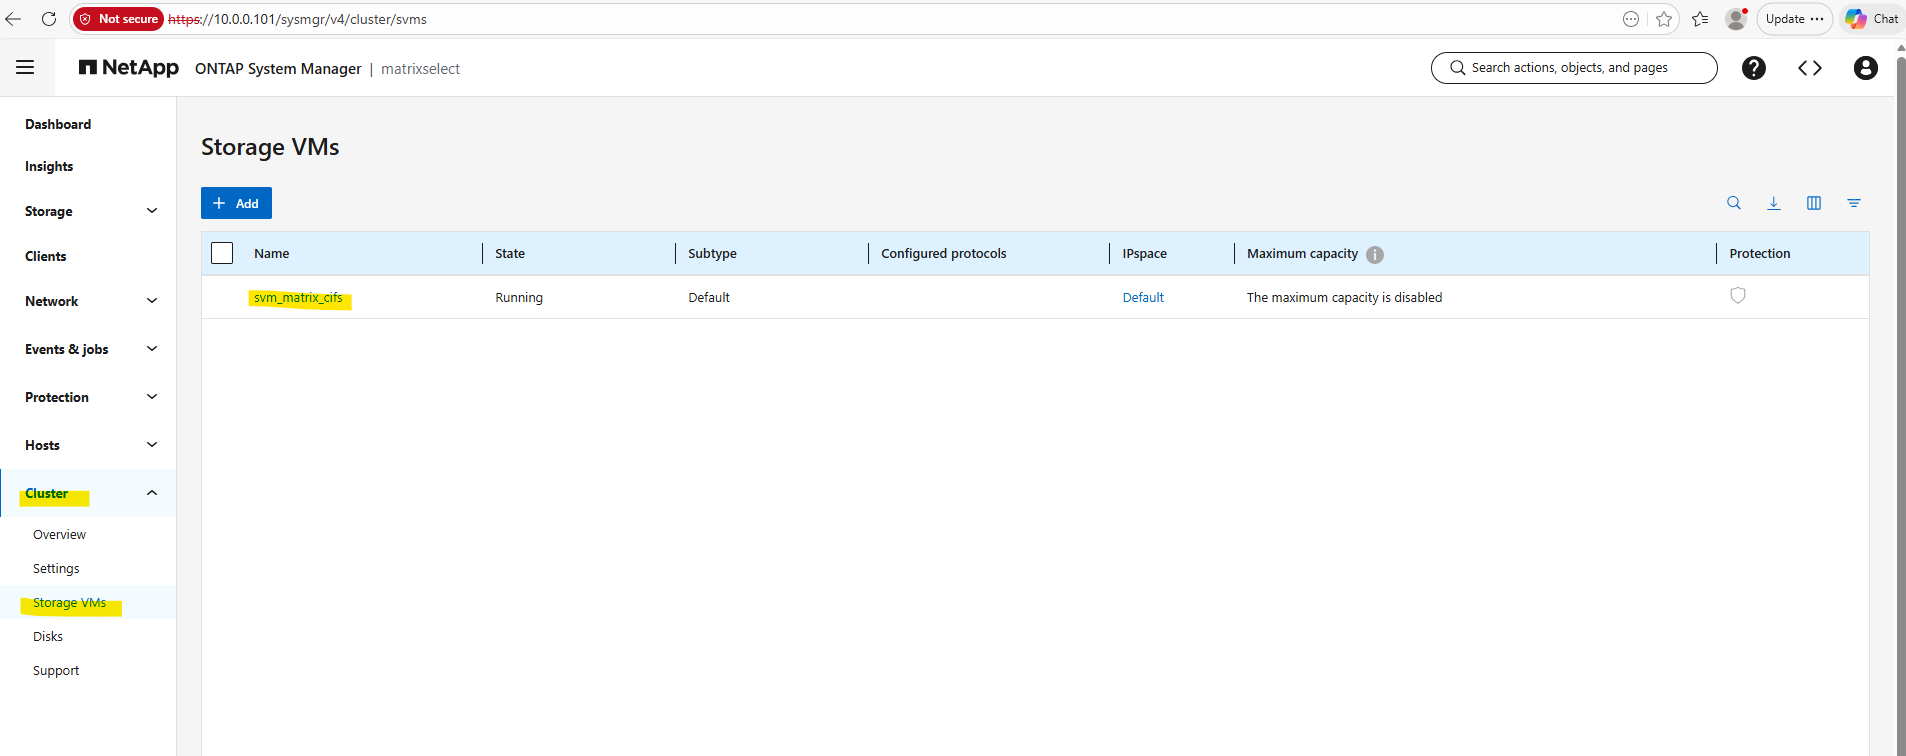
Before creating any storage, I’ll first take a look at the freshly deployed Cloud Volumes ONTAP system to see whether a data SVM is already in place by running the following command.
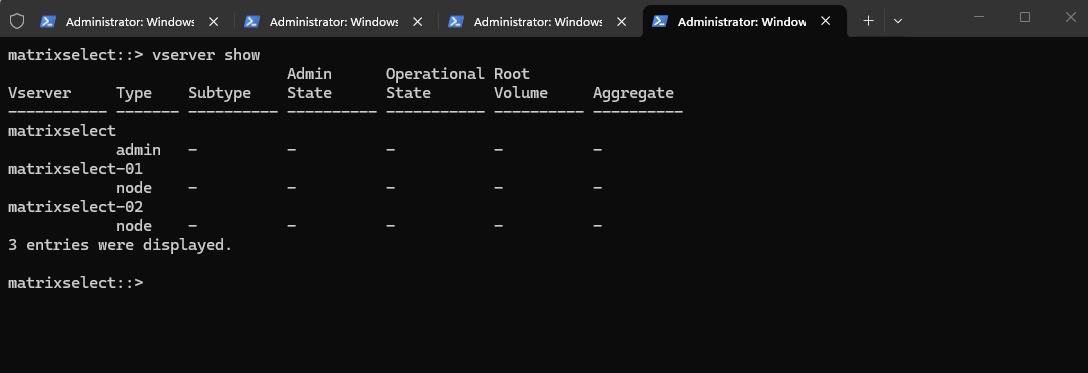
In contrast to Cloud Volumes ONTAP, where the deployment wizard automatically creates an initial data SVM for protocols such as NFS and CIFS/SMB, a newly deployed ONTAP Select cluster does not include such a preconfigured data SVM.
Instead, only the admin SVM and the node SVMs exist initially, so the data SVM must be created manually.
The admin SVM represents the cluster-wide management context and is used for administering the ONTAP cluster as a whole. The node SVMs are internal management SVMs for the individual nodes and are primarily used for node-specific administration and internal ONTAP functions, not for serving client data.
matrixselect::> vserver show
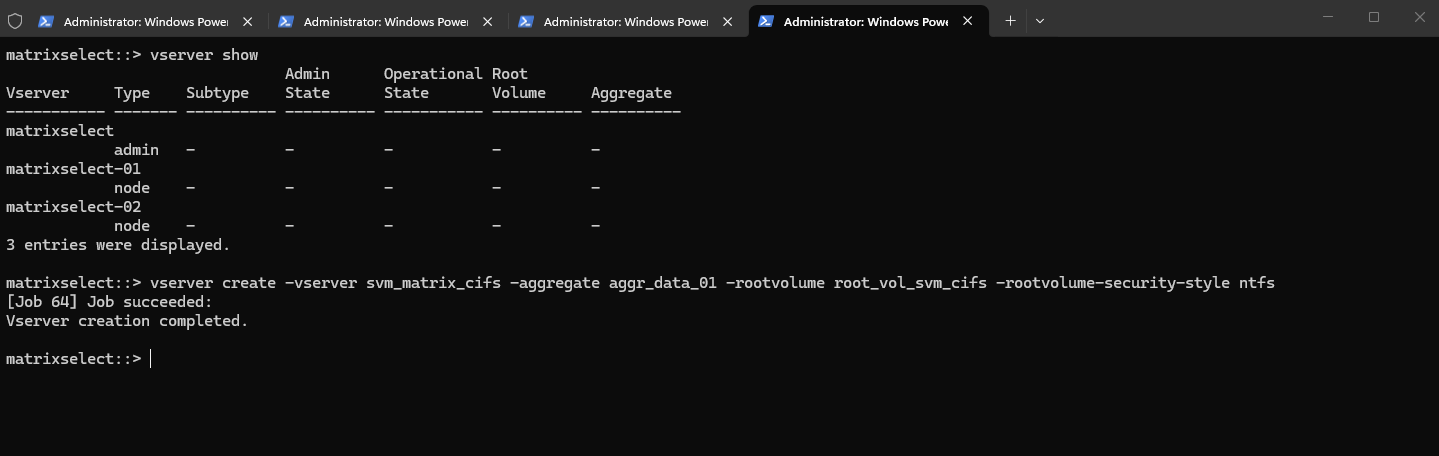
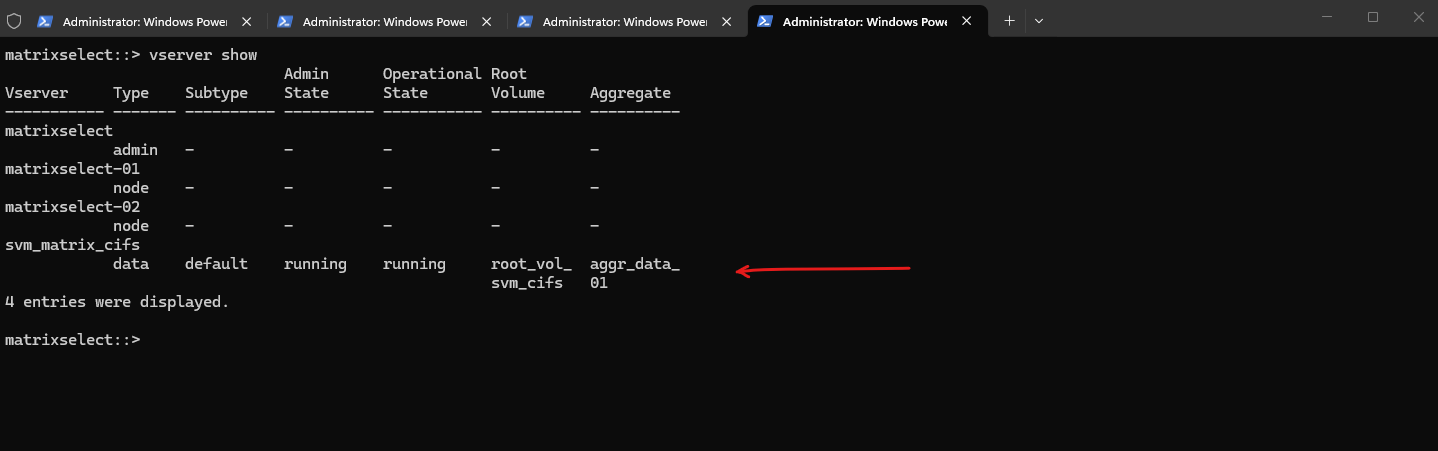
We will now create a Storage Virtual Machine (SVM), then a volume on our new aggregate, and finally enabling access via CIFS (SMB) and/or NFS.
After creating the SVM, its also best practices to create a Management LIF (Logical Interface). This LIF is used for administrative access to the SVM, including management via CLI, System Manager, and protocol configuration.
The system-defined failover policy acts as an intelligent “auto-pilot” that dynamically assigns the best failover targets based on the LIF’s service policy and network configuration. For data and management LIFs, it typically defaults to a broadcast-domain-wide scope, ensuring the IP can automatically migrate to any healthy port on the partner node within the same network segment.
While we can also use sfo-partner-only for the failover policy to ensure a LIF stays strictly within its 2-node HA pair, the modern system-defined policy is preferred because it offers greater flexibility by automatically adapting to your broadcast domain’s specific topology.
The default-managementservice policy in the command above replaces the legacy “management” role by explicitly authorizing the LIF to handle administrative traffic such as SSH, HTTPS, and SNMP.
For a data LIF(NFS or CIFS), you would use -service-policy default-data-files instead.
By using this policy, ONTAP ensures that management tasks are isolated from data services, preventing the interface from responding to file-level protocols like NFS or SMB. This modernization provides a more granular security posture.
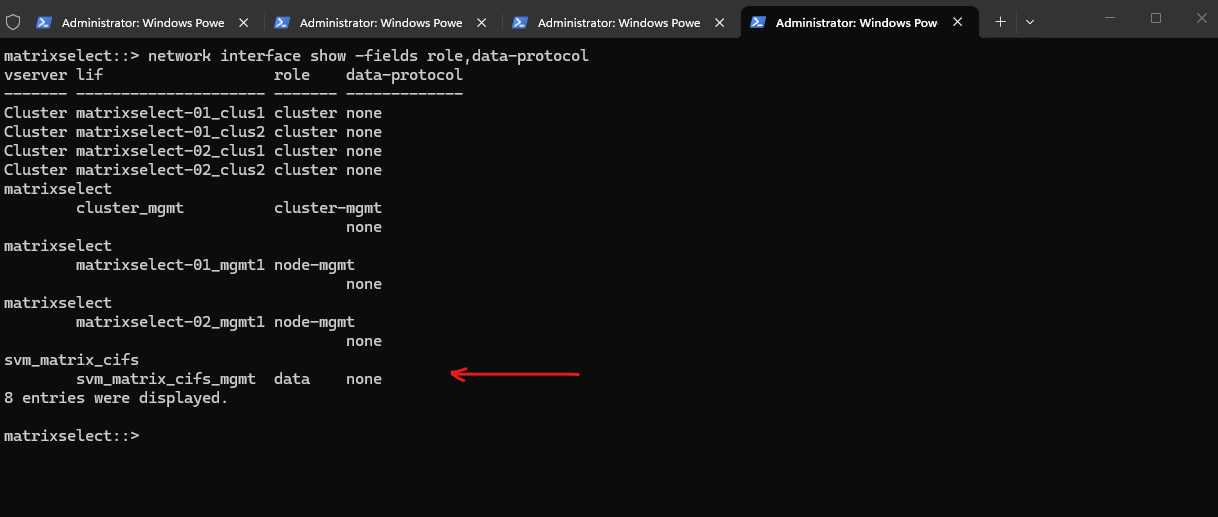
Although the LIF was created with the default-management service policy, it is still shown with the role data because it belongs to a data SVM. In modern ONTAP versions, the actual function of the LIF is mainly determined by the service policy, while the displayed role is more of a general classification based on the SVM type.
matrixselect::> network interface show -fields role,data-protocol
Create the Data LIFs for the new SVM
Creating an SVM alone is not sufficient to provide data access. Each SVM requires at least one data LIF, which represents the network endpoint used by clients to access storage services such as NFS or SMB. The LIF defines the IP address, subnet, and network path used by the SVM.
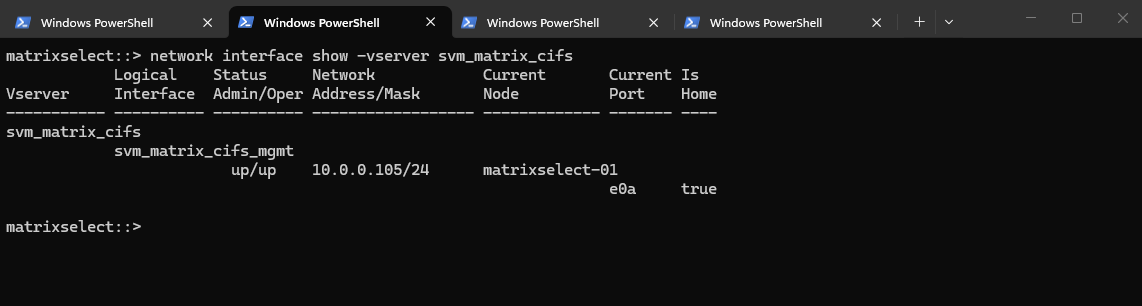
Before creating a new data LIF, it is useful to check the existing LIF configuration, below of the SVM (svm_matrix_cifs) to identify the correct network, port, and addressing scheme that should be reused for the new SVM.
So first, check which port is used by existing data LIFs:
In most CVO deployments this will be e0a.
In an ONTAP HA configuration, each SVM should have at least two data LIFs, one hosted on each node. This ensures high availability, as LIFs automatically fail over to the partner node in case of a node failure. Clients continue accessing data using the same IP addresses, providing seamless failover without manual intervention.
Although ONTAP can fail over data LIFs between nodes, this mechanism is intended for fault tolerance, not normal operation. Best practice is to configure at least one data LIF per node so that each node actively serves client traffic. This ensures optimal performance, predictable failover behavior, and full utilization of the HA architecture.
From a pure availability standpoint, a single data LIF is sufficient, as ONTAP will fail it over to the partner node in case of a node failure. However, using one data LIFper node is considered best practice because it enables load distribution, improves performance, and fully utilizes the HA architecture.
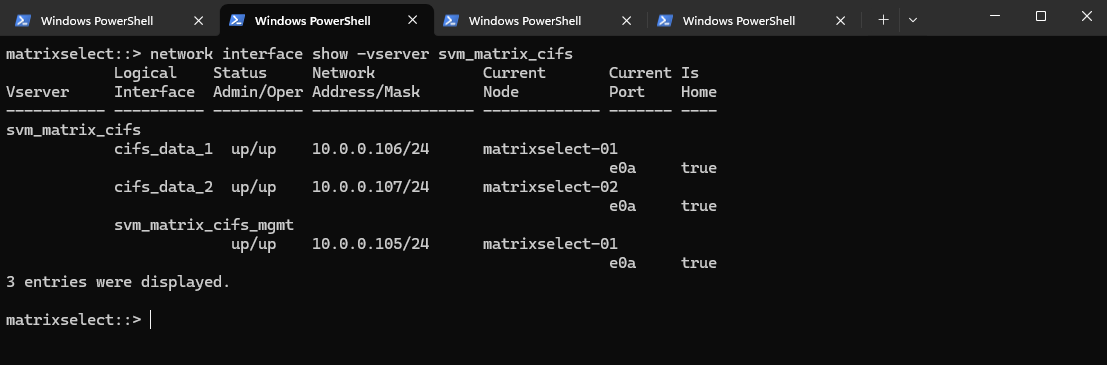
matrixselect::> network interface show -vserver svm_matrix_cifs
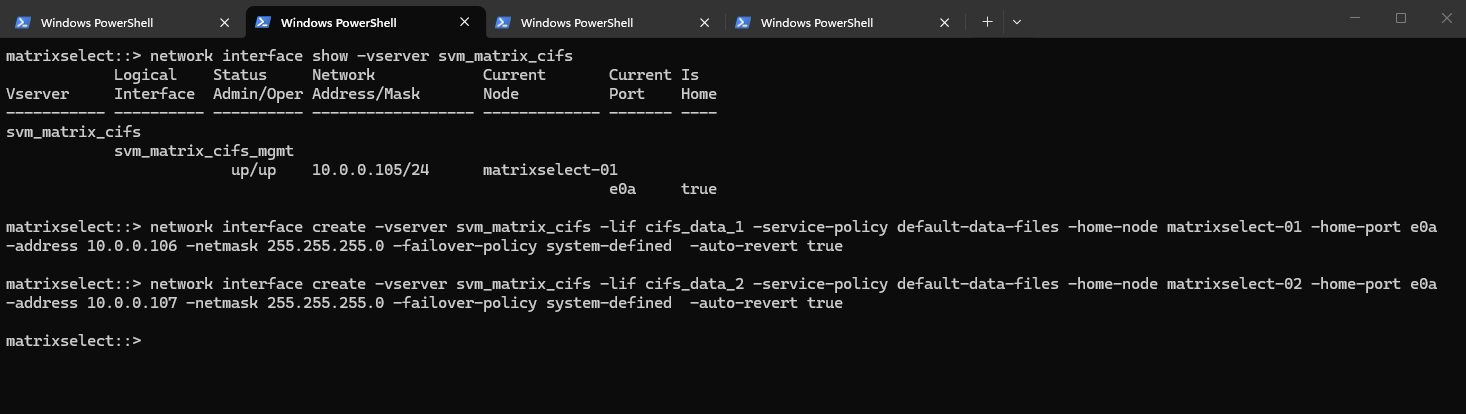
So for my new data LIFs I will use 10.0.0.106 and 10.0.0.107 which both are not in use so far.
By using -service-policy default-data-files, we explicitly define the LIF’s allowed traffic (NFS/SMB) using the modern ONTAP networking stack rather than a legacy role. Combined with -failover-policy system-defined, the system automatically calculates the most resilient failover path within the broadcast domain, ensuring the LIF stays reachable during an Azure HA event.
!! Note !! When using a load balancer in front like for Cloud Volumes ONTAP (CVO) in Azure, we also need to set the probe port for the LIF as shown here.
After creating the data LIFs, the SVM now has one active data interface per node. This setup follows NetApp best practices for high availability.
matrixselect::> network interface show -vserver svm_matrix_cifs
Create a Volume
After creating and configuring a SVM, the next step is to create a new volume that will be used to store and present data to clients.
The volume must be created on the correct SVM and mounted into its namespace so it can later be shared via SMB and/or NFS
A volume in NetApp ONTAP is a logical, mountable unit of storage that resides inside an aggregate, is served by a Storage Virtual Machine (SVM), and is accessible to clients via NFS, SMB, iSCSI, or FC.
ONTAPCloud supports up to 500 FlexVol volumes per node. Since volumes are hosted on nodes rather than directly limited per SVM, an SVM can use all available volumes on its hosting node, subject to overall system limits and sizing considerations.
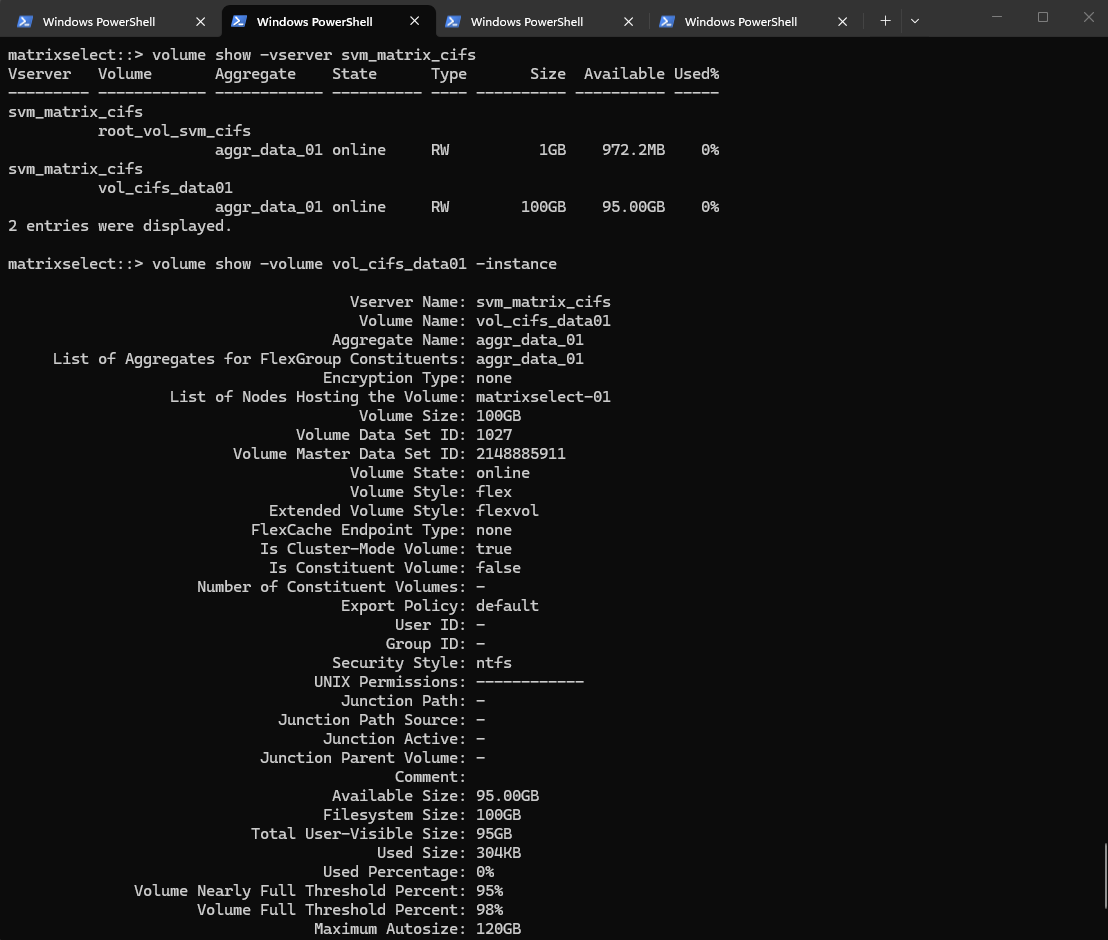
matrixselect::> volume show -vserver svm_matrix_cifs
matrixselect::> volume show -volume vol_cifs_data01 -instance
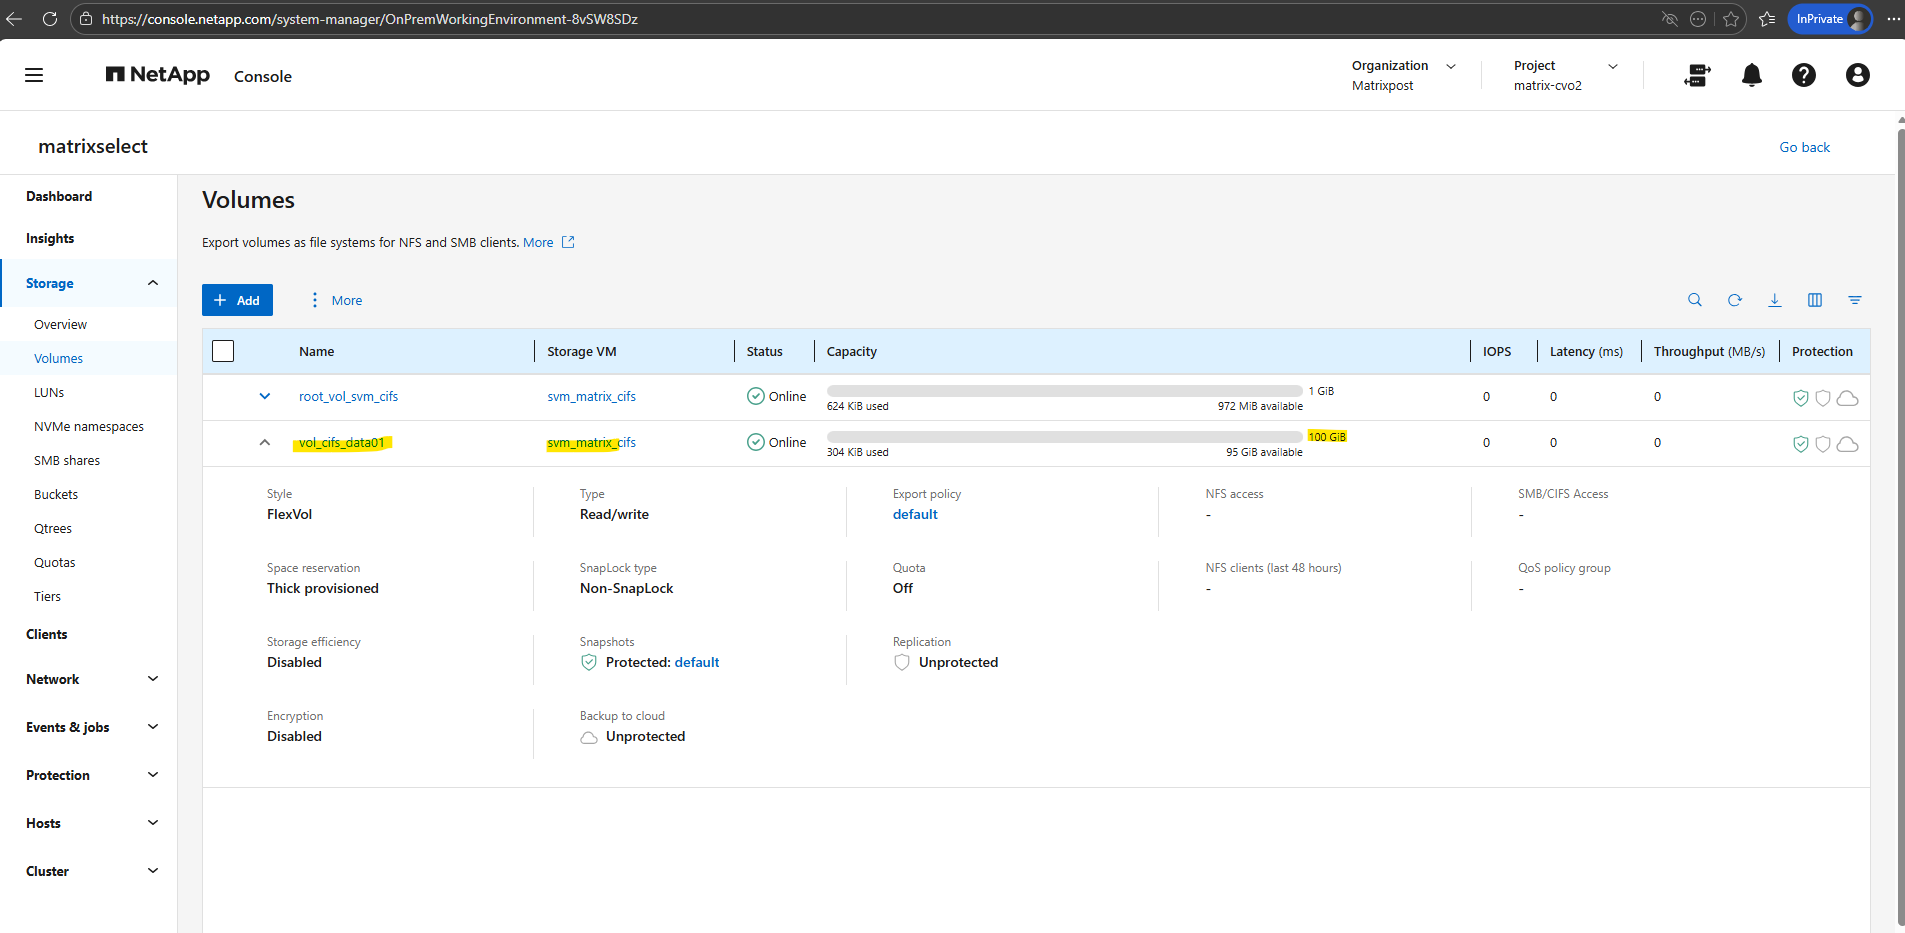
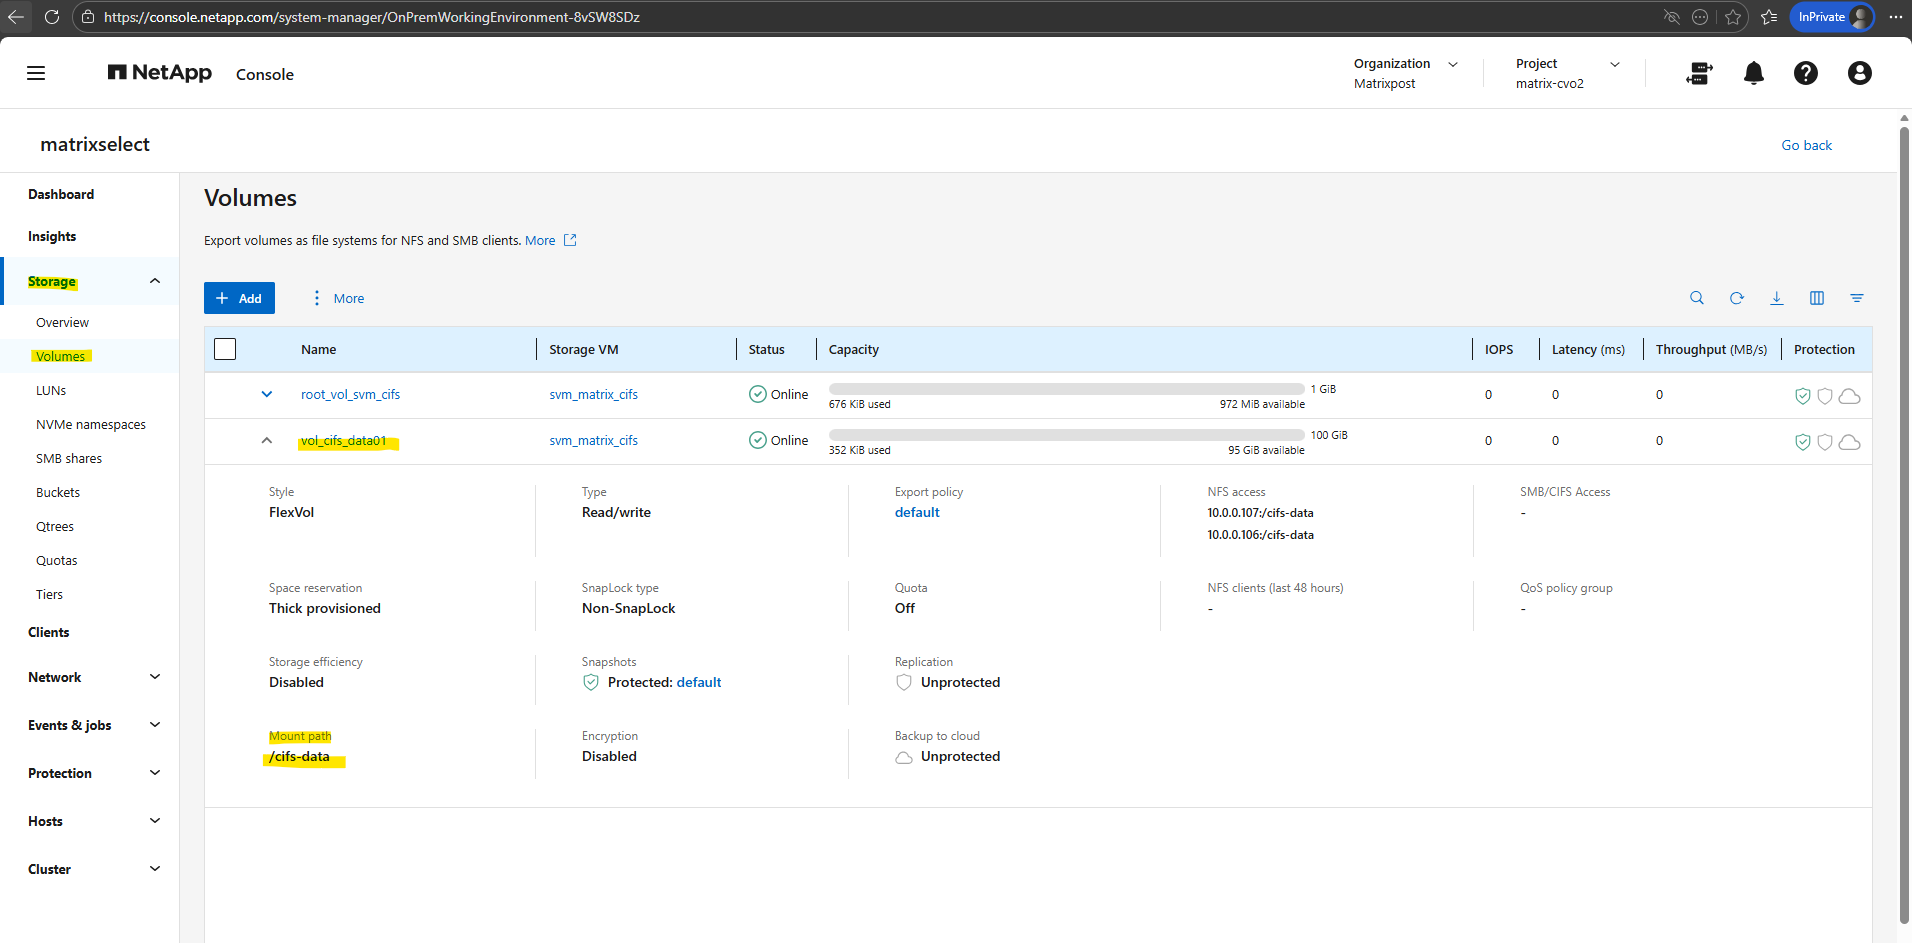
Or by using the ONTAP System Manager and here within Storage -> Volumes.
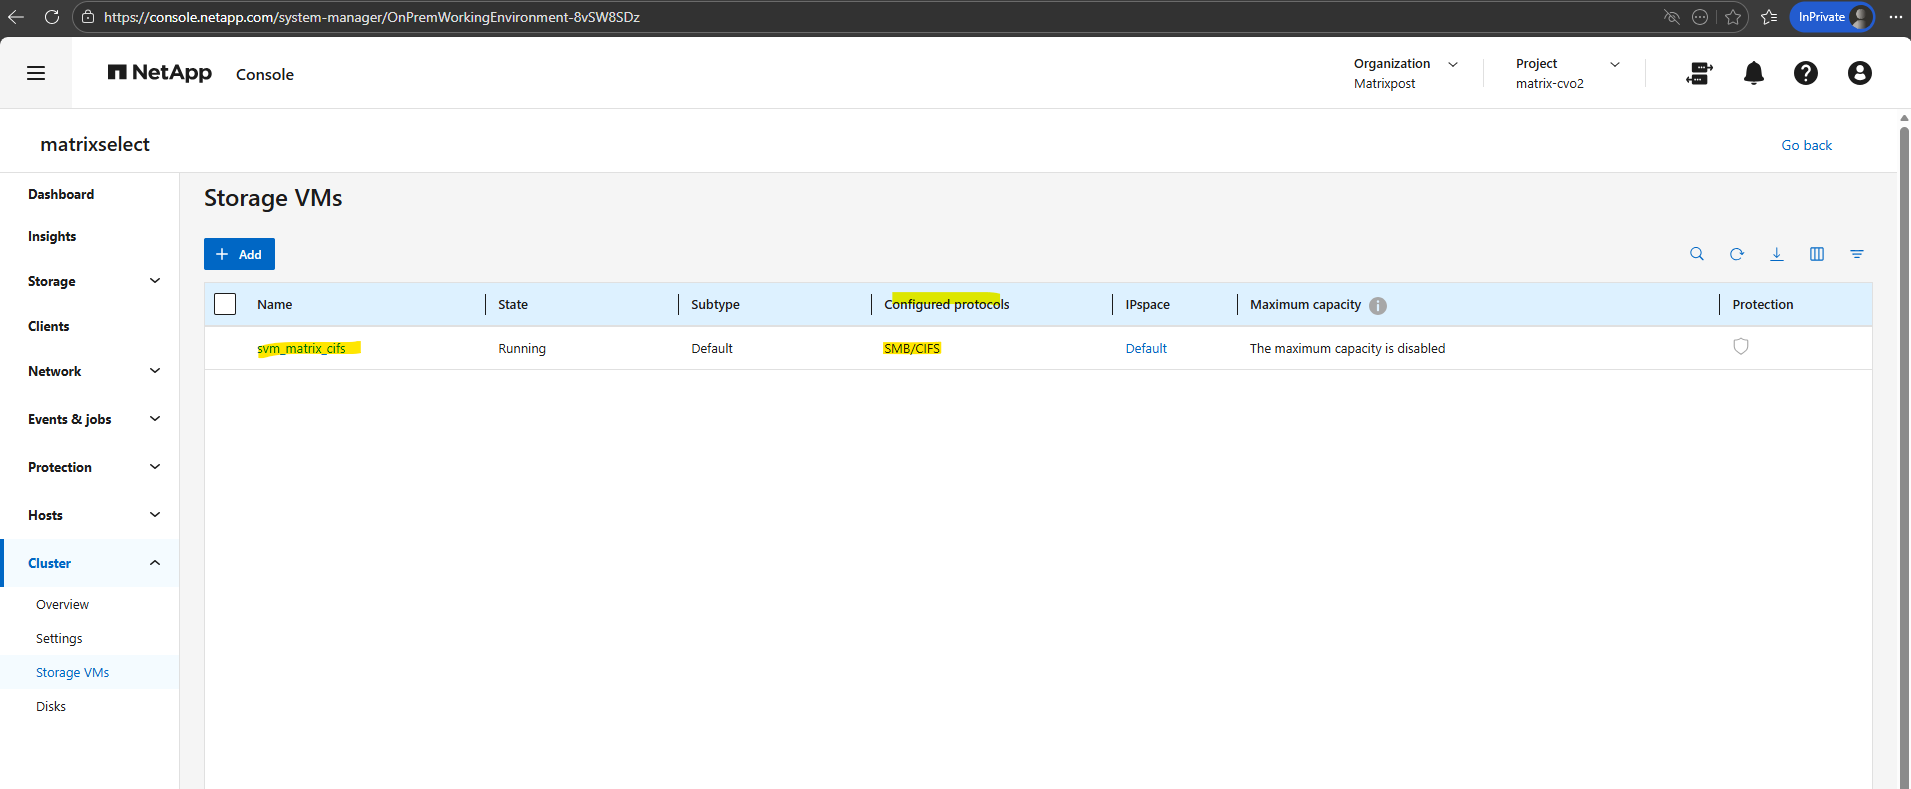
And also by using the NetApp console under Storage -> Management -> Systems, here select our system and click on the right bar on Enter System.
In case we have onboarded our on-prem ONTAP system to the NetApp console as shown in my post here.
Publishing CIFS/SMB shares
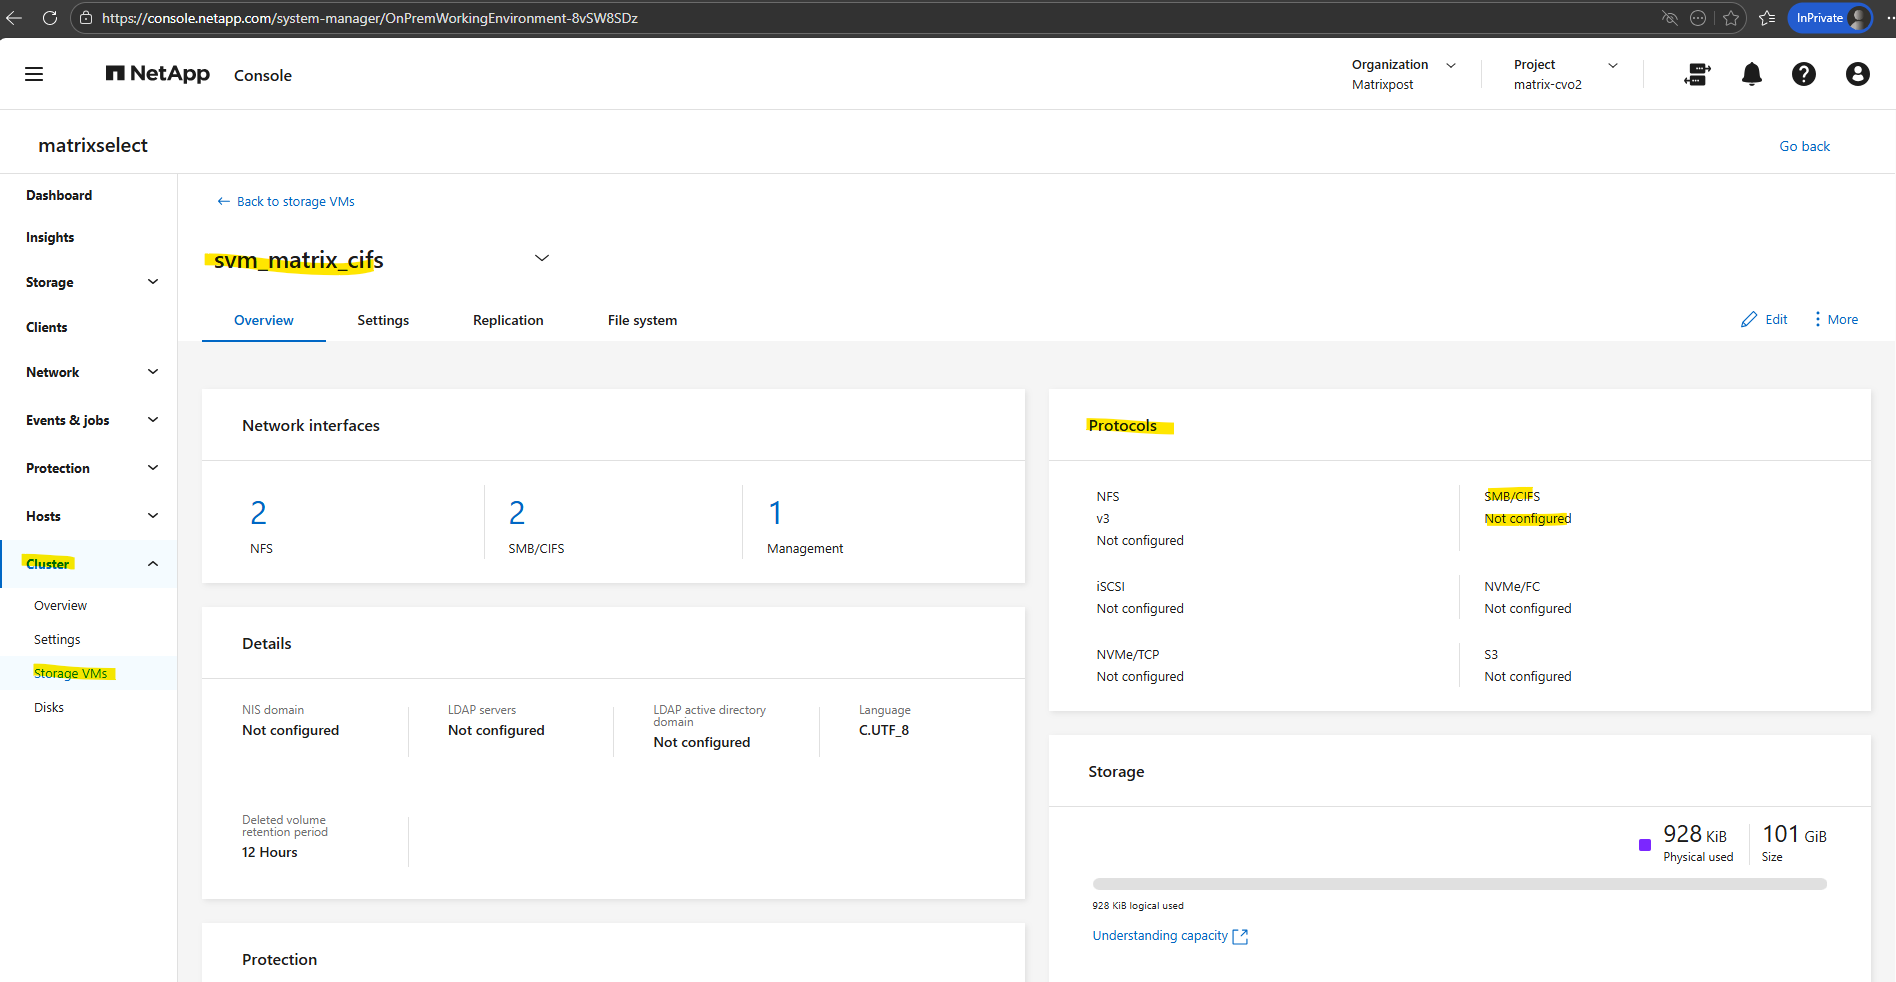
First we ensure if CIFS is already enabled on the SVM by running the following command.
matrixselect::> vserver cifs show -vserver svm_matrix_cifs
So far SMB/CIFS is not configured on this SVM.
So if it isn’t configured yet, we can enable it by running.
This requires the SVM to join an Active Directory domain.
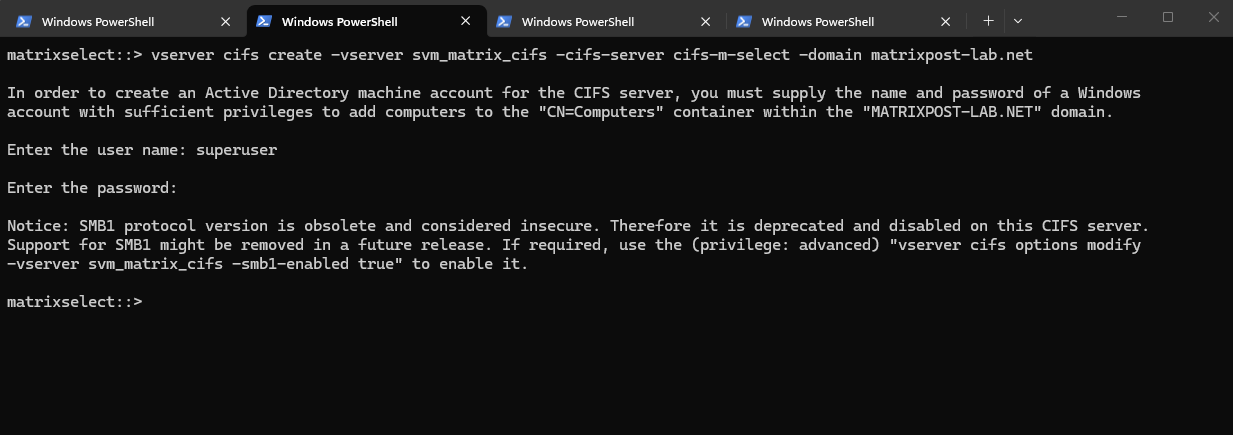
vserver cifs create → Enables the CIFS (SMB) protocol service on the SVM -vserver svm_matrix_cifs → The SVM where CIFS should be activated -cifs-server cifs-matrix-cvo → The NetBIOS/hostname that Windows clients will see when they connect (\\cifs-matrix-cvo\share) -domain matrixpost-lab.net → Joins this CIFS server to the specified Active Directory domain
The cifs-server named here cifs-matrix-cvo finally is the CIFS/SMB server object of the SVM. Think of it as: The Active Directory computer account that represents the SVM for SMB access.
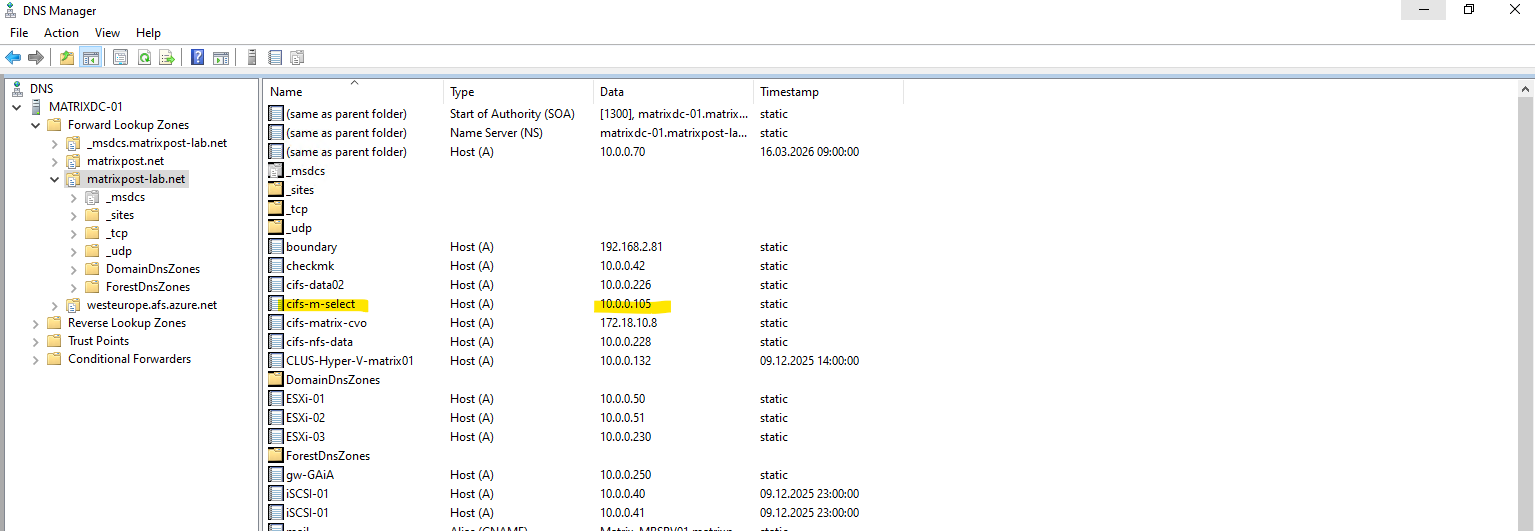
For the CIFS/SMB share (NetBIOS/hostname) I will create a DNS record in my lab environment which points to the IP address of the SVM we enabled CIFS on.
I will also first need to set a DNS server first on the Vserver’s DNS configuration.
We can configure it by using the CLI or the System Manager GUI. Below we will see by using the CLI.
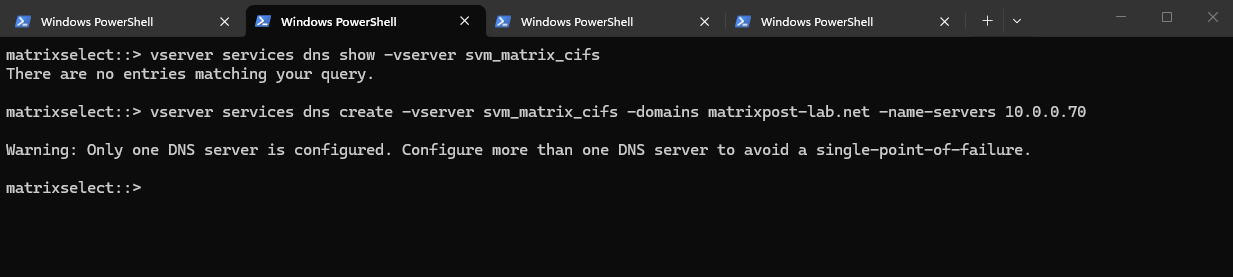
matrixselect::> vserver services dns show -vserver svm_matrix_cifs
matrixselect::> vserver services dns create -vserver svm_matrix_cifs -domains matrixpost-lab.net -name-servers 10.0.0.70
For my lab environment just one DNS server is fine.
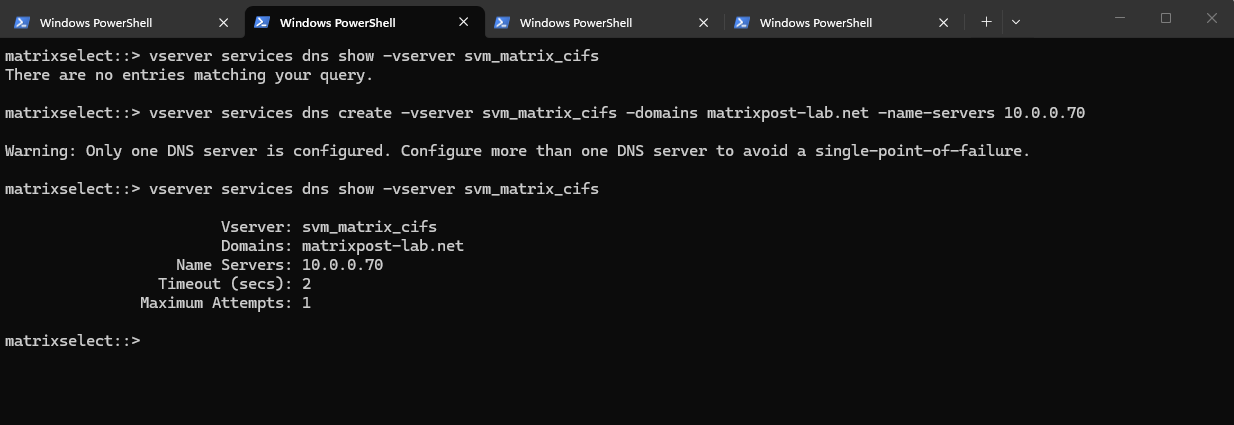
matrixselect::> vserver services dns show -vserver svm_matrix_cifs
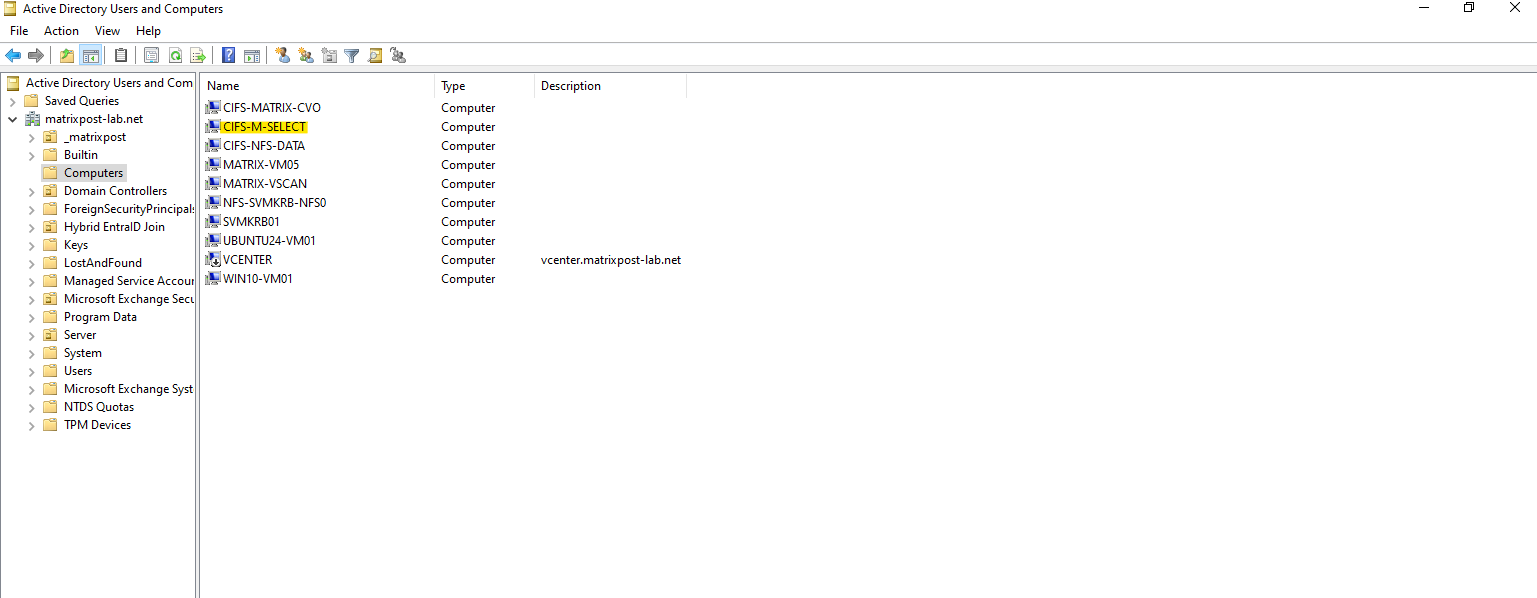
For the domain join and to create a AD machine account for this CIFS server we need to supply the name and password of a Windows account with sufficient privileges to add computers to the AD.
Our new CIFS server is joined to our AD and the default Computers container.
Looks good.
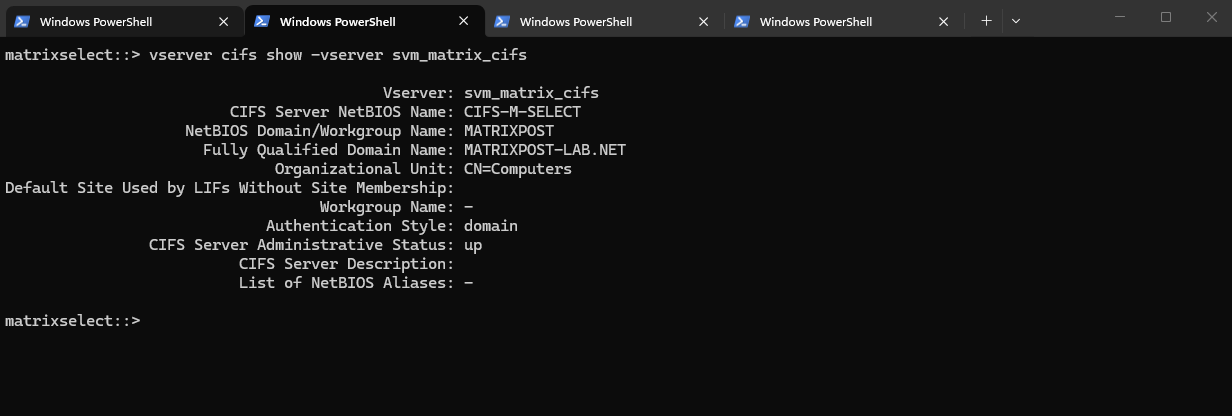
matrixselect::> vserver cifs show -vserver svm_matrix_cifs
We can now mount our previously created new volume named vol_cifs_data01 in the namespace of our newly created SVM named svm_matrix_cifs.
Mounting a volume in the namespace in NetApp ONTAP is a key concept, especially when working with NAS protocols like NFS and SMB.
In ONTAP, each SVM (Storage Virtual Machine) has its own namespace, which is essentially a virtual file system tree made up of Mounted volumes (like mount points) and Junction paths (like folders or subdirectories).
This allows ONTAP to present multiple volumes as a unified file system to clients.
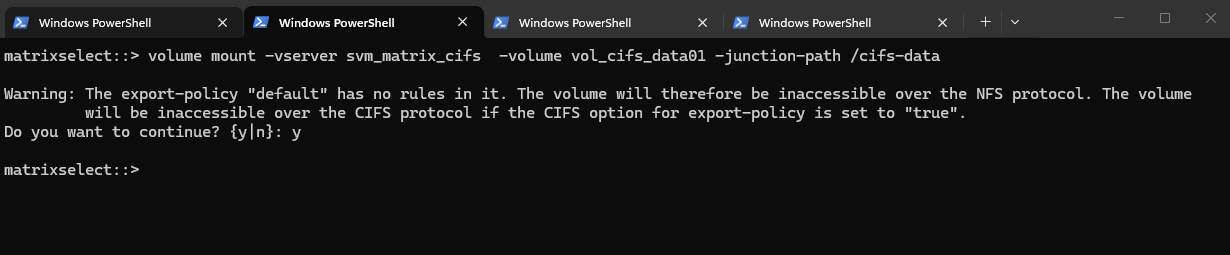
matrixselect::> volume mount -vserver svm_matrix_cifs -volume vol_cifs_data01 -junction-path /cifs-data
Warning: The export-policy “default” has no rules in it. The volume will therefore be inaccessible over NFS and CIFS protocol.
Since we plan to use this volume exclusively for CIFS/SMB access, the warning can be safely ignored and confirmed with yes. The message primarily refers to NFS access, as export policies control NFS permissions, while SMB access is governed by share configuration and NTFS permissions in a standard ONTAP setup.
Export policy enforcement for SMB is disabled by default but can be enabled if required to restrict access based on authentication protocol, client IP addresses, or host names as shown in my post here.
By default, export-policy enforcement for CIFS/SMB is disabled in ONTAP, meaning export policies are not evaluated for CIFS access.
This also applies to the default export policy, so it can safely be ignored when using SMB shares.
Access control is handled exclusively through share permissions and NTFS ACLs unless export-policy enforcement is explicitly enabled.
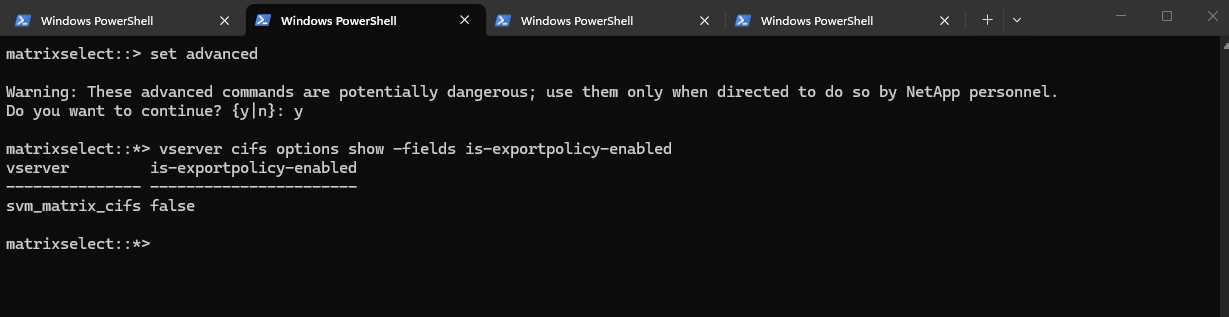
ONTAP does provide the option to configure export-policy check for CIFS. When the CIFS option"is-exportpolicy-enabled" is true you do need to create export-policy rules for CIFS protocol access.
matrixselect::> set advanced
matrixselect::*> vserver cifs options show -fields is-exportpolicy-enabled
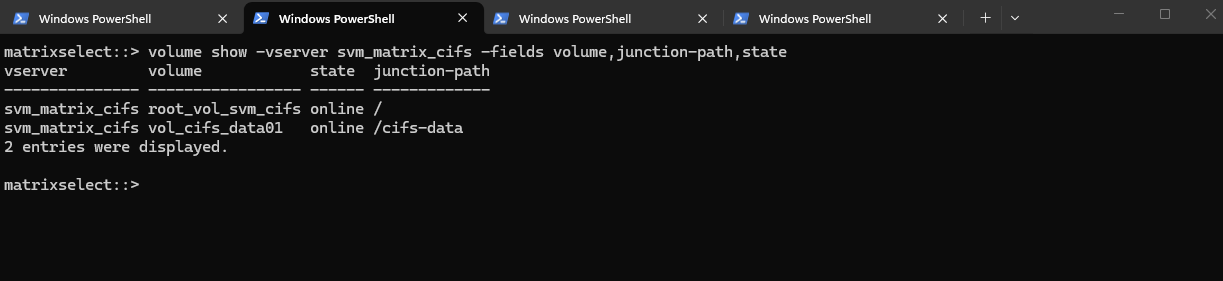
We can verify the mounted volume by running:
matrixselect::> volume show -vserver svm_matrix_cifs -fields volume,junction-path,state
The volume is now mounted under the SVM namespace and ready to be shared via SMB or NFS, completing the storage preparation for client access.
From now on SMB clientss can access it via via CIFS: \\<svm-lif-ip>\DataShare.
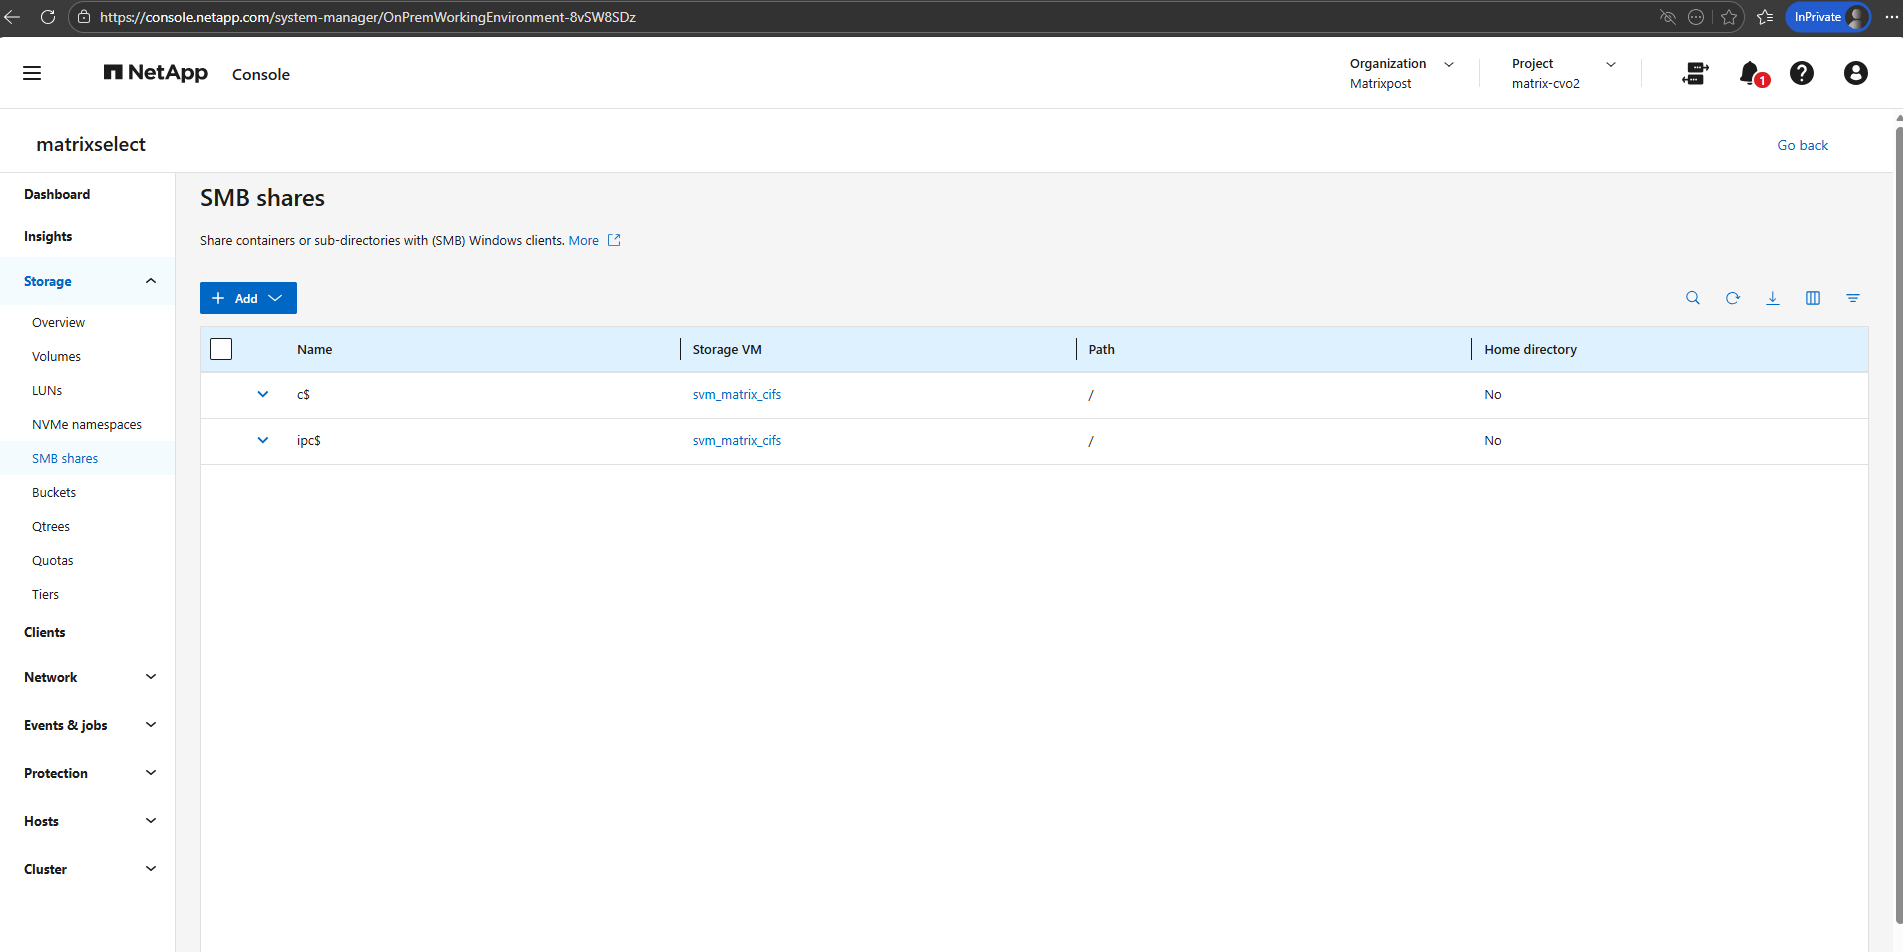
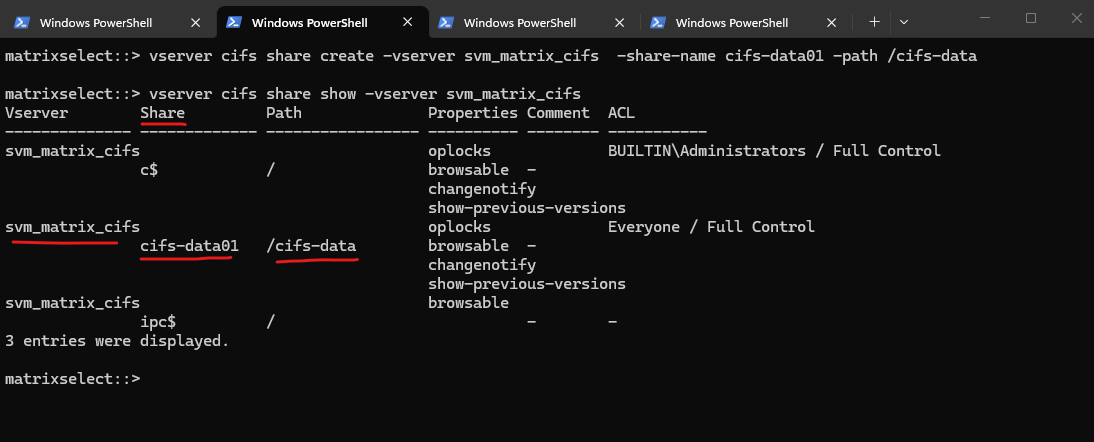
We can run the following command to show the currently existing CIFS shares on our SVM.
c$ and ipc$ shares here are default administrative shares, very similar to those found on a Windows server.
They are pointing to the root of the SVM namespace, which is the root_vol_svm_cifs, not our newly mounted volume vol_cifs_data01.
matrixselect::> vserver cifs share show -vserver svm_matrix_cifs
matrixselect::> volume show -vserver svm_matrix_cifs
Below we can see the root_vol_svm_cifsvolume which includes the above mentioned c$ and ipc$ shares (default administrative shares).
Every SVM in ONTAP requires a root volume, often named something like root_vol_svm_<custom name>. This root volume is mounted at / in the SVM’s namespace.
Our new volume vol_cifs_data01 is mounted at /data, but unless it’s explicitly shared, it’s not exposed via SMB.
We now need to create an SMB share for our newly created vol_cifs_data01 volume.
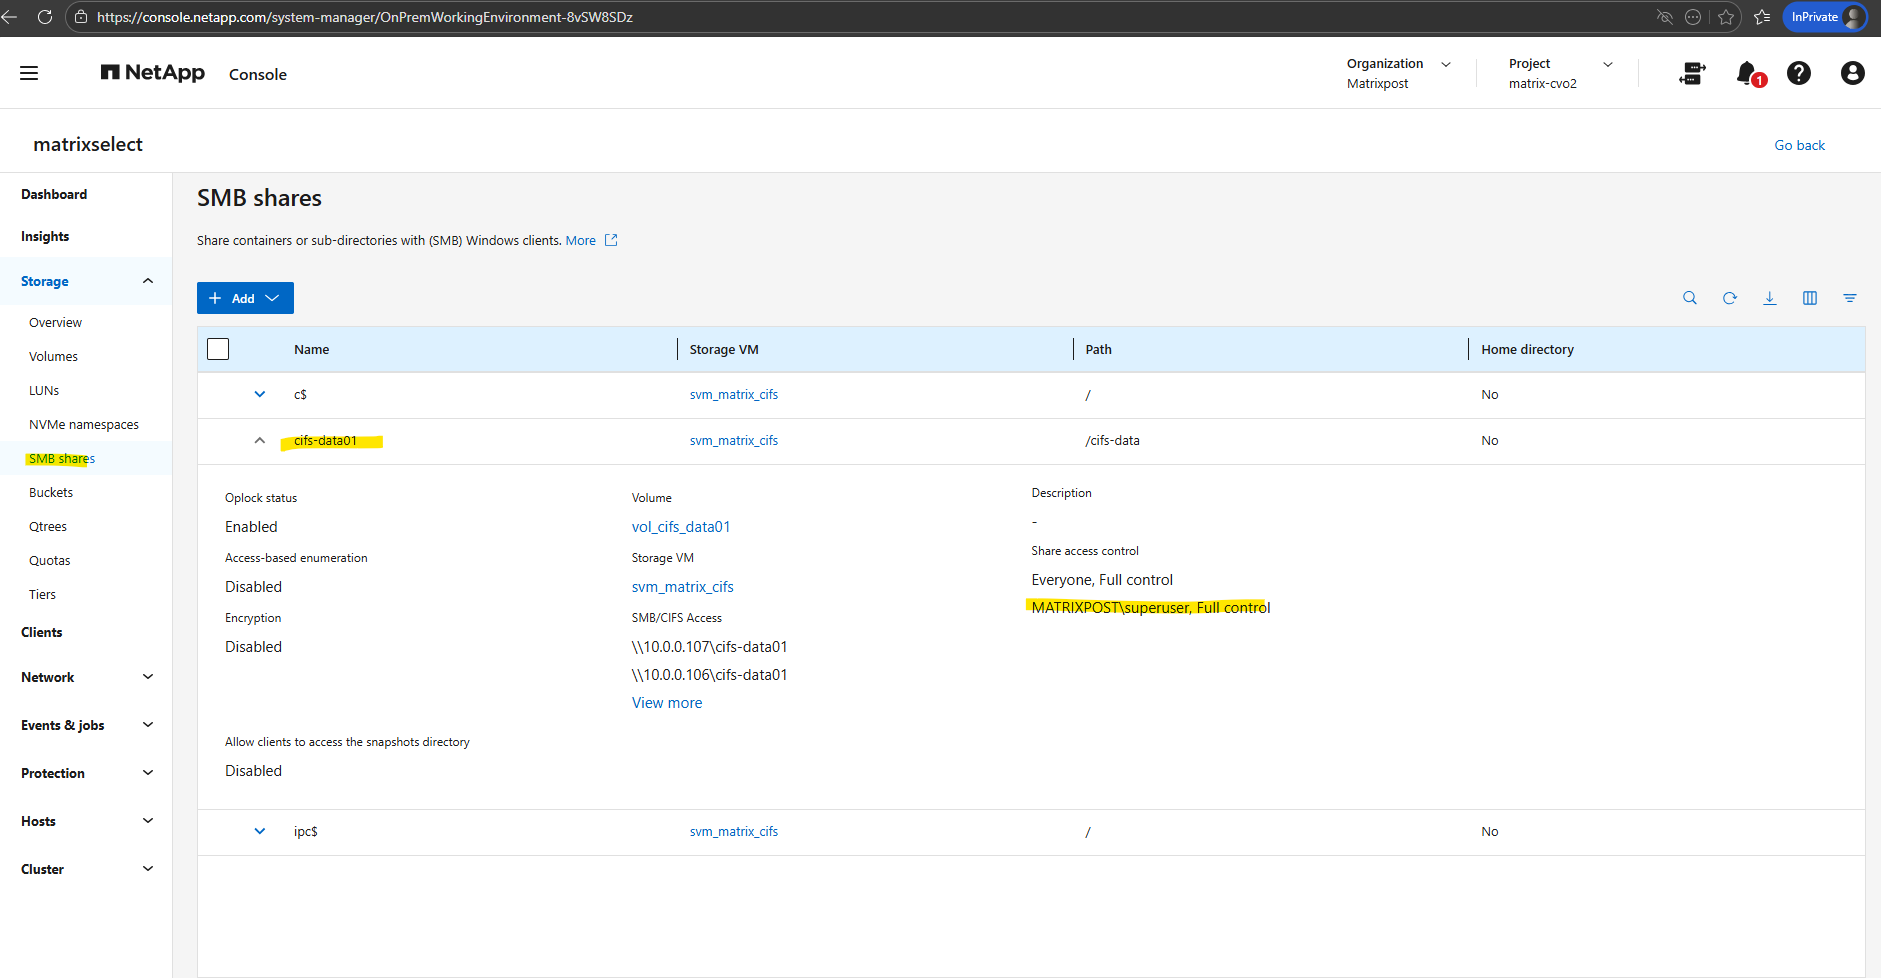
By running the command to list all CIFS shares on a specific SVM (Storage Virtual Machine) in NetApp again, we will now see our newly created cifs-data01 share.
matrixselect::> vserver cifs share show -vserver svm_matrix_cifs
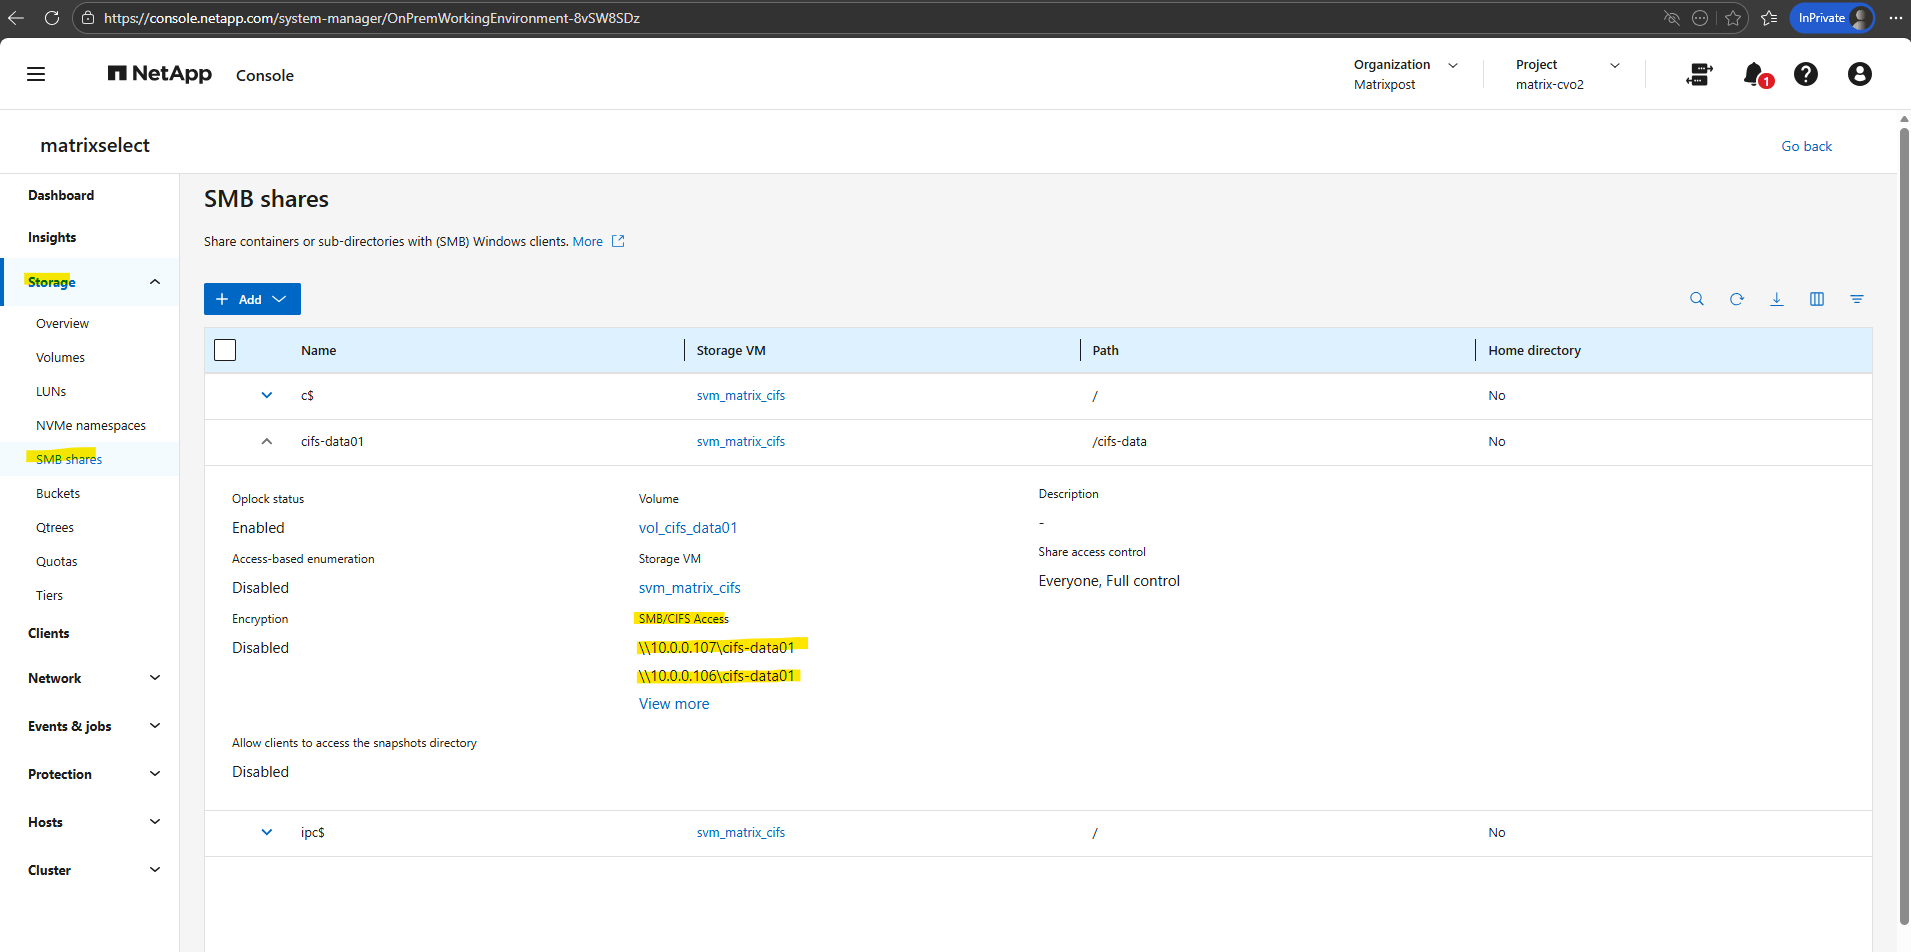
In the System Manager we will see the mount path or our new SMB share.
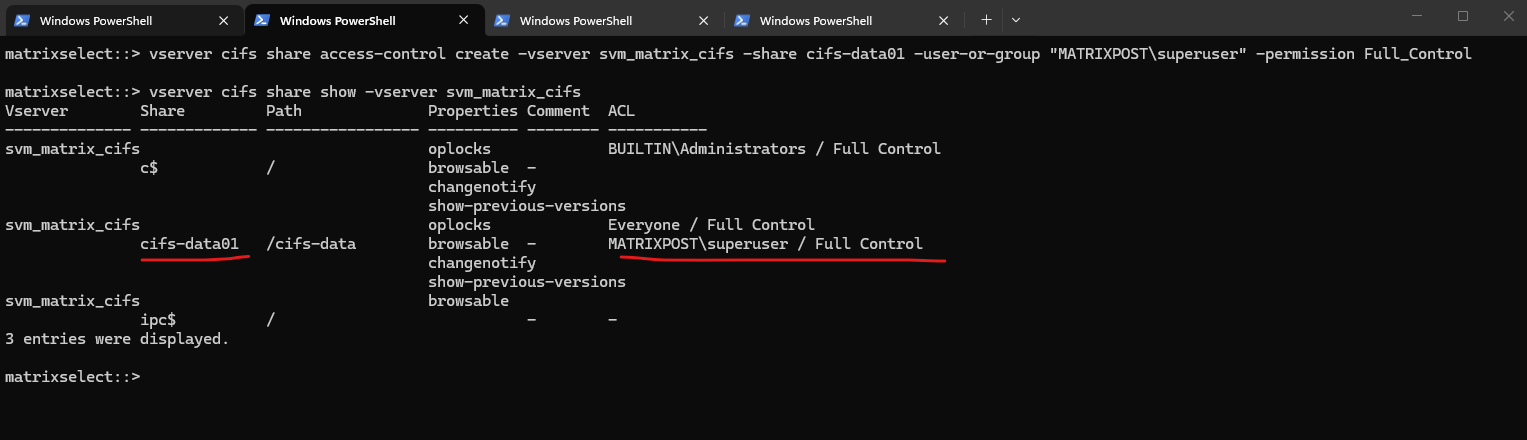
And finally we need to set the share permissions.
For my lab environment I will assign here just my enterprise admin with full control.
matrixselect::> vserver cifs share show -vserver svm_matrix_cifs
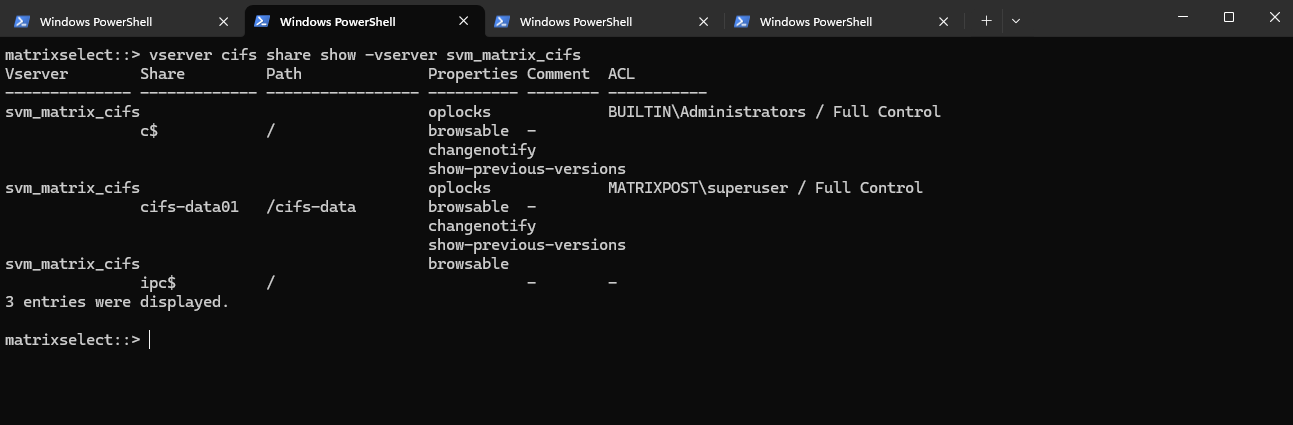
To ensure that access is granted only through explicitly assigned users or groups instead of broad default permissions, we can also remove the default Everyone share permission.
matrixselect::> vserver cifs share show -vserver svm_matrix_cifs
In the System Manager GUI we will also see our newly added share permissions.
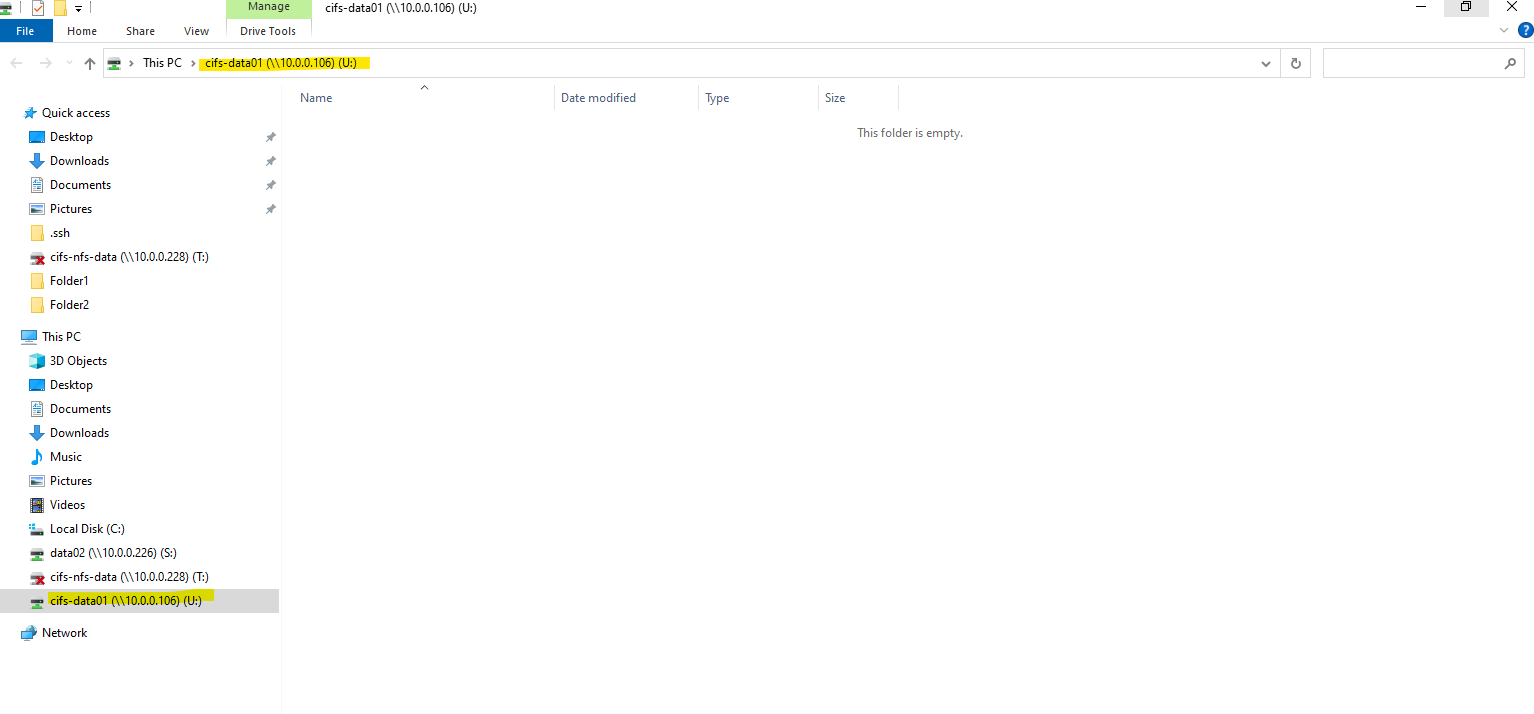
We can now mount our new SMB share when using an account we have authorized previously, in my case this is the enterprise admin named superuser.
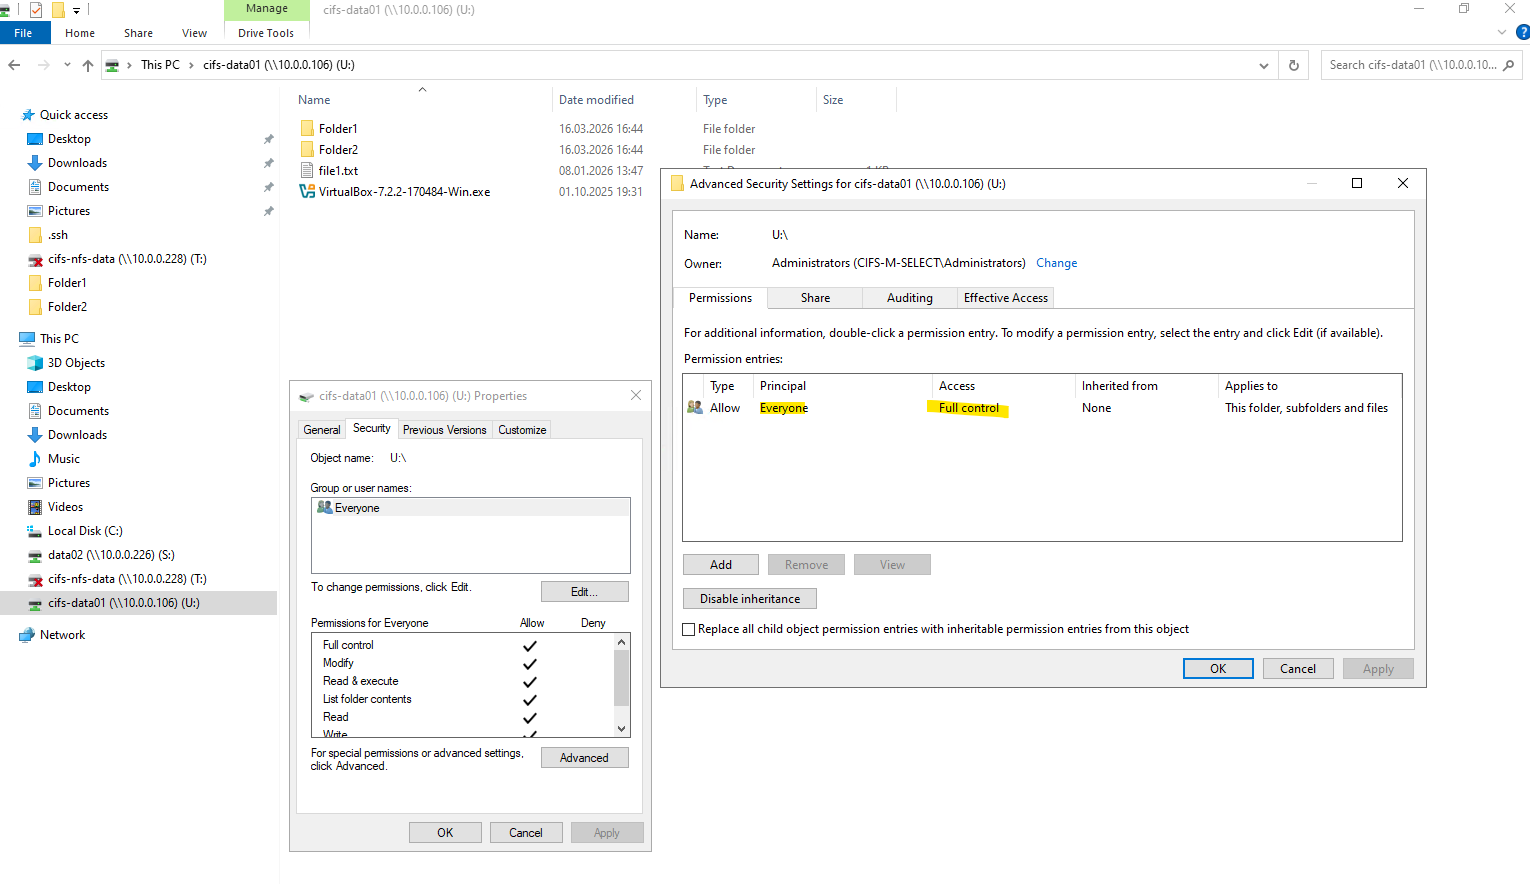
Creating a CIFS share only controls access to the share itself. NTFS permissions are applied at the filesystem level and are independent of share permissions.
By default, ONTAP assigns full control to the local Administrators group, which is expected behavior for newly created NTFS volumes.
After creating the SMB share, the NTFS permissions still need to be adjusted. This is done by mounting the share from a Windows system and modifying the security settings directly via Windows Explorer, as NTFS permissions are managed at the filesystem level and not through ONTAP CLI. This approach ensures proper ownership, inheritance, and access control for users and groups.
Preparing ONTAP Select Storage for CIFS
Configure NFS Export on ONTAP
In the following section, we prepare ONTAP for NFS access by building a dedicated Storage Virtual Machine (SVM) and configuring the required networking components, including management and data LIFs behind an Azure Internal Load Balancer.
After creating and mounting the volume within the SVM namespace, the environment is ready for NFS exports, enabling secure and efficient client connectivity.
An NFS export in NetApp is a volume (or path) made accessible to NFS clients through an SVM, using a combination of:
a mounted volume (junction path)
a logical interface (LIF)
and an export policy
Unlike in Linux where /etc/exports defines NFS access, NetApp uses export policies and rules at the volume level to control who can access what, and how.
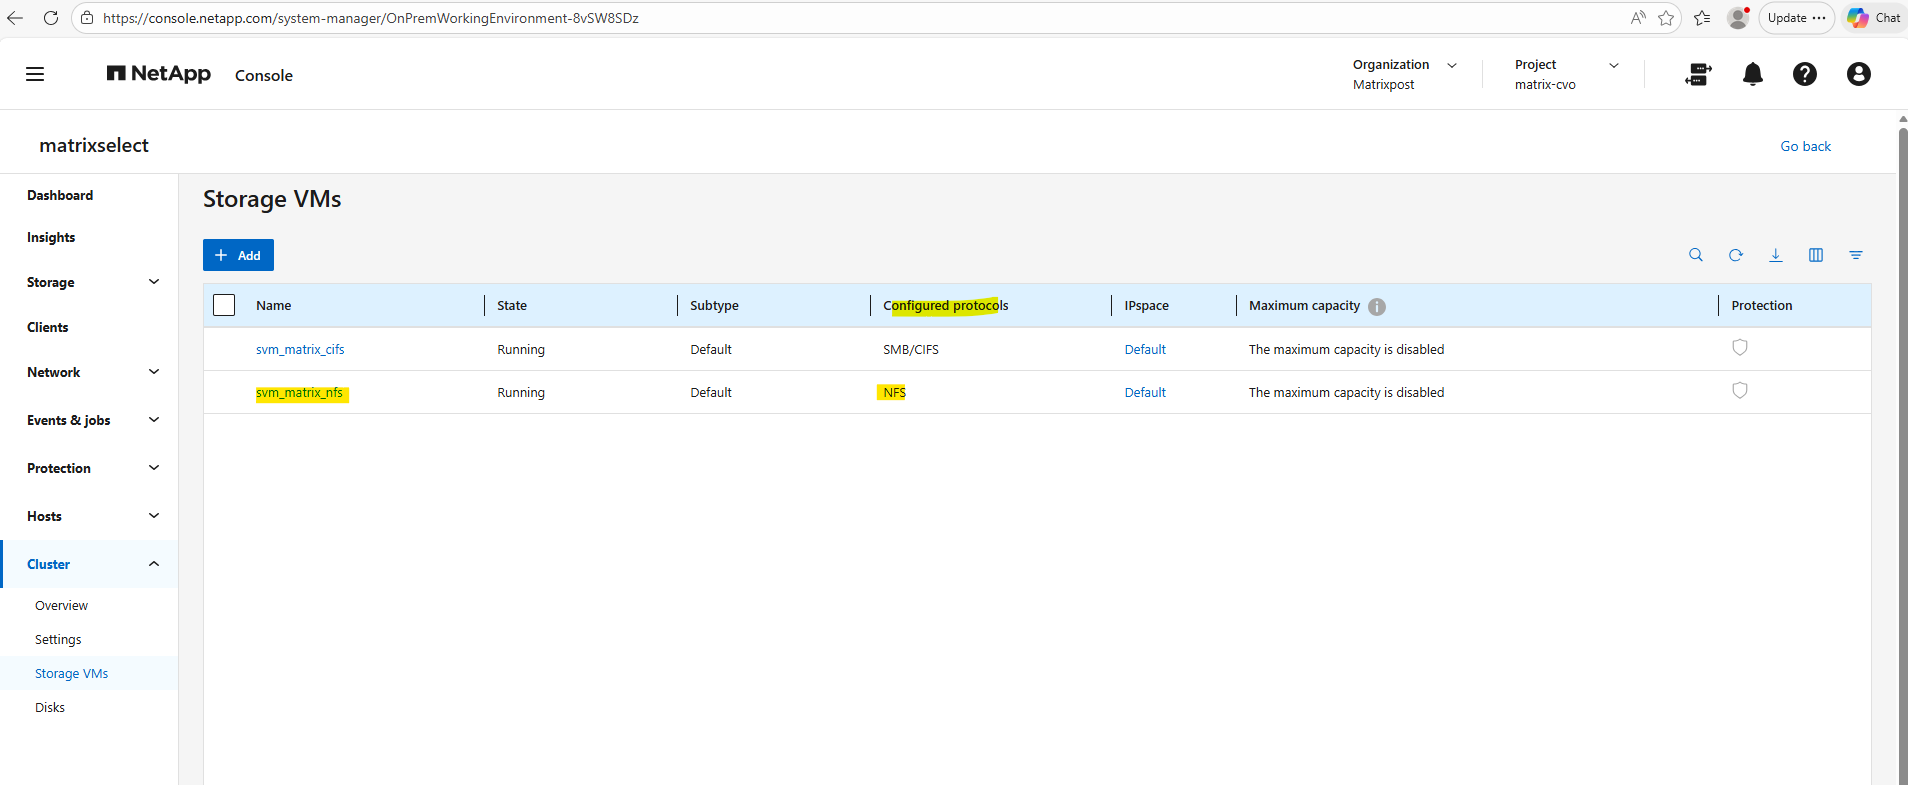
Like previously for publishing CIFS/SMB shares, I will first create a new SVM which I will use dedicated for NFS exports.
Create a Storage Virtual Machine (SVM) for NFS Exports
To provide NFS access, a dedicated Storage Virtual Machine (SVM) is created to logically separate storage resources and protocols. The SVM acts as the tenant for data services, allowing you to manage networking, security, and export policies independently from other workloads.
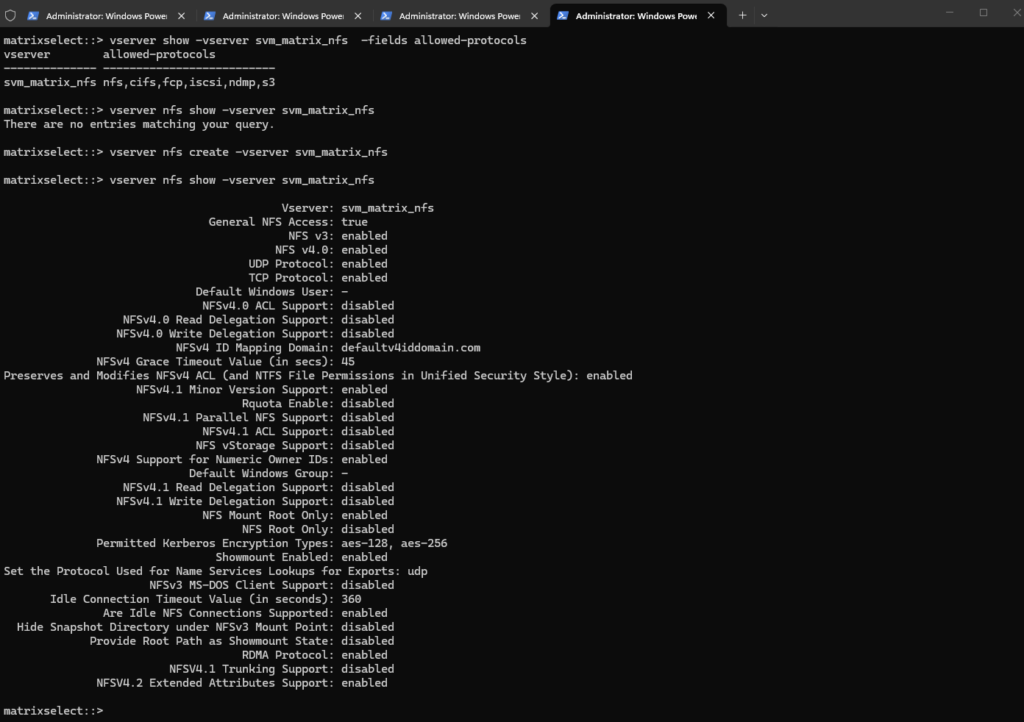
So far NFS is not enabled on our newly created Storage Virtual Machine (SVM).
To enable we need to run:
matrixselect::> vserver show -vserver svm_matrix_nfs  -fields allowed-protocols

# check if NFS is enabled
matrixselect::> vserver nfs show -vserver svm_matrix_nfs

# enable NFS
matrixselect::> vserver nfs create -vserver svm_matrix_nfs
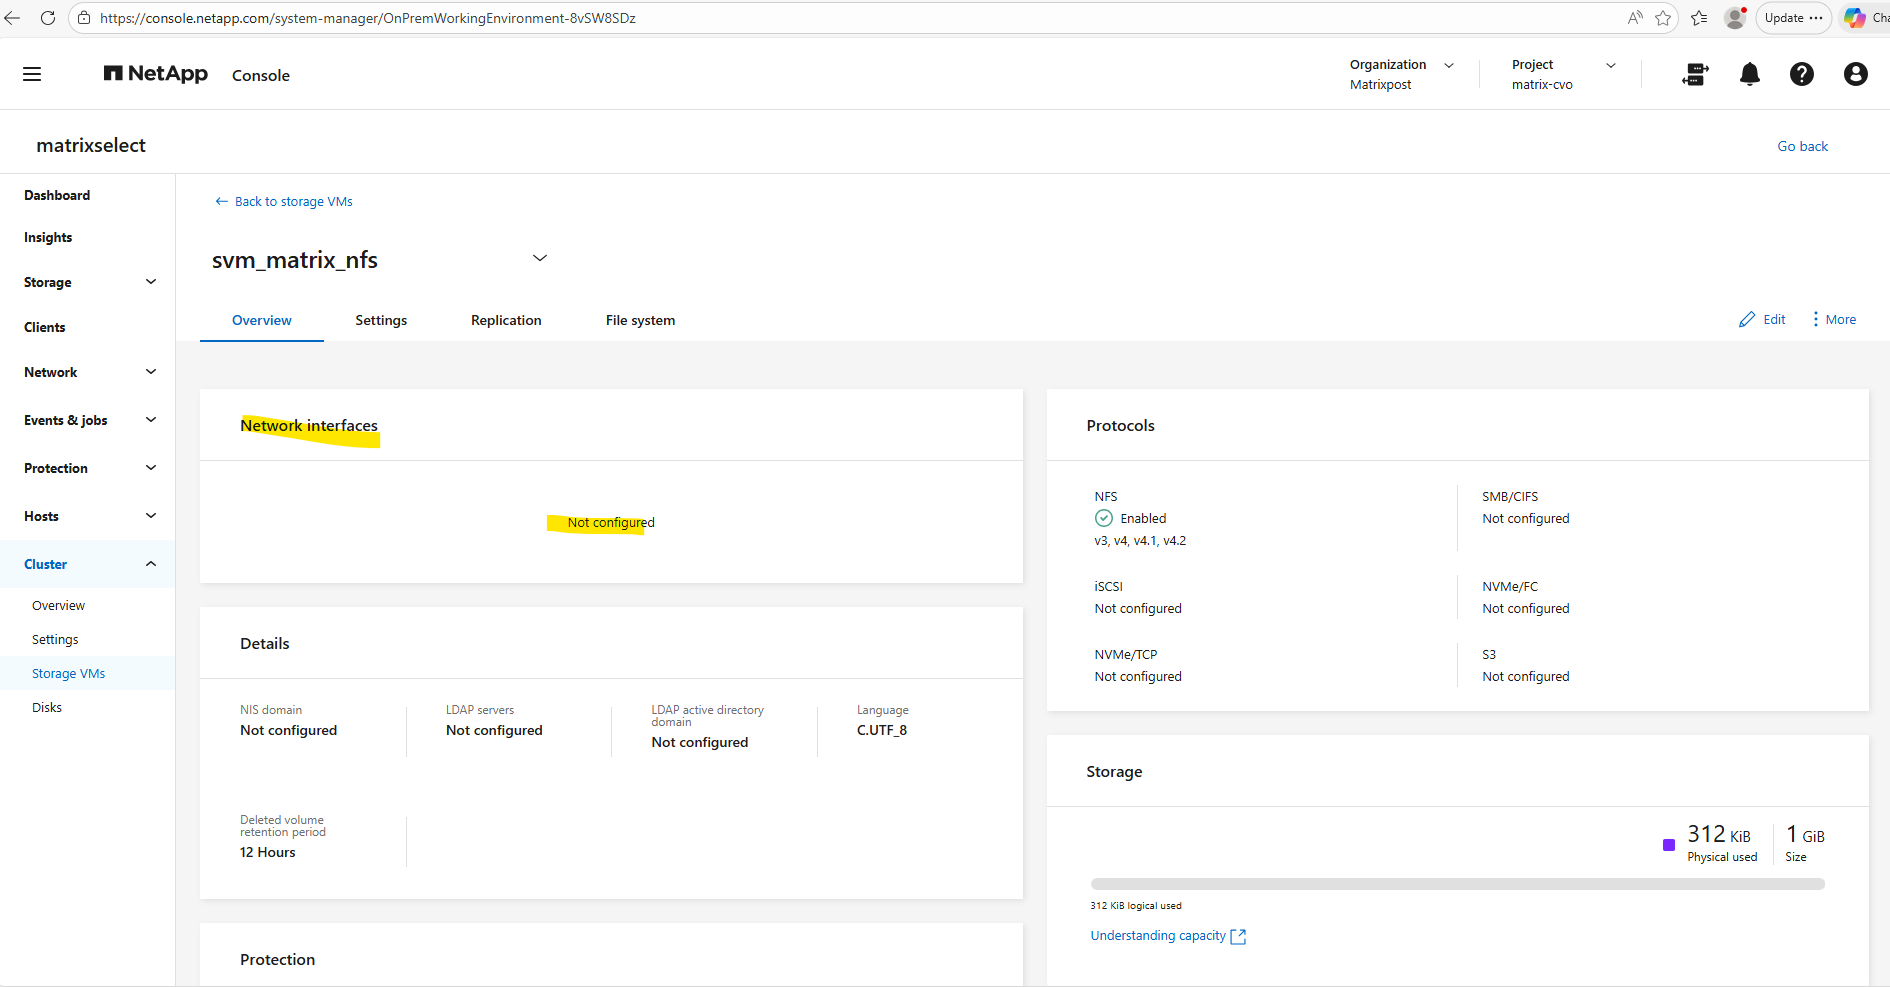
After creating a new SVM, no network interfaces (LIFs) are configured by default, which means the NFS service is not yet reachable by clients.
A data LIF must first be created and assigned an IP address so the SVM can accept incoming NFS connections. Without a properly configured LIF, the storage remains operational internally but inaccessible from the network.
For the dedicated NFS SVM, I create the management LIF in the same way as previously shown for the CIFS SVM, so I will not explain the individual command parameters again here.
Each SVM requires at least one data LIF, which represents the network endpoint used by clients to access storage services such as NFS or SMB. The LIF defines the IP address, subnet, and network path used by the SVM.
The data LIFs for the NFS SVM are created in the same way as previously shown for the CIFS SVM, so I will not go through the individual command parameters again here.
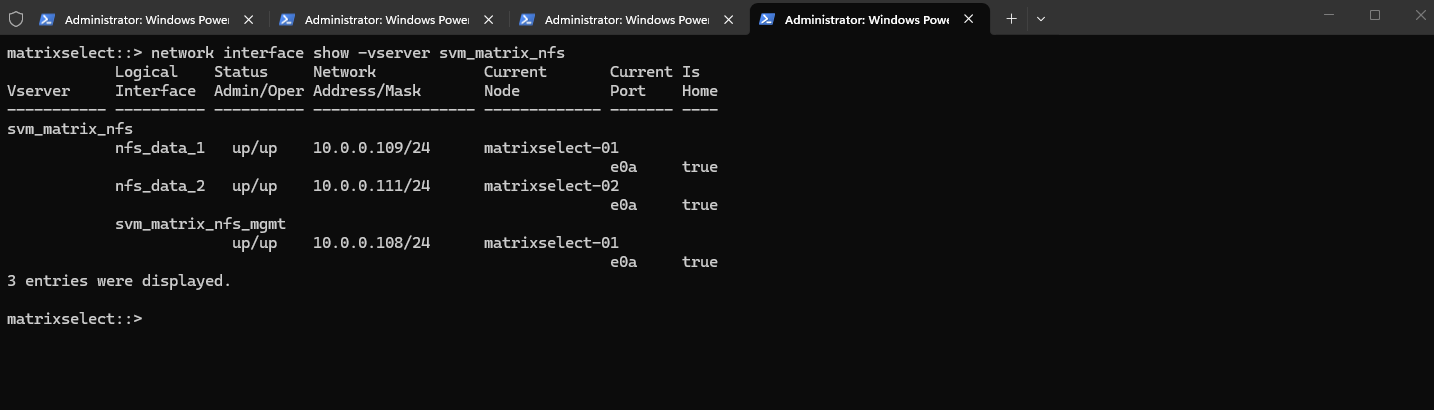
After creating the data LIFs, the SVM now has one active data interface per node. This setup follows NetApp best practices for high availability.
matrixselect::> network interface show -vserver svm_matrix_nfs
Create a Volume
After creating and configuring a SVM, the next step is to create a new volume that will be used to store and present data to clients.
The volume must be created on the correct SVM and mounted into its namespace so it can later be shared via SMB and/or NFS.
A volume in NetApp ONTAP is a logical, mountable unit of storage that resides inside an aggregate, is served by a Storage Virtual Machine (SVM), and is accessible to clients via NFS, SMB, iSCSI, or FC.
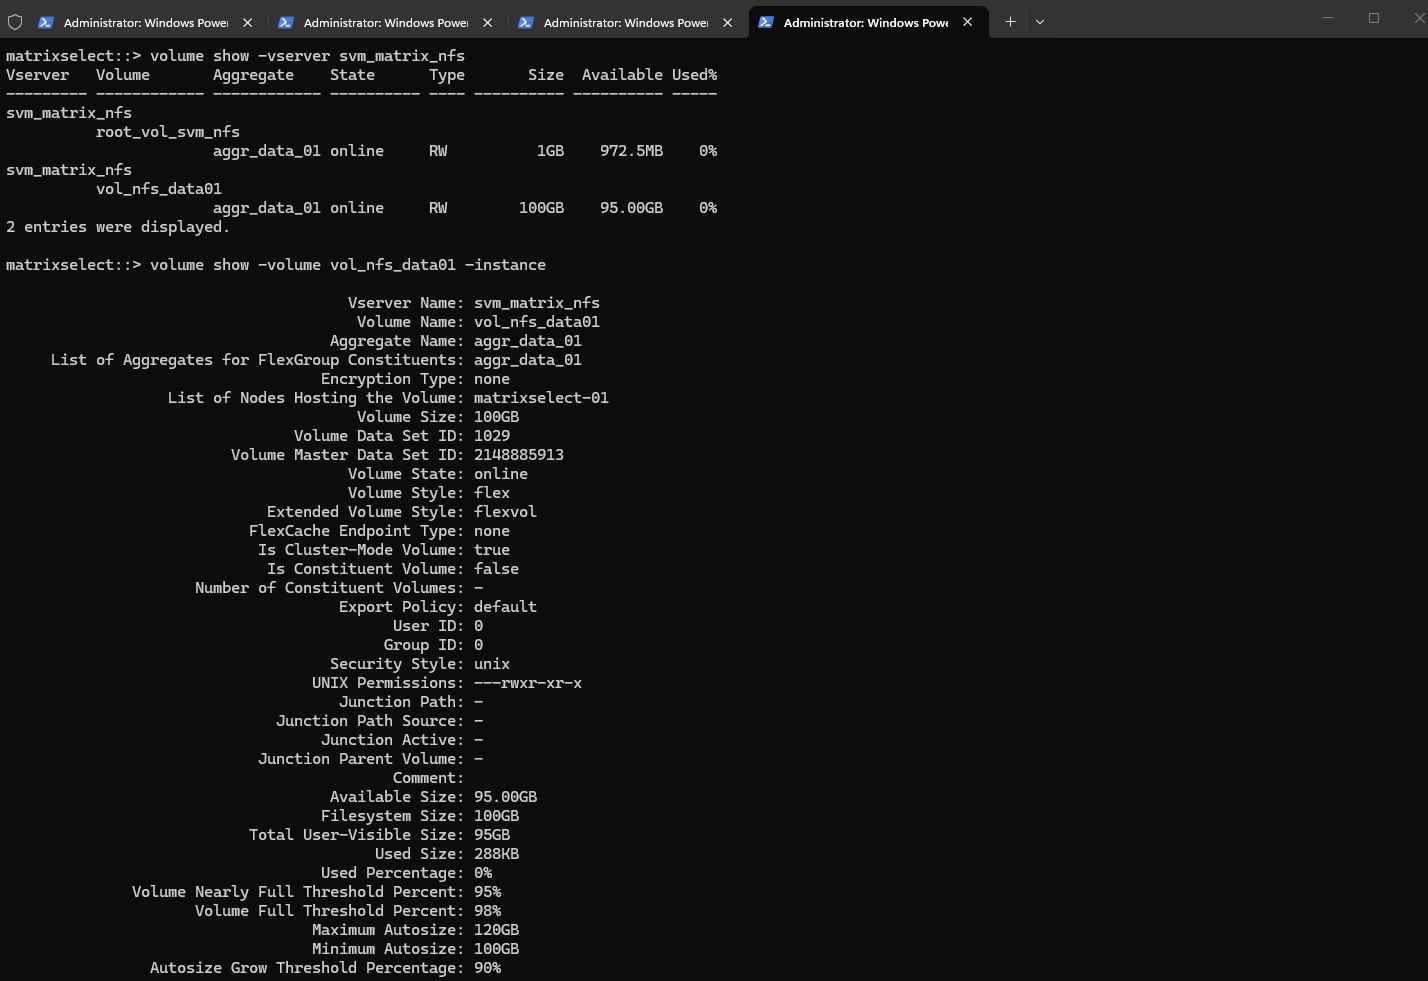
Below we will create a 100 GB data volume called vol_nfs_data01 on aggr_data_01.
matrixselect::> volume show -vserver svm_matrix_nfs
matrixselect::> volume show -volume vol_nfs_data01 -instance
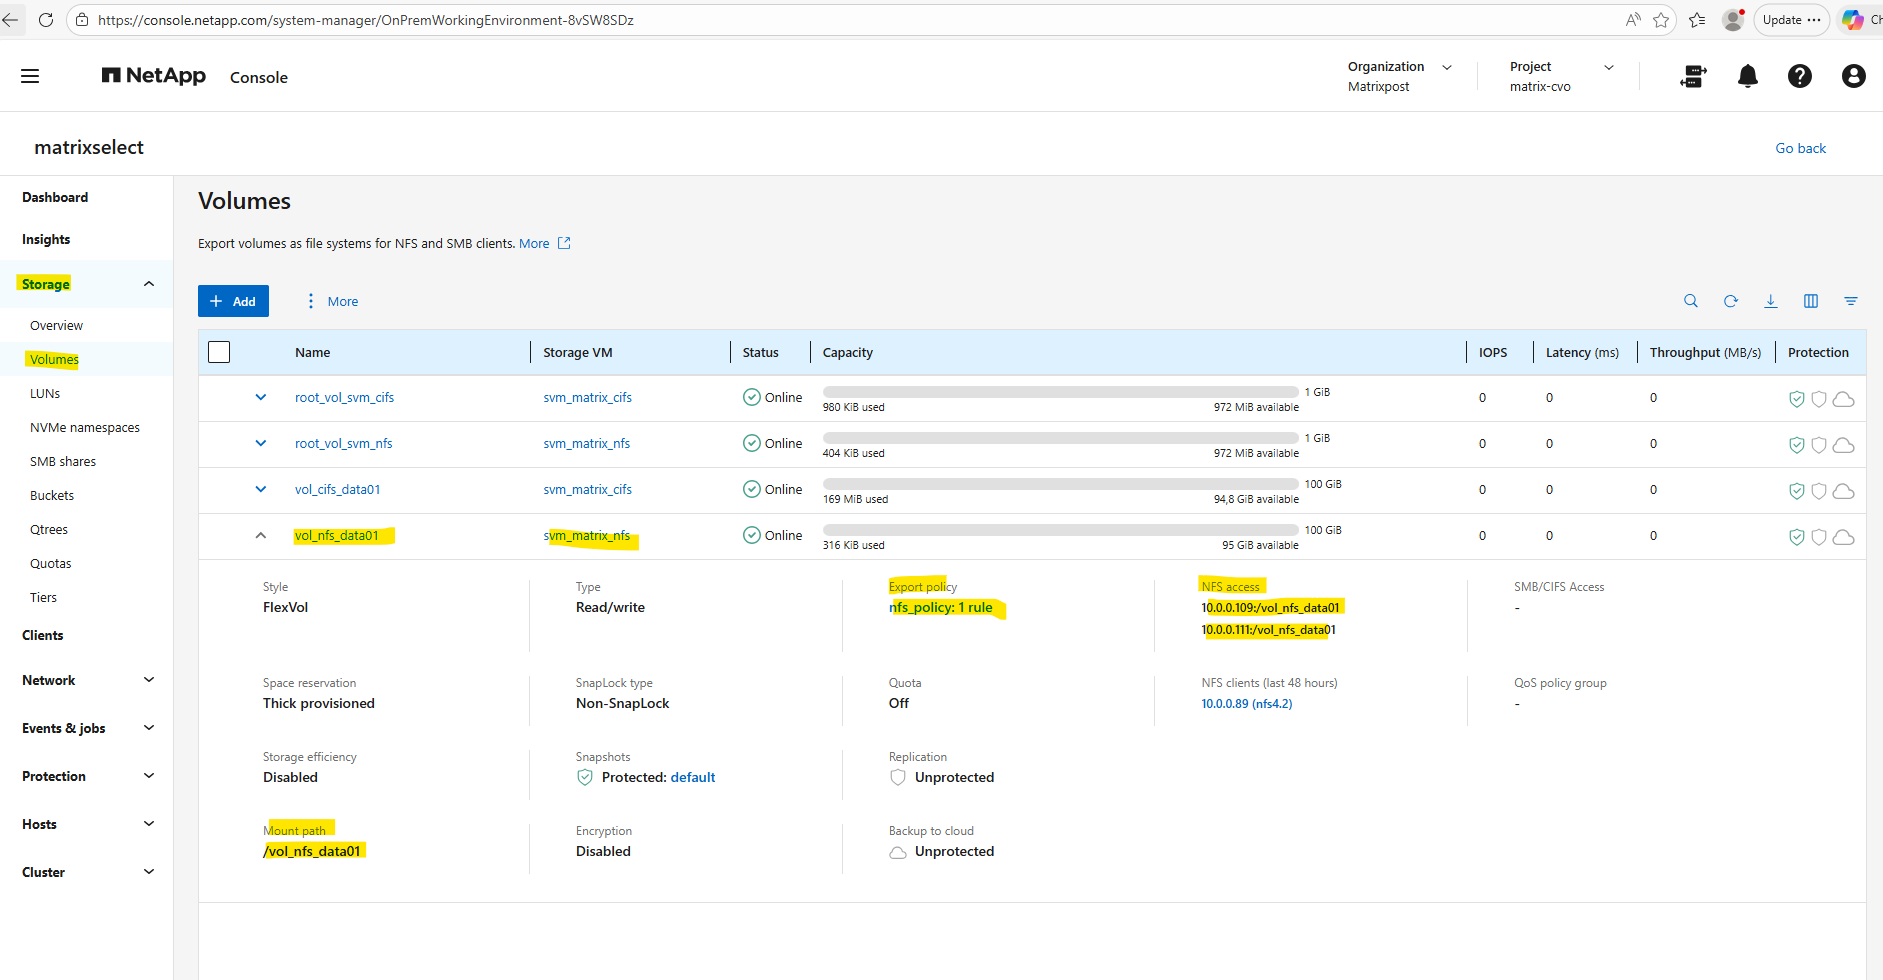
Or by using the ONTAP System Manager and here within Storage -> Volumes.
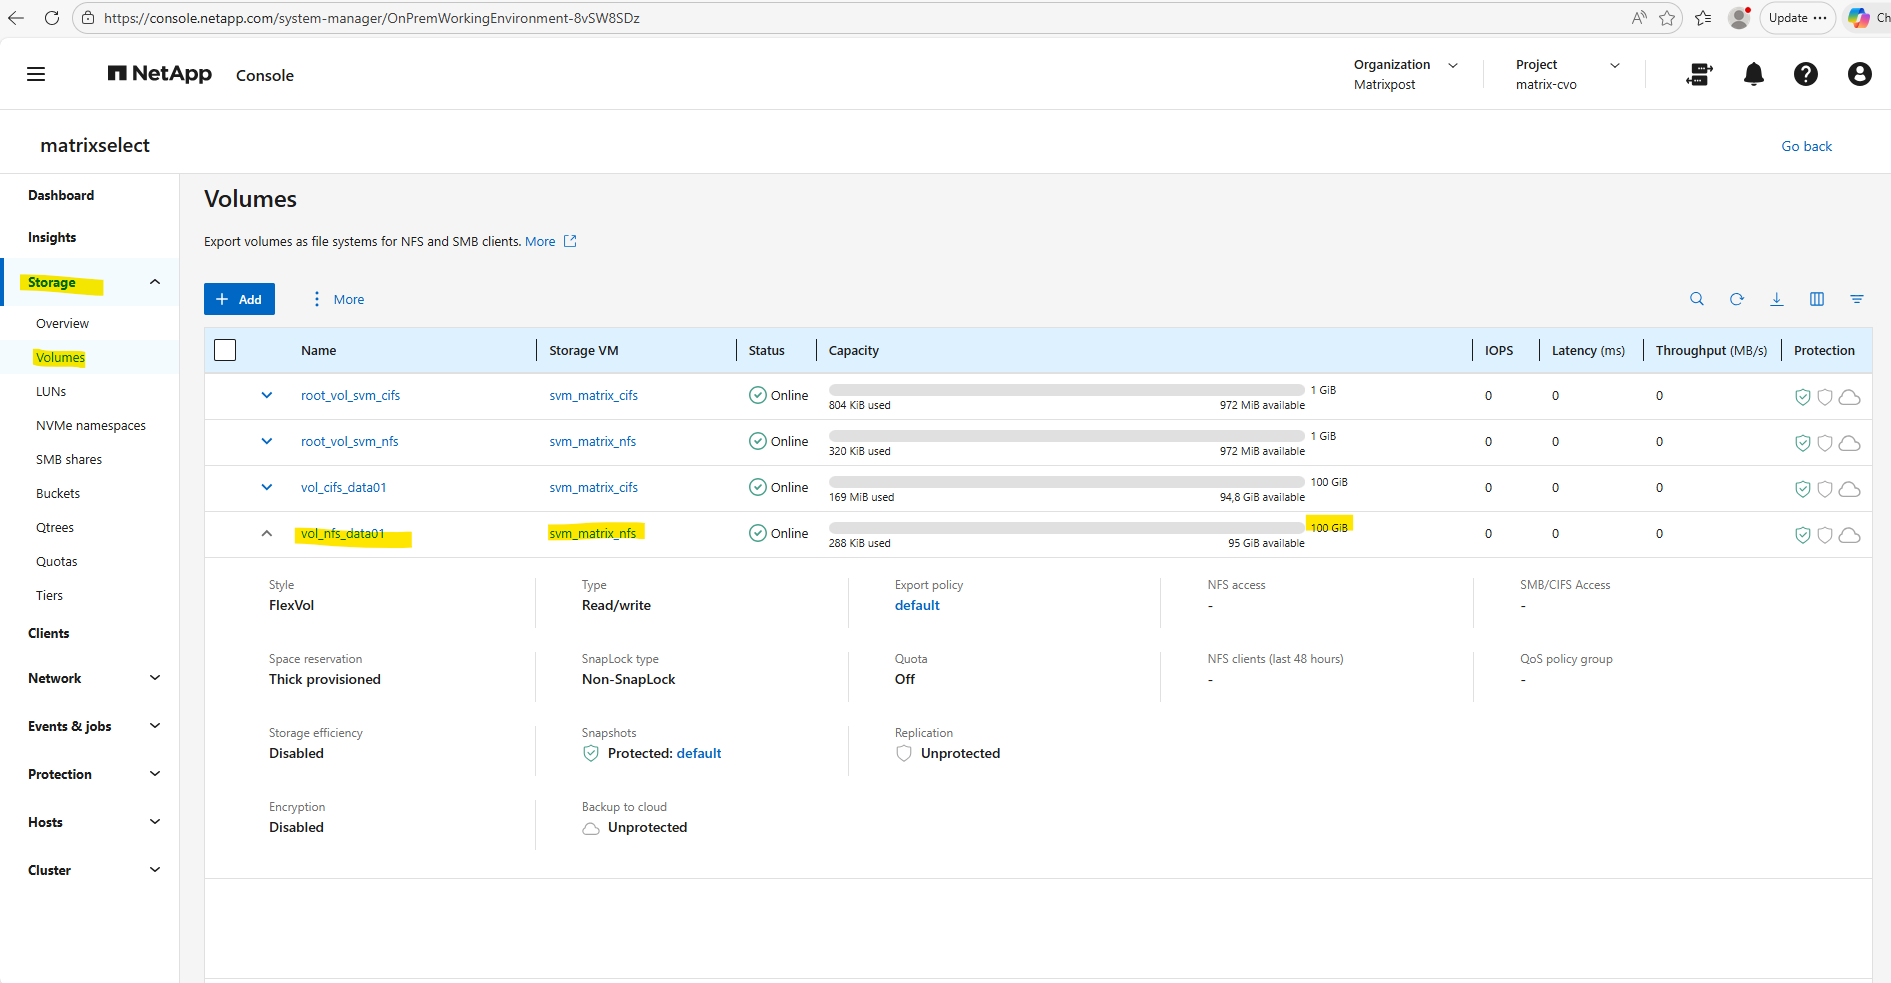
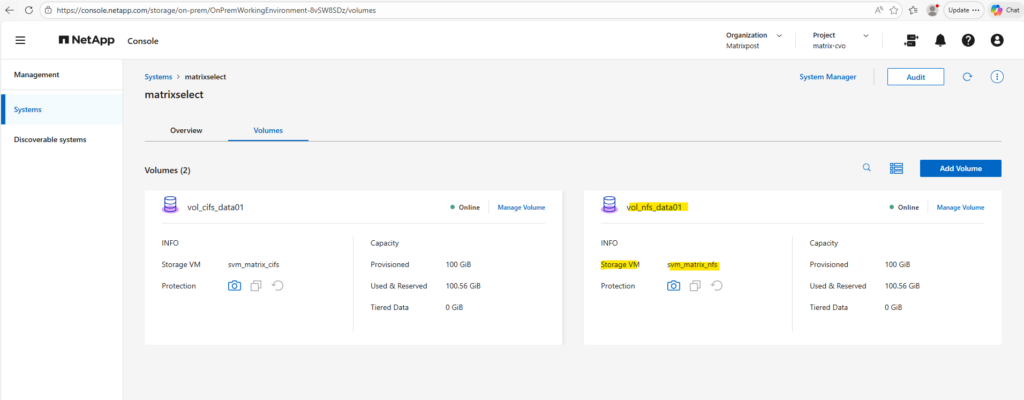
And also by using the NetApp console under Storage -> Management -> Systems, here select our system and click on the right bar on Enter System.
Within the Volumes tab we will find our newly created volume named vol_nfs_data01.
Mounting the ONTAP Volume on the SVM
Now we need to mount the ONTAP volume to a path within our new previously created SVM used for NFS exports.
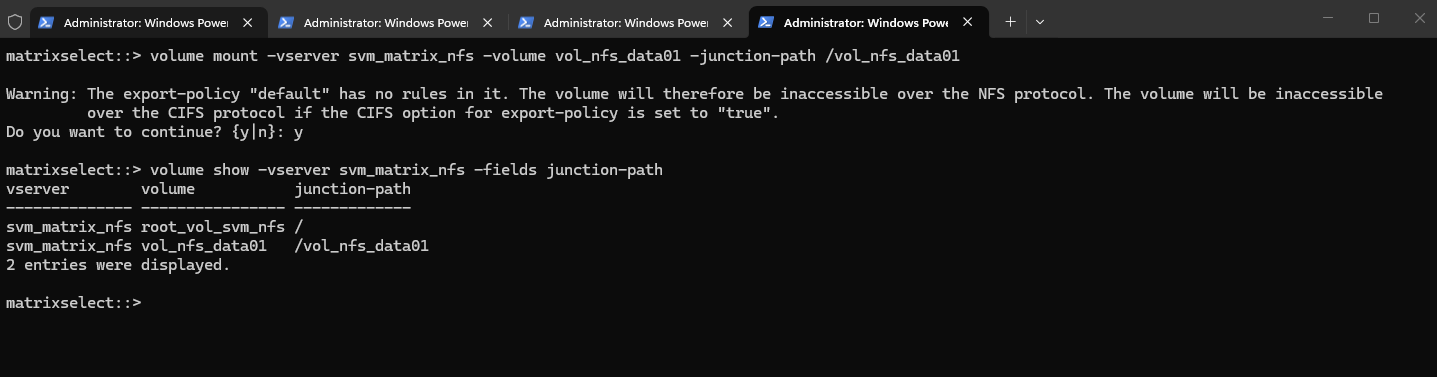
matrixselect::> volume mount -vserver svm_matrix_nfs -volume vol_nfs_data01 -junction-path /vol_nfs_data01
Checking the mount.
matrixselect::> volume show -vserver svm_matrix_nfs -fields junction-path
As shown in the warning message during the mount above, so far no rules are created in the SVM’s default policy. So even if we create a new dedicated export policy for our volume, the NFS access won’t work.
In ONTAP, every volume exists in the namespace hierarchy of the SVM. Even though you’re mounting a specific volume, ONTAP still checks the export policy on the root volume to allow traversal to the volume’s junction point.
The best practice for a secure ONTAP environment is a two-tier approach.
Because ONTAP uses a junction path (a folder-like hierarchy), a client must have “read” access to the SVM Root Volume just to see the path, and then specific permissions on the Data Volume to actually do work.
The Junction Door (SVM Root): Usually uses the defaultexport policy. It only needs to allow read-only access so clients can “traverse” the root directory to find their specific mount point.
The Work Zone (Data Volume): This is where we apply our dedicated policy (like my nfs_policy below). This grants the specific read-write permissions and Superuser (root) access only to the authorized IPs or subnets.
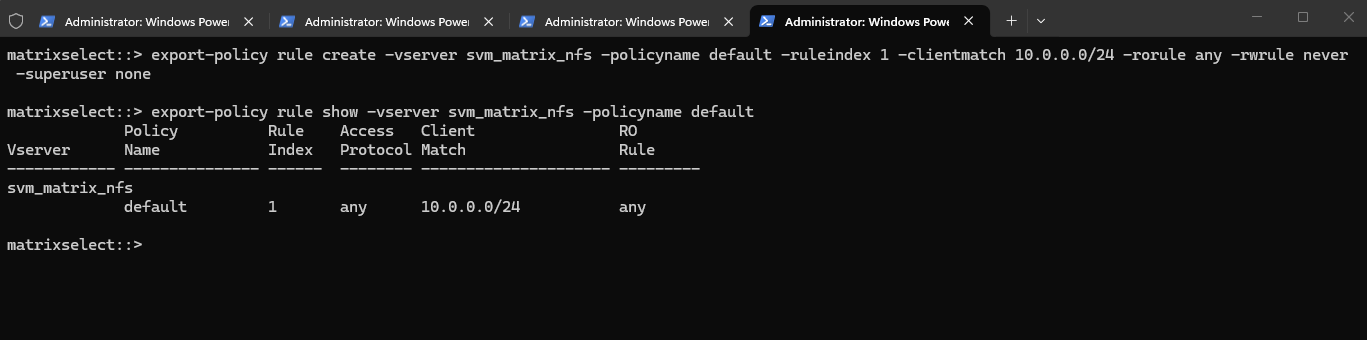
To ensure traversal from the namespace root to volumes (even when those volumes use their own export policies), the default export policy assigned to the SVM’s root volume must allow at least read-only access for the client by running the following command.
matrixselect::> export-policy rule create -vserver svm_matrix_nfs -policyname default -ruleindex 1 -clientmatch 10.0.0.0/24 -rorule any -rwrule never -superuser none

matrixselect::> export-policy rule show -vserver svm_matrix_nfs -policyname default
Clients matching this rule (IP address within my internal subnet 10.0.0.0/24) will be granted read-only access regardless of their authentication type. This includes sys (UNIX), krb5 (Kerberos), ntlm (NTLM), or even none (unauthenticated).
So No explicit authentication is required by this rule’s rorule. The any option means that the client can use any authentication method (or no authentication at all) and still be granted read-only access.
The primary verification for this read-only access is just the client IP address (which must matching to be within the subnet 10.0.0.0/24).
-superuser none: Any client attempting to access the volume as UID 0 (root) will not be granted superuser privileges. Instead, they will be “squashed” to the anonymous user ID.
The Rule Index determines the specific order in which ONTAP evaluates access requirements, where the system processes rules sequentially starting from index 1 until it finds a match for the connecting client’s IP address.
When configuring multiple rules within a single export policy, each rule must be assigned a unique Rule Index to define its priority, as ONTAP evaluates the list in ascending numerical order and stops as soon as it finds the first match for a client.
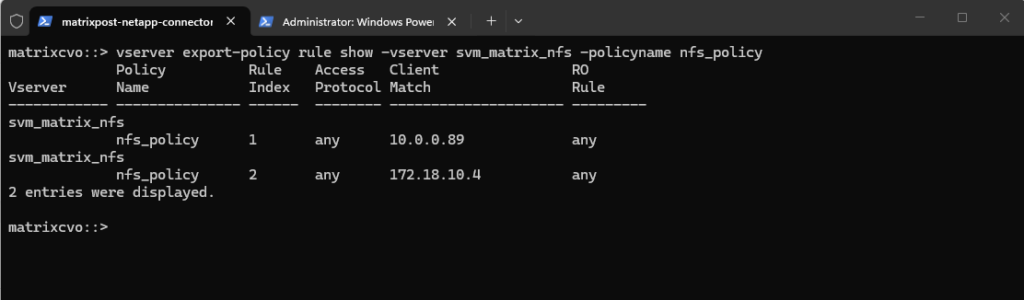
Before we can create a new policy rule with the export-policy rule create command shown above, we first need to determine the next free rule index number by using the vserver export-policy rule show command shown below.
So in case we want to add another export-policy rule for this SVM and export policy, we need to use for the rule index here 3.
This outpout is just for demonstration purpose when having multiple rules here, further below I will create the first rule for the newly created export policy.
matrixselect::> vserver export-policy rule show -vserver svm_matrix_nfs -policyname nfs_policy
To allow access to a volume with its own export policy, the SVM root volume’s export policy (typically default) must:
Allow read-only (ro=sys) access
Match the client’s IP
Be applied to the correct root volume
Now we can create our own policy here and adding a rule to allow NFS clients also read-write access to the NFS export.
matrixselect::> export-policy create -vserver svm_matrix_nfs -policyname nfs_policy

# We can delete it again with
matrixselect::> export-policy delete -vserver svm_matrix_nfs -policyname nfs_policy
Add a rule (e.g., allow all NFS clients). Here I will allow in general all users on the NFS client with the IP address 10.0.0.89 read-write access to the volume (we first need to apply the policy to our volume).
The rule index with 1 below because this is our first rule for the newly created export policy and therefore is the very first one ONTAP checks.
matrixselect::> export-policy rule create -vserver svm_matrix_nfs -policyname nfs_policy -ruleindex 1 -clientmatch 10.0.0.89 -rorule any -rwrule any

# to avoid (disable) root squash, adding here ==> -superuser any
matrixselect::> export-policy rule create -vserver svm_matrix_nfs -policyname nfs_policy -ruleindex 1 -clientmatch 10.0.0.89 -rorule any -rwrule any -superuser any

# in some instances if null authentication (sec=null) is used (more about sec=null in Part 5), it would be required to use the uid configured in the anon=<user id> field. Using -anon 0 for example maps anonymous users all to UID 0 (root)
matrixselect::> vserver export-policy rule modify -vserver svm_matrix_nfs -policyname nfs_policy -ruleindex 1 -anon 0
Finally applying the export policy to our new volume.
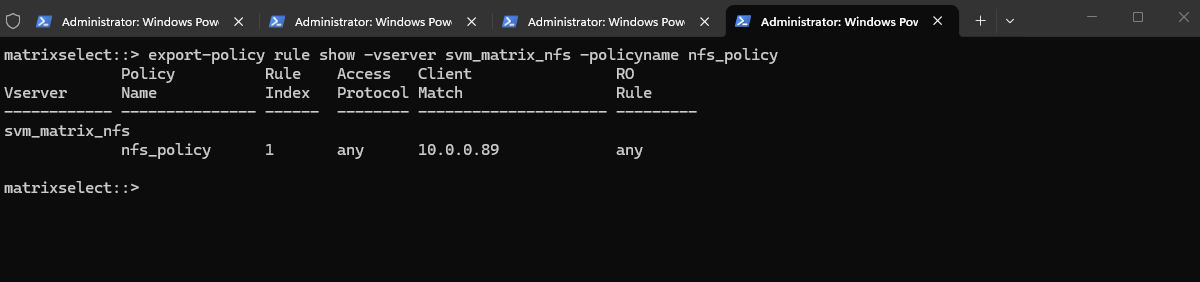
We can verify the export status of a SVM’s export policy by running.
matrixselect::> export-policy rule show -vserver svm_matrix_nfs -policyname nfs_policy
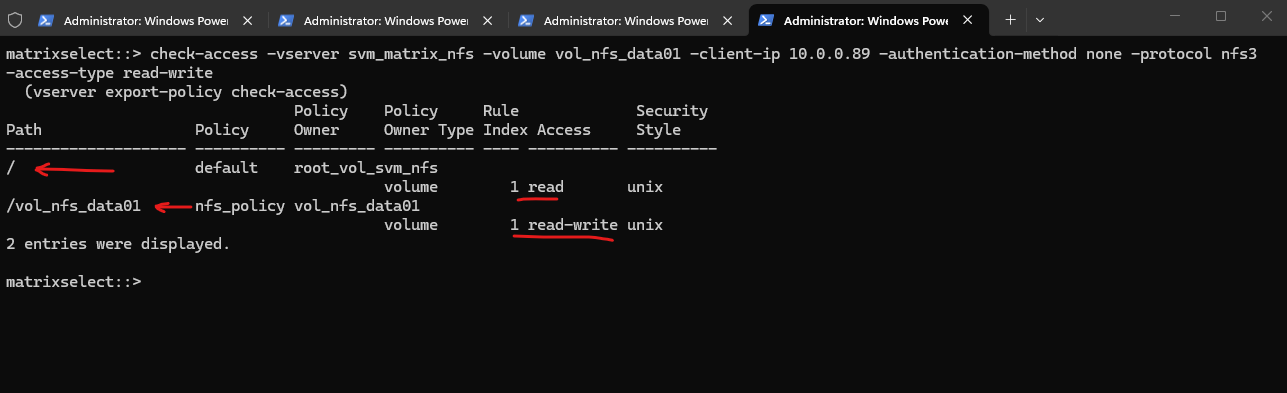
In ONTAP we can also simulate an access to check if a specific client can access the NFSexport by using the following command.
The vserver export-policy check-access command is a vital troubleshooting tool that simulates a client’s connection to verify if our Export Policies actually allow the intended traffic.
In this output, it confirms that while the root of the SVM only allows read access, the specific path for vol_nfs_data01 correctly grants the client at 10.0.0.89 the read-write permissions required for NFSv3 operations. This “bottom-up” validation ensures that even if our Azure Network Security Groups (NSGs) are open, the internal ONTAP policies aren’t silently blocking our Linux workloads.
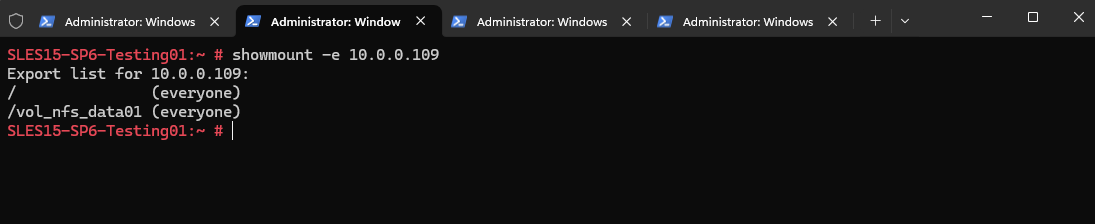
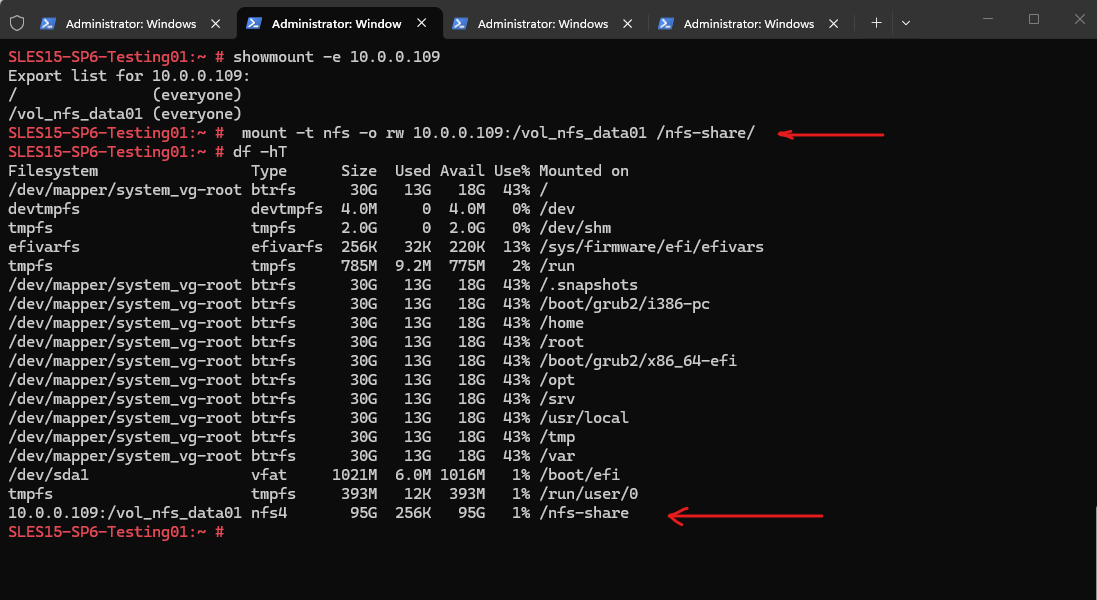
We can now also check from a client which exports exposed by running the showmount command below. The IP address is from our Storage Virtual Machine (SVM) which exposes the NFS export.
For the NFS Server I will use the IP address for the data LIF on node A which is 172.18.10.54.
-e stands for exports. It asks the NFS server’s mountd daemon for a list of currently available shared directories (exports).
showmount is a client-side tool querying an NFSv2 or NFSv3 server. It won’t work for NFSv4 servers, as NFSv4 doesn’t use mountd for exporting filesystems.