

Deploying NetApp ONTAP Select in VMware vSphere – Running ONTAP as a Virtual Storage Appliance – Part 1
NetApp ONTAP is traditionally deployed on dedicated NetApp storage hardware. With ONTAP Select, however, the same storage operating system can run as a virtual appliance on a standard hypervisor such as VMware vSphere.
It complements the suite of mainstream FAS, AFF, and ASA ONTAP offerings as well as other software-only options such as Cloud Volumes ONTAP.
Source: https://docs.netapp.com/us-en/ontap-select/concept_ots_overview.html
This makes it possible to build flexible lab environments, test ONTAP features without physical hardware, or deploy software-defined storage in environments where dedicated NetApp systems are not available.
In this first part of this series, we will see how to deploy a two-node ONTAP Select cluster in a VMware vSphere environment using the ONTAP Select Deploy appliance. The focus is on the initial setup, including the deployment of the Deploy utility and the automated provisioning of the ONTAP Select nodes.
In part 2 of this series, we prepare the ONTAP Select cluster for data services (CIFS/SMB and NFS) by creating the first data aggregate, volumes, and SVMs, and finally configuring and exporting NFS exports and CIFS shares.
Lab tip: When an ONTAP Select evaluation cluster expires, rebuilding the lab with the same cluster, node, network, and storage configuration makes it possible to reuse the configuration commands from this series almost unchanged.
In my lab, recreating the two-node cluster and restoring the aggregate, SVM, volume, NFS, and SMB configuration took less than one hour.
- Introduction
- Download the ONTAP Select Deploy administration utility
- Access ONTAP Select evaluation software
- Download ONTAP Select evaluation software
- Install ONTAP Select Deploy
- Deploy an ONTAP Select Cluster
- ONTAP Select high availability configurations
- Bringing ONTAP Select On-Prem into NetApp Console
- ONTAPI (ZAPI) vs. ONTAP REST API
- Links
Introduction
ONTAP Select is a software-only version of ONTAP that you can deploy as a virtual machine on a hypervisor host. It complements the suite of mainstream FAS, AFF, and ASA ONTAP offerings as well as other software-only options such as Cloud Volumes ONTAP.
About how to deploy Cloud Volumes ONTAP in Azure you can read my following post.
ONTAP Select converts internal disk drives, NVMe, SSD or HDD, and external array storage, into a flexible storage system with many of the same benefits offered by dedicated ONTAP storage systems. You can also deploy ONTAP Select on new servers or on your existing server infrastructure. ONTAP Select is easy to manage and leverages the same management software as ONTAP based solutions, which means reduced operational overhead and training requirements.
ONTAP Select adapts to your capacity consumption needs with two complementary licensing models — Capacity Tiers and the completely flexible Capacity Pools. Both licensing models allow you to increase capacity in increments of as little as 1TB. For example, you can start with a few terabytes and dynamically add capacity as your project grows. If you are using Capacity Pools, you can redistribute the capacity as you see fit when your project is finished.
ONTAP Select is integrated into cloud management frameworks such as VMware vSphere. This helps accelerate deployment of new projects such as file services, home directories, software development environments, and application testing.
SnapMirror software lets you move data between ONTAP storage across the hybrid cloud so that you can easily access your data where you want it. For example, you can bring up an environment quickly to prove an idea. Later, you can move the project to a dedicated storage platform for production deployment or make it more accessible in the cloud as part of a development workflow.
The following figure illustrates the NetApp ONTAP Select Deploy administration utility being used to deploy and support a four-node ONTAP Select cluster. The Deploy utility and ONTAP Select nodes run as separate virtual machines on dedicated hypervisor hosts.
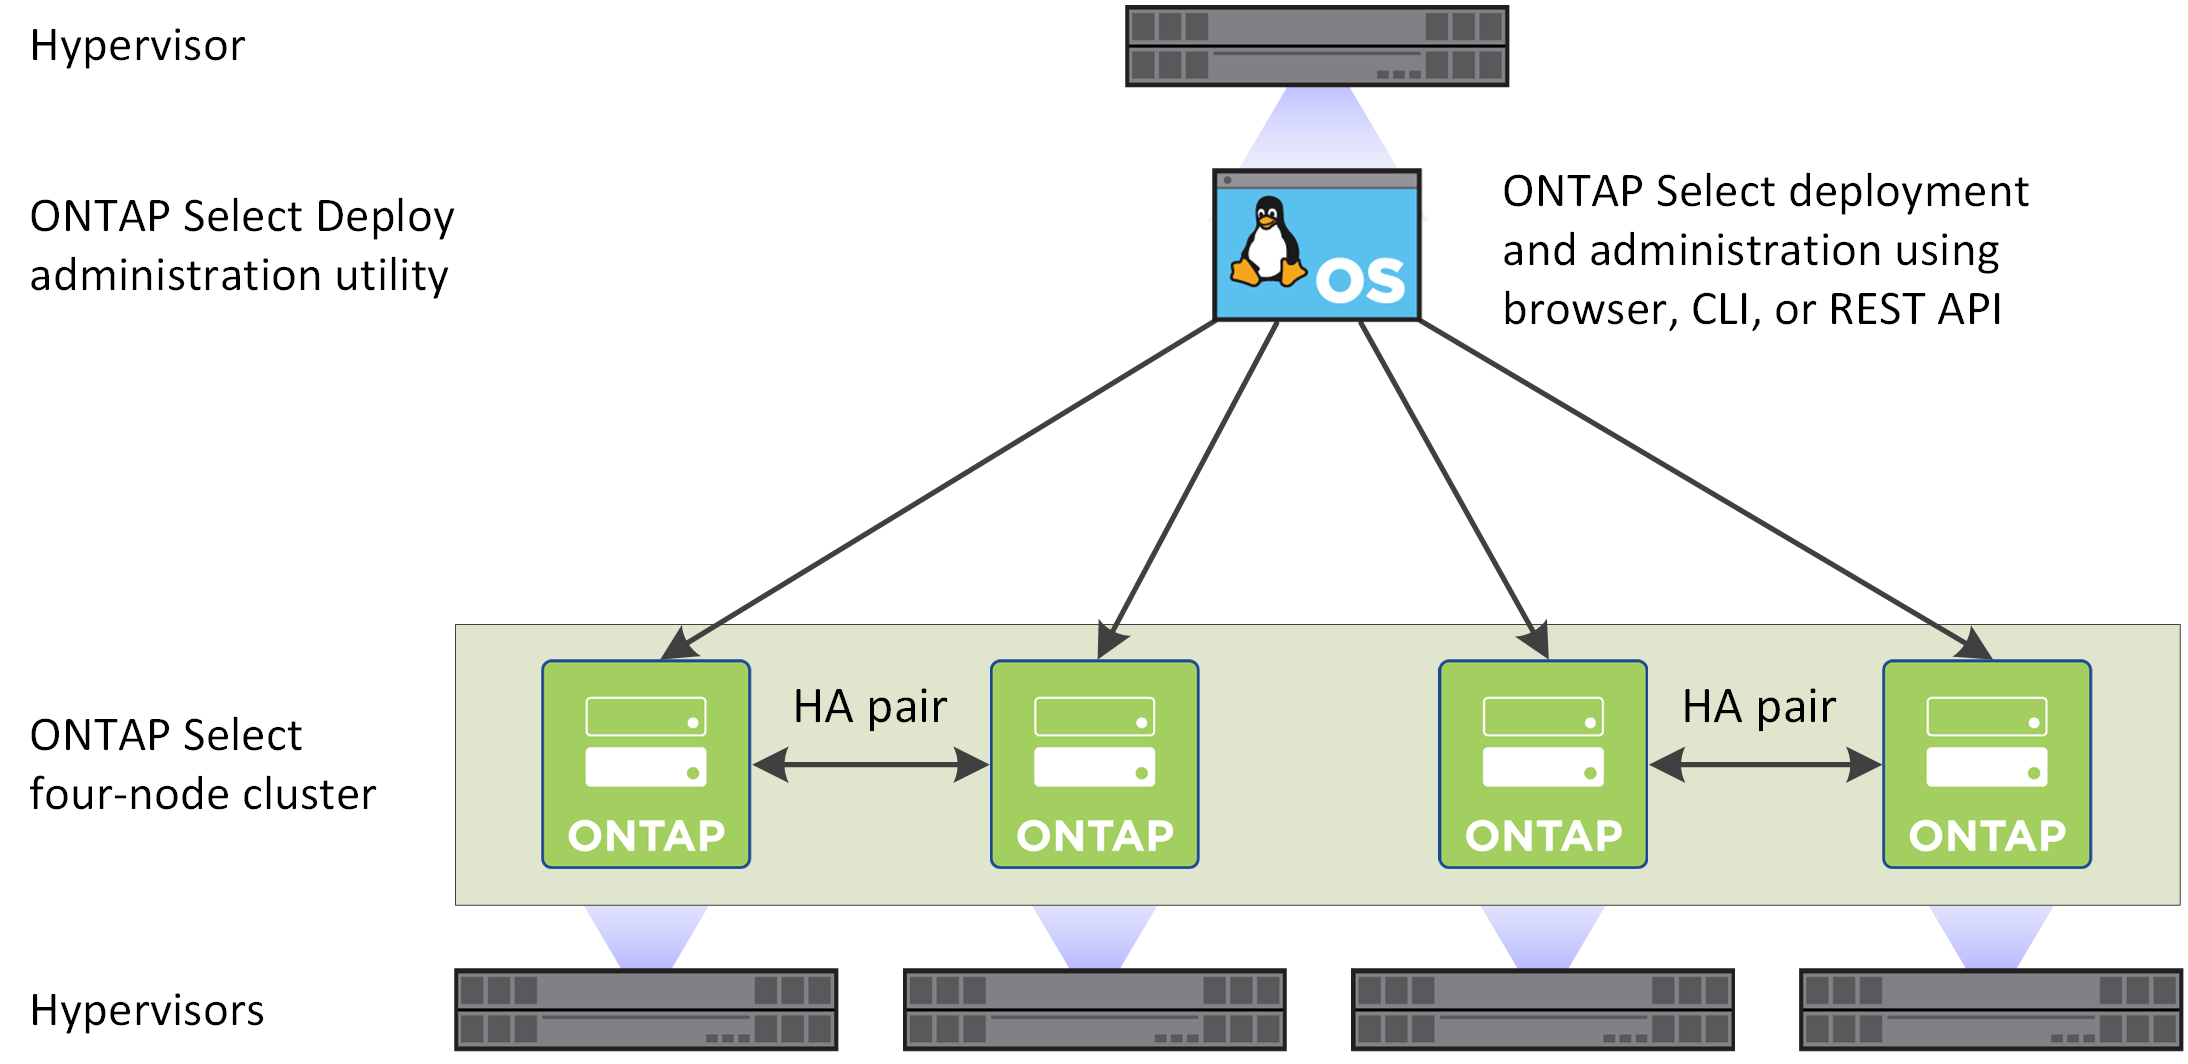
Source: https://docs.netapp.com/us-en/ontap-select/concept_ots_overview.html
Download the ONTAP Select Deploy administration utility
To download the ONTAP Select Deploy administration utility, you need the following:
- A registered NetApp Support Site account. If you don’t have an account, see User registration.
- To accept the End User License agreement for an ONTAP Select deployment with an evaluation license.
There are several considerations when deploying and supporting an evaluation cluster:
- You can only use the cluster for evaluation purposes. You must not use a cluster with an evaluation license in a production environment.
- You should use the ONTAP Select Deploy administration utility as follows when configuring each host:
- Don’t supply a serial number
- Configure to use an evaluation license
The evaluation period provided by the license can be up to 90 days.
The node serial number is twenty digits and automatically generated by ONTAP Select Deploy (you don’t acquire it directly from NetApp).
The maximum storage allocated by each node is the same as a production license.
Access ONTAP Select evaluation software
You can access the ONTAP Select evaluation software if you are a current customer of ONTAP Select and you have an active entitlement or a NetApp Partner and want to download a new Capacity Tiers evaluation license.
If you are neither of the above and would like to try ONTAP Select for an evaluation, you can follow these steps to request access to download the evaluation software.
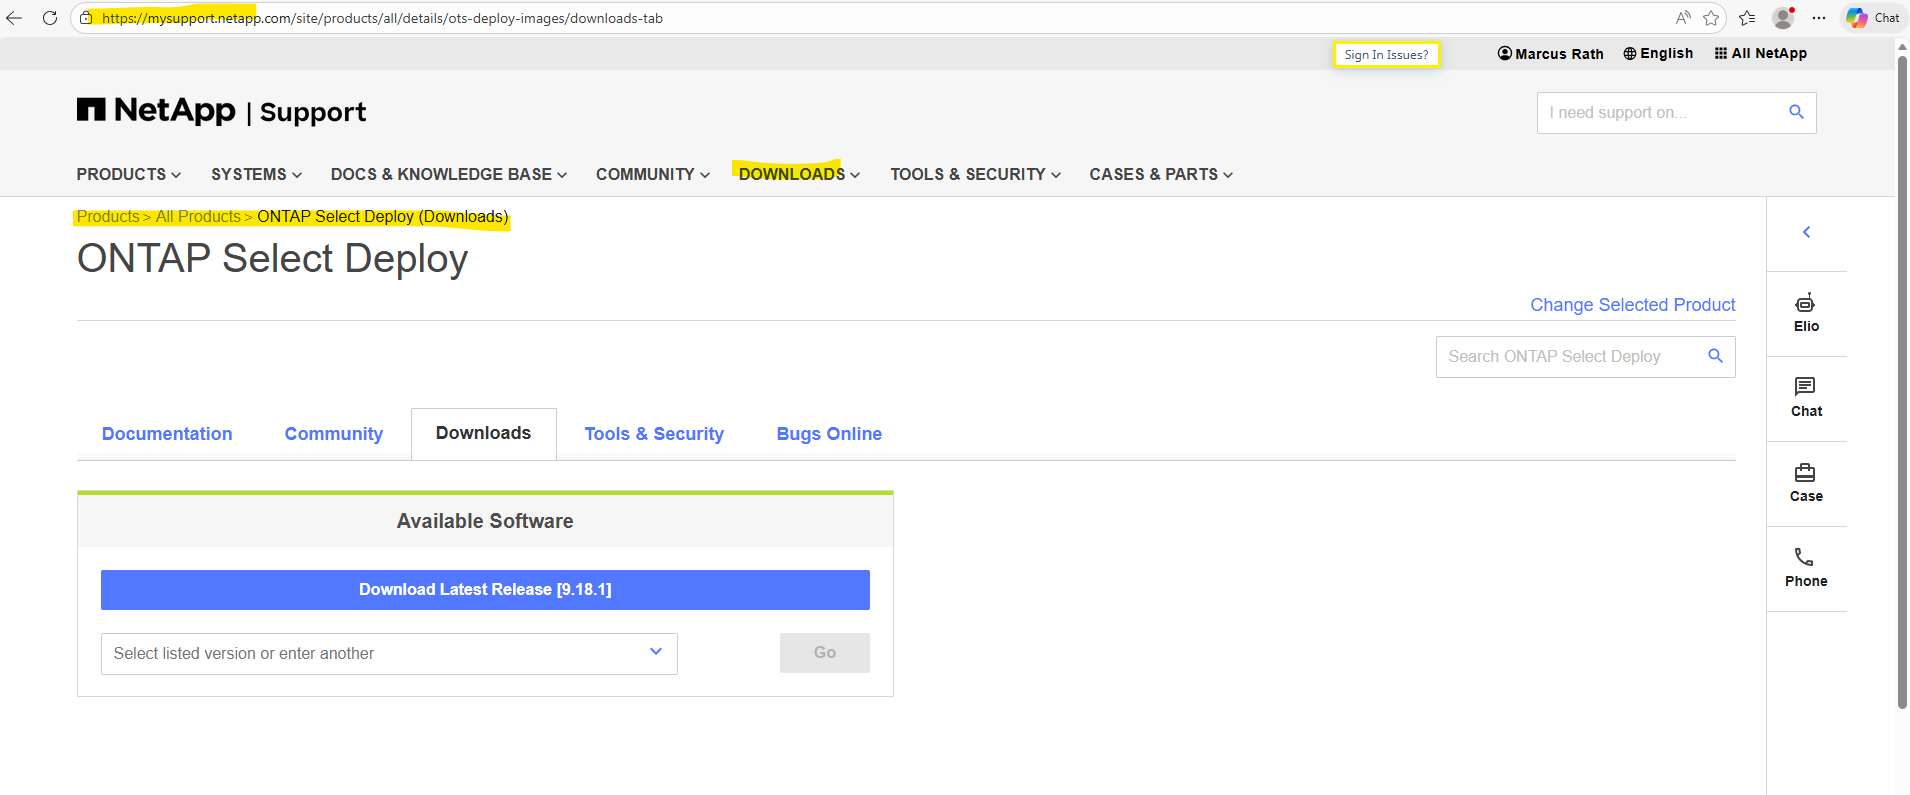
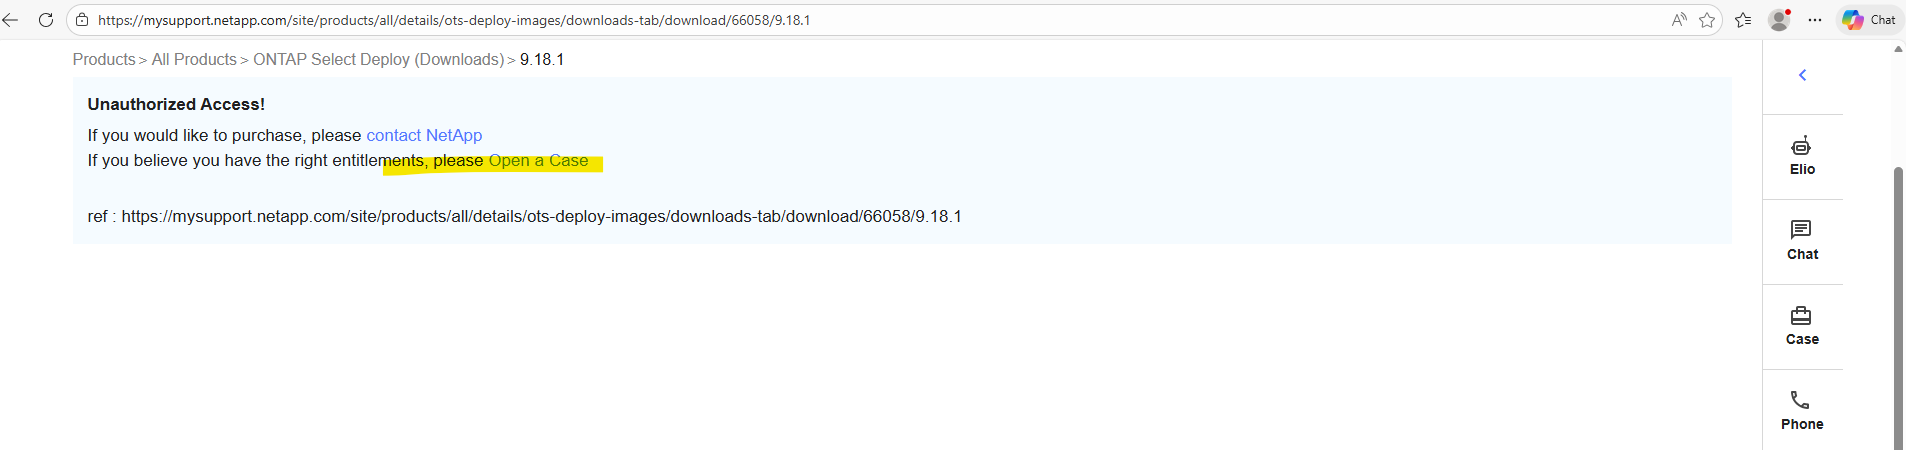
Create a non-technical support case to elevate access levels to “prospect.”
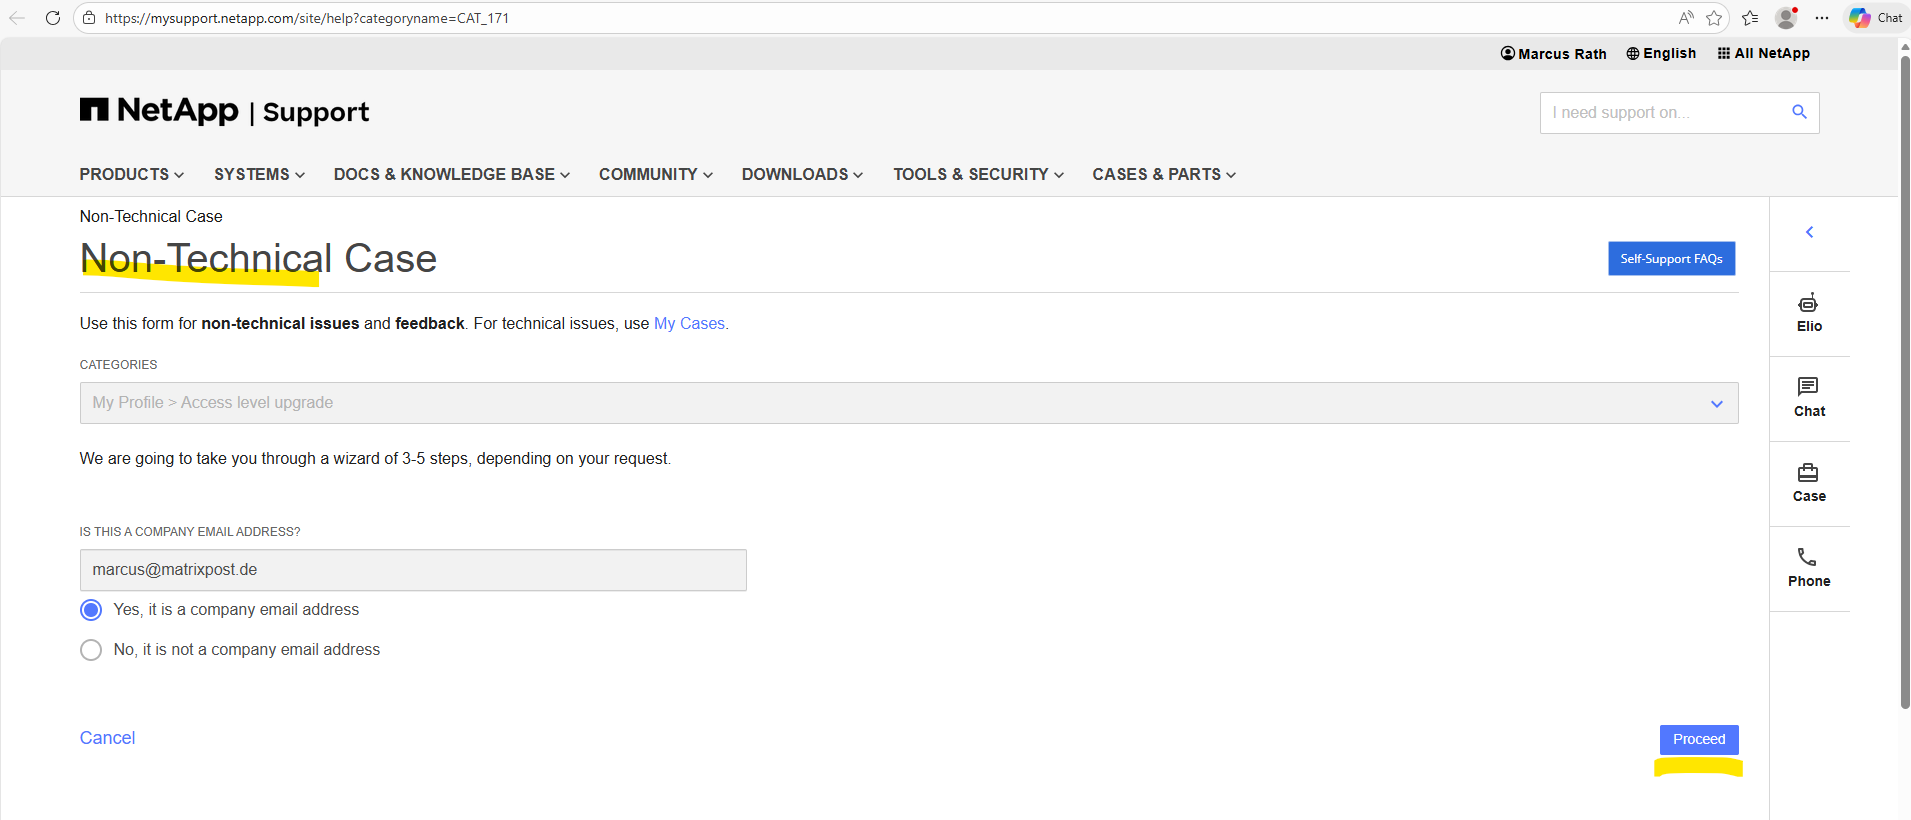
Fill out all required information and in the comments section, write: “My business email address is <your-email-address>. I would like to get prospect access to download the ONTAP Select evaluation software.”
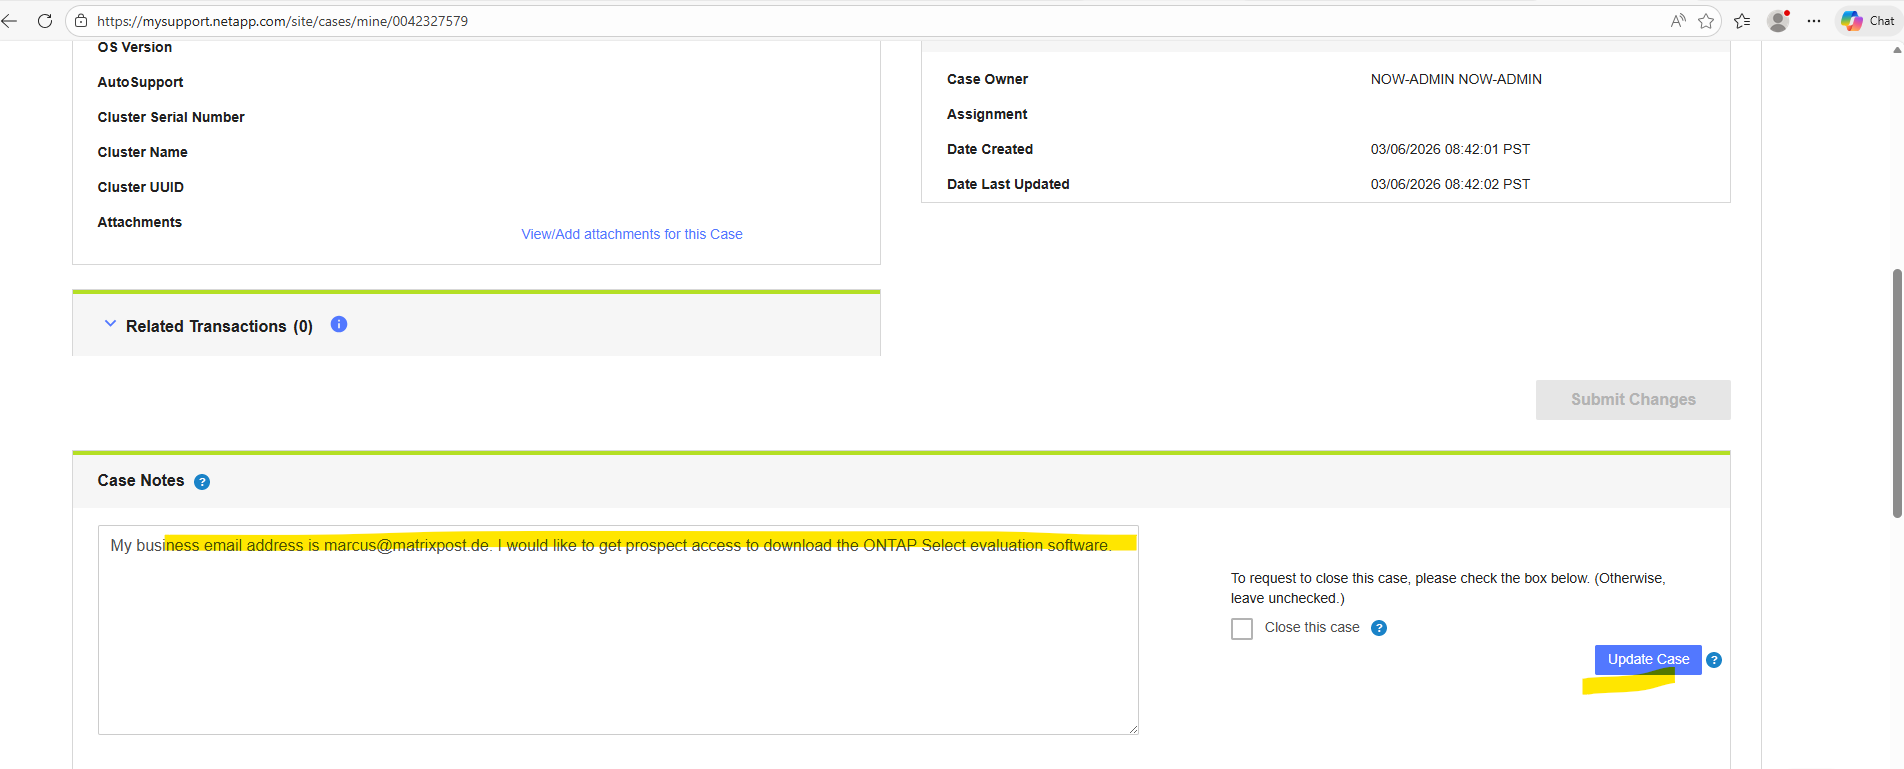
After your support case is reviewed and approved, NetApp support notifies you using the email address supplied.
Download ONTAP Select evaluation software
ONTAP Select is a software-only version of ONTAP 9 implemented as a virtual appliance. It provides an enterprise class storage management solution running on commodity hardware. Because of the inherent flexibility of the virtualization technology, ONTAP Select offers several deployment models that can be used to address different business requirements and usage scenarios.
ONTAP Select is composed of two major software components:
- ONTAP Select node image
Each node in a cluster is deployed as a virtual machine and runs a specially-designed derivative of the ONTAP 9 software - ONTAP Select Deploy administration utility
The Deploy administration utility is installed as a separate Linux virtual machine and is used to deploy the ONTAP Select clusters.
To deploy an ONTAP Select cluster, we first need to download the ONTAP Select Deploy administration utility using the link below, which is provided as a virtual appliance package for VMware ESXi (OVA) and as a TGZ package for KVM.
I will download the OVA package to deploy the ONTAP Select Deploy administration utility (appliance) in my vSphere lab environment.
Download the ONTAP Select Deploy administration utility here https://mysupport.netapp.com/site/downloads/evaluation/ontap-select
Warning: Starting with 9.9.1, only CPU models from Intel Xeon Sandy Bridge or later are supported for ONTAP Select. EVC setting in VMWare ESXi cluster should be checked prior to installing or upgrading to ONTAP Select 9.18.1. If EVC is enabled, make sure to set the EVC mode as Intel® “Sandy Bridge” Generation or later. Refer to the
Knowledge Base for more details.
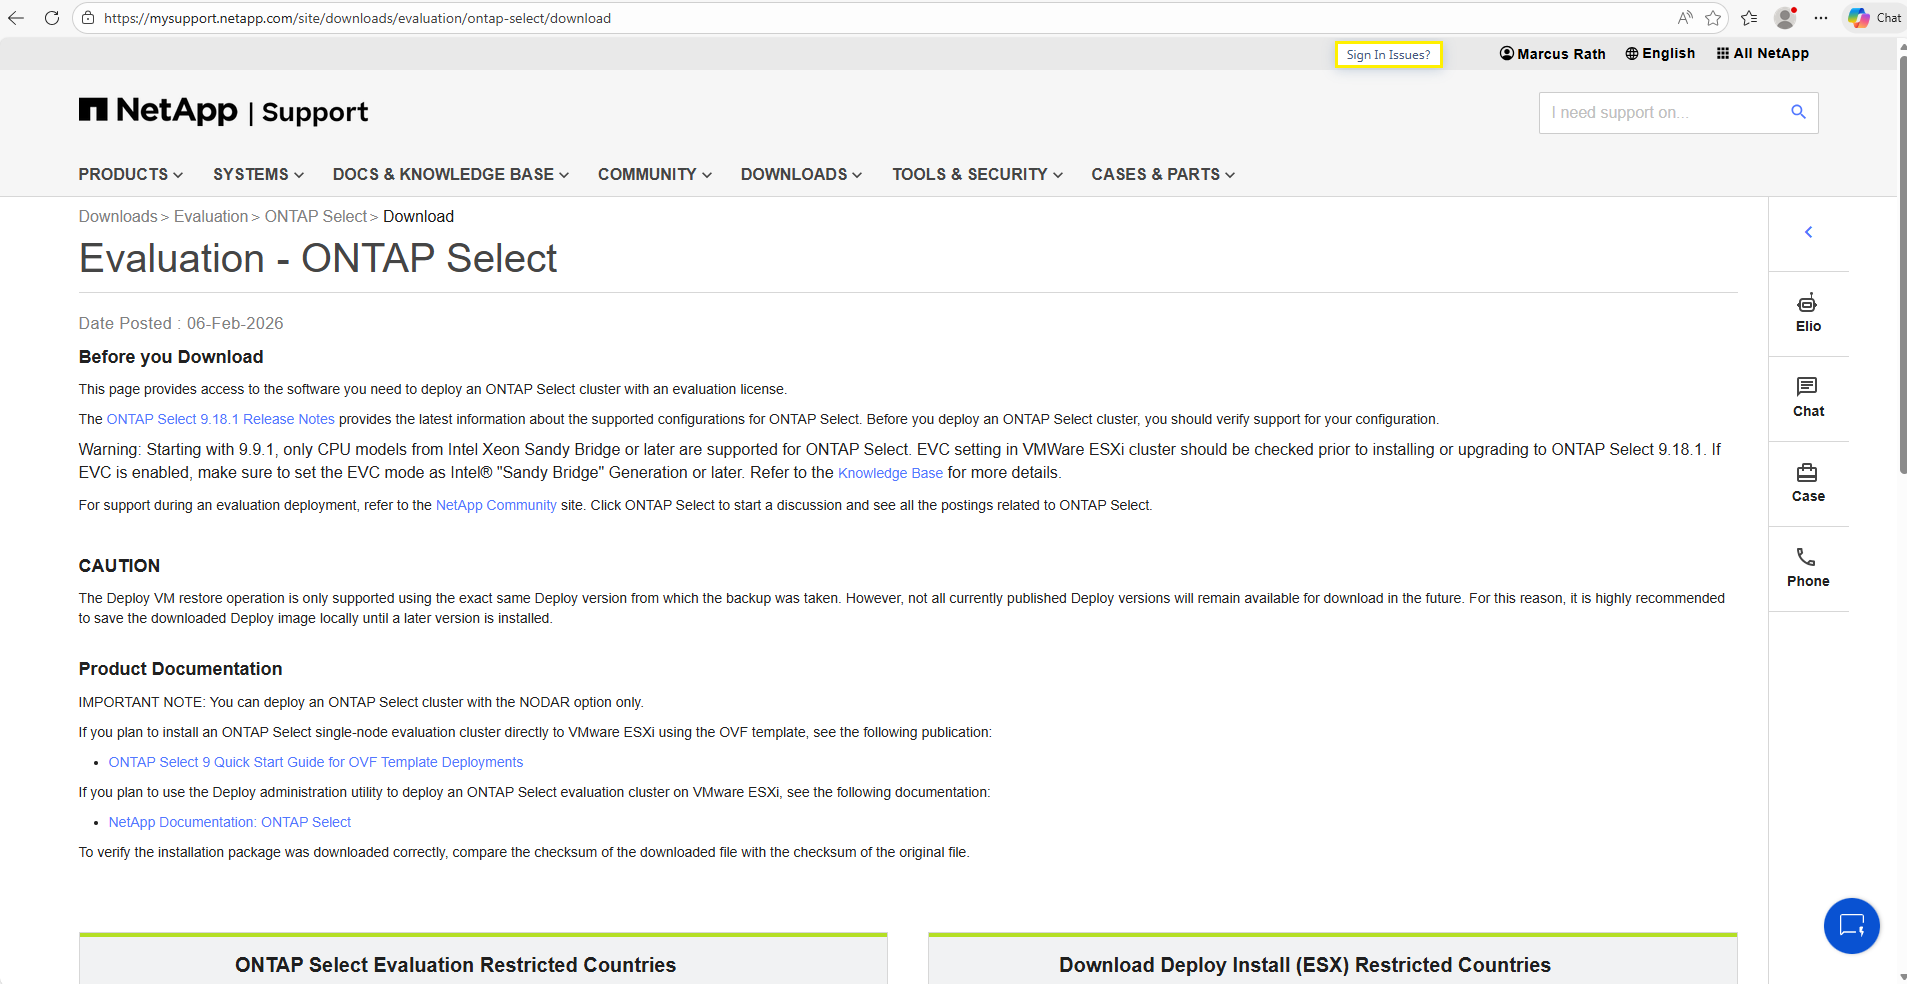
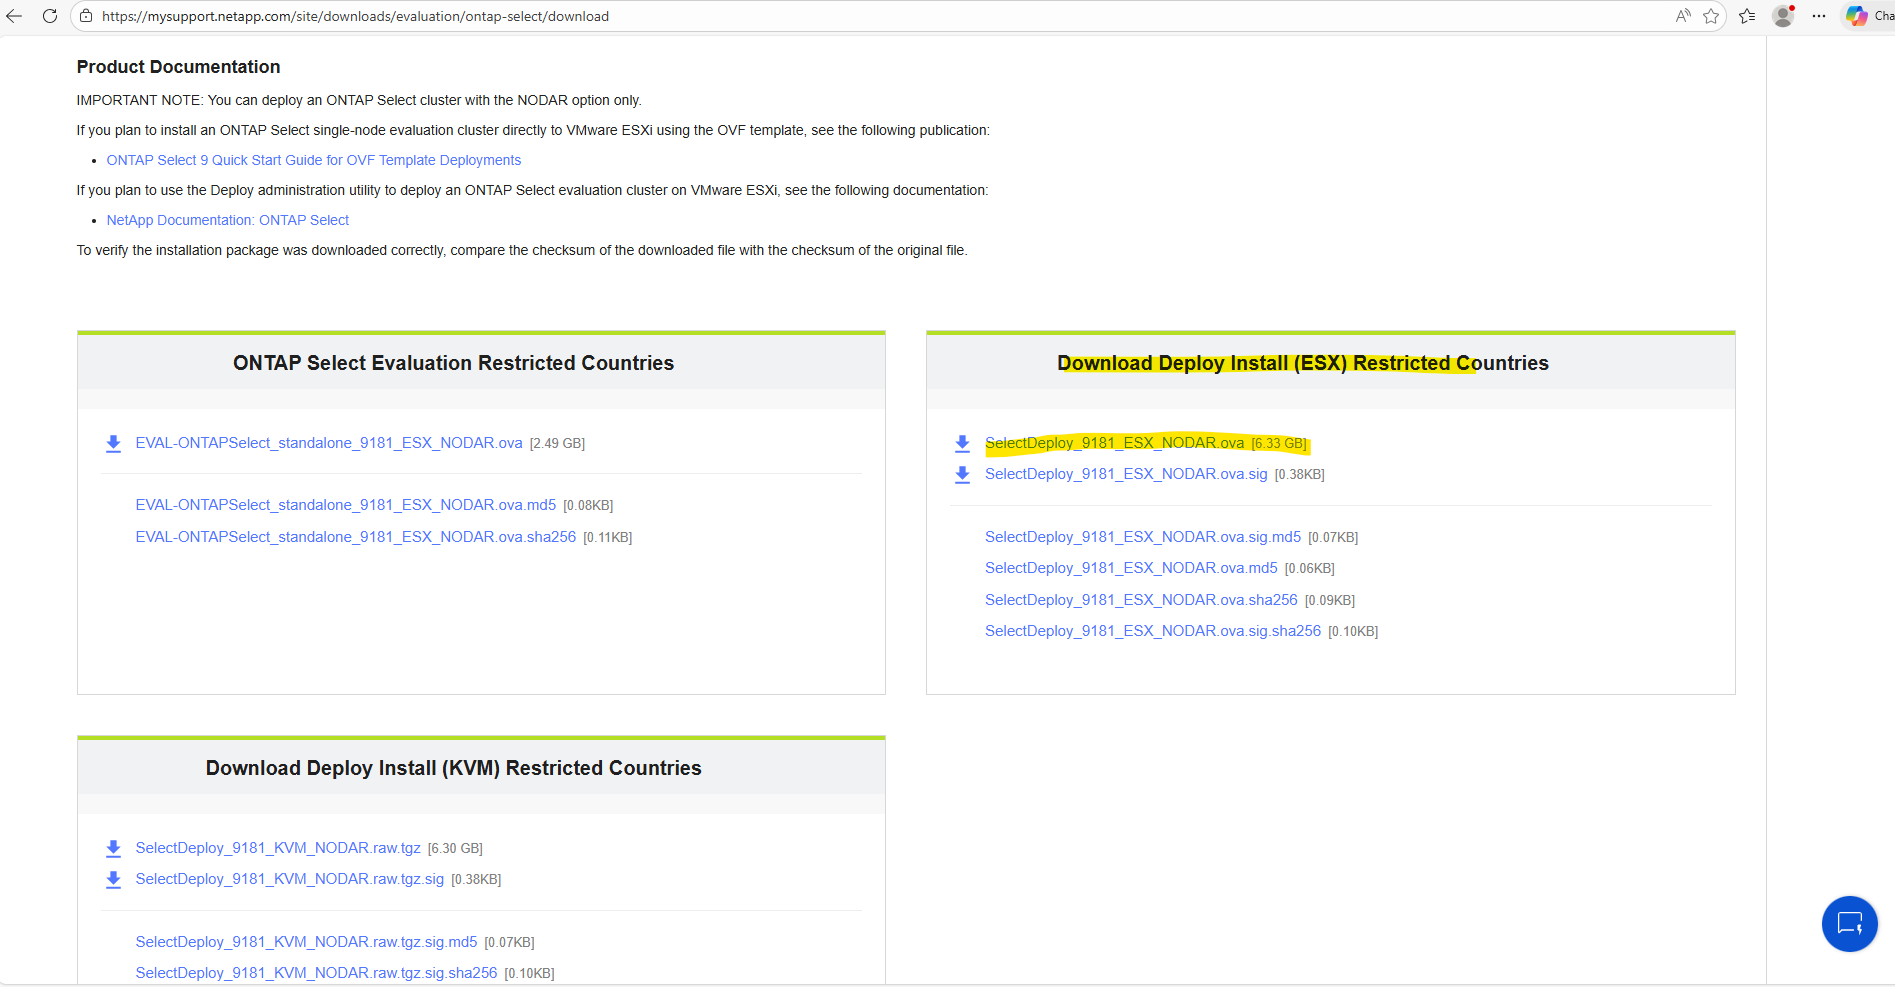
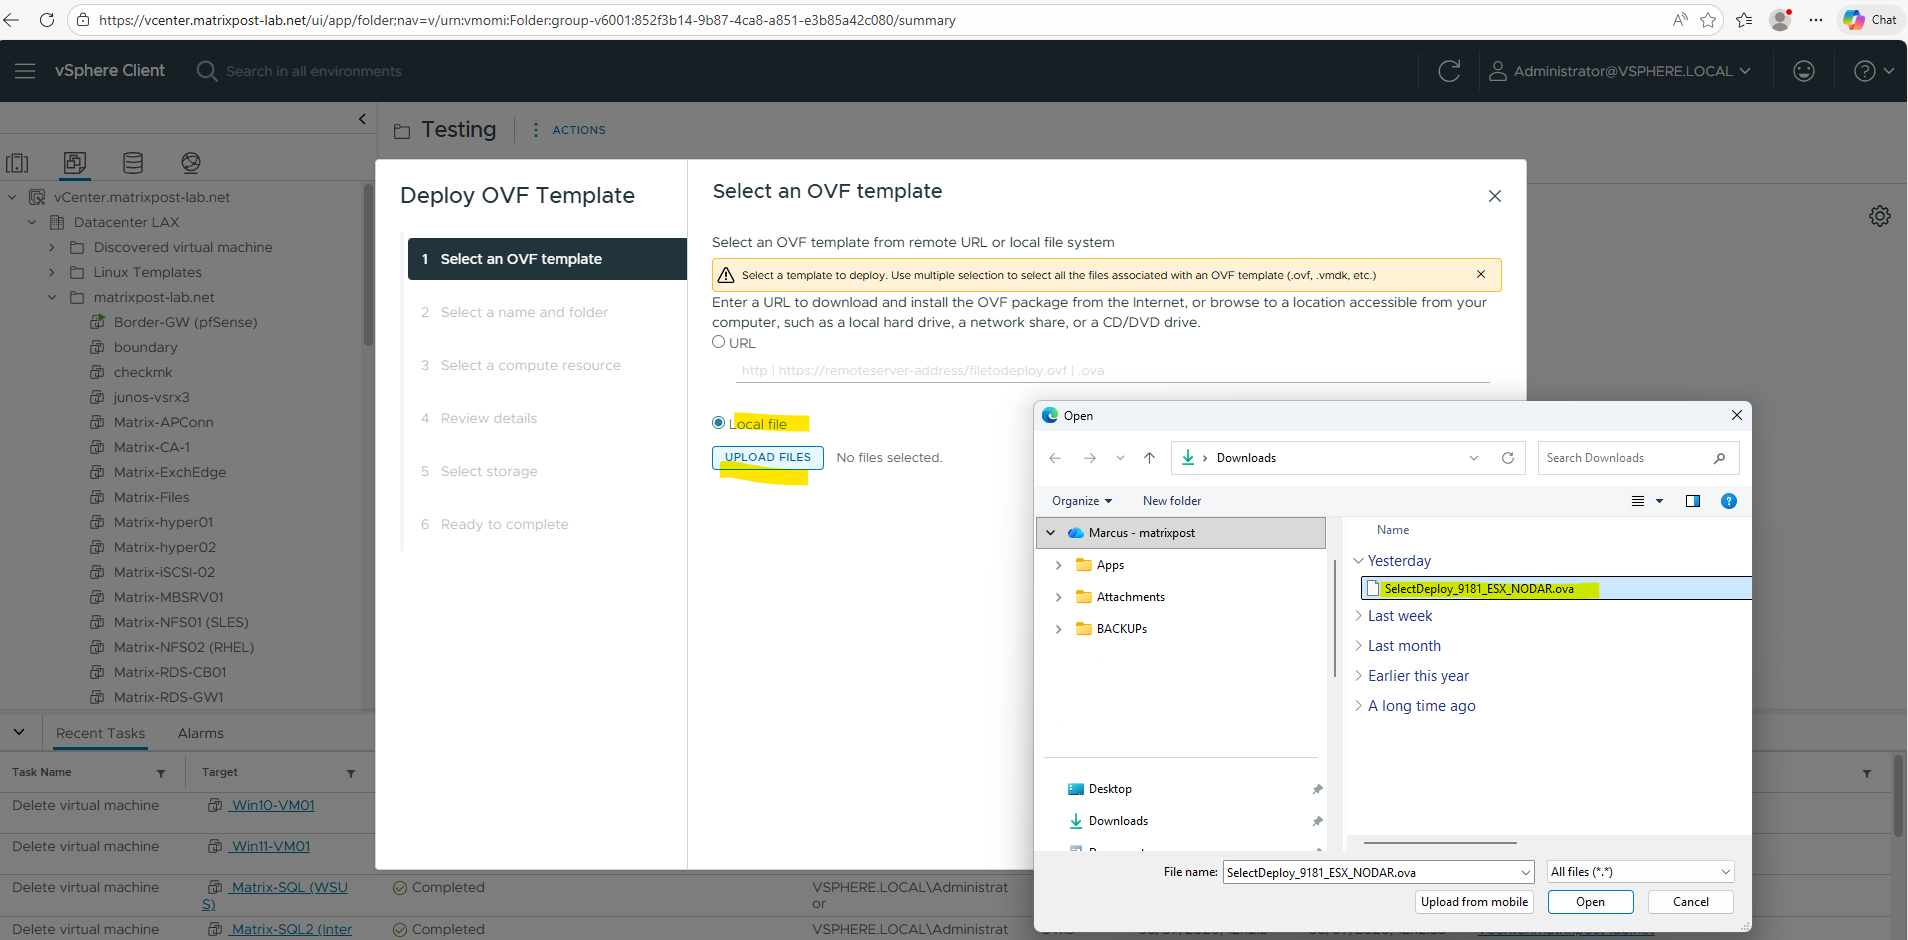
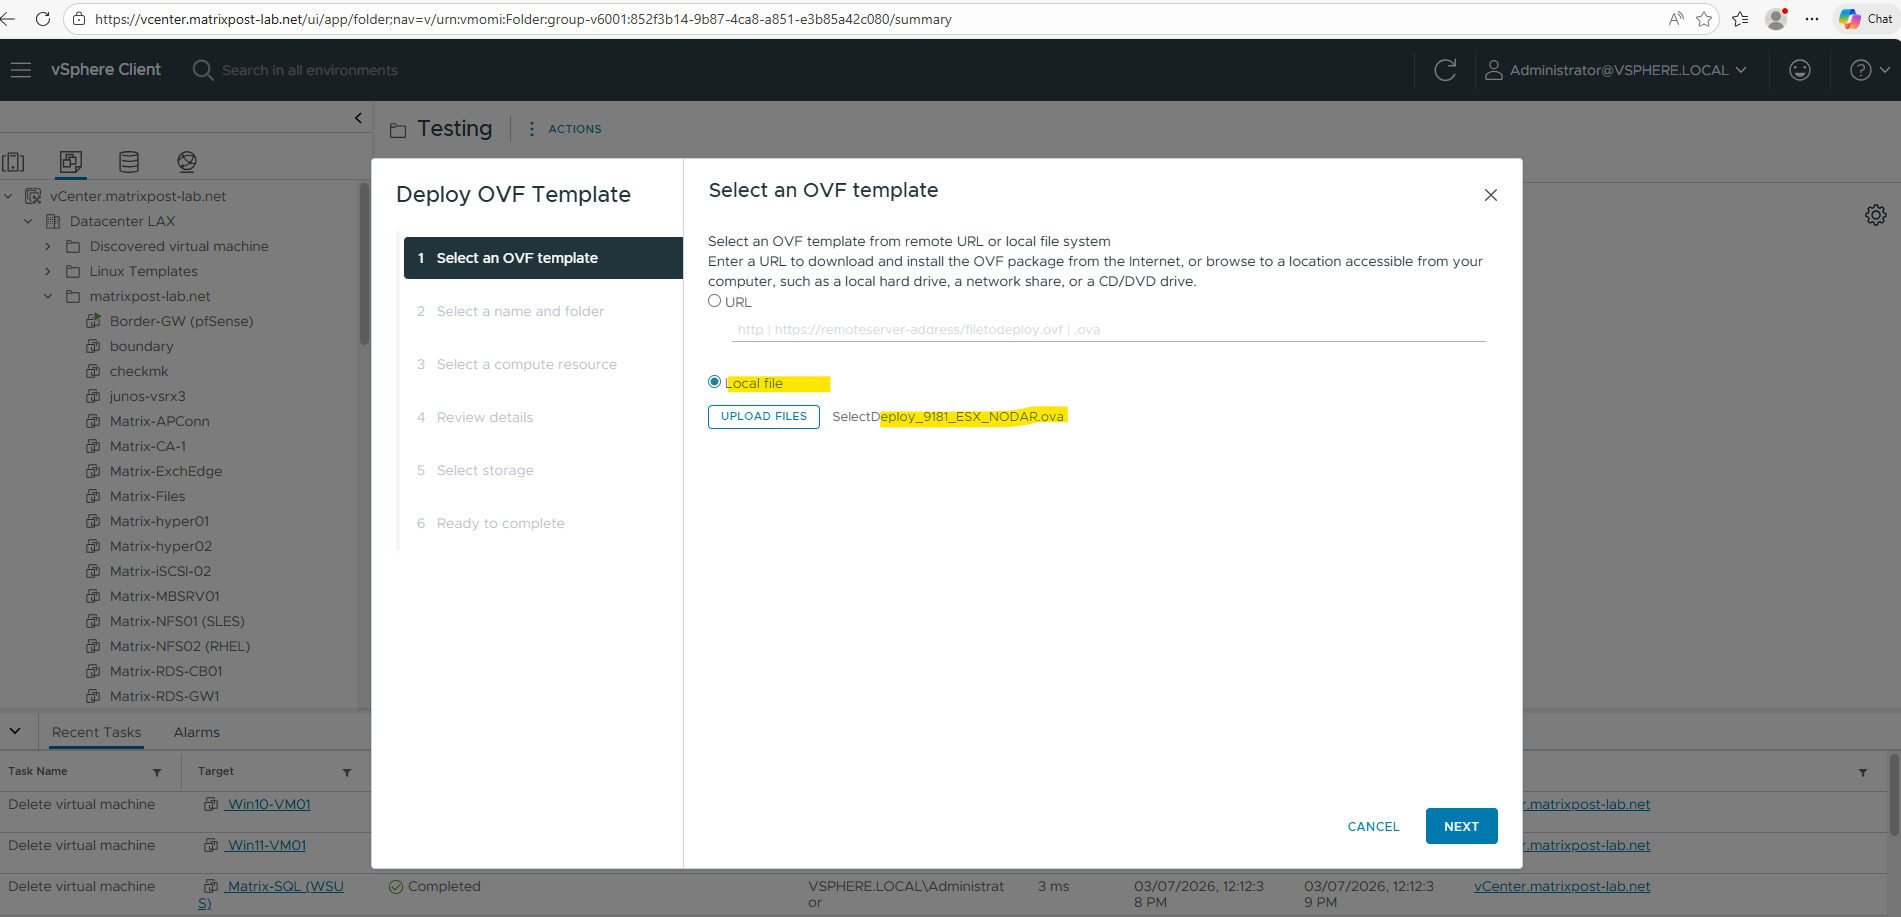
I will download the SelectDeploy_9181_ESX_NODAR.ova package.
This is the ONTAP Select Deploy administration utility packaged as an OVA for VMware ESXi.
When you deploy this OVA in vSphere, you get a VM called something like ONTAP Select Deploy. This VM provides the management utility used to deploy and manage ONTAP Select clusters as shown in this post.
After deploying it, we use it to deploy the actual ONTAP Select nodes
Install ONTAP Select Deploy
You need to install the ONTAP Select Deploy administration utility and use the utility to create an ONTAP Select cluster.
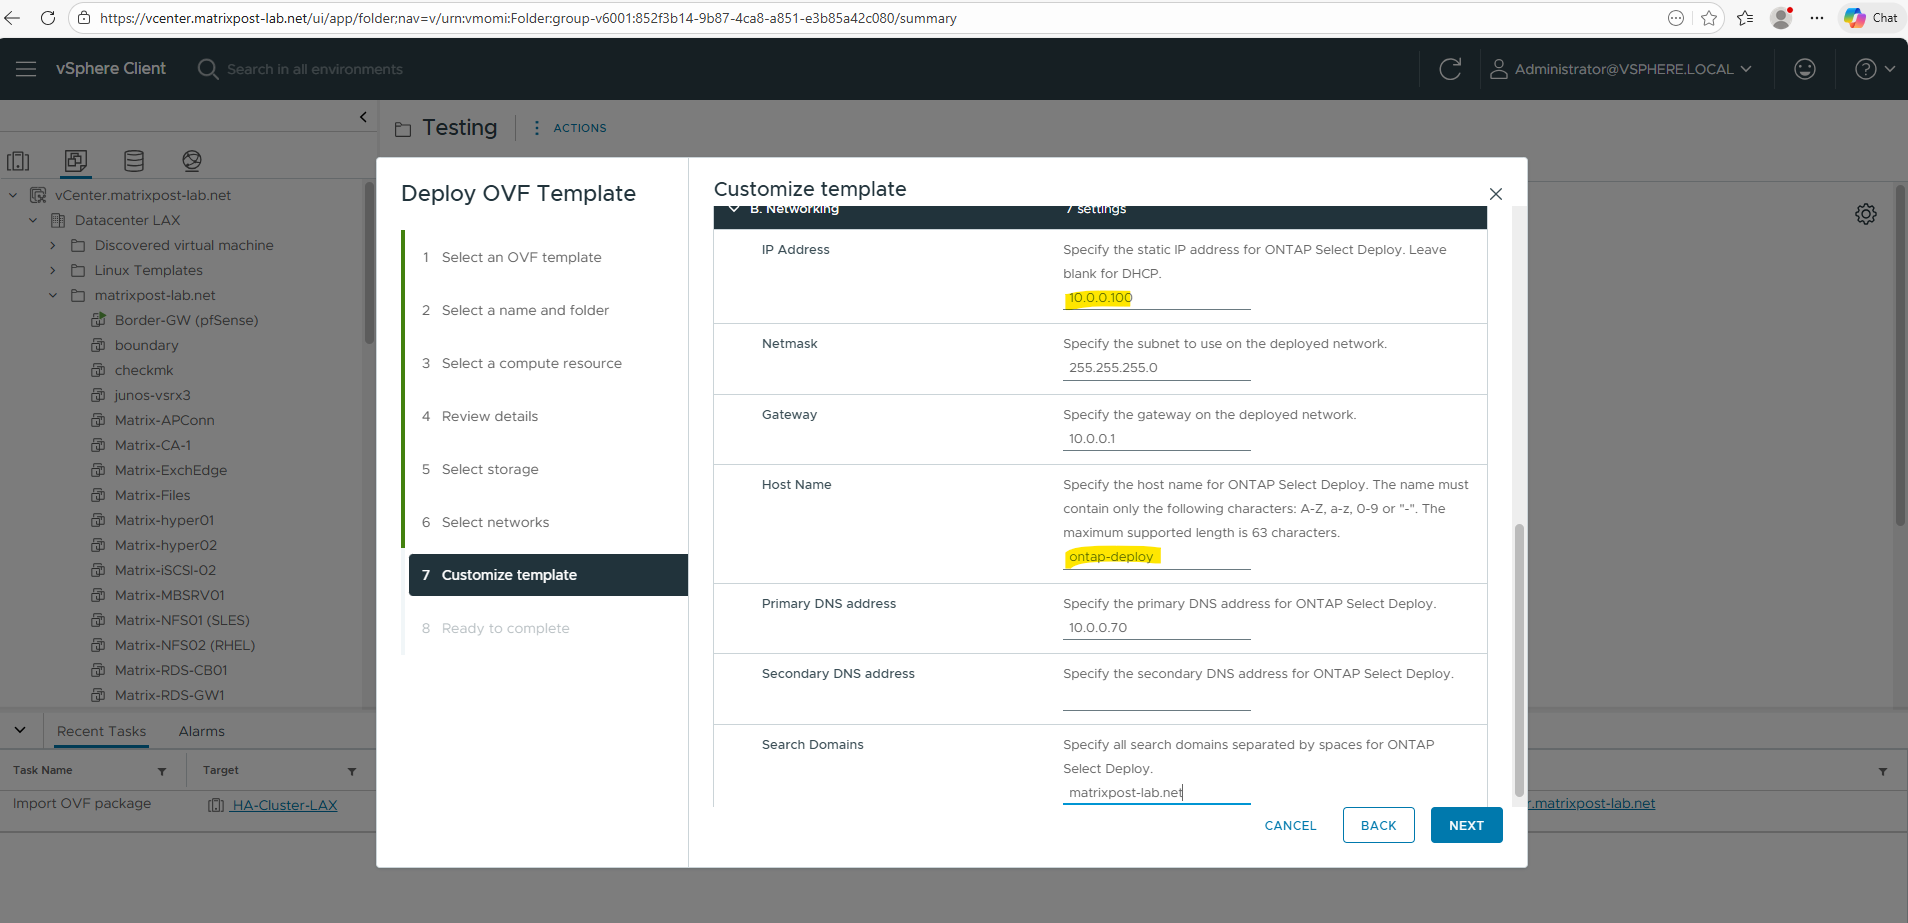
If you use vSphere, the Deploy OVF template wizard includes a form to provide all of the Deploy configuration information, including the network configuration. However, if you choose not to use this form, you can use the console of the Deploy VM to configure the network instead.
Navigate to the appropriate location in the hierarchy and select Deploy OVF Template.
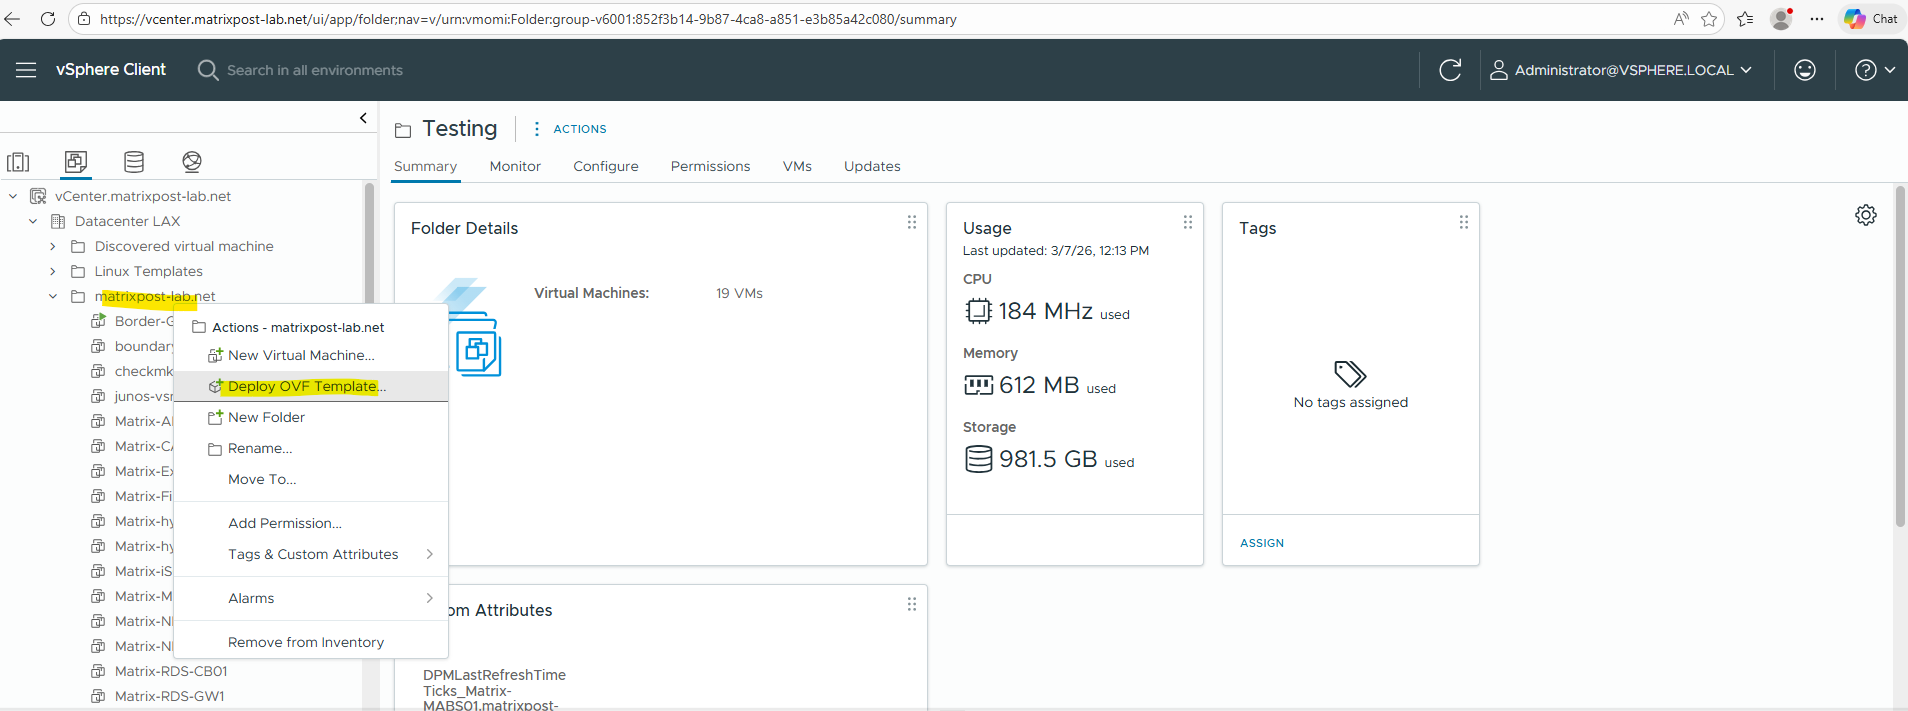
Select the OVA file and complete the Deploy OVF Template wizard. Select the options that are appropriate for your environment.
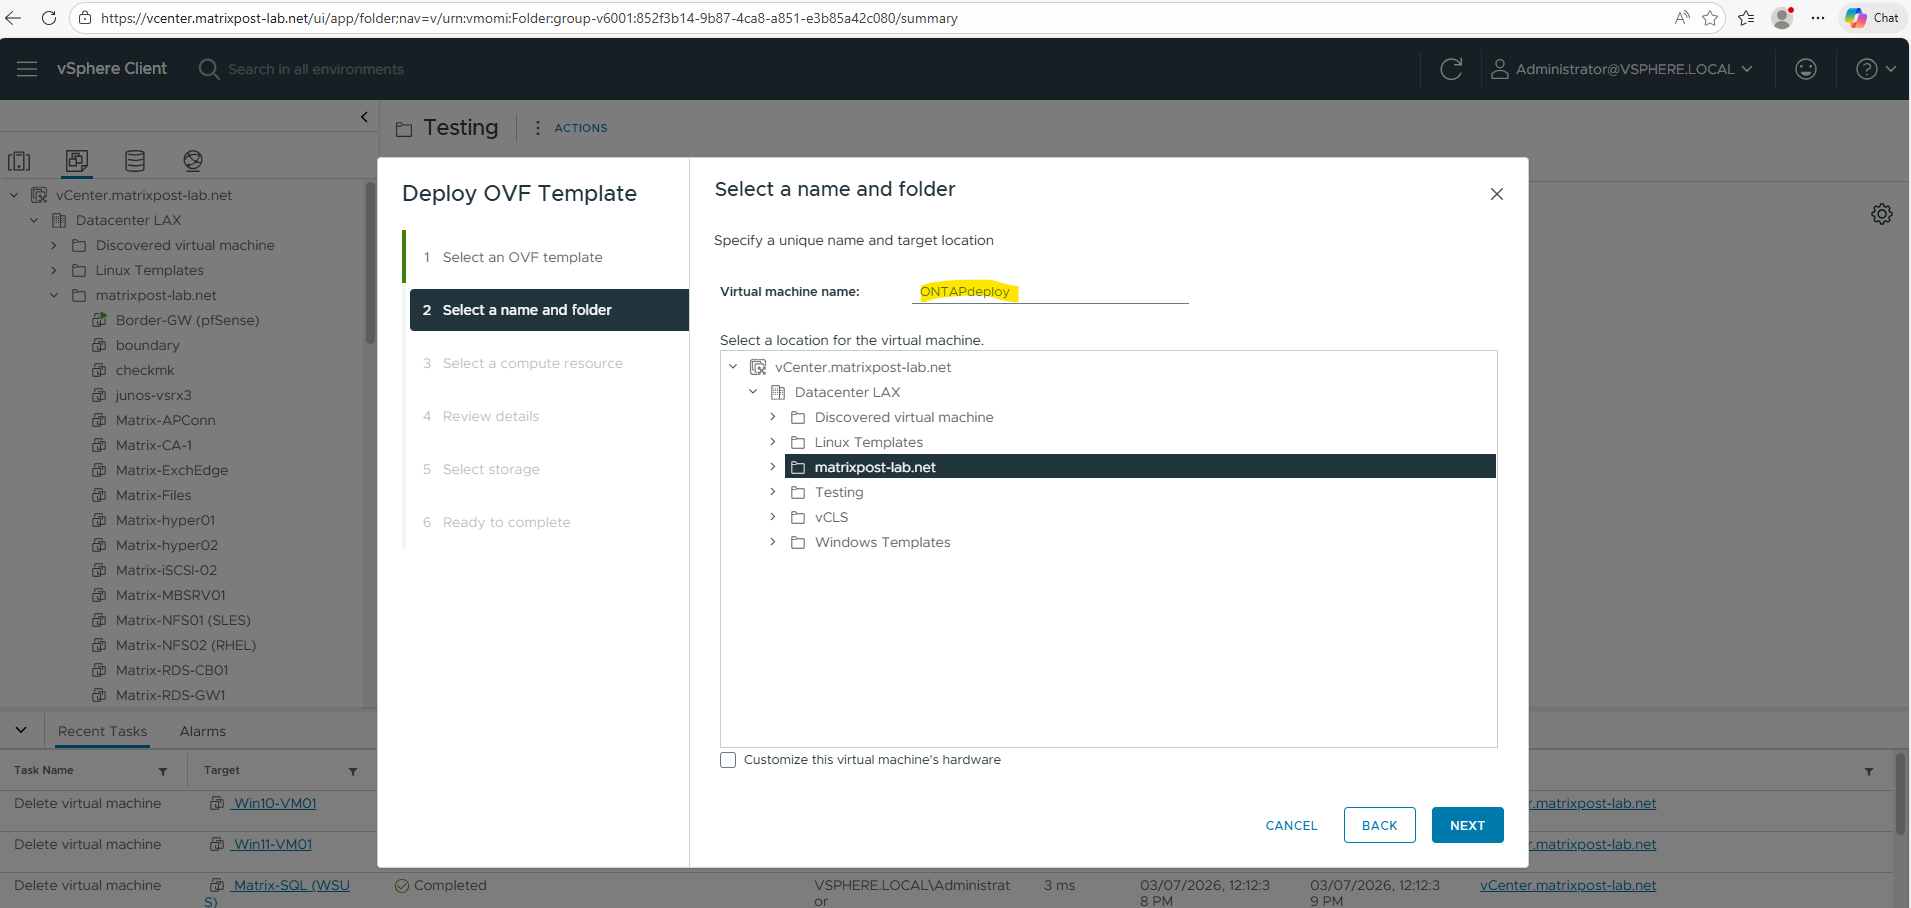
Enter a name for the virtual machine name.
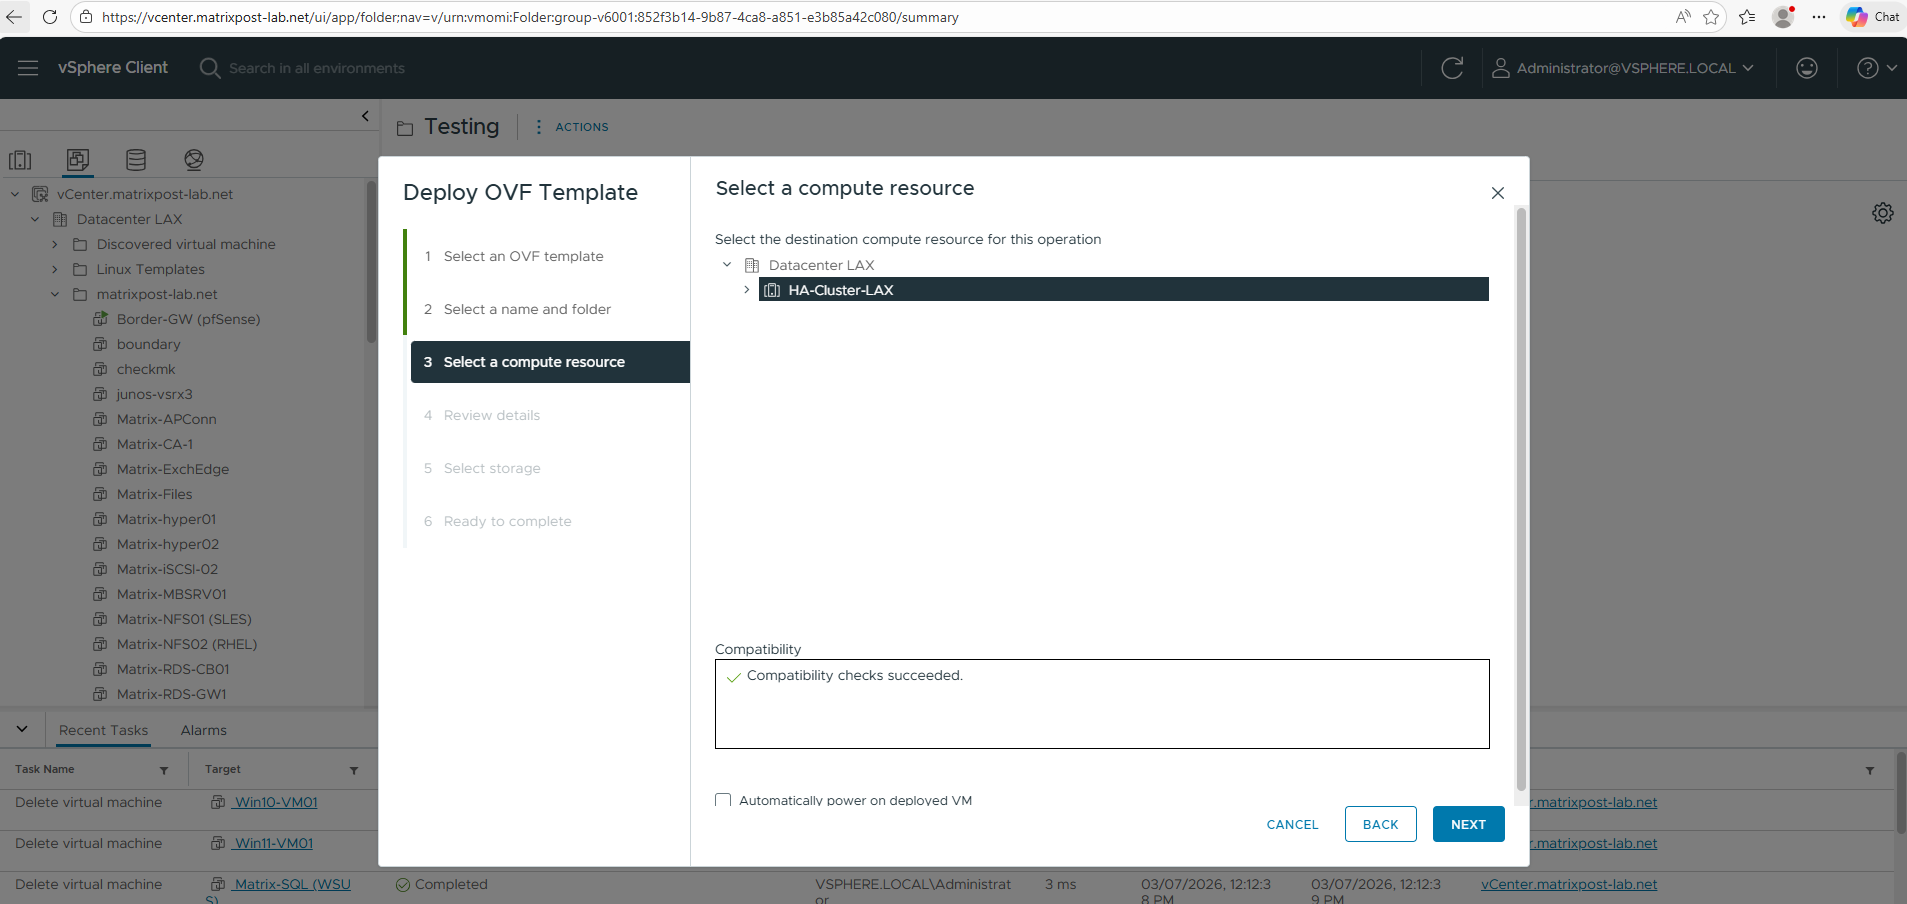
Select a compute resource.
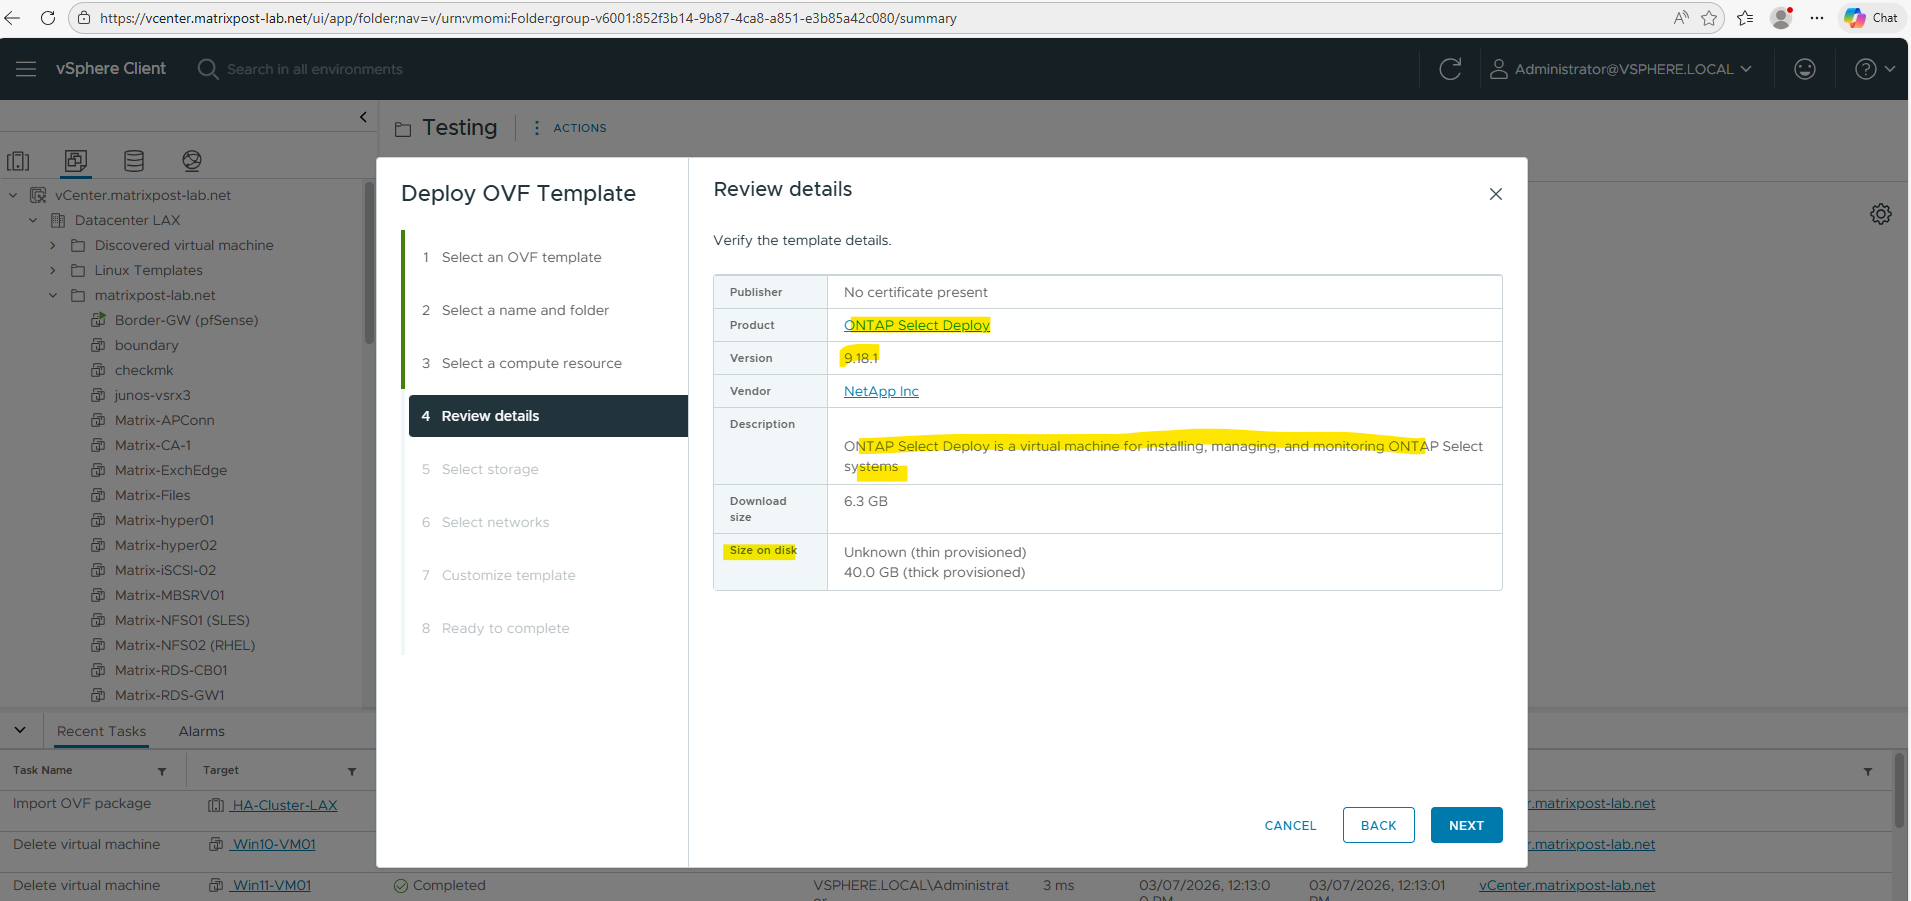
Review the details page.
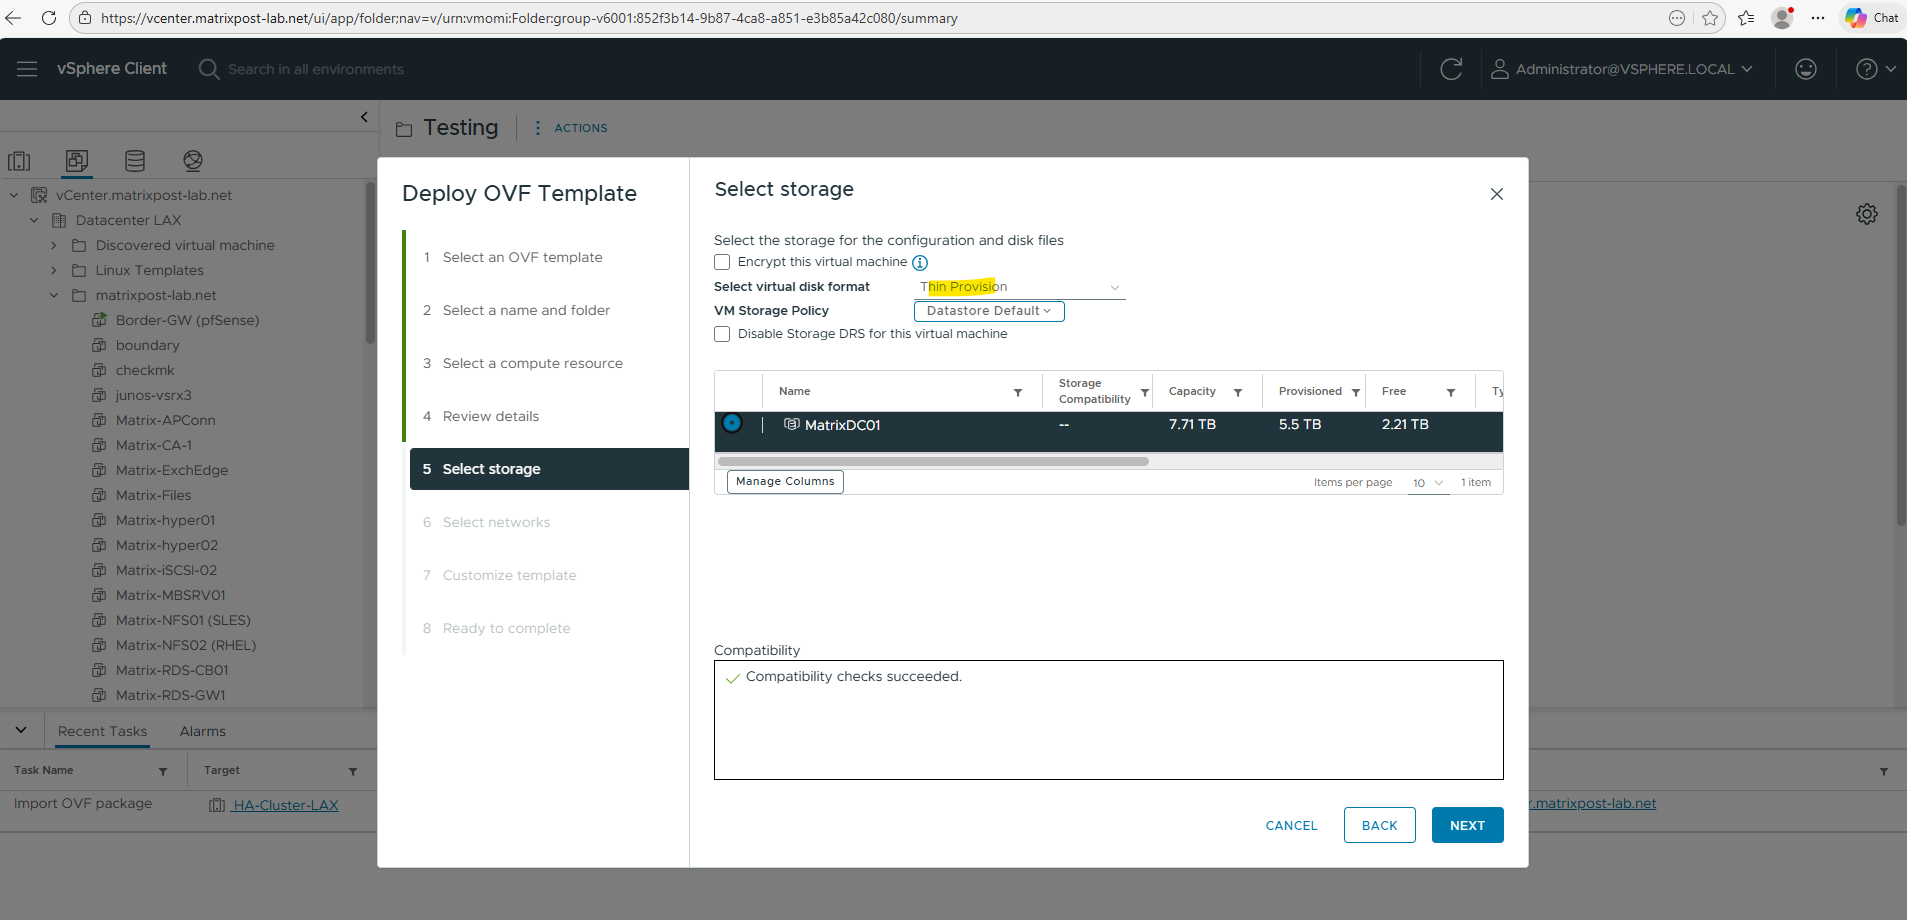
For my lab environment, I’ll use thin provisioning to keep the storage footprint small.
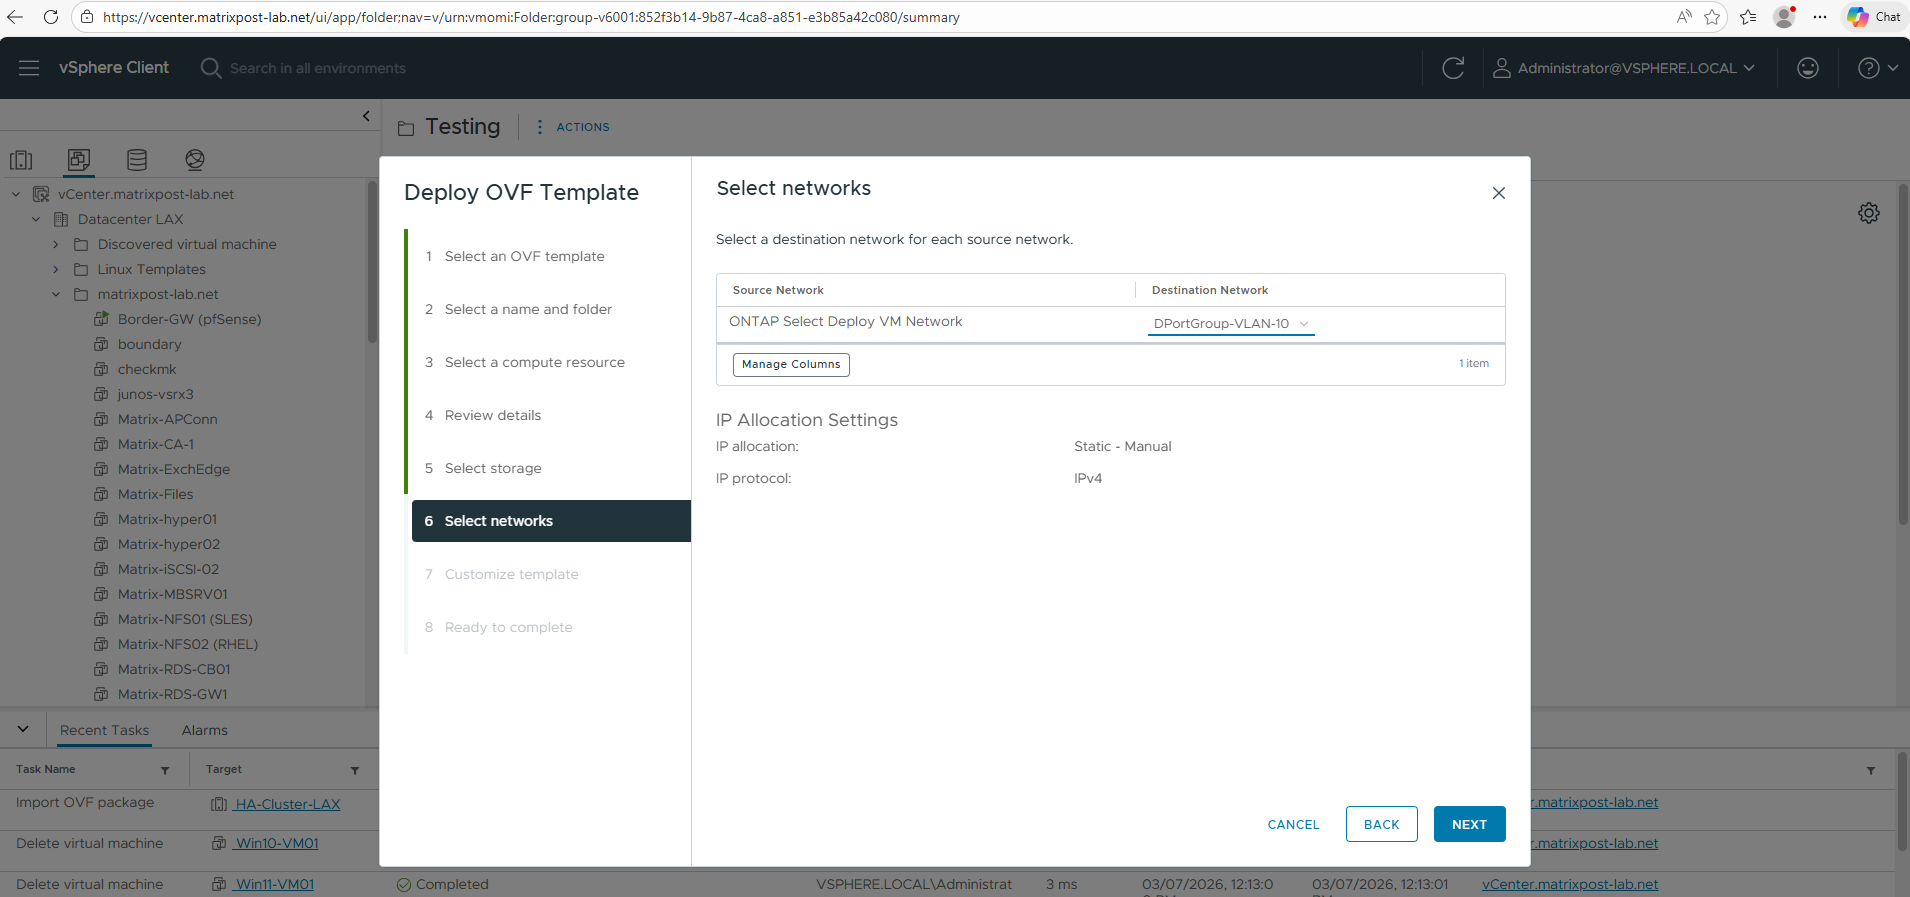
Select the desired network for the ONTAP Deploy VM.
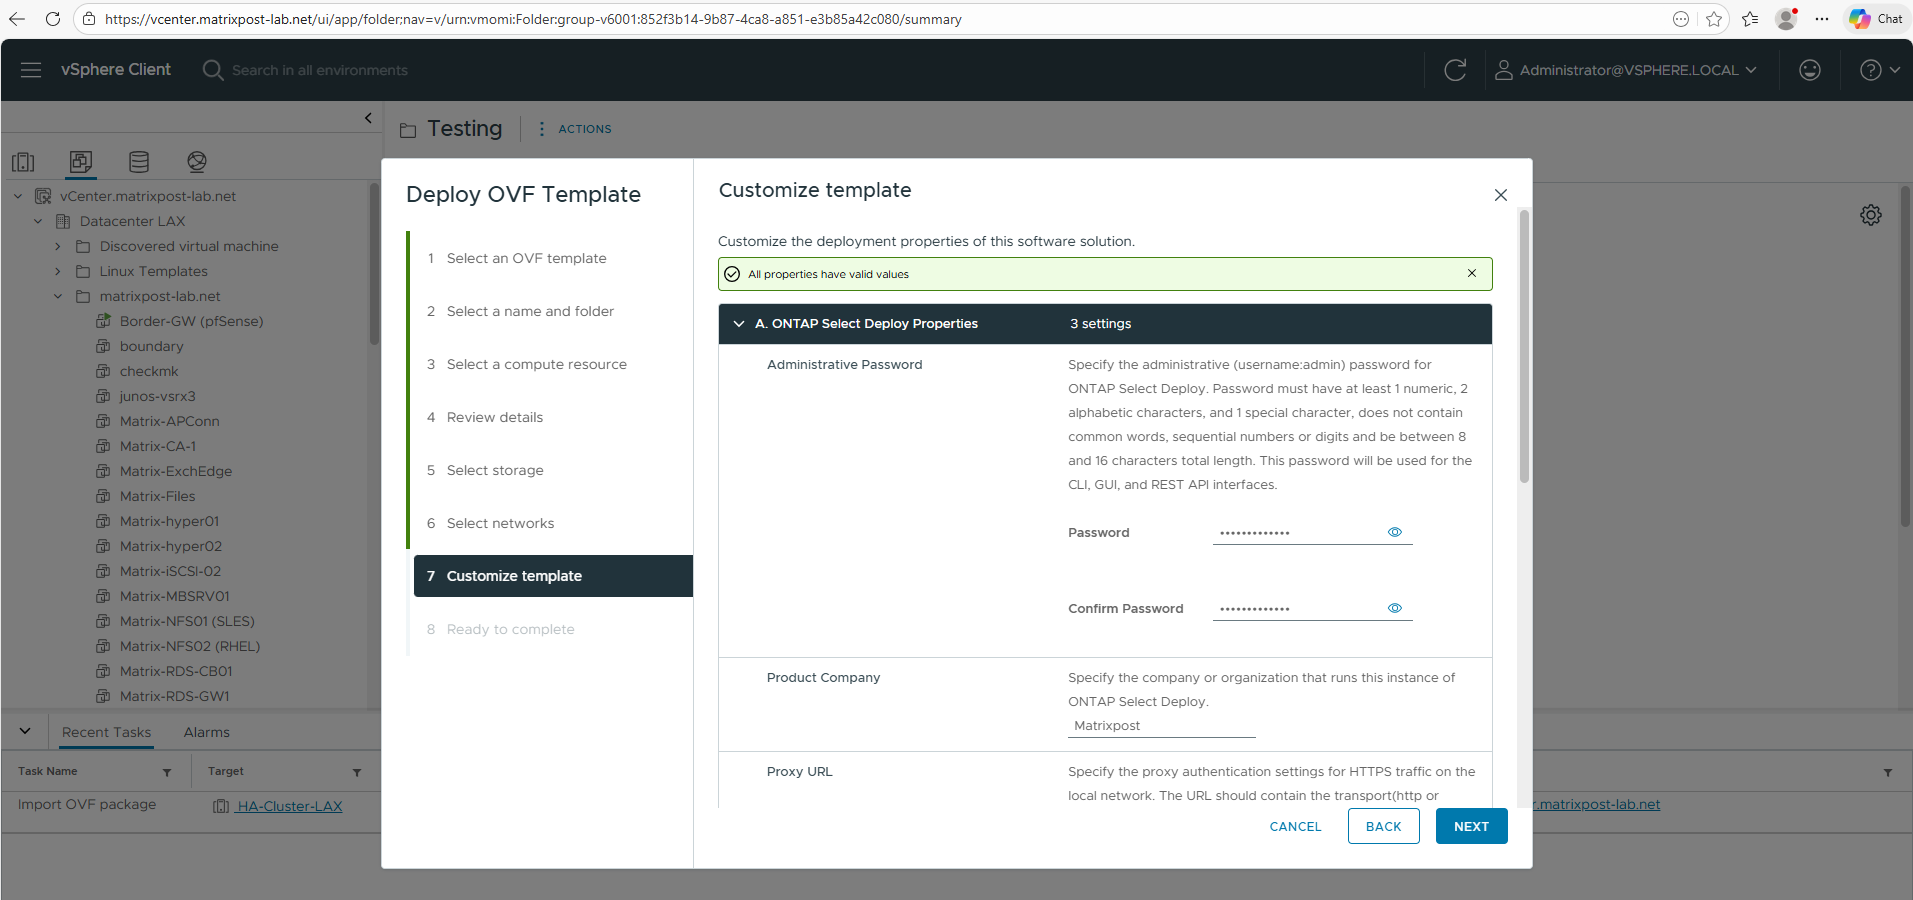
Next we will see in vSphere the mentioned form to provide all of the Deploy configuration information.
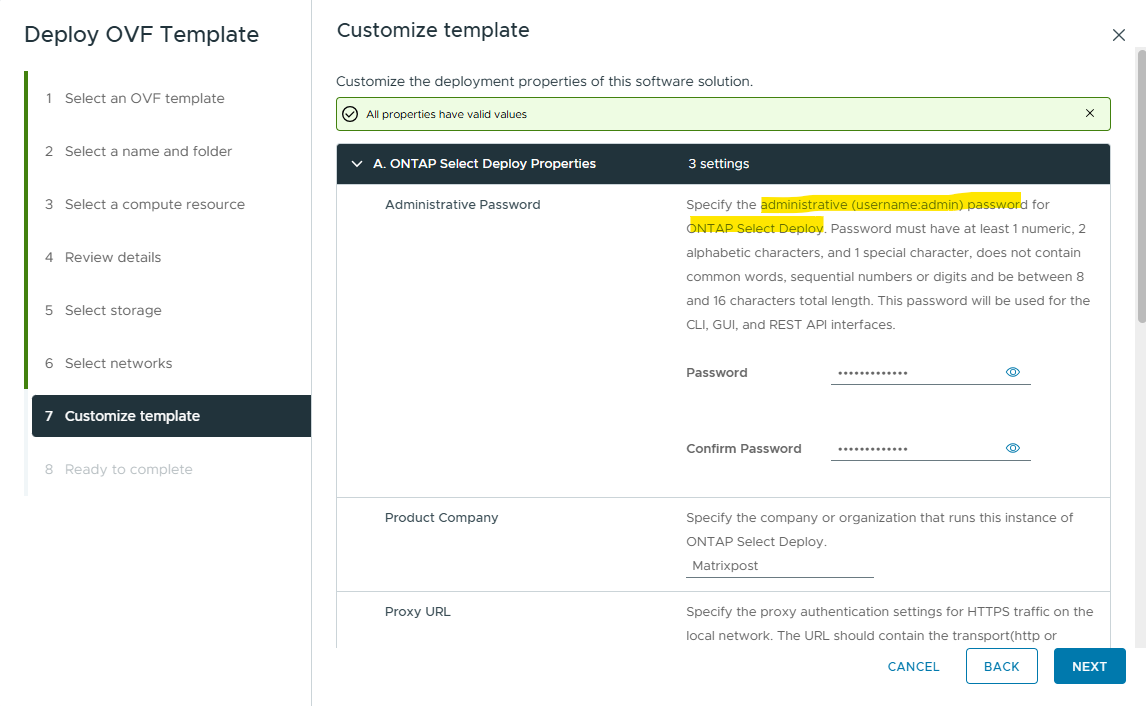
After deploying the ONTAP Select Deploy appliance, administrators can access the system using the admin user account. The password is defined during the OVA deployment in vSphere and allows access either via SSH or through the VM’s interactive console for basic administration and troubleshooting tasks.
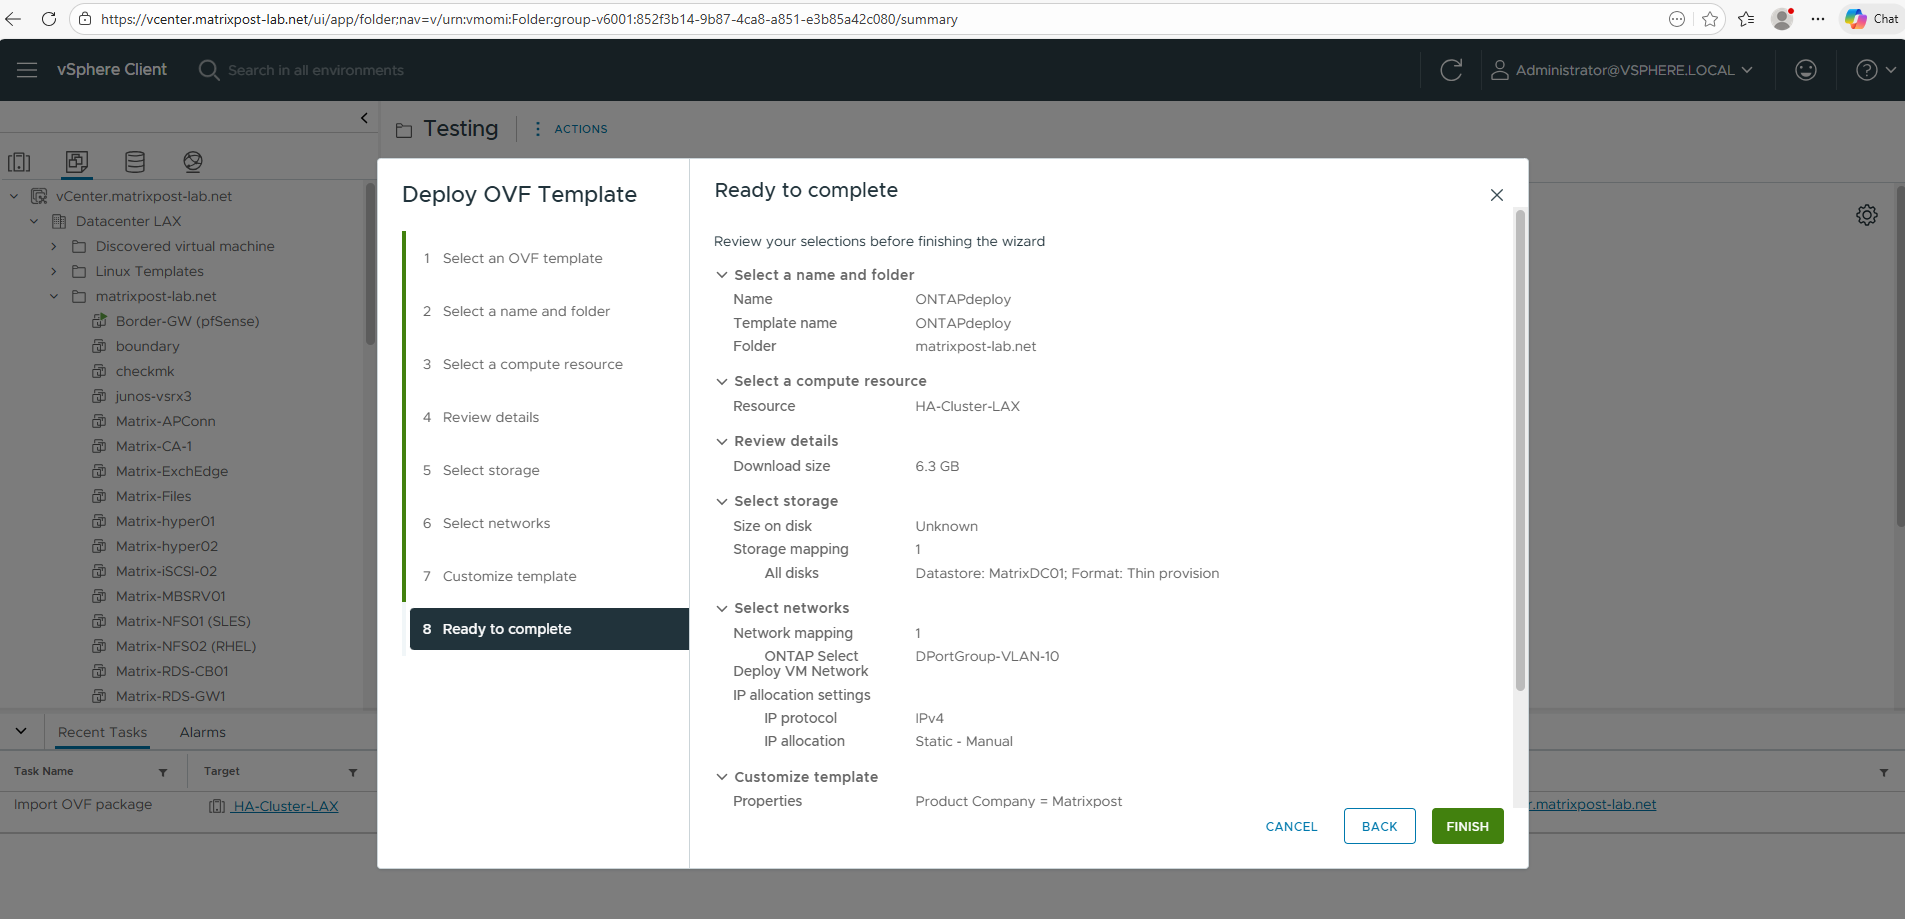
Finally click on FINISH to deploy the appliance (ONTAP Deploy) in vSphere.
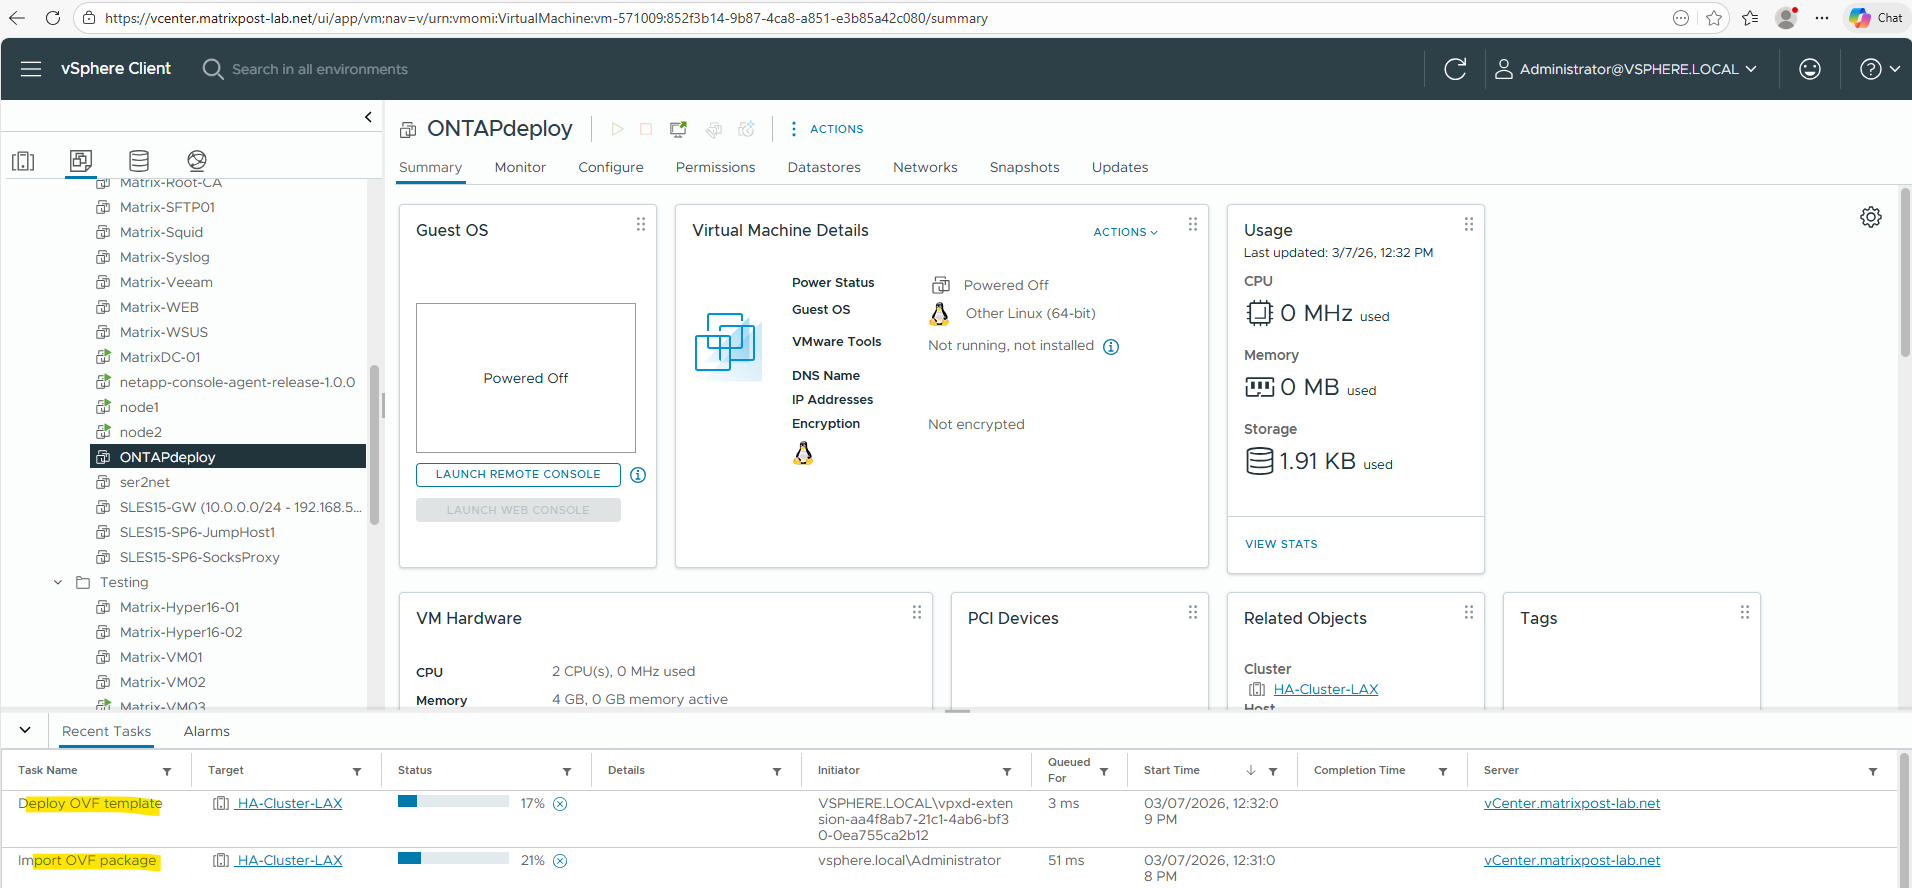
During the deployment, the task progress bar in the vSphere task panel shows the current status of the OVF import and VM creation process. This allows you to monitor the deployment progress until the appliance is fully deployed and ready to be powered on.
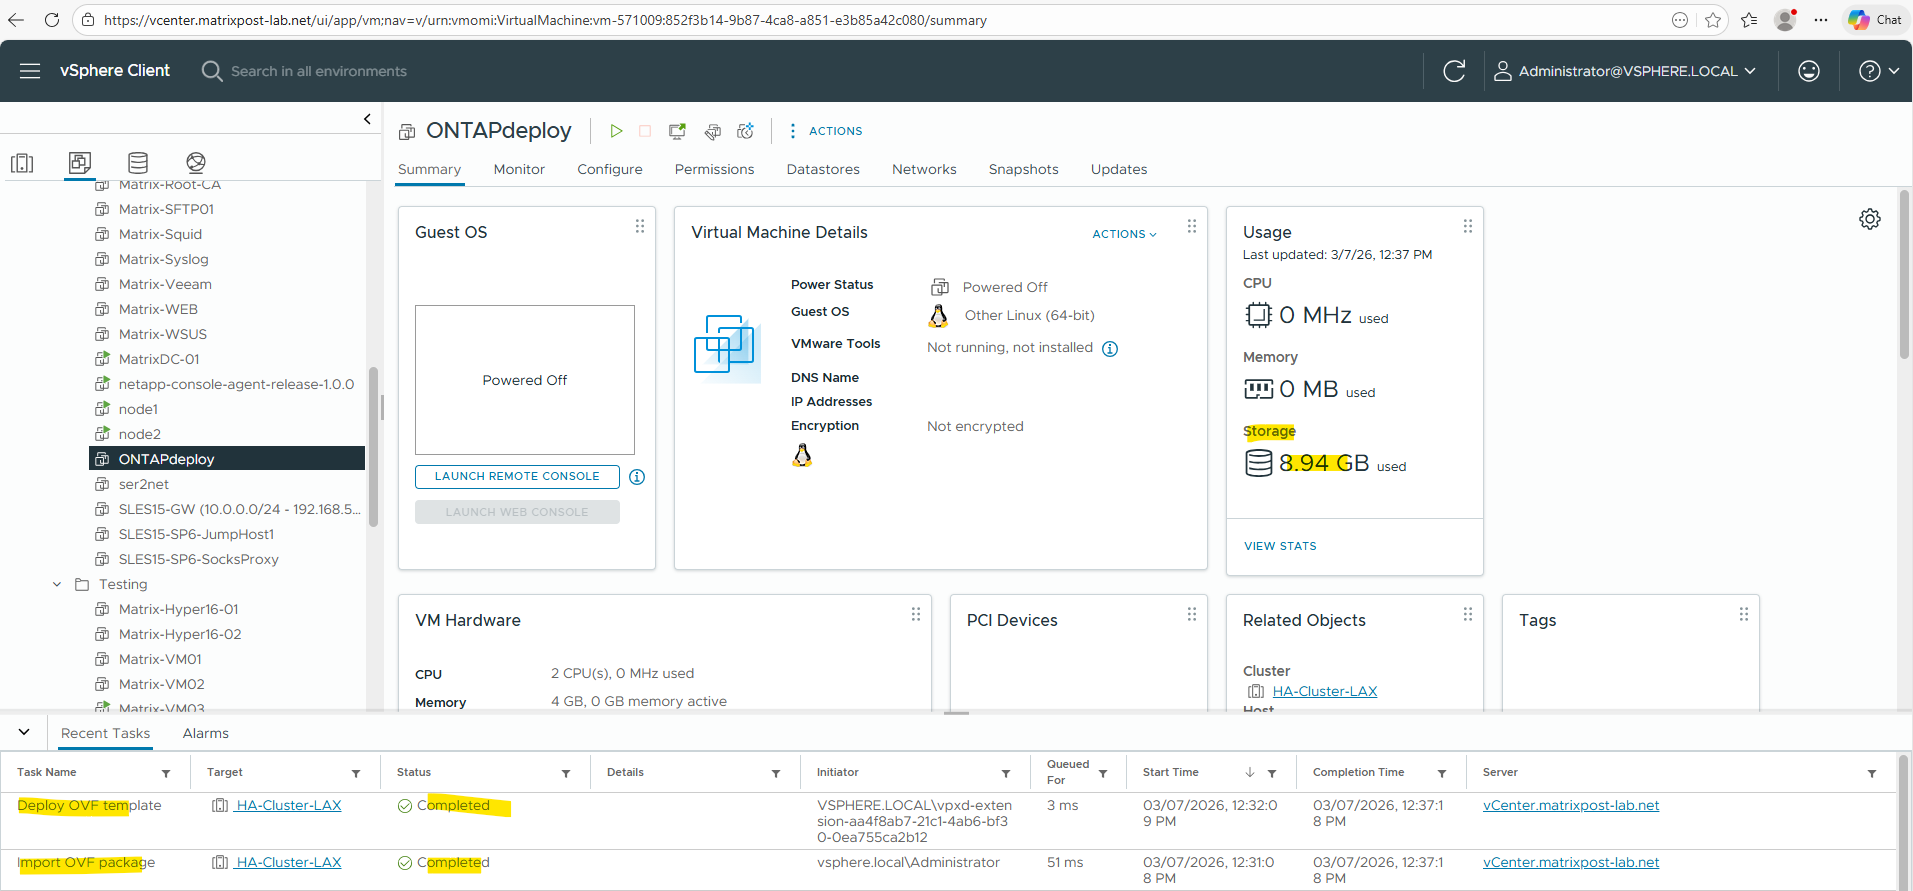
When using thin provisioning, the appliance initially consumes only about 8.94 GB of storage on the datastore. The virtual disks will grow dynamically as needed, instead of allocating the full disk size during deployment.
Initial Appliance Boot
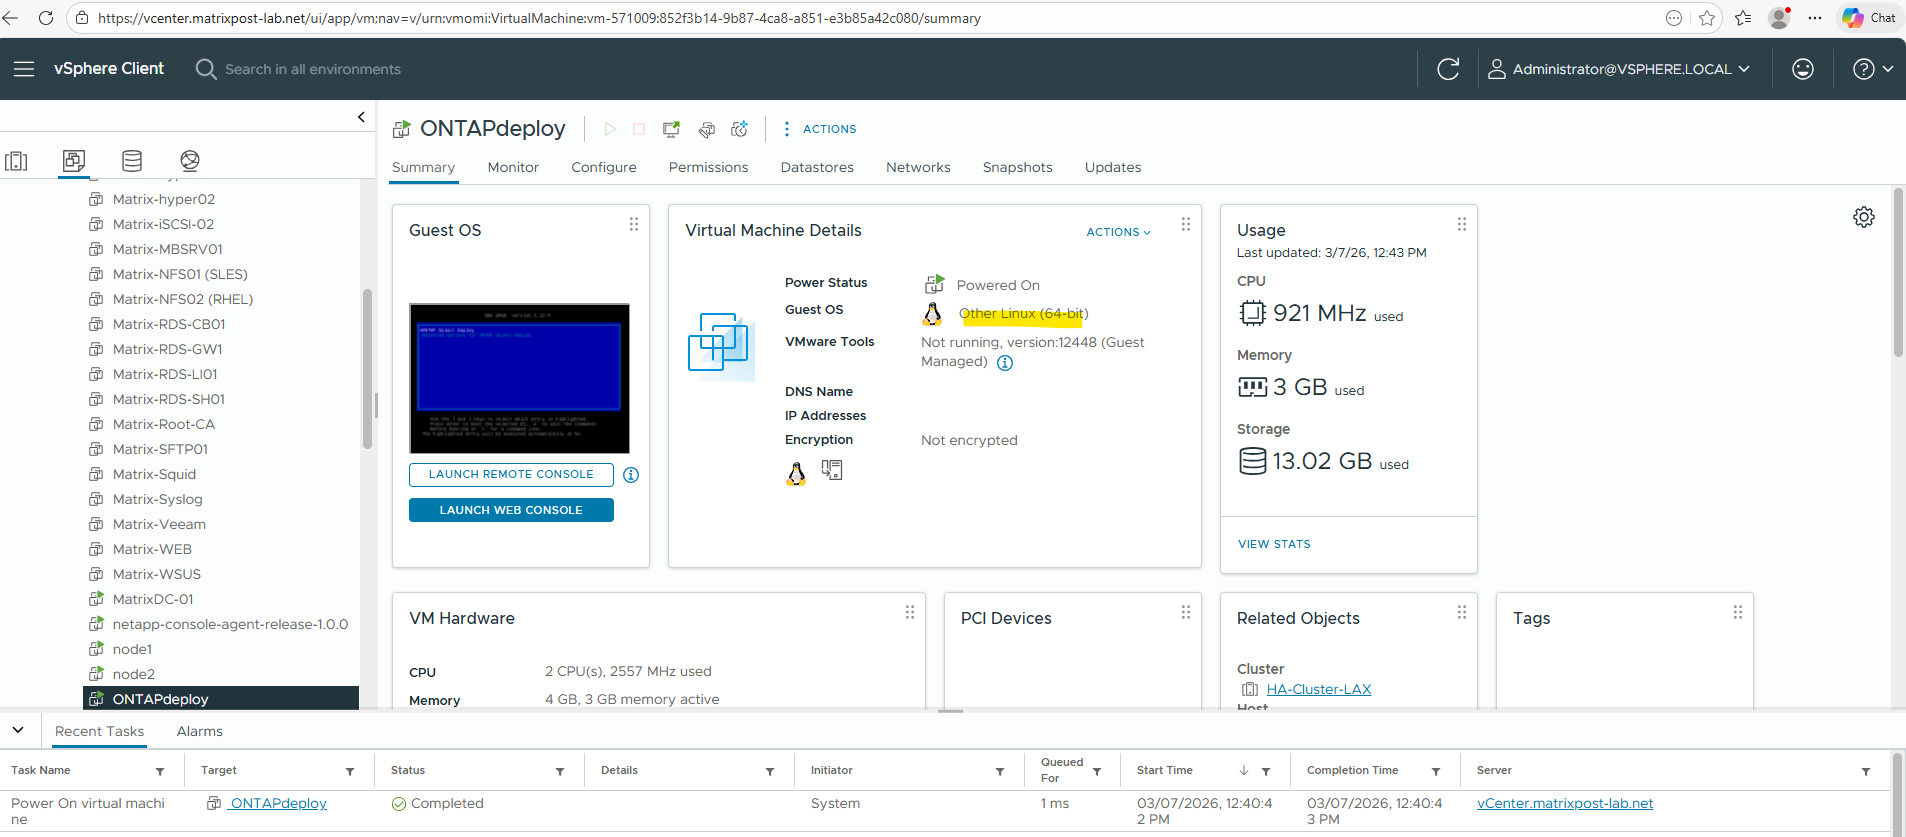
After the deployment completes, the appliance virtual machine can be powered on from the vSphere inventory. Once started, the system boots the appliance and presents the console interface, where only minimal information such as the company name and optional proxy settings can be configured as shown below.
The actual configuration and deployment of ONTAP Select clusters is performed later through the web interface of the Deploy utility (appliance).
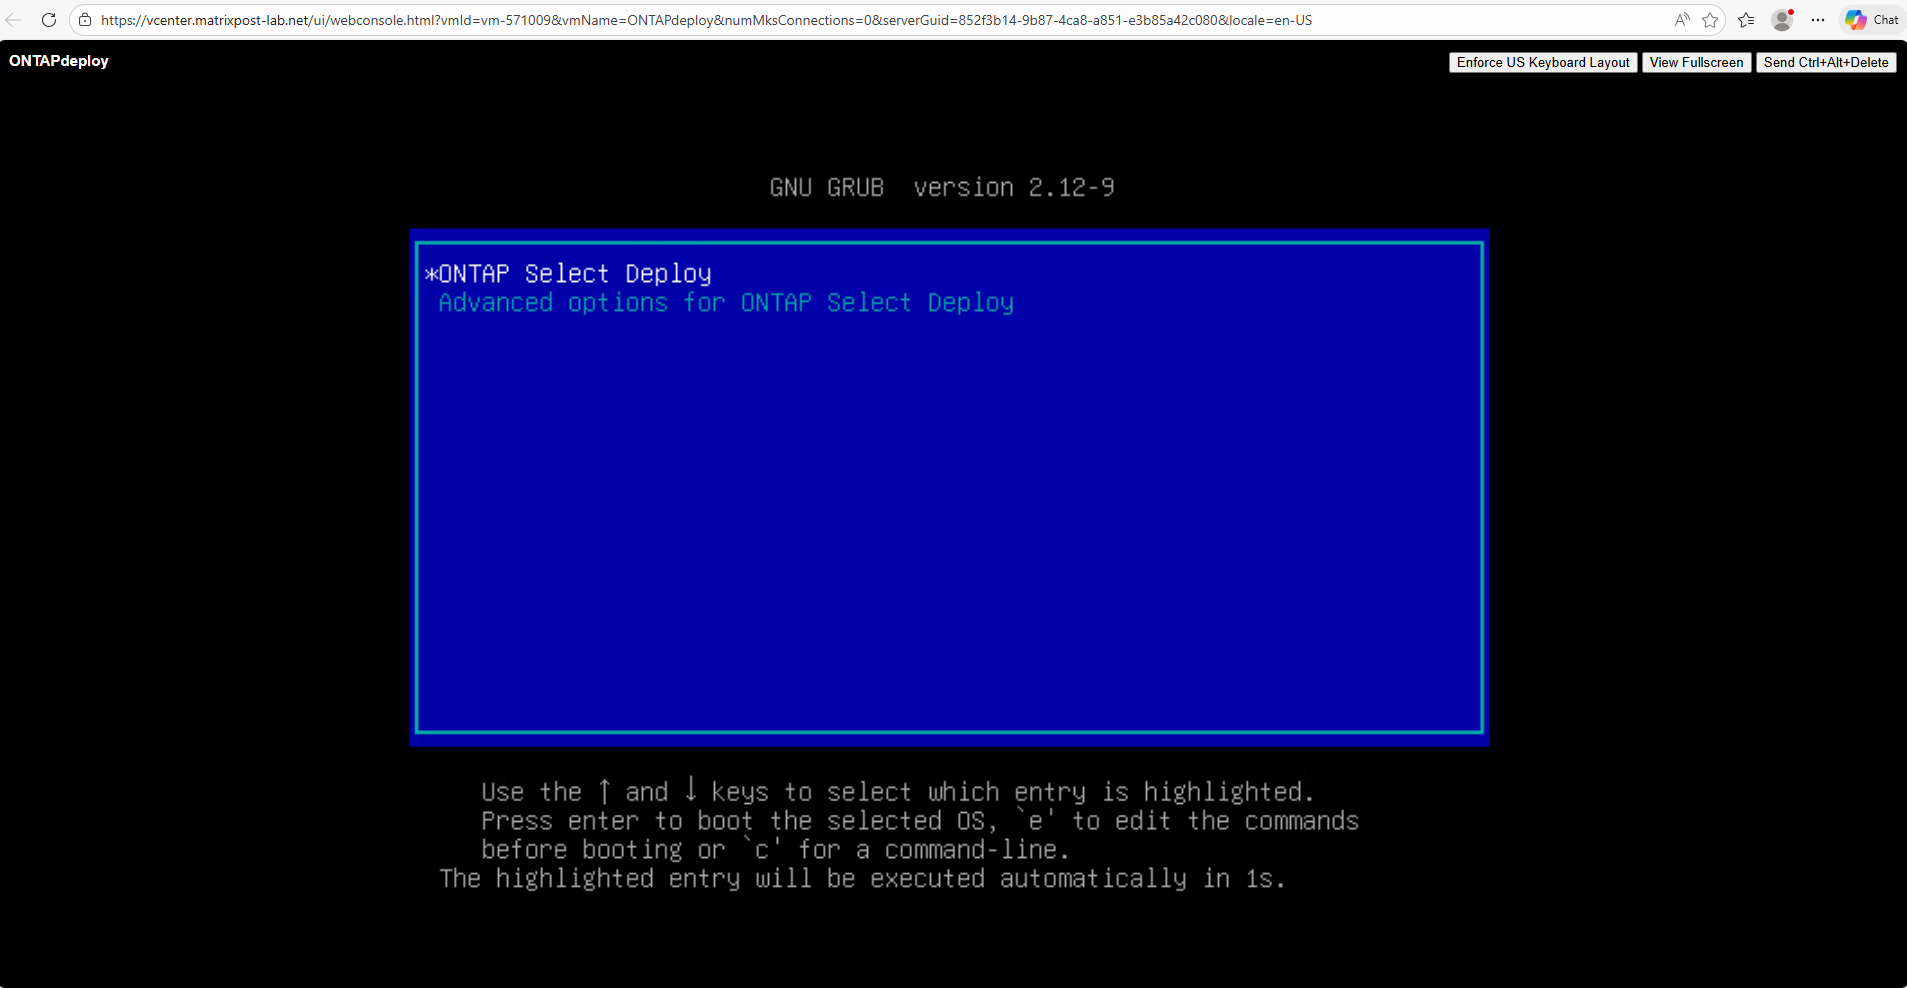
Interactive console login of the ONTAP Select Deploy VM using the admin user and the password configured during the OVA deployment.
Note that the vSphere console uses the US keyboard layout by default. If you are using a different keyboard layout, keep this in mind when entering the password.
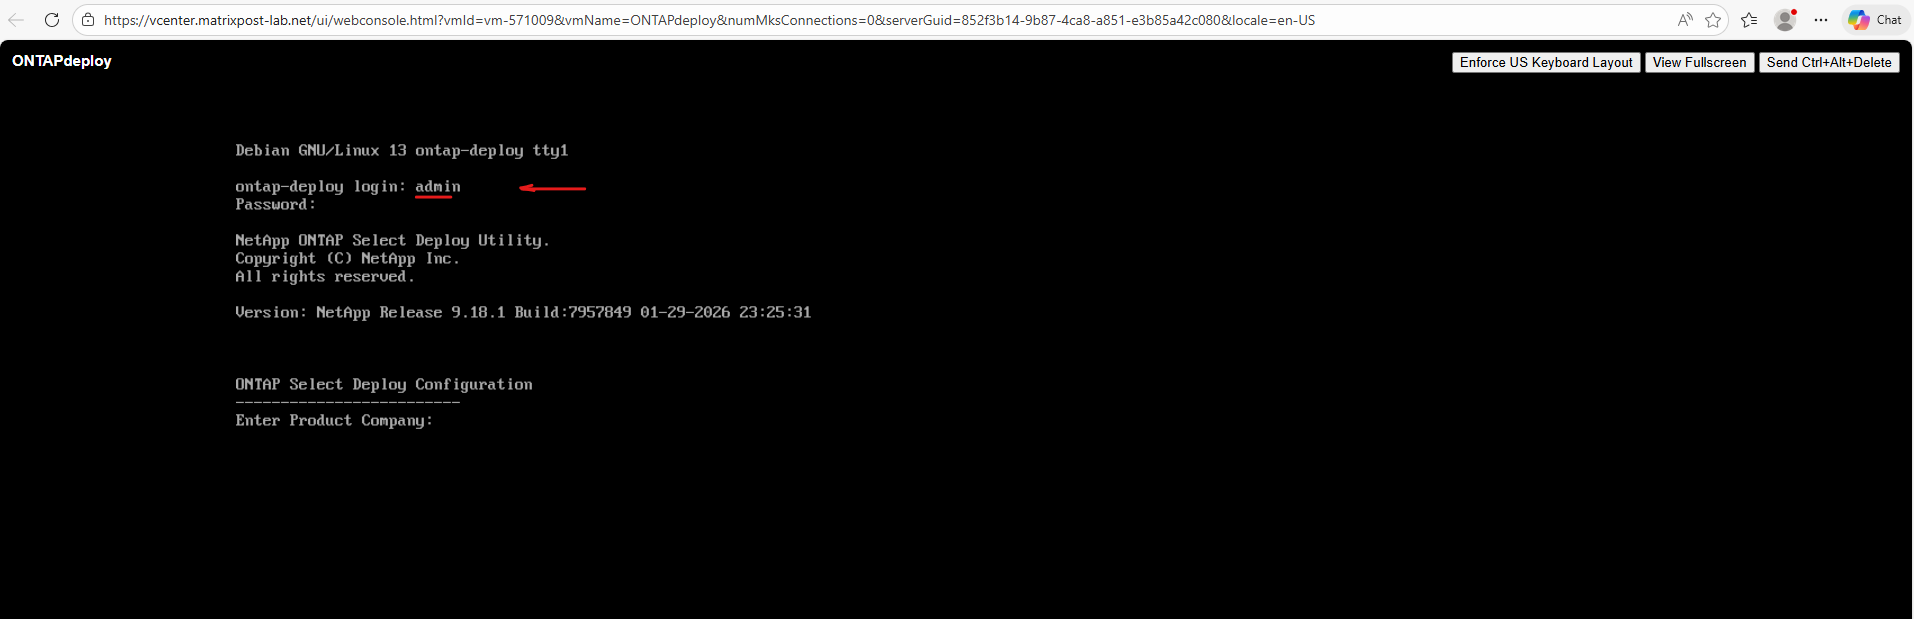
The “Enter Product Company” prompt is simply part of the initial configuration wizard of the ONTAP Select Deploy appliance. It’s basically informational metadata used for the appliance configuration and logs.
In my case I don’t need a proxy for outbound internet connection and a direct gateway is configured in my lab environment.
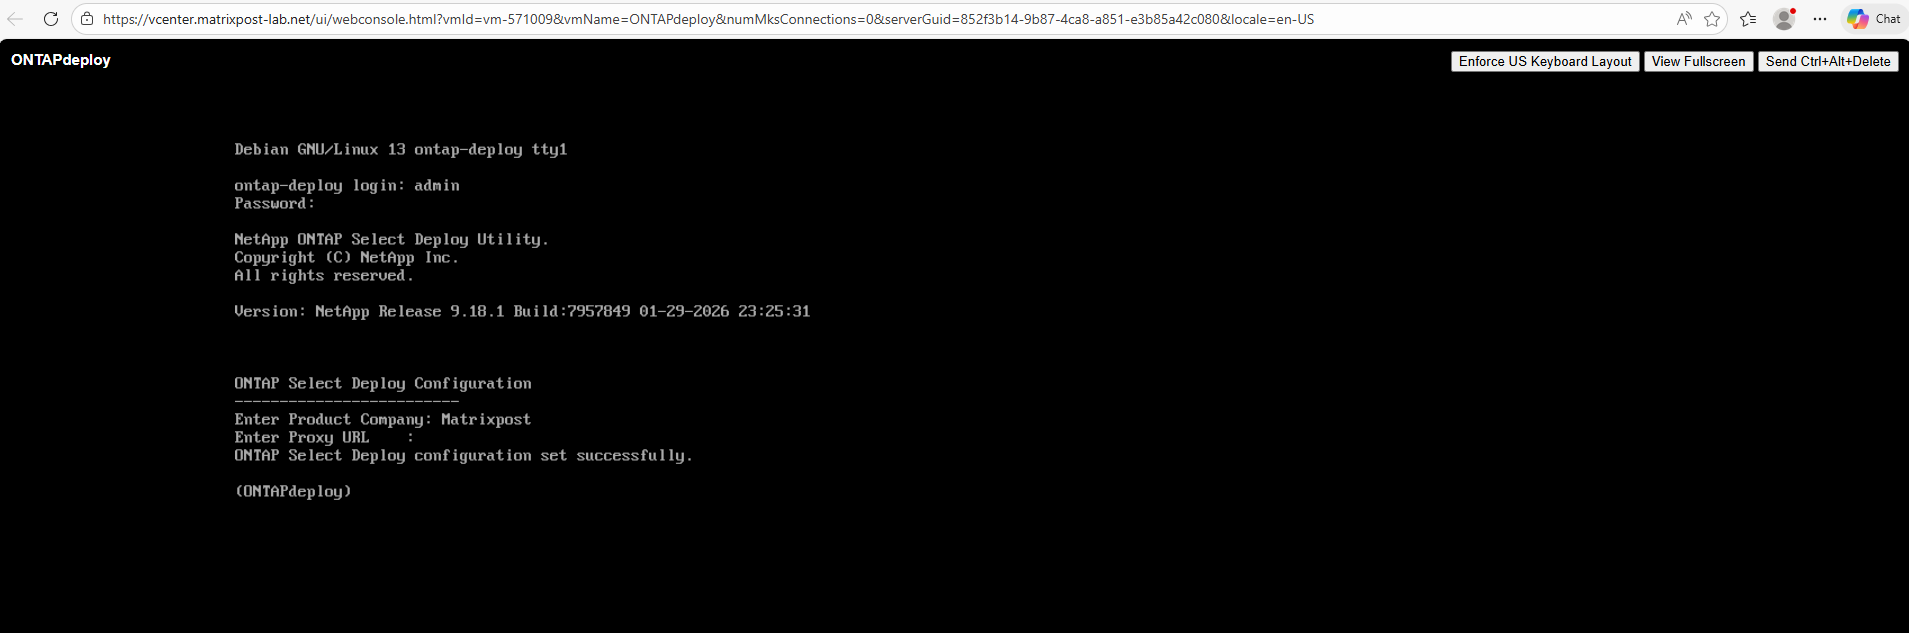
No further configuration is required in the console at this point. To continue with the deployment, point your web browser to the Deploy utility using the appliances IP address or domain name.
Provide the administrator (admin) account name and password and sign in.
We can use the web user interface provided with the ONTAP Select Deploy administration utility to deploy a single-node or multi-node ONTAP Select cluster.
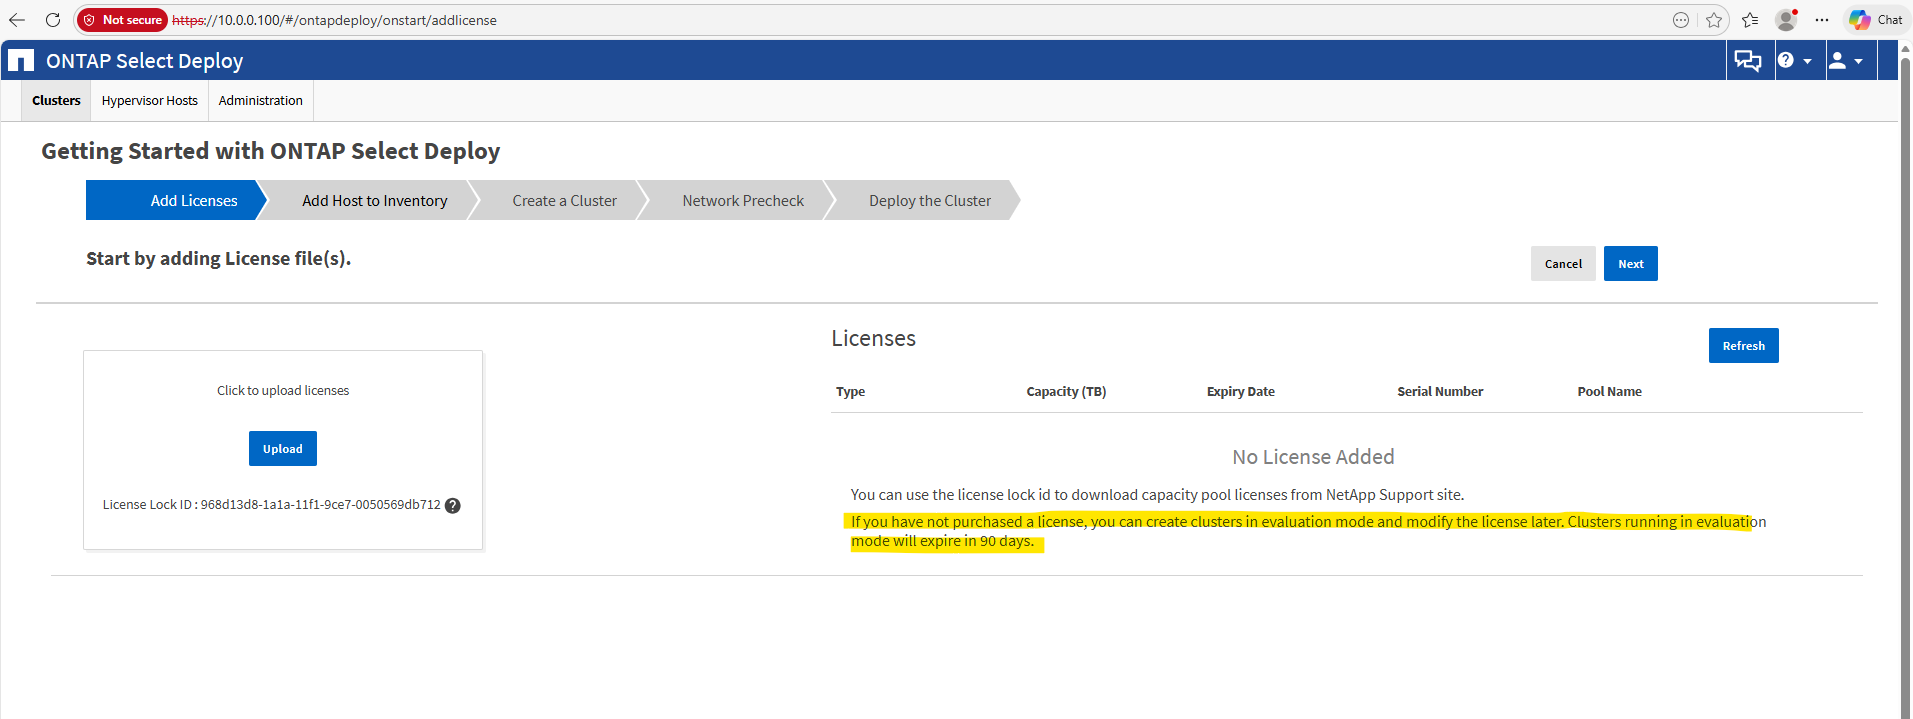
Source: https://docs.netapp.com/us-en/ontap-select/task_install_deploy.html
Deploy an ONTAP Select Cluster
When you create an ONTAP Select cluster using the Deploy utility web interface, you are guided through a specific sequence of steps. The exact process varies depending on whether you deploy a single-node or multi-node cluster.
Prerequisites
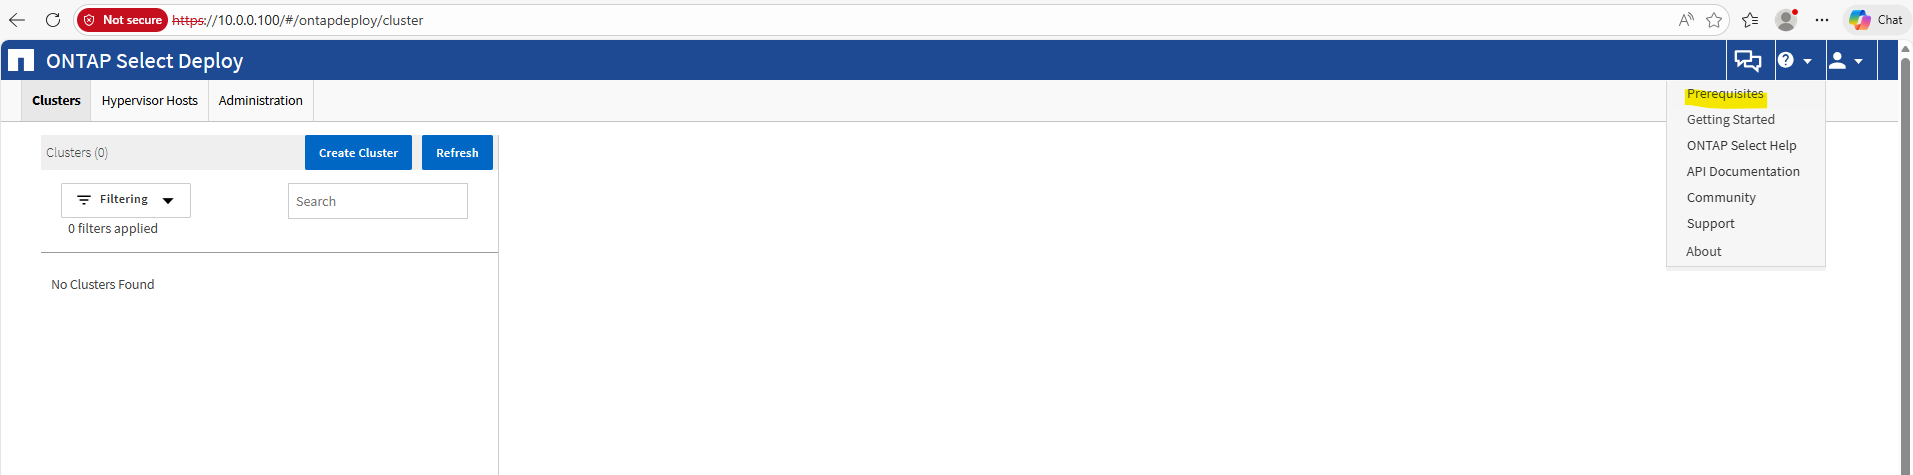
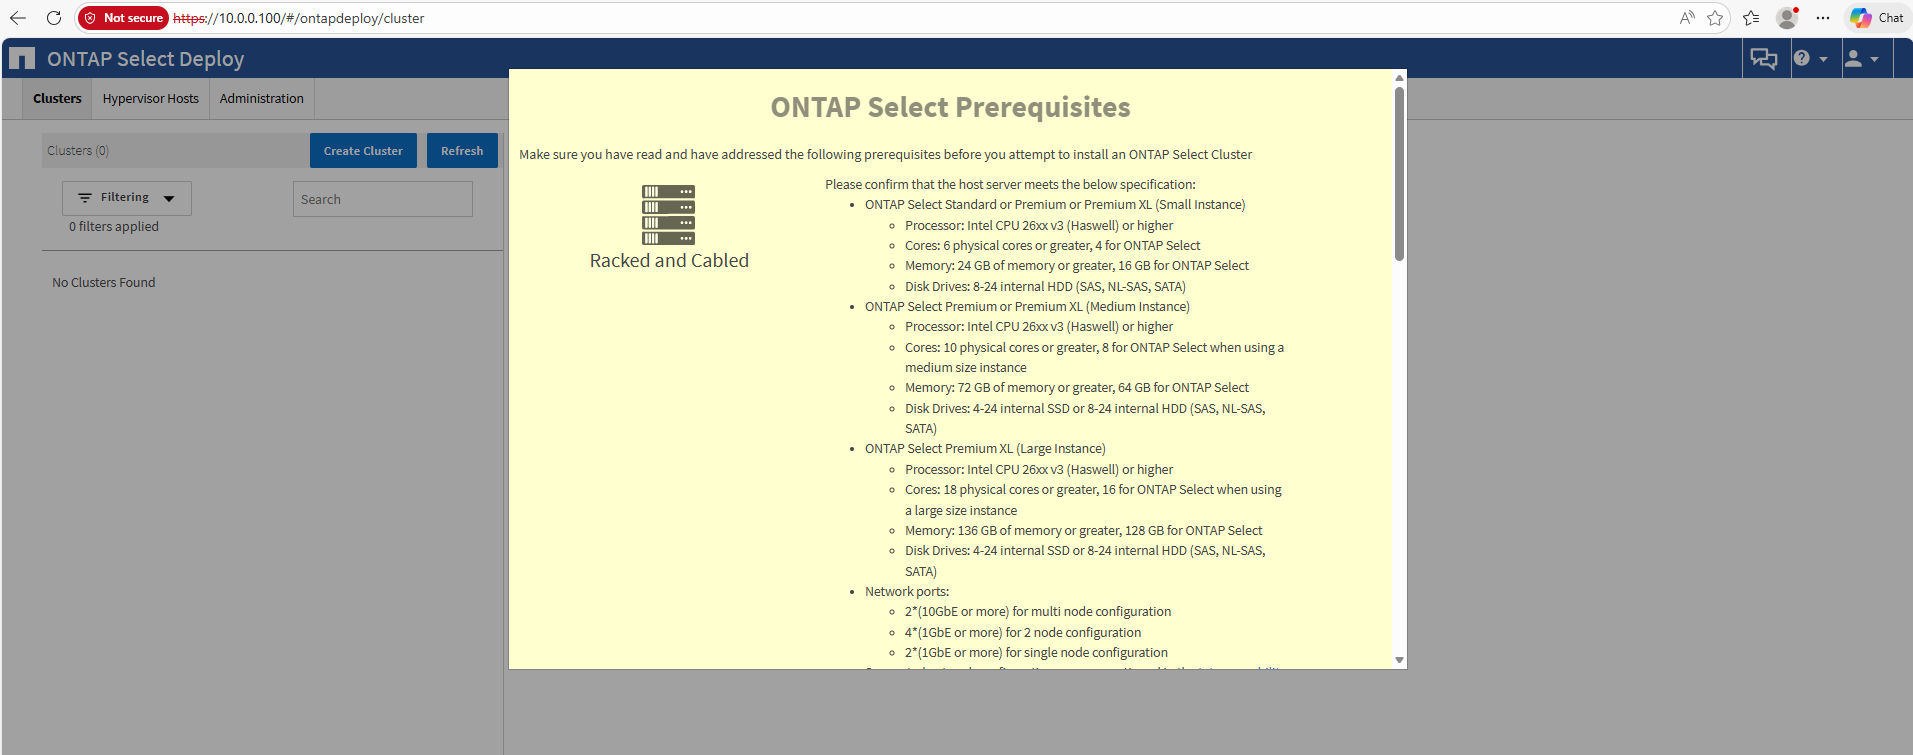
You must prepare the hypervisor hosts where the ONTAP Select nodes will run and have the needed storage license files based on your licensing model. To view the preparation requirements:
Select  at the top of the page. Select Prerequisites.
Create a Multi-Node Cluster
First we need to add our ESXi hosts as new hypervisor hosts for the deployment.
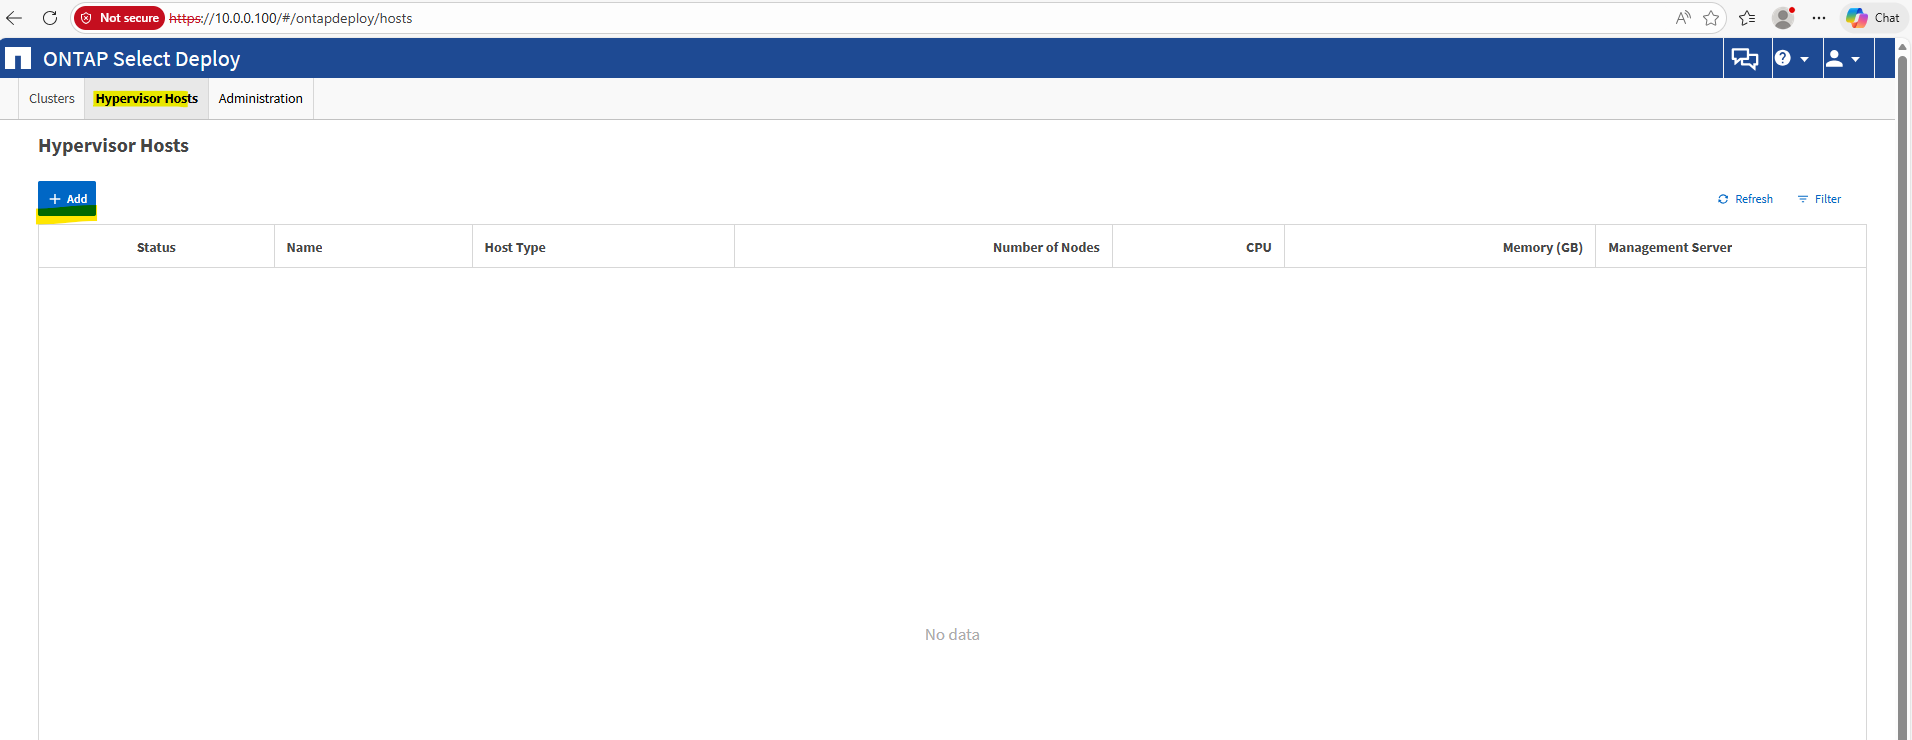
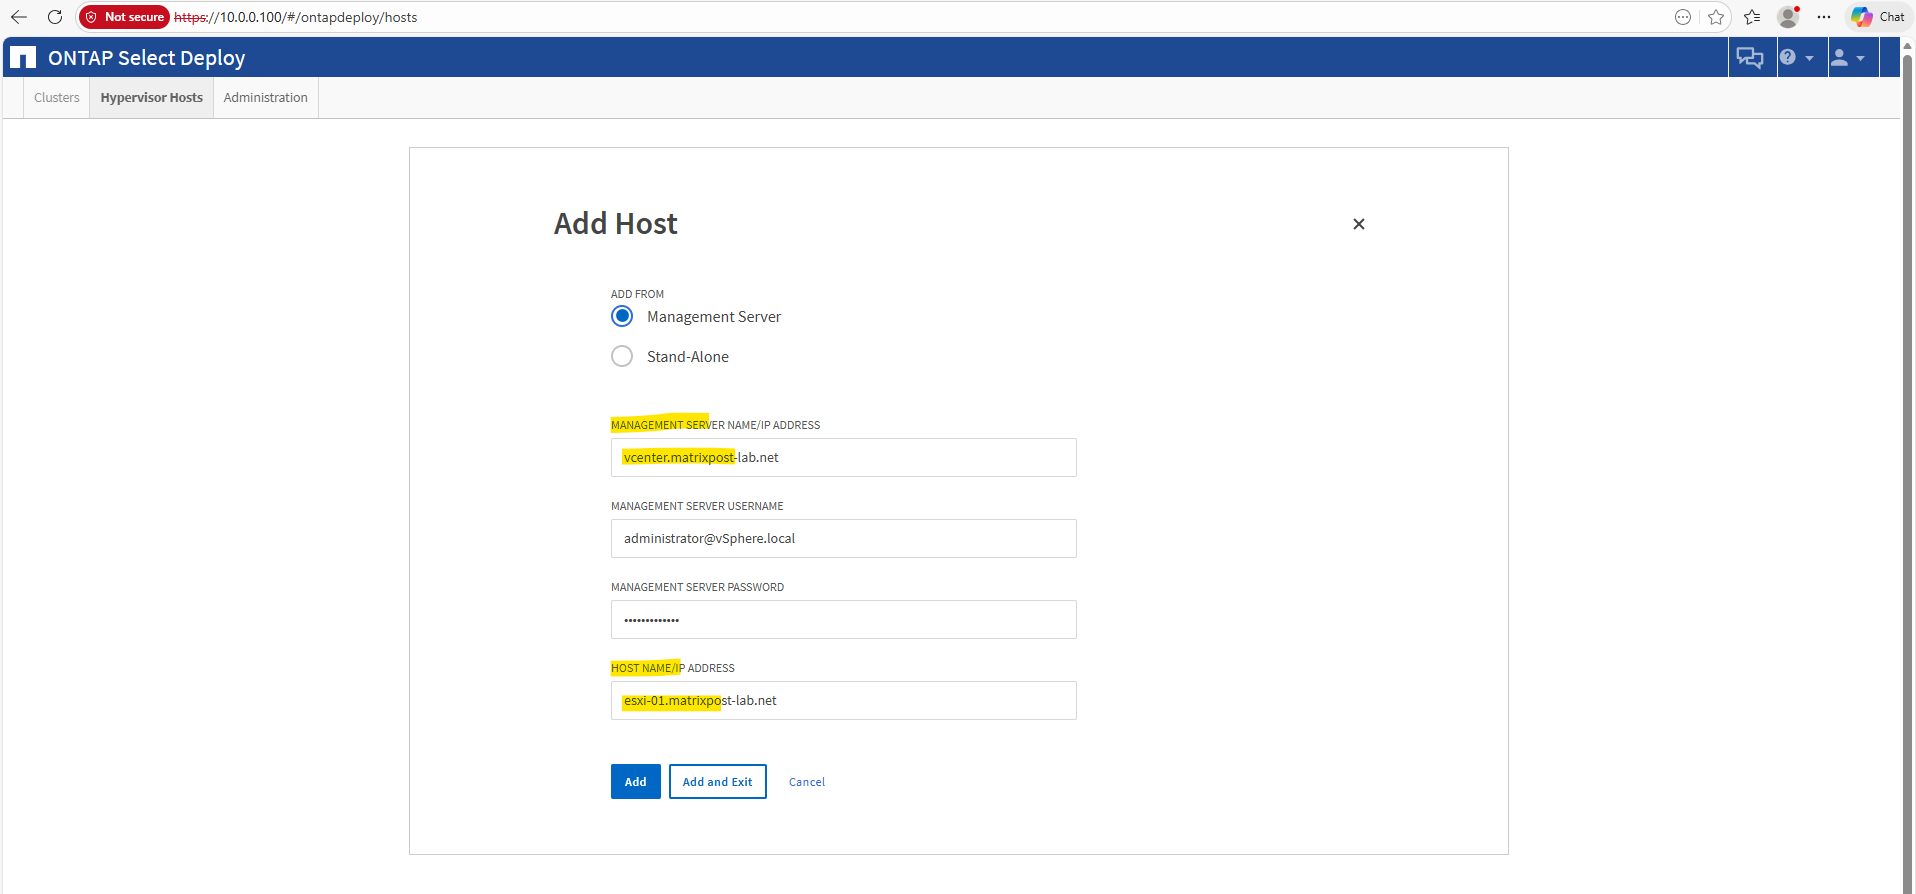
When running vCenter we can select the Management Server option to add our ESX hosts. When using this option we also need to provide the vCenter server credentials.
Further we need to enter all ESX hosts we want to add and be used for the cluster.
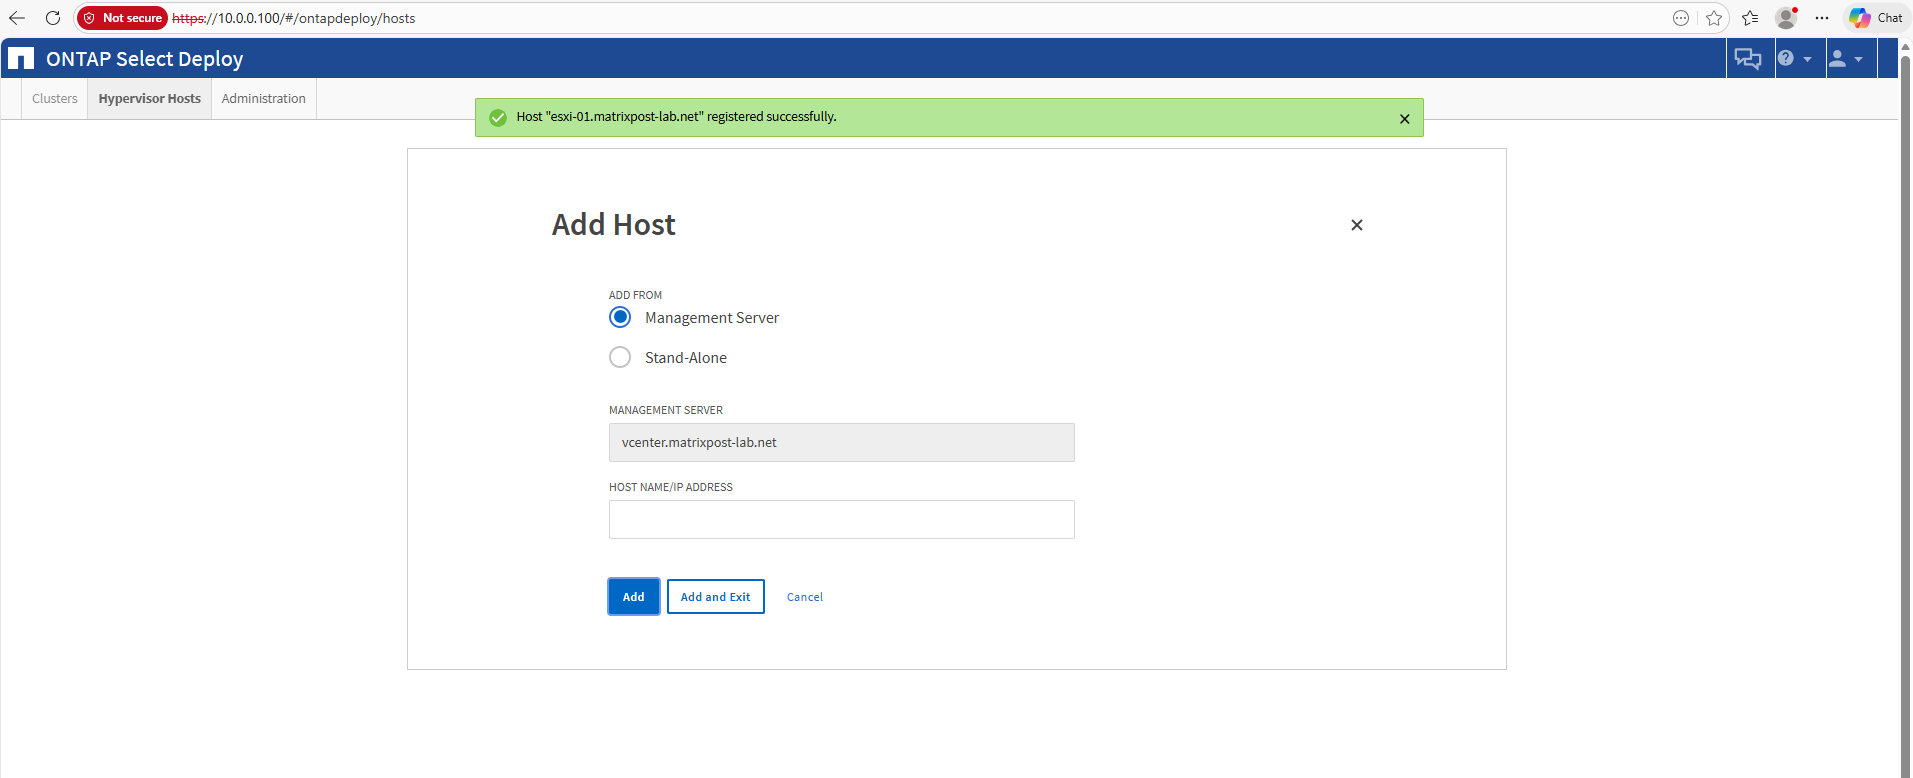
I will also adding my second ESX host.
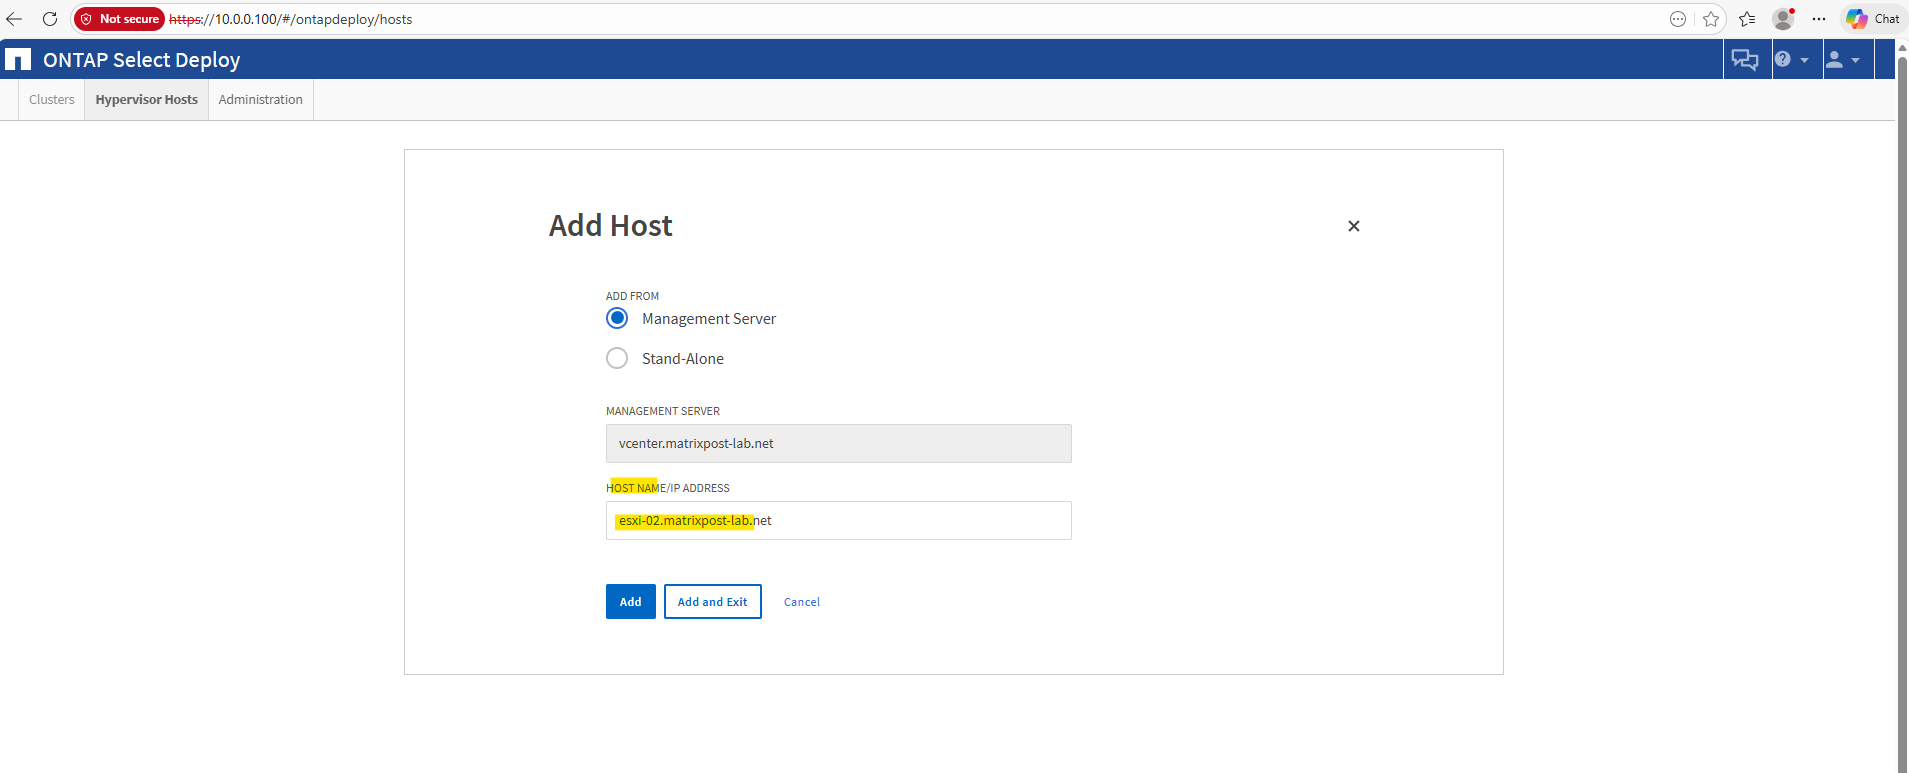
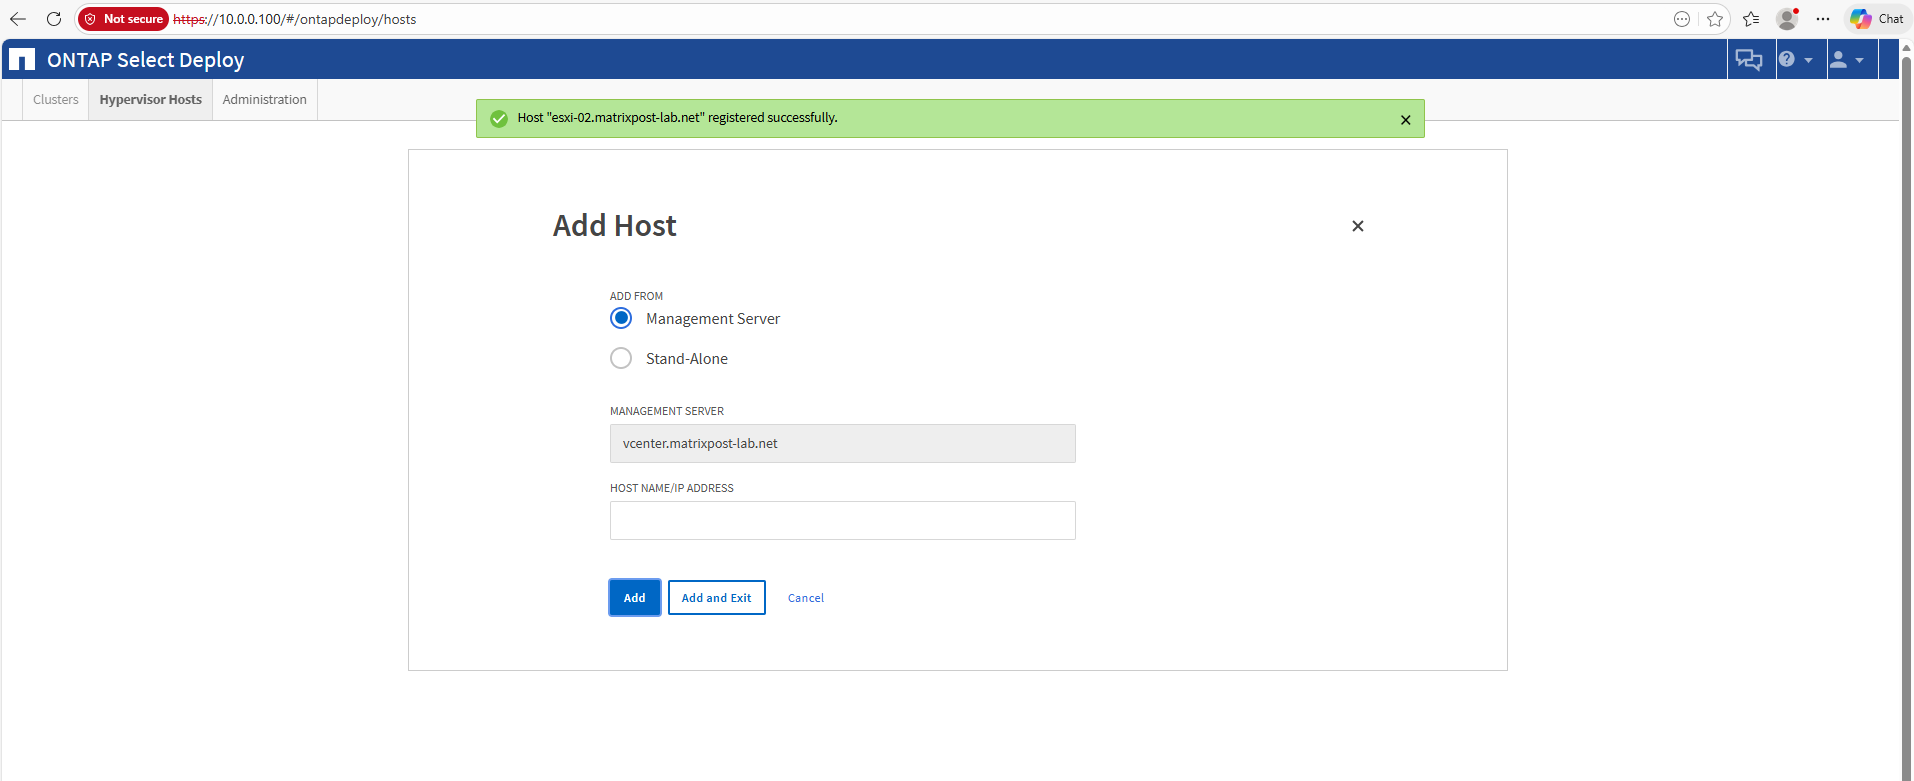
These two ESX hosts will now be used to deploy the ONTAP cluster.
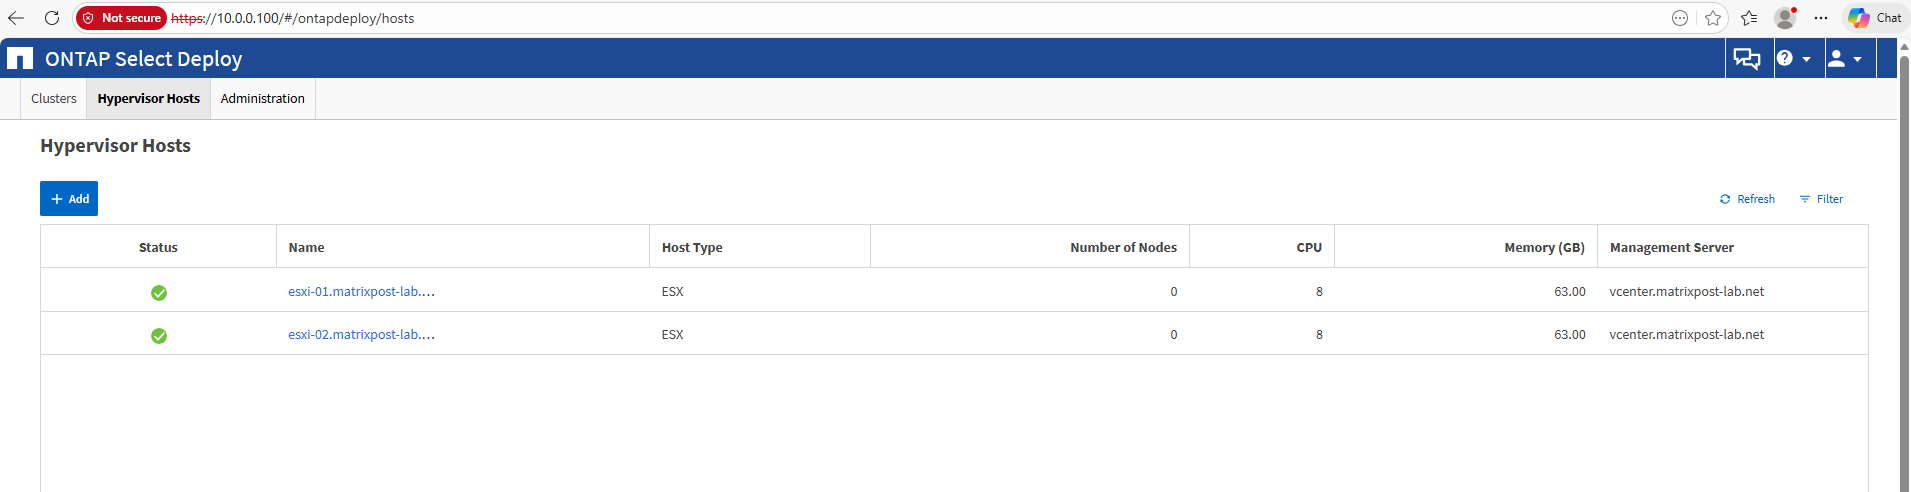
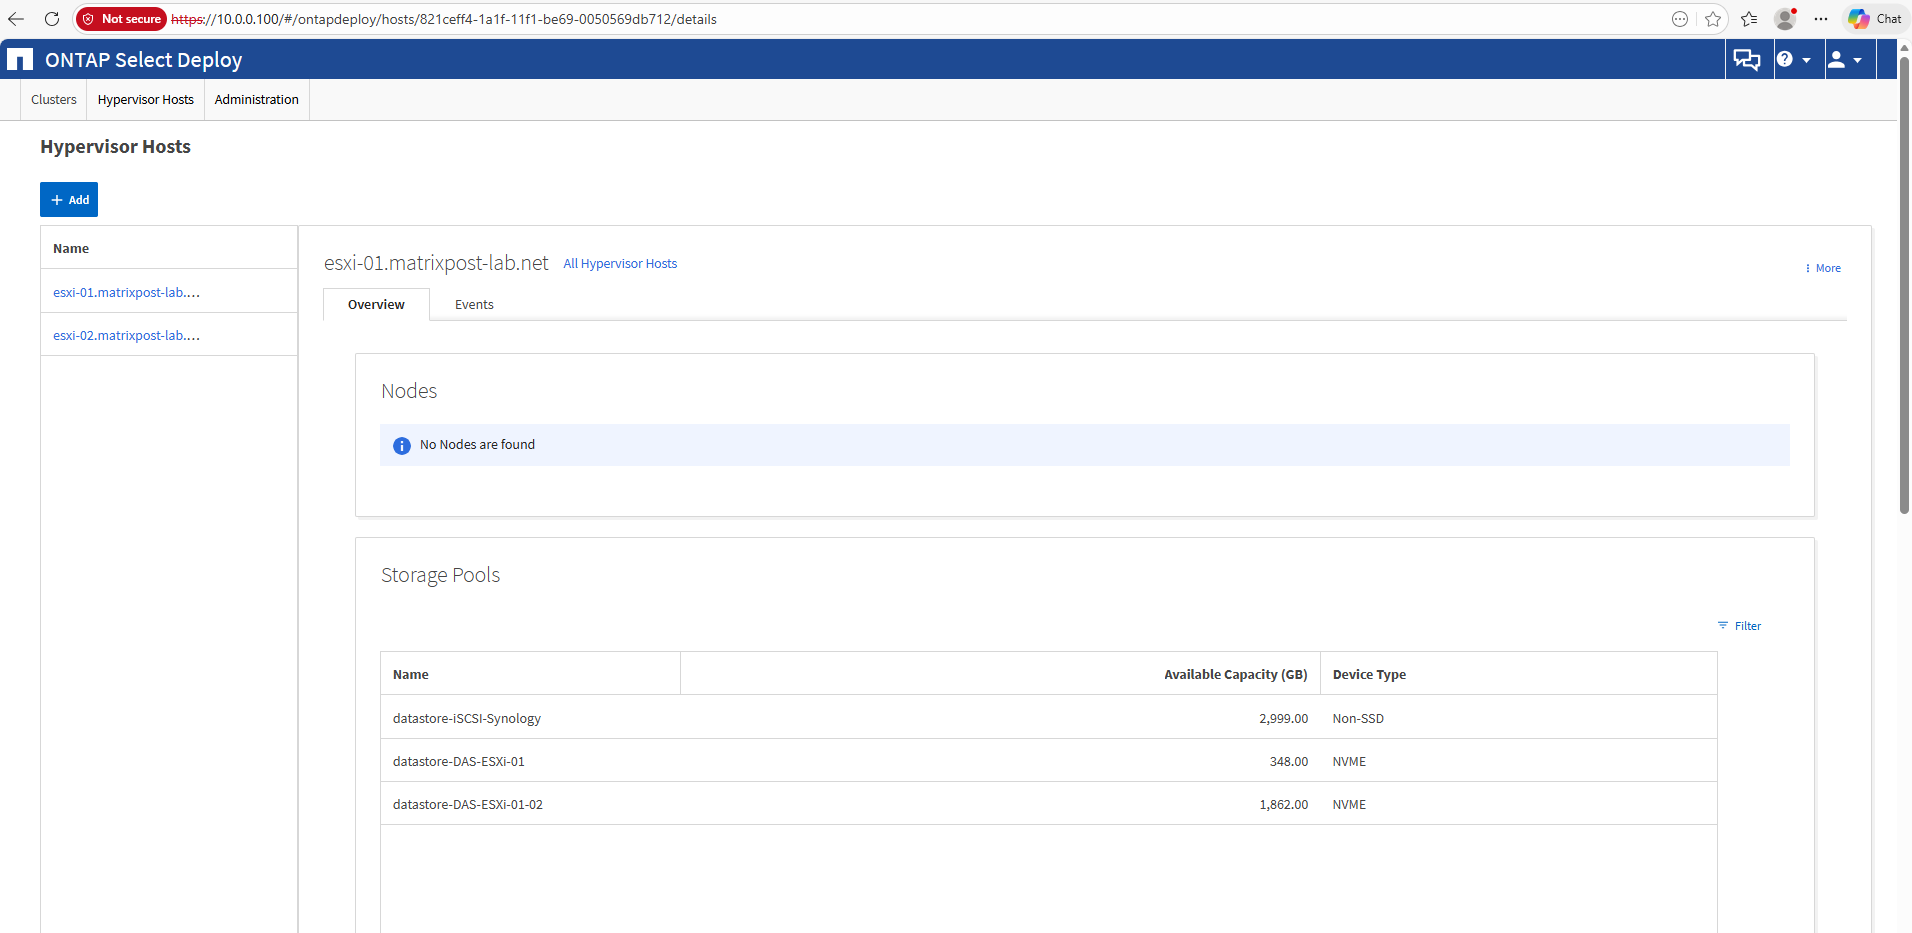
Select Create Cluster to begin the cluster creation process, and then select OK in the popup window.
It can take up to 45 minutes for the cluster to be created.
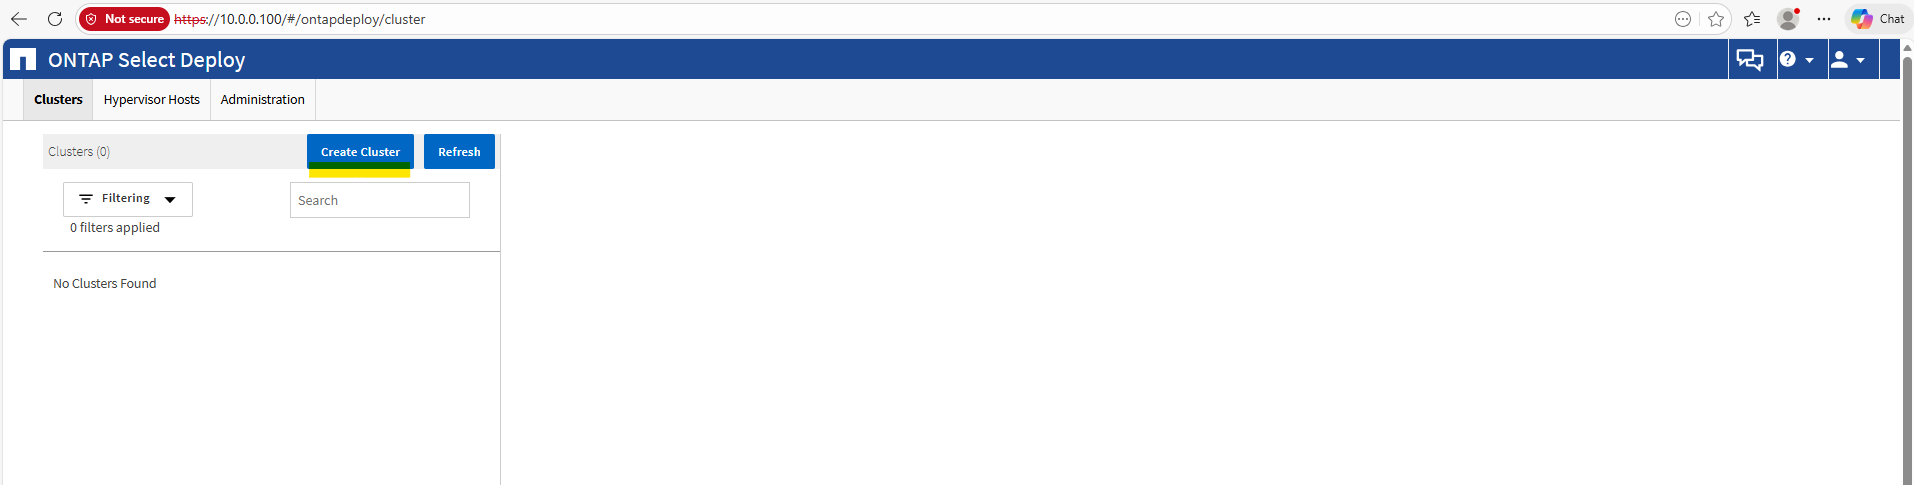
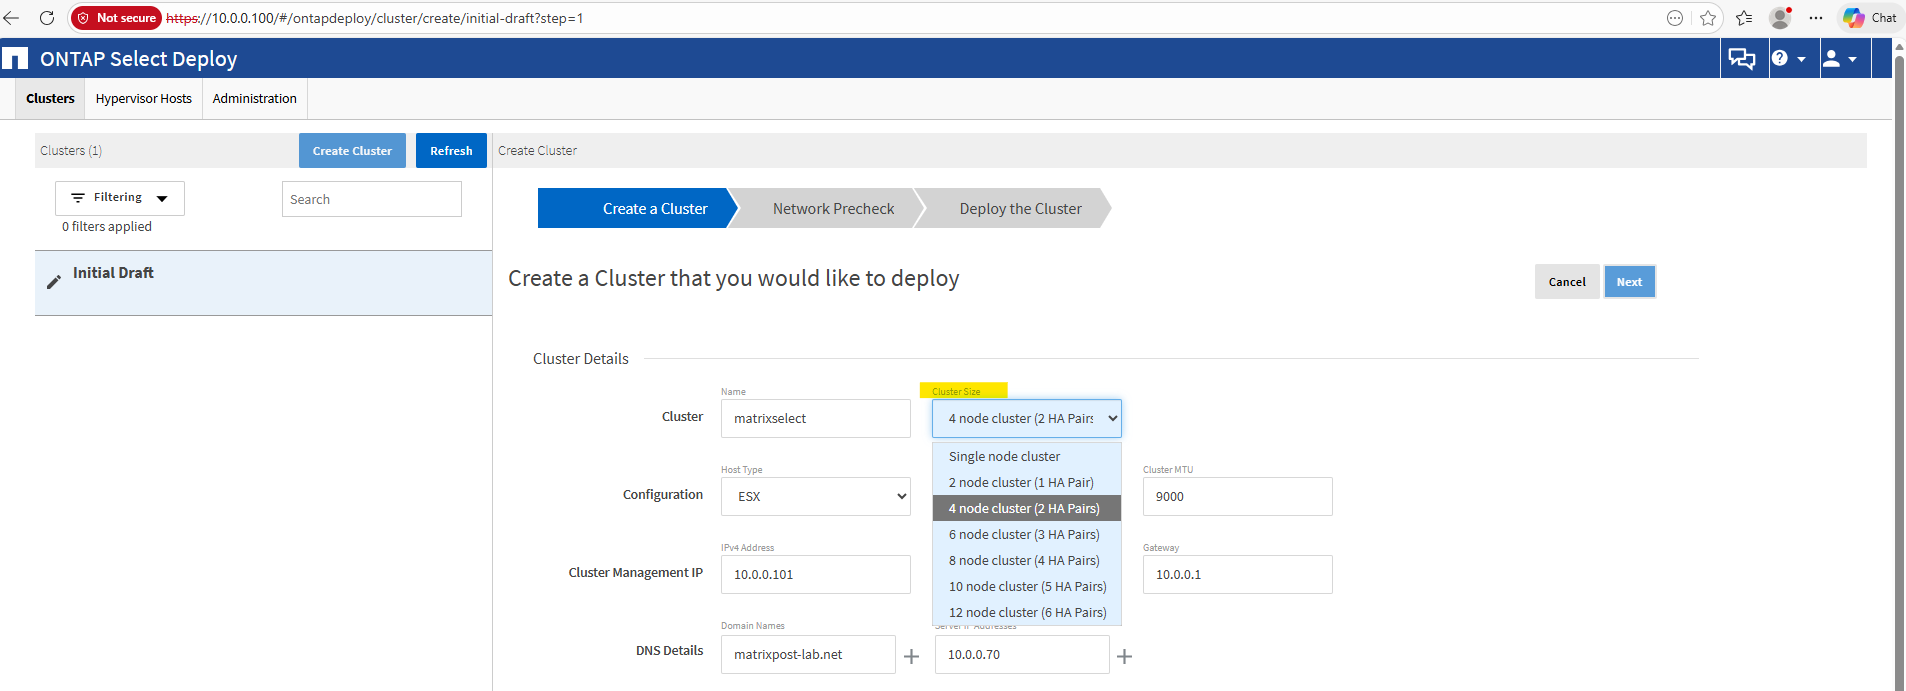
In the first step, we need to provide basic information such as the cluster name, select the cluster size, and enter some general configuration details. This information is used by the Deploy utility to define and prepare the ONTAP Select cluster deployment.
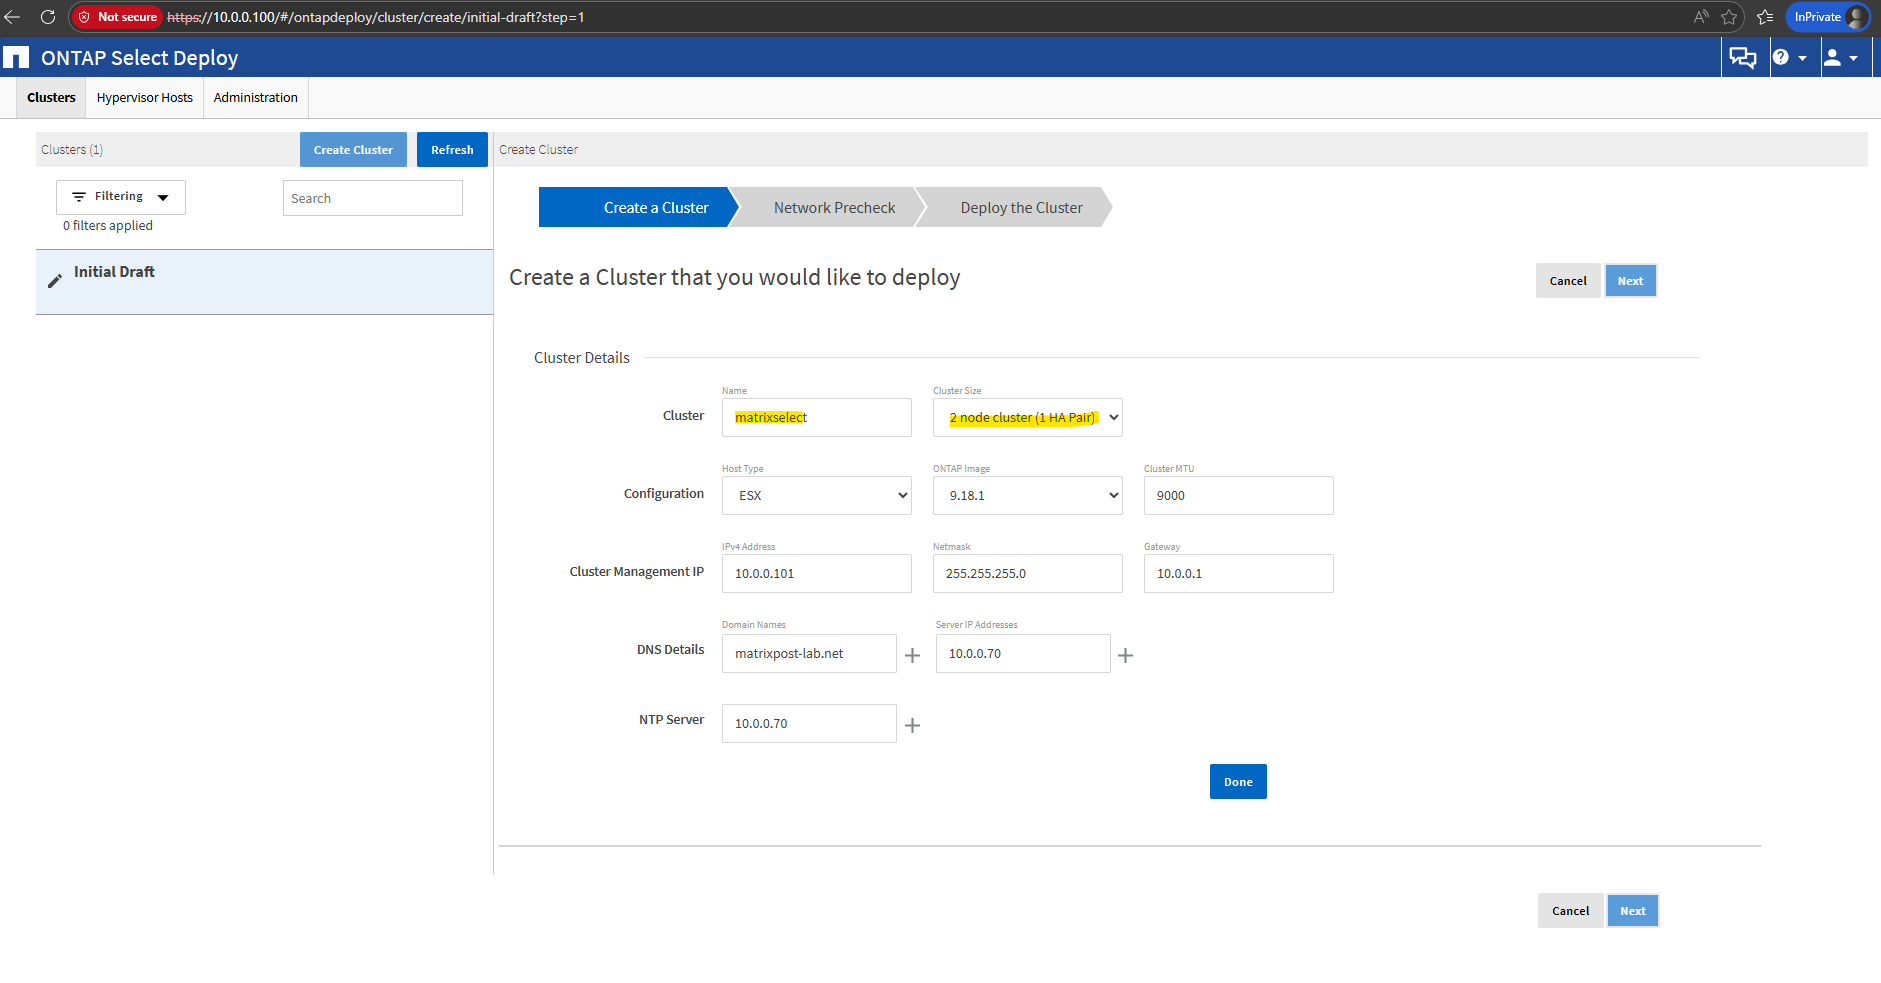
An ONTAP Select cluster can scale up to 12 nodes, organized as six high-availability (HA) pairs. Each HA pair provides the same failover capabilities as a traditional ONTAP system, while additional pairs allow the cluster to scale out for increased performance and capacity.
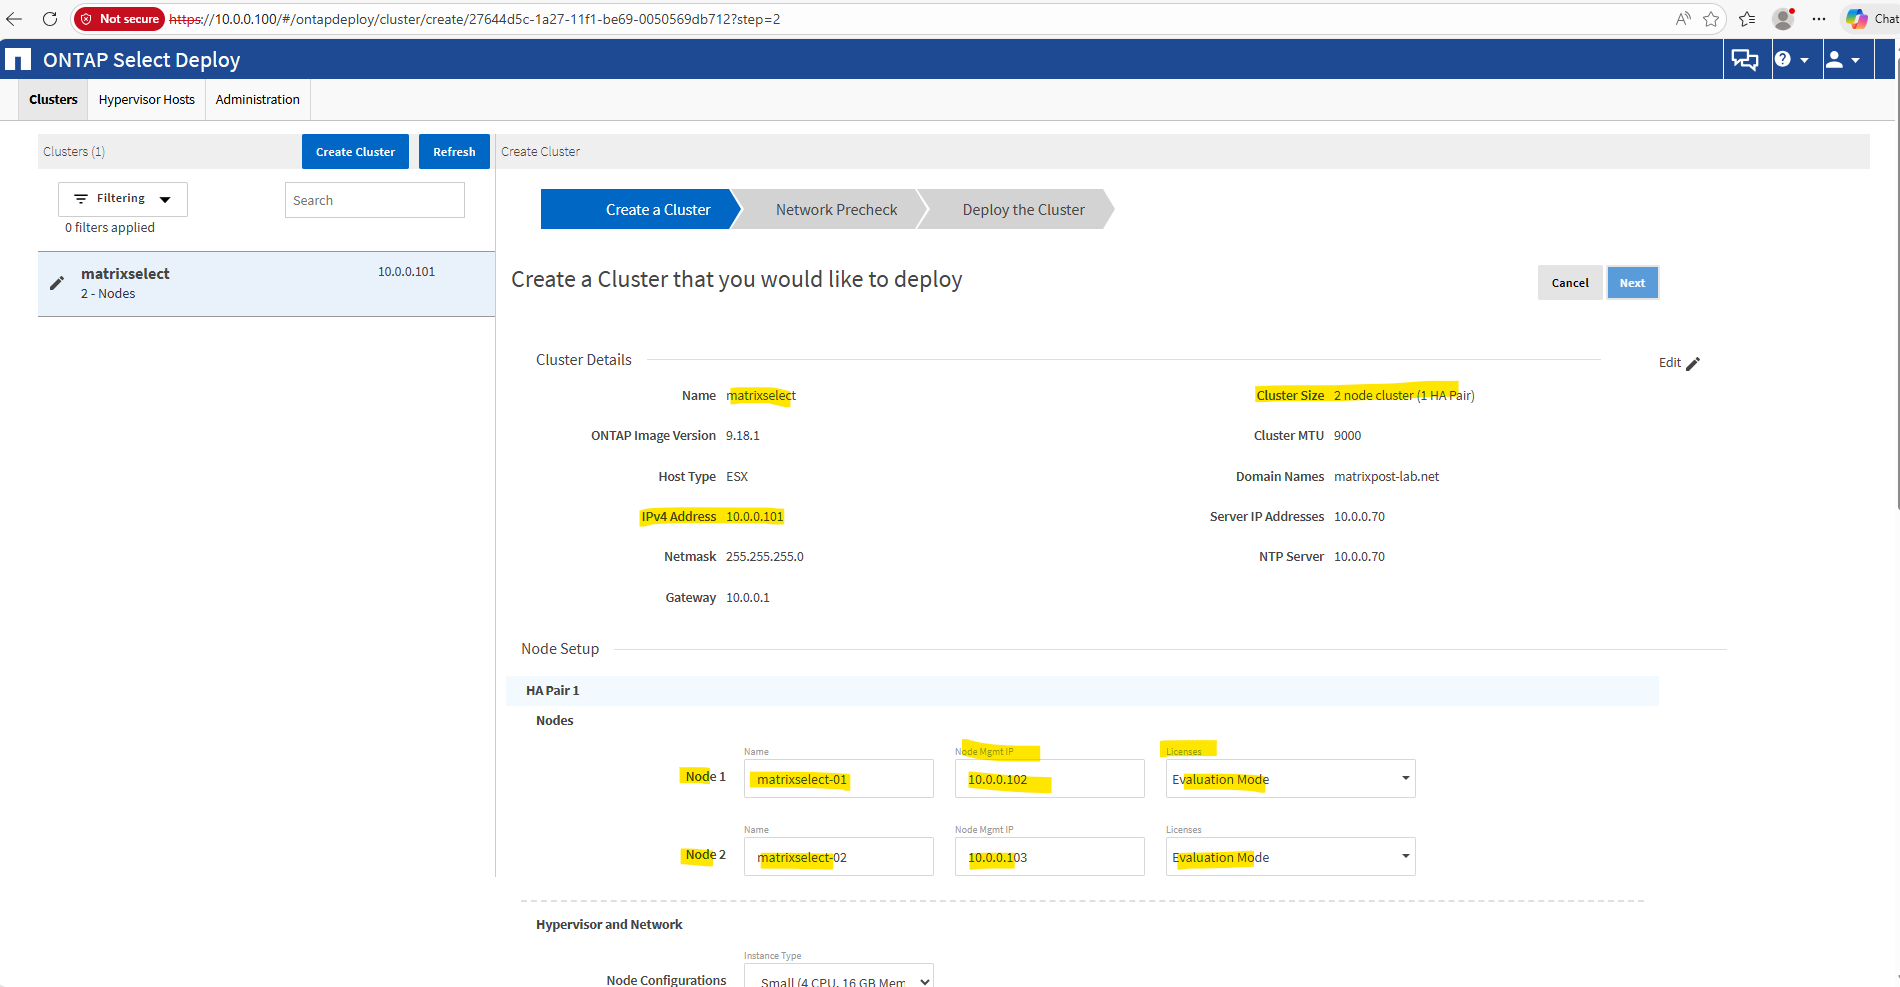
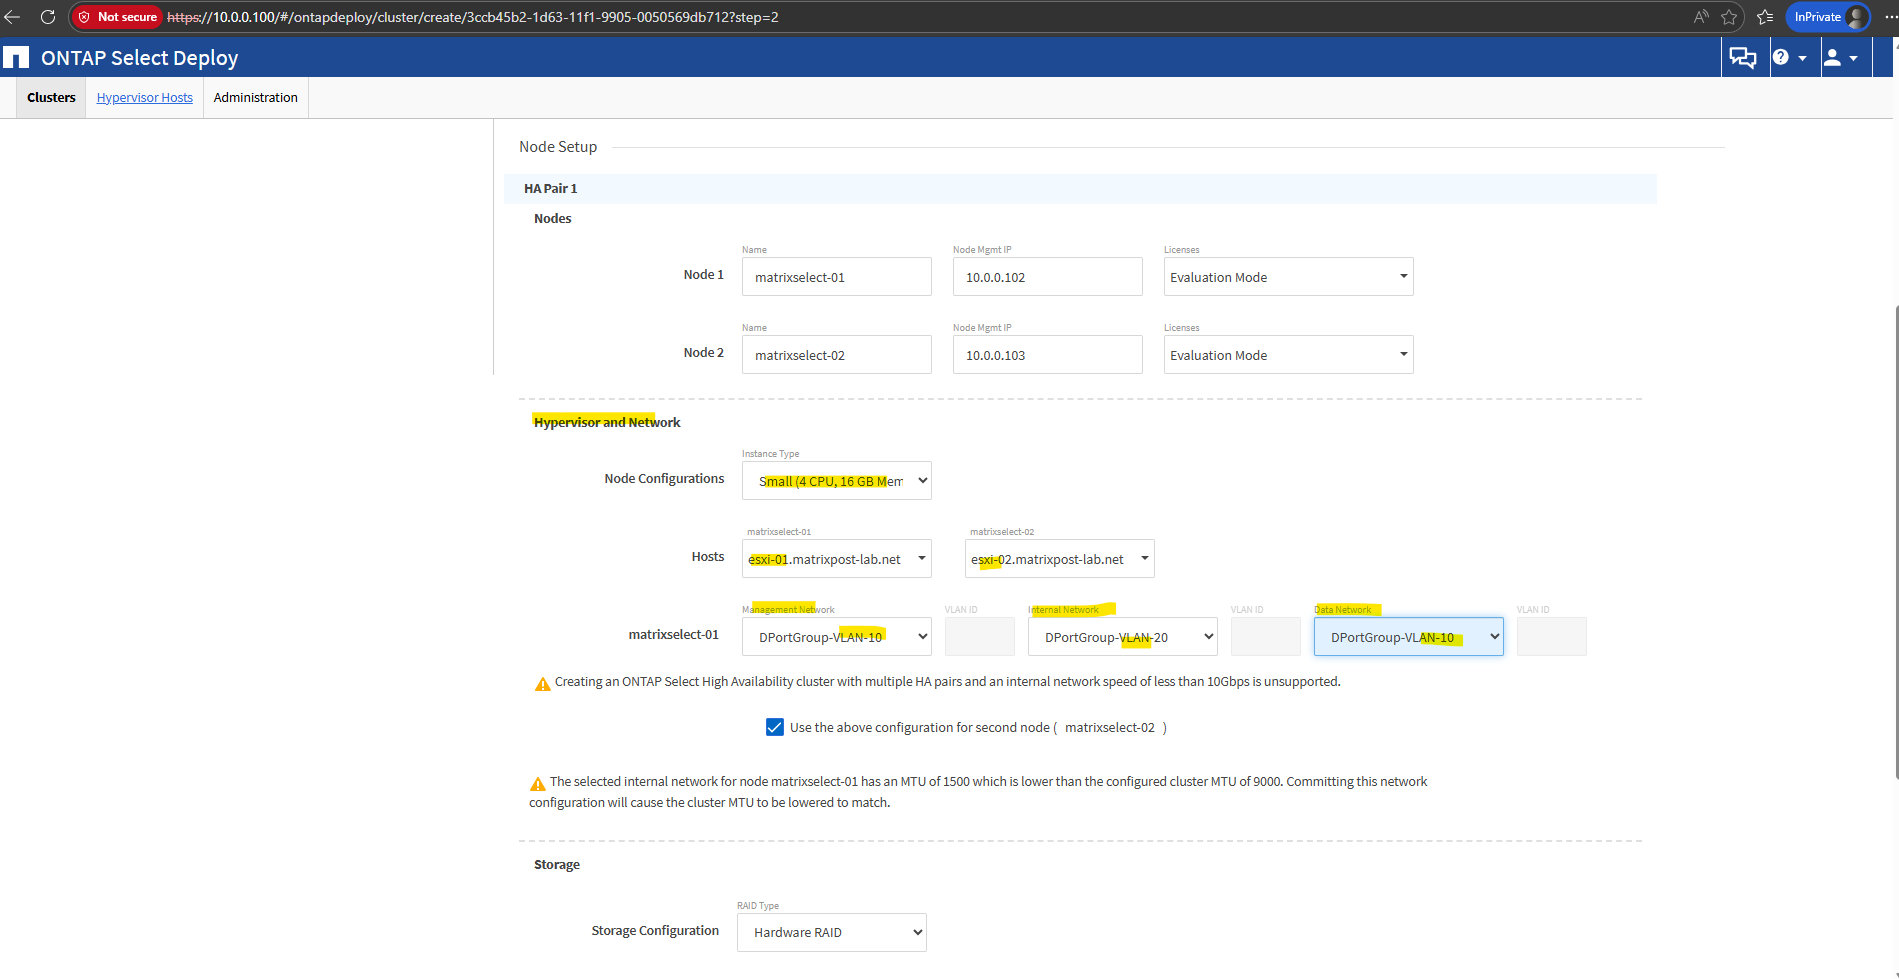
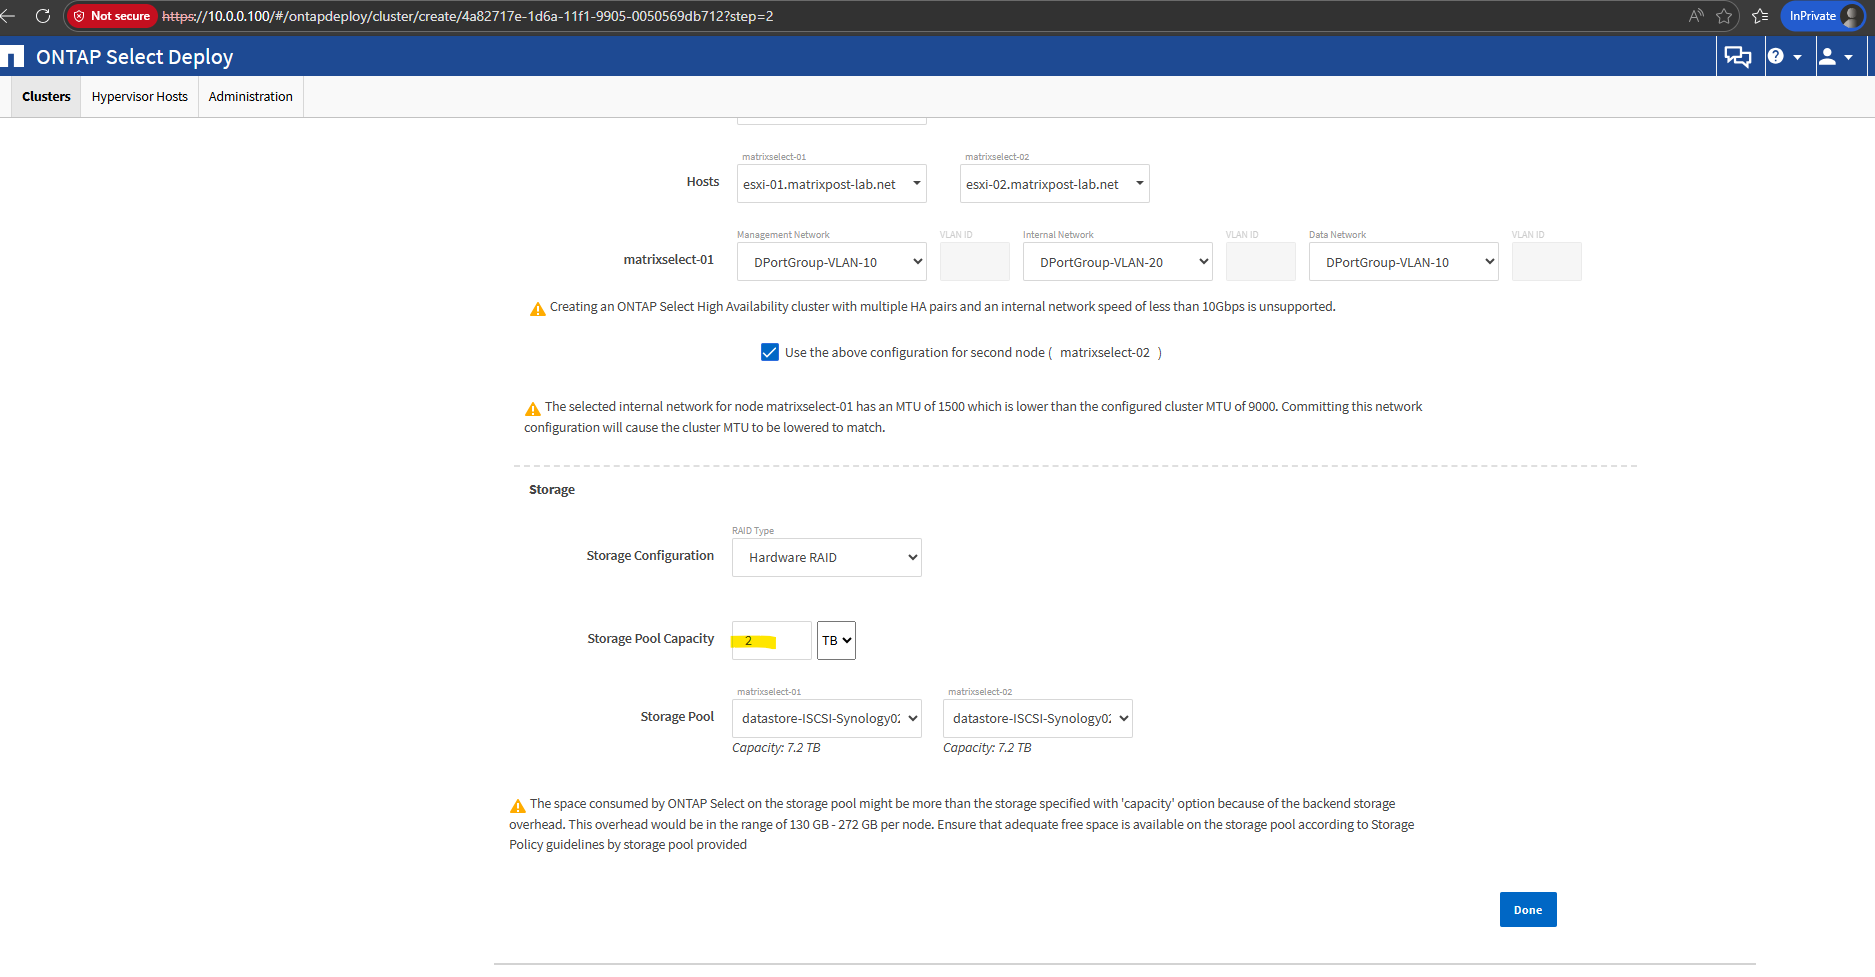
Configure the used hypervisor hosts (ESXi hosts in my case) and the management network, internal network and data network.
Initially, no storage pools were detected when selecting Hardware RAID during the cluster creation wizard.
To have enough storage to create a 2-node cluster, I was adding a new datastore with 7.2 TB in vSphere and used finally 2 TB for the cluster and its storage pool.
The configured 2 TB storage pool capacity is applied per node, meaning ONTAP Select creates a 2 TB storage pool on each node of the cluster.
Although the deployment allocates 2 TB per node (4 TB total raw capacity), the data aggregates are mirrored across the HA pair, resulting in approximately 2 TB of usable storage capacity for volumes.
In contrast to ONTAP Select, where data aggregates are mirrored between both nodes, Cloud Volumes ONTAP does not mirror the disks across the nodes.
Instead, the disks are attached to one node and can be reattached to the partner node during a failover event.
ONTAP Select mirrors aggregates between the nodes because, in typical on-premises virtualization environments, there is no shared storage that can simply be reattached during a failover.
By synchronously mirroring the data across the nodes, ONTAP Select ensures that both nodes maintain a complete copy of the data, allowing the surviving node to immediately take over if its partner fails.
All aggregates in an ONTAP Select cluster must be mirrored for data availability in the event of a node failover and to avoid an SPOF in case of hardware failure.
Aggregates in an ONTAP Select cluster are built from virtual disks provided from each node in the HA pair and use the following disks:
- A local set of disks (contributed by the current ONTAP Select node)
- A mirrored set of disks (contributed by the HA partner of the current node)
This approach is fundamentally different from the way standard ONTAP clusters work. This applies to all root and data disks within the ONTAP Select cluster. The aggregate contains both local and mirror copies of data. Therefore, an aggregate that contains N virtual disks offers N/2 disks’ worth of unique storage, because the second copy of data resides on its own unique disks.
More about you will find here https://docs.netapp.com/us-en/ontap-select/concept_ha_mirroring.html.
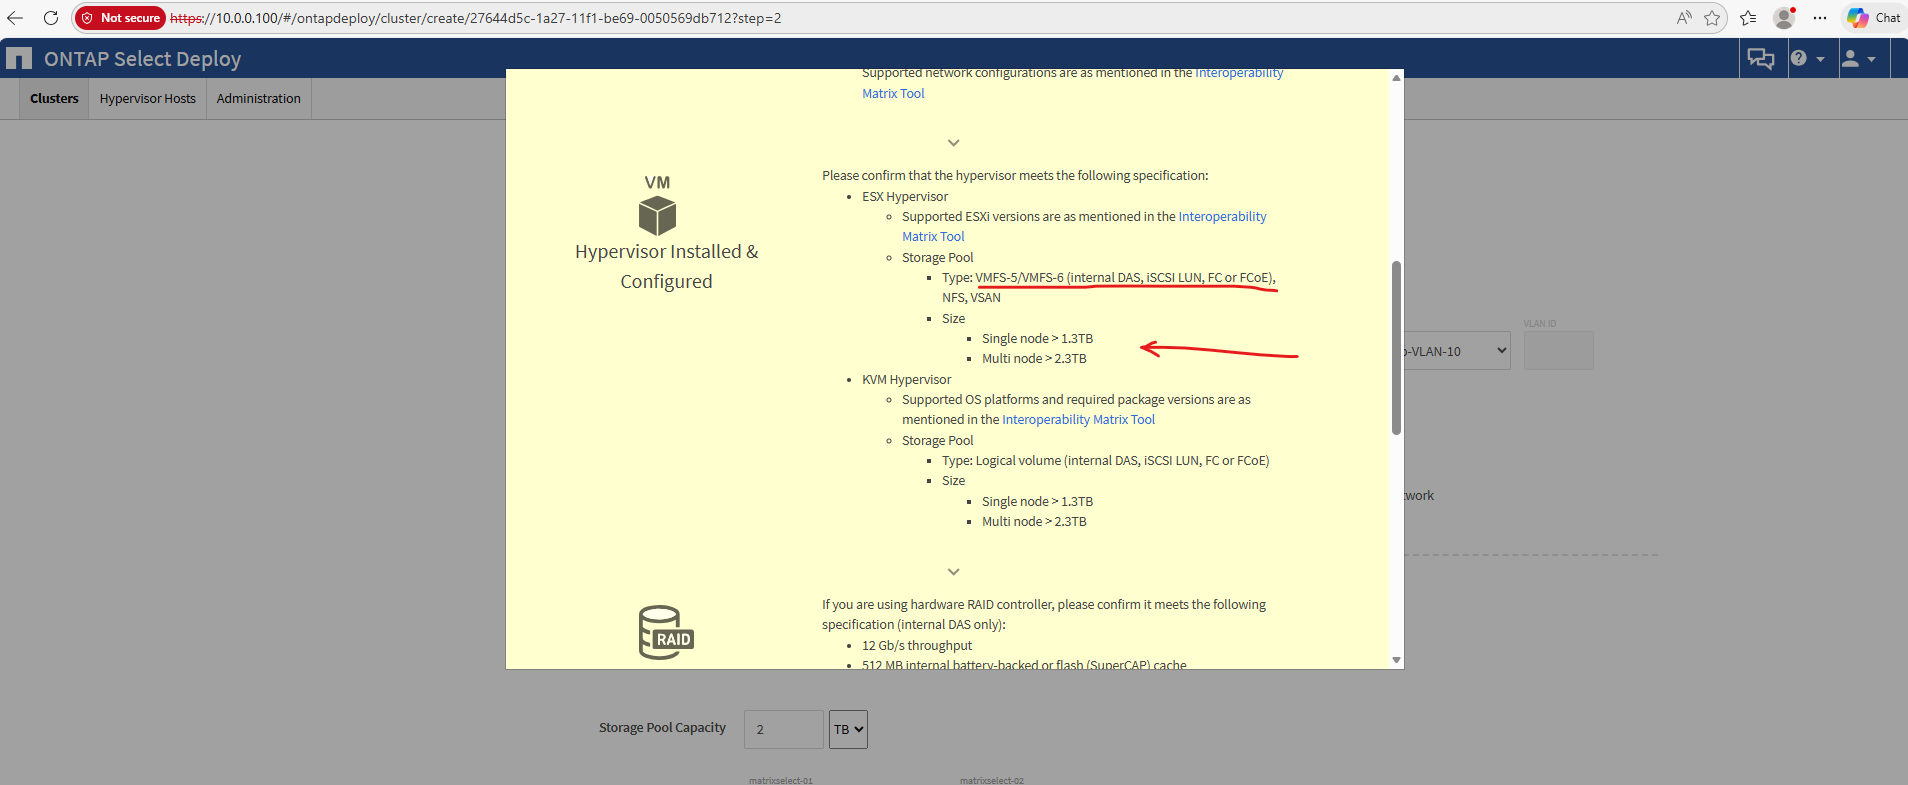
Click on Next.
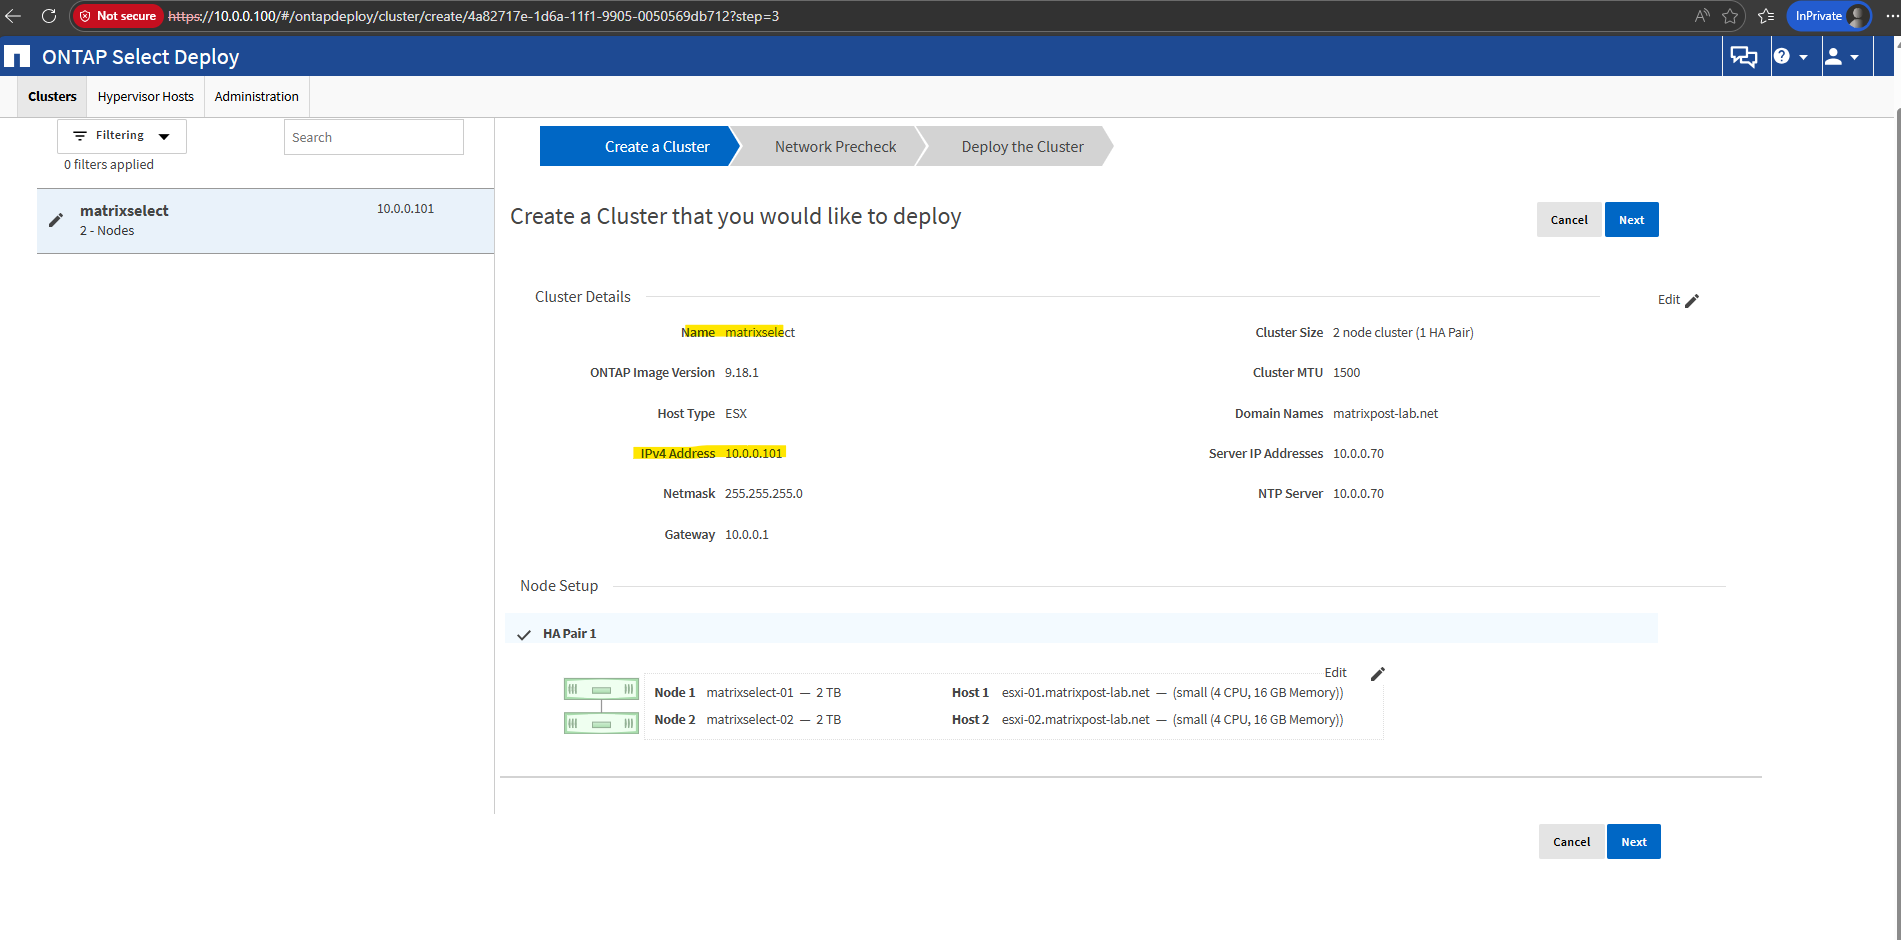
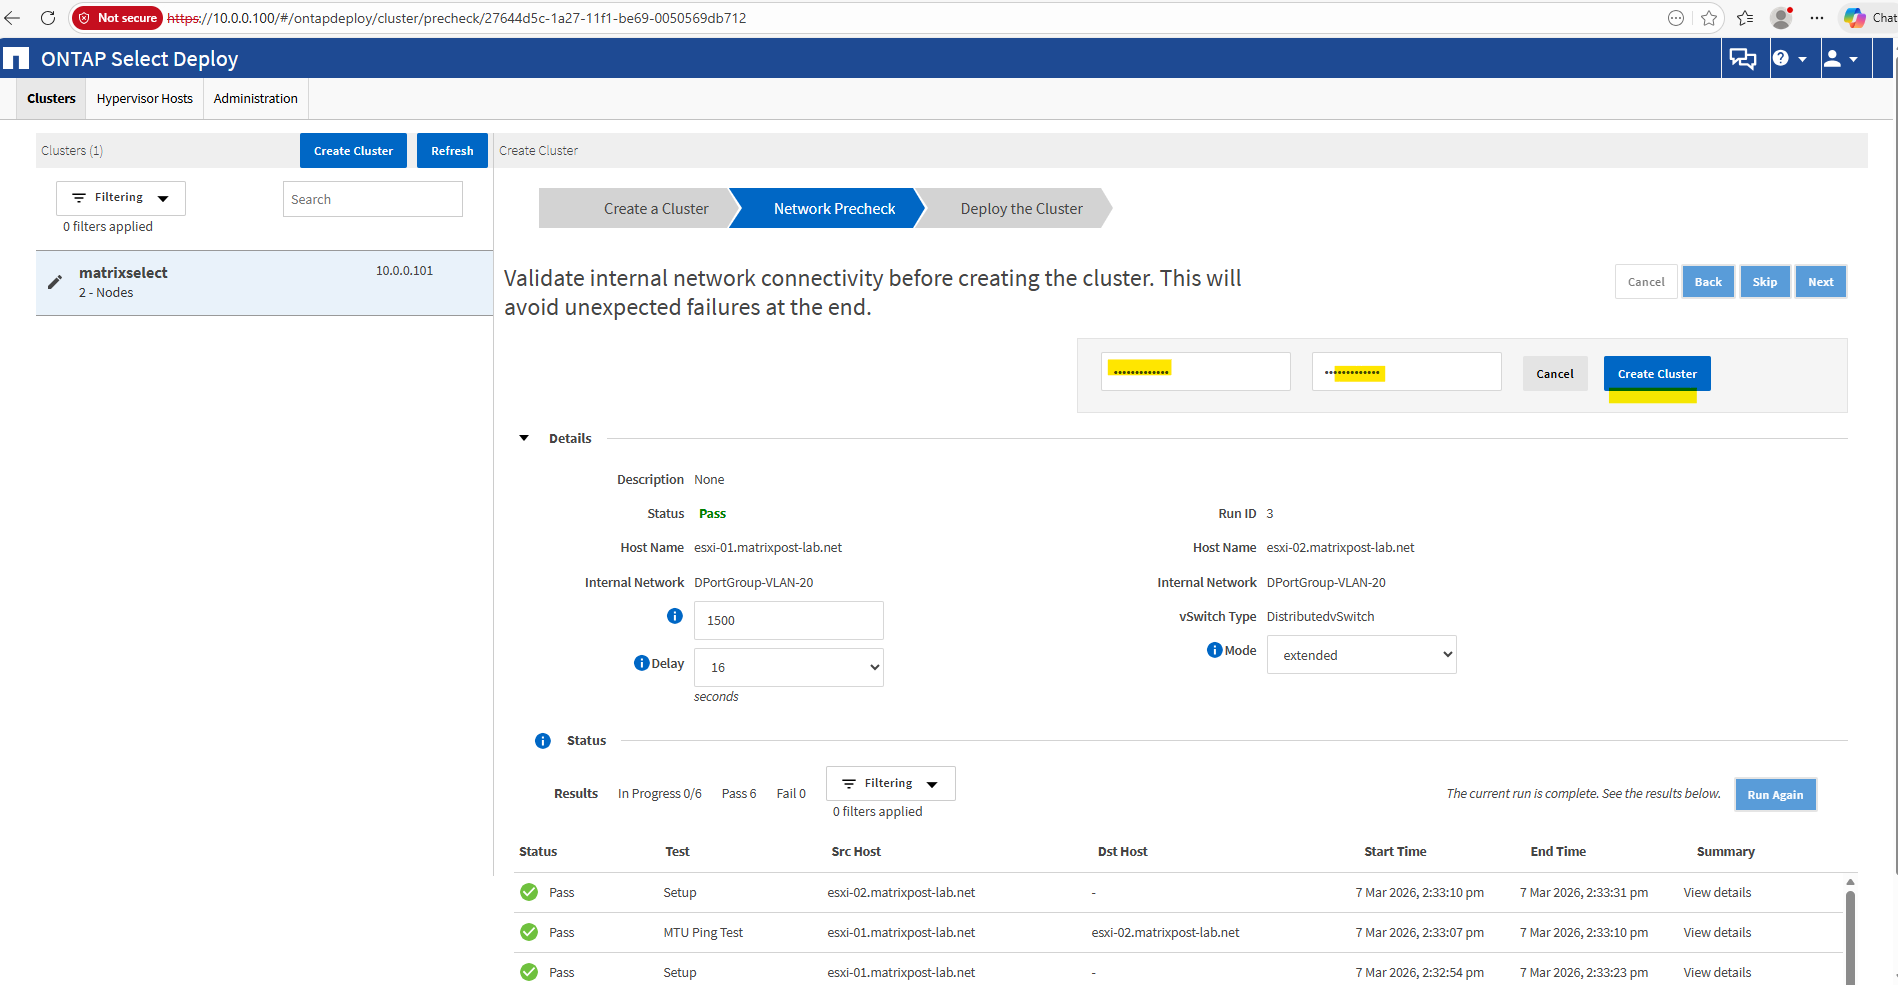
To validate the internal network connectivity for our new cluster, we can choose between a quick and extended vSwitch Type mode.
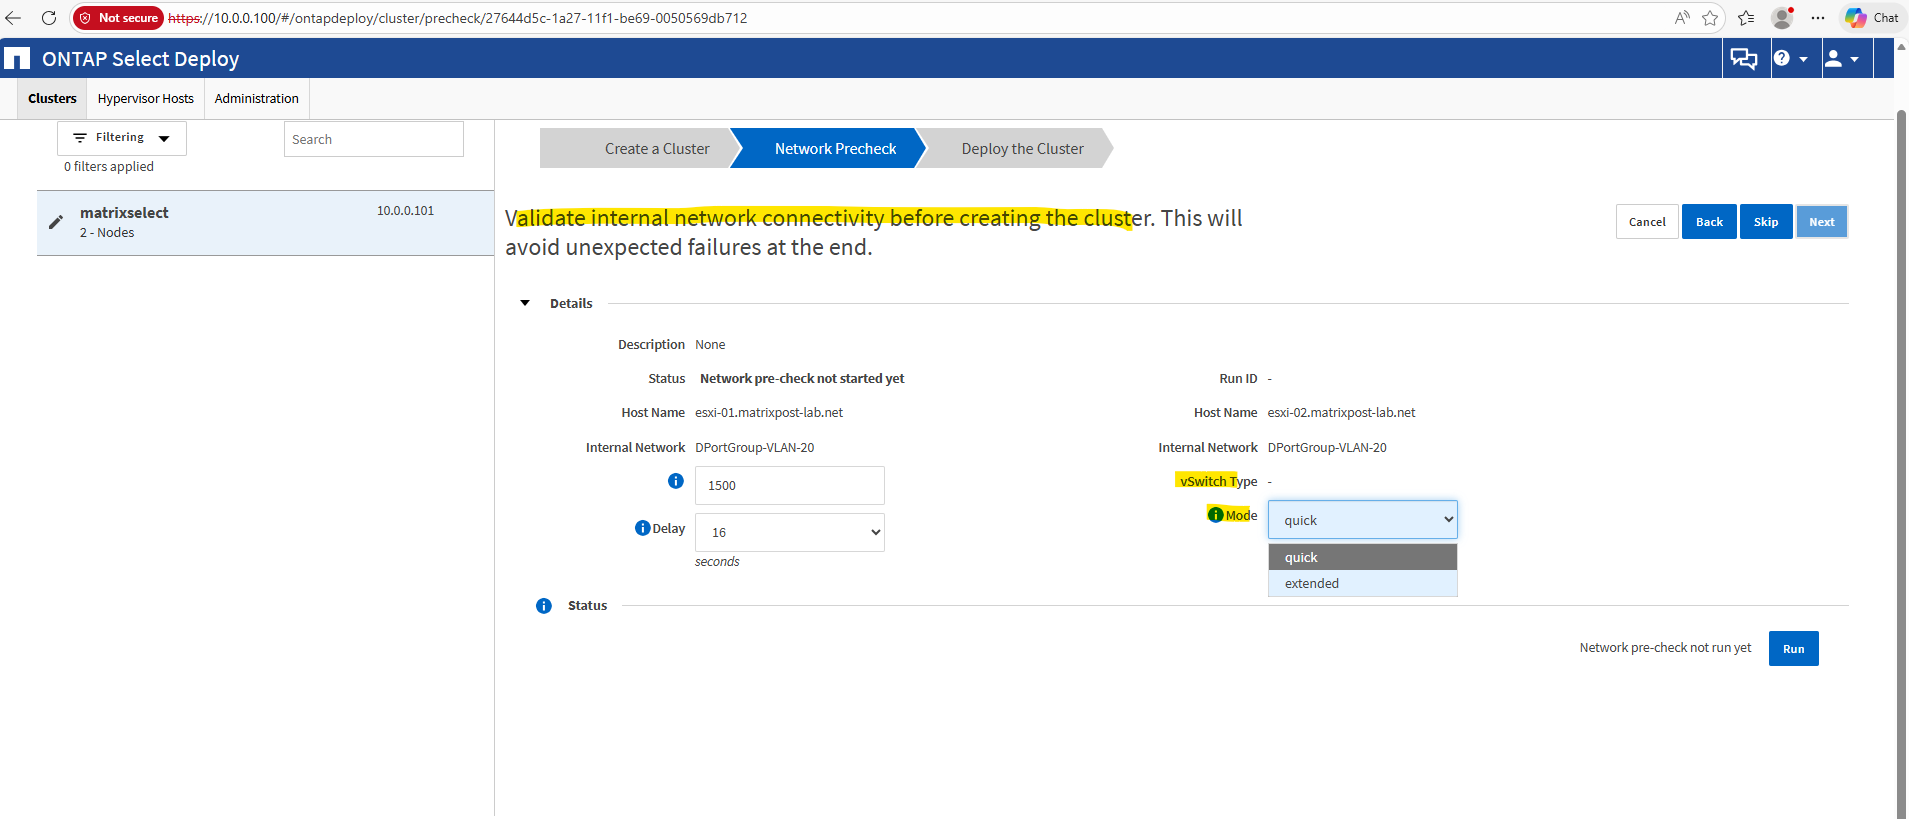
I will run an extended check.
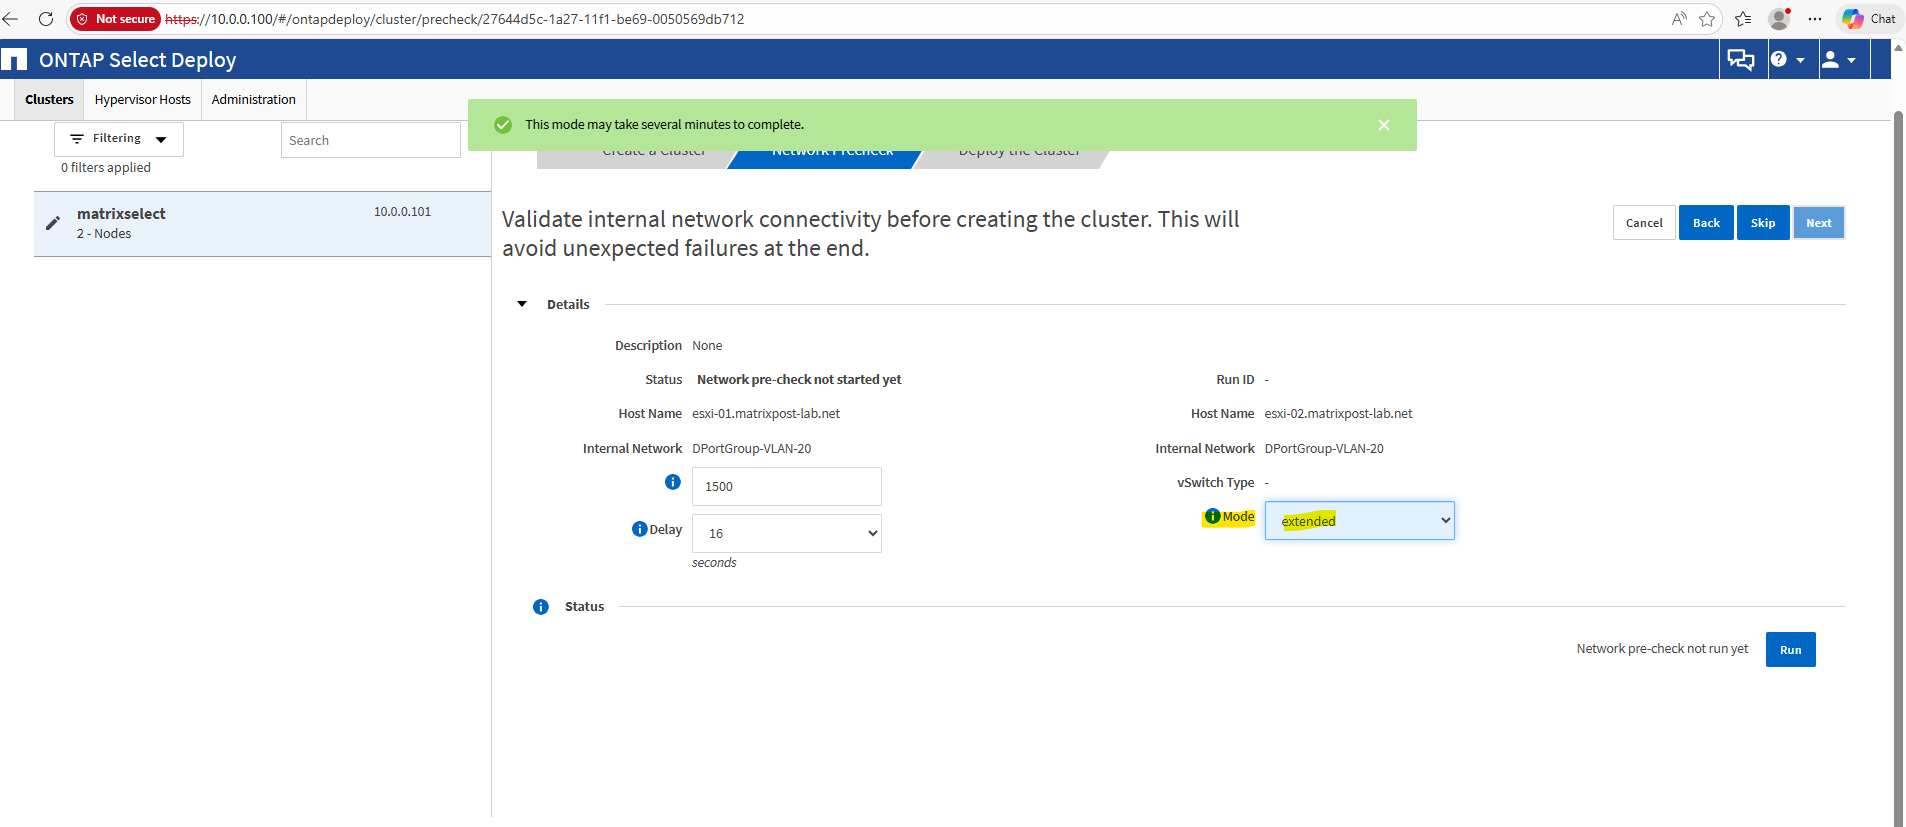
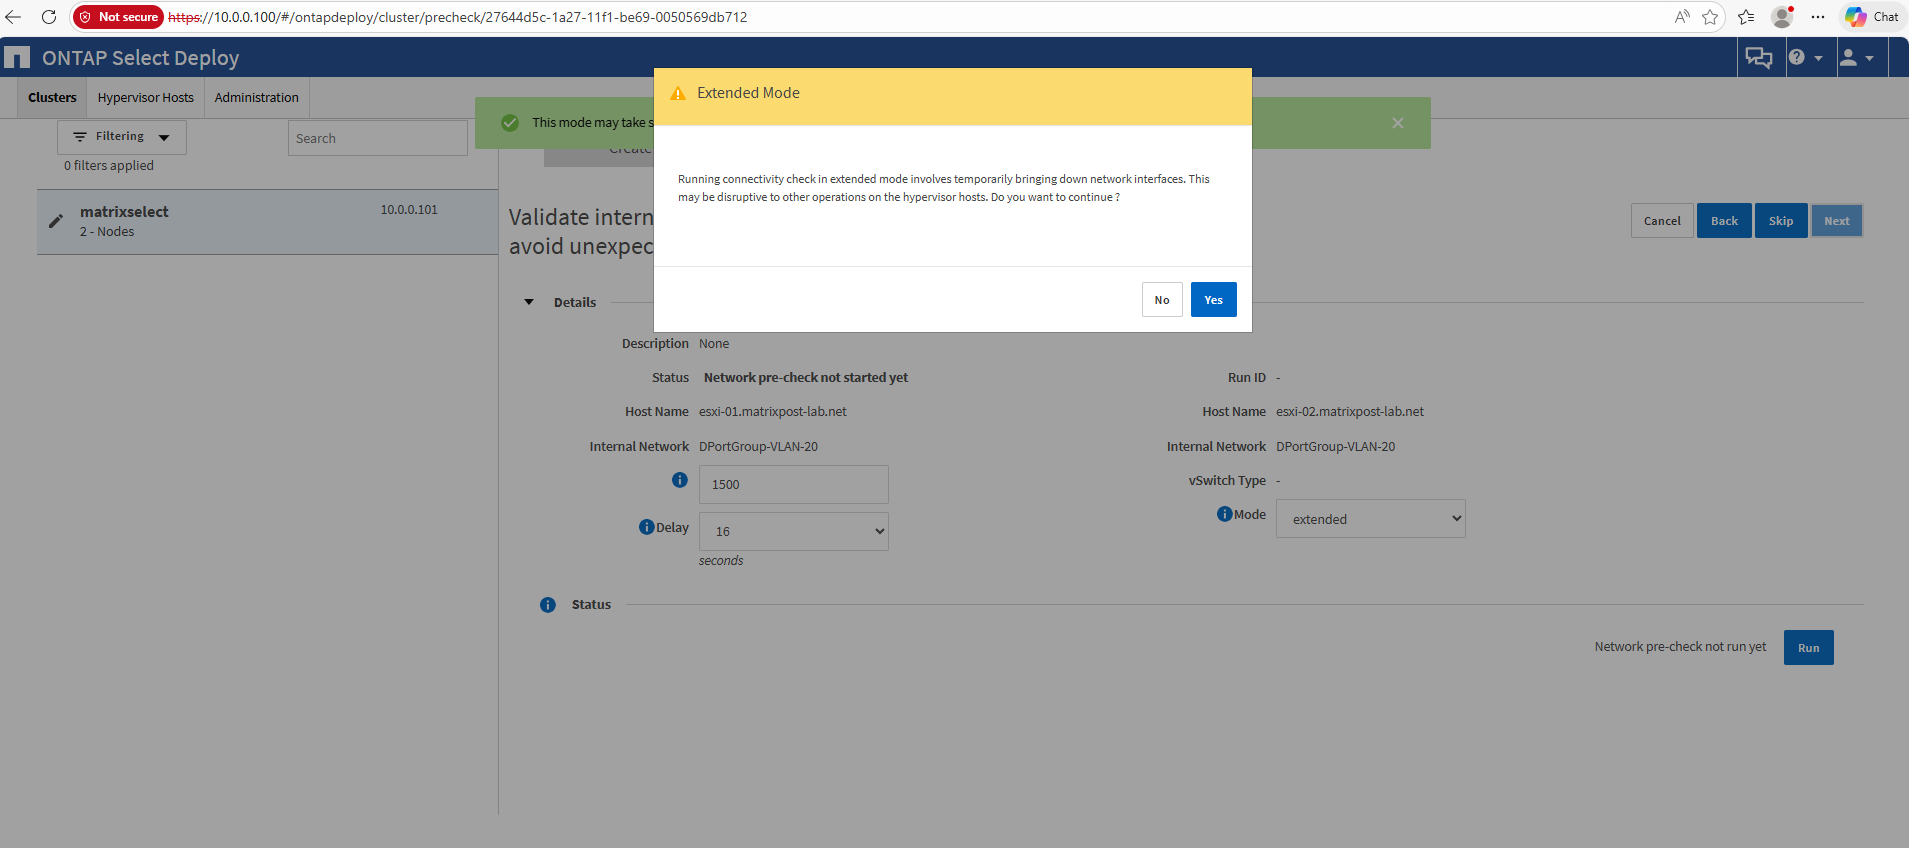
The Quick mode runs a shorter basic validation, while the Extended mode performs a more thorough test of the internal network path; however, it temporarily brings down the involved network interfaces during the test and should therefore be used with care.
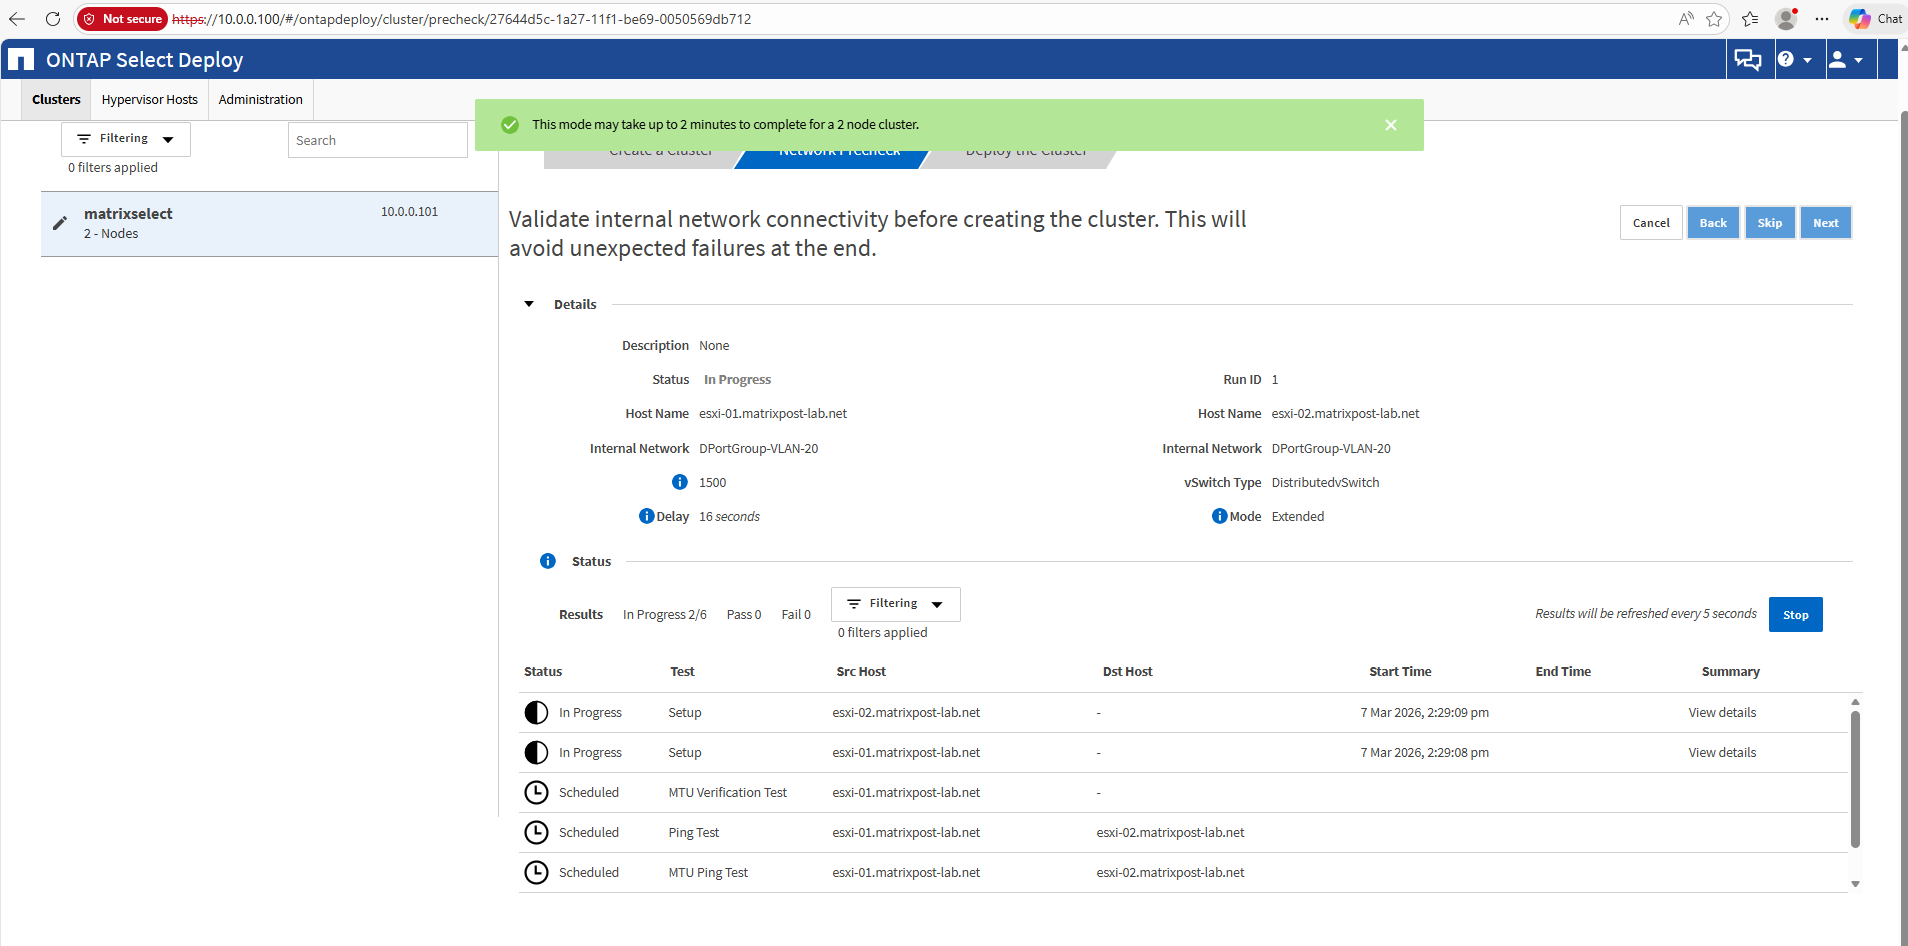
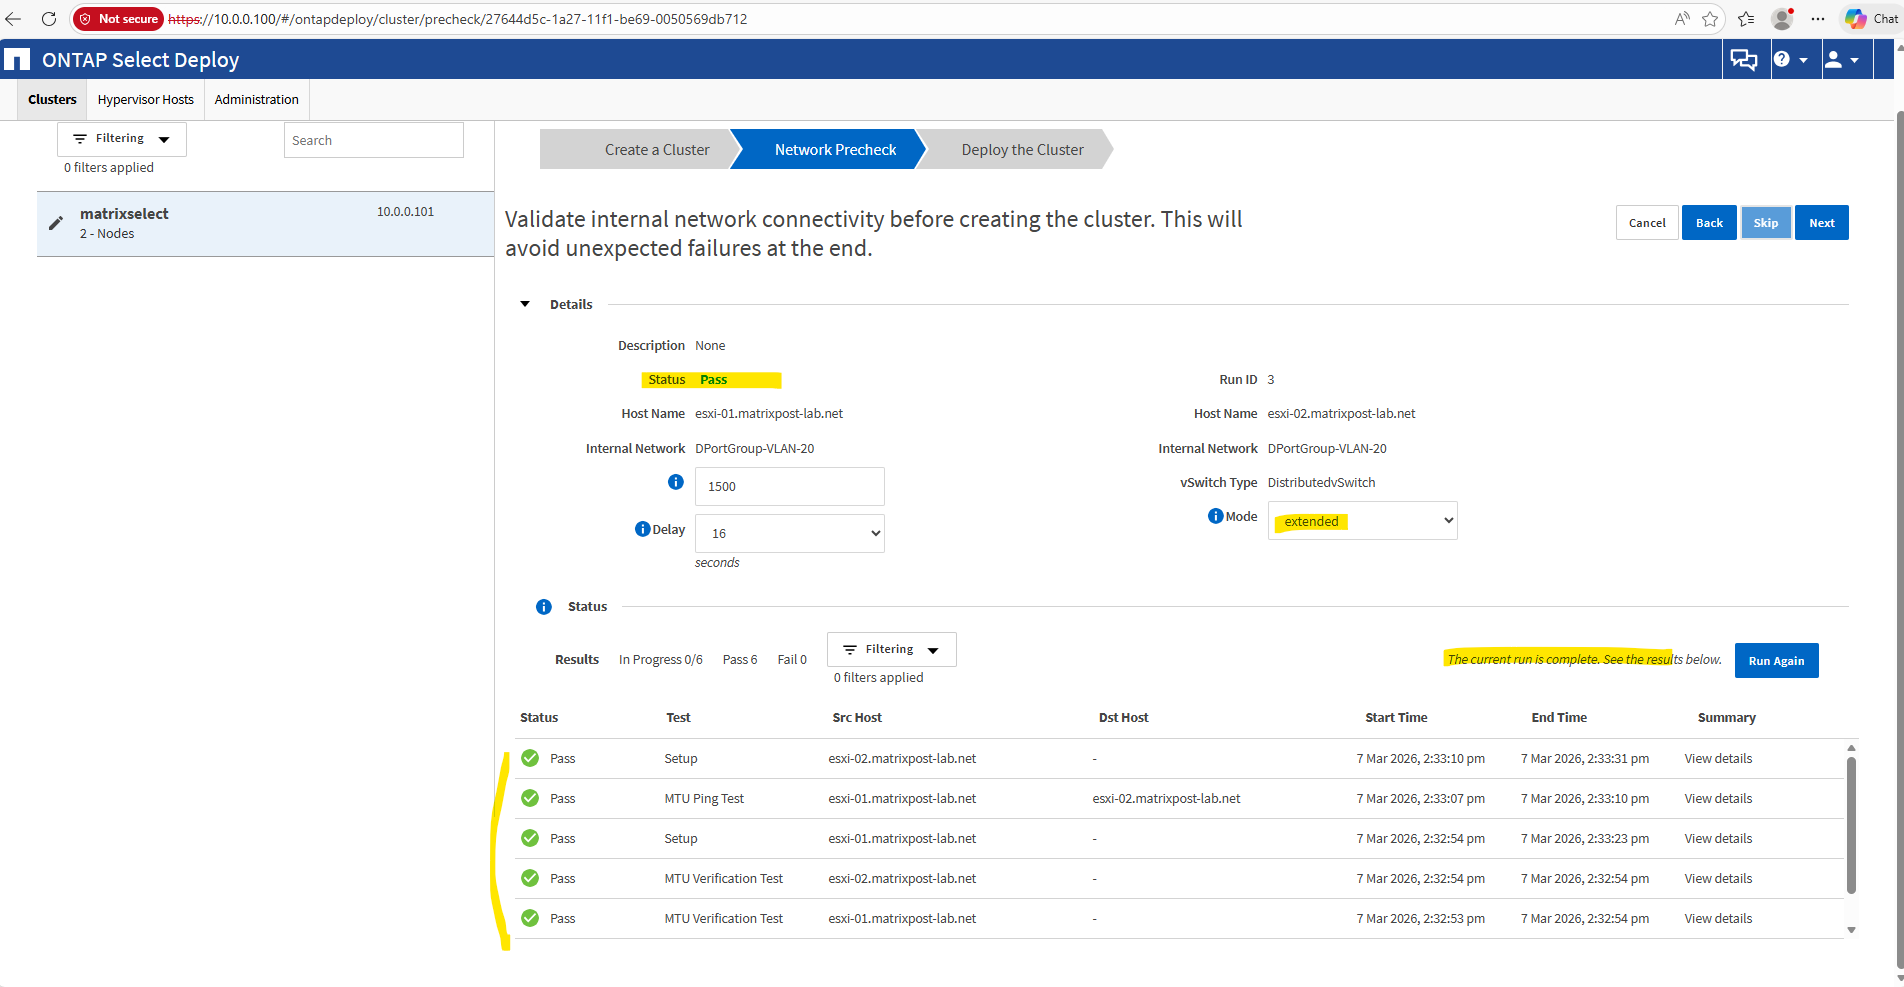
Looks good. Click on Next.
We can now finally create our 2-node cluster by providing a password and clicking on Create Cluster below.
The password finally is for the
adminuser we can later logon to the ONTAP System Manager or ONTAP CLI.
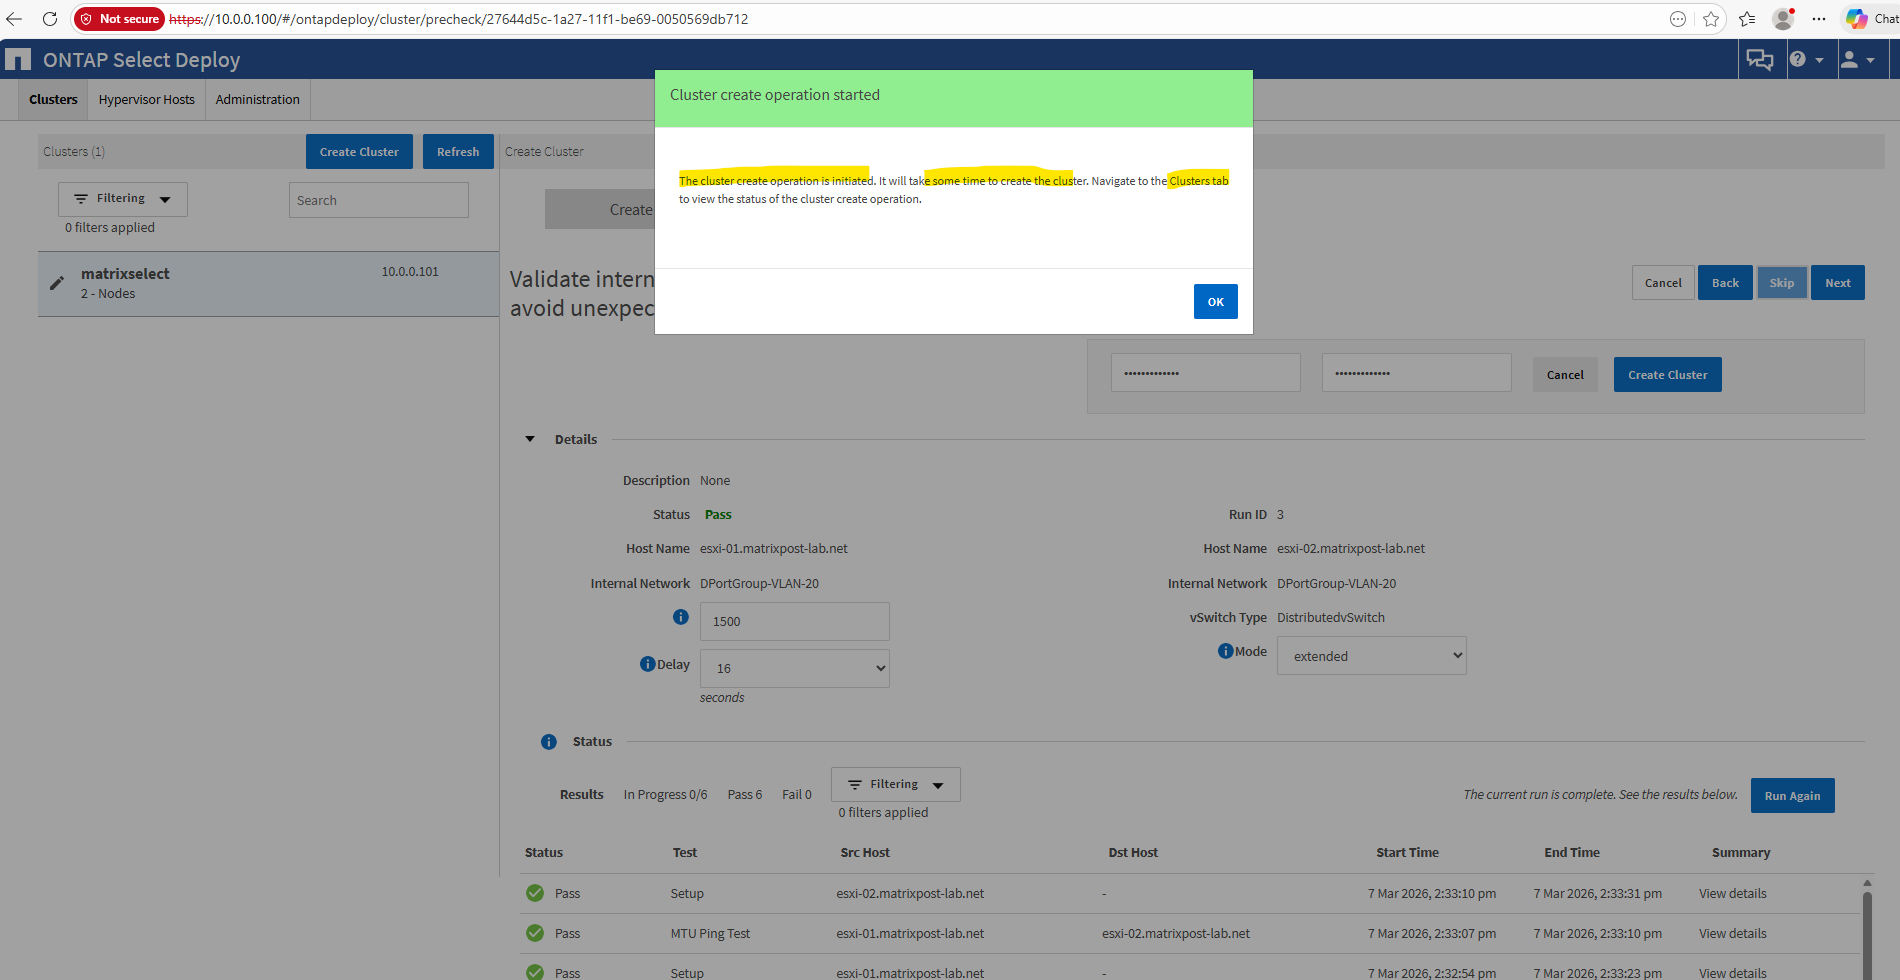
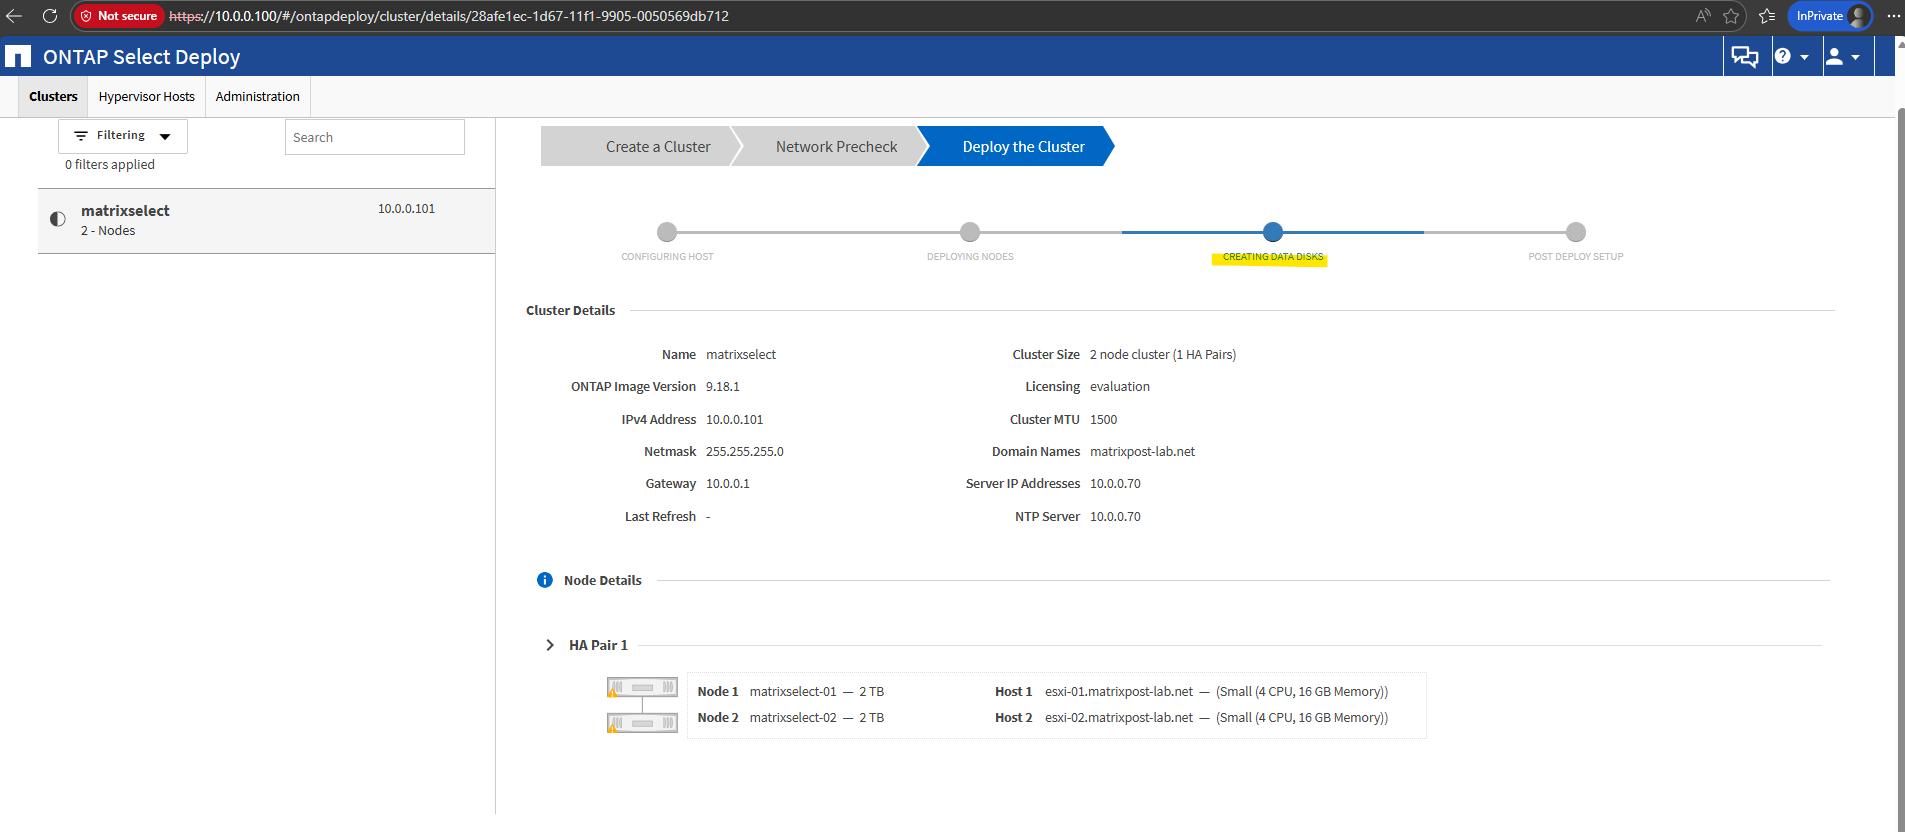
Below we can see the deployment progress in the ONTAPdeploy web interface. The the ONTAP Select Deploy utility automatically deploys the ONTAP Select node virtual machines on the selected ESXi hosts.
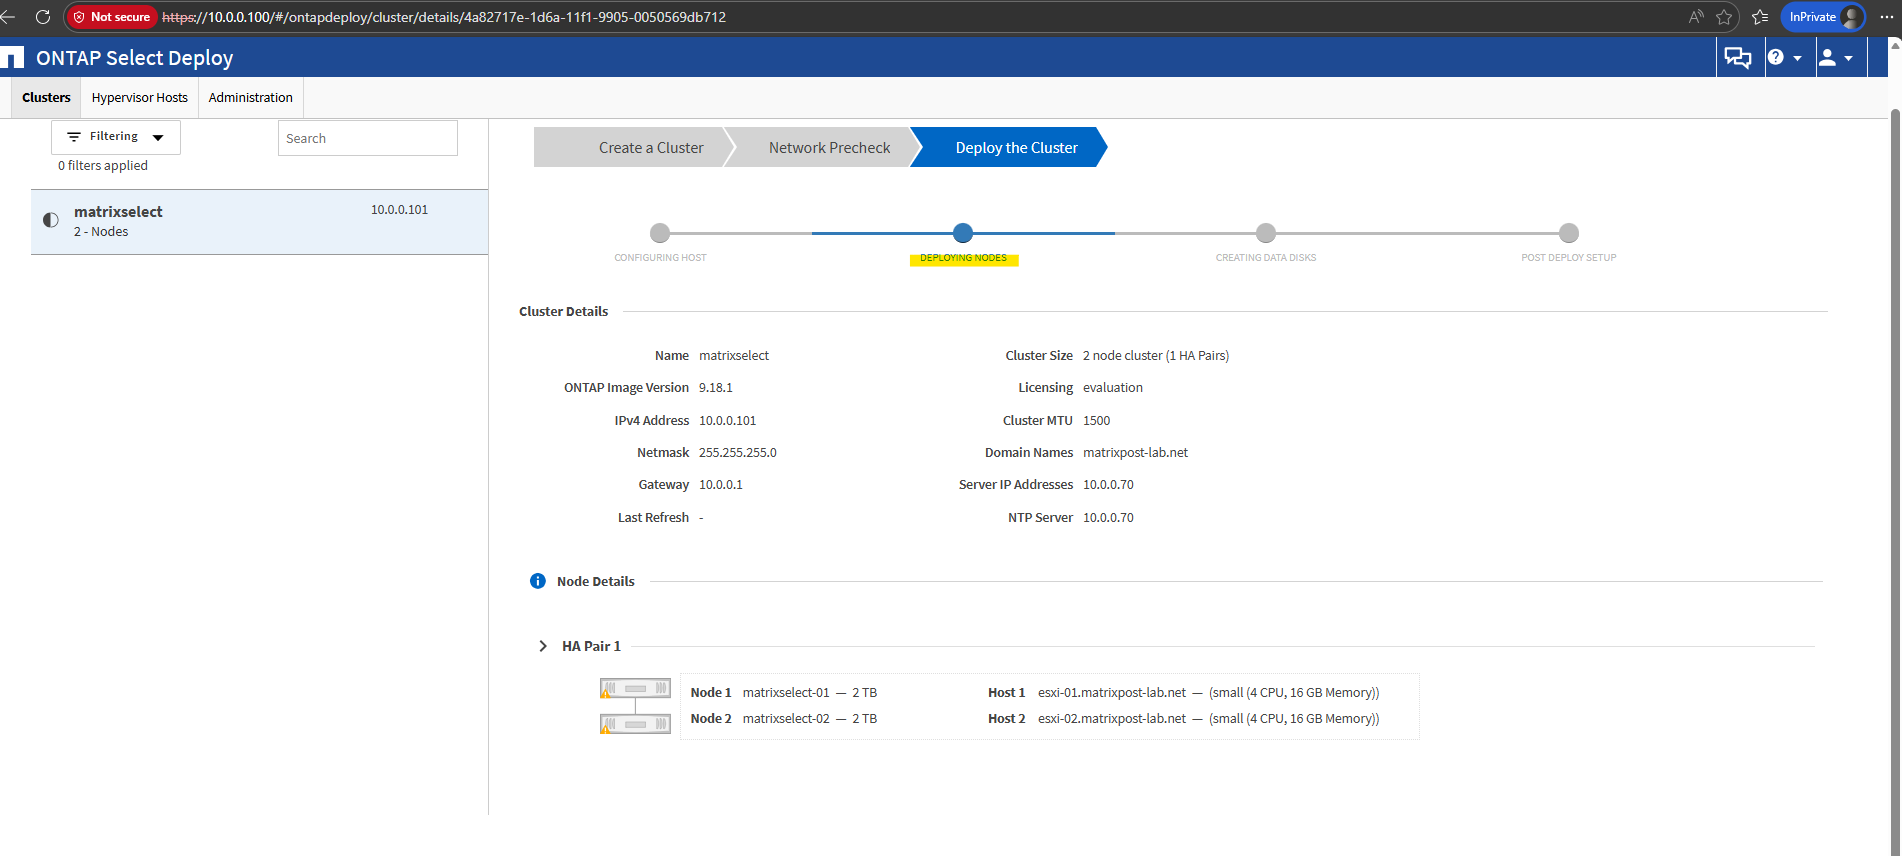
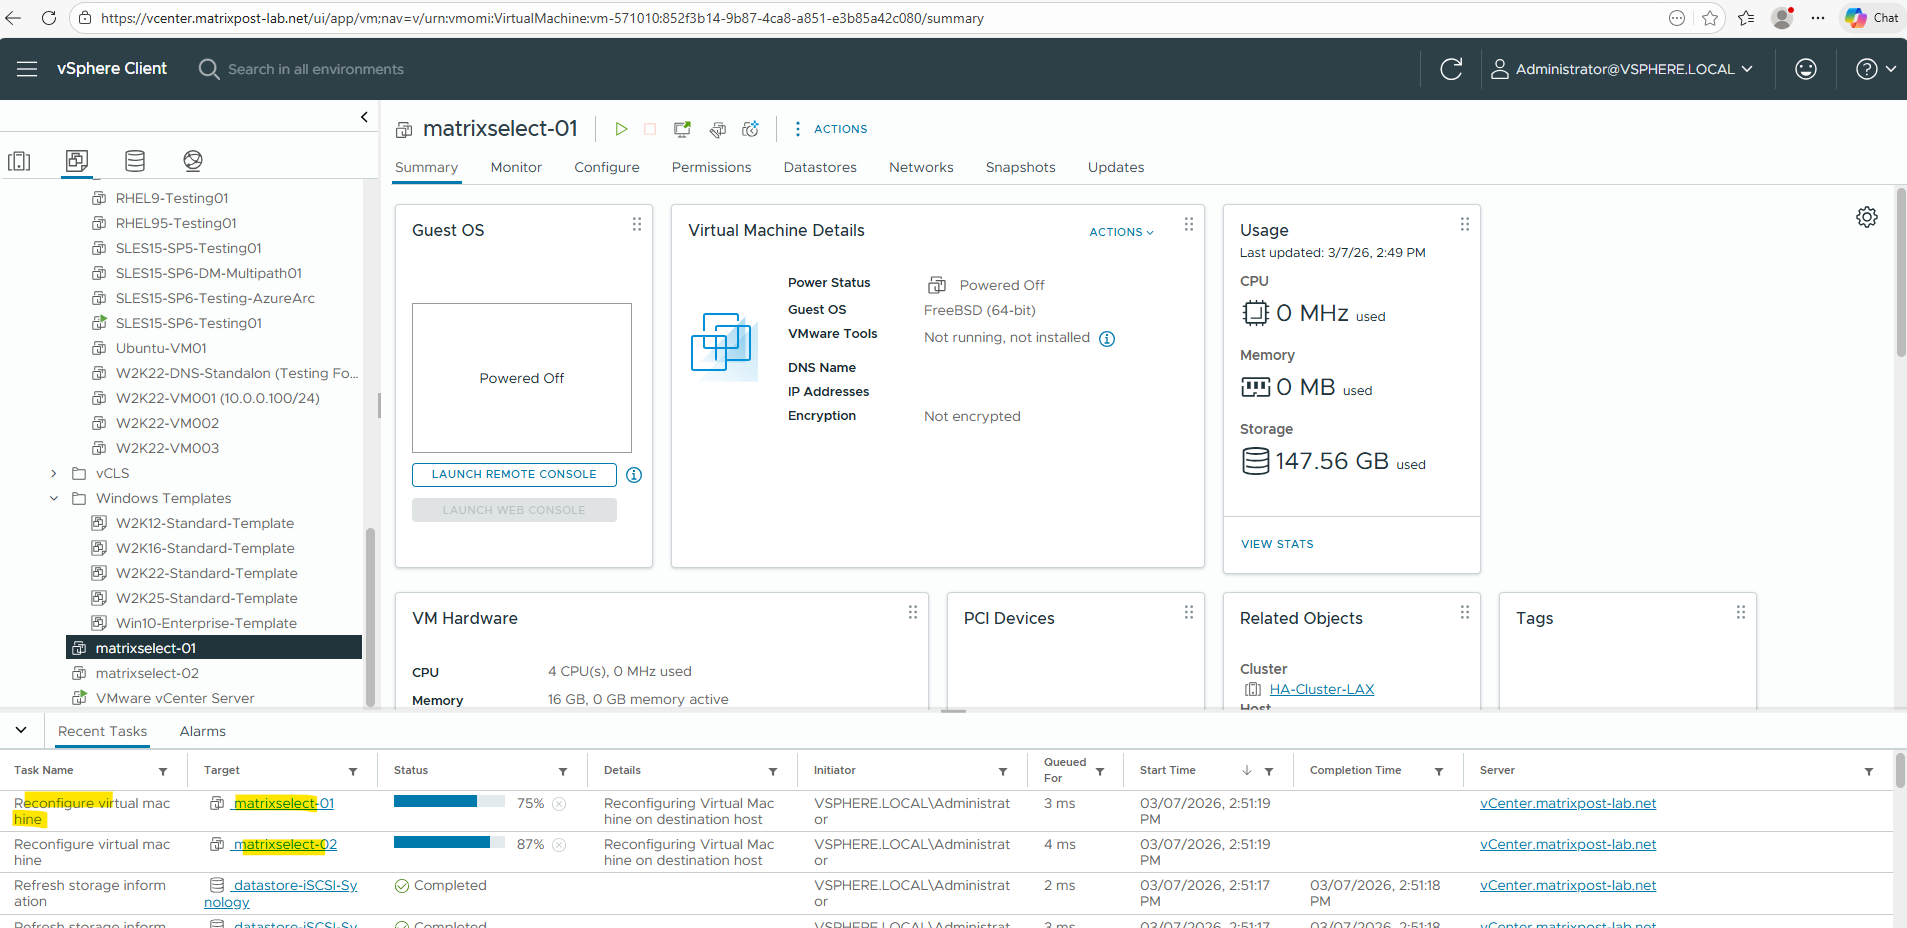
TIn vSphere, this can be observed as OVF deployment activity, because the Deploy utility uploads and instantiates the ONTAP Select node templates before attaching the required virtual disks and completing the cluster configuration.
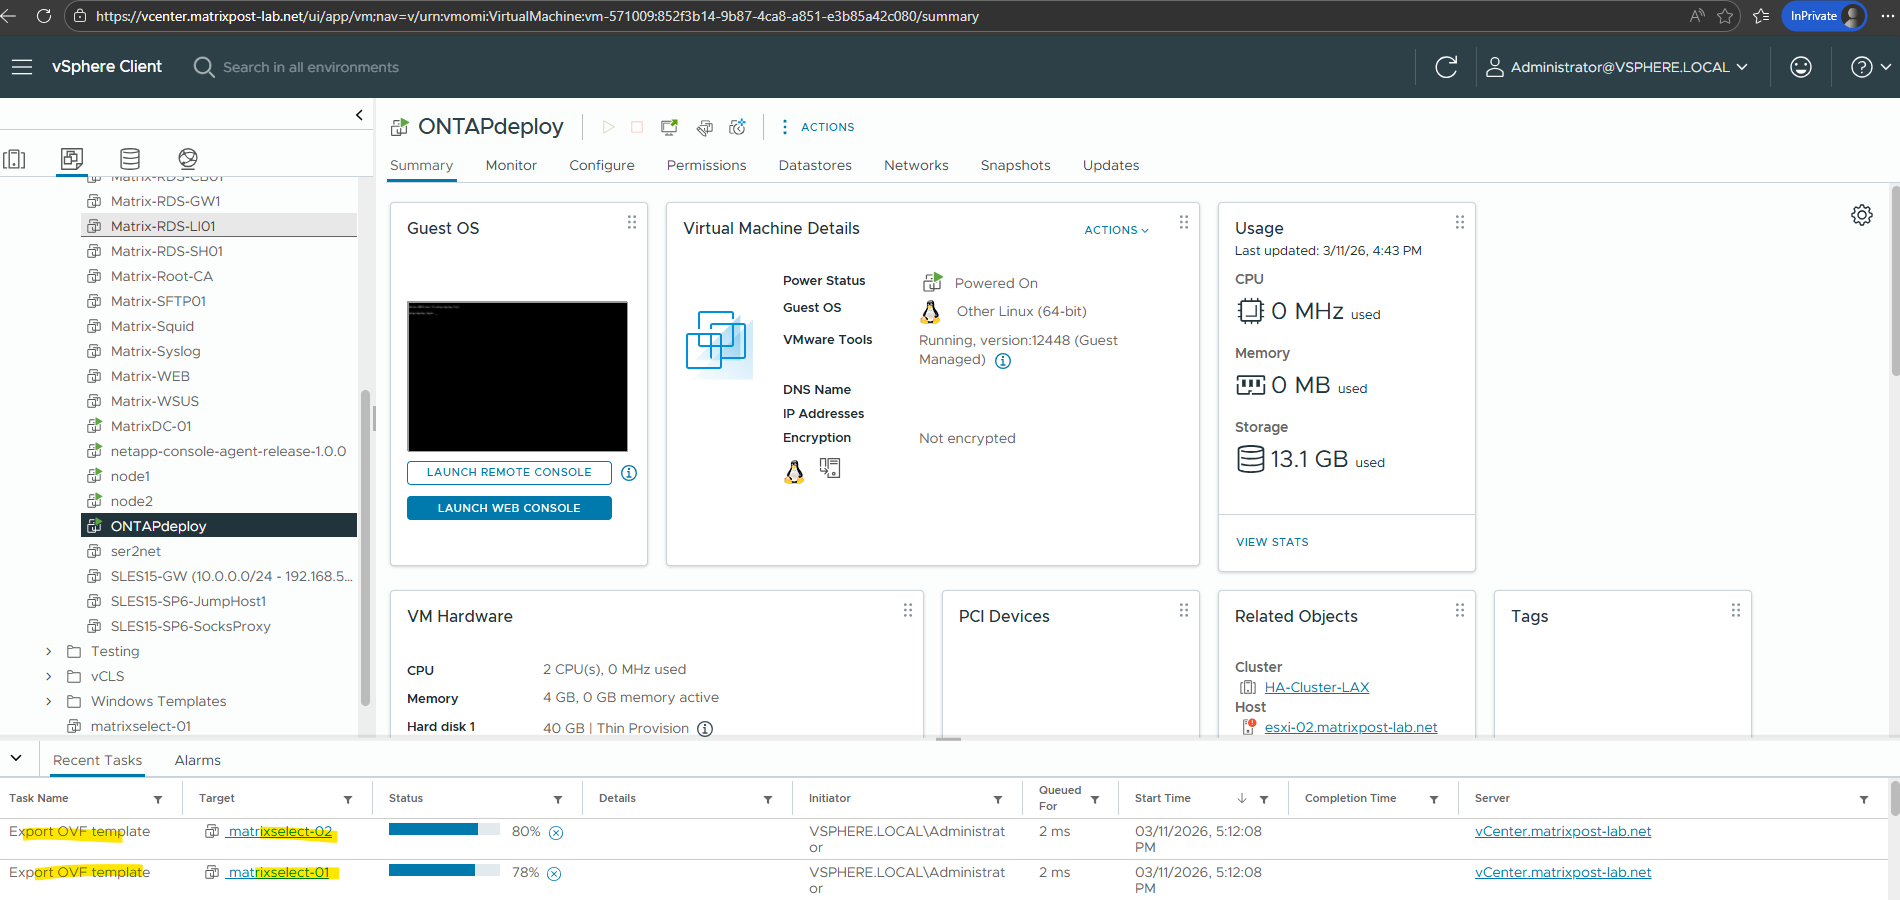
It now creates the data disks.
Which we will also see in the vSphere client.
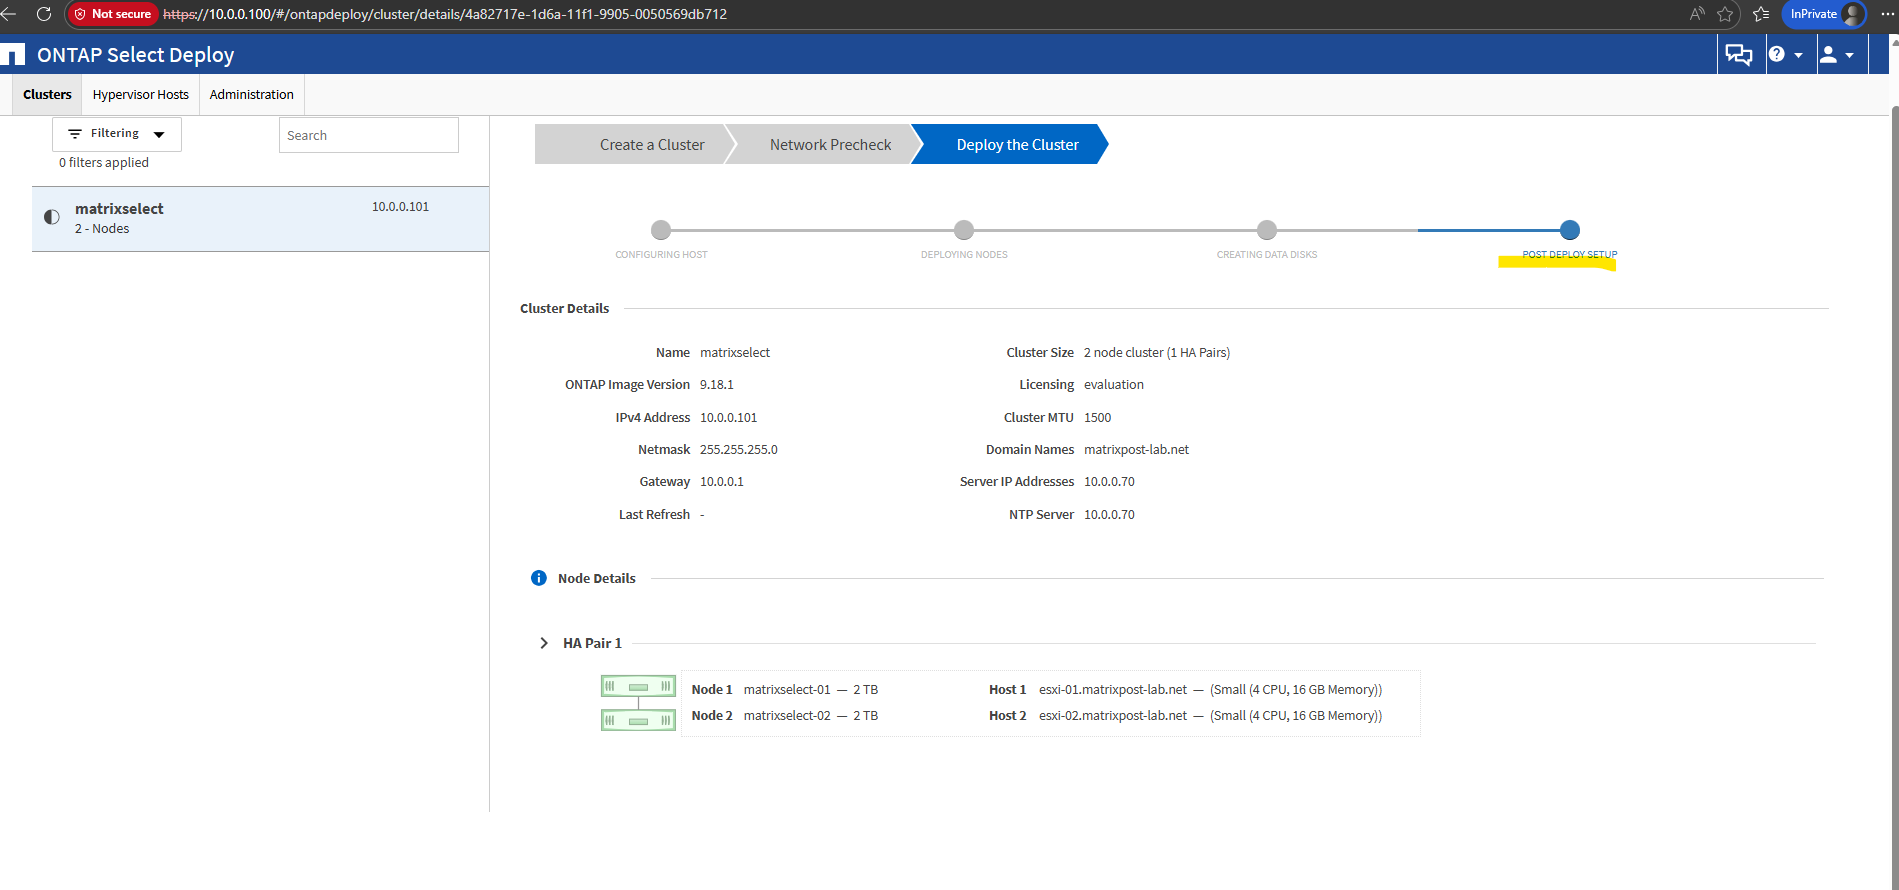
After the OVF deployment of the node VMs and creating the disks., the Deploy utility continues with the post-deployment process, which includes attaching and configuring the virtual disks, applying the network configuration, powering on the nodes, bootstrapping ONTAP, and then creating and initializing the cluster. In a two-node HA deployment, this also includes configuring the HA relationship and mediator communication so the cluster becomes fully operational.
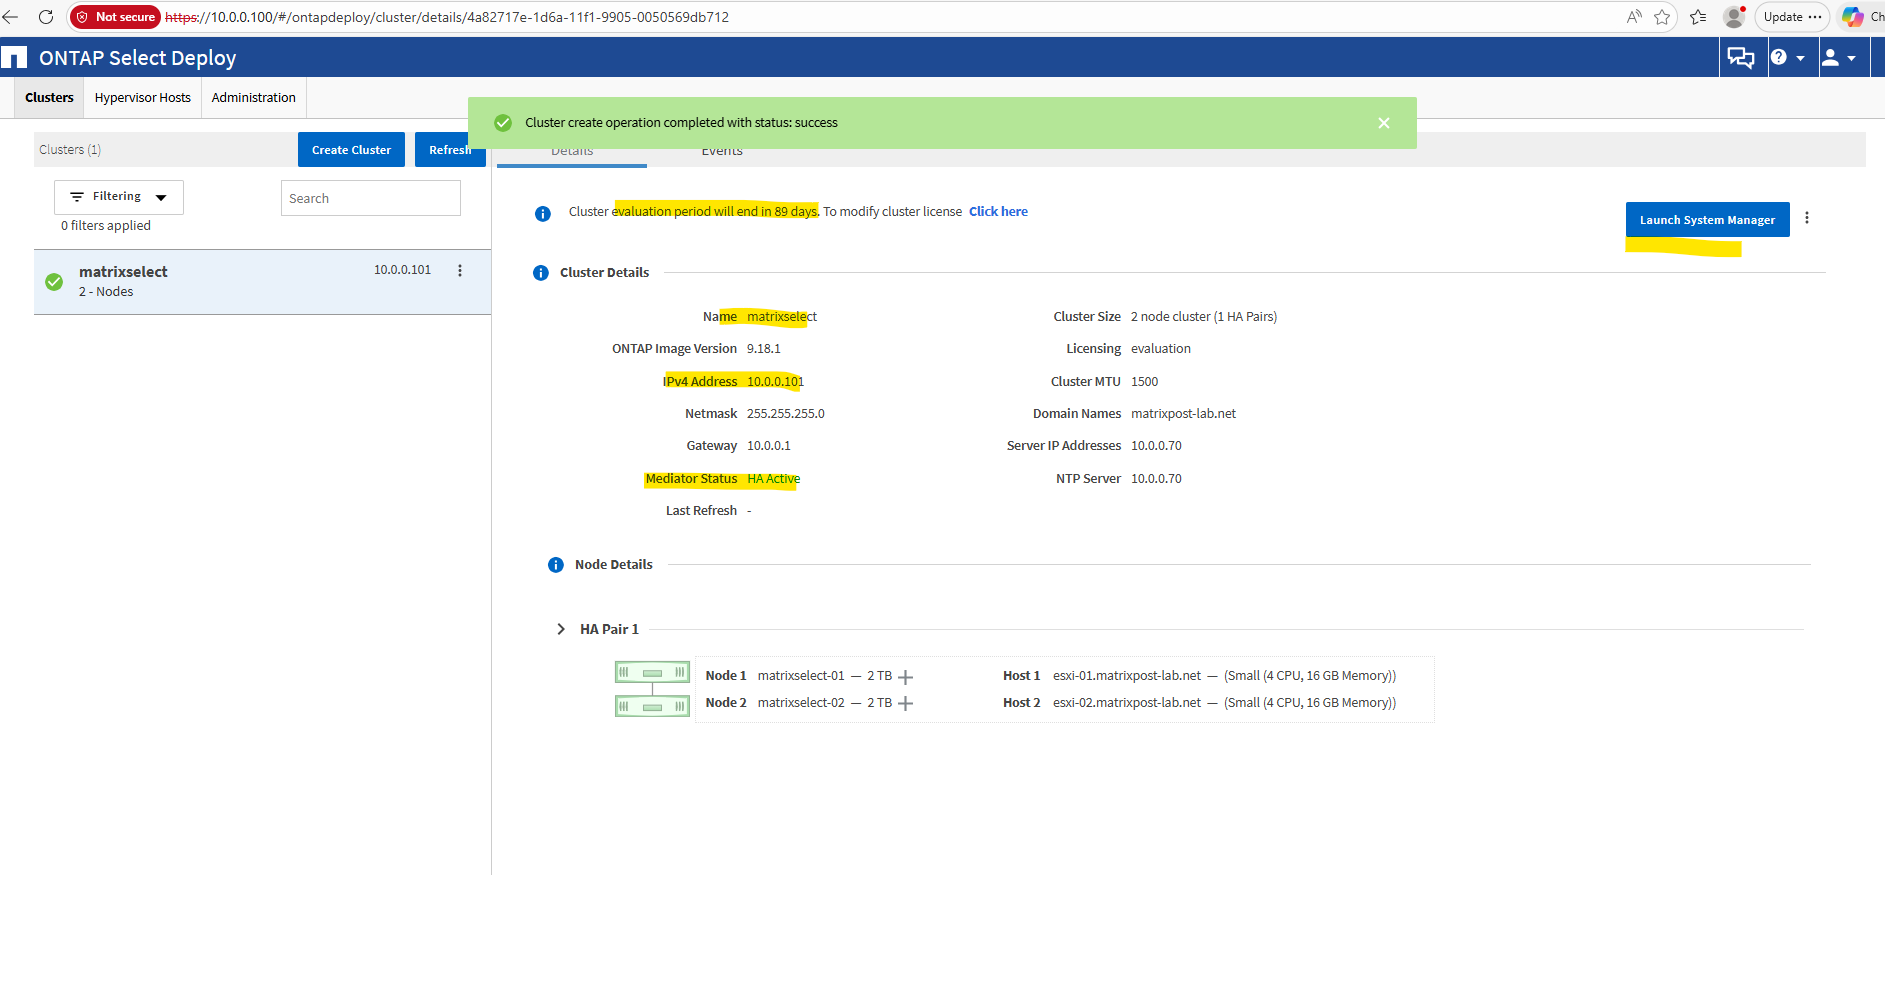
We can now launch the ONTAP System Manager.
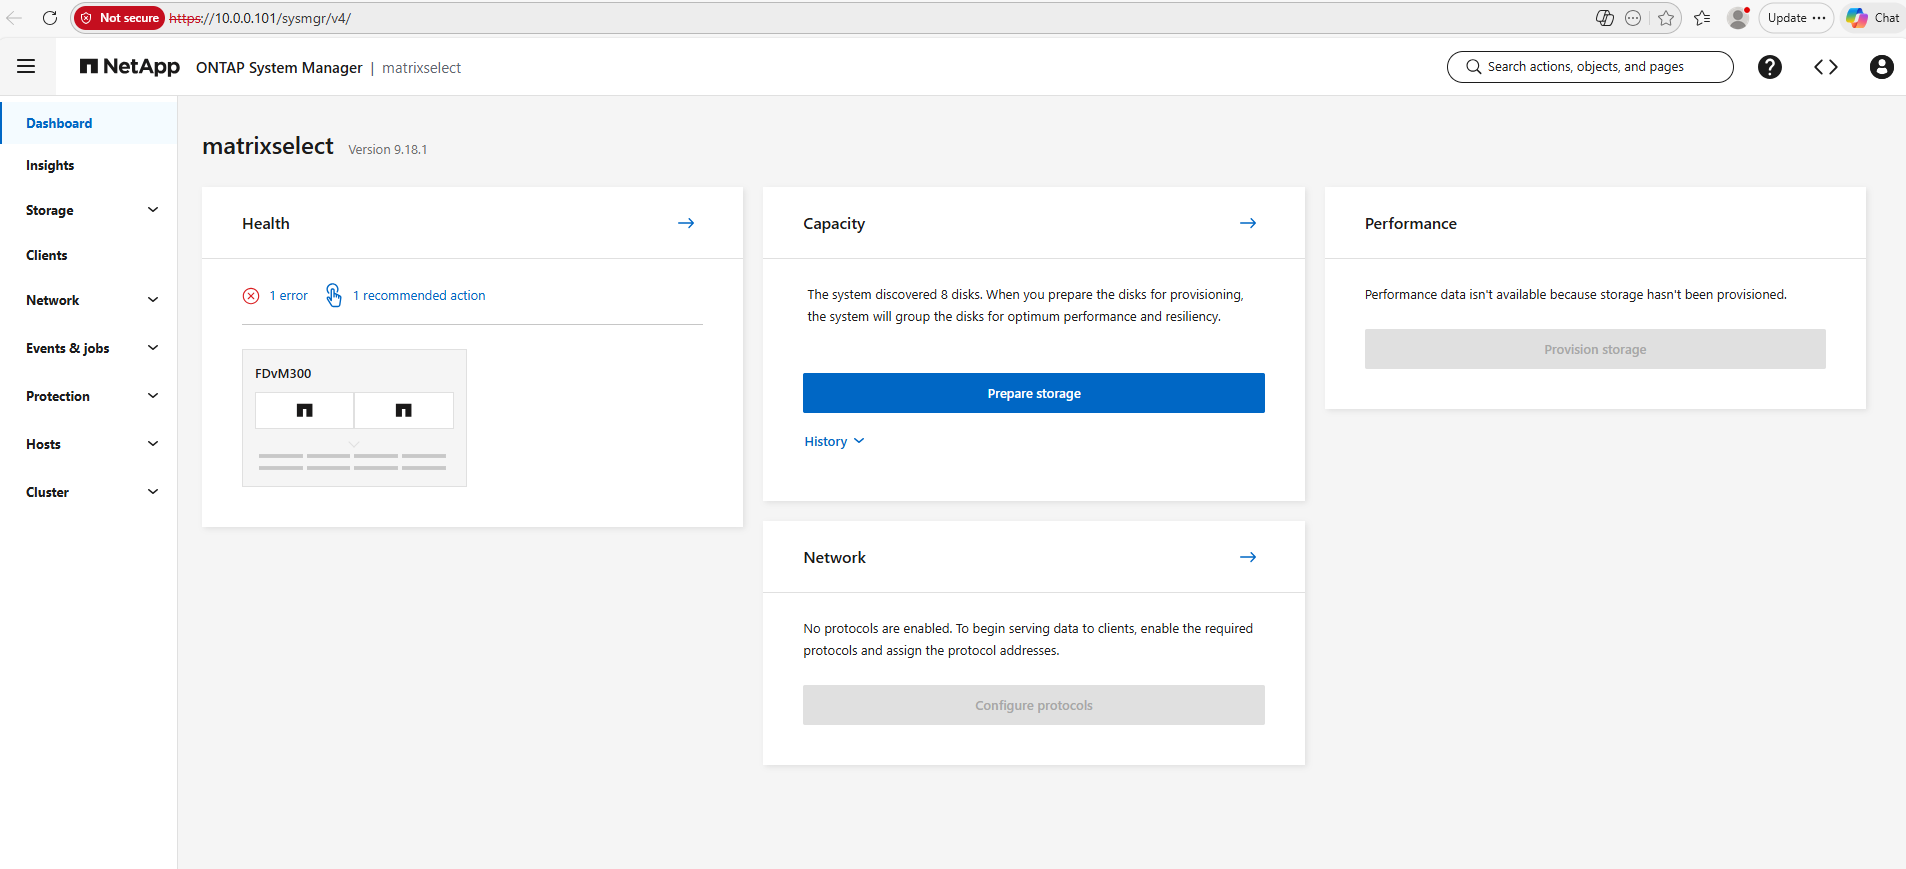
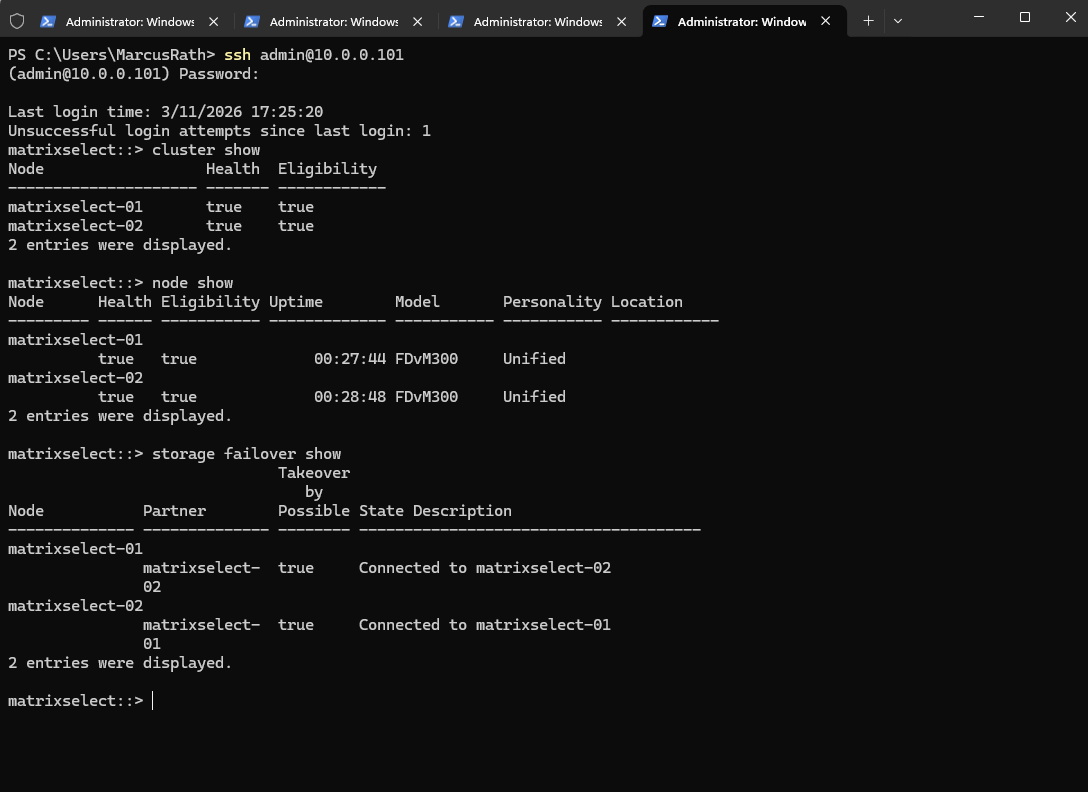
We can from now on also connect to the cluster by using SSH and the ONTAP CLI.
matrixselect::> cluster show
matrixselect::> node show
matrixselect::> storage failover show
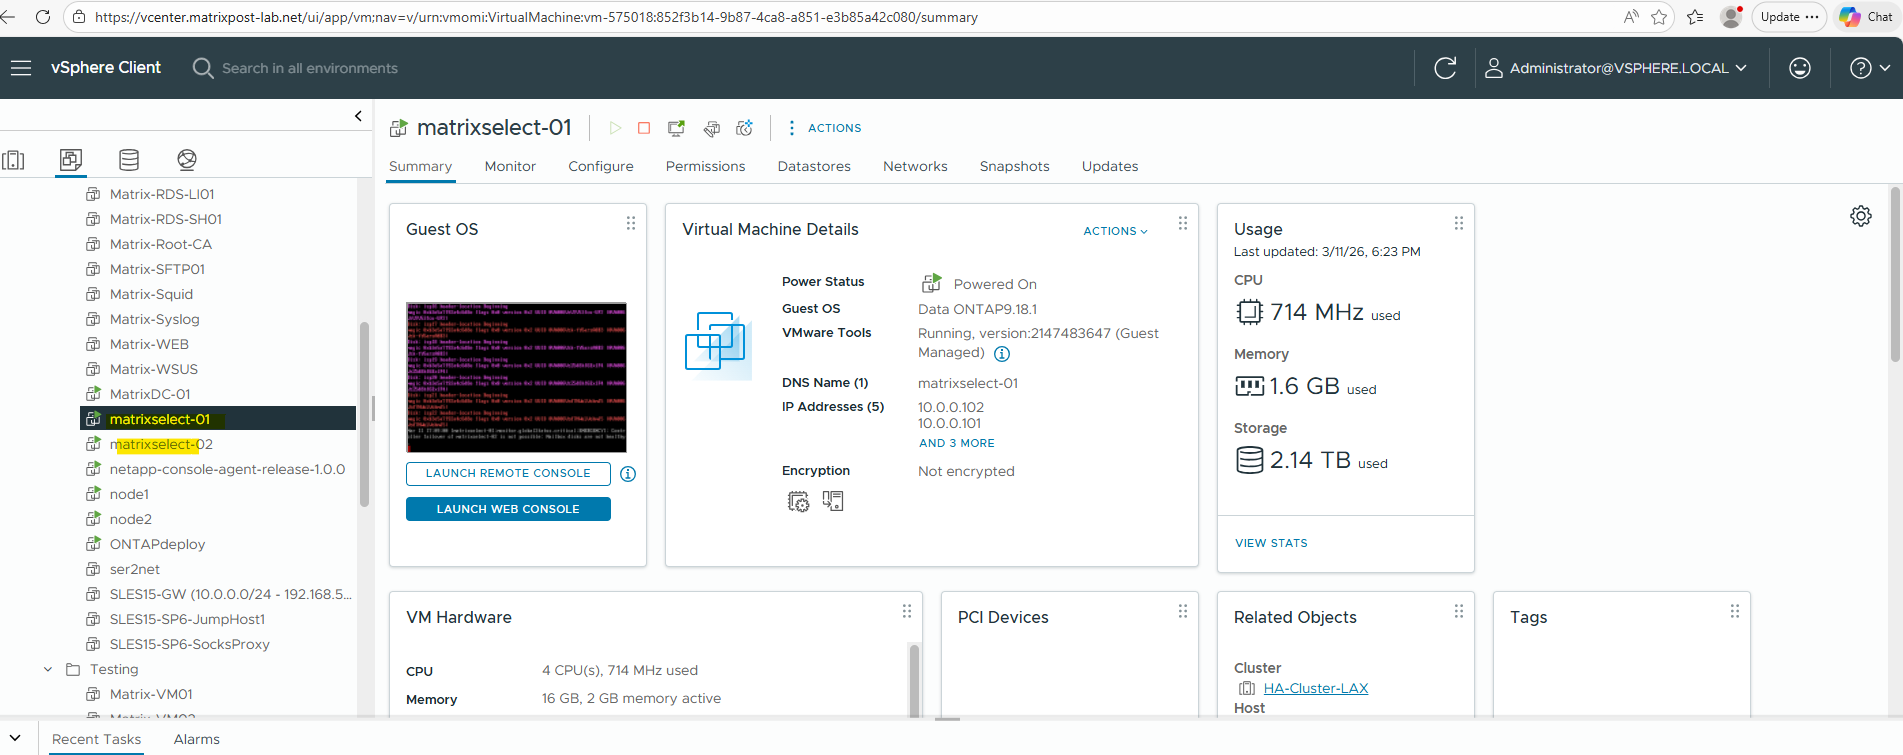
Both nodes are now running in vSphere.
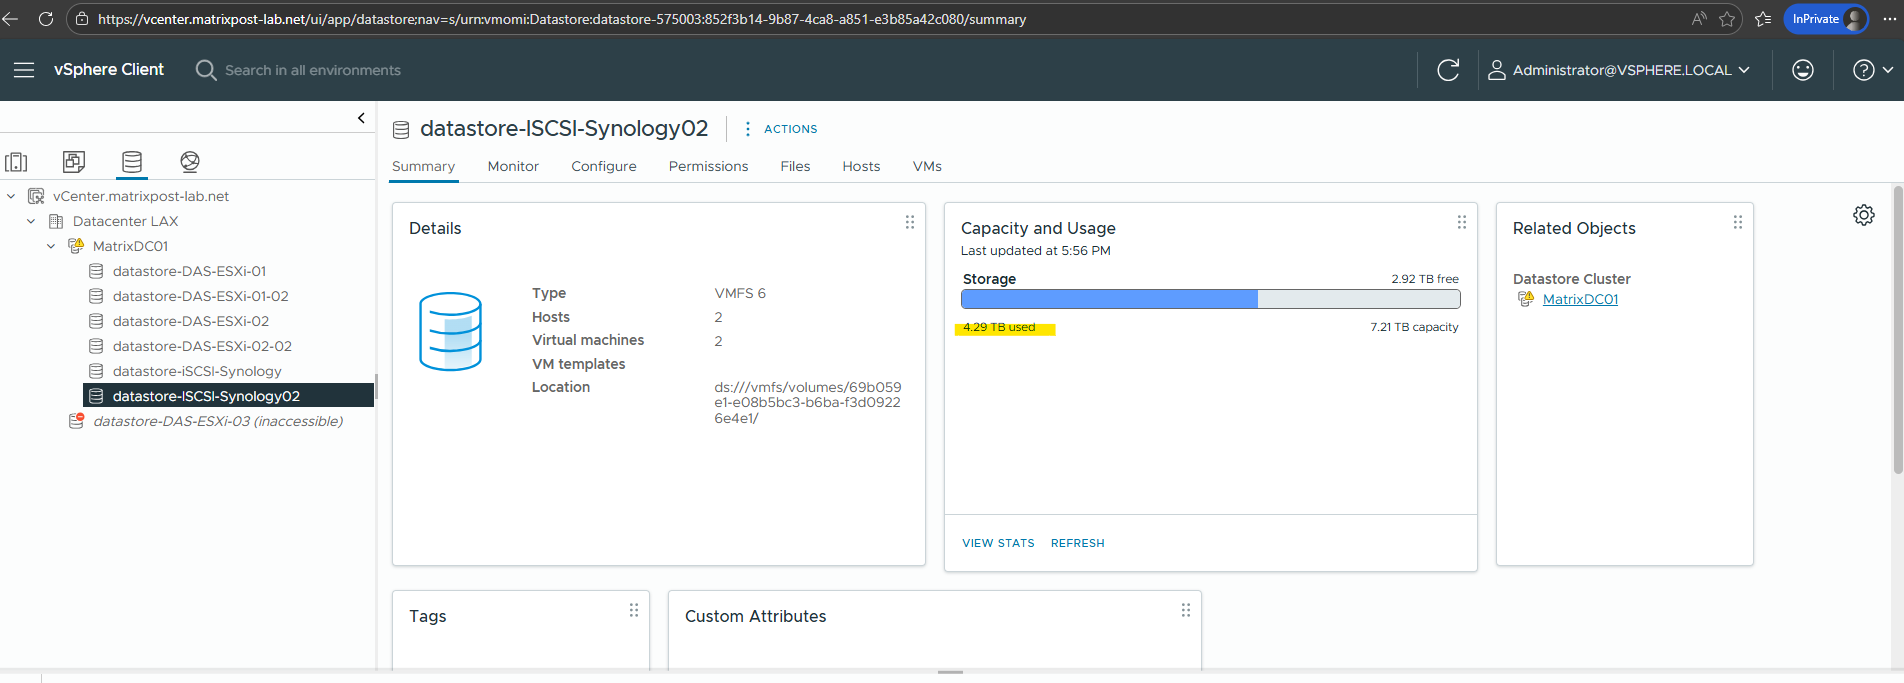
Even though only 2 TB was configured for the storage pool, the final deployment consumed approximately 4.29 TB of datastore capacity.
This is because, in a two-node ONTAP Select HA cluster, the configured storage pool capacity is allocated per node, the data aggregates are mirrored across both nodes, and additional space is required for the system disks.
ONTAP Select high availability configurations
In a two-node ONTAP Select HA cluster, the ONTAP Select Deploy VM also acts as a mediator to maintain quorum and prevent split-brain scenarios during failures. This is different from Cloud Volumes ONTAP, where this type of Deploy-hosted mediator is not used.
Unlike a 2-node ONTAP Select HA cluster, which relies on the ONTAP Select Deploy VM as a mediator to maintain quorum in a shared-nothing architecture, Cloud Volumes ONTAP in Azure uses an HA design based on Azure shared managed disks. Because the storage is already built on a cloud-native shared-disk architecture, Azure CVO does not use the same Deploy-hosted mediator approach as ONTAP Select.
There are two ONTAP Select HA deployment models: the multi-node clusters (four, six, eight, ten, or twelve nodes) and the two-node clusters. The salient feature of a two-node ONTAP Select cluster is the use of an external mediator service to resolve split-brain scenarios.
The ONTAP Deploy VM serves as the default mediator for all of the two-node HA pairs that it configures.
More about here https://docs.netapp.com/us-en/ontap-select/concept_ha_config.html.
Understanding Mailbox Disks in ONTAP Select
During the deployment of an ONTAP Select cluster, the Deploy utility automatically creates so-called mailbox disks. These disks are not used for user data, but instead serve an internal role within the cluster.
Mailbox disks are used to store cluster metadata and enable communication between the nodes, which is especially important in HA configurations. They act as a coordination mechanism to maintain cluster state and support proper failover behavior.
In contrast to data disks, mailbox disks are not part of any aggregate, cannot be used to host volumes, and are fully managed by ONTAP Select Deploy. Their size and placement are automatically determined during deployment.
Because they are essential for cluster operation, mailbox disks should not be modified or removed.
Mailbox diskscannot be listed directly via ONTAP CLI. Their health is validated indirectly throughstorage failover showcommand and EMS logs, which indicate whether HA takeover is possible.
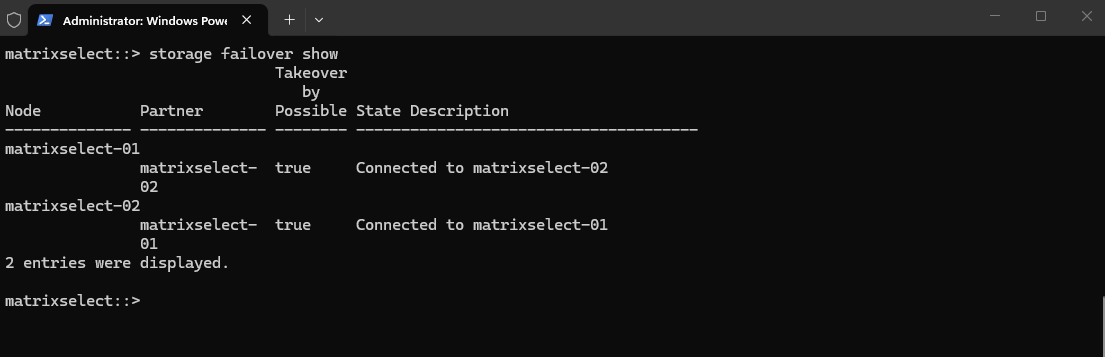
In a two-node ONTAP Select HA cluster like in my case, the ONTAP Select Deploy VM also acts as a mediator to maintain quorum and prevent split-brain scenarios during failures. This is different from Cloud Volumes ONTAP, where this type of Deploy-hosted mediator is not used.
Disconnecting the ONTAP Select Deploy VM removes the mediator from the cluster, resulting in a loss of quorum. Although both nodes are still connected, takeover is disabled and reported as “Mailbox disks are not healthy” to prevent split-brain scenarios.
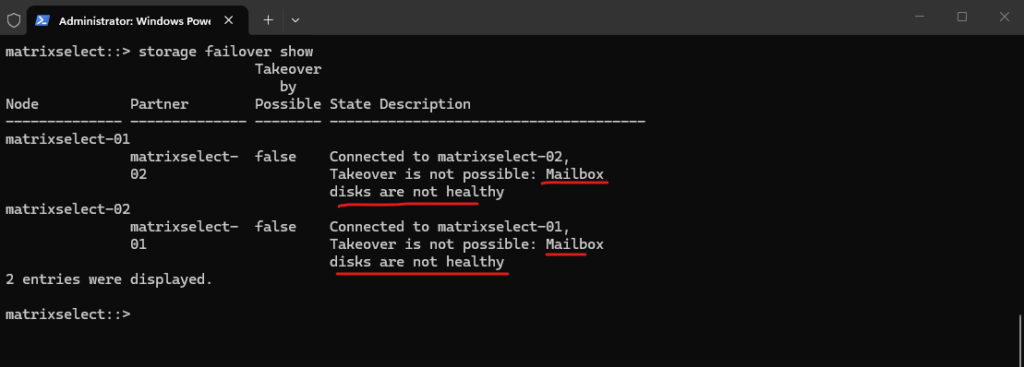
Unlike a 2-node ONTAP Select HA cluster, which relies on the ONTAP Select Deploy VM as a mediator to maintain quorum in a shared-nothing architecture, Cloud Volumes ONTAP in Azure uses an HA design based on Azure shared managed disks. Because the storage is already built on a cloud-native shared-disk architecture, Azure CVO does not use the same Deploy-hosted mediator approach as ONTAP Select.
While both physical ONTAP systems and Cloud Volumes ONTAP in Azure provide shared disk access to both nodes, the underlying control mechanism differs significantly. Physical ONTAP relies on direct-attached storage and hardware-level HA interconnects fully managed by ONTAP, whereas Azure CVO depends on Azure-managed disks with platform-enforced ownership and fencing. As a result, CVO leverages cloud-native HA capabilities instead of requiring an external mediator like ONTAP Select.
Bringing ONTAP Select On-Prem into NetApp Console
NetApp Console is not limited to managing Cloud Volumes ONTAP in Azure, AWS, or GCP. It can also act as a centralized control plane for on-premises ONTAP systems.
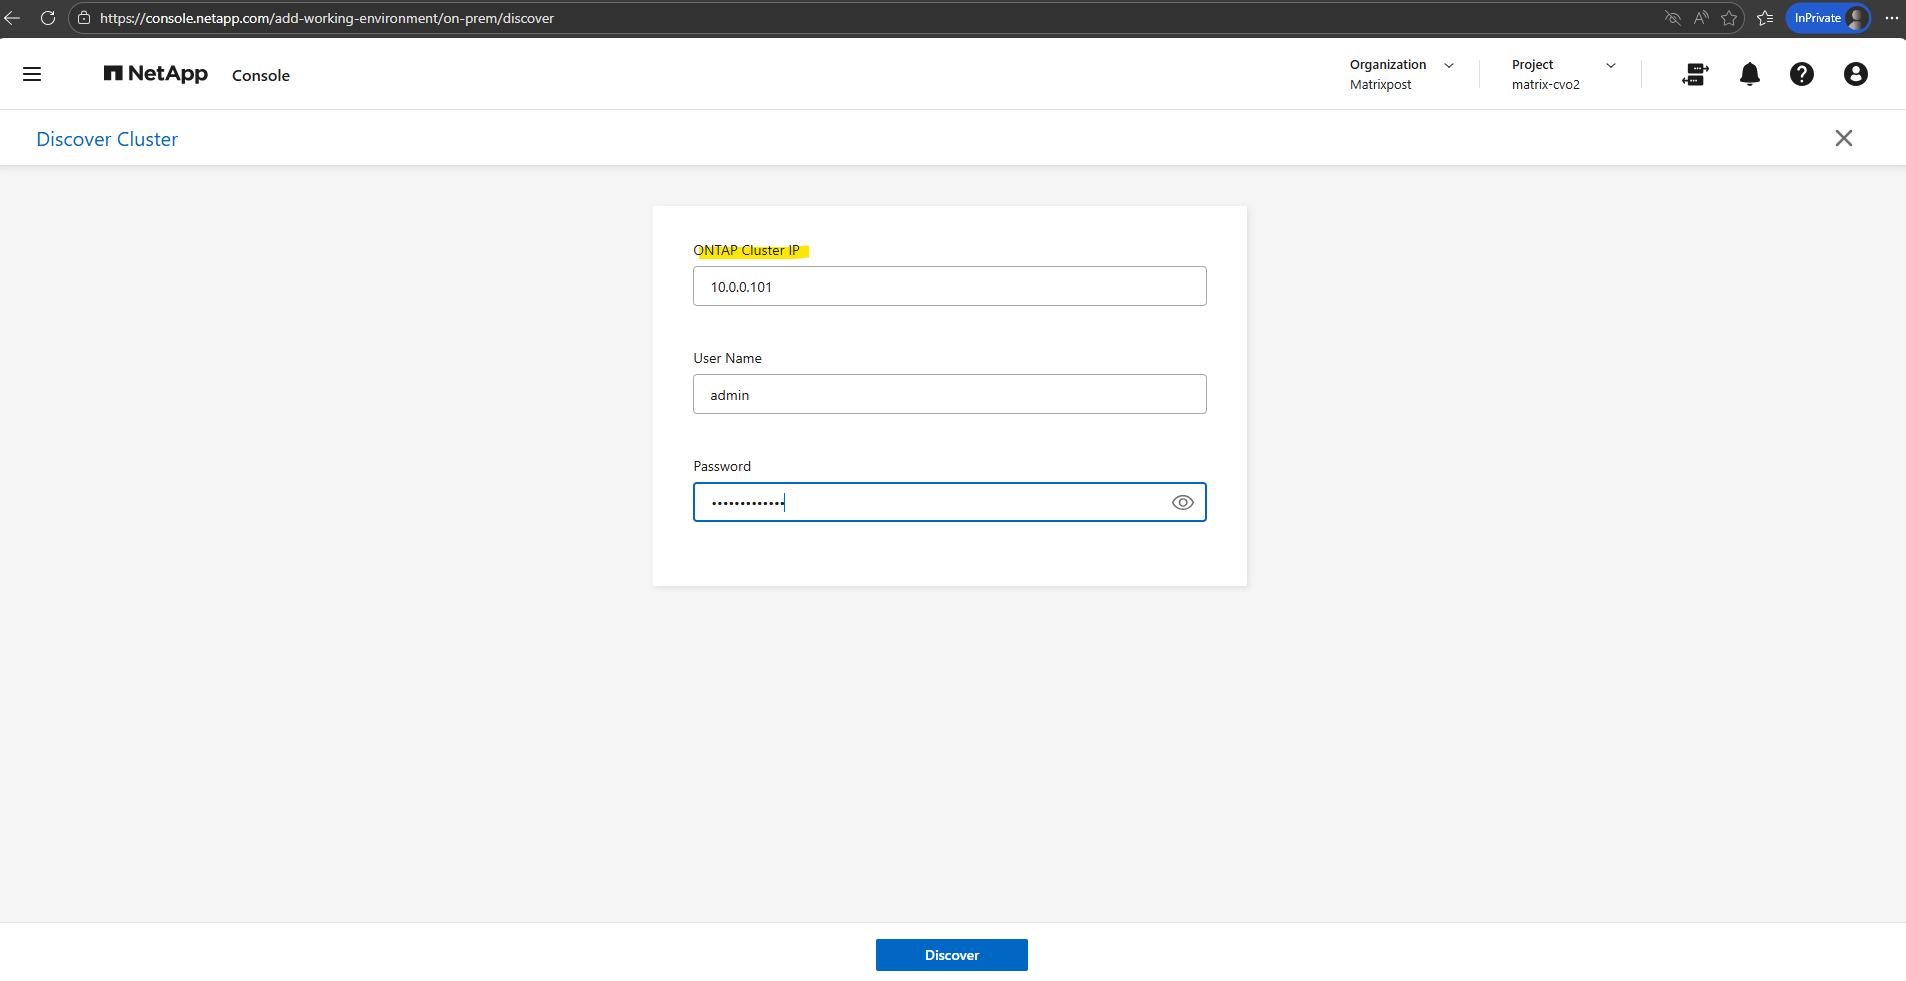
As already shown in my post below for my ONTAP simulator environment, we can of course also connect our ONTAP Select environment to the NetApp console.
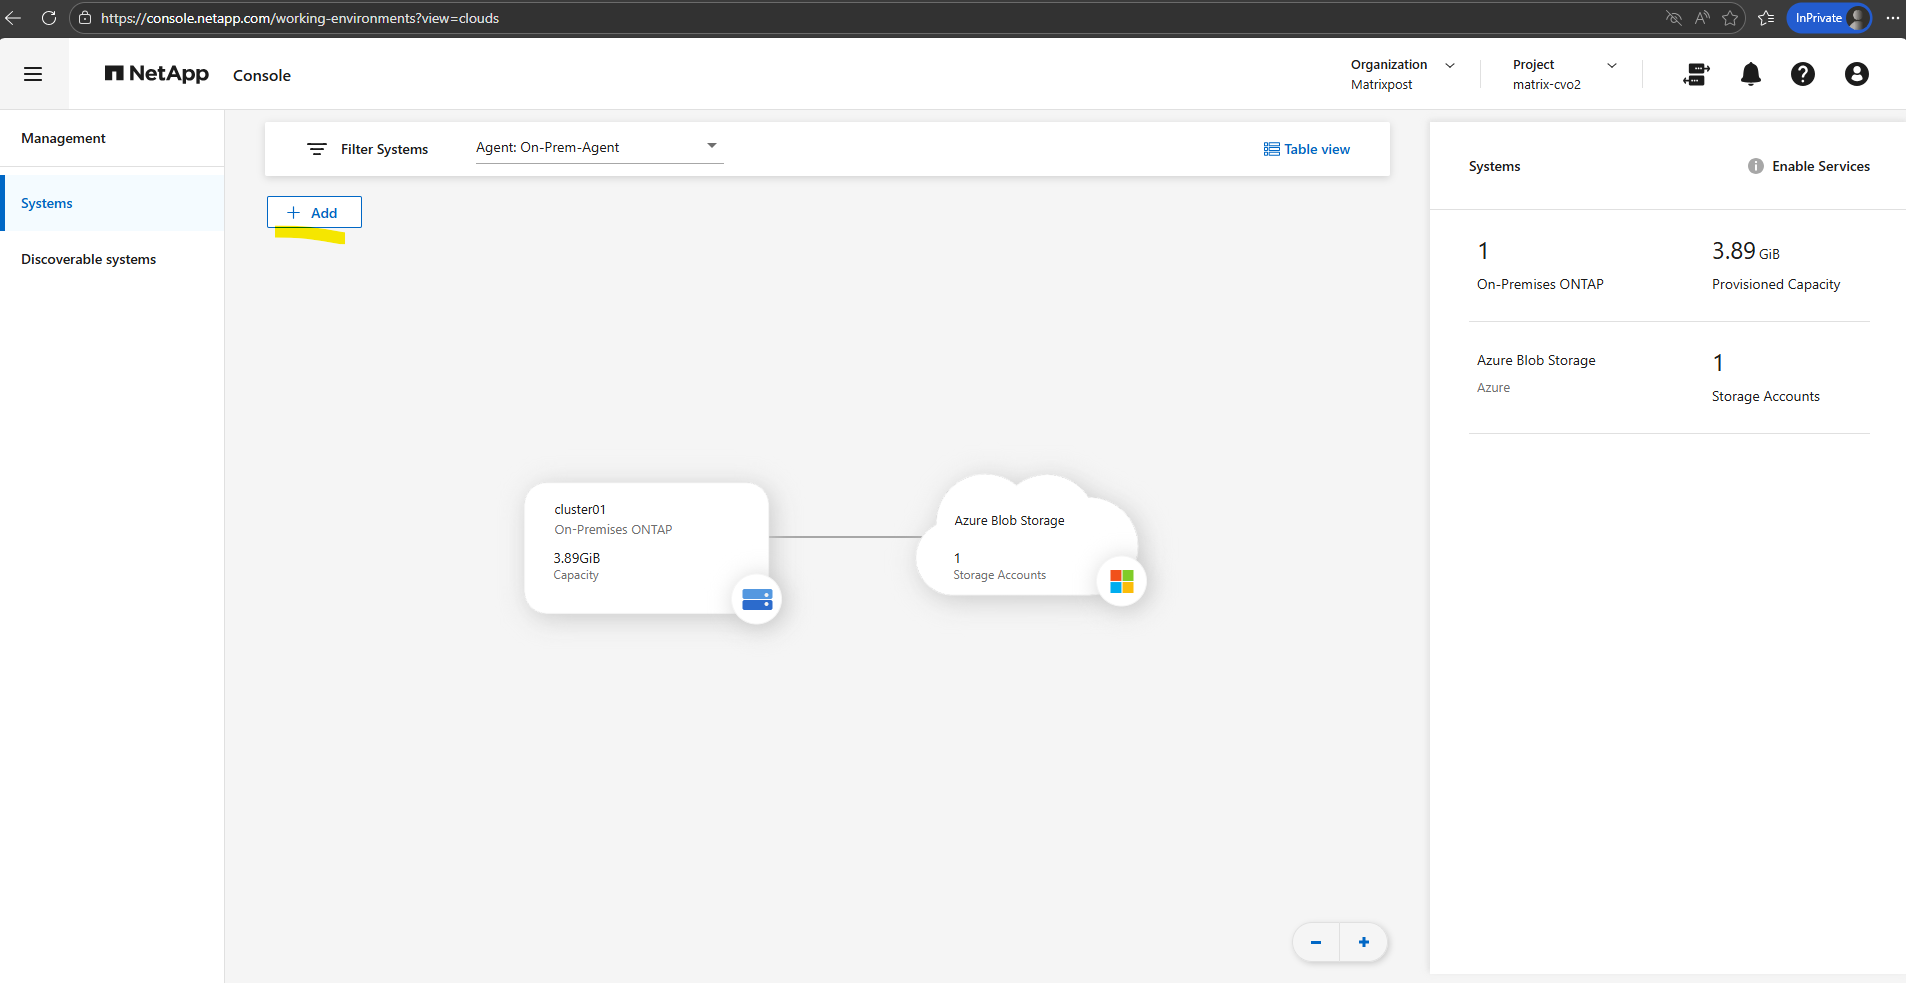
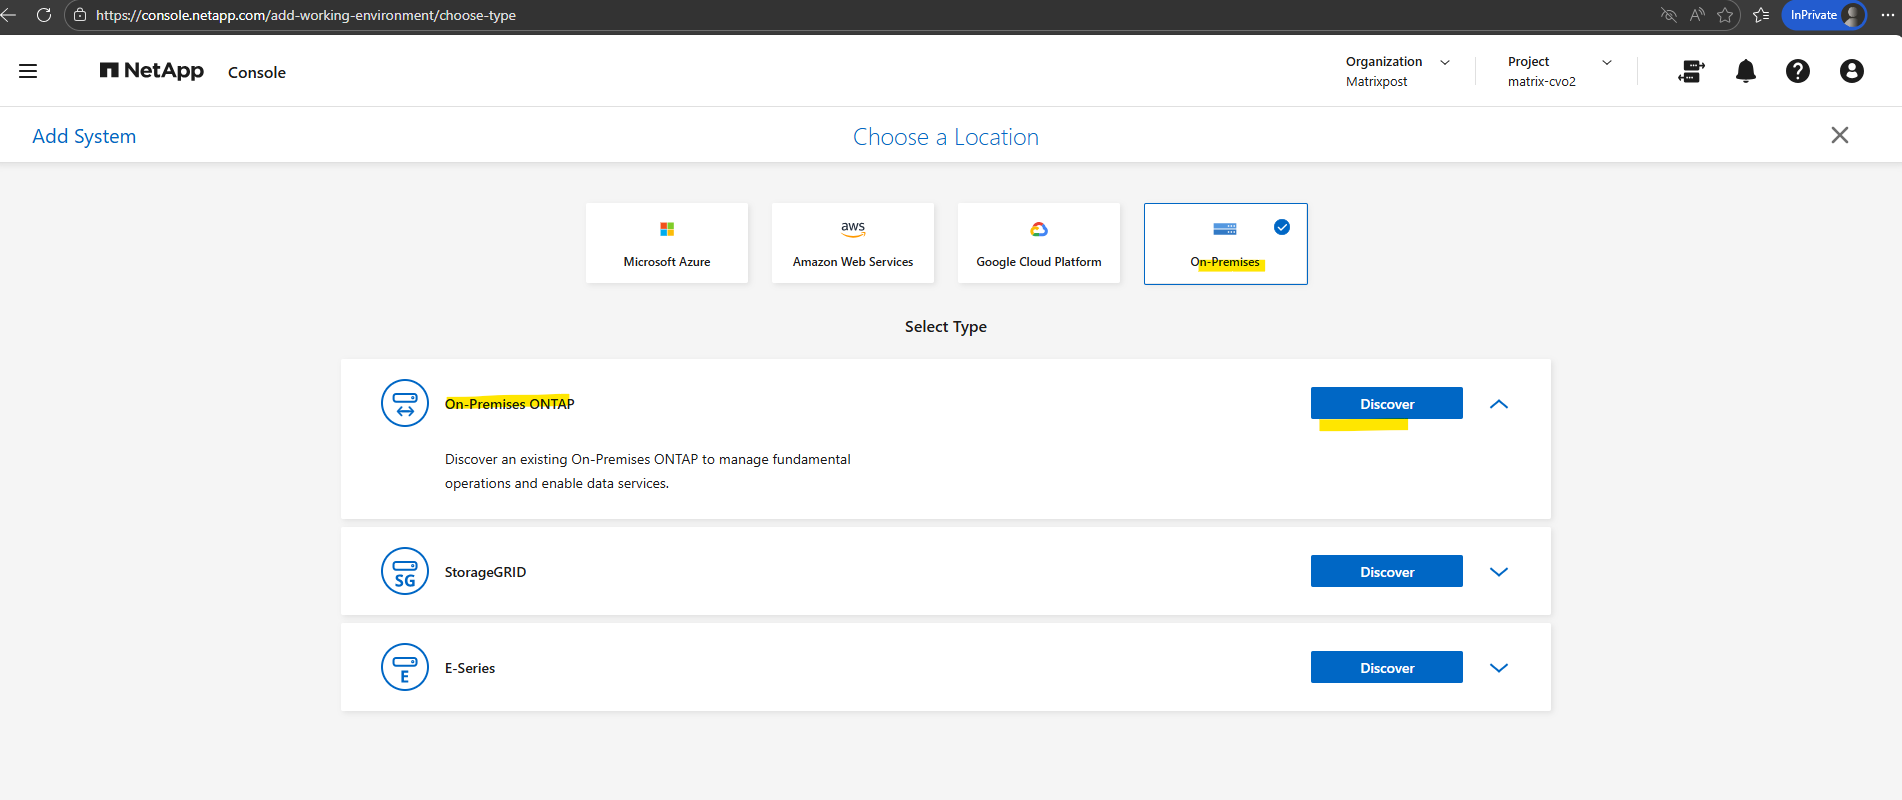
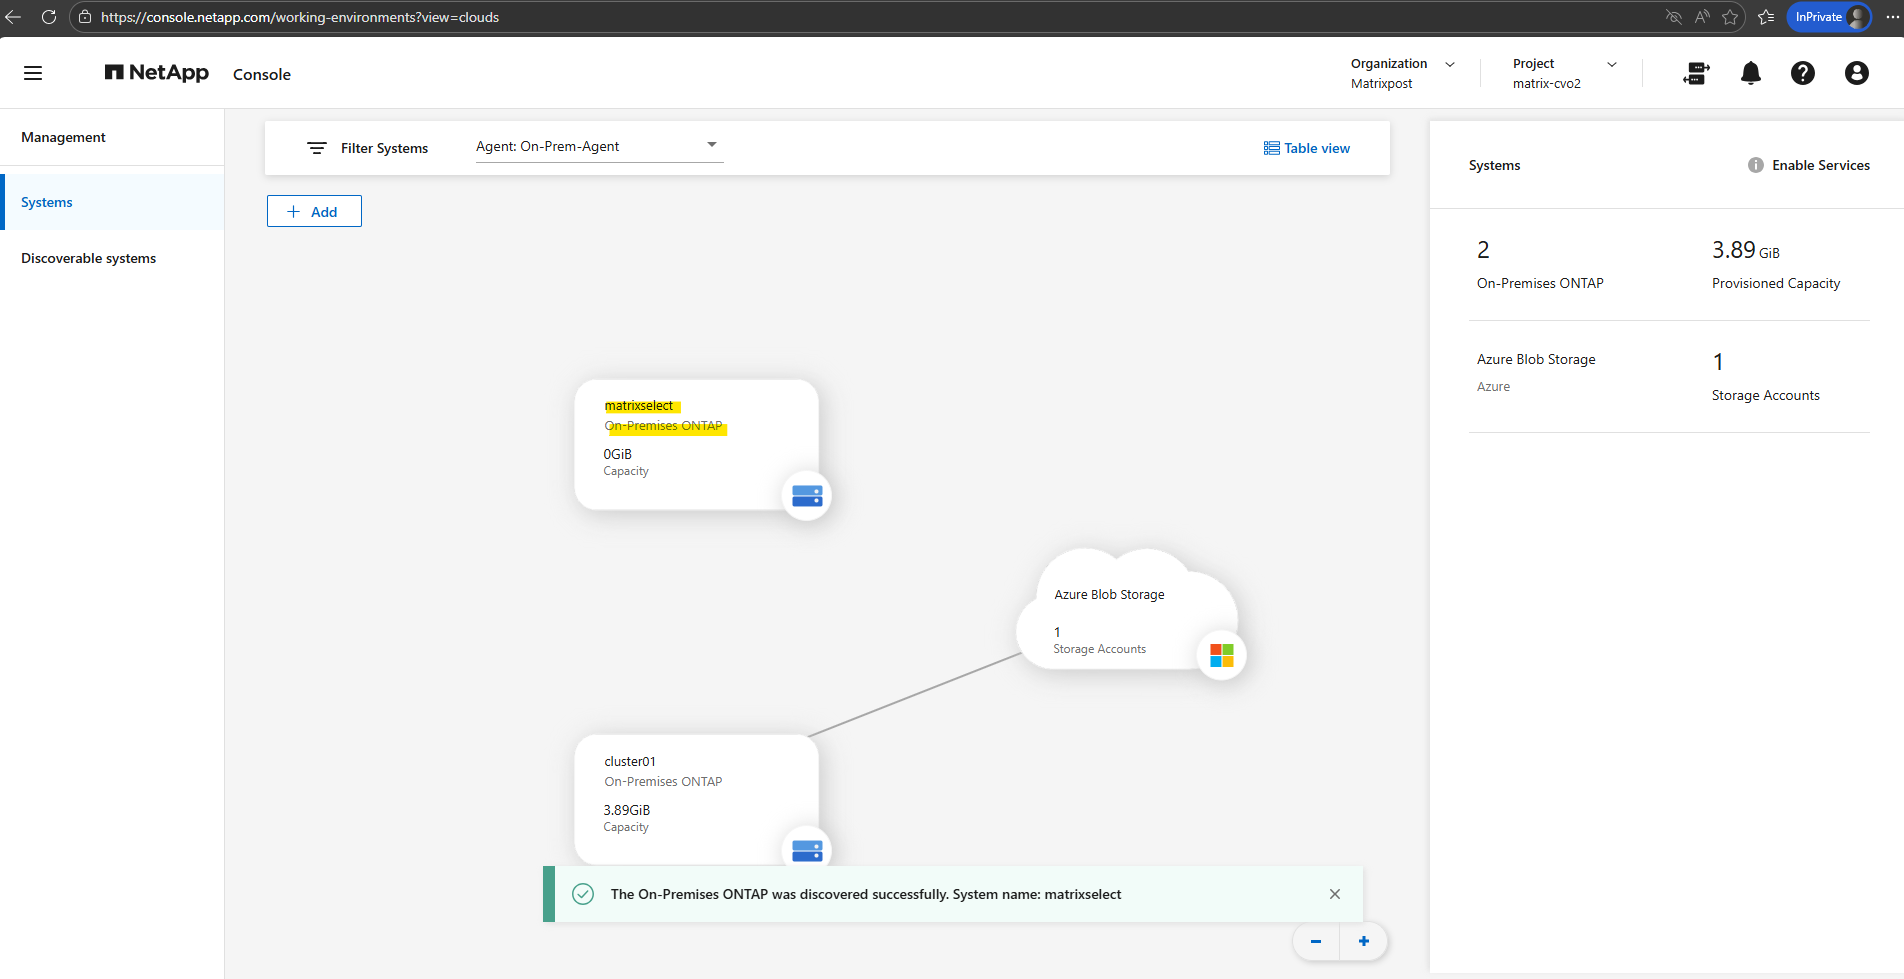
At this stage, the NetApp Console shows 0 GiB capacity because only the root aggregates (aggr0) exist on the system. Since no data aggregates have been created yet, the available disks are still listed as spares, and therefore no usable storage capacity is reported.
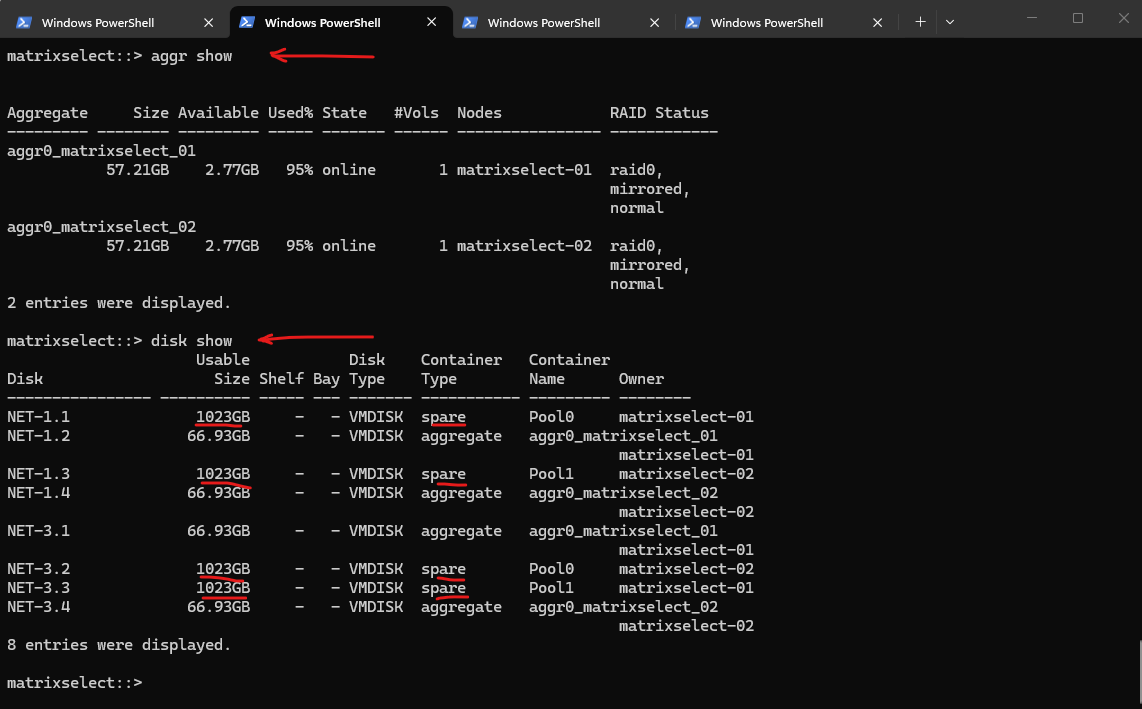
Although a 2 TB storage pool was configured during deployment, ONTAP Select divides this capacity into multiple virtual disks.
In a two-node HA deployment, the storage is split into two approximately 1 TB disks per node, which are placed in Pool0 and Pool1 to support mirrored aggregates across the cluster.
More about mirrored aggregates in ONTAP Select you will also find here https://docs.netapp.com/us-en/ontap-select/concept_ha_mirroring.html.
matrixselect::> aggr show
matrixselect::> disk show
ONTAPI (ZAPI) vs. ONTAP REST API
NetApp ONTAPI (ZAPI) calls are NetApp’s proprietary APIs that are included with NetApp ONTAP® software to automate ONTAP data storage management tasks. Automation is a strategic imperative for most organizations. Today, organizations are looking to simplify, modernize, and standardize their approach to automation with industry-standard APIs. For this reason, NetApp decided to refocus on the REST (representational state transfer) API.
NetApp added support for an expansive REST API in the ONTAP 9.6 software release. Starting with ONTAP 9.7, new features and enhancements are available only through the ONTAP REST API for automation.
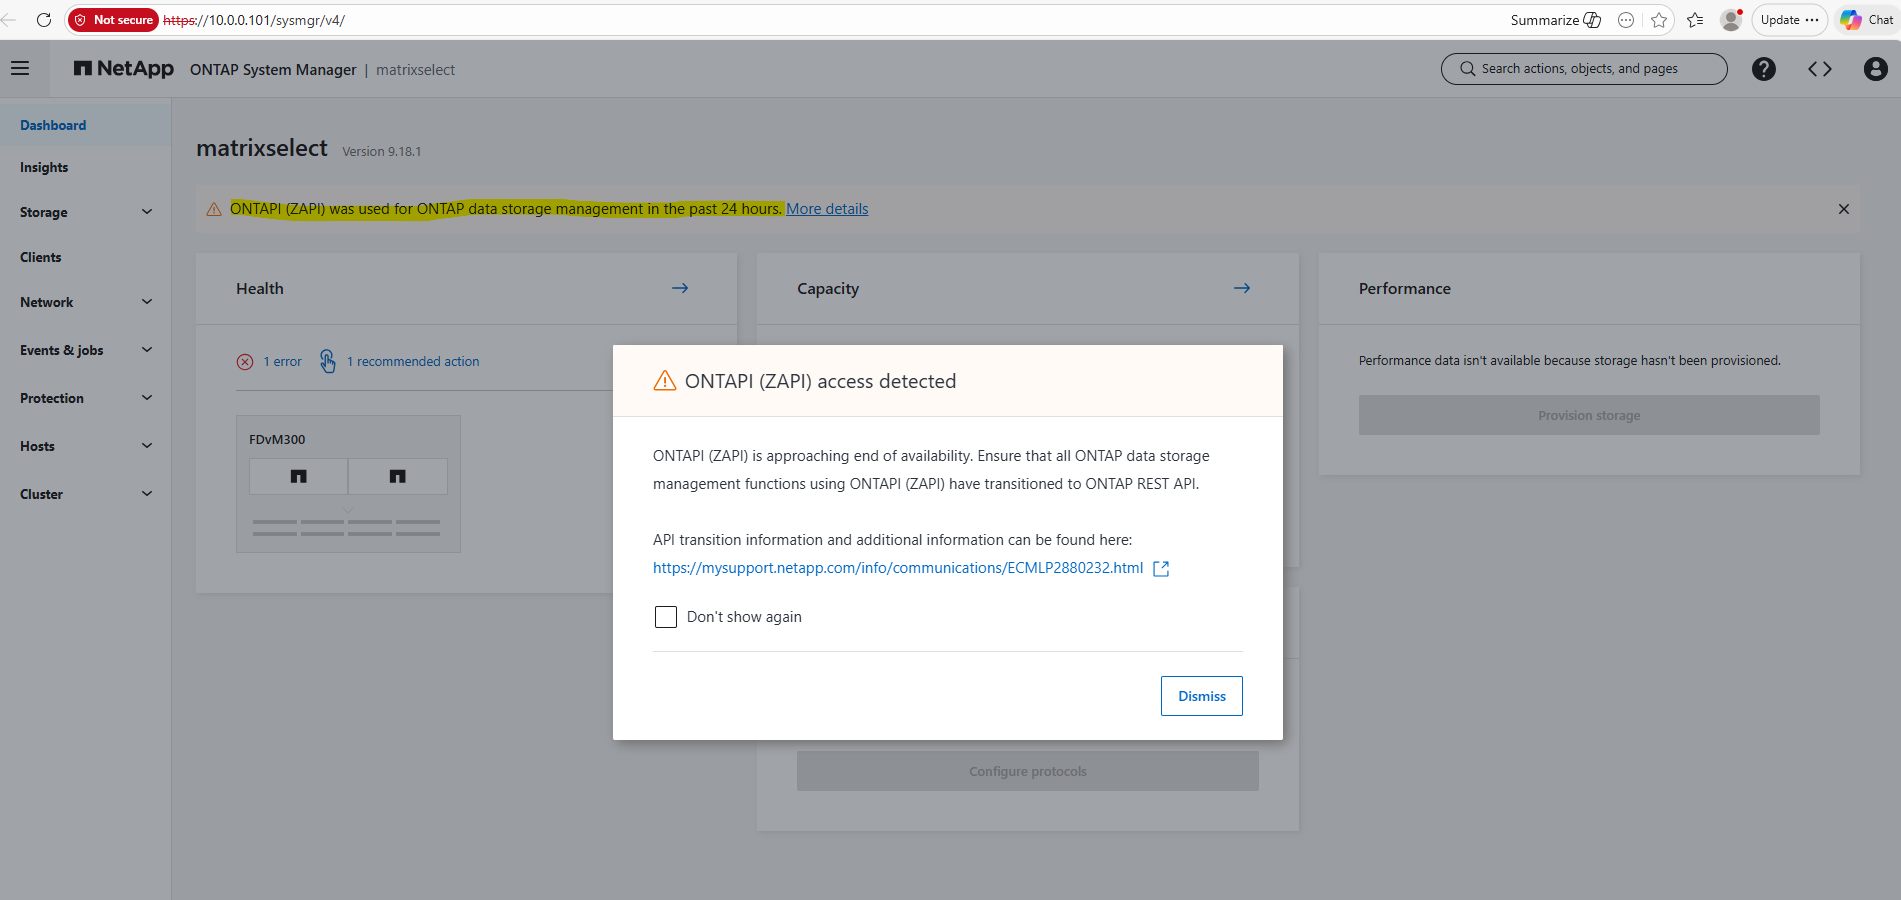
This correspondence is an update to our previous announcement from February 2023, which stated the end of availability (EOA) of ONTAPI (ZAPI) in January 2024. Upon reassessment and recognizing our customers’ continued reliance on ONTAPI, we have decided to prolong offering ONTAPI. Consequently, the EOA for ONTAPI is now deferred until further communication.
Post upgrade to ONTAP versions 9.14 and beyond, ONTAPI (ZAPI) will stay active for 30 days. If no ONTAPI calls are detected during this timeframe, ONTAPI will be automatically disabled. However, it can be re-enabled if necessary, using a CLI command.
We would like to emphasize that to fully utilize the capabilities of ONTAP, we highly recommend transitioning to the ONTAP REST API. If you have any inquiries or concerns about the migration to the REST API, please contact ng-ontapi-queries@netapp.com.
More about here https://mysupport.netapp.com/info/communications/ECMLP2880232.html
In part 2 of this series, we prepare the ONTAP Select cluster for data services (CIFS/SMB and NFS) by creating the first data aggregate, volumes, and SVMs, and finally configuring and exporting NFS exports and CIFS shares.
Links
Learn about ONTAP Select
https://docs.netapp.com/us-en/ontap-select/concept_ots_overview.htmlNetApp ONTAP Select
https://futurumgroup.com/wp-content/uploads/documents/EG1_NetApp_ONTAP_Select-4.pdfEvaluation licenses for ONTAP Select deployments
https://docs.netapp.com/us-en/ontap-select/concept_lic_evaluation.htmlNetApp Licensing
https://www.youtube.com/watch?v=DOztTPWvHcUNetApp High Availability (new version)
https://www.youtube.com/watch?v=SOJiR7zTIRwONTAP Select Deploy
https://docs.netapp.com/us-en/ontap-select/concept_ots_deploy.htmlONTAP Select HA RSM and mirrored aggregates
https://docs.netapp.com/us-en/ontap-select/concept_ha_mirroring.htmlONTAP Select high availability configurations
https://docs.netapp.com/us-en/ontap-select/concept_ha_config.html
