

Mastering Netplan: Modern Network Configuration on Ubuntu
Modern Ubuntu Server releases (17.10 and later) use Netplan as the default network configuration system.
Instead of editing /etc/network/interfaces, the network settings are now defined in declarative YAML files and applied through systemd-networkd or NetworkManager.
In this post, we’ll walk through the essential Netplan concepts and show how to configure common setups like static IPs, gateways, and routes.
Introduction
Netplan is the default network configuration framework on modern Ubuntu systems. Developed by Canonical, it provides a simple YAML-based configuration format that defines network settings such as IP addresses, gateways, DNS servers, and routes.
During system boot, Netplan reads its configuration files from the /etc/netplan/ directory and generates the appropriate backend configuration for either systemd-networkd or NetworkManager, which then apply the network settings to the system.
Netplan was created by Canonical and is primarily associated with Ubuntu, but it is not exclusive to Ubuntu.
Netplan is used by:
- Ubuntu Server
- Ubuntu Desktop
- Ubuntu Cloud Images
- Some Ubuntu-based distributions
Most other Linux distributions use different network configuration frameworks:
- NetworkManager (Fedora, Rocky Linux, AlmaLinux, RHEL desktops)
- systemd-networkd directly (many minimal/server installations)
- Wicked (openSUSE/SLES)
- ifupdown (older Debian systems)
- Traditional network-scripts (older RHEL/CentOS releases)
Netplan itself does not configure the network. It acts as a frontend that generates configuration for either systemd-networkd or NetworkManager, which then perform the actual network configuration.
About Mastering Linux NetworkManager and its nmcli you can also read my following post.
When NetworkManager is used as the network backend, connection profiles are typically stored as key files in the /etc/NetworkManager/system-connections/ directory. These files contain settings such as IP addresses, gateways, DNS servers, routes, and Wi-Fi credentials in a simple INI-style format.
About directly using these key files to configure the network settings you will also see in my following post.
Alternatively, network connections can be created and managed using the nmcli command-line utility (shown in my post above), which modifies the same connection profiles through the NetworkManager API without requiring direct file editing.
About Wicked for openSUSE/SLES my following post.
Configuring Network Settings (Static and DHCP)
Ubuntu uses Netplan to manage network configuration through YAML files located in the /etc/netplan/ directory.
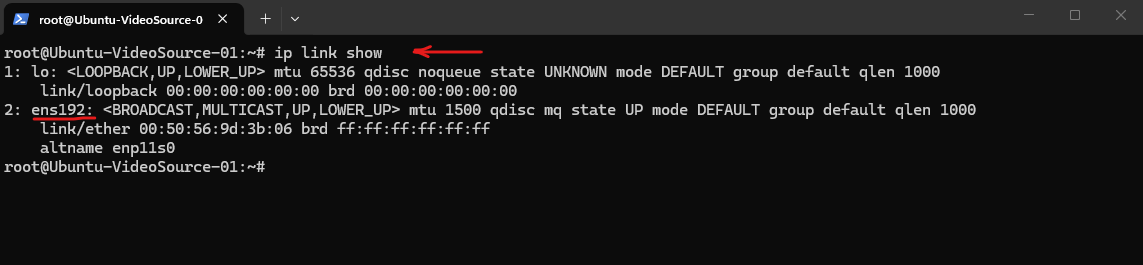
Before modifying the Netplan configuration, we can use the
ip link showcommand to identify the network interfaces available on the system. In this example, the primary network adapter is namedens192, which is the interface referenced below in the50-cloud-init.yamlconfiguration file.
$ ip link show
In this example below, we will modify the 50-cloud-init.yaml configuration file to configure a static IP address, default gateway, DNS server, and DNS search domain, ensuring the system can automatically resolve short hostnames within the matrixpost-lab.net domain.
The
version: 2parameter specifies the Netplan configuration format version and is required in all Netplan configuration files. Currently, version 2 is the standard and only supported configuration schema used by modern Ubuntu releases.
$ sudo nano /etc/netplan/50-cloud-init.yaml

network:
    ethernets:
        ens192:
            addresses:
            - 10.0.0.241/24
            nameservers:
                addresses:
                - 10.0.0.70
                search:
                - matrixpost-lab.net
            routes:
            -   to: default
                via: 10.0.0.1
    version: 2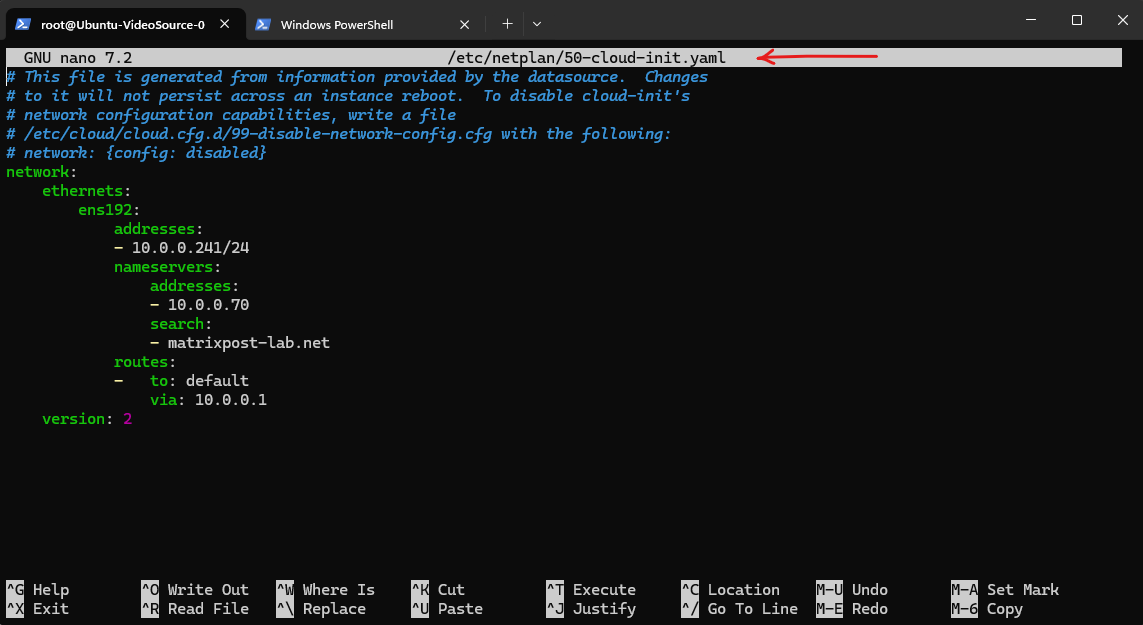
In addition to the default gateway, Netplan allows you to configure static routes to reach remote networks through specific next-hop routers.
In the example below, traffic destined for the
172.16.0.0/16network is forwarded to the router at10.0.0.254, while all other traffic uses the default gateway10.0.0.1.
        routes:
        -   to: default
            via: 10.0.0.1
        -   to: 172.16.0.0/16
            via: 10.0.0.254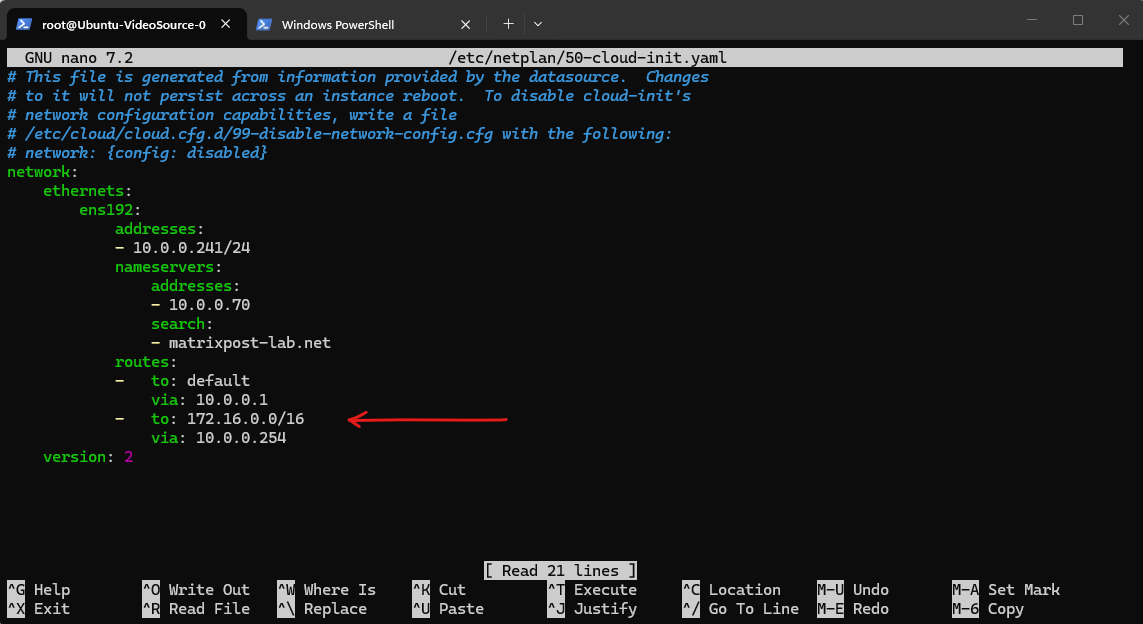
On Ubuntu with Netplan, after editing the YAML file, apply the new configuration with:
$ sudo netplan apply
To obtain network settings automatically from a DHCP server, replace the static configuration with the dhcp4: true directive.
The DHCP server will then provide the IP address, subnet mask, default gateway, DNS servers, and any additional network options configured in the environment.
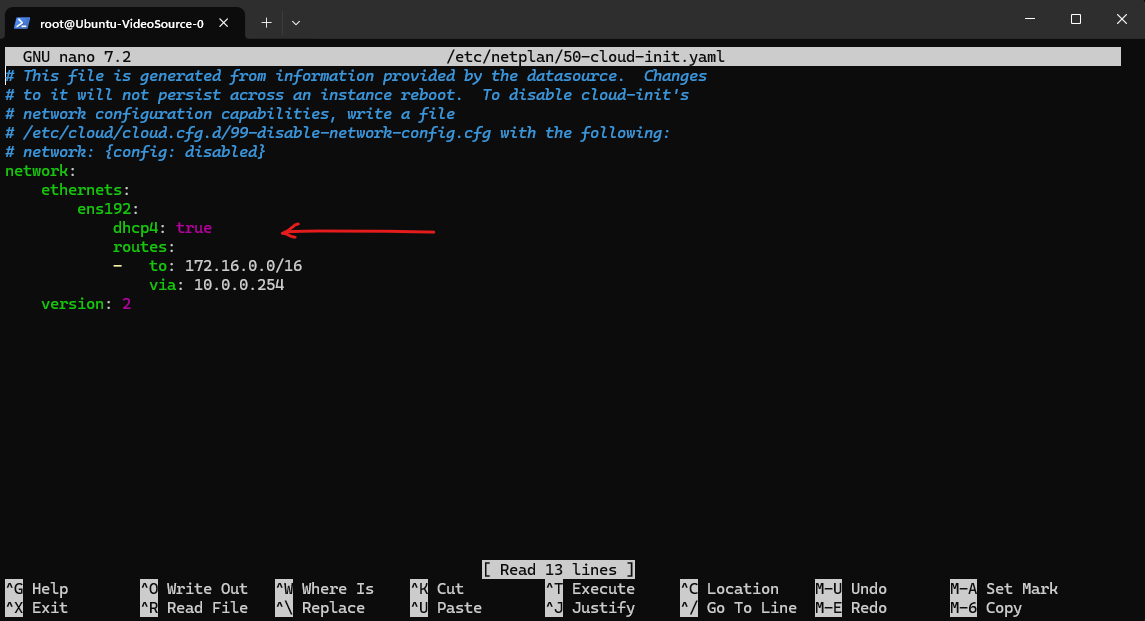
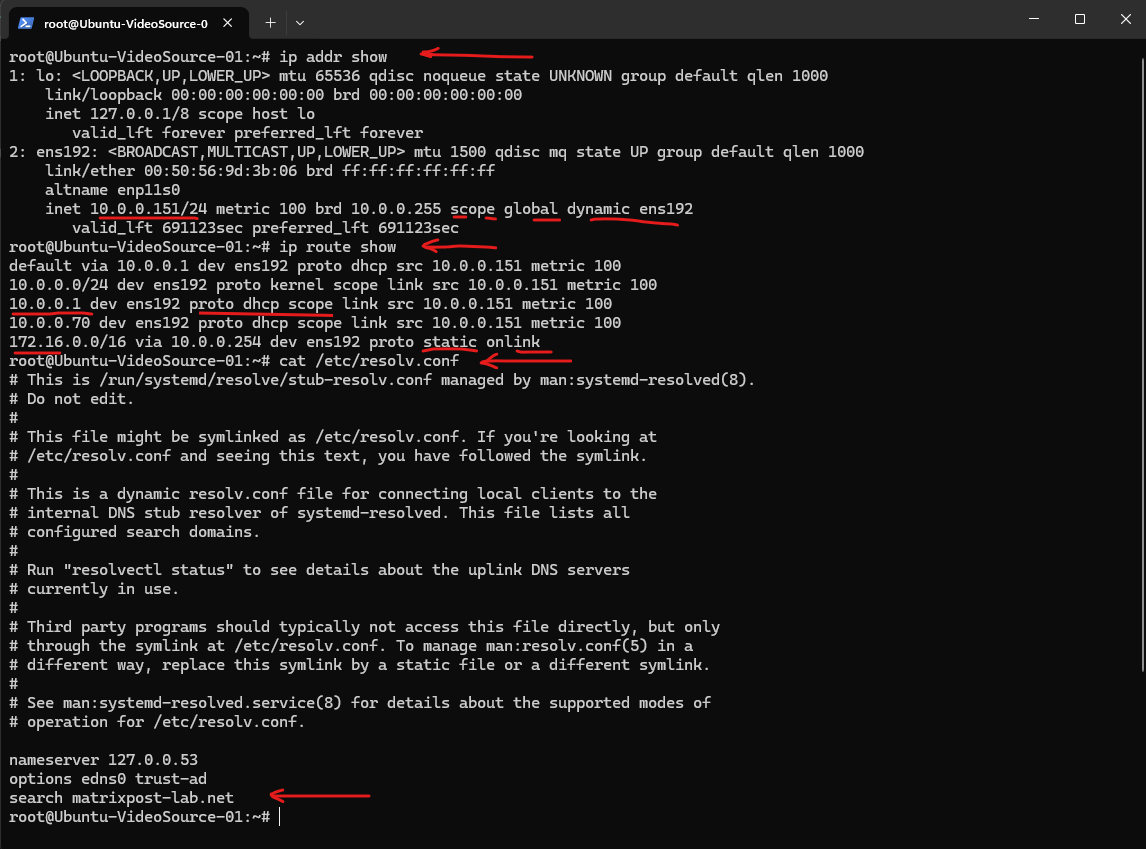
The ip addr show, ip route show, and /etc/resolv.conf commands can be used to verify the currently active network configuration. In the output below, the dynamic flag on the IP address and the proto dhcp entries for the default route indicate that the network settings were assigned dynamically by a DHCP server, while the proto static entry confirms that the route to 172.16.0.0/16 was configured manually. The DNS search domain can be verified in /etc/resolv.conf, where the search matrixpost-lab.net entry allows short hostnames within the domain to be resolved automatically.
/etc/resolv.confon modern Ubuntu systems usingsystemd-resolvedonly shows the local stub resolver (127.0.0.53) and not the actual upstream DNS servers received from DHCP.
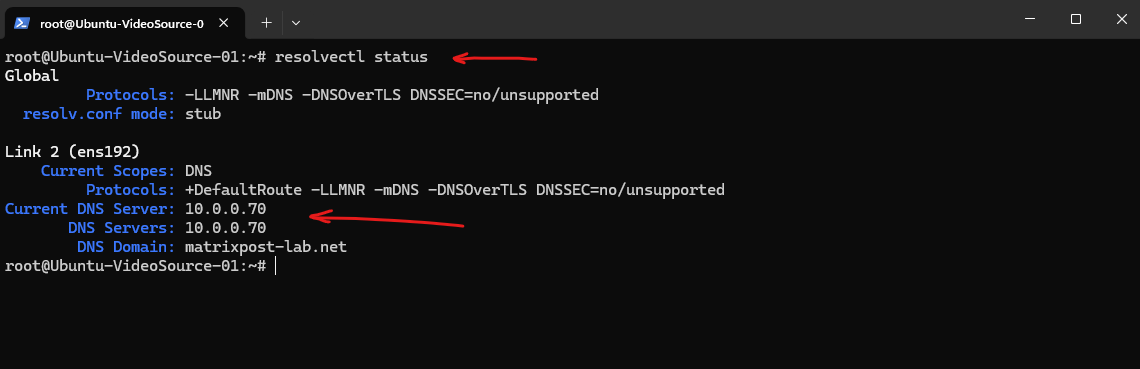
The resolvectl status command displays the actual DNS configuration currently in use by the system. In this example, the DNS server 10.0.0.70 and the DNS search domain matrixpost-lab.net were assigned to the ens192 interface and are used by systemd-resolved to perform name resolution.
$ resolvectl status

or for a specific interface:
$ resolvectl status ens192
Disable IPv6 Persistently
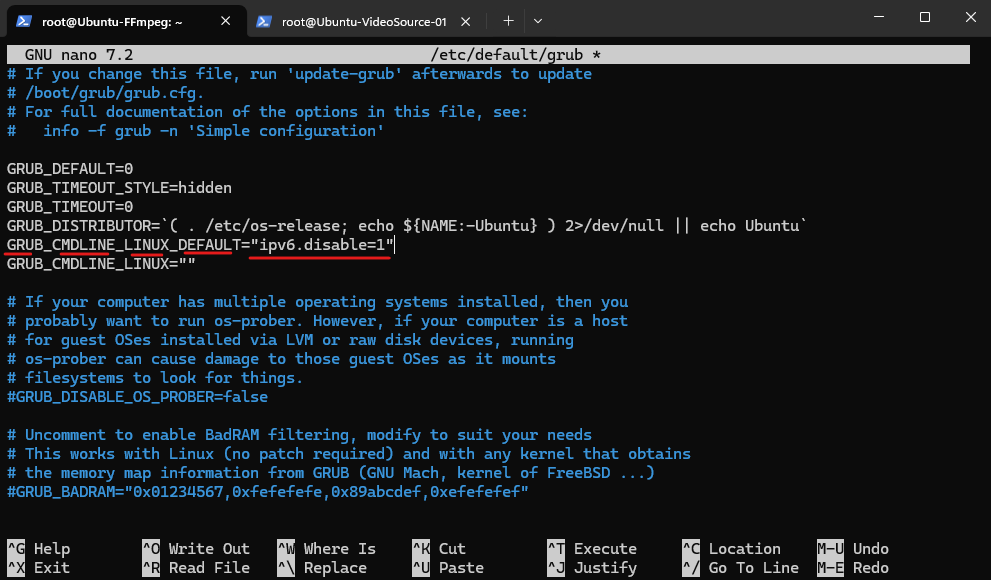
Although disabling IPv6 using sysctl removed the IPv6 addresses temporarily, the settings were not fully preserved during the network initialization process after a reboot. By adding the kernel parameter ipv6.disable=1 to the GRUB configuration, IPv6 is disabled at boot time before any network interfaces are initialized, preventing link-local IPv6 addresses (fe80::/64) from being created in the first place.
Edit /etc/default/grub
$ sudo nano /etc/default/grub

Add "ipv6.disable=1" for GRUB_CMDLINE_LINUX_DEFAULT as shown below.
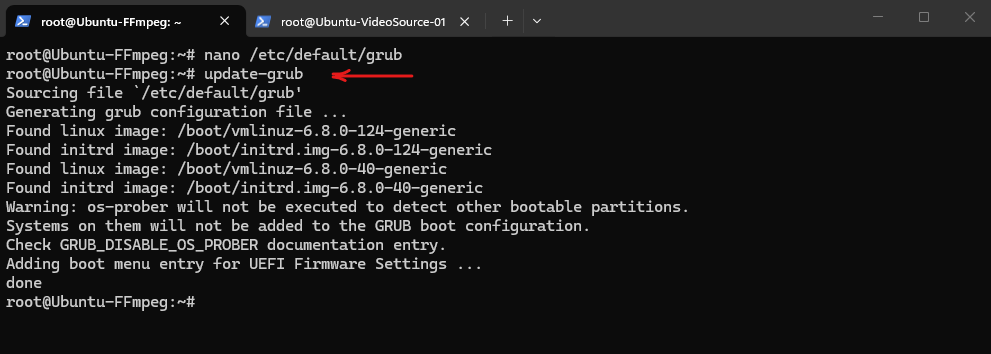
Next update Grub and reboot the system.
$ sudo update-grub
$ sudo reboot
Determining which Network Backend (systemd-networkd or NetworkManager) manages an Interface
Since Netplan itself does not configure network interfaces directly, it can be useful to determine which backend is actually managing a particular interface.
On Ubuntu, this is typically systemd-networkd on server installations and NetworkManager on desktop installations, and we can easily identify the active backend using networkctl, systemctl, and nmcli.
Ubuntu Server without Desktop – systemd-networkd
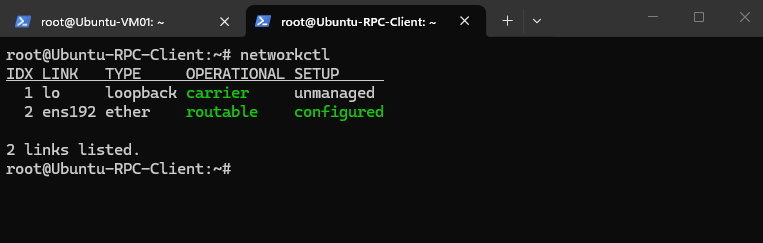
The networkctl output shows that ens192 is routable and configured by systemd-networkd.
The SETUP state configured indicates that systemd-networkd successfully applied the network configuration to the interface.
networkctl
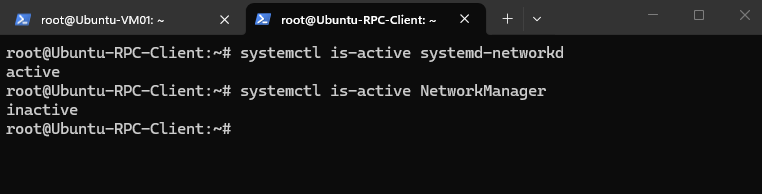
The service check confirms that systemd-networkd is active, while NetworkManager is inactive. Together with the networkctl output, this confirms that systemd-networkd is the network backend used on this Ubuntu Server installation.
systemctl is-active systemd-networkd
systemctl is-active NetworkManager
systemd-networkd is a lightweight system service that manages and configures network interfaces based on configuration provided by tools such as Netplan.
It is commonly used as the network backend on Ubuntu Server, where it handles settings such as IP addresses, routes, gateways, DNS, VLANs, and bonds (Linux equivalent of NIC teaming in Windows, for example eth0 + eth1 → bond0).
Ubuntu Server with Desktop – NetworkManager
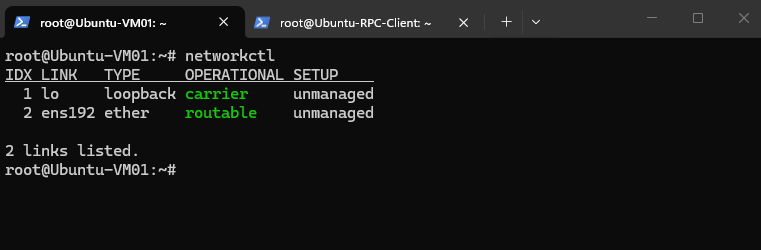
On the Ubuntu Desktop system, networkctl shows ens192 as routable but unmanaged, indicating that systemd-networkd is not managing the interface.
In this case, the network configuration is handled by NetworkManager instead.
networkctl
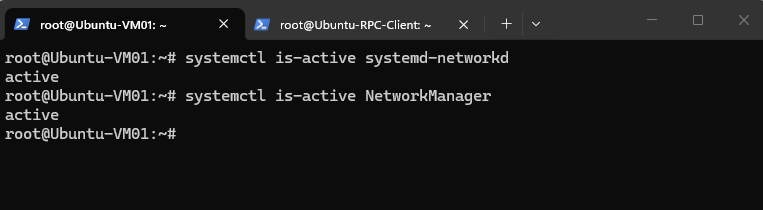
Interestingly, both systemd-networkd and NetworkManager are active on the desktop system. However, as networkctl shows ens192 as unmanaged, systemd-networkd is not managing this interface; NetworkManager is responsible for it instead.
systemctl is-active systemd-networkd
systemctl is-active NetworkManager
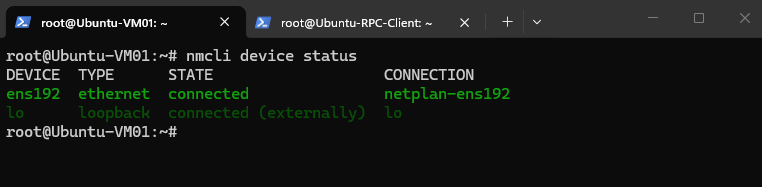
The nmcli device status output confirms that ens192 is connected and managed by NetworkManager. The connection name netplan-ens192 also shows that the configuration originated from Netplan, while NetworkManager acts as the backend that applies and manages it.
nmcli device status
Disabling systemd-networkd-wait-online when Using NetworkManager
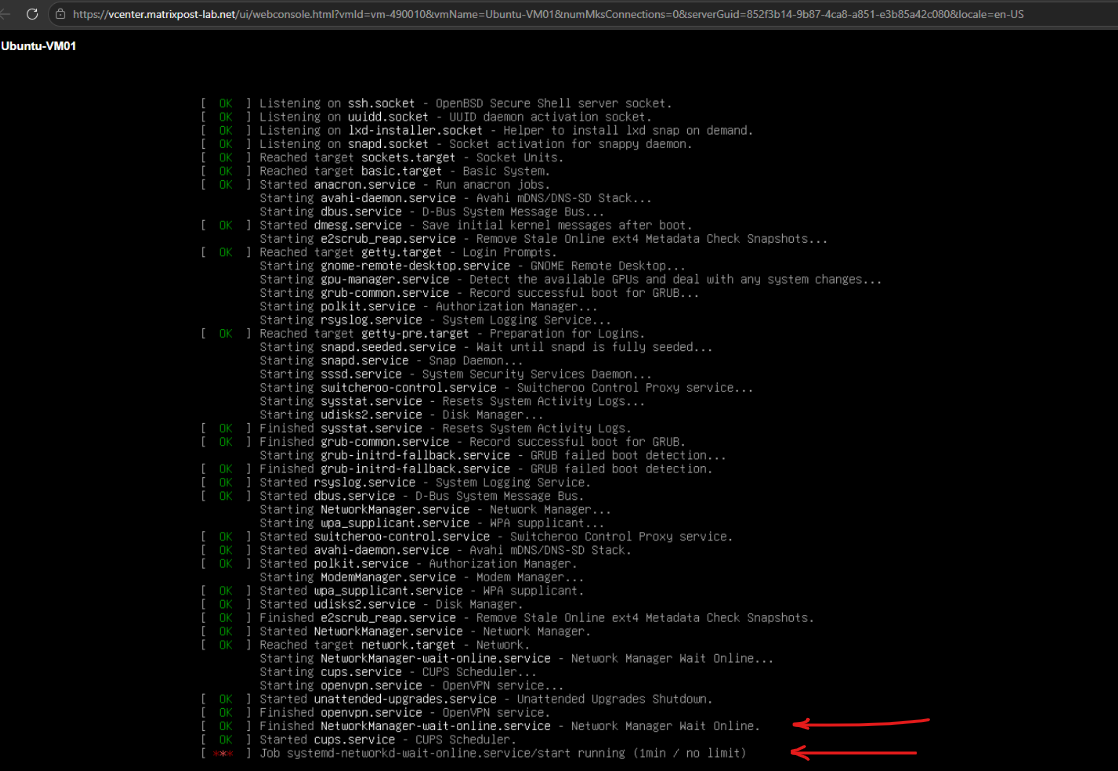
After installing the Ubuntu Desktop environment, NetworkManager manages our network interface, while the now unnecessary systemd-networkd-wait-online.service can still delay the boot process waiting for interfaces managed by systemd-networkd.
Since networkctl confirmed that our ens192 interface is unmanaged by systemd-networkd, we can safely disable and mask only its wait-online service to eliminate this boot delay.
The screenshot shows that NetworkManager has already reached the online state, while
systemd-networkd-wait-online.servicecontinues waiting unnecessarily for more than a minute.This redundant wait is what causes the noticeable delay during system startup.
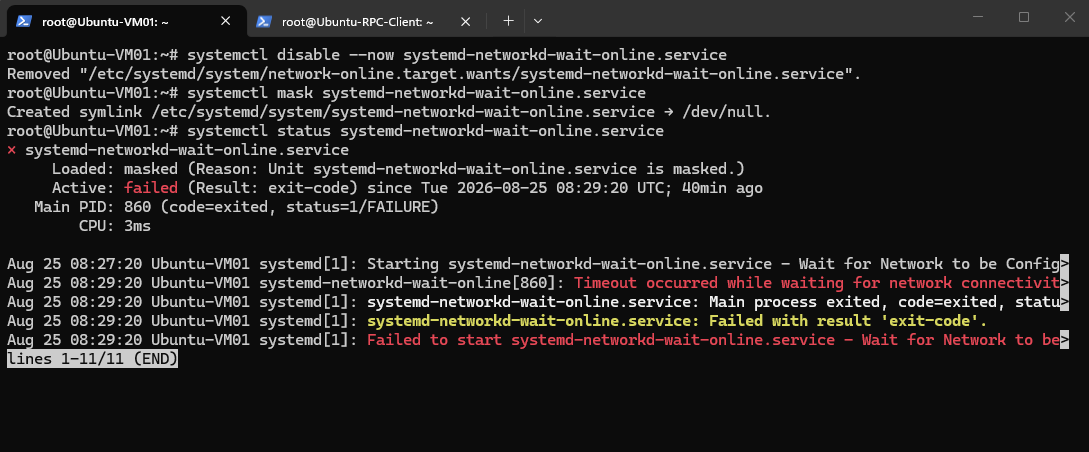
The commands disable and mask systemd-networkd-wait-online.service, preventing it from being started again during subsequent boots.
The status confirms that the service is now masked; the displayed timeout and failed state refer to its previous execution before it was disabled.
Masked means the service is hard-disabled in systemd. Its unit is linked to
/dev/null, so it cannot be started manually or automatically by another service/dependency until it is unmasked again withsystemctl unmask.
systemctl disable --now systemd-networkd-wait-online.service
systemctl mask systemd-networkd-wait-online.service
systemctl status systemd-networkd-wait-online.service
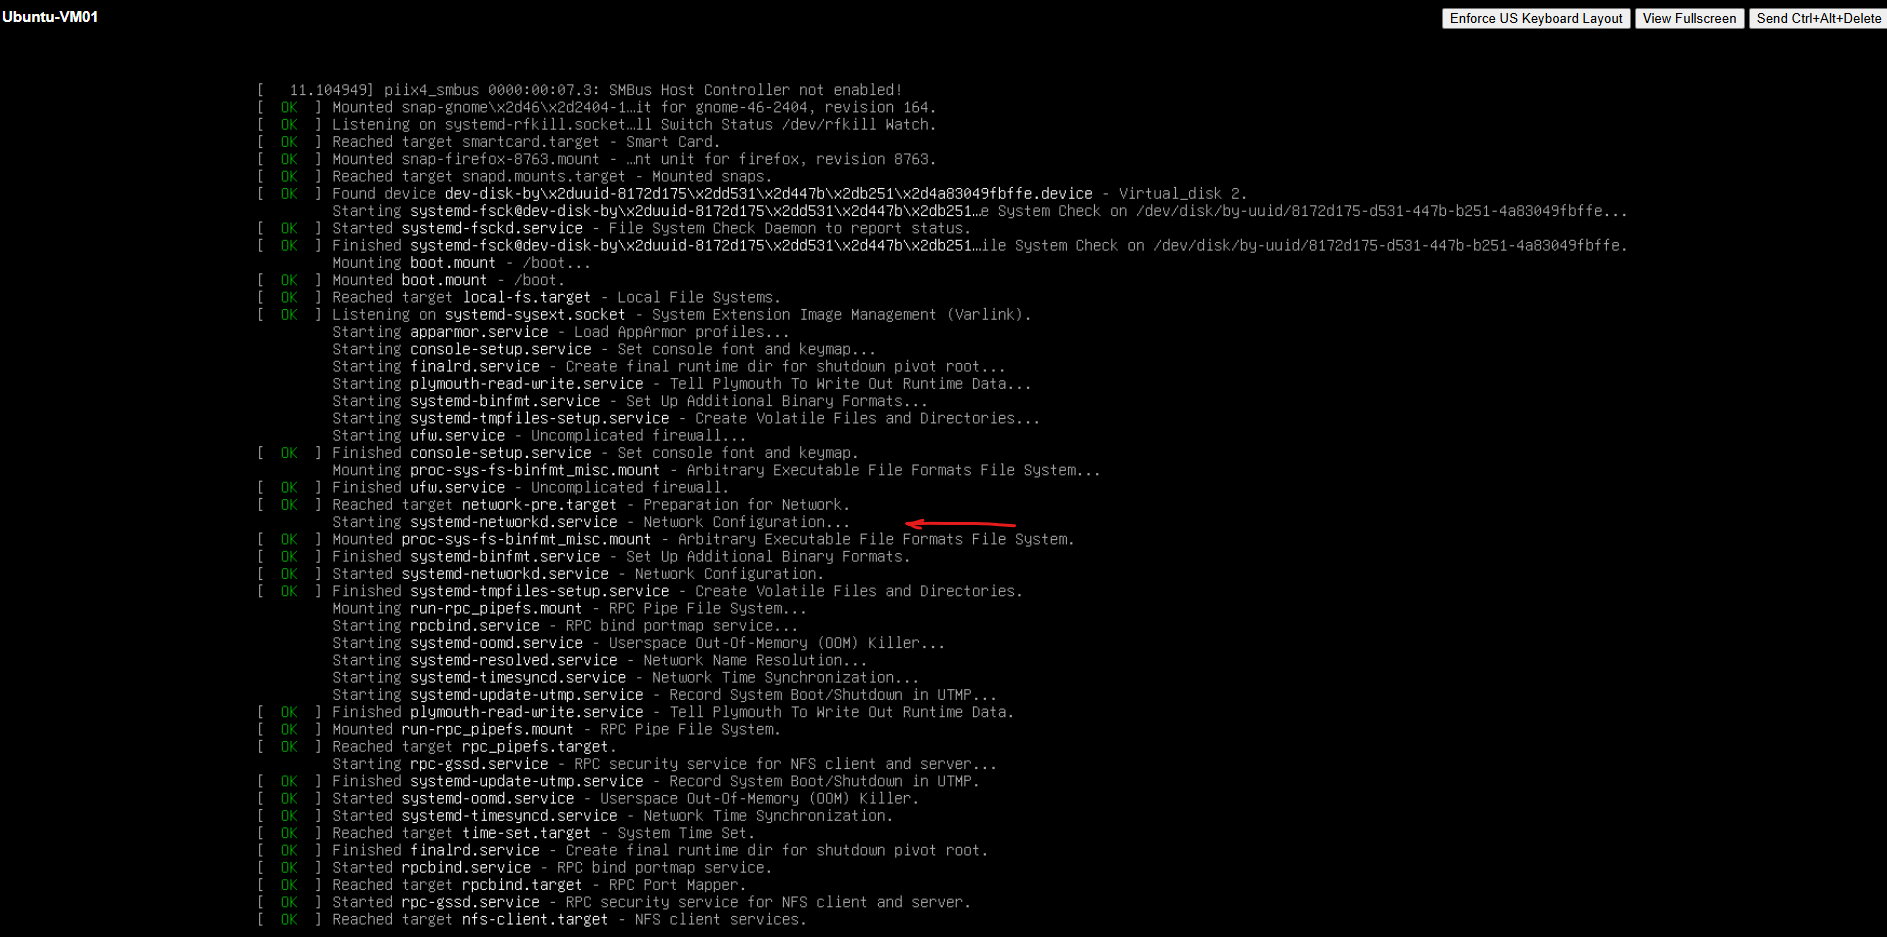
During the reboot,
systemd-networkd-wait-online.serviceis no longer started, so the previous ~2-minute wait for an interface that systemd-networkd does not manage has disappeared. The system can proceed normally through the remaining boot targets and services without that unnecessary delay.
For a deeper dive into NetworkManager, including its architecture, configuration, and useful nmcli commands, see my dedicated post below.
Links
Canonical Netplan
https://netplan.io/Netplan documentation
https://netplan.readthedocs.io/en/stable/
