NetApp ONTAP – Switching Existing Cloud Backups to DataLock and Ransomware Protection
In our previous articles, we configured NetApp Console Backup and Recovery to protect both on-premises NetApp ONTAP systems and Azure Cloud Volumes ONTAP using Microsoft Azure Blob Storage. However, our initial on-premises backup configuration did not include DataLock and Ransomware Protection.
But what if we want to enable these features later, after backups have already been created?
Since the DataLock protection mode cannot simply be changed for an existing backup policy, we need to deactivate the current backup configuration and activate a new one with DataLock enabled.
In this article, we will walk through the entire process, including exporting backup metadata, unregistering the existing backup configuration while preserving existing Azure Blob backups, and registering and activating a new backup configuration with a new policy using DataLock Governance.
We will also verify Azure Blob immutability, configure scheduled ransomware scanning, trigger an on-demand scan, and verify the protection status directly in NetApp Console.
For the initial configuration of NetApp Console Backup and Recovery for an on-premises ONTAP system using Microsoft Azure Blob Storage, refer to my previous article:
For the configuration of NetApp Console Backup and Recovery with Azure Cloud Volumes ONTAP (CVO), refer to my previous article:
For additional protection directly at the ONTAP storage layer, I can also refer to my article series on Autonomous Ransomware Protection (ARP), which covers ransomware detection and protection for ONTAP workloads:
Unregister Existing Backups (Without DataLock)
Before we can enable DataLock and Ransomware Protection, we first need to unregister our existing backup configuration, which was created without DataLock. During this process, we will ensure that our existing backups in Azure Blob Storage are preserved rather than deleted.
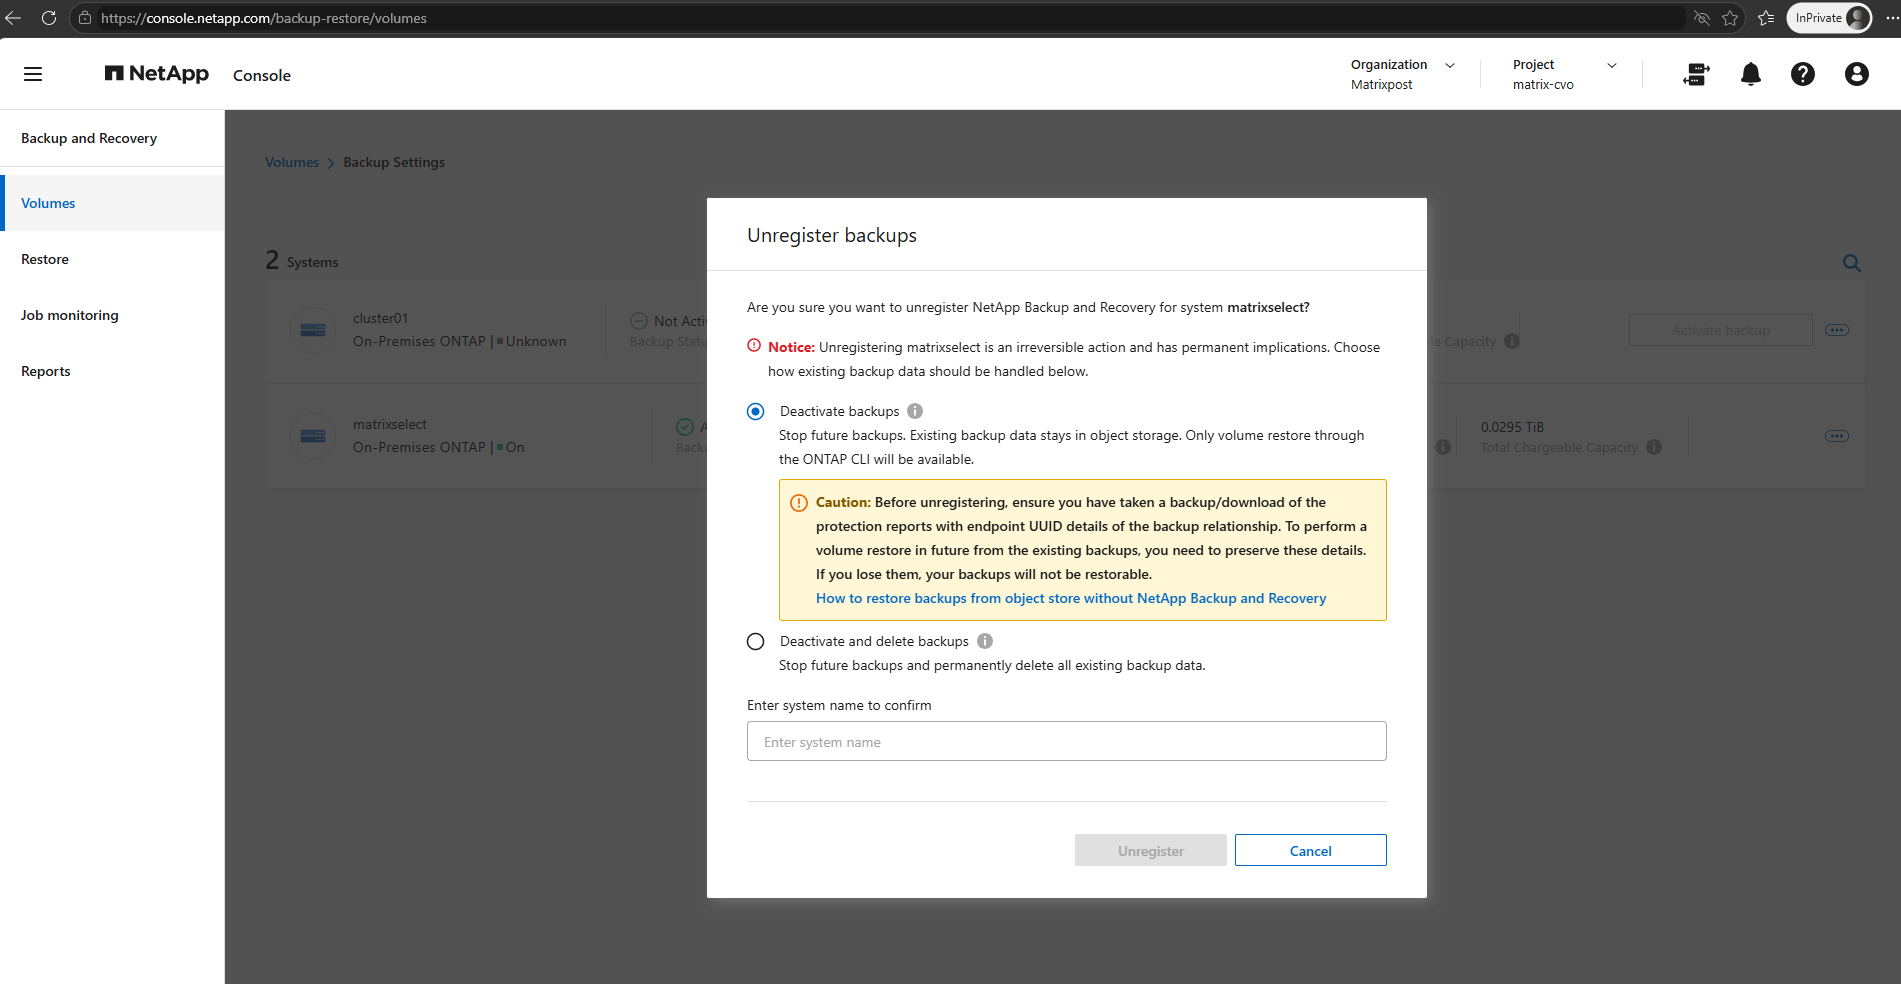
First, navigate to Backup and Recovery → Volumes → Backup Settings in NetApp Console to access the existing backup configuration for our ONTAP cluster.
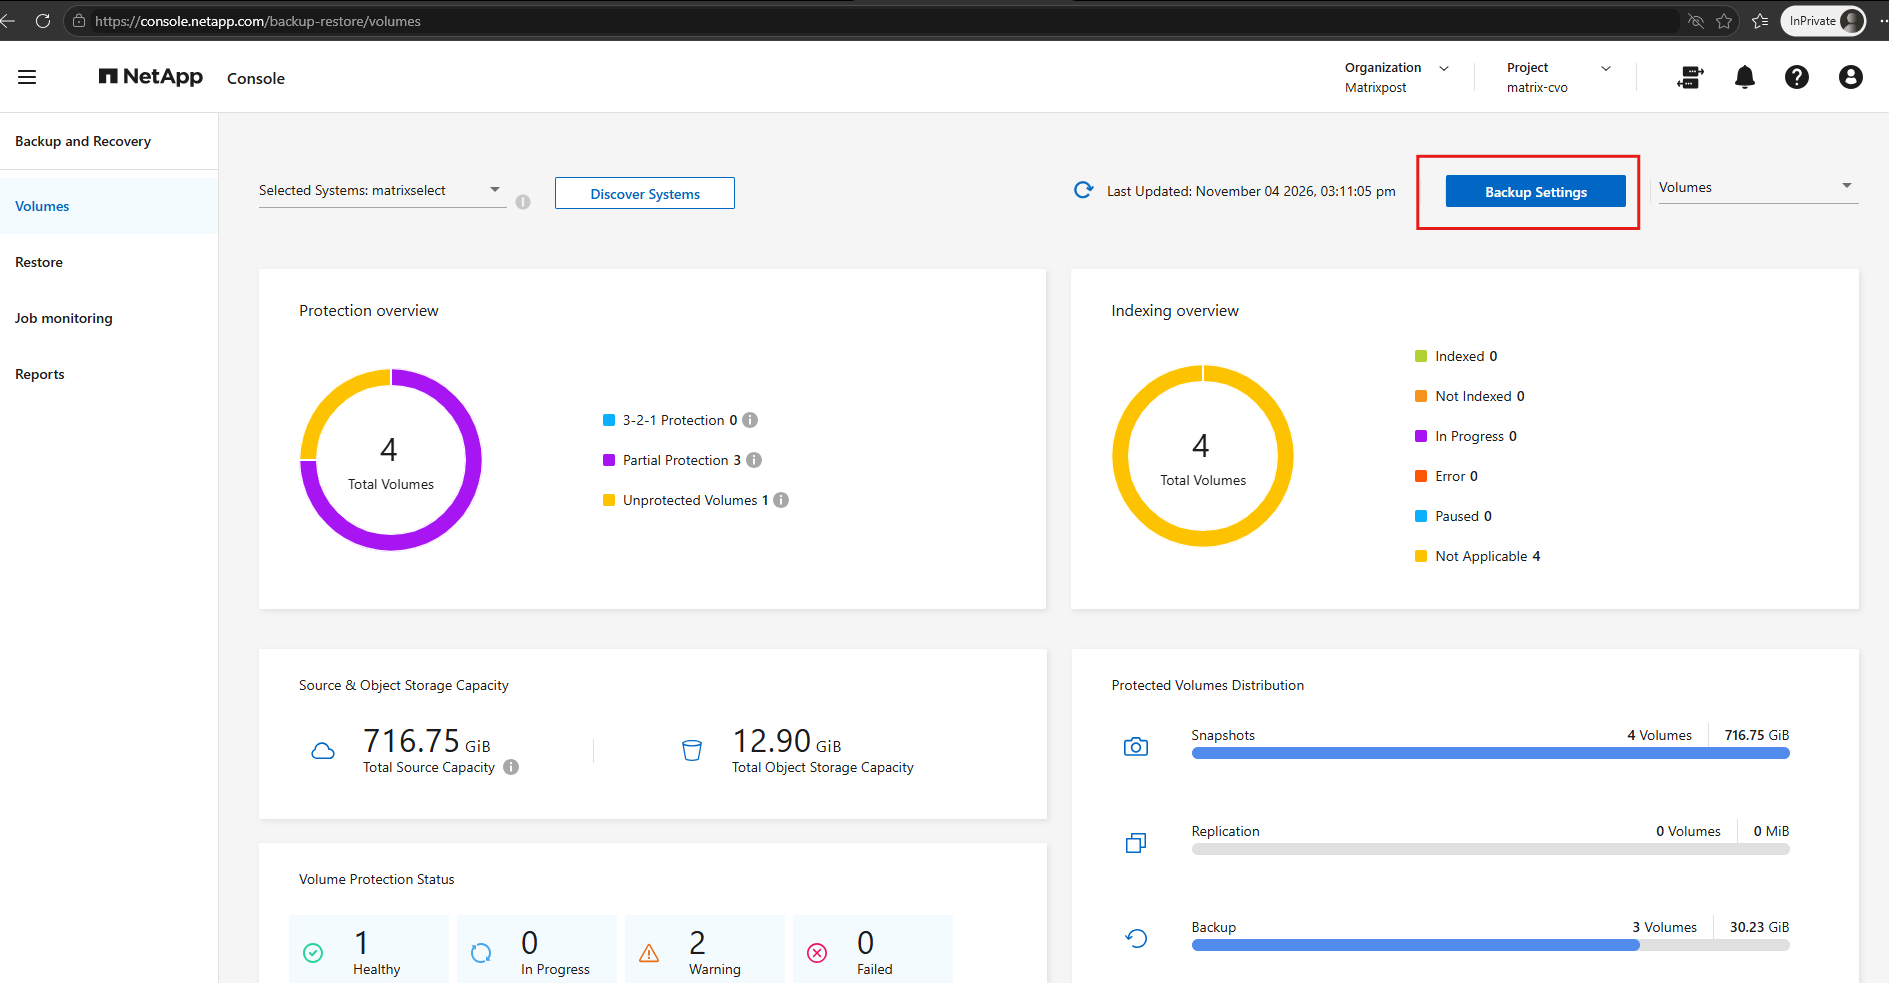
Before enabling DataLock for a new backup configuration, we first unregister the existing backup configuration.
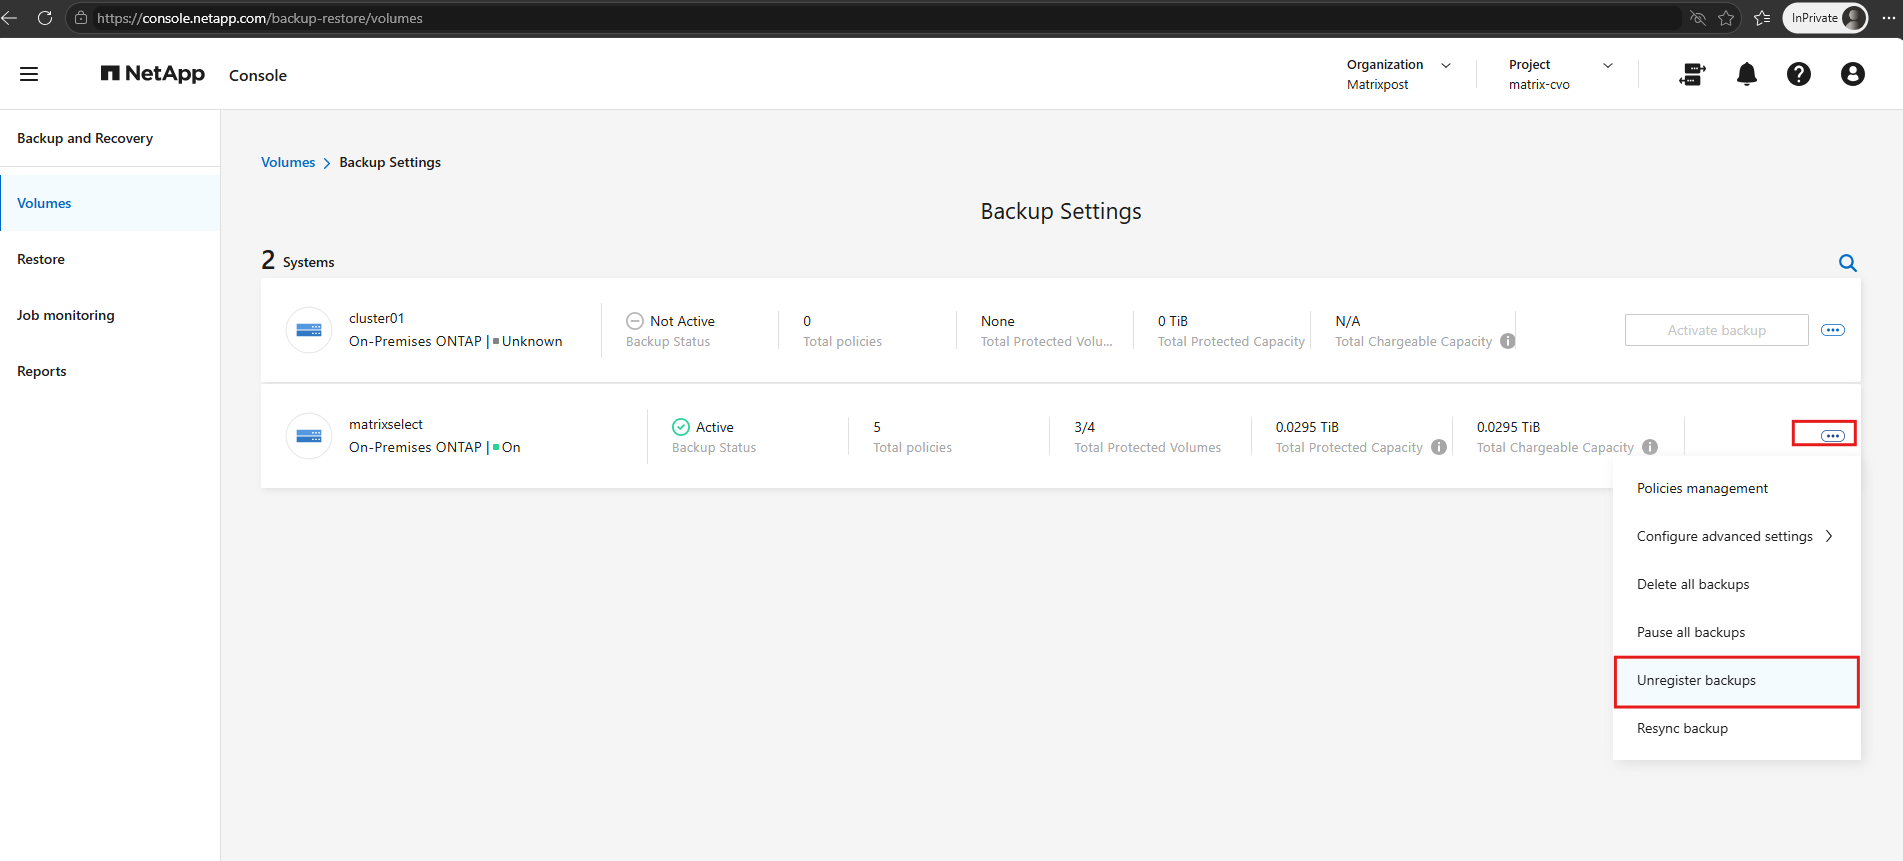
By selecting Deactivate backups, existing backups remain in object storage and can still be restored using the ONTAP CLI, while future backups are stopped.
This preserves the existing recovery points while a new backup configuration with DataLock enabled is established. Before unregistering, the protection reports containing the backup relationship endpoint UUIDs should be saved for potential future restores.
You might not be able to restore some ONTAP data using the Backup and Recovery web UI. This can happen if you kept backups after unregistering a system, or if the backups were created through a relationship that no longer exists. In either case, restore the backup using the ONTAP CLI.
Source: https://docs.netapp.com/us-en/data-services-backup-recovery/prev-ontap-restore-cli.html
Export Backup Metadata and Volume UUIDs
Before unregistering the existing backup configuration, we should export a backup inventory report containing the backup metadata and associated volume UUIDs.
This information is important for identifying and potentially restoring existing backups from Azure Blob Storage after unregistering them from NetApp Console.
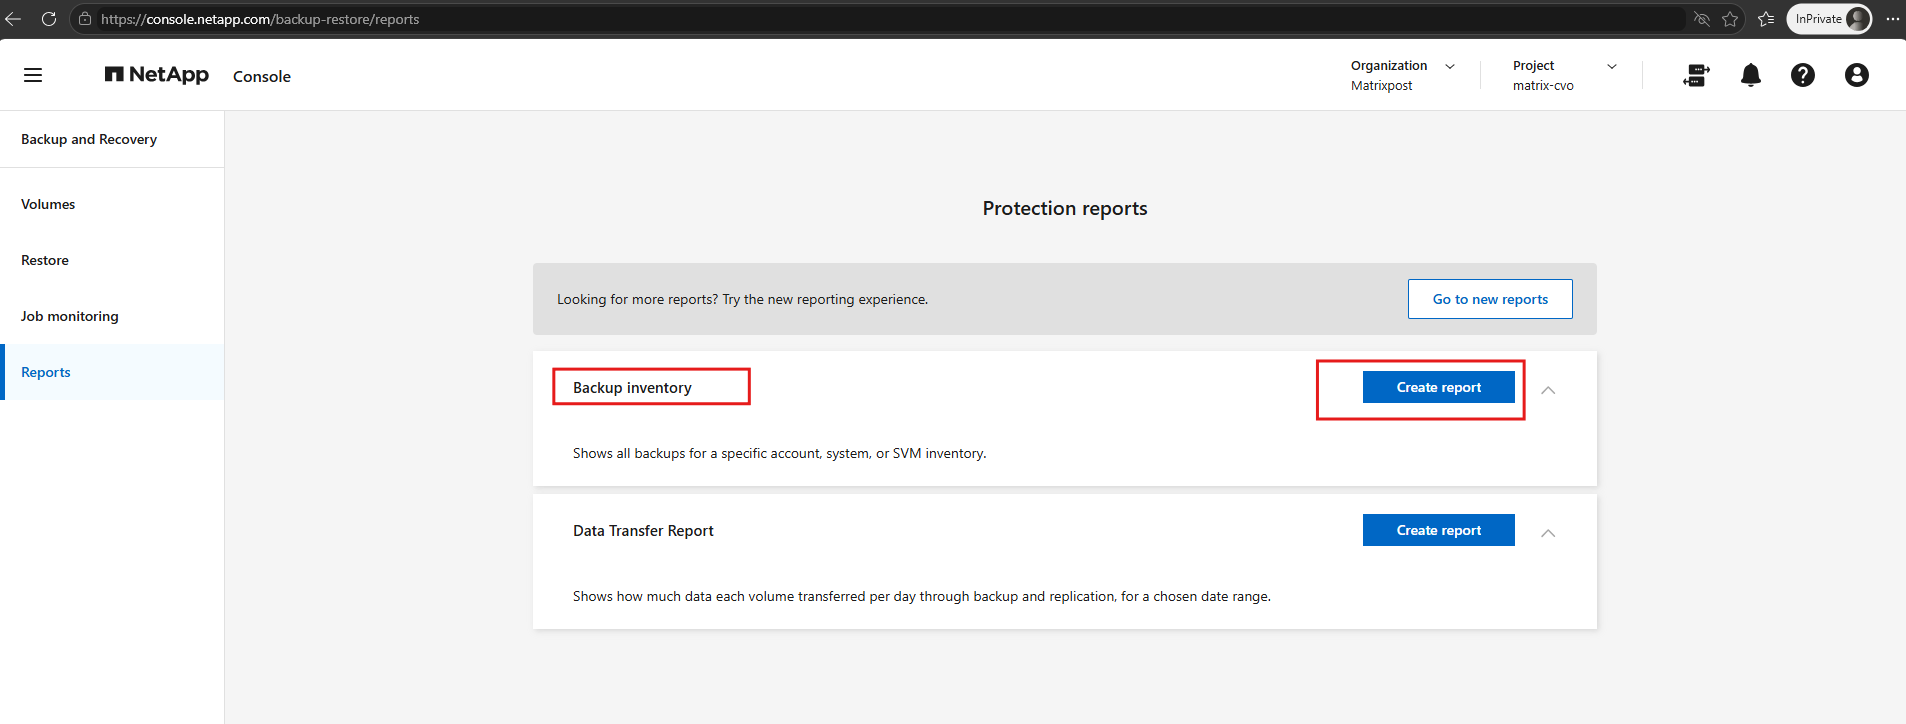
From the NetApp Backup and Recovery menu, select Reports.
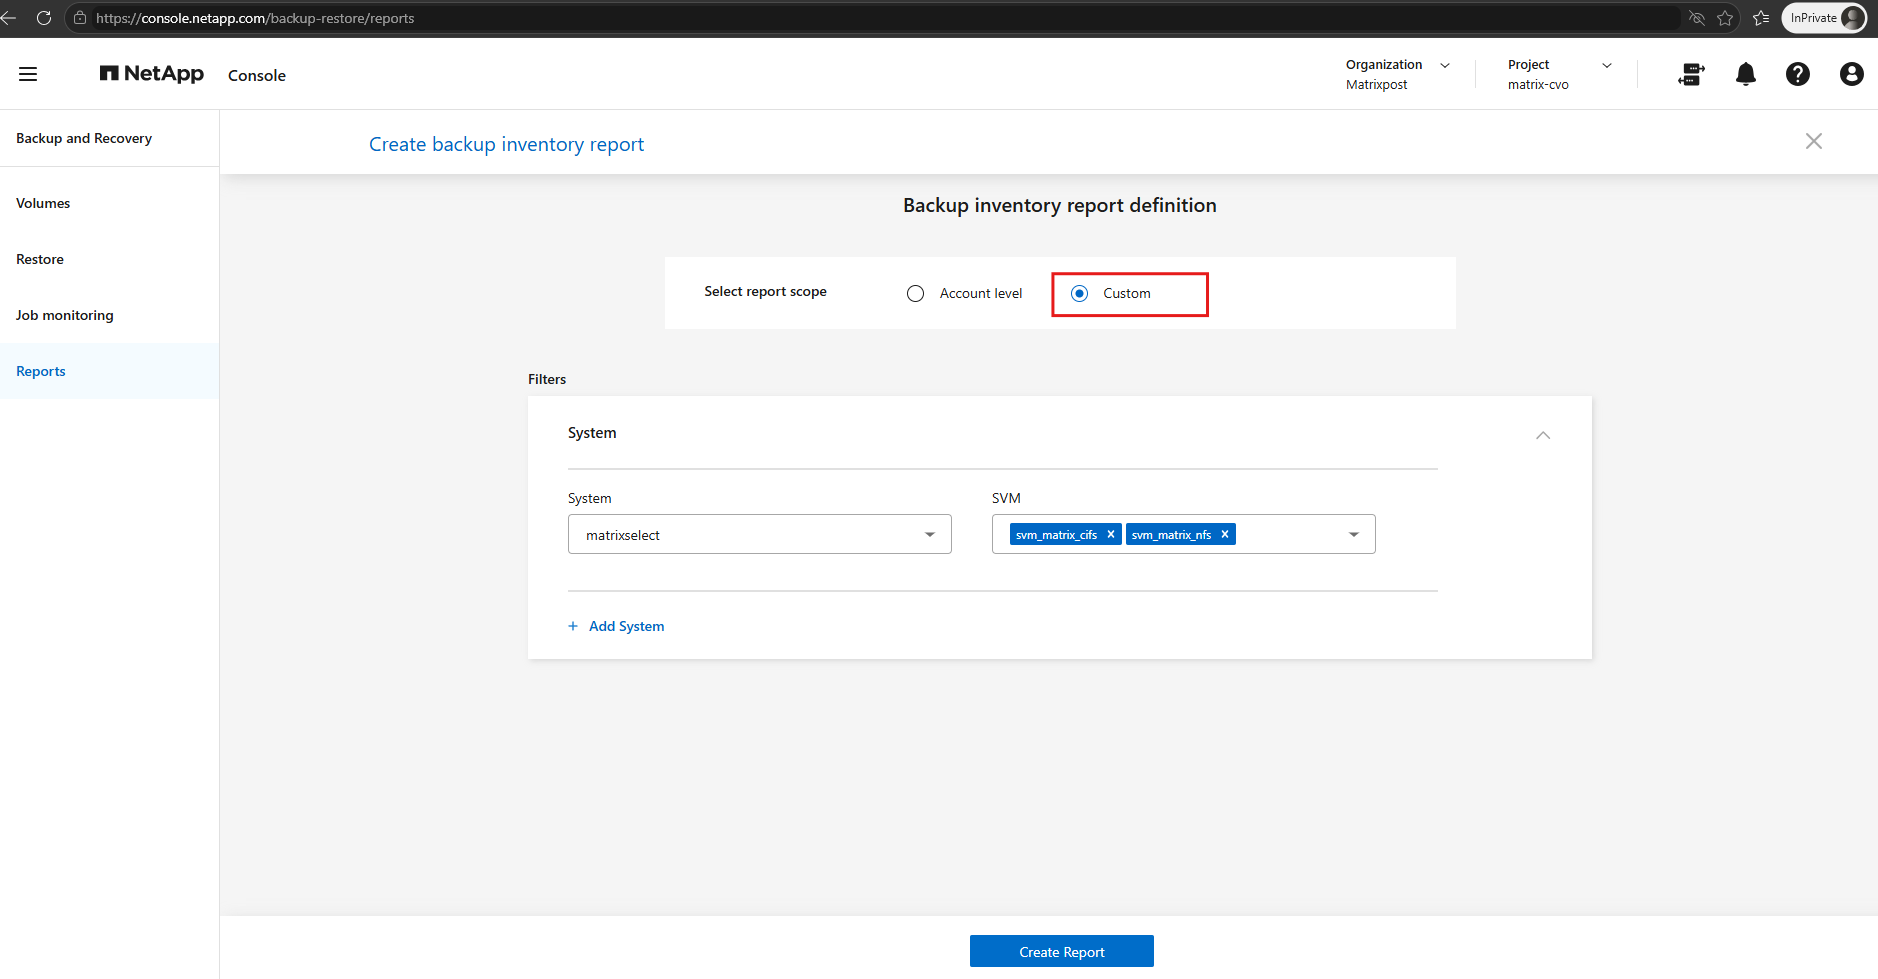
We need to select Custom as the report scope, choose our ONTAP system, in my case matrixselect, and include all SVMs you need to be able to restore files for, in my case both SVMs (svm_matrix_cifs and svm_matrix_nfs).
Then click Create Report to generate the backup inventory report for the selected SVMs.
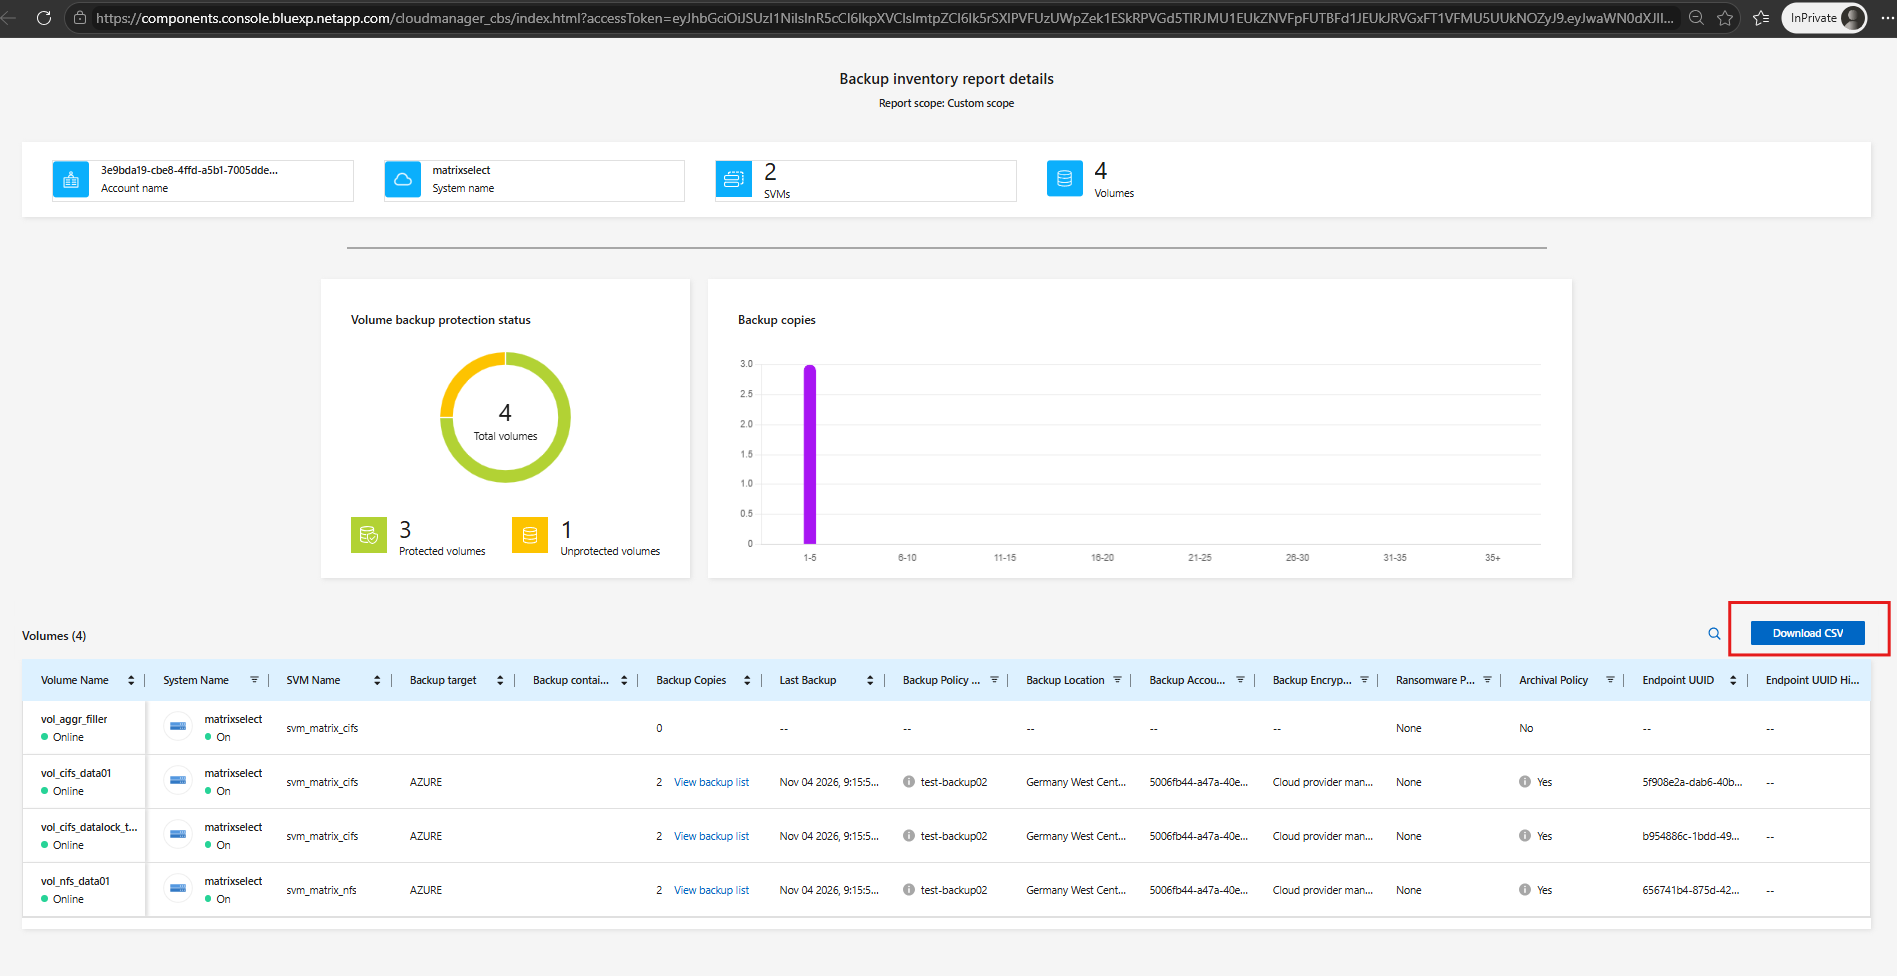
The generated Backup Inventory Report provides an overview of the protected volumes, existing backup copies, backup policies, storage locations, and associated endpoint UUIDs.
Before unregistering NetApp Backup and Recovery, download the report as a CSV file to preserve these details for potential future restores of the existing backups.
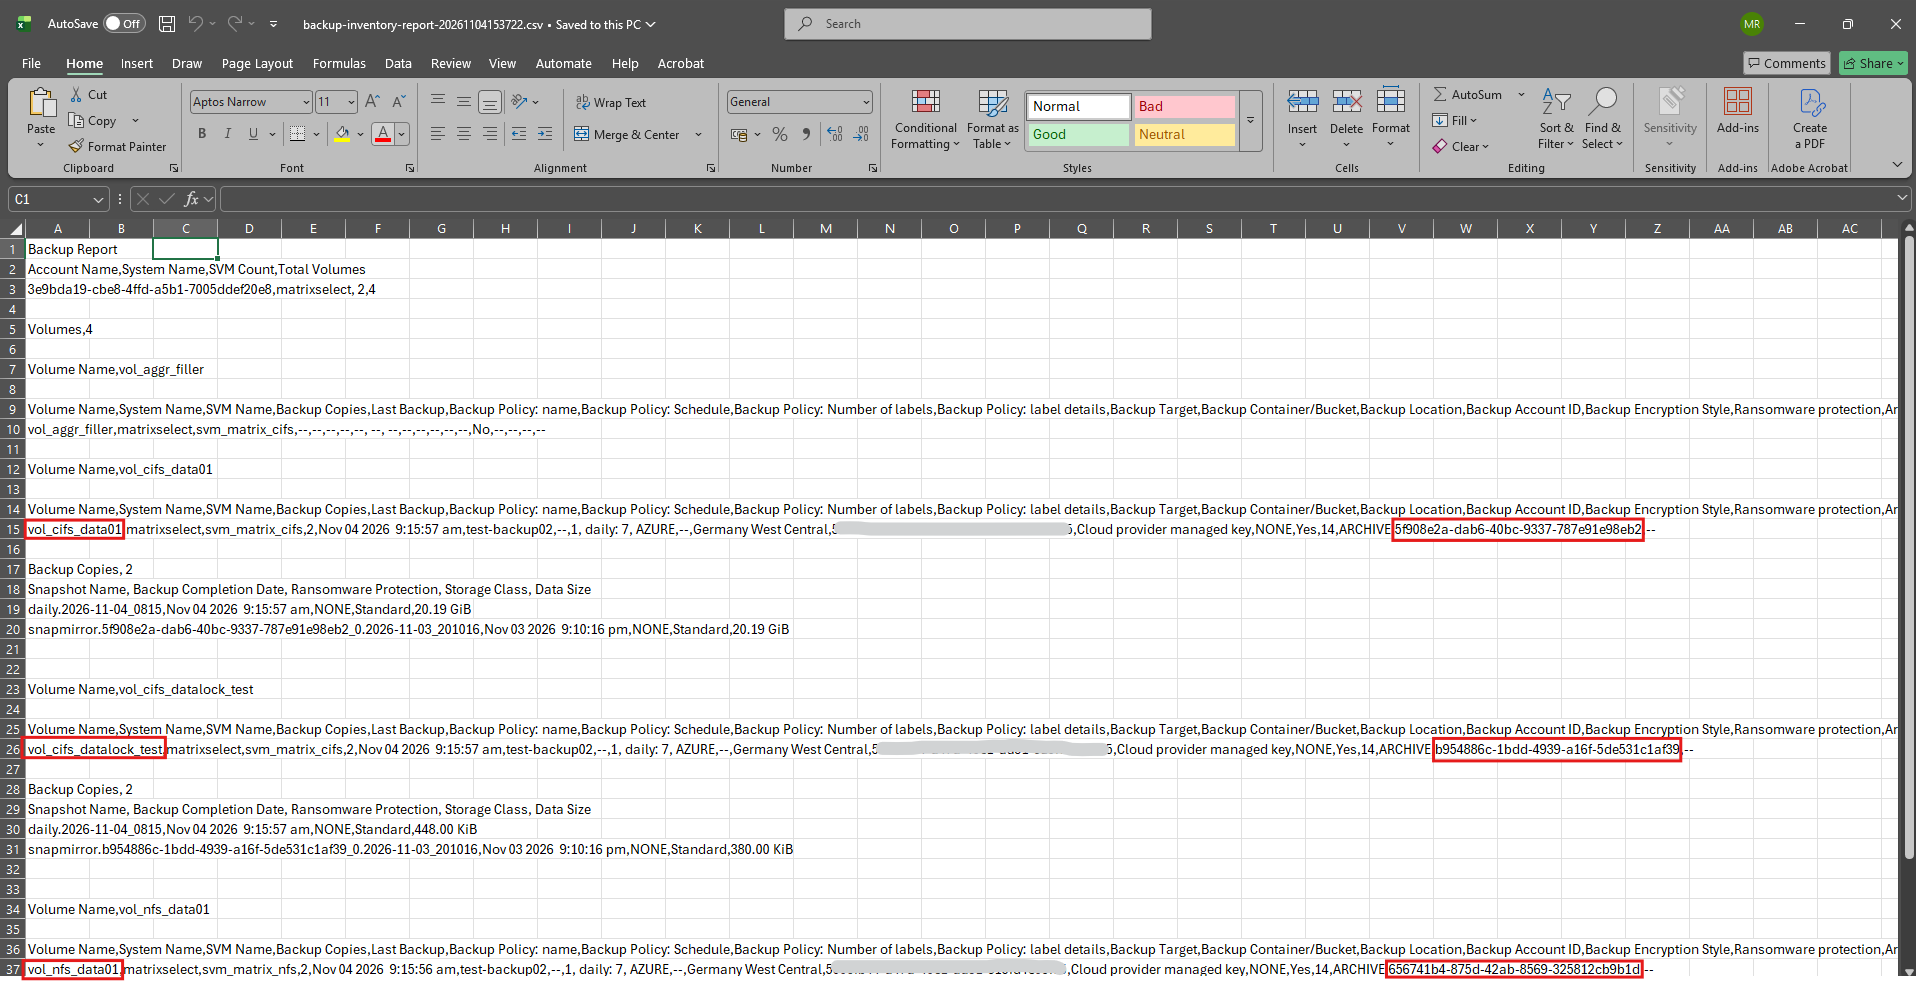
The UUIDs (Universally Unique Identifiers) are unique identifiers that NetApp uses to identify individual backup relationships and their associated endpoints.
In my CSV, we can see entries such as:
This is the Endpoint UUID for the backup relationship associated with
vol_cifs_data01.Volume name: Identifies the original ONTAP volume.
Endpoint UUID: Identifies the backup relationship endpoint in object storage.
Backup account, container, and location: Identify where the backup data resides.
The Azure subscription ID has been greyed out in the screenshot for privacy reasons.
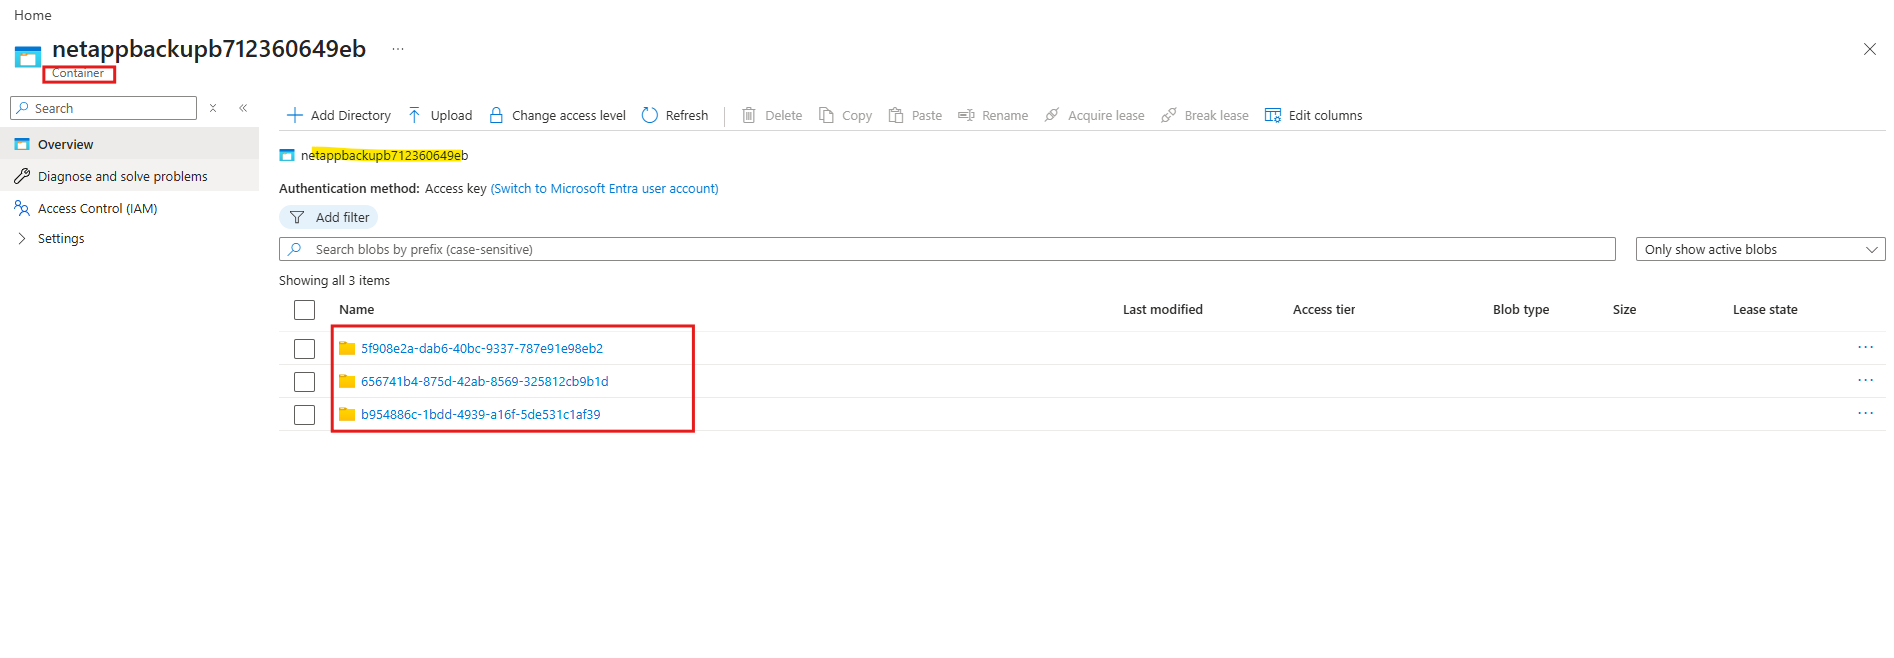
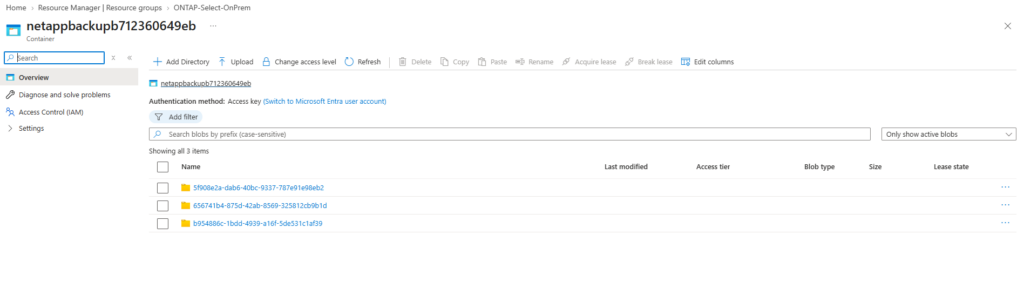
5f908e2a-dab6-40bc-9337-787e91e98eb2
In the Azure portal, we can identify the three backup endpoint UUIDs from the exported inventory report as corresponding folders within the Azure Blob Storage container.
Each UUID represents the backup data associated with a protected ONTAP volume.
Unregister Backups After Exporting the UUID Metadata
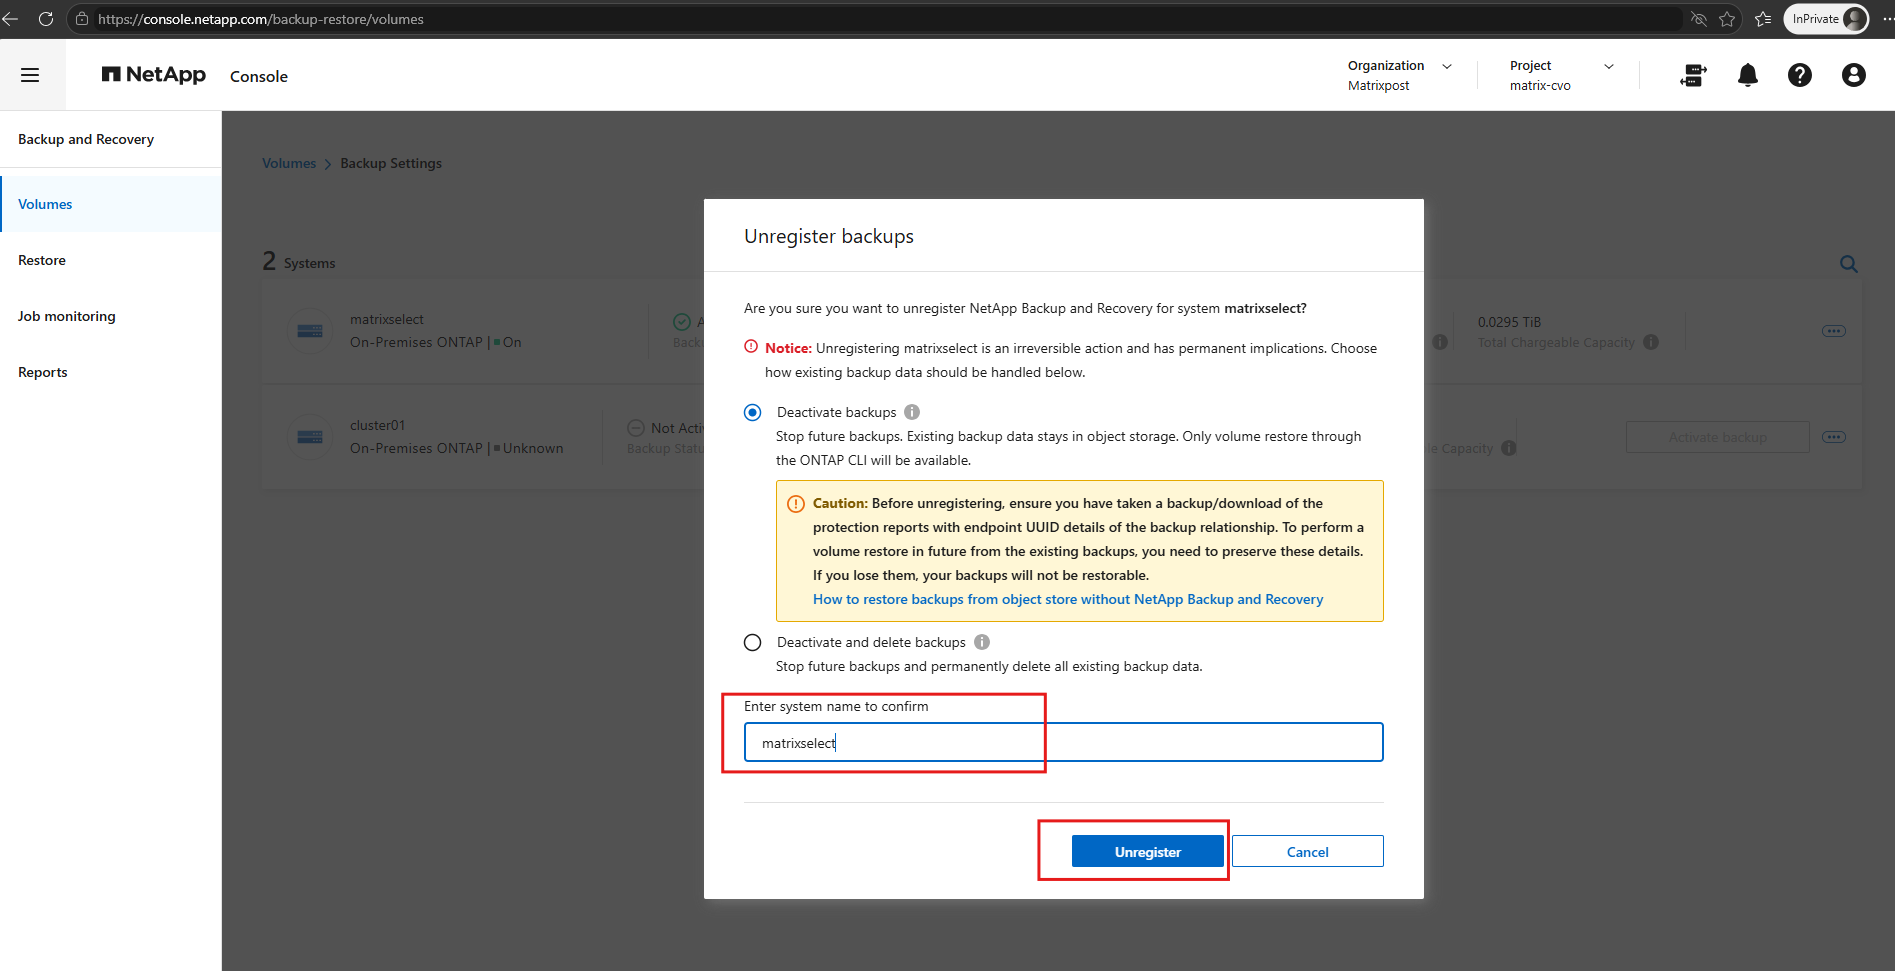
After exporting the backup inventory report and preserving the endpoint UUIDs, select Deactivate backups to unregister the ONTAP system without deleting the existing backups from Azure Blob Storage. Enter the system name to confirm and click Unregister.
The existing backup data remains in object storage for potential recovery through the ONTAP CLI, while future backups are stopped.
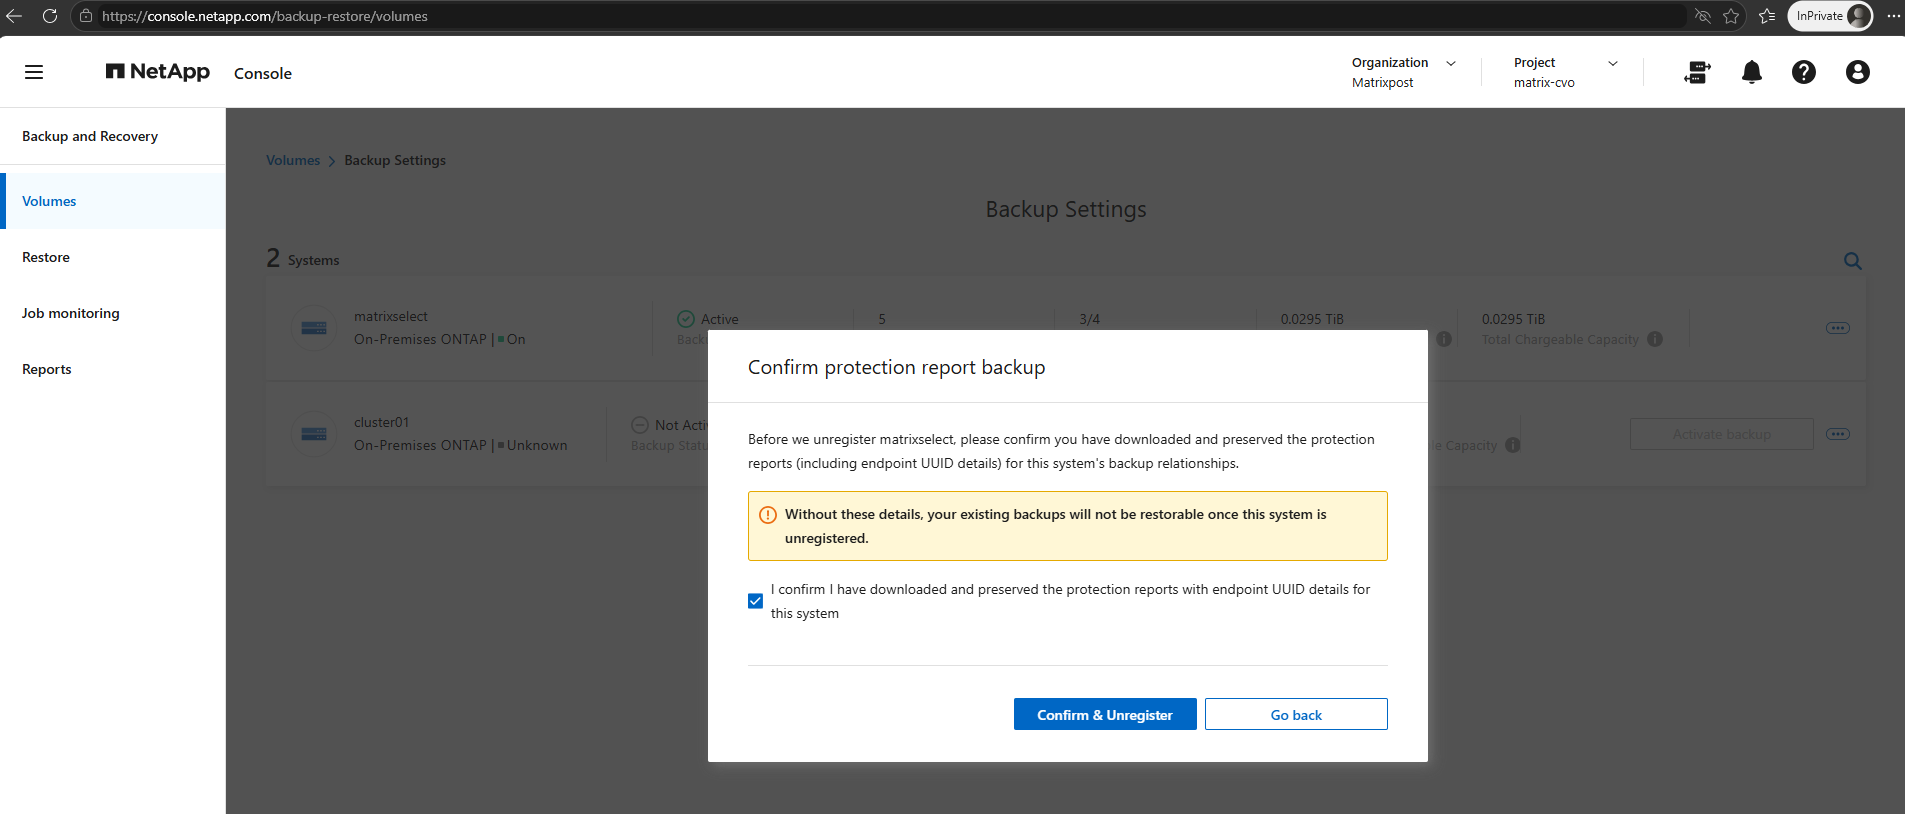
Click Confirm & Unregister.
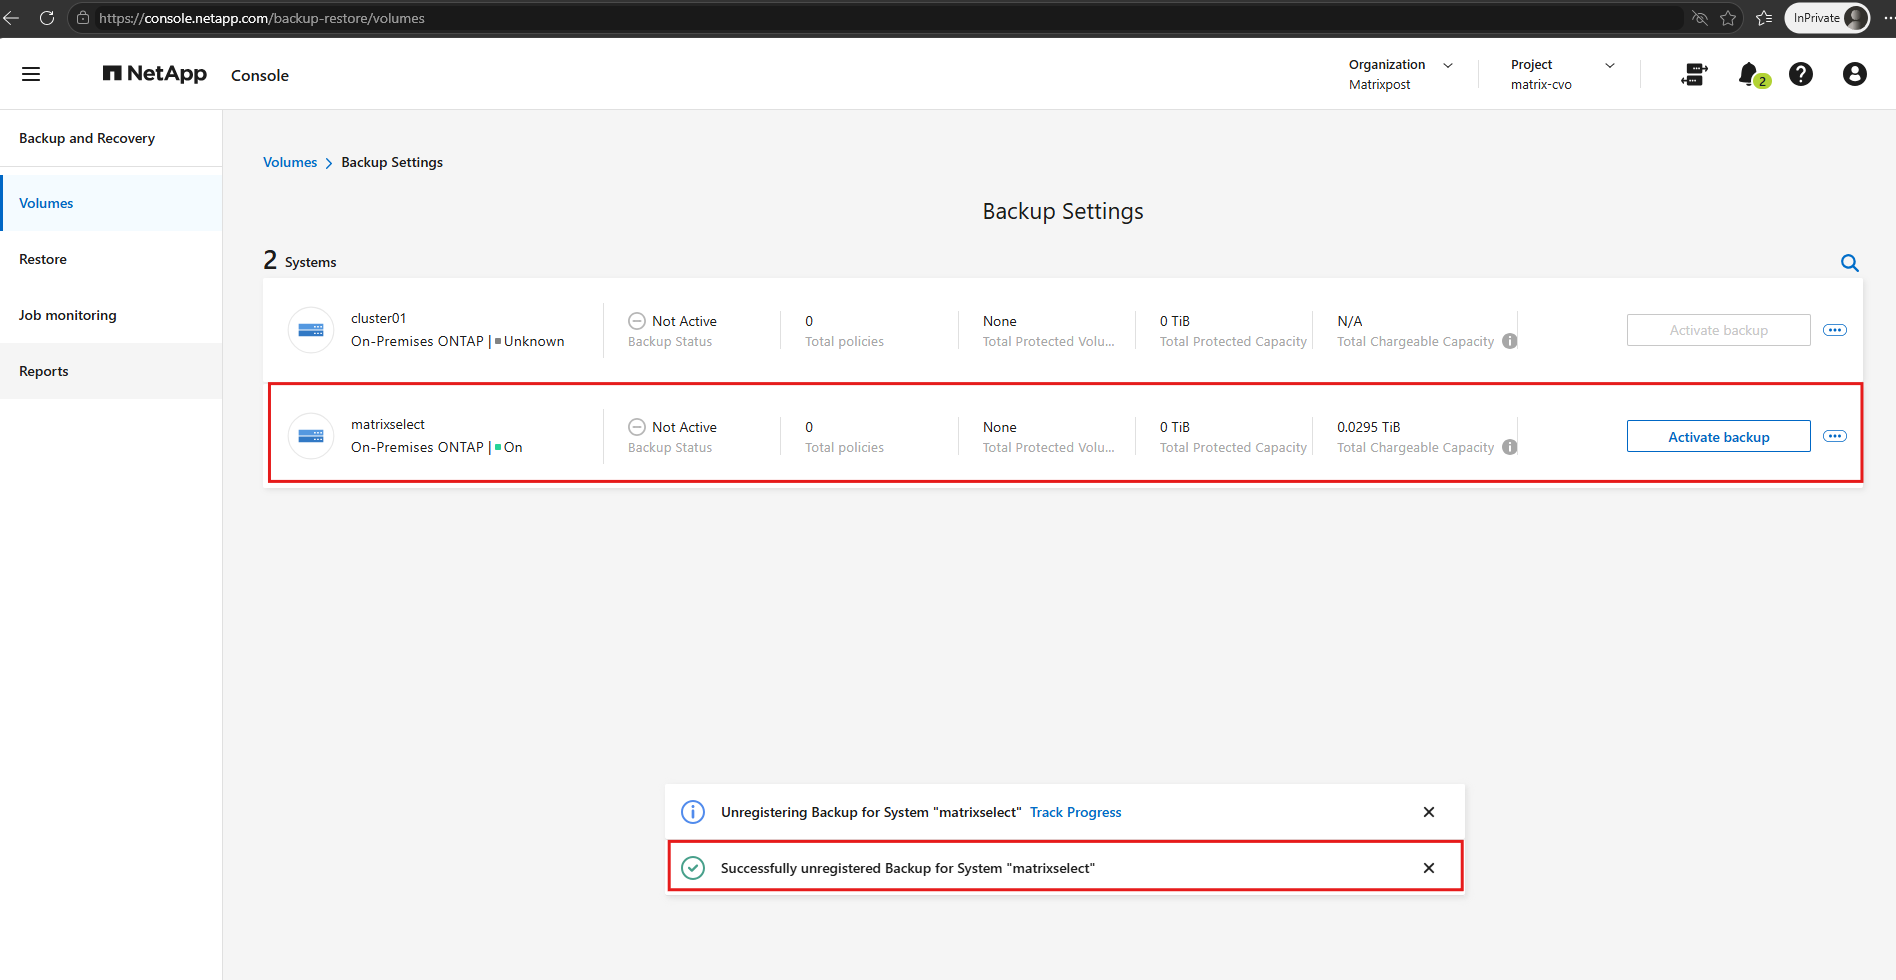
NetApp Console confirms that Backup and Recovery has been successfully unregistered for the ONTAP system.
The backup status changes to Not Active, all previously assigned backup policies are removed from the active configuration, and the Activate backup option becomes available again.
After successfully unregistering Backup and Recovery, we verified in the Azure portal that the existing Blob Storage container and all three backup endpoint UUID directories were still present.
This confirms that selecting Deactivate backups preserves the existing backup data rather than deleting it.
Re-register Backups with DataLock and Ransomware Protection
After unregistering Backup and Recovery, the ONTAP system remains online in NetApp Console, while the backup service is disabled. To activate backups again with DataLock enabled, select Backup and Recovery → Enable → Backup Volumes.
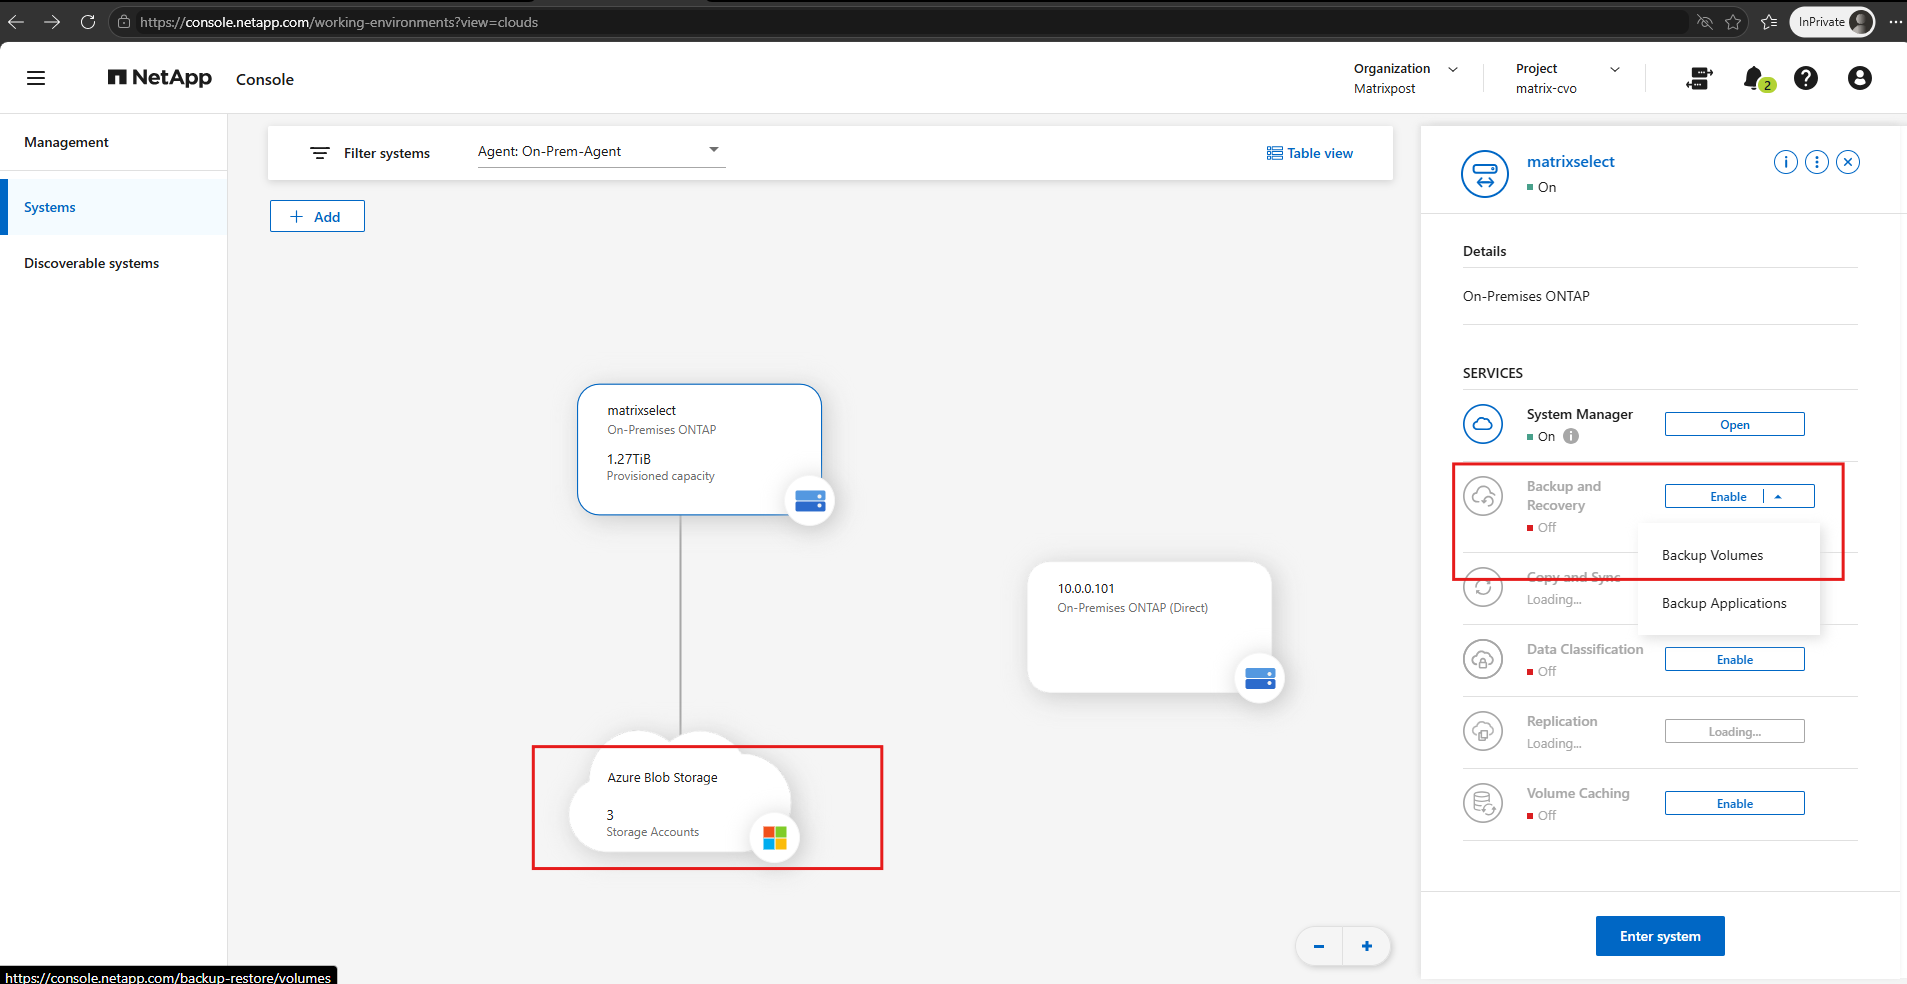
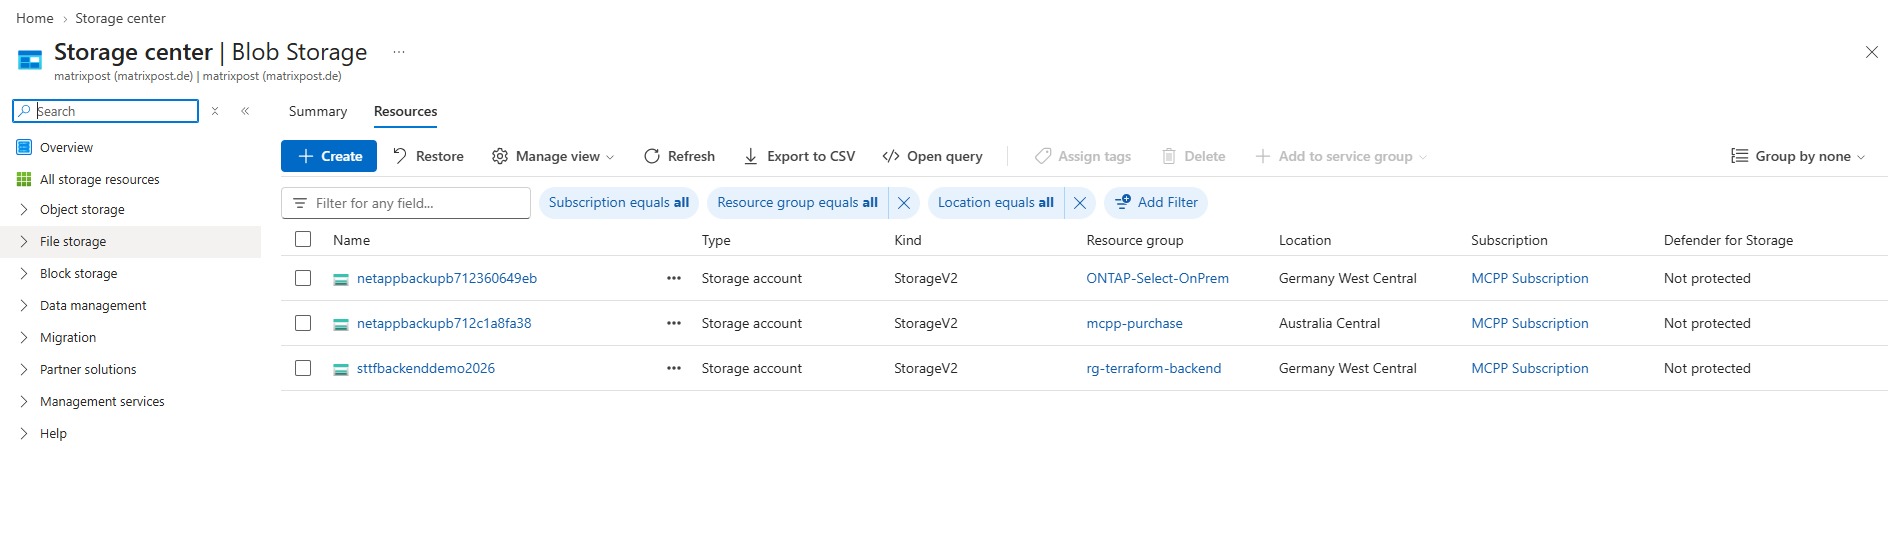
In the Azure portal, we can see three storage accounts, all located within the same Azure subscription (MCPP Subscription). The service principal (SPN) configured for NetApp Console has access to this subscription, allowing NetApp Backup and Recovery to provision and manage the required Azure Blob Storage resources.
Since the NetApp Console service principal (SPN) has access to the Azure subscription containing these three storage accounts, all three are also discovered and displayed under Azure Blob Storage in the NetApp Console Systems overview shown above.
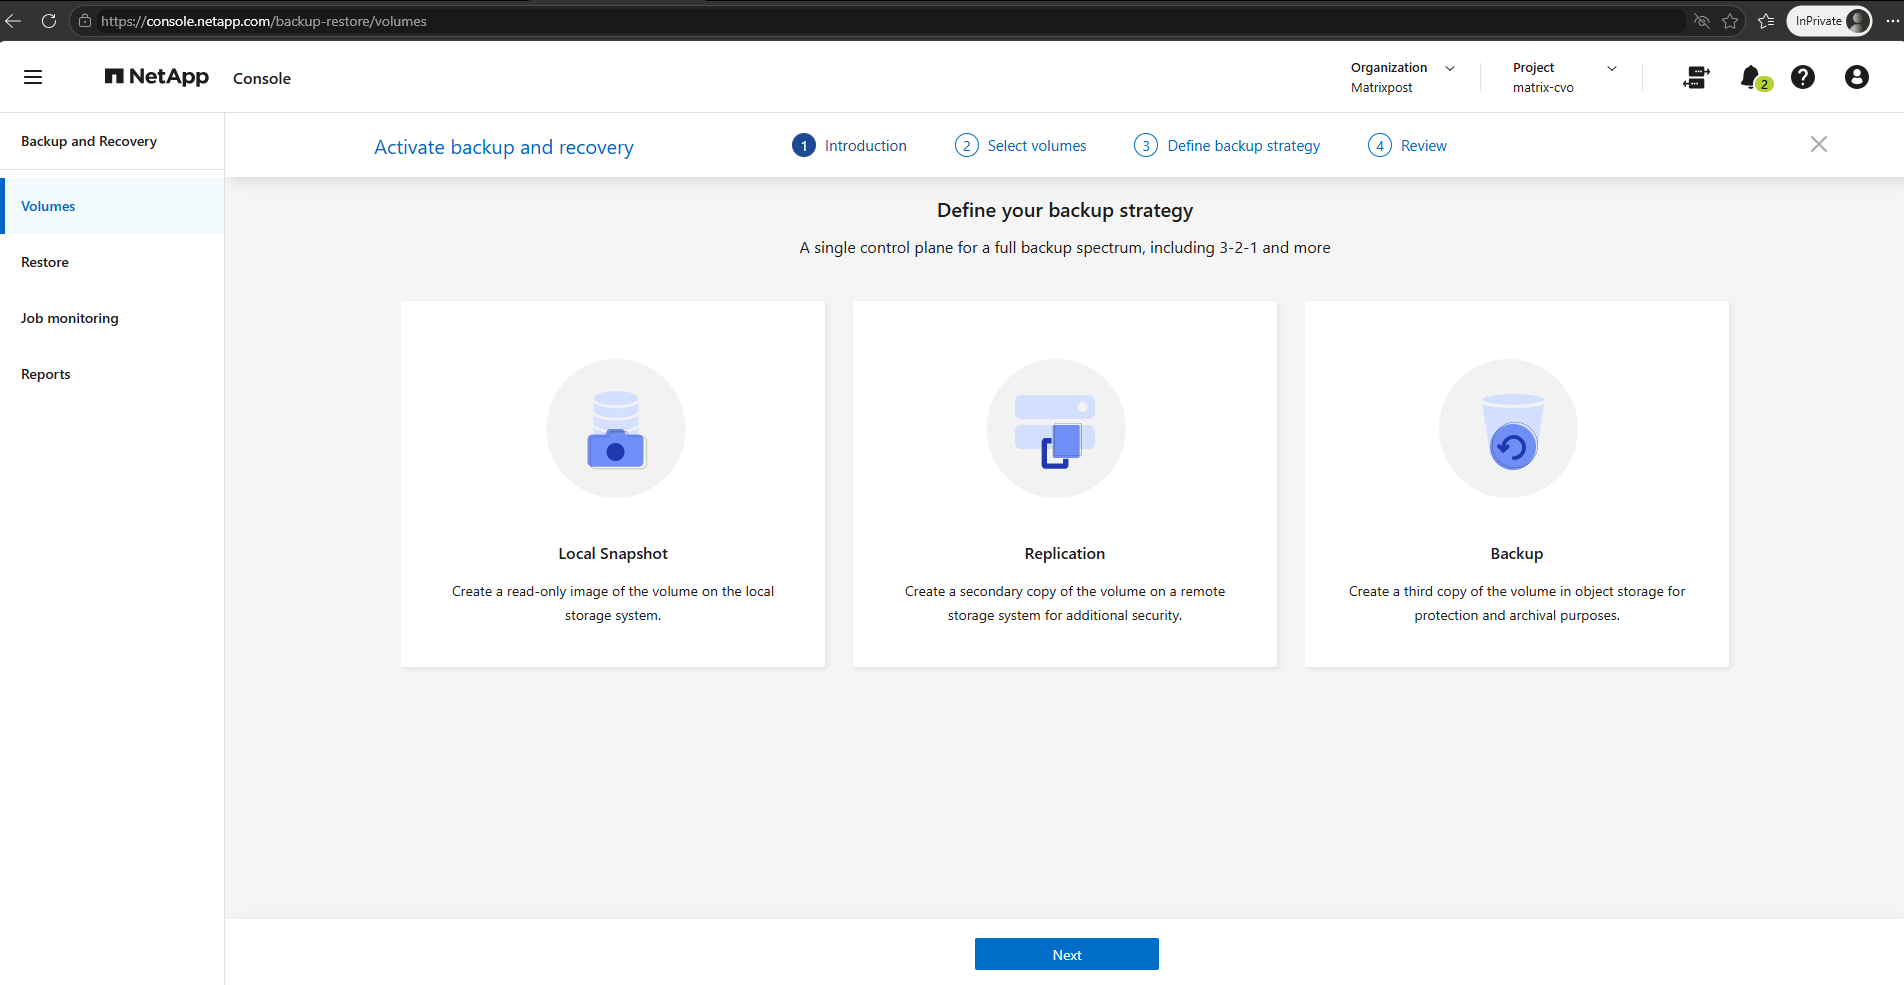
We now start the Activate Backup and Recovery wizard again to configure a new backup strategy.
This time, we will enable DataLock and Ransomware Protection for backups stored in Azure Blob Storage.
To minimize Azure Blob Storage costs during our DataLock testing, we select only vol_cifs_datalock_test, which contains approximately 472 KiB of data, instead of backing up the larger production-like test volumes.
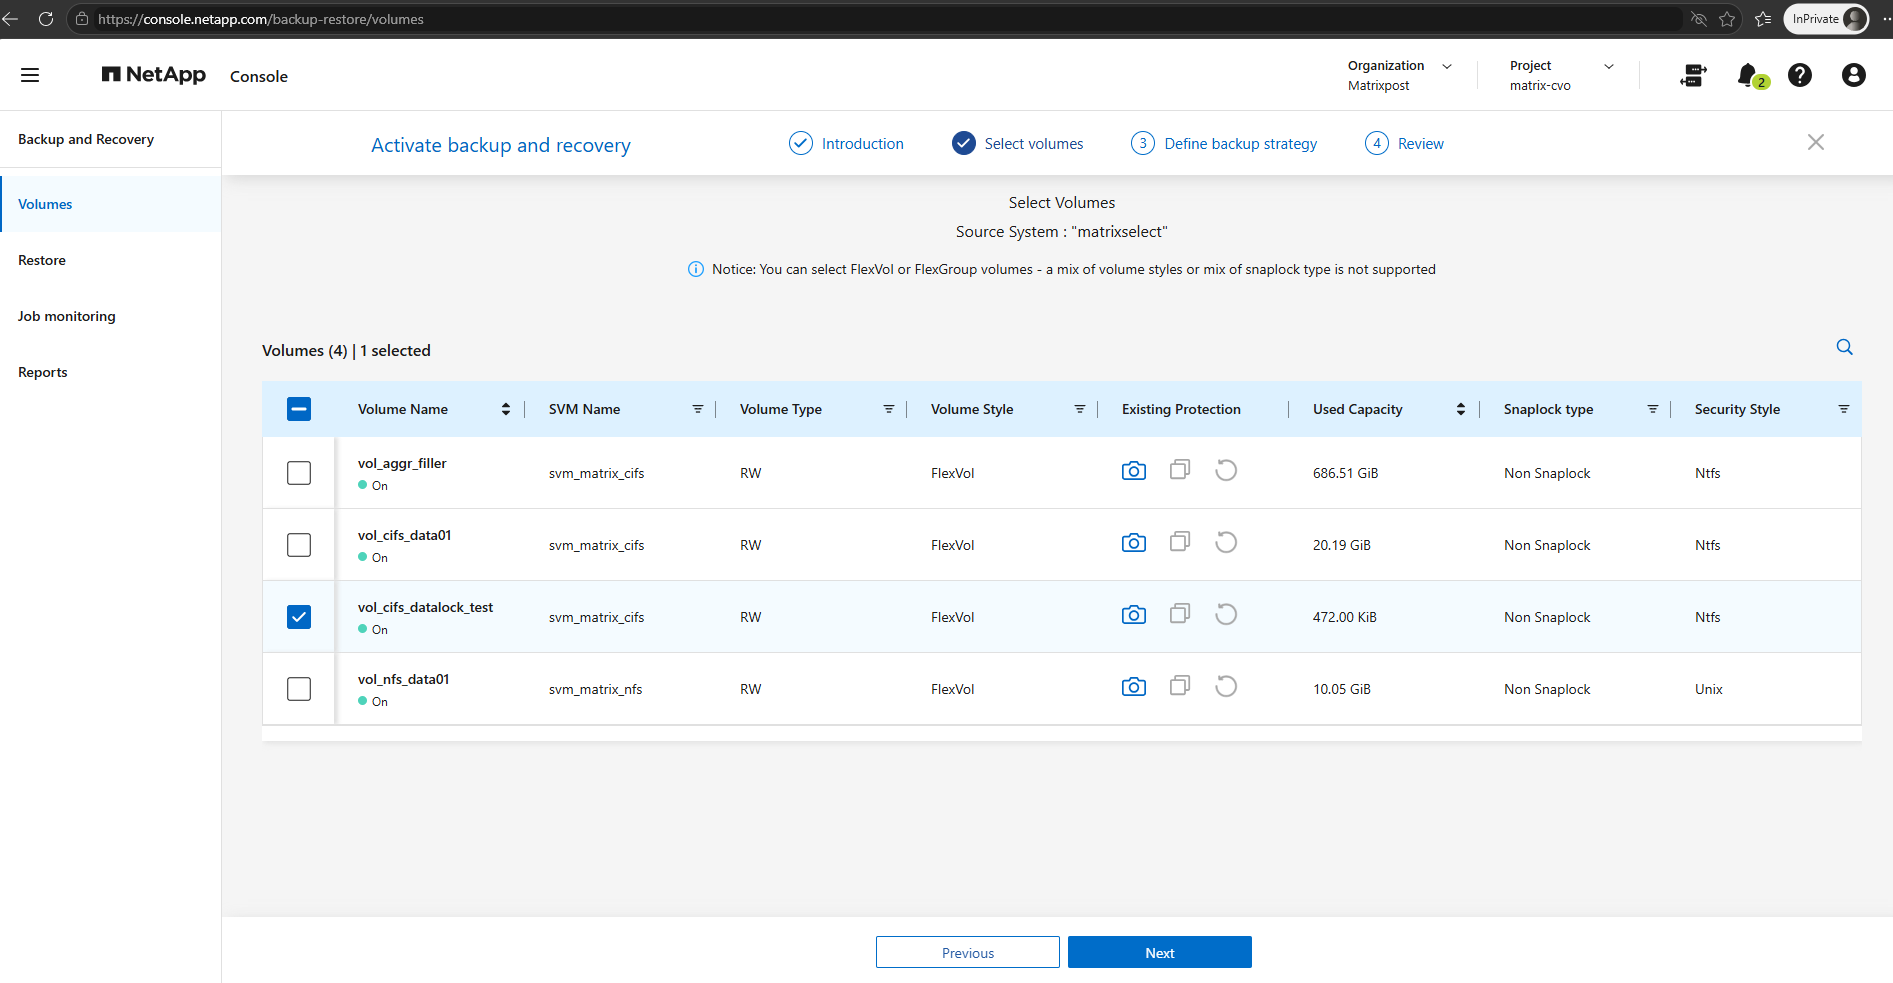
Since the selected volume already has an ONTAP Snapshot policy assigned, NetApp Console warns that existing Snapshot or replication policies may be overwritten if different policies are configured during the new backup activation.
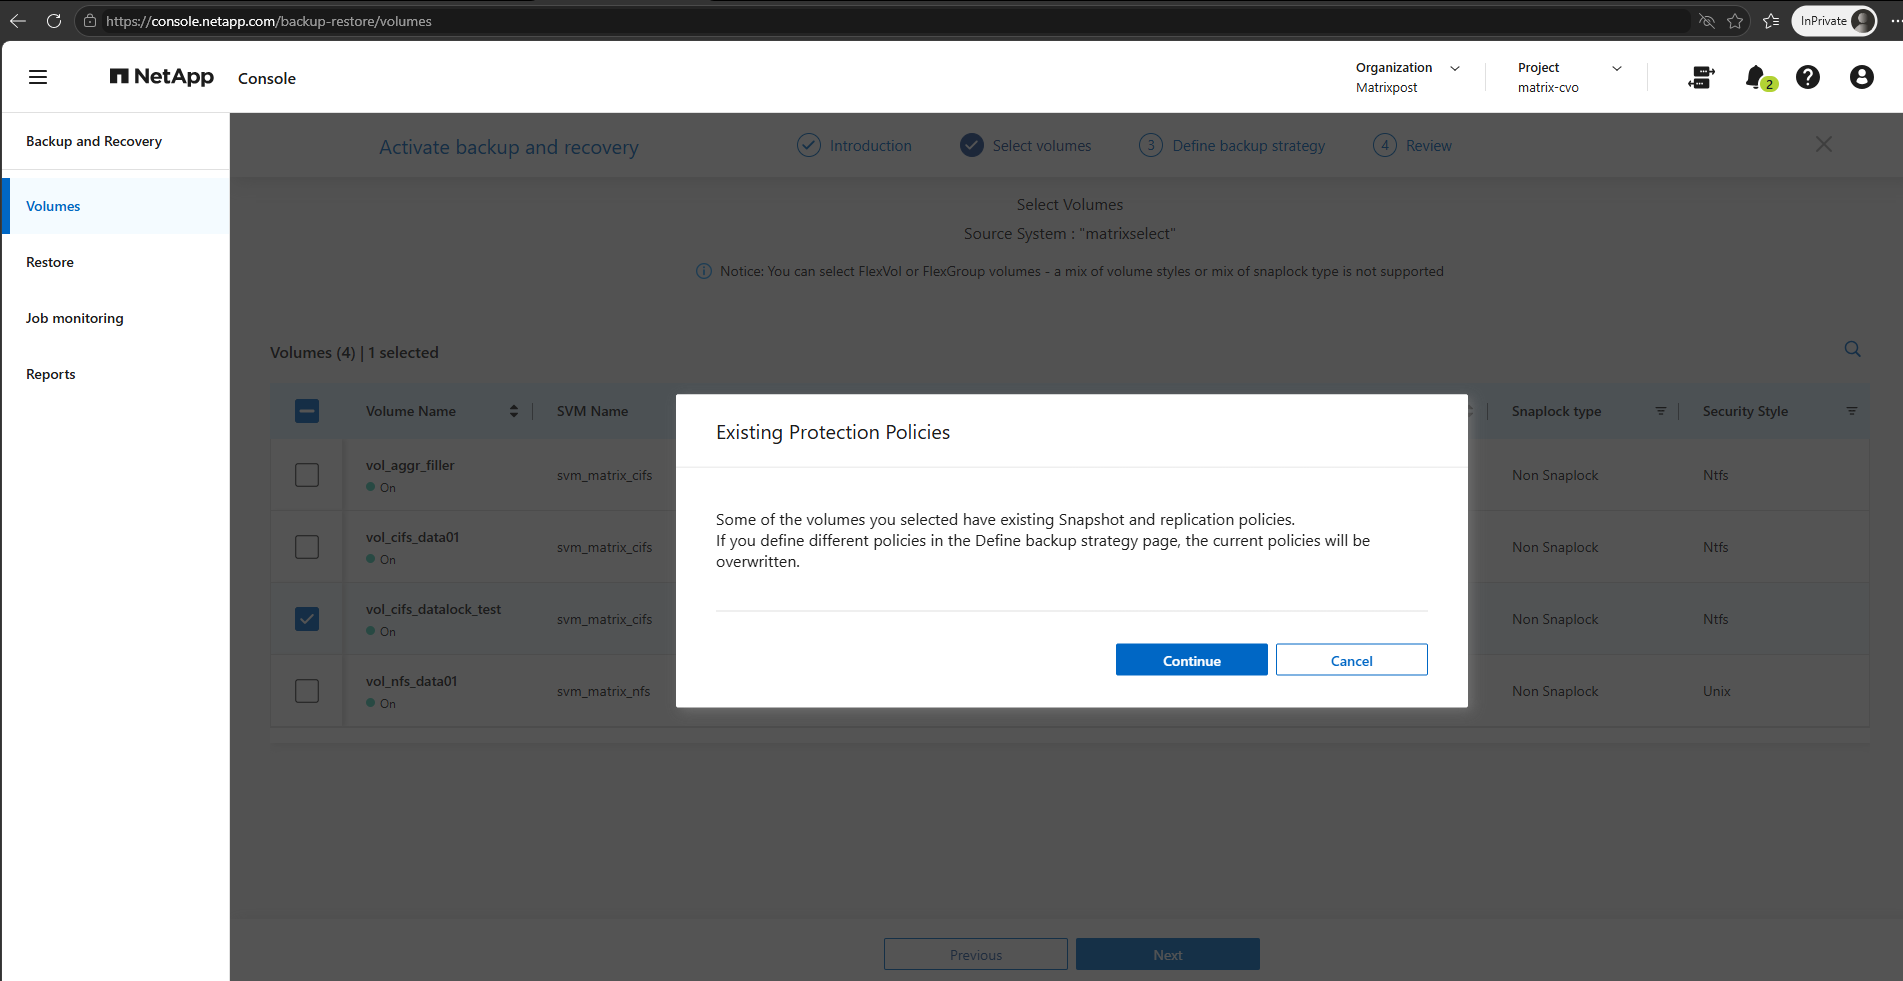
During the new backup activation, we can select Microsoft Azure as the backup provider and configure a new Azure Storage Account for the backup relationship.
This allows us to establish a new backup configuration with DataLock enabled, while preserving the previous backups in the existing storage account.
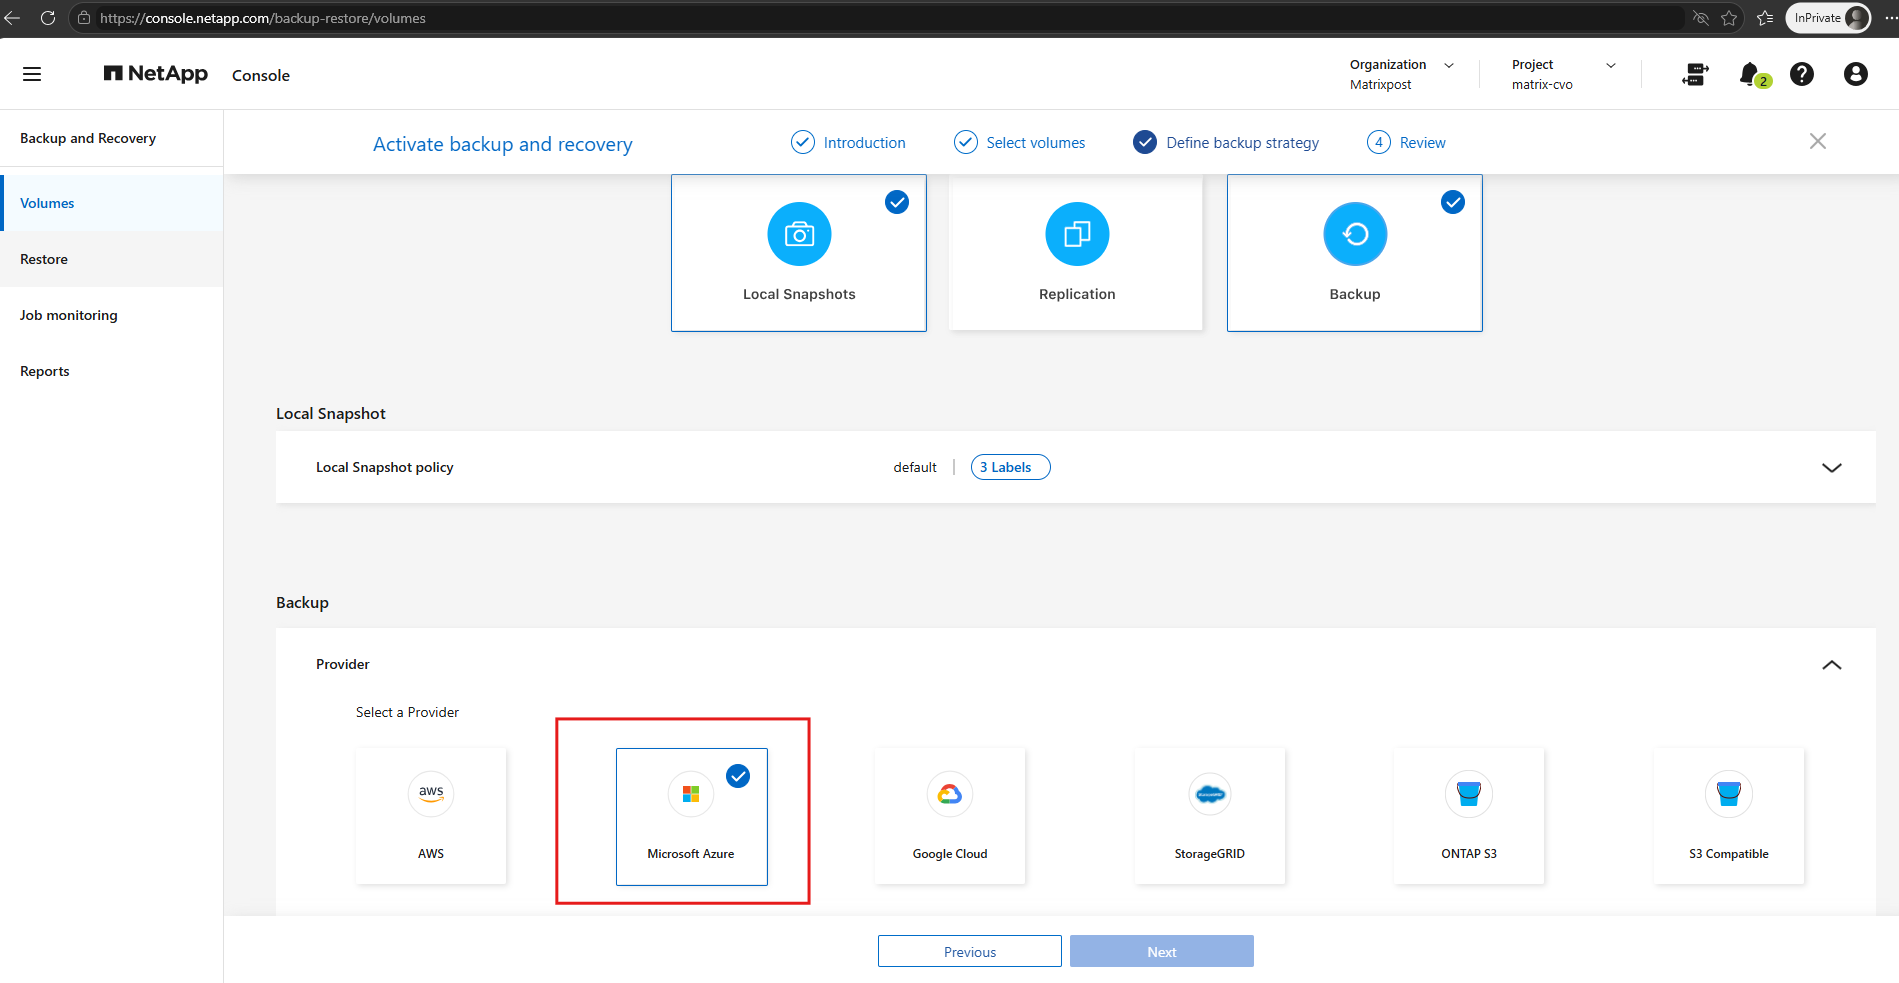
Here we select Create New Bucket, allowing NetApp Console to provision new Azure backup storage in our existing MCPP Subscription, in the Germany West Central region and ONTAP-Select-OnPrem resource group.
This keeps the new DataLock backup configuration separate from our existing backup data.
The term “bucket” remains fixed in the interface because NetApp console is a cross-cloud platform; NetApp uses this universal storage industry term (originally popularized by AWS S3) to provide a consistent management experience whether you are backing up to Azure Blob, AWS S3, or Google Cloud Storage.
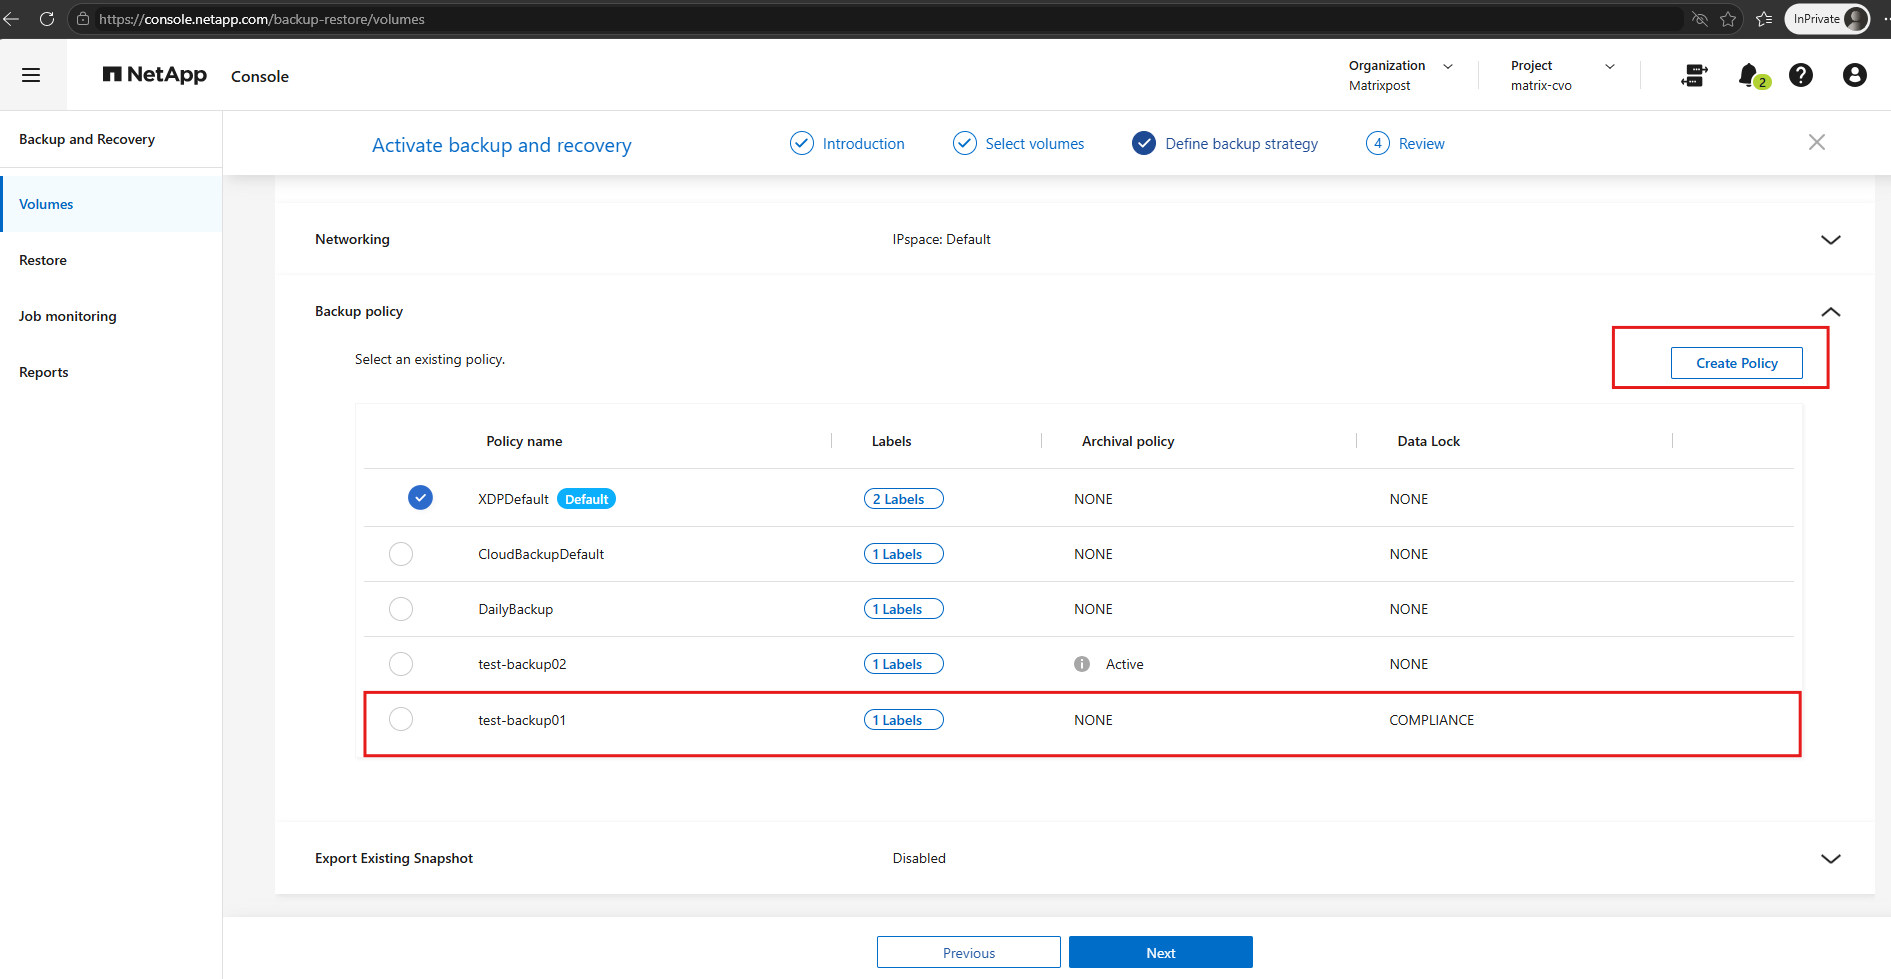
We already have a backup policy named test-backup01 with DataLock set to Compliance, while our other policies have DataLock disabled. To demonstrate the configuration process from scratch, we will select Create Policy and configure a new backup policy with DataLock enabled.
COMPLIANCEis the strictest DataLock mode in NetApp Backup and Recovery, designed to provide immutable, WORM-protected backups (Write Once, Read Many). Next, we will explore the available DataLock modes, including Governance and Compliance, and their differences in protecting backups against modification or deletion.
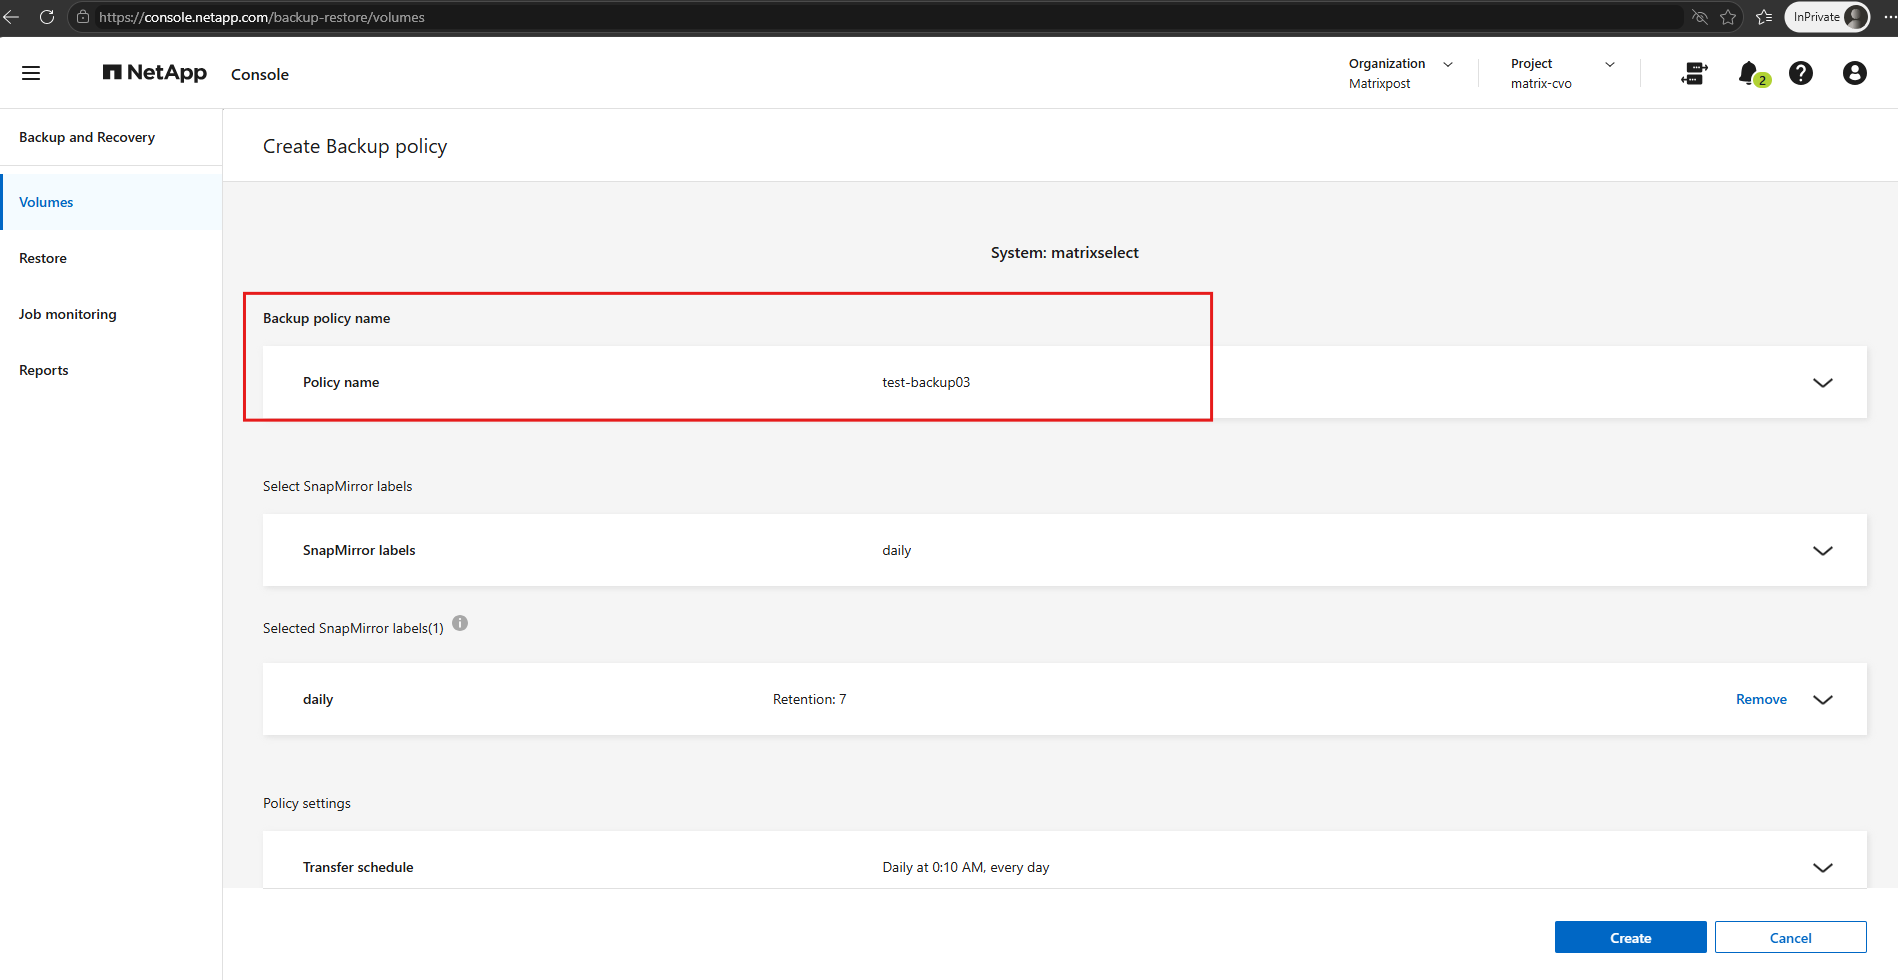
We create a new backup policy named test-backup03, using the daily SnapMirror label with a retention of 7 backup copies. The transfer schedule is initially set to 00:10 daily and can be adjusted independently of the local Snapshot schedule.
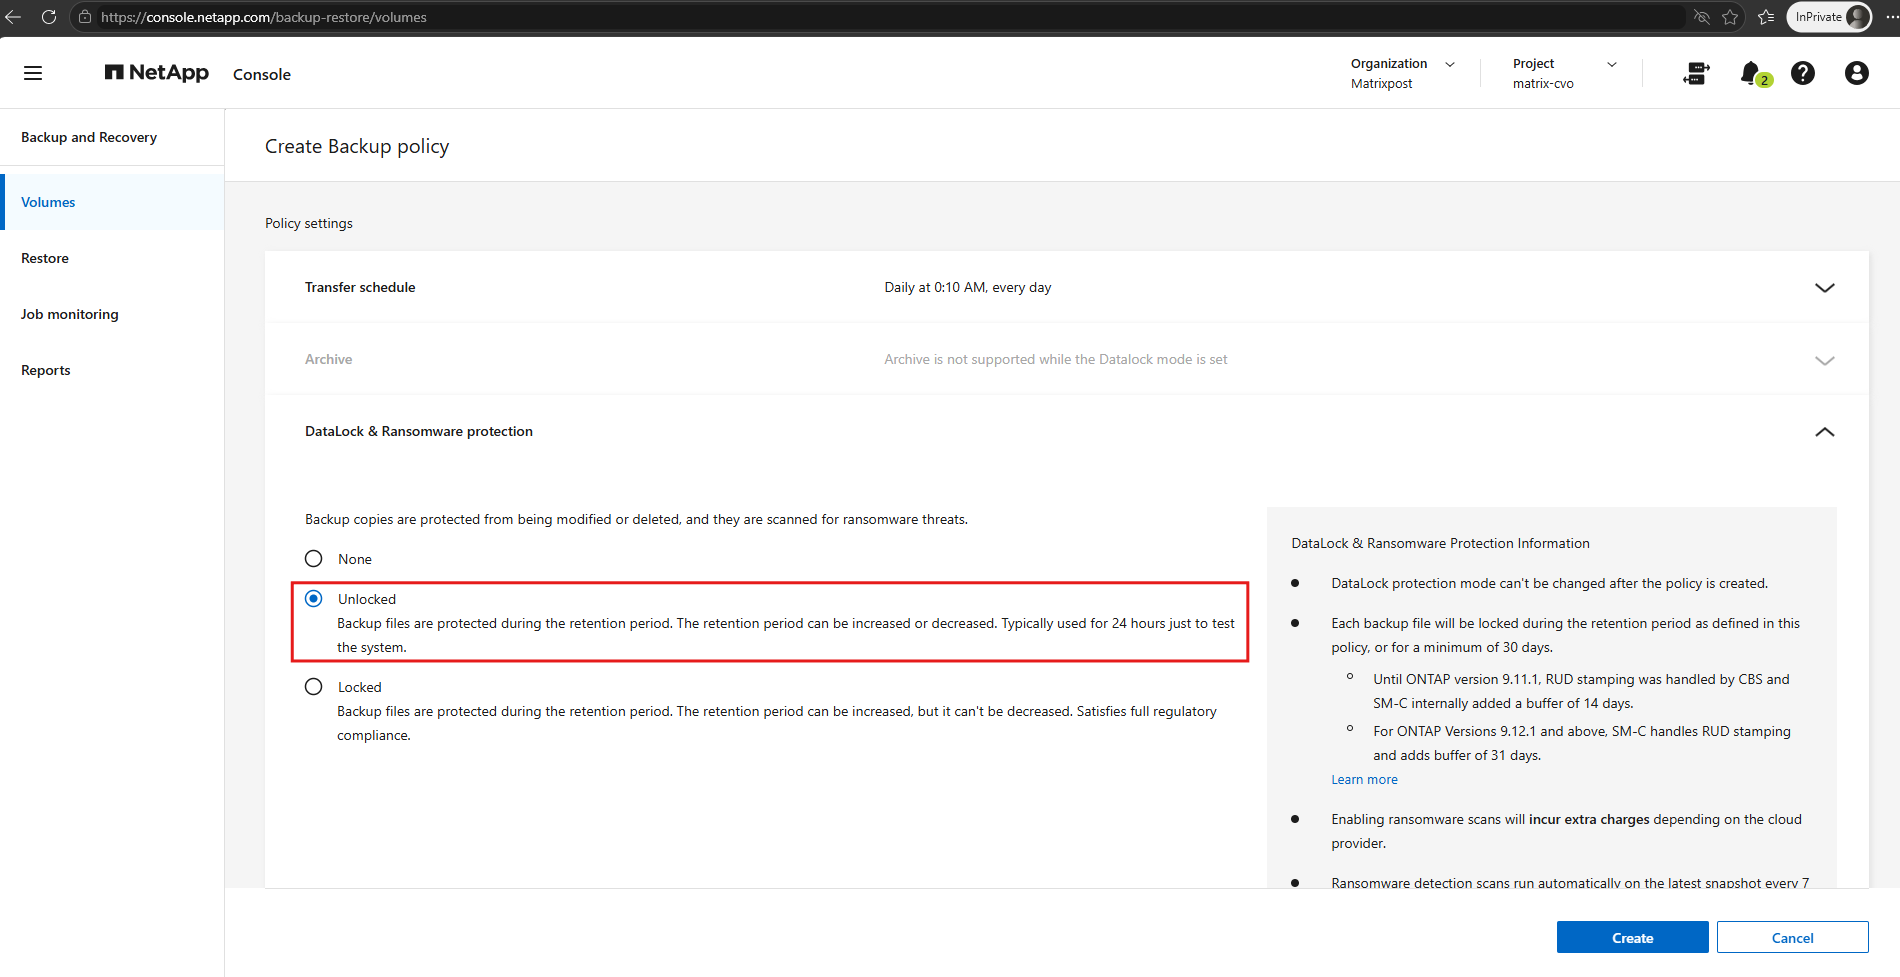
NetApp Console provides two DataLock protection modes: Unlocked, which allows the retention period to be increased or decreased and is primarily intended for testing, and Locked, which allows retention to be increased but not decreased and is designed for regulatory compliance.
Once the backup policy is created, its DataLock protection mode cannot be changed, and archive tiering is not supported while DataLock is enabled.
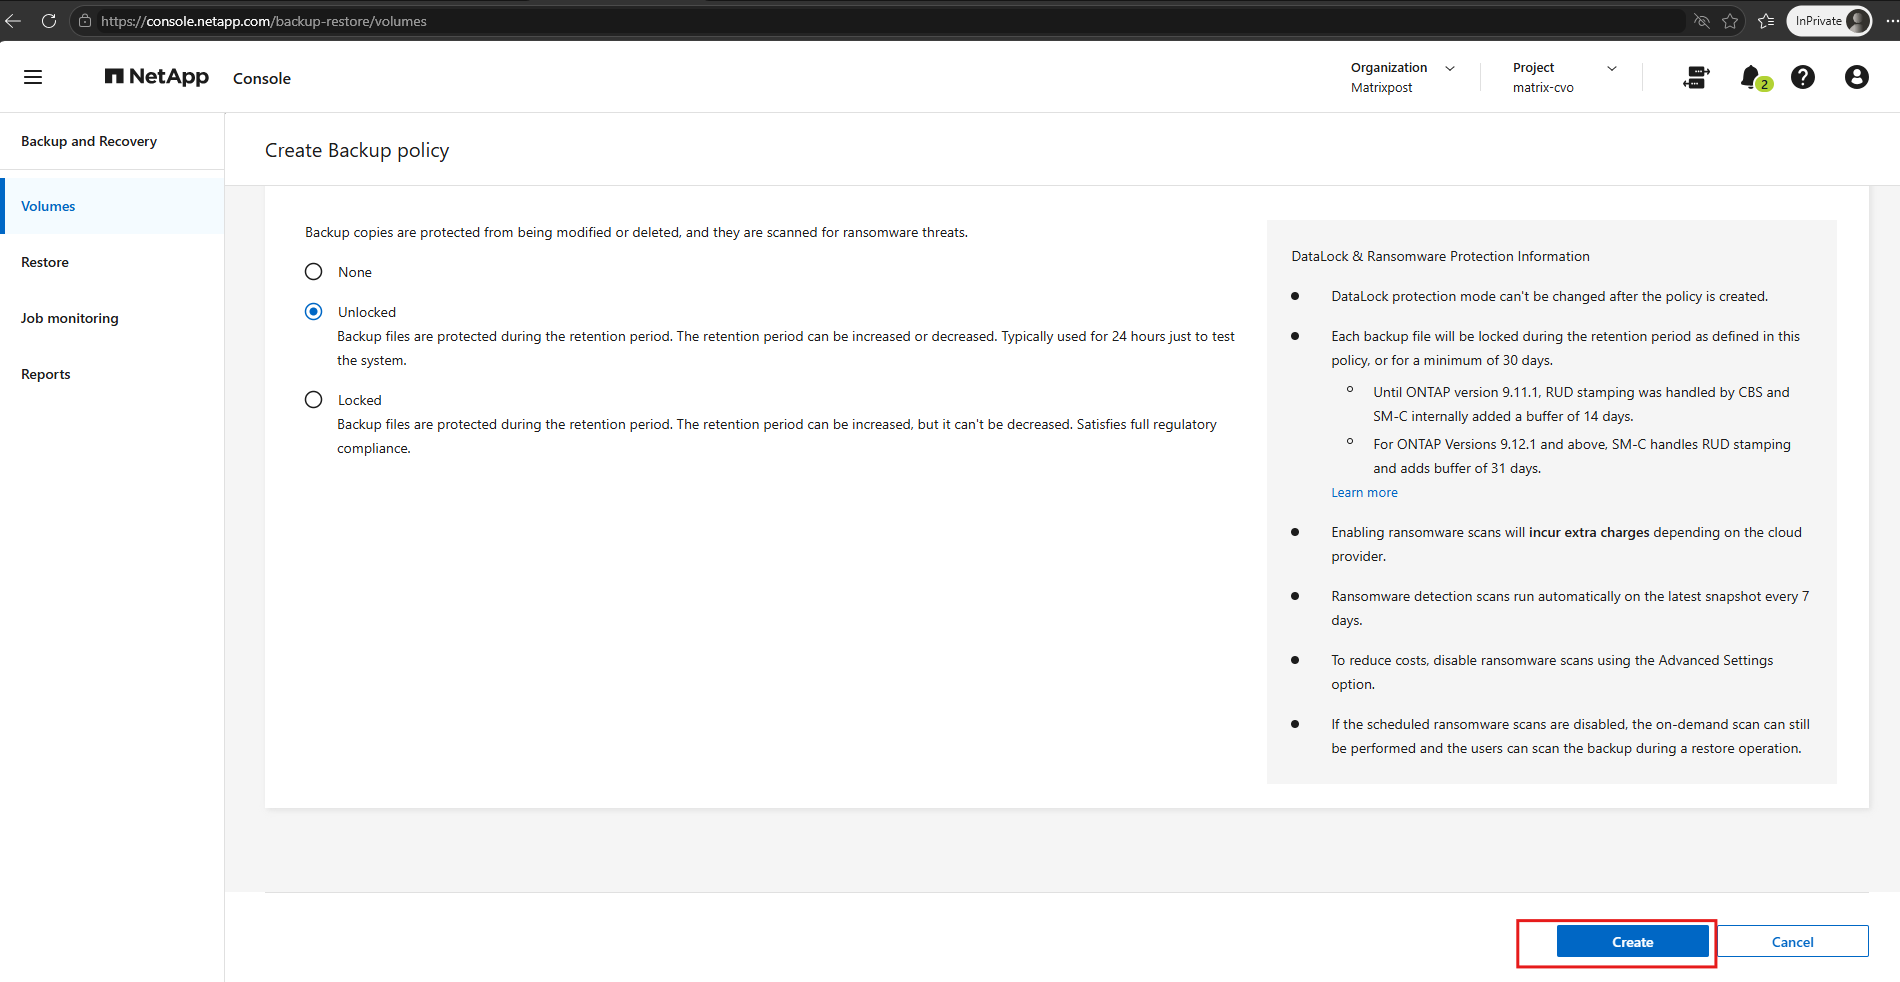
Click on Create.
When DataLock & Ransomware Protection is enabled, ransomware scanning is enabled by default and runs every seven days against the latest backup Snapshot. The scan frequency can be adjusted or scheduled scans disabled independently through the advanced backup settings, while DataLock remains active.
The new backup policy
test-backup03was successfully created with DataLock Governance enabled (Unlocked mode). Unlike our existing test-backup01 policy, which uses Compliance mode (Locked mode), the new policy allows the retention period to be adjusted for testing purposes.
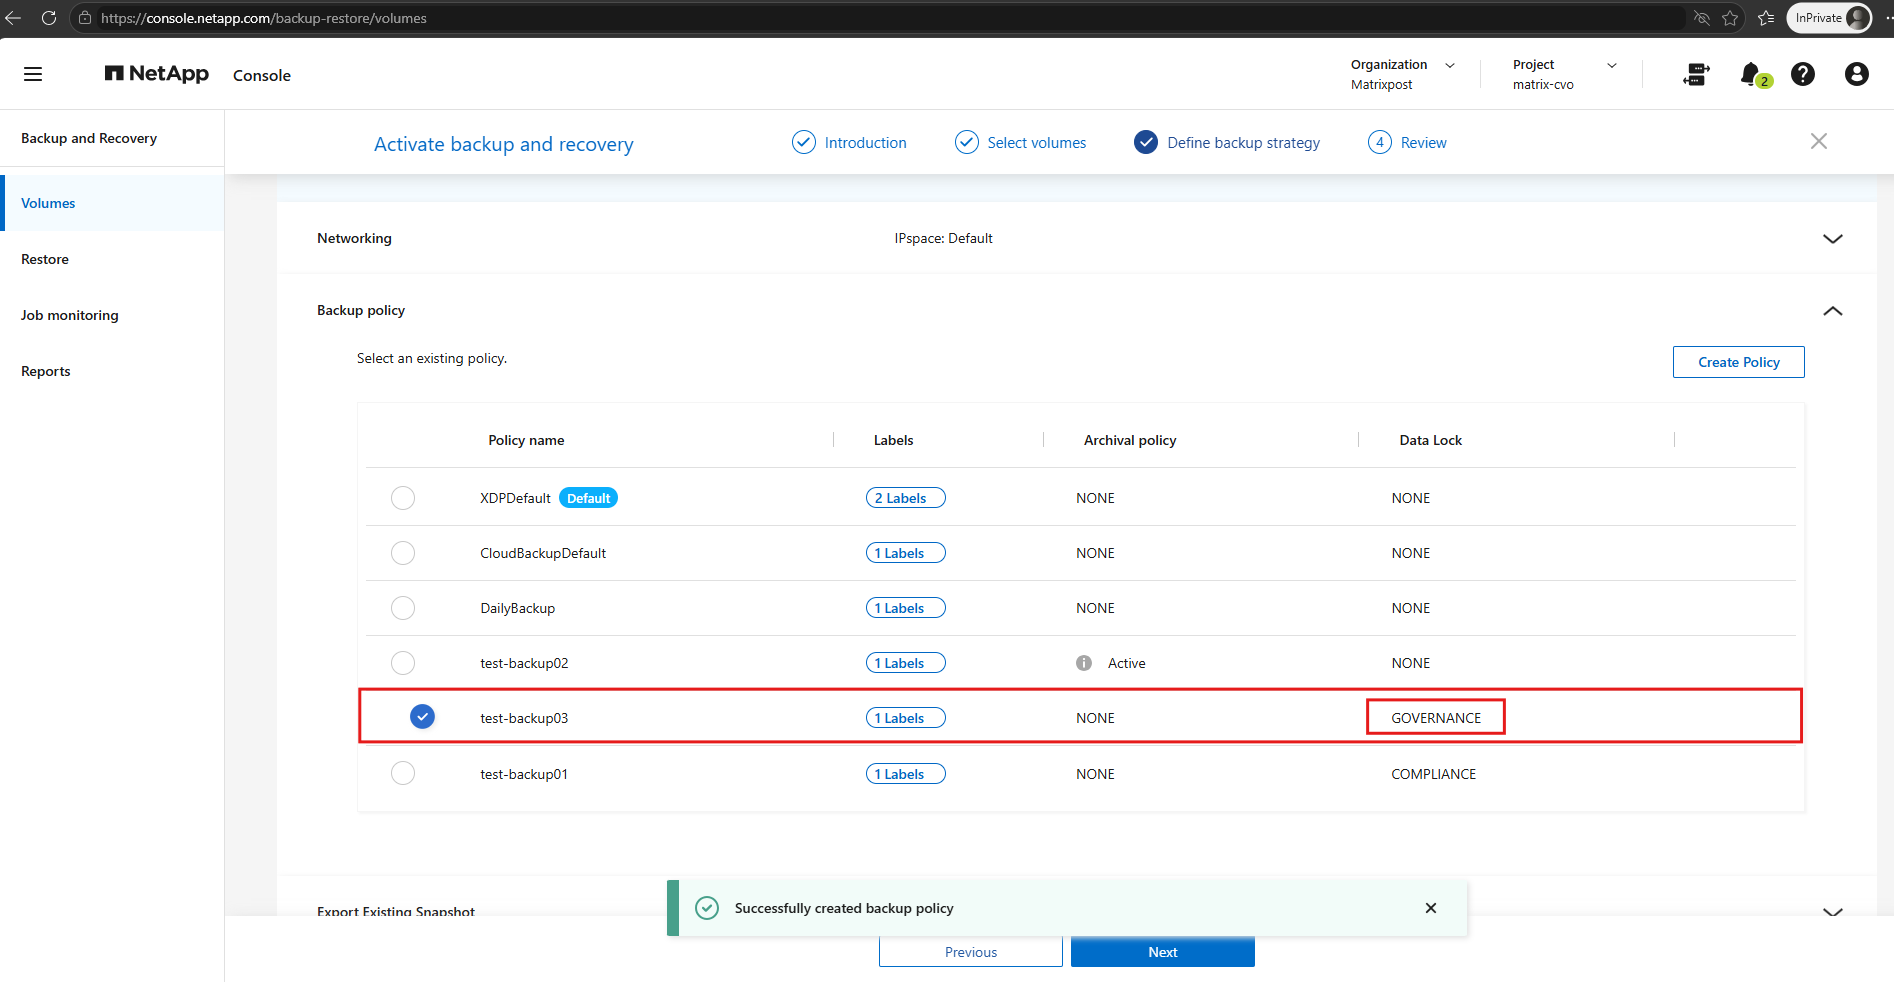
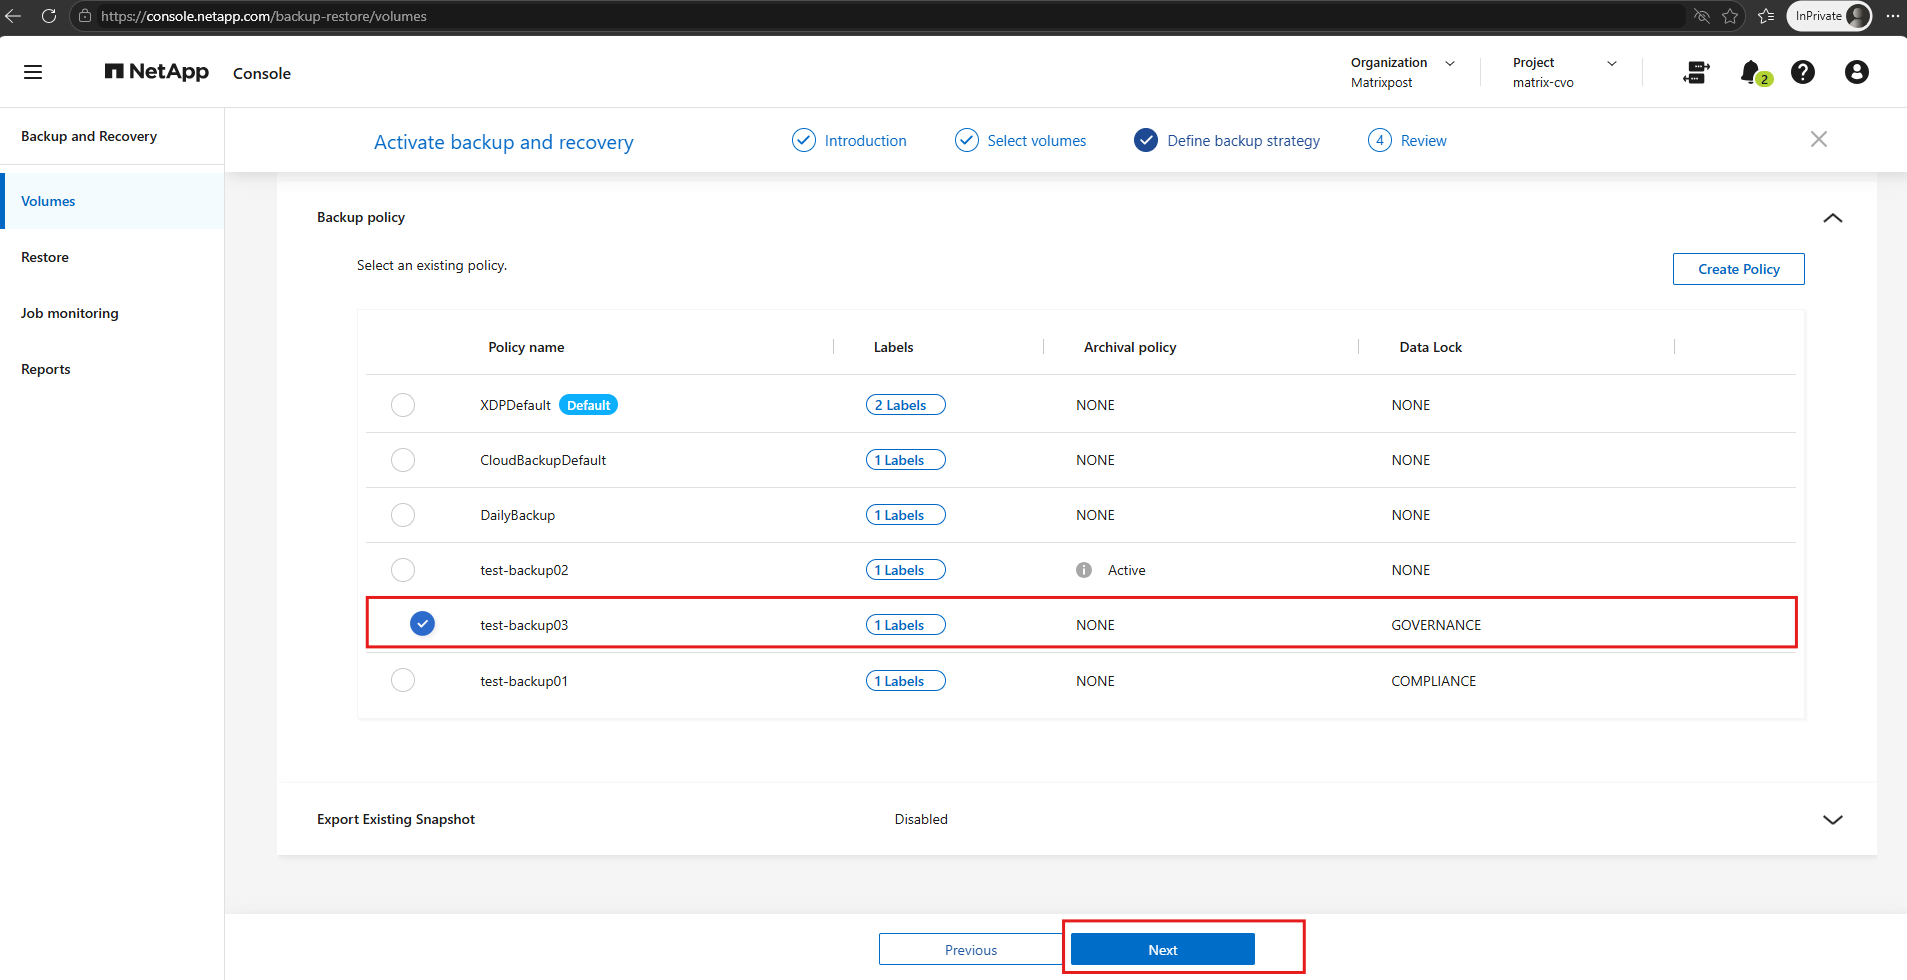
With our new test-backup03 policy using DataLock Governance selected, we leave Export Existing Snapshot disabled and click Next to review the backup configuration before activation.
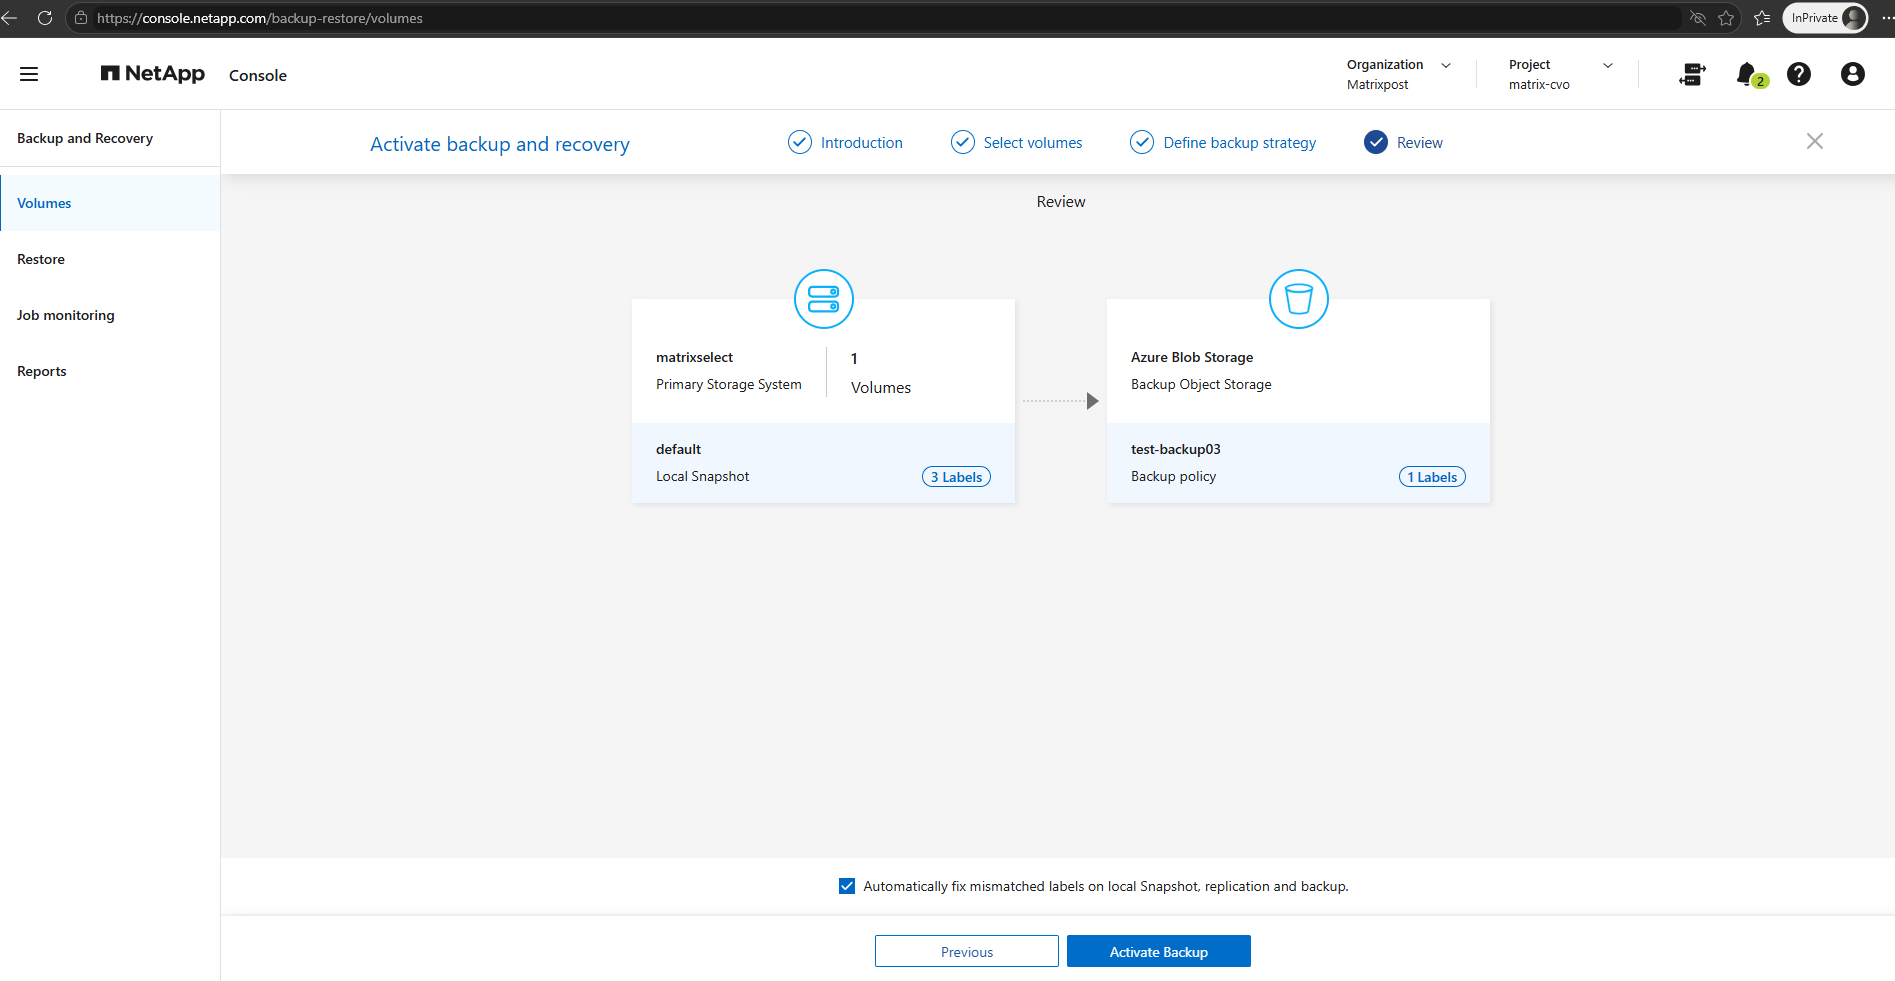
The final review confirms that our selected volume on matrixselect will be protected using the local Snapshot policy default and the new test-backup03 policy for Azure Blob Storage with DataLock Governance enabled. We leave Automatically fix mismatched labels enabled and click Activate Backup to start the configuration.
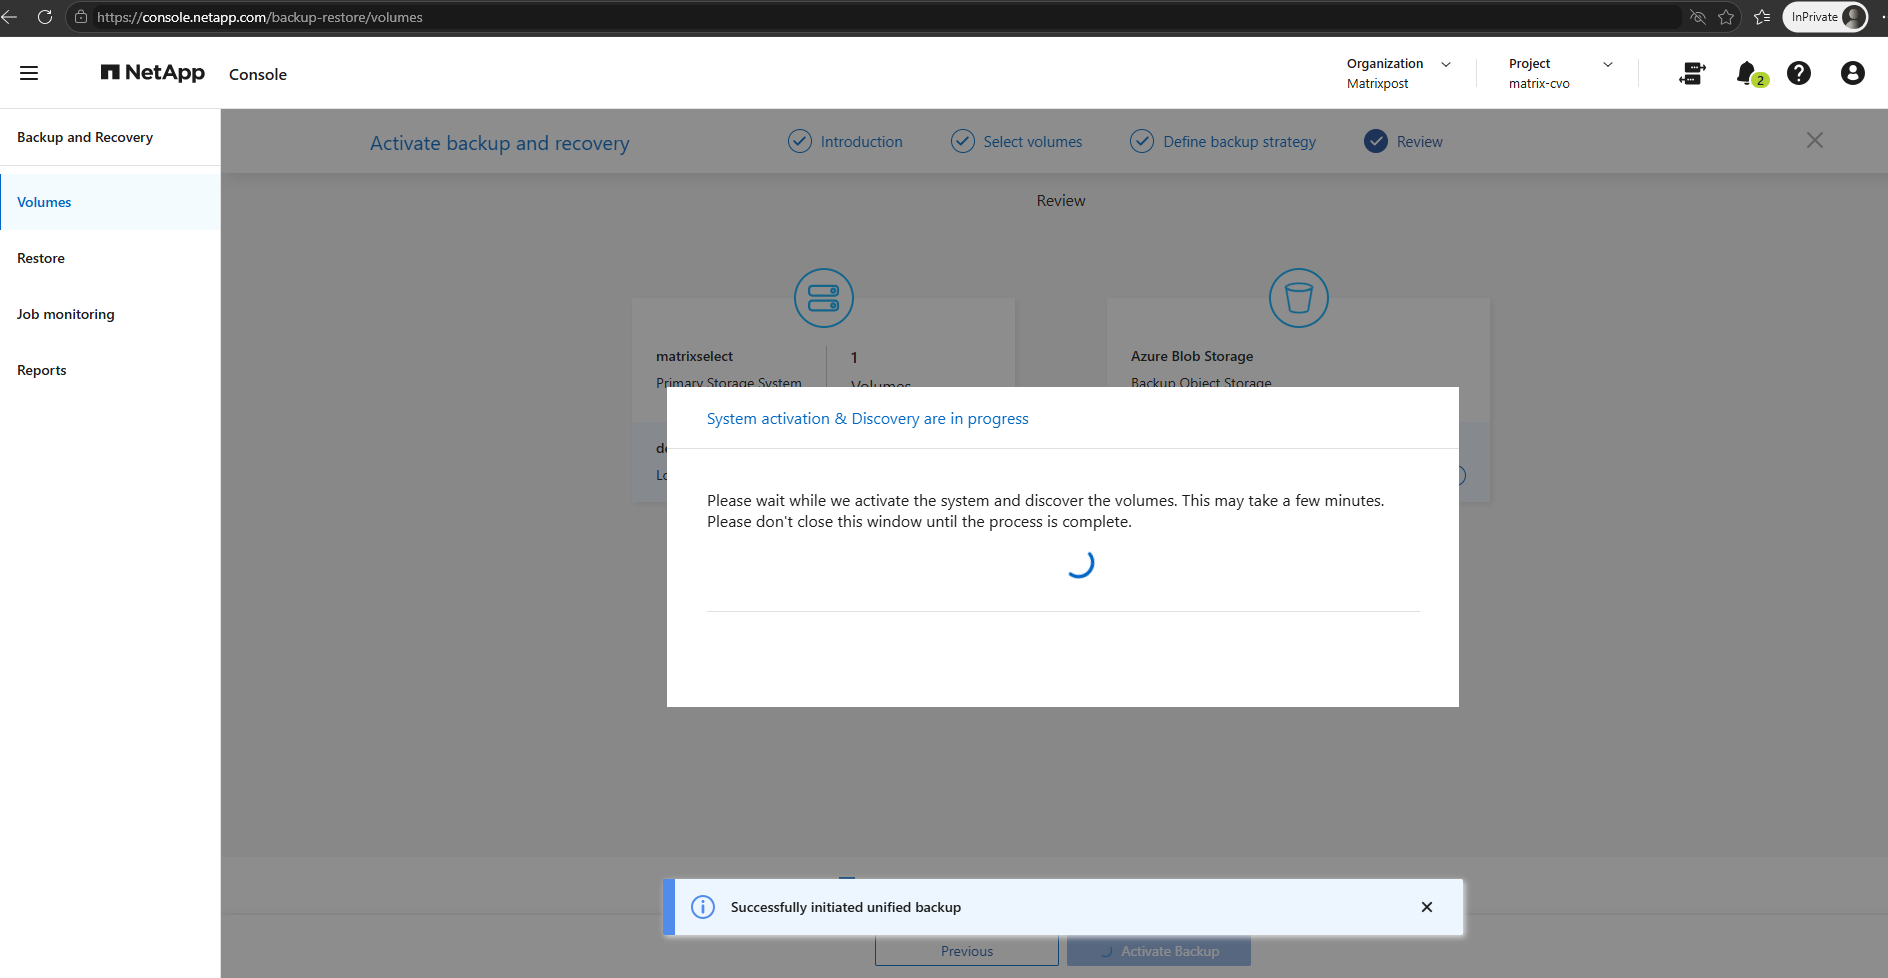
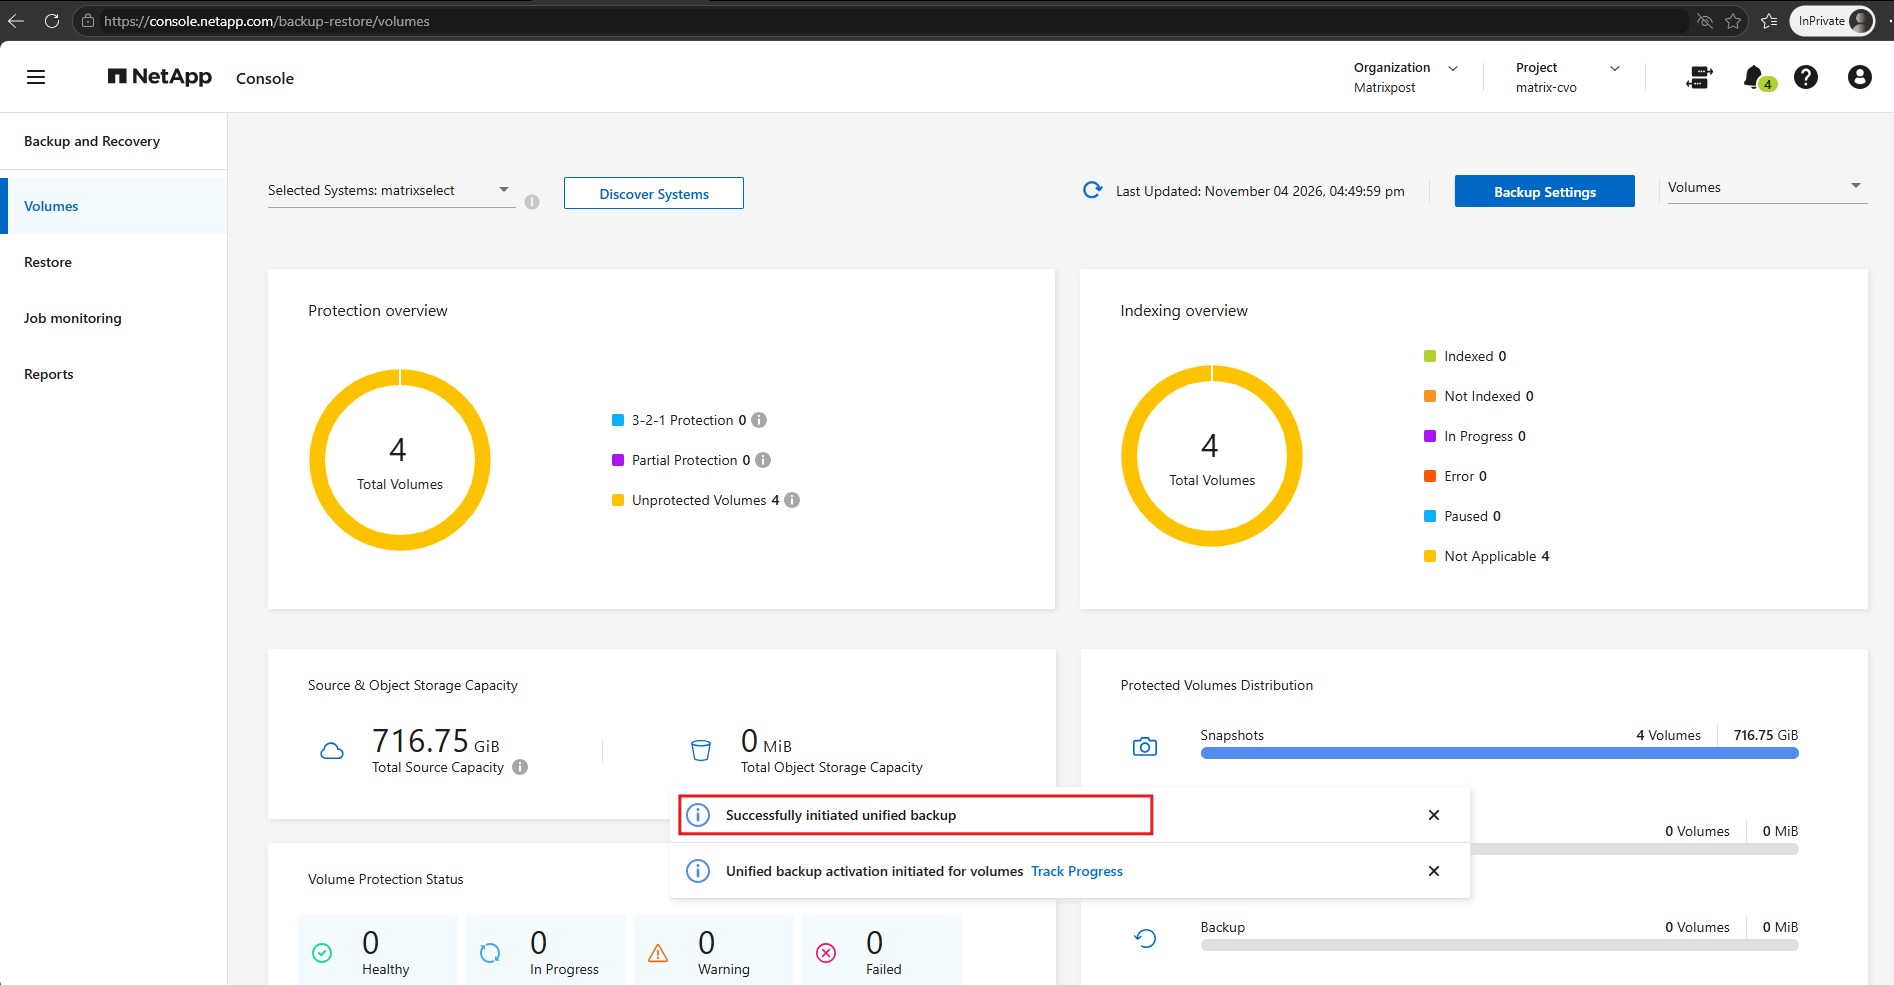
NetApp Console confirms that the backup activation was successfully initiated. The configuration now runs in the background, and we can monitor its progress using Track Progress under Job Monitoring.
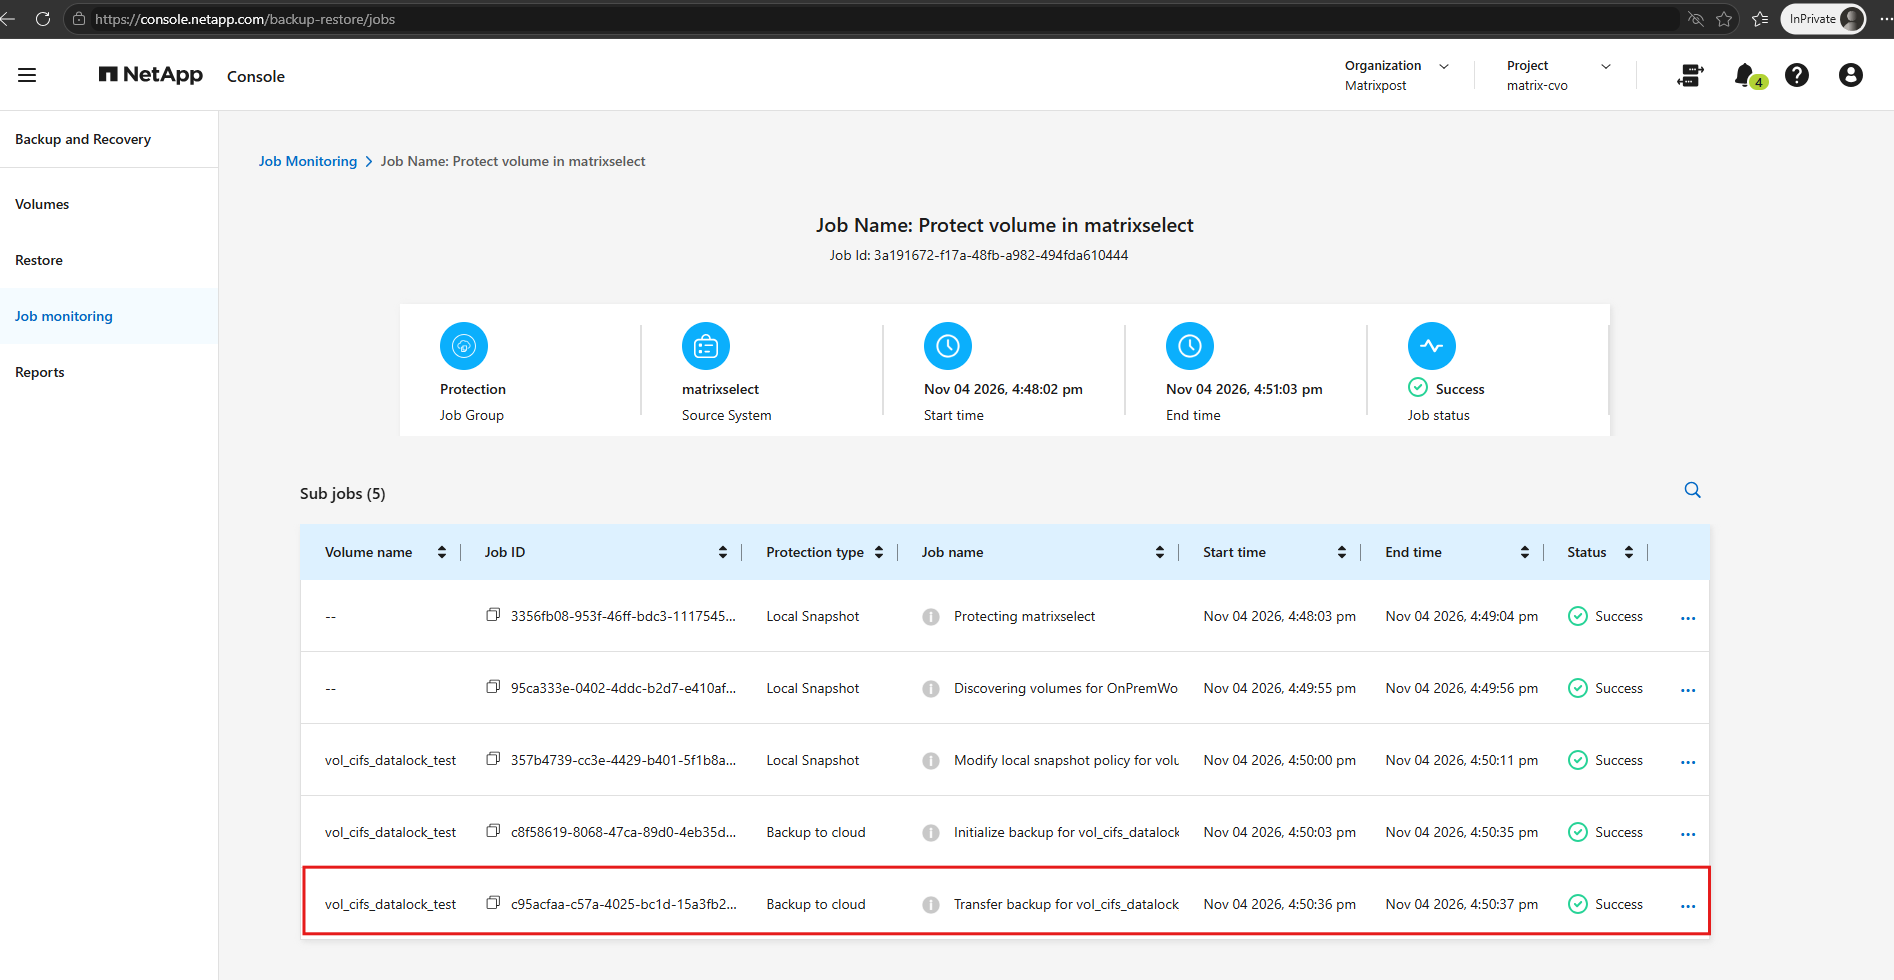
The Job Monitoring details confirm that backup activation completed successfully, including all five sub-jobs. The initial cloud backup of
vol_cifs_datalock_testwas initialized and transferred successfully to Azure Blob Storage using our new DataLock Governance policy.
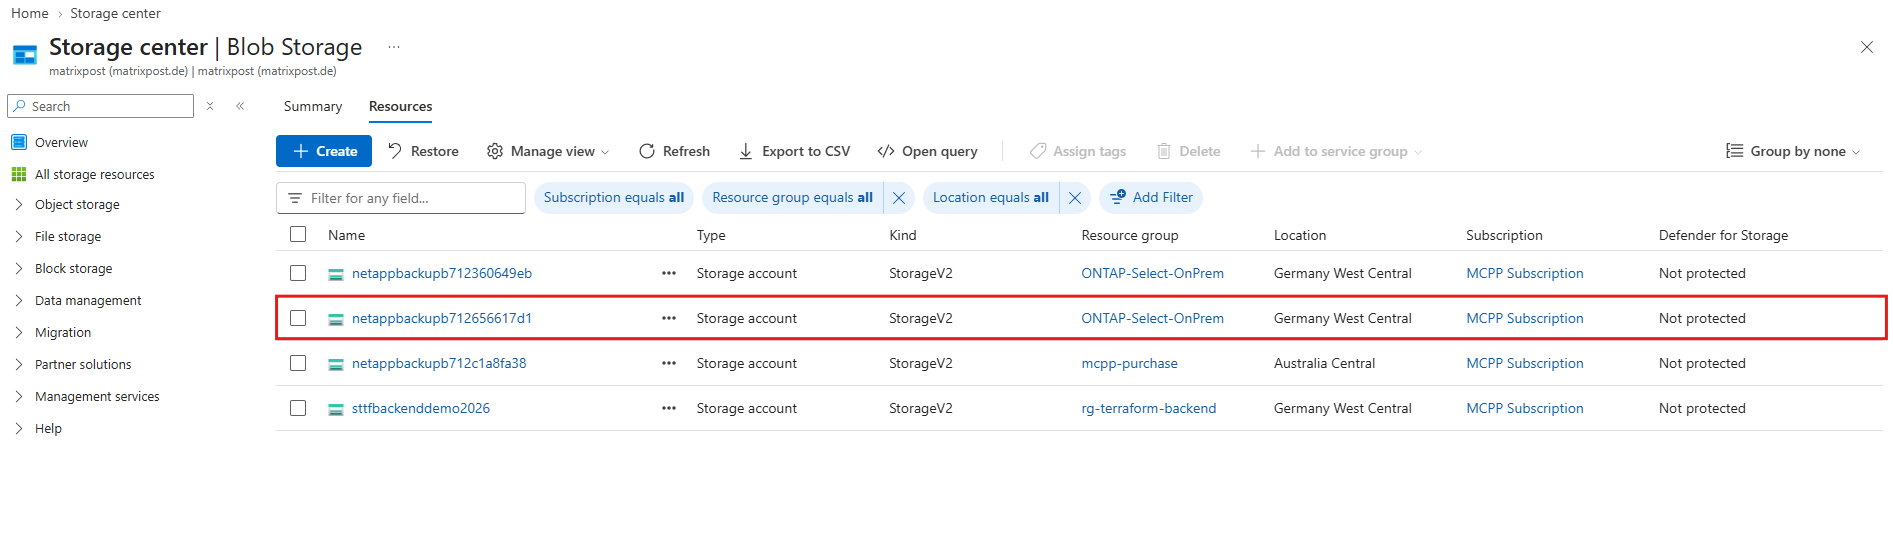
Azure confirms that NetApp Console automatically provisioned a new storage account, netappbackup712656617d1, in the ONTAP-Select-OnPrem resource group in Germany West Central.
Our previous storage account remains in place, preserving the existing backups after unregistering the original backup configuration.
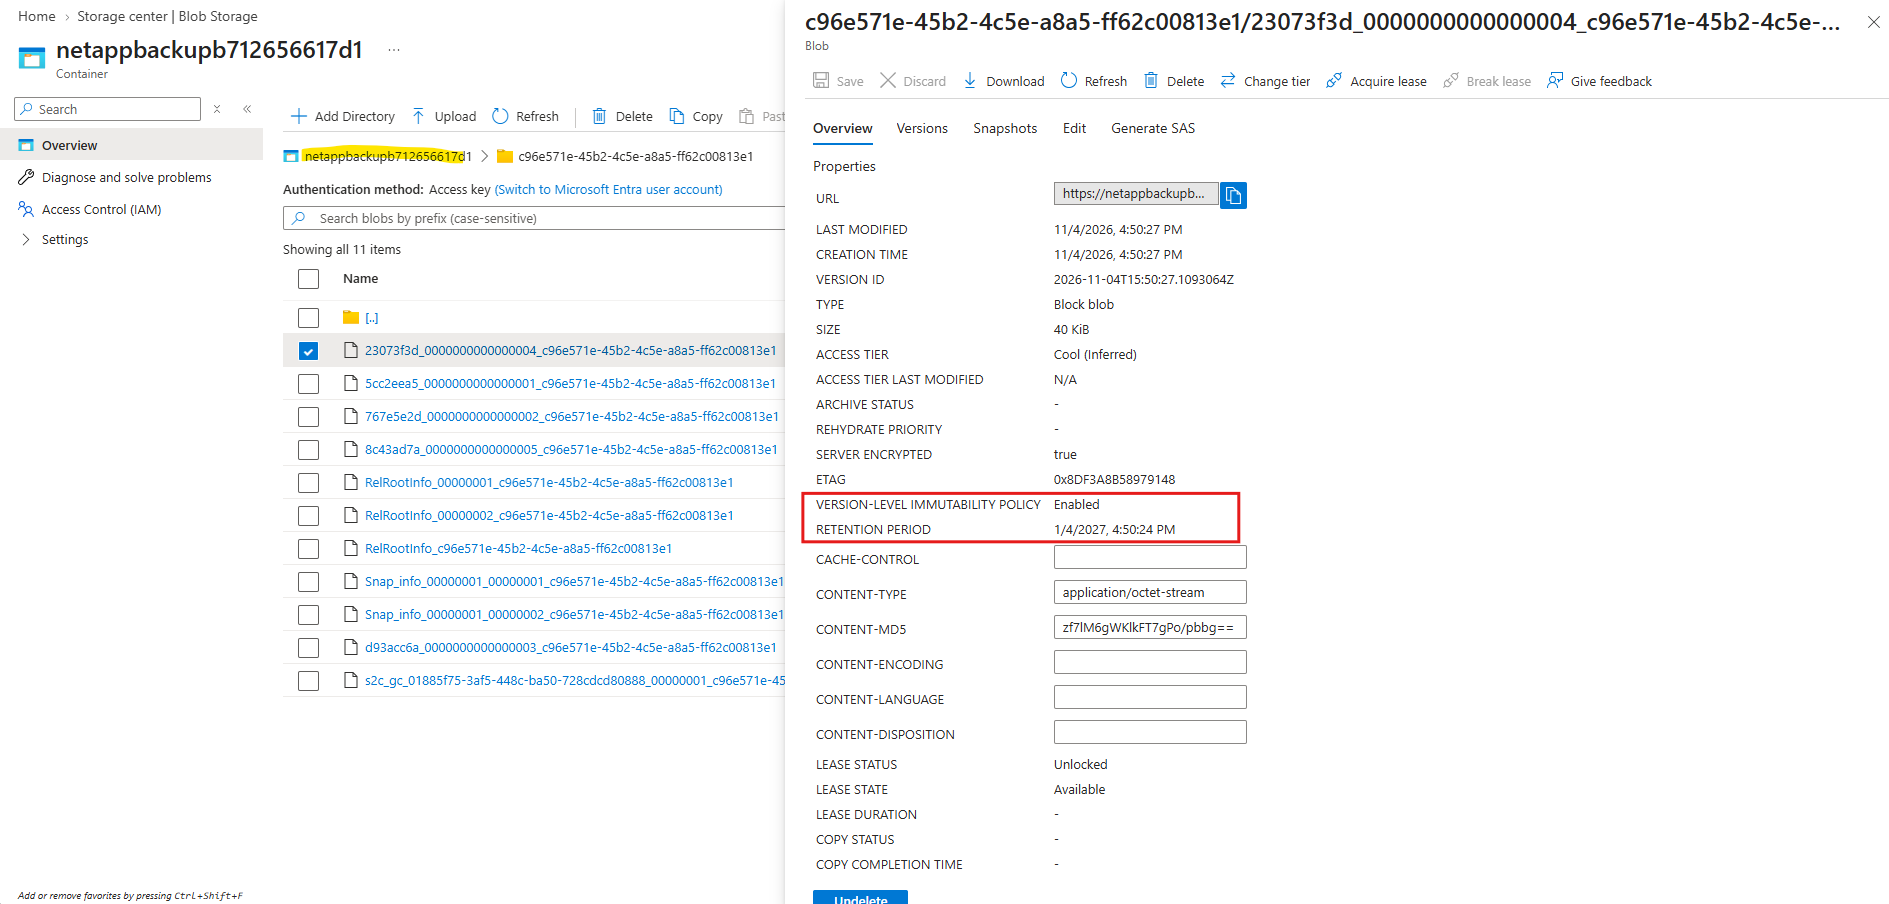
Inspecting the backup blobs in Azure confirms that version-level immutability is enabled, with a retention period extending until January 4, 2027.
This verifies that our new DataLock Governance policy is protecting the backup objects against modification or deletion during their retention period.
Verify Ransomware Protection Settings
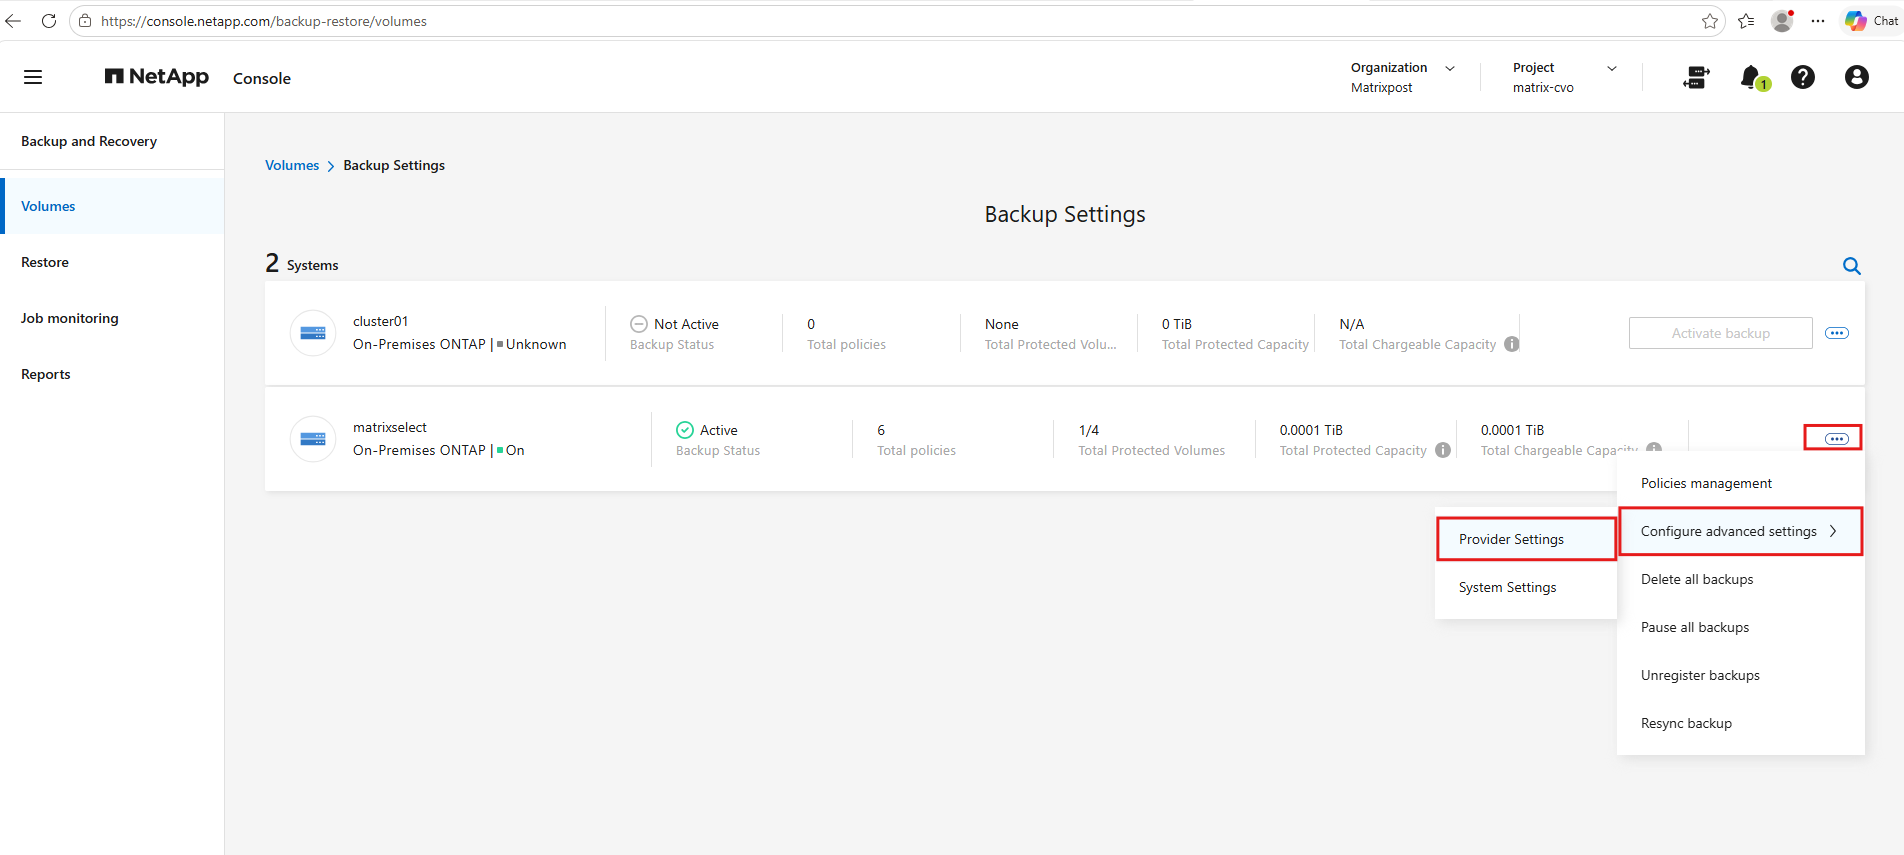
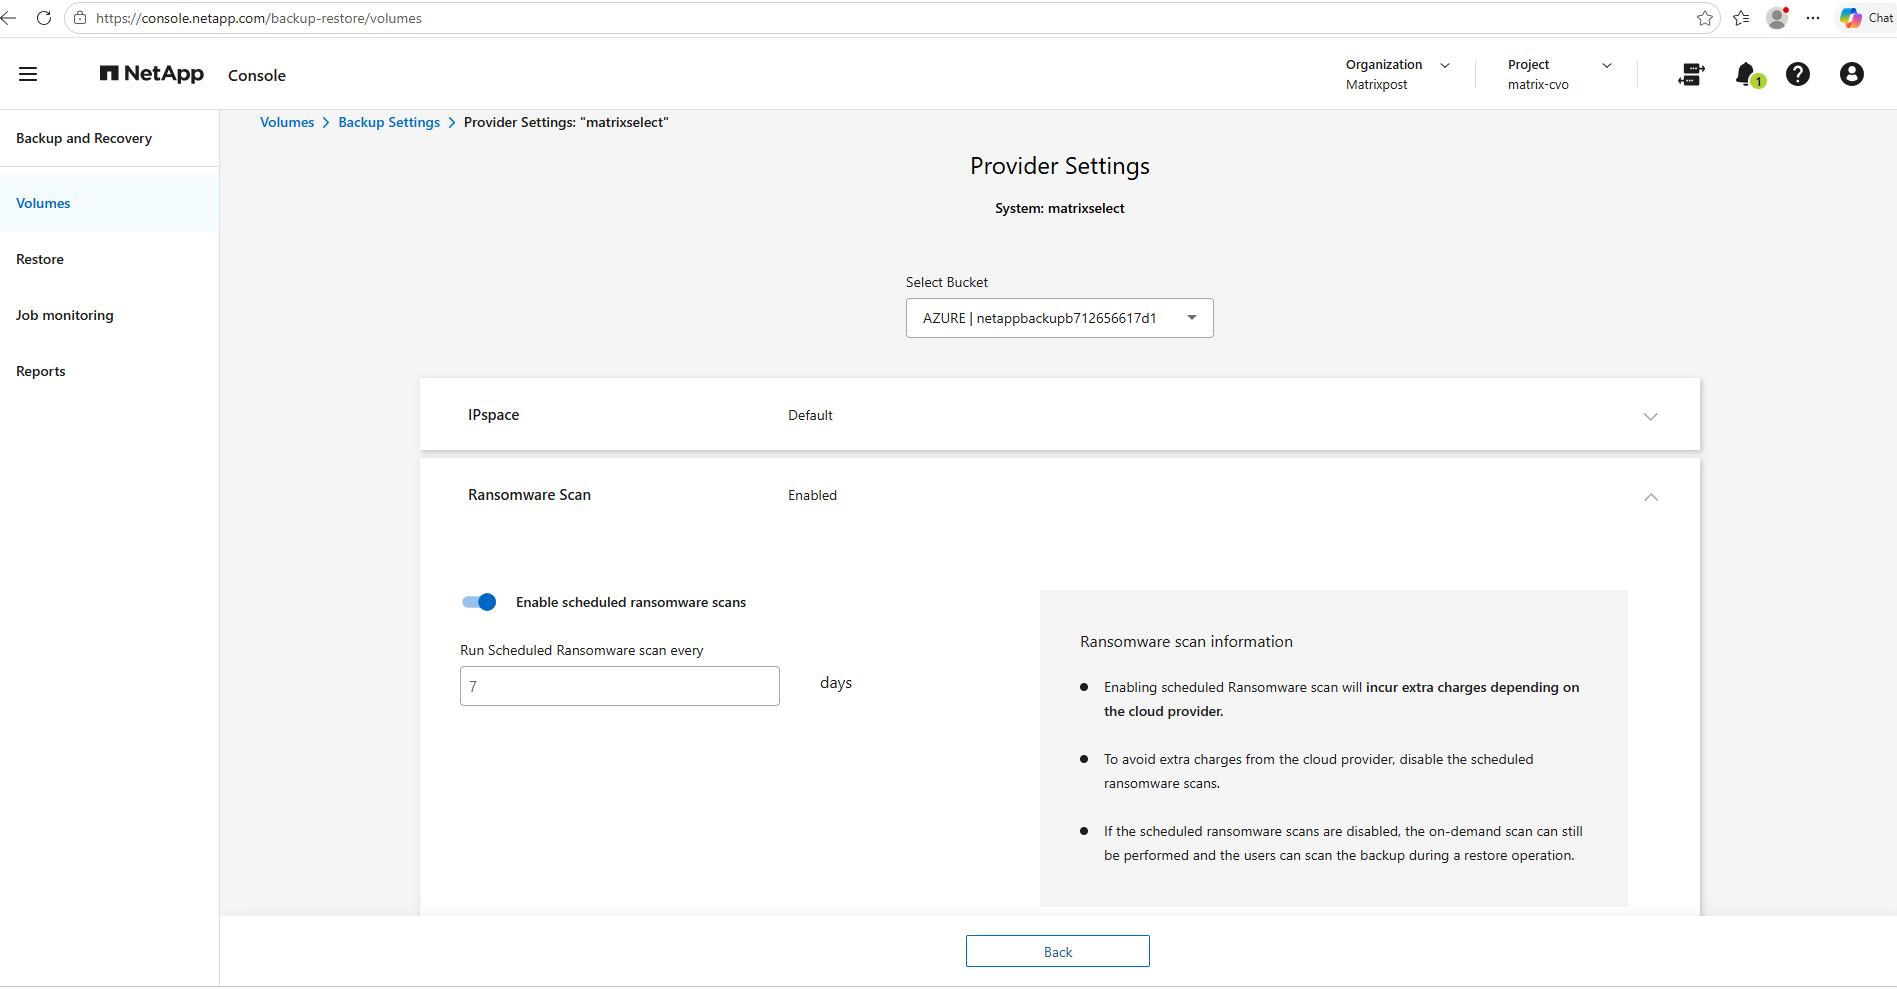
After activating the new backup configuration with DataLock Governance, we will verify that scheduled ransomware scanning is enabled and review its configuration, including the default seven-day scan interval.
Under Backup Settings → Provider Settings → Ransomware Scan, we can verify it.
This interval can be adjusted or scheduled scanning disabled entirely, while on-demand scans remain available.
NetApp explicitly confirms that ransomware scanning is supported for Azure and that enabling it can generate additional cloud-provider costs.
More about here: https://docs.netapp.com/us-en/data-services-backup-recovery/prev-ontap-policy-object-options.html
Trigger an On-Demand Ransomware Scan
To verify ransomware protection without waiting for the next scheduled scan, we will manually trigger an on-demand ransomware scan for our initial Azure backup. Once completed, we will check the scan results and confirm that the backup’s Ransomware Protection status changes to Protected.
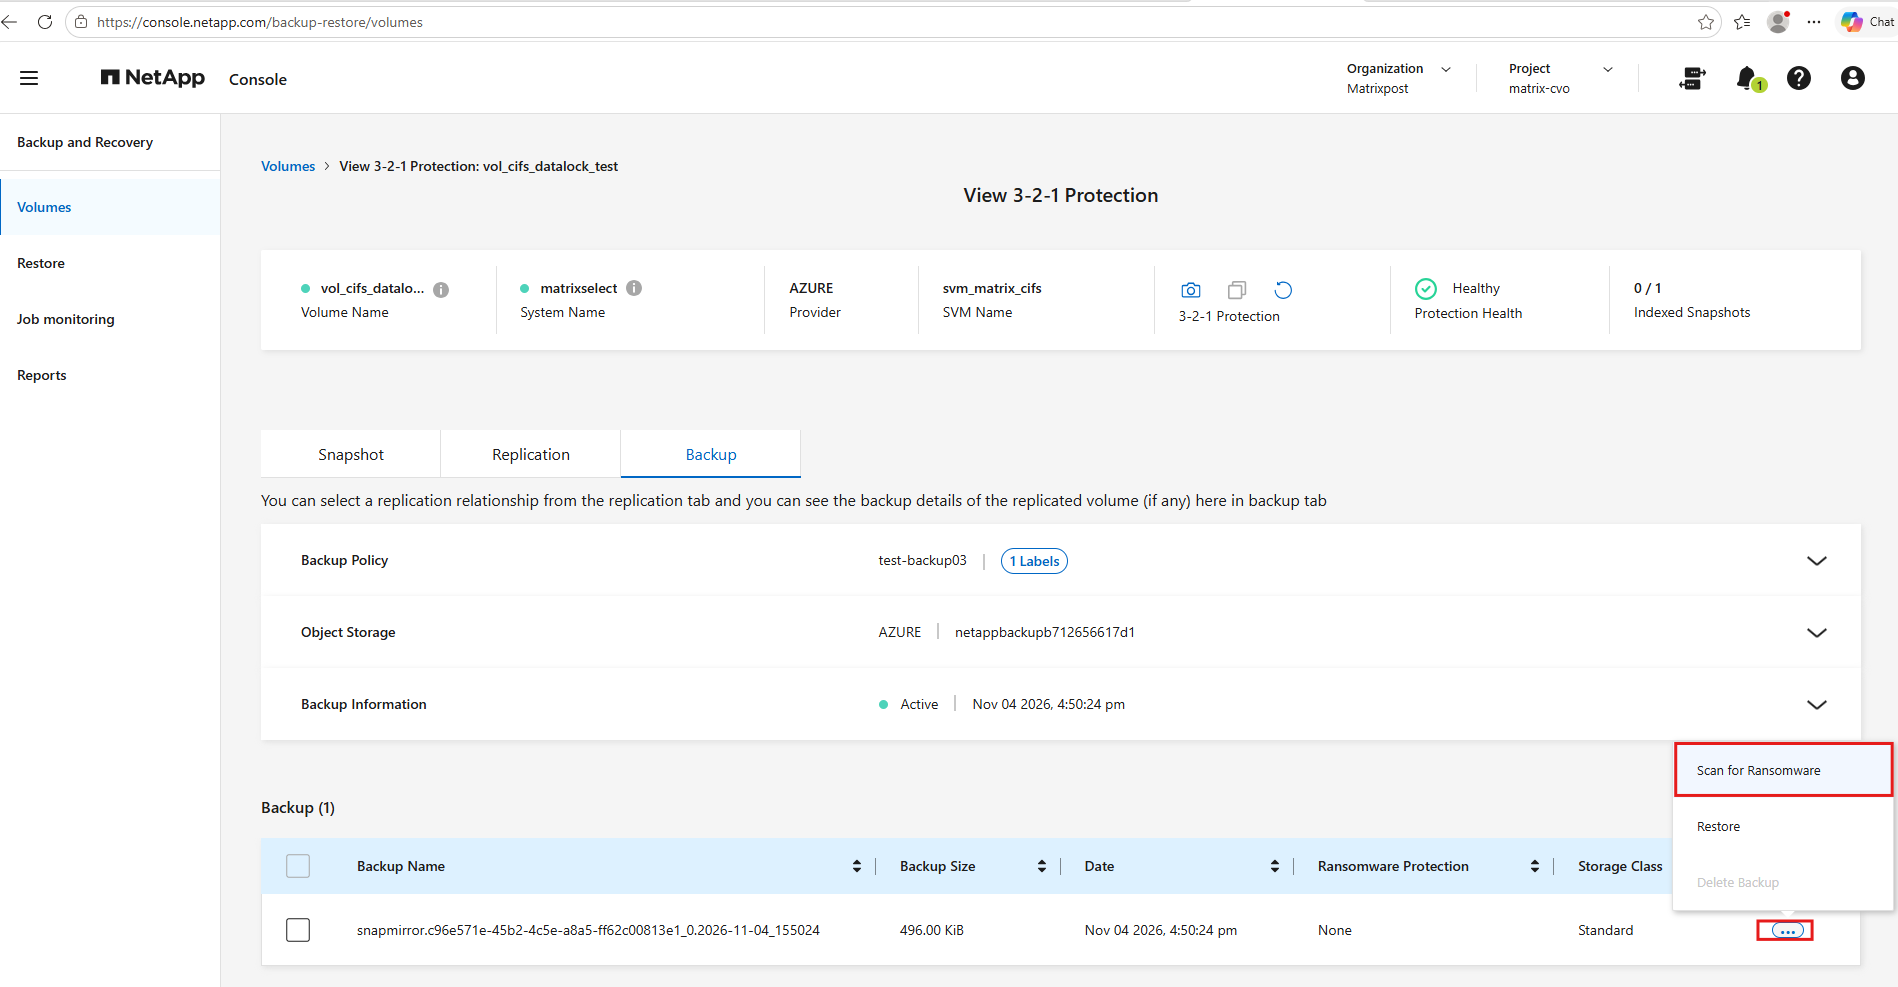
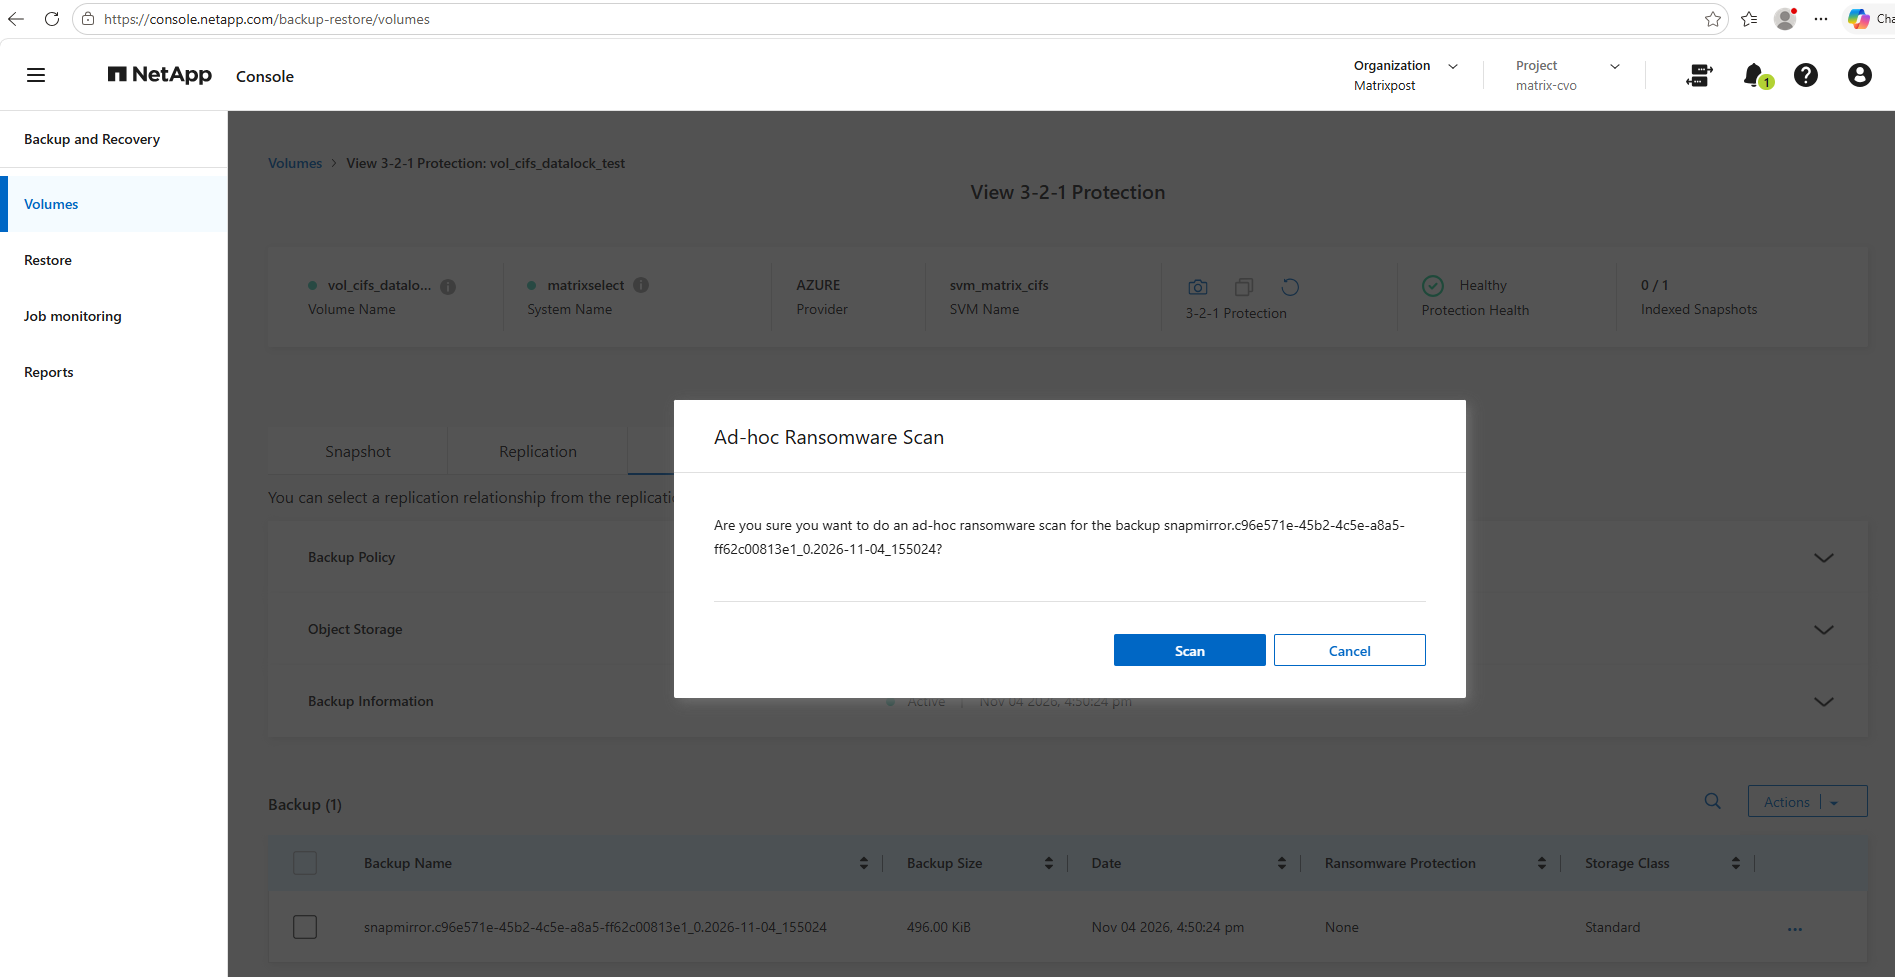
The Ad-hoc Ransomware Scan confirmation dialog appears for our initial backup of vol_cifs_datalock_test. We click Scan to initiate the ransomware scan manually, without waiting for the next scheduled scan.
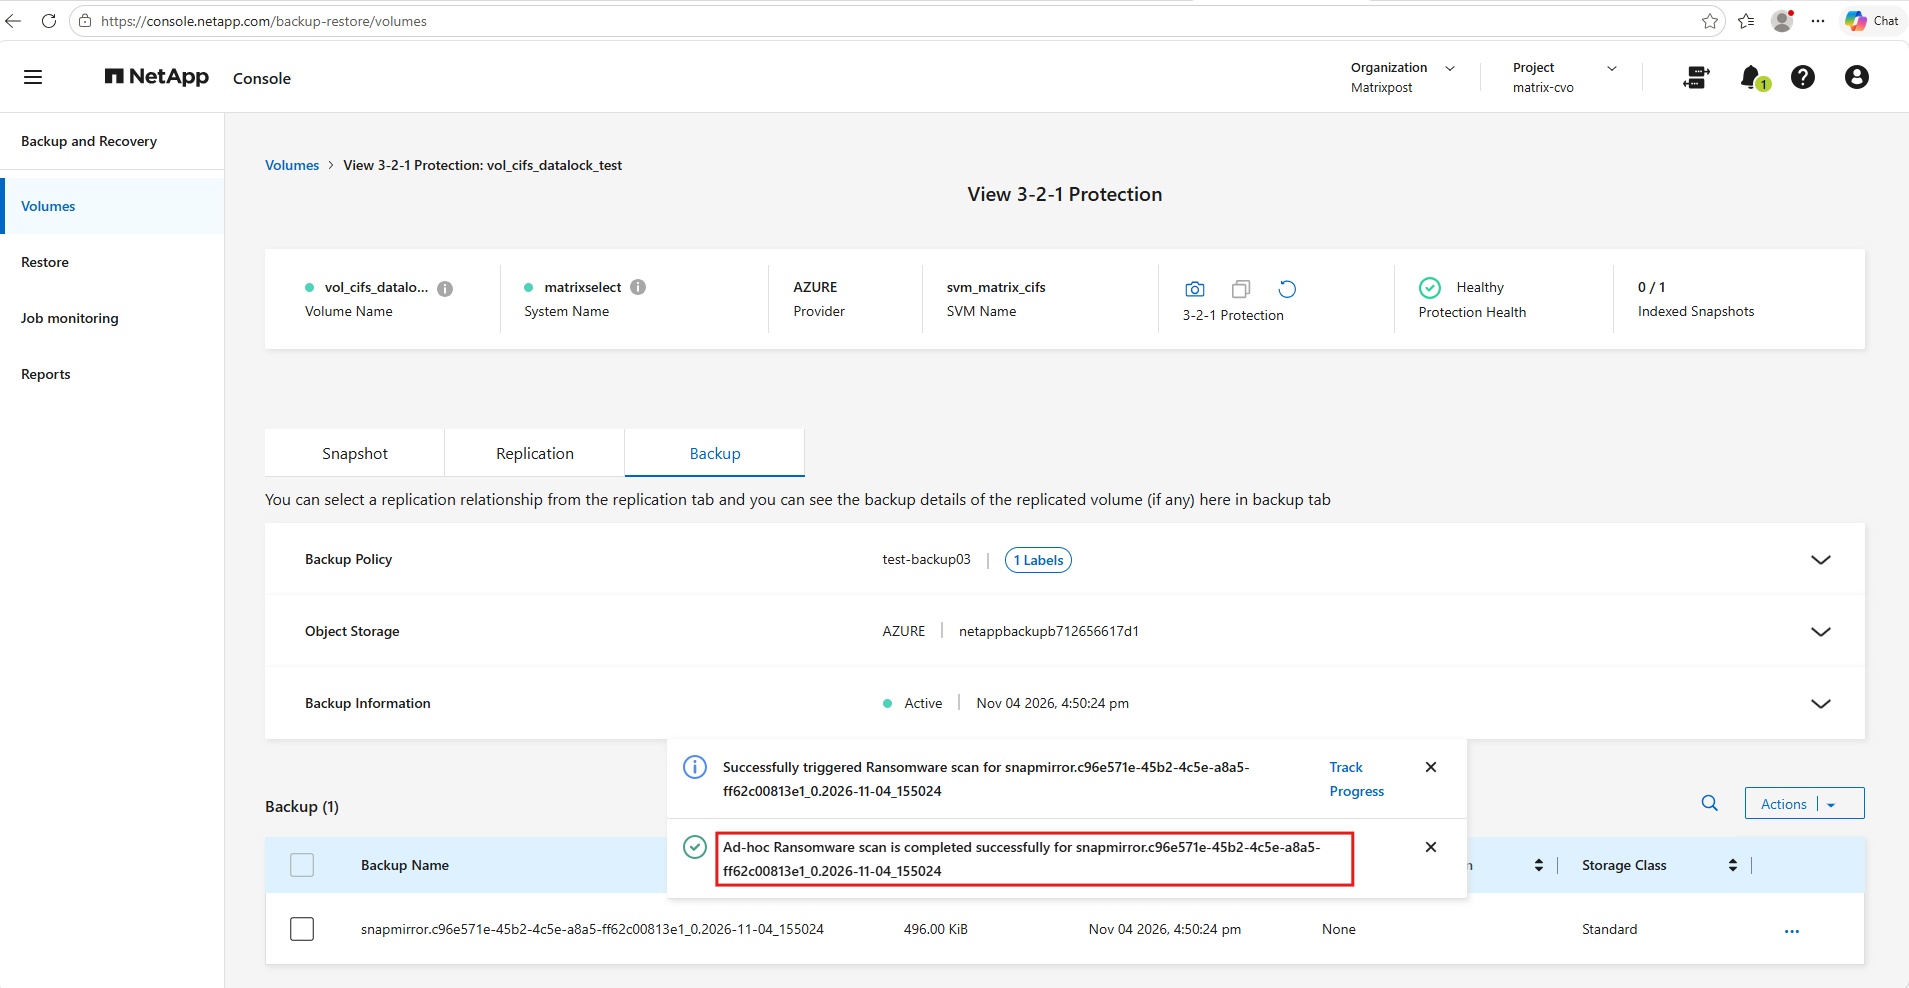
The on-demand ransomware scan completed successfully for our initial Azure backup, as confirmed by NetApp Console. We can now review the scan results and verify whether any ransomware-related threats were detected.
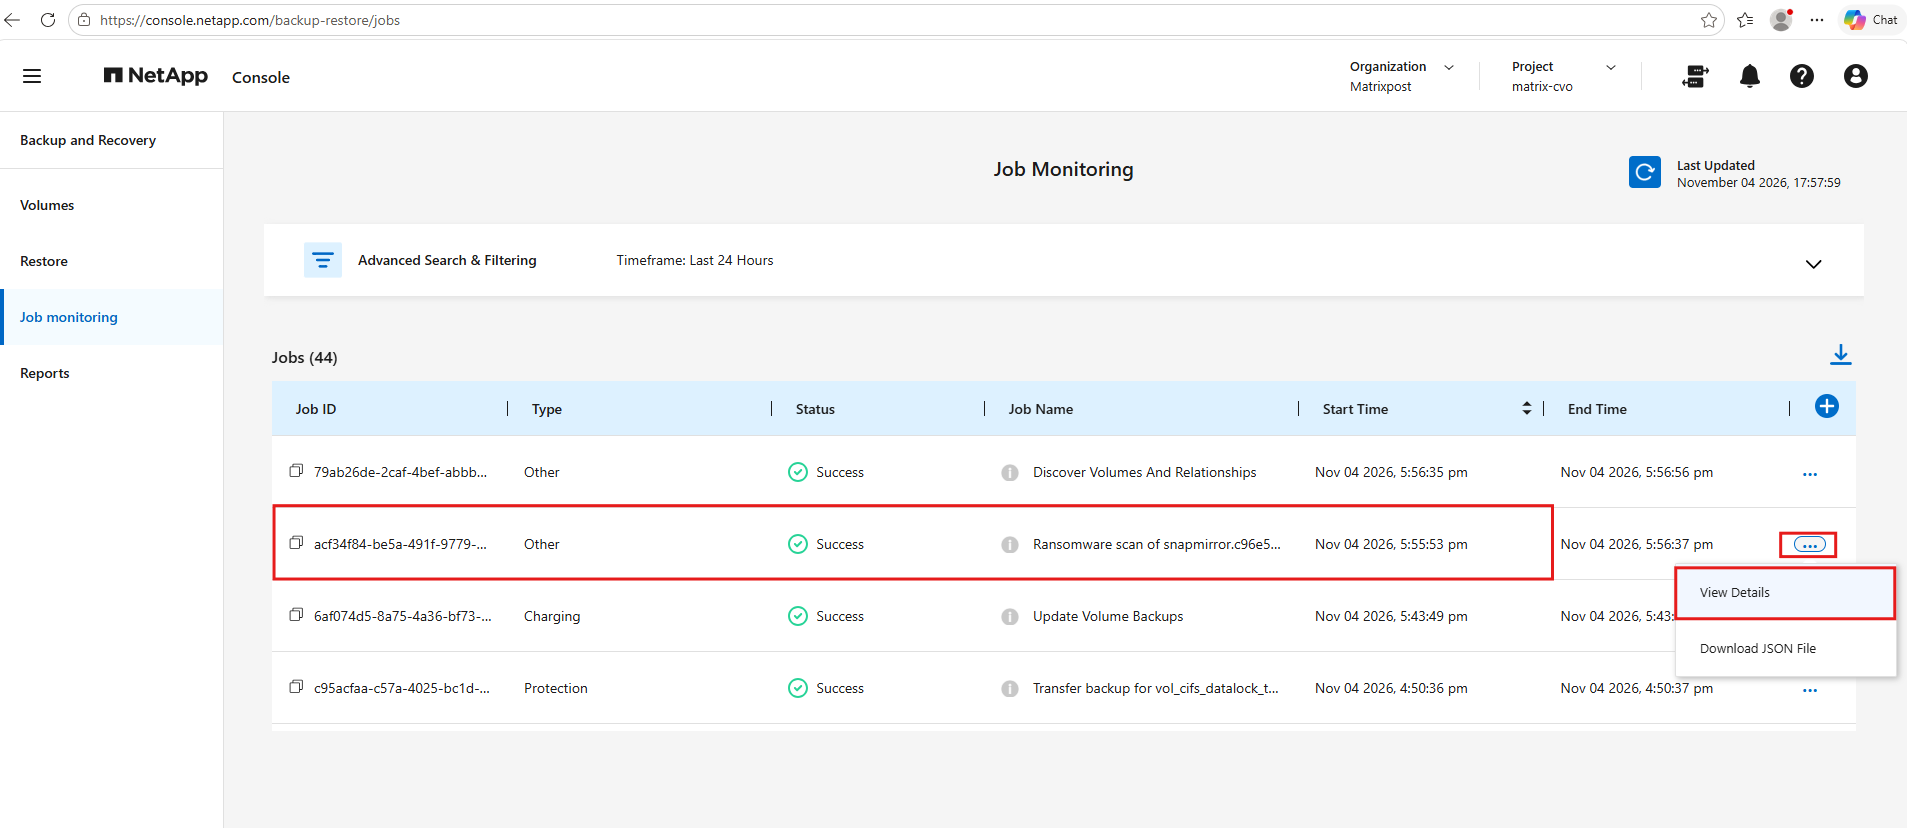
Under Job Monitoring, the on-demand ransomware scan is listed with a Success status, confirming that the scan completed successfully. We can open the job’s three-dot menu (⋯) → View Details to inspect the results.
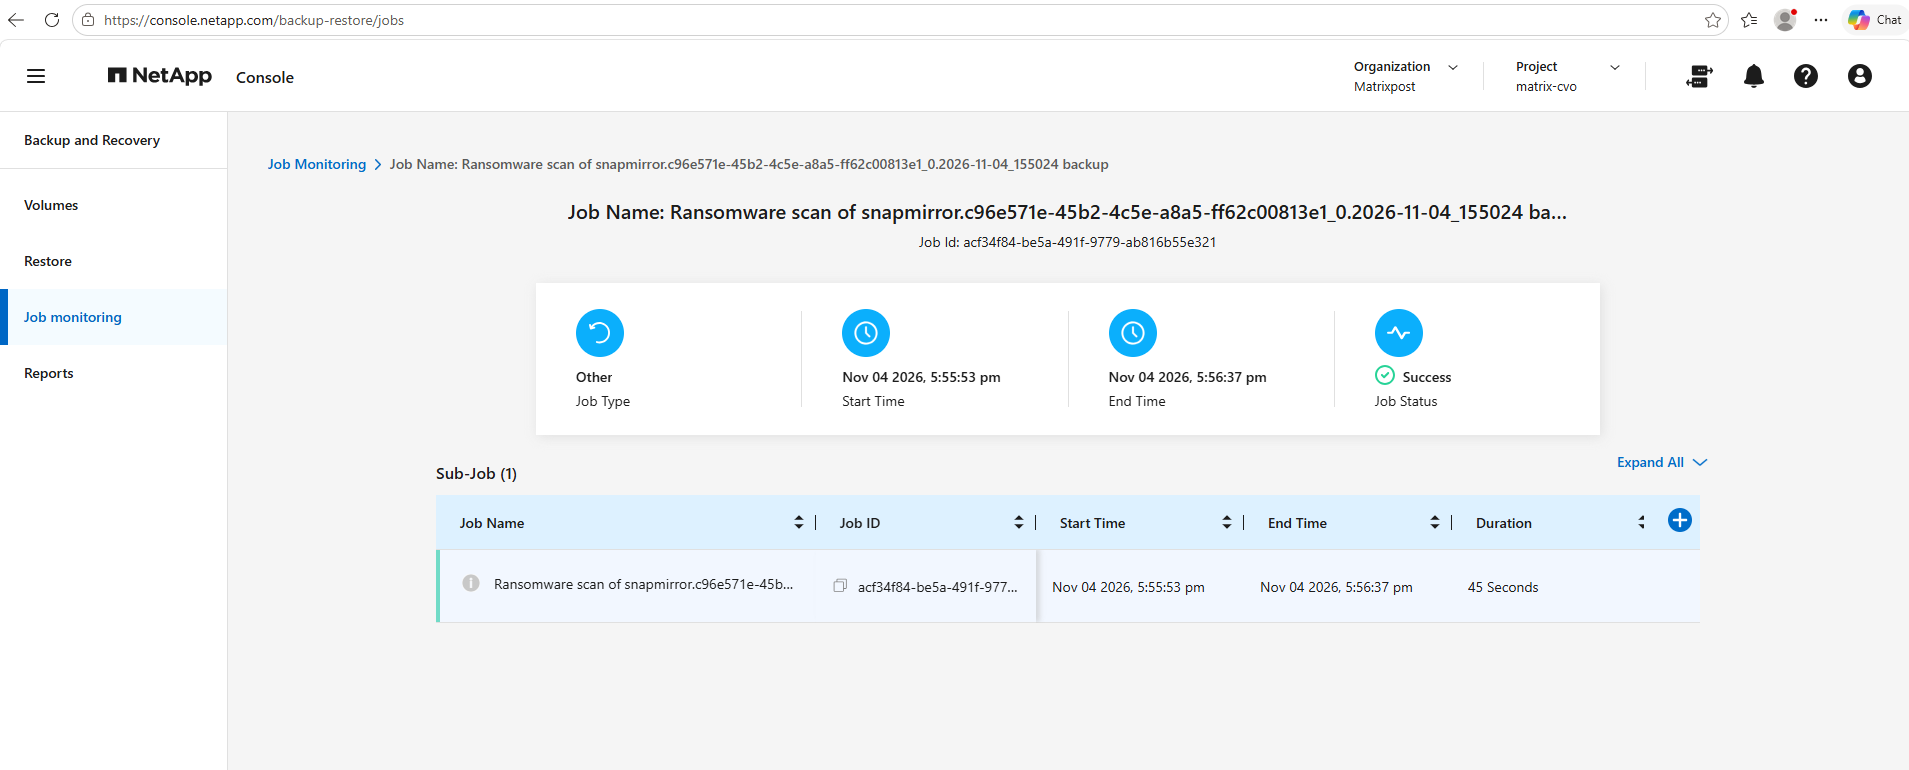
The Job Monitoring details confirm that our on-demand ransomware scan completed successfully in just 45 seconds, with no job errors reported. However, the successful job status confirms scan execution, not necessarily that the backup was classified as ransomware-free; we should verify that separately in the backup details.
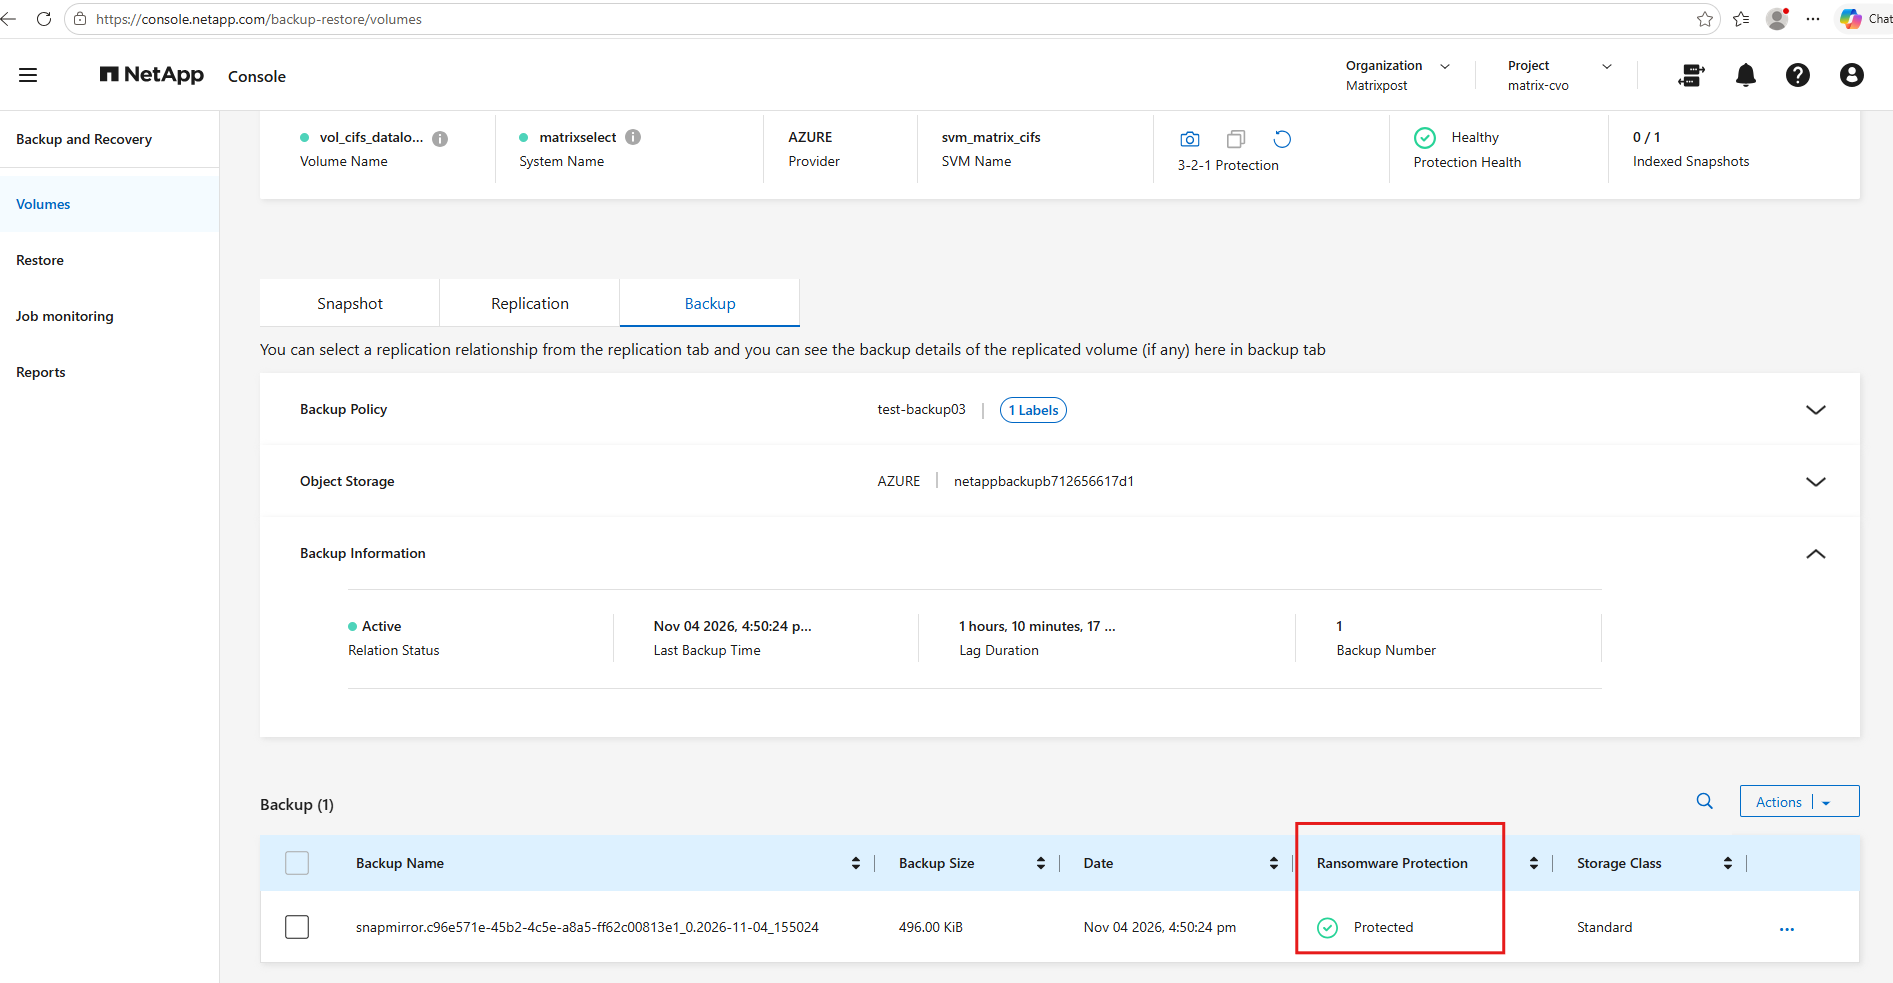
After the on-demand ransomware scan completed successfully, the backup’s Ransomware Protection status changed from None to Protected.
This confirms that NetApp Console has completed the ransomware protection assessment for our initial backup.
Conclusion
In this article, we demonstrated how to switch an existing NetApp Console Backup and Recovery configuration to DataLock and Ransomware Protection without deleting previously created backups in Microsoft Azure Blob Storage.
By exporting the backup metadata and UUIDs before unregistering the existing configuration, we preserved the information needed to identify and potentially restore our previous backups. We then registered a new backup configuration using DataLock Governance and successfully verified Azure Blob immutability.
Finally, we confirmed that scheduled ransomware scanning was enabled, triggered an on-demand ransomware scan, and verified that our backup’s protection status changed to Protected.
With DataLock and Ransomware Protection enabled, our new backups benefit from both immutable storage and additional ransomware detection capabilities, providing another layer of protection against ransomware attacks and accidental or malicious backup deletion.
Links
Backup-to-object policy options in NetApp Backup and Recovery
https://docs.netapp.com/us-en/data-services-backup-recovery/prev-ontap-policy-object-options.htmlManage backups for your ONTAP systems with NetApp Backup and Recovery
https://docs.netapp.com/us-en/data-services-backup-recovery/prev-ontap-backup-manage.htmlManage backup-to-object advanced settings in NetApp Backup and Recovery
https://docs.netapp.com/us-en/data-services-backup-recovery/prev-ontap-policy-object-advanced-settings.htmlManage backup policies for ONTAP volumes with NetApp Backup and Recovery
https://docs.netapp.com/us-en/data-services-backup-recovery/prev-ontap-policy-manage.htmlLearn about ONTAP Autonomous Ransomware Protection
https://docs.netapp.com/us-en/ontap/anti-ransomware/index.html