Set up an Azure Storage Account and Blob Storage for NFS Access by using a Private Endpoint
Azure Blob Storage now supports NFS 3.0, allowing organizations to use Azure Storage accounts as a scalable, cloud-based file system accessible through the Network File System (NFS) protocol.
Windows client for NFS isn’t yet supported. However, there’s a workaround available that uses the Windows Subsystem for Linux (WSL 2) to mount storage by using the NFS 3.0 protocol. See the BlobNFS-wsl2 project on GitHub.
This feature enables lift-and-shift of existing applications that rely on NFS for file access, without needing to rewrite code or deploy additional infrastructure. It combines the flexibility of object storage with the simplicity of POSIX-like file access, making it ideal for analytics, backup, and media workloads in hybrid or cloud-native environments.
In this post we will see how to set up the storage account, enable NFS support for and how to access from Windows and Linux machines to from Azure and on-premise through a private endpoint and site-to-site IPSec VPN tunnel.
Blob storage now supports the Network File System (NFS) 3.0 protocol. This support provides Linux file system compatibility at object storage scale and prices and enables Linux clients to mount a container in Blob storage from an Azure Virtual Machine (VM) or a computer on-premises.
Blob Storage now supports a hierarchical namespace, and when combined with NFS 3.0 protocol support, Azure makes it much easier to run legacy applications on top of large-scale cloud object storage.
The NFS 3.0 protocol feature is best suited for processing high throughput, high scale, read heavy workloads such as media processing, risk simulations, and genomics sequencing. You should consider using this feature for any other type of workload that uses multiple readers and many threads, which require high bandwidth.
Source: https://learn.microsoft.com/en-us/azure/storage/blobs/network-file-system-protocol-support
Create a new Storage Account
In this post I just want to show the different configuration when enabling NFS support for the storage account and blob storage.
About set up a new storage account in general, please refer to one of my last posts and section https://blog.matrixpost.net/set-up-an-azure-storage-account-and-blob-storage-for-sftp-access/#create_storage_account.
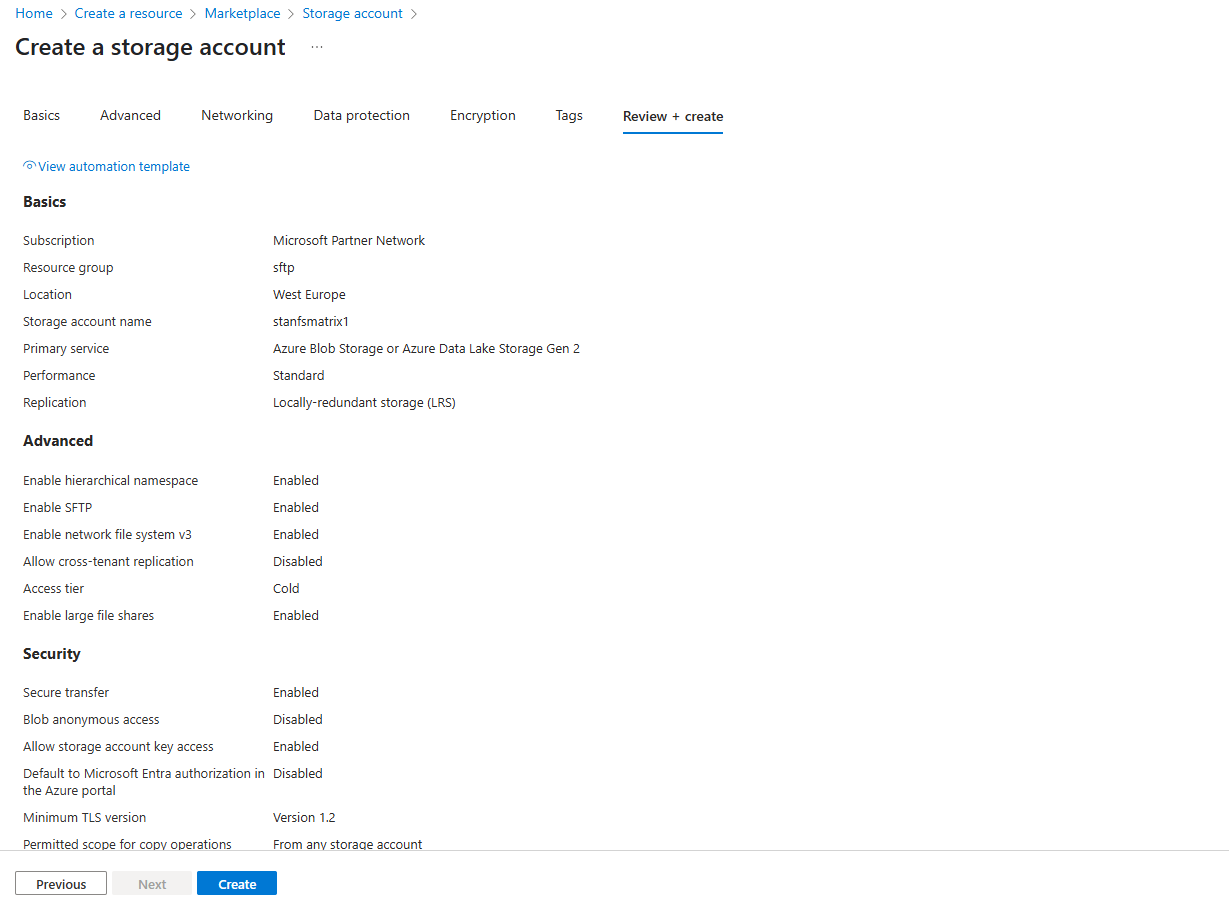
The different configuration starts on the Advanced tab below. Check both features below, Enable hierarchical namespace (To enable NFS v3 ‘hierarchical namespace’ must be enabled) and Enable network file system v3.
NFS 3.0 protocol support requires blobs to be organized into a hierarchical namespace. The ability to use a hierarchical namespace was introduced by Azure Data Lake Storage. It organizes objects (files) into a hierarchy of directories and subdirectories in the same way that the file system on your computer is organized.
The hierarchical namespace scales linearly and doesn’t degrade data capacity or performance.
NFS v3 support must be set during storage account creation, we can’t enable this afterwards for an existing storage account.

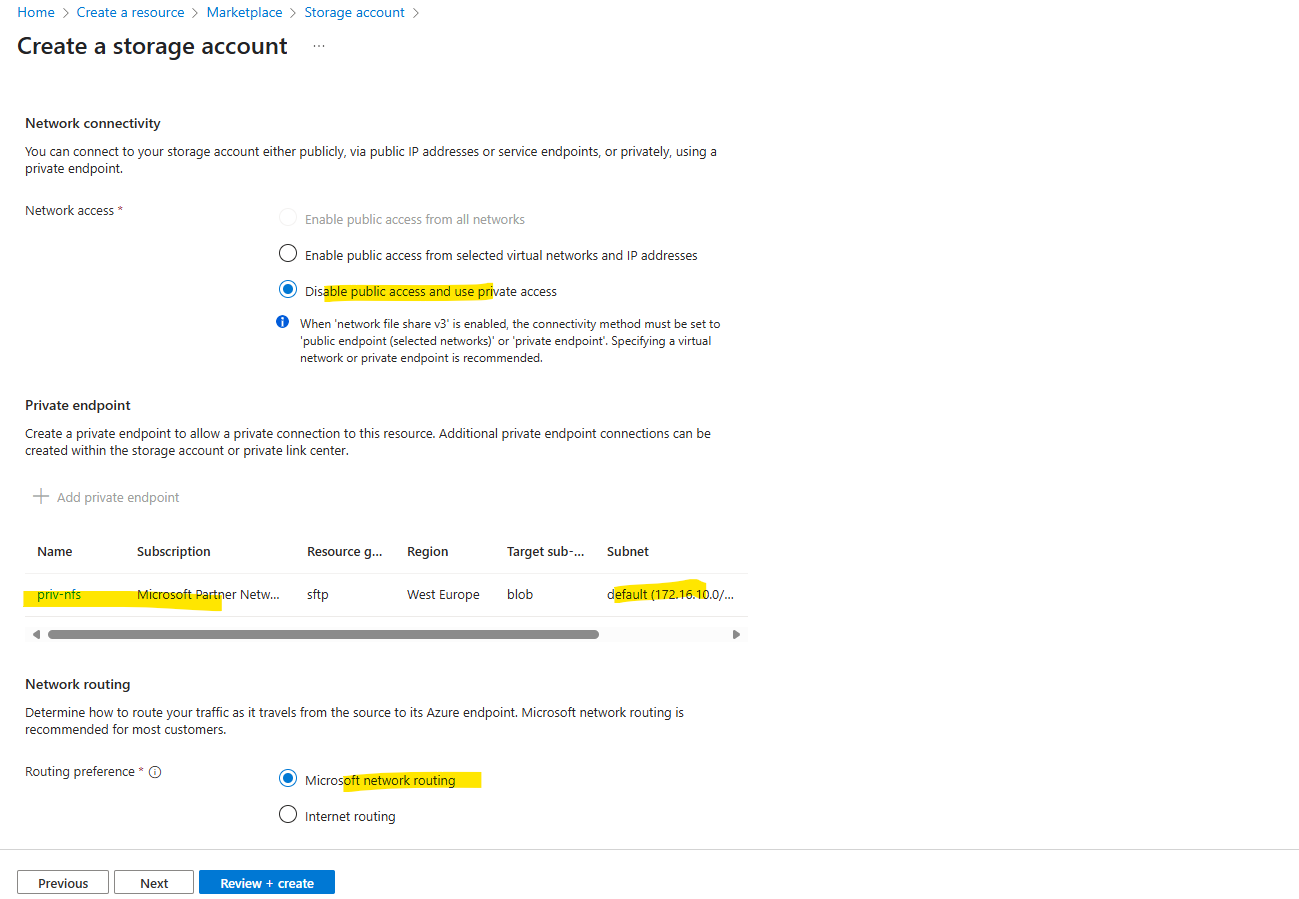
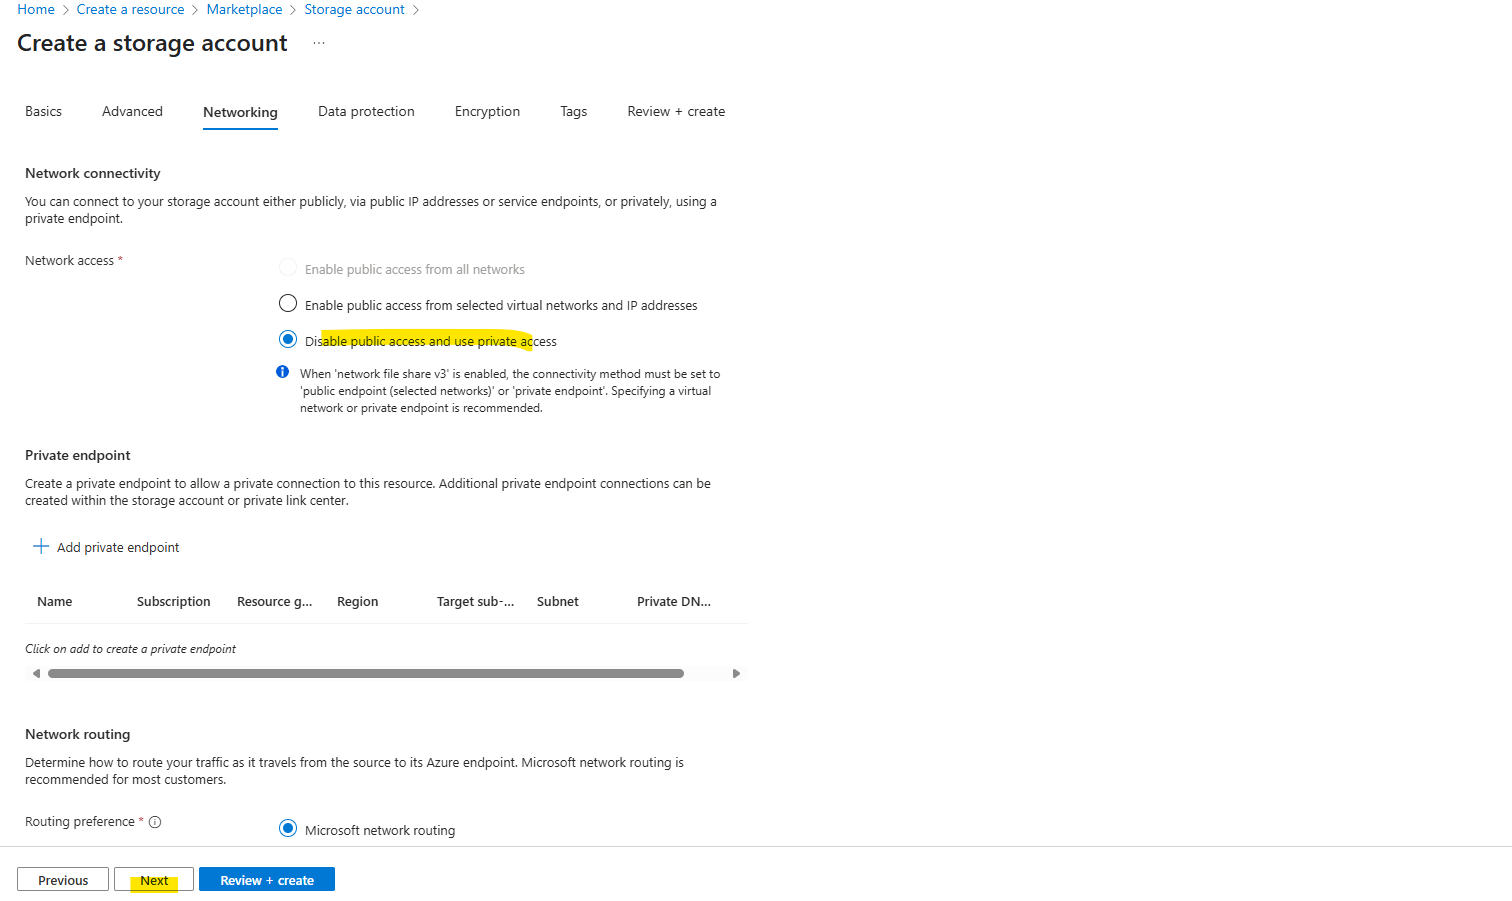
On the Networking tab I will disable public access and enable private access by creating a private endpoint.
In case we want to configure a static IP address we can skip the step by adding a private endpoint here and configure it afterwards by using Azure PowerShell as shown further down here.
Private endpoint IPs assigned dynamically (by using the Azure portal by default) are generally stable but can change in rare cases.
The configuration here finally is the same as in my previous post here https://blog.matrixpost.net/set-up-an-azure-storage-account-and-blob-storage-for-sftp-access-and-using-a-private-endpoint/#setup.

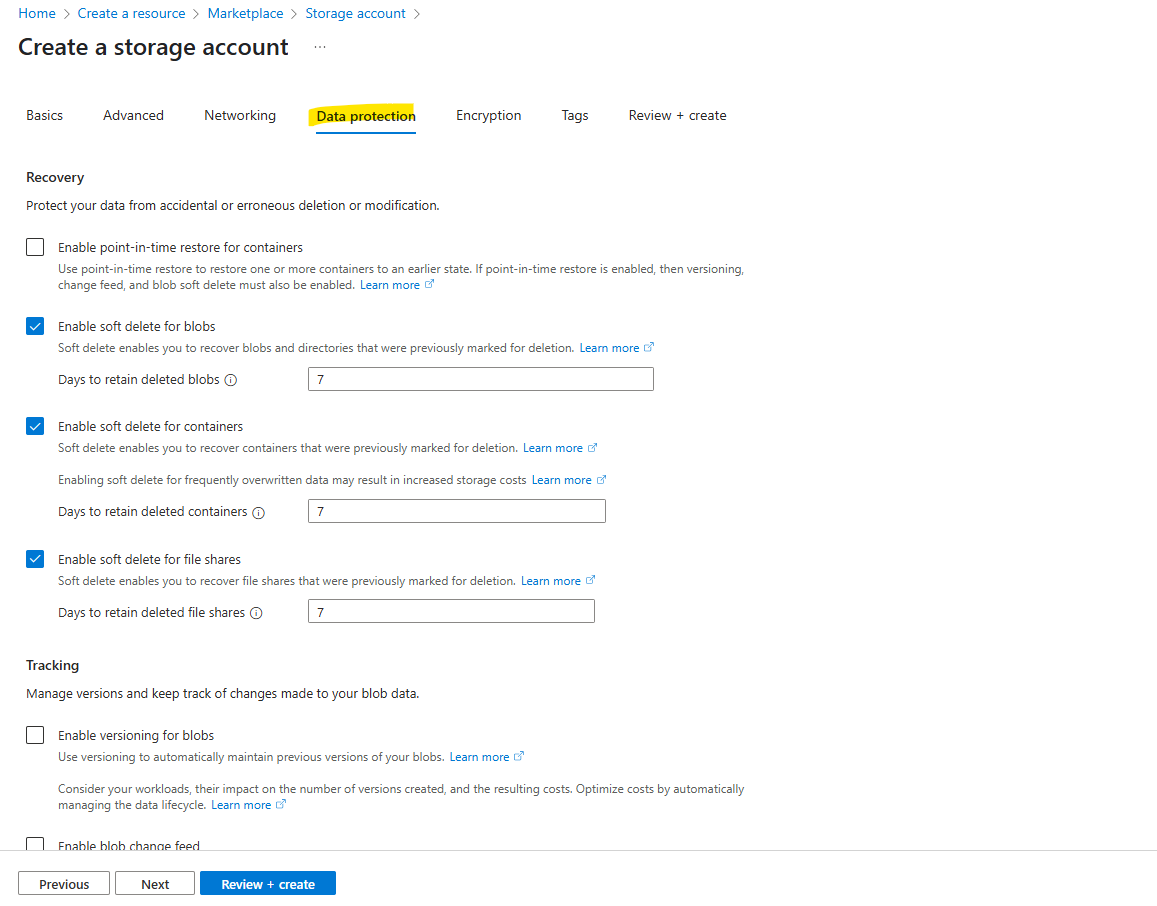
For data protection I will use the default settings.
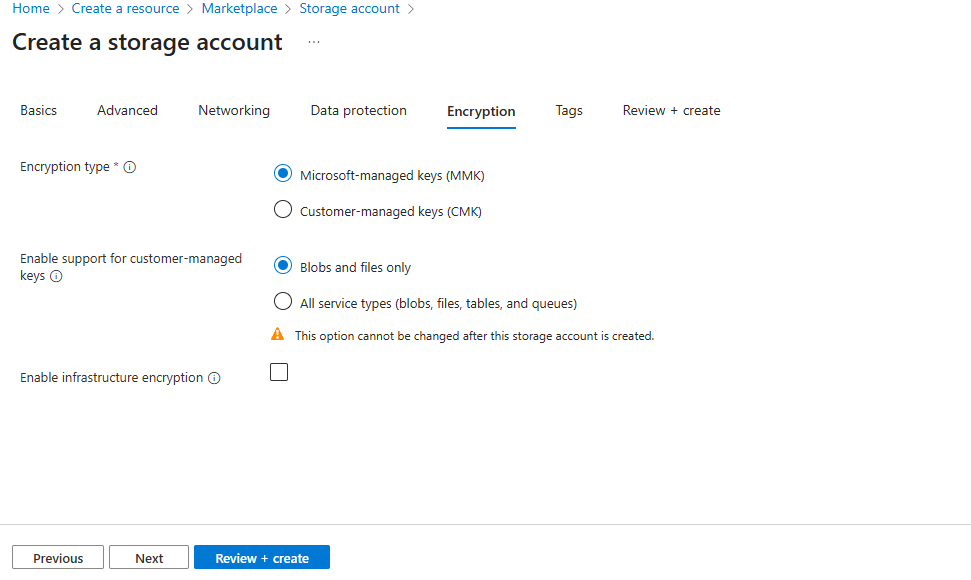
Also for the encryption I will use the default settings.
Finally click on Create.
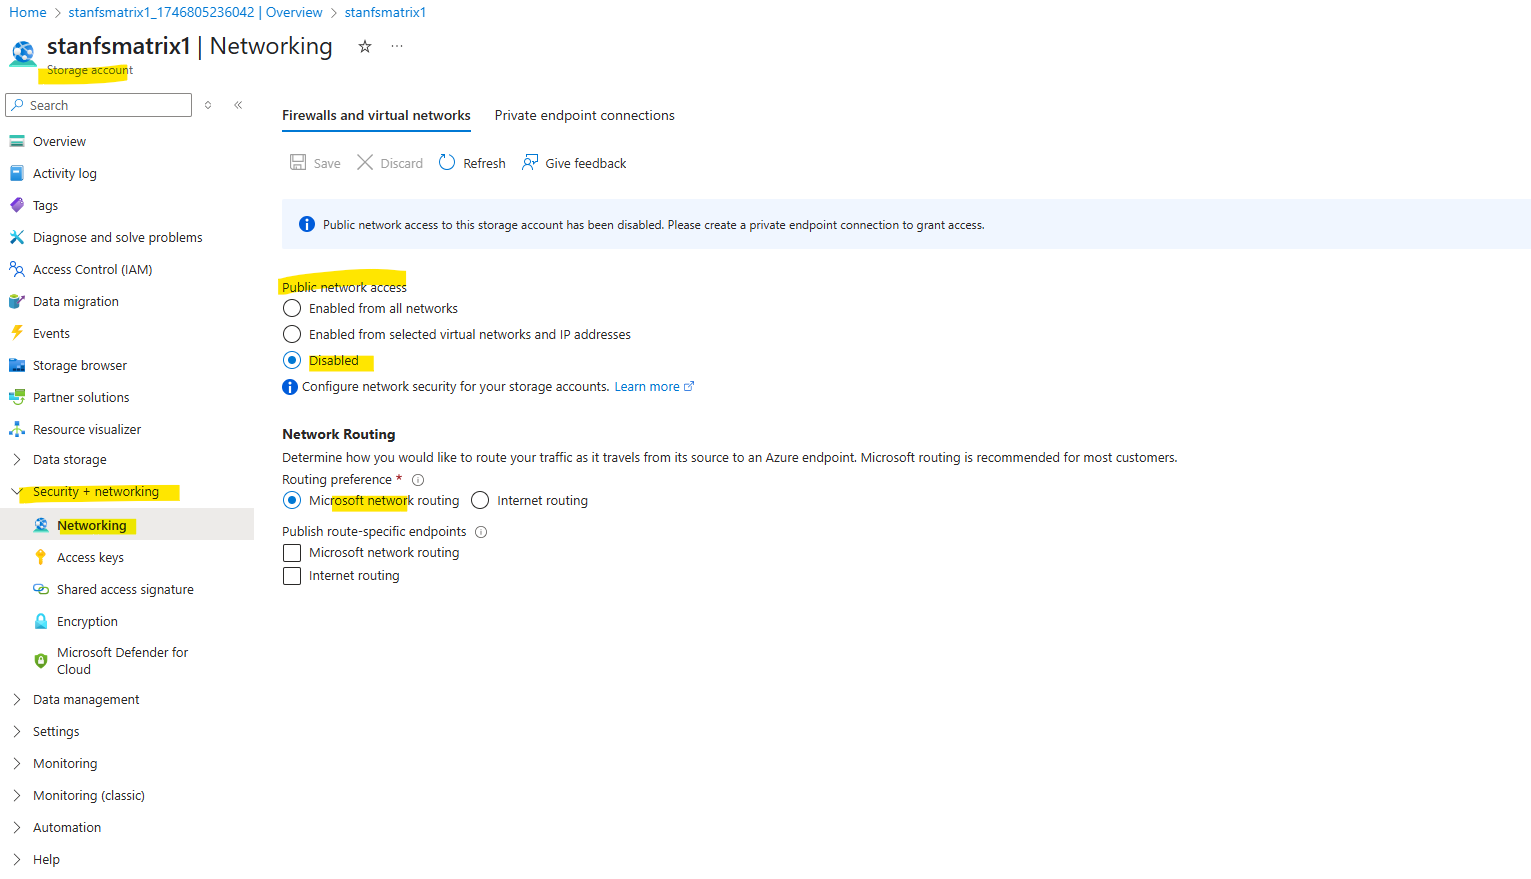
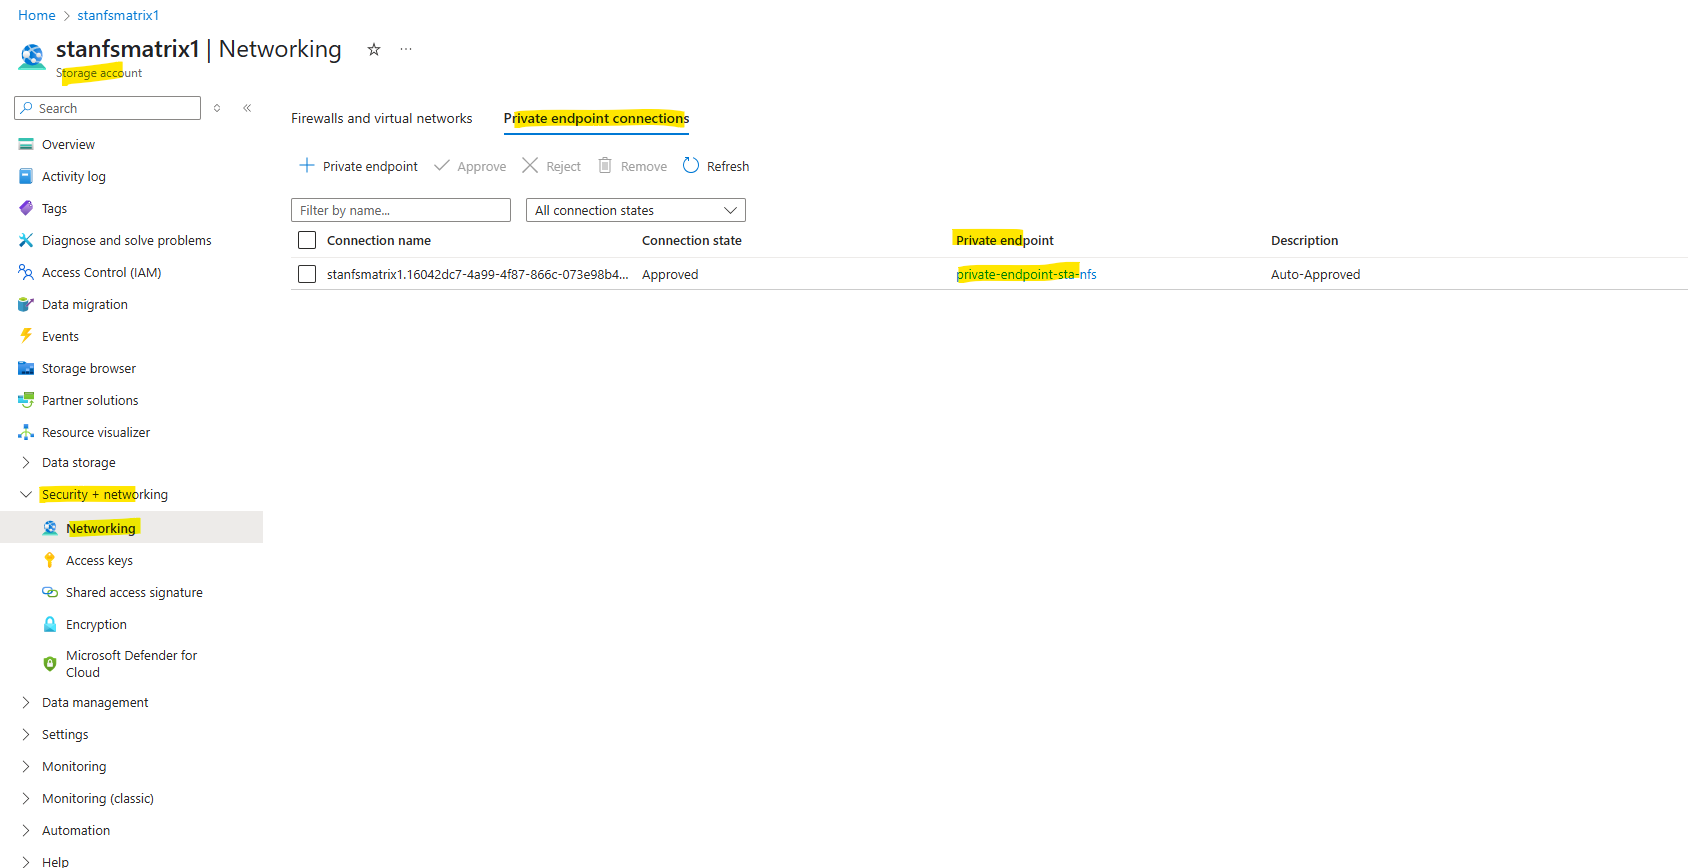
When the storage account is successfully created, we will see the network access under Storage account -> Security + networking -> Networking as shown below.
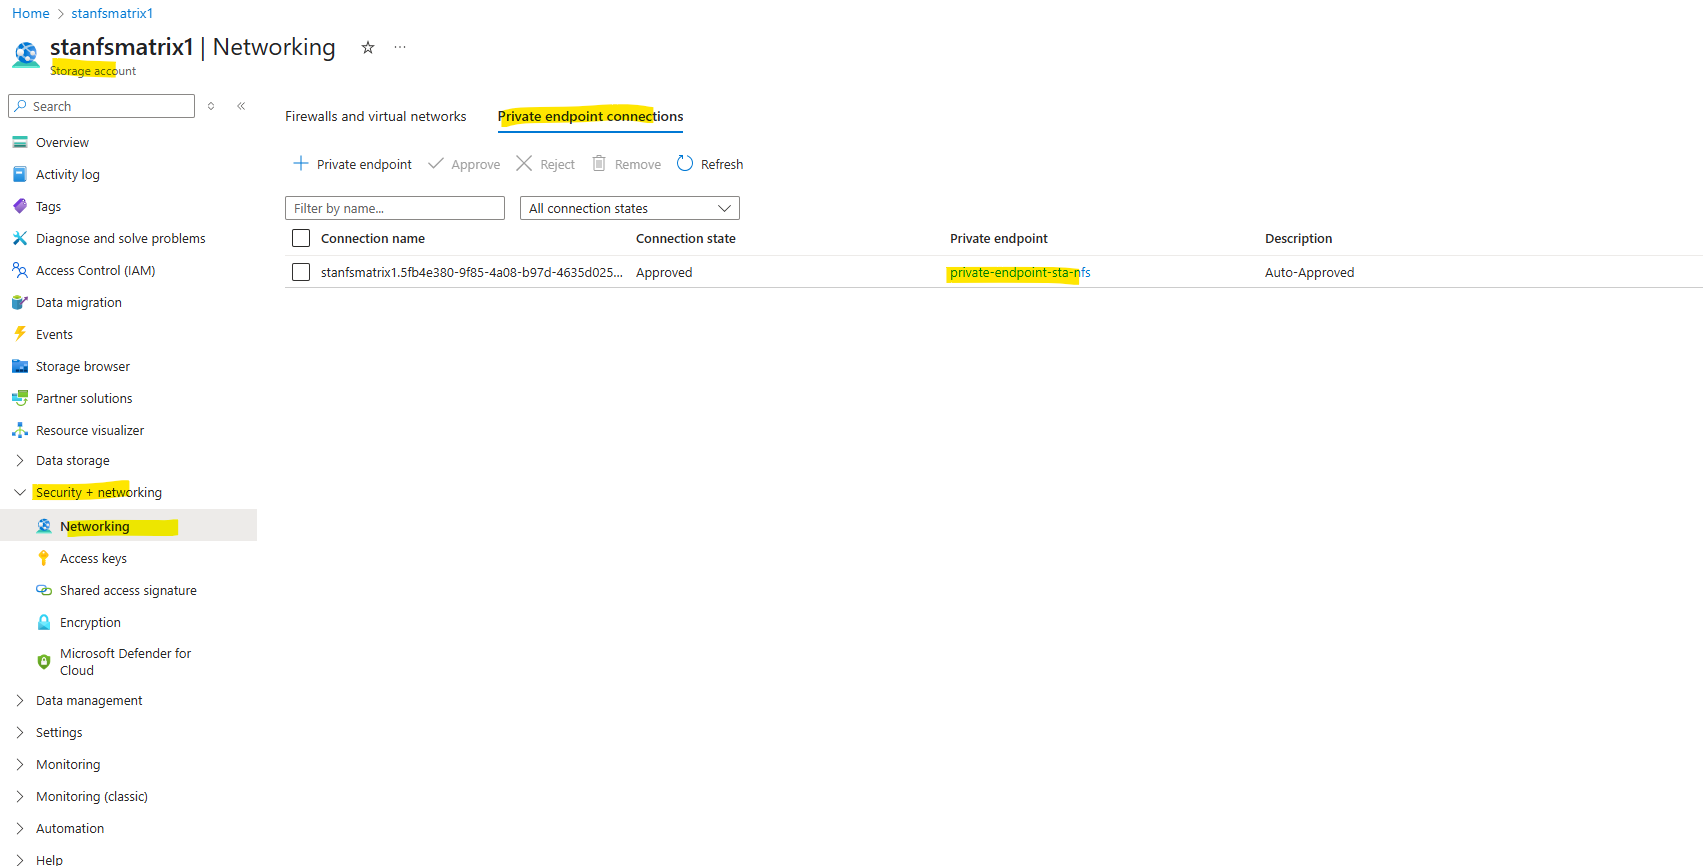
On the Private endpoint connections tab we will also see that our created private endpoint is successfully assigned to the storage account.
The private endpoint showing here below I was creating later and seen further down in this post by using a PowerShell script to assign a static IP address to. By using the Azure portal, the IP address will be assigned by default dynamically.
DNS Configuration
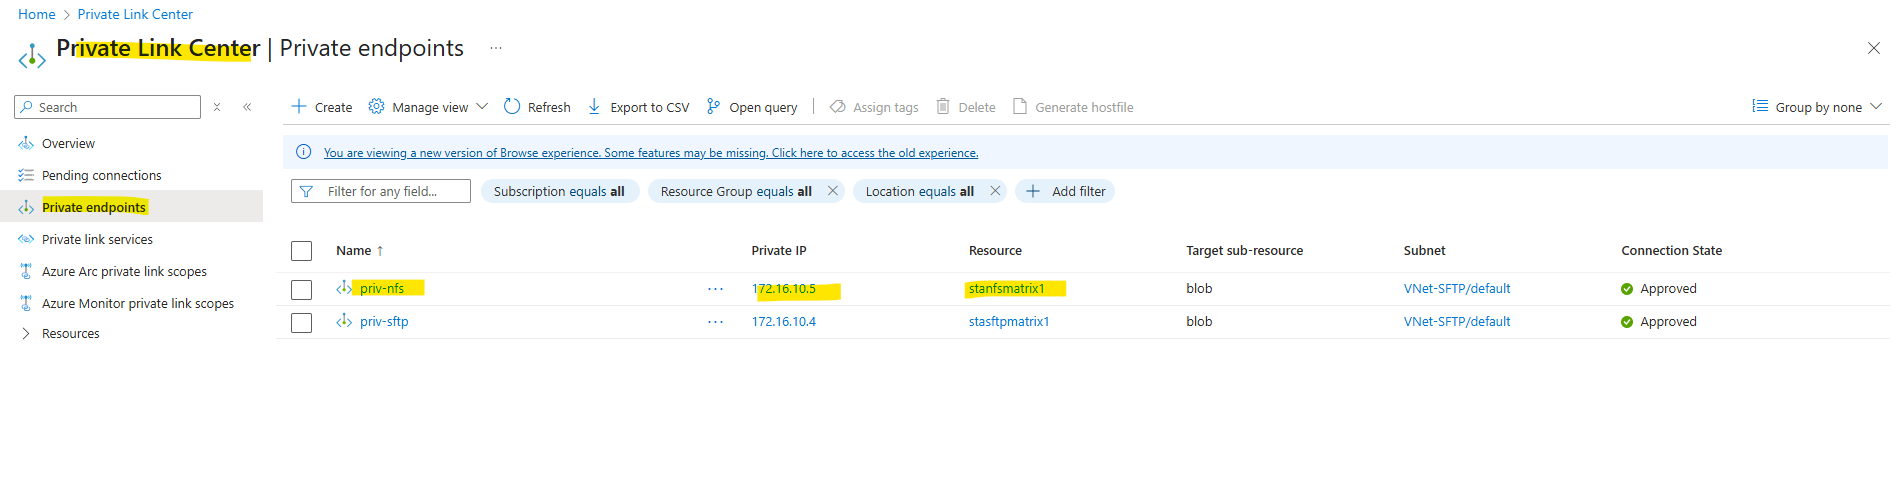
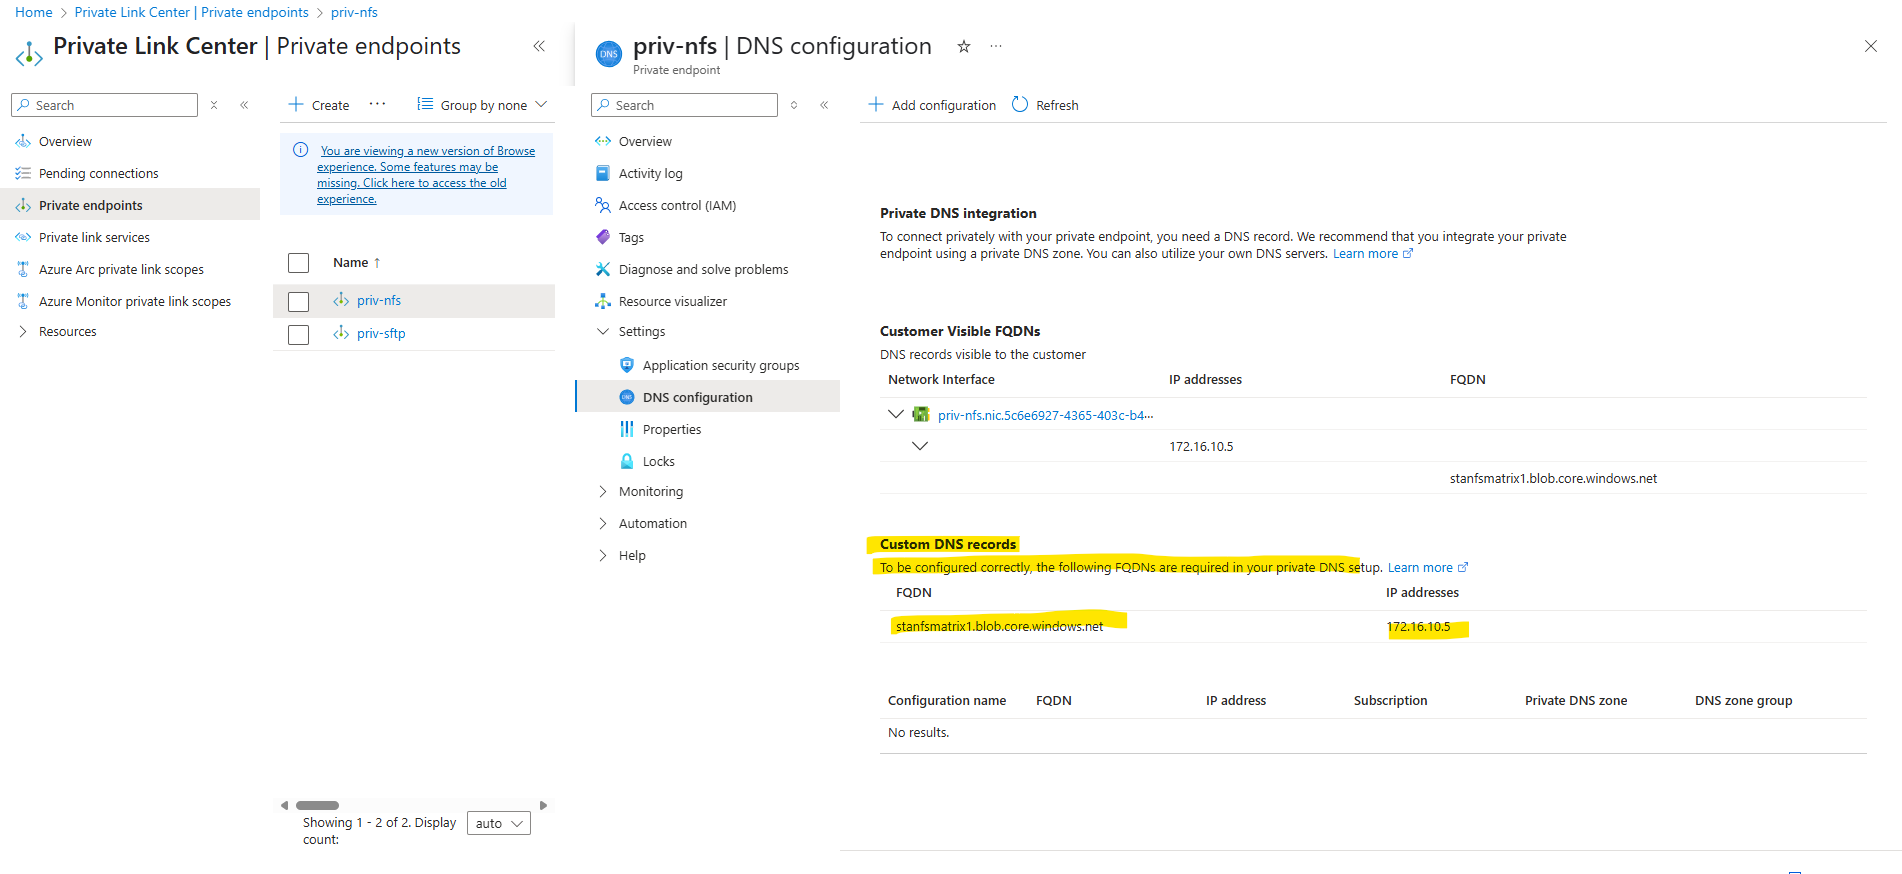
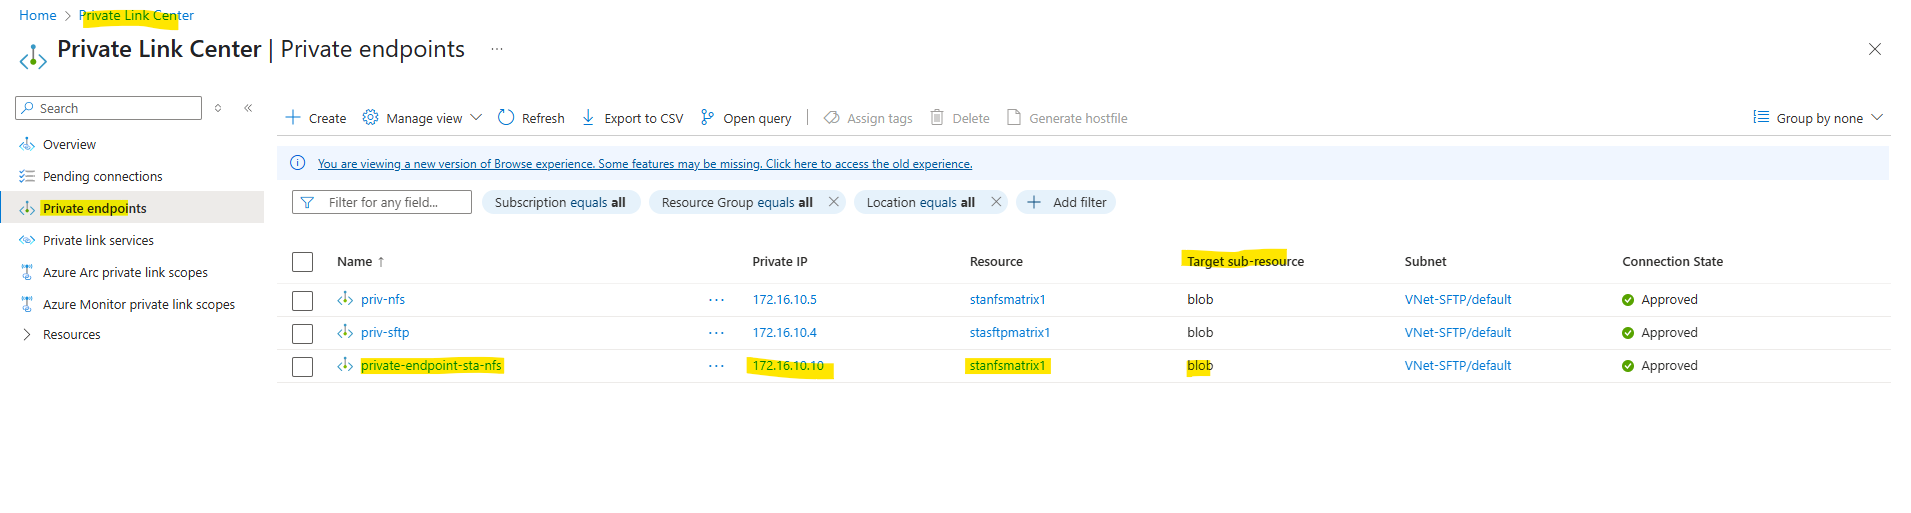
The private endpoint we configured when creating our storage account above, we will later find in the Private Link Center shown below. Just search for private endpoints.
We can also see below the assigned private IP address from the virtual network we choose to use for.
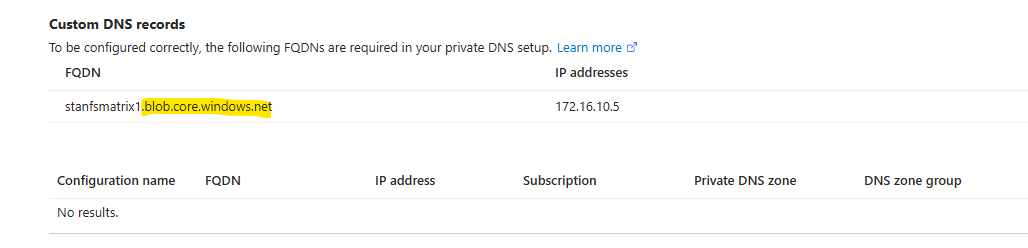
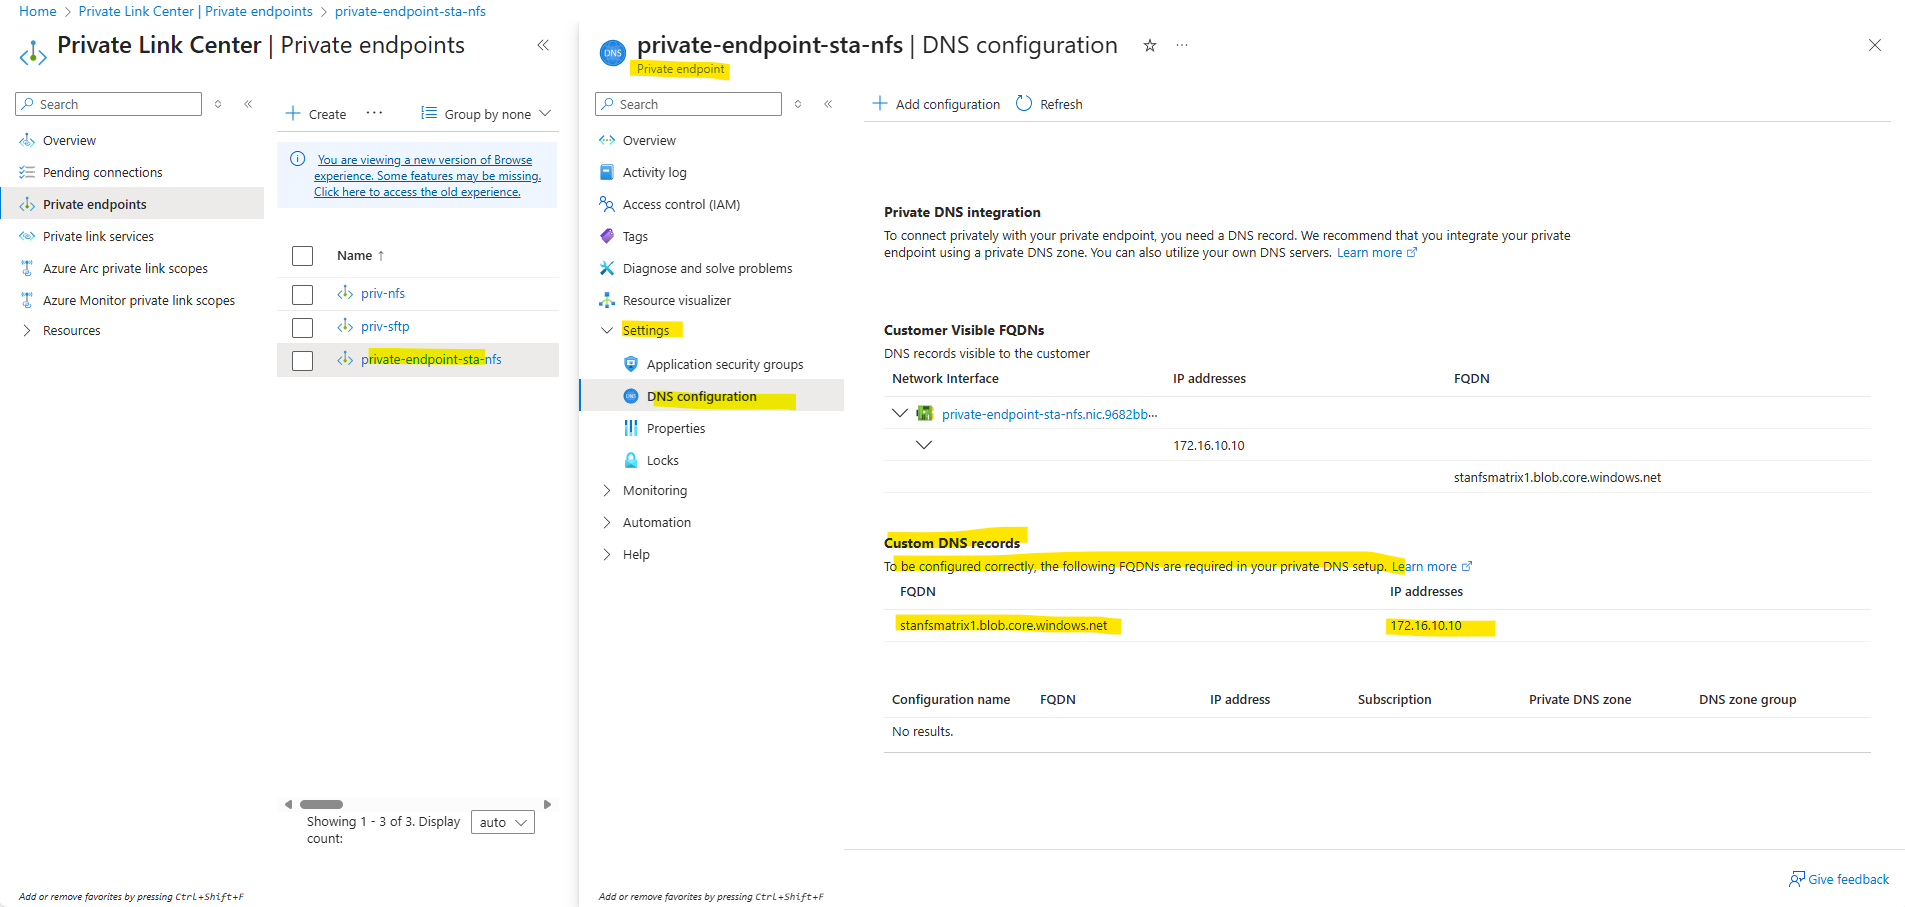
We first need to note the DNS records within the newly created private endpoint. We need to configure them later on our on-premise DNS server.
In case just a bunch of machines needs to access the storage account and blob storage, we can of course also just add the DNS records to the local hosts file for name resolution.
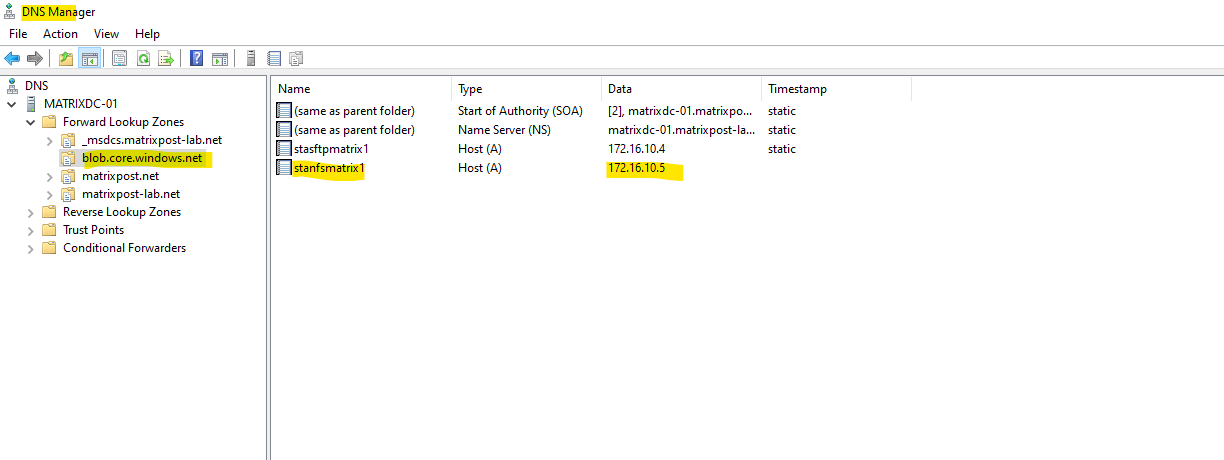
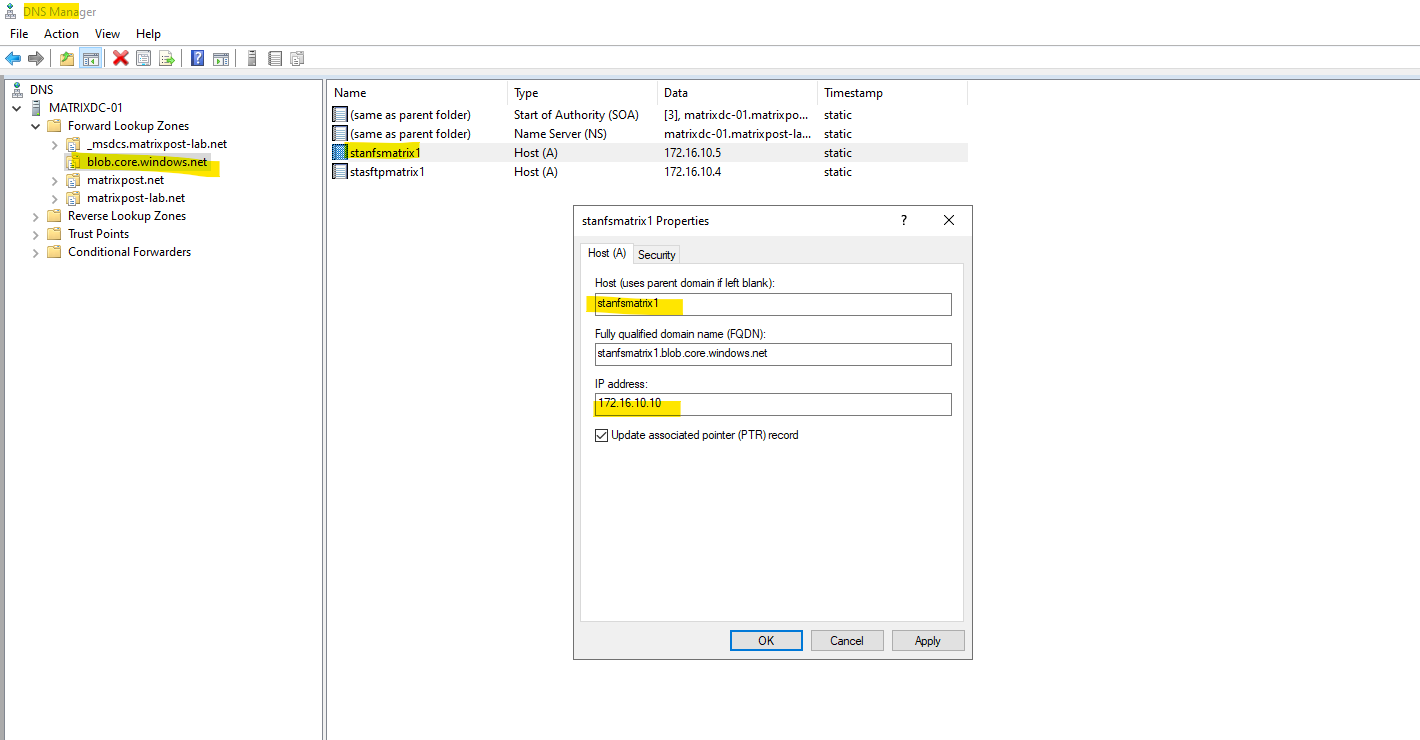
Configured on my on-premise DNS server. Create a new forward lookup zone.
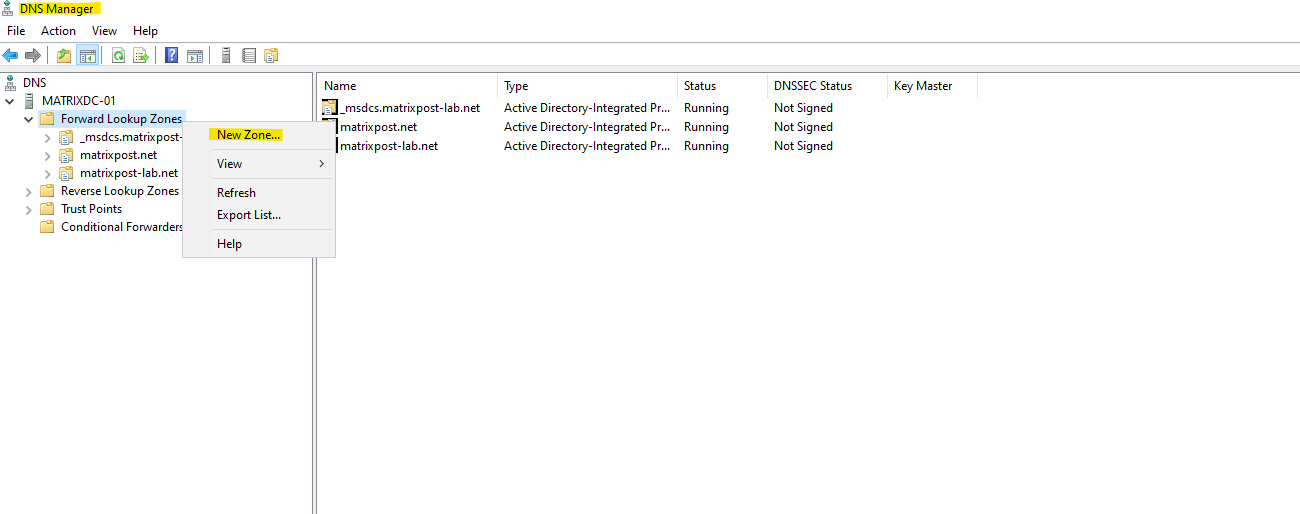
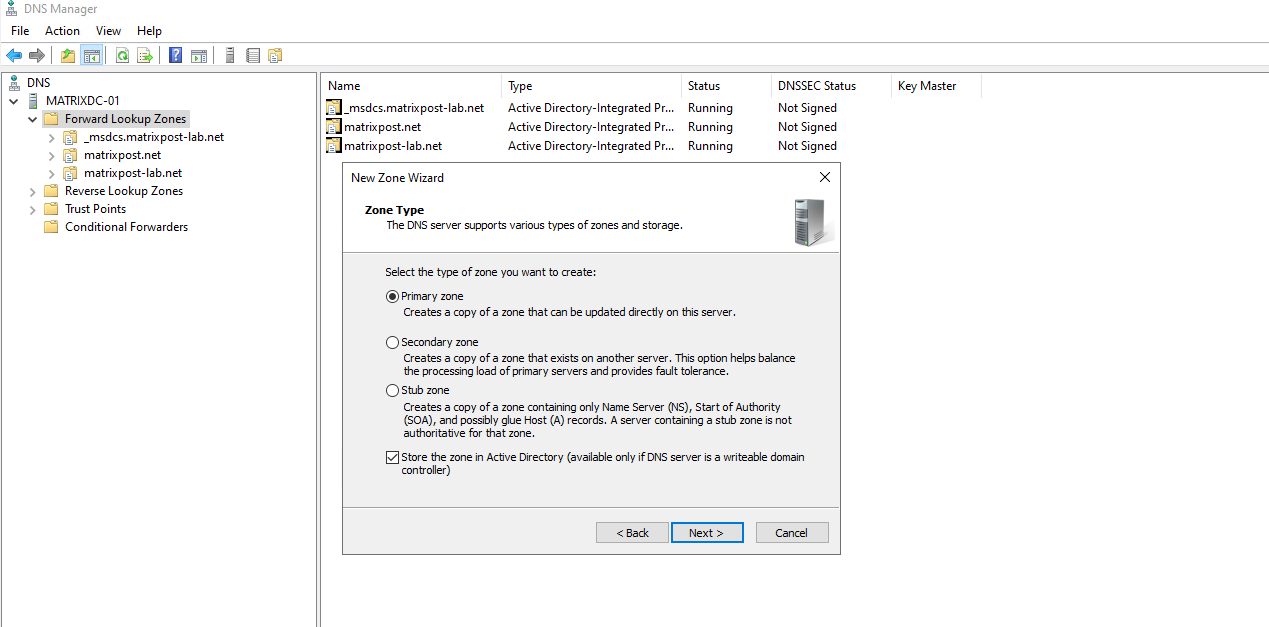
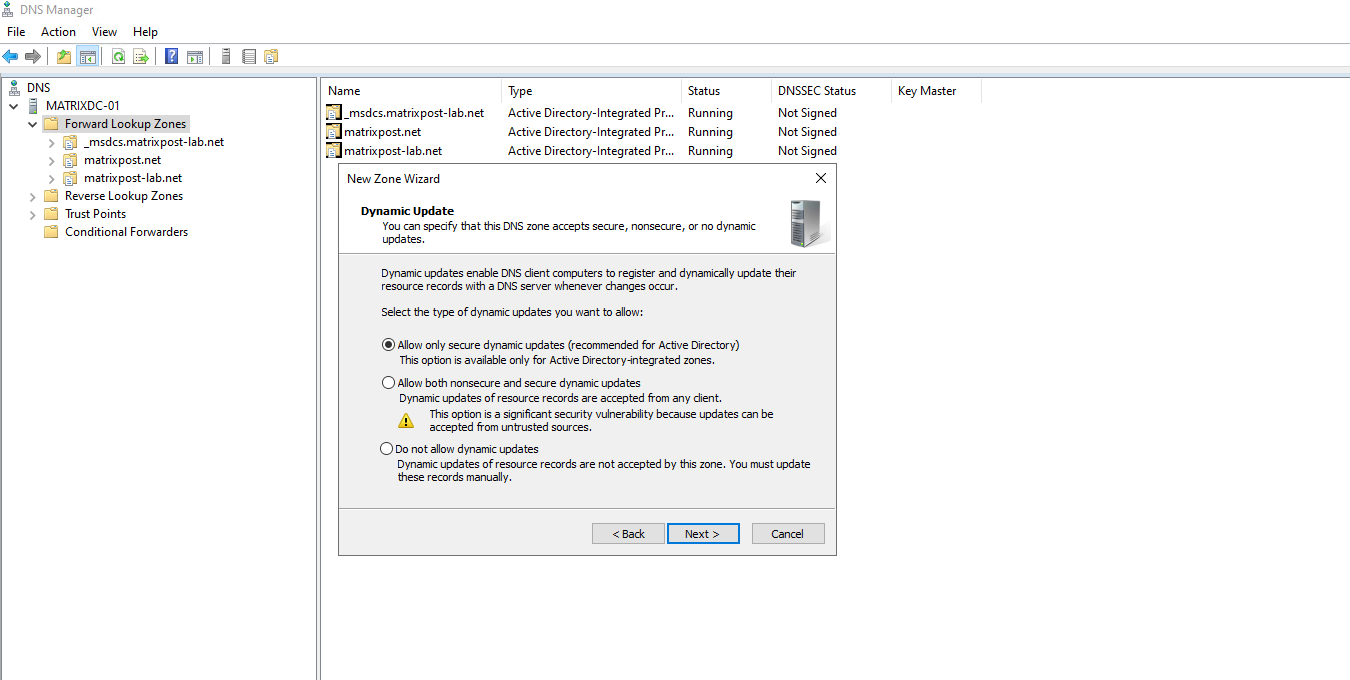
We will configure here a primary zone.
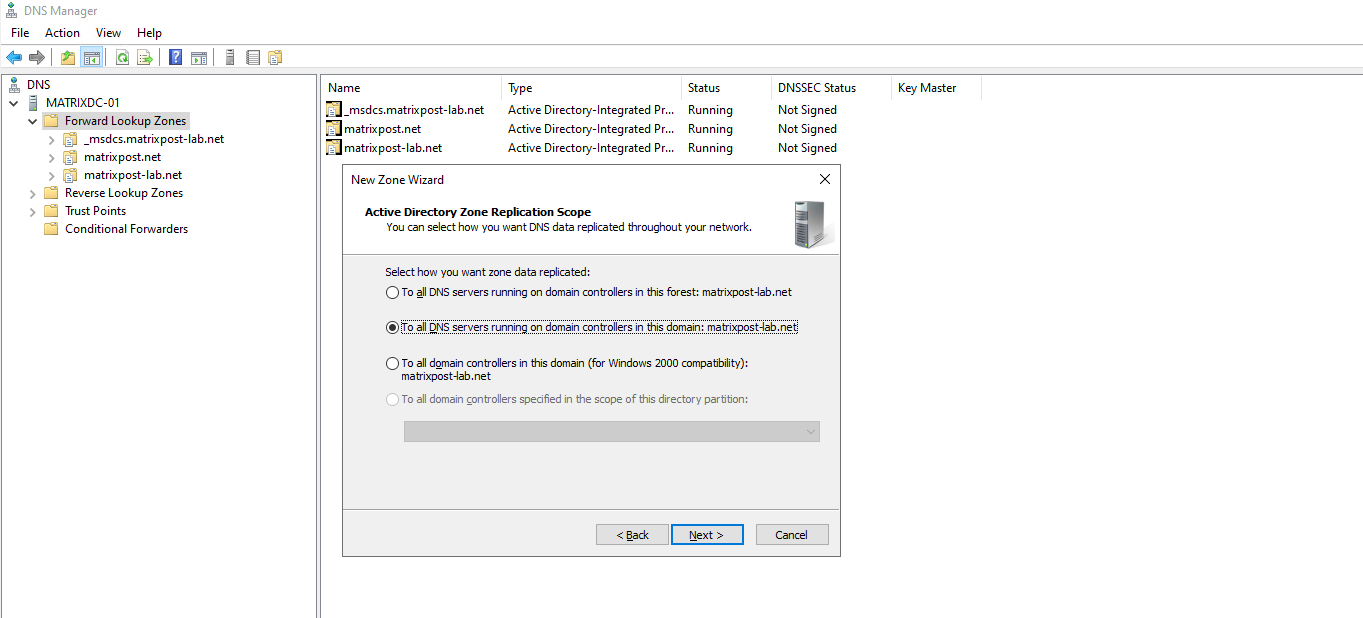
For the zone name enter the domain part of the private endpoint.
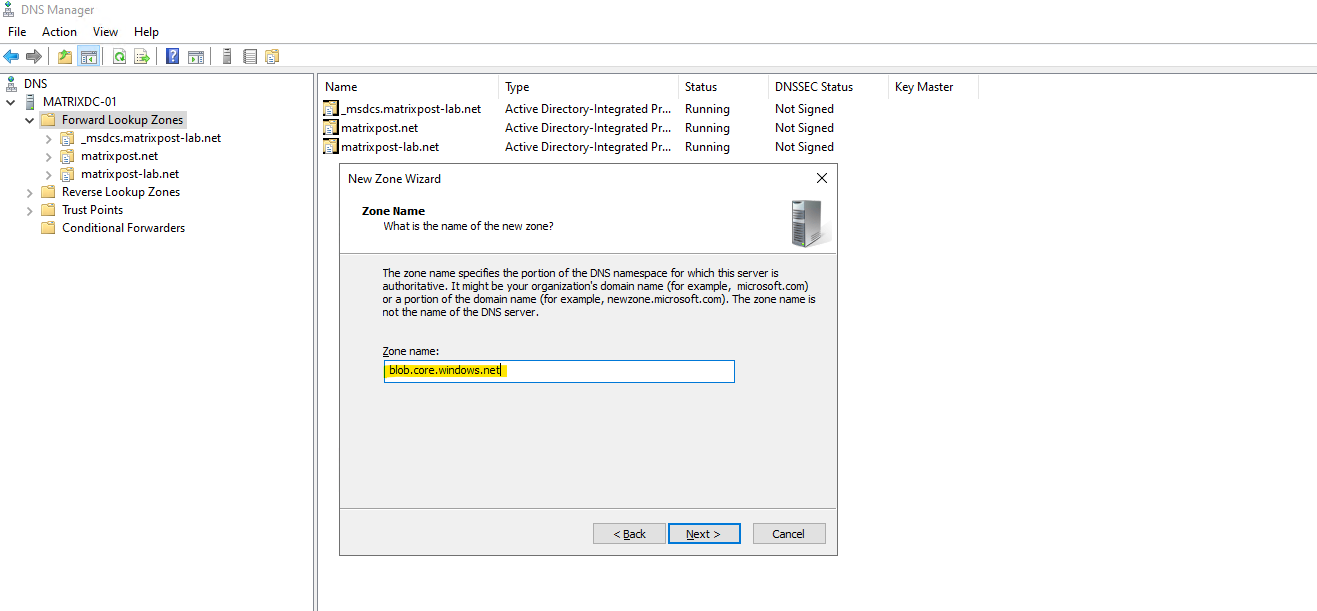
The domain we will find as shown further above under Private Endpoint -> Settings -> DNS configuration.
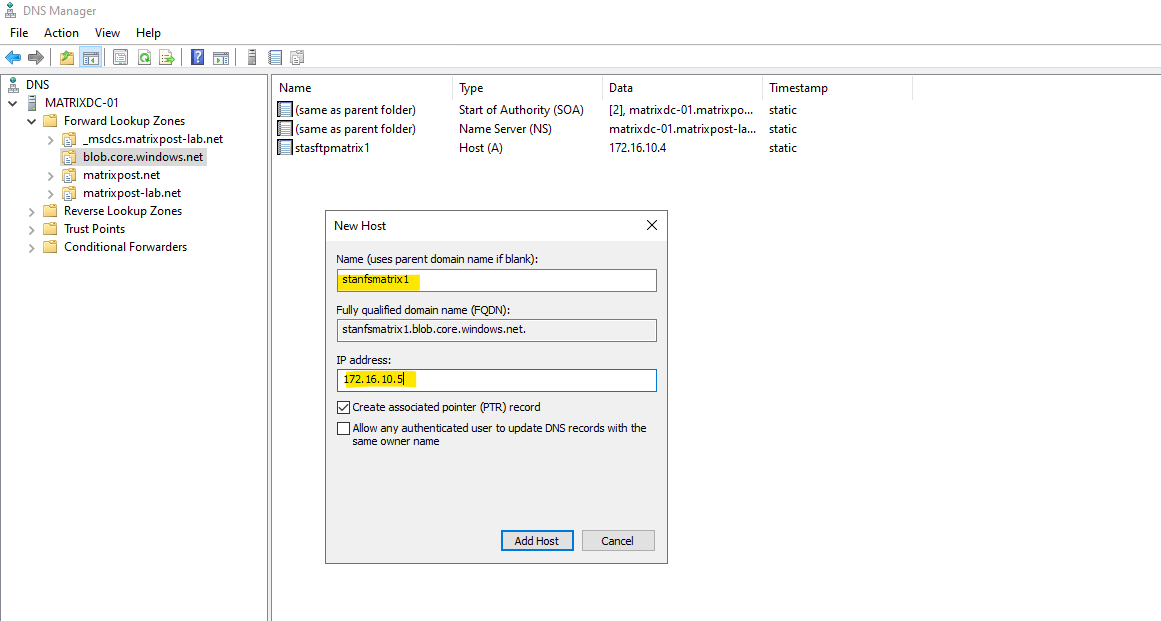
Create the A-Record for the private endpoint.
As my Site-to-Site IPSec VPN tunnel between my on-premise lab environment and Azure is already established, I can now first check if I can connect to my Azure storage account and blob storage on its assigned private endpoint (IP address) and SSH/SFTP Port 22.
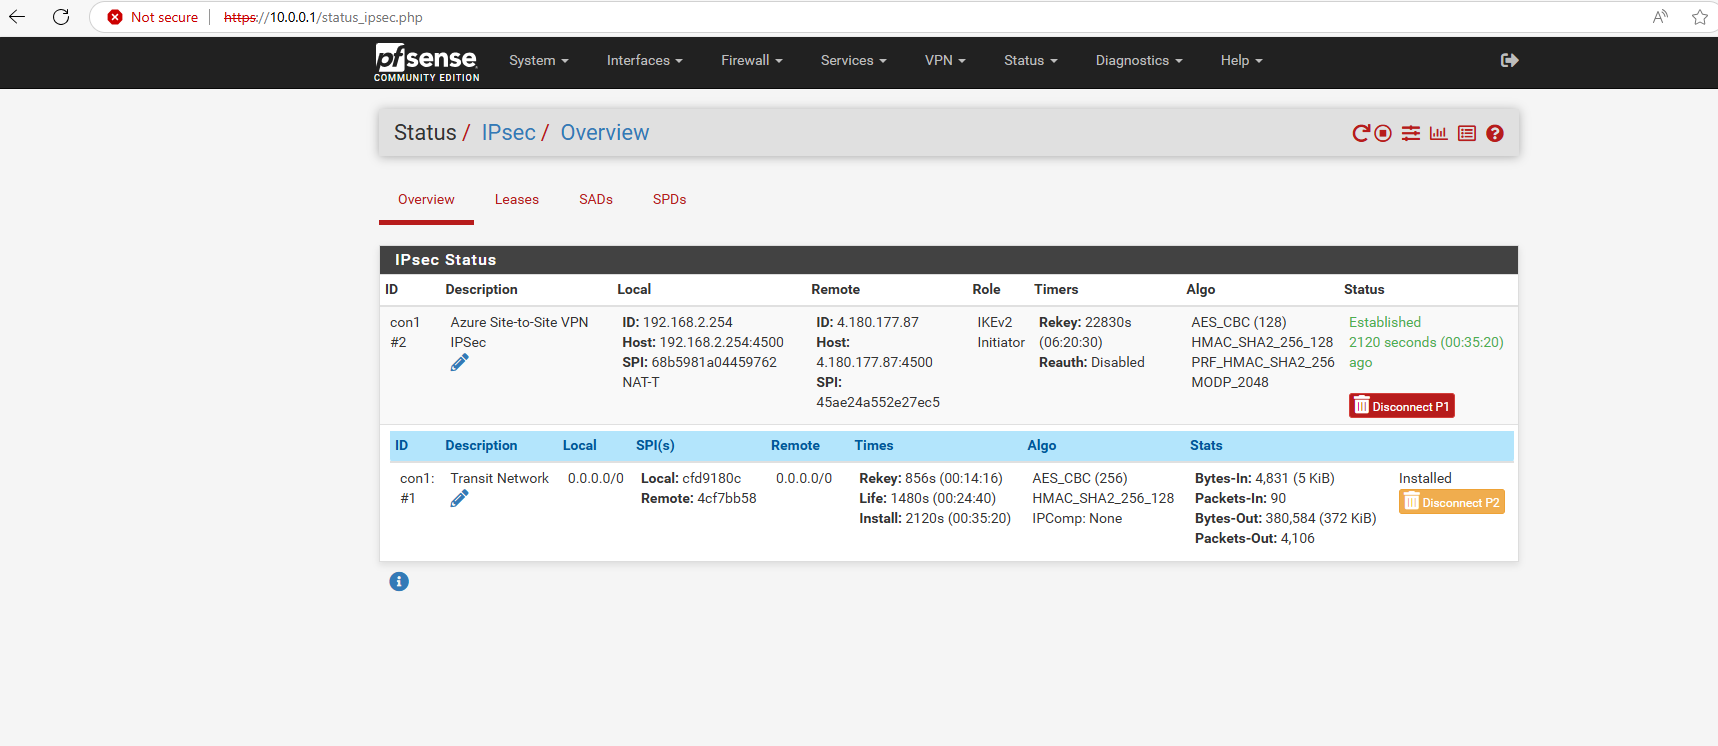
About how to set up an IPSec route-based Site-to-Site VPN Tunnel between Azure and your on-premise network, you can also read my following posts.
BGP is also working and advertised both of my internal LAN subnets (10.0.0.0/24 & 192.168.2.0/24).
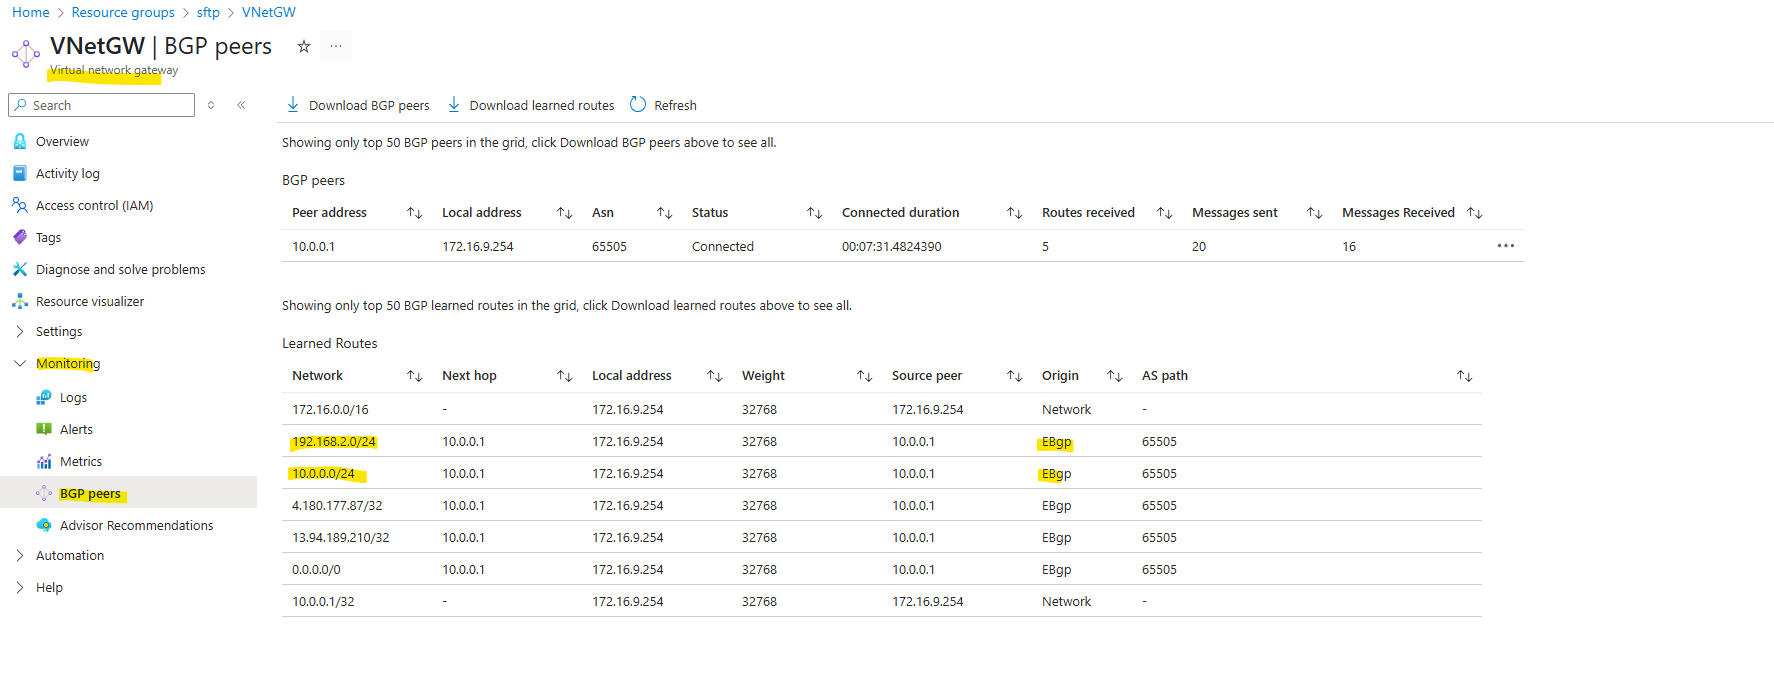
By the way we can also see that here both public IP addresses of the VPN Gateways (on-premise and Azure) will be advertised by my on-premise VPN applicance (pfSense) to Azure which will lead to some issues and we should avoid here.
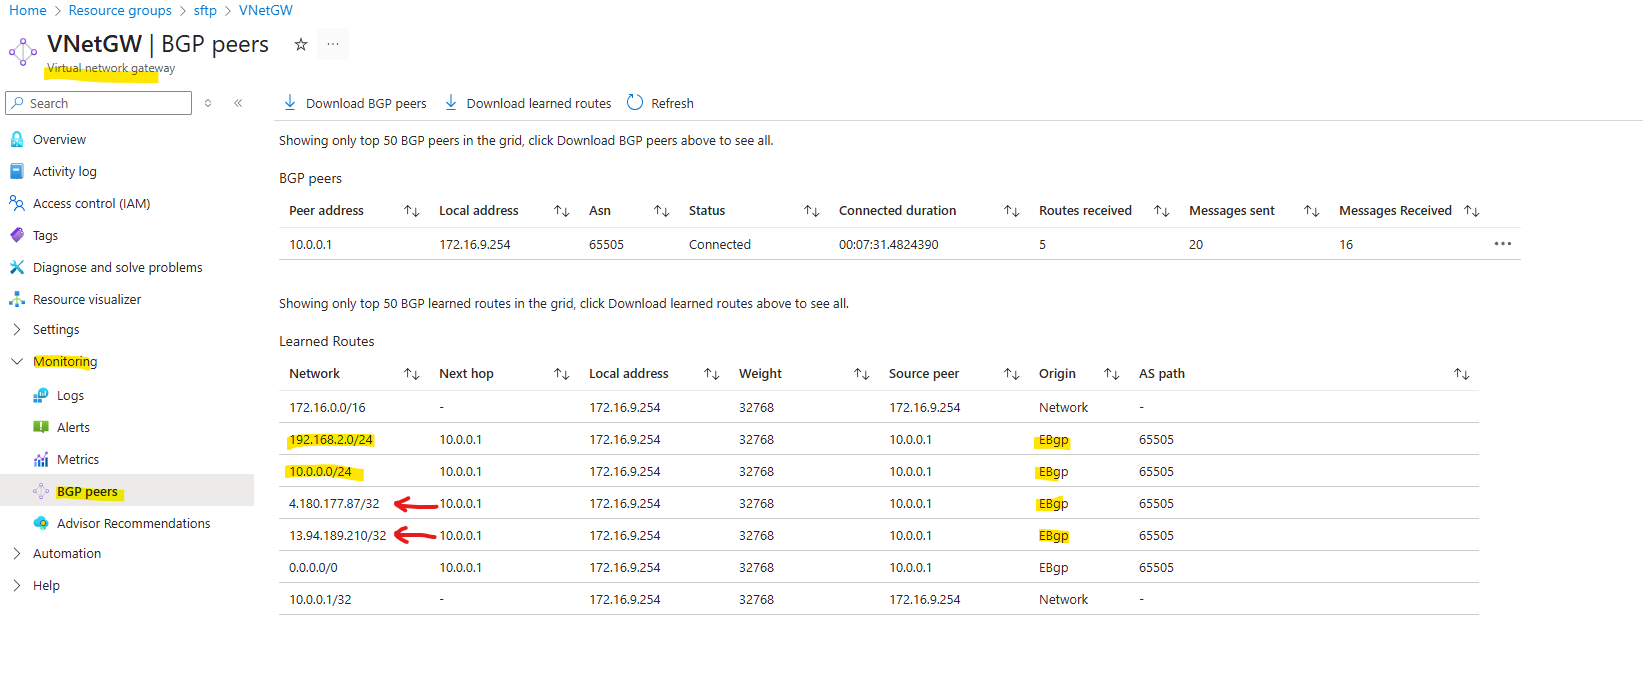
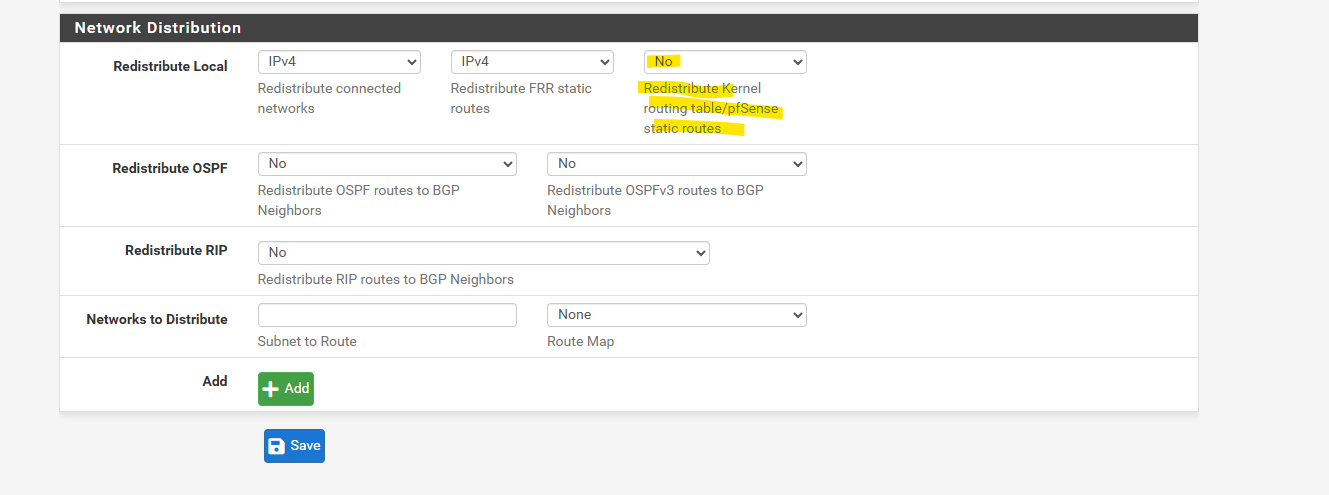
In pfSense we need to set the following to No under Services -> FRR -> BGP -> BGP -> Network Distribution section in order to avoid that also the public IP addresses of the VPN Gateways will be advertised through BGP.
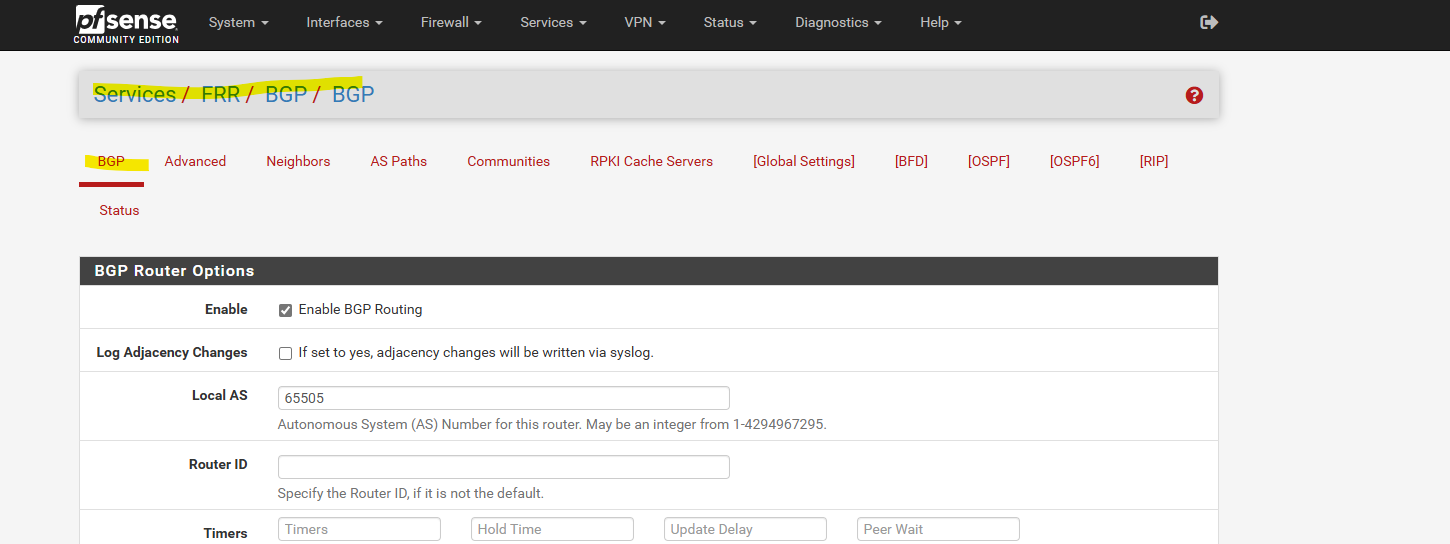
More about this issue you will also find in my following post about how to set up dynamic routing with FRR (Free Range Routing) in pfSense which is the successor of OpenBGPD.
Also on the on-premise VPN appliance (pfSense).

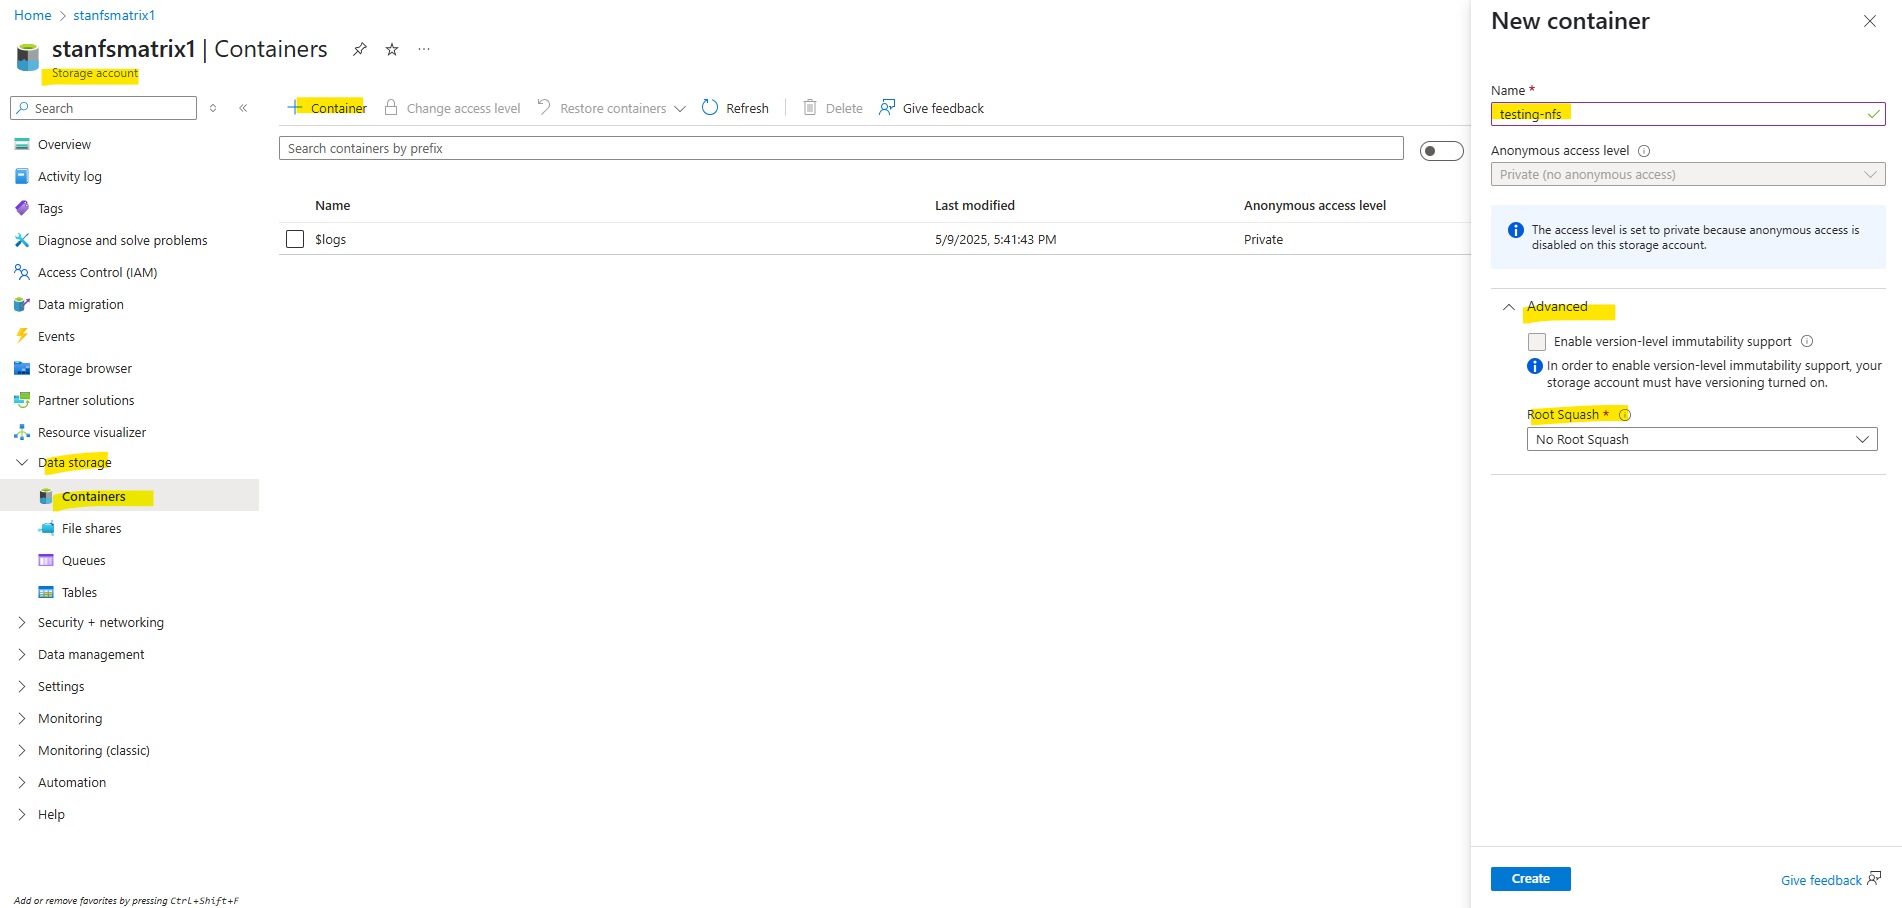
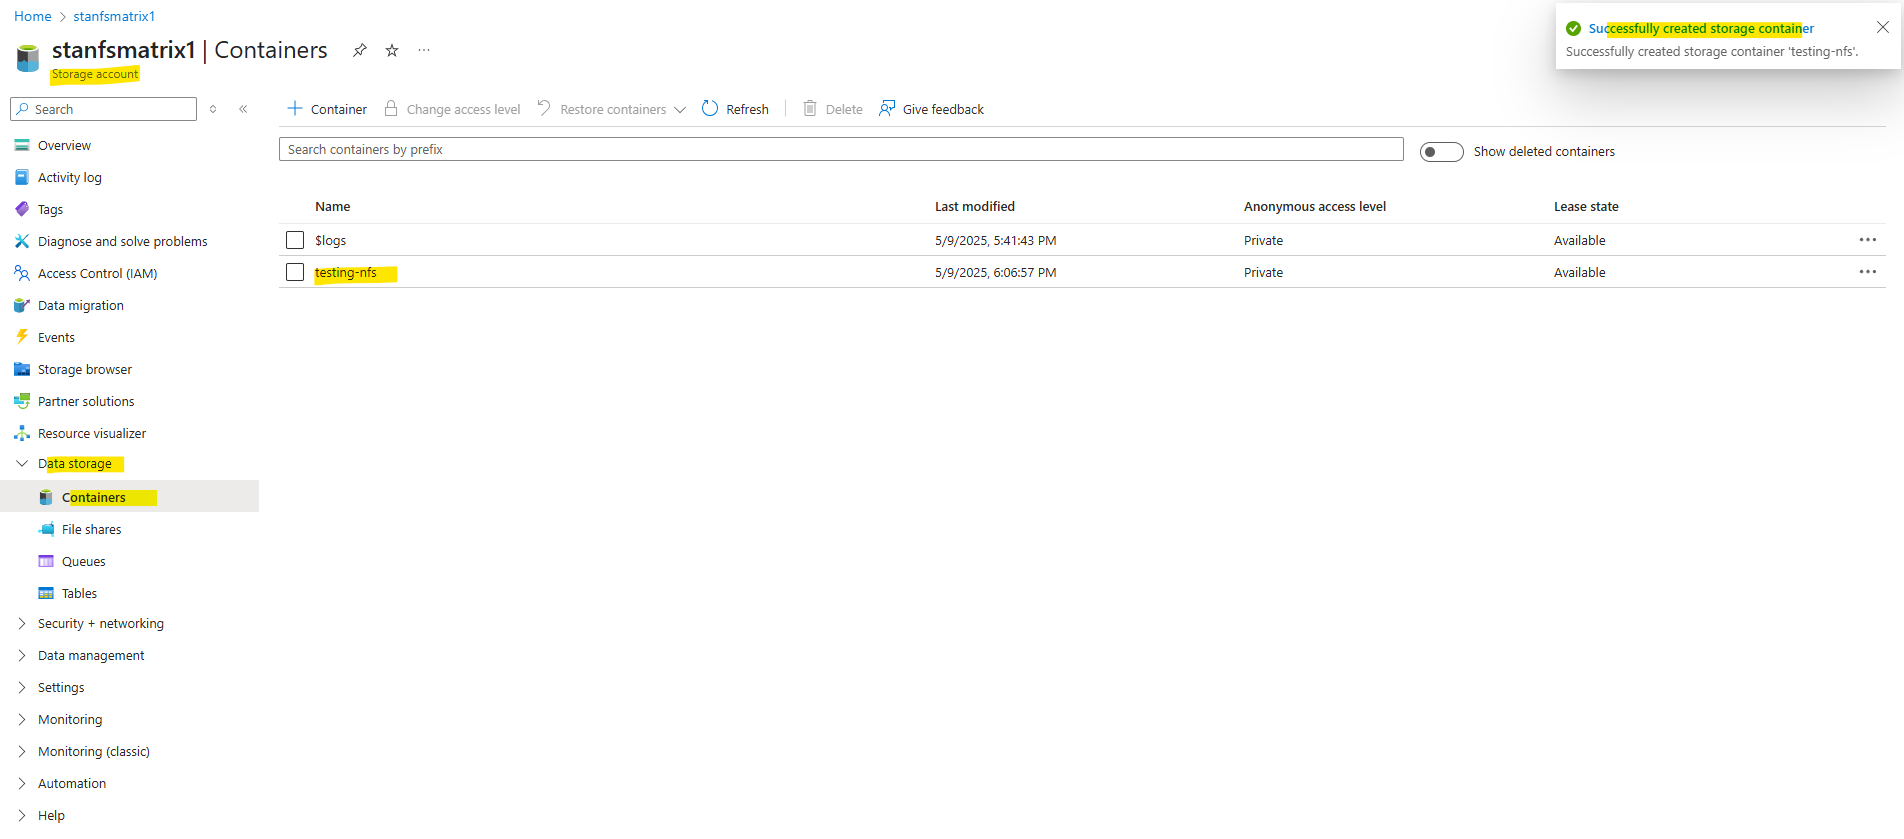
Create a new Container
Create a container in your storage account.
Permissions for NFS file shares are enforced by the client OS rather than the Azure Blob service. Toggling the root squash behavior reduces the rights of the root user for NFS containers. Learn more
Mount the container
Create a directory on your Linux system and then mount the container in the storage account.
$ sudo mkdir -p /nfsdata
Mount the container by using one of the following methods. In both methods, replace the <storage-account-name> placeholder with the name of your storage account, and replace <container-name> with the name of your container.
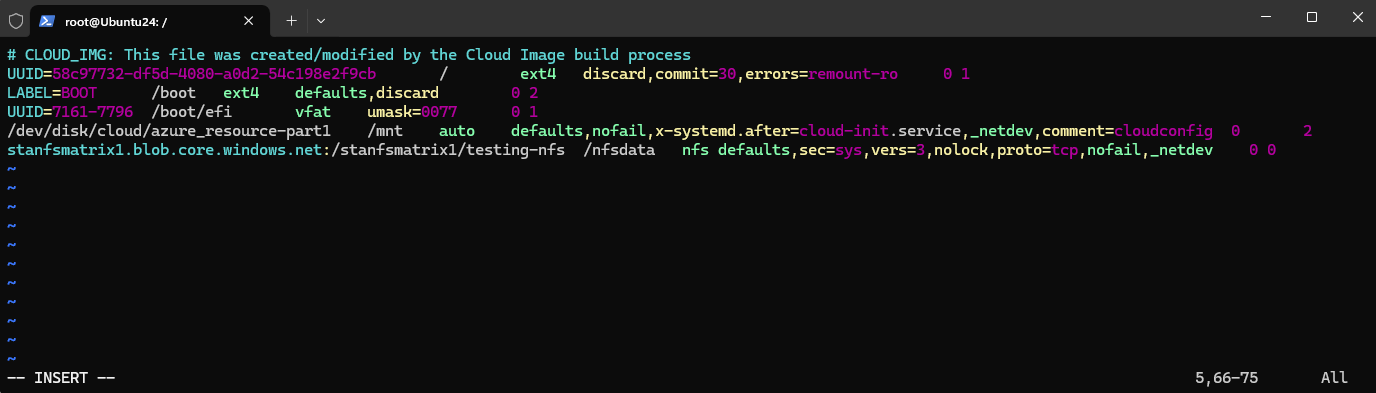
To have the share mounted automatically on reboot create an entry in the /etc/fstab file by adding the following line:
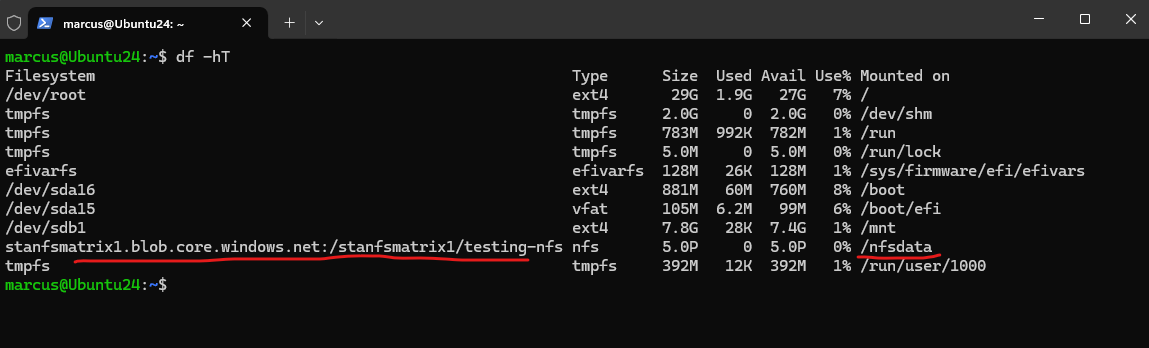
storage-account-name>.blob.core.windows.net:/<storage-account-name>/<container-name>  /nfsdata    nfs defaults,sec=sys,vers=3,nolock,proto=tcp,nofail,_netdev    0 0

stanfsmatrix1.blob.core.windows.net:/stanfsmatrix1/testing-nfs  /nfsdata    nfs defaults,sec=sys,vers=3,nolock,proto=tcp,nofail,_netdev    0 0
Run the following command to immediately process the /etc/fstab entries and attempt to mount the preceding path:
$ sudo mount /nfsdata
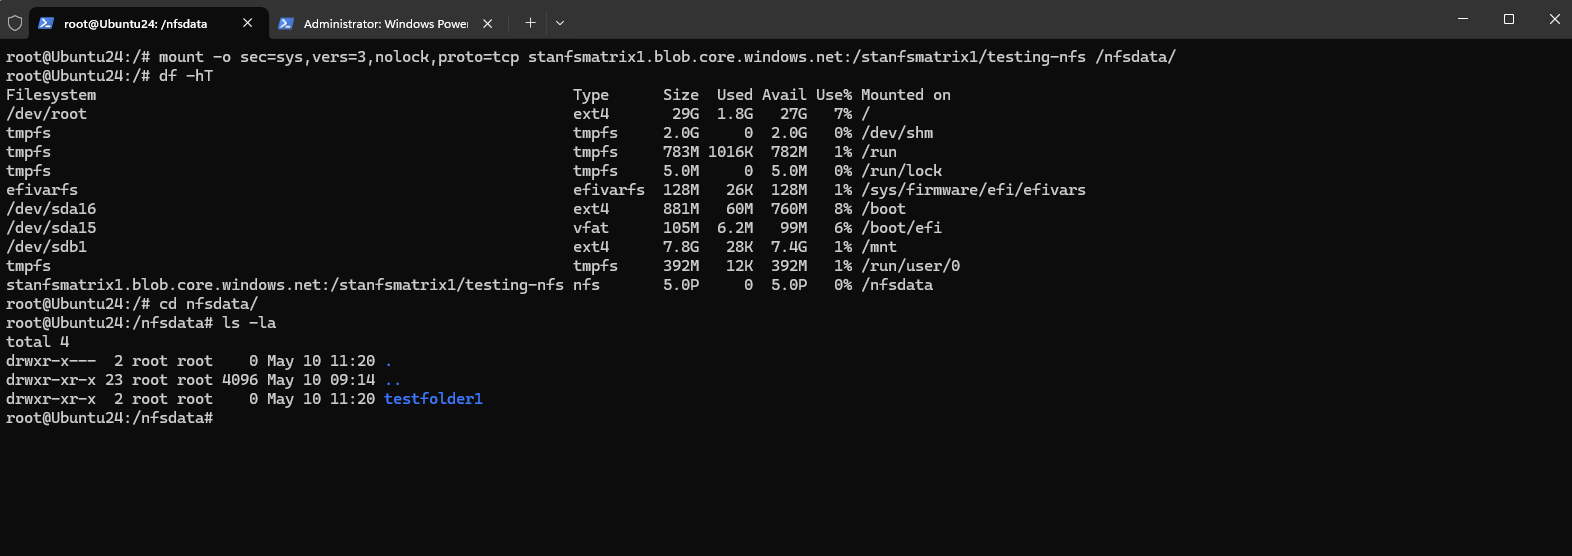
For a temporary mount that doesn’t persist across reboots, run the following command:
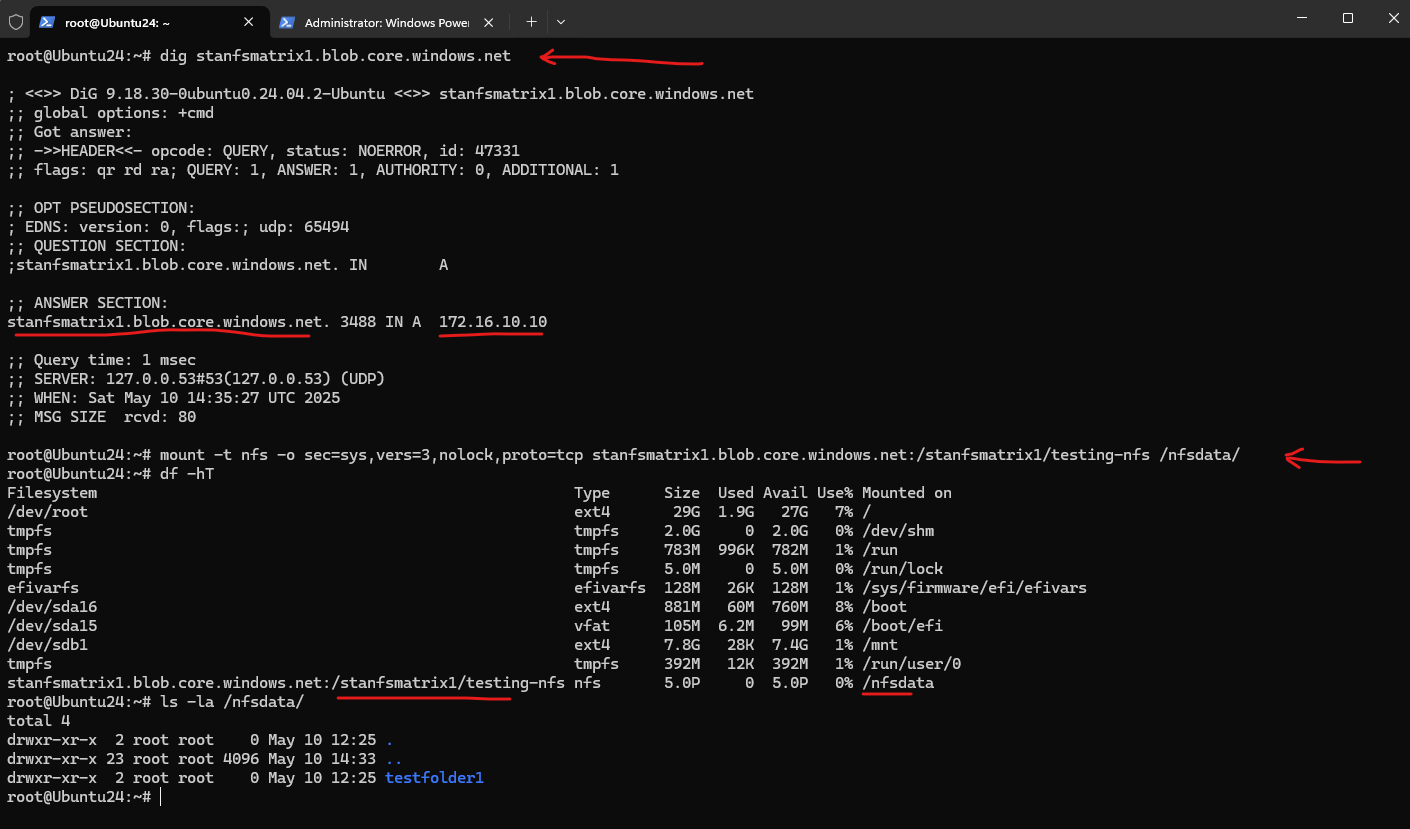
$ sudo mount -t nfs -o sec=sys,vers=3,nolock,proto=tcp <storage-account-name>.blob.core.windows.net:/<storage-account-name>/<container-name> /nfsdata
# sudo mount -t nfs -o sec=sys,vers=3,nolock,proto=tcp stanfsmatrix1.blob.core.windows.net:/stanfsmatrix1/testing-nfs /nfsdata/

Flags
-t nfs   Mount this as an NFS (Network File System) share.
-o, --options <list>    comma-separated list of mount options.
vers=3    mount the share using NFSv3 instead of the newer versions like NFSv4.
sec=sys   telling the NFS client to authenticate users using the standard UNIX UID and GID values.
nolock  Disable file locking (necessary for Azure NFS because Azure does not support file locking).
proto=tcp    tells the NFS client to use the TCP protocol instead of UDP when communicating with the NFS server. Required by some NFS servers (including Azure Blob NFS 3.0).
Mount the Container by using the AZNFS Mount Helper Package
In case you will use public access for your storage account or using private access with private endpoints and dynamically assigned IP addresses, the preferred way to mount the container is to use the AZNFS Mount Helper Package as described in the following two links.
Install the AZNFS Mount Helper package
https://learn.microsoft.com/en-us/azure/storage/blobs/network-file-system-protocol-support-how-to#step-5-install-the-aznfs-mount-helper-packageAZNFS Mount Helper
https://github.com/Azure/AZNFS-mount/Azure Blob NFSv3 is a highly available clustered NFSv3 server for providing NFSv3 access to Azure Blobs. To maintain availability in case of infrequent-but-likely events like hardware failures, hardware decommissioning, etc, the endpoint IP of the Azure Blob NFS endpoint may change.
This change in IP is mostly transparent to applications because the DNS records are updated such that the Azure Blob NFS FQDN always resolves to the updated IP. This works fine for new mounts as they will automatically connect to the new IP, but this change in IP is not handled by Linux NFS client for already mounted shares, as it only resolves the IP at the time of mount and any change in the server IP after mount will cause it to indefinitely attempt reconnect to the old IP.
Also NFSv3 protocol doesn’t provide a way for server to convey such change in IP to the clients. This means that this change in IP has to be detected by a userspace process and conveyed to the kernel through some supported interface.
When configuring a static IP address for the private endpoint as shown below, we can mount the container as usual without the AZNFS Mount Helper Package.
Configure a static IP Address for the Private Endpoint
Private endpoint IPs assigned dynamically (by using the Azure portal by default) are generally stable but can change in rare cases. To be sure we can also assign a private endpoint with a static IP address to our storage account and blob storage.
We can assign a new private endpoint with a static IP address also for already created storage accounts, below I was creating and assigning it to my existing storage account which was already using a private endpoint with a dynamically assigned IP address.
When creating a new storage account by using the Azure portal, we can skip the creation of the private endpoint and later create and assign it by using the below PowerShell script.
To create a new private endpoint with a static IP address and assign it to our storage account, we can use the following PowerShell script from here https://learn.microsoft.com/en-us/azure/private-link/create-private-endpoint-powershell?tabs=static-ip.
To use it adjust it to your environment. I was already changing the script that we can use it to create and assign it to a storage account.
## Place the storage account into a variable. ##
$sta = Get-AzStorageAccount -ResourceGroupName sftp -Name stanfsmatrix1

## Create the private endpoint connection. ##
$pec = @{
    Name = 'connection-1'
    PrivateLinkServiceId = $sta.ID
    GroupID = 'blob'
}
$privateEndpointConnection = New-AzPrivateLinkServiceConnection @pec

## Place the virtual network the storage account should be available into a variable. ##
$vnet = Get-AzVirtualNetwork -ResourceGroupName 'sftp' -Name 'VNet-SFTP'

## Create the static IP configuration. ##
$ip = @{
    Name = 'ipconfig-1'
    GroupId = 'blob'
    MemberName = 'blob'
    PrivateIPAddress = '172.16.10.10'
}
$ipconfig = New-AzPrivateEndpointIpConfiguration @ip

## Create the private endpoint. ##
$pe = @{
    ResourceGroupName = 'sftp'
    Name = 'private-endpoint-sta-nfs'
    Location = 'west europe'
    Subnet = $vnet.Subnets[0]
    PrivateLinkServiceConnection = $privateEndpointConnection
    IpConfiguration = $ipconfig
}
New-AzPrivateEndpoint @pePS> Connect-AzAccount or sign-in by using the tenant and subscription id PS> Connect-AzAccount -Tenant <tenant id> -Subscription <subscription id>
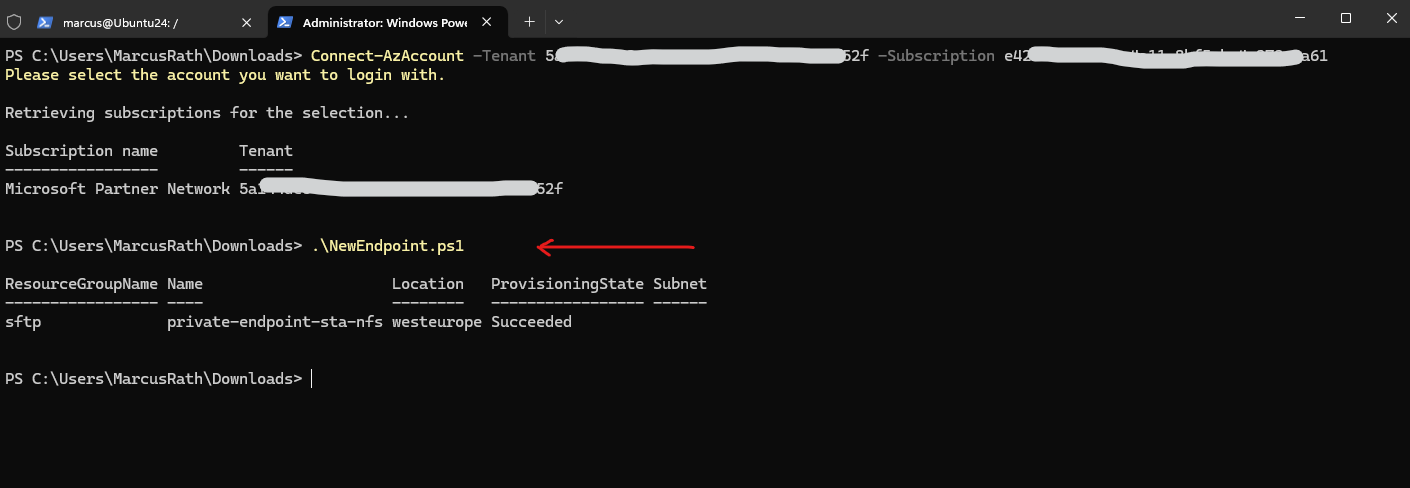
The new private endpoint with a static IP address is also assigned successfully to our storage account.
We can adjust the DNS A-record on our on-premise DNS server to the new static IP address.
We can now mount the container by using our new private endpoint and its static IP address.
Troubleshooting
AZNFS depends on dynamically detecting DNS changes for proper handling of endpoint address changes – Please remove the entry from /etc/hosts
When using the AZNFS Mount Helper we cannot use static entries for the NFS share (export) host and therefore needs to configure DNS.
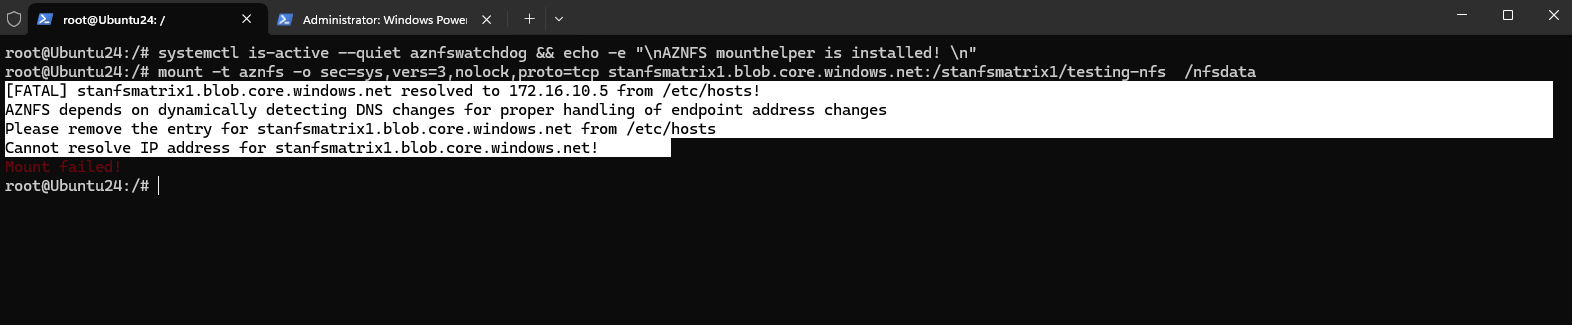
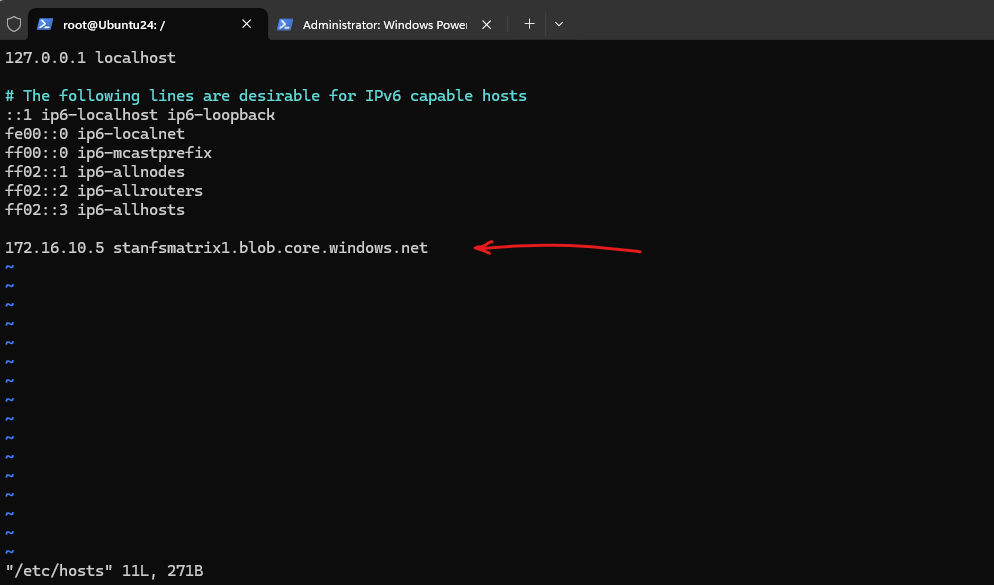
Remove the A-record in the /etc/hosts file and configure DNS therefore.
I will set my on-premise DNS server on the NIC of the virtual machine.
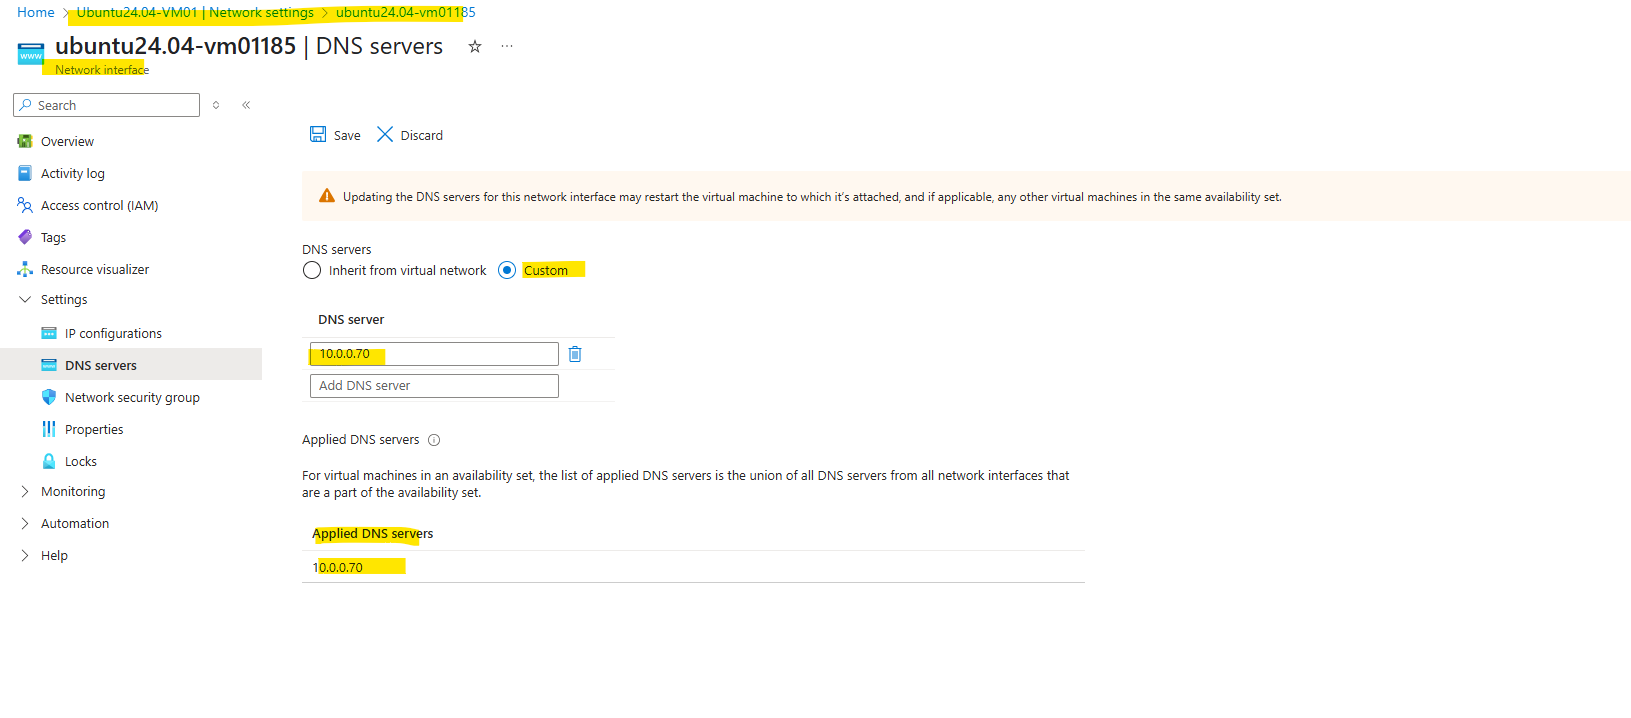
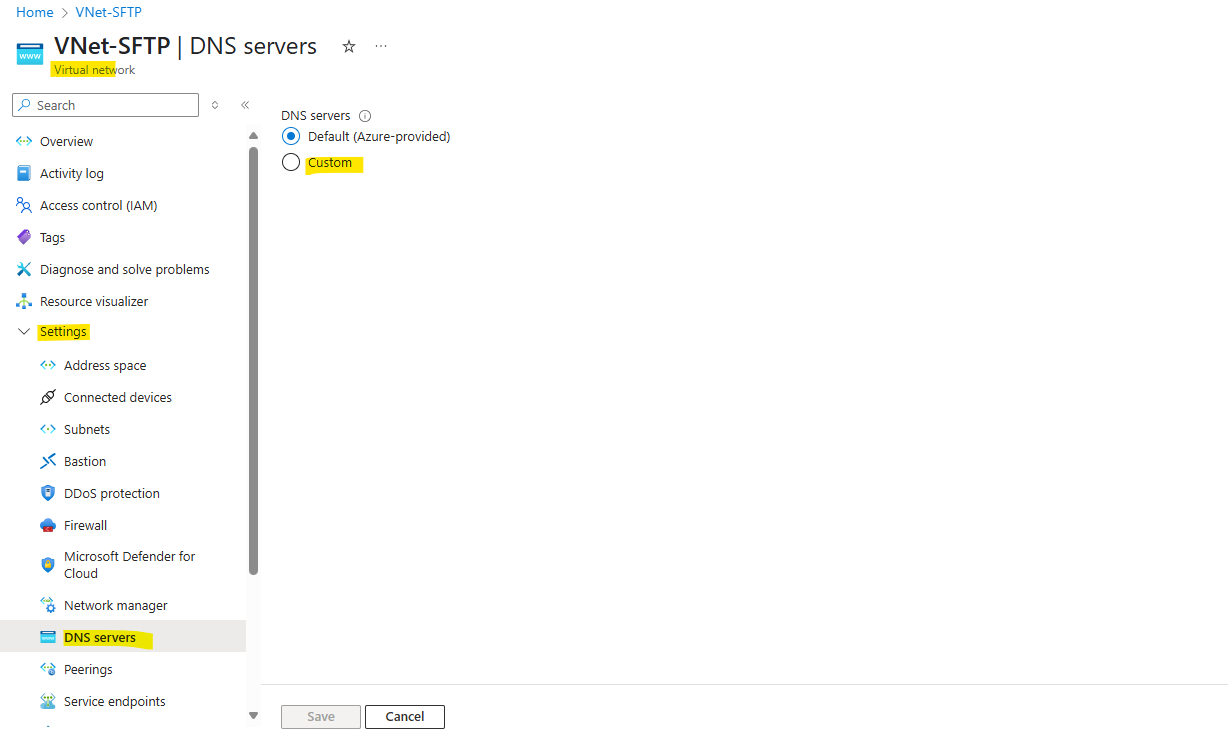
We can also set a custom DNS server directly on the virtual network which will be applied to all resources running inside or creating a new Azure-integrated private DNS zone.
The Azure-integrated private DNS zone I doesn’t want to want to configure as mentioned here https://blog.matrixpost.net/set-up-an-azure-storage-account-and-blob-storage-for-sftp-access-and-using-a-private-endpoint/#setup.
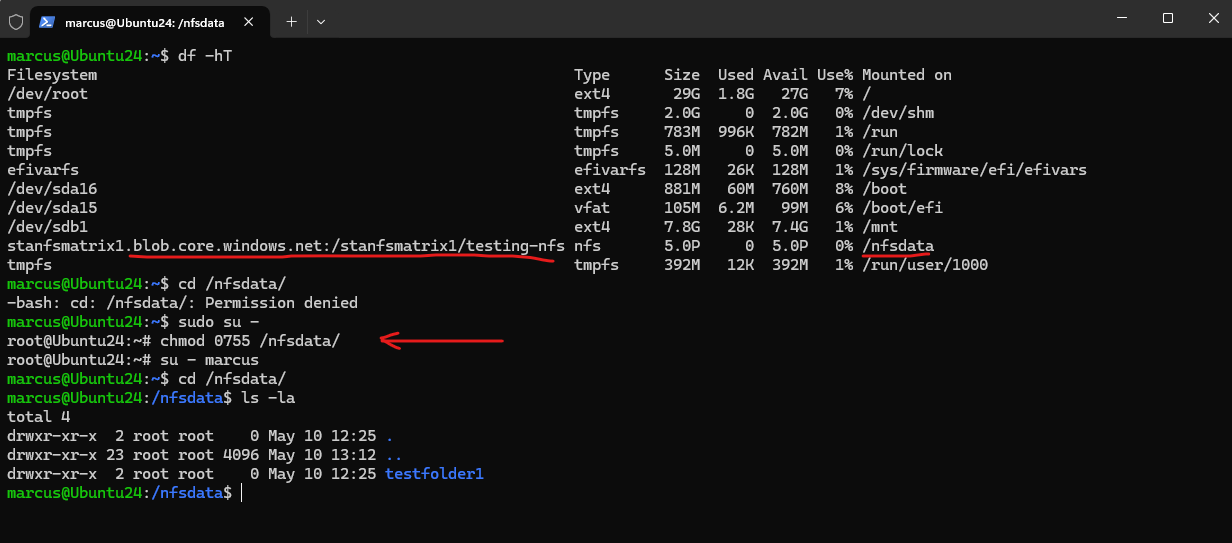
Permission Denied
When mounting the NFS share (export) as a non-root user, you will by default run into the permission denied error.

The default mode of a newly created NFS 3.0 container is 0750.
Non-root users don’t have access to the volume. If access from non-root users is required, root users must change the mode to 0755. Sample command: sudo chmod 0755 /nfsdata.
0755
││└── Other users (5 = read + execute)
│└── Group users (5 = read + execute)
└── Owner (7 = read + write + execute)
Granting also write permissions and therefore full permissions for non-root users.
sudo chmod 0777 /nfsdata.

0777
││└── Other users (7 = read + write + execute)
│└── Group users (7 = read + write + execute)
└── Owner (7 = read + write + execute)
Links
Use private endpoints for Azure Storage
https://learn.microsoft.com/en-us/azure/storage/common/storage-private-endpointsNetwork File System (NFS) 3.0 protocol support for Azure Blob Storage
https://learn.microsoft.com/en-us/azure/storage/blobs/network-file-system-protocol-supportMount Blob Storage by using the Network File System (NFS) 3.0 protocol
https://learn.microsoft.com/en-us/azure/storage/blobs/network-file-system-protocol-support-how-toNetwork File System (NFS) 3.0 performance considerations in Azure Blob storage
https://learn.microsoft.com/en-us/azure/storage/blobs/network-file-system-protocol-support-performanceCompare access to Azure Files, Blob Storage, and Azure NetApp Files with NFS
https://learn.microsoft.com/en-us/azure/storage/common/nfs-comparisonAZNFS Mount Helper
https://github.com/Azure/AZNFS-mount/Resolve common errors
https://learn.microsoft.com/en-us/azure/storage/blobs/network-file-system-protocol-support-how-to#resolve-common-errorsQuickstart: Create a private endpoint by using Azure PowerShell
https://learn.microsoft.com/en-us/azure/private-link/create-private-endpoint-powershell?tabs=static-ipManage Azure private endpoints
https://learn.microsoft.com/en-us/azure/private-link/manage-private-endpointCustom DNS configuration in Azure Linux Virtual Machines
https://learn.microsoft.com/en-us/troubleshoot/azure/virtual-machines/linux/custom-dns-configuration-for-azure-linux-vmsKnown issues with Network File System (NFS) 3.0 protocol support for Azure Blob Storage
https://learn.microsoft.com/en-us/azure/storage/blobs/network-file-system-protocol-known-issues