Set up Microsoft Defender for Identity
In this post I want to show what Microsoft Defender for Identity is and how you can set up and configure it.
Microsoft Defender for Identity, formerly Azure Advanced Threat Protection, is a cloud-based security solution. It uses your on-premises Windows Server Active Directory signals to identify, detect, and investigate advanced threats, compromised identities, and malicious insider actions directed at your organization.
Defender for Identity consists of the following components:
- Cloud service. The cloud service runs on the Microsoft Entra infrastructure and is currently deployed in the United States, Europe, and Asia. The Defender for Identity cloud service is connected to the Microsoft Intelligent Security Graph.
- Portal. Use the Microsoft Defender for Identity portal to create a Defender for Identity instance, display data received from sensors, and monitor, manage, and investigate threats in your network environment.
- Sensors. Defender for Identity sensors capture and inspect domain controller network traffic and can be directly installed on domain controllers and Active Directory Federation Services (AD FS) servers.
Introduction
Defender for Identity is fully integrated with Microsoft 365 Defender, and leverages signals from both on-premises Active Directory and cloud identities to help you better identify, detect, and investigate advanced threats directed at your organization.
So Defender for Identity will detect identity-based attacks in a hybrid environment by analyzing signals from your on-premise environment as well as your cloud environment.
The following image shows how Defender for Identity is layered over Microsoft 365 Defender, and works together with other Microsoft services and third-party identity providers to monitor traffic coming in from domain controllers and Active Directory servers.
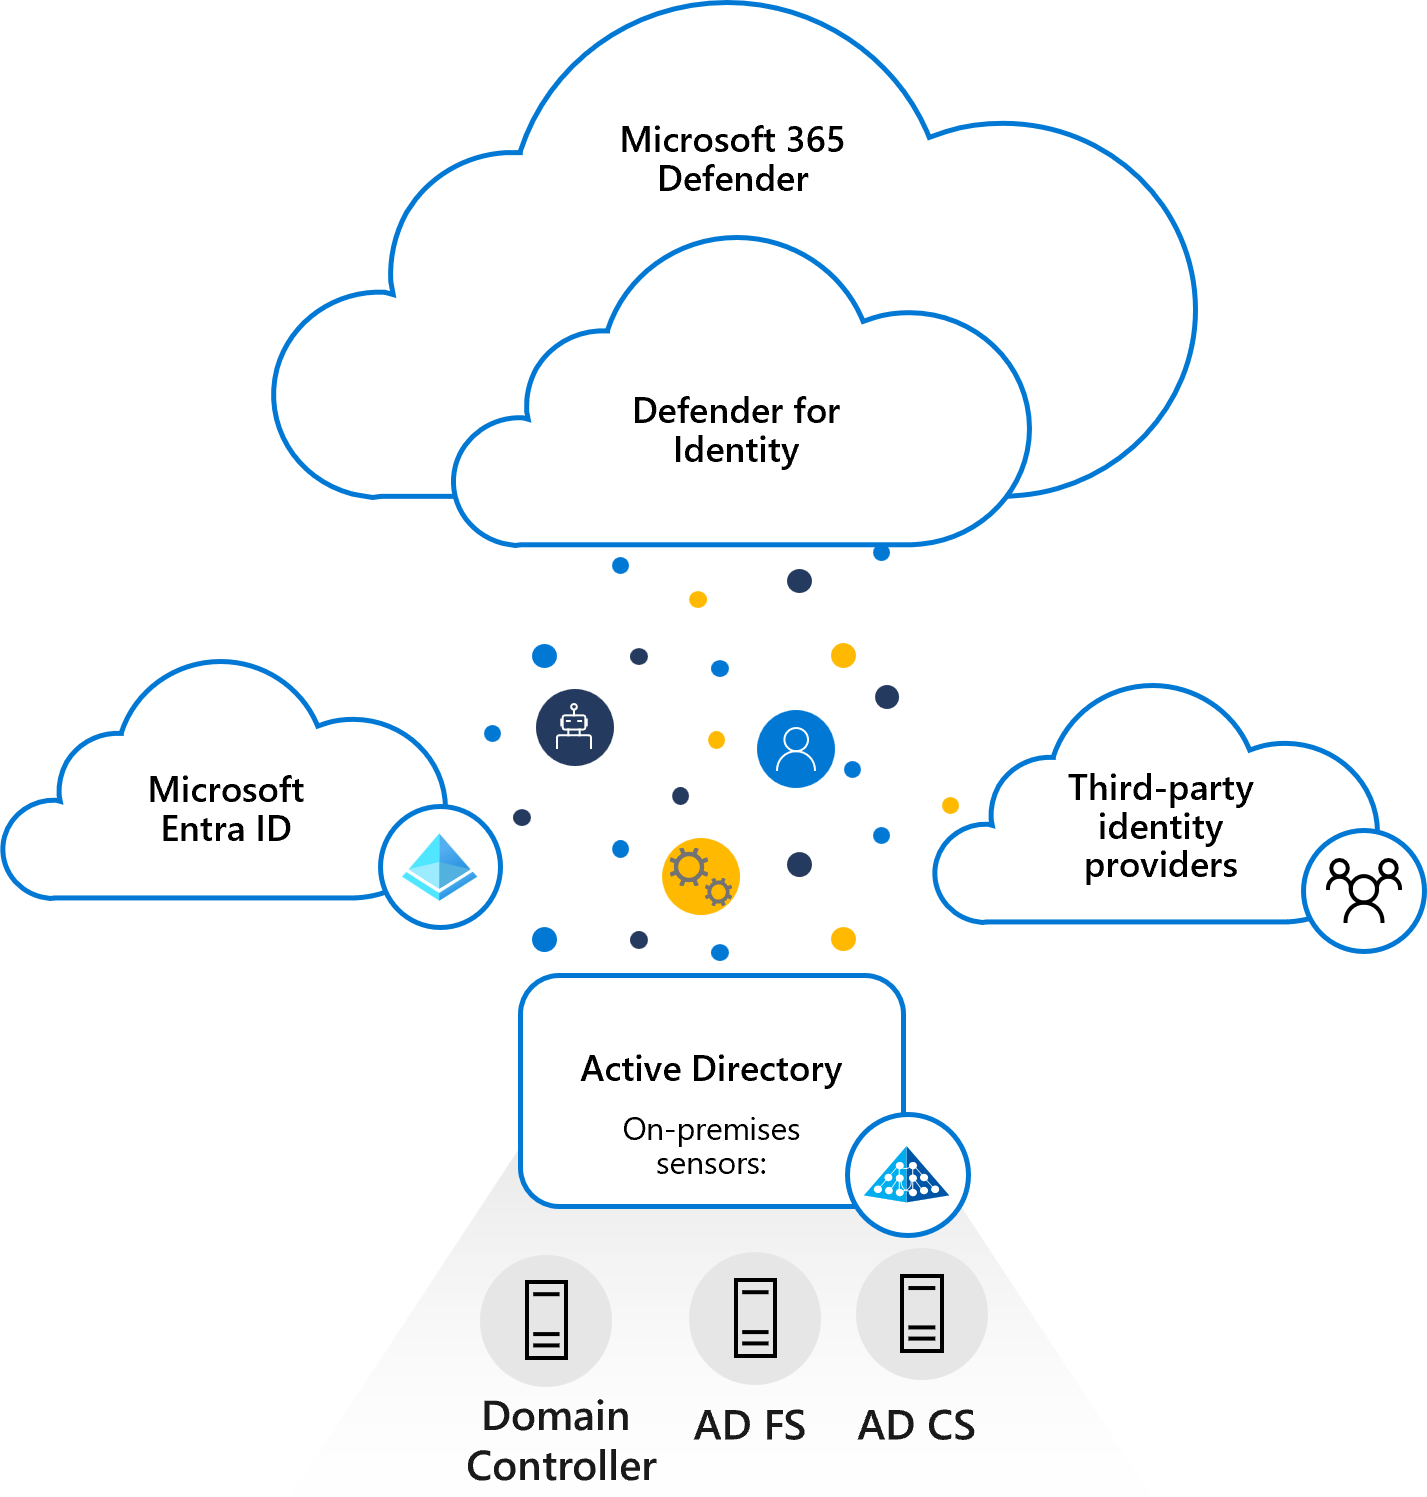
Source: https://learn.microsoft.com/en-us/defender-for-identity/architecture
Deploy Defender for Identity to help your SecOp teams deliver a modern identity threat detection (ITDR) solution across hybrid environments, including:
- Prevent breaches, using proactive identity security posture assessments
- Detect threats, using real-time analytics and data intelligence
- Investigate suspicious activities, using clear, actionable incident information
- Respond to attacks, using automatic response to compromised identities
Defender for Identity provides you with invaluable insights on identity configurations and suggested security best-practices. Through security reports and user profile analytics, Defender for Identity helps dramatically reduce your organizational attack surface, making it harder to compromise user credentials, and advance an attack.
Defender for Identity was formerly known as Azure Advanced Threat Protection (Azure ATP).
More about Defender for Identity you will find in the following article from Microsoft https://learn.microsoft.com/en-us/defender-for-identity/what-is.
Prerequisites
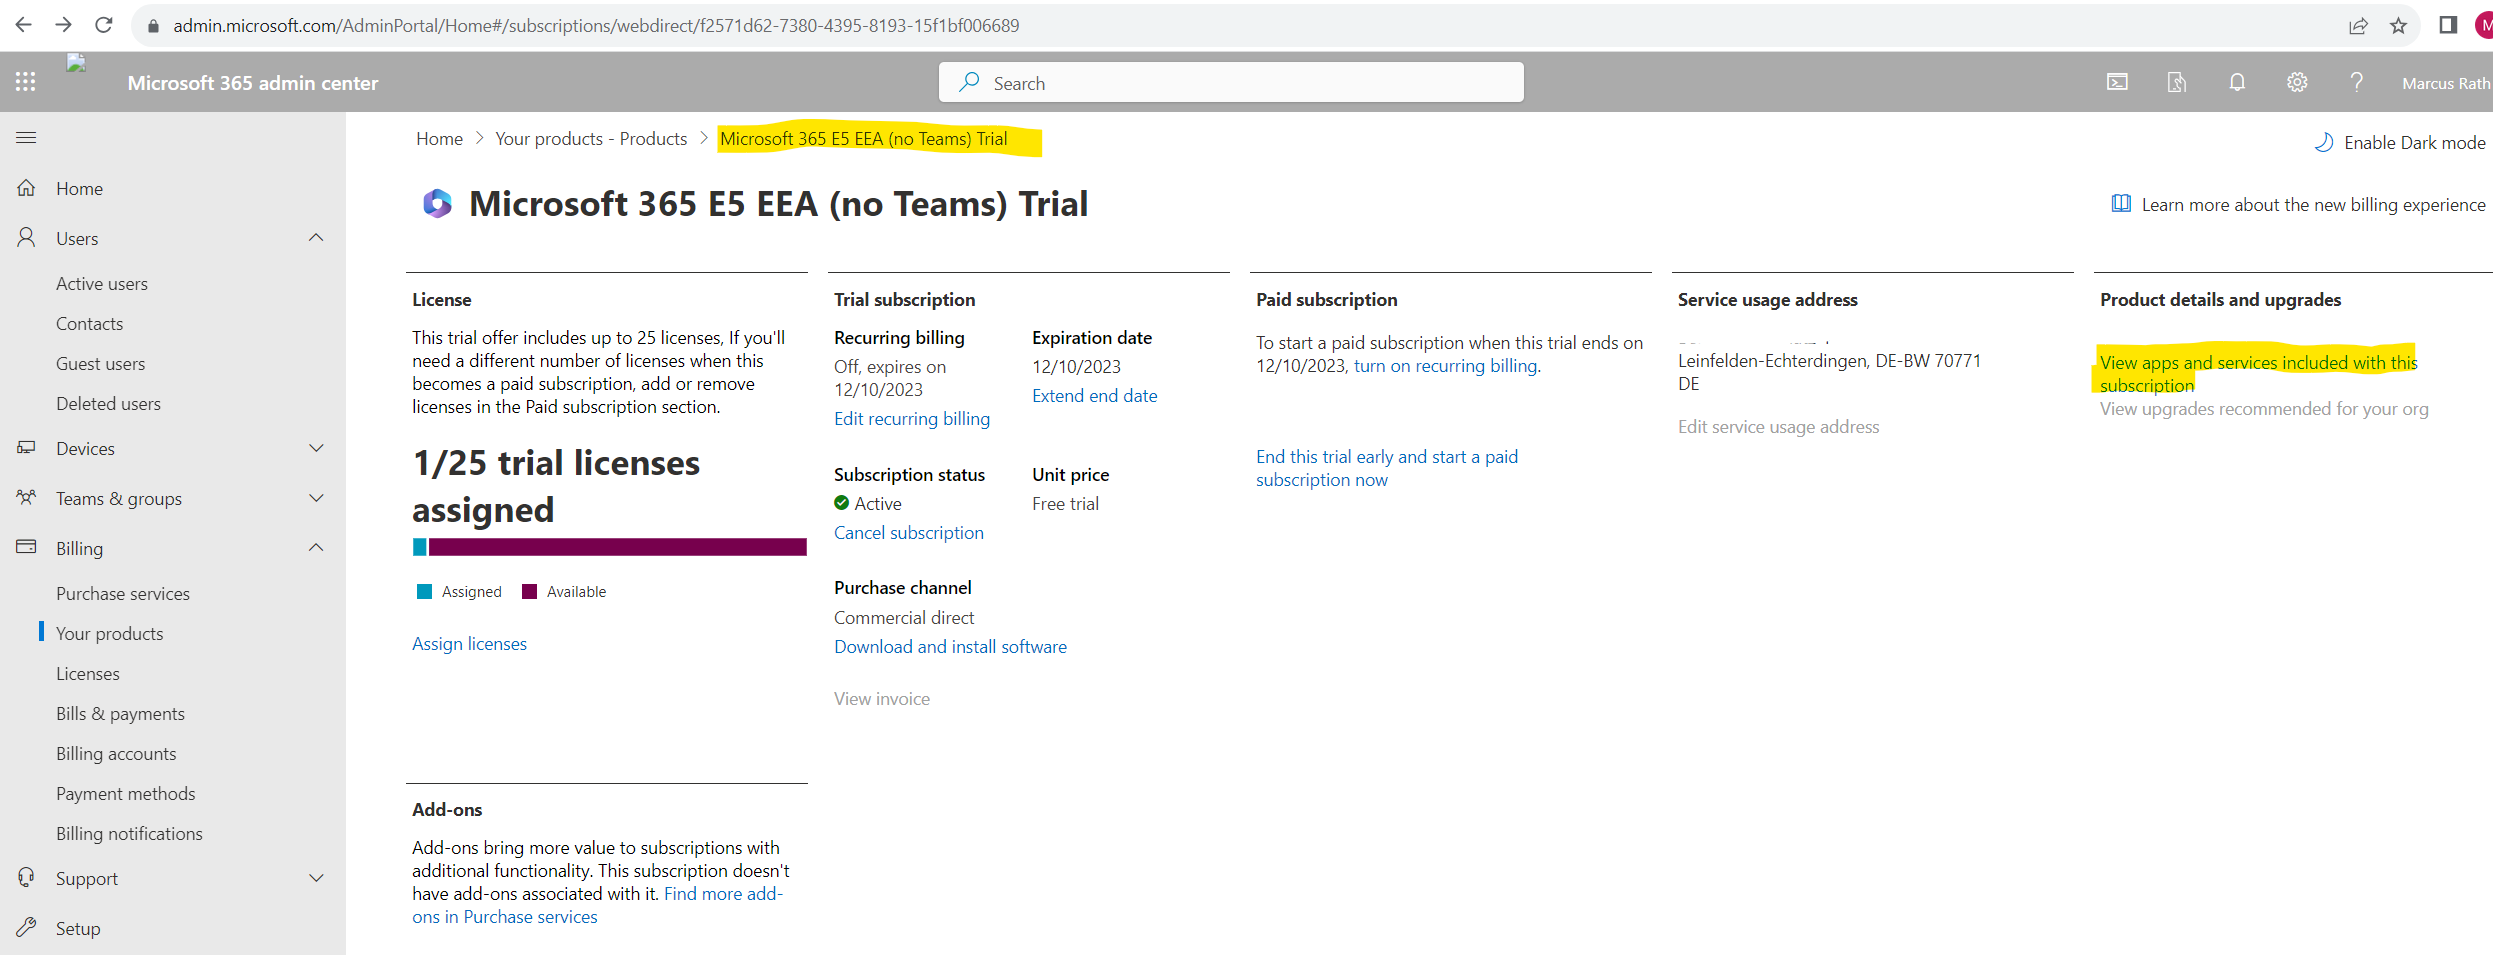
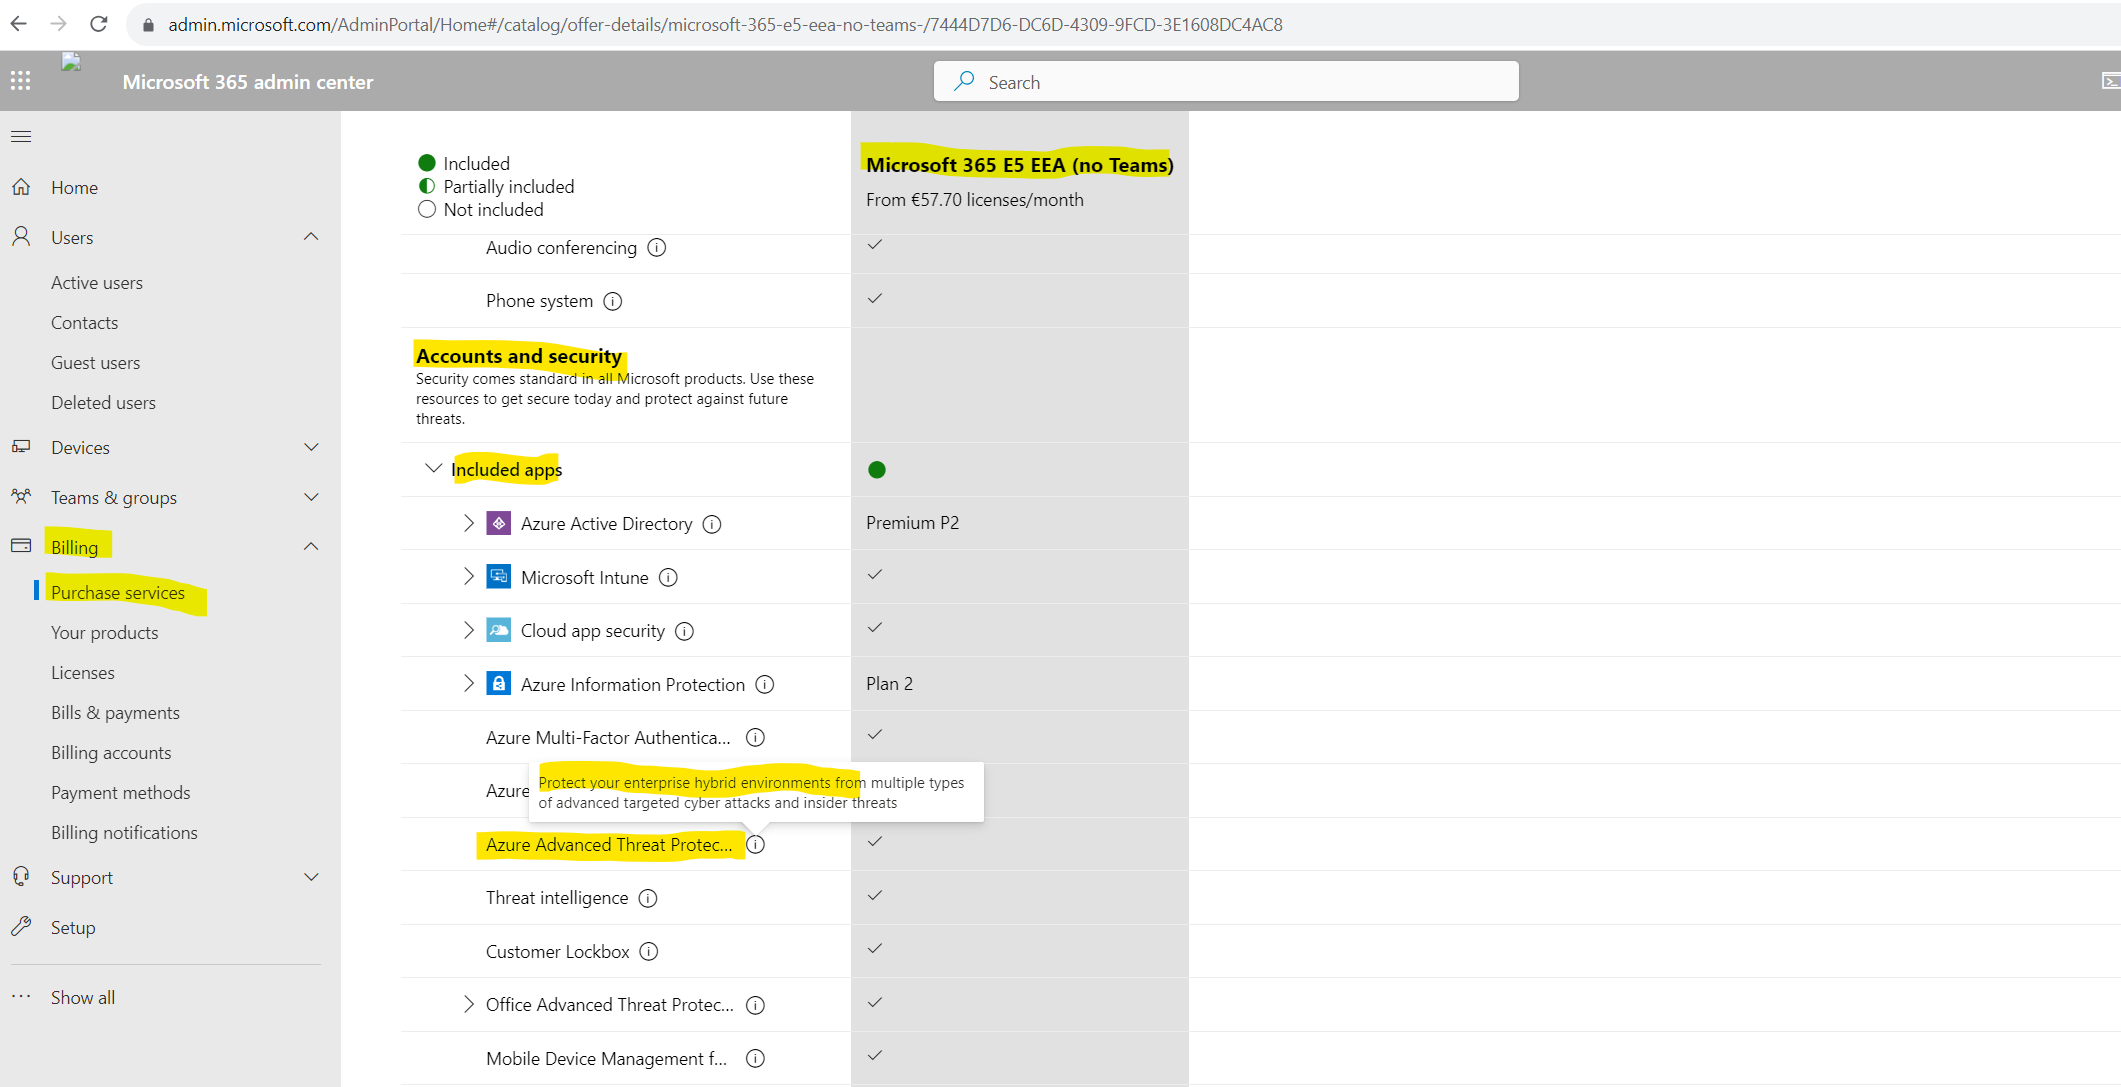
Acquire a license for Enterprise Mobility + Security E5 (EMS E5/A5), Microsoft 365 E5 (M365 E5/A5/G5) or Microsoft 365 E5/A5/G5 Security directly via the Microsoft 365 portal or use the Cloud Solution Partner (CSP) licensing model. Standalone Defender for Identity licenses are also available.
I will use for this post a Microsoft 365 E5 Trial license which also includes Defender for Identity (formerly Azure Advanced Threat Protection).
In case you wonder which trial version this is exactly below named Microsoft 365 E5 EEA (not Teams) you can read my following post https://blog.matrixpost.net/new-subscription-structure-for-microsoft-365-in-europe/.
Microsoft Defender for Identity vs. Microsoft Entra ID Protection
You may wonder what’s exactly the difference between Microsoft Defender for Identity and Microsoft Entra ID Protection (formerly Azure AD Identity Protection)?
First of all both products will provide very similar protection for identity and access. Both will prevent, detect and remediate identity risks in your organization.
Microsoft Entra ID Protection (formerly Azure AD Identity Protection) can just be used exclusively to protect cloud native identities.
Microsoft Defender for Identity in contrast is primarily focused to secure on-premise identities but also capable to secure cloud native identities.
Microsoft Defender for Identity can secure on-premise identities by leveraging signals from sensors installed within the on-premise environment. In addition because Defender for Identity is fully integrated with Microsoft 365 Defender, it is also able to leverage signals from cloud identities to get a holistic picture and single view what’s going on in your hybrid environment.
Setup and configure Defender for Identity
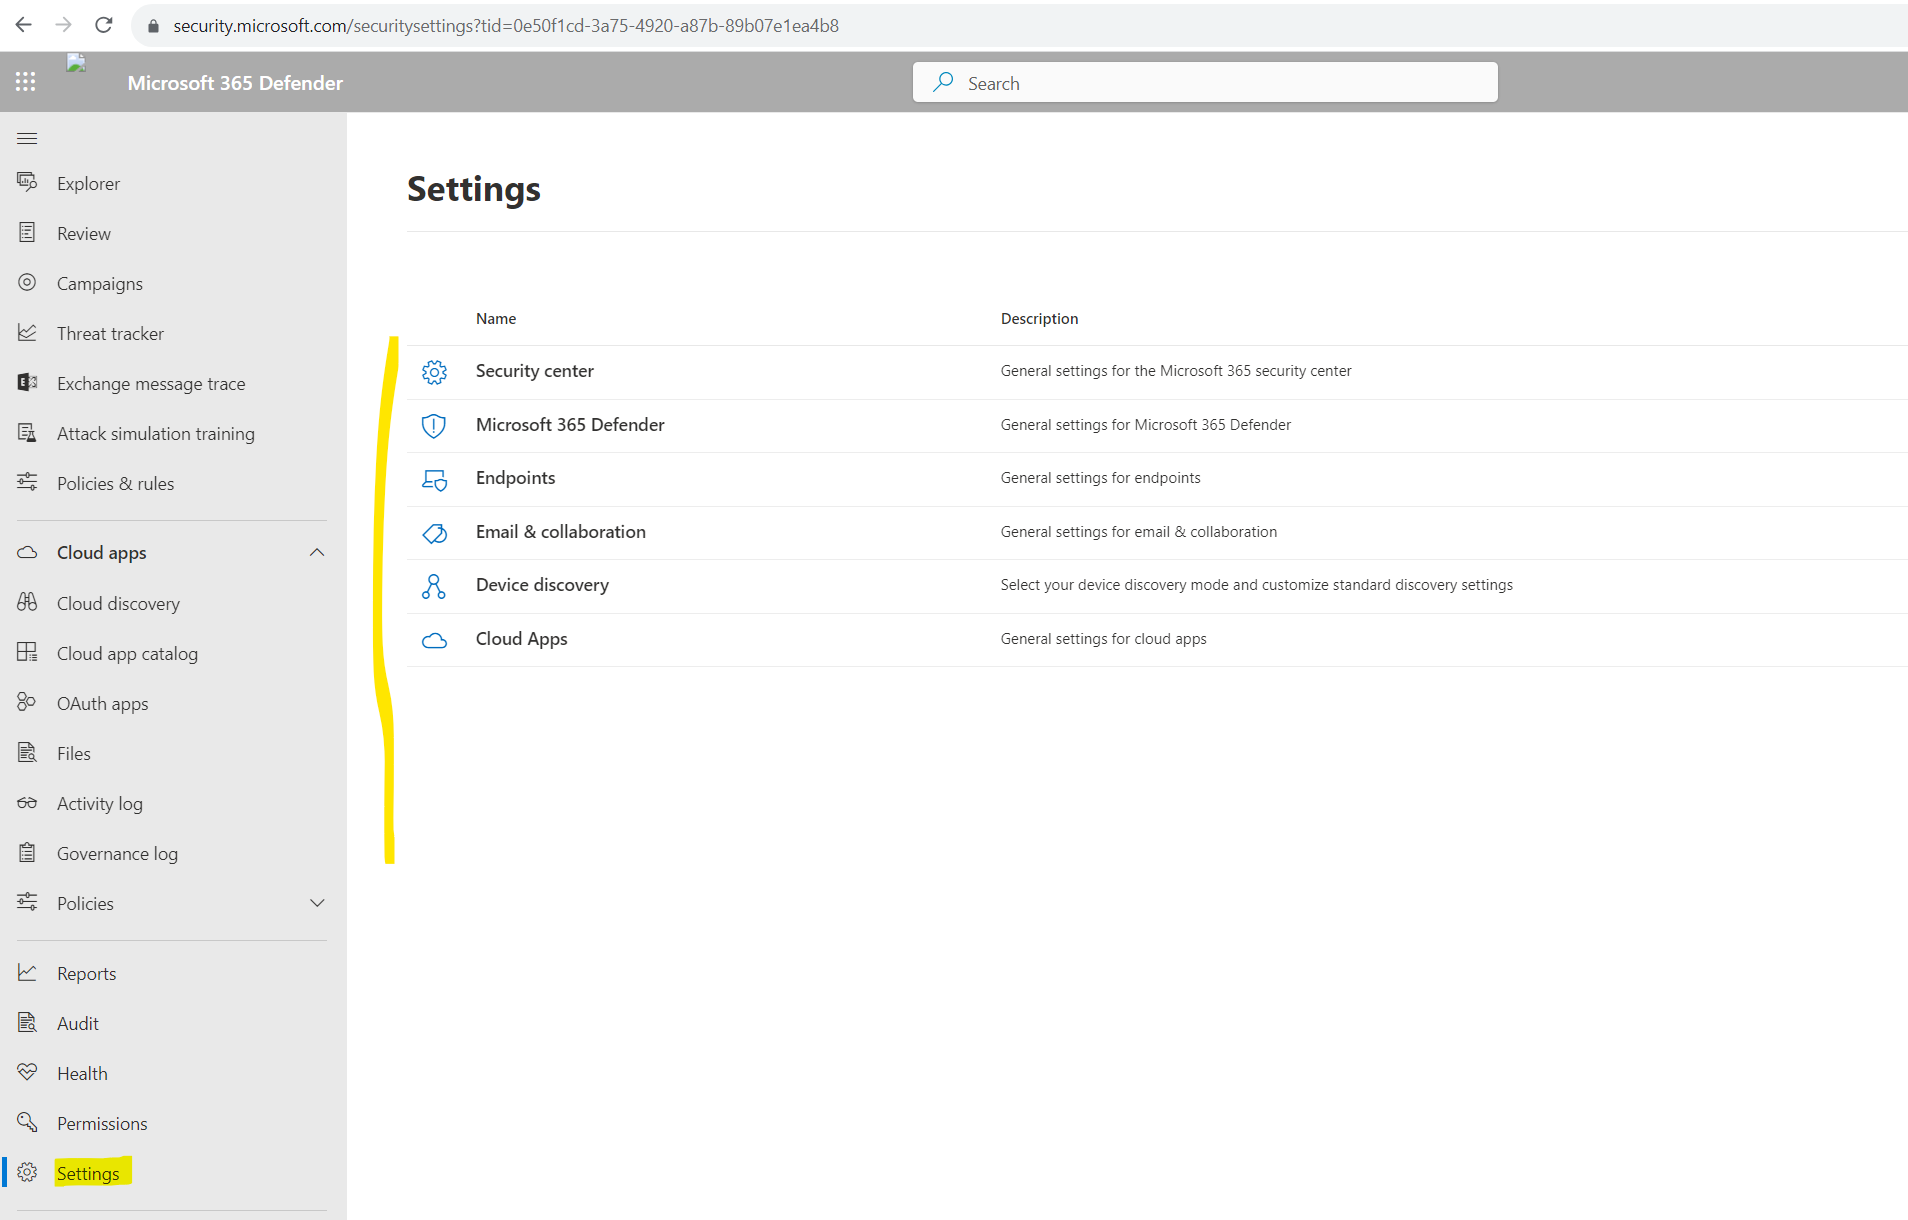
Open the Microsoft 365 Defender portal and navigate to the Settings menu. In my case here the Identities menu as shown in the quick installation guide was missing.
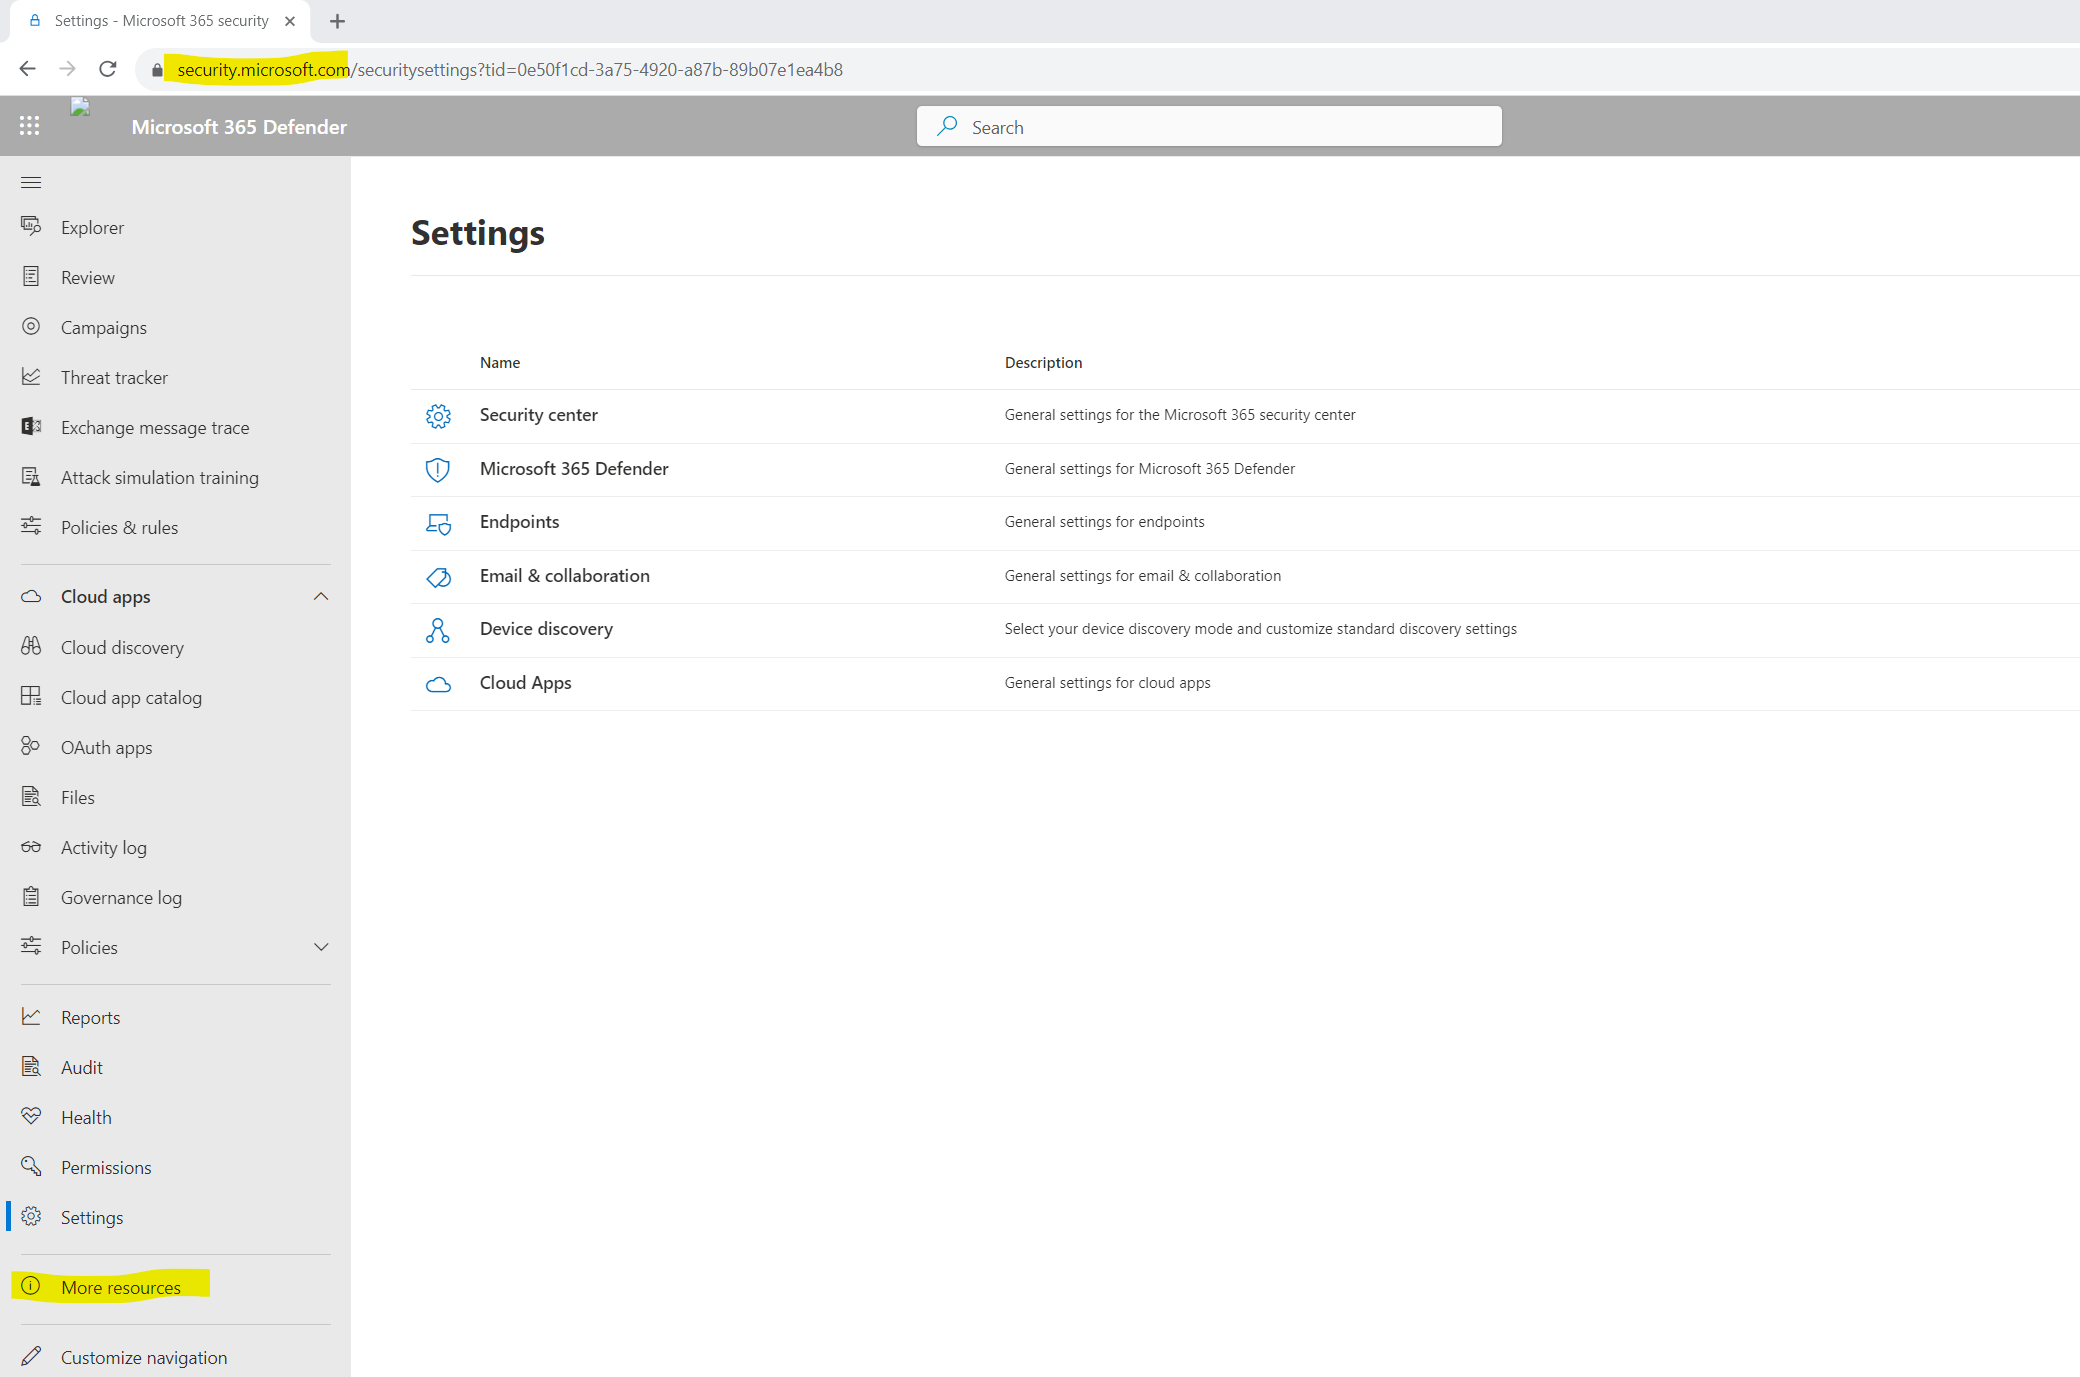
Therefore I was checking the More resources item in the left menu and found here the Azure Advanced Threat Protection point.
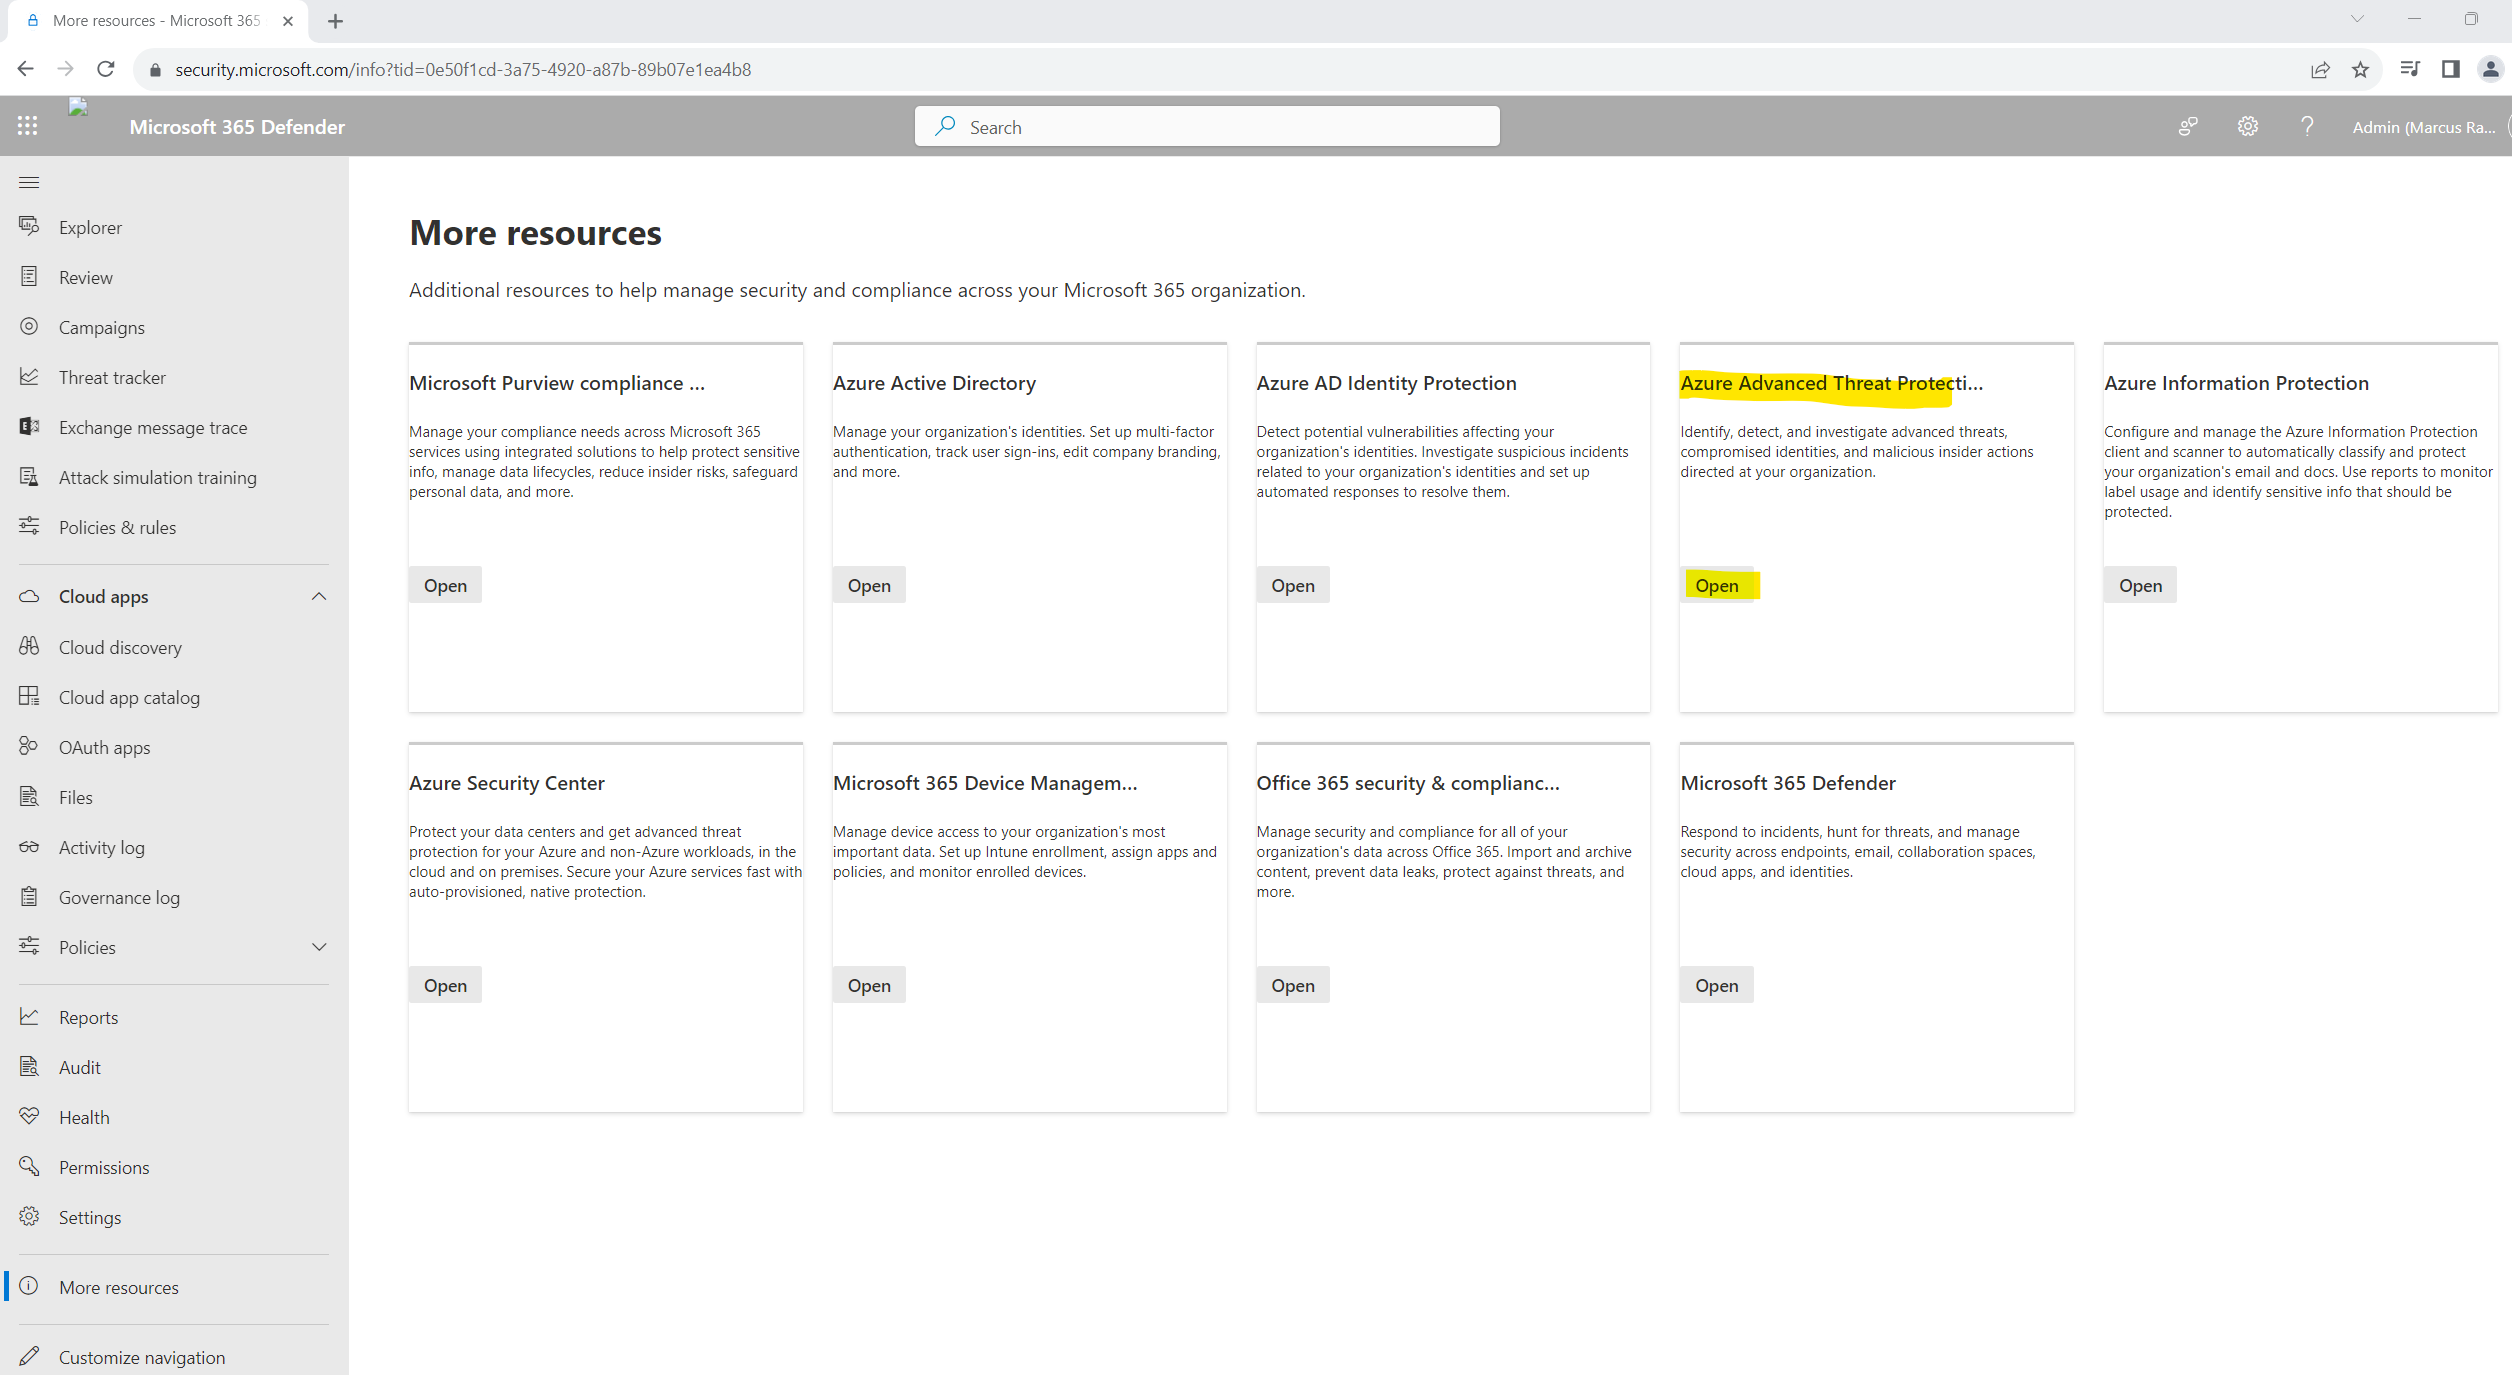
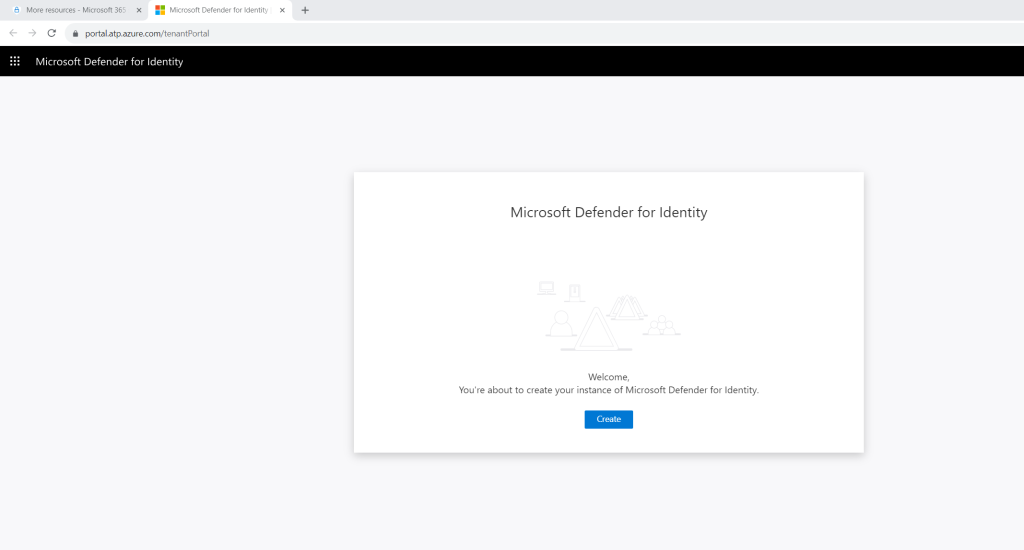
When clicking on it you will get forwarded to the following new page to create a new instance of Microsoft Defender for Identity.
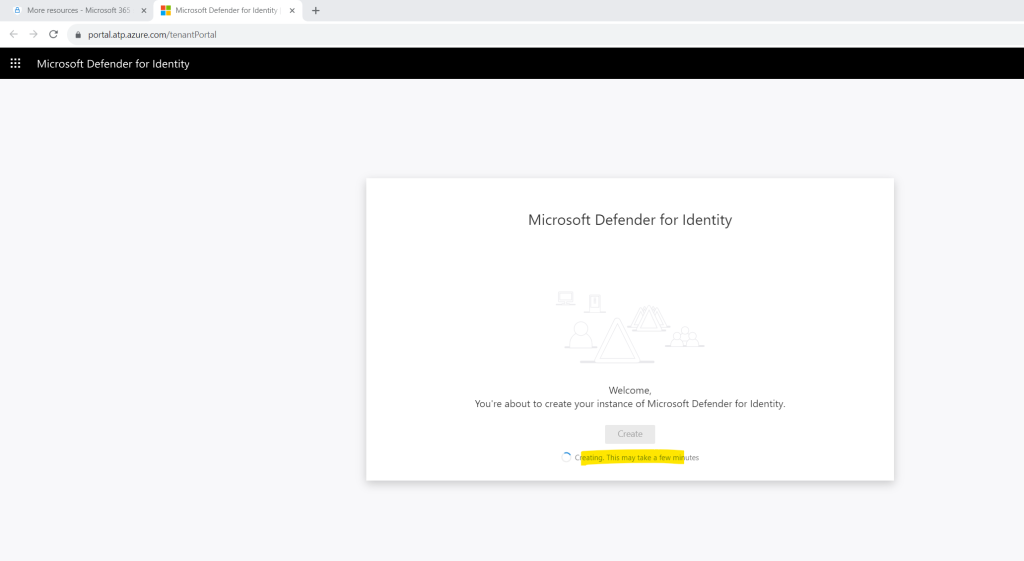
No idea what here exactly went wrong. I suppose the new instance is not already replicated to all data center.
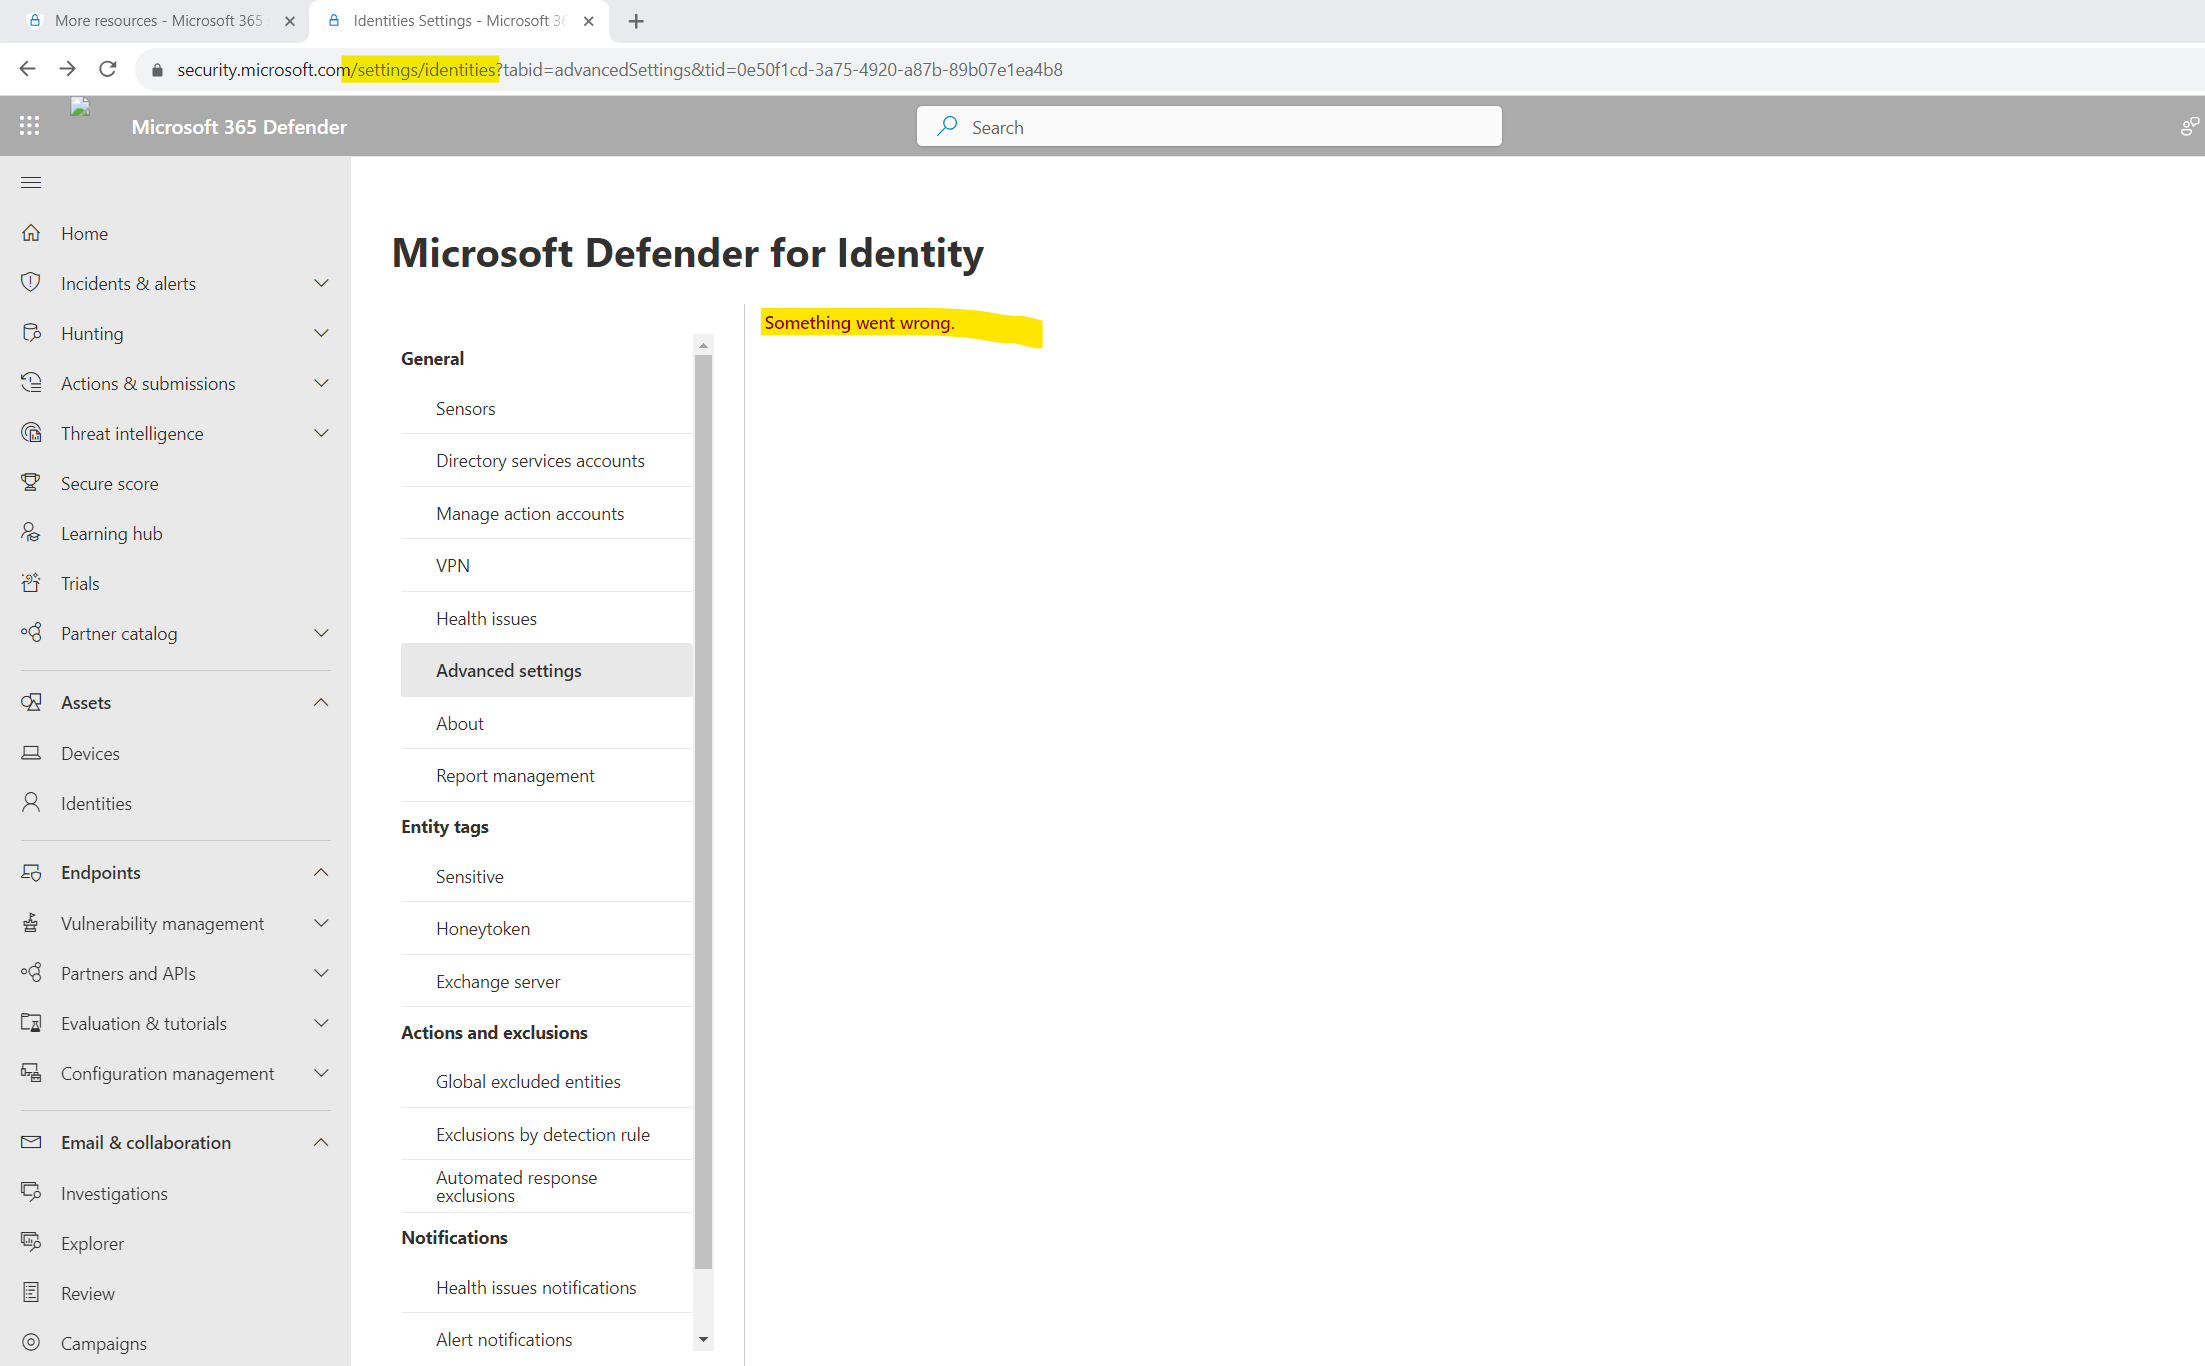
But when I will open the Advanced setting menu directly by using the link below all looks fine.
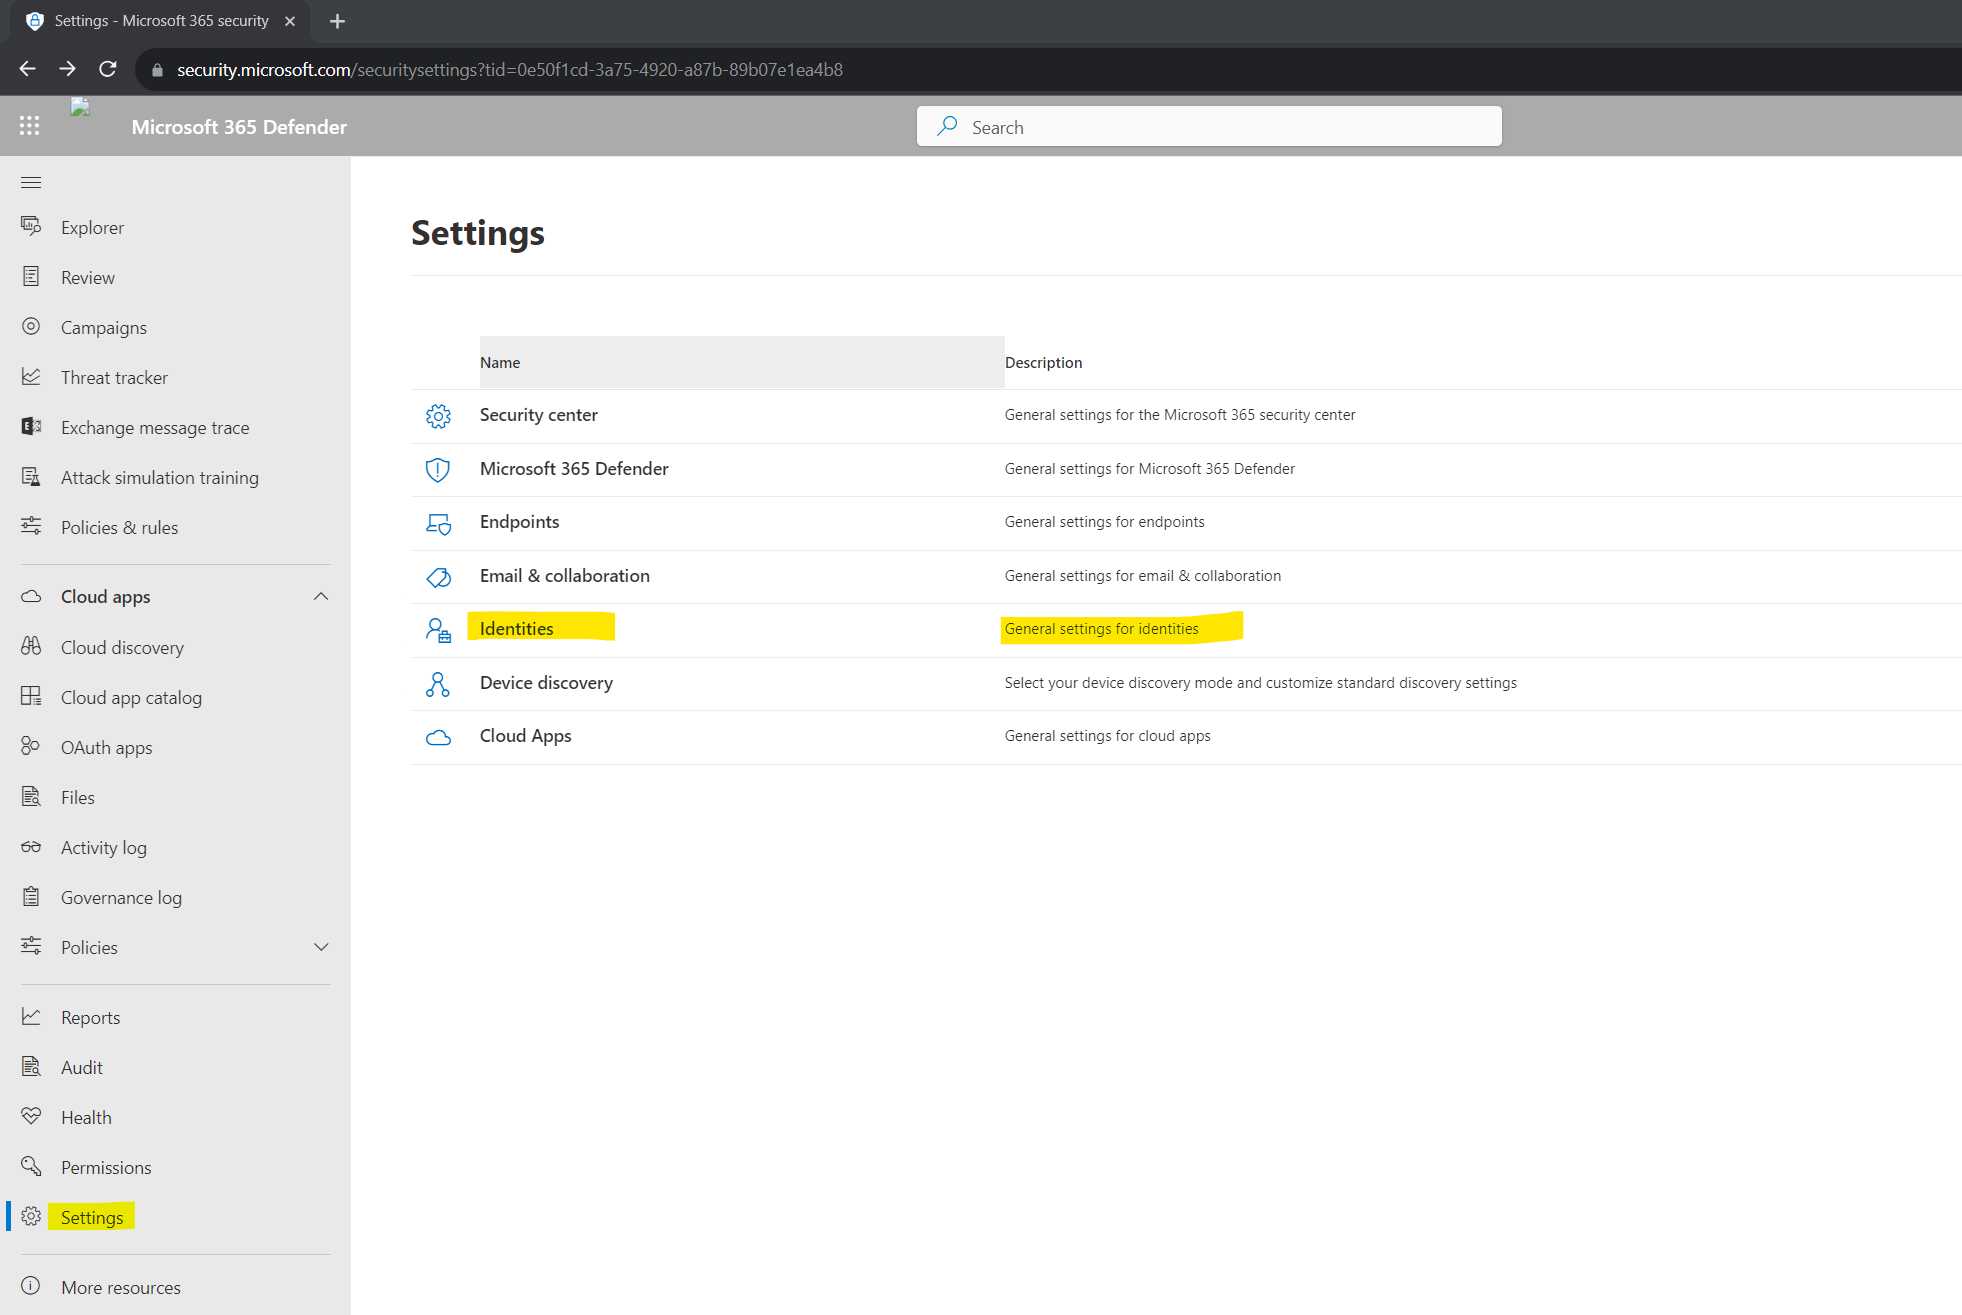
Nevertheless within the Settings menu the Identities menu is still missing.
When using a new browser incognito window the Identities menu was shown up correctly.
In my case it took a while till the entry is shown up in a normal browser windows.
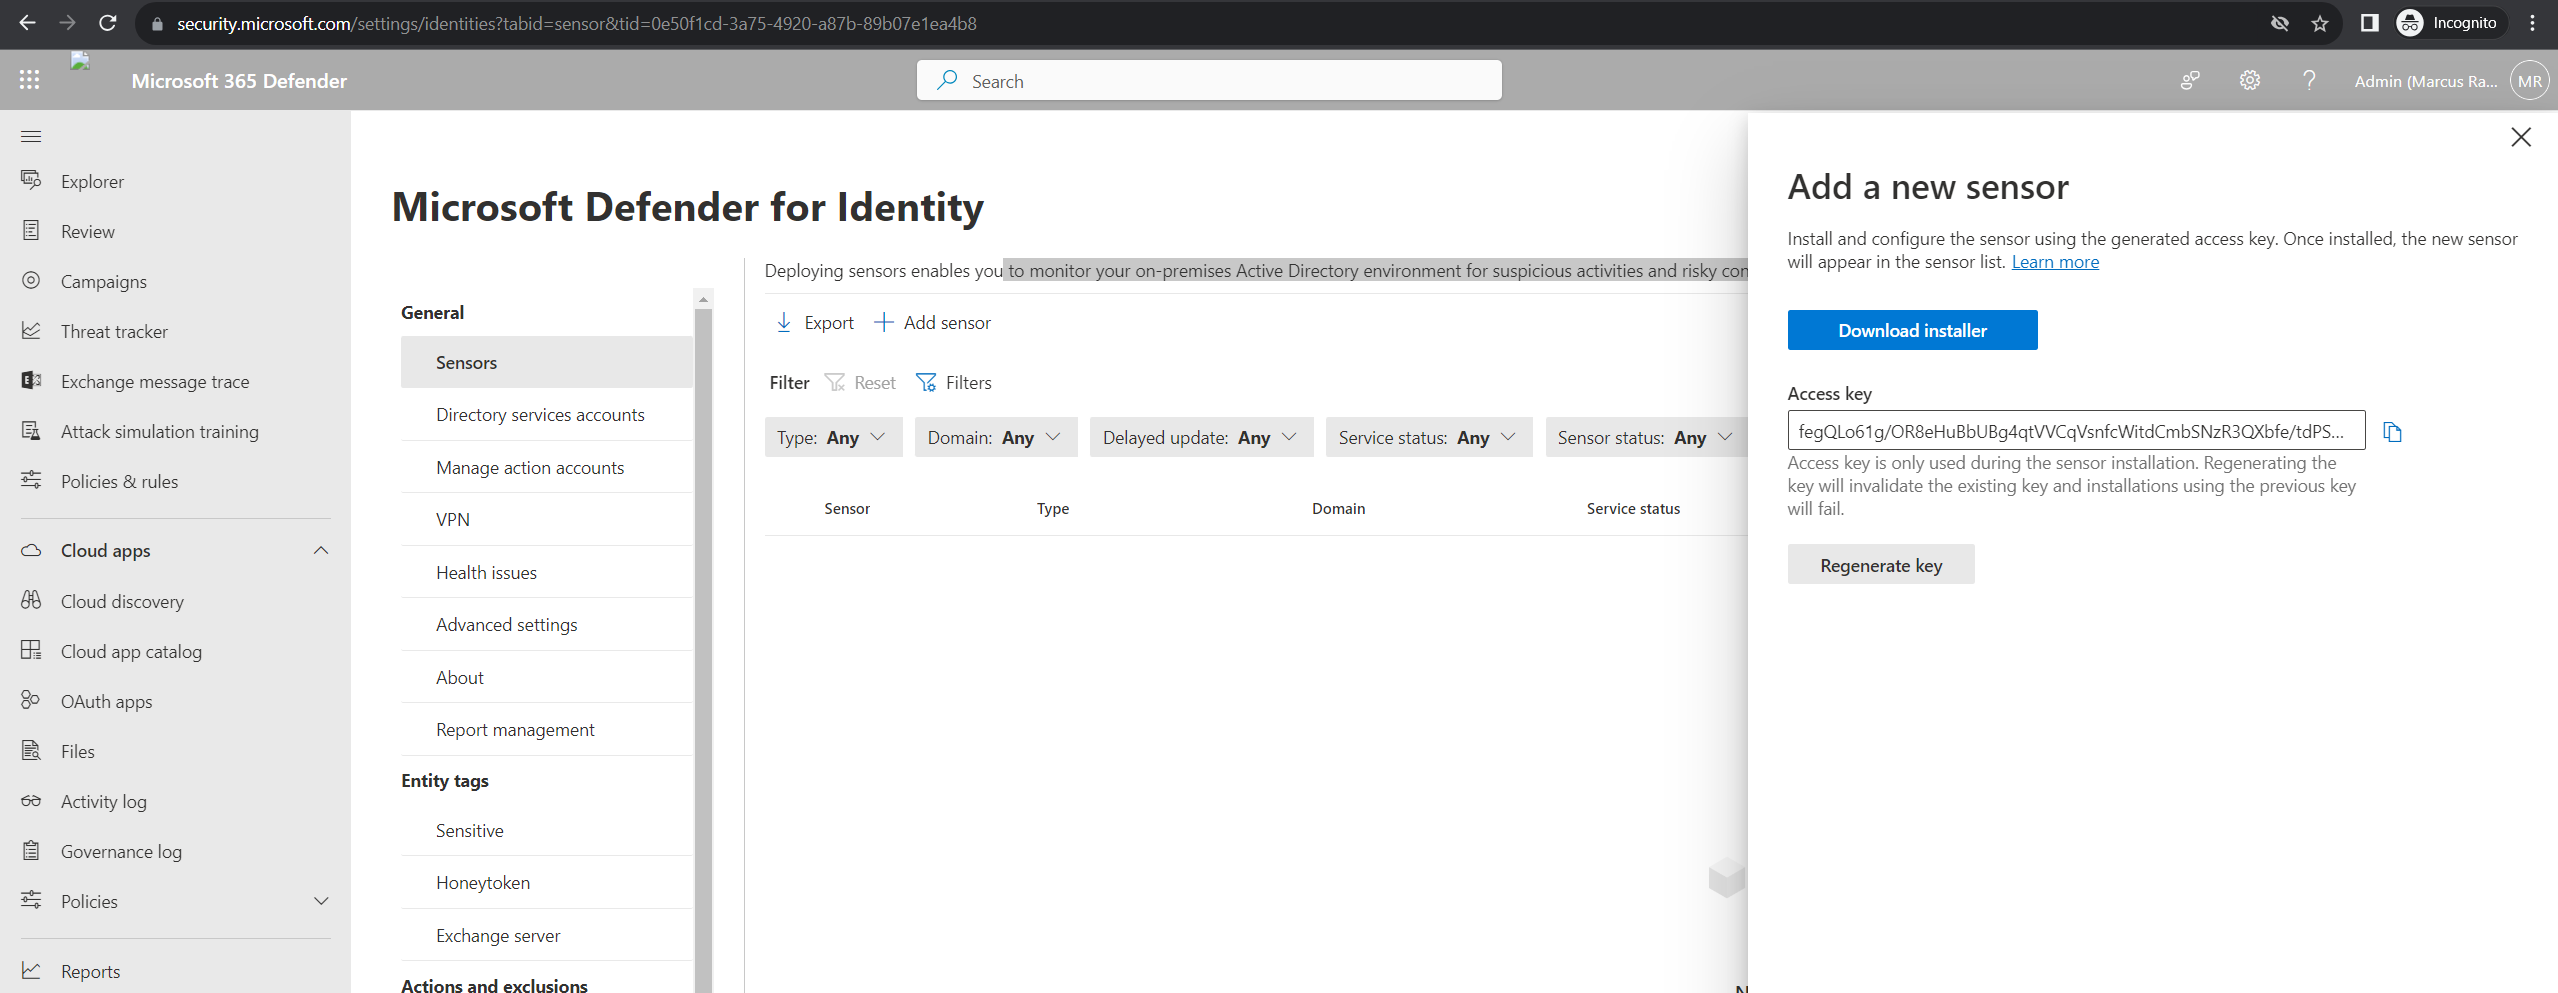
Now we first need to deploy sensors on our on-premise domain controllers in order to monitor the on-premises Active Directory environment for suspicious activities and risky configurations.
Download the Microsoft Defender for Identity sensor
https://learn.microsoft.com/en-us/defender-for-identity/download-sensor
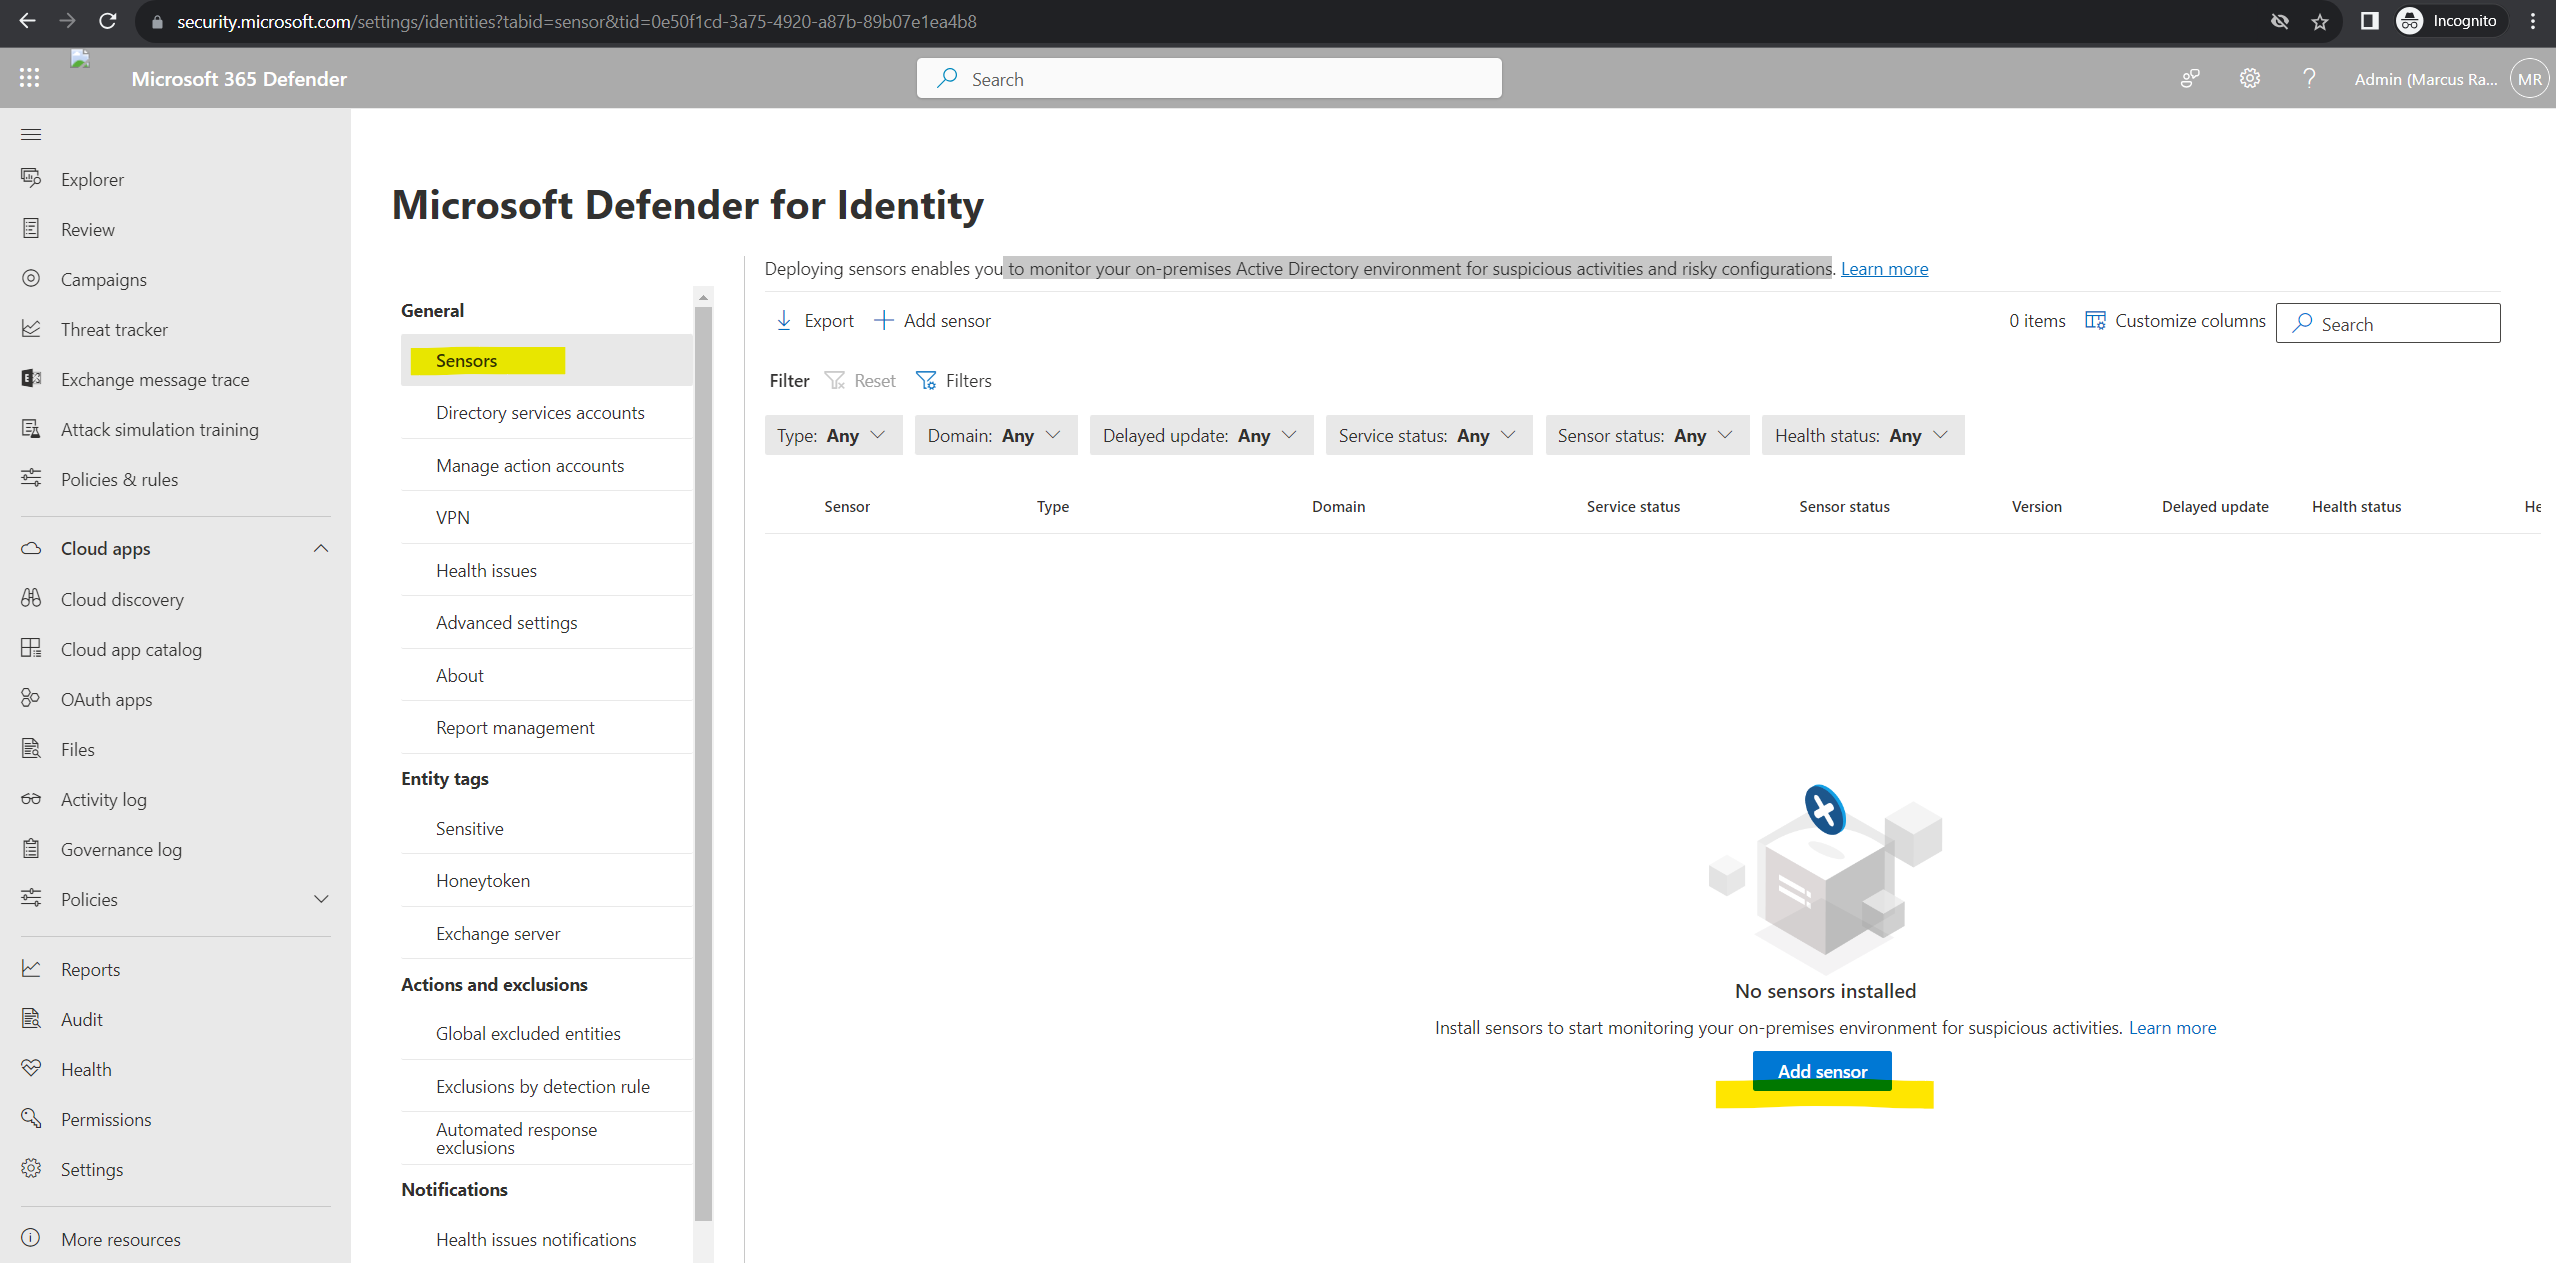
Click on Add sensor and a pane will open, providing you with a button to download the sensor installer and a generated access key.
Select Download installer to save the package locally. The zip file includes the following files:
- The Defender for Identity sensor installer
- The configuration setting file with the required information to connect to the Defender for Identity cloud service
Copy the Access key. The access key is required for the Defender for Identity sensor to connect to your Defender for Identity workspace. The access key is a one-time-password for sensor deployment, after which all communication is performed using certificates for authentication and TLS encryption. Use the Regenerate key button if you ever need to regenerate the new access key. It won’t affect any previously deployed sensors, because it’s only used for initial registration of the sensor.
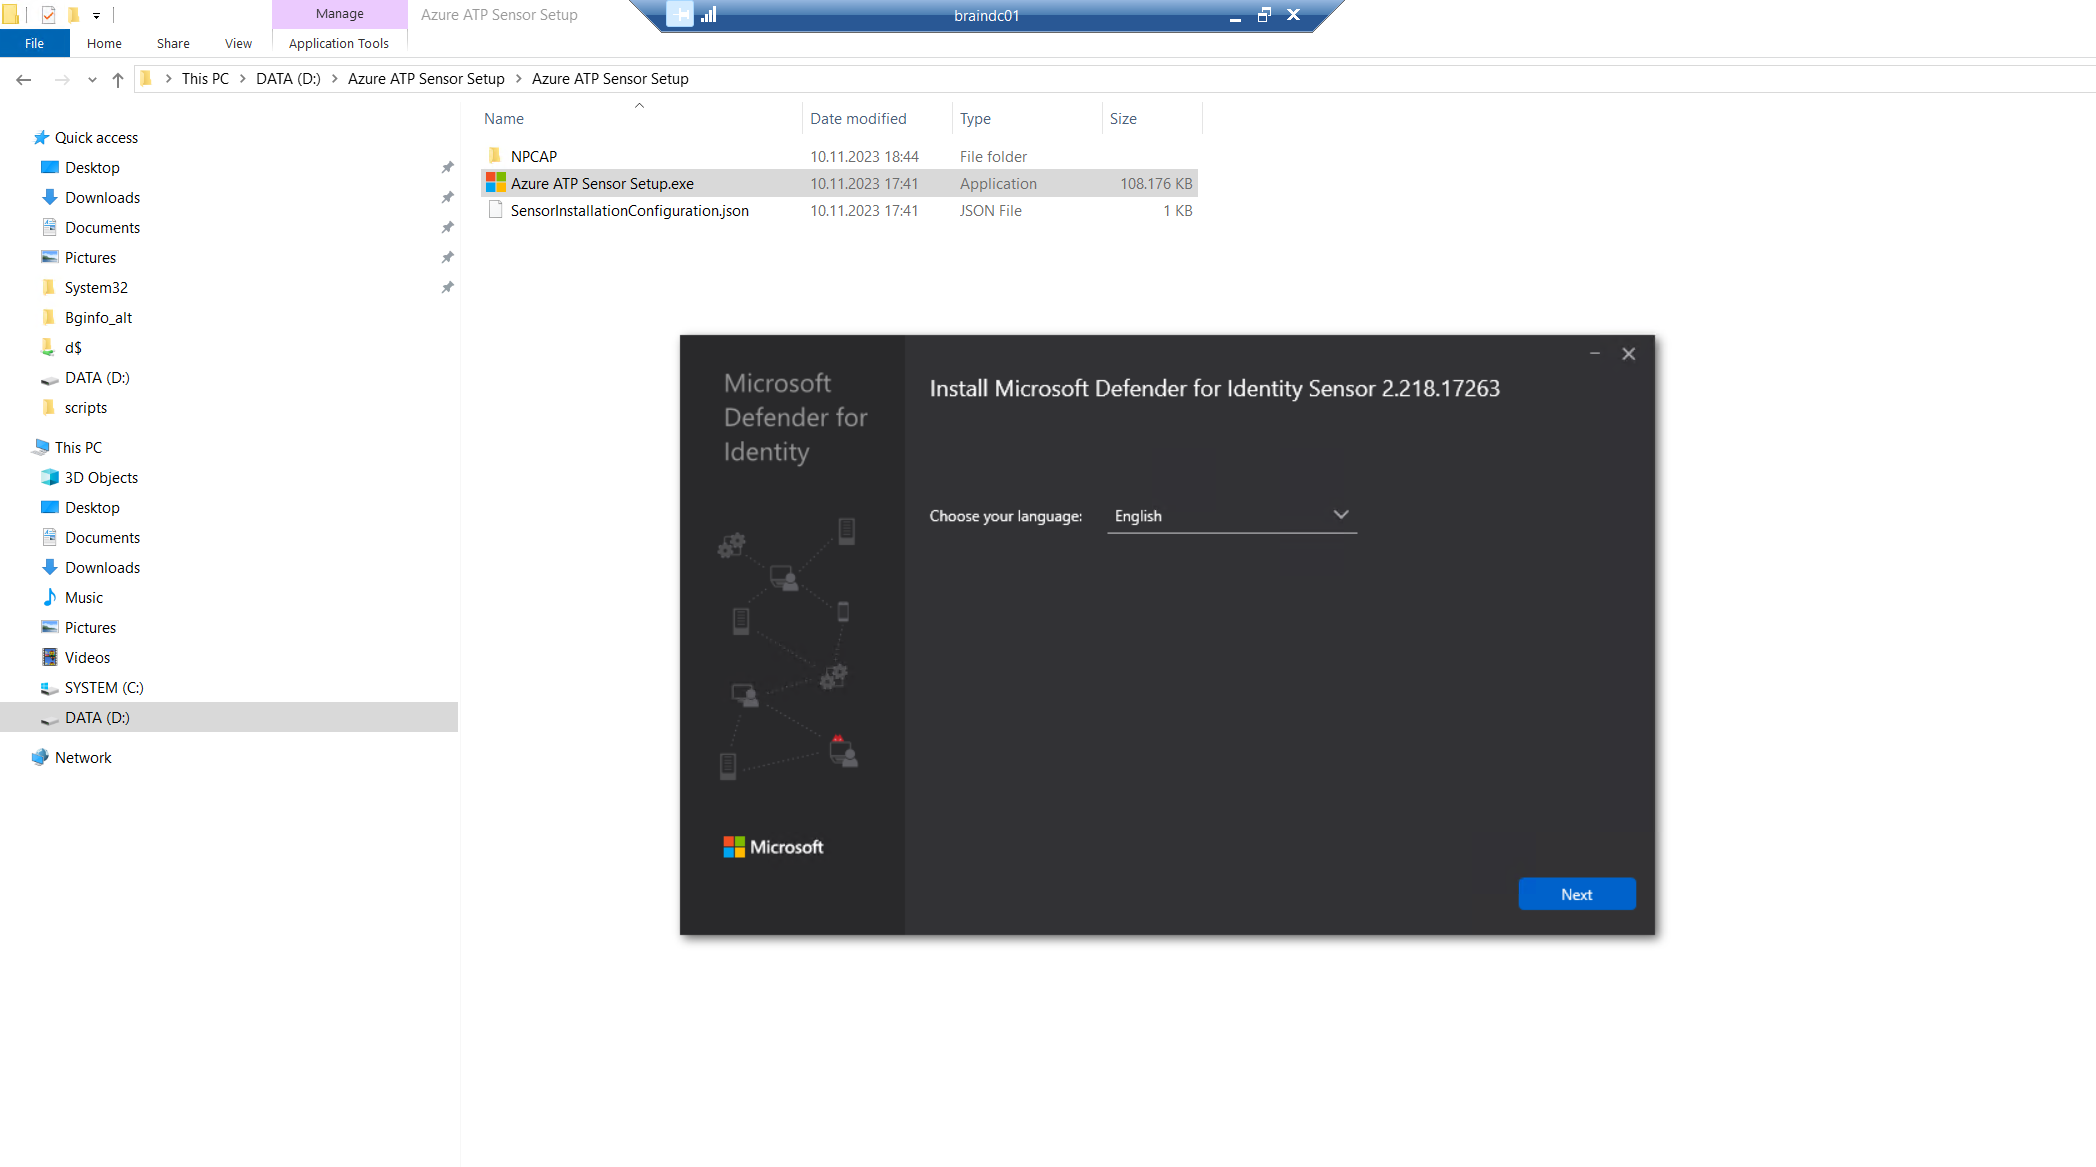
Copy the package to a dedicated server or domain controller onto which you’re installing the Defender for Identity sensor.
For full coverage of the on-premises Active Directory environment, Microsoft recommends deploying the Defender for Identity sensor on all on-premise domain controllers.
I will install the Azure ATP sensor on all of my on-premises domain controllers as recommended by Microsoft.
Install the Microsoft Defender for Identity sensor
https://learn.microsoft.com/en-us/defender-for-identity/install-sensor
Verify the machine has connectivity to the relevant Defender for Identity cloud service endpoint(s).
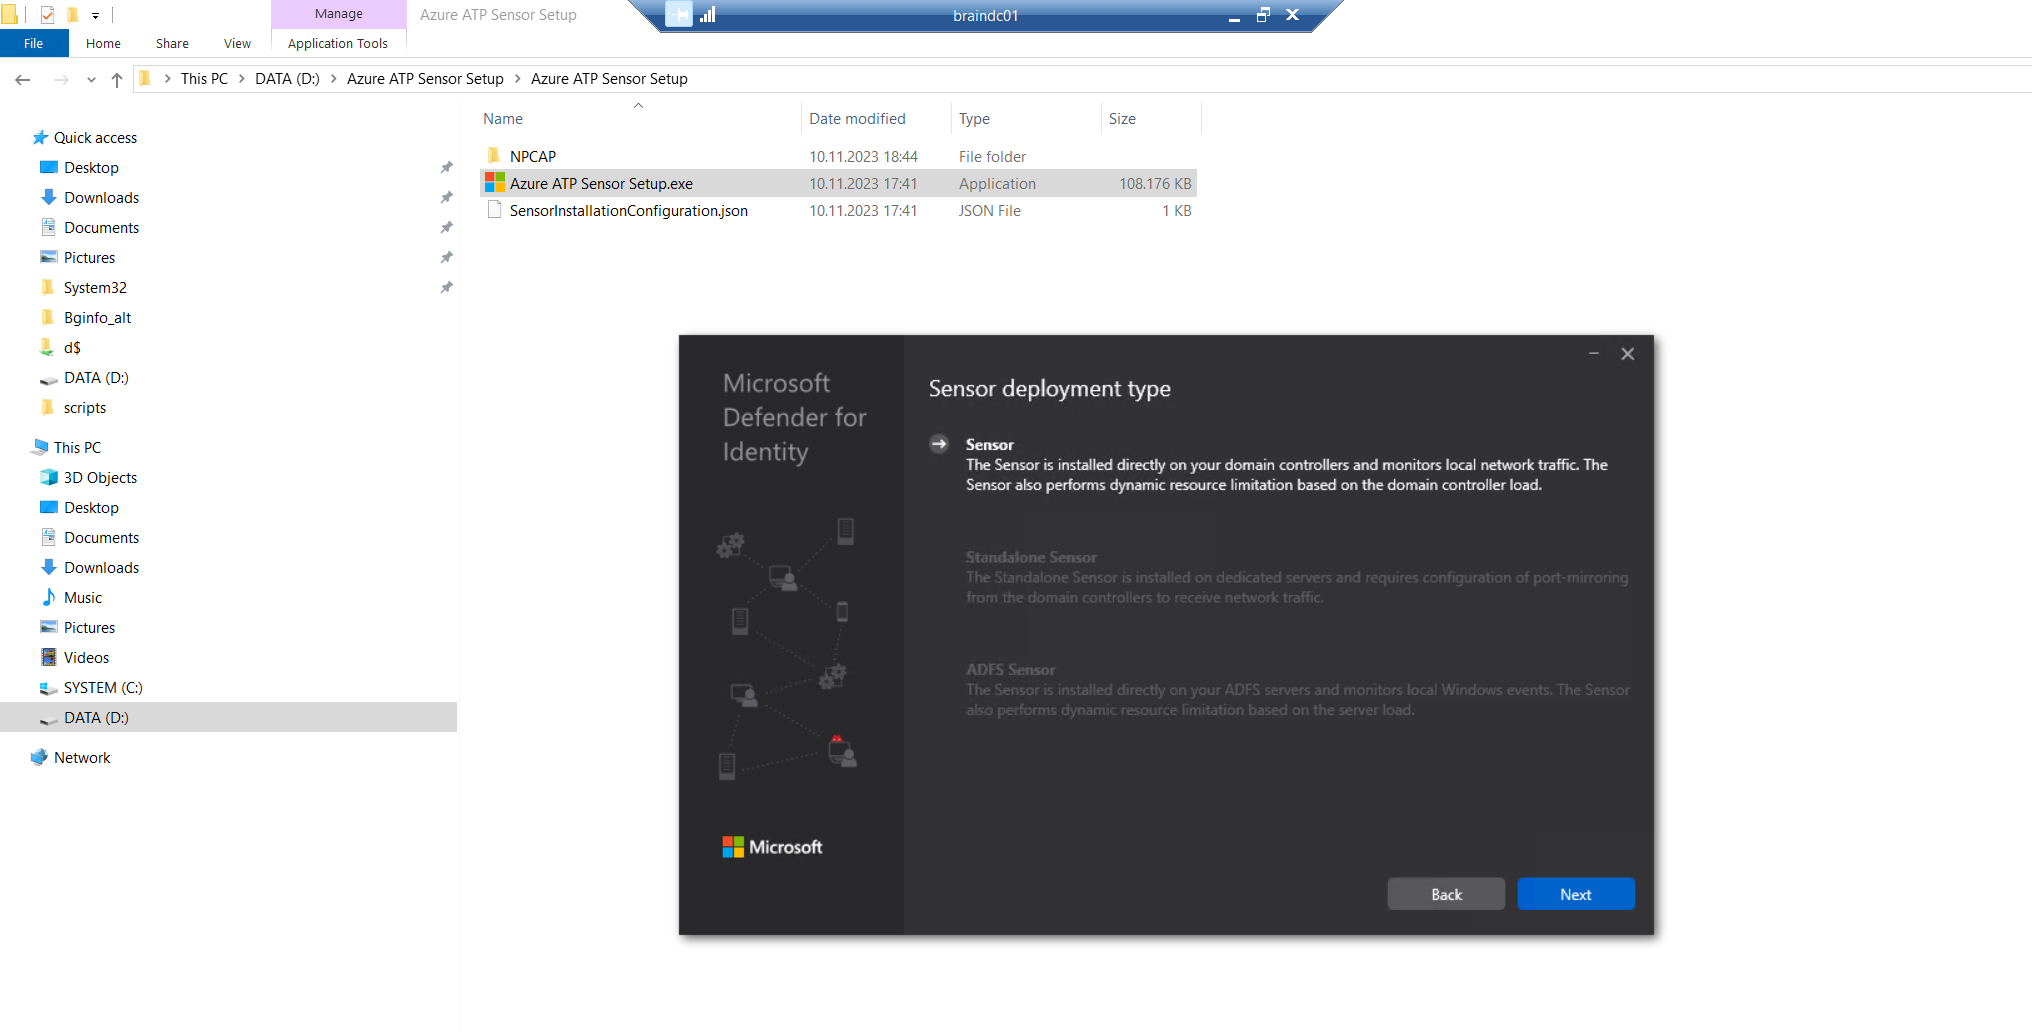
The installation wizard automatically checks if the server is a domain controller/ AD FS server or a dedicated server. If it’s a domain controller / AD FS server, the Defender for Identity sensor is installed. If it’s a dedicated server, the Defender for Identity standalone sensor is installed.
Under Configure the sensor, enter the installation path and the access key that you copied from the previous step, based on your environment.
Select Install.
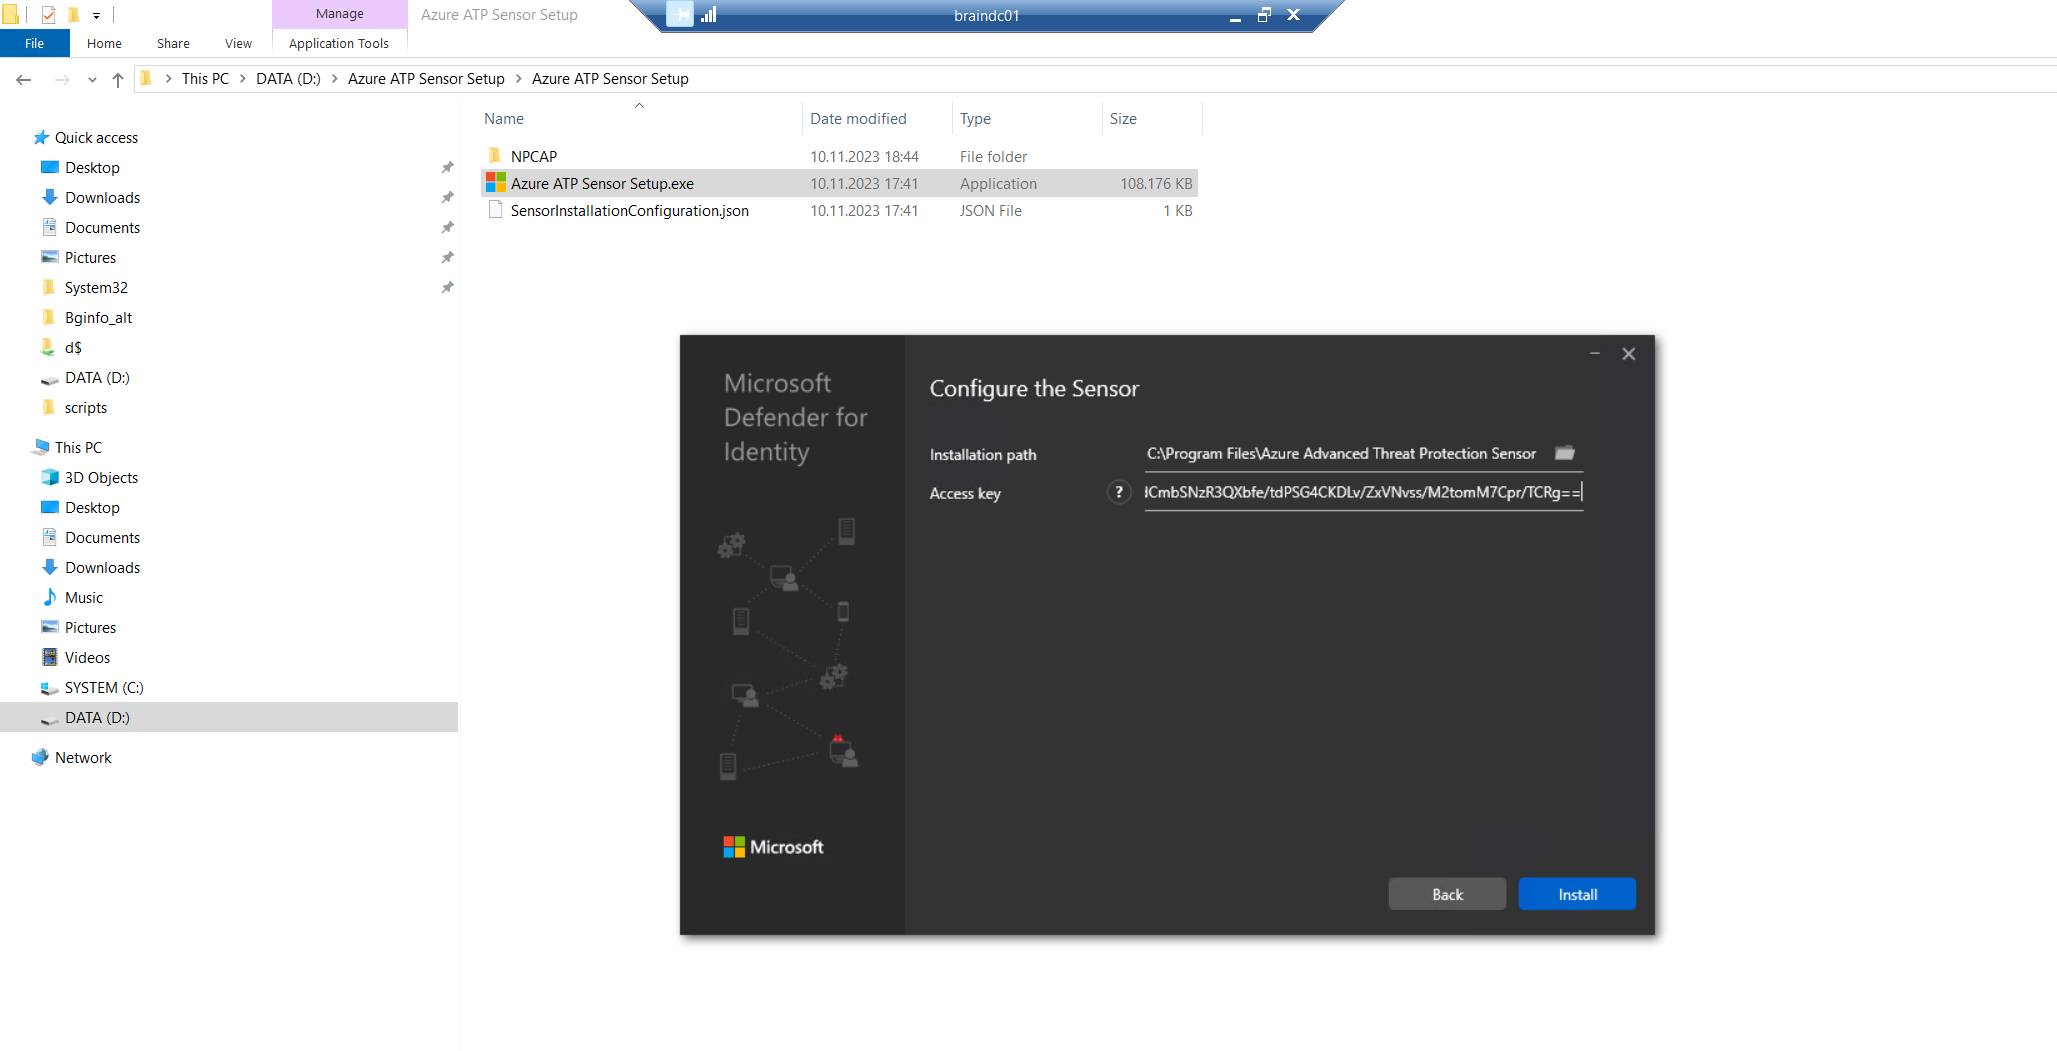
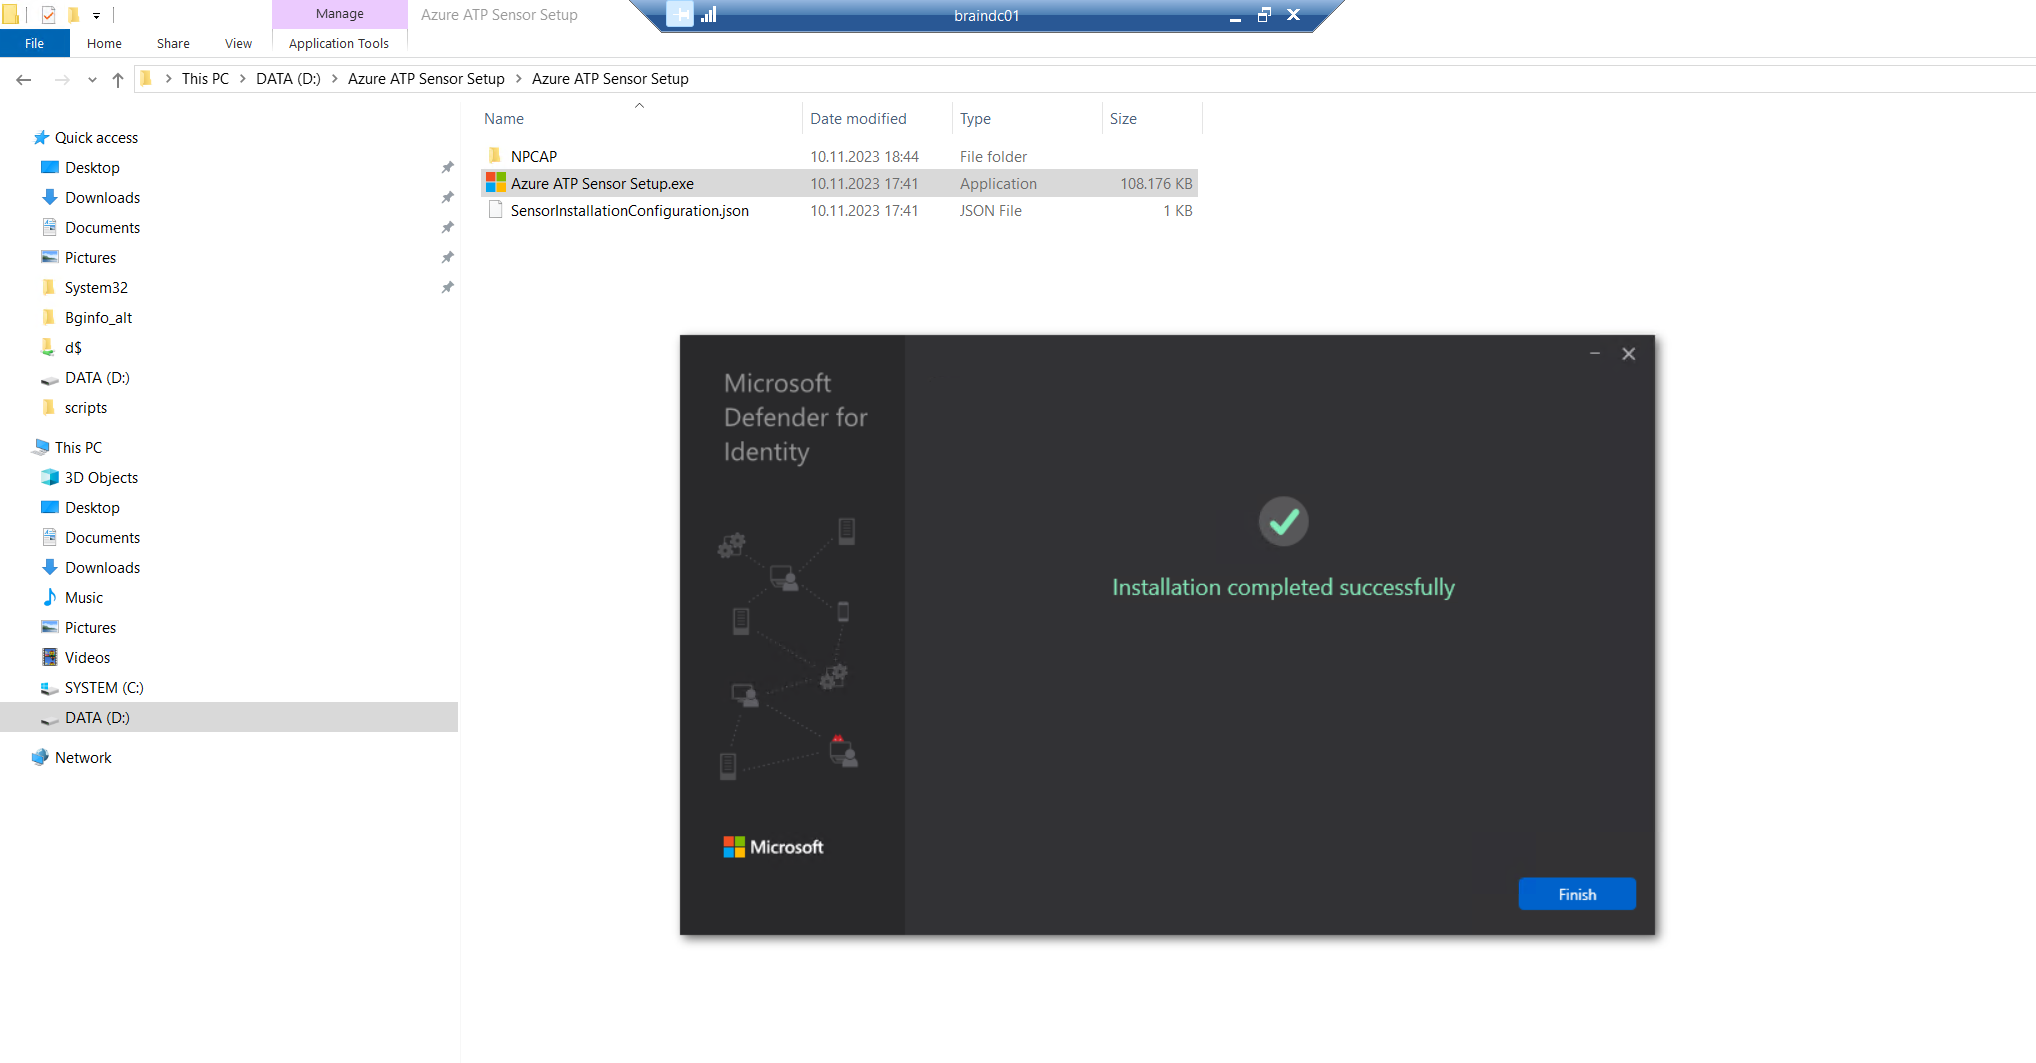
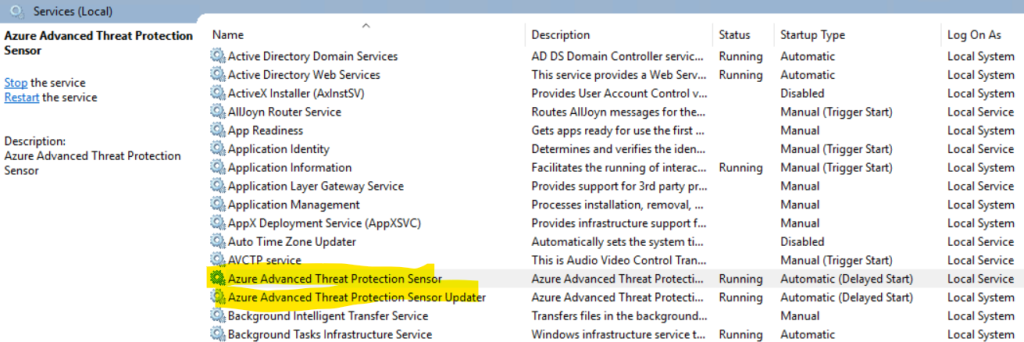
The Azure ATP sensor setup will install two Windows services on the domain controller.
Now when refreshing the Microsoft 365 Defender portal page I will see an alert banner that my MDI sensor was installed successfully on my server.
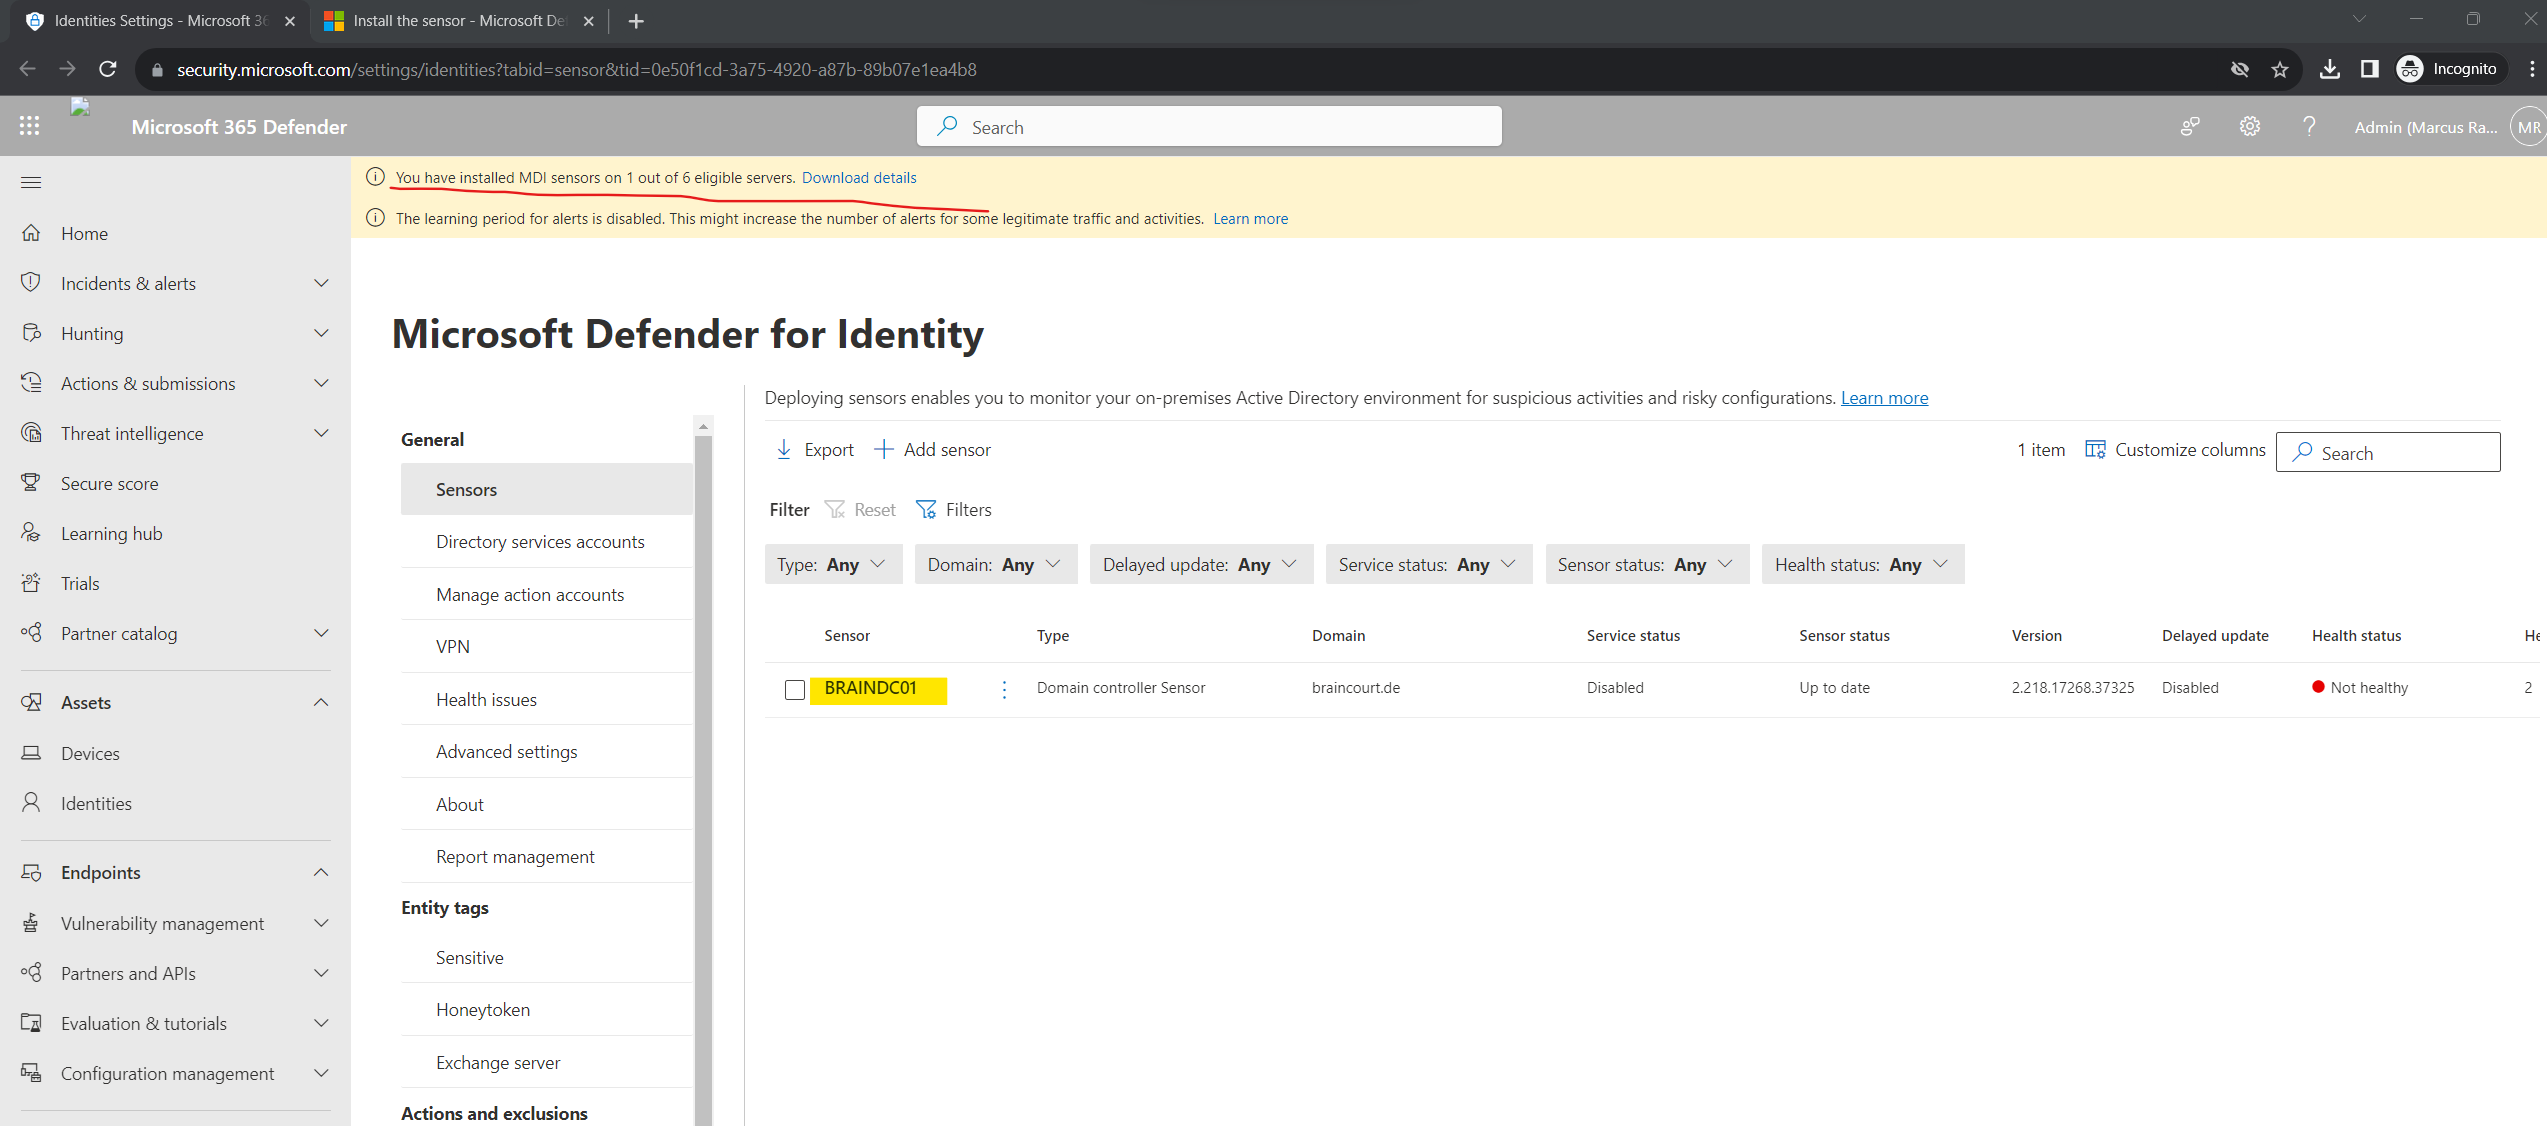
When clicking above on the Download details link, you will see all eligible servers from your environment on which you can install the MDI sensor.
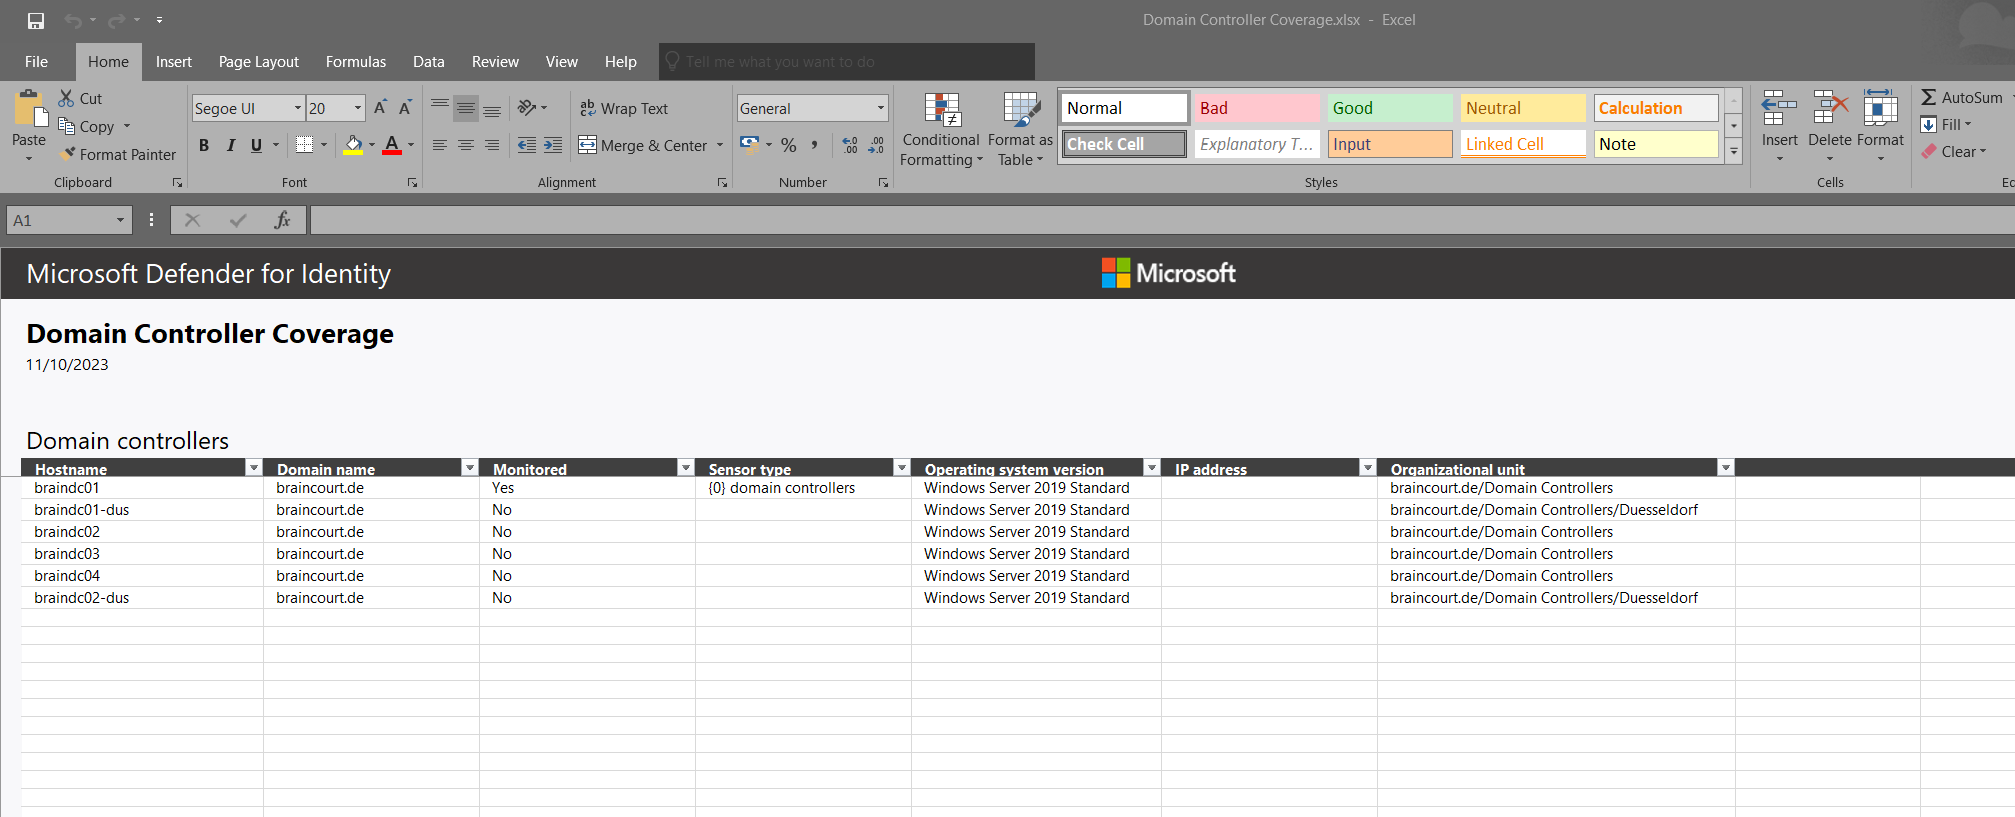
In my case I will see here all domain controllers from our environment. Meanwhile the domain controllers from our branch office and Active Directory Site Duesseldorf are already off-boarded resp. the data center is offline and degraded because of a corporate merger.
Finally I had installed the MDI sensor on all domain controllers from the main and still existing data center.
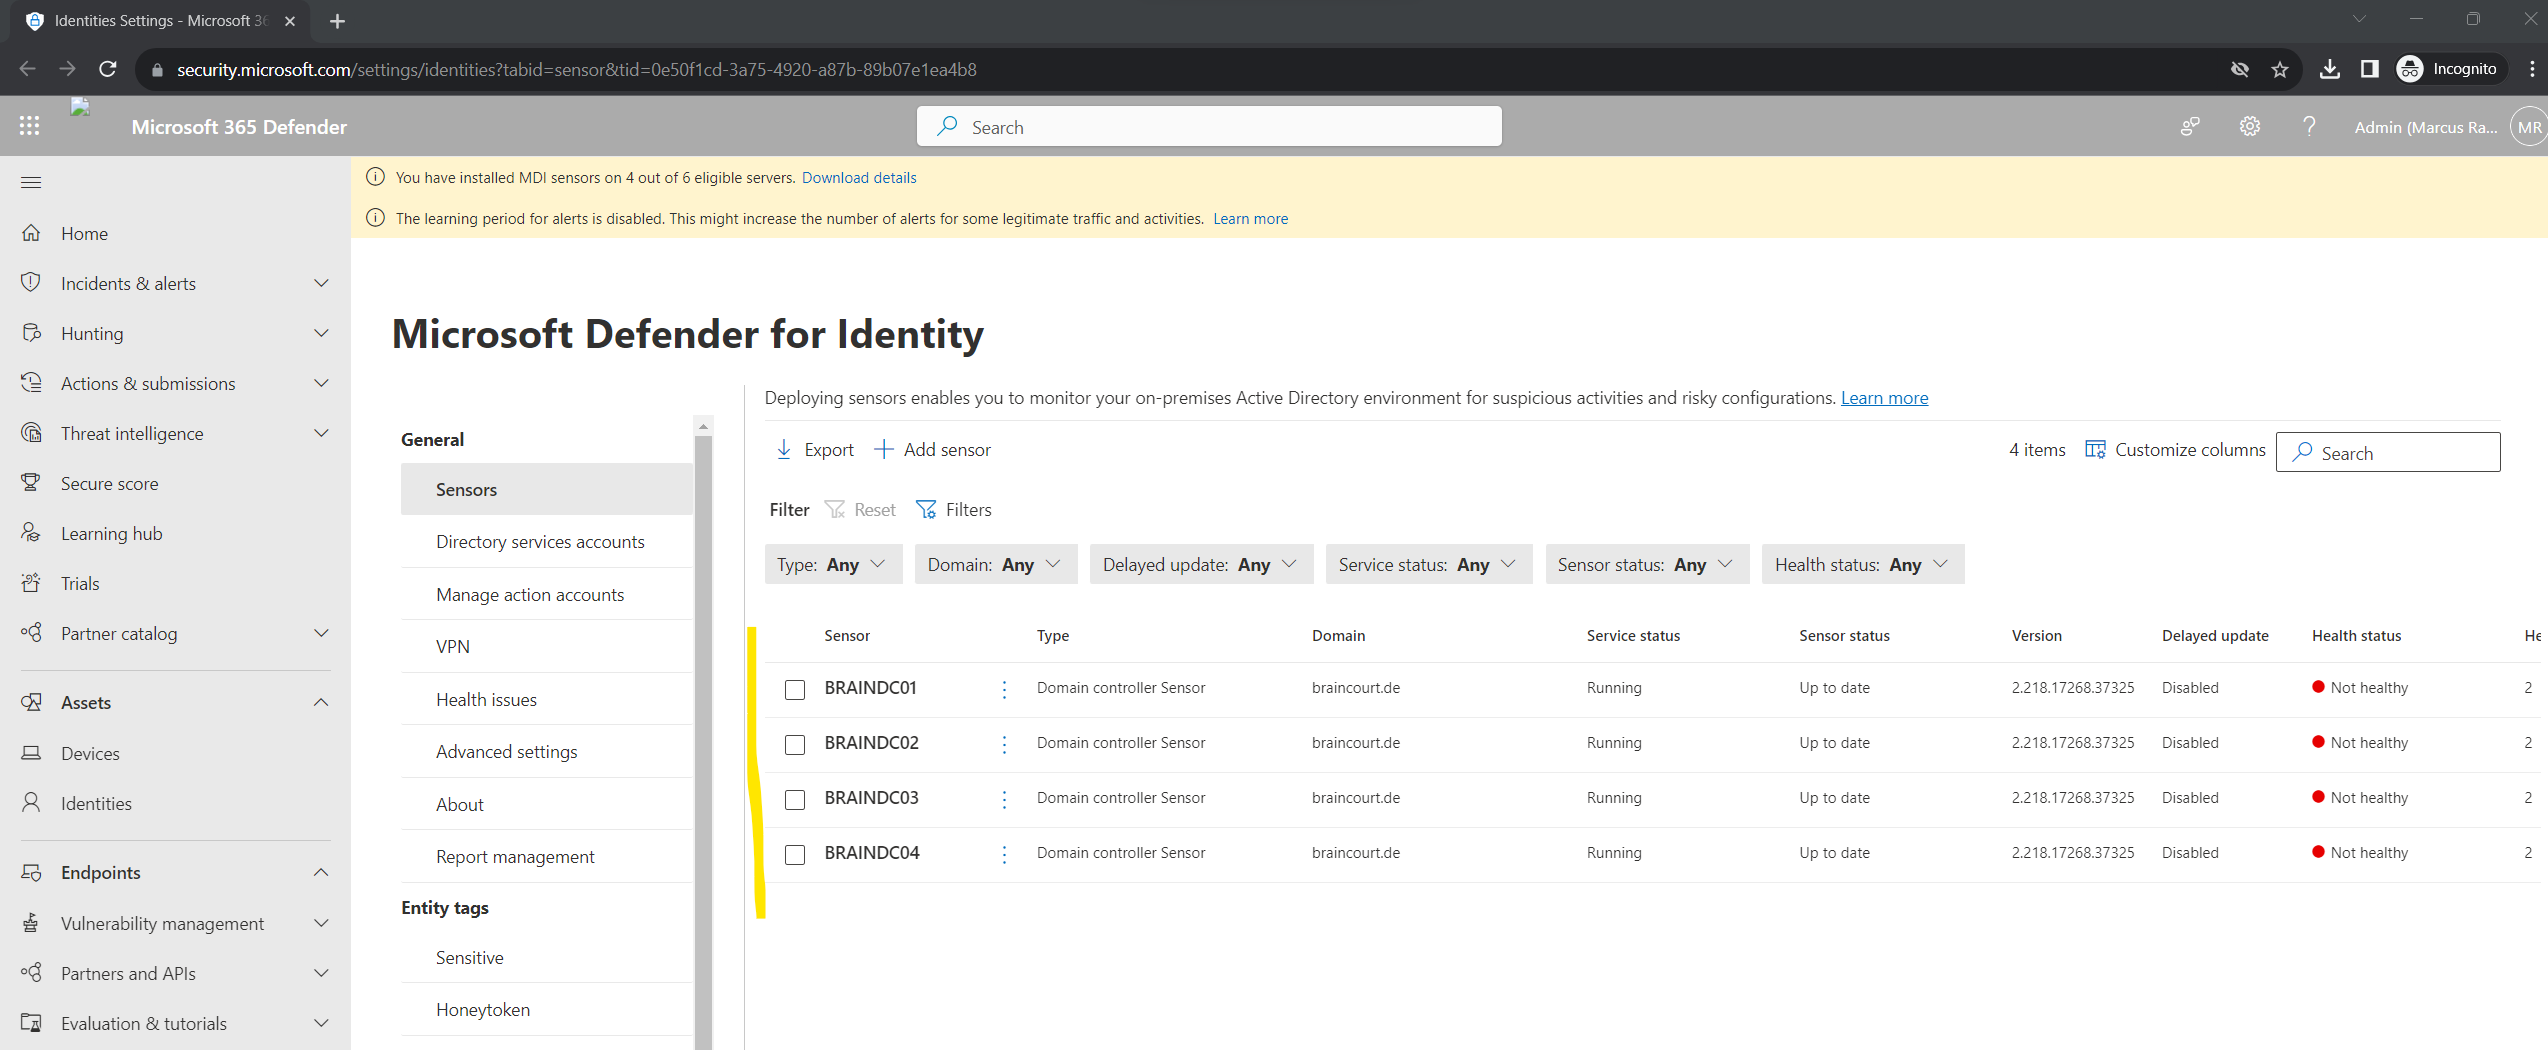
After removing the degraded branch office Active Directory Site and its domain controllers the notifying banner with eligible servers disappeared.
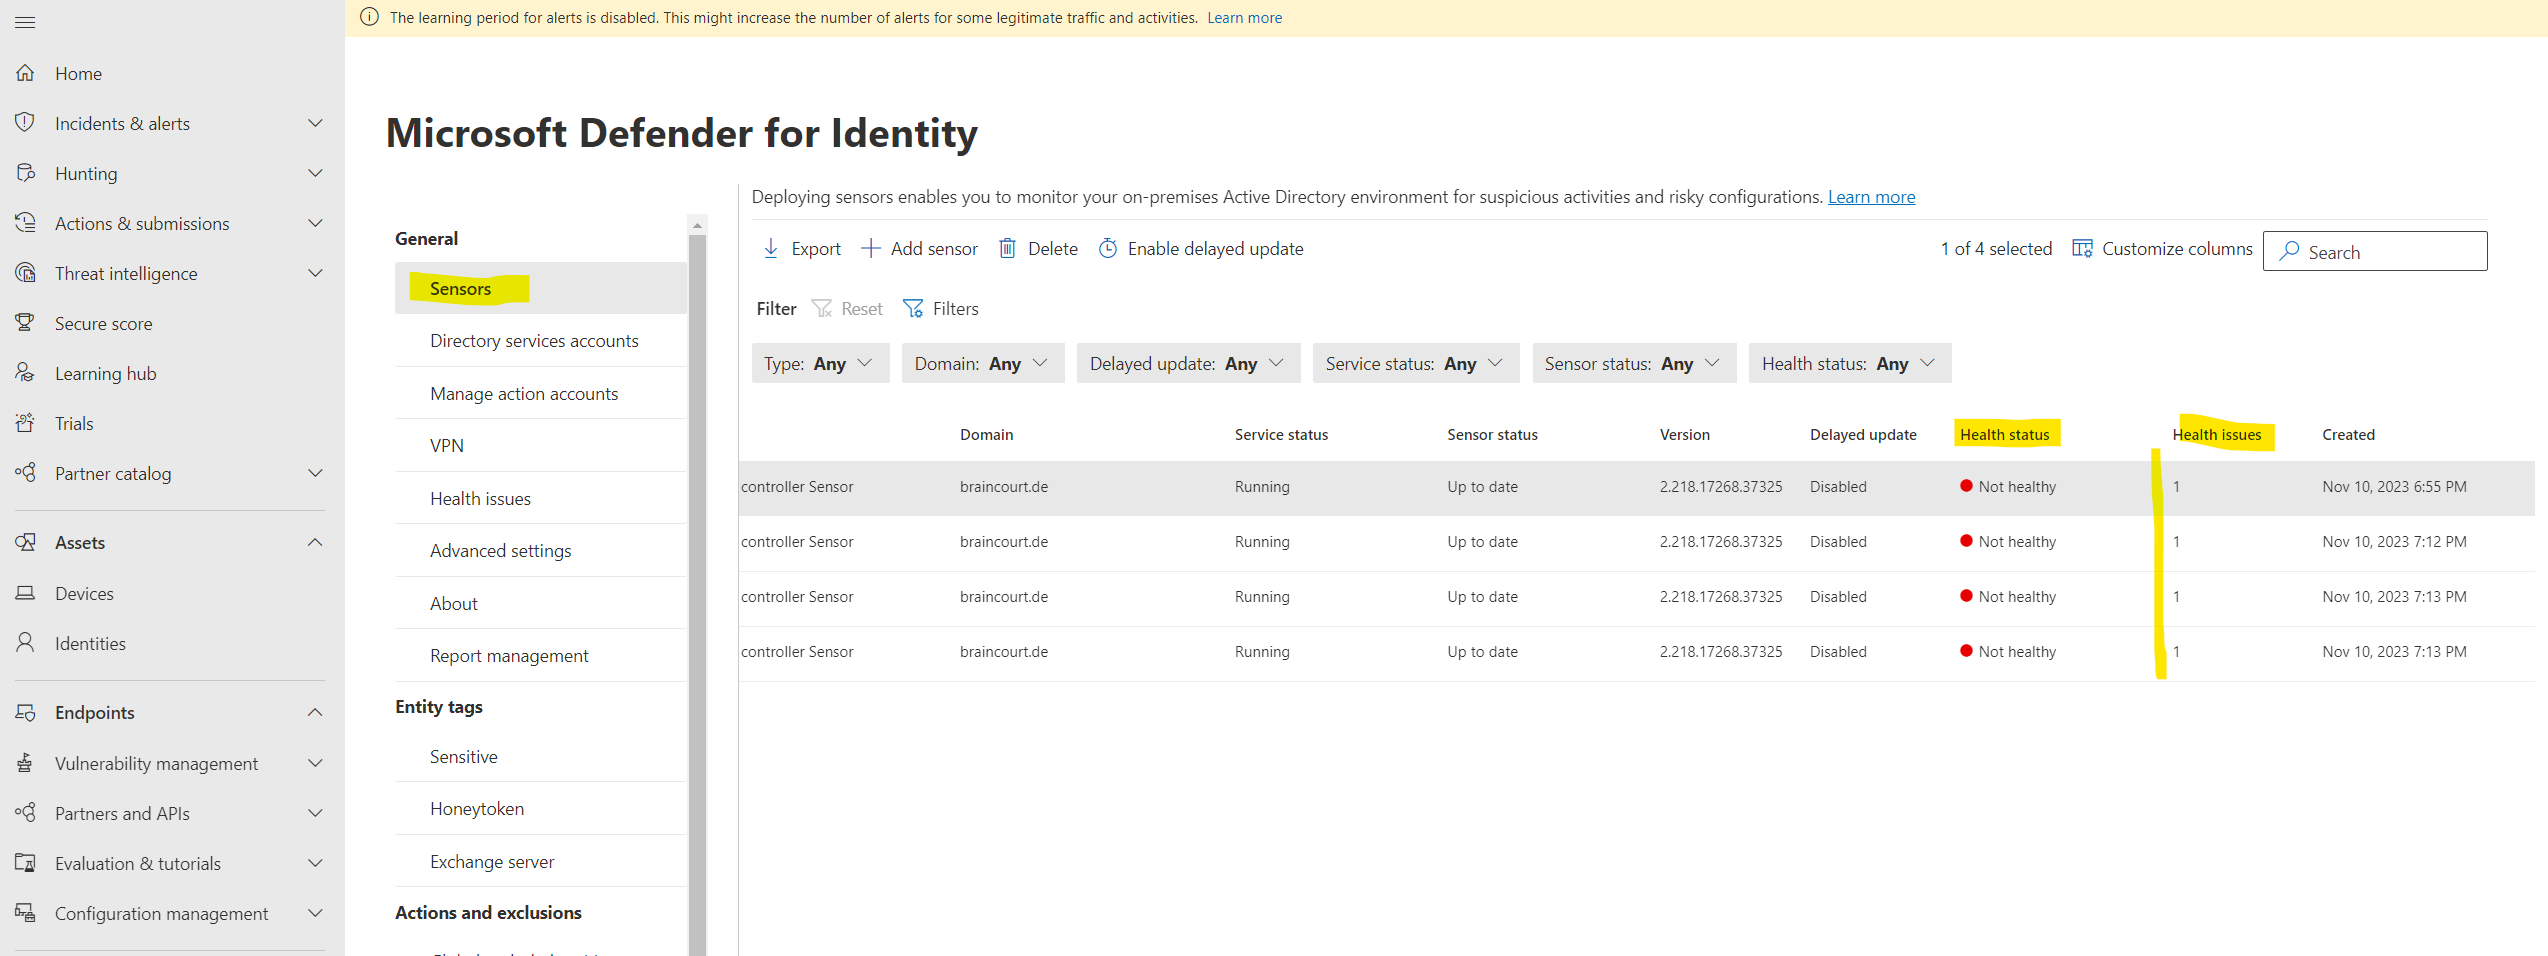
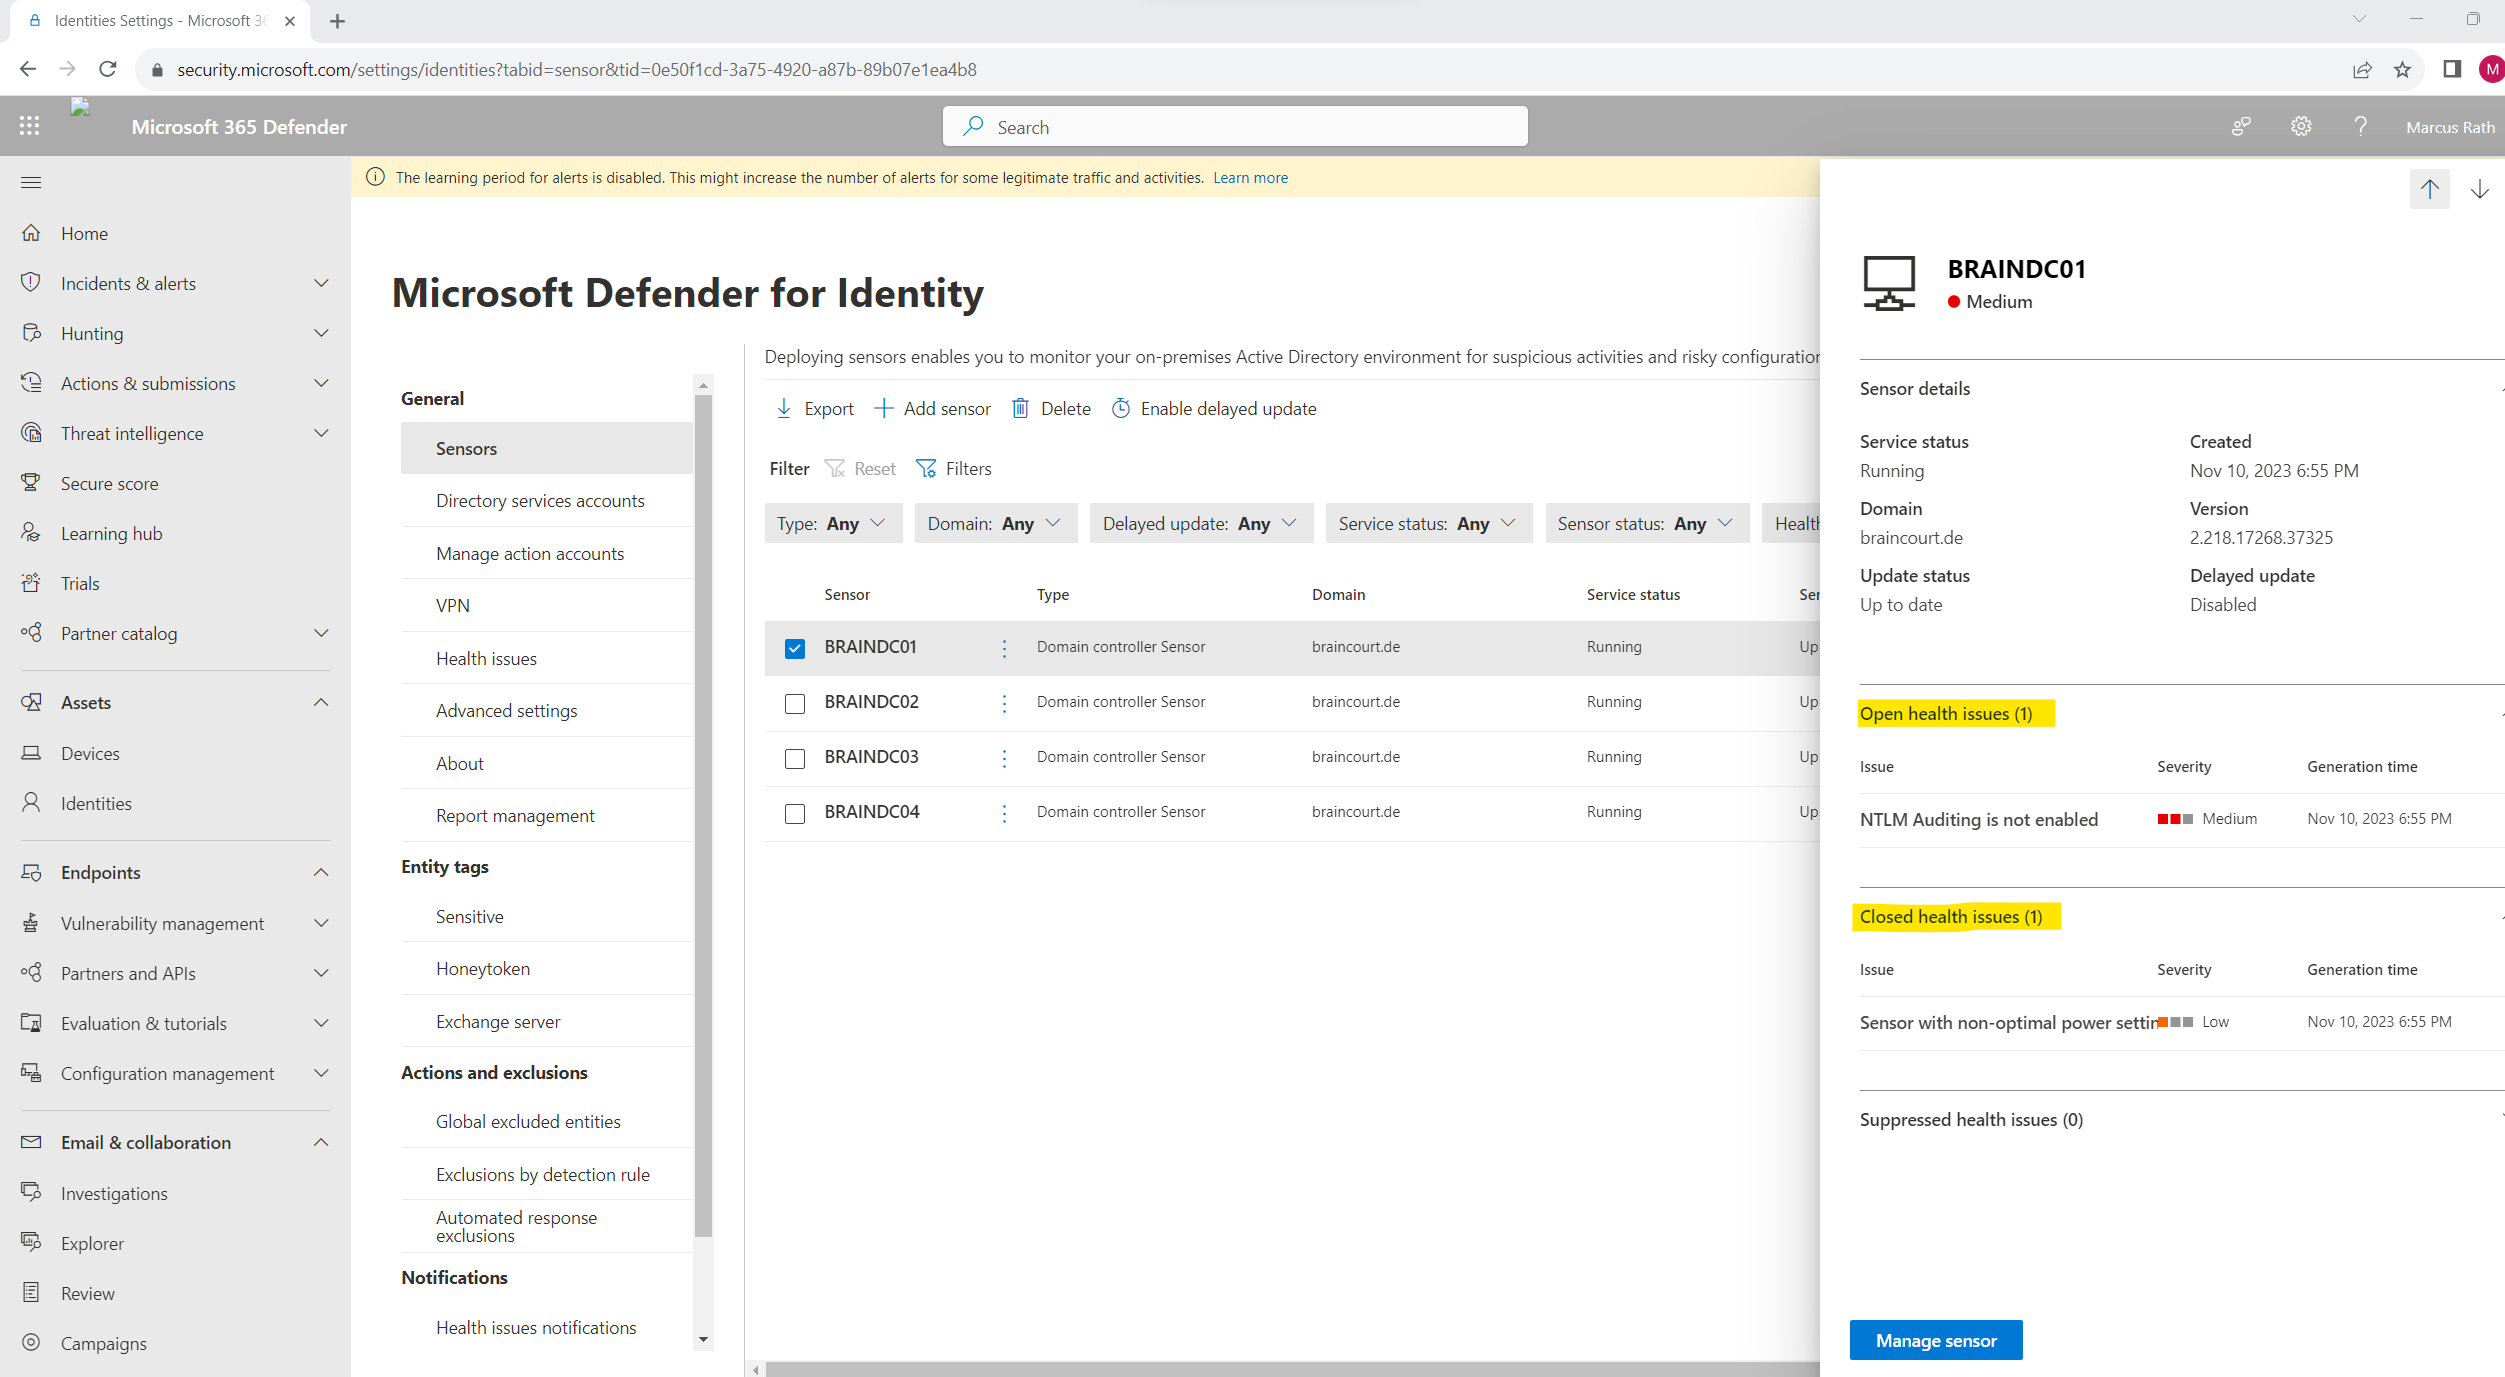
All 4 domain controllers shows so far a not healthy state.
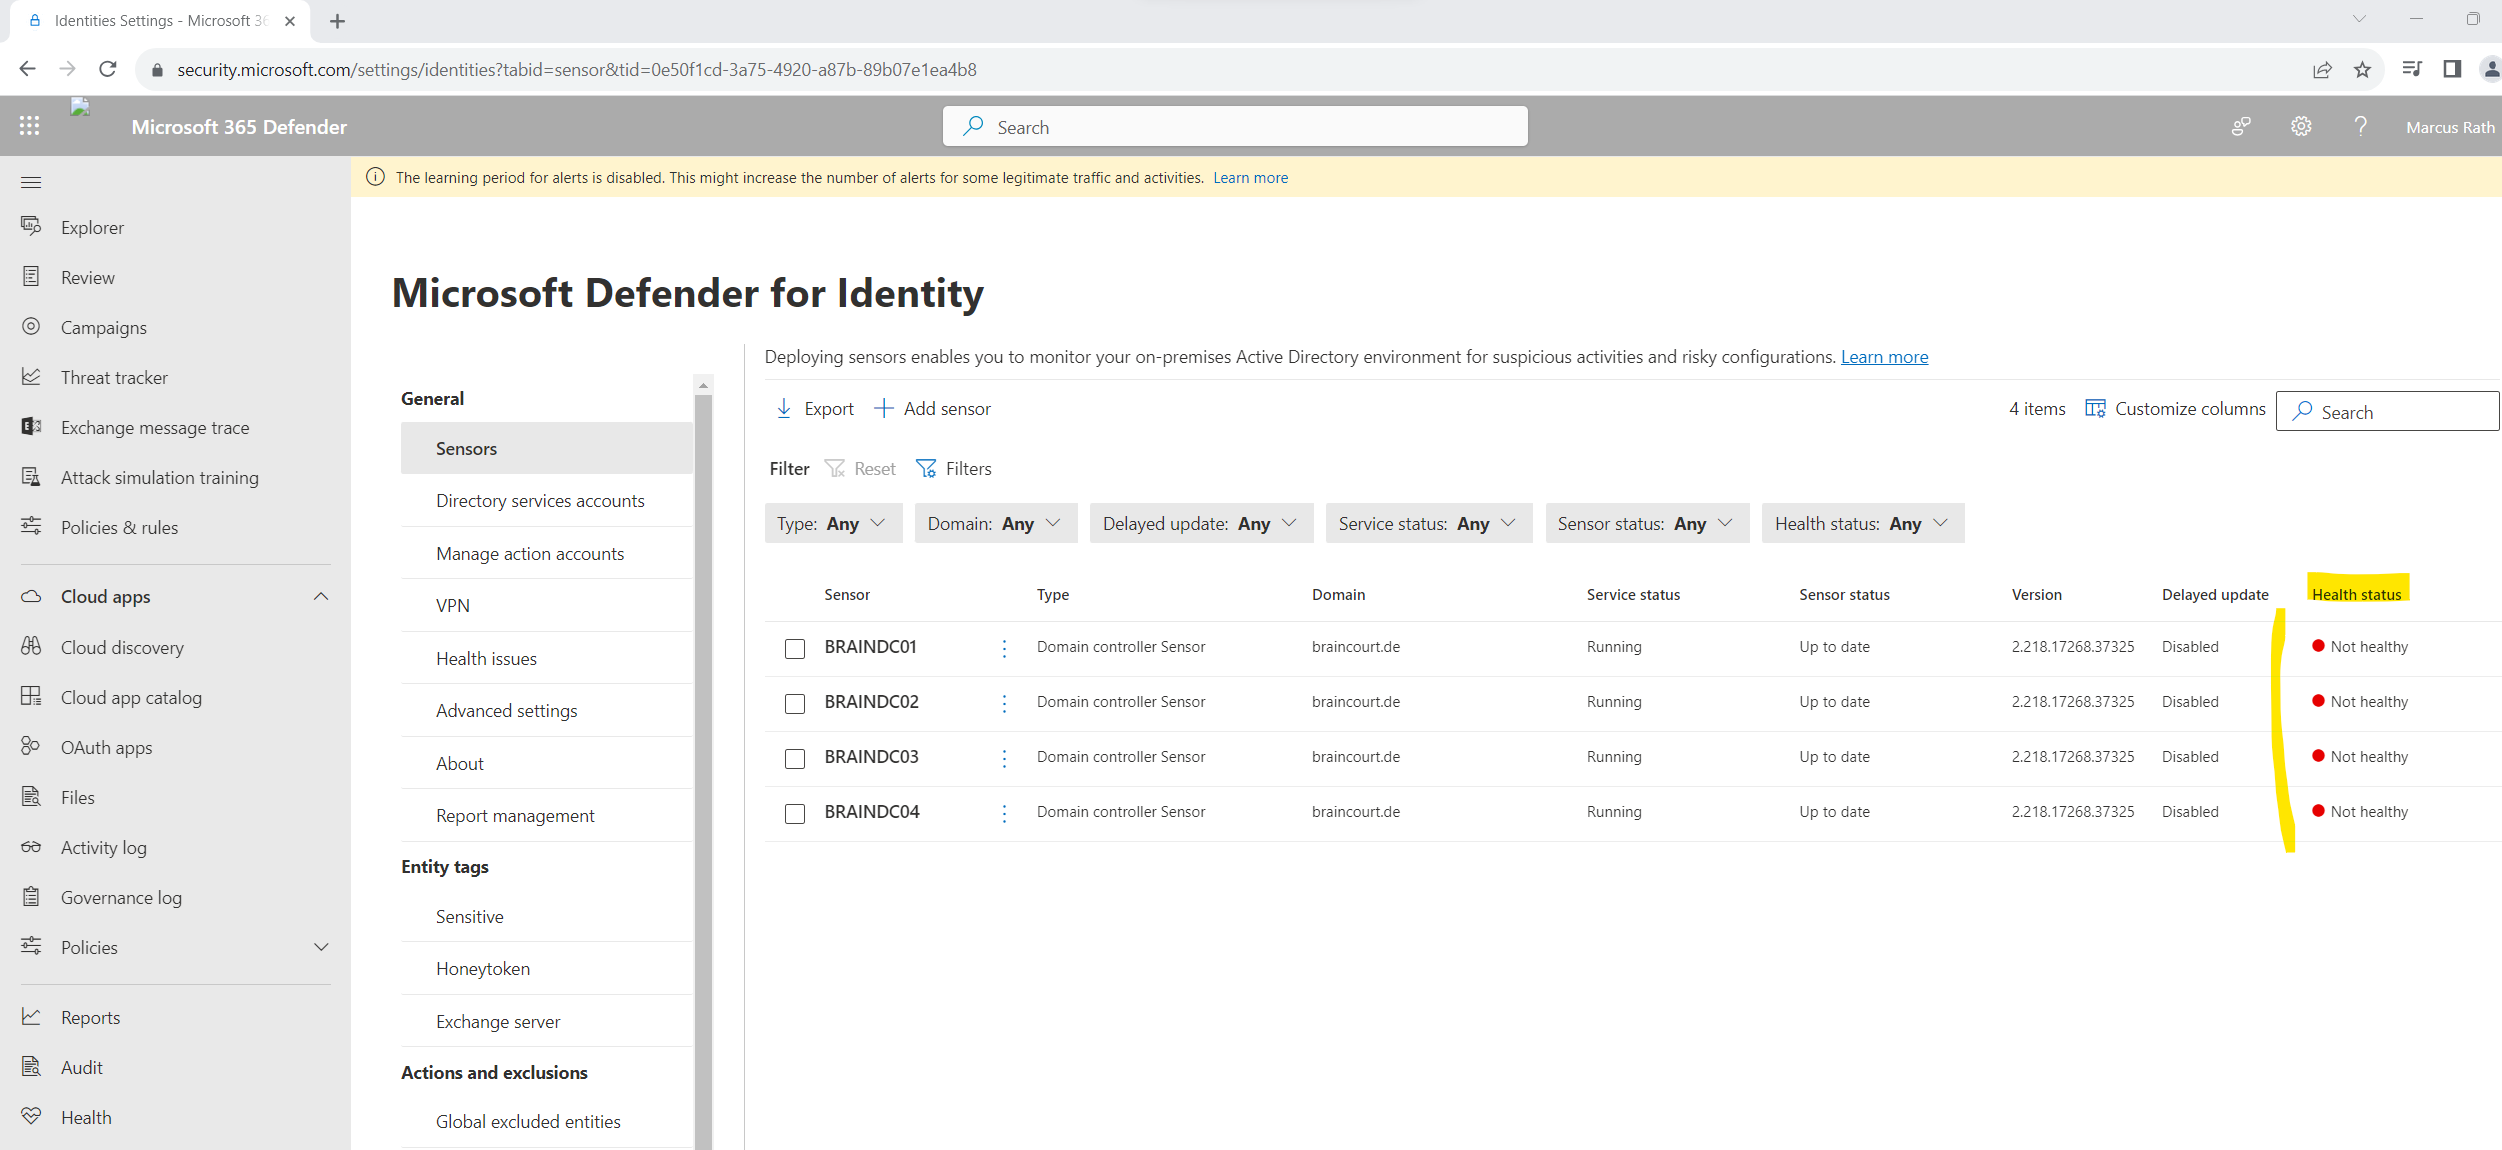
When clicking on one of them you will see all open health issues as shown below.

The operating system’s power mode is not configured to the optimal processor performance settings. This can impact the server’s performance and the sensor’s ability to detect suspicious activities.
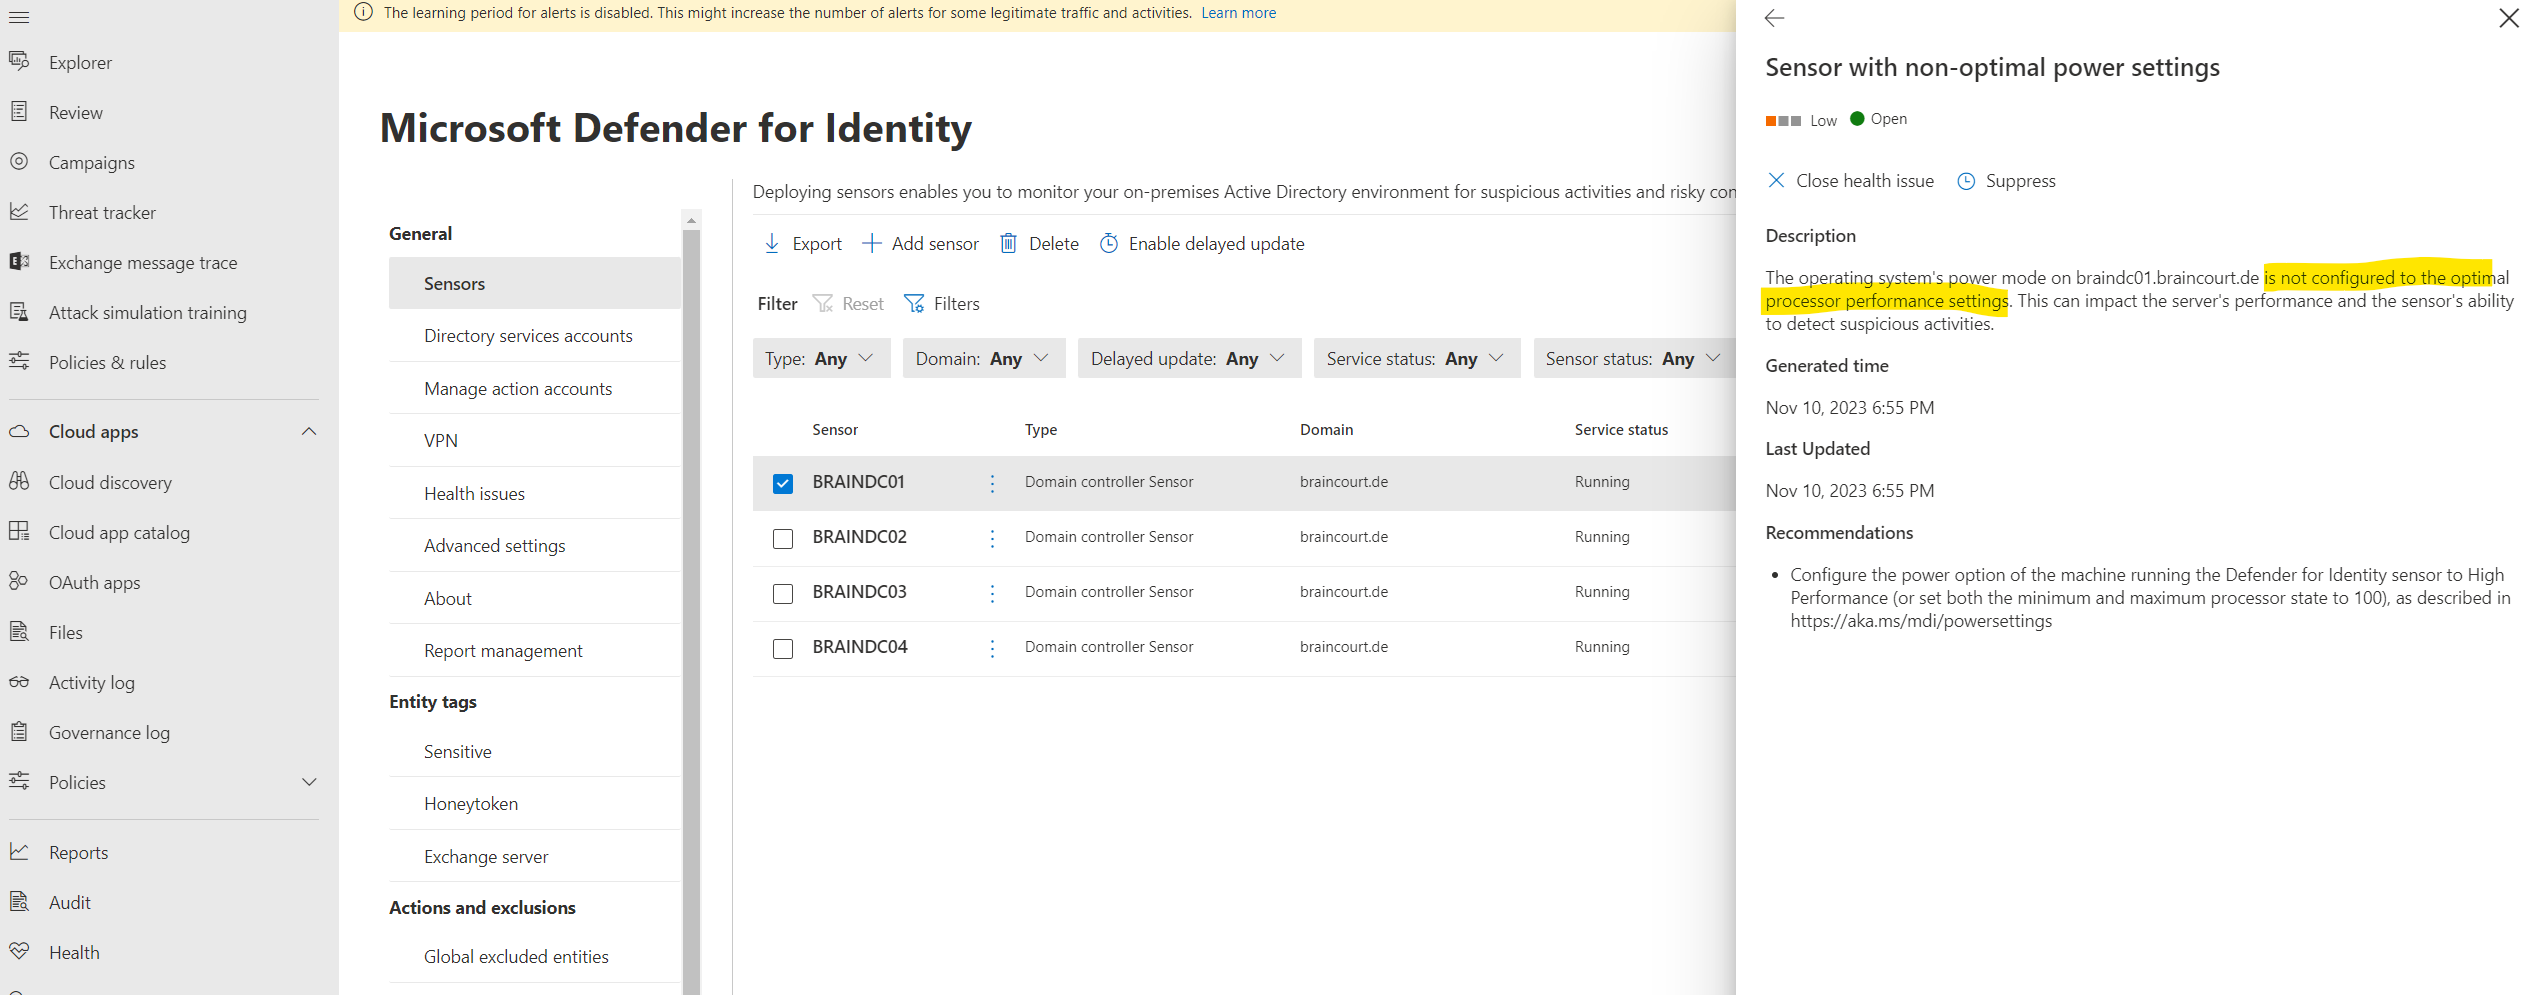
To solve this issue we just need to go to the power options of the domain controller and switch it to High performance.
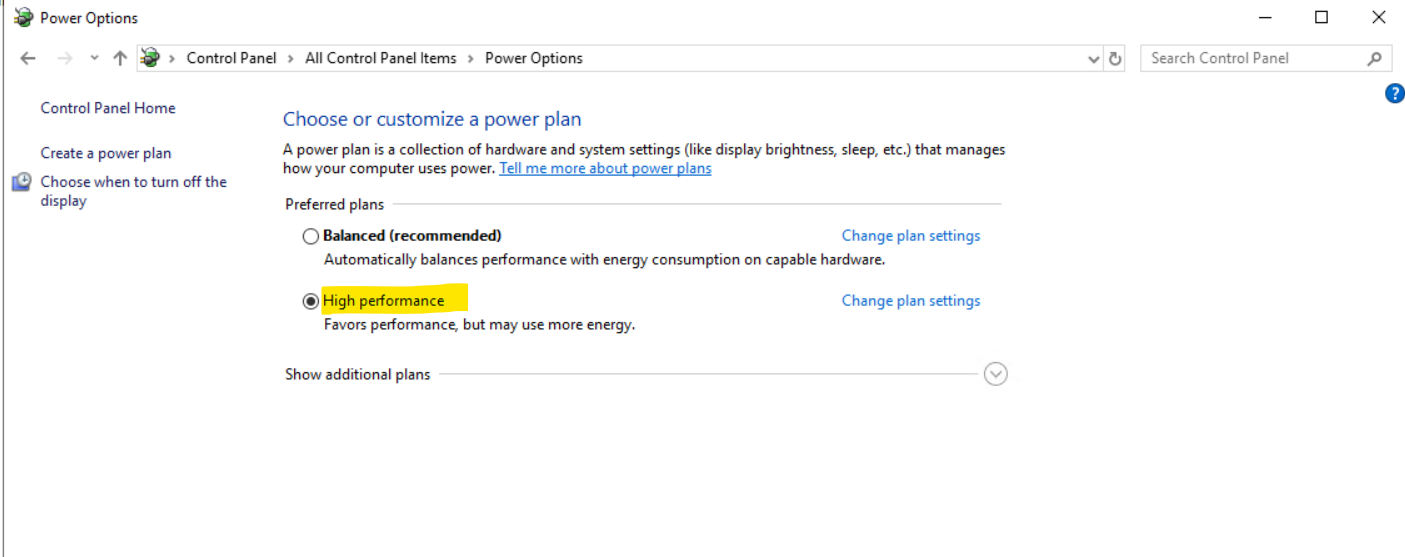
The health status of the sensors will change here immediately after you switch to high performance. Below you can see that in my case the issue regarding sensor with non-optimal power settings is now closed and just the NTLM Auditing is not enabled issue is still open.
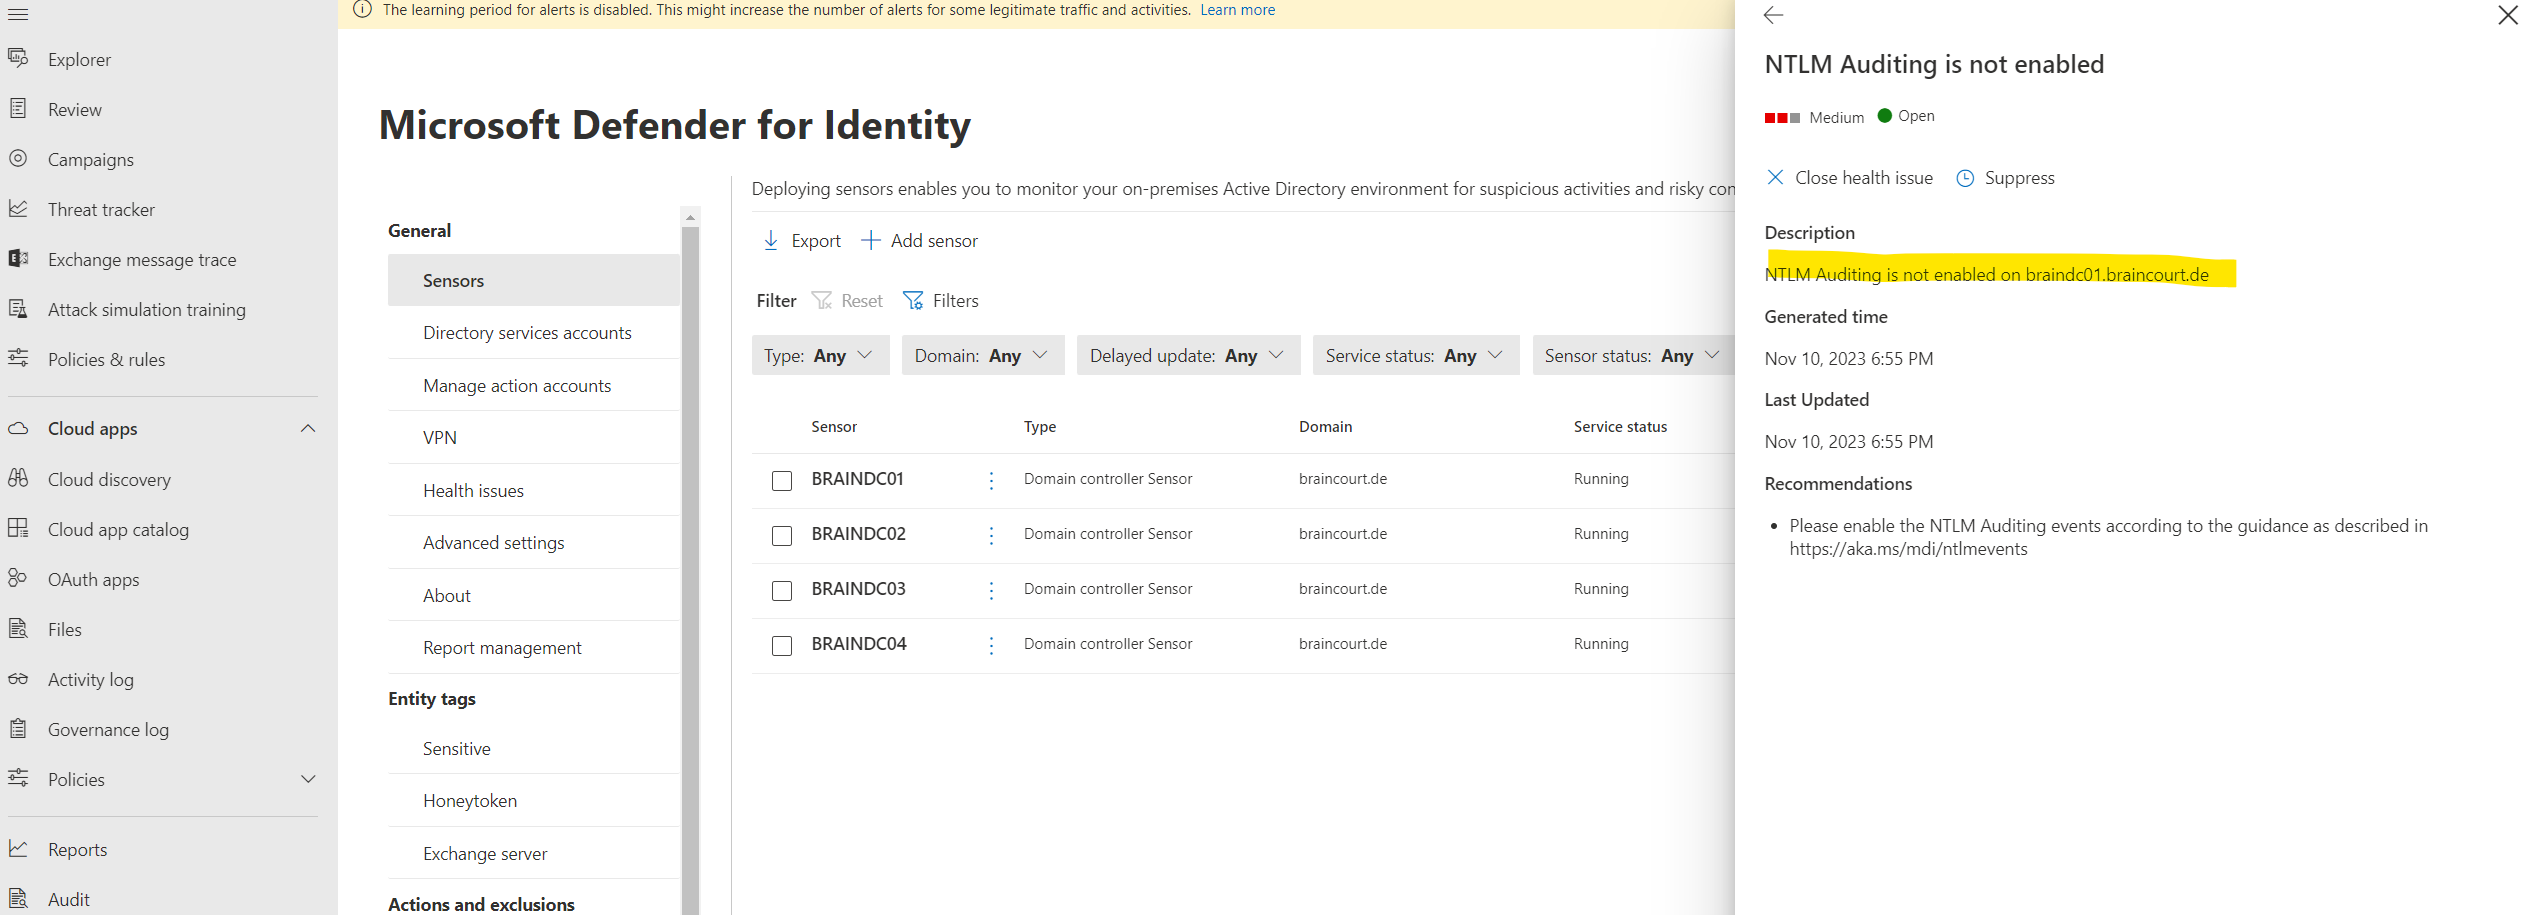
Now I will investigate the next issue that NTLM Auditing is not enabled on my domain controllers.
Please enable the NTLM Auditing events according to the guidance as described in https://aka.ms/mdi/ntlmevents
To enable NTLM Auditing on the domain controllers we need to adjust the default domain controller policy from our on-premises Active Directory environment as described in the following article https://learn.microsoft.com/en-us/defender-for-identity/configure-windows-event-collection#configure-audit-policies.
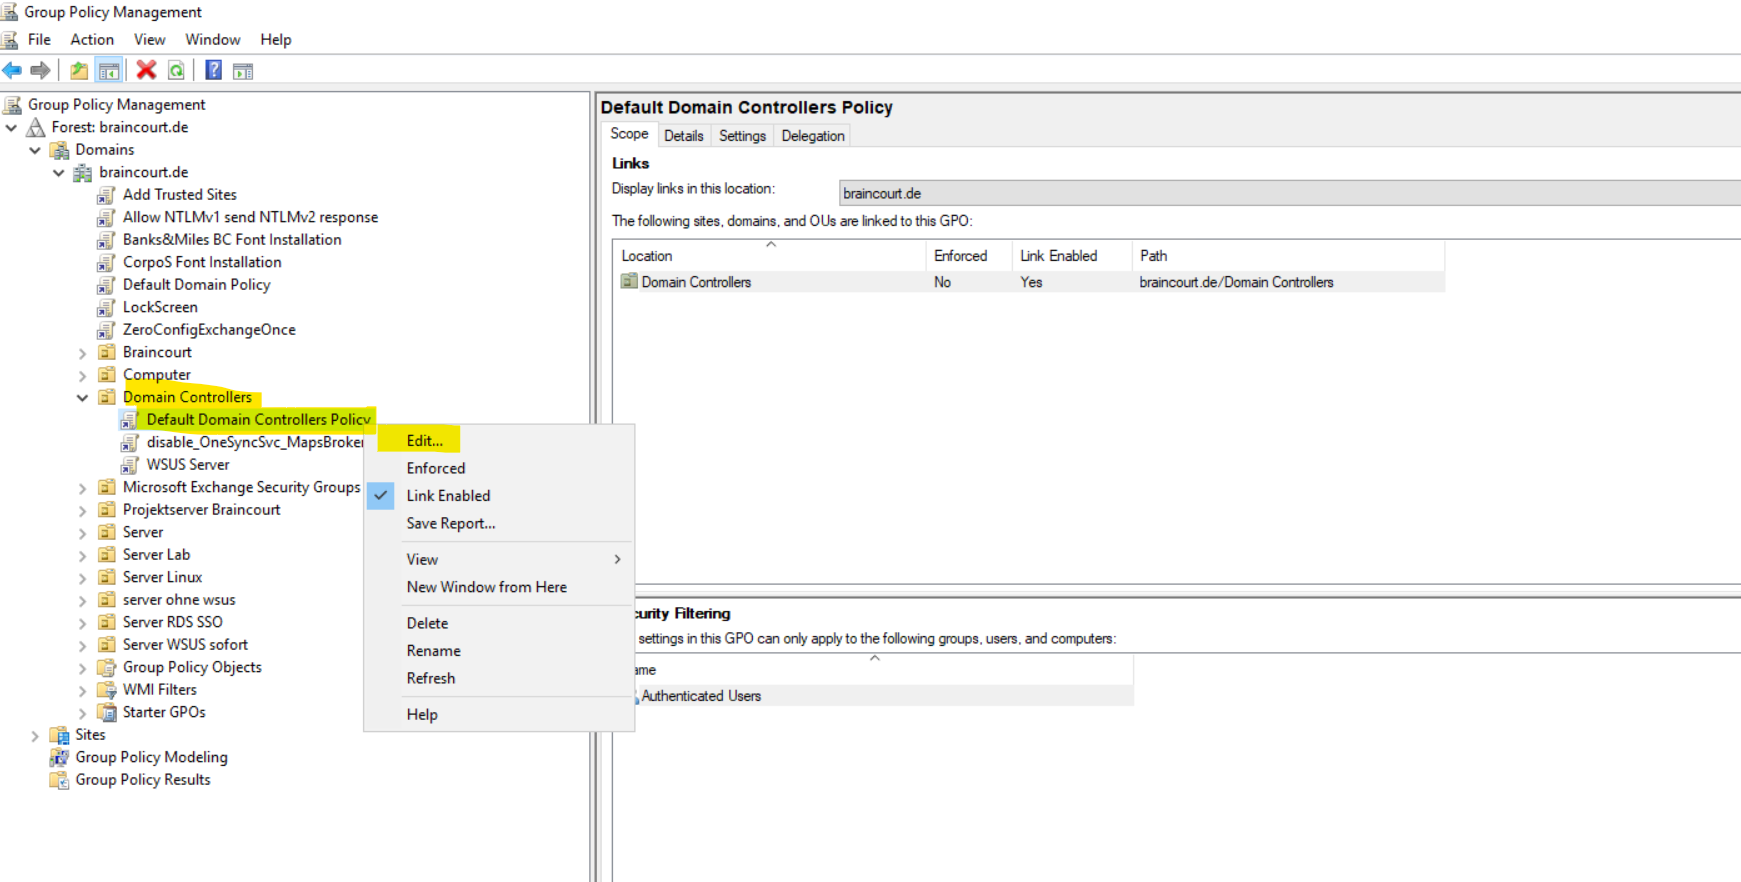
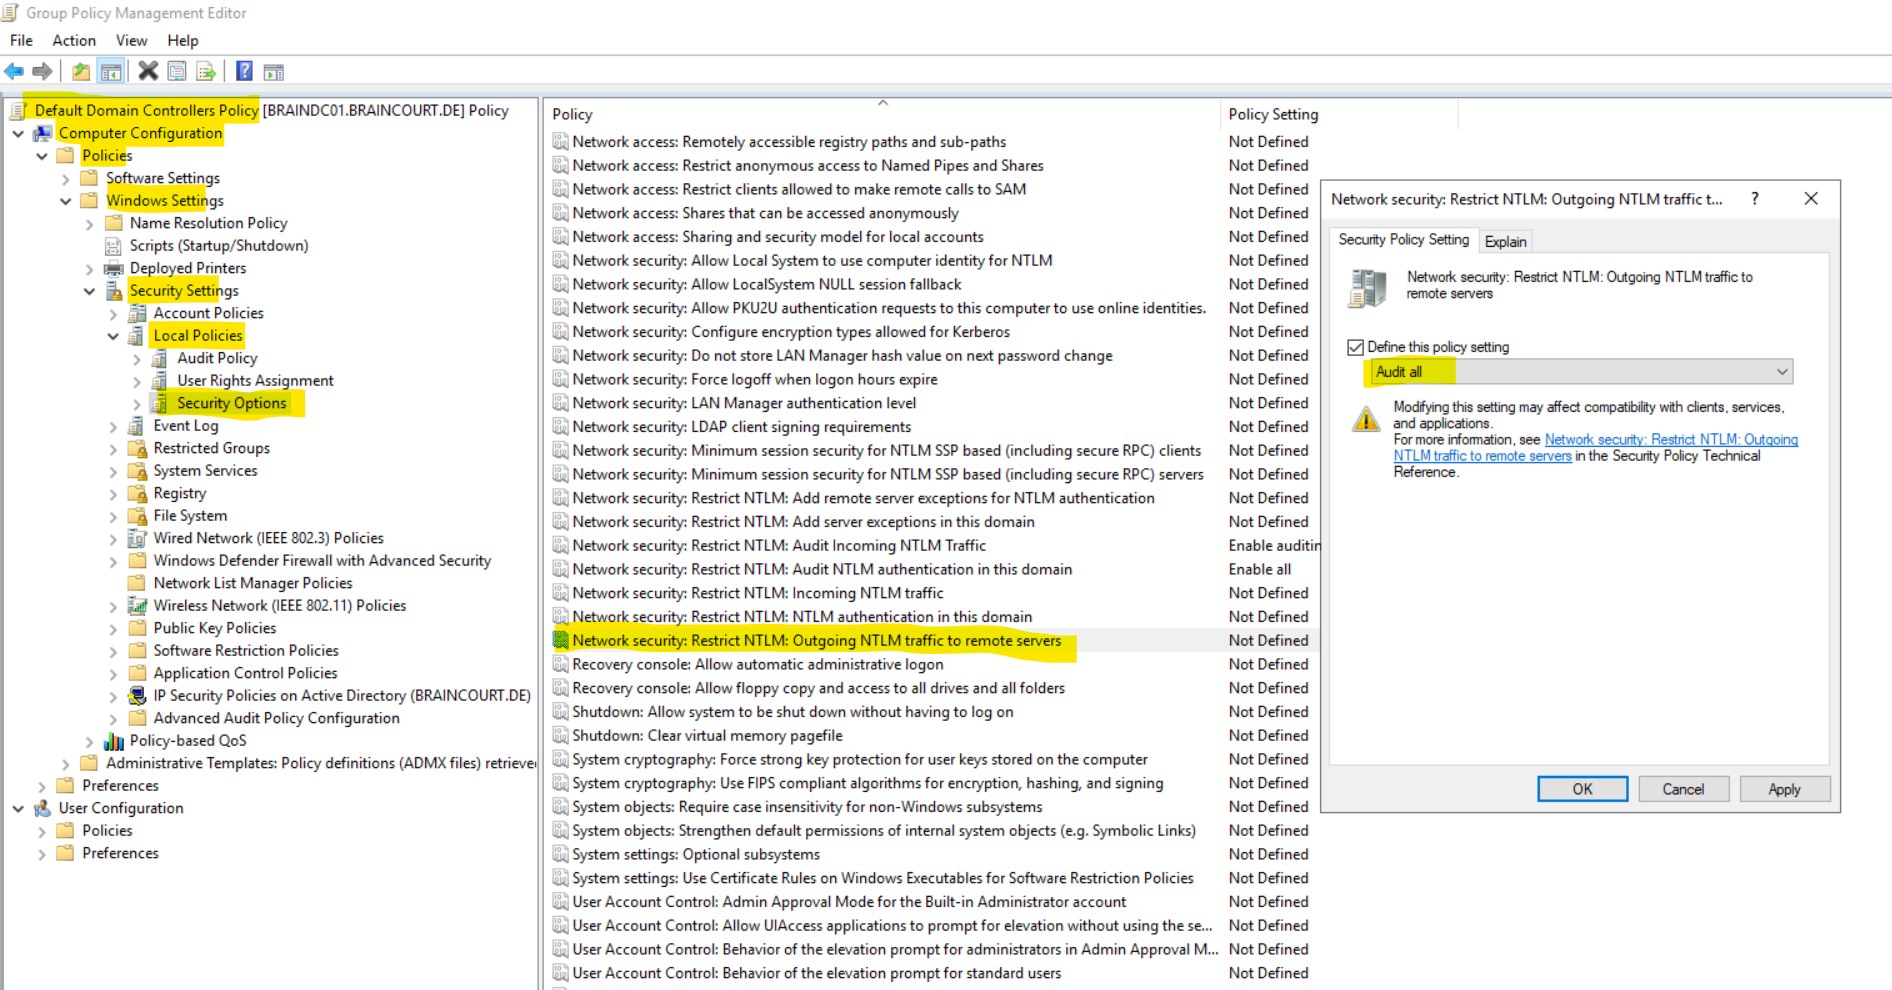
Configure Outgoing NTLM traffic to remote servers, under Security Options, double-click Network security: Restrict NTLM: Outgoing NTLM traffic to remote servers, and then select Audit all.
!!! Note !!! Take care to select here Audit all instead of Allow all.
By accident I first selected Allow all and therefore the health status doesn’t changed to healthy and green which costs me a lot of time to find and detect the misconfiguration.
We also need to configure two more policies.
Network security: Restrict NTLM: Audit NTLM authentication in this domain -> Enable all
Network security: Restrict NTLM: Audit Incoming NTLM Traffic -> Enable auditing for all accounts
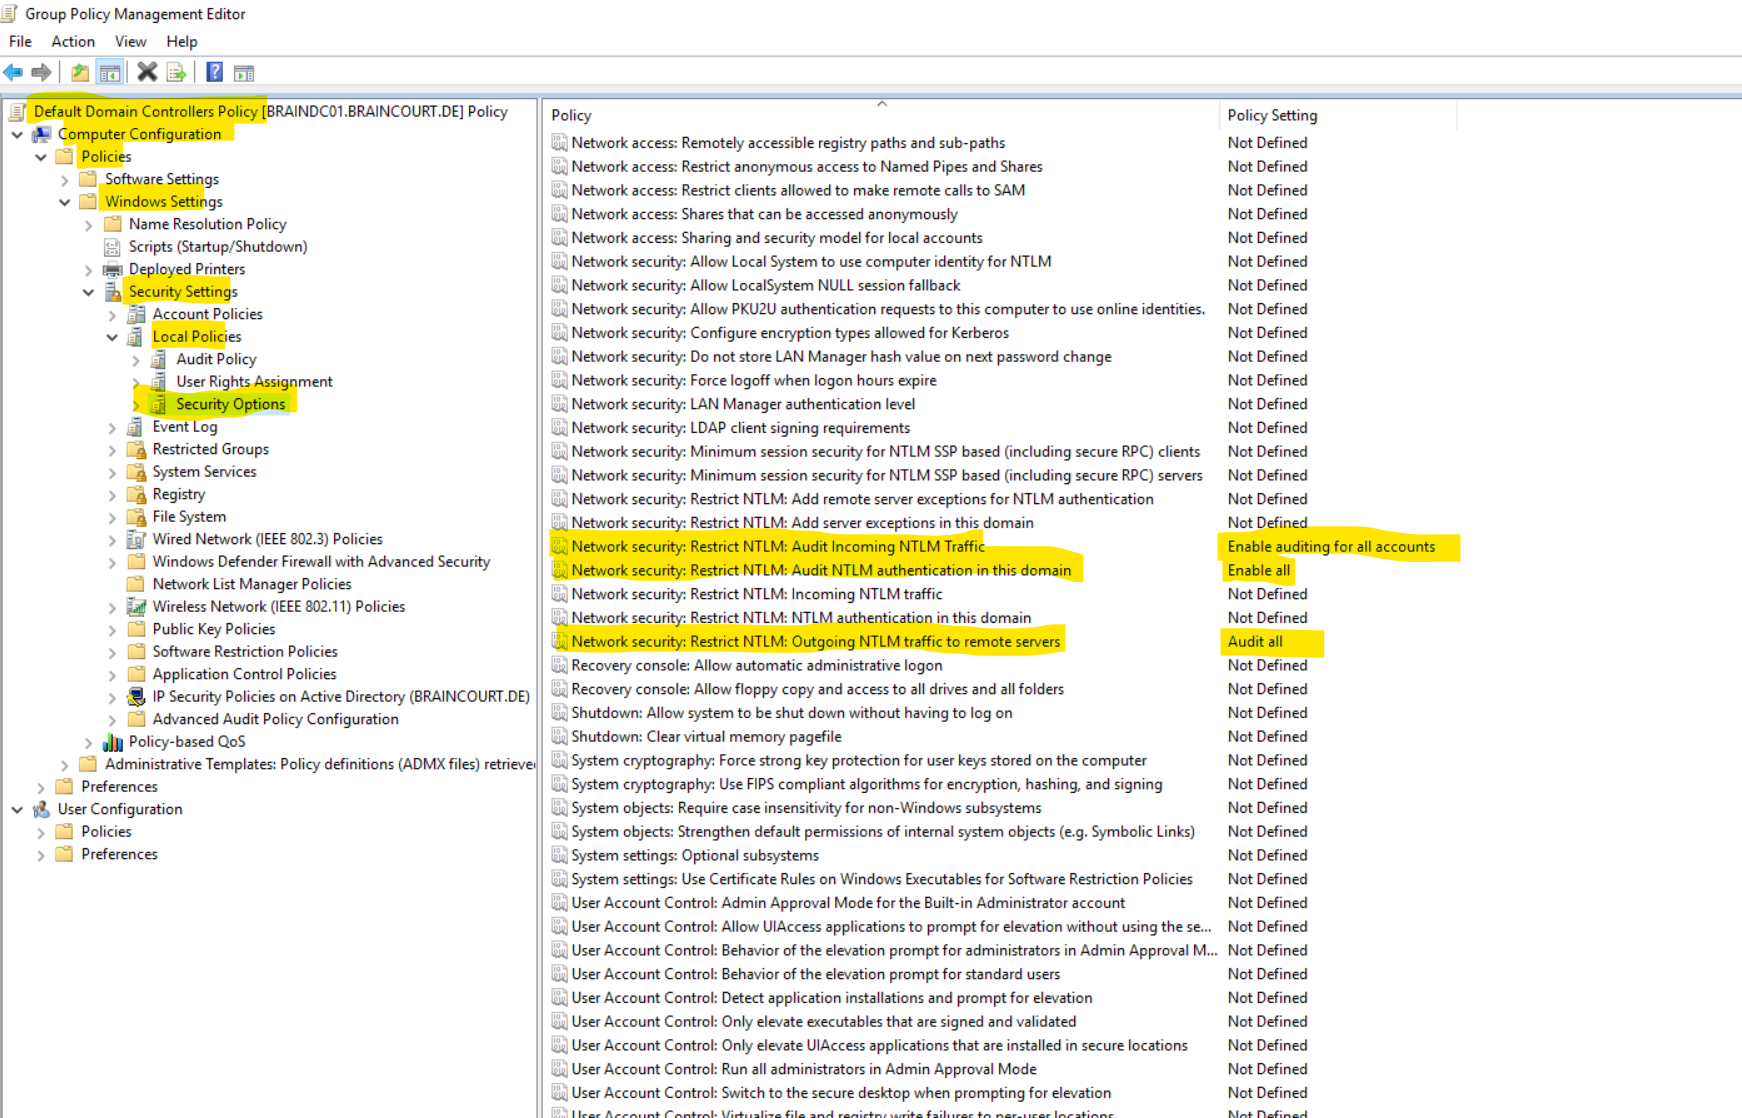
A while later the health status of all four domain controllers changed to healthy.

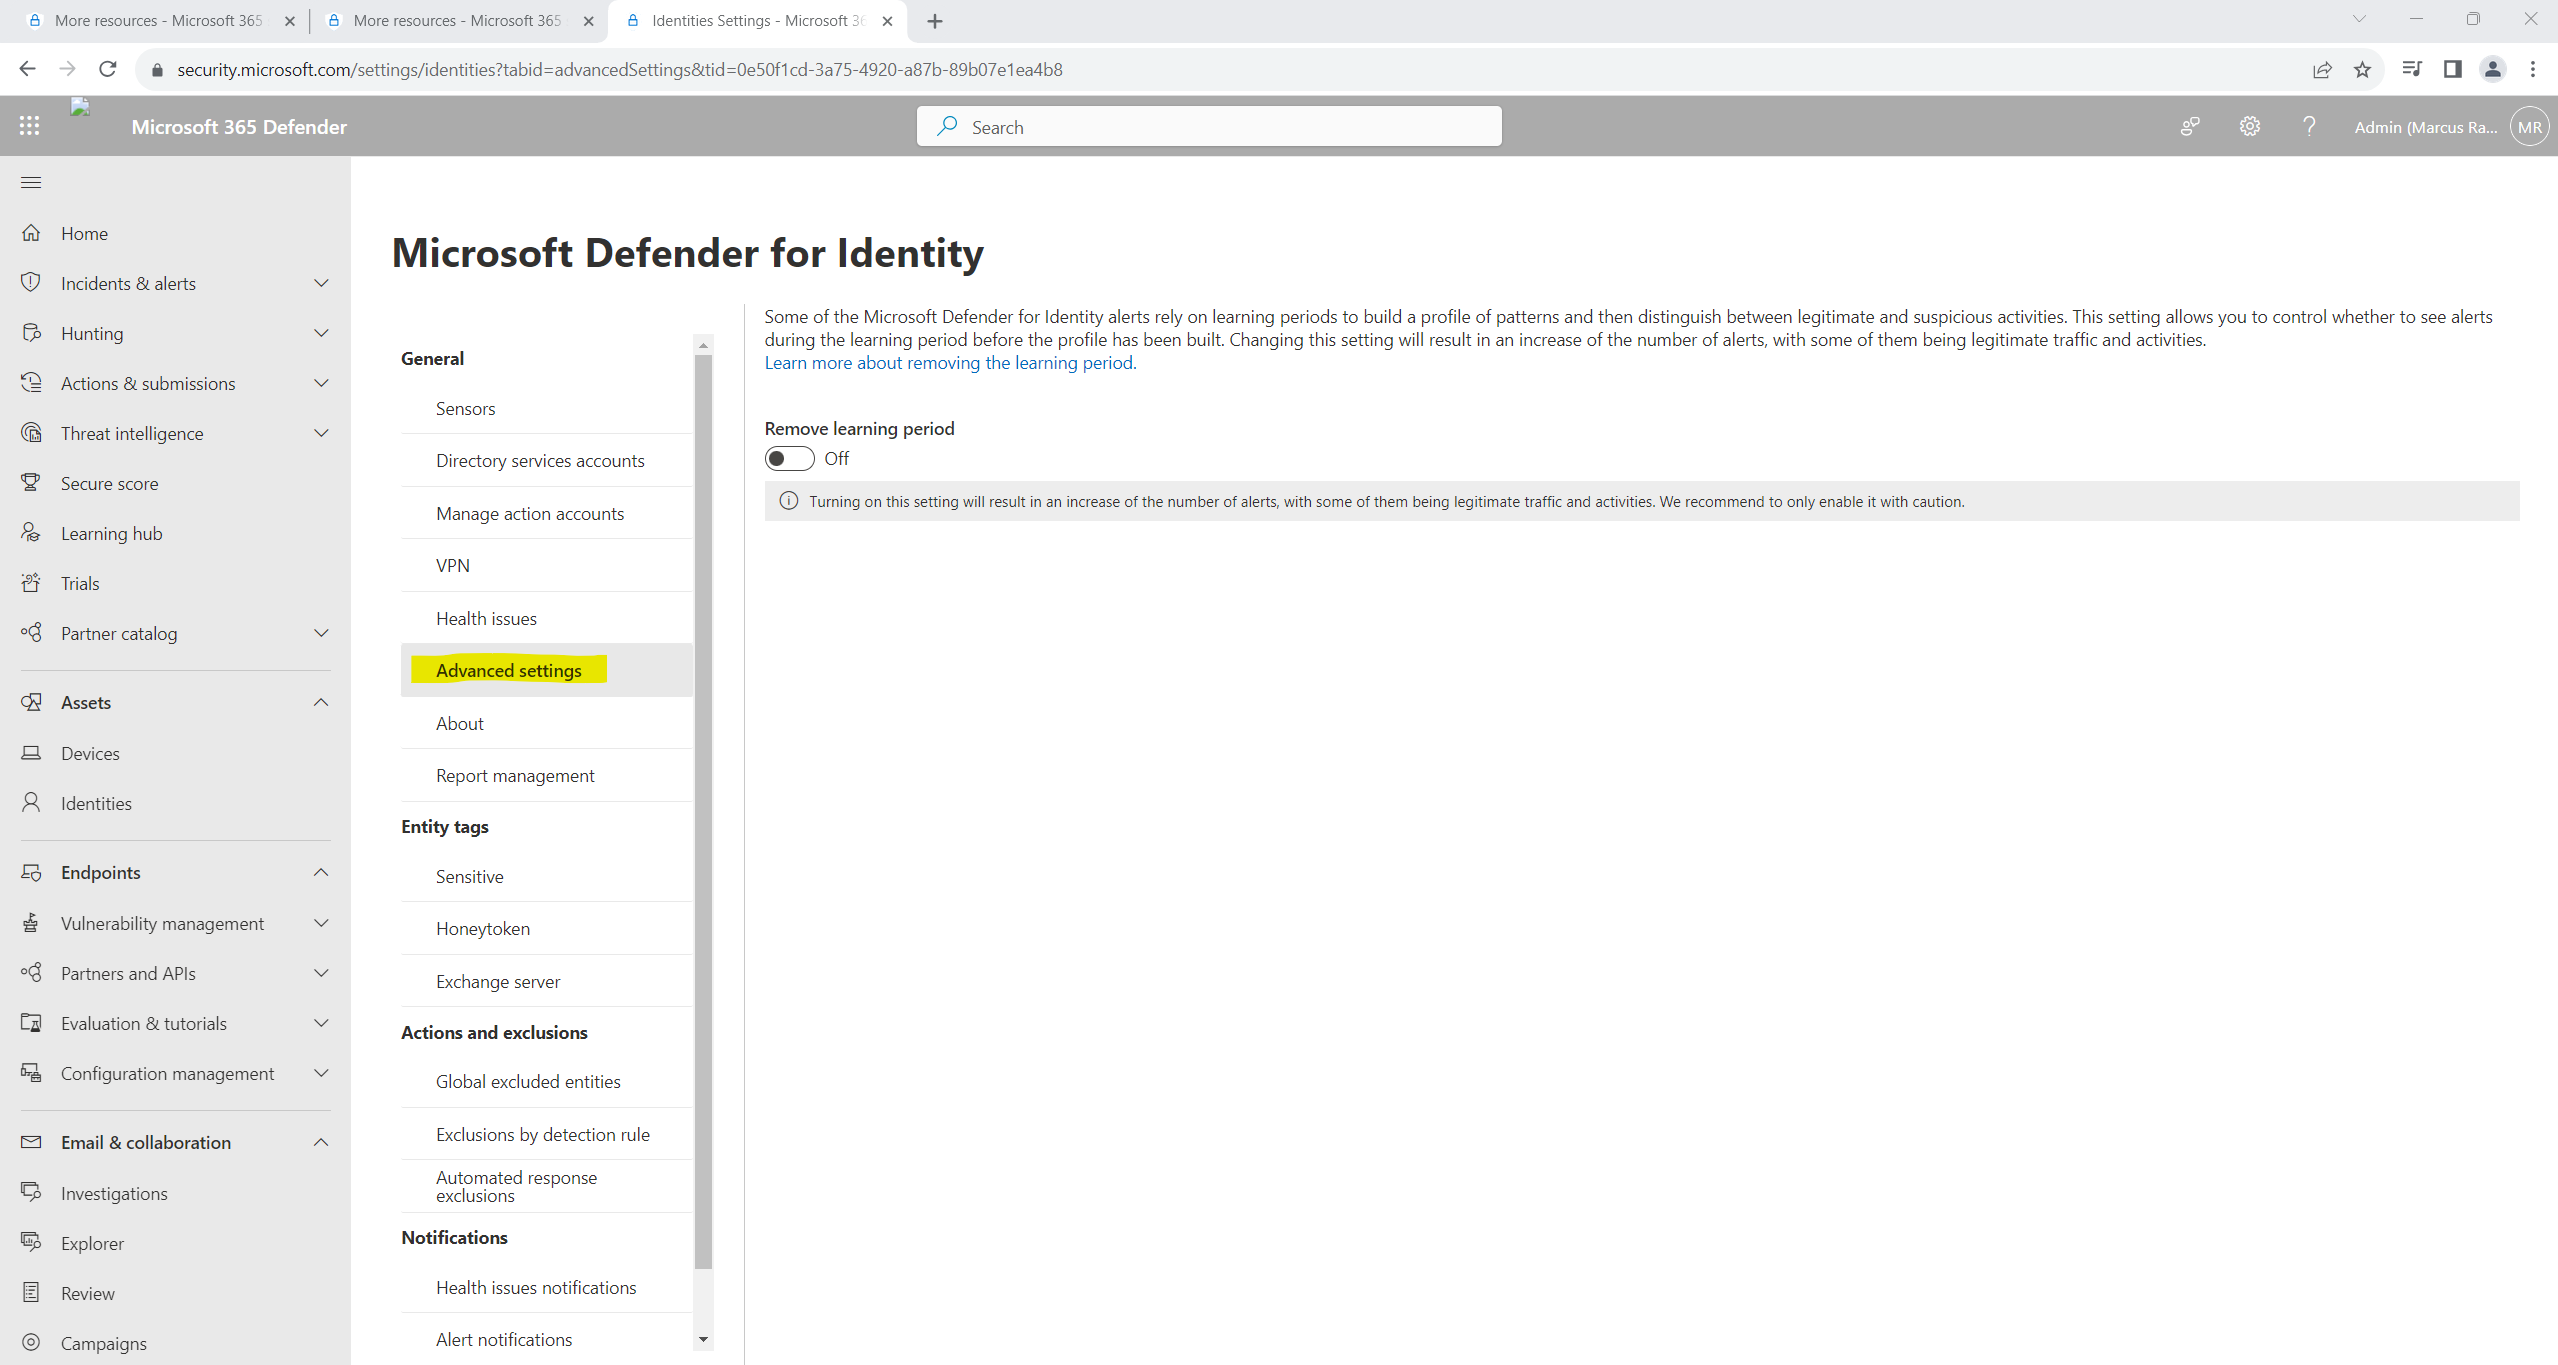
Below I was wondering why I get the warning banner that the learning period for alerts is disabled. That was previously still enabled and I didn’t changed it actively. The reason for is that I installed the MDI sensors on the domain controllers which disabled the learning period by default.
By default, after deploying your first sensor, new Defender for Identity workspaces are configured with a Remove learning period set to On.
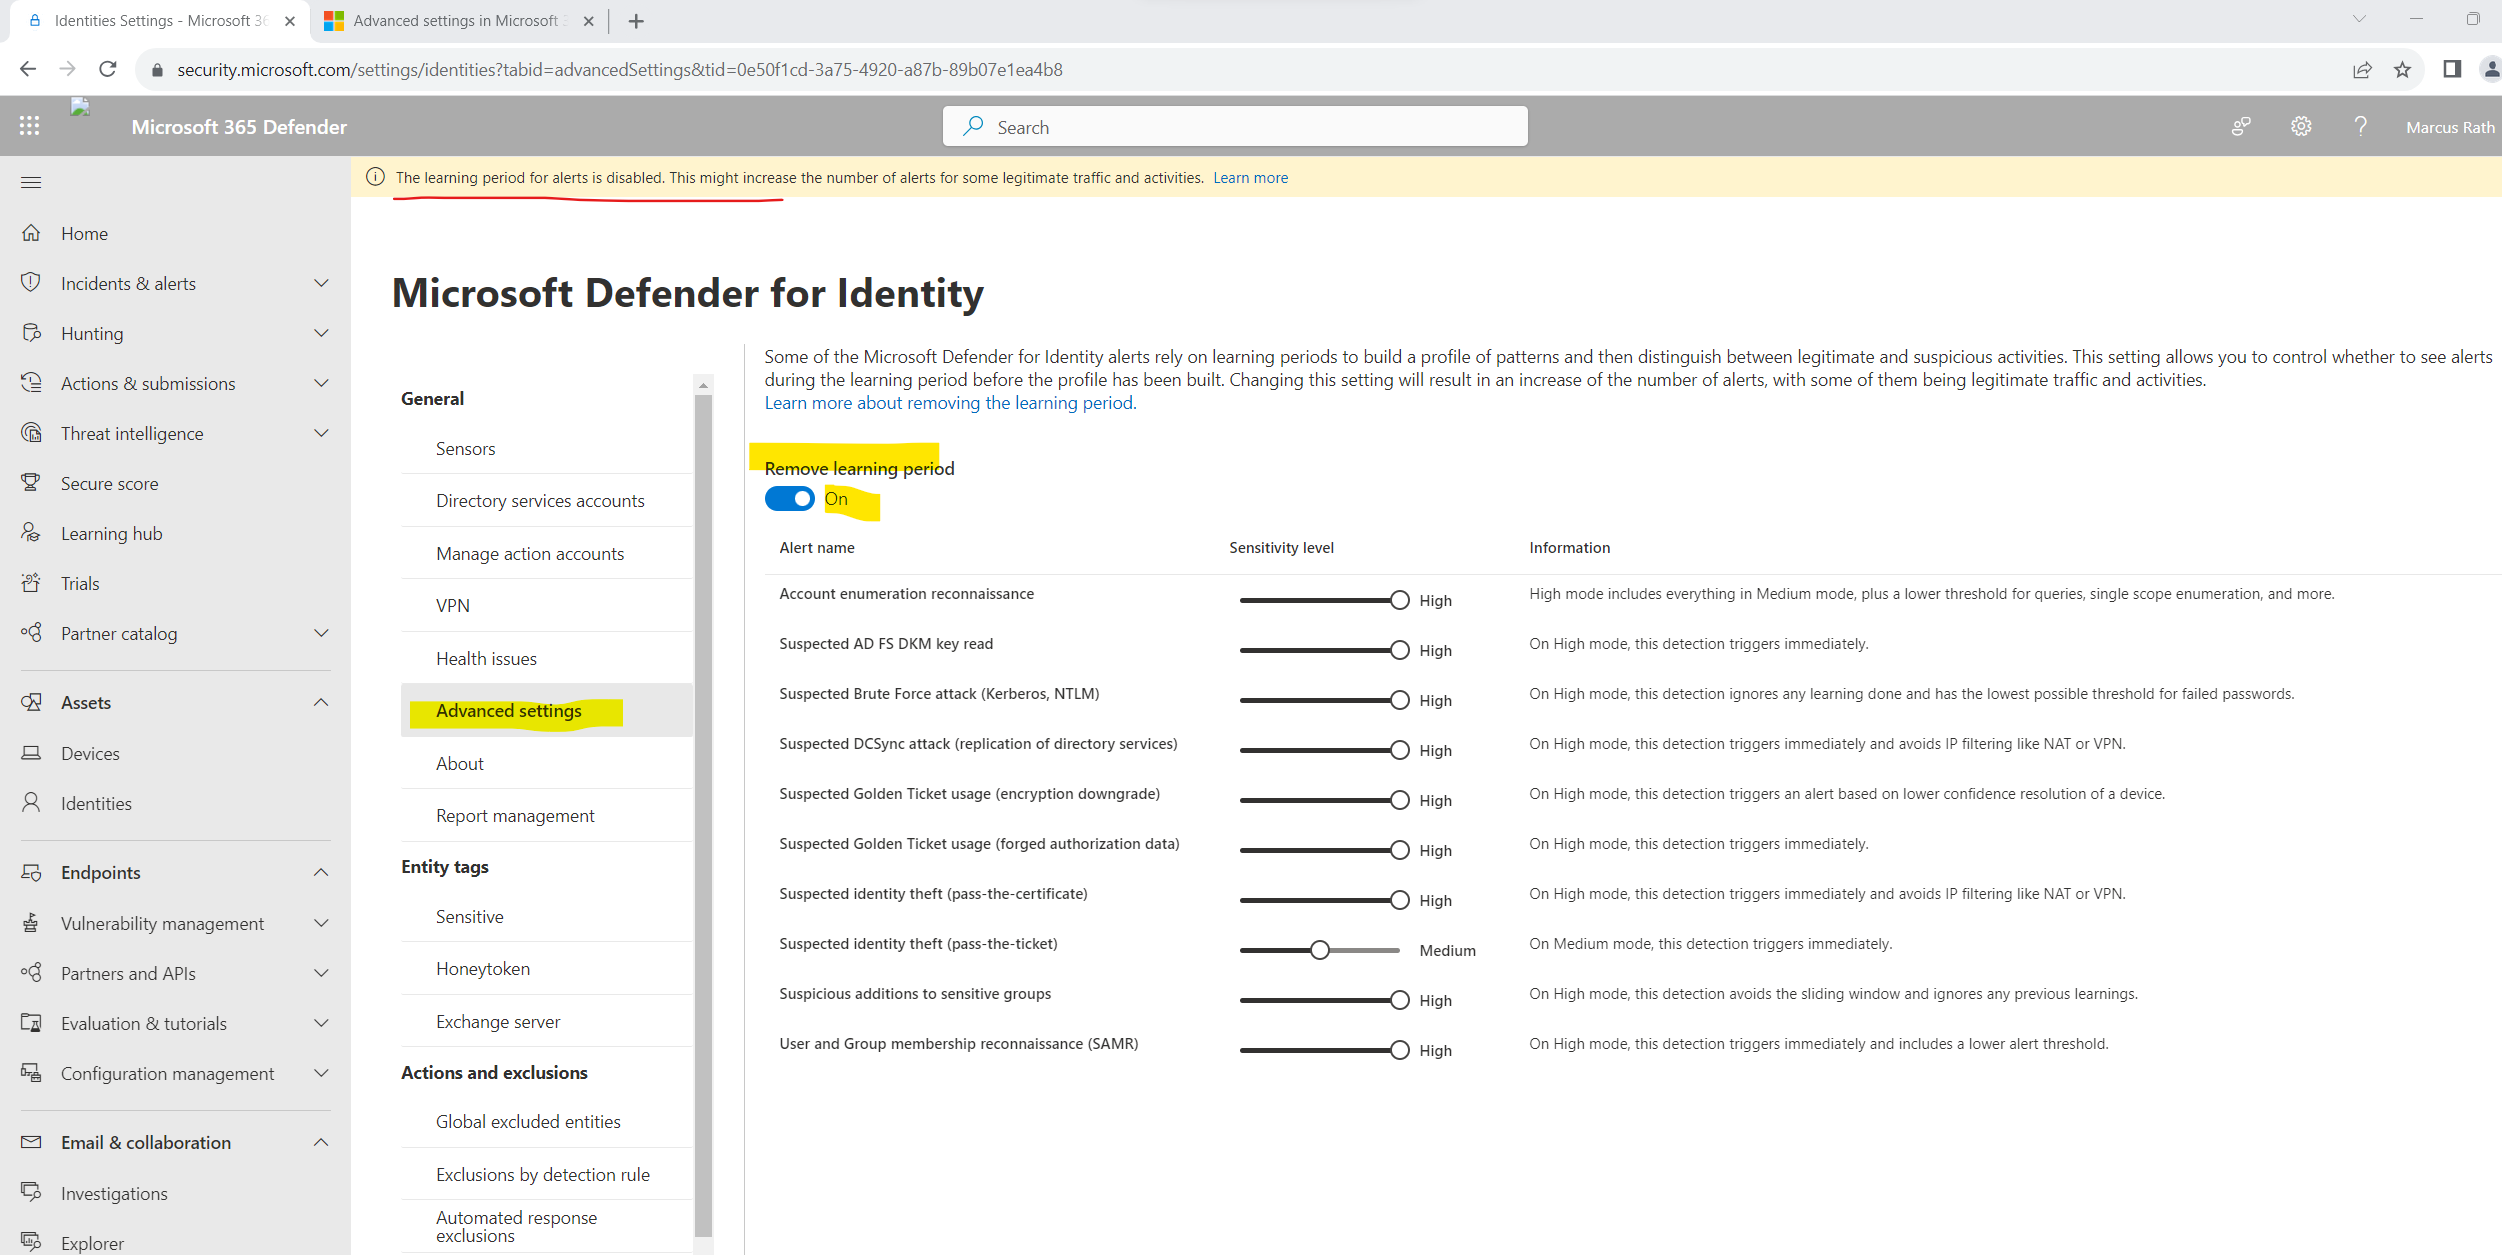
Some Defender for Identity alerts wait for a learning period before alerts are triggered. During this learning period, Defender for Identity builds a profile of patterns to use when distinguishing between legitimate and suspicious activities.
By default, after deploying your first sensor, new Defender for Identity workspaces are configured with a Remove learning period set to On.
Setting the Remove learning period option to On causes Defender for Identity to trigger affected alerts even while your baseline is still being built. The default setting for new workspaces is designed to help you start evaluating Defender for Identity as soon and as thoroughly as possible.
However, the Remove learning period setting turned On can result in an immediate increase of the number of alerts, with some of them being legitimate traffic and activities. You might want to turn the Remove learning period setting Off manually, before the first 30 days are up, such as if you have a new workspace, but feel that Defender for Identity has learned your network sufficiently before the first 30 days are up.
If the Remove learning period setting is still On at the end of 30 days, Defender for Identity automatically turns it Off and opens a health issue to notify administrators.
So far we finished setting up and configuring Defender for Identity, below we can optionally configure Defender for Identity settings.
Set up Defender for Identity preferences (optional)
In the Microsoft 365 Defender portal, you can view all suspicious activities with Defender for Identity features. You can drill into the details of any activity and perform actions based on those activities. With Defender for Identity, you can also display security alerts and notifications to highlight problems identified with Defender for Identity or new activities that are deemed suspicious.
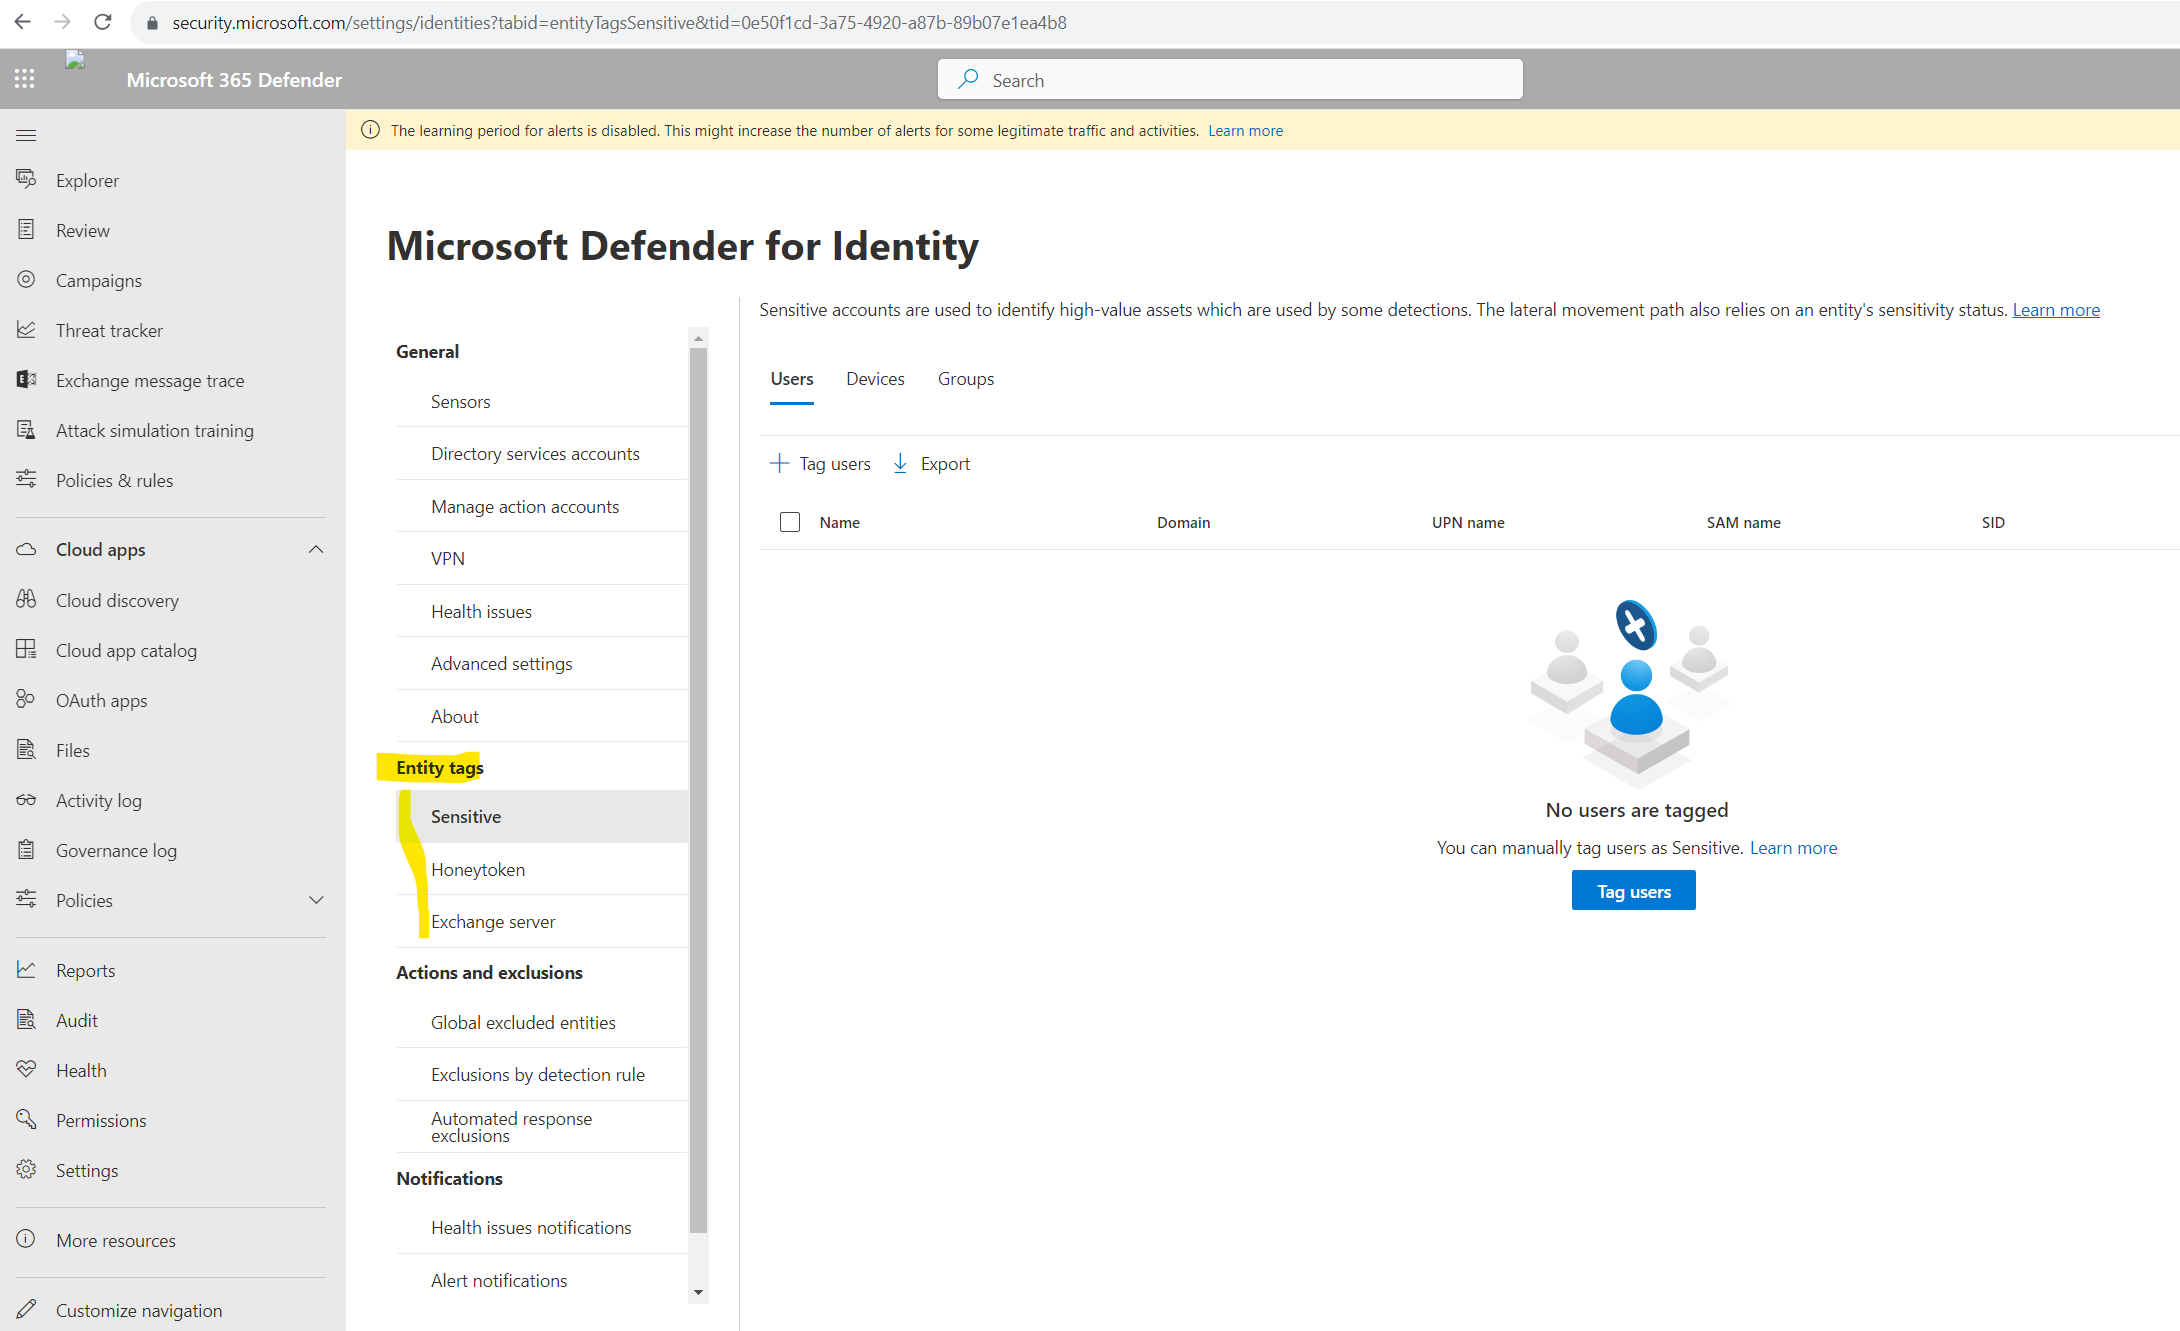
Some Defender for Identity detections, such as sensitive group modification detection and lateral movement, rely on an entity’s sensitivity status. The following preferences can be set up for Defender for Identity.
Create Entity tags
You can create three types of Defender for Identity entity tags: sensitive tags, honeytoken tags, and Exchange server tags. To learn more, see Defender for Identity entity tags in Microsoft 365 Defender.
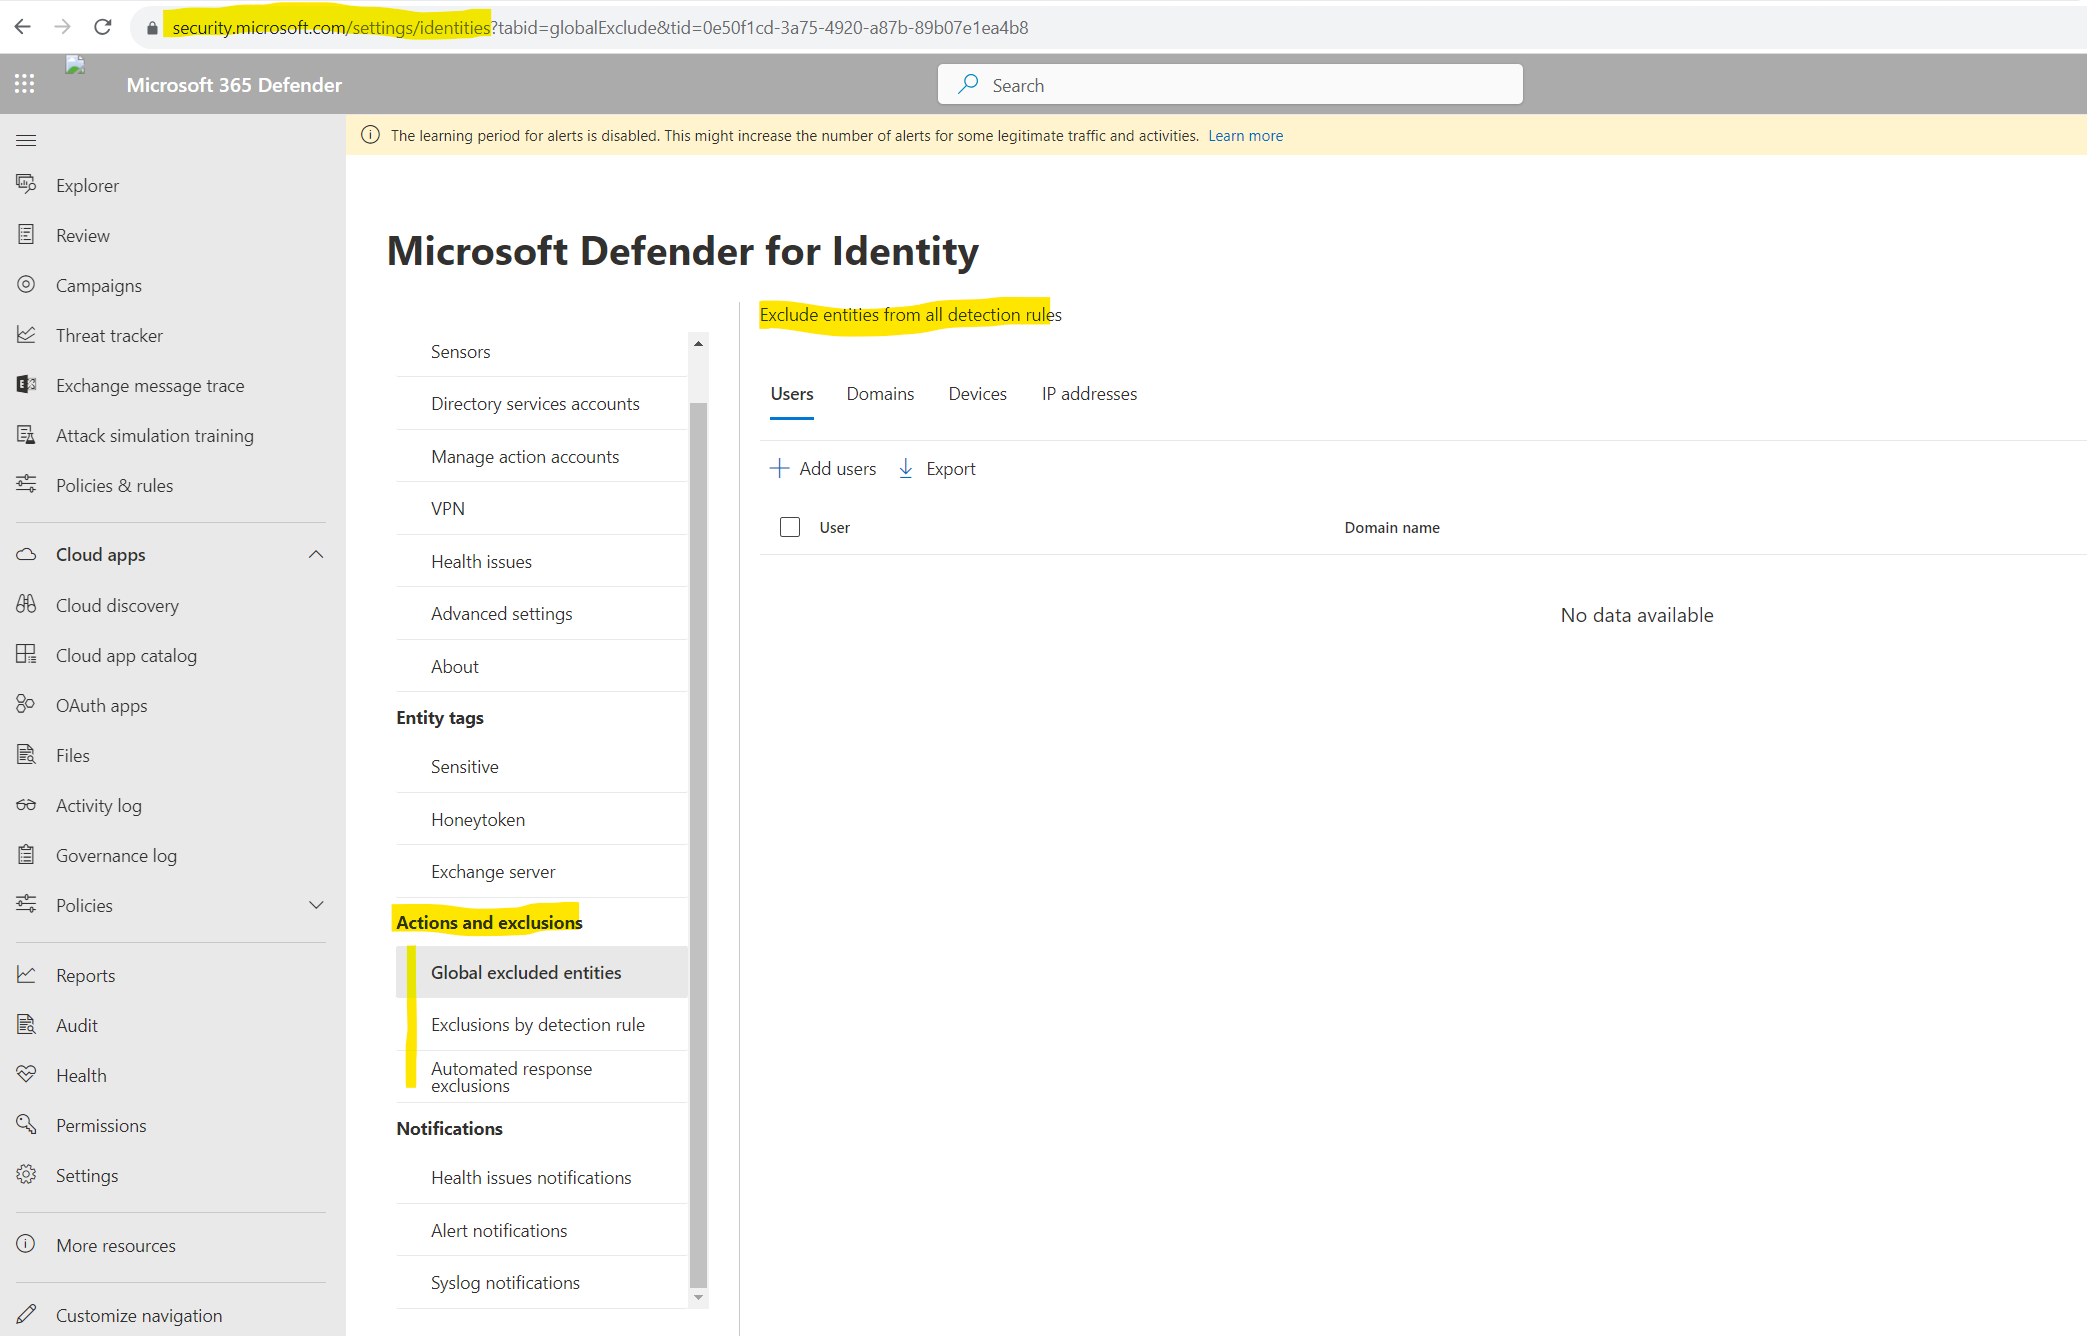
Set up exclusions
Microsoft Defender for Identity lets you exclude specific IP addresses, devices, or users from security alerts.
There are two ways you can manually exclude IP addresses, devices, or users from a security alert. You can follow these steps, or you can do it directly from the security alert. To learn more, see Configure Defender for Identity detection exclusions in Microsoft 365 Defender.
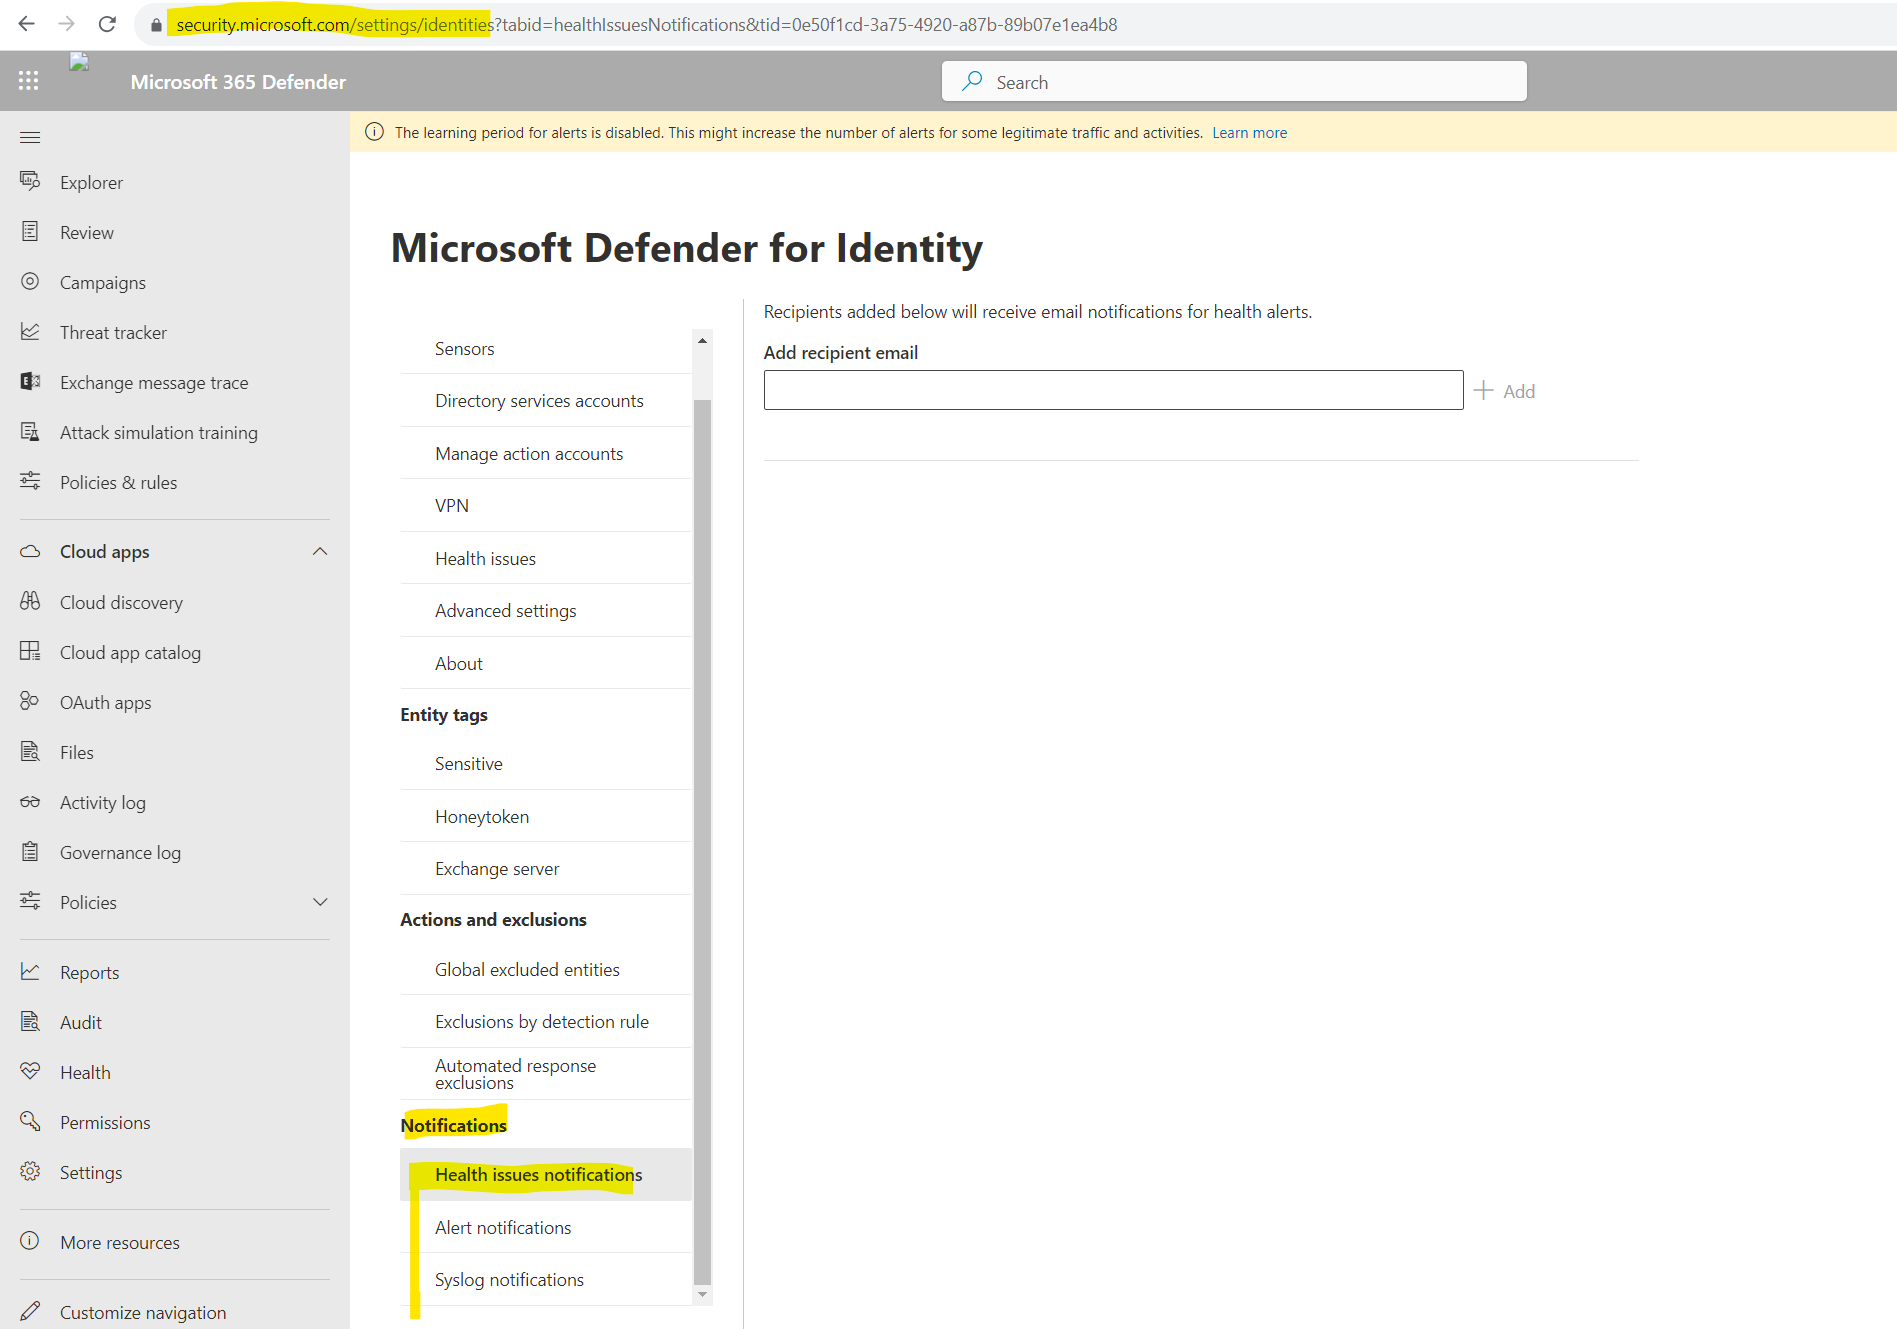
Set up notifications
With Microsoft Defender for Identity, you can notify specific users when suspicious activity is detected. Notifications occur when you set recipients’ email addresses to receive a notification for security or health alerts. To learn more, see Defender for Identity notifications in Microsoft 365 Defender.
Security Posture
Typically, organizations of all sizes have limited visibility into whether or not their on-premises apps and services could introduce a security vulnerability to their organization. The problem of limited visibility is especially true regarding use of unsupported or outdated components.
While your company may invest significant time and effort on hardening identities and identity infrastructure (such as Active Directory, Active Directory Connect) as an on-going project, it’s easy to remain unaware of common misconfigurations and use of legacy components that represent one of the greatest threat risks to your organization. Microsoft security research reveals that most identity attacks utilize common misconfigurations in Active Directory and continued use of legacy components (such as NTLMv1 protocol) to compromise identities and successfully breach your organization.
To combat this effectively, Microsoft Defender for Identity now offers proactive identity security posture assessments to detect and recommend actions across your on-premises Active Directory configurations.
Defender for Identity’s security posture assessments provides the following features.
- Detections and contextual data on known exploitable components and misconfigurations, along with relevant paths for remediation.
- Defender for Identity detects not only suspicious activities, but also actively monitors your on-premises identities and identity infrastructure for weak spots, using the existing Defender for Identity sensor.
- Accurate assessment reports of your current organization security posture, enabling quick response and effect monitoring in a continuous cycle.
To access identity security posture assessments:
Open the Microsoft Secure Score dashboard.
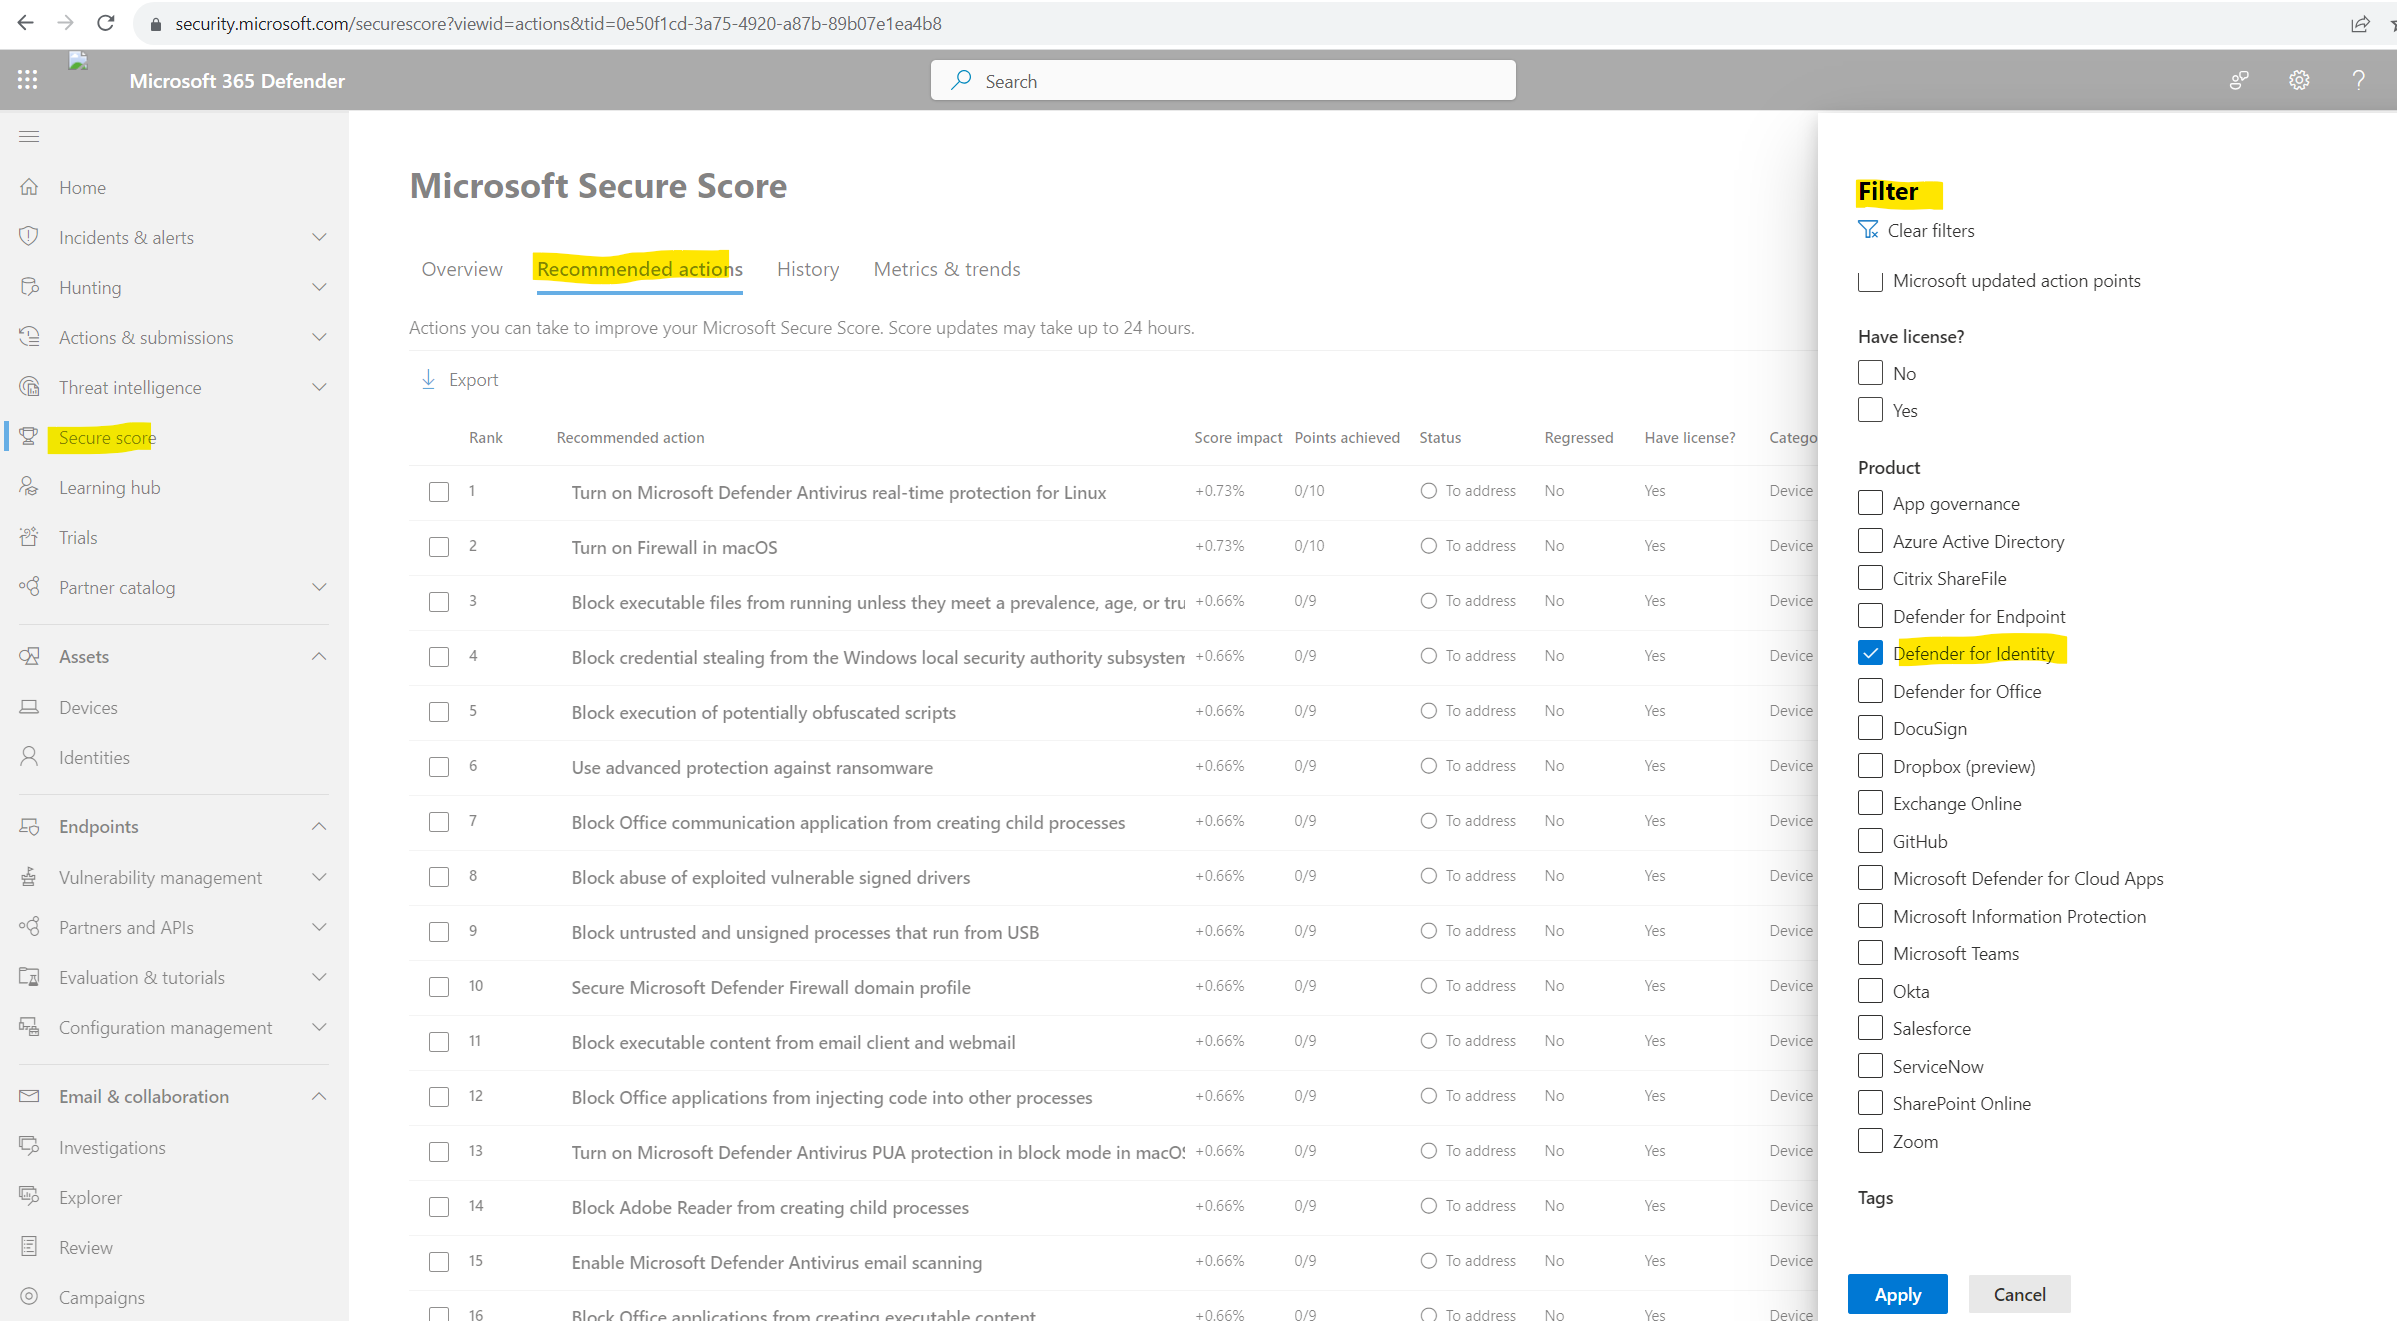
Select the Recommended actions tab. You can search for a particular recommended action, or filter the results (for example, by the category Identity).
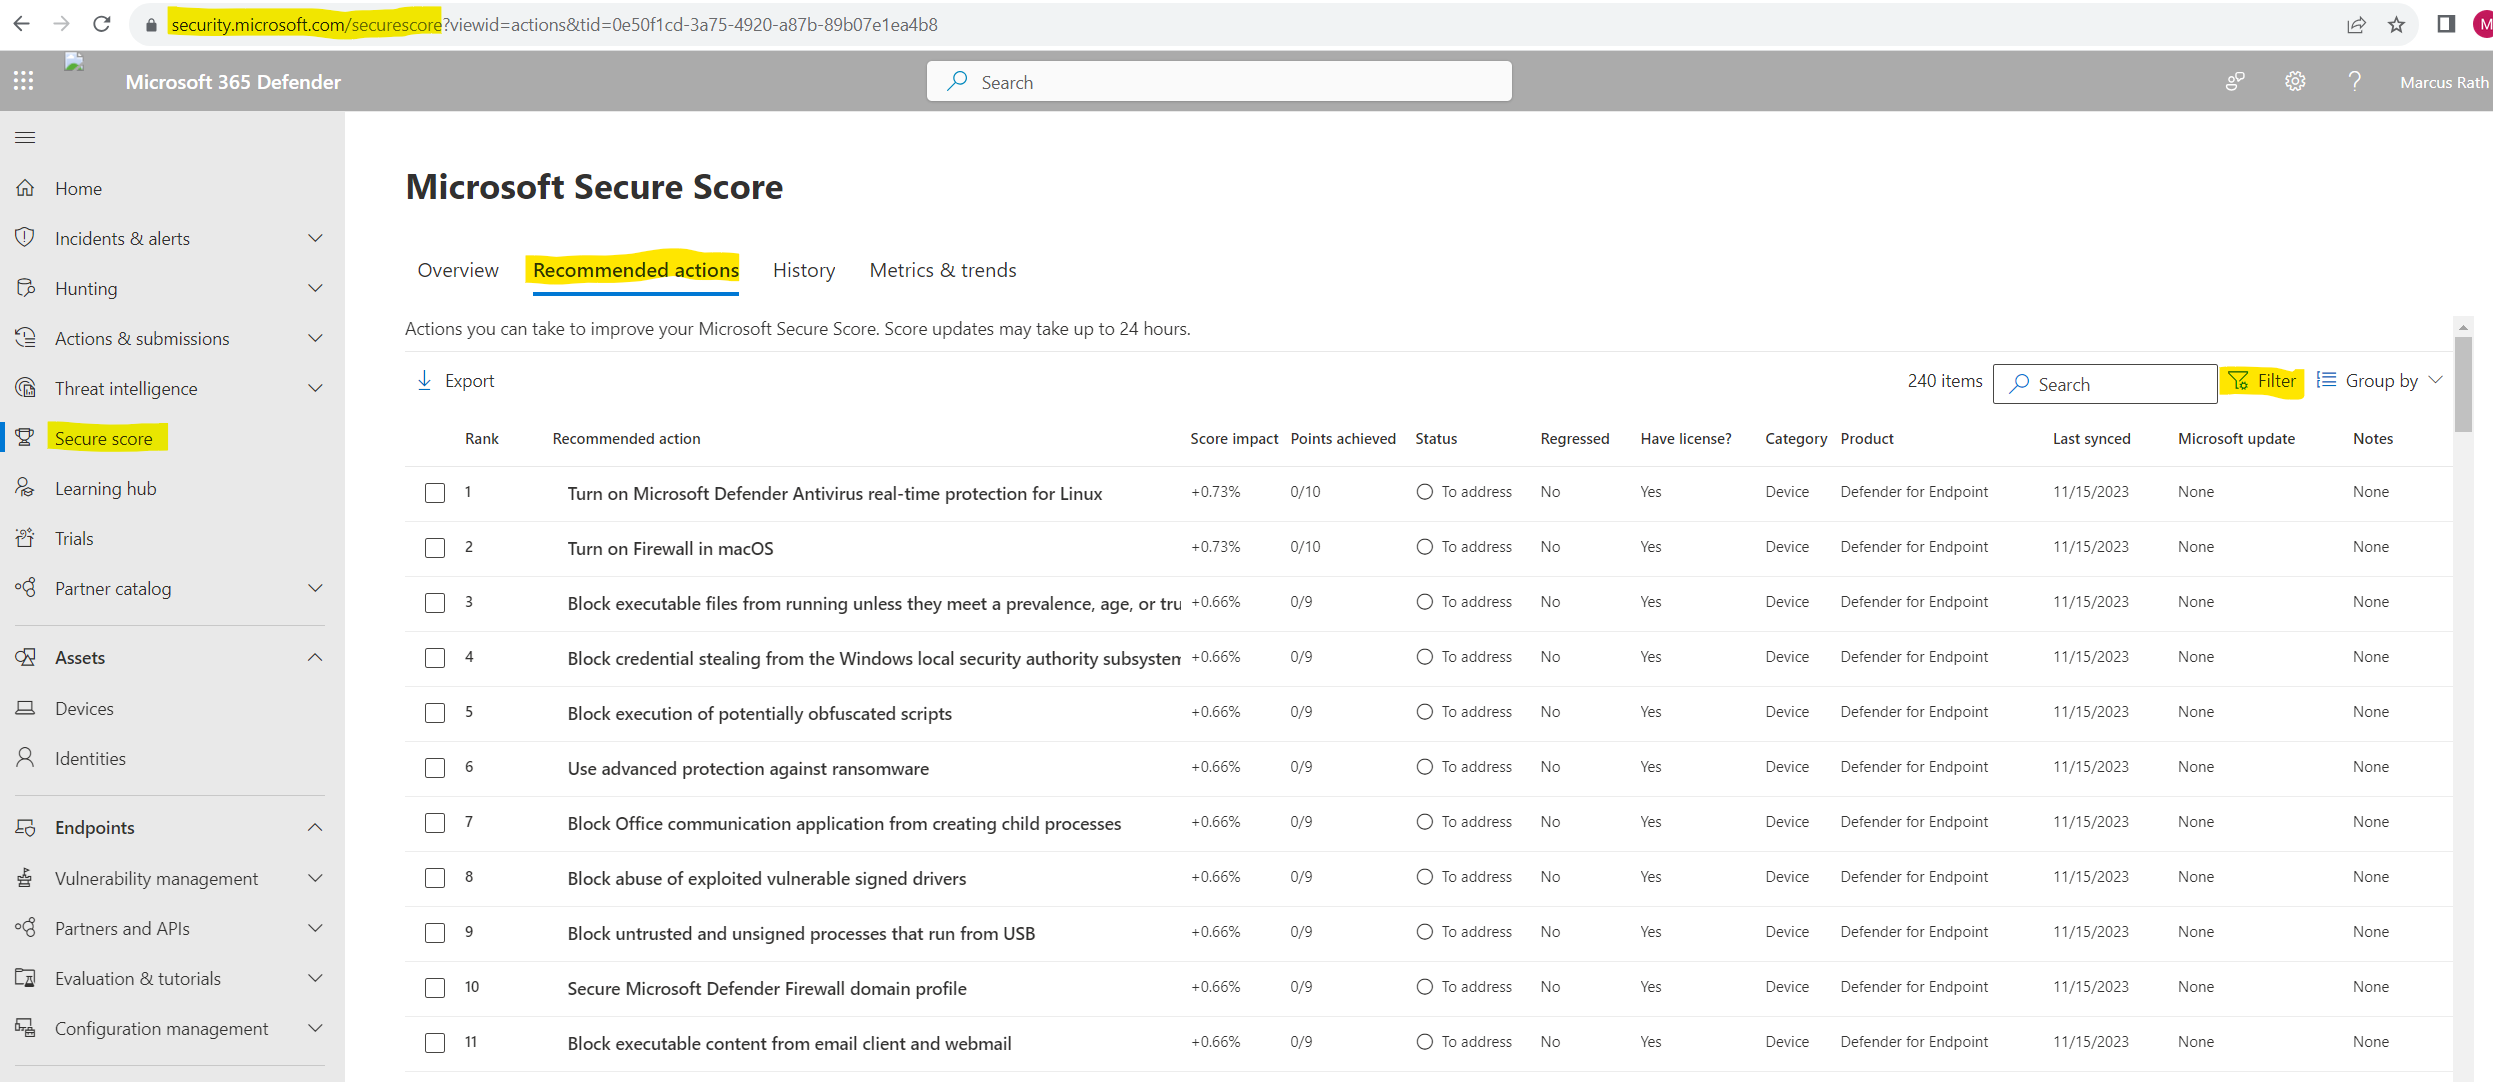
I will filter for recommendations about Defender for Identity.
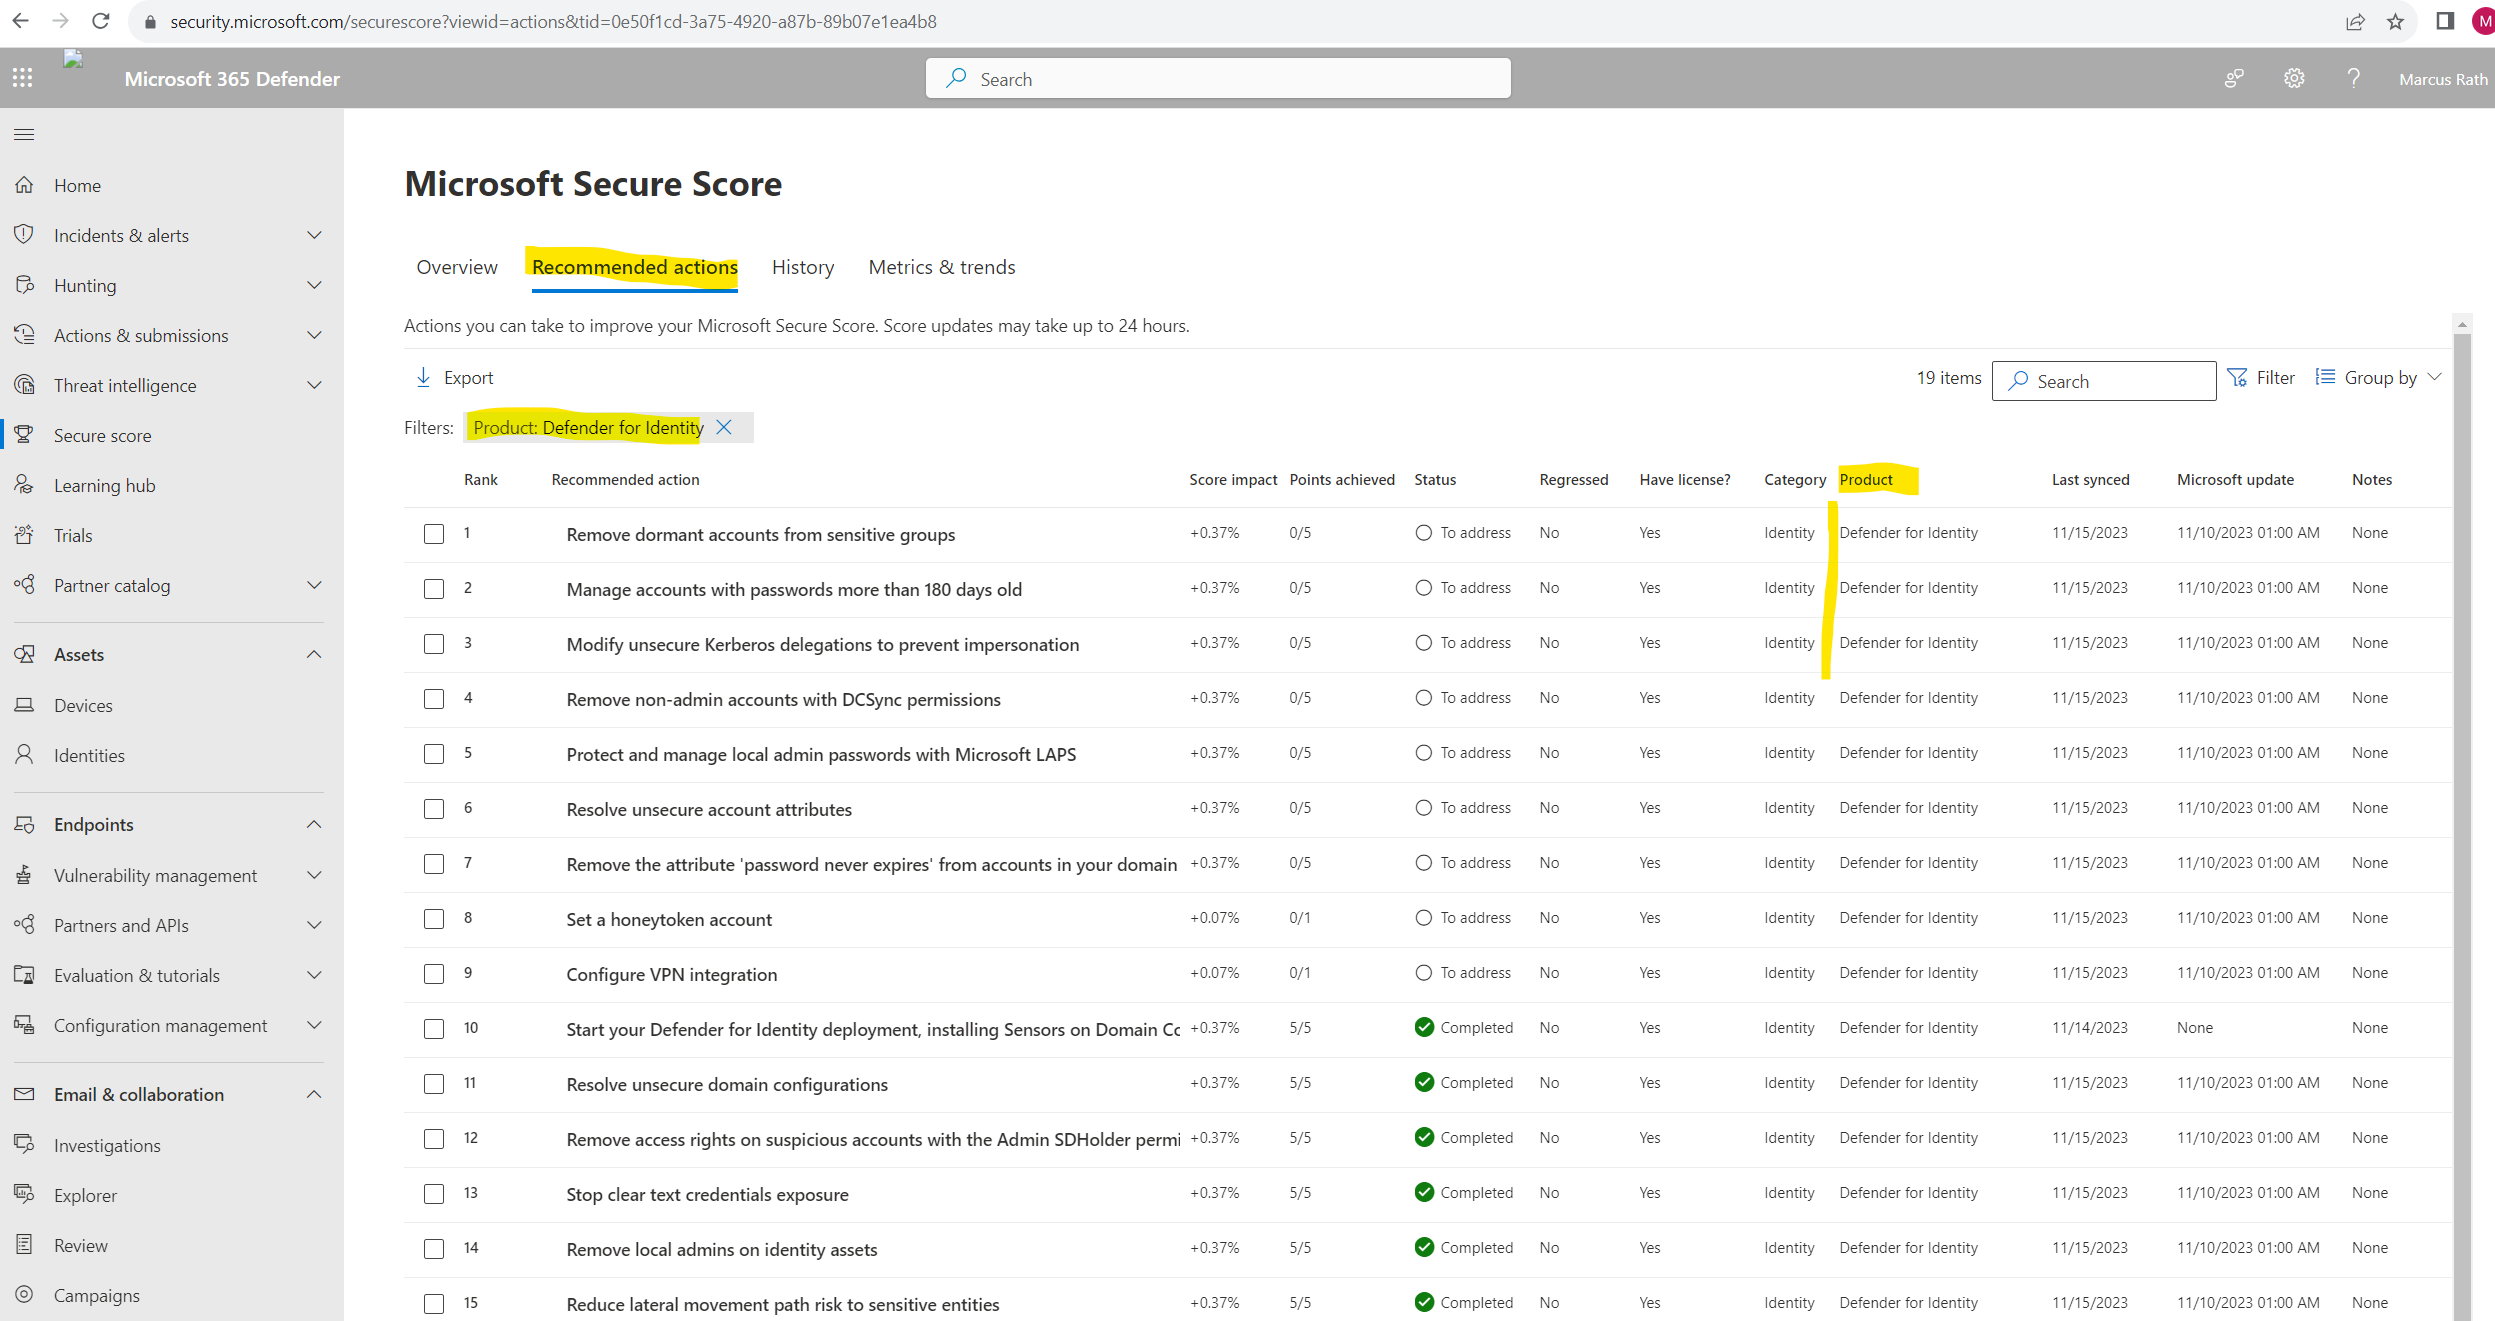
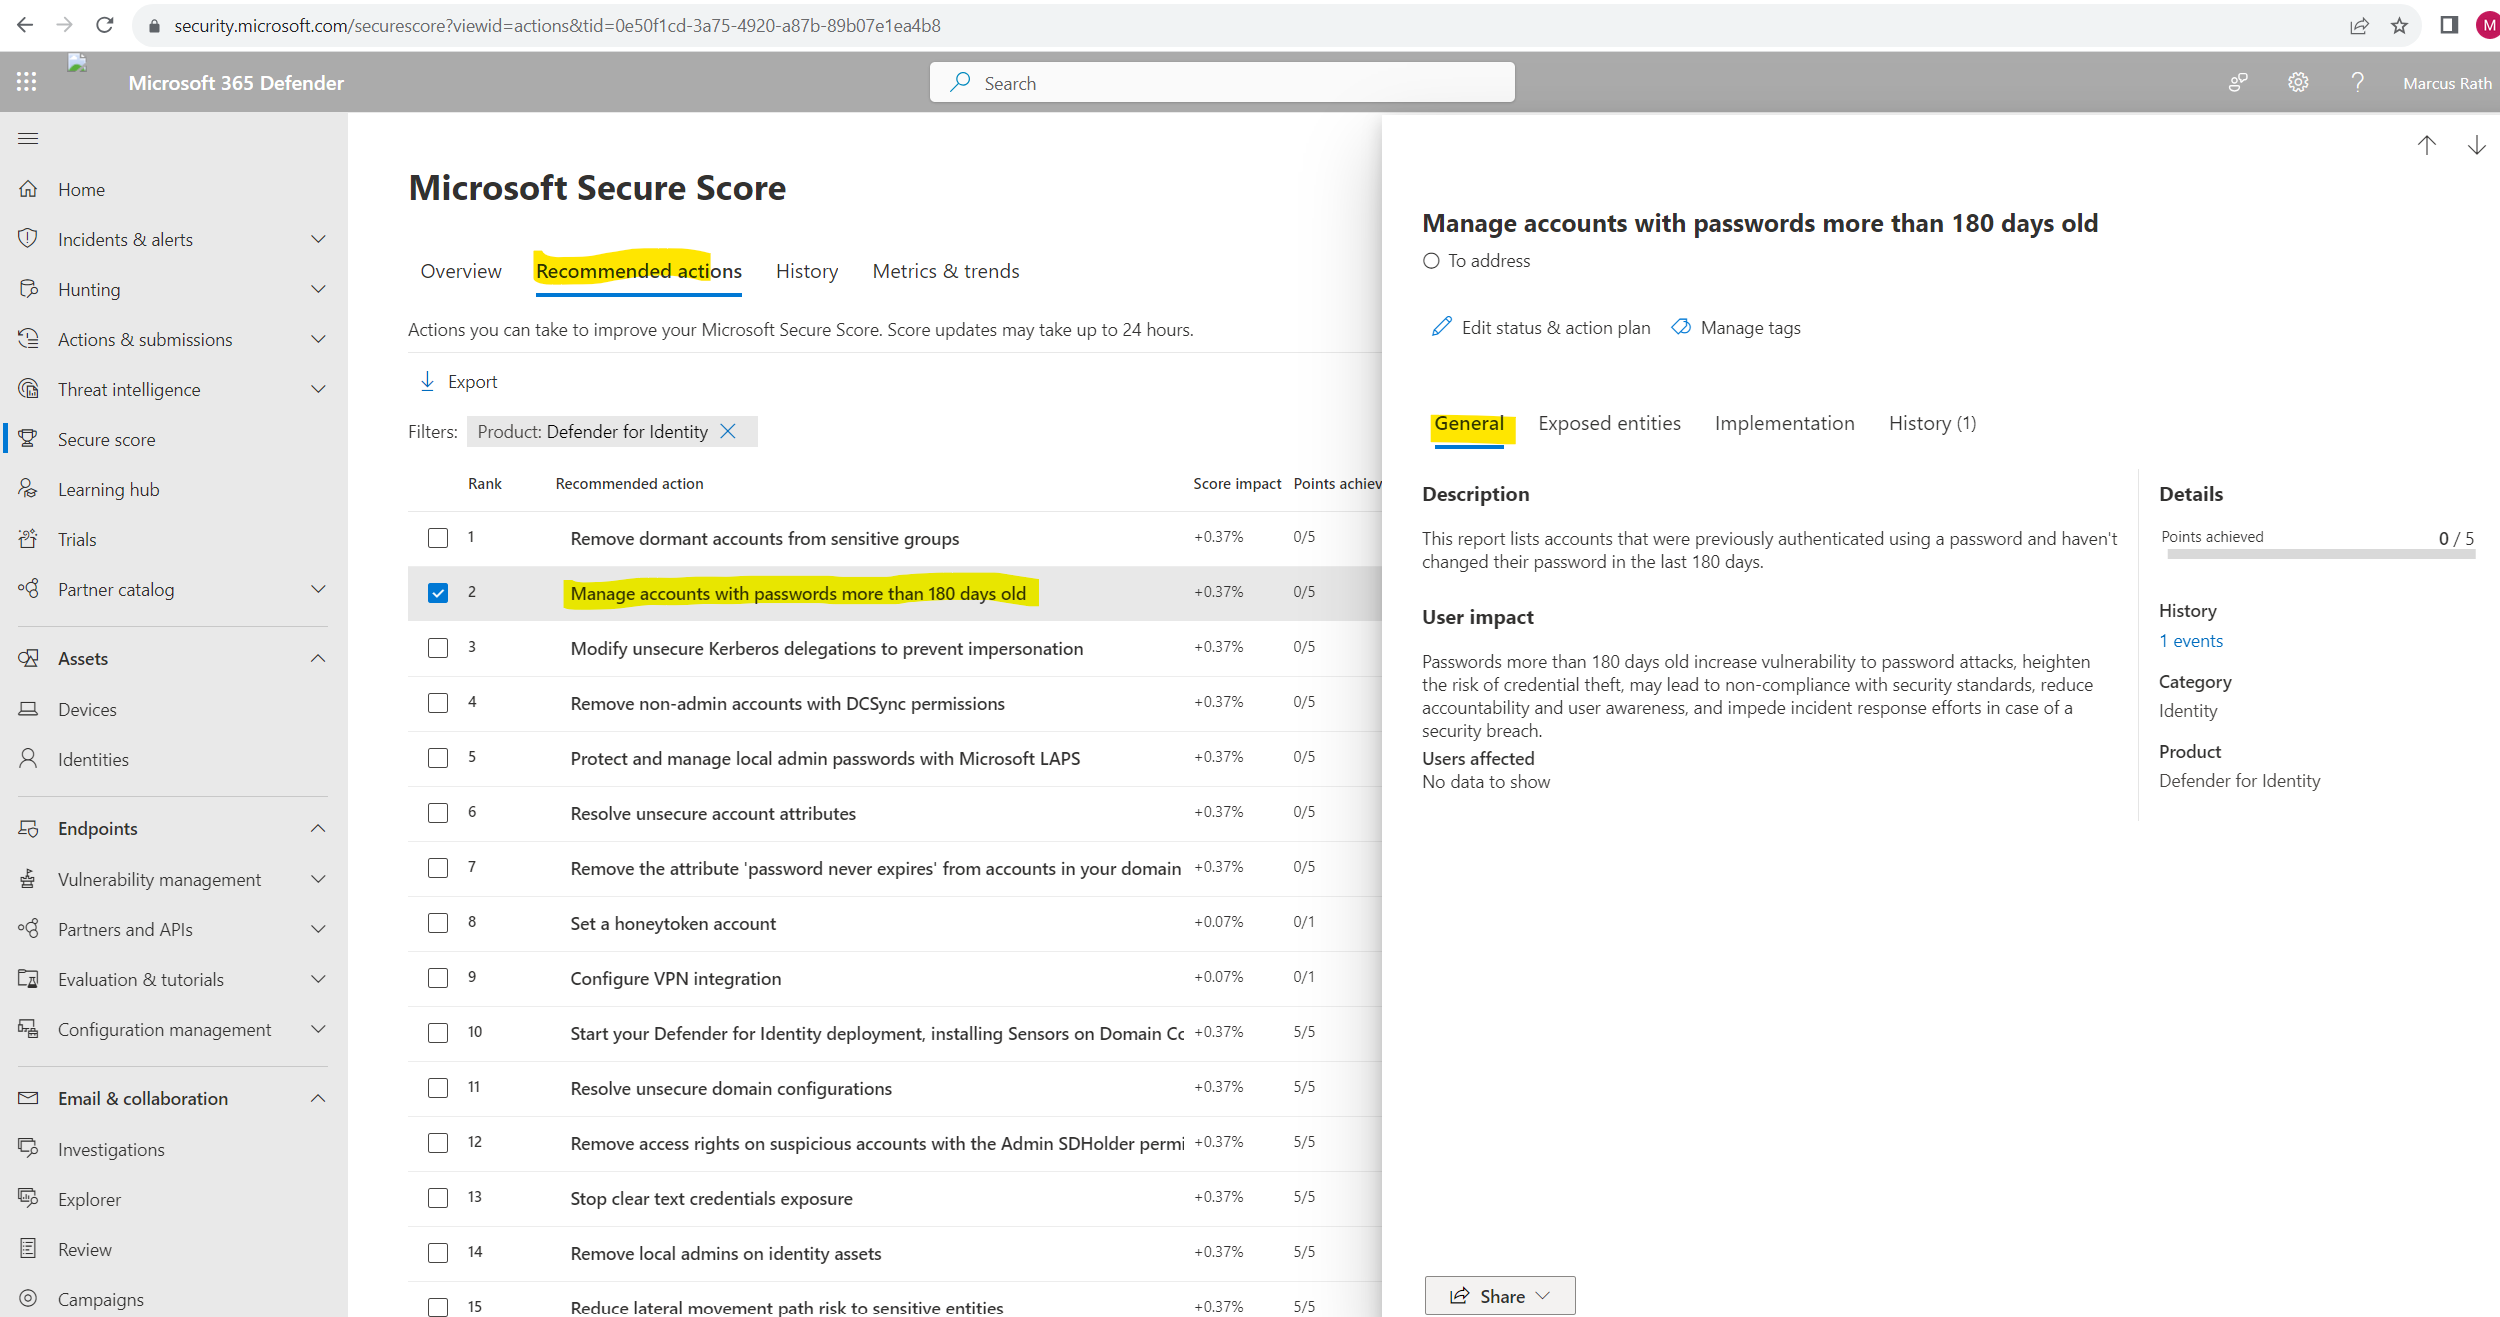
For more details, select the assessment. In the Exposed entities tab all affected accounts will be listed. But to say it right away, not all recommendations listed are are really useful in some context. For example the recommendation Manage accounts with passwords more than 180 days old which is also related to Remove the attribute ‘password never expires’ from accounts in your domain makes no sense in case you will use really strong and complex passwords for these accounts which is much more secure than less complexity but changing frequently.
Source: https://learn.microsoft.com/en-us/defender-for-identity/security-assessment
Monitor alerts
Security alerts are divided into categories seen in a typical cyberattack kill chain and can be managed in the Microsoft 365 Defender portal. Reconnaissance, compromised credential, lateral movement, domain dominance, and exfiltration phase alerts are all identified and remediated by Defender for Identity. To learn more, see Defender for Identity security alerts in Microsoft 365 Defender.
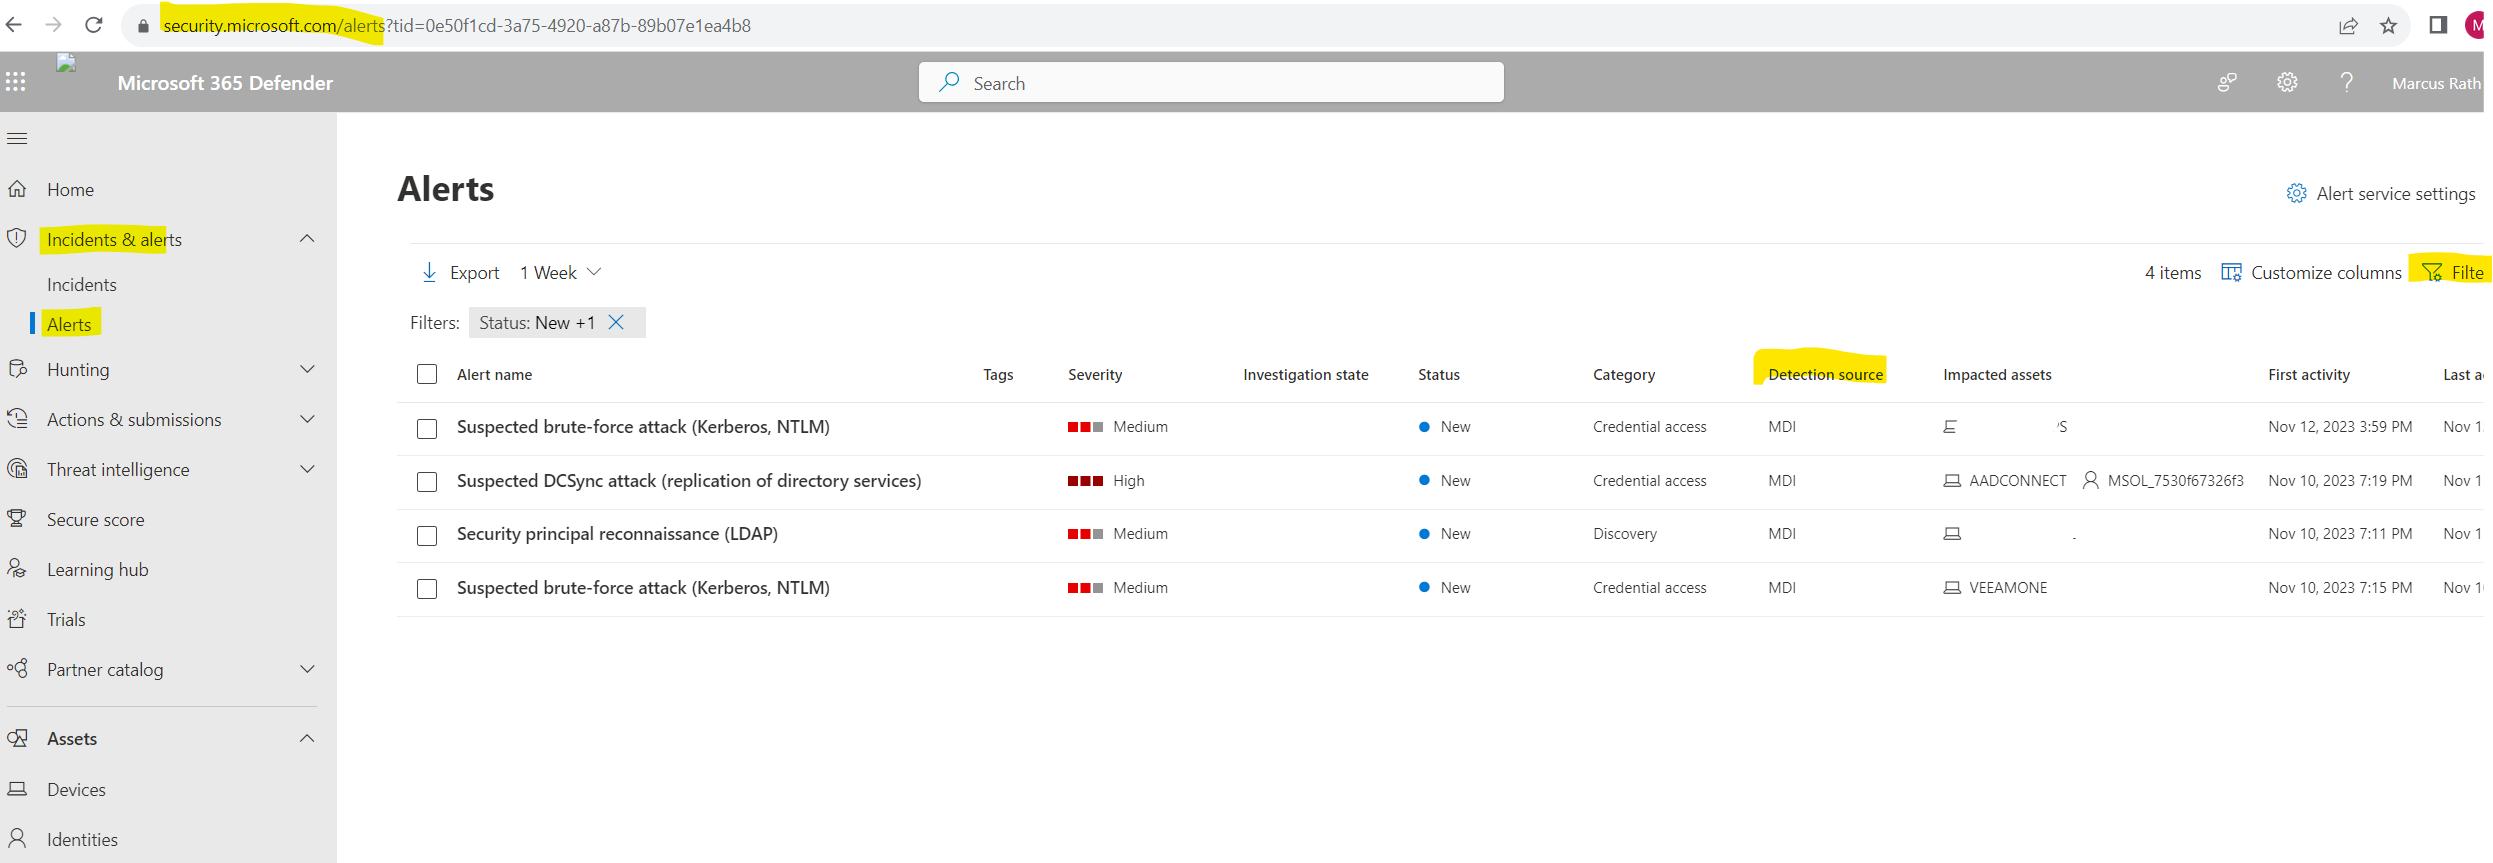
Alerts can be accessed from multiple locations, including the Alerts page, the Incidents page, the pages of individual Devices, and from the Advanced hunting page. In this example, we’ll review the Alerts page.
In Microsoft 365 Defender, go to Incidents & alerts and then to Alerts.
Incident vs. Alert
An incident in Microsoft Defender XDR is a collection of correlated alerts and associated data that make up the story of an attack.Microsoft 365 services and apps create alerts when they detect a suspicious or malicious event or activity. Individual alerts provide valuable clues about a completed or ongoing attack. However, attacks typically employ various techniques against different types of entities, such as devices, users, and mailboxes. The result is multiple alerts for multiple entities in your tenant.
Because piecing the individual alerts together to gain insight into an attack can be challenging and time-consuming, Microsoft Defender XDR automatically aggregates the alerts and their associated information into an incident.
Source: https://learn.microsoft.com/en-us/microsoft-365/security/defender/incidents-overview
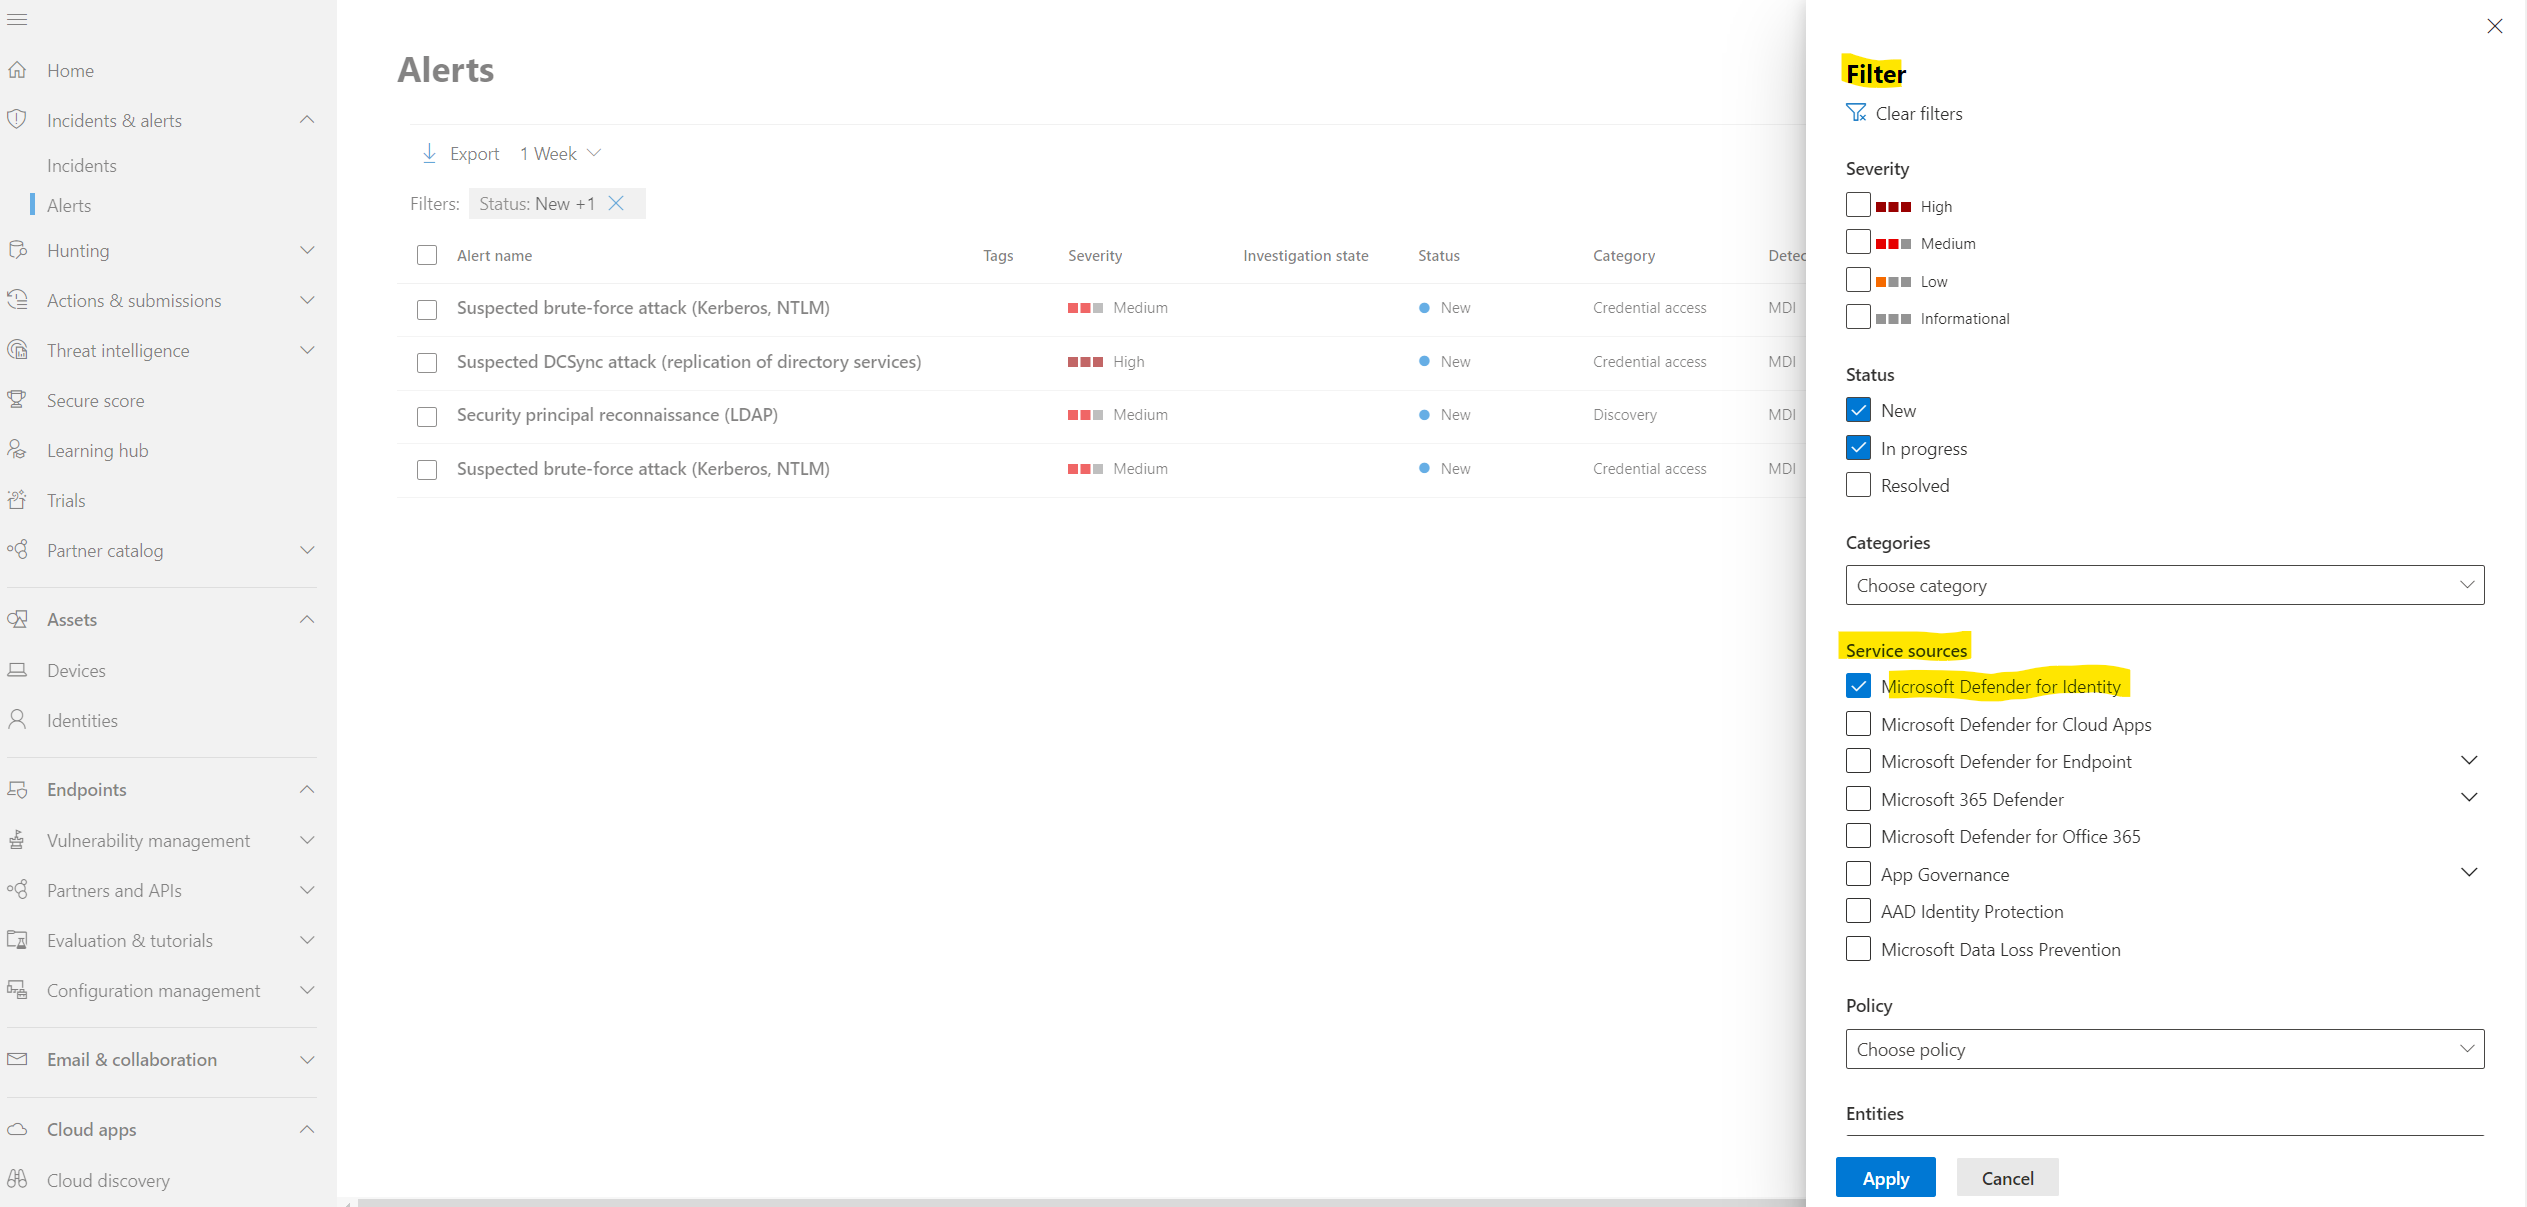
To see alerts from Defender for Identity, on the top-right select Filter, and then under Service sources select Microsoft Defender for Identity, and select Apply:
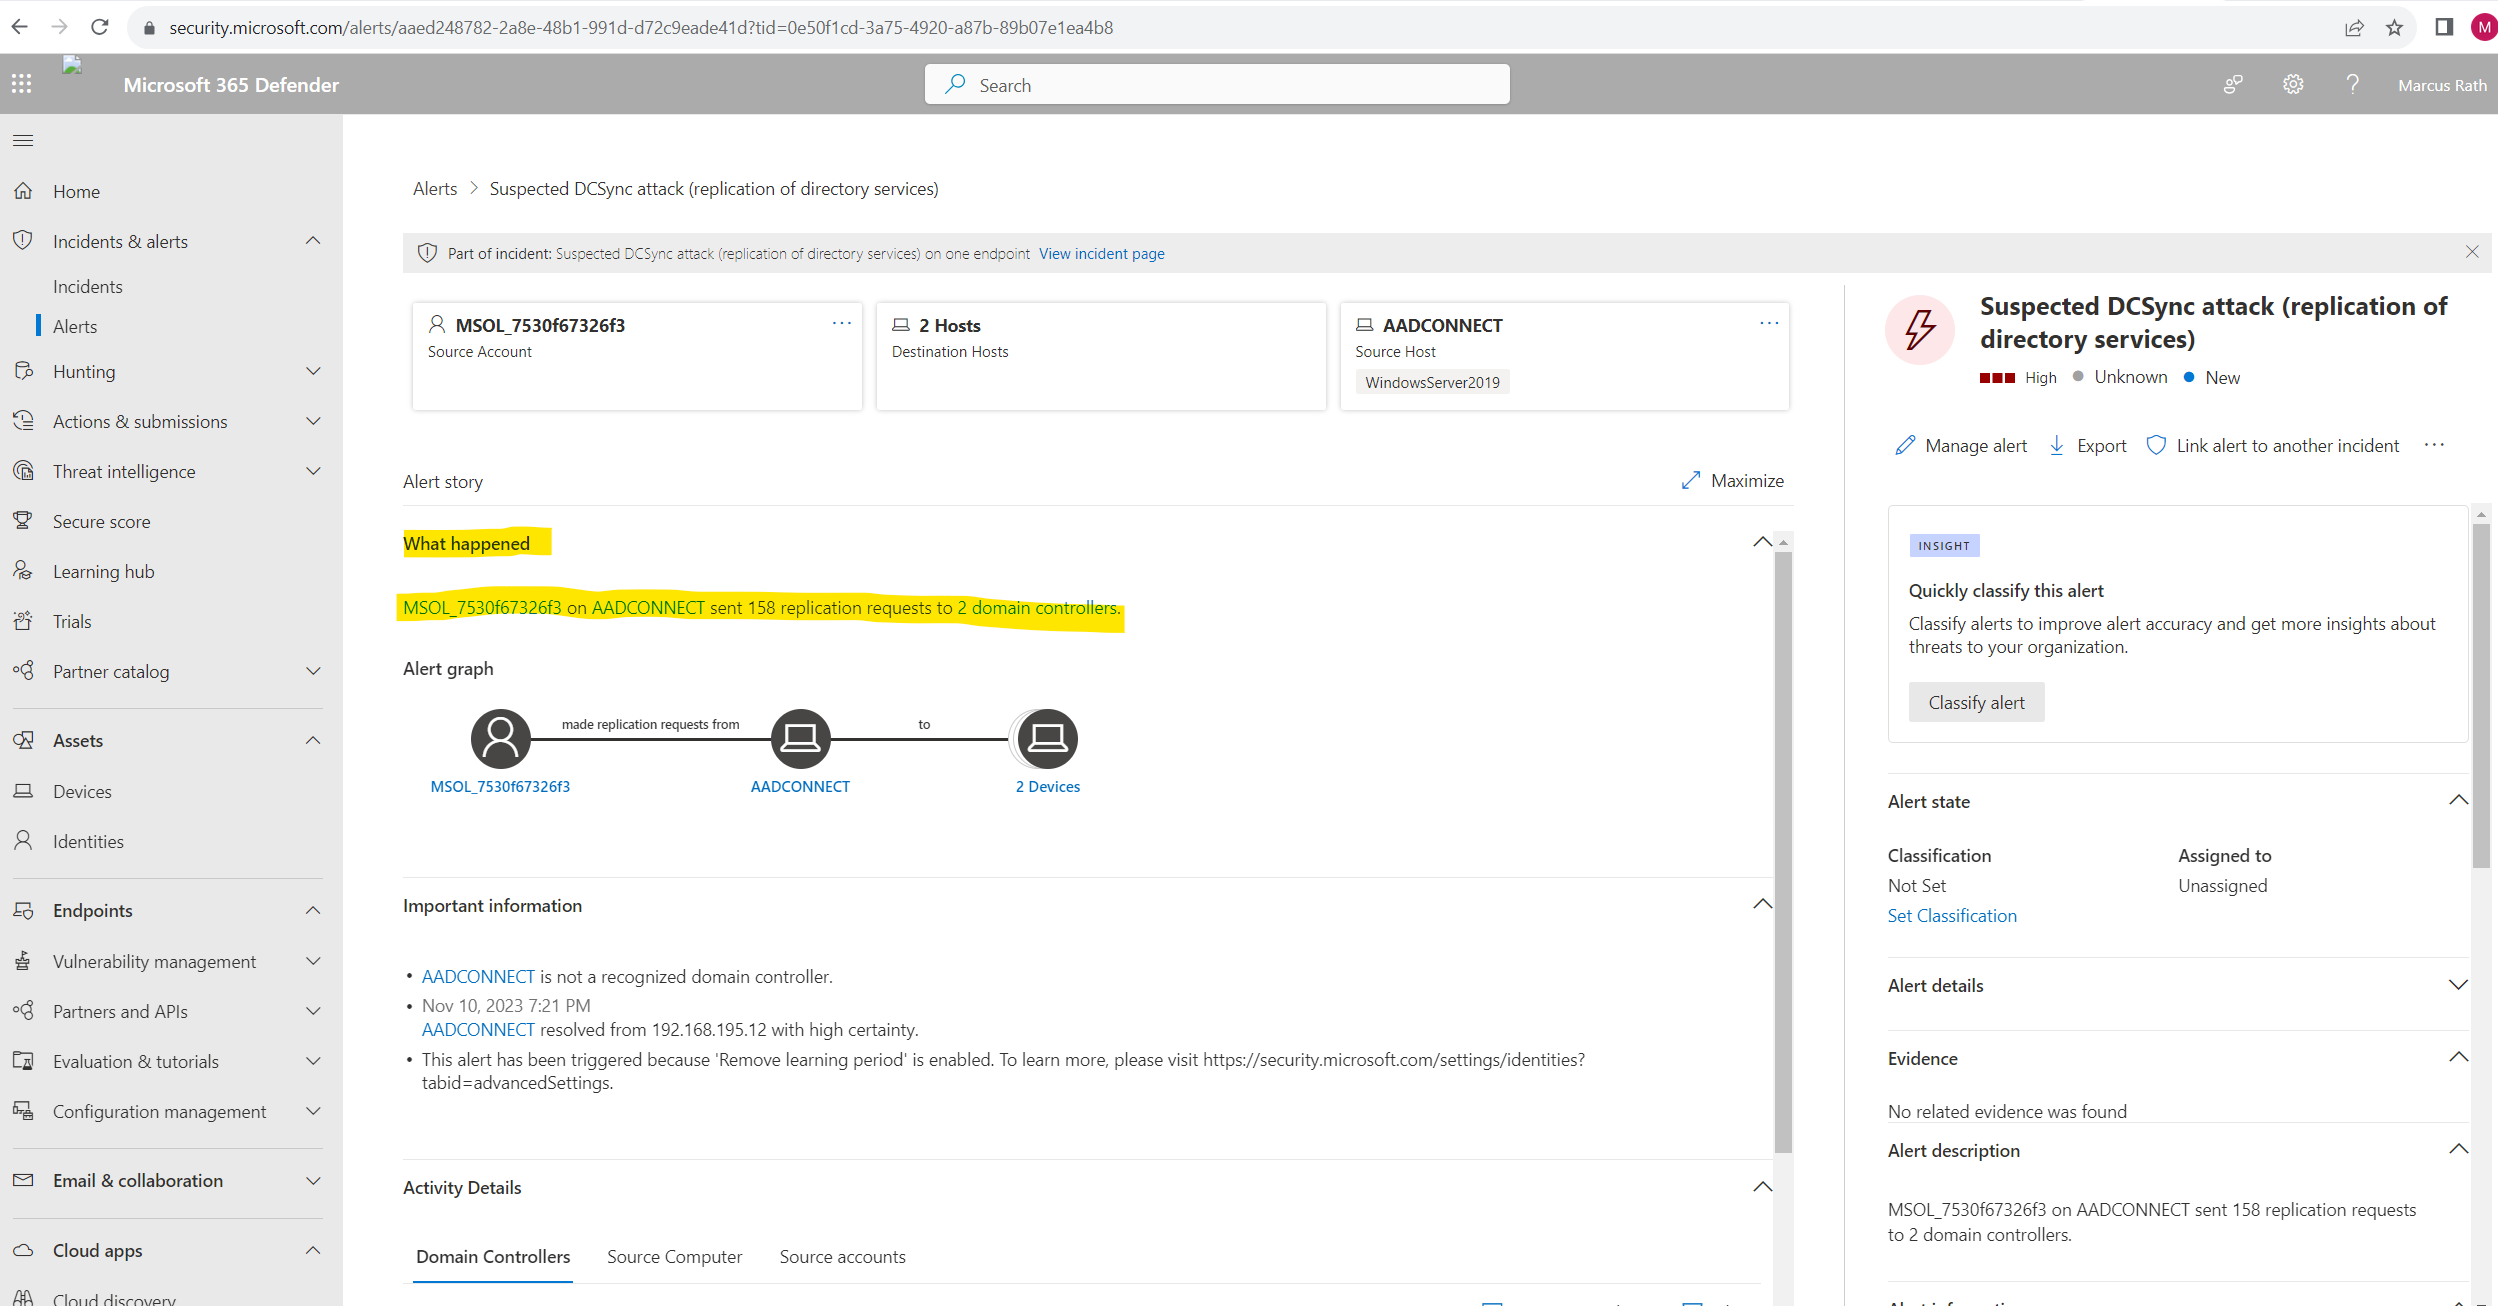
If you select the Alert name for one of the alerts, you’ll go to the page with details about the alert. In the left pane, you’ll see a summary of What happened:
Usually you will see here a lot of false alarms. In past I was using the on-premises platform Advanced Threat Analytics which is the predecessor of Defender for Identity and its mainstream support ended on January 2021.
Here also most of the alerts were just false alarms. You will need to put here first a lot of effort to classify these false alarms to not shown up in future.
Advanced Threat Analytics (ATA) to Microsoft Defender for Identity
https://learn.microsoft.com/en-us/defender-for-identity/migrate-from-ata-overview
For this example the user MSOL_7530f67326f3 is an account created by Azure Active Directory Connect (now Microsoft Entra Connect) and is used to synchronize user, groups and other directory objects between the on-premise Active Directory and Microsoft Entra ID (former Azure AD). Therefore its of course not really suspicious that this account sent 158 replication requests to 2 domain controllers.
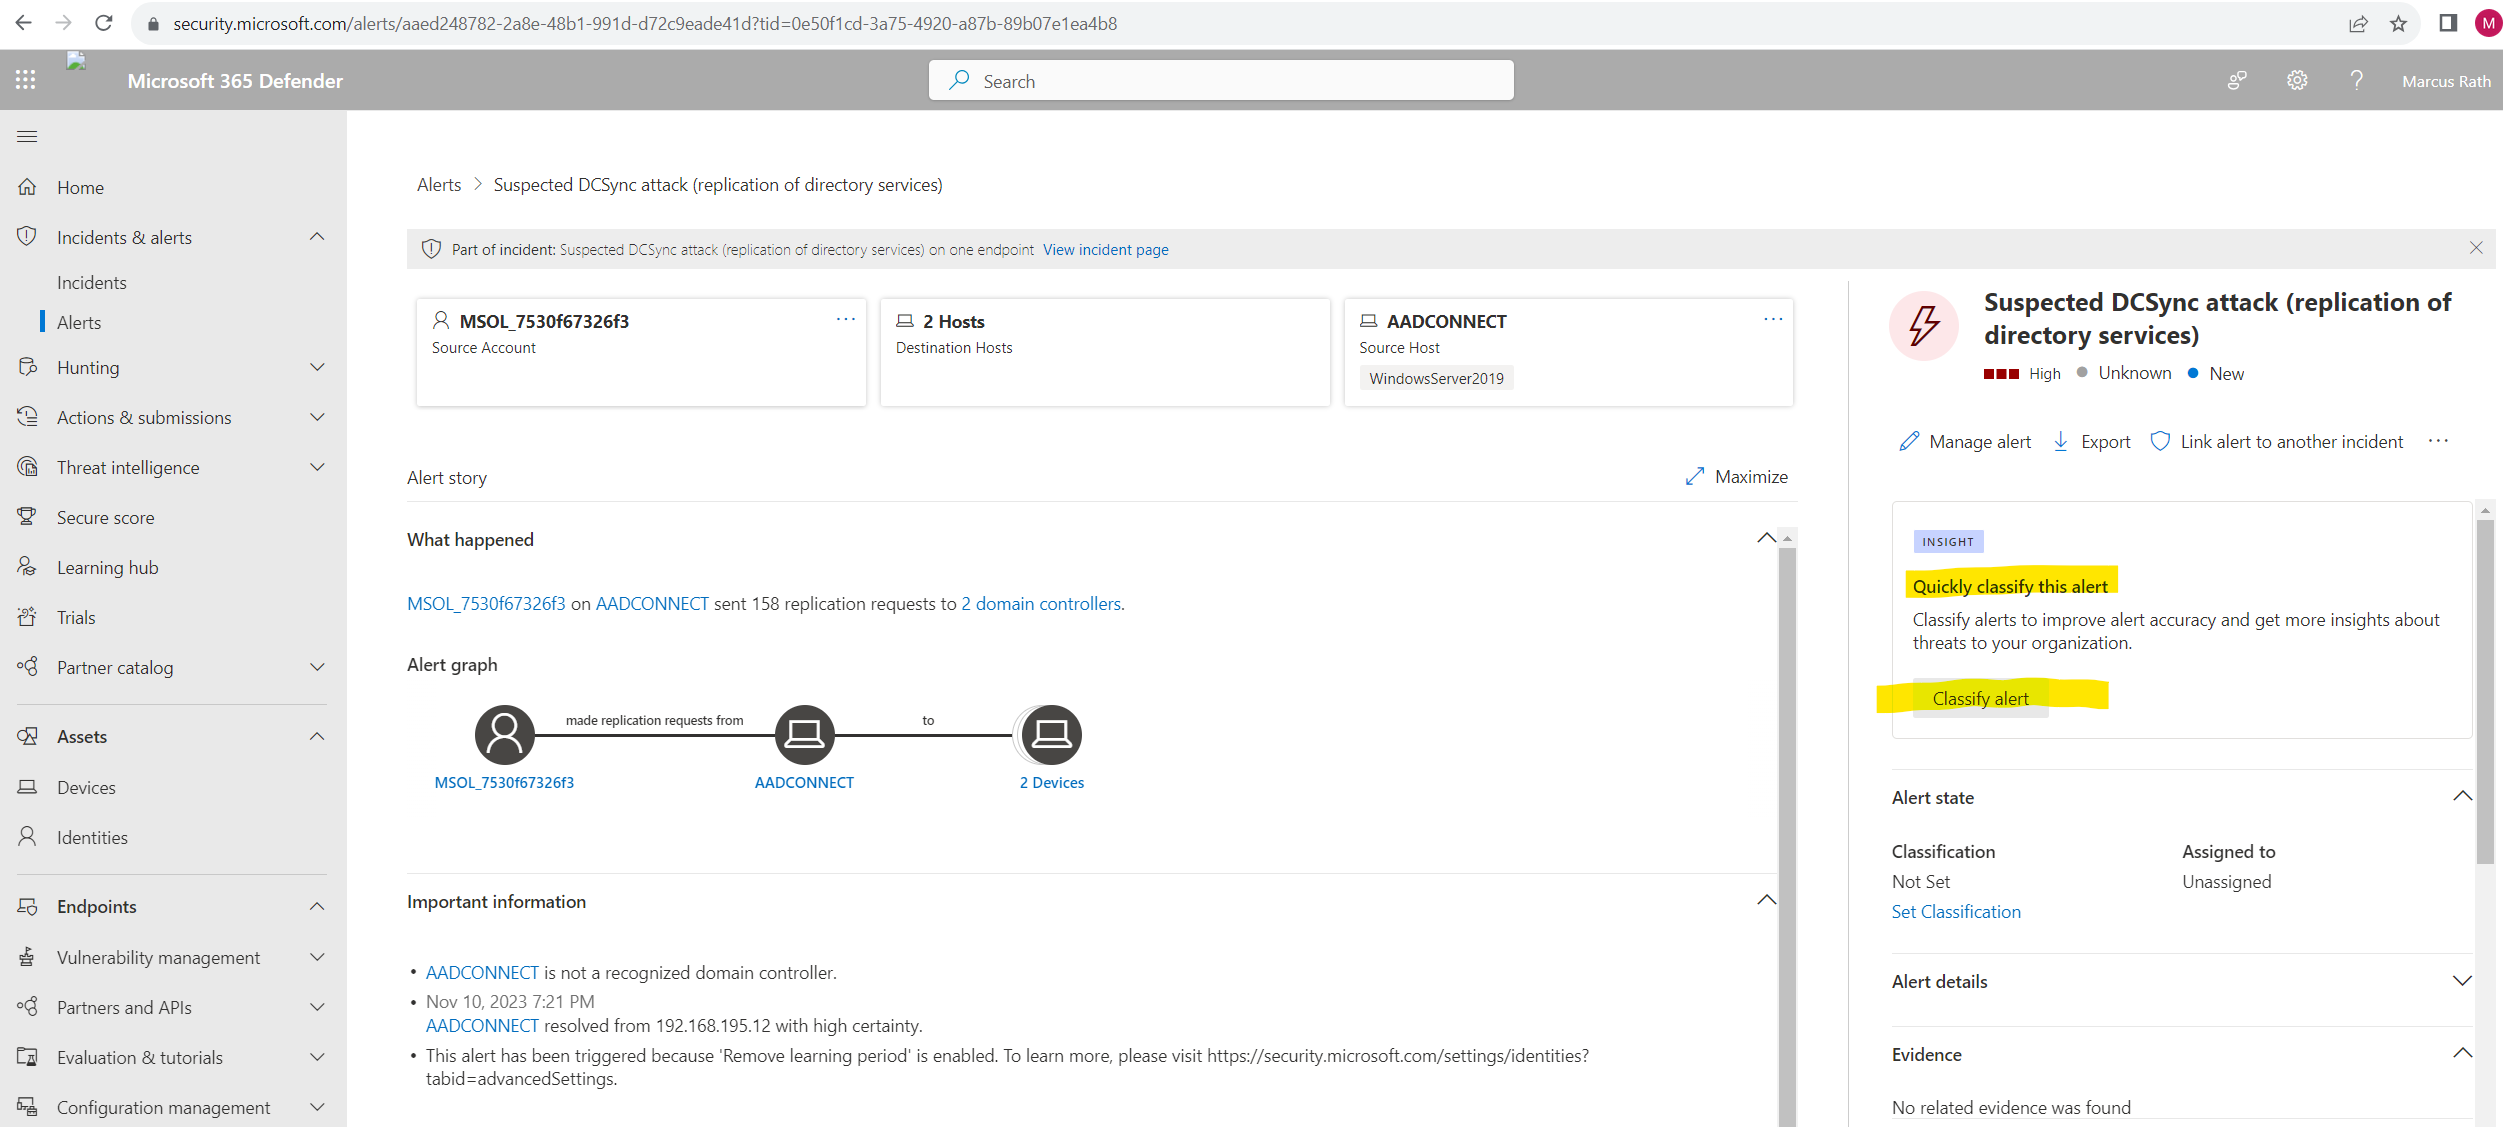
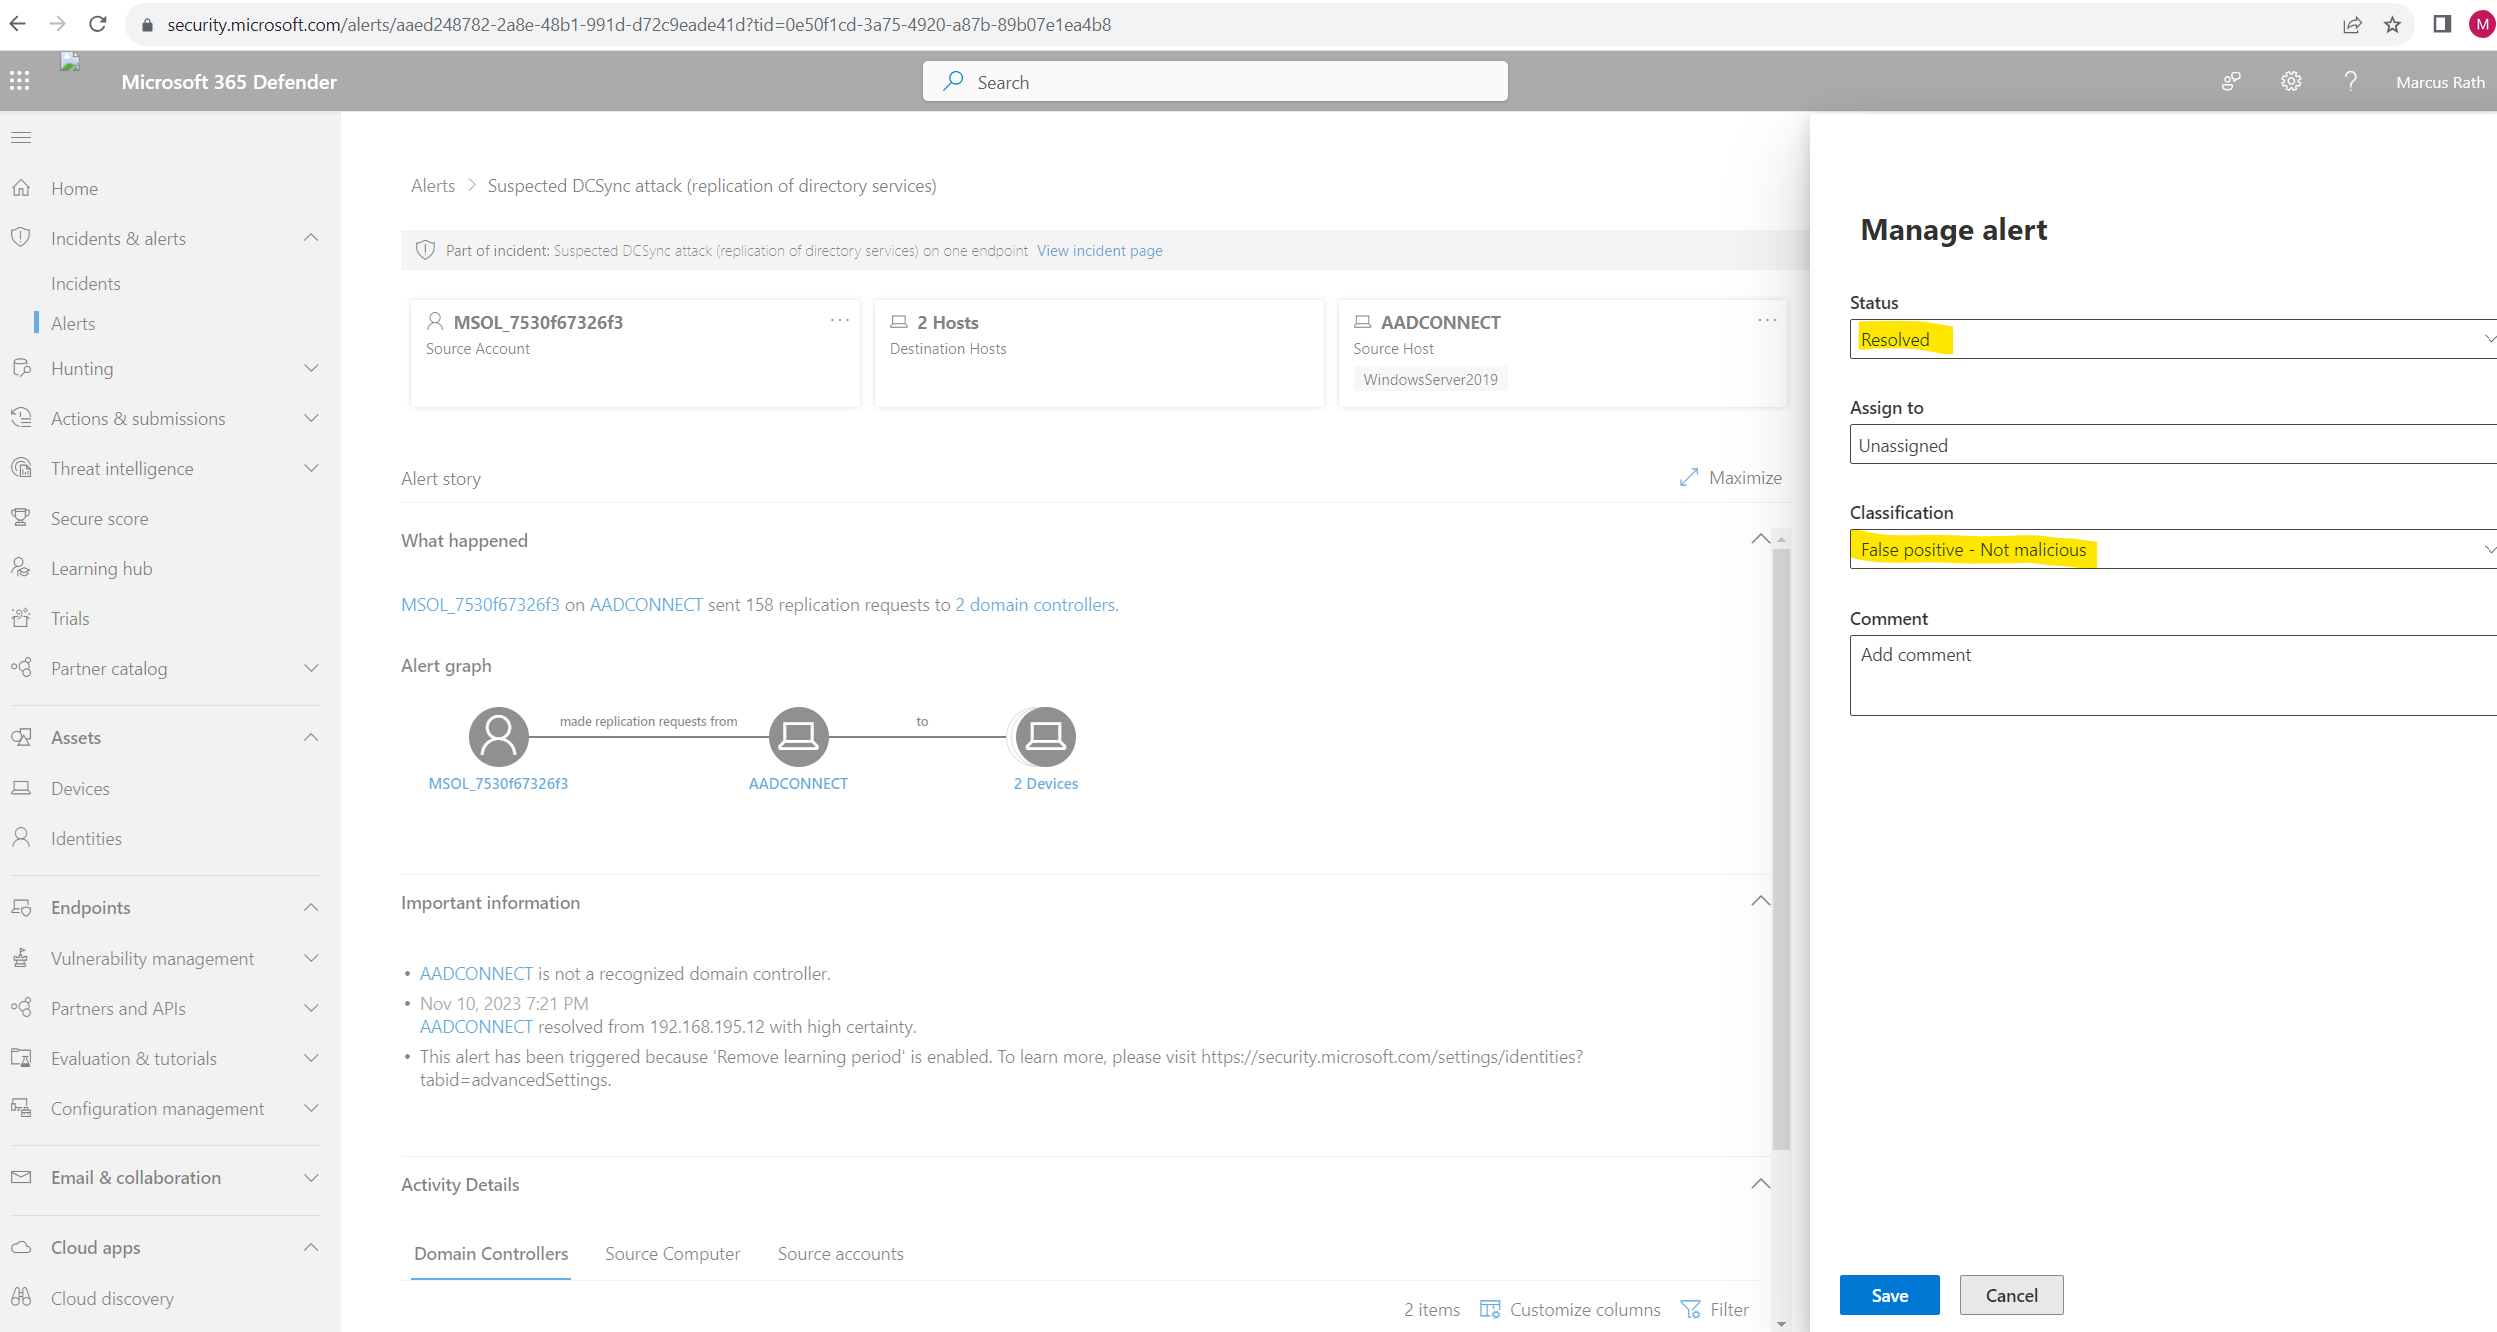
On the right pane above I can classify this alert – because its a false alarm I will designate this as False alert.
Links
Microsoft Defender for Identity documentation
https://learn.microsoft.com/en-us/defender-for-identity/What is Microsoft Defender for Identity?
https://learn.microsoft.com/en-us/defender-for-identity/what-is