Modern Azure Deployments with Terraform & GitHub – Part 1 – Introduction to Terraform, GitHub, and Infrastructure as Code on Azure
Modern cloud environments require deployments that are reproducible, scalable, and version controlled.
While deploying resources manually through the Azure Portal or command-line tools like the Azure CL, may work for small environments, larger infrastructures quickly become difficult to maintain consistently.
In this series, we will use Terraform together with GitHub to automate Azure infrastructure deployments using Infrastructure as Code (IaC) principles and modern CI/CD workflows.
In a following series coming soon, we will additionally explore the same Terraform-based Azure deployments using GitLab, which provides a more tightly integrated all-in-one DevOps platform with built-in CI/CD capabilities, runners, and deployment workflows.
This will allow us to compare Terraform automation workflows between GitHub and GitLab while building fully automated Azure infrastructure deployment pipelines.
While GitHub primarily started as a source code hosting and collaboration platform with CI/CD later added through GitHub Actions, GitLab was designed from the beginning as a more tightly integrated all-in-one DevOps platform.
Both platforms fully support automated Terraform-based Azure deployments, but GitLab often provides a more centralized native DevOps experience.
In this first part of the series, we focus on the Terraform and GitHub fundamentals required for modern Azure Infrastructure as Code deployments. We will build the initial Terraform project structure, integrate Git version control with GitHub, and deploy the first Microsoft Azure resources through Terraform.
In Part 2, we extend the Terraform project by implementing centralized remote state management and multi-environment deployment configurations. We will configure an Azure Storage Account backend for Terraform state files and prepare isolated development, testing, and production deployment environments.
In Part 3, we transform the Terraform project into a fully automated multi-environment CI/CD platform using GitHub Actions and Microsoft Azure. We will implement automated Terraform validation, planning, and deployment workflows, integrate secure Azure authentication through GitHub Secrets, deploy isolated development, testing, and production environments, and finally protect production deployments with approval workflows using GitHub Environments.
- What is Infrastructure as Code (IaC)?
- Why Terraform?
- Why GitHub?
- Preparing the Environment
- Creating the First GitHub Repository
- Creating the First Azure Resource
- Committing the Terraform Configuration to GitHub
- Updating Existing Infrastructure with Terraform
- Working from Another Computer
- Removing Resources with Terraform
- Final Cleanup
- Links
What is Infrastructure as Code (IaC)?
Infrastructure as Code (IaC) is the process of managing and deploying infrastructure through configuration files instead of manually creating resources through graphical interfaces such as the Azure Portal or command-line tools like the Azure CLI.
Traditionally, administrators often deployed resources manually by clicking through the portal or executing individual CLI commands to configure each component separately. While this may work for small environments, it quickly becomes difficult to maintain consistently in larger infrastructures and can easily lead to configuration drift and human error.
With IaC, the infrastructure definition is stored as code files describing the desired state of the environment. Tools such as Terraform then automatically deploy and manage the required Azure resources based on these definitions.
One of the biggest advantages of IaC is consistency and reproducibility. The same deployment can be executed multiple times across different environments while maintaining identical configurations. In addition, storing infrastructure definitions in GitHub enables version control, collaboration, change tracking, and integration into automated CI/CD workflows.
In this series, we will use Terraform together with GitHub and GitHub Actions to build modern and automated Azure deployment workflows based on Infrastructure as Code principles.
Why Terraform?
Terraform is one of the most widely used Infrastructure as Code tools for automating cloud and infrastructure deployments. It allows administrators and engineers to define infrastructure using simple and human-readable configuration files.
Instead of manually deploying Azure resources through the Azure Portal or Azure CLI commands, Terraform uses declarative configuration files to describe the desired infrastructure state. Terraform then determines which resources need to be created, modified, or removed to match the configuration.
One of Terraform’s major advantages is its cloud-agnostic design. While this series focuses on Microsoft Azure, Terraform also supports many other platforms and services through providers, including AWS, Google Cloud, VMware, Kubernetes, GitHub, and many more.
Terraform also introduces several important concepts for modern infrastructure management:
- Declarative deployments – Define the desired end state instead of individual deployment steps.
- Infrastructure consistency – Deploy identical environments repeatedly with minimal configuration drift.
- Version control integration – Store infrastructure definitions in GitHub together with application or deployment code.
- Automation support – Integrate deployments into CI/CD pipelines using GitHub Actions.
- State management – Terraform keeps track of deployed resources through state files.
A typical Terraform workflow usually consists of the following steps:
Write Terraform Code
         │
         ▼
terraform init
         │
         ▼
terraform plan
         │
         ▼
terraform apply
         │
         ▼
Azure Resource Deployment
In the following sections of this series, we will use Terraform to deploy and manage Azure infrastructure while gradually building automated deployment workflows with GitHub and GitHub Actions.
More about the basics to provision resources in Azure by using Terraform you will also find in my following post.
Why GitHub?
GitHub is one of the most widely used platforms for version control, collaboration, and software development workflows. In modern Infrastructure as Code environments, GitHub is commonly used to store Terraform configurations, track infrastructure changes, and automate deployments.
Instead of storing Terraform files locally on a workstation, the infrastructure definitions are managed centrally inside a GitHub repository. This provides several important advantages such as version history, collaboration, rollback capabilities, and change tracking through commits and pull requests.
GitHub also integrates natively with GitHub Actions, which allows infrastructure deployments to be automated directly from the repository. This enables CI/CD workflows where Terraform deployments can automatically run after changes are committed or merged.
Typical use cases include:
- Storing Terraform configuration files centrally
- Tracking infrastructure changes through Git commits
- Reviewing changes with pull requests
- Automating deployments using GitHub Actions
- Managing collaboration across teams and environments
The following diagram illustrates a typical Terraform and GitHub workflow:
Administrator / Engineer
            │
            ▼
Terraform Configuration Files
            │
            ▼
GitHub Repository
            │
            ▼
GitHub Actions Pipeline
            │
            ▼
Automated Azure Deployment
In this series, we will use GitHub not only as a source control platform, but also as the foundation for building automated Azure deployment pipelines using GitHub Actions and Terraform.
Preparing the Environment
Before we can start deploying Azure infrastructure with Terraform, we first need to prepare the local environment and install the required tools.
For this series, we will use the following components:
- Terraform – Infrastructure as Code tool used to deploy and manage Azure resources
- Azure CLI – Command-line interface used for Azure authentication and management
- GitHub – Repository platform used for version control and CI/CD workflows
- Git – Version control system used to interact with GitHub repositories
- Visual Studio Code – Recommended editor for Terraform development
Installing Terraform
Terraform can be downloaded from the official HashiCorp website: Terraform Downloads
I will download here the Windows AMD64 binary. From the download, extract the executable to a directory of your choosing (for example, c:terraform).
Update your system’s global path to the executable.
Open a terminal window.
Verify the global path configuration and that Terraform is available by running:
PS> terraform -version

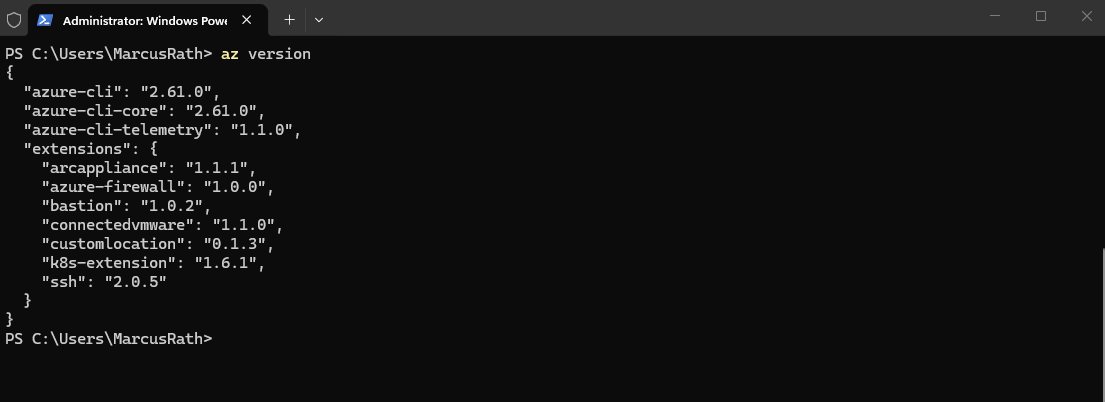
Installing the Azure CLI
The Azure CLI is required to authenticate against Azure and allows Terraform to use the currently authenticated Azure session.
The Azure CLI can be downloaded from Microsoft: Install Azure CLI
After installation, verify the installation with:
PS> az version
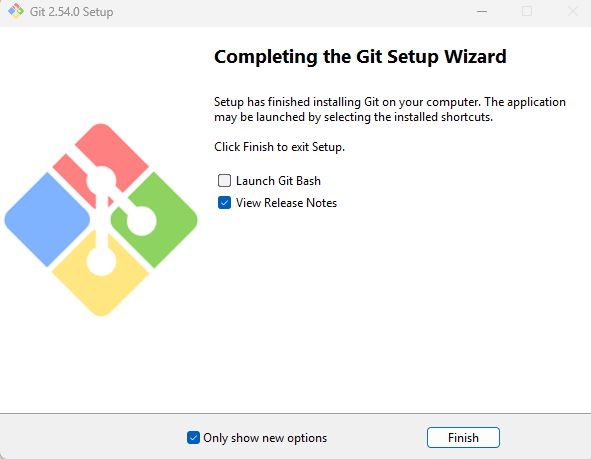
Installing Git
Git is required to clone repositories, manage version control, and push Terraform configurations to GitHub.
The Git installation for Windows also includes additional components such as Git Bash, Git Credential Manager for authentication handling, and command-line integration for tools such as PowerShell and Visual Studio Code.
Git can be downloaded from: Git Downloads
I will download and install the Windows/x64 Setup.

After installing Git, the setup wizard also provides the option to launch Git Bash.
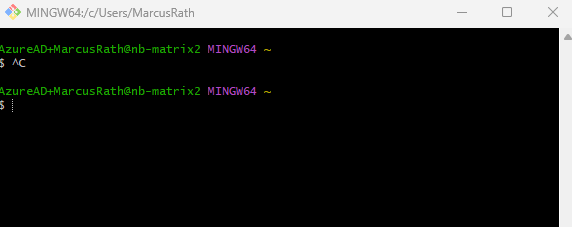
Git Bash opens a Linux-like command-line environment on Windows and is commonly used for Git operations and development workflows.
When starting Git Bash for the first time, a terminal window similar to the following appears:
Git Bash can be used to execute Git commands, Terraform commands, Azure CLI commands, and many common Linux-style shell commands directly from Windows.
The Git installation also automatically adds the Git executable to the Windows system path. This allows Git commands to be executed directly from standard Windows terminals such as Windows PowerShell or the Windows Command Prompt without requiring Git Bash.
While Git Bash provides a Linux-like shell environment with additional Unix utilities, many users today work directly from PowerShell since Git, Terraform, and the Azure CLI integrate seamlessly with the standard Windows terminal environment.
PS> git --version

Installing Visual Studio Code and recommended Extensions
While any editor can be used, Visual Studio Code provides excellent support for Terraform and GitHub workflows.
Download Visual Studio Code.
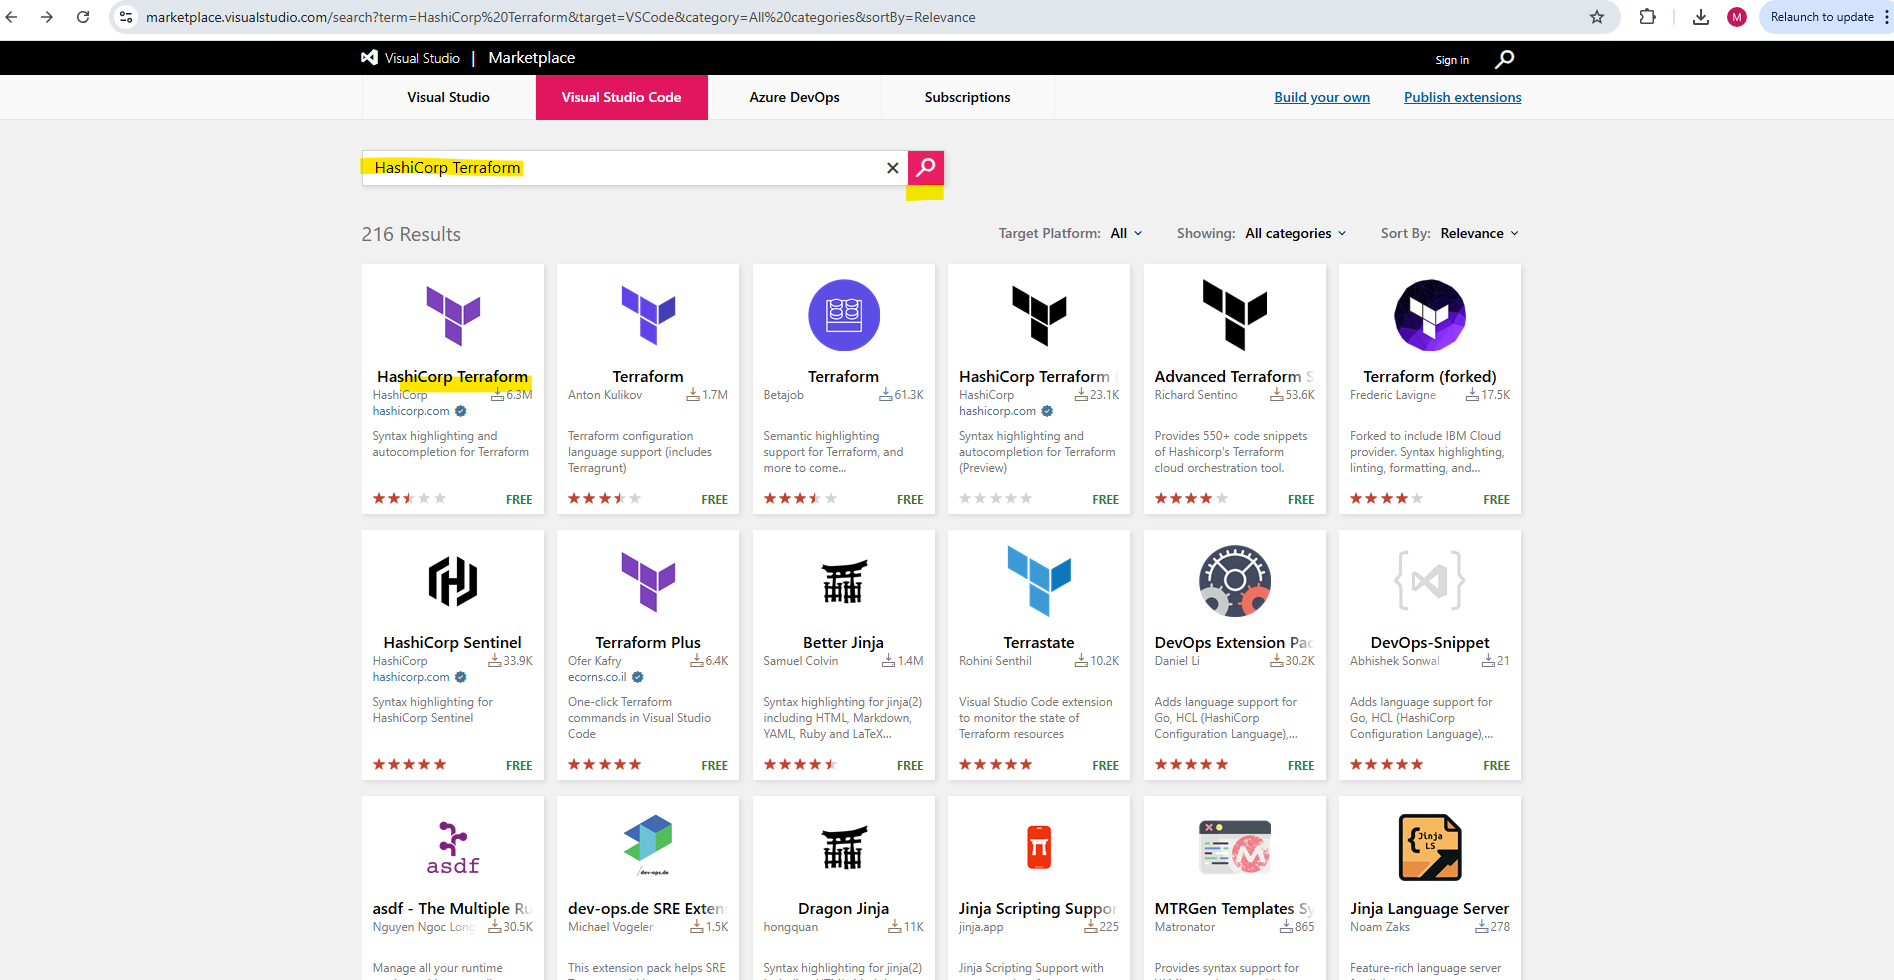
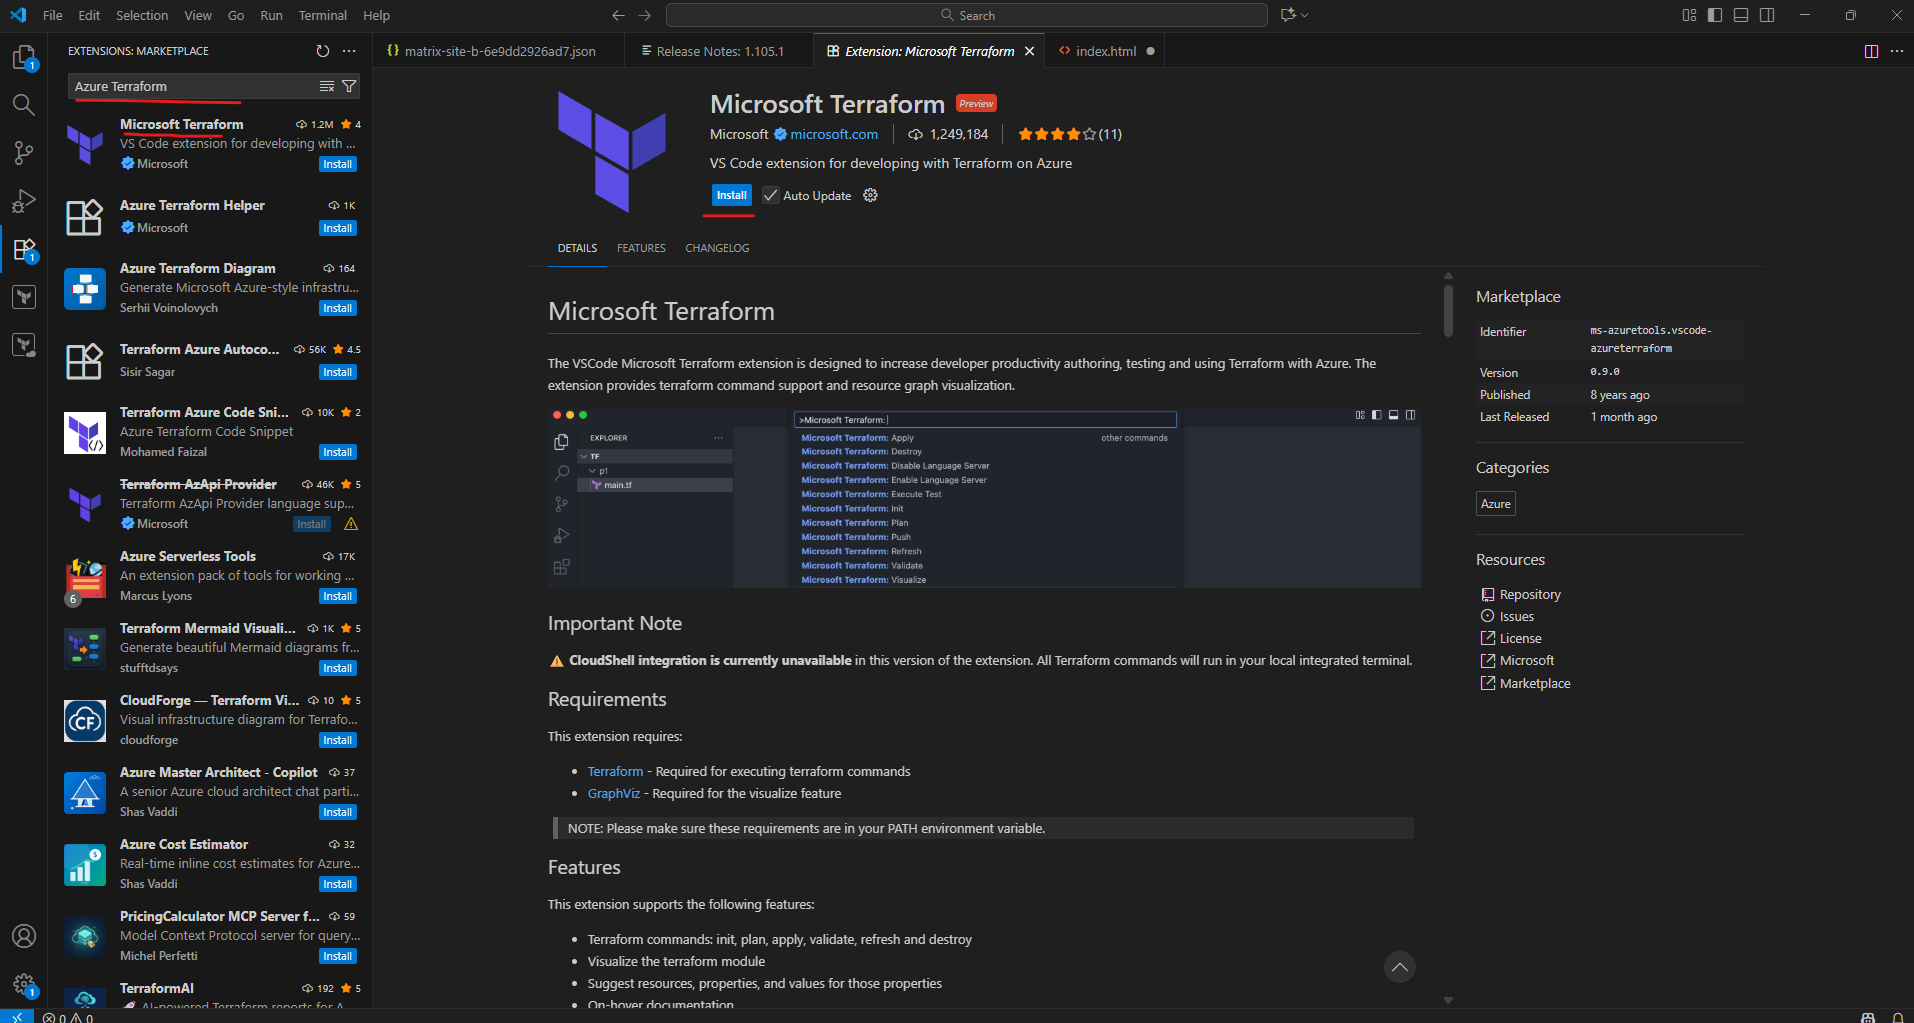
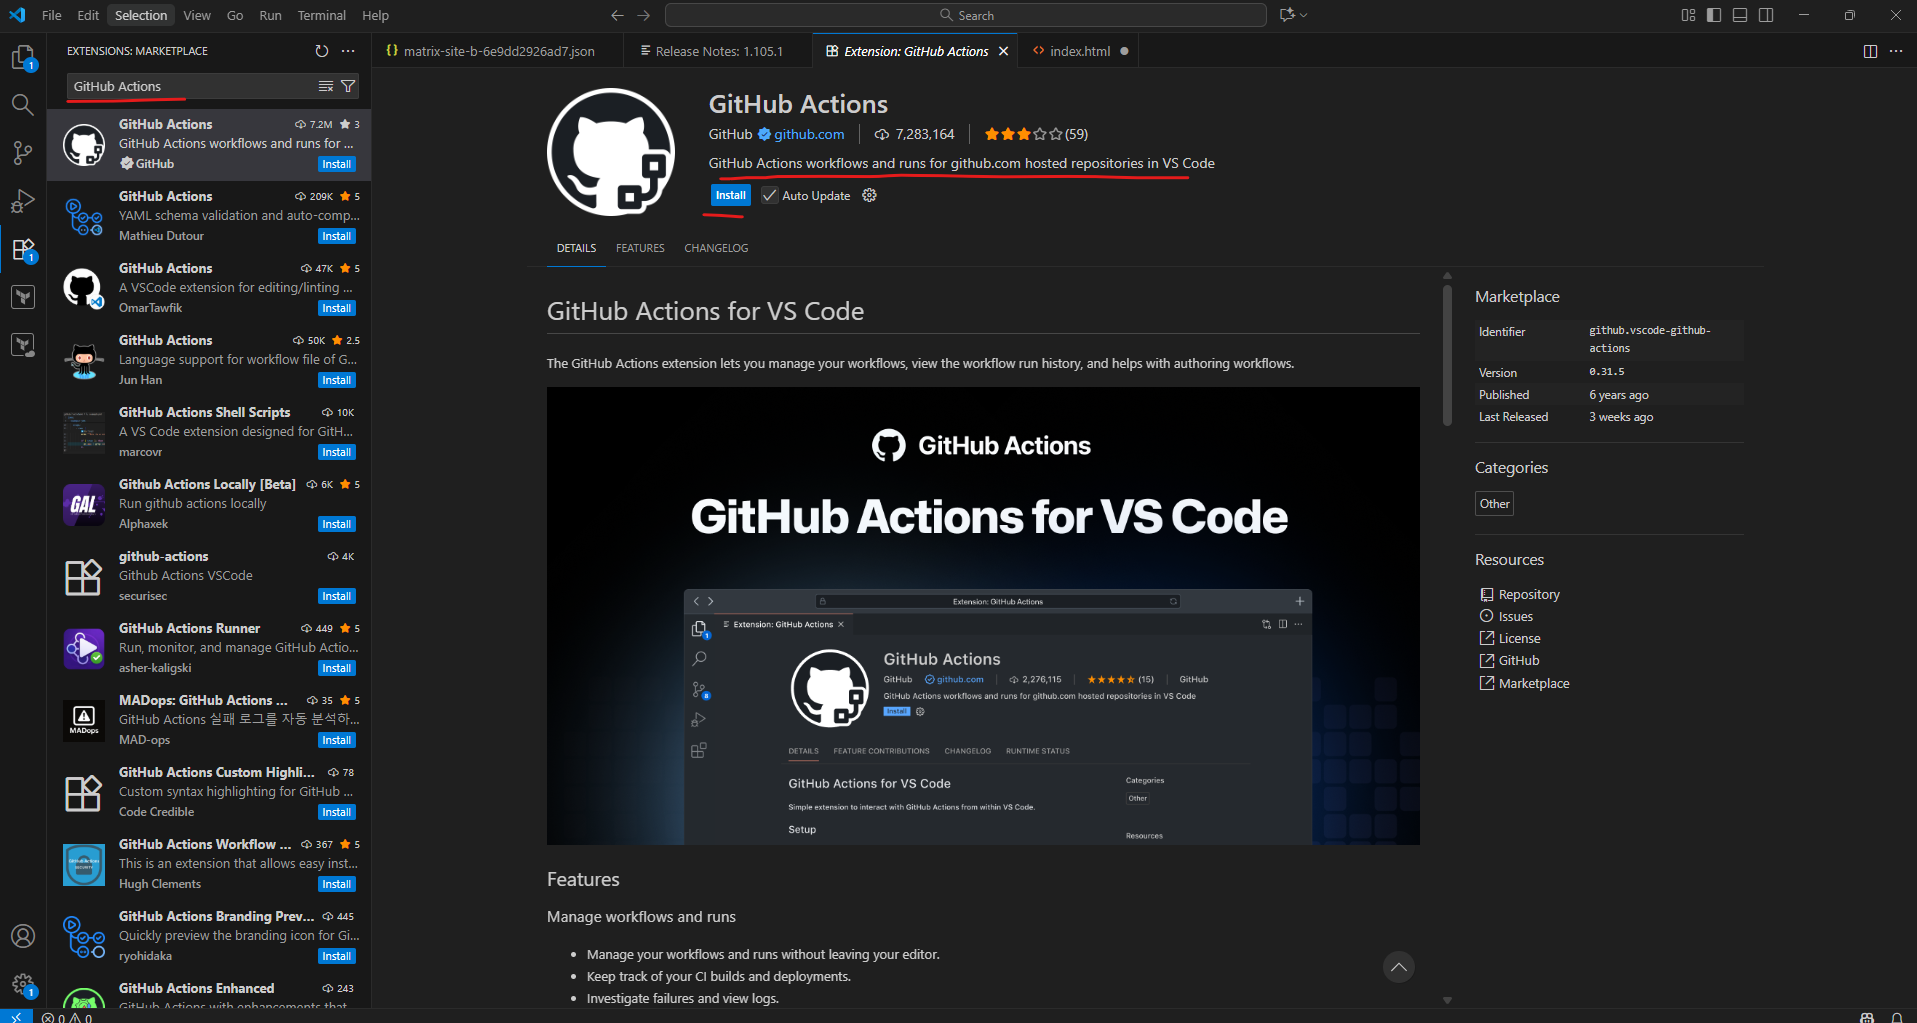
Recommended extensions:
- HashiCorp Terraform
- Azure Terraform
- GitHub Actions
These extensions provide syntax highlighting, Terraform validation, IntelliSense, and GitHub integration directly inside the editor.
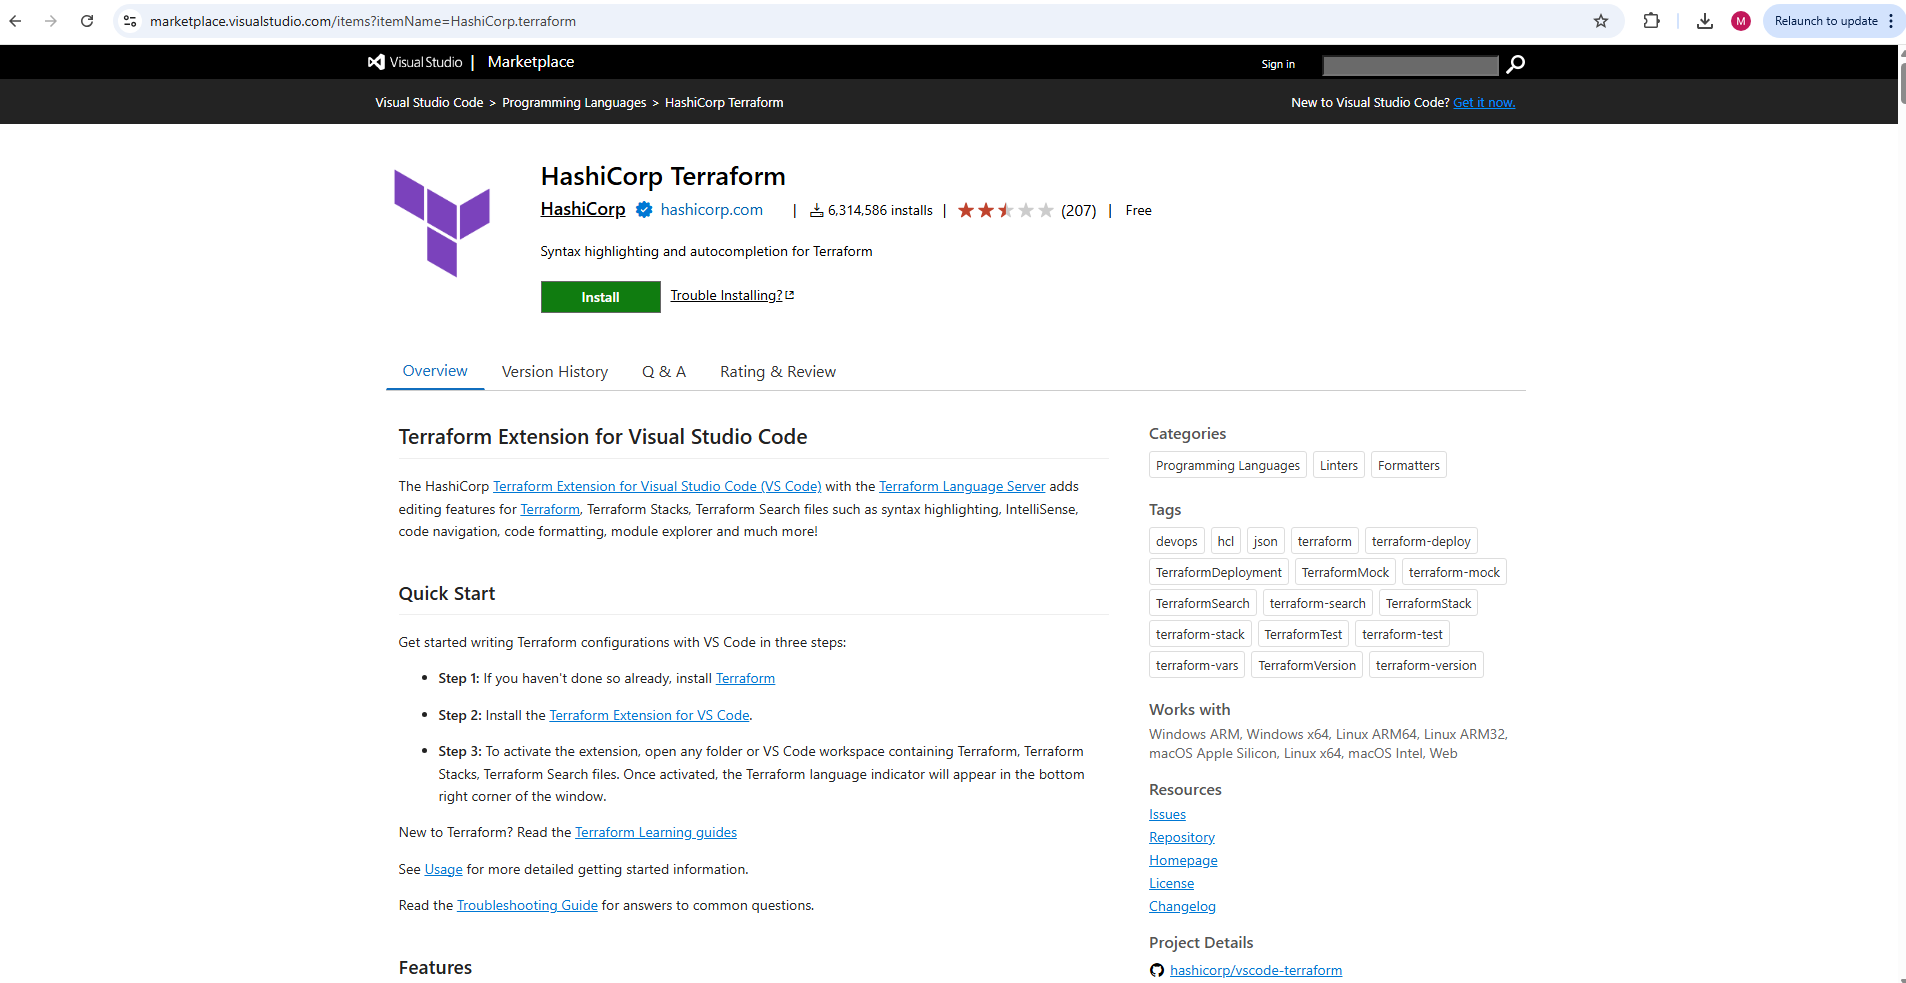
The extensions we will find here.
They can be installed directly from the Visual Studio Marketplace by clicking the Install button, which automatically opens Visual Studio Code to start the installation process.
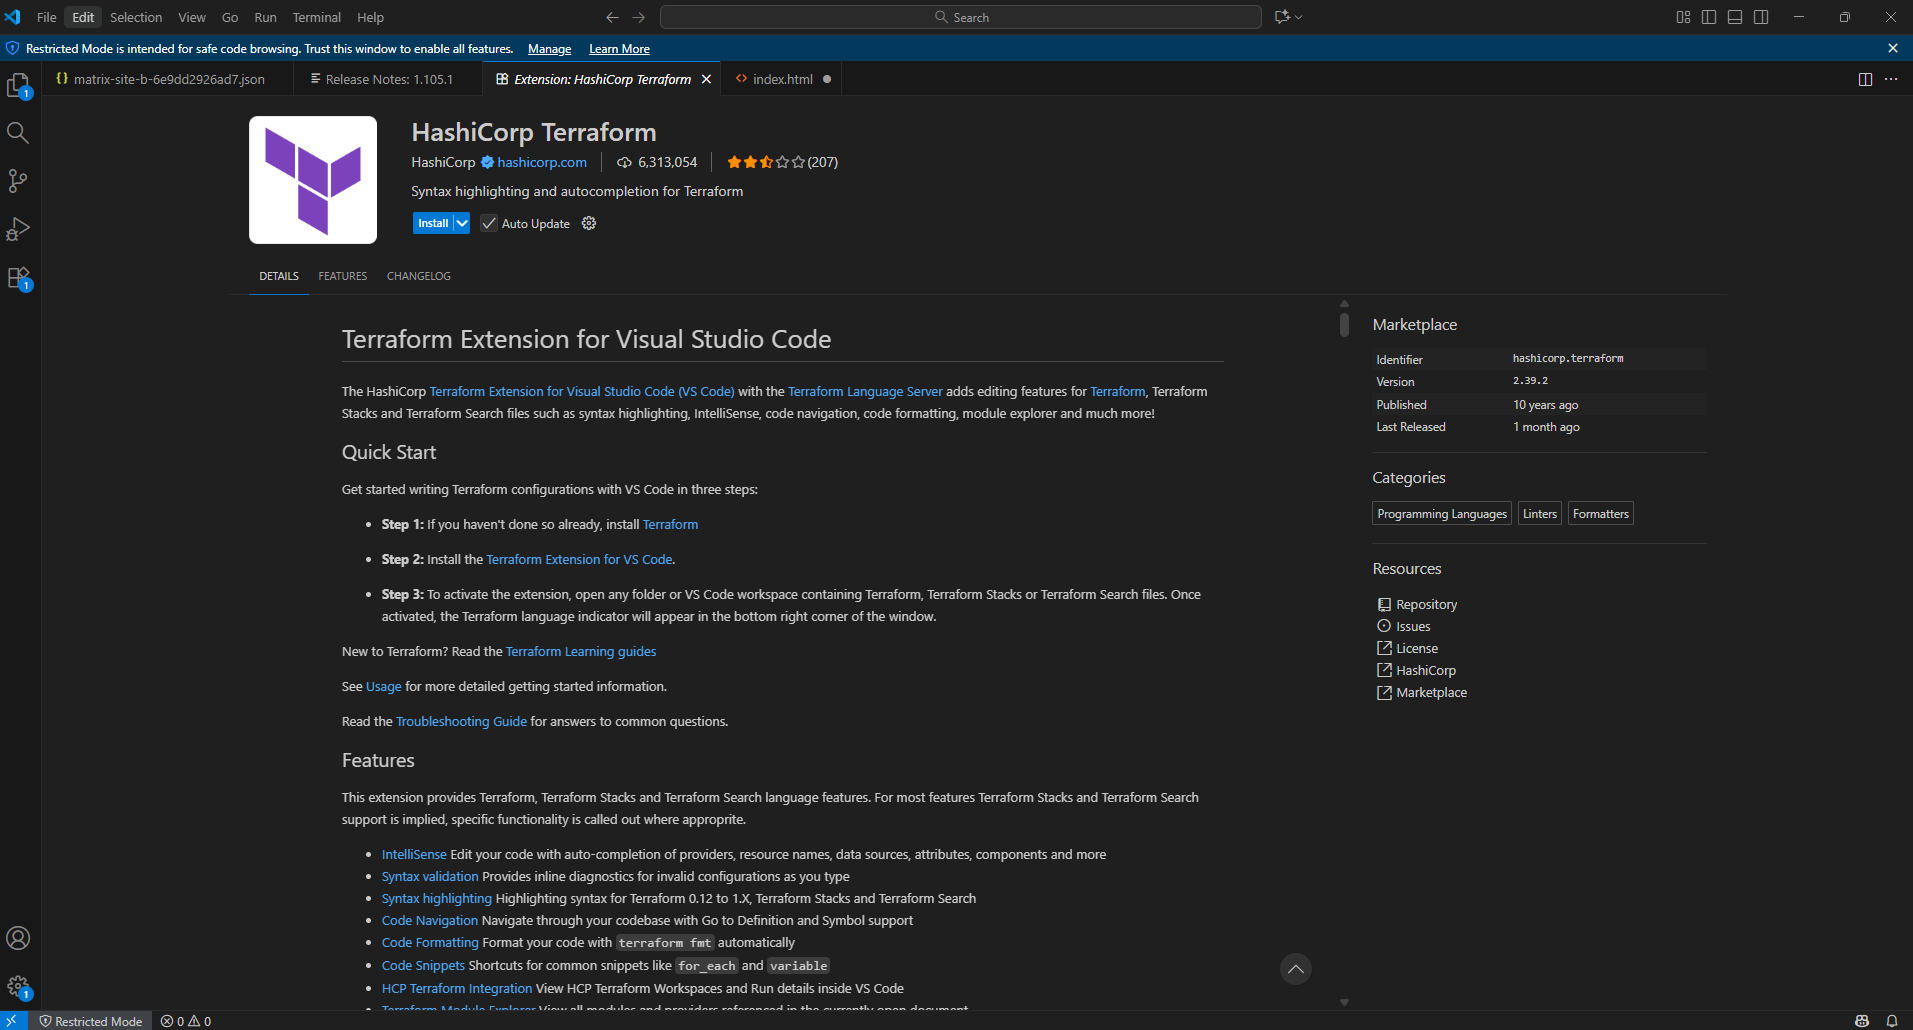
Alternatively, extensions can also be installed directly inside Visual Studio Code by opening the Extensions view and searching for the desired extension name.
Clicking on Install will open Visual Studio Code.
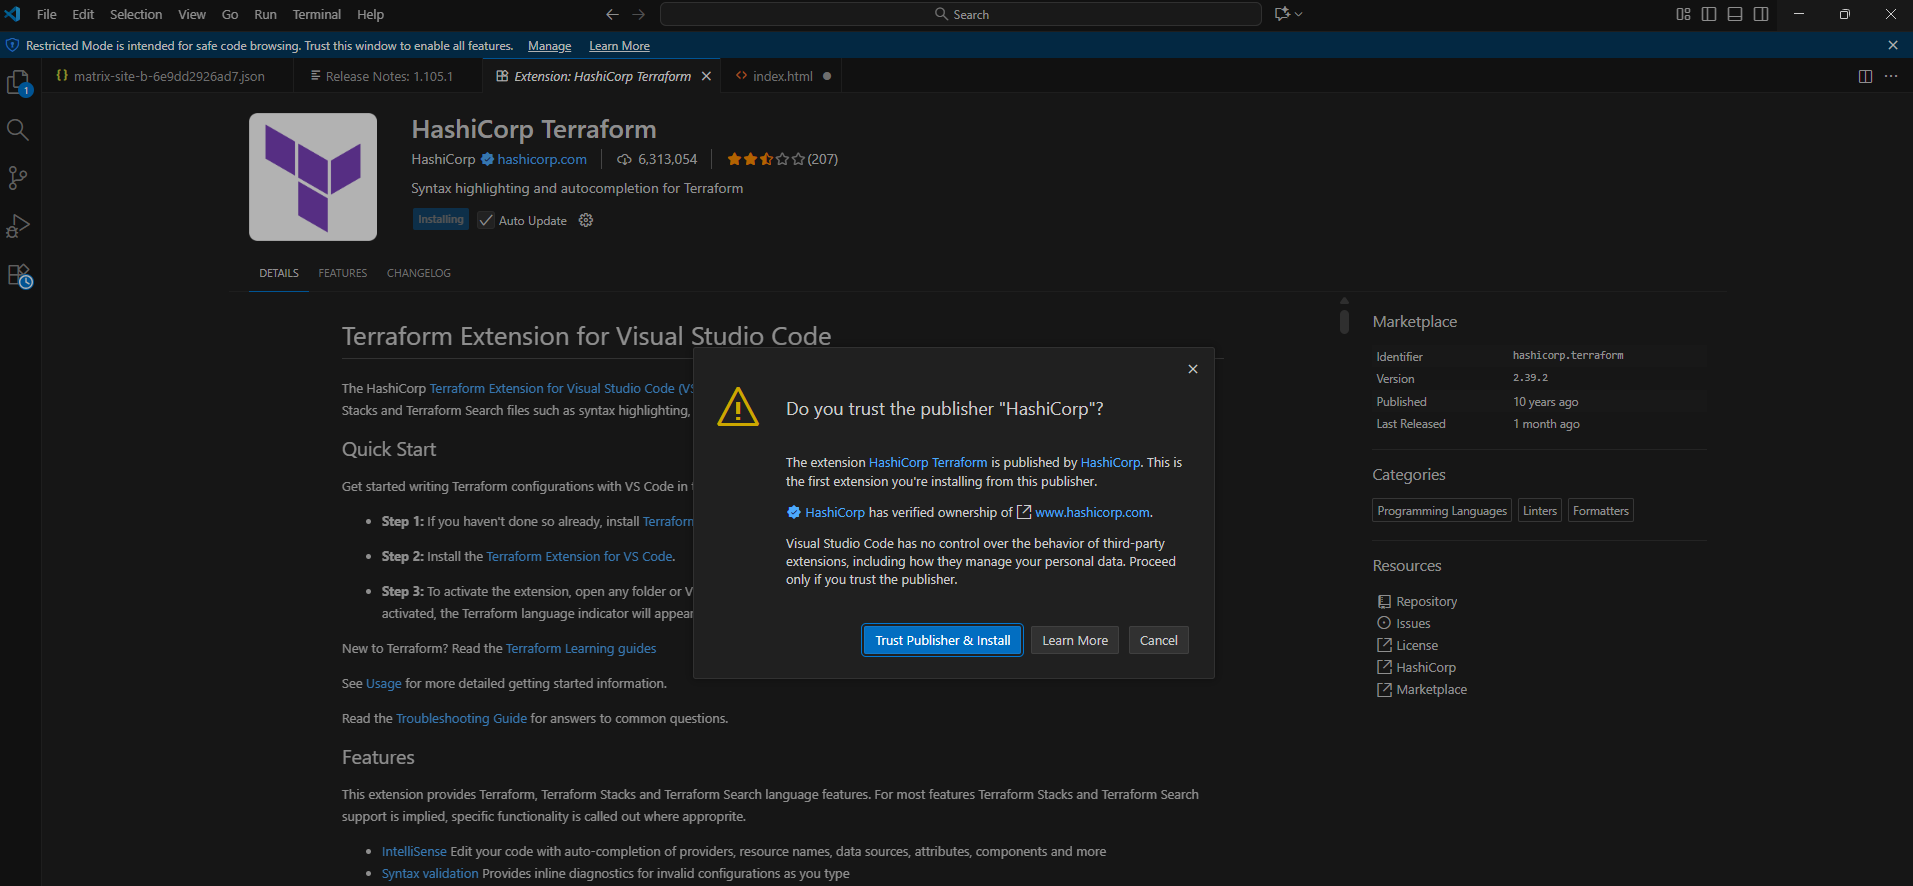
The installation we need to trigger in Visual Studio Code finally
All installed extensions in Visual Studio Code we will see here. As mentioned we can also search and install extensions directly from Visual Studio Code.
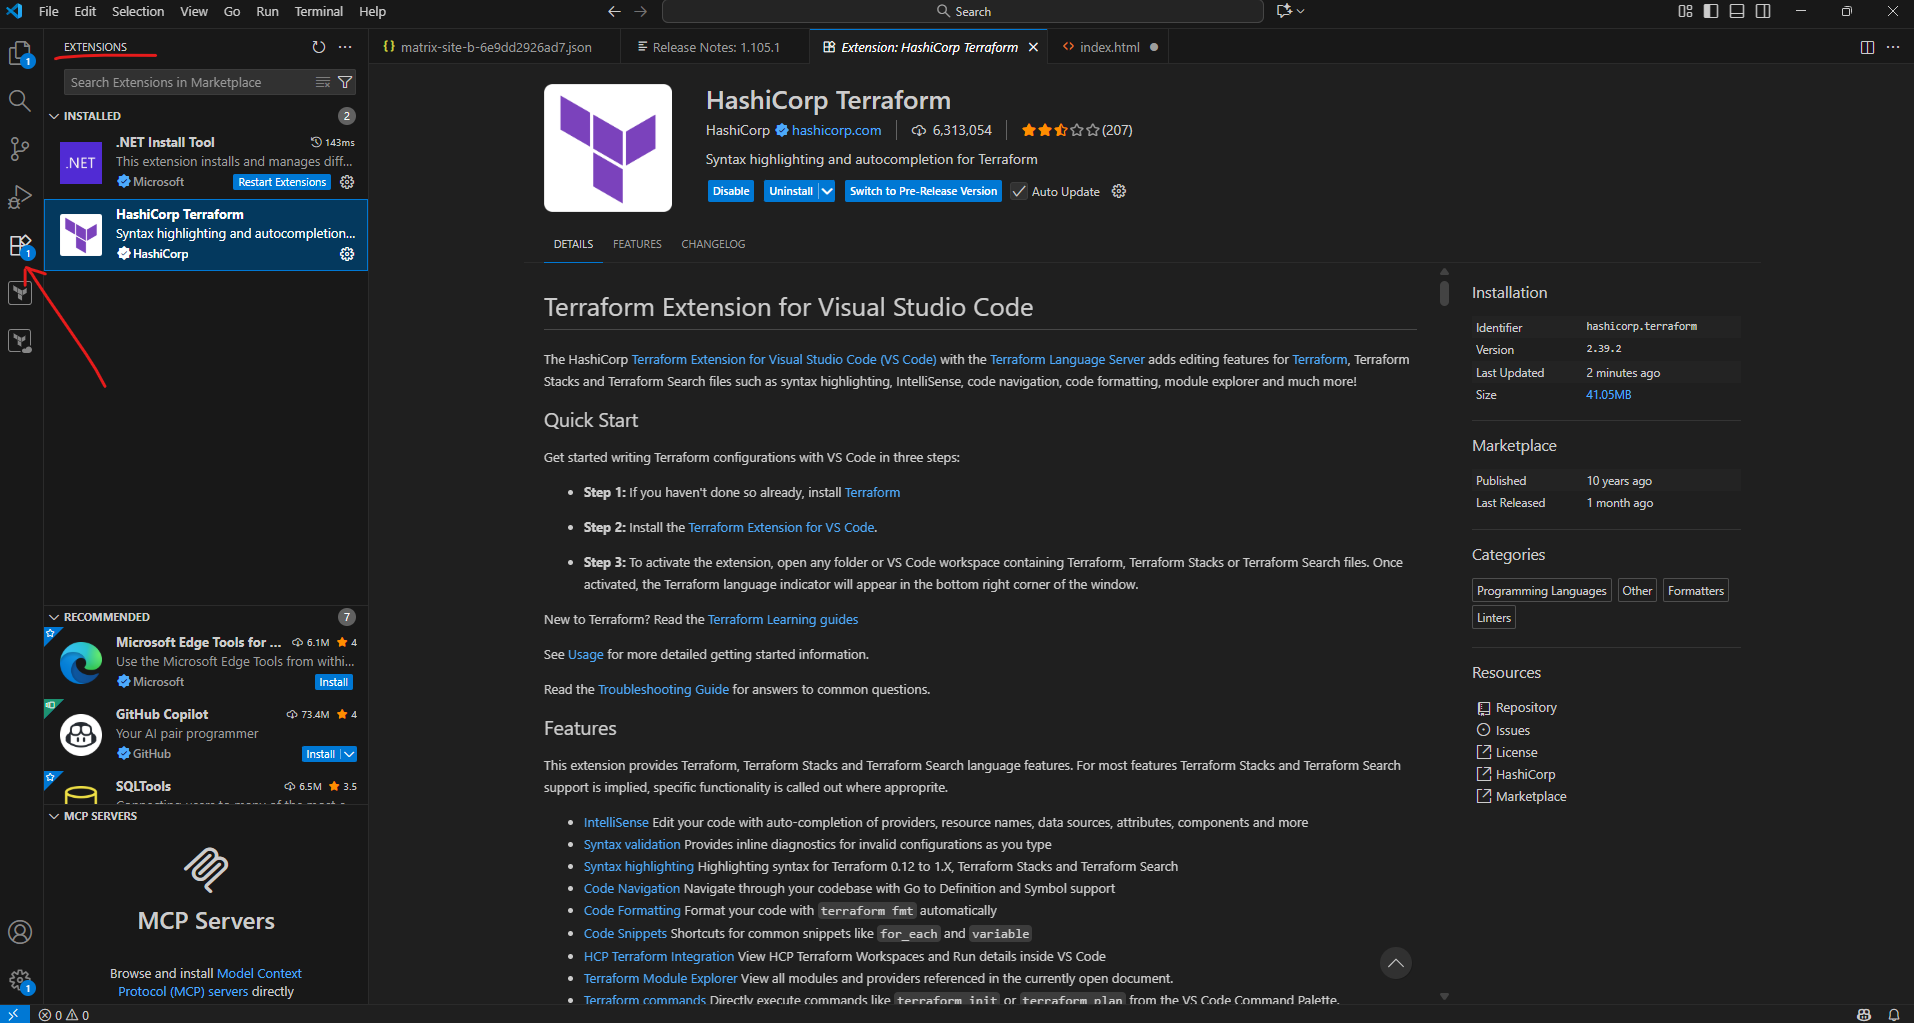
Below e.g. I will search for the Azure Terraform extension which finally is the Microsoft Terraform extension shown below.
Signing in to Azure
After installing the required tools, we can authenticate to Azure using the Azure CLI.
Open a PowerShell or terminal window and run:
This command opens a browser window where we can authenticate with our Azure account.
PS> az login
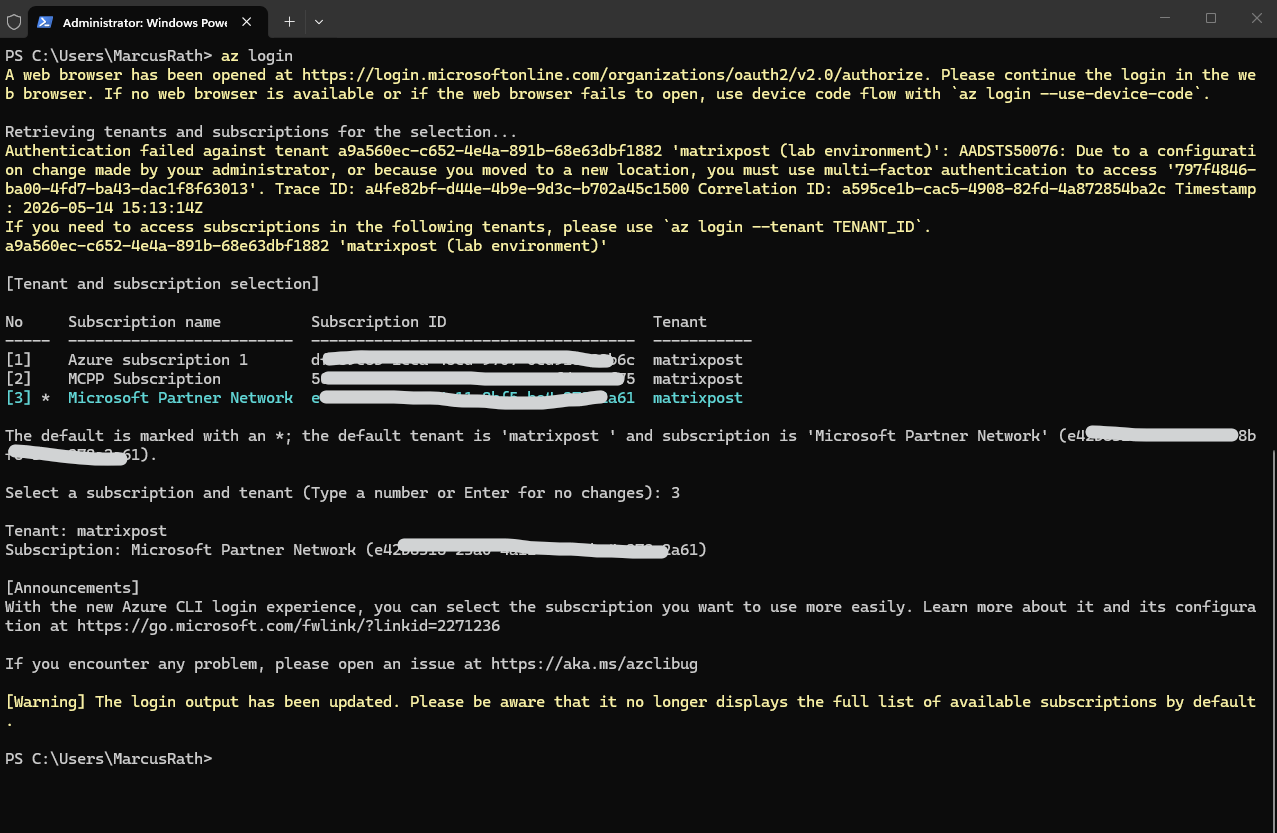
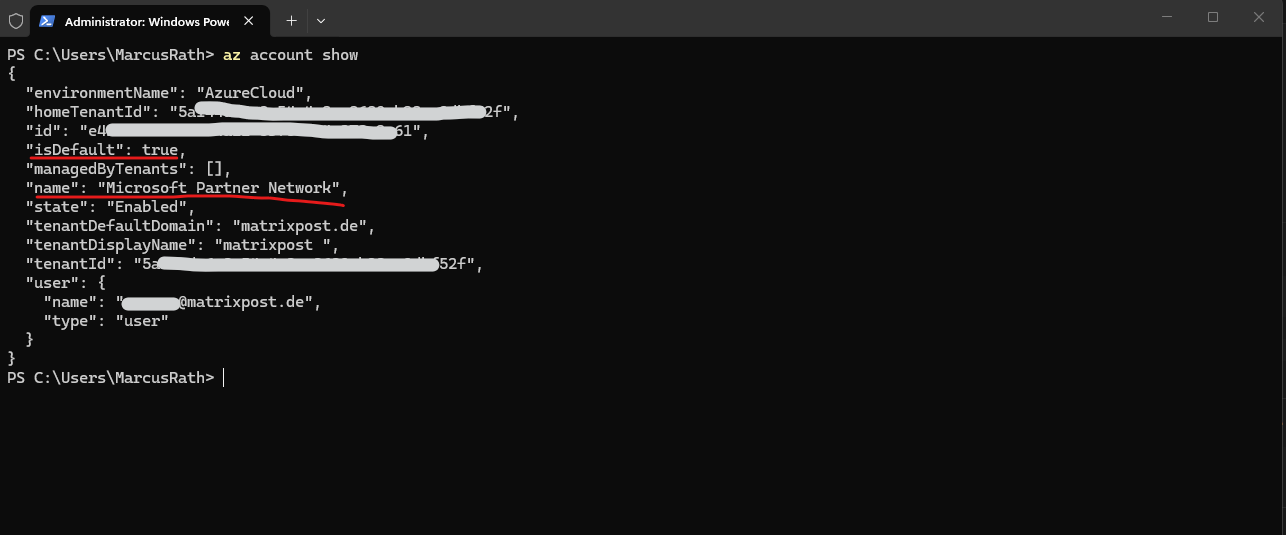
After a successful login, we can verify the active subscription and tenant context with:
After authenticating once with
Azure CLI, authentication tokens are cached locally and reused automatically for future commands.
PS> az account show
If multiple Azure subscriptions are available, they can be listed with:
PS> az account list
To switch to a different subscription:
PS> az account set --subscription "<subscription-name-or-id>"
At this point, the local environment is fully prepared and ready for the first Terraform deployment against Microsoft Azure.
Creating the First GitHub Repository
After preparing the local environment, we can now create our first GitHub repository which will store the Terraform configuration files for this series.
In modern Infrastructure as Code environments, platforms such as GitHub are commonly used to centrally manage infrastructure definitions, track changes through version control, and later automate deployments using CI/CD pipelines.
Creating a New Repository
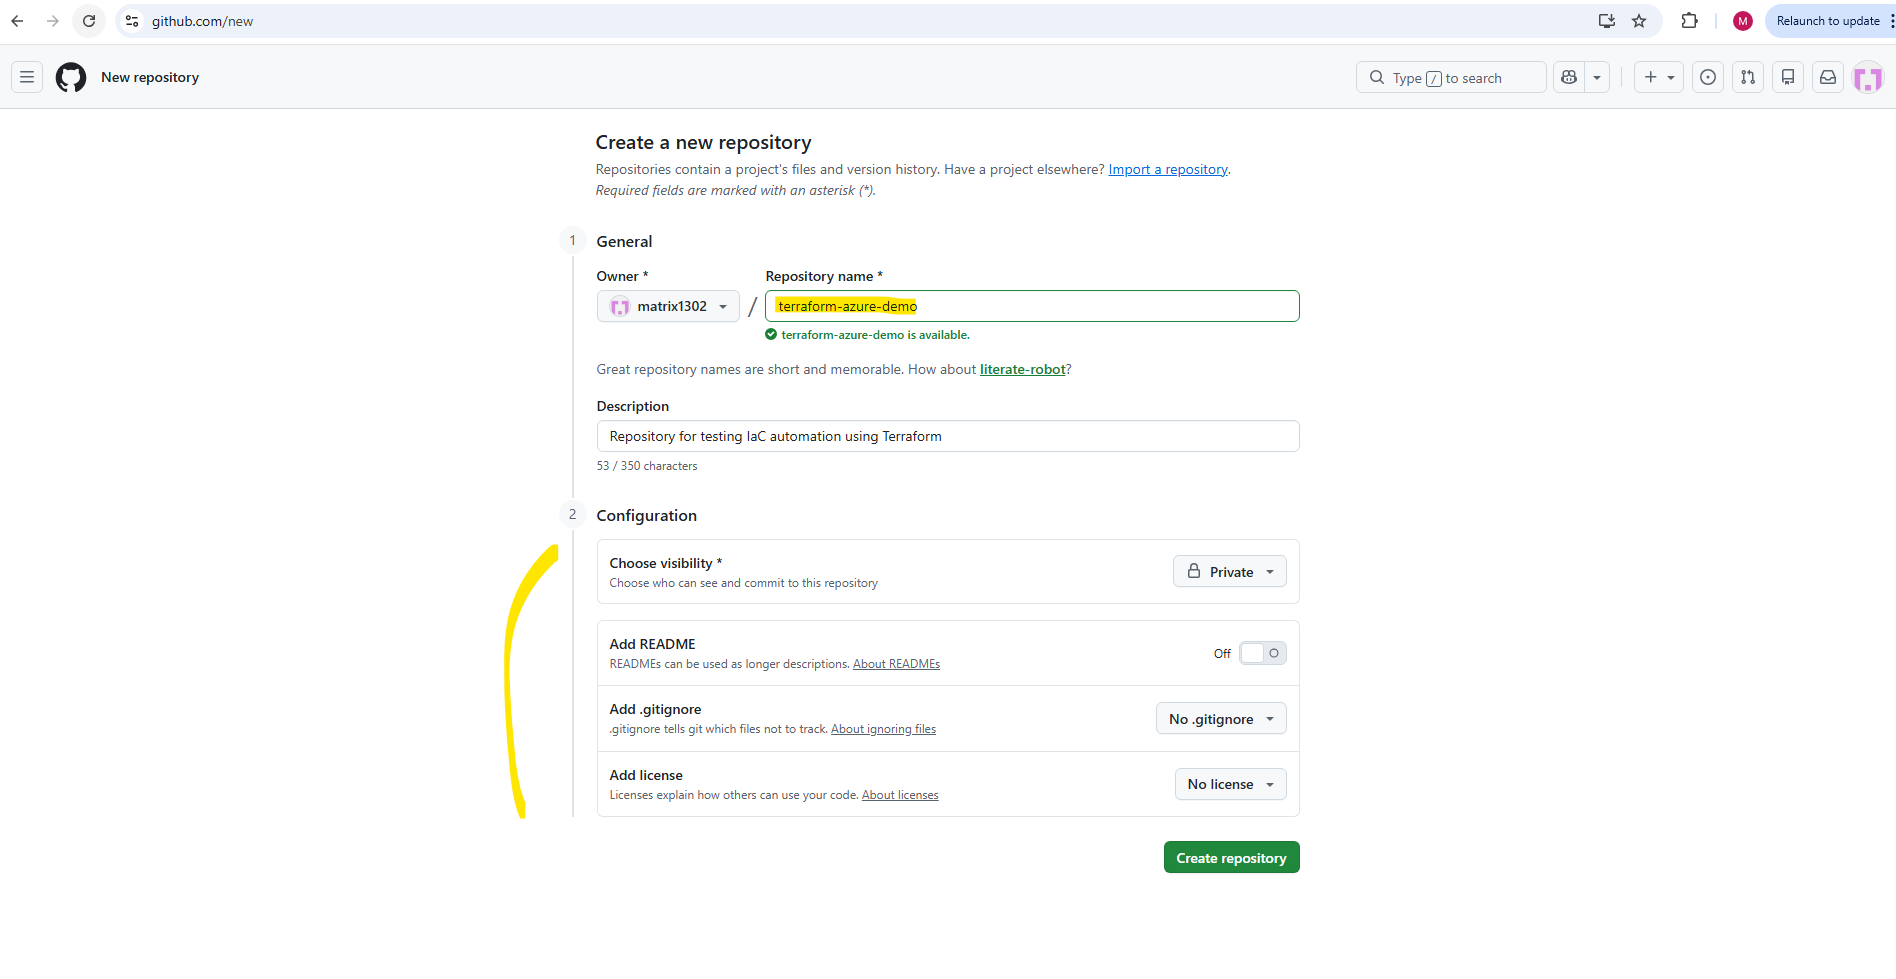
After signing in to GitHub, click on New Repository from the GitHub dashboard.
For this series, we will create a repository named
terraform-azure-demo.
The repository can either be public or private depending on the intended use case. For learning and testing purposes, both options work equally well. I will use here private.
Optionally, we can also initialize the repository with:
- A
README.mdfile ==> You can add a README file to your repository to tell other people why your project is useful, what they can do with your project, and how they can use it. - A
.gitignorefile ==> You can create a.gitignorefile in your repository’s root directory to tell Git which files and directories to ignore when you make a commit. To share the ignore rules with other users who clone the repository, commit the.gitignorefile into your repository. - A
license==> Public repositories on GitHub are often used to share open source software. For your repository to truly be open source, you’ll need to license it so that others are free to use, change, and distribute the software.
For Terraform projects, GitHub already provides a predefined Terraform .gitignore template (shown below in the screenshot) which excludes files such as:
.terraform/terraform.tfstateterraform.tfstate.backup
This is important because Terraform state files often contain sensitive deployment information and should usually not be committed to Git repositories.
Finally I will click on Create repository.
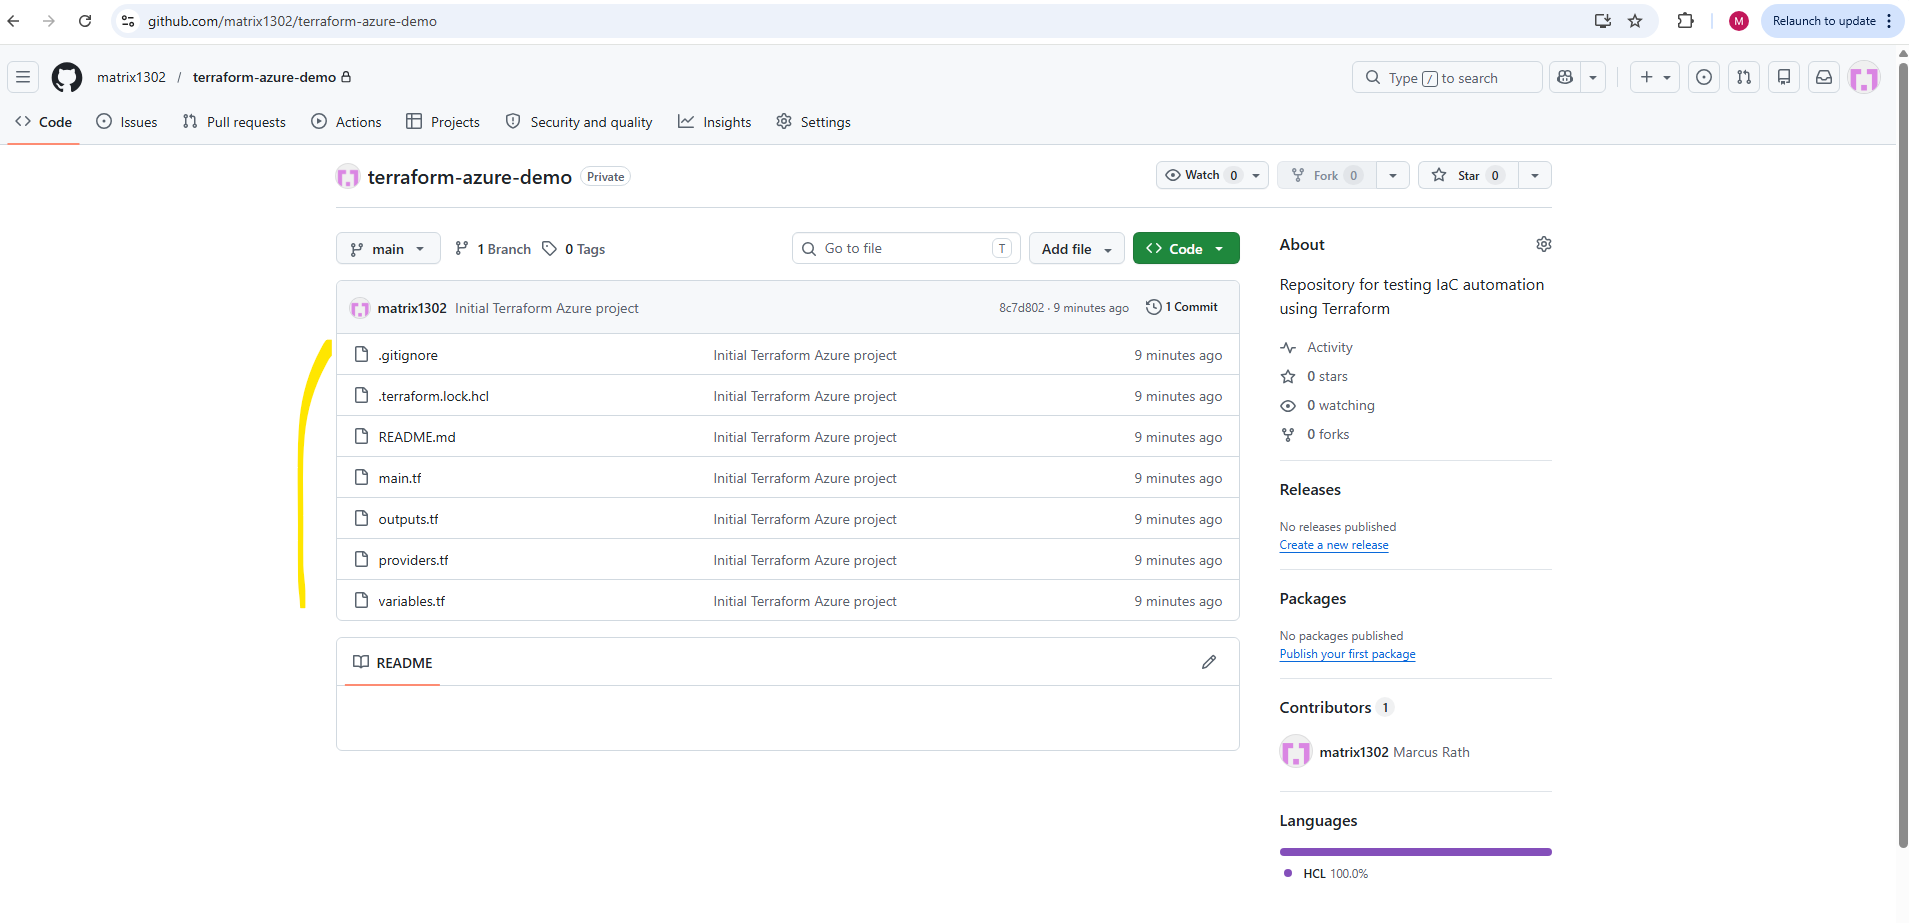
The repository was created successfully.
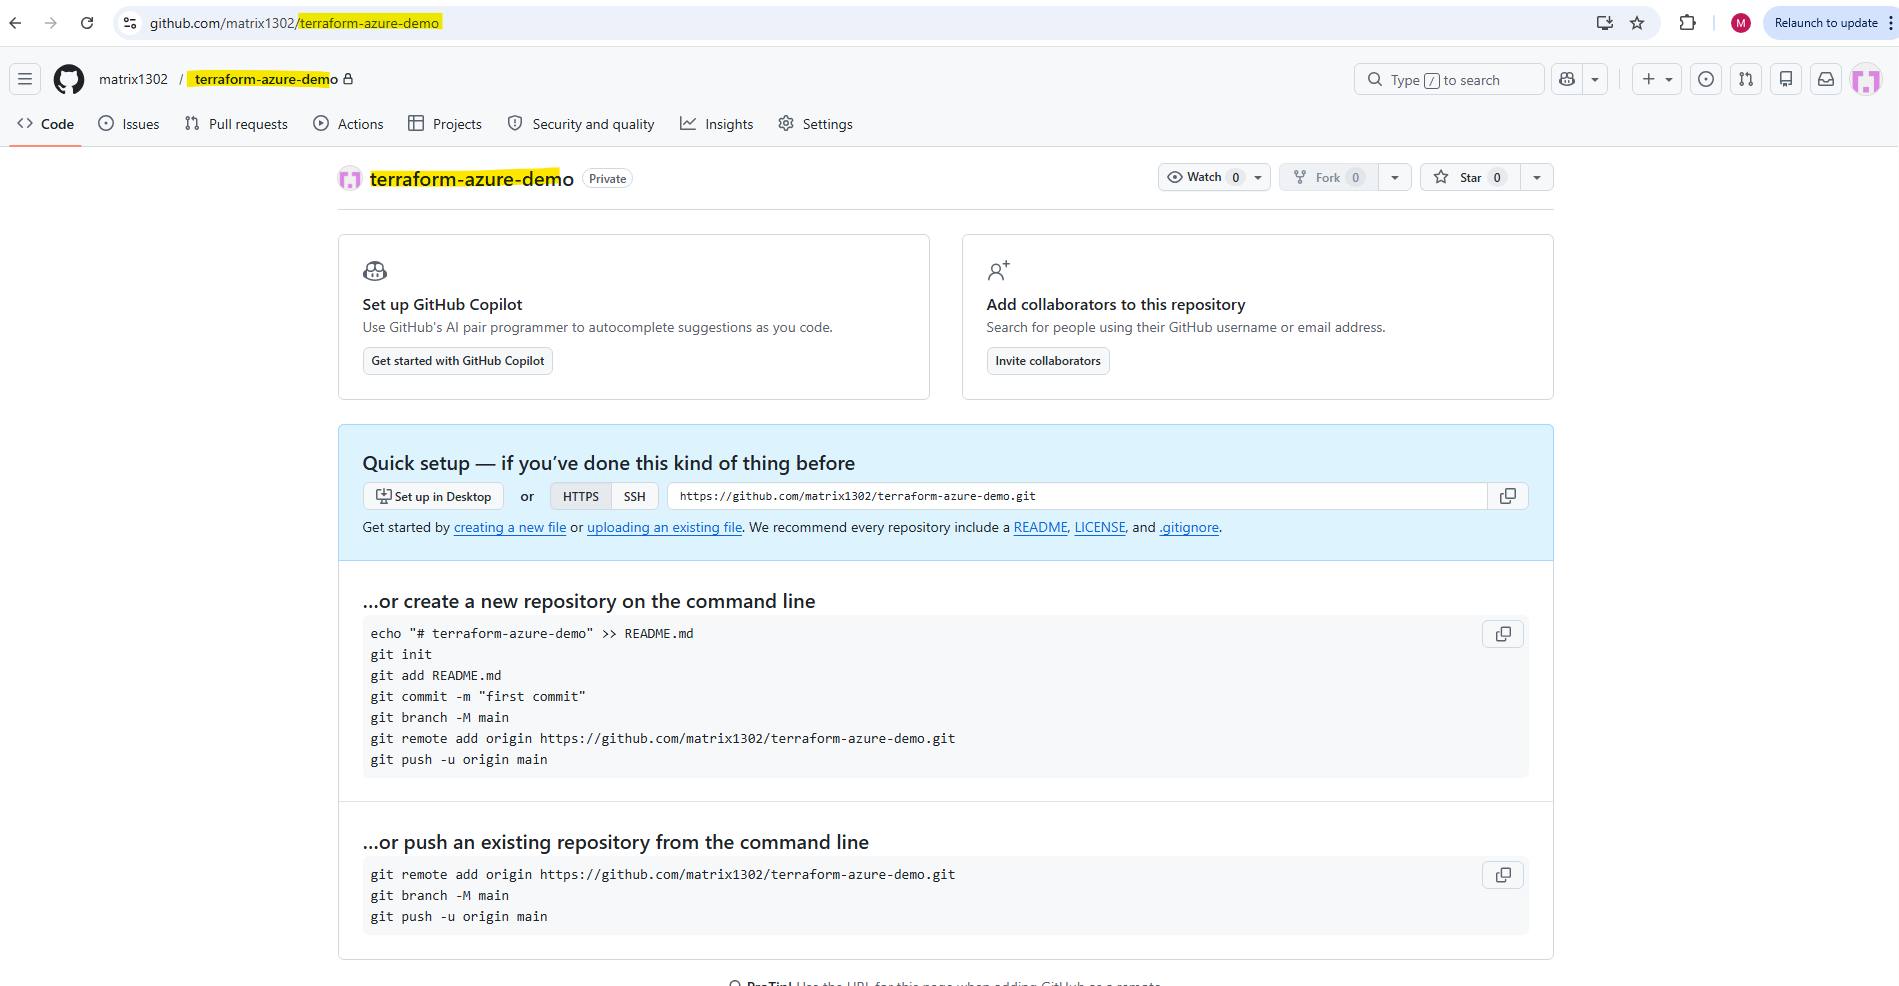
When creating a new repository directly on GitHub, the default branch is nowadays automatically named main. This branch is created automatically in the background, even if you do not explicitly select or create it yourself during the repository creation process.
We can also create a new repository by using the command line. Below e.g. we can create the same repository by using the following commands.
The command
git branch -M mainin the examples simply renames the current local branch tomainbefore pushing it to GitHub. This is useful because older Git versions or local repositories may still usemasteras the default branch name.
echo "# terraform-azure-demo" >> README.md
git init
git add README.md
git commit -m "first commit"
git branch -M main
git remote add origin https://github.com/matrix1302/terraform-azure-demo.git
git push -u origin main
We can also push an existing repository from the command line to a GitHub repository.
git remote add origin https://github.com/matrix1302/terraform-azure-demo.git
git branch -M main
git push -u origin main
The branch names themselves are not technically fixed, you can name branches almost however you want, such as
development,feature/networking,test, orterraform-lab.However, conventions like
main,develop, orfeature/*are commonly used because they make the repository structure easier to understand for teams and CI/CD pipelines.
Cloning the Repository
After creating the repository, we can clone it to the local system using Git.
Cloning a repository locally creates a complete local copy of the remote GitHub repository on the local system. This allows us to work with the Terraform configuration files locally, make changes, test deployments, and later synchronize the changes back to GitHub.
Instead of editing files directly inside the browser, the typical workflow is: Clone the repository locally, Create or modify Terraform files, Test and validate the configuration locally, Commit the changes with Git, Push the changes back to GitHub.
This local working copy also enables integration with tools such as Visual Studio Code, Terraform, and the Azure CLI directly from the local development environment.
First, copy the repository URL from GitHub:
https://github.com/<username>/terraform-azure-demo.git
https://github.com/matrix1302/terraform-azure-demo
Then clone the repository locally:
By default, the
git clonecommand downloads the repository into the current working directory using the repository name as the local folder name.
git clone https://github.com/<username>/terraform-azure-demo.git
To specify a different local path or folder name, simply add the target directory at the end of the command. This clones the repository directly into the specified local path instead of the current directory.
PS> git clone https://github.com/<username>/terraform-azure-demo.git <path local destination>

PS> git clone https://github.com/matrix1302/terraform-azure-demo.git D:\Terraform-GitHub-Blog\terraform-azure-demo
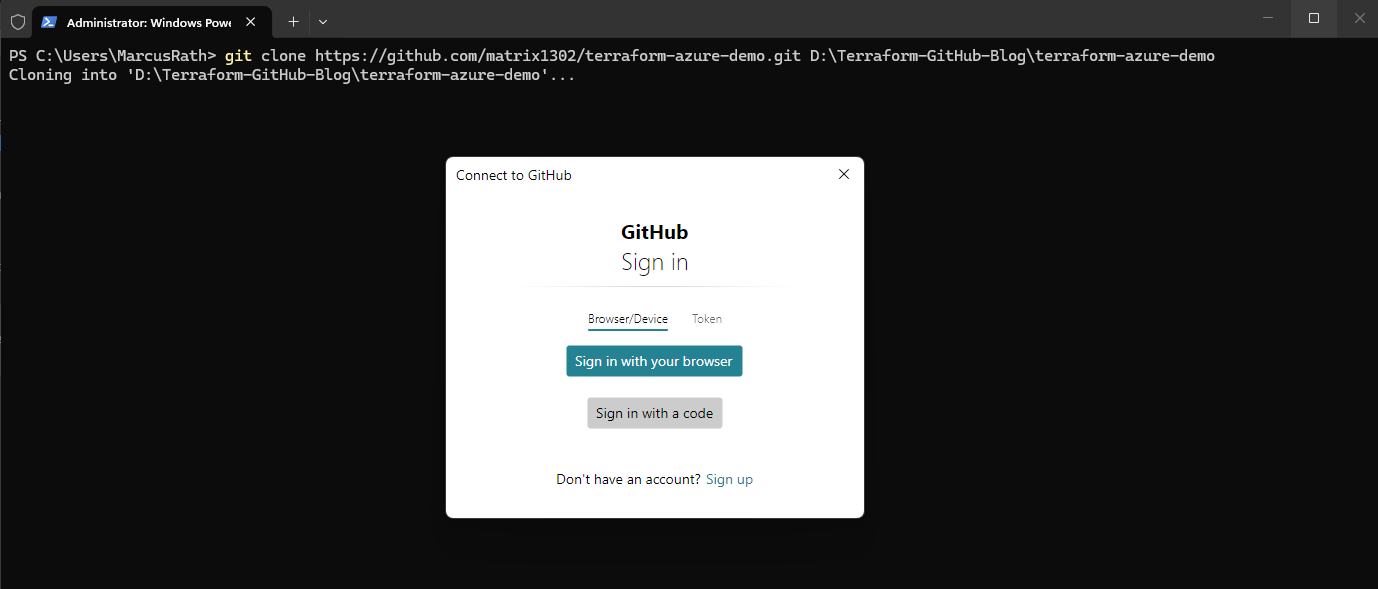
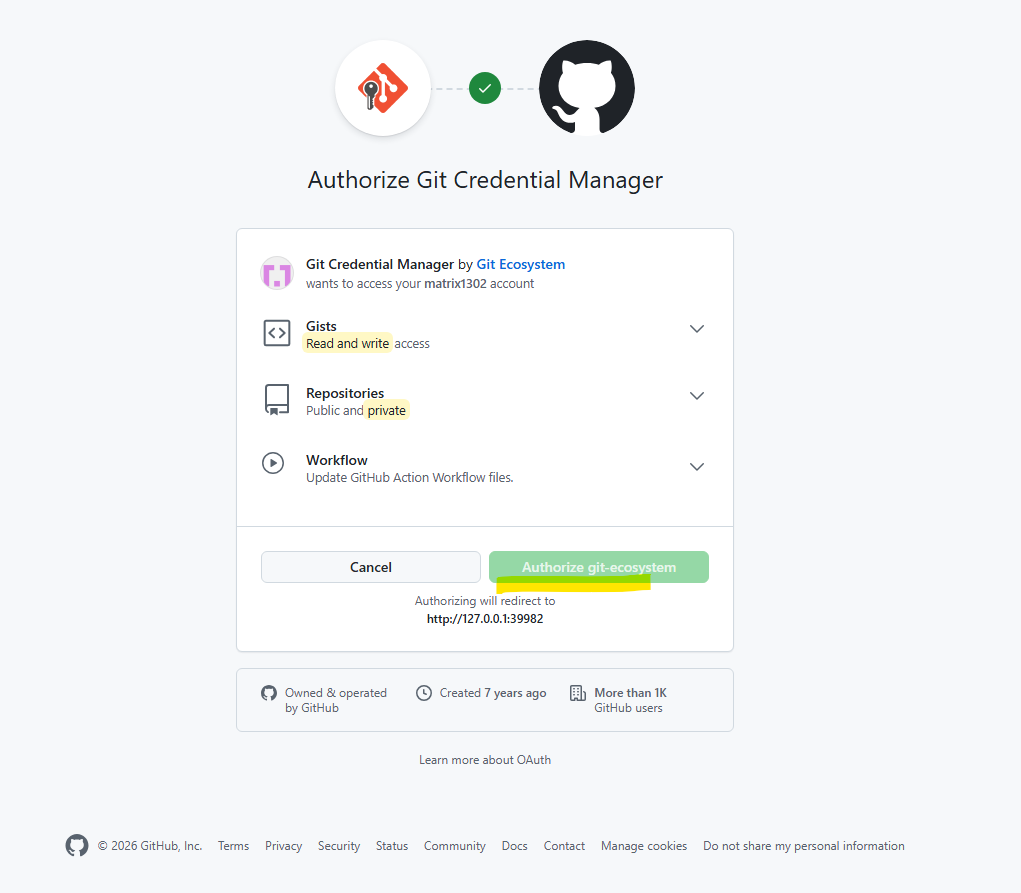
When cloning or accessing a private GitHub repository for the first time, Git for Windows may open a browser-based authentication flow. The login page asks to authorize Git Credential Manager / git-ecosystem with permissions such as repository access, workflow file updates, and access to GitHub Gist (code snippets).
GitHub
Gistis a lightweight code and text sharing service provided by GitHub. It allows developers to quickly publish and share small scripts, configuration files, notes, or code snippets without creating a full Git repository.During the Git installation process, Git Credential Manager is enabled by default and integrates directly with Git to handle authentication for services such as GitHub or Azure DevOps. This is why browser-based authentication windows can automatically appear during operations such as
git clone,git push, orgit pullwhen accessing remote repositories.
After clicking Authorize git-ecosystem, GitHub redirects the browser to a local callback URL.
This local address is part of the authentication flow and is used by Git Credential Manager to securely receive the login result. After successful authorization, Git stores the authentication token in the Windows Credential Manager, so future Git operations such as
git clone,git pull, orgit pushcan authenticate automatically.

After cloning the repository, change into the project directory:
PS> cd D:\Terraform-GitHub-Blog\terraform-azure-demo\

Opening the Repository in Visual Studio Code
The repository can now be opened directly in Visual Studio Code using:
The
.parameter tells Visual Studio Code to open the current working directory as the active project folder.
PS> code .

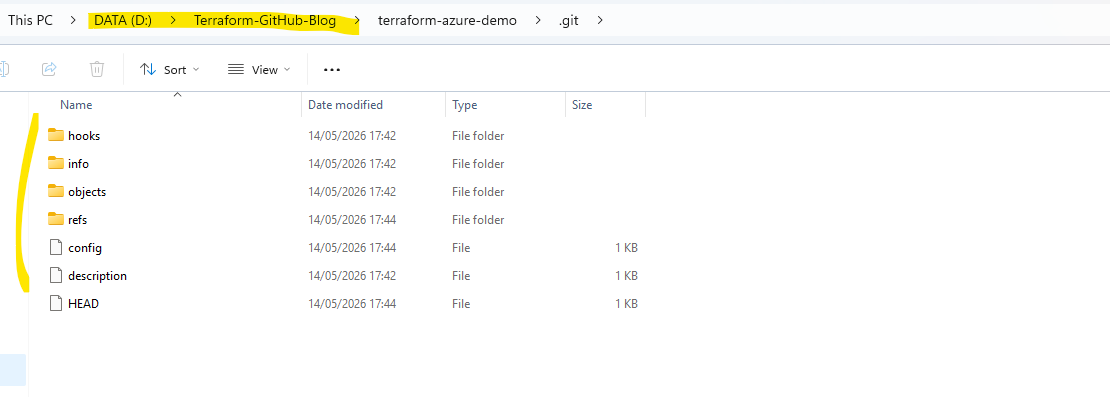
The
.gitfolder itself is normally hidden in Visual Studio Code even though it exists locally inside the repository directory.This folder contains the complete Git repository metadata such as commit history, branches, configuration, and object database.
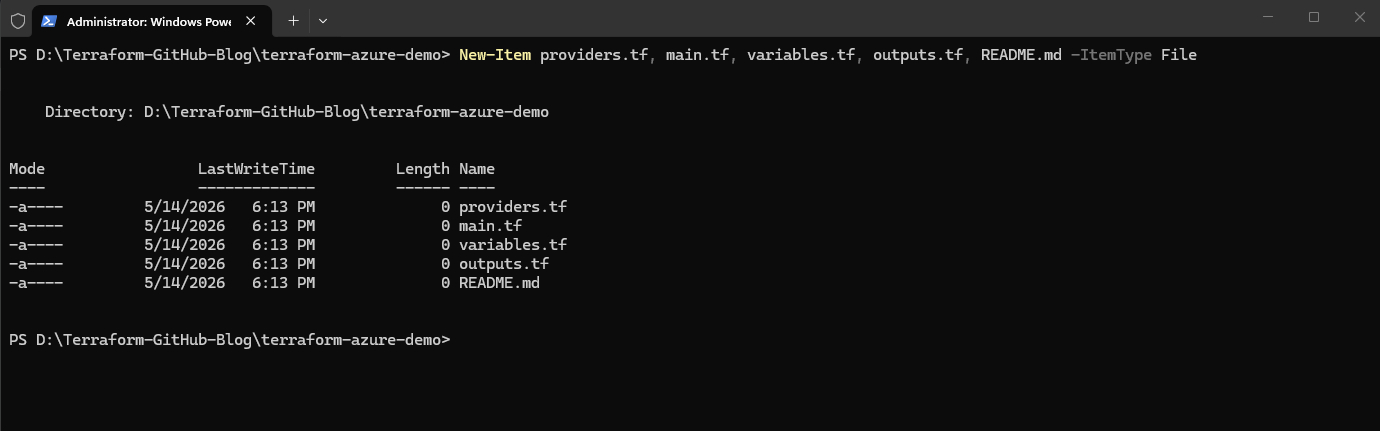
Creating the Initial Terraform File Structure
After cloning the empty GitHub repository locally and opening it in Visual Studio Code, we can create the first Terraform project files.
For this initial setup, we will use the following simple structure:
terraform-azure-demo/
│
├── providers.tf
├── main.tf
├── variables.tf
├── outputs.tf
└── README.md
Each file has a specific purpose:
providers.tf==> Defines the required Terraform provider, in our case the AzureRM provider for Microsoft Azure.main.tf==> Contains the main Azure resources we want to deploy.variables.tf==> Defines input variables, for example resource names, locations, or environment names.outputs.tf==> Defines values Terraform should print after deployment, for example resource IDs or names.README.md==> Provides basic documentation for the repository.
The files can be created directly in Visual Studio Code by right-clicking in the Explorer pane and selecting New File. Alternatively, we can create them from PowerShell inside the repository folder:
PS> New-Item providers.tf, main.tf, variables.tf, outputs.tf, README.md -ItemType File
The new files appear in green in Visual Studio Code because Git detects them as newly created and not yet committed files. Visual Studio Code uses Git integration to visually indicate file states:
- Green = new/untracked files
- Yellow = modified files
- Red = deleted files
At this point, the repository contains the basic file structure for our Terraform project, but the files are still empty. In the next step, we will add the Azure provider configuration and create our first Azure resource using Terraform.
Adding the Azure Provider Configuration
Terraform uses providers to interact with external platforms and services. Since we want to deploy resources to Microsoft Azure, we need to configure the AzureRM provider.
Open the providers.tf file and add the following configuration:
terraform {
  required_providers {
    azurerm = {
      source  = "hashicorp/azurerm"
      version = "~> 4.0"
    }
  }
}

provider "azurerm" {
  features {}
}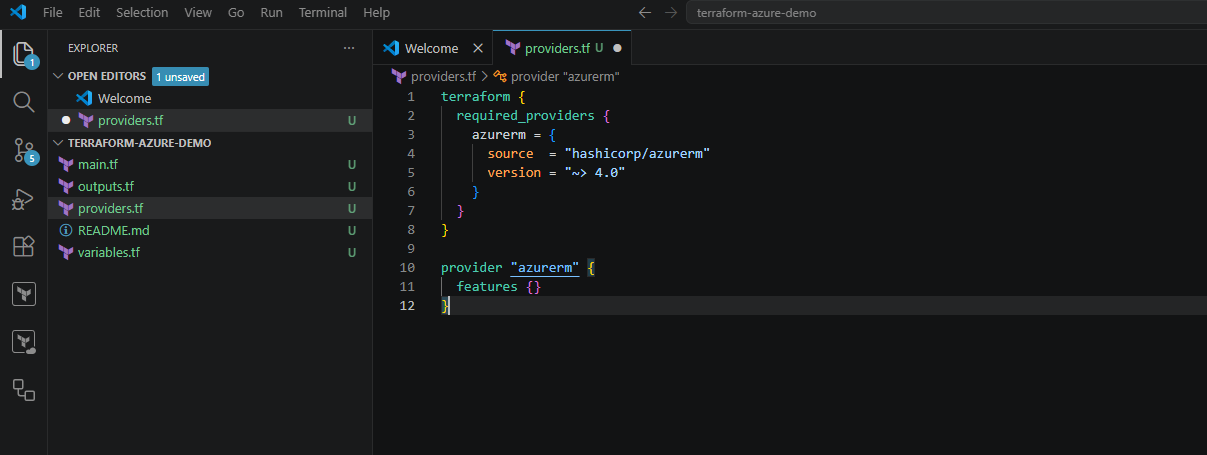
The required_providers block tells Terraform which provider should be downloaded and used. In this case, we are using the official AzureRM provider from HashiCorp.
The provider "azurerm" block configures the Azure provider itself. The features {} block is required by the AzureRM provider, even if we do not configure additional provider features at this point.
After saving the file, Terraform now knows that this project is intended to manage Azure resources.
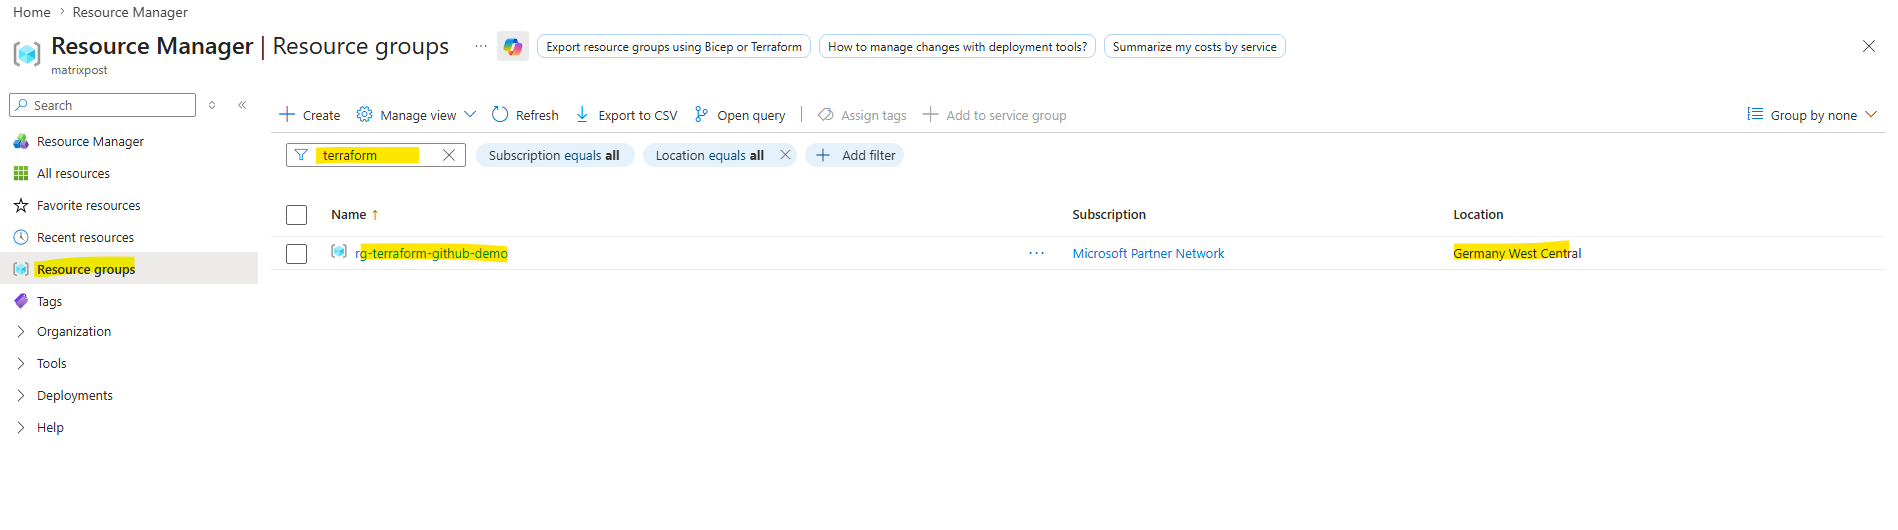
Creating the First Azure Resource
Now that the AzureRM provider is configured, we can define our first Azure resource. For the initial deployment, we will keep it simple and create only an Azure Resource Group.
Open the main.tf file and add the following configuration:
resource "azurerm_resource_group" "rg_demo" {
  name     = "rg-terraform-github-demo"
  location = "Germany West Central"
}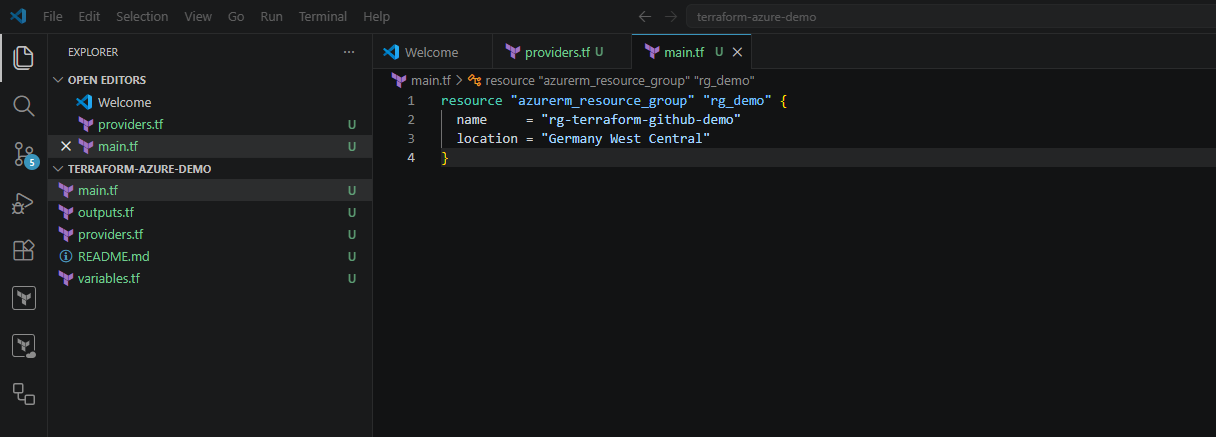
This block defines an Azure Resource Group using the azurerm_resource_group resource type.
The first value, azurerm_resource_group, defines the Azure resource type Terraform should manage. The second value, rg_demo, is the local Terraform resource name used inside the Terraform configuration.
The actual Azure Resource Group will be created with the name rg-terraform-github-demo and deployed to the Azure region Germany West Central.
At this point, we have defined the desired state of our first Azure resource. In the next step, we will initialize Terraform, validate the configuration, and create an execution plan before deploying the Resource Group to Azure.
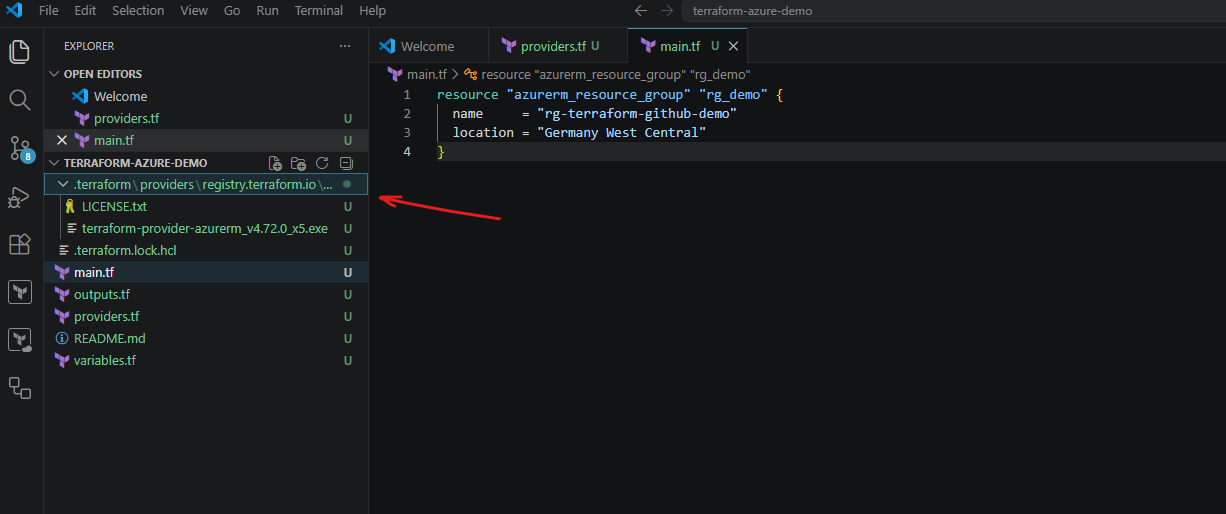
Initializing Terraform
Before Terraform can deploy the Resource Group, we need to initialize the working directory. During this step, Terraform downloads the required provider plugins, in our case the AzureRM provider.
Run the following command from inside the repository folder:
Terraform will now initialize the project and download the required provider version defined in
providers.tf.After a successful initialization, the output should end with something similar to: Terraform has been successfully initialized!
PS> terraform init

Terraform also creates a hidden .terraform folder in the local project directory. This folder contains downloaded provider plugins and other local Terraform working data. Similar to the .git folder, it is usually not committed to GitHub and should be excluded through the .gitignore file.
Validating and Reviewing the Terraform Configuration
After initializing the project, we can validate the Terraform configuration and generate an execution plan before actually deploying any resources to Azure.
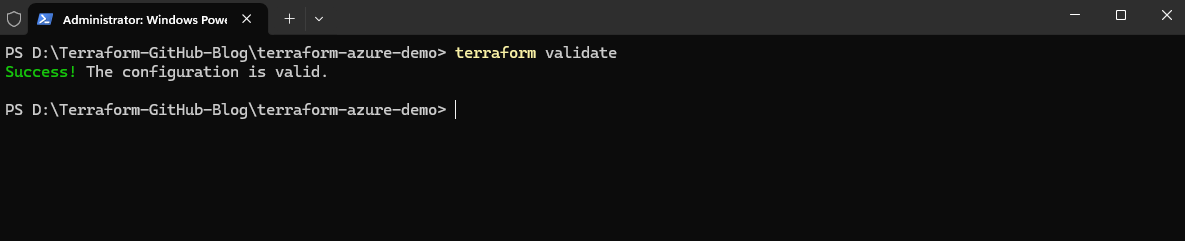
First, run the following command to validate the syntax and overall configuration:
If the configuration is valid, Terraform returns: Success! The configuration is valid.
This step helps identify syntax errors or invalid configuration settings before deployment.
PS> terraform validate
Creating the Execution Plan
Next, generate the Terraform execution plan.
Terraform compares our configuration with the current Azure environment and detects that one new resource group needs to be created: Plan: 1 to add, 0 to change, 0 to destroy.
PS> terraform plan
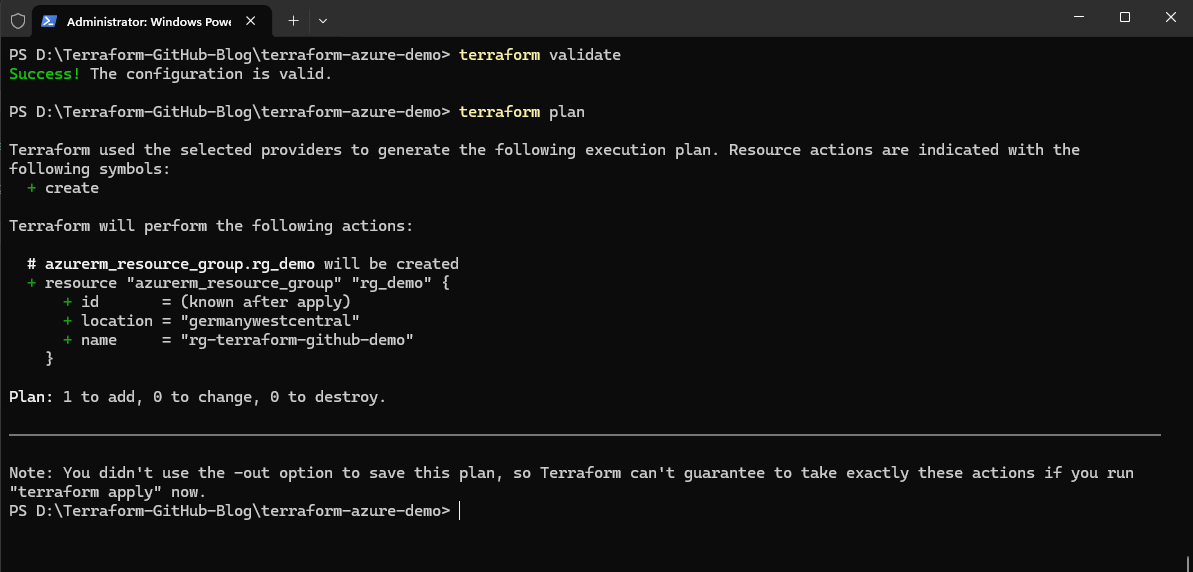
The note at the end simply means that we did not save this plan to a separate plan file using the -out option. For this simple example, that is fine, but in more controlled environments it is common to save the plan first and then apply exactly that saved plan.
Deploying the Azure Resource Group
After validating the configuration and reviewing the execution plan, we can now deploy the Resource Group to Microsoft Azure.
PS> terraform apply
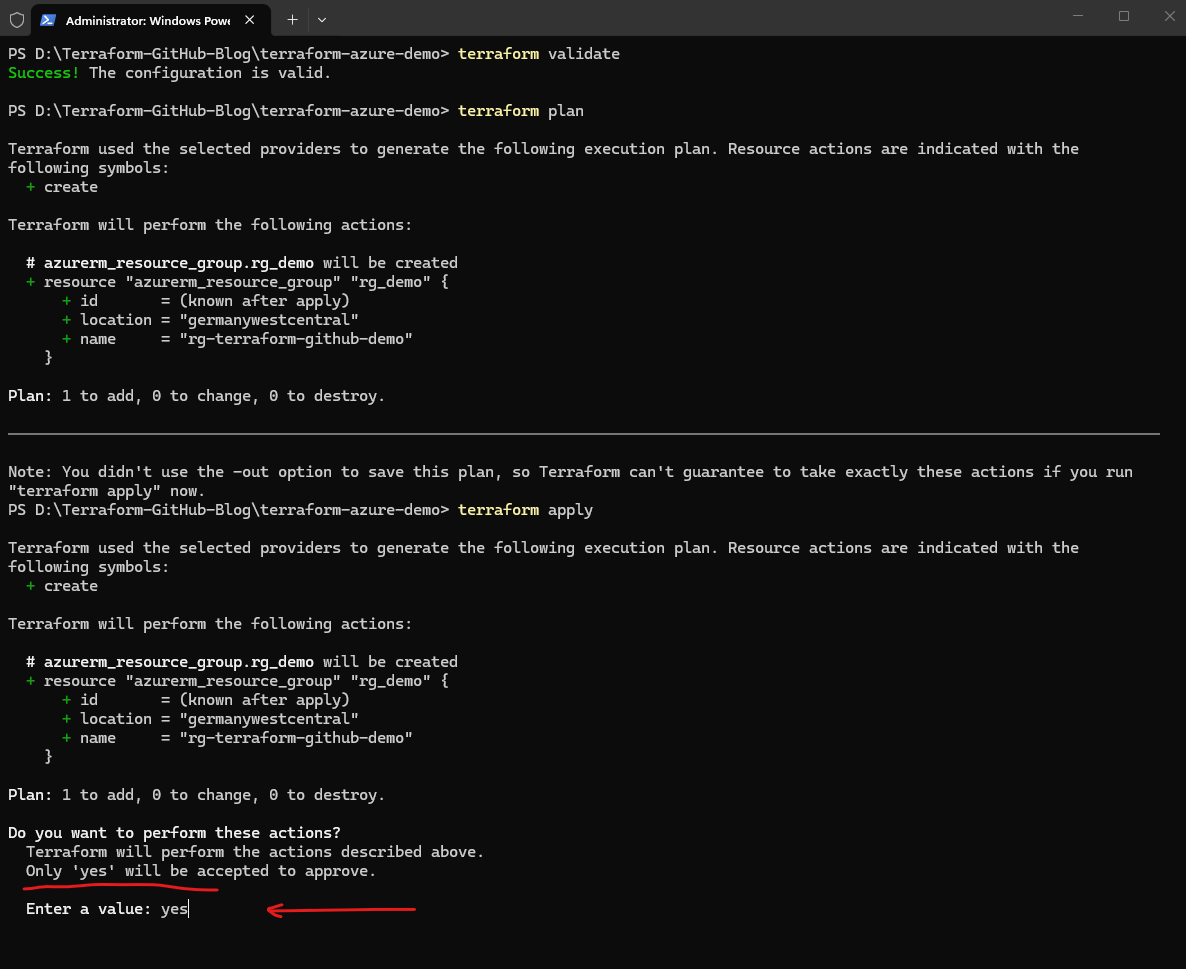
To continue with the deployment, type: yes
After confirming the deployment with
yes, Terraform starts creating the Azure Resource Group and continuously displays the deployment progress.
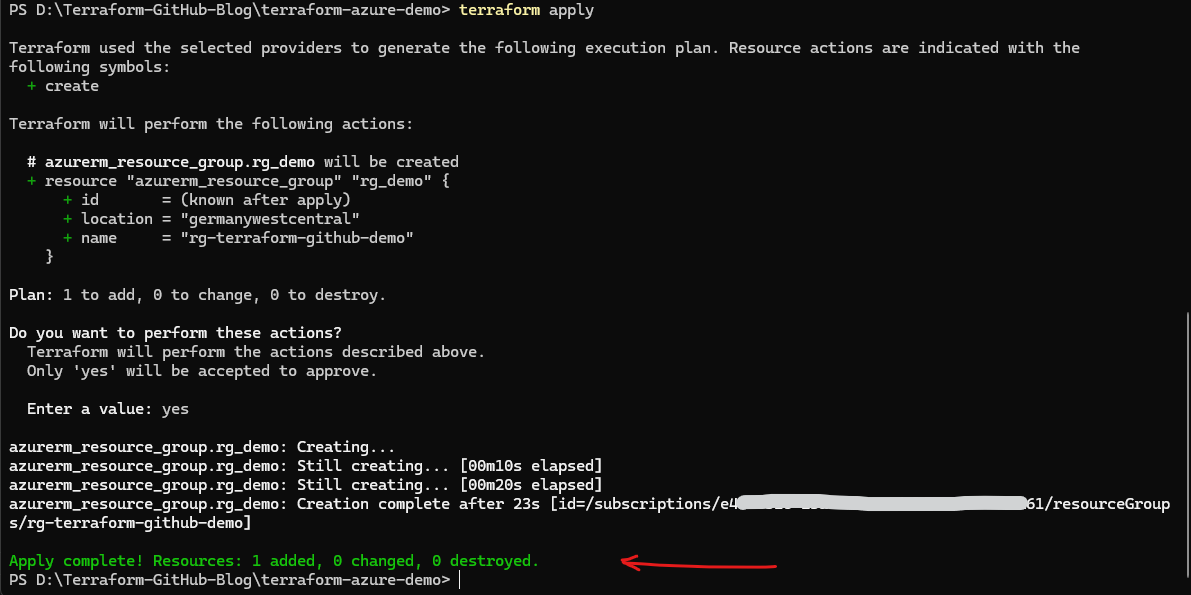
After the deployment completes successfully, Terraform returns the Azure Resource ID of the newly created Resource Group together with a deployment summary:
Apply complete! Resources: 1 added, 0 changed, 0 destroyed.
The deployment output also shows that Terraform automatically tracks the created resource using its Azure Resource ID:
/subscriptions/<subscription-id>/resourceGroups/rg-terraform-github-demo
At this point, the Resource Group has been successfully deployed to Microsoft Azure using Terraform and Infrastructure as Code principles.
Understanding the Terraform State File
After the deployment completes successfully, Terraform automatically creates a local state file named terraform.tfstate.
This file is one of the most important components of Terraform because it stores the current state of the deployed infrastructure.
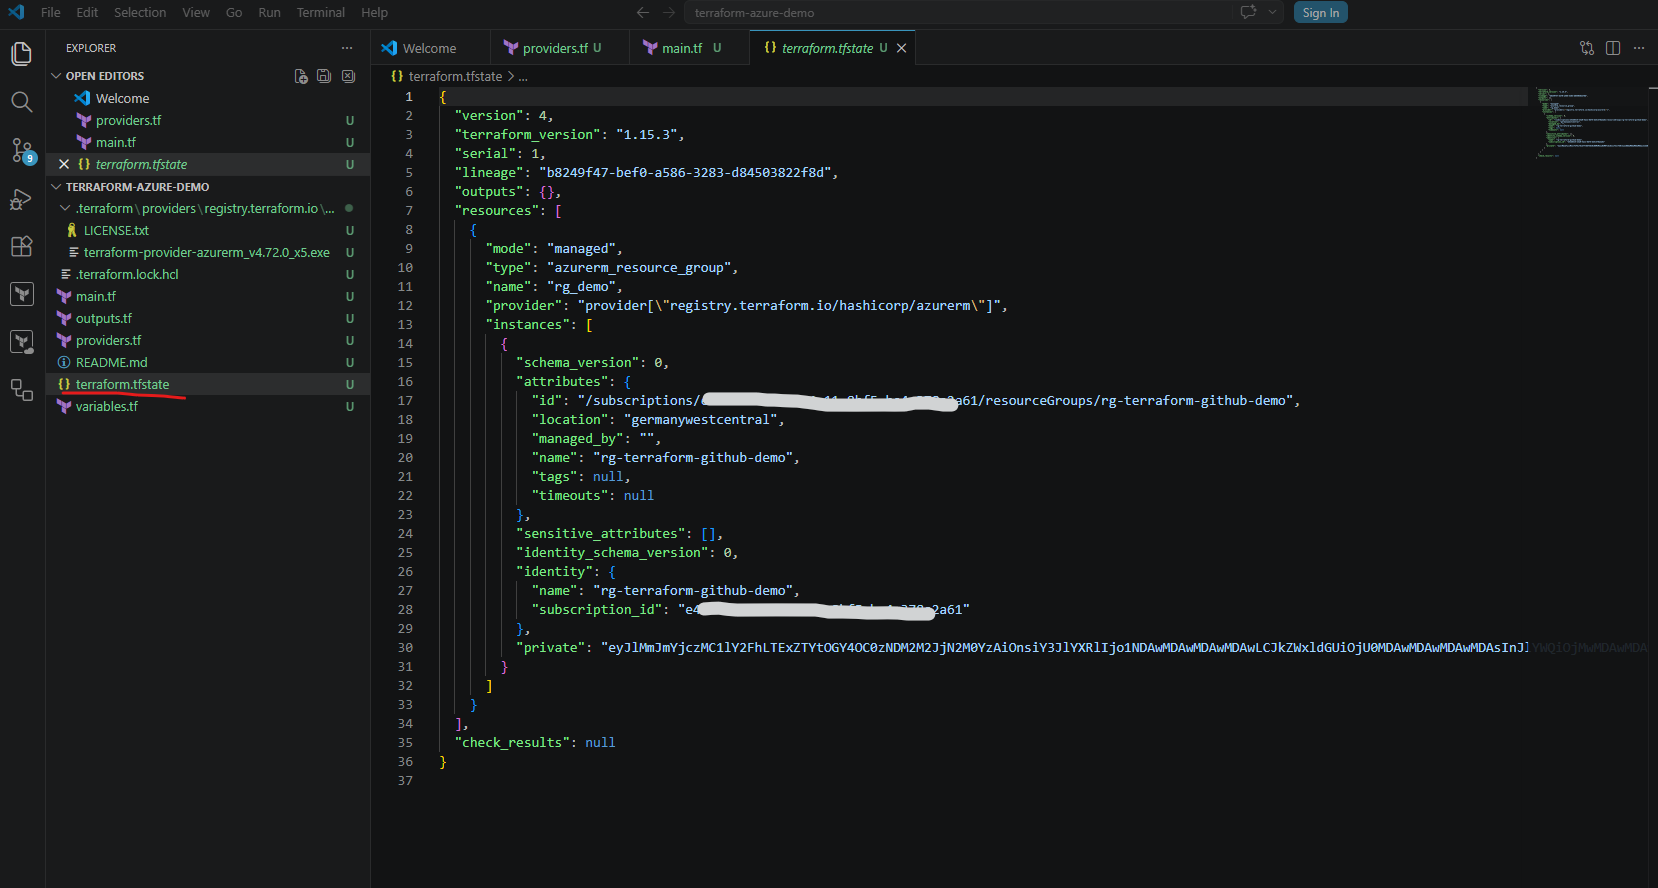
The state file contains information such as:
- Deployed resources
- Azure resource IDs
- Resource properties
- Terraform metadata
- Dependency mappings
Terraform uses this information to compare the desired configuration in the .tf files with the actual deployed infrastructure in Azure.
This allows Terraform to determine which resources need to be created, modified, or removed during future deployments.
Although local state files are acceptable for testing and learning environments, they are usually not suitable for production environments because:
- The state is only stored locally
- Collaboration becomes difficult
- State locking is not available
- Sensitive information may be stored inside the state file
For enterprise and team-based environments, Terraform state is therefore commonly stored remotely, for example inside an Azure Storage Account. We will configure a remote backend later in this series.
Terraform state file is not just source code, it is a dynamic operational database used by Terraform to track infrastructure state.
Platforms such as GitHub are excellent for storing static Terraform configuration files (
.tffiles), but they are not designed for safely managing continuously changing state files.
There are several important reasons why Terraform state is typically stored in remote backends such as an Azure Storage Account instead of GitHub:
- State locking – Azure Storage supports state locking to prevent multiple users or pipelines from modifying the same infrastructure simultaneously. GitHub does not provide this functionality for Terraform state files.
- Collaboration – Multiple engineers or CI/CD pipelines can safely share the same centralized state backend.
- Security – Terraform state files may contain sensitive information such as resource IDs, IP addresses, secrets, or configuration details which should not be committed into Git repositories.
- Consistency – The remote backend always provides the latest infrastructure state independent of the local workstation.
- Automation support – GitHub Actions pipelines can directly access the shared Azure backend during deployments.
GitHub therefore stores the Terraform code itself, while the actual Terraform runtime state is typically stored separately in a dedicated backend such as:
- Azure Storage Account
- AWS S3
- Terraform Cloud
- HashiCorp Consul
This separation between configuration code and operational state is a fundamental concept in Terraform-based infrastructure management.
Committing the Terraform Configuration to GitHub
Now that the Terraform deployment was successfully completed, we can commit the Terraform configuration files to the local Git repository and push them to GitHub.
This allows the Infrastructure as Code configuration to be version controlled, centrally stored, and later integrated into automated CI/CD workflows.
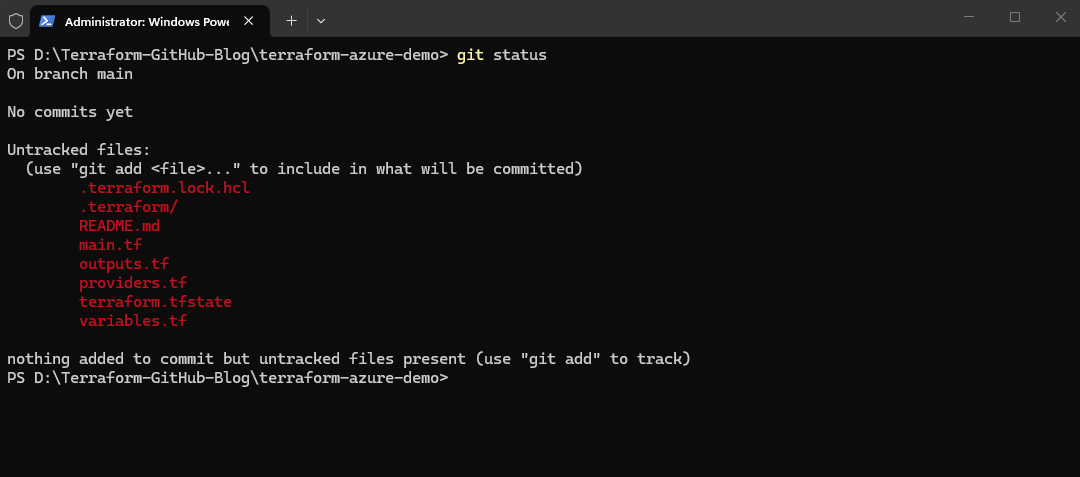
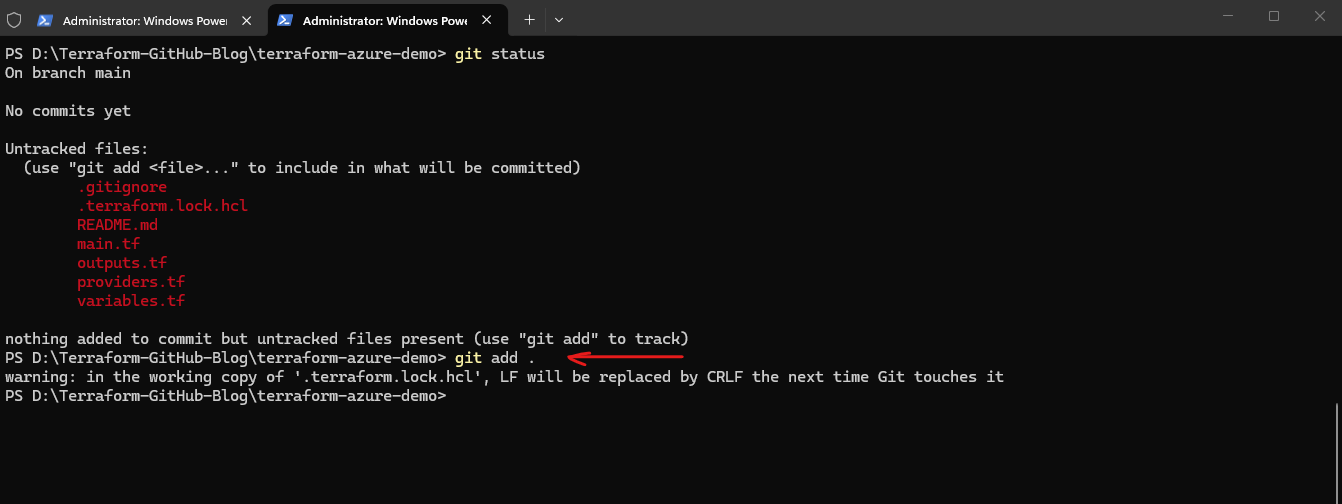
Checking the Current Git Status
Inside the repository folder, run:
This output is expected because Git currently detects all newly created Terraform files as untracked files which have not yet been added to the repository history.
PS> git status
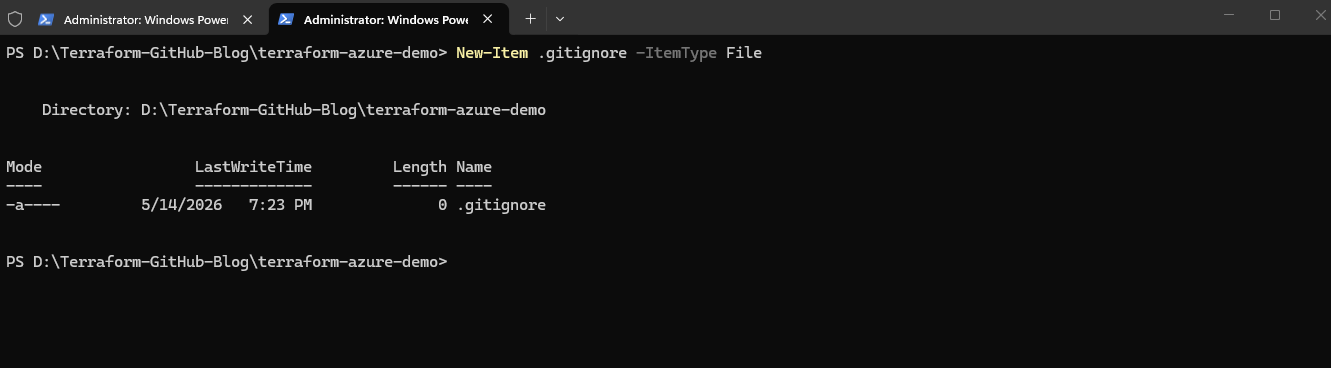
However, before adding the files to Git, we should exclude Terraform working directories and local state files from version control. In particular, the following should normally not be committed:
.terraform/terraform.tfstateterraform.tfstate.backup
The .terraform directory contains downloaded provider plugins and local Terraform working data, while the Terraform state file may contain sensitive infrastructure information.
To exclude these files, create a .gitignore file inside the repository directory by running:
PS D:\Terraform-GitHub-Blog\terraform-azure-demo> New-Item .gitignore -ItemType File
Then adding the following content:
# Terraform working directory
.terraform/

# Terraform state files
terraform.tfstate
terraform.tfstate.*

# Terraform plan files
*.tfplan

# Crash logs
crash.log

After saving the .gitignore file, run:
PS> git status

The output above now shows that the .gitignore file is working correctly.
The following files and folders are no longer displayed because they are now excluded from Git tracking:
.terraform/terraform.tfstateterraform.tfstate.backup
The remaining files are the actual Terraform project files which should normally be committed to GitHub.
You can also see that the file .terraform.lock.hcl is still included. This is expected and recommended.
The
.terraform.lock.hclfile is automatically generated by Terraform and stores the exact provider versions used by the project. Committing this file ensures that all users and CI/CD pipelines use consistent provider versions across environments and deployments.
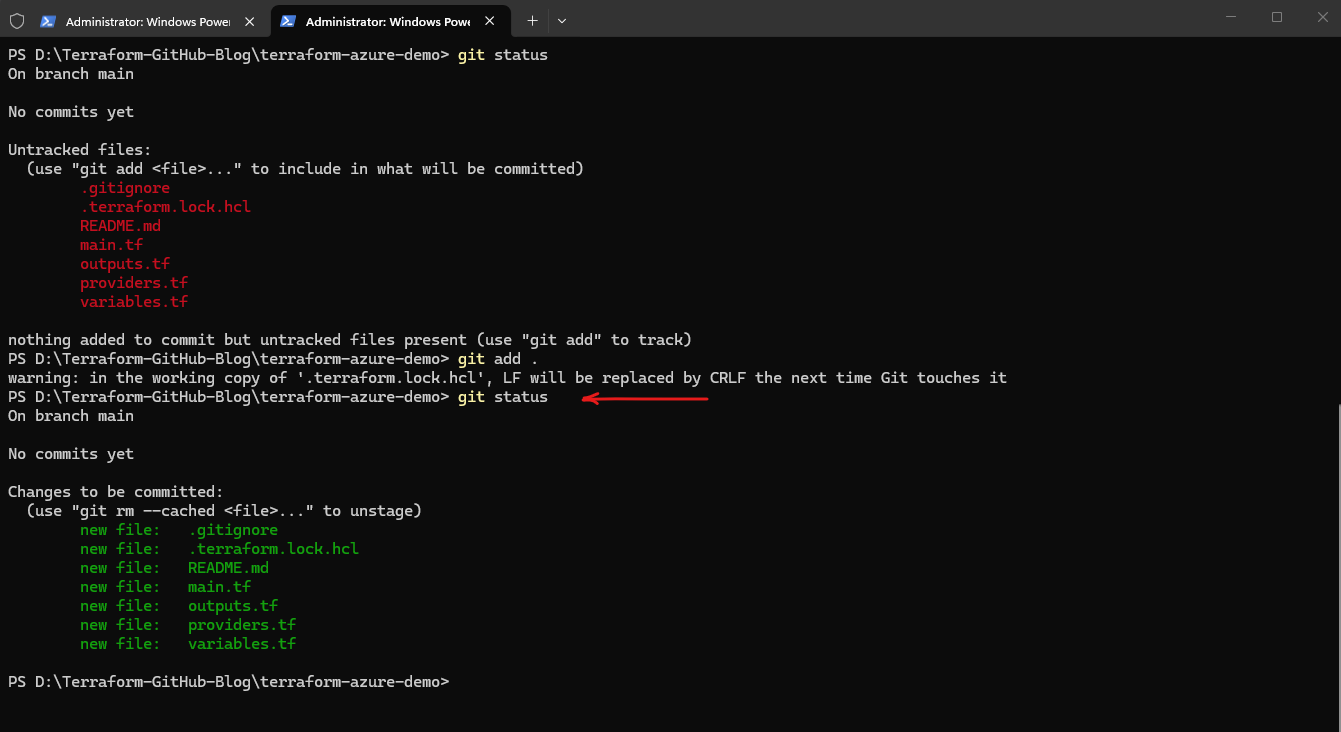
Adding the Files to Git
Now that the unnecessary Terraform working files and local state files are excluded through the .gitignore file, we can add the remaining project files to the local Git repository.
To add all current files from the repository directory to the Git staging area run the command below.
The Git staging area is an intermediate step between the local working directory and the actual Git commit. This command moves the selected files into the staging area, which means:
- Git marks them for inclusion in the next commit
- Git takes a snapshot (new version of the file) of their current content
- The files are prepared for version control
The staging area allows us to control exactly which file changes should become part of the next commit instead of automatically committing everything immediately.
The warning message is normal on Windows systems and is related to different line ending formats used by Linux and Windows.
Git automatically handles line ending conversions depending on the operating system and Git configuration. In this case, Git informs us that the
.terraform.lock.hclfile currently uses Linux-style line endings (LF) and will be converted to Windows-style line endings (CRLF) locally.
PS> git add .
After running the command, we can verify the current repository status again:
This confirms that the files are now staged and will be included in the next commit.
PS> git status
Creating the First Git Commit
After verifying that all required files are staged, we can now create the first Git commit.
A commit represents a snapshot of the current project state (specific version of the files) inside the local Git repository together with metadata such as the author, timestamp, and commit message (
-mflag) explaining the changes.
To create the first commit, run:
After running the commit command, Git creates the first local repository commit and displays a summary of the committed files.
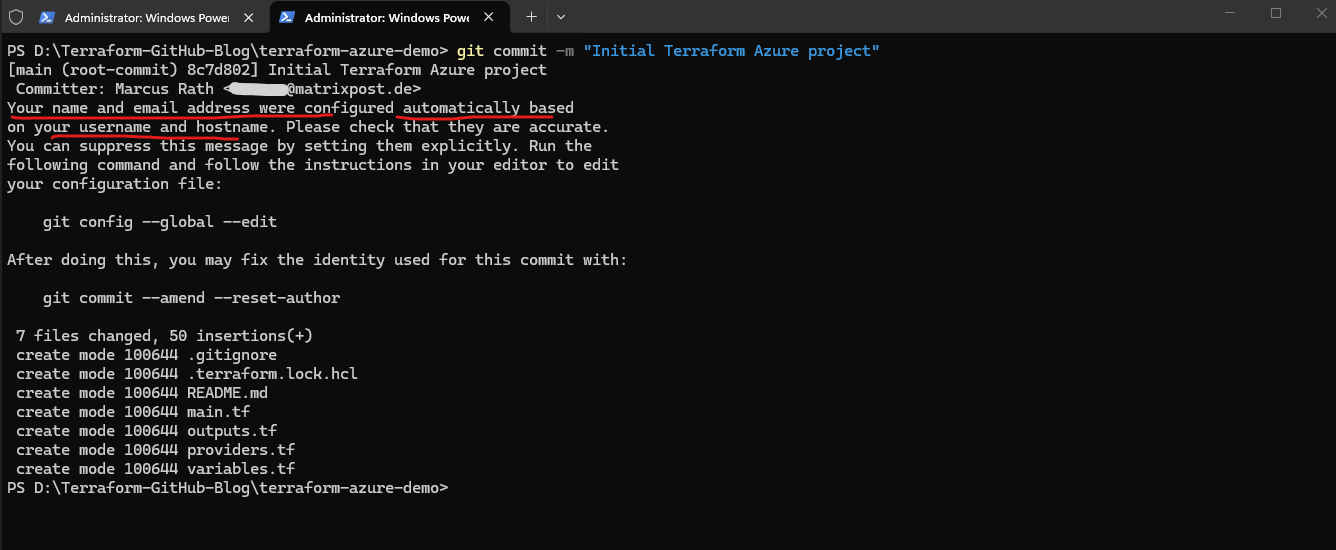
PS> git commit -m "Initial Terraform Azure project"
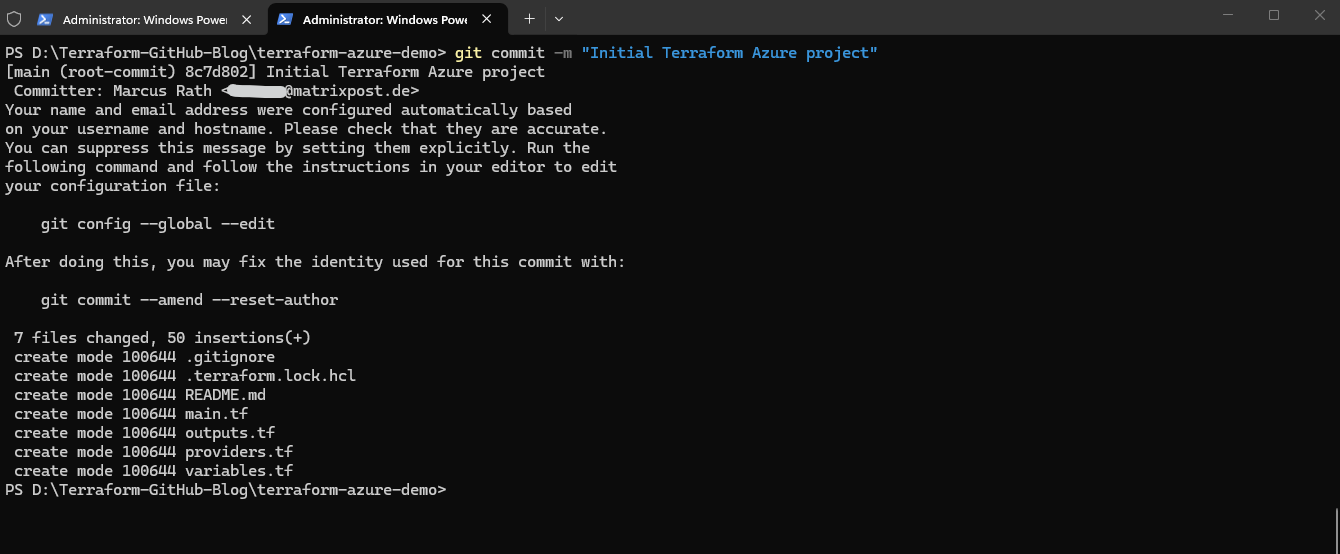
The output shows:
- The active branch (
main) - The commit type (
root-commit) indicating the first repository commit - The generated commit ID (
8c7d802) - The commit message
Git also displays the automatically detected commit identity with name and email.
On Windows systems, Git often automatically derives the initial username and email address from the currently logged-in Windows account and system hostname. The message shown by Git is informational and indicates that the Git identity can optionally be configured manually.
For example:
PS> git config --global user.name "Marcus Rath"
PS> git config --global user.email "<name>@matrixpost.de"
Git then summarizes the committed files and inserted content:
7 files changed, 50 insertions(+)
At this point, the Terraform project is now fully stored inside the local Git repository. In the next step, we will upload the repository to GitHub using
git push.
Uploading the Repository to GitHub
At this point, the Terraform project already exists inside the local Git repository, but it is still only stored on the local workstation. To synchronize the local repository with GitHub, we can now upload the commit to the remote GitHub repository.
After running
git push, the local commit is transferred to the remote repository on GitHub, where it is still called a commit and keeps the same unique commit ID (hash).
To push the local main branch to GitHub, run:
PS> git push -u origin main
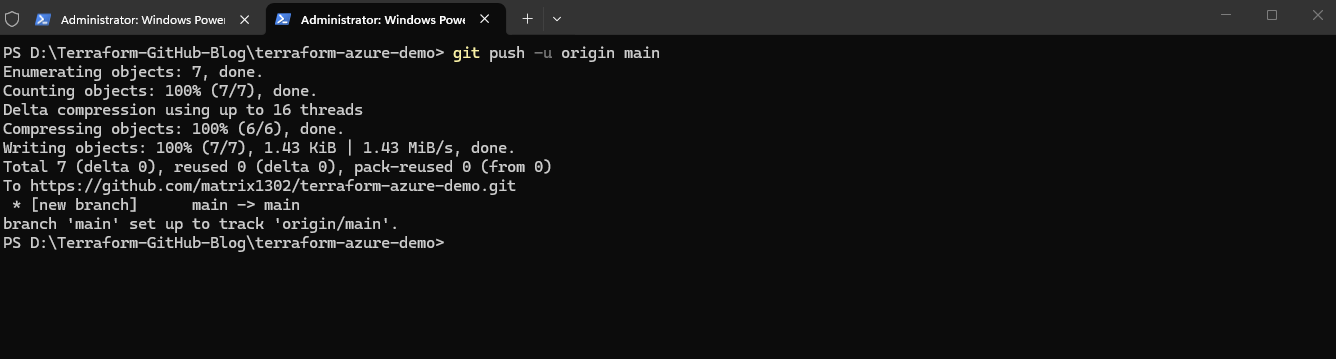
The command performs the following actions:
git pushuploads the local commits to the remote repositoryoriginrefers to the remote GitHub repository configured during the clone operationmainspecifies the branch to upload-uconfigures the local branch to track the remote branch for future push and pull operations
During the first push, Git may again open a browser-based authentication window if authentication has not yet been cached by Git Credential Manager.
In Git, a
branchis an independent line of development within the same repository. The default branch is often calledmainand usually represents the stable or production-ready version of the Terraform code, while additional branches can be used to develop and test changes separately before merging them back intomain.
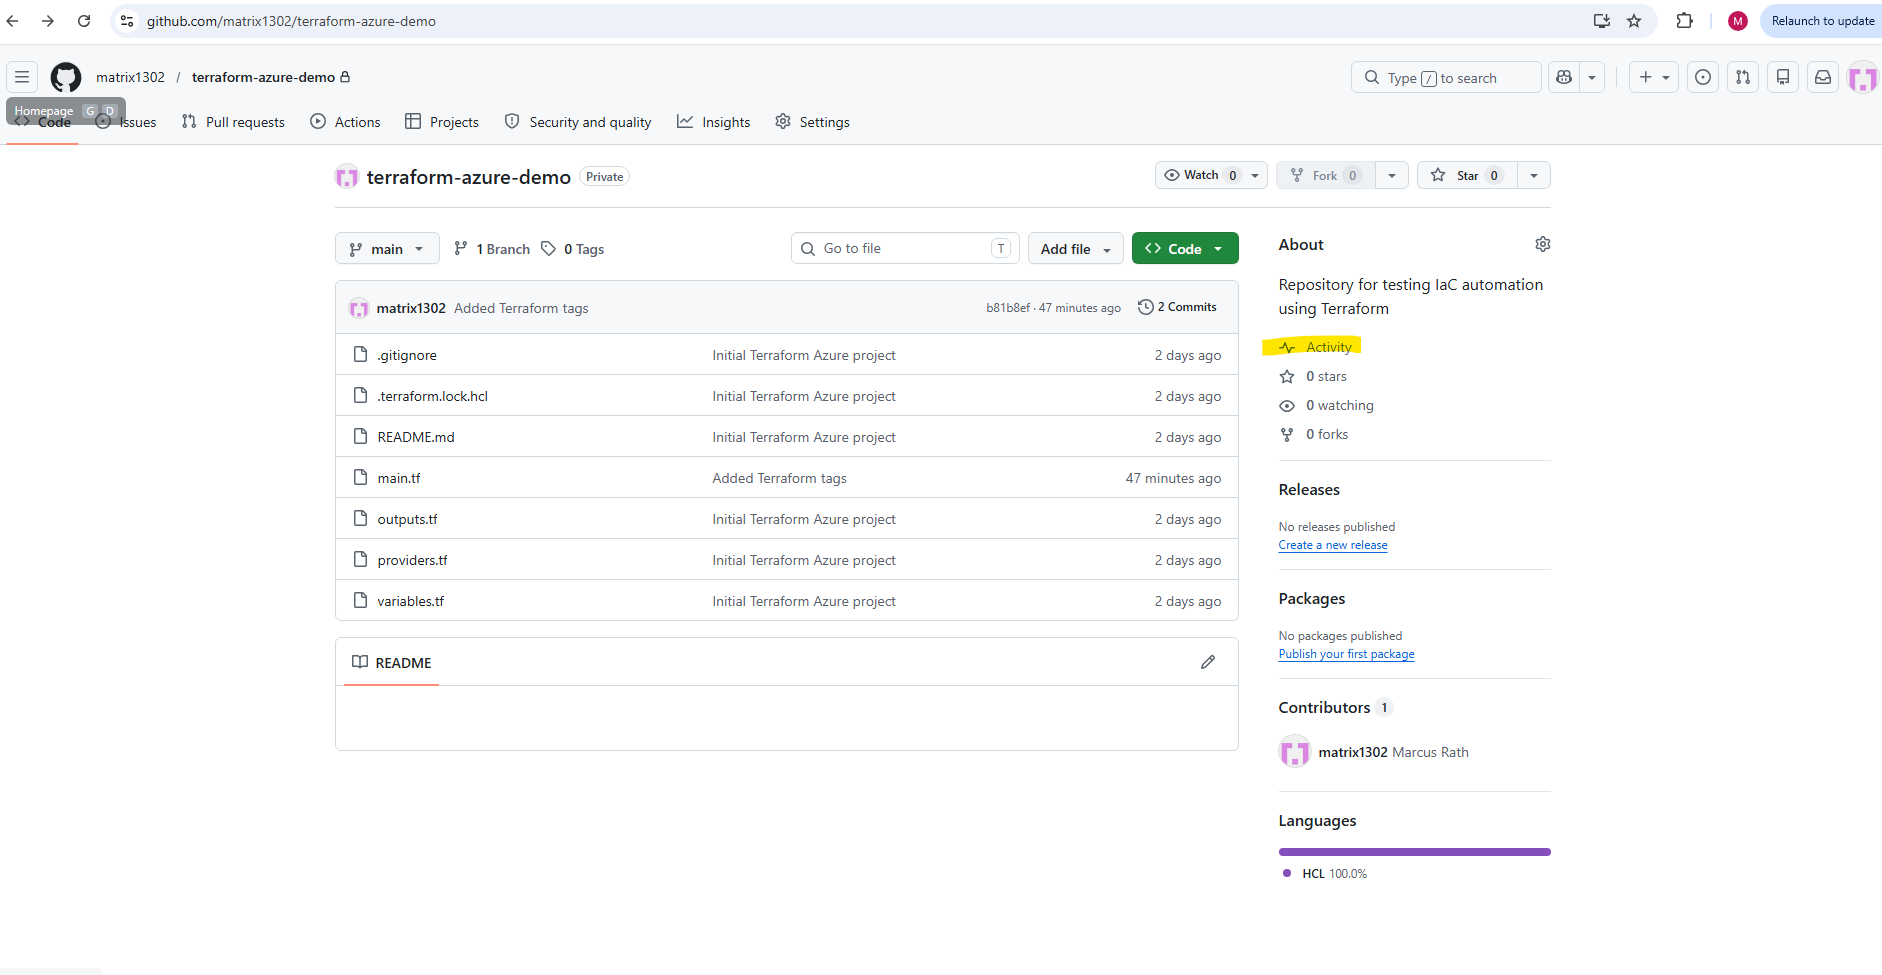
After the upload completes successfully, the Terraform project files become visible directly inside the GitHub repository. At this point, the Infrastructure as Code project is now version controlled both locally and remotely on GitHub.
After the
git pushoperation completes successfully, the uploaded Terraform project files immediately become visible inside the remote GitHub repository.GitHub also displays repository activity information such as: 10 minutes ago · 1 Commit
This indicates that the repository currently contains one commit which was uploaded approximately 10 minutes ago. Each future commit and push operation will automatically update the repository history and activity timeline visible on GitHub.
Commits in Git represent versioned snapshots of a project at a specific point in time. Each commit stores the tracked file changes together with metadata such as the author, timestamp, commit message, and a unique commit ID, allowing the complete project history to be tracked and restored later if needed.
So a commit is essentially a version or snapshot of the project at a specific point in time.
Updating Existing Infrastructure with Terraform
One of Terraform’s major advantages is that it can not only create infrastructure, but also continuously manage and modify existing resources.
Instead of manually changing resources through the Azure Portal or Azure CLI, we simply update the Terraform configuration files and let Terraform determine and apply the required infrastructure changes automatically.
This introduces several important Infrastructure as Code concepts such as:
- Configuration drift management – Detecting differences between the desired and actual infrastructure state
- Declarative updates – Defining the desired end state instead of individual change steps
- Idempotency – Repeated Terraform executions produce consistent results without unnecessary changes
- Incremental changes – Terraform only modifies the resources that actually require updates
Modifying the Terraform Configuration
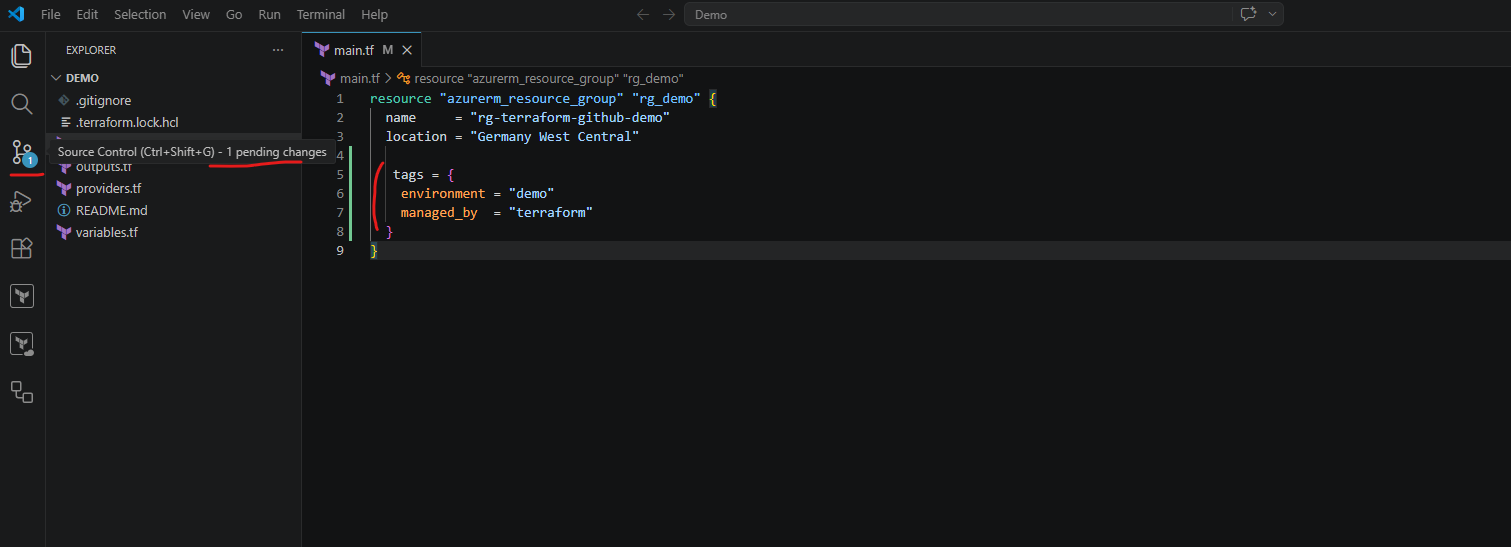
In the following example, we will modify the existing Azure Resource Group configuration and let Terraform automatically apply the detected changes.
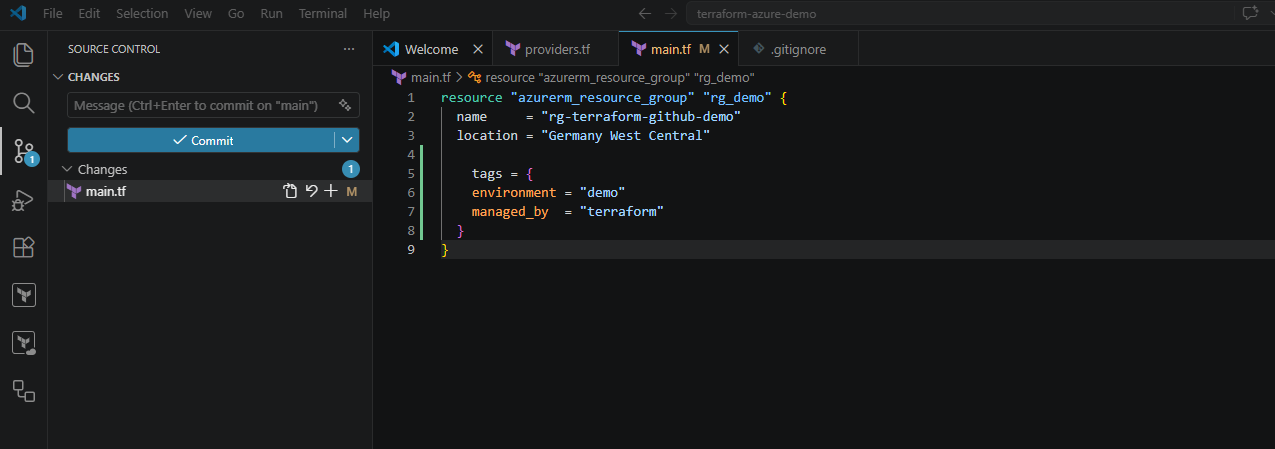
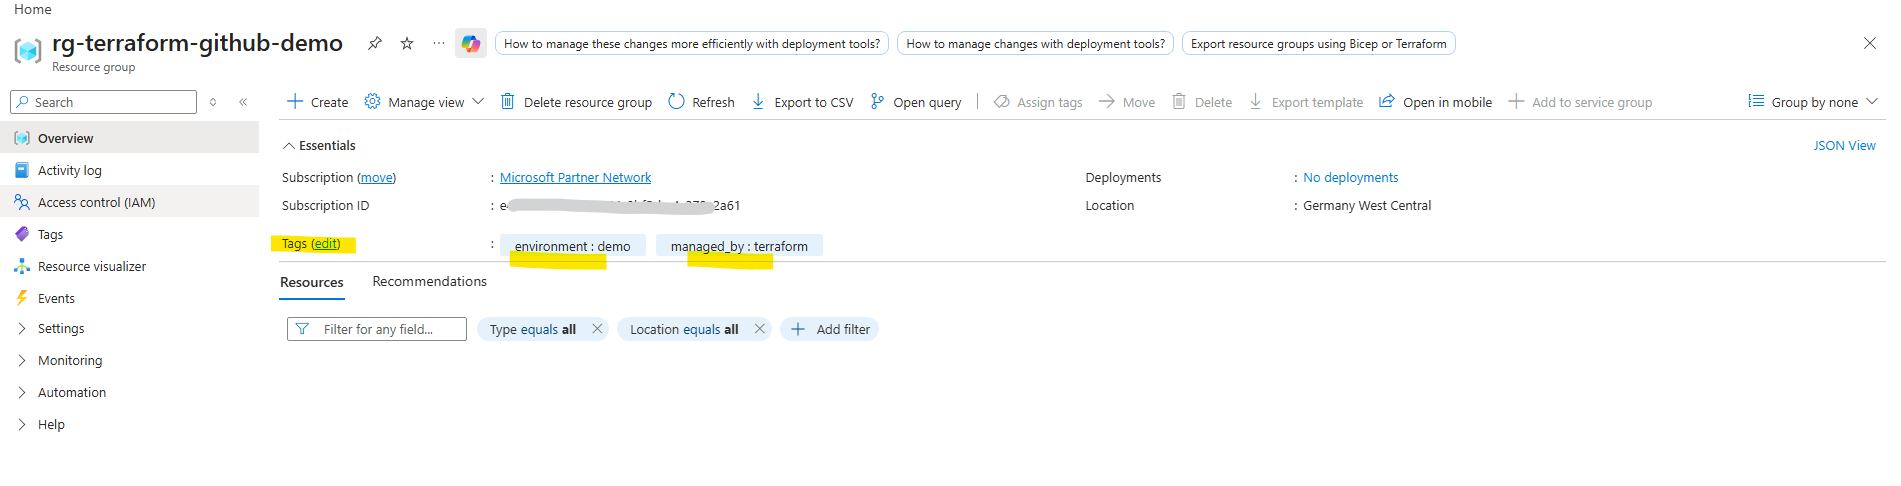
A very simple and clean example would be adding tags to the resource group.
resource "azurerm_resource_group" "rg_demo" {
  name     = "rg-terraform-github-demo"
  location = "Germany West Central"

  tags = {
    environment = "demo"
    managed_by  = "terraform"
  }
}
After modifying Terraform files, Visual Studio Code automatically detects the Git repository changes and displays the number of pending file modifications inside the Source Control view through its integrated Git support.
1 Pending ChangeThis means that one tracked file inside the local Git repository has been modified but not yet committed. Visual Studio Code continuously monitors the repository state and visually highlights changed files before they are staged, committed, and pushed back to GitHub.
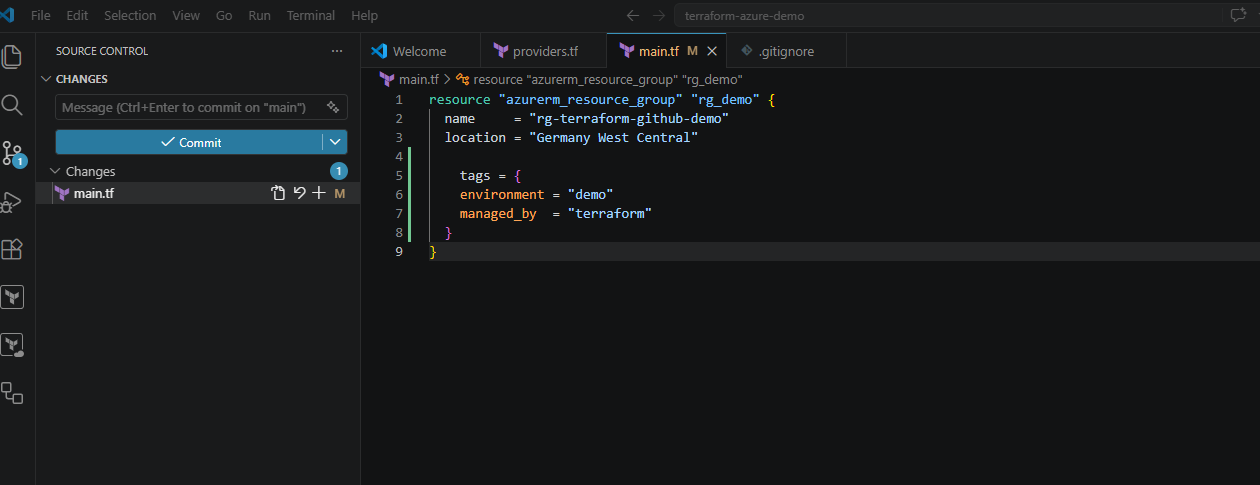
Pending Changes in Visual Studio Code – Staging and Committing Changes
Opening the Source Control section shows a Commit button which provides a graphical alternative to the CLI-based git add and git commit workflow directly from within Visual Studio Code.
This functionality is not provided by the GitHub Actions extension. Instead, it is built into Visual Studio Code itself through its native Git integration, which automatically becomes active when a local Git repository is detected.
The GitHub Actions extension for Visual Studio Code mainly provides support for working with GitHub Actions workflows directly inside Visual Studio Code.
Typical features include:
- Syntax highlighting and validation for GitHub Actions YAML workflow files
- IntelliSense and auto-completion for workflow syntax
- Viewing and managing GitHub Actions workflows
- Triggering and monitoring workflow runs
- Viewing workflow logs and job results directly from Visual Studio Code
- Integration with GitHub repositories and CI/CD pipelines
The extension therefore focuses on CI/CD pipeline development and GitHub workflow management, while the normal Git repository features such as commits, staging, source control, and pending changes are already built into Visual Studio Code itself through its native Git integration.
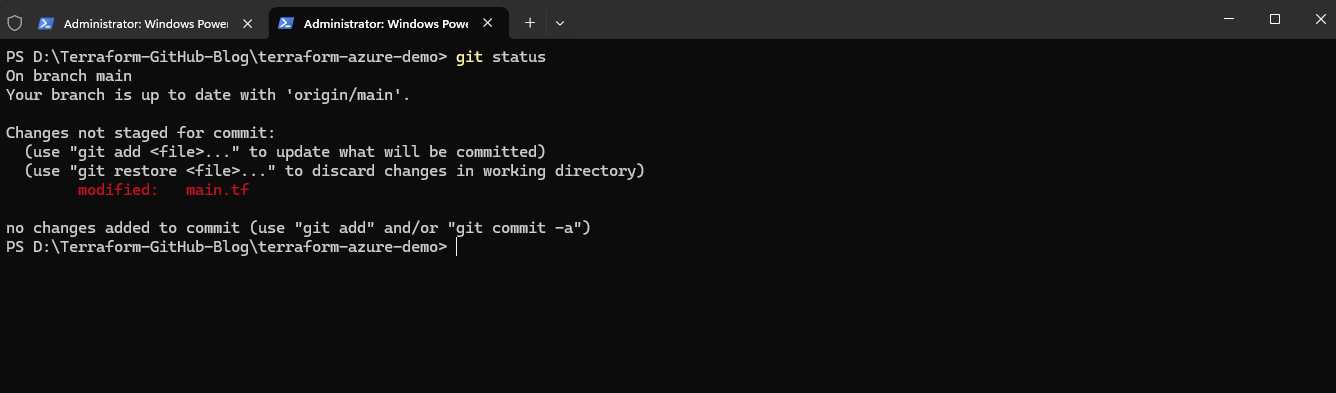
We can also check which changes not already staged for commit by running:
PS> git status
When clicking the Commit button in Visual Studio Code below, Visual Studio Code typically performs the equivalent of:
PS> git add .
PS> git commit
or more precisely stages the selected changes first and then creates the commit through the integrated Git functionality.
Visual Studio Code therefore acts as a graphical frontend for common Git operations which would otherwise be executed manually through the command line.
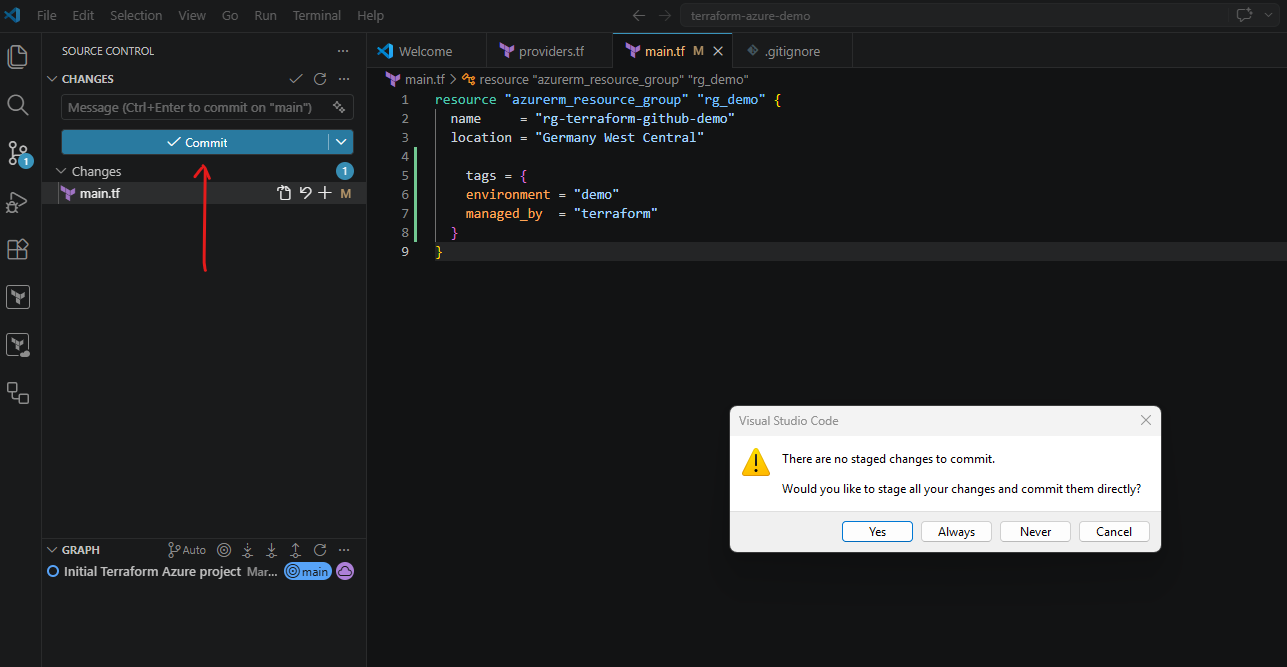
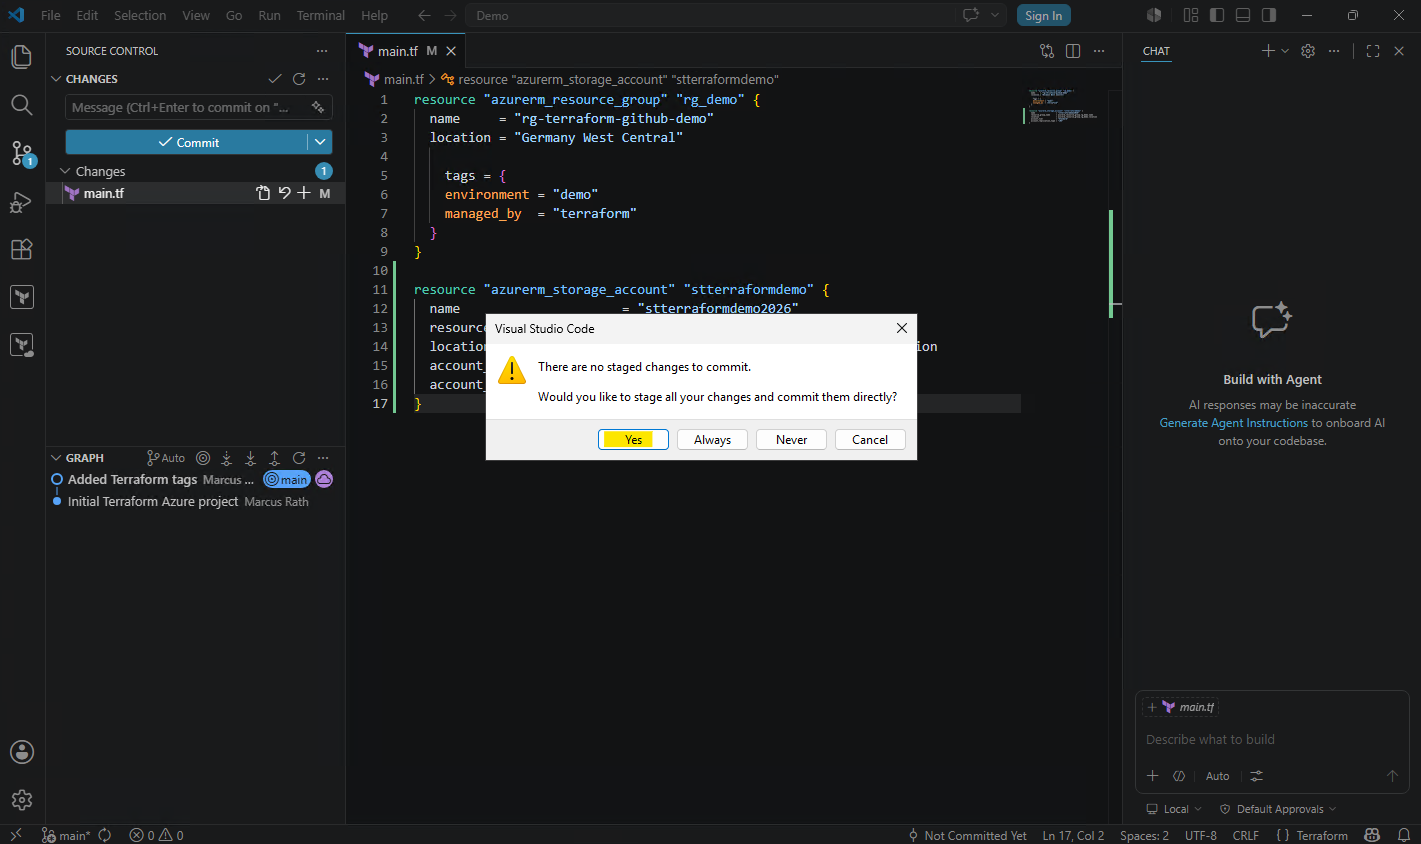
When clicking the Commit button in Visual Studio Code without staged changes, Visual Studio Code detects this situation and asks whether it should automatically stage all modified files before creating the commit.
Selecting Yes essentially performs the equivalent of
git add .followed by the commit operation automatically through the graphical interface.
The message below after clicking on on Yes above, appears because Git does not yet have an explicitly configured commit identity on this workstation.
Git requires both a username and email address because each commit stores author metadata together with the project changes.
When using the command-line workflow earlier, Git was still able to create the commit because it automatically derived a temporary identity from the current Windows user and hostname.
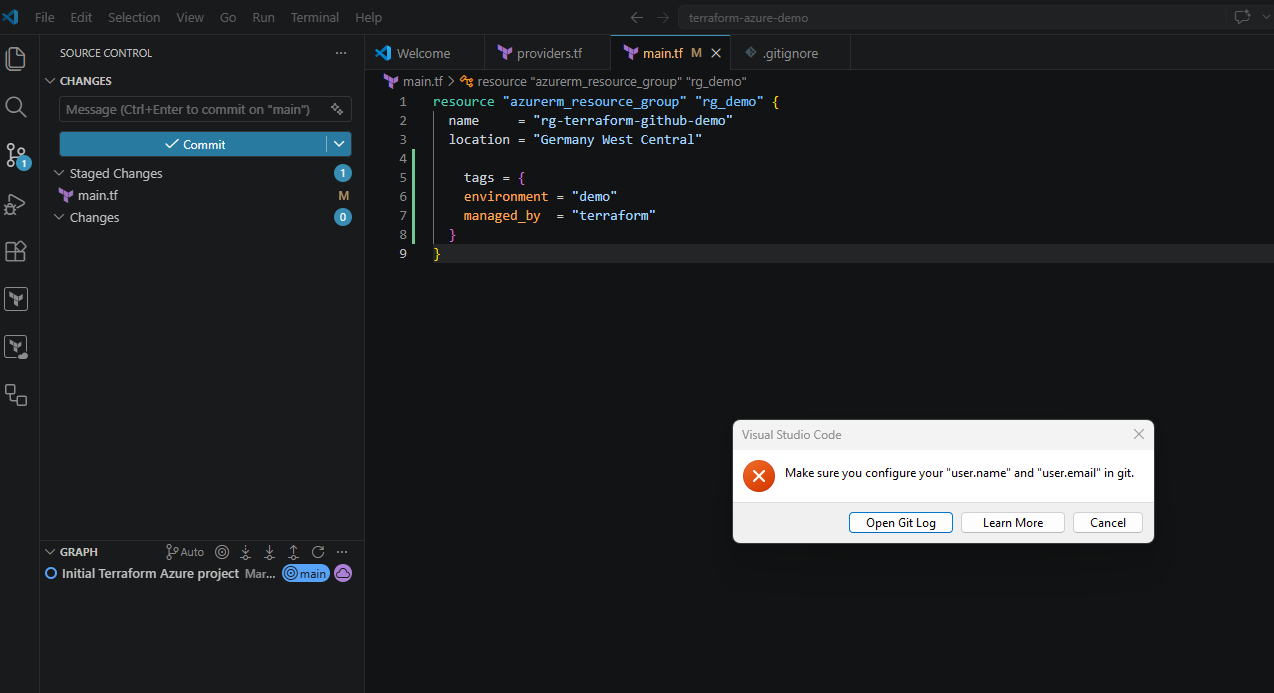
However, Git also displayed a warning that this identity was only auto-detected and not explicitly configured as shown below again.
Visual Studio Code is stricter in this scenario and therefore blocks the graphical commit operation until the Git identity is configured manually.
The identity can be configured globally using:
git config --global user.name "Marcus Rath"
git config --global user.email "<user>@matrixpost.de"

After configuring the Git identity, the commit operation now works successfully through the integrated Source Control interface in Visual Studio Code.
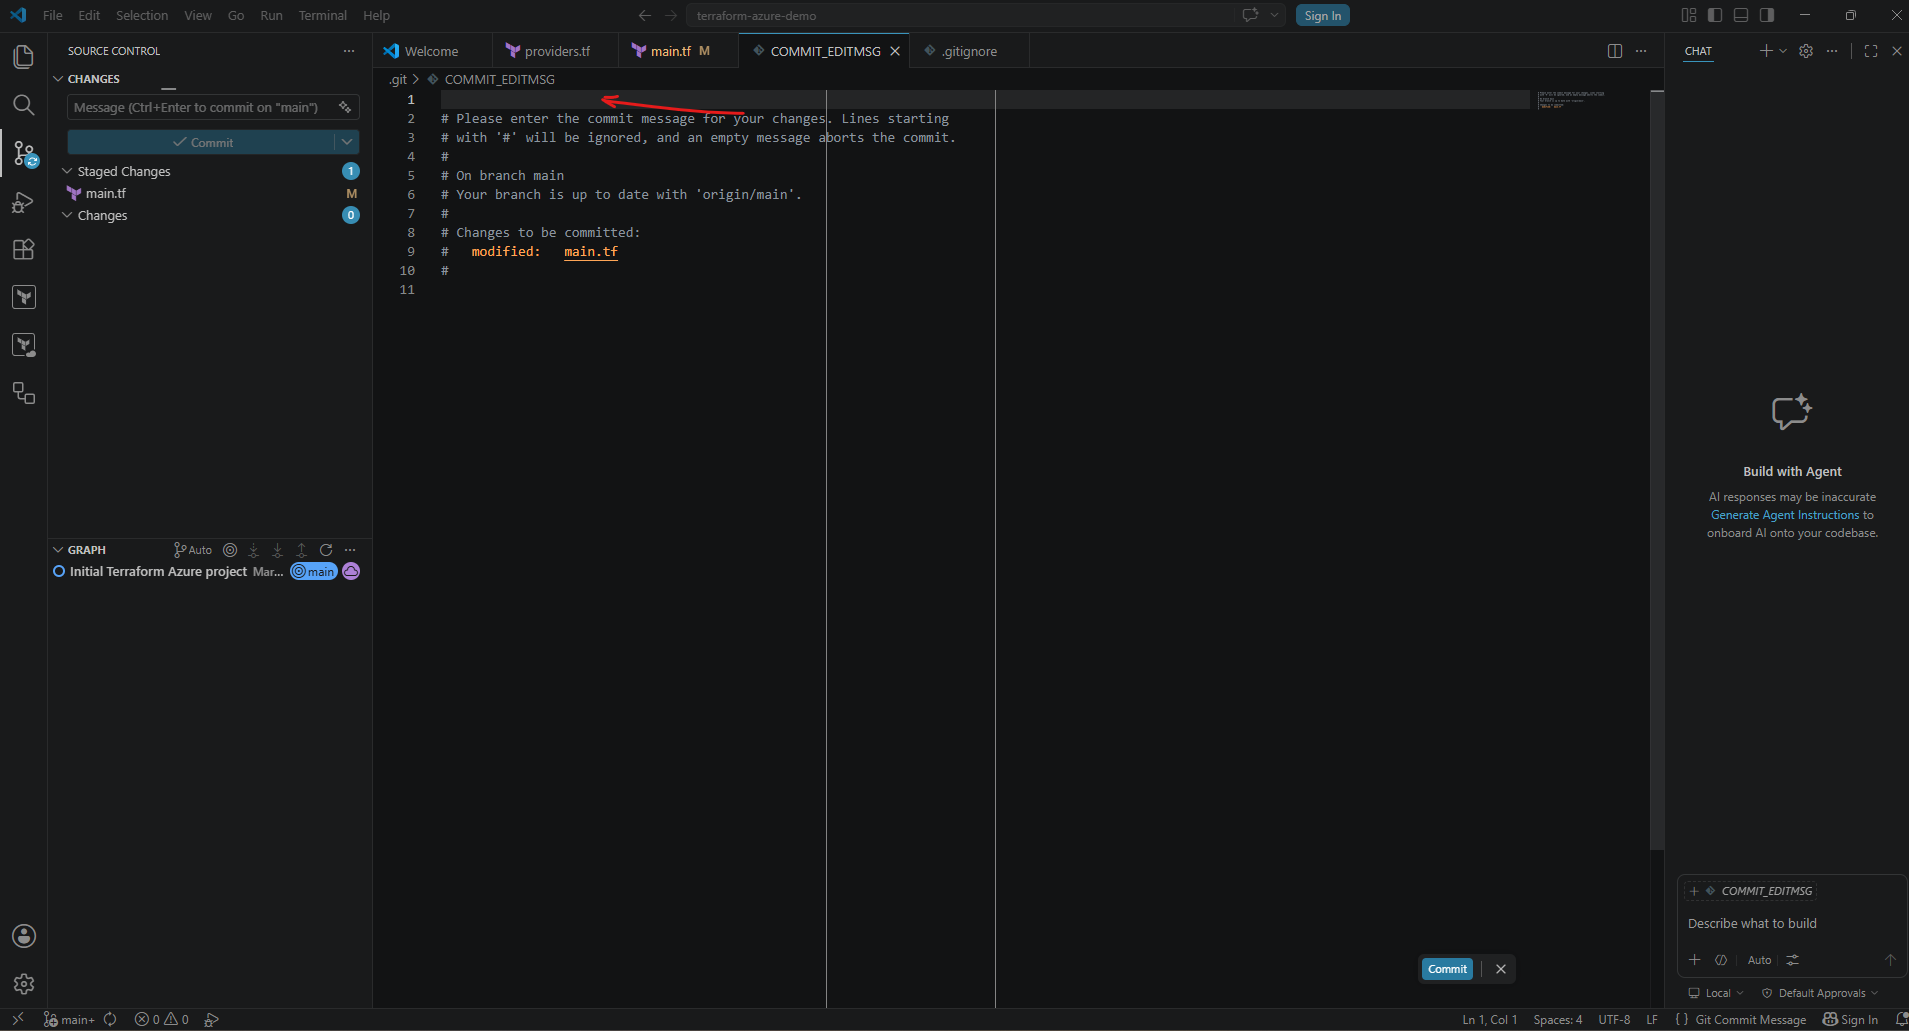
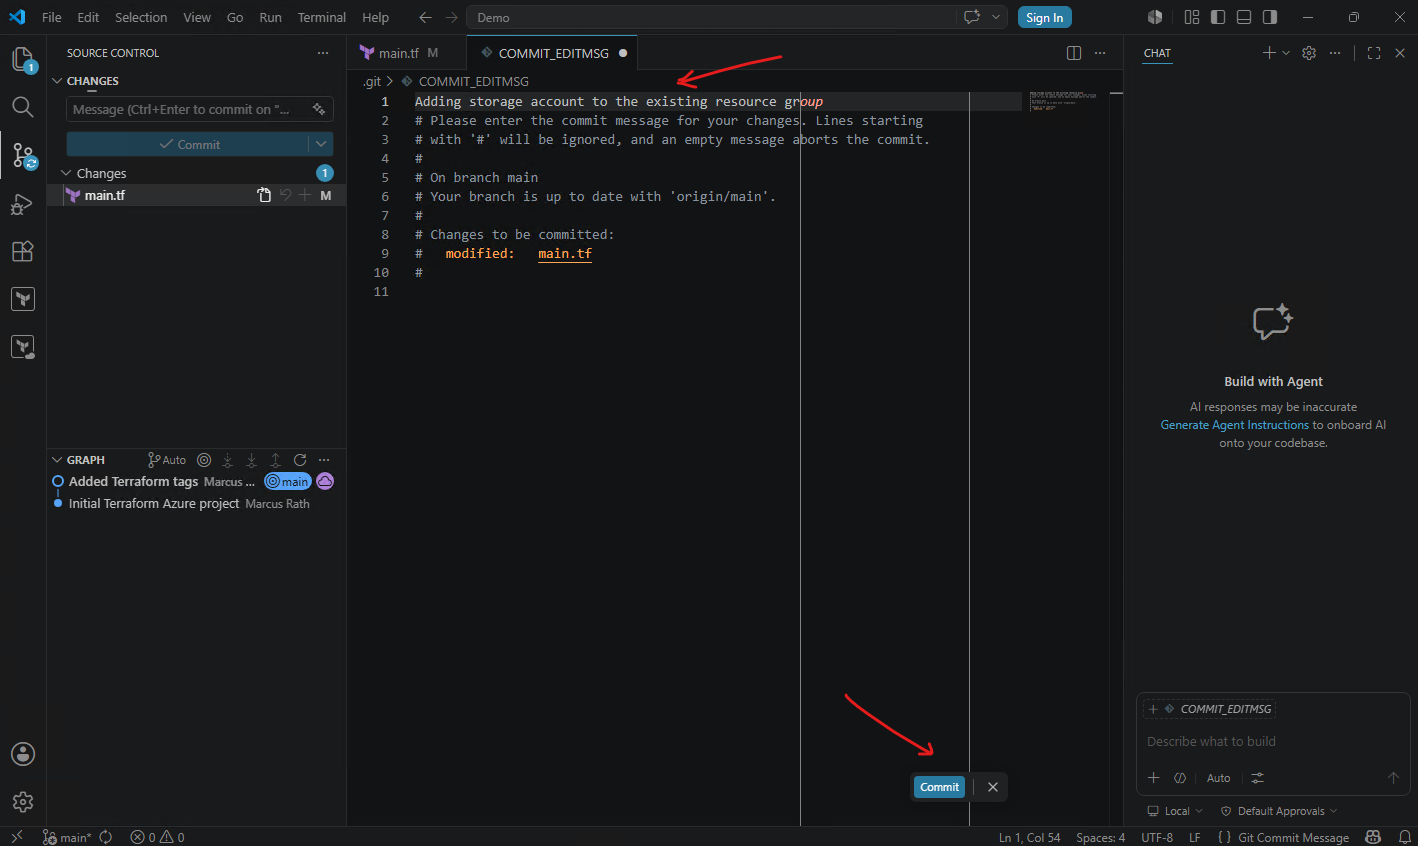
Before the commit is created, Visual Studio Code prompts for a commit message describing the current project changes.
This corresponds to the command-line parameter used previously:
git commit -m "Added Terraform tags"
The commit message becomes part of the permanent Git repository history and helps document the purpose of each infrastructure or configuration change over time.
After entering a commit message we need to click again on the Commit button shown below.
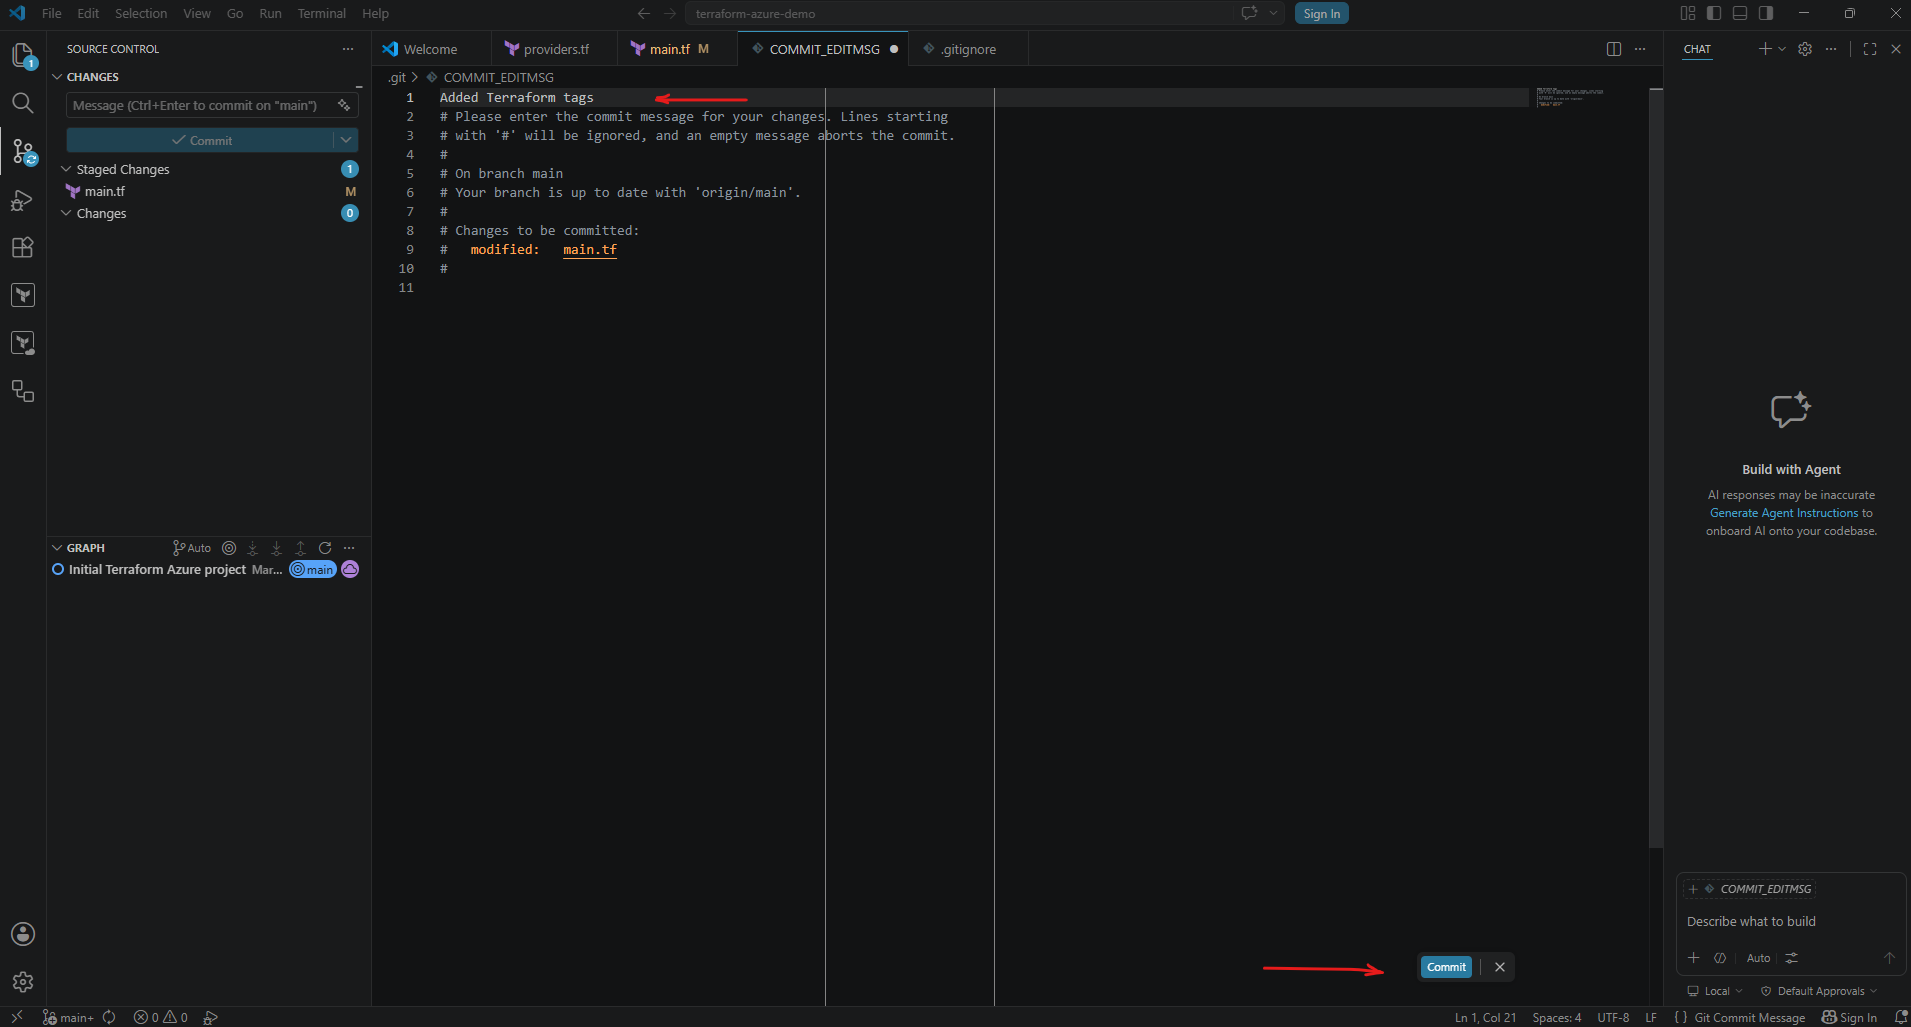
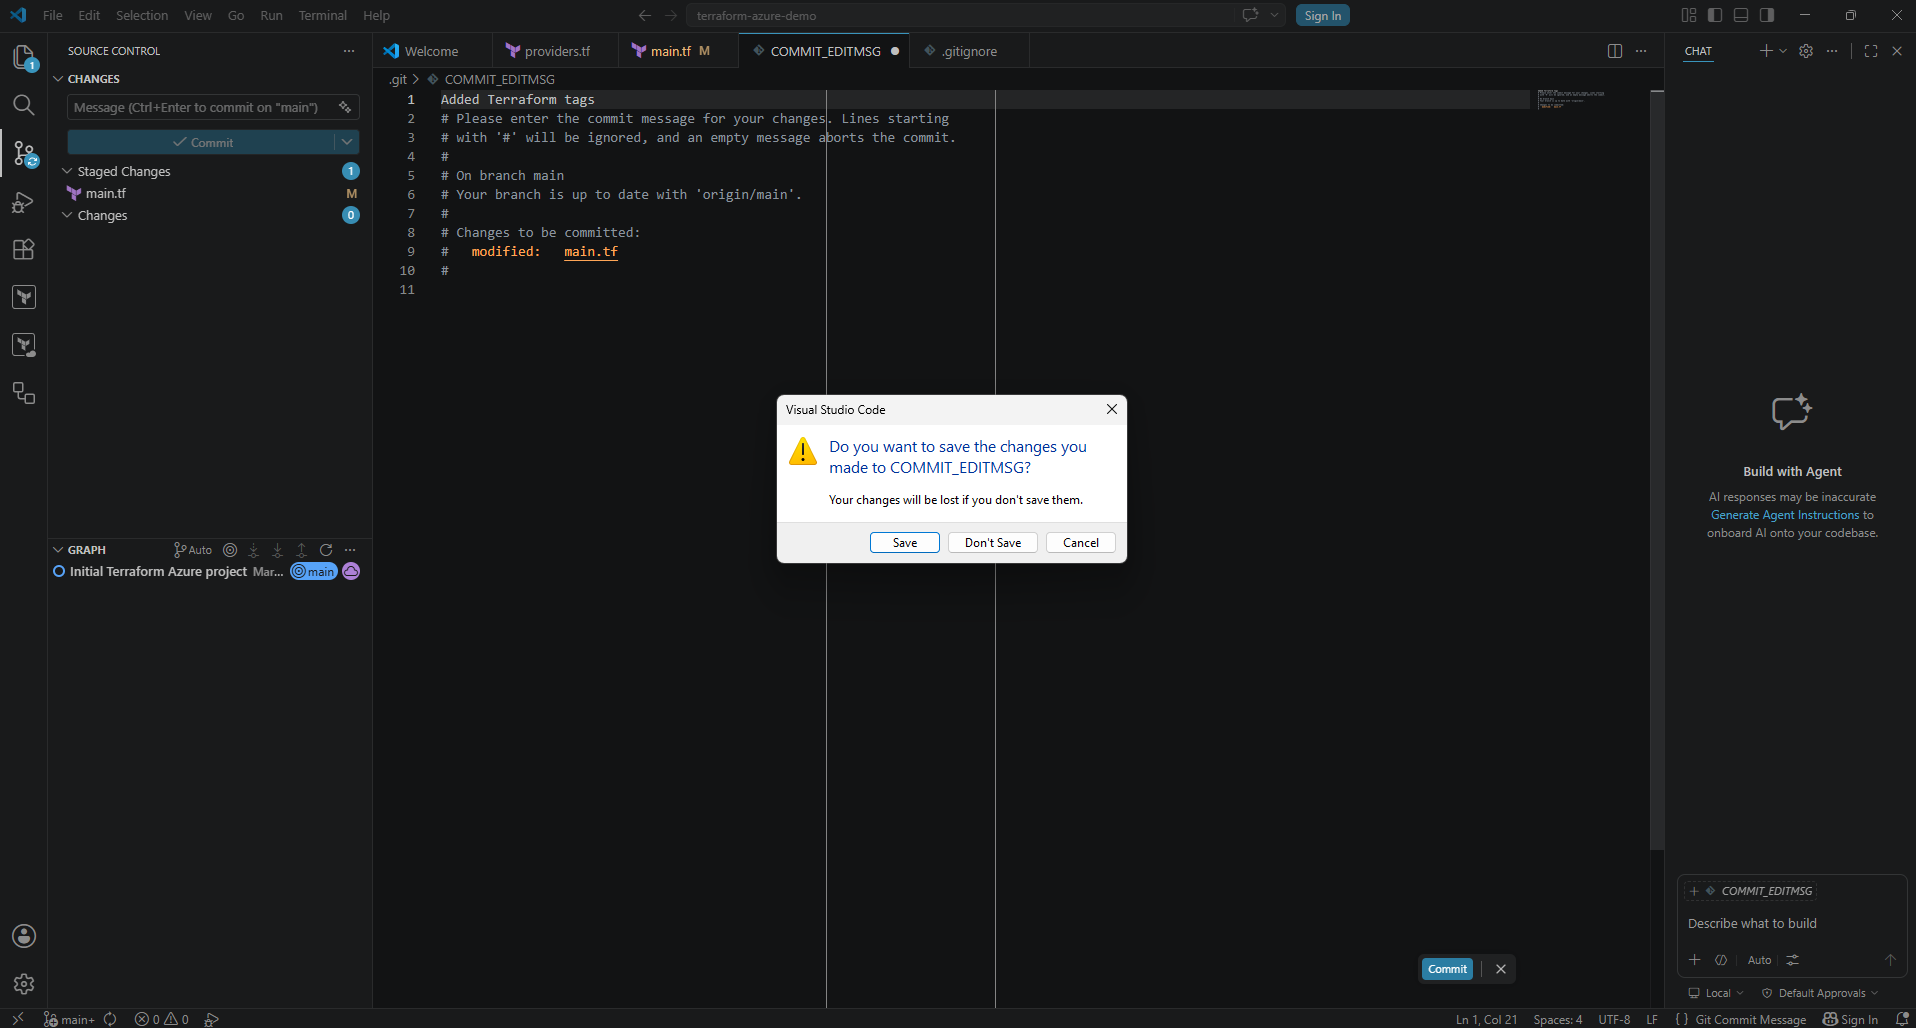
Click on Save.
Synchronizing Changes with GitHub
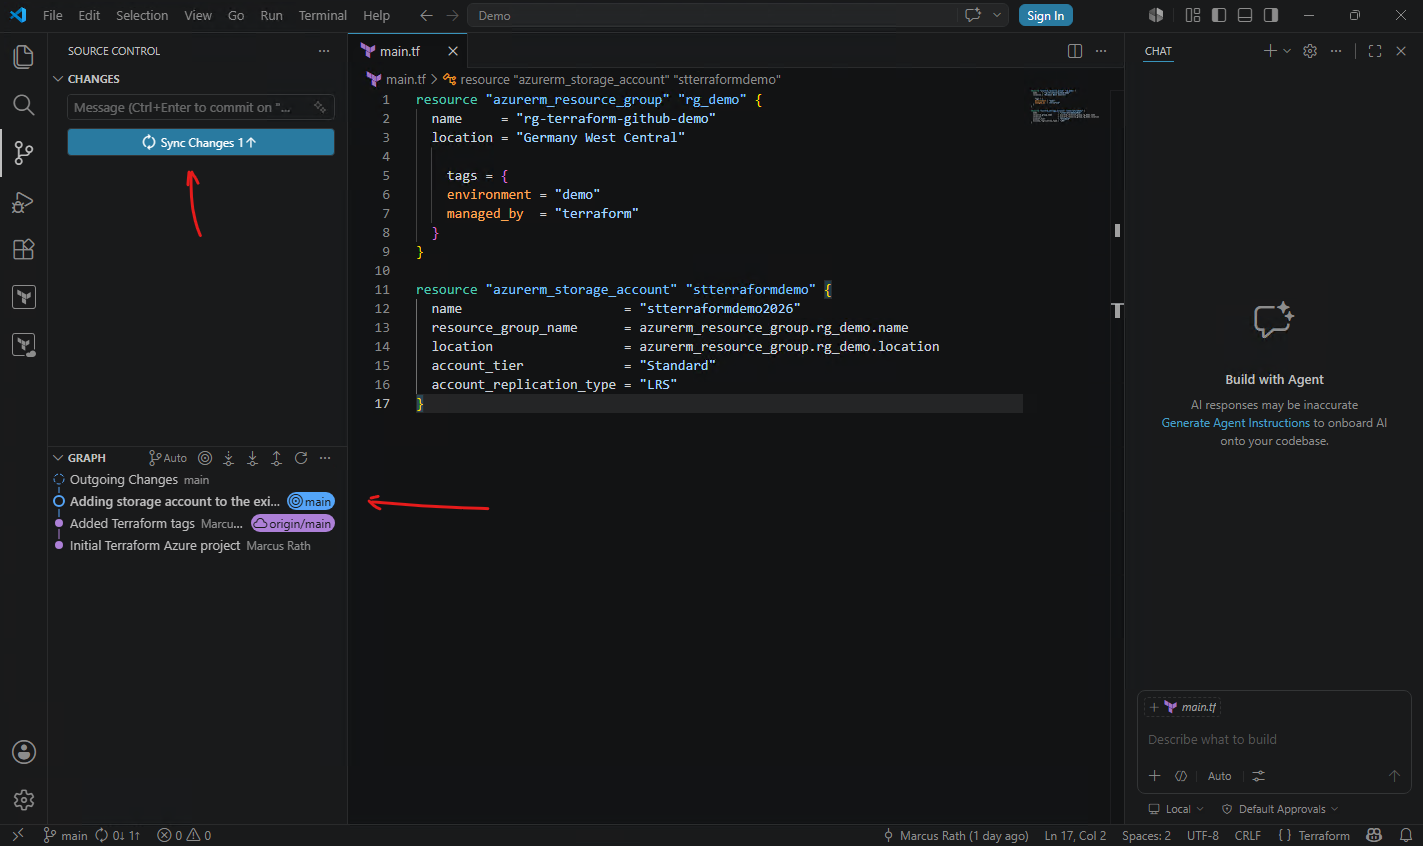
After the local commit is created successfully, Visual Studio Code automatically detects that the local Git repository now contains commits which have not yet been uploaded to the remote GitHub repository.
The previous Commit button therefore changes to Sync Changes as shown below.
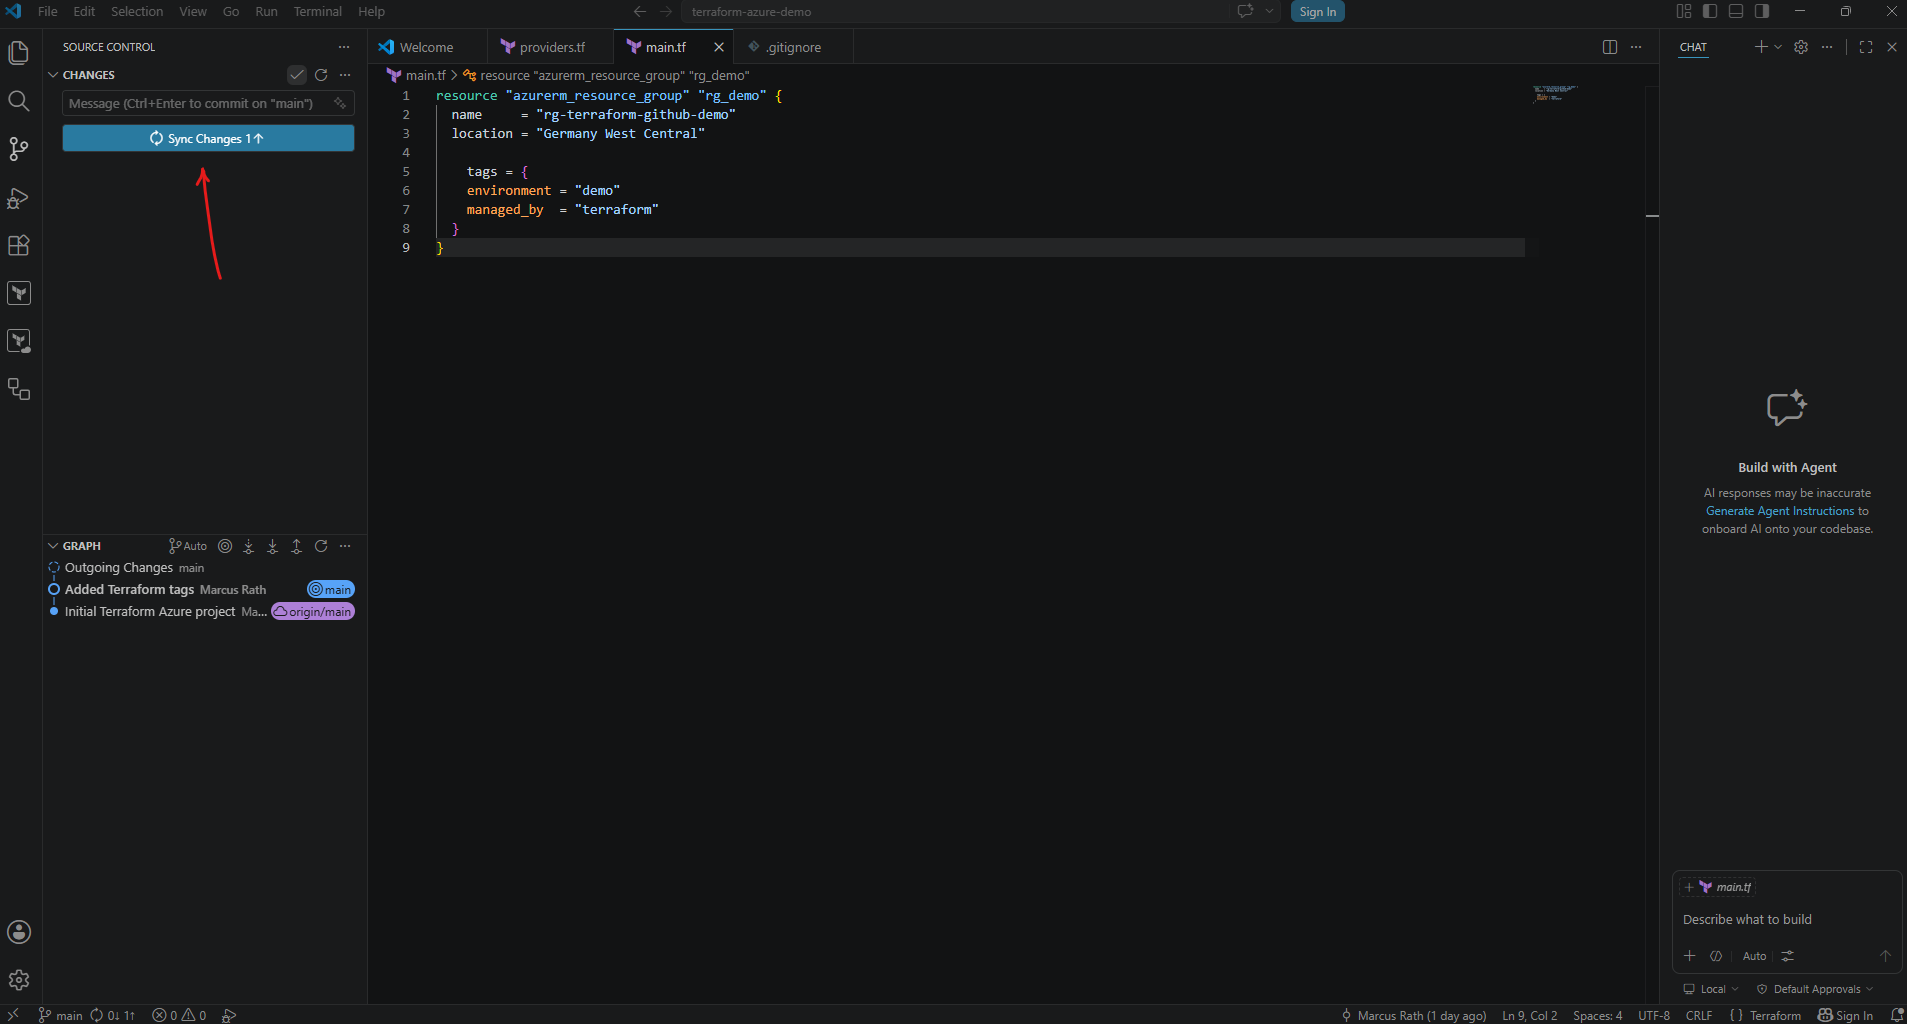
This operation typically performs the equivalent of a git push and optionally a git pull if required, synchronizing the local repository state with the remote GitHub repository directly through the graphical interface.
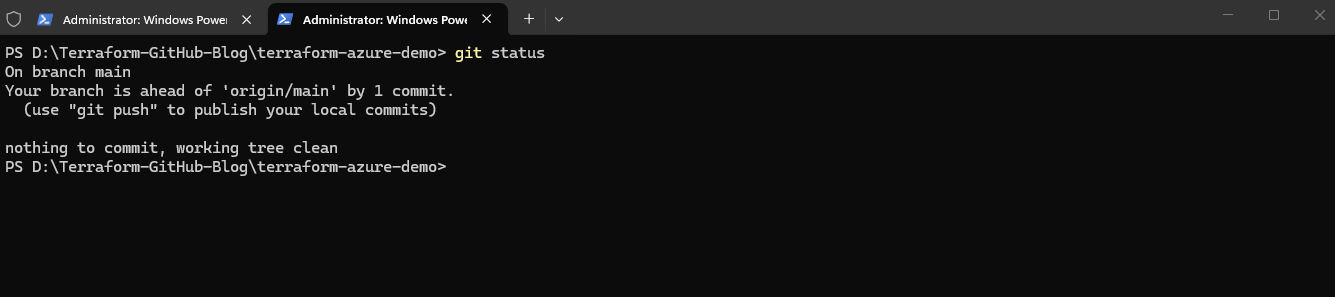
Before clicking on Sync Changes I want to check first the new state by using the command line and running:
Your branch is ahead of ‘origin/main’ by 1 commit.
This means that the local
mainbranch already contains one additional commit which does not yet exist in the remote GitHub repository. The local working directory itself is already clean because all file changes were committed successfully: nothing to commit, working tree clean
PS> git status
The remaining step is therefore only uploading the local commit to GitHub using either:
- the
git pushCLI command - or the Sync Changes button inside Visual Studio Code.
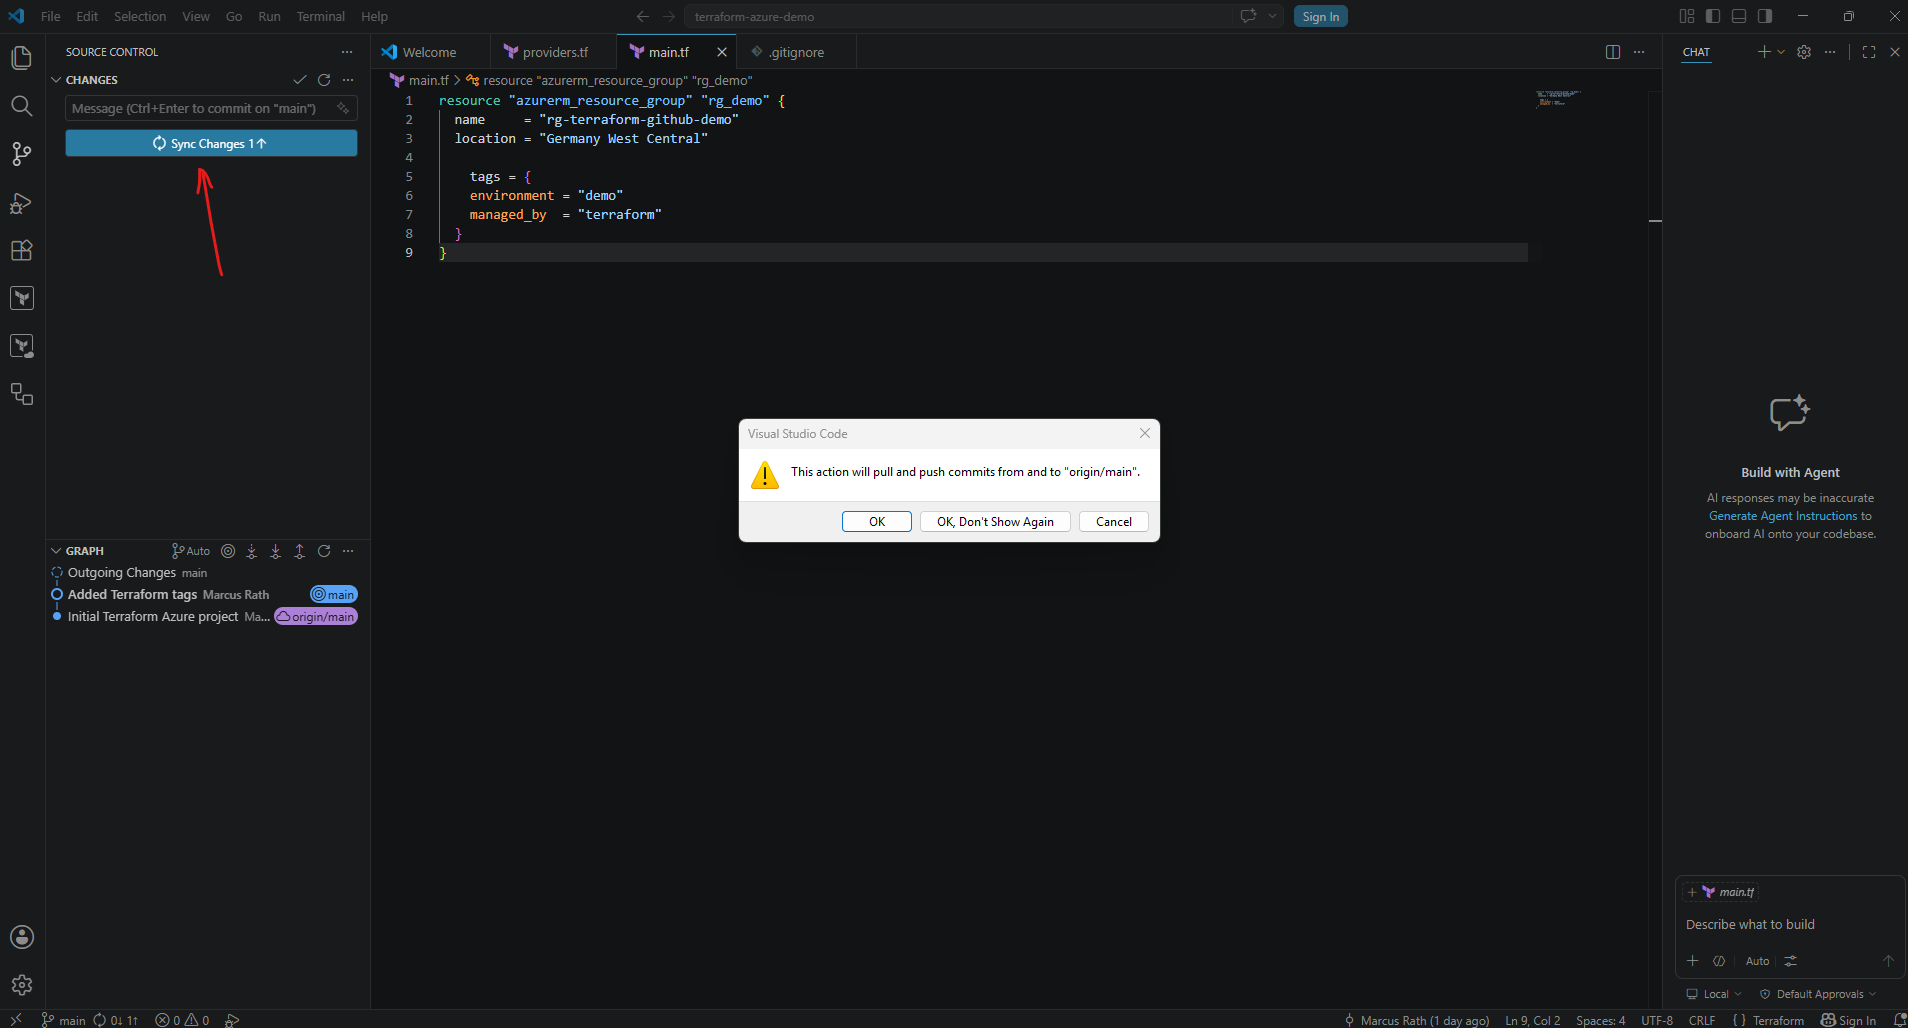
When clicking the Sync Changes button shown below, Visual Studio Code displays a confirmation dialog explaining that the synchronization process may both:
- upload local commits to the remote repository (
git push) - and download newer remote commits if they exist (
git pull)
The message references: origin/main
where:
originrepresents the remote GitHub repositorymainrepresents the currently tracked branch
The synchronization operation therefore keeps the local and remote Git repository states aligned through a combined pull and push workflow.
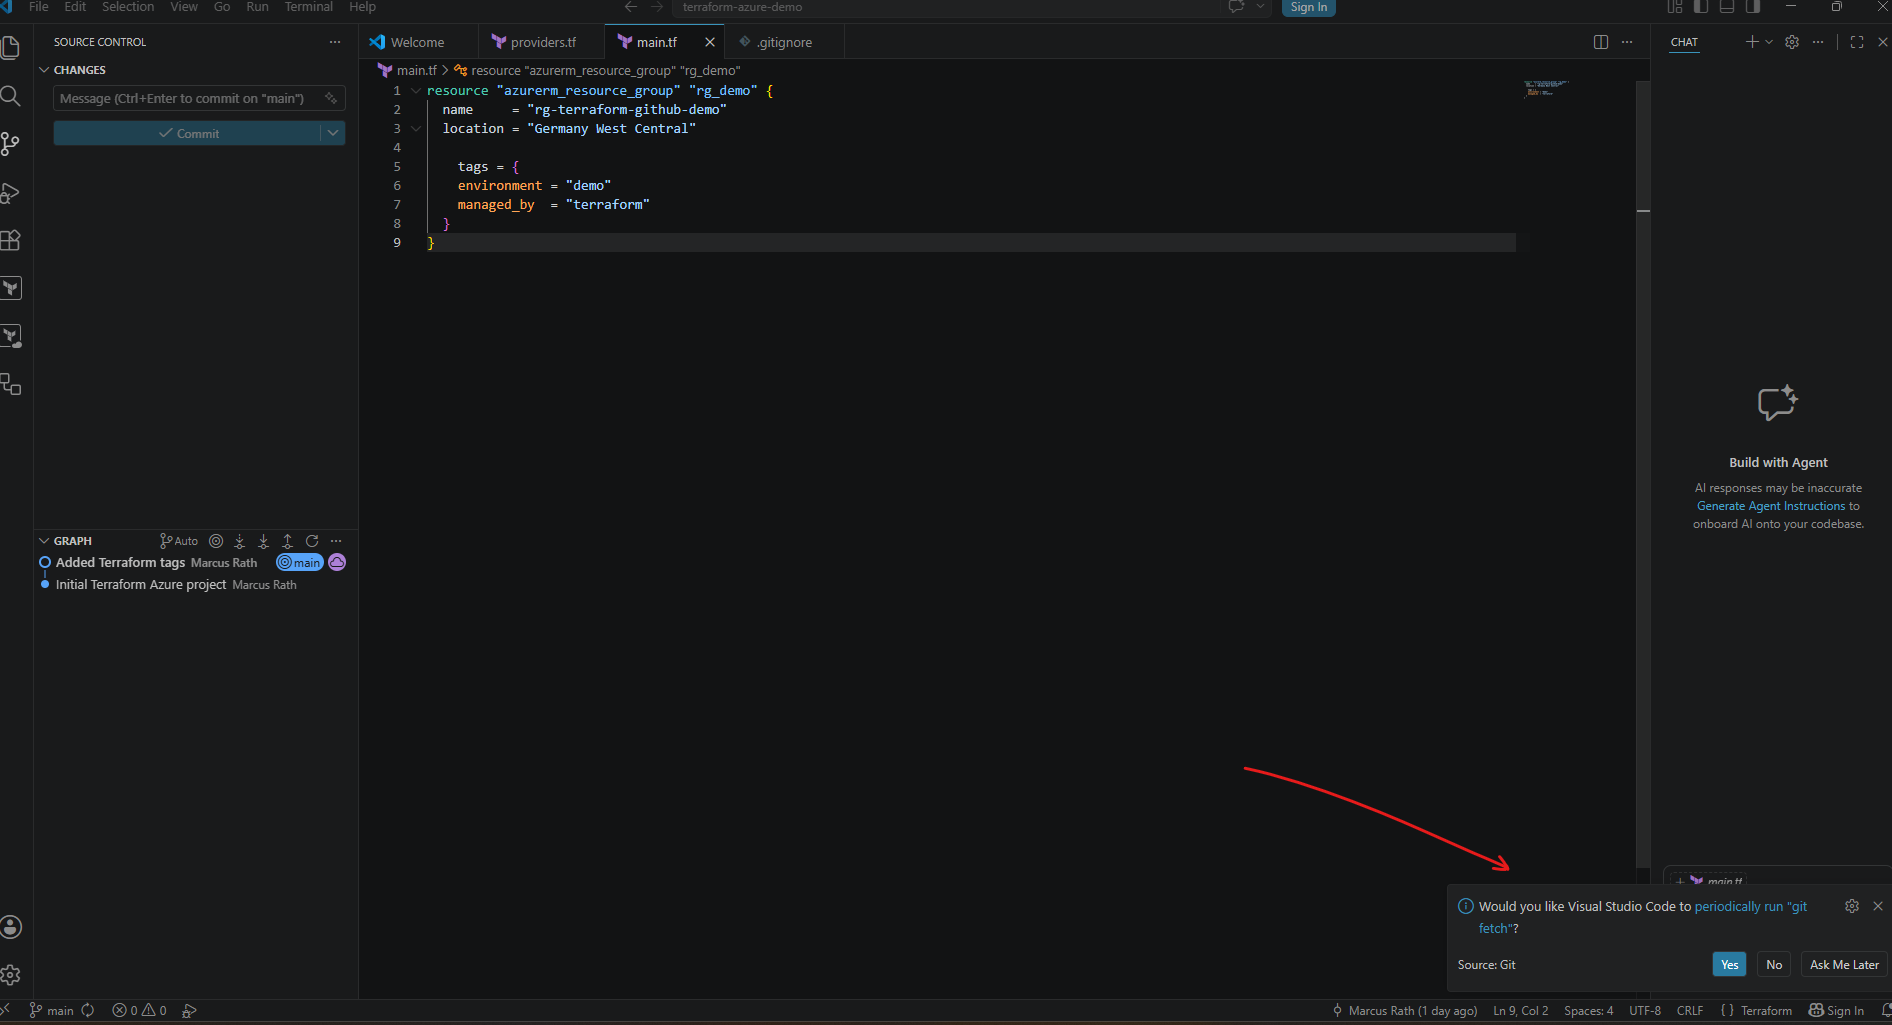
After synchronizing the repository, Visual Studio Code may ask whether it should periodically execute the following command in the background.
The
git fetchoperation checks the remote GitHub repository for newer commits, branches, or repository changes without automatically modifying the local working files. This allows Visual Studio Code to continuously display whether the local repository is behind or ahead of the remote repository and helps keep the Source Control status information up to date.
git fetch
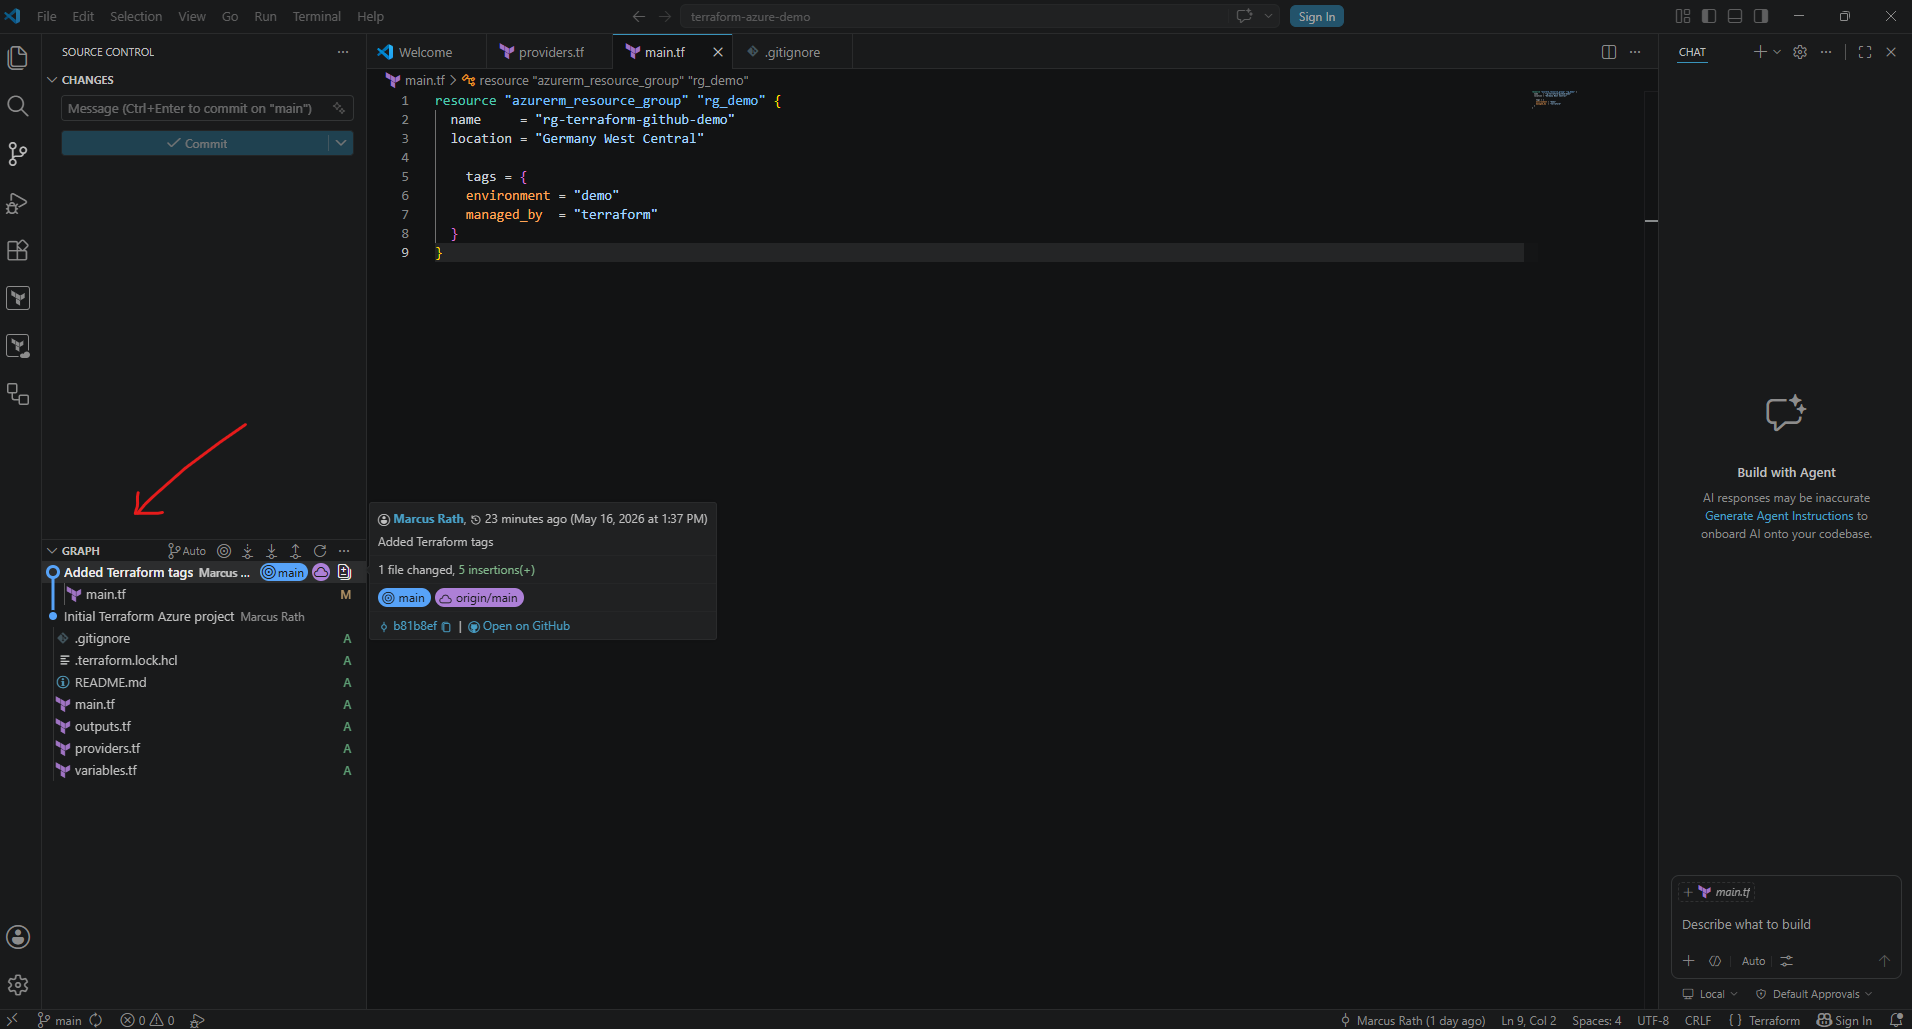
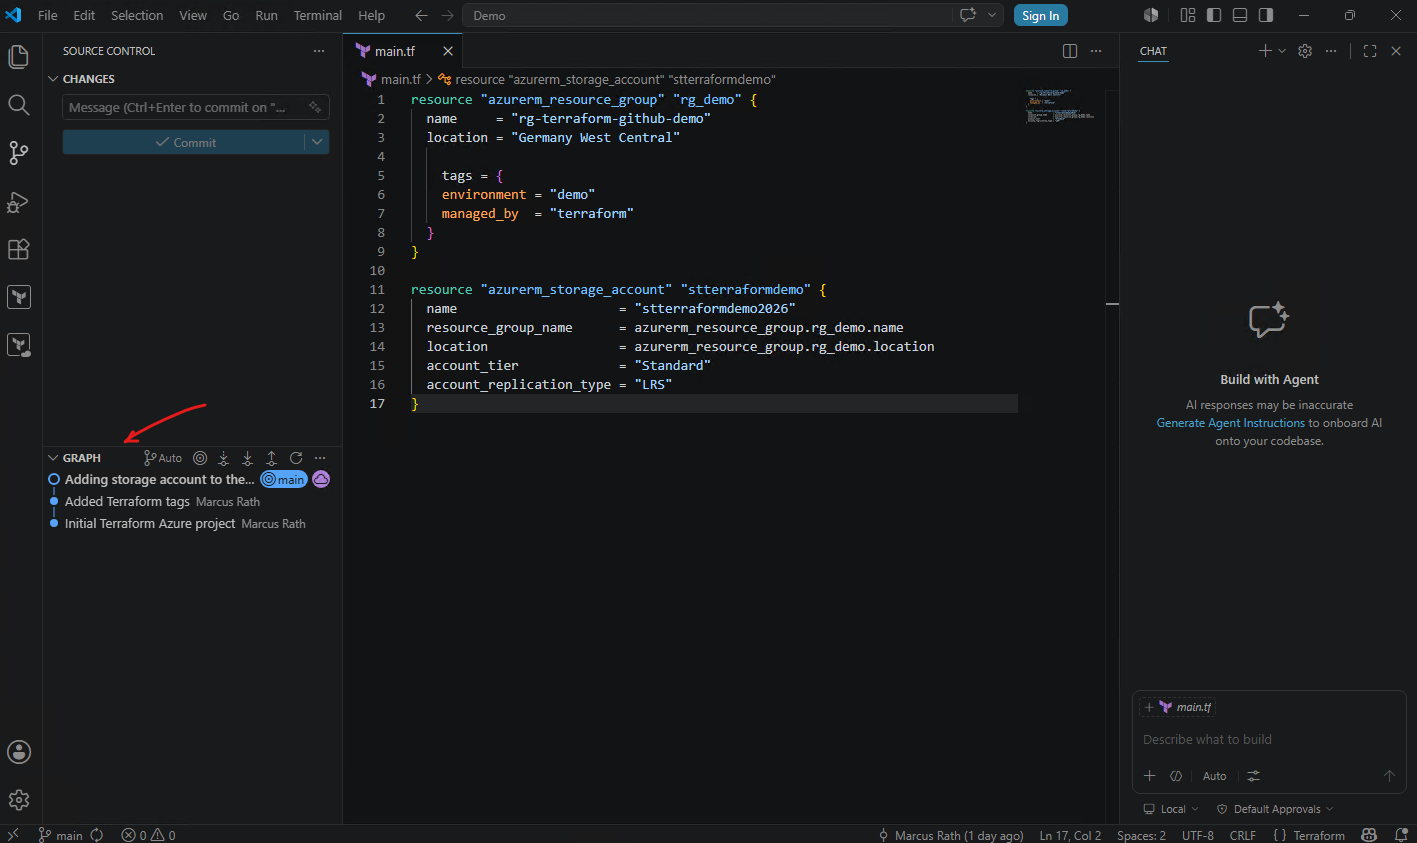
The Graph view in Visual Studio Code visually displays the Git commit history of the repository.
The two entries:
Initial Terraform Azure projectAdded Terraform tags
represent the two commits currently stored in the repository history. Each entry corresponds to a separate project snapshot created through the Git commit process.
This graphical history view makes it easier to track infrastructure changes over time and helps visualize how the Terraform project evolves through individual commits.
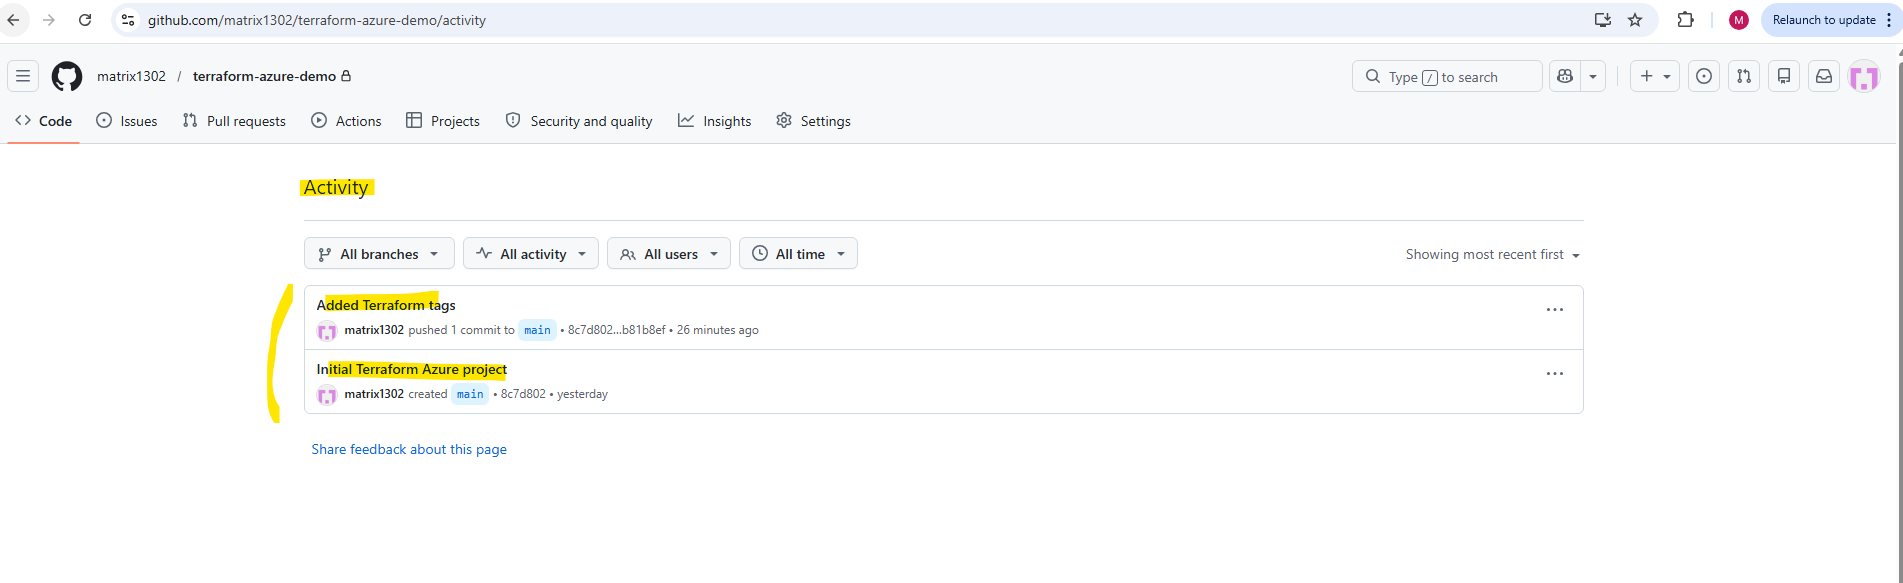
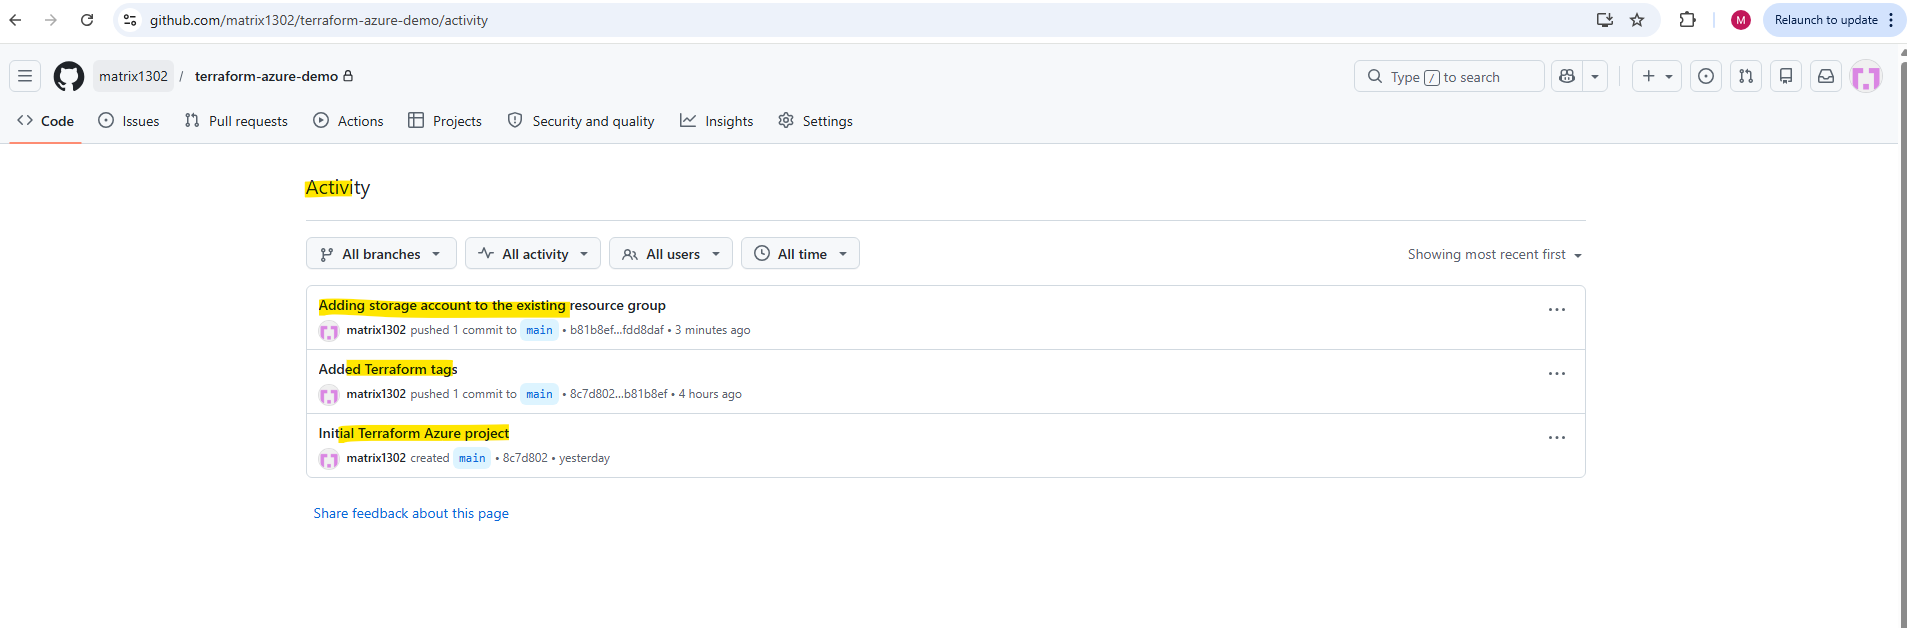
After synchronizing the repository, the updated commit history also becomes visible in the remote GitHub repository.
GitHub now displays both commits, showing that the local repository history and the remote GitHub repository are fully synchronized.

The repository activity now shows two separate project versions.
Initial Terraform Azure projectAdded Terraform tags
which represent the current Infrastructure as Code change history of the Terraform project.
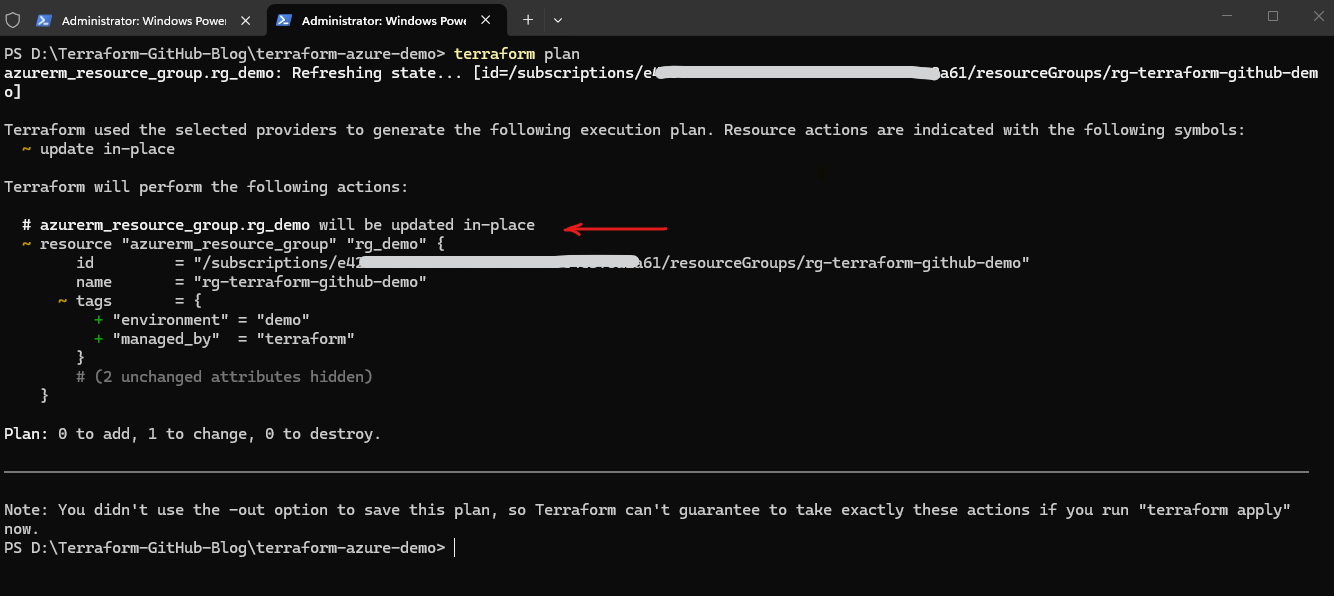
Applying the Updated Terraform Configuration
After updating the Terraform configuration and synchronizing the repository changes with GitHub, we can now apply the infrastructure modification to Microsoft Azure.
First run:
Terraform now compares the updated Terraform configuration with the current Azure infrastructure and detects the incremental changes required for the existing Resource Group.
The execution plan should now show an in-place update highlighted below. This demonstrates one of Terraform’s key advantages: instead of recreating the entire resource, Terraform only applies the specific configuration differences that were added to the Terraform code.
PS> terraform plan
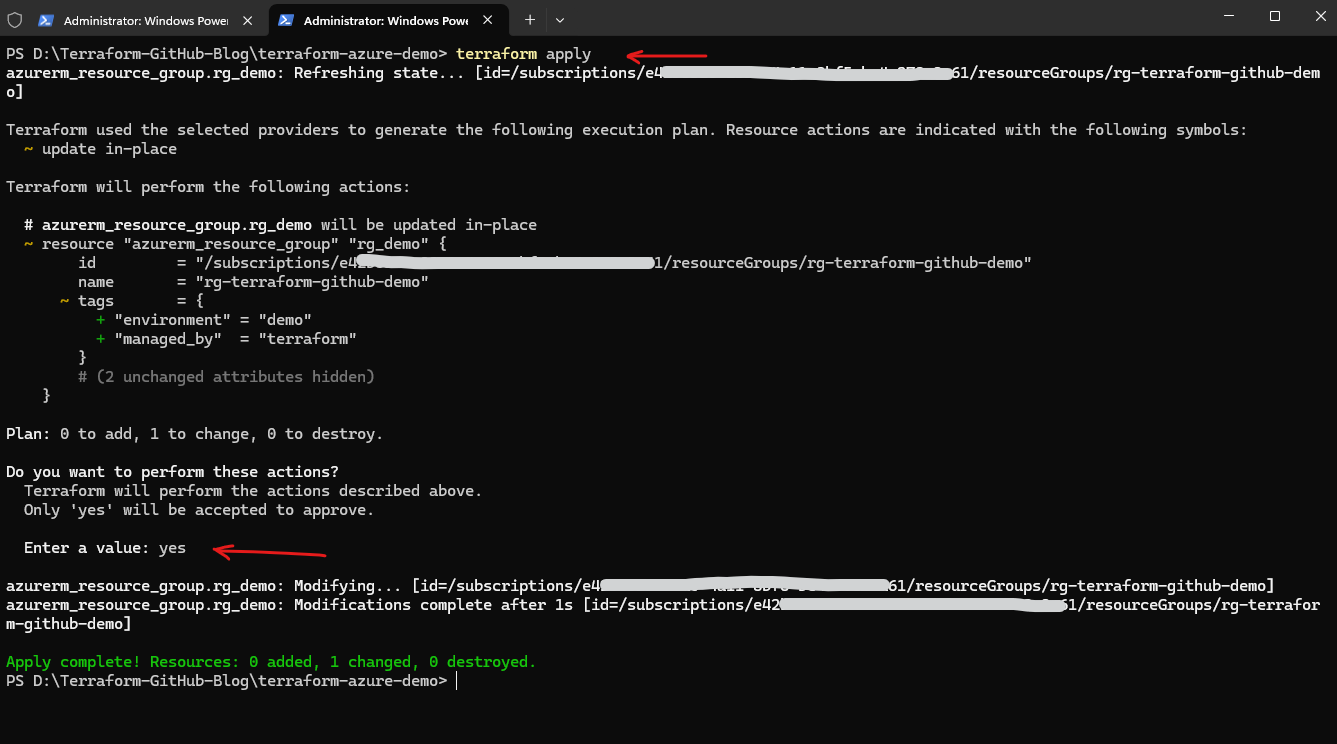
To apply the changes, run and confirming with yes.
Terraform updates the Azure Resource Group and applies the newly configured tags directly to the existing Azure resource.
PS> terraform apply
Working from Another Computer
Since the Terraform configuration is stored in GitHub, we are not limited to the original workstation.
The repository can easily be cloned and used from different computers and environments independently of the local folder structure, which is one of the major advantages of combining Terraform with Git-based version control systems.
The Git repository can be cloned into any local directory on any workstation. For example:
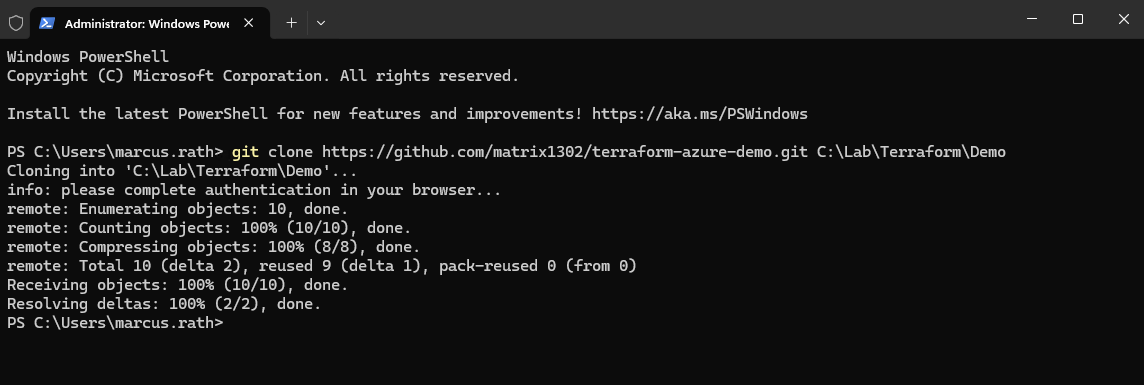
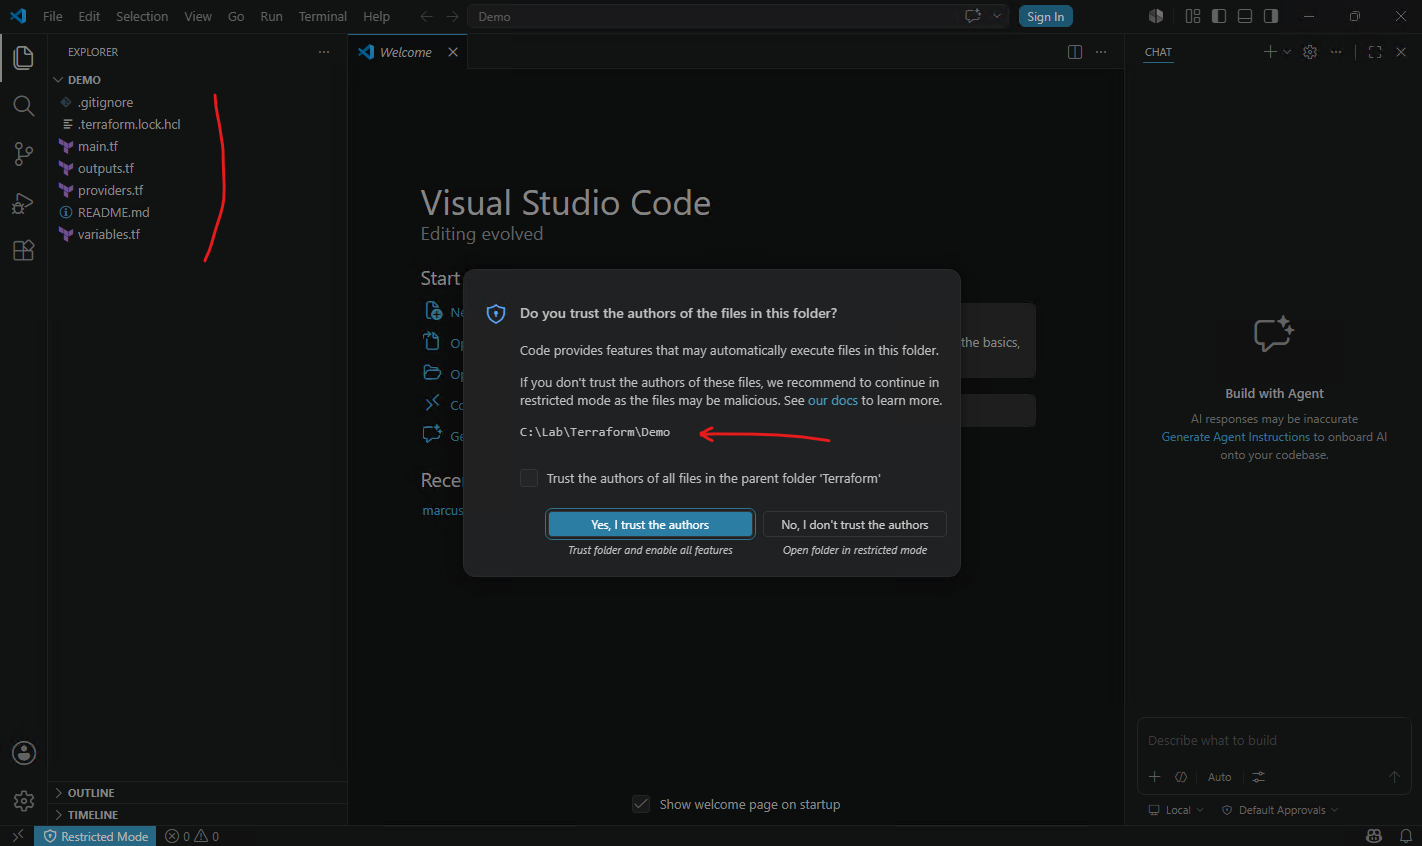
PS> git clone https://github.com/matrix1302/terraform-azure-demo.git C:\Lab\Terraform\Demo
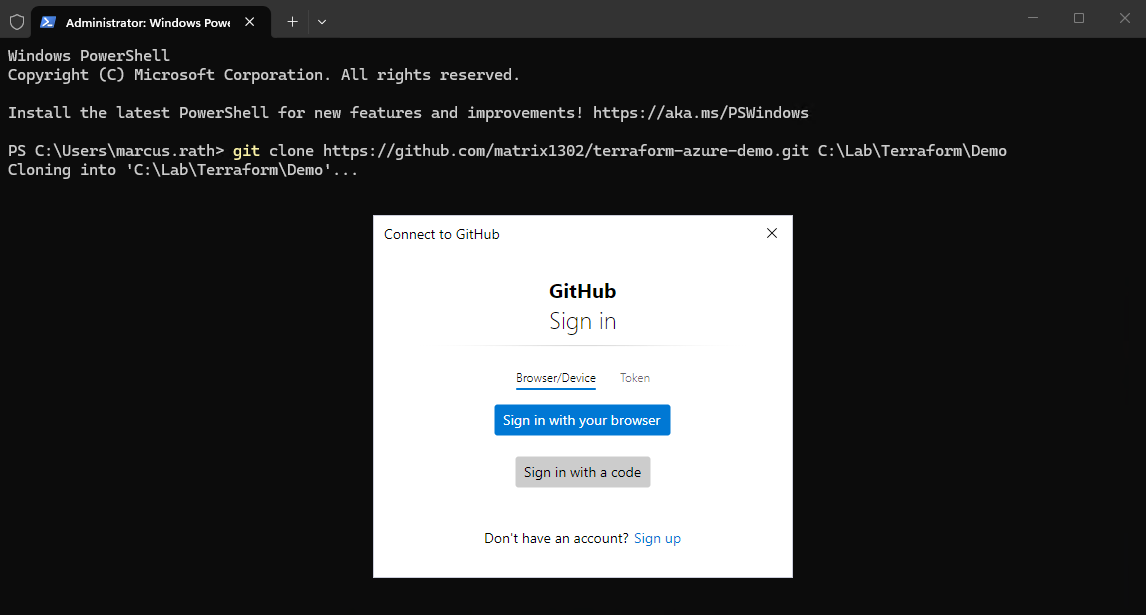
When cloning or accessing a private GitHub repository for the first time, Git for Windows may open a browser-based authentication flow. The login page asks to authorize Git Credential Manager / git-ecosystem with permissions such as repository access, workflow file updates, and Gist access.
During the Git installation process, Git Credential Manager is enabled by default and integrates directly with Git to handle authentication for services such as GitHub or Azure DevOps. This is why browser-based authentication windows can automatically appear during operations such as
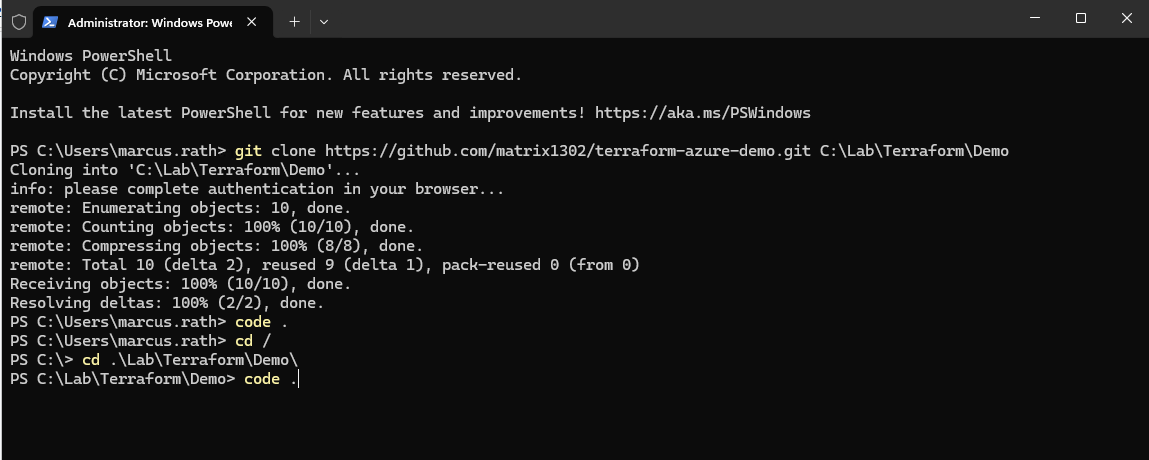
The repository can now be opened directly in Visual Studio Code using:
The
.parameter tells Visual Studio Code to open the current working directory as the active project folder. Therefore I will first change into the project directory.
Since the .terraform working directory and provider plugins are not stored inside the GitHub repository, Terraform must be initialized again after cloning the project on another computer. Running terraform init recreates the local Terraform working environment and downloads the required provider plugins defined in the Terraform configuration.
PS> terraform init

After initializing Terraform on the new computer, we can continue working with the same Infrastructure as Code project exactly as on the original workstation.
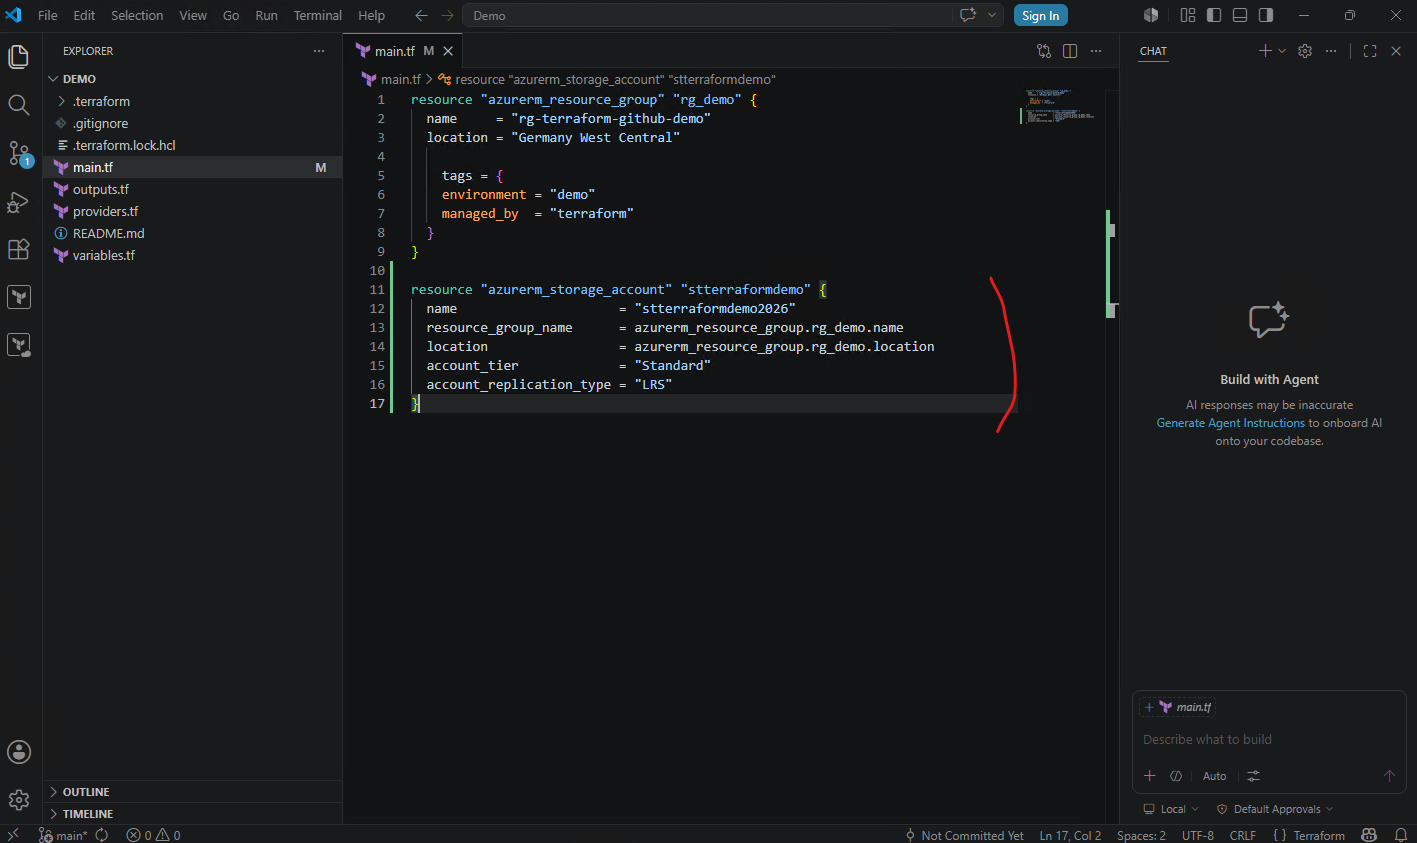
To demonstrate this, we will now extend the existing Terraform configuration by adding an Azure Storage Account and deploy the new resource to the already existing Azure Resource Group.
To extend the existing Terraform deployment, we will now add an Azure Storage Account resource definition to the main.tf configuration file. This demonstrates how Terraform can incrementally expand already deployed infrastructure without recreating existing Azure resources.
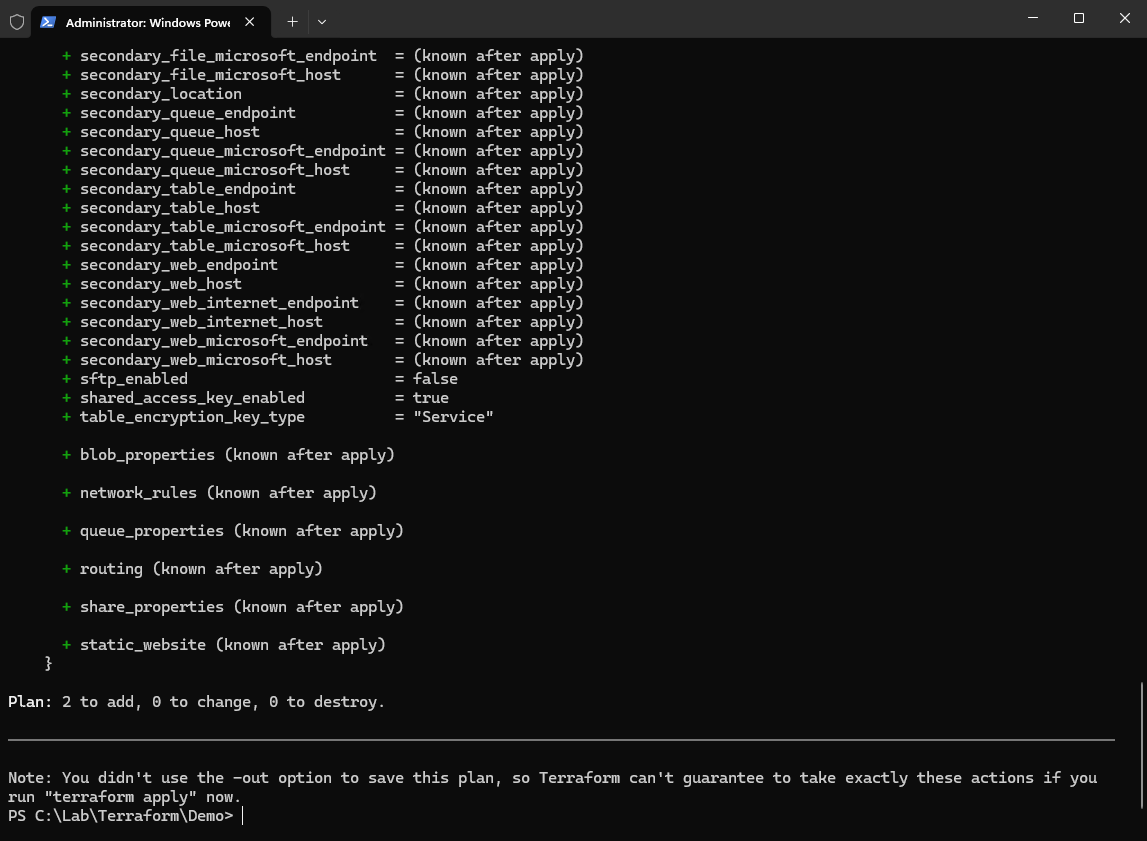
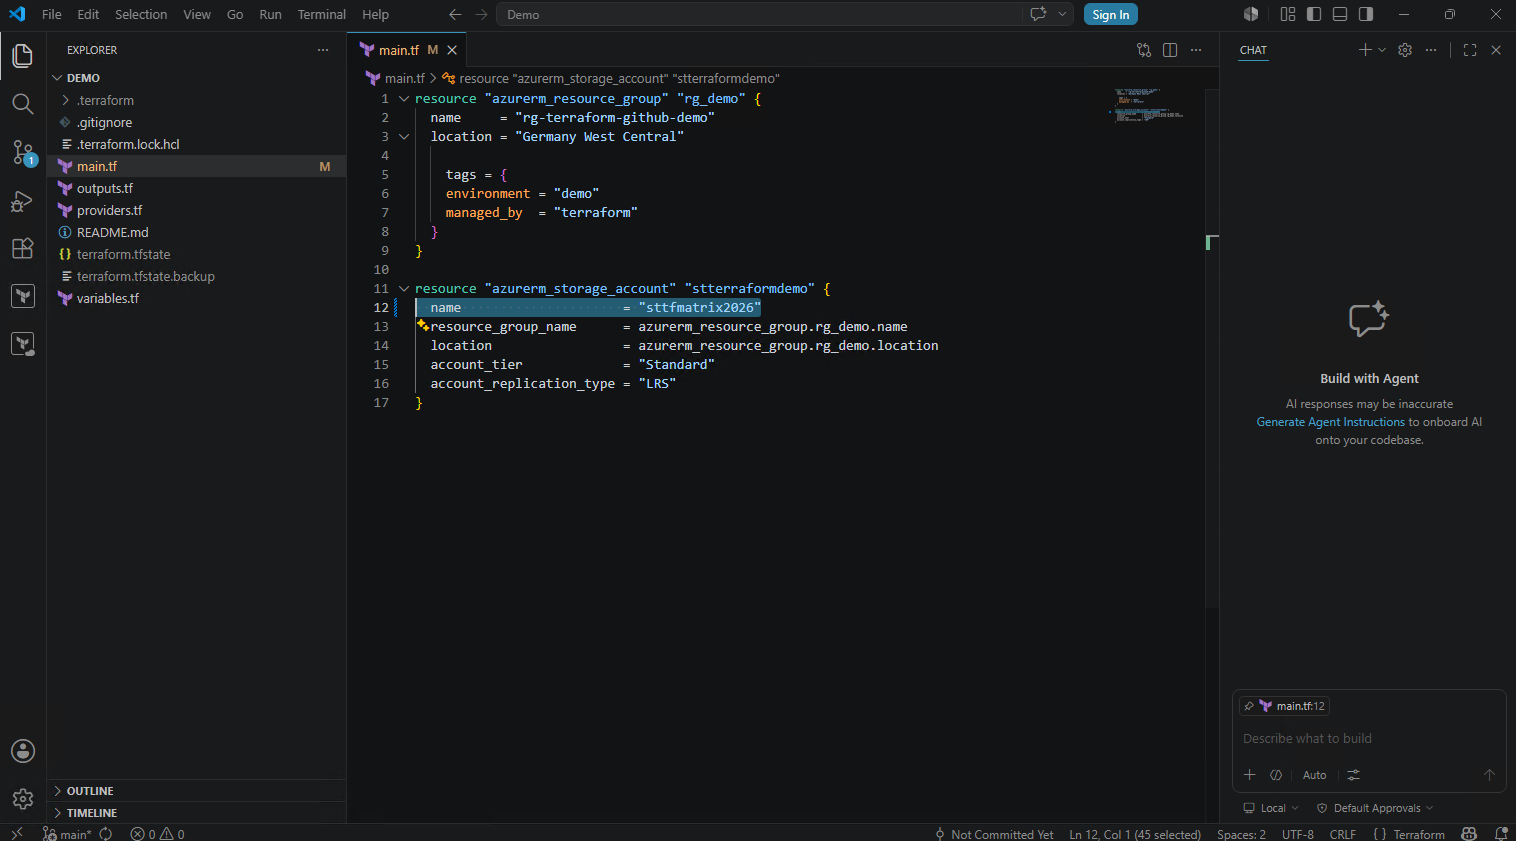
resource "azurerm_storage_account" "stterraformdemo" {
  name                     = "stterraformdemo2026"
  resource_group_name      = azurerm_resource_group.rg_demo.name
  location                 = azurerm_resource_group.rg_demo.location
  account_tier             = "Standard"
  account_replication_type = "LRS"
}
The updated
main.tffile now contains both the existing Azure Resource Group configuration together with the newly added Azure Storage Account resource.Terraform will use these combined resource definitions to determine the required incremental infrastructure changes for the Azure environment.
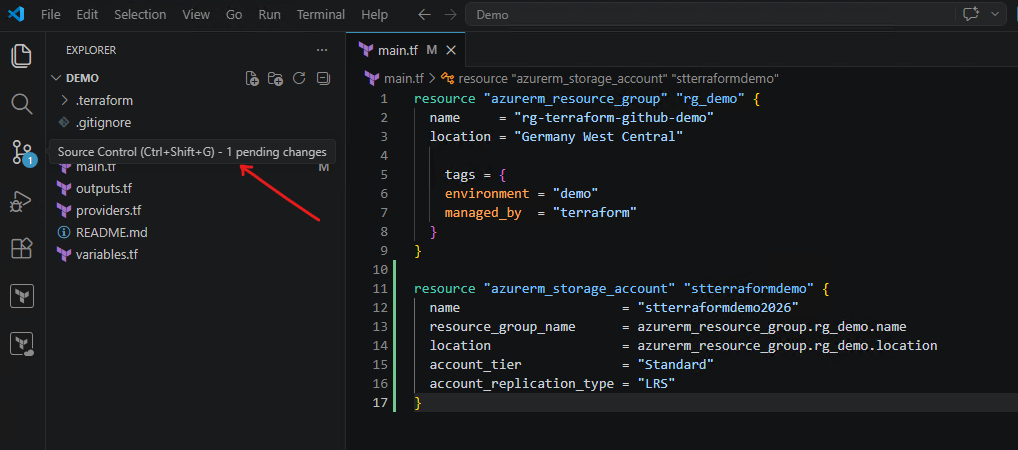
After adding the new Azure Storage Account resource to the main.tf file, Visual Studio Code again automatically detects the modified Terraform configuration through its integrated Git support.
The updated file now appears as a pending change inside the Source Control view, indicating that the Infrastructure as Code configuration was modified locally but has not yet been committed to the Git repository.
The modified Terraform configuration can now again be staged and committed either through the integrated Source Control interface in Visual Studio Code or directly through the command line using standard Git commands such as git add, git commit, and git push.
Both approaches finally perform the same Git repository operations and synchronize the updated Infrastructure as Code configuration with the remote GitHub repository.
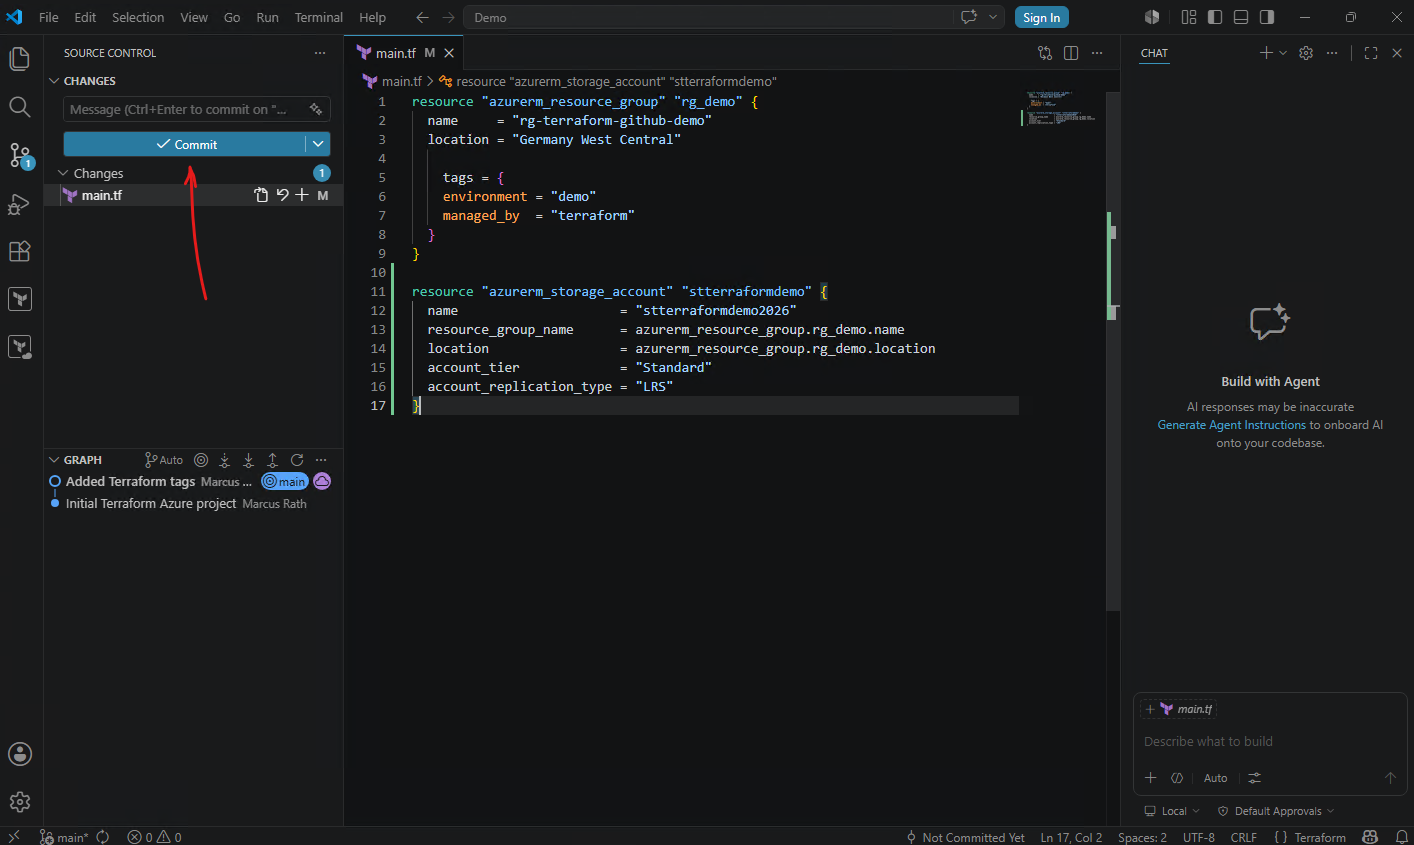
For this example, we will use the integrated Source Control functionality in Visual Studio Code instead of the command-line Git workflow. Before Visual Studio Code can create commits successfully, we first configure the Git commit identity consisting of the username and email address used for the Git repository history.
PS> git config --global user.name "Marcus Rath"
PS> git config --global user.email "<user>@matrixpost.de"

When clicking the Commit button in Visual Studio Code below, Visual Studio Code typically performs the equivalent of:
PS> git add .
PS> git commit
or more precisely stages the selected changes first and then creates the commit through the integrated Git functionality.
Before the commit is created, Visual Studio Code prompts for a commit message describing the current project changes. After entering a commit message we need to click again on the Commit button shown below
This corresponds to the command-line parameter used previously:
git commit -m "Adding storage account to the existing resource group"
The commit message becomes part of the permanent Git repository history and helps document the purpose of each infrastructure or configuration change over time.
After the local commit is created successfully, Visual Studio Code automatically detects that the local Git repository now contains commits which have not yet been uploaded to the remote GitHub repository.
The previous Commit button therefore changes to Sync Changes as shown below.
This operation typically performs the equivalent of a git push and optionally a git pull if required, synchronizing the local repository state with the remote GitHub repository directly through the graphical interface.

The Graph view in Visual Studio Code visually displays the Git commit history of the repository.
Initial Terraform Azure projectAdded Terraform tagsAdding storage account to the existing resource group
After synchronizing the repository, the updated commit history also becomes visible in the remote GitHub repository.
GitHub now displays 3 commits, showing that the local repository history and the remote GitHub repository are fully synchronized.
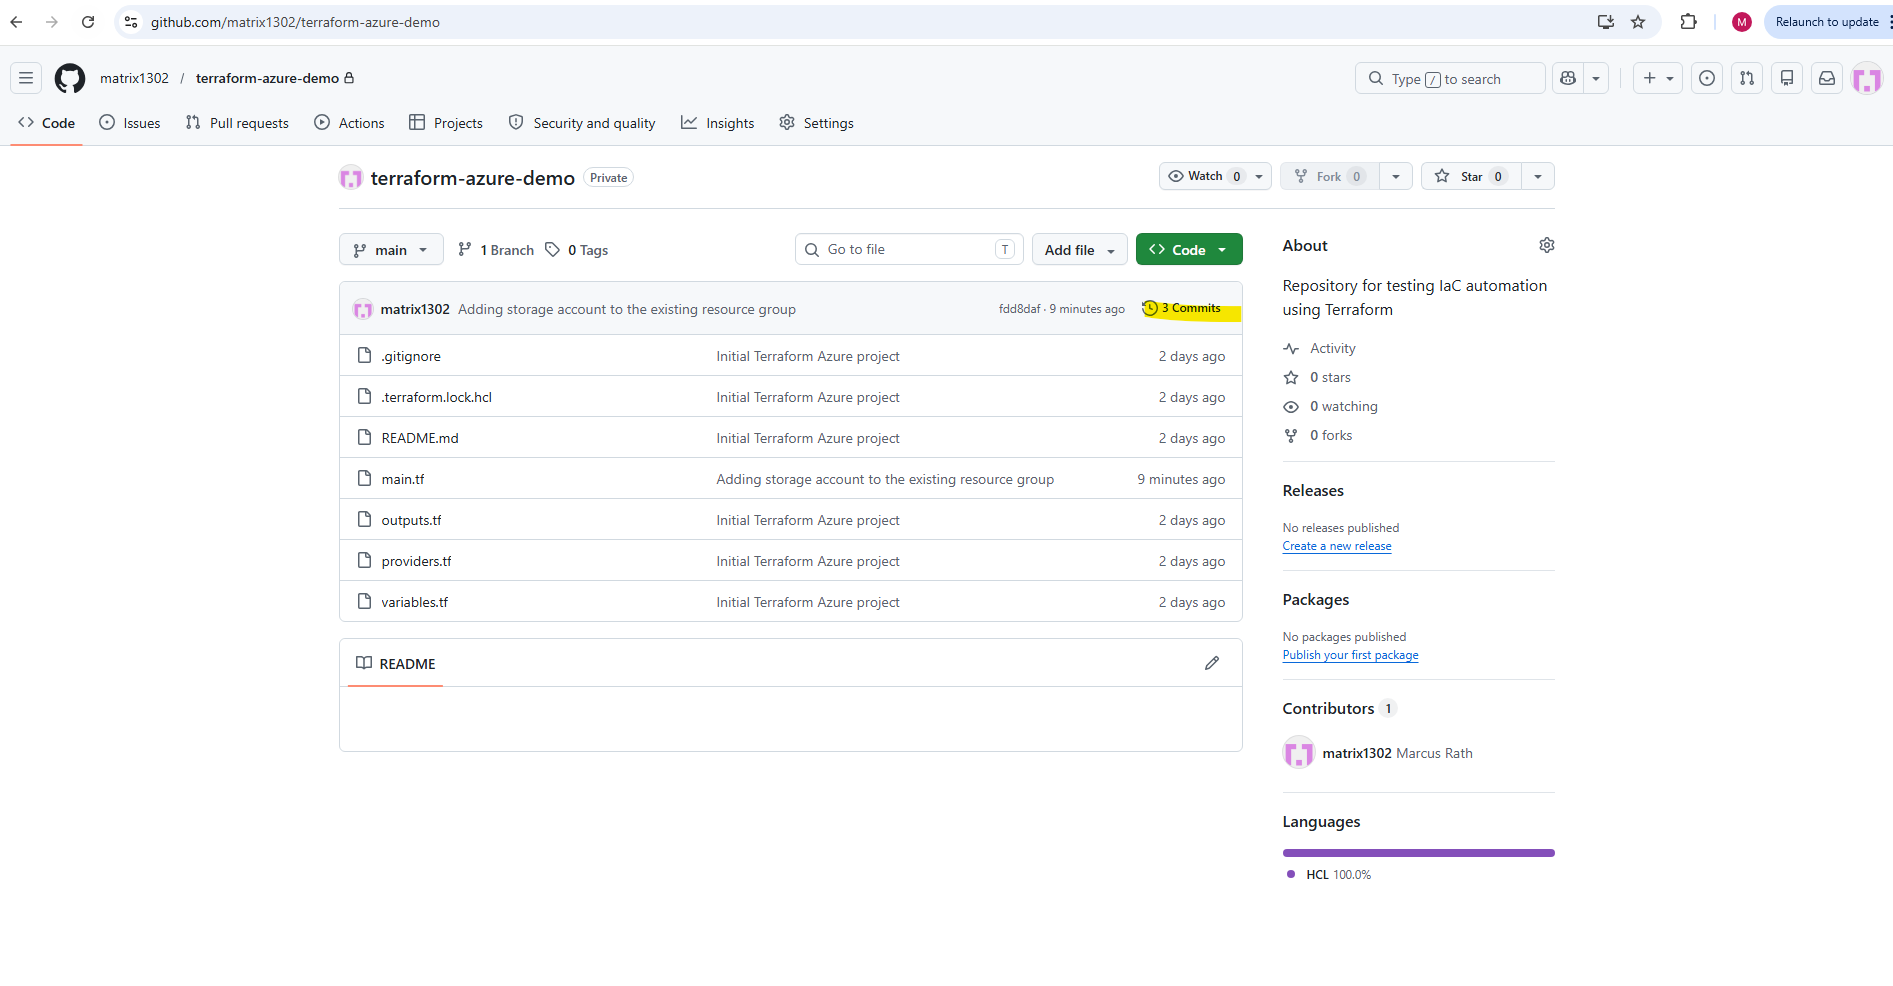
The repository activity now shows 3 separate project versions.
After updating the Terraform configuration and synchronizing the repository changes with GitHub, we can now apply the infrastructure modification to Microsoft Azure.
Before Terraform can generate the execution plan or deploy infrastructure changes, the local Azure CLI session must first be authenticated against Microsoft Azure.
Since the AzureRM provider uses the Azure CLI authentication context in this setup, Terraform will fail if no active Azure login session exists on the current workstation.
PS> terraform plan
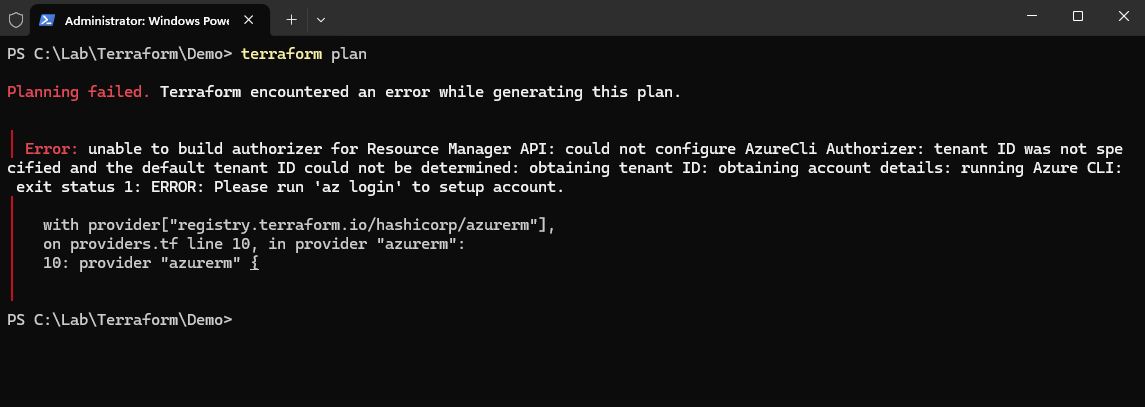
So we will first need to sign-in to Azure on this workstation.
PS> az login
Then re-run:
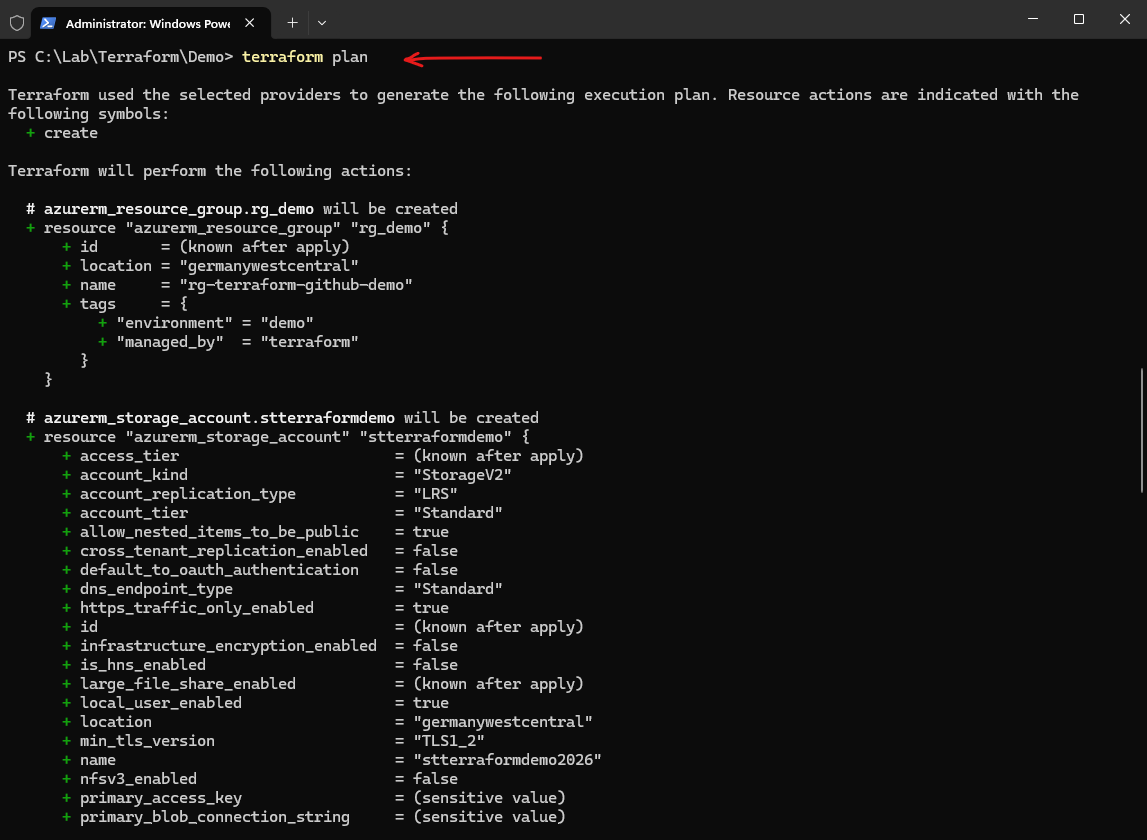
After authenticating successfully with Azure CLI, Terraform can now again compare the local Terraform configuration with the current Azure environment and generate the execution plan.
PS> terraform plan
To apply the changes, run and confirming with yes.
PS> terraform apply
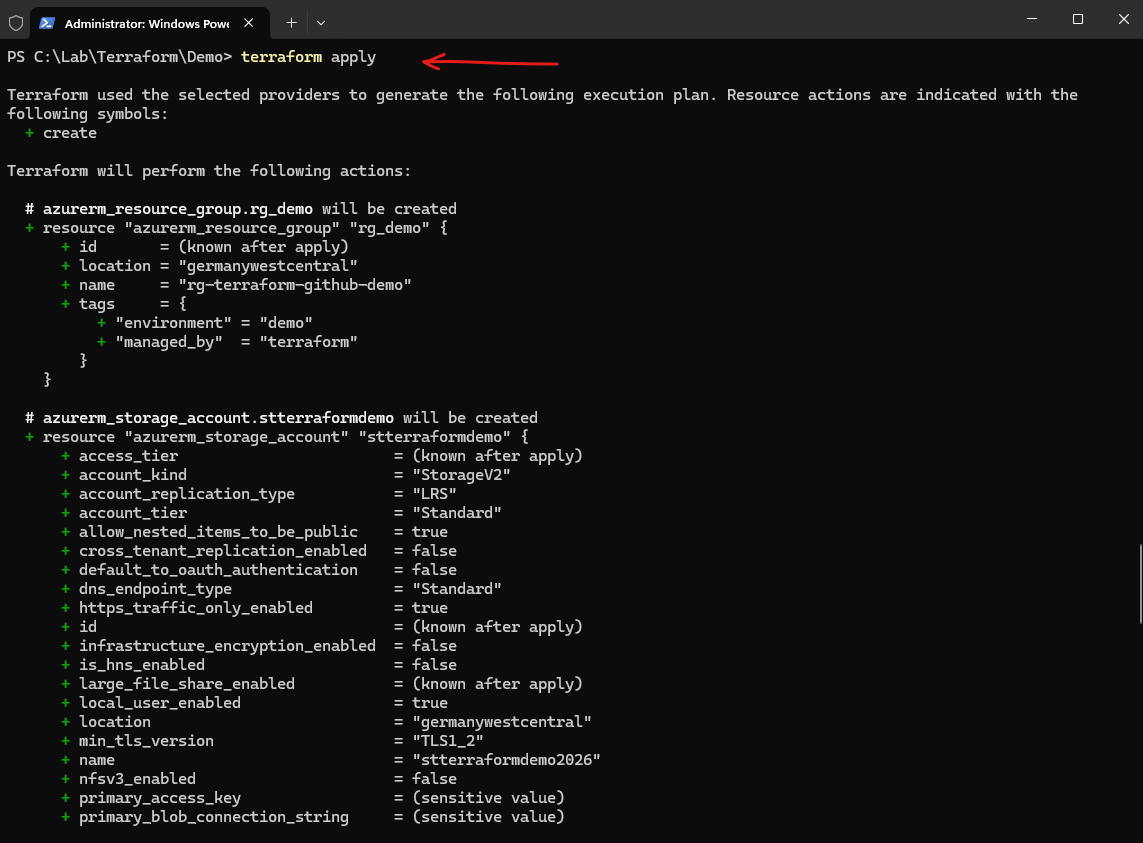
Error: a resource with the ID “/subscriptions/e …………………….. a61/resourceGroups/
rg-terraform-github-demo” already exists – to be managed via Terraform this resource needs to be imported into the State
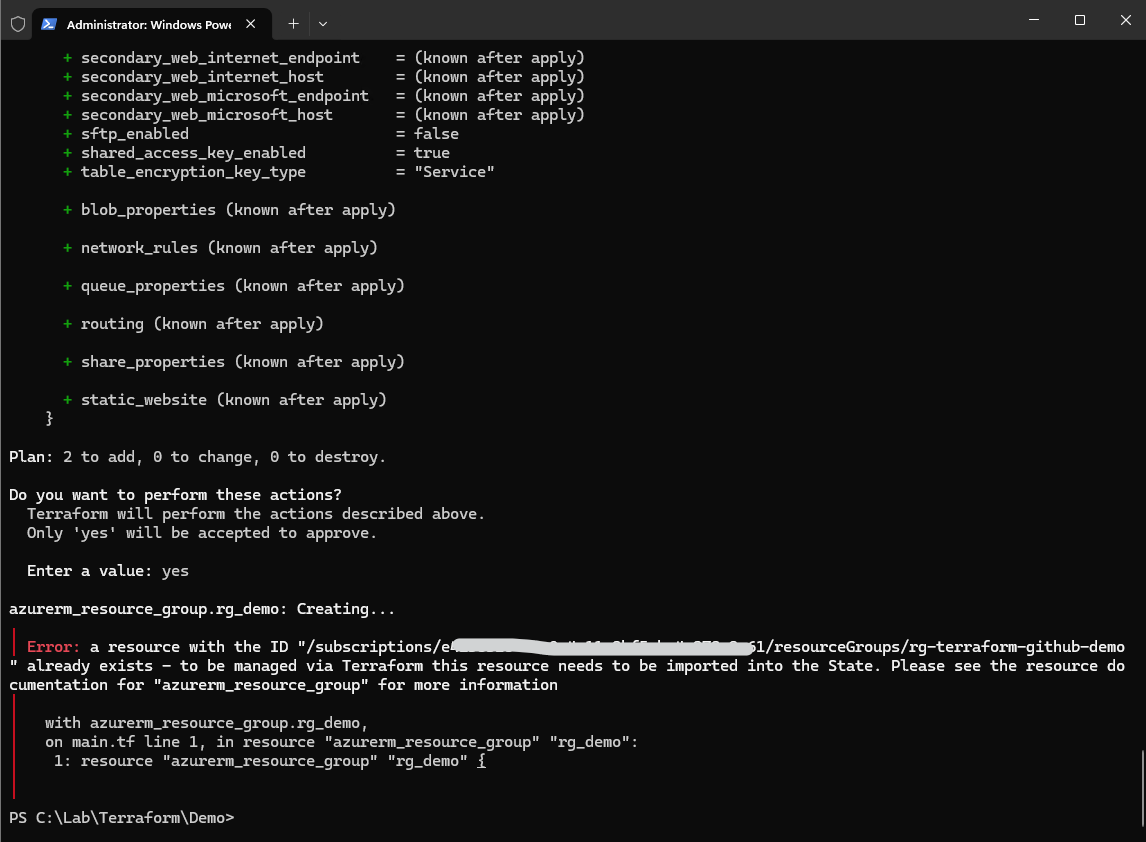
Exactly this happened because we are on another computer and the local terraform.tfstate file was not available there.
Terraform sees the Resource Group in our code, but because the local state does not know about the already existing Azure Resource Group, Terraform tries to create it again. Azure then correctly rejects it because the Resource Group already exists.
This demonstrates one of the most important Terraform concepts: while the Terraform configuration files are stored centrally in GitHub, the Terraform state itself is not automatically shared between systems.
When working from another computer without access to the existing Terraform state, Terraform cannot know which infrastructure resources are already managed and therefore may attempt to recreate existing resources.
This is one of the main reasons why production Terraform environments typically use a centralized remote backend for Terraform state management instead of local state files.
In Part 2 of this series coming soon, we will therefore configure a remote backend in Microsoft Azure to centrally manage and share Terraform state files across multiple systems and deployment workflows.
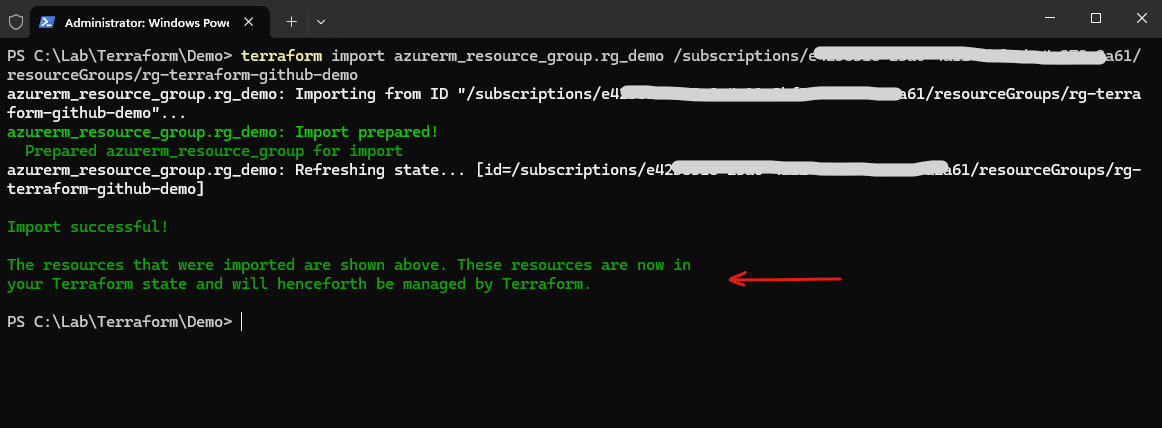
To fix this in our current lab, we can just import the existing Resource Group into the local Terraform state:
PS> terraform import azurerm_resource_group.rg_demo /subscriptions/<subscription id>/resourceGroups/rg-terraform-github-demo
We will now apply the changes again and this time run into an error regarding the storage account name which must be globally unique.
Azure Storage Account names must be globally unique across Azure, not only within the current subscription or tenant. If Terraform returns
StorageAccountAlreadyTaken, the name is already used somewhere in Azure and must be changed to a more unique value.
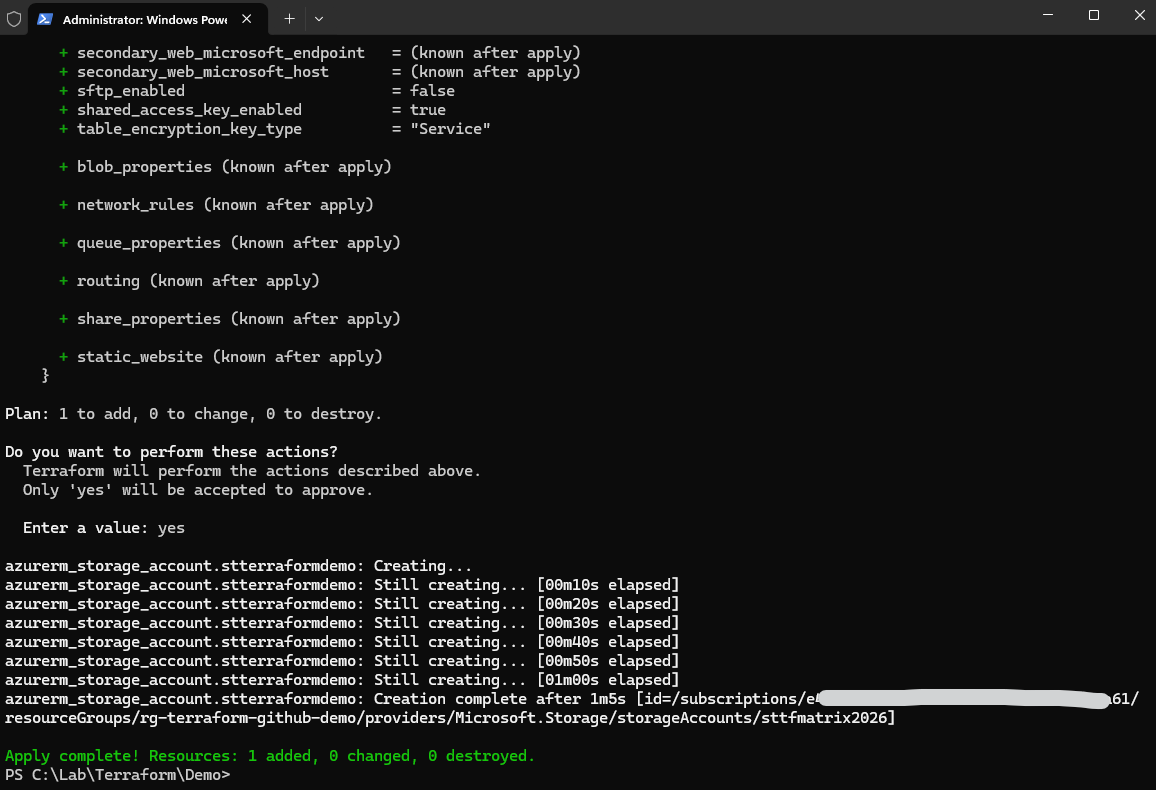
PS> terraform apply

Since Azure Storage Account names must be globally unique across all Azure environments, we will now change the Storage Account name in the Terraform configuration to a more unique value. After updating the main.tf file, Terraform can again generate the execution plan and deploy the new Azure resource successfully.
Since the Terraform configuration was modified again, we also need to stage, commit, and synchronize the updated Infrastructure as Code configuration with the remote GitHub repository before continuing with the deployment.
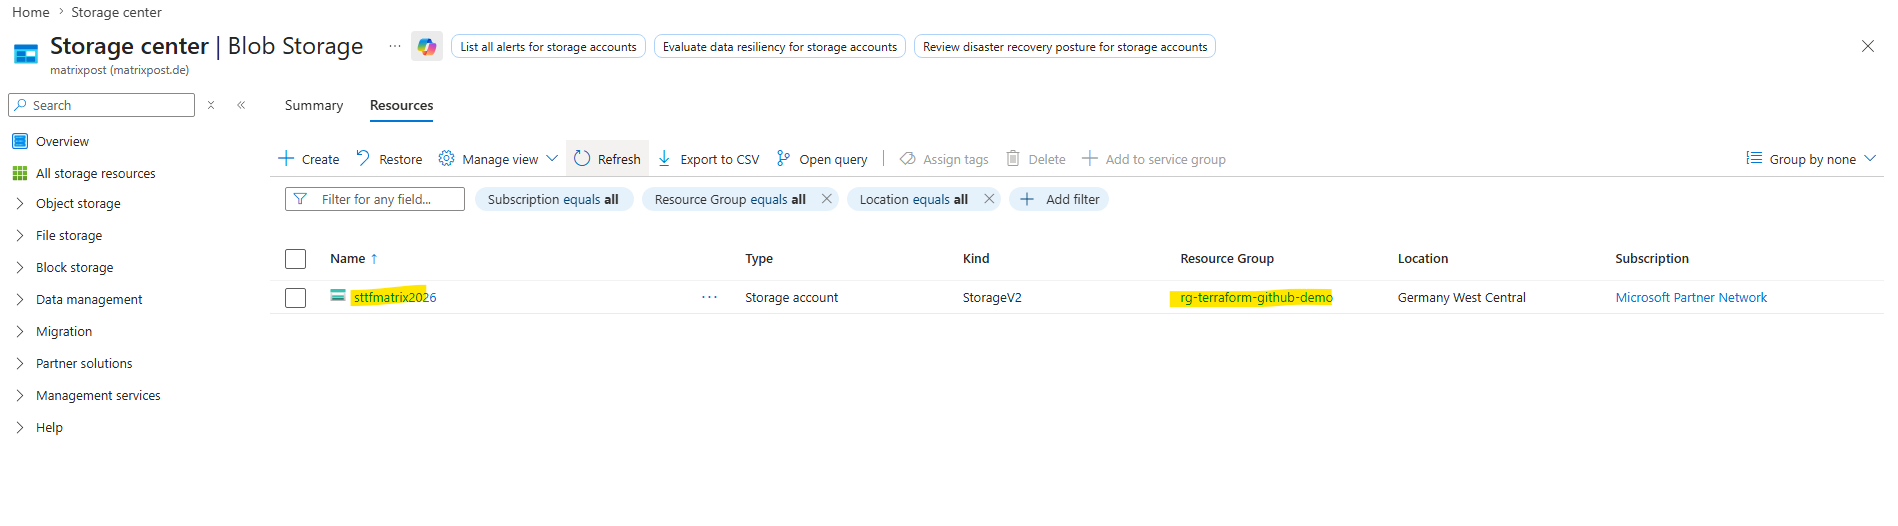
name = "sttfmatrix2026"
So this time applying the changes finally works.
Removing Resources with Terraform
Terraform can not only create and update infrastructure resources, but also selectively remove individual resources through configuration changes.
To demonstrate this, we will now remove the Azure Storage Account resource definition from the Terraform configuration and let Terraform automatically detect and apply the required infrastructure deletion.
Since the Storage Account was created from another workstation, the original workstation first needs to pull the latest GitHub changes and import the already existing Azure resource into its local Terraform state.
This again highlights why production Terraform environments should use a centralized remote backend instead of separate local state files.
In Part 2 of this series coming soon, we will therefore configure a remote backend in Microsoft Azure to centrally manage and share Terraform state files across multiple systems and deployment workflows.
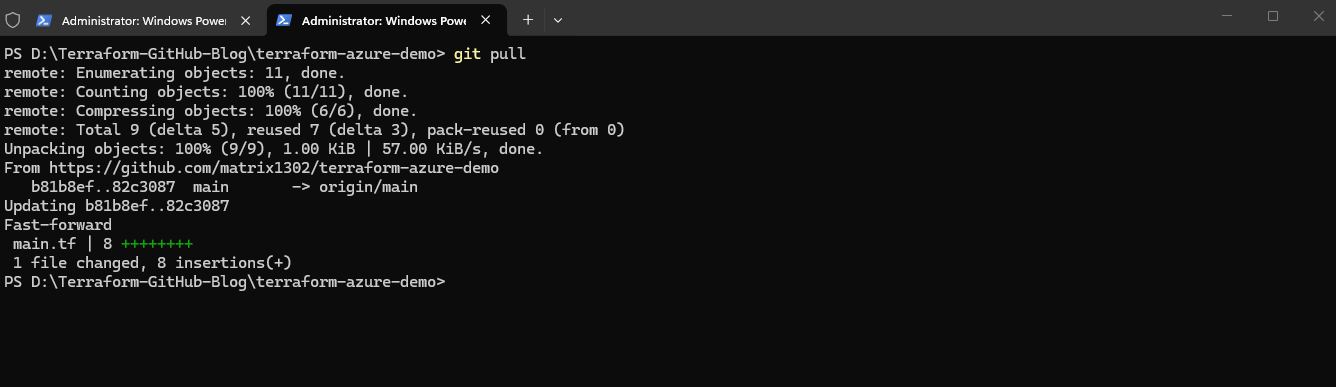
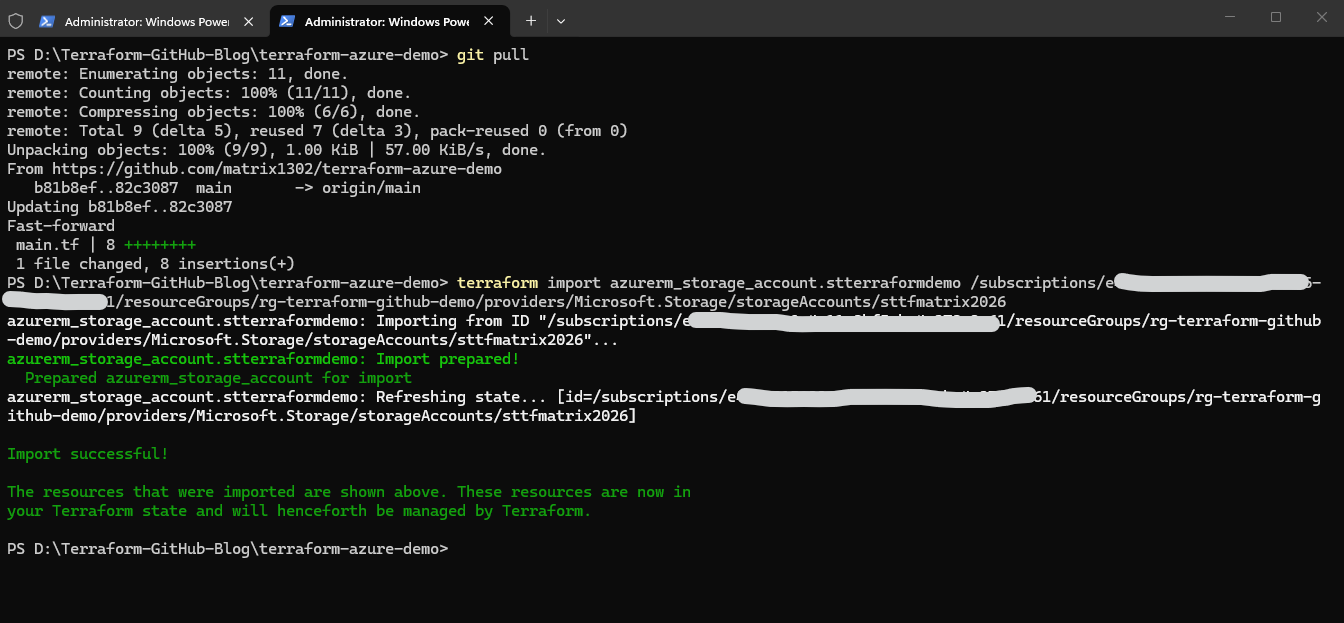
So first we pull the latest repository changes by running:
This downloads the latest changes from GitHub to the original workstation, including the updated
main.tffile with the Storage Account resource definition.
PS> git pull
Next we also first need to import the Storage Account into the local Terraform state by running:
The Storage Account was created from another workstation, so the original workstation’s local Terraform state does not know about it yet. The import command connects the already existing Azure resource with the Terraform resource definition in
main.tf.
PS> terraform import azurerm_storage_account.stterraformdemo /subscriptions/<subscription id>/resourceGroups/rg-terraform-github-demo/providers/Microsoft.Storage/storageAccounts/sttfmatrix2026
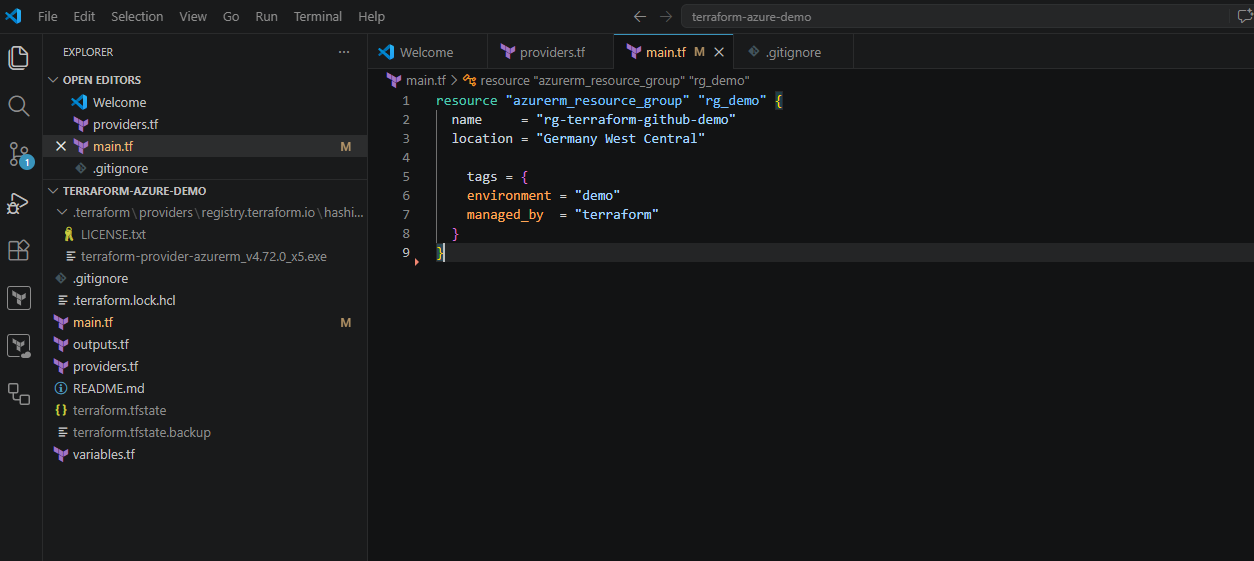
Now we remove the Storage Account block from the maint.tf Terraform configuration file.
Now the Storage Account still exists in Terraform state, but no longer exists in the desired configuration.
resource "azurerm_storage_account" "stterraformdemo"
  name                     = "sttfmatrix2026"
  resource_group_name      = azurerm_resource_group.rg_demo.name
  location                 = azurerm_resource_group.rg_demo.location
  account_tier             = "Standard"
  account_replication_type = "LRS"
}
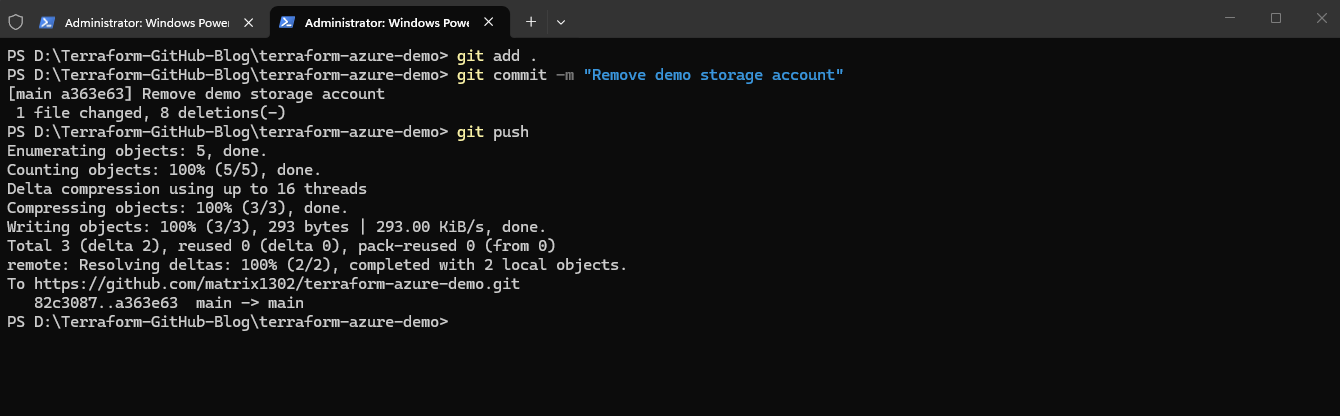
After removing the Azure Storage Account resource definition from the Terraform configuration, we also need to stage, commit, and synchronize the updated Infrastructure as Code changes with the remote GitHub repository so that the repository again reflects the desired infrastructure state.
Either by using the command line or Visual Studio Code.
PS> git add .
PS> git commit -m "Remove demo storage account"
PS> git push
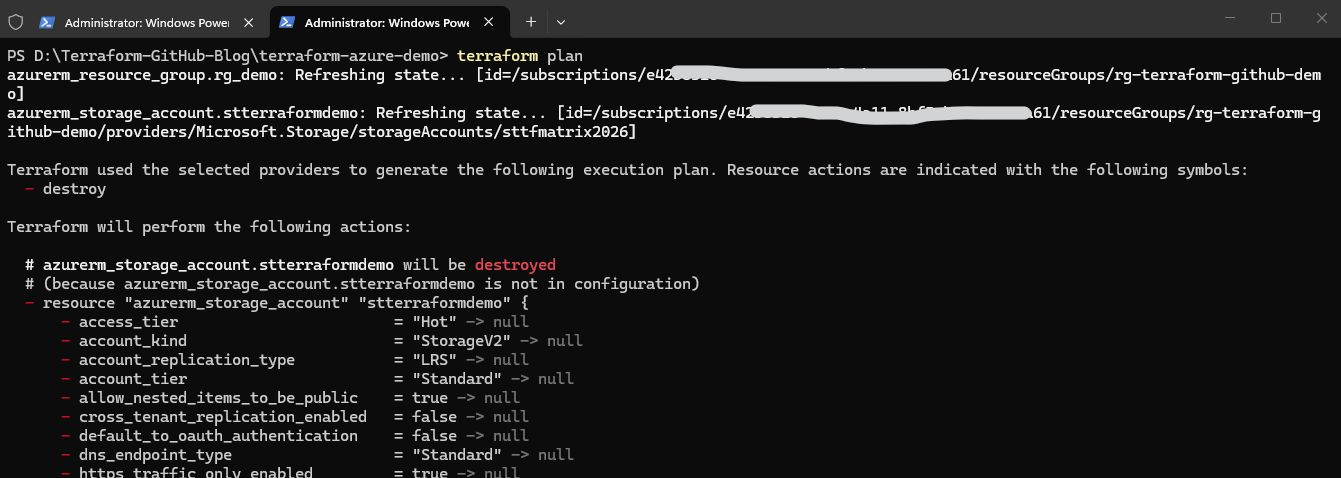
After synchronizing the updated Terraform configuration, we can again run terraform plan to review the planned infrastructure changes. Terraform now detects that the Azure Storage Account still exists in the Terraform state but no longer exists in the configuration, and therefore plans to remove the resource from Microsoft Azure.
PS> terraform plan
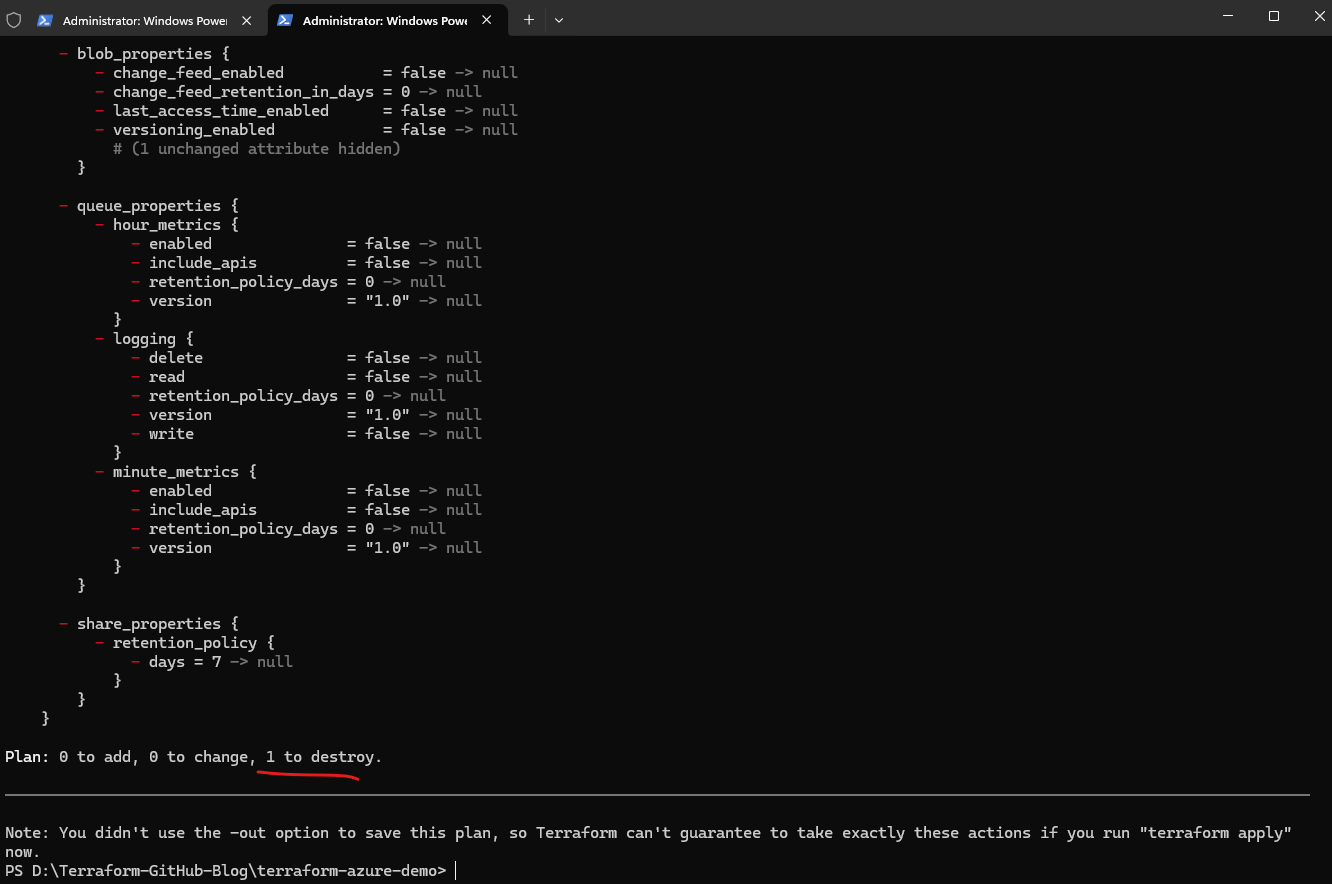
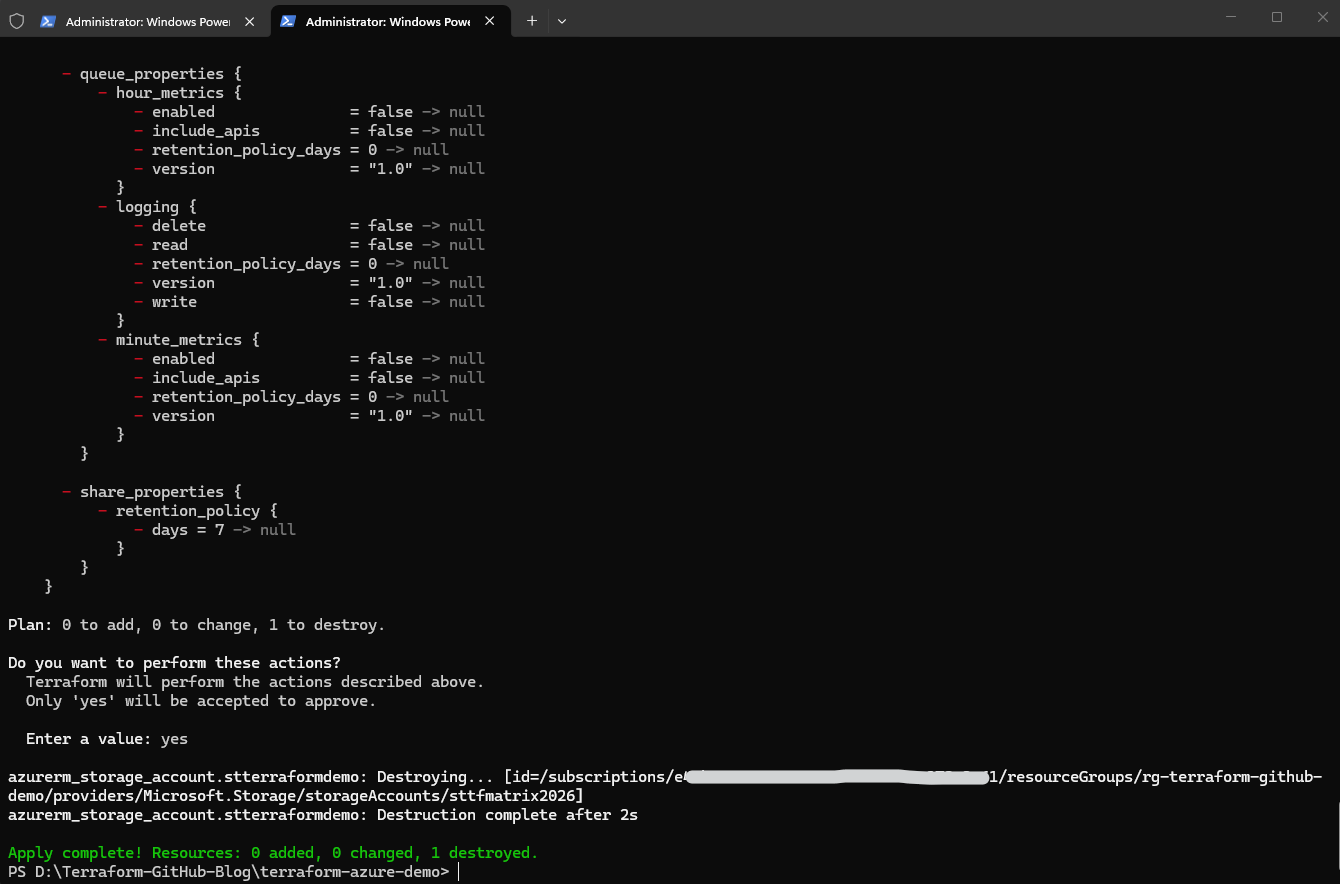
After reviewing the execution plan, we can now apply the infrastructure change using terraform apply. Terraform will then remove the Azure Storage Account from Microsoft Azure while keeping the remaining Terraform-managed resources unchanged.
After confirming the execution with
yes, Terraform successfully removes the Azure Storage Account from Microsoft Azure while leaving the remaining Terraform-managed infrastructure unchanged. The final output confirms that only a single resource was destroyed:
PS> terraform apply
Final Cleanup
After demonstrating how Terraform can create, update, and selectively remove infrastructure resources, we will now perform a final cleanup of the remaining Azure resources.
Terraform allows us to completely remove all currently managed infrastructure resources through a single declarative destroy operation.
Terraform will again show an execution plan, this time listing all remaining resources that are currently managed in the Terraform state and will be removed from Azure.
PS> terraform destroy
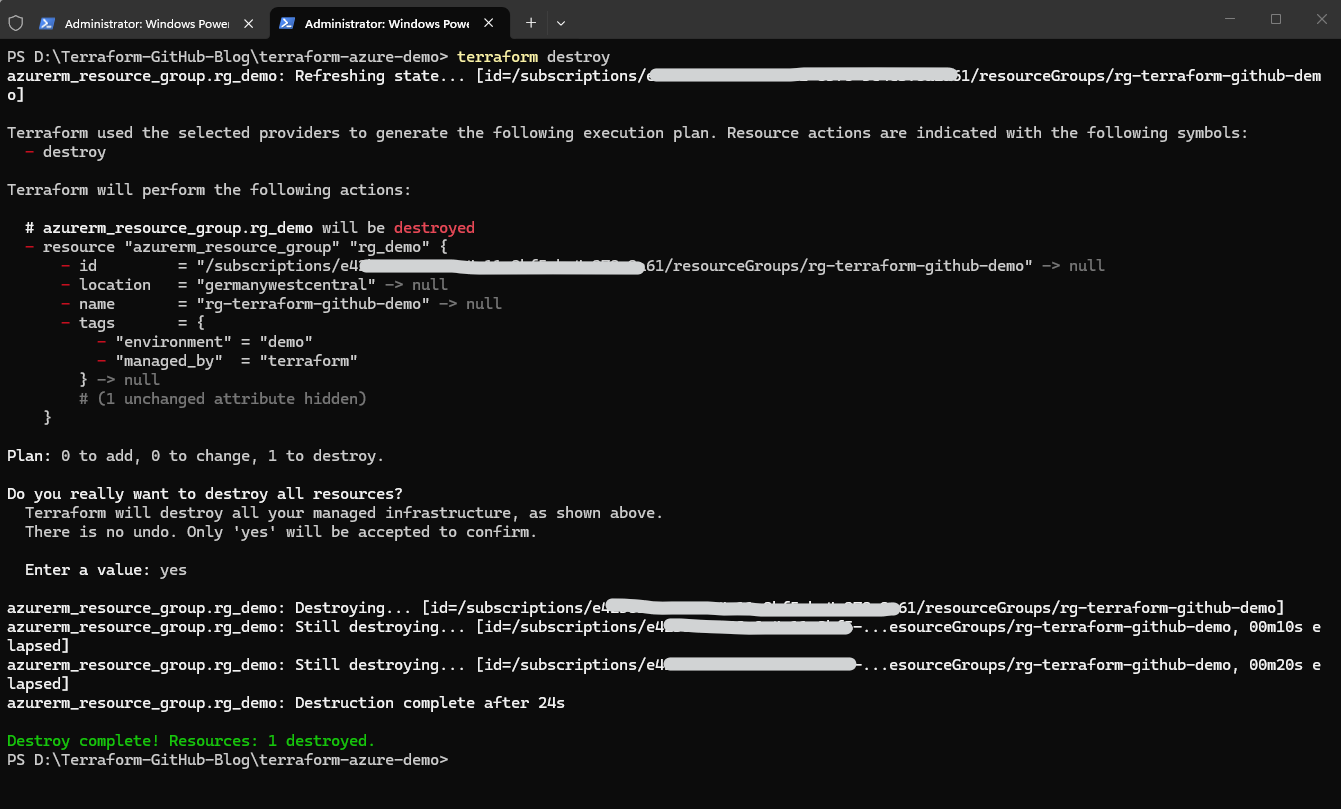
In this example, the remaining Azure Resource Group is removed. This completes the full Terraform lifecycle: creating, updating, versioning, selectively removing, and finally cleaning up Azure infrastructure through Infrastructure as Code.
In this first part of the series, we deployed and managed Microsoft Azure infrastructure using Terraform together with GitHub and integrated Git workflows in Visual Studio Code.
We created Azure resources, tracked infrastructure changes through Git commits, synchronized configurations through GitHub, worked from multiple systems, and finally updated and removed infrastructure resources through declarative Infrastructure as Code workflows.
One of the most important observations throughout this lab was the challenge of managing local Terraform state files across multiple systems.
In Part 2 of this series, we will therefore move to a production-style Terraform setup by configuring a centralized remote backend in Microsoft Azure Storage.
We further extended the Terraform project to support real multi-environment deployments by separating remote Terraform state files and environment-specific deployment variables for development, testing, and production environments.
This will allow multiple systems, engineers, and later CI/CD pipelines to safely share and manage the same Terraform state.
Links
Terraform Platform
https://www.hashicorp.com/GitHub
https://github.com/GitHub Blog
https://github.blog/