

Protecting NetApp ONTAP Workloads with Autonomous Ransomware Protection (ARP) – Part 3 – Extending Protection with NetApp Console Ransomware Resilience
In Part 1 of this series, we explored the fundamentals of NetApp ONTAP Autonomous Ransomware Protection (ARP), including its architecture, licensing, configuration, and built-in protection mechanisms.
In Part 2, we validated ARP in a VMware vSphere lab by simulating a ransomware attack against a VMFS datastore backed by an ONTAP iSCSI LUN and examined how ONTAP detected the attack and automatically created recovery snapshots.
In this part we cover the NetApp Console Ransomware Resilience service, which extends native ONTAP Autonomous Ransomware Protection (ARP) with centralized protection, ransomware detection, orchestration, and recovery capabilities for VMware SAN workloads.
The following examples demonstrate how VMware SAN workloads can be protected, analyzed, and recovered using NetApp Console Ransomware Resilience.
In Part 4, we cover the protection, detection, and recovery of SMB (CIFS) file workloads using NetApp Console Ransomware Resilience, demonstrating how it extends native ONTAP Autonomous Ransomware Protection (ARP) with centralized visibility, orchestration, and recovery capabilities.
Enabling NetApp Console Ransomware Resilience
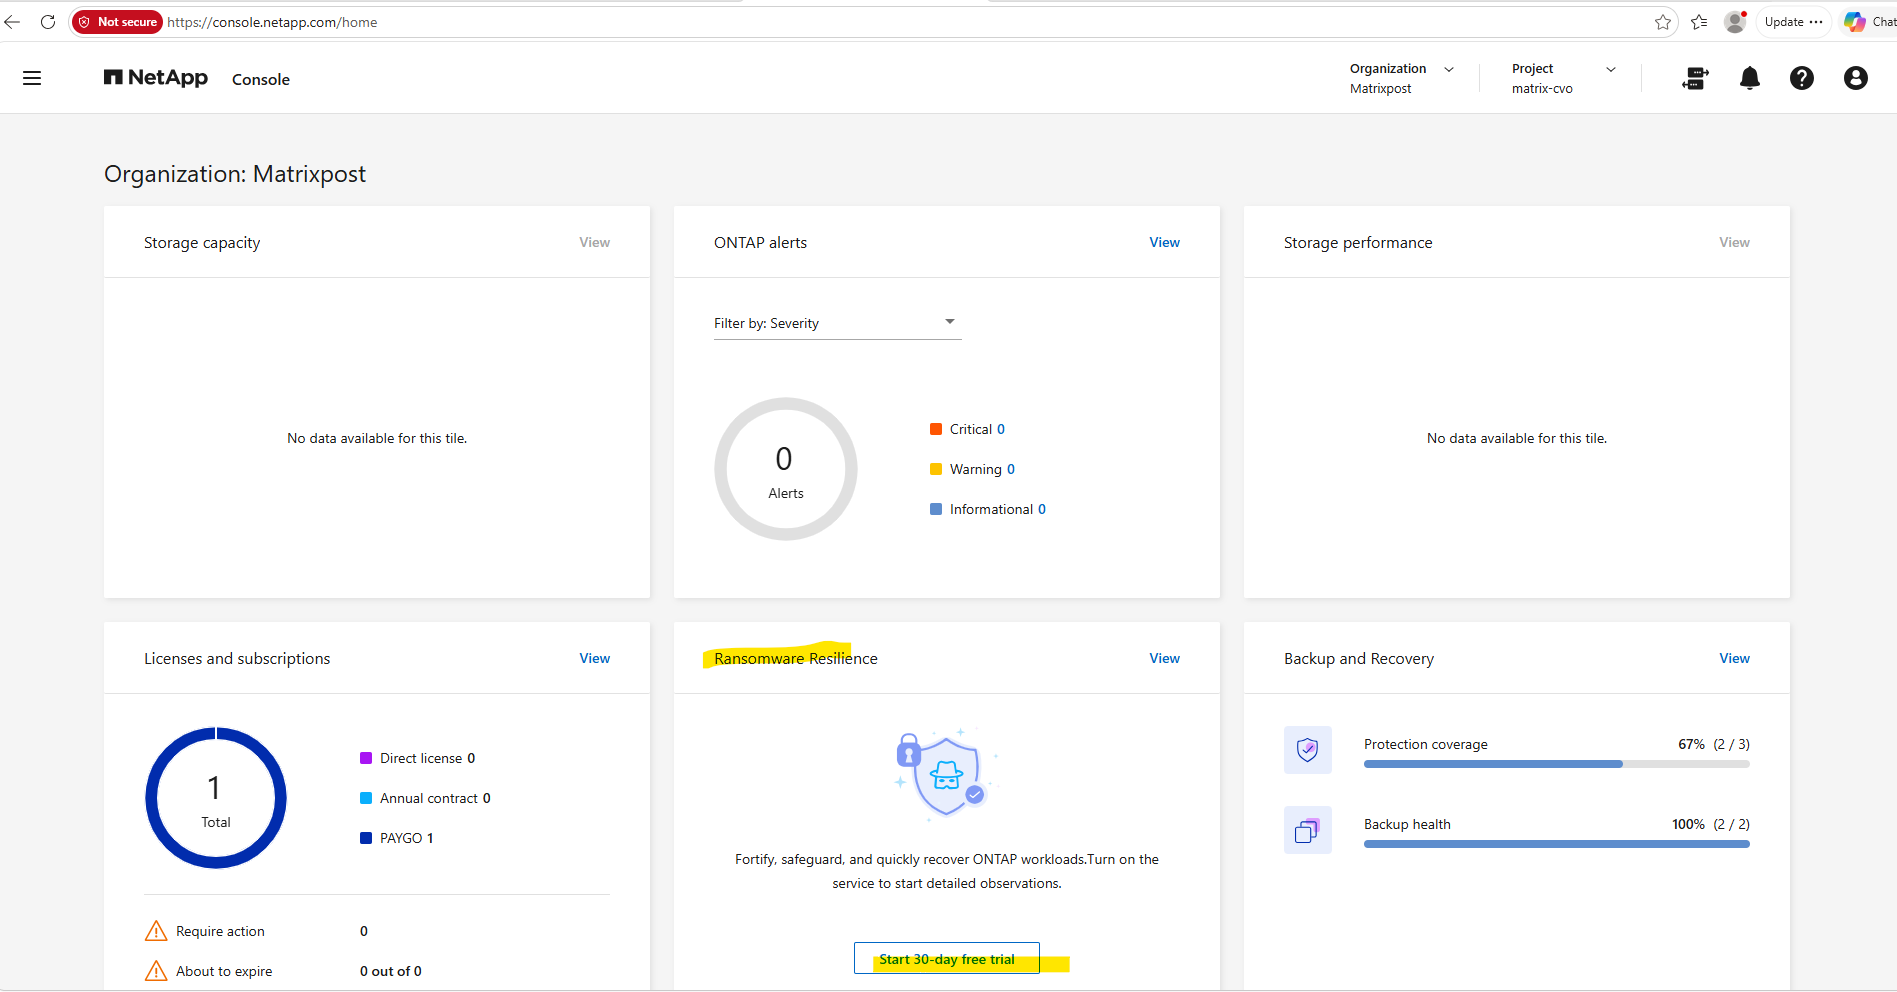
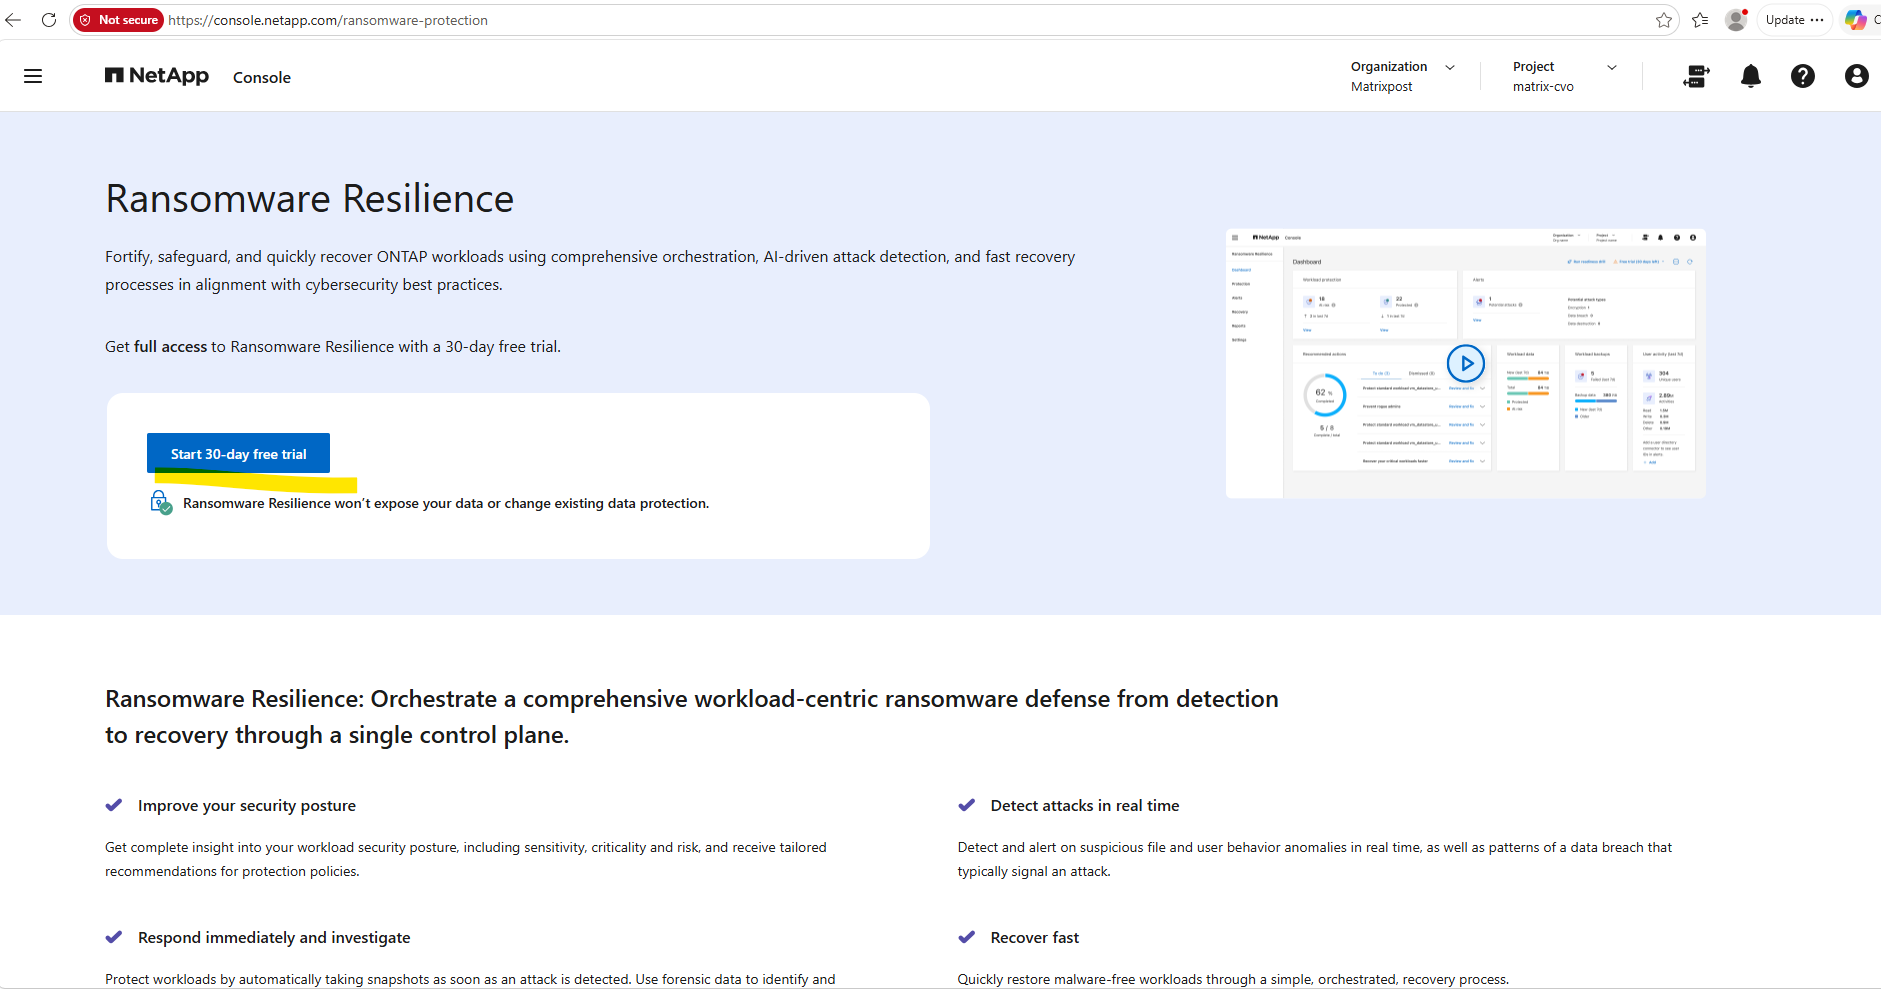
To enable NetApp Console Ransomware Resilience, open the NetApp Console dashboard and click Start 30-day free trial.
This activates the service for your environment, allowing you to evaluate its centralized ransomware protection, workload discovery, security posture assessment, and orchestrated recovery capabilities.
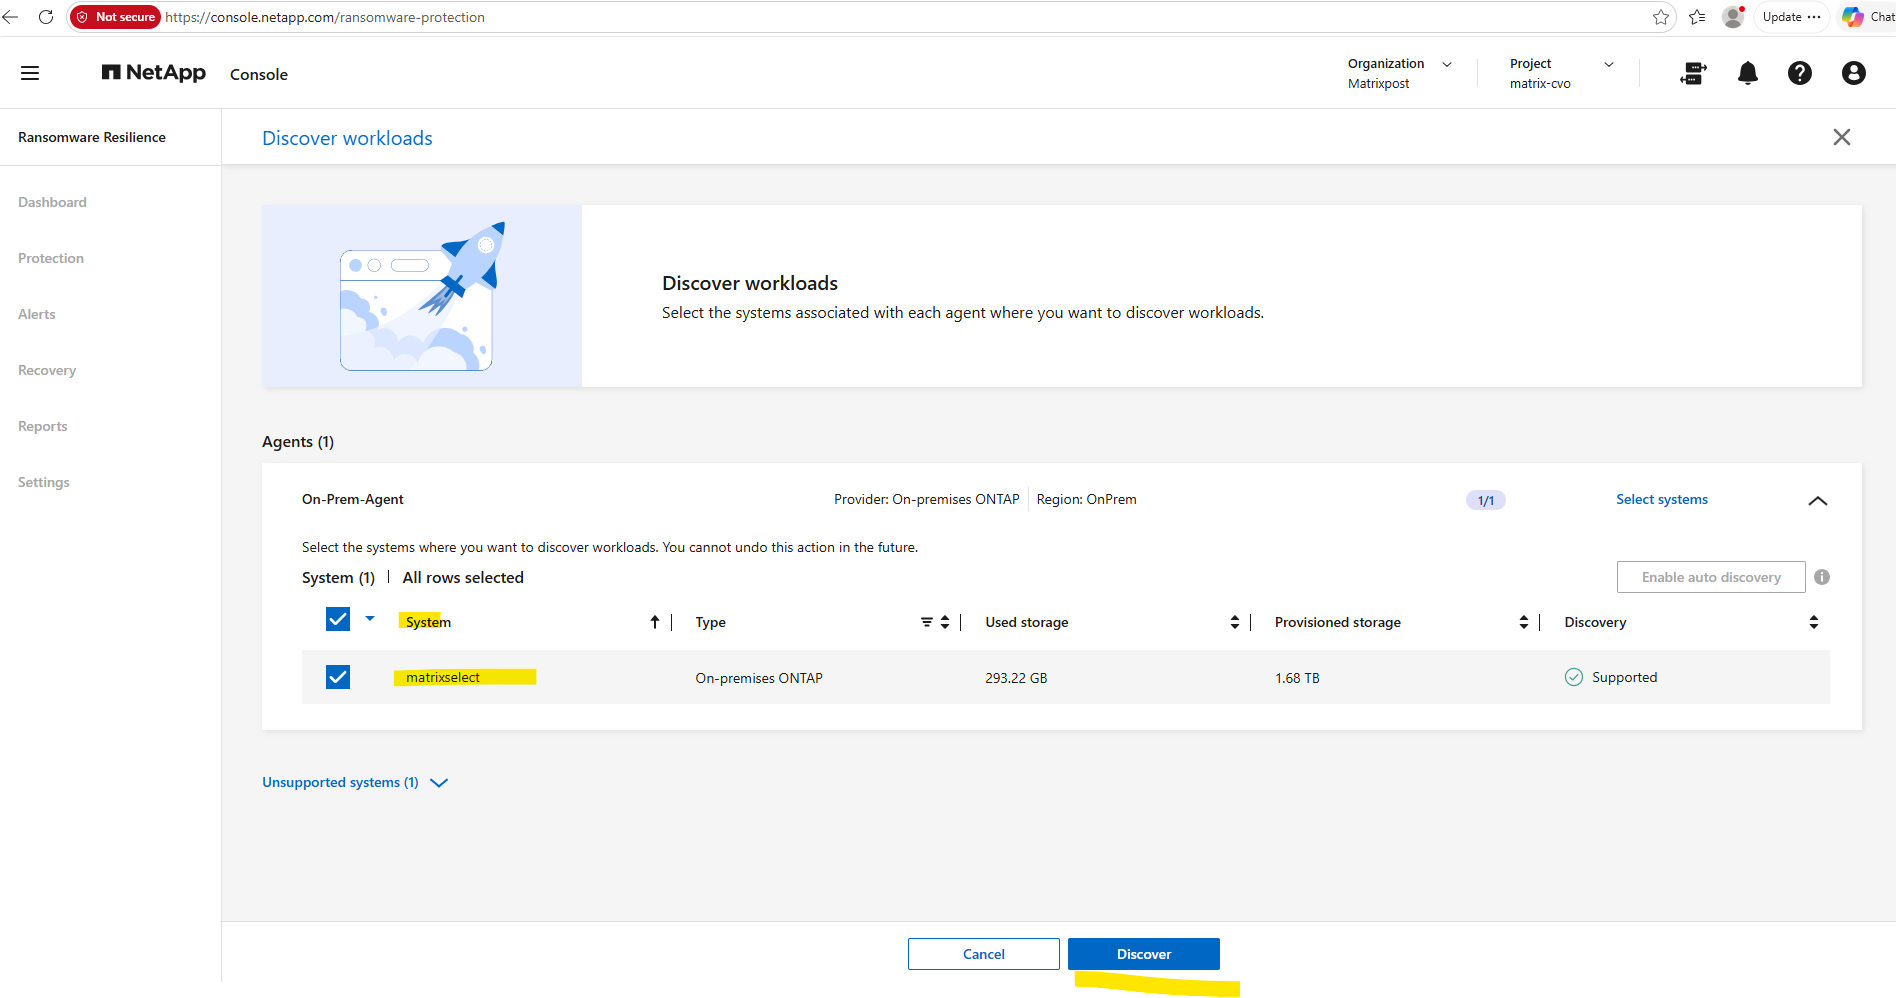
The next step is to discover the ONTAP systems that should be managed by NetApp Console Ransomware Resilience. After selecting the desired systems and clicking Discover, NetApp Console analyzes the available workloads and prepares them for centralized ransomware protection, monitoring, and recovery.
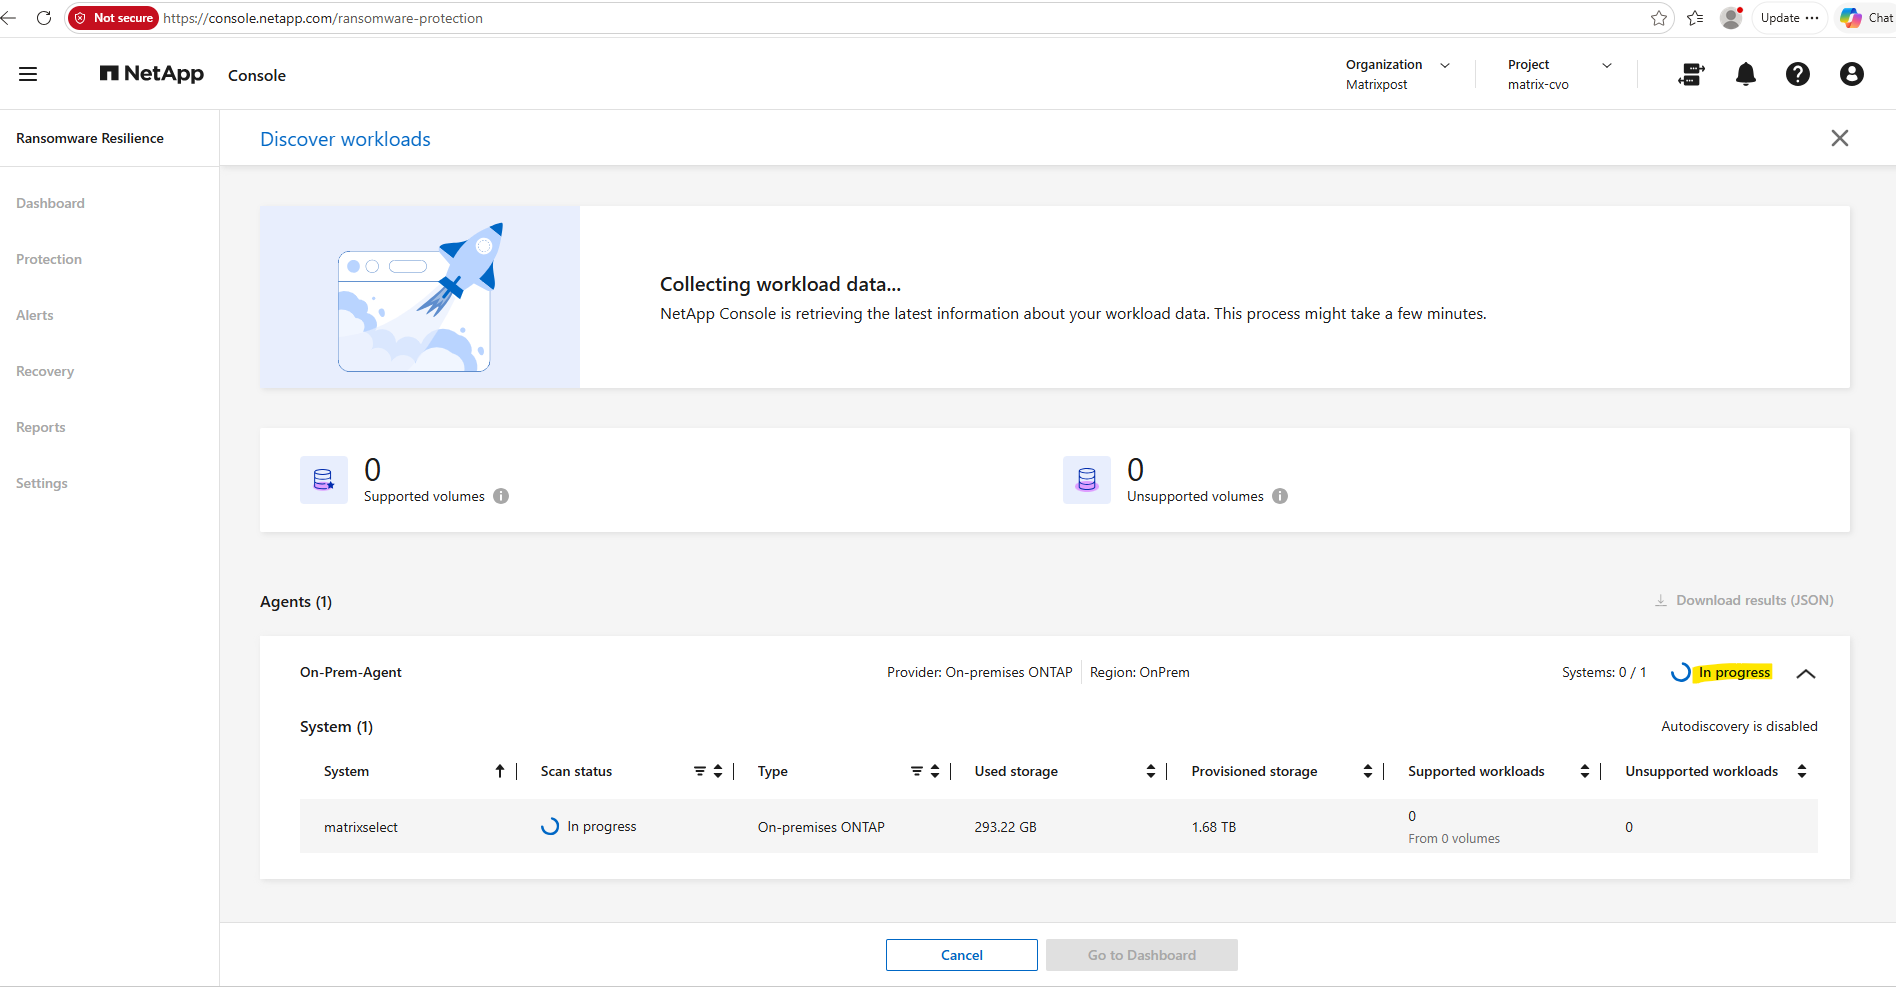
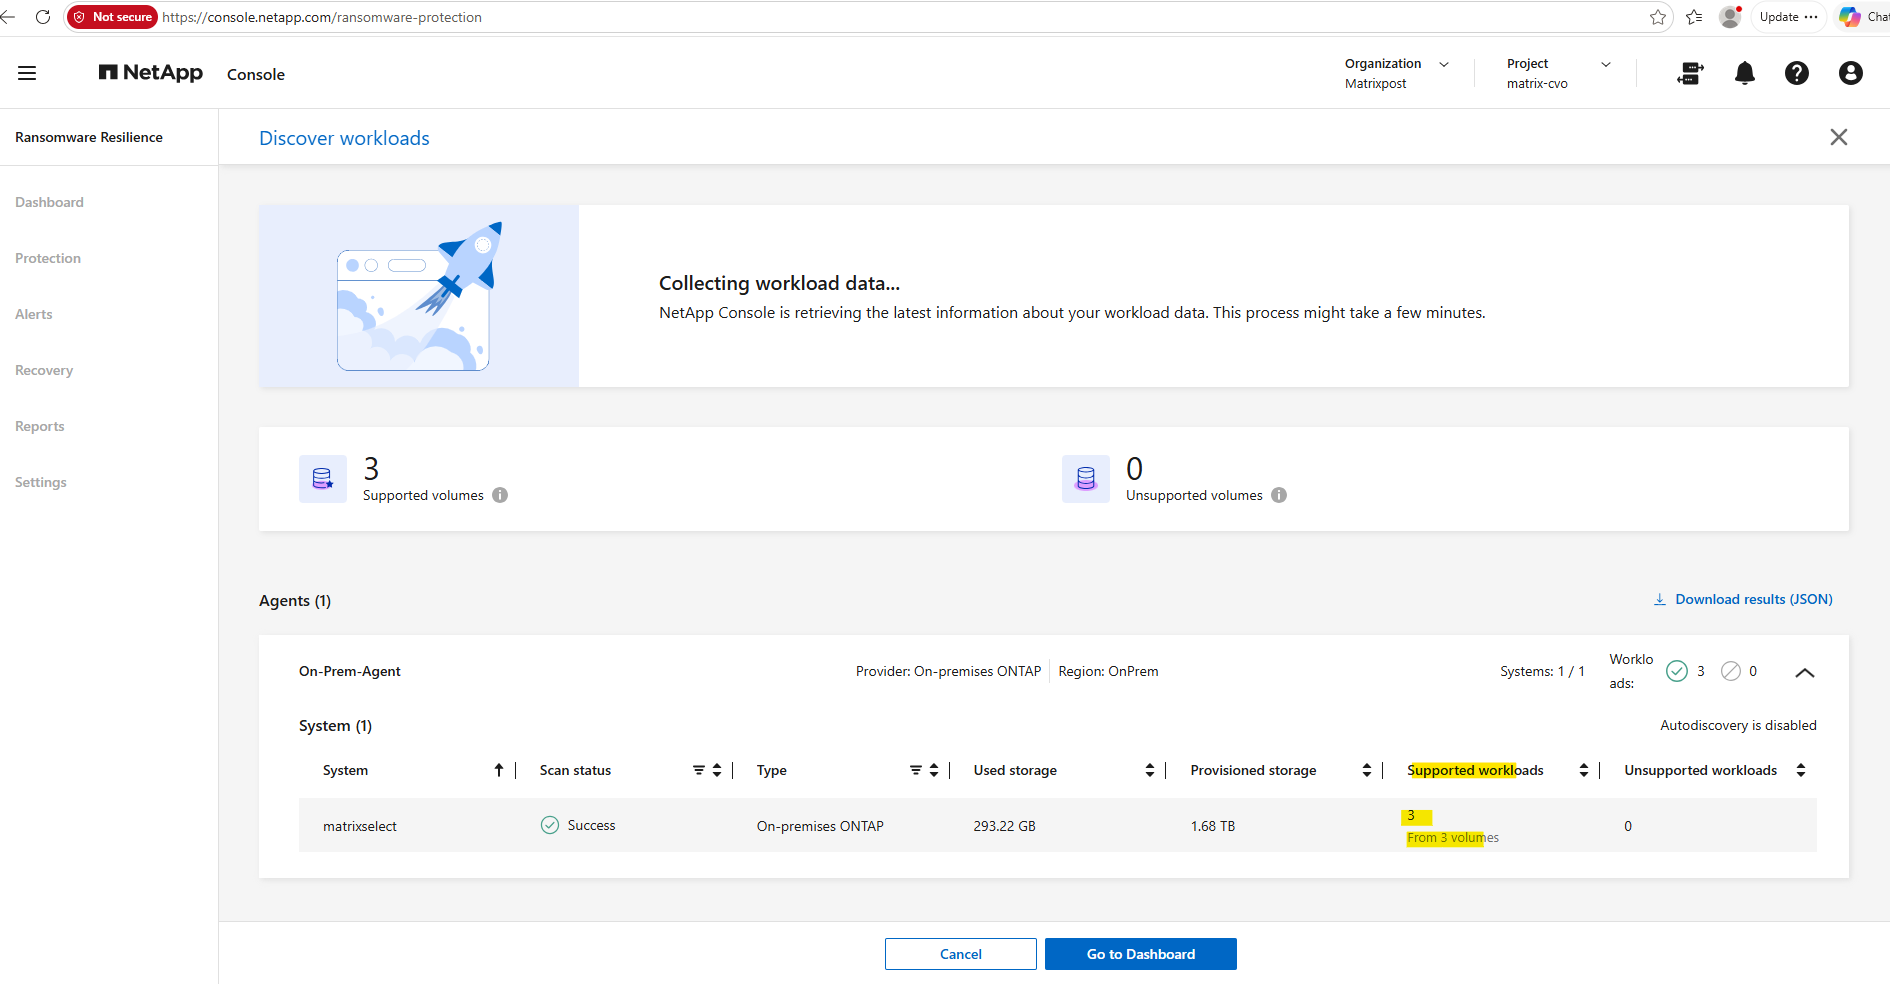
Discovery is in progress.
In my small lab environment, the workload discovery finished within a few seconds. The results confirmed that all three ONTAP volumes were supported, no unsupported workloads were found, and the scan completed successfully.
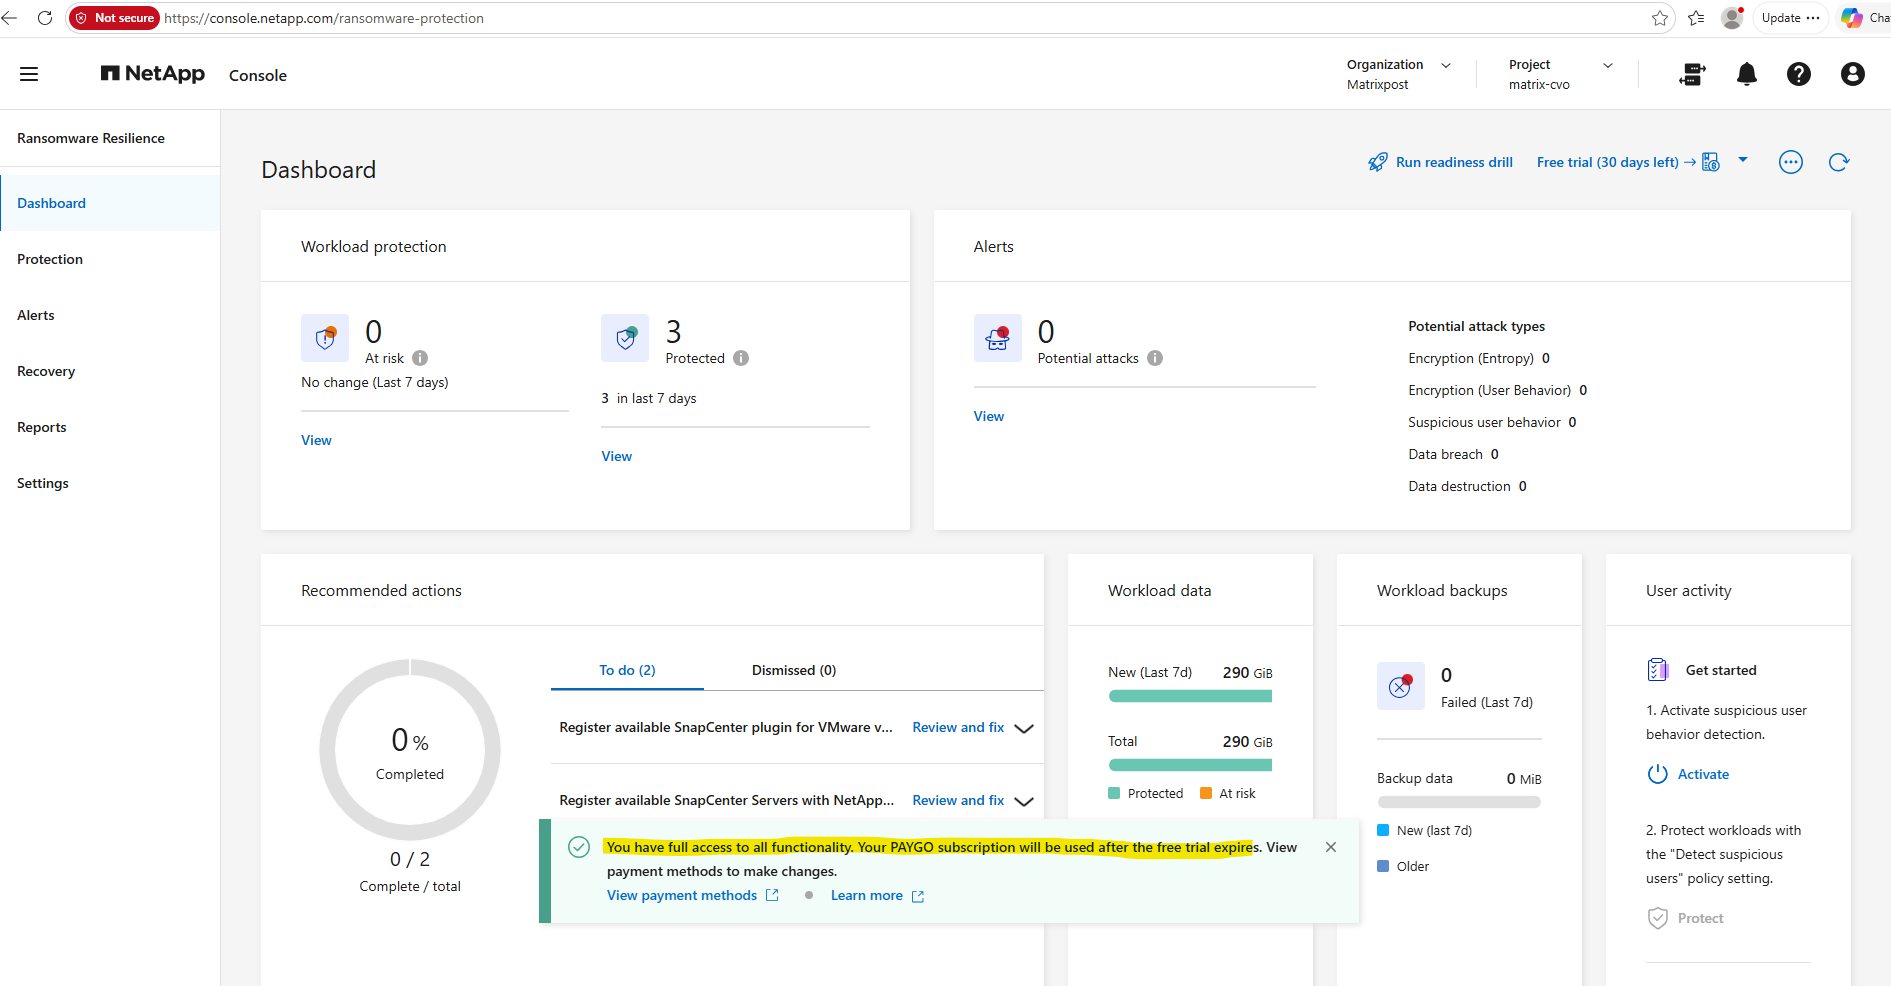
Once the workload discovery is complete, the Ransomware Resilience dashboard presents a centralized view of the protected environment. It highlights the current protection status, potential attacks, recommended actions, backup information, and other security-related insights for the managed ONTAP workloads.
During the 30-day trial, all Ransomware Resilience features are available without restrictions. After the trial expires, the service automatically transitions to a pay-as-you-go (PAYGO) subscription unless you modify or cancel the billing configuration.
More about you will find here https://docs.netapp.com/us-en/data-services-ransomware-resilience/concept-ransomware-resilience.html.
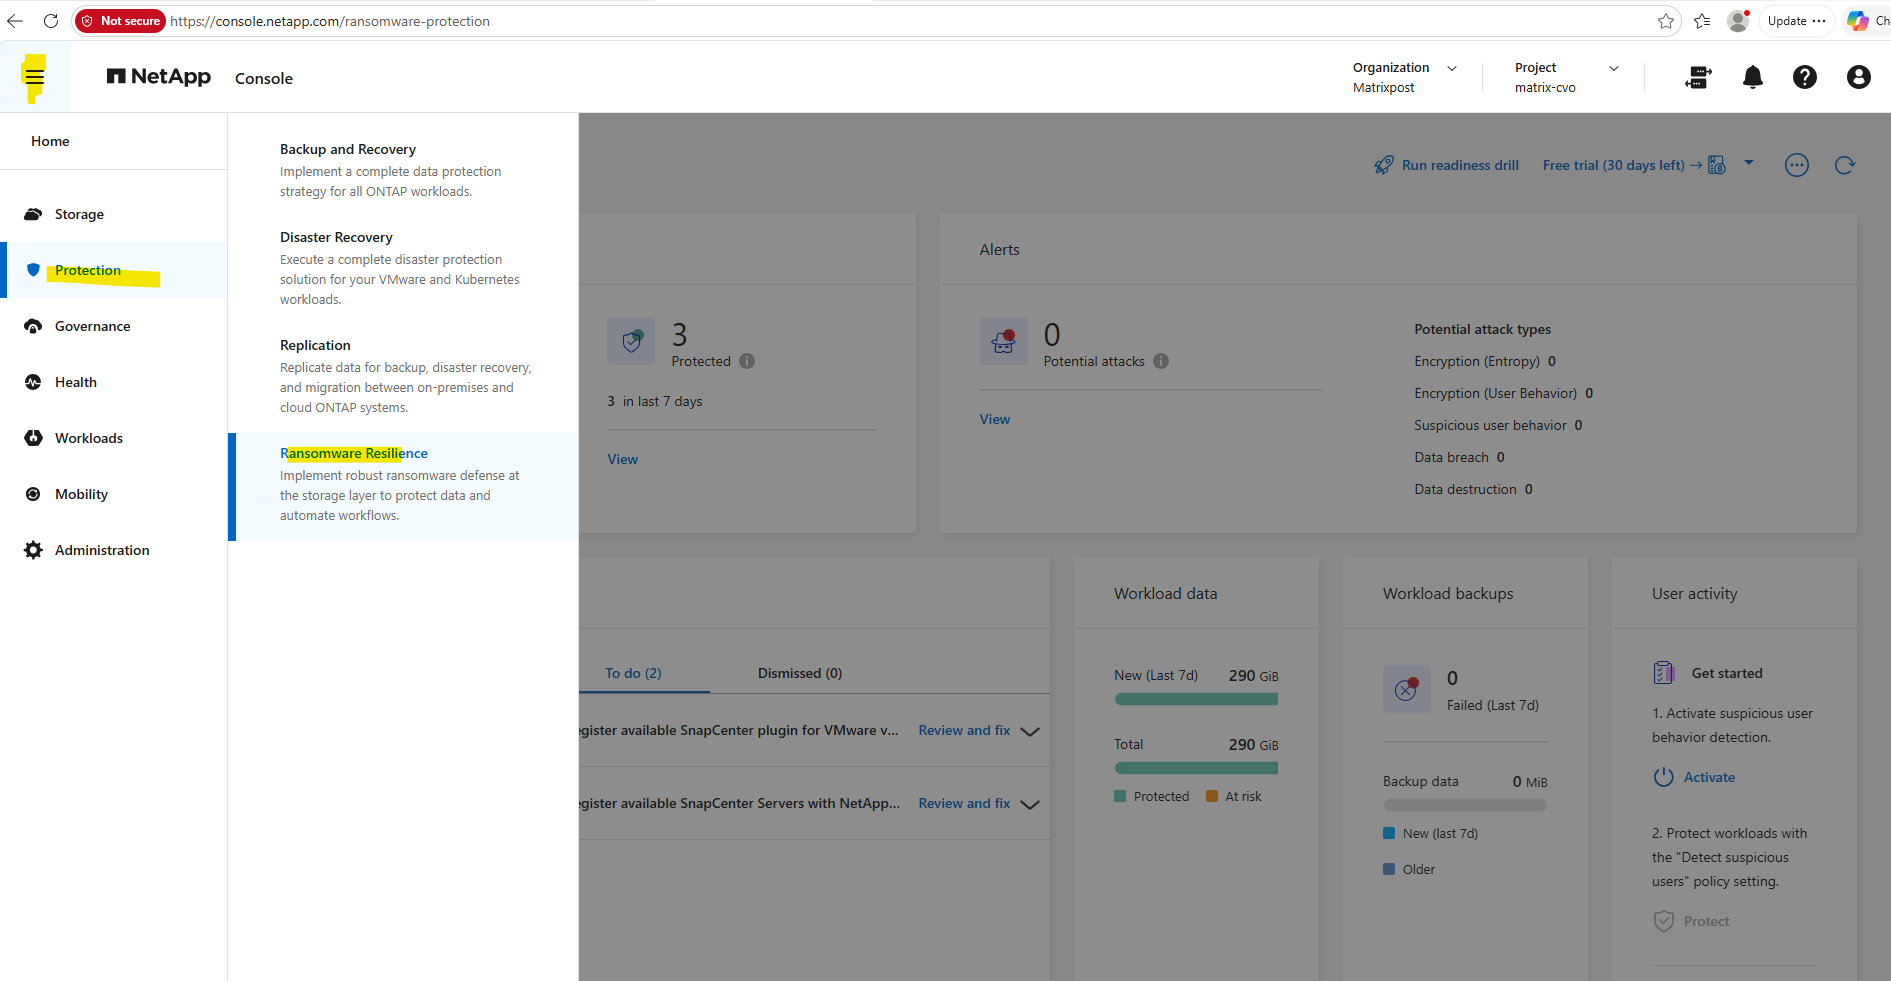
This Ransomware Resilience dashboard we can open anytime when selecting in the NetApp console menu Protection -> Ransomware Resilience.
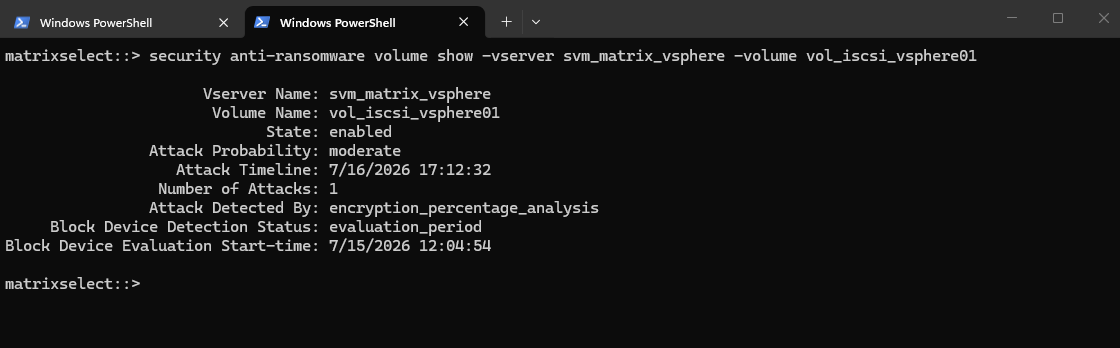
Although ONTAP ARP had already detected a ransomware-like attack on the protected volume as shown in Part 2 shown below, no corresponding alert was displayed in NetApp Console Ransomware Resilience.
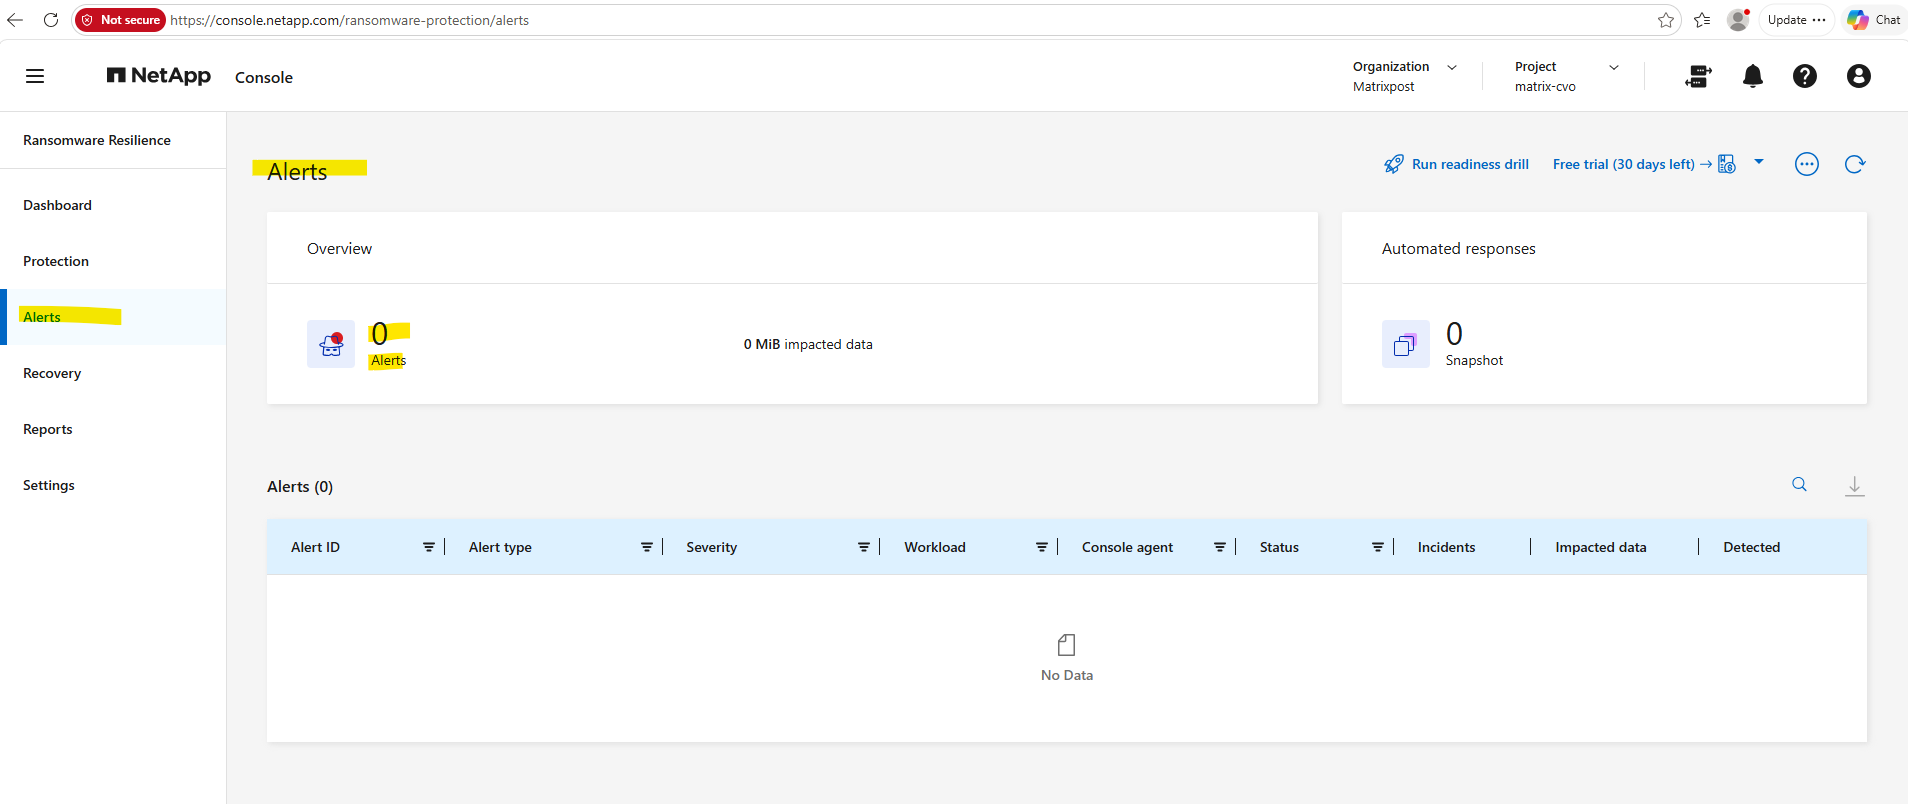
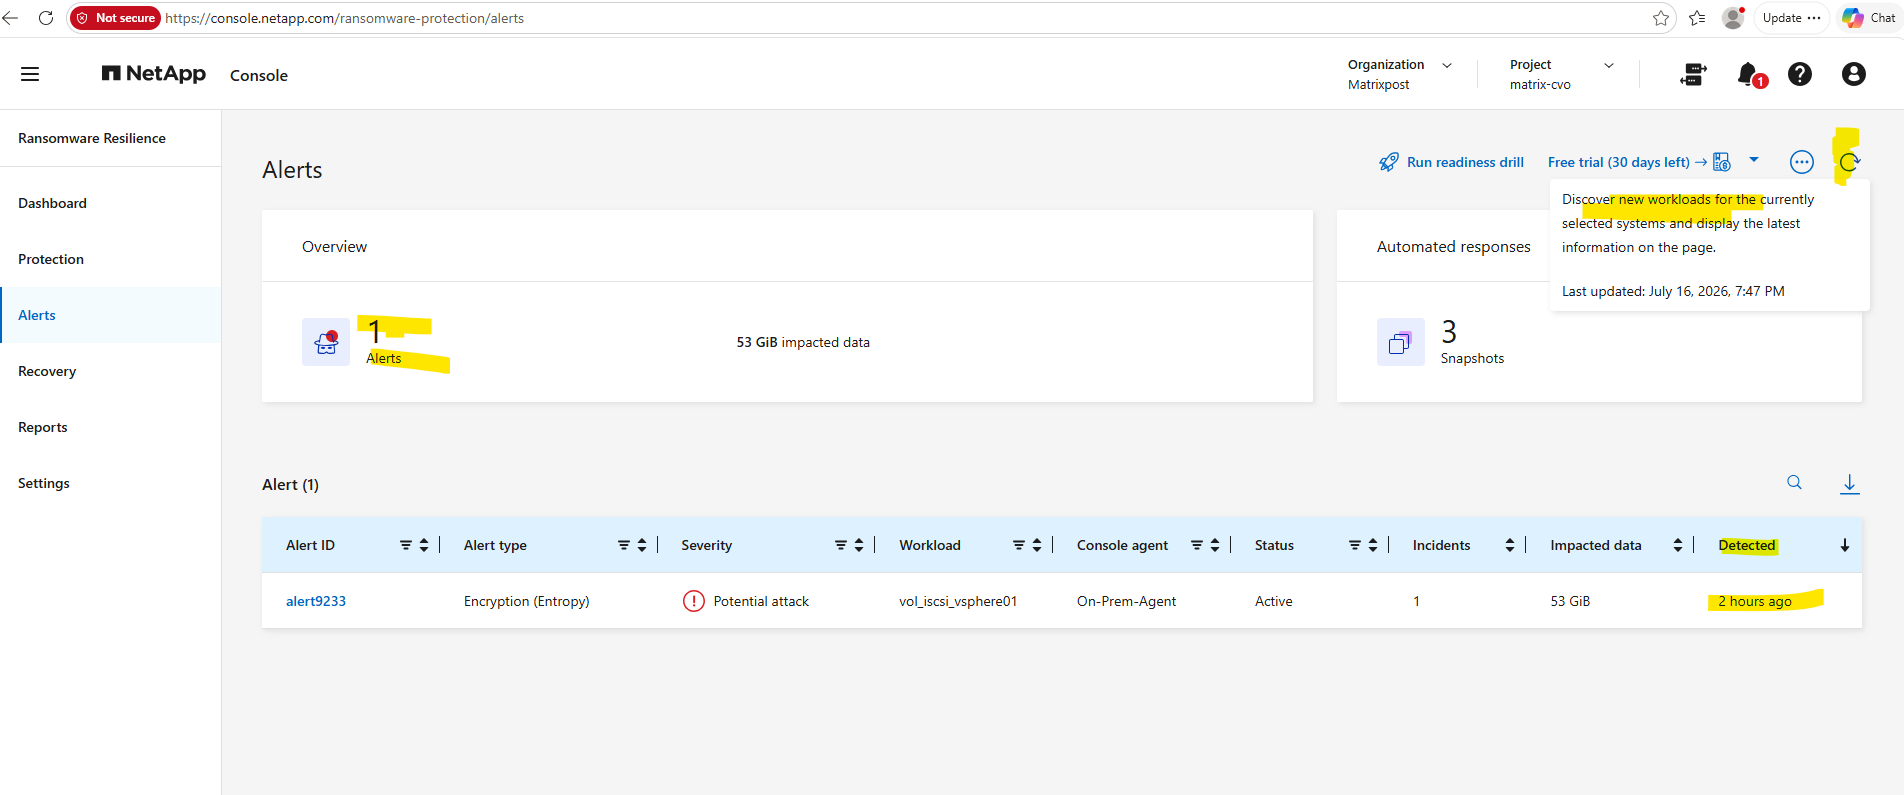
Although no alert was initially displayed, a manual refresh of the dashboard by clicking the Refresh (circular arrow) button synchronized the latest information from the monitored ONTAP system.
The previously detected ransomware attack then appeared immediately in the Alerts dashboard together with the corresponding automated recovery snapshots.
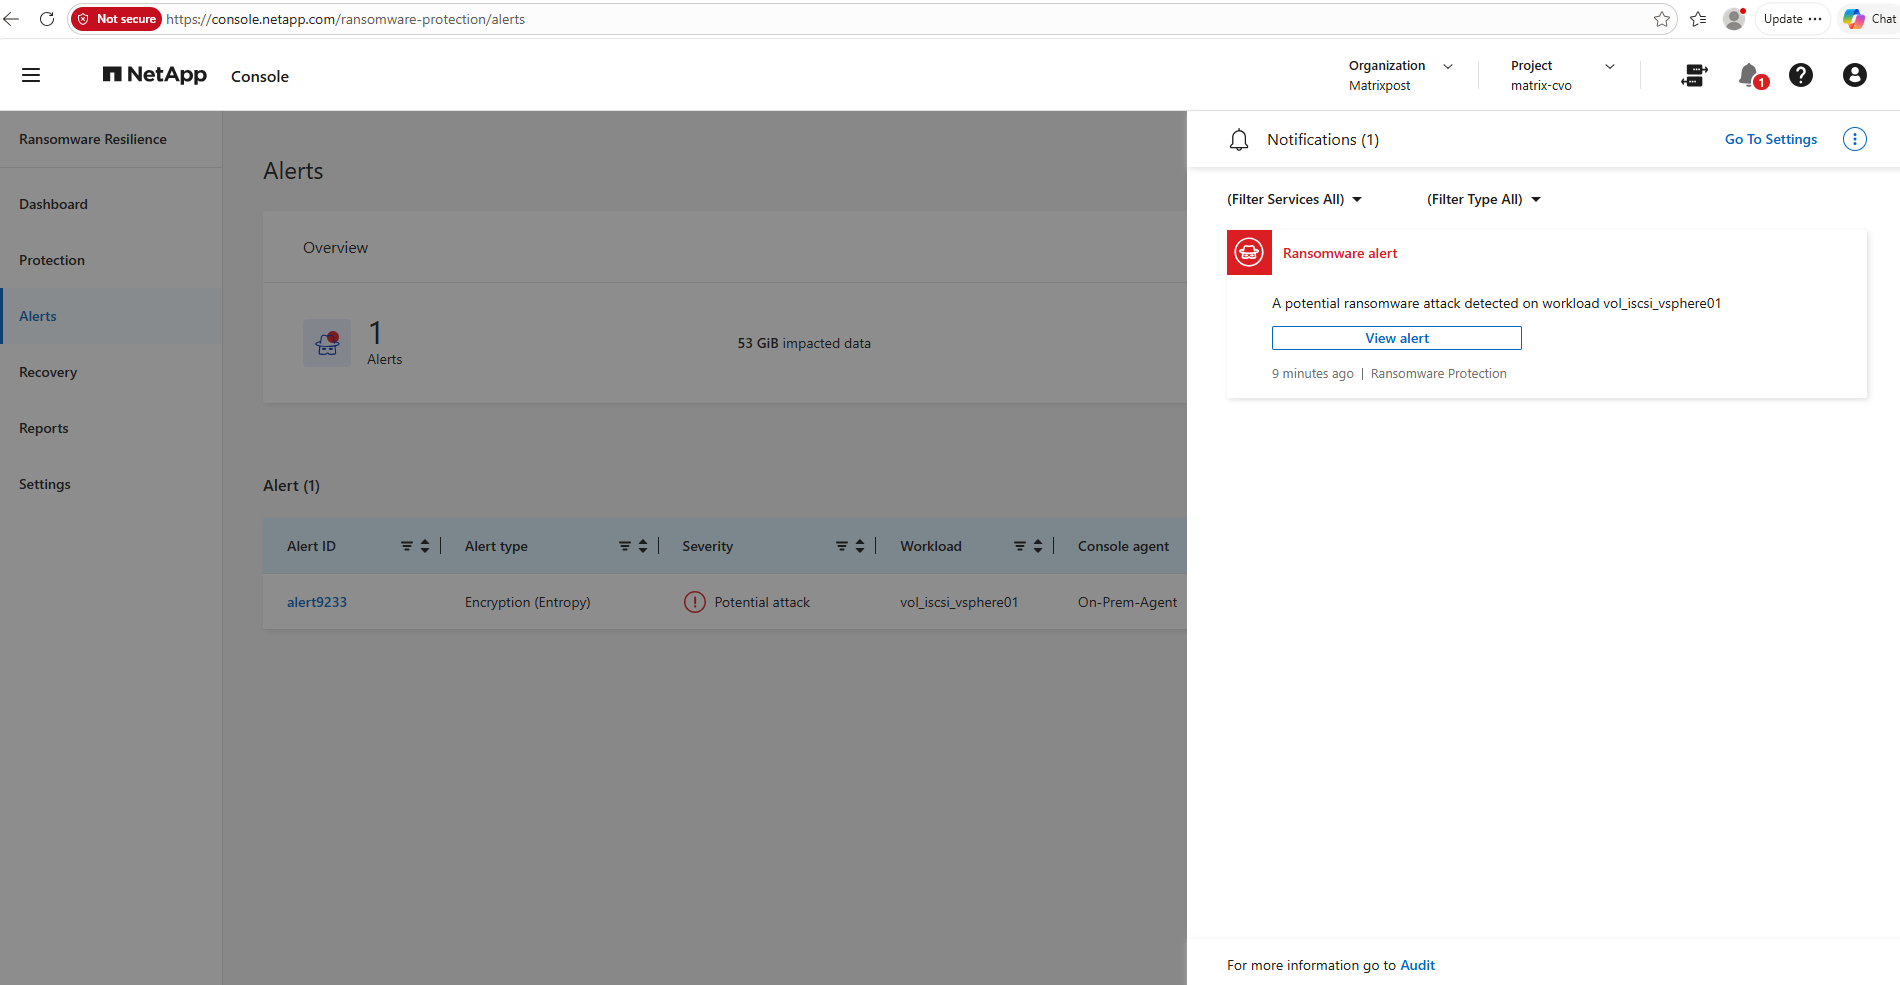
New ransomware detections also appear in the NetApp Console notification center. From there, administrators can immediately open the alert and access the corresponding incident details with a single click.
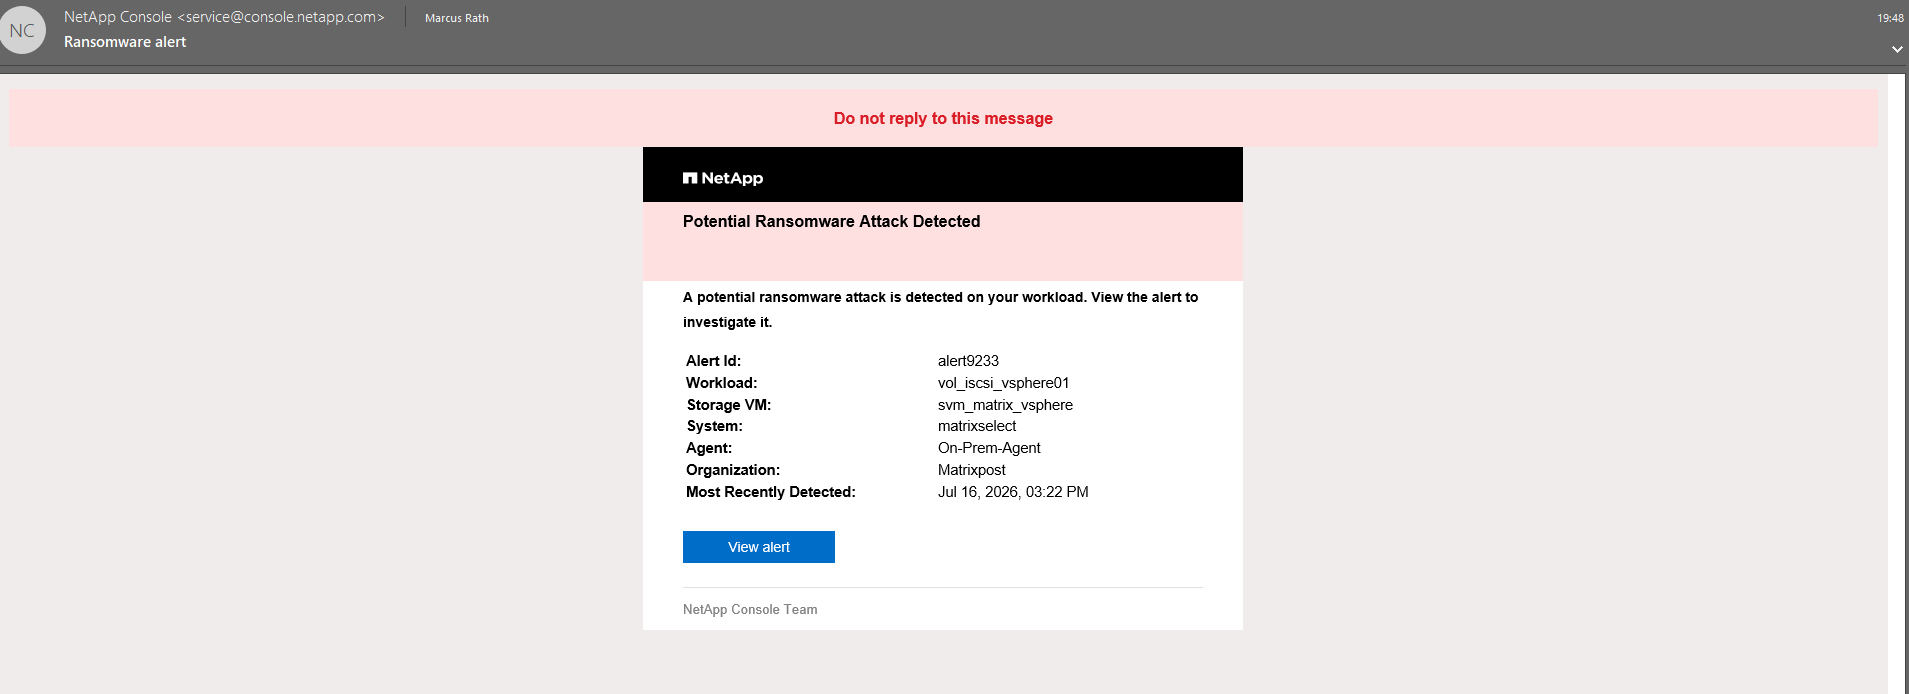
In addition to displaying the alert in the dashboard, NetApp Console Ransomware Resilience automatically generated an email notification. The notification includes the most important incident details, such as the affected workload, Storage VM, ONTAP system, and detection time, enabling administrators to respond promptly to potential ransomware attacks.
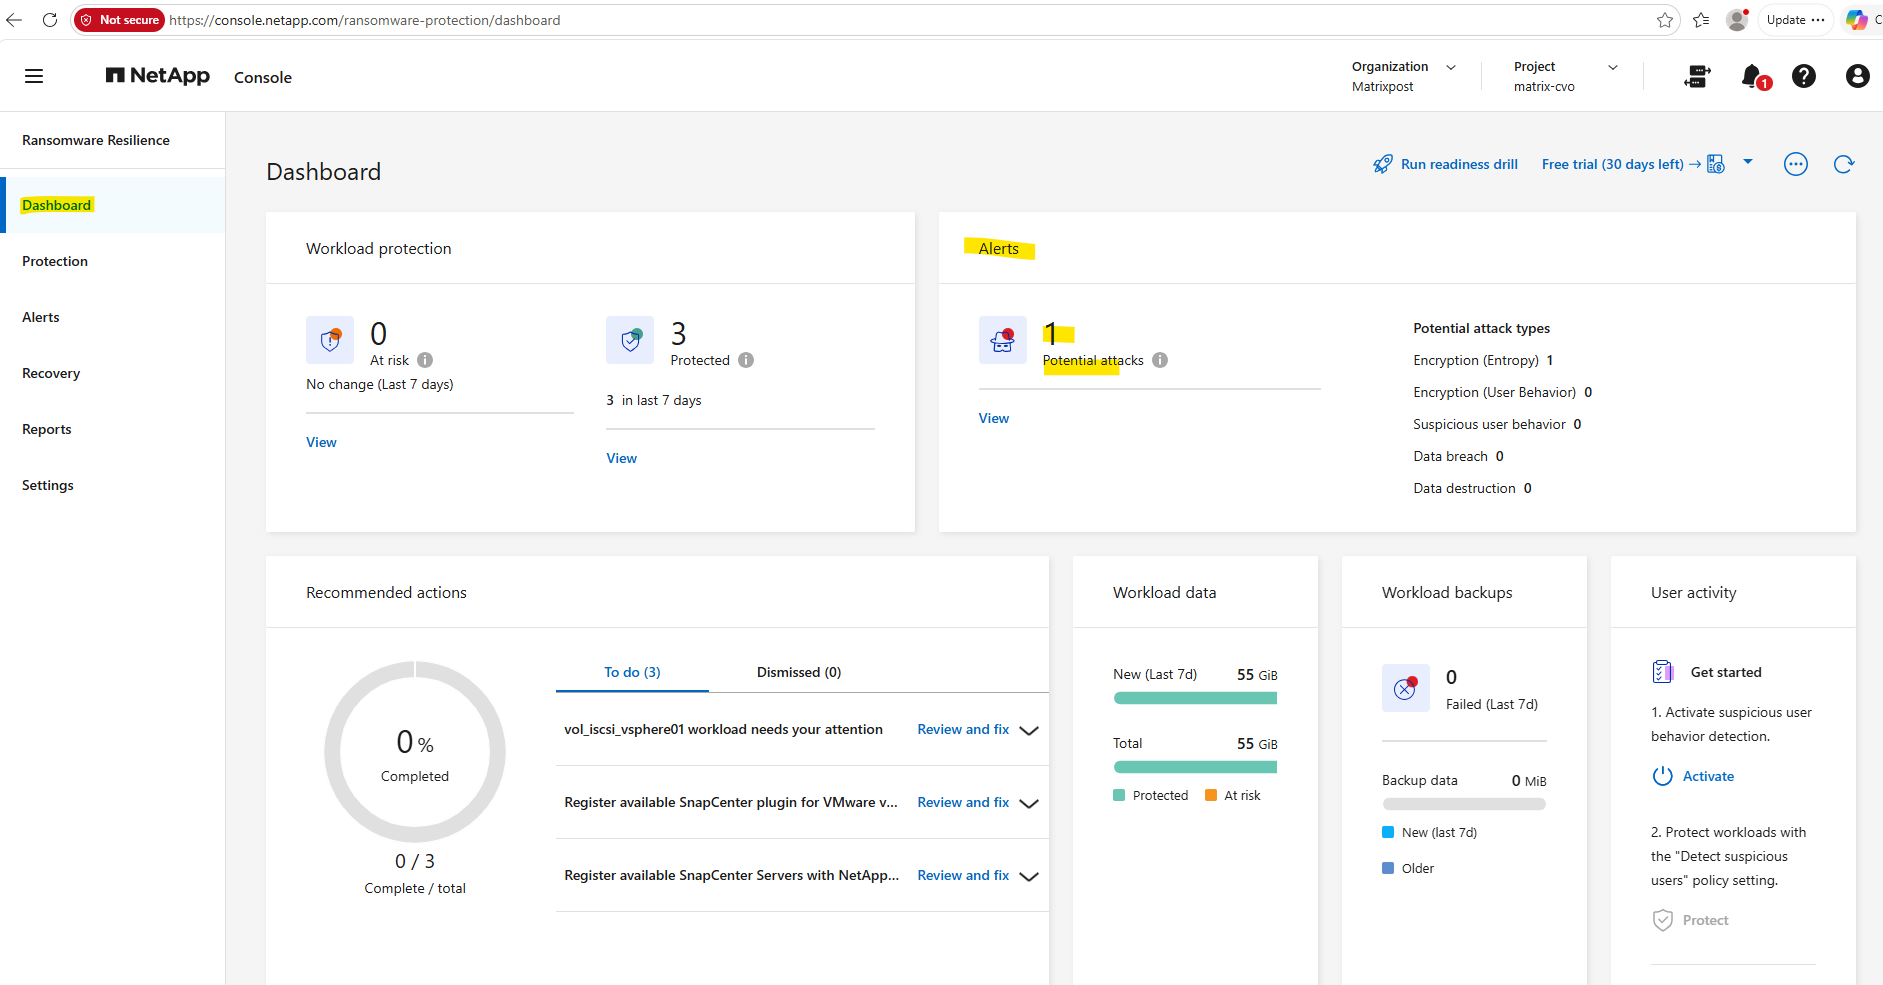
Once the alert has been synchronized, it is also visible directly on the Ransomware Resilience dashboard. The dashboard provides an at-a-glance overview of the current ransomware protection status, including the number of detected attacks and their classification, allowing administrators to quickly identify security incidents.
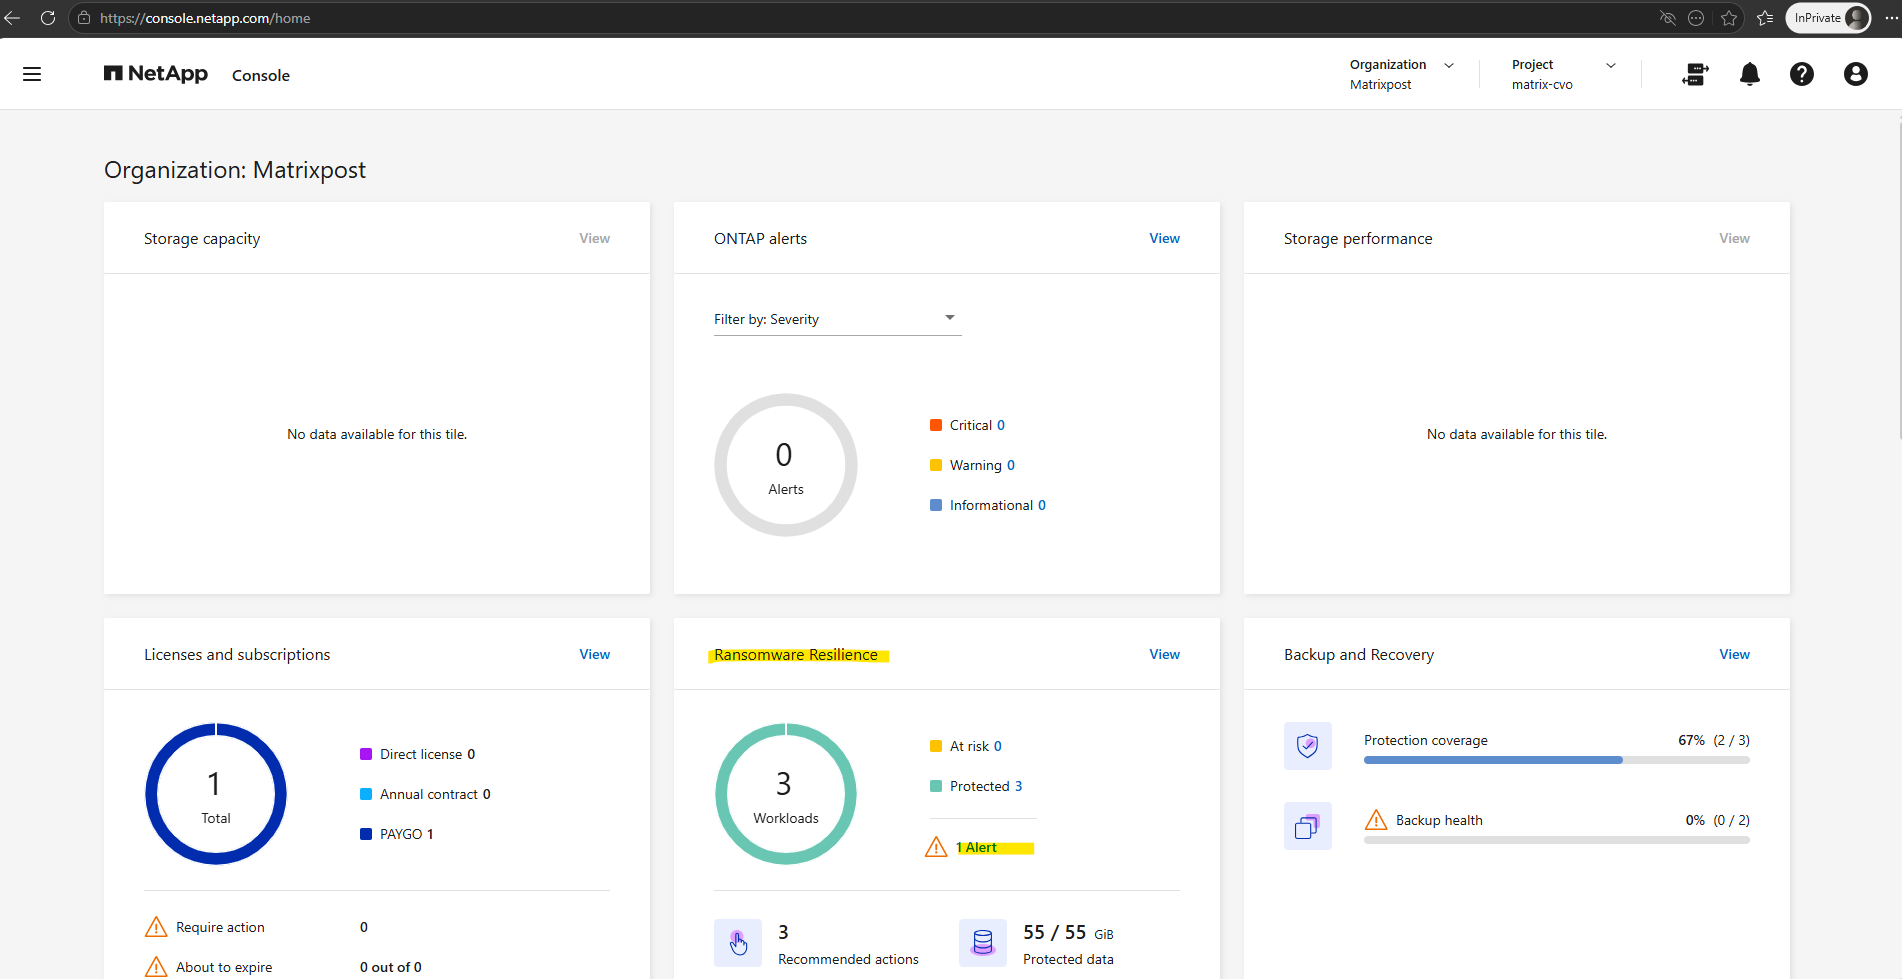
In addition to the Ransomware Resilience dashboard, the detected attack is also highlighted on the NetApp Console home dashboard. This gives administrators immediate visibility into active ransomware incidents directly after signing in.
In this lab, repeating the ransomware simulation against the same dataset did not trigger a new ransomware incident.
This suggests that ONTAP ARP correlates continued encryption activity on an already affected workload with the existing incident instead of creating a separate alert.
Review the Alert
Selecting the alert provides detailed information about the detected ransomware activity, including the affected workload, attack characteristics, severity, and the recovery options available to help assess and respond to the incident.
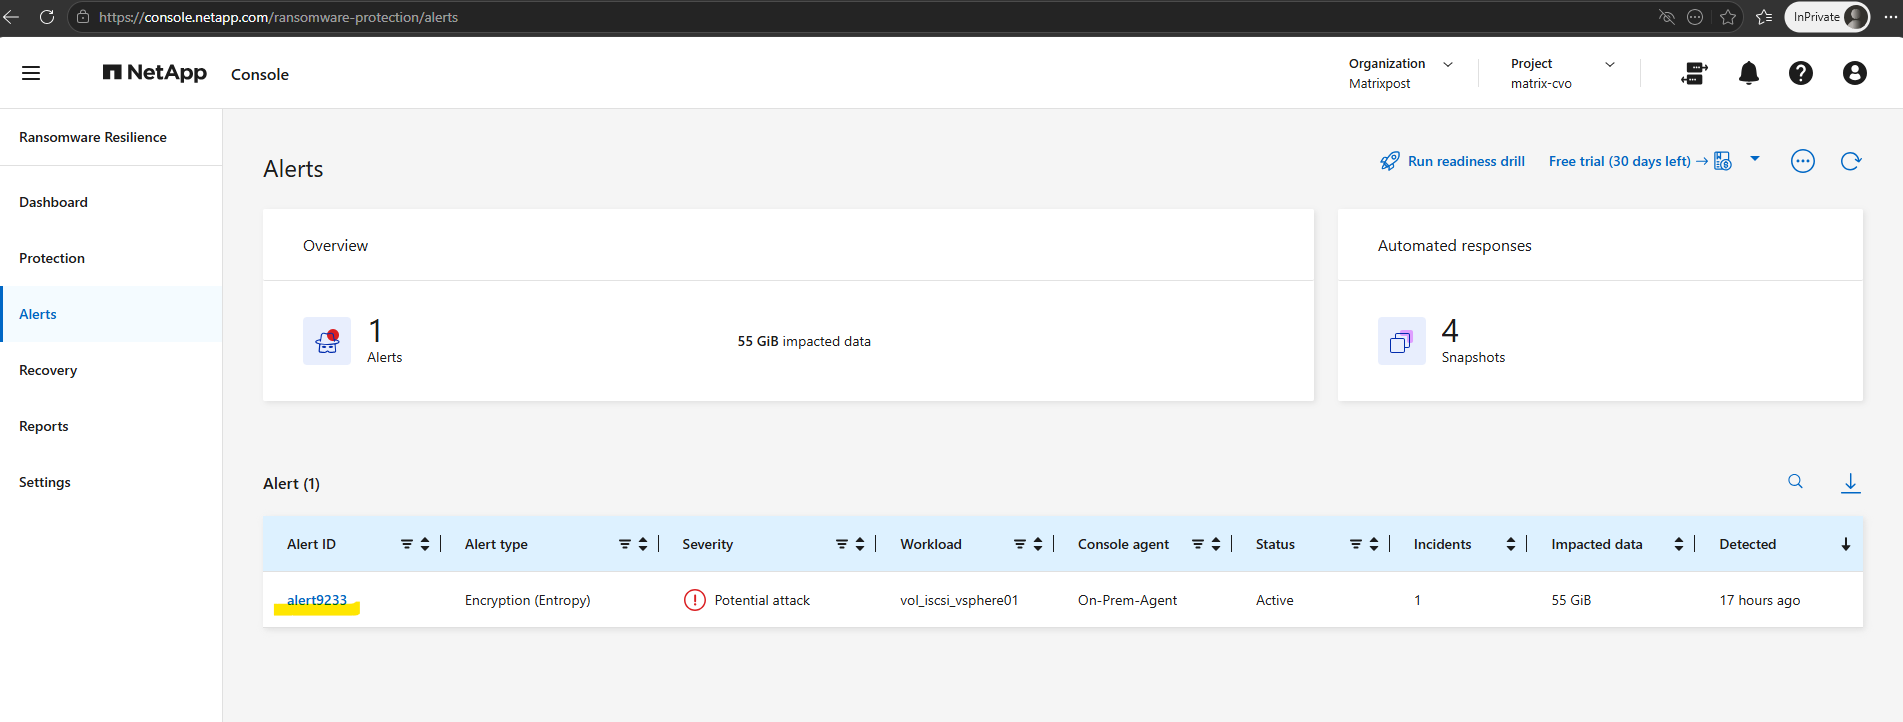
The detailed alert view can be accessed from multiple locations within NetApp Console, including the Home dashboard, the Ransomware Resilience dashboard, and the Alerts section in Ransomware Resilience like shown below. Each entry opens the same incident details, allowing administrators to investigate the detected ransomware activity.
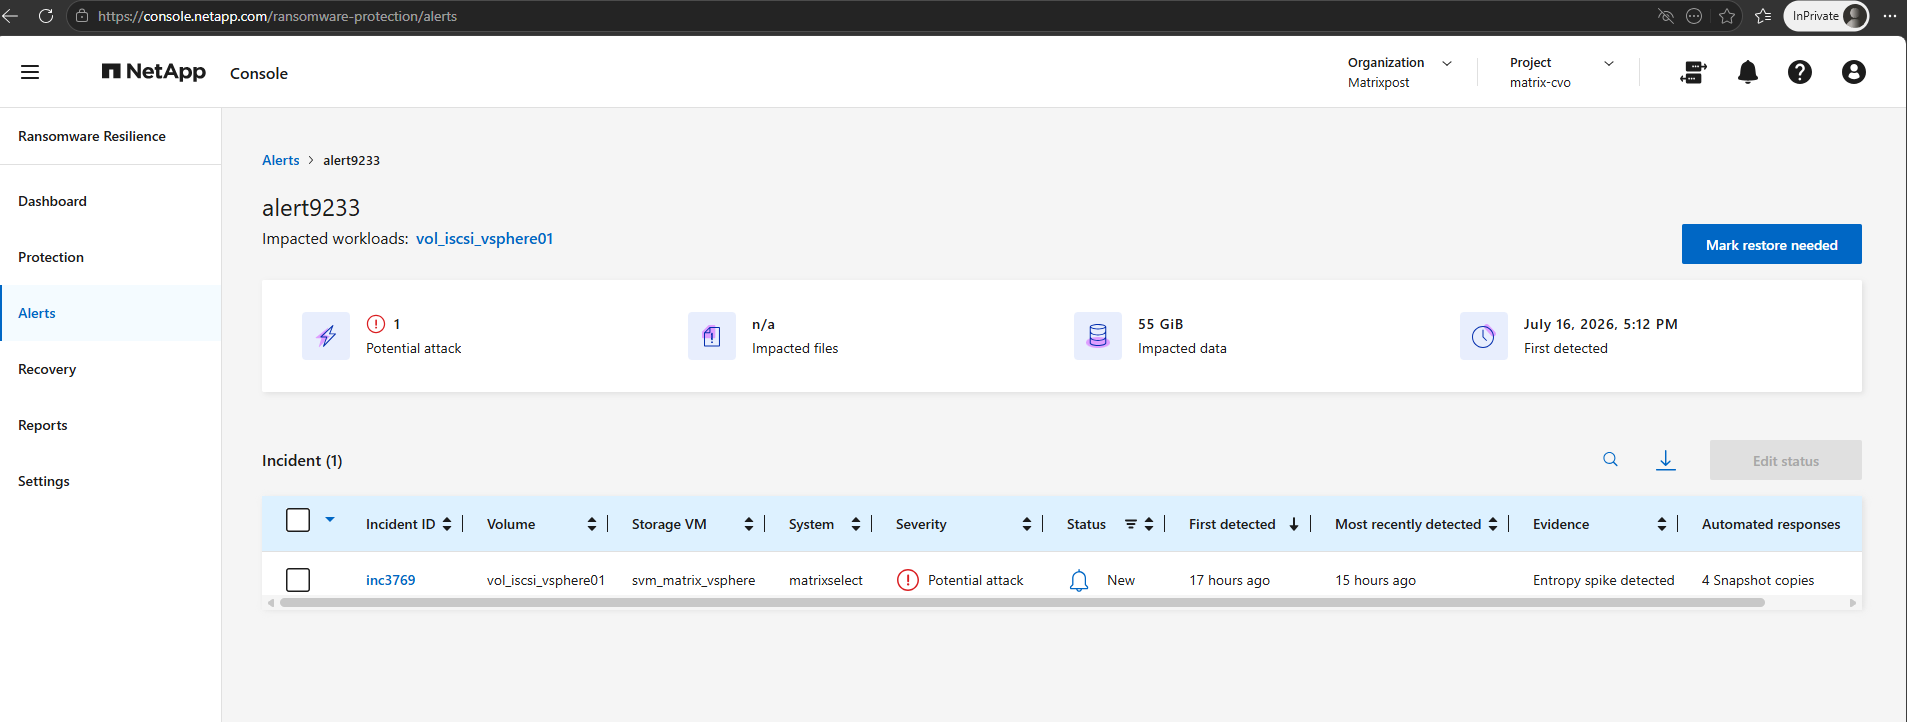
The alert details provide a consolidated view of the detected ransomware incident, including the affected workload, detection time, estimated amount of impacted data, and the evidence that triggered the alert, in this case, an entropy spike detected.
The incident overview also lists the automated responses performed by ONTAP, such as the creation of recovery snapshot copies, enabling administrators to quickly assess the event and determine the appropriate next steps.
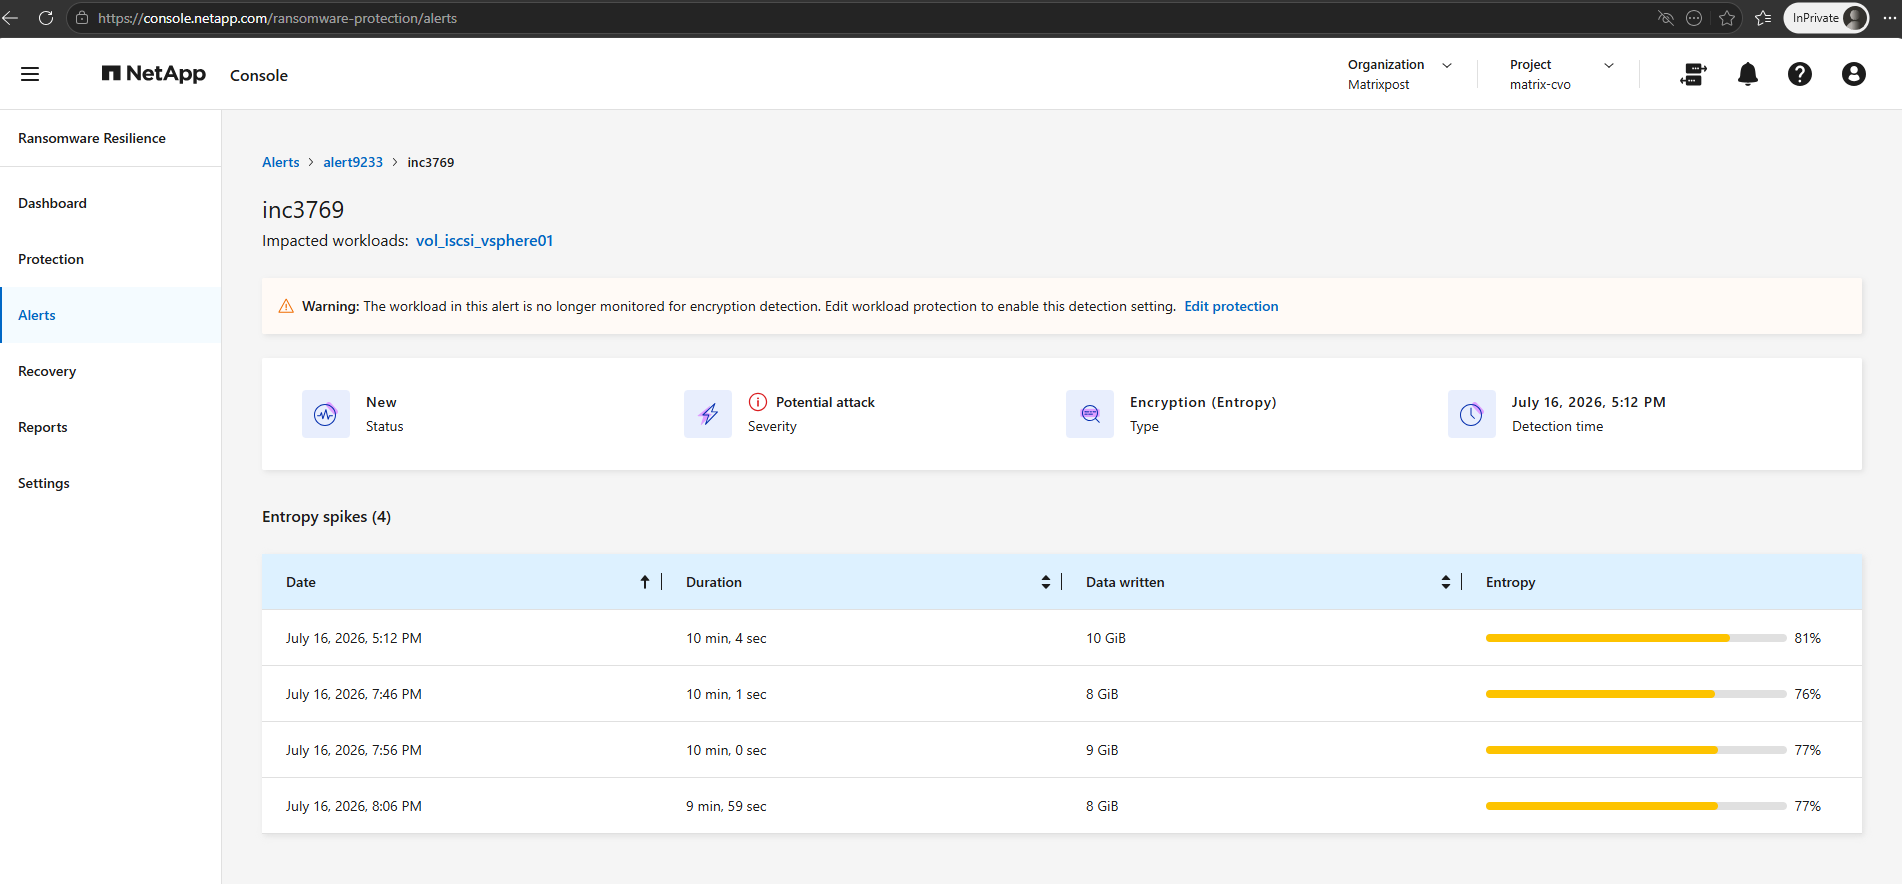
Clicking the Incident ID above displays the complete incident details, including the ransomware classification (Encryption (Entropy)) and a timeline of all detected entropy spikes. For each detection event, NetApp Console records the duration, amount of data written, and calculated entropy, helping administrators understand why the workload was classified as a potential ransomware attack.
Note: Although the incident details displayed a warning that the workload was no longer monitored for encryption detection, the current protection settings below show Encryption detection as enabled. This suggests that the protection state changed after the alert was generated or that the warning no longer reflects the current configuration.
Protection
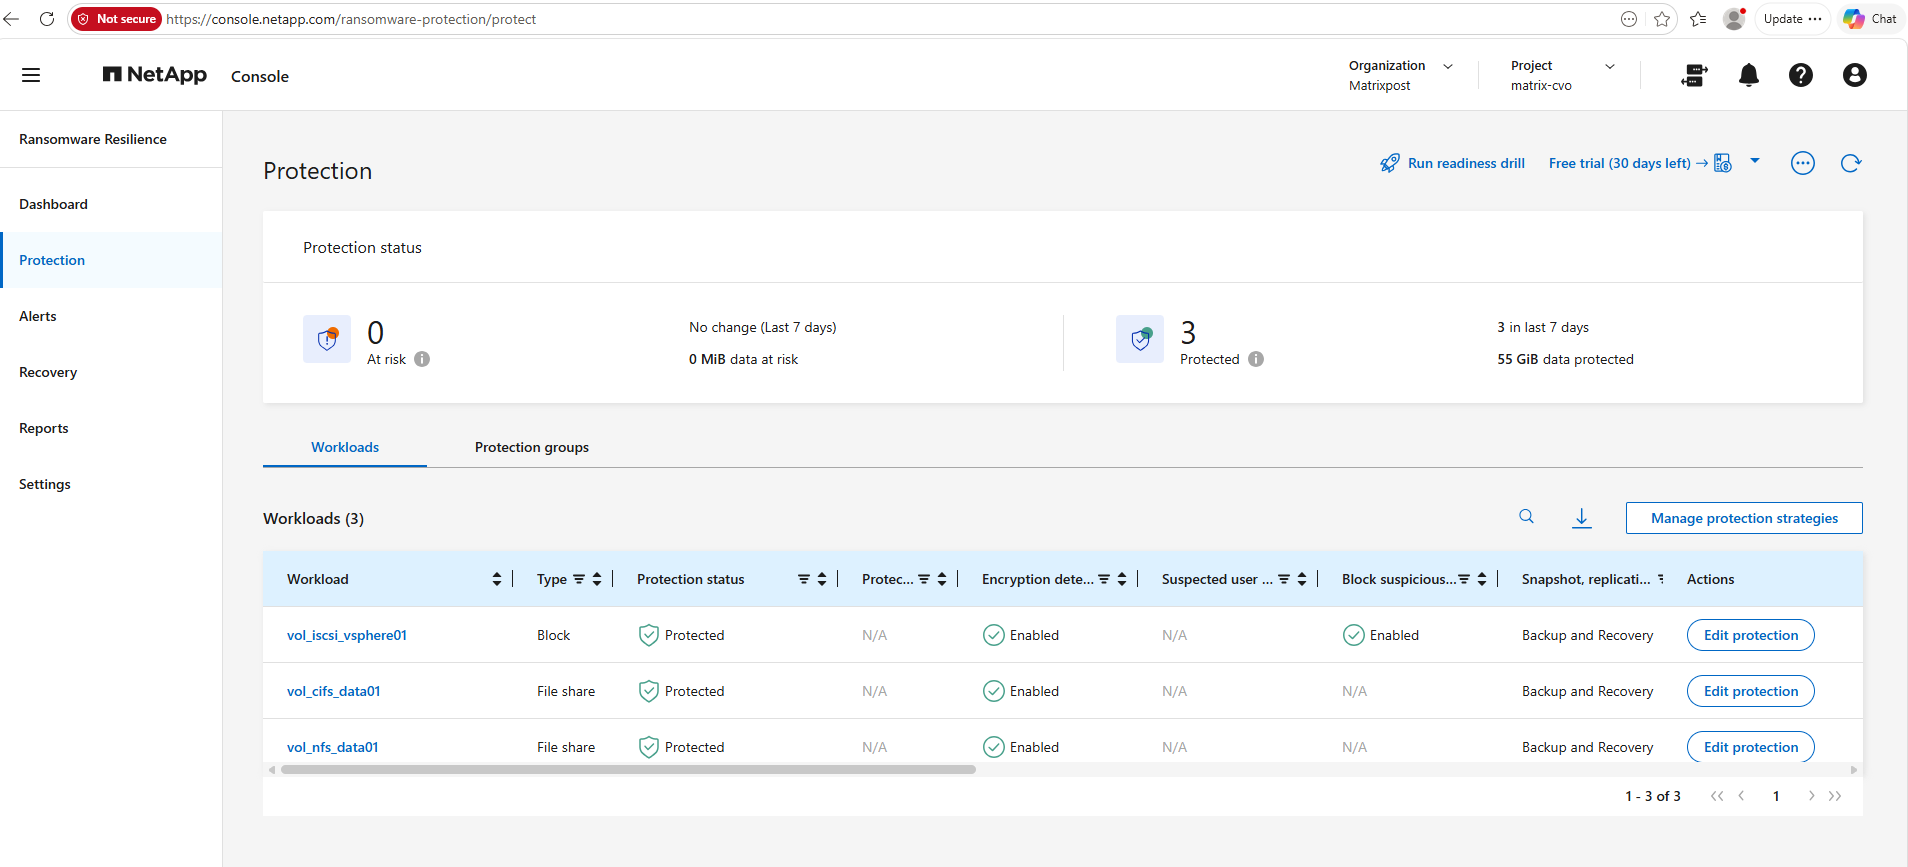
The Protection page provides a consolidated view of a workload’s ransomware protection and data protection configuration. Here you can review and modify the configured protection mechanisms as well as the existing snapshot and backup policies managed by NetApp Backup and Recovery.
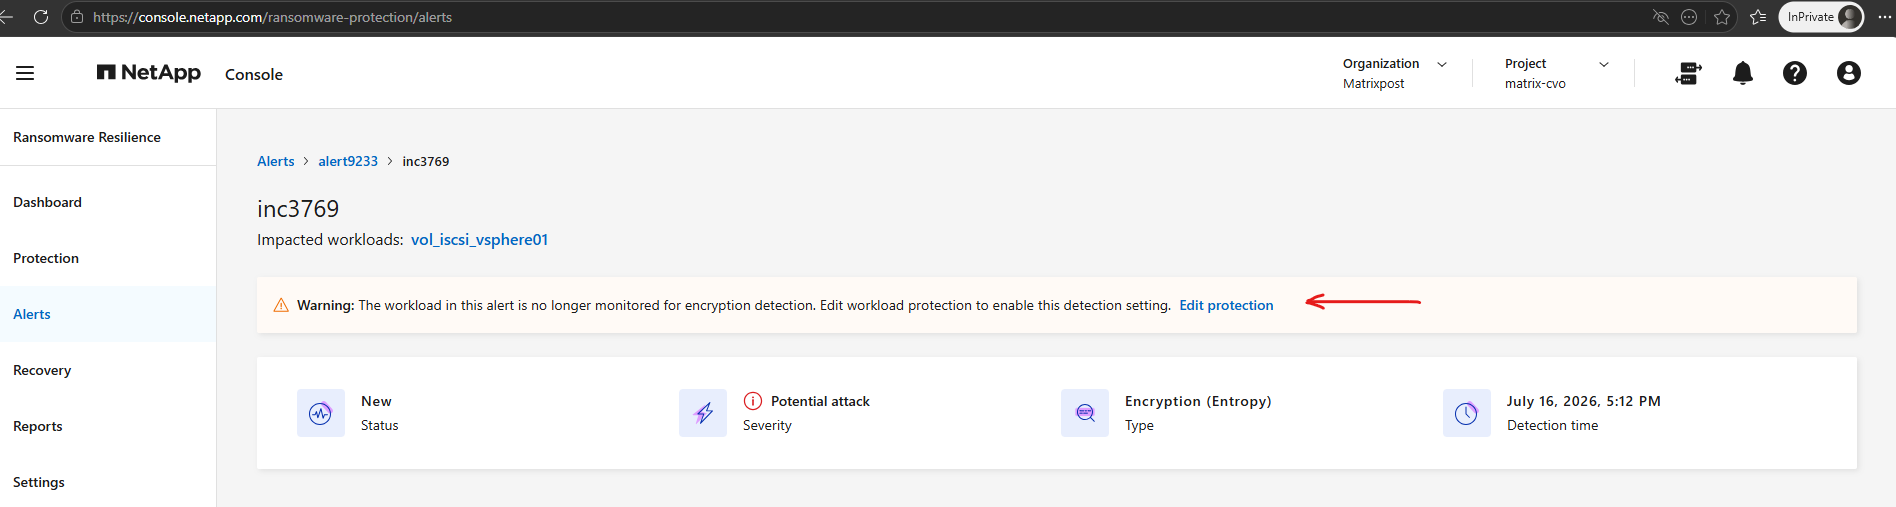
Previously for the potential attack alert, when selecting Edit protection opens the workload’s protection settings.
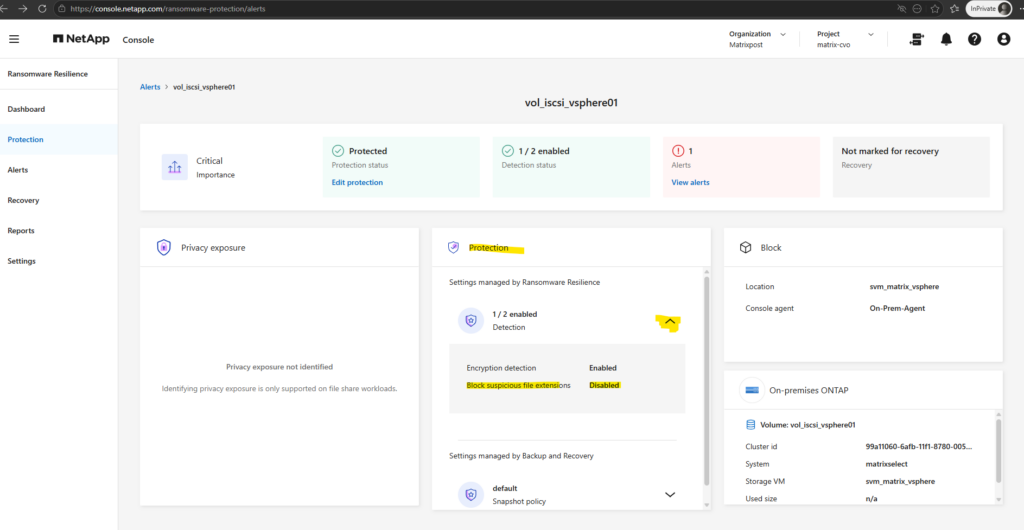
In this case, the Detection status shows that one of the two available protection mechanisms is enabled.
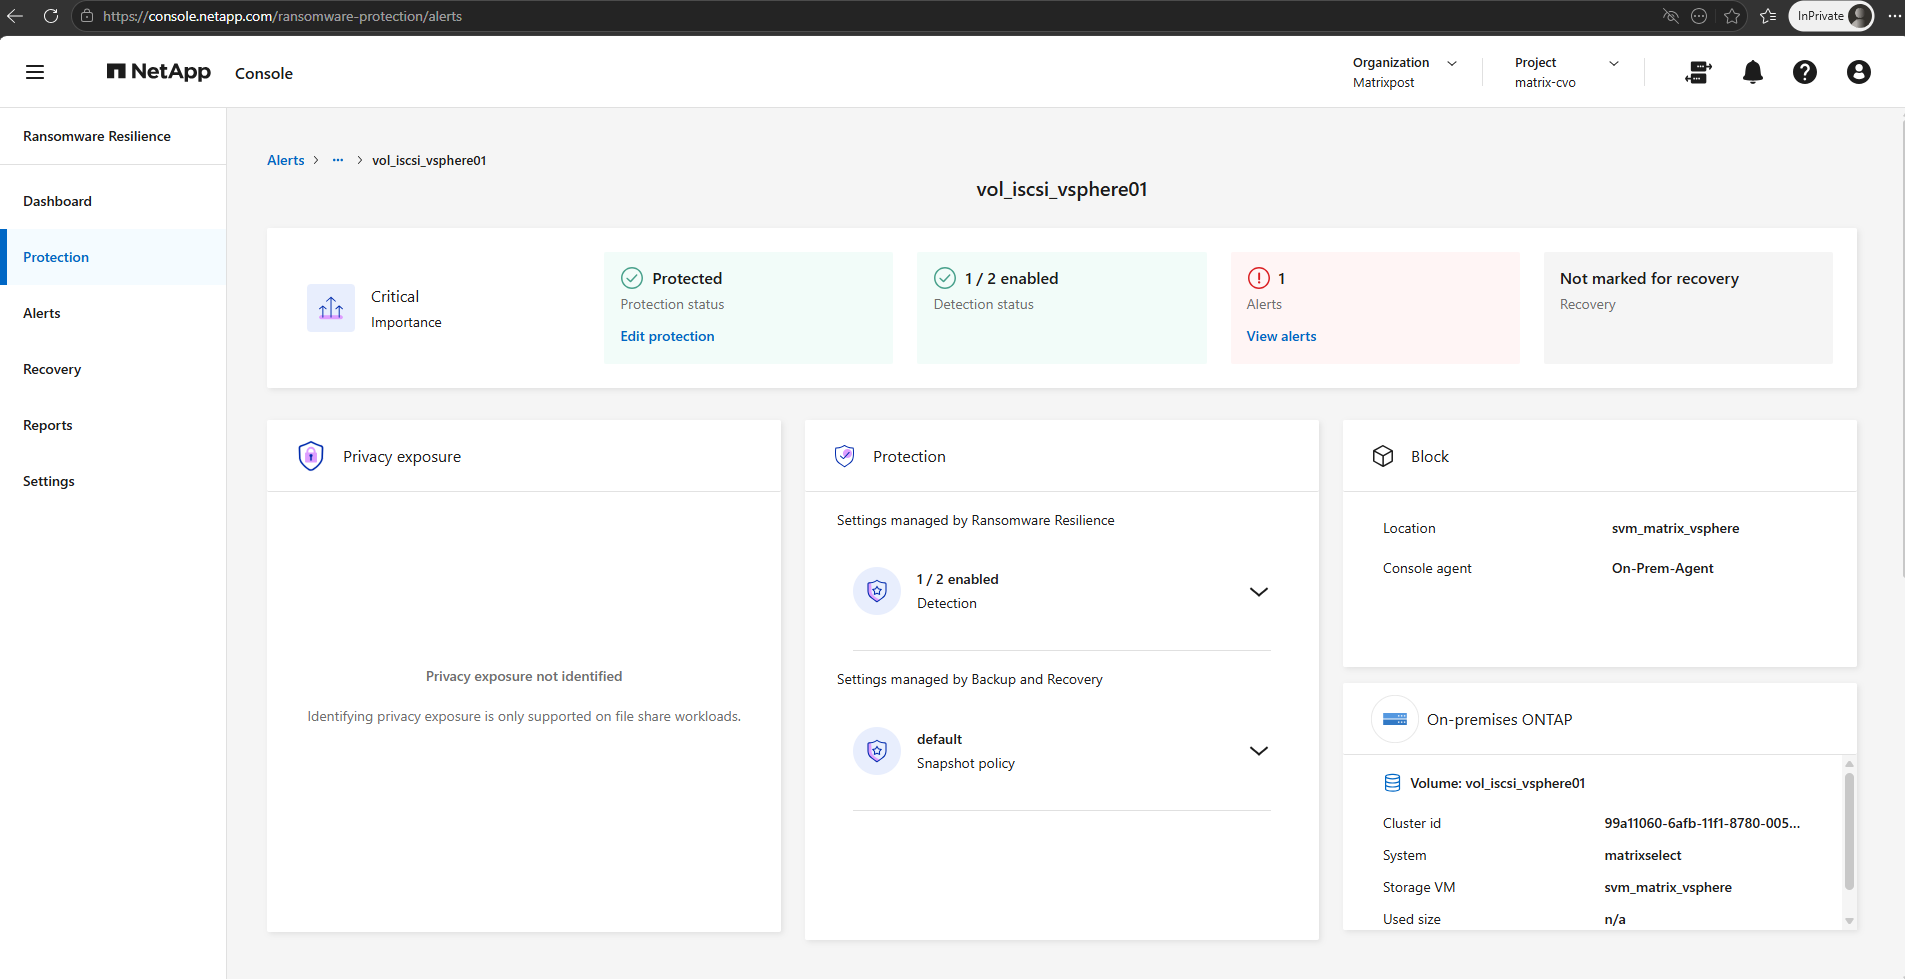
Expanding the Protection settings reveals that Encryption detection is enabled, while Block suspicious file extensions is disabled. These are separate protection mechanisms, with the former detecting ransomware-like encryption activity based on entropy analysis and the latter preventing writes using known suspicious file extensions.
Note:
Encryption detection analyzes entropy and write patterns (this is what triggered your incident). Block suspicious file extensions is a preventive feature that blocks writes of known ransomware file extensions and is independent of entropy detection.While Encryption detection is enabled to detect ransomware-like encryption activity, Block suspicious file extensions is disabled. When enabled, this feature proactively blocks attempts to create or rename files using known ransomware-associated file extensions, providing an additional layer of protection beyond behavioral detection.
Block suspicious file extensions is built on ONTAP’s native FPolicy technology, which can prevent files with known ransomware-associated extensions from being created or renamed on protected NAS workloads. NetApp Console integrates this capability into Ransomware Resilience, allowing it to be managed as part of a centralized ransomware protection policy.
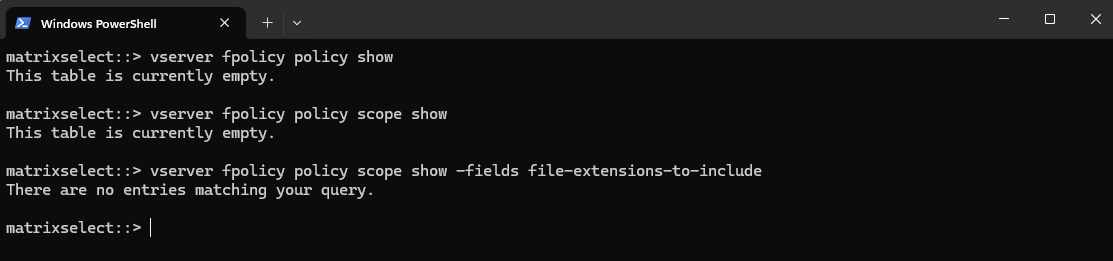
The configuration of native FPolicy (Block suspicious file extensions) policies can be verified from the ONTAP CLI using the vserver fpolicy commands shown below. In this lab, the commands returned no entries, confirming that no native FPolicy configuration had been deployed on the cluster.
matrixselect::> vserver fpolicy policy show
matrixselect::> vserver fpolicy policy scope show
matrixselect::> vserver fpolicy policy scope show -fields file-extensions-to-include
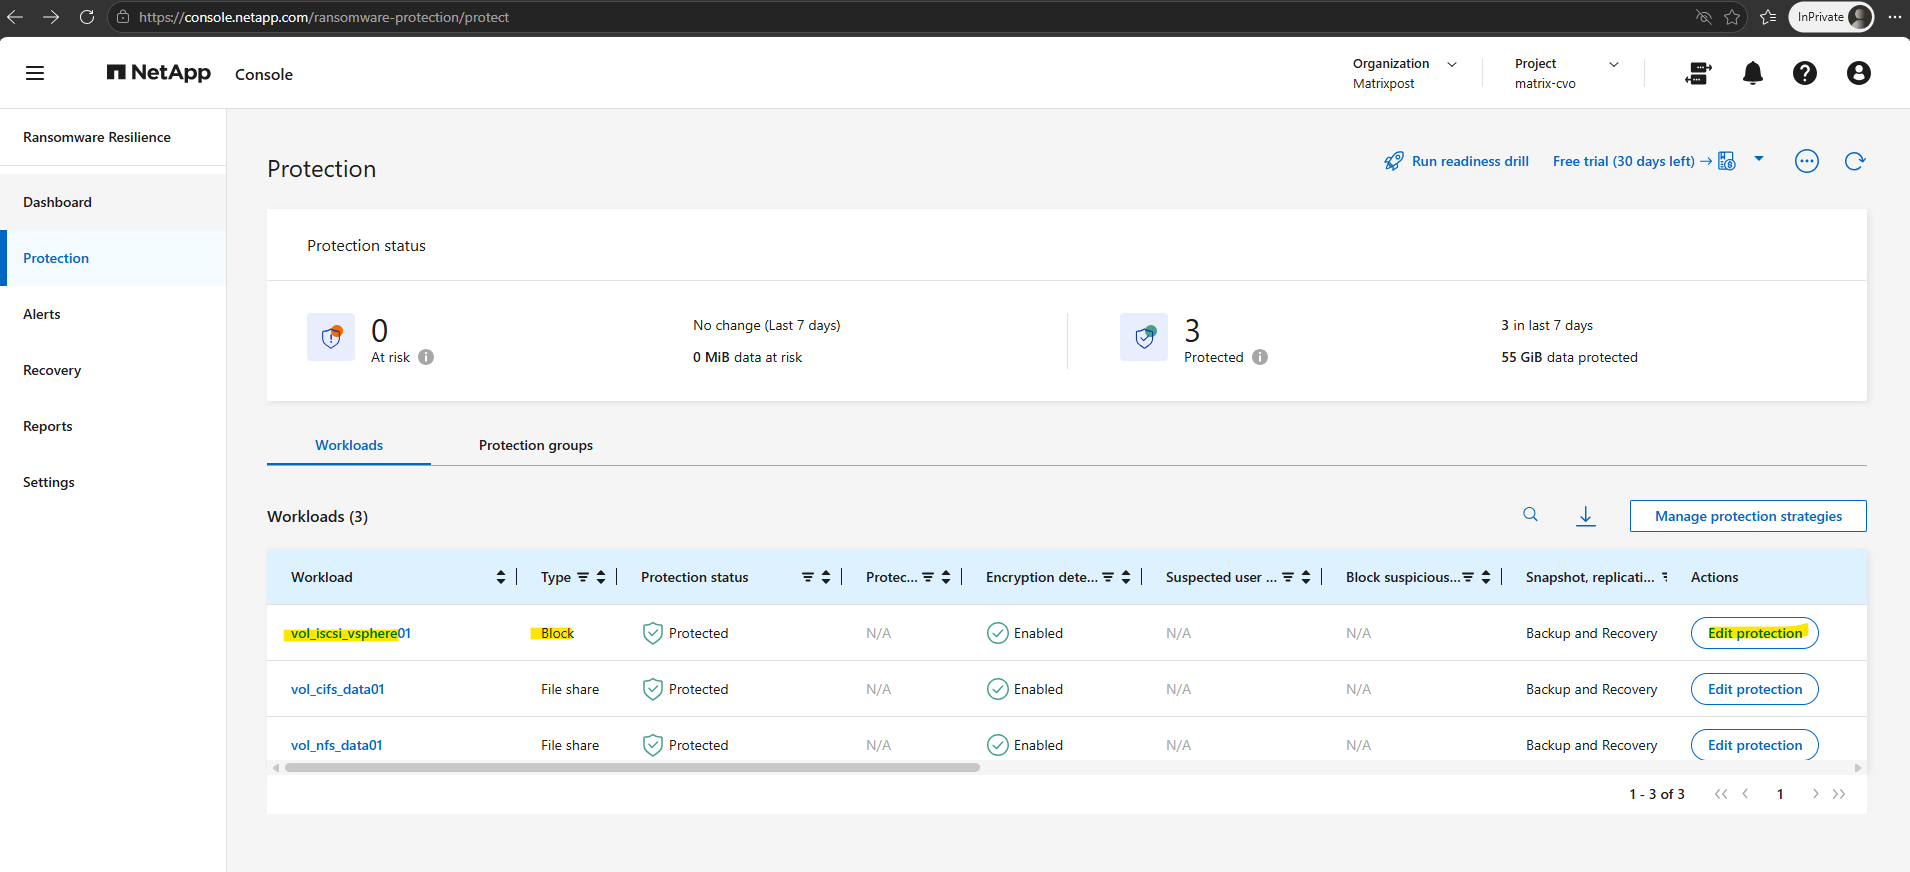
To evaluate whether Block suspicious file extensions is also supported for SAN workloads, we first edit the protection settings for the iSCSI-backed VMware datastore. From the Protection page, select the workload and click Edit protection to modify its ransomware detection settings.
Block suspicious file extensions can also be enabled for this SAN (block) workload, even though Suspicious user behavior detection is explicitly marked as unsupported for block workloads. This raises the question of whether file extension blocking is actually supported for SAN volumes or whether the option is simply exposed in the user interface.
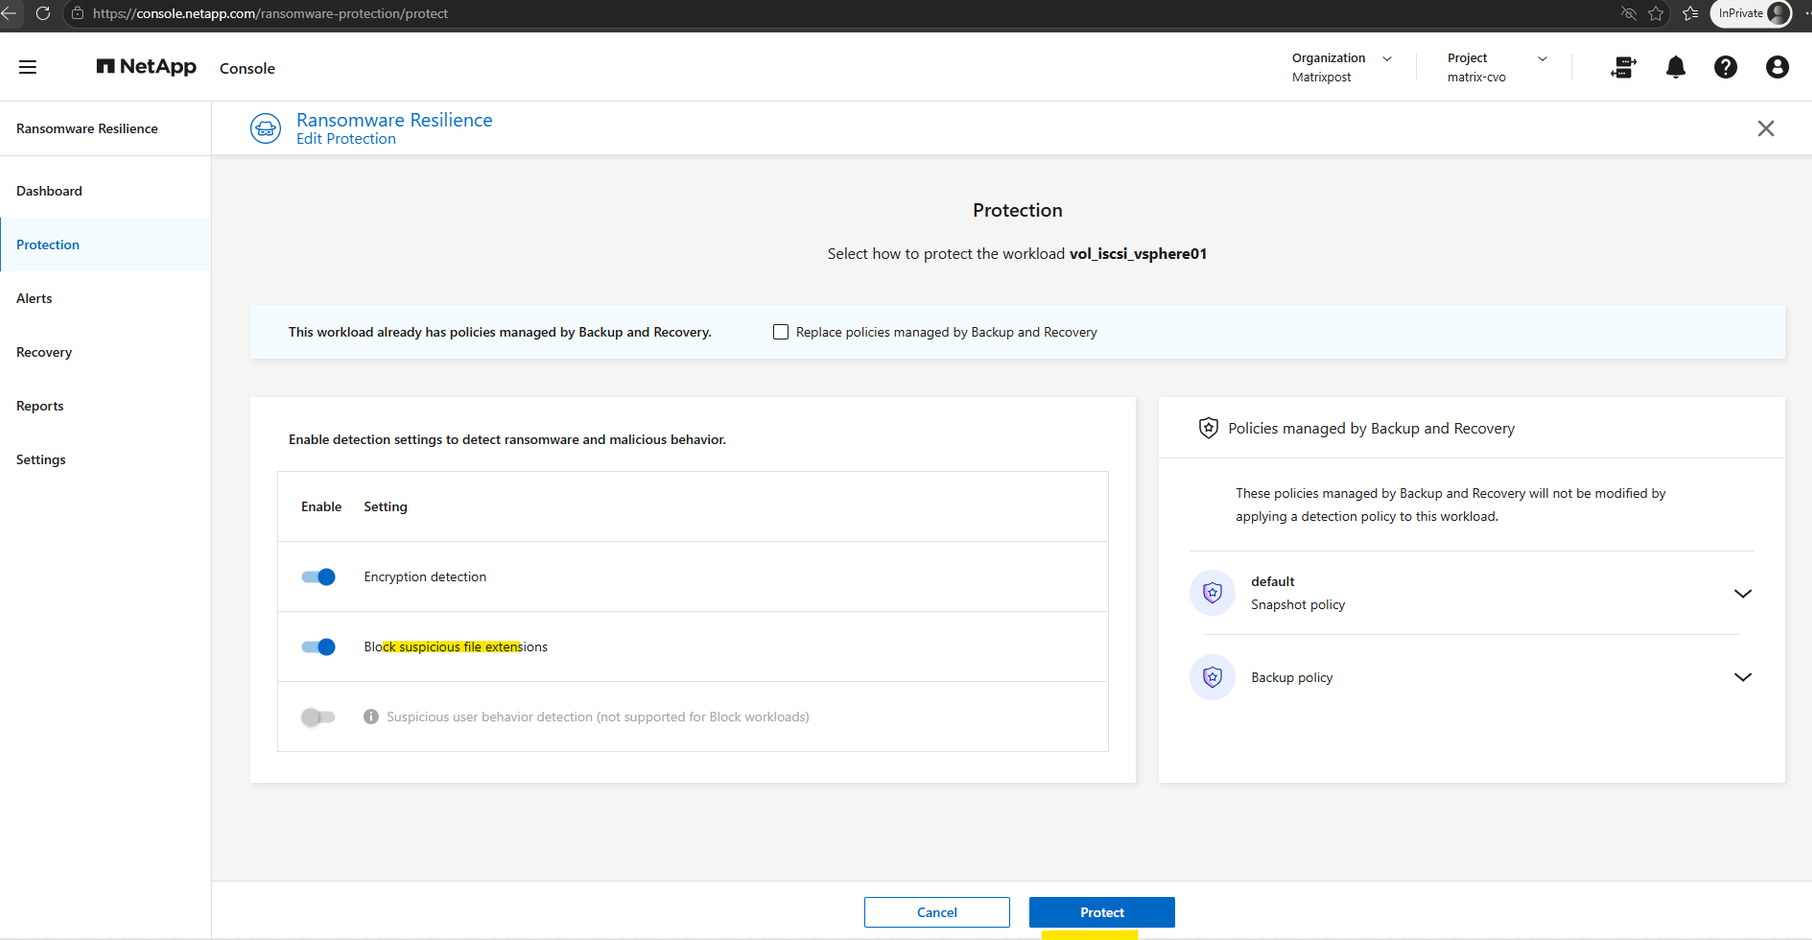
So I will try to toggle the Block suspicious file extensions protection on.
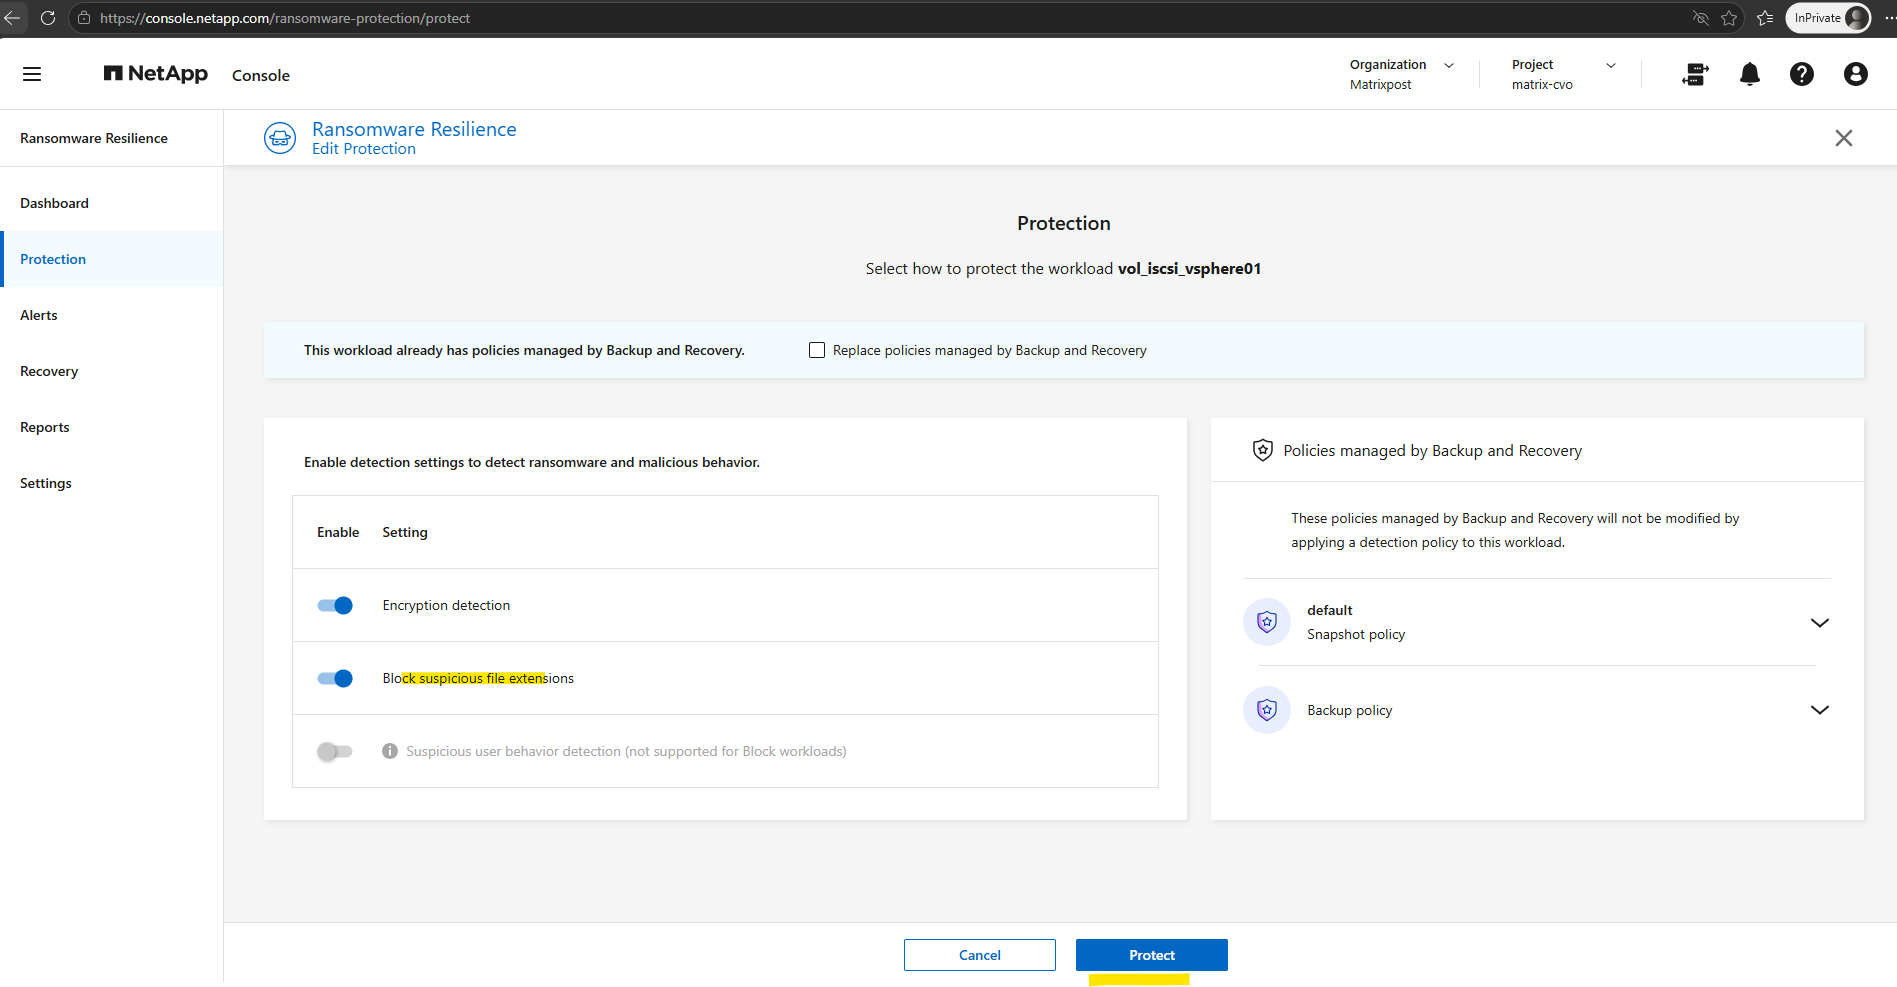
After applying the updated protection settings, Block suspicious file extensions is shown as Enabled for the SAN (block) workload. The next step is to verify from the ONTAP CLI whether enabling this option results in a corresponding native FPolicy configuration or whether the setting is managed differently for block workloads.
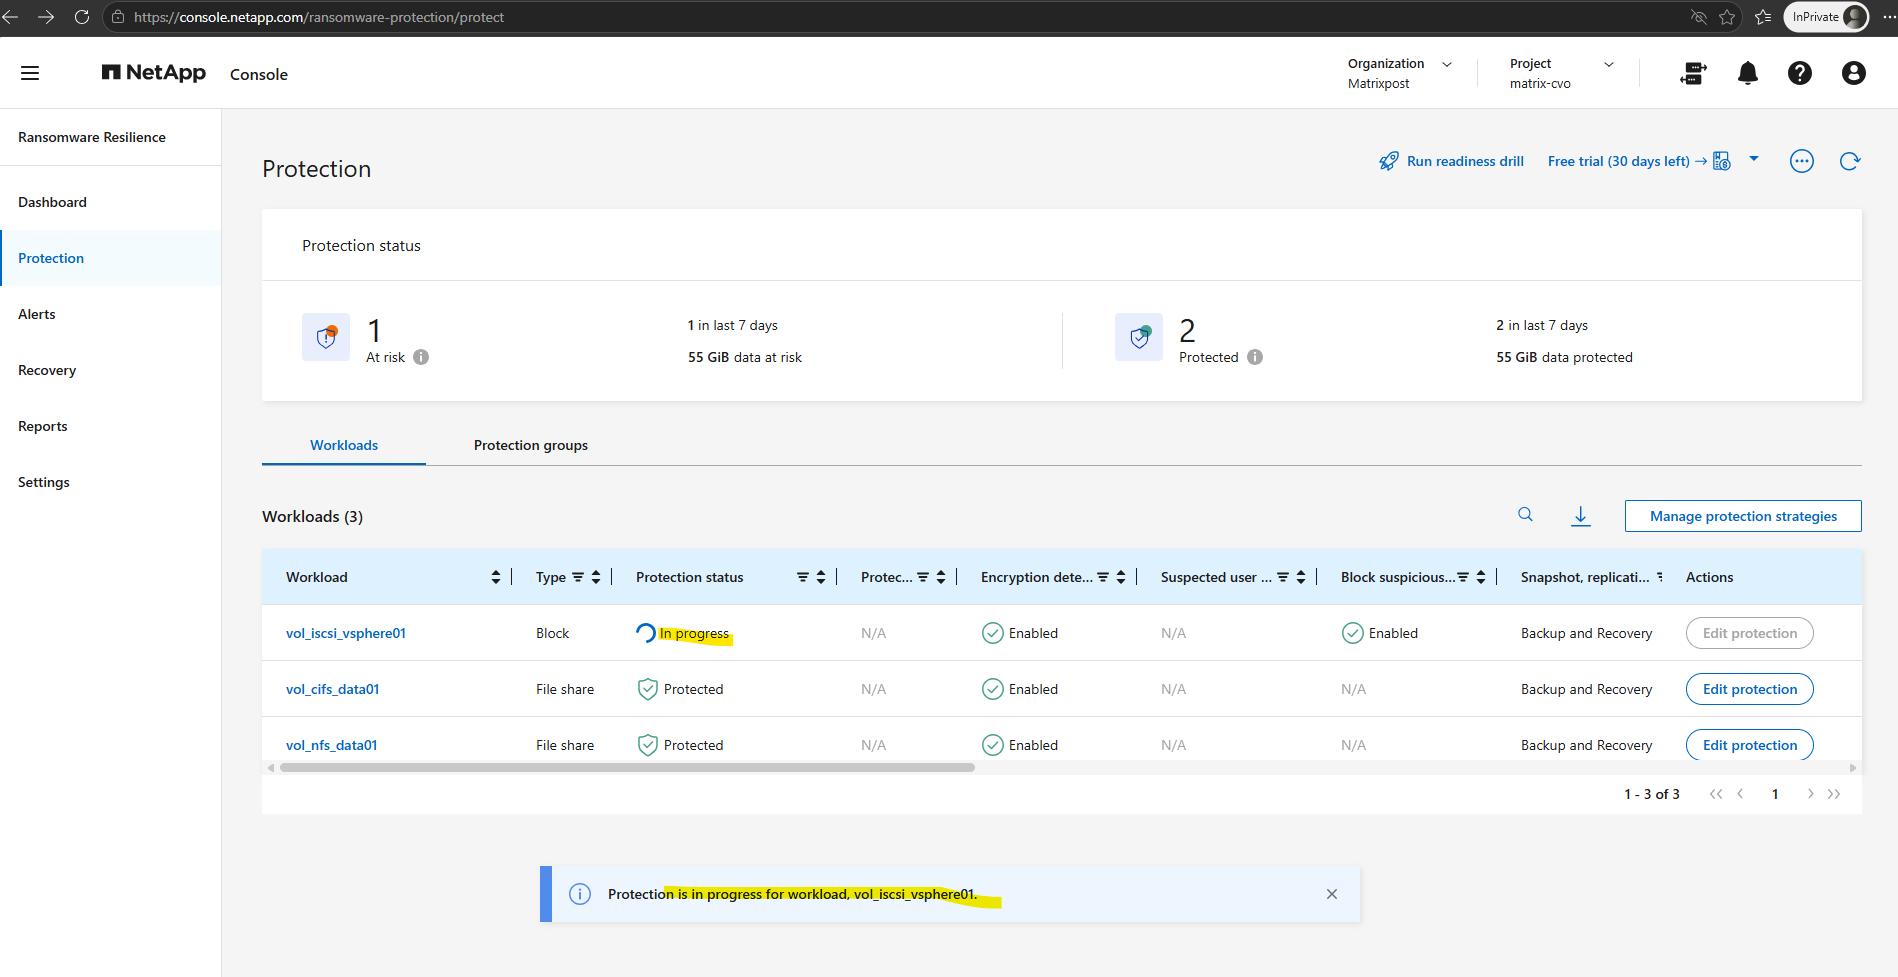
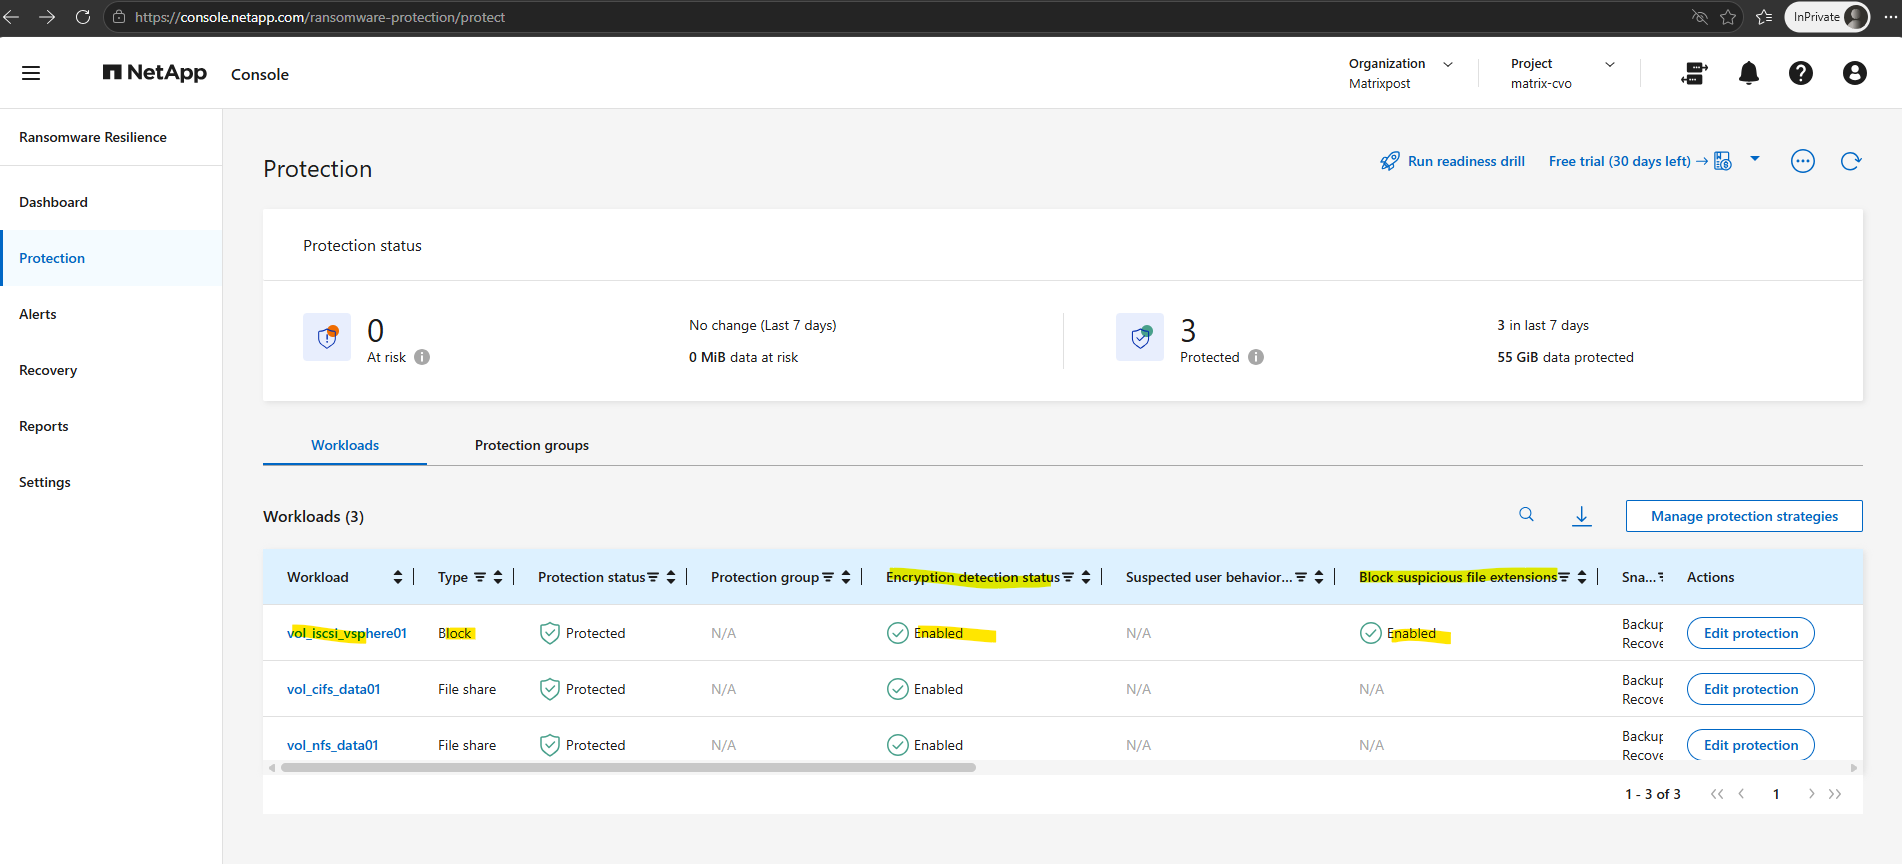
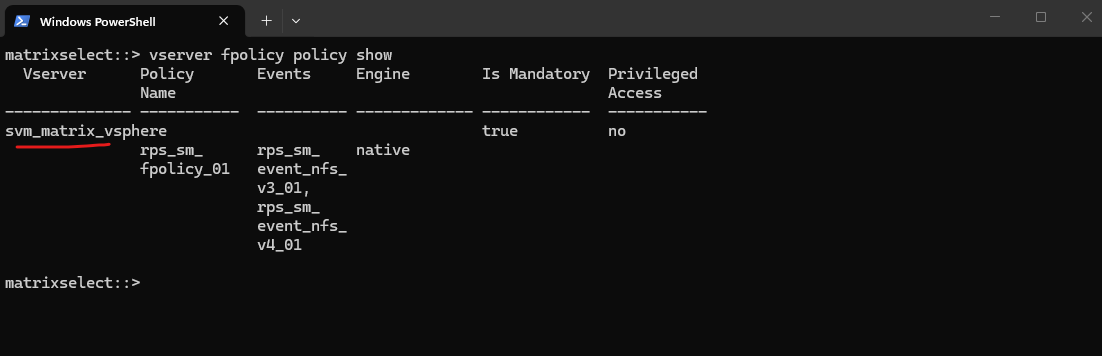
After enabling Block suspicious file extensions, ONTAP immediately created a native FPolicy configuration.
The vserver fpolicy policy show command lists all configured FPolicy policies on the SVM, including the associated events, policy engine, and enforcement settings.
Similar to Autonomous Ransomware Protection (ARP), FPolicy is a native ONTAP security feature, while NetApp Console Ransomware Resilience provides a centralized management, monitoring, and orchestration layer that configures these capabilities and presents alerts, recommendations, and recovery workflows through a unified cloud-based interface.
matrixselect::> vserver fpolicy policy show
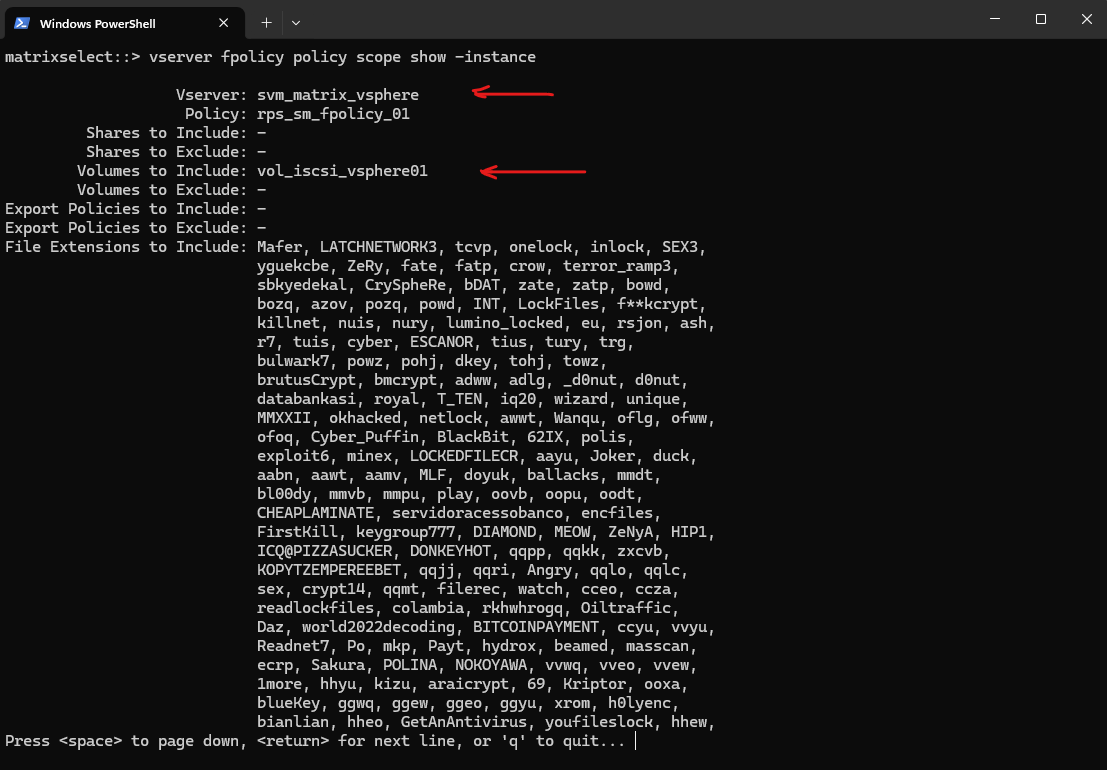
The vserver fpolicy policy scope show -instance command displays the complete scope of the FPolicy policy, that is, the objects and filters to which the policy applies.
In this example, the policy is scoped to the
vol_iscsi_vsphere01volume and configured with a comprehensive list of known ransomware file extensions that ONTAP monitors and blocks as part of the Block suspicious file extensions protection mechanism.
matrixselect::> vserver fpolicy policy scope show -instance
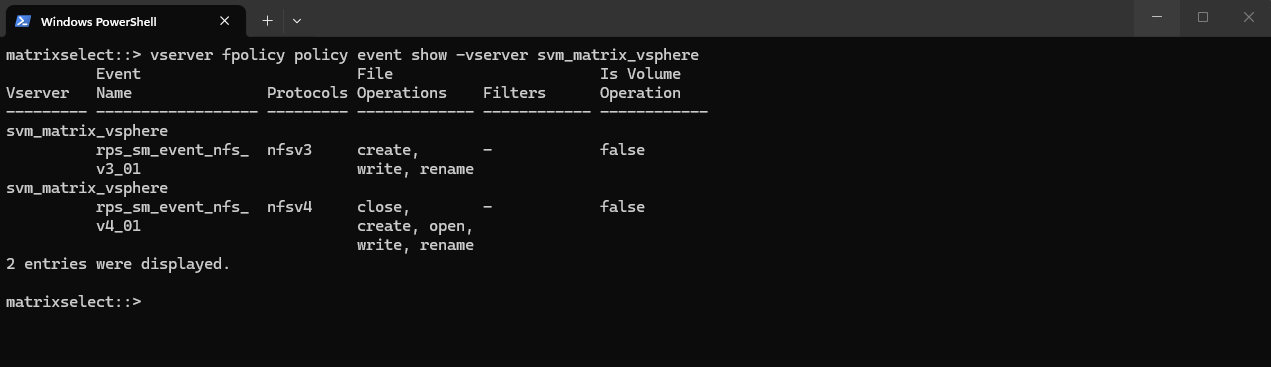
The command below displays the FPolicy events configured on the Storage VM.
Each event specifies the NAS protocol (SMB/CIFS, NFSv3, or NFSv4) and the file operations, such as
open,create,write,rename, andclose, that ONTAP monitors.These events are associated with the FPolicy policies automatically created by NetApp Console when the Block suspicious file extensions feature is enabled.
When one of these operations occurs, the associated native FPolicy engine evaluates the request and, if it matches the configured criteria for suspicious file extensions, blocks the operation and returns an Access Denied error to the client.
matrixselect::> vserver fpolicy policy event show -vserver svm_matrix_vsphere
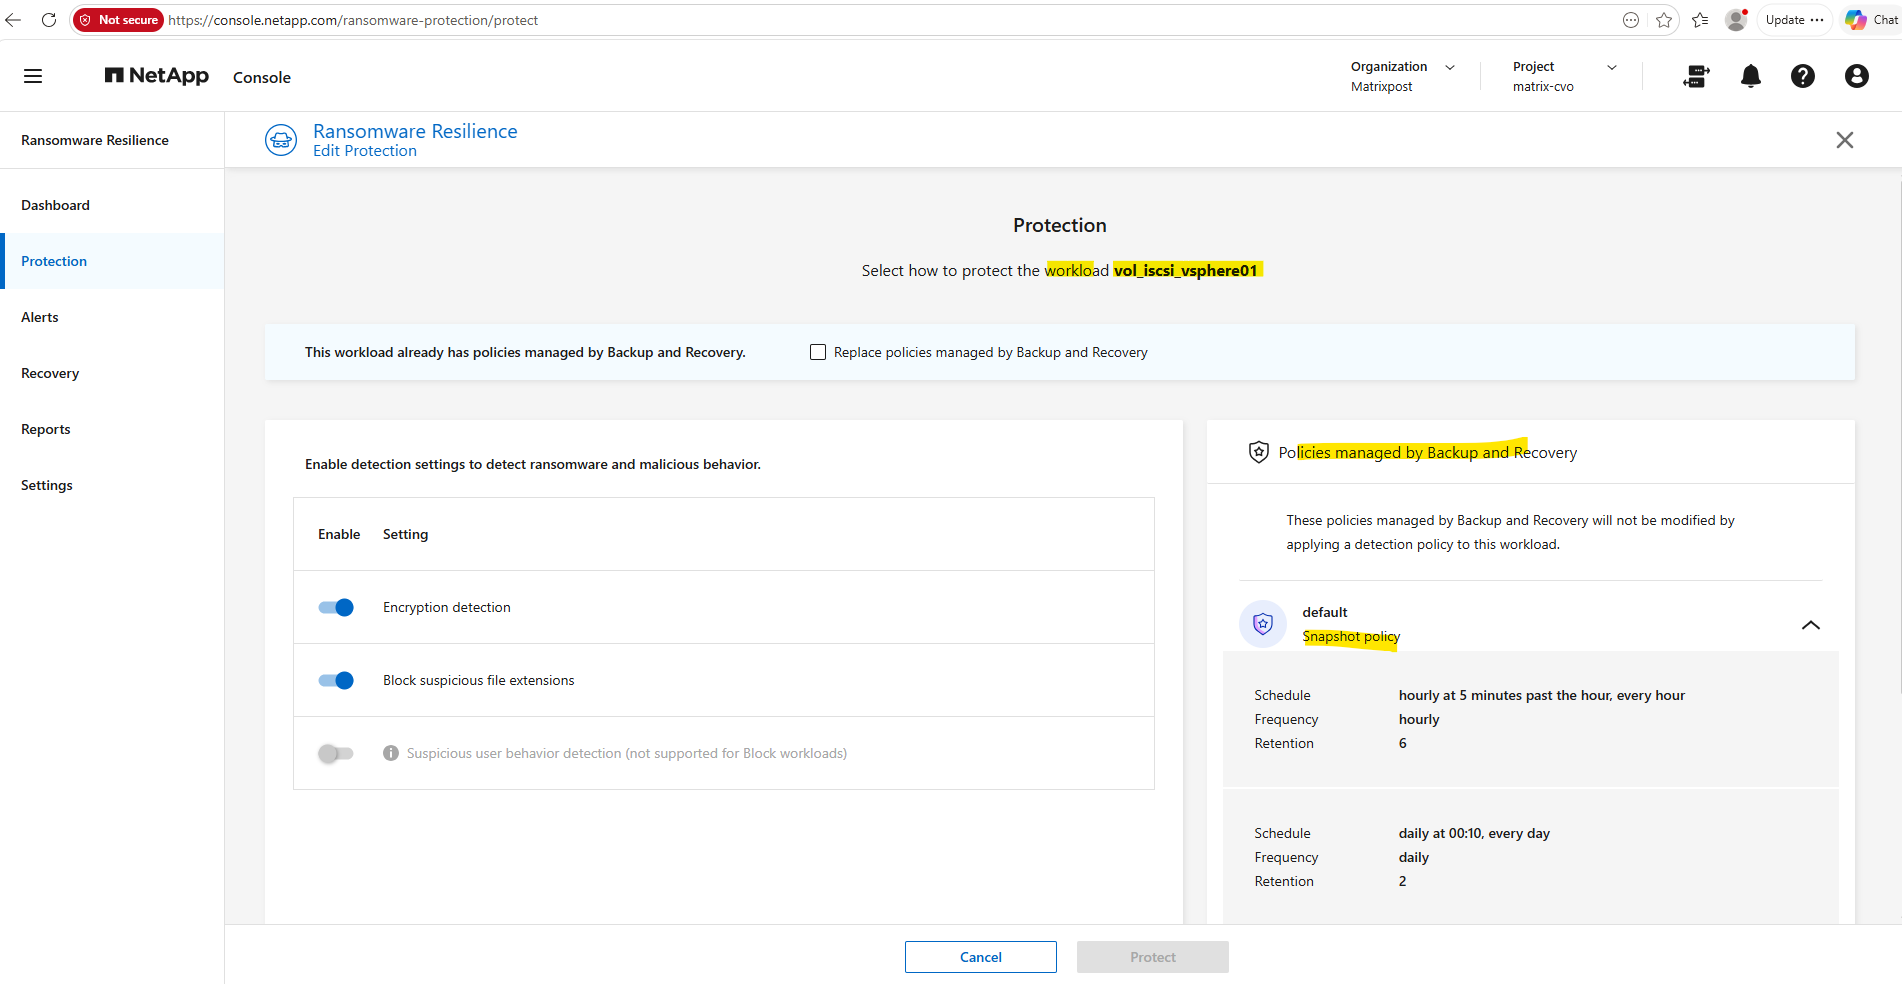
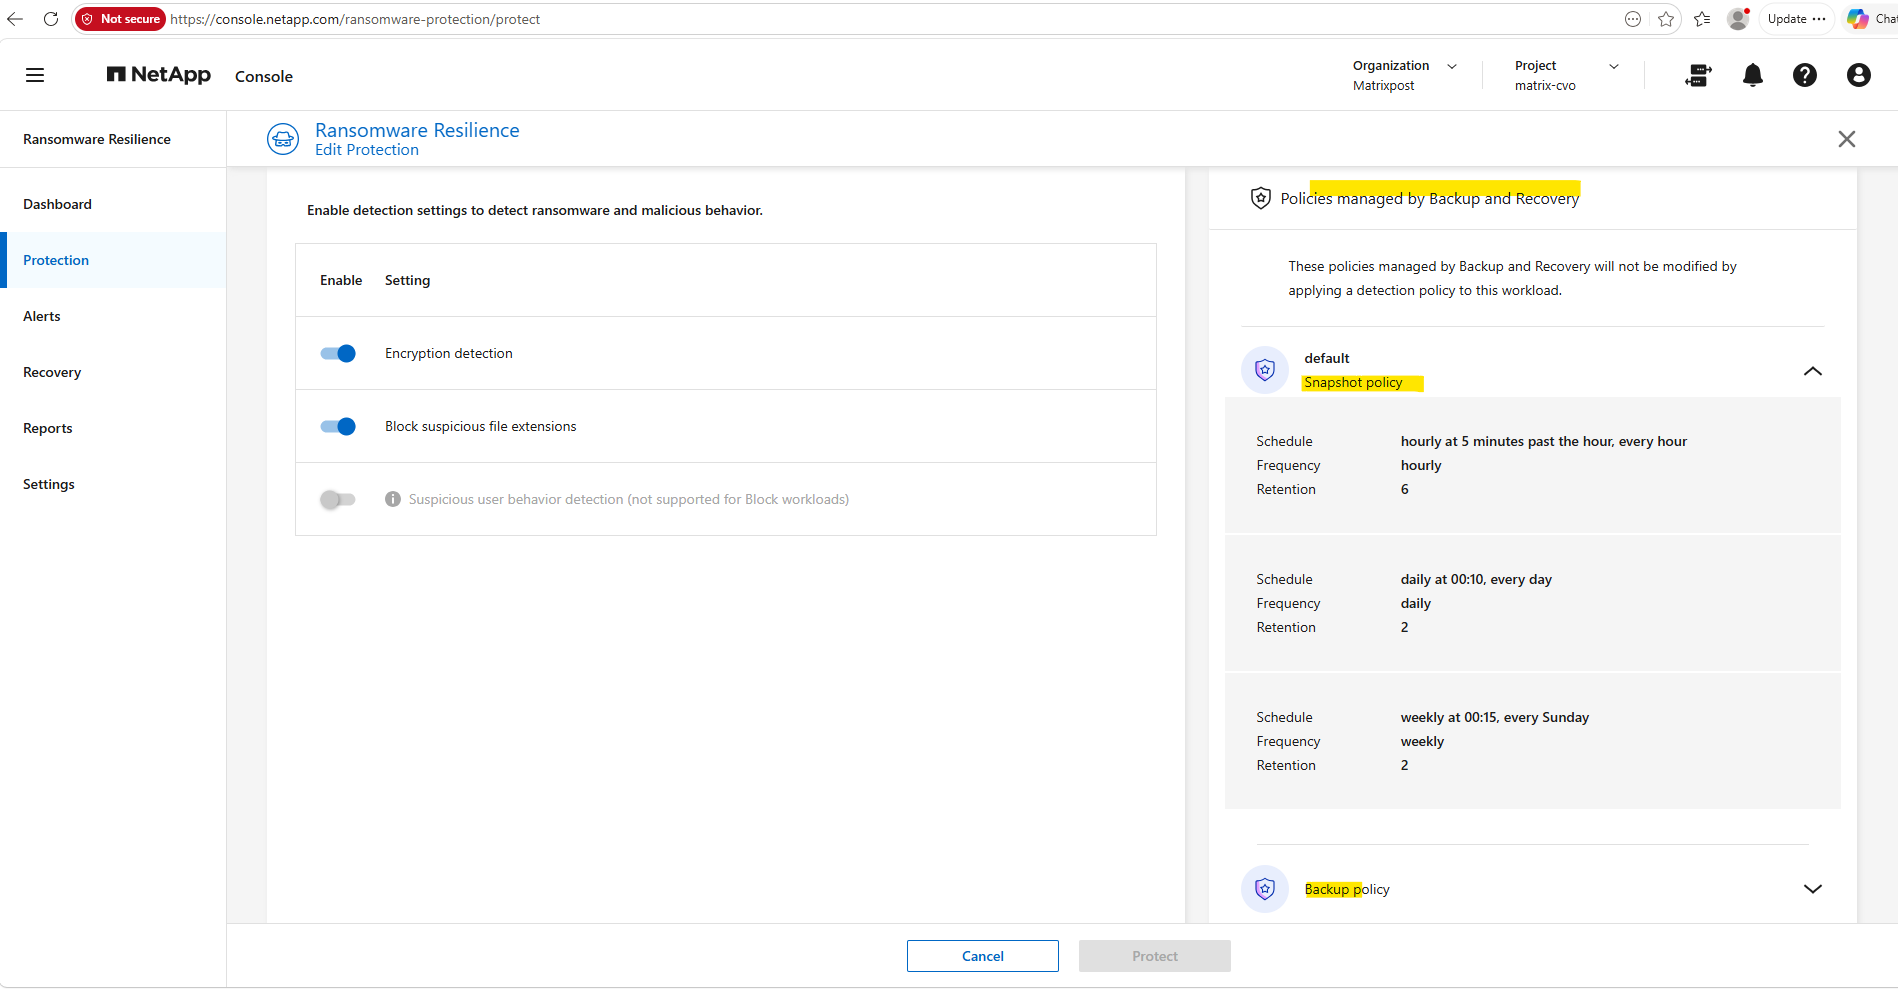
The Protection page provides a consolidated view of the workload’s ransomware protection and data protection settings.
Besides configuring ransomware detection features such as Encryption detection and Block suspicious file extensions, it also displays the existing Snapshot and Backup policies managed by NetApp Backup and Recovery. This allows administrators to verify both the workload’s ransomware protection configuration and its current backup strategy from a single location.
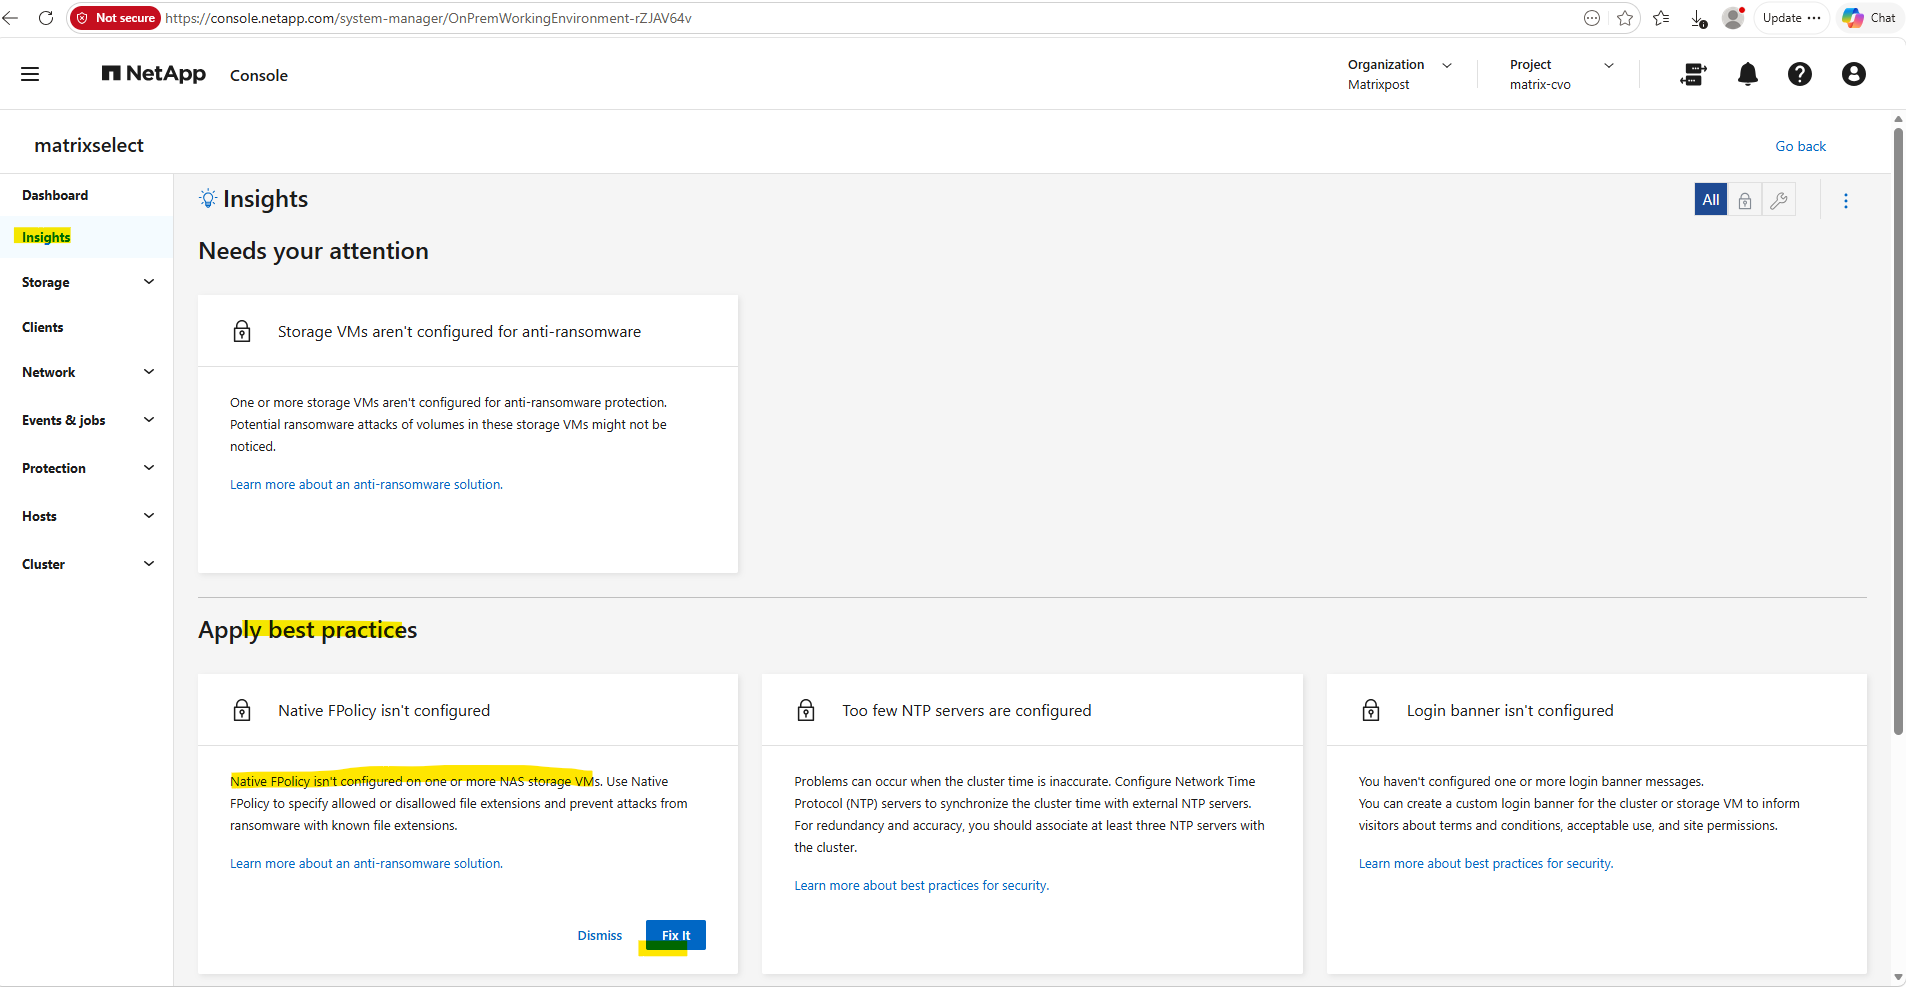
Native FPolicy can also be configured directly in ONTAP System Manager under Insights → Apply best practices. Here, ONTAP identifies Storage VMs that are not yet protected and provides a guided workflow to configure native FPolicy for ransomware protection based on allowed or disallowed file extensions.
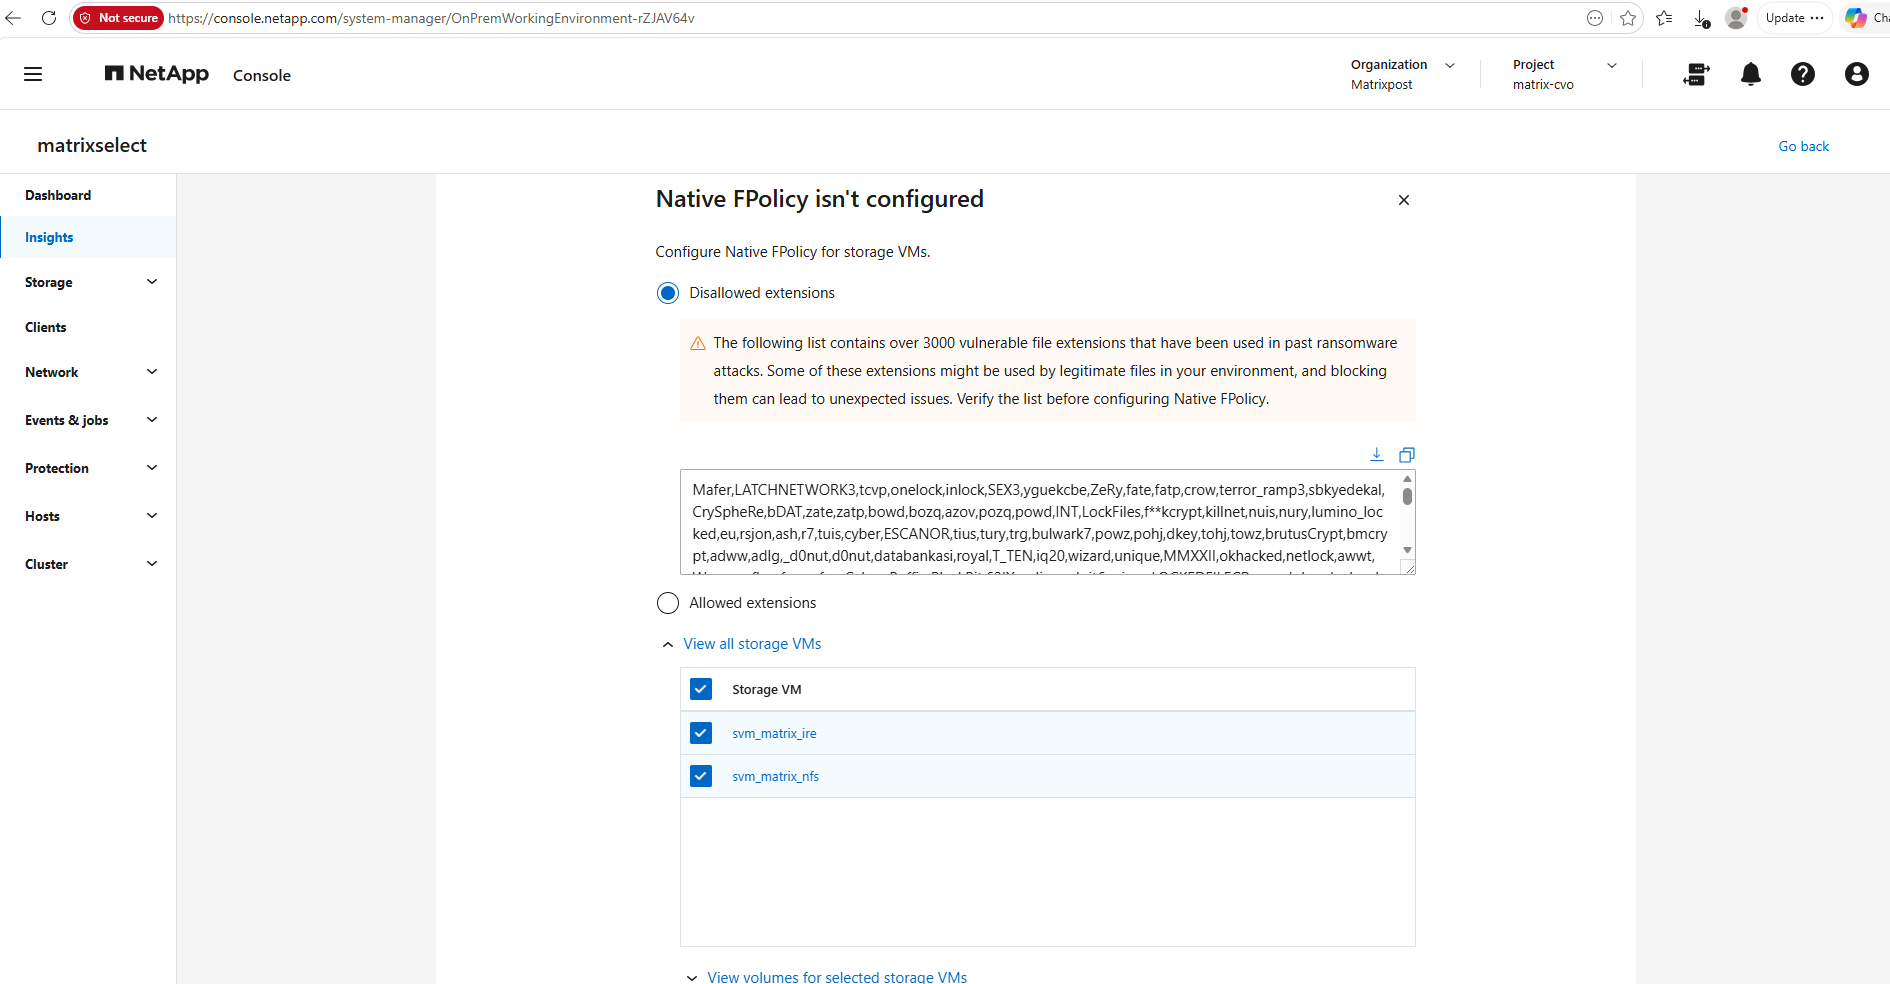
The configuration wizard allows you to define either disallowed or allowed file extensions. By default, it includes a denylist of more than 3,000 known ransomware-related file extensions, which can be reviewed and customized before applying the native FPolicy configuration to selected Storage VMs and volumes.
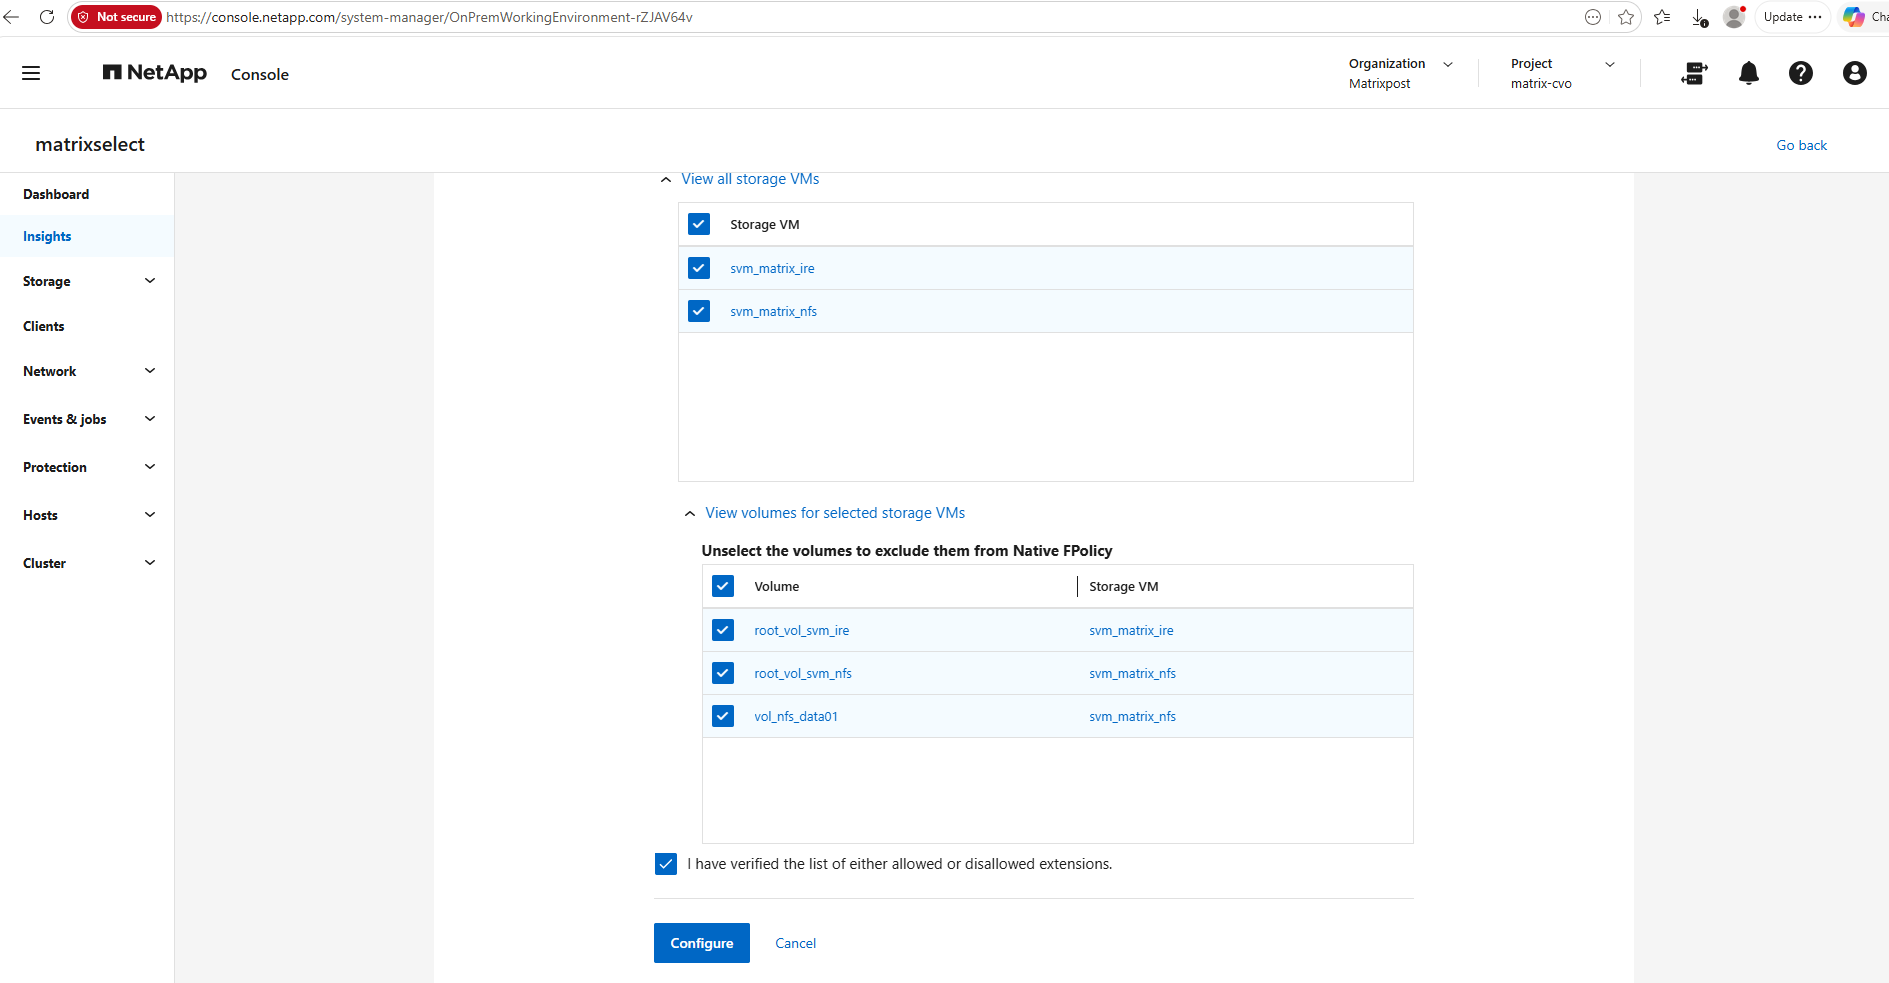
Finally, choose the Storage VMs and volumes that should be protected. All eligible volumes are selected by default, but individual volumes can be excluded if required. After confirming the reviewed list of file extensions, click Configure to deploy the native FPolicy configuration.
Recovery
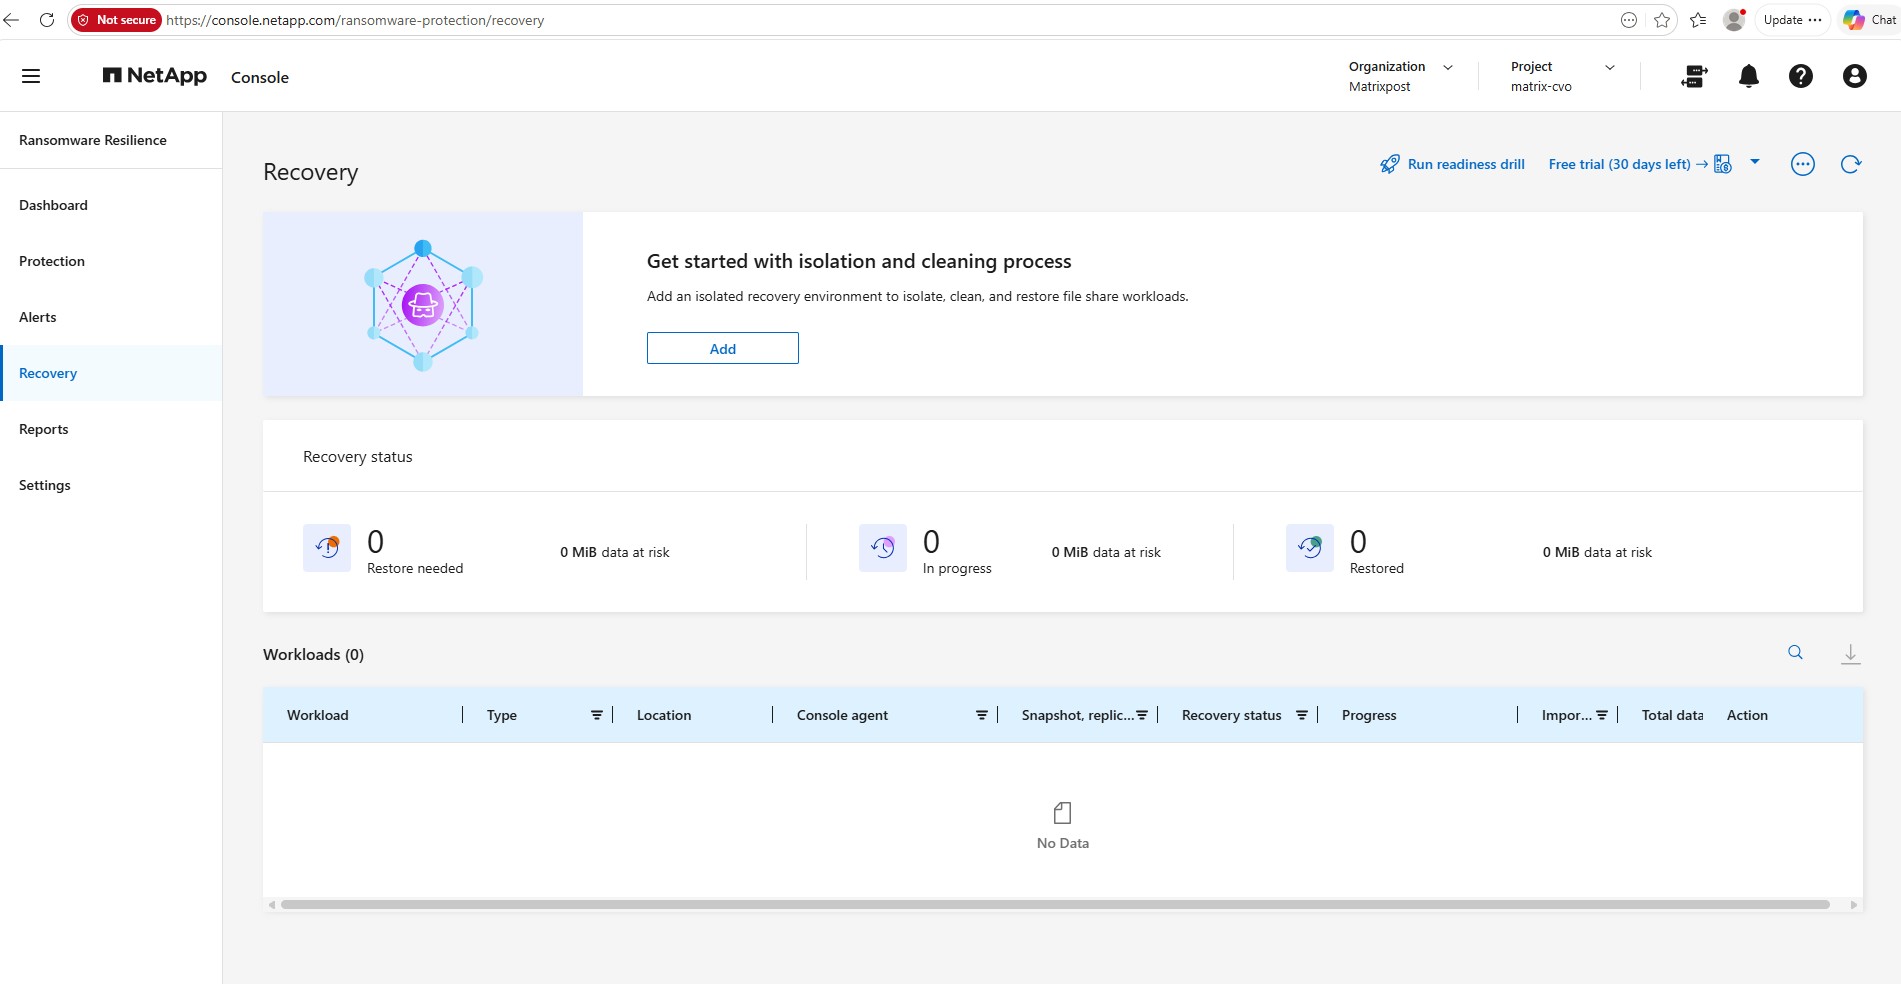
The Recovery page provides a centralized overview of ransomware recovery operations across all protected workloads. From here, administrators can monitor the recovery status of affected workloads, initiate recovery workflows, and configure an isolated recovery environment to safely isolate, clean, and restore compromised file share workloads.
In this example, no recovery operations are currently required or in progress. The Recovery status section summarizes the overall recovery state by displaying the number of workloads that require restoration, are currently being restored, or have been successfully restored, together with the corresponding amount of data at risk.
The Workloads table lists all workloads participating in recovery operations and provides details such as the workload type, location, available snapshots or replicas, recovery status, progress, and the corresponding recovery actions.
Workloads do not appear on this page automatically when ransomware-like activity is detected. Instead, after reviewing a detected incident on the Alerts page, an administrator must explicitly select Mark restore needed as shown below. The affected workload is then added to the Recovery page, where its recovery status can be monitored and the restoration process can be initiated.
Before recovery operations can be performed, NetApp Console supports configuring an isolated recovery environment. This dedicated environment can be used to isolate compromised workloads, perform malware analysis and cleanup, and validate recovered data before restoring it to production.
The page also provides the option to Run a readiness drill, allowing administrators to verify that the recovery environment and associated recovery processes are operational before an actual ransomware incident occurs.
After reviewing the incident details on the Alerts page, administrators can select Mark restore needed to indicate that the affected workload requires recovery. This action adds the workload to the Recovery page, where the restoration process can be initiated and its progress monitored.
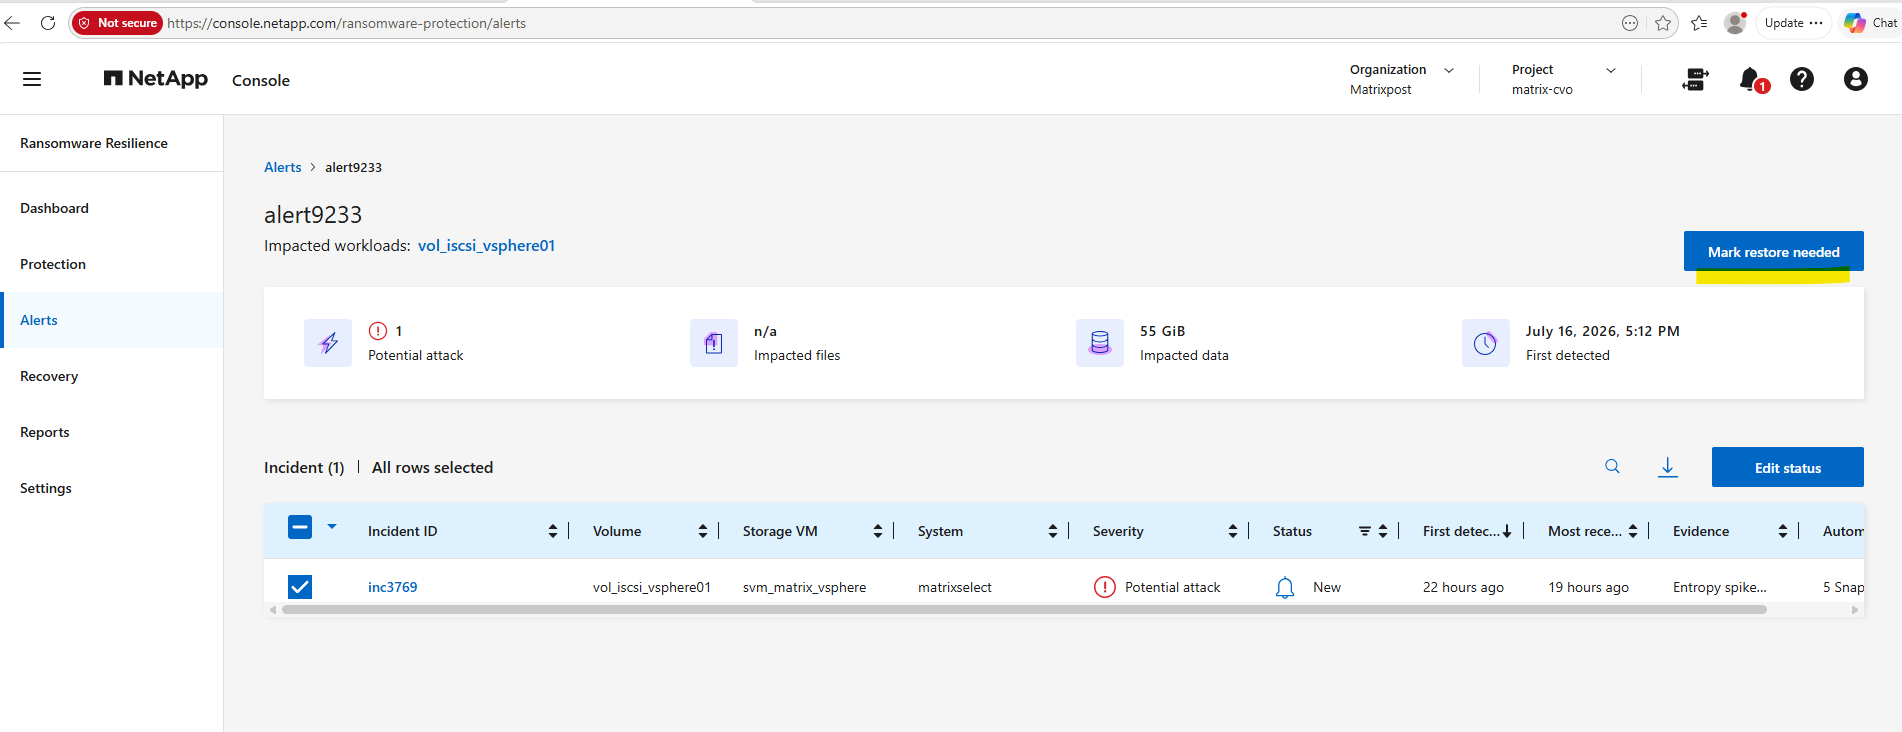
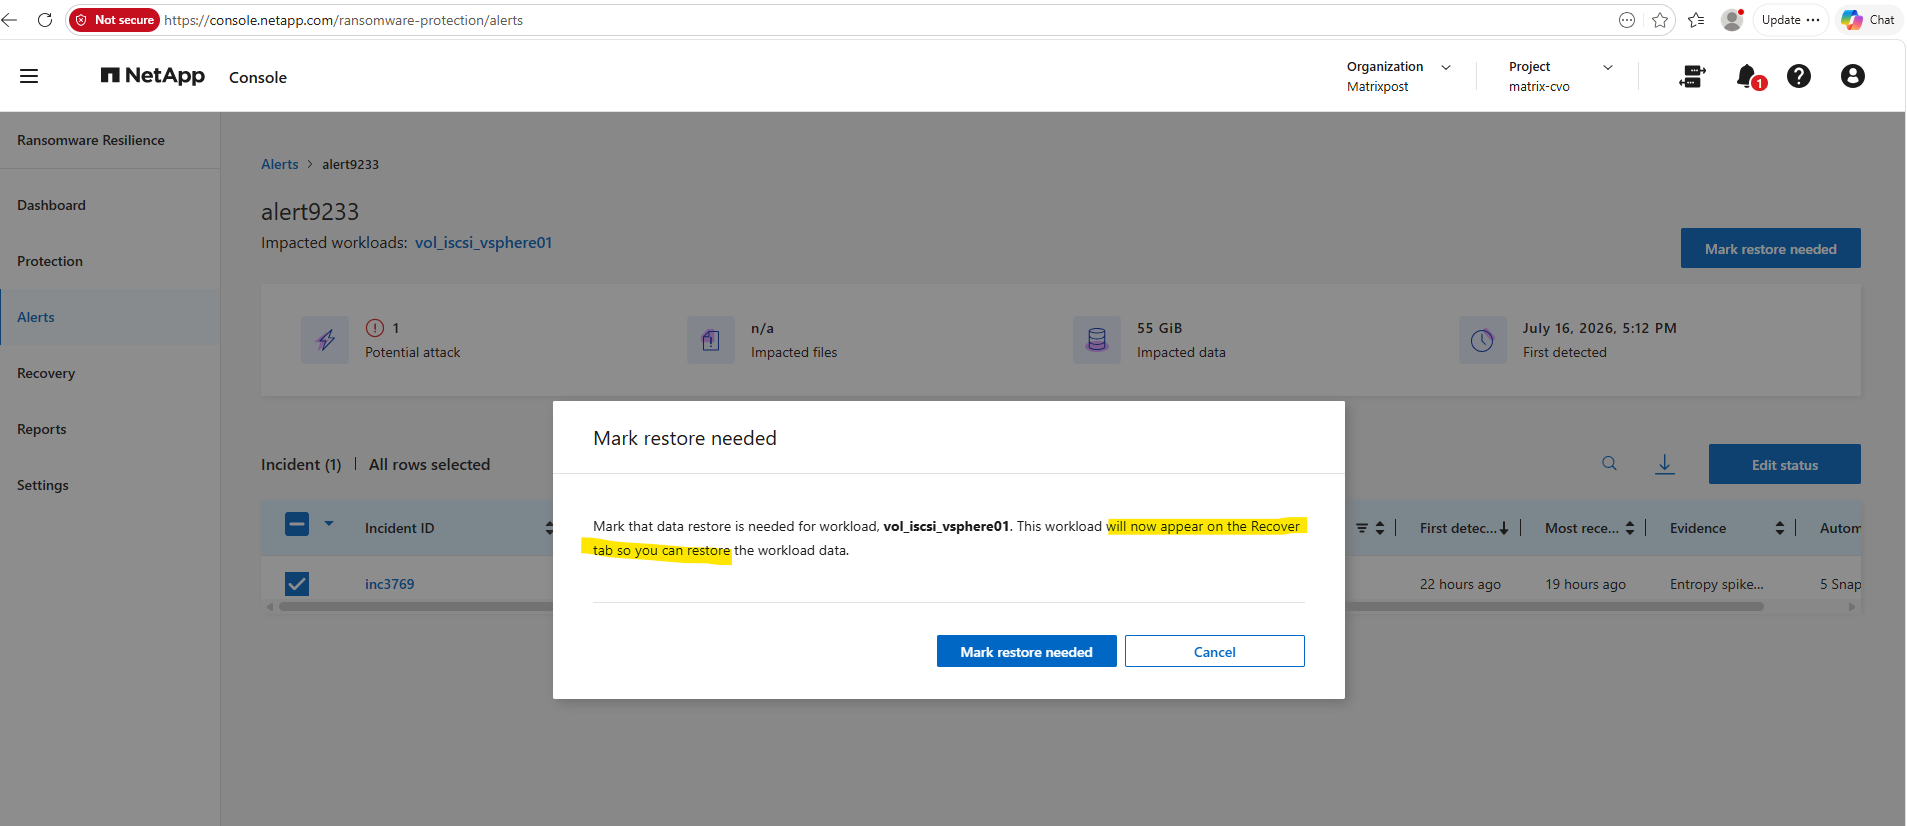
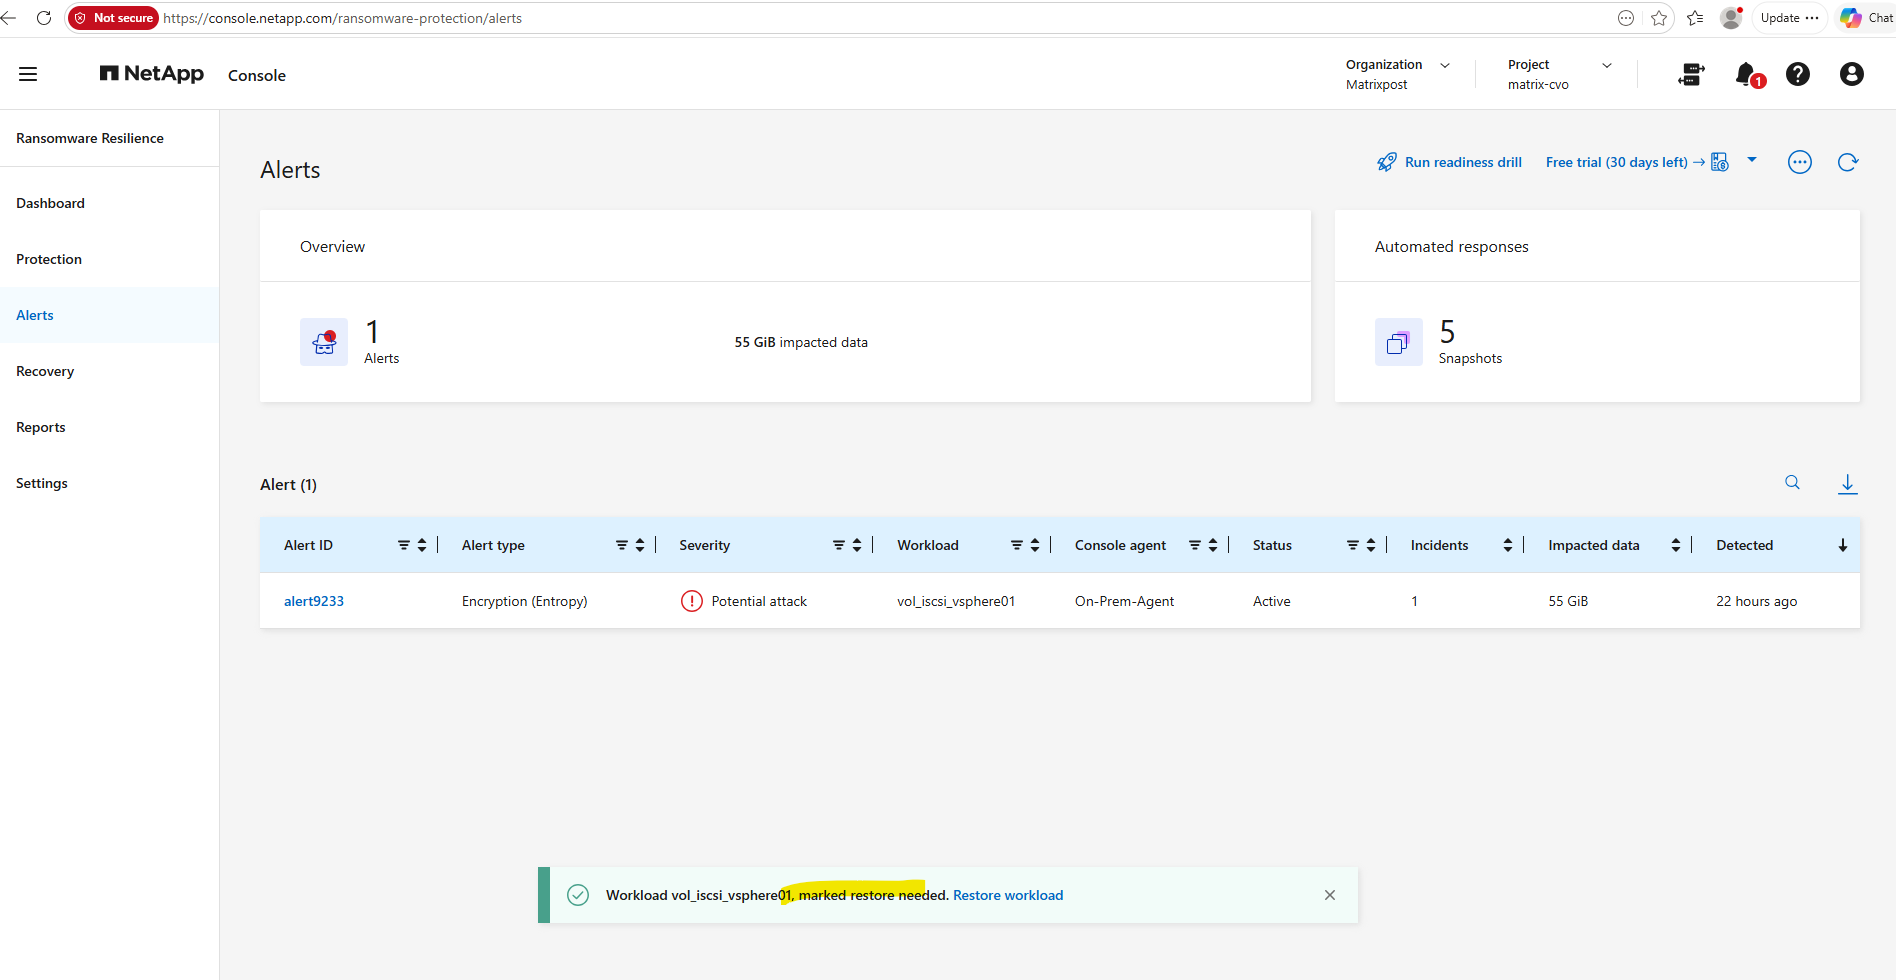
After selecting Mark restore needed, a confirmation message is displayed. The Restore workload link provides a convenient shortcut to the Recovery page, where the workload is listed and the recovery process can be initiated.
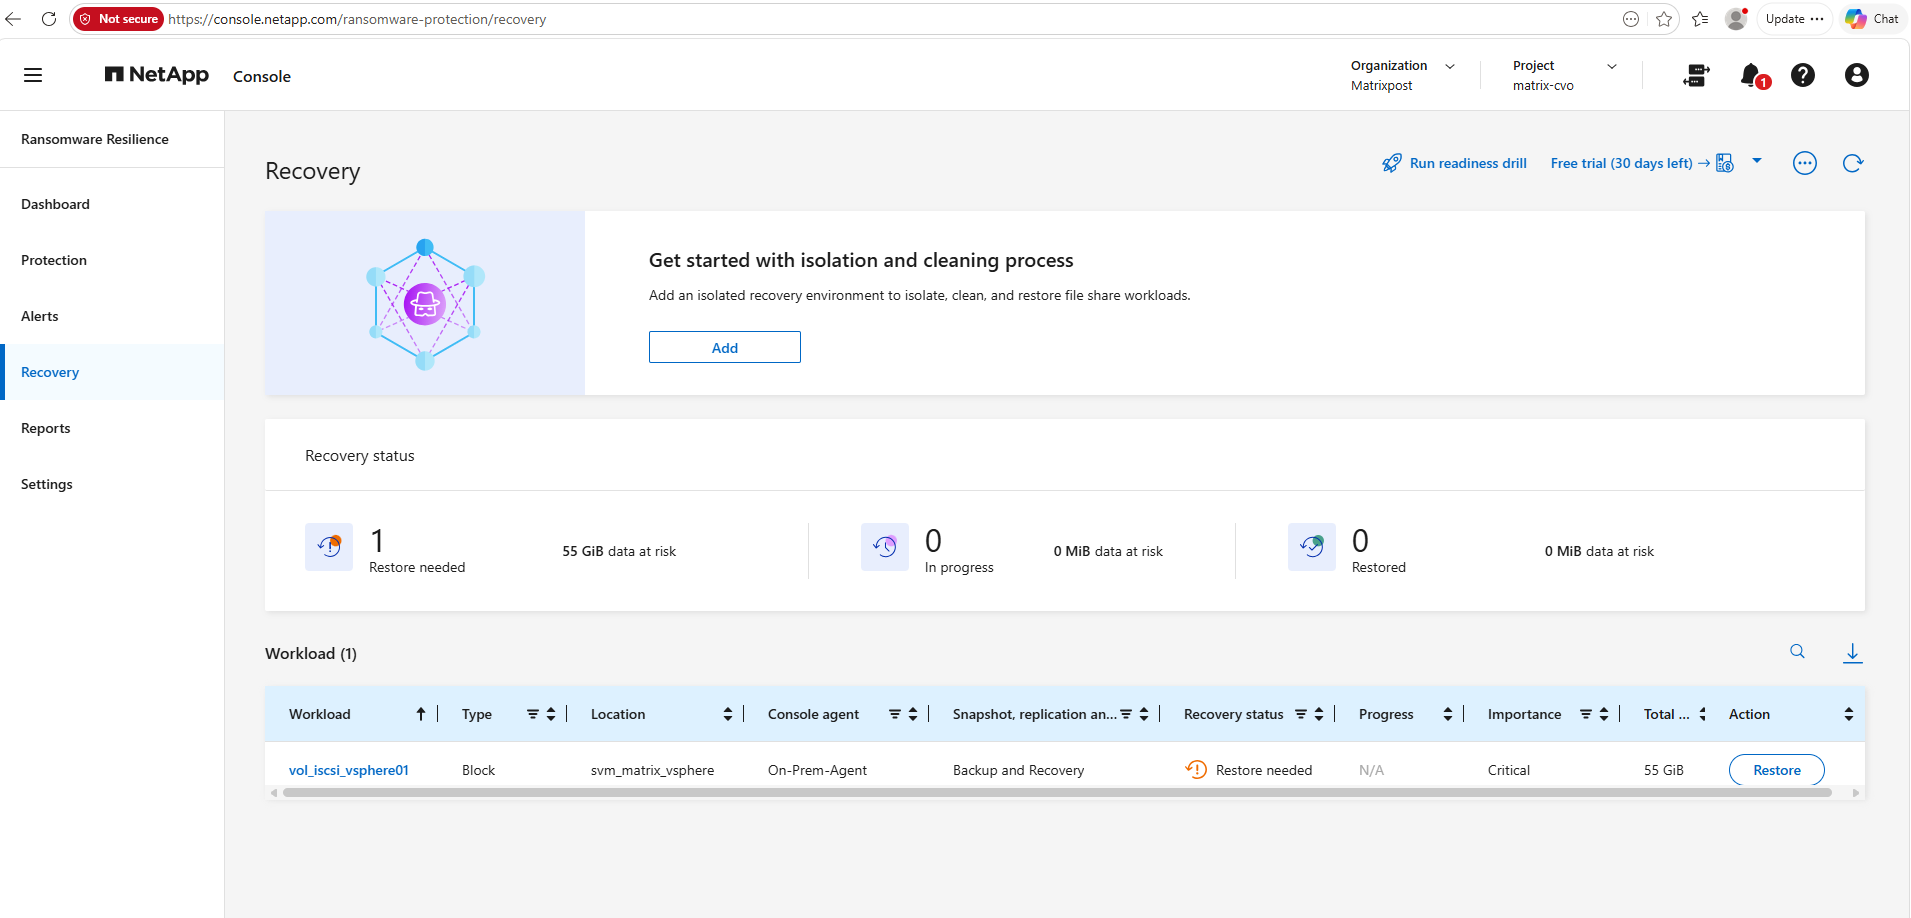
The Recovery page provides a centralized view of all workloads awaiting recovery as well as ongoing and completed recovery operations.
Because the workload was previously marked as Restore needed, it is now listed on the Recovery page with the corresponding recovery status.
Clicking Restore starts the guided recovery process using the configured recovery source, Backup and Recovery.
The recovery wizard guides administrators through the restore process in three steps: selecting the restore type, configuring the restore options, and reviewing the configuration before starting the recovery.
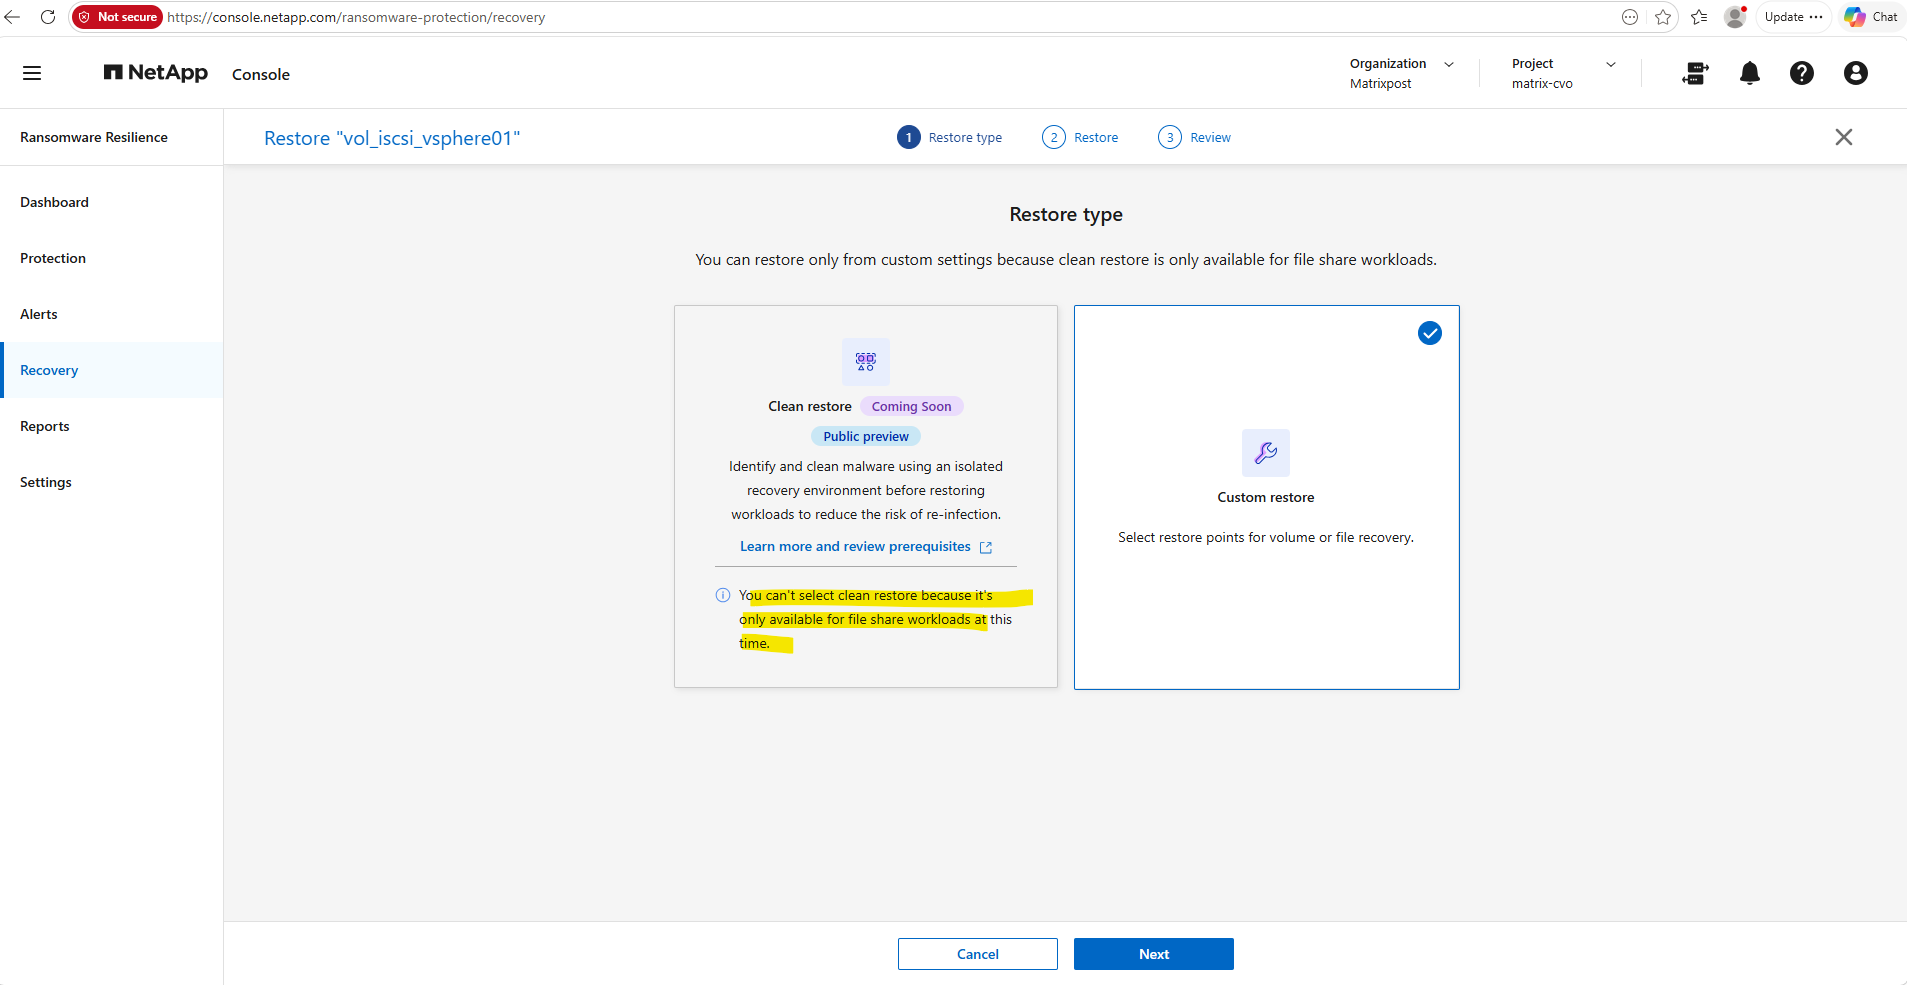
Because vol_iscsi_vsphere01 is a block workload, only Custom restore is supported. The Clean restore option is currently available only for file share workloads and therefore cannot be selected in this example.
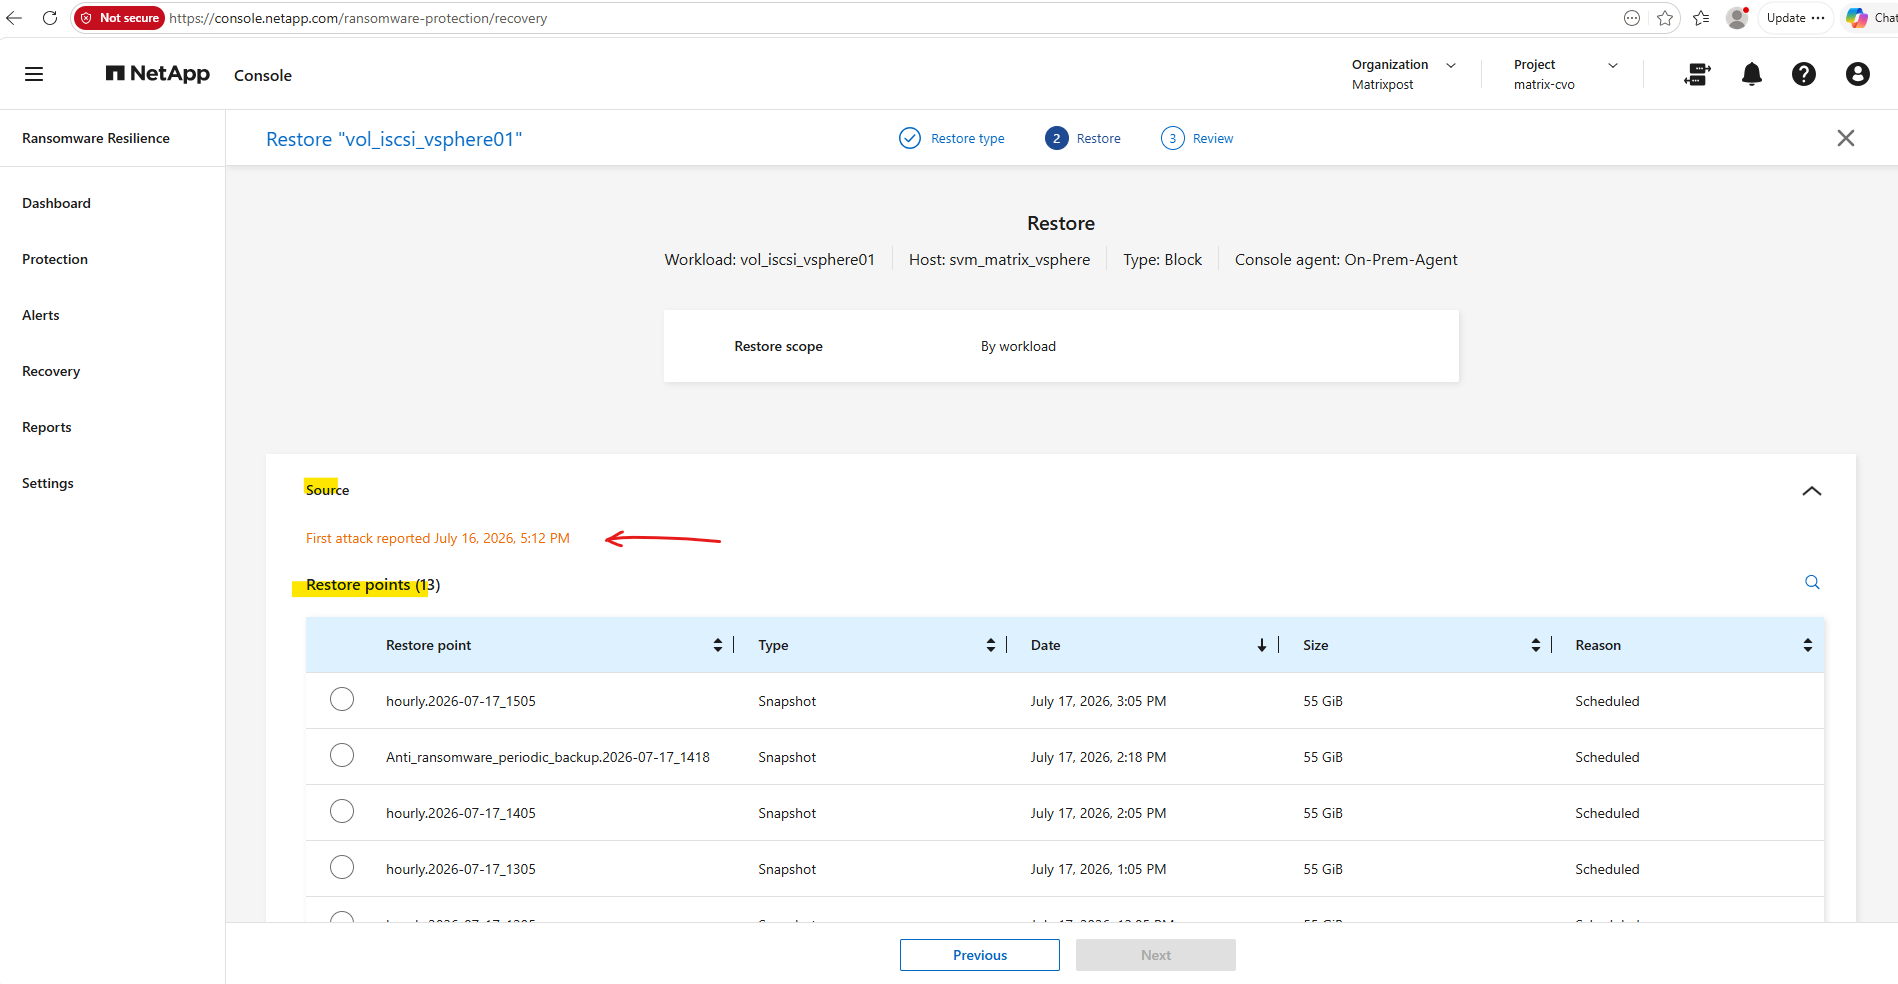
The Restore step lists all available restore points for the affected workload. In addition to regular scheduled snapshots, ARP-created Anti_ransomware_periodic_backup snapshots are also available for selection.
The First attack reported timestamp helps administrators choose a restore point that predates the detected ransomware activity, minimizing the risk of restoring already compromised data.
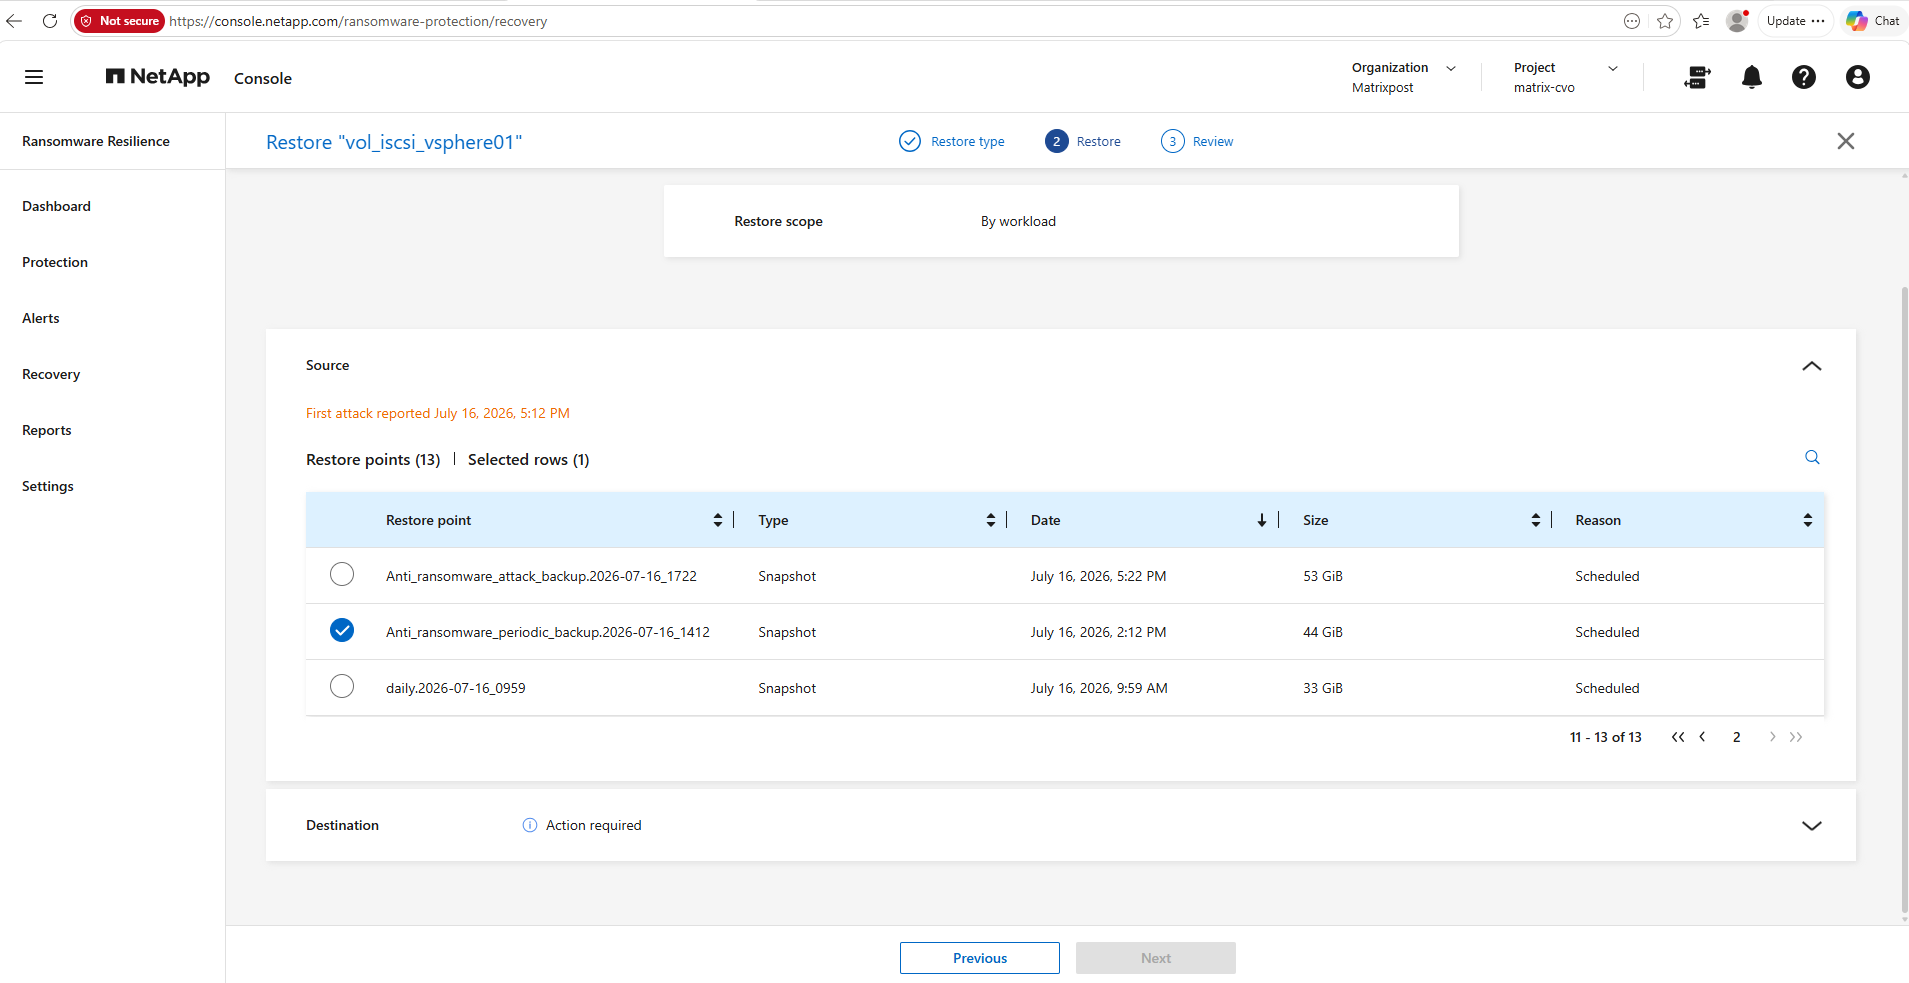
In this example, the Anti_ransomware_periodic_backup.2026-07-16_1412 snapshot was selected because it was created approximately three hours before the ransomware activity was first reported at 5:12 PM.
Choosing a restore point that predates the attack helps ensure that the recovered workload does not already contain encrypted or otherwise compromised data.
The list of available restore points also reflects the growth of the volume over time, with snapshot sizes increasing from 33 GiB to 53 GiB. This corresponds to the additional test data that was created and subsequently overwritten during the ransomware attack simulation using the PowerShell script described in Part 2 of this series.
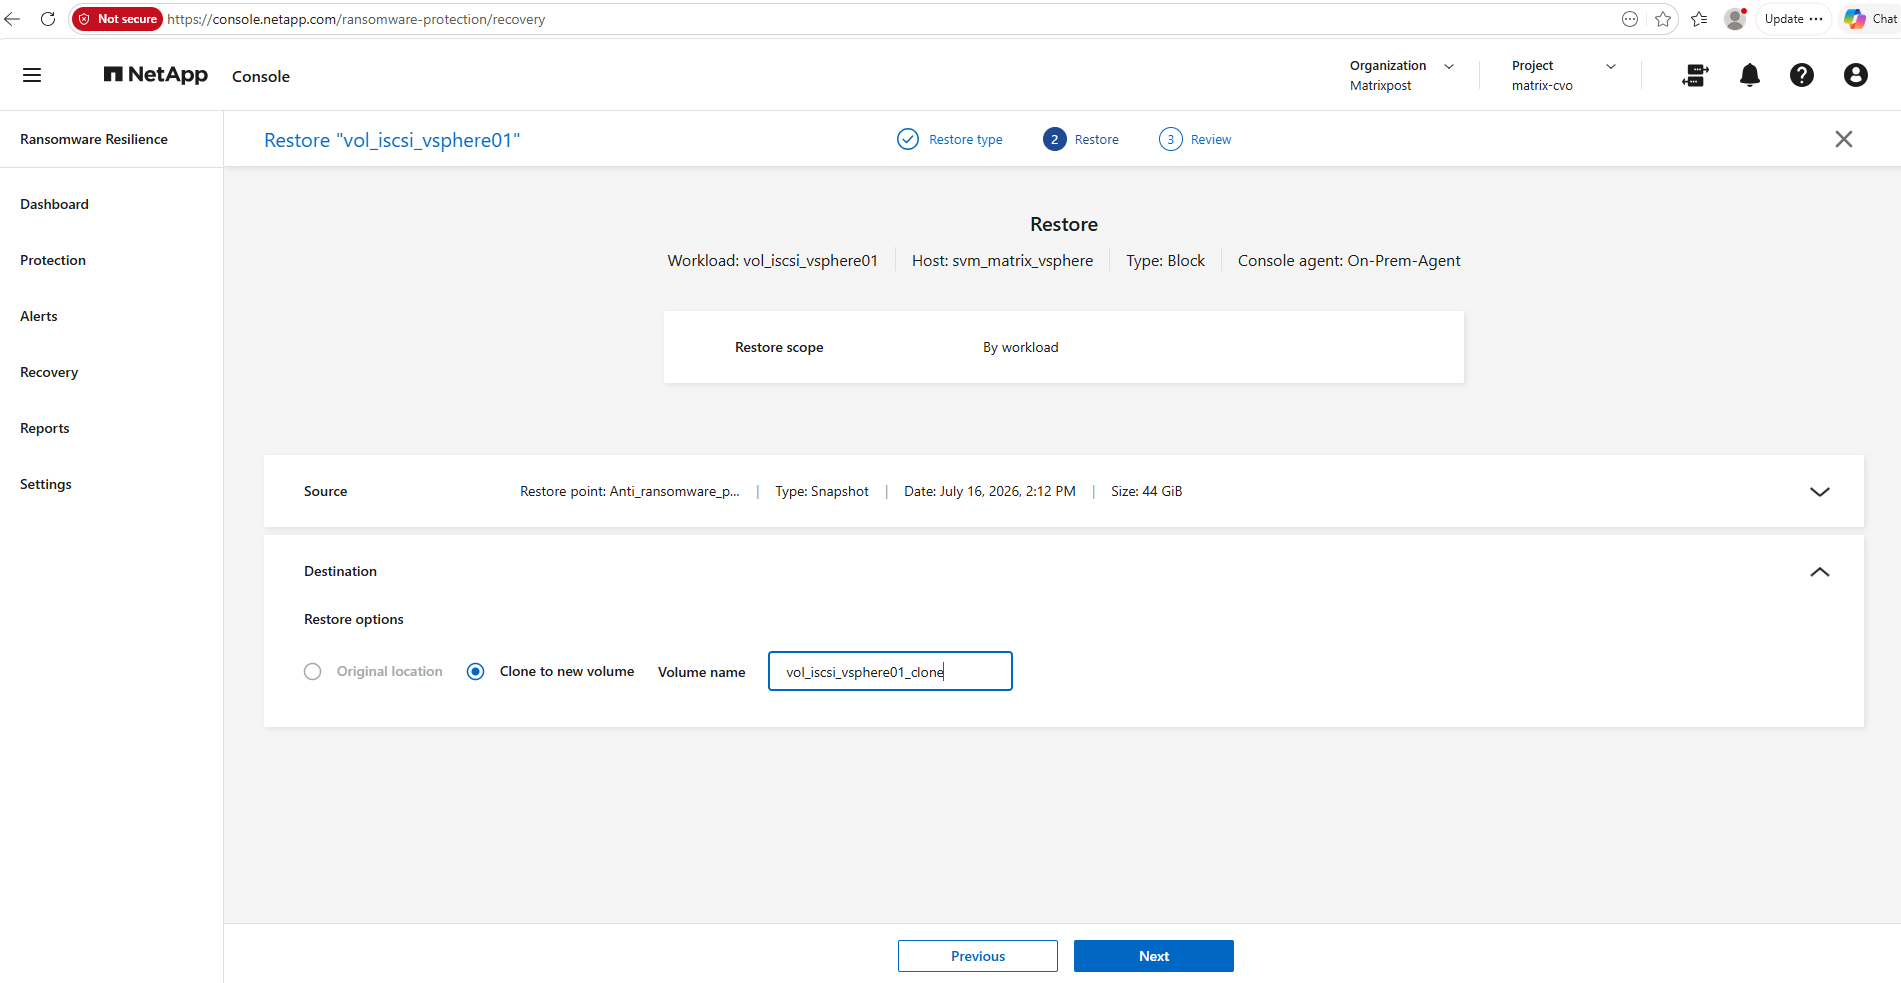
In this example, the Original location option is unavailable and therefore appears greyed out. Consequently, the selected restore point must be restored by choosing Clone to new volume.
After selecting this option, a name for the cloned volume must be specified. NetApp Console will then restore the selected snapshot as a new volume instead of overwriting the original workload.
This provides a non-destructive recovery option, allowing administrators to validate the recovered data before deciding whether to replace the original volume.
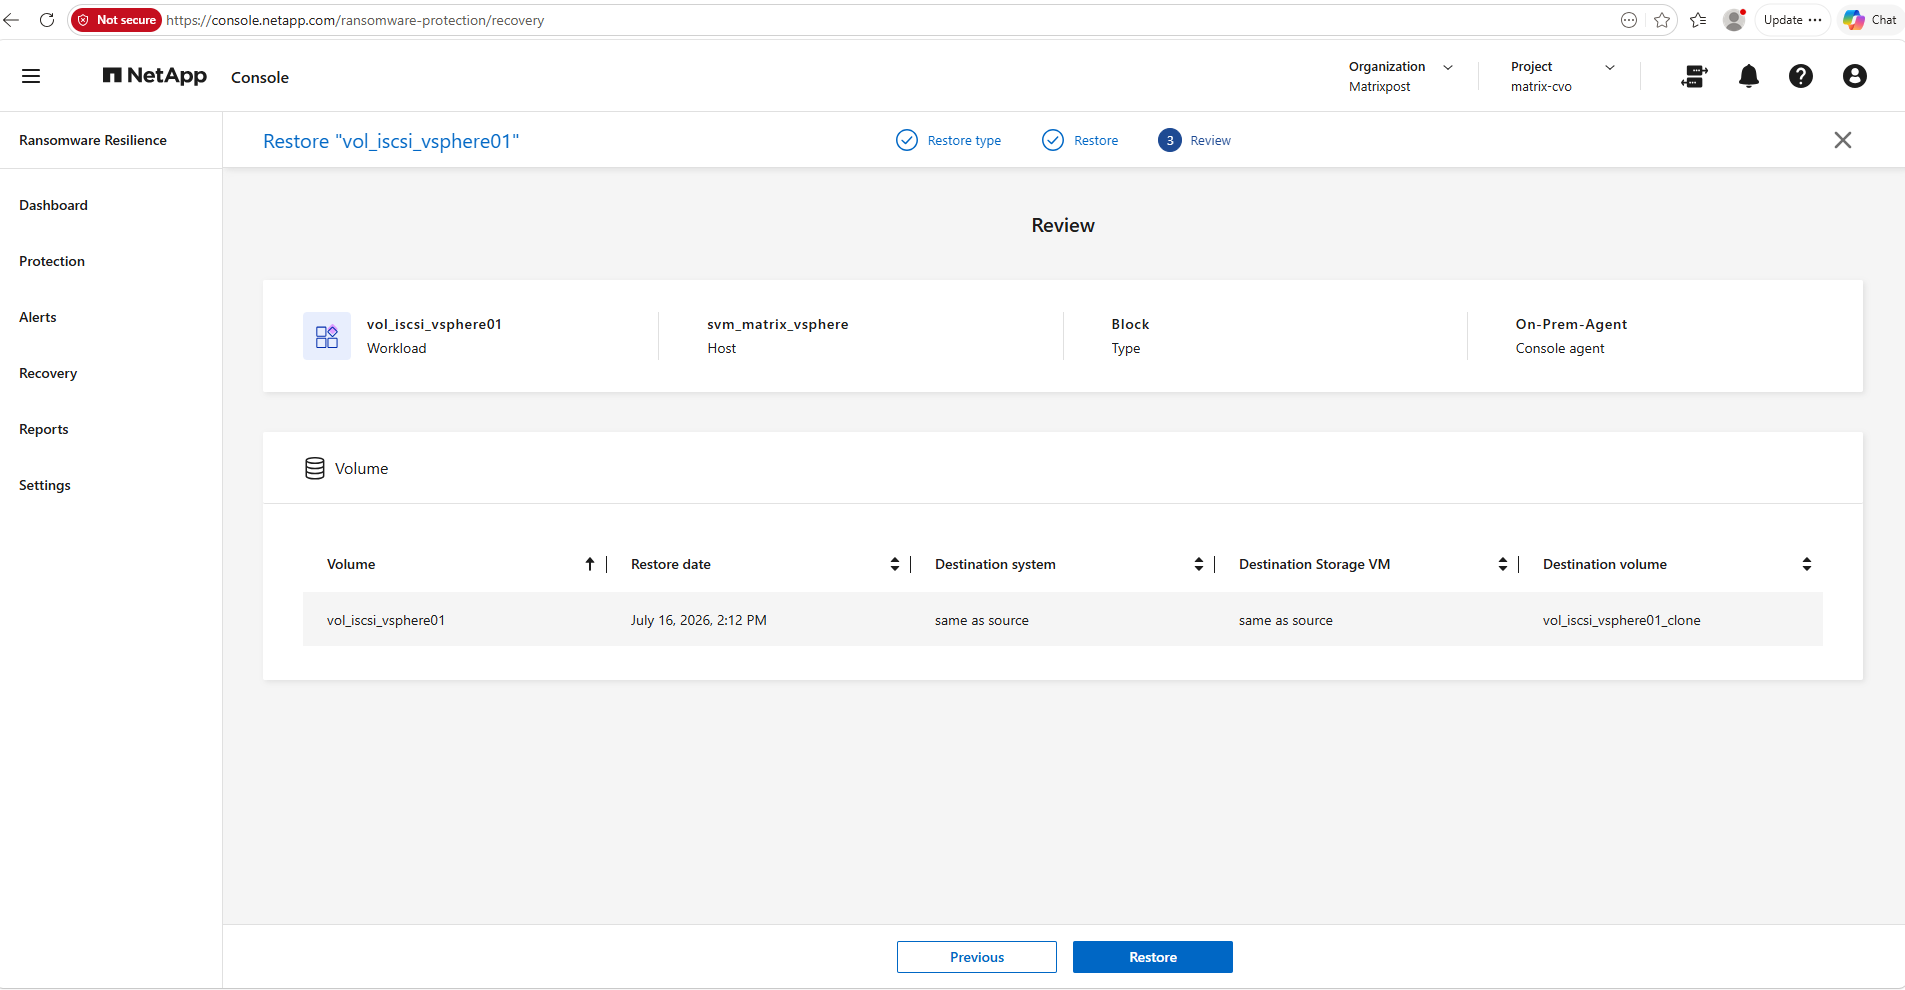
The final Review step summarizes the restore configuration before the recovery operation is started.
In this example, the workload vol_iscsi_vsphere01 will be restored from the selected snapshot created on July 16, 2026, at 2:12 PM. The recovered data will be restored to the same ONTAP cluster and Storage VM as the original workload, while creating a new volume named vol_iscsi_vsphere01_clone.
After verifying the restore settings, clicking Restore starts the recovery process.
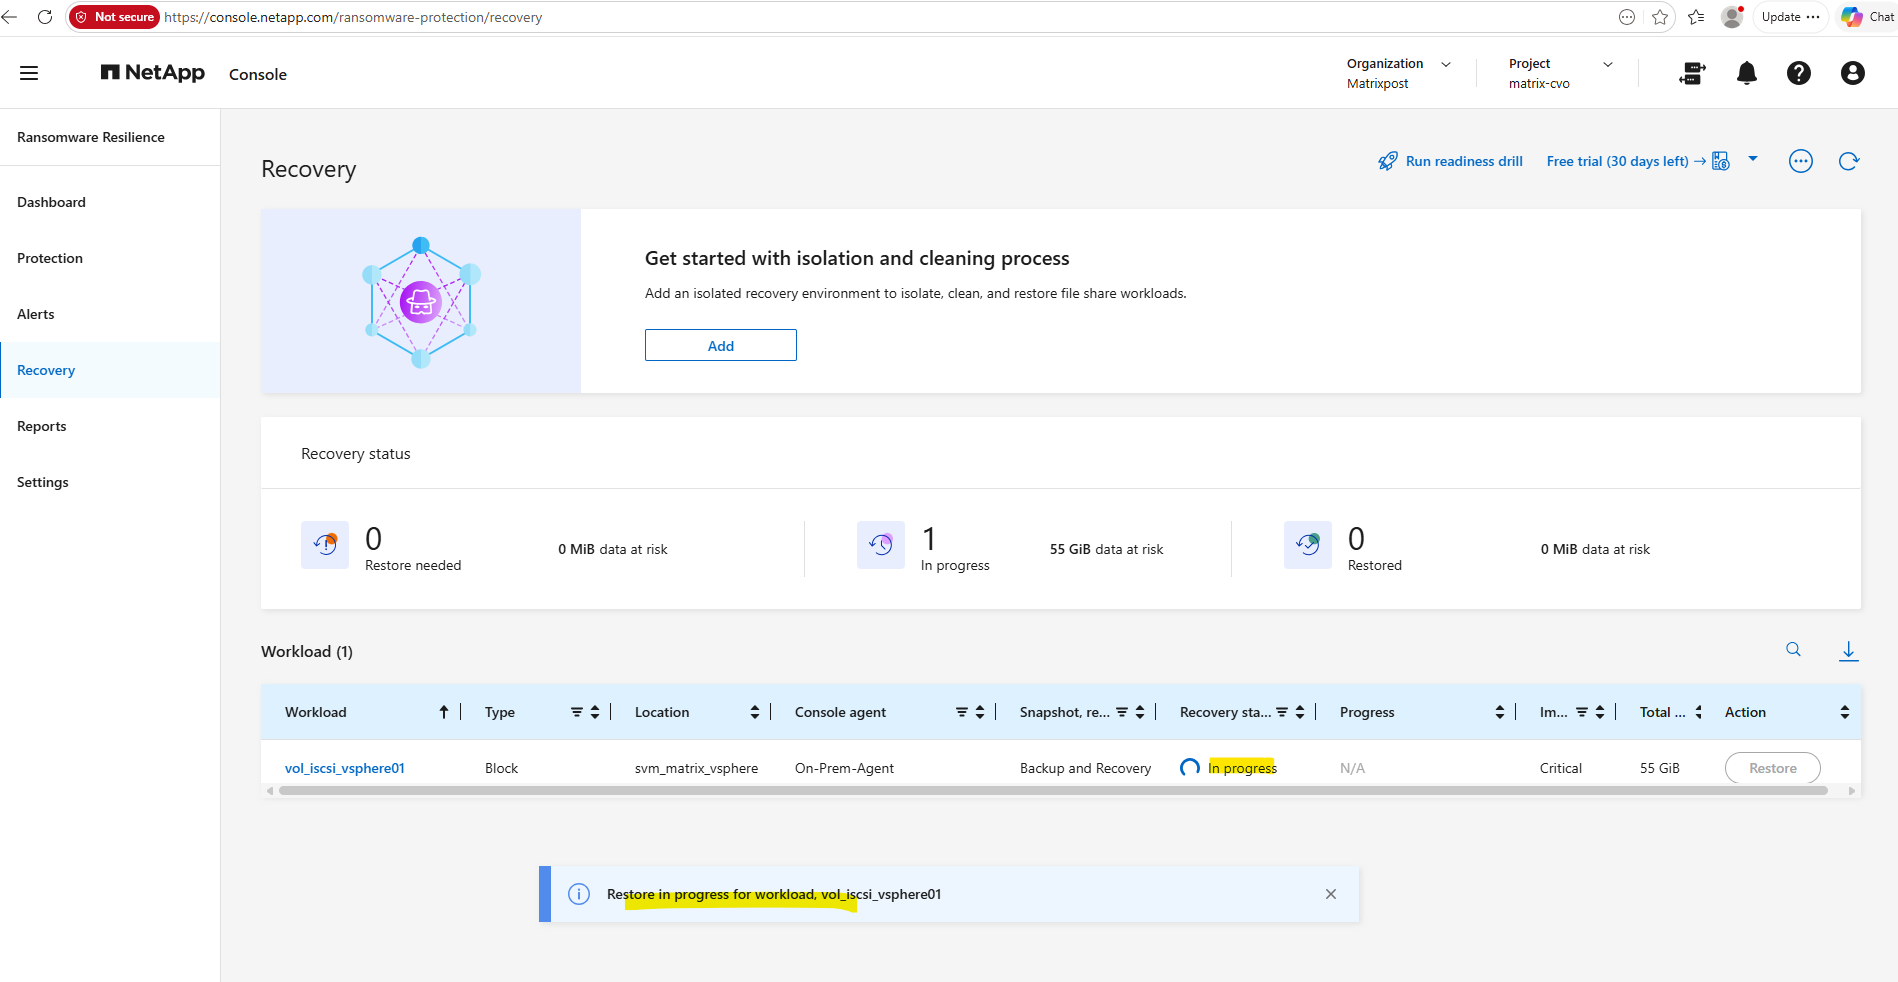
Once the restore process has finished, NetApp Console returns to the Recovery page, where the workload is displayed with the status Restored and a progress of Custom restore: 100%.
The recovery summary at the top of the page reflects the completed operation, indicating that there are no remaining workloads requiring restoration or currently in progress. The restored workload remains listed in the recovery history, allowing administrators to review the completed recovery operation and its associated restore details.
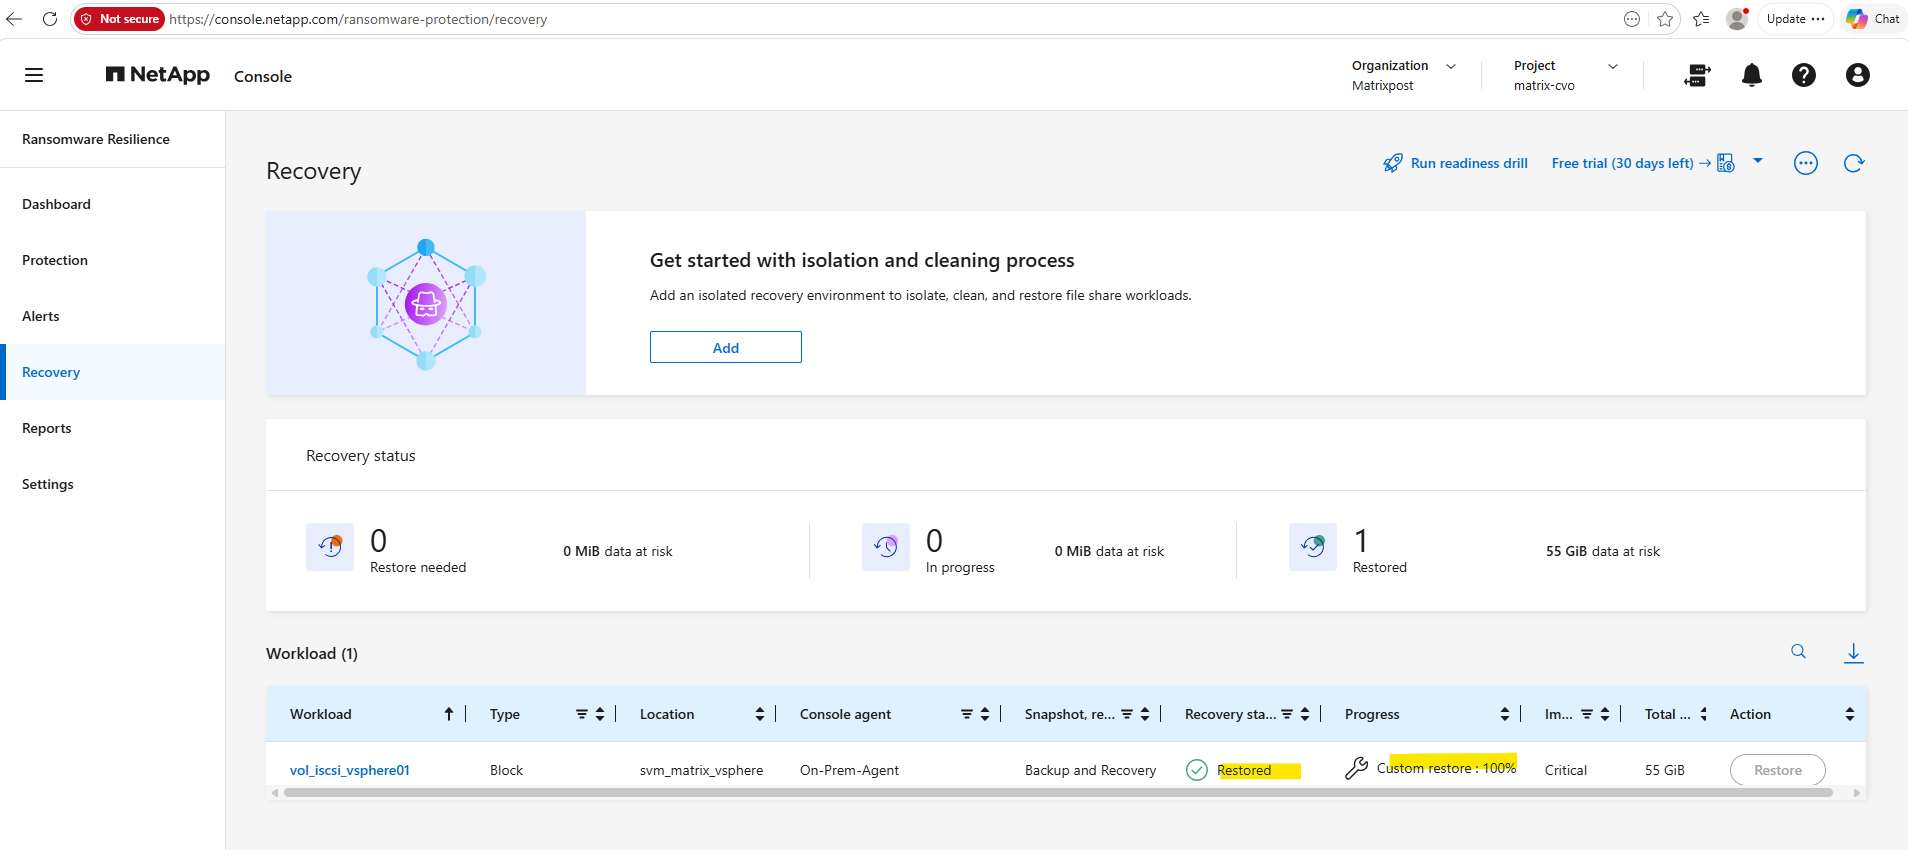
Returning to ONTAP System Manager confirms that the restore operation completed successfully. As expected, a new volume named vol_iscsi_vsphere01_clone has been created alongside the original vol_iscsi_vsphere01 volume.
The cloned volume is online and contains approximately 43.7 GiB of data, matching the selected restore point from 2:12 PM, while the original volume still contains approximately 101 GiB of data after the ransomware simulation.
This confirms that NetApp Console performed a non-destructive restore, leaving the original workload unchanged while recovering the selected snapshot into a separate volume.
Finally, ONTAP System Manager confirms that the restore operation successfully recreated not only the cloned volume but also the corresponding VMware LUN.
A new volume named vol_iscsi_vsphere01_clone contains a cloned lun_iscsi_vsphere01, preserving the original 200 GiB LUN size and configuration. This confirms that NetApp Console restores the complete SAN workload, including both the volume and its contained LUN, rather than restoring only the underlying FlexVol volume.
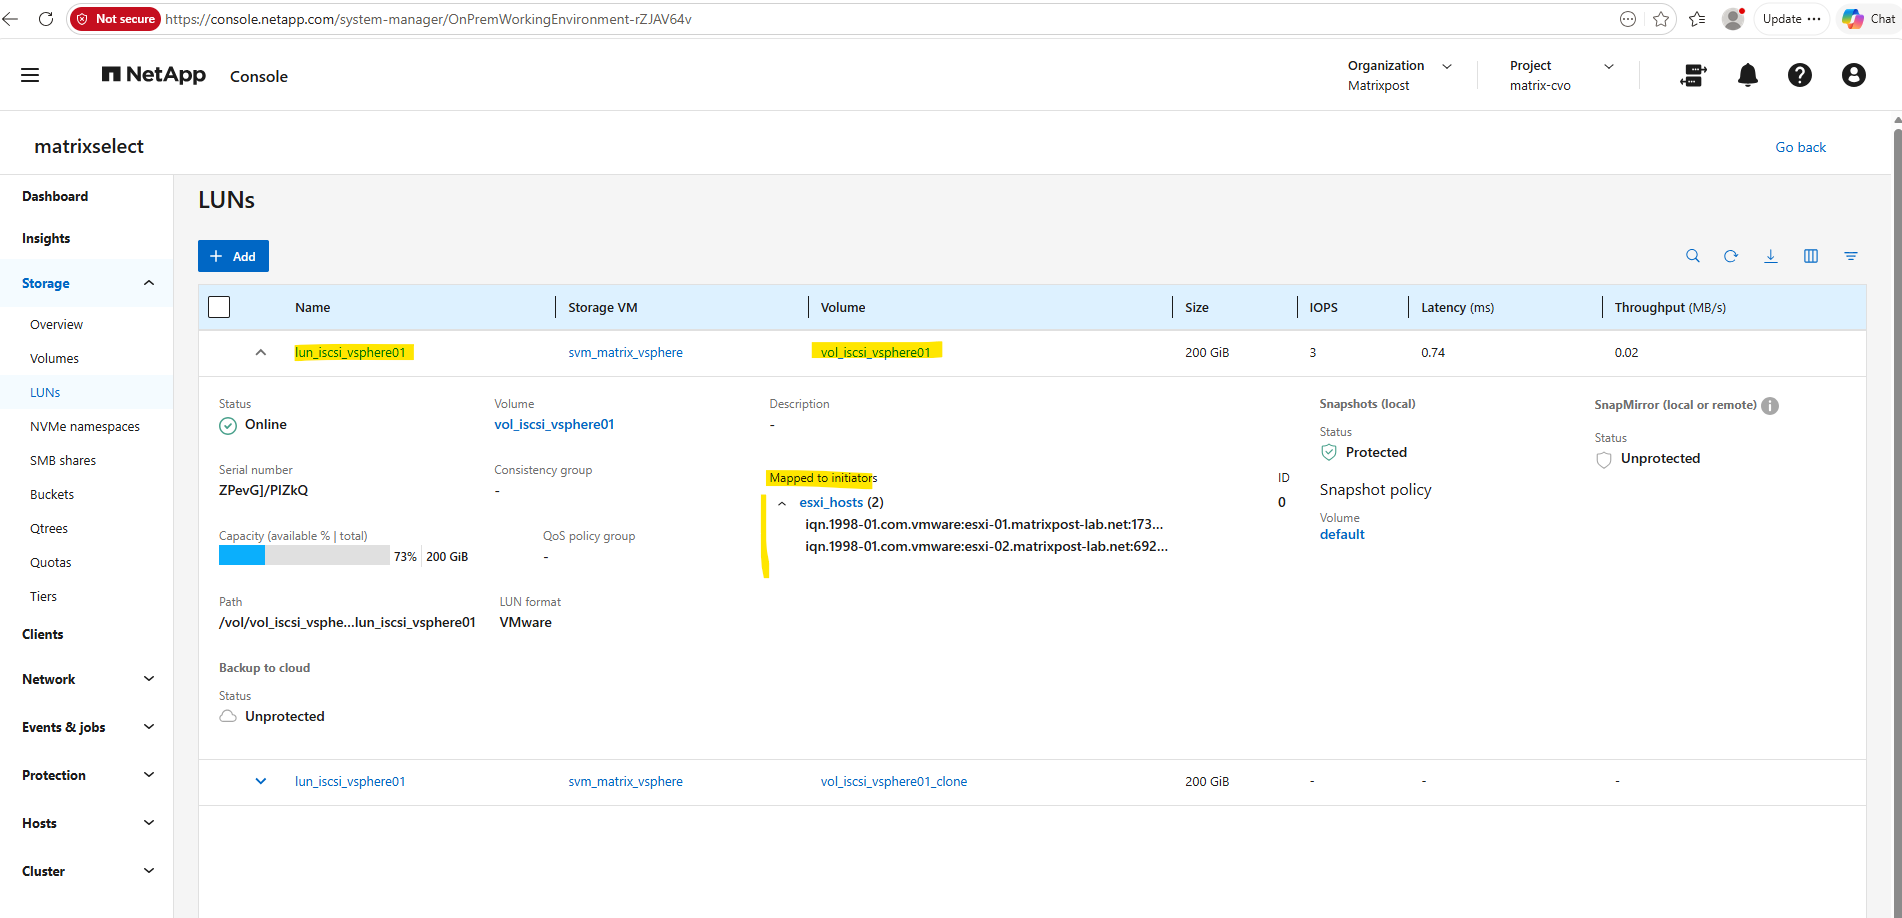
At this stage, however, the cloned LUN has not yet been mapped to the VMware vSphere environment or its ESXi hosts and therefore cannot be accessed until the required SAN mapping has been configured.
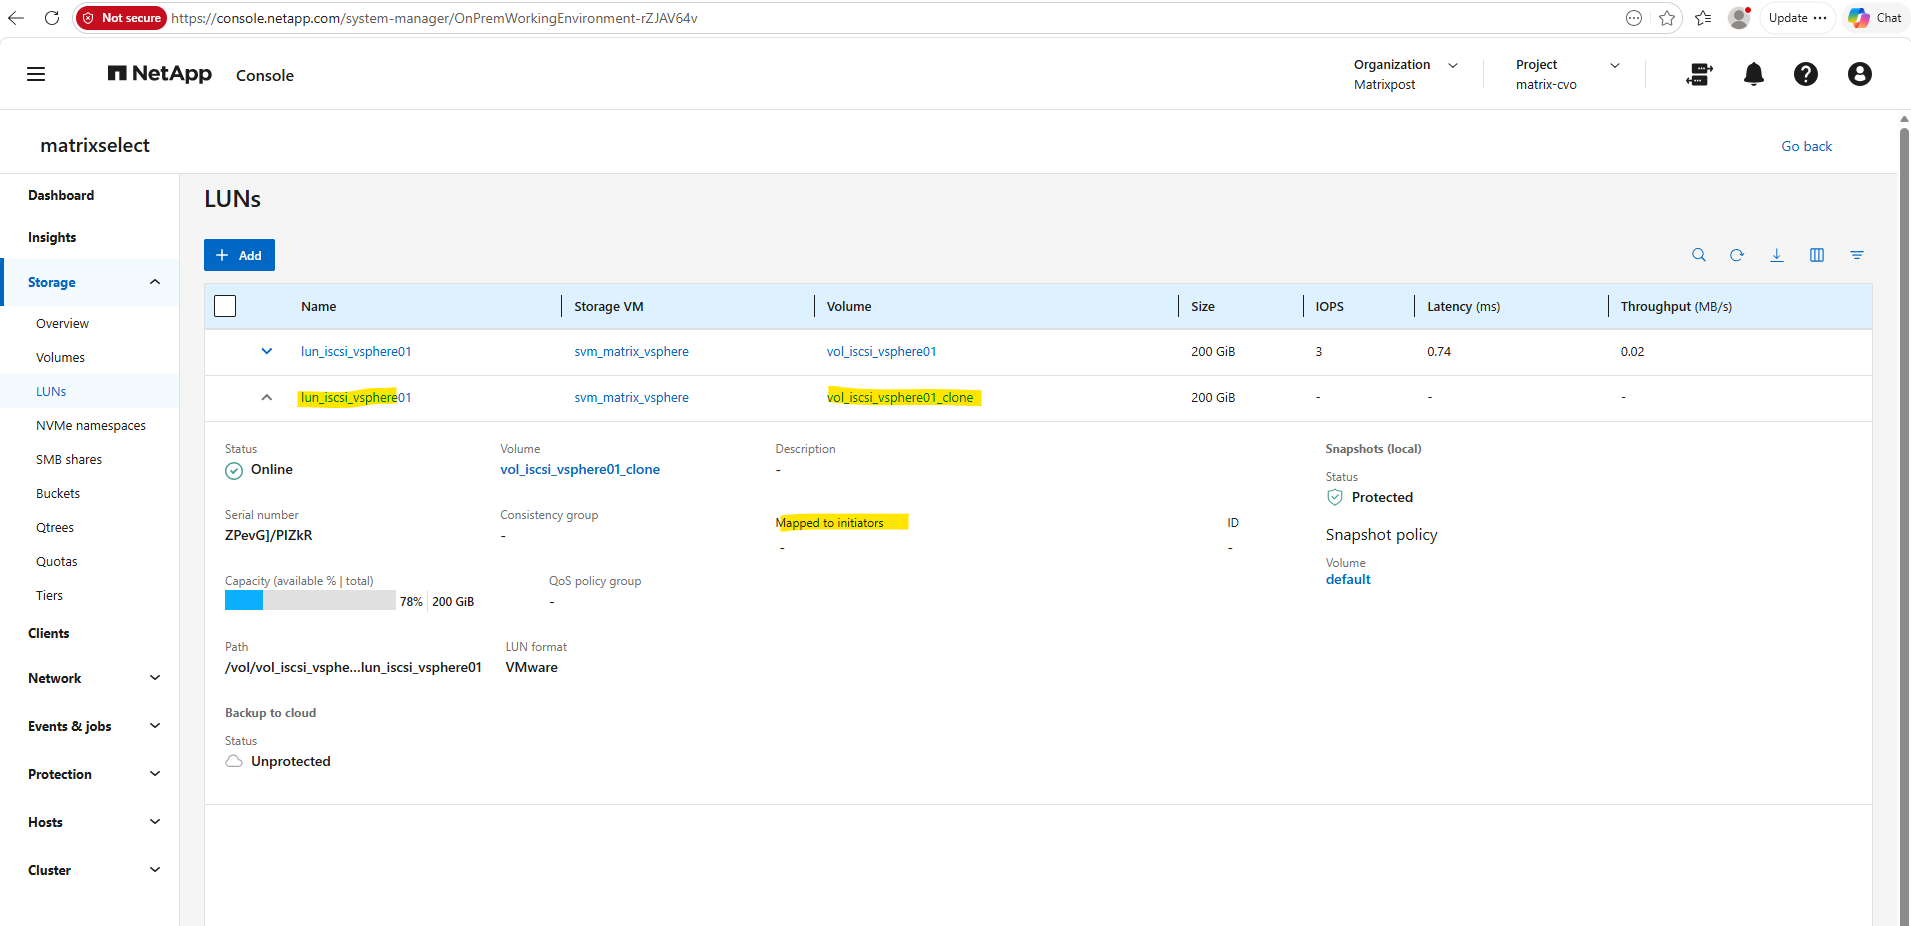
The original LUN remains unchanged and continues to be mapped to the ESXi hosts, while the restored LUN is created separately within the cloned volume.
It is important to distinguish between the ONTAP Autonomous Ransomware Protection (ARP) detection workflow and the NetApp Console ransomware incident workflow.
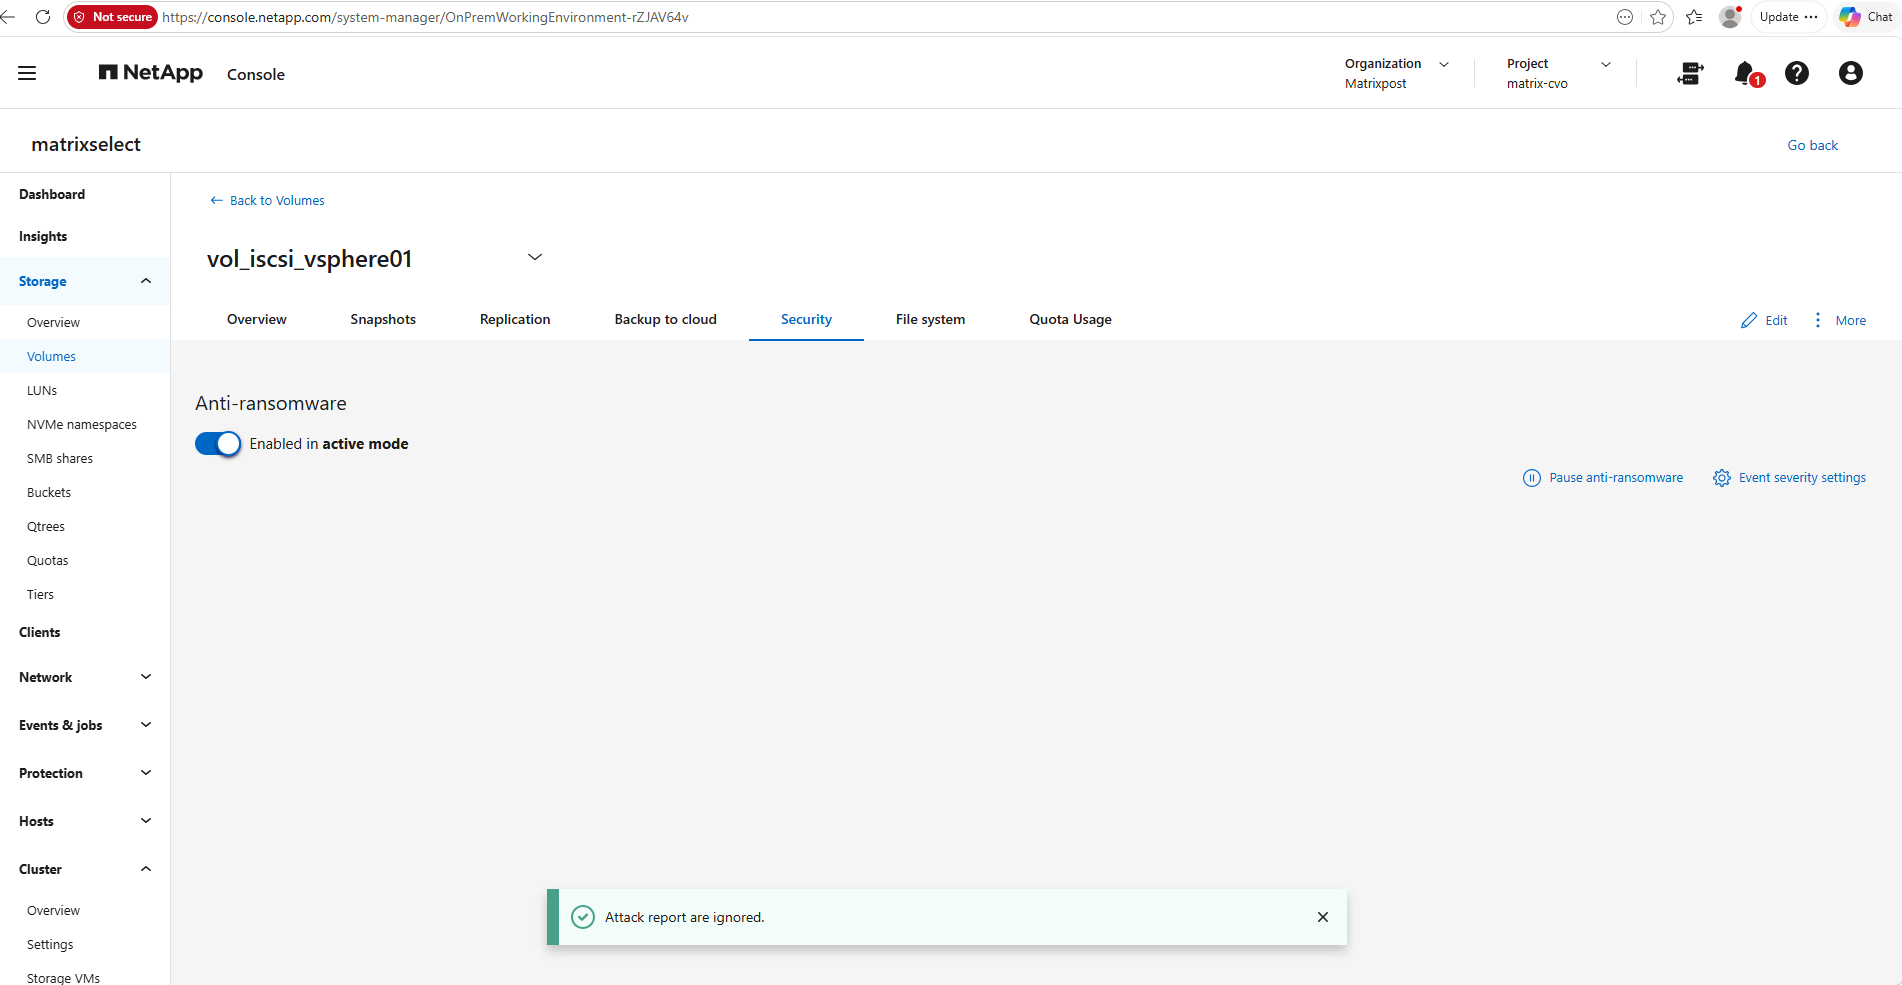
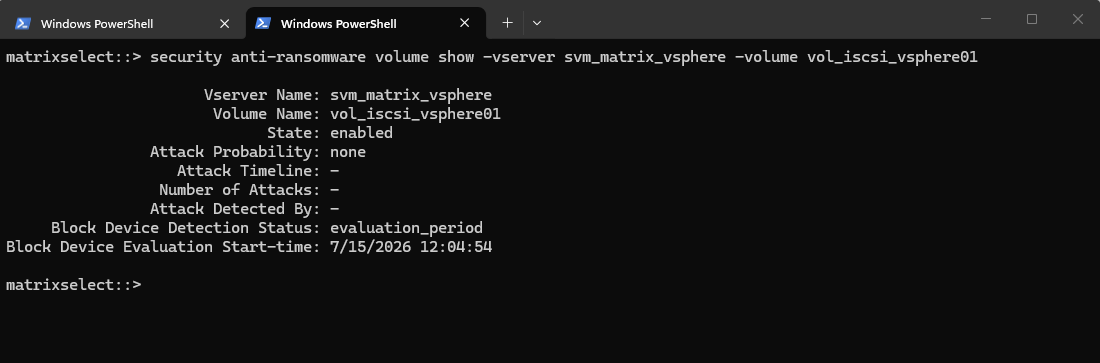
After an administrator classifies a detected event in ONTAP System Manager, for example by selecting Mark as potential ransomware attack as shown below, the corresponding ARP attack report is cleared, and the CLI no longer reports an active attack (Attack Probability: none) also shown below.
However, if the incident has already been imported into NetApp Console, it remains available there and can continue through the recovery workflow, including Mark restore needed and Restore operations as shown previously above.
This indicates that NetApp Console maintains its own incident state independently of the transient ARP detection state maintained by ONTAP.
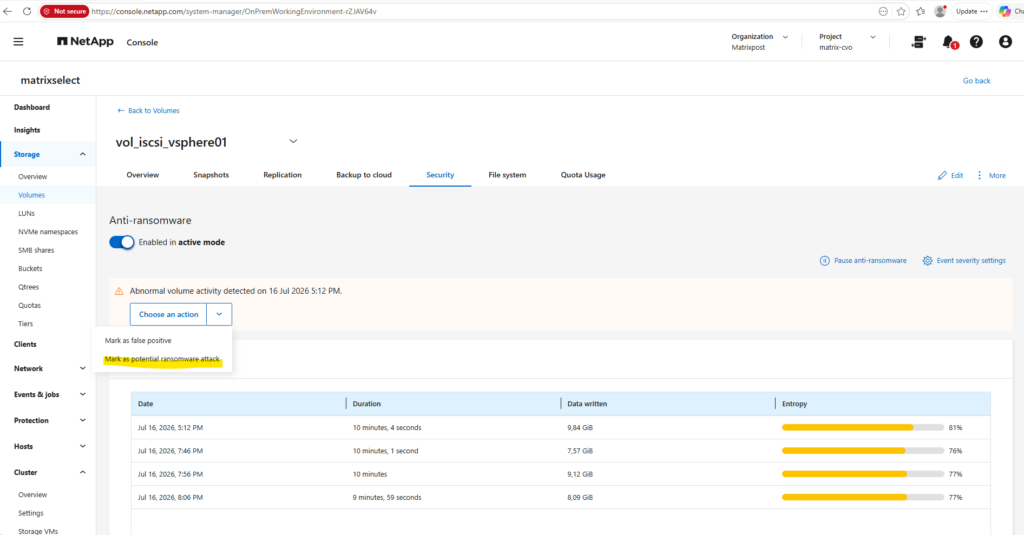
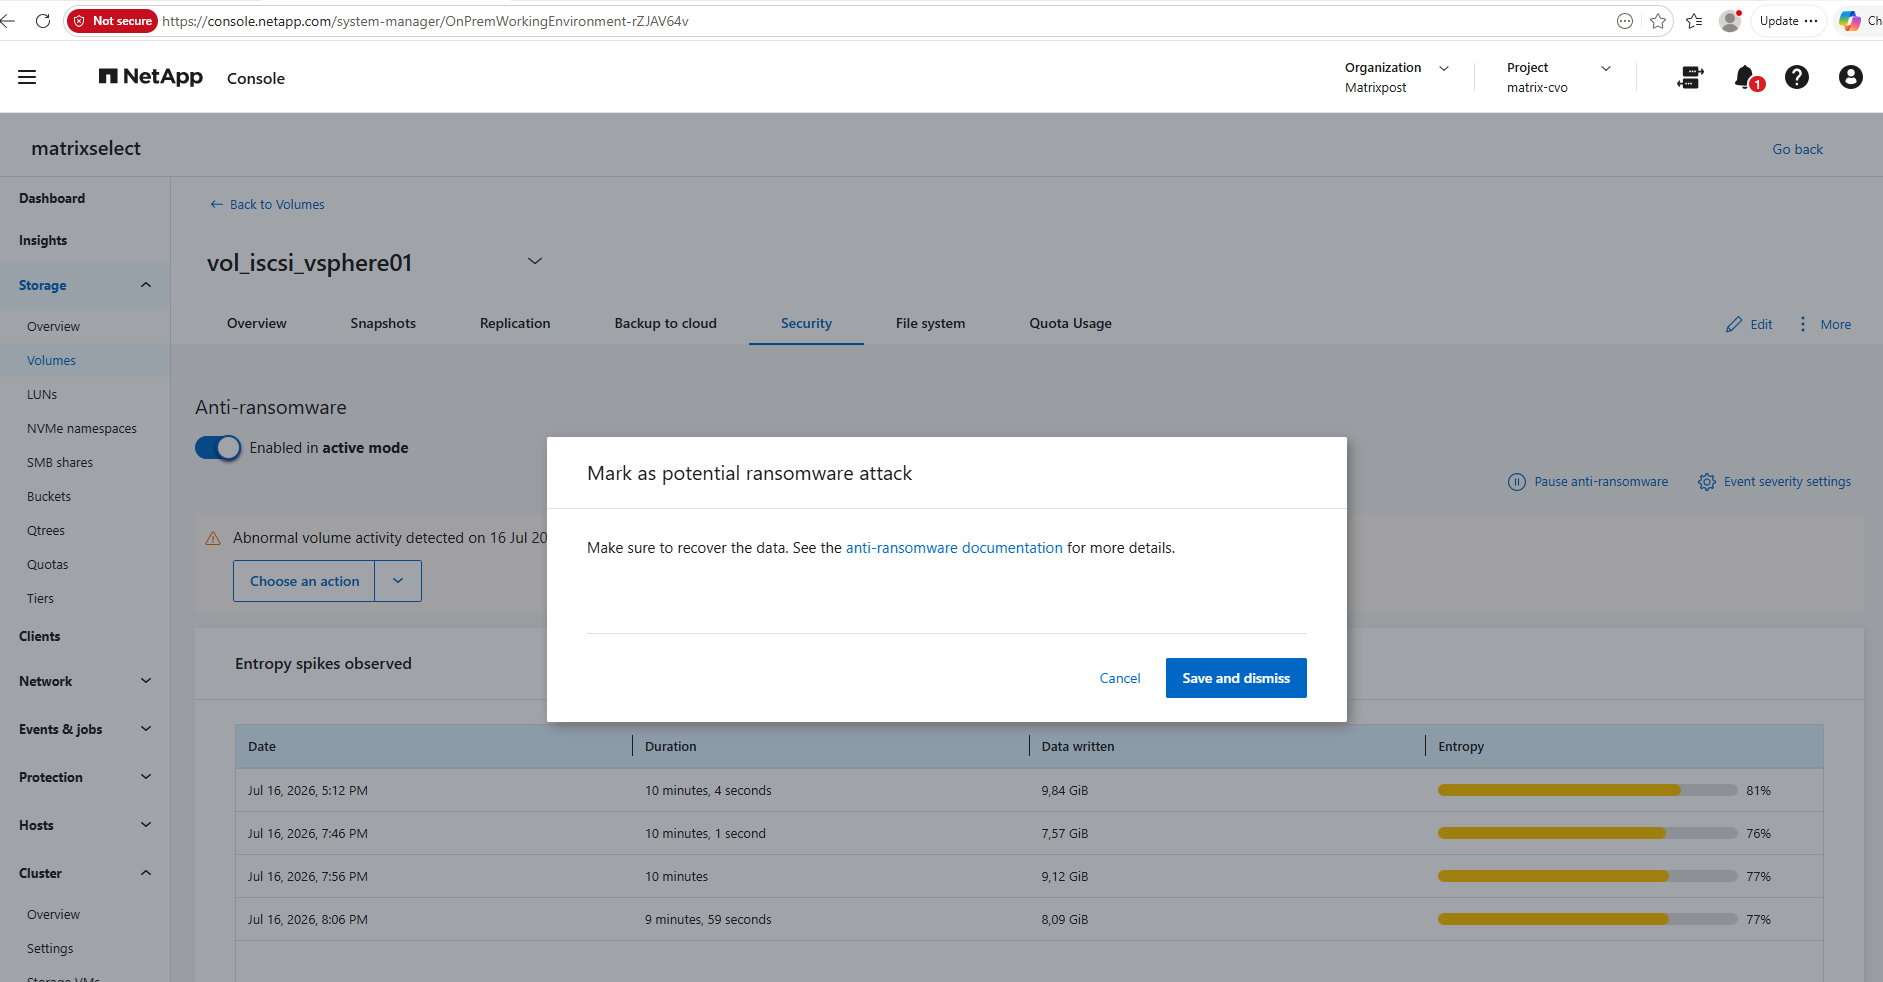
The alert is cleared in System Manager on the volume.
Also in the CLI the alert was cleared.
Presenting the Restored LUN to VMware vSphere
Although the recovery operation has recreated the volume and its contained LUN, the restored storage is not yet accessible from the VMware vSphere environment.
The cloned LUN must first be mapped to the appropriate ESXi initiator group and then discovered by the ESXi hosts. After presenting the recovered storage to vSphere, the restored virtual disk can be located and attached to the affected virtual machine for validation and final recovery.
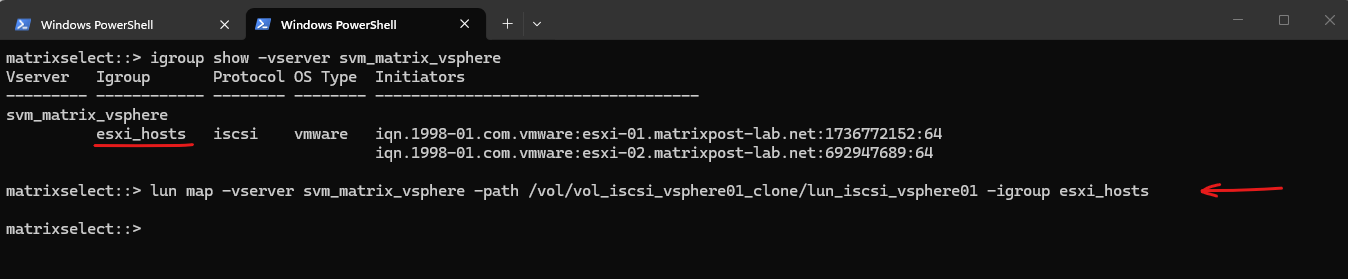
As shown in Part 2 of this series, the ESXi hosts are already members of the esxi_hosts iSCSI initiator group (igroup). To present the restored LUN to the VMware vSphere environment, the cloned LUN simply needs to be mapped to this existing igroup.
Once the mapping has been created, the ESXi hosts can discover the restored LUN during the next storage rescan.
matrixselect::> igroup show -vserver svm_matrix_vsphere
matrixselect::> lun map -vserver svm_matrix_vsphere -path /vol/vol_iscsi_vsphere01_clone/lun_iscsi_vsphere01 -igroup esxi_hosts
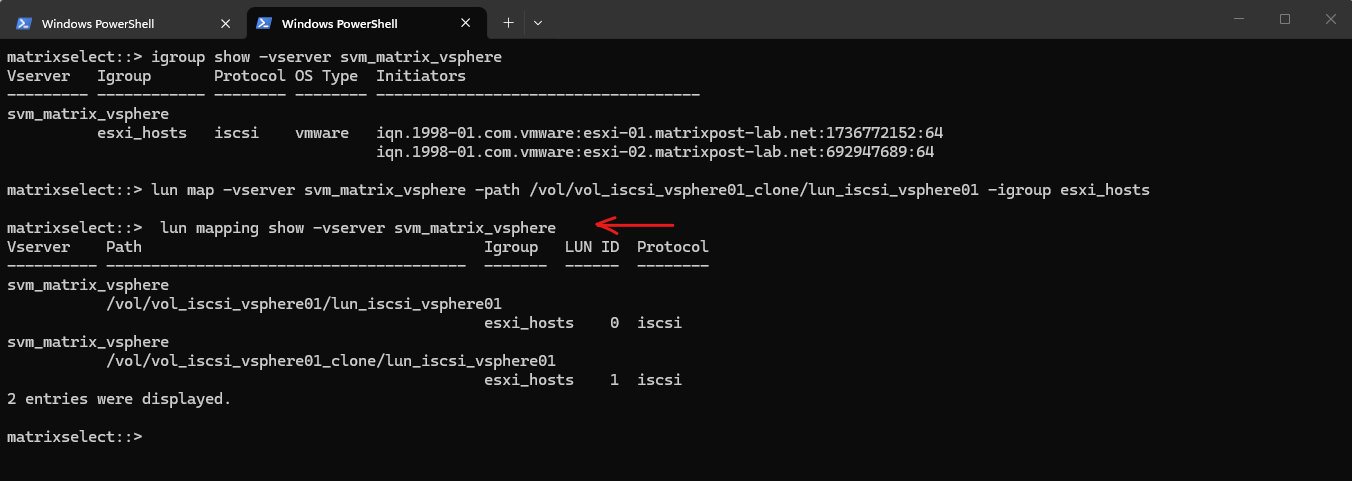
After mapping the cloned LUN to the esxi_hosts initiator group, the mapping can be verified using the following command. The output confirms that the restored LUN is now presented to the same ESXi hosts as the original production LUN.
Note: because the original LUN is already mapped to
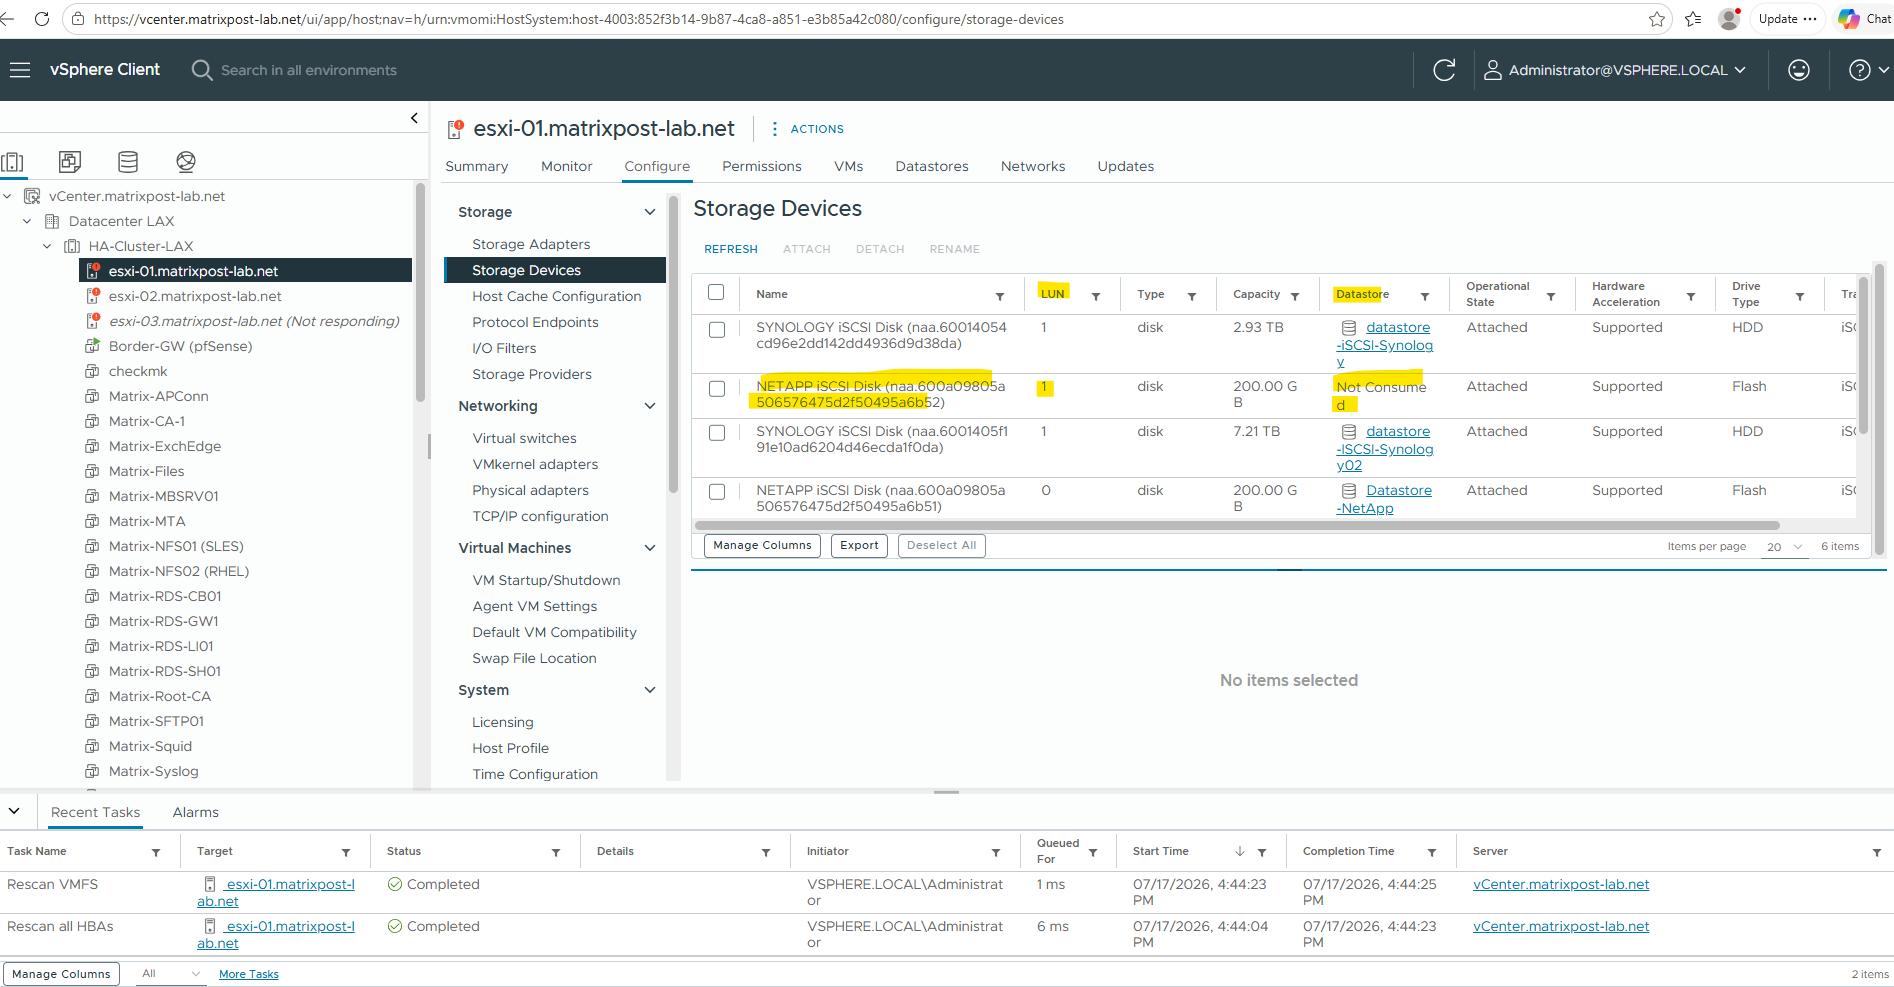
esxi_hosts, ONTAP will automatically assign the cloned LUN a different LUN ID (for example,1instead of0).That’s perfectly normal and doesn’t matter to ESXi, it identifies the LUN by its NAA identifier rather than the LUN ID alone.
matrixselect::> lun mapping show -vserver svm_matrix_vsphere
Below I will initiate a storage rescan directly in vsphere.
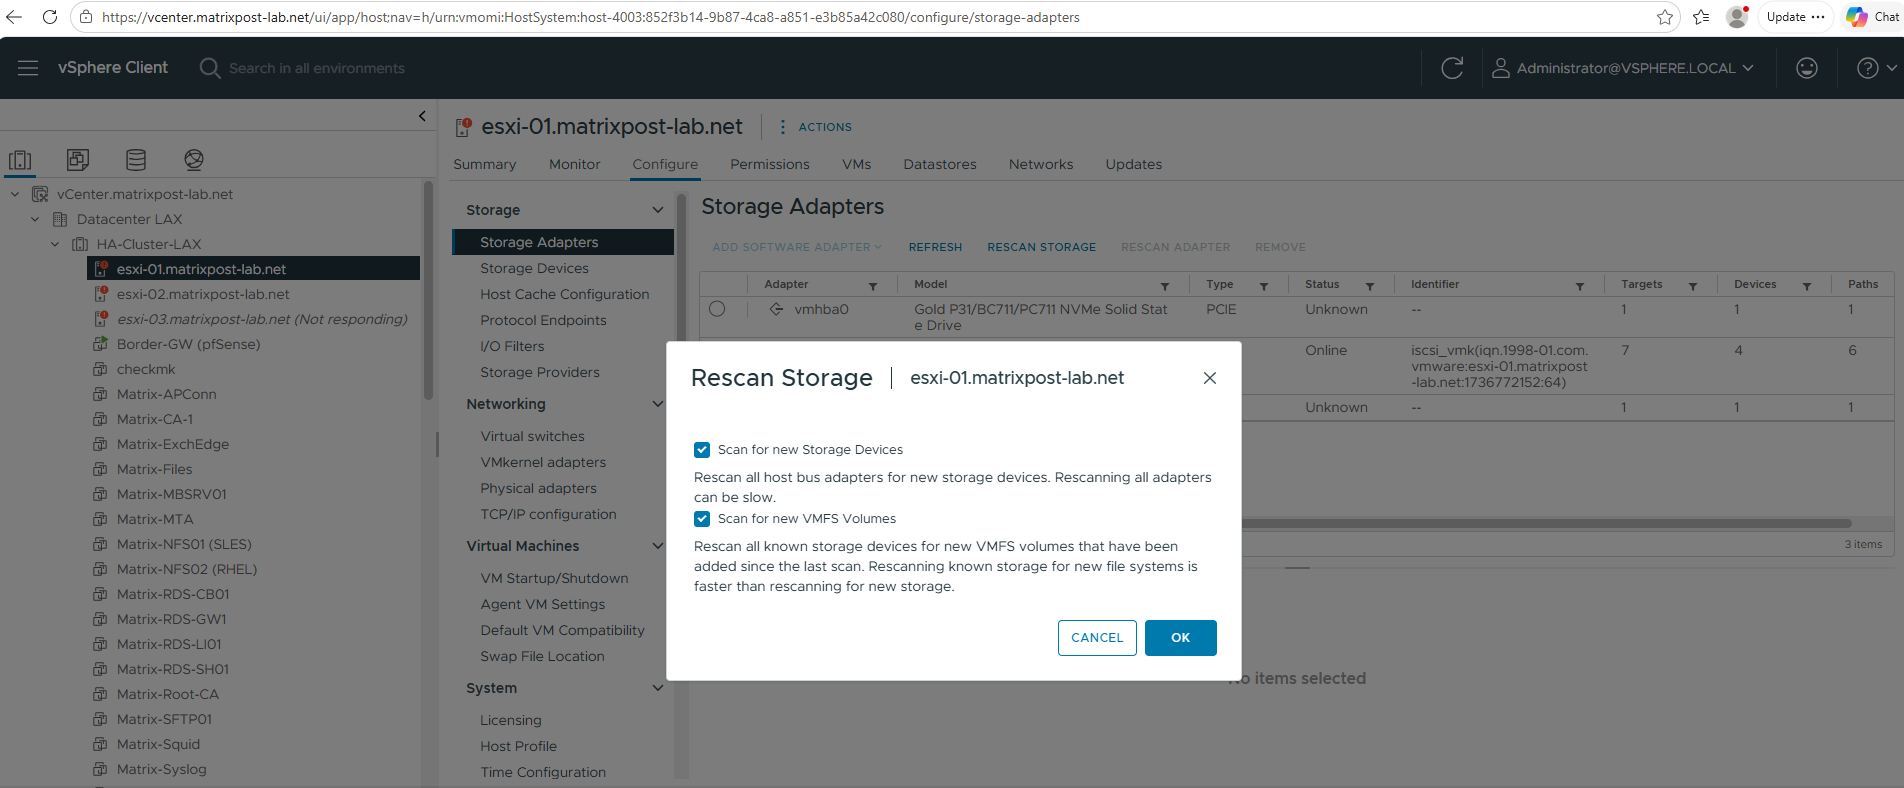
After the storage rescan completes successfully, VMware ESXi detects the newly mapped NetApp iSCSI LUN.
Since the restored LUN has not yet been mounted or used by vSphere, it is listed as Not Consumed in the Datastore column. This indicates that the storage device has been successfully discovered and is available for mounting the existing VMFS datastore or performing additional recovery operations.
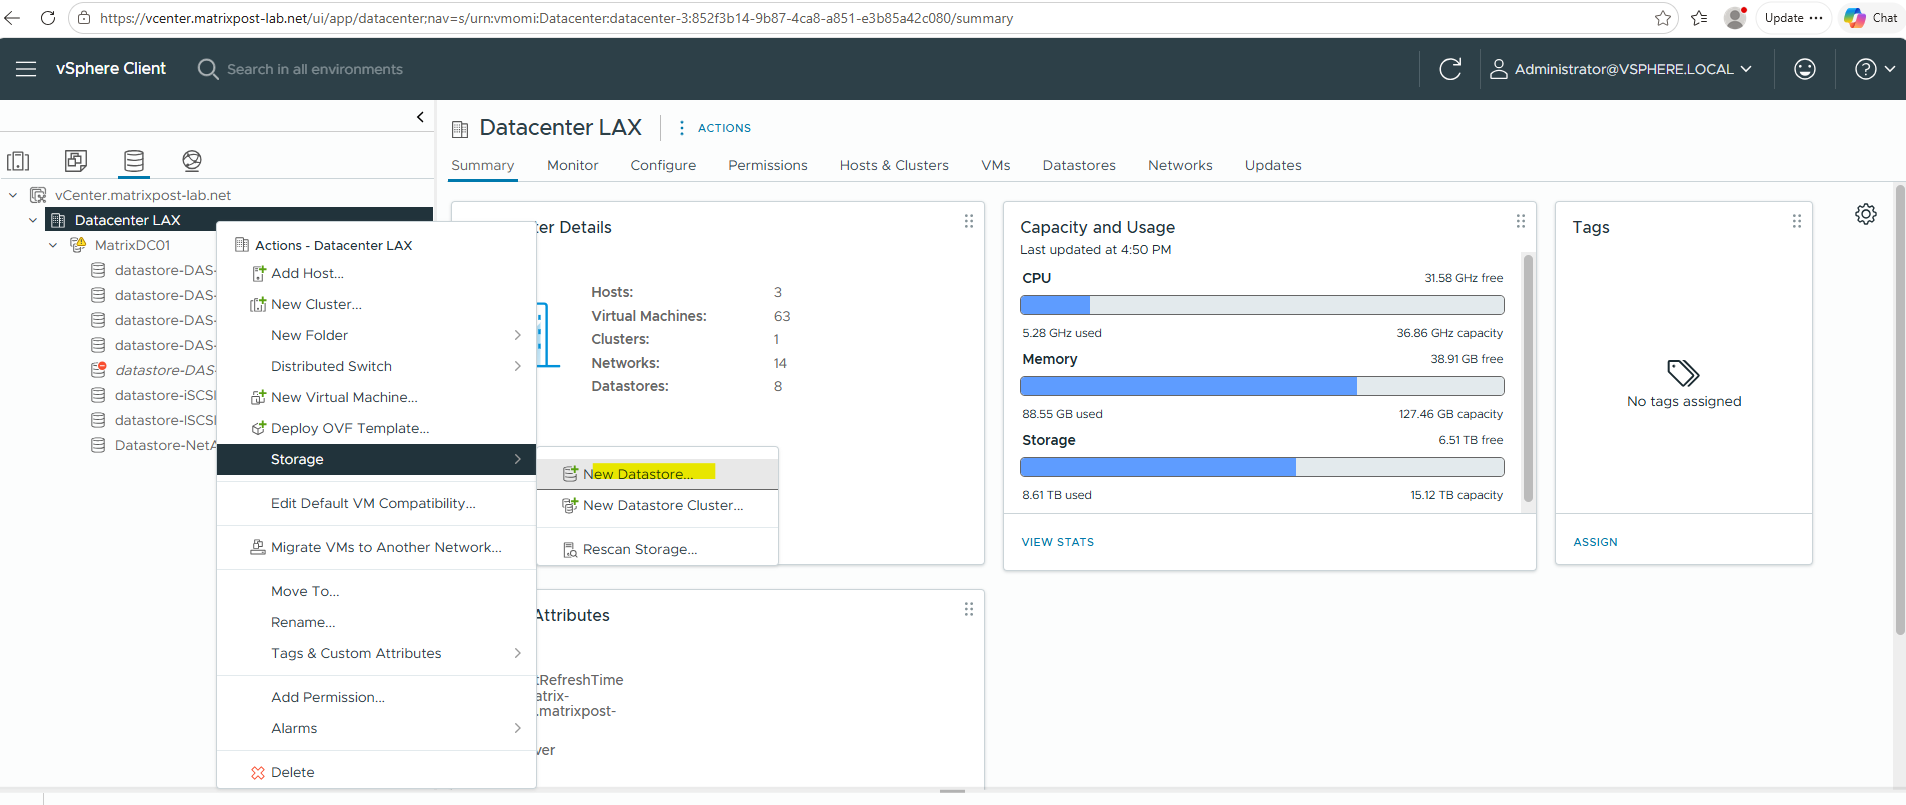
The next step is to mount the existing VMFS datastore contained on the restored LUN, making the recovered virtual machines and their virtual disks available for validation and recovery.
Right click on the datacenter node and select Storage -> New Datastore …
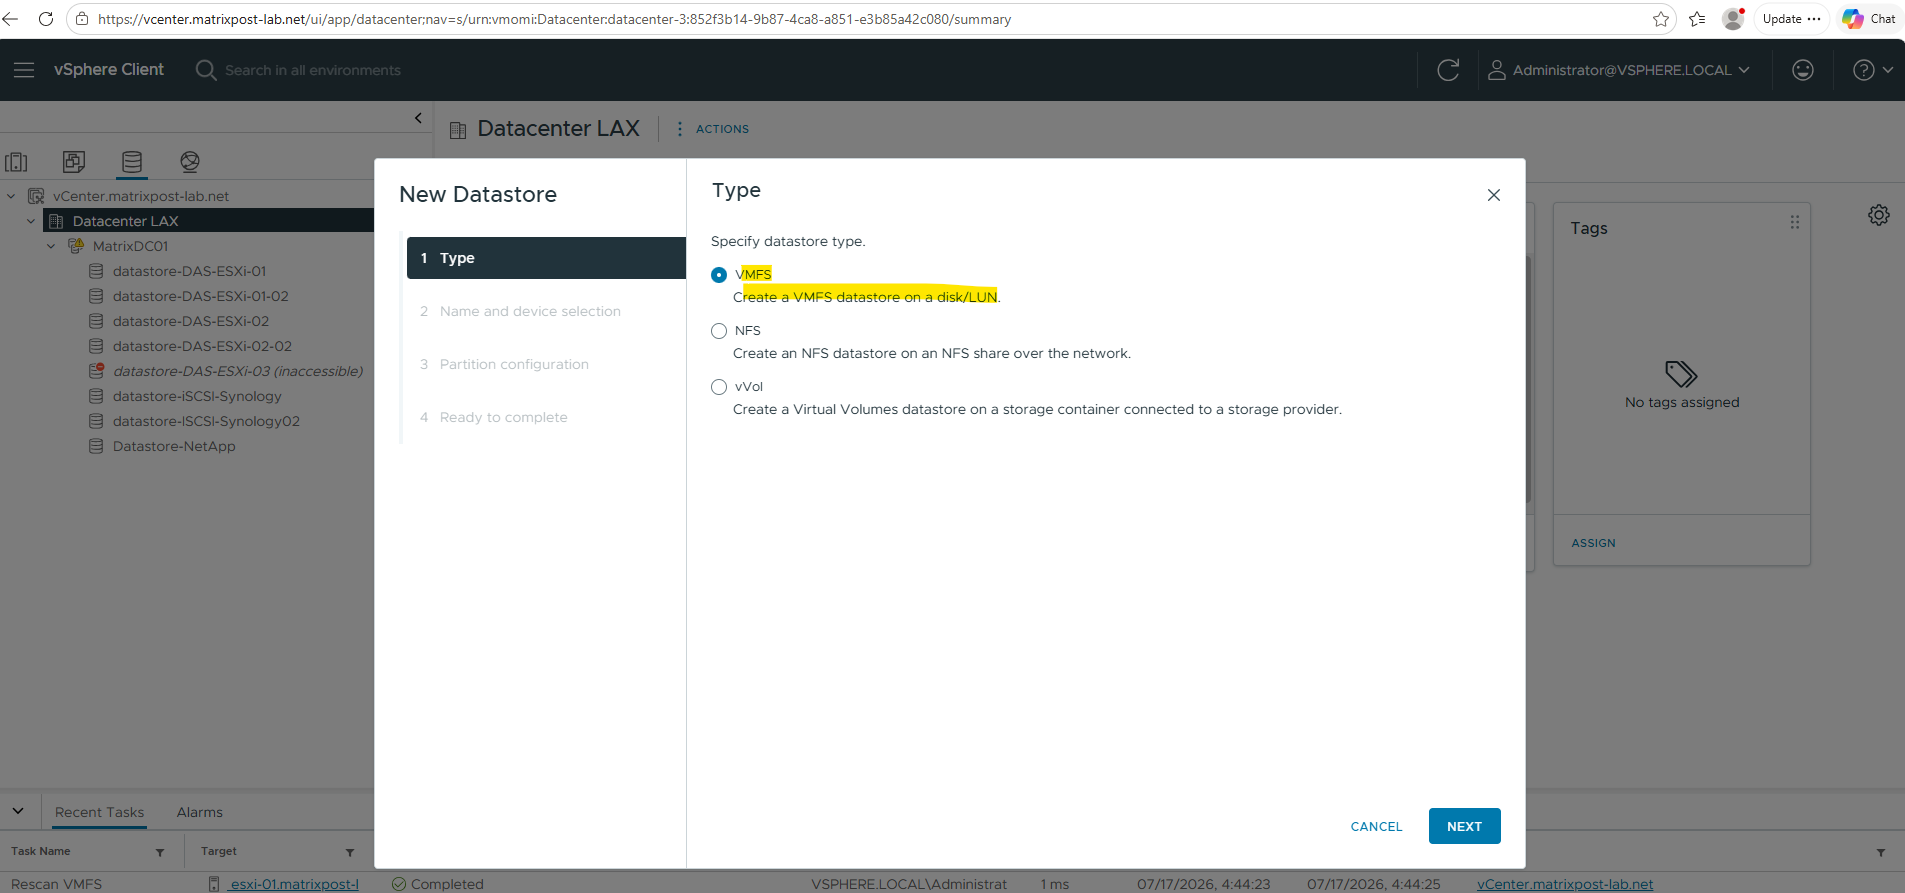
Select VMFS for the type.
Although a datastore name can be entered at this stage, it is ignored when assigning a new VMFS signature later. Instead, VMware automatically generates a unique datastore name based on the original datastore. Also select a host that was previously connected to the cloned LUN through the ONTAP igroup and select the cloned LUN.
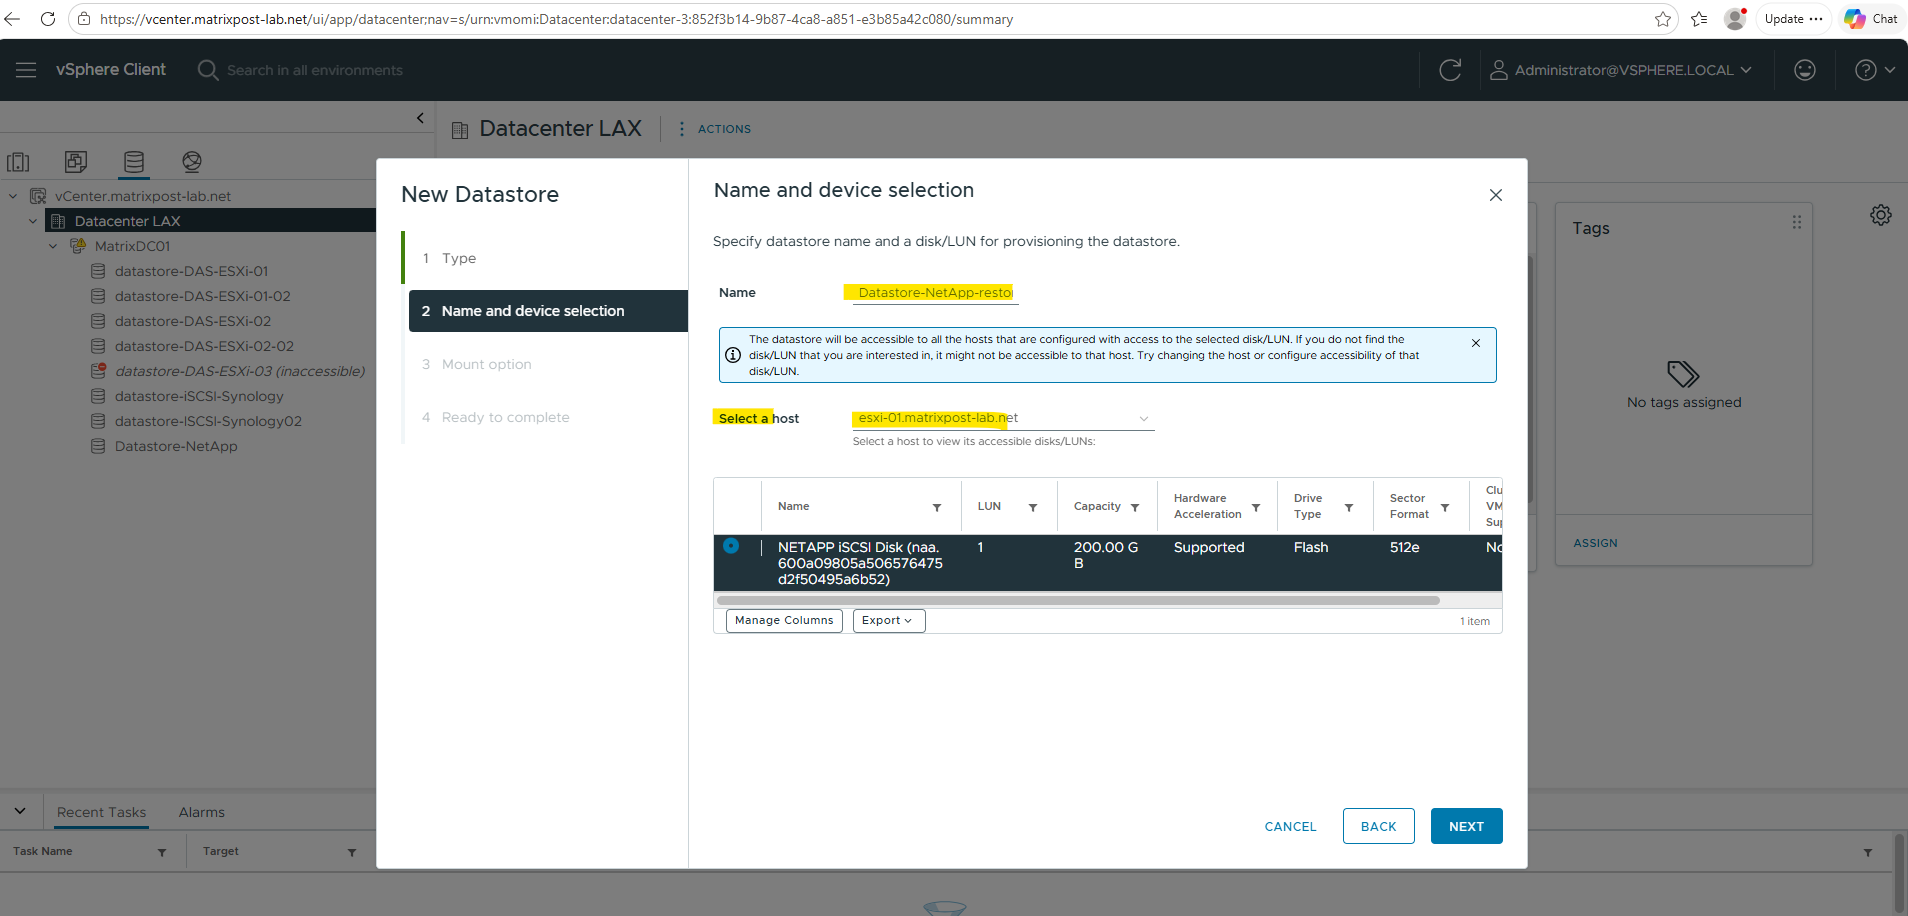
Because the original datastore is still mounted and accessible, Assign a new signature was selected. This generates a unique VMFS signature (UUID), allowing the restored datastore to coexist with the original datastore without causing signature conflicts.
More about here https://knowledge.broadcom.com/external/article/399295/an-unresolved-vmfs-volume-with-signature.html
| Scenario | Choose "Keep Existing Signature"? || ------------------------------------- | --------------------------------- || Reconnecting a known datastore | ✅ Yes || Re-attaching storage after failover | ✅ Yes || Restoring LUN access after rescanning | ✅ Yes || Connecting a clone of another LUN | ❌ No – Use “Assign New Signature” || Disk will be used as RDM | ❌ No – Don't mount it as VMFS |
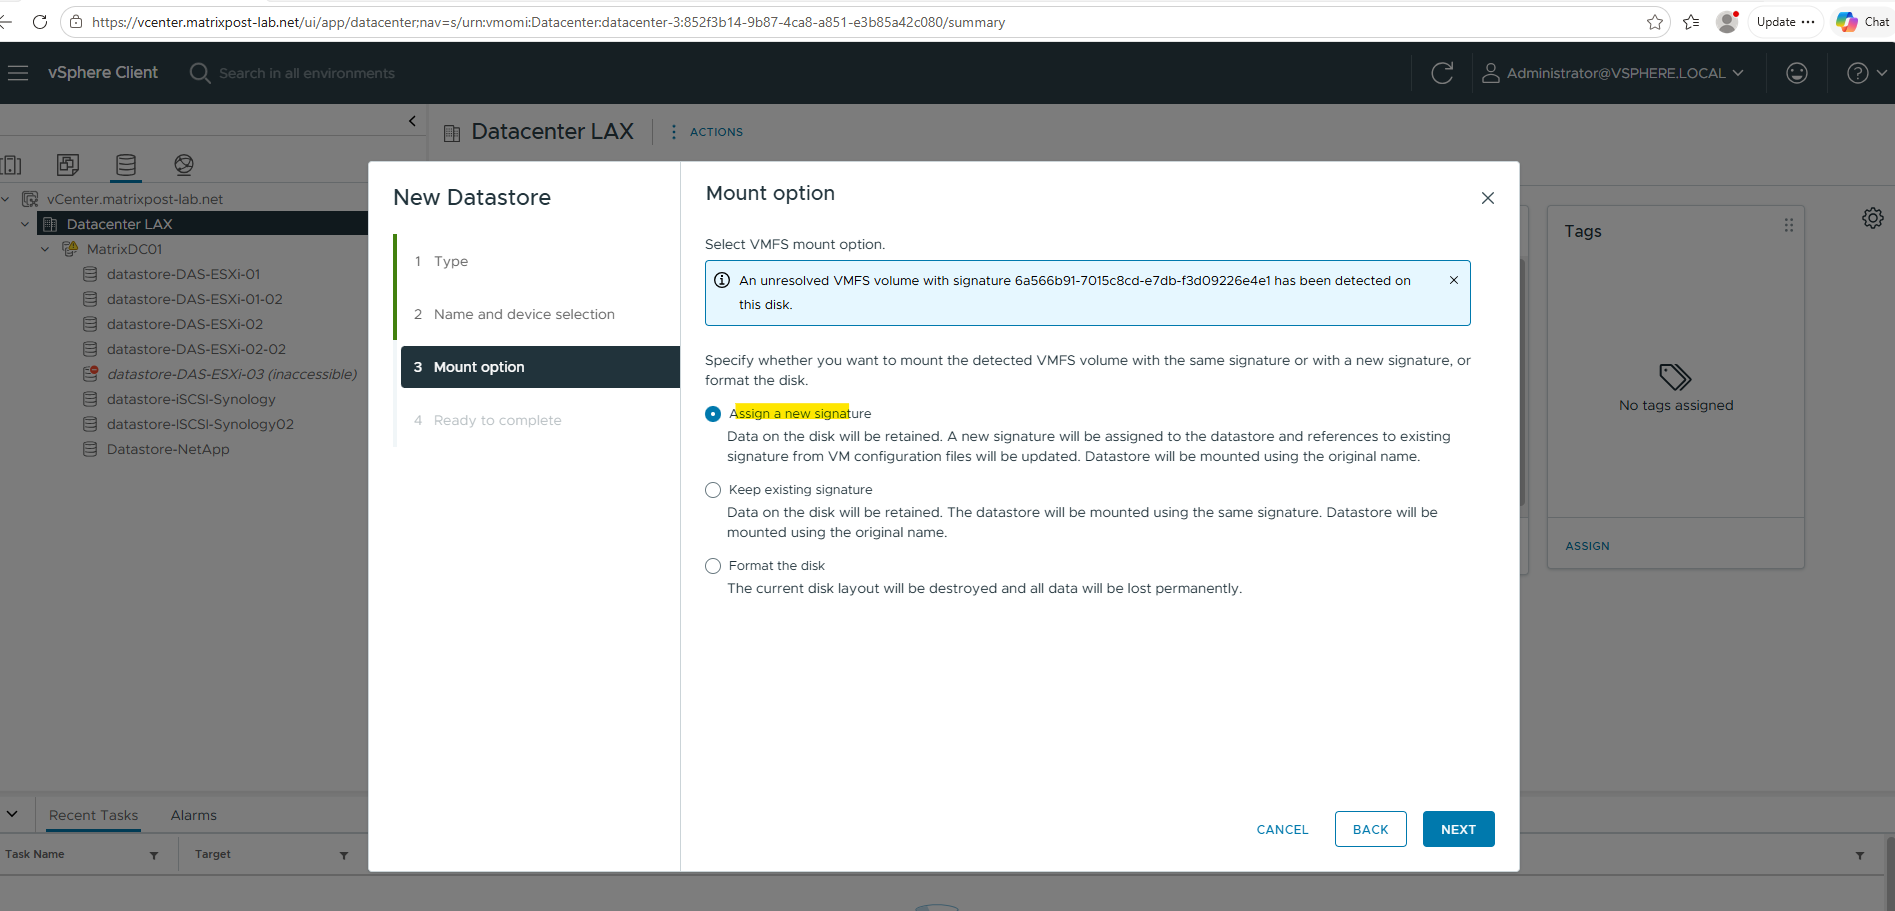
Finally click on FINISH.
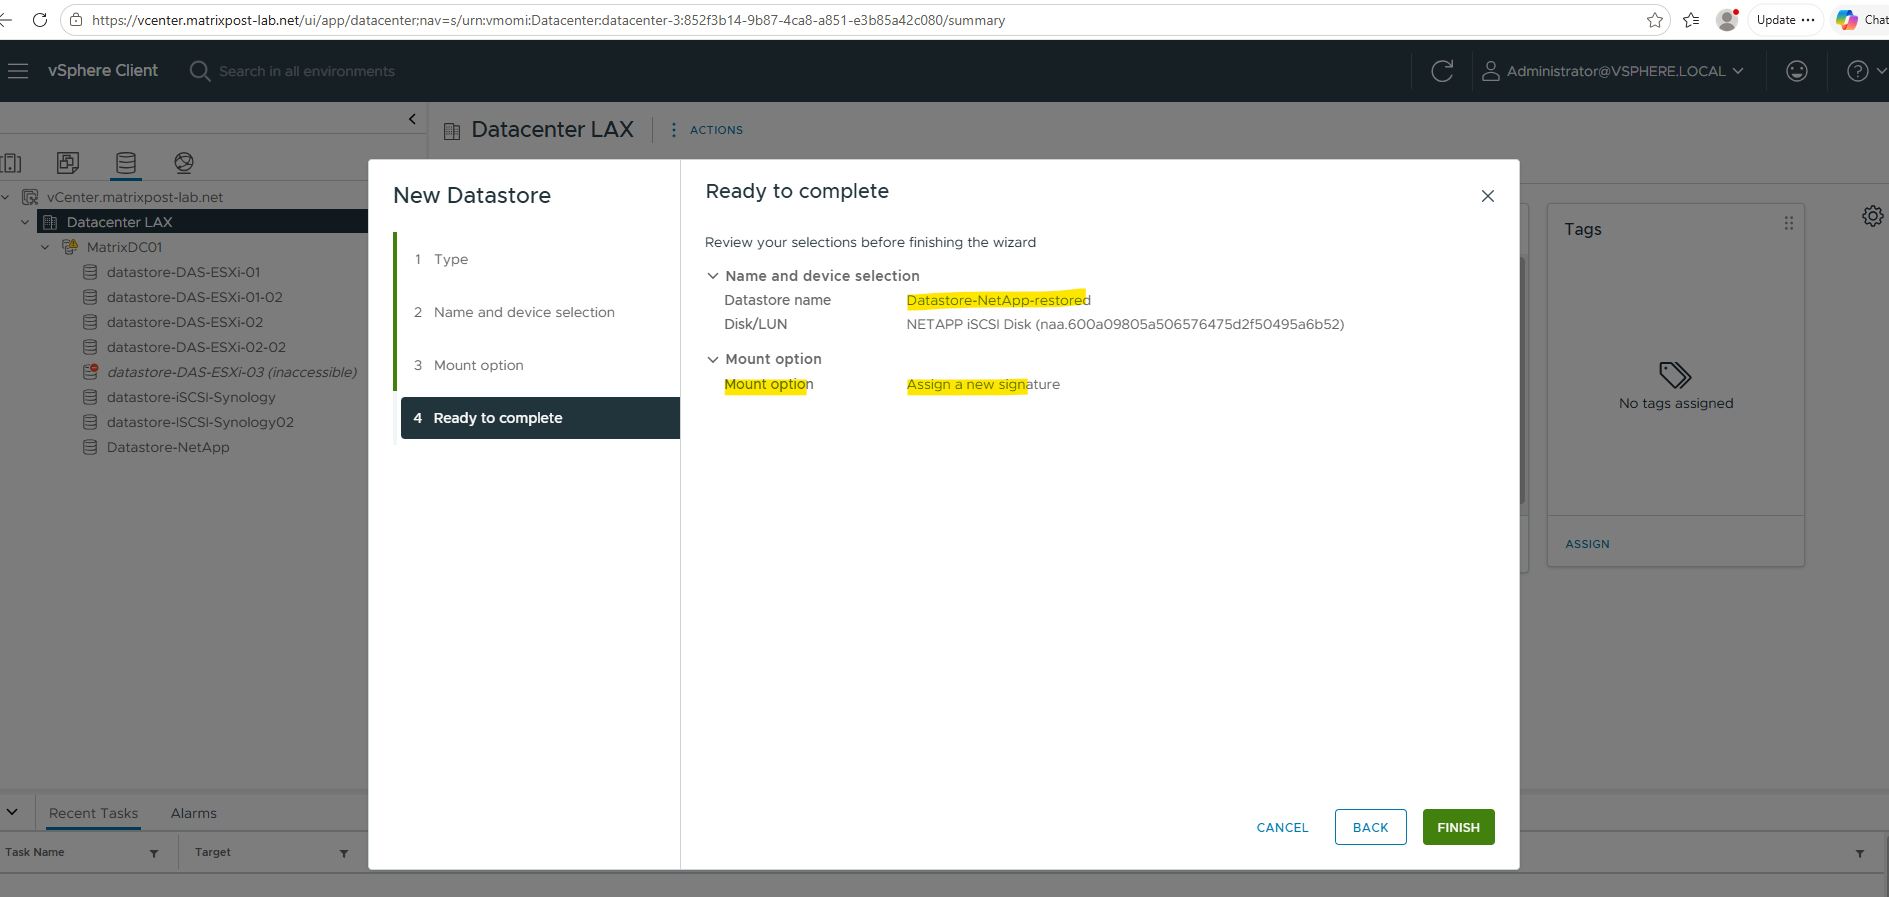
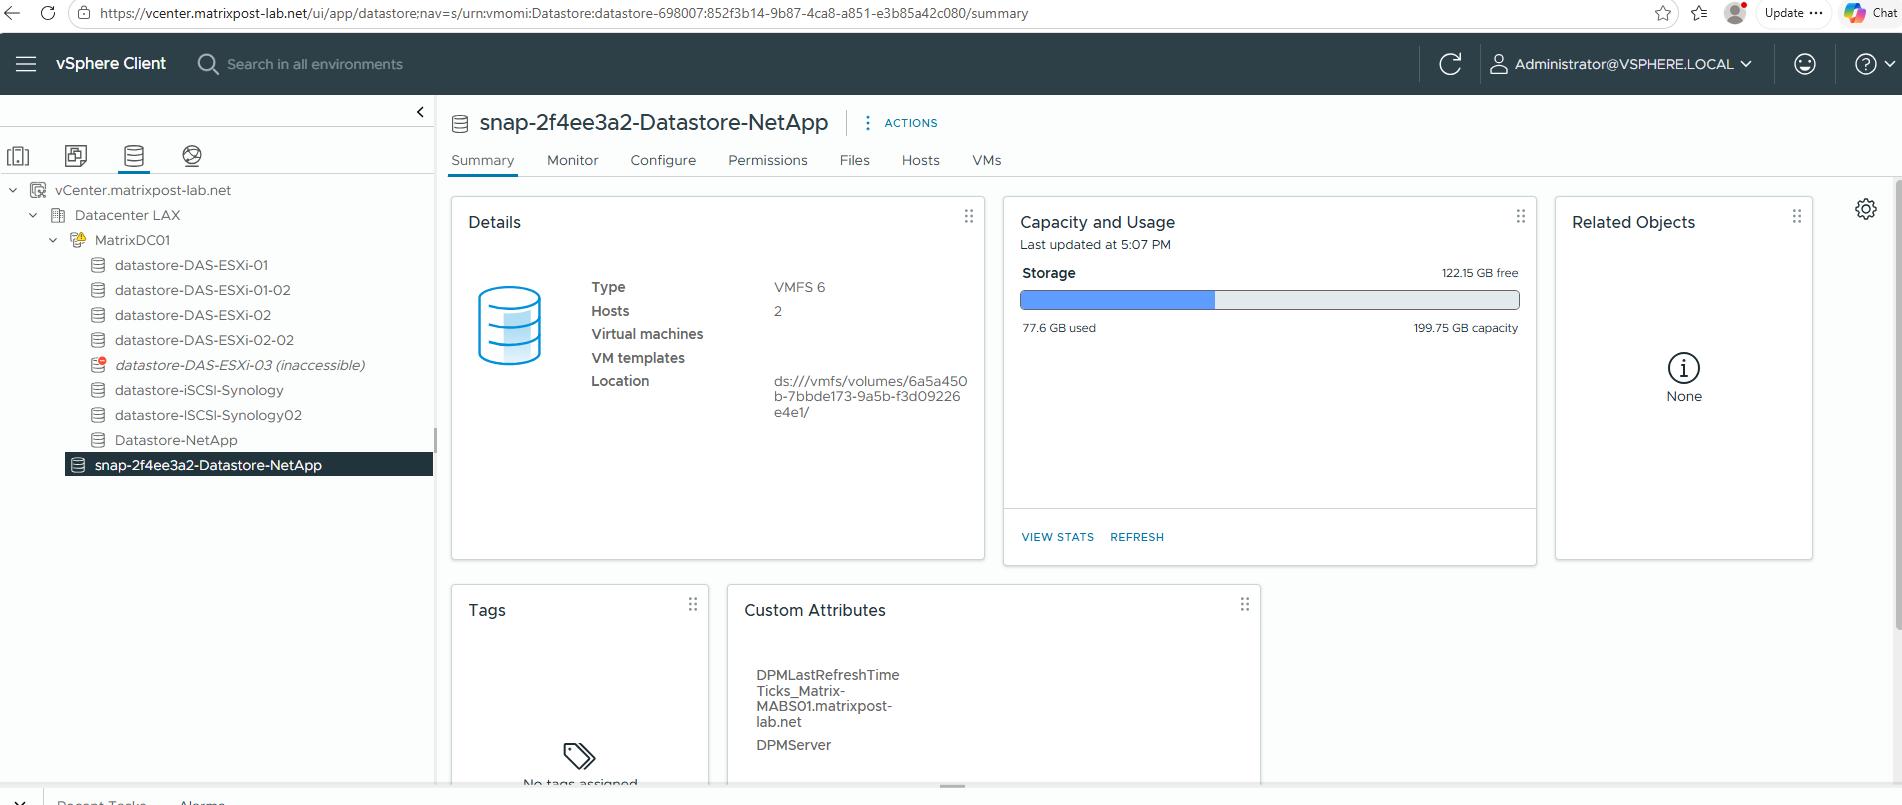
Although the wizard indicates that the datastore will be mounted using its original name, vSphere automatically assigns a unique name when the original datastore is still mounted.
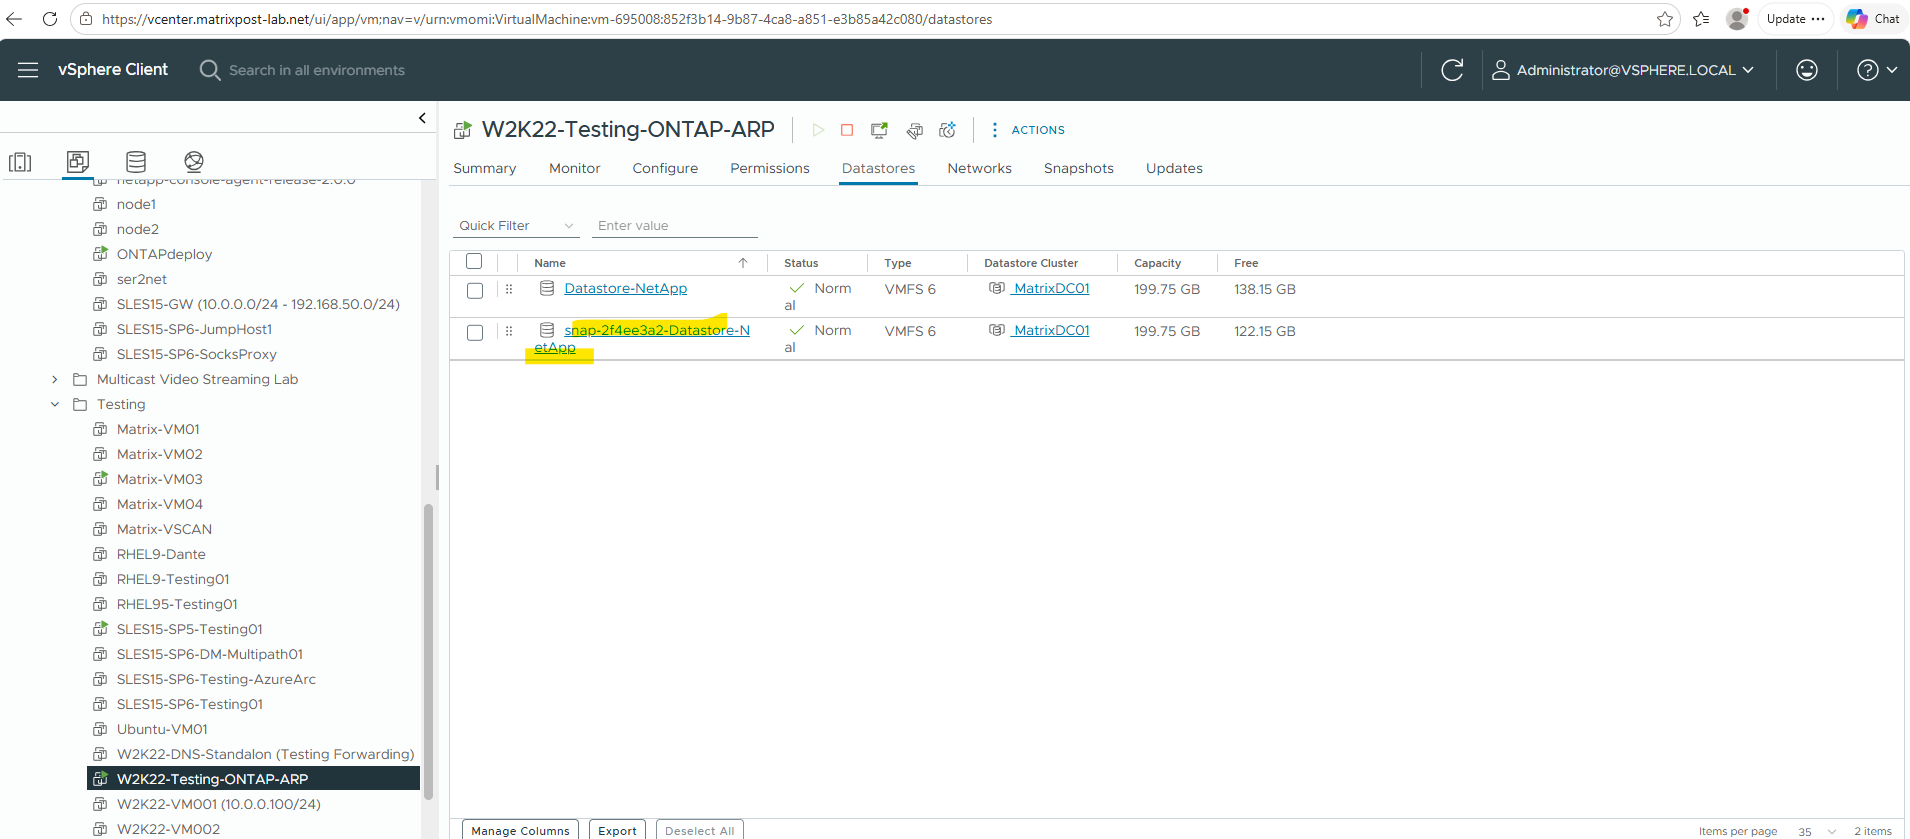
In this example, the restored datastore was mounted as snap-2f4ee3a2-Datastore-NetApp, preserving the original name while adding a snapshot-specific prefix to avoid a naming conflict.
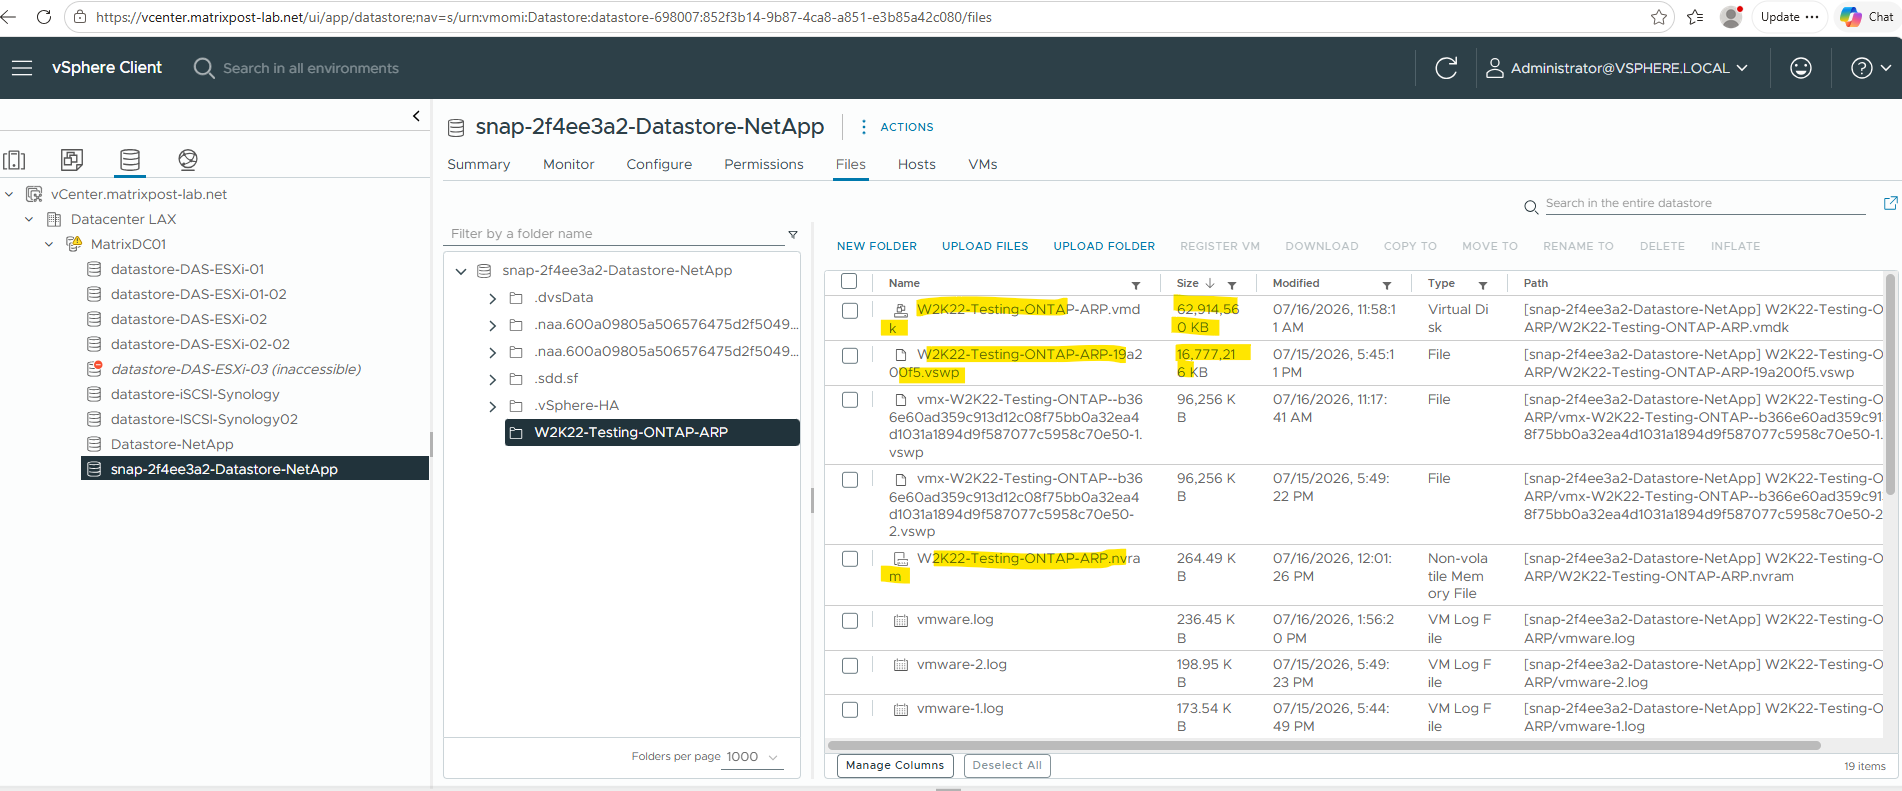
After the restored datastore has been mounted successfully, the recovered virtual machine files become accessible through the vSphere Datastore Browser.
As shown below, the restored virtual machine directory contains the complete VM, including its configuration files, virtual disks, snapshots, logs, and other associated files.
At this point, administrators can either register the recovered virtual machine, restore individual virtual disks, or selectively recover other files depending on the recovery scenario.
Replacing the Corrupted Virtual Disk
In this example, only the operating system disk was affected by the simulated ransomware attack.
Instead of restoring the entire virtual machine, the corrupted virtual disk is replaced with the recovered VMDK from the mounted snapshot datastore.
This preserves the existing virtual machine configuration, virtual hardware, networking, and inventory object while restoring the virtual disk to its state at the selected recovery point.
Although the restored datastore also contains the virtual machine swap file (*.vswp), it does not need to be recovered.
In this example, the restored
*.vswpfile originates from a snapshot that was taken before the simulated ransomware attack and therefore does not contain memory pages from the compromised system.Even if the snapshot had been taken during the attack, the file would not affect the recovery because ESXi automatically creates a new virtual machine swap file whenever the virtual machine is powered on.
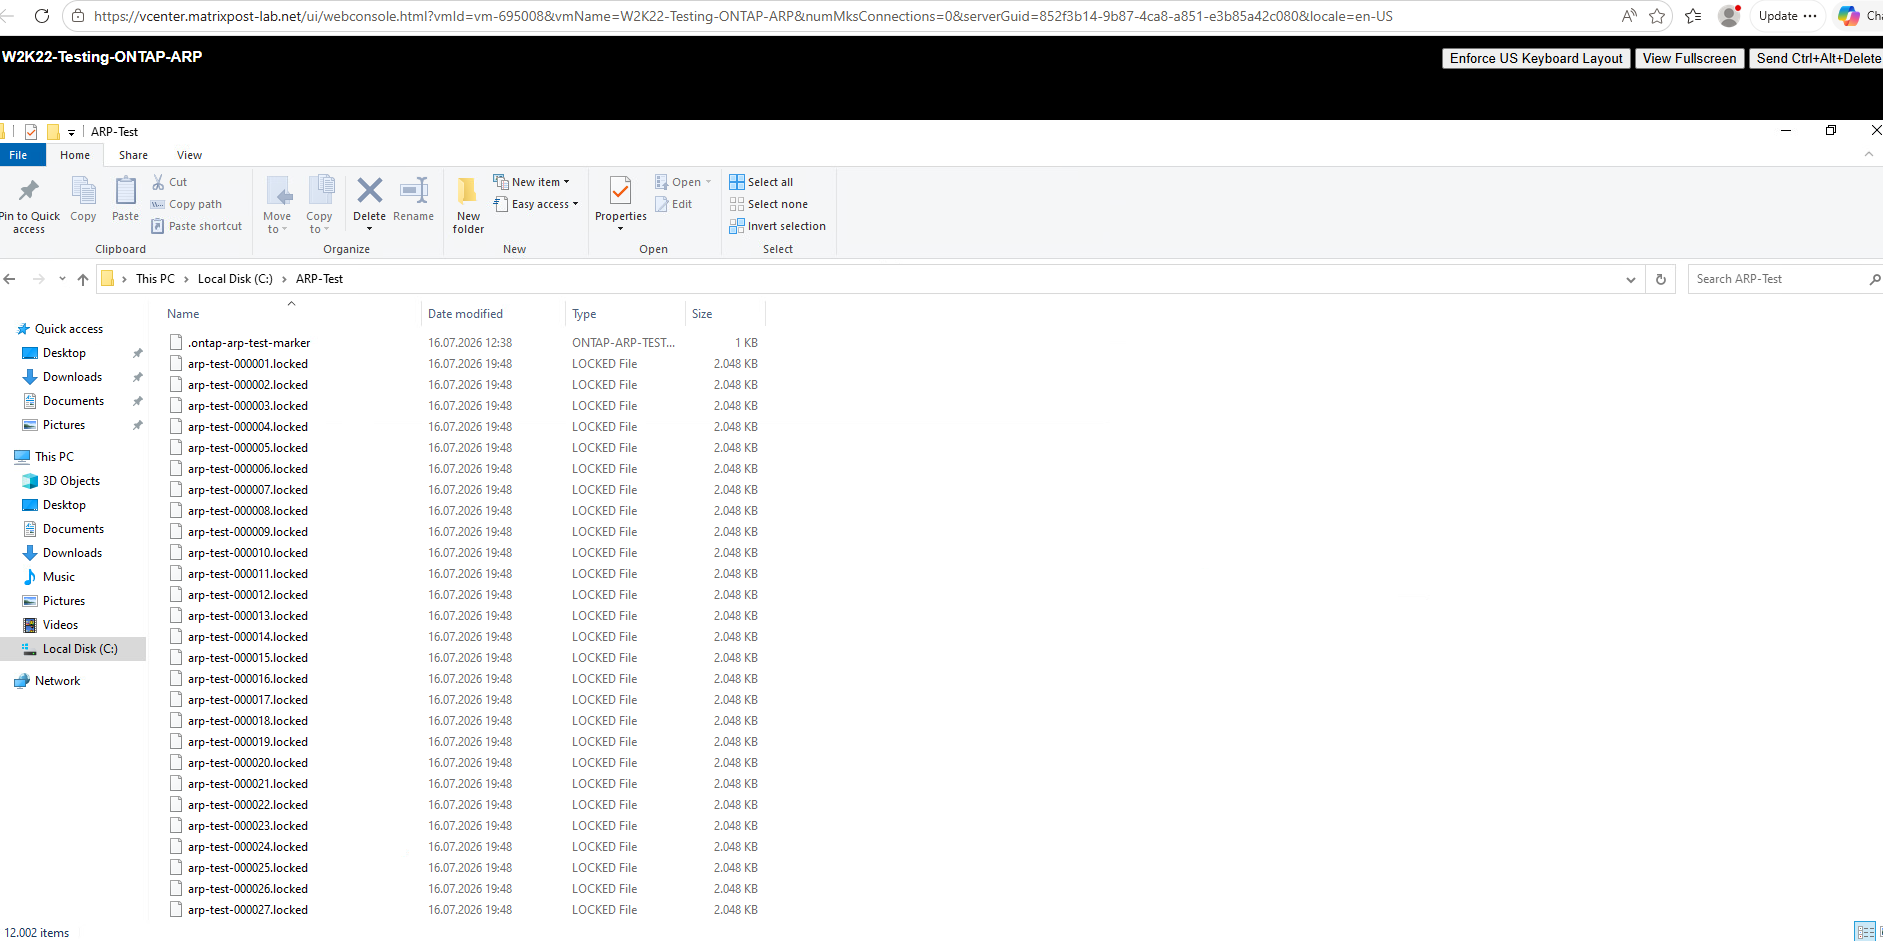
Before powering off the affected virtual machine, the current state of the compromised disk was verified.
The screenshot below shows the files created by the ransomware simulation with the
.lockedextension, confirming that the active virtual disk still contains the encrypted test data.
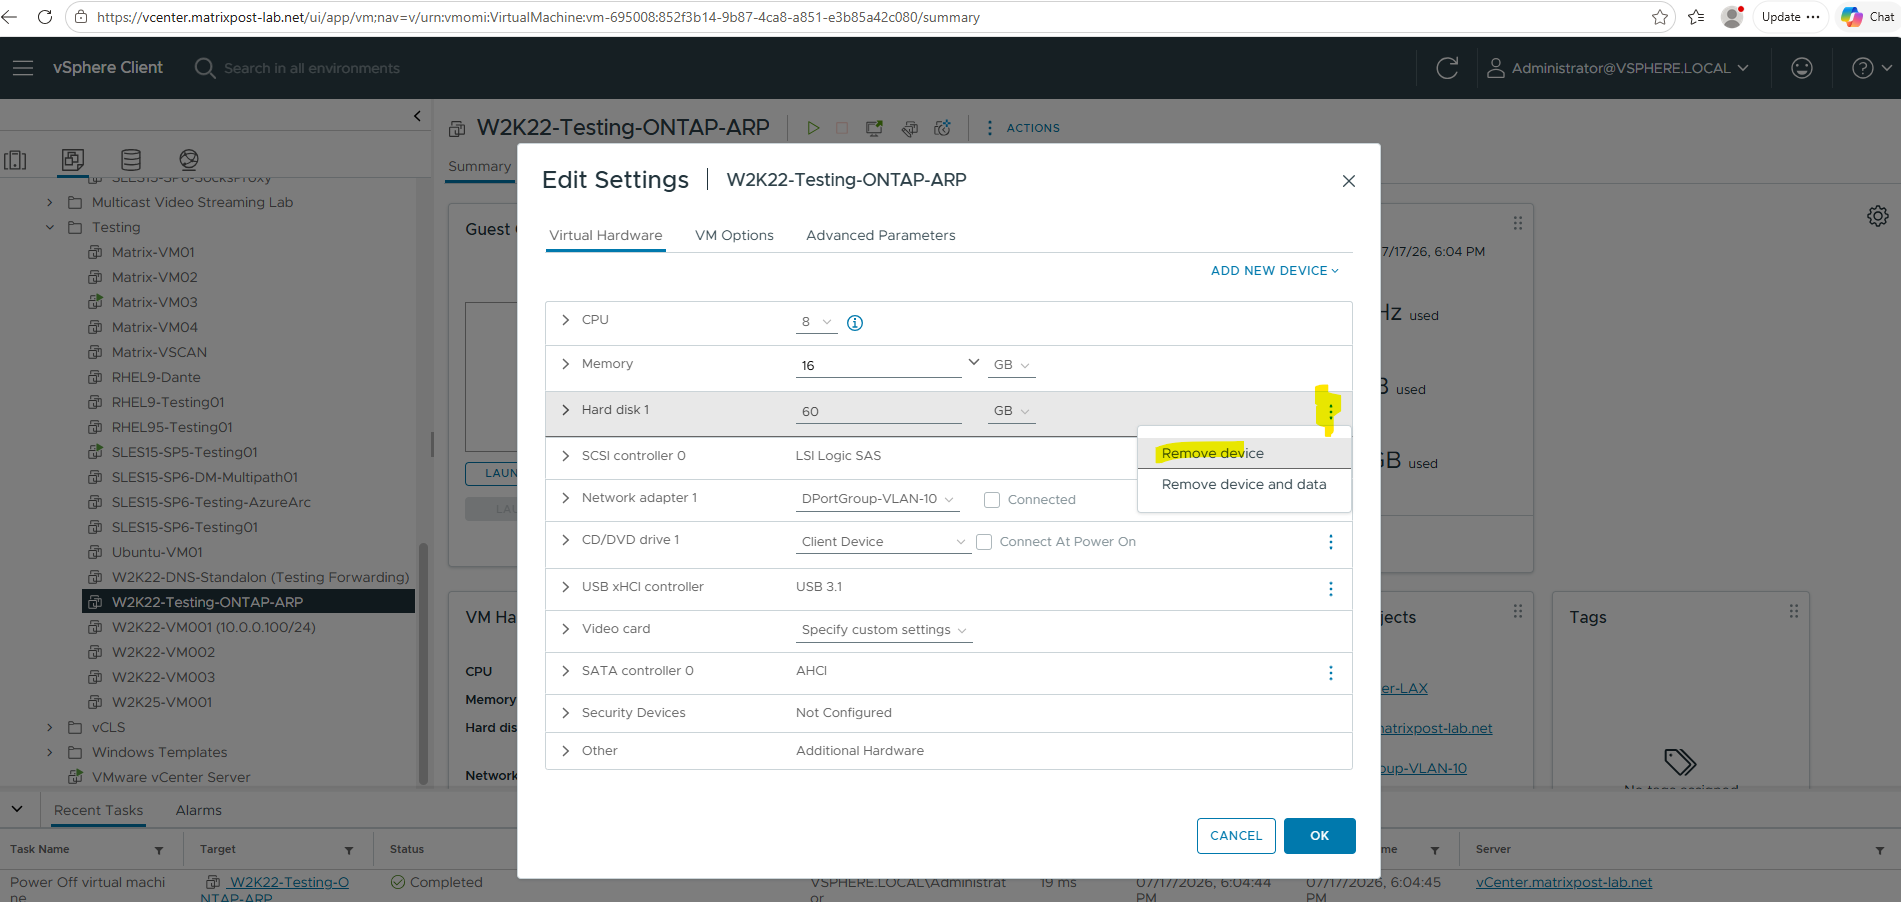
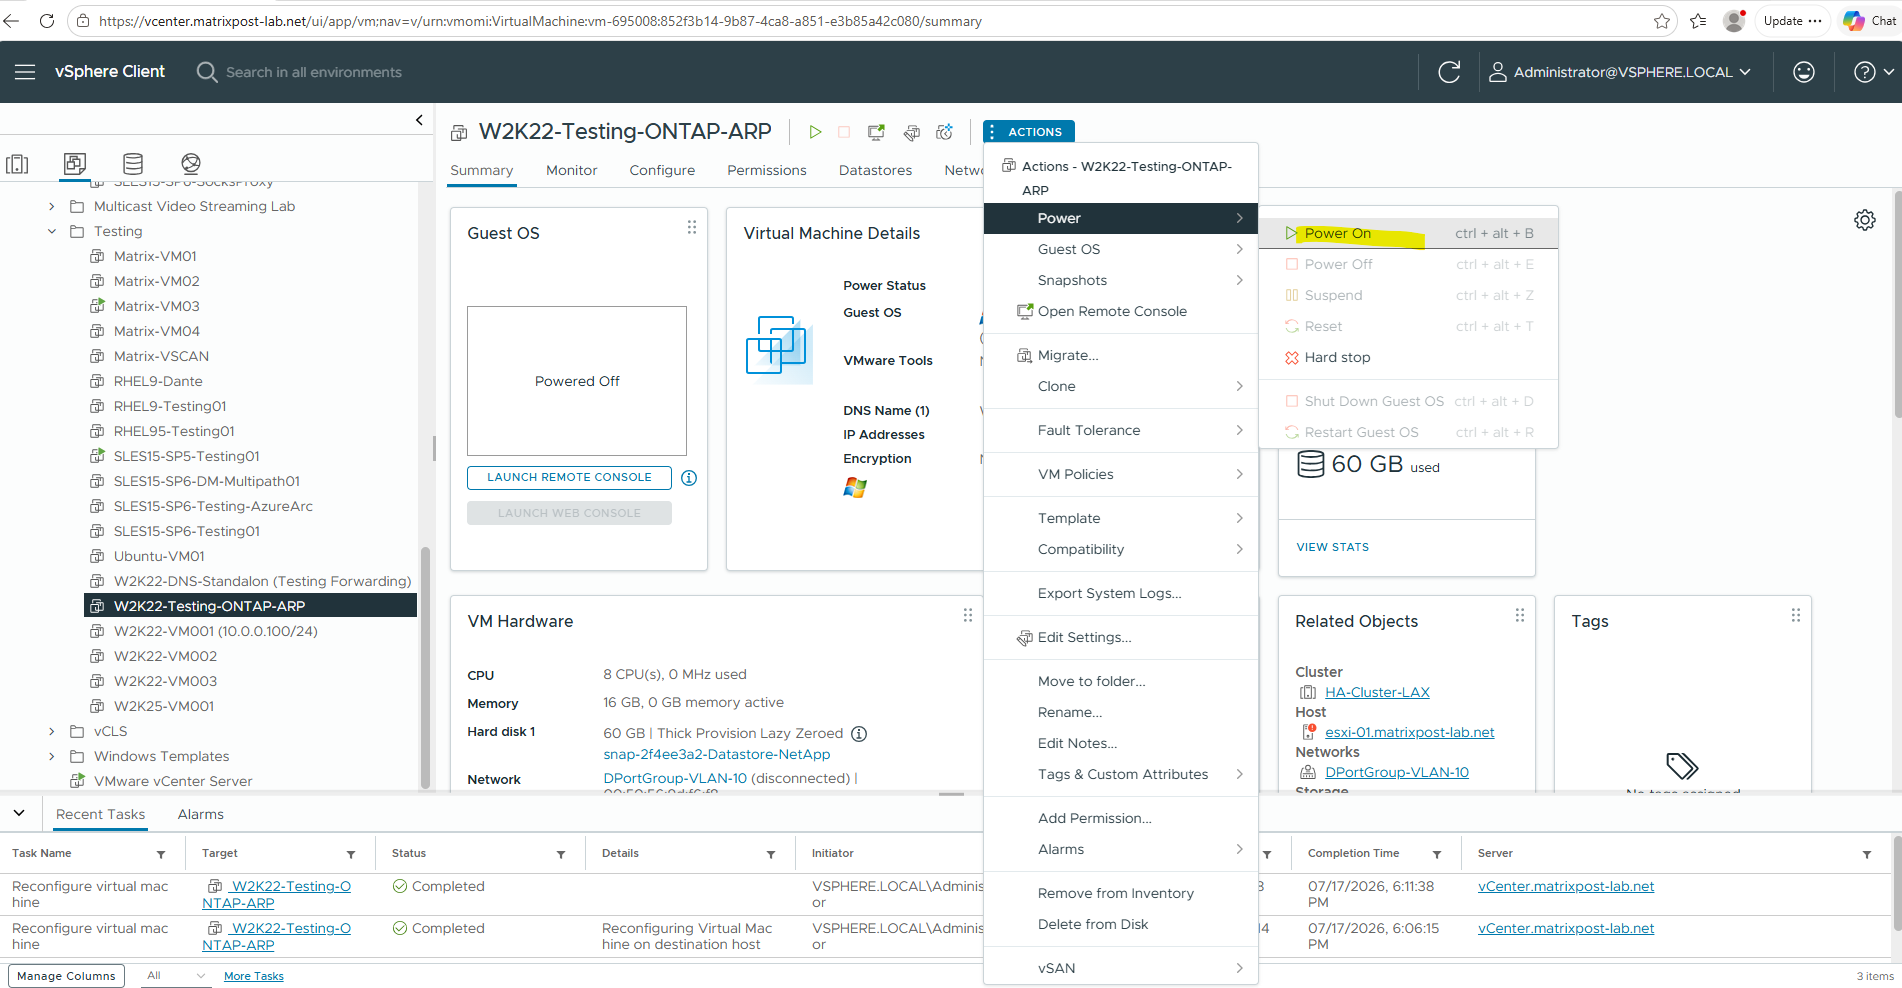
After verifying that the recovered virtual machine files are accessible, power off the affected virtual machine.
Next, detach the corrupted virtual disk from the virtual machine without deleting it from the datastore.
Finally, attach the recovered virtual disk (*.vmdk) from the restored datastore to the existing virtual machine. This preserves the virtual machine’s configuration, hardware settings, networking, UUID, and inventory object while restoring the disk contents to the selected recovery point.
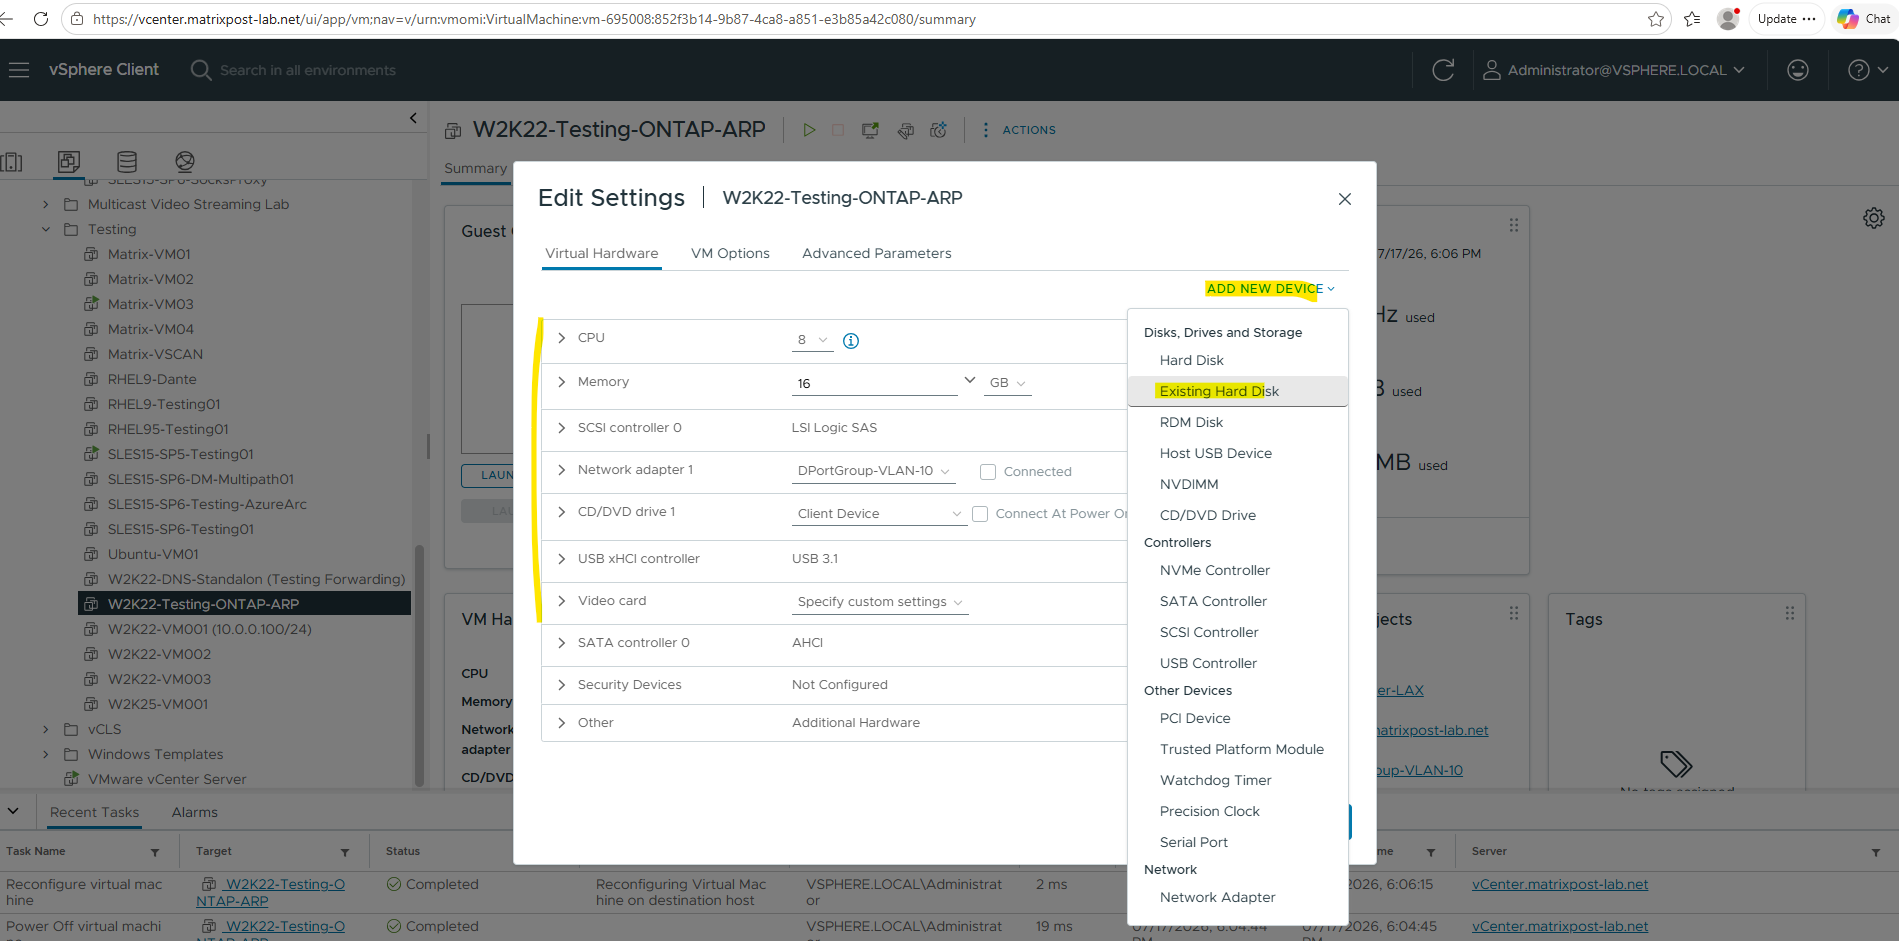
After removing the corrupted virtual disk from the virtual machine (Remove from virtual machine only), add an Existing Hard Disk.
In the file selection dialog, browse to the restored datastore, in this example snap-2f4ee3a2-Datastore-NetApp, which contains the recovered virtual machine files restored by NetApp Console.
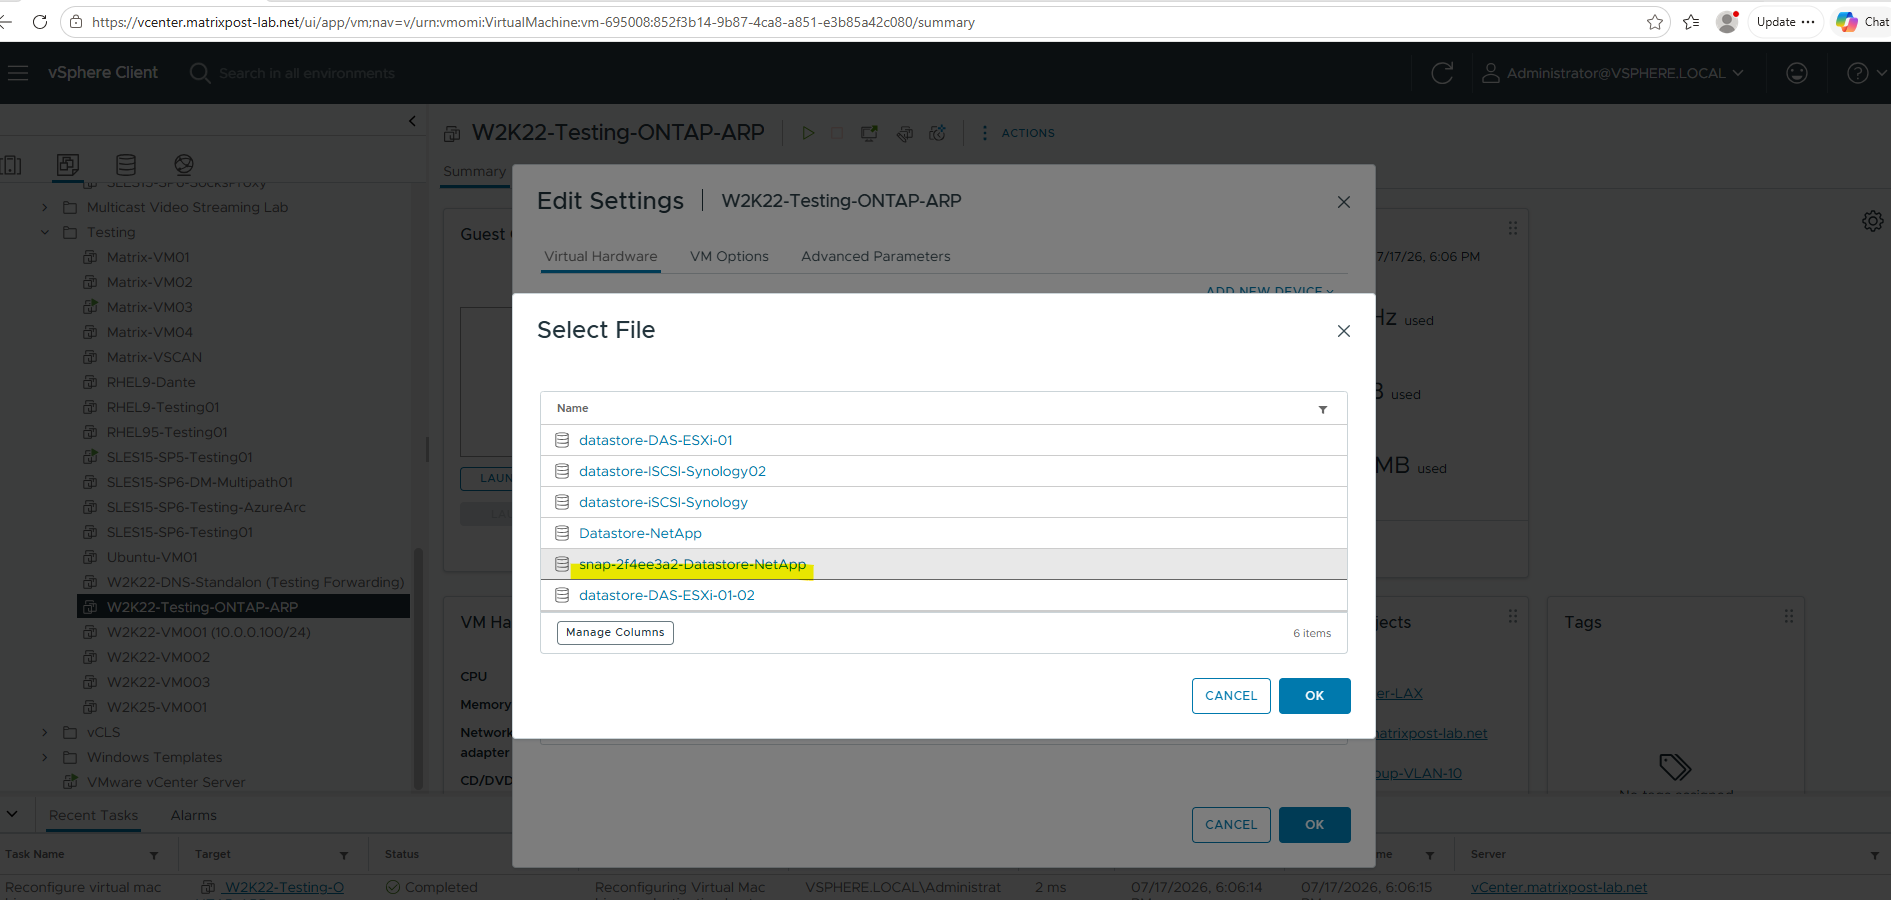
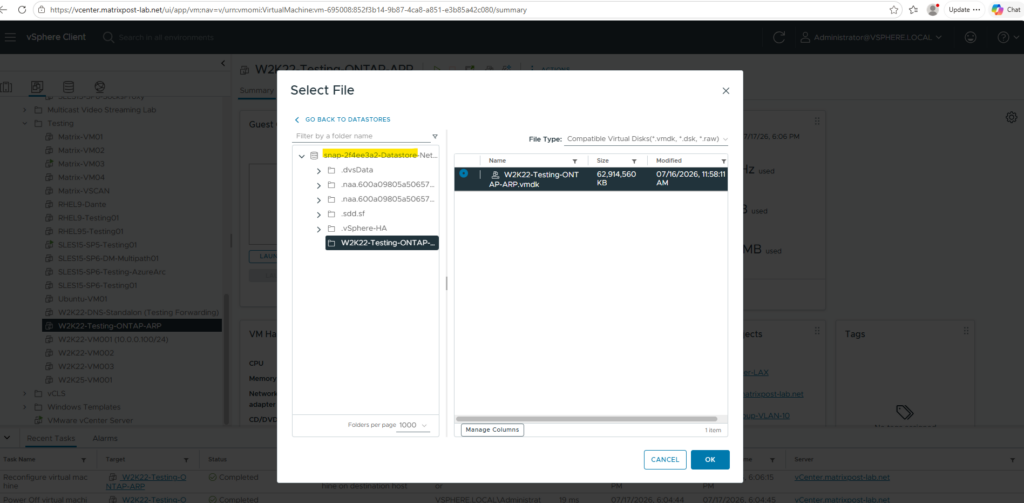
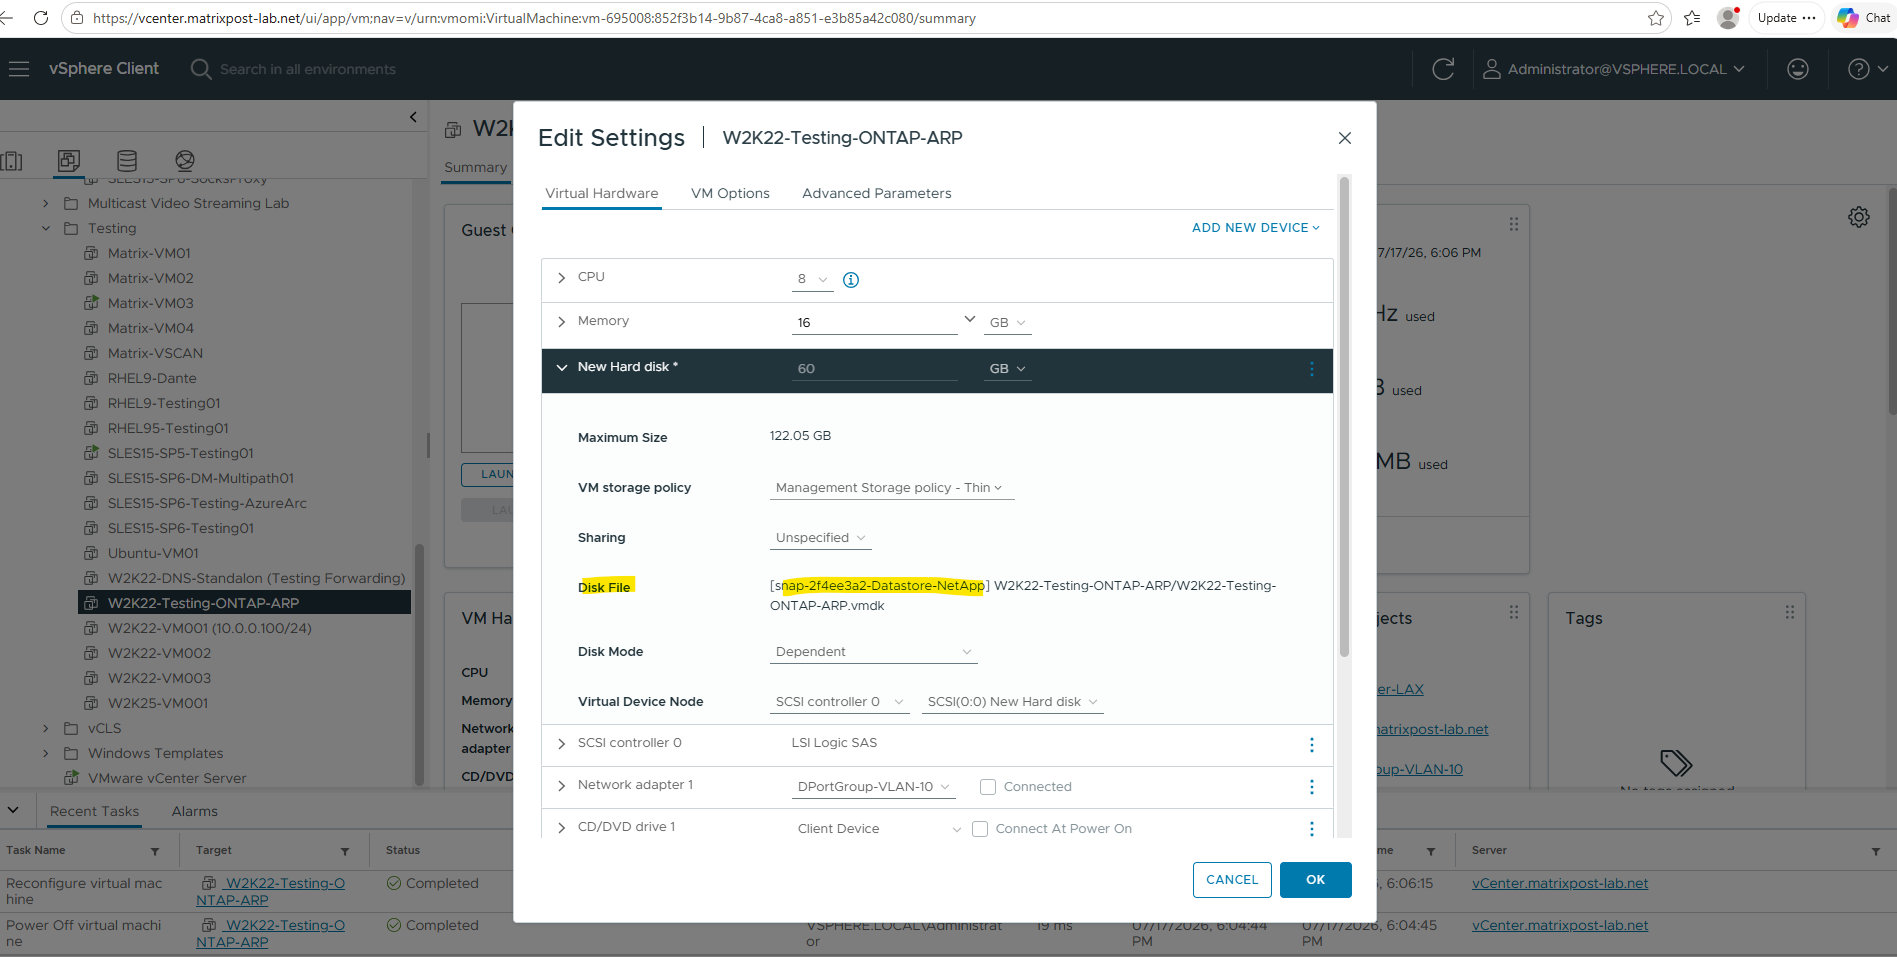
Before applying the configuration, verify that the Disk File path references the restored datastore rather than the original production datastore. This ensures that the virtual machine will boot from the recovered virtual disk while preserving its existing virtual hardware, networking, and inventory configuration.
After attaching the recovered virtual disk, power on the virtual machine.
After attaching the recovered virtual disk, the virtual machine boots successfully from the restored datastore.
As shown below, Hard disk 1 now references snap-2f4ee3a2-Datastore-NetApp, confirming that the recovered VMDK is being used while the existing virtual machine configuration, hardware, networking, and inventory object remain unchanged.
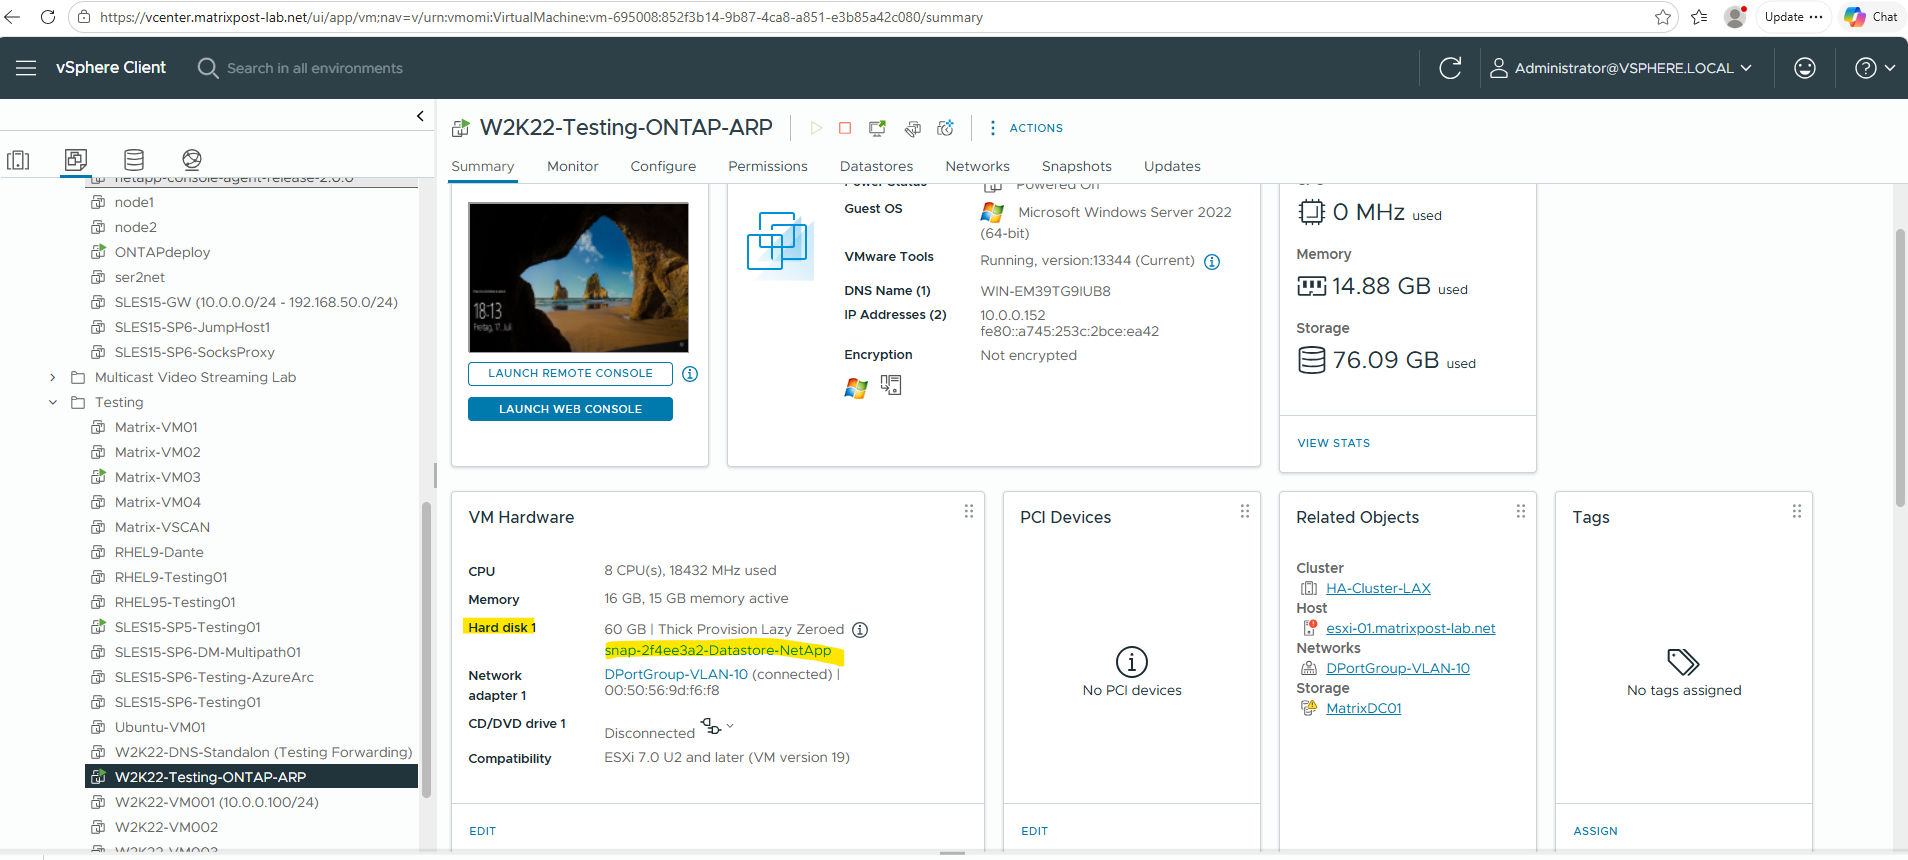
As a final verification, the virtual machine remains connected to both the original and the restored datastore. While the original datastore is still available, the operating system now boots from the recovered virtual disk located on snap-2f4ee3a2-Datastore-NetApp, allowing the restored data to be validated before any further cleanup or migration is performed.
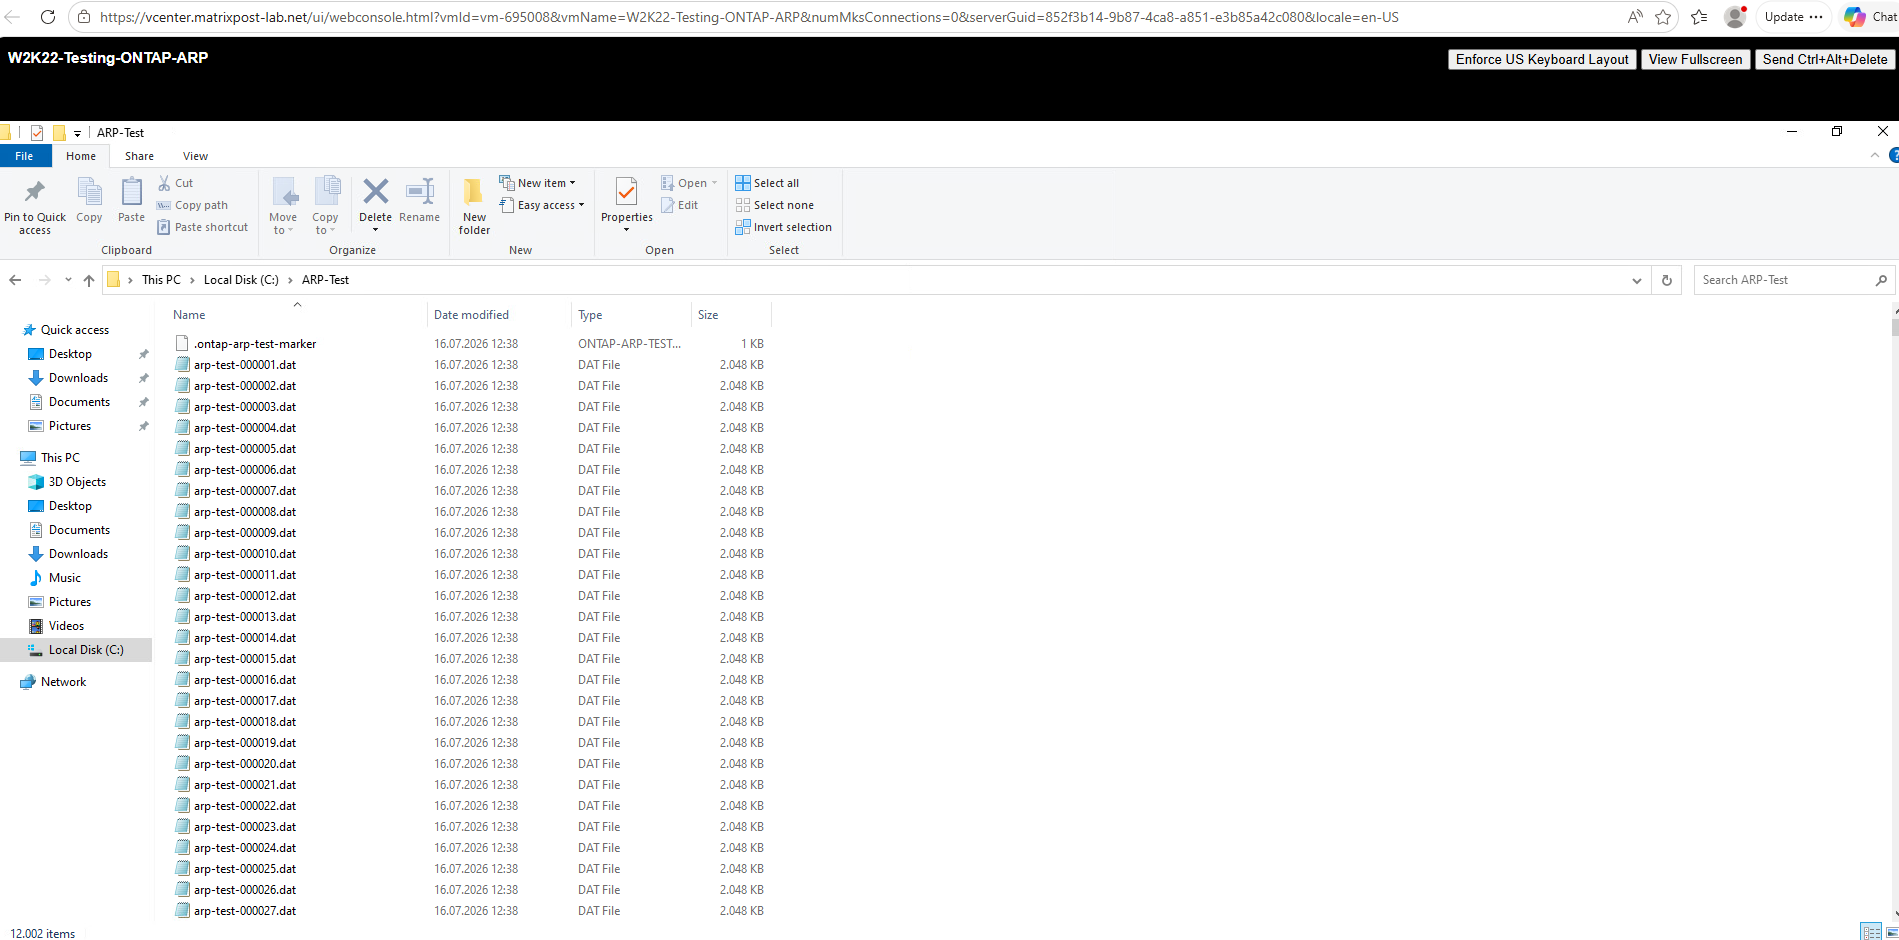
Finally, opening the previously affected folder confirms that the recovery was successful.
The ransomware-encrypted files with the
.lockedextension have been replaced by their original.datfiles from the selected recovery point, demonstrating that the corrupted virtual disk was successfully replaced without restoring or rebuilding the entire virtual machine.
Links
Learn about NetApp Ransomware Resilience
https://docs.netapp.com/us-en/data-services-ransomware-resilience/concept-ransomware-resilience.htmlFPolicy file blocking
https://docs.netapp.com/us-en/ontap-technical-reports/ransomware-solutions/ransomware-fpolicy.htmlProtect workloads with NetApp Ransomware Resilience protection strategies
https://docs.netapp.com/us-en/data-services-ransomware-resilience/rp-use-protect.htmlNative FPolicy File Blocking
https://kb.netapp.com/on-prem/ontap/da/NAS/NAS-KBs/Native_FPolicy_File_BlockingHow to configure native Fpolicy in ONTAP to block extensions
https://kb.netapp.com/on-prem/ontap/da/NAS/NAS-KBs/How_to_configure_native_Fpolicy_in_ONTAP_to_block_extensionsRestore data from ONTAP ARP snapshots after a ransomware attack
https://docs.netapp.com/us-en/ontap/anti-ransomware/recover-data-task.htmlRecover from a ransomware attack with a custom restore in NetApp Ransomware Resilience
https://docs.netapp.com/us-en/data-services-ransomware-resilience/task-custom-restore.htmlConfigure the environment for a clean restore in NetApp Ransomware Resilience
https://docs.netapp.com/us-en/data-services-ransomware-resilience/task-clean-restore.html
