

Protecting NetApp ONTAP Workloads with Autonomous Ransomware Protection (ARP) – Part 2 – Simulating Ransomware Attacks on VMware VMFS Datastores
In Part 1 of this series, we explored the fundamentals of NetApp ONTAP Autonomous Ransomware Protection (ARP), including its architecture, licensing, protection mechanisms, and how to enable ARP on supported volumes.
In this second part, we’ll build a complete VMware vSphere SAN environment from scratch to validate ARP in a realistic lab. Starting with a dedicated Storage Virtual Machine (SVM) for iSCSI workloads, we’ll configure the required management and data LIFs, enable the iSCSI protocol, create a dedicated FlexVol volume and LUN, map the LUN to the ESXi hosts using an initiator group (igroup), and connect it to VMware vSphere to create a VMFS datastore.
After deploying a Windows Server 2022 virtual machine on the datastore, we’ll enable Autonomous Ransomware Protection (ARP) on the underlying ONTAP volume and simulate a ransomware attack by overwriting thousands of files with high-entropy random data.
Finally, we’ll examine how ONTAP detects the ransomware-like activity, automatically creates dedicated recovery snapshots, and provides recovery options for affected workloads.
In Part 3, we cover the NetApp Console Ransomware Resilience service, which extends native ONTAP Autonomous Ransomware Protection (ARP) with centralized protection, ransomware detection, orchestration, and recovery capabilities for VMware SAN workloads.
In Part 4, we cover the protection, detection, and recovery of SMB (CIFS) file workloads using NetApp Console Ransomware Resilience, demonstrating how it extends native ONTAP Autonomous Ransomware Protection (ARP) with centralized visibility, orchestration, and recovery capabilities.
If you’re new to using NetApp ONTAP as VMware vSphere SAN storage, you can also refer to my previous post, which walks through the complete process of configuring ONTAP iSCSI storage and connecting it to VMware vSphere
Prepare the SAN Workload on ONTAP
Create dedicated SVM
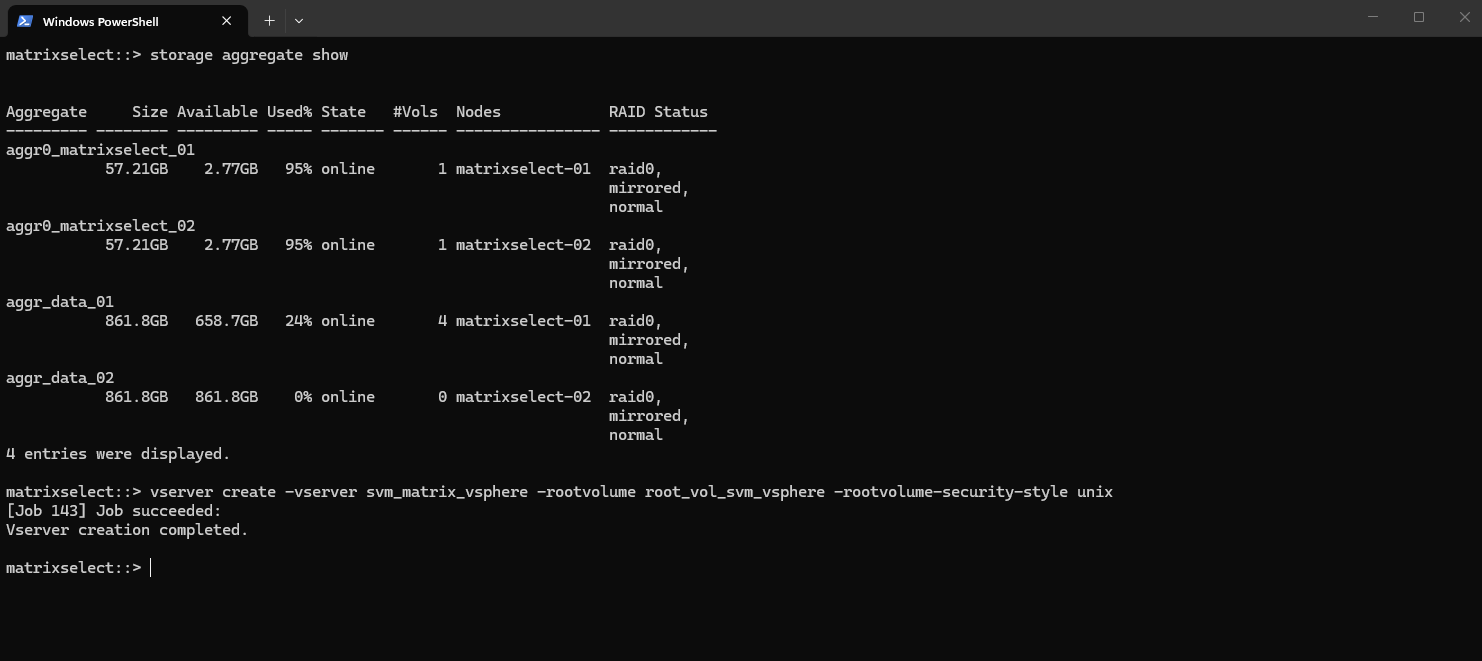
To separate the VMware SAN workload from the existing NAS services, we first create a dedicated Storage Virtual Machine (SVM) for iSCSI. This provides an isolated administrative and network boundary for the management LIF, iSCSI data LIFs, volumes, LUNs, and host mappings used in the lab.
matrixselect::> storage aggregate show
matrixselect::> vserver create -vserver svm_matrix_vsphere -rootvolume root_vol_svm_vsphere -rootvolume-security-style unix
Create Management LIF
After creating the SVM, its also best practices to create a Management LIF (Logical Interface). This LIF is used for administrative access to the SVM, including management via CLI, System Manager, and protocol configuration.
matrixselect::> network interface create -vserver svm_matrix_vsphere -lif lif_svm_matrix_vsphere_mgmt -service-policy default-management -home-node matrixselect-01 -home-port e0a -address 10.0.0.116 -netmask 255.255.255.0 -failover-policy system-defined -auto-revert true

Create Data Lifs
Each SVM requires at least one data LIF, which represents the network endpoint used by clients to access storage services such as NFS, SMB or block-based storage using iSCSI. The LIF defines the IP address, subnet, and network path used by the SVM.
In HA setups, it is recommended to create one data LIF per node.
We should create two LIFs, one per node, with different names and IPs
matrixselect::> network interface create -vserver svm_matrix_vsphere -lif lif_iscsi01 -service-policy default-data-files -home-node matrixselect-01 -home-port e0a -address 10.0.0.117 -netmask 255.255.255.0 -failover-policy system-defined  -auto-revert true

matrixselect::> network interface create -vserver svm_matrix_vsphere -lif lif_iscsi02 -service-policy default-data-files -home-node matrixselect-02 -home-port e0a -address 10.0.0.118 -netmask 255.255.255.0 -failover-policy system-defined  -auto-revert true

Enable iSCSI for the SVM and Data LIFs
So far no protocols are enabled on our new SVM.
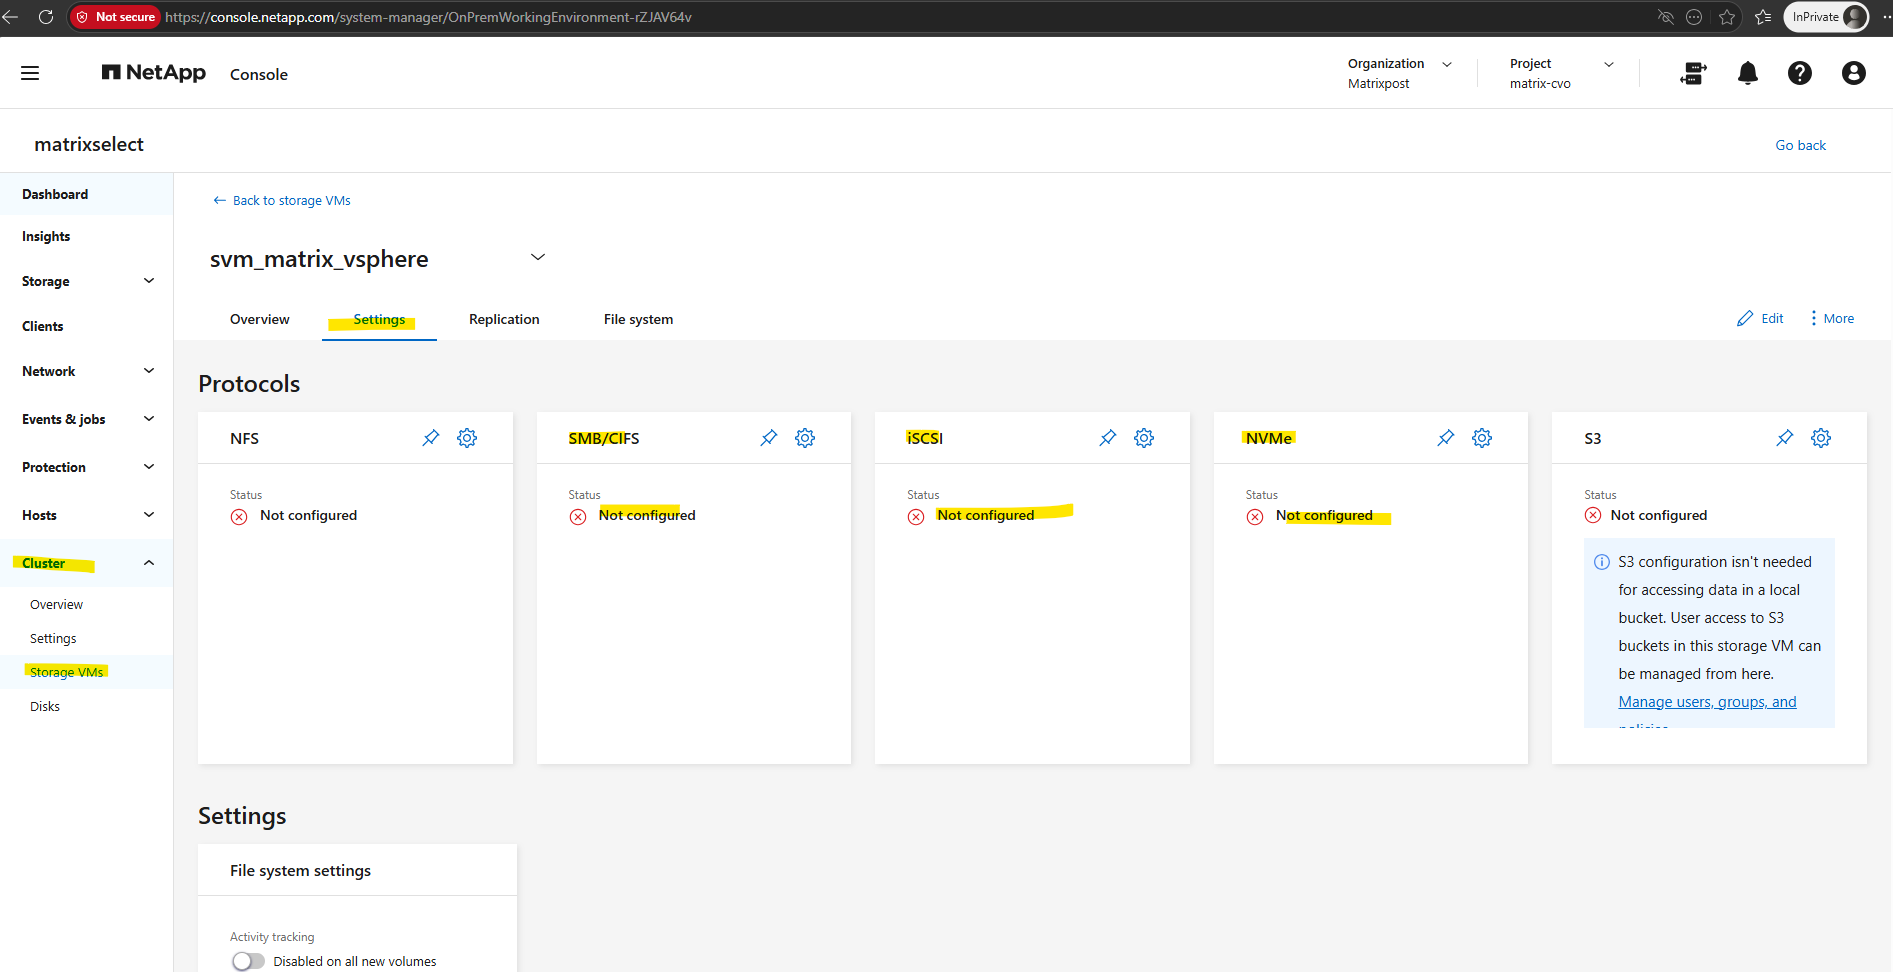
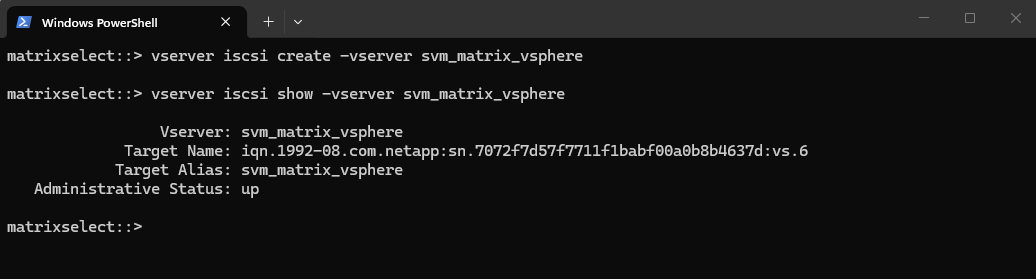
To enable iSCSI on our SVM by using the CLI, we can run.
matrixselect::> vserver iscsi create -vserver svm_matrix_vsphered
matrixselect::> vserver iscsi show -vserver svm_matrix_vsphere
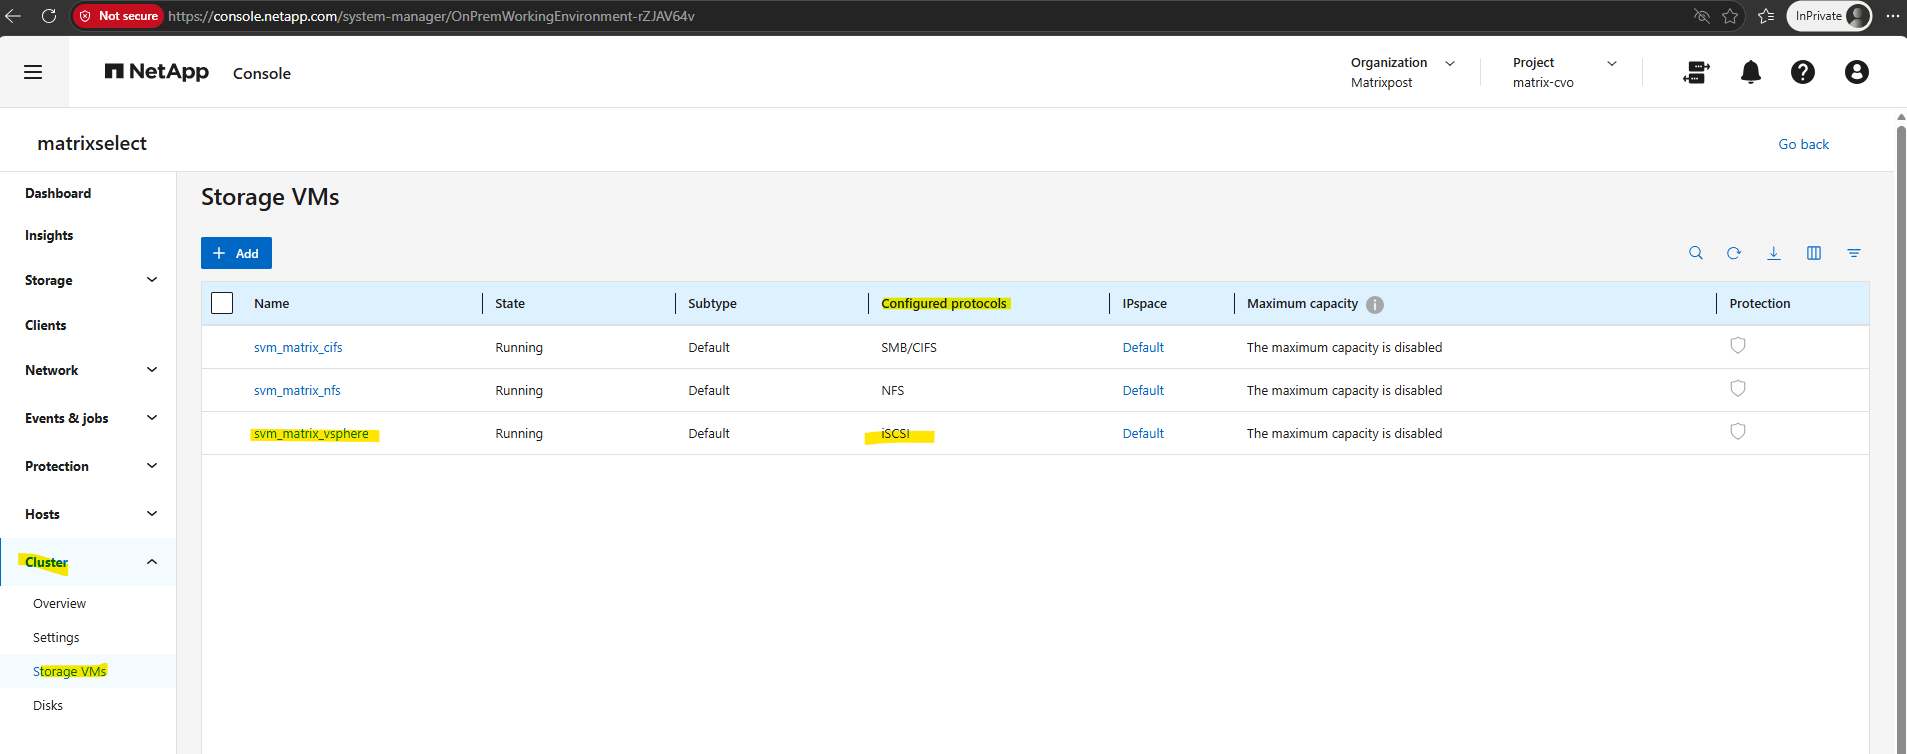
In our case we already created and assigned a LIF to our SVM but is currently not configured for iSCSI access.
So far the Data Protocol is just set to: nfs, cifs, fcache, but not iscsi
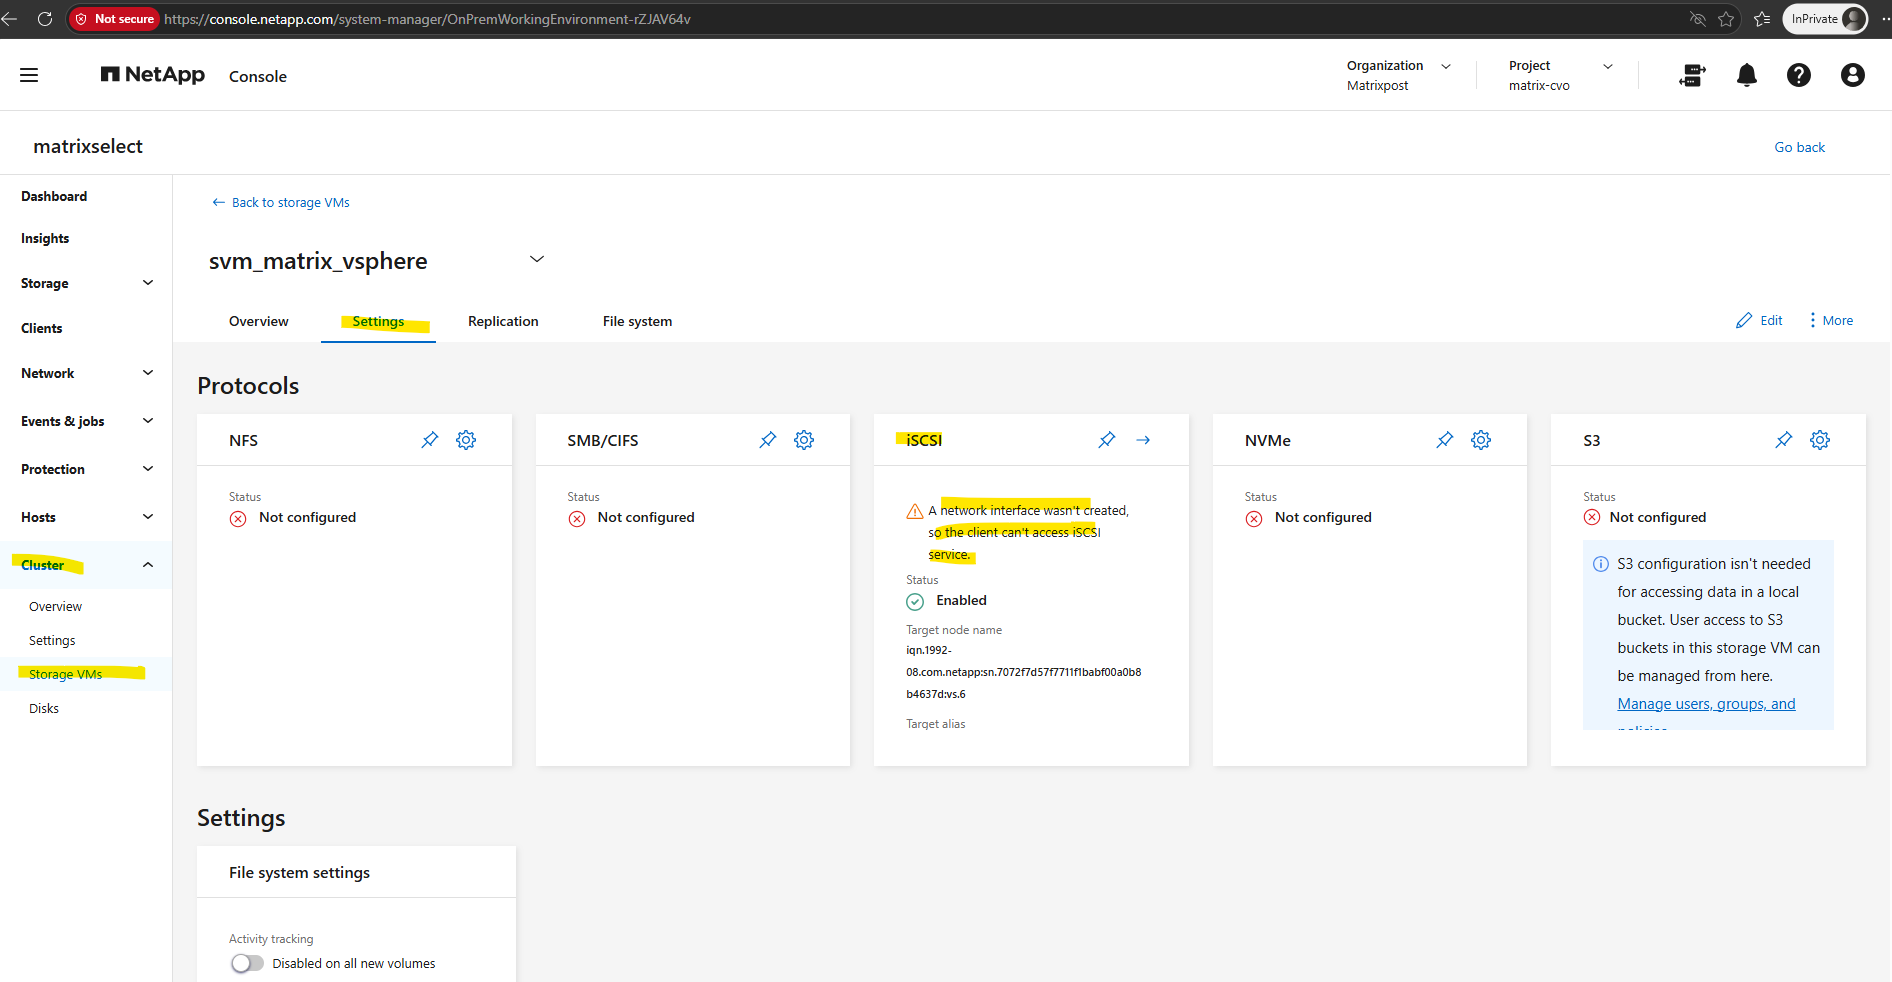
matrixselect::> network interface show -vserver svm_matrix_vsphere -lif lif_iscsi01 -fields data-protocol
matrixselect::> network interface show -vserver svm_matrix_vsphere -lif lif_iscsi02 -fields data-protocol
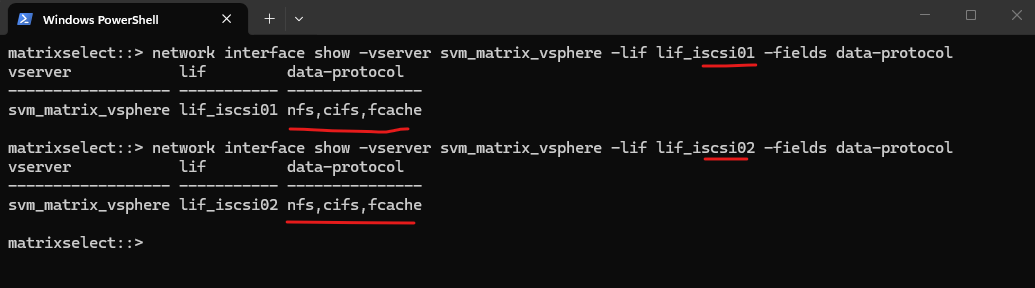
We must modify the LIF to allow the iSCSI protocol, by assigning the correct service policy.
matrixselect::> network interface service-policy show -policy default-data-iscsi
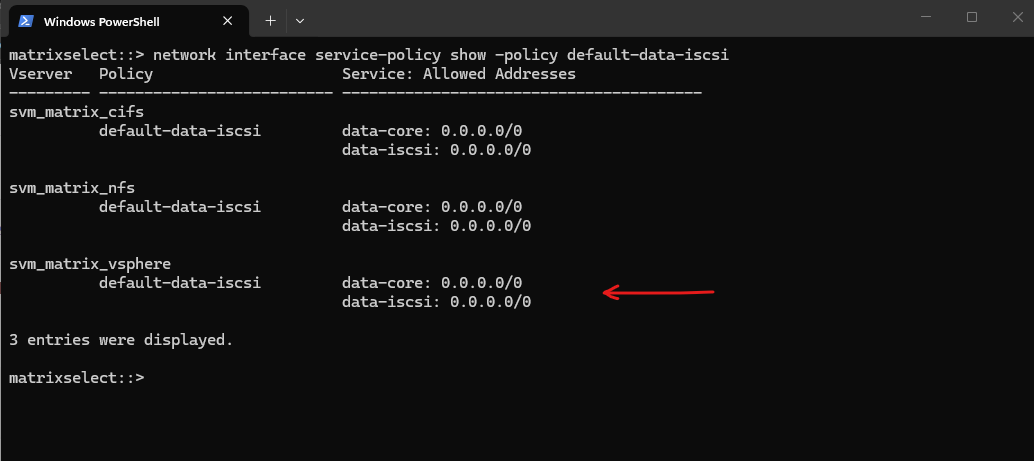
Then assign the LIF to this policy.
matrixselect::> network interface modify -vserver svm_matrix_vsphere -lif lif_iscsi01 -service-policy default-data-iscsi
matrixselect::> network interface modify -vserver svm_matrix_vsphere -lif lif_iscsi02 -service-policy default-data-iscsi
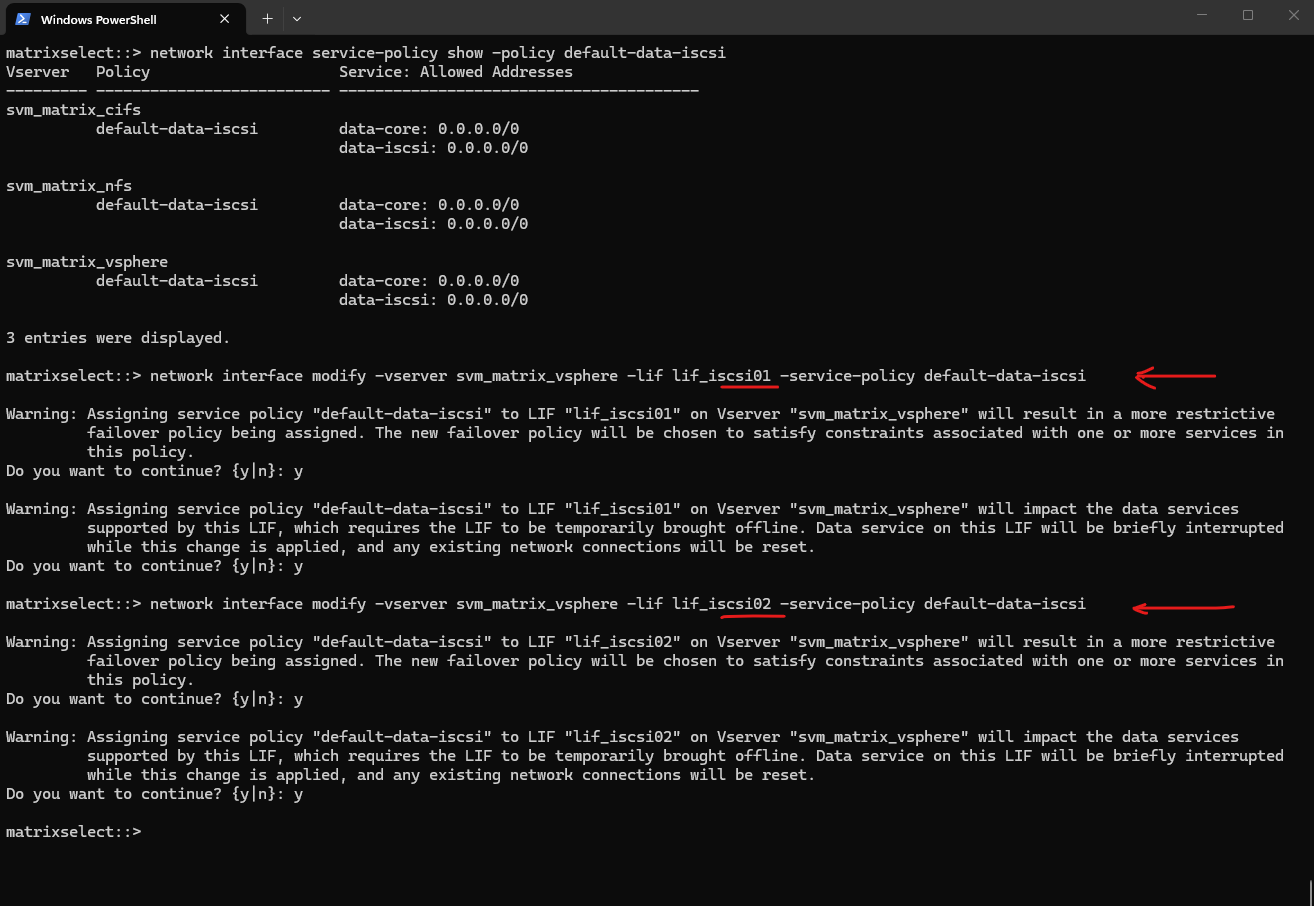
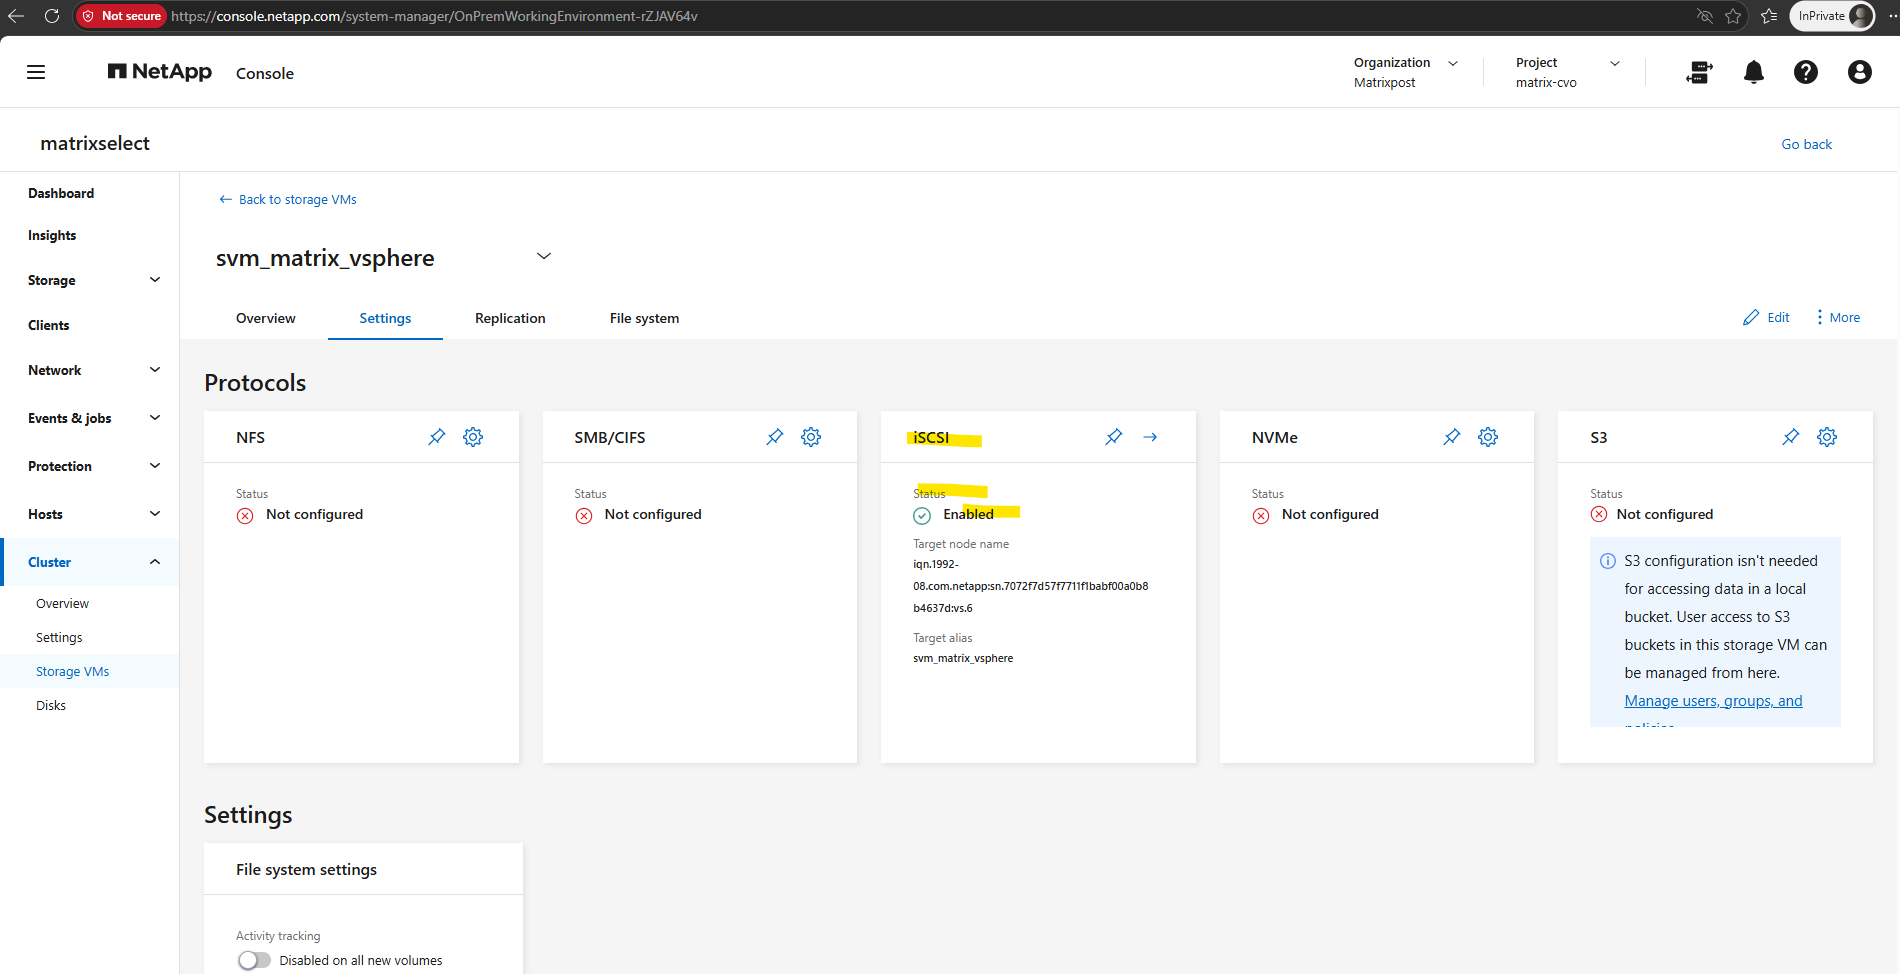
Now it looks good.
Create a Volume for the LUN
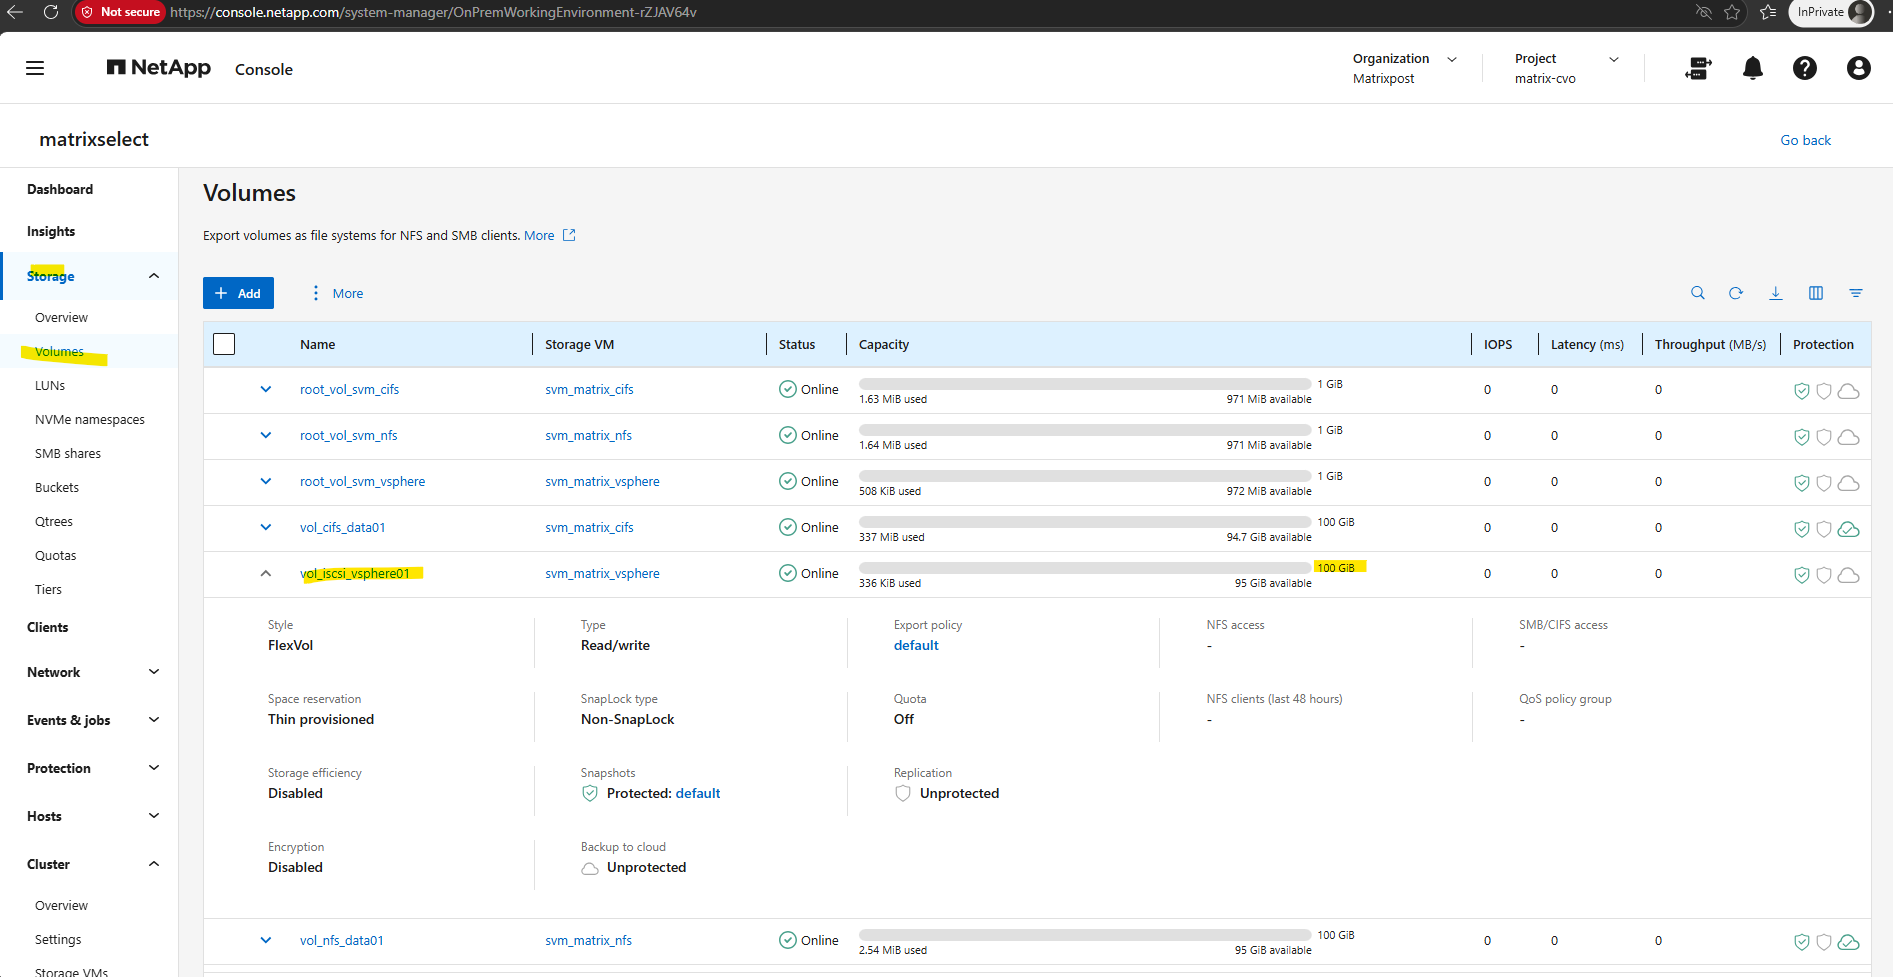
A volume in NetApp ONTAP is a logical, mountable unit of storage that resides inside an aggregate, is served by a Storage Virtual Machine (SVM), and is accessible to clients via NFS, SMB, iSCSI, or FC.
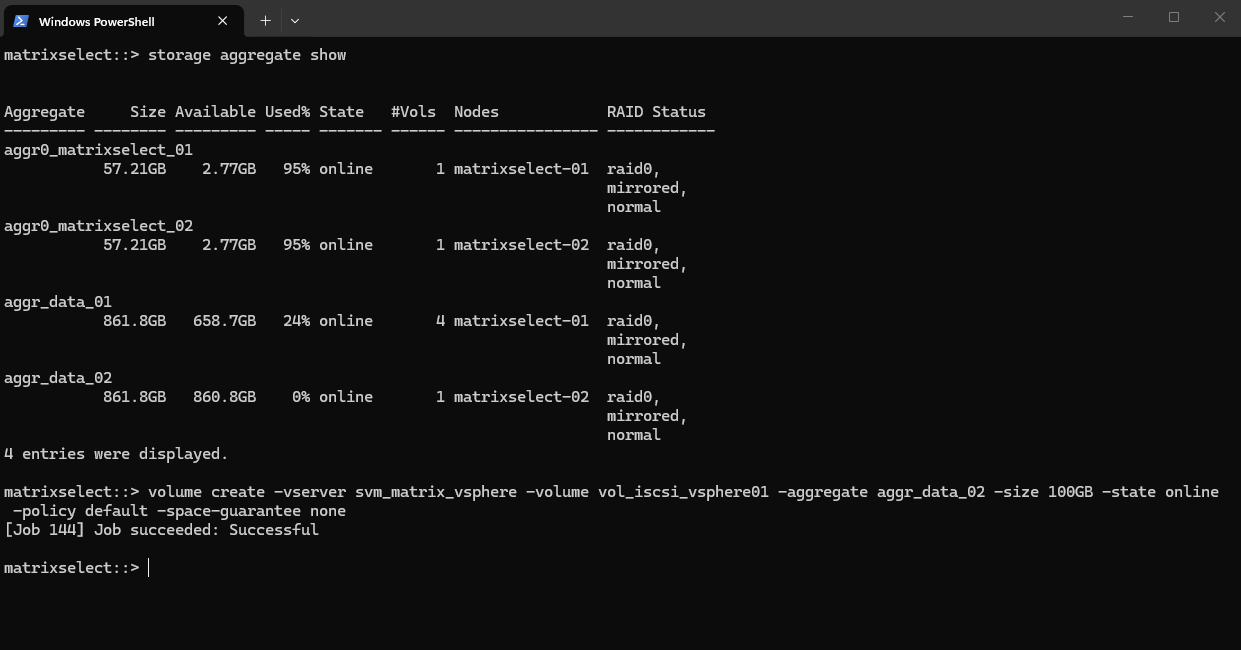
matrixselect::> storage aggregate show
matrixselect::> volume create -vserver svm_matrix_vsphere -volume vol_iscsi_vsphere01 -aggregate aggr_data_02 -size 100GB -state online -policy default -space-guarantee none
Create the LUN inside the Volume
A LUN (Logical Unit Number) is a block-level storage object presented by NetApp to a host (like ESXi, Windows, or Linux) over iSCSI or Fibre Channel (FC).
It acts like a virtual hard disk to the host. The host formats it with a filesystem (e.g., VMFS on ESXi, NTFS on Windows). It is used as a datastore, shared disk, or raw device.
To create the LUN run the following command.
You must provide the correct volume path under the
/vol/directory with the actual volume name.-ostype vmware ==> Aligns LUN geometry for VMware use
-space-reserve ==> disabled means thin provisioning
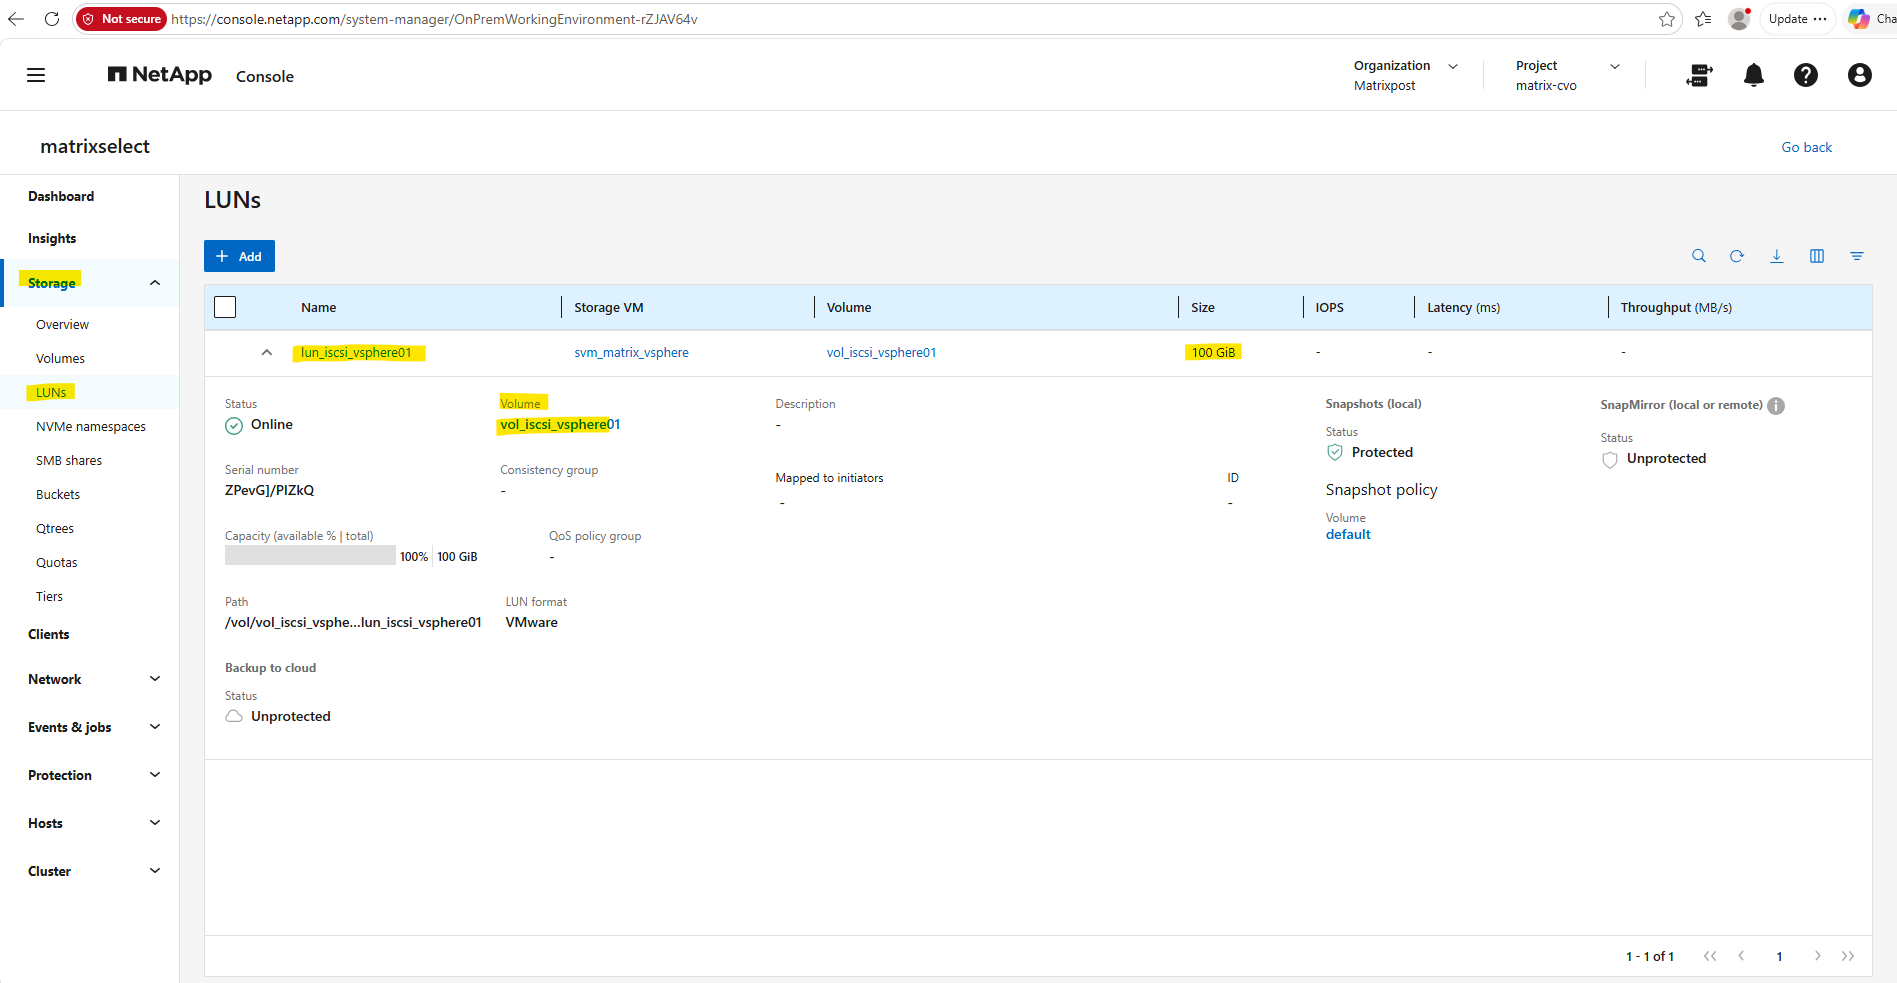
matrixselect::> lun create -vserver svm_matrix_vsphere -path /vol/vol_iscsi_vsphere01/lun_iscsi_vsphere01 -size 100G -ostype vmware -space-reserve disabled

Create an igroup for ESXi
After creating the LUN, the next step is to create an igroup to control which iSCSI initiators (like ESXi hosts) are allowed to access it.
Once the igroup is ready, the next step is to map the LUN to the igroup so your ESXi host can discover and access it.
Below I will add both iSCSI initiators of my ESXi hosts comma separated.
-ostype ==> is used to specify the operating system type of the initiators in the igroup.
-initiator ==> specifies the iSCSI initiator IQN that will be granted access to LUNs mapped to that igroup.
matrixselect::> igroup create -vserver svm_matrix_vsphere -igroup esxi_hosts -protocol iscsi -ostype vmware -initiator iqn.1998-01.com.vmware:esxi-01.matrixpost-lab.net:1736772152:64,iqn.1998-01.com.vmware:esxi-02.matrixpost-lab.net:692947689:64

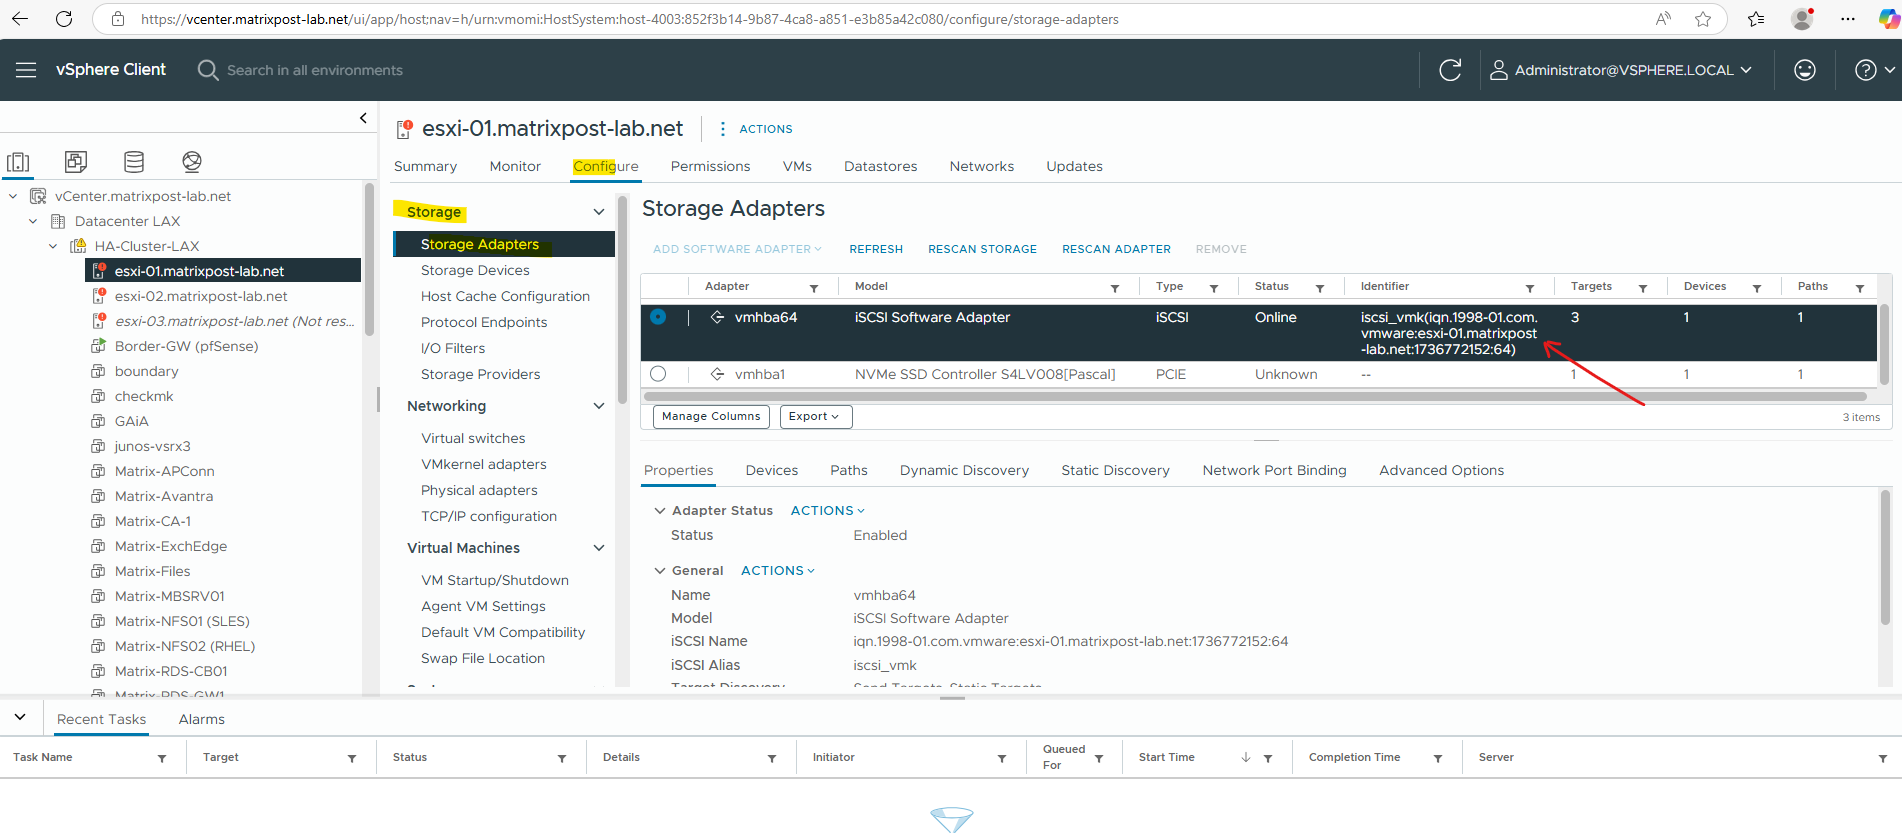
The corresponding iSCSI initiator IQN for each ESXi host we can determine directly in the vSphere client as shown below. Select your ESXi Host and navigate to Configure -> Storage -> Storage Adapters and check the iSCSI Software Adapter.
Map the LUN to the igroup
Now we need to map the LUN to our igroup so that our ESXi hosts can discover and access it.
Therefore run the following command.
matrixselect::> lun map -vserver svm_matrix_vsphere -path /vol/vol_iscsi_vsphere01/lun_iscsi_vsphere01 -igroup esxi_hosts

Connecting the LUN to our ESXi Hosts
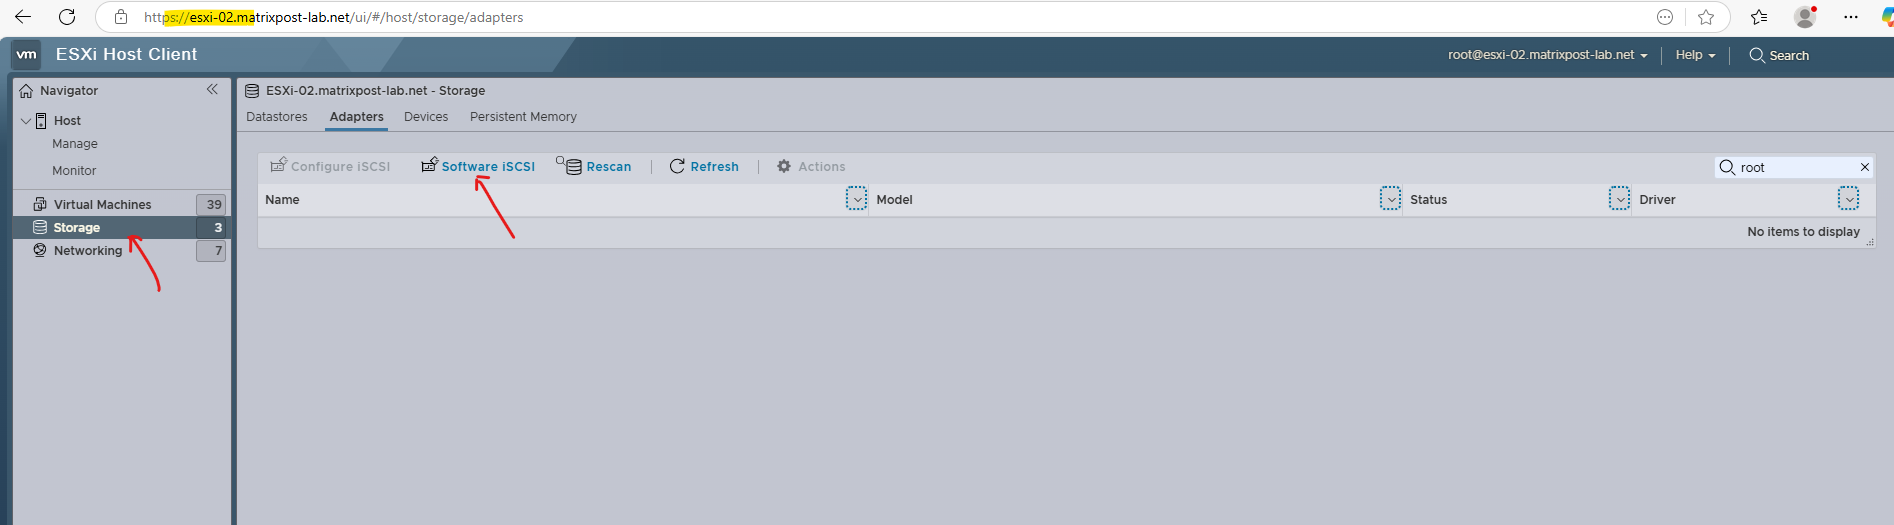
Now finally we need to connect our new LUN to our ESXi hosts. Therefore you can use either the vSphere (vCenter) Client or the ESXi Host Clients.
If not already done, we first need to enable iSCSI below. More about you will find also in my following post.
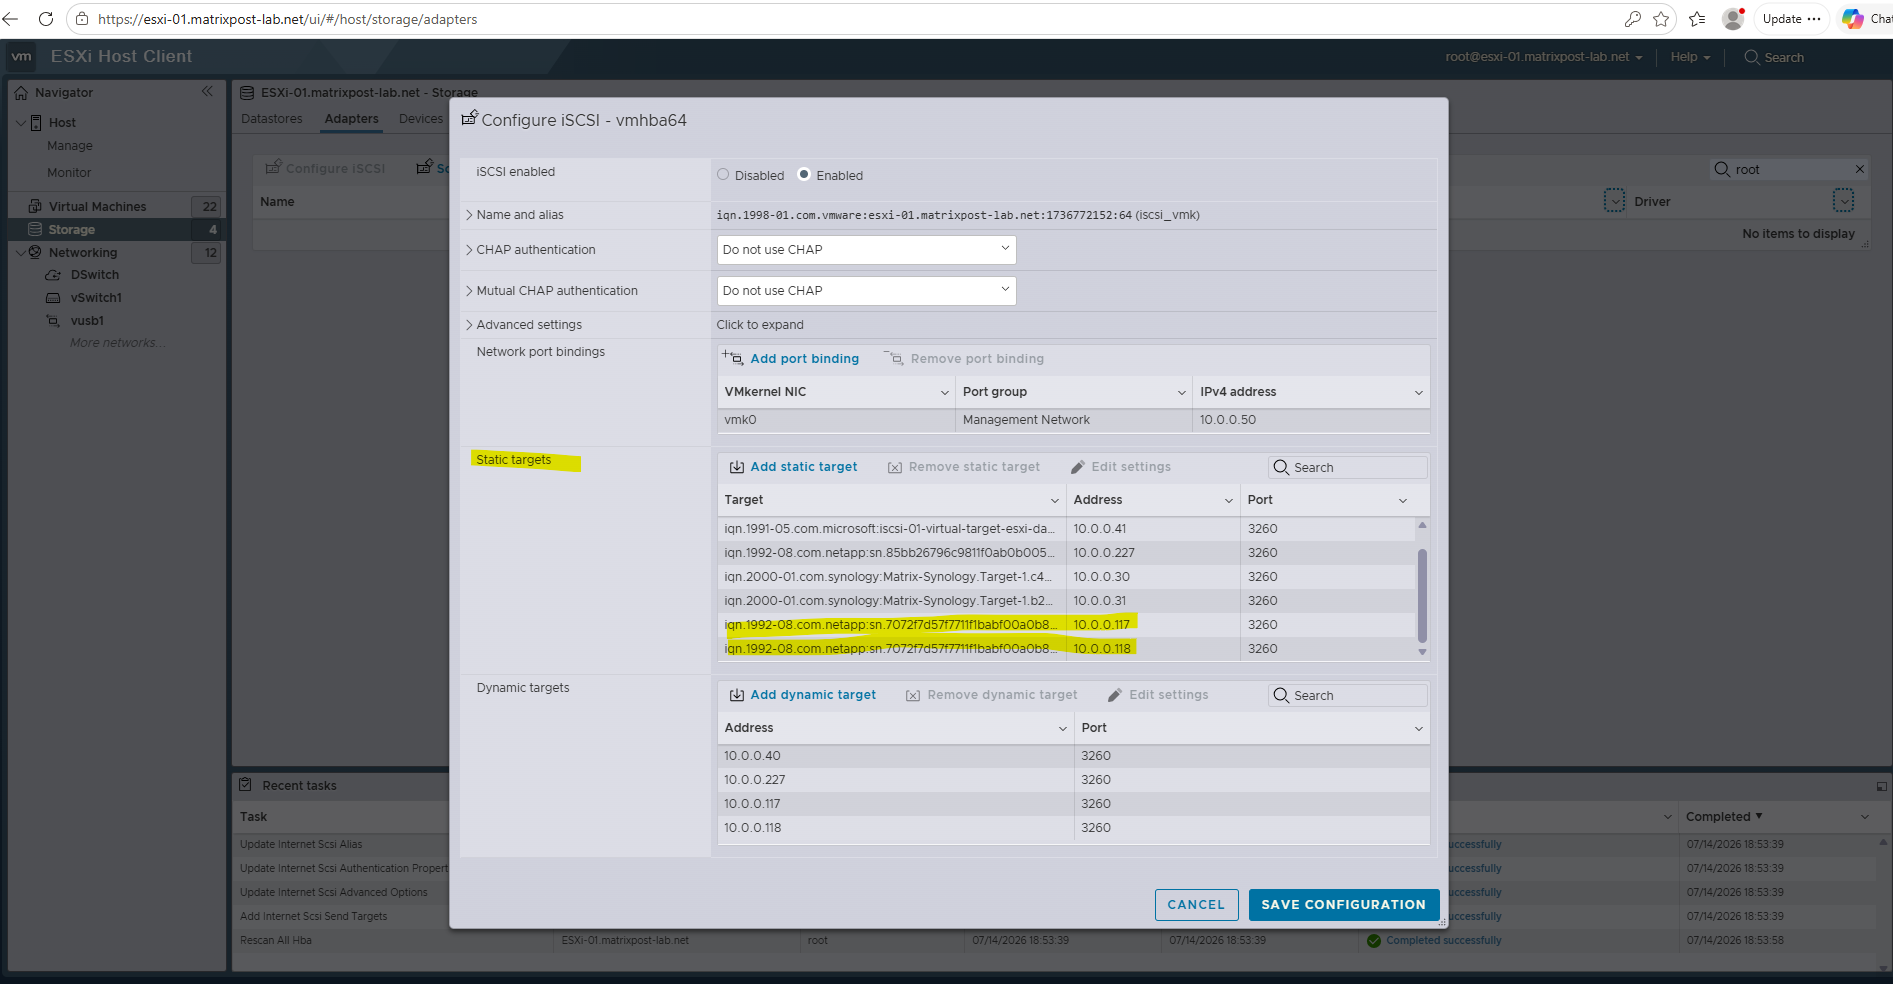
Below we need to add a new iSCSI target, we need to perform these steps on all ESXi hosts we want to connect the LUN to and previously allowed within the igroup. I will add here a dynamic target and finally save the configuration. The IP address I need to provide here is our NetApp’s SVM where the LUN was created for.
Also known as SendTargets discovery. Each time the initiator contacts a specified iSCSI server, the initiator sends the SendTargets request to the server. The server responds by supplying a list of available targets to the initiator. The names and IP addresses of these targets appear on the Static Discovery tab. If you remove a static target added by dynamic discovery, the target might be returned to the list the next time a rescan happens, the storage adapter is reset, or the host is rebooted.
In addition to the dynamic discovery method, you can use static discovery and manually enter information for the targets. The iSCSI or iSER adapter uses a list of targets that you provide to contact and communicate with the iSCSI servers.
When you set up static or dynamic discovery, you can only add new iSCSI targets. You cannot change any parameters of an existing target. To make changes, remove the existing target and add a new one.
You can see here that my target also appears on the Static Discovery tab because of the SendTargets request of the dynamic targets configuration as mentioned above.
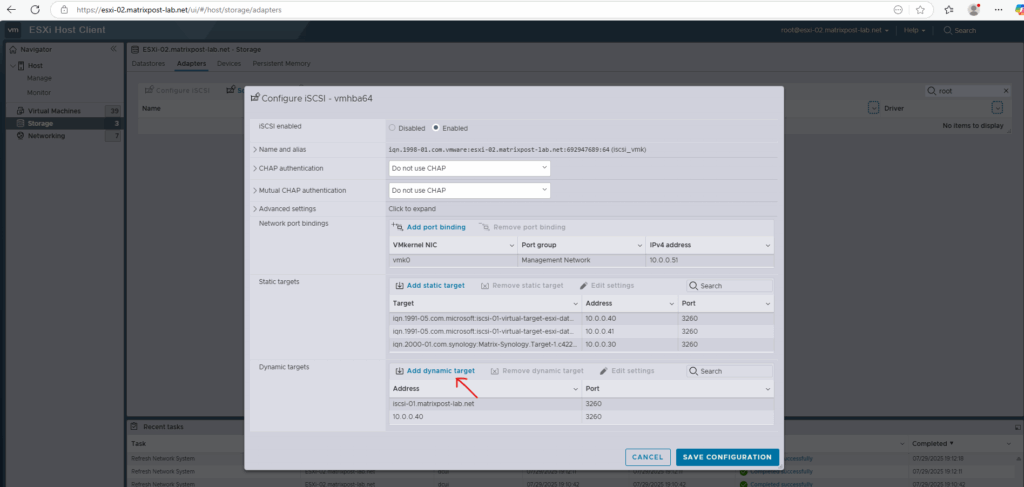
Adding the NetApp’s SVM IP address and click on Save Configuration.
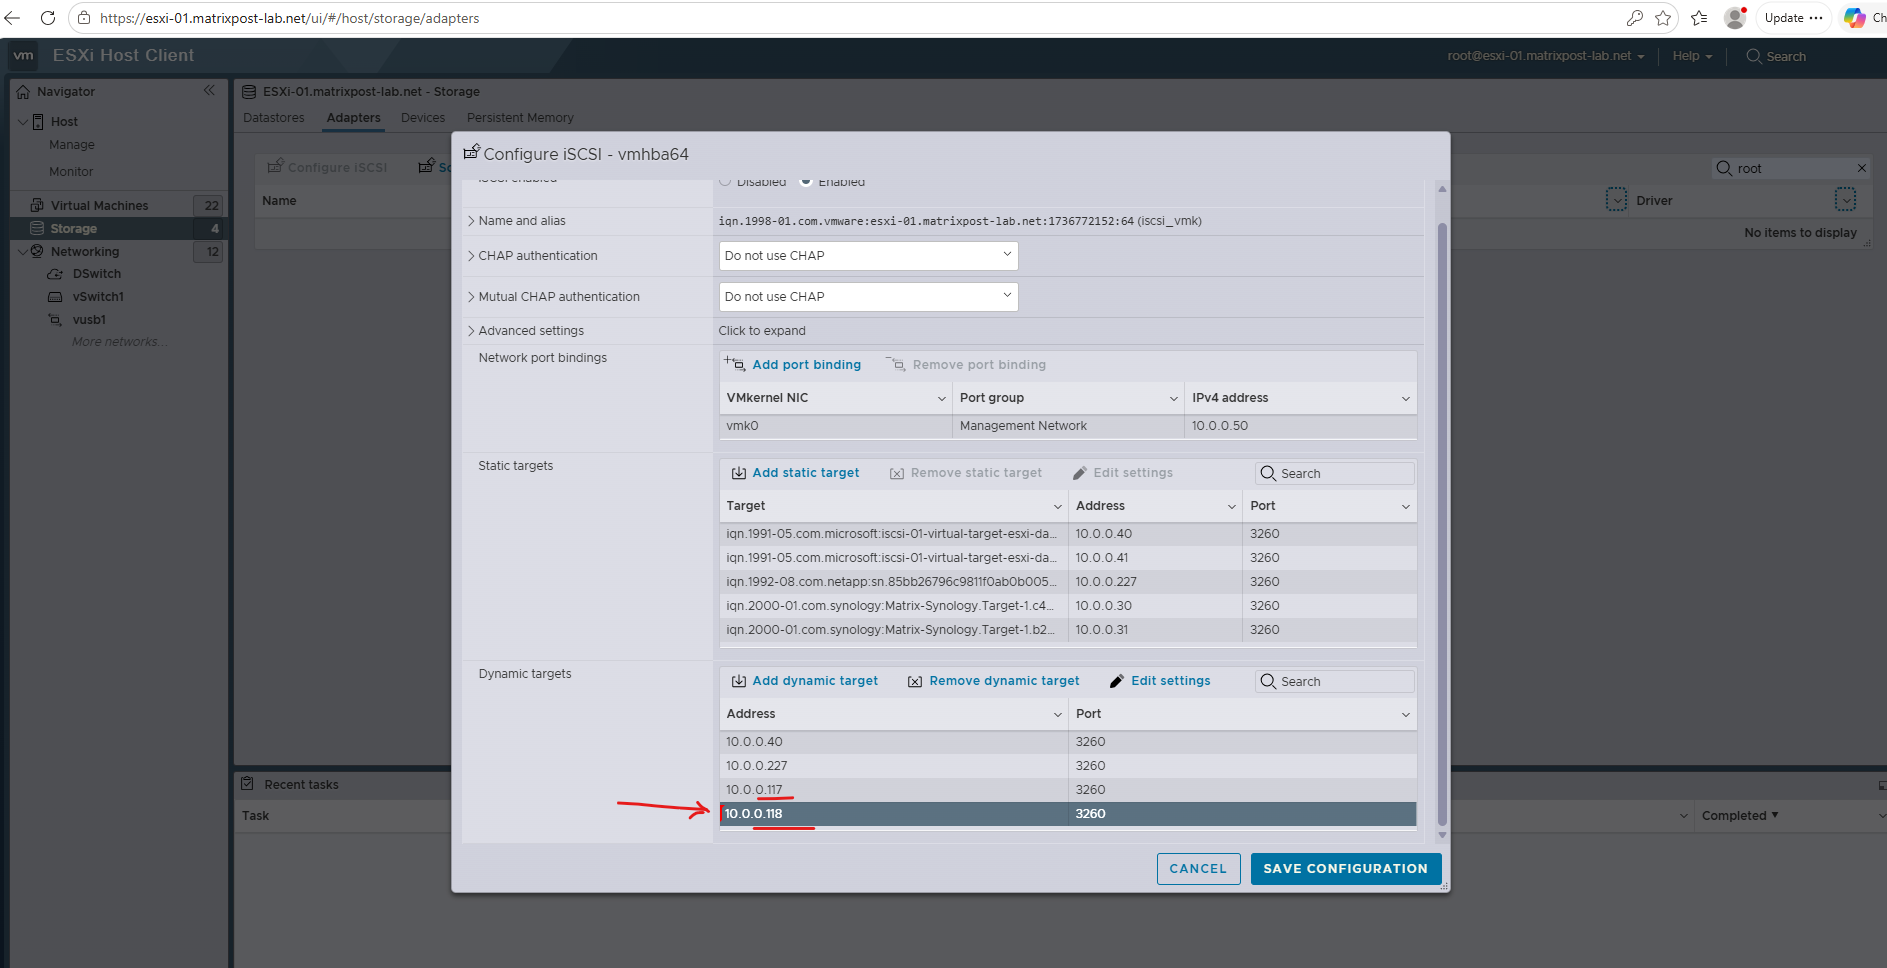
The LUN is now connected.
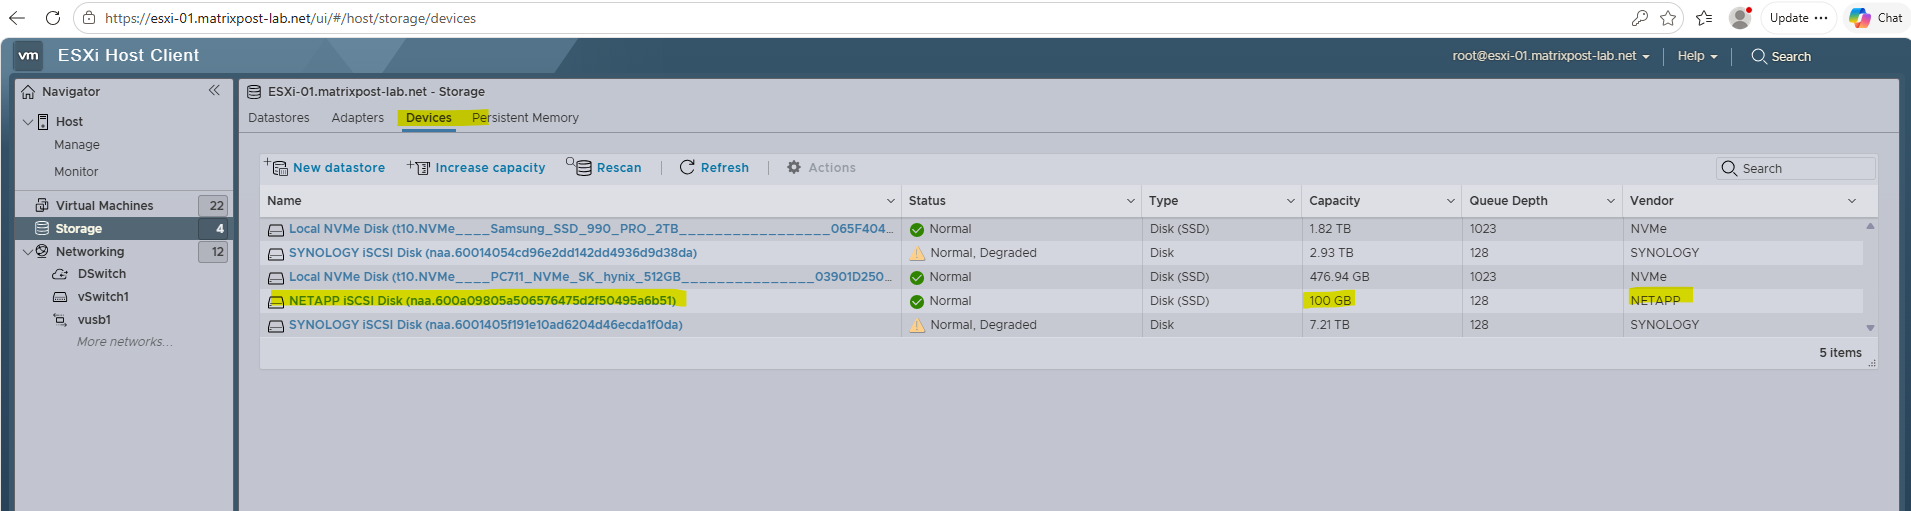
Within the Devices tab we can now see our new LUN shown up as disk.
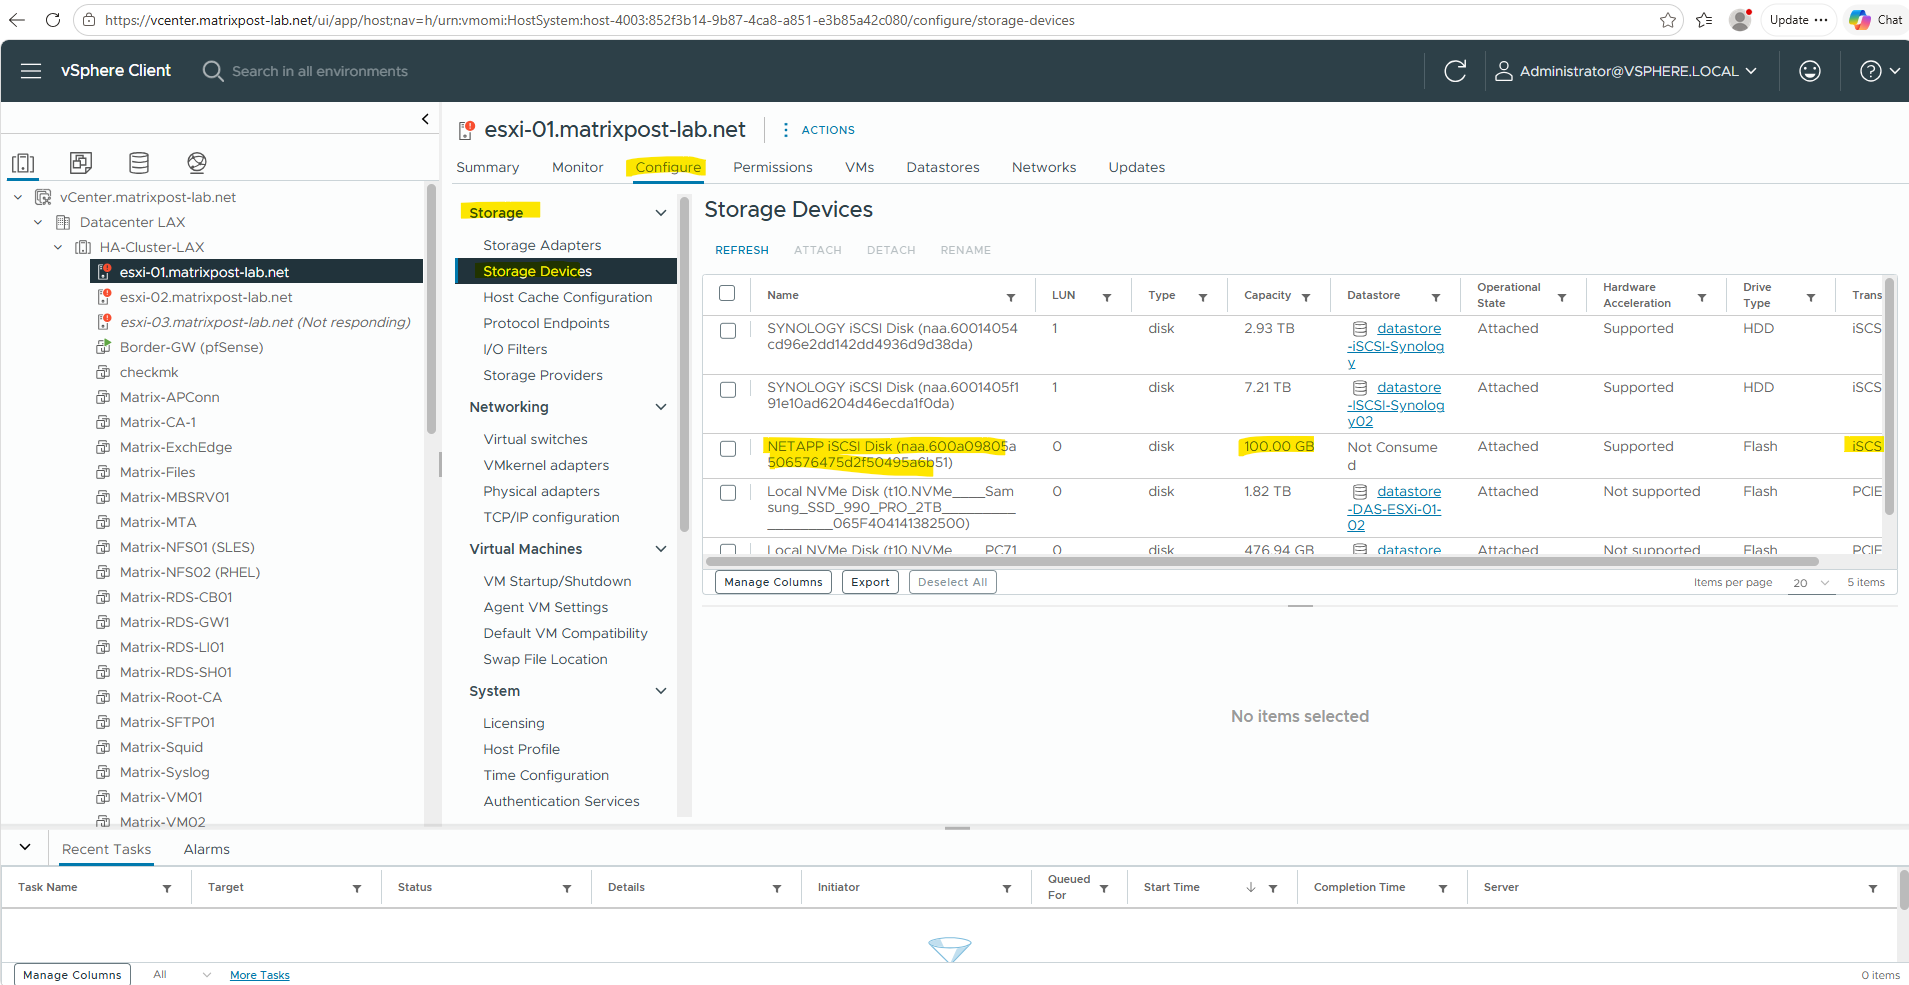
We can also see our new LUN in the vSphere client.
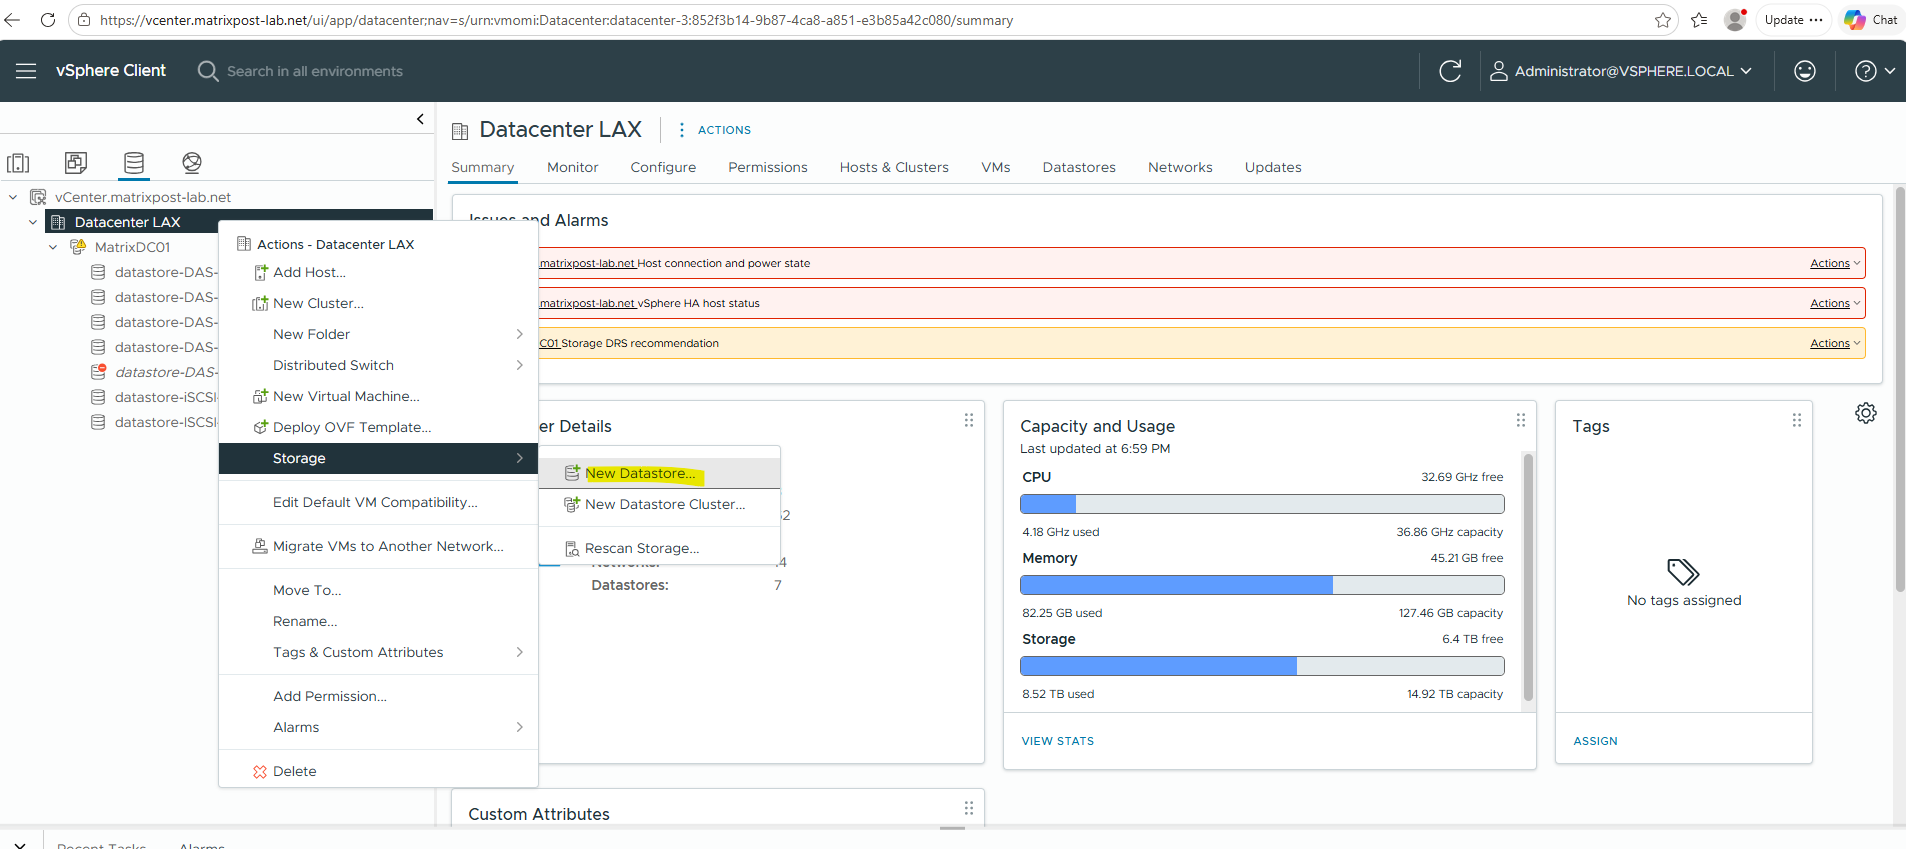
Finally we can create a new datastore by using the new LUN (block storage device) as usual in vSphere.
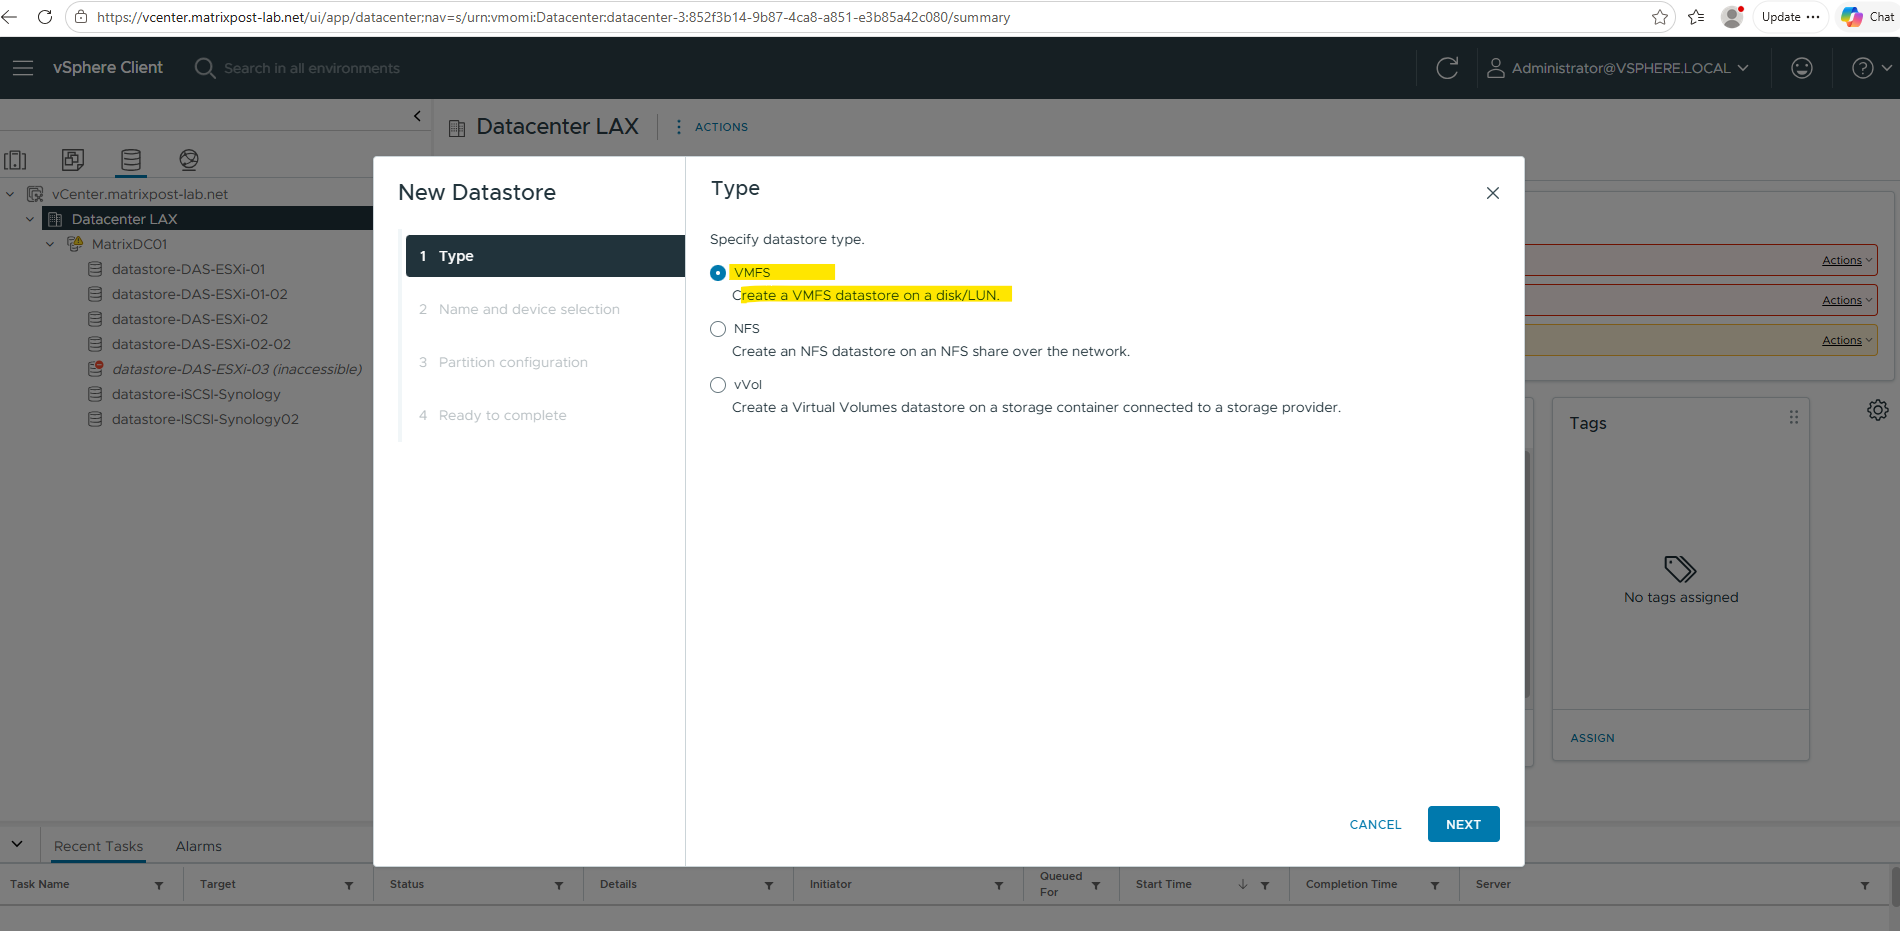
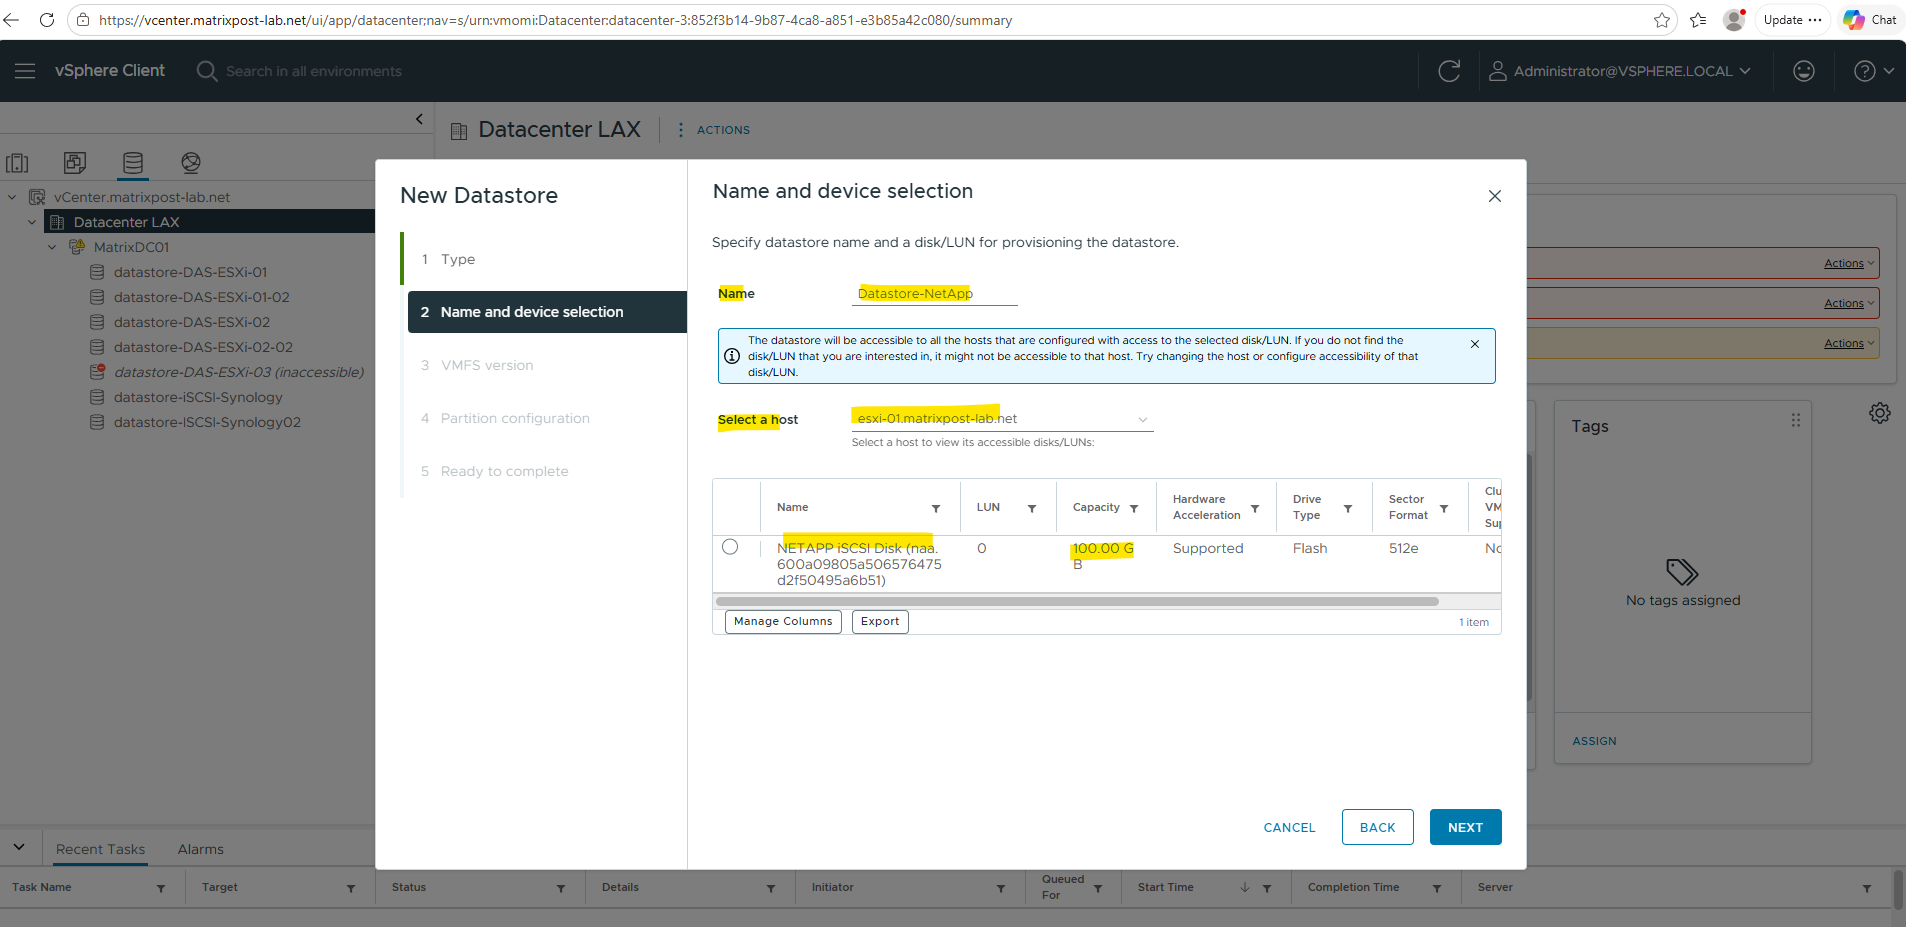
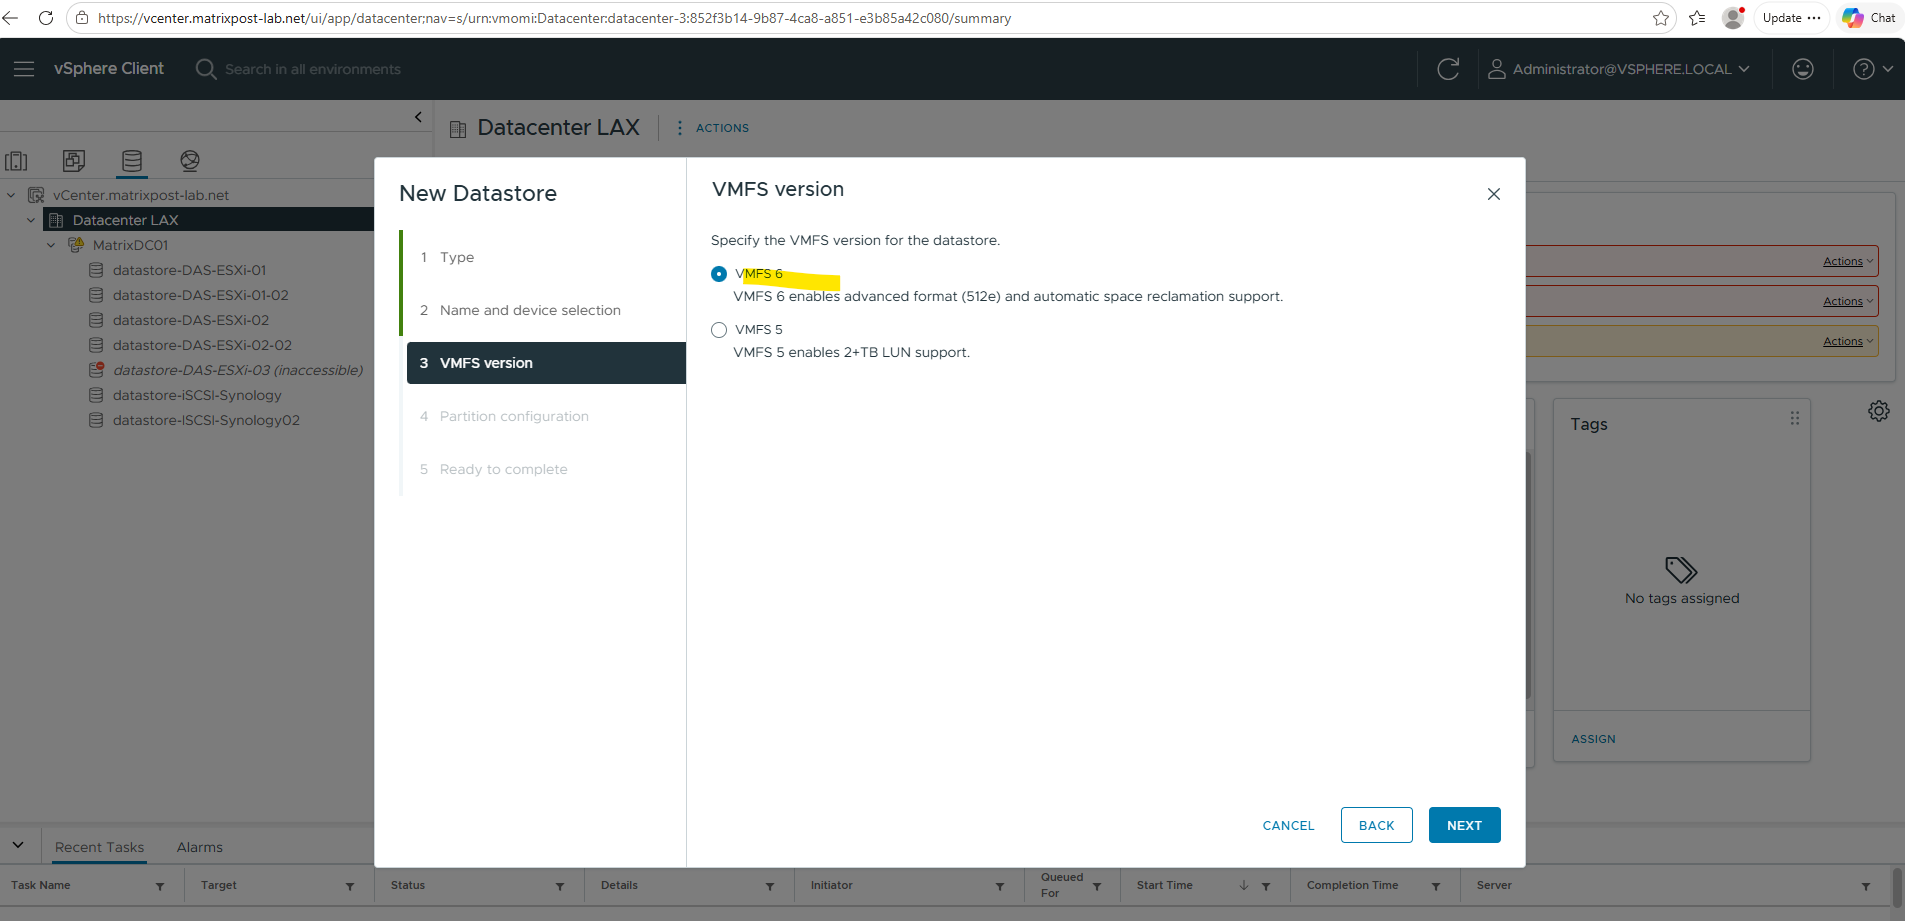
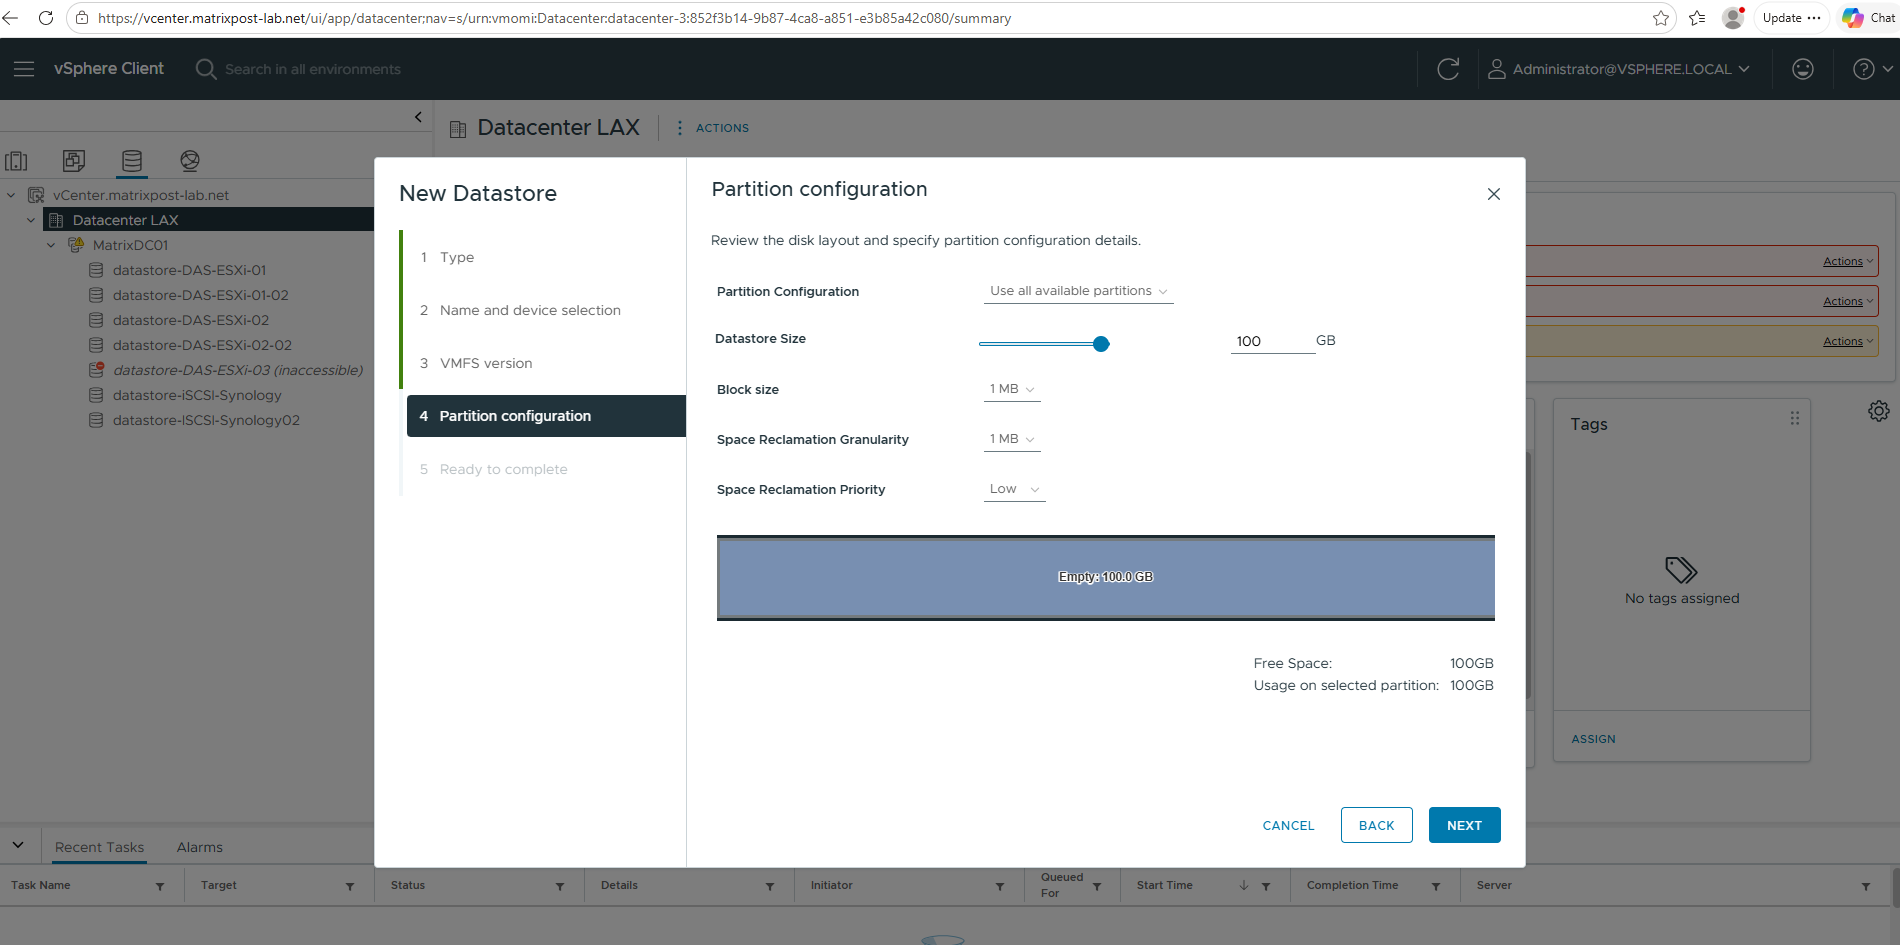
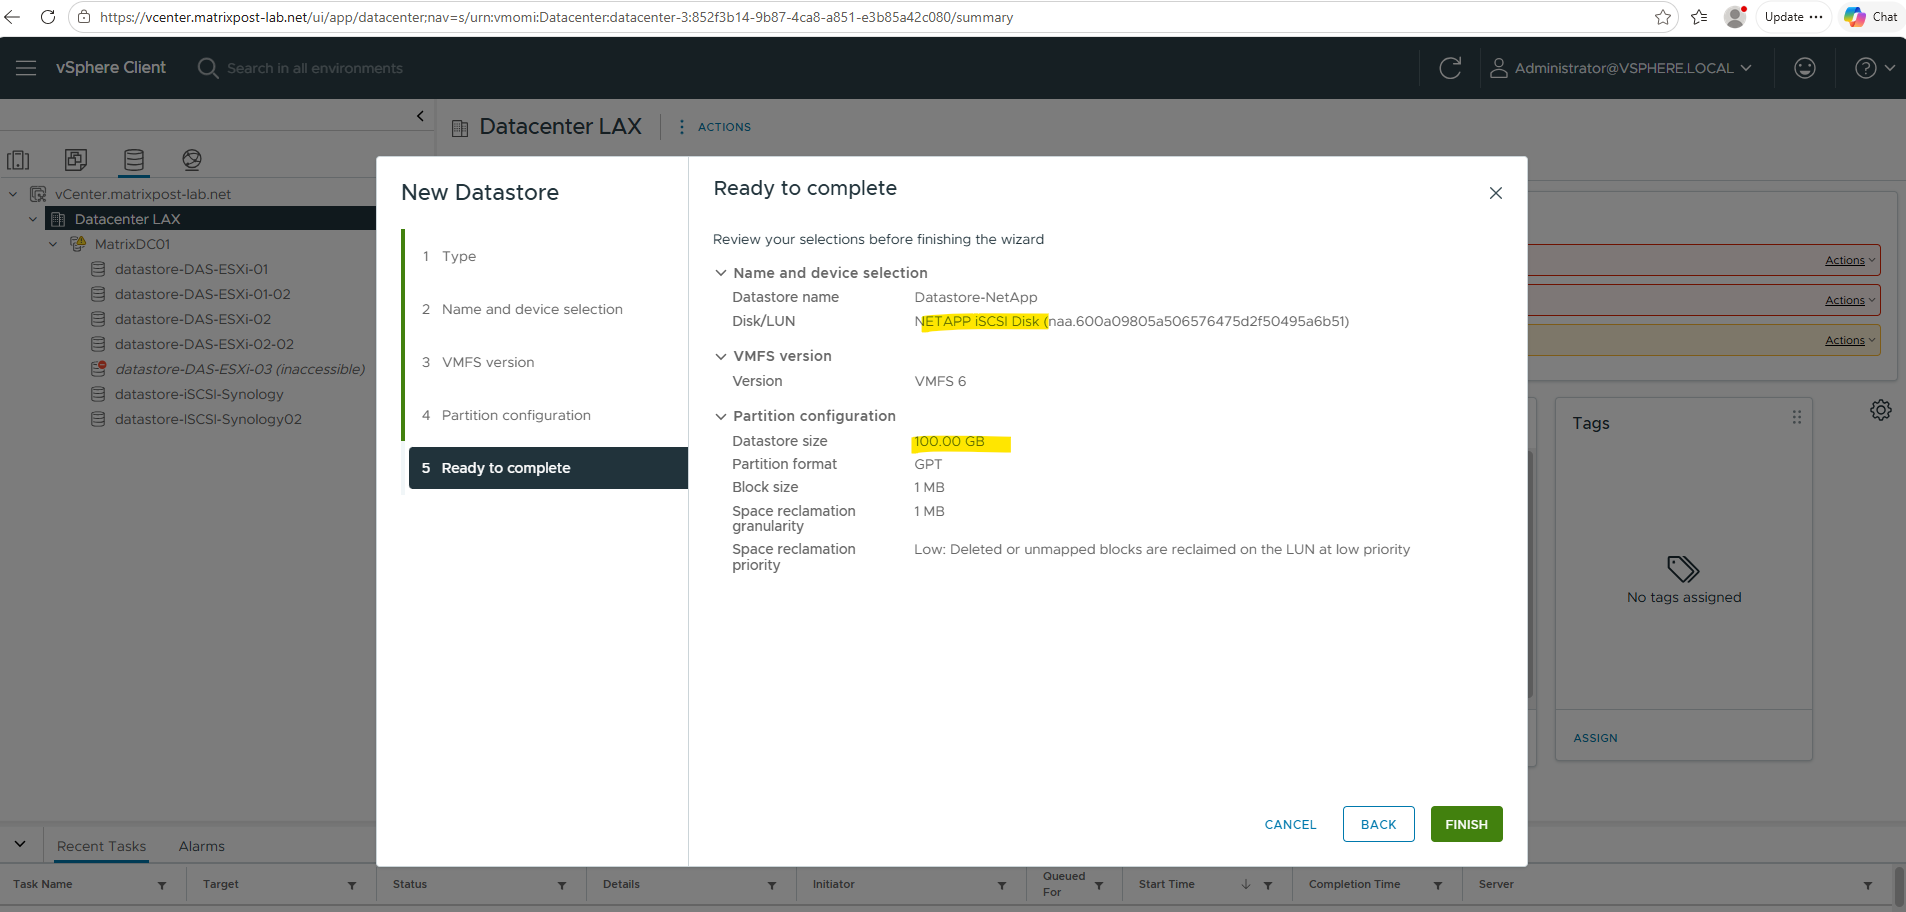
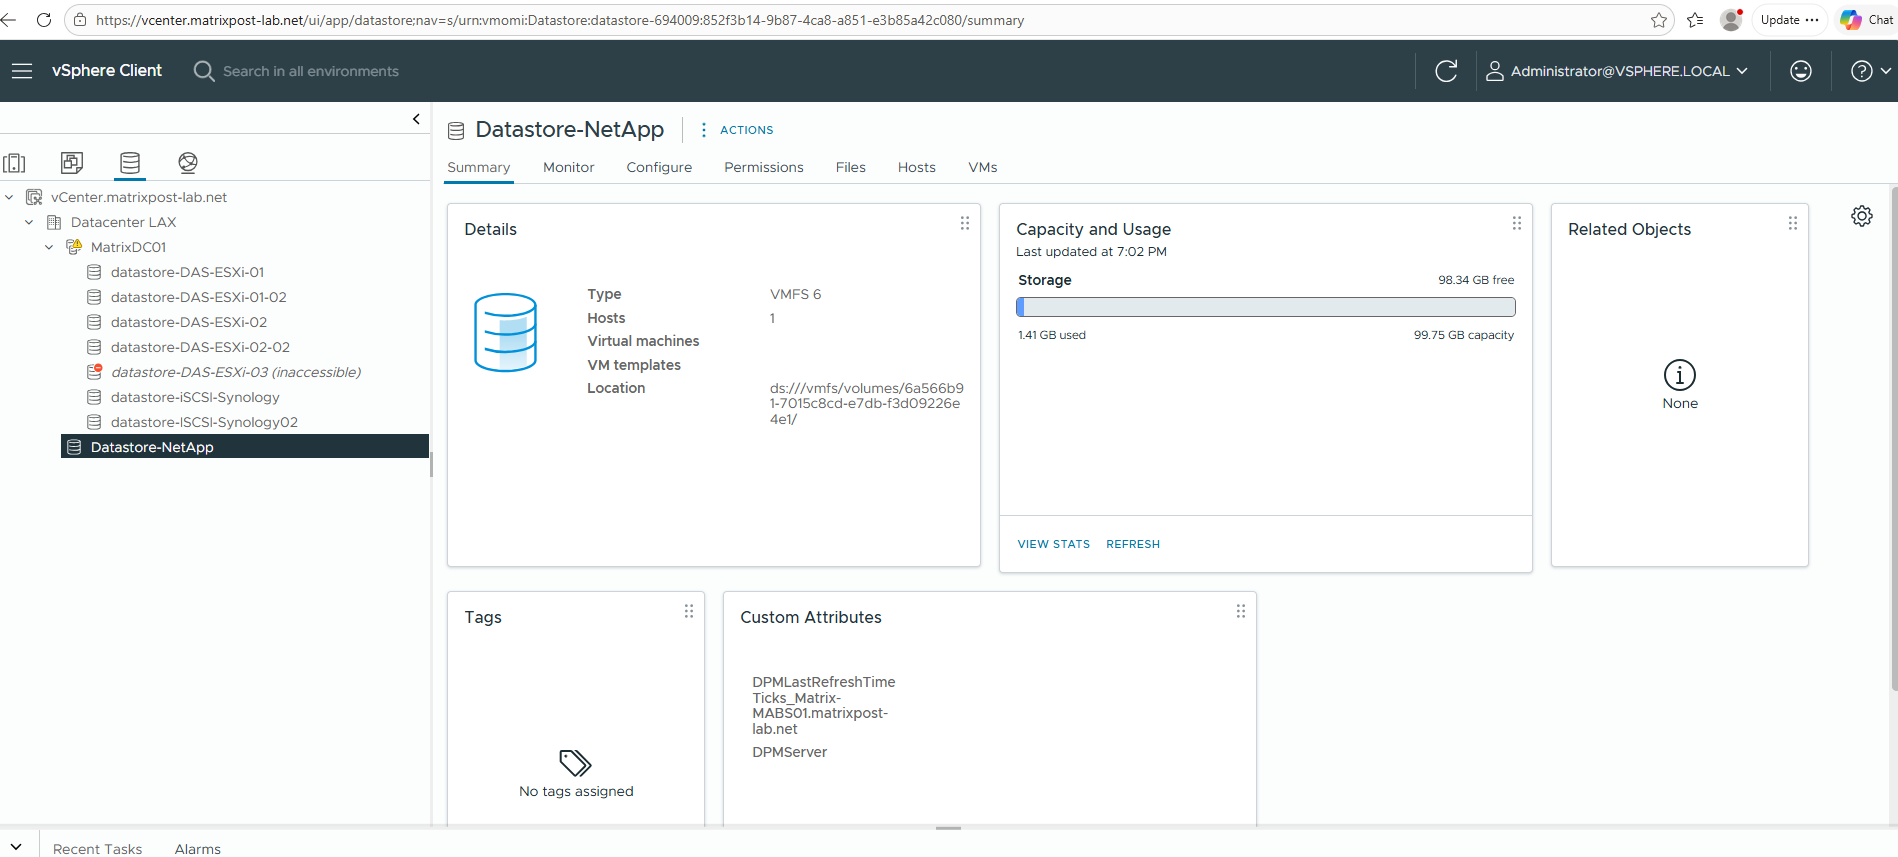
More about iSCSI you will find also in my blog under https://blog.matrixpost.net/?s=iscsi.
Configure ARP on NAS and SAN Volumes
Learn how to enable NetApp ONTAP Autonomous Ransomware Protection (ARP) on NAS and SAN volumes used for VMware datastores, and simulate ransomware attacks to see how ARP detects threats and facilitates rapid recovery.
When ARP is enabled on a NAS volume using System Manager or the CLI, ARP/AI protection is enabled and active immediately. No learning period is required.
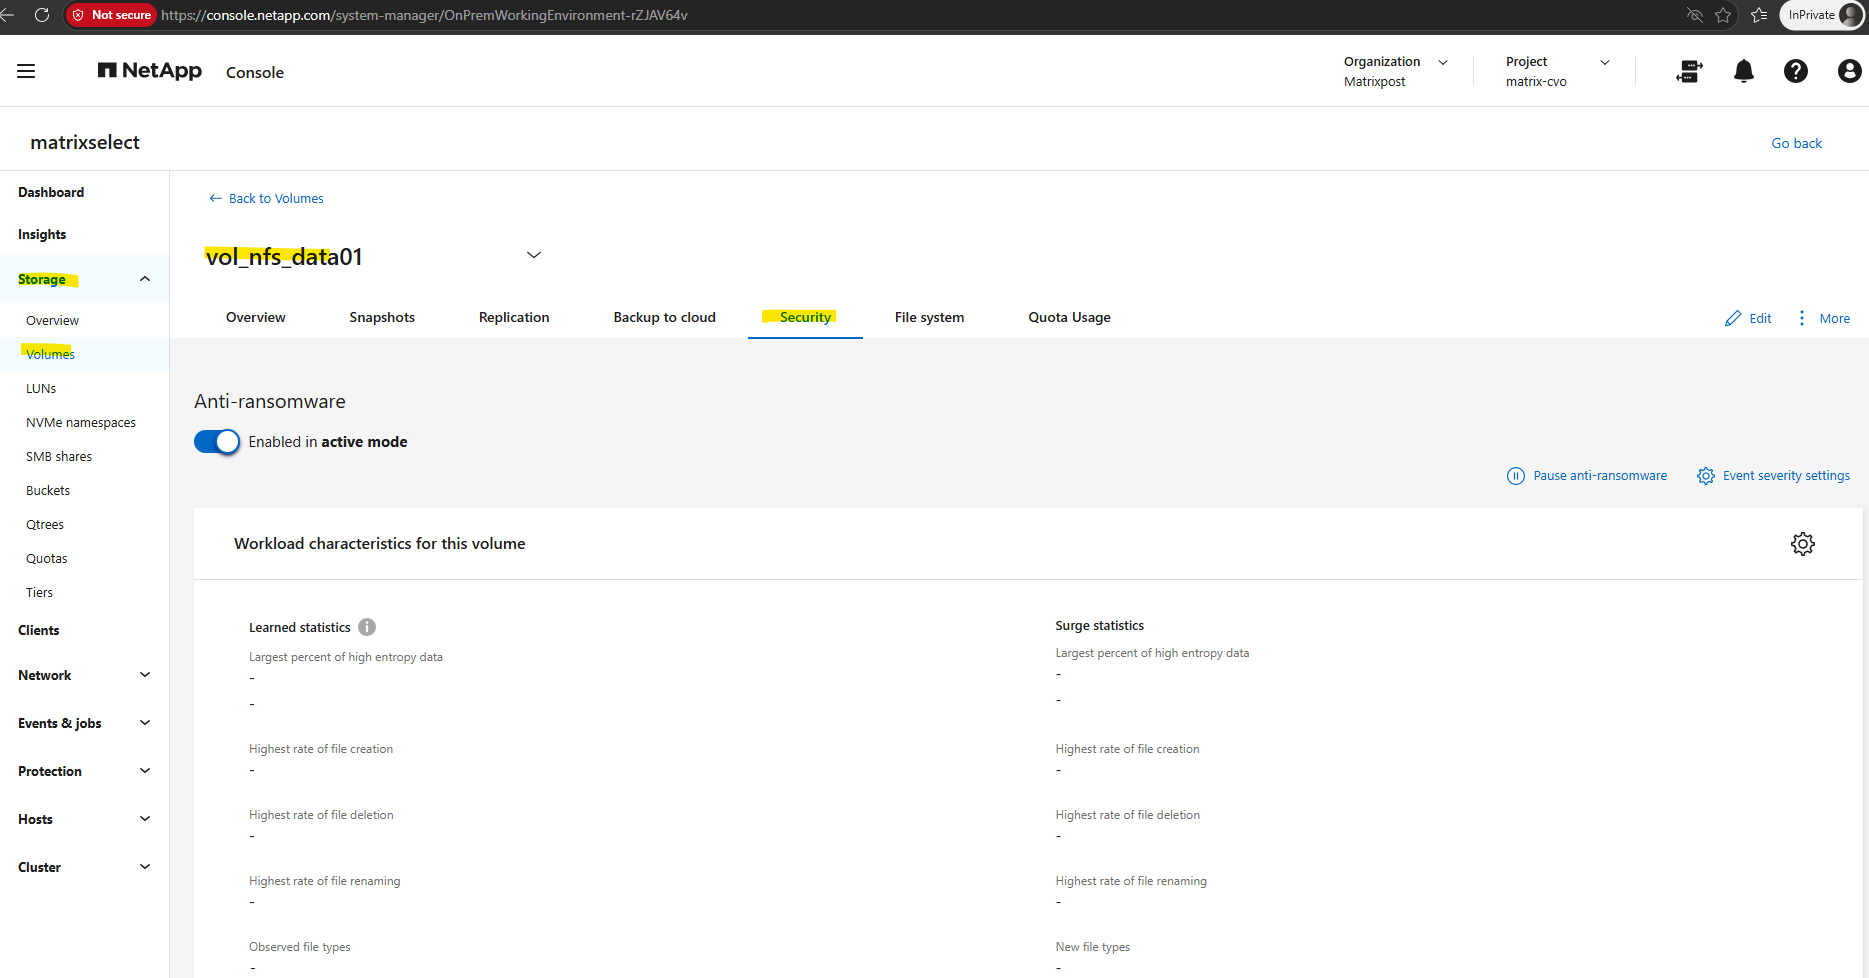
When ARP is enabled on a SAN volume like below my LUN (its Volume) which is connected to my vSphere lab environment used as SAN storage for a vSphere datastore, it begins with an evaluation phase, similar to the learning mode used in NAS environments before automatically transitioning into active detection.
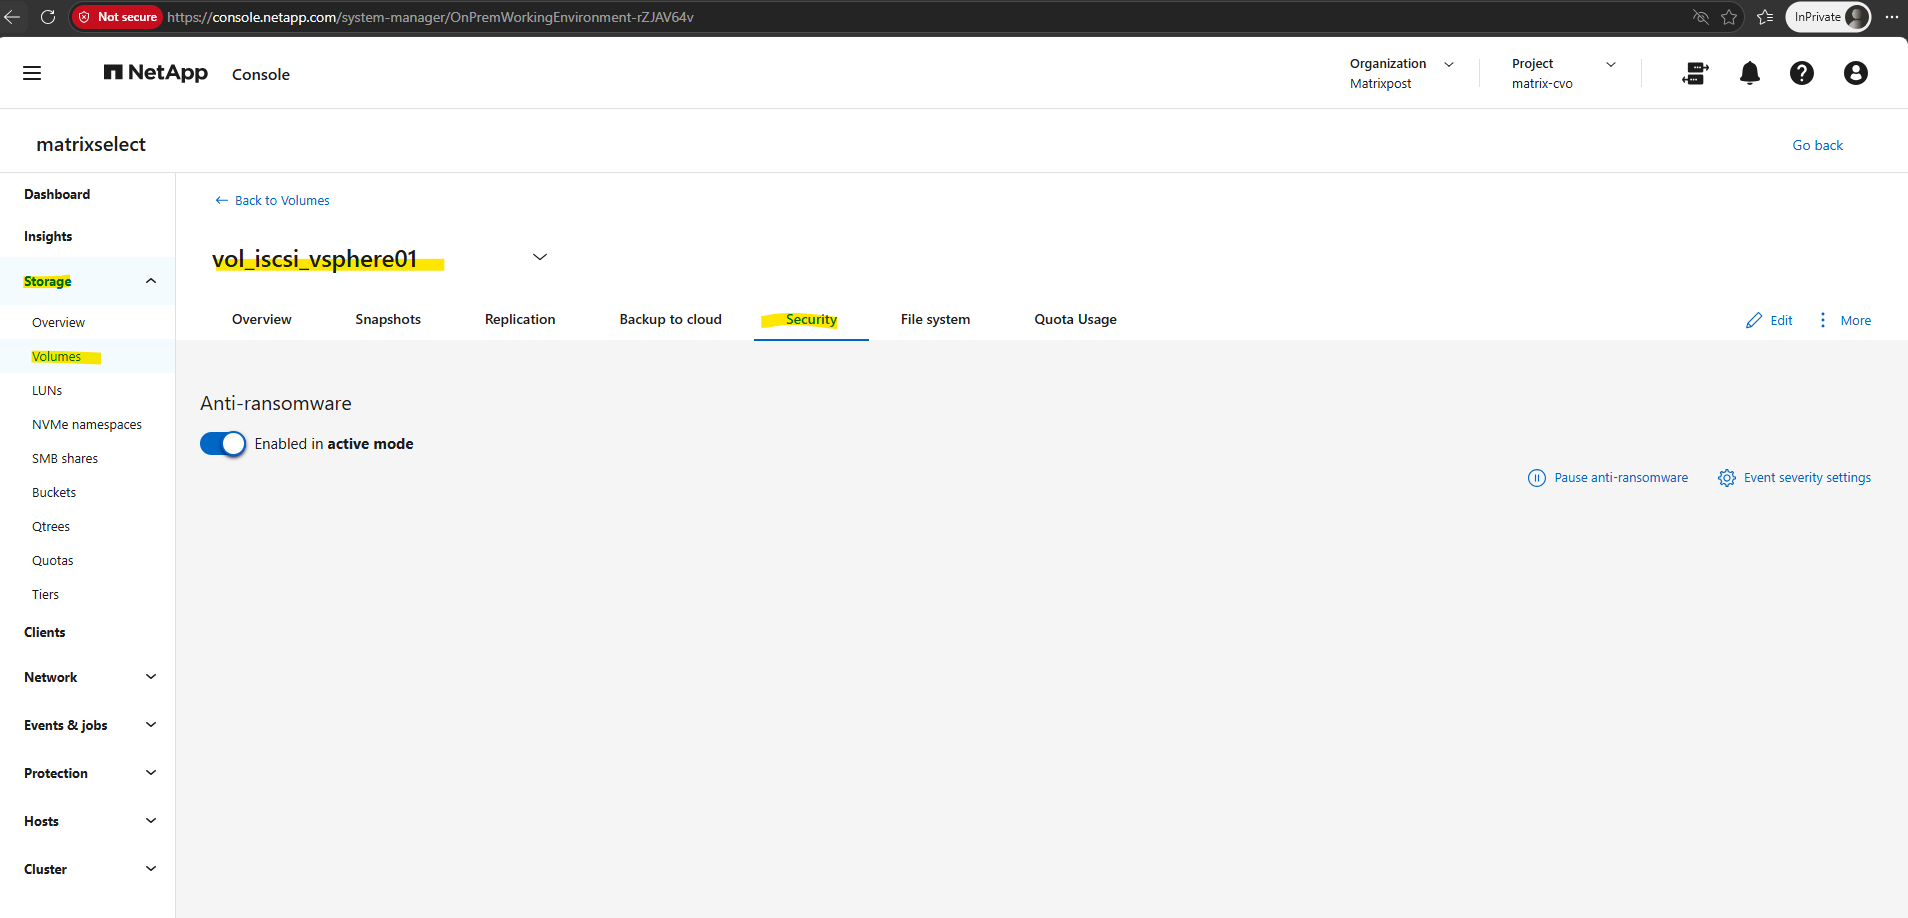
I created a new virtual machine in vSphere and on the connected LUN (datastore) which using approximately 17 GB.
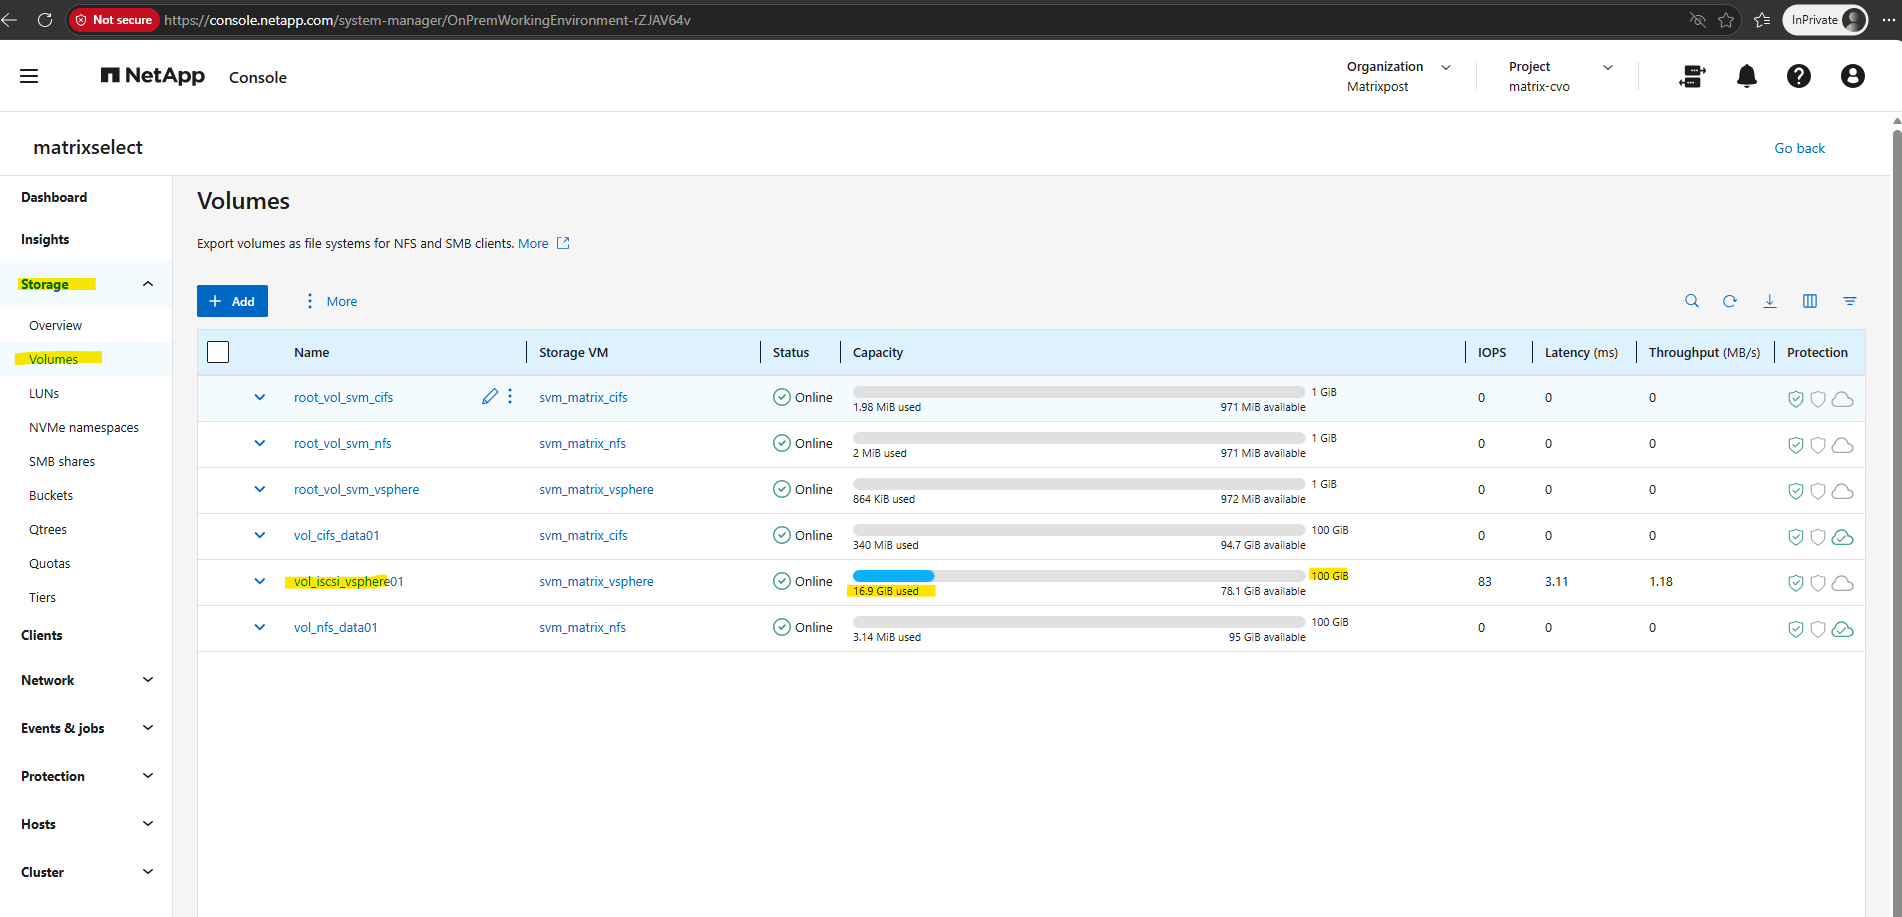
The LUN placed on the dedicated volume.
A dedicated FlexVol is not required for each LUN. A single FlexVol can host one or multiple LUNs; however, it is considered a best practice to use dedicated volumes per workload and to avoid mixing SAN (LUNs) and NAS (NFS/SMB) workloads within the same volume to simplify management, protection, and recovery.
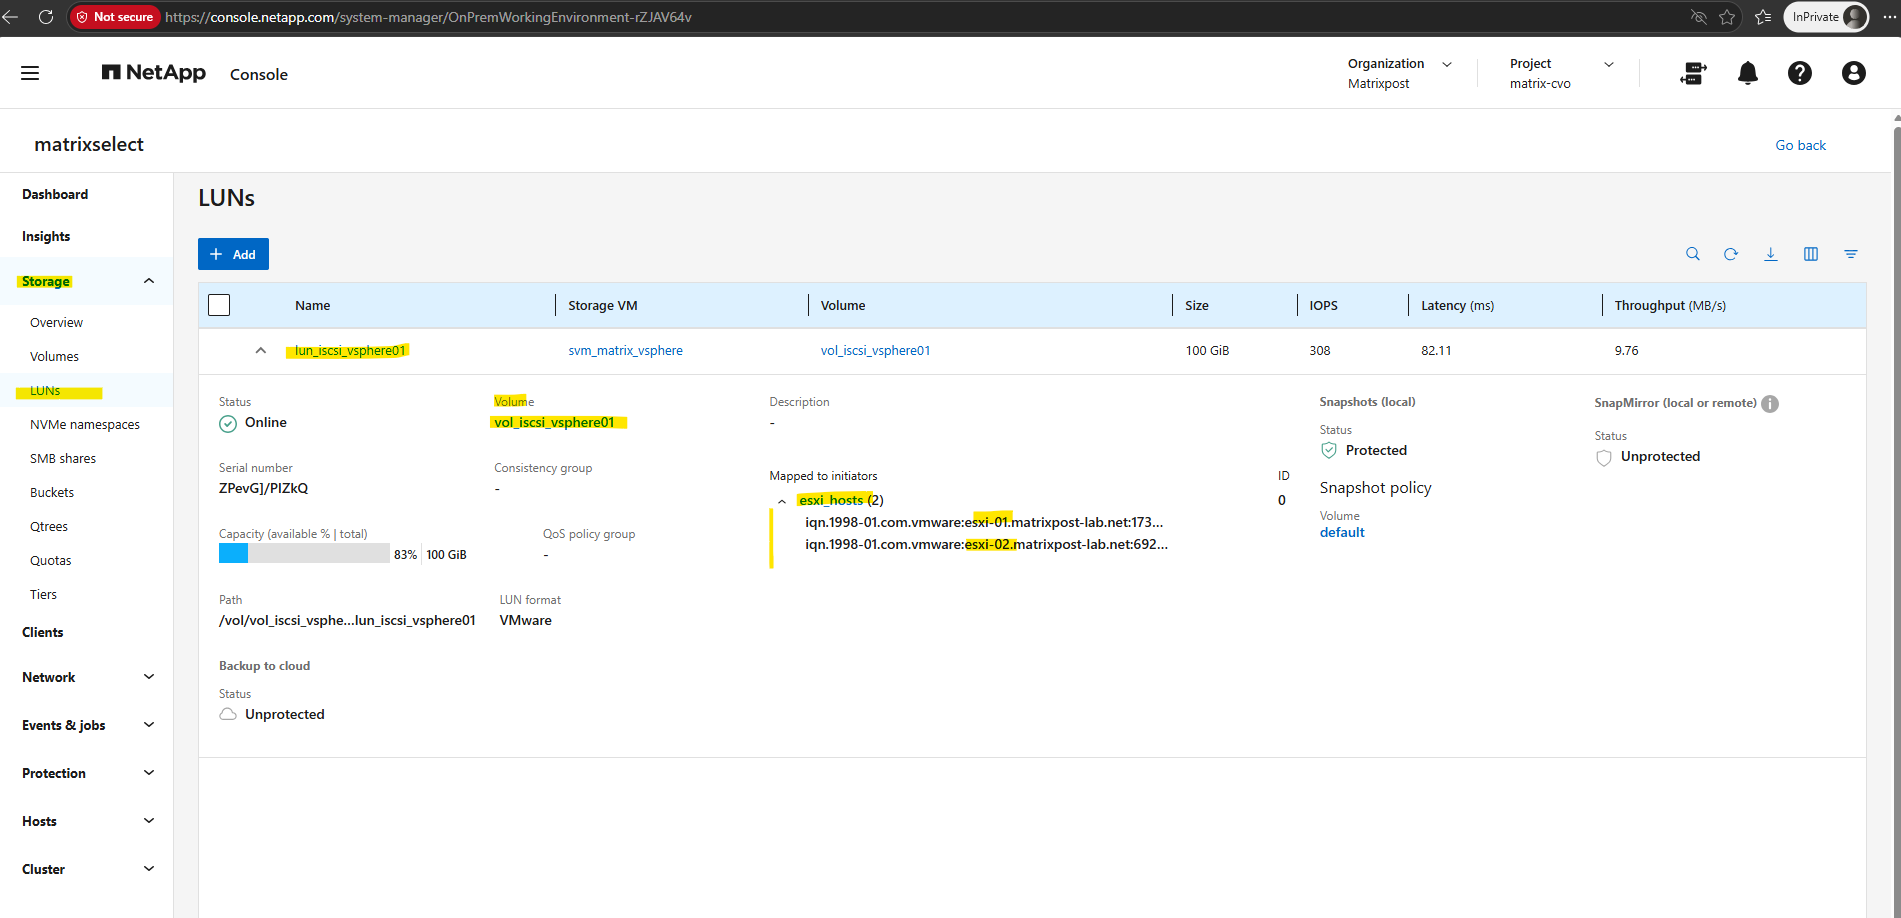
Simulating an attack on a VM
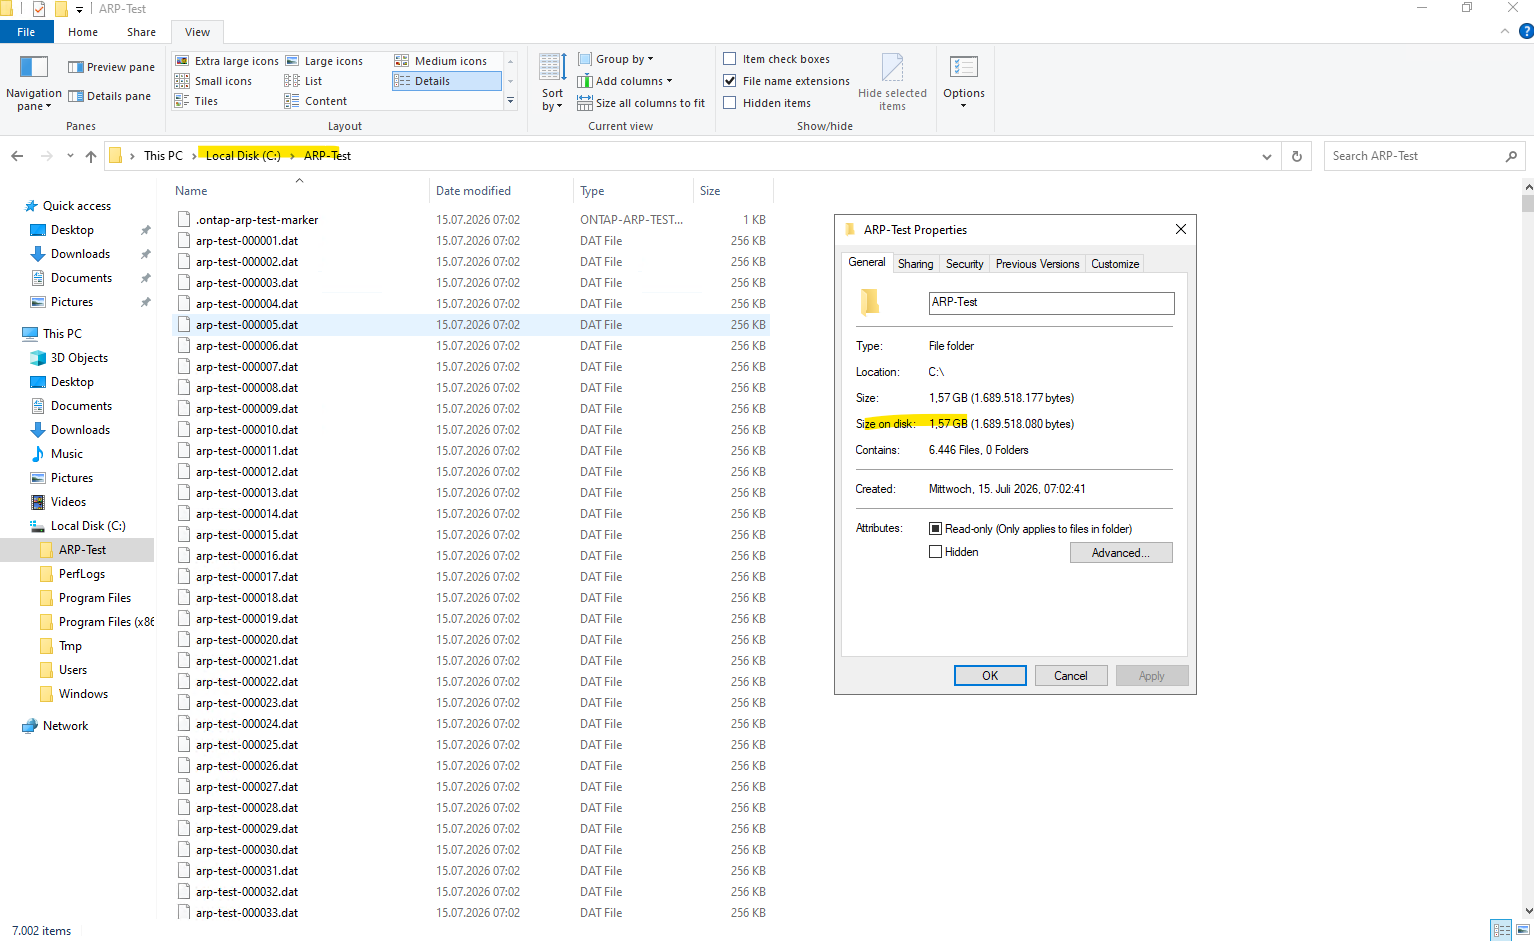
To generate ransomware-like activity, we first create a large set of low-entropy test files inside a Windows Server virtual machine running on VMware vSphere and stored on the VMFS datastore created on our ONTAP iSCSI LUN.
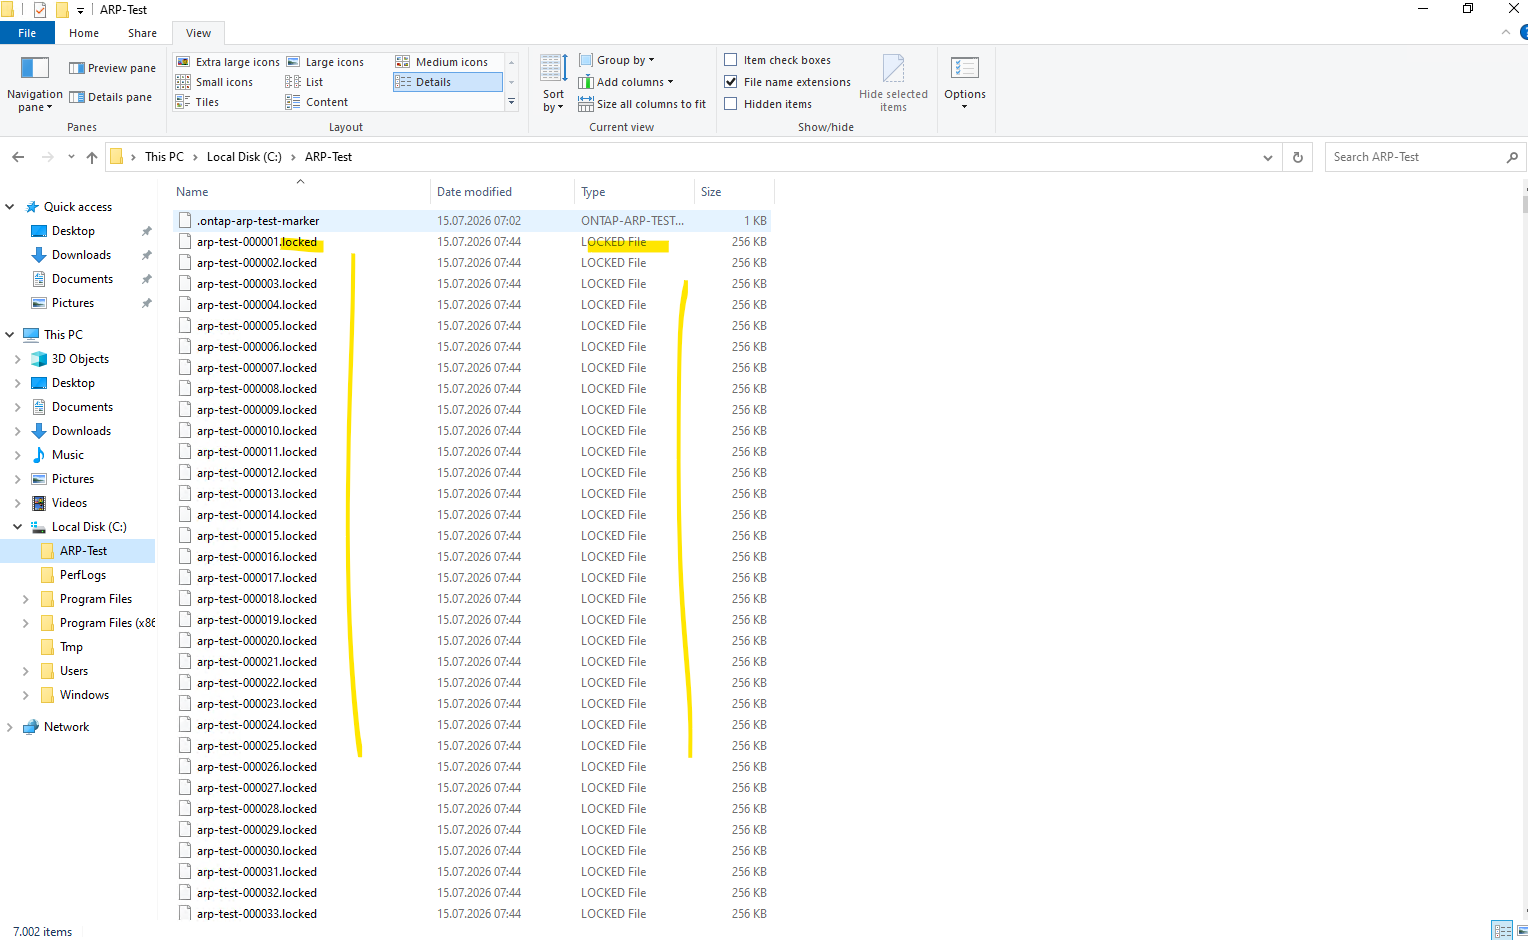
The script then overwrites these files with high-entropy random data and renames them with a .locked extension. Because ONTAP only exposes the LUN as block storage, it never sees the individual files or filenames inside the virtual machine, it only observes the resulting block-level write patterns, which ARP analyzes for ransomware-like behavior.
The following PowerShell script can be used to safely simulate ransomware-like activity in an isolated lab environment. It creates a configurable dataset of test files, overwrites them with high-entropy random data to generate ransomware-like block writes, and provides separate Prepare, Attack, and Cleanup phases while ensuring that all operations remain confined to a dedicated test directory.
<#
.SYNOPSIS
Safely generates ransomware-like storage activity for testing NetApp ONTAP ARP.

.DESCRIPTION
The script operates only inside the specified test directory.

Prepare:
  Creates a marker file and a configurable number of low-entropy test files.

Attack:
  Verifies that the directory was created by this script, overwrites every
  test file with high-entropy random data, and renames it with a .locked
  extension.

Cleanup:
  Deletes only the marked test directory.

Run only in an isolated lab VM with disposable data.
#>

[CmdletBinding()]
param(
    [Parameter(Mandatory)]
    [ValidateSet("Prepare", "Attack", "Cleanup")]
    [string]$Phase,

    [string]$TestPath = "C:\ARP-Test",

    [ValidateRange(100, 50000)]
    [int]$FileCount = 7000,

    [ValidateRange(4, 10240)]
    [int]$FileSizeKB = 256,

    [switch]$ConfirmAttack
)

Set-StrictMode -Version Latest
$ErrorActionPreference = "Stop"

$MarkerName = ".ontap-arp-test-marker"
$MarkerPath = Join-Path $TestPath $MarkerName
$ManifestPath = Join-Path $TestPath "arp-test-manifest.txt"
$FilePrefix = "arp-test-"

function Assert-SafeTestPath {
    param([string]$Path)

    $fullPath = [System.IO.Path]::GetFullPath($Path).TrimEnd("\")

    $unsafePaths = @(
        [System.IO.Path]::GetPathRoot($fullPath).TrimEnd("\"),
        $env:SystemRoot.TrimEnd("\"),
        $env:ProgramFiles.TrimEnd("\"),
        ${env:ProgramFiles(x86)}.TrimEnd("\"),
        $env:USERPROFILE.TrimEnd("\")
    )

    if ($unsafePaths -contains $fullPath) {
        throw "Unsafe test path rejected: $fullPath"
    }

    return $fullPath
}

function Assert-MarkedDirectory {
    if (-not (Test-Path -LiteralPath $MarkerPath -PathType Leaf)) {
        throw "Safety marker not found. This script will not modify '$TestPath'. Run the Prepare phase first."
    }

    $marker = Get-Content -LiteralPath $MarkerPath -Raw

    if ($marker -notmatch "^ONTAP-ARP-TEST-DIRECTORY") {
        throw "The safety marker is invalid. Operation cancelled."
    }
}

function Write-RepeatedFile {
    param(
        [string]$Path,
        [long]$Length
    )

    $bufferSize = 64KB
    $buffer = New-Object byte[] $bufferSize

    # Repetitive, low-entropy content.
    for ($i = 0; $i -lt $buffer.Length; $i++) {
        $buffer[$i] = 0x41
    }

    $stream = [System.IO.File]::Open(
        $Path,
        [System.IO.FileMode]::Create,
        [System.IO.FileAccess]::Write,
        [System.IO.FileShare]::None
    )

    try {
        $remaining = $Length

        while ($remaining -gt 0) {
            $bytesToWrite = [int][Math]::Min($buffer.Length, $remaining)
            $stream.Write($buffer, 0, $bytesToWrite)
            $remaining -= $bytesToWrite
        }

        $stream.Flush()
    }
    finally {
        $stream.Dispose()
    }
}

function Write-RandomFile {
    param(
        [string]$Path,
        [long]$Length
    )

    $bufferSize = 64KB
    $buffer = New-Object byte[] $bufferSize
    $rng = [System.Security.Cryptography.RandomNumberGenerator]::Create()

    $stream = [System.IO.File]::Open(
        $Path,
        [System.IO.FileMode]::Create,
        [System.IO.FileAccess]::Write,
        [System.IO.FileShare]::None
    )

    try {
        $remaining = $Length

        while ($remaining -gt 0) {
            $rng.GetBytes($buffer)
            $bytesToWrite = [int][Math]::Min($buffer.Length, $remaining)
            $stream.Write($buffer, 0, $bytesToWrite)
            $remaining -= $bytesToWrite
        }

        $stream.Flush()
    }
    finally {
        $stream.Dispose()
        $rng.Dispose()
    }
}

$TestPath = Assert-SafeTestPath -Path $TestPath
$MarkerPath = Join-Path $TestPath $MarkerName
$ManifestPath = Join-Path $TestPath "arp-test-manifest.txt"

switch ($Phase) {
    "Prepare" {
        if (Test-Path -LiteralPath $TestPath) {
            throw "The test path already exists: $TestPath. Use a new empty path or run Cleanup if it was created by this script."
        }

        $requiredBytes = [long]$FileCount * $FileSizeKB * 1KB
        $driveName = ([System.IO.Path]::GetPathRoot($TestPath)).TrimEnd("\")
        $drive = Get-CimInstance Win32_LogicalDisk -Filter "DeviceID='$driveName'"

        if (-not $drive) {
            throw "Could not determine free space for drive $driveName."
        }

        # Leave at least 1 GB free in addition to the generated data.
        if ($drive.FreeSpace -lt ($requiredBytes + 1GB)) {
            throw "Insufficient free space. Approximately $([Math]::Round($requiredBytes / 1GB, 2)) GB plus 1 GB safety reserve is required."
        }

        New-Item -ItemType Directory -Path $TestPath | Out-Null

        @"
ONTAP-ARP-TEST-DIRECTORY
Created: $(Get-Date -Format o)
Computer: $env:COMPUTERNAME
"@ | Set-Content -LiteralPath $MarkerPath -Encoding ASCII

        "FileCount=$FileCount`r`nFileSizeKB=$FileSizeKB" |
            Set-Content -LiteralPath $ManifestPath -Encoding ASCII

        $length = [long]$FileSizeKB * 1KB
        $progressInterval = [Math]::Max(1, [int]($FileCount / 100))

        for ($i = 1; $i -le $FileCount; $i++) {
            $fileName = "{0}{1:D6}.dat" -f $FilePrefix, $i
            $filePath = Join-Path $TestPath $fileName

            Write-RepeatedFile -Path $filePath -Length $length

            if (($i % $progressInterval) -eq 0 -or $i -eq $FileCount) {
                Write-Progress `
                    -Activity "Creating low-entropy test files" `
                    -Status "$i of $FileCount files" `
                    -PercentComplete (($i / $FileCount) * 100)
            }
        }

        Write-Progress -Activity "Creating low-entropy test files" -Completed

        Write-Host ""
        Write-Host "Preparation completed."
        Write-Host "Created $FileCount files of $FileSizeKB KB in:"
        Write-Host $TestPath
        Write-Host ""
        Write-Host "Take a VM or ONTAP snapshot if desired, then run:"
        Write-Host ".\Test-ONTAP-ARP.ps1 -Phase Attack -TestPath `"$TestPath`" -ConfirmAttack"
    }

    "Attack" {
        Assert-MarkedDirectory

        if (-not $ConfirmAttack) {
            throw "Attack simulation was not armed. Add -ConfirmAttack after verifying that this is an isolated lab VM."
        }

        $files = Get-ChildItem -LiteralPath $TestPath -File |
            Where-Object {
                $_.Name -like "$FilePrefix*.dat" -or
                $_.Name -like "$FilePrefix*.locked"
            }

        if ($files.Count -eq 0) {
            throw "No test files created by this script were found."
        }

        Write-Warning "Beginning high-entropy overwrite of $($files.Count) test files in '$TestPath'."
        Start-Sleep -Seconds 3

        $processed = 0
        $progressInterval = [Math]::Max(1, [int]($files.Count / 100))

        foreach ($file in $files) {
            $processed++

            # Keep the original allocation size while replacing its contents
            # with high-entropy random data.
            Write-RandomFile -Path $file.FullName -Length $file.Length

            if ($file.Extension -ne ".locked") {
                Rename-Item -LiteralPath $file.FullName -NewName ($file.BaseName + ".locked")
            }

            if (($processed % $progressInterval) -eq 0 -or $processed -eq $files.Count) {
                Write-Progress `
                    -Activity "Simulating ransomware-like writes" `
                    -Status "$processed of $($files.Count) files" `
                    -PercentComplete (($processed / $files.Count) * 100)
            }
        }

        Write-Progress -Activity "Simulating ransomware-like writes" -Completed

        Write-Host ""
        Write-Host "Simulation completed."
        Write-Host "Only files created inside '$TestPath' were modified."
        Write-Host "Monitor ONTAP ARP status, EMS events, and ARP snapshots."
    }

    "Cleanup" {
        Assert-MarkedDirectory

        Remove-Item -LiteralPath $TestPath -Recurse -Force

        Write-Host "Removed the marked ARP test directory:"
        Write-Host $TestPath
    }
}
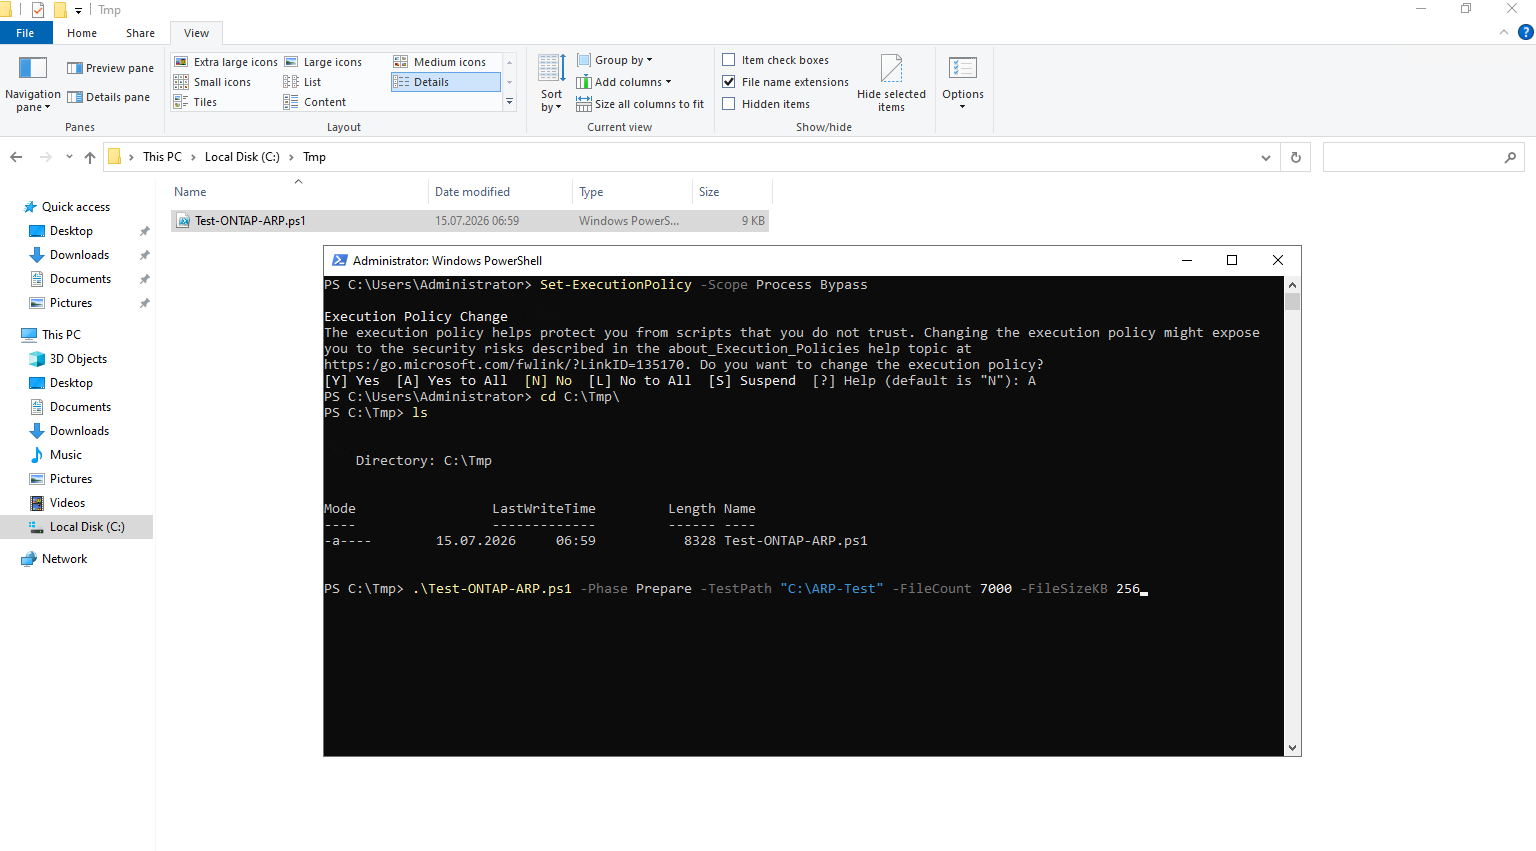
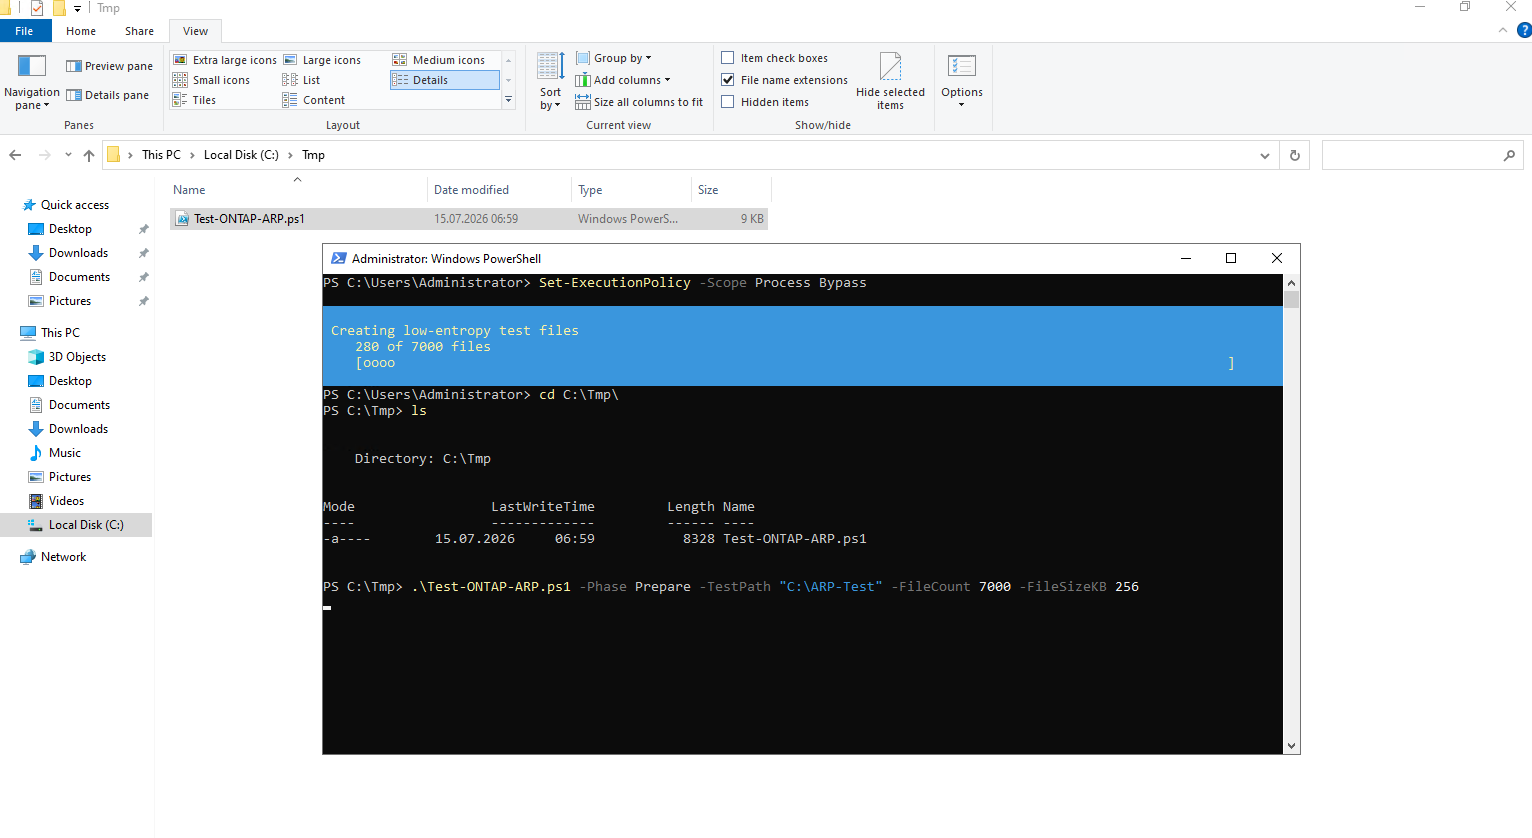
To create the test data run:
Set-ExecutionPolicy -Scope Process Bypass
.\Test-ONTAP-ARP.ps1 -Phase Prepare -TestPath "C:\ARP-Test" -FileCount 7000 -FileSizeKB 256
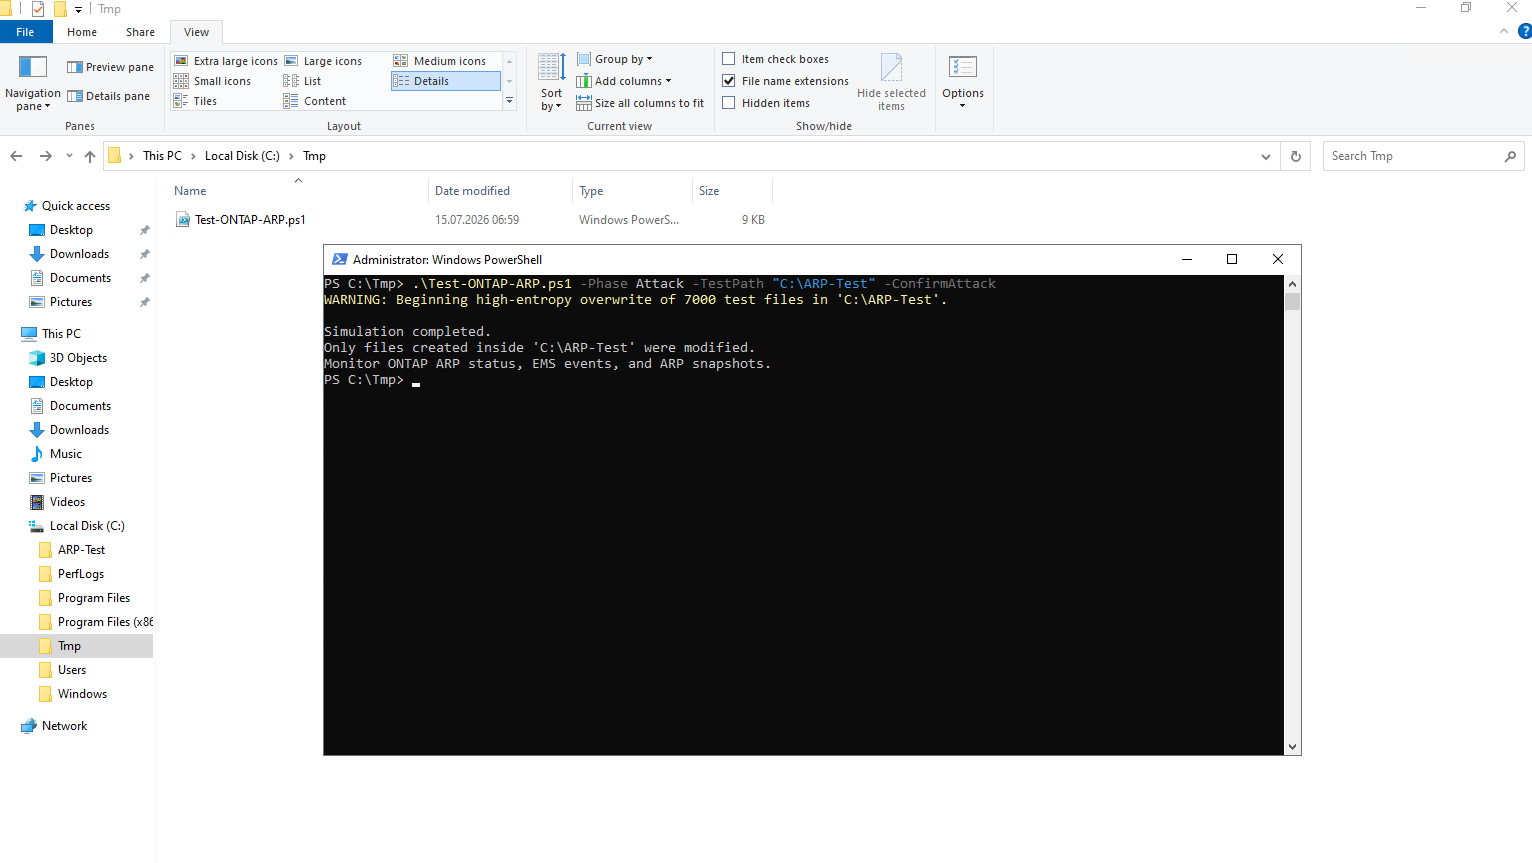
After creating the test dataset, the Attack phase overwrites every generated test file with high-entropy random data and renames it with a .locked extension, simulating the storage activity typically caused by ransomware.
The -ConfirmAttack switch serves as an additional safety mechanism, ensuring that the attack simulation is only executed intentionally in an isolated lab environment.
.\Test-ONTAP-ARP.ps1 -Phase Attack -TestPath "C:\ARP-Test" -ConfirmAttack
In the ONTAP System Manager no alert is shown.
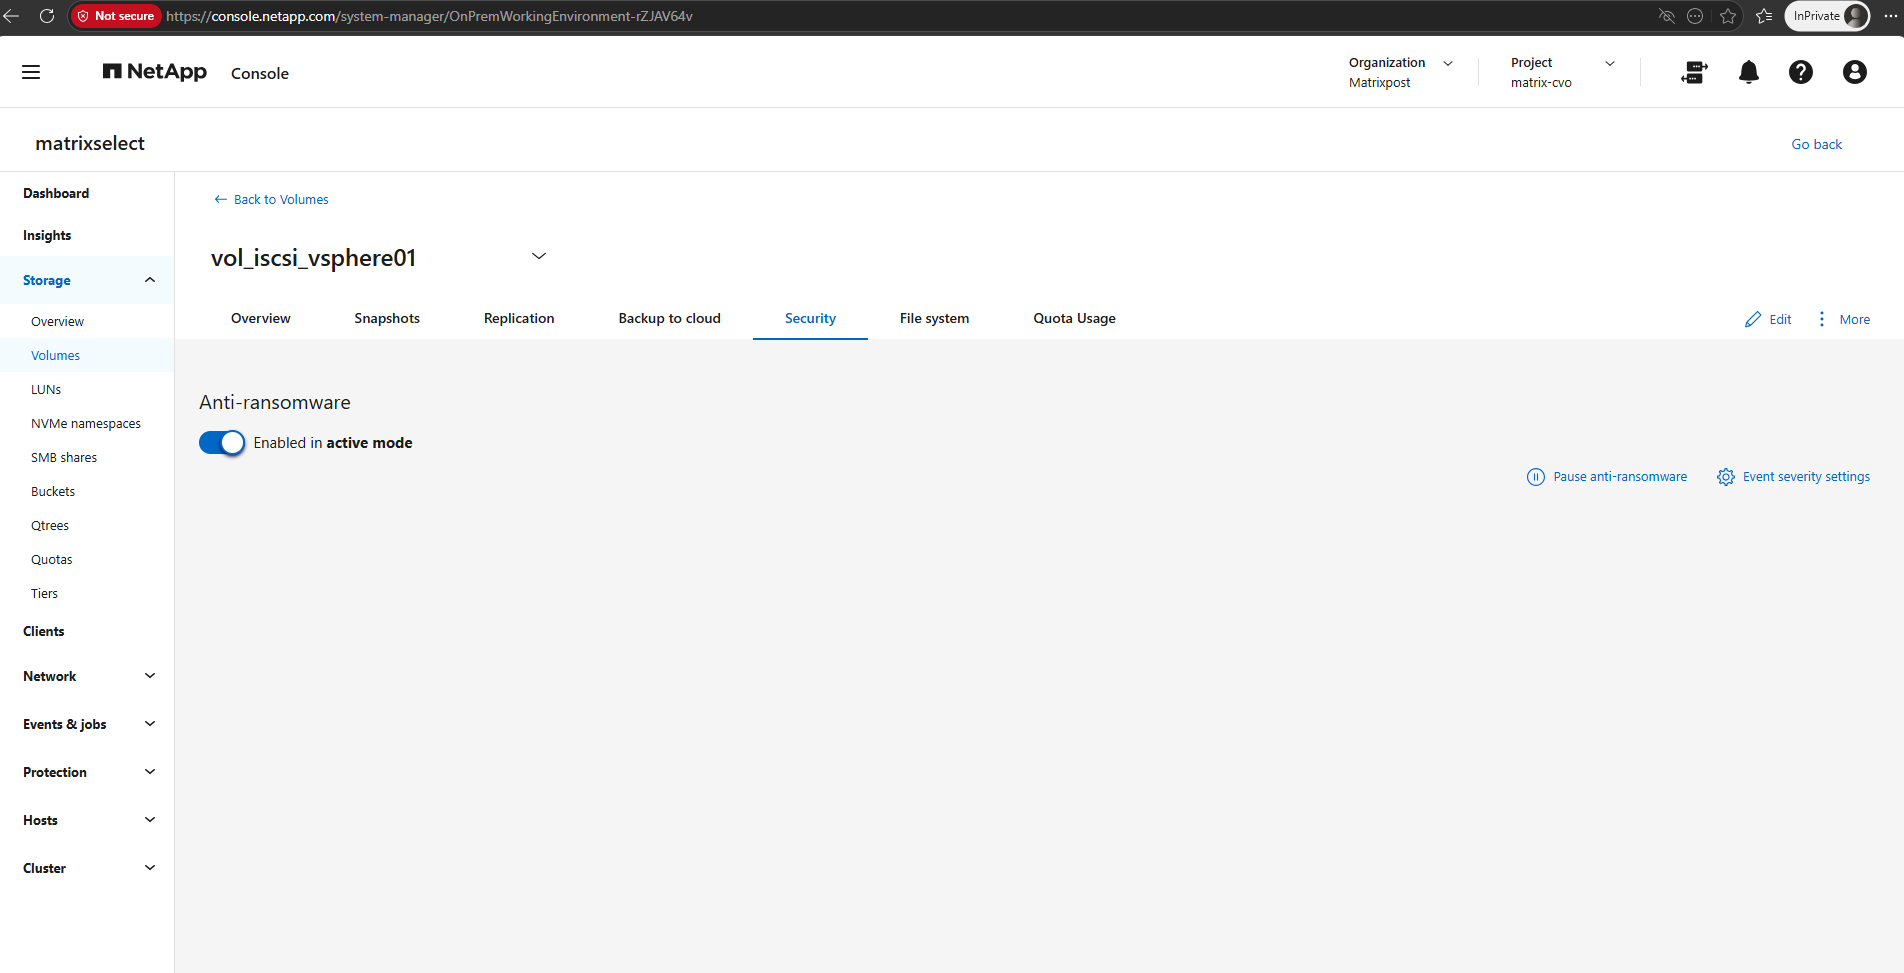
The same by using the CLI:
Block Device Detection Status: evaluation_periodFor SAN workloads, ARP initiates a two to four week evaluation period with a threshold of 75% to establish a baseline for encryption behaviour.
Progress during this phase can be monitored using the
security anti-ransomware volume showcommand by checking the Block device detection status. After the evaluation completes, a status of Active_suitable_workload confirms that the observed entropy levels are suitable for ongoing monitoring.Based on the data collected, ARP automatically adjusts its adaptive threshold to ensure accurate and responsive threat detection
matrixselect::> security anti-ransomware volume show -vserver svm_matrix_vsphere -volume vol_iscsi_vsphere01
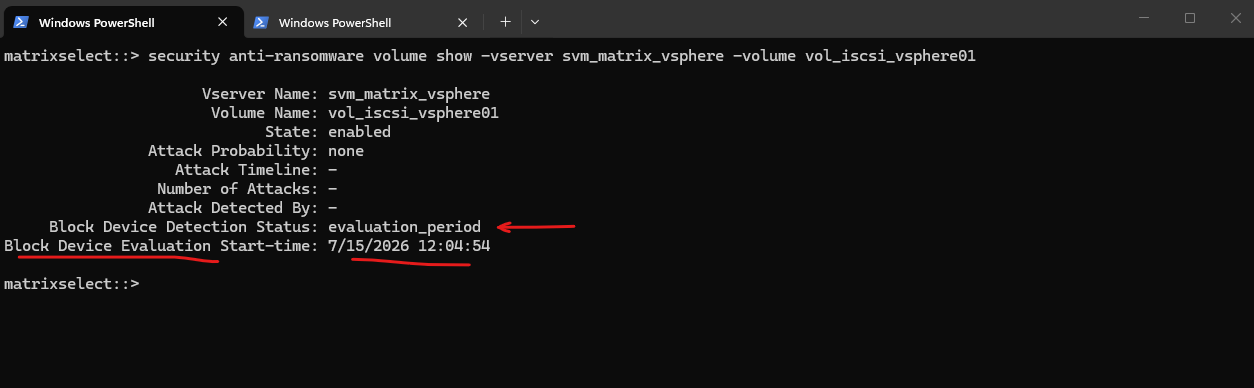
Our simulation may simply not have generated enough high-entropy writes relative to the overall LUN workload.
In the NetApp demonstration, nearly 7,000 files were encrypted, but the documentation does not state their sizes; therefore, their total changed data could have been substantially larger than yours. NetApp observed the alert within approximately ten minutes, but that is a lab result rather than a guaranteed detection time.
Also, because the files are inside a Windows guest on VMFS, ONTAP does not see filenames or the .locked extension. It only sees changed blocks inside the LUN. The rename operation therefore contributes very little, the important signal is the percentage of newly written high-entropy data.
I would perform a stronger second test with larger files, for example:
# first cleanup
.\Test-ONTAP-ARP.ps1 -Phase Cleanup -TestPath "C:\ARP-Test"

.\Test-ONTAP-ARP.ps1 -Phase Prepare -TestPath "C:\ARP-Test" -FileCount 12000 -FileSizeKB 2048
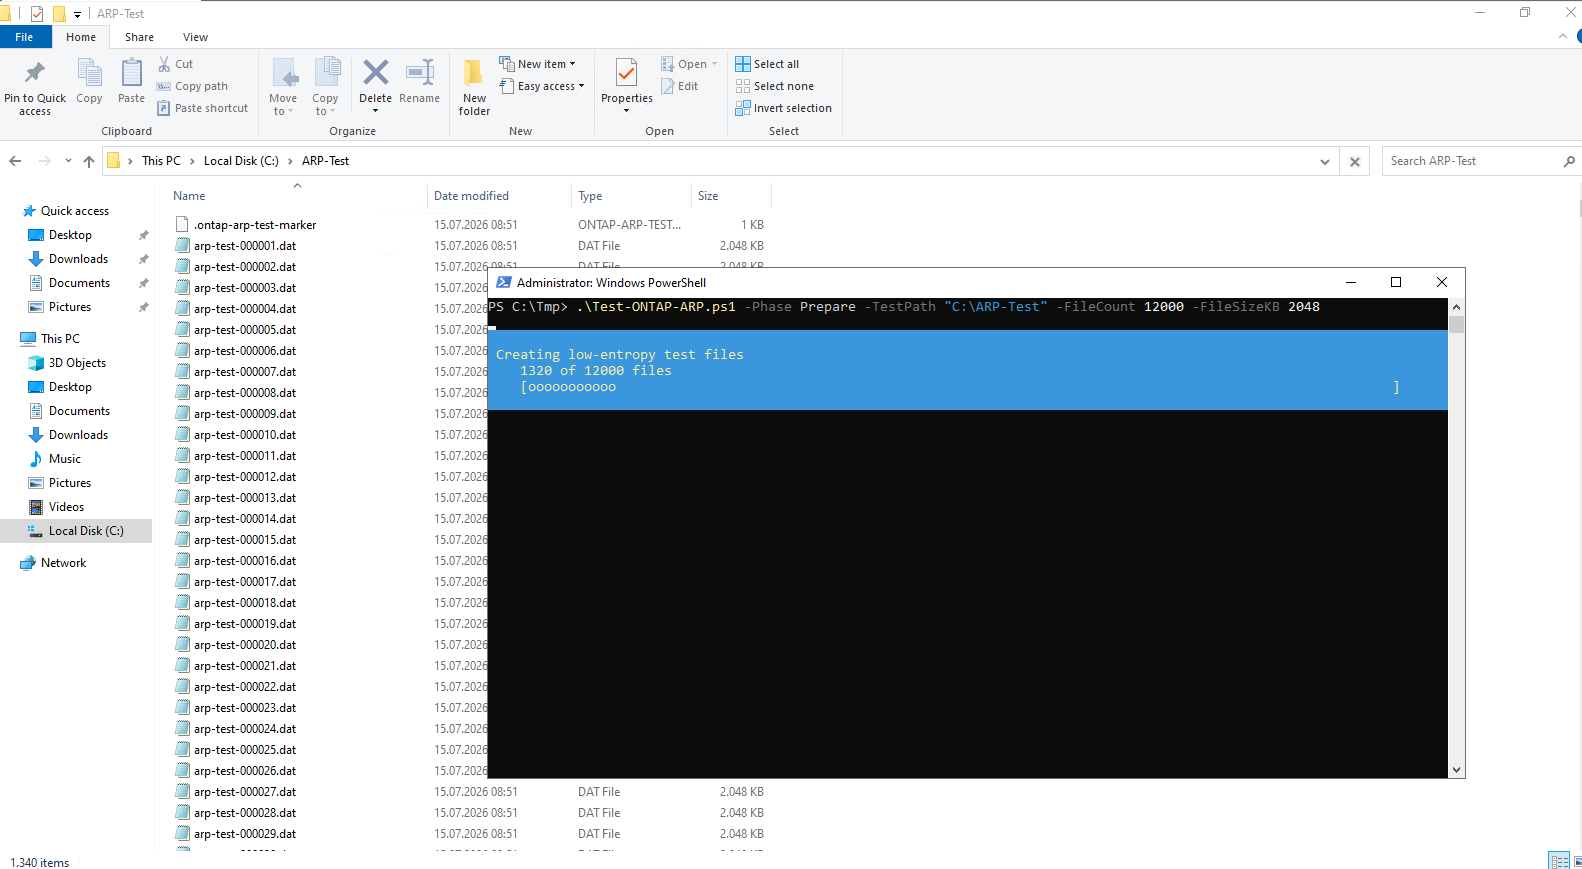
This creates approximately 23,4 GB. Then run the attack again.
.\Test-ONTAP-ARP.ps1 -Phase Attack -TestPath "C:\ARP-Test" -ConfirmAttack
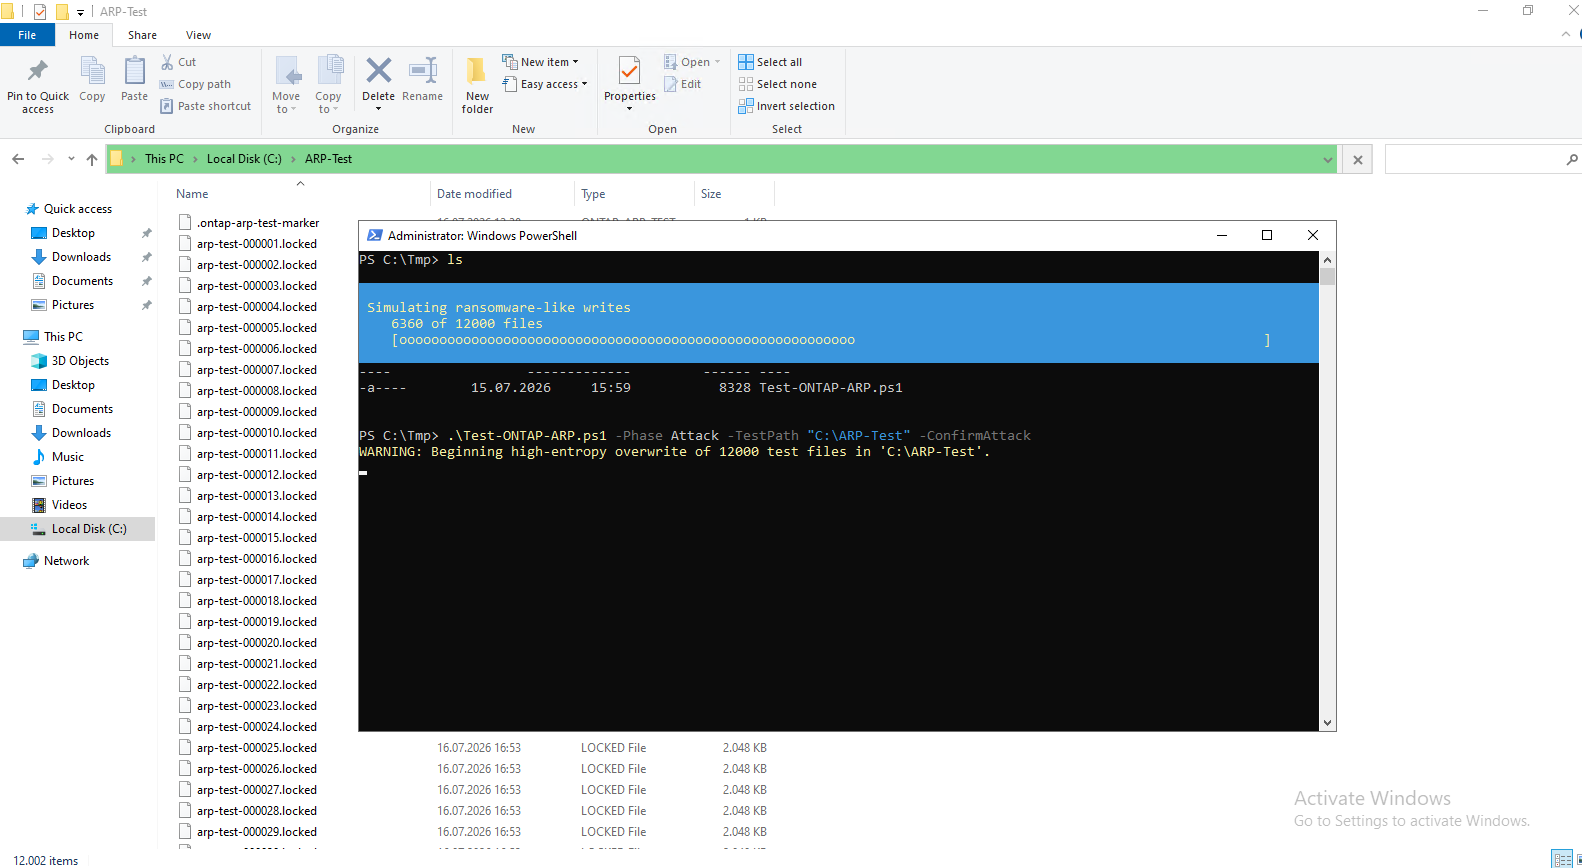
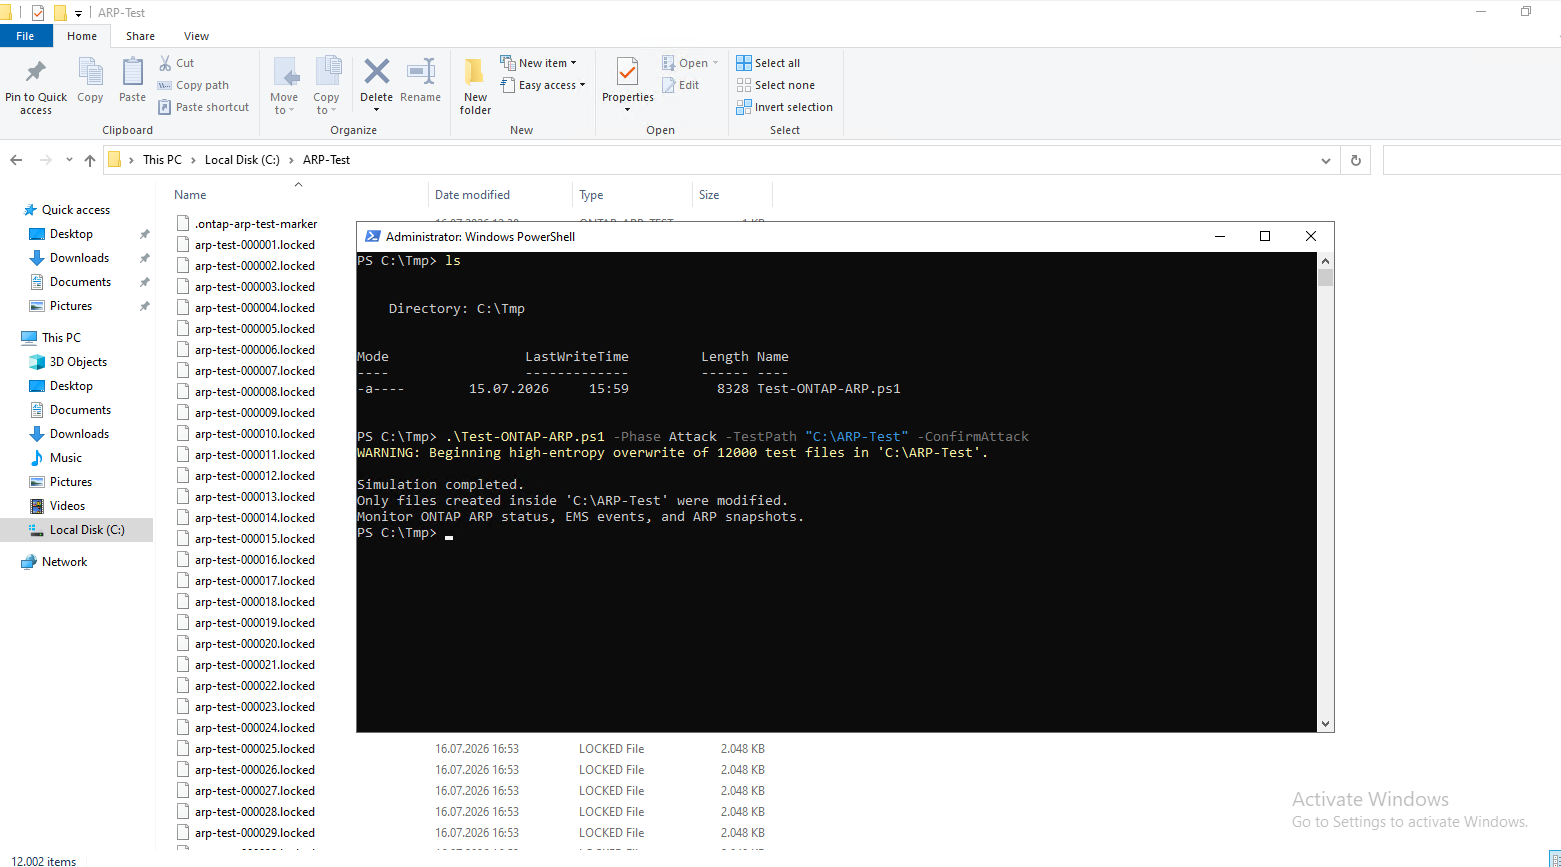
While the initial simulation was not sufficient to trigger ARP, increasing the number and size of the test files generated enough ransomware-like block-write activity for ONTAP to classify the workload as a potential ransomware attack.
That means ONTAP identified the workload as suspicious based on the proportion of high-entropy/encrypted-looking block writes. Because this is a SAN/VMFS workload, ONTAP cannot see the
.lockedfilenames; it detected the attack purely from the changed block patterns.So ARP can already detect an attack during the evaluation period. The evaluation period does not mean detection is inactive, it is still learning the workload characteristics while monitoring and alerting.
matrixselect::> security anti-ransomware volume show -vserver svm_matrix_vsphere -volume vol_iscsi_vsphere01
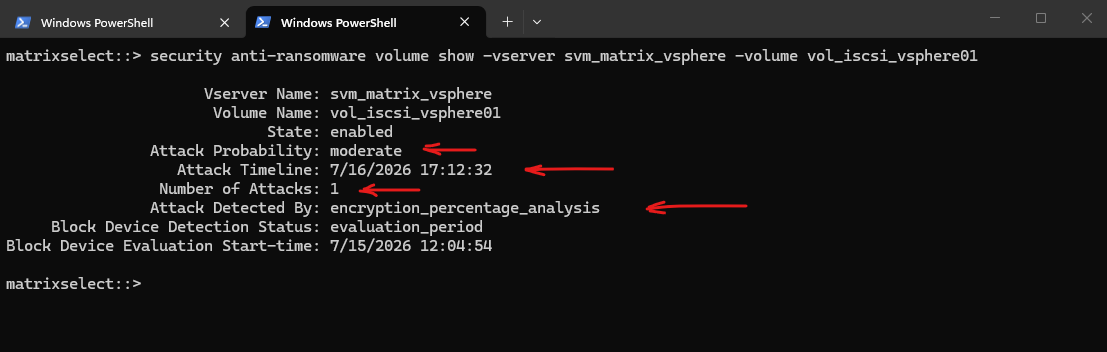
Within 10 mins, abnormal activity was detected on the volume based on the high entropy data and ARP generates a threat alert as it detected an entropy anomaly inside the VM.
ARP detects the attack early and enables data recovery from snapshots taken close to the attack time. To rollback, use ARP periodic snapshot that was generated before the incident was triggered. And the screenshot below shows the snapshots created:
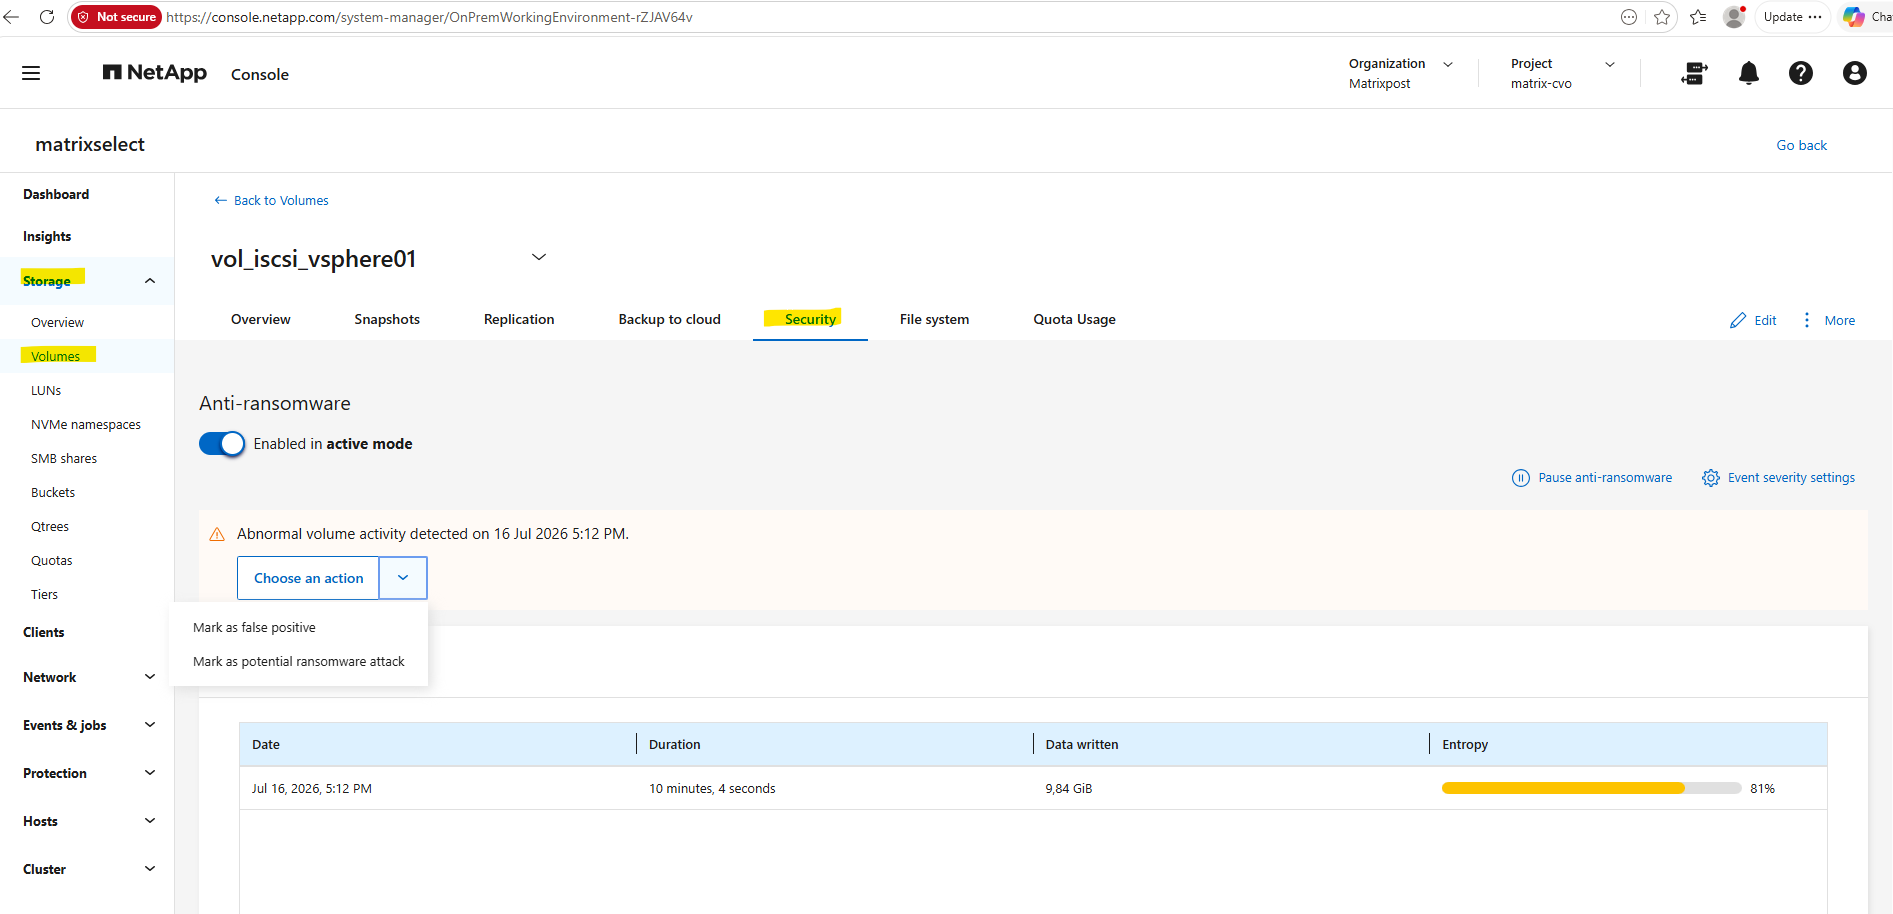
After overwriting 12,000 test files with high-entropy random data, ONTAP ARP detected one potential attack with a moderate probability. The attack was identified by encryption_percentage_analysis, confirming that SAN ARP detected the ransomware-like block-write pattern even though the volume was still in its evaluation period.
Besides the regular scheduled snapshots, ONTAP ARP maintains its own Anti_ransomware_periodic_backup snapshots while protection is enabled.
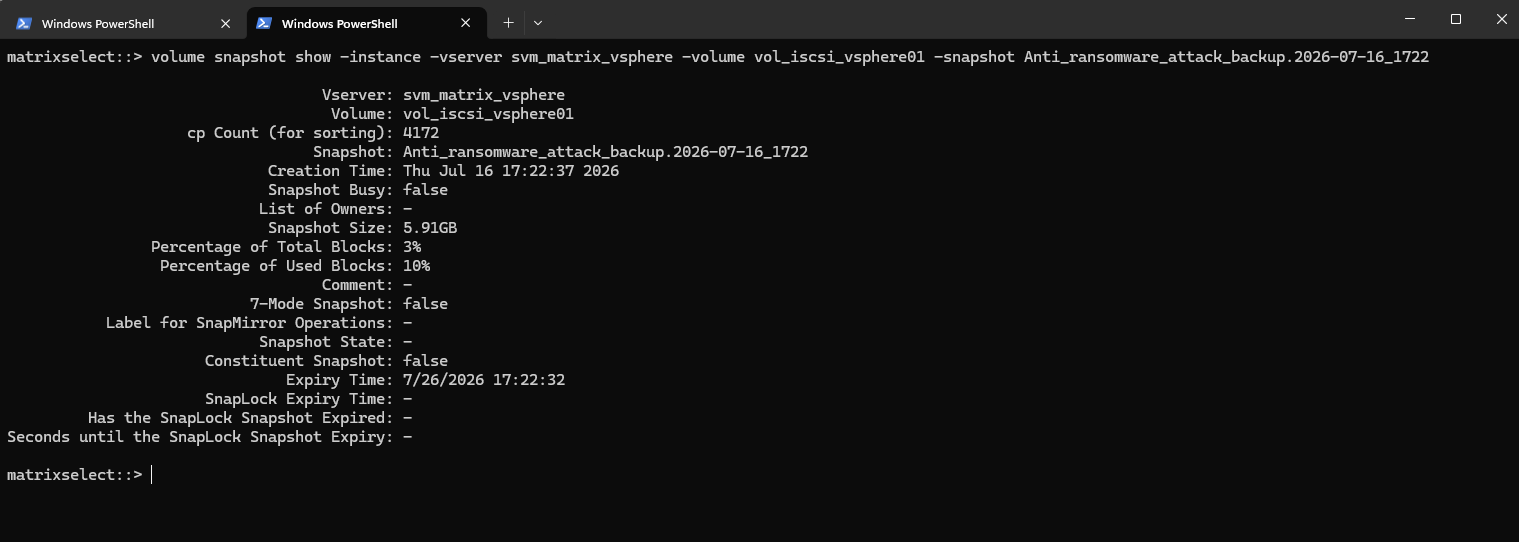
When ARP detects a potential ransomware attack, it automatically creates a dedicated
Anti_ransomware_attack_backupsnapshot to preserve a recovery point before additional changes occur.
matrixselect::> volume snapshot show -vserver svm_matrix_vsphere -volume vol_iscsi_vsphere01
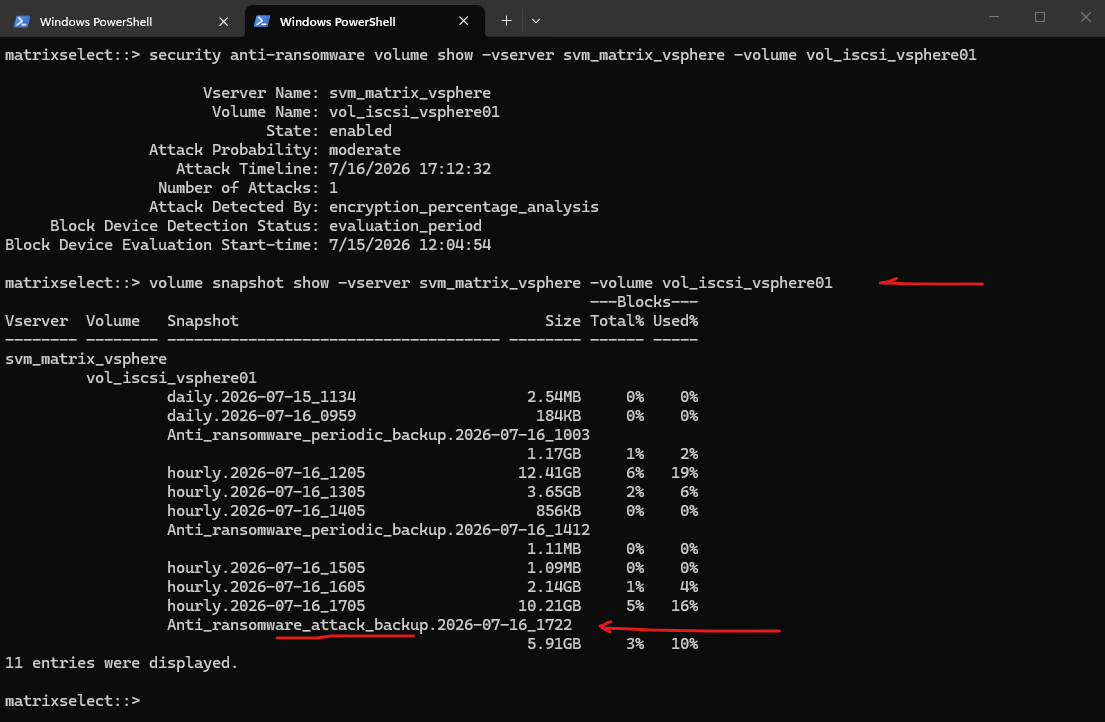
As shown below, the Anti_ransomware_attack_backup snapshot was automatically created after ARP detected the ransomware-like activity.
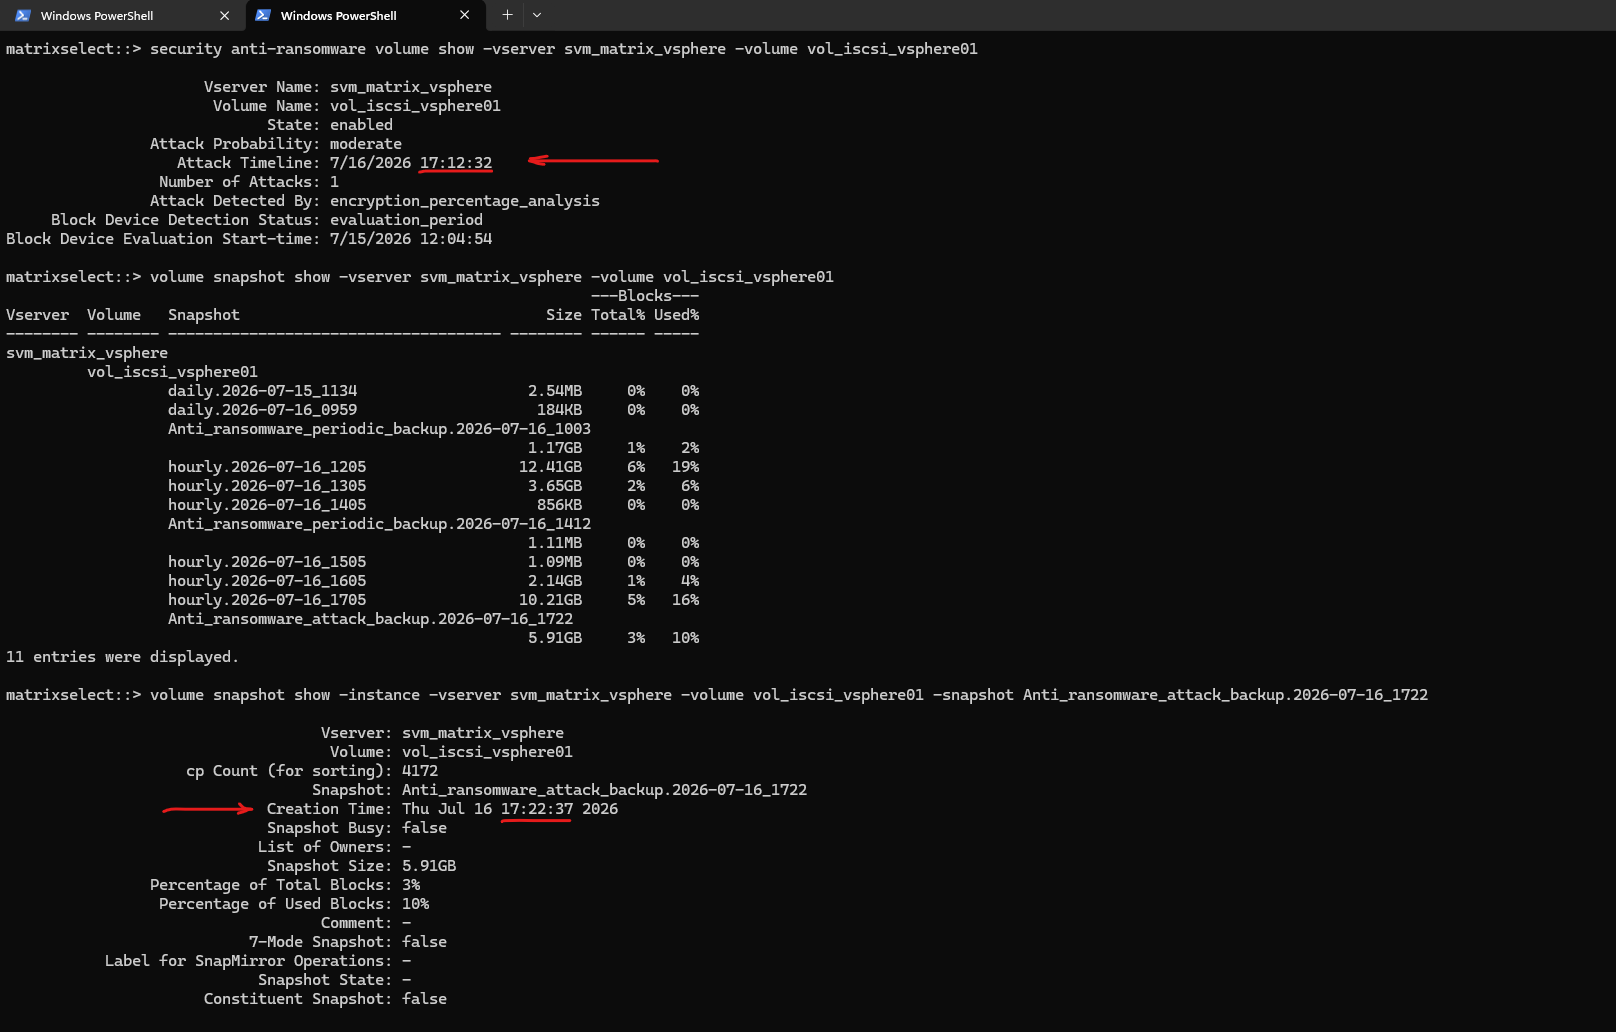
An interesting observation is that the automatically created Anti_ransomware_attack_backup snapshot is not necessarily intended to be the primary restore point. As recommended by NetApp, recovery should typically use the most recent Anti_ransomware_periodic_backup snapshot that was created before the attack was detected, as it represents the last known good state of the data. The attack snapshot, created after detection, primarily serves as a forensic recovery point, preserving the state of the volume at the time of the detected attack.
matrixselect::> volume snapshot show -instance -vserver svm_matrix_vsphere -volume vol_iscsi_vsphere01 -snapshot Anti_ransomware_attack_backup.2026-07-16_1722
More about you will also find here https://docs.netapp.com/us-en/netapp-solutions-virtualization/vmware/vmw-arp-nfs-vmfs.html#configure-arp-on-san-volumes-and-simulating-an-attack-on-a-vm.
Links
Autonomous Ransomware Protection for NFS and VMFS
https://docs.netapp.com/us-en/netapp-solutions-virtualization/vmware/vmw-arp-nfs-vmfs.html
