Set Up iSCSI Virtual Disks as Shared Storage for an ESXi Host Cluster
In order to provide shared storage to my vSphere lab environment and later creating a vSphere ESXi host cluster, I will configure a new iSCSI virtual disk on my iSCSI Target Server and specify as access servers (so called iSCSI initiator(s)) both of my ESXi hosts.
More about the Microsoft iSCSI Target Server you can read in my following post.
About how to set up and deploy a VMware ESXi Host Cluster and Datastore Cluster, you can also read my following post.
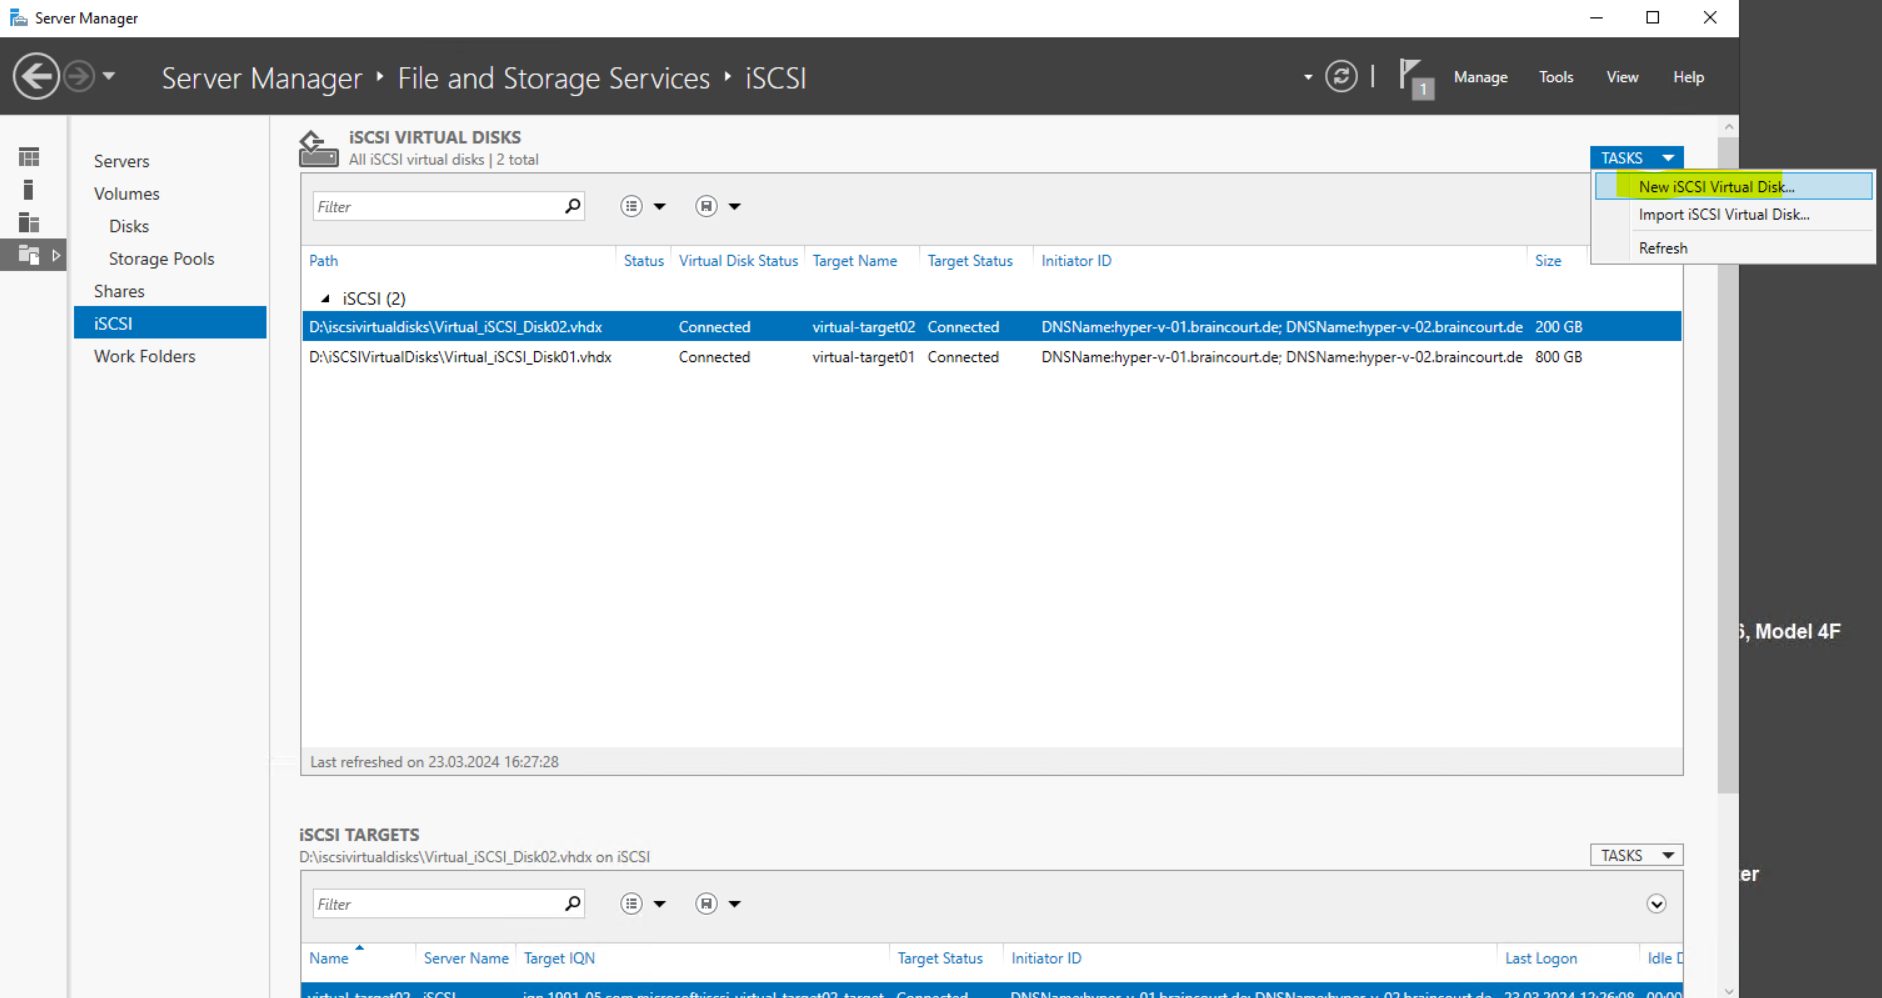
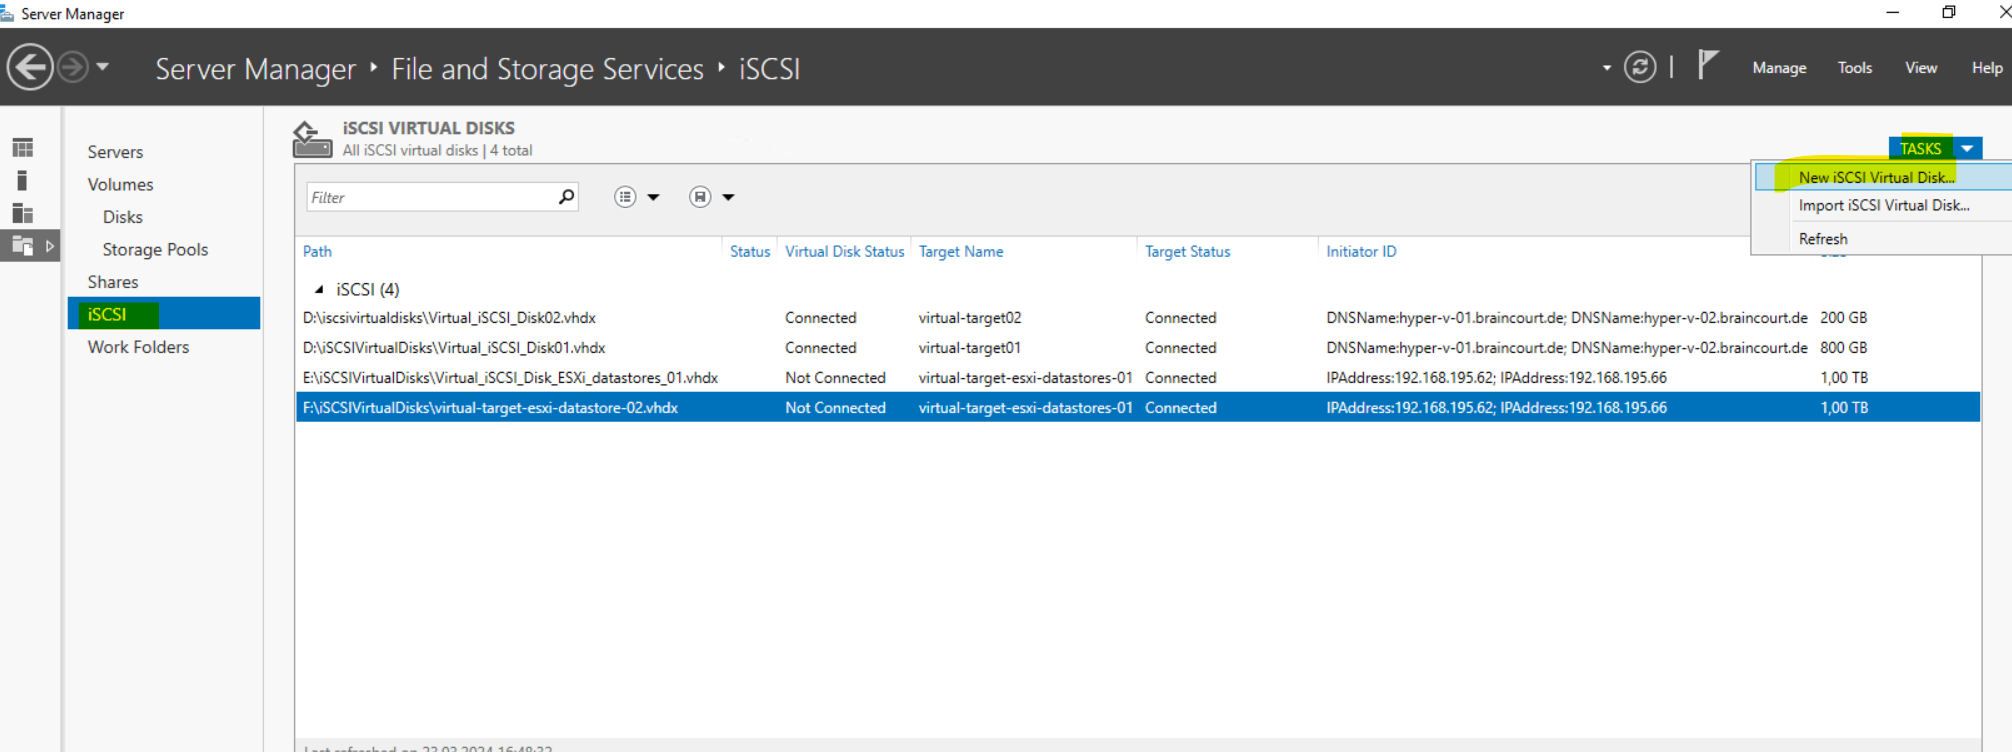
Creating a new iSCSI Virtual Disk
Create an iSCSI LUN (iSCSI virtual disk) to share storage. The iSCSI virtual disk is finally a VHD. Click on the link below to start the New iSCSI Virtual Disk Wizard.
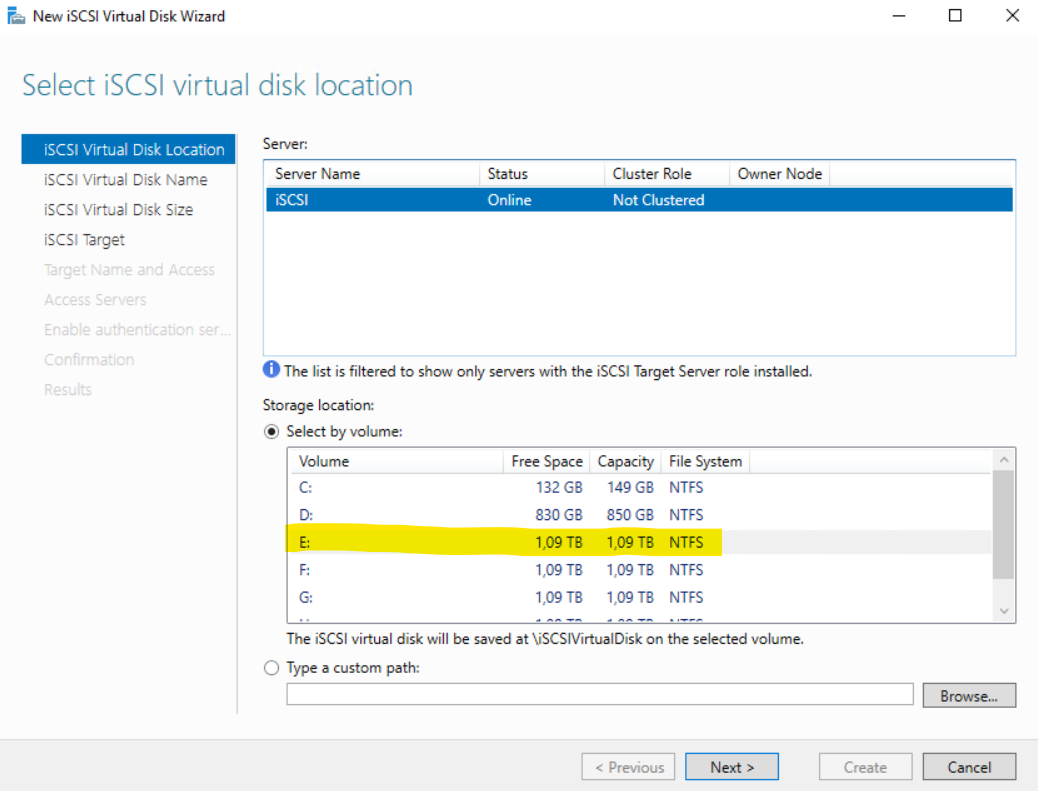
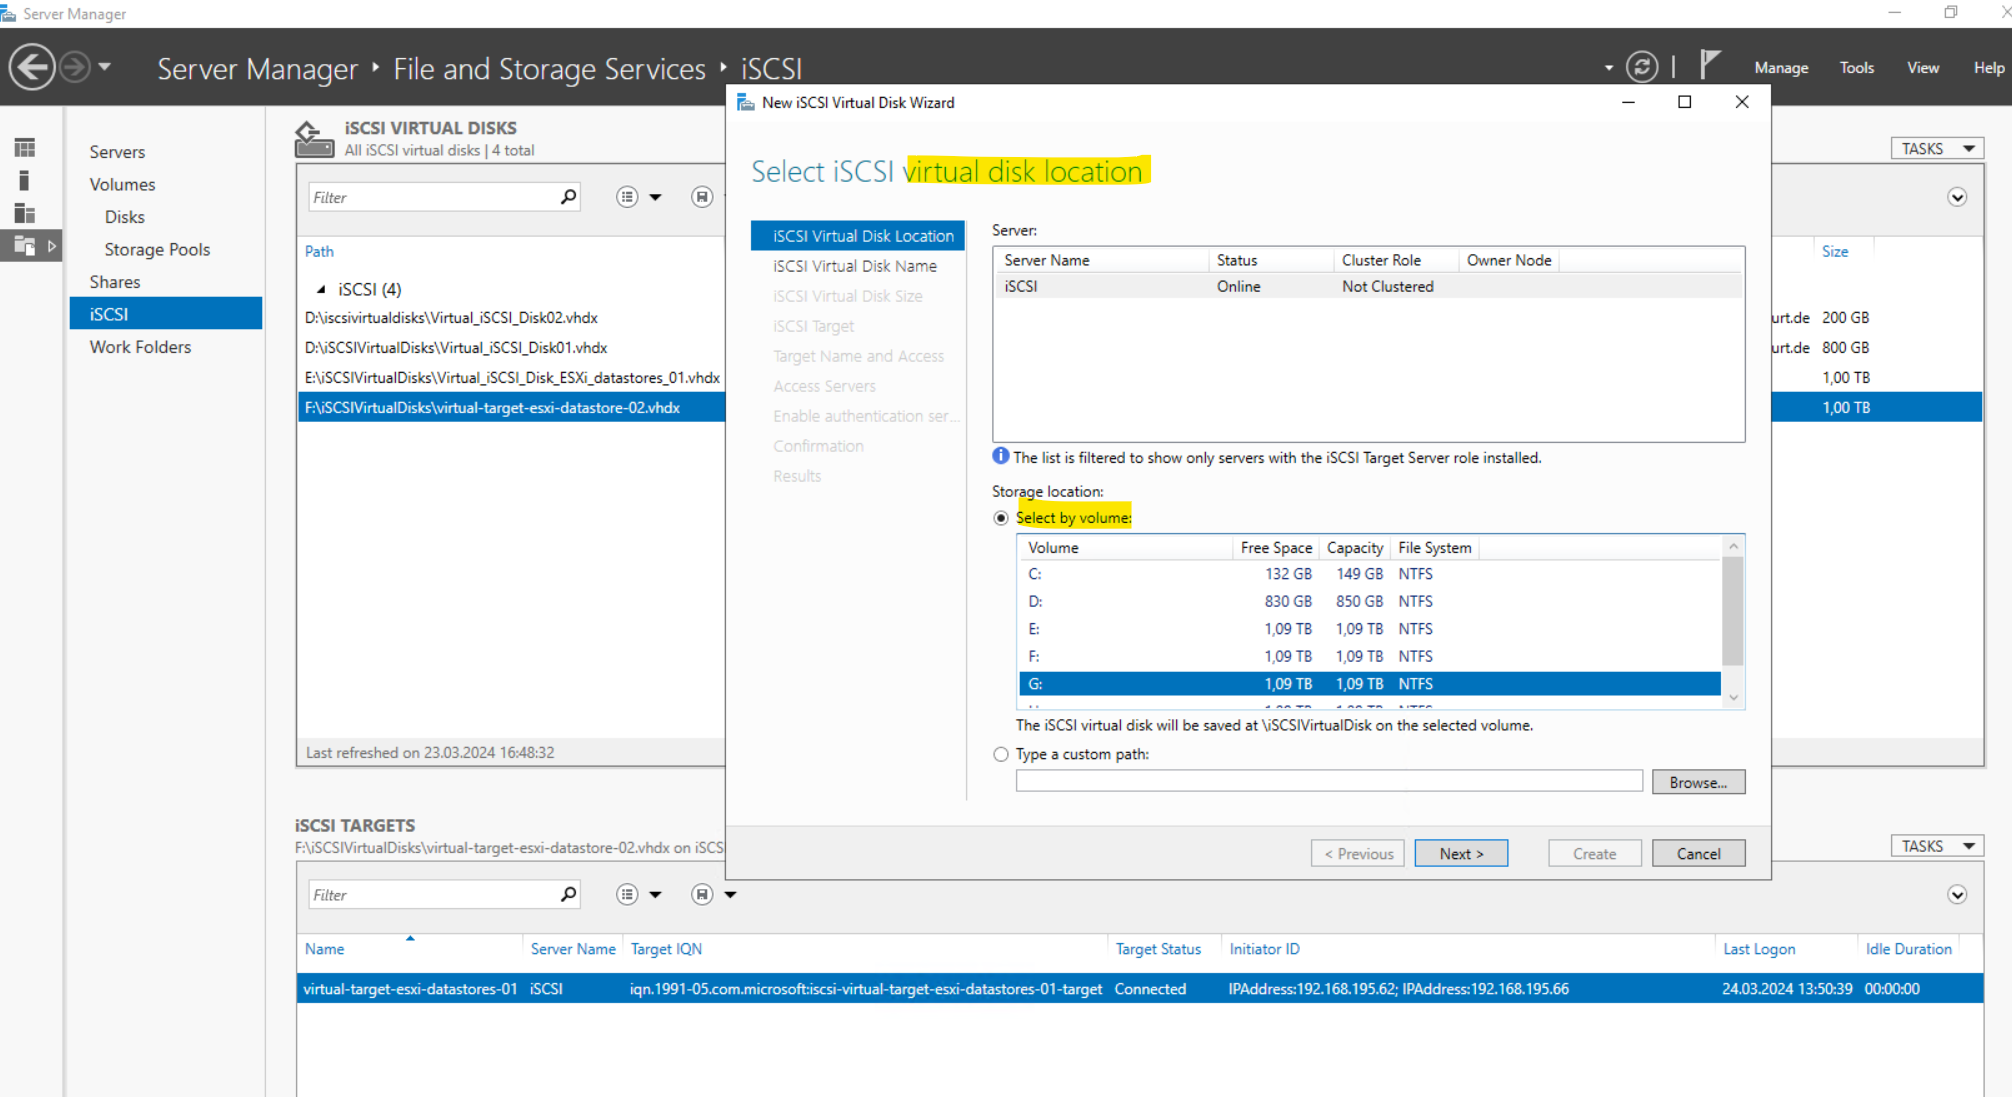
Select the server and the volume where the iSCSI virtual disk will be saved. Then click on Next.
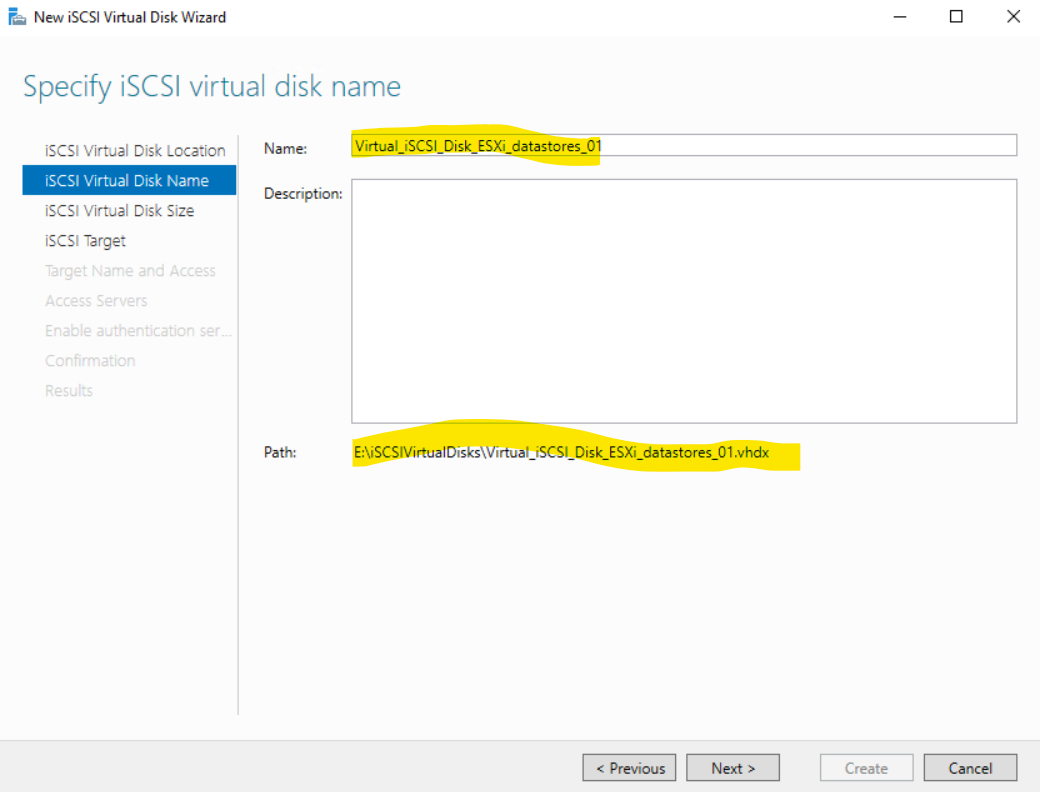
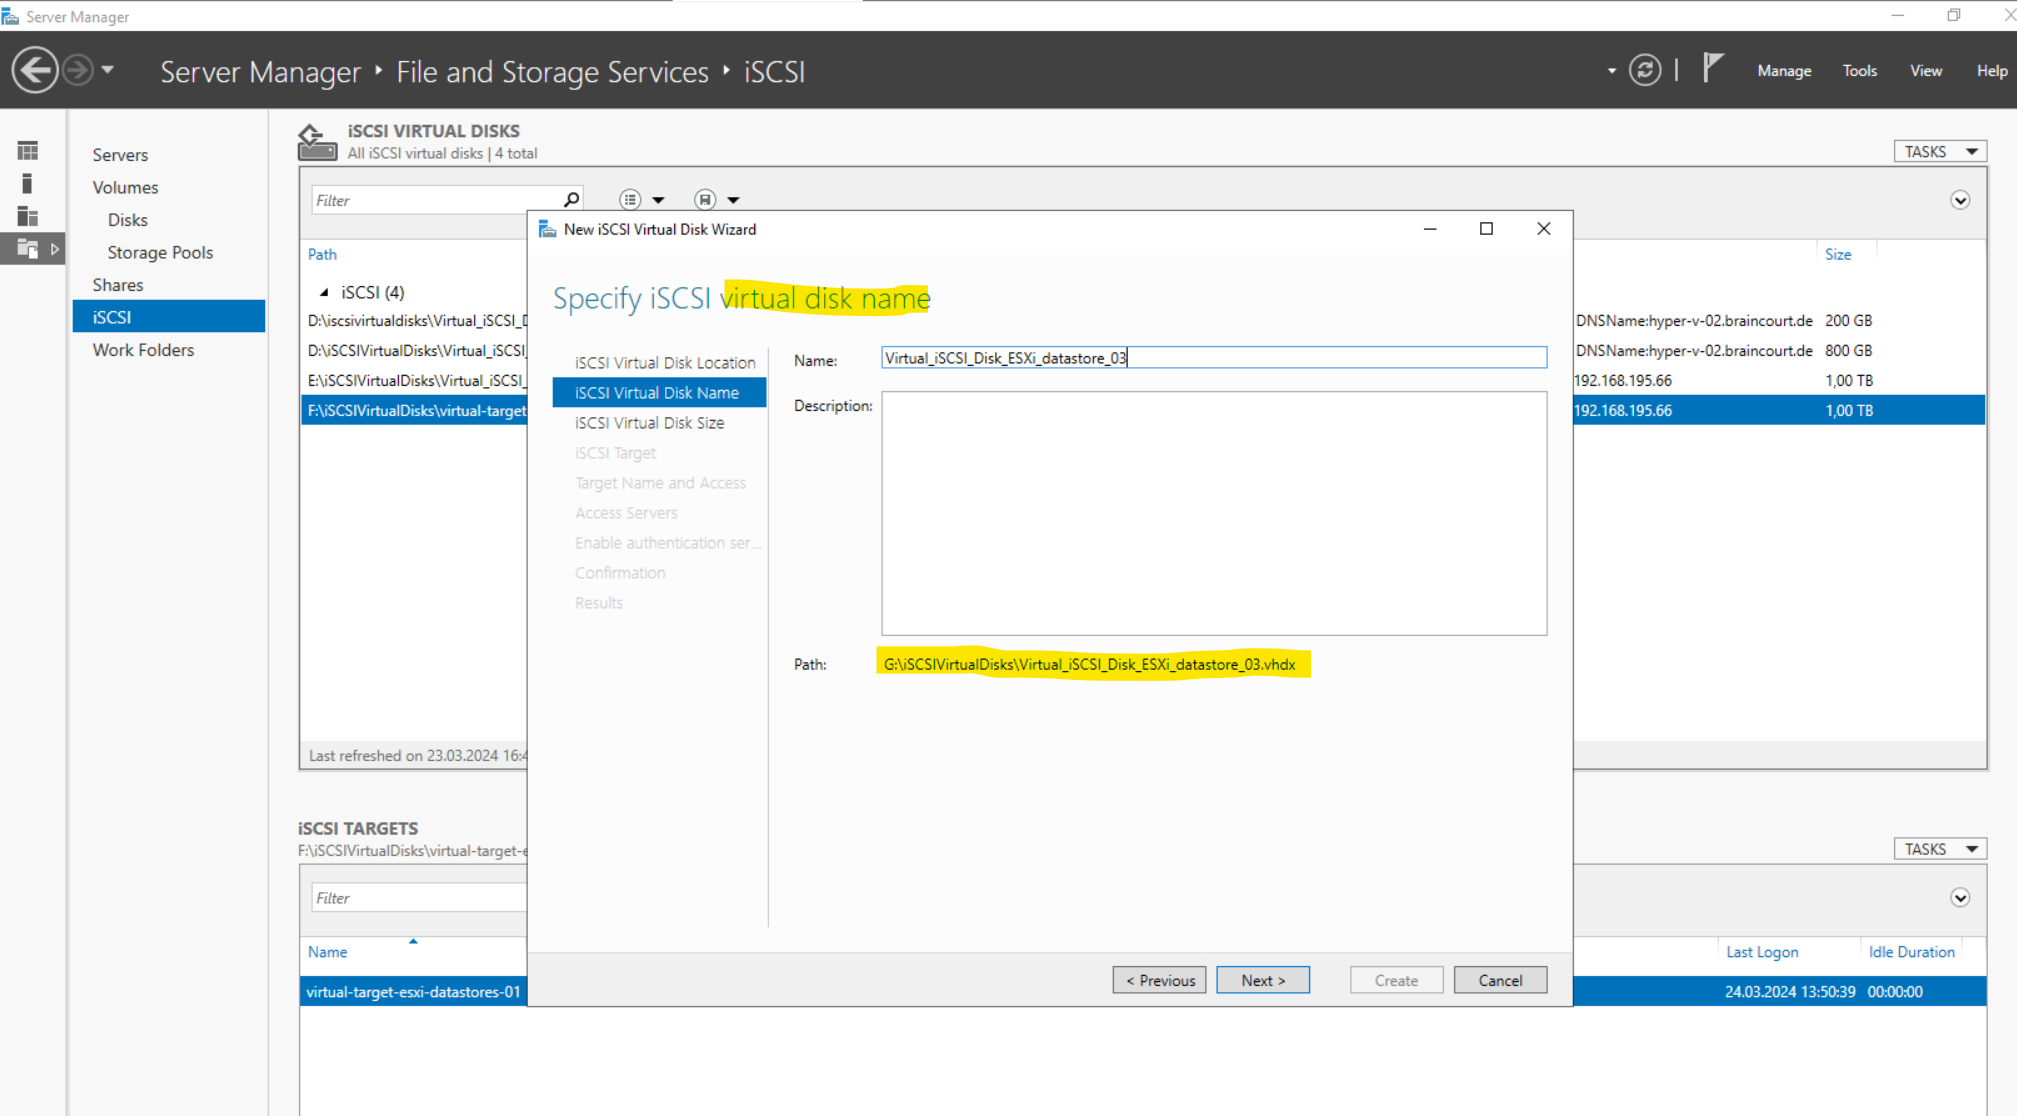
Provide a name for the iSCSI virtual disk.
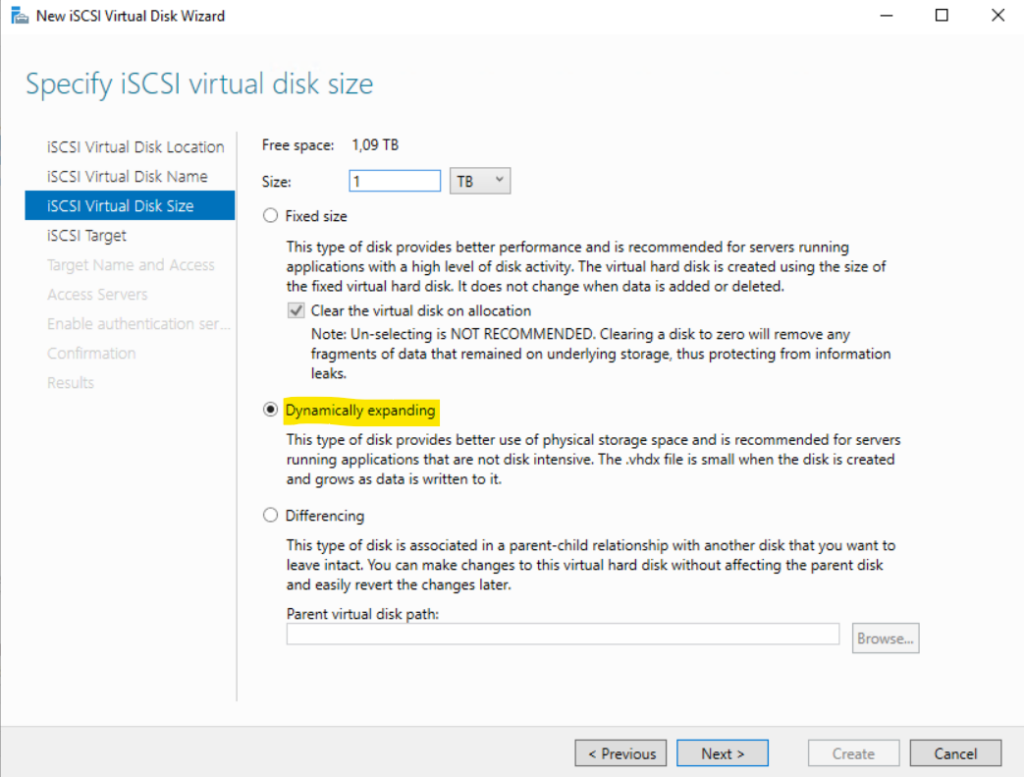
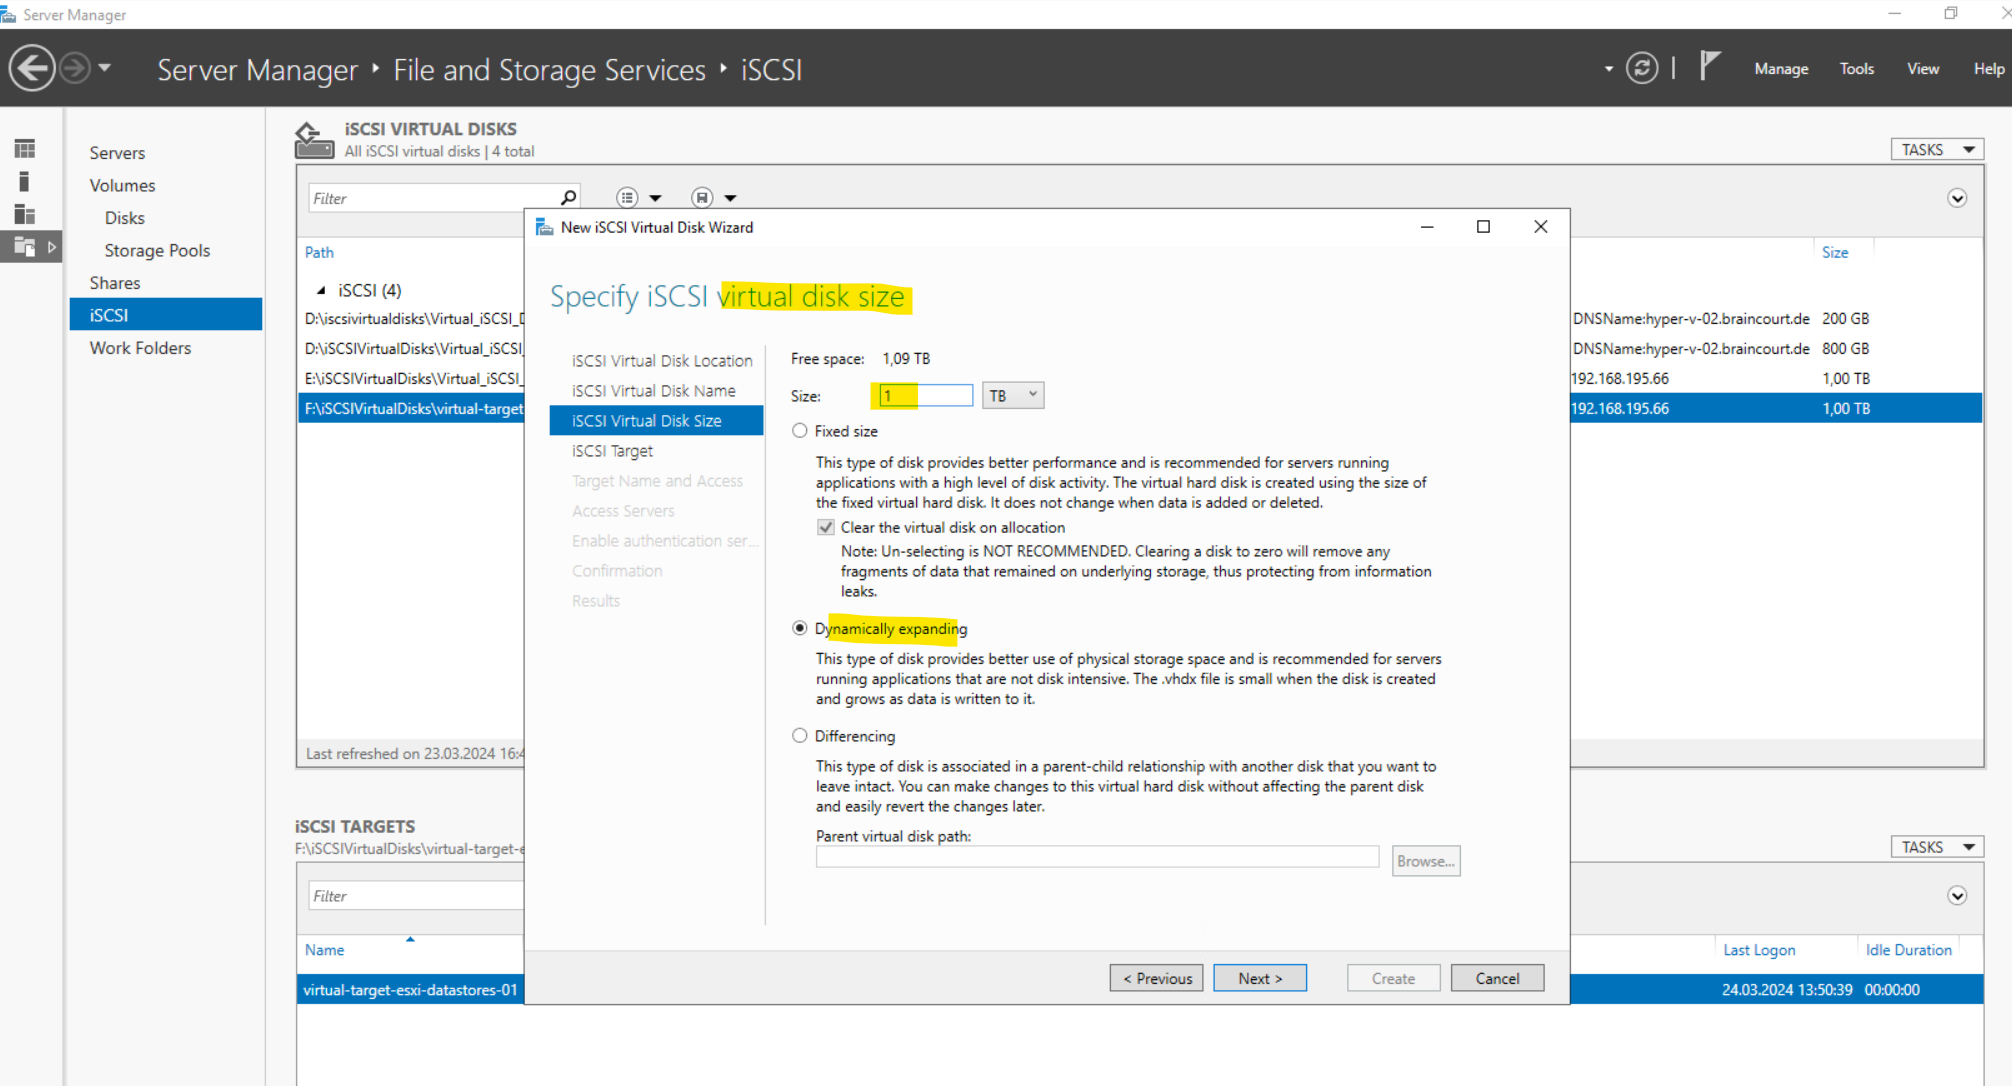
Specify the size for the virtual disk. Further I will select here dynamically expanding because it’s just for demonstration and testing purpose and the final performance is not crucial in my case.
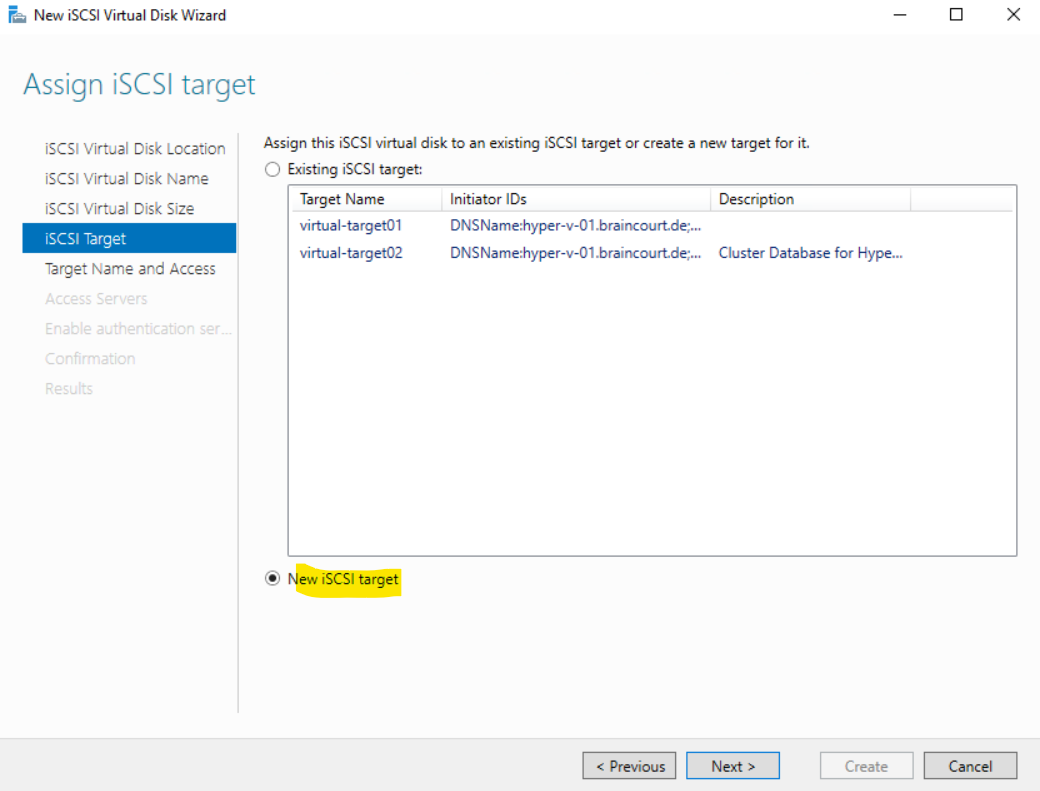
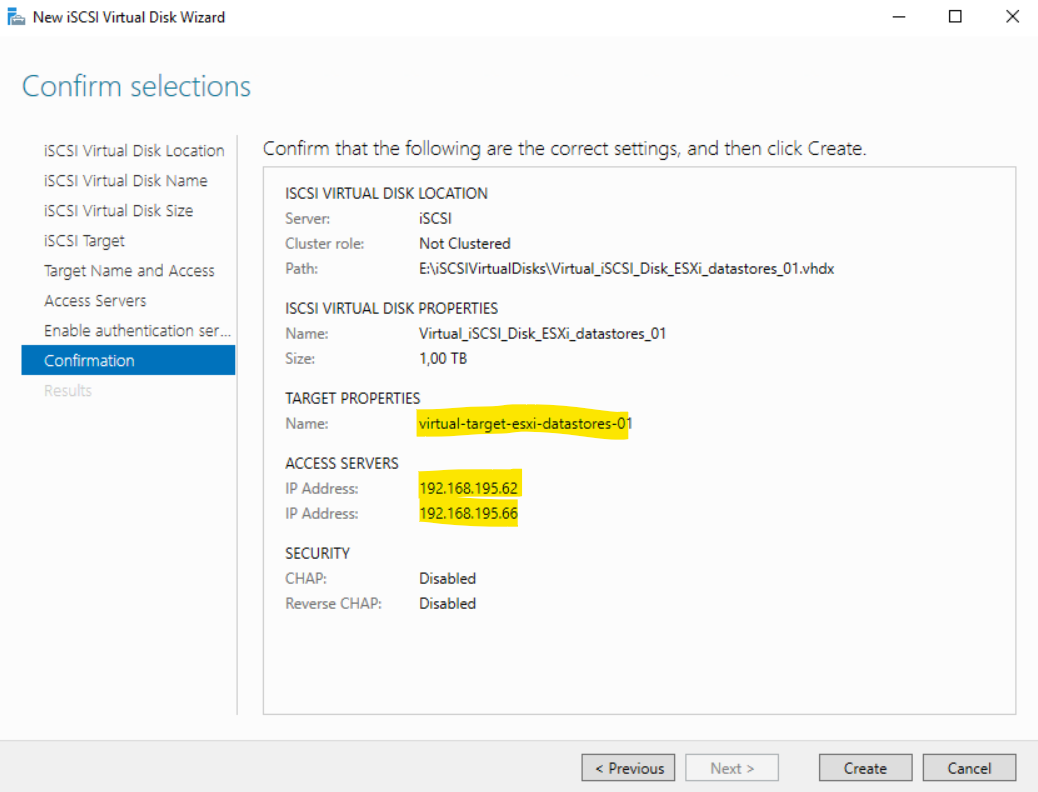
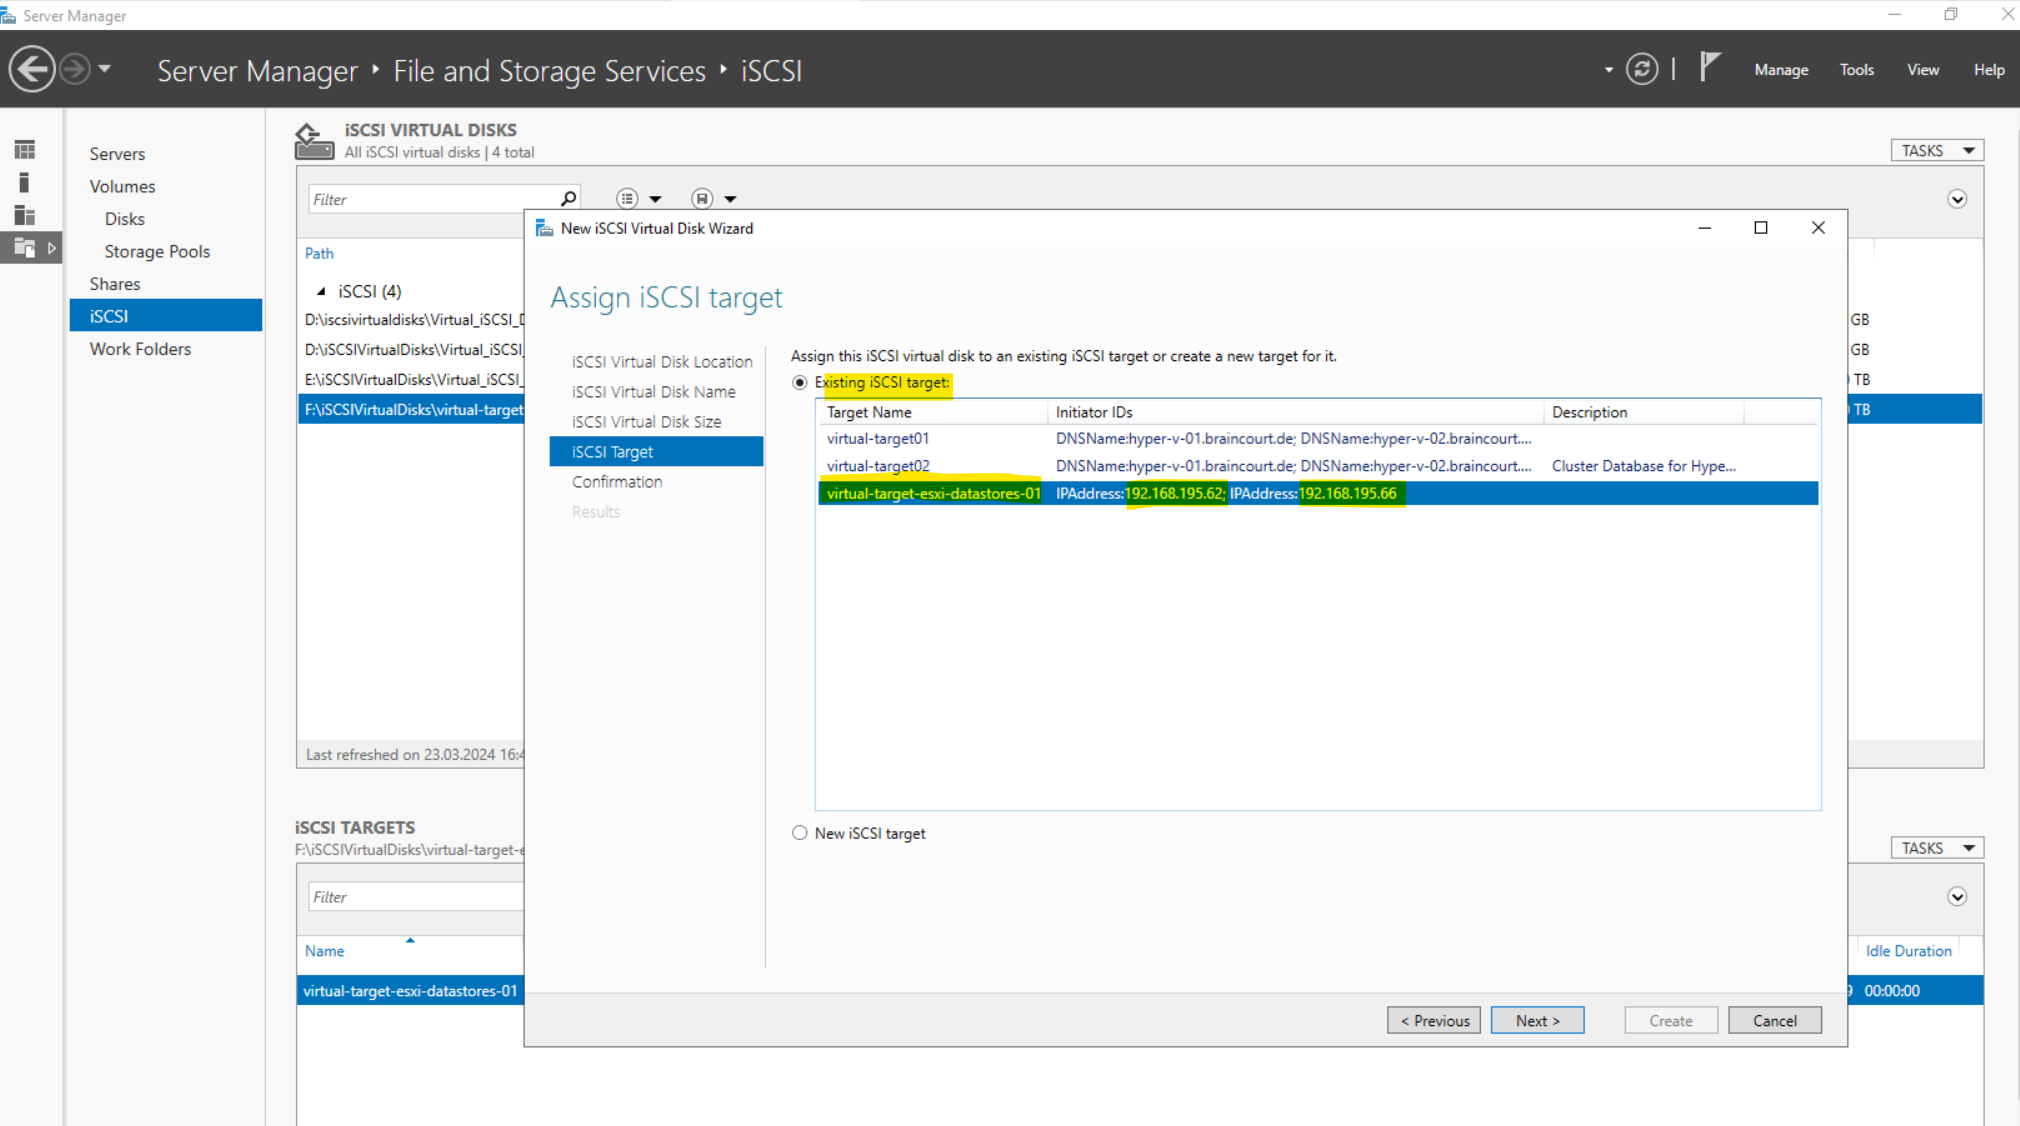
I will create a new iSCSI target for my vSphere lab environment.
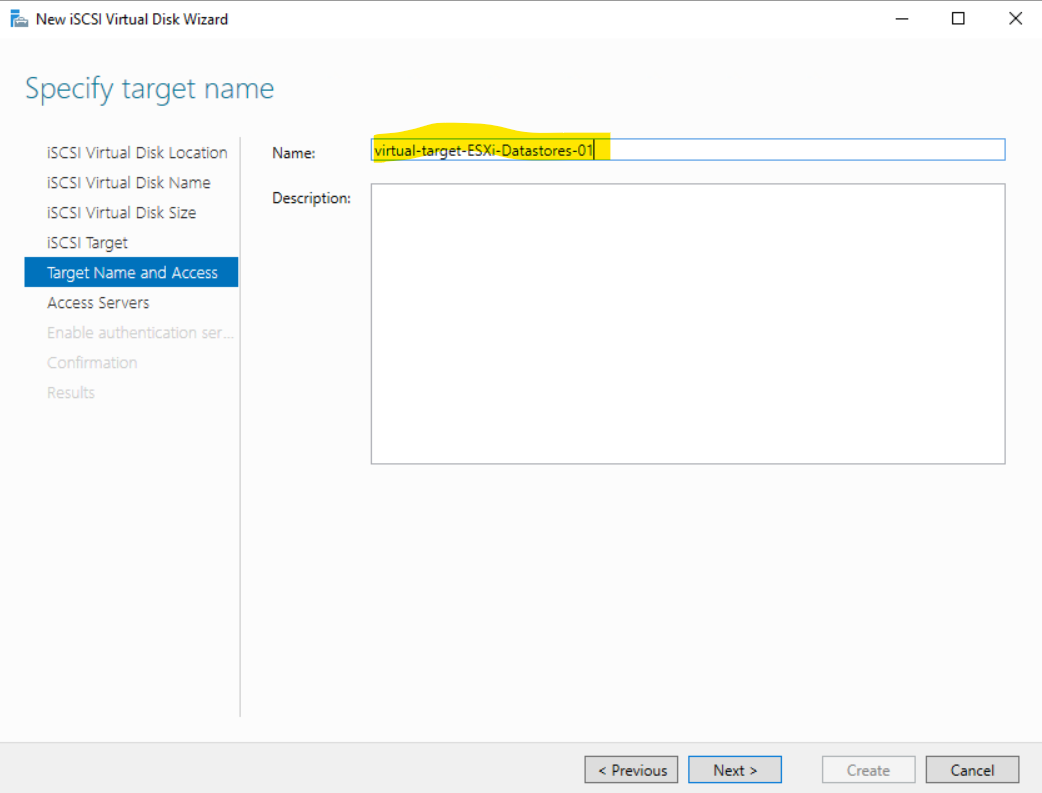
Specify a target name for the new iSCSI target.
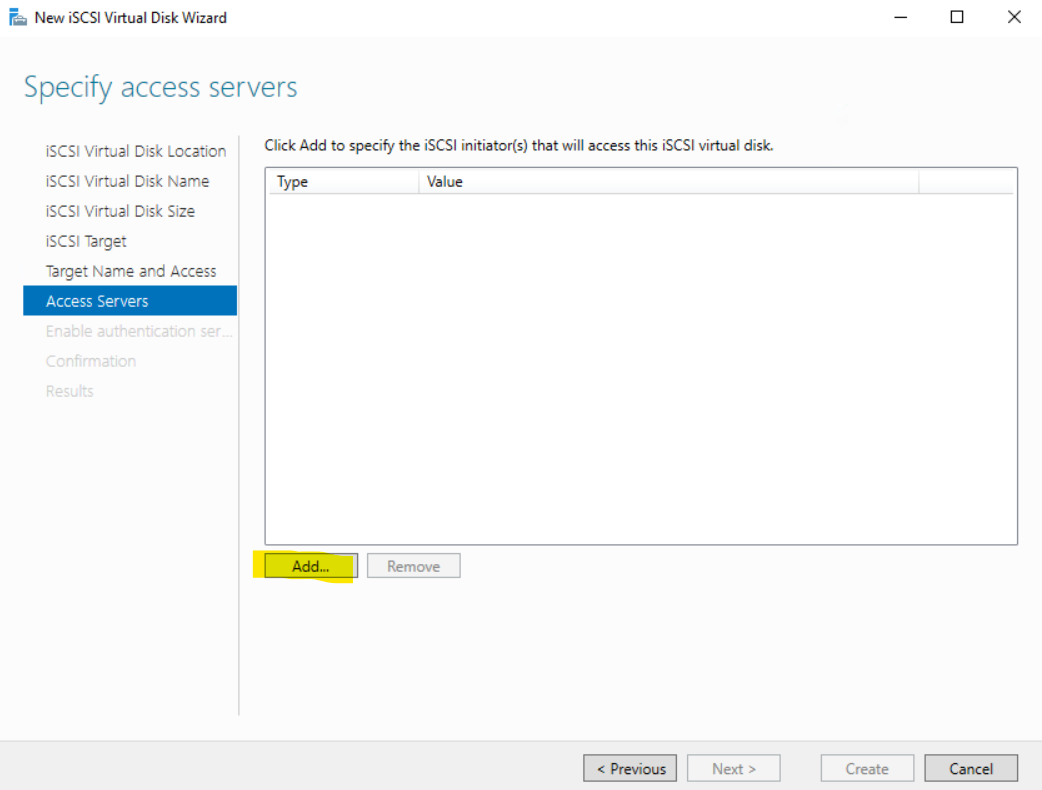
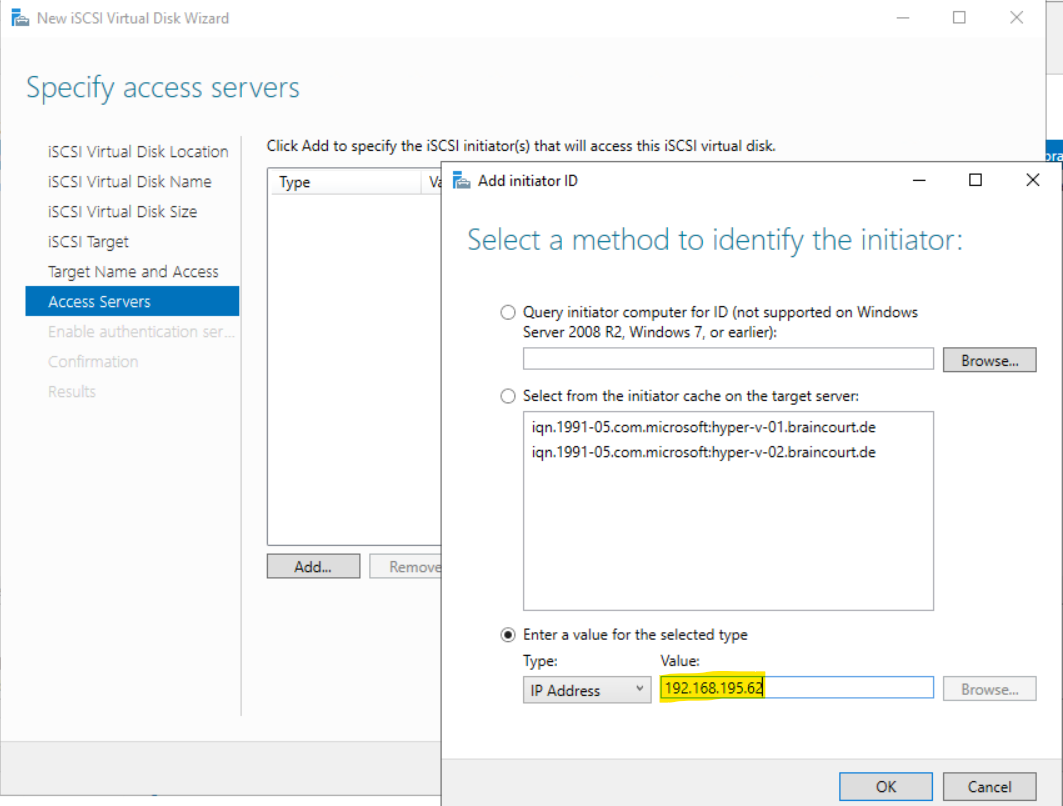
On the Specify access servers page we need to add the servers (so called iSCSI initiator(s)) which should have access to this iSCSI virtual disk later.
An initiator functions as an iSCSI client. An initiator typically serves the same purpose to a computer as a SCSI bus adapter would, except that, instead of physically cabling SCSI devices (like hard drives and tape changers), an iSCSI initiator sends SCSI commands over an IP network.
Click on Add… to add the servers.
For the initiator ID I will select IP Address and enter the IP address from my ESXi hosts which should have access to this iSCSI virtual disk.
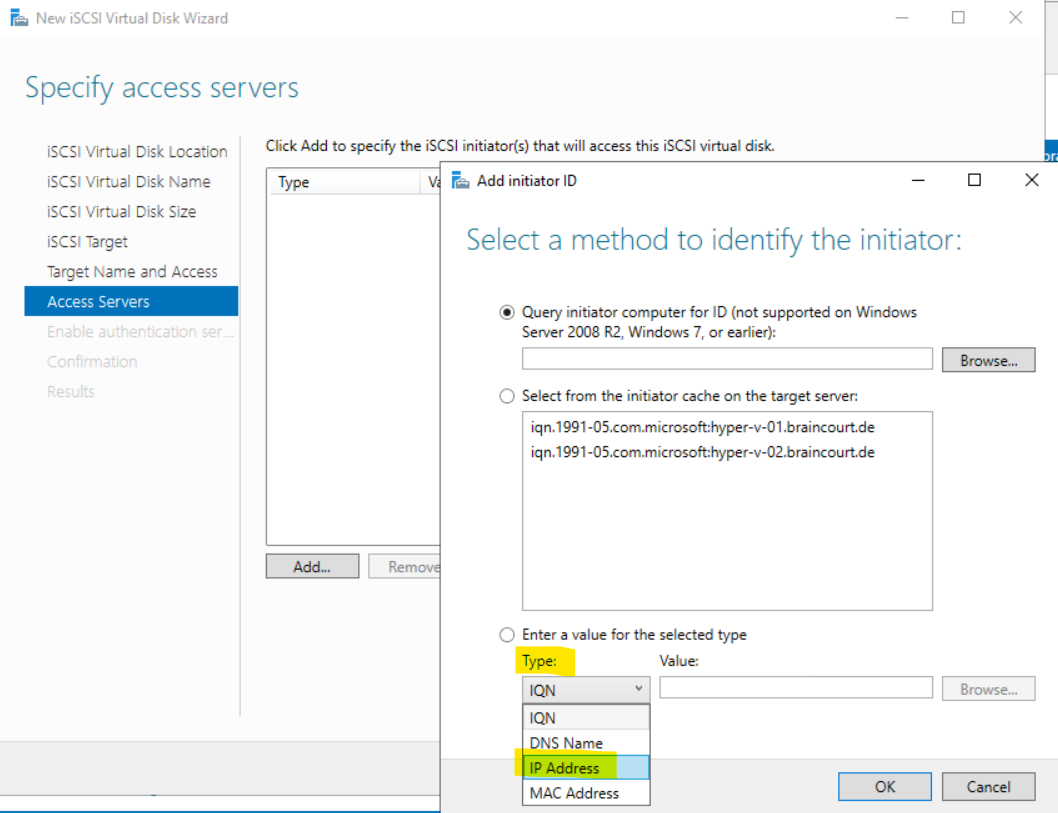
This is my esxi-01.braincourt.de host.
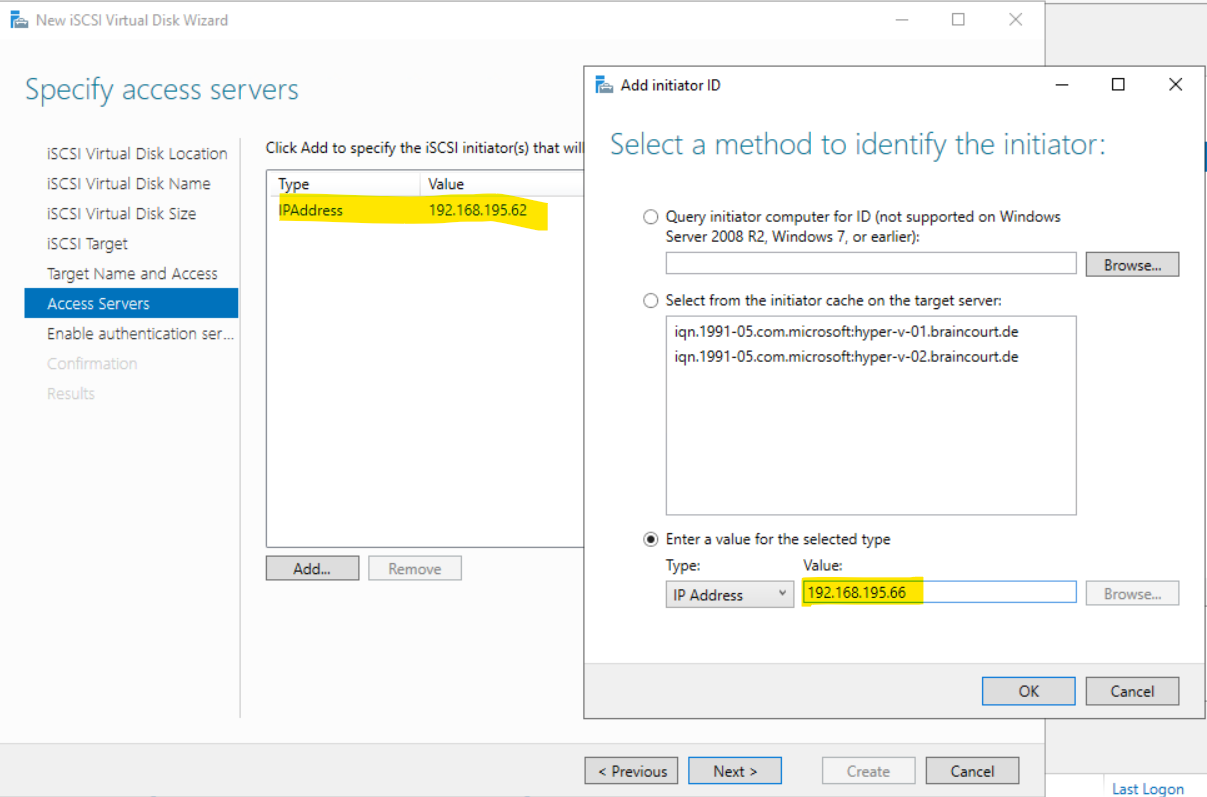
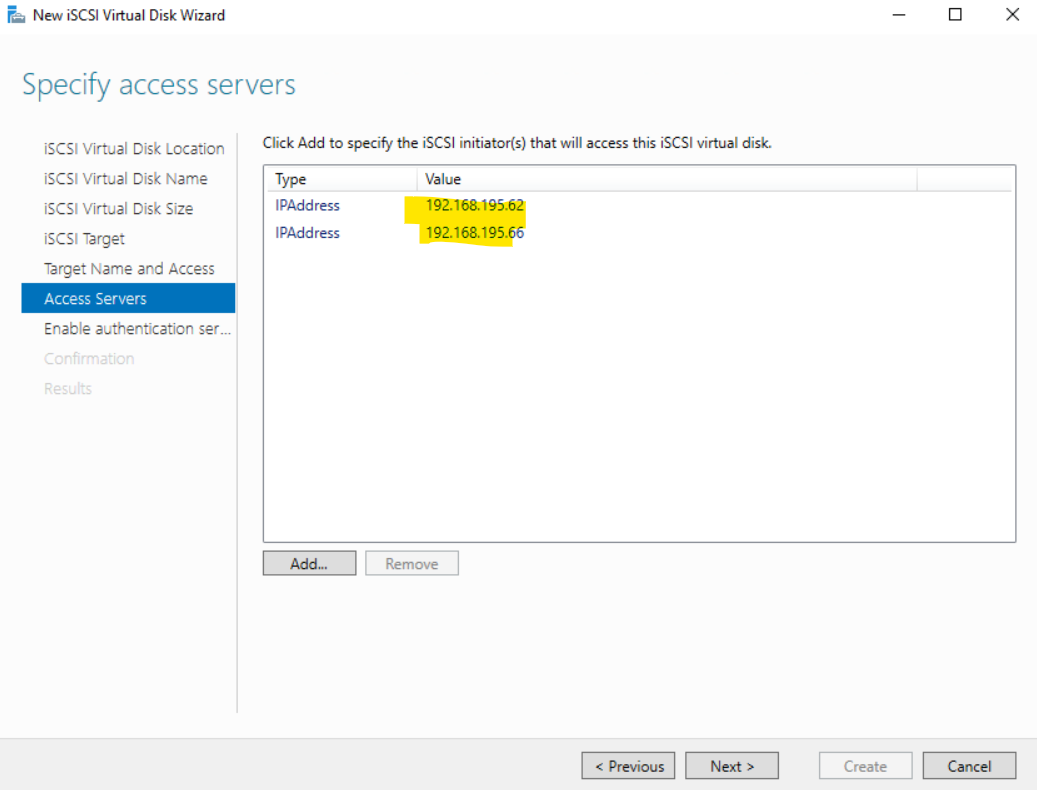
The same I will do for my second ESXi host. (esxi-02.braincourt.de)
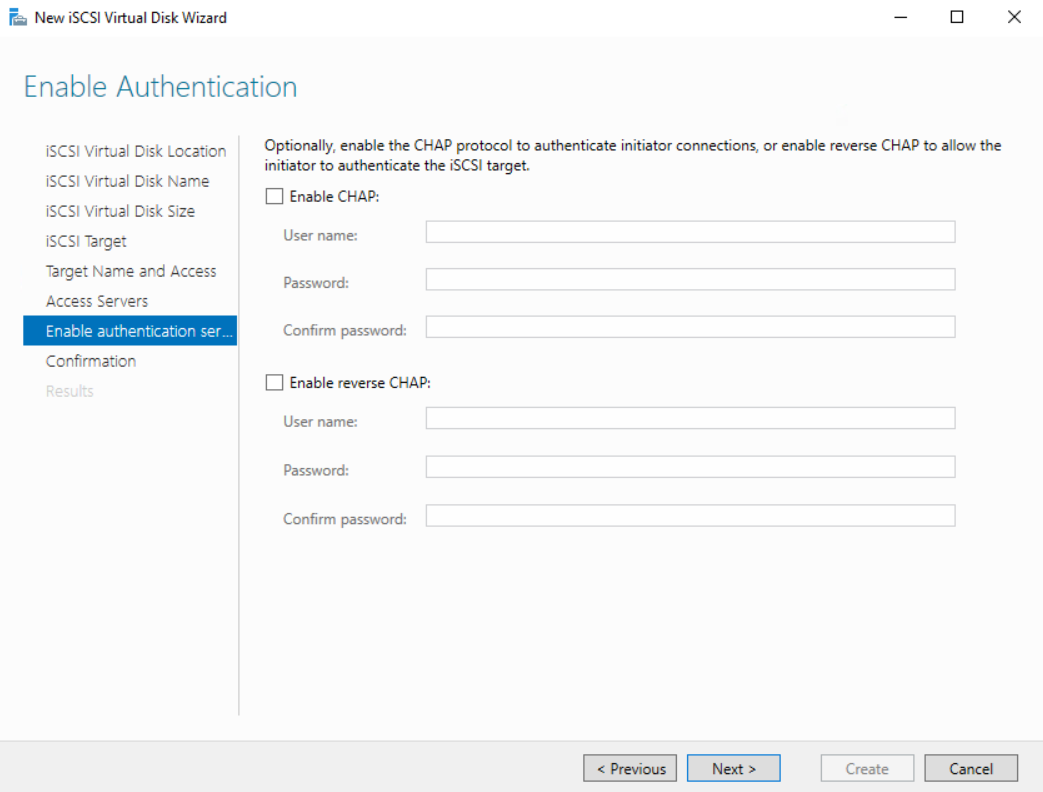
On the Enable Authentication page you can optionally add CHAP or reverse CHAP to secure the access to the iSCSI virtual disk. I will leave this blank just for demonstration and testing purpose. Then click Next.
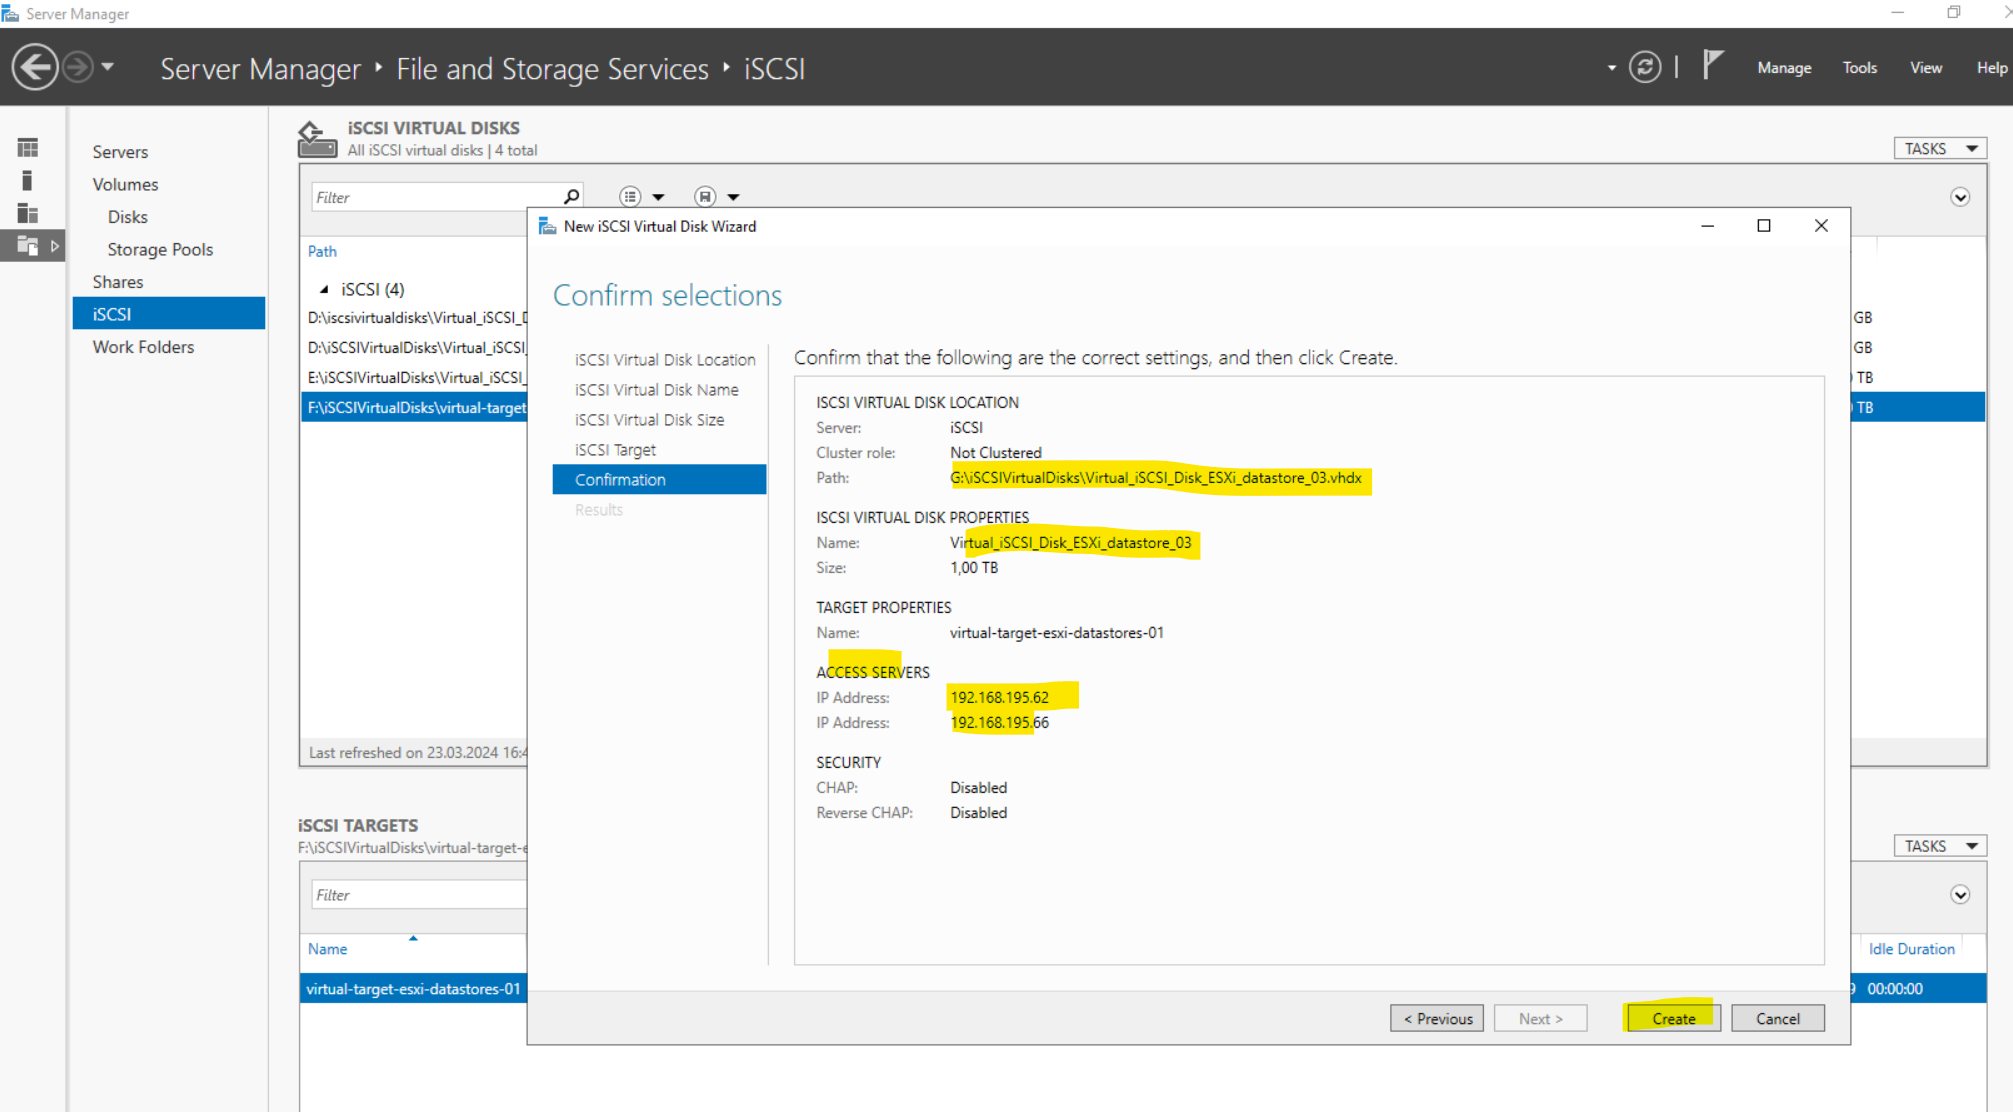
On the Confirm selections page I will click on Create to finally create the iSCSI virtual disk.
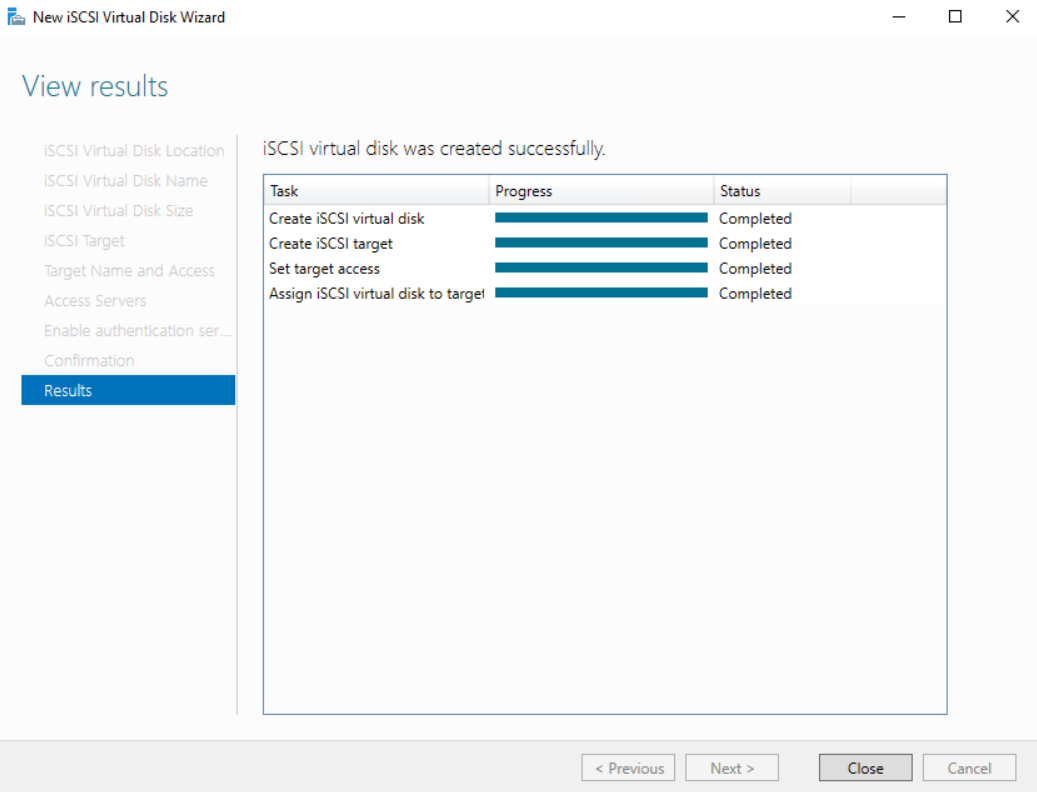
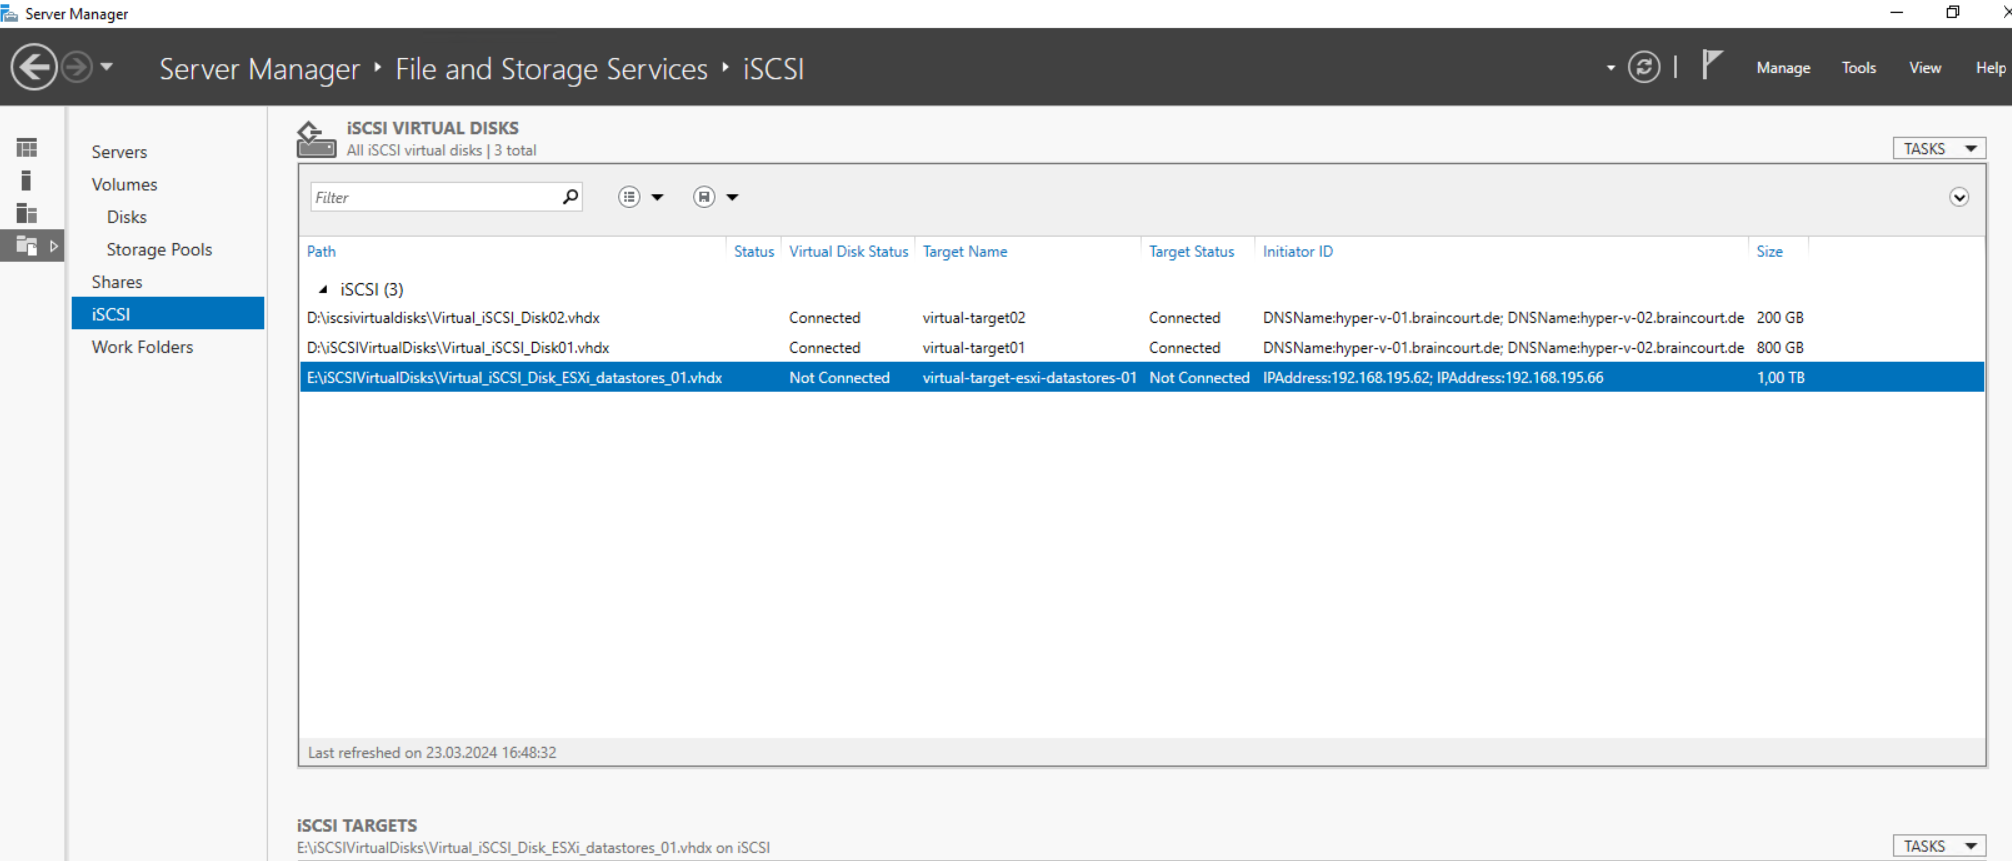
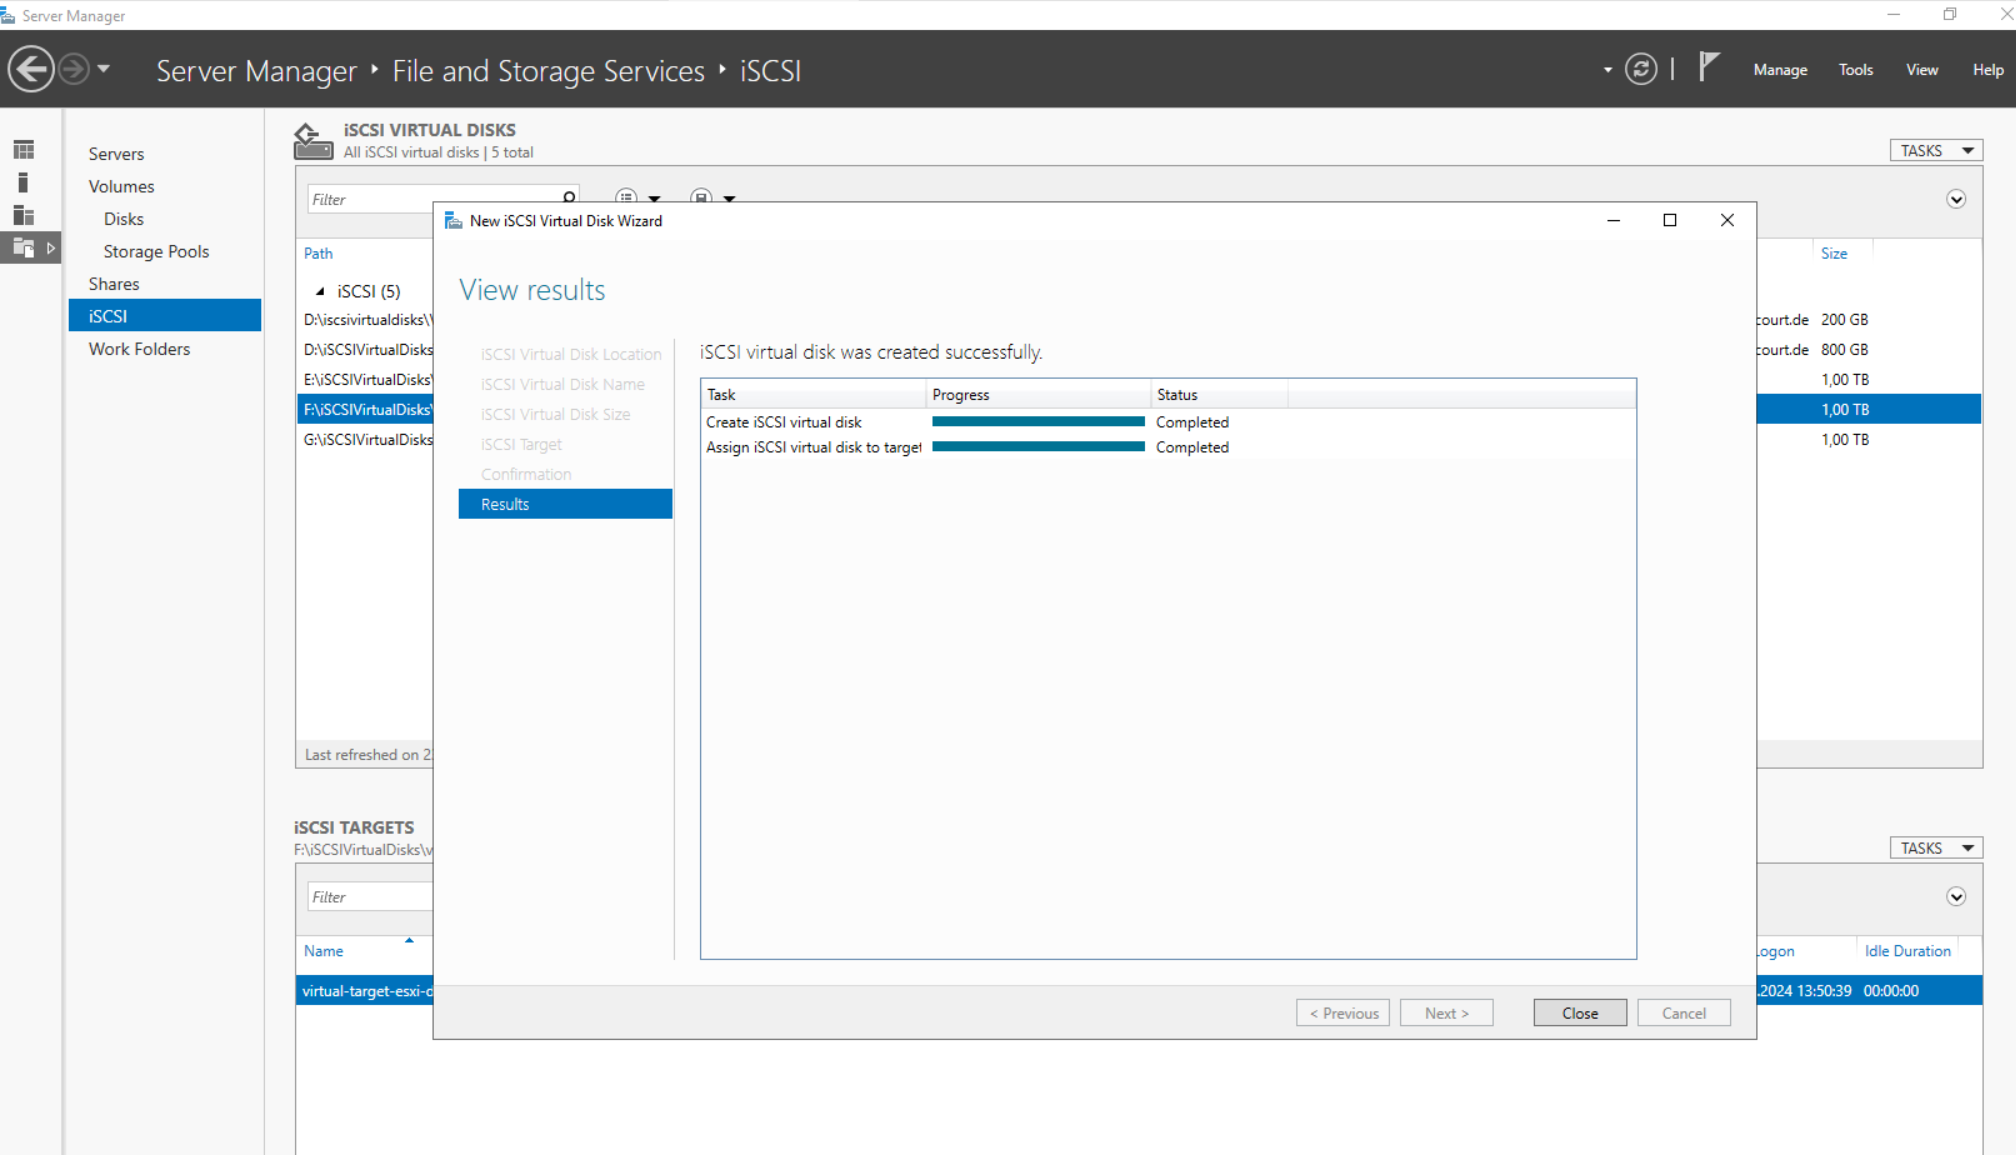
Finally the iSCSI virtual disk, which I will use as Shared (datastore) Storage for my vSphere lab environment, is created.
As you can see, so far the iSCSI virtual disk is not connected to any targets (ESXi hosts).
Connect the iSCSI Virtual Disk with the ESXi Host
The next step is to add this iSCSI virtual disk to store a new datastore on it for my vSphere lab environment. Therefore you can use either the vSphere (vCenter) Client or the ESXi Host Clients.
Because I will set up my vSphere lab environment new as my first trial license is now expired, so far I didn’t have deployed the VCSA (vCenter Server Appliance) and this time, I want it to store from the start on a shared (datastore) storage, my new iSCSI virtual disk.
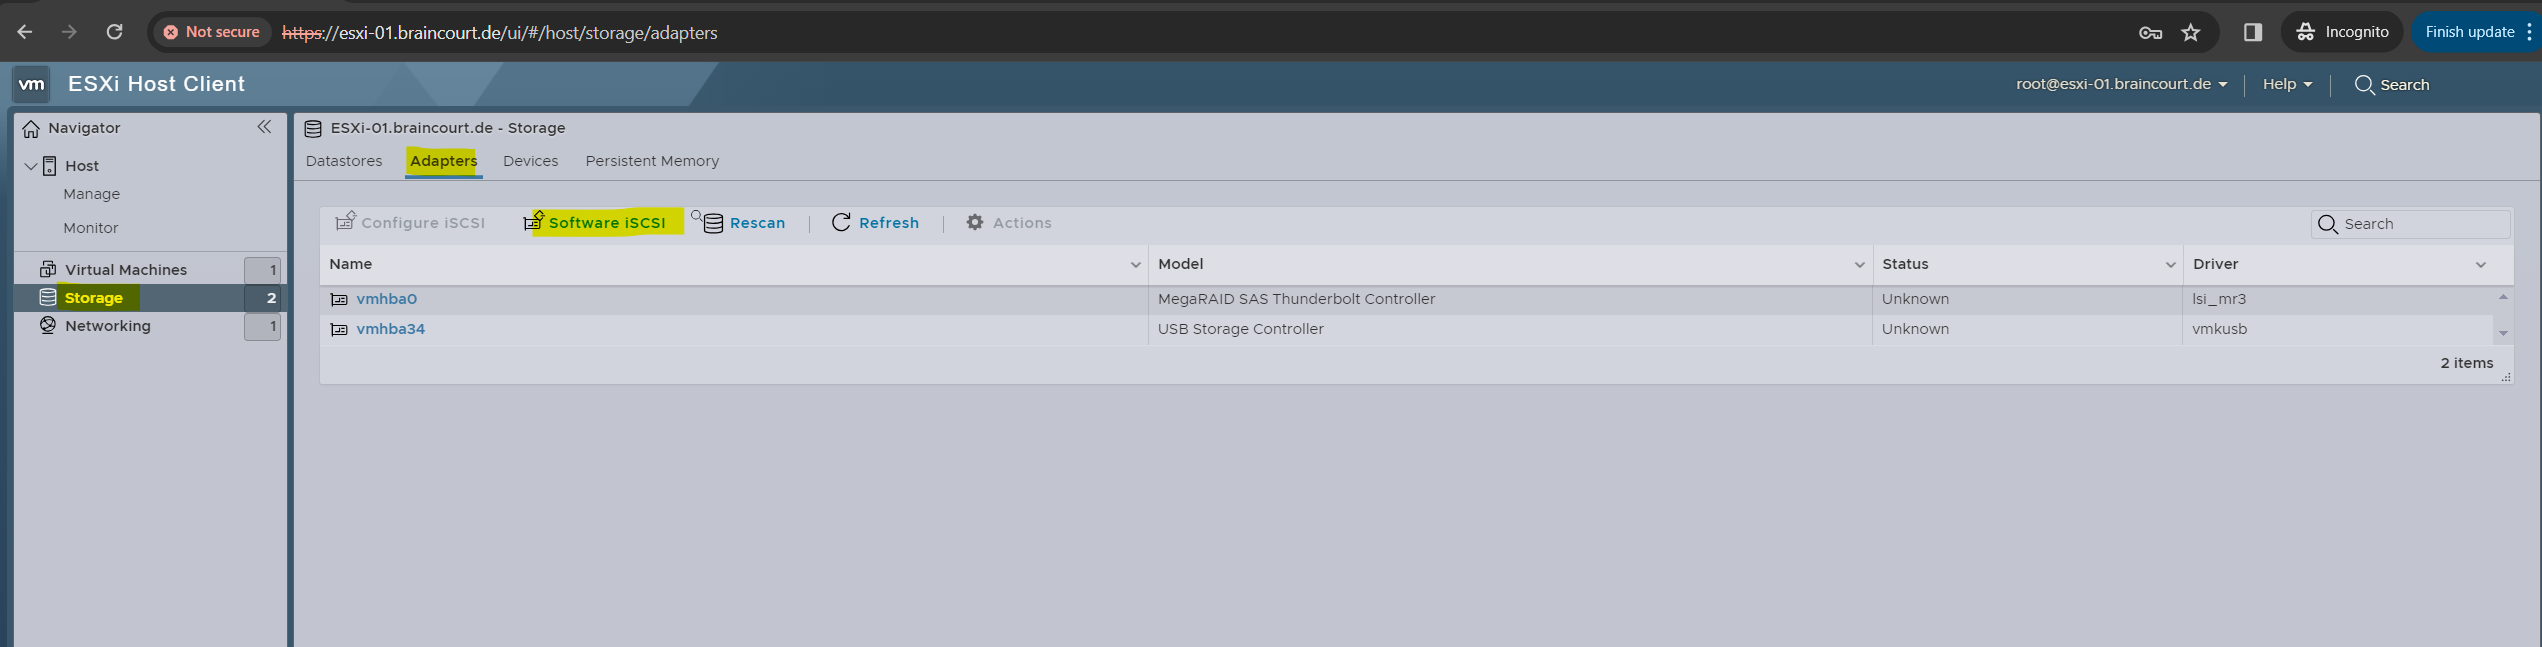
Therefore I will add the iSCSI virtual disk, on which I will create the new datastore later, on my first ESXi host and its ESXi Host Client web interface.
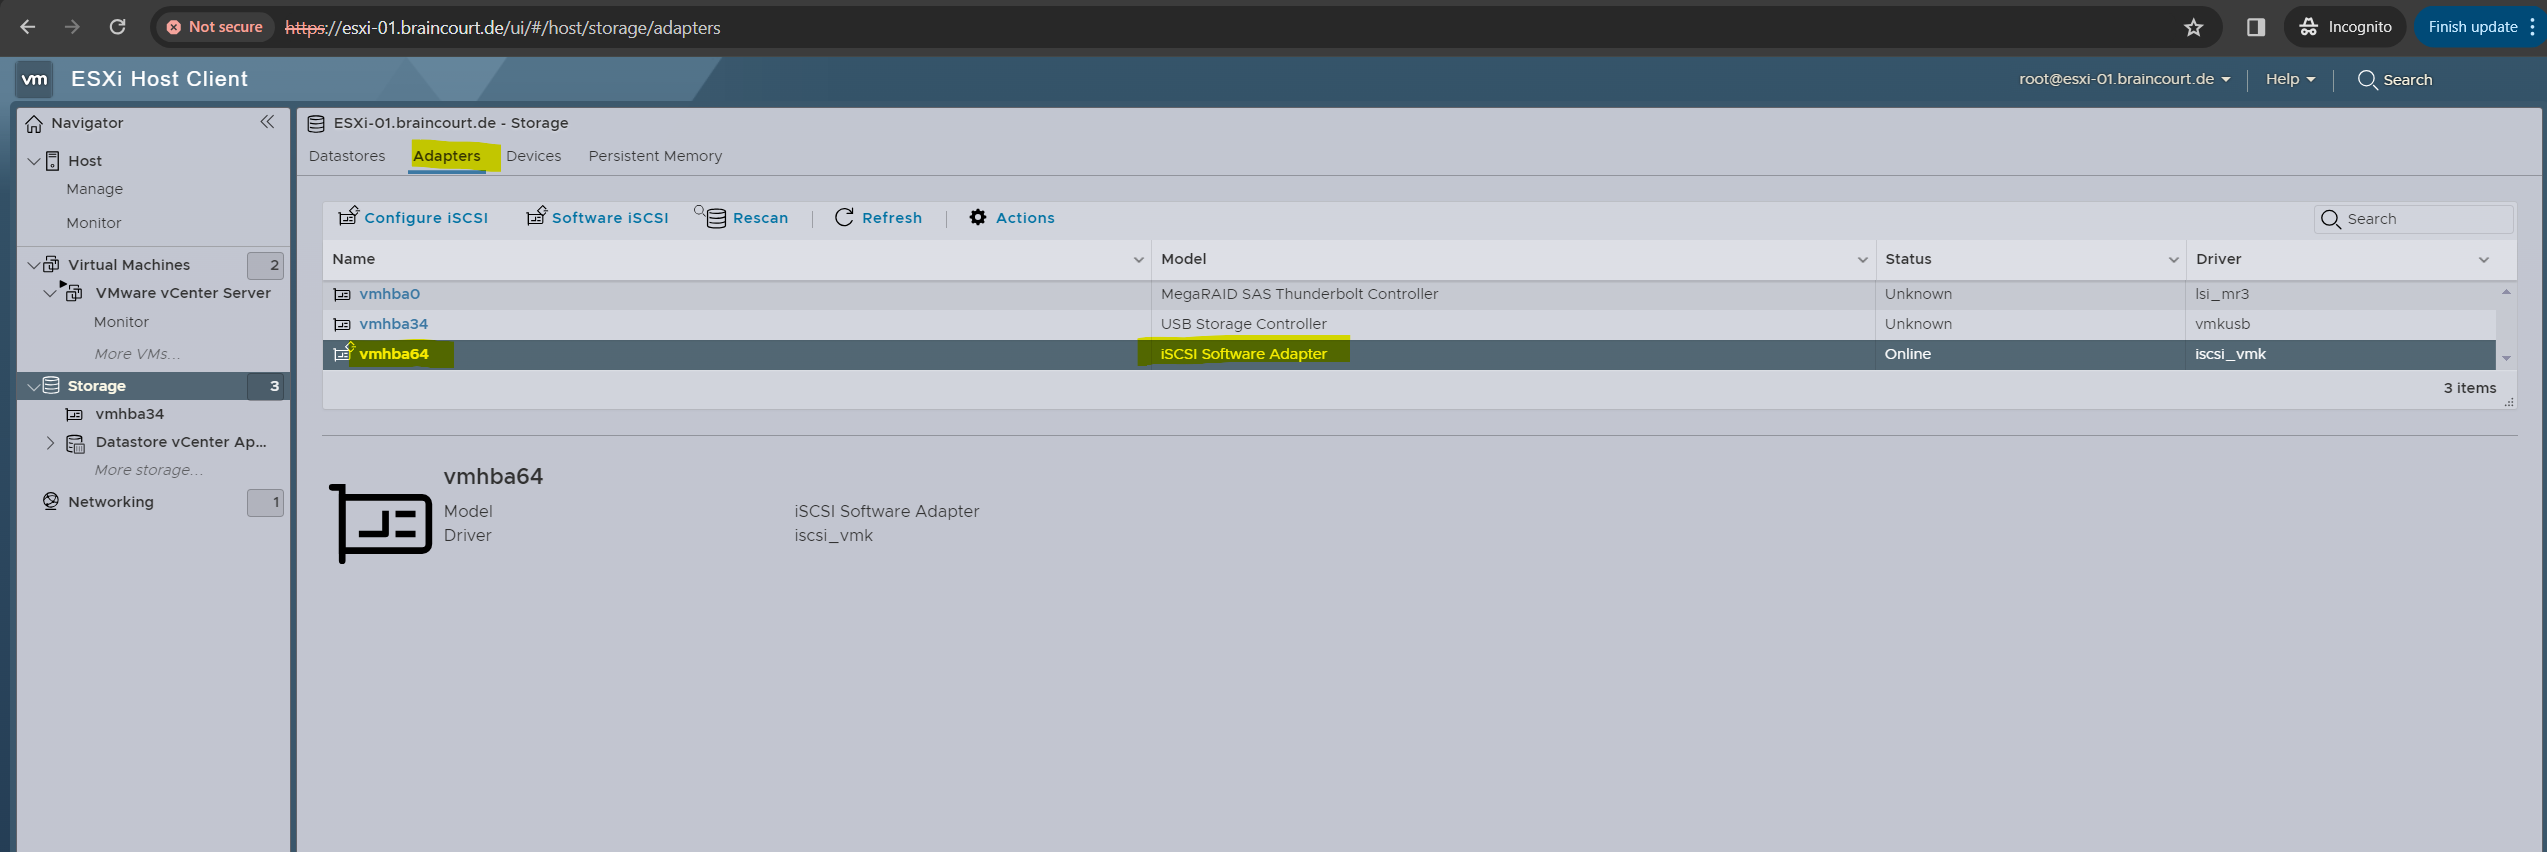
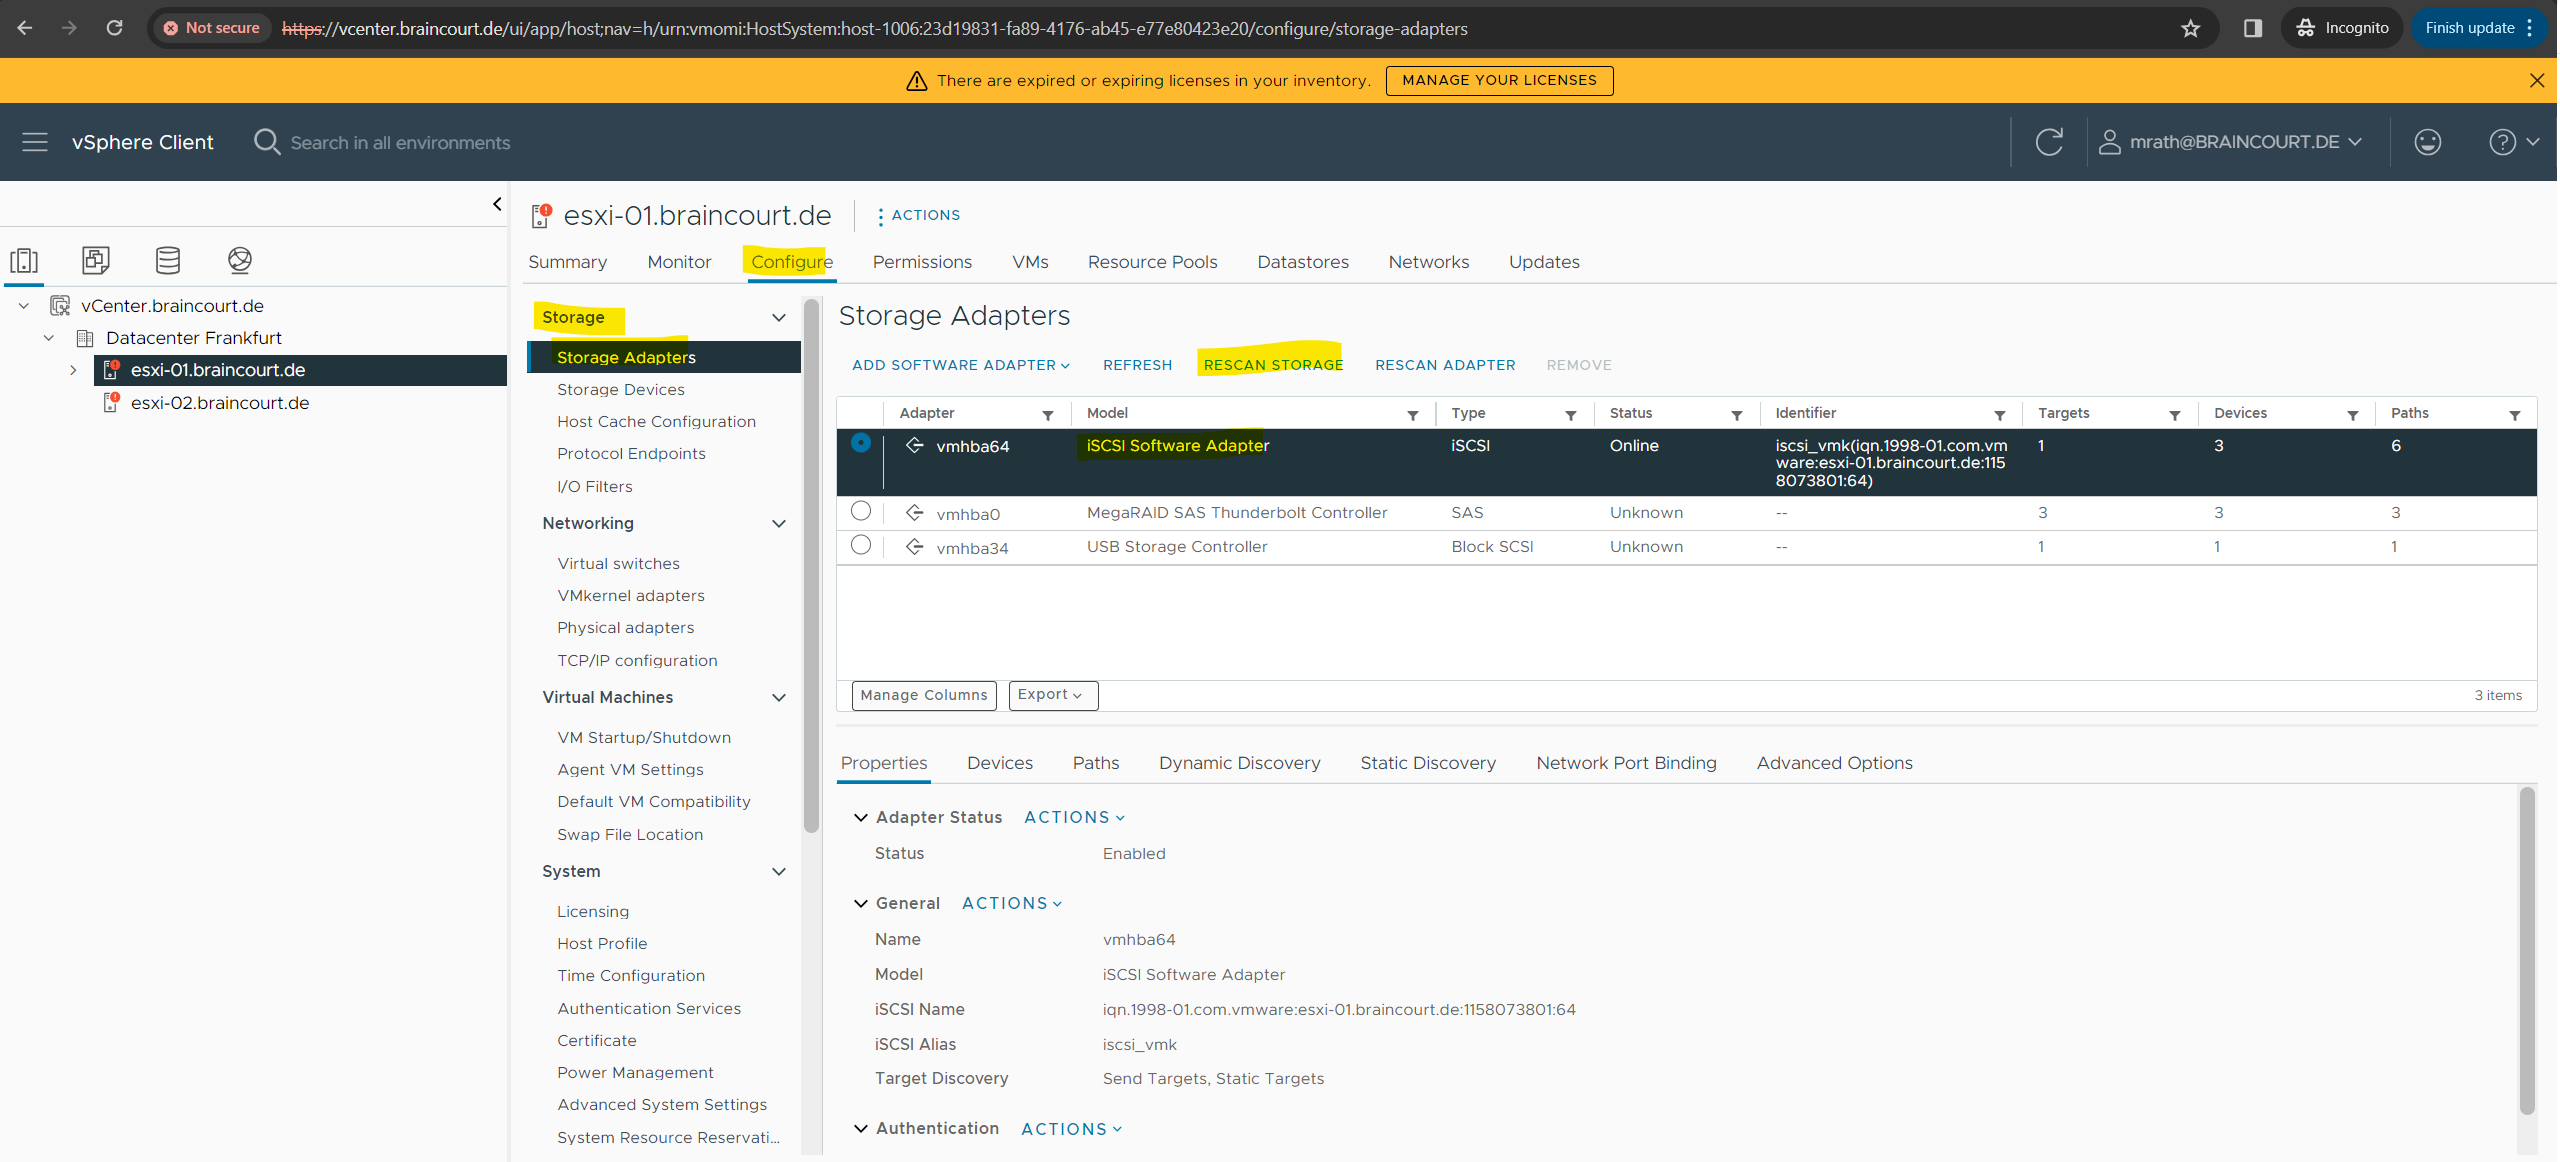
So first we need to add a new iSCSI Software Adapter as shown below.
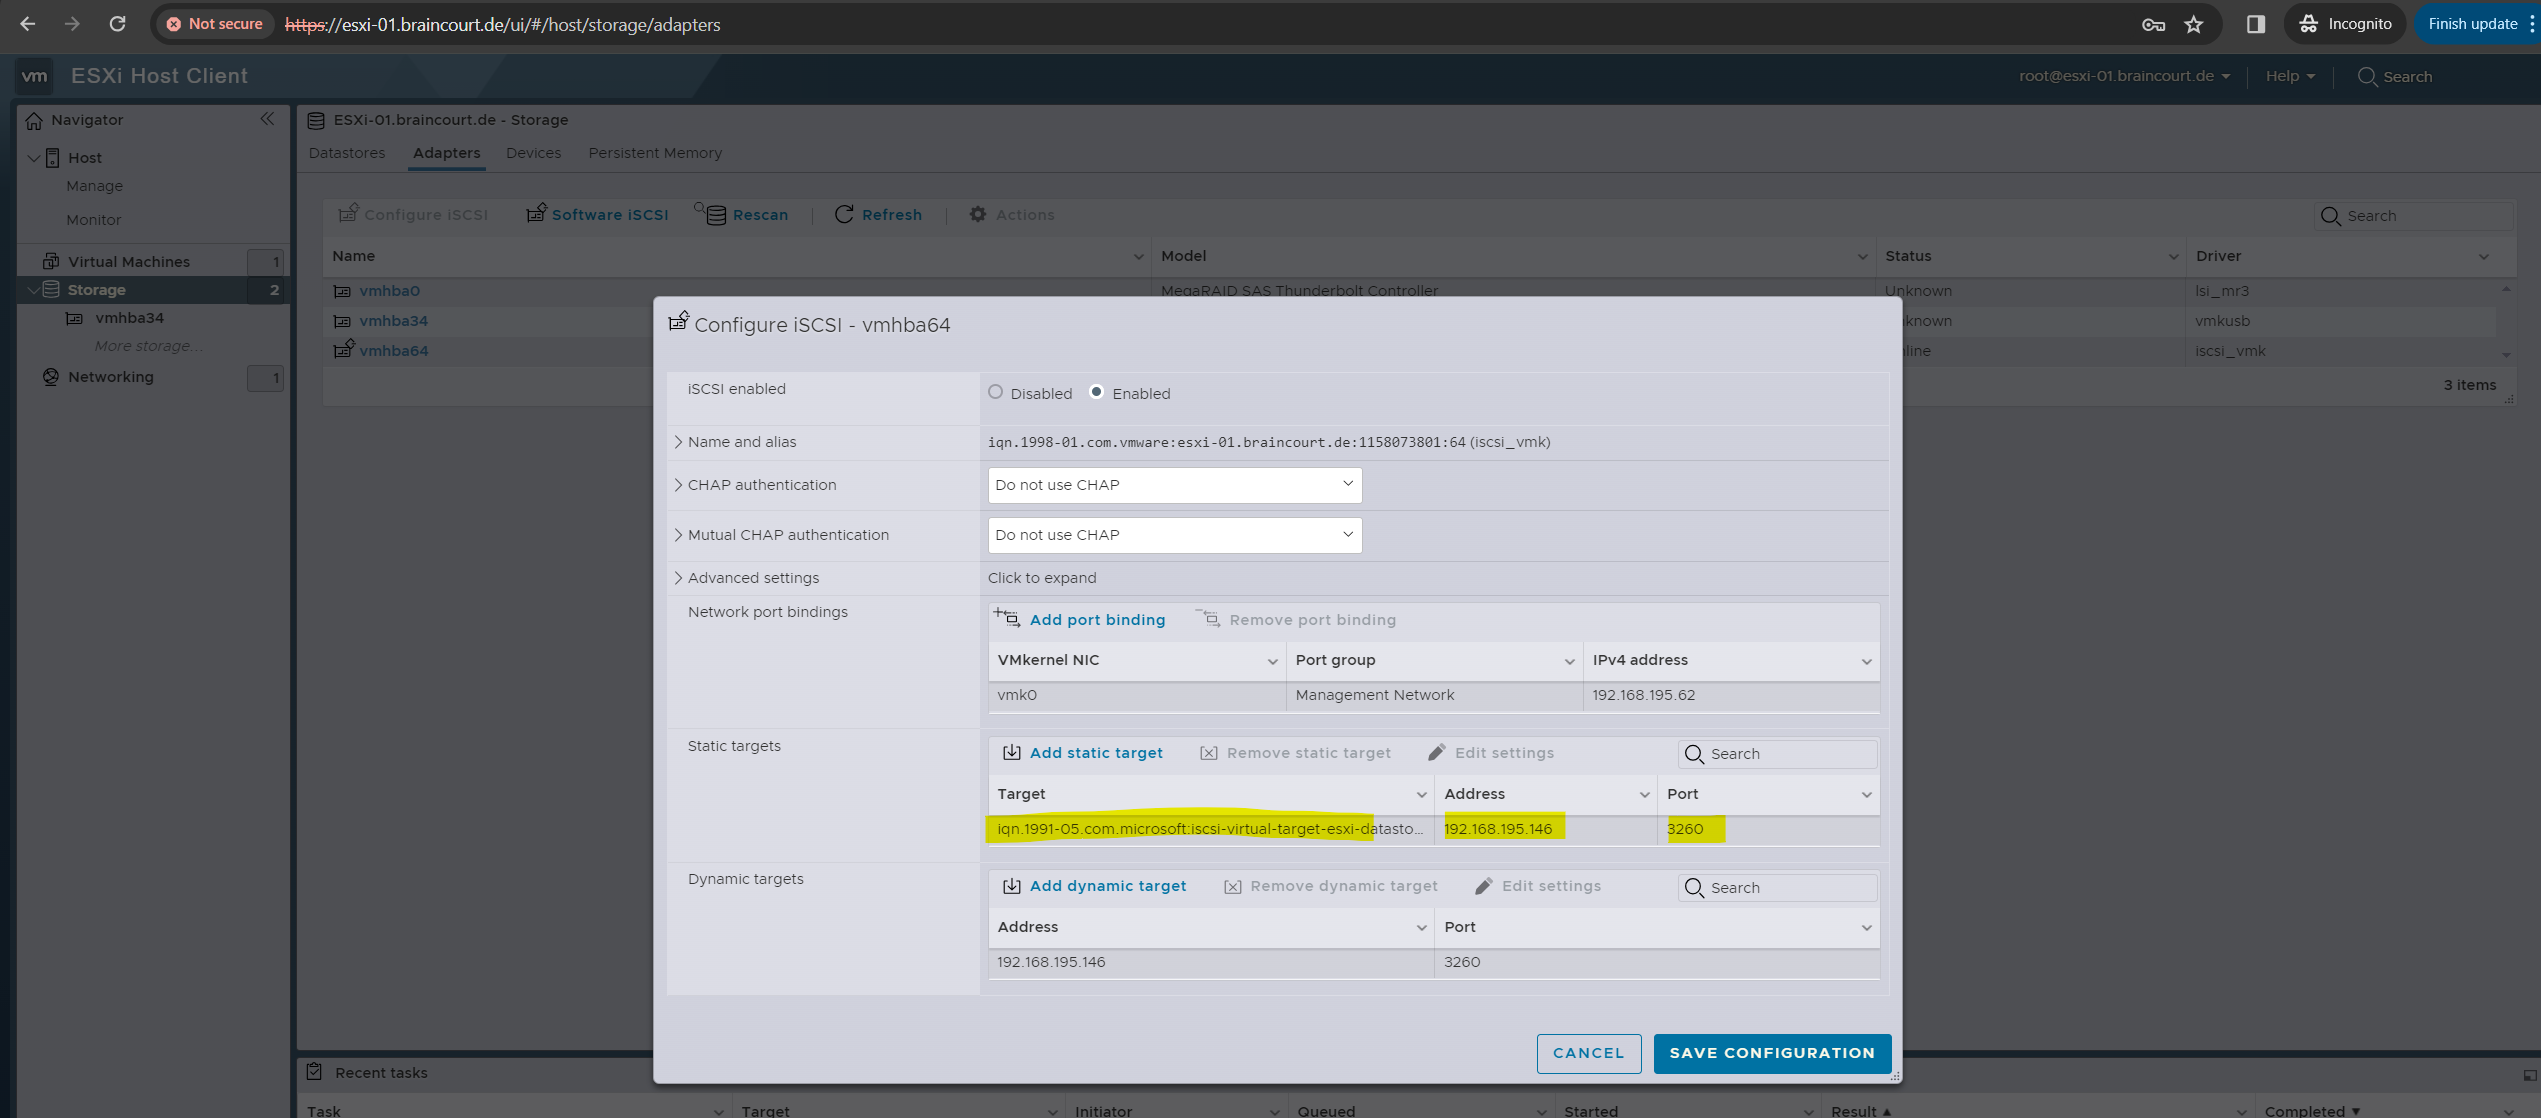
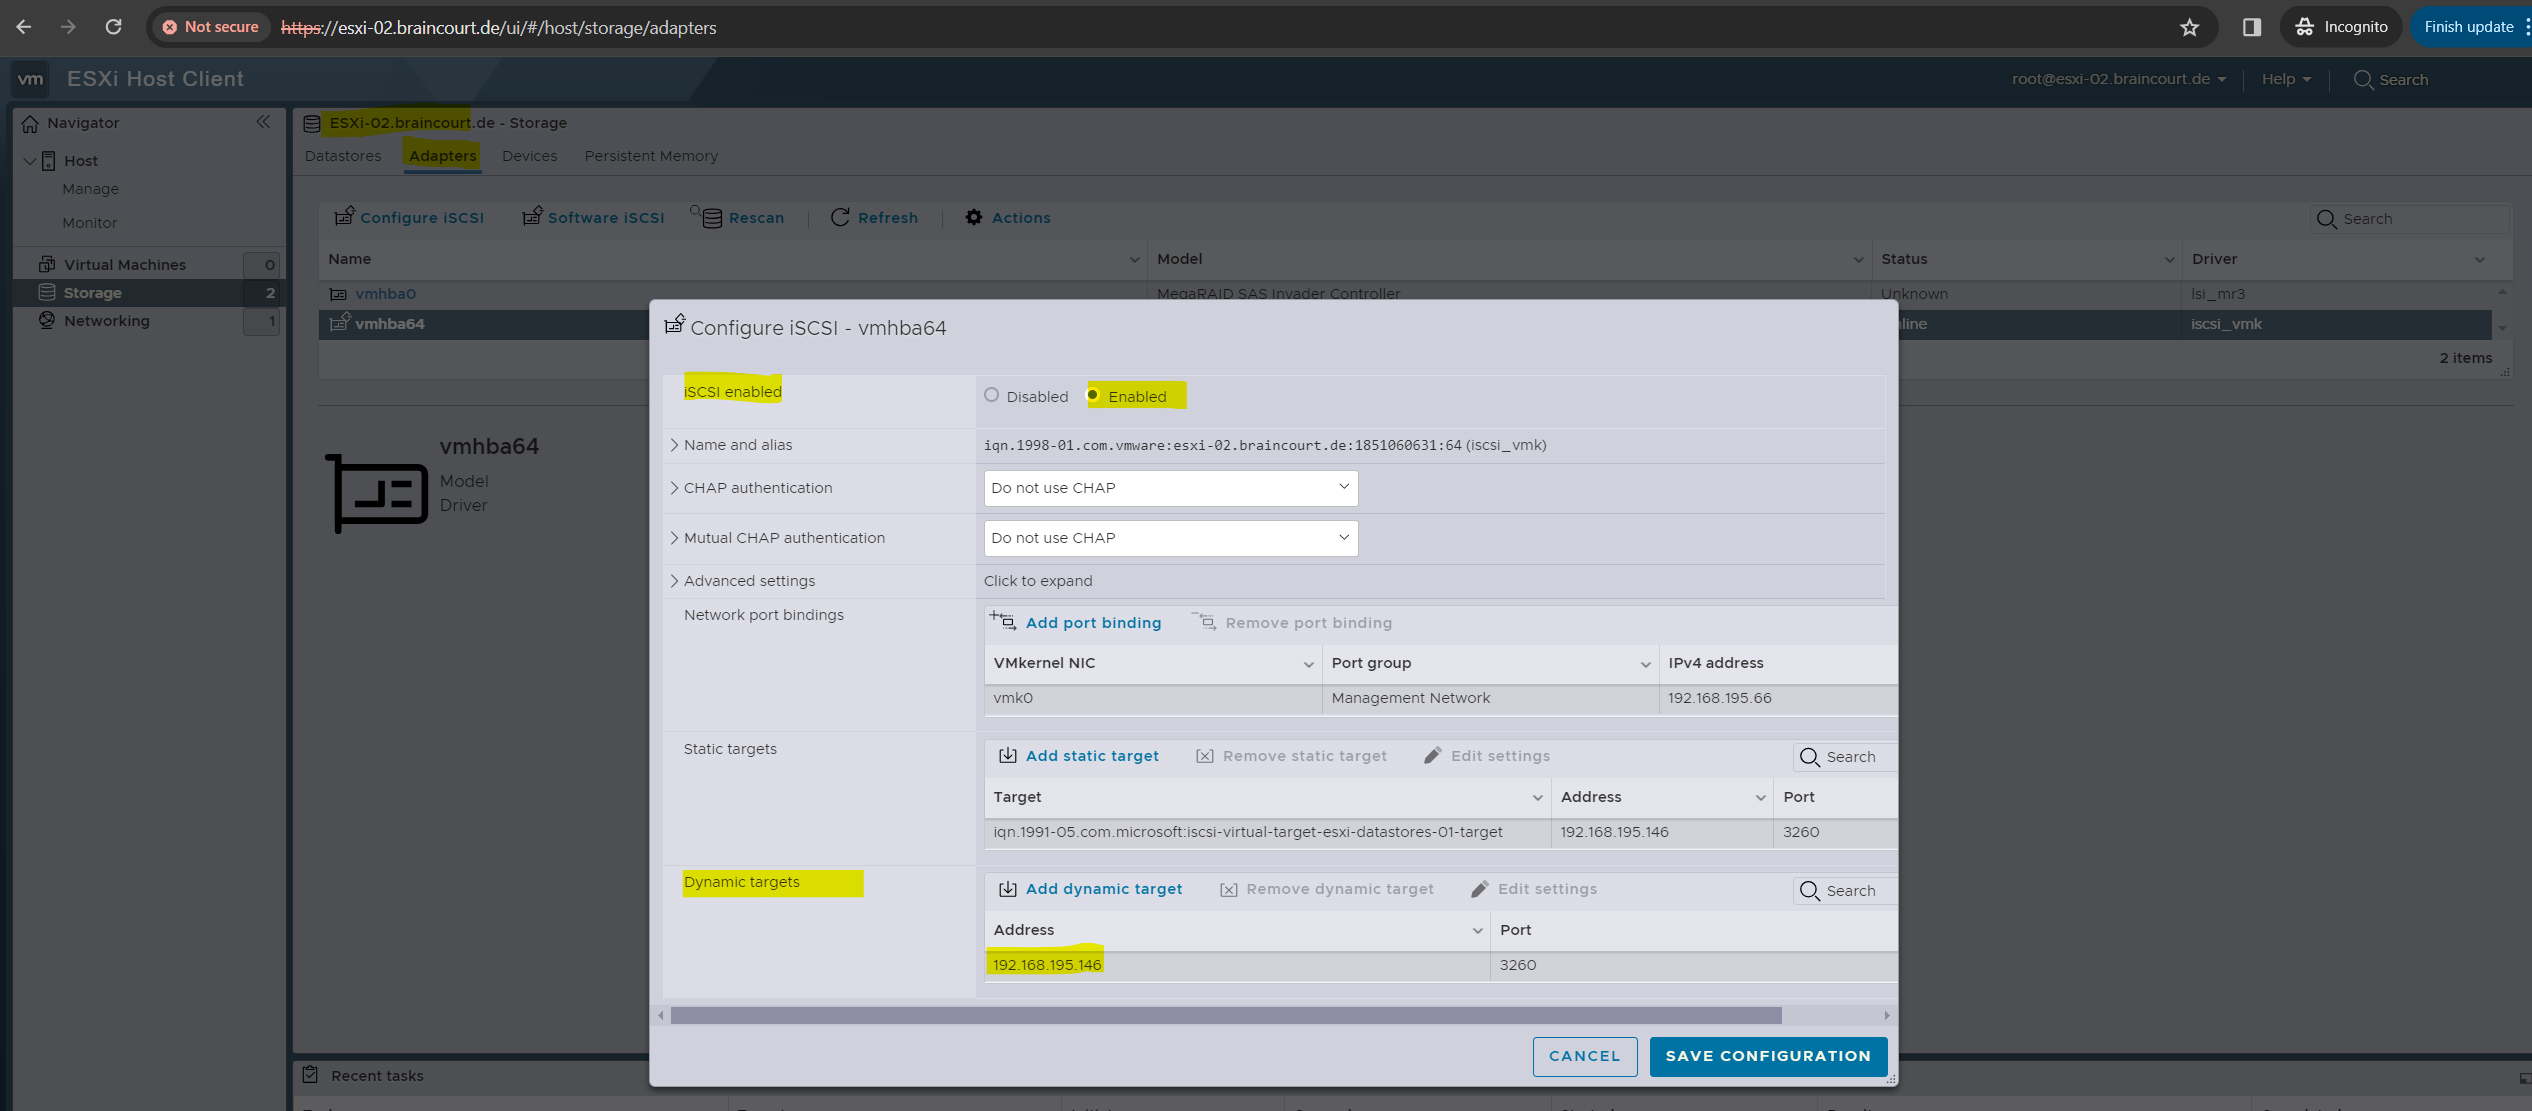
ESXi Host Client -> Storage -> Adapters -> Software iSCSI
We first need to enable iSCSI as shown below.
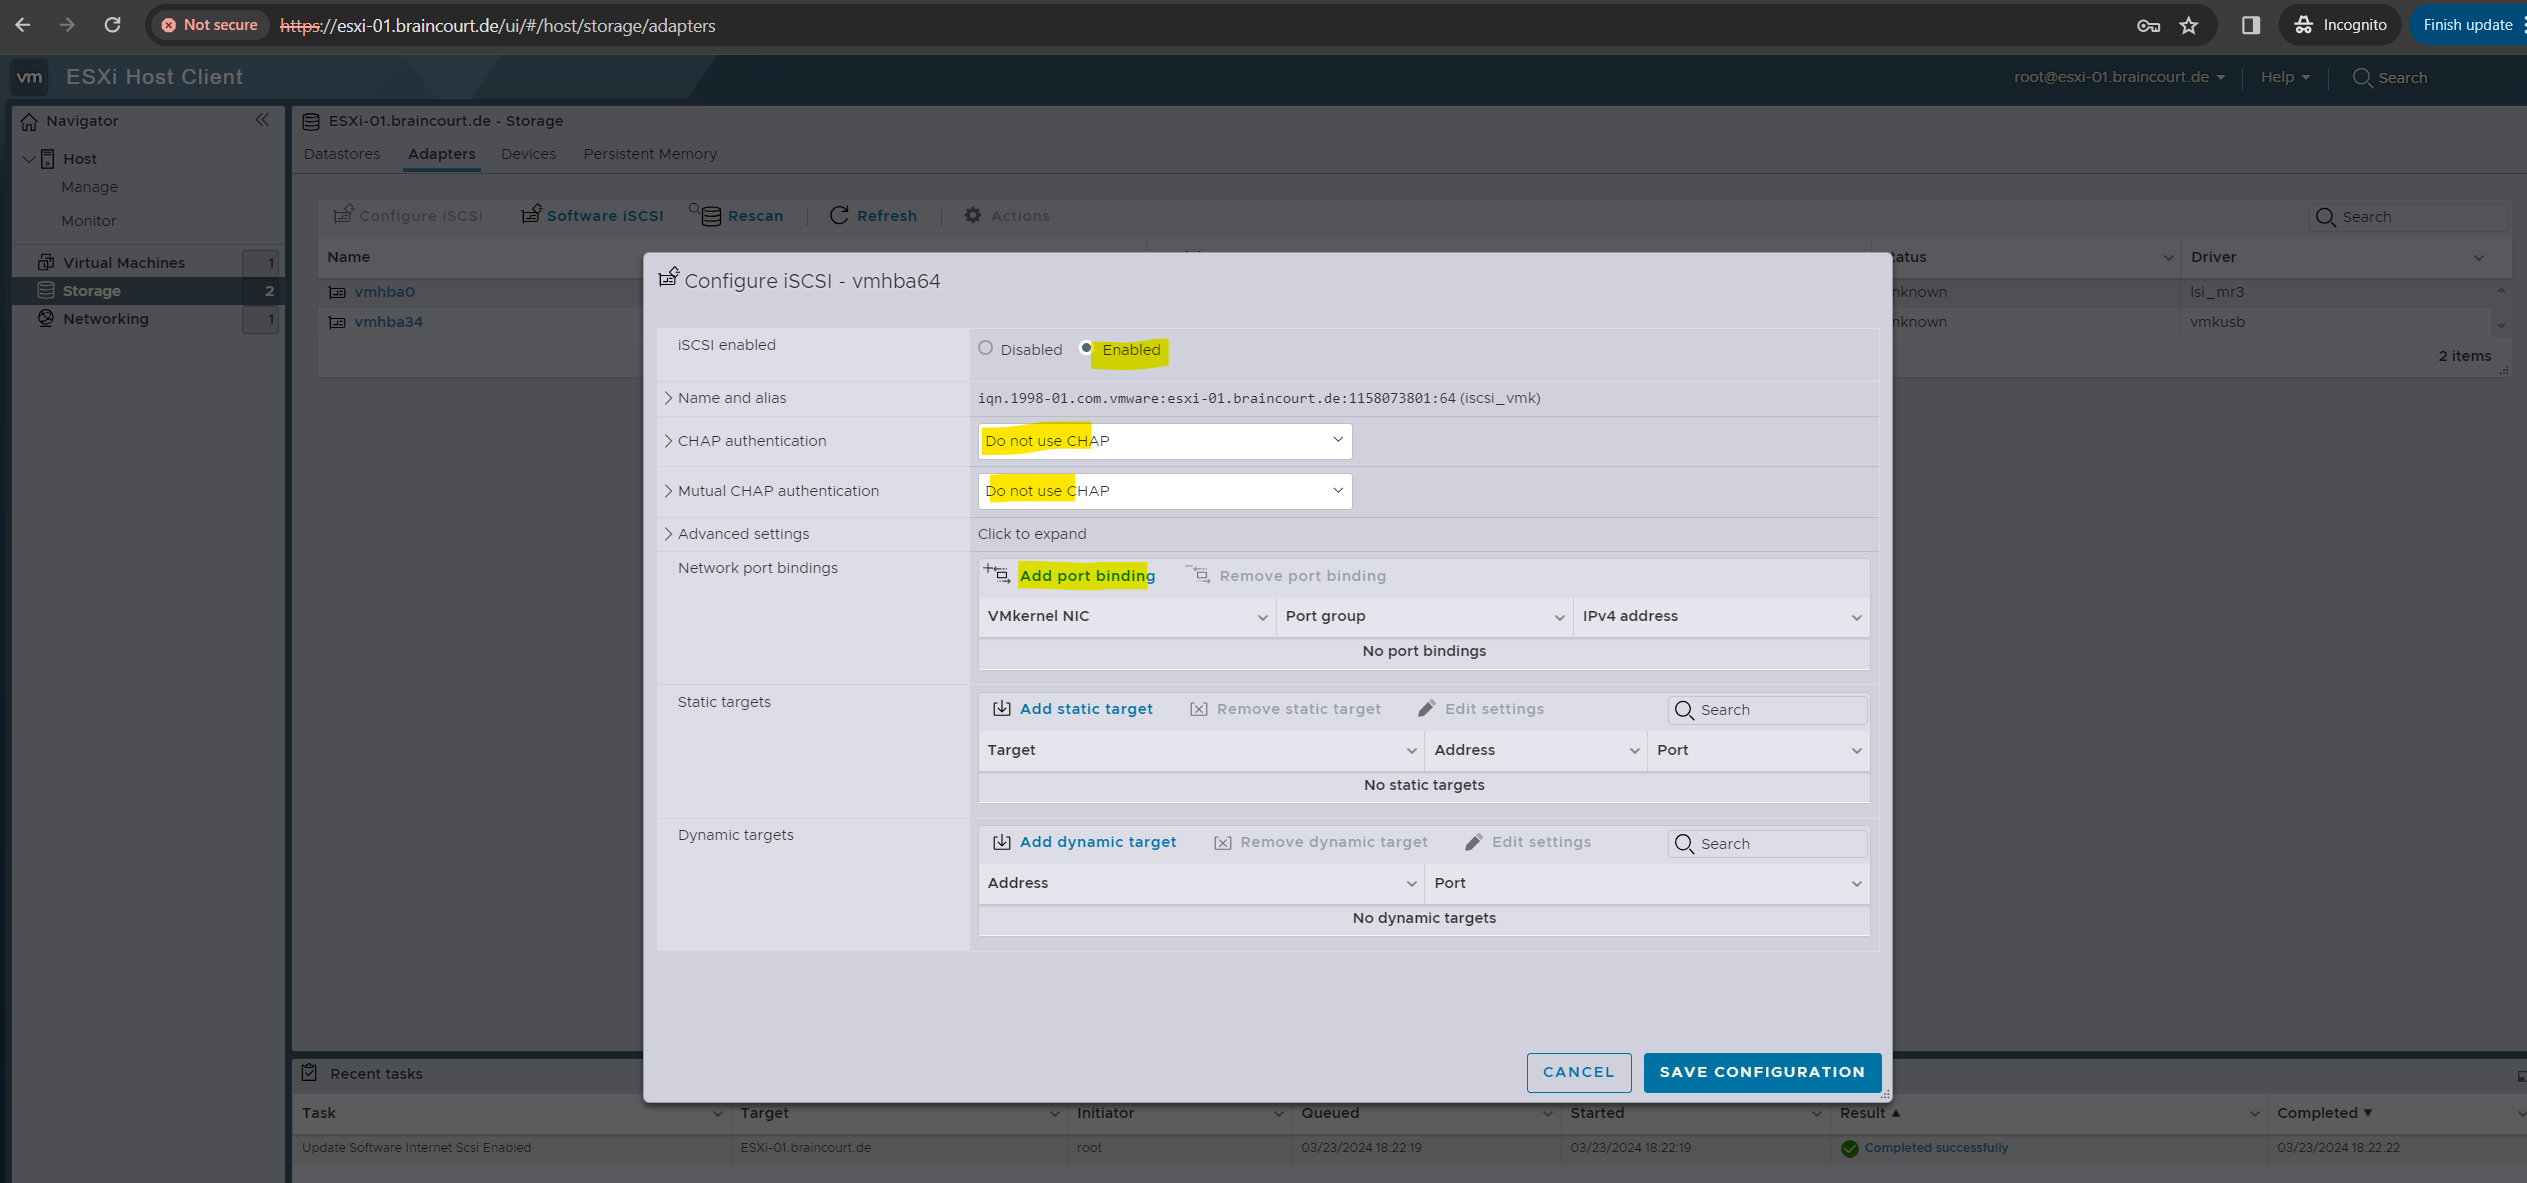
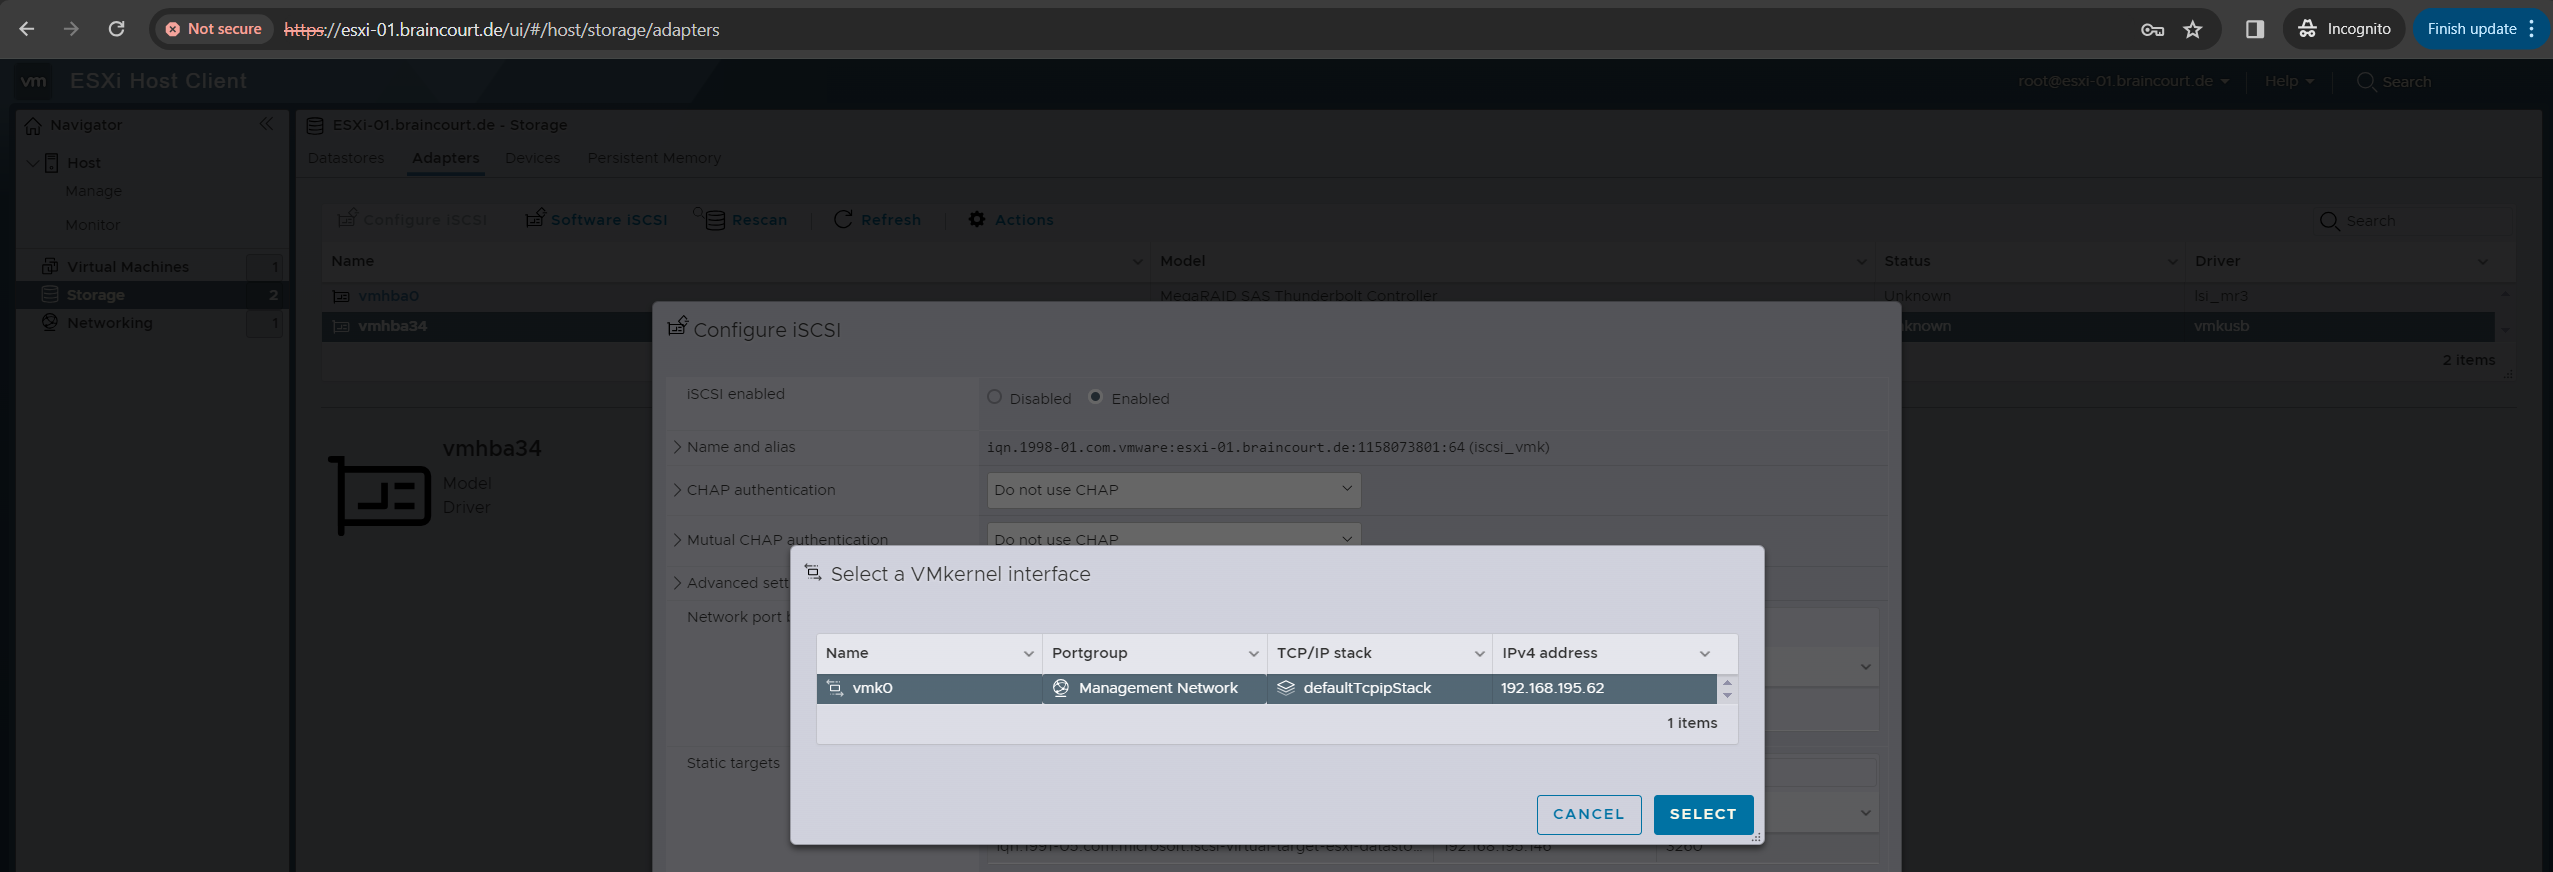
Select a VMkernel interface on the host which will be used to connect to the iSCSI server.
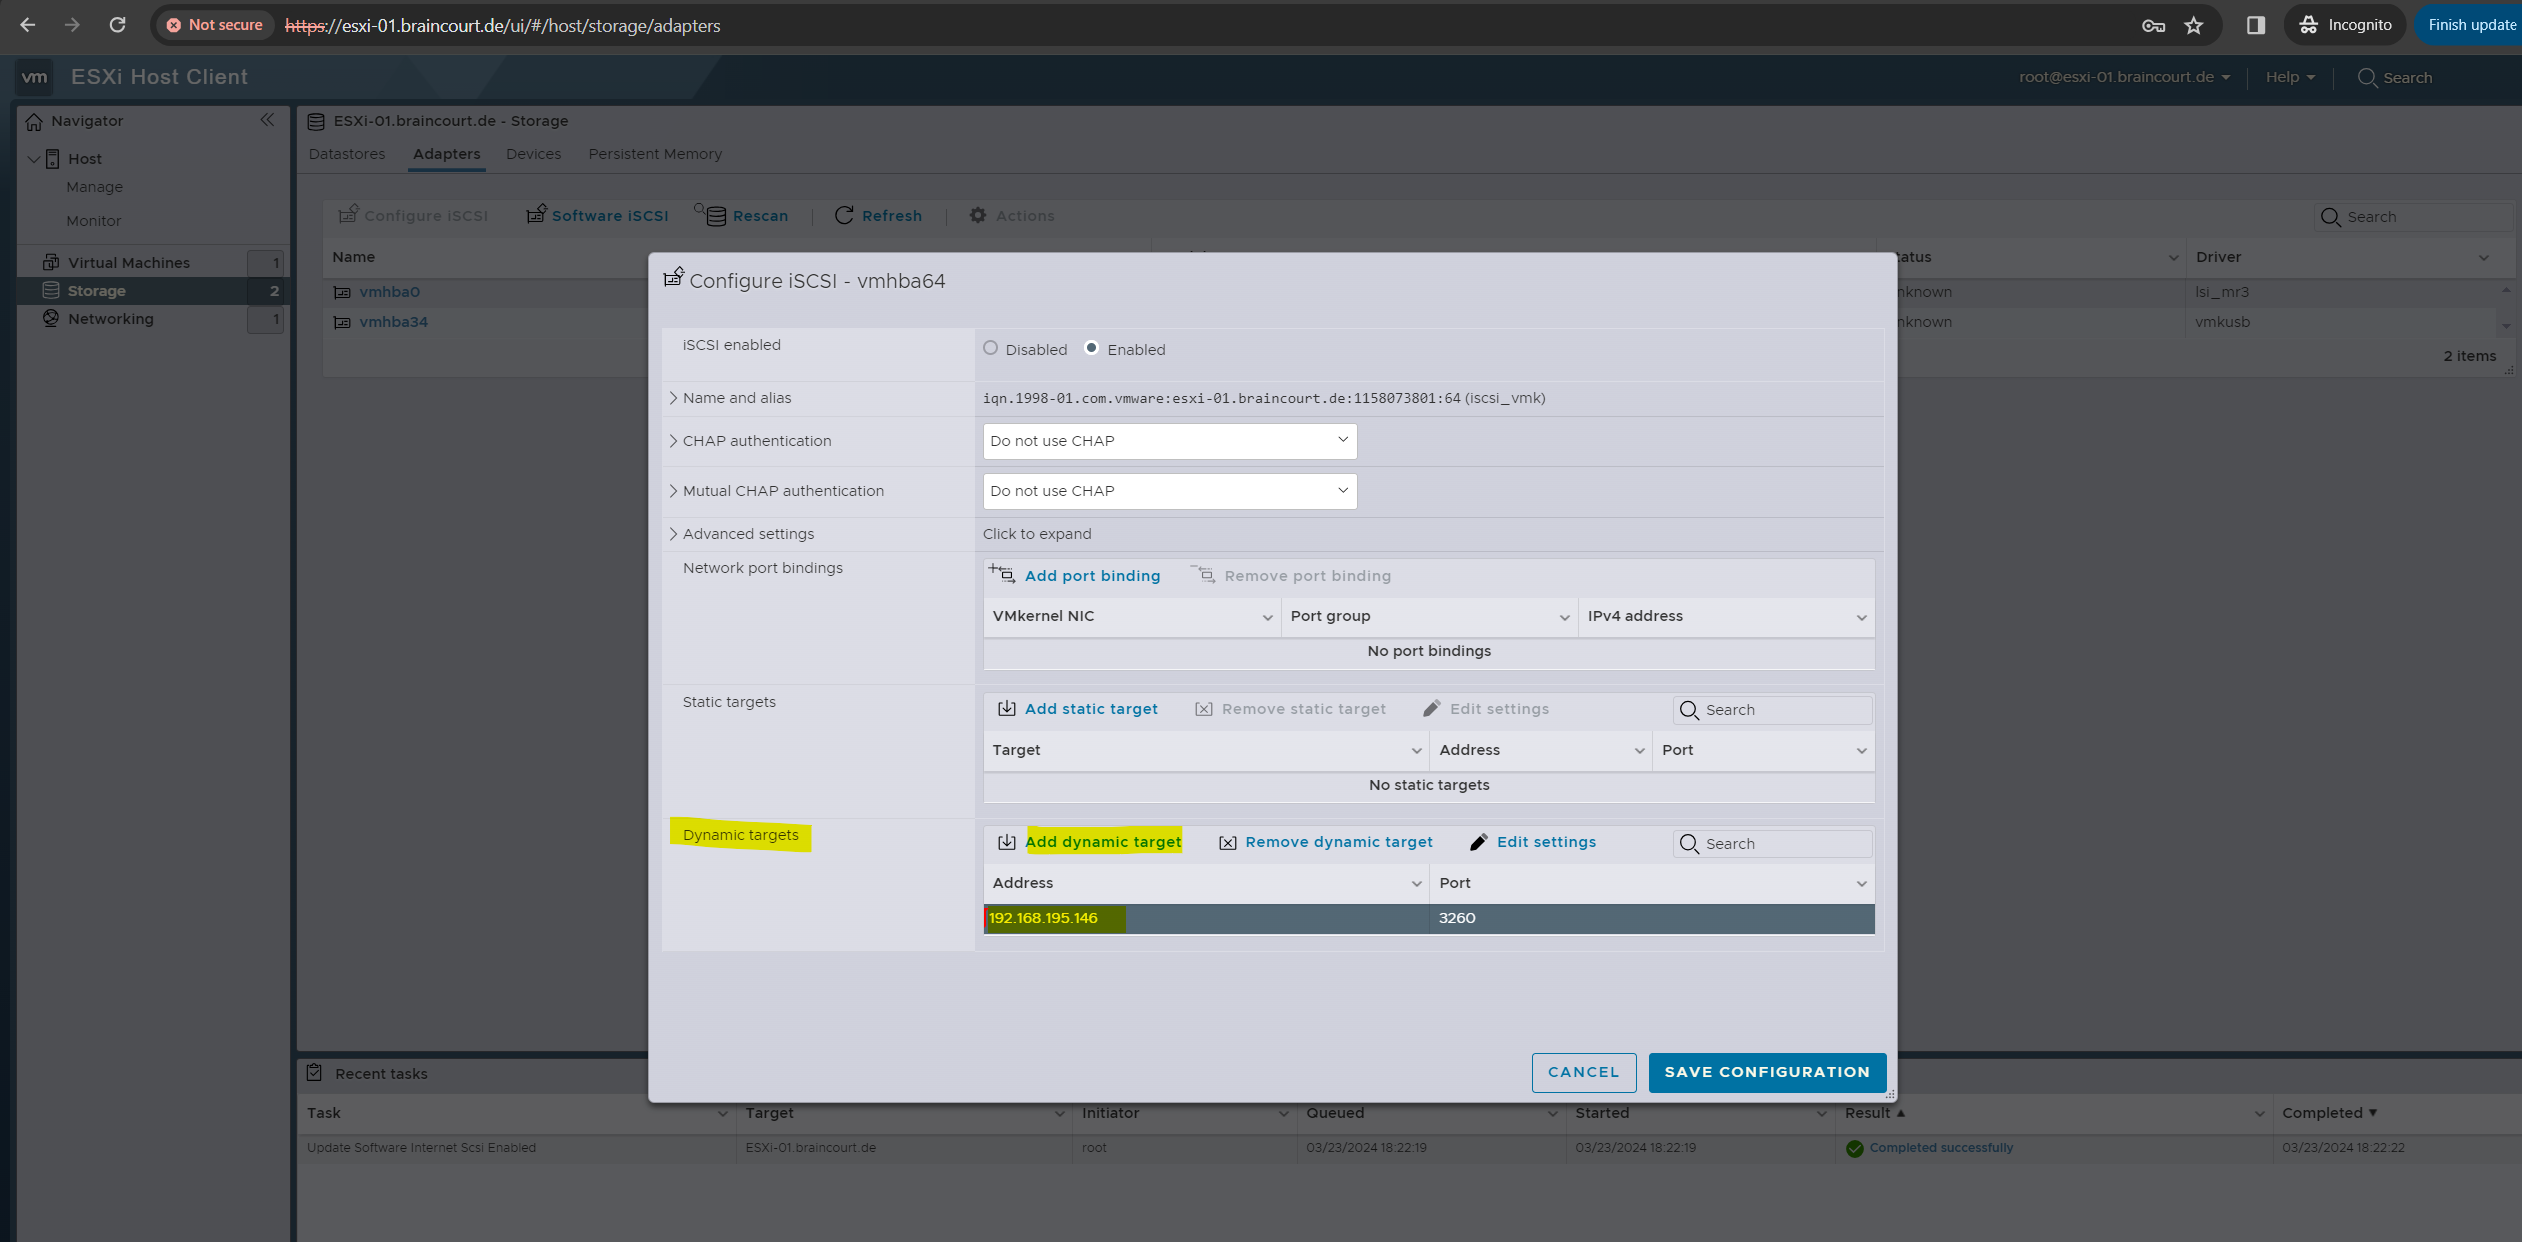
Next we need to add a new iSCSI target. I will add here a dynamic target and finally save the configuration. The IP address I need to provide here is the one from my iSCSI Target Server on which I previously created the iSCSI virtual disk and which I want to use as new datastore in my vSphere lab environment.
Also known as SendTargets discovery. Each time the initiator contacts a specified iSCSI server, the initiator sends the SendTargets request to the server. The server responds by supplying a list of available targets to the initiator. The names and IP addresses of these targets appear on the Static Discovery tab. If you remove a static target added by dynamic discovery, the target might be returned to the list the next time a rescan happens, the storage adapter is reset, or the host is rebooted.
In addition to the dynamic discovery method, you can use static discovery and manually enter information for the targets. The iSCSI or iSER adapter uses a list of targets that you provide to contact and communicate with the iSCSI servers.
When you set up static or dynamic discovery, you can only add new iSCSI targets. You cannot change any parameters of an existing target. To make changes, remove the existing target and add a new one.
Here you can see the new iSCSI Software Adapter.
By clicking above on Configure iSCSI or Software iSCSI the wizard below will appear where we can see the configuration and we can adding further targets.
You can see here that my target also appears on the Static Discovery tab because of the SendTargets request of the dynamic targets configuration as mentioned above.
Creating a new Datastore on the iSCSI Virtual Disk
I can now create a new datastore on the previously connected target, my iSCSI virtual disk.

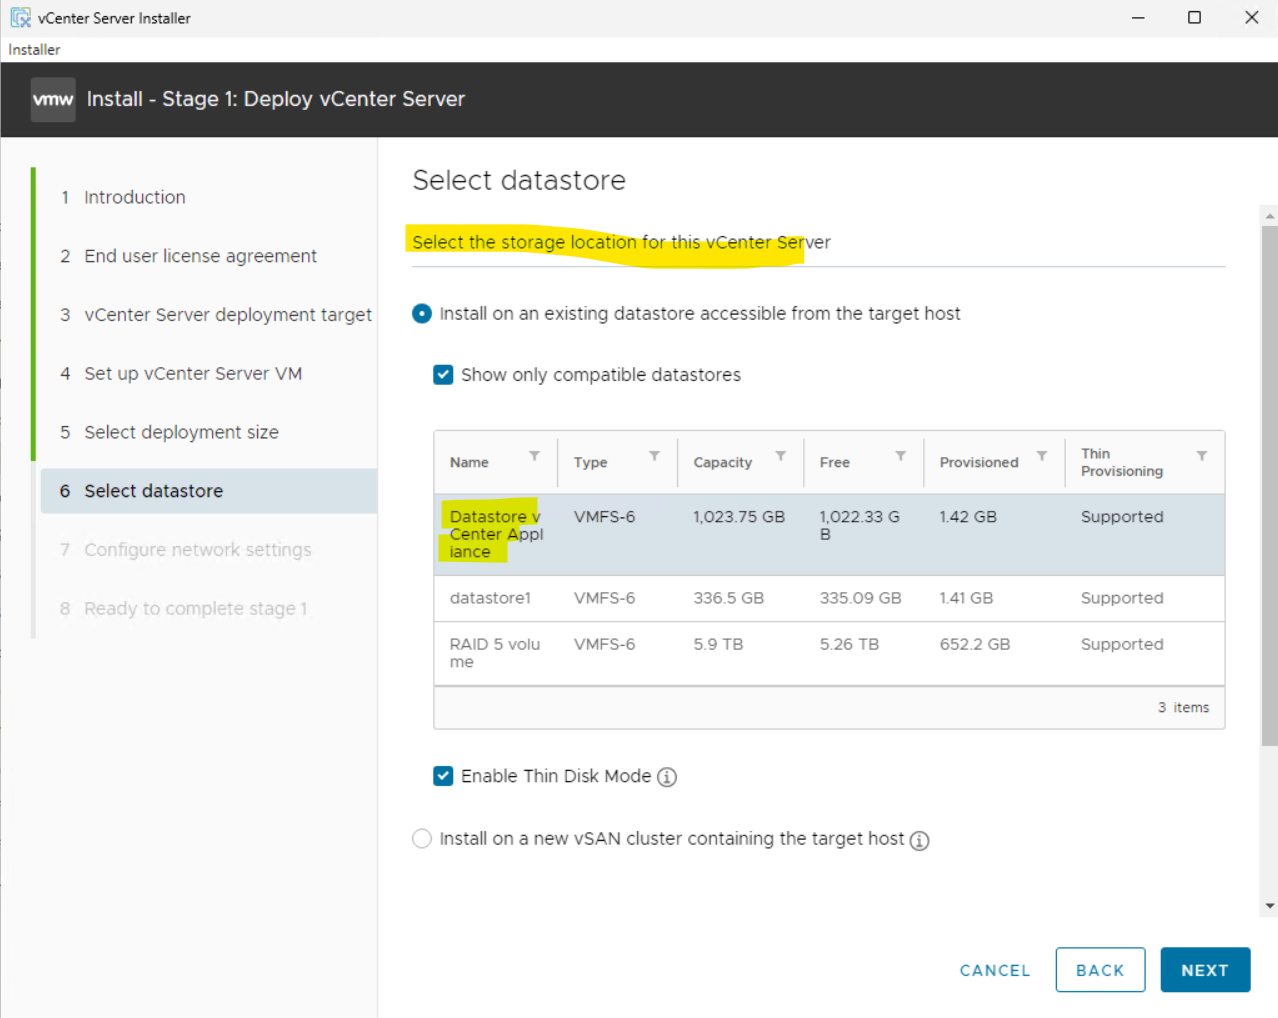
This datastore I will use exclusively just for the vCenter appliance. As device my iSCSI virtual disk appears to select for.
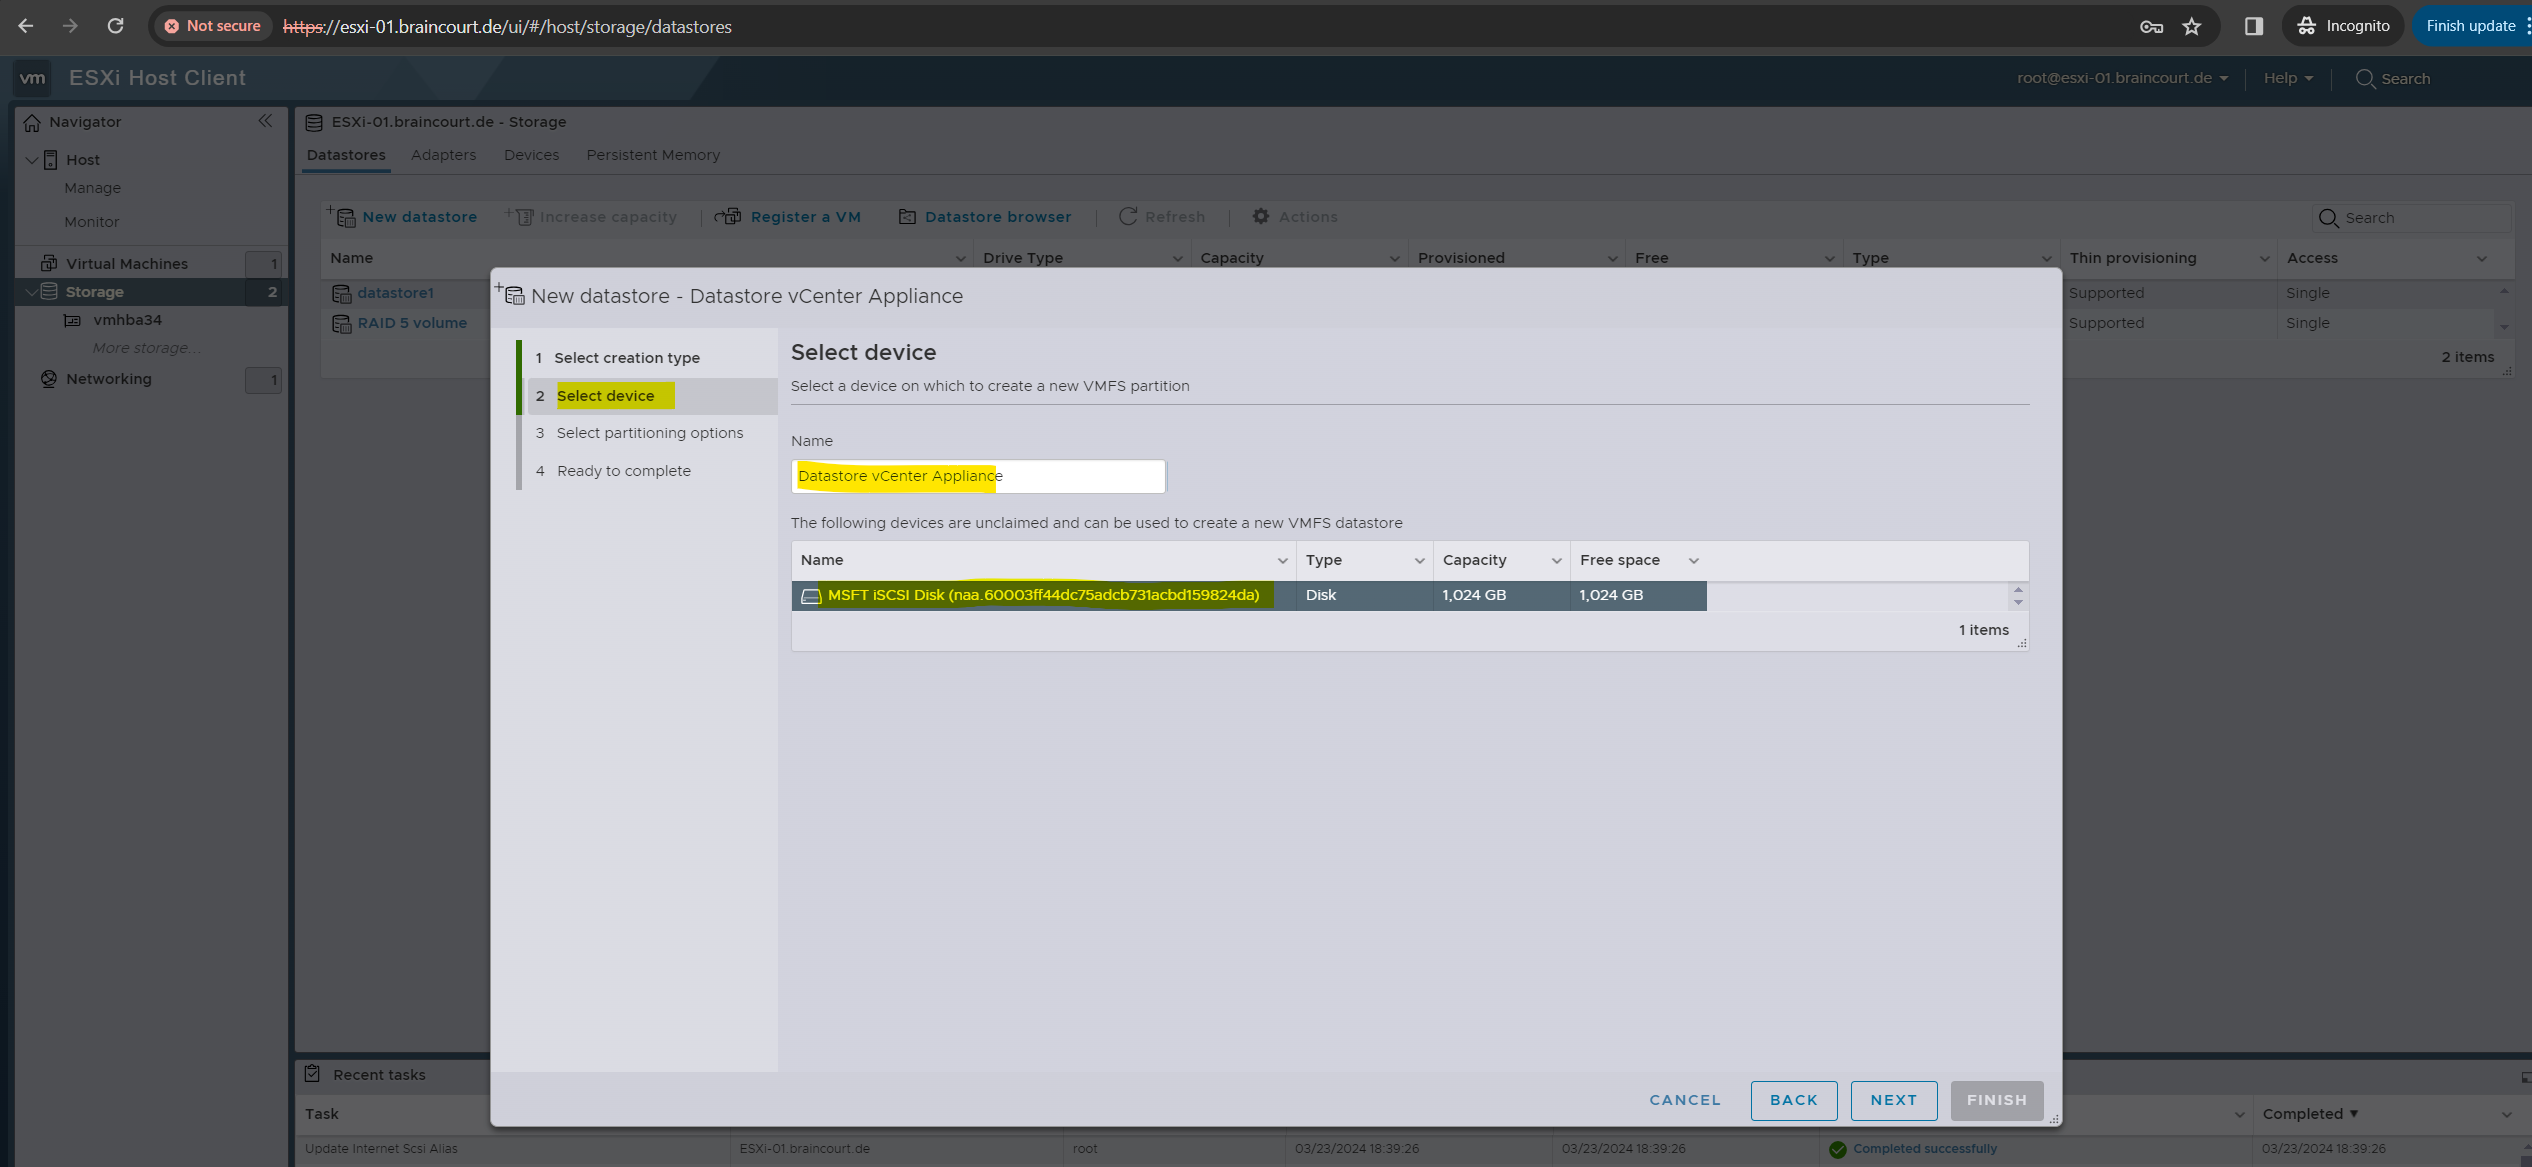
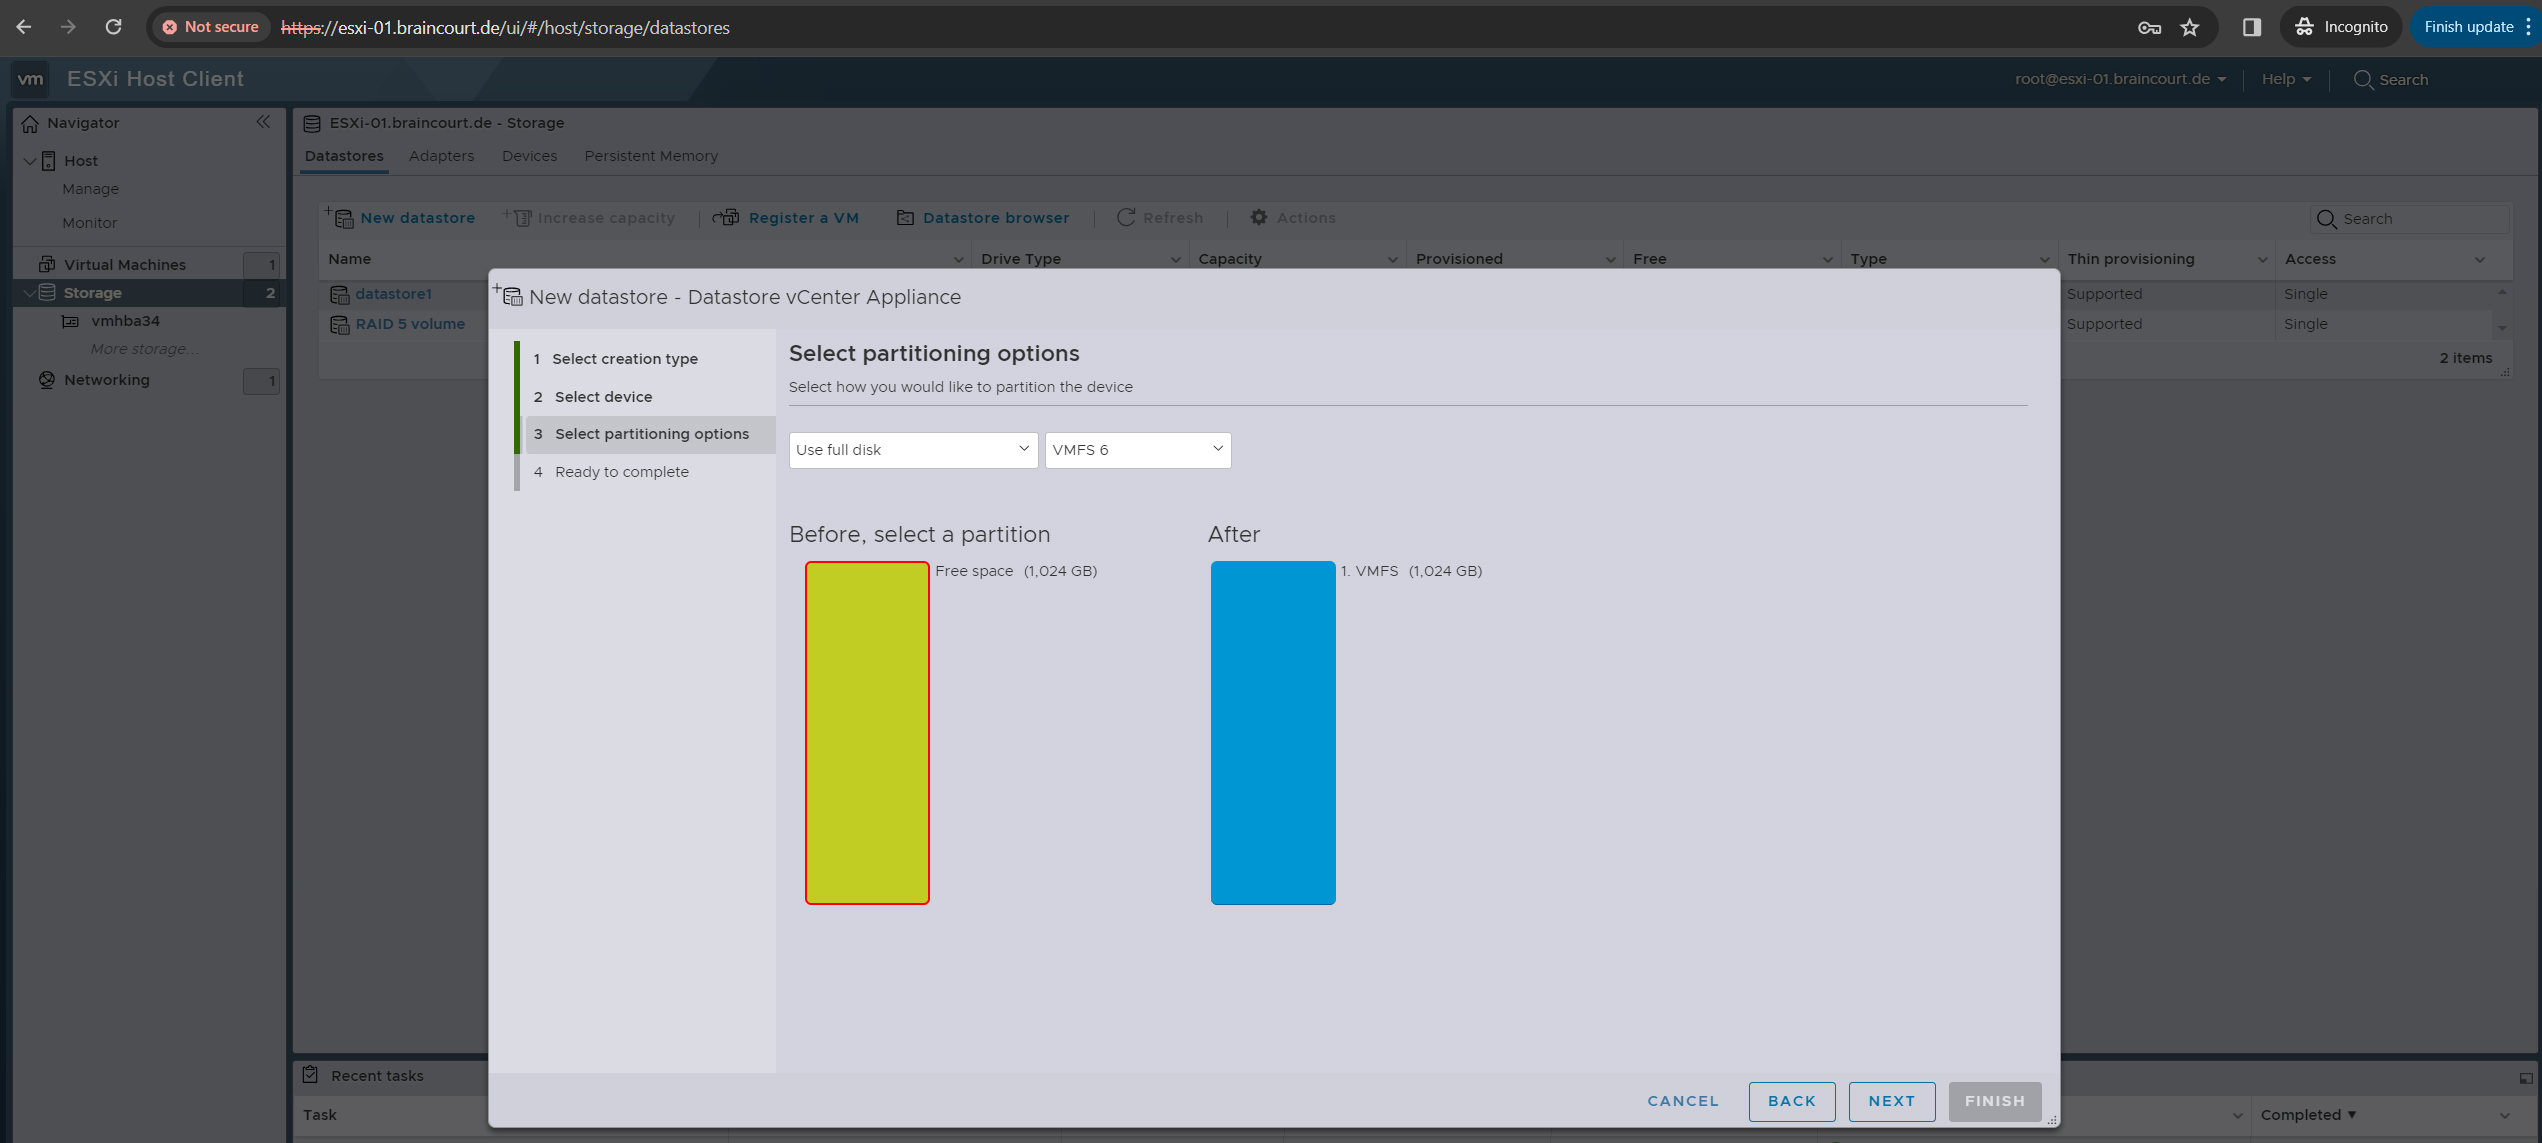
I will use below the full disk and the new VMFS 6 file system.
VMFS 6 is the new filesystem of vSphere 6.5. The new filesystem supports 512e advanced format drives and is 4098 sector (4K) aligned. It also supports automatic UNMAP, which asynchronously tracks freed blocks and sends UNMAPs to backend storage in background.
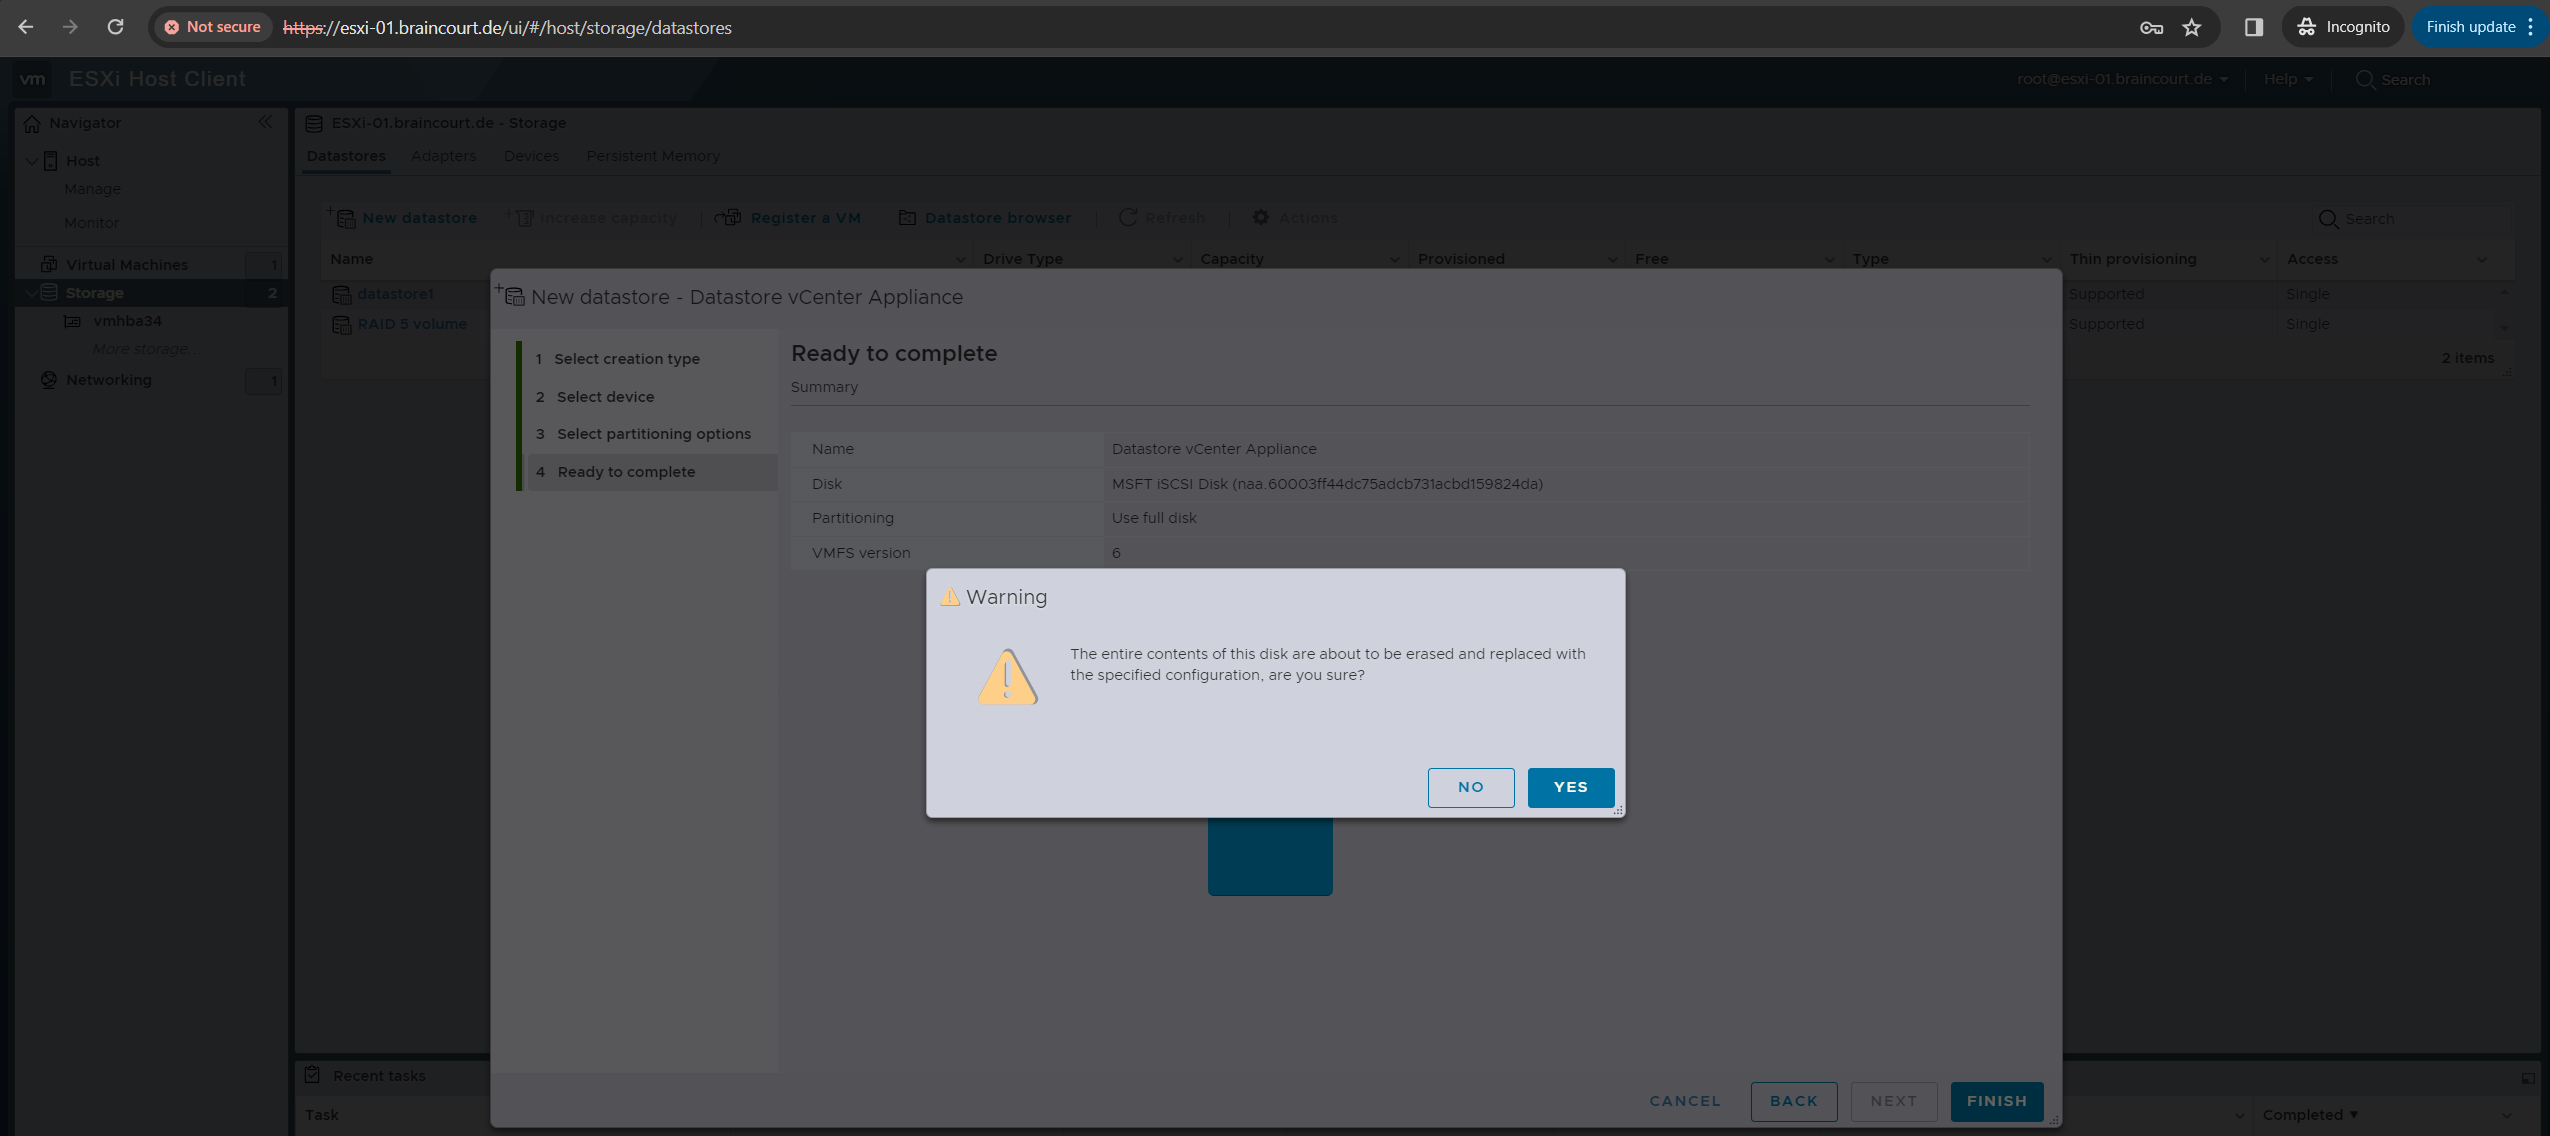
Finally we can click on Finish to create the new datastore.
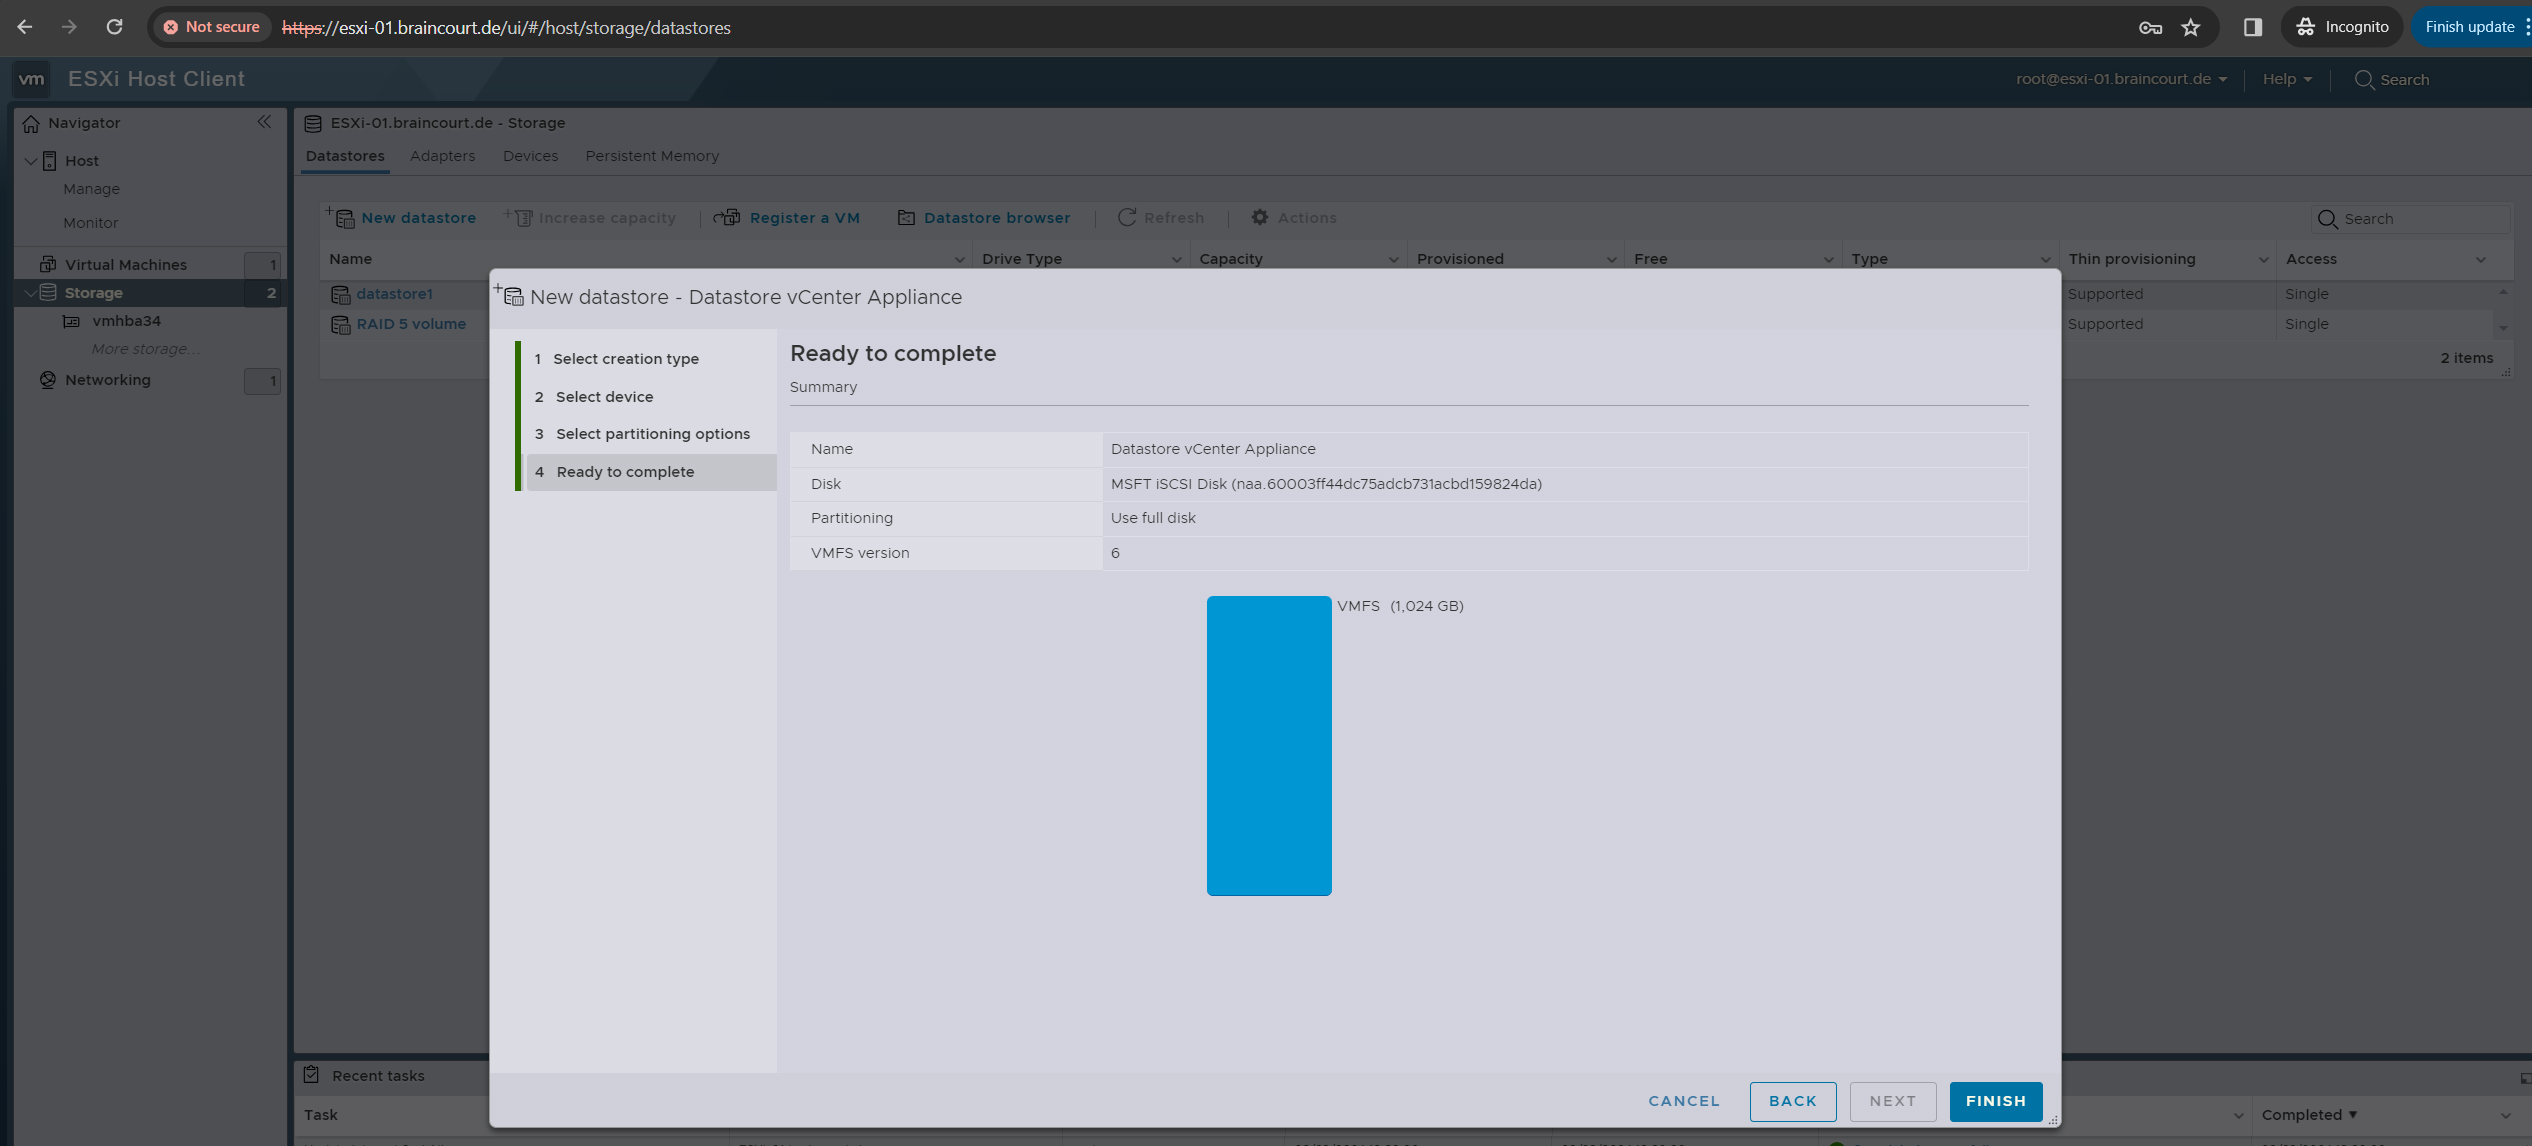
Confirm that the entire content on the disk will be erased in order to create a new datastore on.
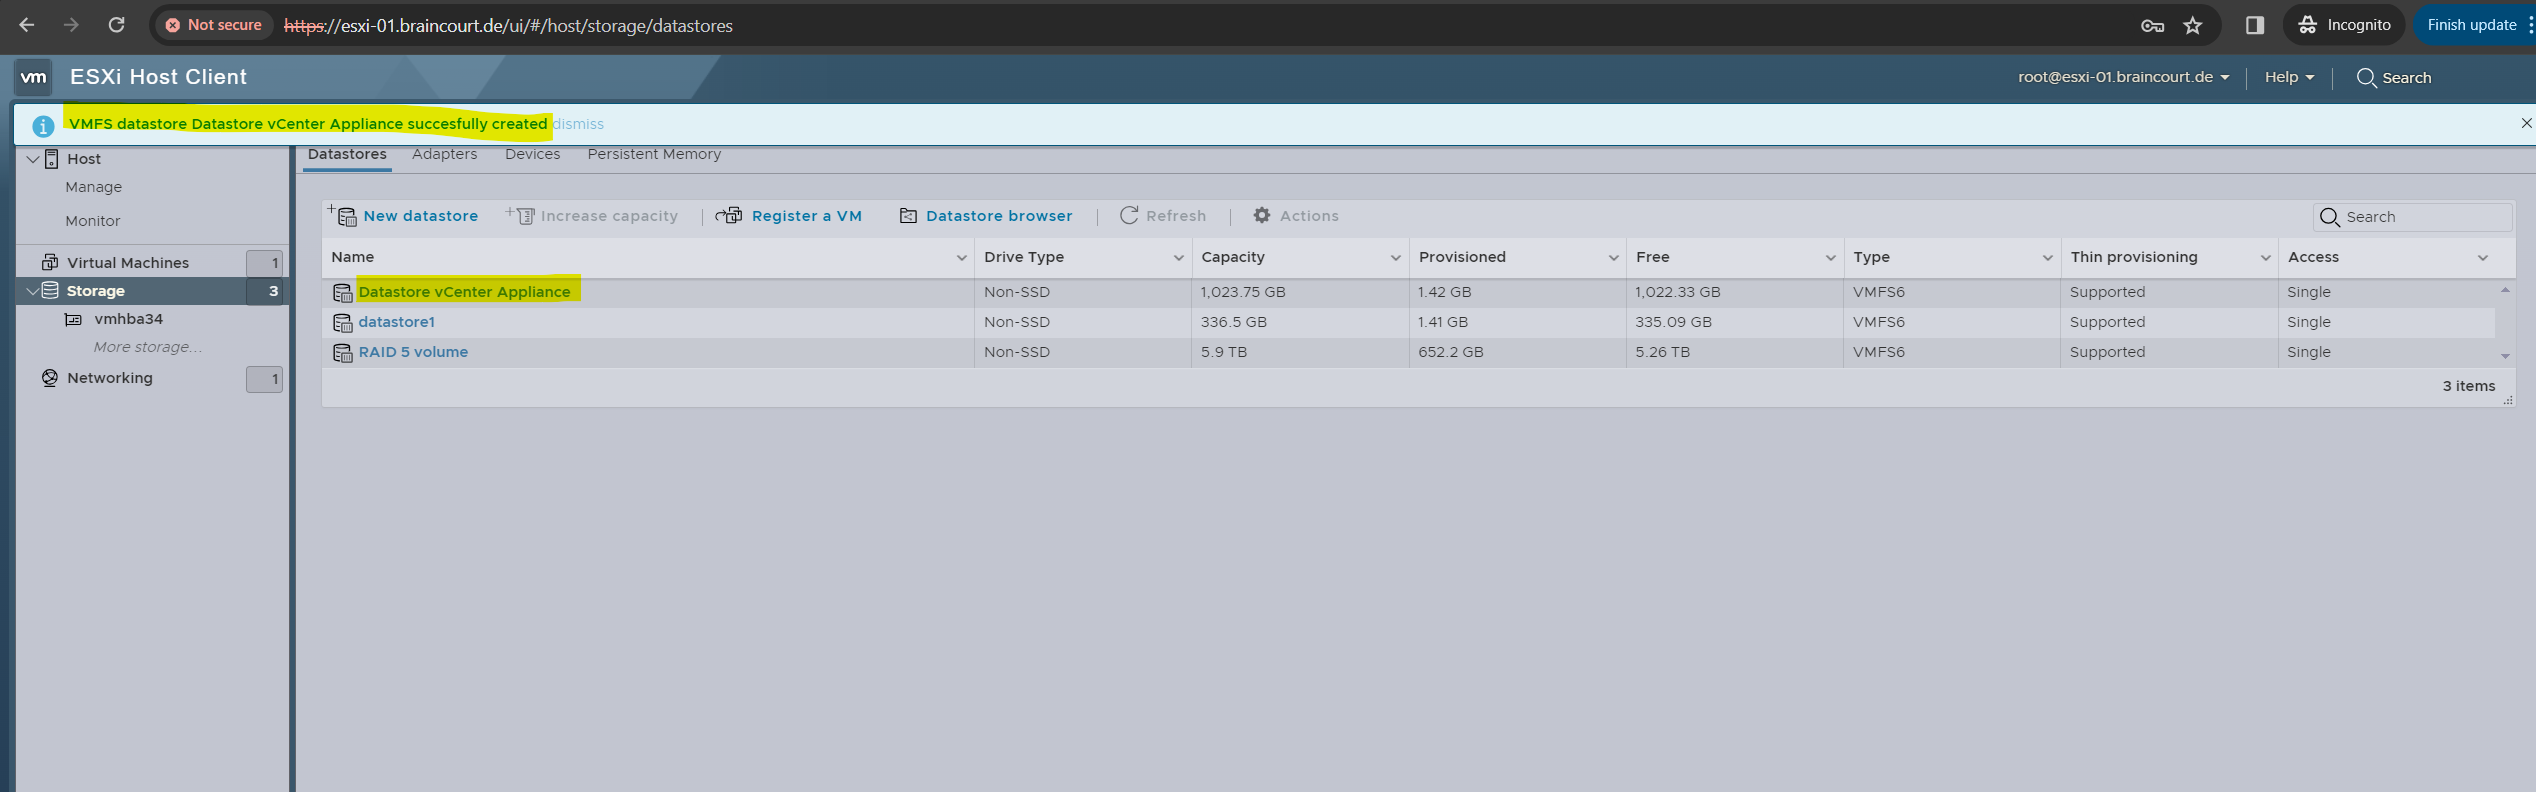
Finally we have a new datastore on the ESXi host.
Deploying the vCenter Server on the new Datastore
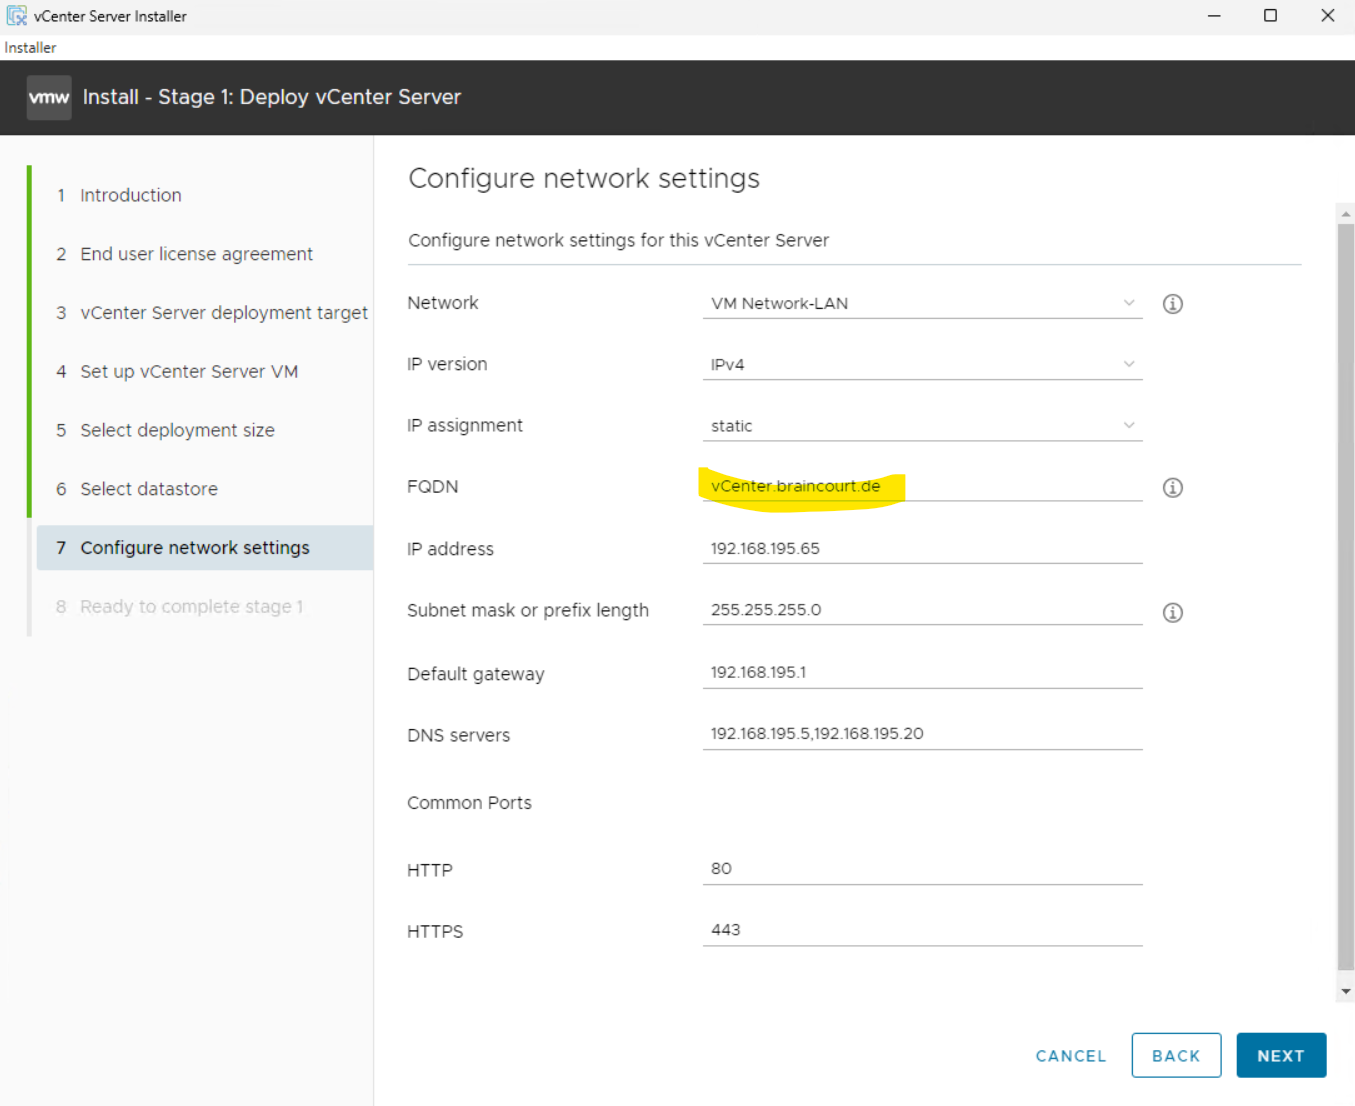
I will now deploy a new vCenter server applicance on my first ESXi host (esxi-01.braincourt.de) and its new datastore (stored on the iSCSI virtual disk) we previously created and later should be used as shared (datastore) storage.
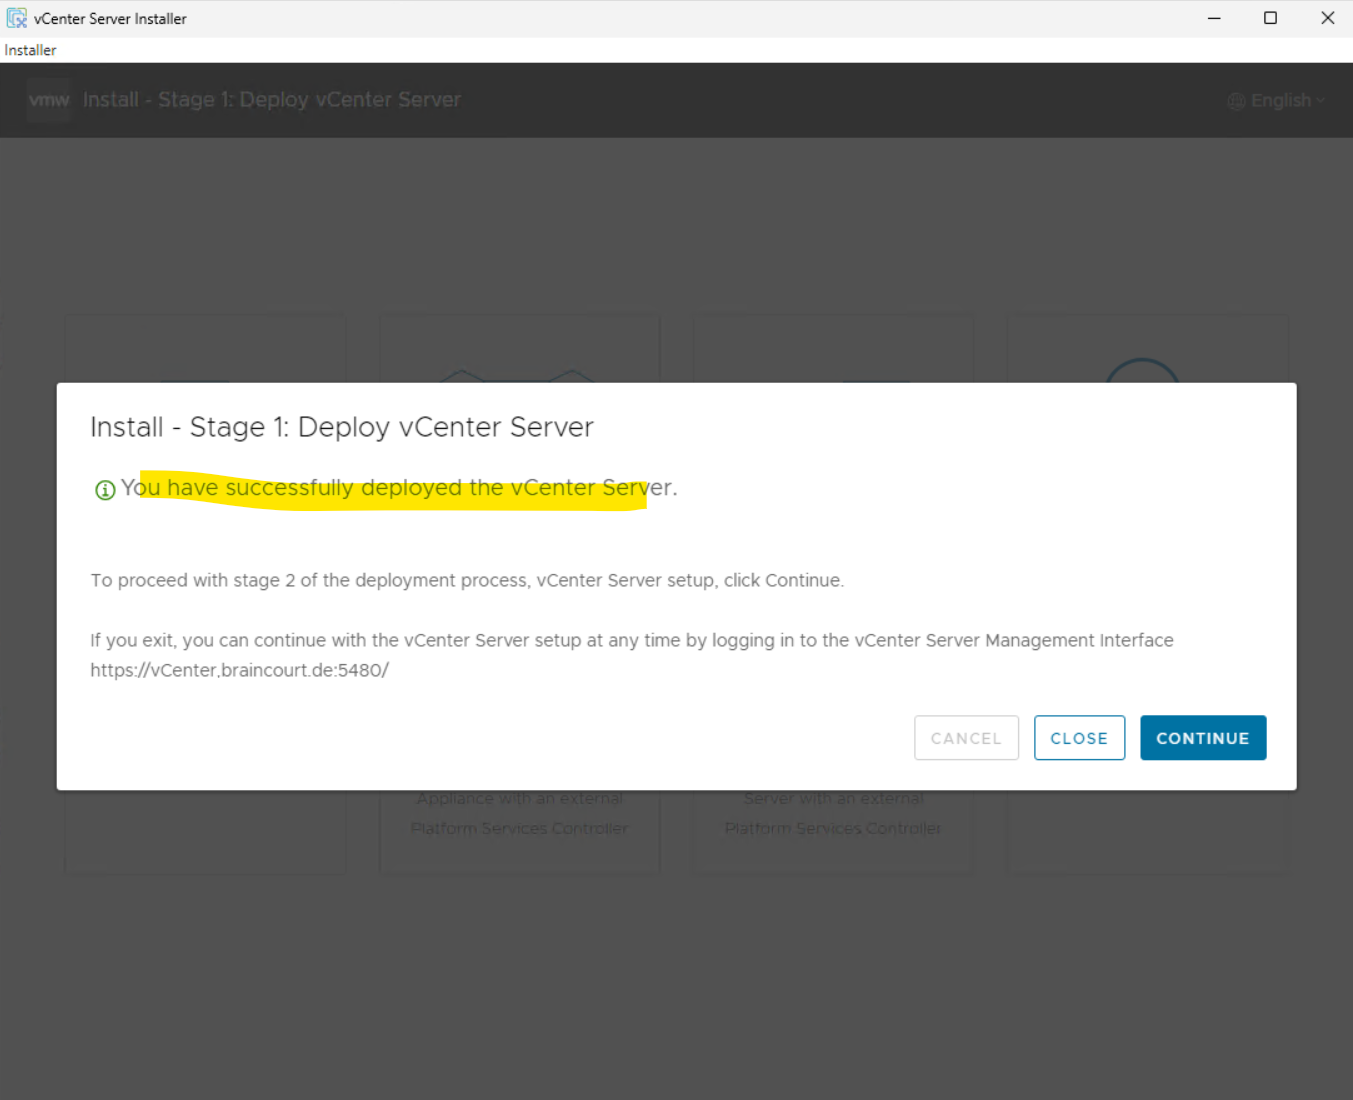
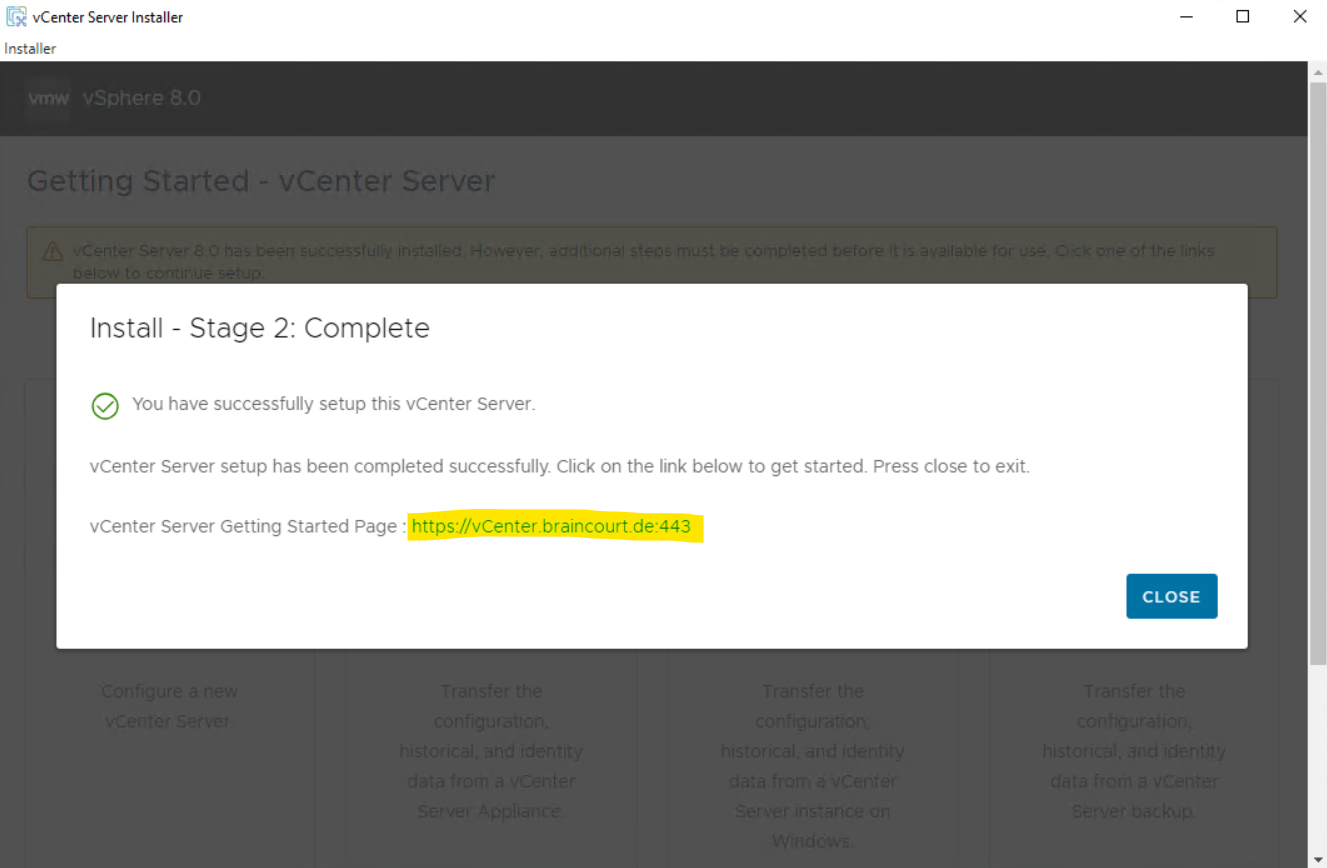
If you exit, you can continue with the vCenter Server setup at any time by logging in to the vCenter Server Management Interface https://vCenter.braincourt.de:5480/
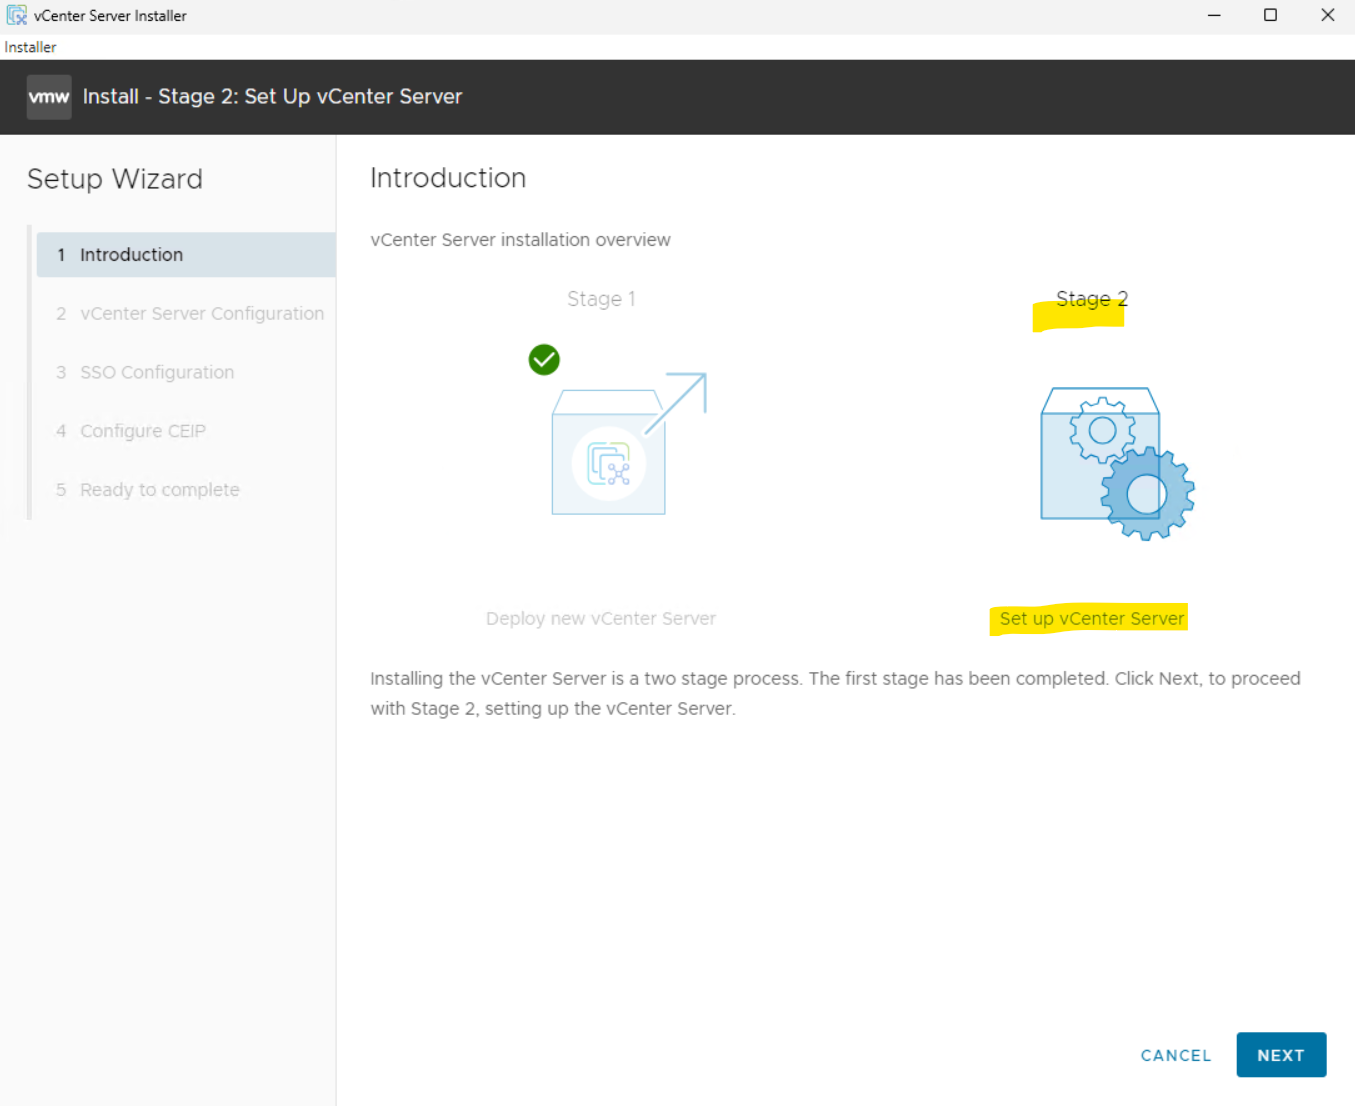
Select Next to proceed with Stage 2, setting up the vCenter Server.
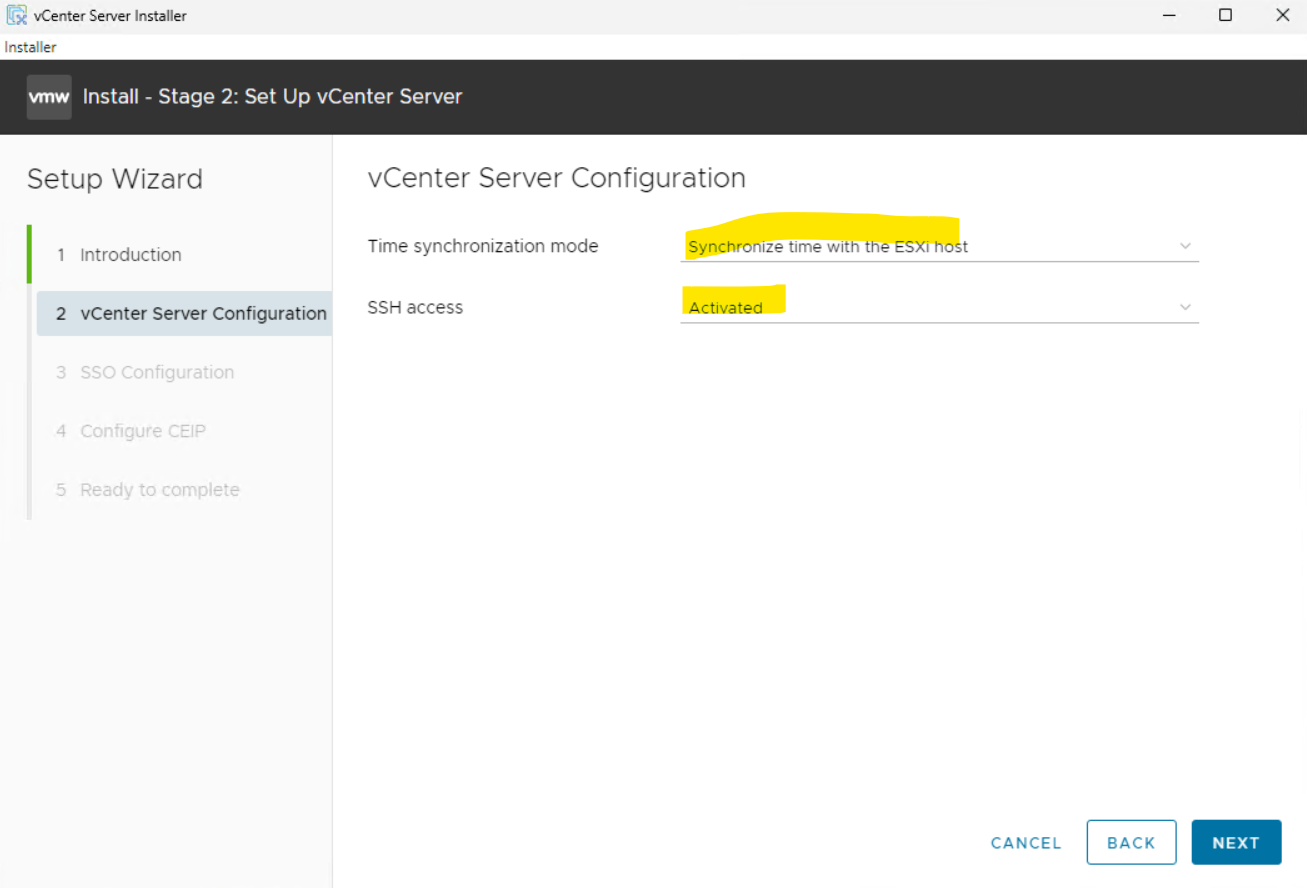
Configure the NTP server by selecting the Time synchronization mode and Enabling the SSH access, then click Next
Enter a unique SSO domain name, configure a password for the SSO administrator, click Next.
Note !
The default SSO domain name is vSphere.local.
The SSO domain name should not be the same as your Active Directory Domain.
Just for demonstration purpose I will use here the default SSO domain name.
After installation, the administrator of the vCenter Single Sign-On domain, administrator@vsphere.local by default, has administrator access to both vCenter Single Sign-On and vCenter Server. That user can then add identity sources, set the default identity source, and manage users and groups in the vCenter Single Sign-On domain.

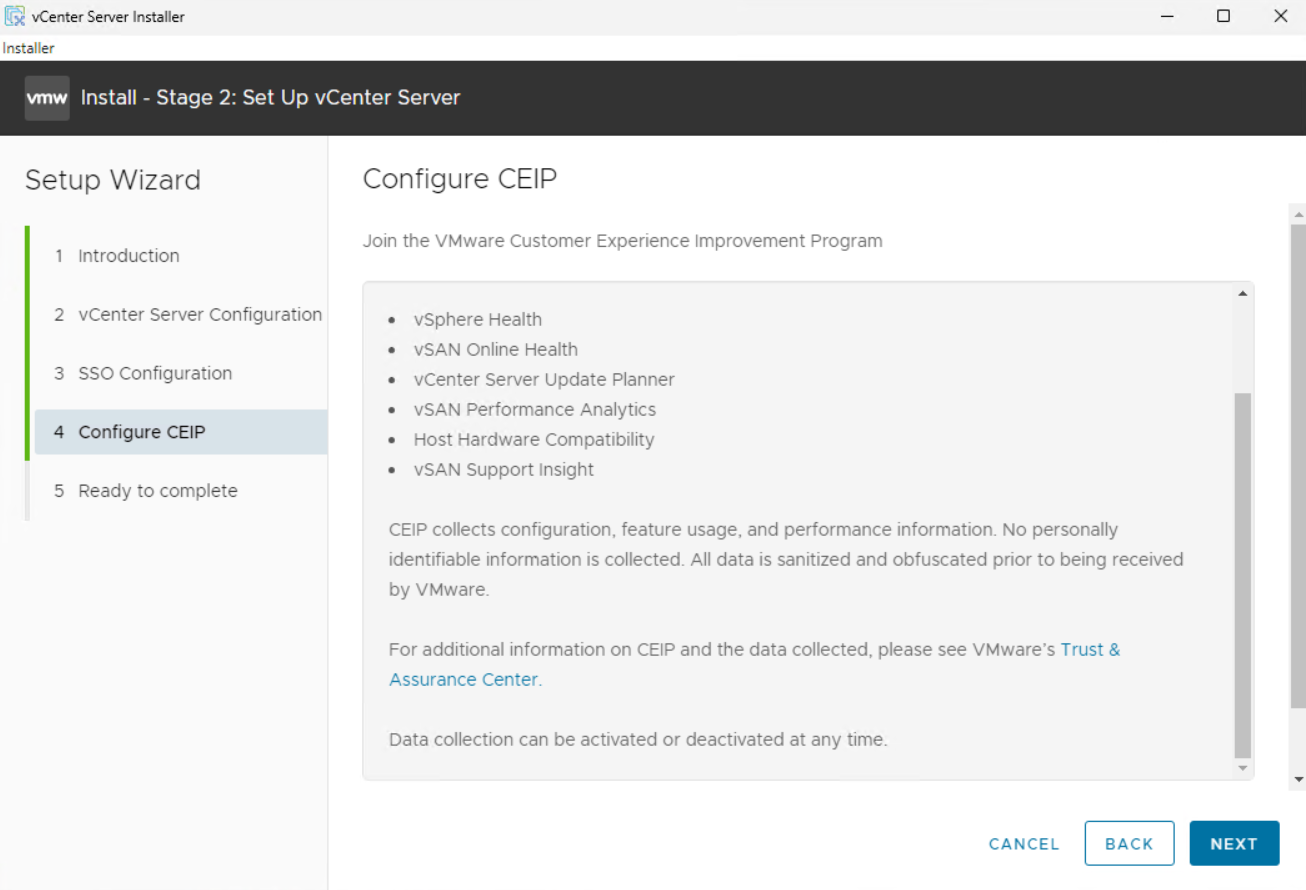
Select or deselect the customer experience improvement program box and click Next.
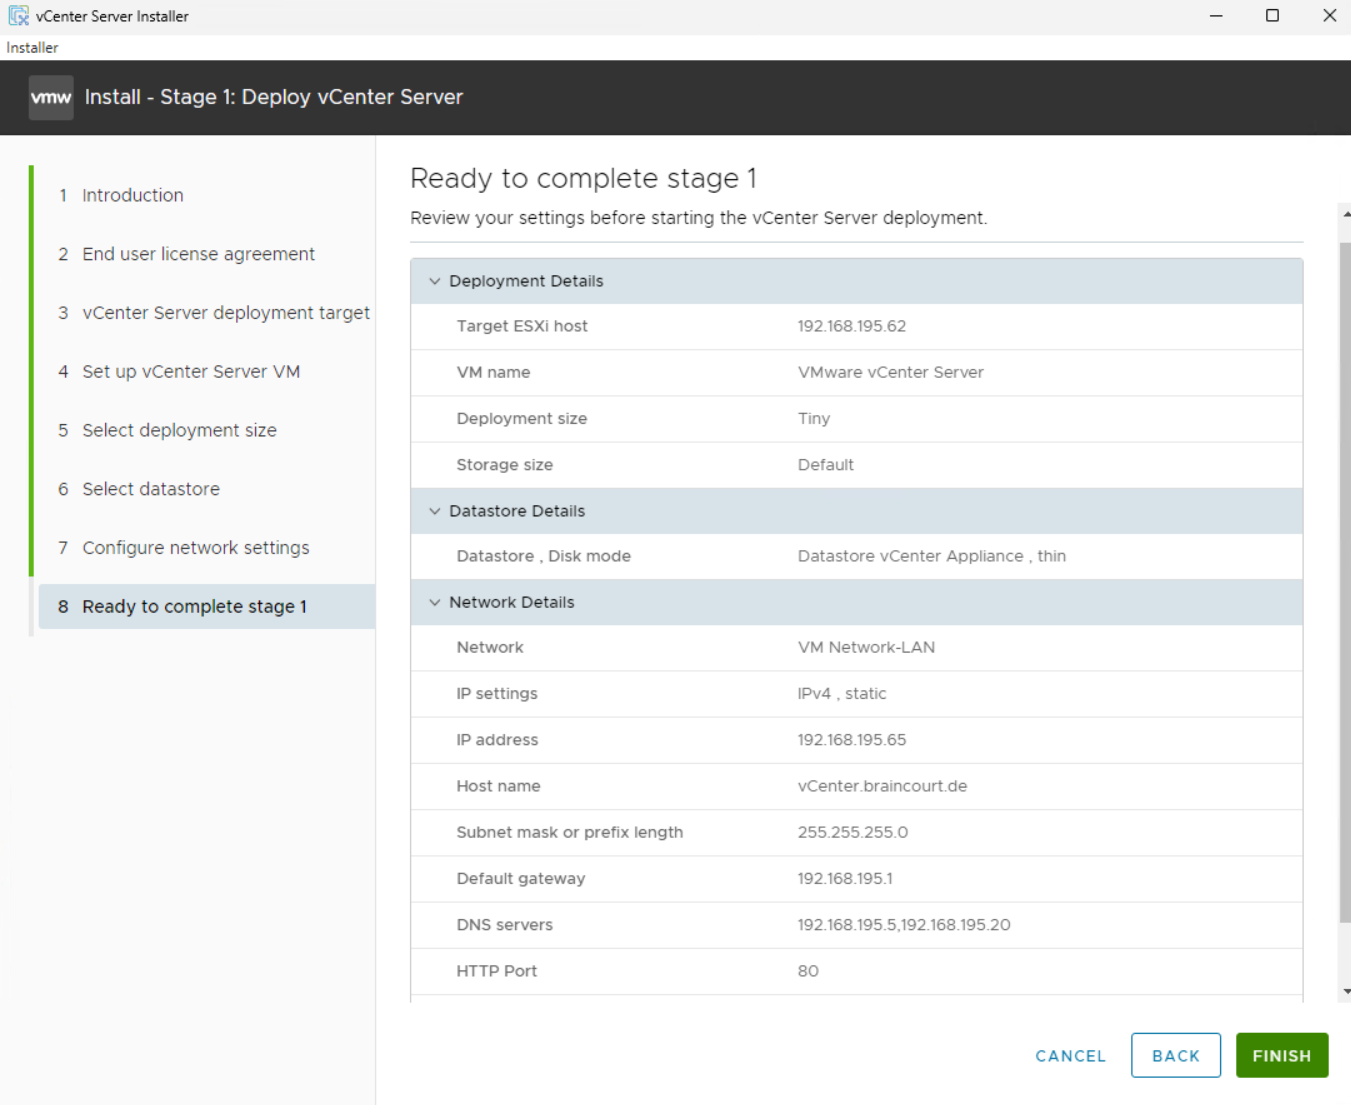
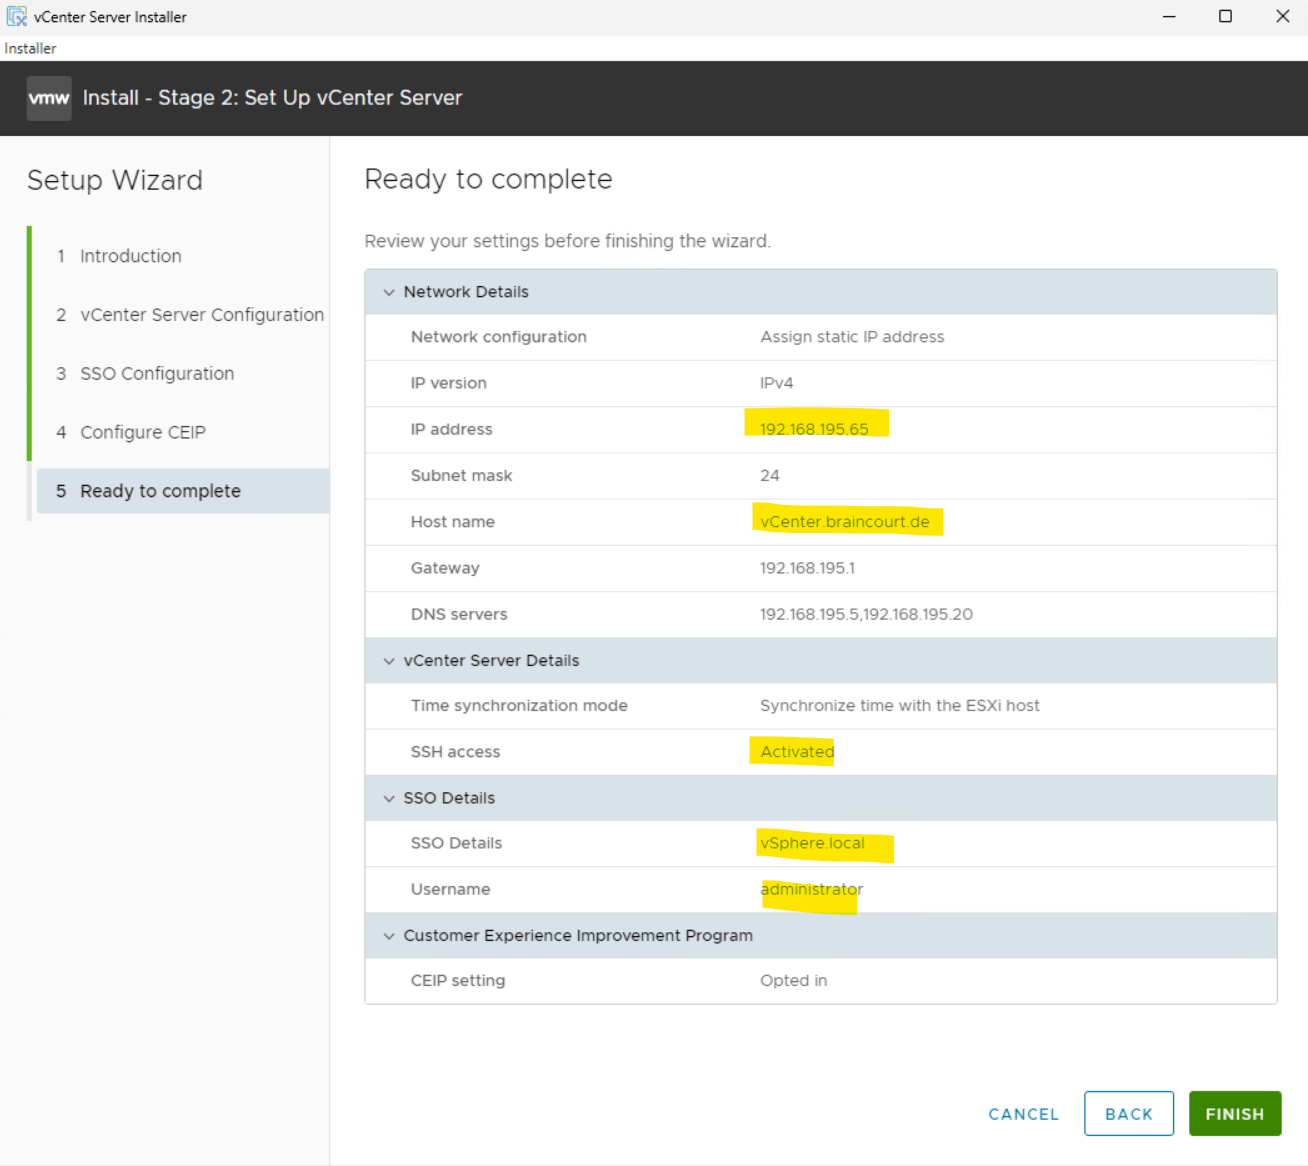
Review the details on the summary page and click Finish to finalize the setup.
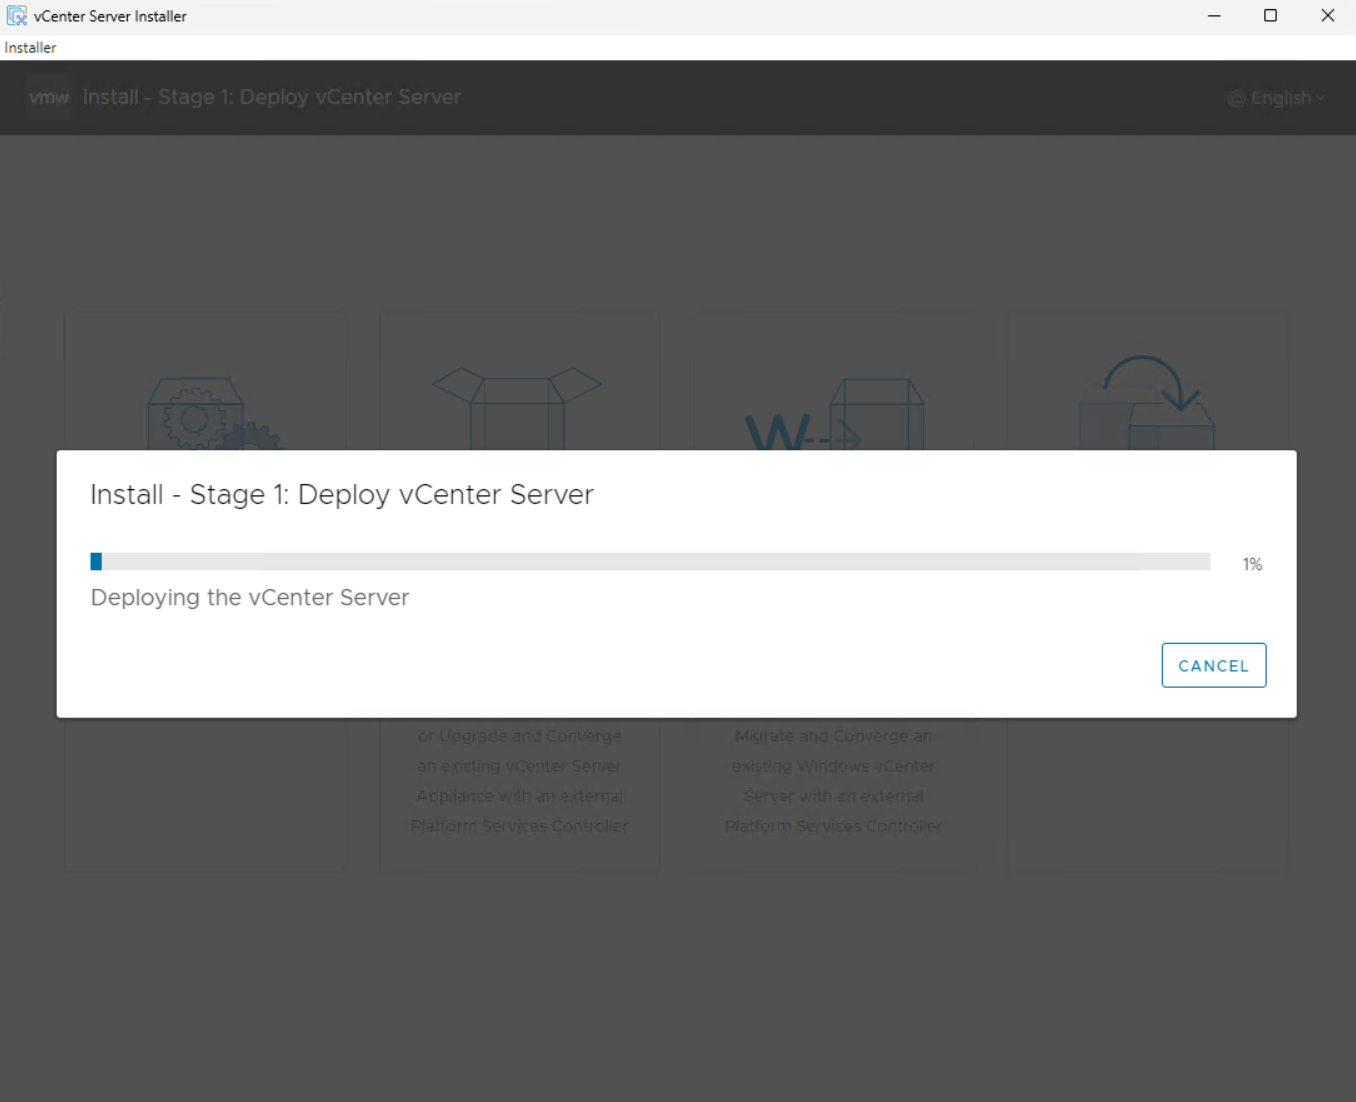
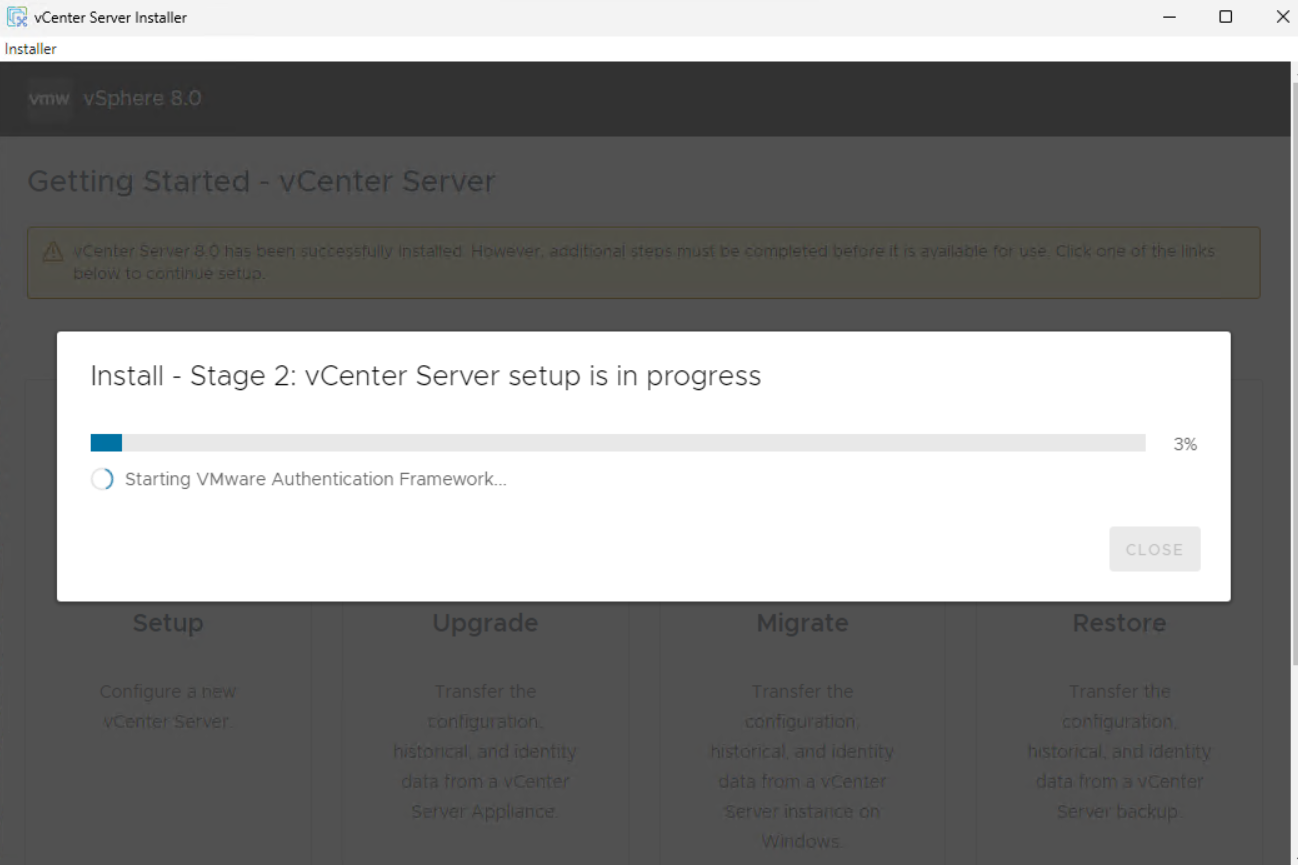
The installer displays a warning that you cannot pause or stop the install once you start it. Click Ok to acknowledge the warning and start the install.

When the install process is complete, click Close to exit the installer and entire Stage 2 of the VCSA setup.
Connect the iSCSI Virtual Disk with the second ESXi Host
I will now connect also my second ESXi host with the iSCSI virtual disk on which the new datastore is created and the vCenter server appliance is stored on.
Because I have already deployed the vCenter server (appliance) successfully, I can now also use the vSphere client to connect the iSCSI virtual disk with my second ESXi host.
The steps by using the hosts ESXi Host Client are the same as previously for the first ESXi host. We can add the iSCSI virtual disk as a datastore directly on my ESXi Hosts client web interface.
ESXi Host Client -> Storage -> Adapters -> Software iSCSI
Below I will show the steps by using the vShere client to connect the iSCSI virtual disk with my second ESXi host.
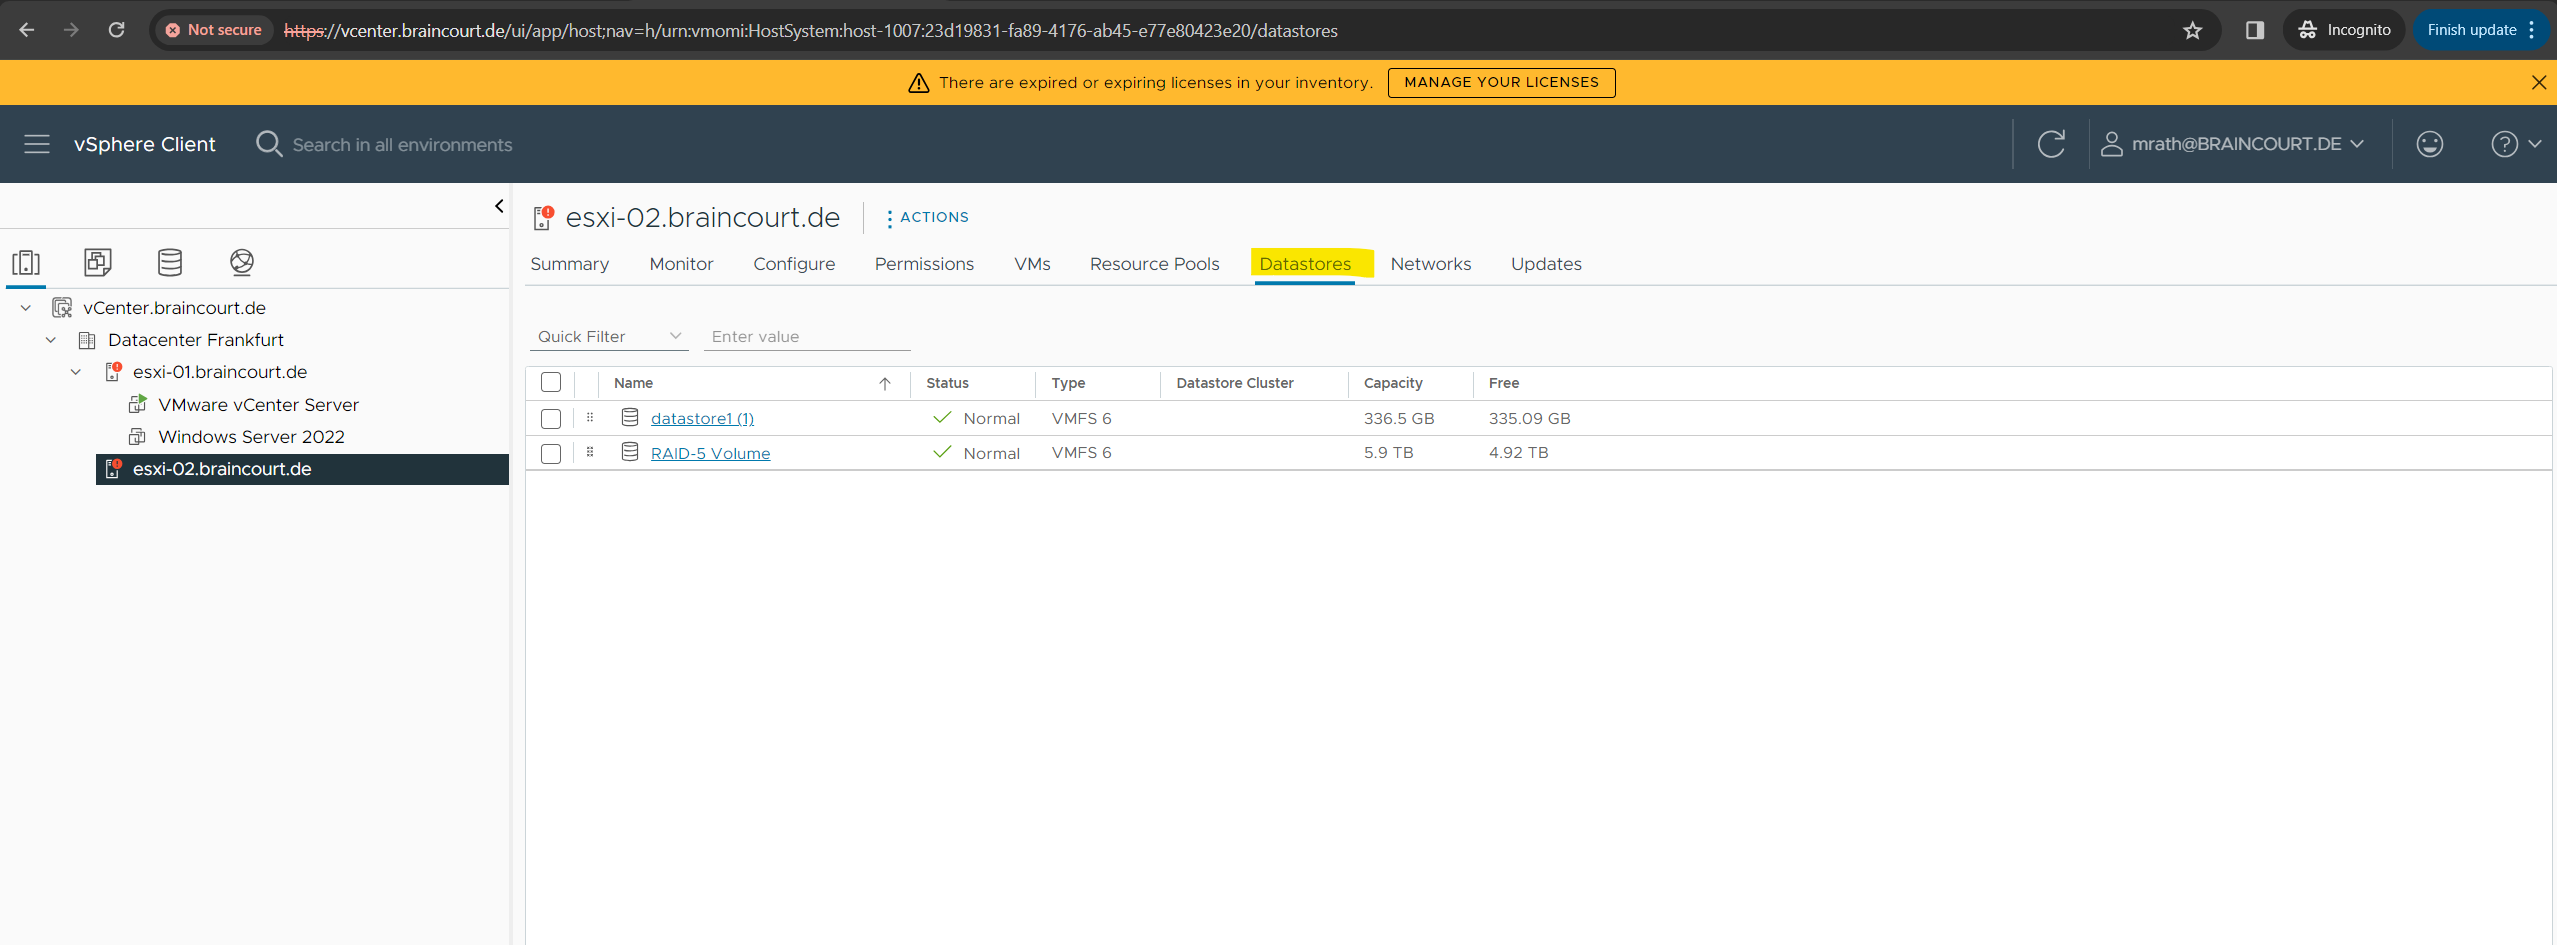
Below you will see that the previously new created datastore on which the vCenter server (appliance) is stored, is already listed as datastore for my first ESXi host (esxi-01.braincourt.de).
vSphere Client -> Inventories -> Host and Clusters -> Host -> Datastores

On my second ESXi host (esxi-02.braincourt.de) so far I have just its own local stored datastores.
In order to connect my new iSCSI virtual disk, on which the newly created datastore is stored on, also to my second ESXi host by using the vSphere client this time, navigate to:
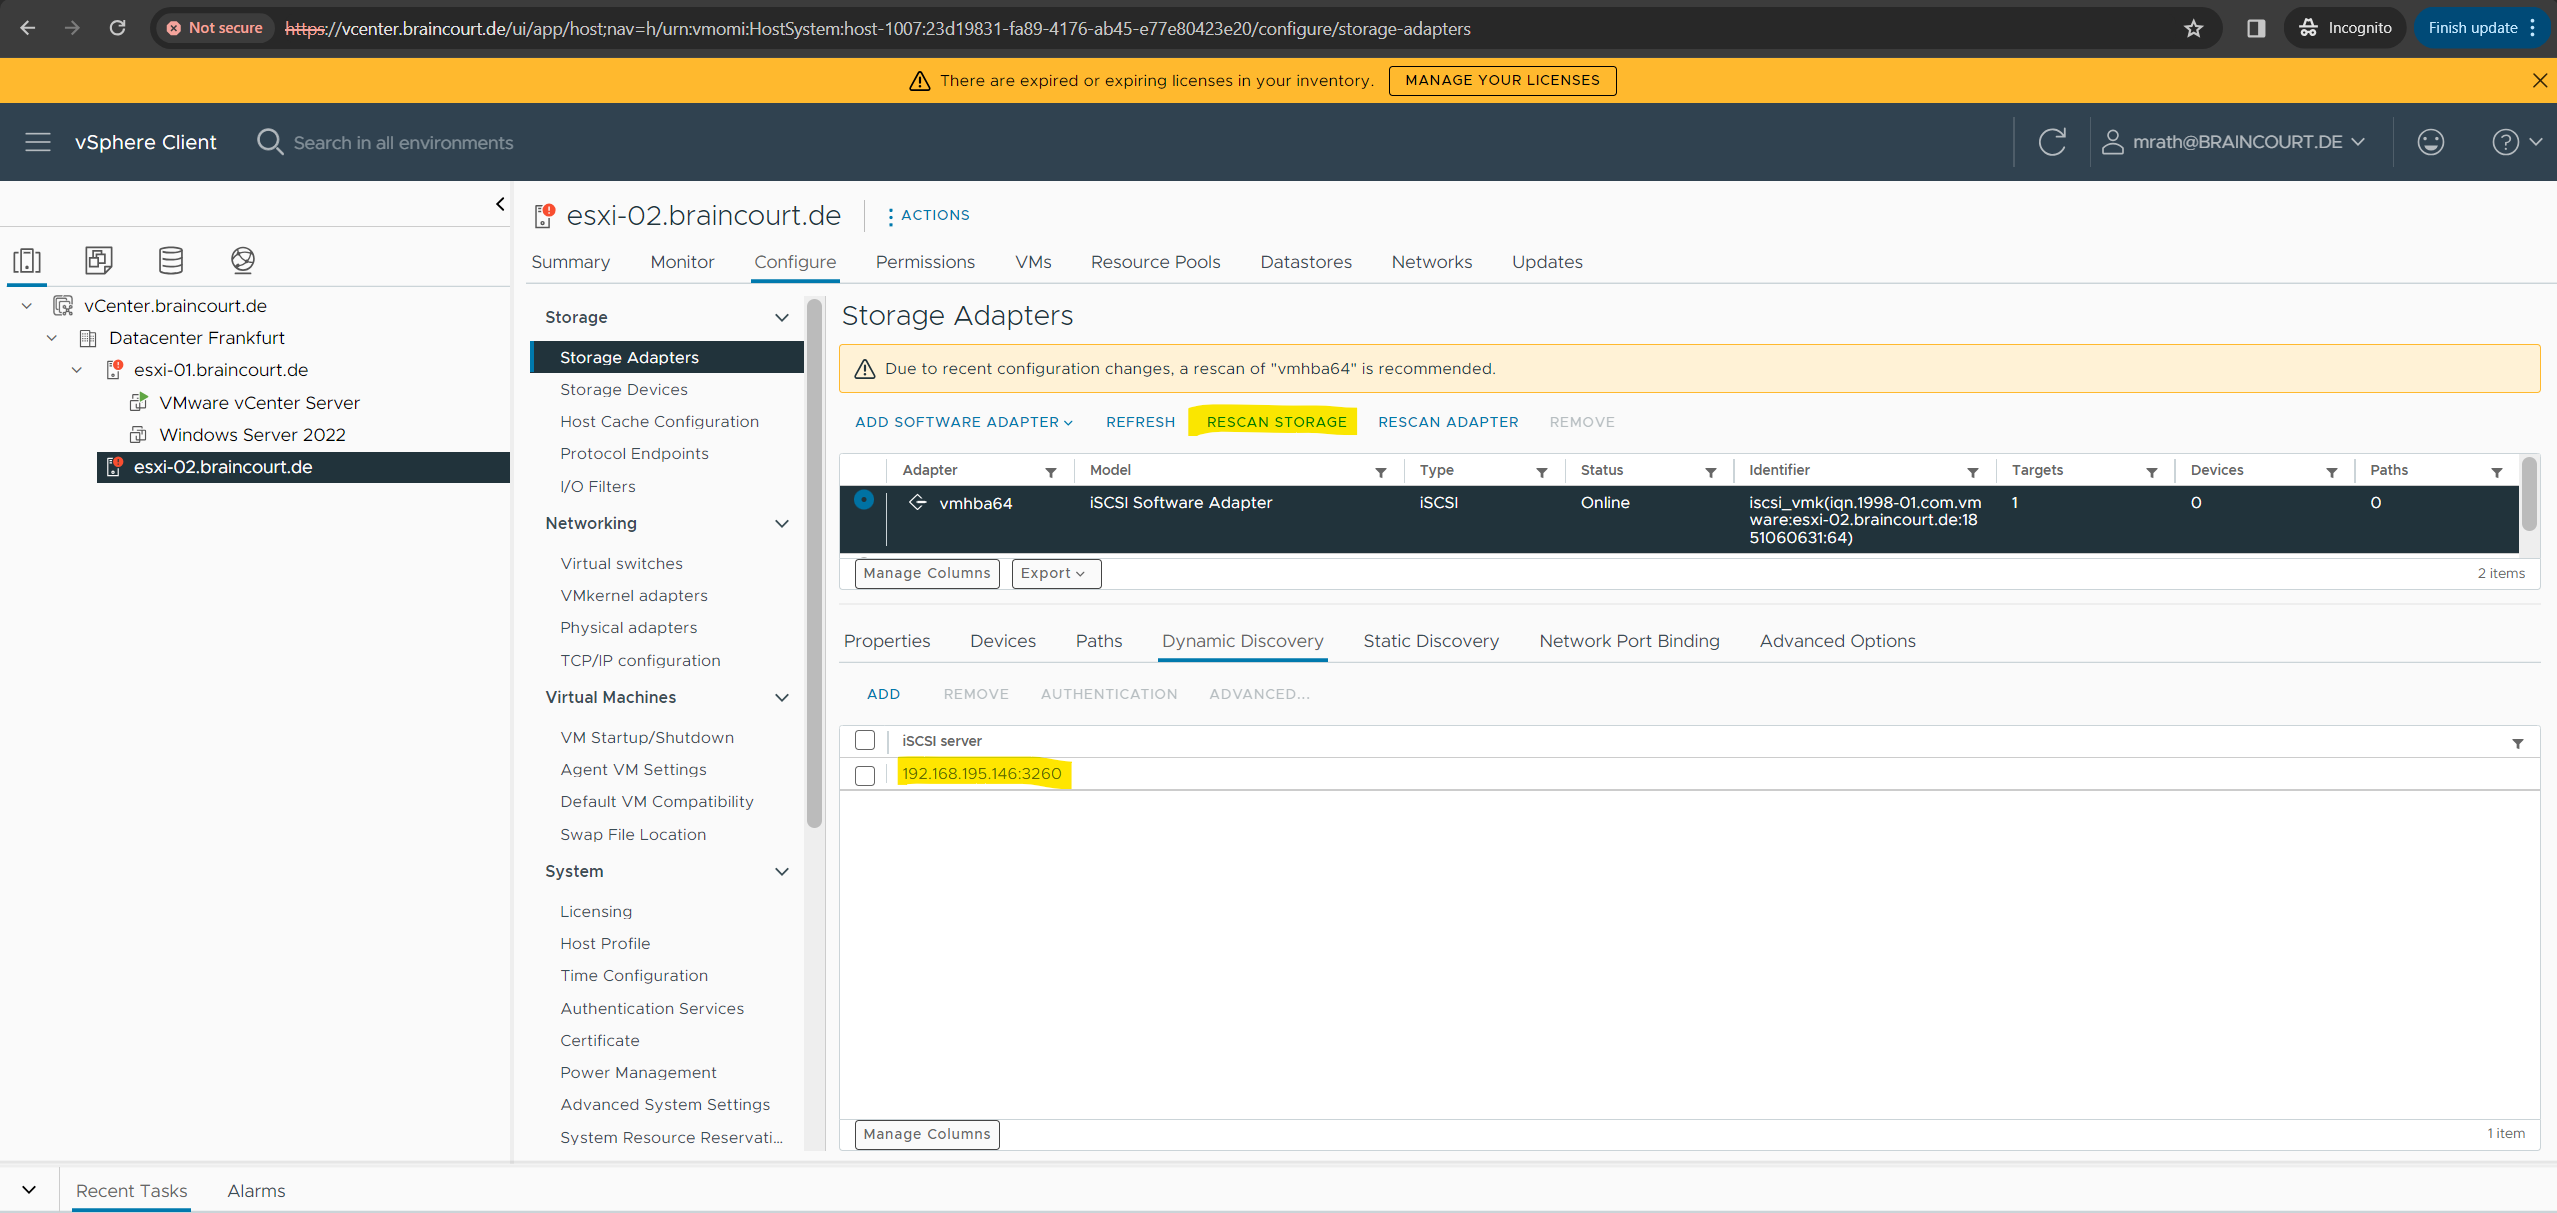
vSphere Client -> Inventories -> Host and Clusters -> Host -> Configure -> Storage (Storage Adapters) -> ADD SOFTWARE ADAPTER -> Add iSCSI adapter
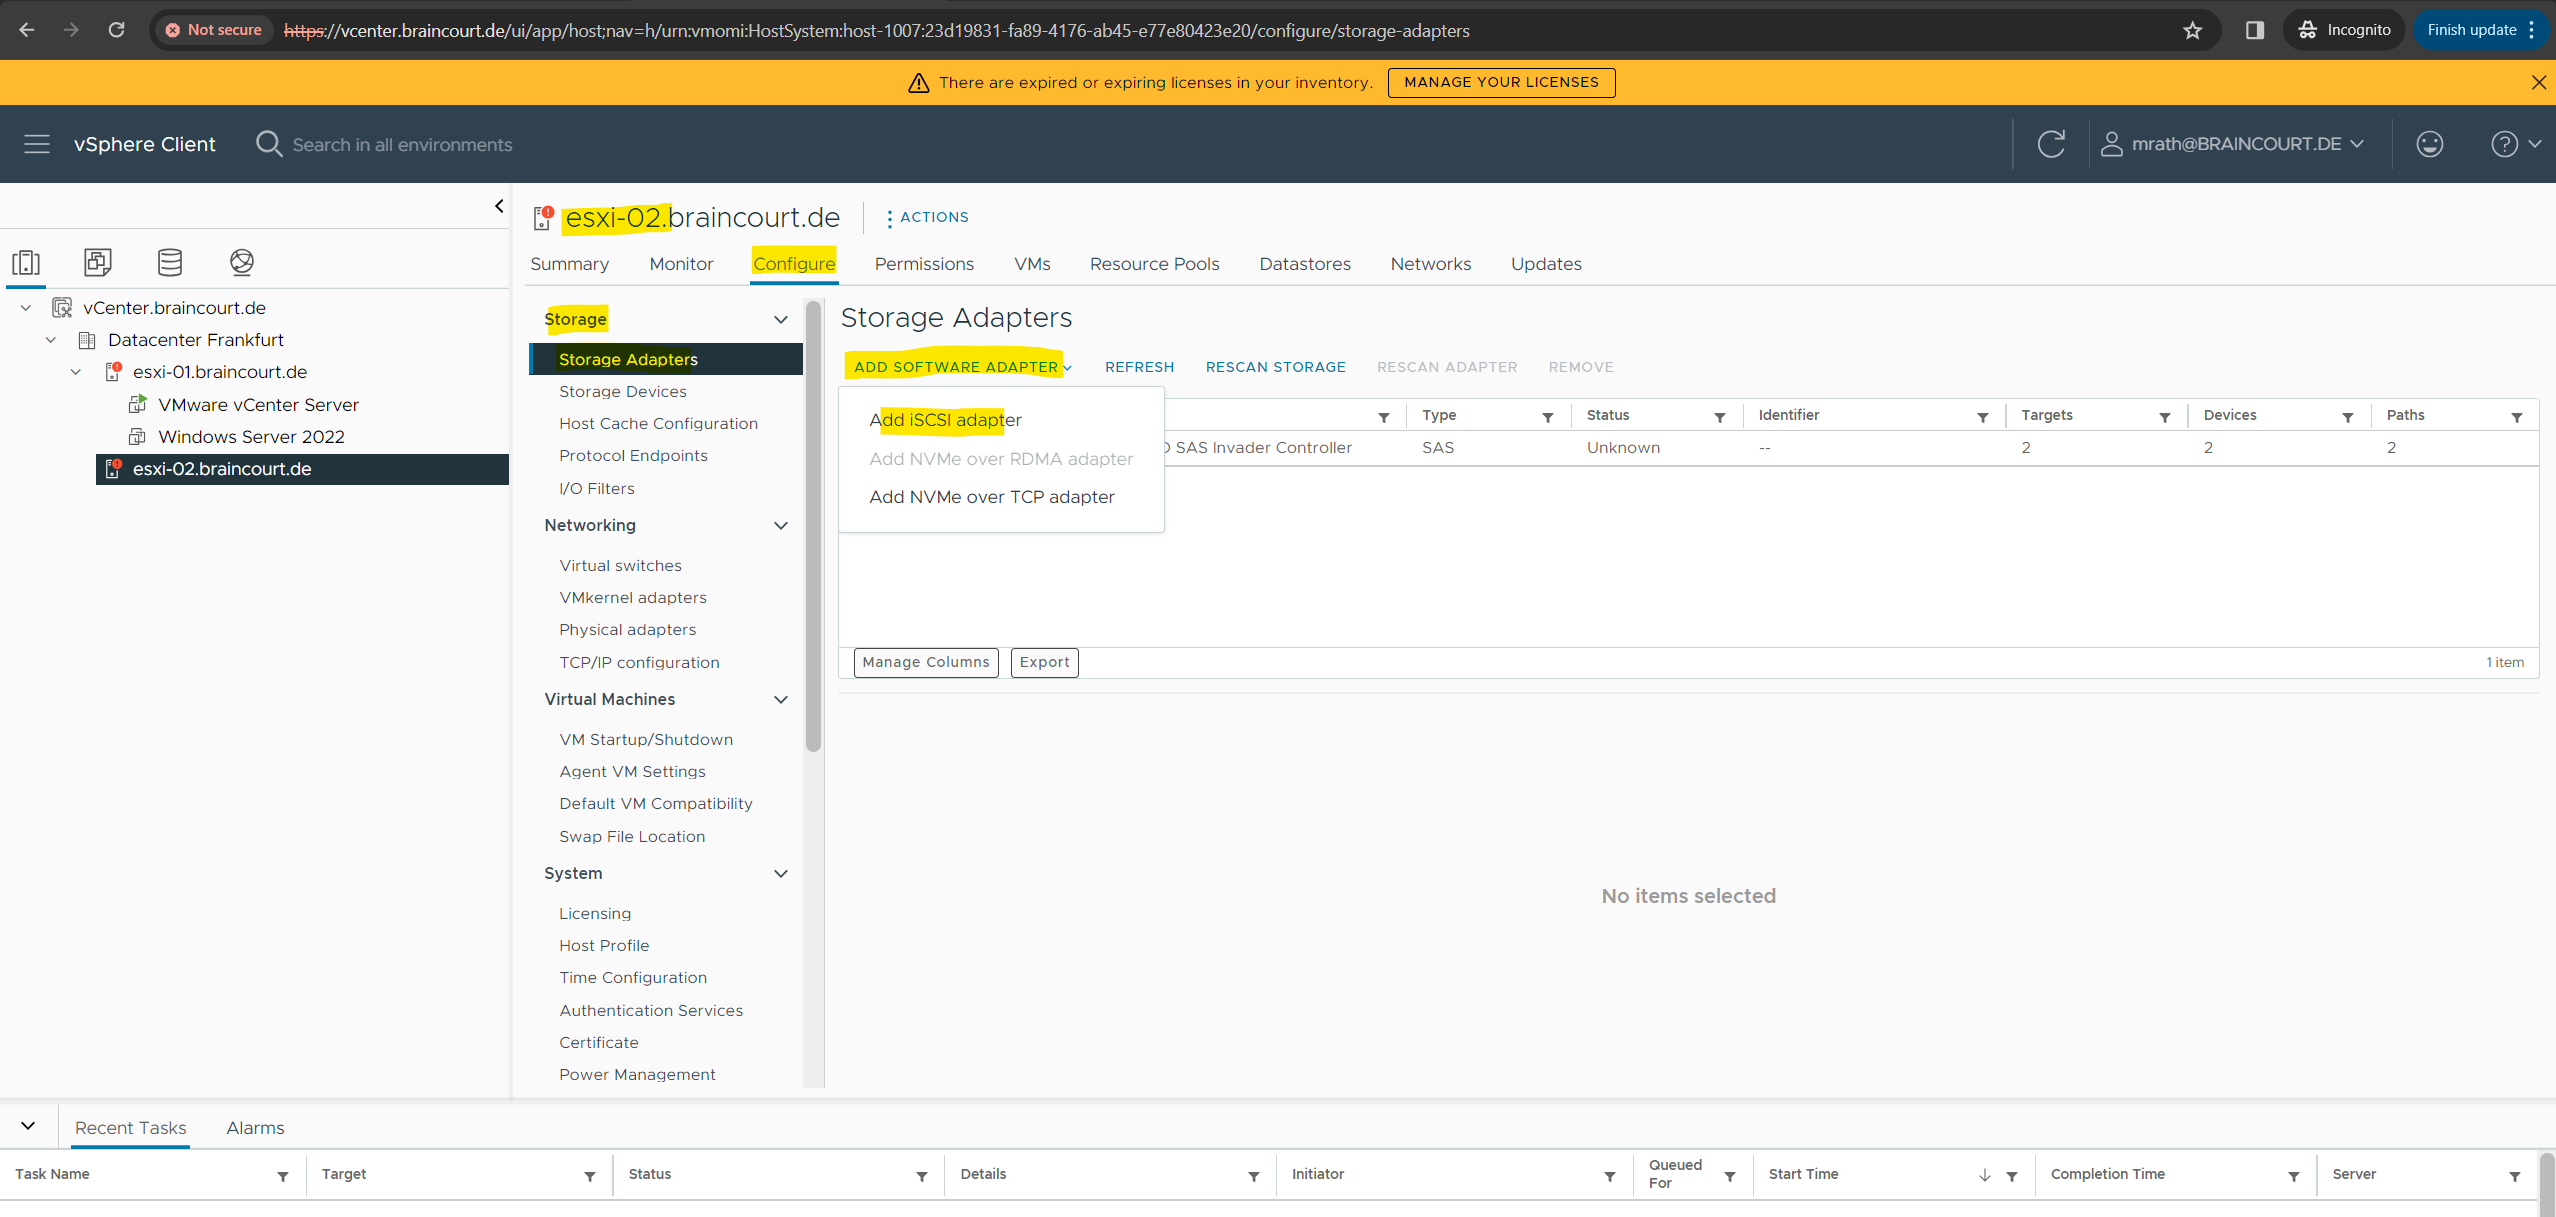
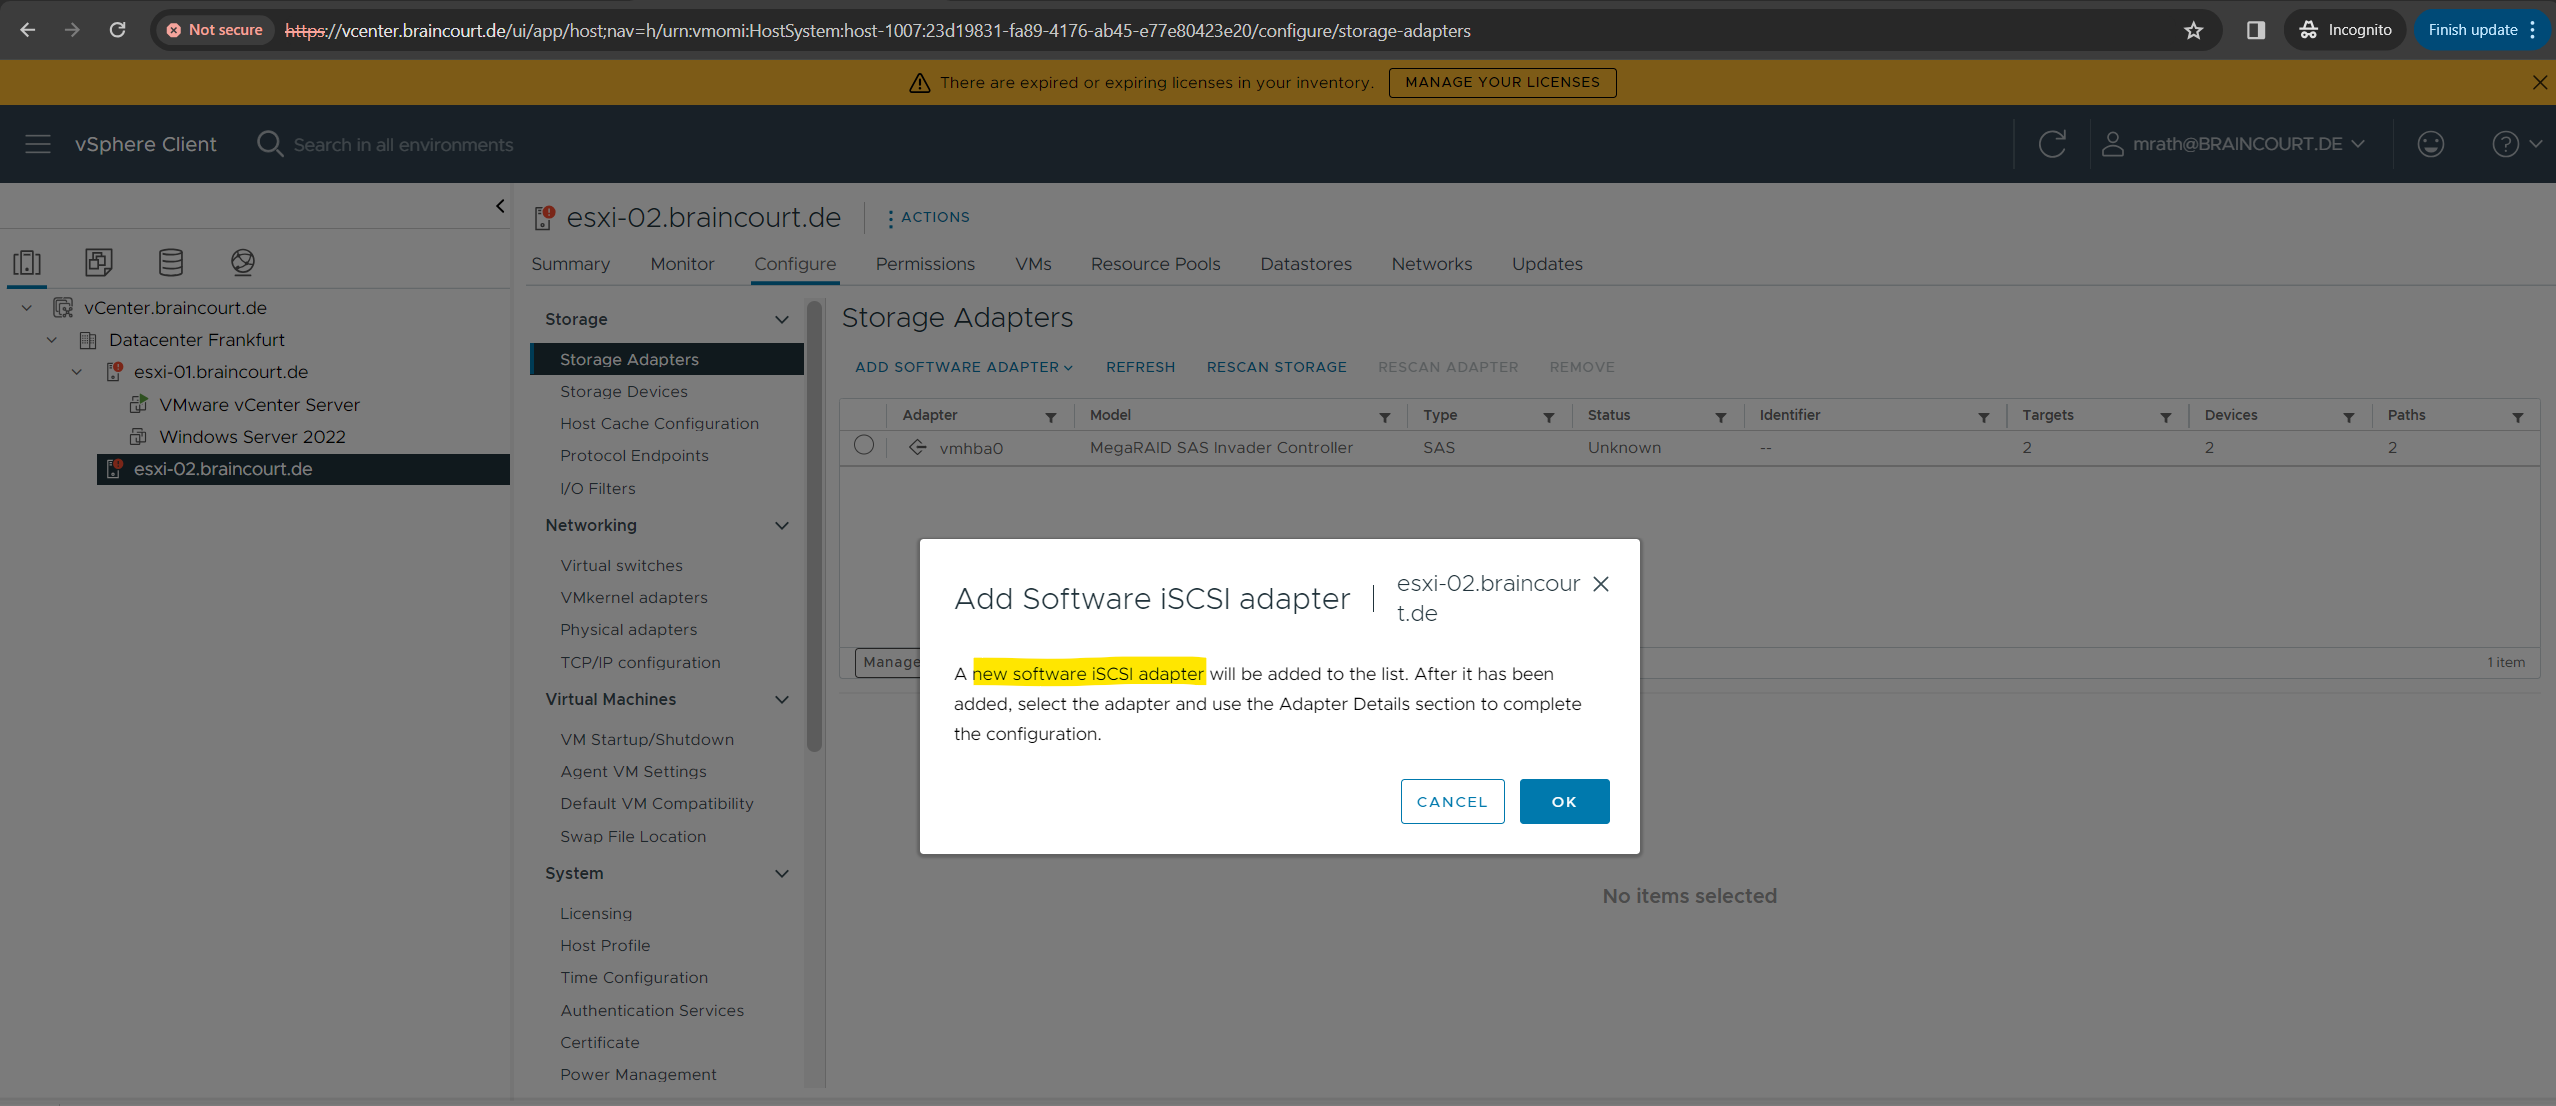
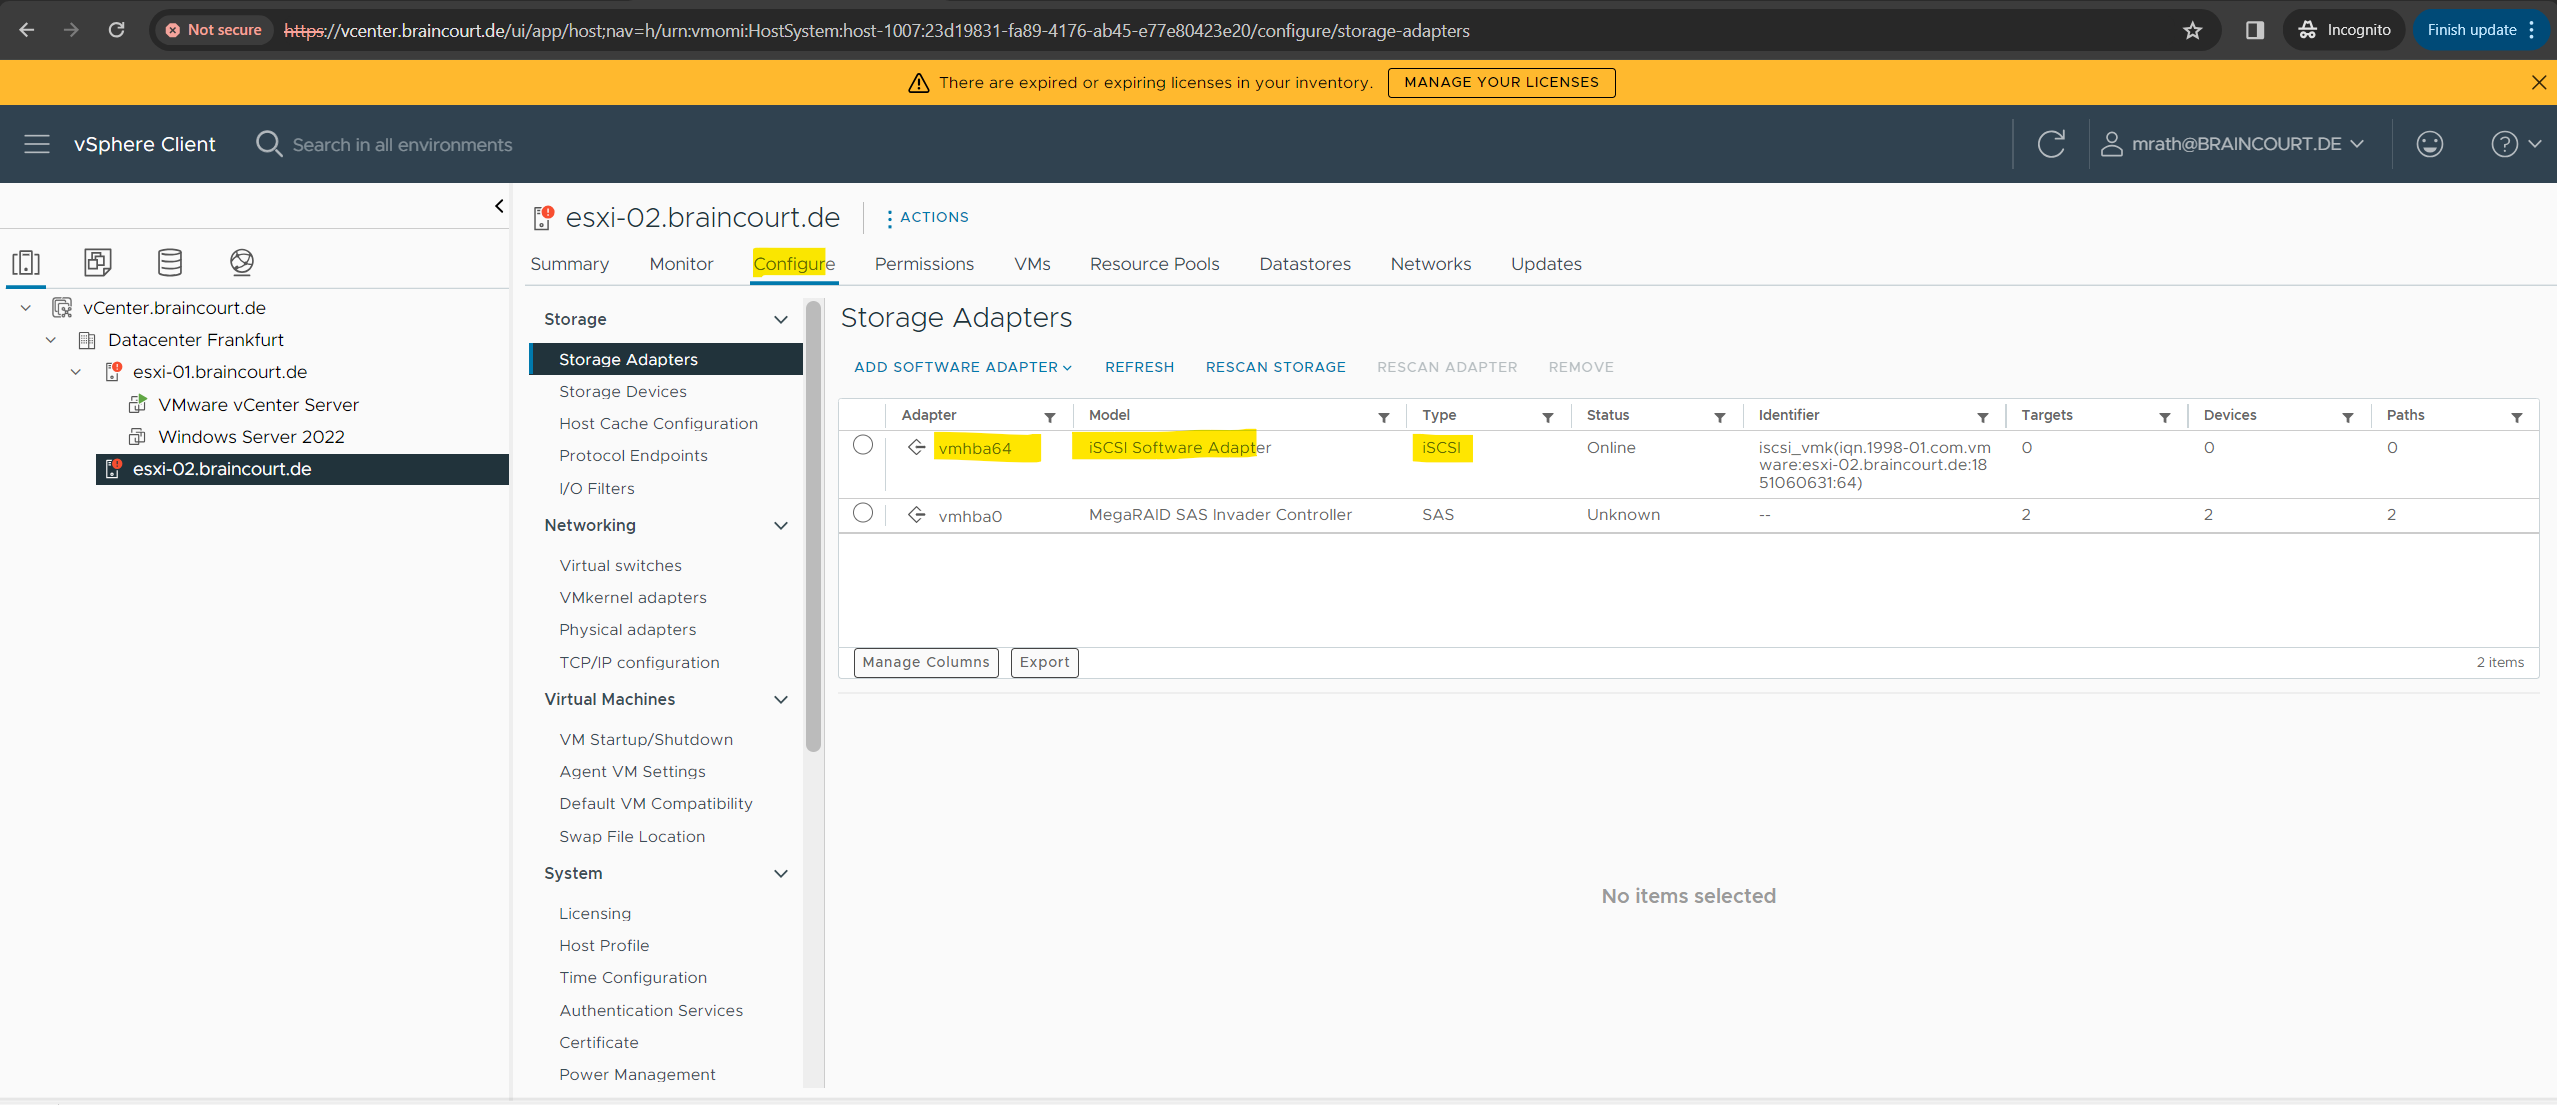
The new Software iSCSI adapter was successfully added.
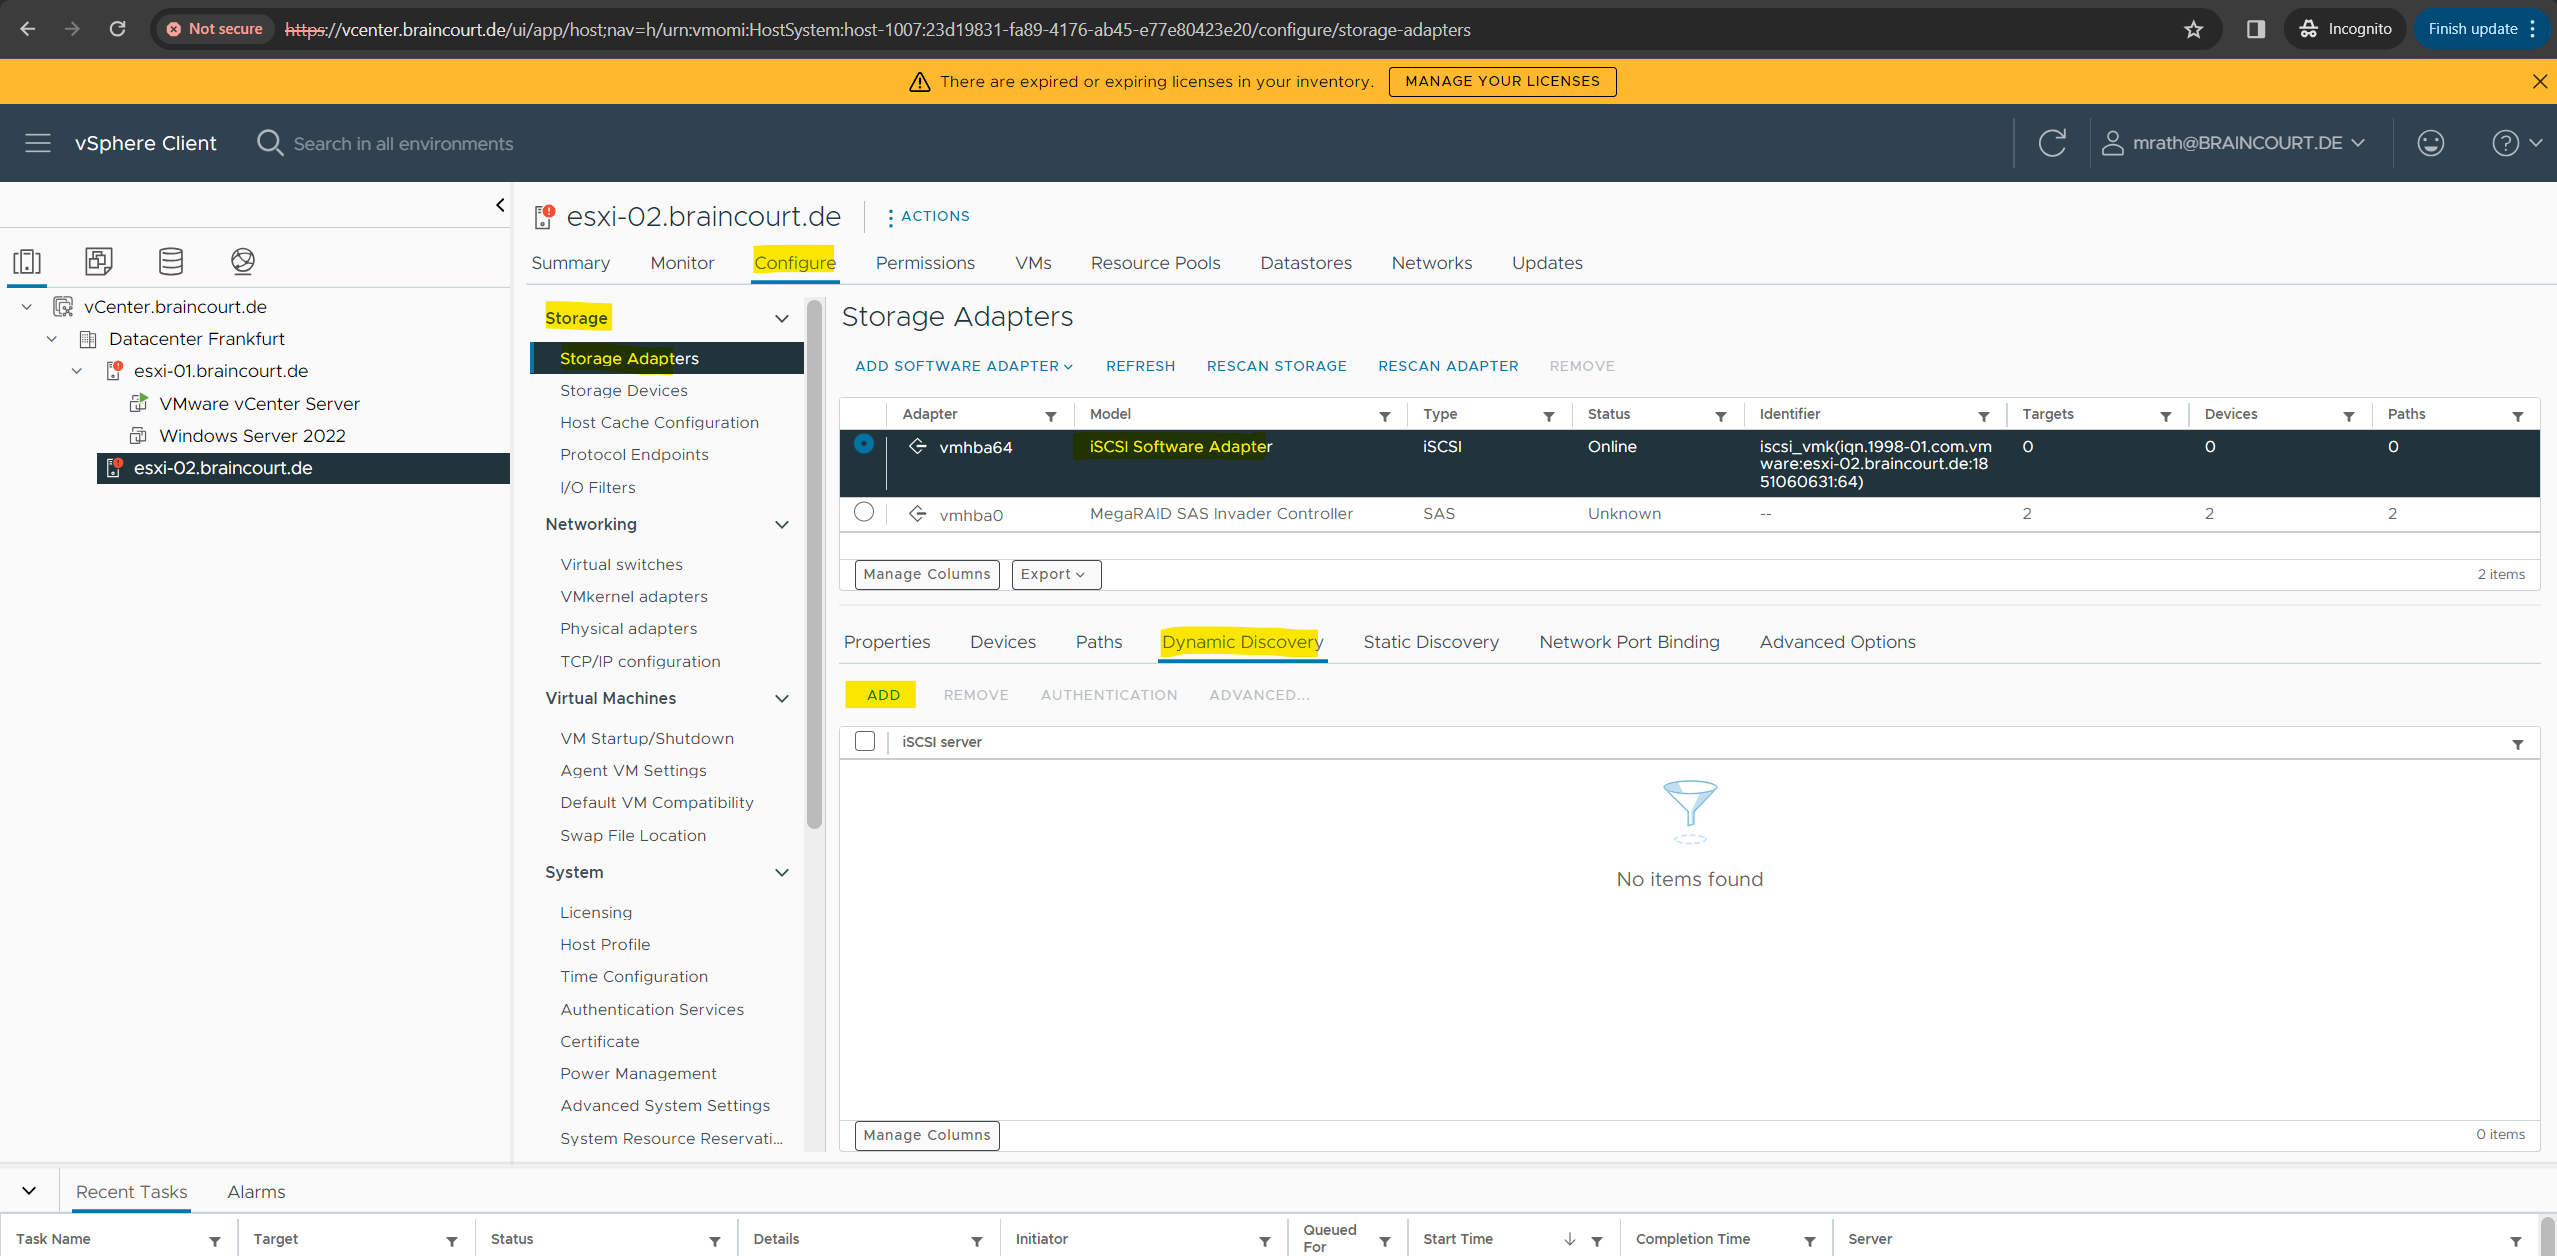
Select the new Software iSCSI adapter and click on Dynamic Discovery -> Add.
The differences between Dynamic Discovery and Static Discovery we also clarified previously further above under the section Connect the iSCSI Virtual Disk with the ESXi Host.
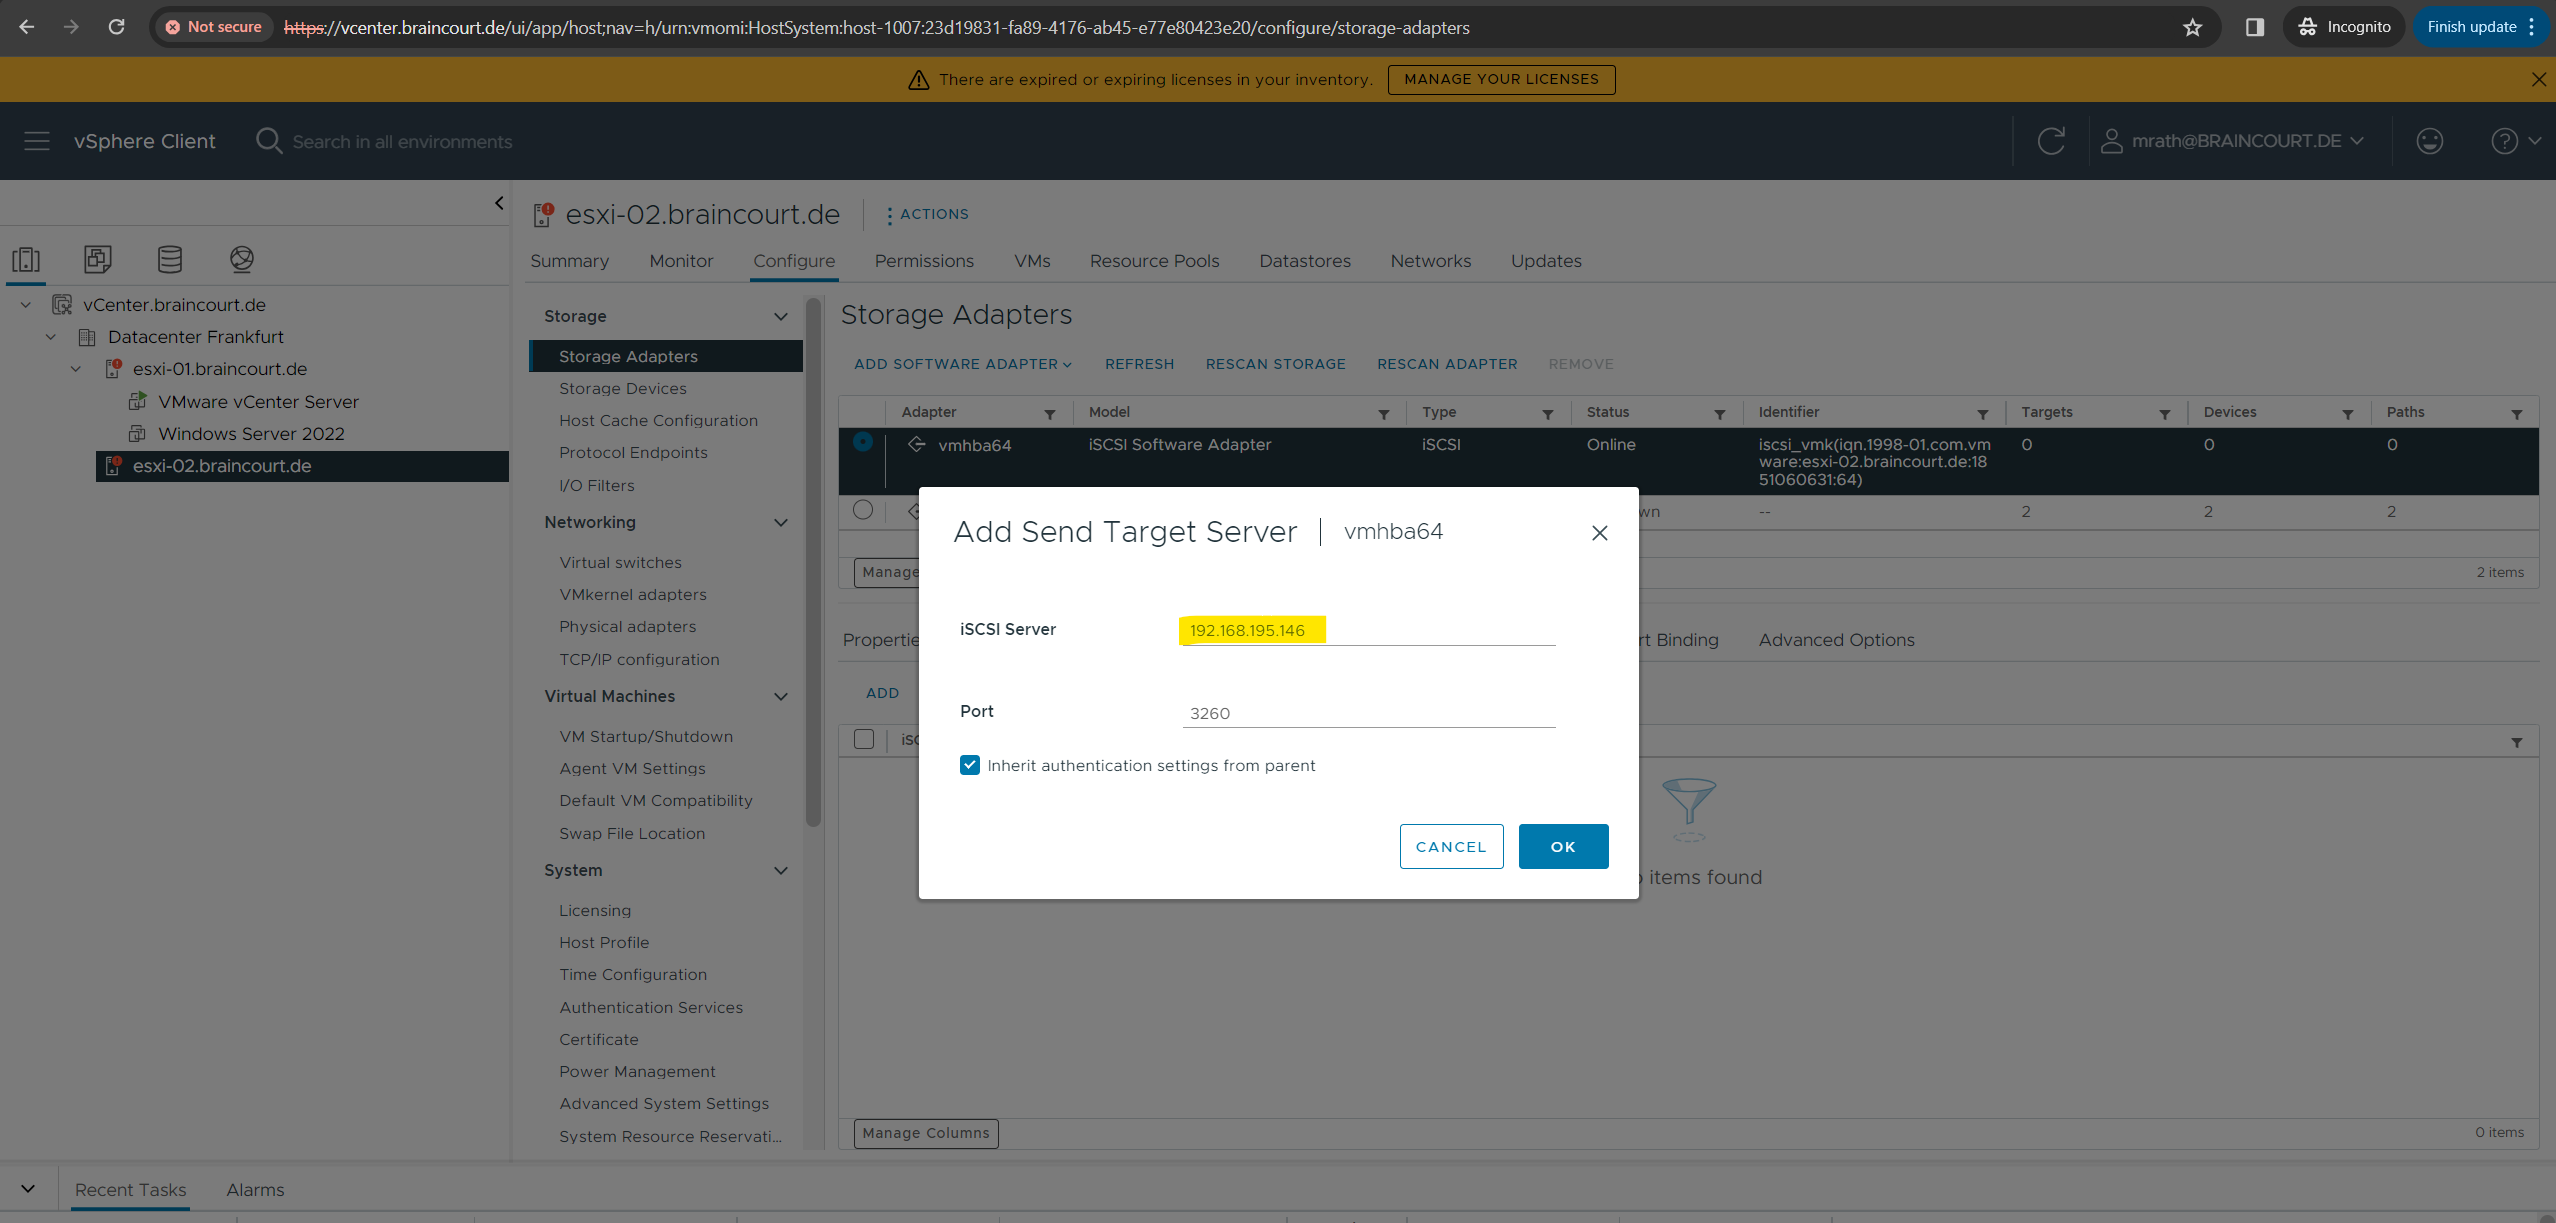
Enter the FQDN or IP address of the iSCSI Server and click on OK.
Click Rescan Storage.

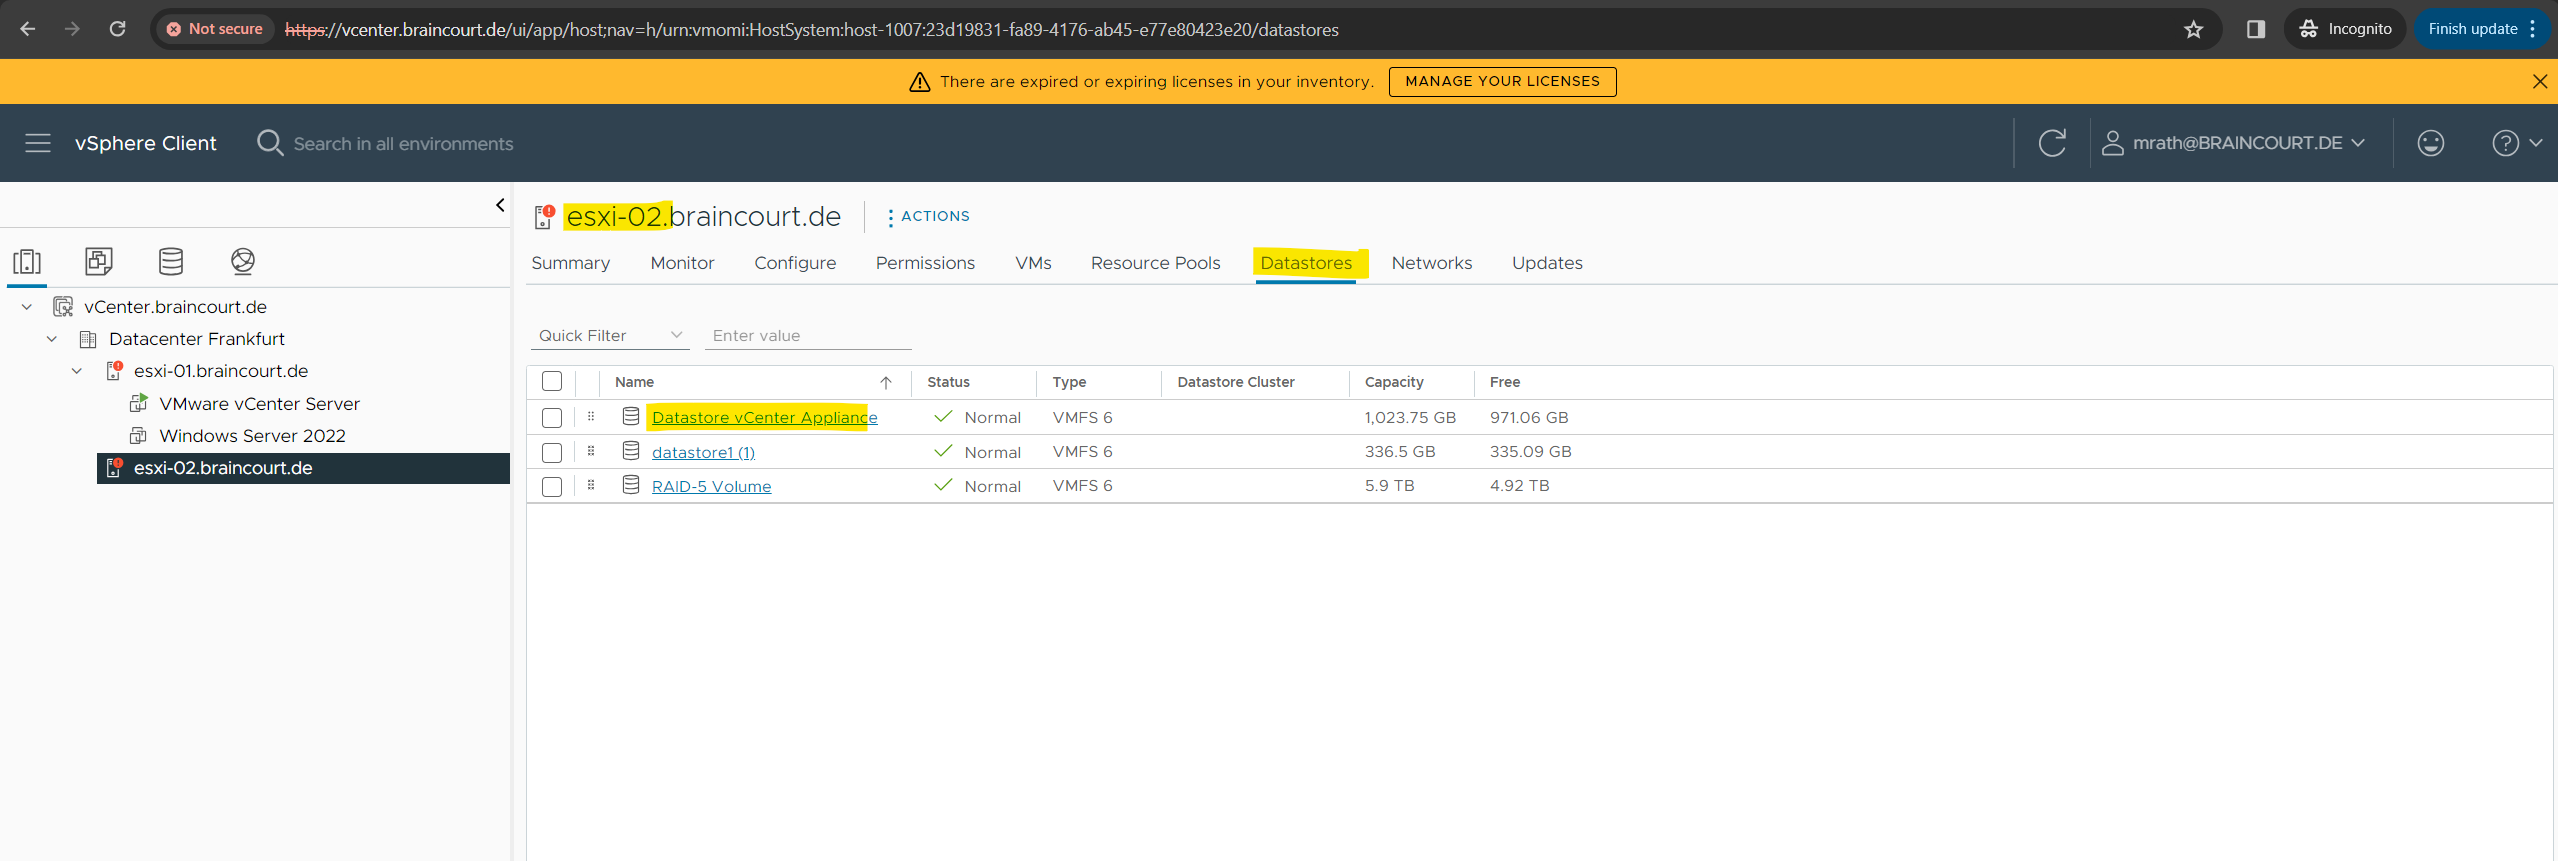
When I will now navigate on my second ESXi host back to the Datastores menu, I can here also see my newly created datastore on the iSCSI virtual disk where the vCenter server (applicance) is stored.
So from now on both ESXi hosts can access this shared (datastore) storage, my iSCSI virtual disk and the datastore on it.
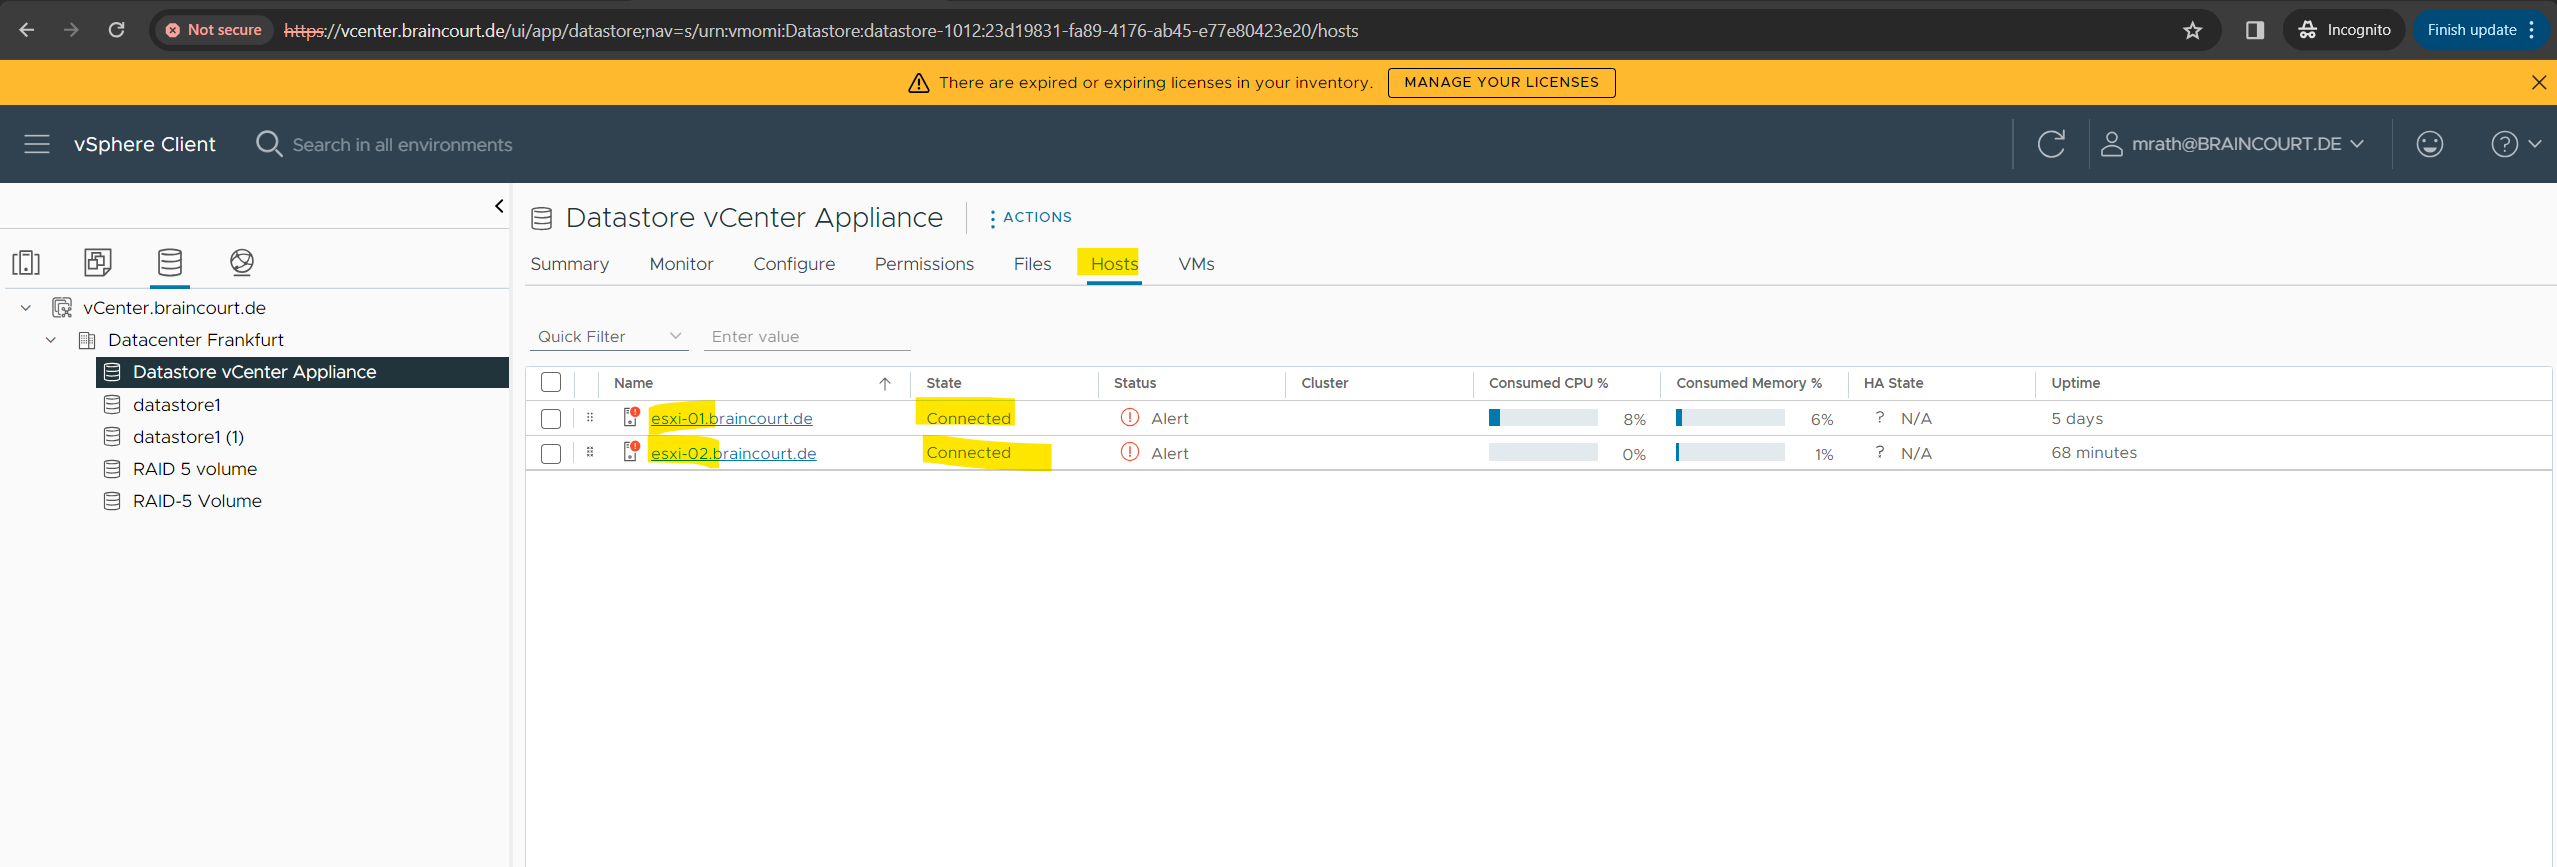
When I will click on this datastore above, I can see that both of my ESXi hosts are connected with.
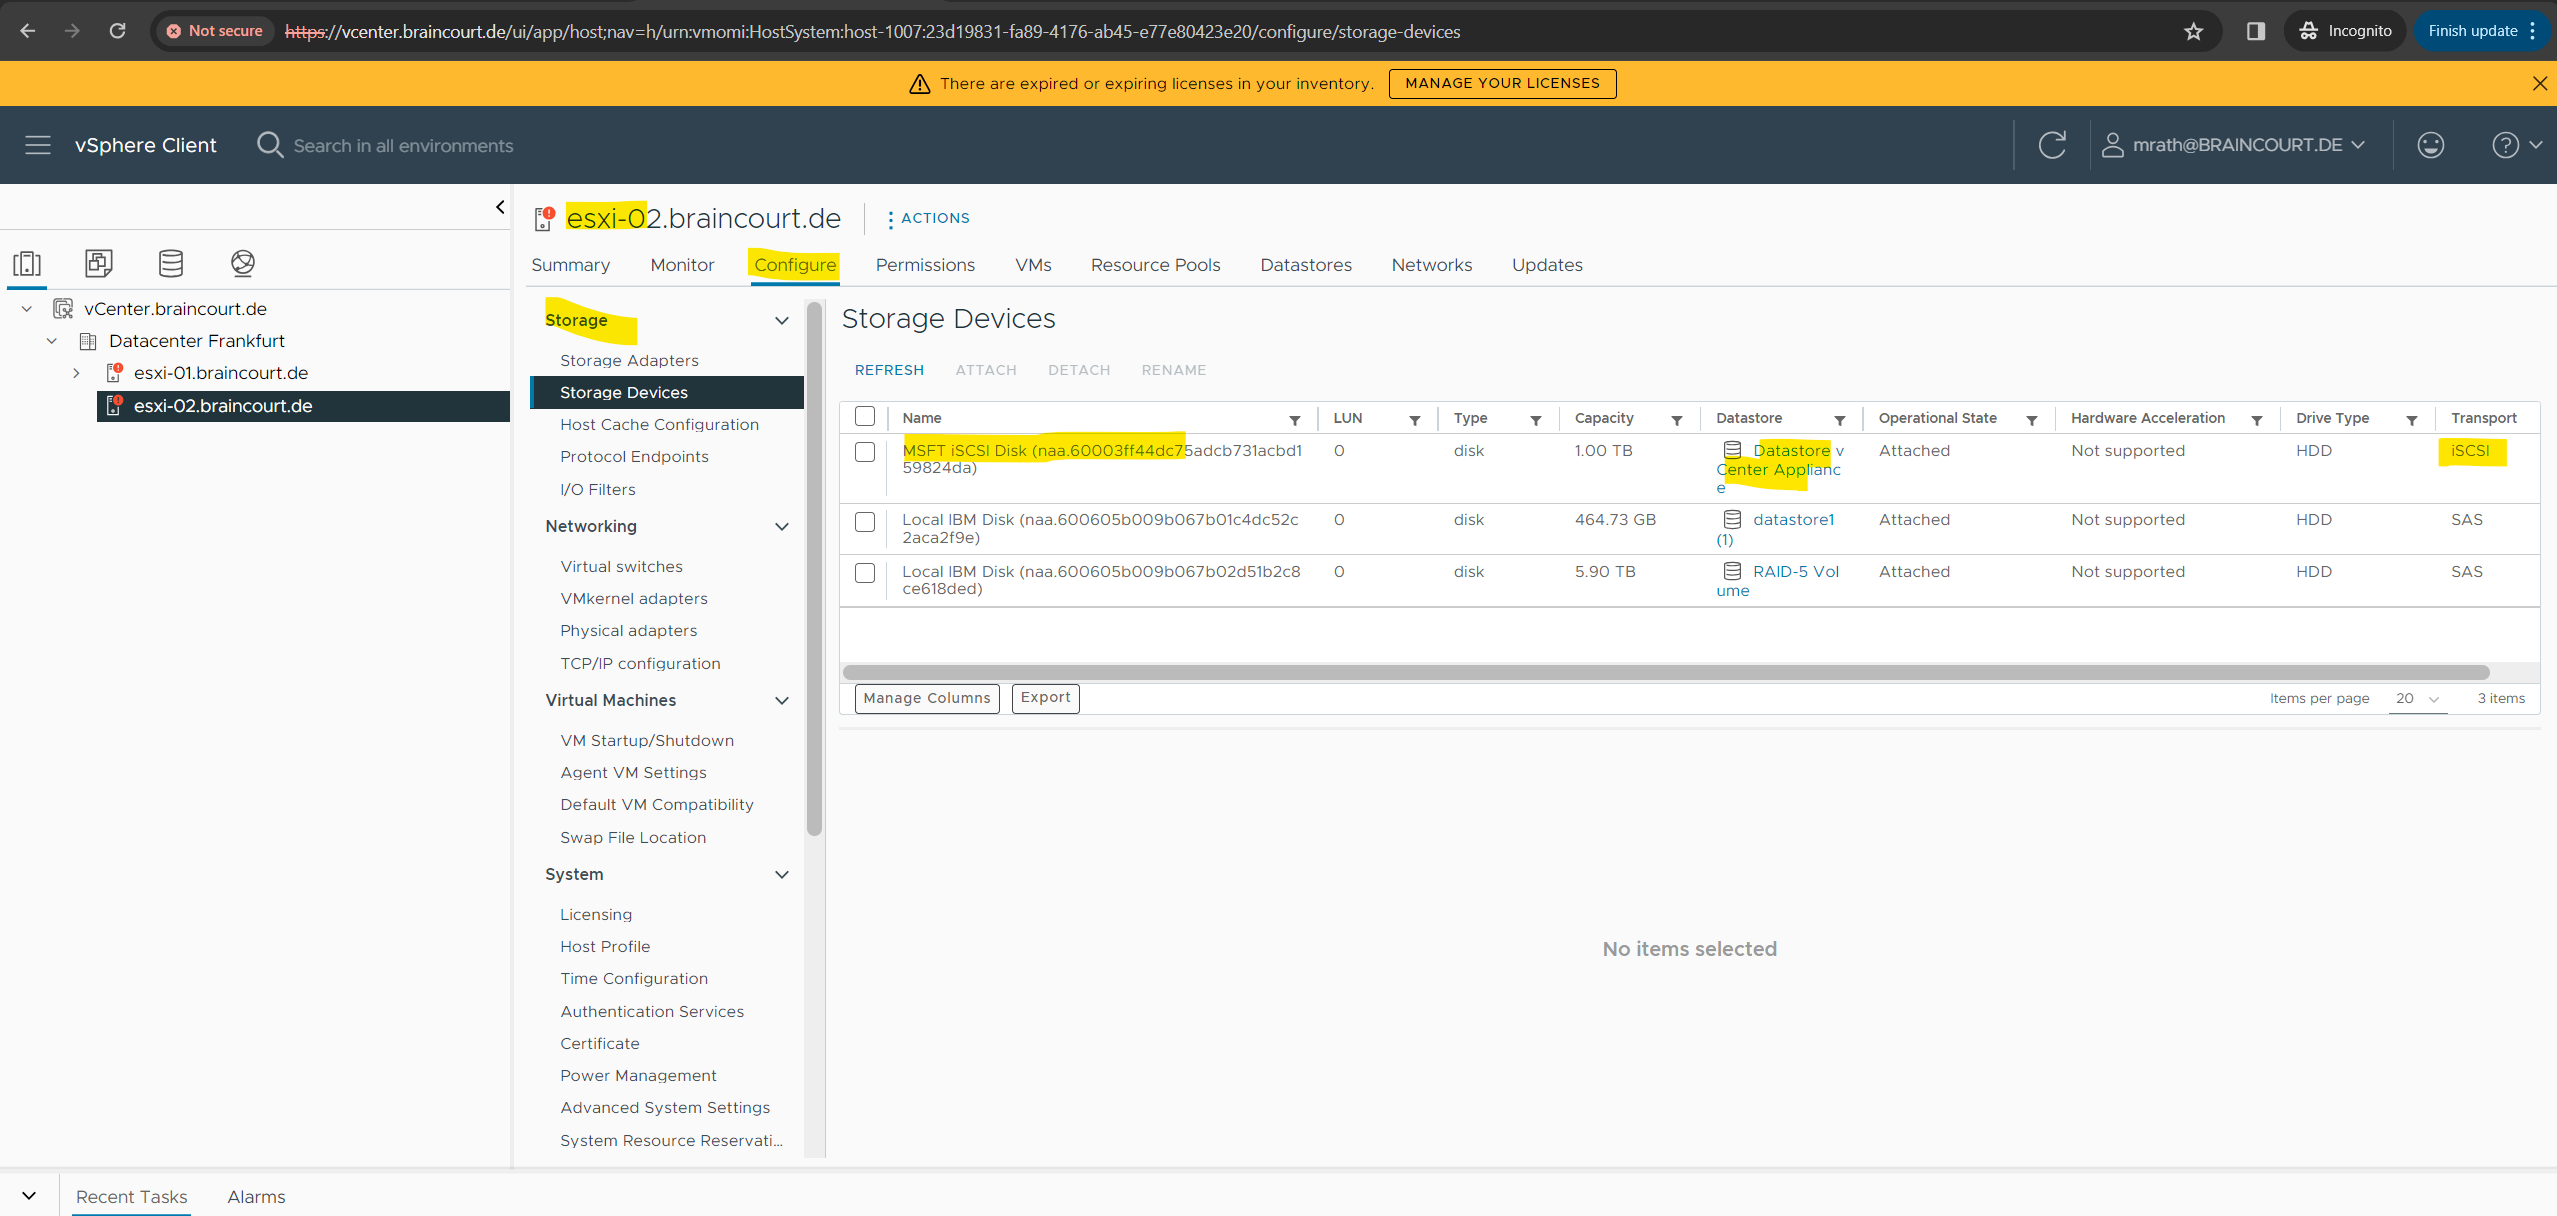
On the Storage Device menu under Configuration of the second ESXi host you can see all storage devices this host have access to.
Adding further iSCSI Virtual Disks in vSphere
In order to provide more storage to my vSphere lab environment, I will add more iSCSI virtual disks where finally the datastores will be created on .
Adding a further new iSCSI Virtual Disk on the Microsoft iSCSI Target Server
On my Microsoft iSCSI Target Server I will first add a new iSCSI virtual disk as usual besides that we this time didn’t need to create a new iSCSI target and can use the one we created for the first iSCSI virtual disk.
This time I will not create a new iSCSI target which is pointing to both of my ESXi hosts and can use the one we previously created already for.
Therefore also the steps for Target Name and Access, Access Servers and Enable authentication we doesn’t need to configure this time when using an existing iSCSI target.
iSCSI Target Server Scalability Limits
https://learn.microsoft.com/en-us/windows-server/storage/iscsi/iscsi-target-server-limits
Rescan Storage on the vSphere Client
In order to detect and initialize the new iSCSI virtual disk for the ESXi hosts, we can first execute the RESCAN STORAGE within the vSphere client for both hosts.
Below you can see under Storage Devices the new connected iSCSI virtual disk on LUN 2 (not consumed in the Datastore column) on which we can now create a new datastore which will also function as shared (datastore) storage within my vSphere lab environment.
The one on LUN 1 I also created previously on my iSCSI server but not documented here.

Create a new Datastore on the new Storage Device (iSCSI virtual disk)
We can now create a new datastore on the connected iSCSI virtual disk as shown below.
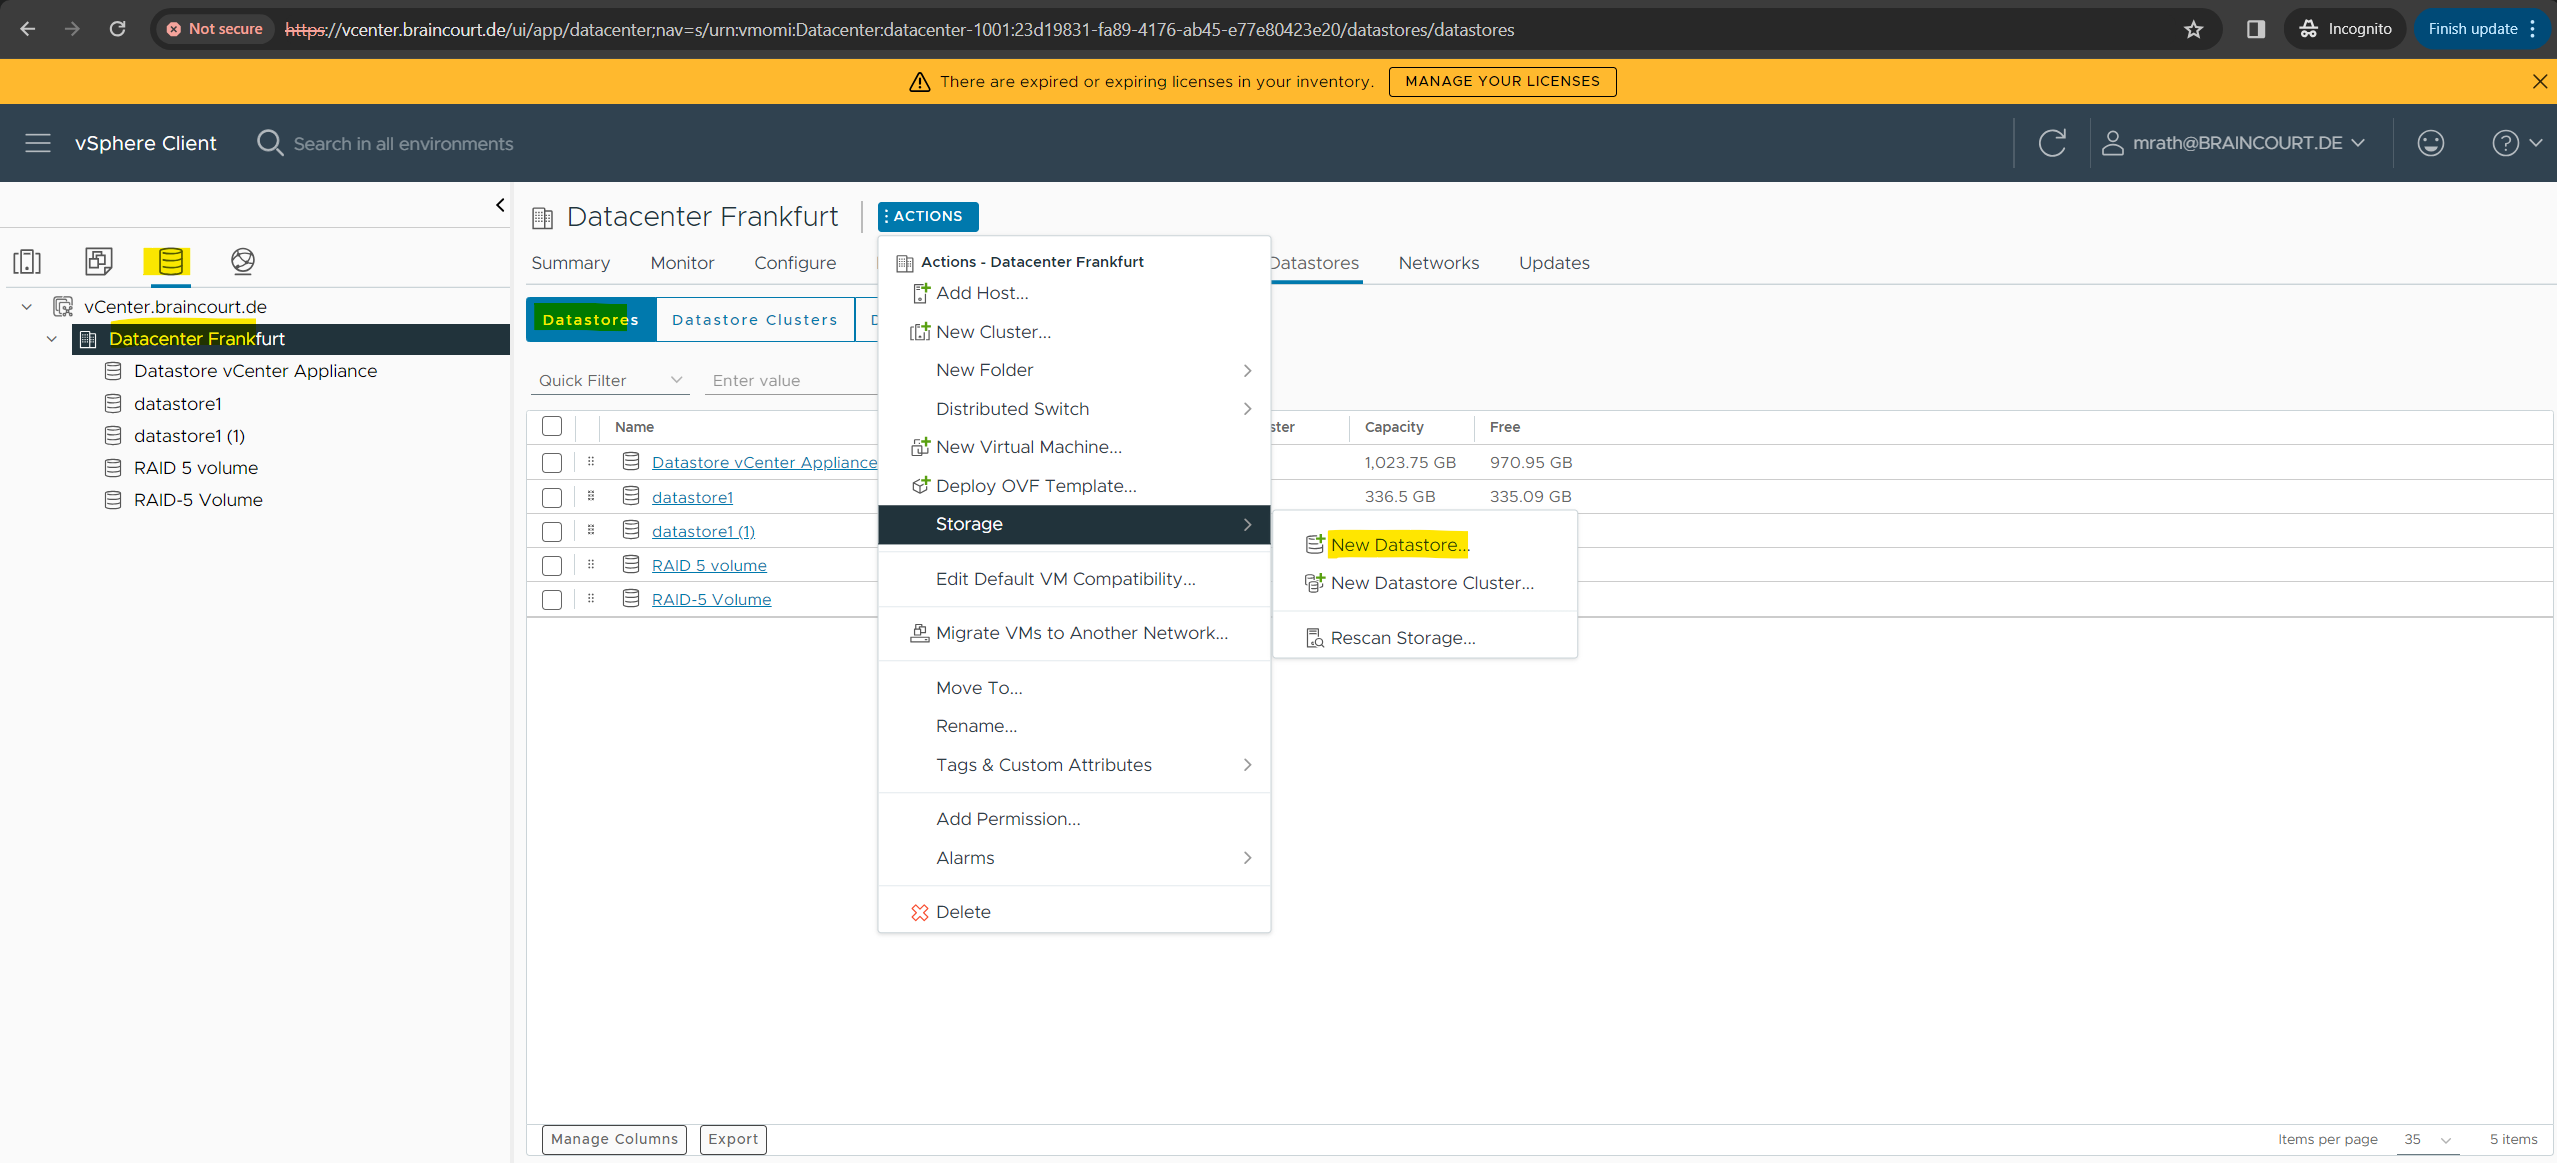
vSphere Client -> Inventories -> Storage -> Datacenter -> Datastores -> ACTIONS -> STORAGE -> New Datastore …
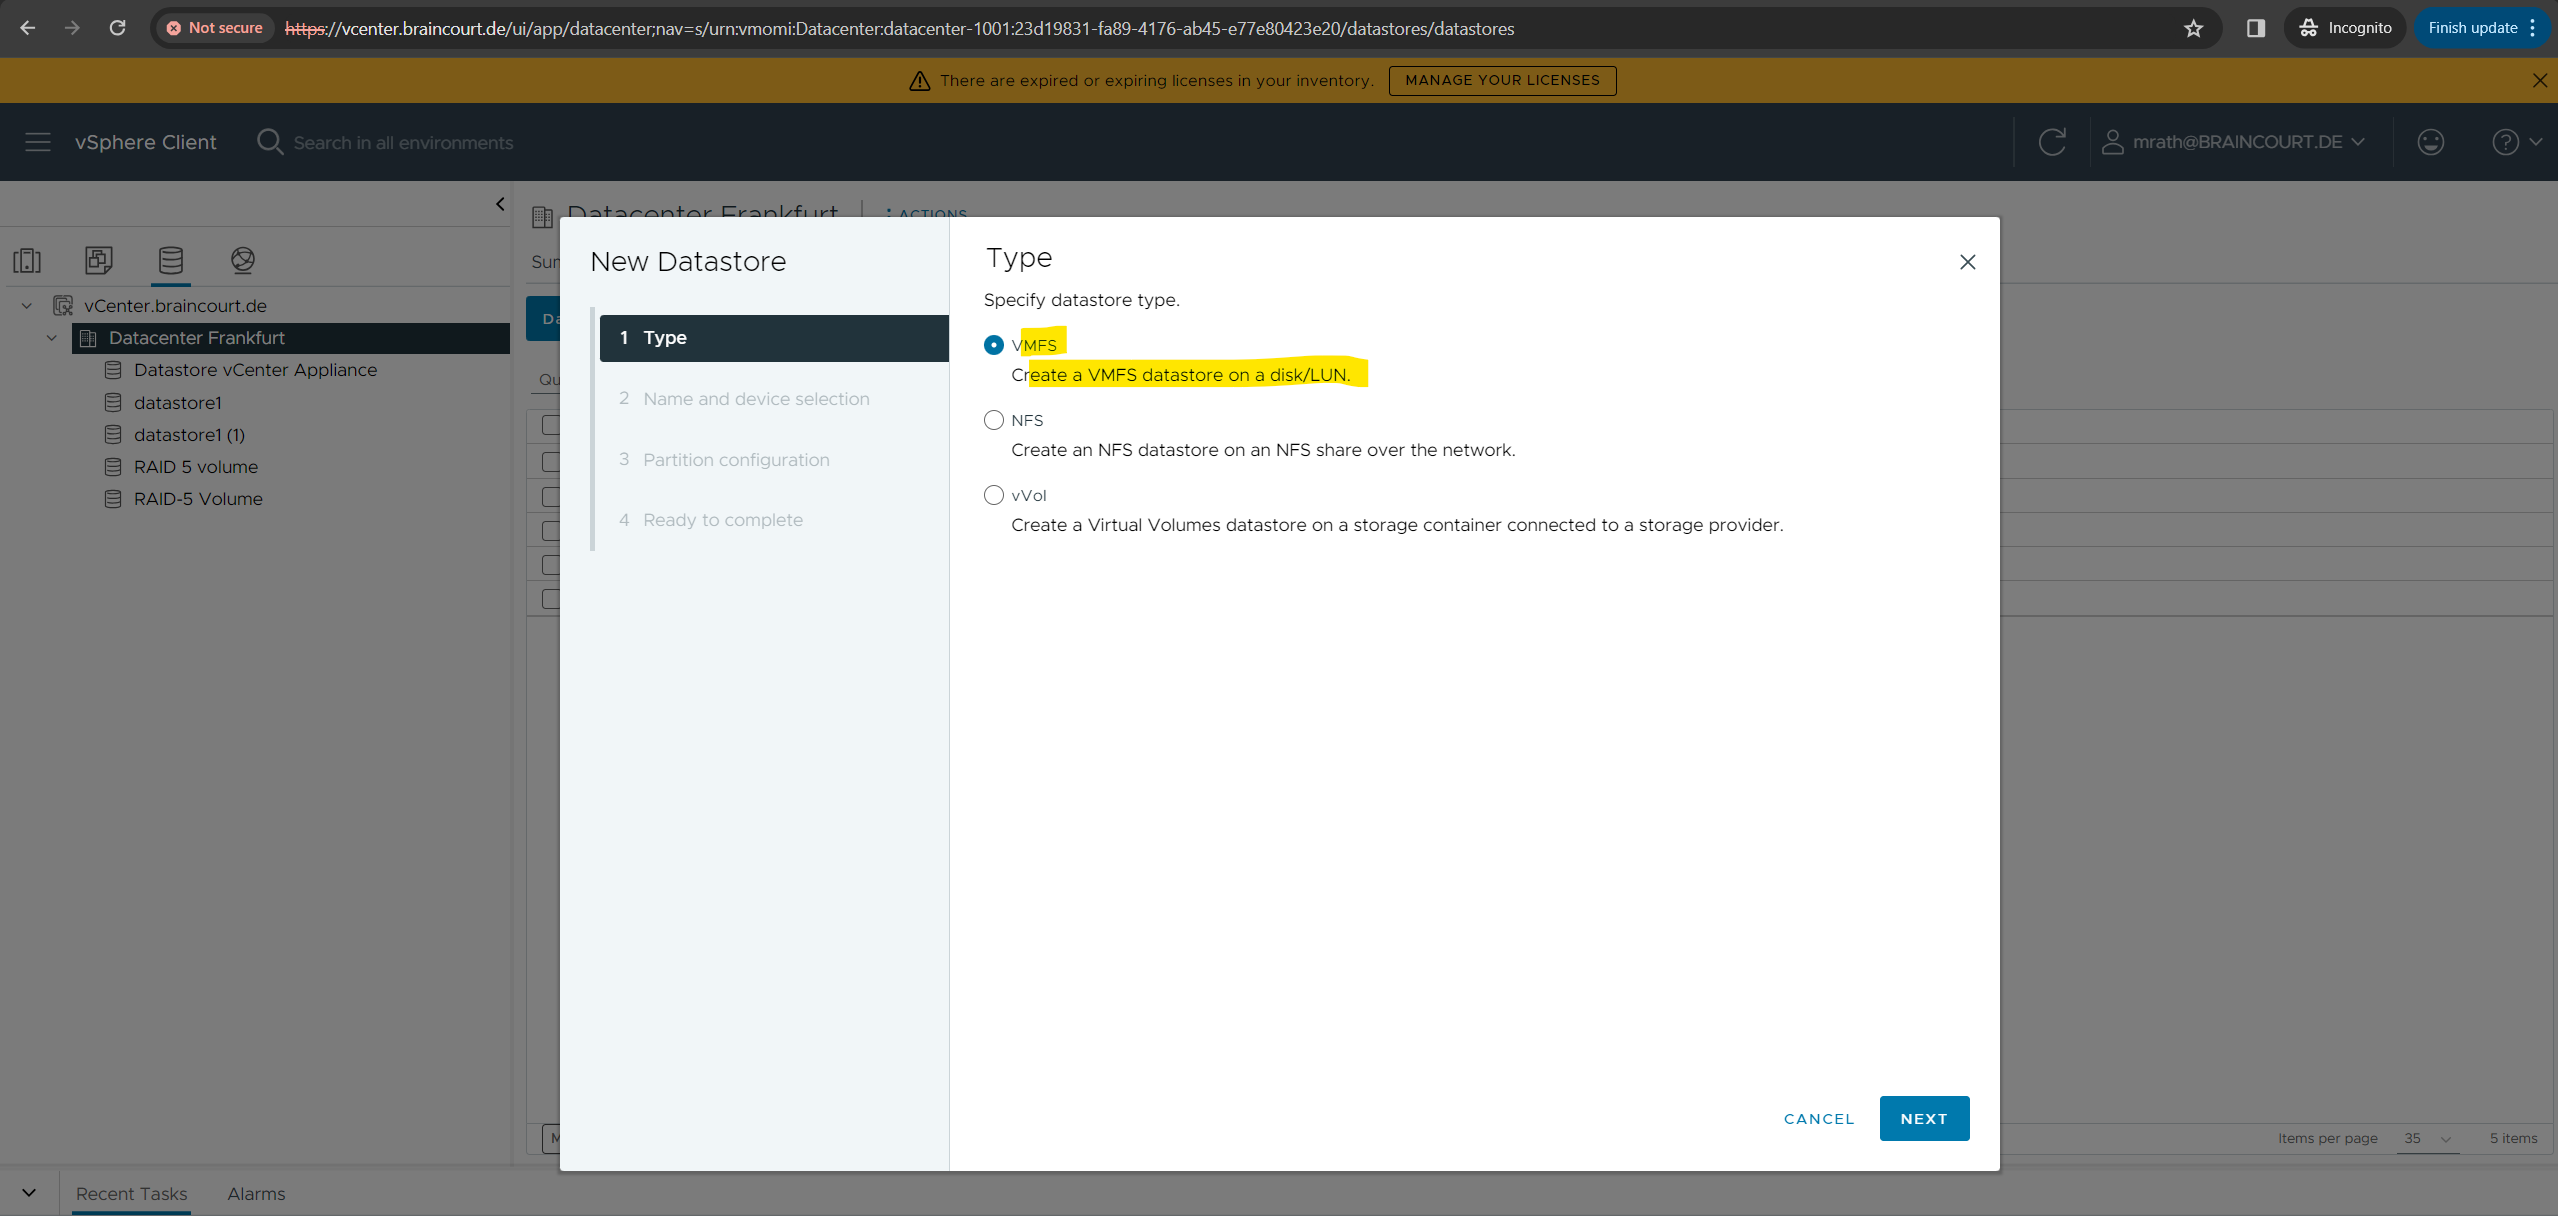
Virtual Machine File System (VMFS)
VMFS (version 5 and 6)
Datastores that you deploy on block storage devices use the vSphere Virtual Machine File System (VMFS) format. VMFS is a special high-performance file system format that is optimized for storing virtual machines. See Understanding VMFS Datastores.
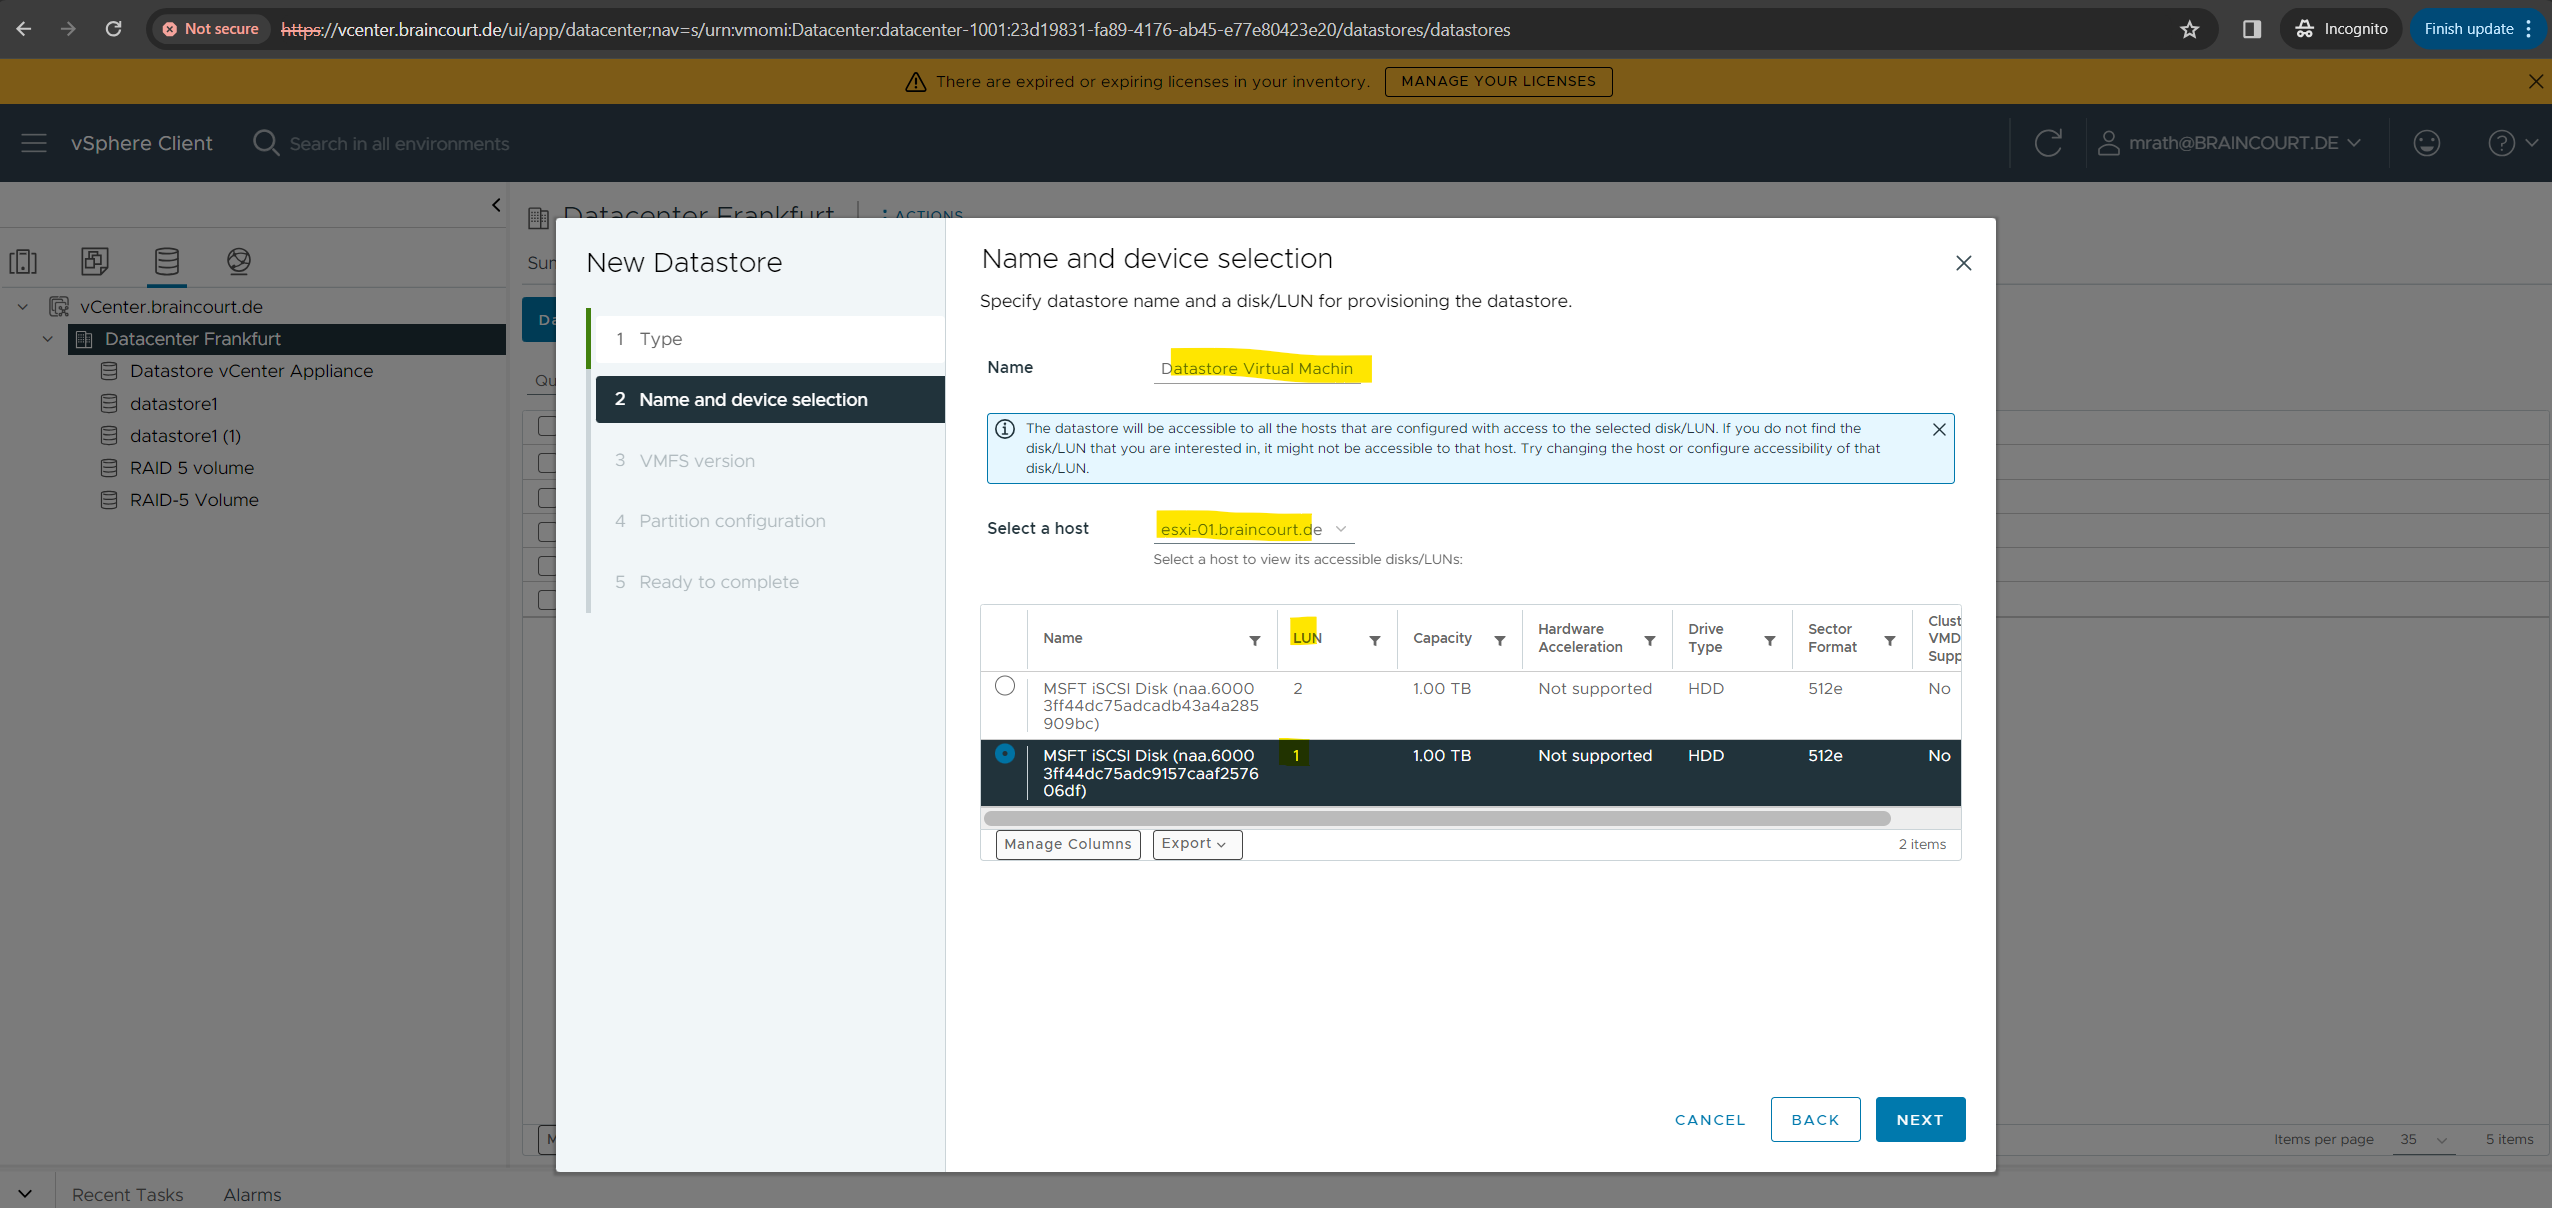
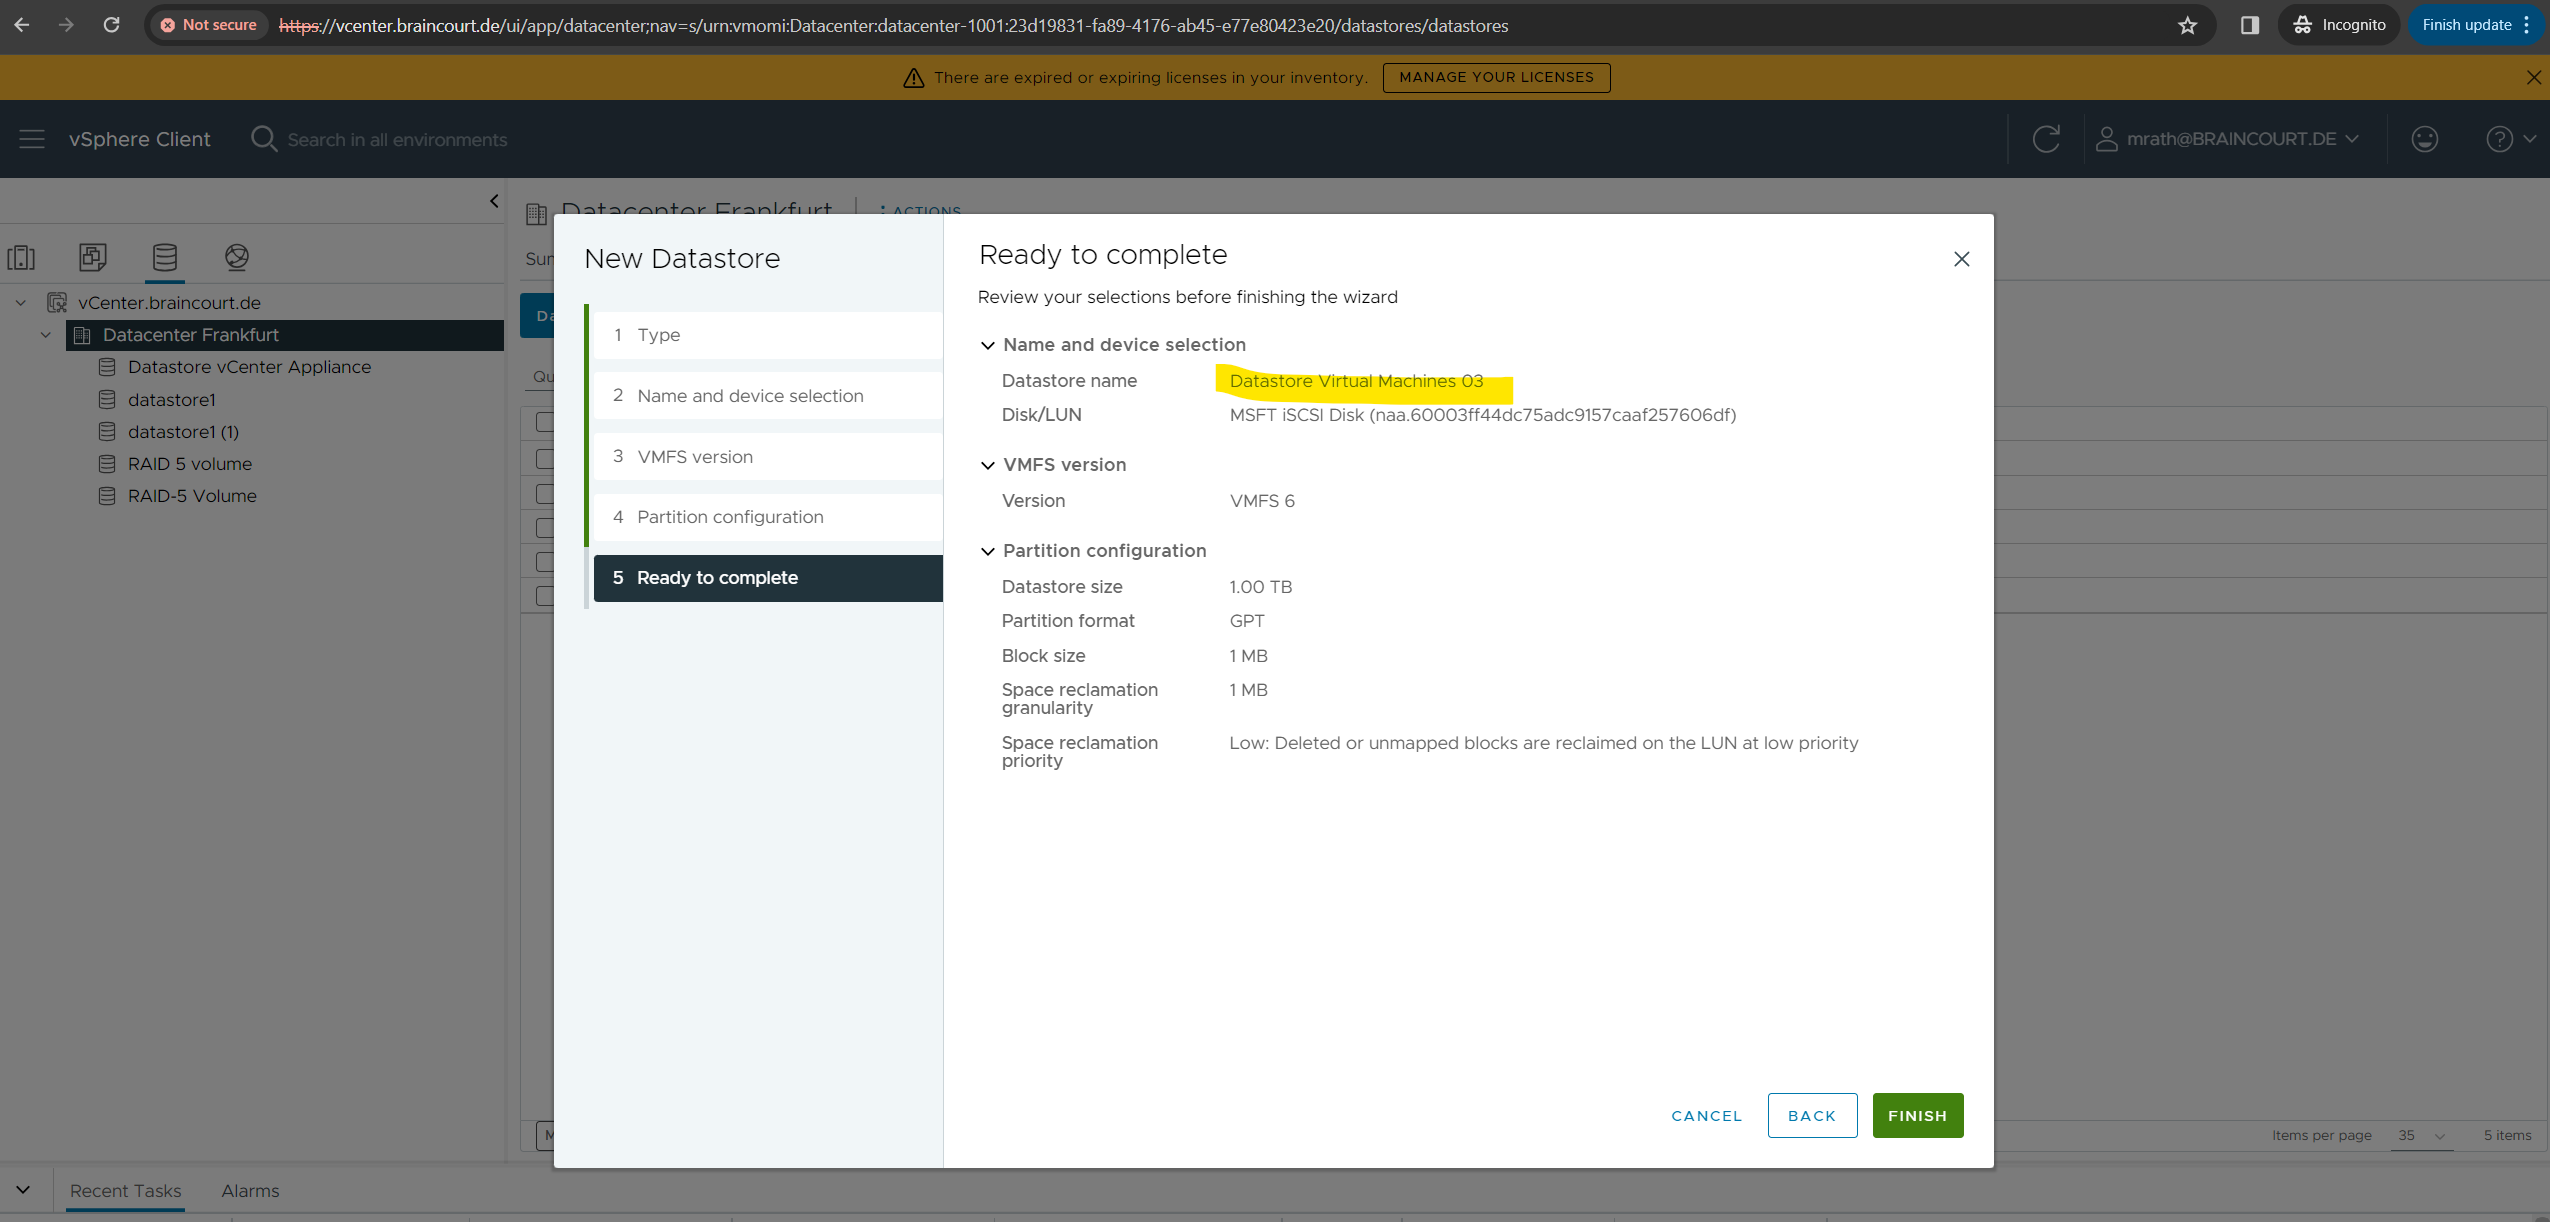
I will now have to enter a name for the new datastore and because so far I didn’t have configured a ESXi Cluster, I need to select a host to which the new datastore will be connected to instead of just selecting and connecting to a cluster.
Because both of the ESXi hosts are connected to the underlaying iSCSI virtual disk by using the iSCSI target, the datastore will also be available and accessible for both hosts by default. This design is finally realized by the Virtual Machine File System (VMFS) format.
VMFS allows for concurrent connections to a single LUN by multiple ESXi hosts.
This behavior is for Hyper-V Servers or in general for Windows Servers by the way different, in case multiple Windows Servers are connected to the same iSCSI virtual disk (a single target), just one of them will have exclusively access and can read and write data to.
For Windows Server to have multiple initiators share a single target, whether over ISCSI, Fibre Channel or other SAN solution, you need a cluster-aware filesystem and therefore need to create a cluster to access the iSCSI virtual disk from multiple nodes.
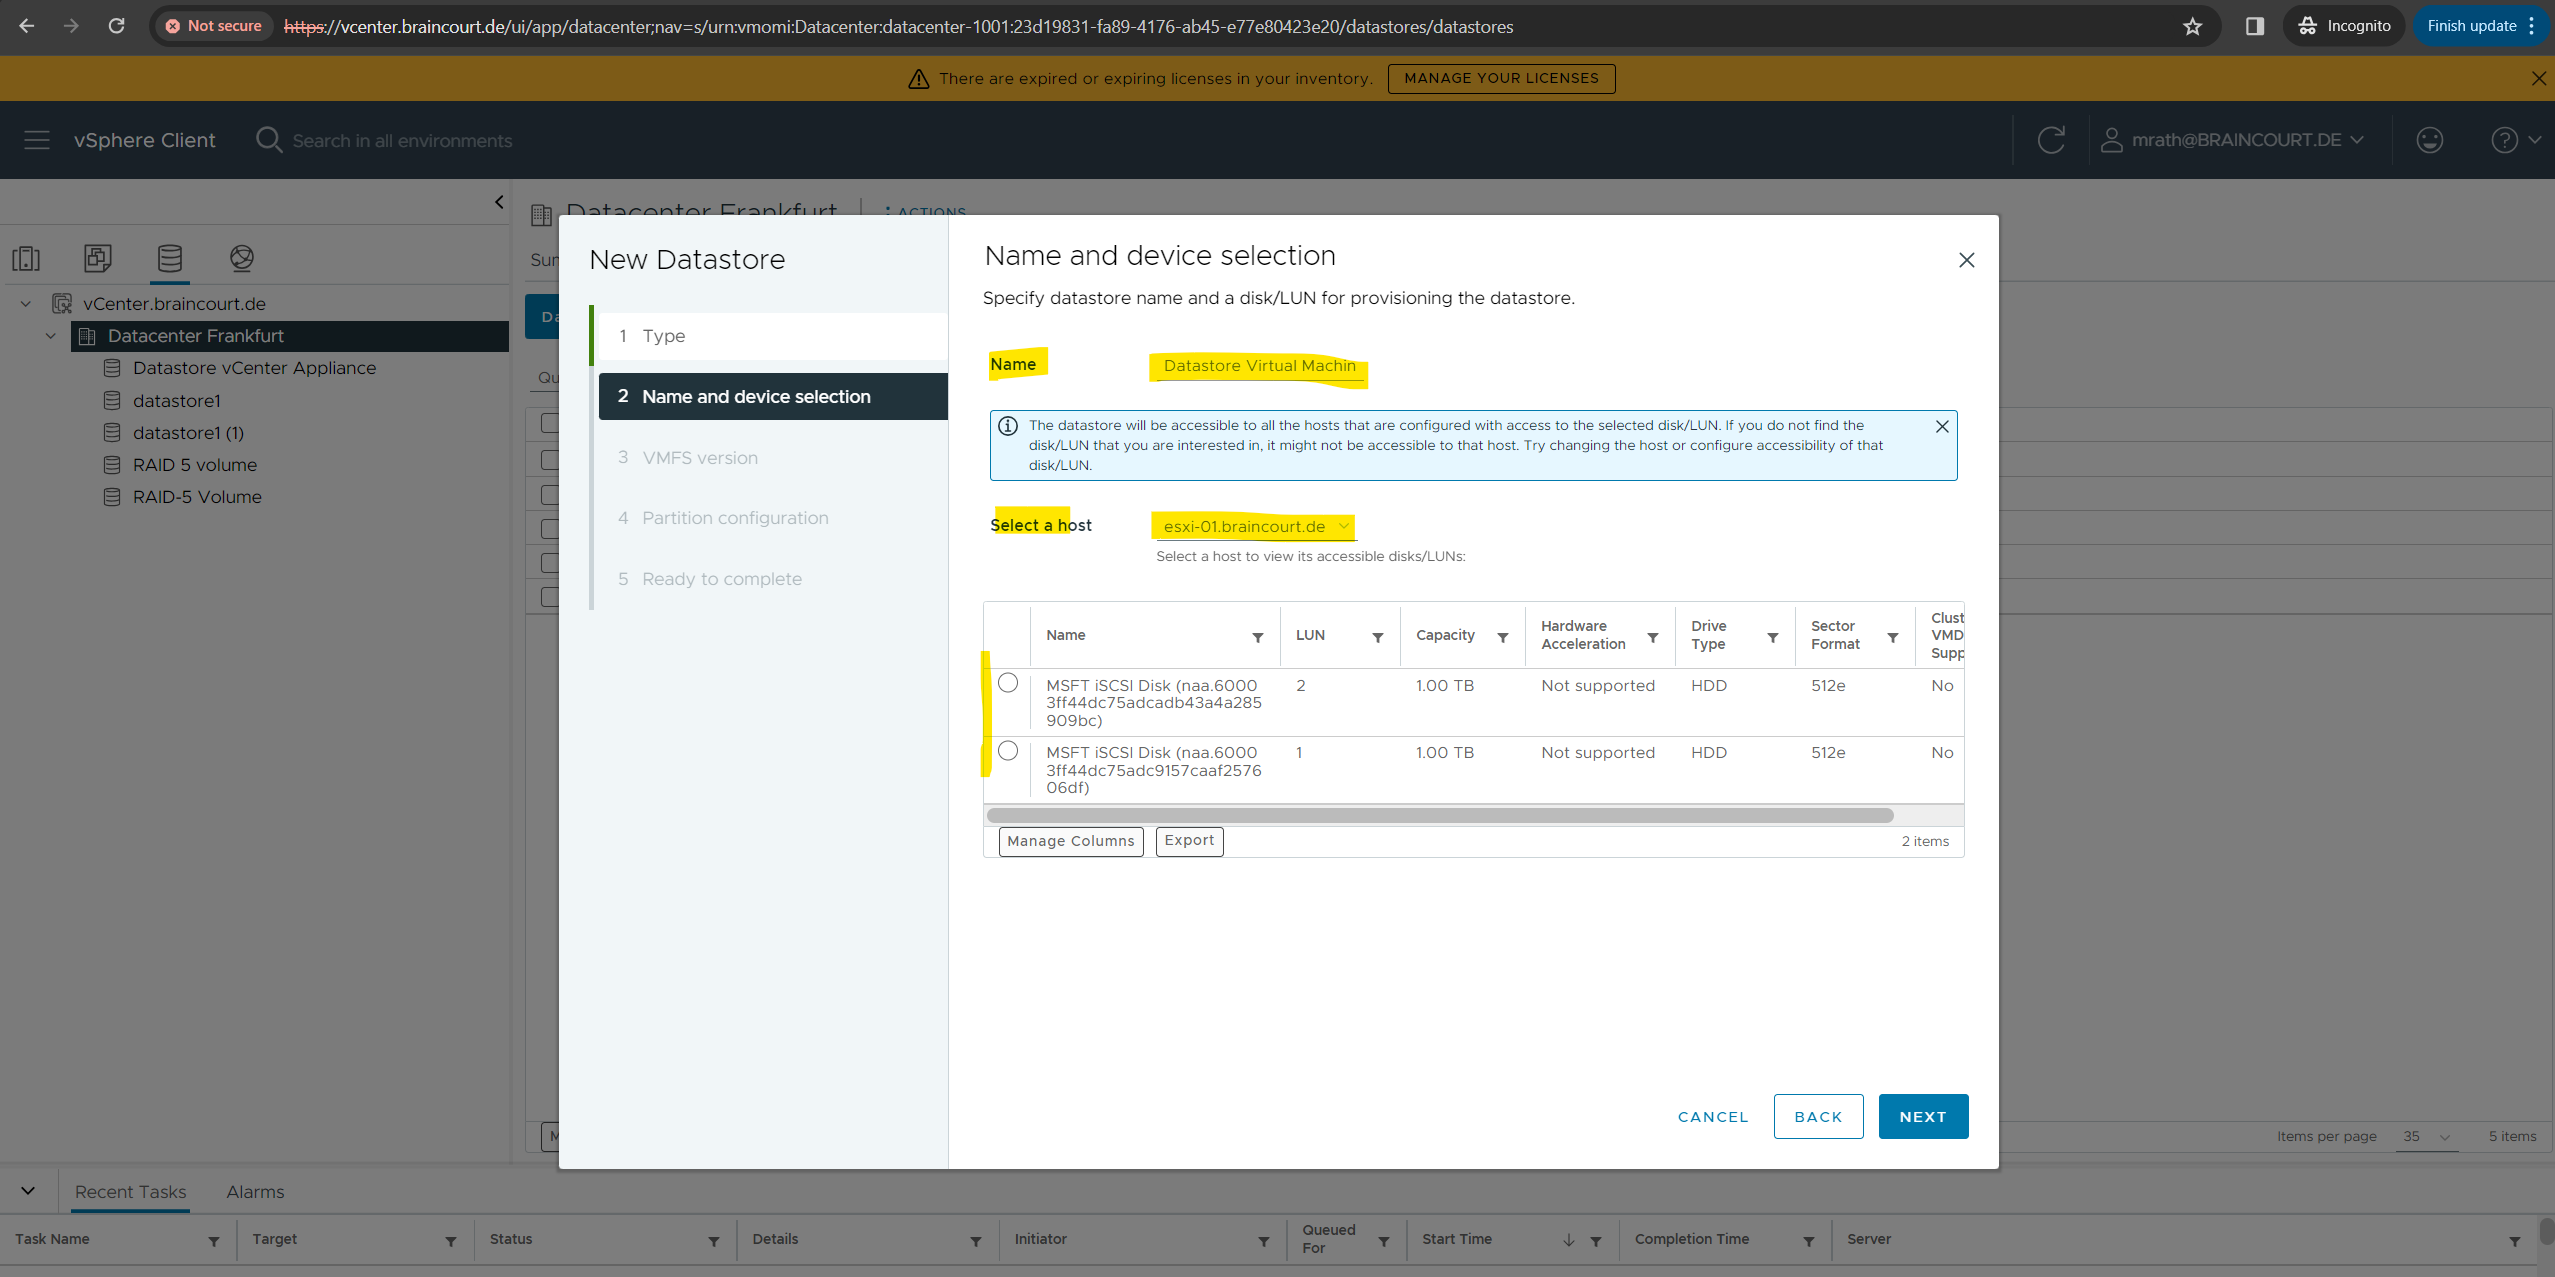
Here I will select the iSCSI virtual disk connected through LUN 1.
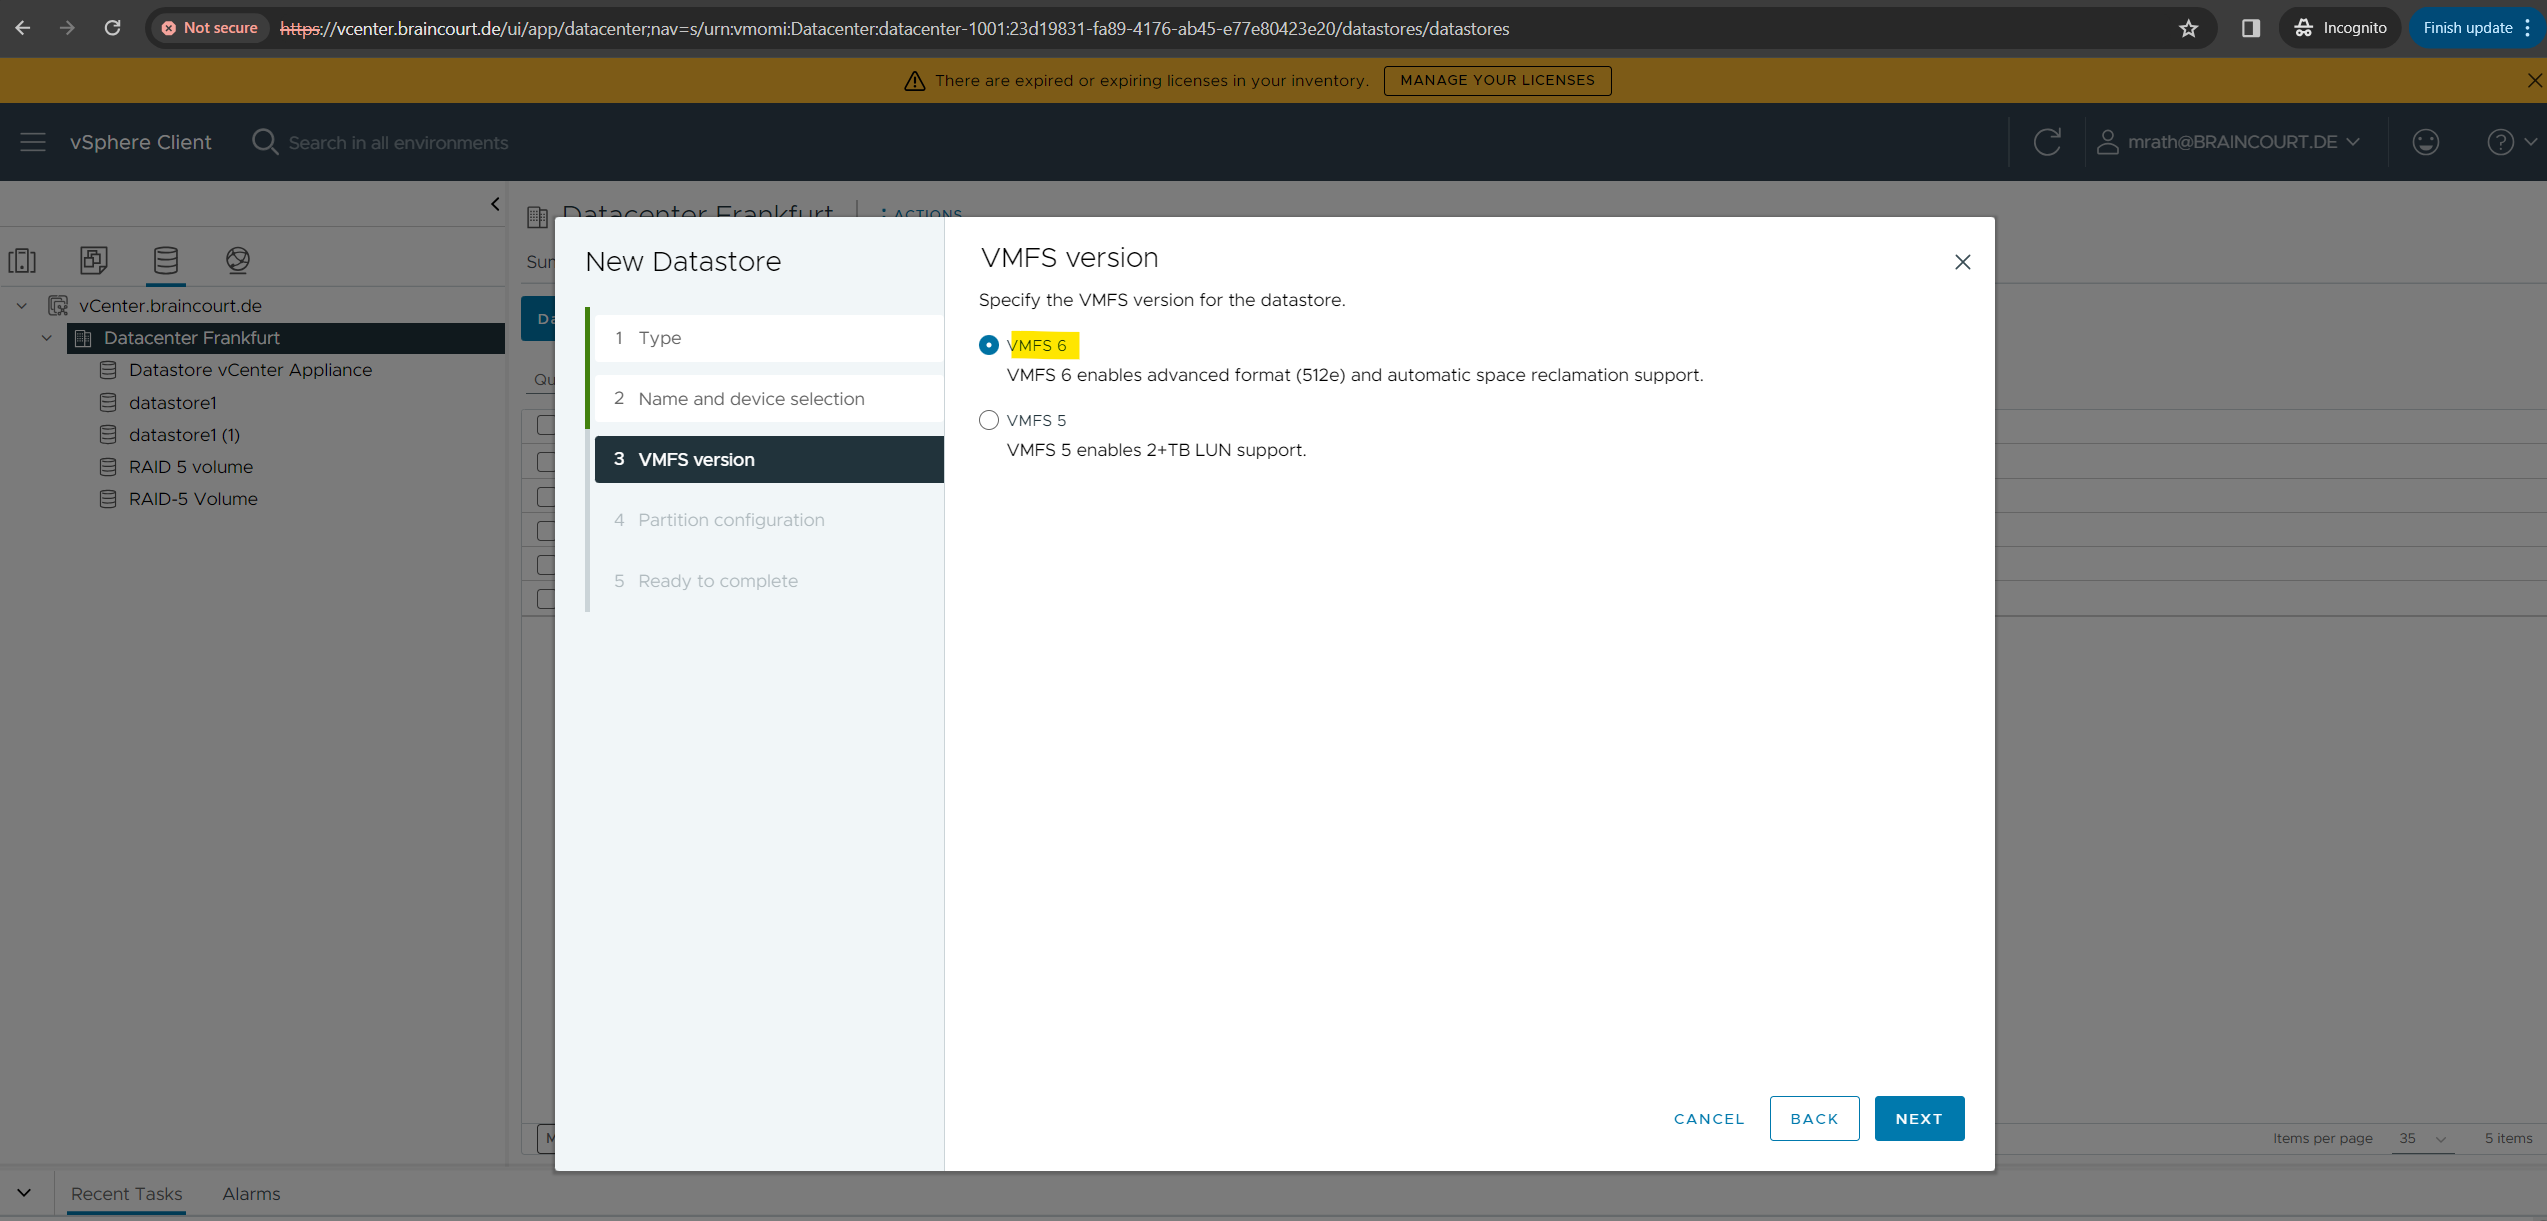
I also have to specify a VMFS version for the datastore.
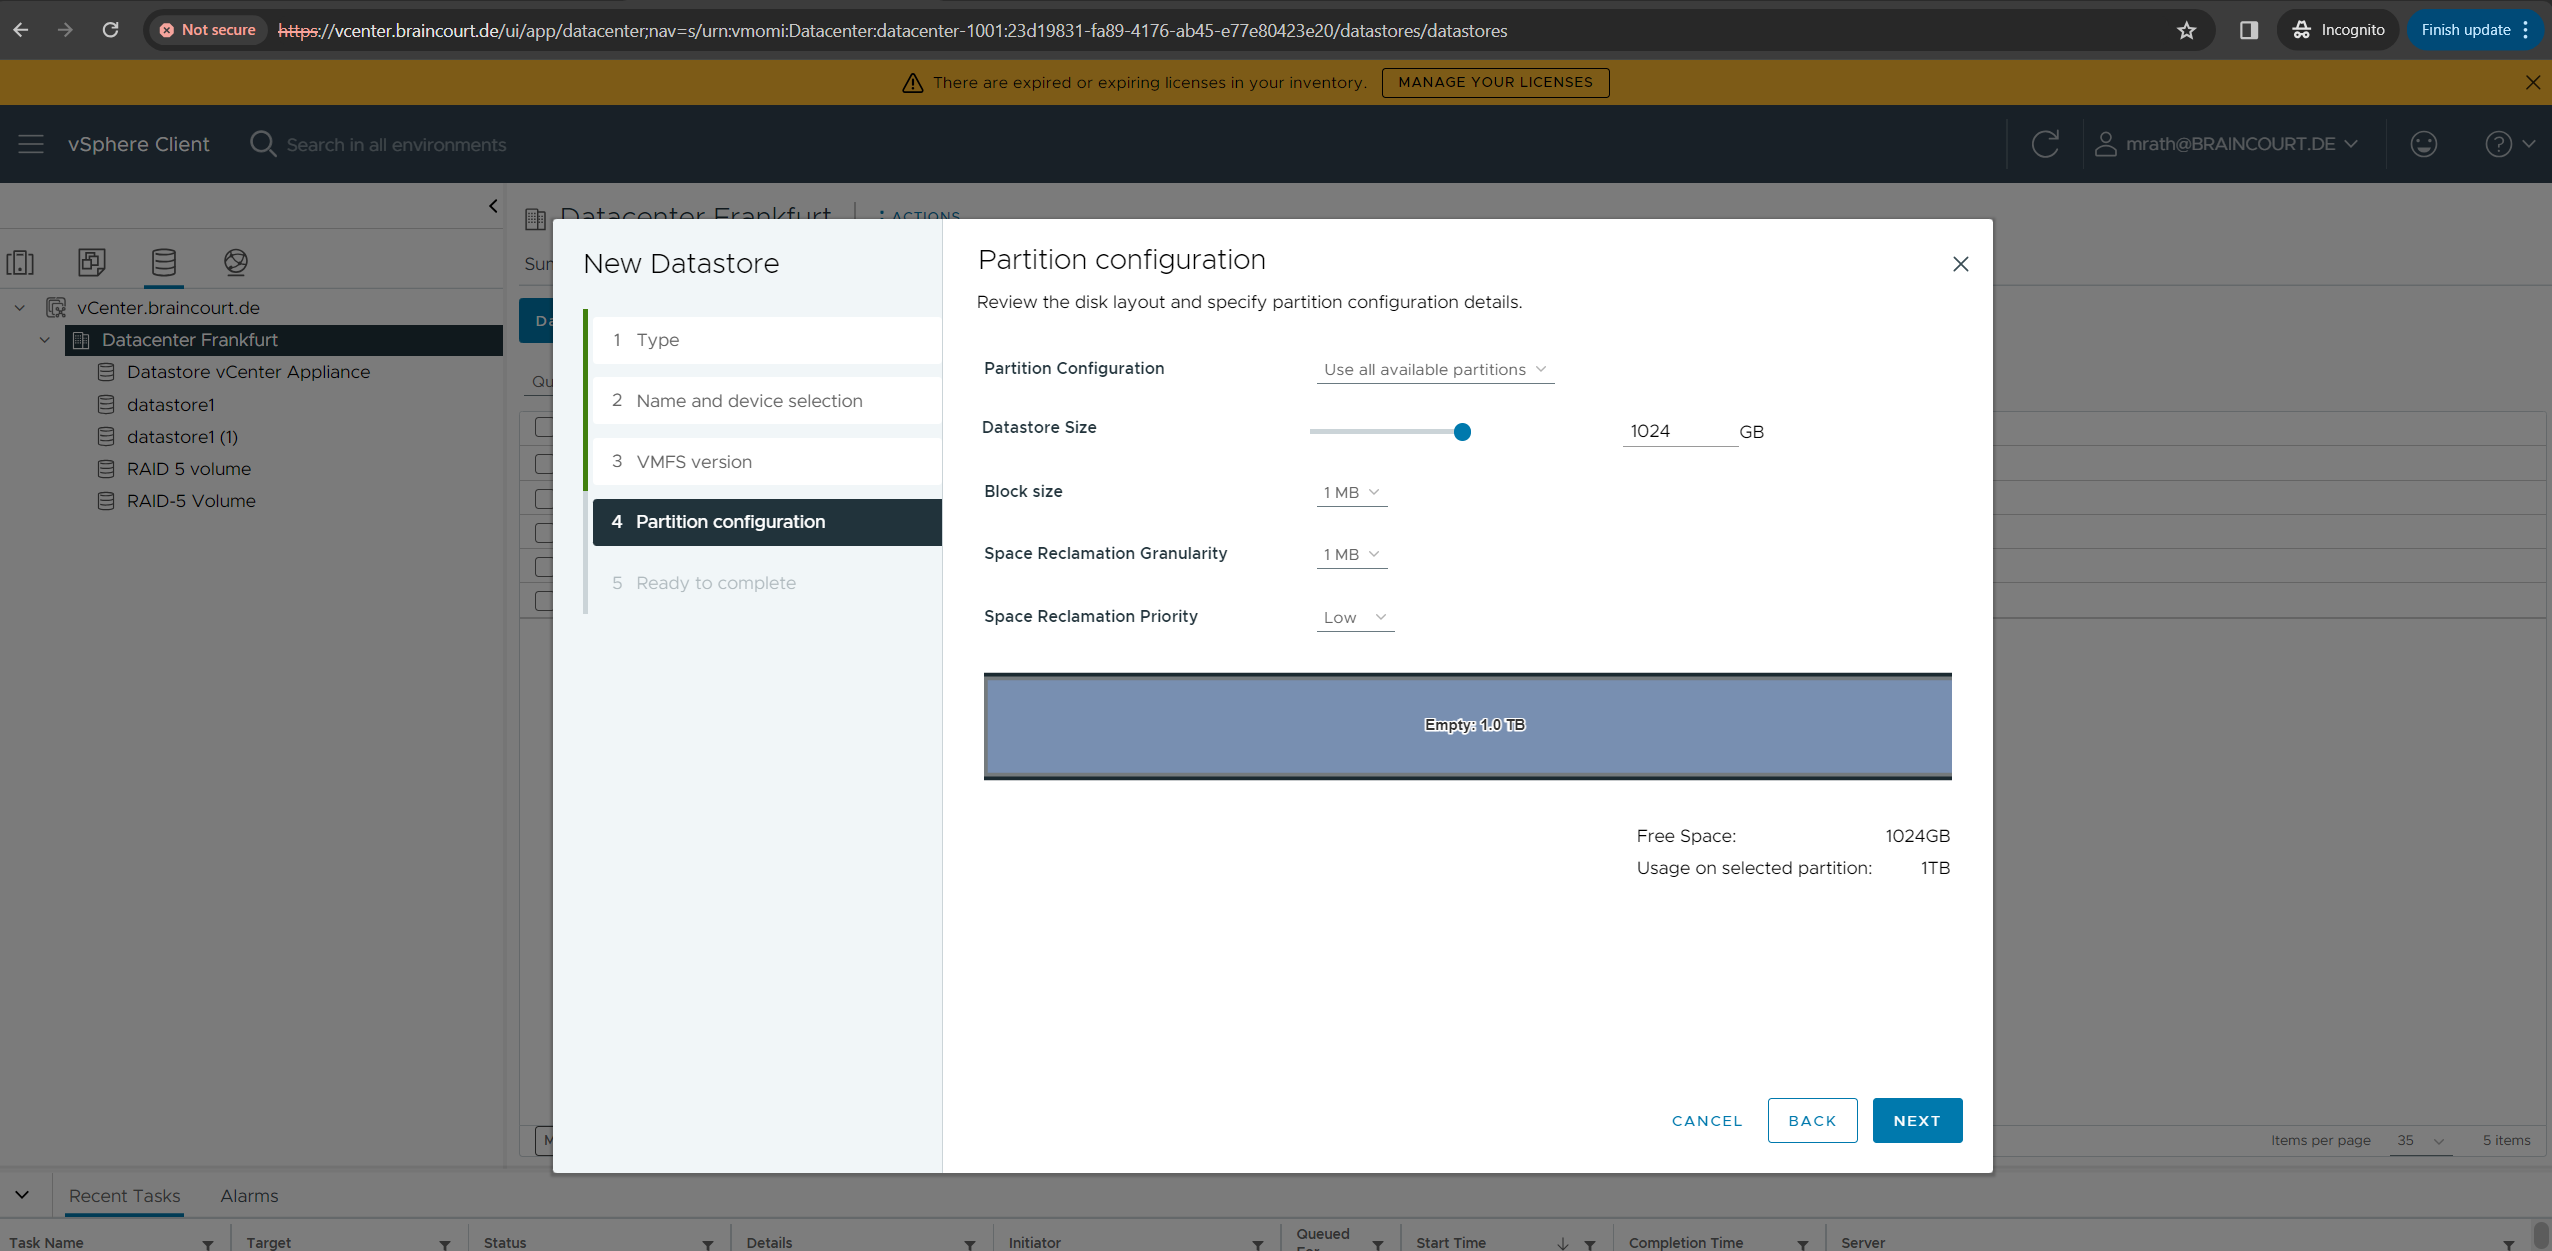
In this step we can adjust the partition configuration, I will left the default settings for.
Finally we can create the new datastore by clicking on FINISH.
A few second later the new datastore is created and listed below.

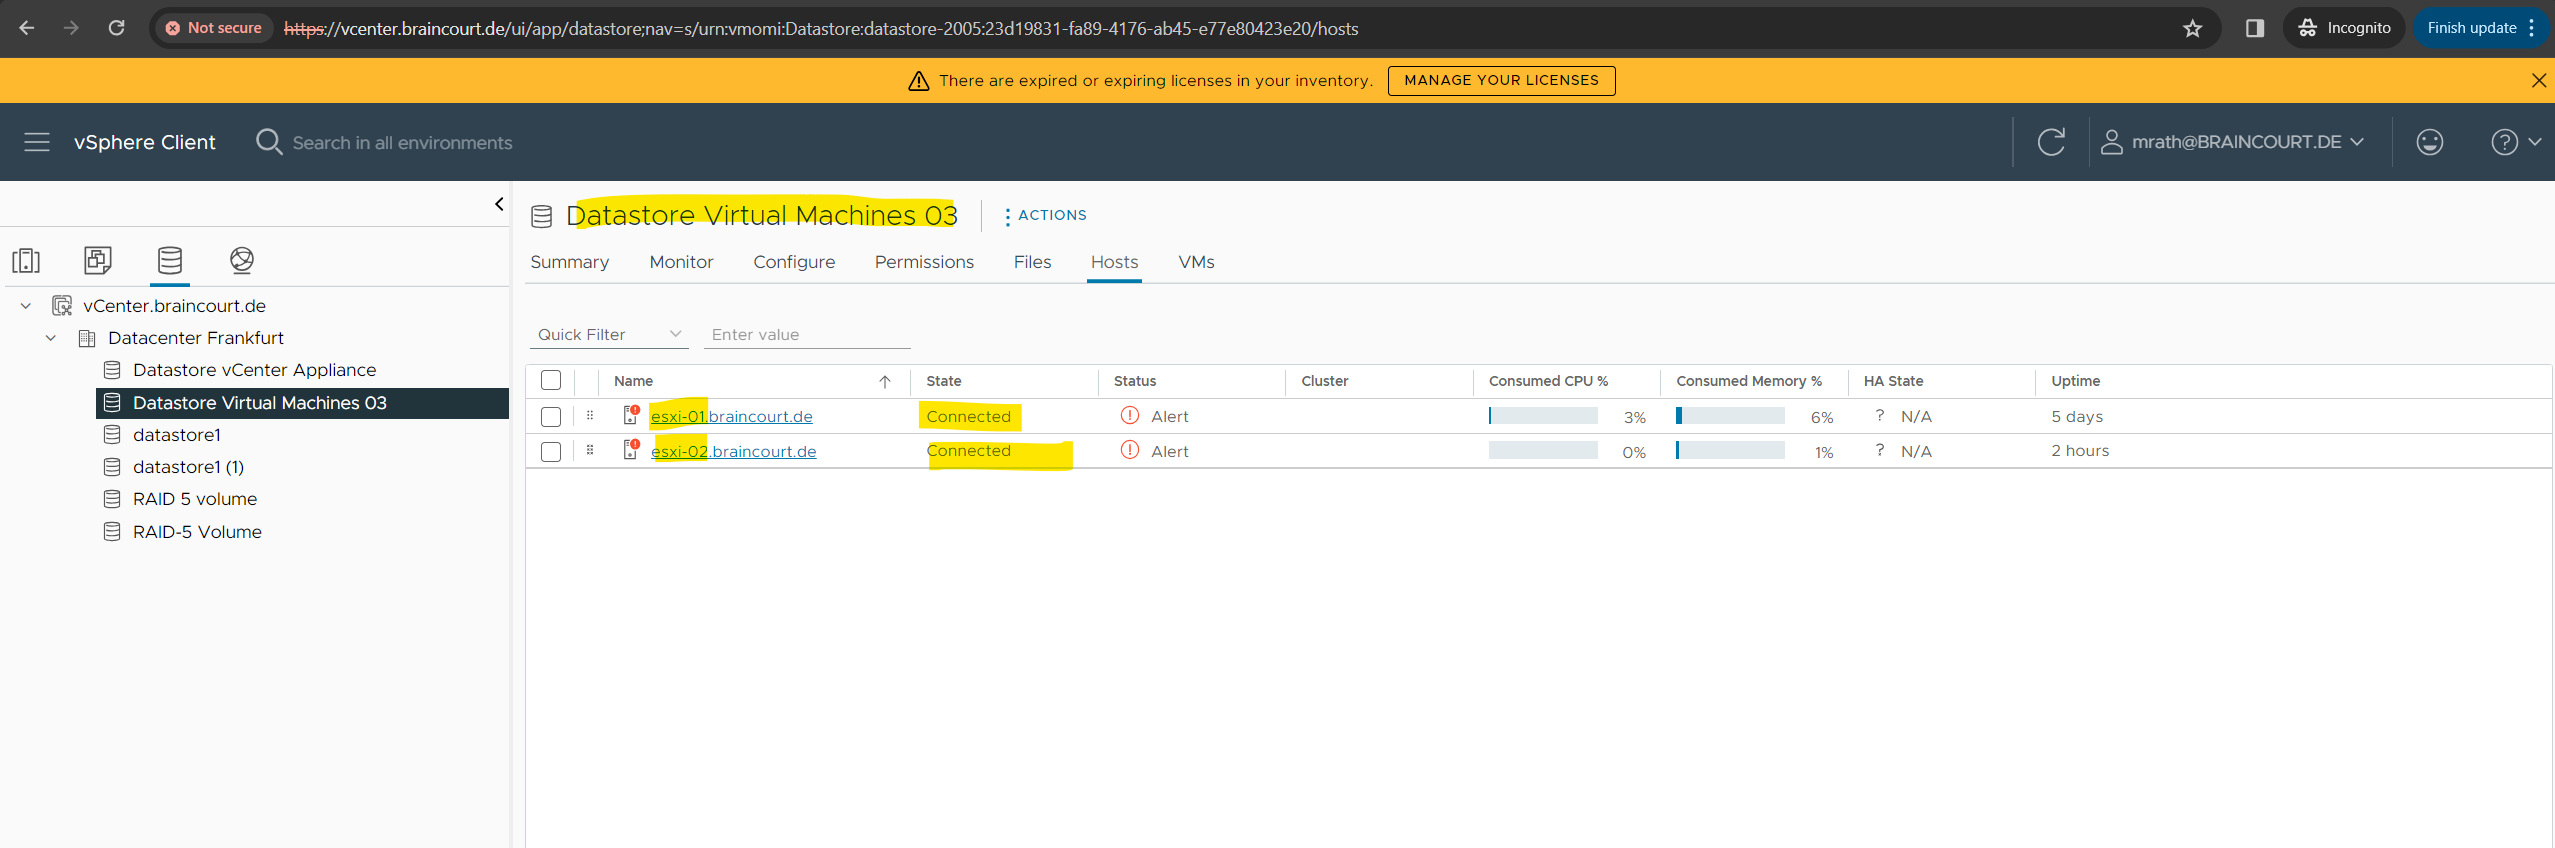
When you click on the new datastore and switch to the Hosts tab as shown below, you can see that both of my ESXi hosts are now connected to the new datastore.
As already mentioned previously, because both of the ESXi hosts are connected to the underlaying iSCSI virtual disk by using the iSCSI target, the datastore will also be available and accessible for both hosts by default. This design is finally realized by the Virtual Machine File System (VMFS) format.
VMFS allows for concurrent connections to a single LUN by multiple ESXi hosts.
Links
iSCSI Target Server overview
https://learn.microsoft.com/en-us/windows-server/storage/iscsi/iscsi-target-serveriSCSI Target Server Scalability Limits
https://learn.microsoft.com/en-us/windows-server/storage/iscsi/iscsi-target-server-limitsUnderstanding VMFS Datastores
https://docs.vmware.com/en/VMware-vSphere/7.0/com.vmware.vsphere.storage.doc/GUID-5EE84941-366D-4D37-8B7B-767D08928888.html#GUID-5EE84941-366D-4D37-8B7B-767D08928888
Tags In
Related Posts
Follow me on LinkedIn