NetApp Backup & Recovery Ad-Hoc Backups Demystified – What Really Happens Behind the Scenes?
NetApp Backup & Recovery makes it easy to create ad-hoc backups directly from the NetApp Console, but what actually happens behind the scenes is not always obvious.
When a manual backup is triggered, ONTAP creates a Snapshot copy, assigns a SnapMirror label, transfers the backup data to object storage, and registers the recovery point in the Backup & Recovery catalog.
In this post, we will examine the complete workflow of ad-hoc backups created through both the NetApp Console and the ONTAP CLI.
We will explore how Backup Names and Backup Labels are mapped to ONTAP Snapshot copies, how the special AD_HOC label is assigned when no label is specified, how backup data is stored in Azure Blob Storage, and how retention behavior appears to be influenced by Snapshot and SnapMirror labels.
Along the way, we will compare documented behavior with real-world observations from a lab running ONTAP Select 9.18.1 and the latest NetApp Backup & Recovery service.
Create ad-hoc Backup in NetApp Backup and Recovery Console
Ad-hoc backups can be created directly from the NetApp Backup and Recovery console at any time, independently of the configured Snapshot and backup schedules.
During the backup process, NetApp creates a Snapshot copy on the source volume, assigns a SnapMirror label, and transfers the backup data to the configured object storage target.
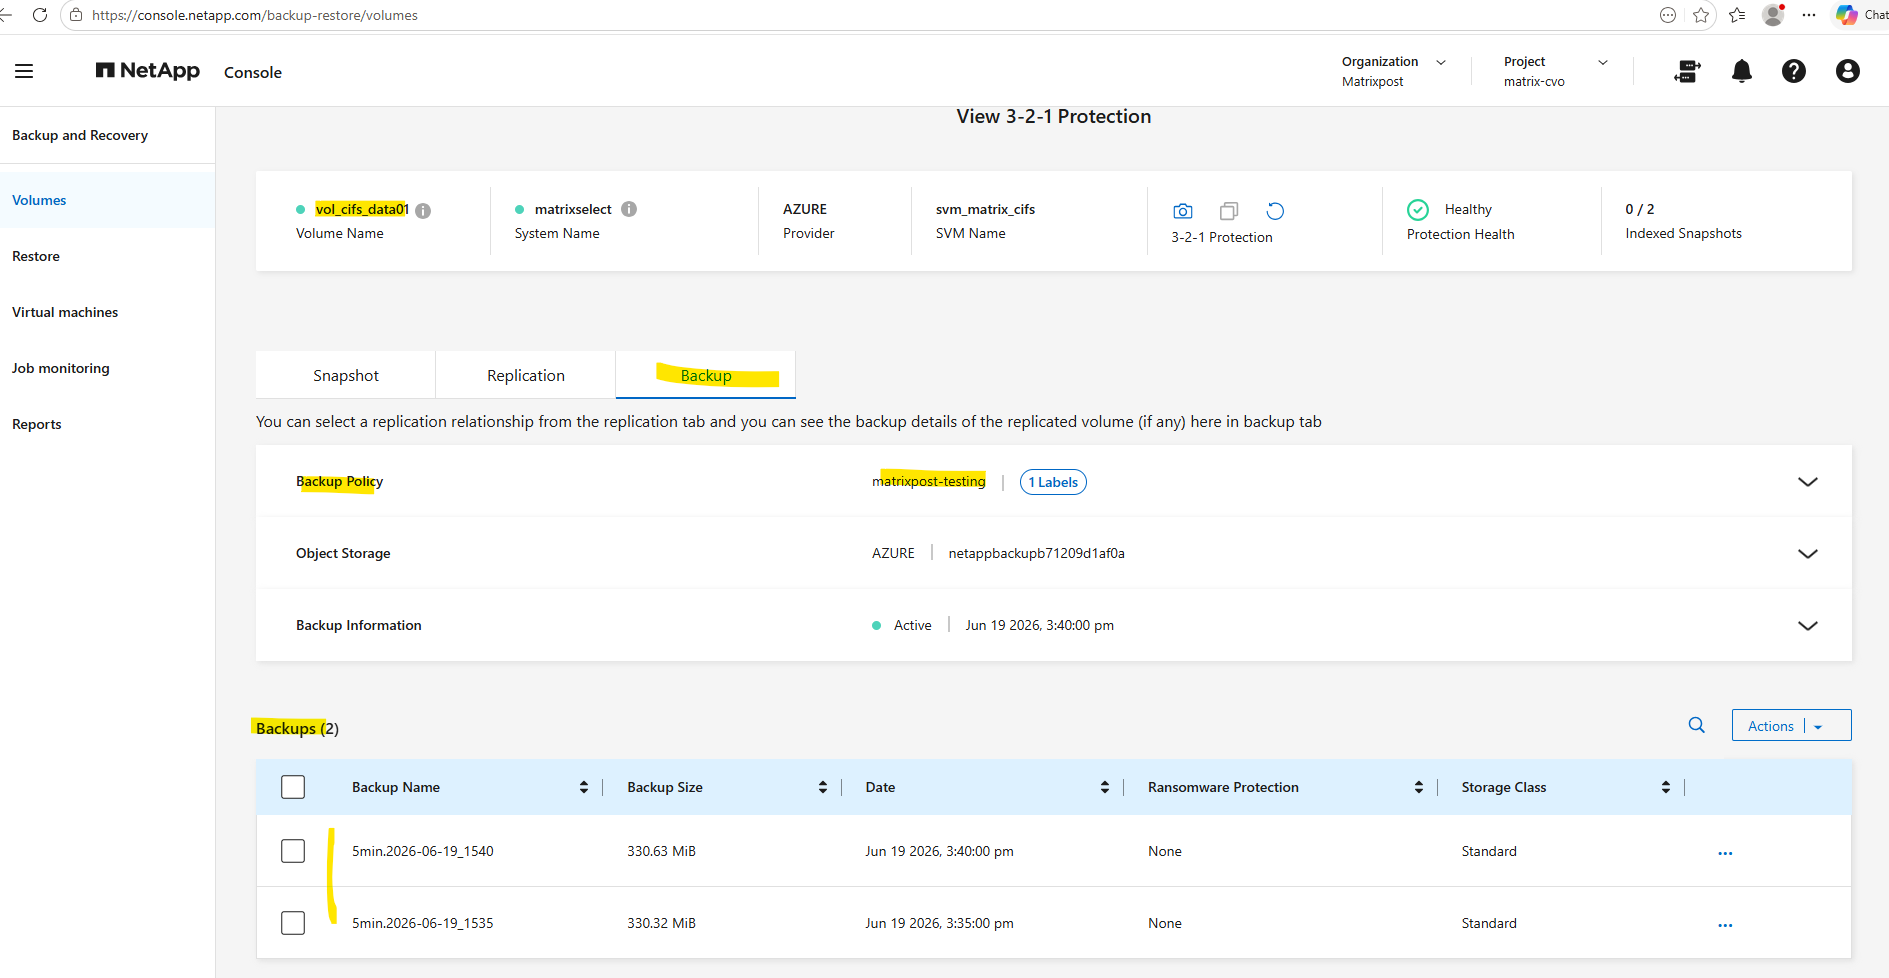
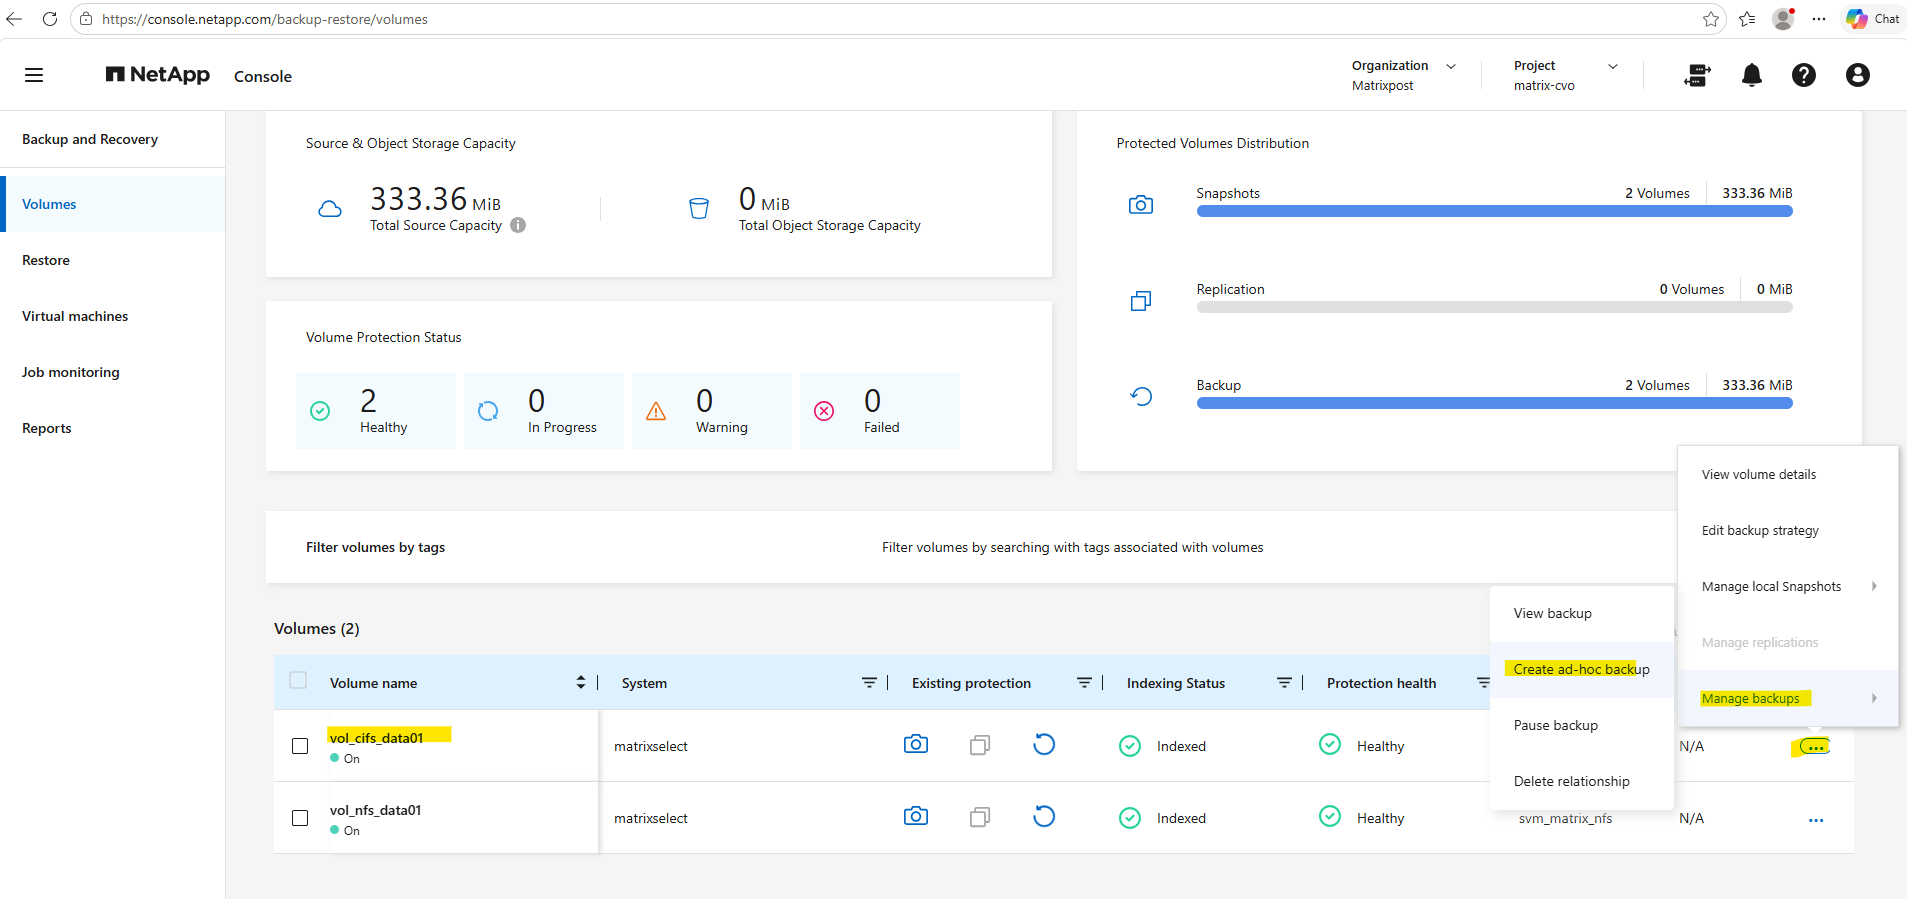
In the NetApp console under Backup and Recovery -> Volumes click on the three dots shown below for the volume you want create an ad-hoc backup. Select Manage Backups and click on Create ad-hoc backup.
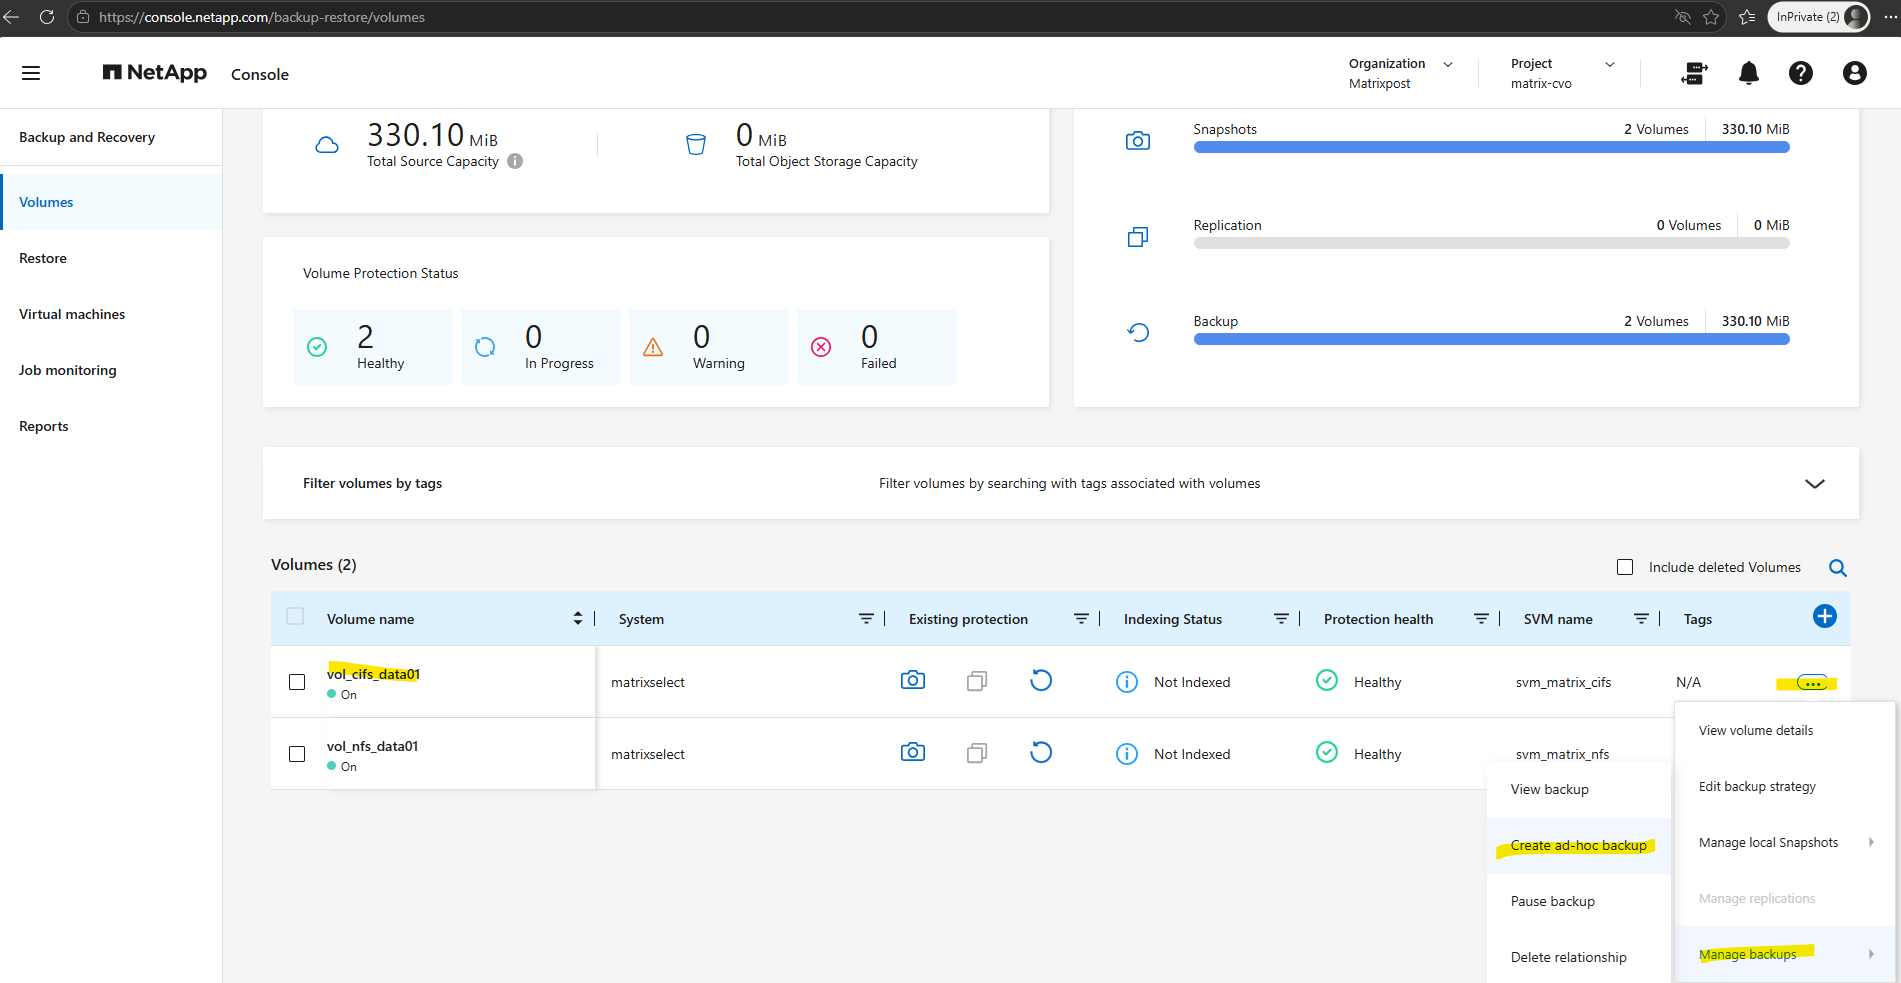
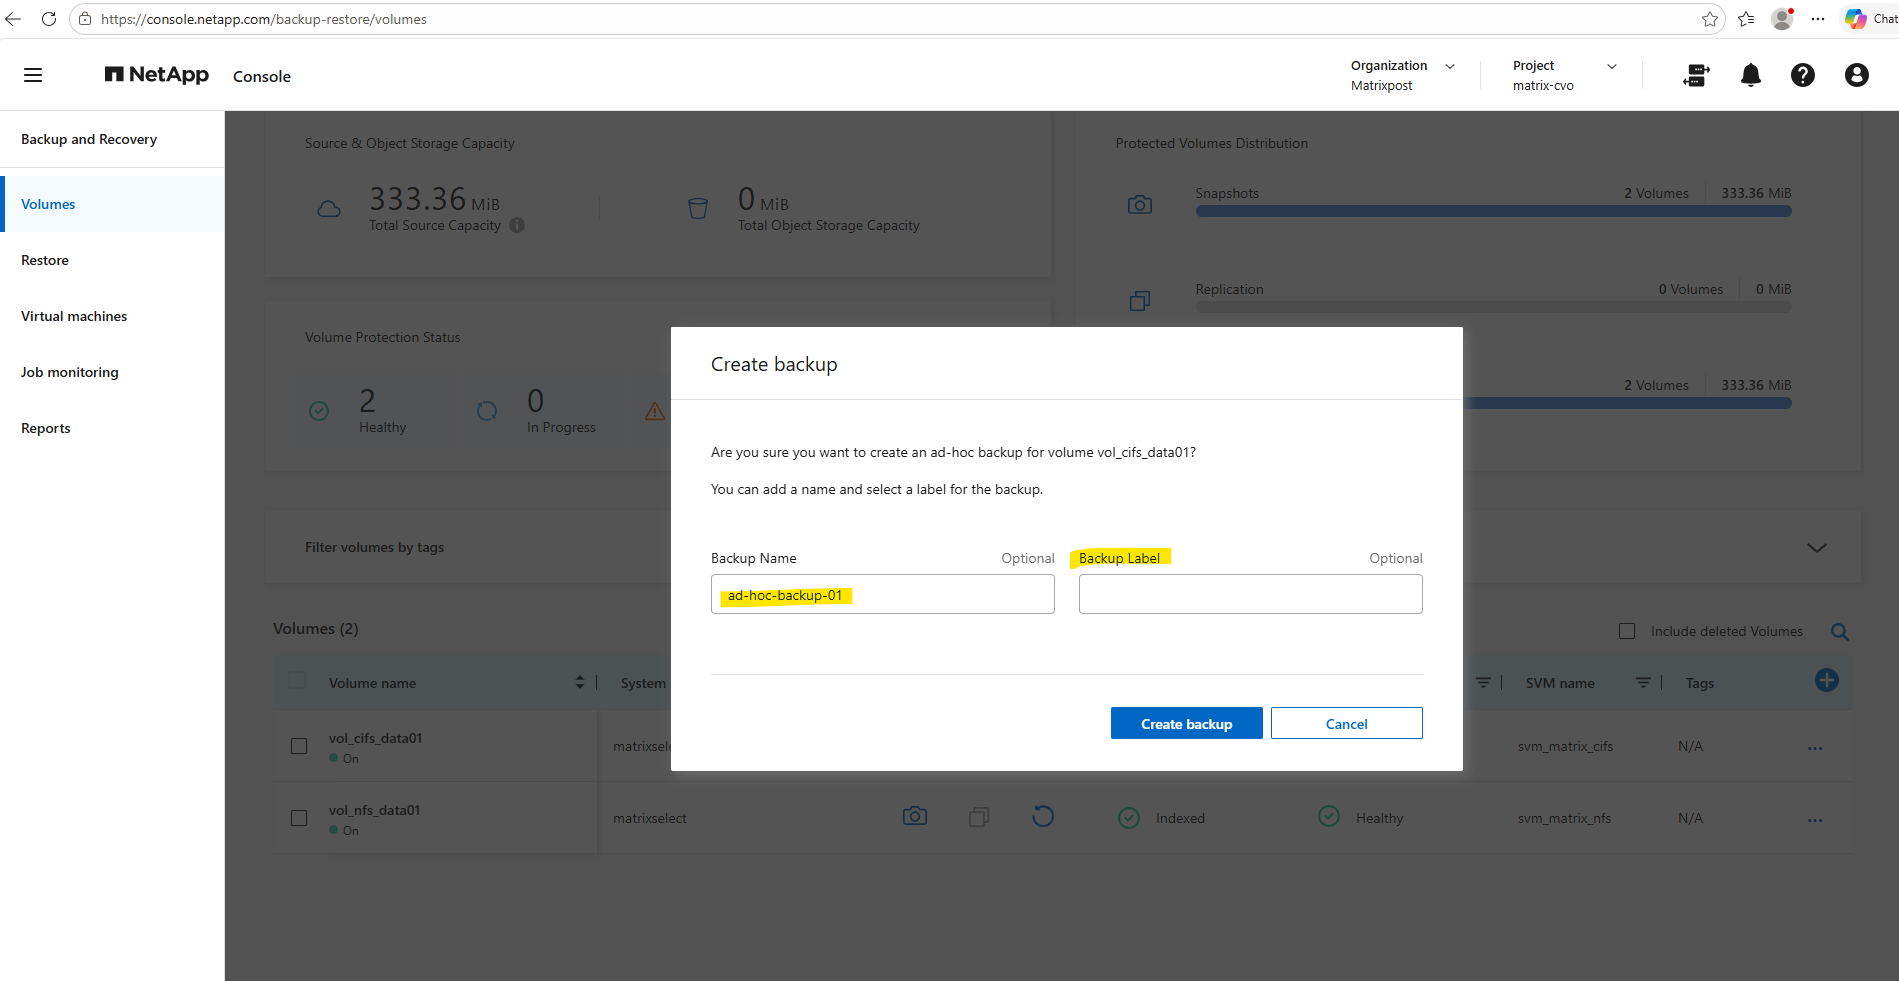
In the Create backup dialog, both the Backup Name and Backup Label fields are optional.
The optional Backup Label specified when creating an ad-hoc backup becomes the SnapMirror label of the generated ONTAP Snapshot. Unlike scheduled backups, however, ad-hoc backups are transferred to the configured object storage regardless of the specified SnapMirror label, including custom or non-existing labels.
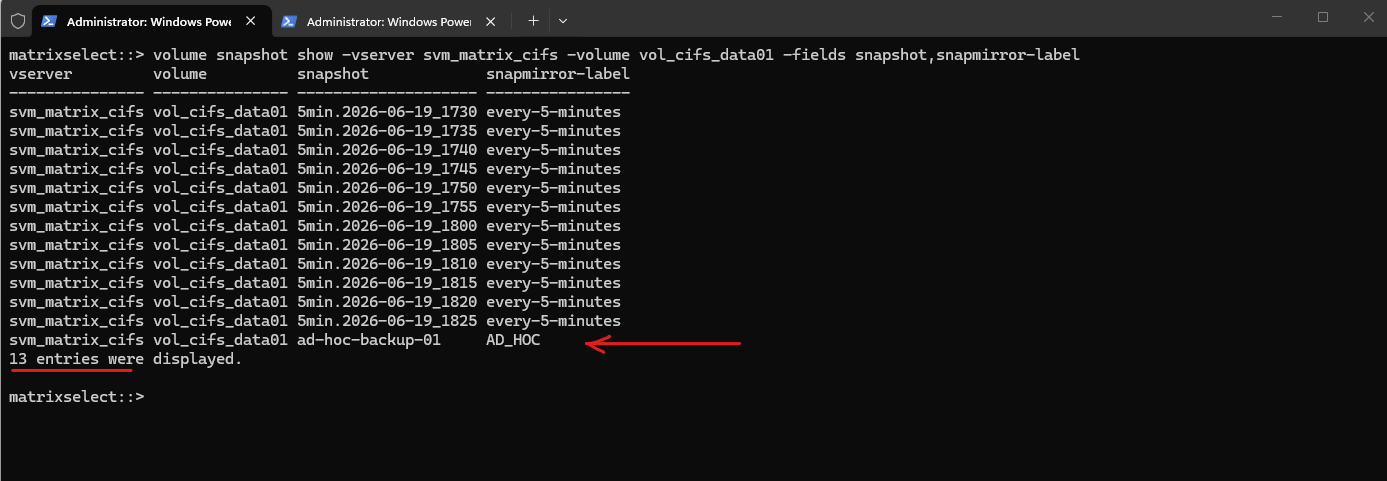
If no values are specified, NetApp automatically generates a Snapshot name in the format
cbs-snapshot-adhoc-<timestamp>and assigns the SnapMirror labelAD_HOCto the created Snapshot copy.NetApp assigns this exact prefix so you can easily distinguish on-demand backups from automated ones.
Because this snapshot is not part of a normal snapshot schedule, it will not rotate off. You may want to manually delete this snapshot from the source volume once the backup is complete.
Source: https://docs.netapp.com/us-en/data-services-backup-recovery/prev-ontap-backup-manage.html

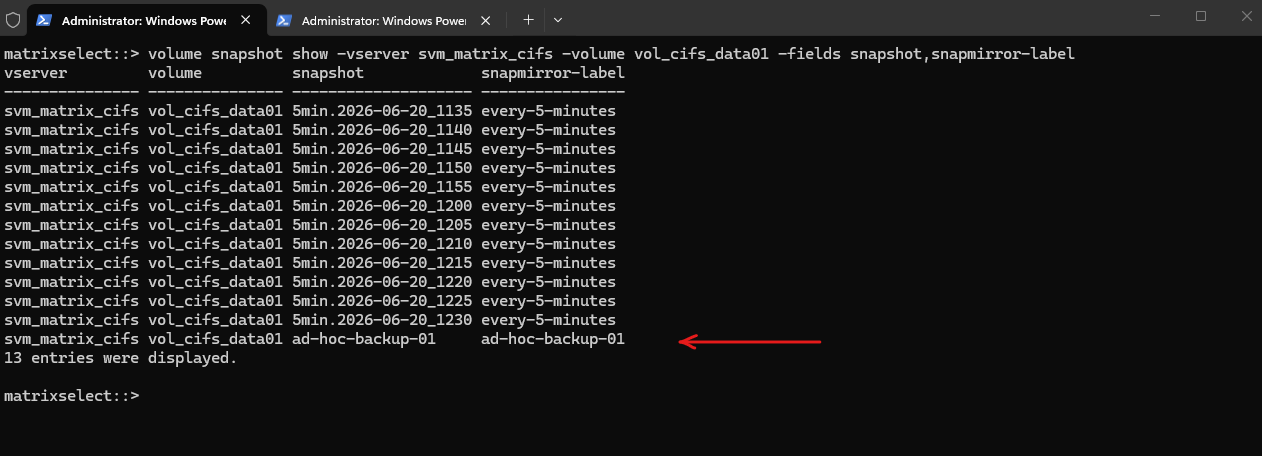
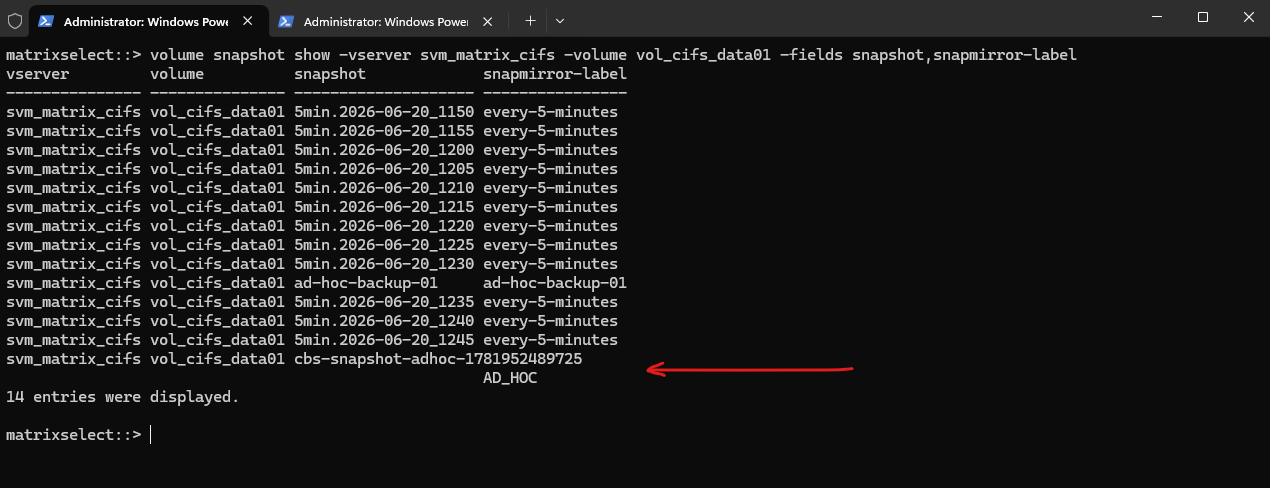
After creating the ad-hoc backup in the NetApp Backup and Recovery console, the corresponding Snapshot copy can first be verified directly on the ONTAP system.
The following command displays the created Snapshot copies together with their assigned SnapMirror labels, allowing you to verify the successful Snapshot creation.
matrixselect::> volume snapshot show -vserver svm_matrix_cifs -volume vol_cifs_data01 -fields snapmirror-label
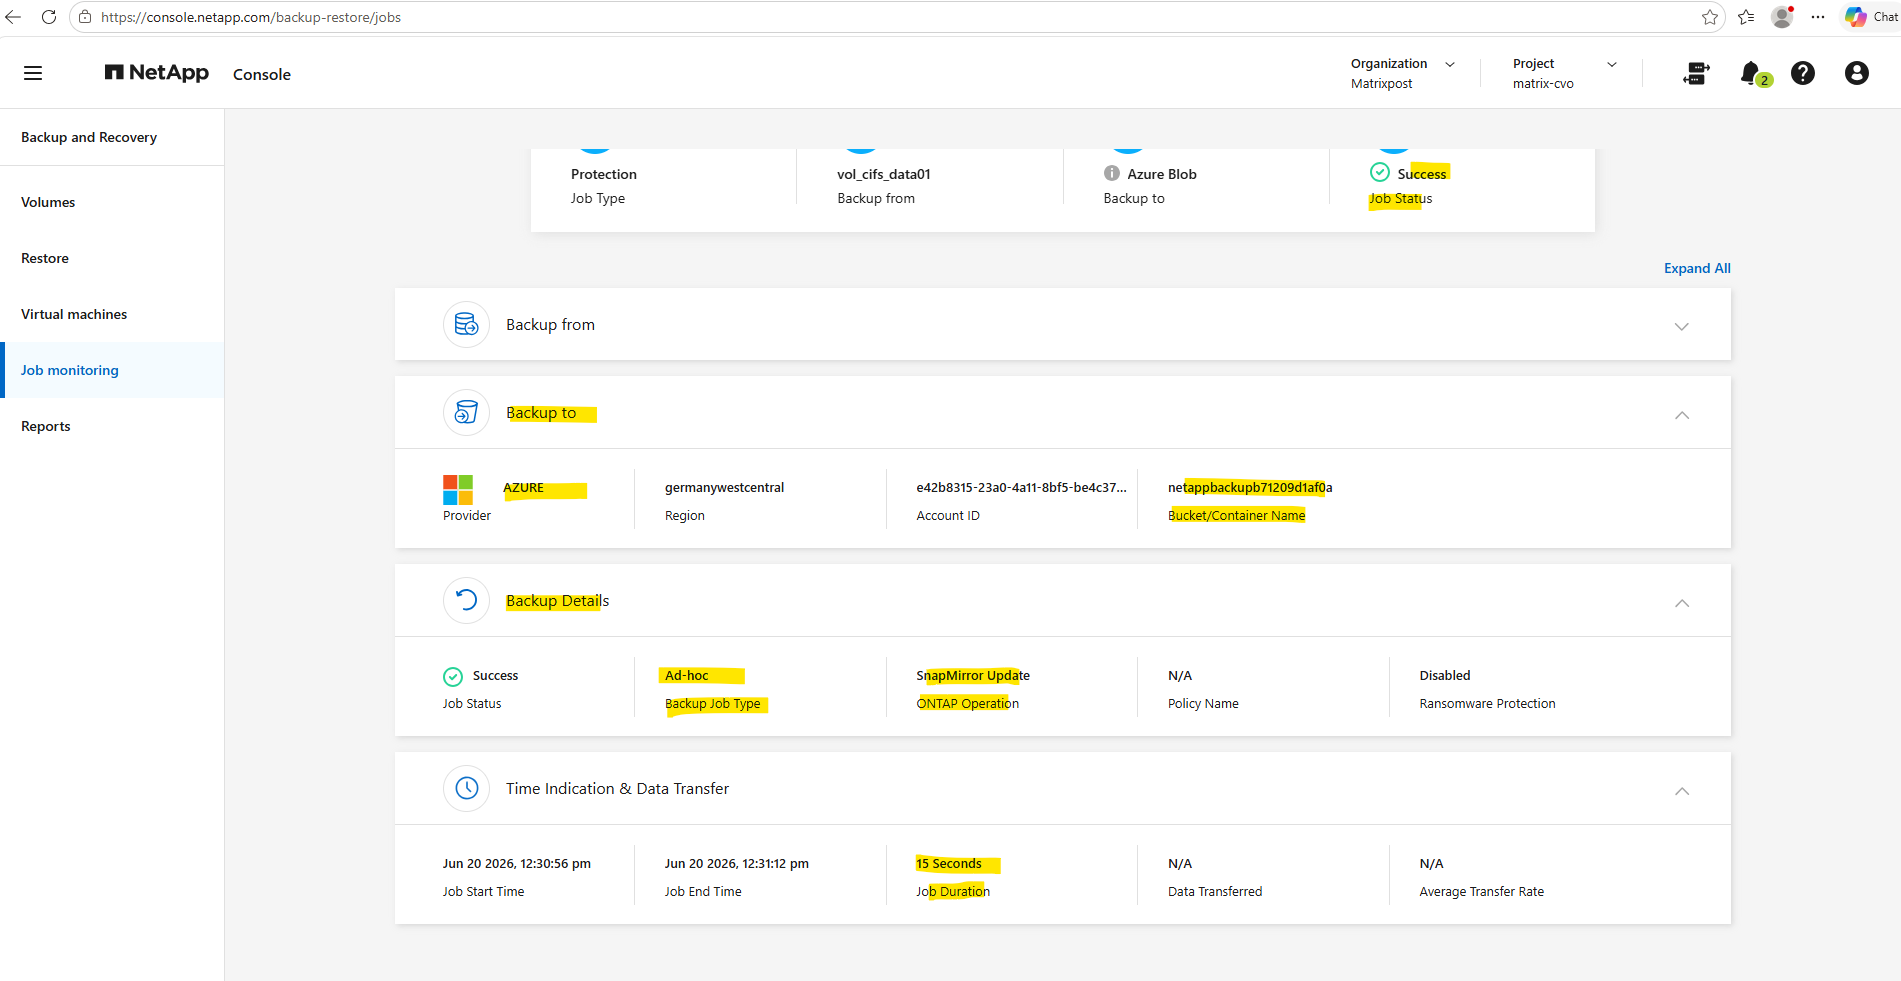
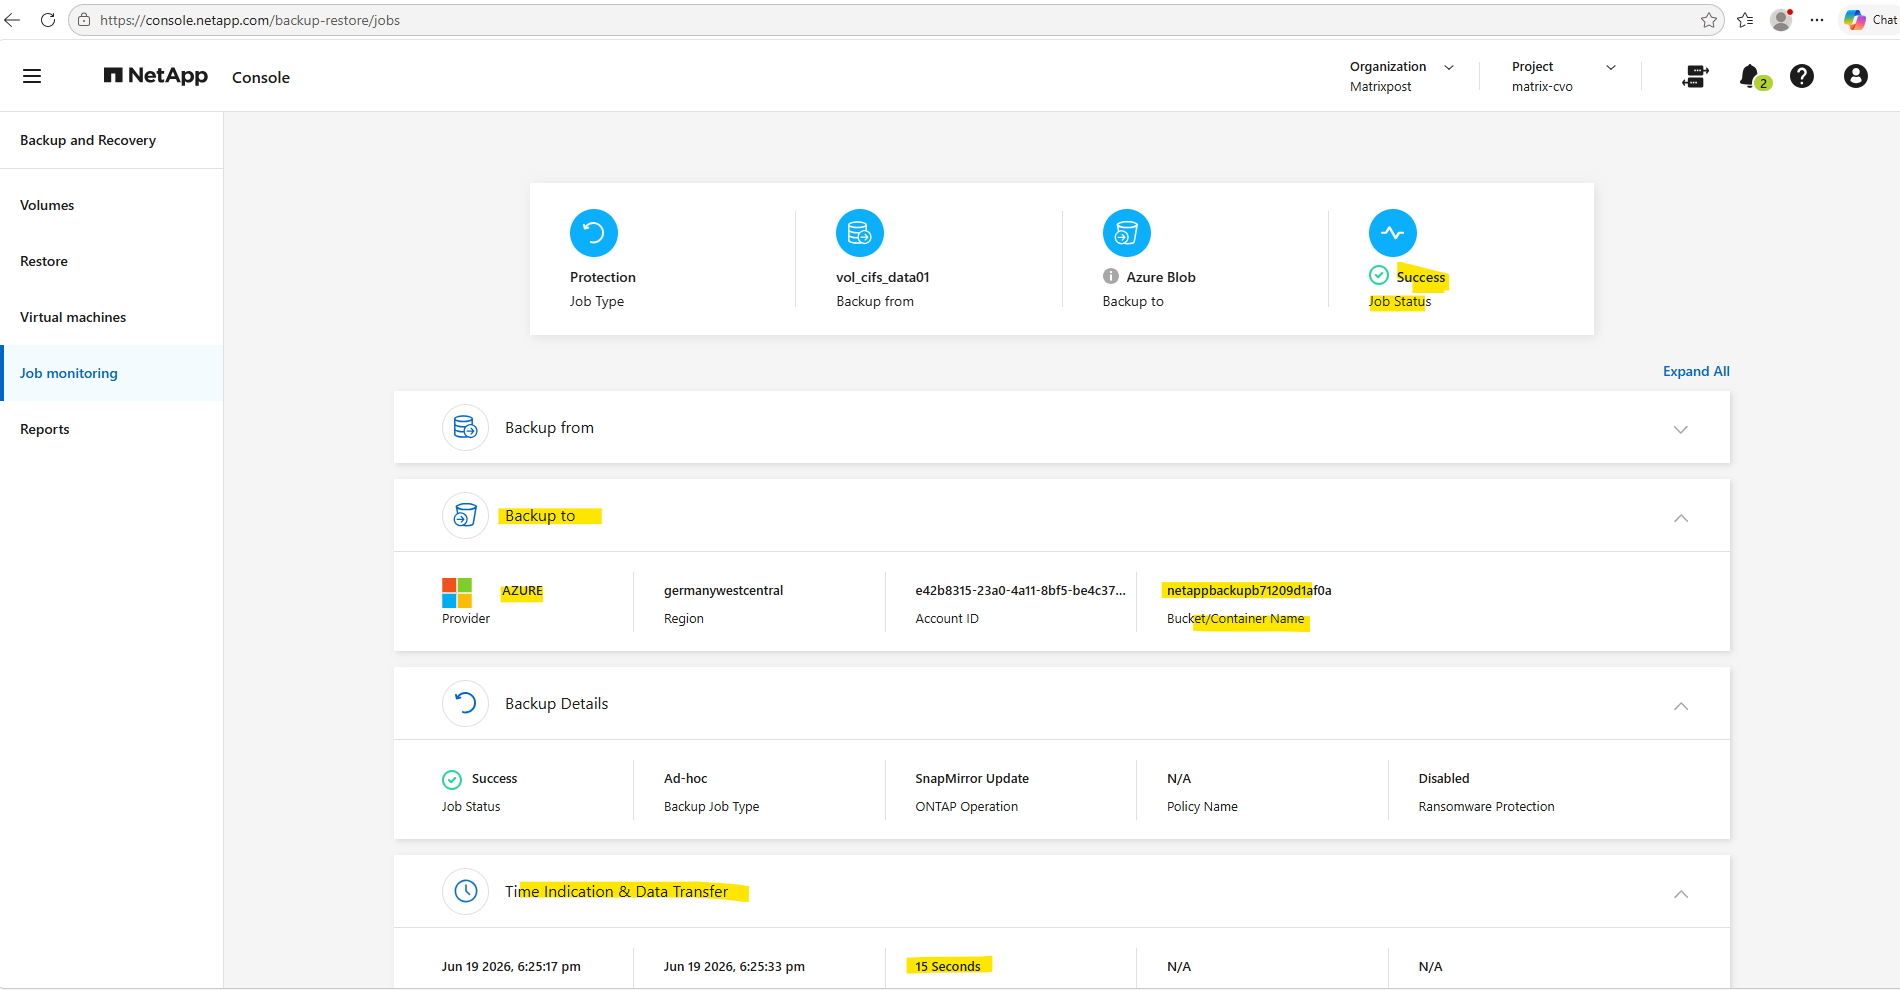
Under Job monitoring we will also see the creation of the ad-hoc backup.
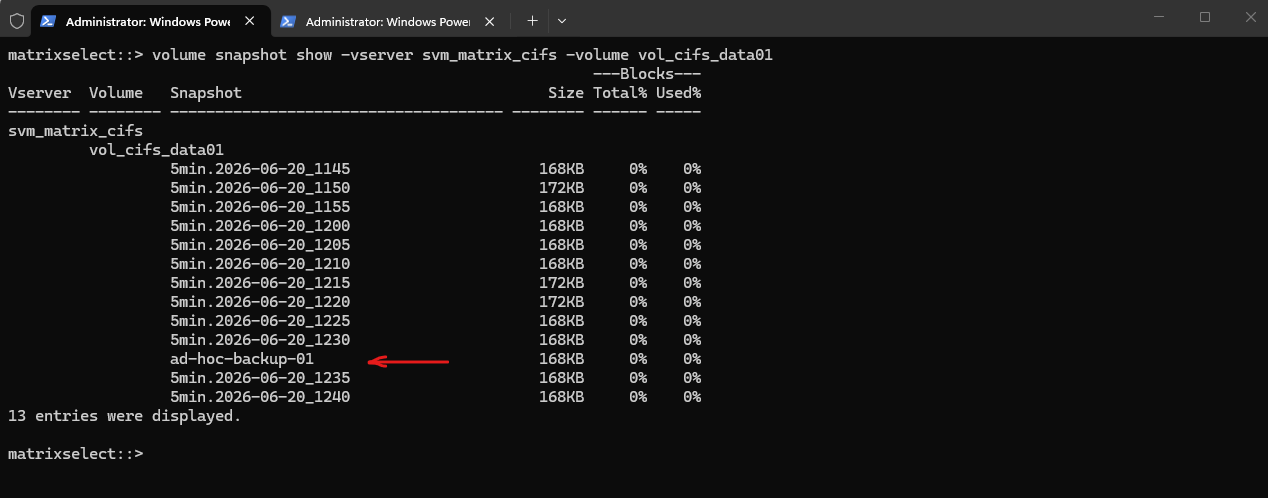
The command below displays all Snapshot copies of a volume, including their creation time, size, and can be used to verify Snapshot creation.
matrixselect::> volume snapshot show -vserver svm_matrix_cifs -volume vol_cifs_data01
The transfer of the Snapshot data to Azure object storage in the case of ad-hoc backups happens immediately and can be verified directly in the storage account and blob container.
Although the NetApp Backup and Recovery console does not expose the associated container folder for a protected volume, in my lab environment with only two protected volumes the blob timestamps clearly correlated with the Snapshot creation times, allowing the corresponding folder to be identified.
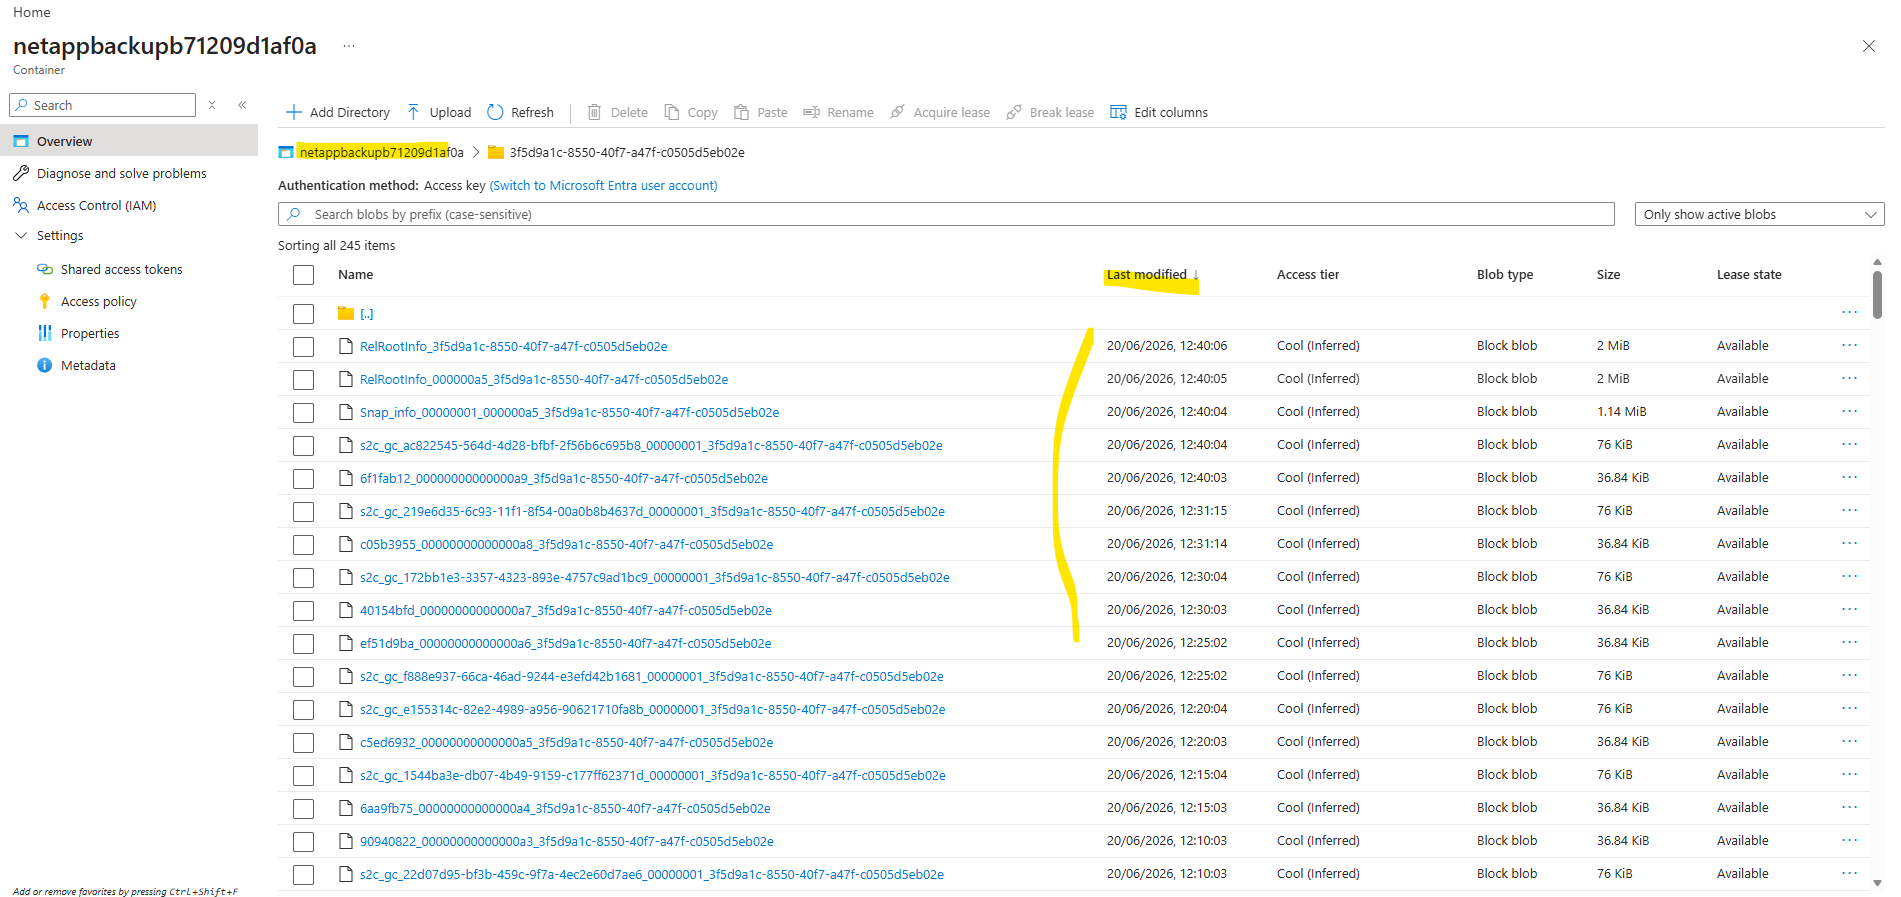
As already mentioned, if both the Backup Name and Backup Label fields are left empty, NetApp automatically generates a Snapshot name in the format
cbs-snapshot-adhoc-<timestamp>and assigns the SnapMirror labelAD_HOC.
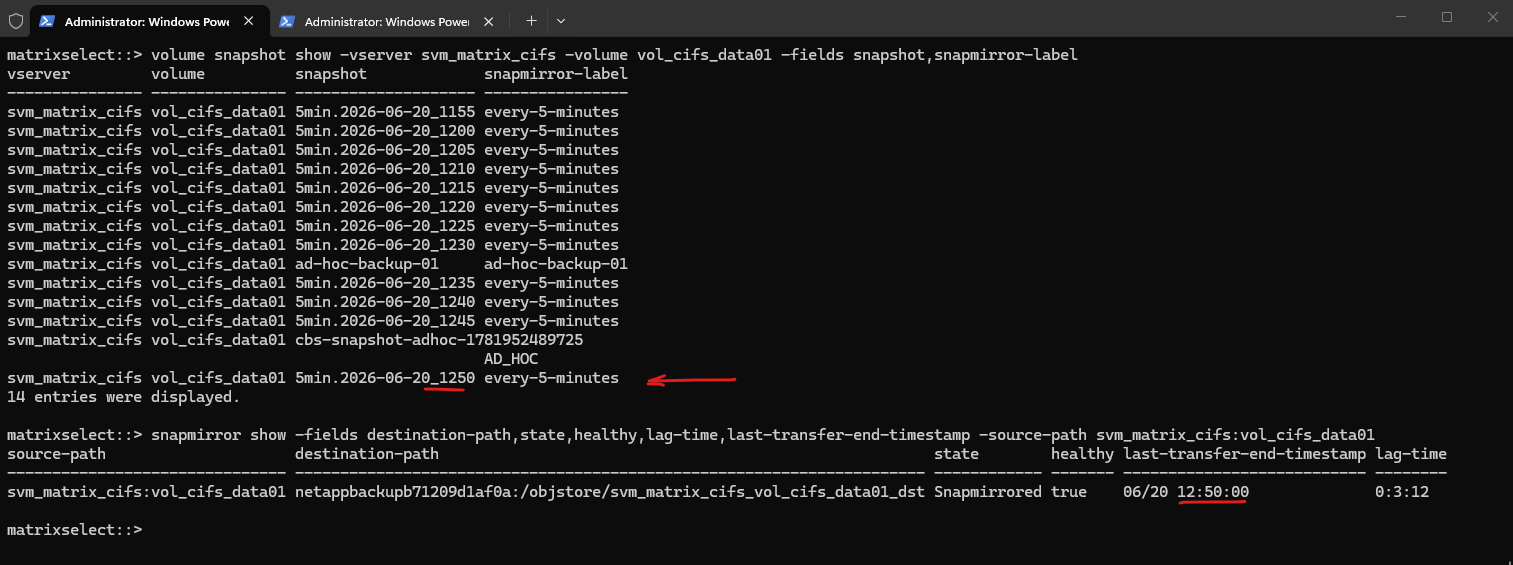
The command below can be used to verify that the Snapshot copy has been successfully transferred to the object storage destination.
The output always reflects the latest completed transfer and displays the health status of the backup relationship, the last successful transfer time, and the current lag time between the source volume and the backup destination.
matrixselect::> snapmirror show -fields destination-path,state,healthy,lag-time,last-transfer-end-timestamp -source-path svm_matrix_cifs:vol_cifs_data01
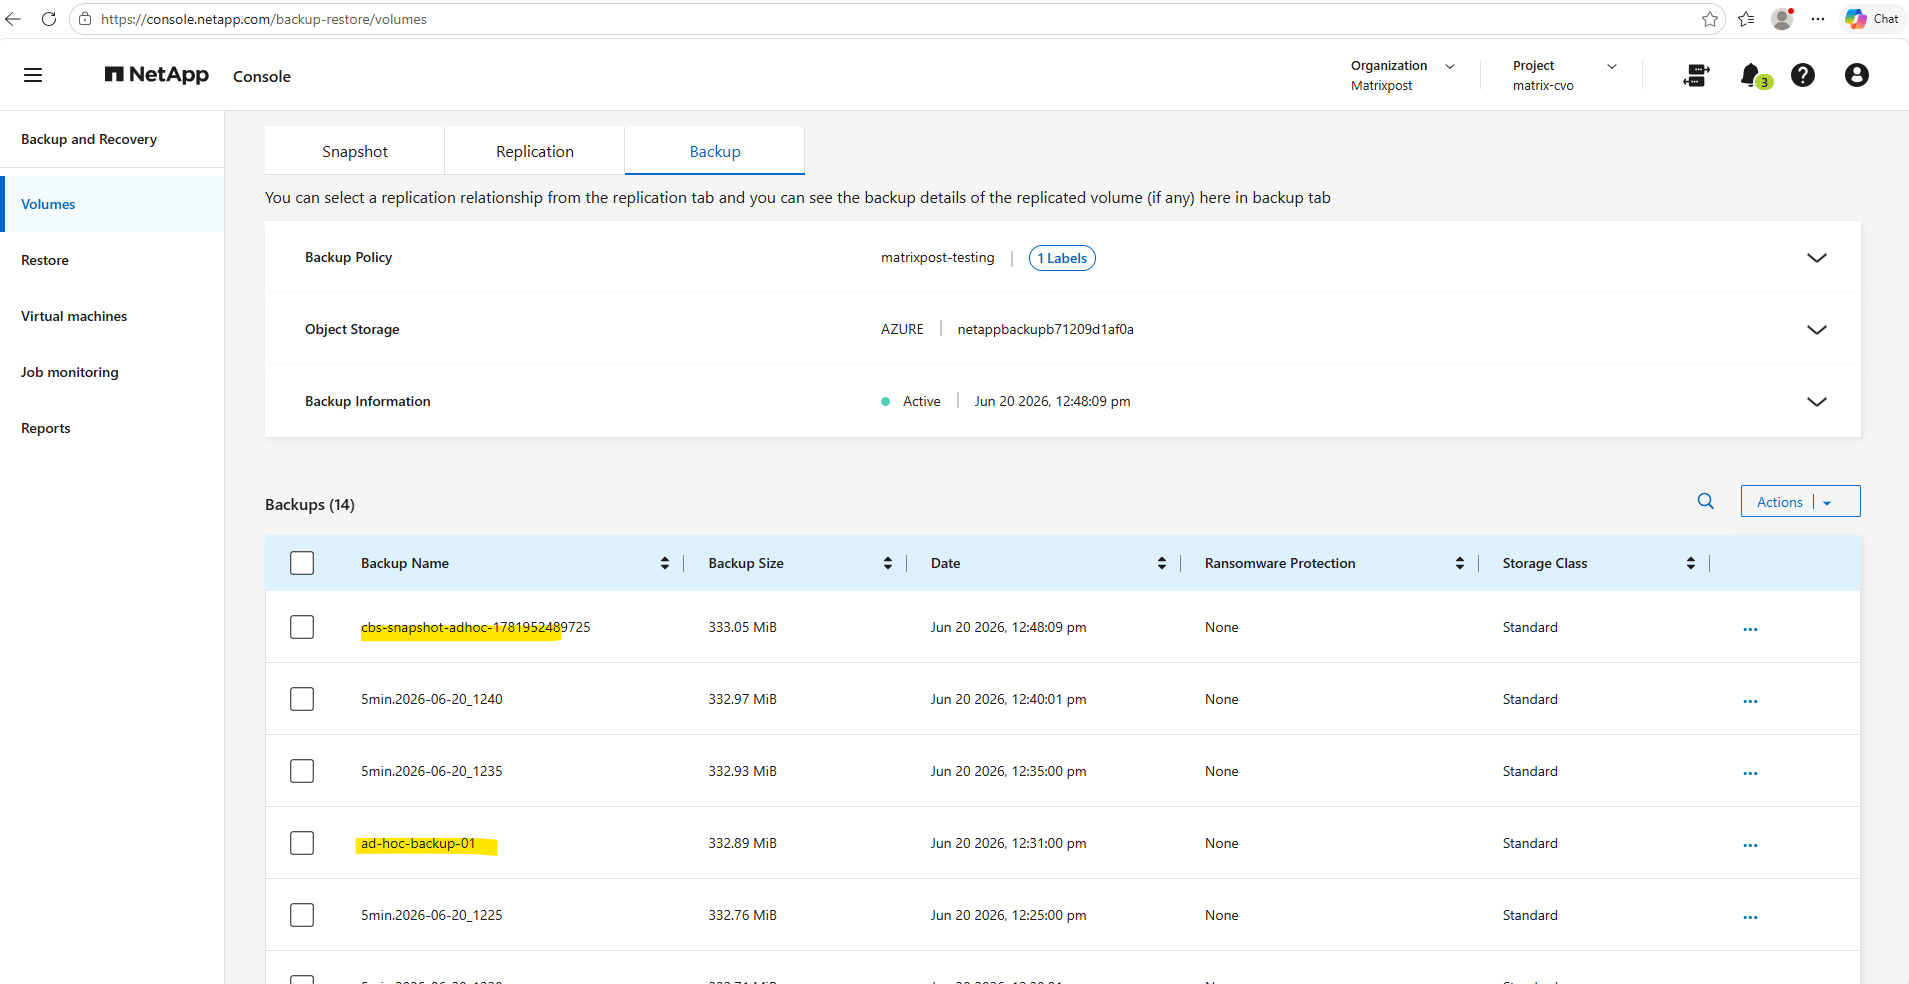
And the ad-hoc backup is also immediately shown in the NetApp console in contrast to scheduled backups which always shown here with a delay.
During testing, manually triggered backups became visible in the NetApp Backup & Recovery console almost immediately after the backup data was written to Azure Blob Storage.
In contrast, scheduled backups often appeared significantly later, even though the backup objects were already present in the storage account.
This behavior suggests that scheduled backups rely on asynchronous catalog or metadata updates within the Backup & Recovery service, whereas manually triggered backups appear to perform an immediate catalog refresh upon successful completion.
Retention for ad-hoc Backups
To test the retention behavior for ad-hoc backups, I was creating a snapshot and backup policy where each have a 5 minute schedule assigned and both have a retention of 12.
So every 5 minutes a snapshot is created and also every 5 minutes these snapshots transferred to Azure (object storage -> Azure Storage Account Blob Storage).
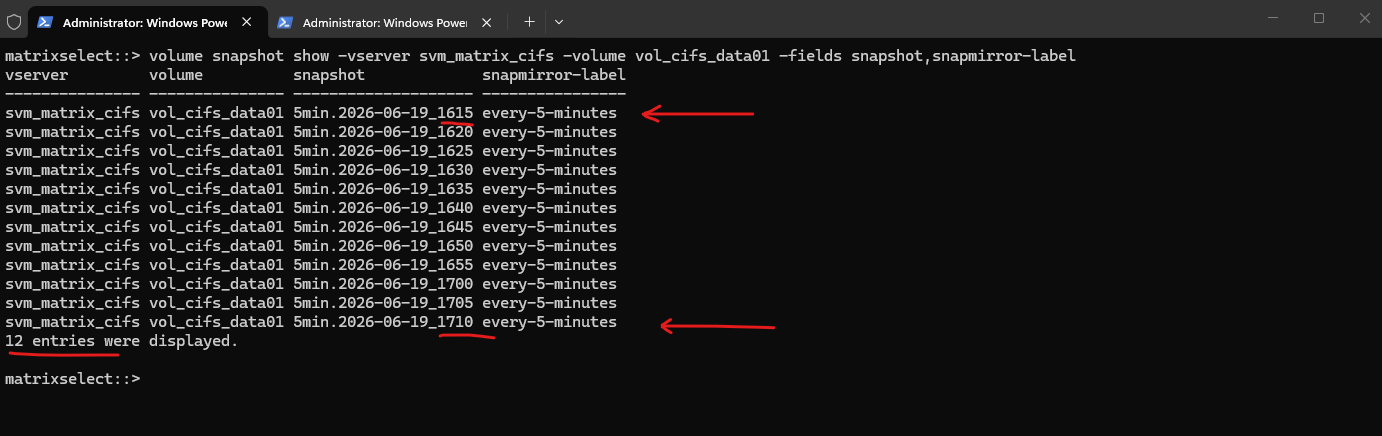
matrixselect::> volume snapshot show -vserver svm_matrix_cifs -volume vol_cifs_data01 -fields snapshot,snapmirror-label

As already shown further above, the command below can be used to verify that the Snapshot copy has been successfully transferred to the object storage destination.
The output always reflects the latest completed transfer and displays the health status of the backup relationship, the last successful transfer time, and the current lag time between the source volume and the backup destination.
We can query either for the destination or source path.
# using destination path
matrixselect::> snapmirror show -fields destination-path,state,healthy,lag-time,last-transfer-end-timestamp -destination-path *vol_cifs_data01_dst

# using source path
matrixselect::> snapmirror show -fields destination-path,state,healthy,lag-time,last-transfer-end-timestamp -source-path svm_matrix_cifs:vol_cifs_data01
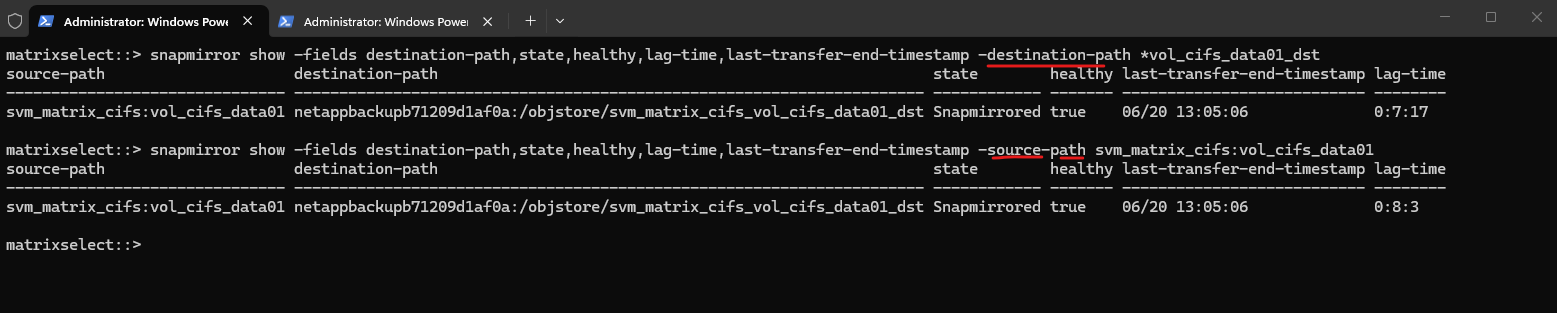
The backups lags where one backup is missing shown below because of the backup policy and its transfer schedule every 5 minutes. When the snapshot is taken the same time as the transfer schedule, the current snapshot creation is not already finished and not available for transfer, it will transferred instead with the next 5 minutes cycle.
We can also see here some discrepancies temporary because of asynchronous metadata and catalog updates within the Backup & Recovery service.
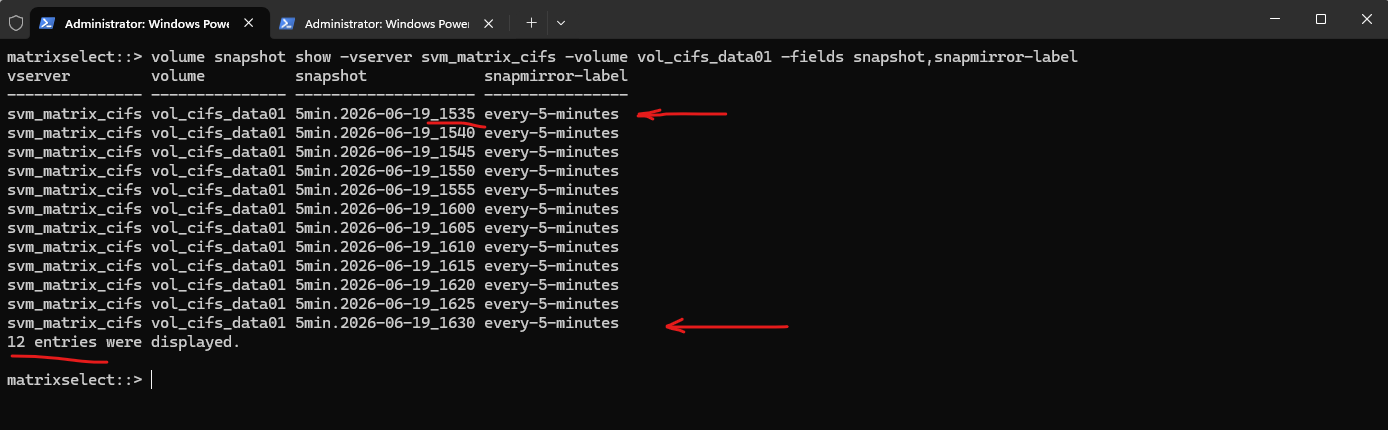
Because of the retention policy of 12 for both, snapshots and backups we should never see more than 12 snapshots and backups and the oldest will be removed. So when creating the 13th snapshot and backup (at 16:35 hour), the first snapshot and backup named 5min.2026-06-19_1535 will be deleted automatically by the policy and its retention settings.
Now at 16:30 hour the 12th snapshot and backup was created.
At 16:35 hour the first snapshot and backup named
5min.2026-06-19_1535and marked below should be deleted.
matrixselect::> volume snapshot show -vserver svm_matrix_cifs -volume vol_cifs_data01 -fields snapshot,snapmirror-label
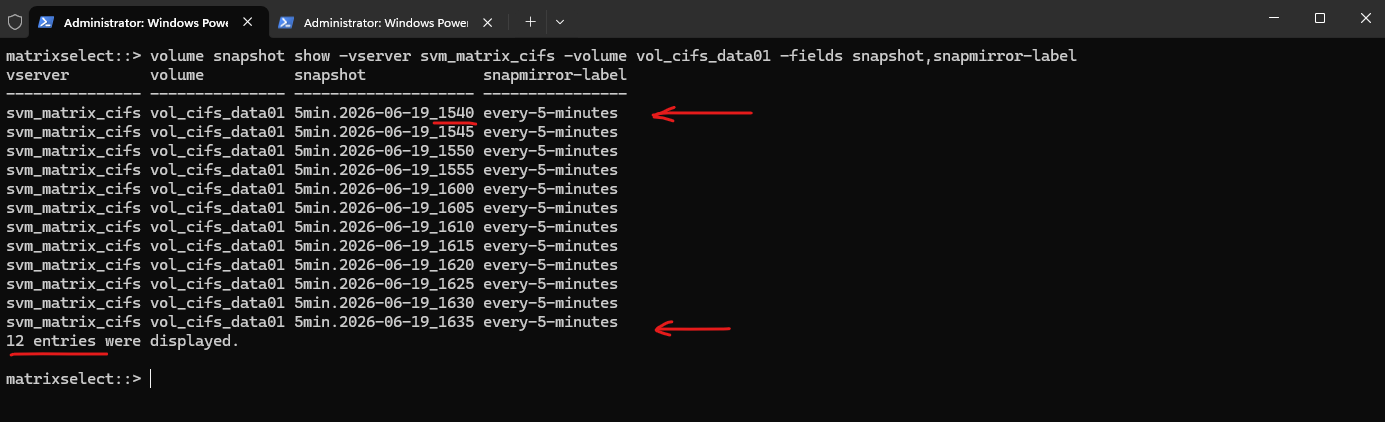
As expected, at 16:35 the first snapshot and backup named 5min.2026-06-19_1535 was deleted so after creating the 13th snapshot and backup below, the sum of all snapshots and backups is not more than 12.
matrixselect::> volume snapshot show -vserver svm_matrix_cifs -volume vol_cifs_data01 -fields snapshot,snapmirror-label
Also the next cycles shows that just 12 snapshots and backups will be retained because of the snapshot and backup policy and its retention with 12.
matrixselect::> volume snapshot show -vserver svm_matrix_cifs -volume vol_cifs_data01 -fields snapshot,snapmirror-label
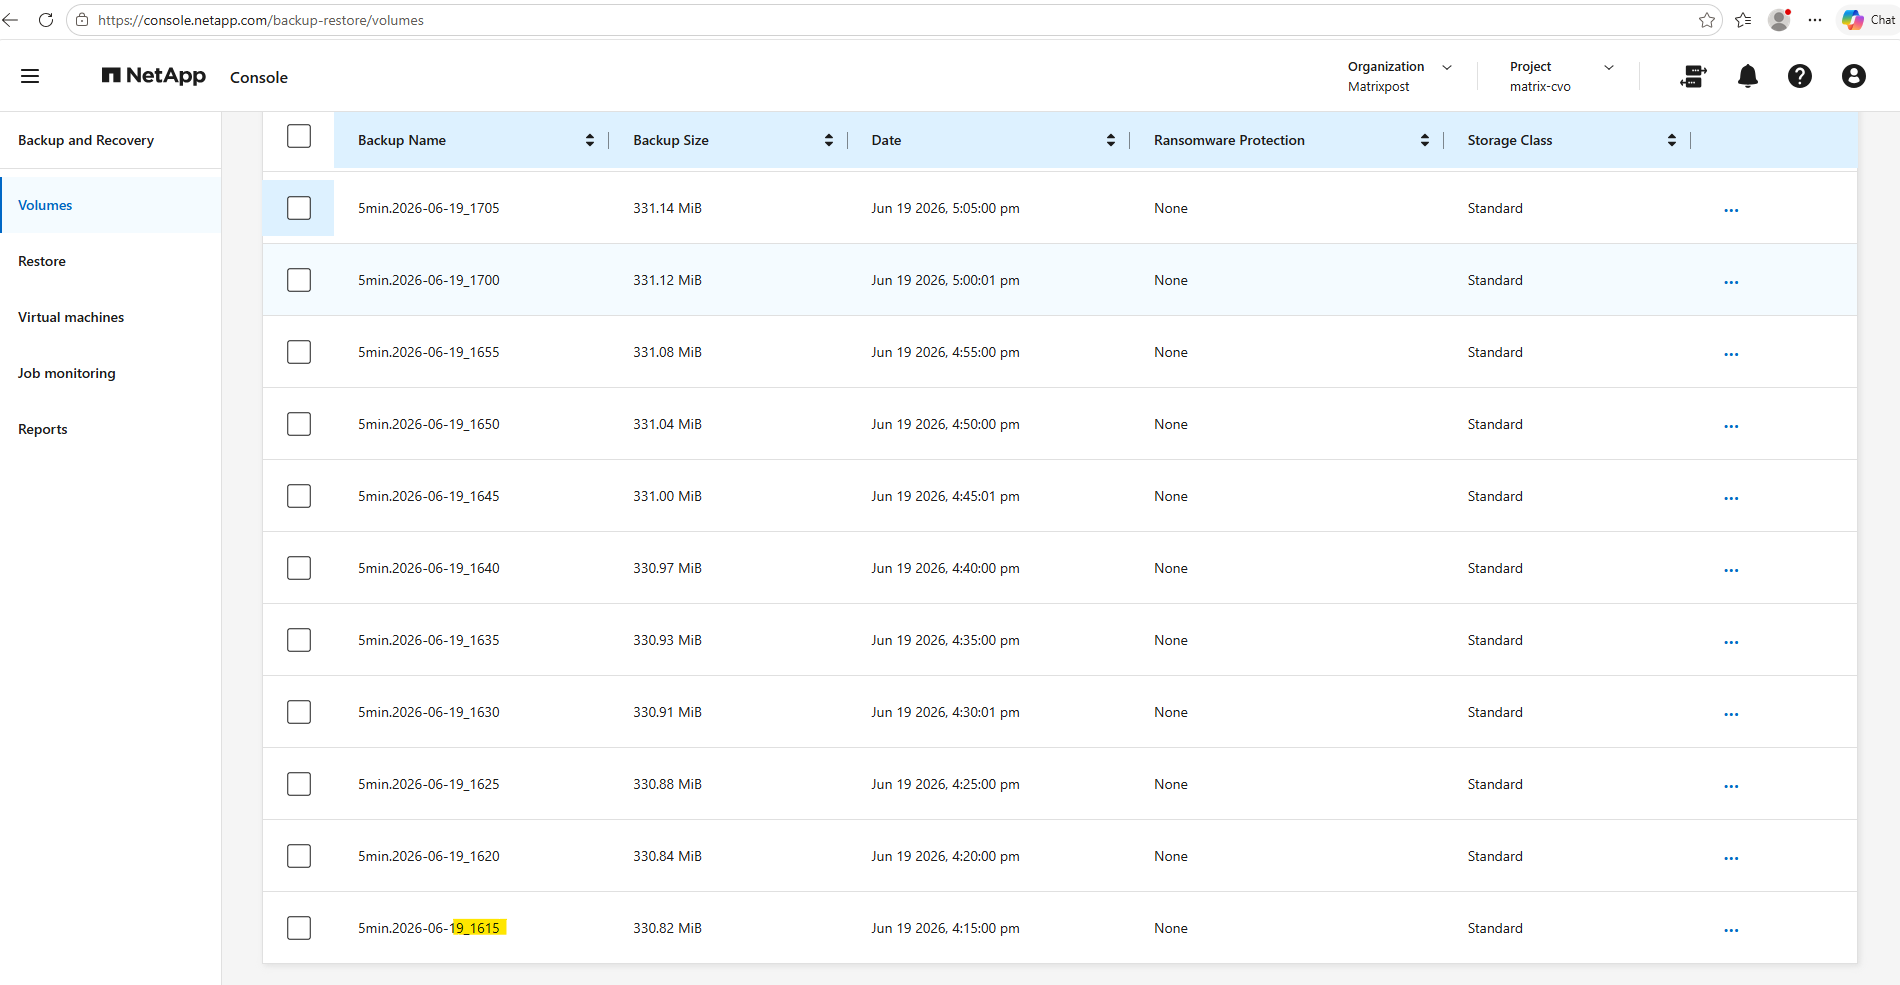
Also just 12 backups identical with the snapshots above in the NetApp Backup and Recovery Console.
Because of asynchronous metadata and catalog updates within the Backup & Recovery service, will will not always see immediately the same output as in the ONTAP CLI for the snapshots.
As already mentioned, even the snapshots already transferred to the object storage in Azure, the NetApp Backup and Recovery Console will not immediately refresh the and reflect this state.
During testing, I observed that backup and snapshot metadata was not always reflected immediately in the NetApp Backup & Recovery console.
Manually triggered ad-hoc backups appeared almost instantly, while local Snapshot updates typically required around 20 minutes and backup recovery points stored in Azure Blob Storage typically up to one hour to appear.
This behavior suggests that the console relies on asynchronous discovery, indexing, and catalog refresh processes rather than real-time updates from ONTAP or the underlying object storage.

I will now trigger an ad-hoc backup for the volume in the NetApp console to see the retention behavior.
The Backup Label is optional and as already seen finally the SnapMirror label which will be assigned to the snapshot which is created here and afterwards transferred to the object storage in Azure.
We can also check the backup details in the NetApp console for this ad-hoc backup.
In the ONTAP CLI we can already see that this created snapshot as source for our manually triggered ad-hoc backup will not be managed by the snapshot policy and retention assigned to the volume.
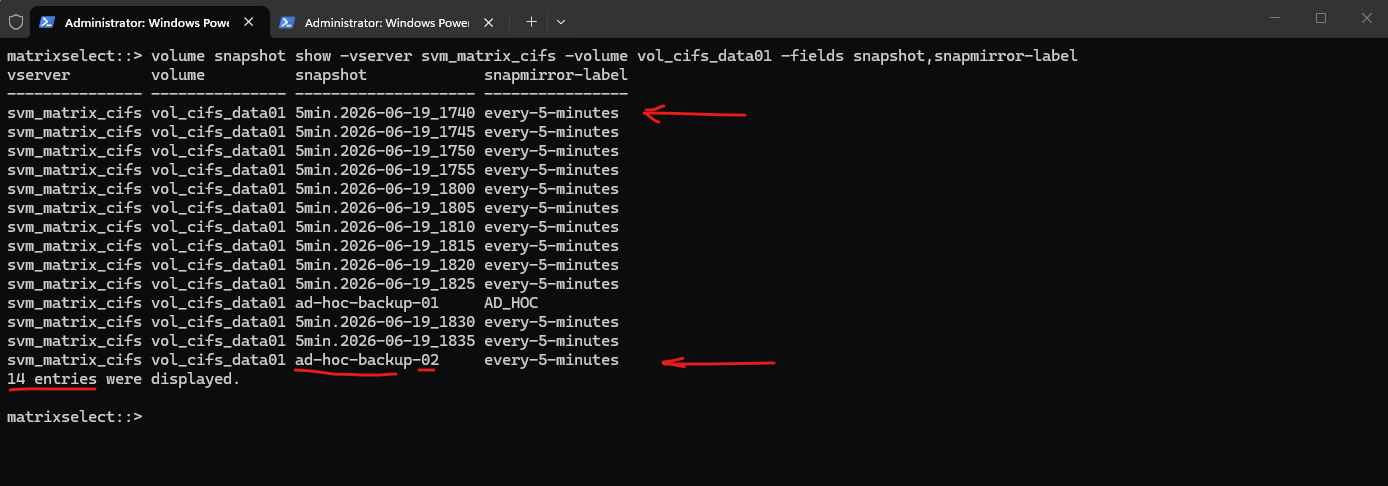
We now have 13 snapshots for this volume as the retention with 12 just belongs to snapshots with the label every-5-minutes.
matrixselect::> volume snapshot show -vserver svm_matrix_cifs -volume vol_cifs_data01 -fields snapshot,snapmirror-label
But now what happens when we use for the Backup label which finally is the snapmirror-label we also use every-5-minutes?
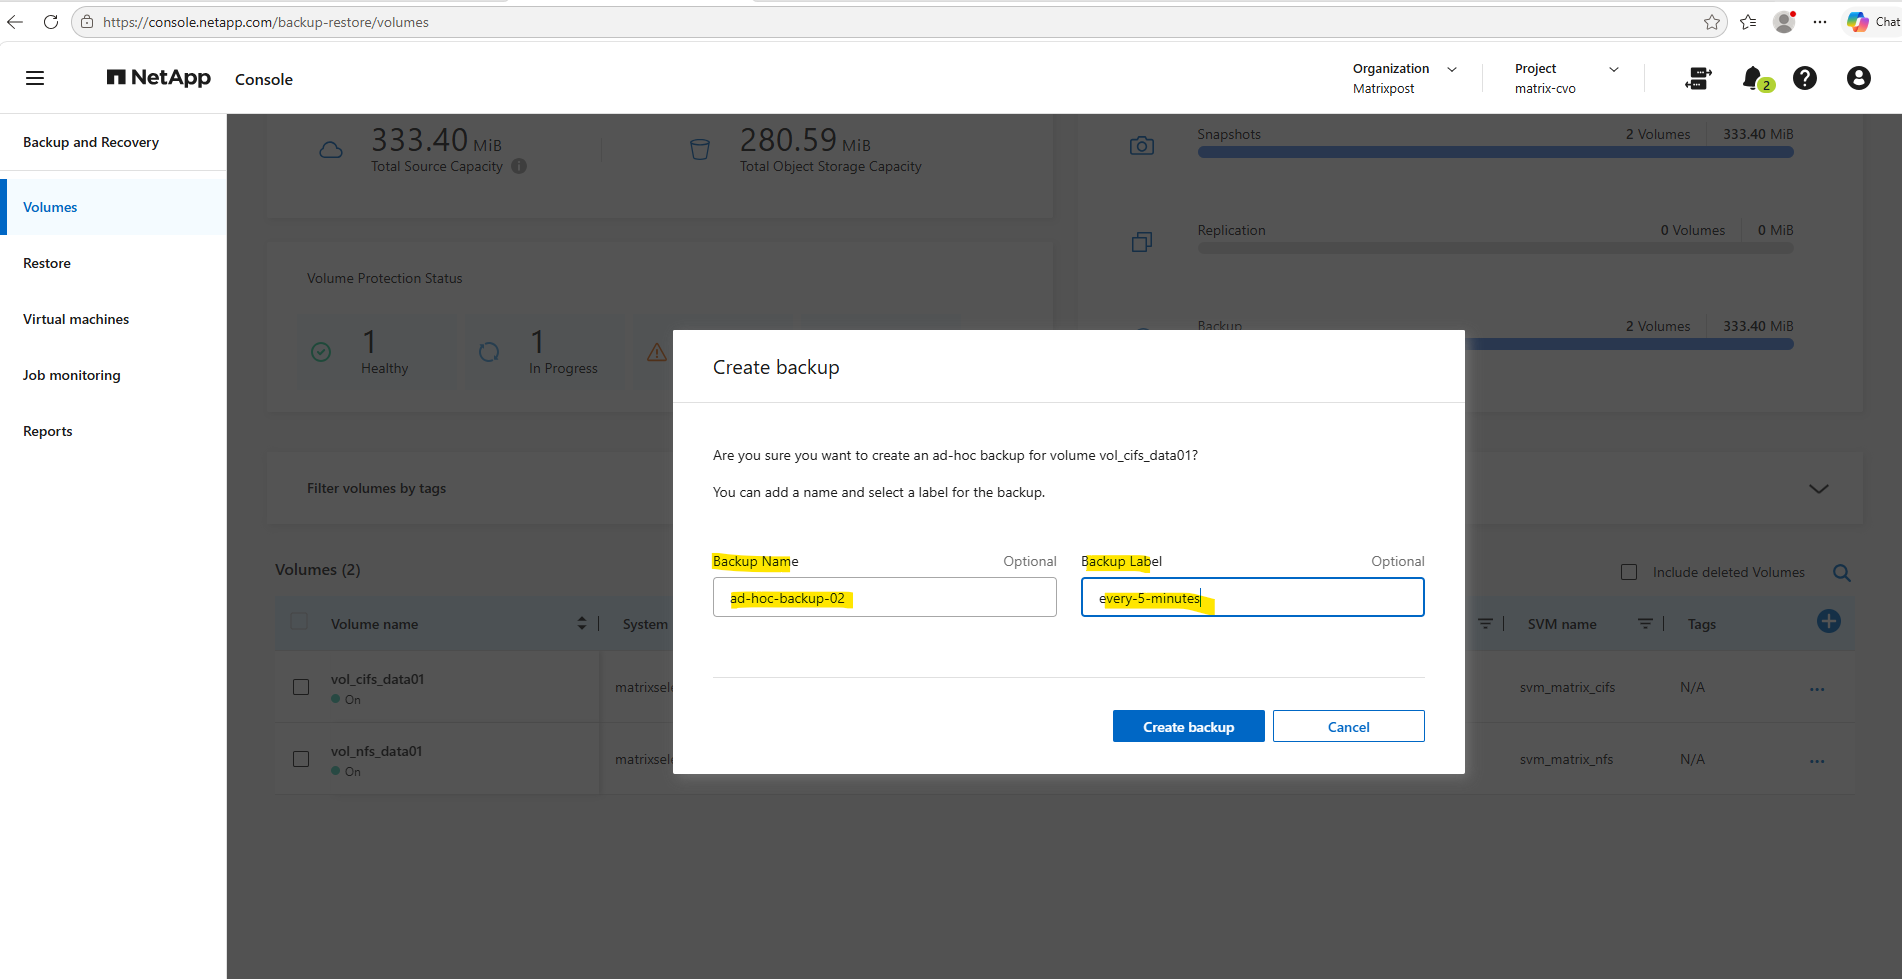
Before clicking above on Create backup, I will first check the currently oldest snapshot to see if it will be deleted in order to create the ad-hoc backup which also first creates a snapshot.
Currently the oldest snapshot is
5min.2026-06-19_1740.
matrixselect::> volume snapshot show -vserver svm_matrix_cifs -volume vol_cifs_data01 -fields snapshot,snapmirror-label
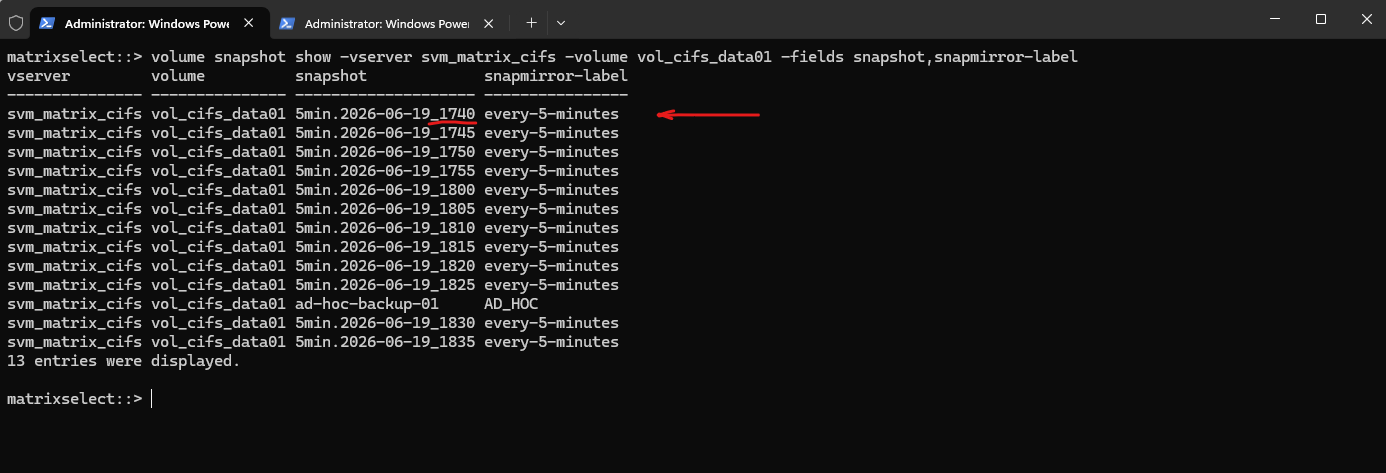
After creating the second ad-hoc backup (and snapshot) named ad-hoc-backup-02 and using the label every-5-minutes, we can see that even when using the snapmirror-label every-5-minutes, this snapshot and backup will not be managed by the snapshot and backup policy associated with the volume. We now have 14 snapshots for this volume.
An on-demand backup triggered manually creates an independent object recovery point. The retention rules configured within an automated policy schedule only actively track and prune snapshots generated natively by that schedule’s cron execution sequence.
The SnapMirror label itself is primarily used to identify Snapshot copies for SnapMirror replication and backup transfers, while local Snapshot retention is determined by the Snapshot policy schedules and retention counts.
matrixselect::> volume snapshot show -vserver svm_matrix_cifs -volume vol_cifs_data01 -fields snapshot,snapmirror-label
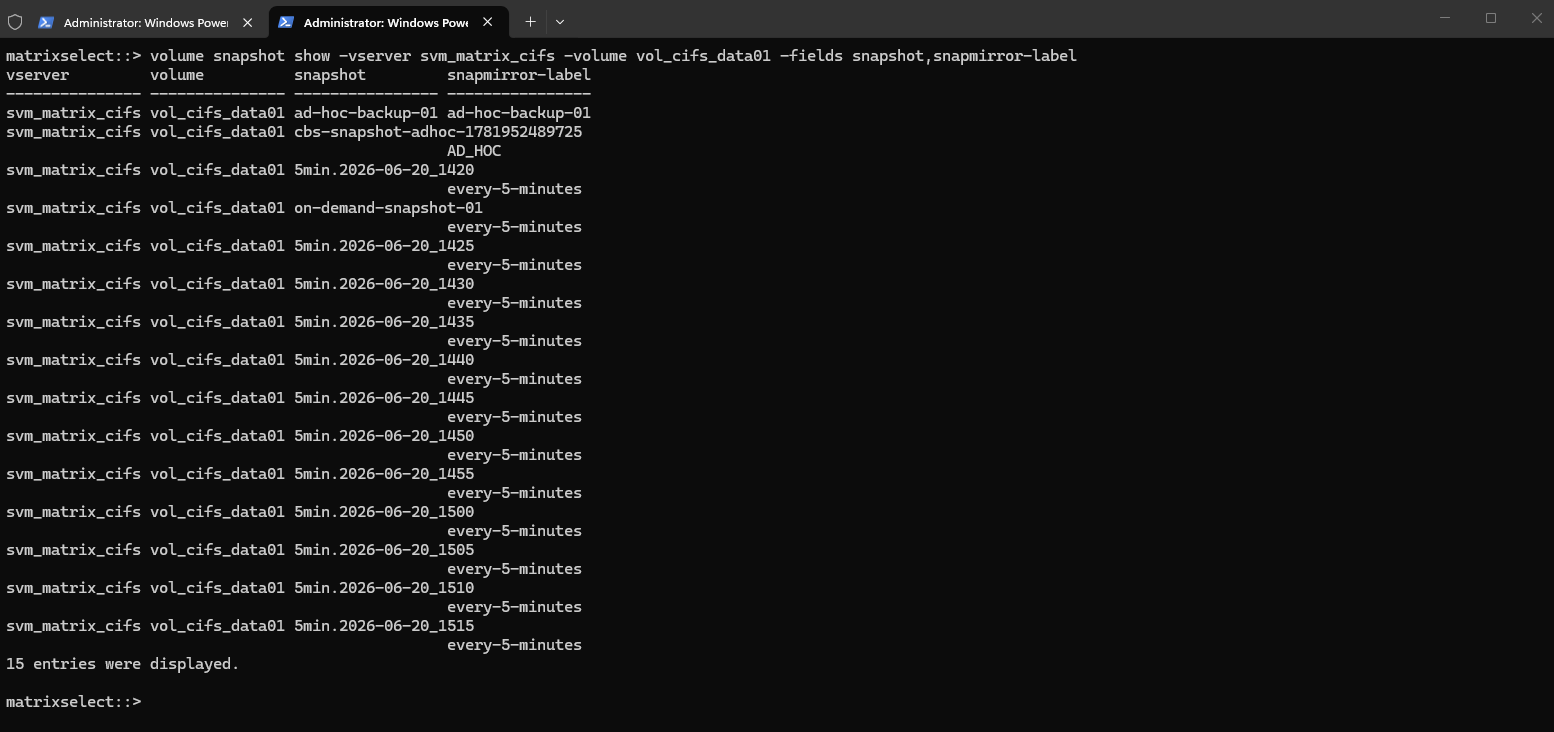
Limitations of CLI-Created On-Demand Snapshots
During testing, Snapshot copies created manually using the volume snapshot create command were not transferred to object storage, even when using a SnapMirror label that was already configured in the associated backup policy like:
matrixselect::> volume snapshot create -vserver svm_matrix_cifs -volume vol_cifs_data01 -snapshot on-demand-snapshot-01 -snapmirror-label every-5-minutes

# we can delete this snapshot later by running
matrixselect::> volume snapshot delete -vserver svm_matrix_cifs -volume vol_cifs_data01 -snapshot on-demand-snapshot-01
Likewise, manually triggering a snapmirror update operation like below did not result in the transfer of these snapshots.
matrixselect::> snapmirror update -destination-path netappbackupb71209d1af0a:/objstore/svm_matrix_cifs_vol_cifs_data01_dst
This behavior indicates that the object storage backup relationship managed by NetApp Backup and Recovery relies on additional metadata or backup catalog information beyond the SnapMirror label itself.
Inspecting Snapshot Details Using the ONTAP CLI
While the NetApp Backup and Recovery console provides a simplified view of backup operations, the ONTAP CLI reveals the actual Snapshot metadata stored on the source volume.
Show all snapshots and labels
The following command provides a compact overview of all Snapshot copies on the volume together with their associated SnapMirror labels.
matrixselect::> volume snapshot show -vserver svm_matrix_cifs -volume vol_cifs_data01 -fields snapshot,snapmirror-label
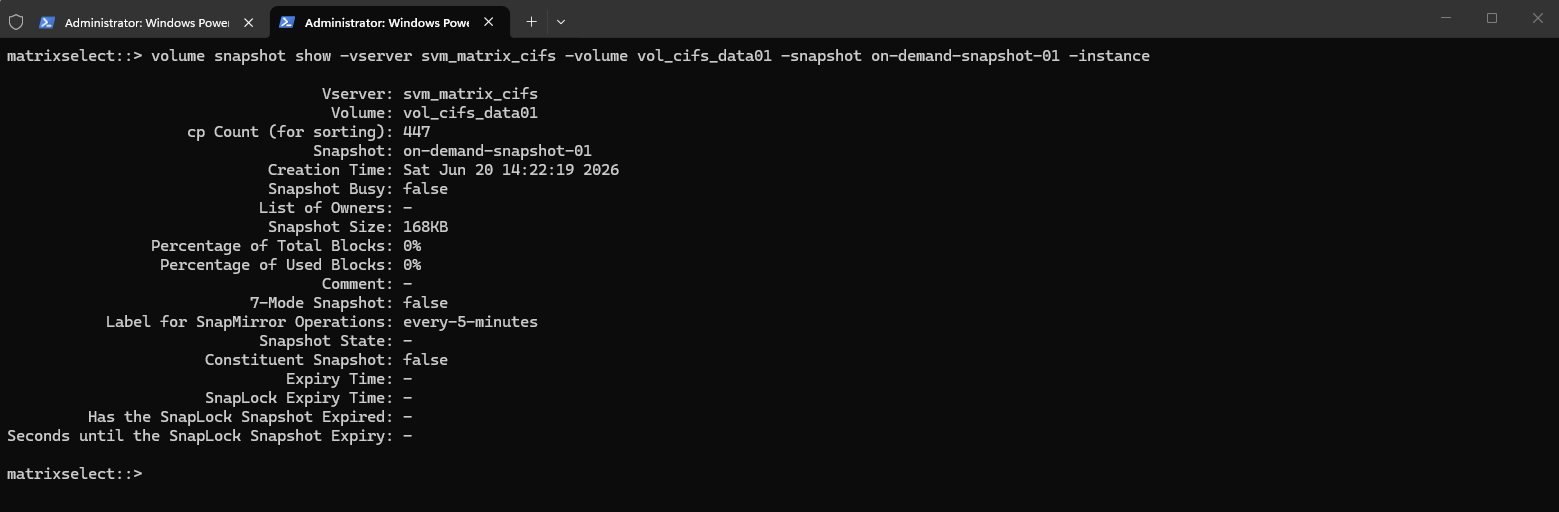
Show detailed snapshot information
The following command displays detailed information about a specific Snapshot copy, including its creation time, size, SnapMirror label, ownership information, expiration settings, and other metadata that can help analyze how the Snapshot is handled by ONTAP.
matrixselect::> volume snapshot show -vserver svm_matrix_cifs -volume vol_cifs_data01 -snapshot on-demand-snapshot-01 -instance
Show SnapMirror relationship status
The following command displays the current status of the object storage SnapMirror relationship, including its health, replication state, lag time, and the timestamp of the latest transfer.
matrixselect::> snapmirror show -source-path svm_matrix_cifs:vol_cifs_data01 -fields destination-path,state,healthy,lag-time,last-transfer-end-timestamp

Links
Learn about NetApp Backup and Recovery
https://docs.netapp.com/us-en/data-services-backup-recovery/concept-backup-to-cloud.htmlSnapMirror Cloud backups to object storage
https://docs.netapp.com/us-en/ontap/concepts/snapmirror-cloud-backups-object-store-concept.htmlNetApp Cloud Backup is Your NetApp AltaVault Replacement
https://www.netapp.com/blog/blg-netapp-cloud-backup-is-your-netapp-altavault-replacement/Manage backups for your ONTAP systems with NetApp Backup and Recovery
https://docs.netapp.com/us-en/data-services-backup-recovery/prev-ontap-backup-manage.html