Join Ubuntu to an Active Directory Domain using SSSD (System Security Services Daemon)
In this post I want to set up the sssd daemon on Ubuntu to join an AD domain and authenticate users against a Active Directory Domain Controller by using the AD provider from sssd.
In previous versions of sssd, it was possible to authenticate using the ldap provider. Nevertheless for authenticating against a Microsoft Windows AD Domain Controller, it was generally necessary to install the POSIX AD extensions on the Domain Controller.
The AD provider simplifies the configuration and requires no modifications to the AD structure.
sssd – Open Source Client for Enterprise Identity Management
Enroll your Linux machine into an Active Directory, FreeIPA or LDAP domain. Use remote identities, policies and various authentication and authorization mechanisms to access your computer.
https://sssd.io/
https://sssd.io/docs/introduction.html
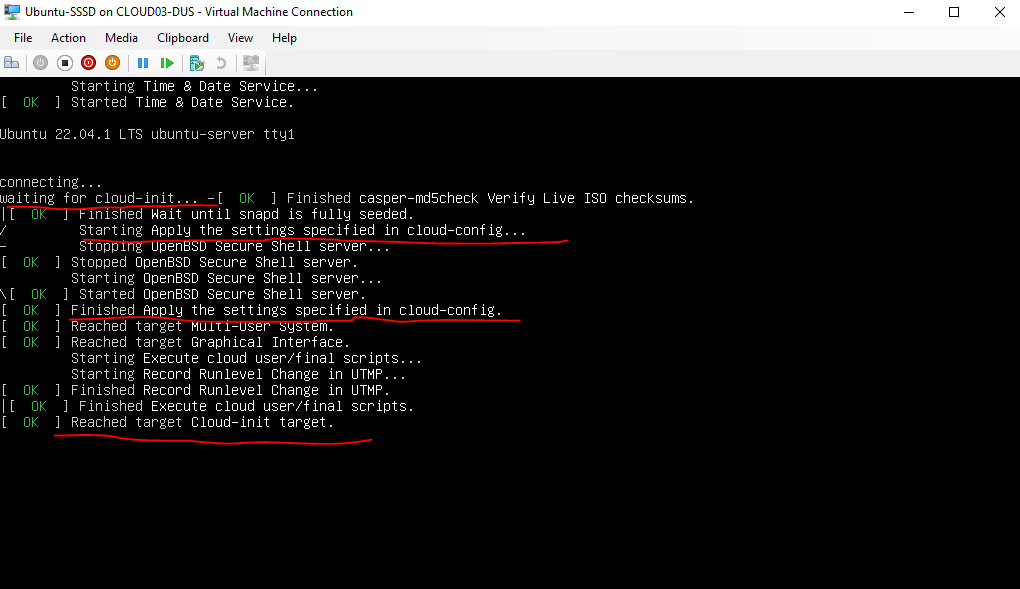
For this post I will set up a new Ubuntu server 22.04.1 server VM in my on-premise lab environment on Hyper-V. In past I preferred using for on-premise VMs the alternative or legacy image over the live image.
The main differences between these server versions are the preinstalled packets and installation wizard. The live version is well-adjusted for the cloud.
The cloud version (live image) includes for example the cloud-init packet which will get installed by default since version 18.04. This packet is leveraged by hyperscaler like Microsoft Azure, Amazon AWS or Google Cloud to customize a Linux VM.
The cloud-init packet can handle and run scripts you attach in the control panel from your hyperscaler provider.
You can use cloud-init to install packages and write files, or to configure users and security. Because cloud-init is called during the initial boot process, there are no additional steps or required agents to apply your configuration.
Source: https://learn.microsoft.com/en-us/azure/virtual-machines/linux/using-cloud-init#cloud-init-overview
So for my on-premise environment I don’t need this package and I also preferred the legacy installer from Ubuntu.
Unfortunately as far as I can see, the latest version of Ubuntu provided with the legacy image is version 20.04.1 LTS and the link below, I didn’t found any hint on the web if the legacy images will be continued by Canonical.
http://cdimage.ubuntu.com/ubuntu-legacy-server/releases/20.04/release/
So for this post and installation I will be using the latest live version as of today is 22.04.1.
To set up sssd I will using the following documentation from Canonical.
SSSD and Active Directory
https://ubuntu.com/server/docs/service-sssd-ad
Install sssd package
I was installing the minimized version, so I will first install some basic networking utilities and the nano editor.
$ sudo apt install iputils-ping
$ sudo apt install inetutils-tools
$ sudo apt install nano
Then I will install the following packages we need to set up sssd.
$ sudo apt install sssd-ad sssd-tools realmd adcli
Join the domain
We are using the realm command from the realmd package we previously installed to join the domain and set up the sssd configuration.
First we will verify if our AD domain is discoverable via DNS.
$ sudo realm -v discover <domain-name>
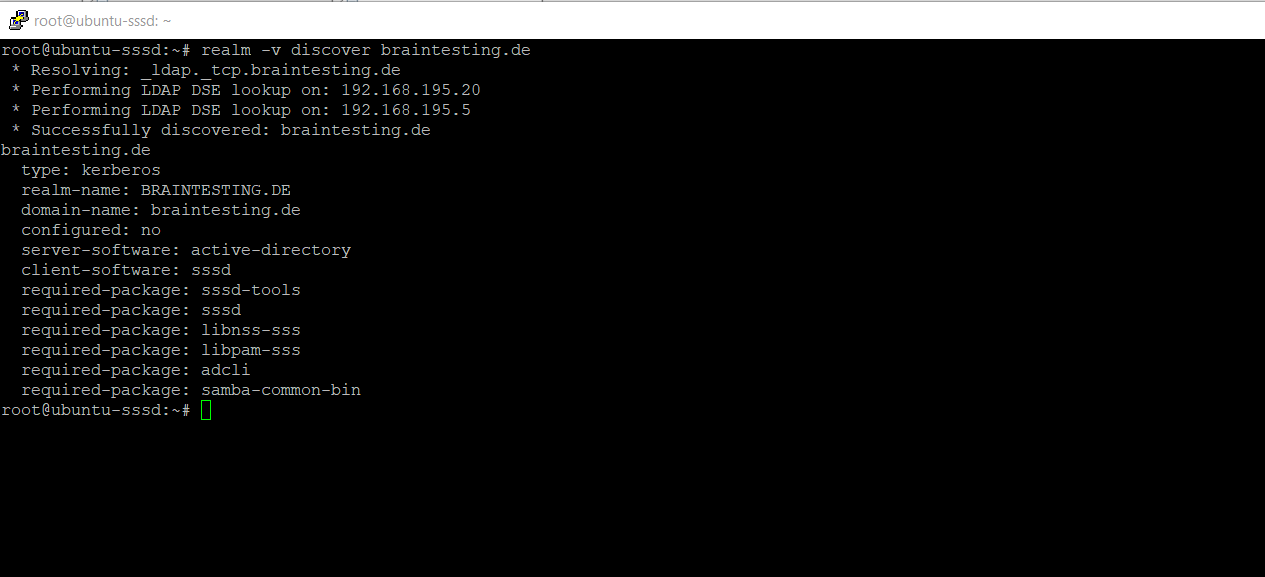
This performs several checks and determines the best software stack to use with sssd. sssd can install the missing packages via packagekit, but we installed them already previously.
To join the Ubuntu server to my AD domain braintesting.de I will use the following command.
$ sudo realm join <domain-name> -U <username@DOMAIN.TLD> -v
!! Note !!
The domain name portion from the username must be in capital letters, otherwise you will run into the error shown below.The -v flag for verbose will provide you with detailed information about the join or potential errors.
You can also leave out the -U flag, in this case it will try to join the domain by using the default Administrator account. In case you renamed it or using another user account which is member of the domain administrators group, you need to use the -U flag and enter the name of the account.
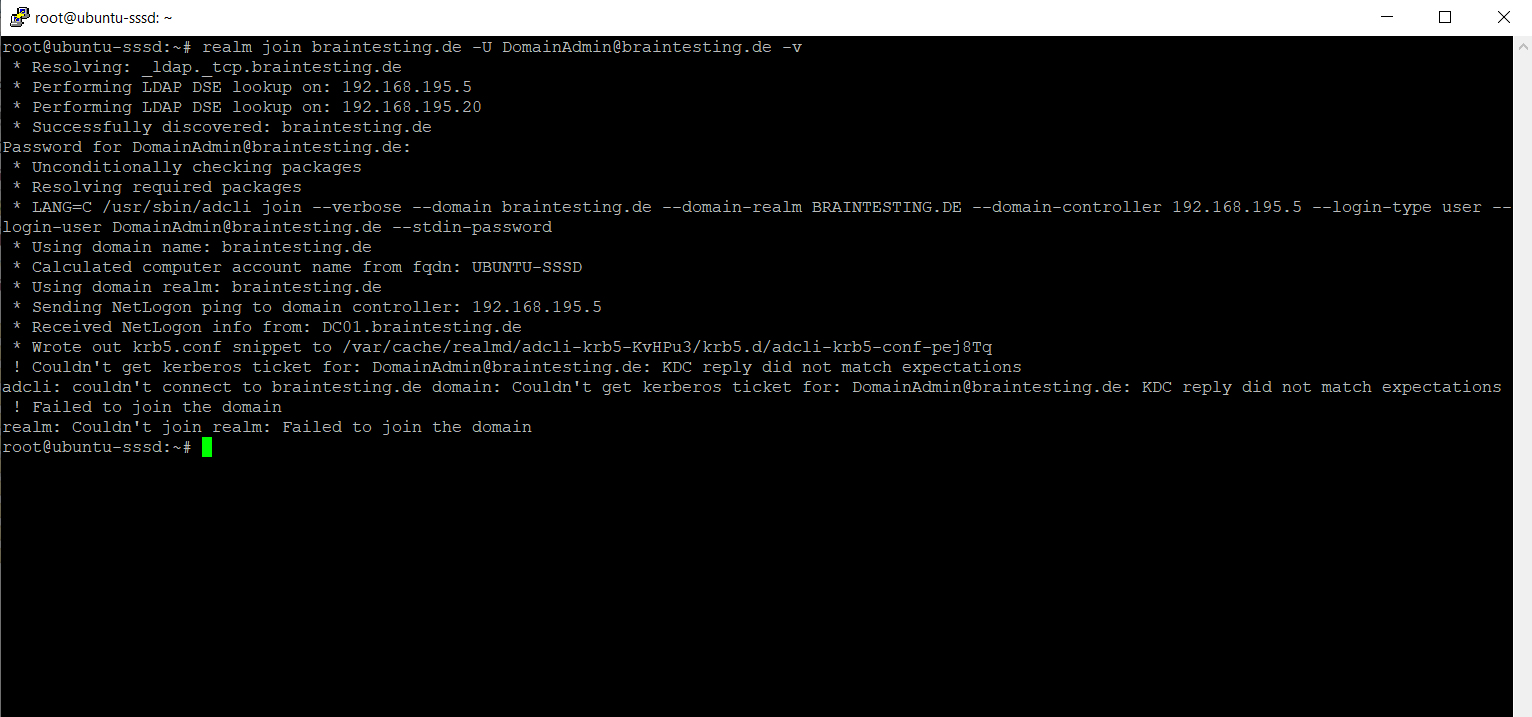
So the first try to join the Ubuntu server to my domain failed with the following error messages. The reason for was as mentioned not using capital letters for the domain portion of the username.
! Couldn’t get kerberos ticket for: <my domain admin user>: KDC reply did not match expectation adcli: couldn’t connect to <my domain> domain: Couldn’t get kerberos ticket for: <my domain admin user>: KDC reply did not match expectations ! Failed to join the domain
realm: Couldn’t join realm: Failed to join the domain
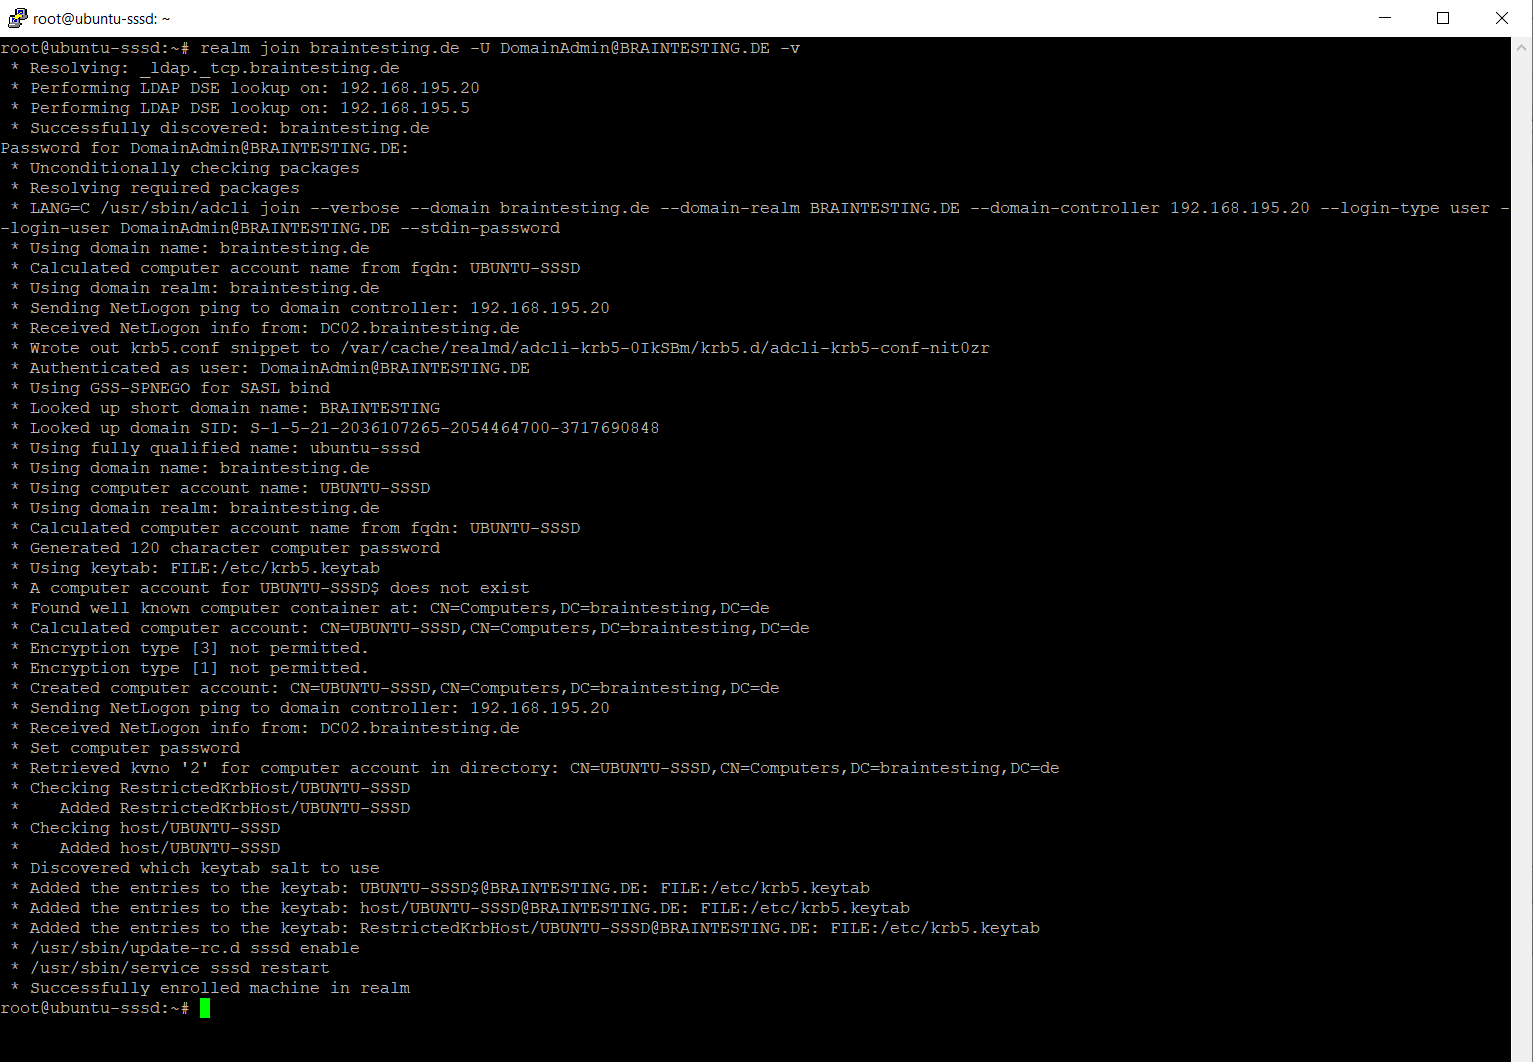
So when I use capital letters for the domain name portion of the username, I was able to join the Ubuntu server to my AD domain from my lab environment as shown below.
Successfully enrolled machine in realm
MIT Kerberos Documentation
https://web.mit.edu/kerberos/krb5-1.12/doc/admin/realm_config.htmlAlthough your Kerberos realm can be any ASCII string, convention is to make it the same as your domain name, in upper-case letters.
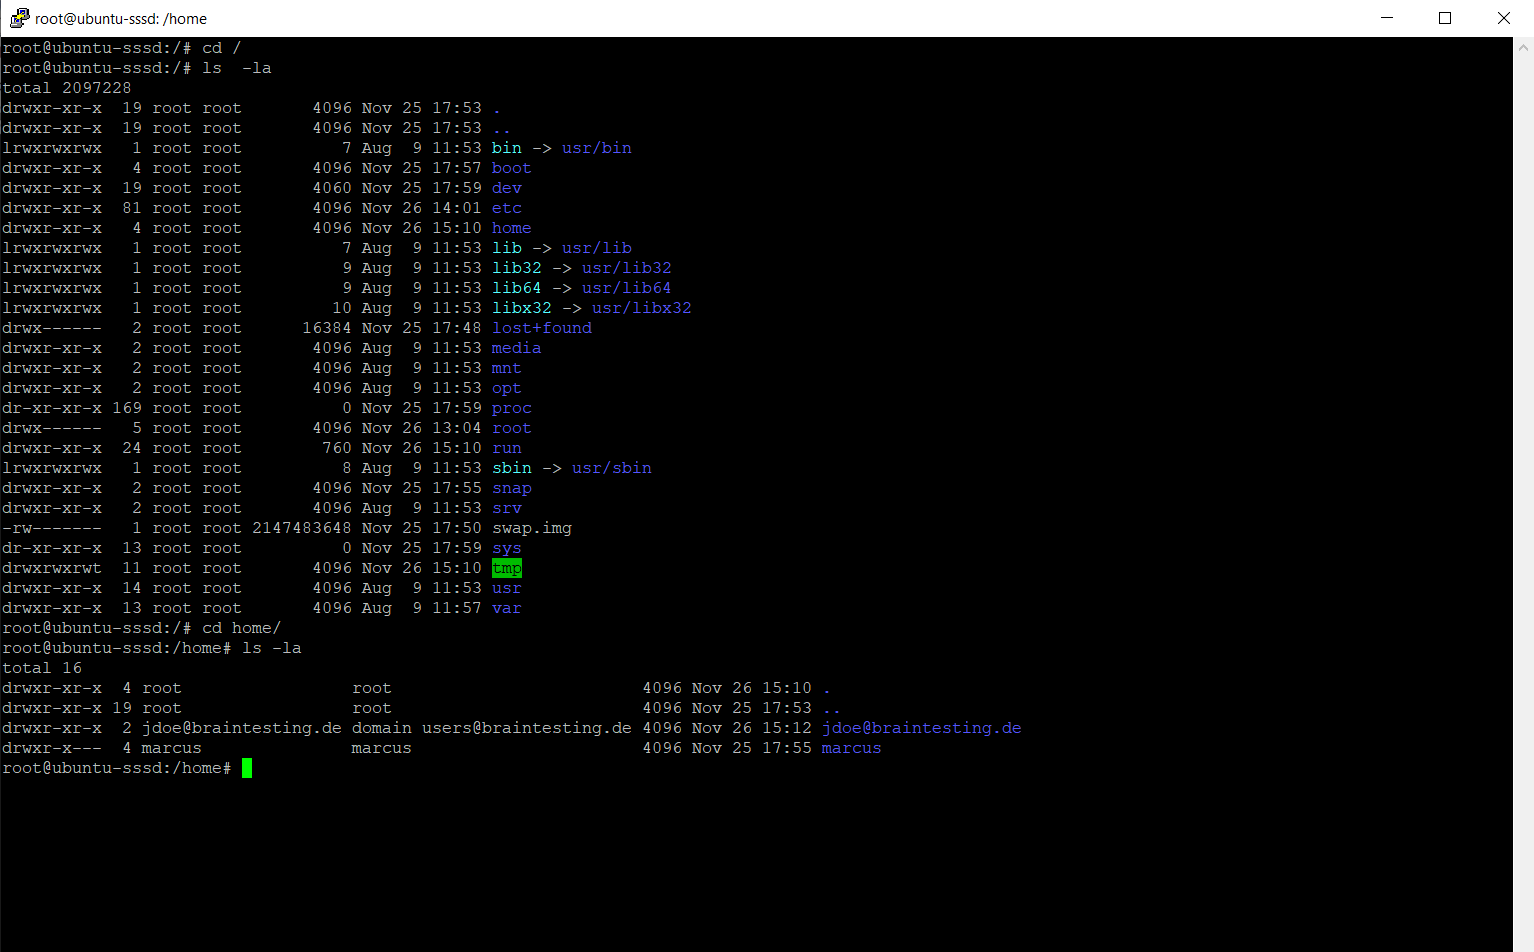
After the join, my Ubuntu server will appear in my lab environements Active Directory.
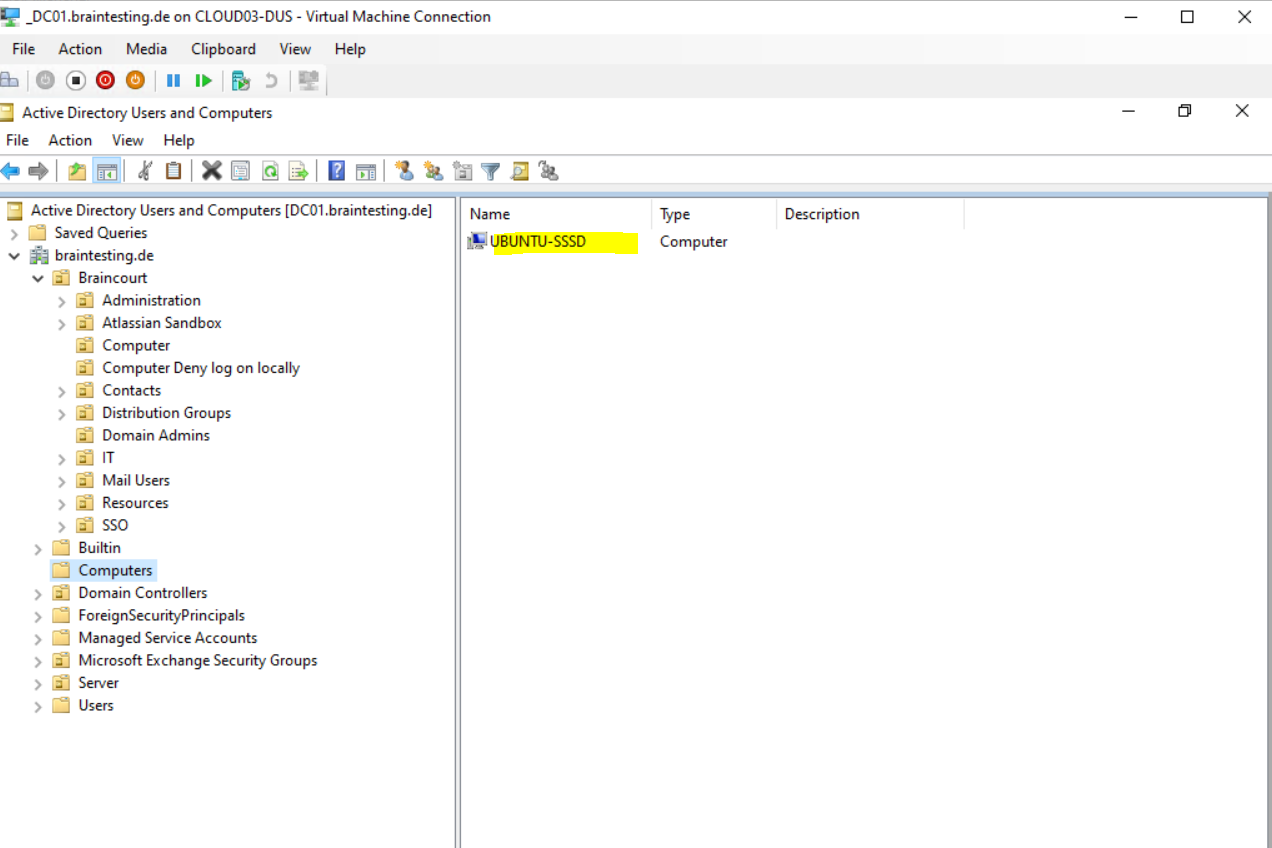
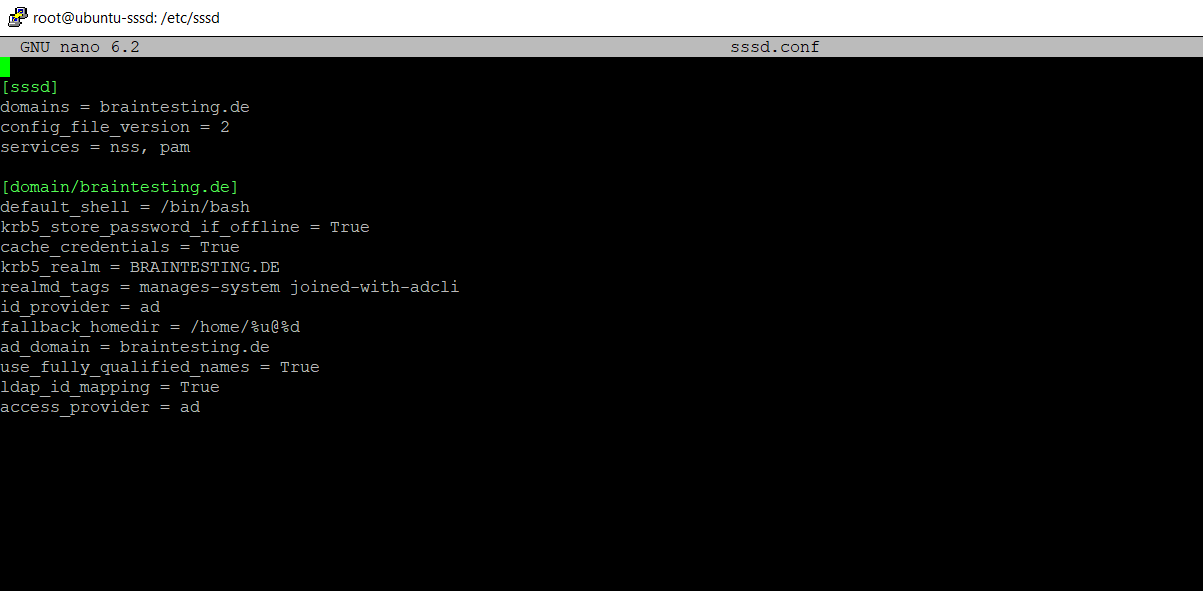
The realm tool also already created an sssd configuration in the following path and sssd.conf file.
/etc/sssd/sssd.conf
It was also adding the pam and nss mudules.
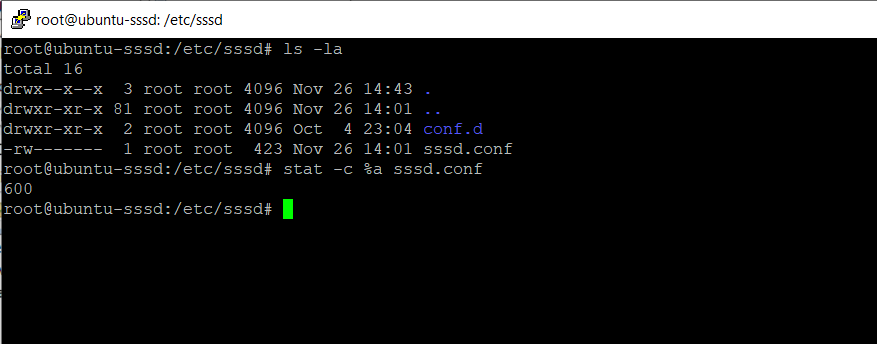
Something very important to remember is that this file must have permissions 0600 and ownership root:root, or else sssd won’t start!
Configuration parameter in sssd.conf
- cache_credentials: Users can login with cached credentials in case the domain controller is unreachable.
- home directory: by default /home/<user>@<domain>.
- use_fully_qualified_names: users will be of the form user@domain, not just user. This should only be changed if you are certain no other domains will ever join the AD forest, via one of the several possible trust relationships
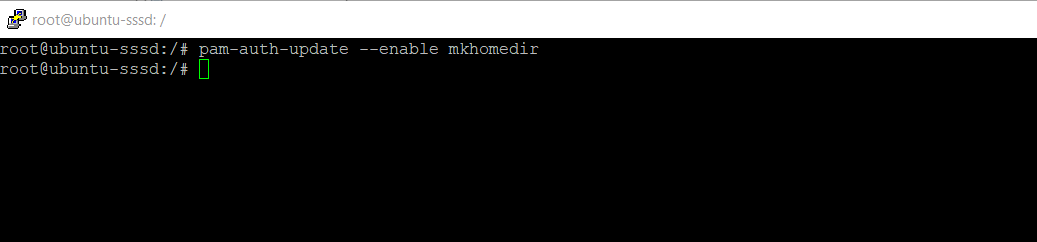
Finally in order users will get its own home directory on the Ubuntu server after the login, we need to execute the following command.
$ sudo pam-auth-update –enable mkhomedir
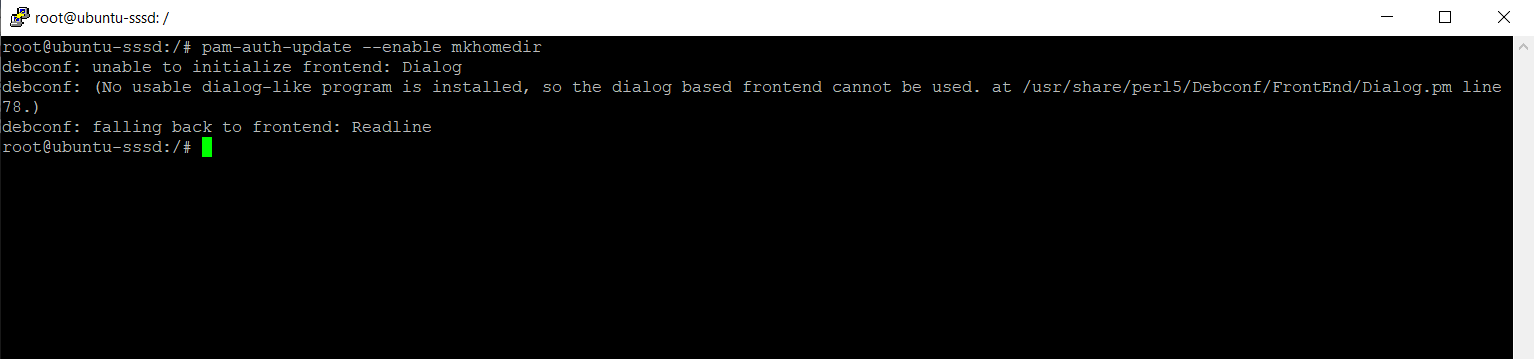
I was getting the following error for the command above.
debconf: unable to initialize frontend: Dialog
debconf: (No usable dialog-like program is installed, so the dialog based frontend cannot be used. at /usr/share/perl5/Debconf/FrontEnd/Dialog.pm line 78.)
debconf: falling back to frontend: Readline
The reason for was my minimized Ubuntu server installation. So I also have to install the following package.
$ sudo apt-get install dialog apt-utils
After that I was able to execute the above command successfully.
Testing
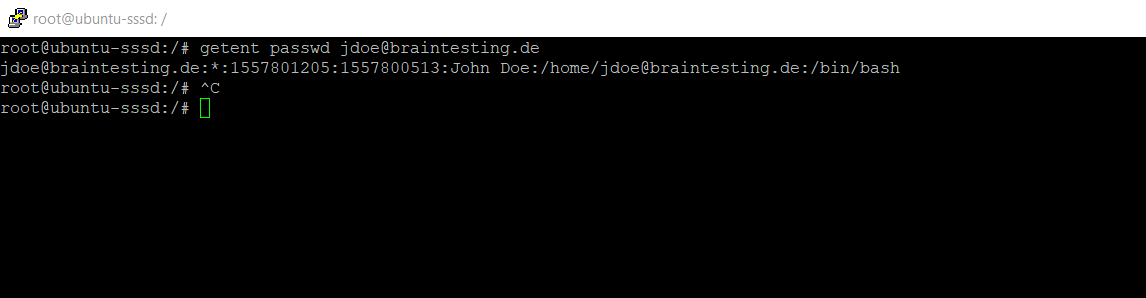
From now on we should be able to fetch information from the Active Directory about users.
$ getent passwd jdoe@braintesting.de
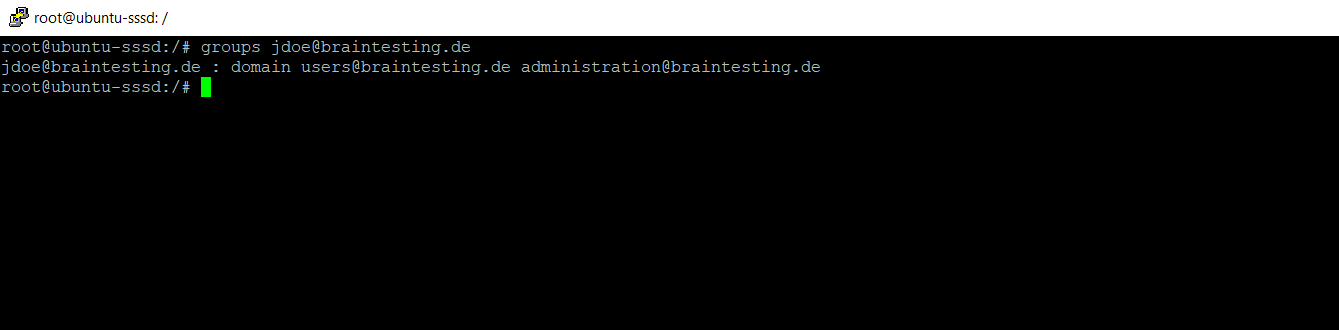
To determin the users group membership we can use the following command.
$ groups jdoe@braintesting.de
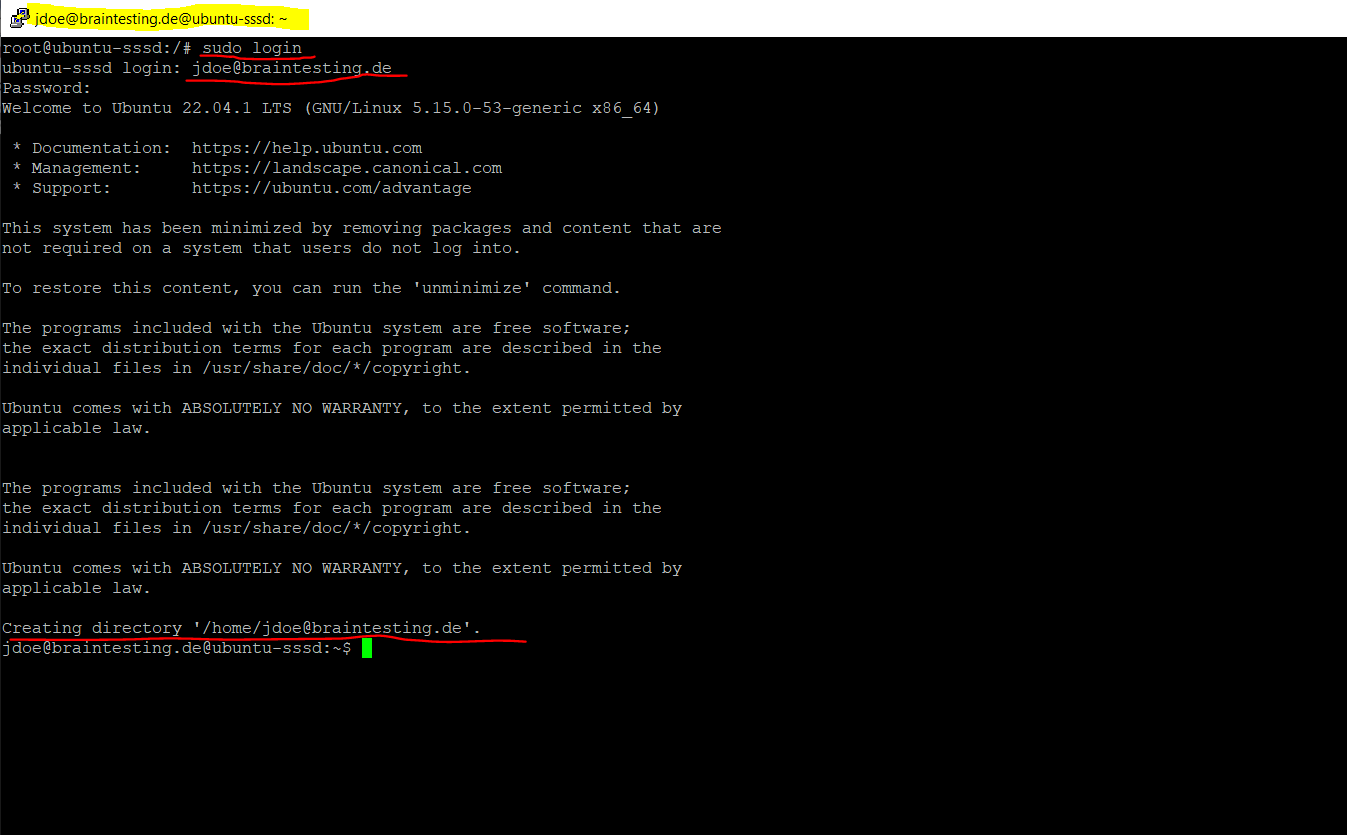
Now we can try if users can login to my Ubuntu server by using their domain accounts.
$ sudo login
Below you can see that also the users home directory was created.
Further as I was using here SSH and putty, the username in the caption from putty changed from root to my AD user.
You can also install the following kerberos client to view the kerberos ticket for logged on AD user.
$ sudo apt install krb5-user
$ klist
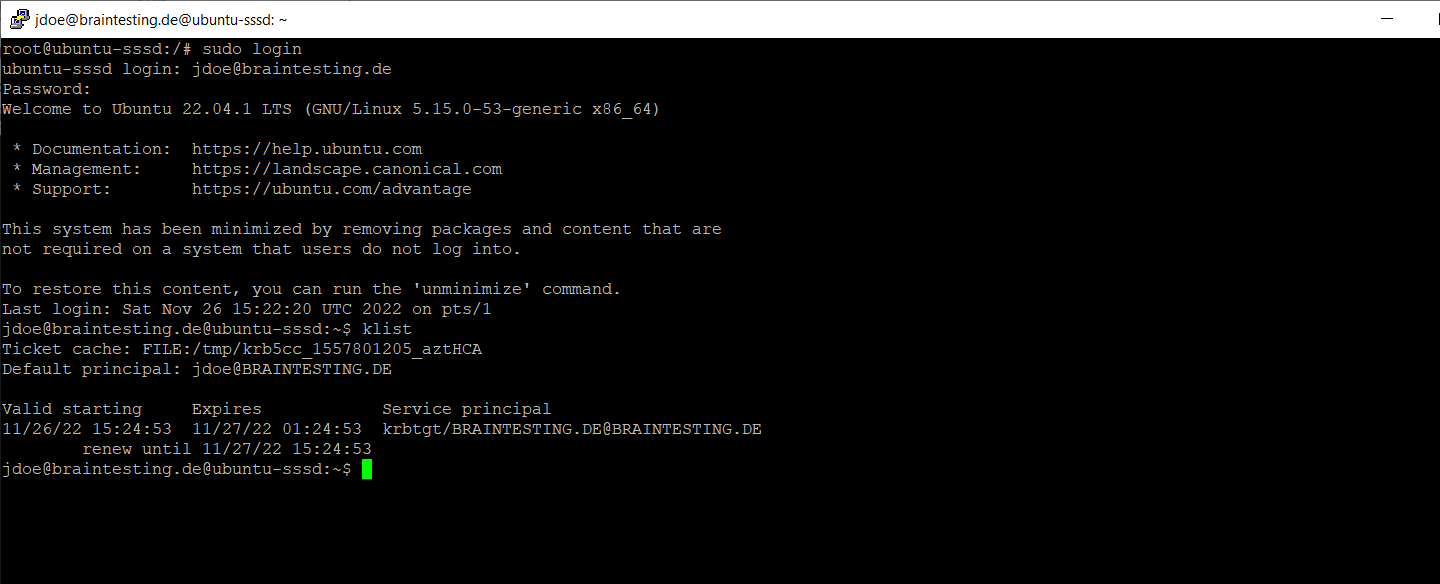
realm also configured /etc/krb5.conf for you, so there should be no further configuration prompts when installing krb5-user

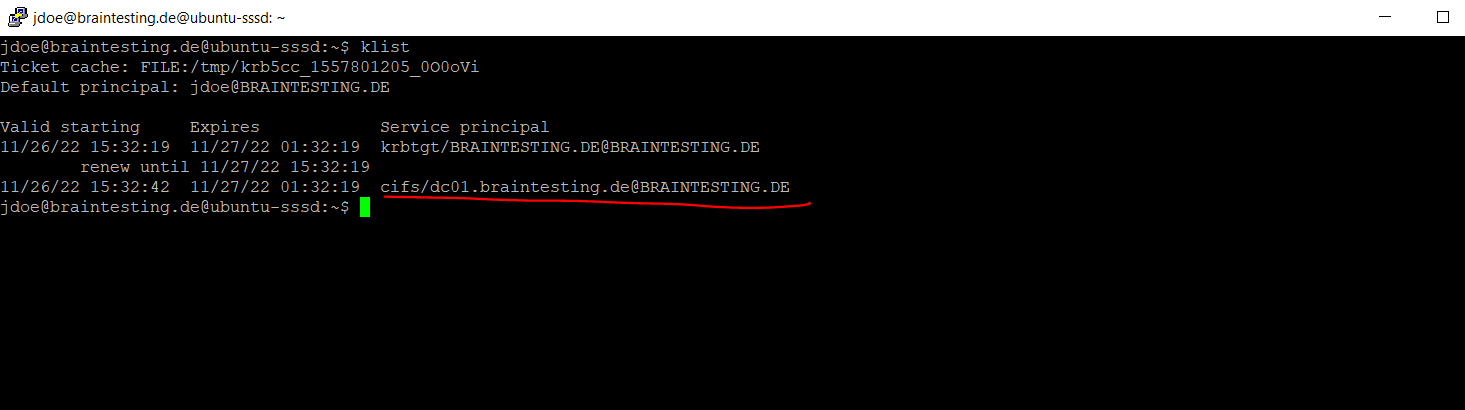
You can also check to access SMB Shares like the DCs default shares. Therefore I first need to install the smbclient on my minimized Ubuntu server installation.
$ sudo apt install smbclient
$ smbclient -k -L dc01.braintesting.de

You can also see that my AD user John Doe was getting a kerberos ticket for the cifs service to access the SMB shares from the domain controller.
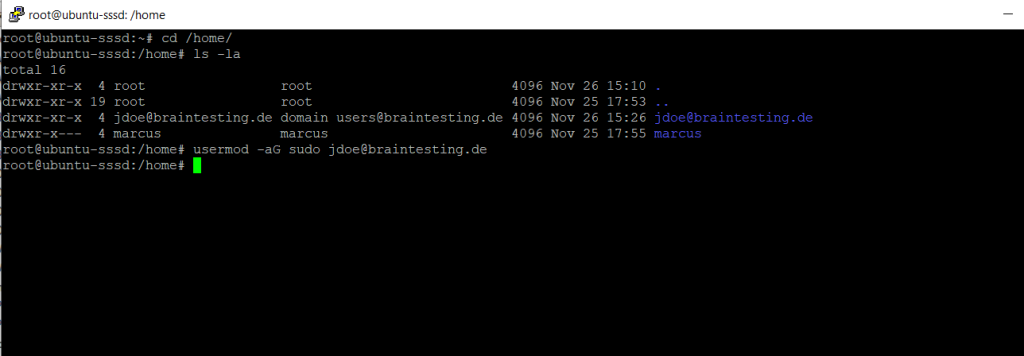
Adding Domain User to the sudo Group
If you want to grant the domain user local admin rights on the Ubuntu server, you can add them to the sudo group as usual.
$ usermod -aG sudo jdoe@braintesting.de
or
$ adduser jdoe@braintesting.de sudoTo remove the user from the sudo group use
$ deluser jdoe@braintesting.de sudo
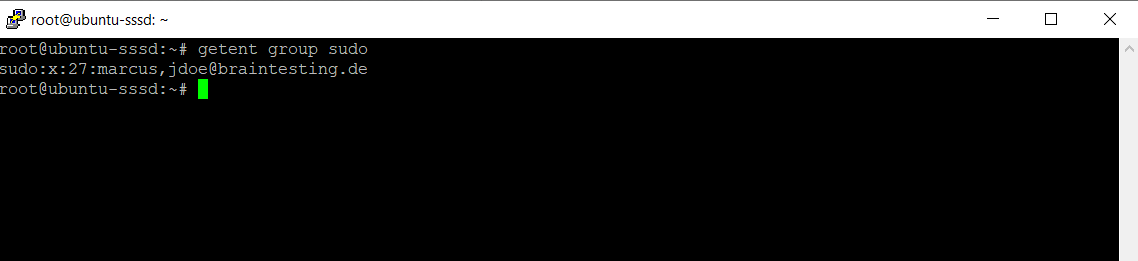
To determine which users are member of the sudo group you can use the following commands.
$ getent group sudo
More about th sudo command and /etc/sudoers file you can read in my following post.
Leaving a Domain
The domain name portion from the username must be in capital letters as previously for the domain join.
$ sudo realm leave <domain-name> -U <username@DOMAIN.TLD> --remove
Links
SSSD and Active Directory
https://ubuntu.com/server/docs/service-sssd-adsssd – Open Source Client for Enterprise Identity Management
https://sssd.io/docs/introduction.htmlcloud-init support for virtual machines in Azure
https://learn.microsoft.com/en-us/azure/virtual-machines/linux/using-cloud-init#cloud-init-overviewJoin a Linux VM to a domain
https://cloud.google.com/managed-microsoft-ad/docs/quickstart-domain-join-linux