

Upgrade NetApp Cloud Volumes ONTAP in Azure – Using Manually Uploaded ONTAP Images
Keeping NetApp Cloud Volumes ONTAP (CVO) up to date is essential for maintaining security, stability, and compatibility with the underlying Azure infrastructure. However, newly released ONTAP versions are not always immediately available through the built-in upgrade selection in NetApp Console.
In my previous article, Deploying NetApp Cloud Volumes ONTAP – Part 1, I covered the initial deployment of Cloud Volumes ONTAP in Microsoft Azure, including the architecture and configuration of a two-node high-availability (HA) cluster.
Later, in Deploying NetApp Cloud Volumes ONTAP – Part 6, I demonstrated the standard upgrade procedure using the ONTAP software versions provided directly through NetApp Console.
In this article, we’ll take a different approach and walk through upgrading Cloud Volumes ONTAP by manually uploading an ONTAP software image.
For this demonstration, we’ll upgrade an existing two-node Cloud Volumes ONTAP HA cluster running ONTAP 9.17.1P3 to ONTAP 9.18.1P7, deployed across multiple Azure Availability Zones.
We’ll examine how to obtain and provide the software image, initiate the upgrade through NetApp Console, and monitor the upgrade process. We’ll also look at how the HA nodes behave during the upgrade and verify the ONTAP version and high-availability status afterward.
This approach is particularly useful when a required ONTAP release is supported for Cloud Volumes ONTAP but has not yet appeared in NetApp Console’s standard upgrade selection.
- Checking the Current ONTAP Version Before the Upgrade
- Supported Upgrade Paths and Manually Uploaded ONTAP Images
- Desired ONTAP Upgrade Version Not Available in NetApp Console
- Manually Uploading the ONTAP Software Image
- Preparing the ONTAP Image on the NetApp Console Connector
- Upgrading Cloud Volumes ONTAP Using the Manually Uploaded Image
- Links
Checking the Current ONTAP Version Before the Upgrade
Before starting the upgrade, we first need to verify the currently installed ONTAP version on our Cloud Volumes ONTAP HA cluster.
During the initial deployment through NetApp Console, I was explicitly selected ONTAP 9.17.1P1. However, checking the running version afterward revealed that both nodes were already running ONTAP 9.17.1P8, even though I had not manually initiated an upgrade.
To investigate further, we can switch to advanced privilege mode and display the installed ONTAP software images on both HA nodes:
version
set -privilege advanced
system image show
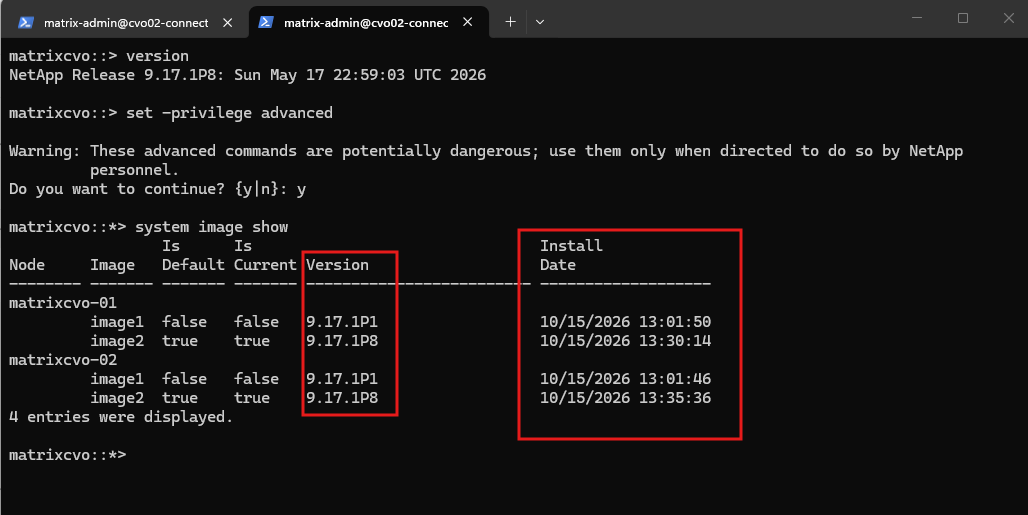
The output confirms that both nodes were initially installed with ONTAP 9.17.1P1 on October 15, 2026, at approximately 13:01. However, a second software image containing ONTAP 9.17.1P8 was installed approximately 30 minutes later.
On both nodes, image2 is marked as the current and default boot image, while the original 9.17.1P1 image remains available as image1.
This suggests that the ONTAP software was automatically updated during the initial provisioning process, although the exact trigger has not yet been confirmed.
Therefore, our starting point for the following manual upgrade procedure is ONTAP 9.17.1P8 rather than the originally selected 9.17.1P1.
Supported Upgrade Paths and Manually Uploaded ONTAP Images
NetApp Cloud Volumes ONTAP upgrades are normally performed through the NetApp Console, which provides the available software versions and manages the upgrade process. However, newly released ONTAP versions and patch releases may not immediately appear in the Console’s regular upgrade selection.
In my case, we want to upgrade my Azure Cloud Volumes ONTAP HA pair from ONTAP 9.17.1P3 to 9.18.1P7. While the target version is not yet available through the regular upgrade selection, we can provide the software image manually and initiate the upgrade through NetApp Console.
Before upgrading, we must consider the supported Cloud Volumes ONTAP upgrade paths, which differ from those for on-premises ONTAP clusters.
As a general rule, upgrades are supported within the current release branch or to the next supported release branch, provided the specific upgrade path is supported by NetApp.
For example:
- Within the current release branch: ONTAP 9.17.1P3 → the latest available patch release of 9.17.1 (for example, 9.17.1P11).
- To the next supported release branch: ONTAP 9.17.1P3 → 9.18.1P7
- Skipping a release branch: ONTAP 9.17.1 → 9.19.1 is not a supported direct upgrade path.
For patch releases, NetApp generally allows upgrades from a lower patch level to a higher patch level within the same or next supported Cloud Volumes ONTAP release.
The official documentation provides the supported upgrade paths for AWS, Azure, and Google Cloud, along with the patch release requirements:
NetApp Documentation – Supported Upgrade Paths and Patch Releases
Important: Manually providing an ONTAP image does not bypass these upgrade restrictions. Cloud Volumes ONTAP upgrades must still be initiated through NetApp Console, not directly through ONTAP System Manager or the ONTAP CLI.
Desired ONTAP Upgrade Version Not Available in NetApp Console
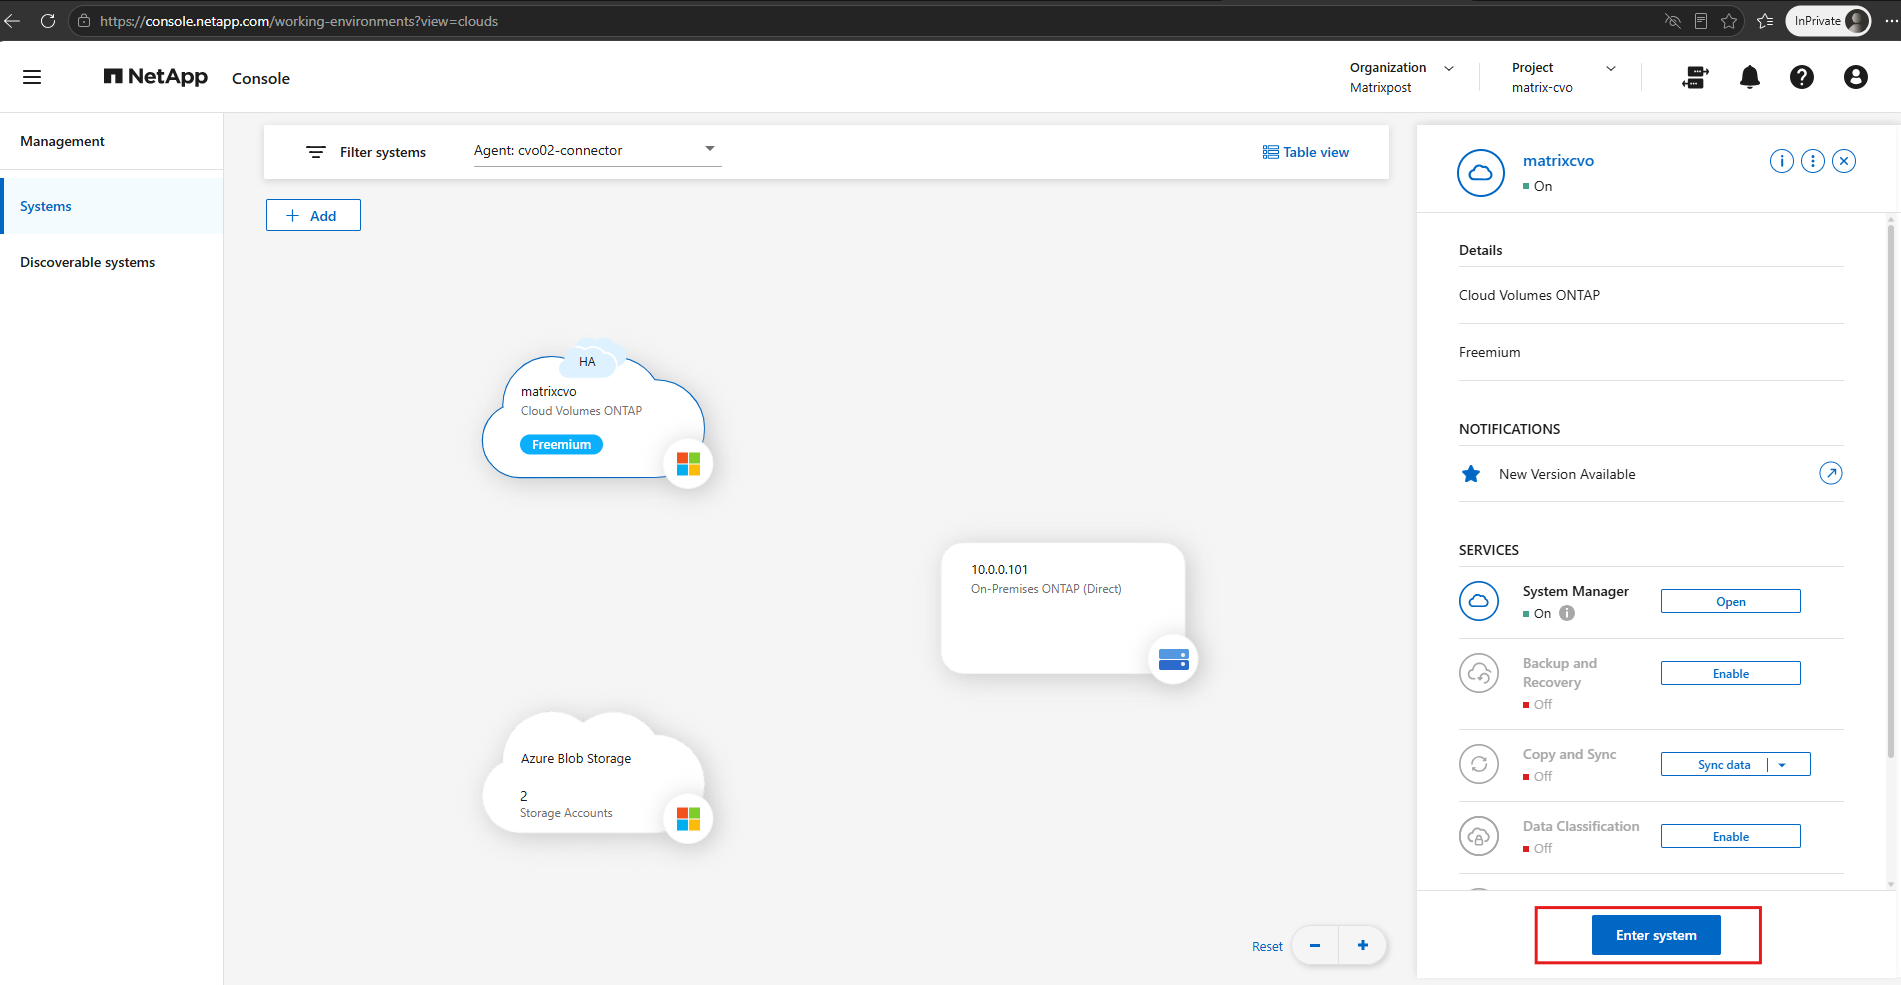
To initiate the upgrade, navigate to NetApp Console → Systems, select the Cloud Volumes ONTAP system, click Enter system.
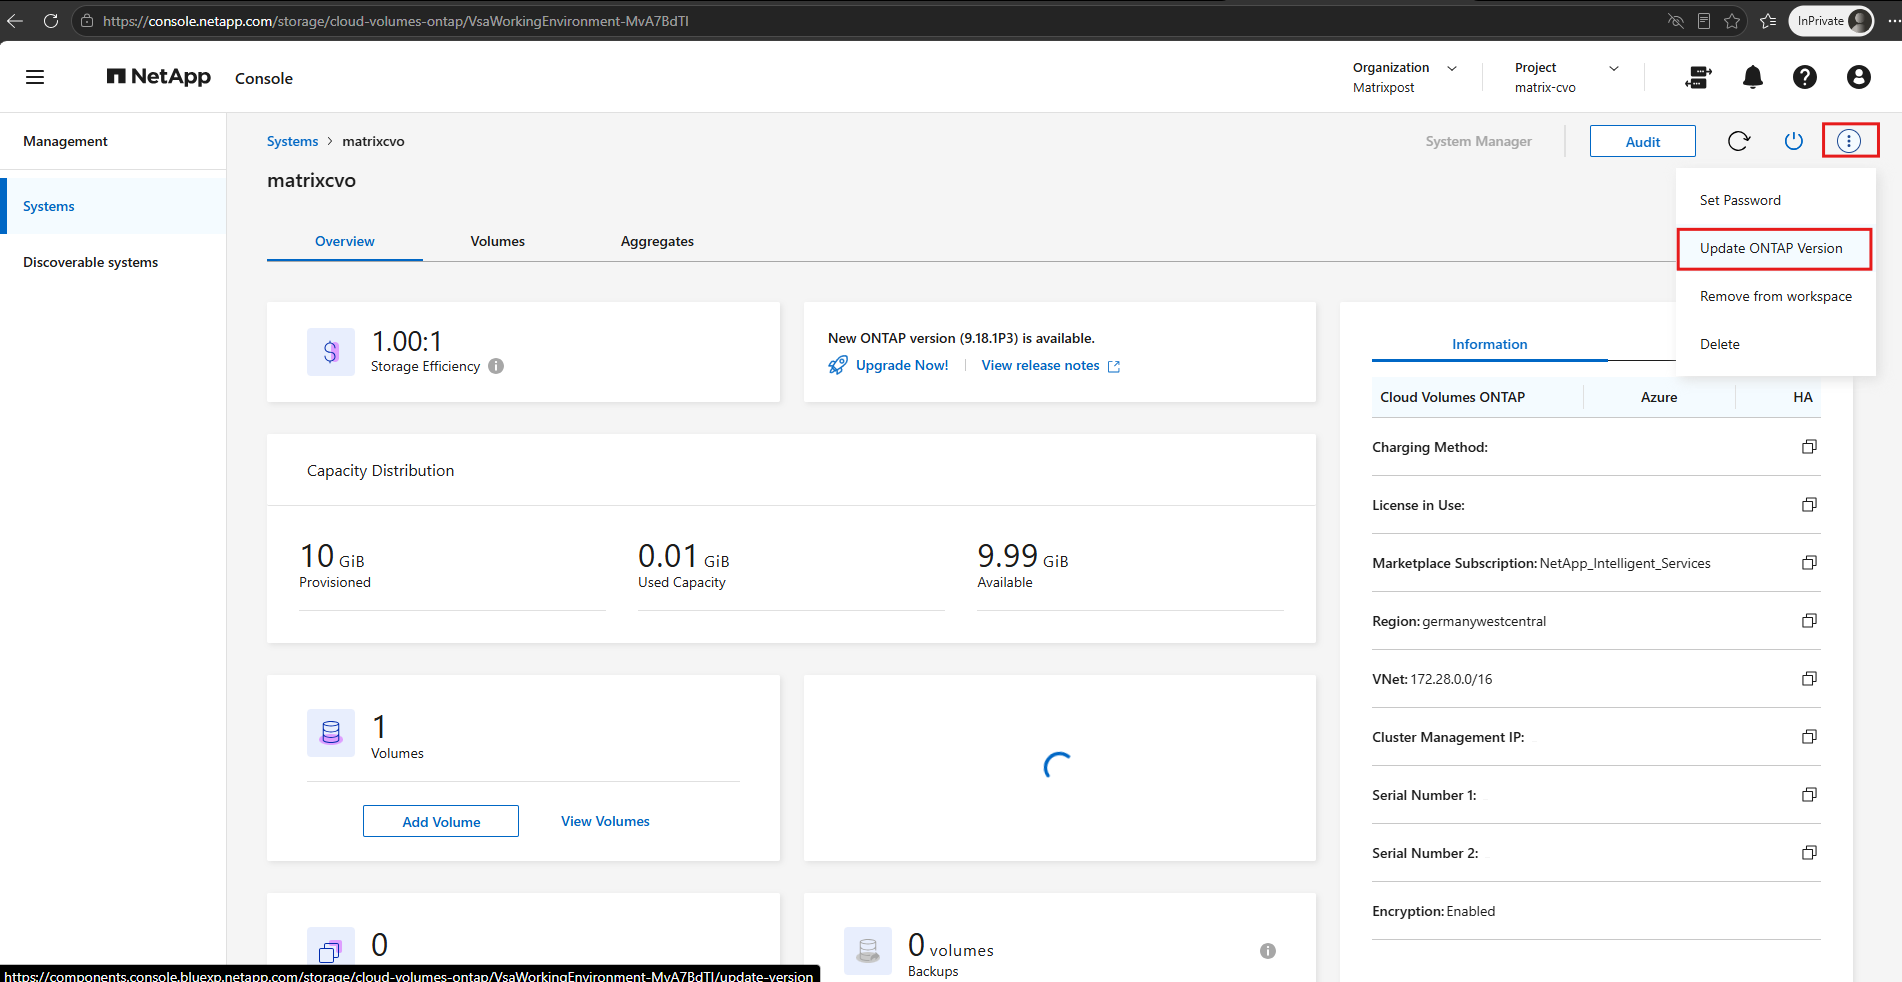
Select Upgrade Now.
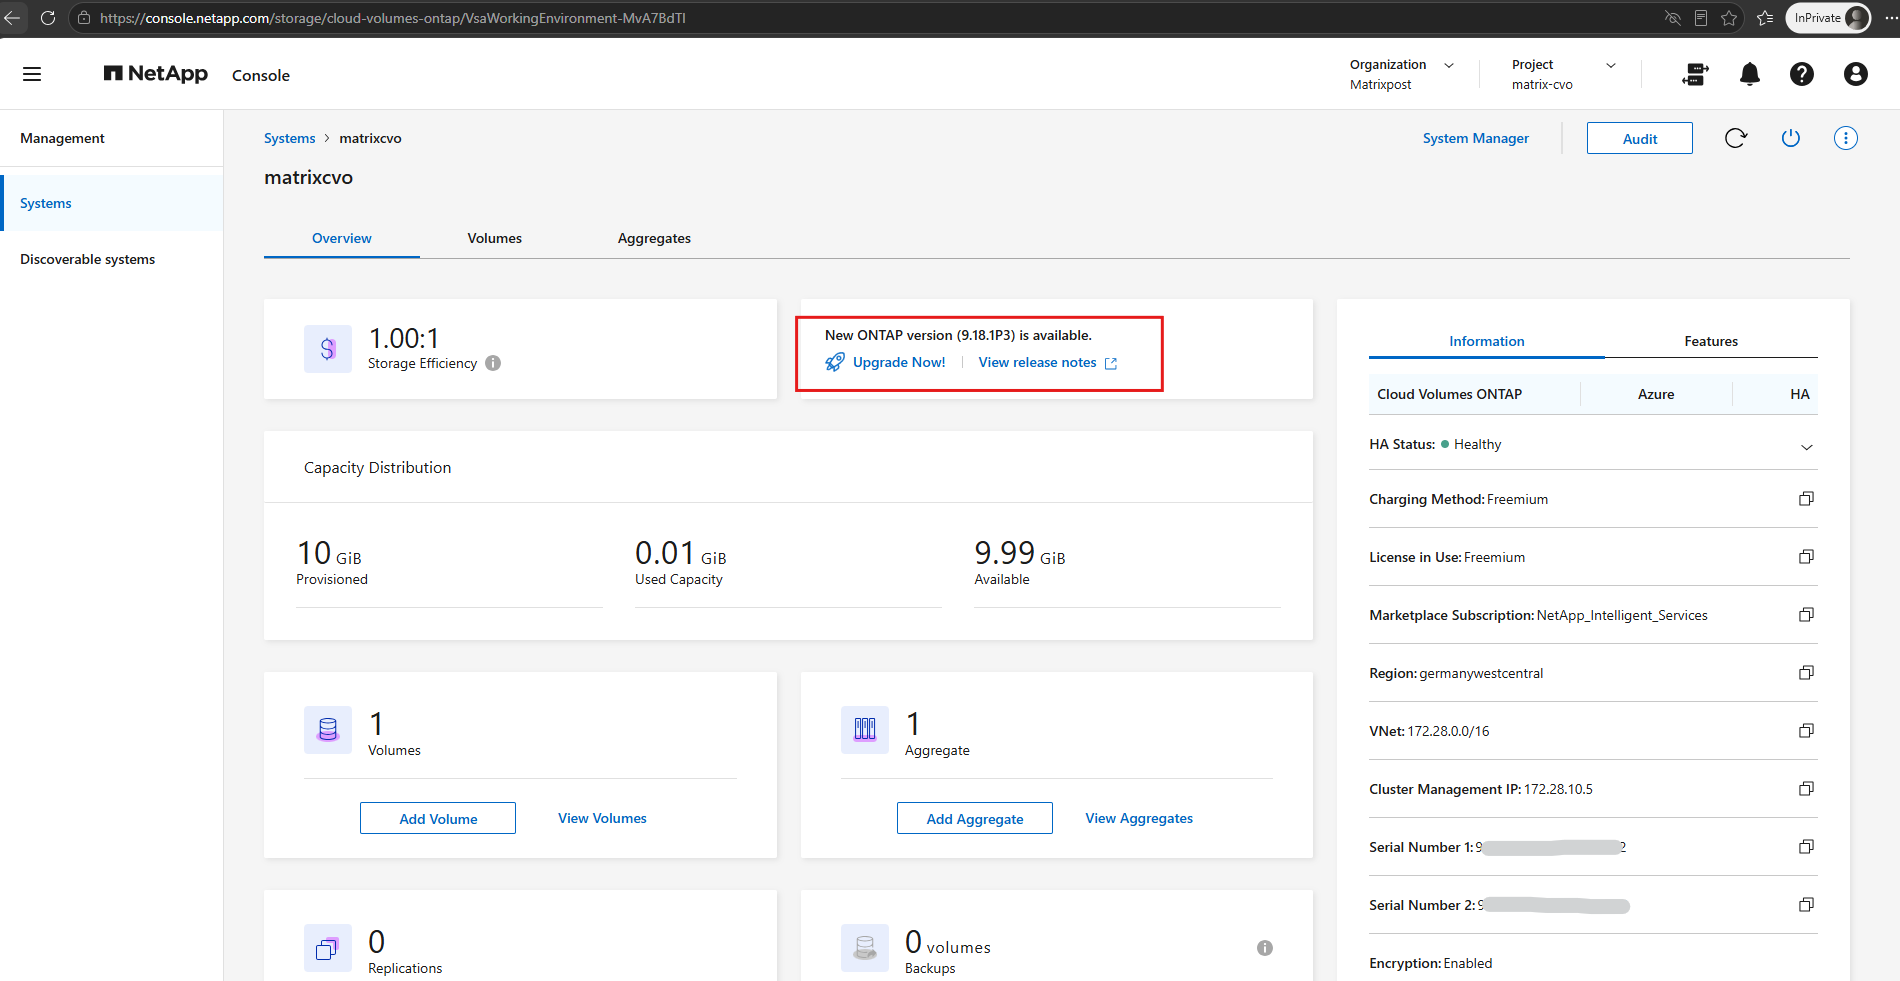
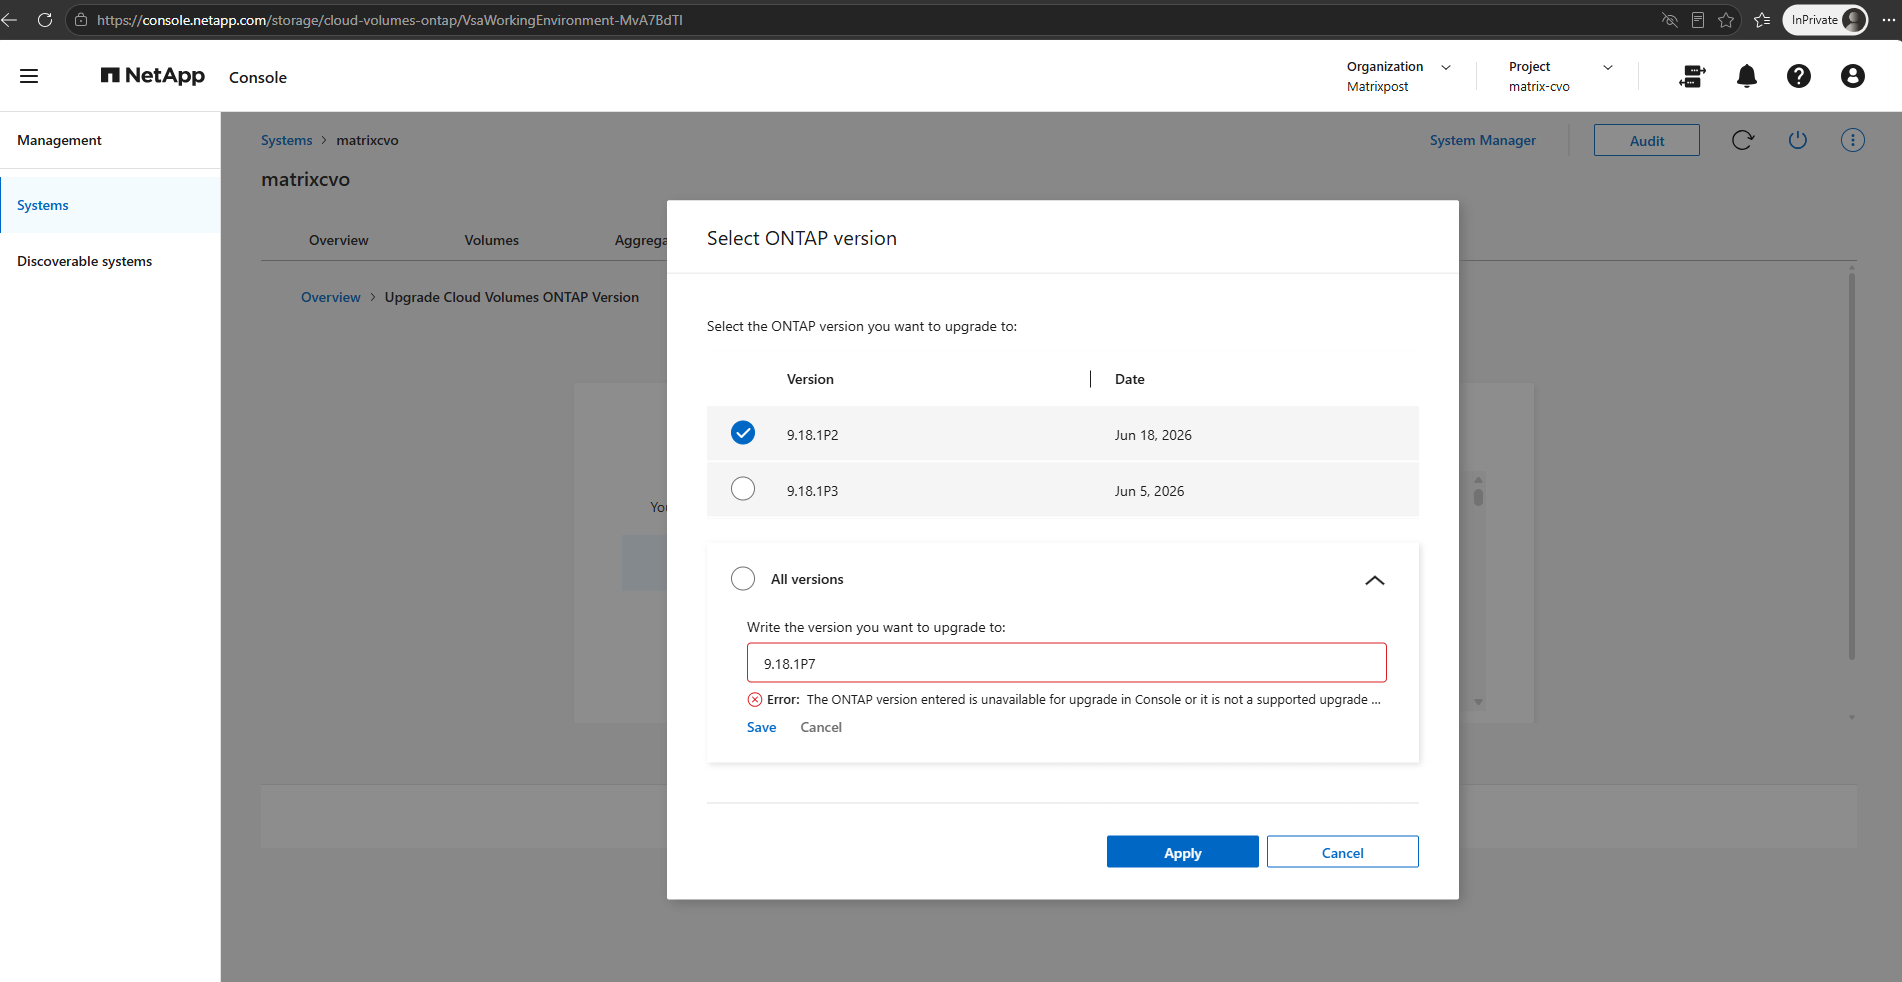
However, the desired target version ONTAP 9.18.1P7 is not listed among the available releases.
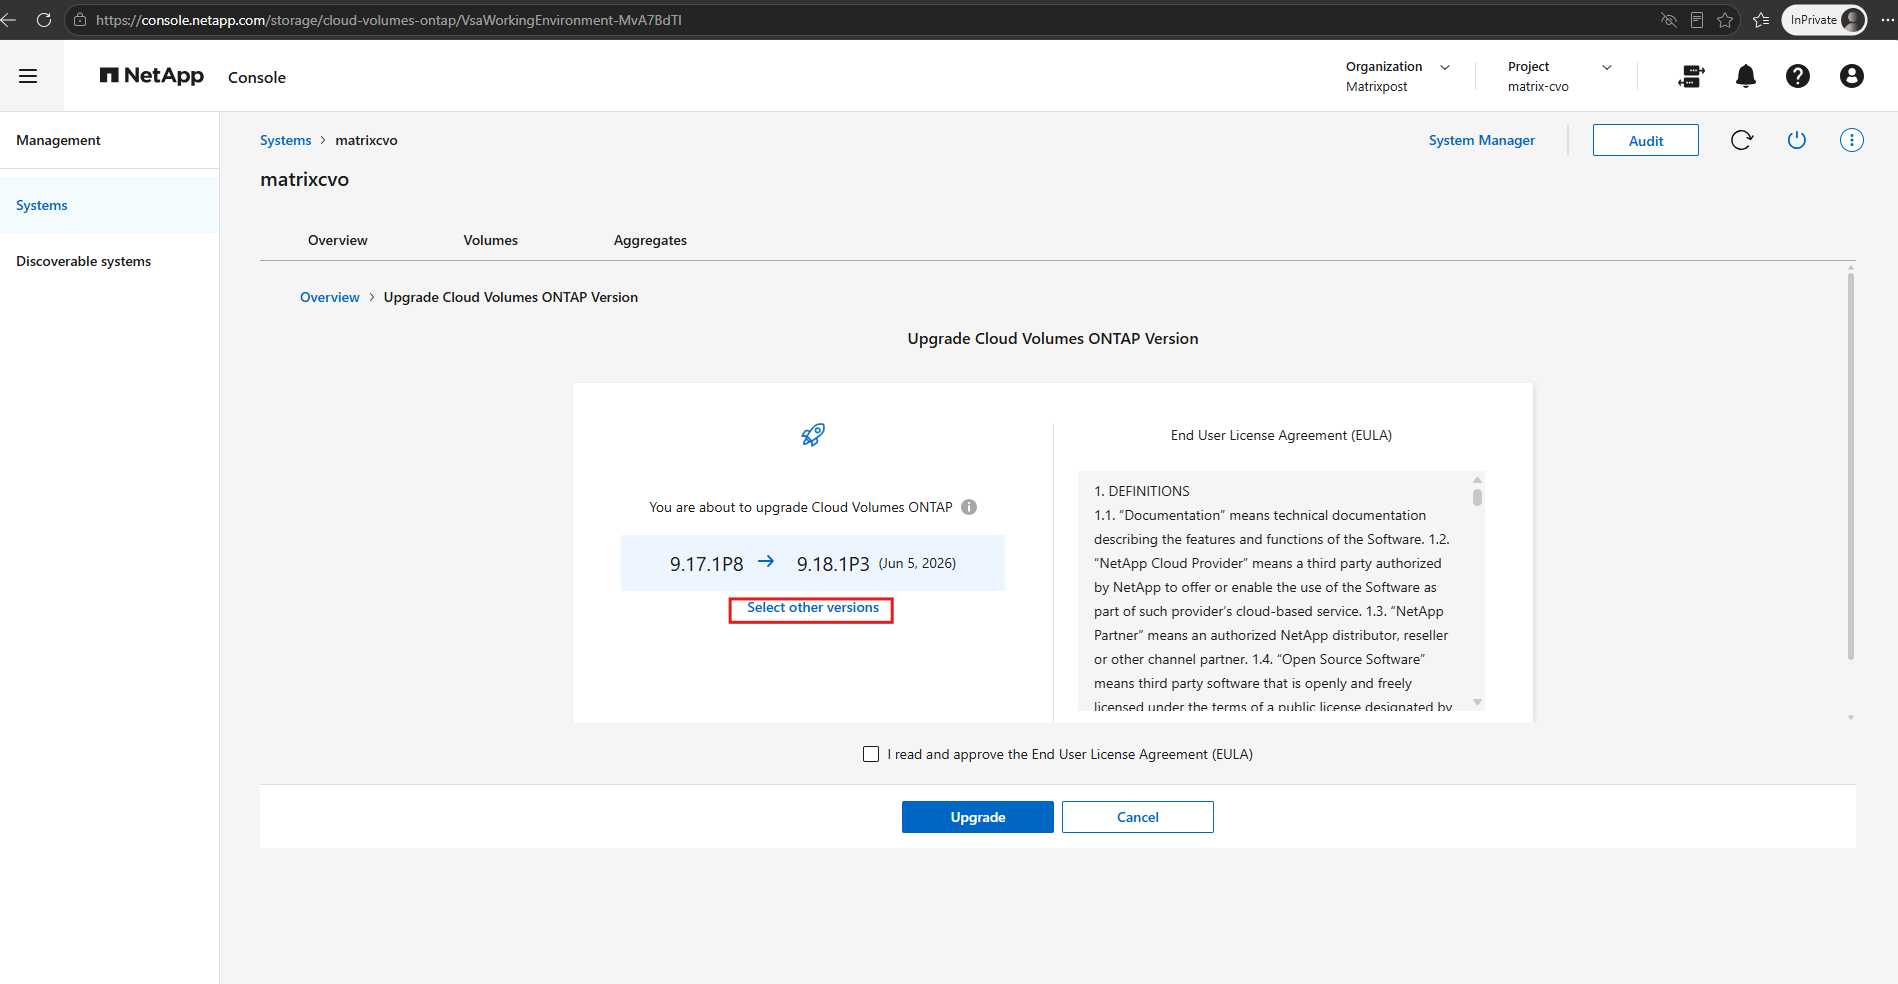
Even when manually entering the version under All versions, NetApp Console rejects it as unavailable or unsupported for the selected upgrade path.
However, as already discussed in the section “Supported Upgrade Paths and Manually Uploaded ONTAP Images”, upgrading our Cloud Volumes ONTAP HA cluster to ONTAP 9.18.1P7 is supported. The limitation here is the availability of the release through NetApp Console, not the upgrade path itself.
Manually Uploading the ONTAP Software Image
Since our desired target version, ONTAP 9.18.1P7, is not yet available through NetApp Console’s built-in upgrade selection, we’ll use a manually provided ONTAP software image instead.
In the following steps, we’ll download the appropriate Cloud Volumes ONTAP software image from NetApp and explore how to make it available for the upgrade of our existing two-node HA cluster in Microsoft Azure.
Downloading the ONTAP Software Image
First, we need to download the appropriate ONTAP software image for our target release, ONTAP 9.18.1P7.
Navigate to the NetApp Support Site and locate the Cloud Volumes ONTAP software downloads. Select the required ONTAP release and download the software image suitable for our Azure Cloud Volumes ONTAP deployment.
Make sure to select the correct image for Cloud Volumes ONTAP rather than an installation package intended for a different ONTAP platform.
We’ll use this image in the following steps to perform the upgrade outside NetApp Console’s predefined version selection.
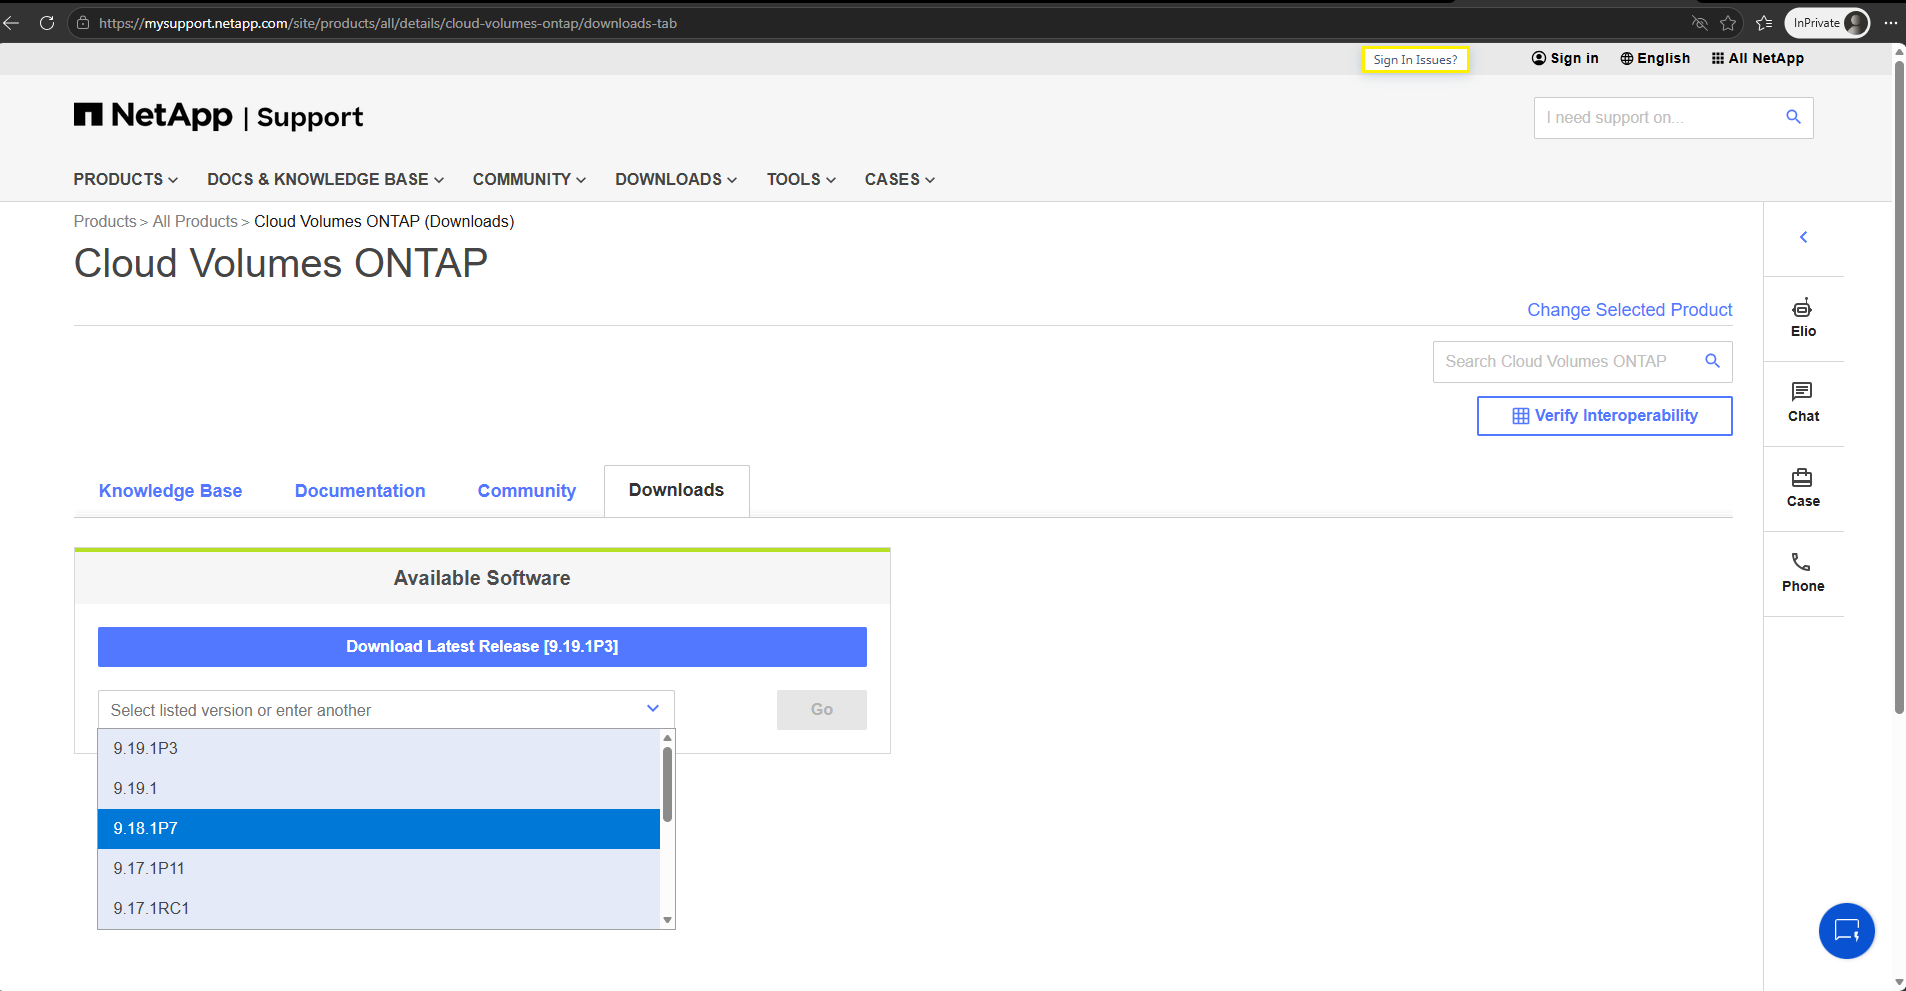
Under Available Software, open the version dropdown and select our desired target release, ONTAP 9.18.1P7, then click Go to proceed to the download page.
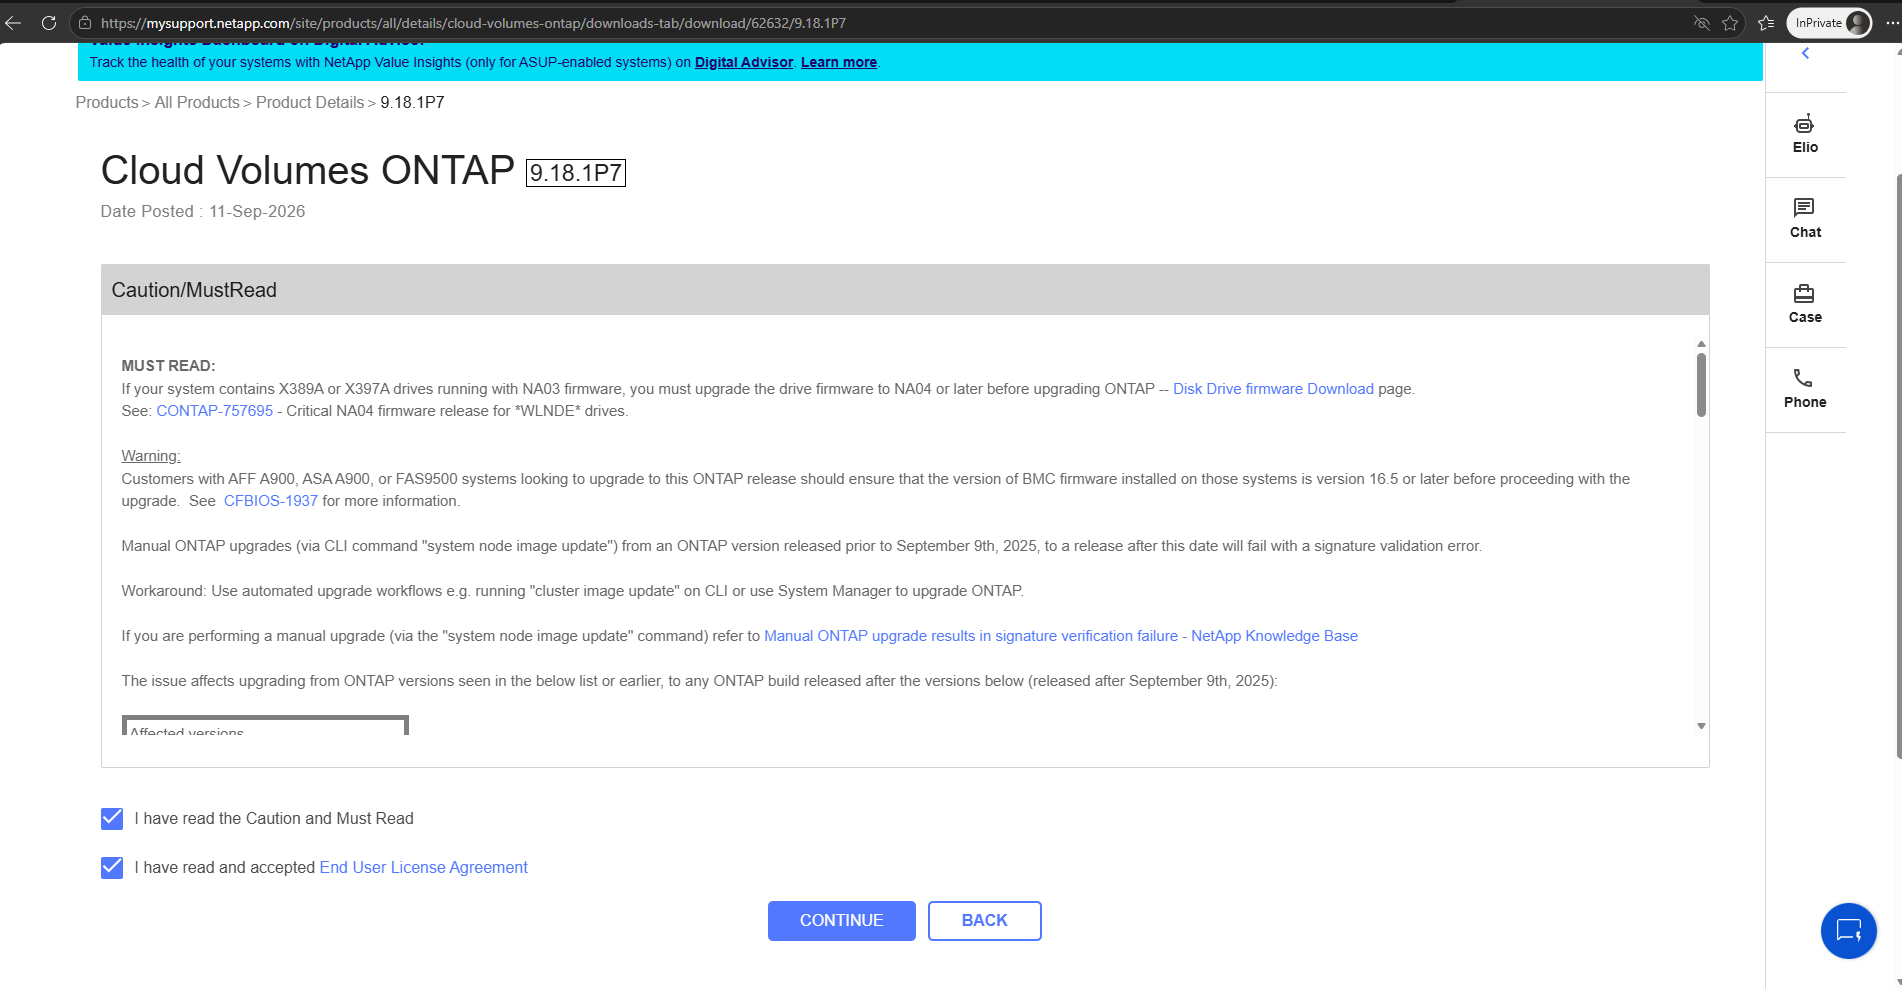
After selecting ONTAP 9.18.1P7, review the Caution/MustRead information and accept the End User License Agreement by selecting both checkboxes. Click Continue to proceed to the software download.
The release notes also warn about signature validation failures when using the legacy
system node image updatecommand for certain upgrade paths. NetApp recommends using the automatedcluster image updateworkflow instead.
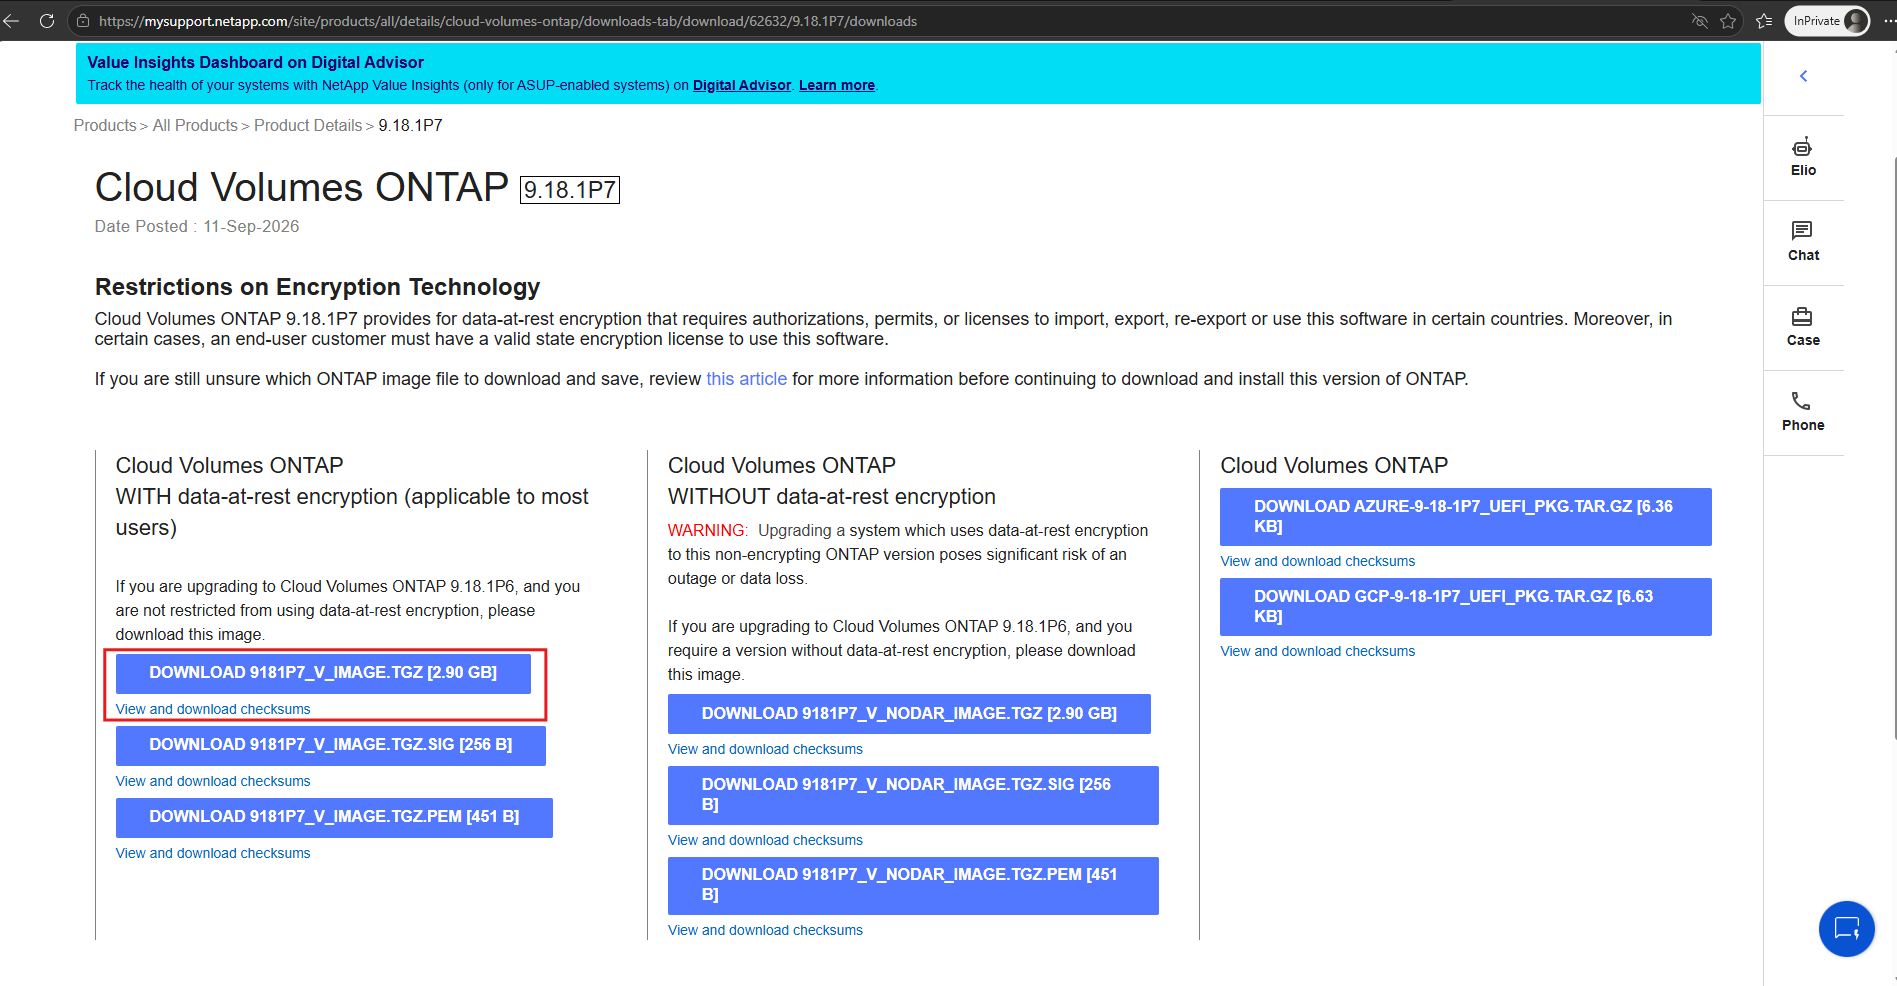
On the download page, select the Cloud Volumes ONTAP image with data-at-rest encryption, which is applicable to most deployments.
For our Azure Cloud Volumes ONTAP HA system, download
9181P7_V_IMAGE.TGZ(approximately 2.90 GB). This is the ONTAP 9.18.1P7 software image that we will manually upload to the cluster for the upgrade.Optionally, download the corresponding checksum to verify the integrity of the downloaded image.
Uploading the ONTAP Image to the NetApp Console Connector VM
After downloading the ONTAP 9.18.1P7 software image, the next step is to transfer the 9181P7_V_IMAGE.TGZ file to our NetApp Console Connector VM in Azure.
Although we manually provide the ONTAP image instead of selecting an available version from NetApp Console, the upgrade itself will still be orchestrated and managed through NetApp Console, including the coordinated upgrade of both nodes in our Cloud Volumes ONTAP HA cluster.
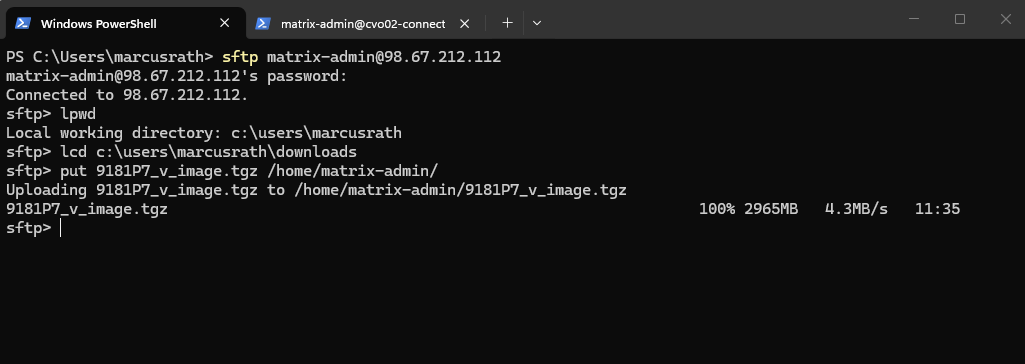
Using SFTP from Windows PowerShell, we upload the downloaded ONTAP 9.18.1P7 image (9181P7_v_image.tgz) to the home directory (/home/matrix-admin/) of our NetApp Console Connector VM in Azure.
The transfer can take several minutes because the image is approximately 2.9 GB in size.
sftp matrix-admin@98.67.212.112
sftp> lpwd
sftp> lcd c:\users\marcusrath\downloads
sftp> put 9181P7_v_image.tgz /home/matrix-admin/
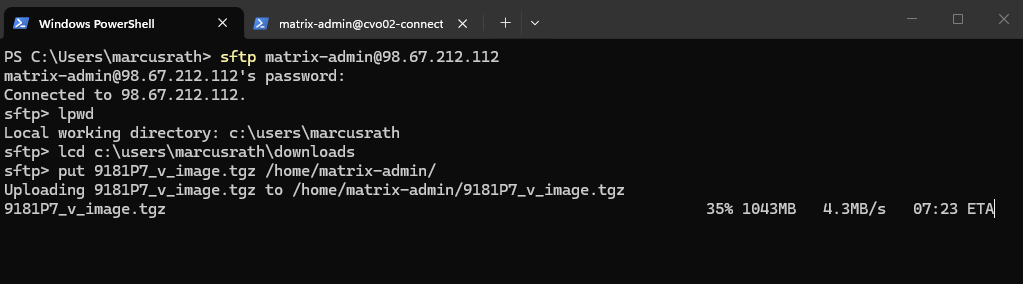
The ONTAP 9.18.1P7 image has been successfully uploaded to the NetApp Console Connector VM via SFTP.
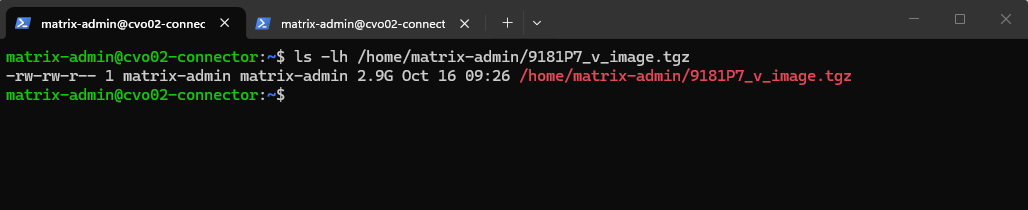
Next, we connect to the Connector VM via SSH to verify that the image is present and was transferred correctly.
The ONTAP 9.18.1P7 image is present in
/home/matrix-admin/with the expected size of approximately 2.9 GB, ready for the next step.
ls -lh /home/matrix-admin/9181P7_v_image.tgz
Preparing the ONTAP Image on the NetApp Console Connector
According to NetApp’s documentation, the ONTAP image must be placed in a specific directory on the Connector VM so it can be served over HTTP and used by the NetApp Console upgrade workflow. The directory depends on the installed Connector version.
First, let’s check which directory exists on our Connector:
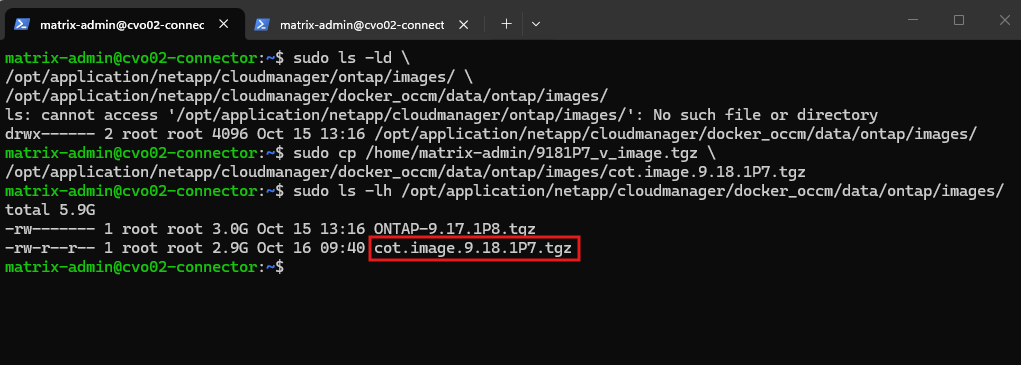
In our installation, the directory
/opt/application/netapp/cloudmanager/docker_occm/data/ontap/images/is present, so we will use this location to store the ONTAP upgrade image.
sudo ls -ld \
/opt/application/netapp/cloudmanager/ontap/images/ \
/opt/application/netapp/cloudmanager/docker_occm/data/ontap/images/
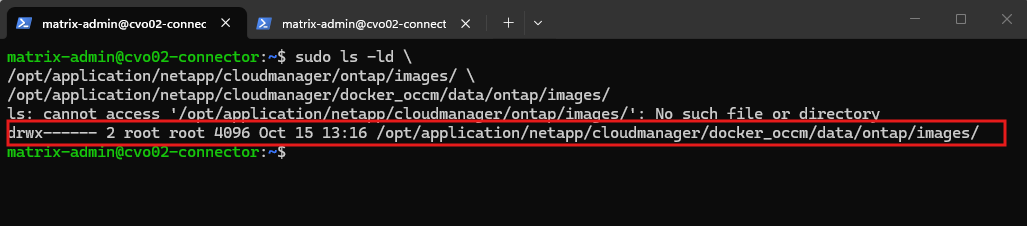
Now we copy the image there and renaming it to NetApp’s documented filename format:
The ONTAP 9.18.1P7 image has been successfully copied and renamed to
cot.image.9.18.1P7.tgz.
sudo cp /home/matrix-admin/9181P7_v_image.tgz \
/opt/application/netapp/cloudmanager/docker_occm/data/ontap/images/cot.image.9.18.1P7.tgz

Then verify:
sudo ls -lh /opt/application/netapp/cloudmanager/docker_occm/data/ontap/images/
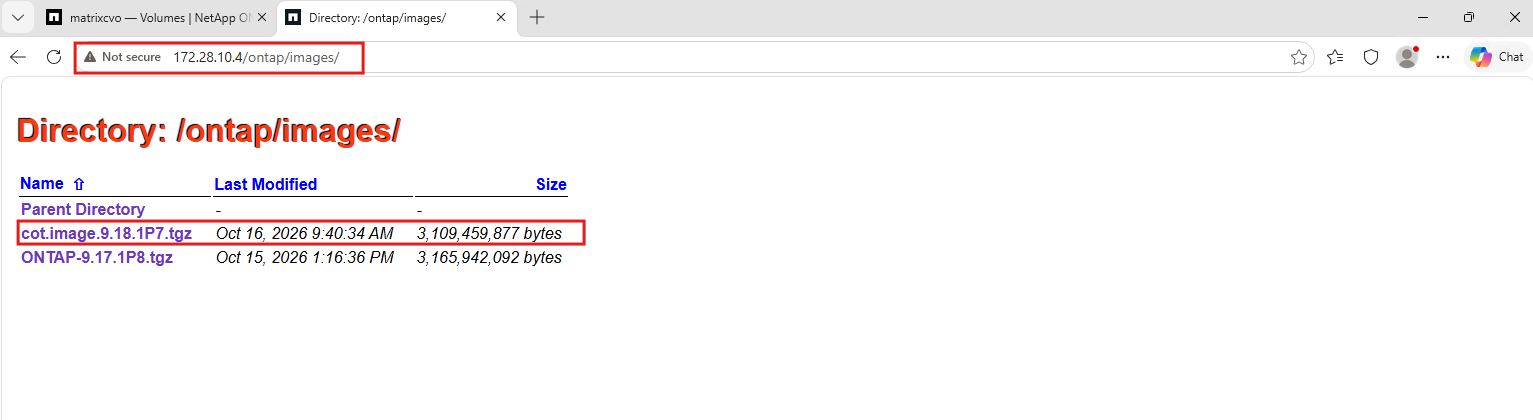
Finally, we verify from a Windows Server VM that the ONTAP image is accessible through the Connector’s HTTP server at http://172.28.10.4/ontap/images/.
According to NetApp’s documentation, the image URL follows the format
http://<Console_agent_private-IP-address>/ontap/images/<image-file-name>, where the IP address belongs to the NetApp Console Connector VM hosting the image.The directory listing confirms that our manually uploaded ONTAP 9.18.1P7 image is available and ready to be used in the NetApp Console upgrade workflow.
Upgrading Cloud Volumes ONTAP Using the Manually Uploaded Image
Now that our ONTAP 9.18.1P7 image has been successfully uploaded to the NetApp Console Connector VM and verified to be accessible over HTTP, we can proceed with the actual upgrade.
Although we manually downloaded and uploaded the image, NetApp Console will still orchestrate the upgrade of both nodes in our Cloud Volumes ONTAP HA cluster.
We will use the image URL configured in the previous section to upgrade our cluster from ONTAP 9.17.1P8 to 9.18.1P7.
Before initiating the upgrade, we should first perform the necessary pre-upgrade health checks to ensure our Cloud Volumes ONTAP HA cluster is healthy and ready for the update. These checks are already covered in detail in Part 6 – Pre-Upgrade Health Checks, so we won’t repeat them here.
With all pre-upgrade health checks completed successfully, we return to NetApp Console and open our Cloud Volumes ONTAP HA system matrixcvo.
From the Overview page, we click the three-dot menu in the upper-right corner and select Update ONTAP Version to launch the upgrade wizard.
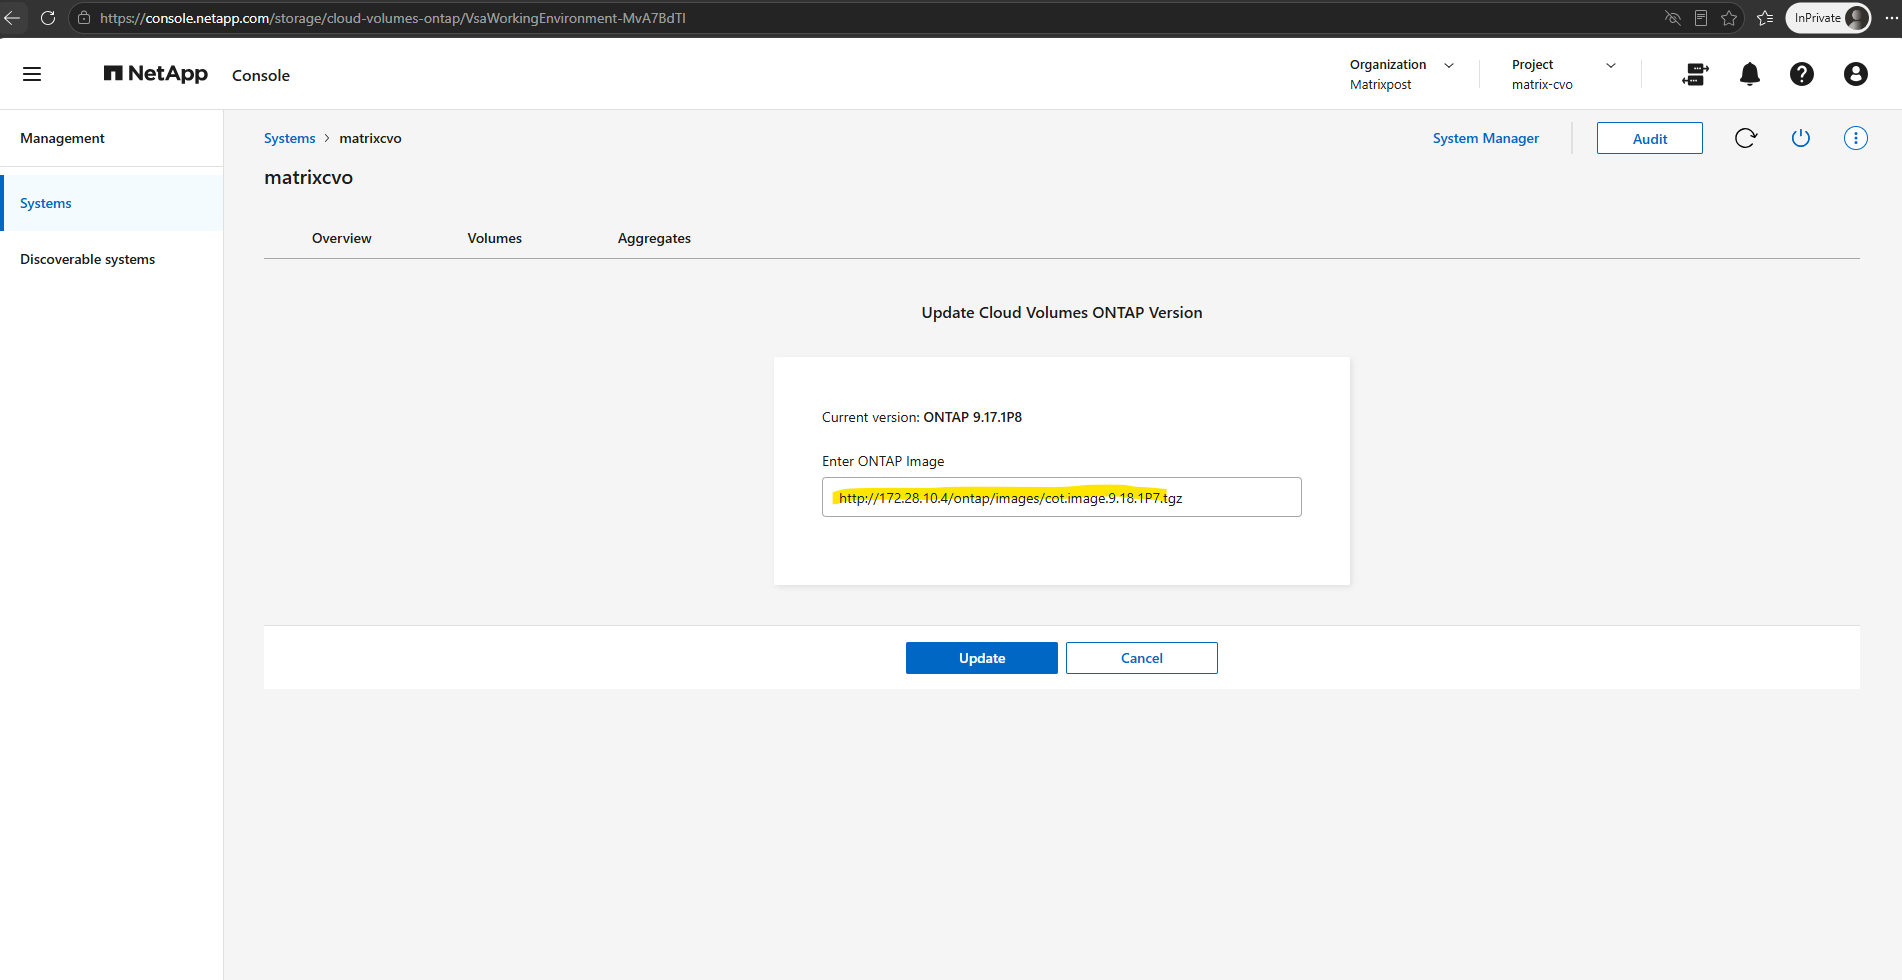
The Update Cloud Volumes ONTAP Version page displays our currently installed version, ONTAP 9.17.1P8, and provides a field to enter the URL of an ONTAP upgrade image.
Here, we will enter the HTTP URL of our manually uploaded ONTAP 9.18.1P7 image hosted on the NetApp Console Connector VM.
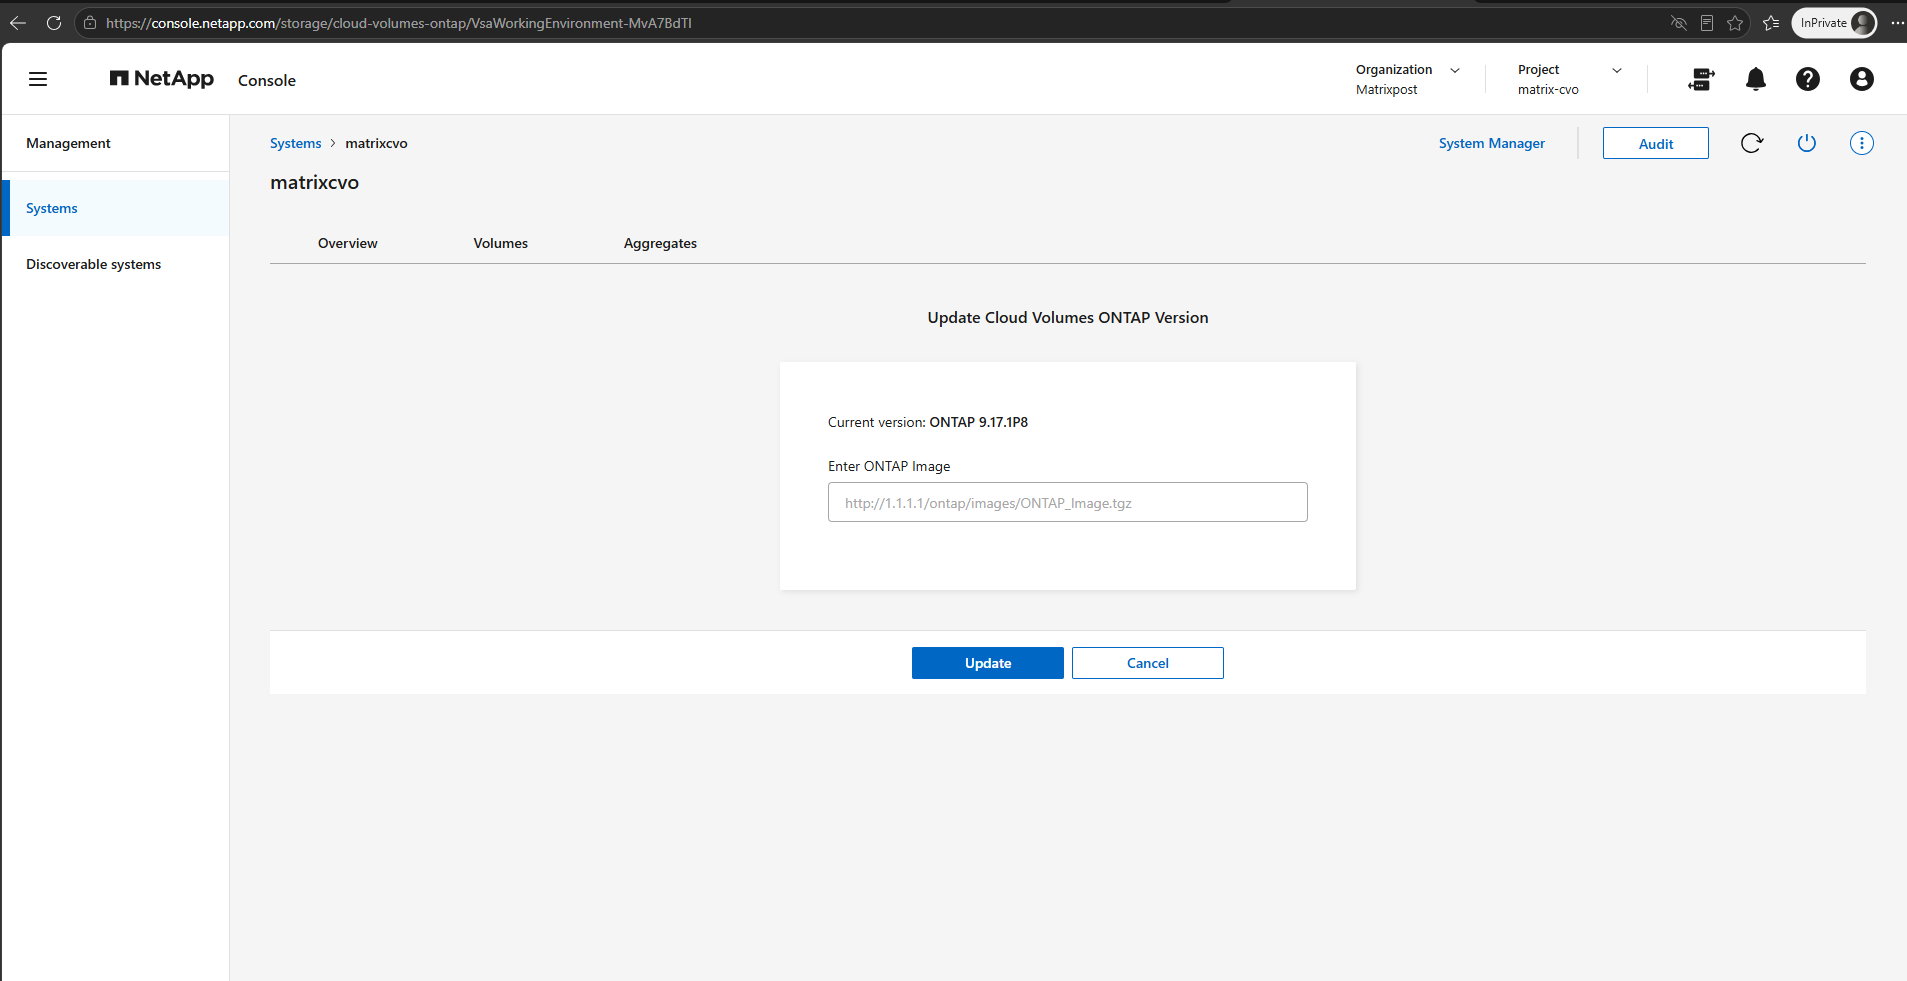
We now enter the direct HTTP URL of our manually uploaded ONTAP 9.18.1P7 image, http://172.28.10.4/ontap/images/cot.image.9.18.1P7.tgz, into the Enter ONTAP Image field.
Once the URL is specified, we click Update to initiate the upgrade from ONTAP 9.17.1P8 to 9.18.1P7.
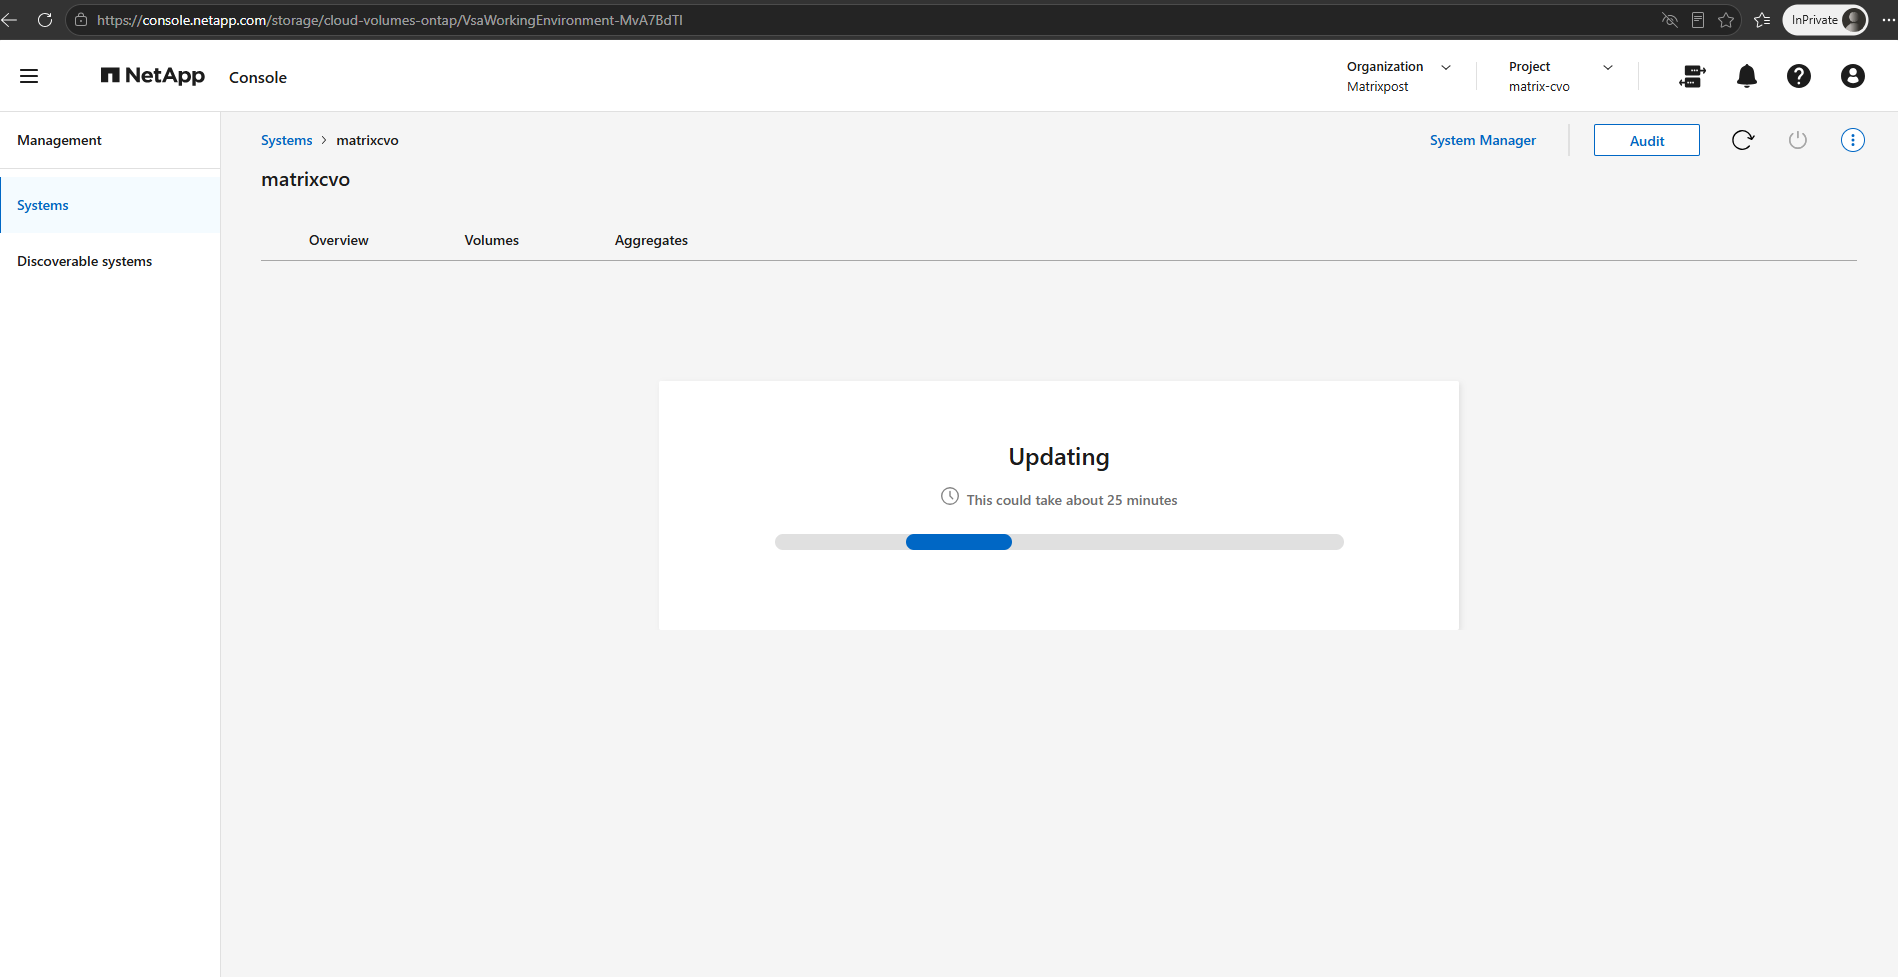
After clicking Update, NetApp Console accepts our manually uploaded ONTAP image and starts the upgrade process.
The interface displays an Updating progress indicator with an estimated duration of approximately 25 minutes, while NetApp Console manages the upgrade of our Cloud Volumes ONTAP HA cluster.
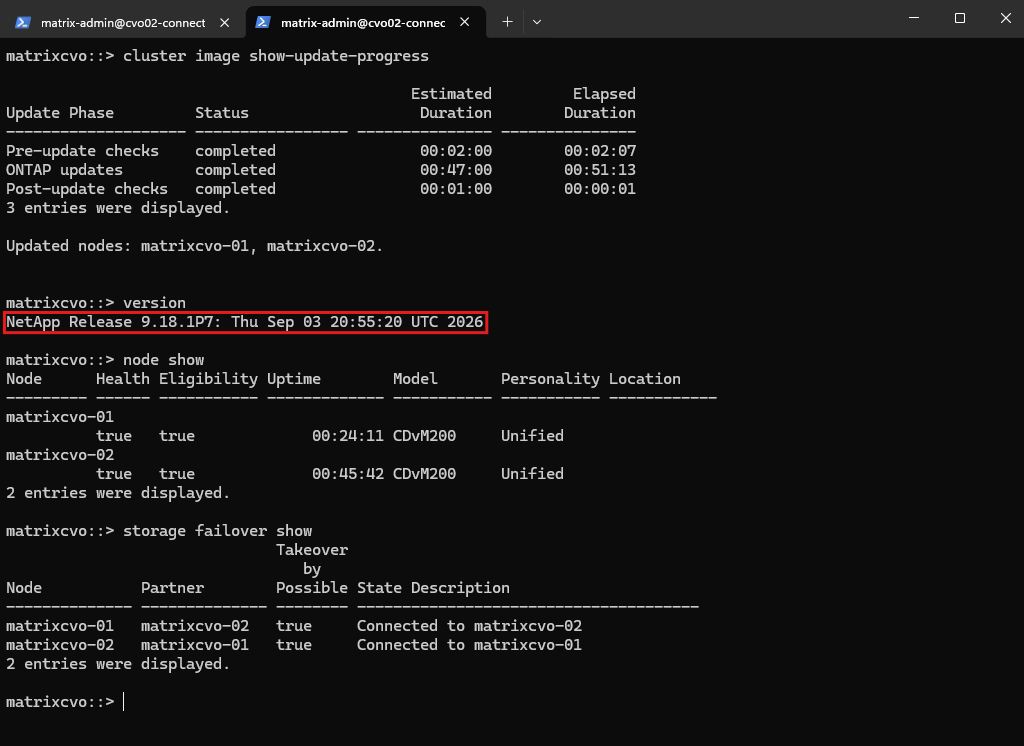
While NetApp Console displays the upgrade progress, we can also monitor the upgrade directly from the ONTAP CLI using several commands to check the software installation status, node versions, and HA status.
These commands and the individual upgrade stages are already covered in Part 6 – Triggering the Upgrade, so we won’t repeat them here.
The complete upgrade took approximately 60 minutes, measured from initiating the upgrade in NetApp Console until the system returned to normal operation.
The ONTAP CLI reported 53 minutes and 21 seconds for the actual upgrade phases.
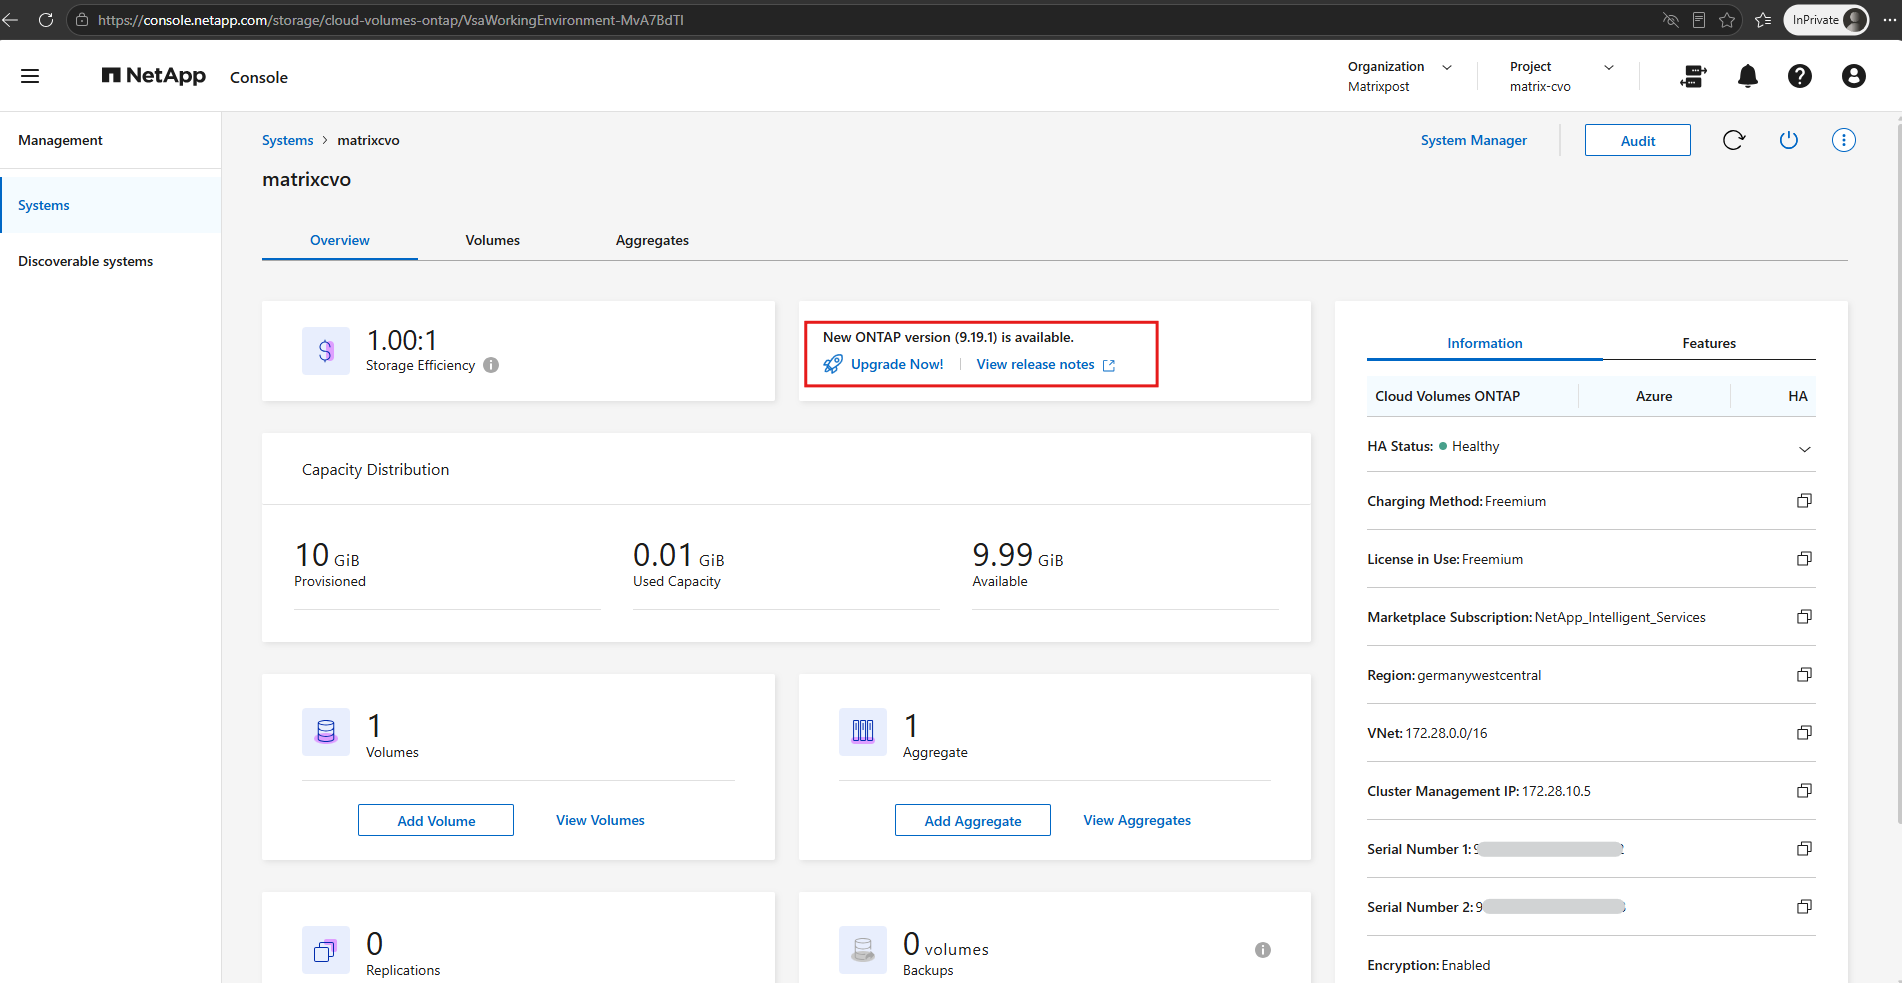
After refreshing NetApp Console, the HA status is healthy, and ONTAP 9.19.1 is already offered as the next available upgrade.
Finally, we repeat the health checks described in Part 6 – Pre-Upgrade Health Checks to verify that both nodes are healthy, HA takeover remains possible, and the cluster is operating normally after the upgrade.
All checks completed successfully, confirming that our Cloud Volumes ONTAP HA cluster is running ONTAP 9.18.1P7.
As a last verification step, we check the installed ONTAP images on both nodes using cluster image show and system image show (advanced privilege).
Both nodes are now running ONTAP 9.18.1P7, which is marked as the current and default boot image (
image1), while the previous version, 9.17.1P8, remains available as the secondary image (image2).
version
cluster image show
set -privilege advanced
system image show
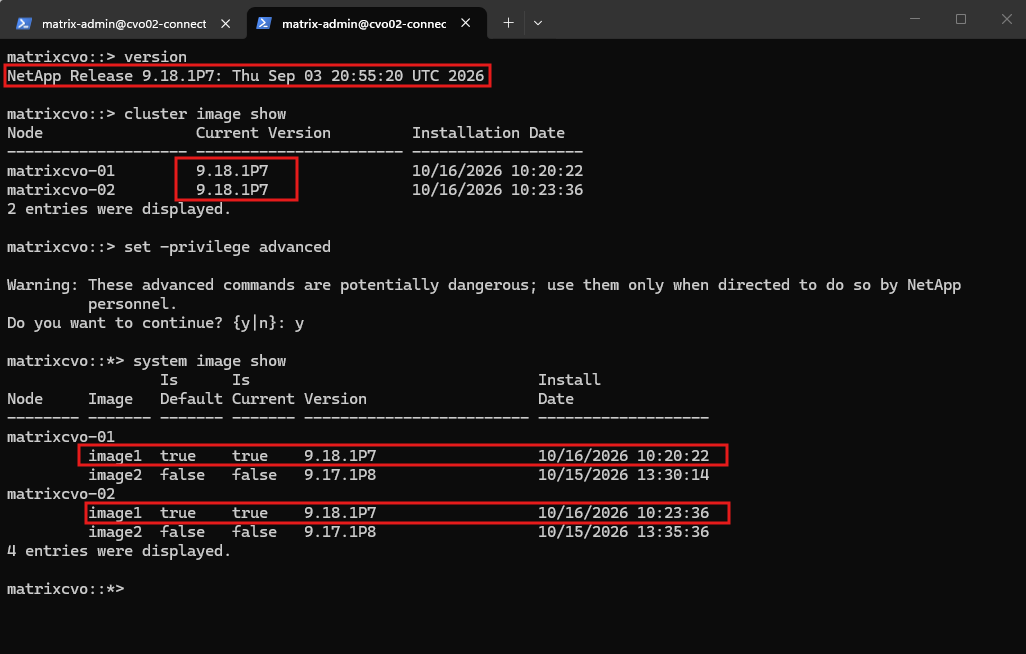
Important: Although the previous ONTAP 9.17.1P8 image remains installed as the secondary boot image, reverting or downgrading Cloud Volumes ONTAP to an earlier release is not supported.
Unlike on-premises ONTAP, the presence of the previous image does not provide a supported rollback option, as also explained in Part 6 – Revert ONTAP.
Links
Upgrade from an image available at a URL
https://docs.netapp.com/us-en/storage-management-cloud-volumes-ontap/task-updating-ontap-cloud.html#upgrade-from-console-notificationsUpgrade Cloud Volumes ONTAP
https://docs.netapp.com/us-en/storage-management-cloud-volumes-ontap/task-updating-ontap-cloud.htmlSupported upgrade paths
https://docs.netapp.com/us-en/storage-management-cloud-volumes-ontap/task-updating-ontap-cloud.html#supported-upgrade-pathsPatch releases
https://docs.netapp.com/us-en/storage-management-cloud-volumes-ontap/task-updating-ontap-cloud.html#patch-releases
