How to Create a Custom ESXi Boot ISO Image with VMware Flings USB Network Drivers injected
Are you struggling to get your USB network adapter recognized during an ESXi installation?
VMware’s native support for USB NICs is limited, but thanks to the VMware Flings community, you can now integrate the USB Network Native Driver into your ESXi installation media.
In this post, we will see step by step how we can create a custom ESXi boot ISO Image that includes the necessary USB NIC drivers, ensuring seamless compatibility with your hardware. Whether you’re setting up a home lab or deploying ESXi on unsupported hardware.
The Flings USB Network Native Driver for ESXi supports the most popular USB network adapter chipsets found in the market.
In my lab environment I will use the following USB-3.0-auf-10/100/1000-Gigabit-Ethernet-Internetadapter which works using the flings drivers. This is finally an USB NIC ASIX AX88179.
https://www.amazon.de/dp/B00M77HMU0?ref=ppx_yo2ov_dt_b_fed_asin_title&th=1
- Create a Custom ESXi 7.0.3 Boot ISO by using the ESXi-Customizer-PS-v2.9.0.ps1
- Create a Custom ESXi 8.x Boot ISO by using the ESXi-Customizer-PS-v2.9.0.ps1
- Create a Custom ESXi 8.0U3c Boot ISO manually by using the VMware.PowerCLI cmdlets directly
- Create a bootable USB flash drive
- Booting the ESXi Host from our bootable USB flash drive
- Links
Create a Custom ESXi 7.0.3 Boot ISO by using the ESXi-Customizer-PS-v2.9.0.ps1
You can download the latest ESXi-Customizer-PS.ps1 (as of today v2.9.0) from here.
Before we run the script we also need to download the Flings USB Network Native Driver for ESXi from the new Broadcom Flings Site.
We need to use here the ESXi703(55634242) driver package.

Extract the downloaded zip file which will finally extract a further zip file as shown below.

Before we can run ESXi-Customizer-PS we first need to check if VMware PowerCLI is installed on our machine.
PS> Get-Module VMware* -ListAvailable
All available versions we can see here https://www.powershellgallery.com/packages?q=VMware.PowerCLI.
To uninstall and re-install a specific version of VMware PowerCLI you can use the following commands. Below I will use version 13.2.1 but I also tested 13.3.0 which also works.
PS> Uninstall-Module -Name VMware.PowerCLI -AllVersions -Force
PS> Install-Module -Name VMware.PowerCLI -RequiredVersion 12.6.0.19610541 -Scope CurrentUser
Further the VMware.ImageBuilder PowerCLI module needs python version 3.7.1 – 3.12 to be installed. I was testing it with version 3.7.9 which works.
https://www.python.org/downloads/release/python-379

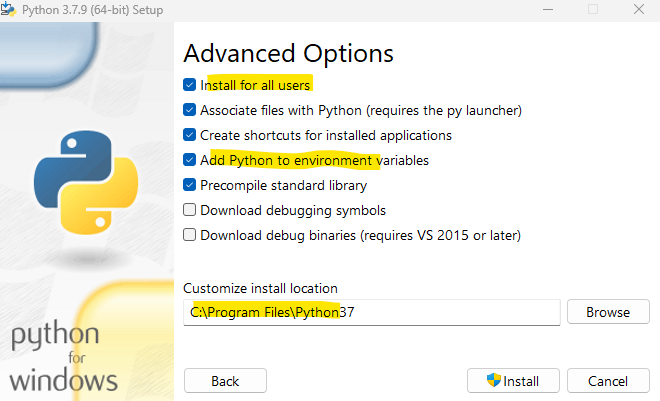
We also need to set the python path for VMware PowerCLI. Further we need to install some required python modules.
PS> Set-PowerCLIConfiguration -PythonPath "C:\Program Files\Python37\python.exe"

PS> pip install --user six lxml psutil pyopenssl
Before running the ESXi-Customizer-PS-v2.9.0.ps1 tool, we should first exit our existing VMware PowerCLI session and re-open it.
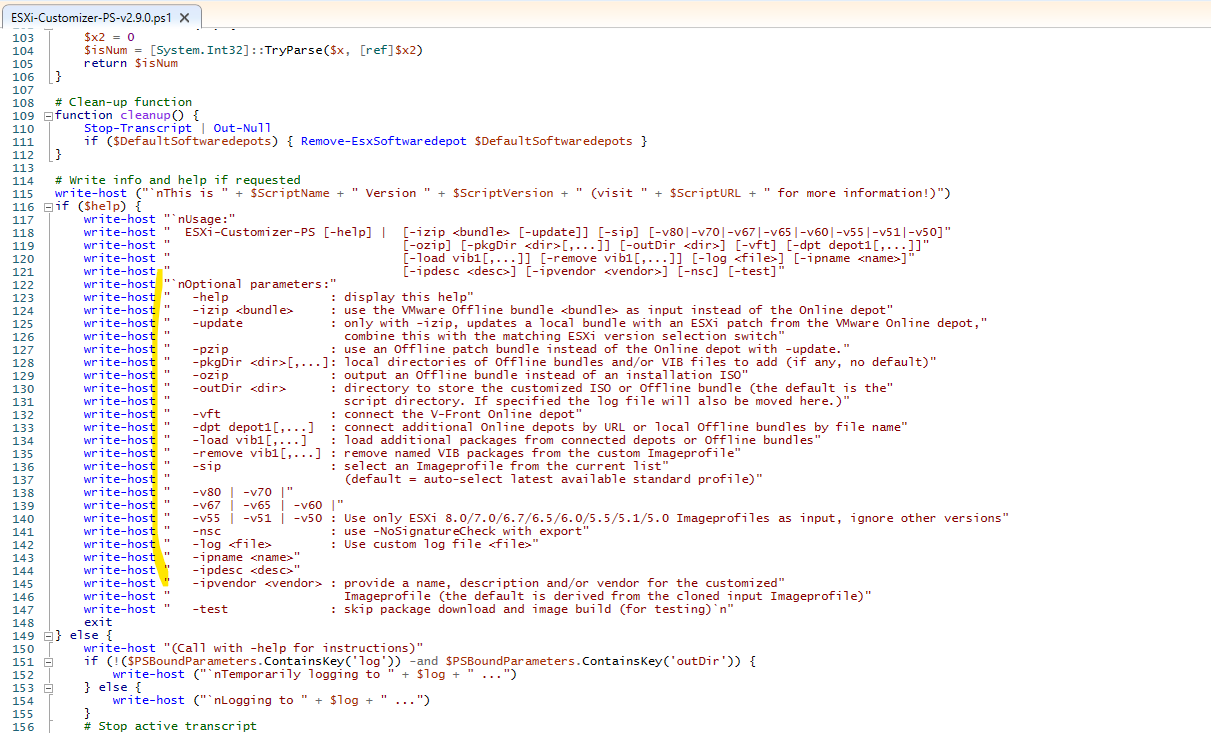
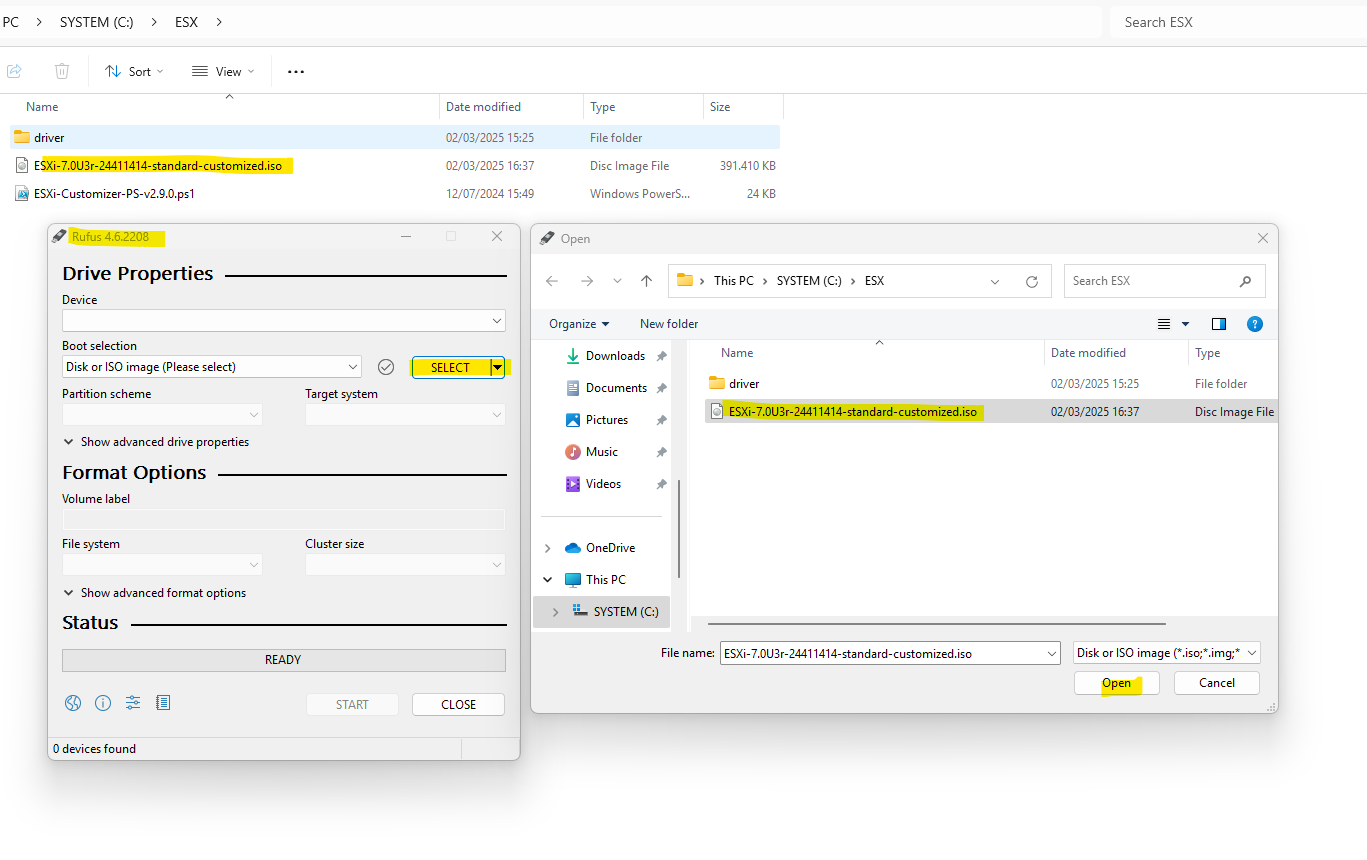
We can now run the ESXi-Customizer-PS-v2.9.0.ps1 tool by using the -sip flag (here we can select an Image profile from the current list) and the -dpt flag where we can connect our local offline bundle with the flings USB NIC driver package we previously downloaded and extracted.
All available flags you will find directly in the script.
PS> Set-ExecutionPolicy -ExecutionPolicy RemoteSigned -Scope Process

# Set Participate in CEIP to $false or $true
PS> Set-PowerCLIConfiguration -Scope User -ParticipateInCEIP $false
PS> .\ESXi-Customizer-PS-v2.9.0.ps1 -sip -dpt .\ESXi703-VMKUSB-NIC-FLING-55634242-component-19849370.zip
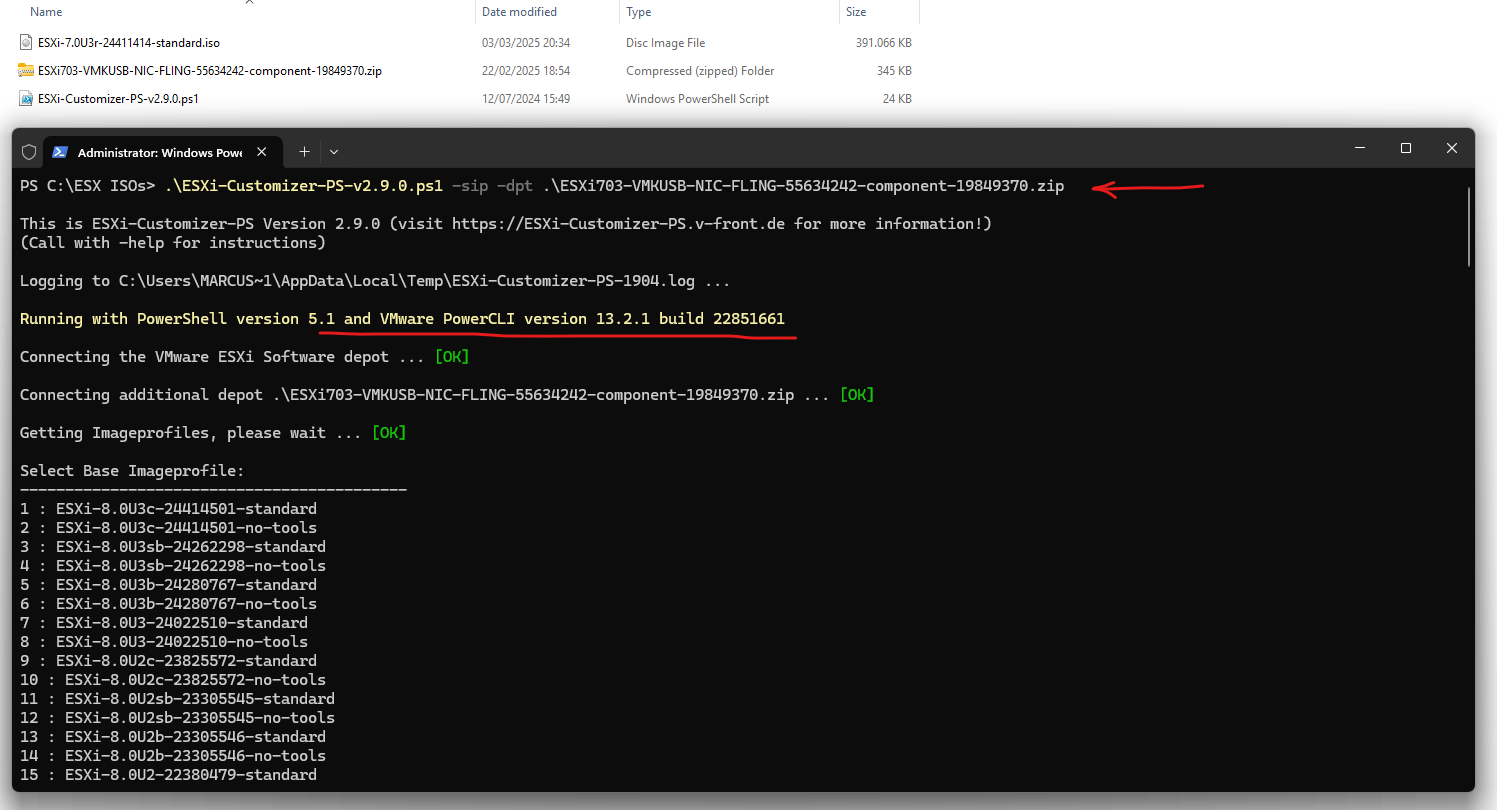
I will select number 37 which is the ESXi-7.0U3r-24411414-standard image profile.

When the script was running successfully we should see the ESXi-7.0U3r-24411414-standard-customized.iso file in our directory as shown above.
Create a Custom ESXi 8.x Boot ISO by using the ESXi-Customizer-PS-v2.9.0.ps1
To create a custom ESXi version 8x I will always run into the following issue for all version 8x by using the ESXi-Customizer-PS utility.
An unexpected error occured: Calculated digest at EOF does not match expected result
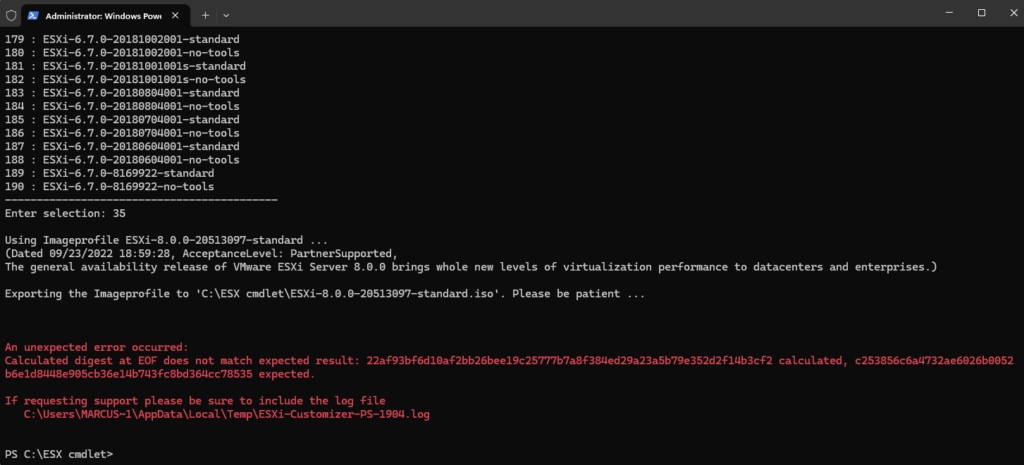
Fortunately using directly the VMware.PowerCLI cmdlets to create custom ESXi version 8x ISO images works great as shown in the next section.
And still with VMware.PowerCLI version 13.3.0 and Python 3.7.9.
Create a Custom ESXi 8.0U3c Boot ISO manually by using the VMware.PowerCLI cmdlets directly
I will create here a ESXi 8.0U3c Boot ISO but this will also work for the other version 8x image profiles.
Finally the PowerShell script above leverages the VMware.PowerCLI to create the custom ESXi ISO image. So we can of course also use the VMware.PowerCLI cmdlets directly to create our custom ESXi ISO image.
Below I will create an ESXi 8.0U3c Boot ISO image which includes the Flings USB Network Native Driver for ESXi from the new Broadcom Flings Site.
I will use therefore VMware.PowerCLI version 13.3.0 and also as above Python version 3.7.9.
We first need to add the online software depot to our PowerCLI session.
!! Update 5 May 2025 !!
Unique tokens are now required to download VMware software binaries for VCF, vCenter, ESX, and vSAN File Services.
Current download URLs will continue to work until 4/23/25. Please refer to the KB article, obtain your unique token, and update in-product URLs.
If tokens are not working after replacing in-product URL’s see: VCF Authenticated Downloads Token Troubleshooting Guide
Source: https://knowledge.broadcom.com/external/article/390098
A software depot is a repository that contains VMware ESXi software packages, such as VIBs (vSphere Installation Bundles) or image profiles, which can be used for installing or updating ESXi hosts.
The depot must be accessible from the system where the PowerCLI session is running.
PS> Add-EsxSoftwareDepot https://hostupdate.vmware.com/software/VUM/PRODUCTION/main/vmw-depot-index.xml
Next we can get a list of available ESXi Host image profiles we can download.
An ESXi Host Image Profile is a collection of software components (such as VIBs – vSphere Installation Bundles) that define the contents of an ESXi installation or upgrade. It is essentially a blueprint for building a customized ESXi installation image.
Image profiles are used to create ISO files or offline bundles that can be deployed to ESXi hosts.
PS> $ImageProfiles = Get-EsxImageProfile | Where-Object { $_.Name -like "ESXi-$baseESXiVer*-standard*" } | Sort-Object -Descending -Property @{Expression={$_.Name.Substring(0,10)}},@{Expression={$_.CreationTime.Date}},Name

# List all available image profiles and filter for version 6, 7 or 8.
PS> $ImageProfiles | findstr ESXi-8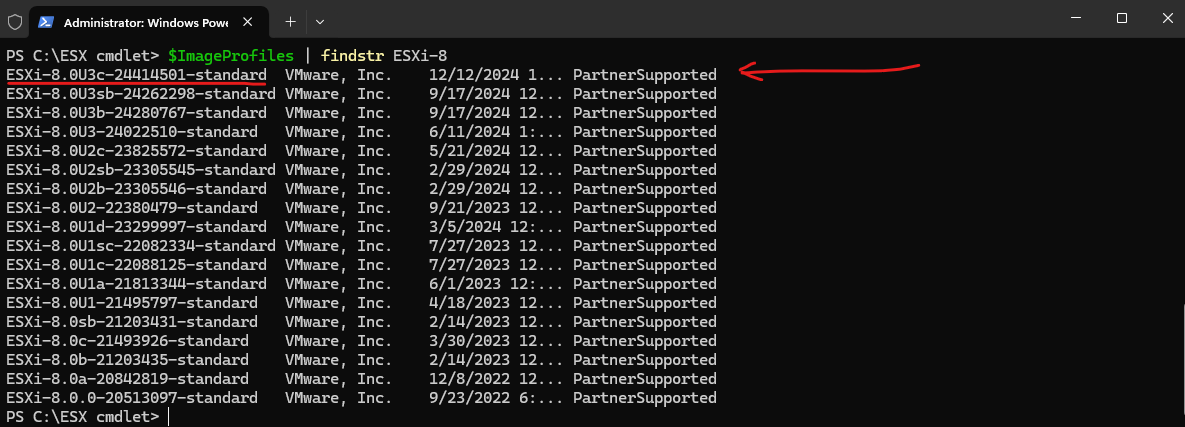
Note the name of the image profile (first column) you want to use to create a custom ESXi Host image profile. We need this name in the further PowerCLI cmdlets we need to execute.
So in my case this is the ESXi-8.0U3c-24414501-standard marked in the screenshot above.
We can export and download this image profile by executing the following command.
PS> Export-EsxImageProfile -ImageProfile ESXi-8.0U3c-24414501-standard -ExportToBundle -FilePath ESXi-8.0U3c-24414501-standard.zip
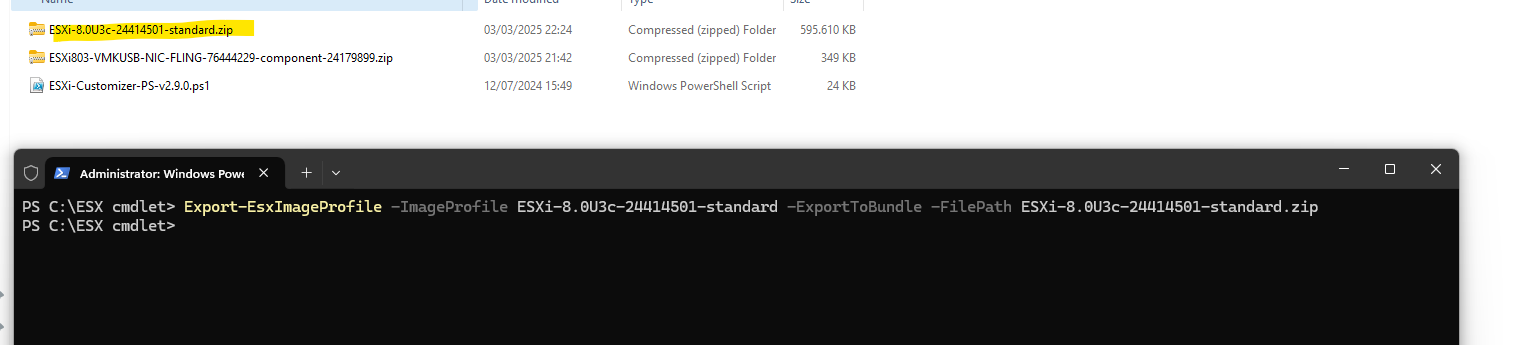
As you can see in the screenshot above, I already have downloaded the ESXi803-VMKUSB-NIC-FLING-76444229-component-24179899.zip package here.
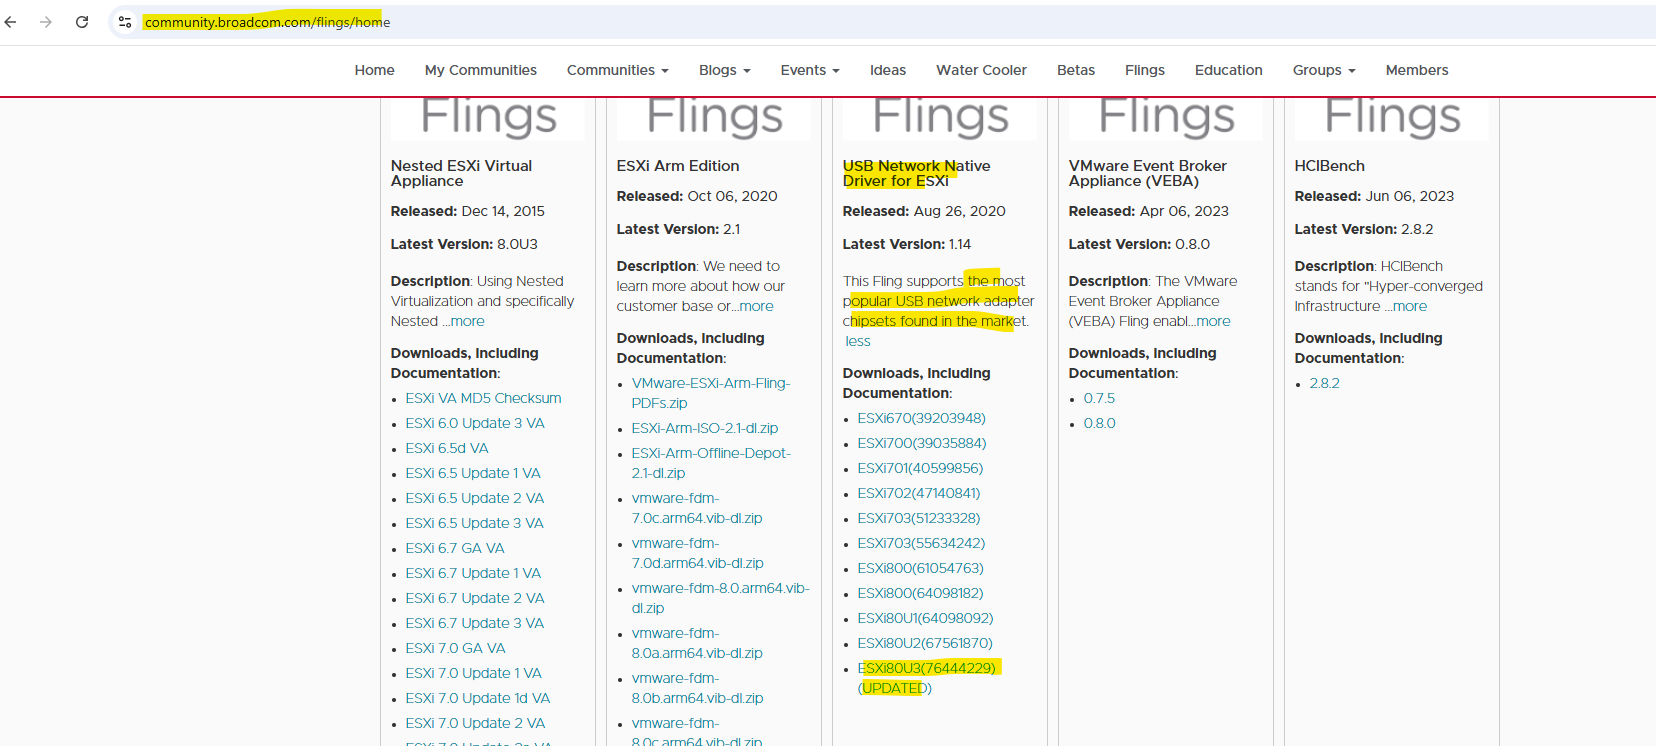
We can download the Flings USB Network Native Driver for ESXi from the new Broadcom Flings Site.
The ESXi80U3(76444229) (UPDATED) will work for the ESXi-8.0U3c-24414501-standard profile.
We can now remove our online software depot.
PS> Remove-EsxSoftwareDepot https://hostupdate.vmware.com/software/VUM/PRODUCTION/main/vmw-depot-index.xml
And therefore adding our previously downloaded and exported image profile as new local software depot.
PS> Add-EsxSoftwareDepot ESXi-8.0U3c-24414501-standard.zip
Next we need to add the USB NIC Driver package from VMware Flings also to the local software depot.
PS> Add-EsxSoftwareDepot ESXi803-VMKUSB-NIC-FLING-76444229-component-24179899.zip
To create a new ISO Image we now need to clone the downloaded image profile in order to later inject the USB NIC Driver package from VMware Flings. For the -Vendor flag you can finally use what you want.
PS> New-EsxImageProfile -CloneProfile "ESXi-8.0U3c-24414501-standard" -Name "ESXi-8.0U3c-24414501-standard-USB-NIC" -Vendor "Matrixpost"
To include the USB NIC Driver package from VMware Flings in our custom image, we also need to set the so called acceptance level of our new cloned image profile to CommunitySupported.
When you set the acceptance level to CommunitySupported, you are allowing VIBs that are provided by the community (in our case the flings VIBs) and are not officially tested or supported by VMware or its partners. These VIBs are typically developed by third parties or open-source contributors and may not meet VMware’s certification standards.
PS> Set-EsxImageProfile "ESXi-8.0U3c-24414501-standard-USB-NIC" -AcceptanceLevel CommunitySupported
We can now add the USB NIC Driver package from VMware Flings to our new cloned image profile.
PS> Add-EsxSoftwarePackage -ImageProfile "ESXi-8.0U3c-24414501-standard-USB-NIC" -SoftwarePackage "vmkusb-nic-fling"
Finally we can export our new image profile which includes our injected USB NIC Driver package from VMware Flings as new custom ISO image.
PS> Export-EsxImageProfile -ImageProfile "ESXi-8.0U3c-24414501-standard-USB-NIC" -ExportToIso "ESXi-8.0U3c-24414501-standard-USB-NIC.iso"

Create a bootable USB flash drive
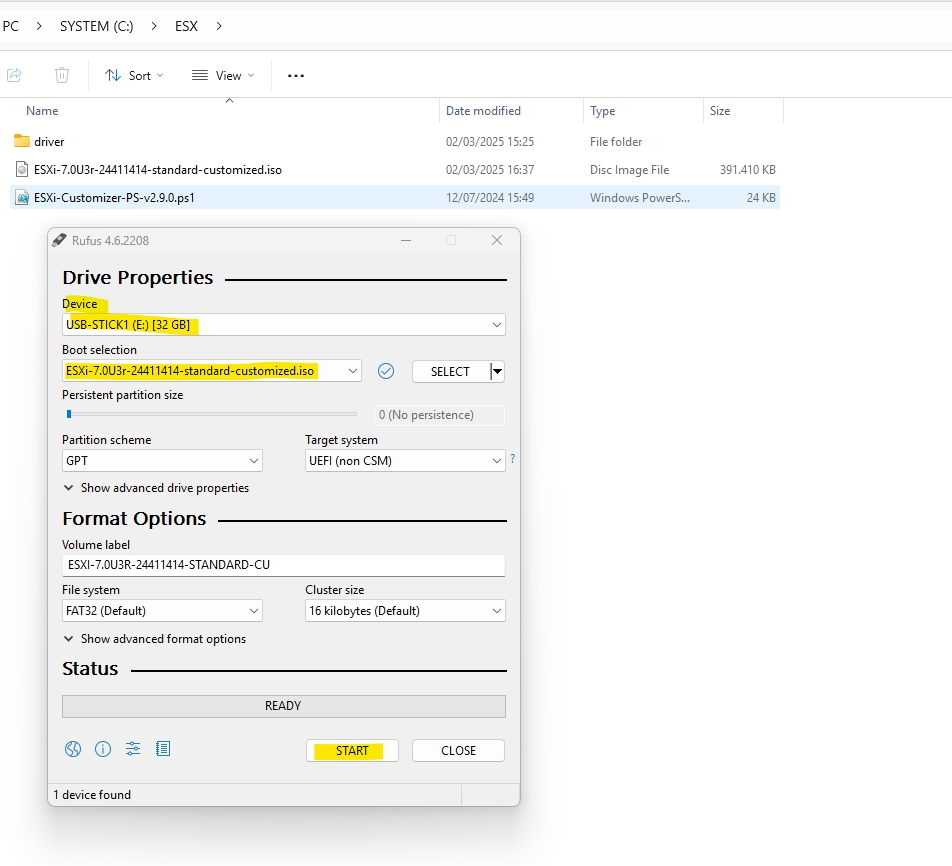
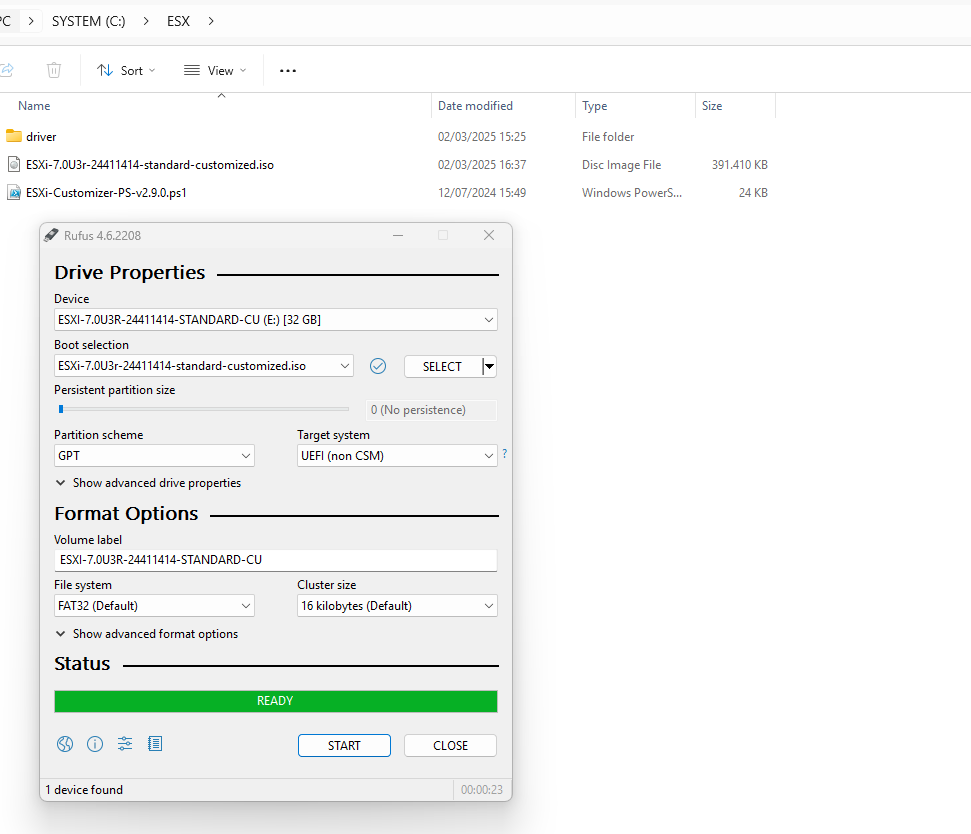
To create from the ESXi host ISO file finally a bootable USB flash drive we can use for example the Rufus utility.
Rufus is a utility that helps format and create bootable USB flash drives.
Select your USB flash drive you want to create the bootable ESXi ISO on and finally click on START.
From now on we can boot our machine using USB NICs from this bootable USB flash drive.
Booting the ESXi Host from our bootable USB flash drive
The installation will later stuck at 81% when using a USB NIC and the following error message will appear on the screen.
Exception: No vmknic tagged for management was found.
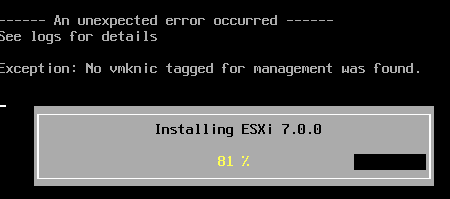
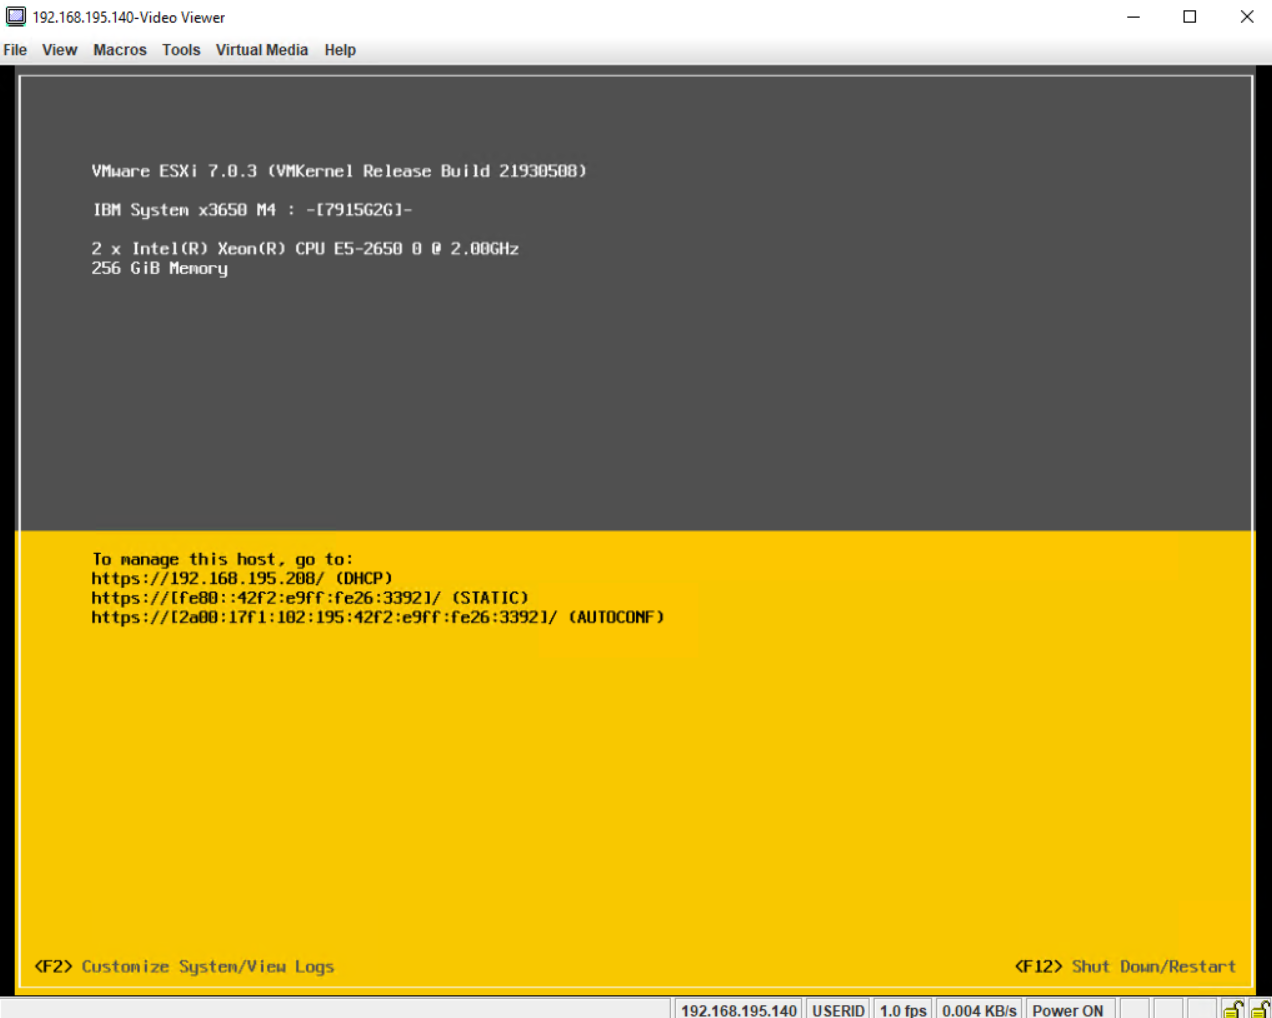
The good news, at this point our installation is already finished and we can remove our bootable USB flash drive and reboot the host.
When our host is rebooted, we need to press F2 to enter the so called Direct Console User Interface (DCUI).
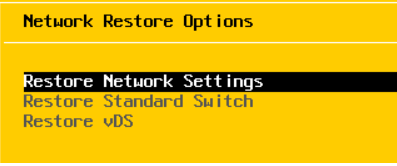
Select Network Restore Options.

Select Restore Network Settings.
Exit the Direct Console User Interface (DCUI) by pressing ESC and enter it again by pressing F2.
You should now be able to configure the network settings.
Unfortunately this setting is just temporary, to make this USB NIC binding persistent, we need to add some code to the /etc/rc.local.d/local.sh file on the ESXi host. Further we need to disable UEFI secure boot on the ESXi host.
Note: This script will not be run when UEFI secure boot is enabled.
# Mapping vusb0 NIC (Kernel Adapter)

vusb0_status=$(esxcli network nic get -n vusb0 | grep 'Link Status' | awk '{print $NF}')
count=0
while [[ $count -lt 20 && "${vusb0_status}" != "Up" ]]
do
    sleep 10
    count=$(( $count + 1 ))
    vusb0_status=$(esxcli network nic get -n vusb0 | grep 'Link Status' | awk '{print $NF}')
done

esxcfg-vswitch -R

exit 0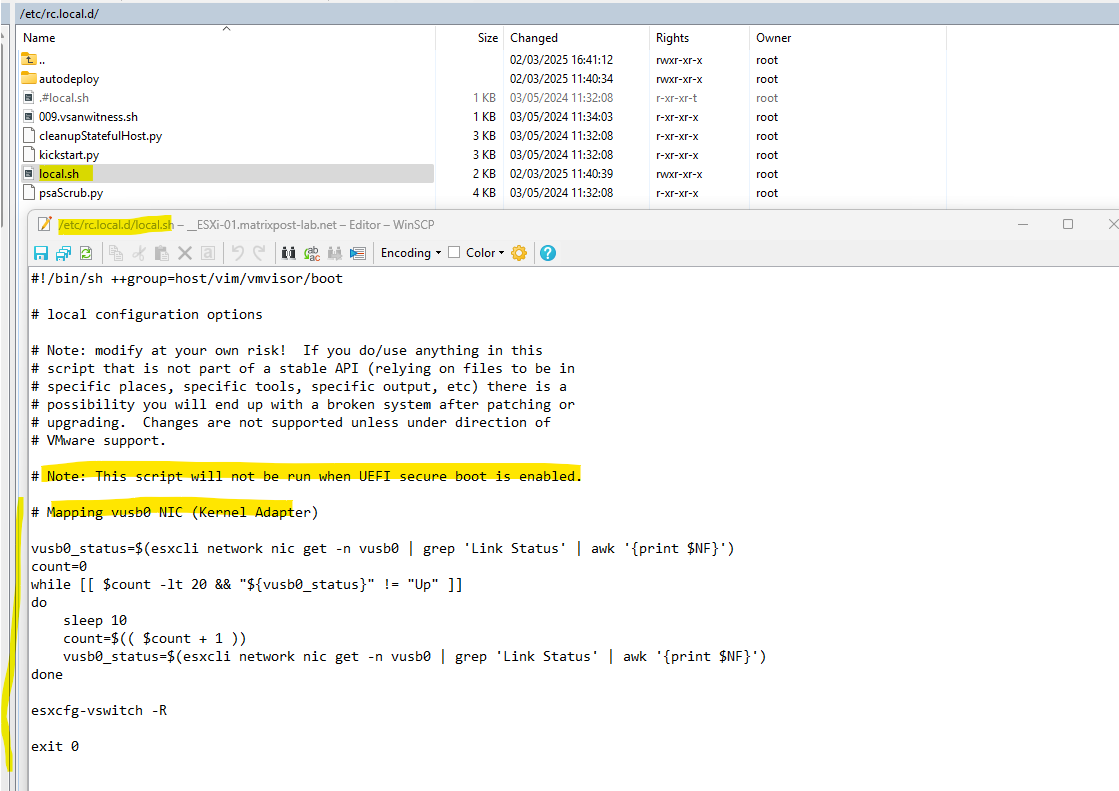
Usually we will have at least two NICs on an ESXi Host. Therefore we can adjust the script like this.
# Mapping vusb0 NIC (Kernel Adapter)

vusb0_status=$(esxcli network nic get -n vusb0 | grep 'Link Status' | awk '{print $NF}')
count=0
while [[ $count -lt 20 && "${vusb0_status}" != "Up" ]]
do
    sleep 10
    count=$(( $count + 1 ))
    vusb0_status=$(esxcli network nic get -n vusb0 | grep 'Link Status' | awk '{print $NF}')
done

esxcfg-vswitch -R


# Mapping vusb1 NIC

vusb1_status=$(esxcli network nic get -n vusb1 | grep 'Link Status' | awk '{print $NF}')
count=0
while [[ $count -lt 20 && "${vusb1_status}" != "Up" ]]
do
    sleep 10
    count=$(( $count + 1 ))
    vusb1_status=$(esxcli network nic get -n vusb1 | grep 'Link Status' | awk '{print $NF}')
done

esxcfg-vswitch -R

exit 0
More about setting up and configuring a VMware ESXi Host you will find in my following post.
Links
Solution: ESXi Installation with USB NIC only fails at 81%
https://www.virten.net/2020/07/solution-esxi-installation-with-usb-nic-only-fails-at-81/Welcome to the new home for Flings!
https://community.broadcom.com/flings/homeESXi-Customizer-PS
https://www.v-front.de/p/esxi-customizer-ps.htmlPowerShell Galleray – VMware.PowerCLI
https://www.powershellgallery.com/packages/VMware.PowerCLI