Hybrid Replication with SnapMirror: From On-Prem ONTAP to Azure Cloud Volumes ONTAP
This guide demonstrates how to configure SnapMirror replication from an on-premises ONTAP system running in a vSphere lab to Azure Cloud Volumes ONTAP (CVO).
The result is a fully functional hybrid replication setup that enables cross-site disaster recovery and seamless data mobility between datacenter and cloud.
About How to build your own NetApp ONTAP 9 LAB you can read my following multi-part guide.
And about Deploying NetApp Cloud Volumes ONTAP (CVO) in Azure my following multi-part guide.
- Prerequisites and Requirements
- Intercluster LIF Configuration and Verification
- Validate Connectivity Between Clusters
- Create Cluster Peering (Cluster-to-Cluster Trust)
- Create SVM Peering (Required Before SnapMirror)
- Create the Destination (DP) Volume on Azure CVO
- Create the SnapMirror Relationship
- Initialize the Baseline Transfer
- Verifying SnapMirror Baseline and Snapshot Creation
- Verifying the SnapMirror Relationship in ONTAP System Manager
- Failover Scenario: Activating and Mounting the DR Volume
- Best Practice for Migrating from On-Prem ONTAP to Azure CVO
- Enable or disable ONTAP export policies for SMB access
- Links
Prerequisites and Requirements
Before configuring SnapMirror between on-prem ONTAP and Azure Cloud Volumes ONTAP, several requirements must be met. Network connectivity between both sites must be established (VPN or ExpressRoute), intercluster LIFs must be configured and reachable, and the required SnapMirror ports (TCP 11104 and 11105) must be allowed through any firewalls.
Note: ONTAP uses port 11104 to manage intercluster communication sessions, and port 11105 to transfer data.
- (Optional) TCP port 10000 between Active IQ Unified Manager and the storage system, for some snapshot restores
- (Optional) TCP port 443 (HTTPS) bidirectionally between the intercluster LIFs, for managing ONTAP arrays using System Manager, or REST APIs
Intercluster LIF Configuration and Verification
We first verified the intercluster LIF configuration on both the on-prem ONTAP cluster and the Azure Cloud Volumes ONTAP system using network interface show -service-policy default-intercluster.
While the CVO system already had intercluster LIFs configured by default, the on-prem cluster had none, as confirmed by network interface show.
We therefore created the first dedicated intercluster LIF on cluster01-01 to enable SnapMirror replication traffic from the datacenter to the cloud.
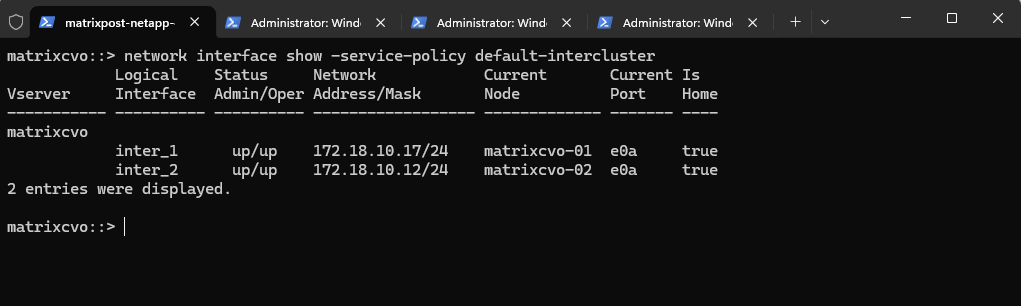
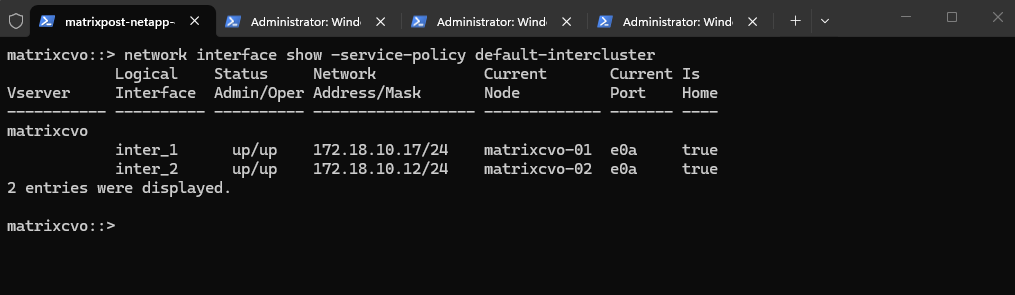
On the Azure Cloud Volumes ONTAP system (
matrixcvo), the intercluster LIFs were already configured by default on both nodes, as shown above, and were fully operational (up/up), making the cloud side immediately ready for cluster peering.
matrixcvo::> network interface show -service-policy default-intercluster
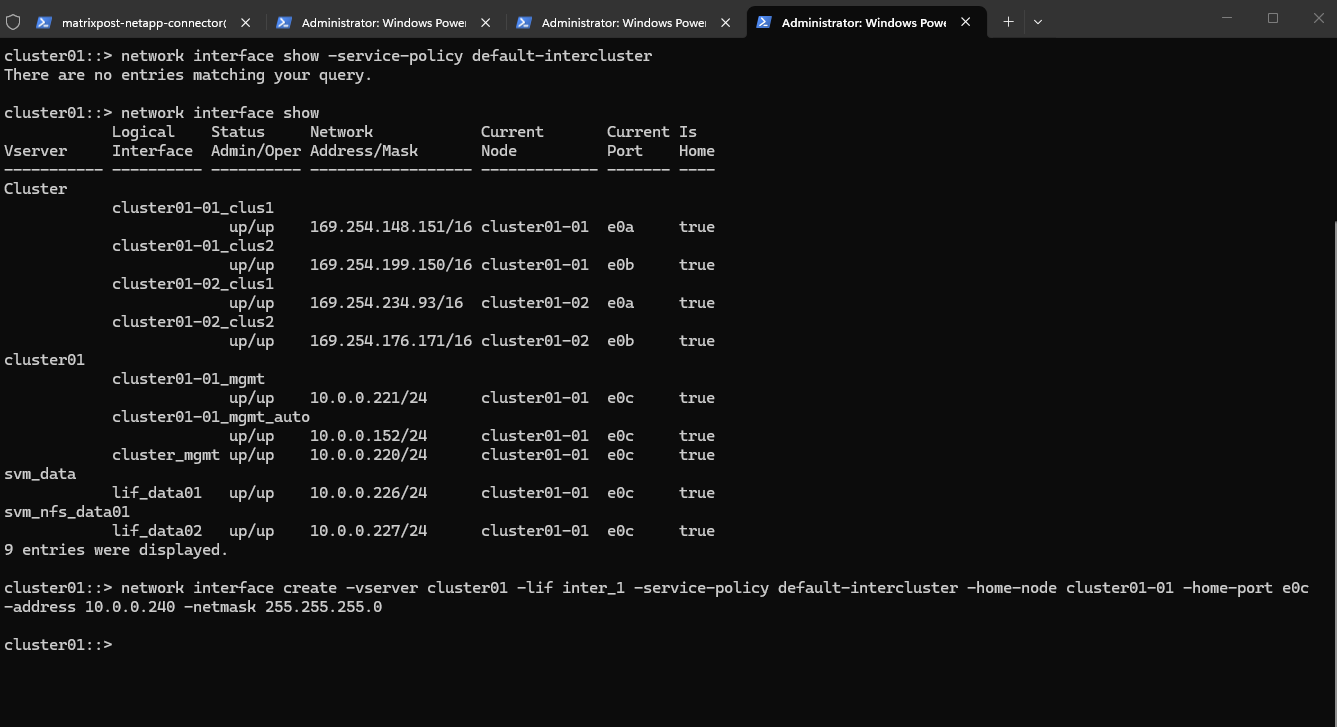
As mentioned we now need to create the first dedicated intercluster LIF on our on-prem NetApp ONTAP system cluster01-01 to enable SnapMirror replication traffic from the datacenter to the cloud.
cluster01::> network interface show -service-policy default-intercluster

cluster01::> network interface show

cluster01::> network interface create -vserver cluster01 -lif inter_1 -service-policy default-intercluster -home-node cluster01-01 -home-port e0c -address 10.0.0.240 -netmask 255.255.255.0
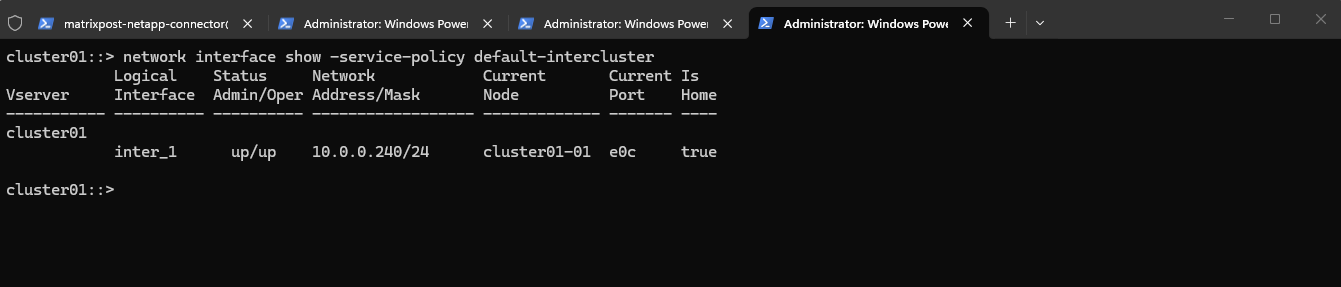
After creating the first intercluster LIF, the command below was used to verify that the LIF was successfully configured and operational.
cluster01::> network interface show -service-policy default-intercluster
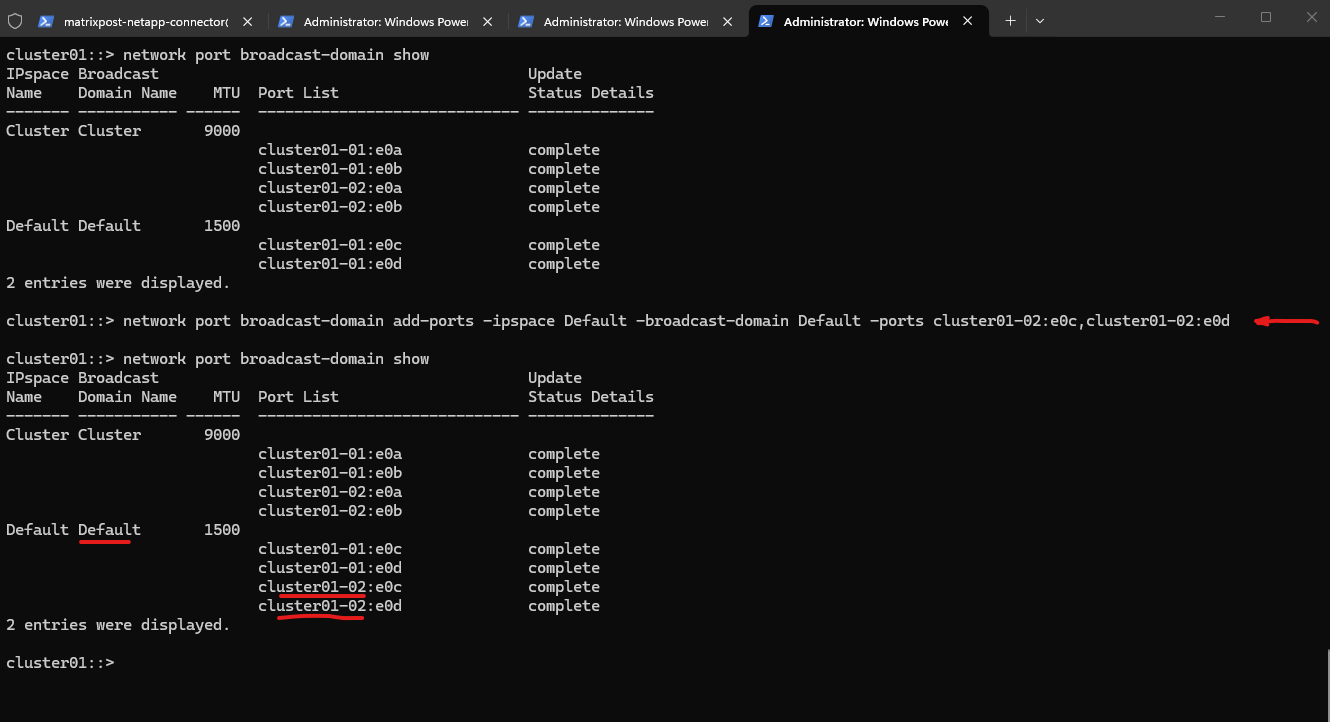
Initially, only the data-facing ports of node 01 were part of the Default broadcast domain, while node 02’s corresponding ports were not assigned.
To ensure a symmetric HA network design and allow proper LIF placement and failover, we added
cluster01-02:e0candcluster01-02:e0dto the same broadcast domain. As shown above, both nodes now have their data ports consistently configured within the Default IPspace.
# displays all broadcast domains within each IPspace
cluster01::> network port broadcast-domain show

# assign the specified ports to an existing broadcast domain within the given IPspace
cluster01::> network port broadcast-domain add-ports -ipspace Default -broadcast-domain Default -ports cluster01-02:e0c,cluster01-02:e0d

# verify
cluster01::> network port broadcast-domain show
Since the intercluster LIF was initially created only on cluster01-01, replication traffic would depend entirely on that single node. To ensure proper high availability and maintain SnapMirror functionality during a node failure or takeover, a second intercluster LIF should also be created on cluster01-02 for redundancy.
cluster01::> network interface create -vserver cluster01 -lif inter_2 -service-policy default-intercluster -home-node cluster01-02 -home-port e0c -address 10.0.0.241 -netmask 255.255.255.0

# verify both newly created intercluster LIFs
cluster01::> network interface show -service-policy default-intercluster

After creating the second intercluster LIF on node 02, replication traffic is now fully redundant across both nodes of the HA pair.
With both LIFs operational, the on-prem cluster is ready for secure cluster peering with Azure Cloud Volumes ONTAP.
Validate Connectivity Between Clusters
Before establishing cluster peering, it is essential to validate network connectivity between the intercluster LIFs of both systems.
This ensures that routing, firewall rules, and required SnapMirror ports are functioning correctly before proceeding with the configuration.
The intercluster LIFs will use the IP addresses 172.18.10.17 and 172.18.10.12.
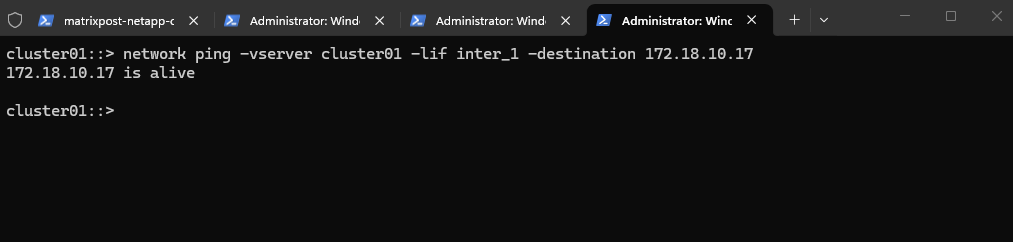
We now first verify connectivity by initiating a ping from the on-prem cluster SVM using the intercluster LIF to the Azure Cloud Volumes ONTAP intercluster IP address.
The successful ping confirms that the on-prem intercluster LIF can reach the Azure CVO intercluster LIF, meaning routing between both networks is correctly configured and no firewall rules are blocking basic connectivity.
With Layer 3 reachability validated, we can now safely proceed to establishing cluster peering between the two systems.
cluster01::> network ping -vserver cluster01 -lif inter_1 -destination 172.18.10.17
If the ping fails, the first thing to check is whether the cluster SVM has a proper route to the Azure network by running the command below.
cluster01::> network route show -vserver cluster01
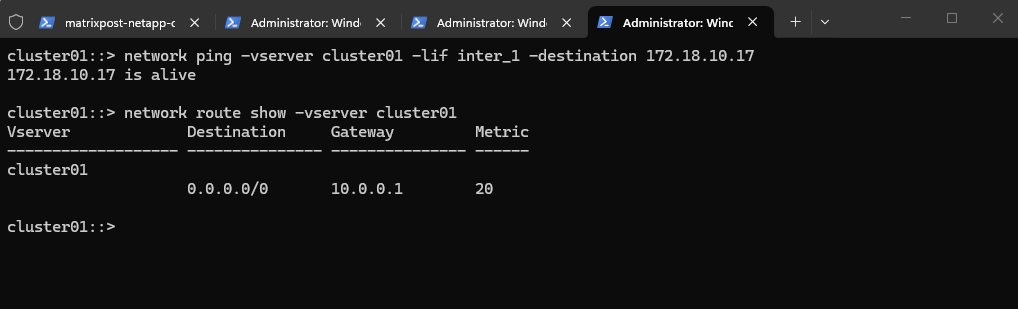
If no route exists for the Azure subnet (e.g., 172.18.10.0/24) or a default route (0.0.0.0/0), you’ll need to add one:
cluster01::> network route create -vserver cluster01 -destination 172.18.10.0/24 -gateway 10.0.0.1
In my lab setup, the default gateway 10.0.0.1 points to my on-prem pfSense appliance, which maintains the established site-to-site IPsec VPN connection to Azure.
On the Azure side, I am not using the native Azure VPN Gateway but instead a custom pfSense appliance deployed as an Azure VM, as described in my dedicated post about building a site-to-site VPN between Azure and on-prem using pfSense on both sites.
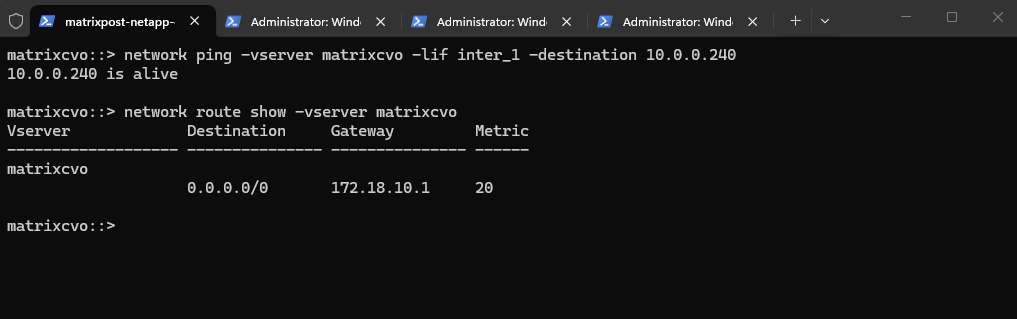
We also validated connectivity from Azure CVO back to the on-prem intercluster LIF, confirming bidirectional reachability.
The routing table shows a default route (
0.0.0.0/0) via172.18.10.1, ensuring that traffic destined for the on-prem network is correctly forwarded through the Azure-side pfSense gateway.
matrixcvo::> network ping -vserver matrixcvo -lif inter_1 -destination 10.0.0.240
matrixcvo::> network route show -vserver matrixcvo
For a detailed walkthrough of the site-to-site VPN configuration between Azure and my on-prem environment, you can refer to my blog series on deploying Azure Cloud Volumes ONTAP. In particular, the sections covering network design and VNet peering explain how connectivity between the environments is established and routed to support hybrid replication scenarios.
Create Cluster Peering (Cluster-to-Cluster Trust)
With network connectivity verified, the next step is to establish cluster peering between the on-prem ONTAP system and Azure Cloud Volumes ONTAP.
Cluster peering creates the required trust relationship that allows SnapMirror and other cross-cluster data protection features to function securely.
You can initiate it from either side, but commonly from the destination (Azure CVO).
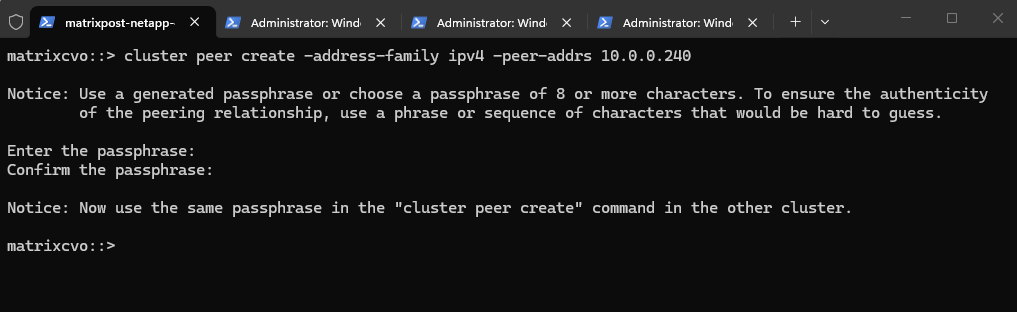
To establish cluster peering, the cluster peer create command must be executed on both systems using the intercluster LIF IP addresses of the respective remote cluster.
It is important to always use the dedicated intercluster LIFs, not management or data LIFs, as they are specifically designed to handle replication and cross-cluster communication.
ONTAP now generated a peering request from Azure CVO and is waiting for the on-prem cluster to complete the trust relationship using the same passphrase.
matrixcvo::> cluster peer create -address-family ipv4 -peer-addrs 10.0.0.240
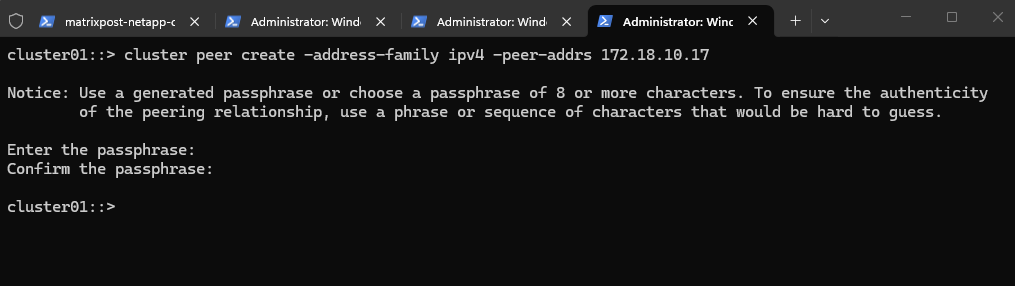
Use the same passphrase and execute the command from the on-prem system.
cluster01::> cluster peer create -address-family ipv4 -peer-addrs 172.18.10.17
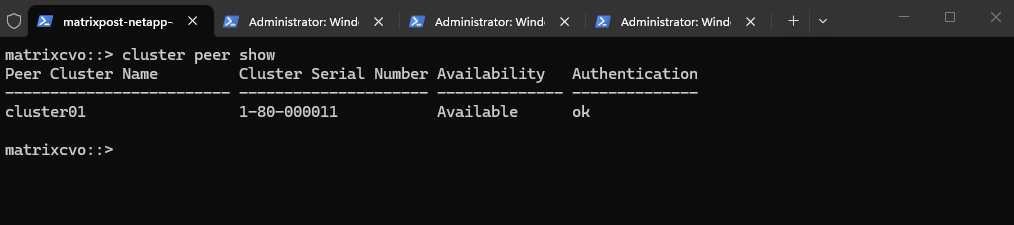
We can now verify the cluster peering on both systems.
On the Azure CVO.
The status Available confirms that the cluster-to-cluster peering between Azure CVO and our on-prem ONTAP system has been successfully established, and authentication is validated (
ok).With the trust relationship in place, both clusters are now ready to proceed with SVM peering and the SnapMirror configuration.
matrixcvo::> cluster peer show
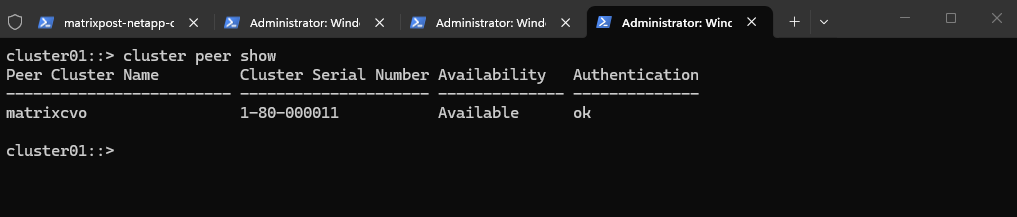
On the on-prem ONTAP system.
cluster01::> cluster peer show
Create SVM Peering (Required Before SnapMirror)
With cluster peering successfully established, the next step is to configure SVM peering between the source and destination Storage Virtual Machines.
SVM peering is required before SnapMirror relationships can be created, as it defines which SVMs are allowed to replicate data across the trusted clusters.
On the destination (our Azure CVO):
When creating the SVM peering from the destination cluster (Azure CVO), the local SVM (
-vserver) must be the target SVM, while the-peer-vserverparameter specifies the source SVM on the remote cluster.In my case,
svm_matrix_cifsis the destination SVM in Azure, andsvm_datarepresents the source SVM on the on-prem cluster.
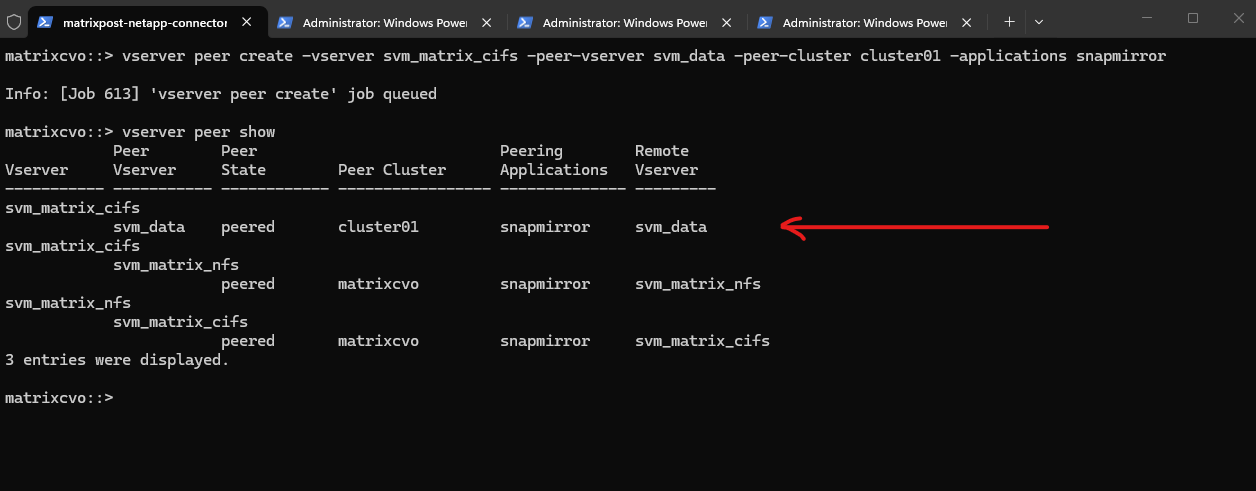
matrixcvo::> vserver peer create -vserver svm_matrix_cifs -peer-vserver svm_data -peer-cluster cluster01 -applications snapmirror

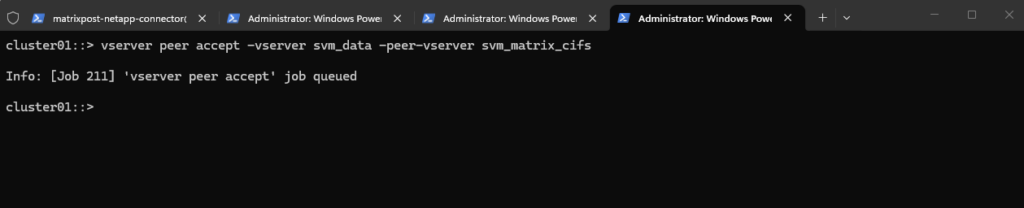
Accept on source (my on-prem ONTAP system):
The SVM peering request must then be accepted on the source cluster to complete the trust relationship between the two Storage VMs.
After running
vserver peer accept, the SVMs are authorized to establish SnapMirror relationships for data replication.
cluster01::> vserver peer accept -vserver <on-prem source SVM> -peer-vserver <Azure Cloud destination SVM>
cluster01::> vserver peer accept -vserver svm_data -peer-vserver svm_matrix_cifs
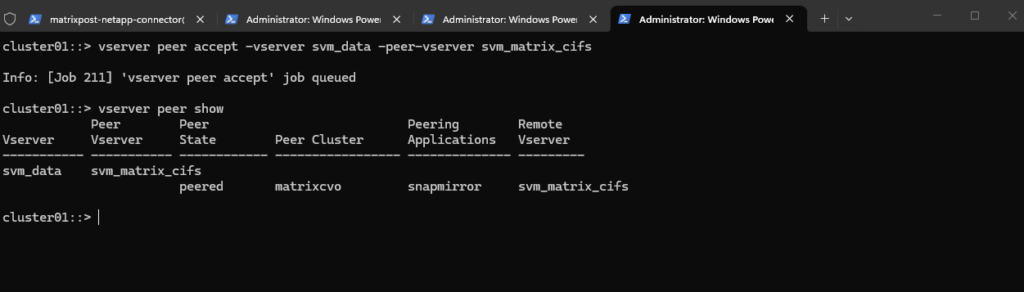
We can verify the SVM peering by running the following command on the source on-prem ONTAP system.
The
vserver peer showcommand confirms that the SVM peering state is peered, indicating that the trust relationship betweensvm_dataandsvm_matrix_cifshas been successfully established. With SVM peering active, the environment is now ready to create the SnapMirror relationship.
cluster01::> vserver peer show
Also we verify the SVM peering by running the following command on the destination Azure CVO system.
On the Azure CVO side, the
vserver peer showoutput confirms thatsvm_matrix_cifsis successfully peered with the on-prem SVMsvm_data, with the peering state set to peered and SnapMirror enabled.In addition, existing intra-cluster SVM peer relationships between
svm_matrix_cifsandsvm_matrix_nfsare also visible, demonstrating that SVM peering can be established both across clusters and within the same cluster. With the cross-cluster SVM peering active, the environment is now fully prepared for creating the SnapMirror relationship.
matrixcvo::> vserver peer show
Create the Destination (DP) Volume on Azure CVO
Now we move to the actual data protection part.
Before creating a SnapMirror relationship, the destination volume must exist and must be of type DP (data protection).
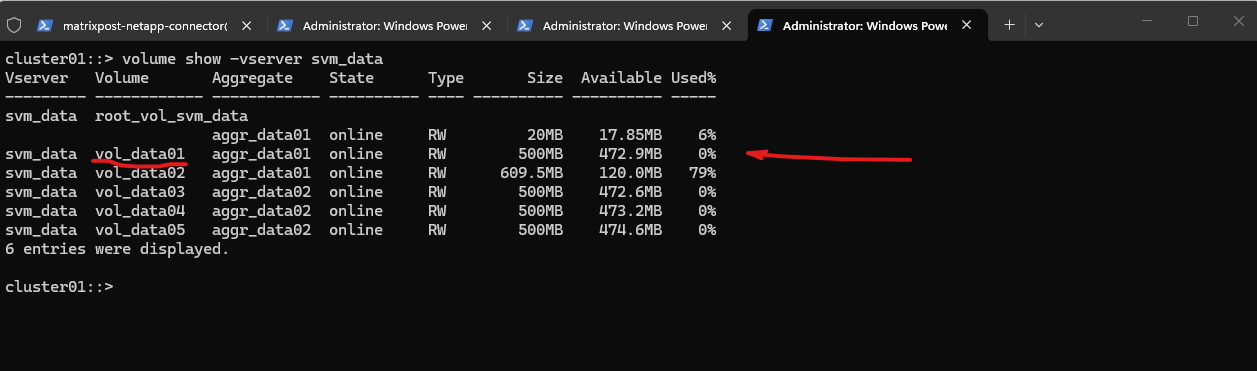
Identify the source volume in on-prem.
Decide which volume you want to replicate (e.g.
vol_data01).
cluster01::> volume show -vserver svm_data
Next create the destination volume in Azure CVO.
Important: The destination volume must be created with
-type DP, and its size must be equal to or larger than the source volume. A junction path is not required because a DP volume is not mounted or accessible to clients unless the SnapMirror relationship is broken during a failover scenario.
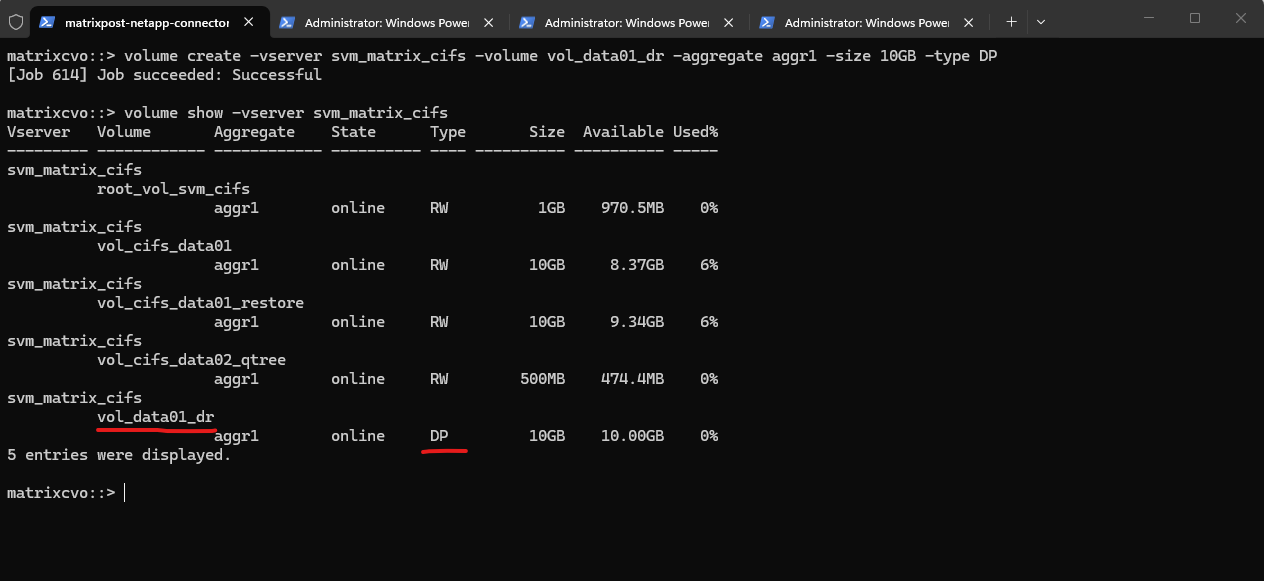
matrixcvo::> volume create -vserver svm_matrix_cifs -volume vol_data01_dr -aggregate aggr1 -size 10GB -type DP

Verify the newly created volume.
SnapMirror does not automatically create the destination volume (unless using certain workflows). The DP volume must exist before creating the SnapMirror relationship.
matrixcvo::> volume show -vserver svm_matrix_cifs
Create the SnapMirror Relationship
With the destination DP volume in place, the next step is to create the SnapMirror relationship between the source volume on the on-prem cluster and the target volume on Azure CVO.
This defines how and when data will be replicated and prepares the environment for the initial baseline transfer.
Run this on Azure CVO (destination side):
The
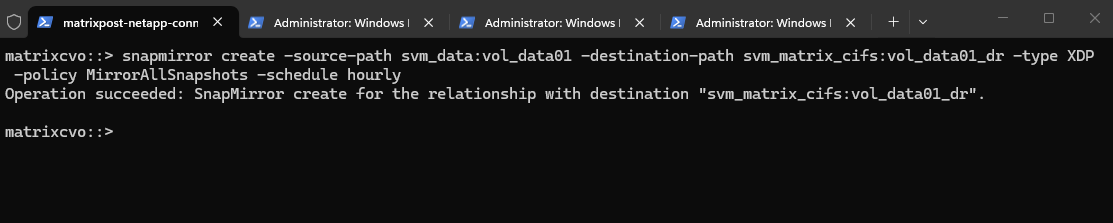
snapmirror createcommand defines the replication relationship between the on-prem source volume and the Azure CVO destination volume, including the replication type, policy, and schedule. With the relationship successfully created, the configuration is now ready for the initial baseline transfer.The type
XDPstands for Extended Data Protection.It is the modern SnapMirror replication type introduced in ONTAP 9 and replaces the older
DPtype. XDP supports unified replication (SnapMirror and SnapVault functionality in one framework), policy-based retention, and advanced data protection features under a single replication engine.
matrixcvo::> snapmirror create -source-path svm_data:vol_data01 -destination-path svm_matrix_cifs:vol_data01_dr -type XDP -policy MirrorAllSnapshots -schedule hourly
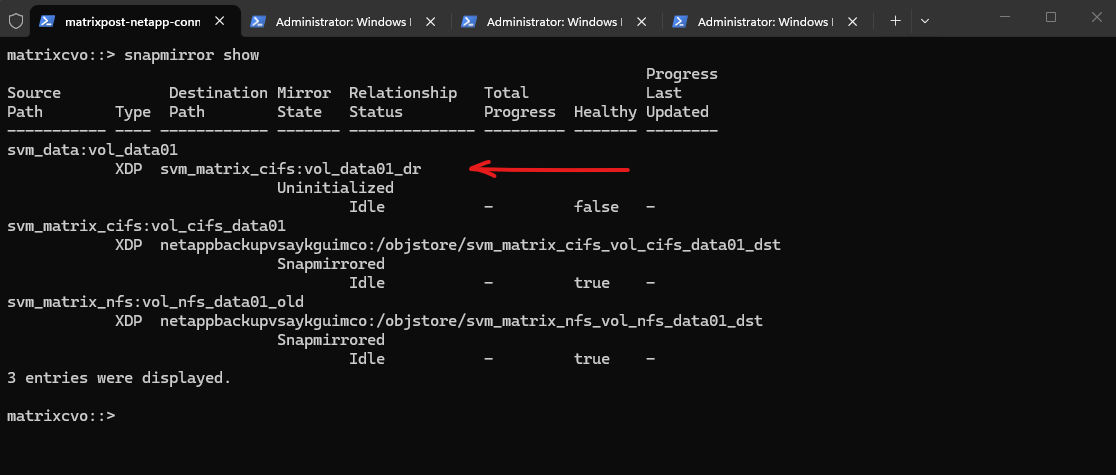
Before initializing the baseline, we can verify that the SnapMirror relationship was created successfully by running:
The
snapmirror showoutput confirms that the newly created relationship betweensvm_data:vol_data01andsvm_matrix_cifs:vol_data01_dris currently in the Uninitialized state and idle, meaning the baseline transfer has not yet been started.The
Healthyfield showsfalse, which is expected until the initial transfer completes successfully. The additional SnapMirror entries visible in the output represent existing backup relationships to object storage in Azure, which are already in the Snapmirrored state and healthy.
matrixcvo::> snapmirror show
Initialize the Baseline Transfer
After creating the SnapMirror relationship, the next step is to initialize the baseline transfer. This operation performs the initial full data copy from the source volume to the destination DP volume, establishing the foundation for all subsequent incremental updates.
This triggers the first full copy:
The
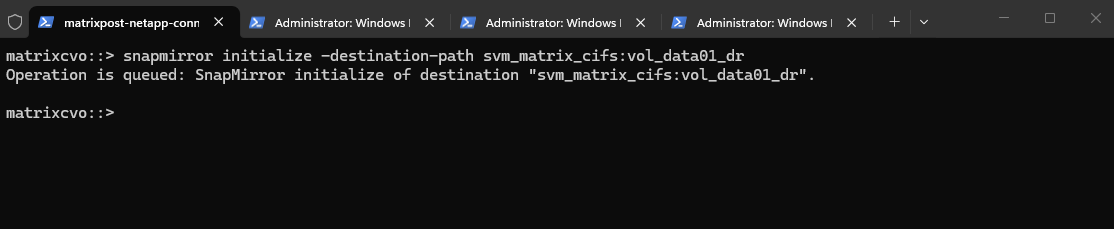
snapmirror initializecommand starts the initial baseline transfer from the source volume to the destination DP volume. This operation queues the full data copy, which will replicate all existing data before incremental updates can occur.For volume SnapMirror, commands like
snapmirror createandsnapmirror initializemust be executed on the destination cluster, meaning the cluster that hosts the DP volume. In my case, that is Azure CVO (matrixcvo), becausevol_data01_drresides there.
matrixcvo::> snapmirror initialize -destination-path svm_matrix_cifs:vol_data01_dr
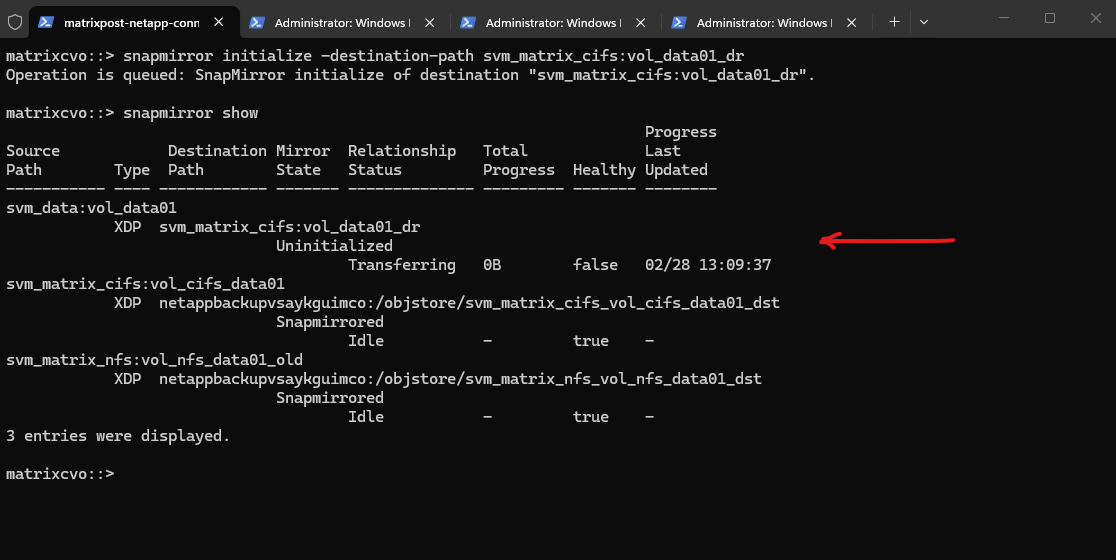
We can monitor the progress by running:
The
snapmirror showoutput now shows the relationship still Uninitialized, but the status has moved to Transferring with a timestamp under Last Updated, which confirms the initialize job is actively running. The progress currently shows0B, which is normal at the very beginning until the first transfer stats refresh.
matrixcvo::> snapmirror show
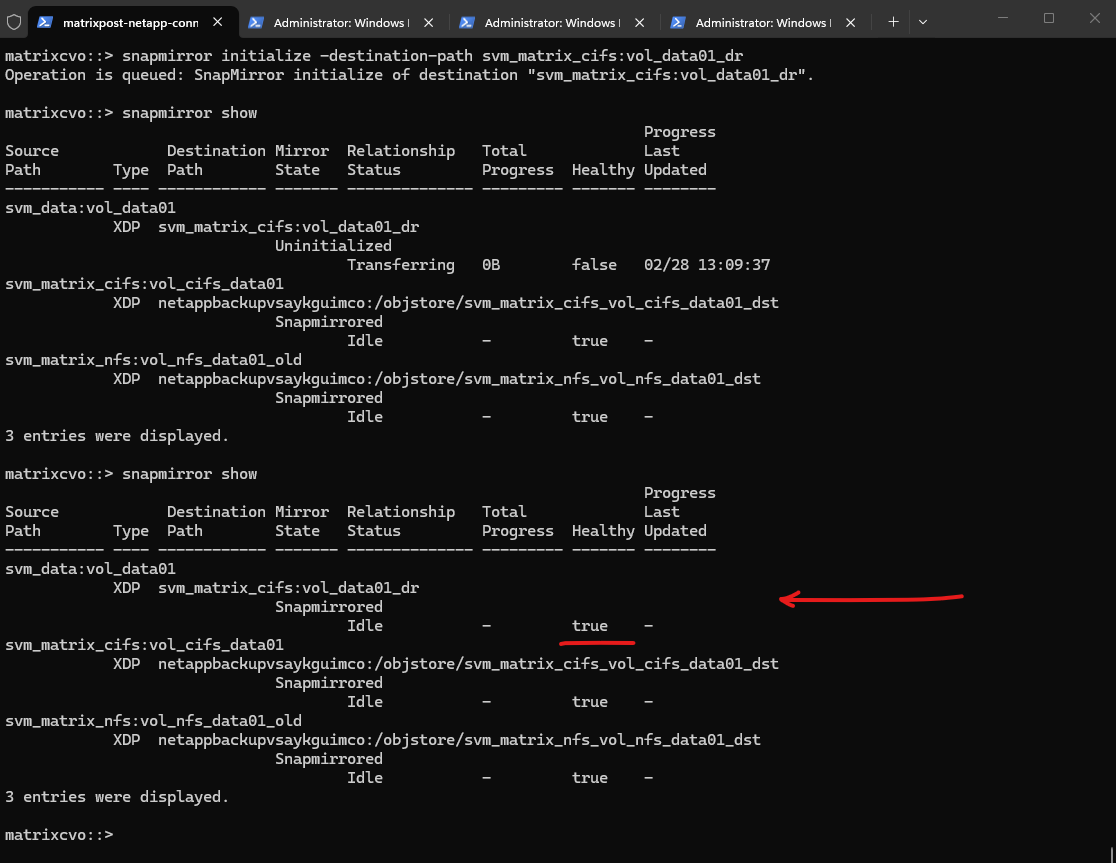
Verifying a few minutes later again.
The relationship state has now changed to Snapmirrored, the status is Idle, and the
Healthyfield shows true, confirming that the initial replication finished without issues. From this point onward, only incremental Snapshot changes will be transferred according to the configured schedule.
matrixcvo::> snapmirror show
Verifying SnapMirror Baseline and Snapshot Creation
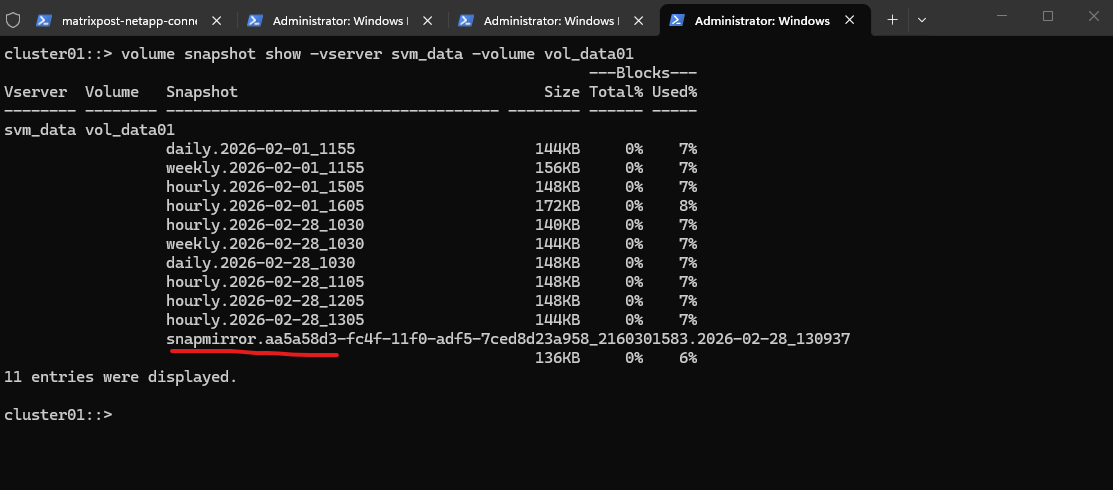
After the baseline transfer completes, it is important to verify that SnapMirror has created its replication snapshot on the source volume.
This snapshot serves as the reference point for all future incremental updates. By inspecting the snapshot list, we can confirm that the initial replication was successfully established.
The snapmirror.<UUID>... snapshot was automatically created during the baseline initialization and represents the replication reference point for the SnapMirror relationship. It ensures that all subsequent transfers are incremental, sending only changes since this snapshot.
cluster01::> volume snapshot show -vserver svm_data -volume vol_data01
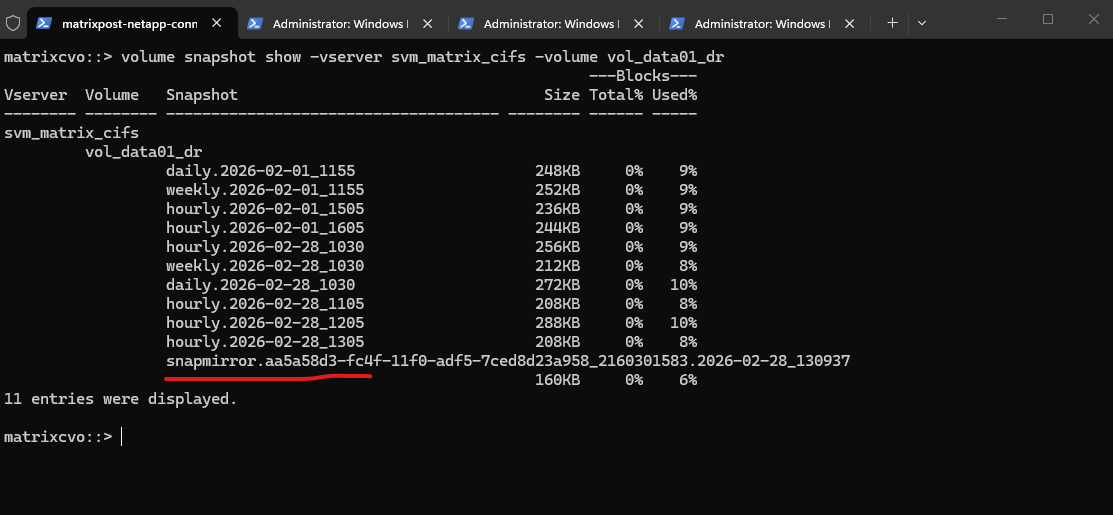
We can also verify the replicated snapshots directly on the destination volume in Azure CVO by running the command below. This confirms that the snapshot history has been successfully transferred as part of the SnapMirror baseline.
The snapshot list on
vol_data01_drmatches the source volume, including thesnapmirror.<UUID>...snapshot created during initialization. This confirms that the baseline transfer was completed successfully and that the destination DP volume now holds a consistent replicated copy of the source data.The hourly, daily, and weekly snapshots visible on the destination volume were not newly created by default on Azure CVO. Instead, they were replicated as part of the baseline transfer because the
MirrorAllSnapshotspolicy copies all existing snapshots from the source volume. This ensures that the destination holds an identical snapshot history, providing a fully consistent replica of the source.
matrixcvo::> volume snapshot show -vserver svm_matrix_cifs -volume vol_data01_dr
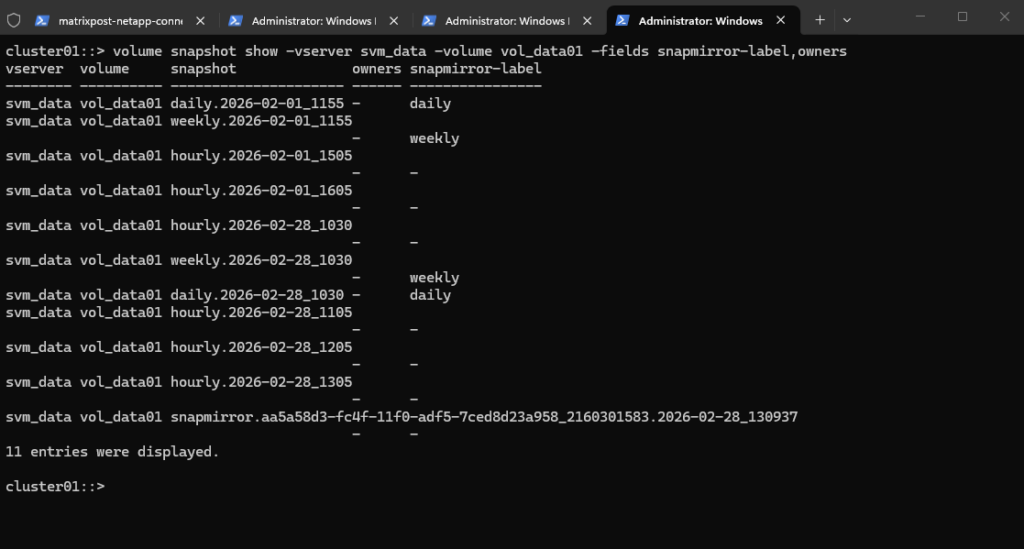
To clearly distinguish between local policy snapshots and SnapMirror-generated snapshots, we can run the command below.
Local hourly, daily, and weekly snapshots follow the defined naming convention and may carry a SnapMirror label such as
dailyorweekly, depending on the policy configuration.In contrast, SnapMirror reference snapshots always begin with
snapmirror.<UUID>and are created by the replication engine to manage baseline and incremental transfers.The
snapmirror-labelfield does not mean SnapMirror created the snapshot. Local snapshots are generated by the volume’s snapshot policy, and the label simply allows SnapMirror policies to determine which snapshots should be replicated.
cluster01::> volume snapshot show -vserver svm_data -volume vol_data01 -fields snapmirror-label,owners
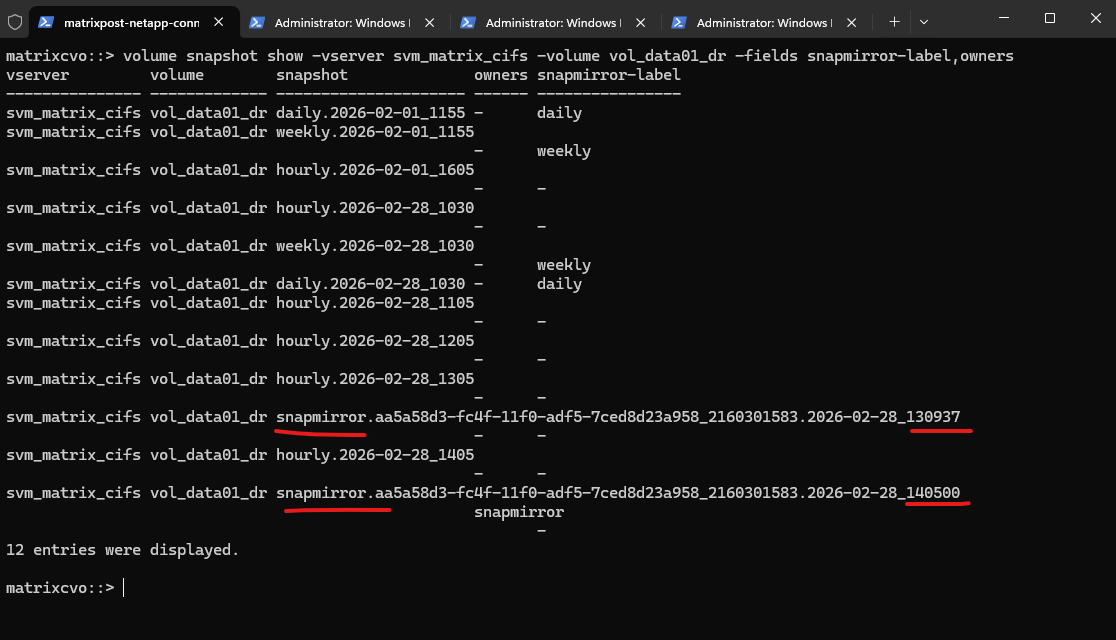
When running the snapshot command on the destination system as shown below, all transferred SnapMirror reference snapshots can be visible depending on the replication state.
matrixcvo::> volume snapshot show -vserver svm_matrix_cifs -volume vol_data01_dr -fields snapmirror-label,owners
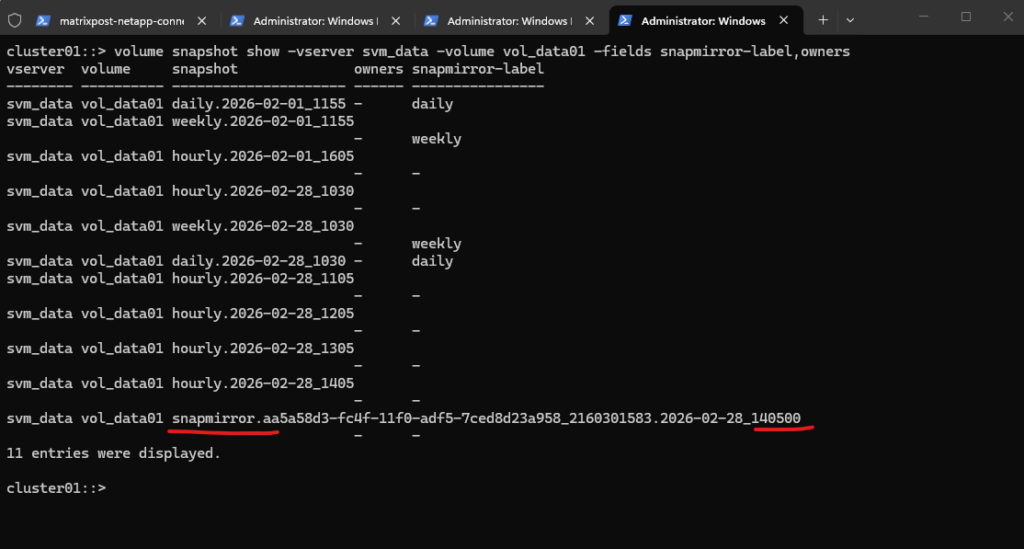
On the source, however, only the latest SnapMirror reference snapshot is retained, as older ones are automatically replaced after successful updates.
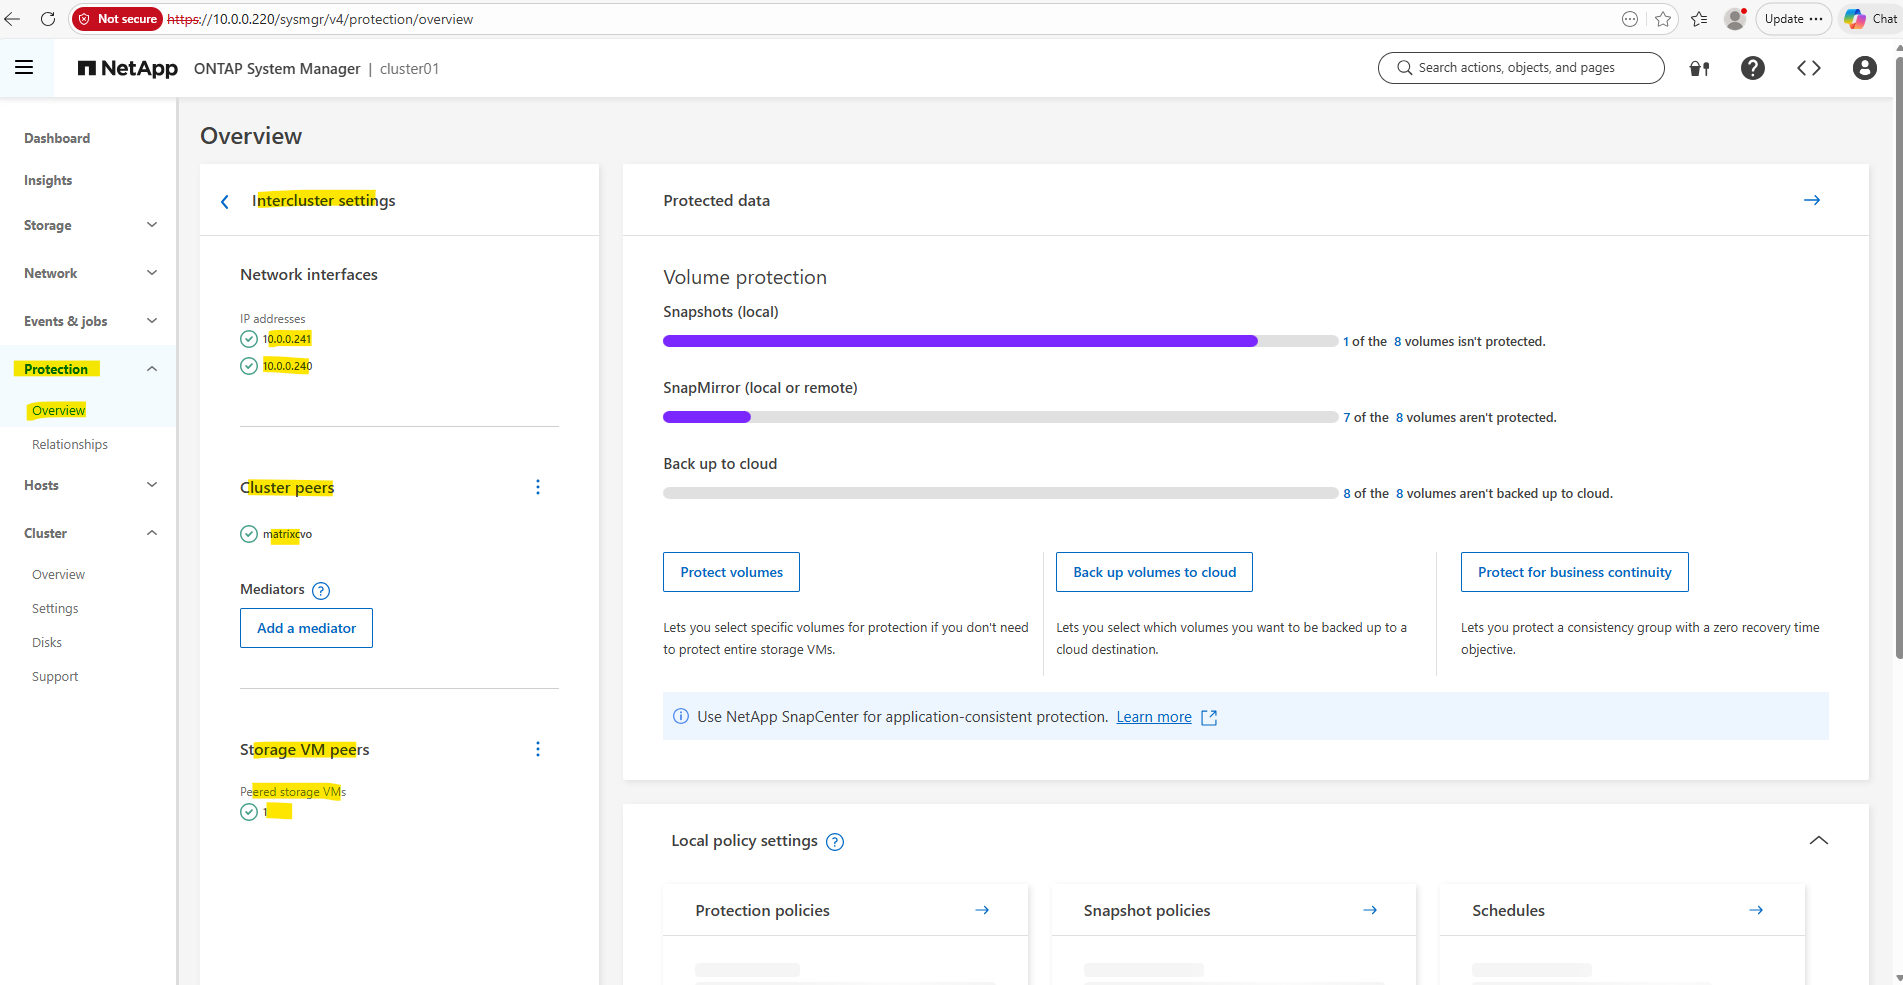
Verifying the SnapMirror Relationship in ONTAP System Manager
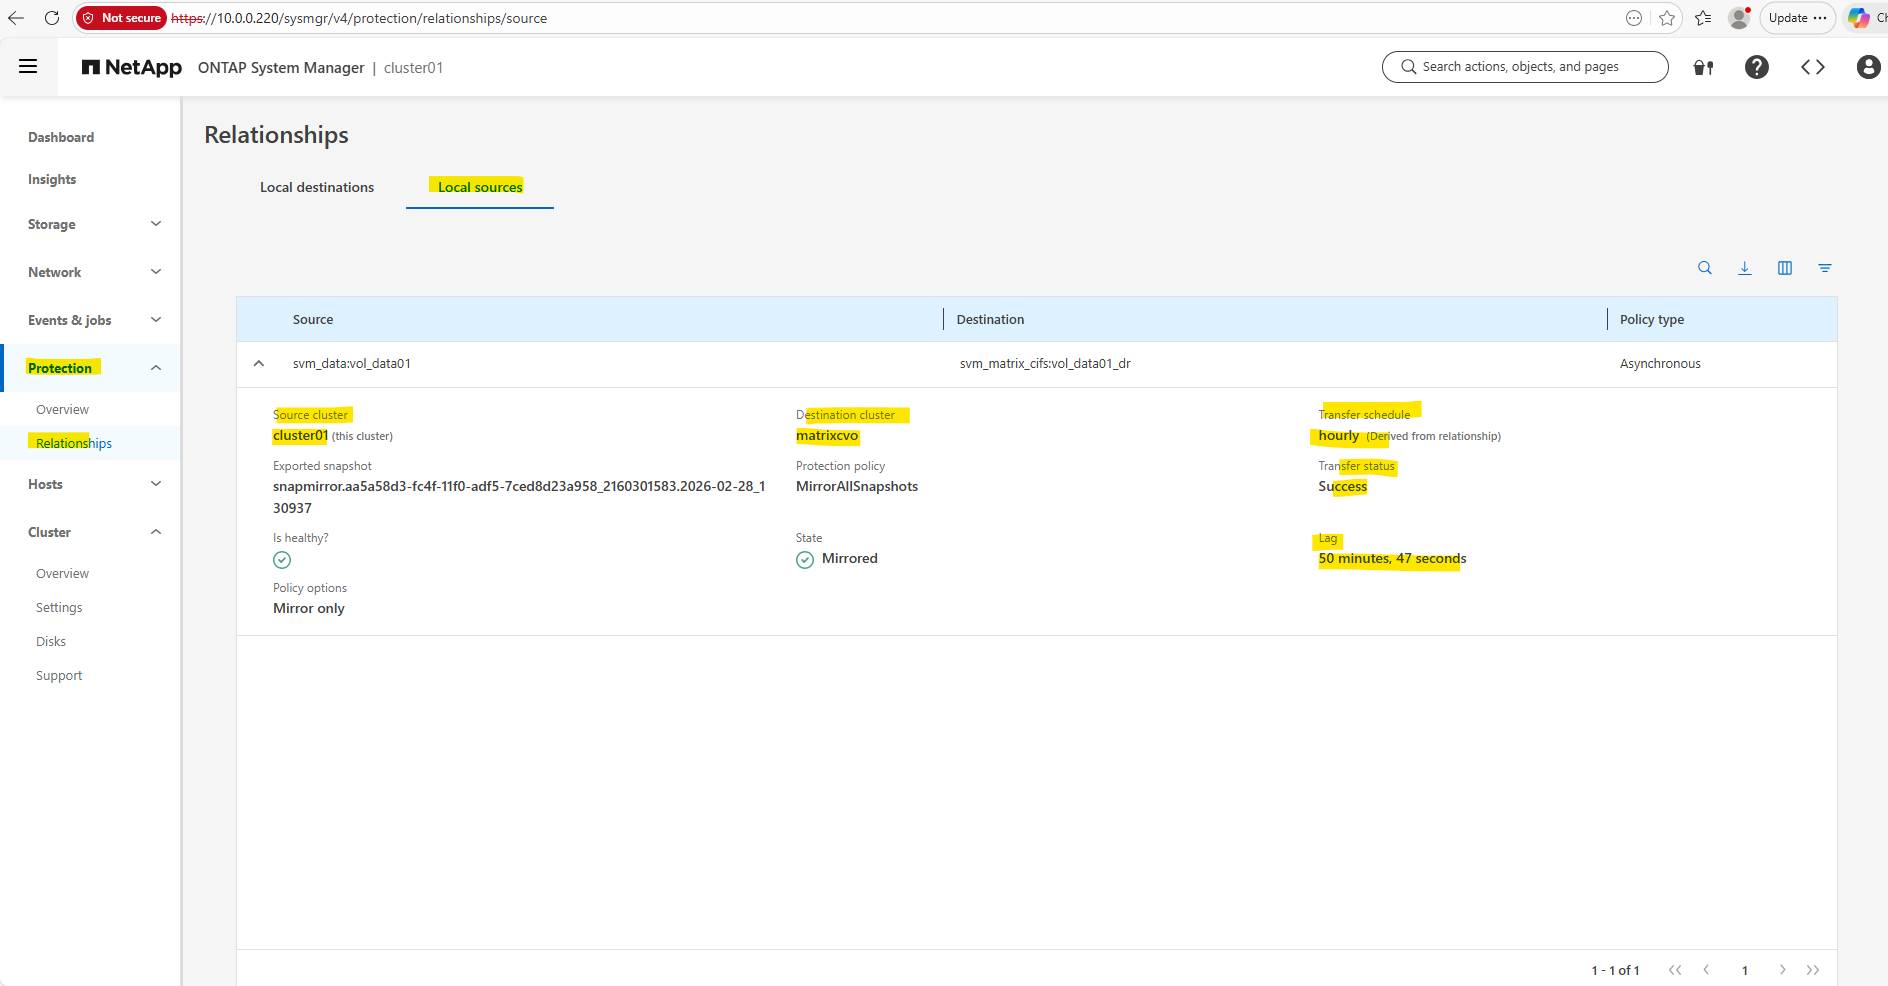
In addition to the CLI, the SnapMirror relationship can also be monitored through ONTAP System Manager. Under Protection → Overview → Overview/Relationships, the replication status, health, schedule, and lag time are clearly displayed.
This provides a convenient graphical overview of the replication state and complements the CLI-based verification.
Under Protection → Overview → Relationships the lag time in ONTAP System Manager represents the time difference between the latest Snapshot on the source volume and the latest Snapshot successfully transferred to the destination
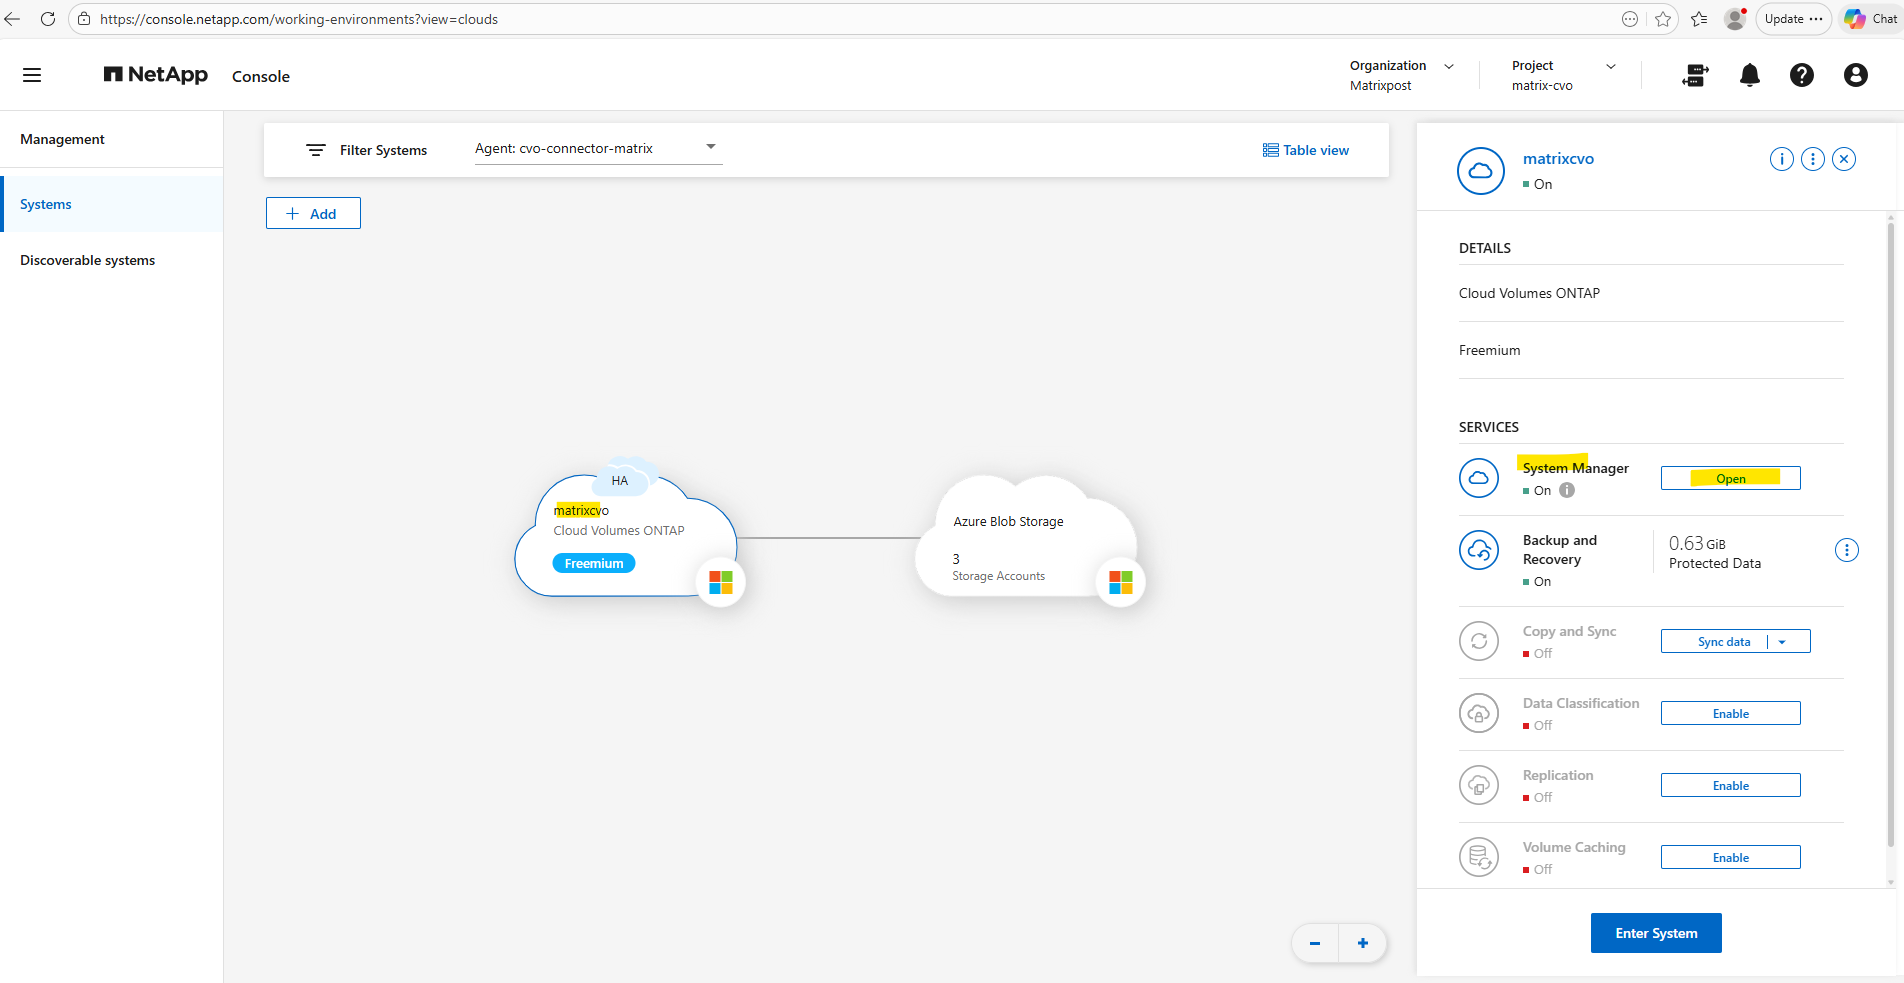
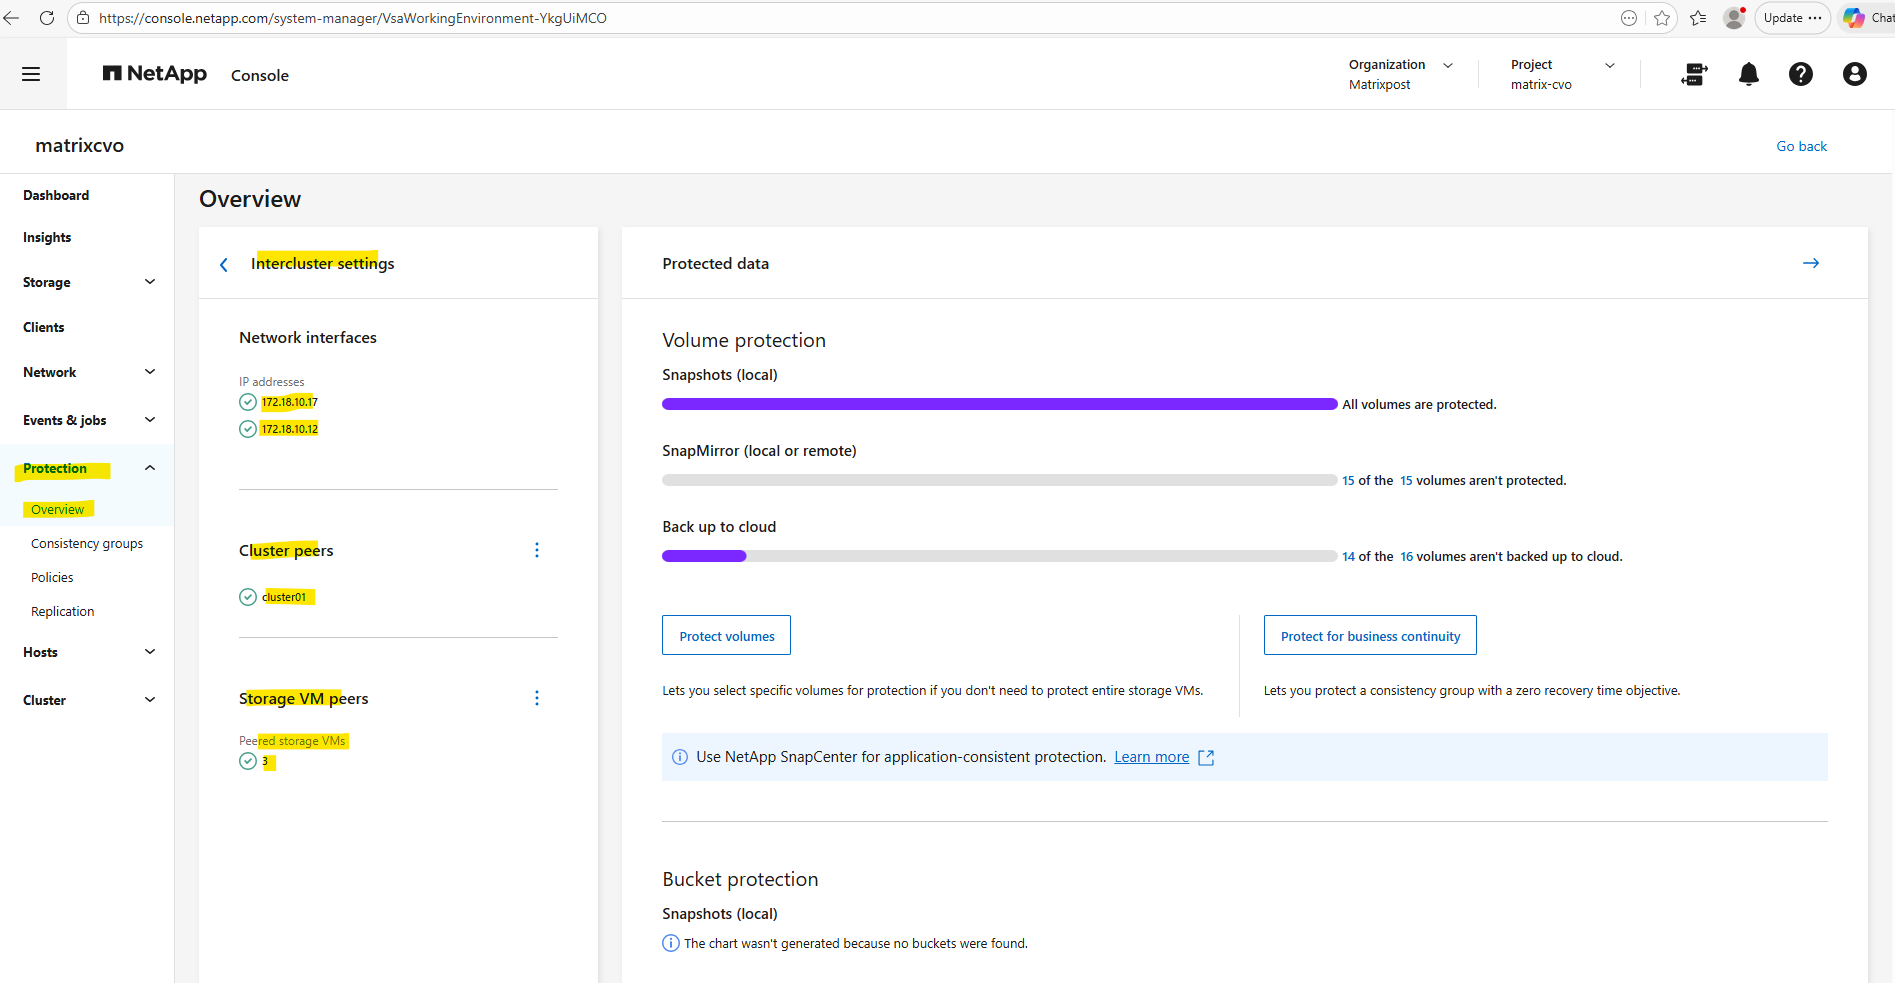
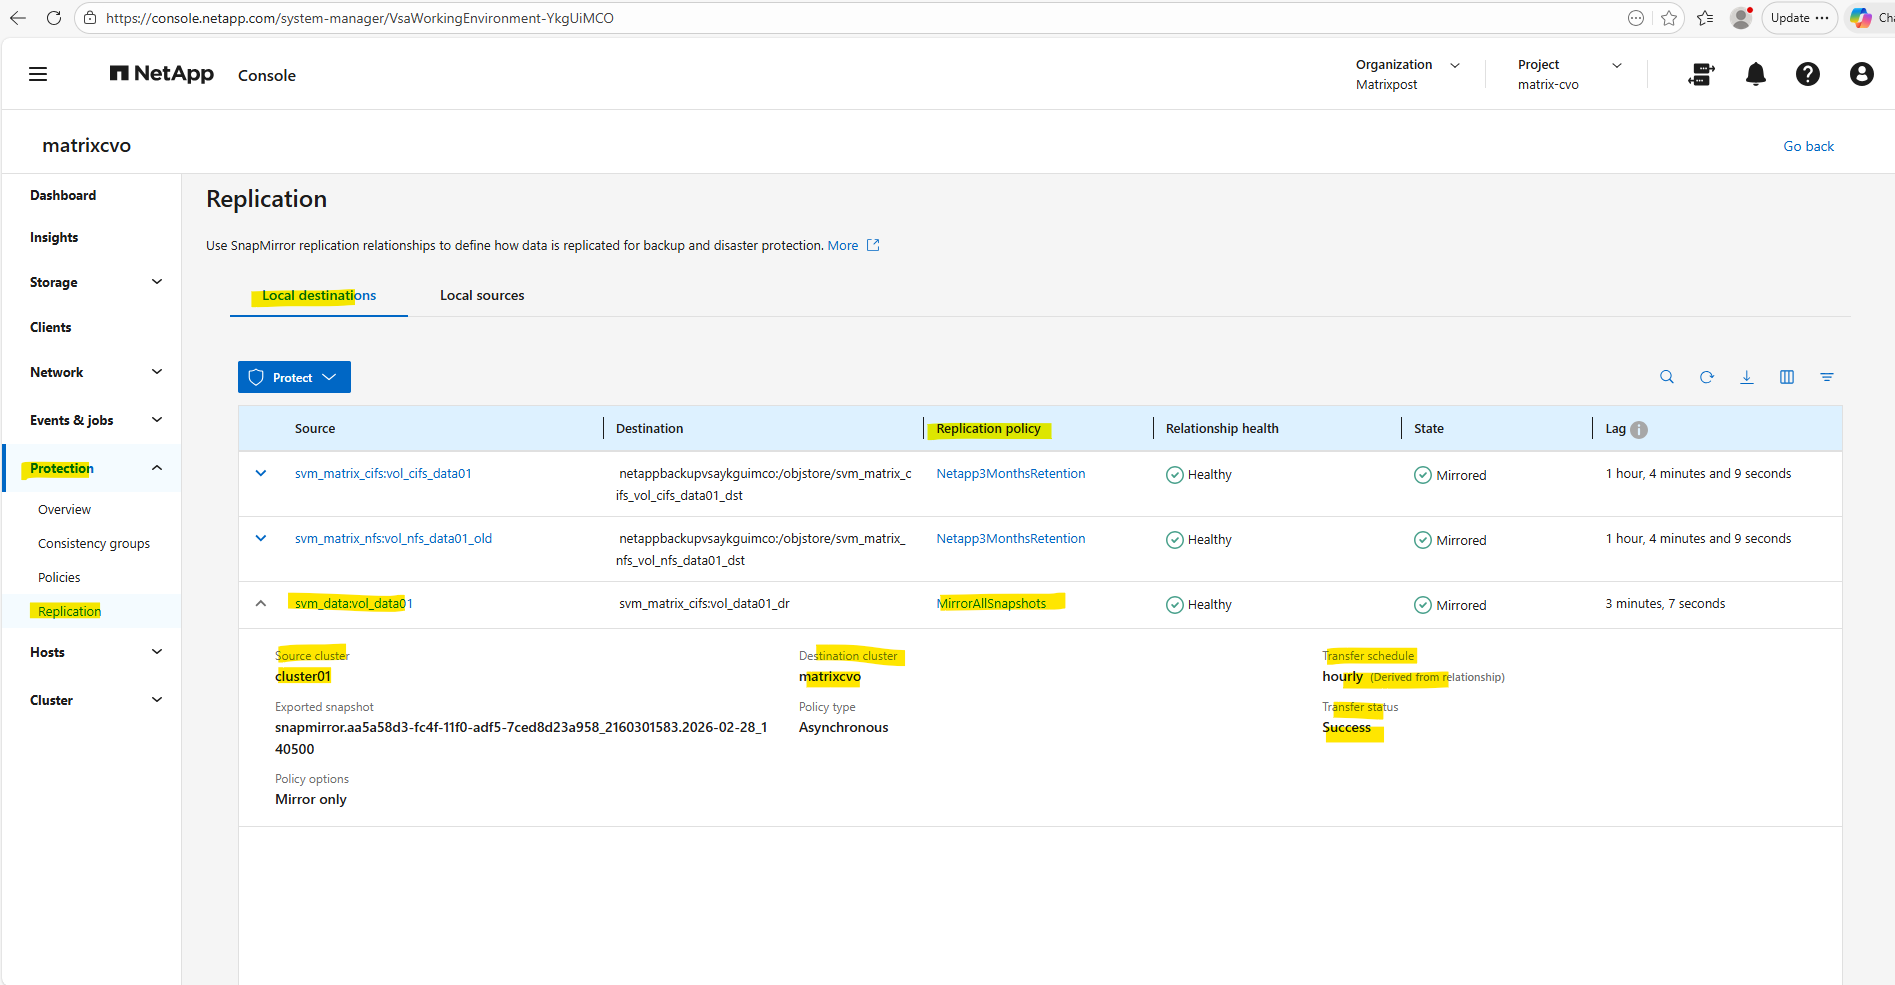
We can also monitor the SnapMirror relationship directly on Azure Cloud Volumes ONTAP using the NetApp Console and ONTAP System Manager as shown below.
In the NetApp Console and its ONTAP System Manager, the replication status and lag time are visible within the protection overview.
Failover Scenario: Activating and Mounting the DR Volume
In a real disaster scenario where the on-prem source system becomes unavailable, the SnapMirror relationship must be broken to activate the destination volume.
Once the relationship is broken, the DP volume on Azure CVO becomes writable and can be mounted to restore client access.
This section demonstrates how to simulate and validate that failover process.
Break the SnapMirror Relationship (on destination)
Running snapmirror break on the destination system (Azure CVO) converts the DP volume into a writable volume and stops the replication relationship.
This step is required in a disaster recovery scenario to activate the destination volume and make it accessible for client access.
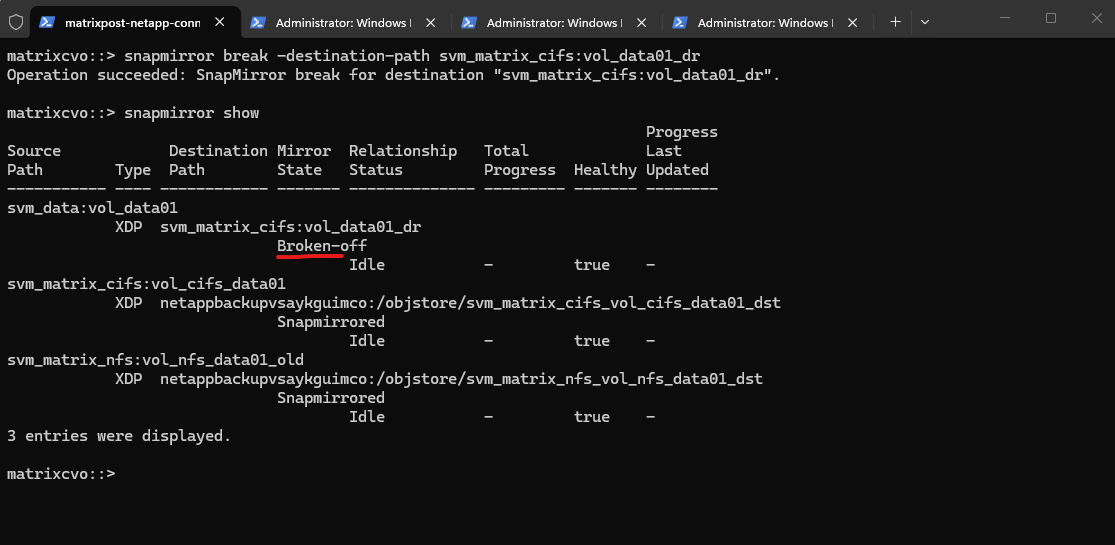
The
snapmirror showoutput now displays the relationship state as Broken-off, confirming that the replication link has been successfully terminated. The destination volume is no longer in Snapmirrored state and is now independent and writable, allowing it to serve client data in a disaster recovery scenario.
matrixcvo::> snapmirror break -destination-path svm_matrix_cifs:vol_data01_dr

# verify
matrixcvo::> snapmirror show
Mount the Volume (if not already mounted)
After breaking the SnapMirror relationship, the volume must be mounted by assigning a junction path if it is not already mounted.
Once mounted, the volume becomes accessible to clients via SMB or NFS, allowing data access from the DR system.
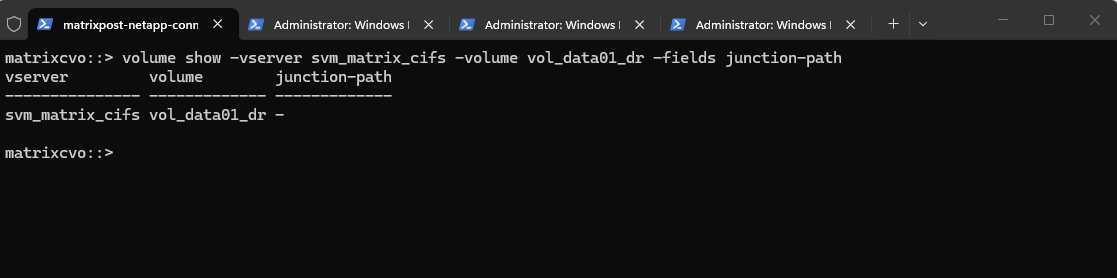
The output shows that no junction path is currently assigned to
vol_data01_dr, which means the volume is not yet mounted and cannot be accessed by clients. To make the DR volume available, a junction path must now be configured.
matrixcvo::> volume show -vserver svm_matrix_cifs -volume vol_data01_dr -fields junction-path
If empty, mount it:
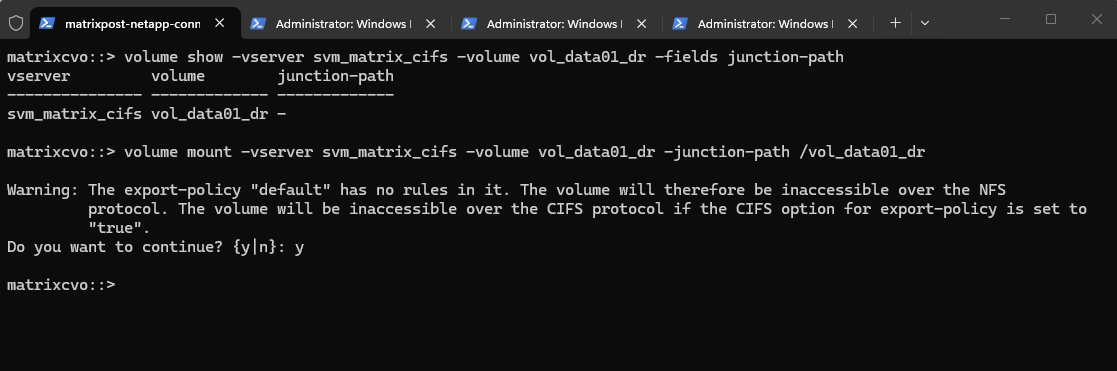
The volume was successfully mounted and is now available under the specified junction path.
The warning primarily applies to NFS access, as export policies control NFS client permissions. In general, SMB/CIFS access is governed by share configuration and NTFS permissions, and export policy enforcement for SMB is disabled by default but can be enabled if required as shown further down.
matrixcvo::> volume mount -vserver svm_matrix_cifs -volume vol_data01_dr -junction-path /vol_data01_dr
Verify it.
matrixcvo::> volume show -vserver svm_matrix_cifs -volume vol_data01_dr -fields junction-path

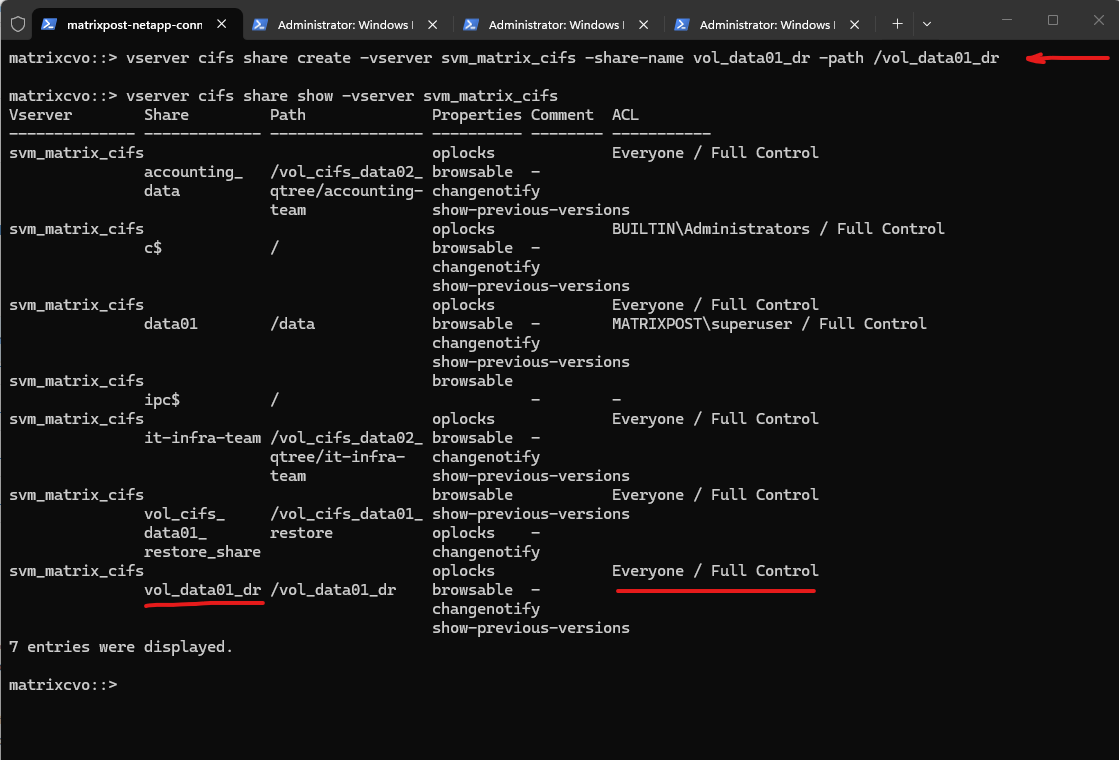
Finally, to provide SMB access to the activated DR volume, a new CIFS share must be created for the mounted junction path. Without an explicit SMB share, the volume will not be accessible to Windows clients.
We create the SMB share for the DR volume by running the command below, making the mounted volume accessible to Windows clients.
By default, the newly created SMB share is configured with the permission Everyone / Full Control.
In practice, it is common to leave the SMB share permission set to “Everyone / Full Control” and enforce access control exclusively through NTFS permissions. This avoids conflicting permission layers and allows for more granular and manageable security configuration.
matrixcvo::> vserver cifs share create -vserver svm_matrix_cifs -share-name vol_data01_dr -path /vol_data01_dr

# verify
matrixcvo::> vserver cifs share show -vserver svm_matrix_cifs
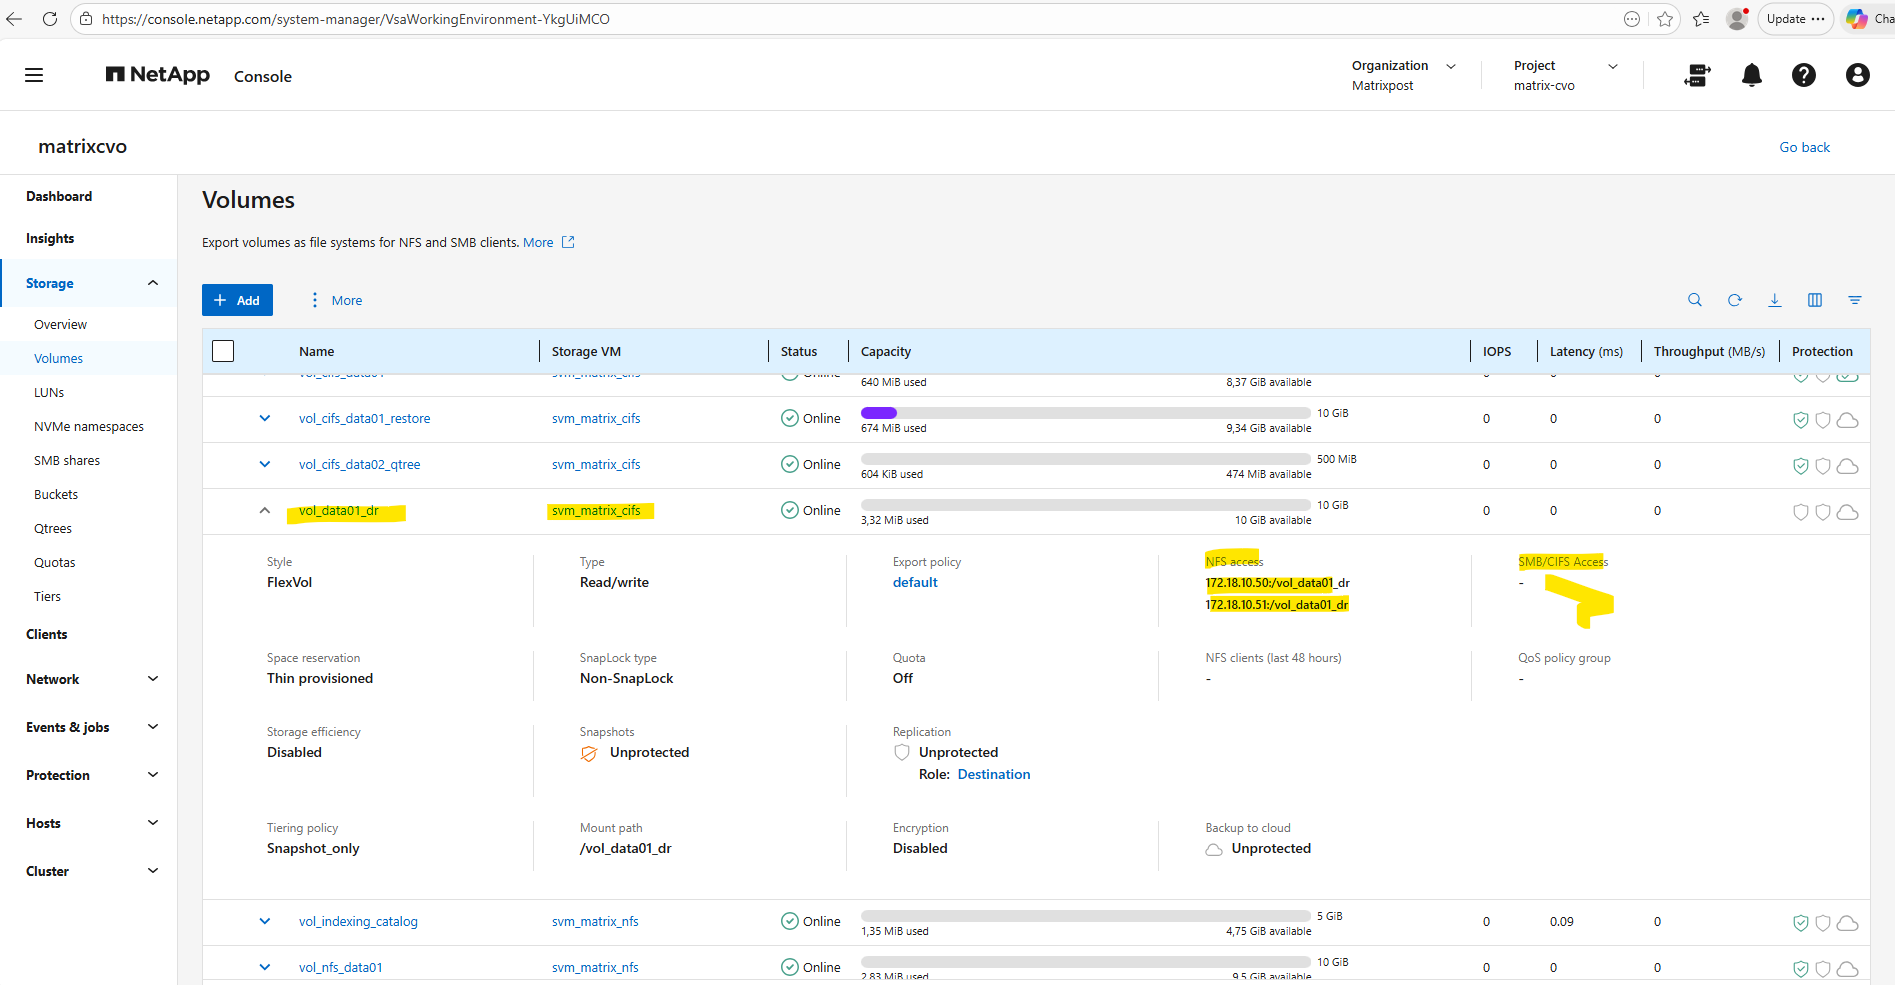
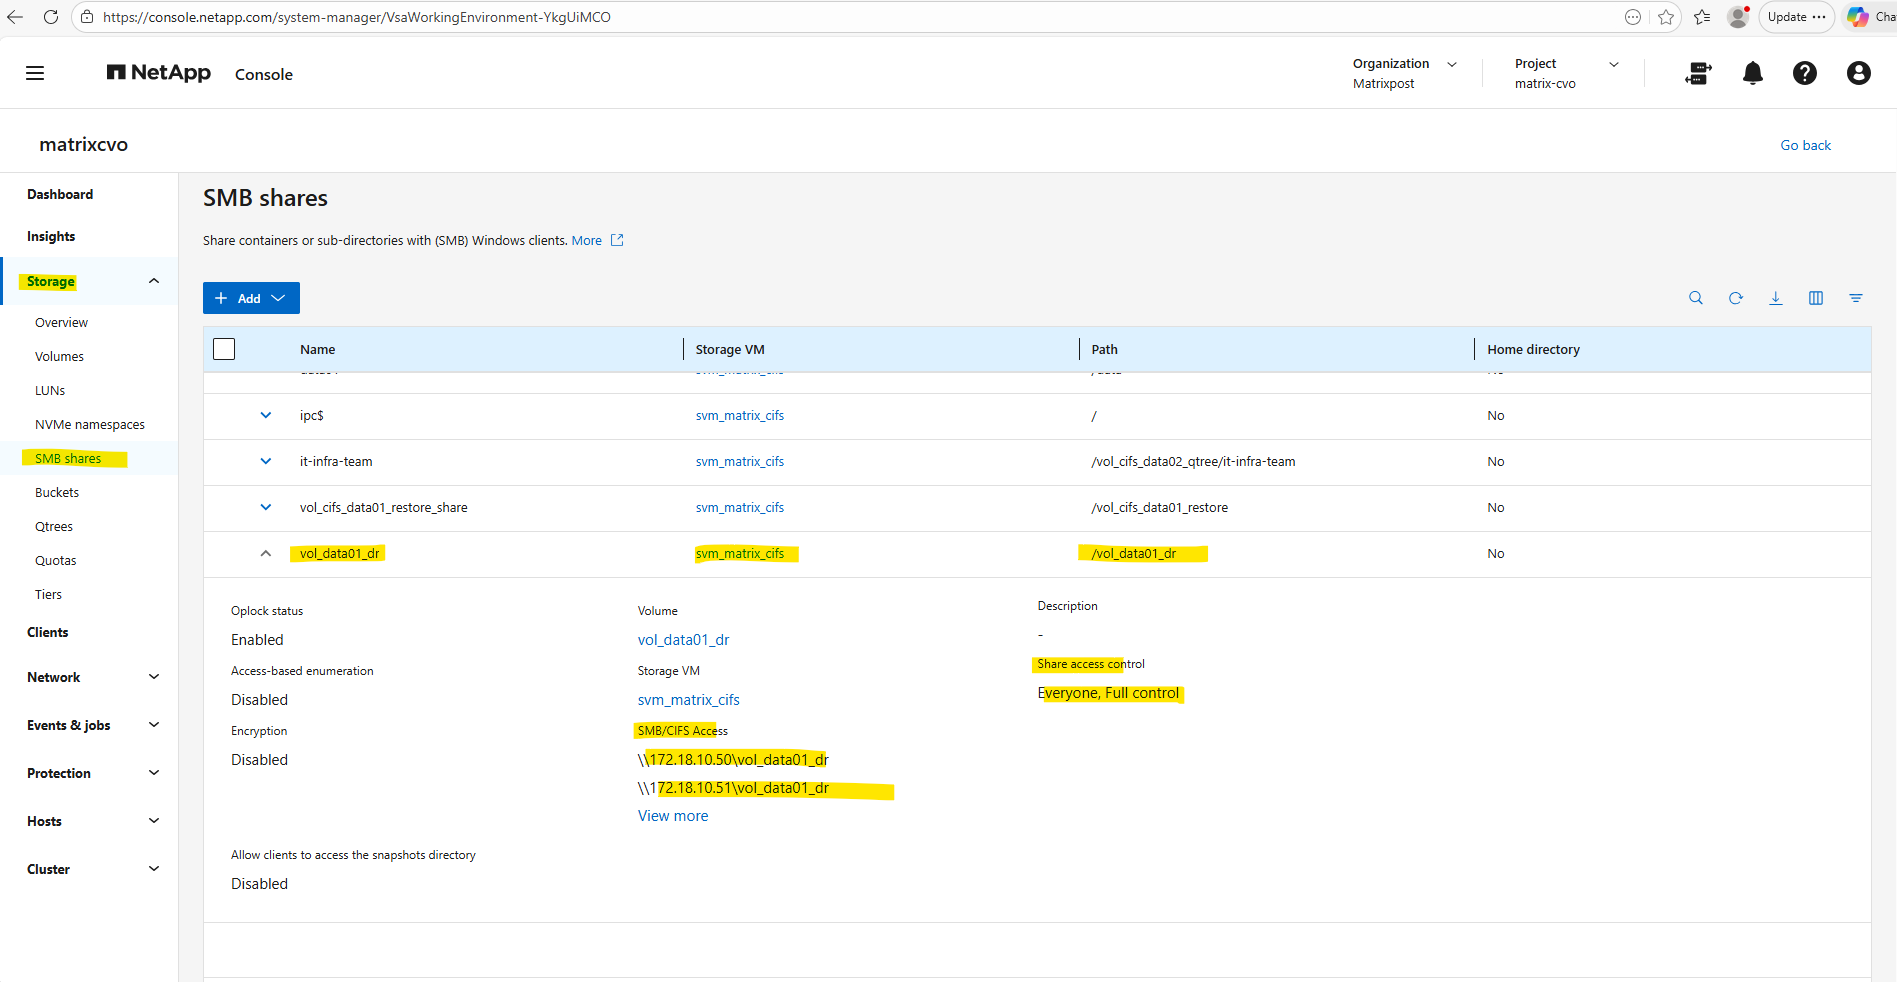
The UNC path to mount the SMB share is now also shown in the System Manager under the SMB/CIFS Access section as shown below.

And directly under Storage -> SMB shares.
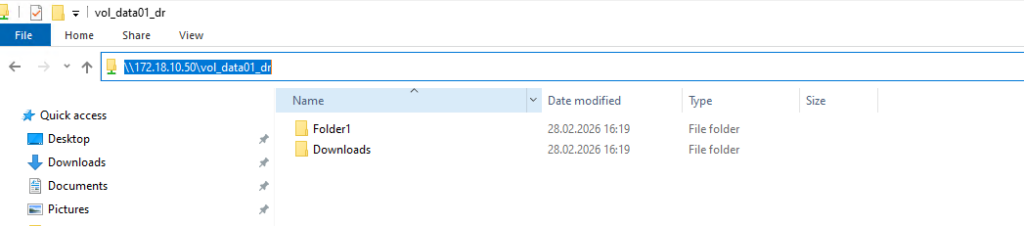
Accessing the SMB share from a Windows Client.
Best Practice for Migrating from On-Prem ONTAP to Azure CVO
To transfer on-prem NetApp ONTAP data to the cloud using Azure Cloud Volumes ONTAP (CVO), a controlled migration strategy should be implemented to ensure minimal downtime and data consistency.
For a planned cloud migration, the recommended approach is to use SnapMirror to synchronize the data, perform a final update during a maintenance window, and then break the relationship to activate the destination volume.
Cloning the DP volume is typically only required for testing or fallback scenarios, not for a standard migration cutover.
Enable or disable ONTAP export policies for SMB access
We can enable or disable export policies for SMB access on storage virtual machines (SVMs). Using export policies to control SMB access to resources is optional.
The following are the requirements for enabling export policies for SMB:
- The client must have a “PTR” record in DNS before you create the export rules for that client.
- An additional set of “A” and “PTR” records for host names is required if the SVM provides access to NFS clients and the host name you want to use for NFS access is different from the CIFS server name.
When setting up a new CIFS server on your SVM, the use of export policies for SMB access is disabled by default.
You can enable export policies for SMB access if you want to control access based on authentication protocol or on client IP addresses or host names. You can enable or disable export policies for SMB access at any time.
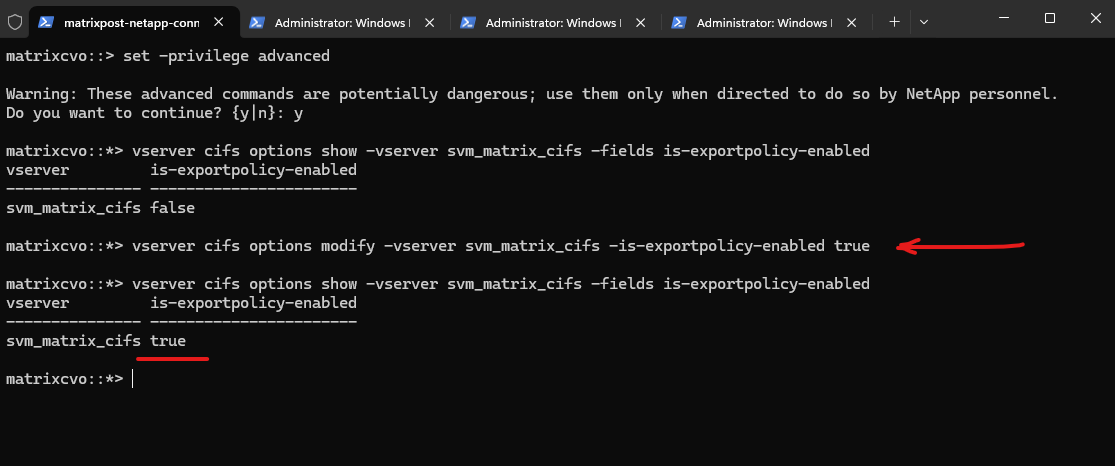
By switching to advanced privilege level and checking the CIFS options, we can see that is-exportpolicy-enabled is set to false for svm_matrix_cifs. This confirms that SMB access is not evaluated against export policy rules in this configuration. Instead, access control is handled exclusively through CIFS share settings and NTFS permissions.
matrixcvo::> vserver cifs options show -vserver svm_matrix_cifs
matrixcvo::> set -privilege advanced
matrixcvo::*> vserver cifs options show -vserver svm_matrix_cifs -fields is-exportpolicy-enabled
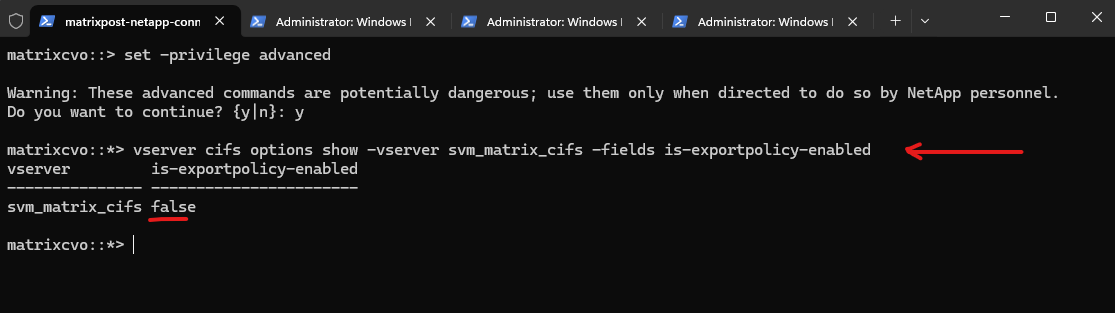
We can enable export policies for SMB access by running the following command.
matrixcvo::*> vserver cifs options modify -vserver svm_matrix_cifs -is-exportpolicy-enabled true
Source: https://docs.netapp.com/us-en/ontap/smb-admin/enable-disable-export-policies-task.html
Links
SnapMirror disaster recovery and data transfer
https://docs.netapp.com/us-en/ontap/concepts/snapmirror-disaster-recovery-data-transfer-concept.htmlEnable or disable ONTAP export policies for SMB access
https://docs.netapp.com/us-en/ontap/smb-admin/enable-disable-export-policies-task.htmlCross-Region Replication: How to Do It with Cloud Volumes ONTAP
https://www.netapp.com/learn/cross-region-replication-with-cloud-volumes-ontapWhat are the firewall requirements for intercluster SnapMirror with ONTAP 9?
https://kb.netapp.com/on-prem/ontap/DP/SnapMirror/SnapMirror-KBs/What_are_the_firewall_requirements_for_intercluster_SnapMirror_with_ONTAP_9