What is Microsoft Entra ID Governance?
Microsoft Entra ID Governance allows you to balance your organization’s need for security and employee productivity with the right processes and visibility. It provides you with capabilities to ensure that the right people have the right access to the right resources. These and related Microsoft Entra ID and Enterprise Mobility + Security features allows you to mitigate access risk by protecting, monitoring, and auditing access to critical assets while ensuring employee and business partner productivity.
ID Governance gives organizations the ability to do the following tasks across employees, business partners and vendors, and across services and applications both on-premises and in clouds:
- Govern the identity lifecycle
- Govern access lifecycle
- Secure privileged access for administration
Specifically, it is intended to help organizations address these four key questions:
- Which users should have access to which resources?
- What are those users doing with that access?
- Are there effective organizational controls for managing access?
- Can auditors verify that the controls are working?
Source: https://learn.microsoft.com/en-us/azure/active-directory/governance/identity-governance-overview
Licences
Using this feature requires Microsoft Entra ID Governance licenses. To find the right license for your requirements, see Microsoft Entra ID Governance licensing fundamentals.
Basics
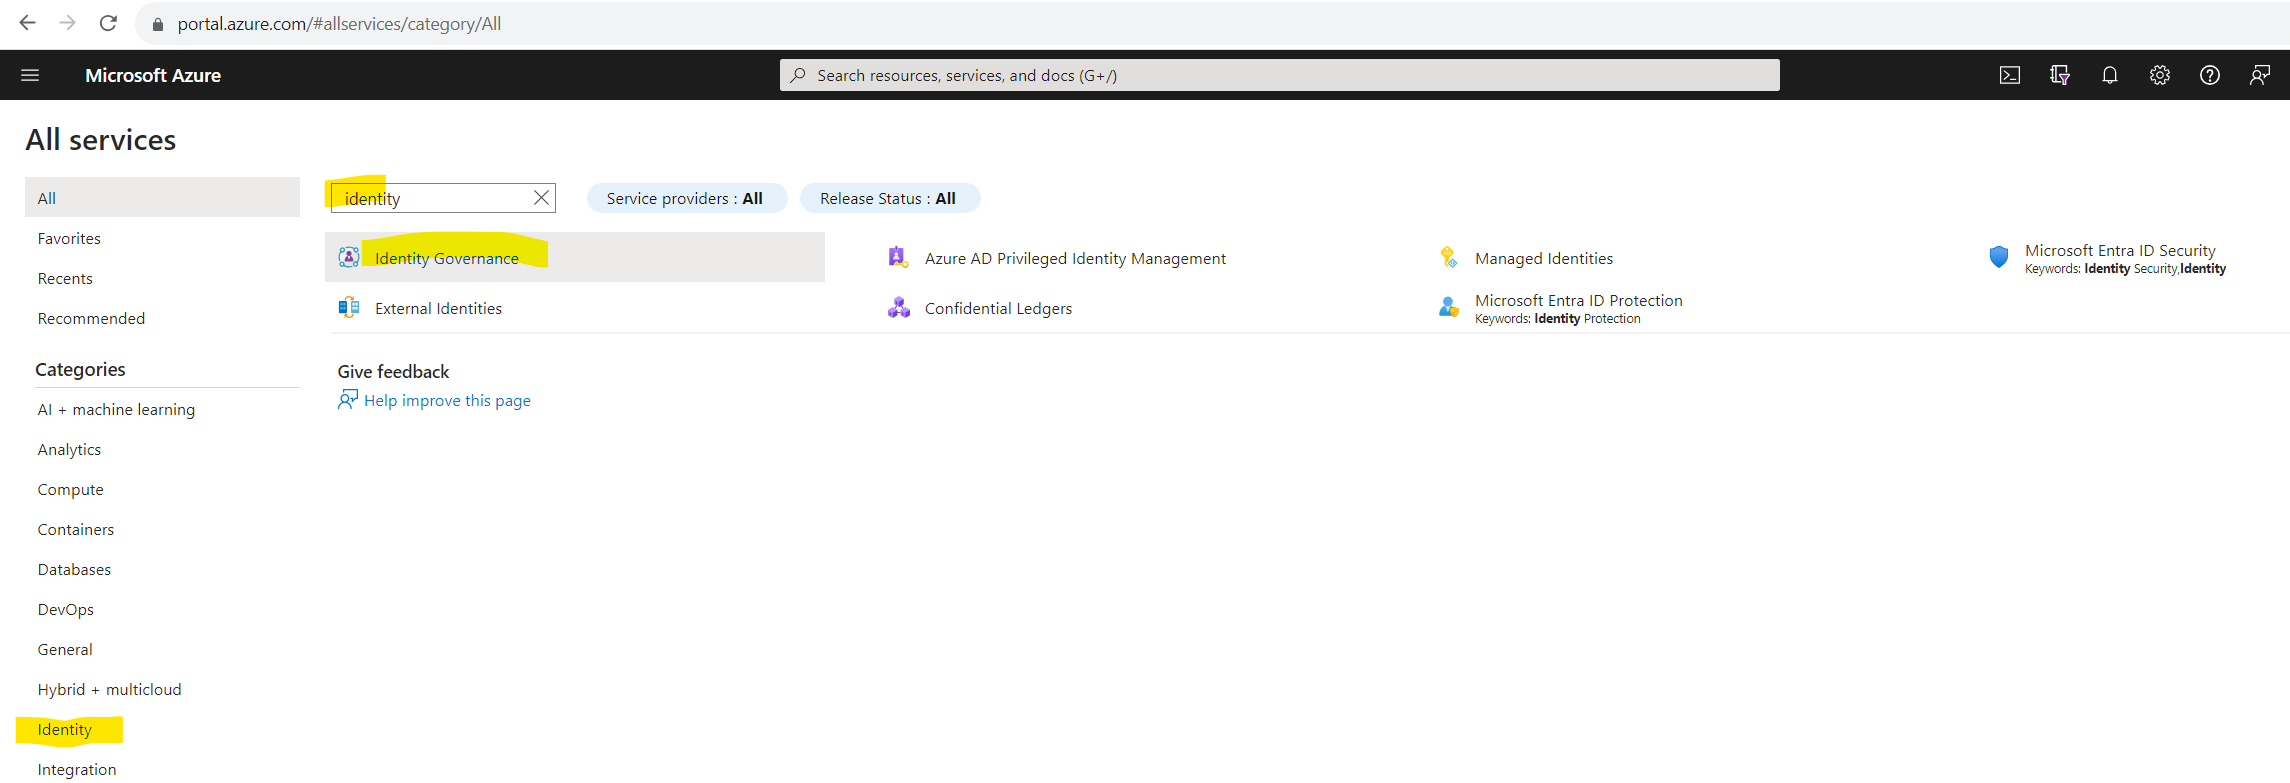
You can open the Identity Governance blade by searching under All services within the Azure portal or within the dedicated Microsoft Entra admin center.
Searching for under All services in the Azure portal.
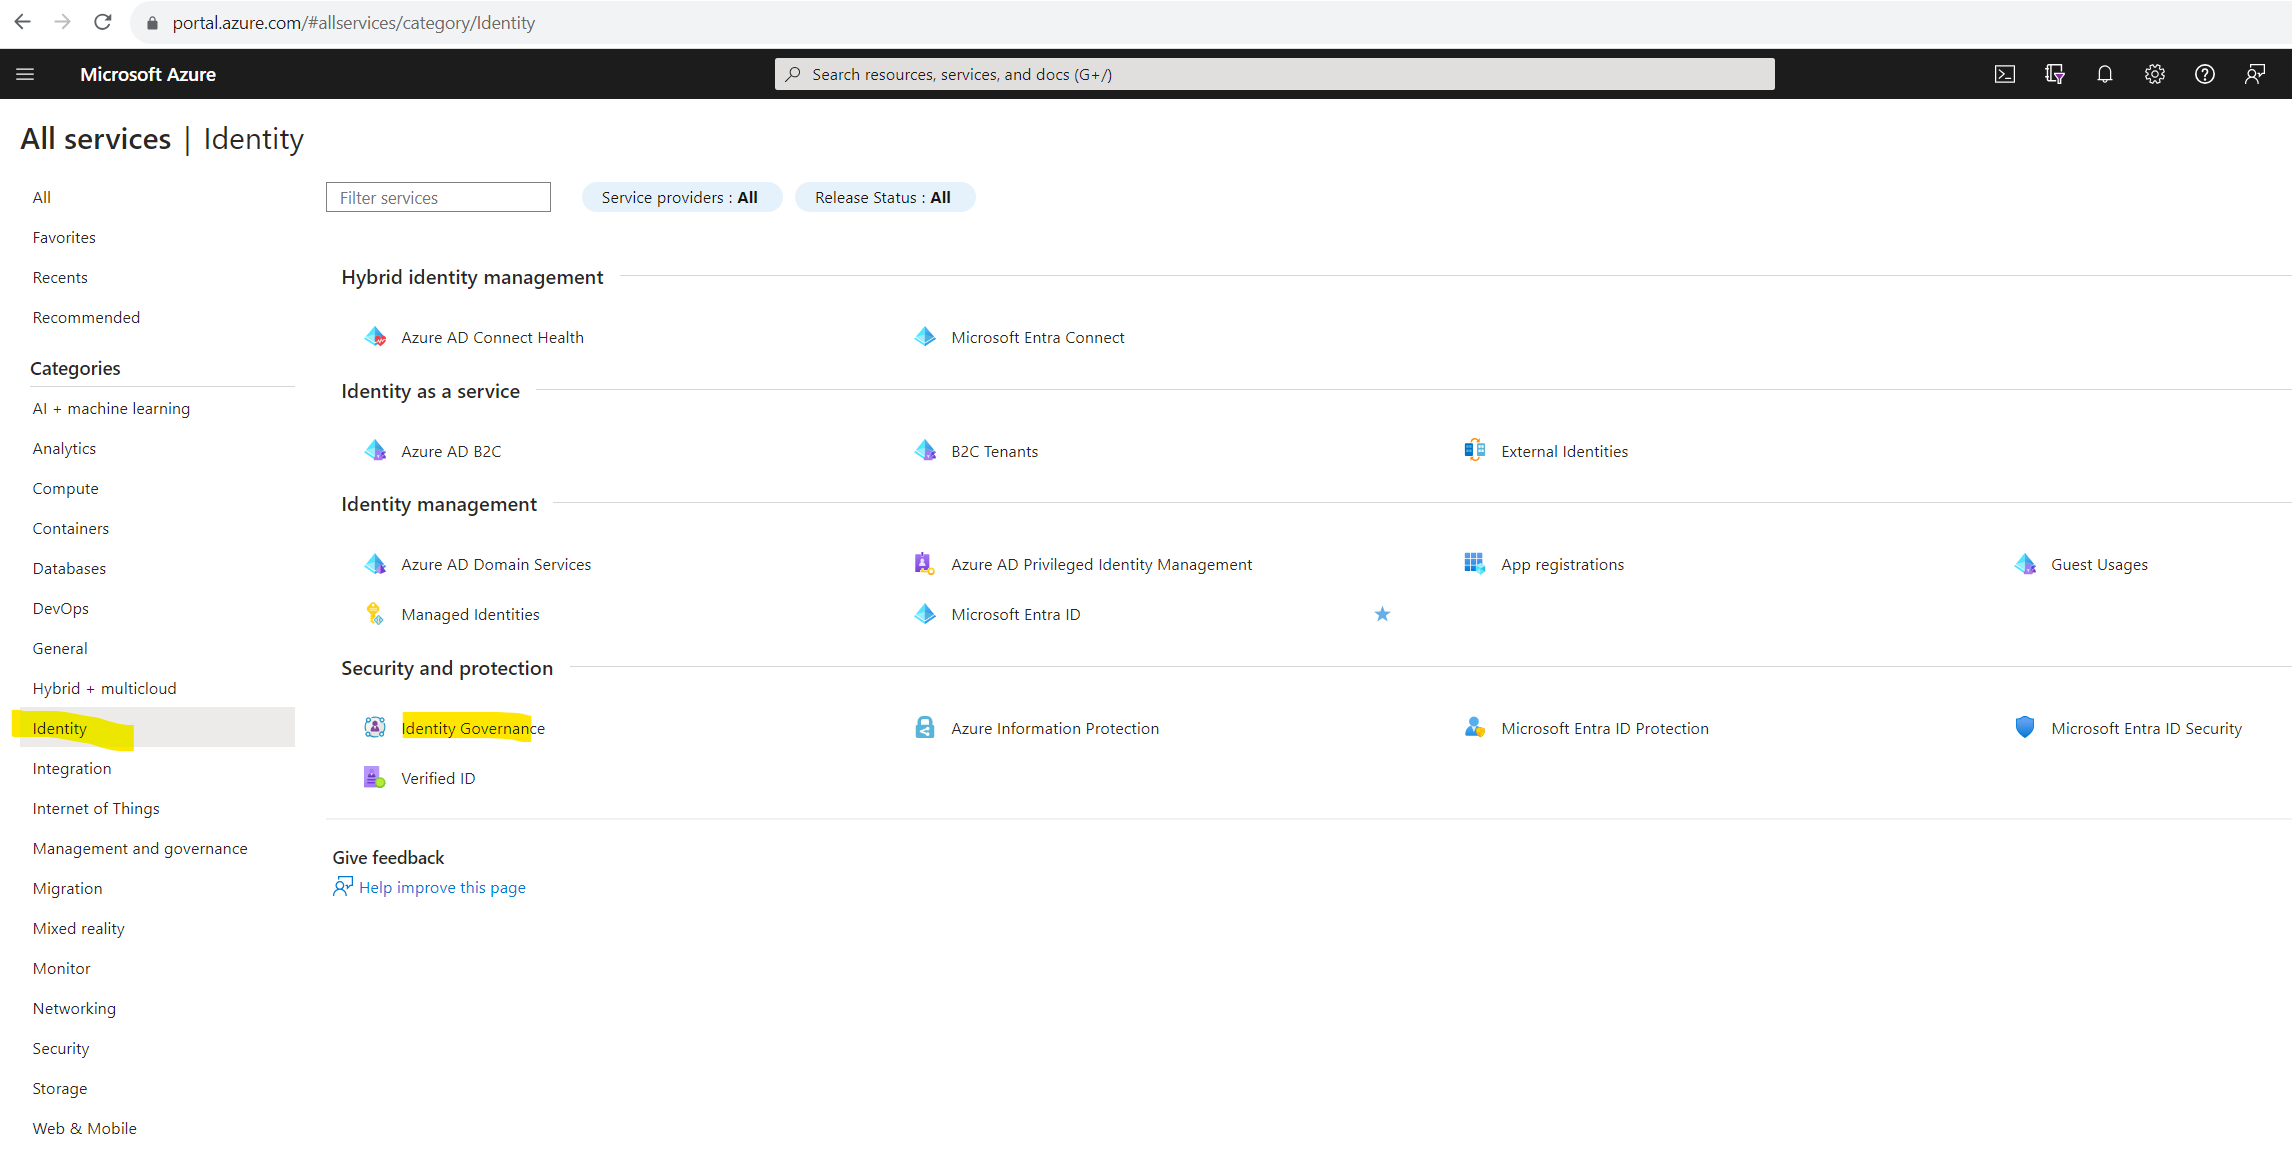
Identity Governance blade within the Azure portal.

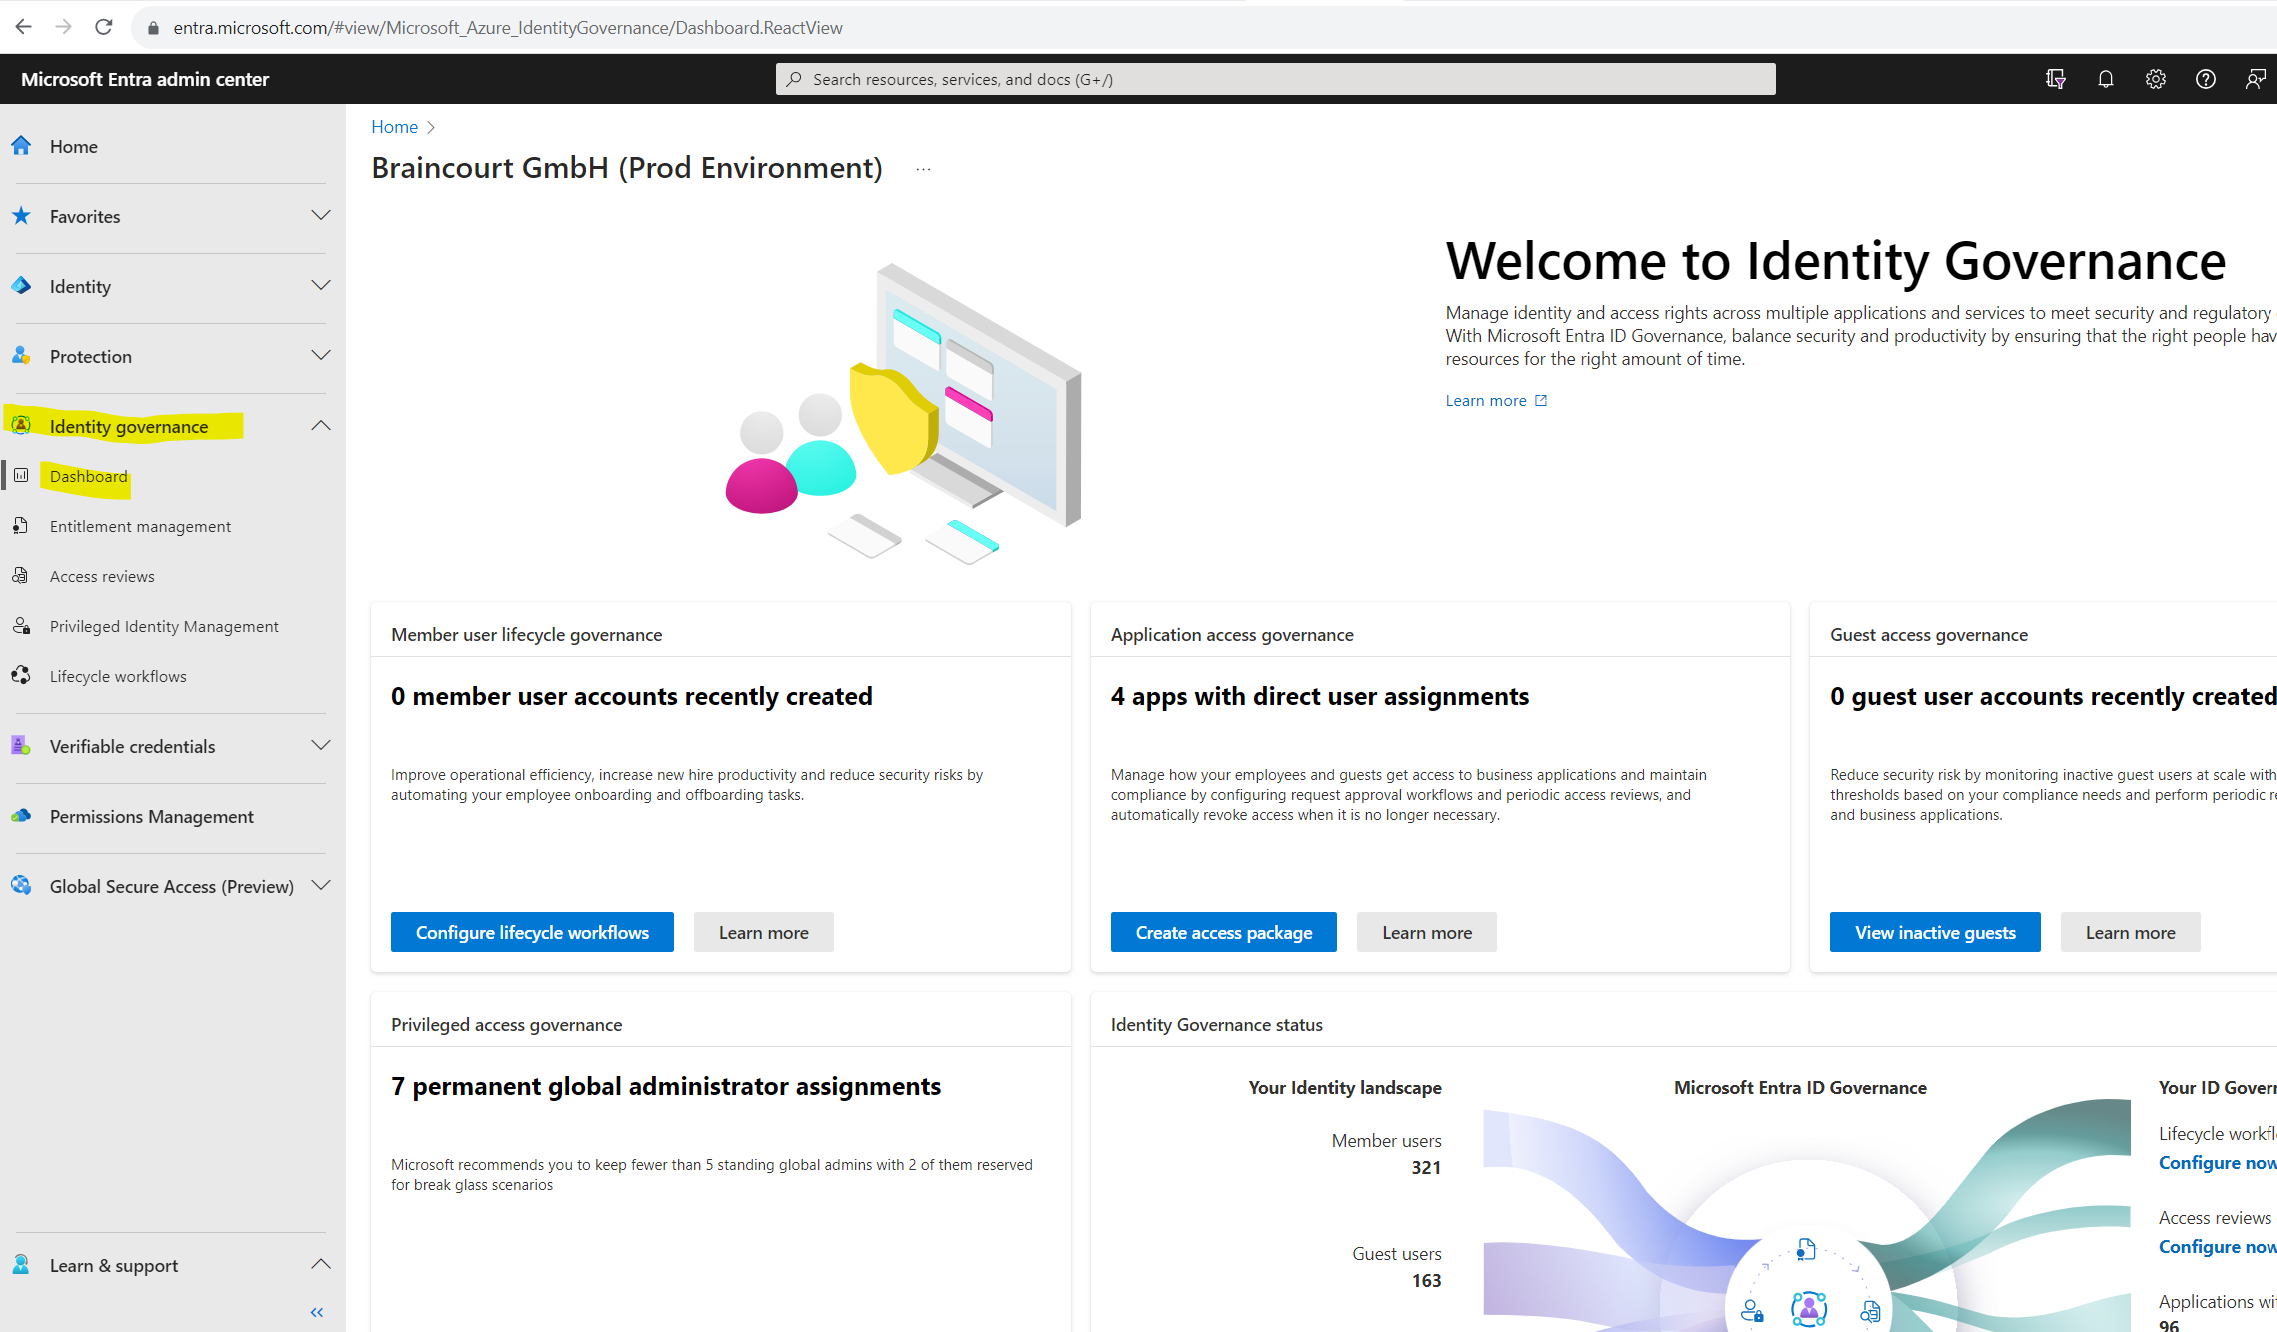
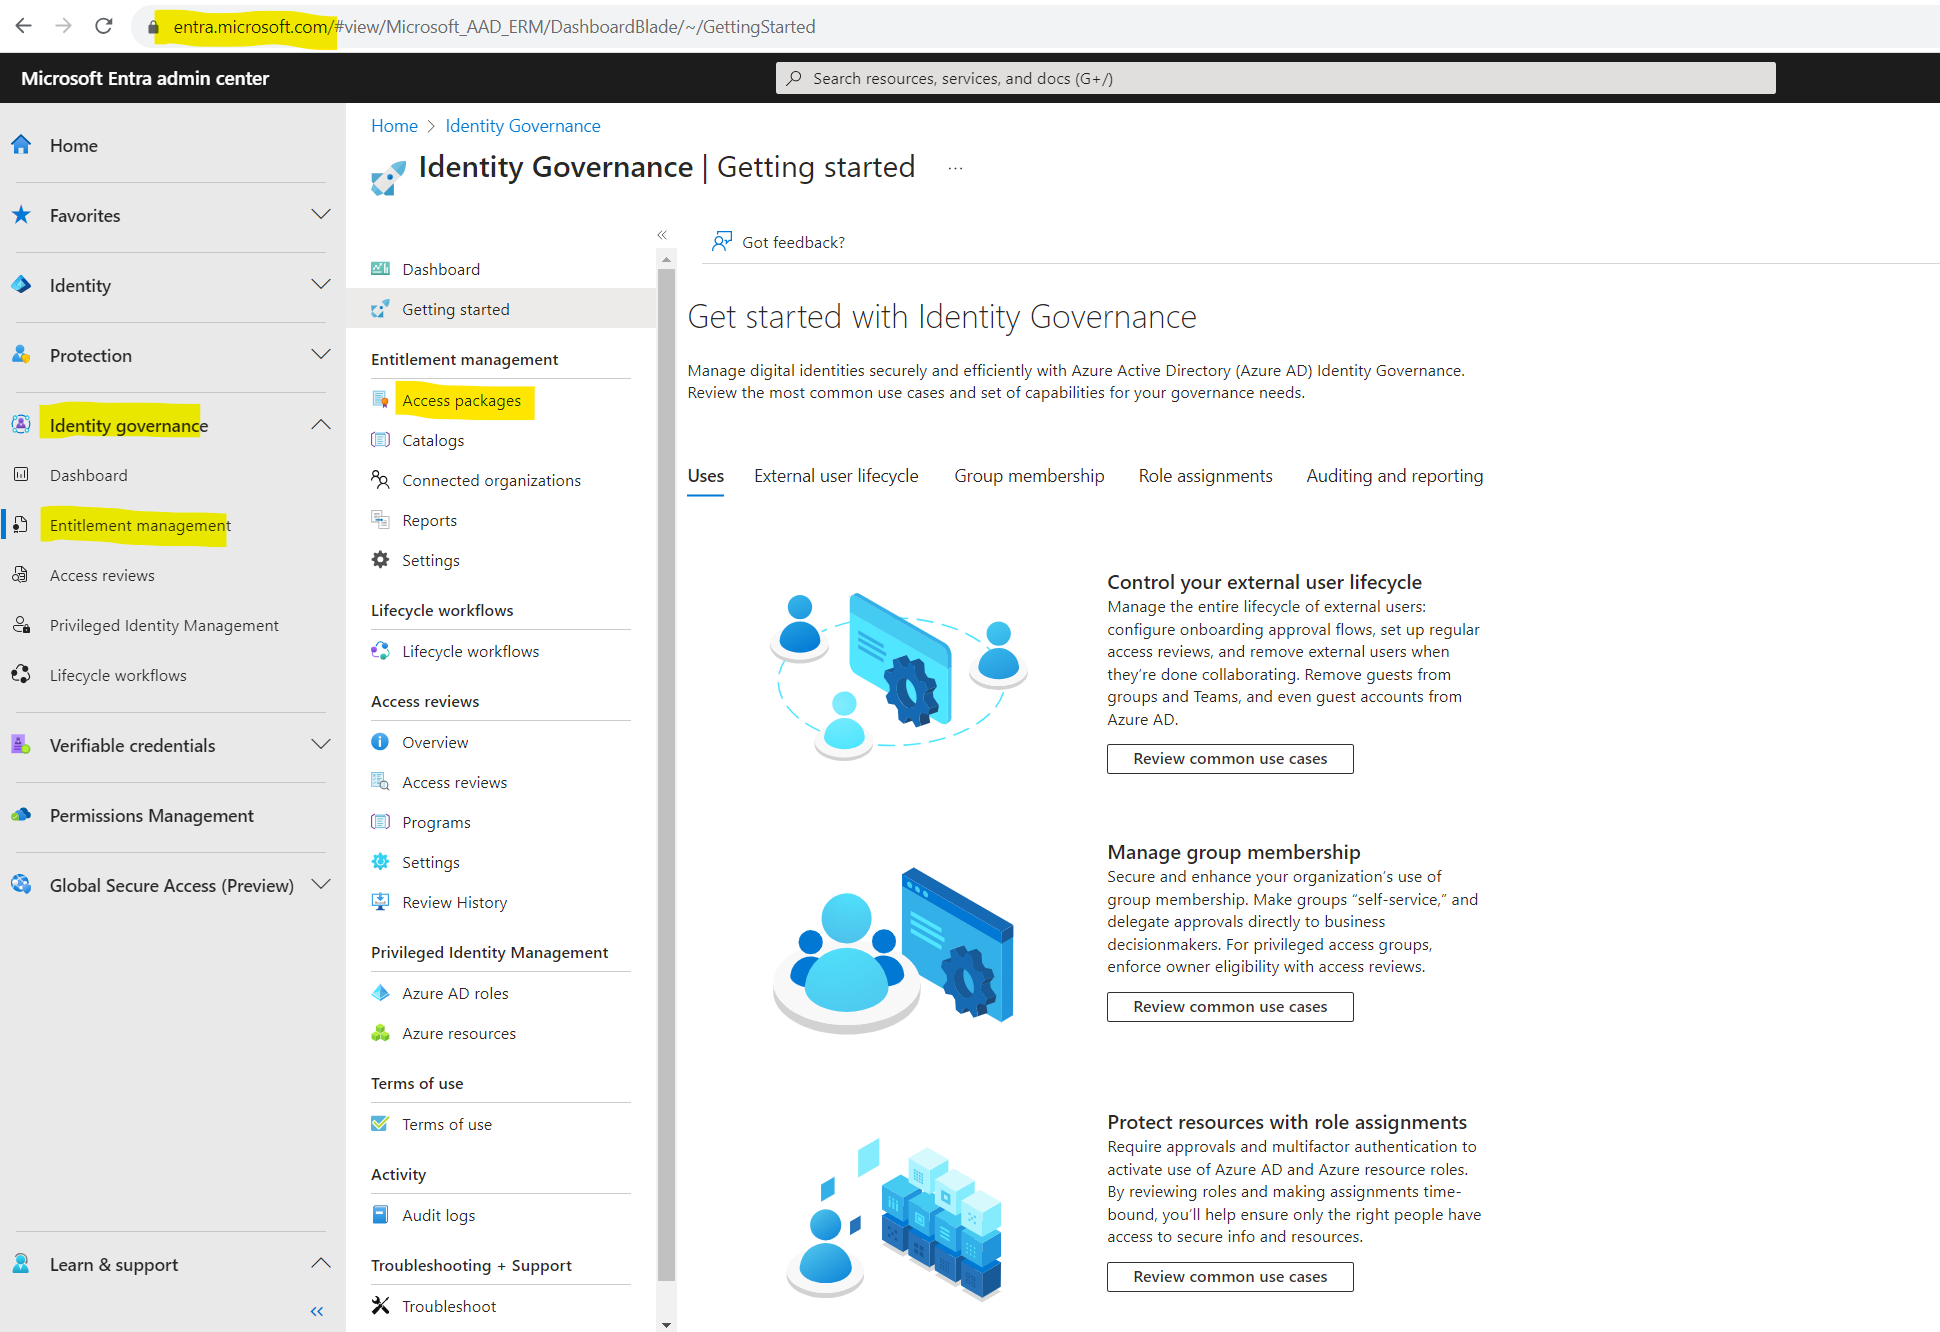
Open it directly by using the Microsoft Entra admin center
https://entra.microsoft.com
Here you can switch to identity governance either under Identity – Identity governance or the dedicated menu point Identity governance as shown below.

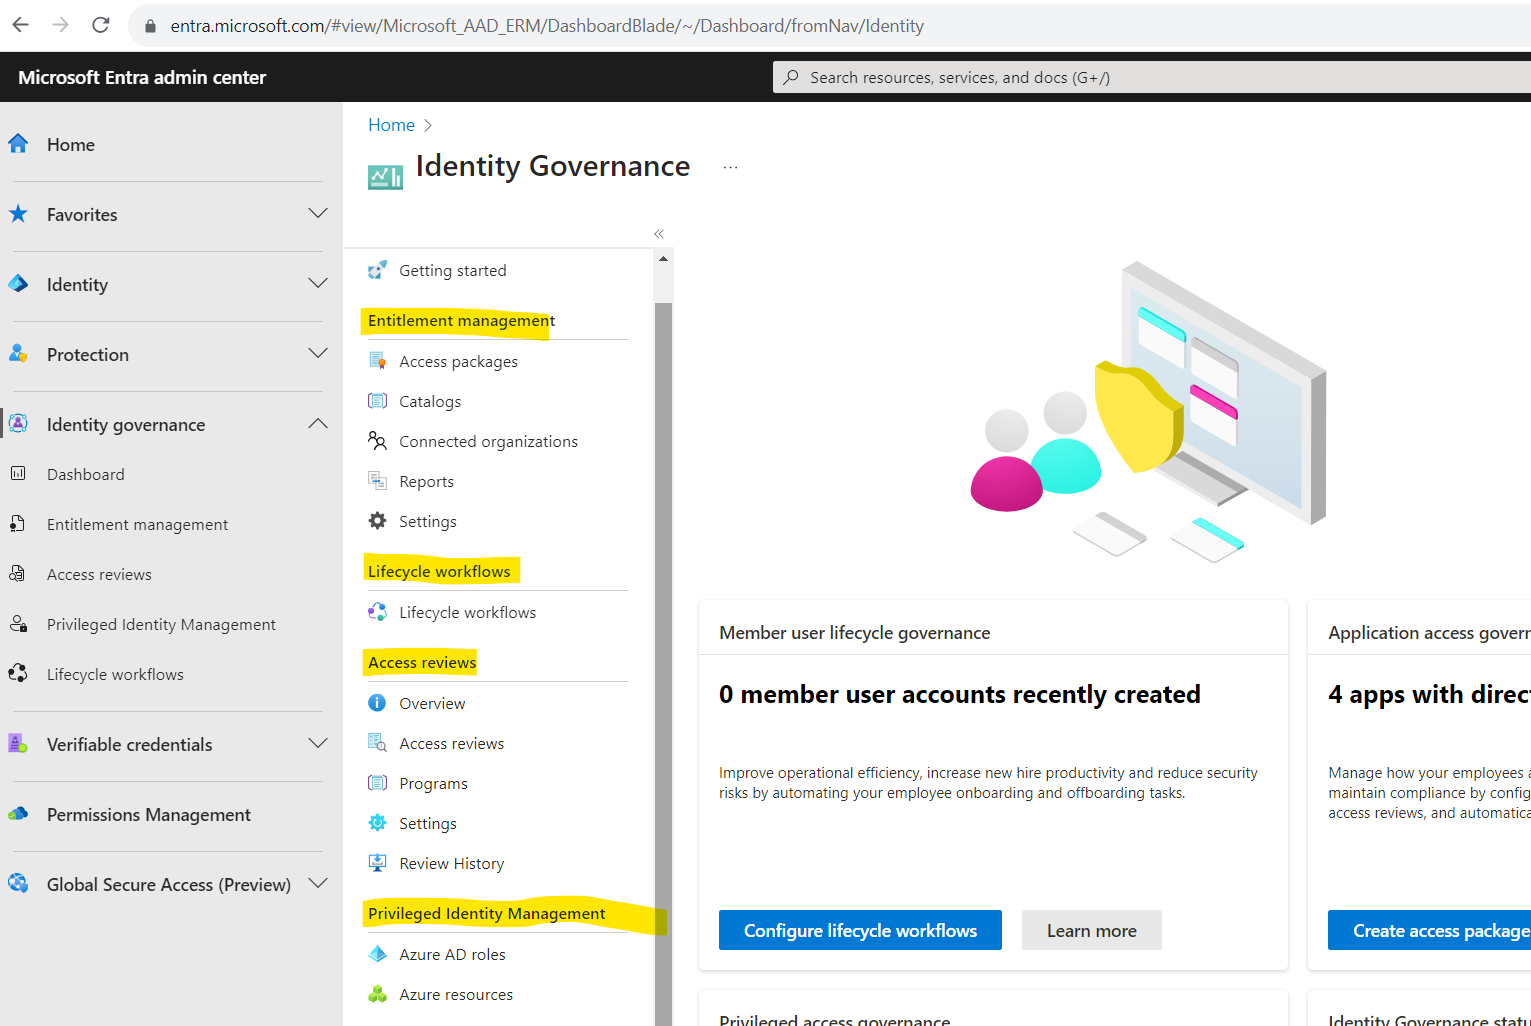
As you can see in the Identity Governance blade below, we have 4 main sections (features) which are:
- Entitlement management
In a nutshell, it allows your organization to manage access to groups, applications and SharePoint online sites for internal users and also users outside your organization. As the name itself implies, the whole process of requesting, approving and expiration of access is automated and self-service by using so called access packages. How they work we will see below in detail. - Access reviews
In a nutshell, user’s access can be reviewed regularly to make sure only the right people have continued access. - Privileged Identity Management
In a nutshell, Privileged Identity Management provides time-based and approval-based role activation to mitigate the risks of excessive, unnecessary, or misused access permissions on resources that you care about. - Lifecycle workflows
All of them we I will show in detail below.
Entitlement management
Entitlement management is an identity governance feature that enables organizations to manage identity and access lifecycle at scale, by automating access request workflows, access assignments, reviews, and expiration.
Employees in organizations need access to various groups, applications, and SharePoint Online sites to perform their job. Managing this access is challenging, as requirements change. New applications are added or users need more access rights. This scenario gets more complicated when you collaborate with outside organizations. You may not know who in the other organization needs access to your organization’s resources, and they won’t know what applications, groups, or sites your organization is using.
Entitlement management can help you more efficiently manage access to groups, applications, and SharePoint Online sites for internal users, and also for users outside your organization who need access to those resources.
Using this feature requires Microsoft Entra ID Governance subscriptions for your organization’s users. Some capabilities within this feature may operate with a Microsoft Azure AD Premium P2 subscription, see the articles of each capability for more details. To find the right license for your requirements, see Microsoft Entra ID Governance licensing fundamentals.
Source: https://learn.microsoft.com/en-us/azure/active-directory/governance/entitlement-management-overview
Below you will have two great videos about Entitlement Management which will explain it in detail.
Why use entitlement management?
https://youtu.be/_Lss6bFrnQ8How to deploy Azure Active Directory entitlement management
https://www.youtube.com/watch?v=zaaKvaaYwI4
To demonstrate Entitlement Management I will go through all separate steps below in detail.
First we have to create a new Access package. So open the Microsoft Entra admin center under https://entra.microsoft.com and click on Identity governance – Entitlement management – Access packages as shown below.
Click on New access package.

Within the New access package wizard we need to provide a name and description for the access package. Further we can group resources and access packages by using a catalog. I will use the default catalog to demonstrate entitlement management.

In the resources tab we need to select all the resources we needed for our access package and therefore we want to manage access for. As previously already mentioned, with entitlement management we can efficiently manage access to groups, applications, and SharePoint Online sites.
Here we need to add these resources to our access package.
I will first add some groups to the access package, you can add here security groups as well as Microsoft 365 groups or a Team.
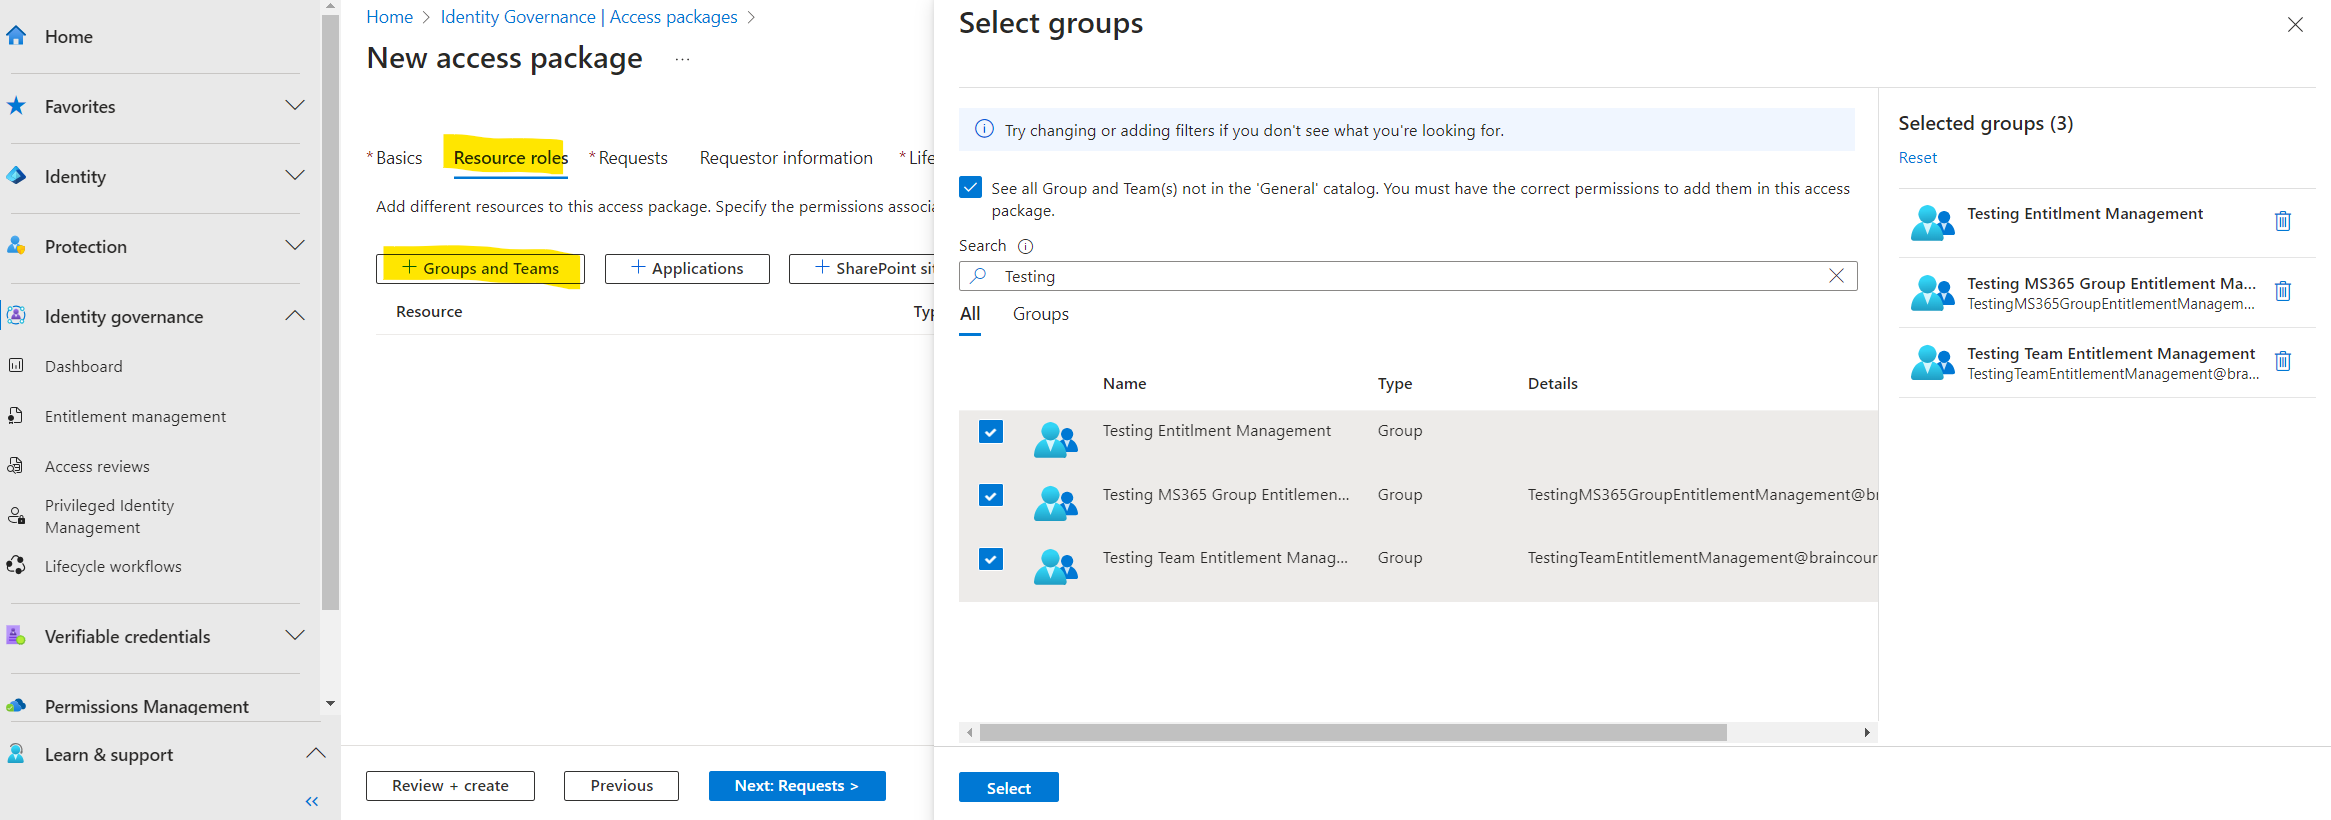
Here you see my added groups and team.

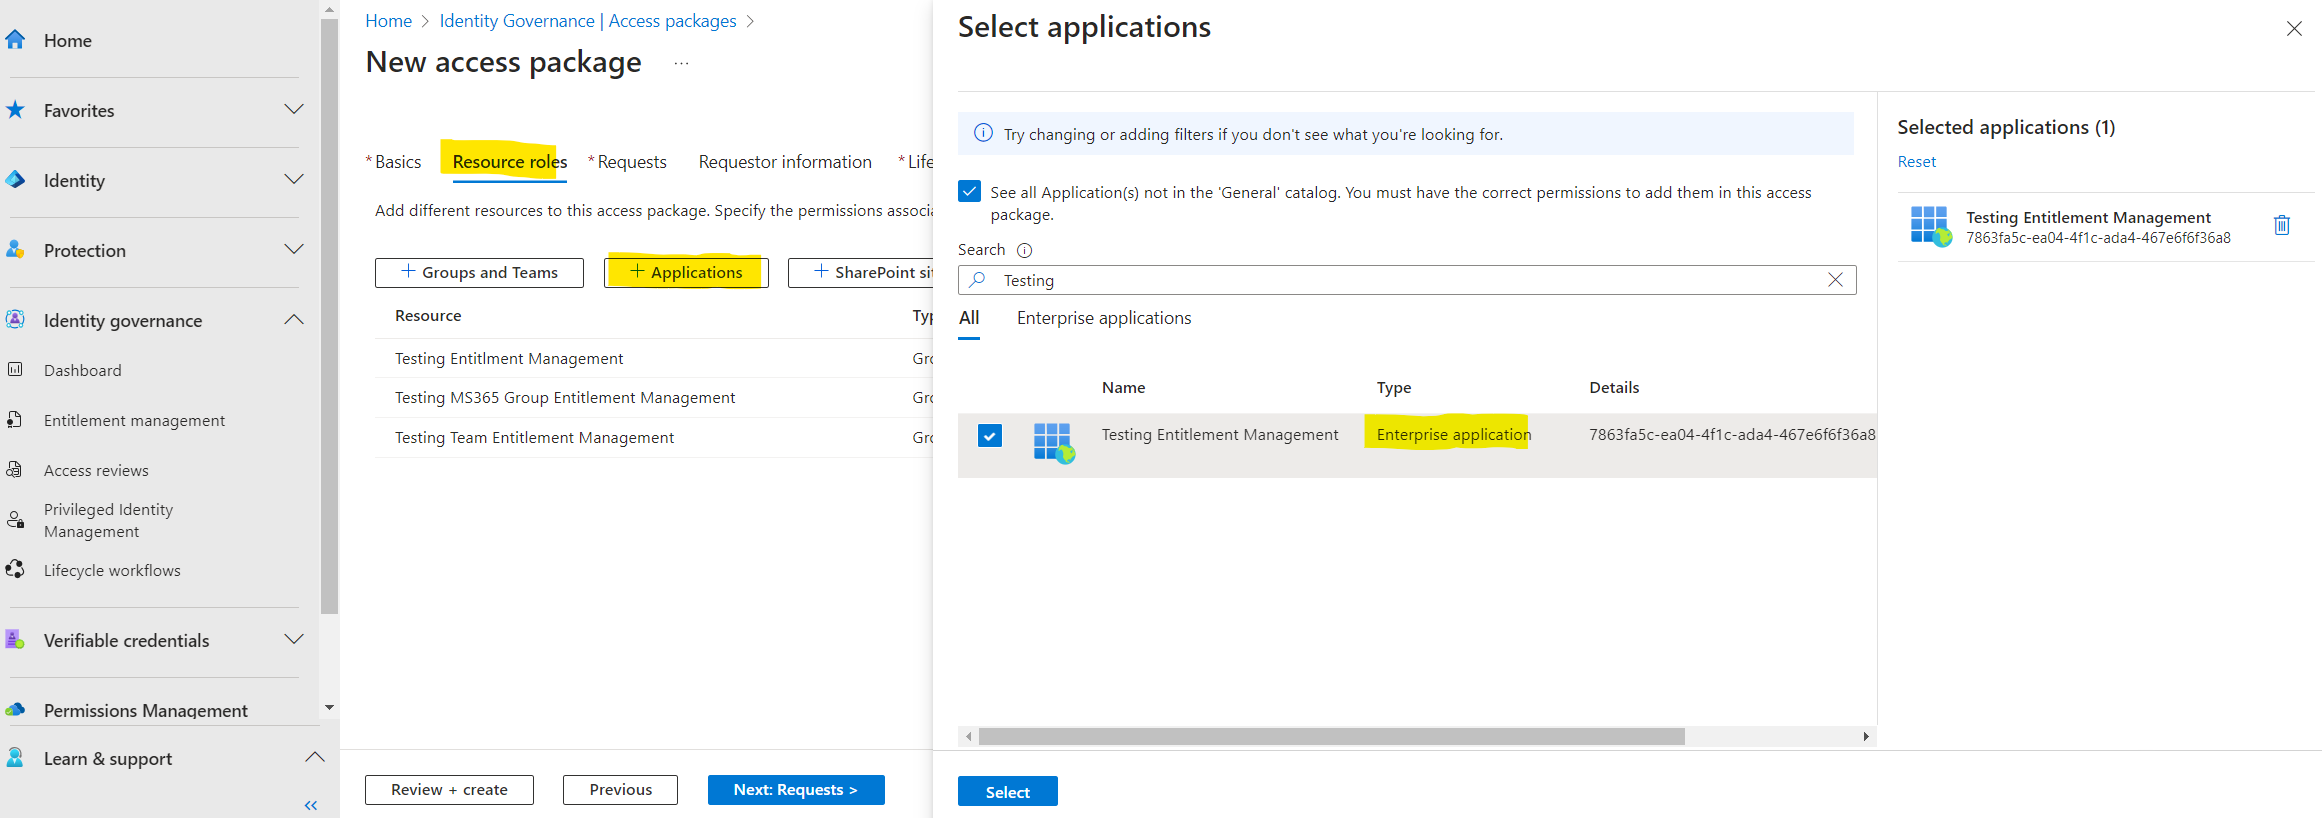
We can also add applications to our access package.
Finally I will add a SharePoint site to my access package.
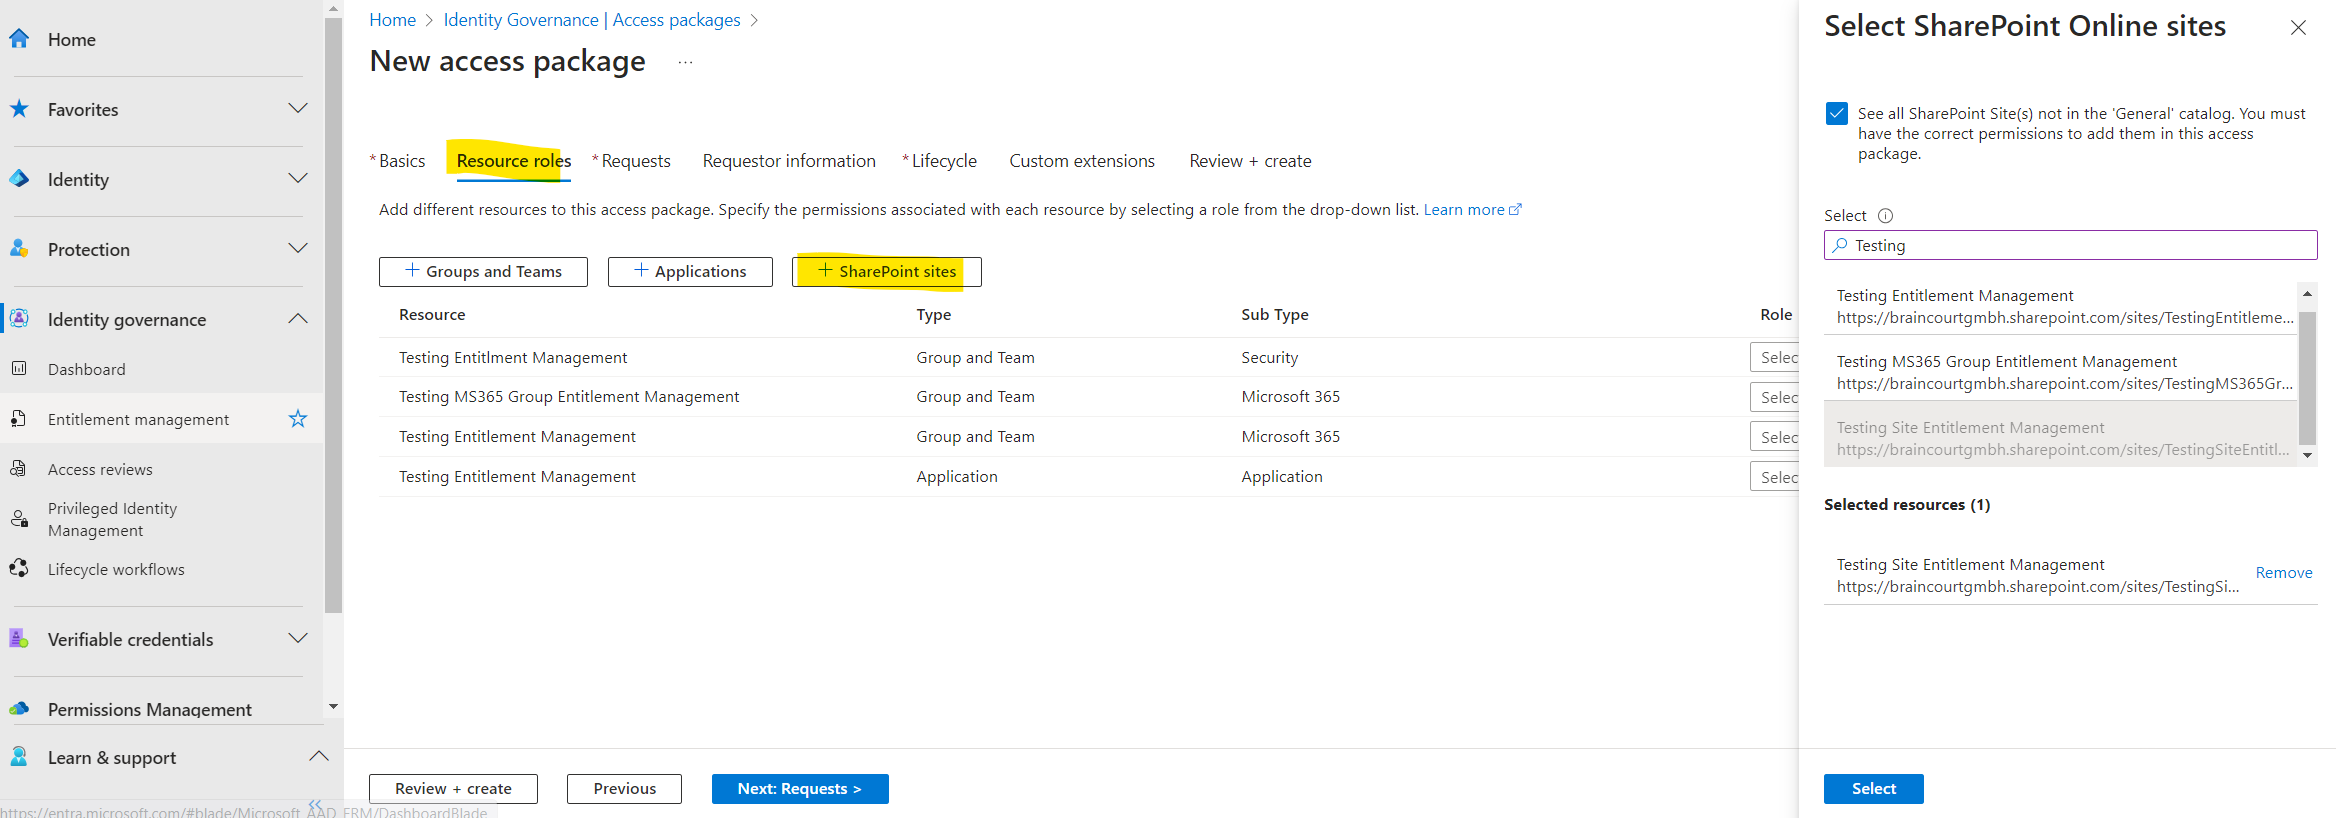
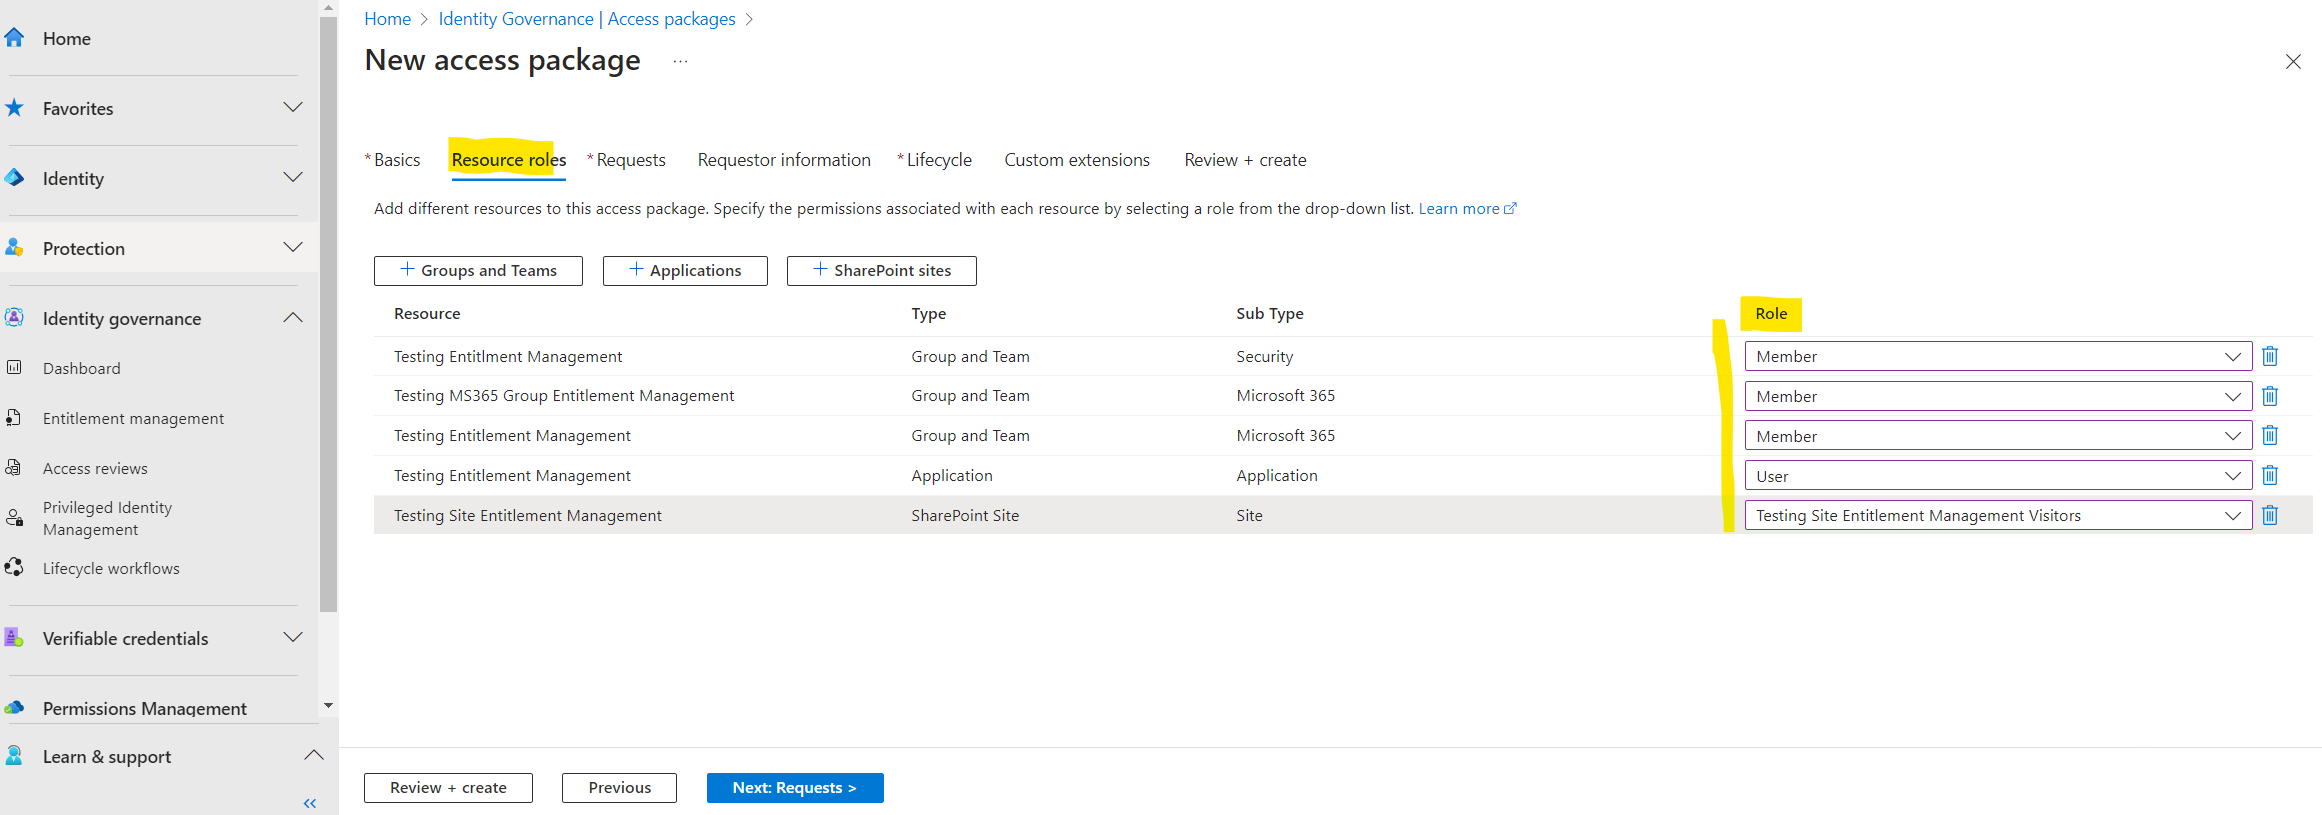
Now after we added all resources for which we want to grant access, we also need to select a role the users should get assigned to for accessing the resource.
The next step within the Requests tab is to create a policy to specify who can request an access package, who can approve requests, and when access expires.
For this post I will first just allow internal users to request access. To demonstrate this I will pick some test users like shown below.
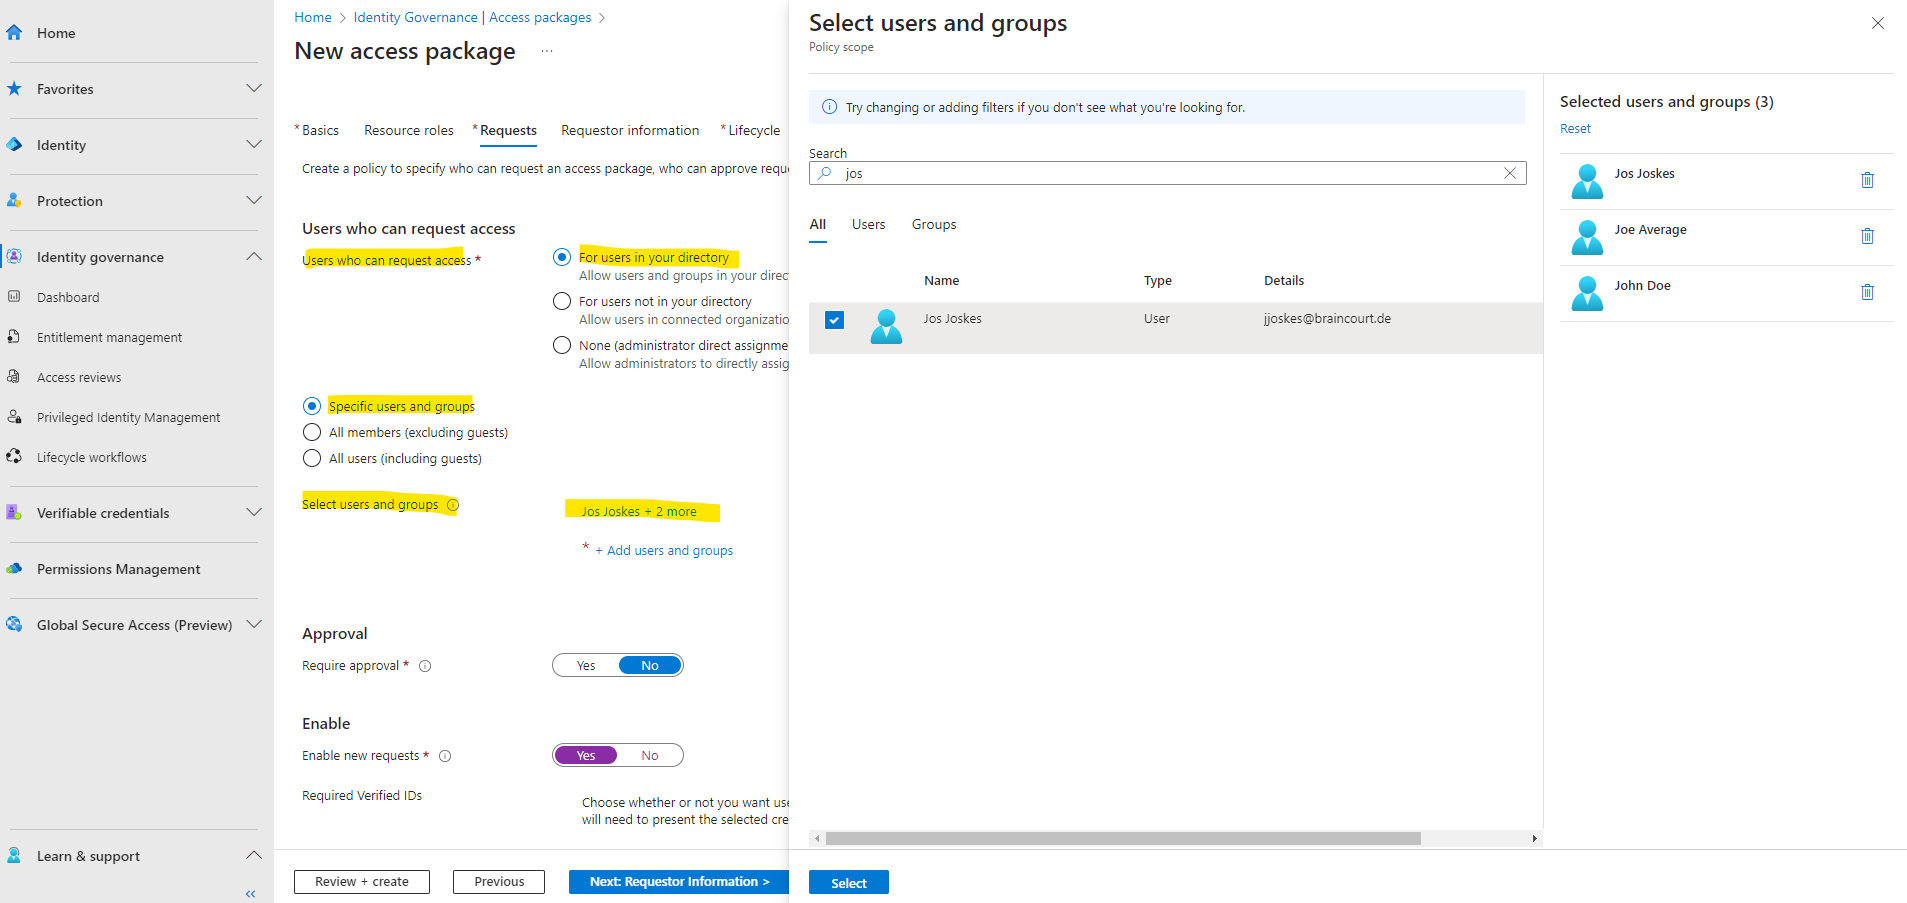
Because I will just add internal users who can request access, I am not going to require approval below. Further I will enable new requests.

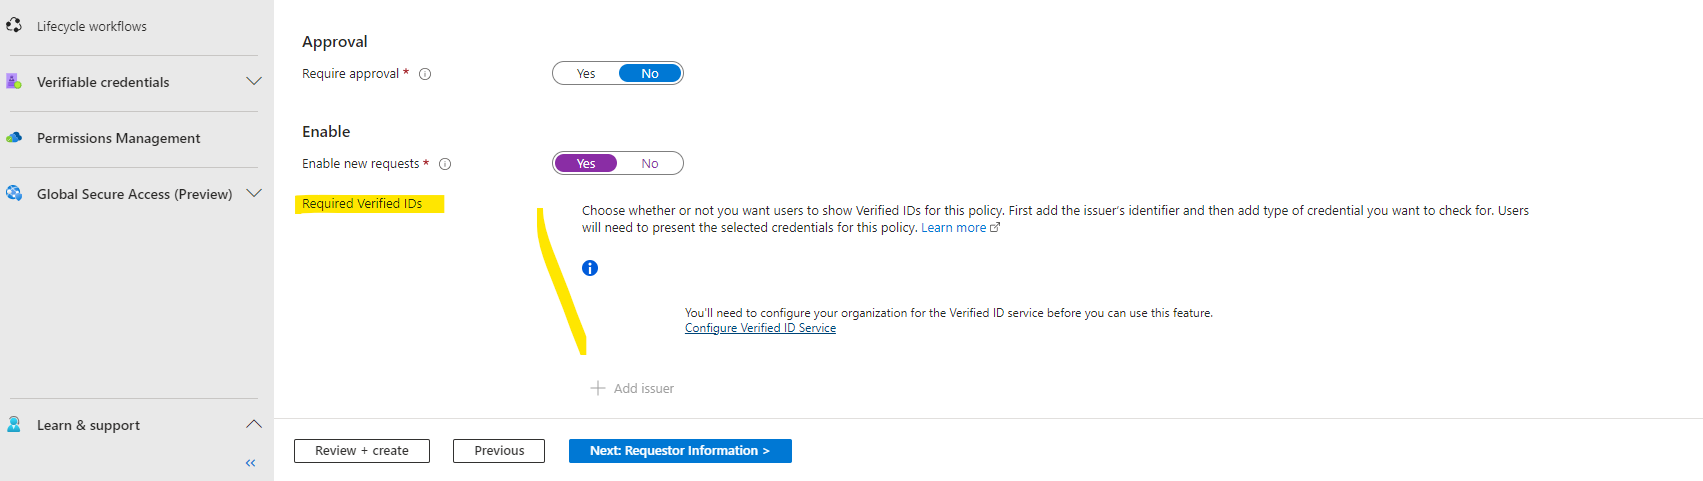
About Verified IDs you can read my following post.
On Requestor Information tab we can collect some information and attributes about the requestor. We can add here some questions or attributes. To demonstrate I will not request further information from the requestor here and skip this.

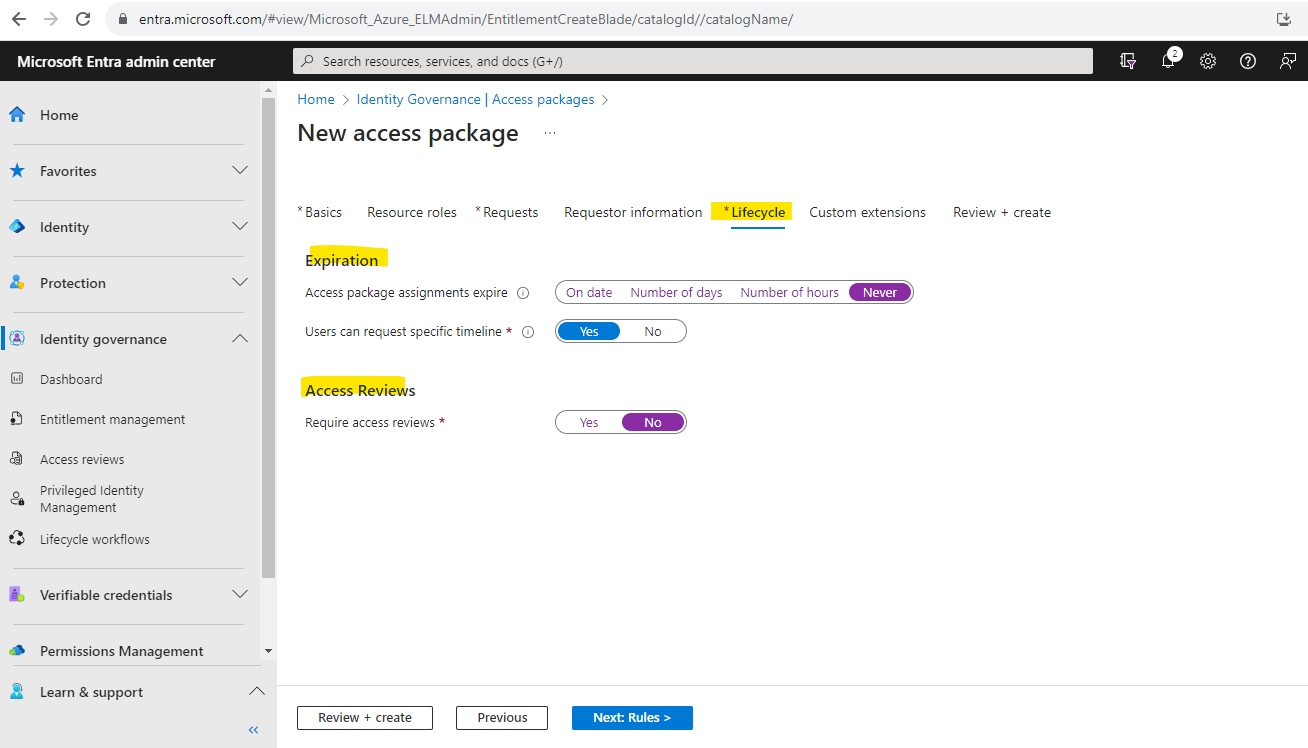
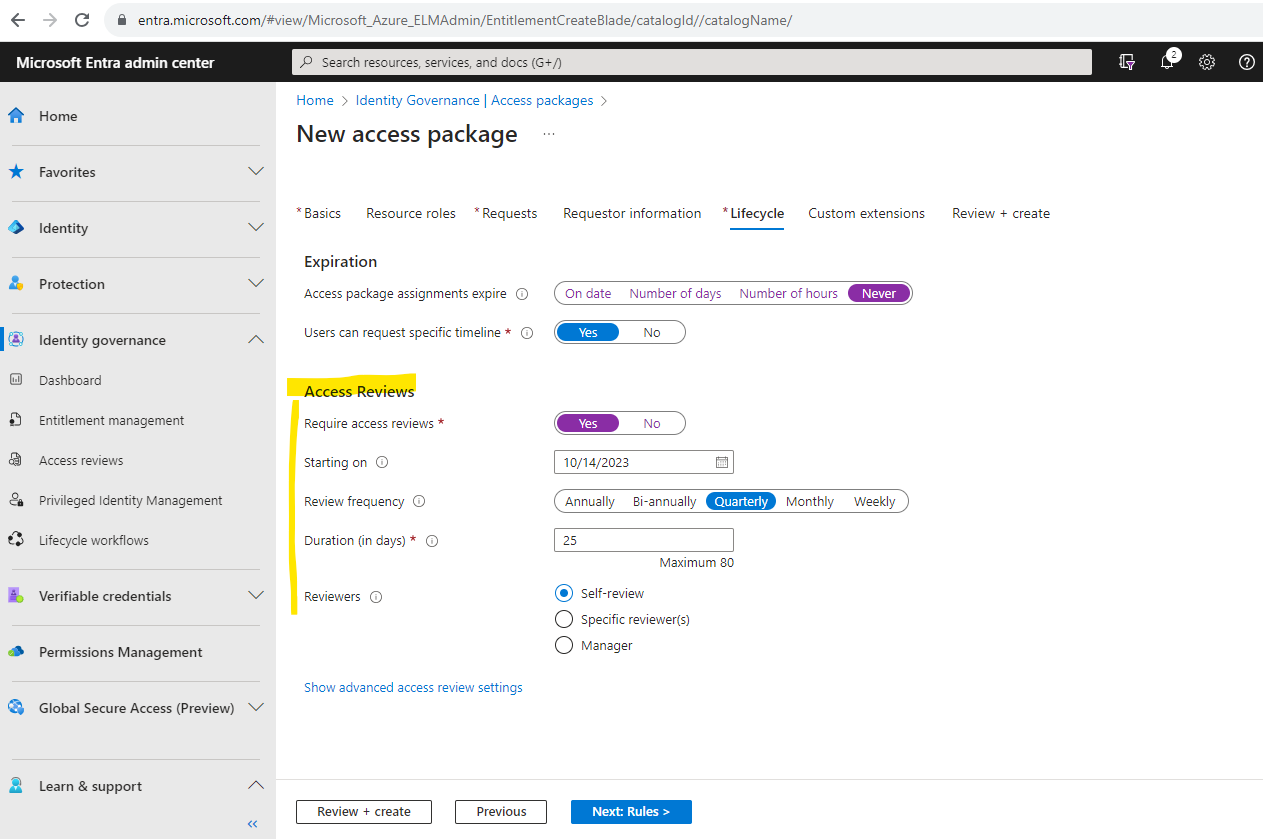
On the Lifecycle tab we can set that the access package will expire. I will not let expire the access package here and therefore select Never. We can also allow users here to request a specific start and end date for their access, I will use the default settings to allow this.
You can also enable Require access reviews to monitor the rights and privileges of everyone who can interact with the resources from this access package. I will not enable it here.
If you enable Access Reviews, you have to configure some settings for like shown below.
More about Access Reviews you will find in the following article from Microsoft.
Review access of an access package in entitlement management
https://learn.microsoft.com/en-us/azure/active-directory/governance/entitlement-management-access-reviews-review-access
The next Custom extensions tab will give you the option to trigger a Logic App in Azure when certain activities occur within an access package, like someone requesting or approving access, when access is activated or removed, or when expiration is near.
I will skip this tab and not using Logic Apps for this access package. More about how to trigger Logic Apps with custom extensions you will find in the following articles.
Trigger Logic Apps with custom extensions in entitlement management
https://learn.microsoft.com/en-us/azure/active-directory/governance/entitlement-management-logic-apps-integrationGetting started with Custom Extensions in Entitlement Management for Azure AD
https://learningbydoing.cloud/blog/getting-started-with-custom-extensions-in-azuread-elm/

Finally I can create my new access package.
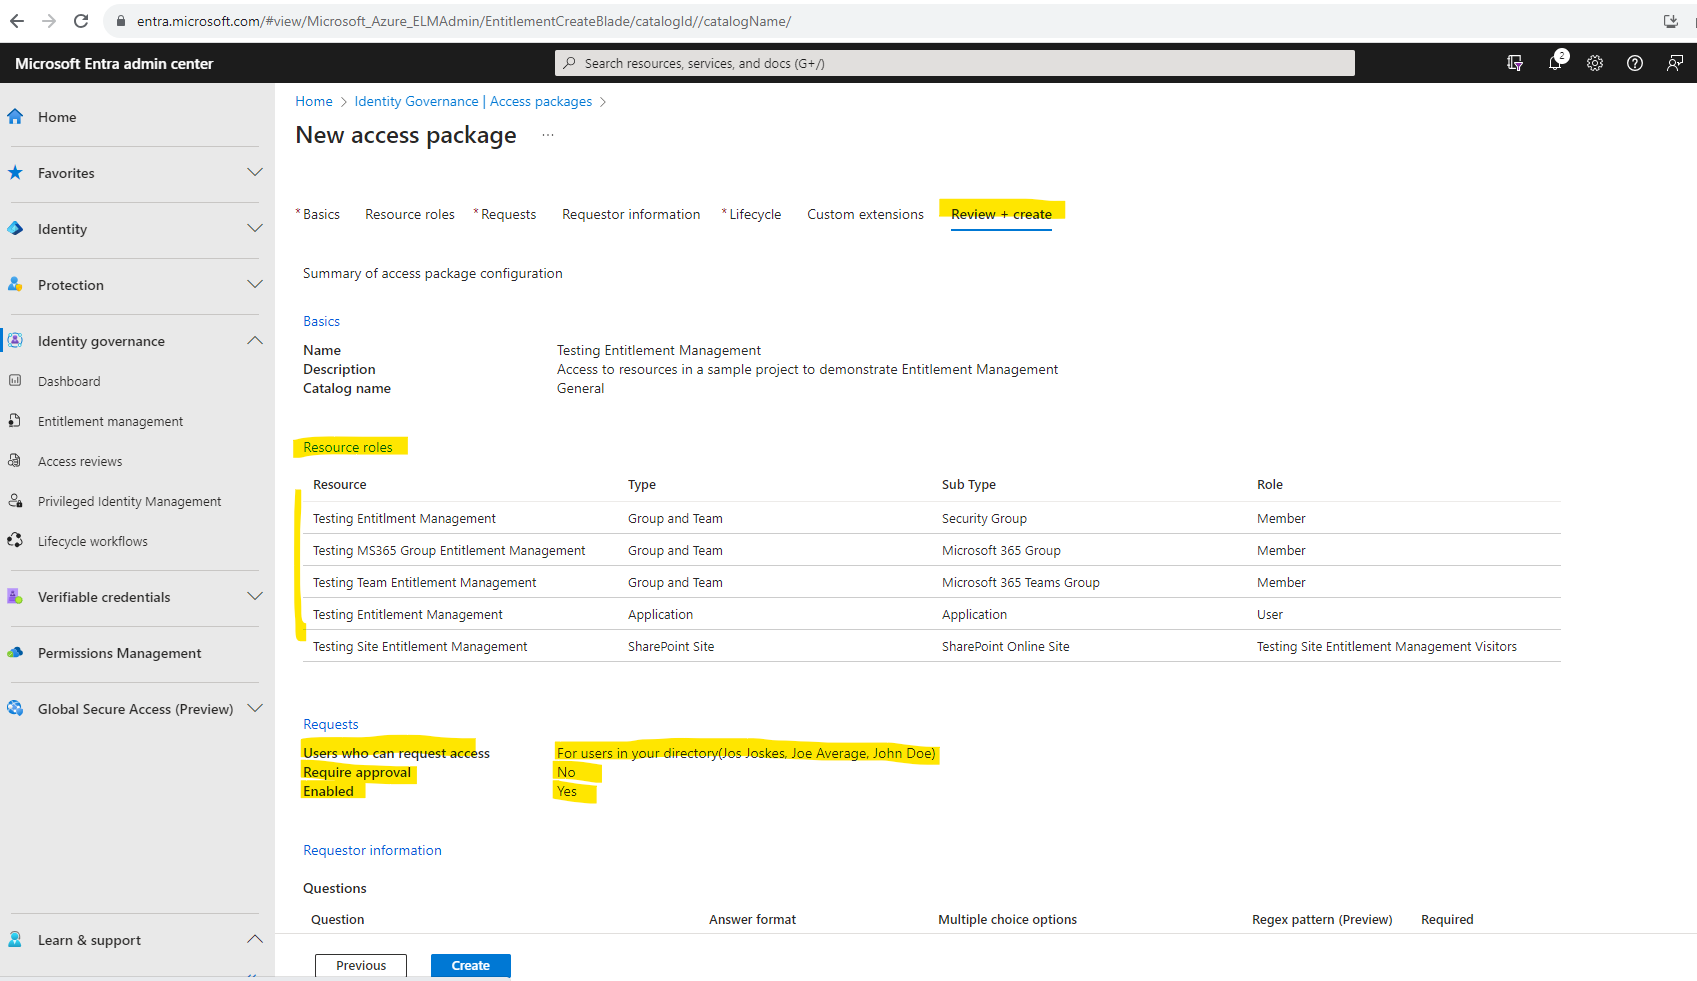
In the access package you will see a shareable link which we can provide to any of our employees they can directly use to access and request the access package.
About how it looks like when the end user will request this access package, we will see below.

In the policy for this access package I was assigning three test users which can request this access package.
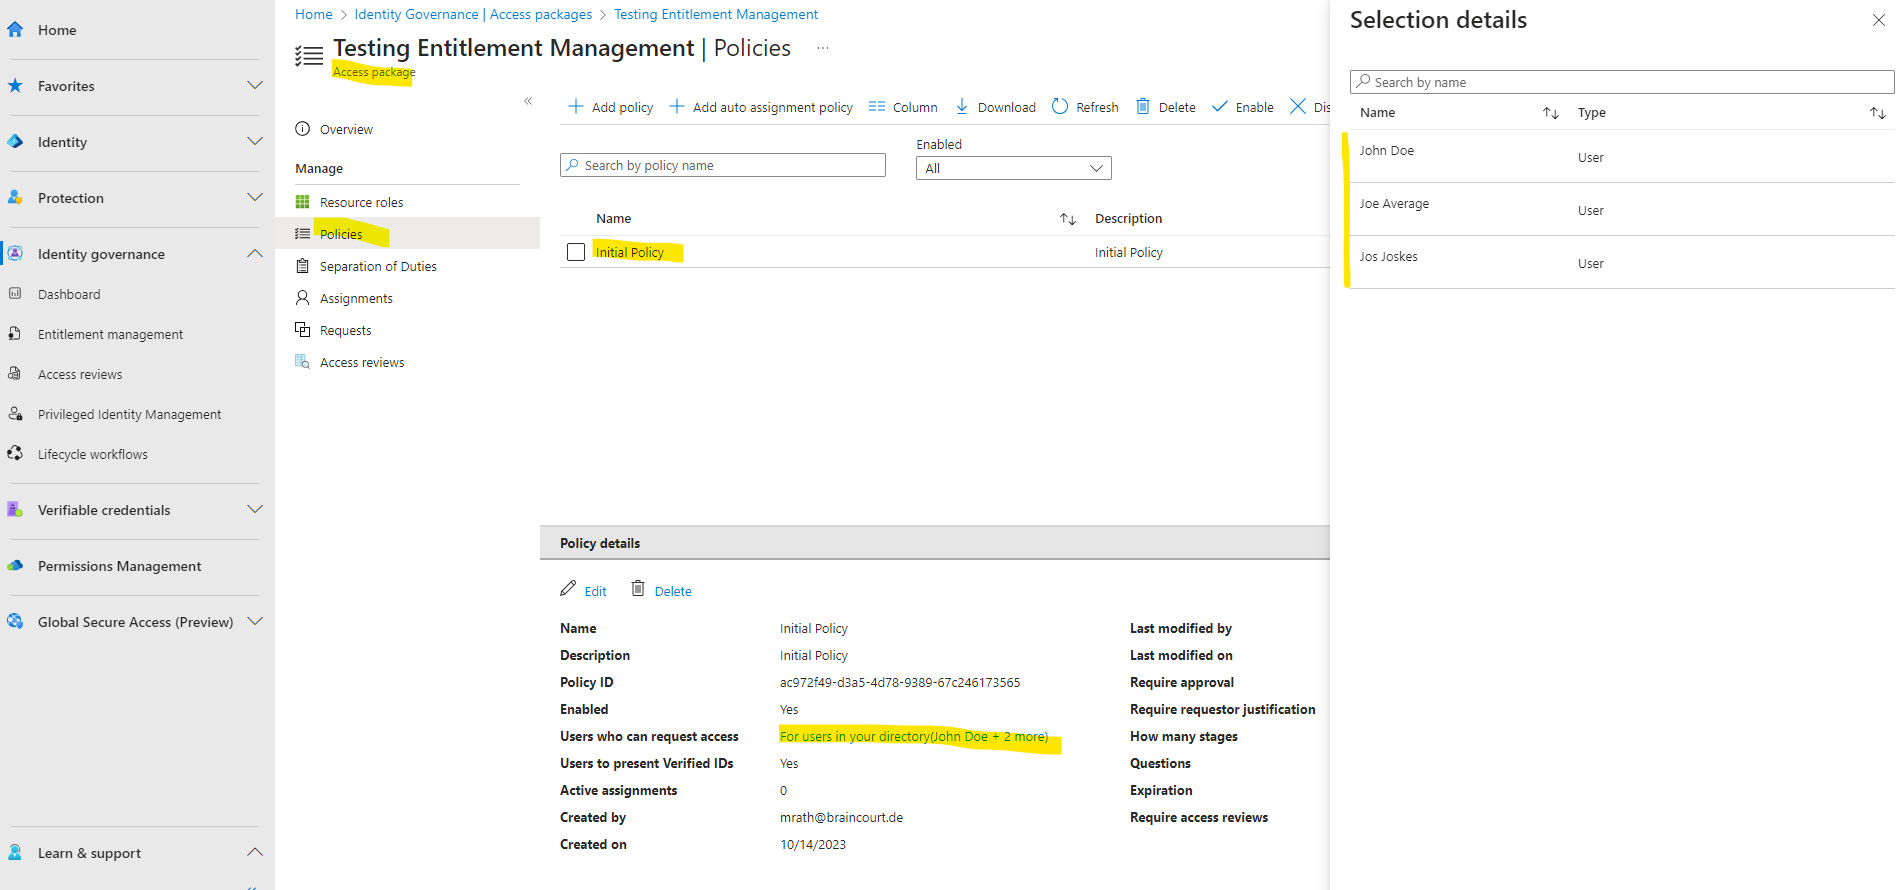
One of them is John Doe which I will use to demonstrate the requesting process from the end user perspective. So I will share and send the link for this access package to John Doe.
https://myaccess.microsoft.com/@braincourt.de#/access-packages/7534a82c-3e26-488b-a406-52d7a7bba6f5
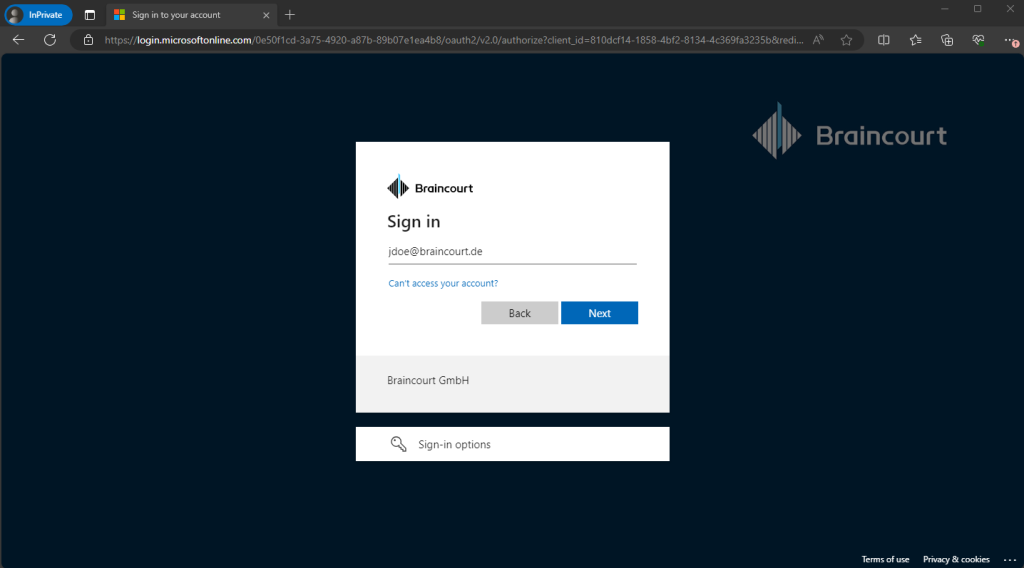
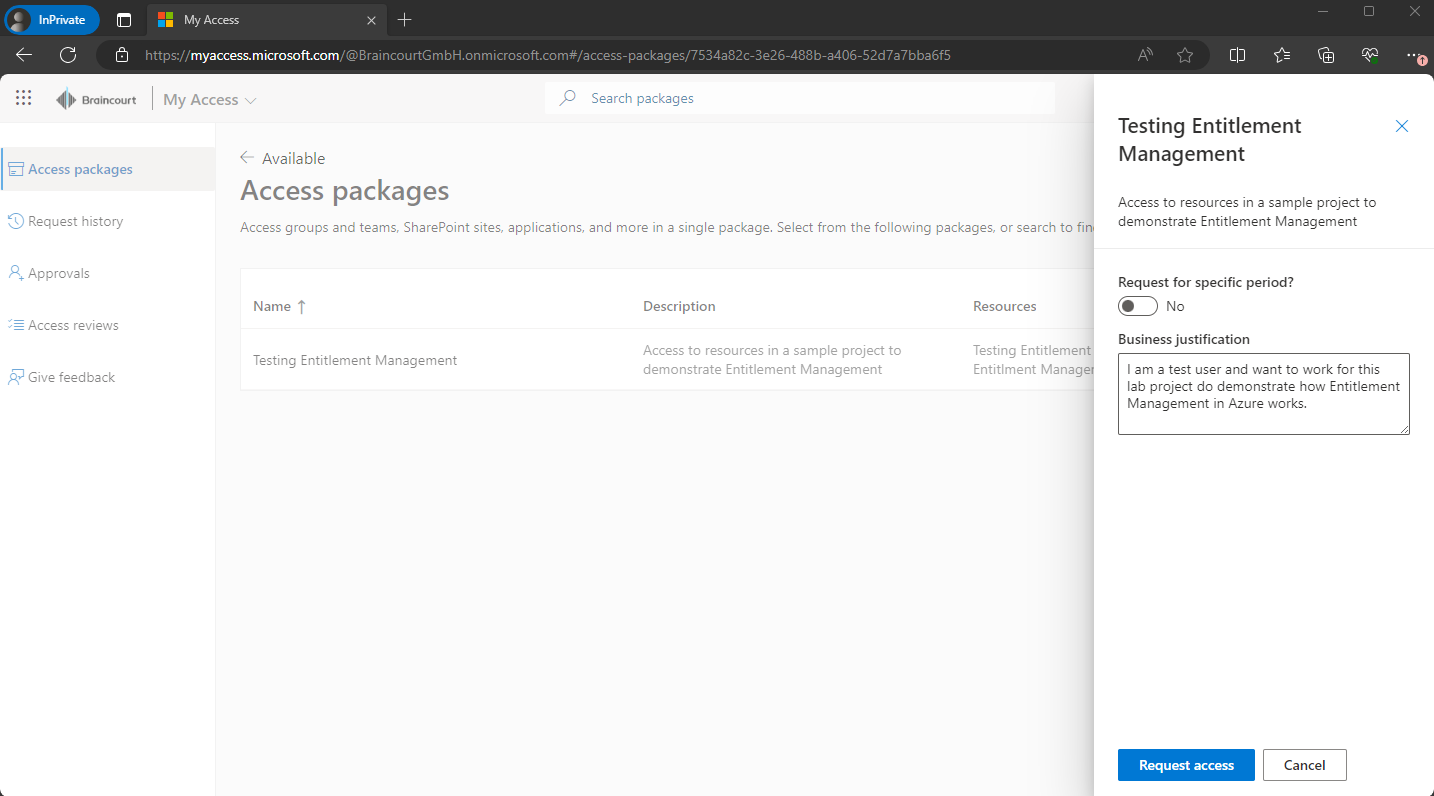
After signing in to the My Access portal, I will directly prompted to request access for the access package we created previously because of the shared direct link. As we previously enabled under the Lifecycle tab from the access package the option to allow user can request specific timeline, we can here optionally just request access for specific timeline.
We need to provide a justification for the request and can then click on Request access.
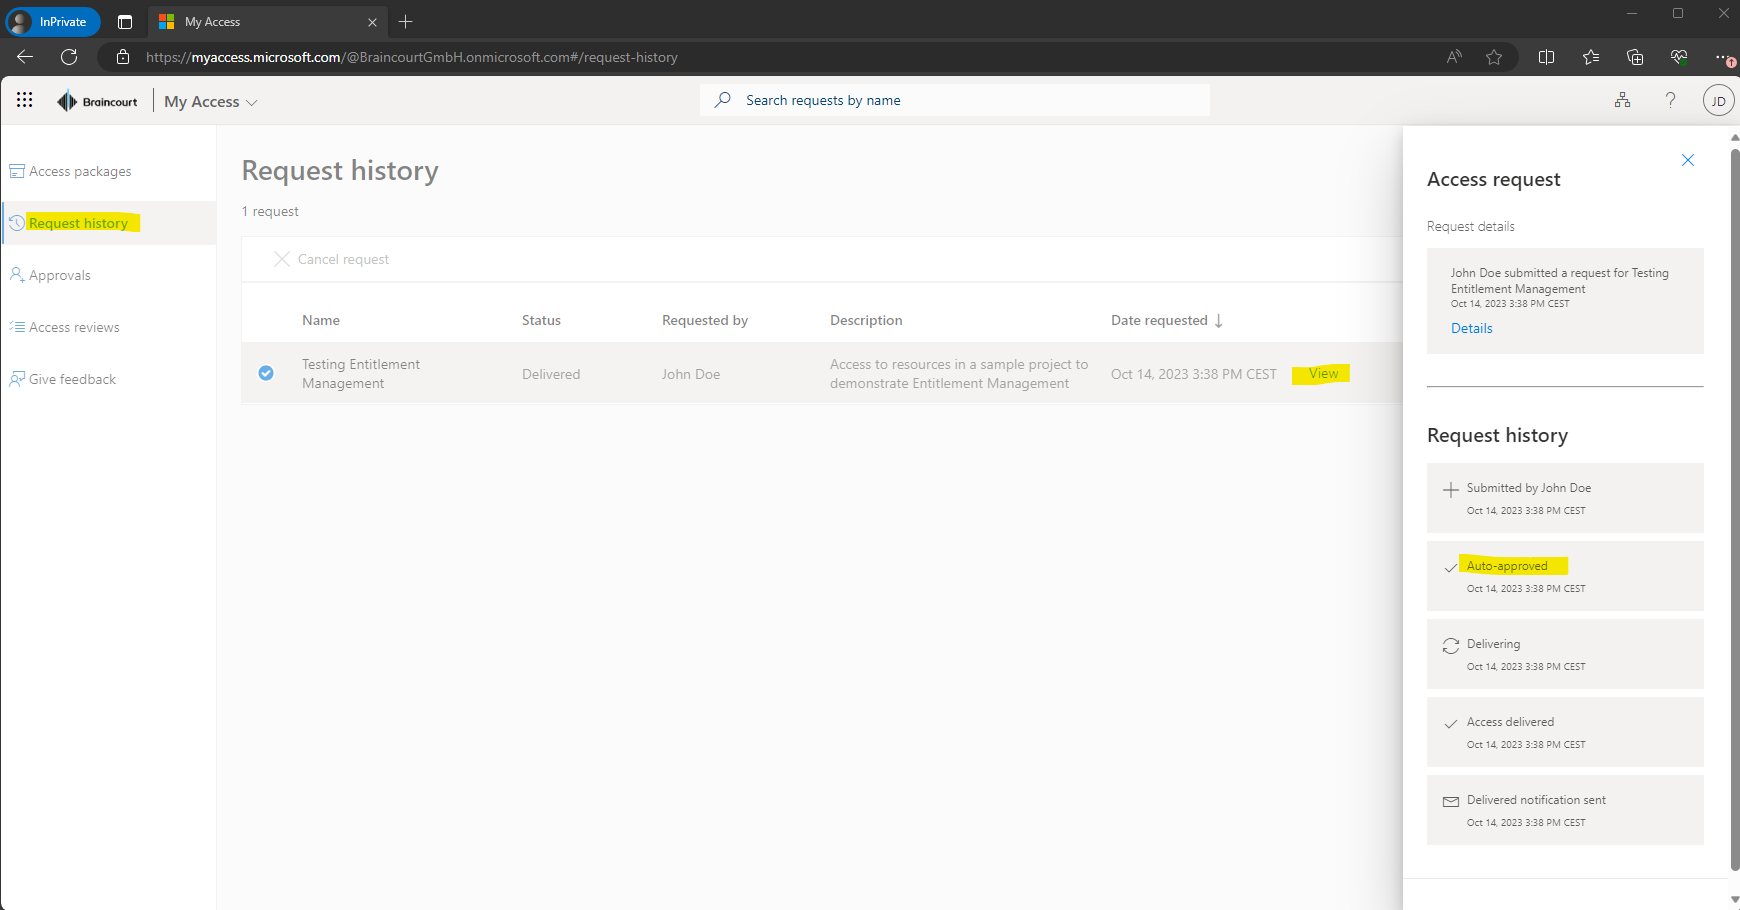
On the Request history page we can see all of our submitted requests in past.

When clicking on View of our submitted request, we can see all details about. Because we previously doesn’t require approval for this package, our request was auto-approved.
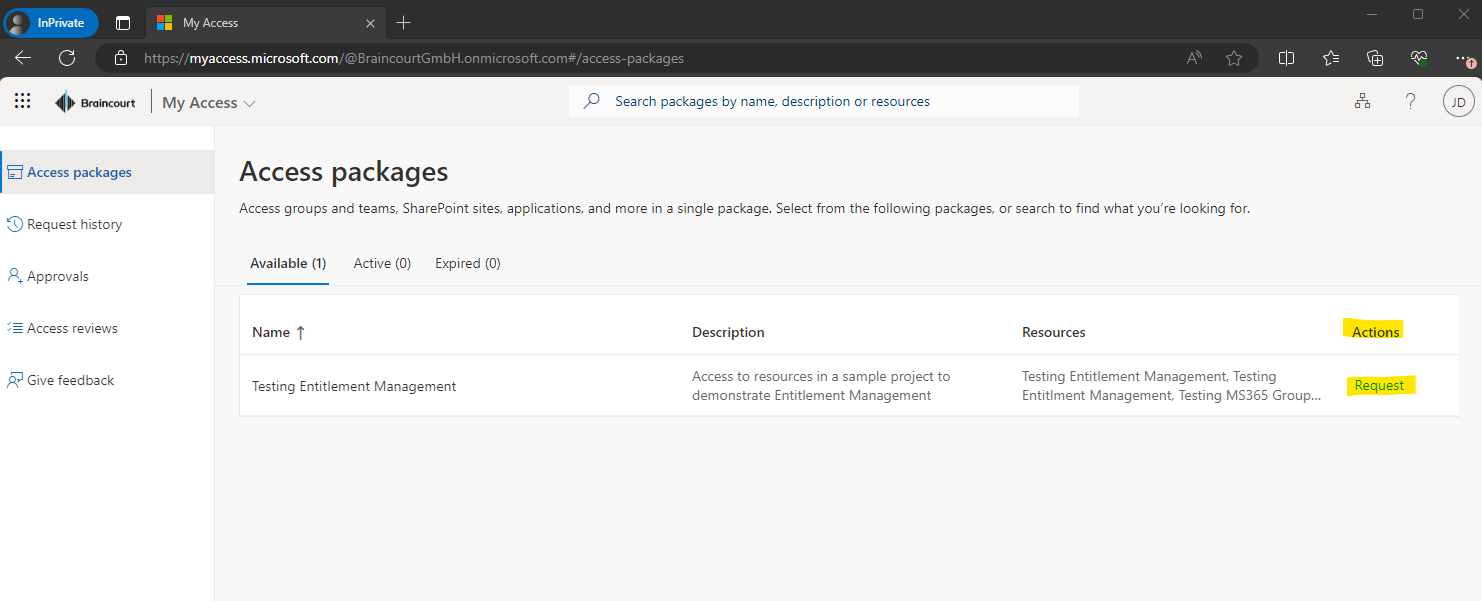
On the Access Packages page, the user can see a list of all access packages available to him. So if not using a provided shareable link to a specific access package, you will sign-in to the My Access portal by using the link https://myaccess.microsoft.com and check all available packages here.
Here you can also request access to the listed packages.
If I will request the package again by using the link above, I will get notified that I have already access to the project.

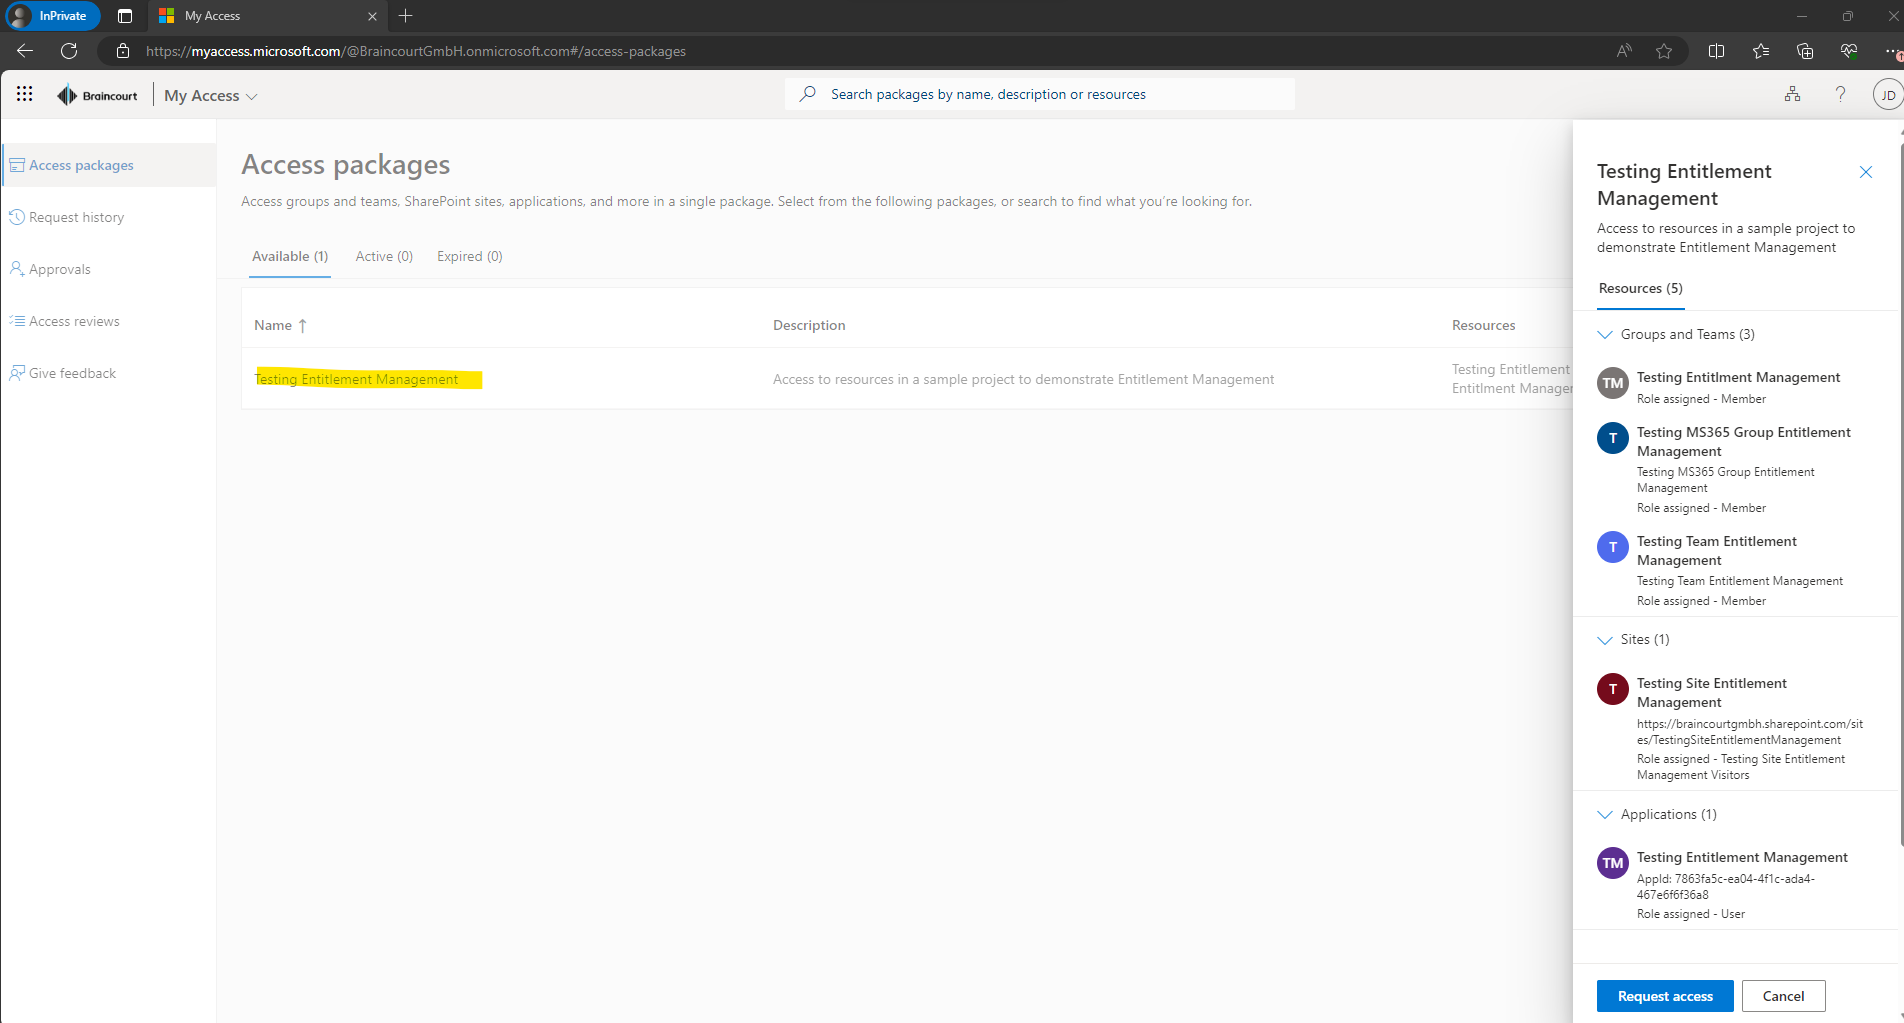
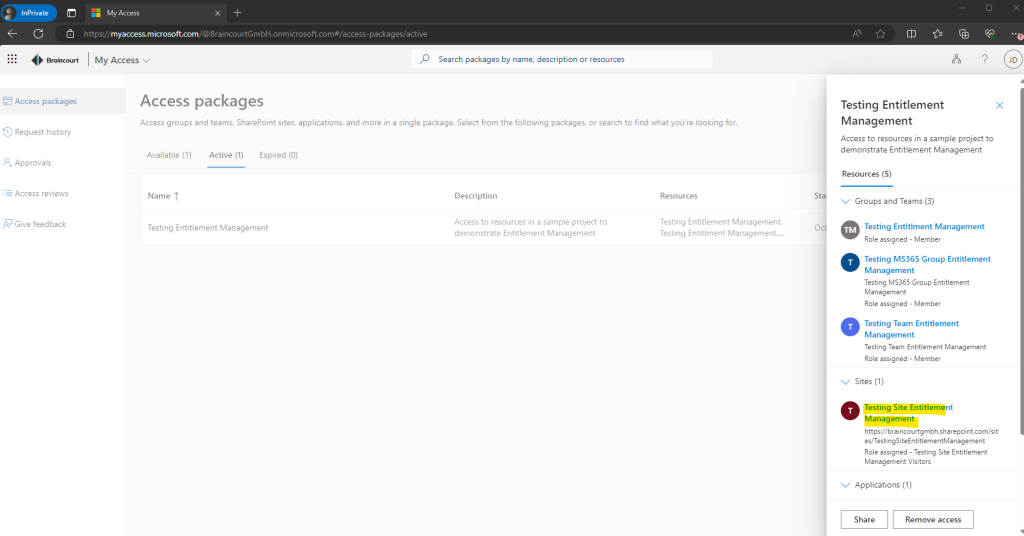
You can also click on a access package here to expand the details and content of it.
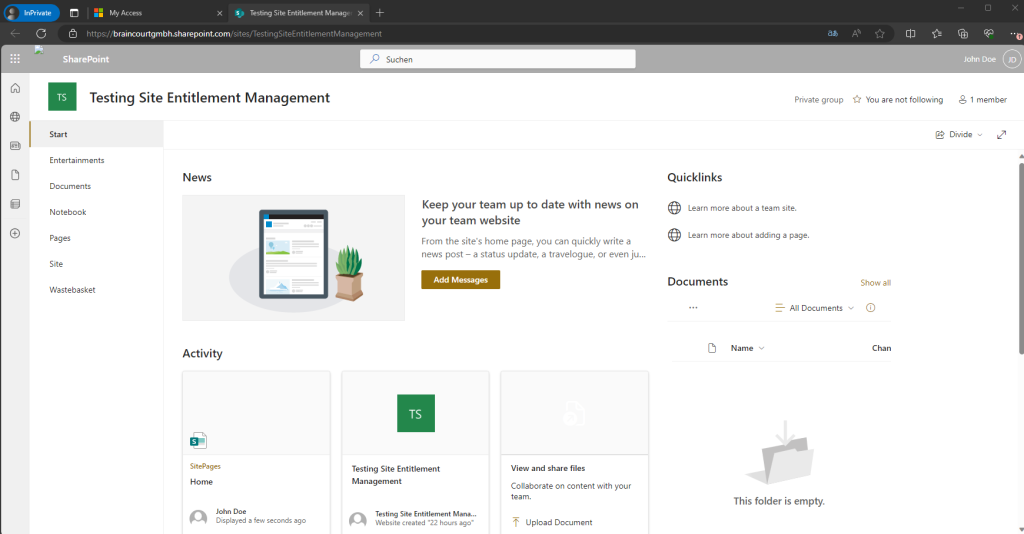
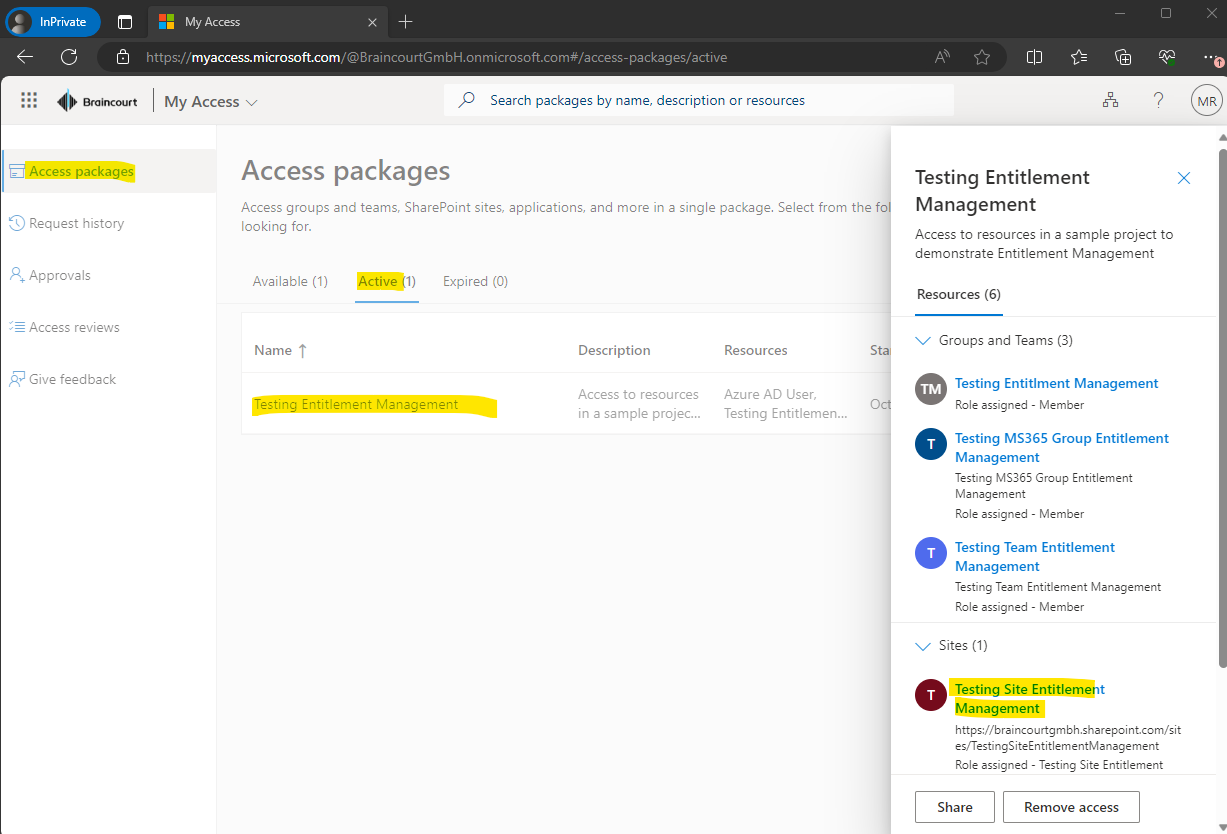
After the package is in state delivered it will also appear under Active packages. When clicking on it like above we can also open and launch the resources from here. Below I will open the SharePoint site from the package.
So finally the user John Doe has access to our SharePoint site.
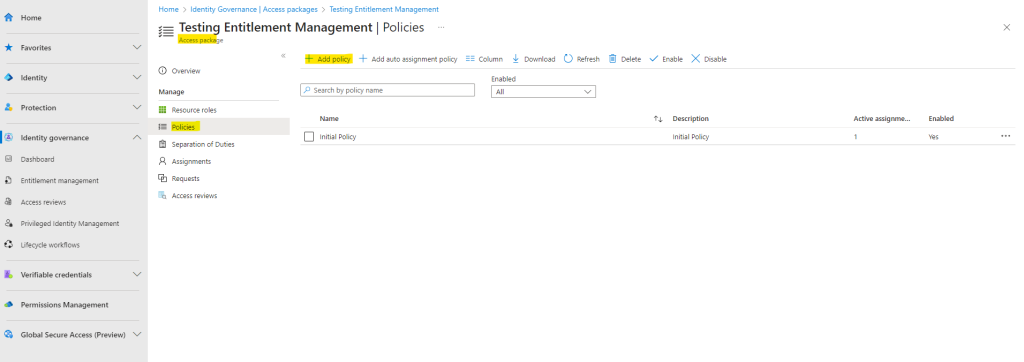
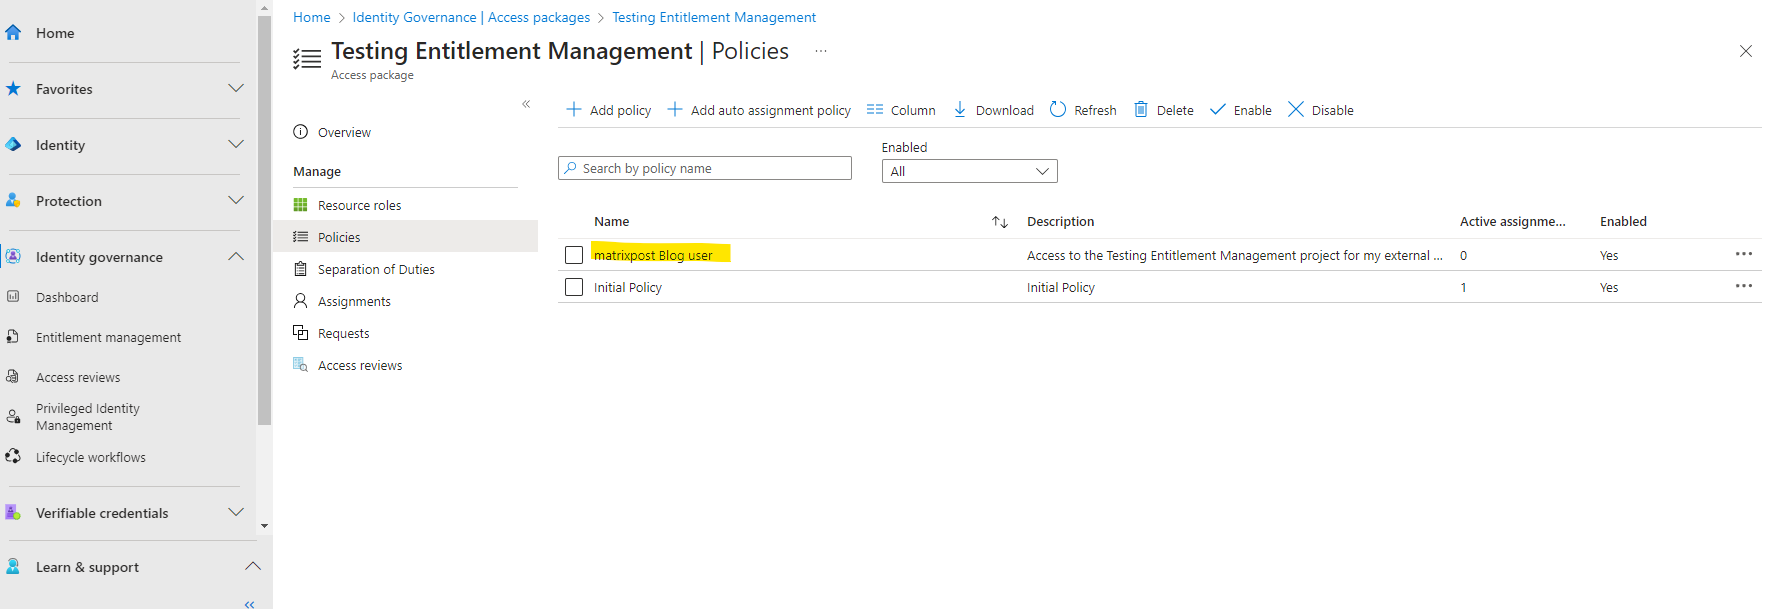
Previously we just allowed in the policy for the access package that only internal users can request access to the package. We can also allow external users to request access to this access package by adding a second policy to the same access package as shown below.
So go to the access package and click on Policies in the left menu to add a second policy for this package.
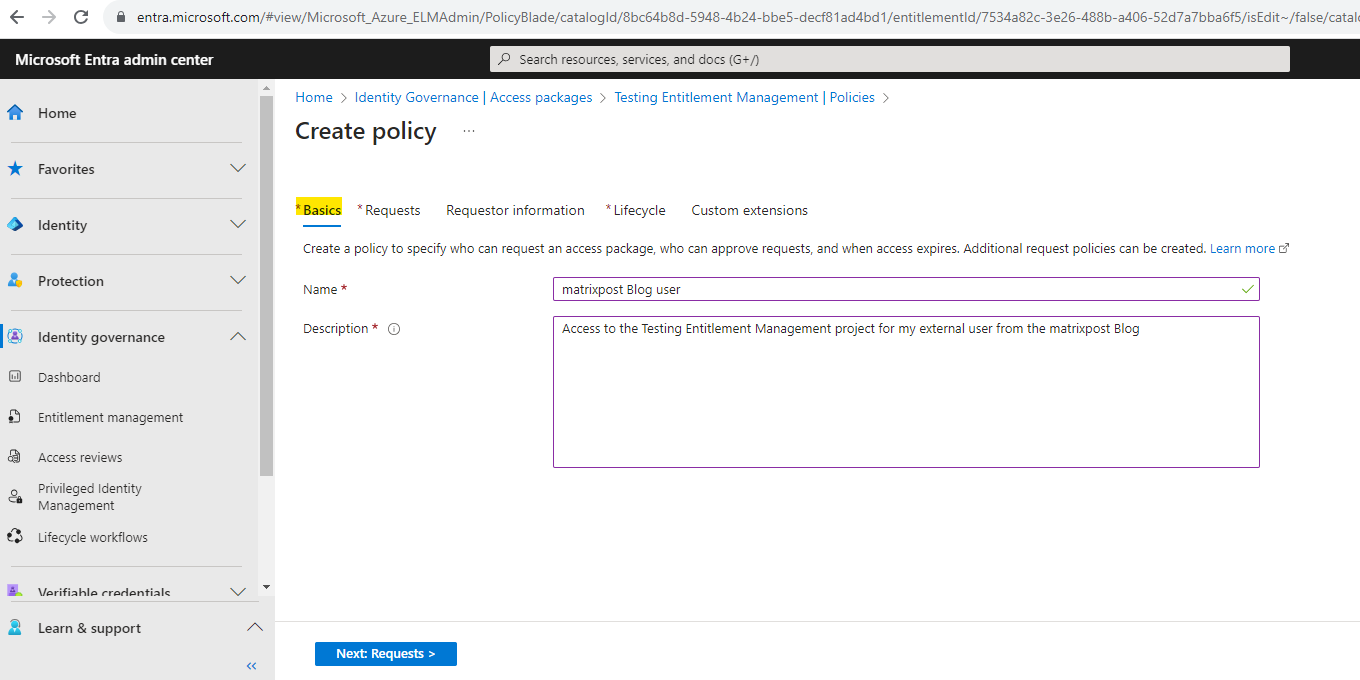
Here I will also name the policy and add a description.
On the Requests tab this time I will select For users not in your directory and add a specific connected organization. Because so far my external organization isn’t connected, I first need to connect it by clicking on Add connected organization below.

More about connected organizations you will find in the following article.
Manage connected organizations in entitlement management
https://learn.microsoft.com/en-us/azure/active-directory/governance/entitlement-management-organization
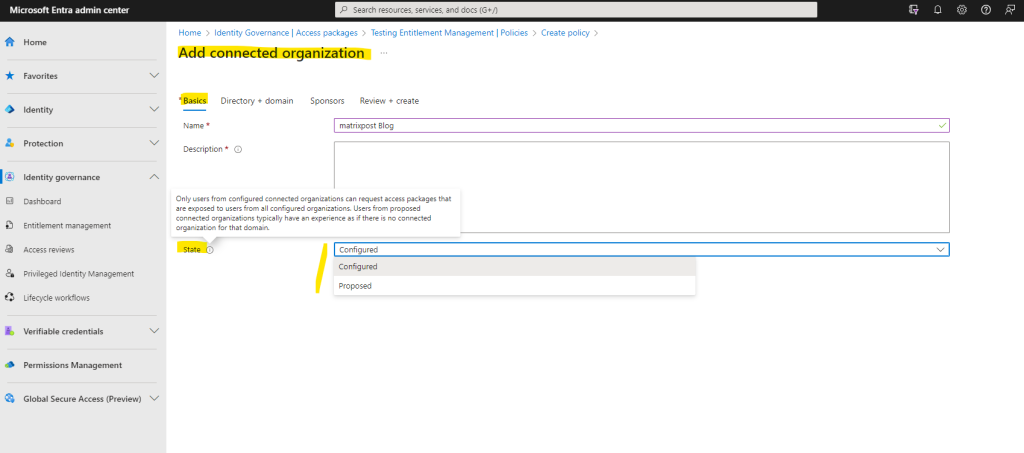
For the connected organization provide a name and description in the Basics tab.
In order to allow users from the external organization to request access packages, I will select for the state below Configured.
Only users from configured connected organizations can request access packages that are exposed to users from all configured organizations. Users from proposed connected organizations typically have an experience as if there is no connected organization for that domain.
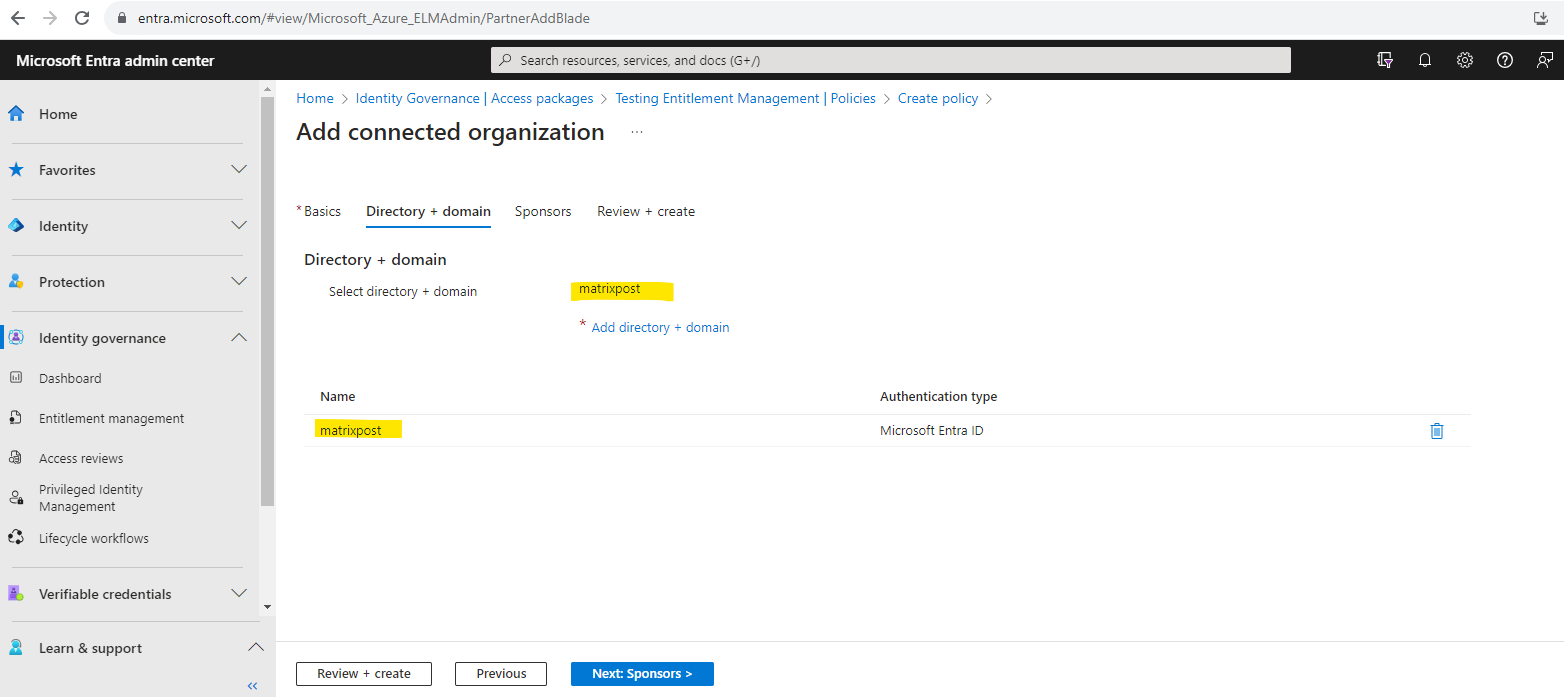
Add the domain from the external organization.
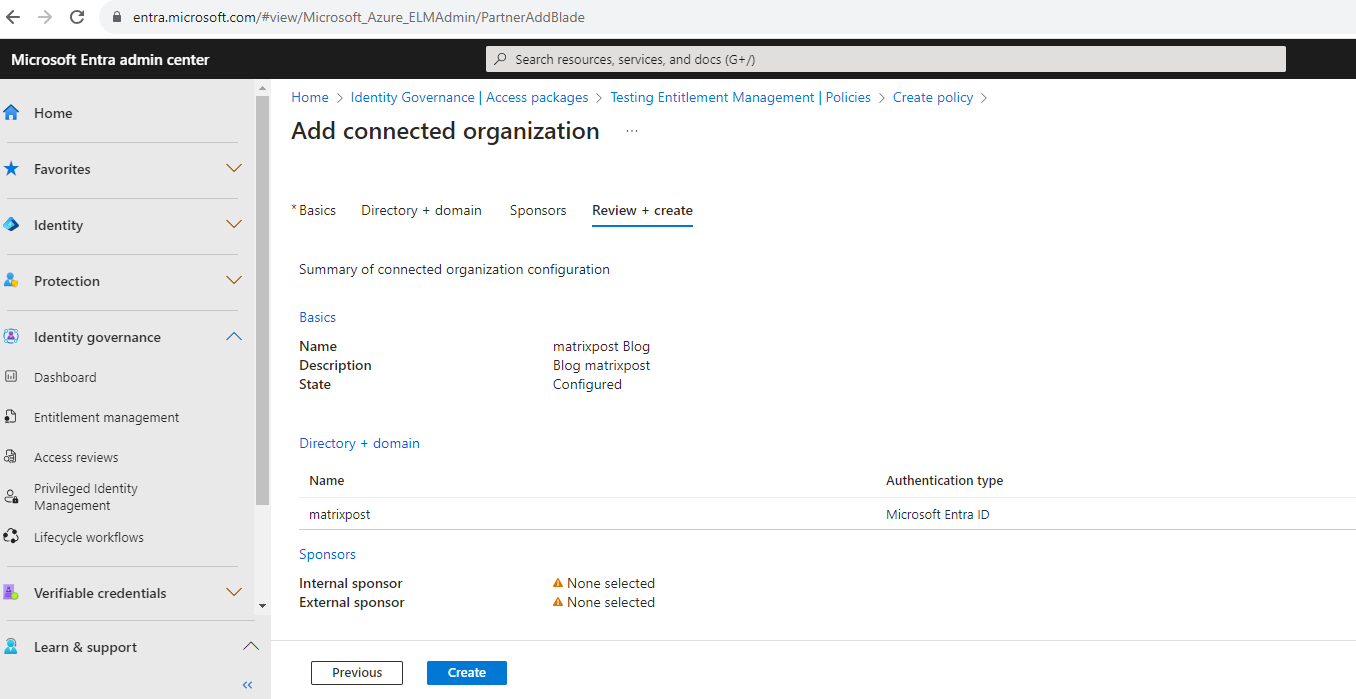
In the Sponsors tab you can add optional sponsors for this connected organization. I will skip this.
Sponsors are internal or external users already in your directory that are the point of contact for the relationship with this connected organization. Internal sponsors are member users in your directory. External sponsors are guest users from the connected organization that were previously invited and are already in your directory. Sponsors can be utilized as approvers when users in this connected organization request access to this access package. For information about how to invite a guest user to your directory, see Add Microsoft Entra B2B collaboration users.

Finally I will create the connected organization.
After finishing the creation of the connected organization you will get redirected to the creation of the policy itself. As we here allow external users to request access to this package, we should add a bunch of security precautions.
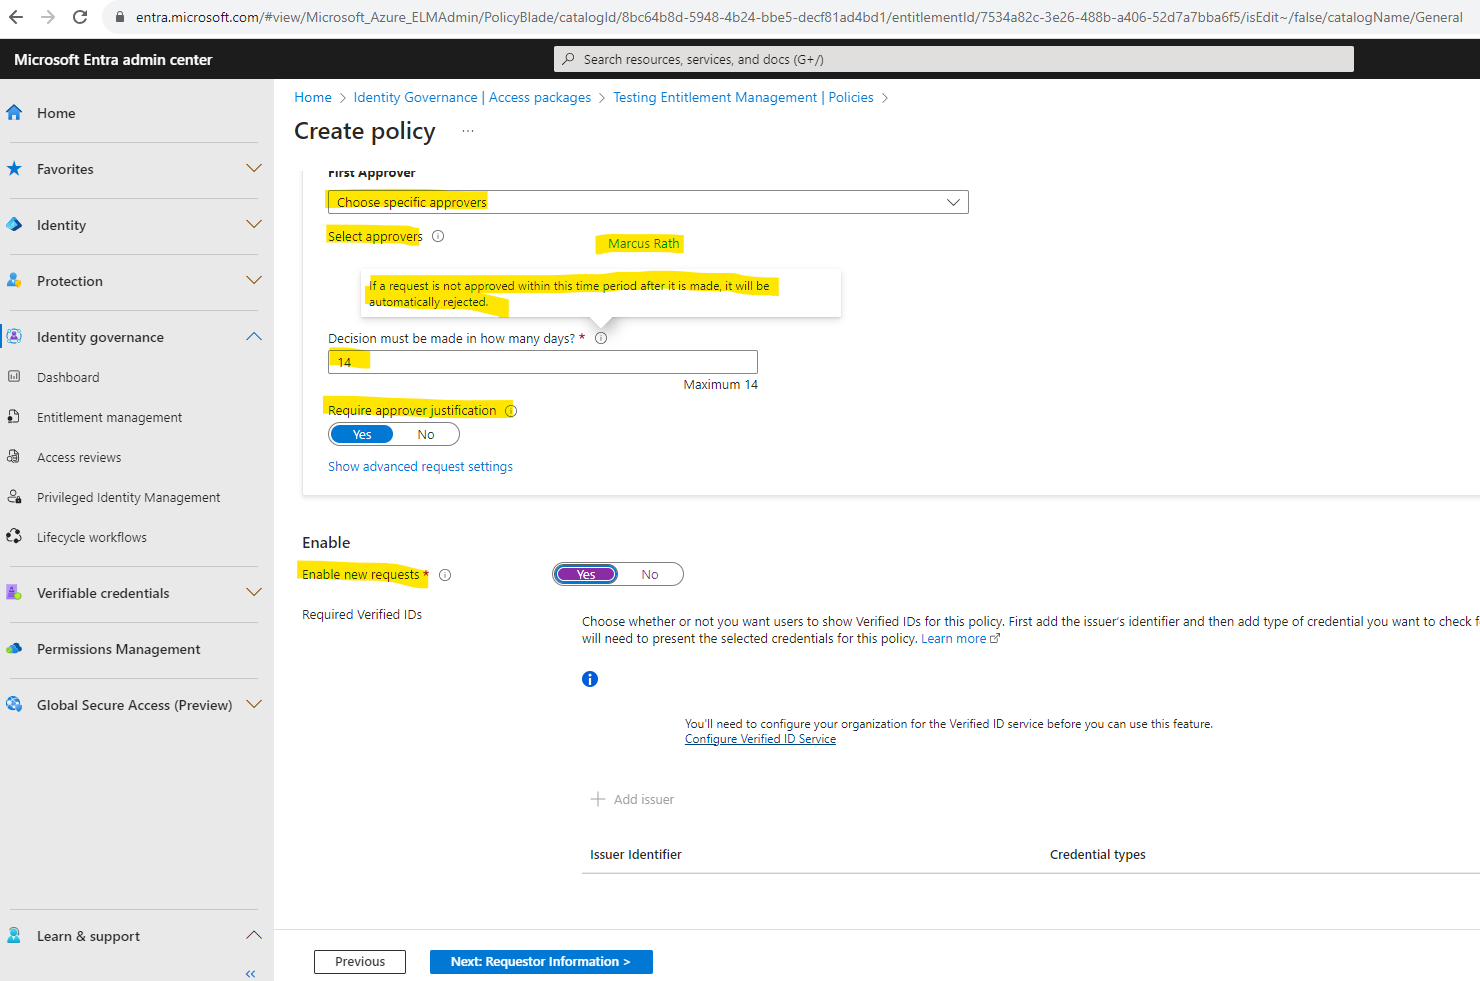
Here we enable Require approval and select an admin user which will be in charge for the approval.
I will choose here to add a specific user.
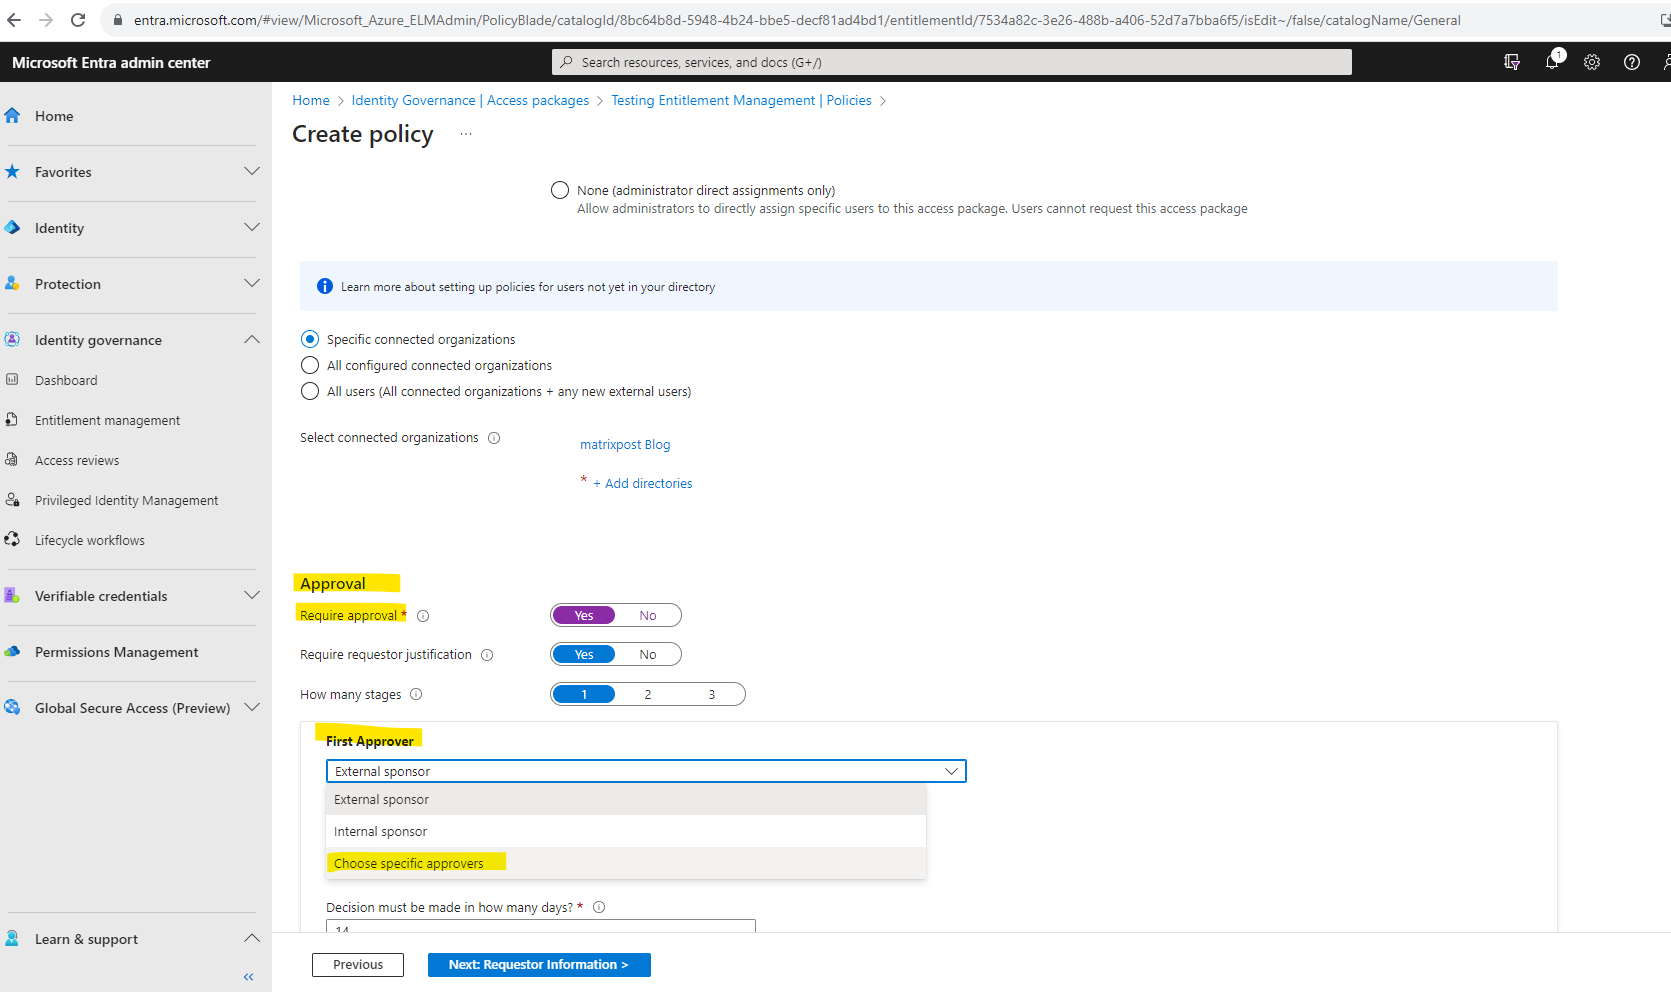
I will use my own user to approve requests from the external organization.

Next you need to enter a time period (by default 14 days) in which a request is not approved within will be automatically rejected.
I will further enable to require a justification and new requests.
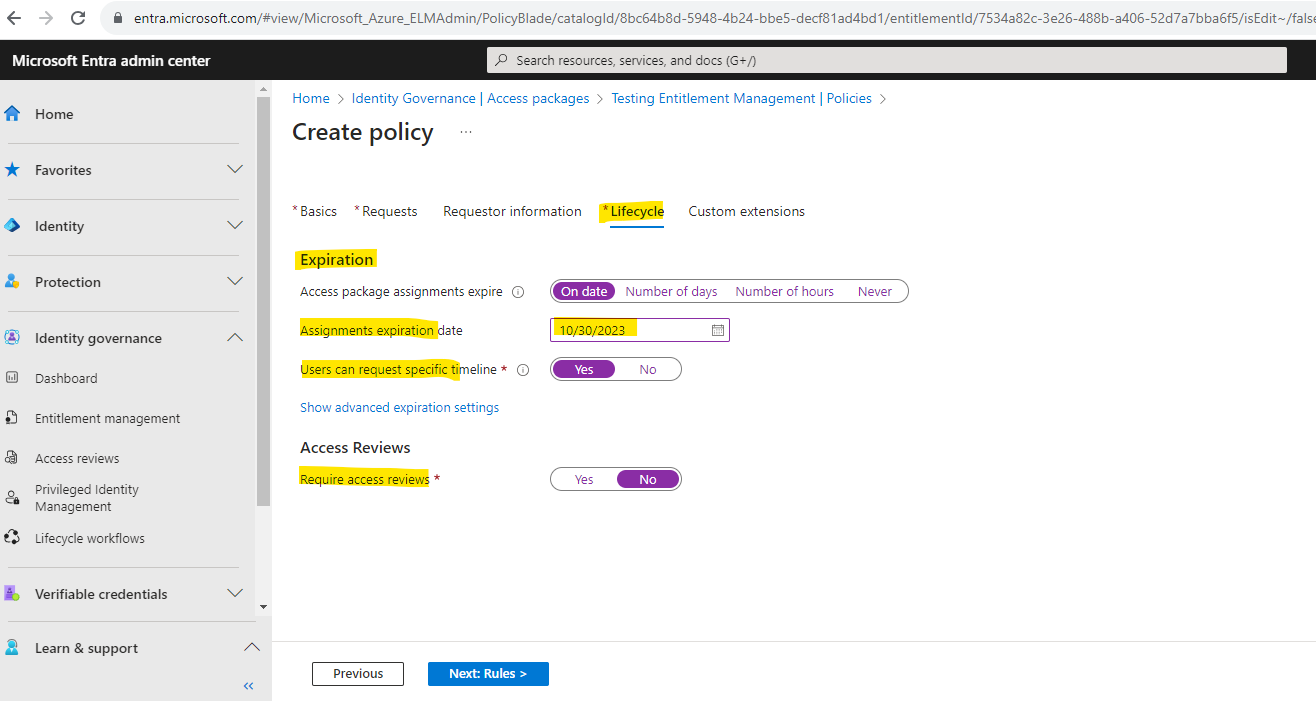
The Requestor information tab I will skip again and for the Lifecycle tab I will activate an expiration date because the project is going to end after this post is finished in my case. Therefore no need to expose resources longer than needed for security reasons.
I will also allow the users to request a specfic timeline, so they maybe not need the whole timeline which is enabled for this package.
Their request cannot extend beyond the timeline defined in the policy for the access package.
Access reviews I will not enable for this short period the package is available.
The Custom extensions tab will also skip again and finally create the second policy.
So from now on we can also allow users from the connected external organization to request access to the resources assigned in our access package.
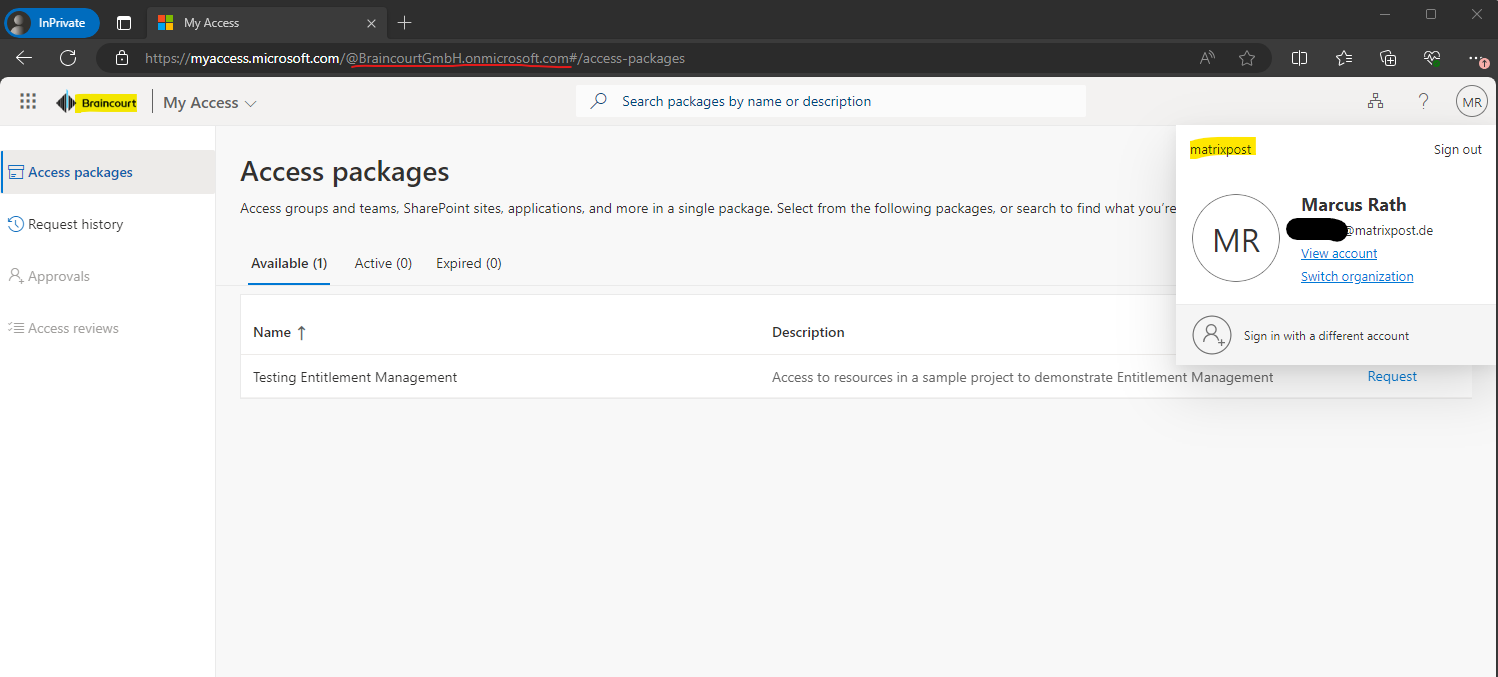
Now I will try to sign-in with the external user (matrixpost tenant) but to the My Access portal from Braincourt (the company who published the access package and resource owner). Therefore the link should be provided to the external user.
Even the user is not from Braincourt, the external user need to enter its own account information.

Finally I am in the My Access portal from Braincourt and will see and can request our access package.
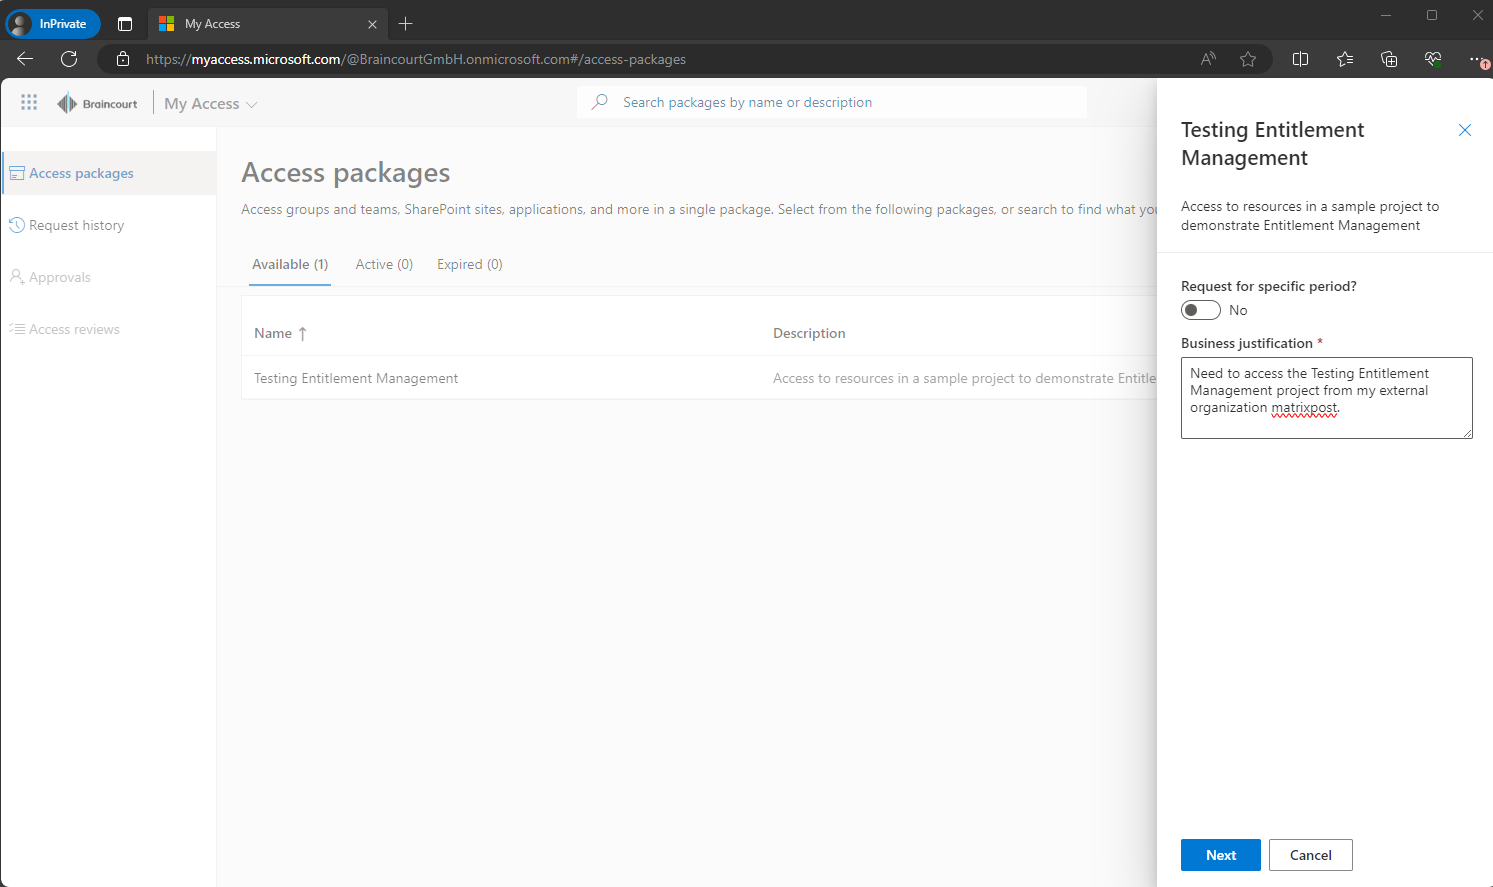

After the user from the external organization is requesting access my user in Braincourt which is assigned as approver will receive the following Mail from Azure to approve or deny the request.
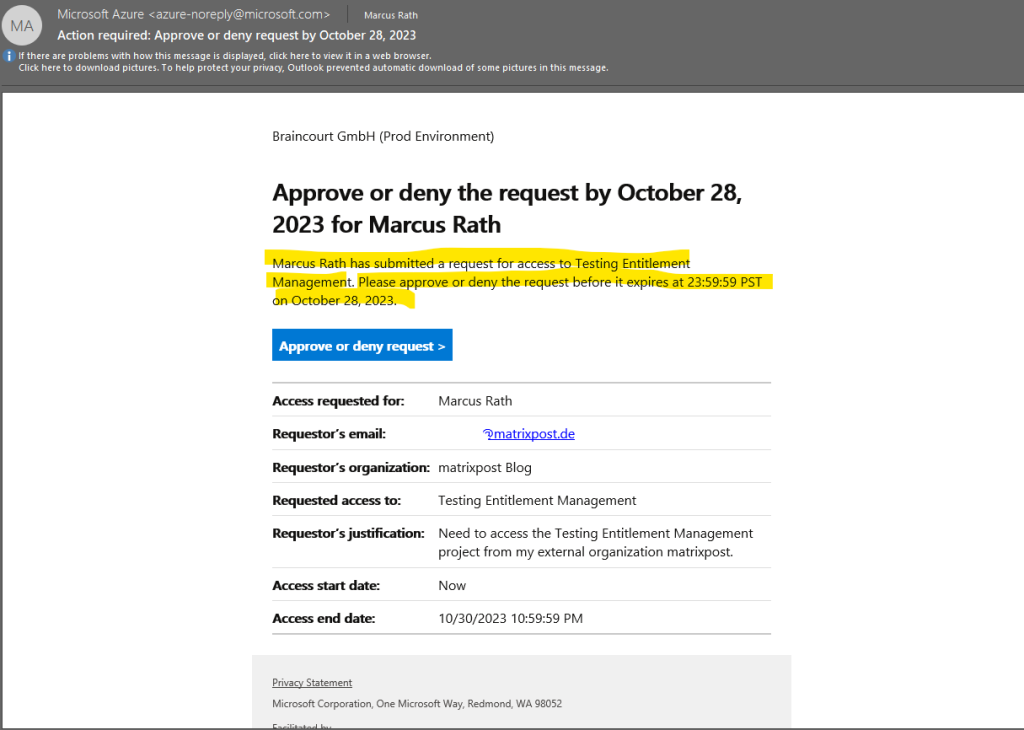
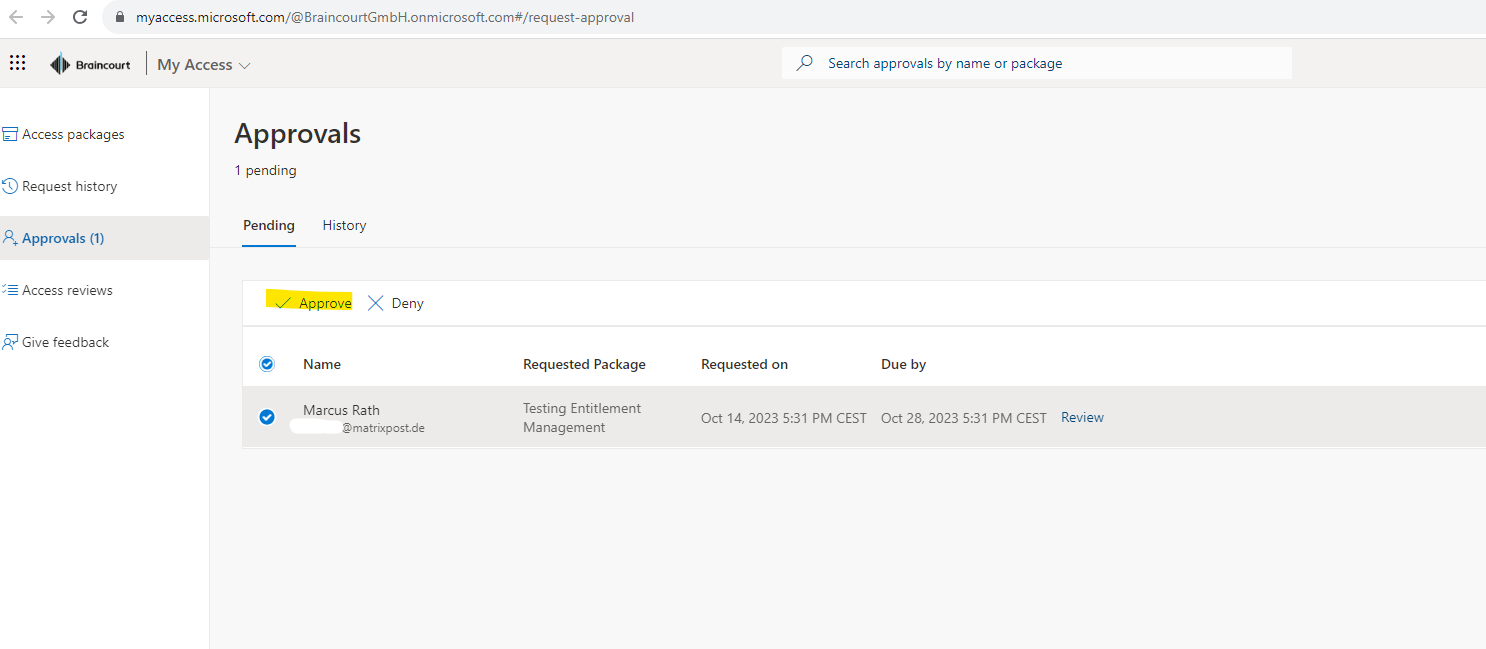
When clicking on the button in the mail I will get forwarded to the My Access portal where I can finally approve the request.
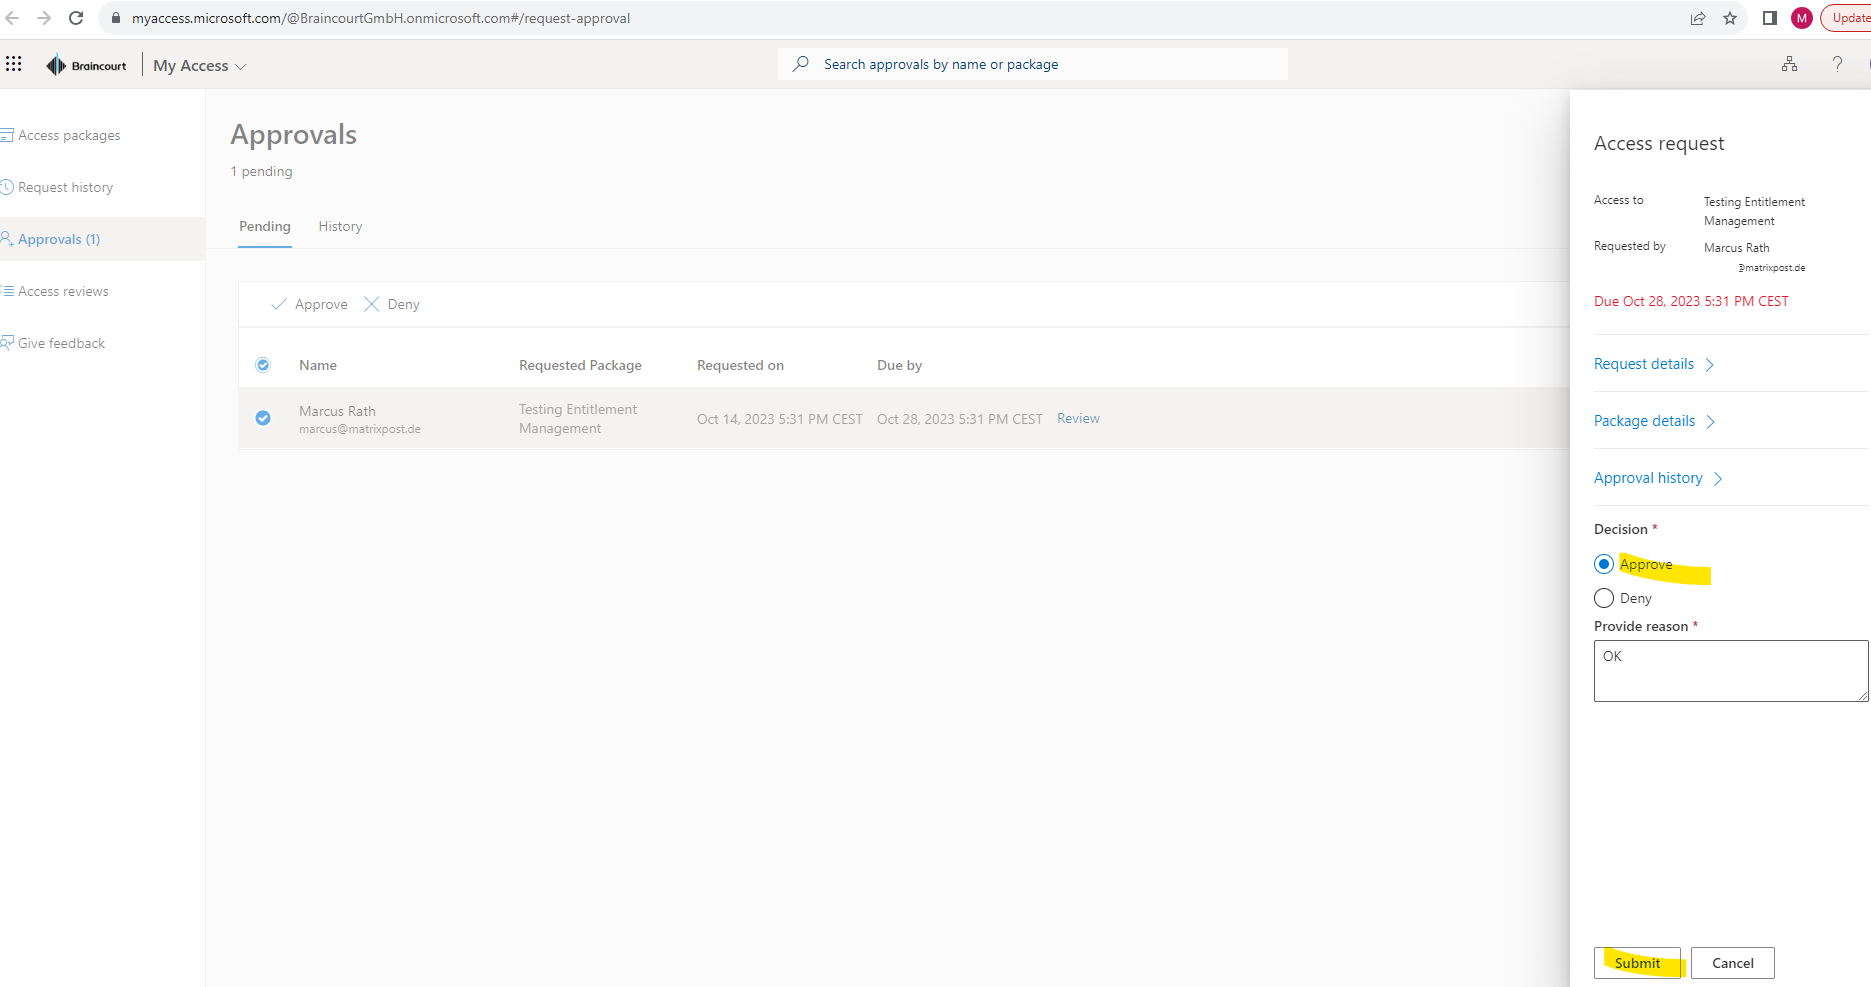

After the approval of the request, the external user will get an e-mail which is notifying about having now access to the requested project previously.

The external user now needs to sign-in again to the My Access portal from Braincourt (the company who published the access package and resource owner). This time the user needs to accept the permissions requested by Braincourt.
The reason for is that Braincourt needs access to the profile data of the external user from the external organization tenant in order to grant and monitor access for its own resources.

You will now also find the external user in the Braincourt tenant by using the #EXT# identifier.
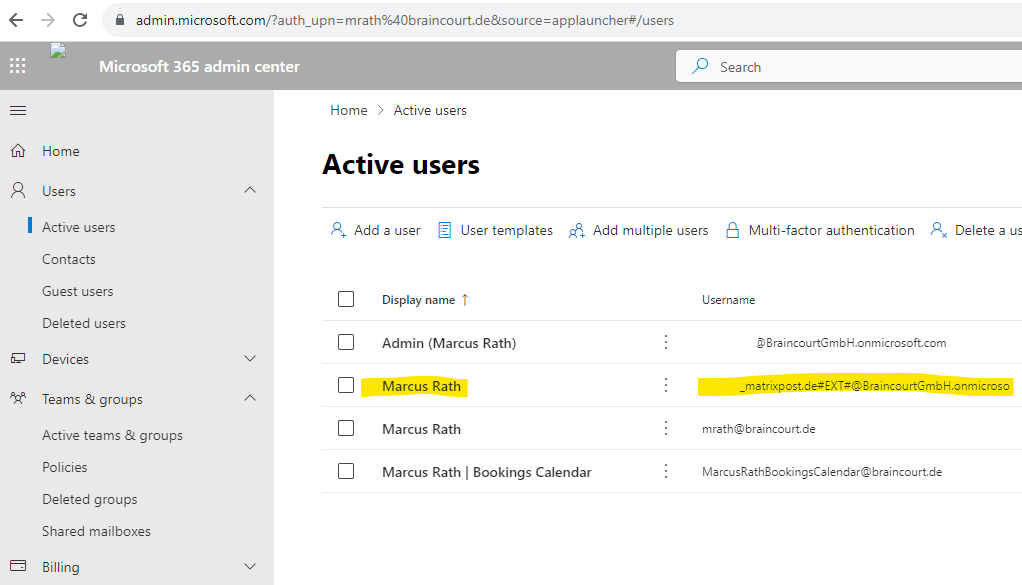
The external user can now also access the SharePoint site and all other resources associated with the access package.

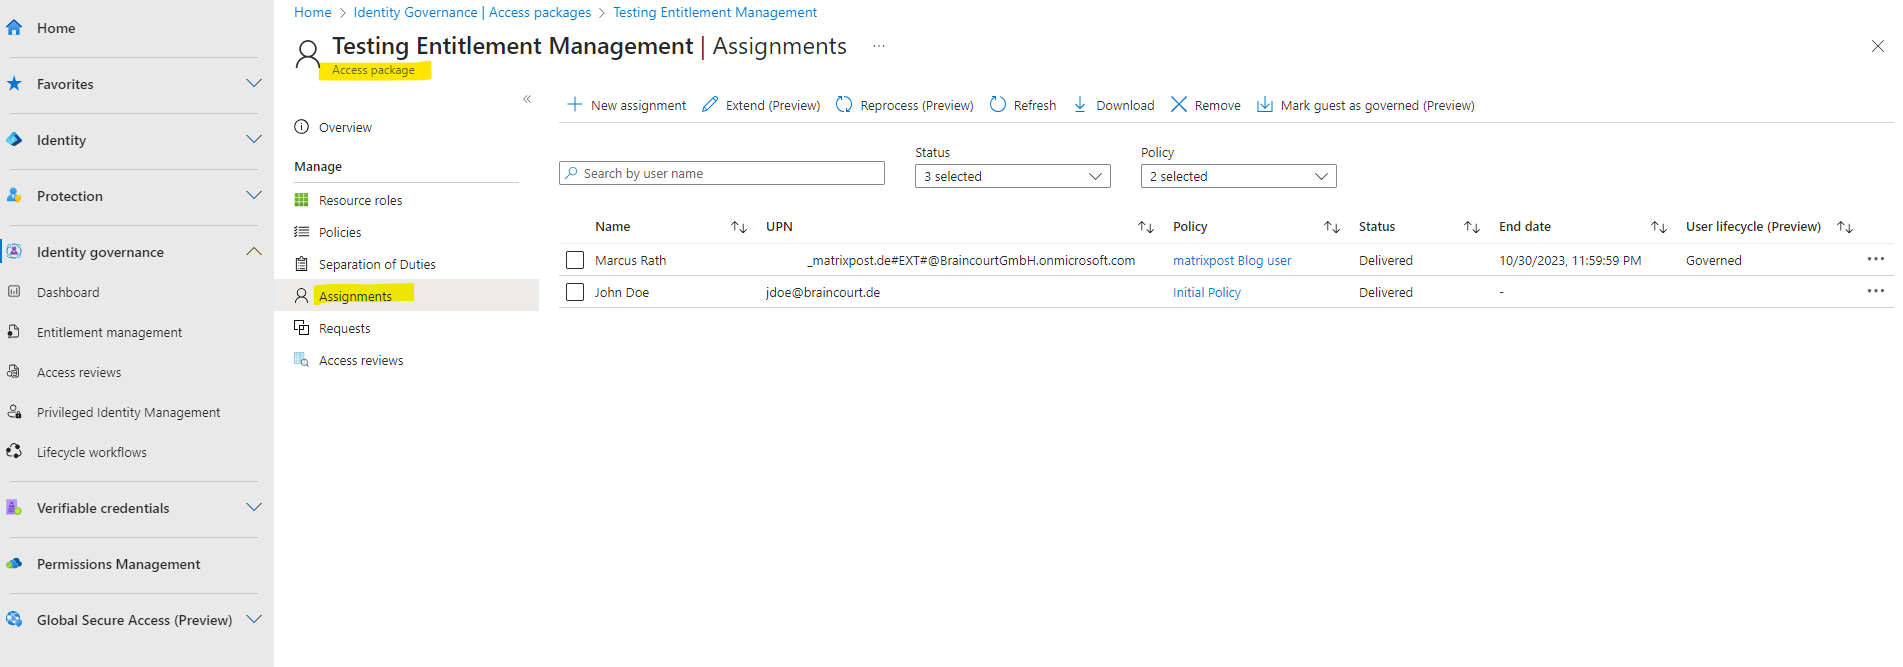
You will find in the access package under Assignments all users they requested access and get approved and delivered the package.
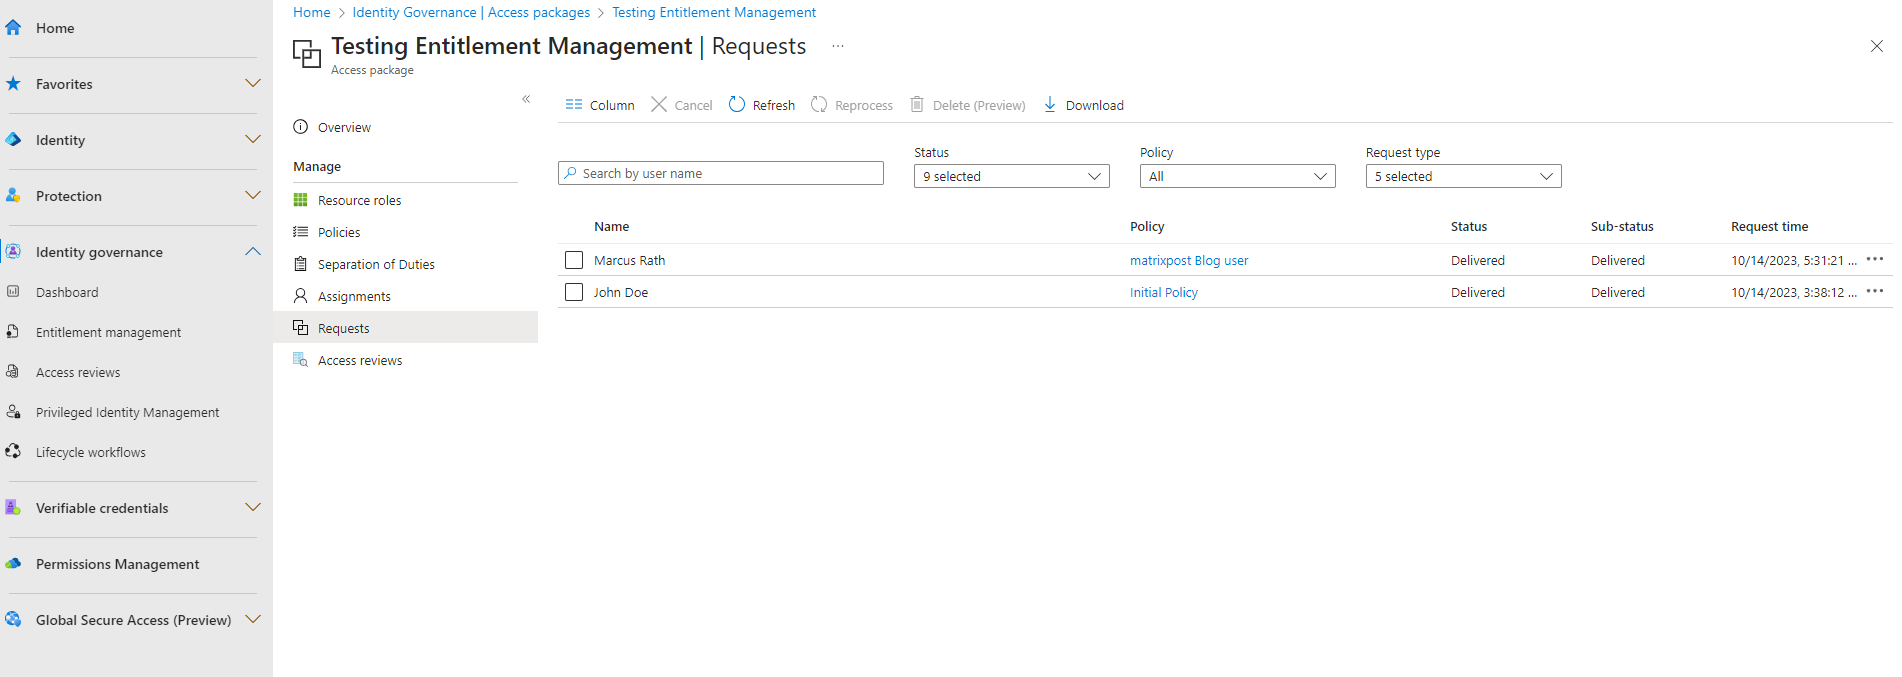
Further under Requests you will see a list of all requests for the package and their status.
Access reviews
Access reviews in Microsoft Entra ID, part of Microsoft Entra, enable organizations to efficiently manage group memberships, access to enterprise applications, and role assignments.
User’s access can be reviewed regularly to make sure only the right people have continued access.
Why are access reviews important?
Microsoft Entra ID enables you to collaborate with users from inside your organization and with external users. Users can join groups, invite guests, connect to cloud apps, and work remotely from their work or personal devices. The convenience of using self-service has led to a need for better access management capabilities.
- As new employees join, how do you ensure they have the access they need to be productive?
- As people move teams or leave the company, how do you make sure that their old access is removed?
- Excessive access rights can lead to compromises.
- Excessive access right may also lead audit findings as they indicate a lack of control over access.
- You have to proactively engage with resource owners to ensure they regularly review who has access to their resources.
Using this feature requires Microsoft Entra ID Governance subscriptions for your organization’s users. Some capabilities within this feature may operate with a Microsoft Azure AD Premium P2 subscription, see the articles of each capability for more details. To find the right license for your requirements, see Microsoft Entra ID Governance licensing fundamentals.
Source: https://learn.microsoft.com/en-us/azure/active-directory/governance/access-reviews-overview
To demonstrate Access Reviews I will go through all separate steps below in detail.
Access Review for Group Membership + Teams and Applications
To create a new access review for group membership + Teams or applications open the Microsoft Entra admin center under https://entra.microsoft.com and click on Identity governance – Access reviews – New access review as shown below.

First we will see how to review access to a Microsoft 365 Group. I will review access for the previously created access package in entitlement management.

Here I will select my MS365 group we assigned previously to the access package in entitlement management.

I will create a review for all users.
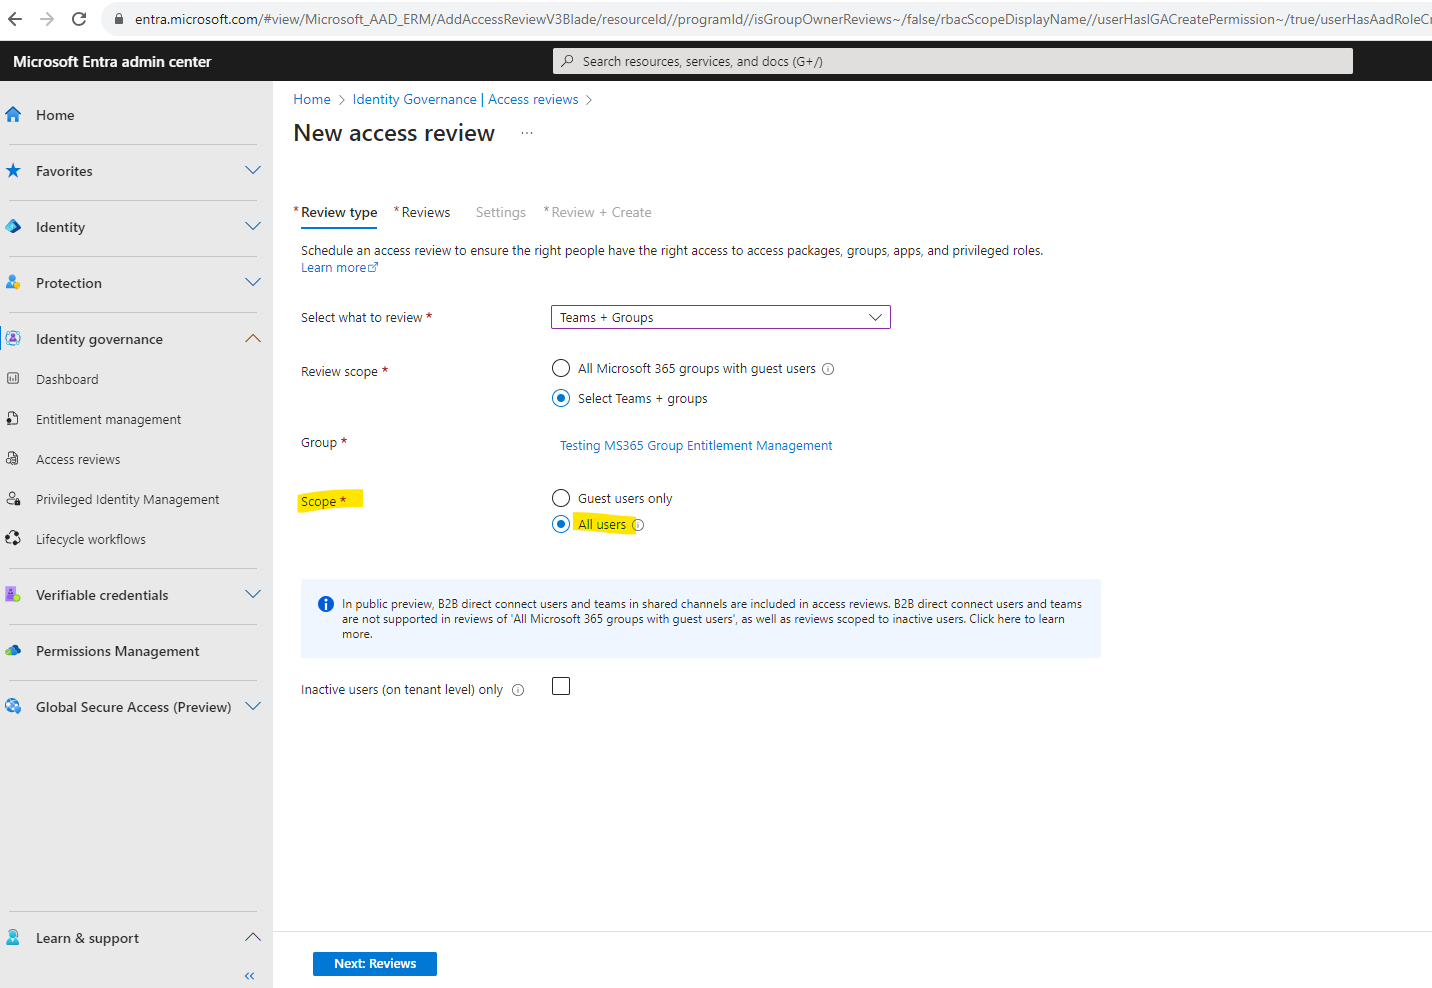
checkbox Inactive users (on tenant level) only
When enabled, only users that have been inactive since a specified date will be included in the review.
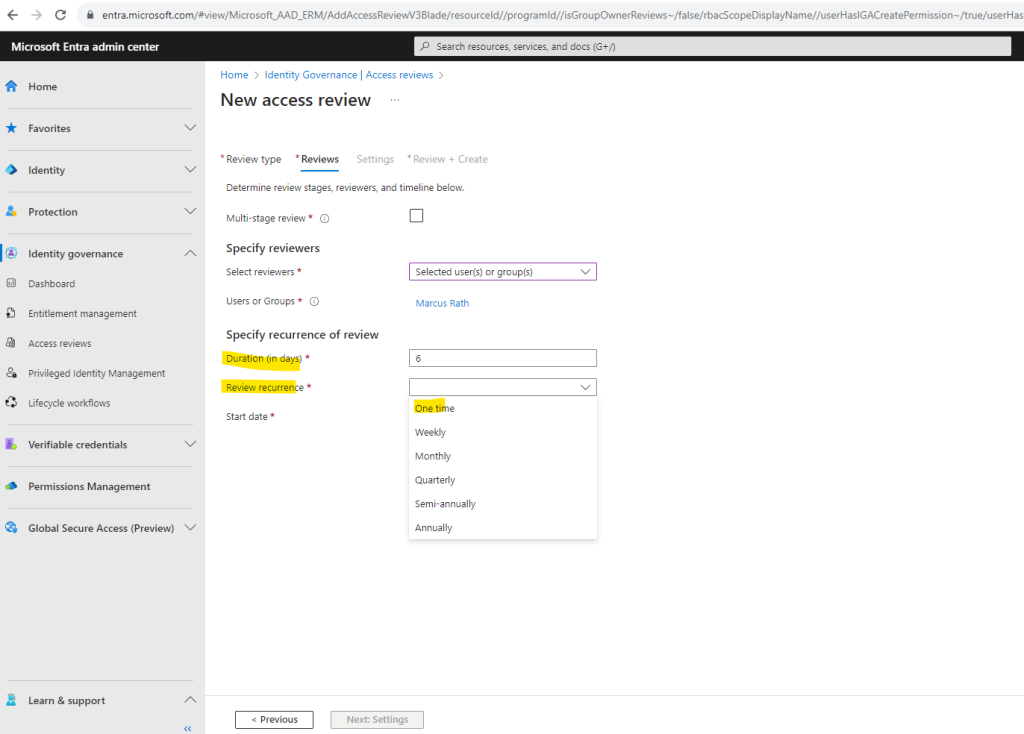
Below the Multi-stage review allows you to specify several reviewers. In the Specify reviewers section I will select myself.
In the Specify recurrence of review section, specify the following selections:
- Duration (in days): How long a review is open for input from reviewers.
- Start date: When the series of reviews begins.
- End date: When the series of reviews ends. You can specify that it Never ends. Or, you can select End on a specific date or End after number of occurrences.
In order to demonstrate Access review I will select for Review recurrence just One time and for the start date I will use the actual day to perform it right now.
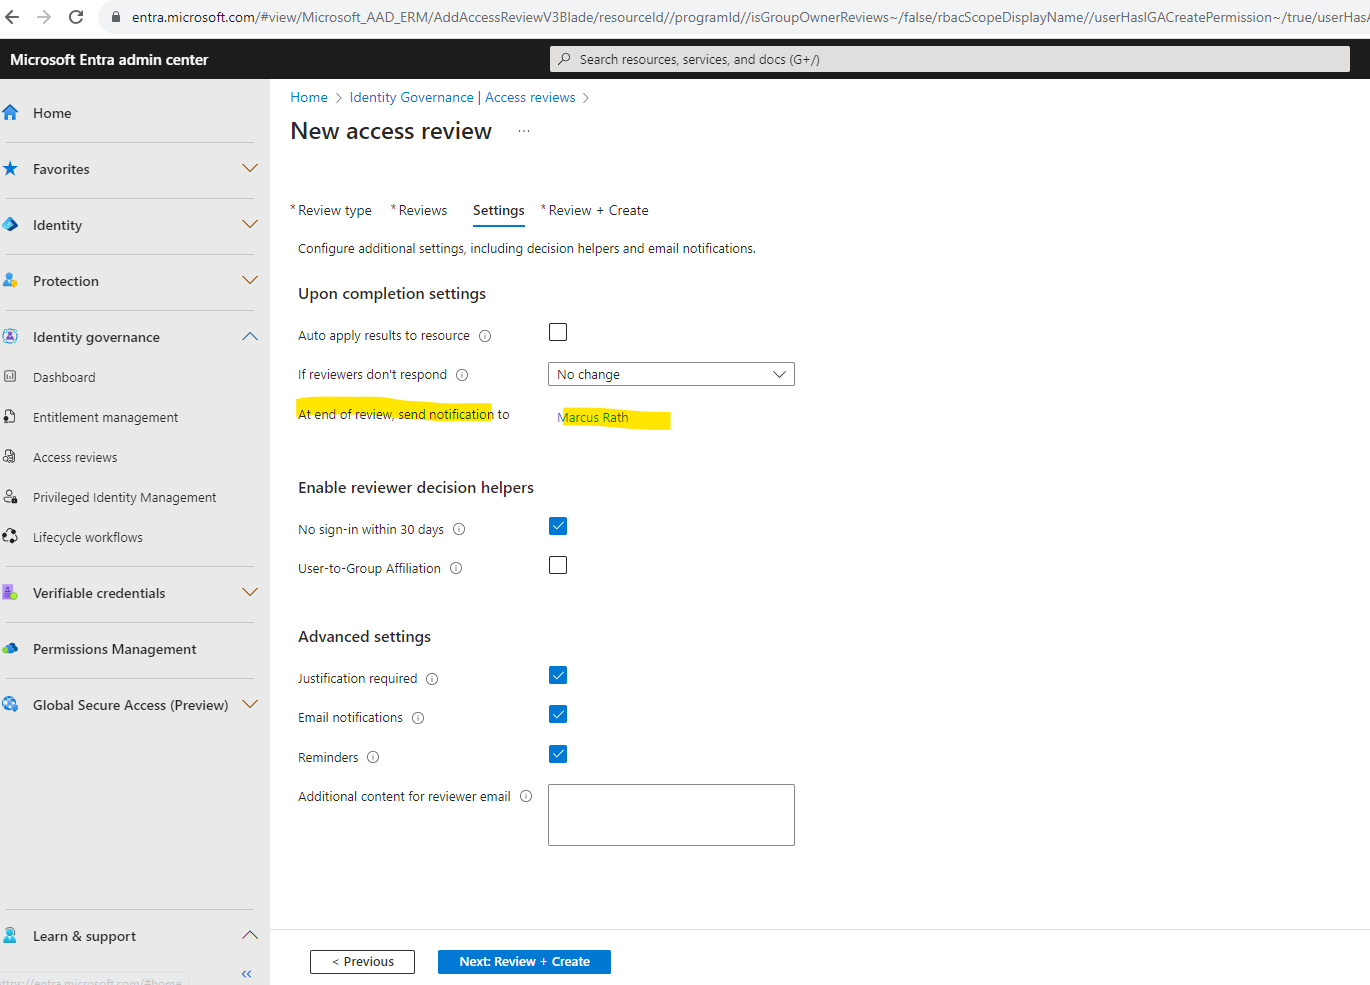
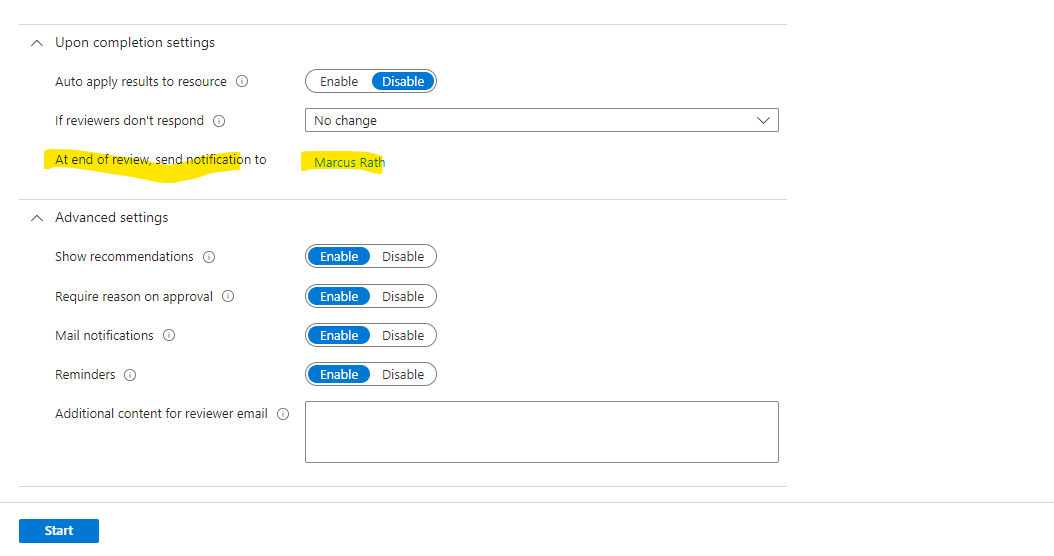
In the Settings tab we can configure additional settings like shown below. I just want to review access and no changes should be done according to this review.
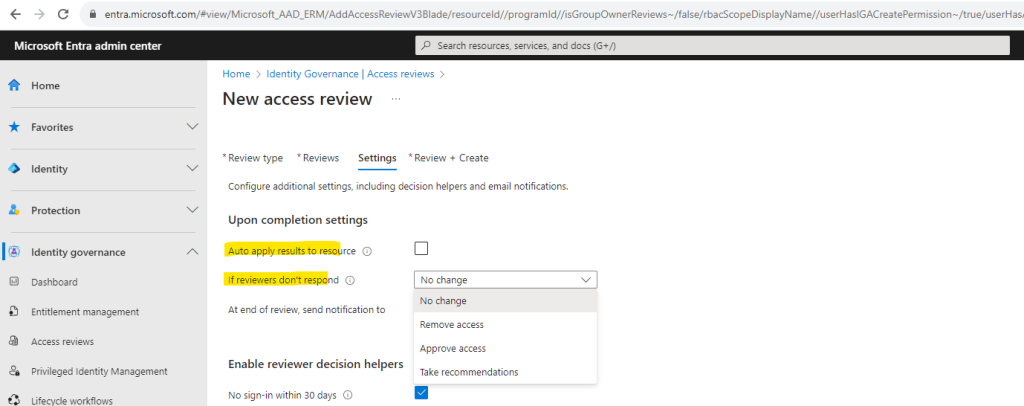
Auto apply results to resource ->
If the user’s access is denied, their access to the resource will be removed after the review is completed.
No sign-in within 30 days -> If enabled, system provides recommendations to reviewers based on enabled criteria (such as ‘Last Sign-in’ or ‘User-to-Group Affiliation’)
User-to-Group Affiliation ->
If enabled, system recommends reviewers to deny users who have low affiliation with other users within the group. Note: User should have Manager attribute for this decision helper to work.
Justification required -> Require the reviewer to supply a reason for approval.
Email notifications -> Azure AD to send emails to reviewers when an access review starts, and to the review owner when a review completes.
Reminders -> If enabled, Azure AD will send emails for in-progress access reviews to all reviewers during the midpoint of the review period.
In the Review + Create section we need to provide a review name before we can create the review.
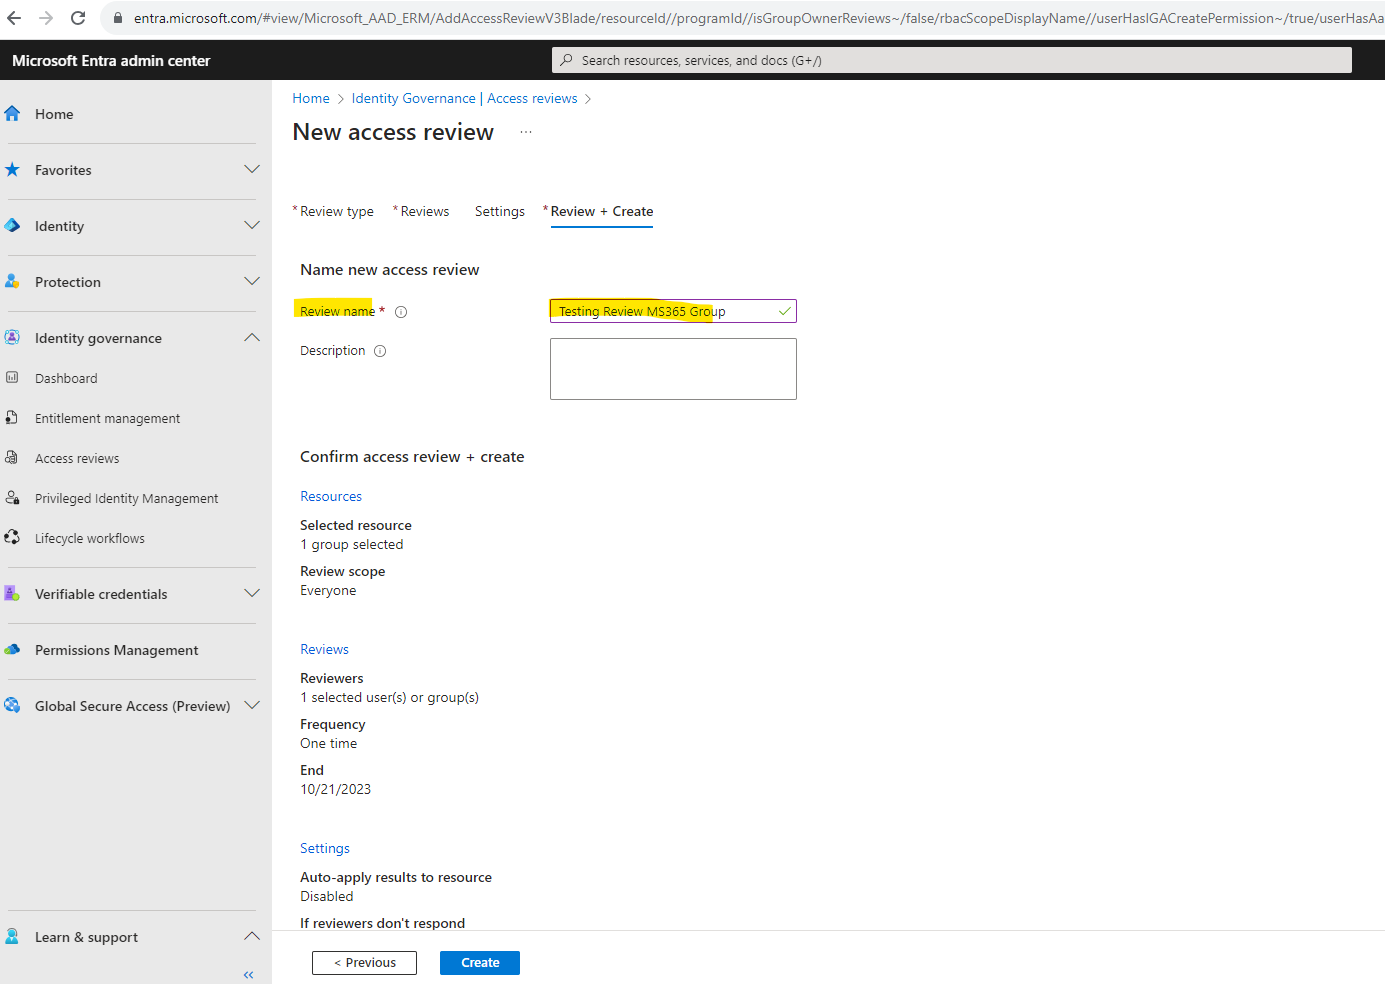
Our Access review is shown up here but so far not started. A few seconds later the status switched to Active because I was previously used the actual day as start day for the review.

The same time the following email was delivered to my inbox notifying me to start the review.

When clicking on the Start review button from the email, I will get routed to the My Access portal and the Access reviews section as shown below.
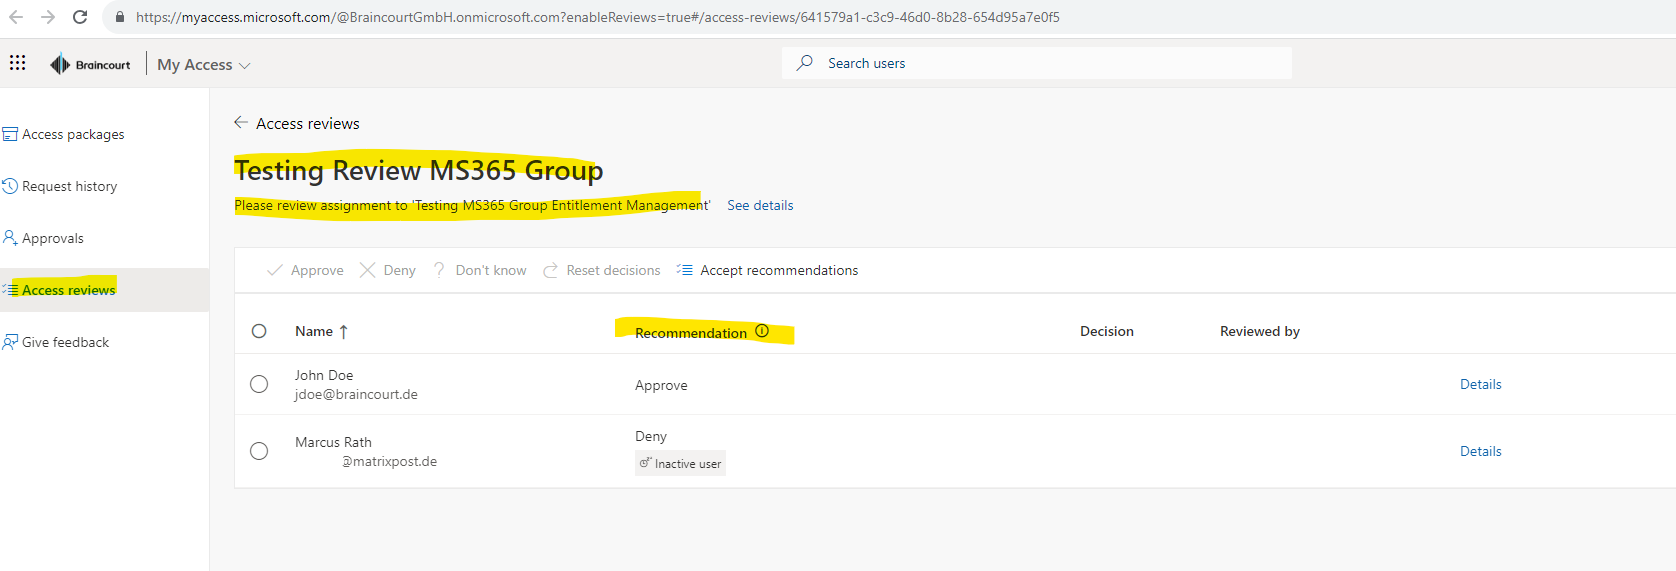
I can now accept the recommendations for each user access or deciding on my own.
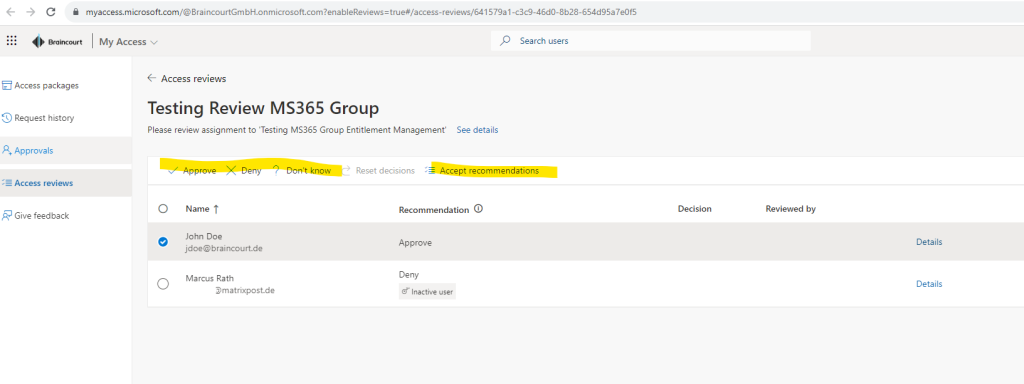
I will approve access for both users listed here.

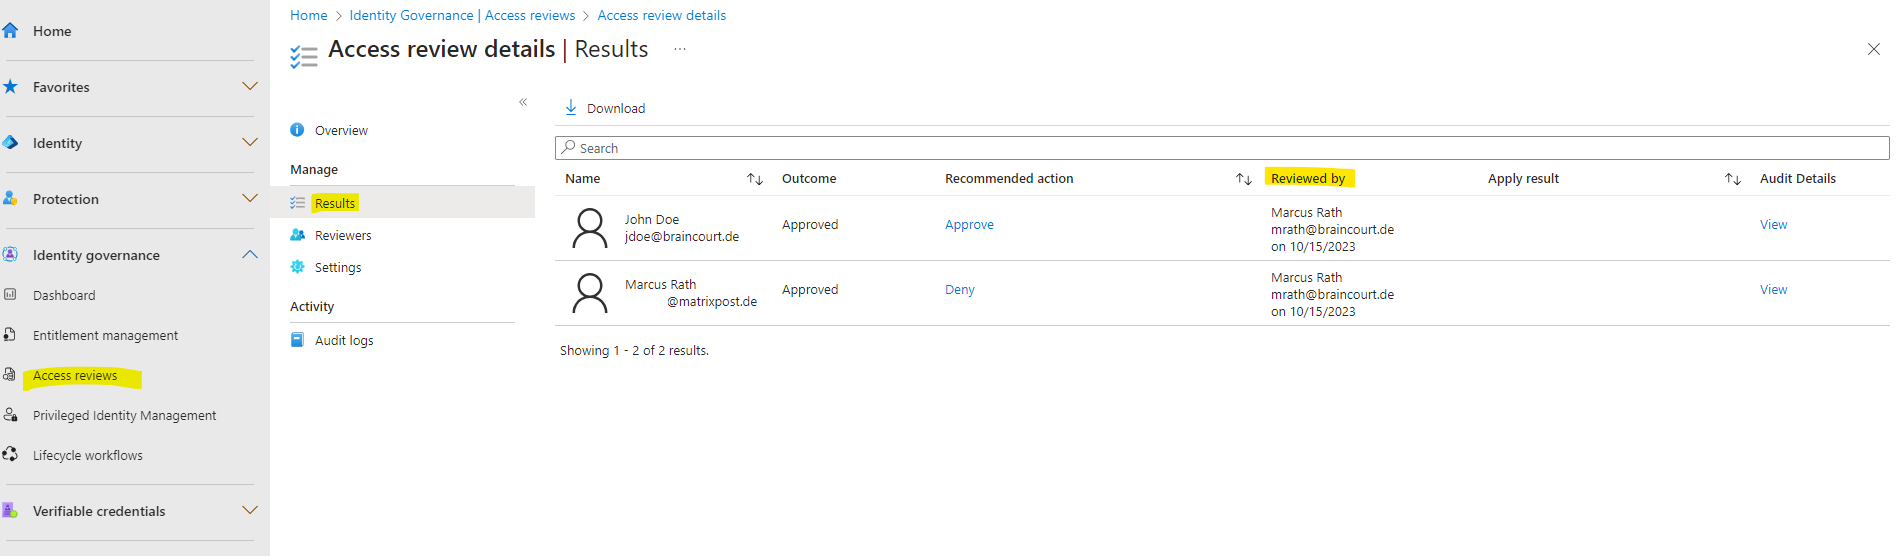
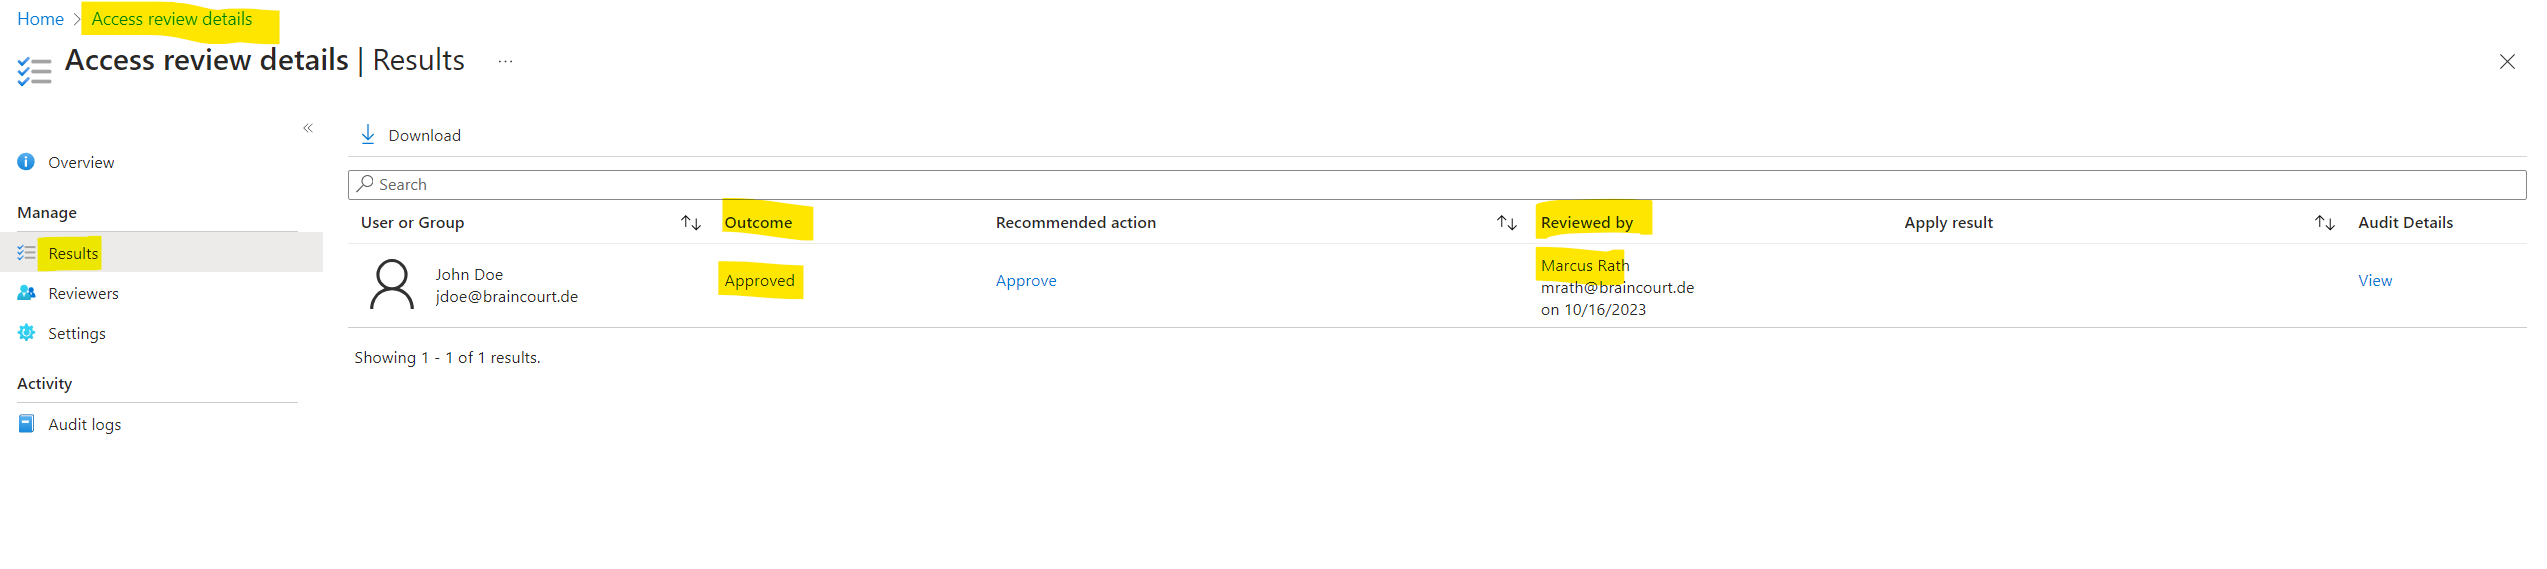
In the Microsoft Entra admin center you will see the results of the access review like shown below.
Access Review for Role Assignments
For role assignment access reviews we need to use the Privileged Identity Management blade. Privileged Identity Management I will show in the next section.
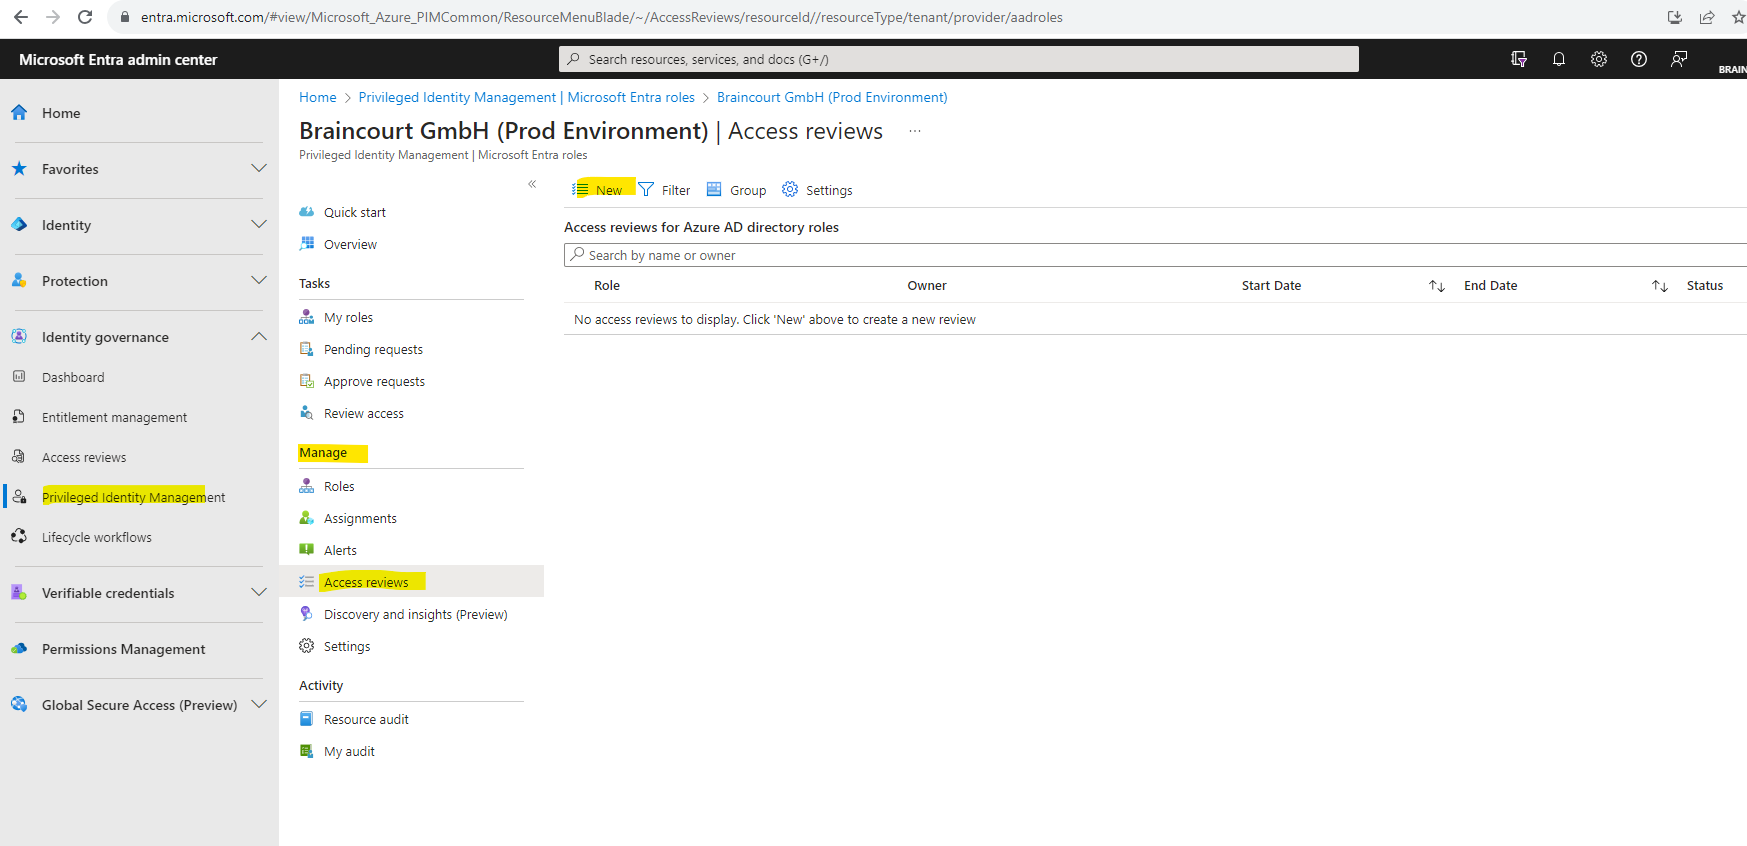
To create a new access review for role assignments open the Microsoft Entra admin center under https://entra.microsoft.com and click on Identity governance – Privileged Identity Management – Microsoft Entra roles – Access reviews – New as shown below.

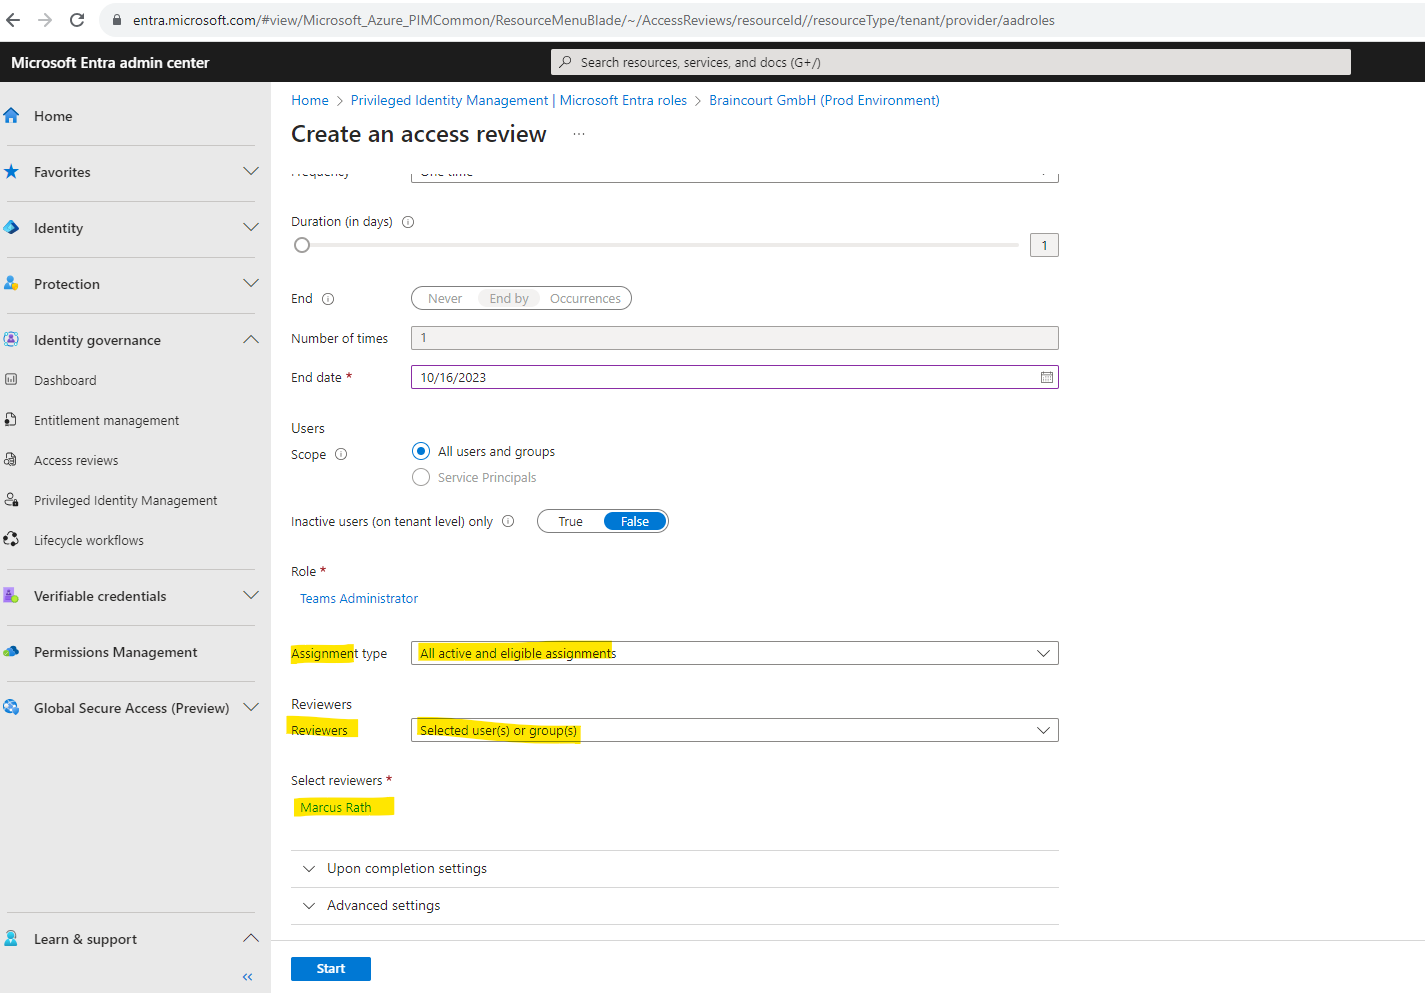
Most of the settings you have to configure for a role assignment review are the same as previously for group membership and applications. Below I will select the Teams Administrator role to enable for review.

Here I can choose the alignment type I want to review access for. I will select All active and eligible assignments to get a list of all users in the tenant which have the role assigned to.
- Eligible assignments require the member to activate the role before using it. Administrator may require role member to perform certain actions before role activation which might include performing a multi-factor authentication (MFA) check, providing a business justification, or requesting approval from designated approvers.
- Active assignments don’t require the member to activate the role before usage. Members assigned as active have the privileges assigned ready to use. This type of assignment is also available to customers that don’t use Azure AD PIM.
For the reviewer I select my own account.
Finally I can start the access review process by clicking on the Start button below.
The access review was created succesfully.
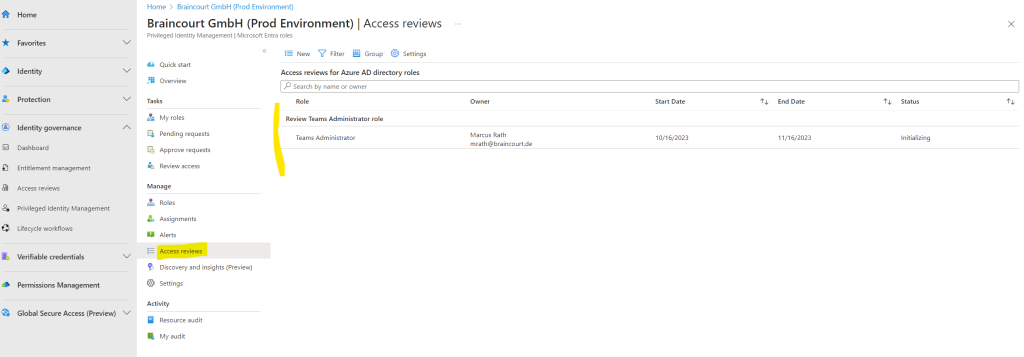
When clicking on the access review above, we can view or change the settings for.
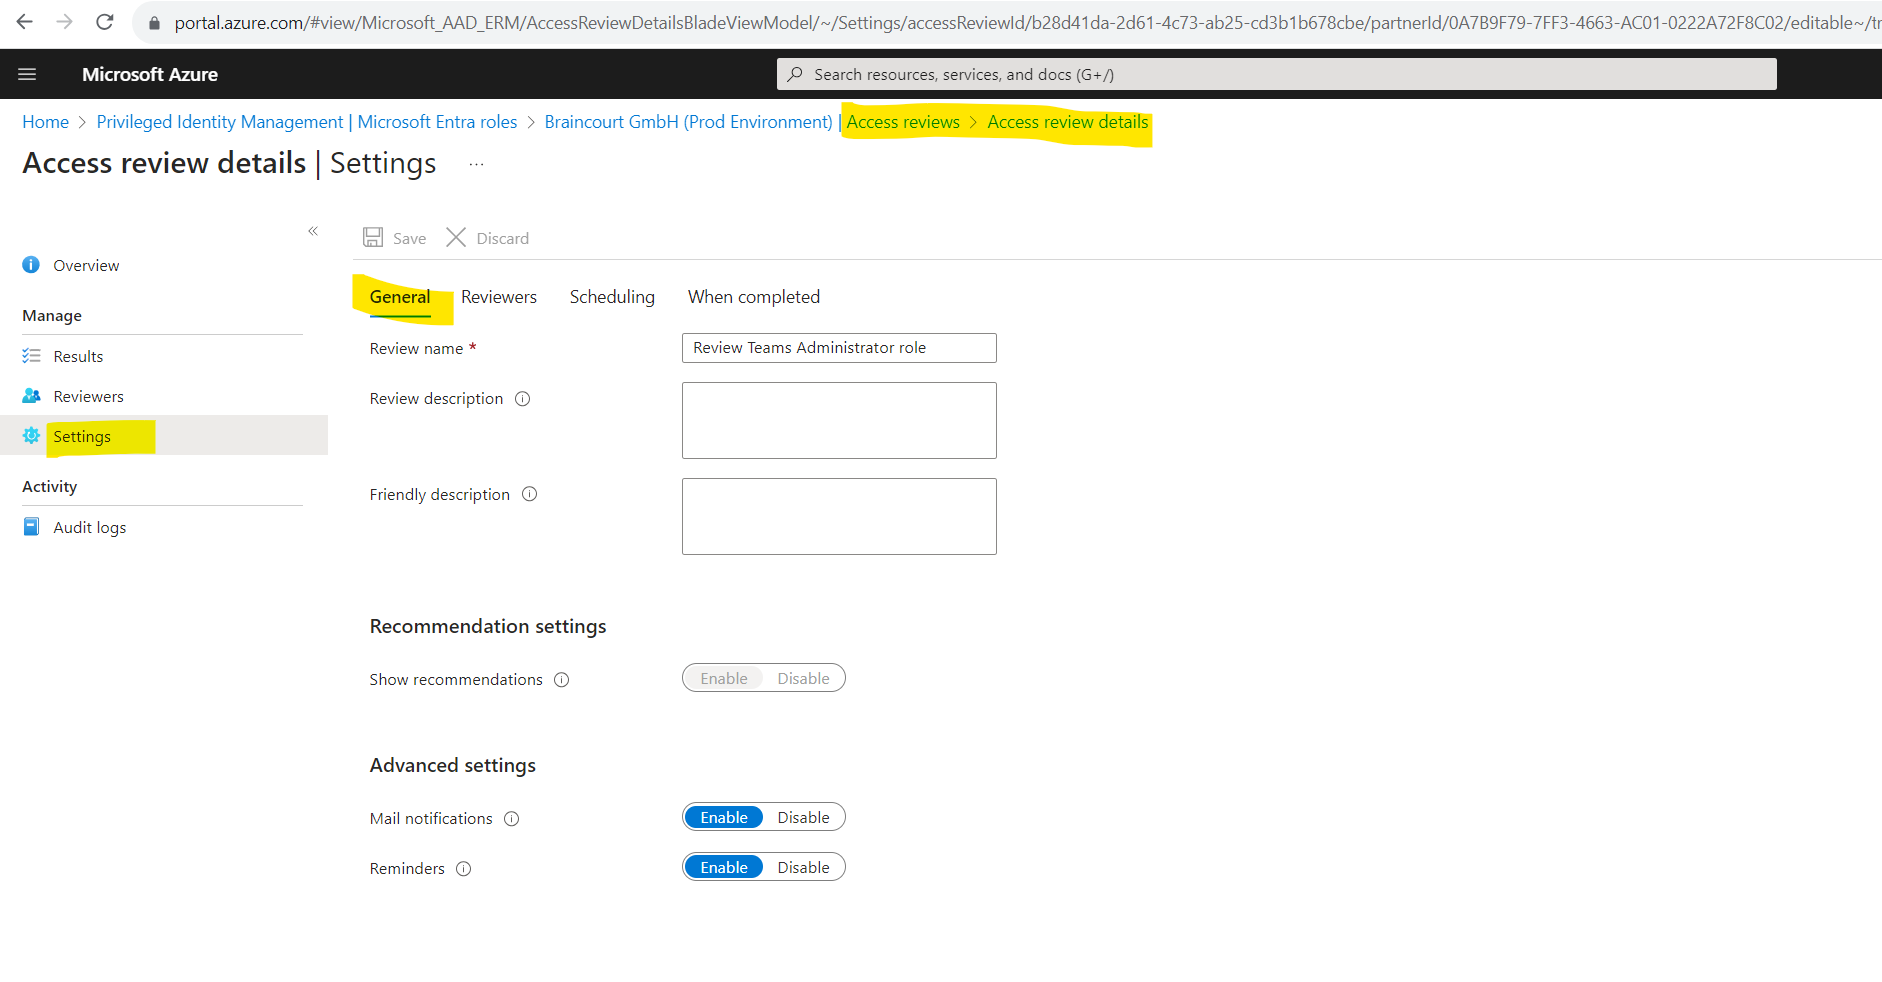
Because I set myself as reviewer for this access review, I was getting the following email right after the review was created in my inbox .
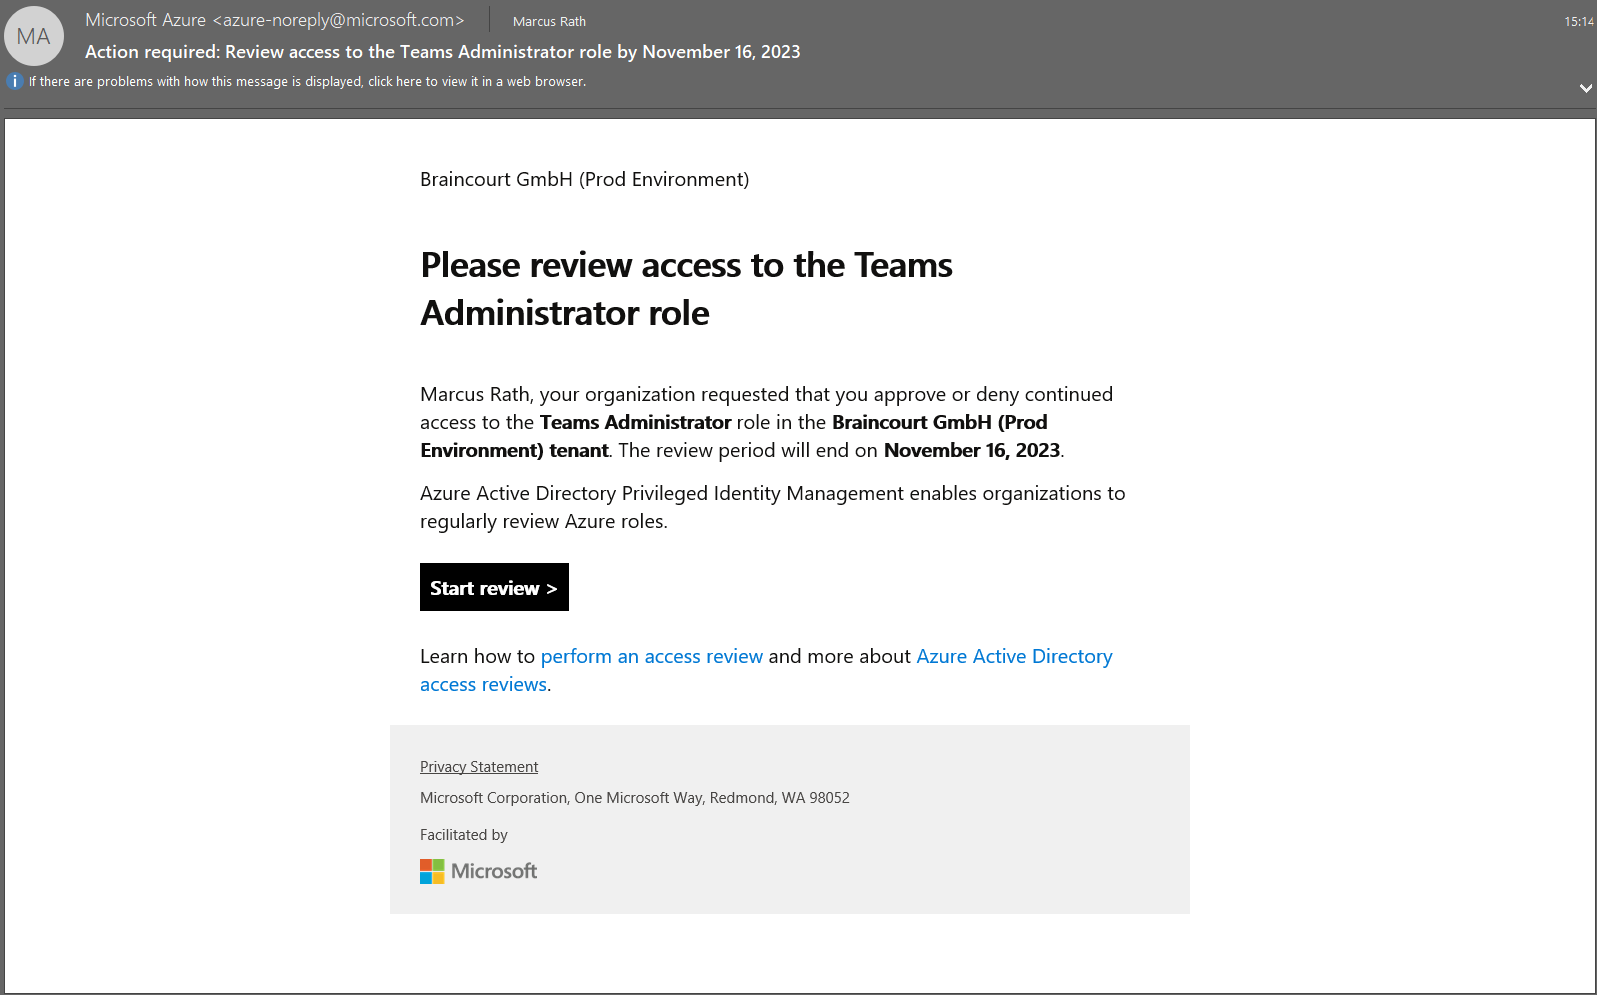
When I am clicking on the Start review button in this mail above, I will get forwarded to the following page in the Azure portal.
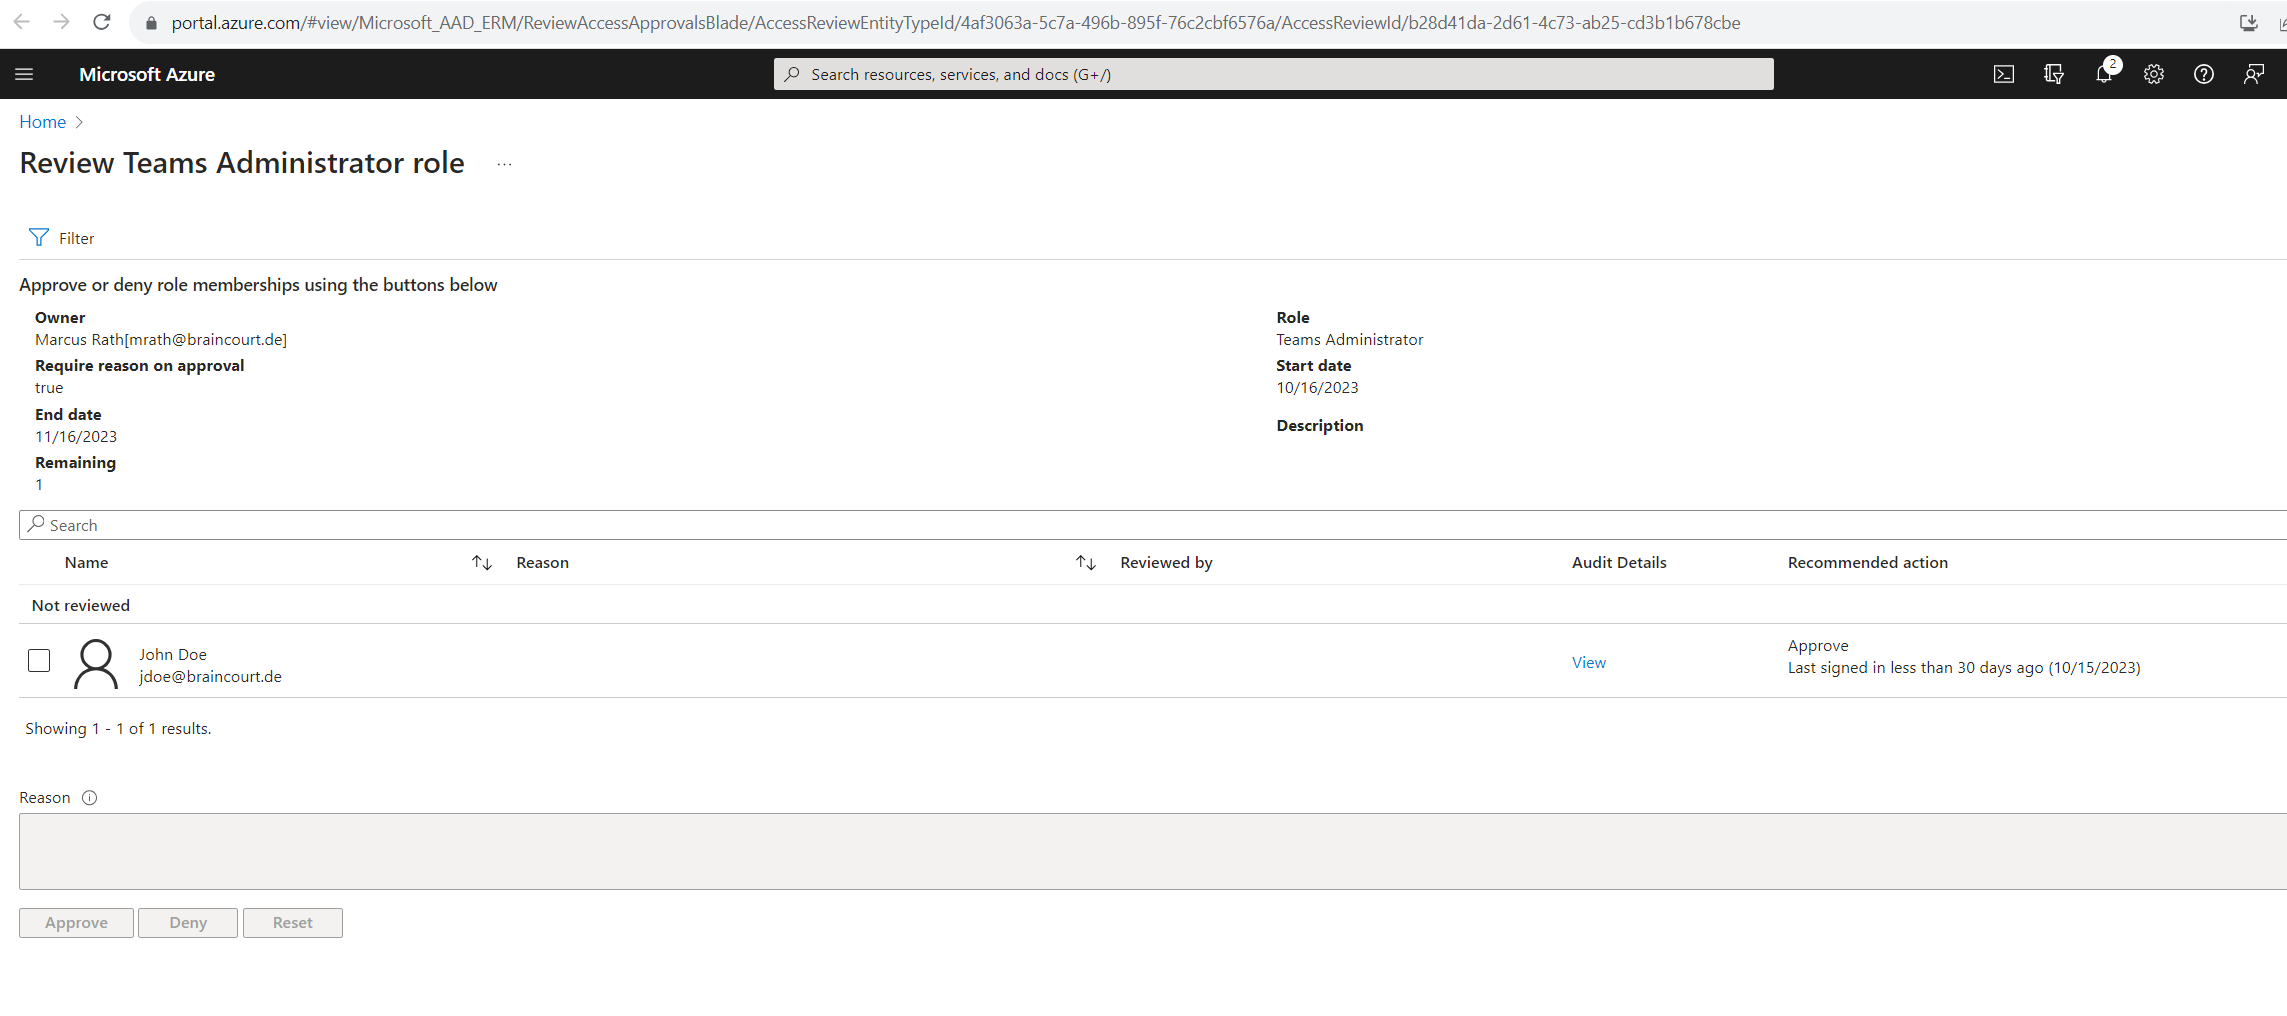
On this page I can either approve or deny the Teams Administrator role membership for John Doe. Here I will approve the role membership.
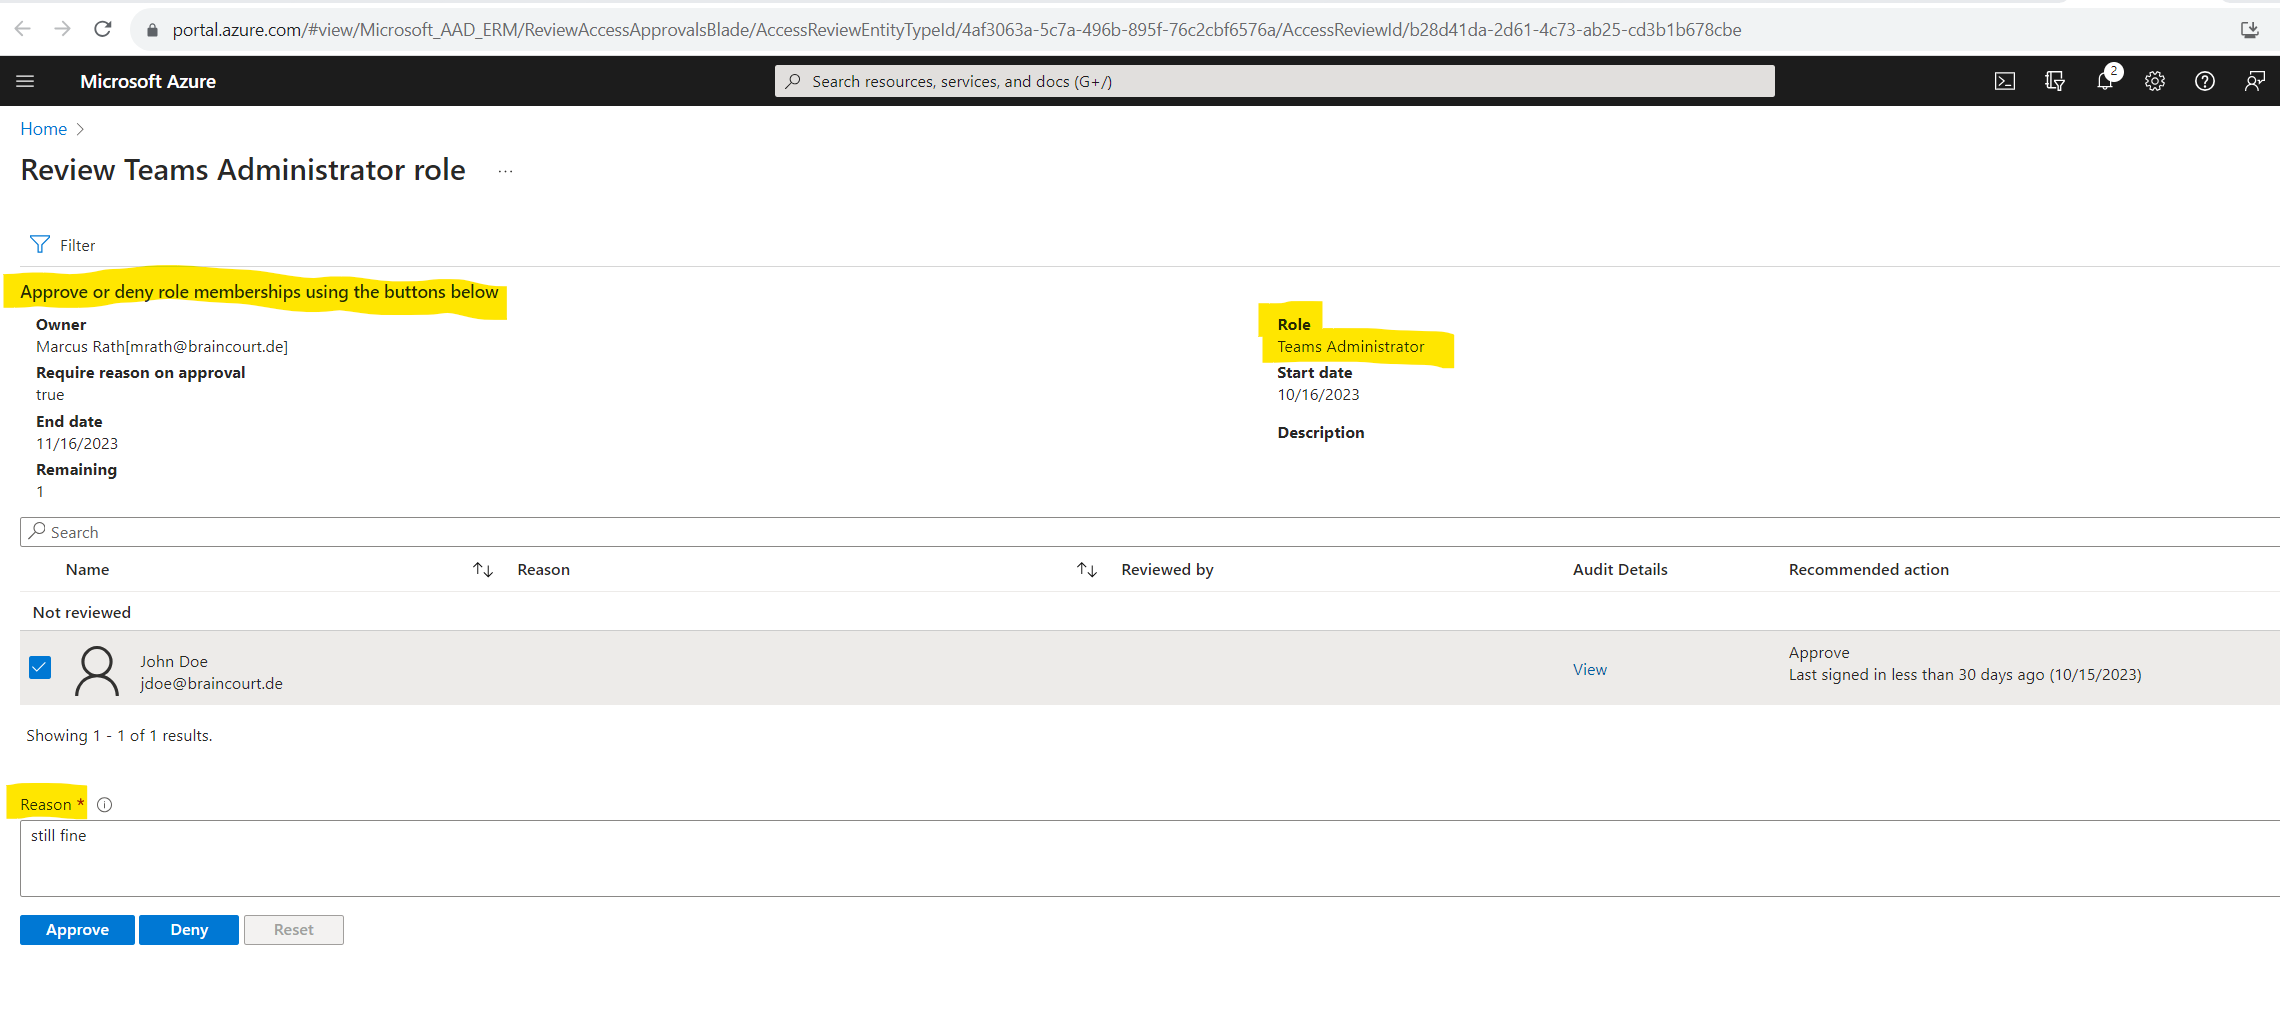
When you now go back to your access reviews in the Privileged Identity Management blade, you can click on your access review and here on results to see all results from like shown below.
About what Privileged Identity Management exactly is and how it works, you can read my post below.
Privileged Identity Management
Privileged Identity Management (PIM) is a service in Microsoft Entra ID.
In a nutshell, Privileged Identity Management provides time-based and approval-based role activation to mitigate the risks of excessive, unnecessary, or misused access permissions on resources that you care about.
More about you will find in my following post.
Lifecycle workflows
Lifecycle workflows are a new identity governance feature that enables organizations to manage Microsoft Entra users by automating these three basic lifecycle processes:
- Joiner: When an individual enters the scope of needing access. An example is a new employee joining a company or organization.
- Mover: When an individual moves between boundaries within an organization. This movement might require more access or authorization. An example is a user who was in marketing and is now a member of the sales organization.
- Leaver: When an individual leaves the scope of needing access. This movement might require the removal of access. Examples are an employee who’s retiring or an employee who’s terminated.
Workflows contain specific processes that run automatically against users as they move through their lifecycle. Workflows consist of tasks and execution conditions.
Using this feature requires Microsoft Entra ID Governance licenses. To find the right license for your requirements, see Microsoft Entra ID Governance licensing fundamentals.
Source: https://learn.microsoft.com/en-us/azure/active-directory/governance/what-are-lifecycle-workflows
Below you will have two great videos about Lifecycle workflows which will explain it in detail.
Automate onboarding & offboarding tasks with Microsoft Entra | Identity Lifecycle Management
https://www.youtube.com/watch?v=BGE5FUHd-UcAzure AD Lifecycle Workflows
https://www.youtube.com/watch?v=wjcw7hRrMDM
To demonstrate Access Reviews I will go through all separate steps below in detail.
In order to create a new lifecycle workflow in the Microsoft Entra admin center you can use one of the prebuilt workflow templates as shown blow.
To create a workflow based on a template:
Sign in to the Microsoft Entra admin center as at least a Lifecycle Workflows Administrator.
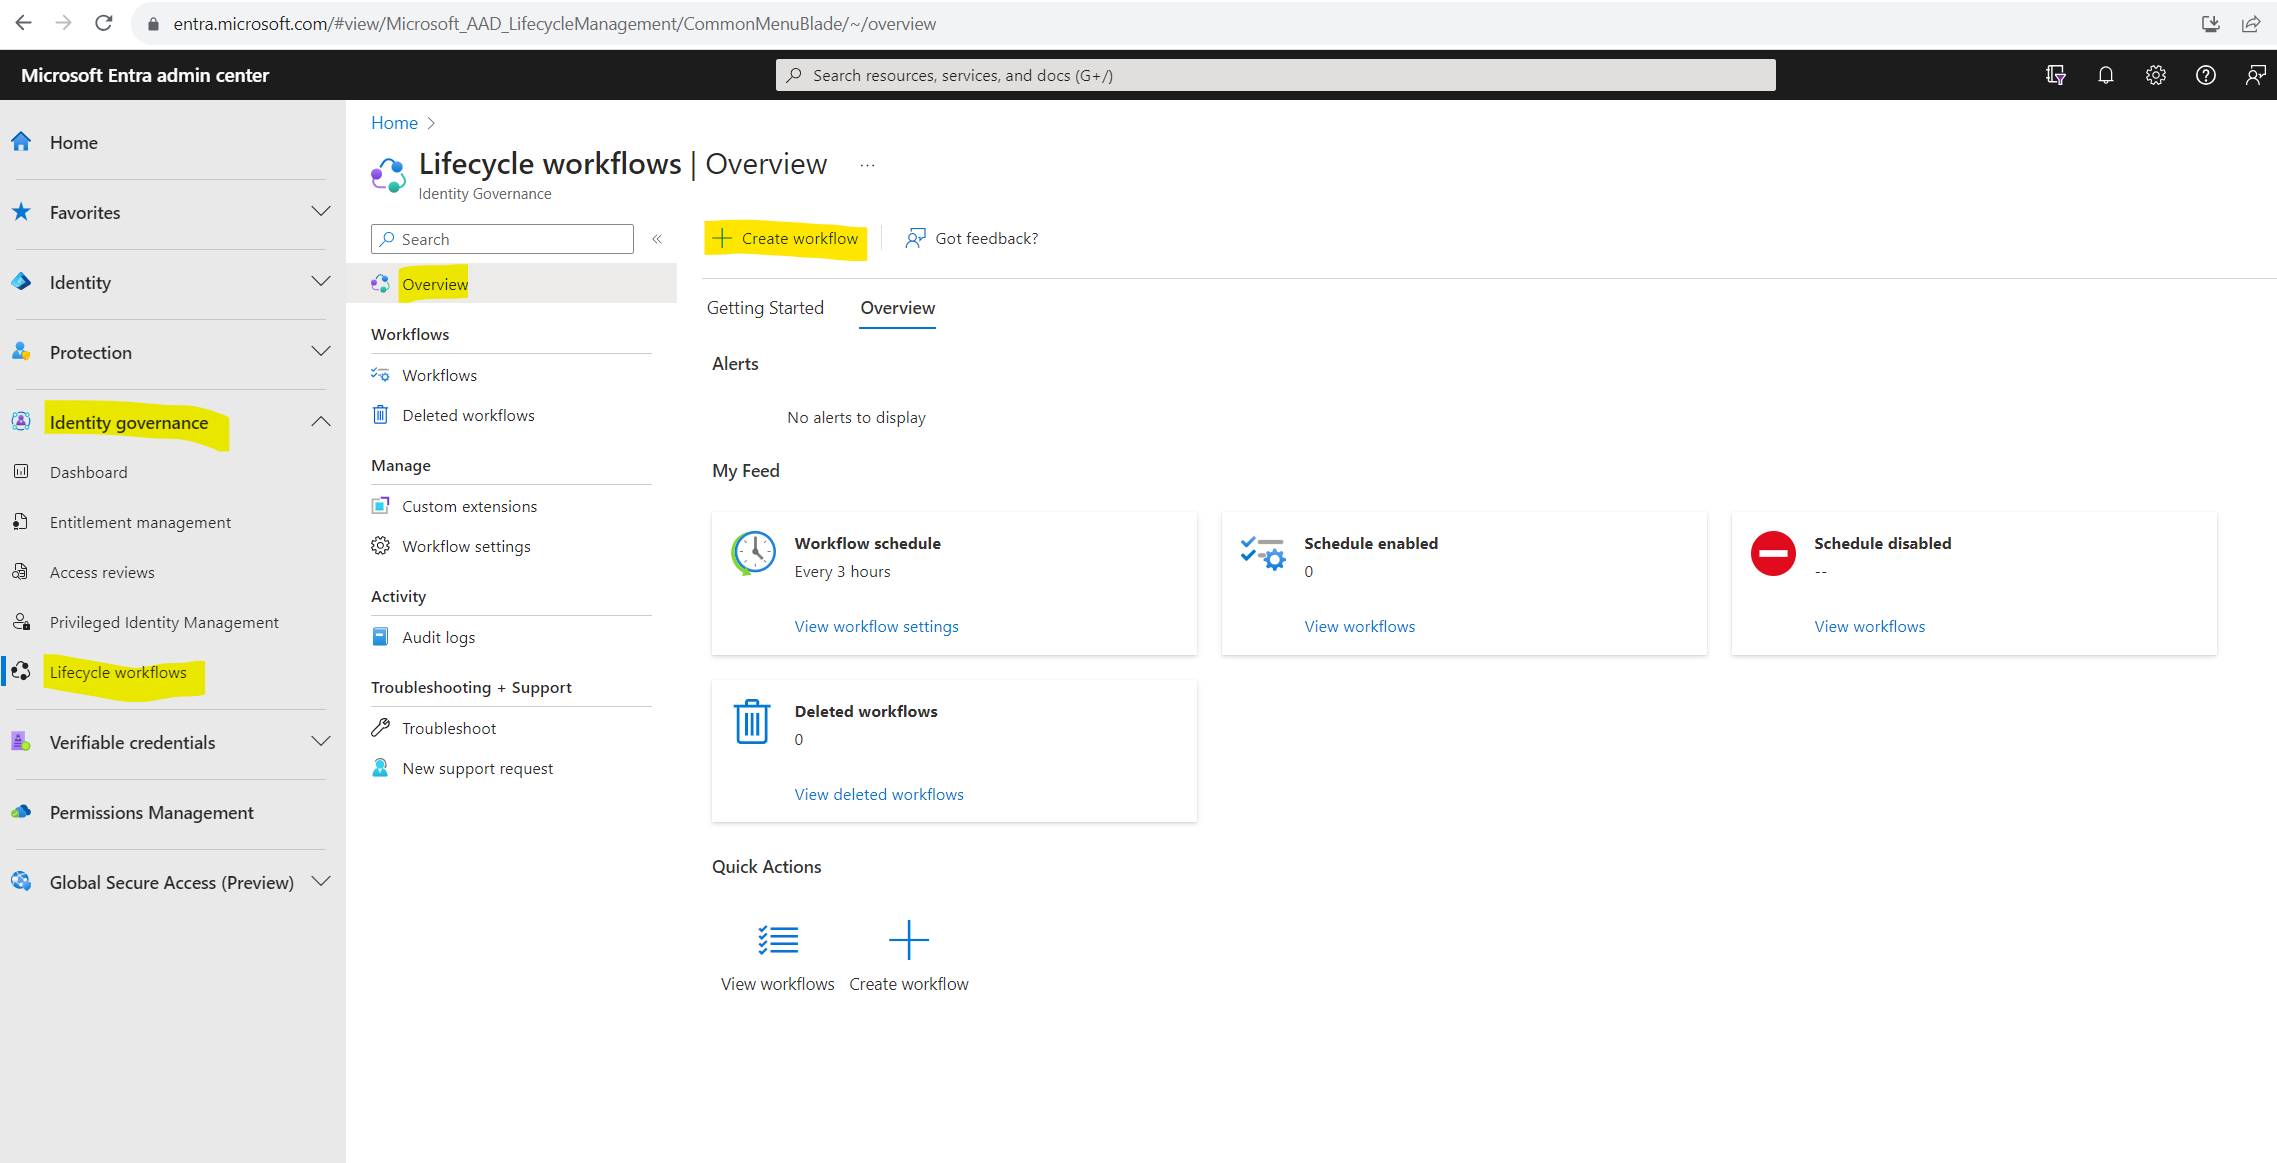
Browse to Identity governance > Lifecycle workflows > Create a workflow
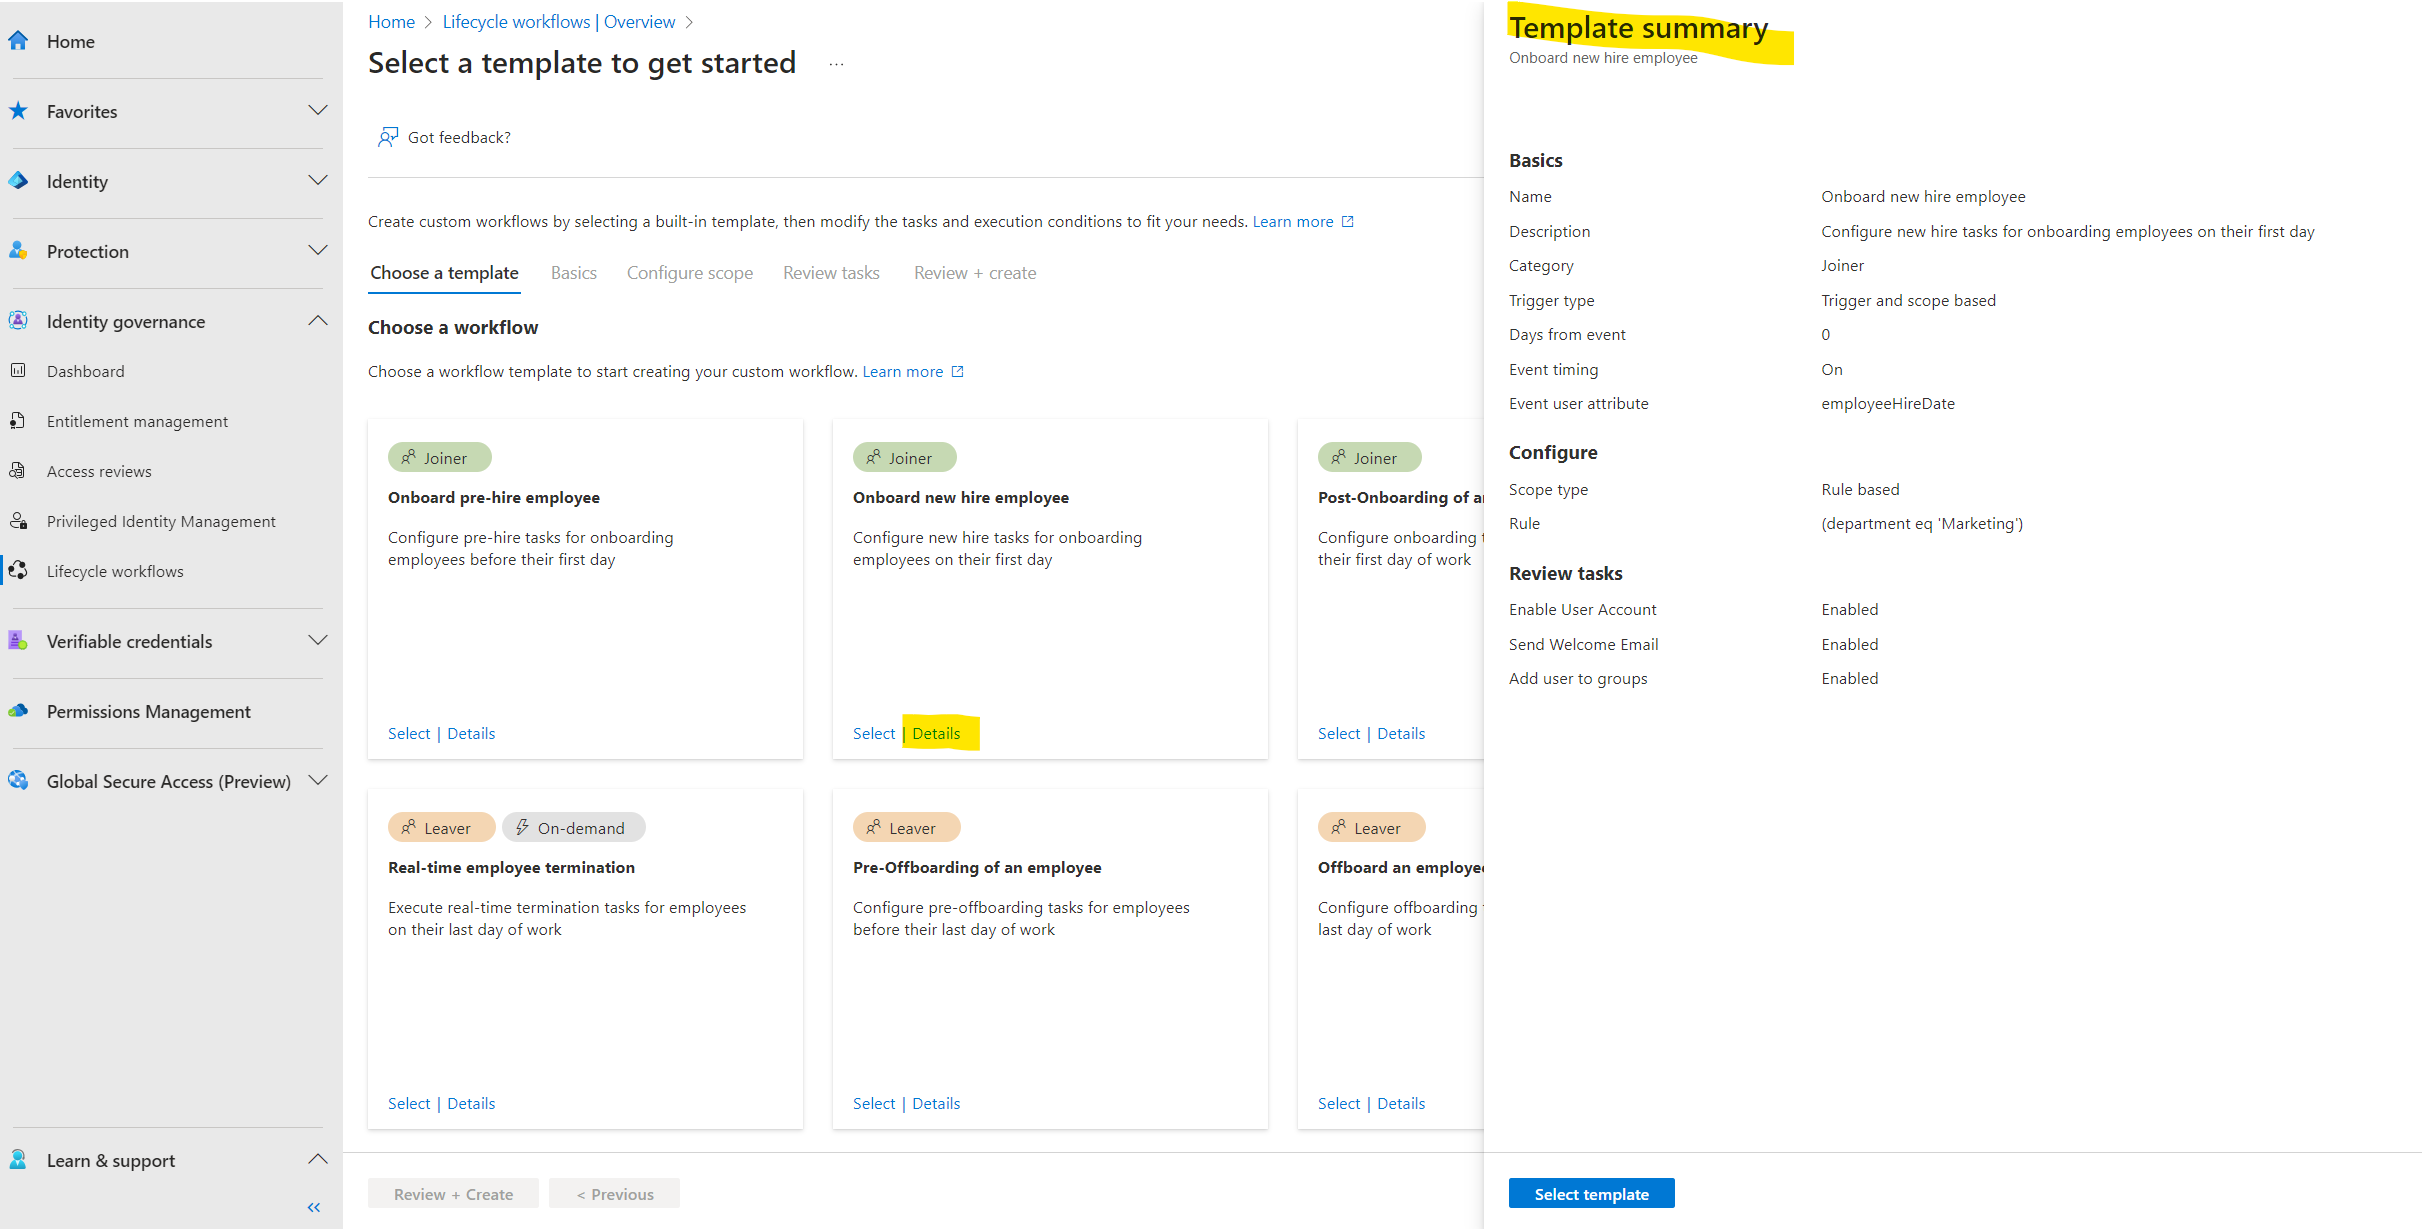
On the Choose a workflow page, select the workflow template that you want to use.
To demonstrate lifecycle workflows I will select here the Onboard new hire employee.
Here you can configure new hire tasks for onboarding employees on their first day

To get more information about what you can configure with this template you can click on the Details link from each template.
After selecting my Onboard new hire employee template I will get navigated to the Basics tab to modify this template according my requirements.
Workflow basics
https://learn.microsoft.com/en-us/azure/active-directory/governance/understanding-lifecycle-workflows#workflow-basics
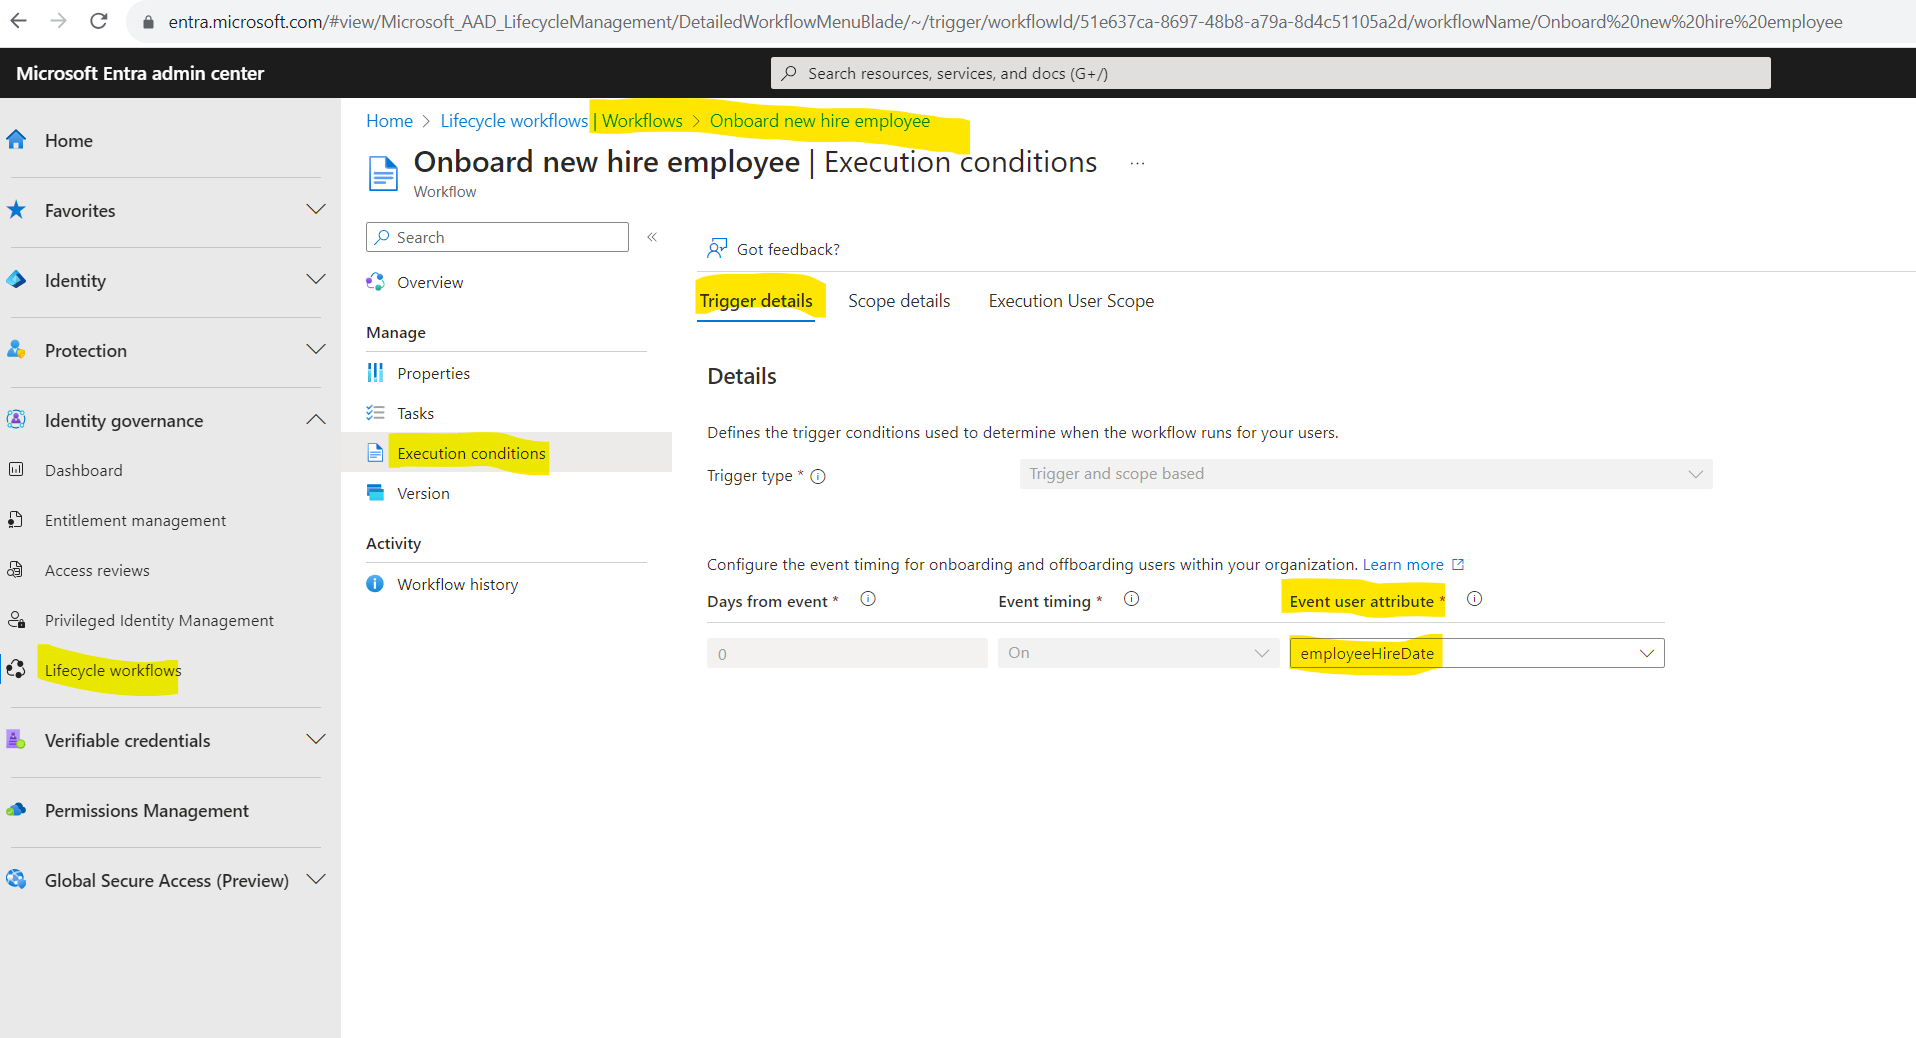
For the trigger event I will select here employeeHireDate.
Because this workflow will trigger tasks they should run on the employees first day, the offset with Days from event is greyed out. The Event timing defines the timing of the offset and is therefore also greyed out.

The trigger of a workflow defines when a scheduled workflow runs for users in scope for the workflow. The trigger is a combination of a time-based attribute, and an offset value. For example, if the attribute is employeeHireDate and offsetInDays is -1, then the workflow should trigger one day before the employee hire date. The value can range between -180 and 180 days.
The time-based attribute can be either one of two values, which are automatically chosen based on the template in which you select during the creation of your workflow. The three values can be:
employeeHireDate: If the template is a joiner workflow
createdDateTime: if the template is a joiner workflow designed to run either on hire or post onboarding
employeeLeaveDateTime: If the template is a leaver workflow
The scope on the next tab shown below defines for who the scheduled workflow runs. Configuring this parameter allows you to further narrow down the users for whom the workflow is to be executed.
In order to demonstrate the lifecycle workflows I will use here my lab user John Doe and therefore filter within the rule for users which givenName attribute in Microsoft Entra ID (formerly Azure AD) is equal John.
You can use the Microsoft Graph PowerShell SDK to determine and check the values for listed attributes you want to use for the scope.
Unfortunately the Microsoft Graph SDK commands like Get-MgUser or Get-MgDevice will not return by default all values for given attributes, therefore you have to explicitly specify each of them in the -Property flag as shown below.
Get-MgUser -Filter "givenName eq 'John'" -Property DisplayName, GivenName, Surname, UserPrincipalName, EmployeeHireDate | Fl DisplayName, GivenName, Surname, UserPrincipalName, EmployeeHireDate
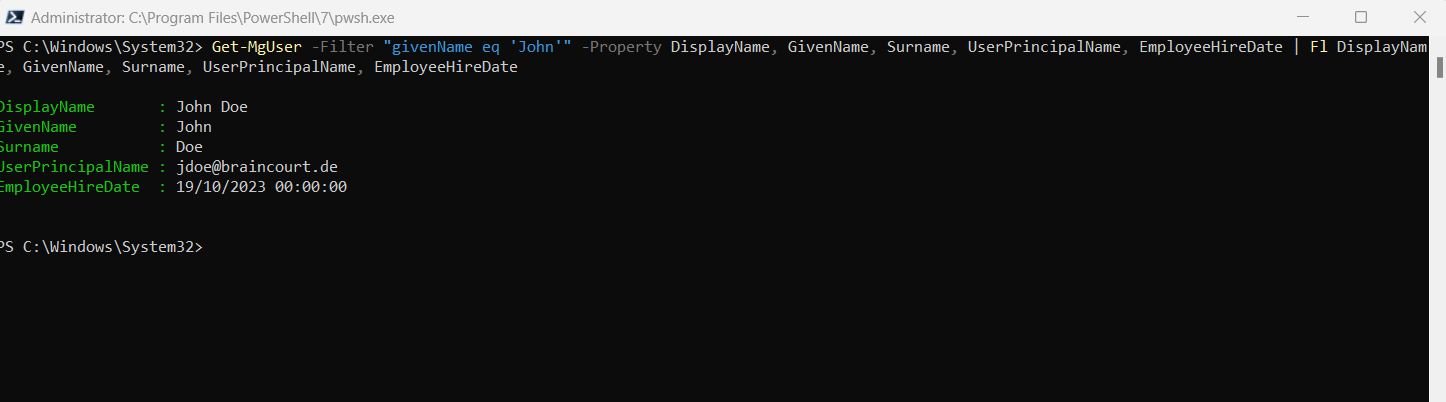
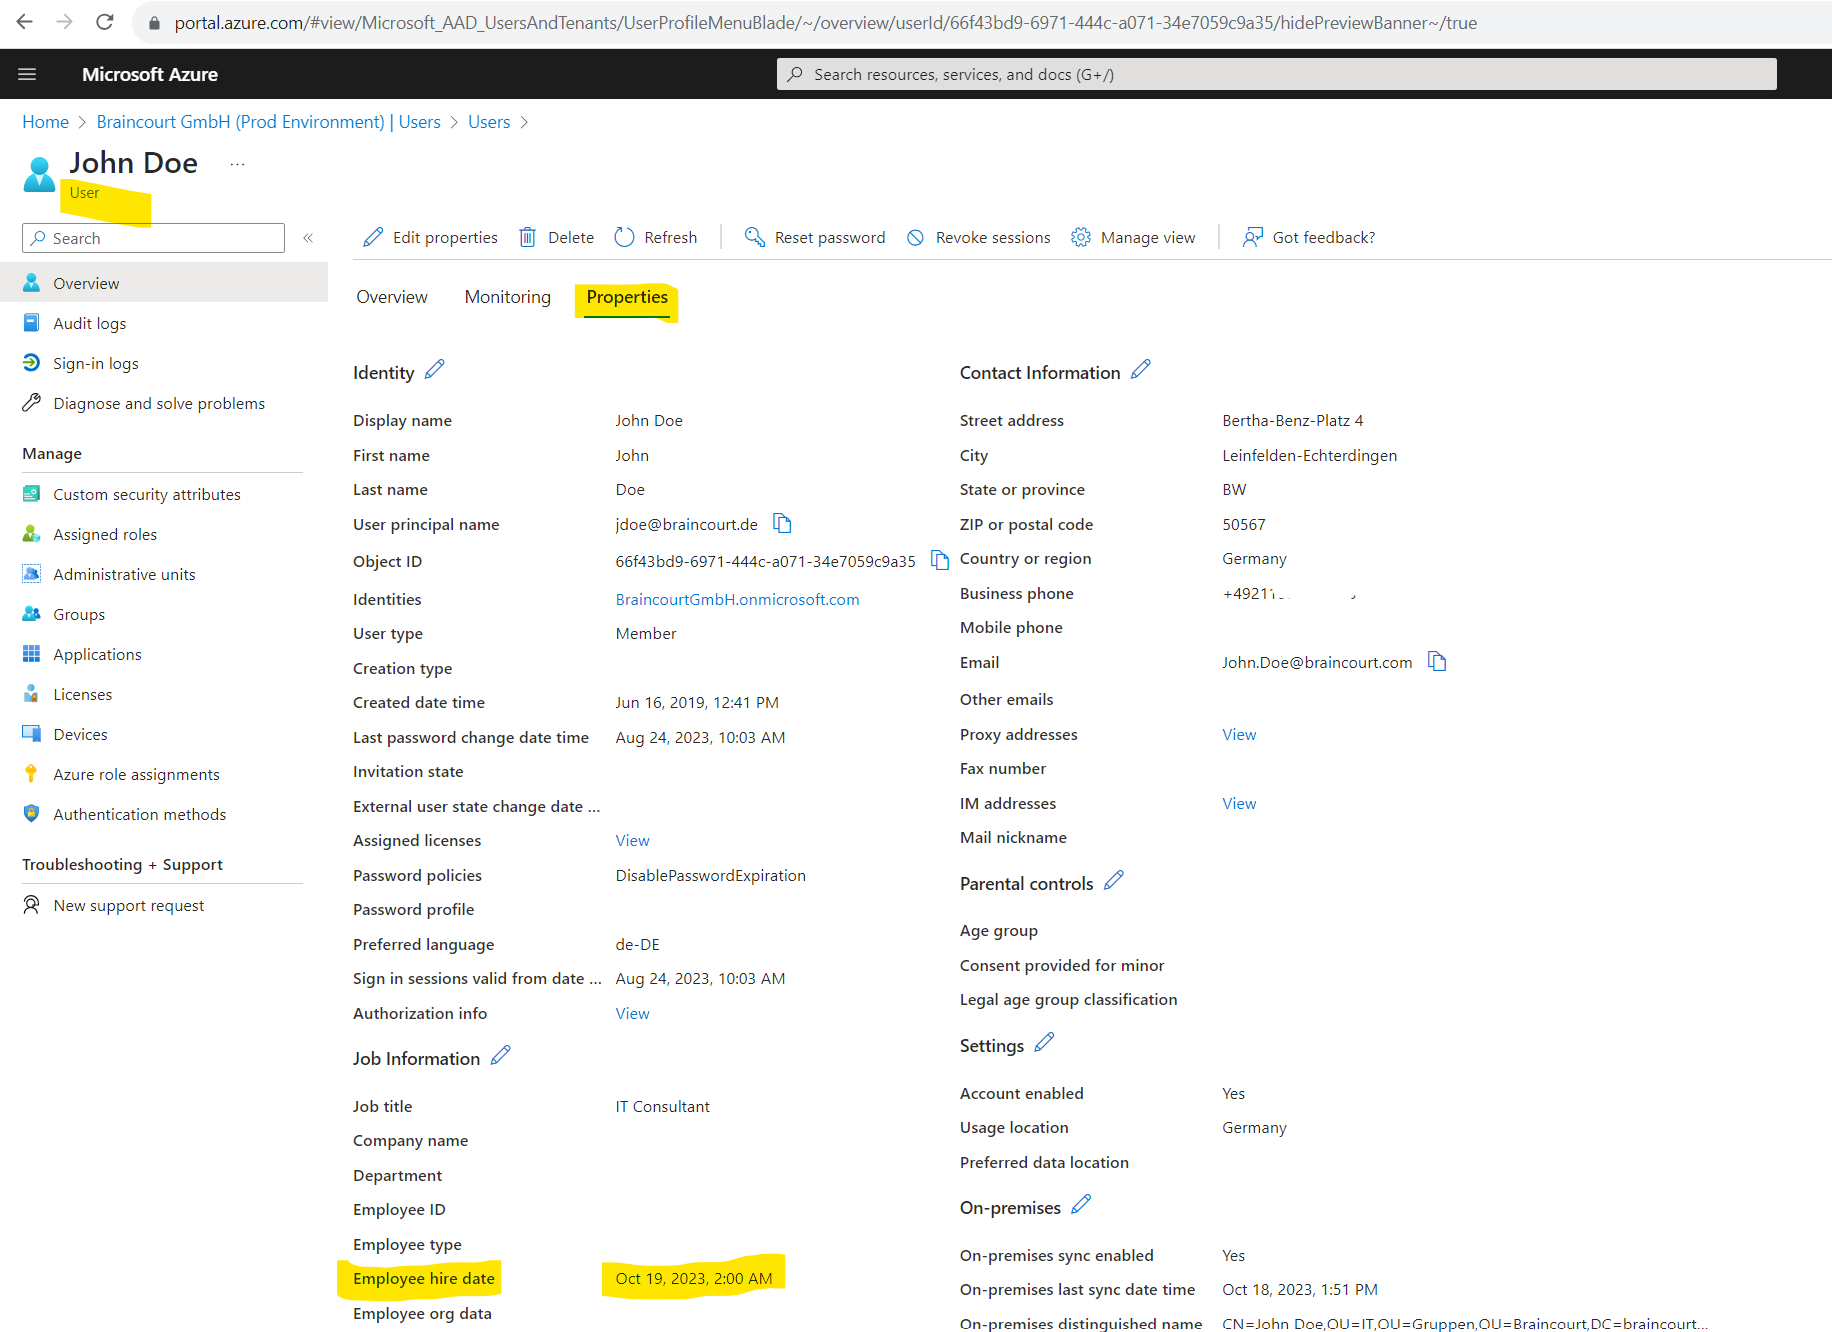
Also keep note of the time portion you set for the employees hire date in Microsoft Entra ID! Above for John Doe you can see I was set 00:00:00 UTC.
The time portion of the attribute must be set accordingly, for example the employeeHireDate should have a time at the beginning of the day like 1AM or 5AM and the employeeLeaveDateTime should have time at the end of the day like 9PM or 11PM.
The Workflows won’t run earlier than the time specified in the attribute, however the tenant schedule (default 3h) may delay the workflow run. For instance, if you set the employeeHireDate to 8AM but the tenant schedule doesn’t run until 9AM, the workflow won’t be processed until then. If a new hire is starting at 8AM, you would want to set the time to something like (start time – tenant schedule) to ensure it runs before the employee arrives.

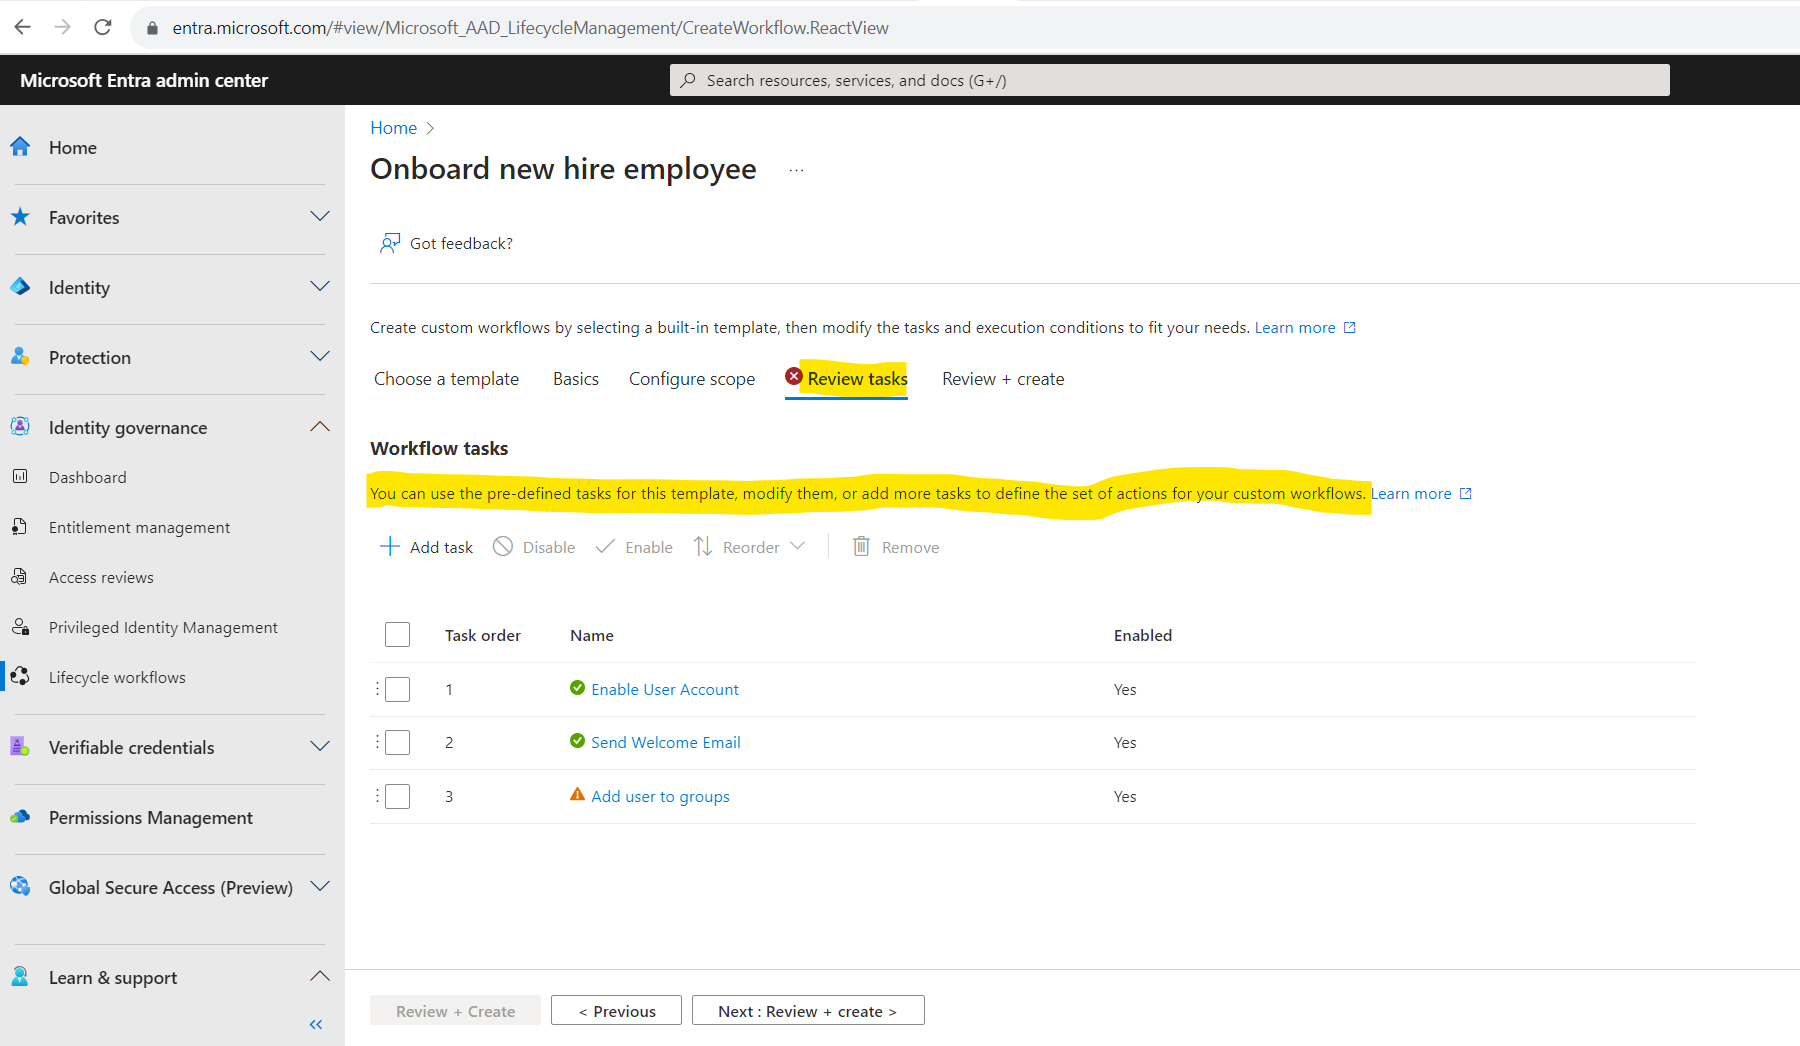
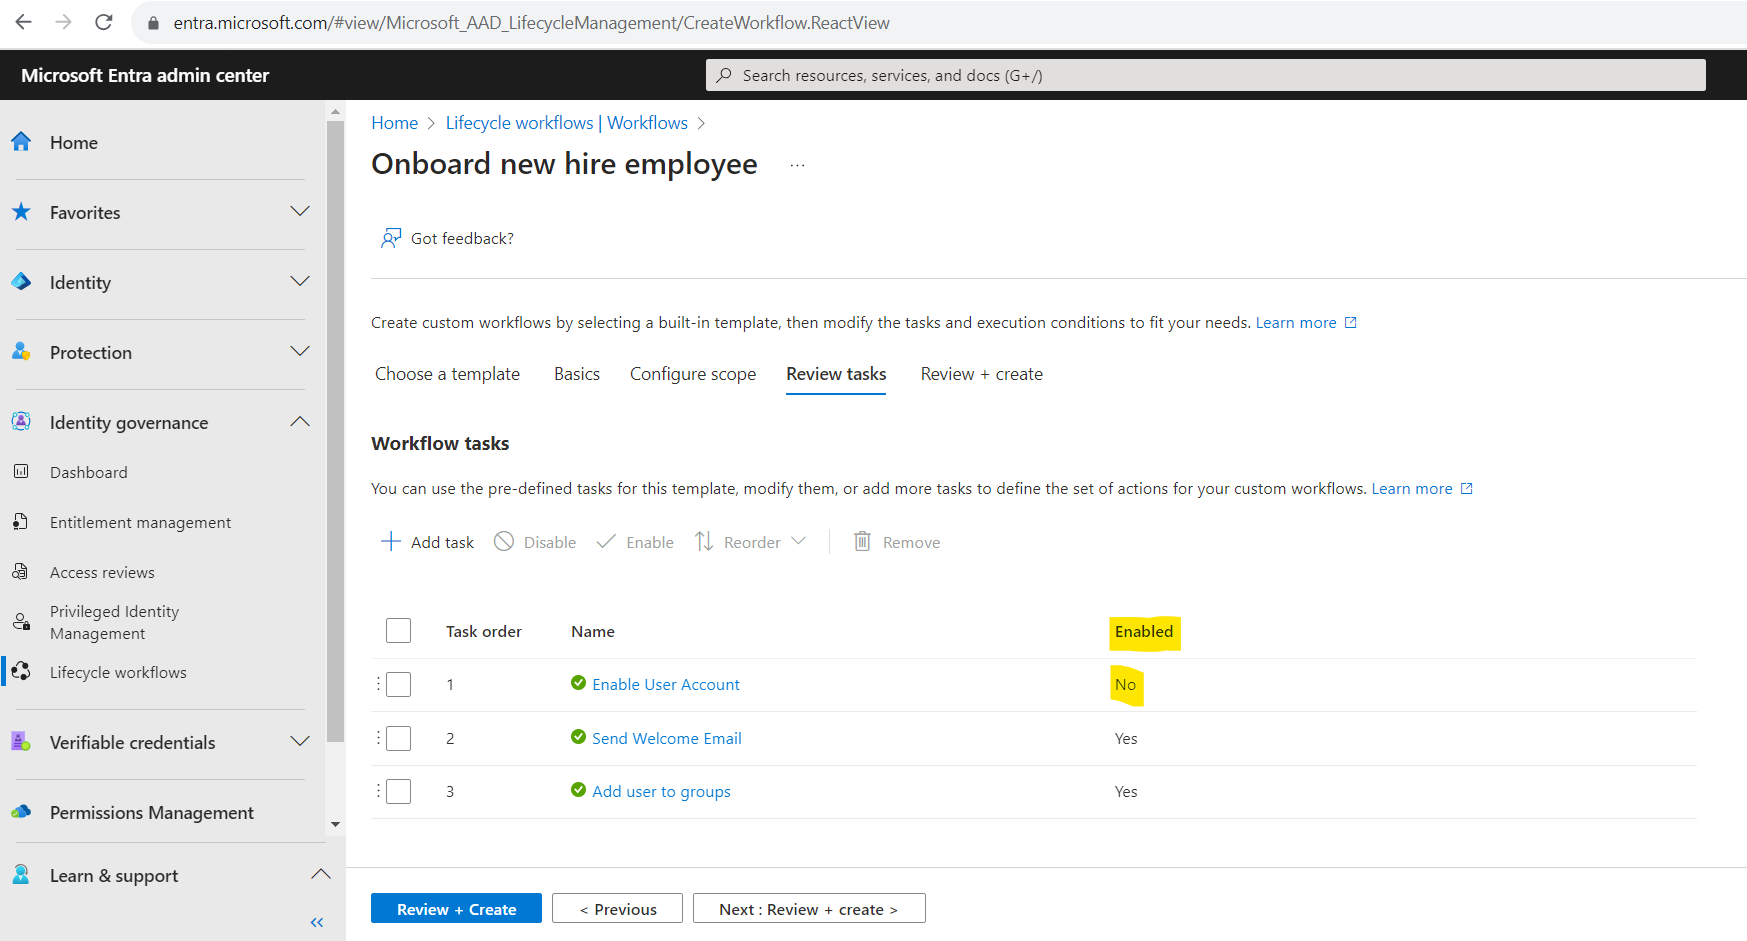
In the next Review tasks tab we can specify which tasks should be performed when the workflow is triggered. For each workflow template you have several built-in tasks by default you can configure.
Lifecycle Workflow built-in tasks
https://learn.microsoft.com/en-us/azure/active-directory/governance/lifecycle-workflow-tasks
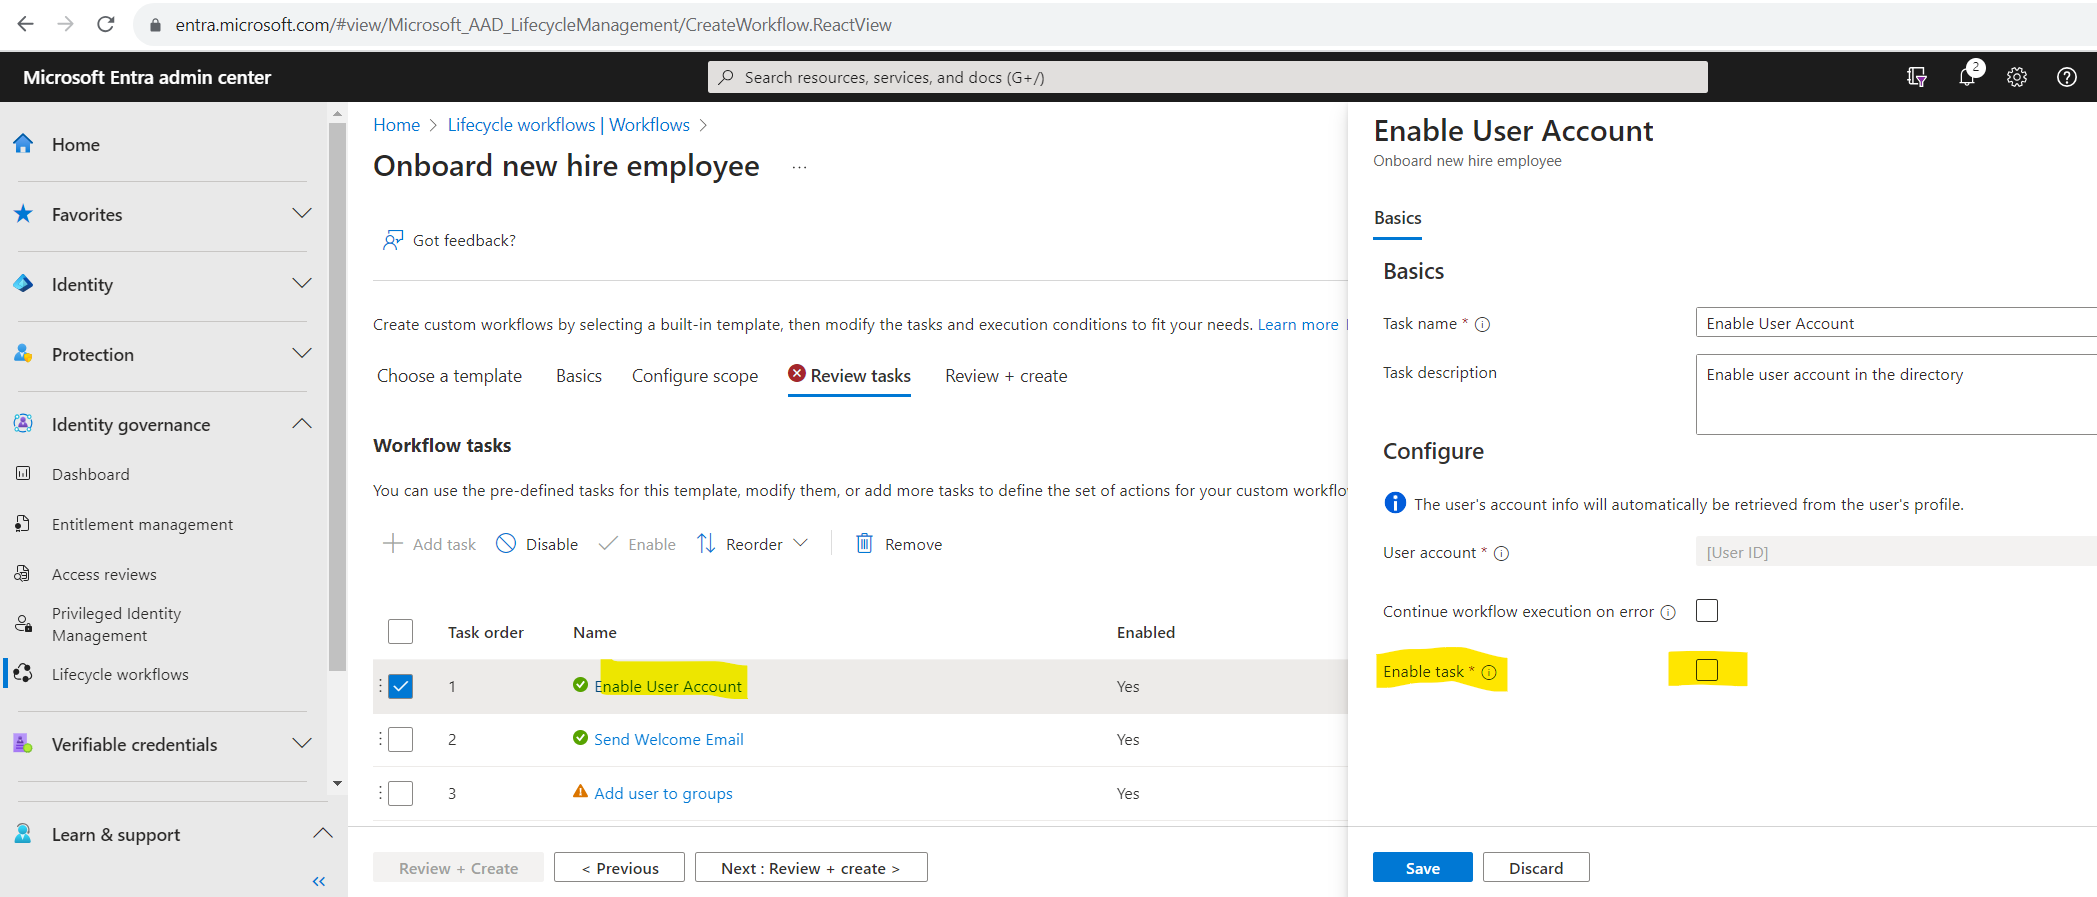
I will first disable the task Enable User Account because I will sync on-premise users to Micrsoft Entra ID (formerly Azure AD). This task works just for cloud-only user accounts.
Allows cloud-only user accounts to be enabled. Users with Microsoft Entra role assignments aren’t supported, nor are users with membership or ownership of role-assignable groups. You can utilize Microsoft Entra ID’s HR driven provisioning to on-premises Active Directory to disable and enable synchronized accounts with an attribute mapping to
accountDisabledbased on data from your HR source. For more information, see: Workday Configure attribute mappings and SuccessFactors Configure attribute mappings. You’re able to customize the task name and description for this task in the Microsoft Entra admin center.
For the task Send Welcome Email I will also add my own user to the CC recipients.

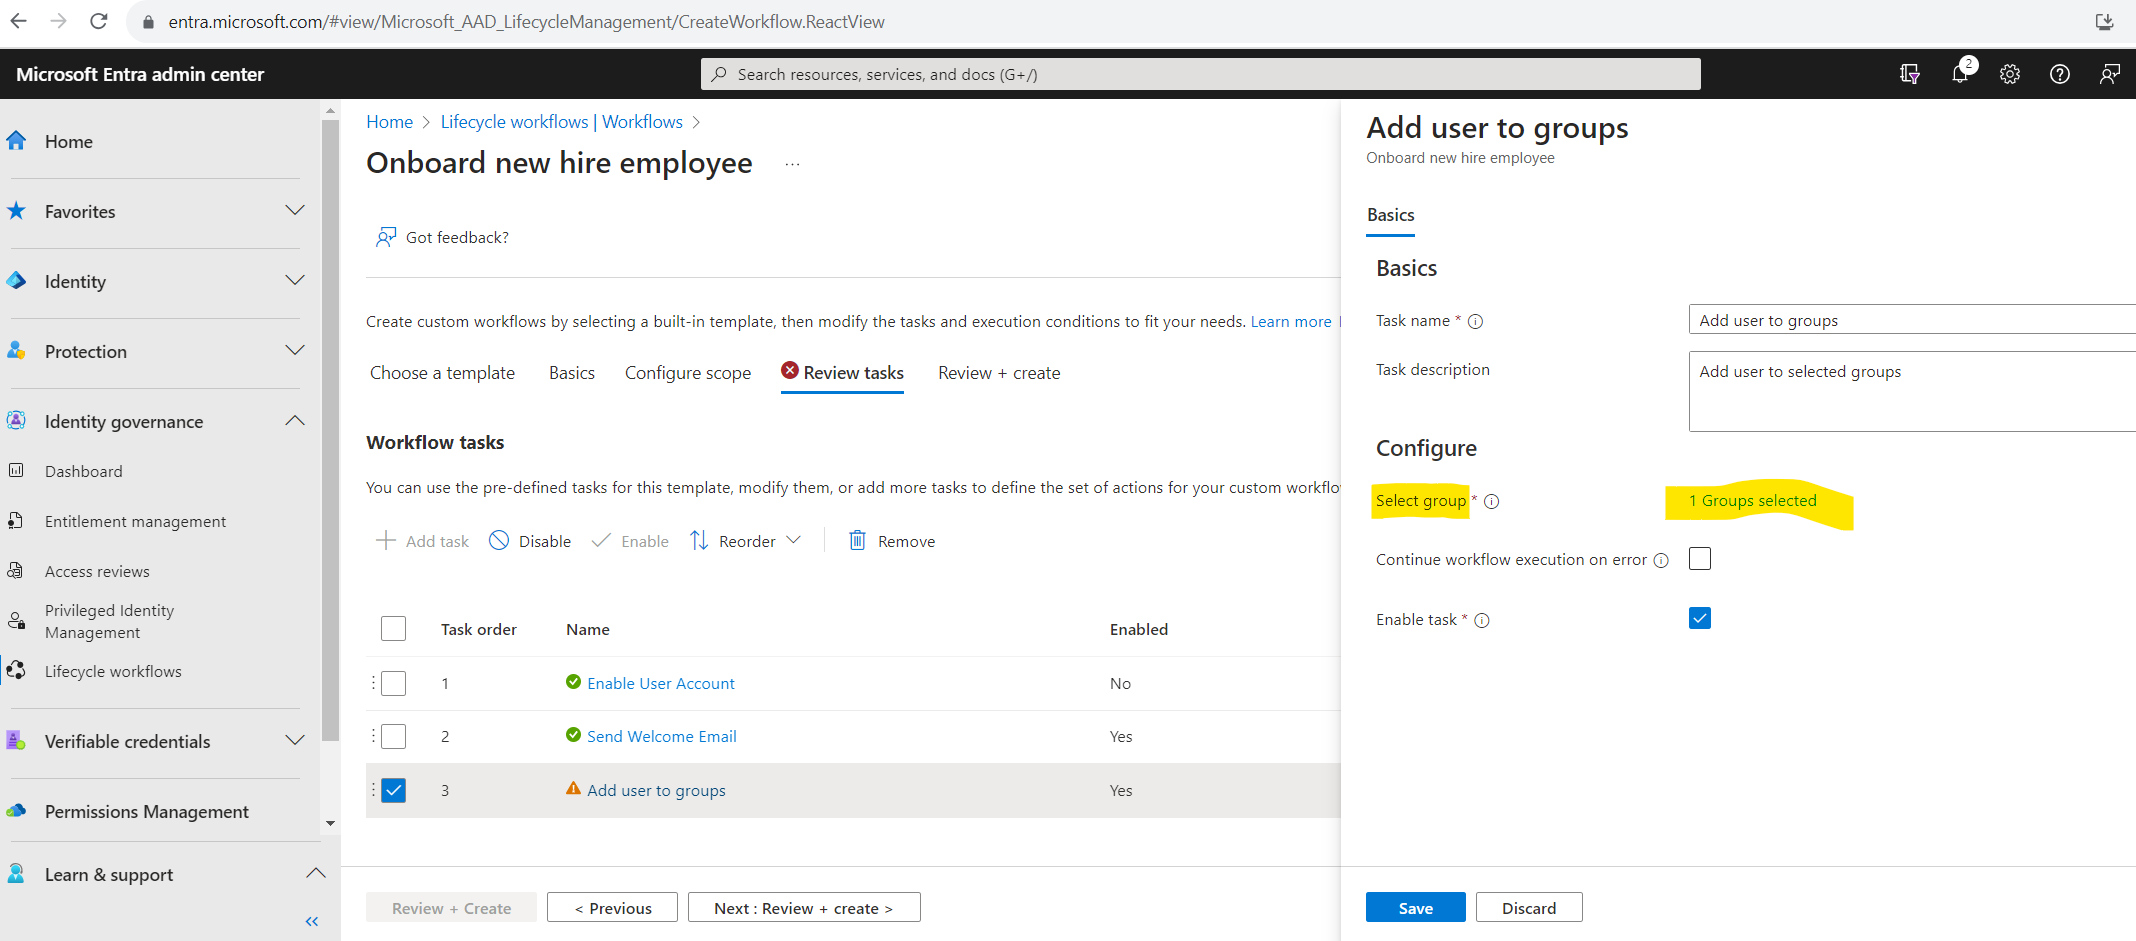
Finally I will also add the new user to a MS365 Group named Testing M365 Group Entitlement Management.
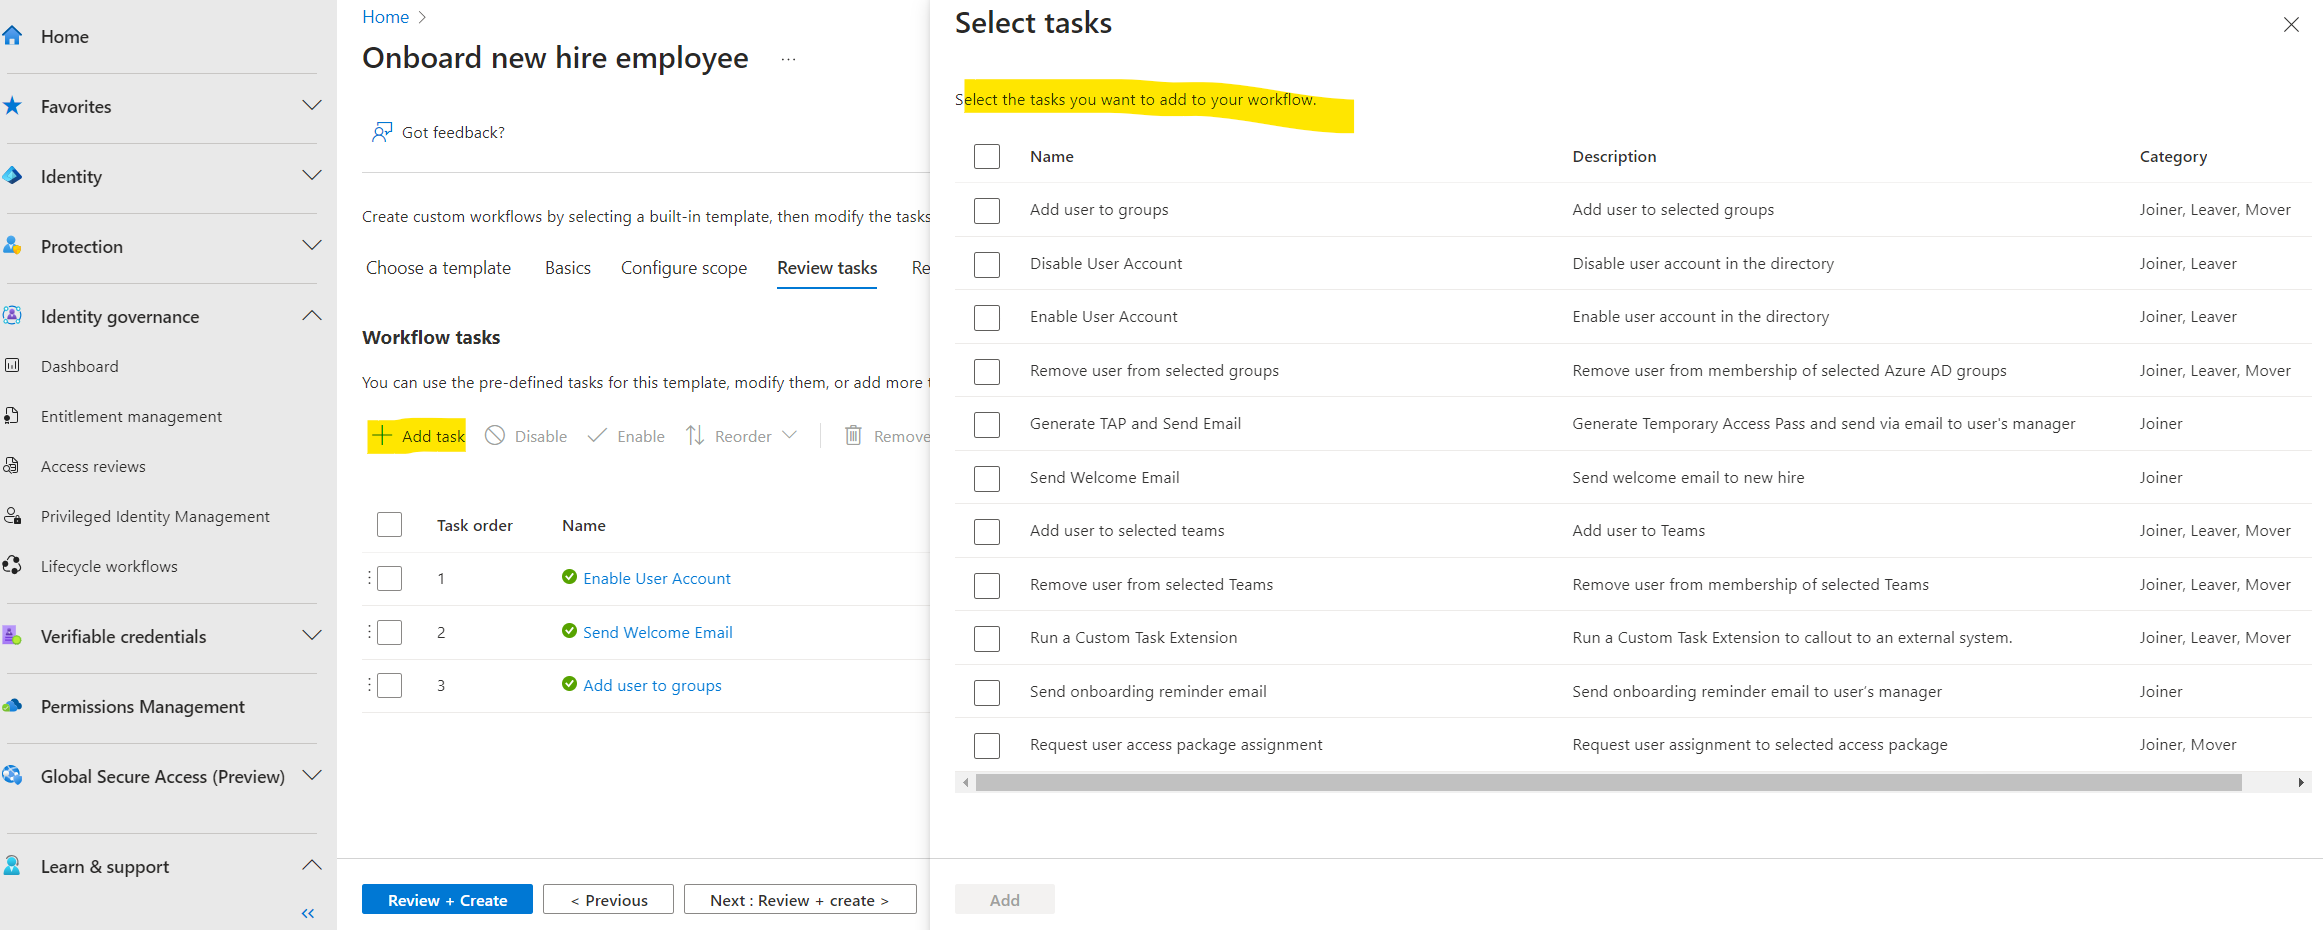
You can also add further tasks if needed by clicking here on Add task.
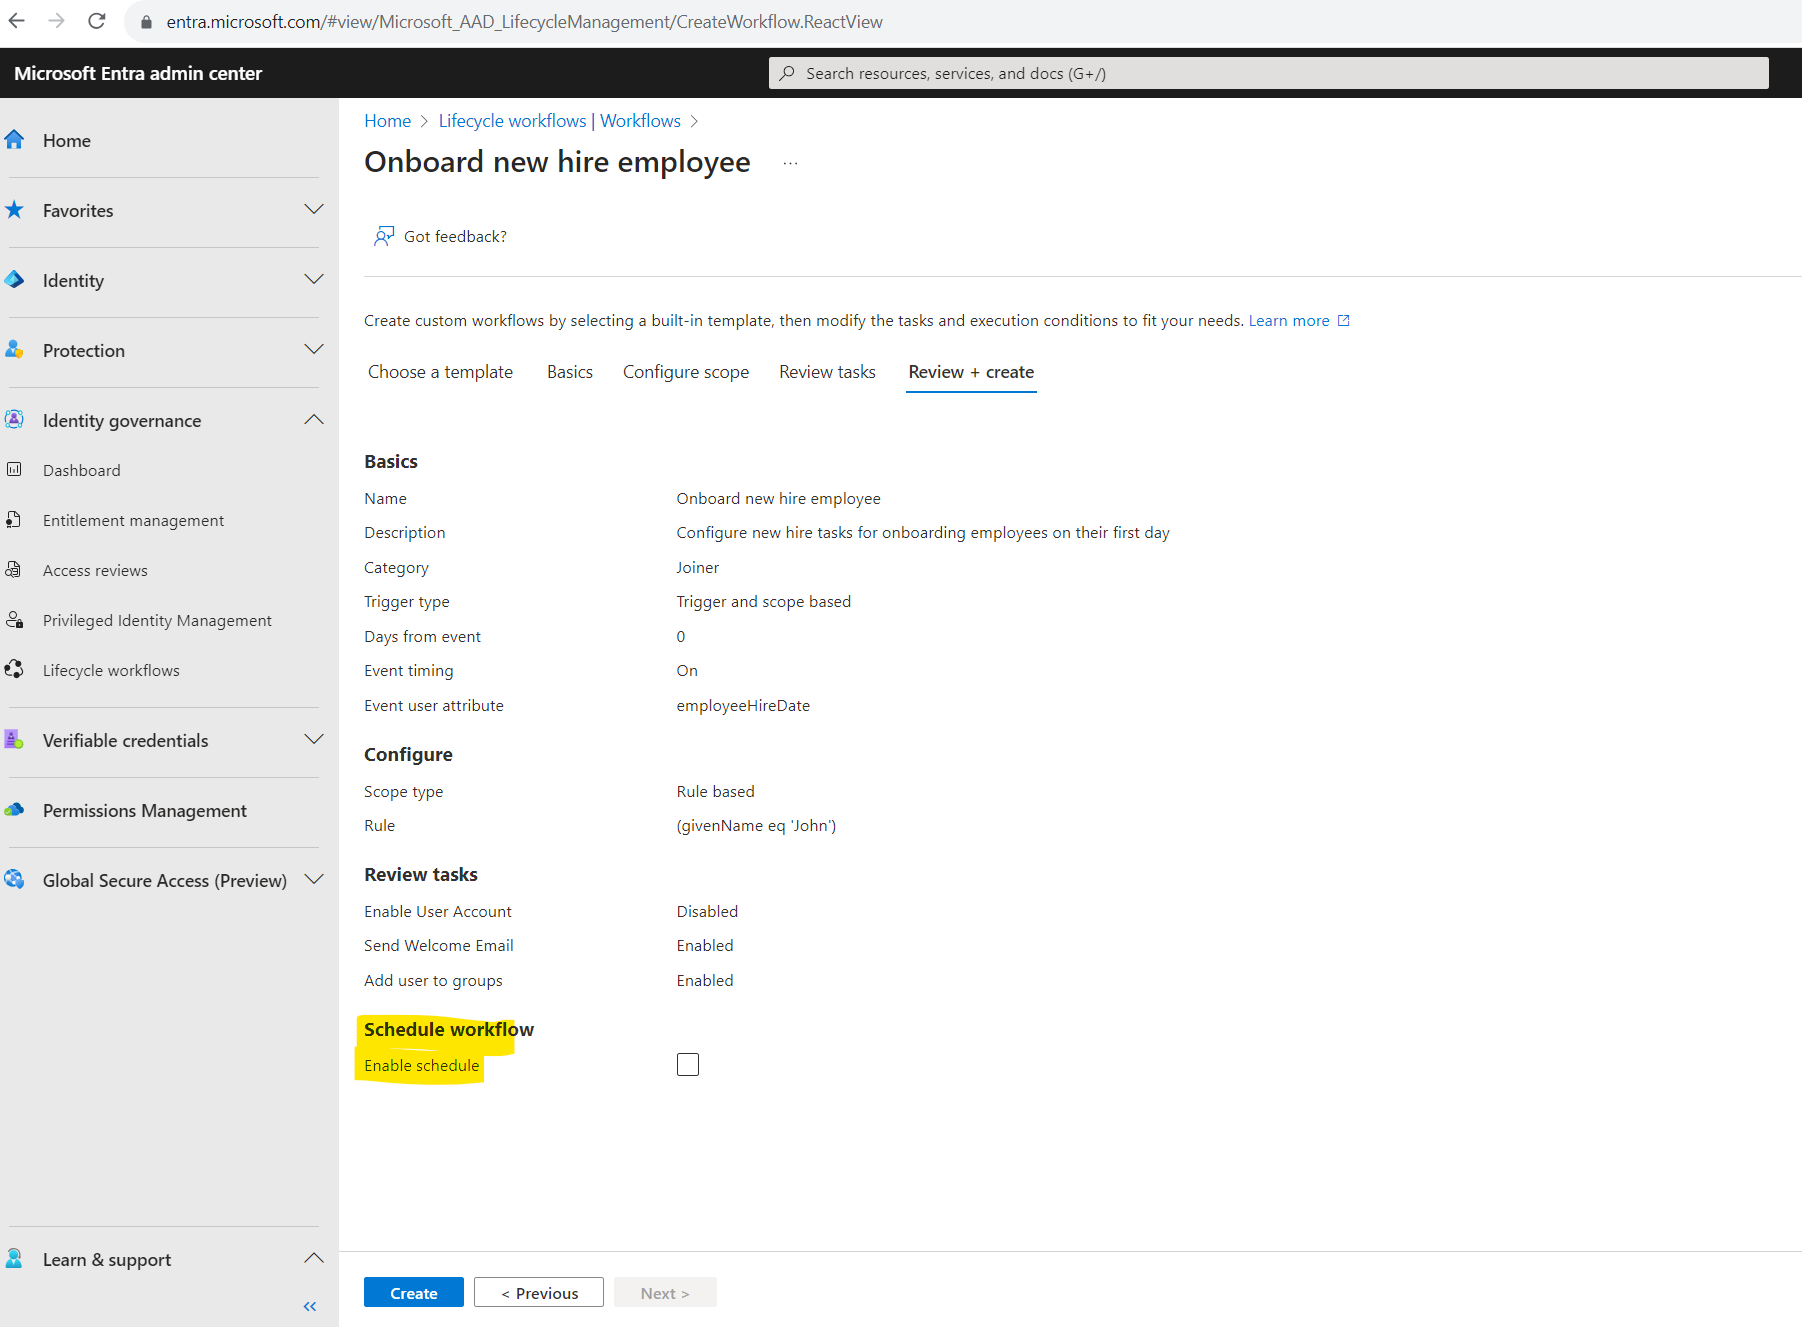
Finally we can click on Review + Create.
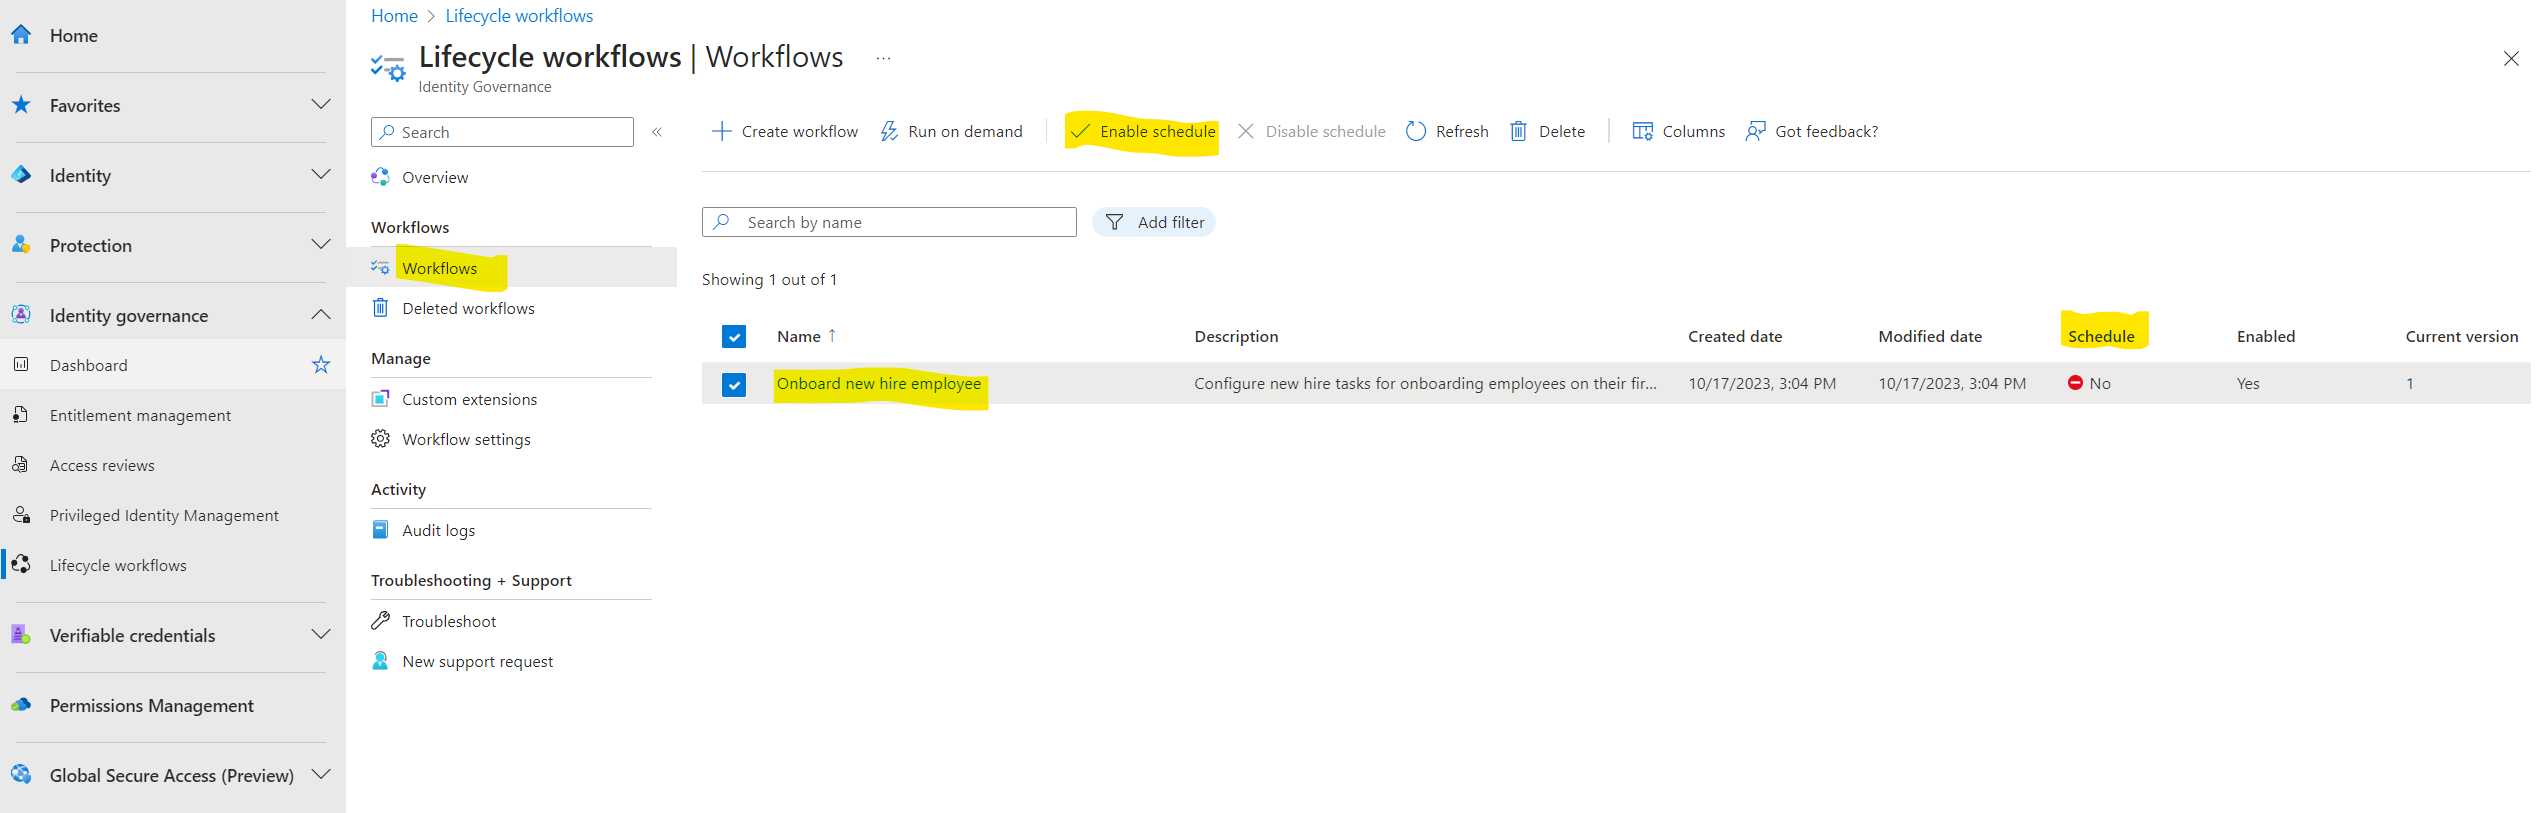
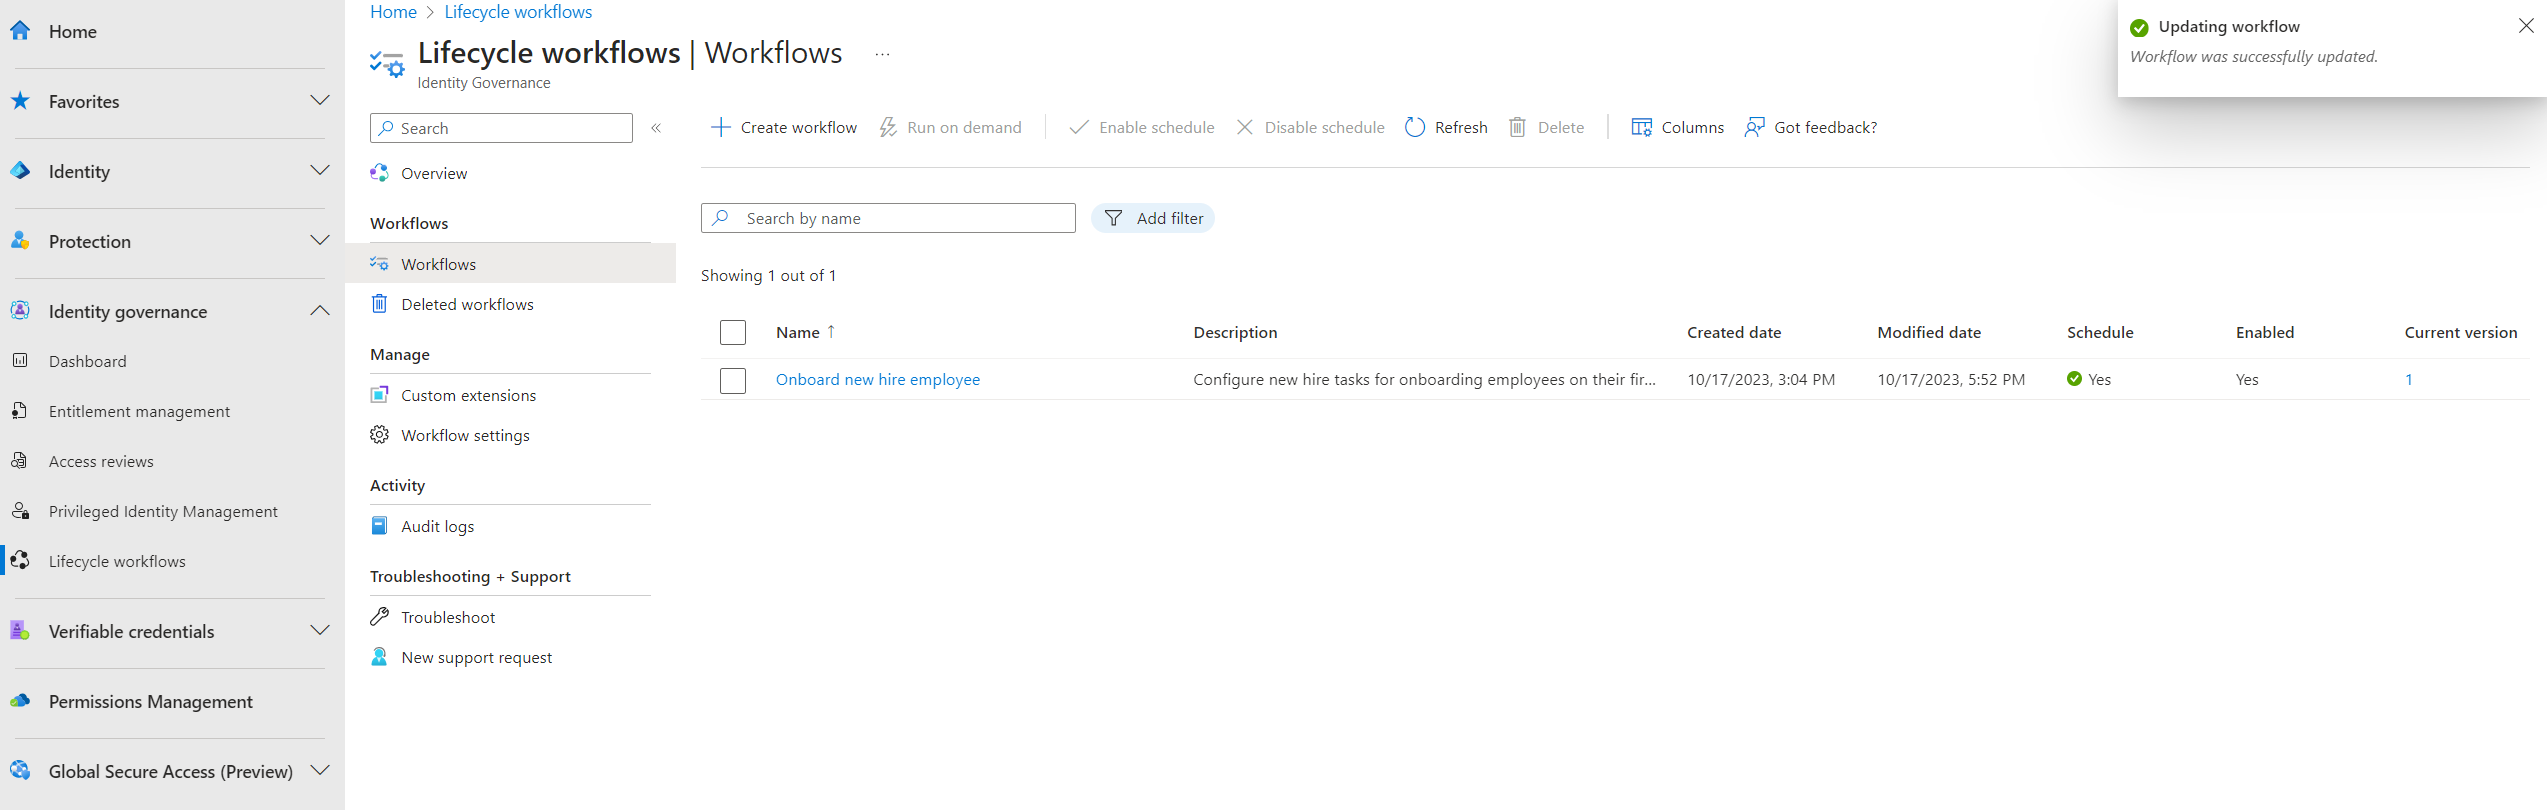
While newly created workflows are enabled by default, scheduling is an option that must be enabled manually.
To verify whether the workflow is scheduled, you can view the Scheduled column.
Once scheduling is enabled, the workflow is evaluated based on the interval that is set within your workflow settings(default of three hours) to determine whether or not it should run based on the execution conditions.
You can customize the schedule of workflows by using the Workflow settings under Identity governance > Lifecycle workflows > Workflow settings as shown below.
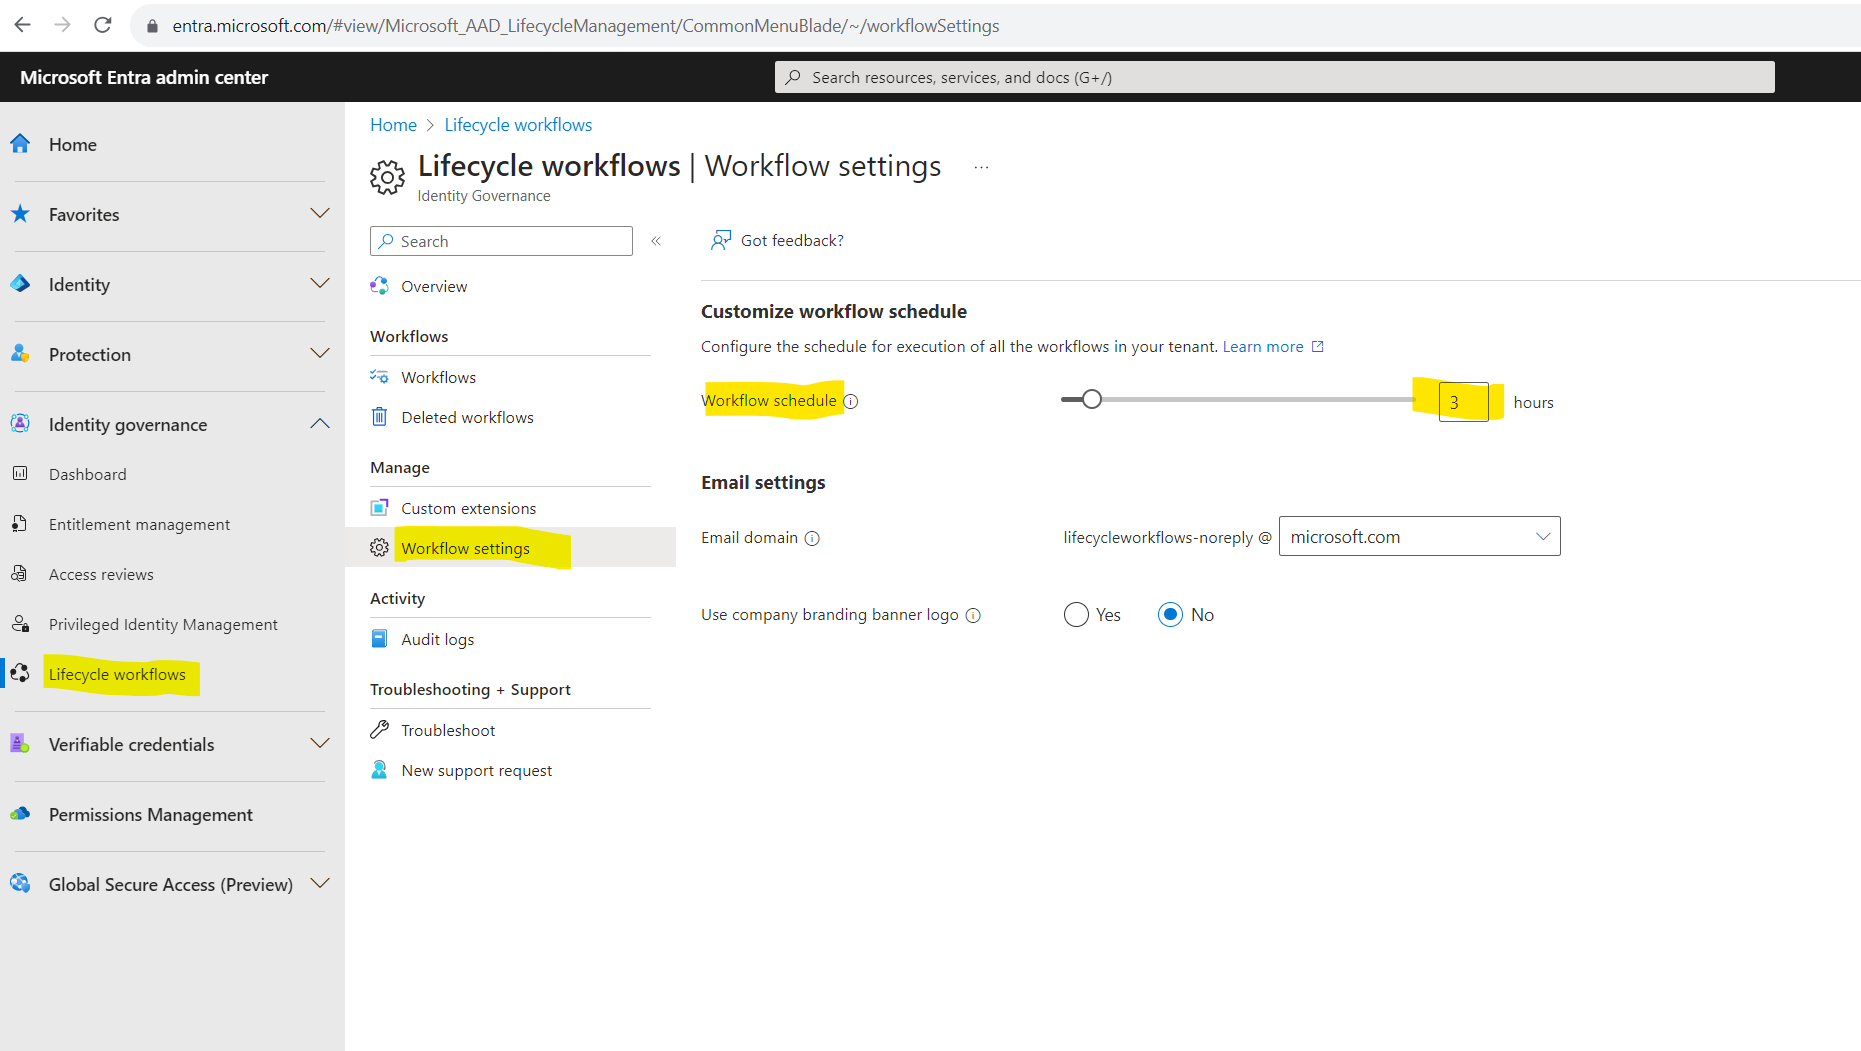
To view a detailed guide on scheduling a workflow, see: Customize the schedule of workflows.
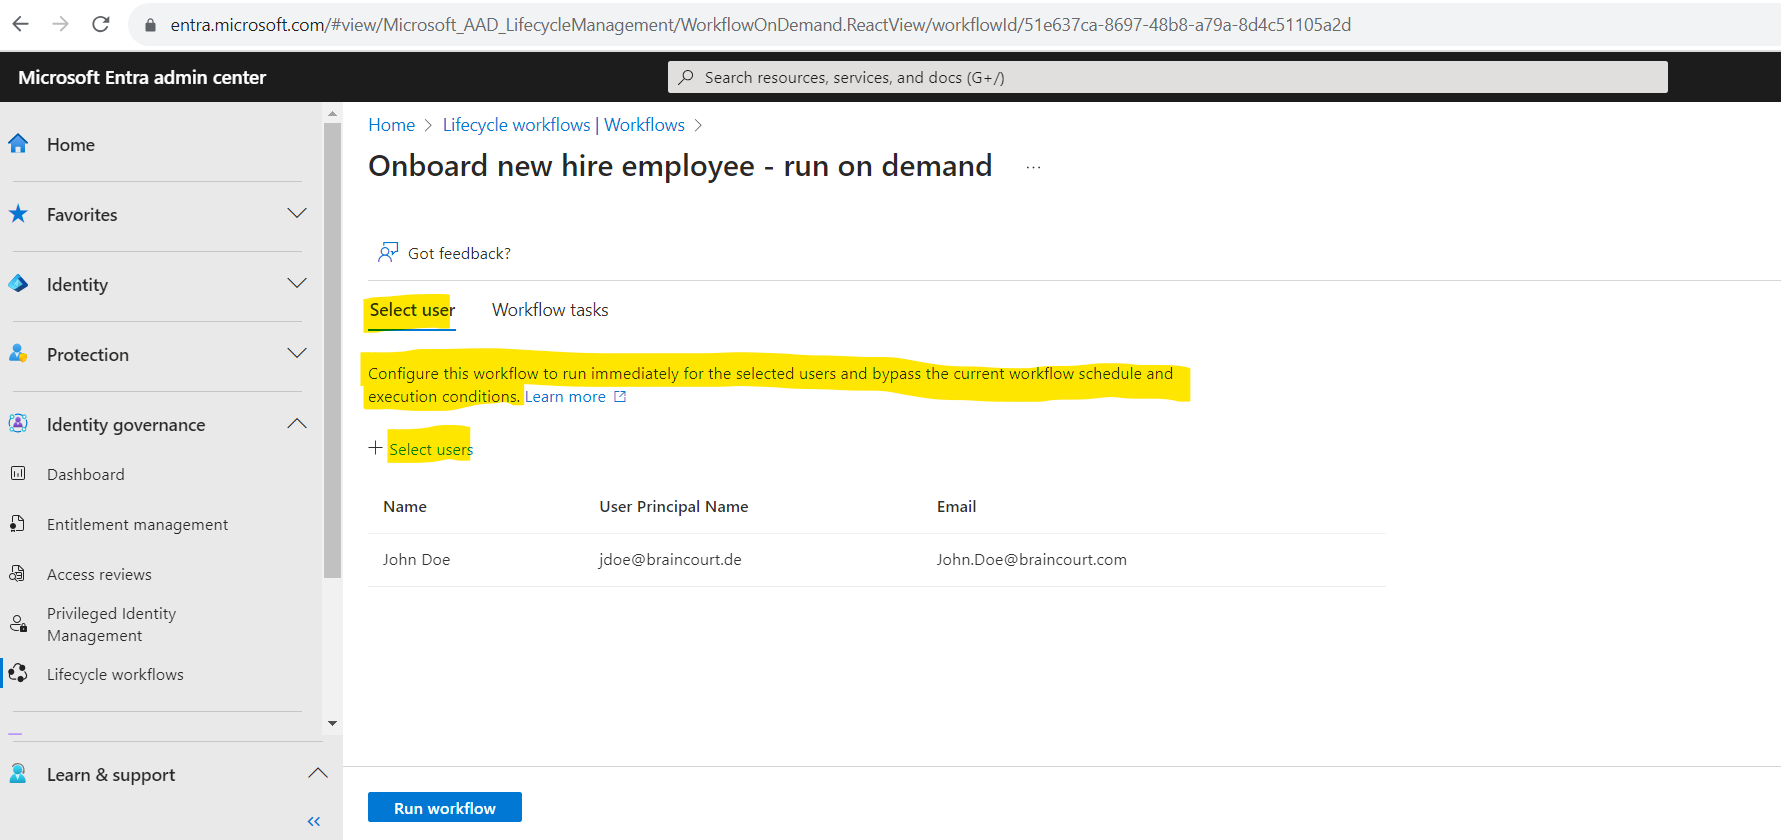
We can also trigger the workflow to run immediately by clicking on the button Run on demand as shown below.


To demonstrate this workflow I will wait that it will be triggered by the event we set previously with the employees hire date.
I was set this by hand on the 19/10/2023 00:00:00 which is tomorrow from now writing this post.
The Azure portal is using here the time zone from the windows settings with an offset UTC+2 for Germany.
I will see tomorrow if the workflow tasks with sending an welcome email and adding the user into the Testing MS365 Group Entitlement Management group was running successfully.
So the next day I was first checking the overview page of my workflow where you can see a summary of the last run date and if there are any failed tasks or processed users.
Looks all good here.

Also the workflow history looks fine and I can see that this night the workflow for John Doe was completed successfully with my two enabled tasks running successfully.
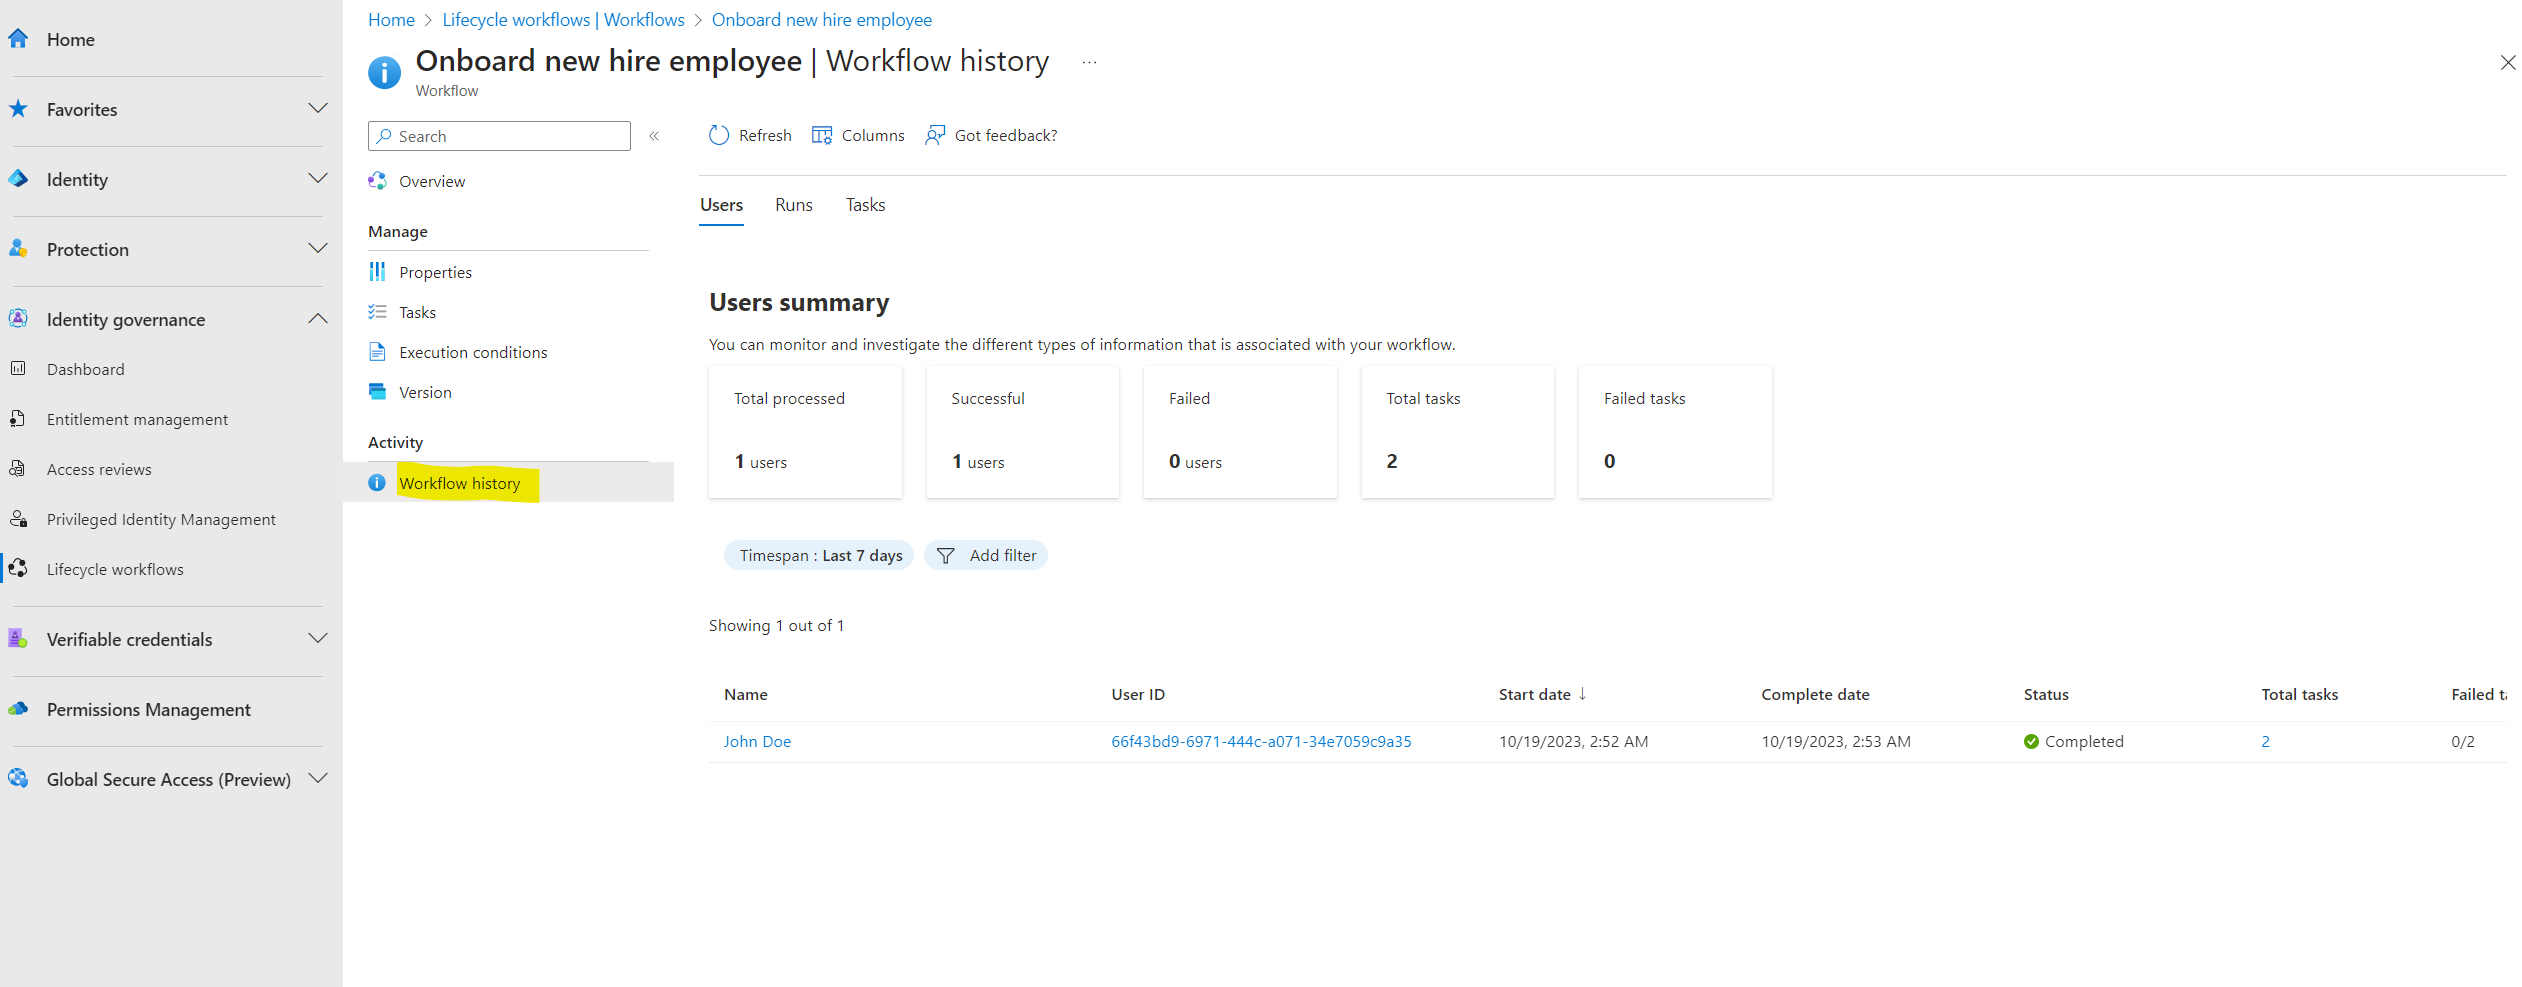
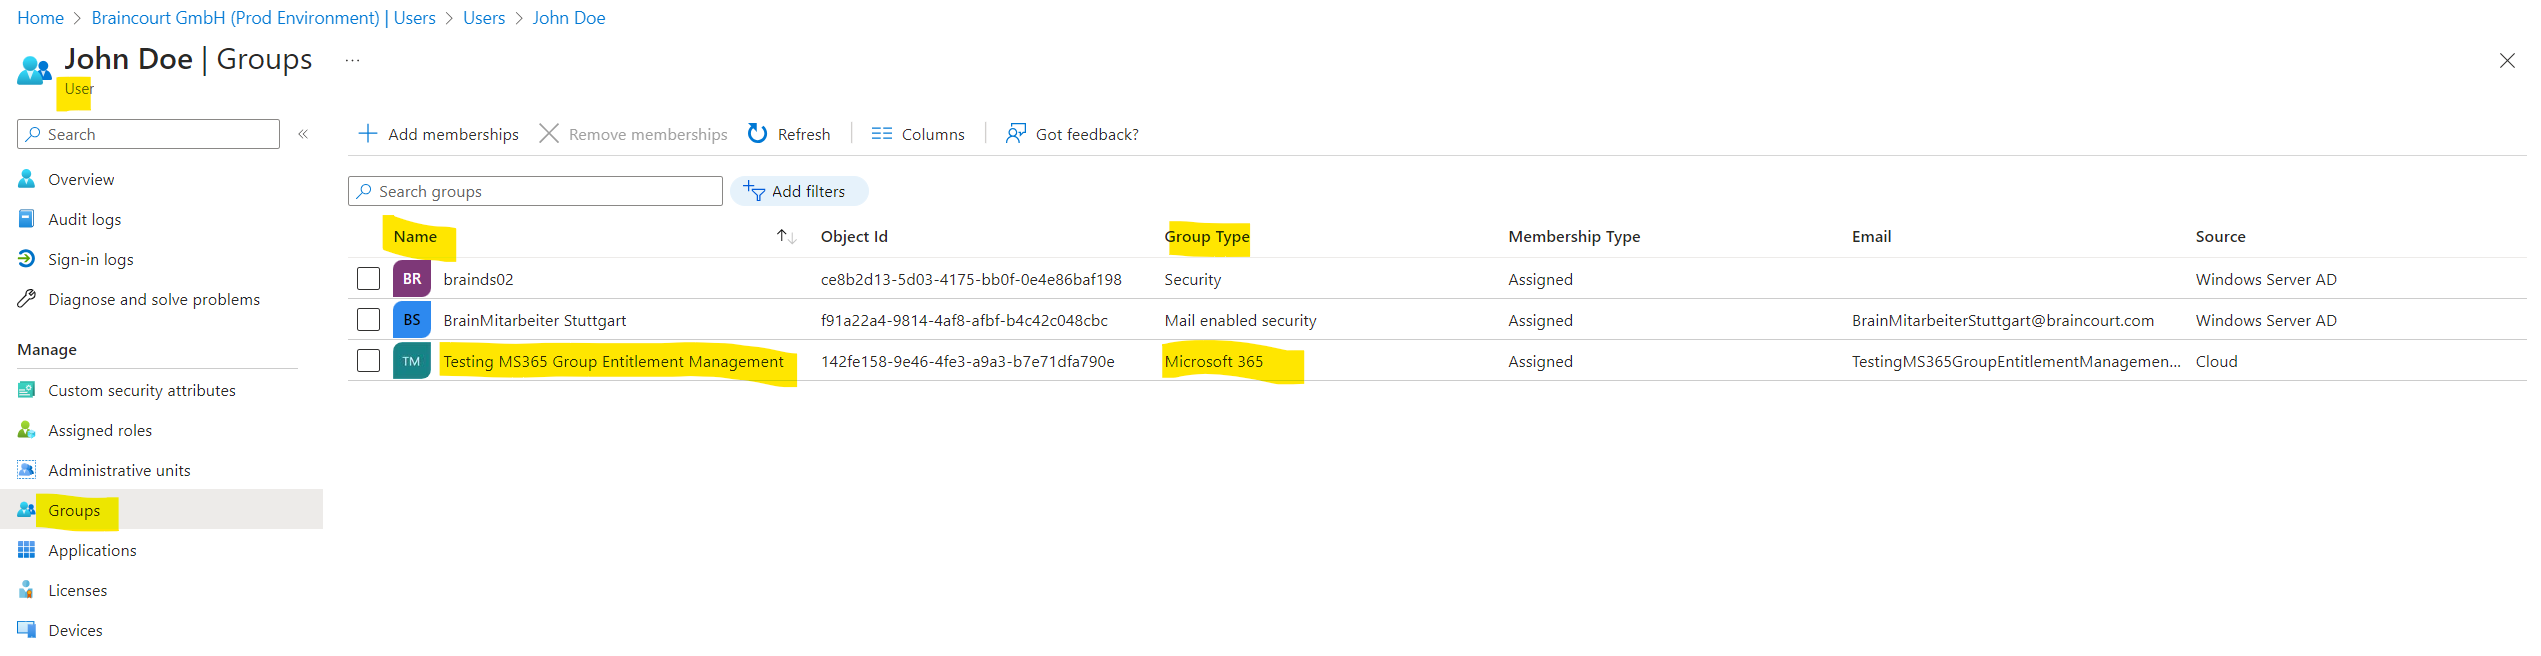
The two enabled tasks for this lifecycle workflow are sending a welcome mail and adding the user to a MS 365 Group named Testing MS365 Group Entitlement Management which I was using previously to demonstrate entitlement management and its access packages.
So I will first check if John Doe was added to this MS 365 Group successful. Looks fine.
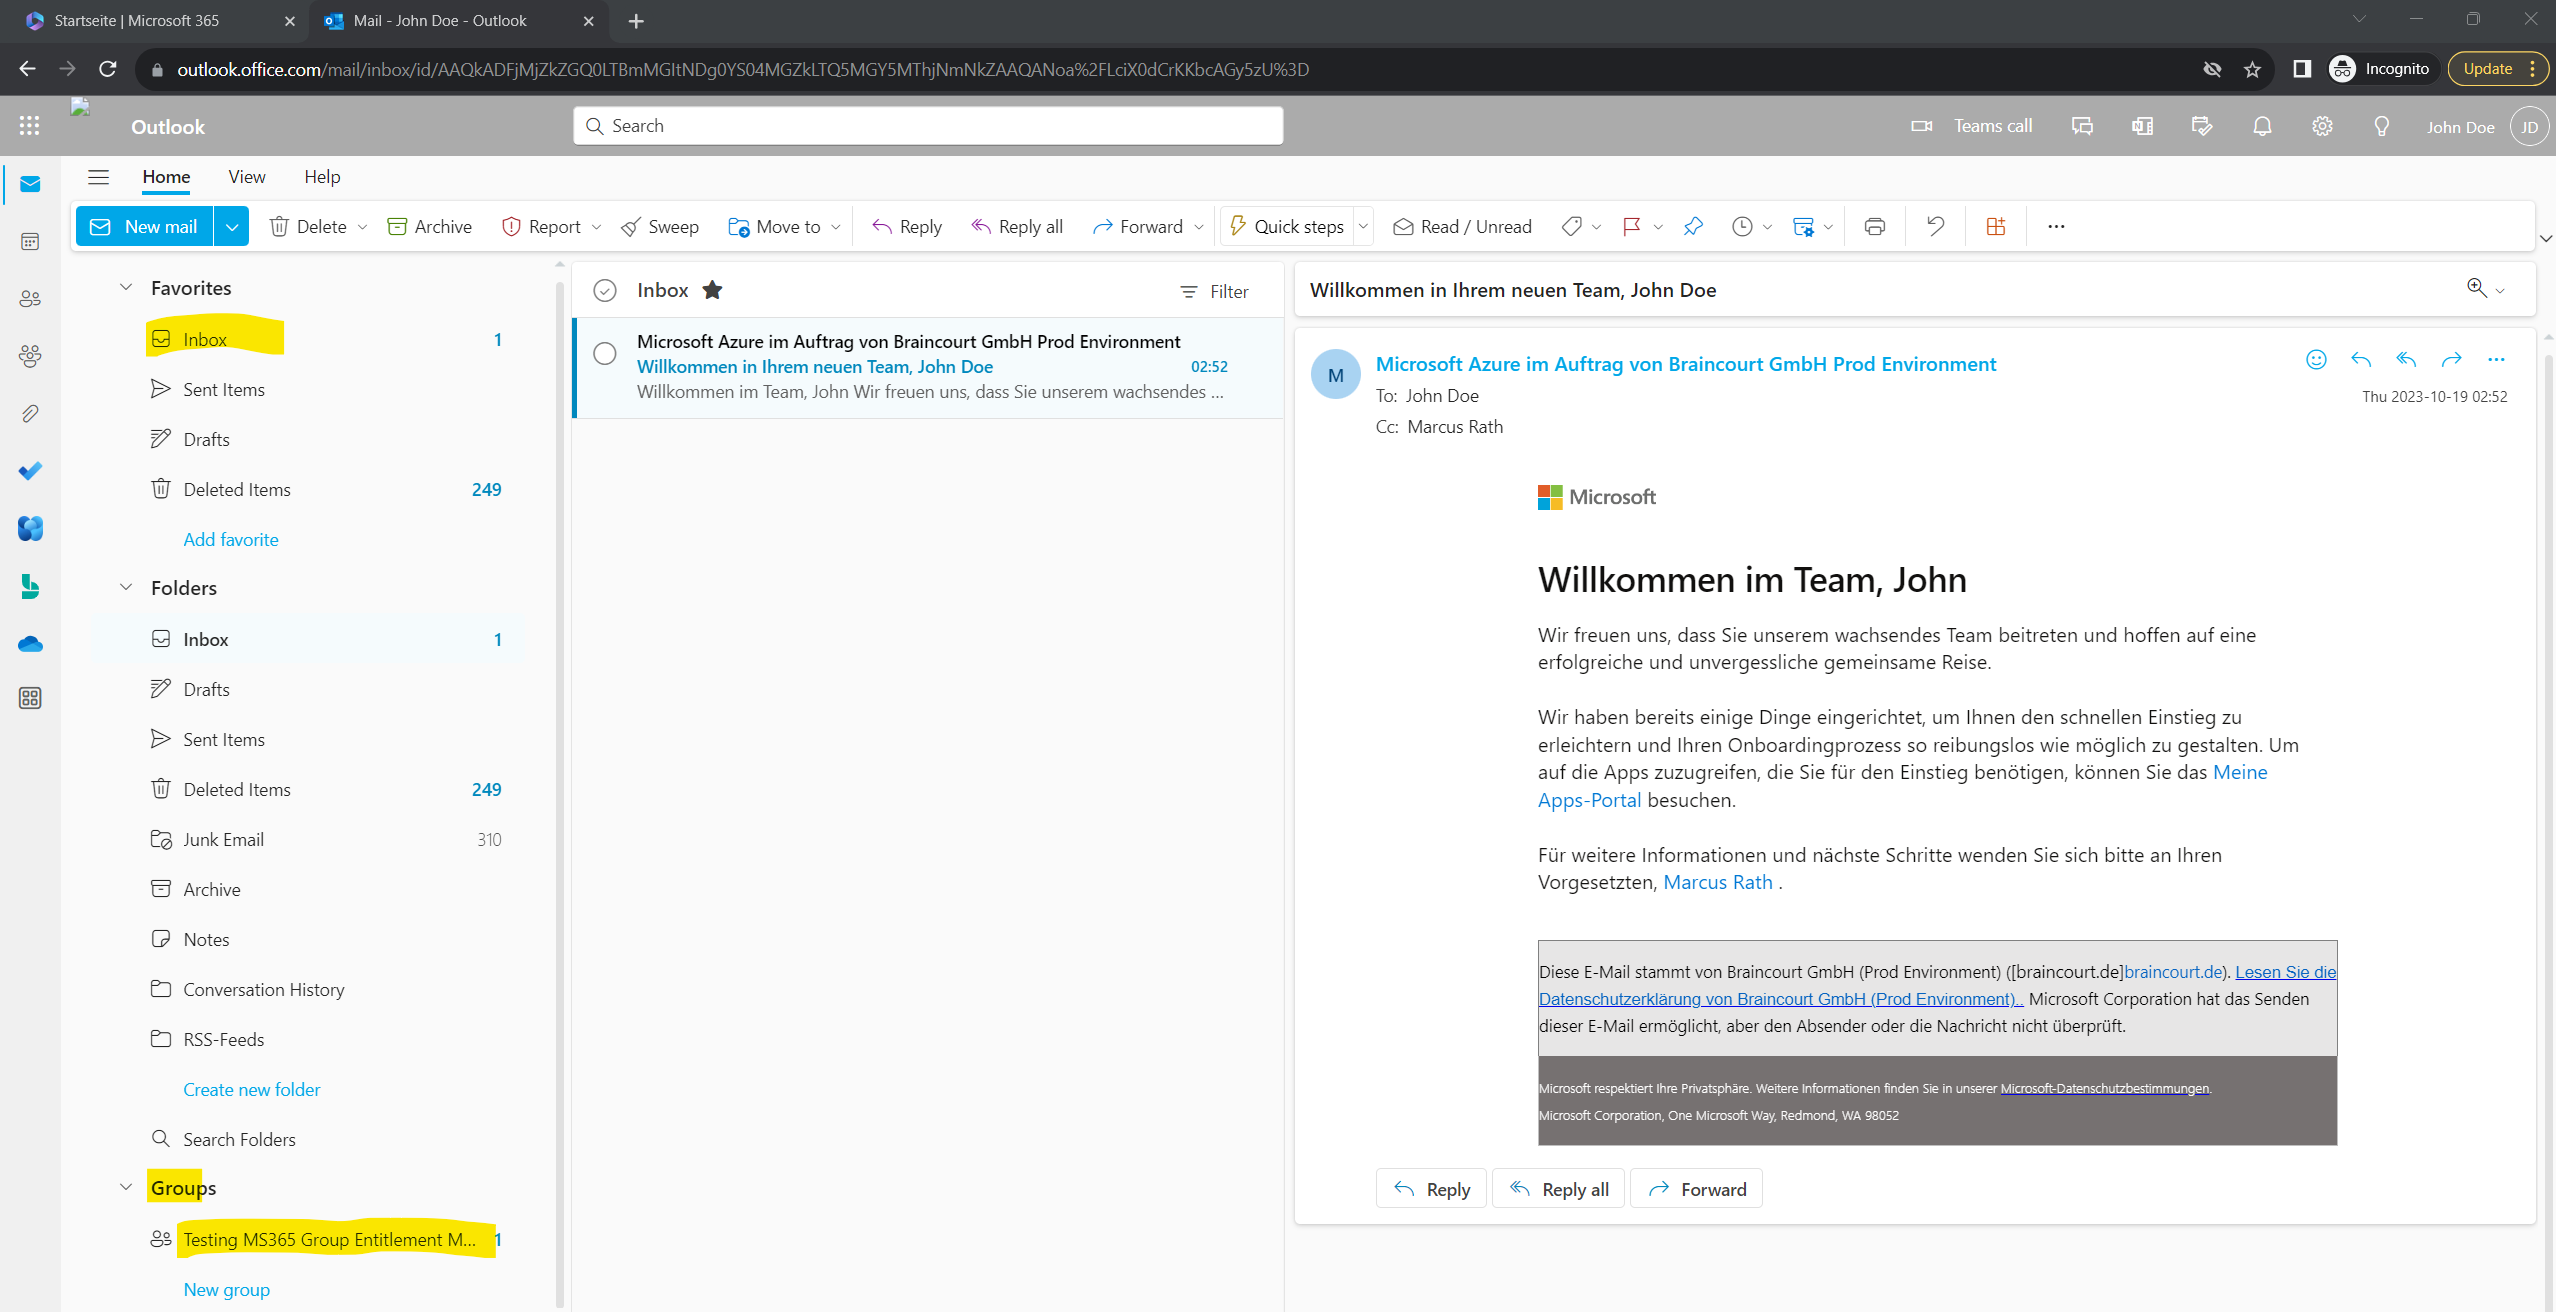
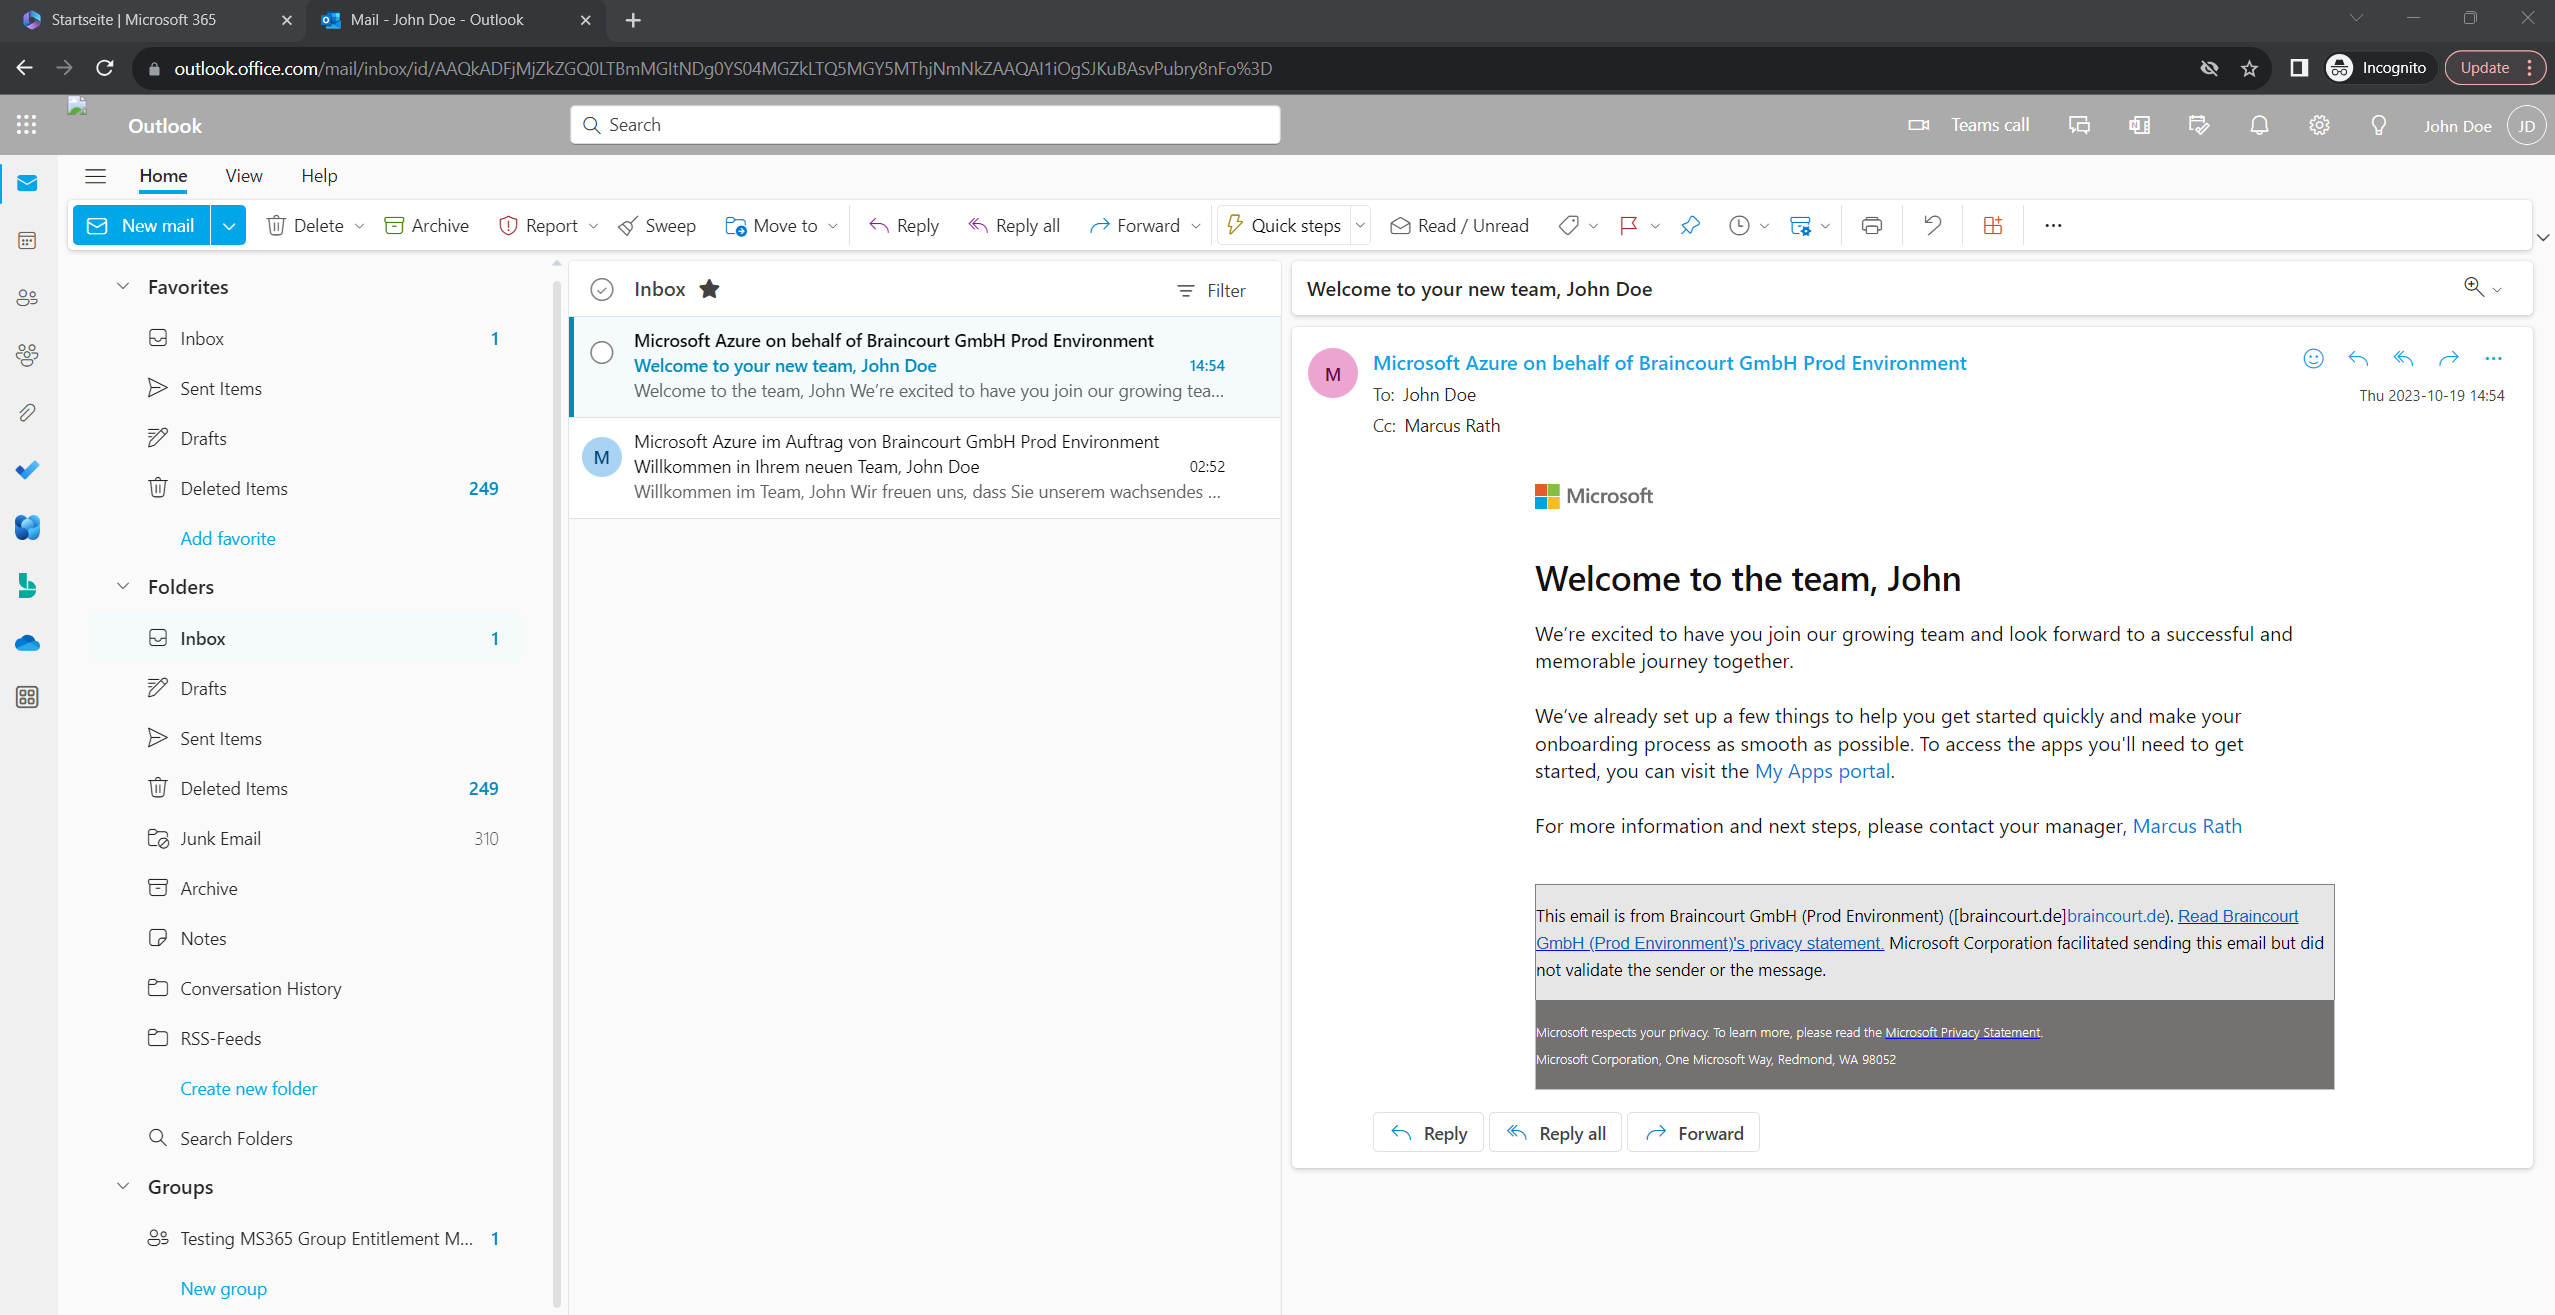
Finally I will check if the welcome mail was also delivered successfully into John Doe’s inbox.
Looks also good besides that I forgot to change the preferred language for John Doe’s user account in Azure and therefore you will see the welcome mail unfortunately just in German.
Actually I need to change the preferred language in on-premise Active Directory because this user account is synced from on-premise to Azure resp. Microsoft Entra ID (formerly Azure AD).
In order to show how this mail in English will looks like, I need to change the preferred language attribute in on-premise Active Directory to en-US.
Here you can see the synced preferred language attribute in Microsoft Entra ID.

And here in the on-premise Active Directory where I will change it to en-US.

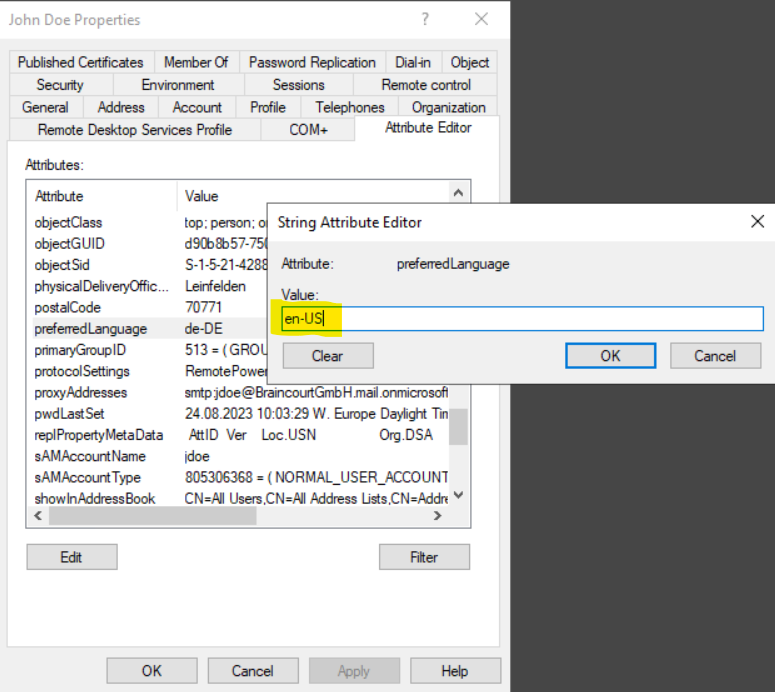

After the next sync cycle from Azure AD Connect the preferred language for John Doe is now switched from de-DE to en-US.
As already shown previously we can also trigger the lifecycle workflows by hand and clicking on Run on demand like shown below.

Select the user for which the lifecycle workflow should be run and click on Run workflow.

Just 1 or two seconds later the welcome message appeared in John Doe’s inbox and this time in English.
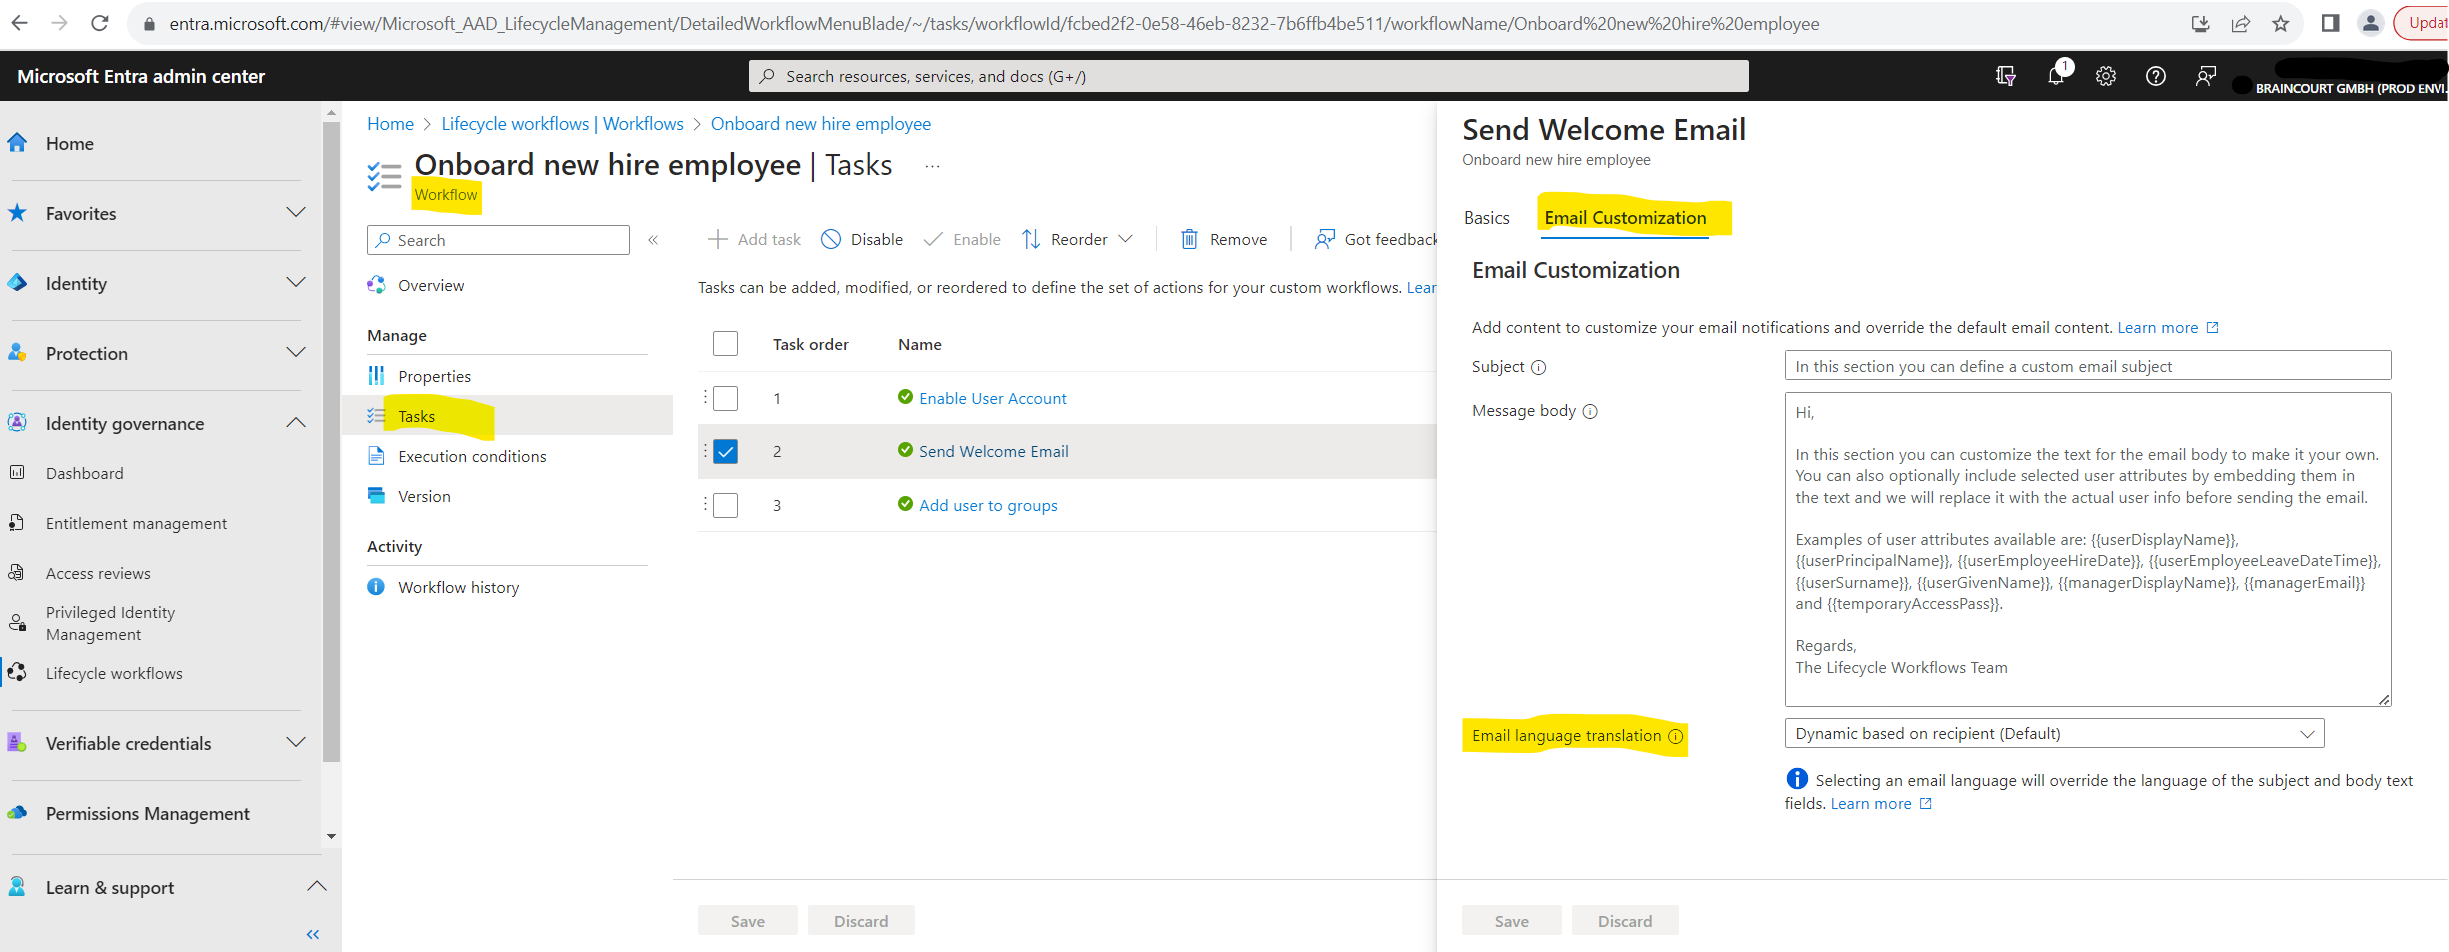
You can of course also customize the welcome message by clicking on the task as shown below.
Here you can also set a specific email language translation. By default this is set to dynamic based on the recipients settings we changed previously for John Doe explicit into en-US.
What is Microsoft Entra?
To see all products included in the unifying brand named Microsoft Entra please take a look at my following post.
Links
What is Microsoft Entra ID Governance?
https://learn.microsoft.com/en-us/azure/active-directory/governance/identity-governance-overviewWhat is entitlement management?
https://learn.microsoft.com/en-us/azure/active-directory/governance/entitlement-management-overviewWhat are access reviews?
https://learn.microsoft.com/en-us/azure/active-directory/governance/access-reviews-overviewPermissions Management
https://learn.microsoft.com/en-us/azure/active-directory/cloud-infrastructure-entitlement-management/What are lifecycle workflows?
https://learn.microsoft.com/en-us/azure/active-directory/governance/create-lifecycle-workflowAzure AD Lifecycle Workflows
https://www.youtube.com/watch?v=wjcw7hRrMDMCreate a lifecycle workflow
https://learn.microsoft.com/en-us/azure/active-directory/governance/create-lifecycle-workflow