What is Microsoft Entra Verified ID?
Microsoft Entra Verified ID is Microsoft’s solution for Verifiable credentials (VCs).
Verifiable credentials (VCs) are digital credentials which follow the relevant World Wide Web Consortium open standards. They can represent information found in physical credentials, such as a passport or license, as well as new things that have no physical equivalent, such as ownership of a bank account. They have numerous advantages over physical credentials, most notably that they’re digitally signed, which makes them tamper-resistant and instantaneously verifiable.
Verifiable credentials can be issued by anyone, about anything, and can be presented to and verified by everyone. The entity that generates the credential is called the Issuer. The credential is then given to the Holder who stores it for later use. The Holder can then prove something about themselves by presenting their credentials to a Verifier.
Source: https://en.wikipedia.org/wiki/Verifiable_credentials
- Setup Microsoft Entra Verified ID in your Tenant
- Manual Microsoft Entra Verified ID setup
- Register an application in Microsoft Entra ID
- Issue Microsoft Entra Verified ID credentials from an application
- Issue your first verified credential expert card
- Verify Microsoft Entra Verified ID credentials from an application
- Reset your Organization
- What is Microsoft Entra?
- Links
Setup Microsoft Entra Verified ID in your Tenant
To setup Microsoft Entra Verified ID in your tenant you can use either the classic way by hand and called Manual Microsoft Entra Verified ID setup or you can use the automated way where all the several individual configuration steps will be configured by just clicking on a Get started button which is the so called Quick Microsoft Entra Verified ID setup and so far available in preview.
To demonstrate Microsoft Entra Verified ID in this post, I will use the classic way to setup by hand.
The automated way in my case so far isn’t working and is anyway in preview.
As prerequisites you need to use a global administrator account and you should also have registered a custom domain in your tenant.
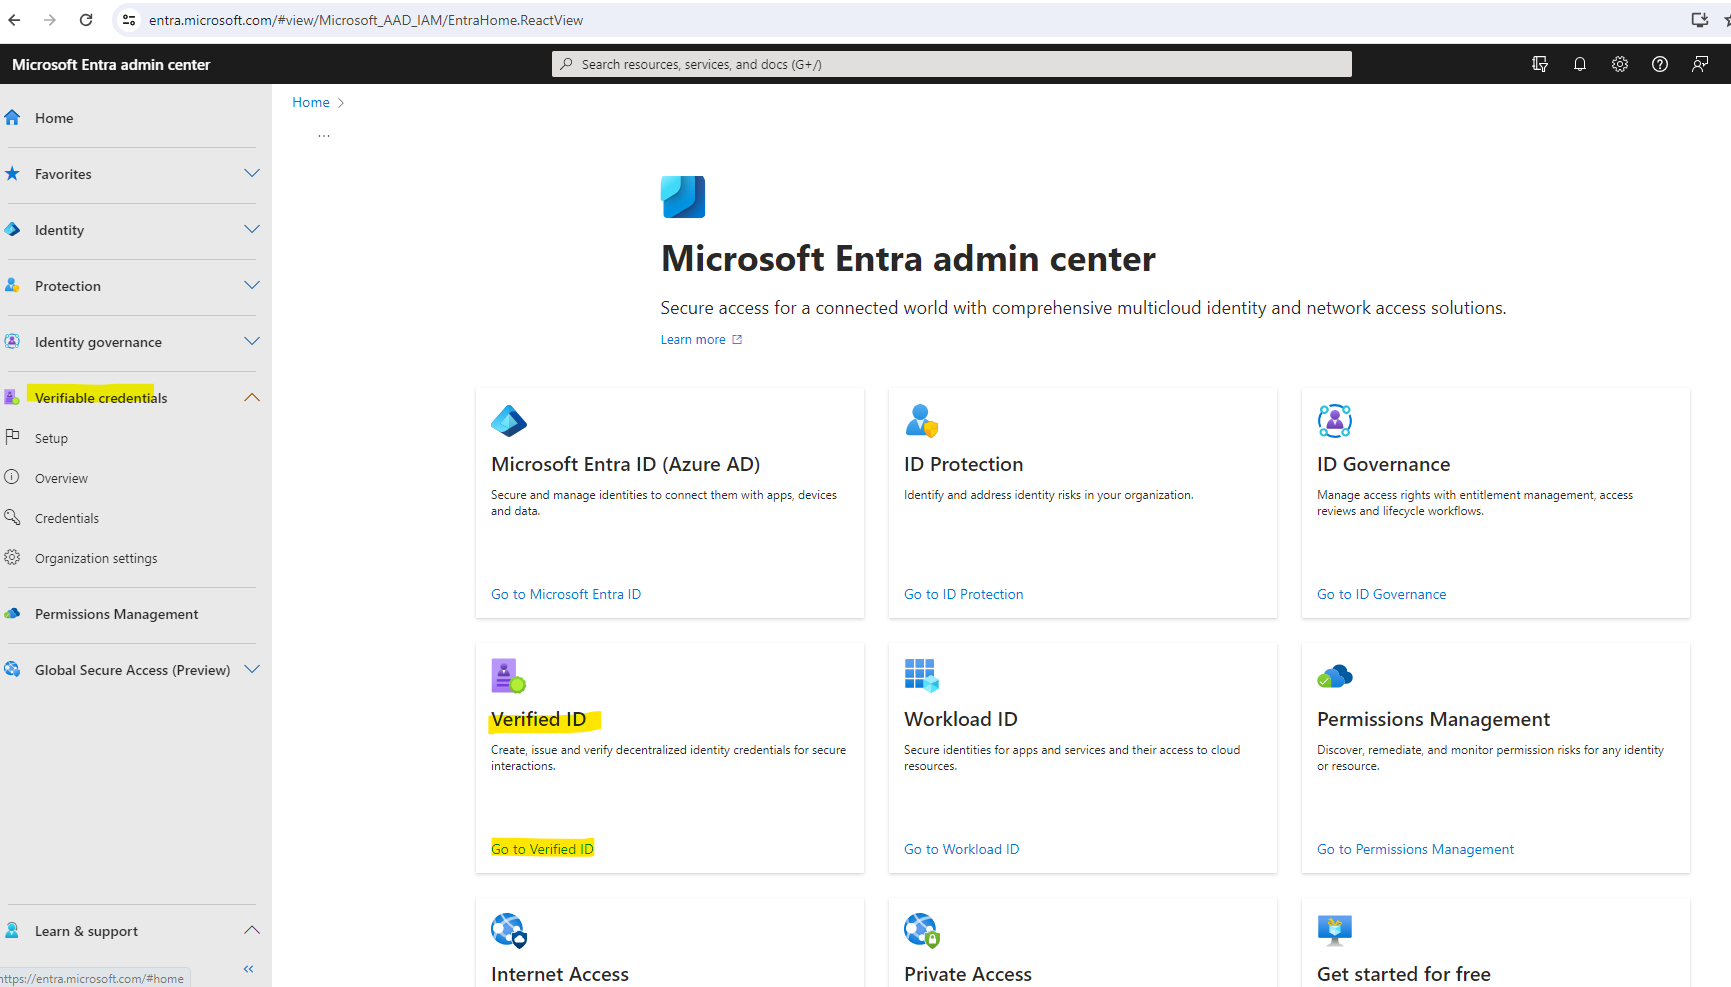
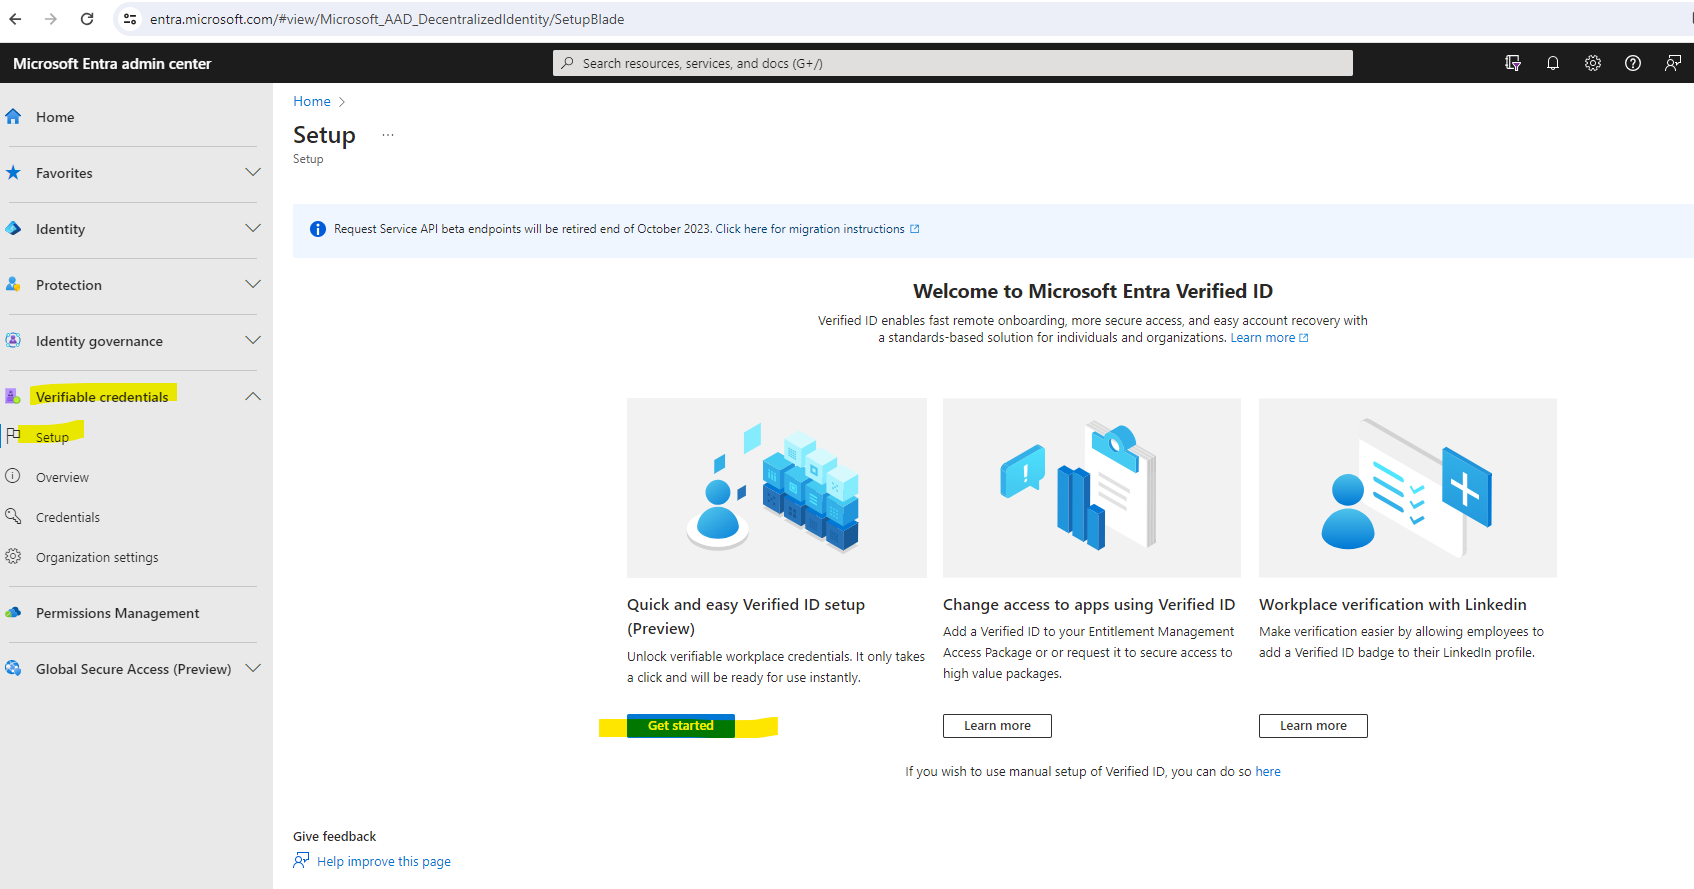
You can navigate to Verified ID in your Microsoft Entra admin center by clicking on the home page of the admin center or in the left menu on Verifiable credentials -> Overview.
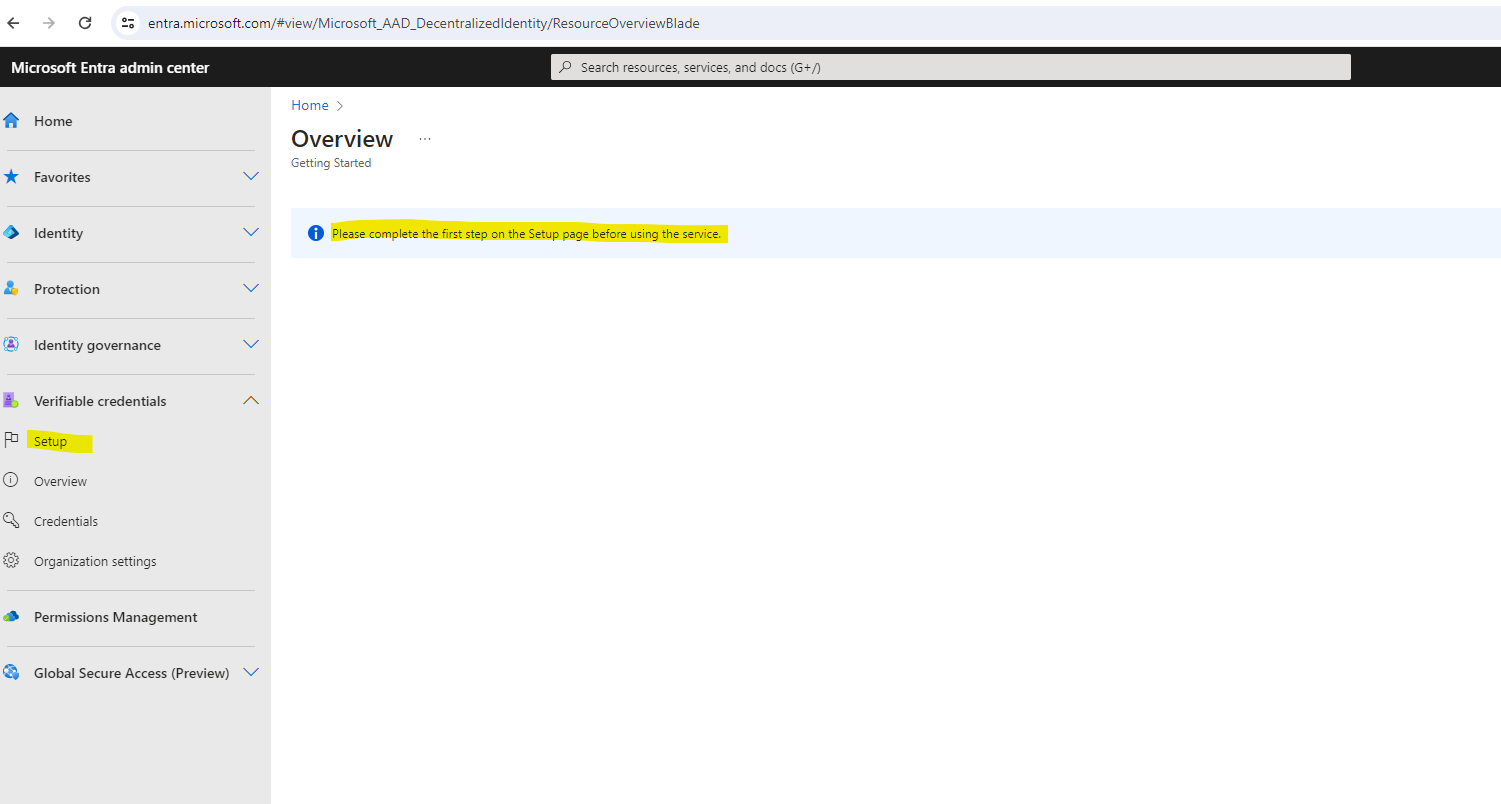
Click on Setup in the left menu.
If you have a custom domain registered for your Microsoft Entra tenant, you see this Get started option. If you don’t have a custom domain registered, either register it before setting up Verified ID or continue using the manual setup.
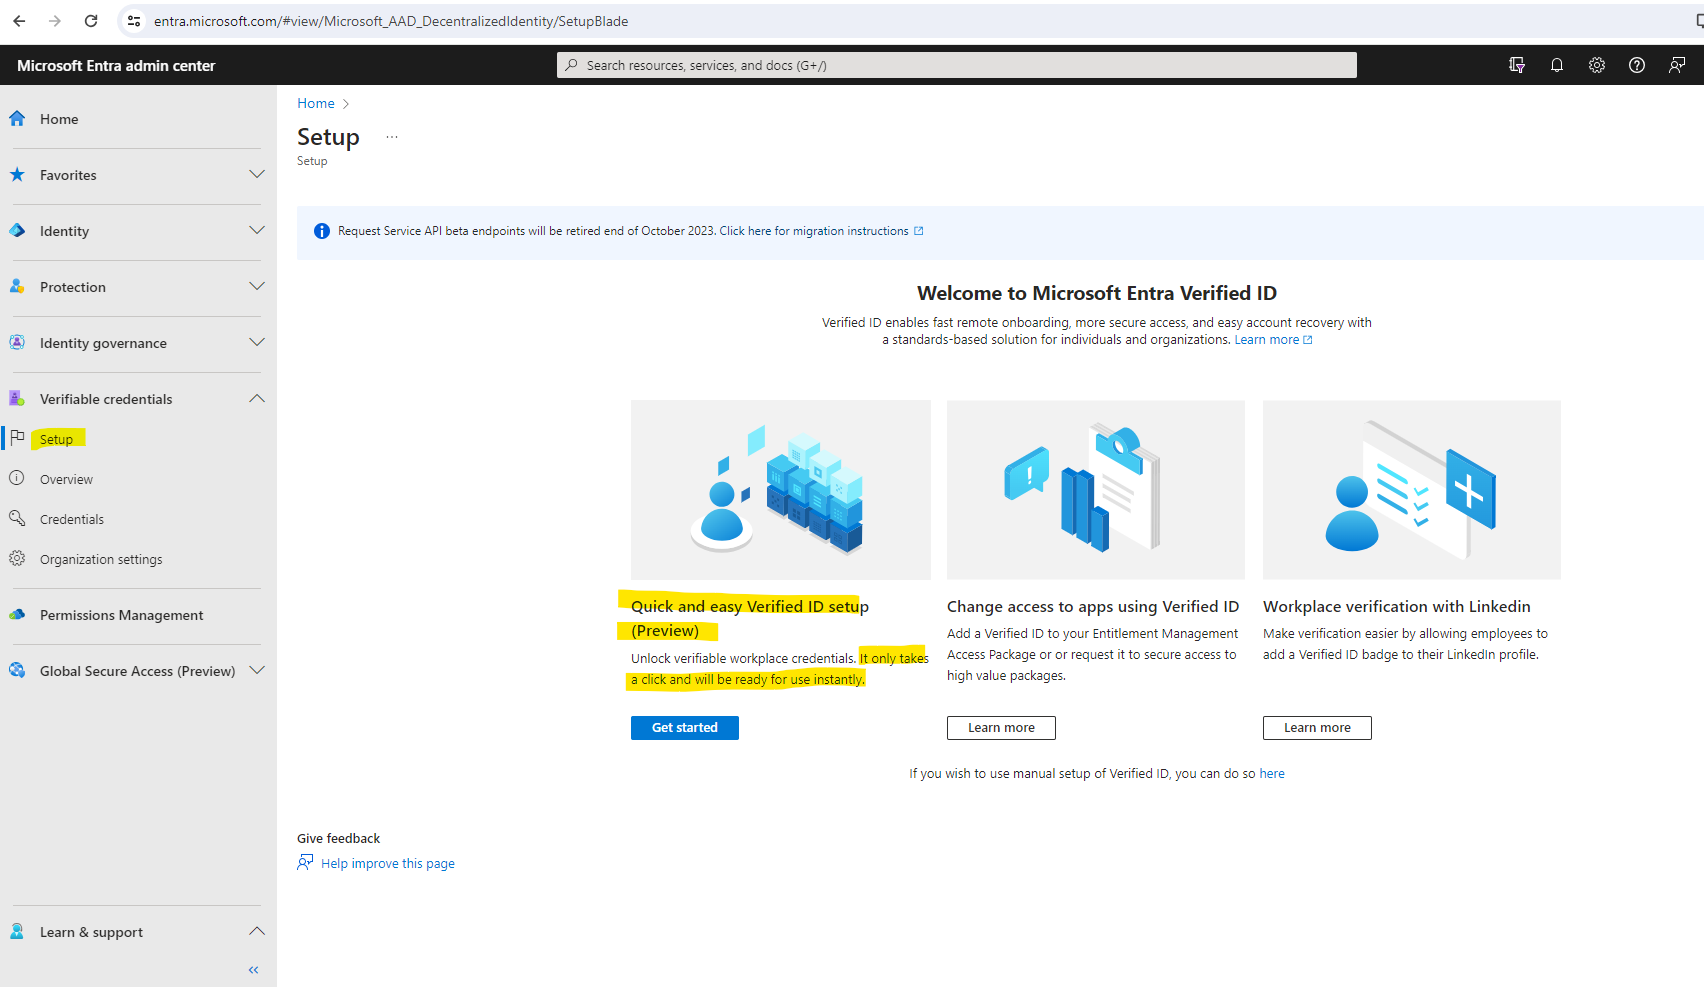
If you haven’t registered any custom domains in your tenant you will see this page to setup Verified ID manual.
First I was testing the quick setup by clicking on the Get stated button to setup Verified ID.
Unfortunately as mentioned in my case absolutely nothing happens when clicking on the button, I even started fiddler to capture the traffic to see what happens under the hood, nothing absolutely no traffic appeared.
So I tried different browsers and systems to eliminate here problems maybe just related to my computer or browser, all the same on the other systems.
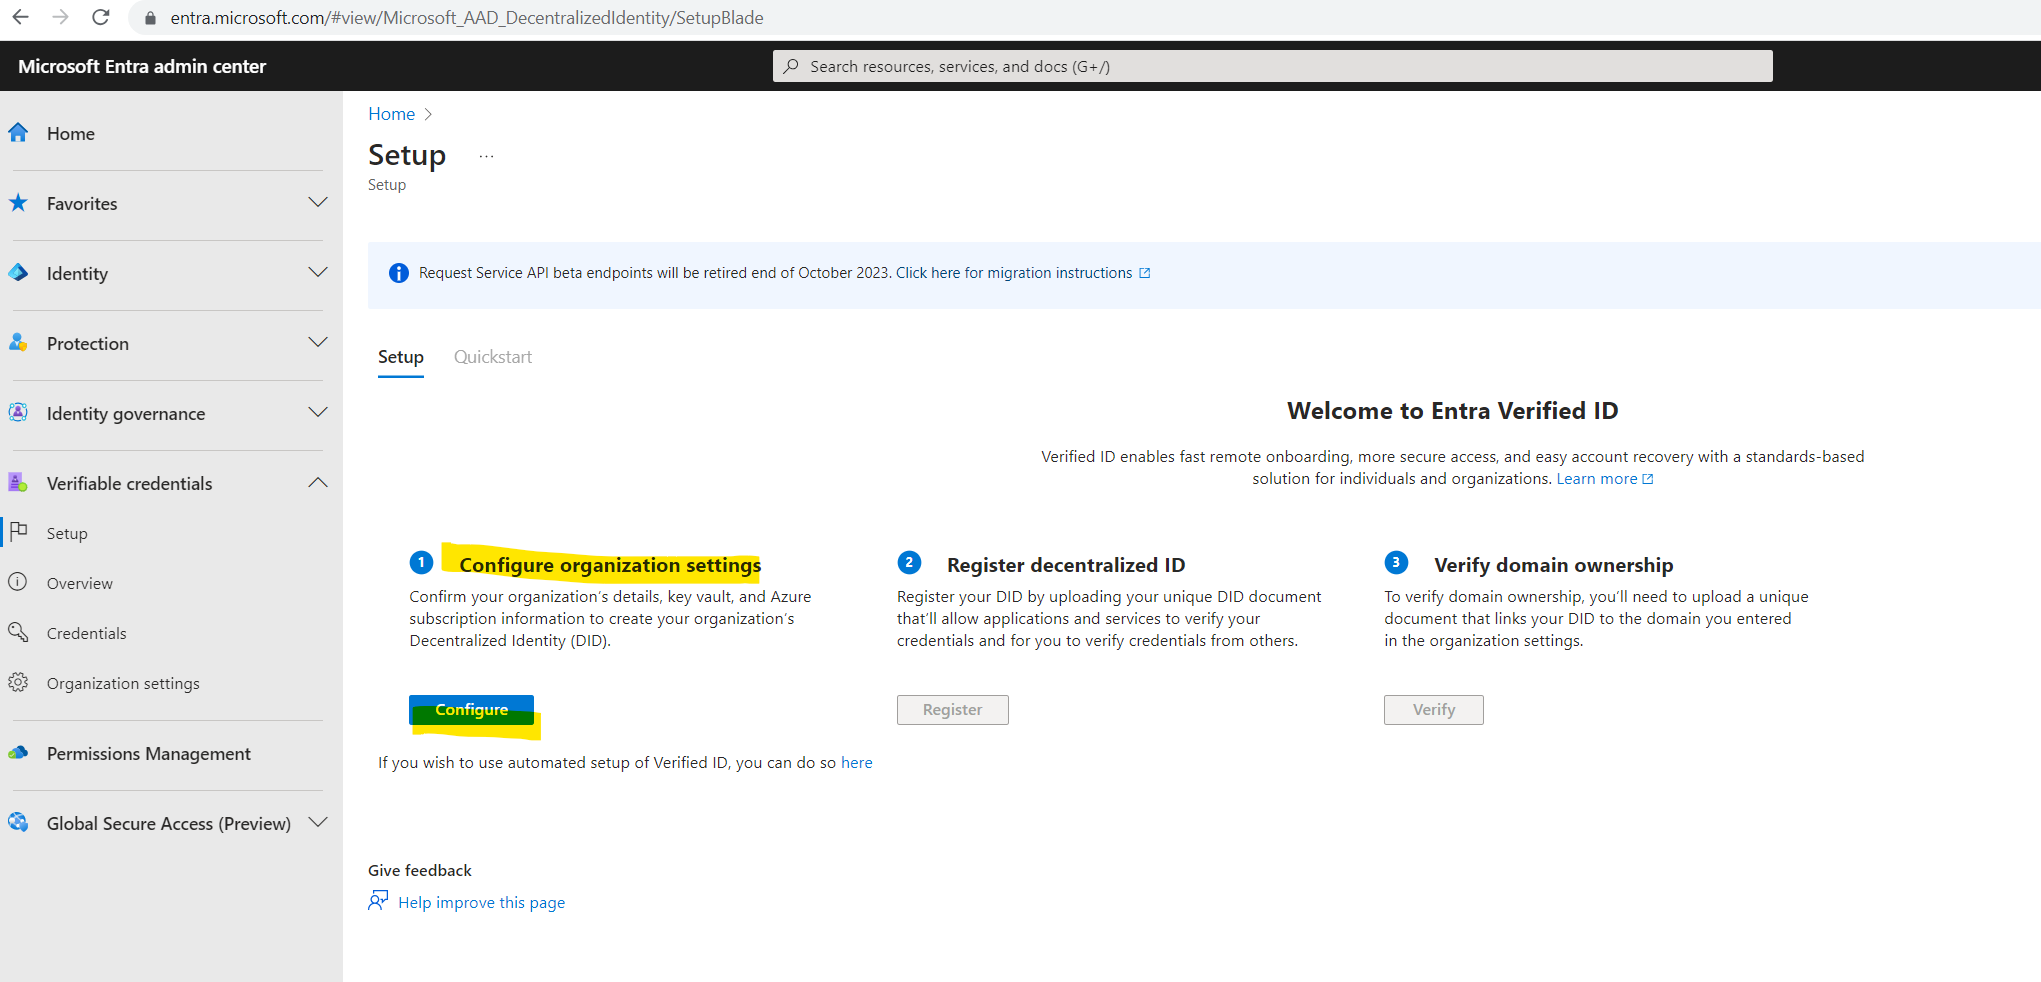
So I was forced either way to manual setup Verified ID like shown below.
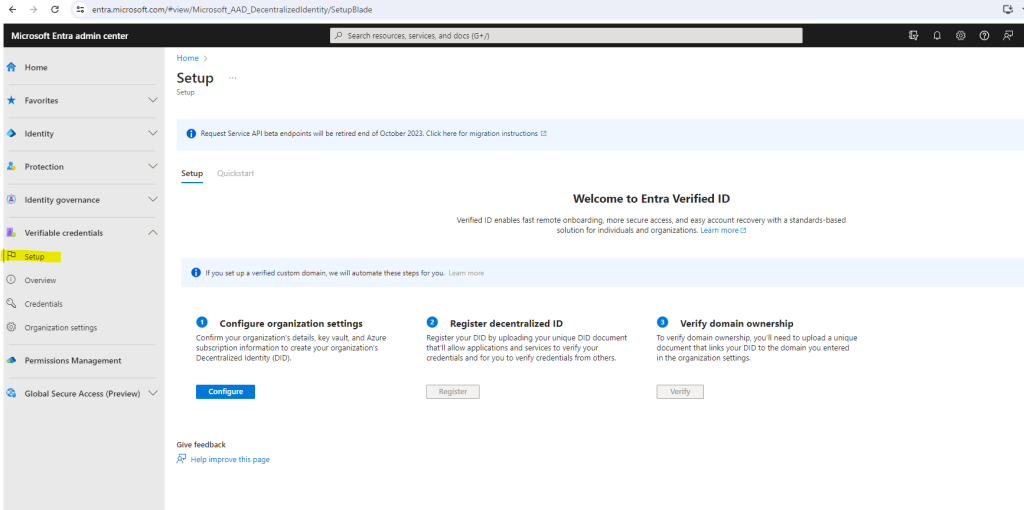
Manual Microsoft Entra Verified ID setup
Manual Verified ID setup is the classic way of setting up Verified ID where you as an admin have to configure Azure KeyVault, take care of registering your decentralized ID and verifying your domain.
Azure Key Vault is a cloud service that enables the secure storage and access of secrets and keys. The Verified ID service stores public and private keys in Azure Key Vault. These keys are used to sign and verify credentials.
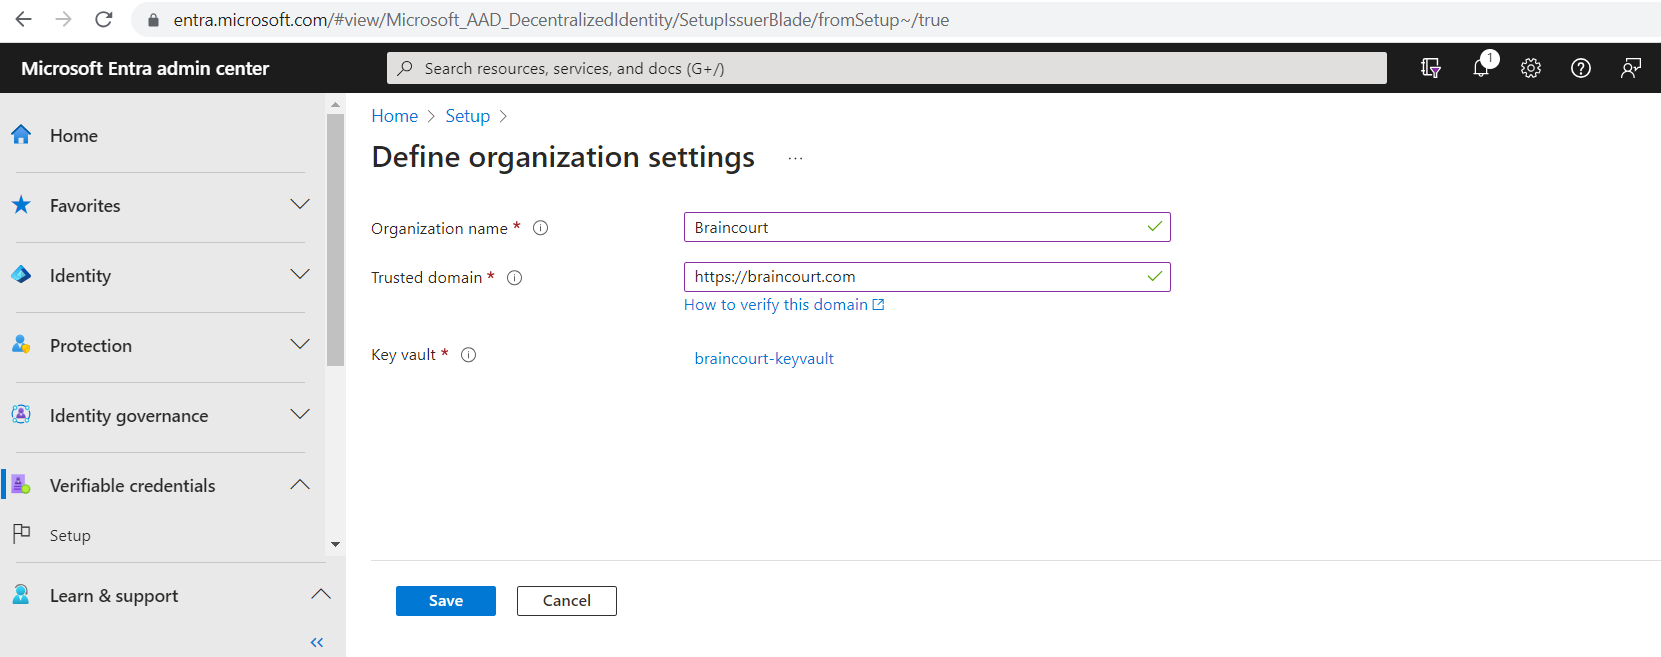
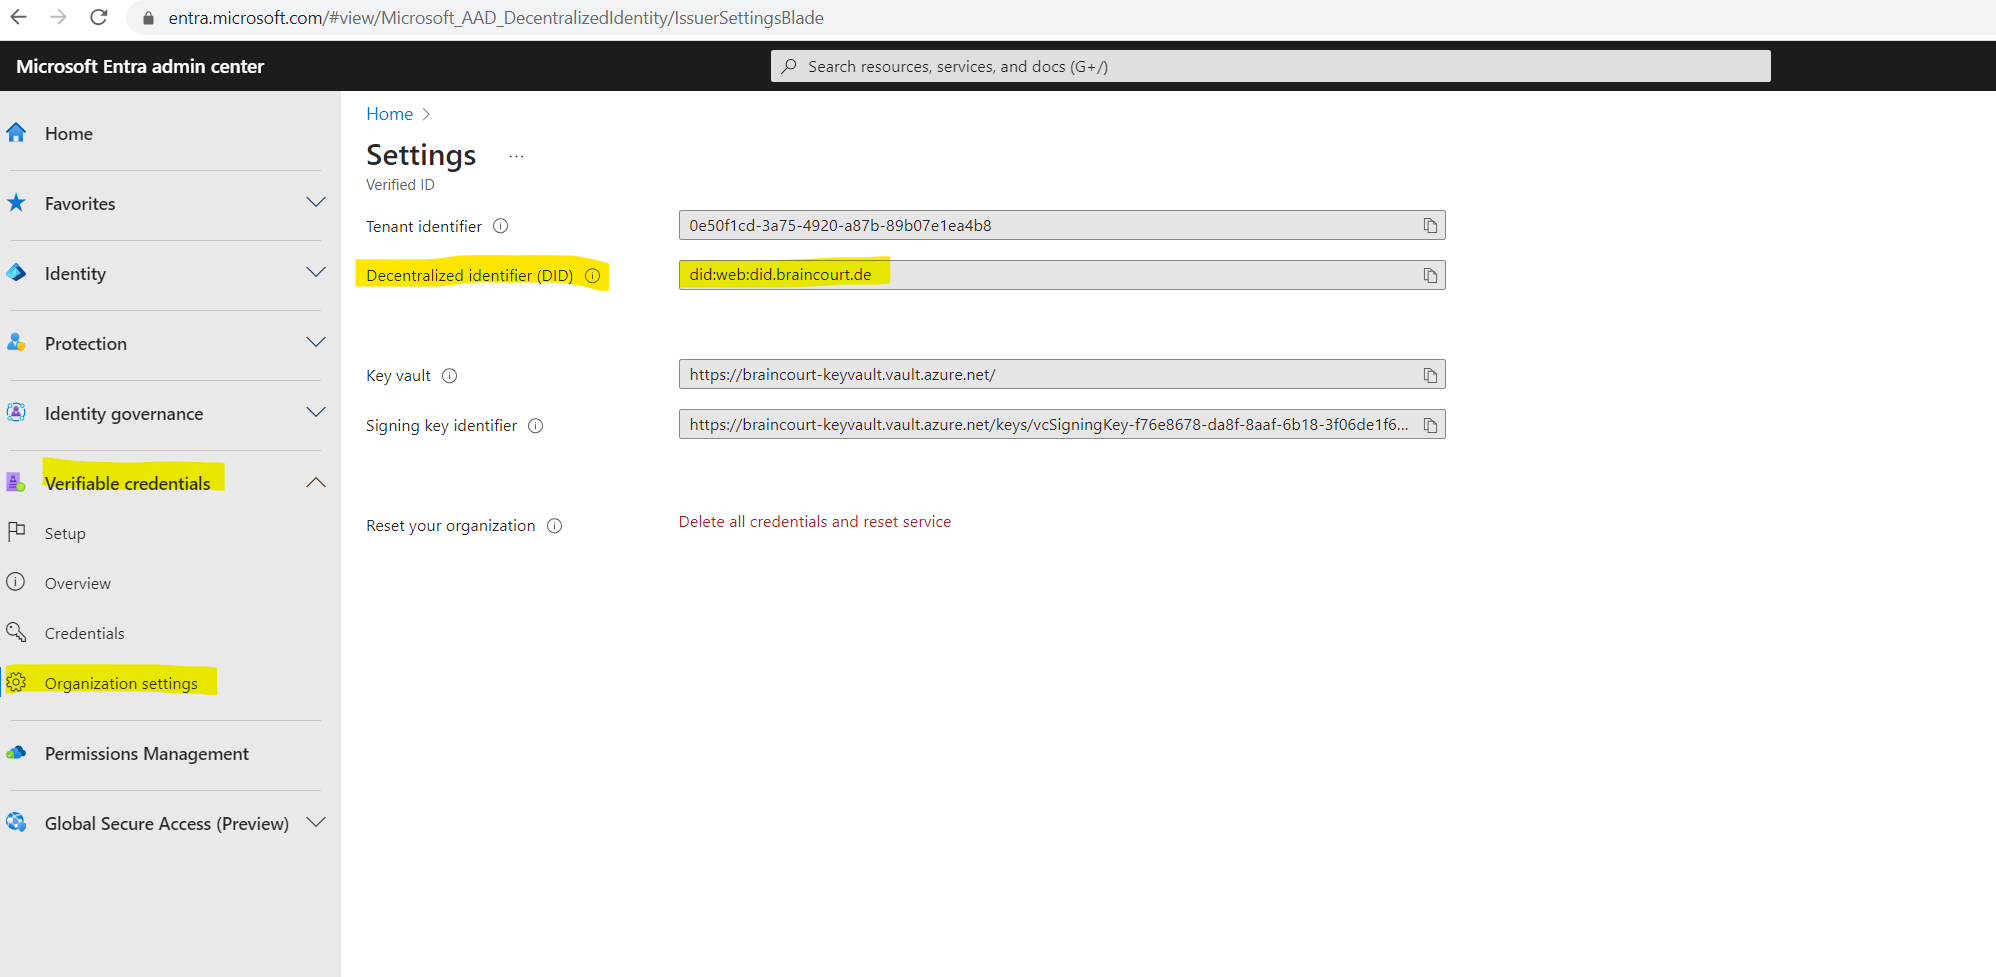
In the first step for the manual setup we need to configure the organization settings. Confirm your organization’s details, key vault, and Azure subscription information to create your organization’s Decentralized Identity (DID).
So I will click below on Configure.
Here we need to enter our organization name, our trusted domain and select or create a new key vault. In case you have also like me registered multiple custom domains in your tenant, use here the domain which is used for the user principal names in Microsoft Entra ID.
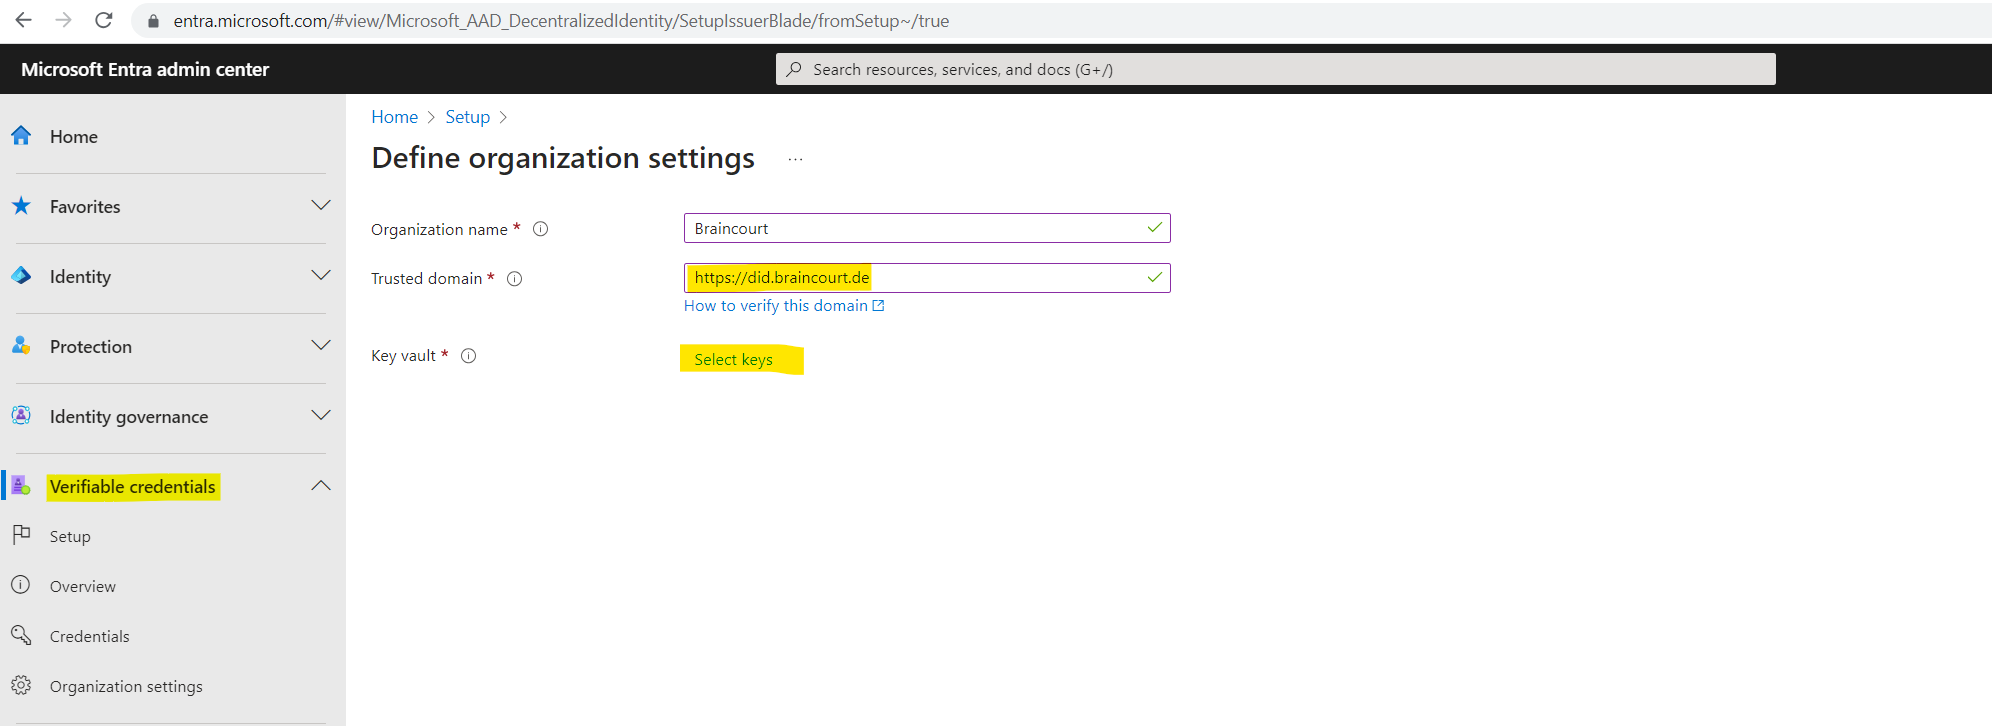
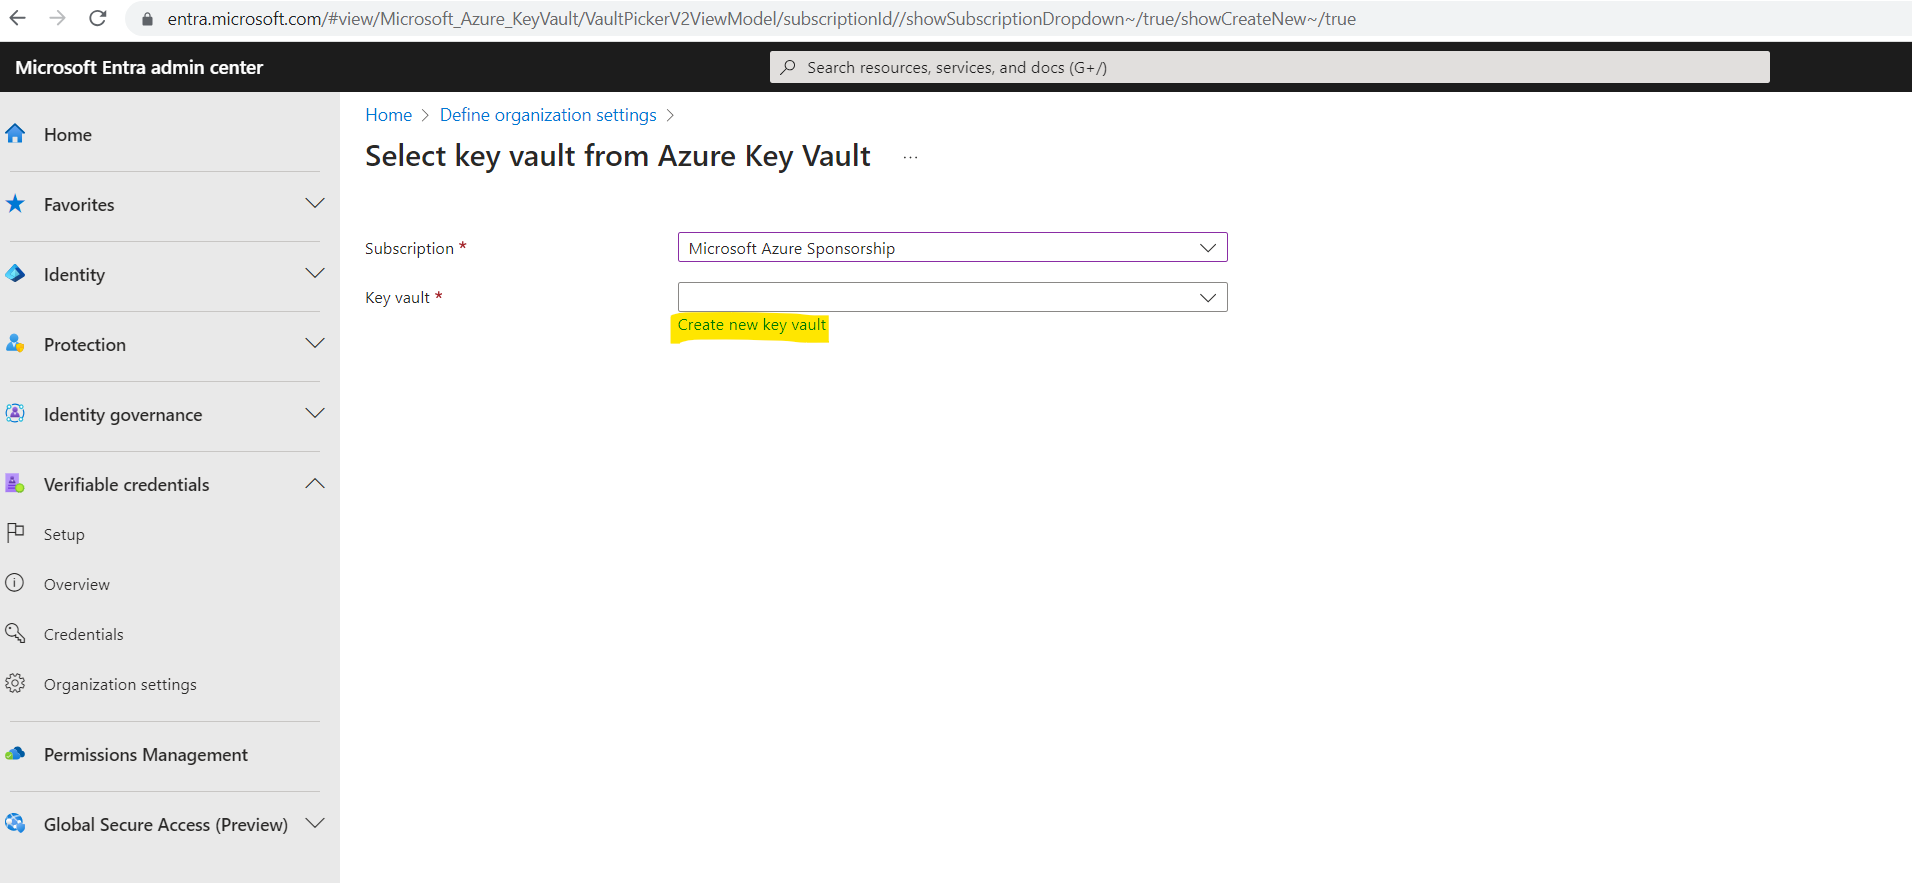
I will create a new dedicated key vault therefore.
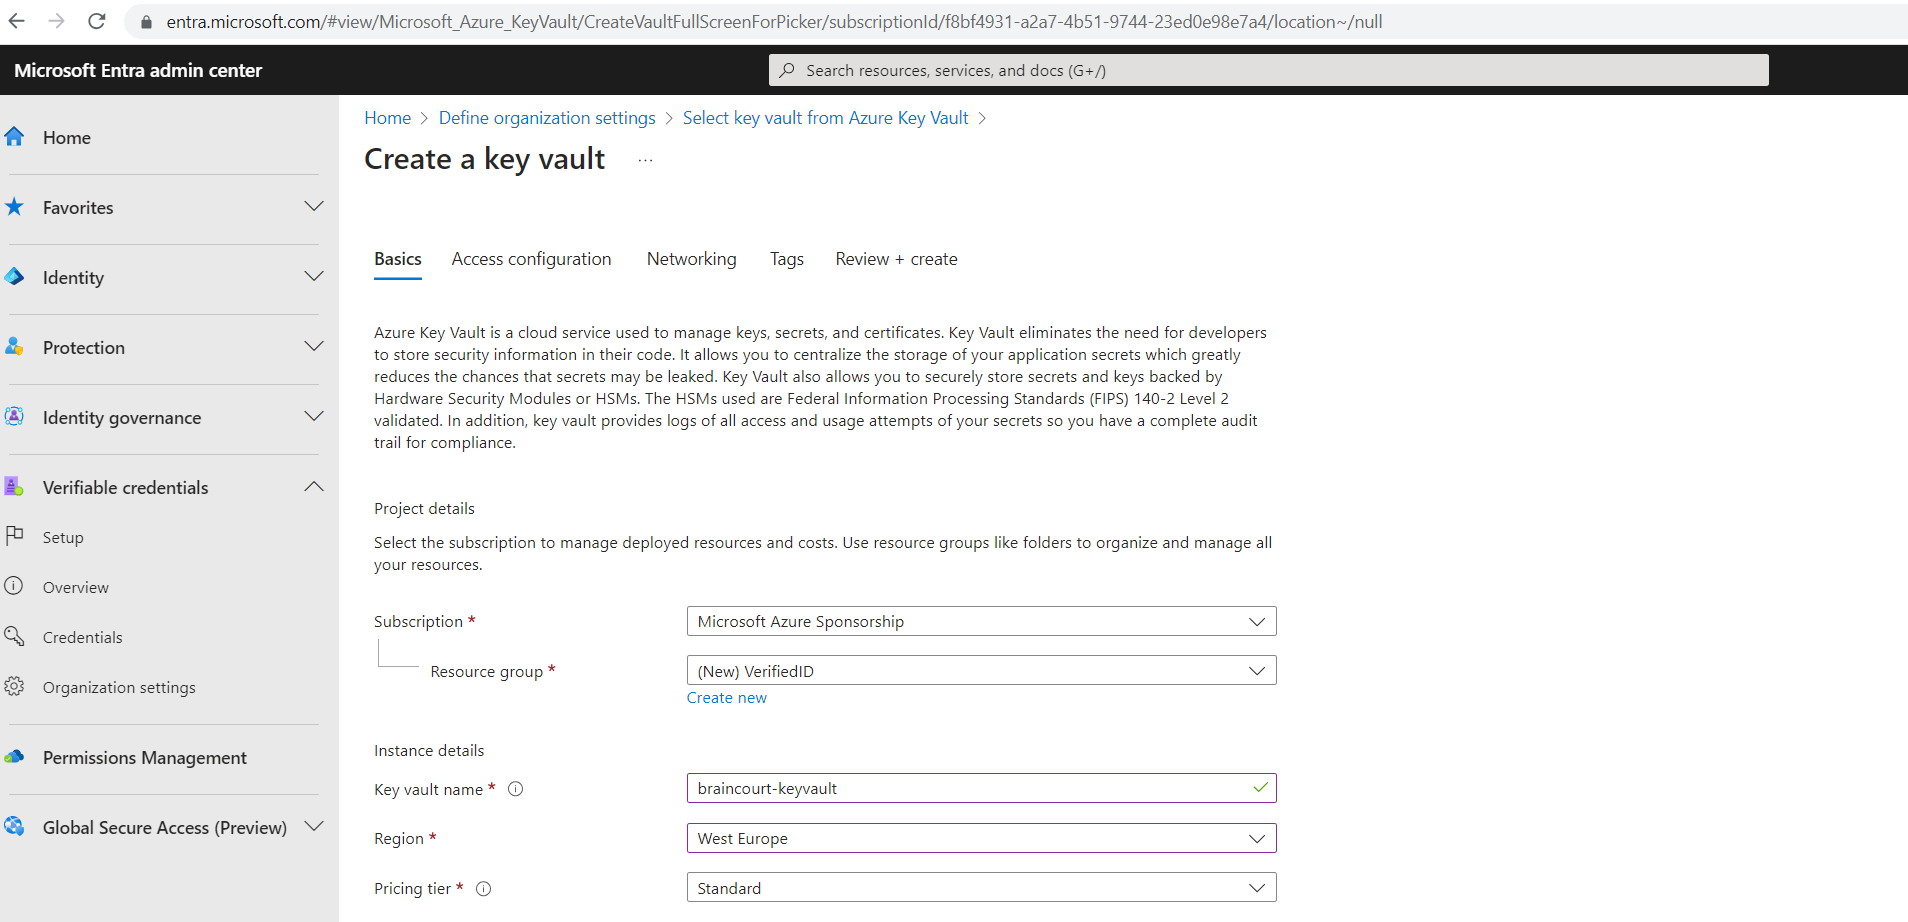
Now I can save the organization settings.
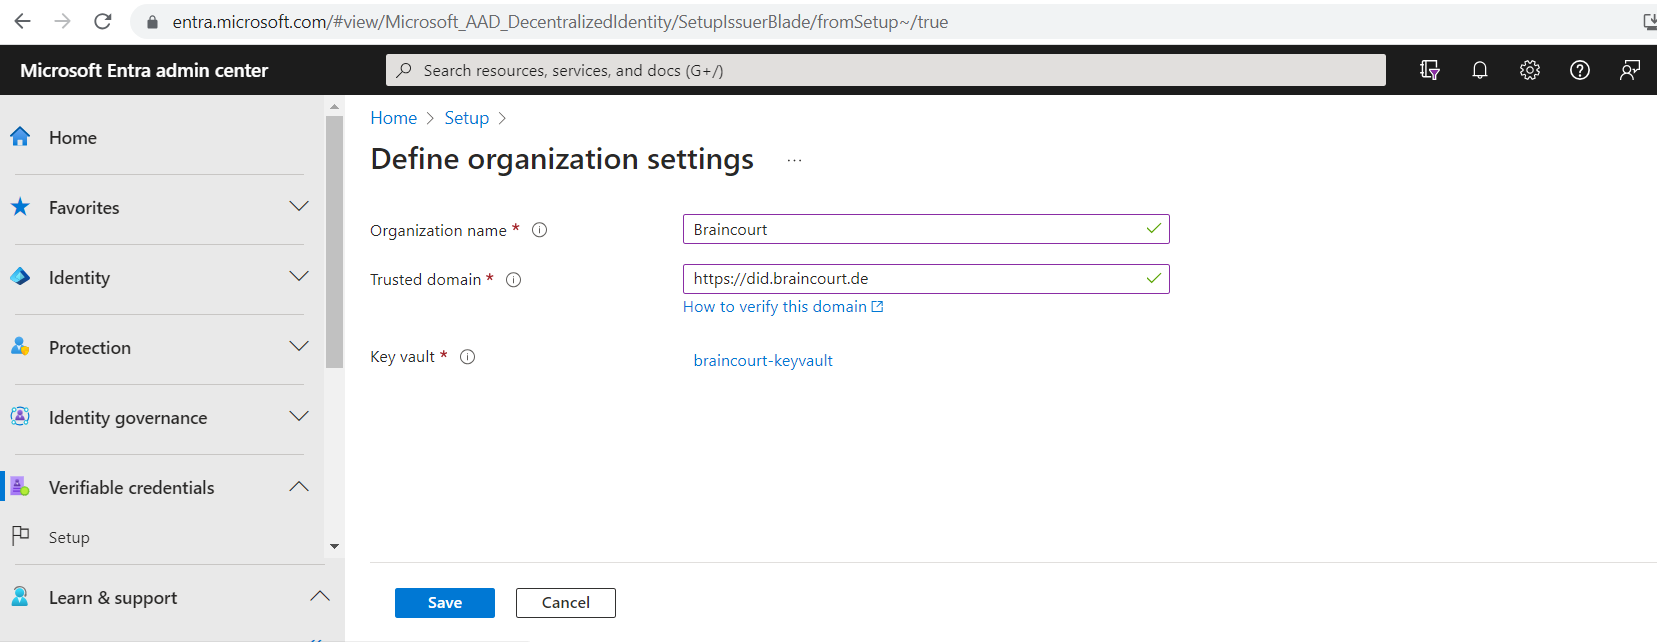
After saving I was getting this error, so first we need to configure access for the Verified ID Admin user.
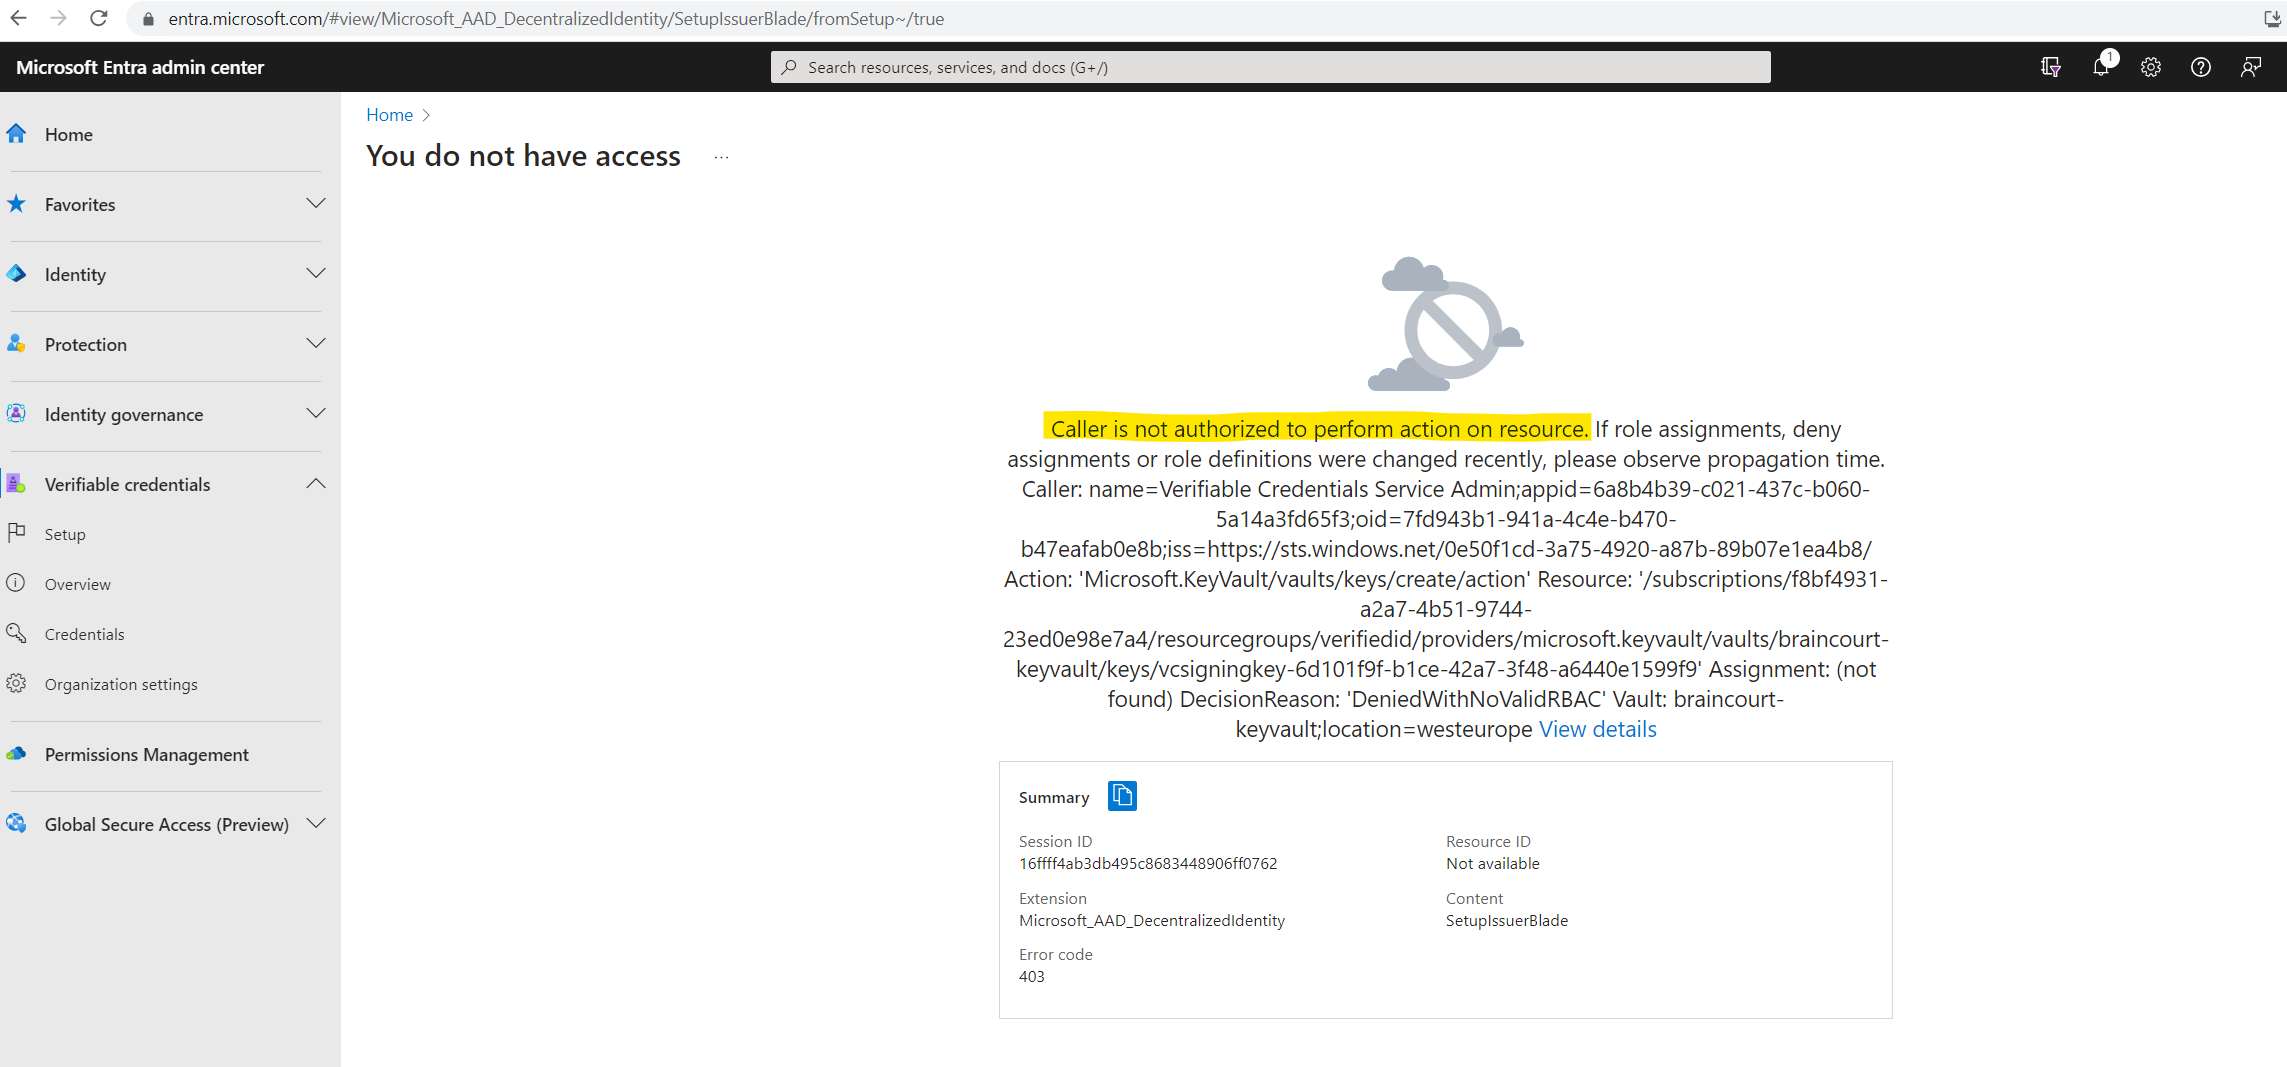
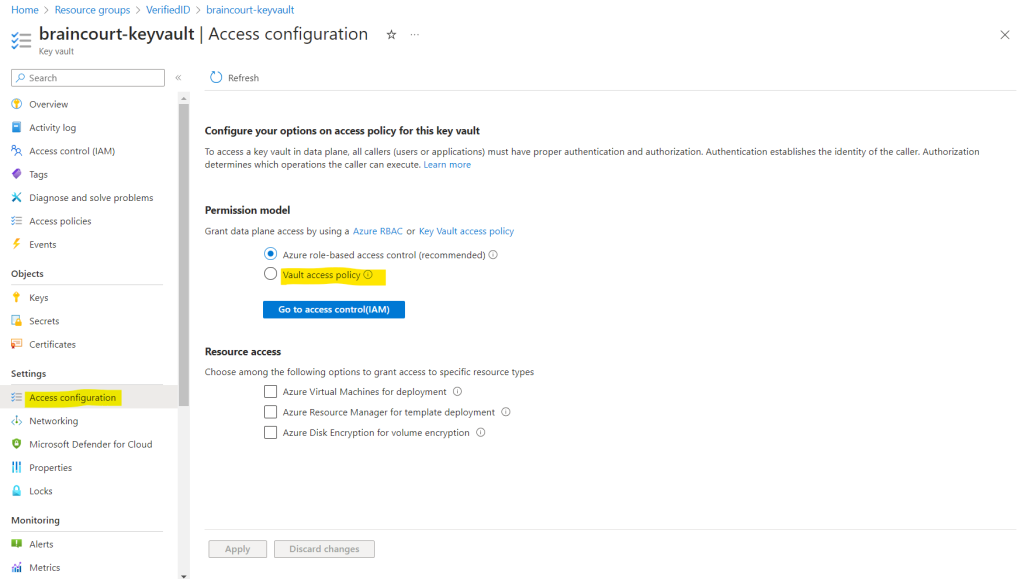
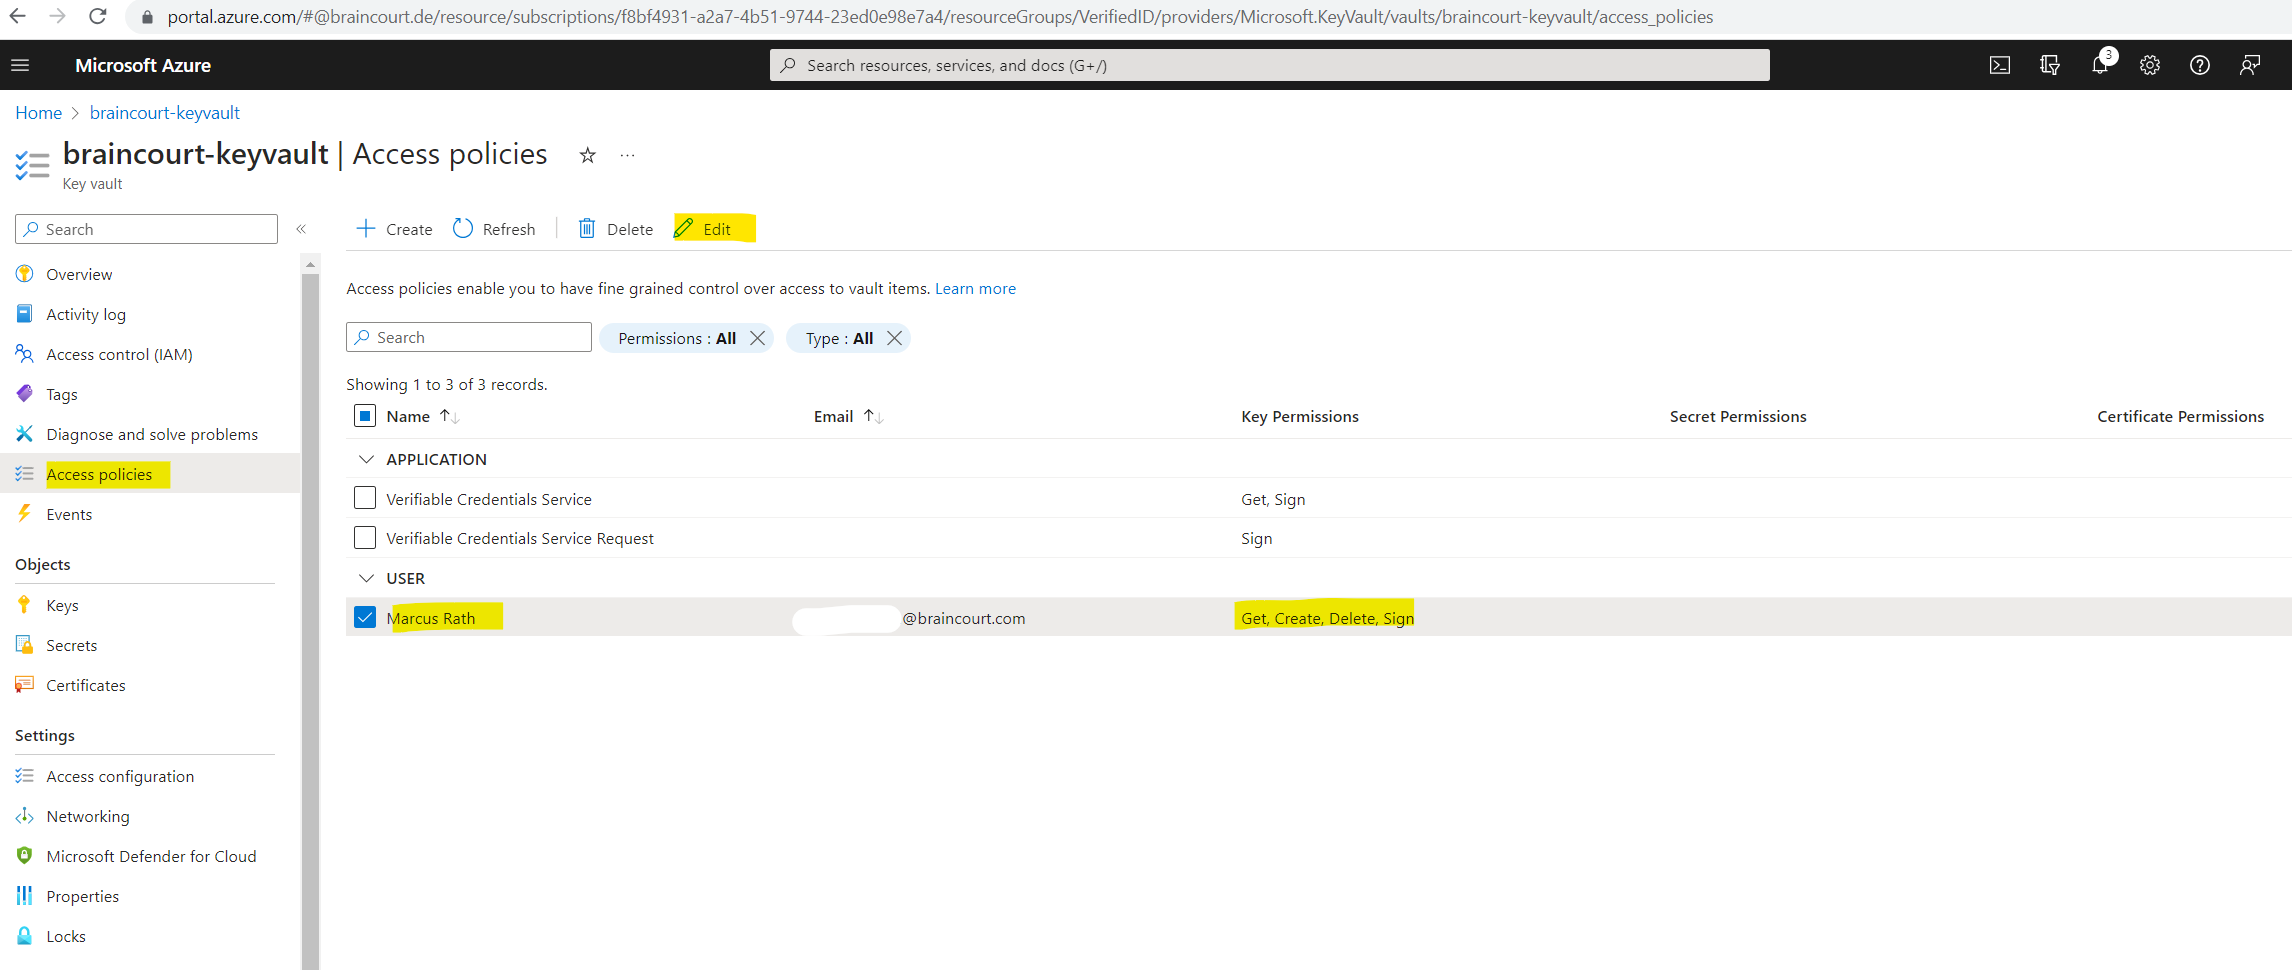
Therefore I will select Access policies on the left menu from the key vault.
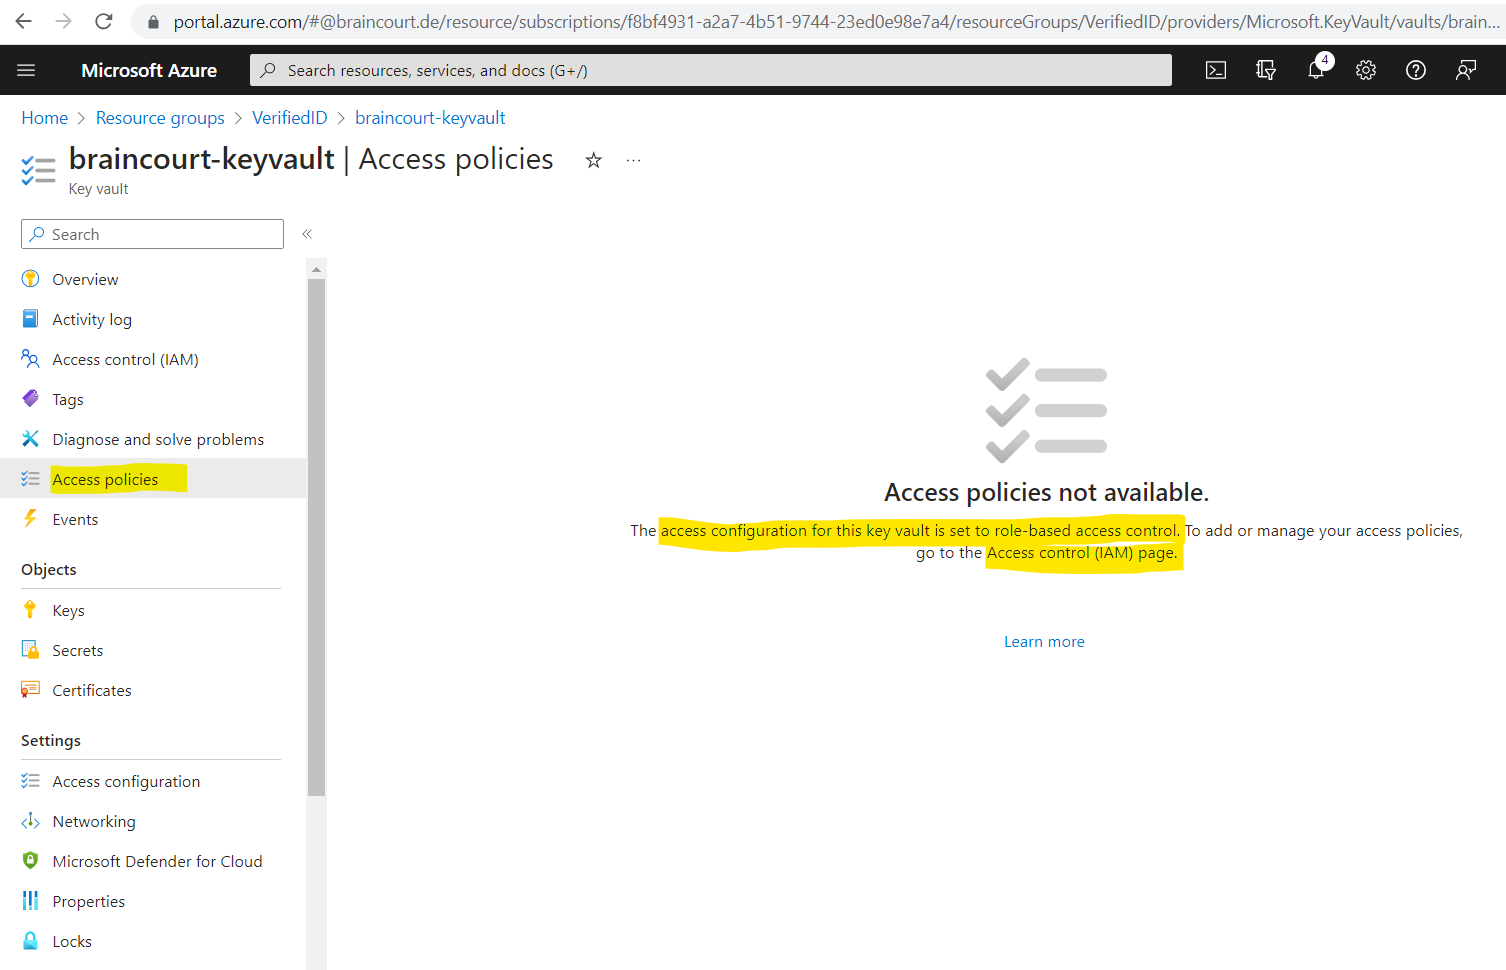
Instead of configuring role-based access by using the Access control (IAM) page, I will switch here the access configuration to use a vault access policy like using in the tutorial from the following Microsoft article.
Manual Microsoft Entra Verified ID setup
https://learn.microsoft.com/en-us/entra/verified-id/verifiable-credentials-configure-tenant
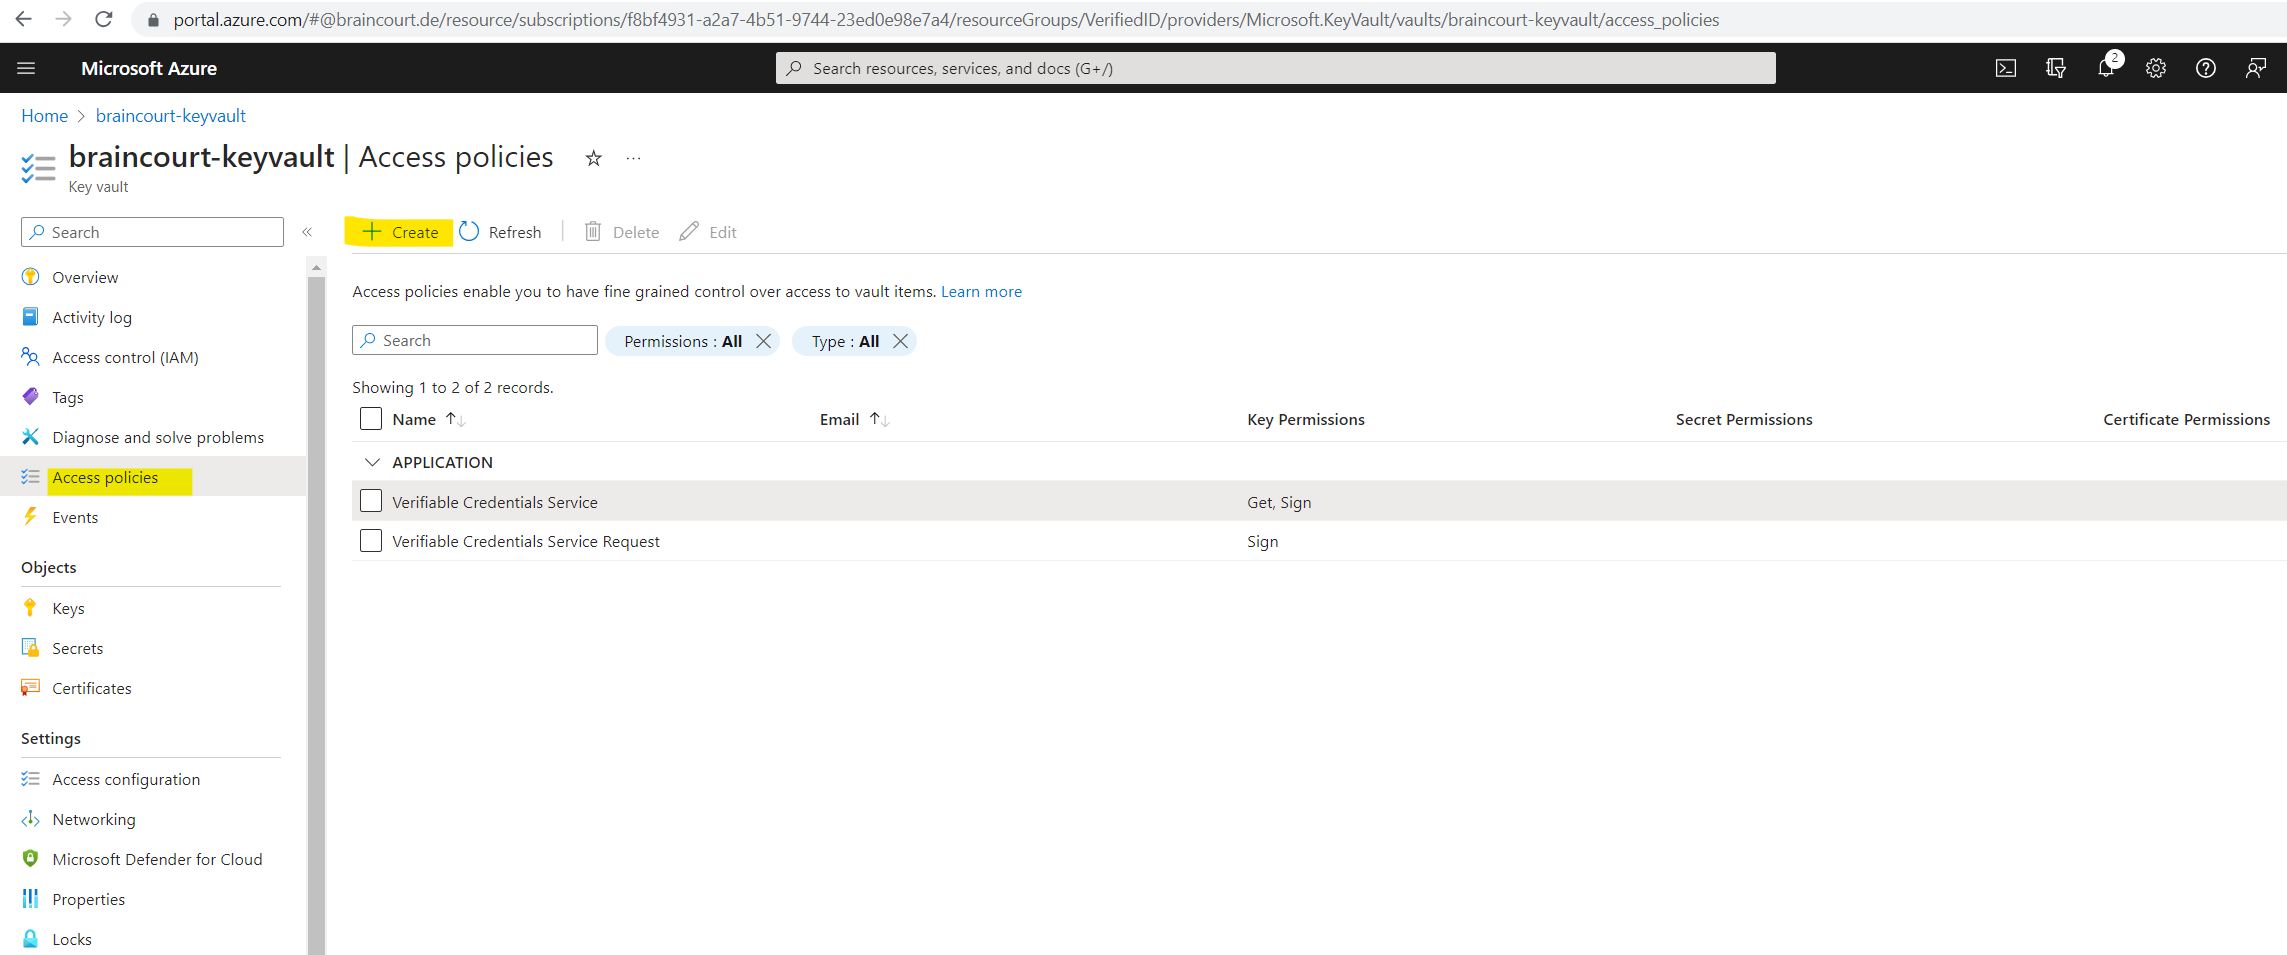
Now I can create a new access policy.
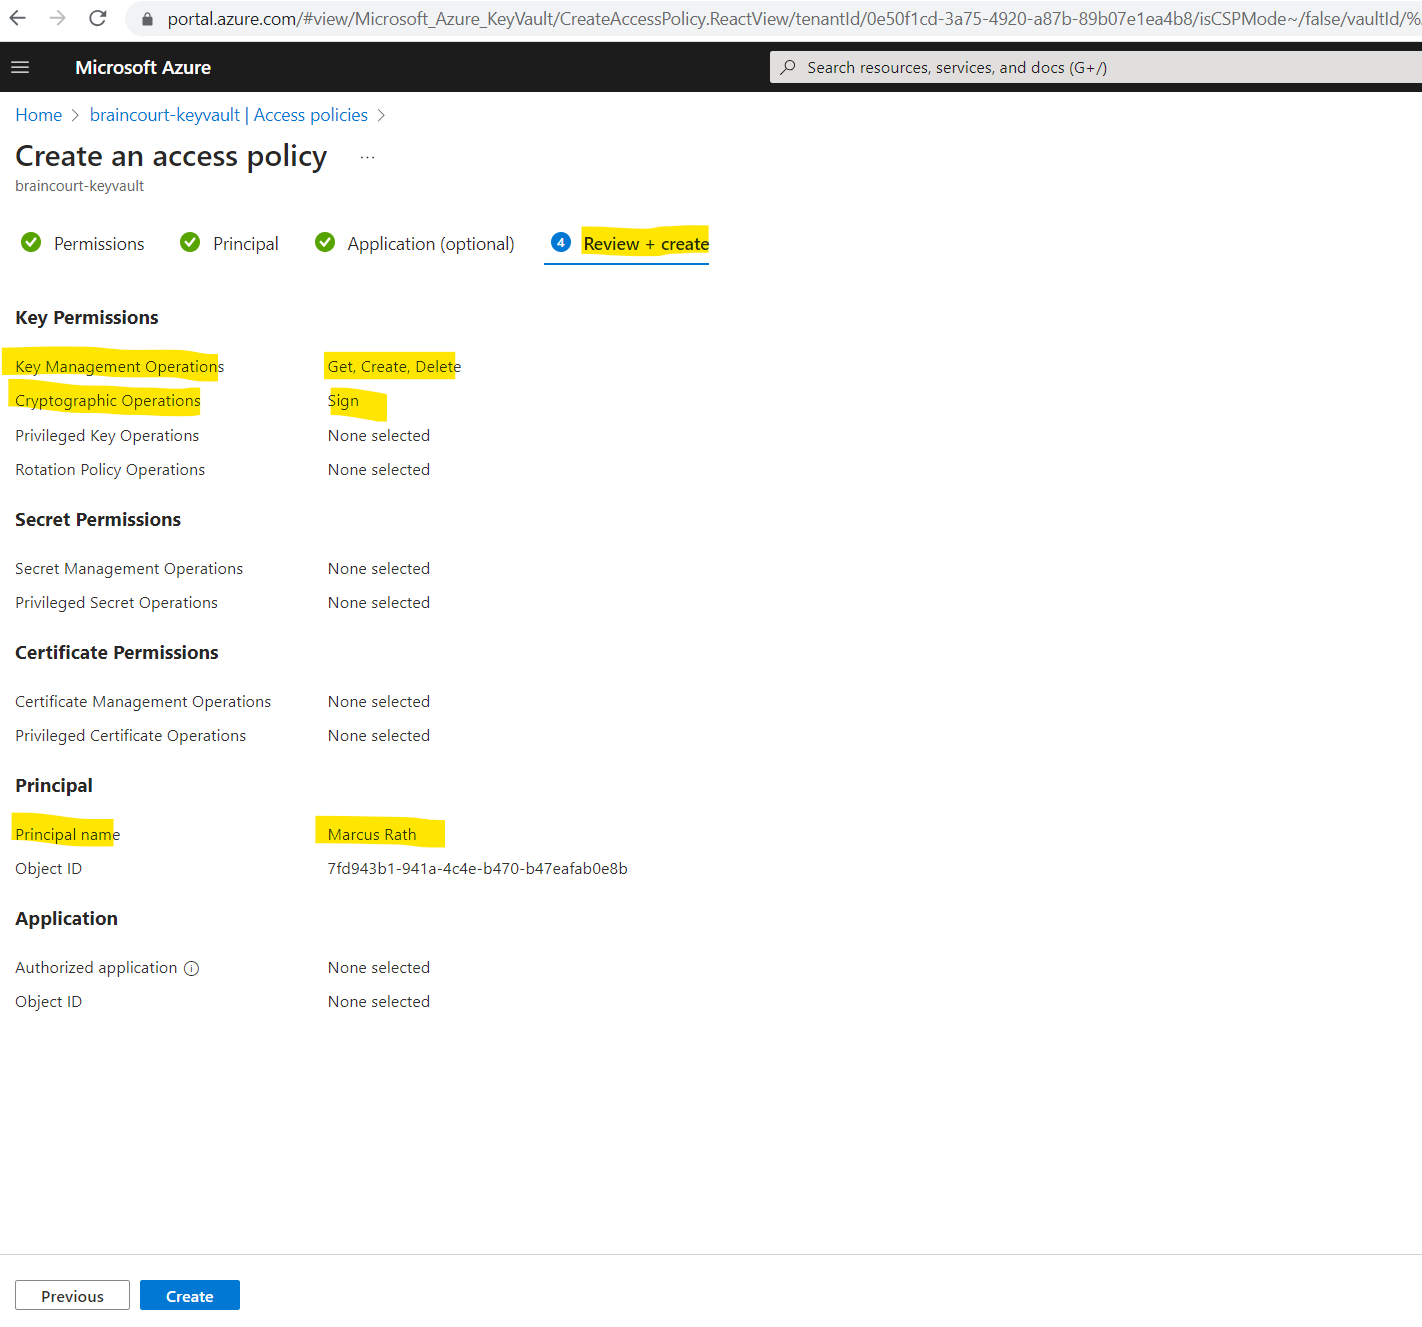
For Key permissions, verify that the following permissions are selected: Get, Create, Delete, and Sign. By default, Create and Delete are already enabled. Sign should be the only key permission you need to update.

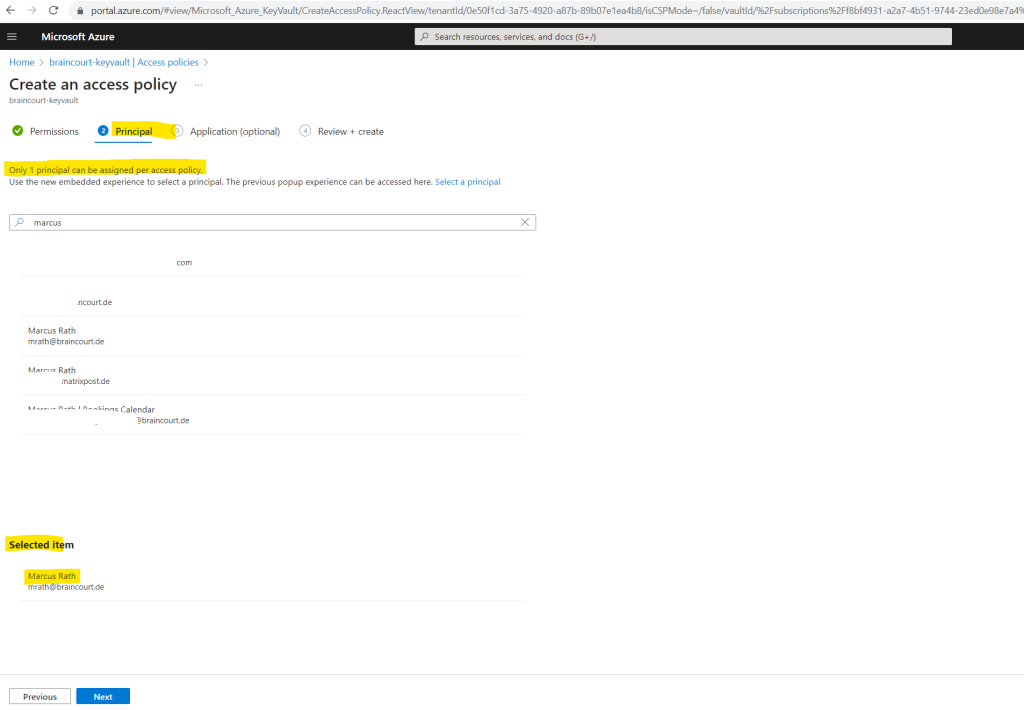
Under the Principal tab select the user you use to configure Verified ID. The next Application tab you can skip.
Finally we can review and create our new access policy for the key vault.

So by now I should be able to complete the previously step to configure the organization settings. Let’s try it again by clicking on Save. Unfortunately we first need to enter and select the information again.
This step will create our organization’s Decentralized Identity (DID).
Looks good!
The first step completed successfully.
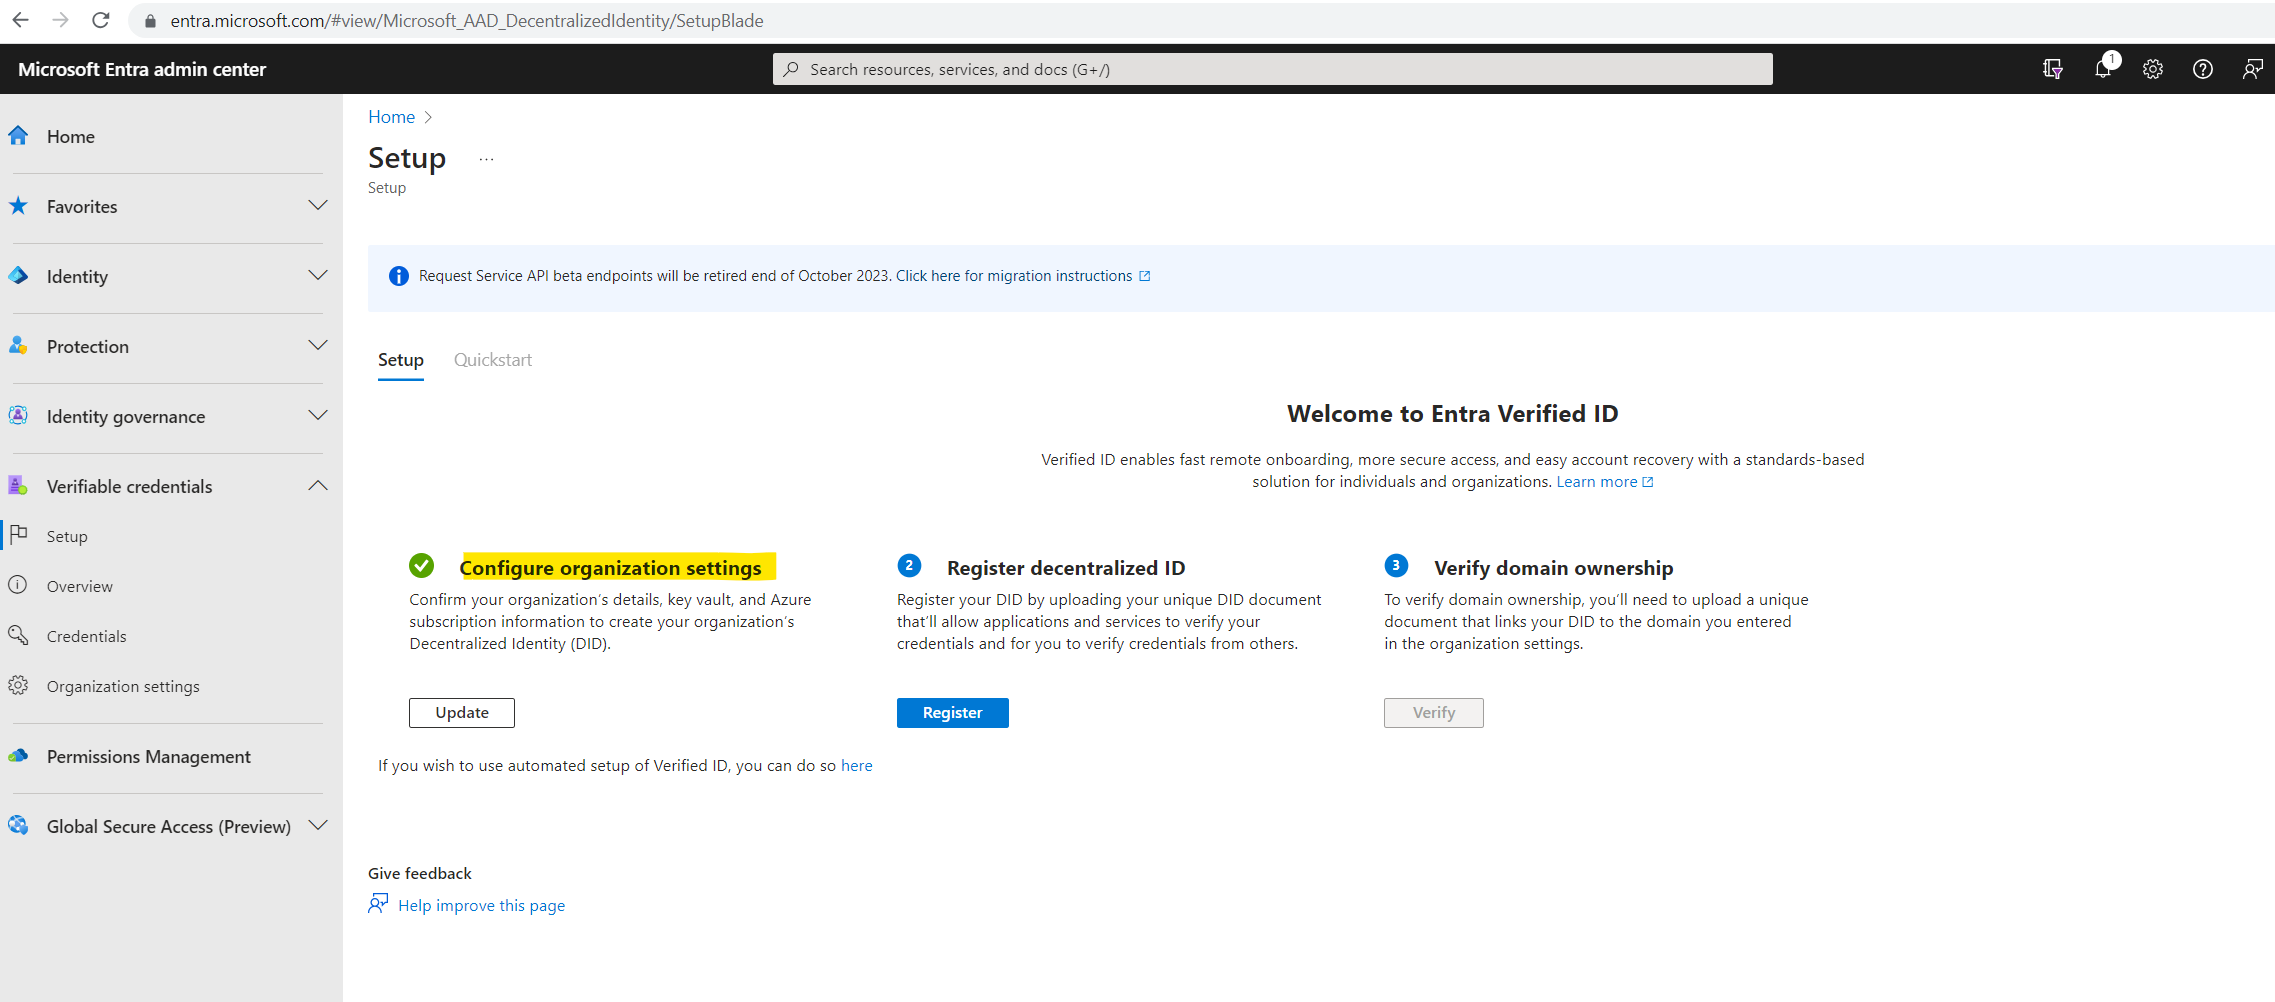
Now I will register my previously created decentralized ID by clicking on Register.
Register your DID by uploading your unique DID document that’ll allow applications and services to verify your credentials and for you to verify credentials from others.

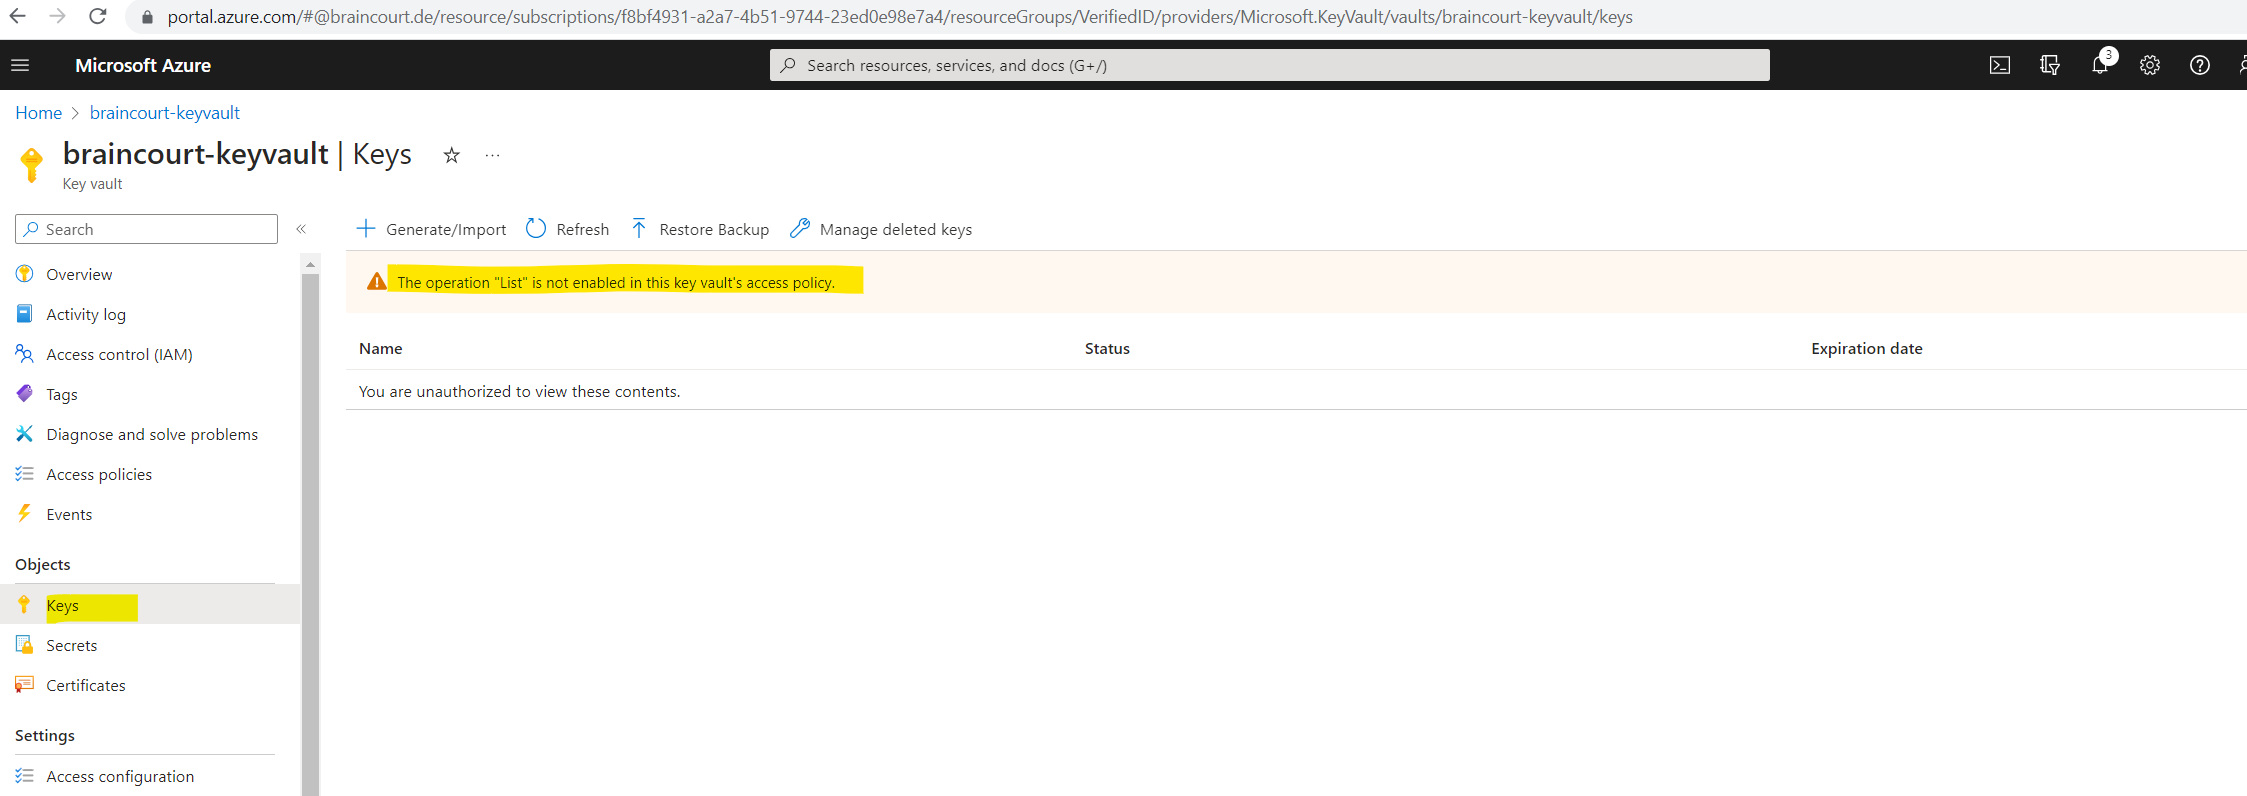
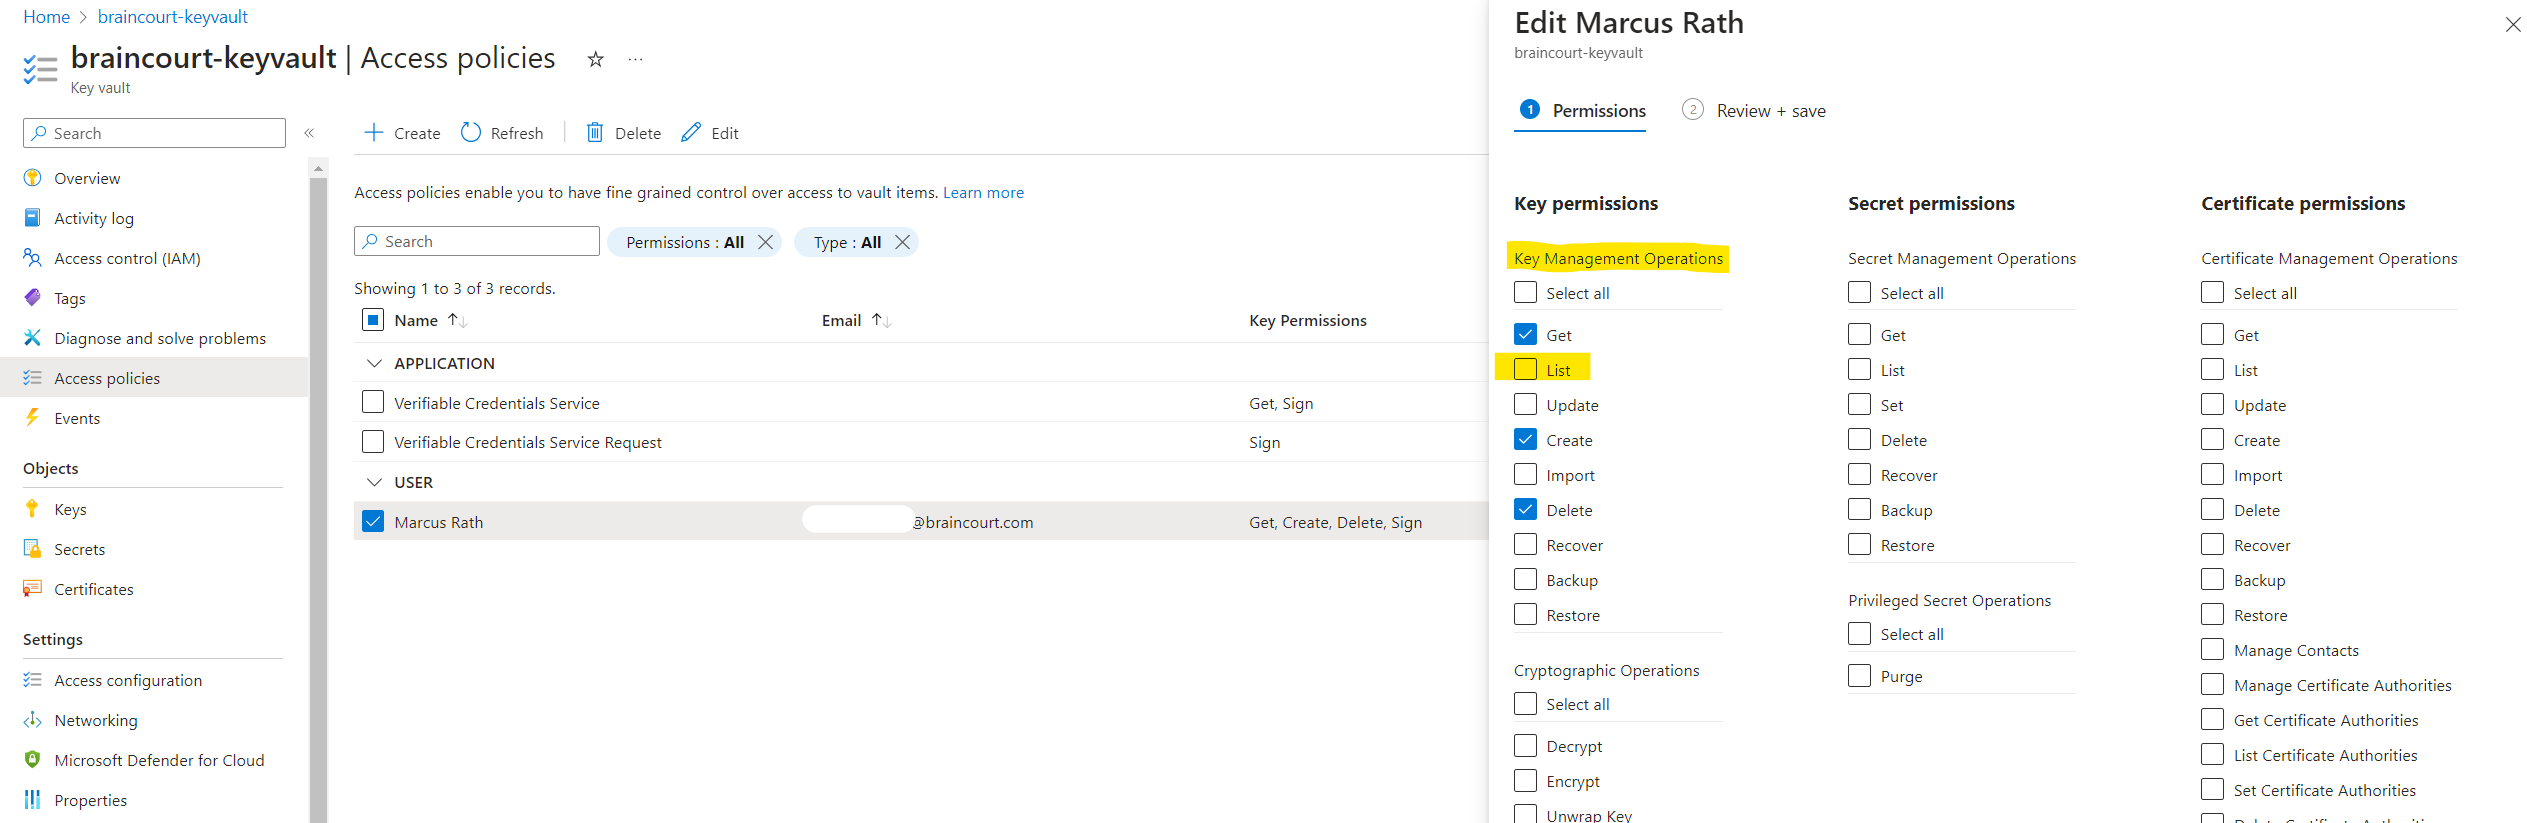
Look like our previously created access policy allow needs to allow the List operation for the key vault.
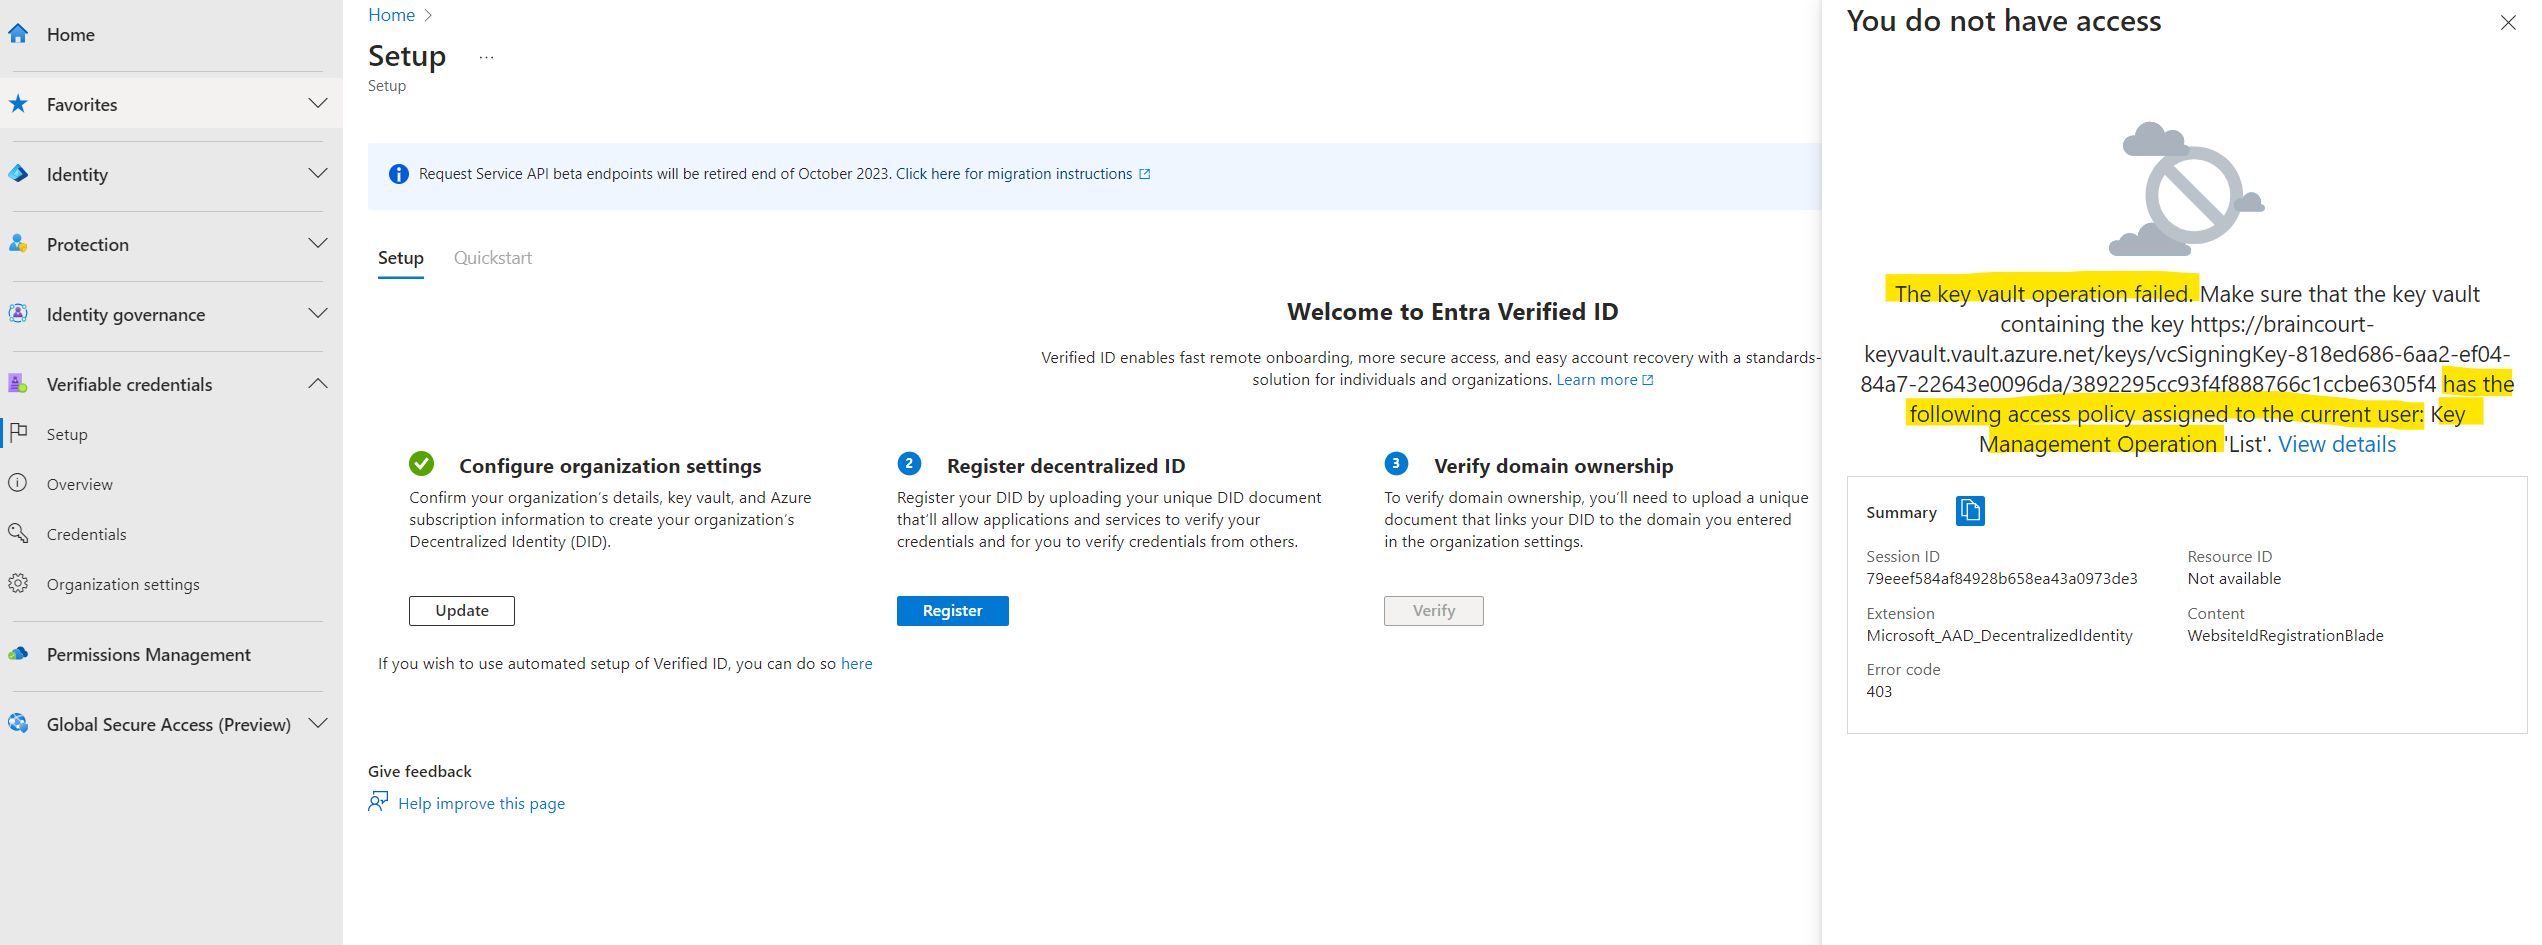
In order to list the key for the previously created decentralized ID in my key vault, I will also need to allow the List operation in my access policy.
Therefore I will edit my access policy.
Here I will allow under Key Management Operations the List operation.
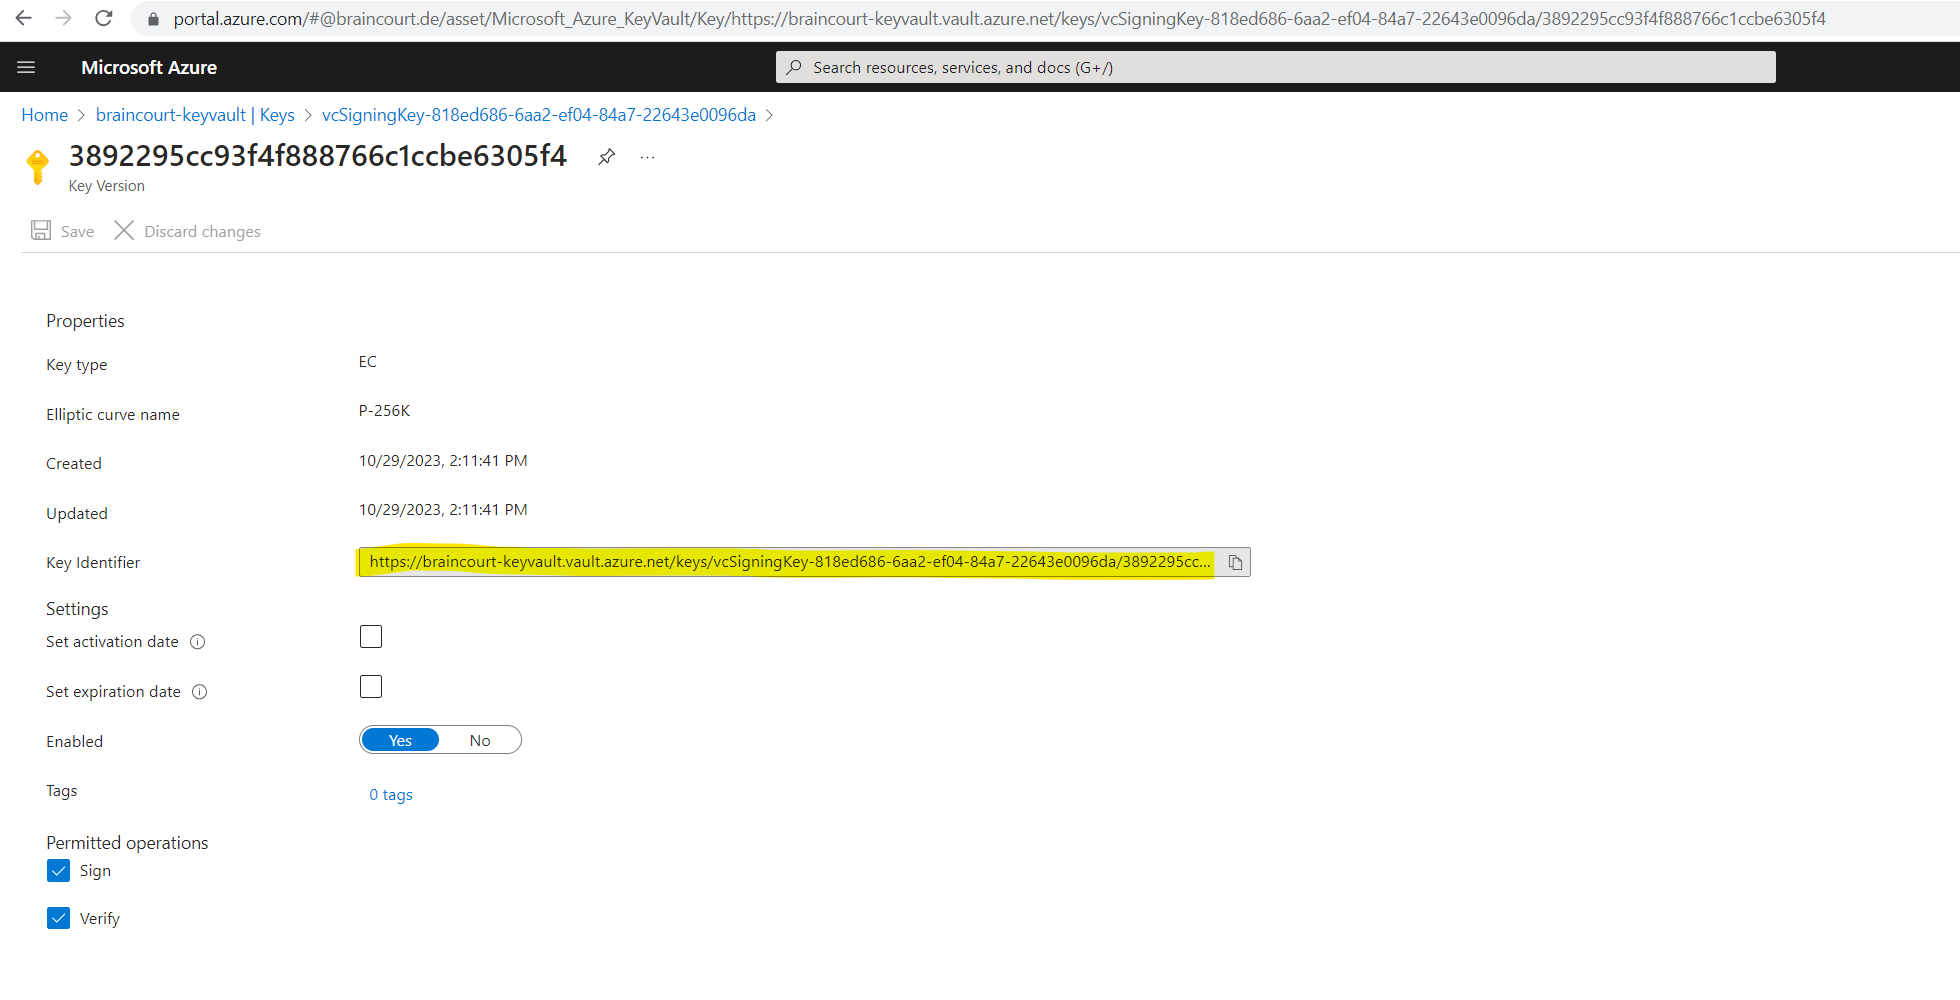
Now I can list the keys which are stored in this key vault.
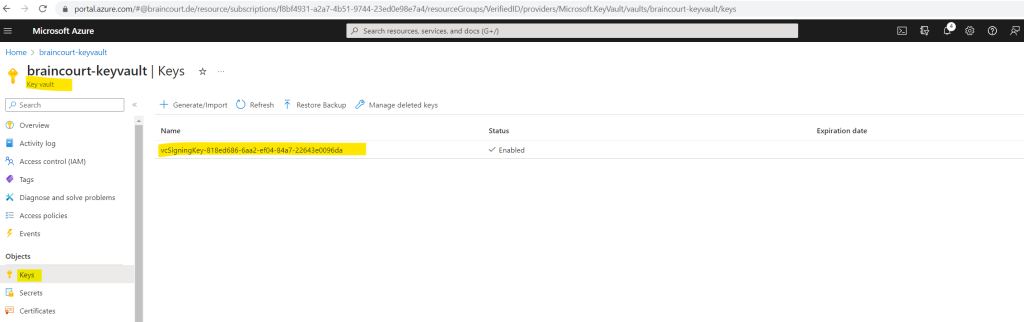
Here I can see that this is the key for which I was getting the previously You do not have access to message.
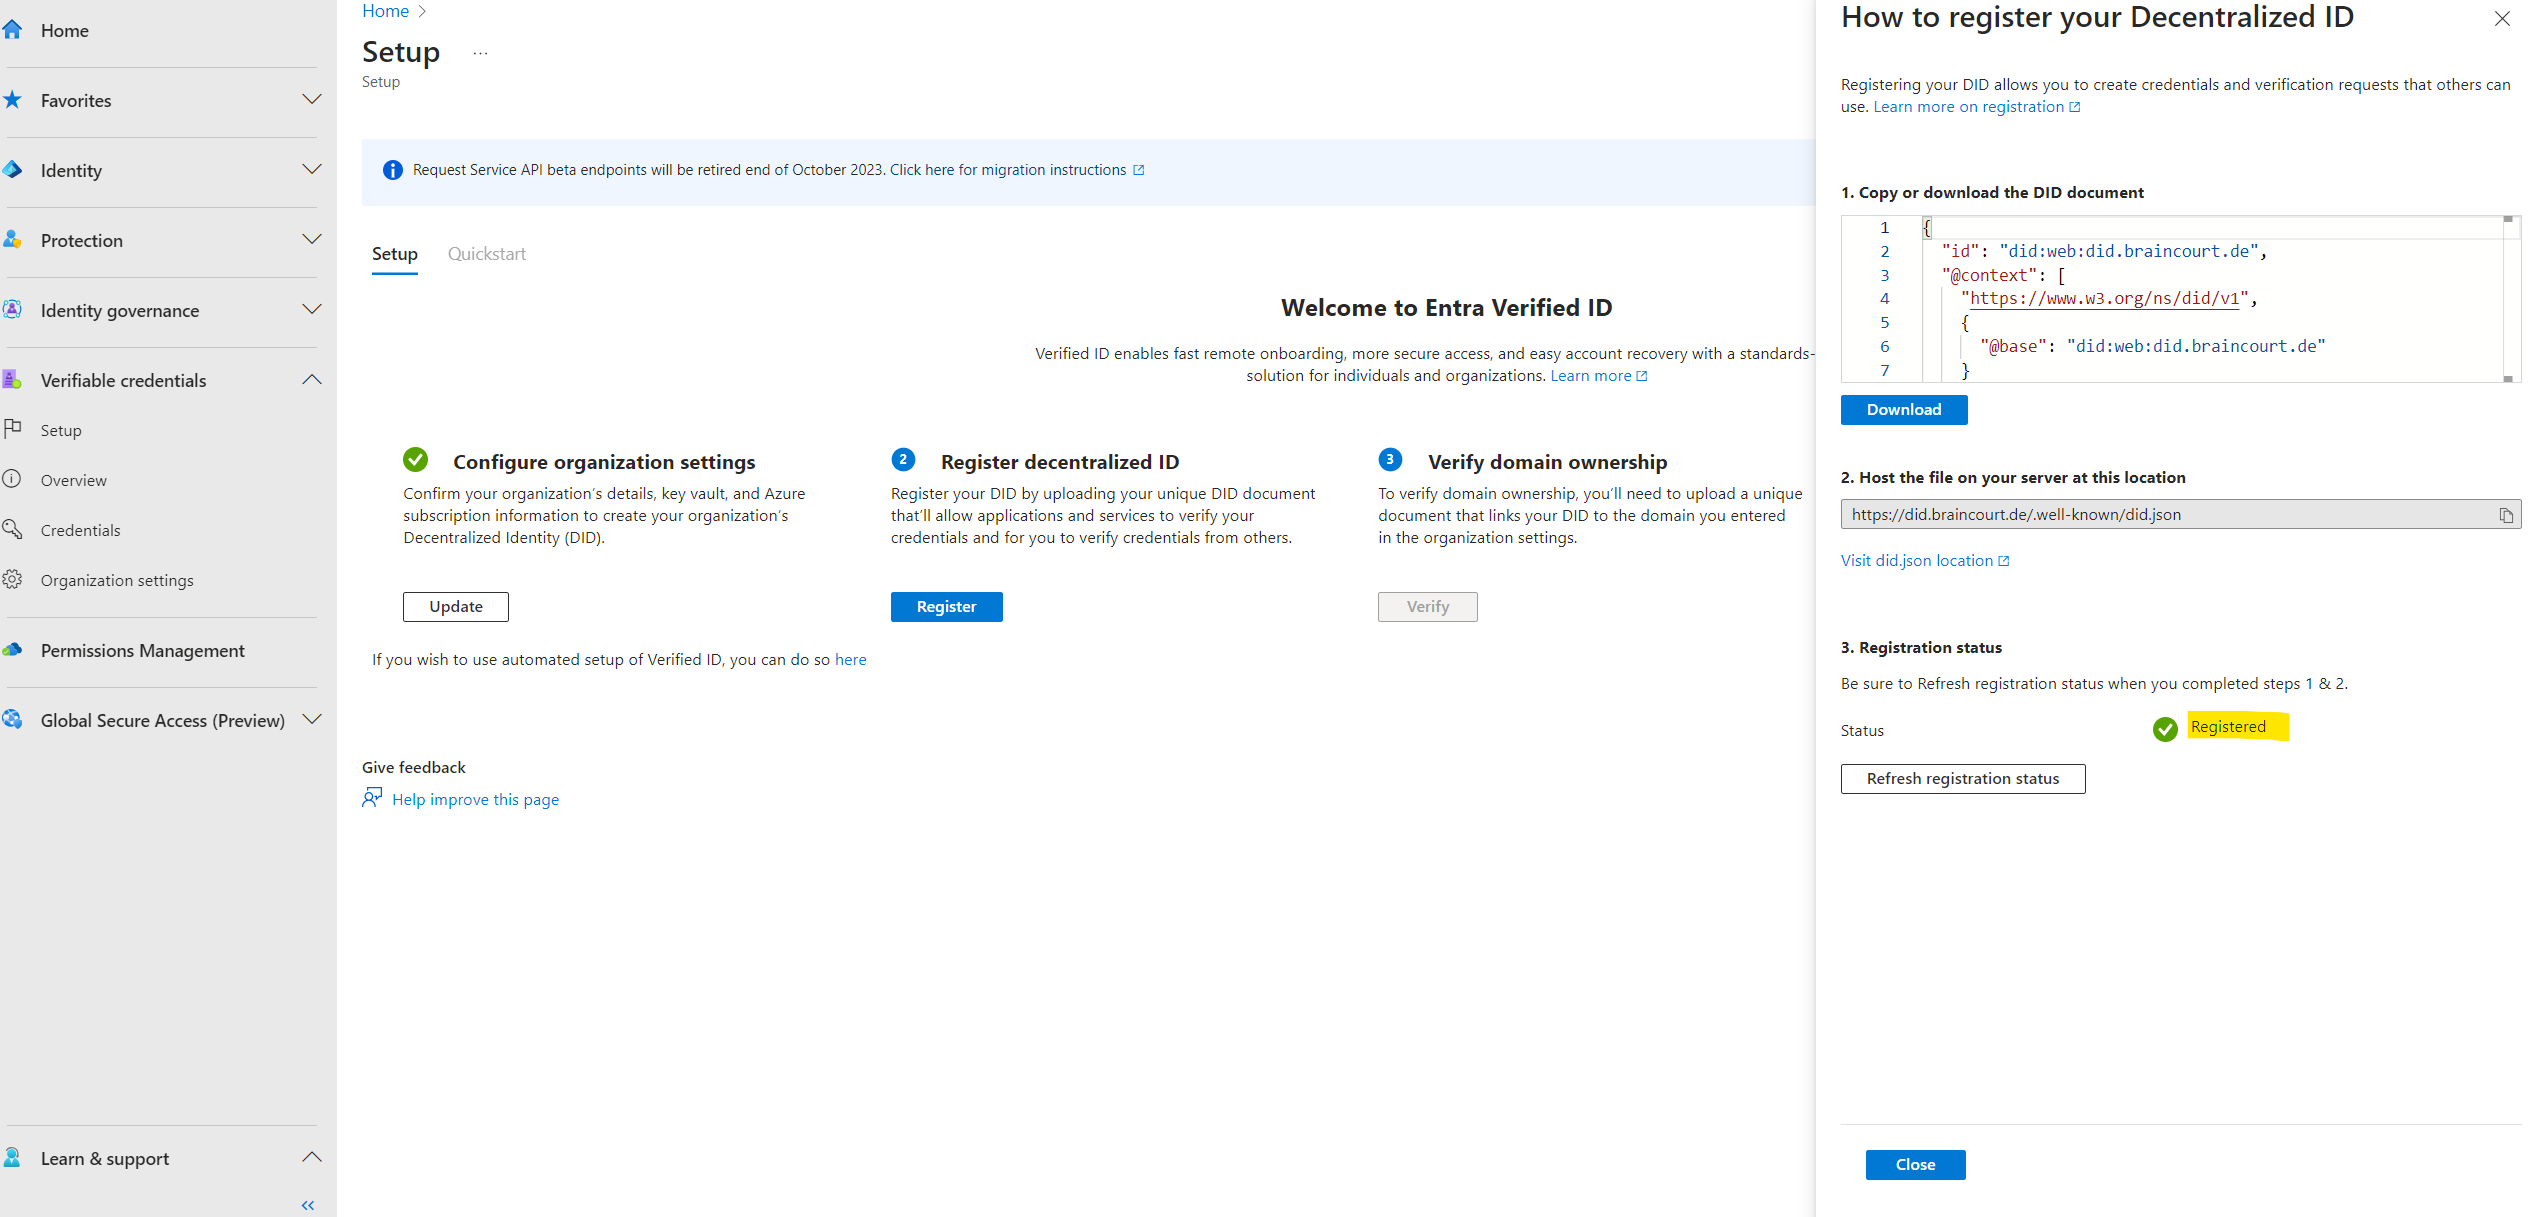
So let’s try again to register my decentralized ID by clicking on Register.
Look’s good.
Registering your DID allows you to create credentials and verification requests that others can use. Learn more on registration
Here I will first have to download the DID document which is a JSON file.
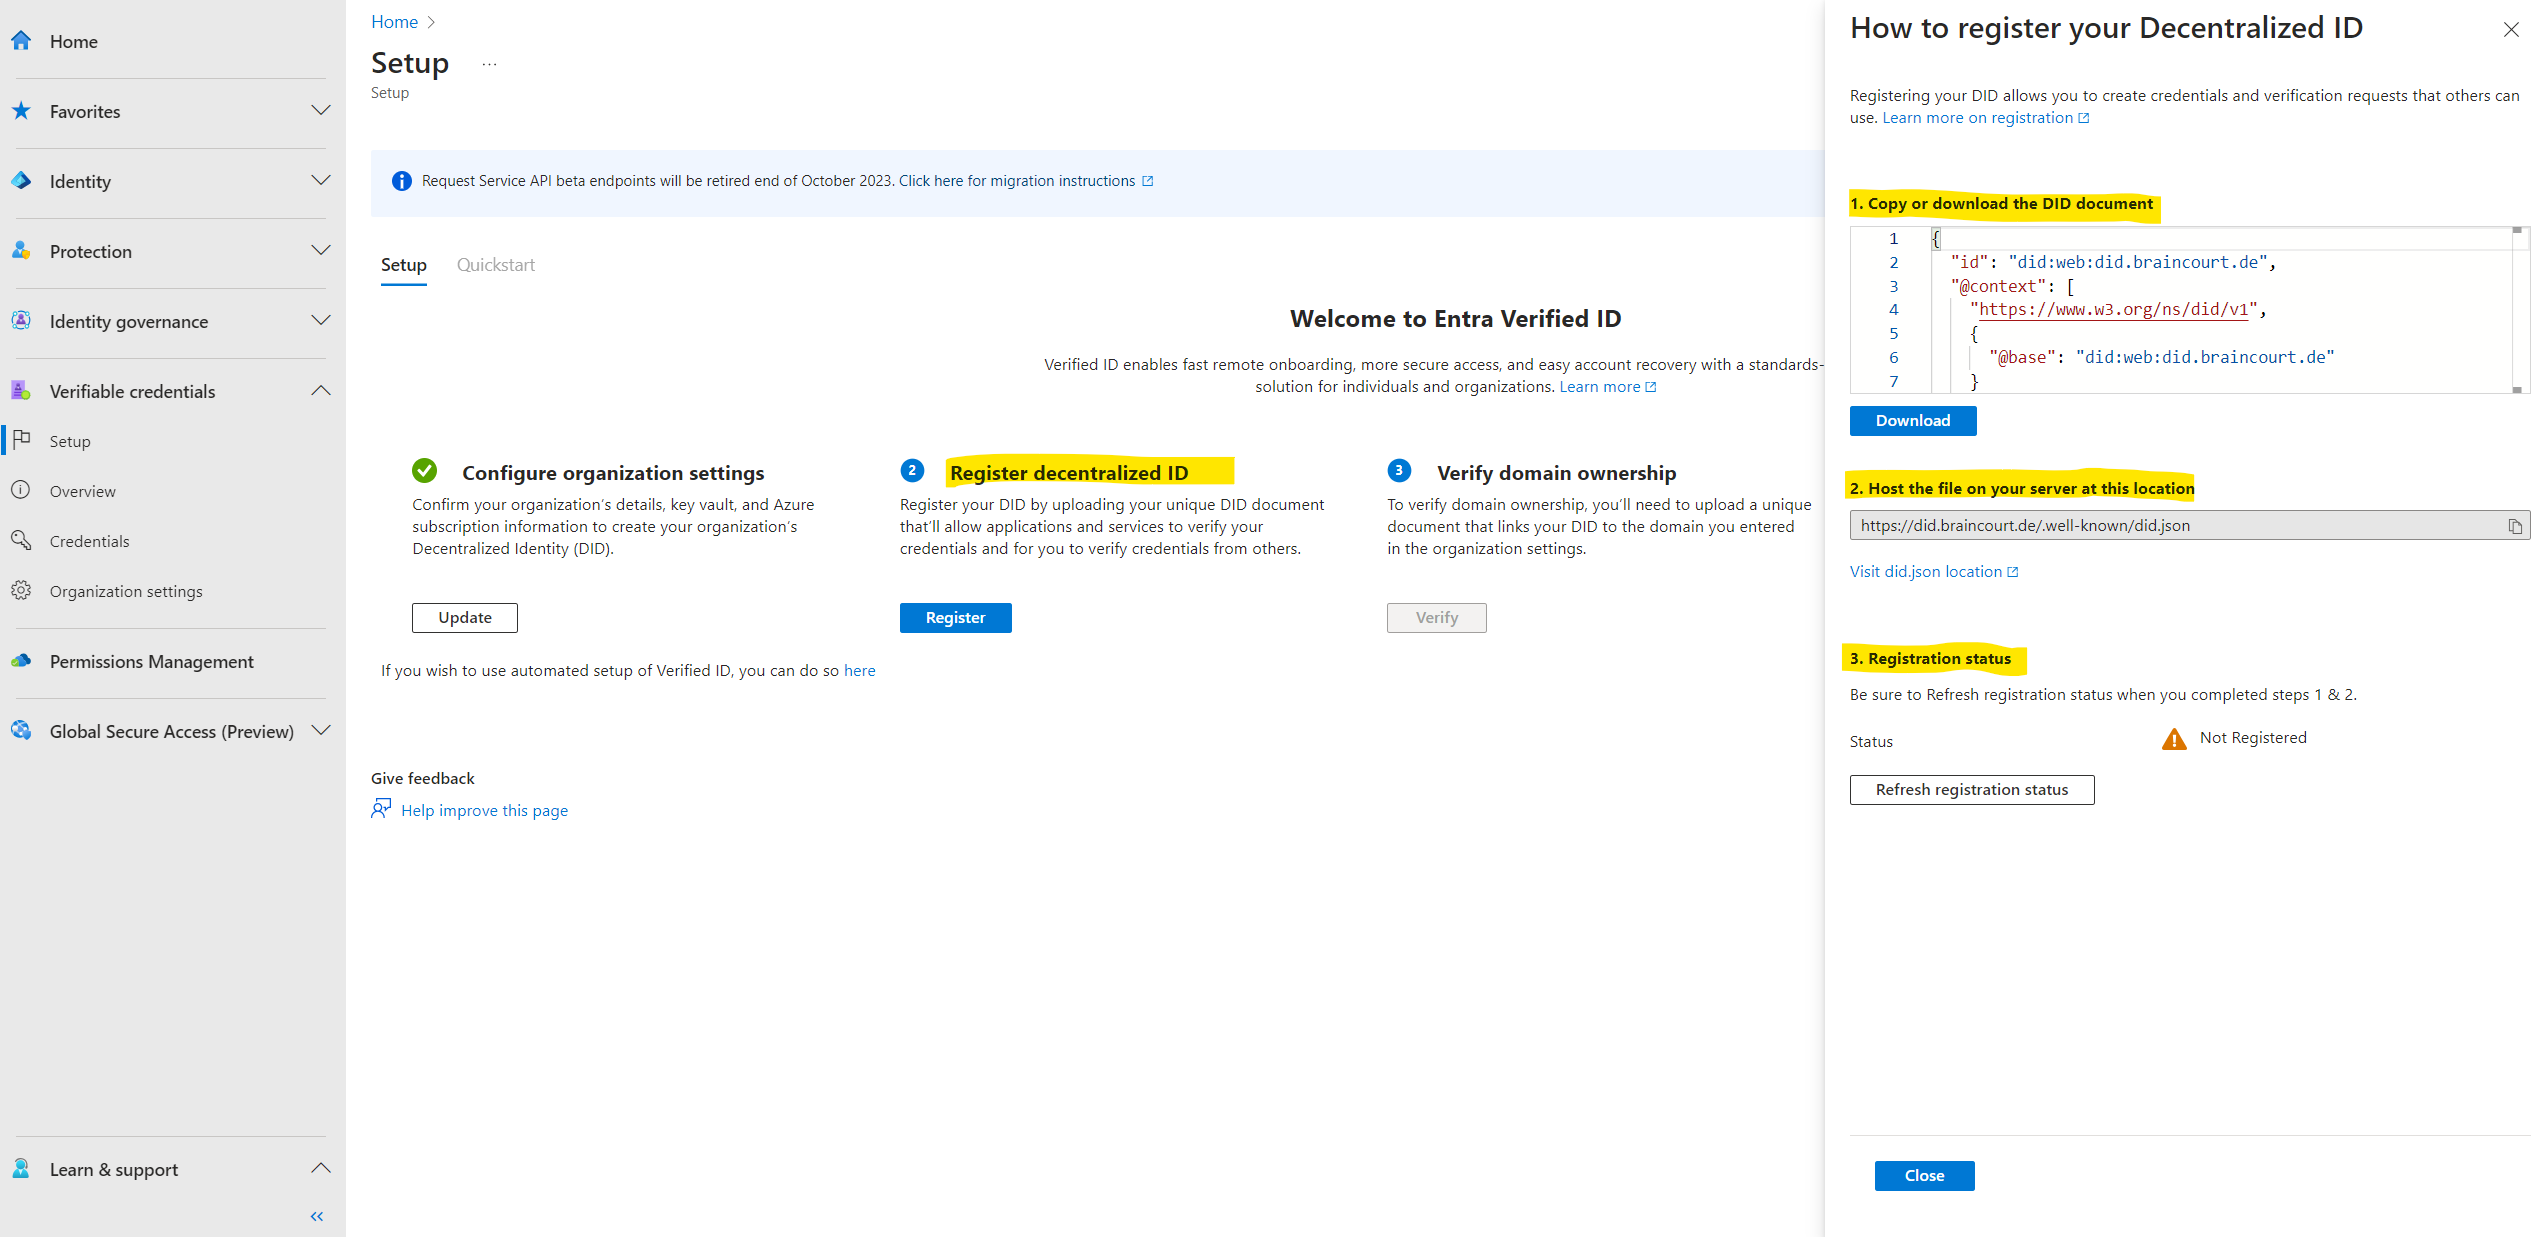
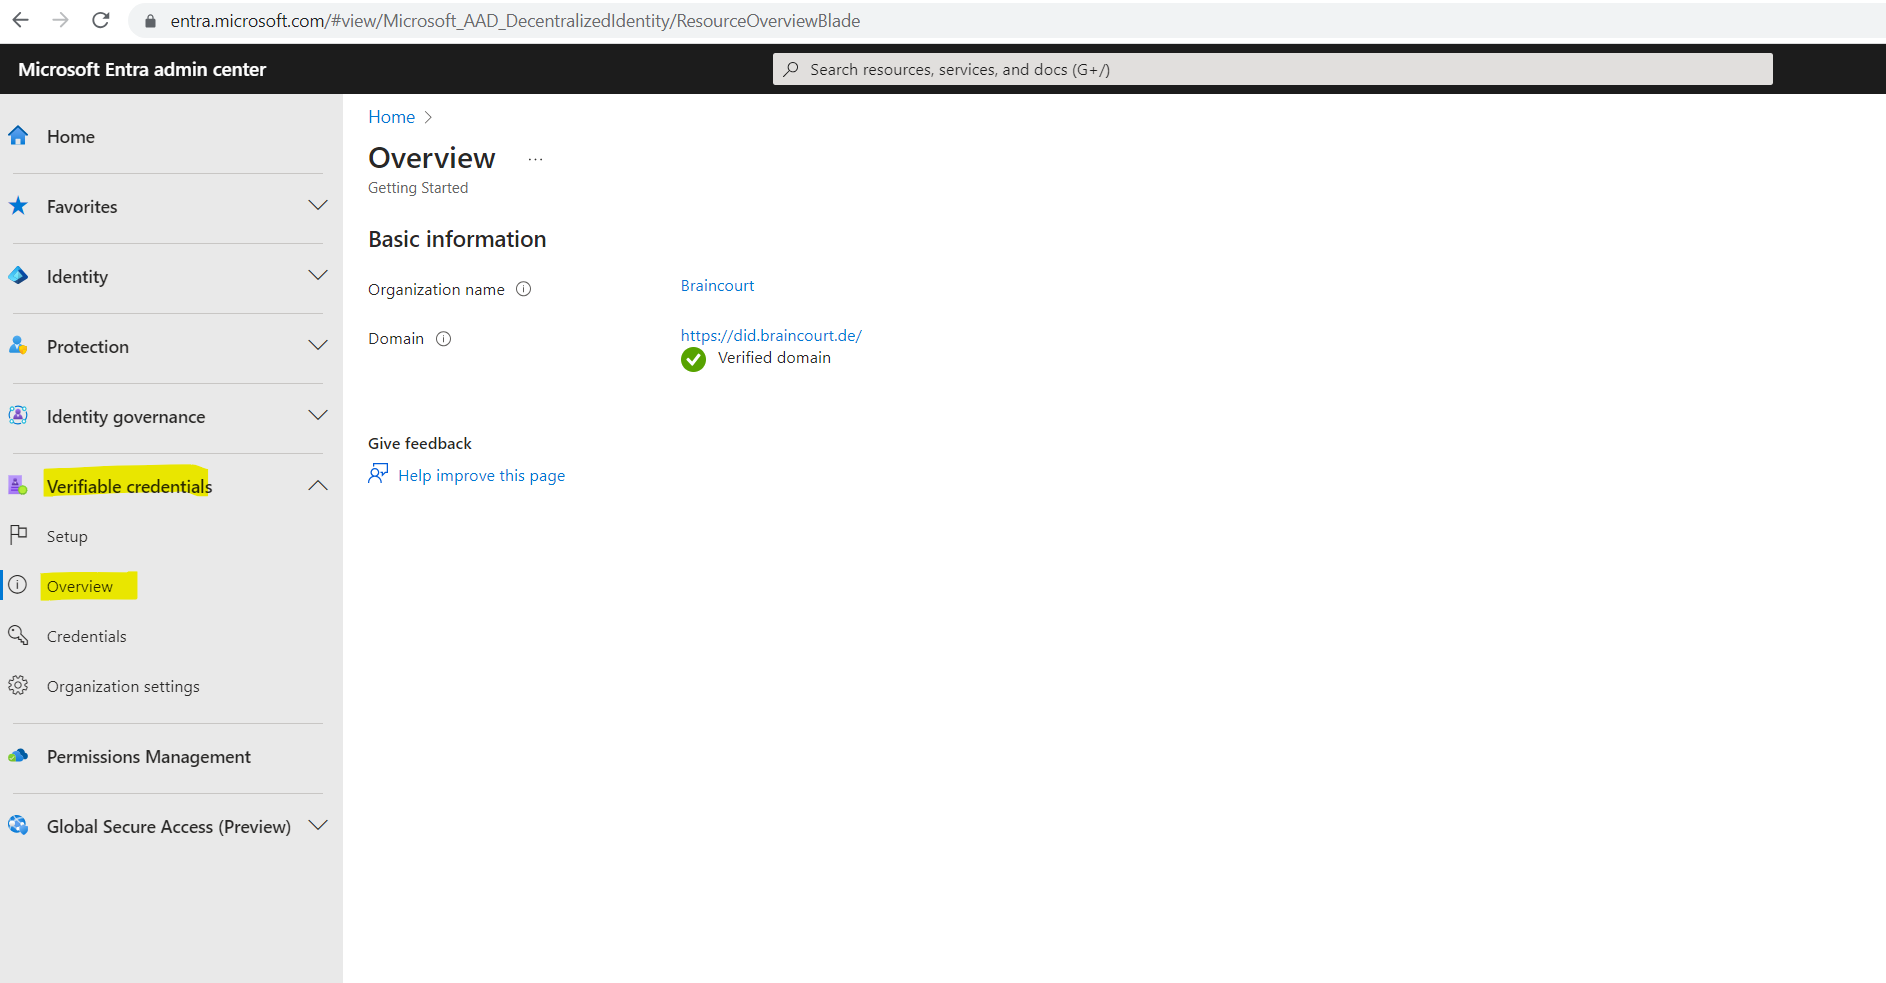
The second step here is to host this file (DID document) on a web server by using the custom domain URL we previously used to configure the organization settings. In my case https://braincourt.de.
The complete URL in my case is https://did.braincourt.de/.well-known/did.json.
In my case I am using a virtual Ubuntu machine in Azure to host the website for Braincourt which is since the merger with Capgemini just forwarded to Capgemini Germany.
To host this file (DID document), I will create on the Apache web server from this virtual Ubuntu machine a new virtual host file which is listening for the URI https://did.braincourt.de. Then I will create the needed hidden subfolder .well-known and upload the file into.
Well-known URI
A well-known URI is a Uniform Resource Identifier for URL path prefixes that start with /.well-known/. They are implemented in webservers so that requests to the servers for well-known services or information are available at URLs consistent well-known locations across servers.

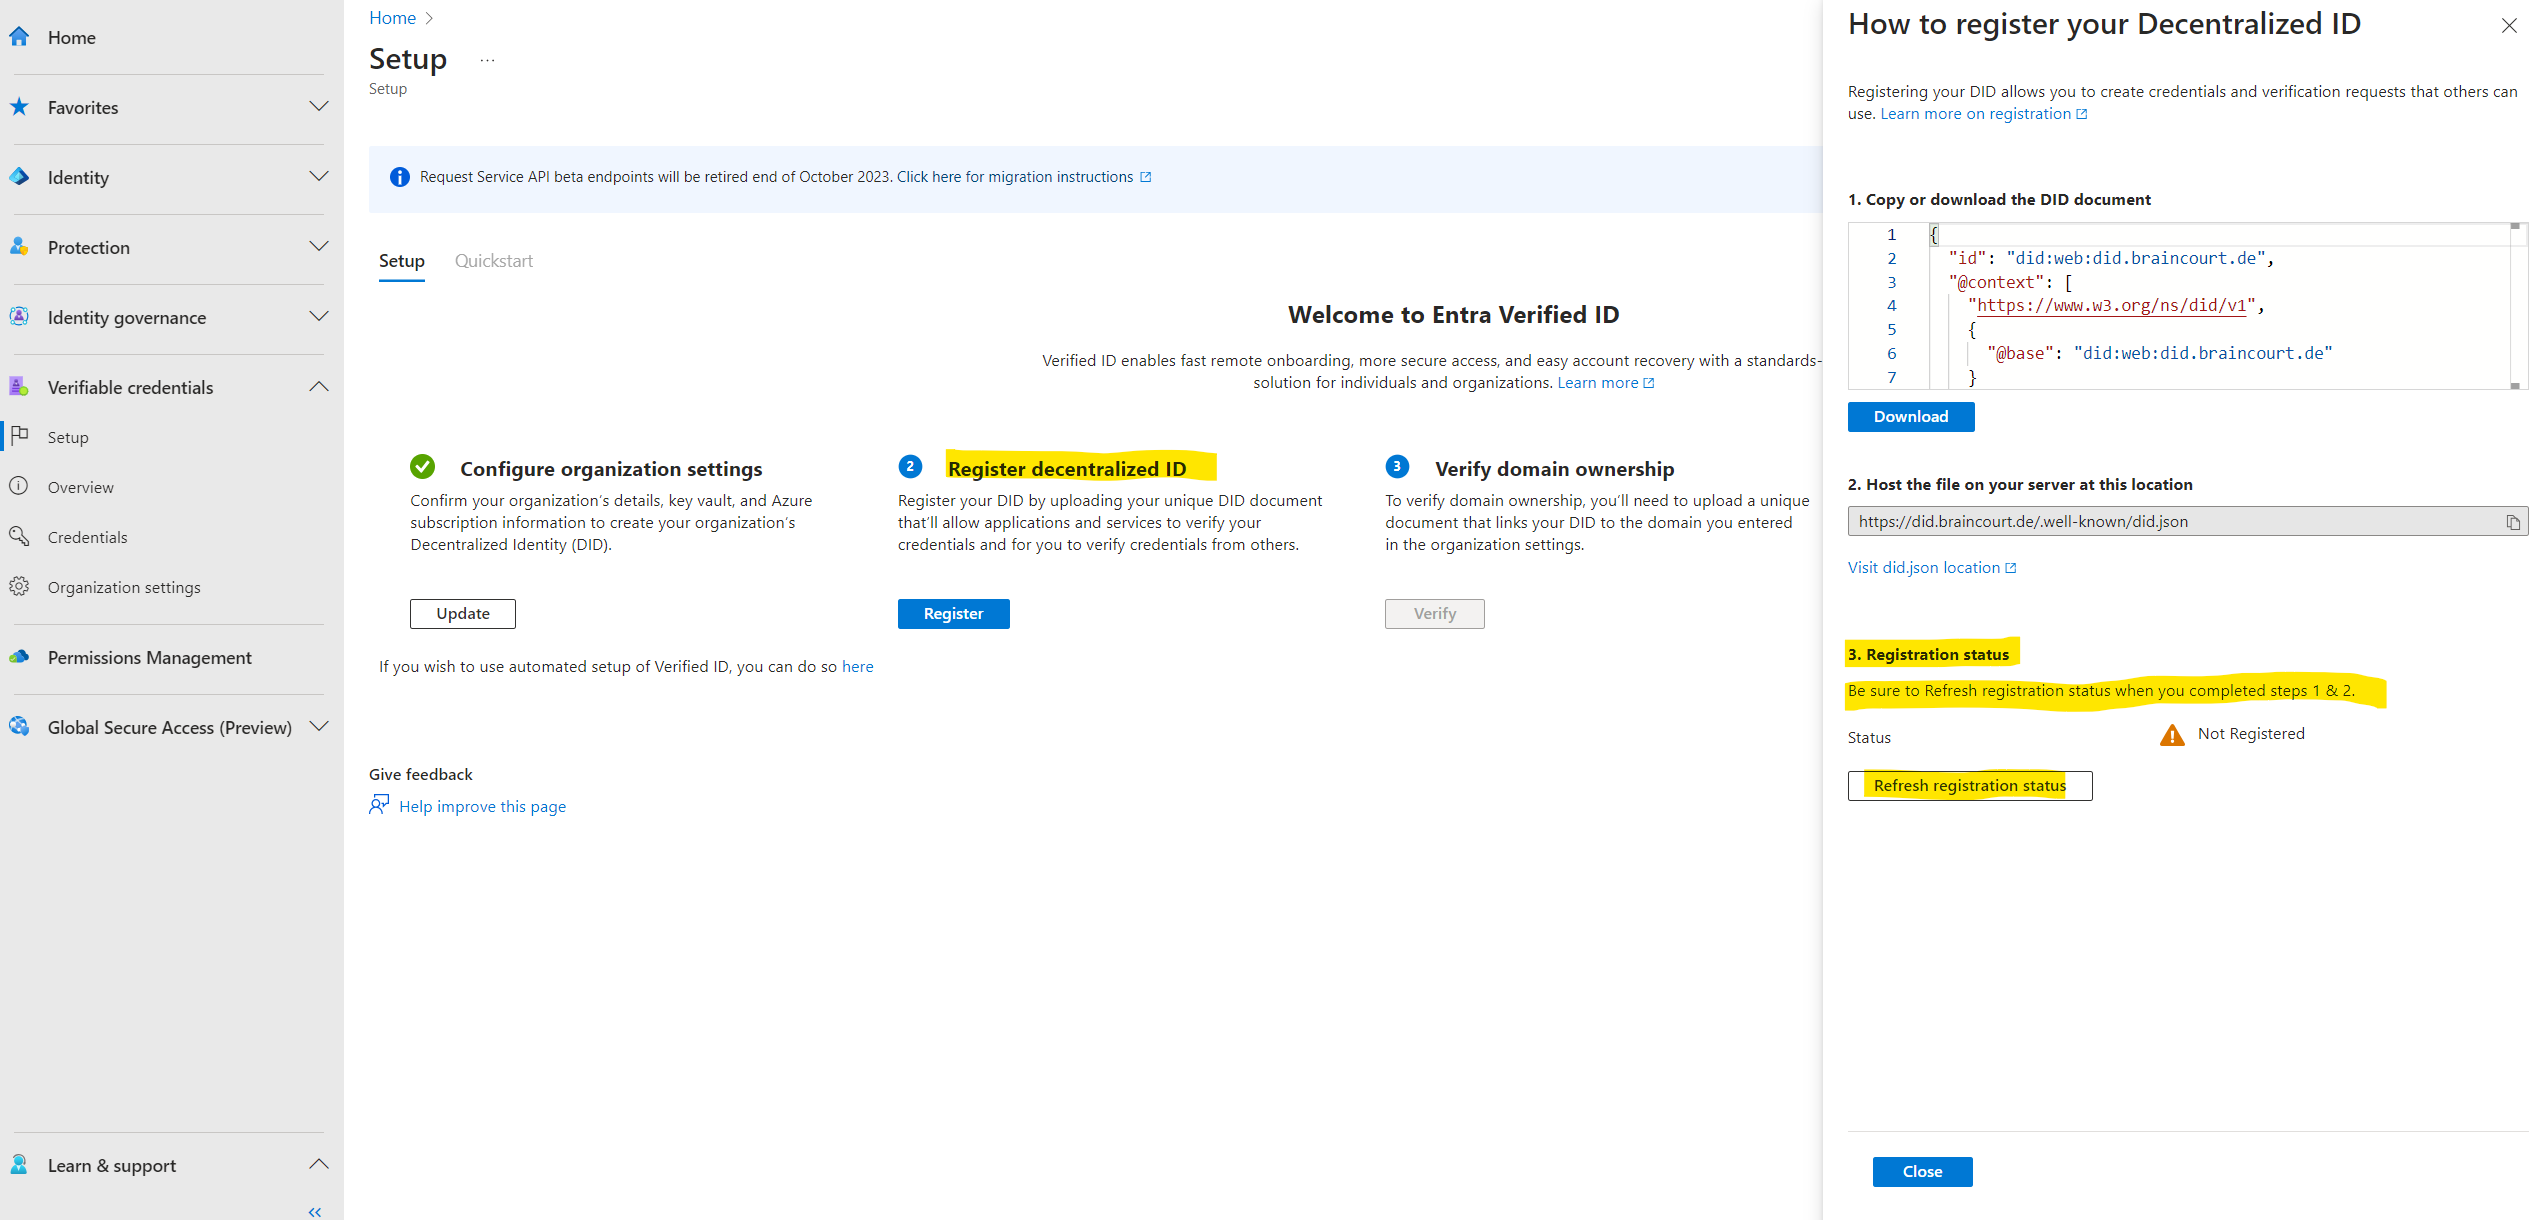
Then after completed steps 1 & 2 we need to refresh the registration status by clicking on the Refresh registration status button below.
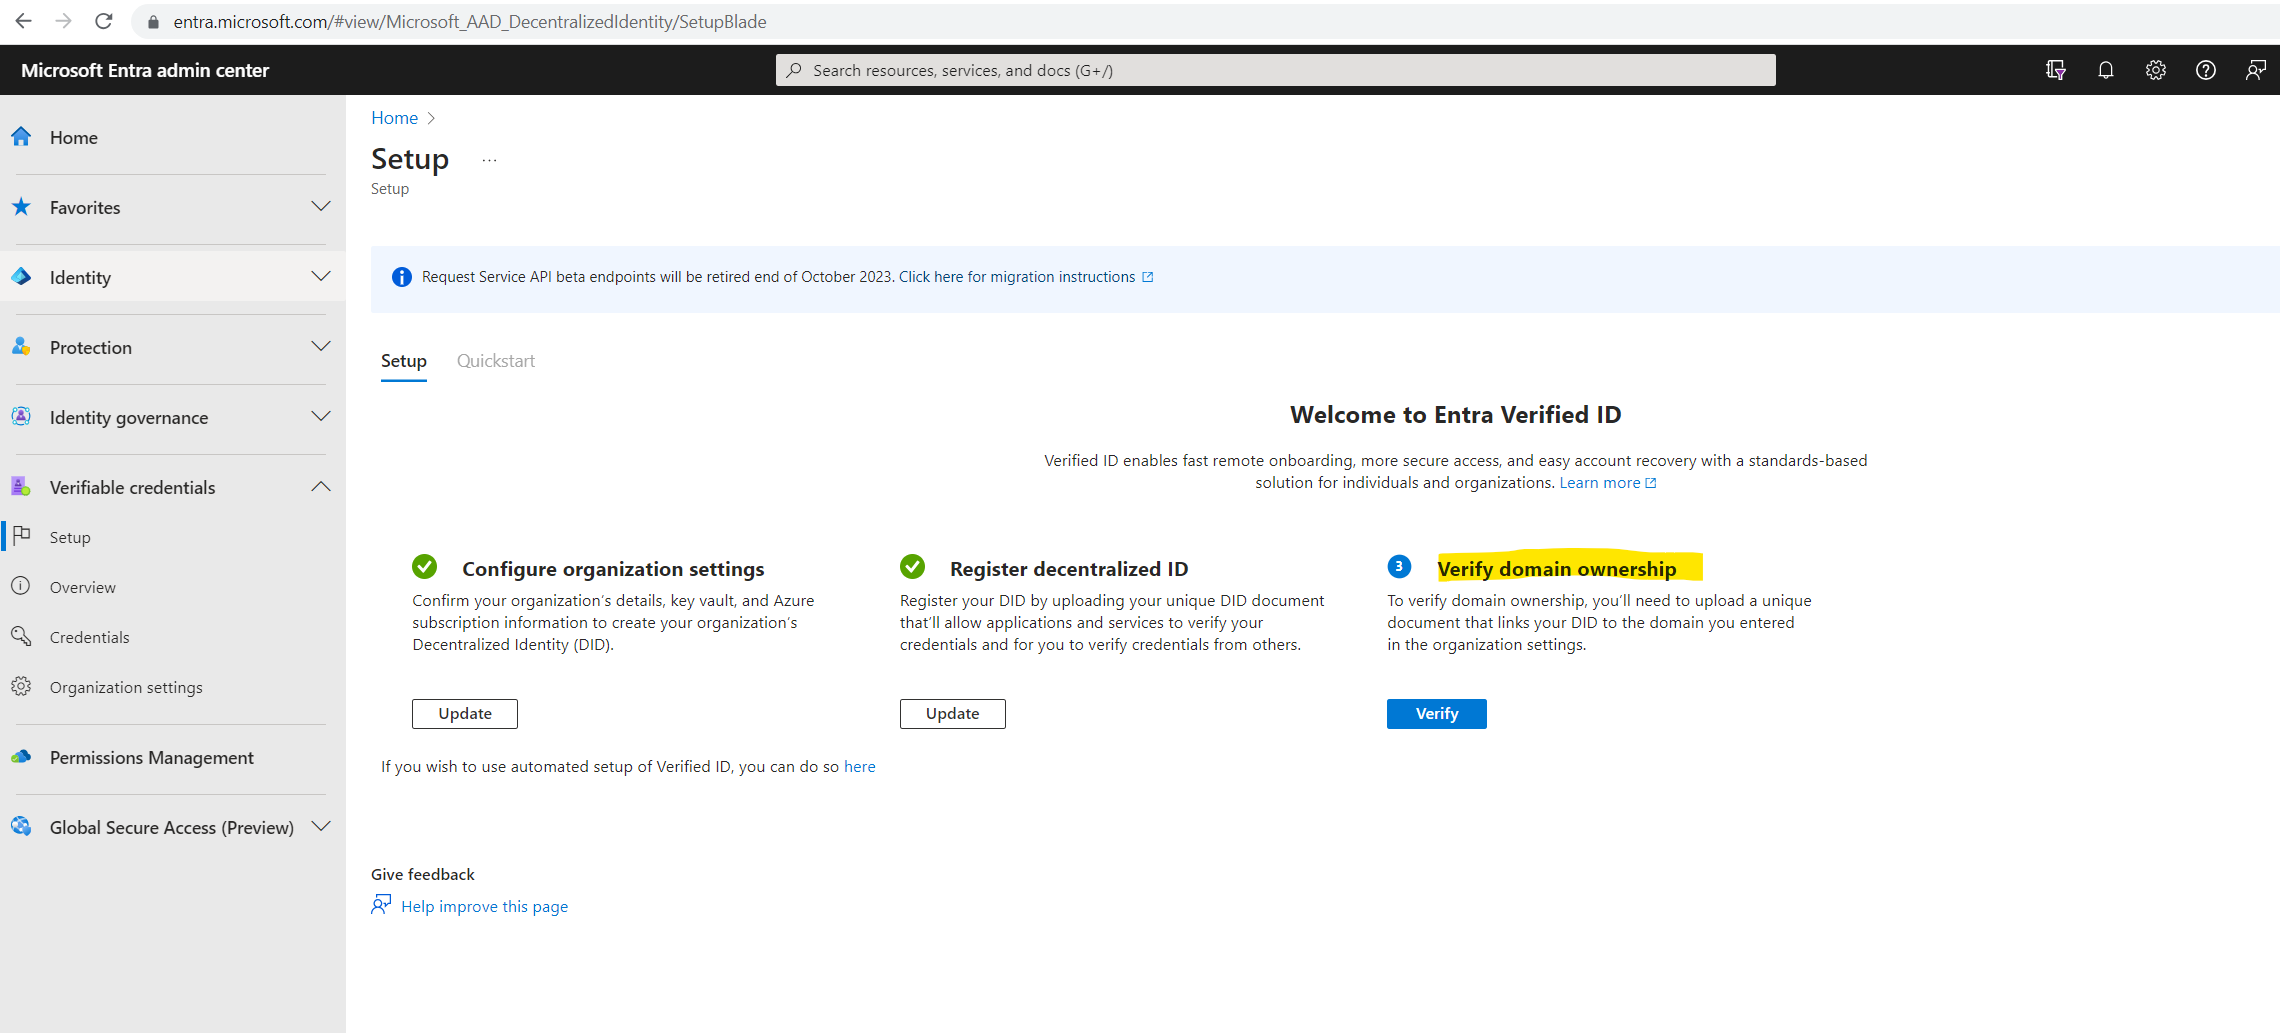
Look’s good, now I can finally verify domain ownership.
So I will click here on Verify.
In order to verify domain ownership we first need to download the manifest and then upload this manifest file like previously the DID document into the .well-known folder from our web server.
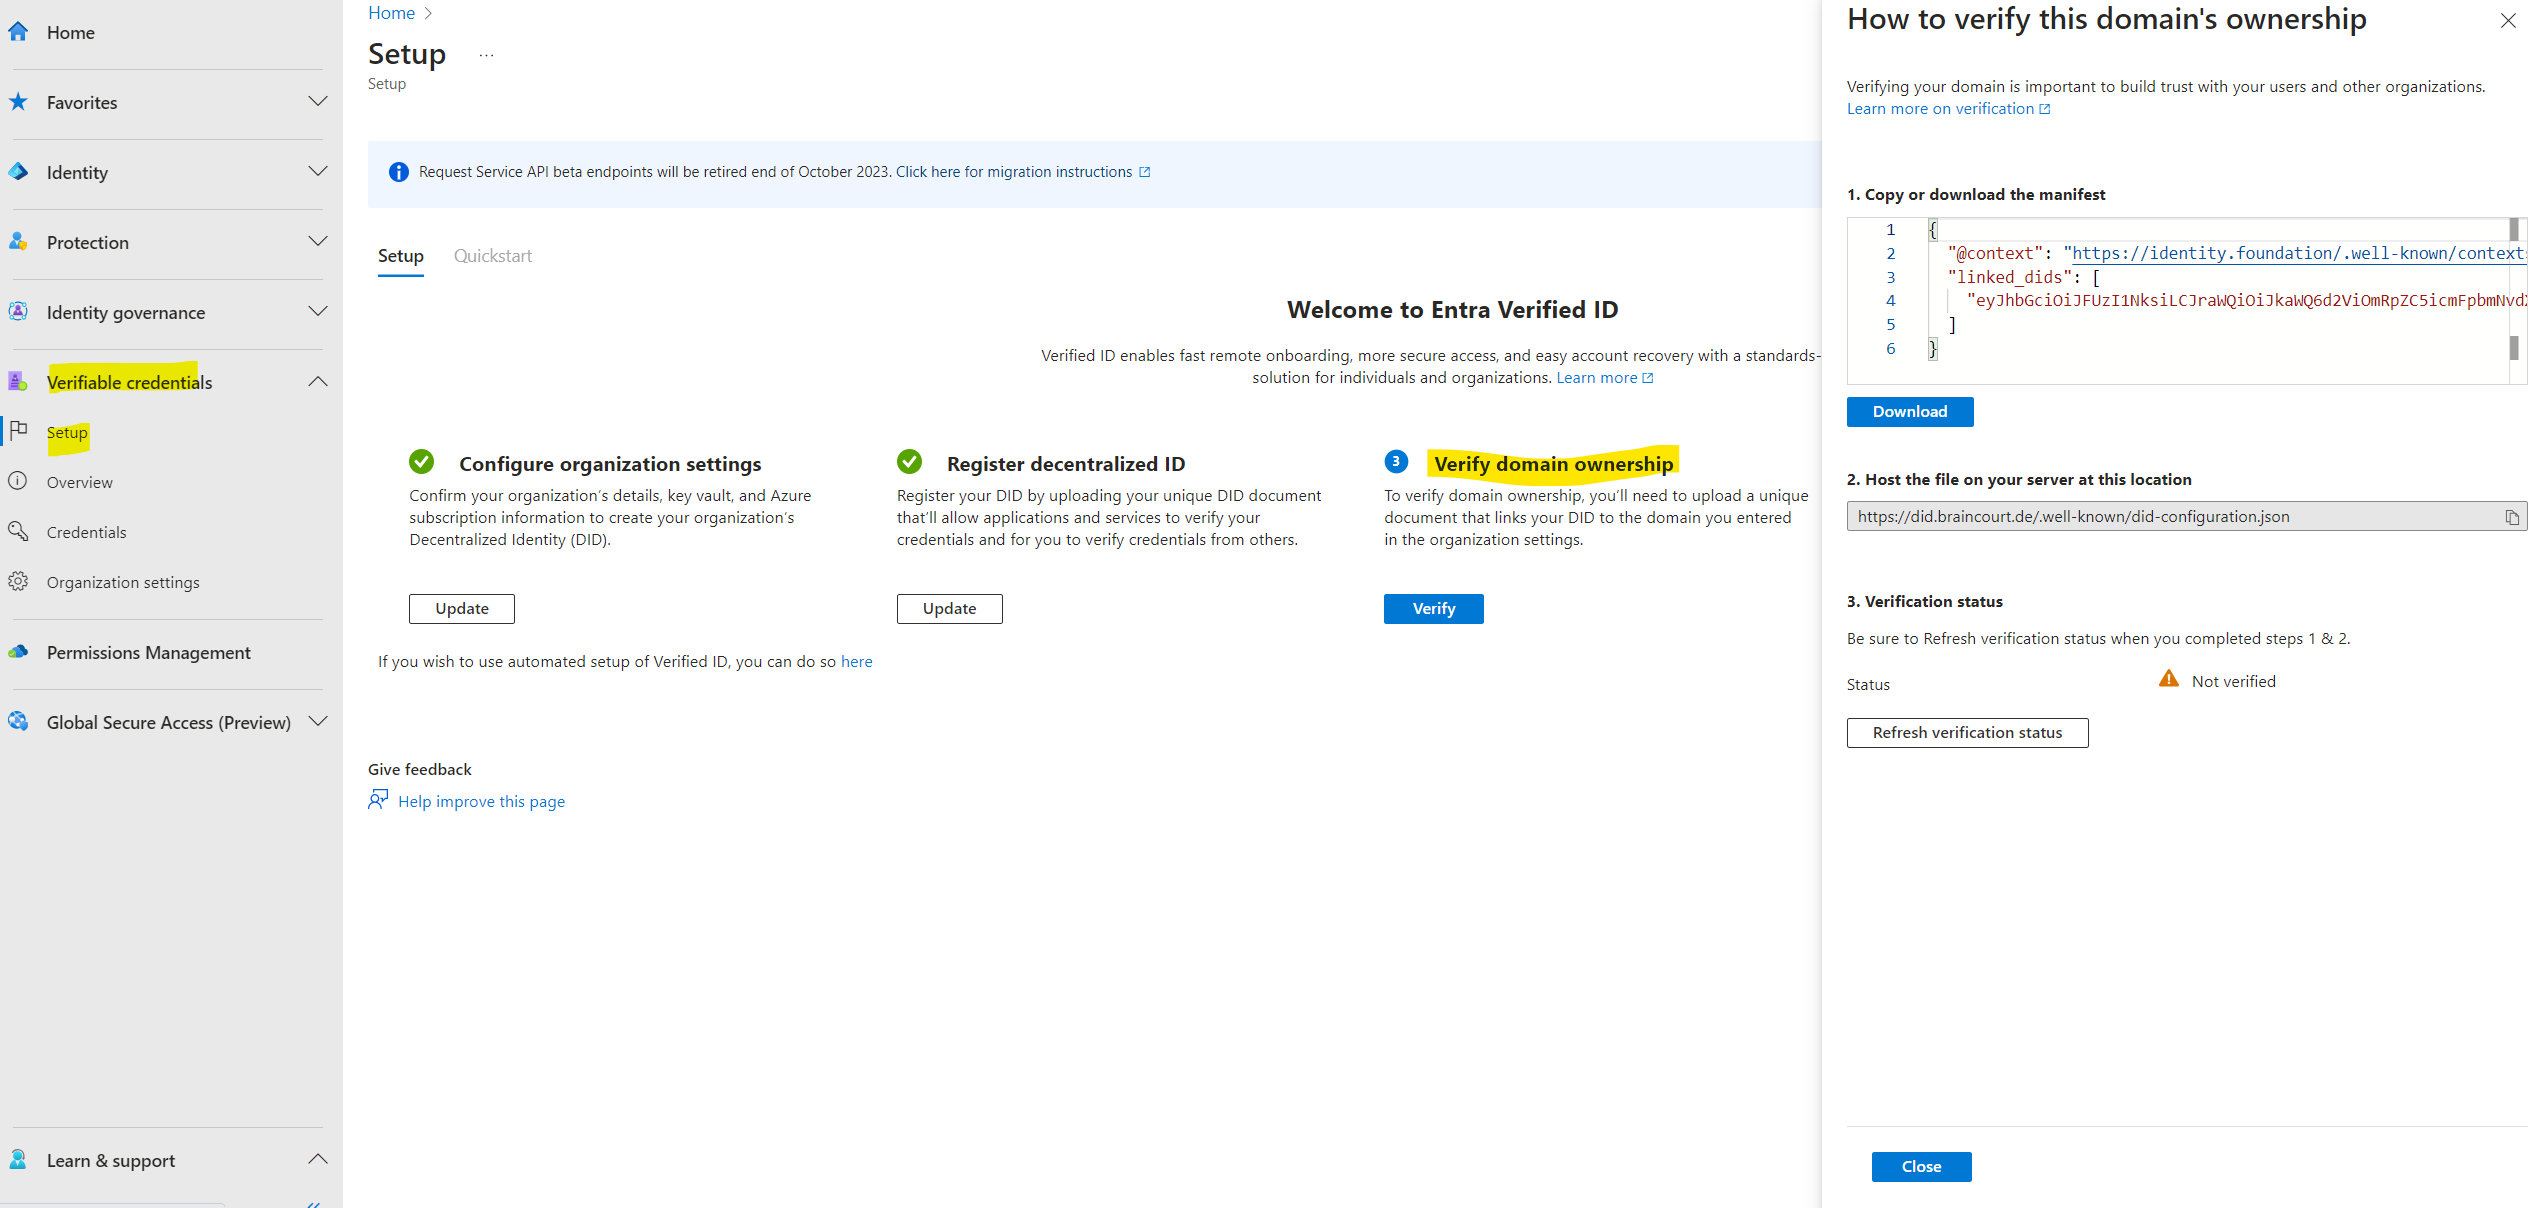
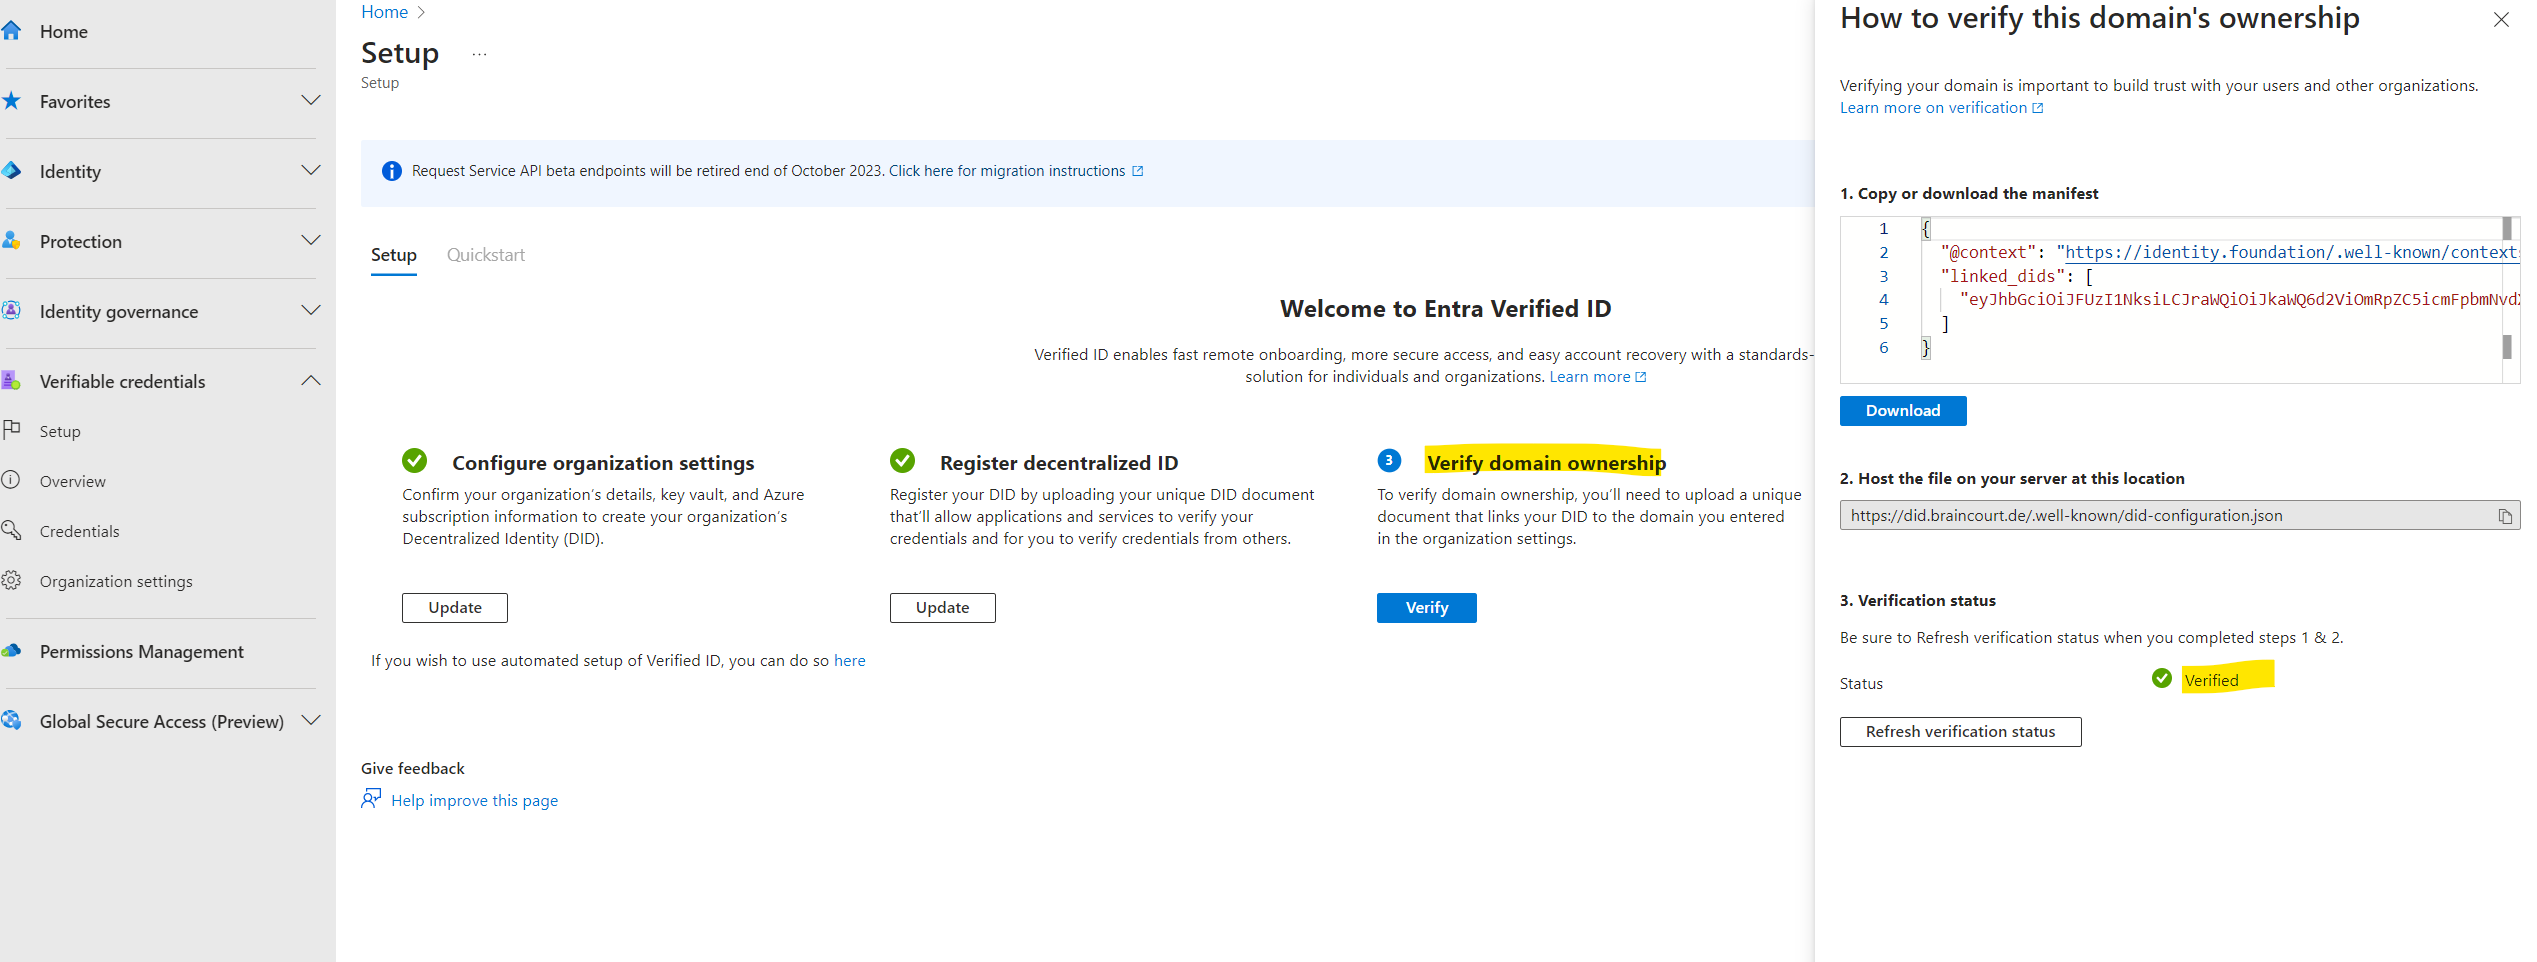
So finally after uploading the manifest to the web server I will click on Refresh verification status.
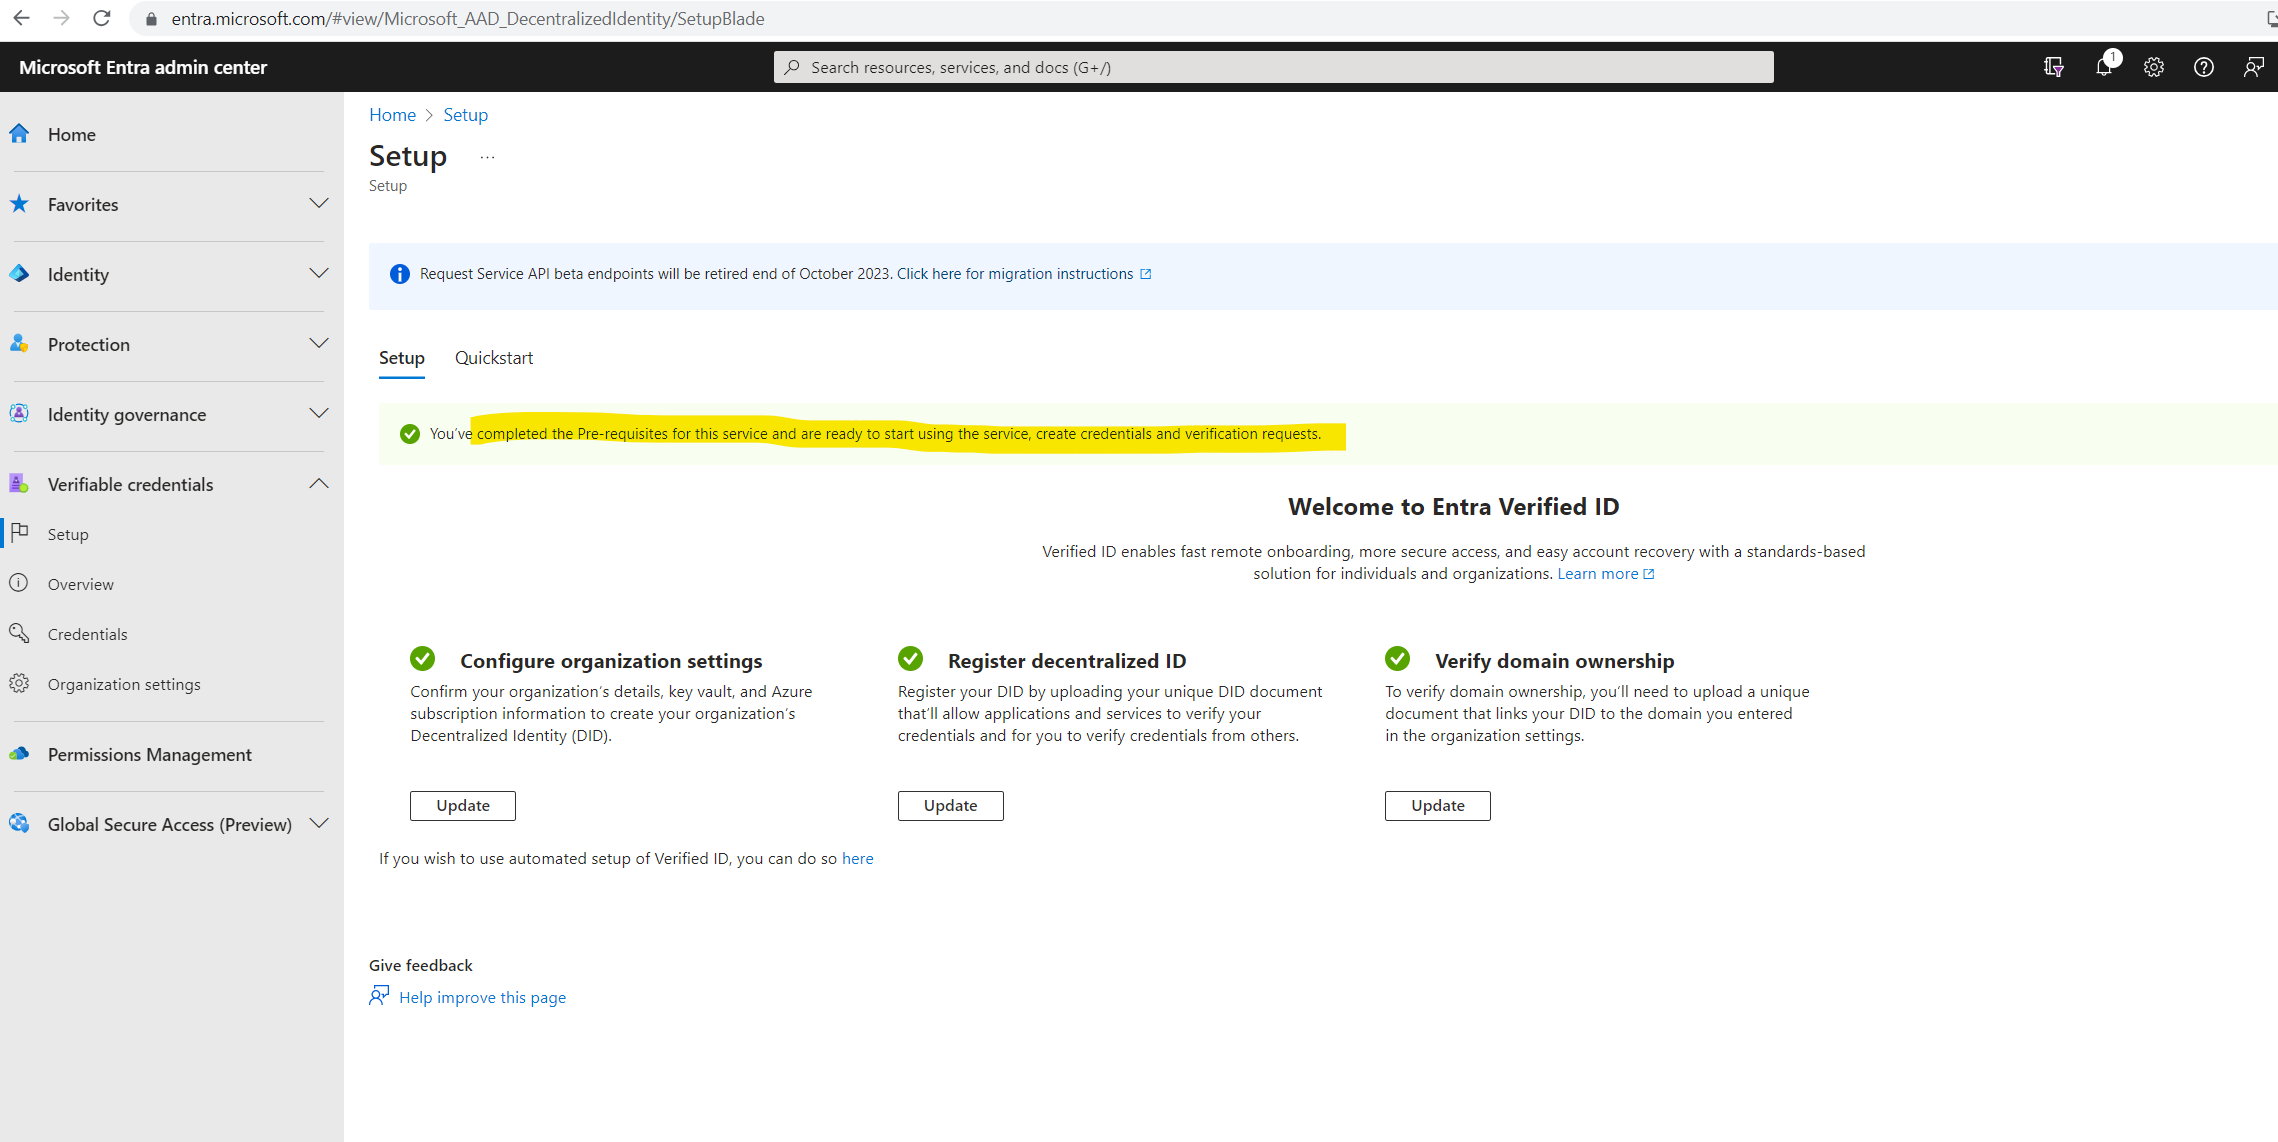
Look’s good.
You’ve completed the Pre-requisites for this service and are ready to start using the service, create credentials and verification requests.
Register an application in Microsoft Entra ID
To demonstrate Microsoft Entra Verified ID we will use a sample ASP.NET Core Web App provided by Microsoft.
This application needs to get access tokens when it wants to call into Microsoft Entra Verified ID so it can issue or verify credentials. To get access tokens, you have to register an application and grant API permission for the Verified ID Request Service. For example, use the following steps for a web application:
Sign in to the Azure portal as at least a Global Administrator.
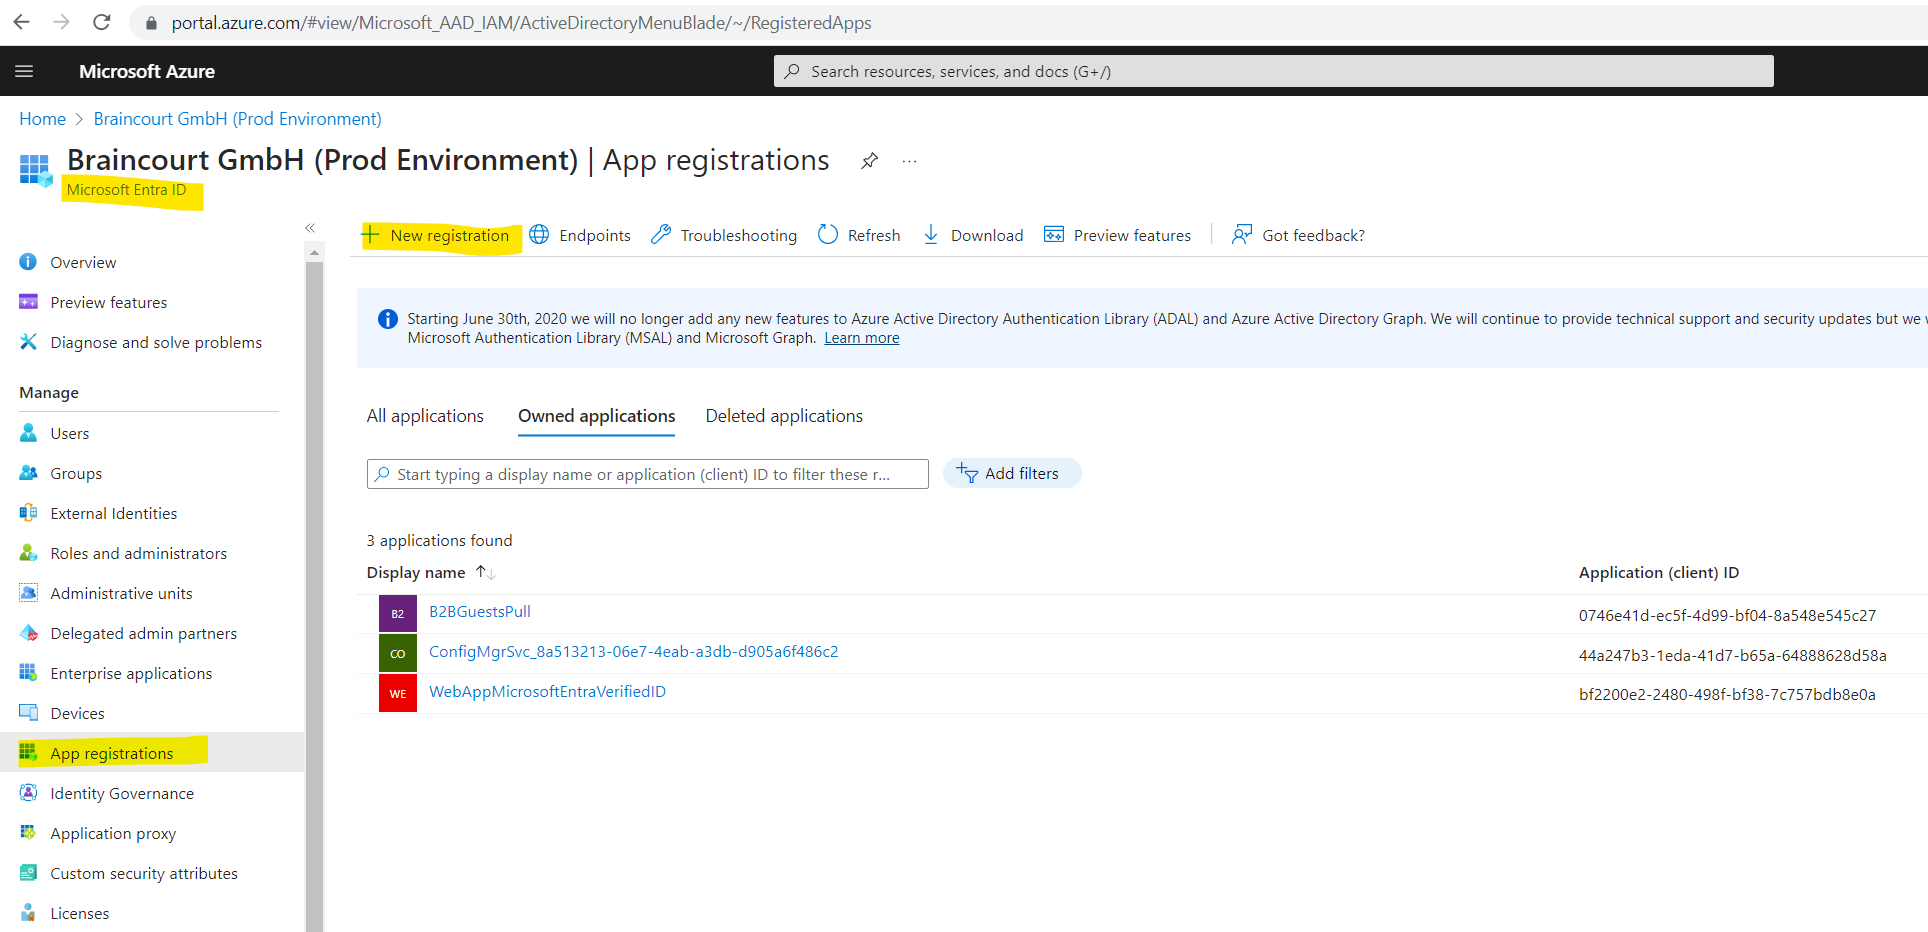
Select Microsoft Entra ID and select App registrations > New registration.
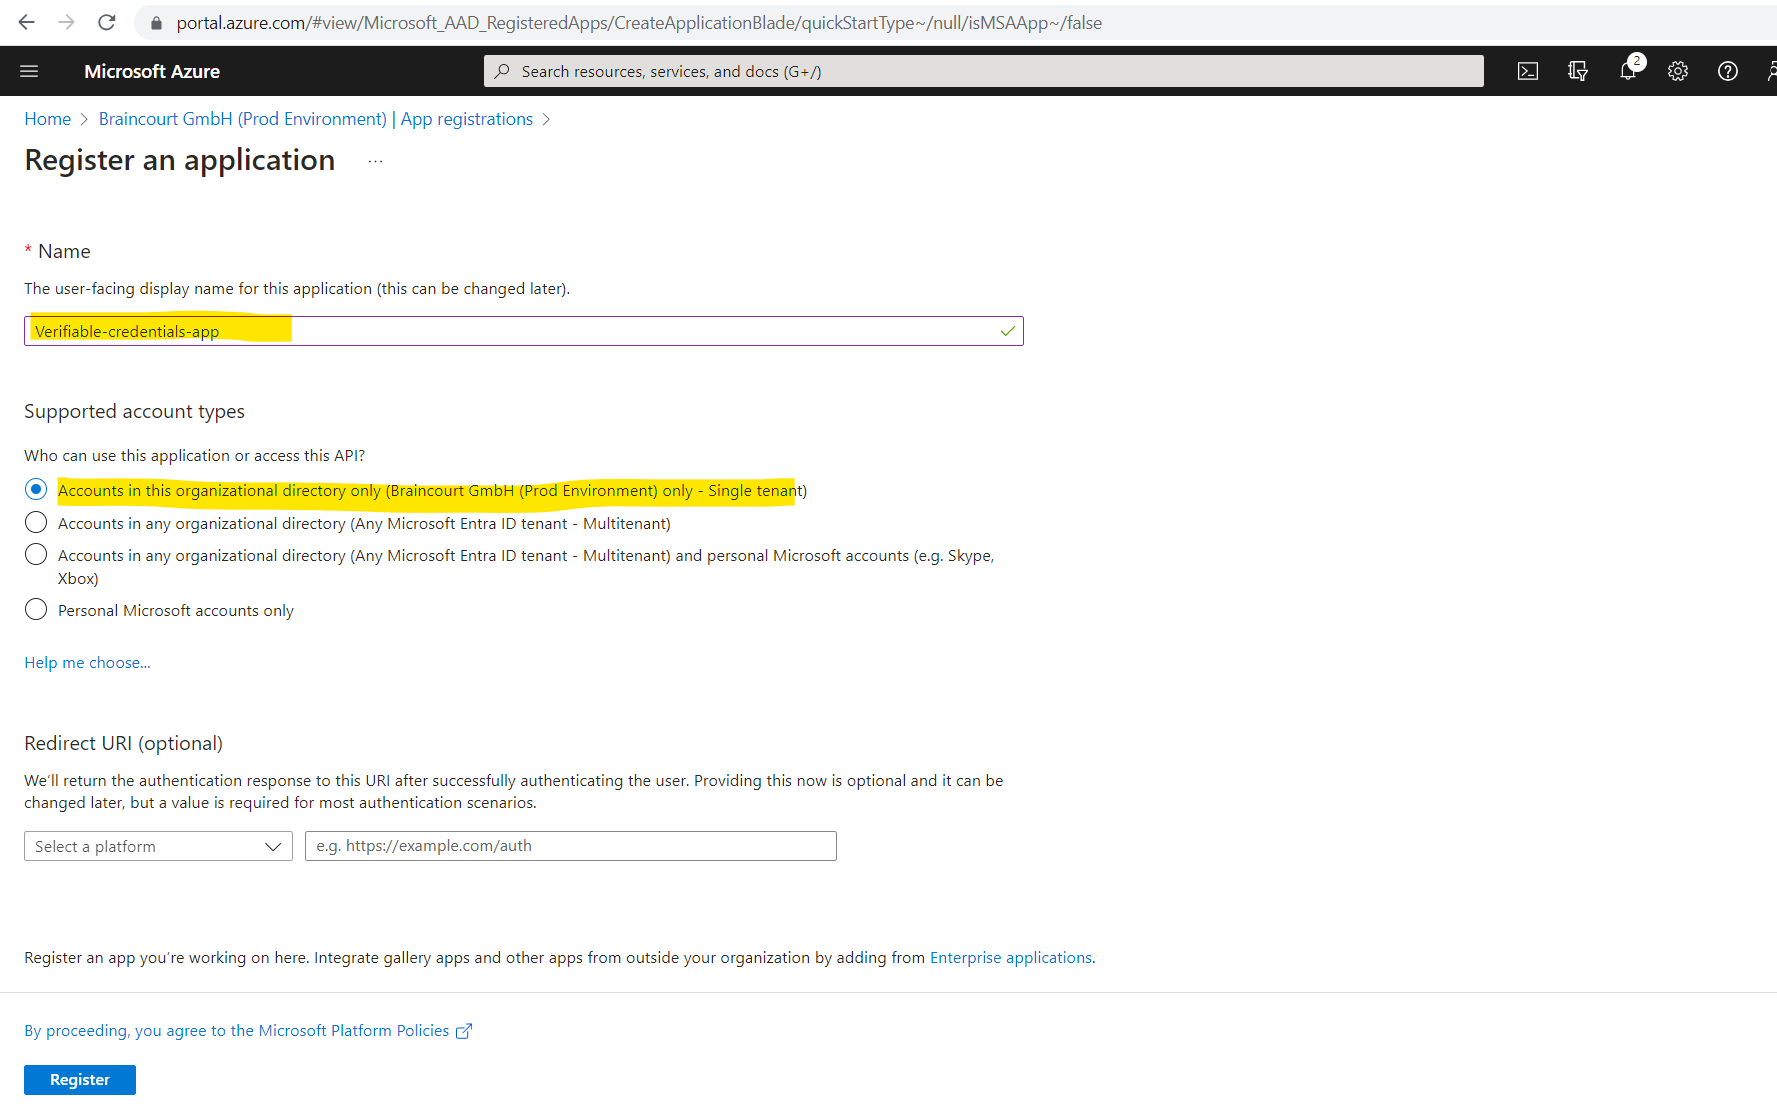
Enter a display name for your application. For example: Verifiable-credentials-app.
For Supported account types, select Accounts in this organizational directory only (Default Directory only – Single tenant).
Select Register to create the application.
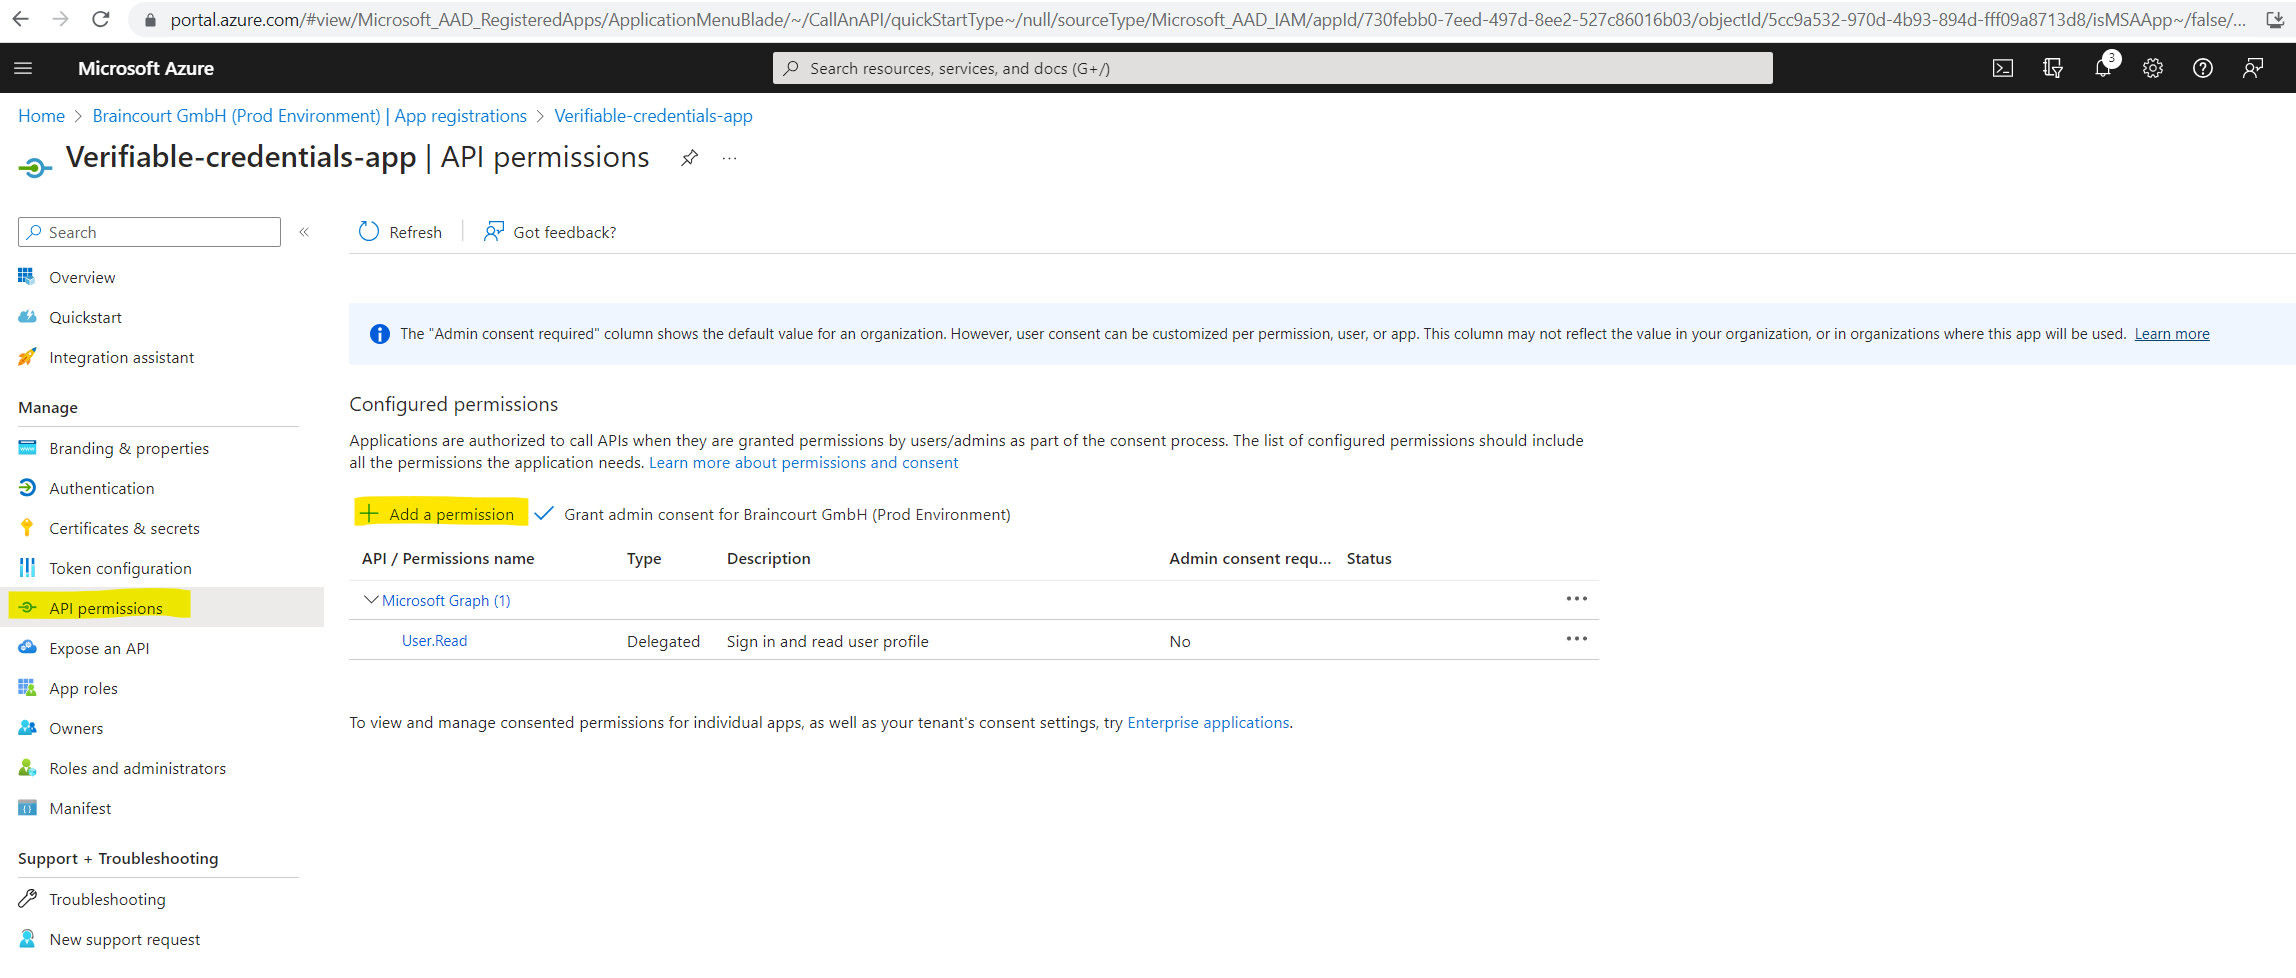
Next we have to grant permissions to the Verifiable Credentials Service Request Service principal.
To add the required permissions, follow these steps:
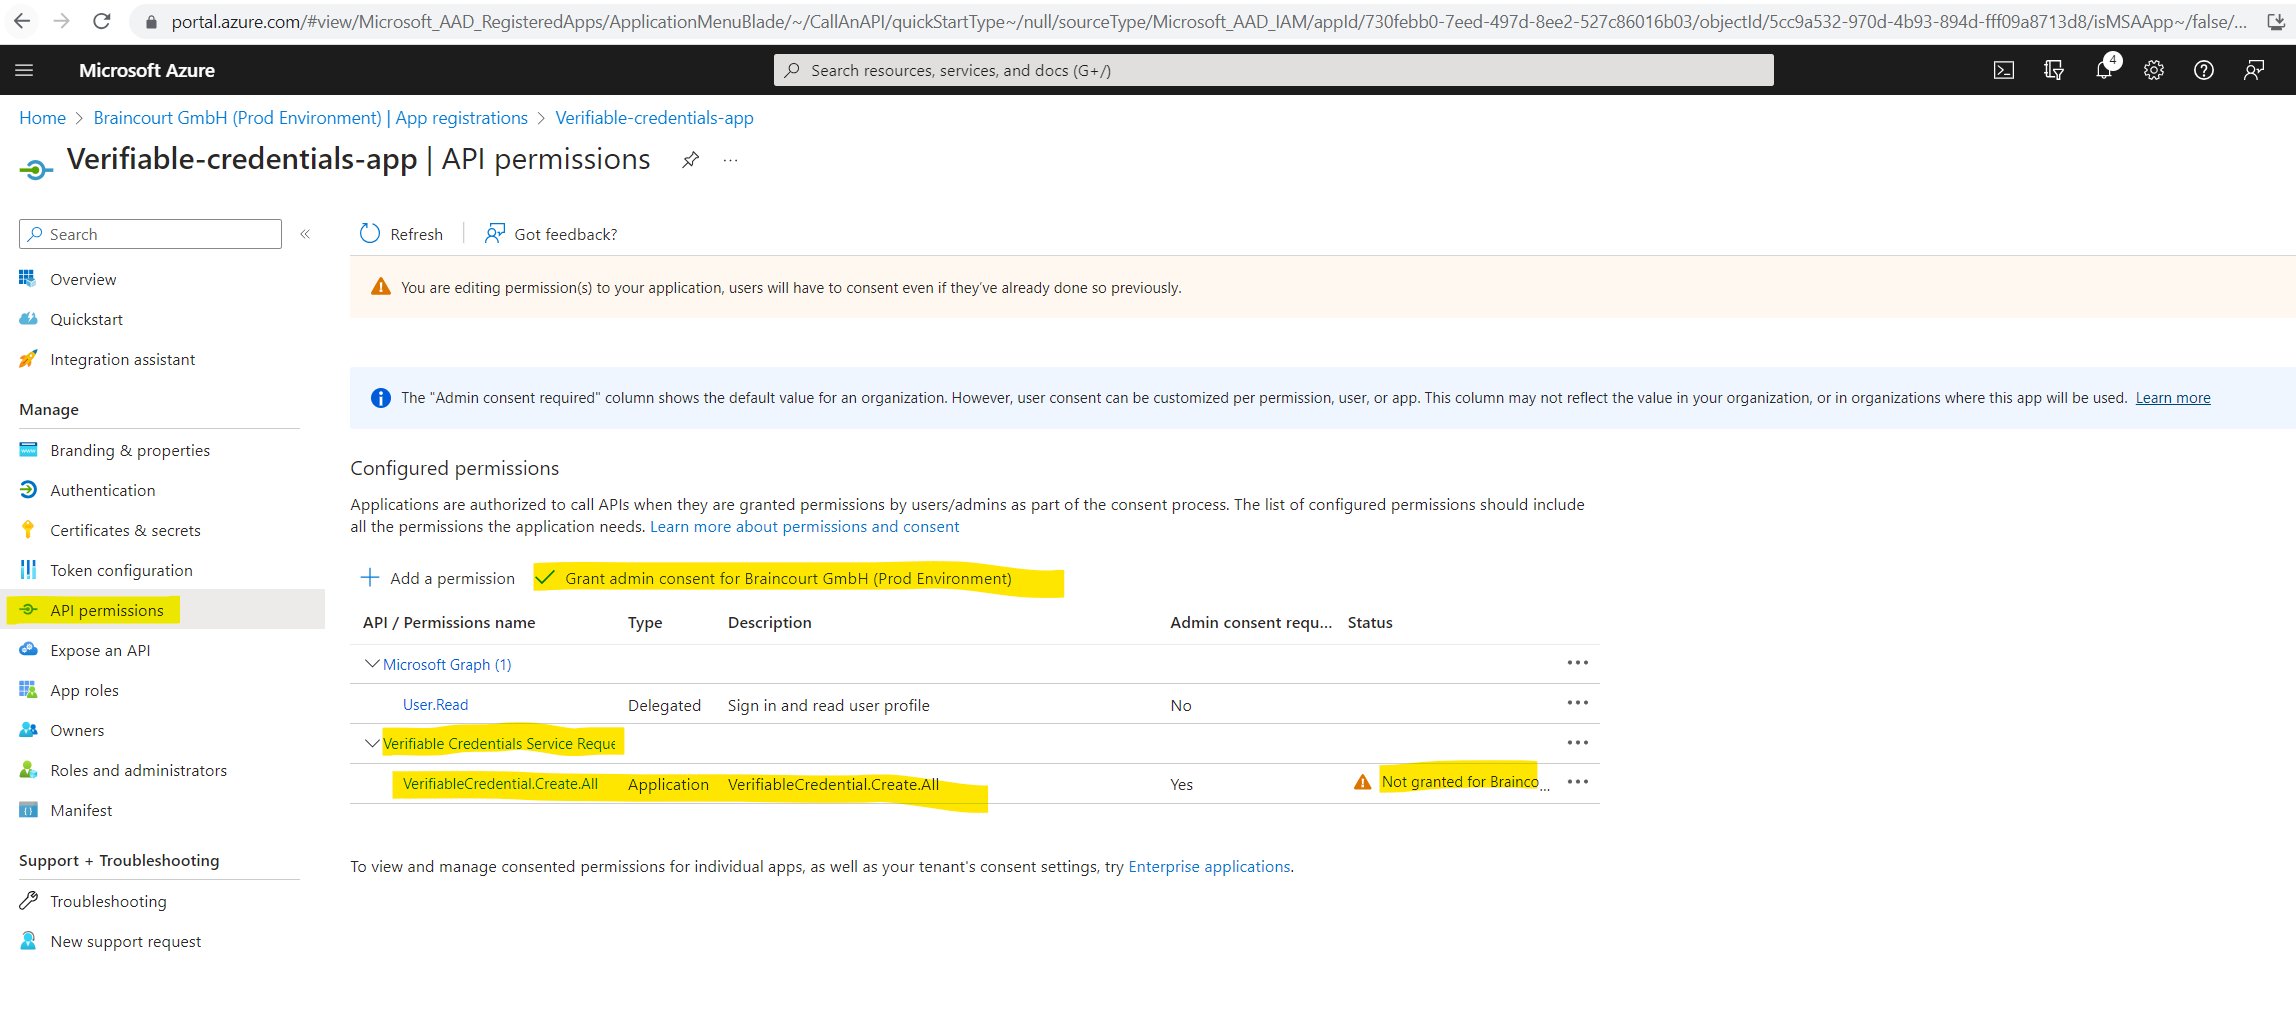
Stay in the verifiable-credentials-app application details page. Select API permissions > Add a permission.
Select APIs my organization uses and search for the Verifiable Credentials Service Request service principal and select it.
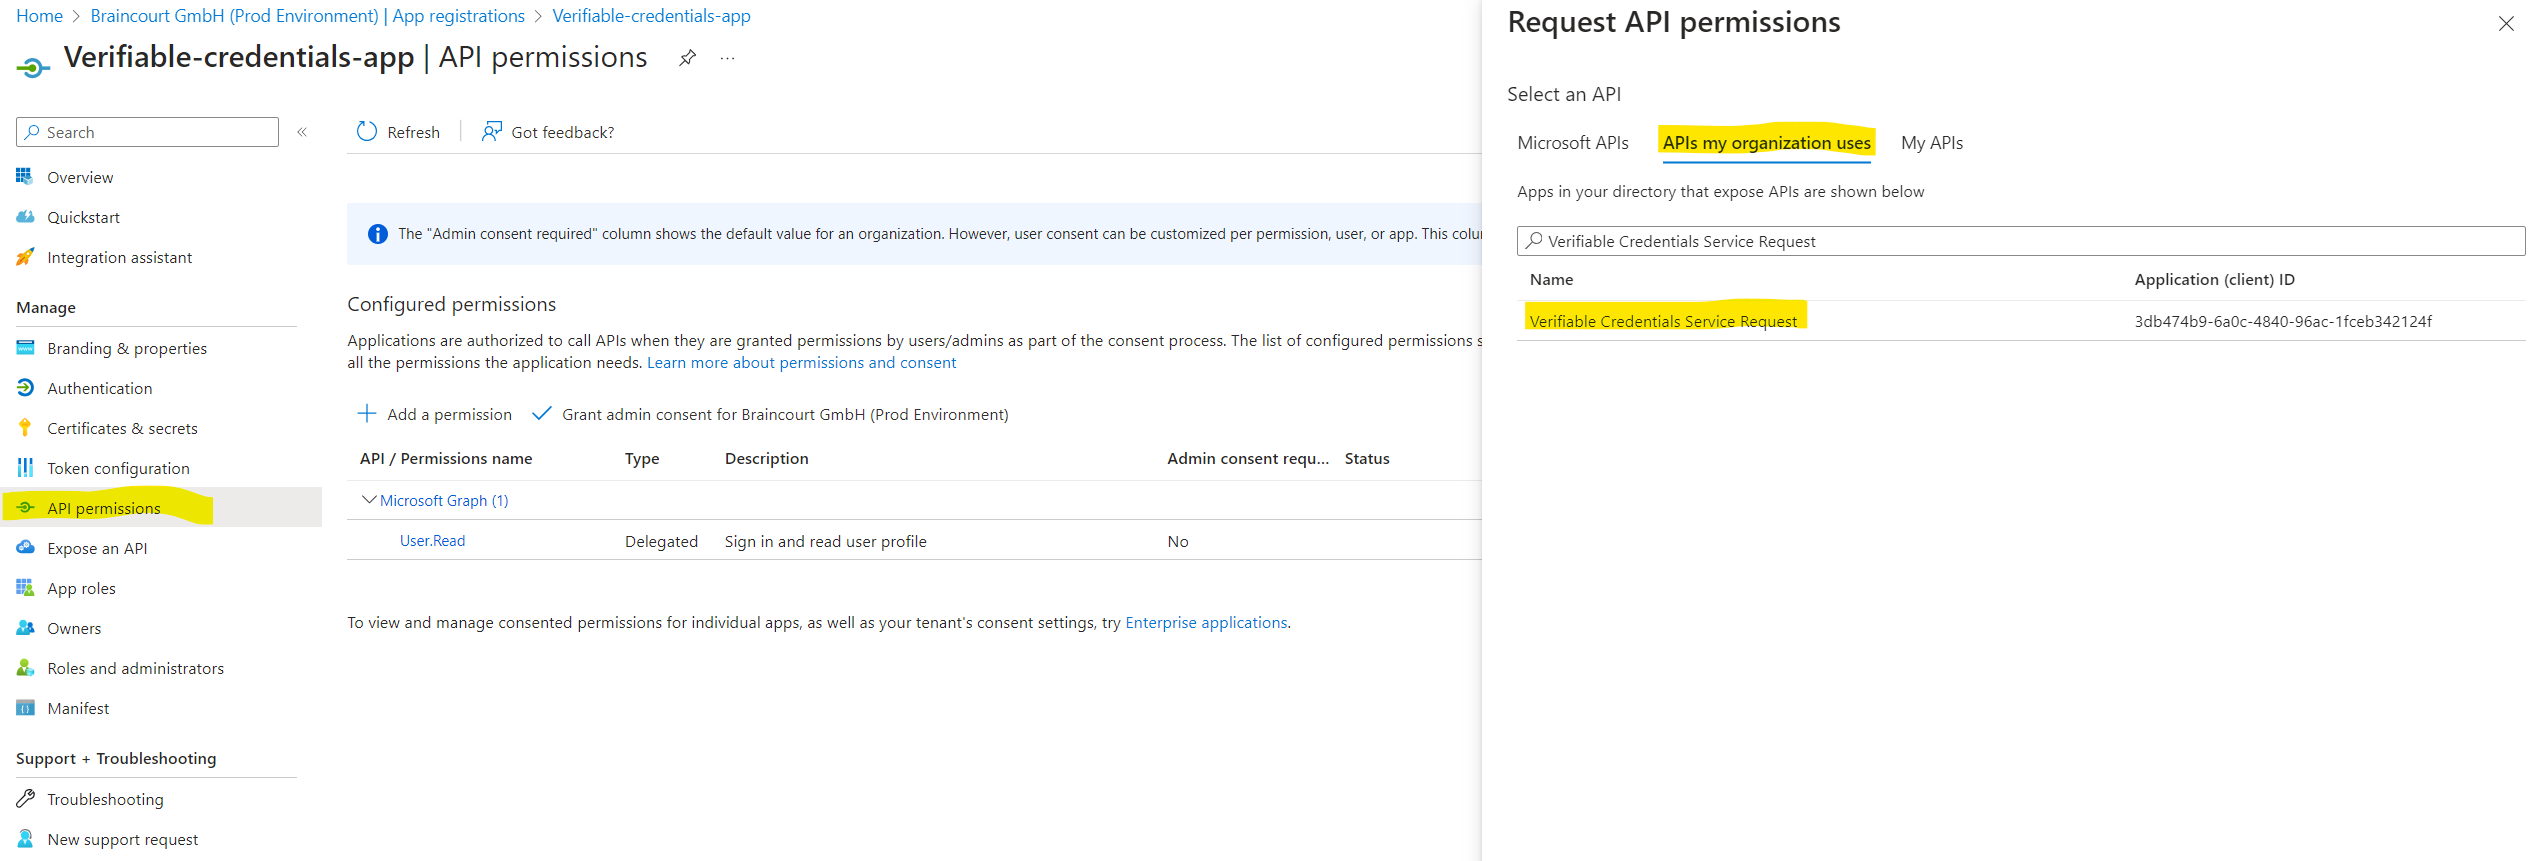
Choose Application Permission, and expand VerifiableCredential.Create.All.
Select Add permissions.
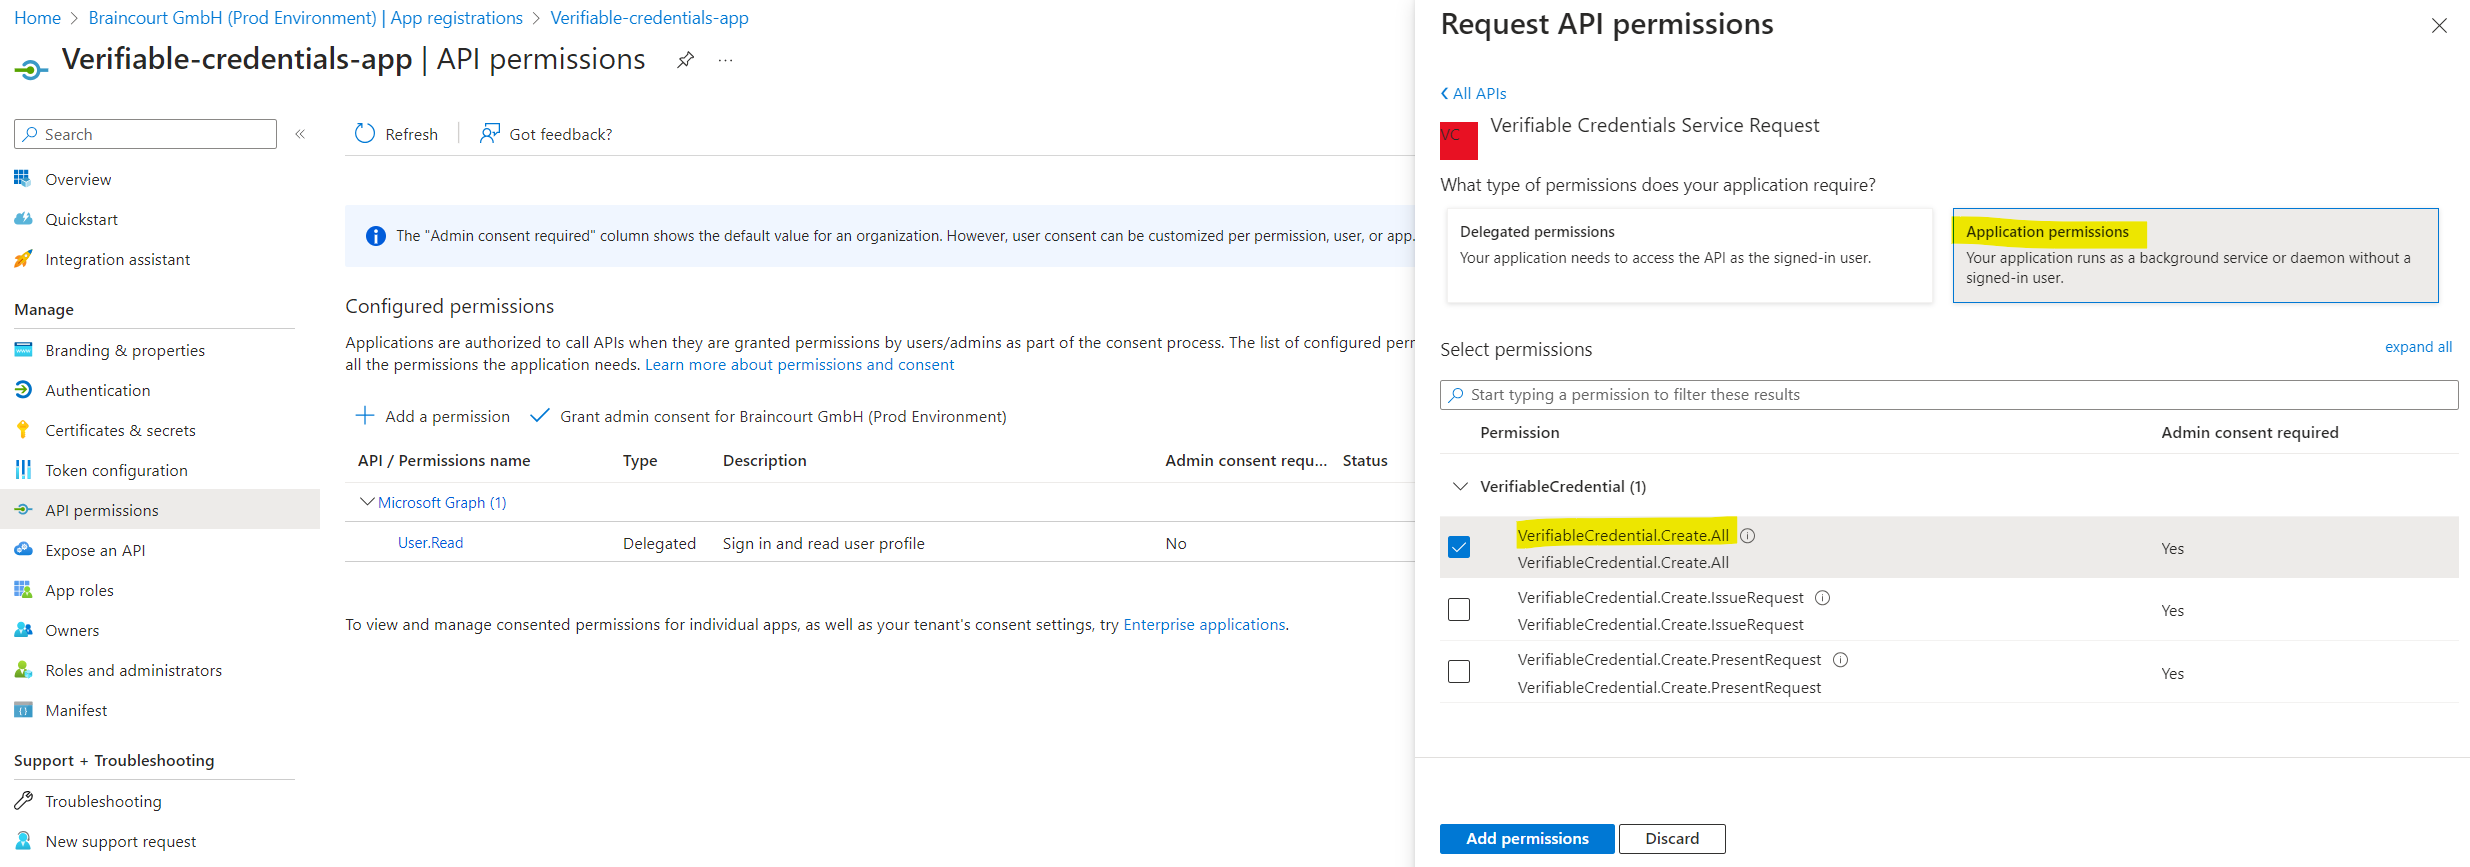
Select Grant admin consent for <your tenant name>.
Source: https://learn.microsoft.com/en-us/entra/verified-id/verifiable-credentials-configure-tenant
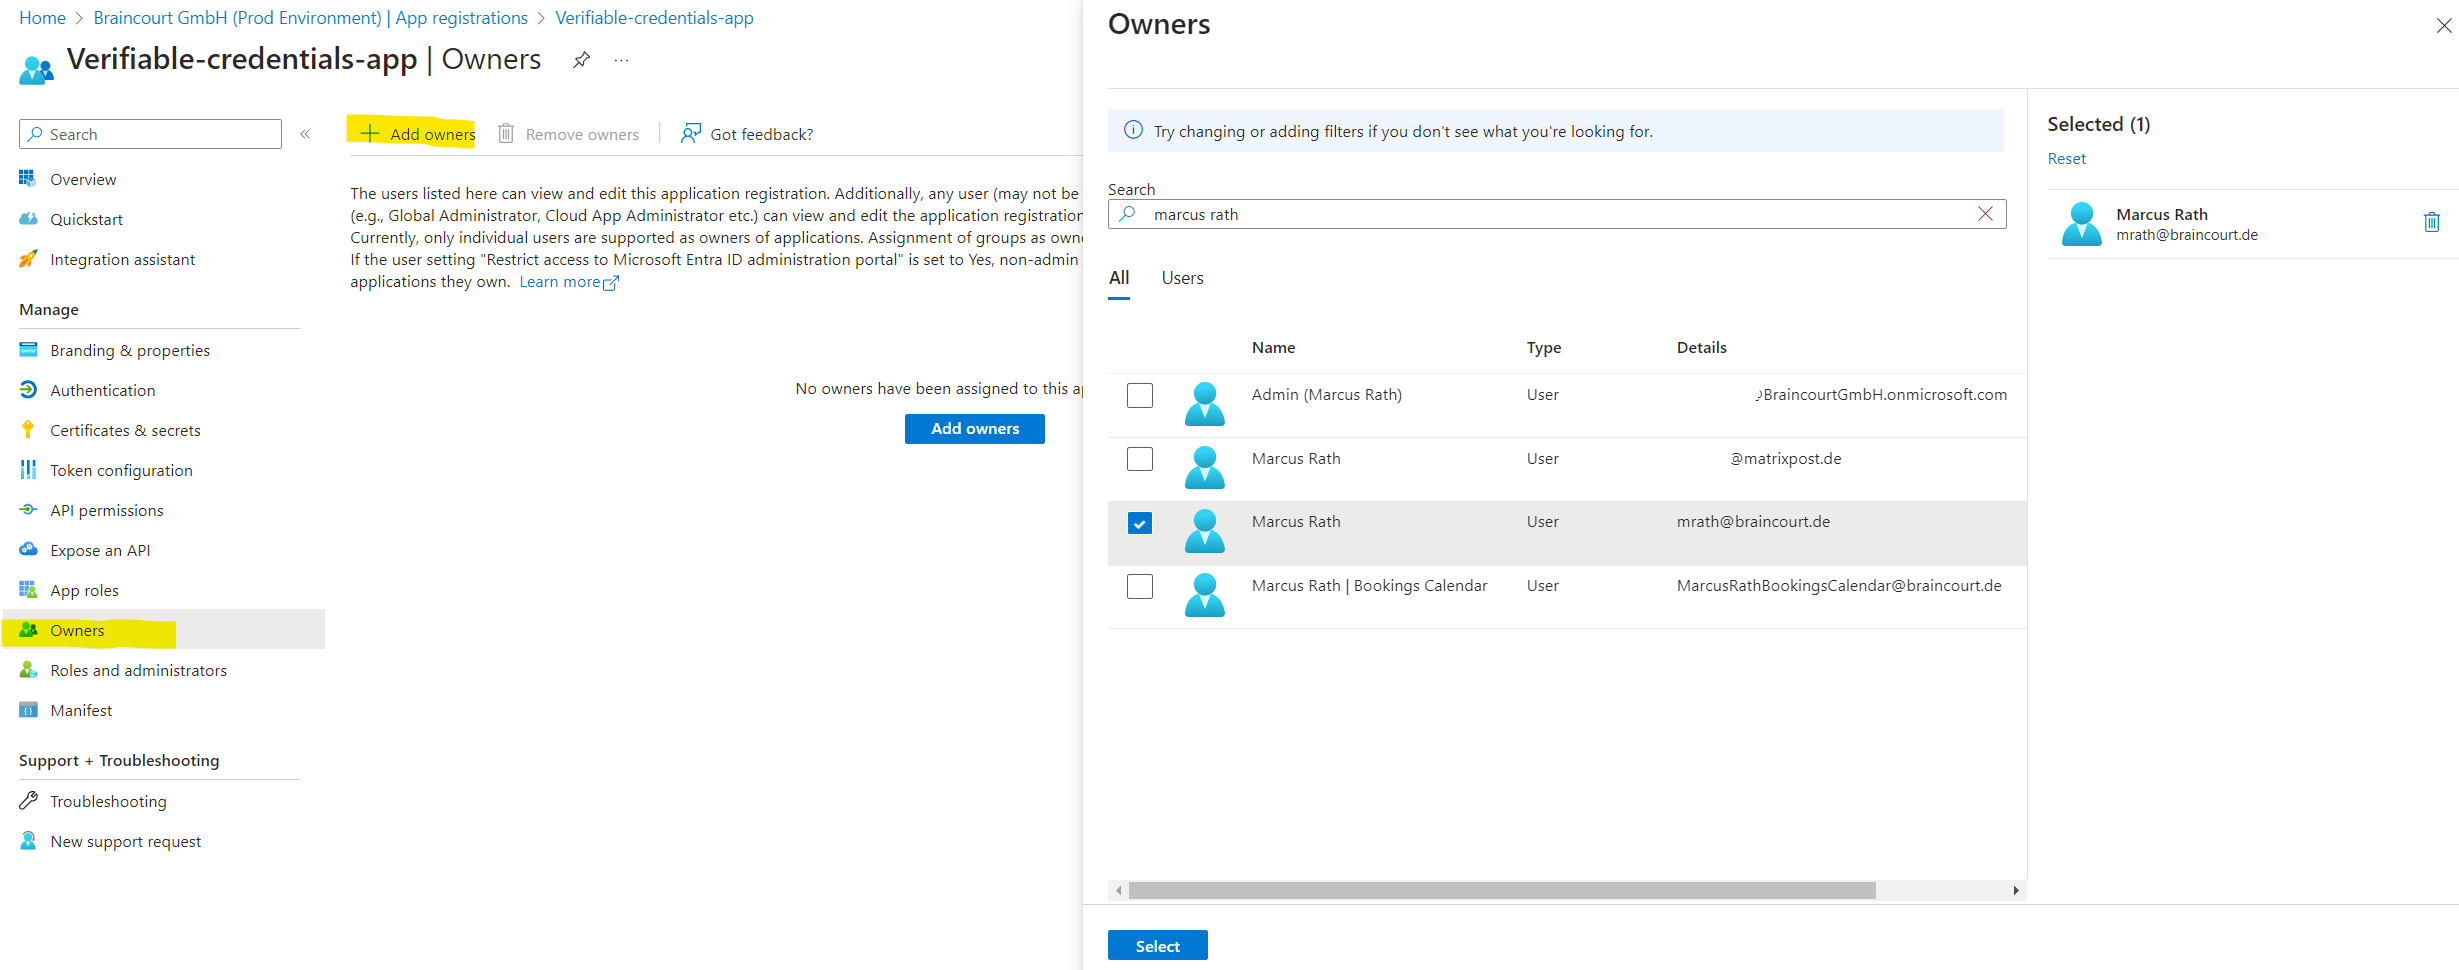
I will also add myself as owner from the application by clicking above in the left menu under Manage on Owners.
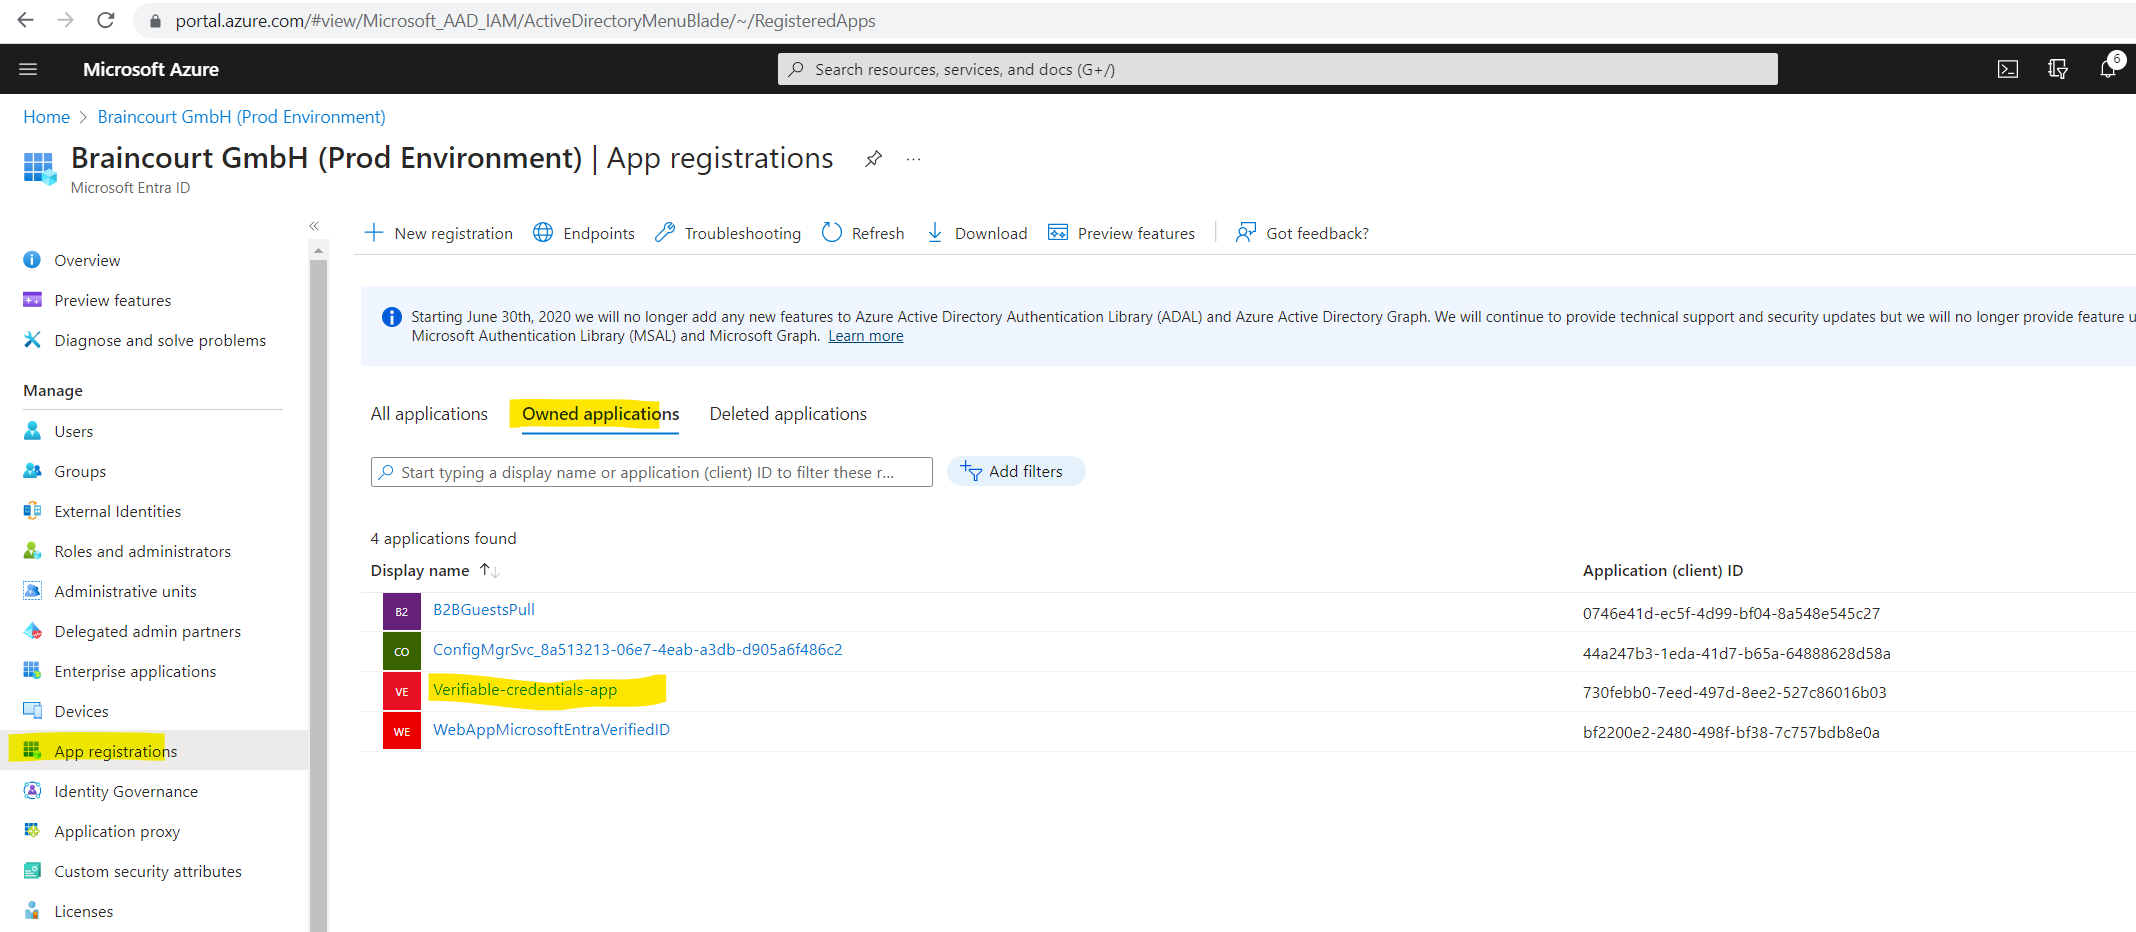
So now the application is also shown up under Owned applications in Microsoft Entra ID.
In the next section, we create the verified credential expert card by using Microsoft Entra Verified ID. After we create the credential, our Microsoft Entra tenant can issue it to users who initiate the process.
Issue Microsoft Entra Verified ID credentials from an application
Now we want to issue and verify a verified credential expert card by using a web app.
We first need to create a new credential within the Microsoft Entra admin center.
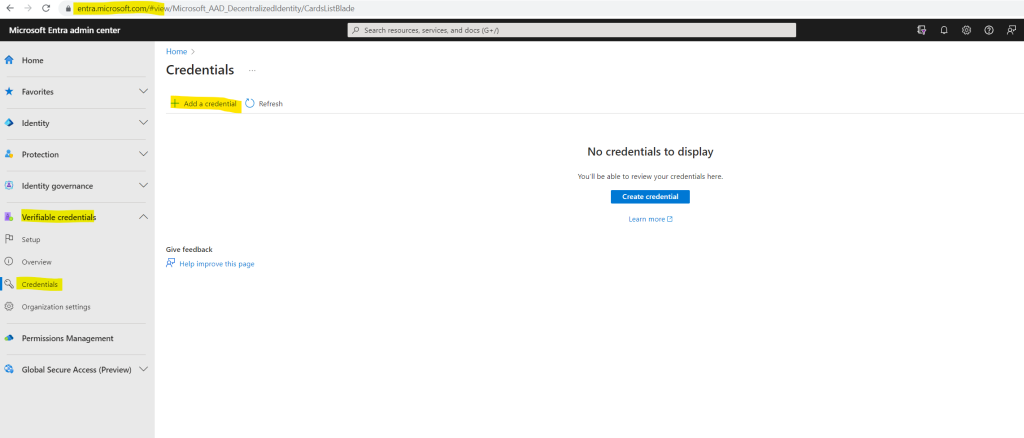
Navigate to Verifiable credentials -> Credentials -> Add a credential
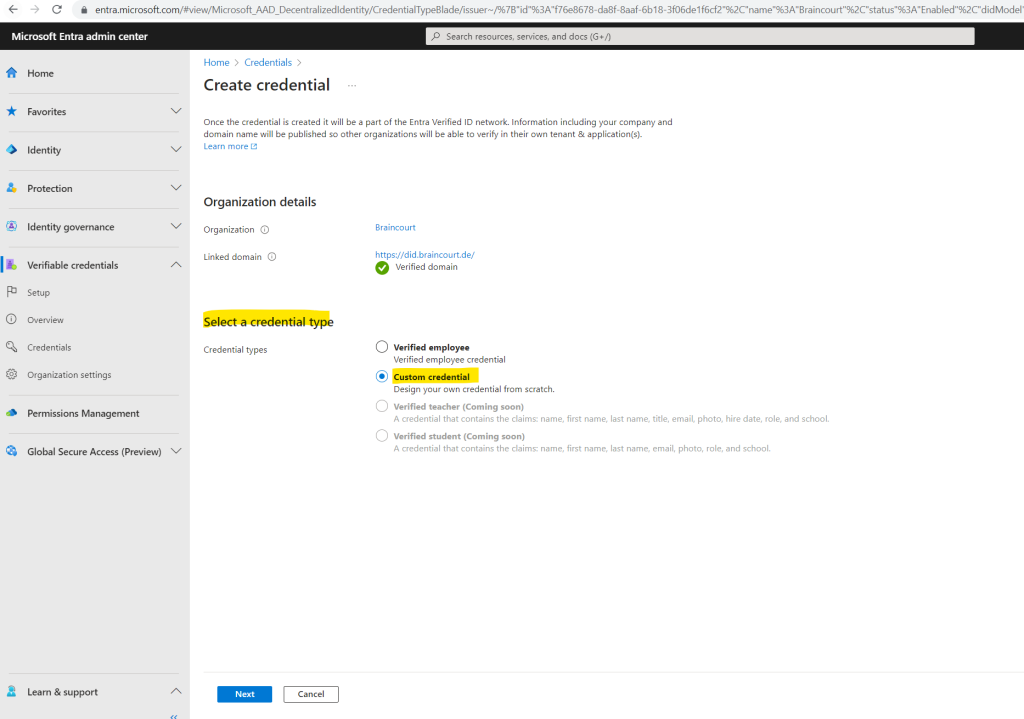
In Create credential, select Custom Credential and click Next.
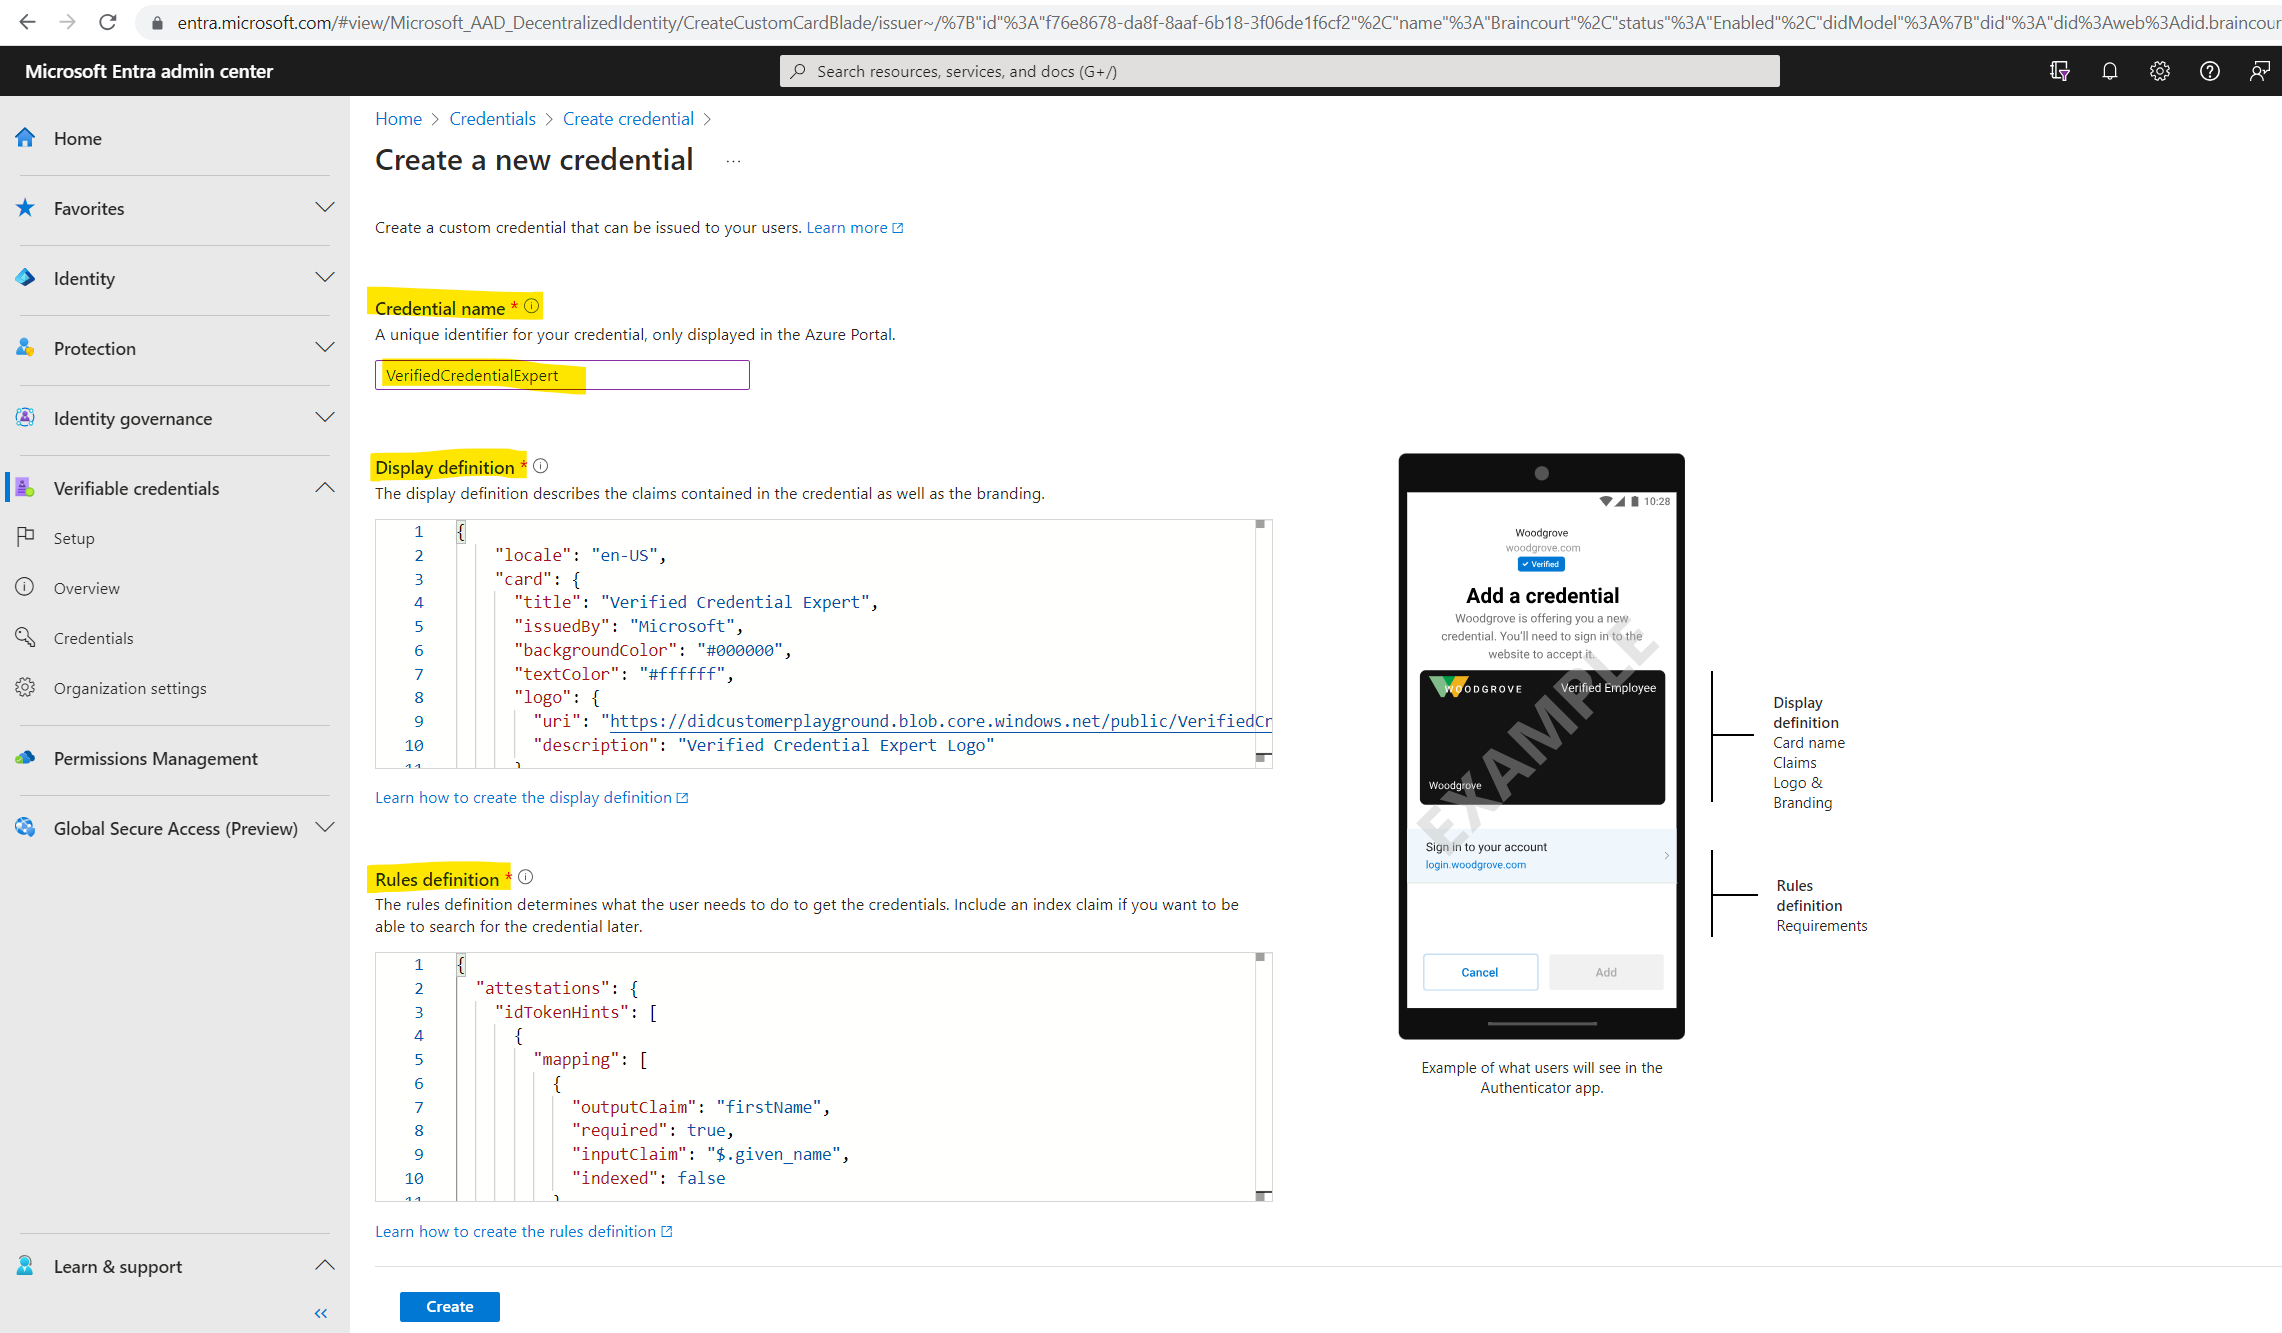
For Credential name, enter VerifiedCredentialExpert. This name is used in the portal to identify your verifiable credentials. It’s included as part of the verifiable credentials contract.
Copy the following JSON and paste it in the Display definition textbox
{
    "locale": "en-US",
    "card": {
      "title": "Verified Credential Expert",
      "issuedBy": "Microsoft",
      "backgroundColor": "#000000",
      "textColor": "#ffffff",
      "logo": {
        "uri": "https://didcustomerplayground.blob.core.windows.net/public/VerifiedCredentialExpert_icon.png",
        "description": "Verified Credential Expert Logo"
      },
      "description": "Use your verified credential to prove to anyone that you know all about verifiable credentials."
    },
    "consent": {
      "title": "Do you want to get your Verified Credential?",
      "instructions": "Sign in with your account to get your card."
    },
    "claims": [
      {
        "claim": "vc.credentialSubject.firstName",
        "label": "First name",
        "type": "String"
      },
      {
        "claim": "vc.credentialSubject.lastName",
        "label": "Last name",
        "type": "String"
      }
    ]
}
Copy the following JSON and paste it in the Rules definition textbox
{
  "attestations": {
    "idTokenHints": [
      {
        "mapping": [
          {
            "outputClaim": "firstName",
            "required": true,
            "inputClaim": "$.given_name",
            "indexed": false
          },
          {
            "outputClaim": "lastName",
            "required": true,
            "inputClaim": "$.family_name",
            "indexed": false
          }
        ],
        "required": false
      }
    ]
  },
  "validityInterval": 2592000,
  "vc": {
    "type": [
      "VerifiedCredentialExpert"
    ]
  }
}
Select Create.
In Verifiable Credentials, select Issue credential.
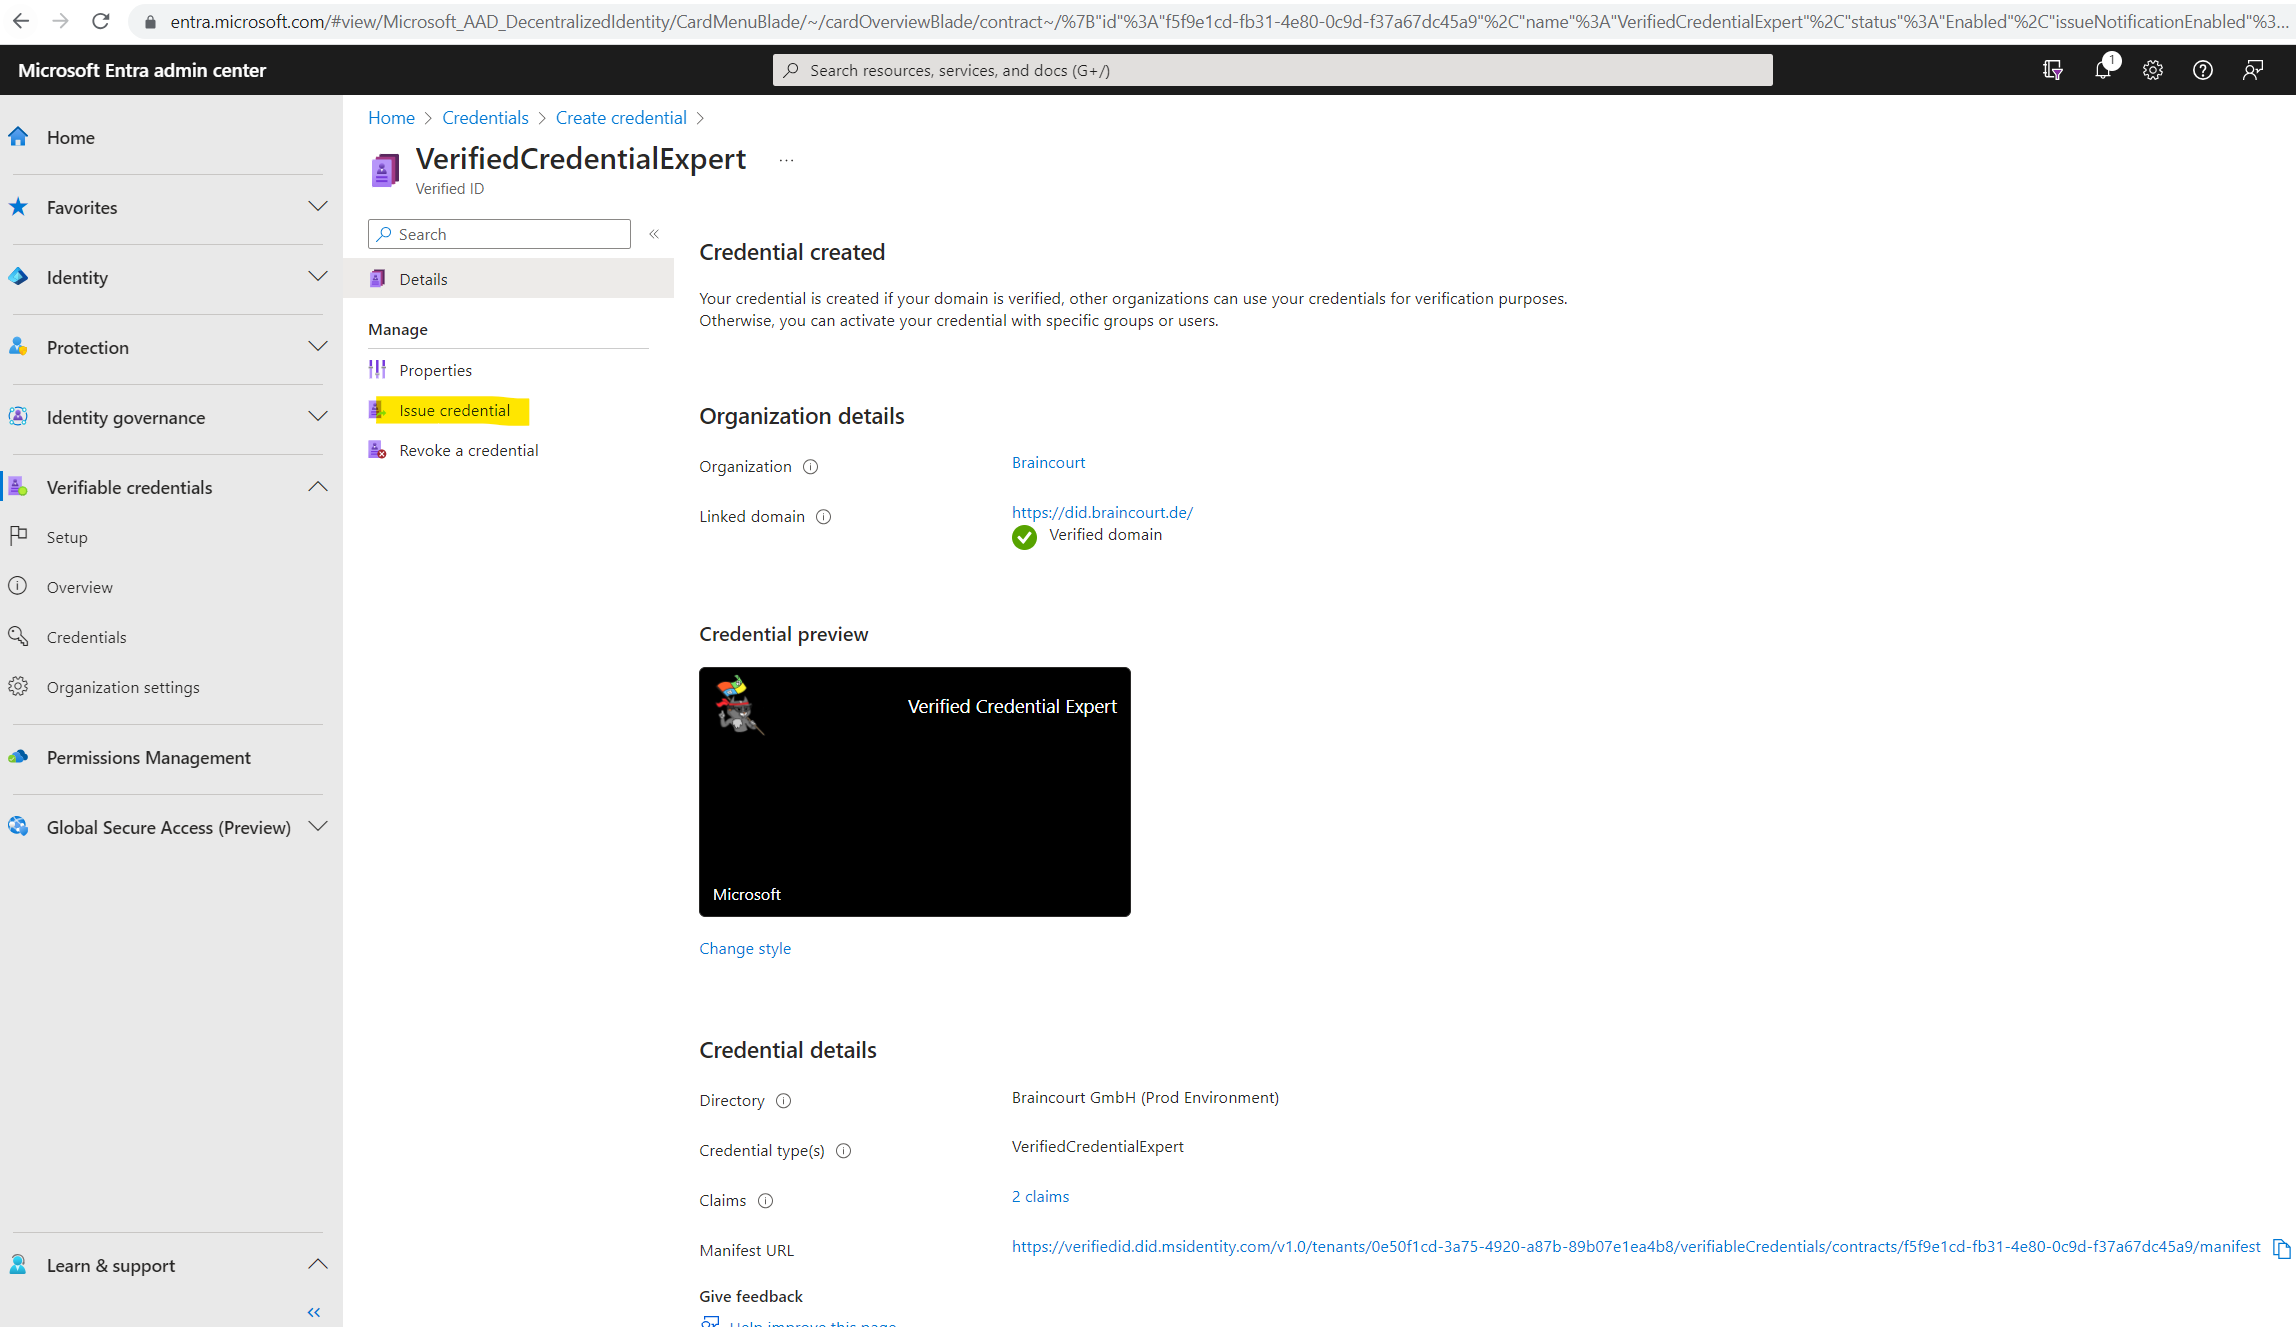
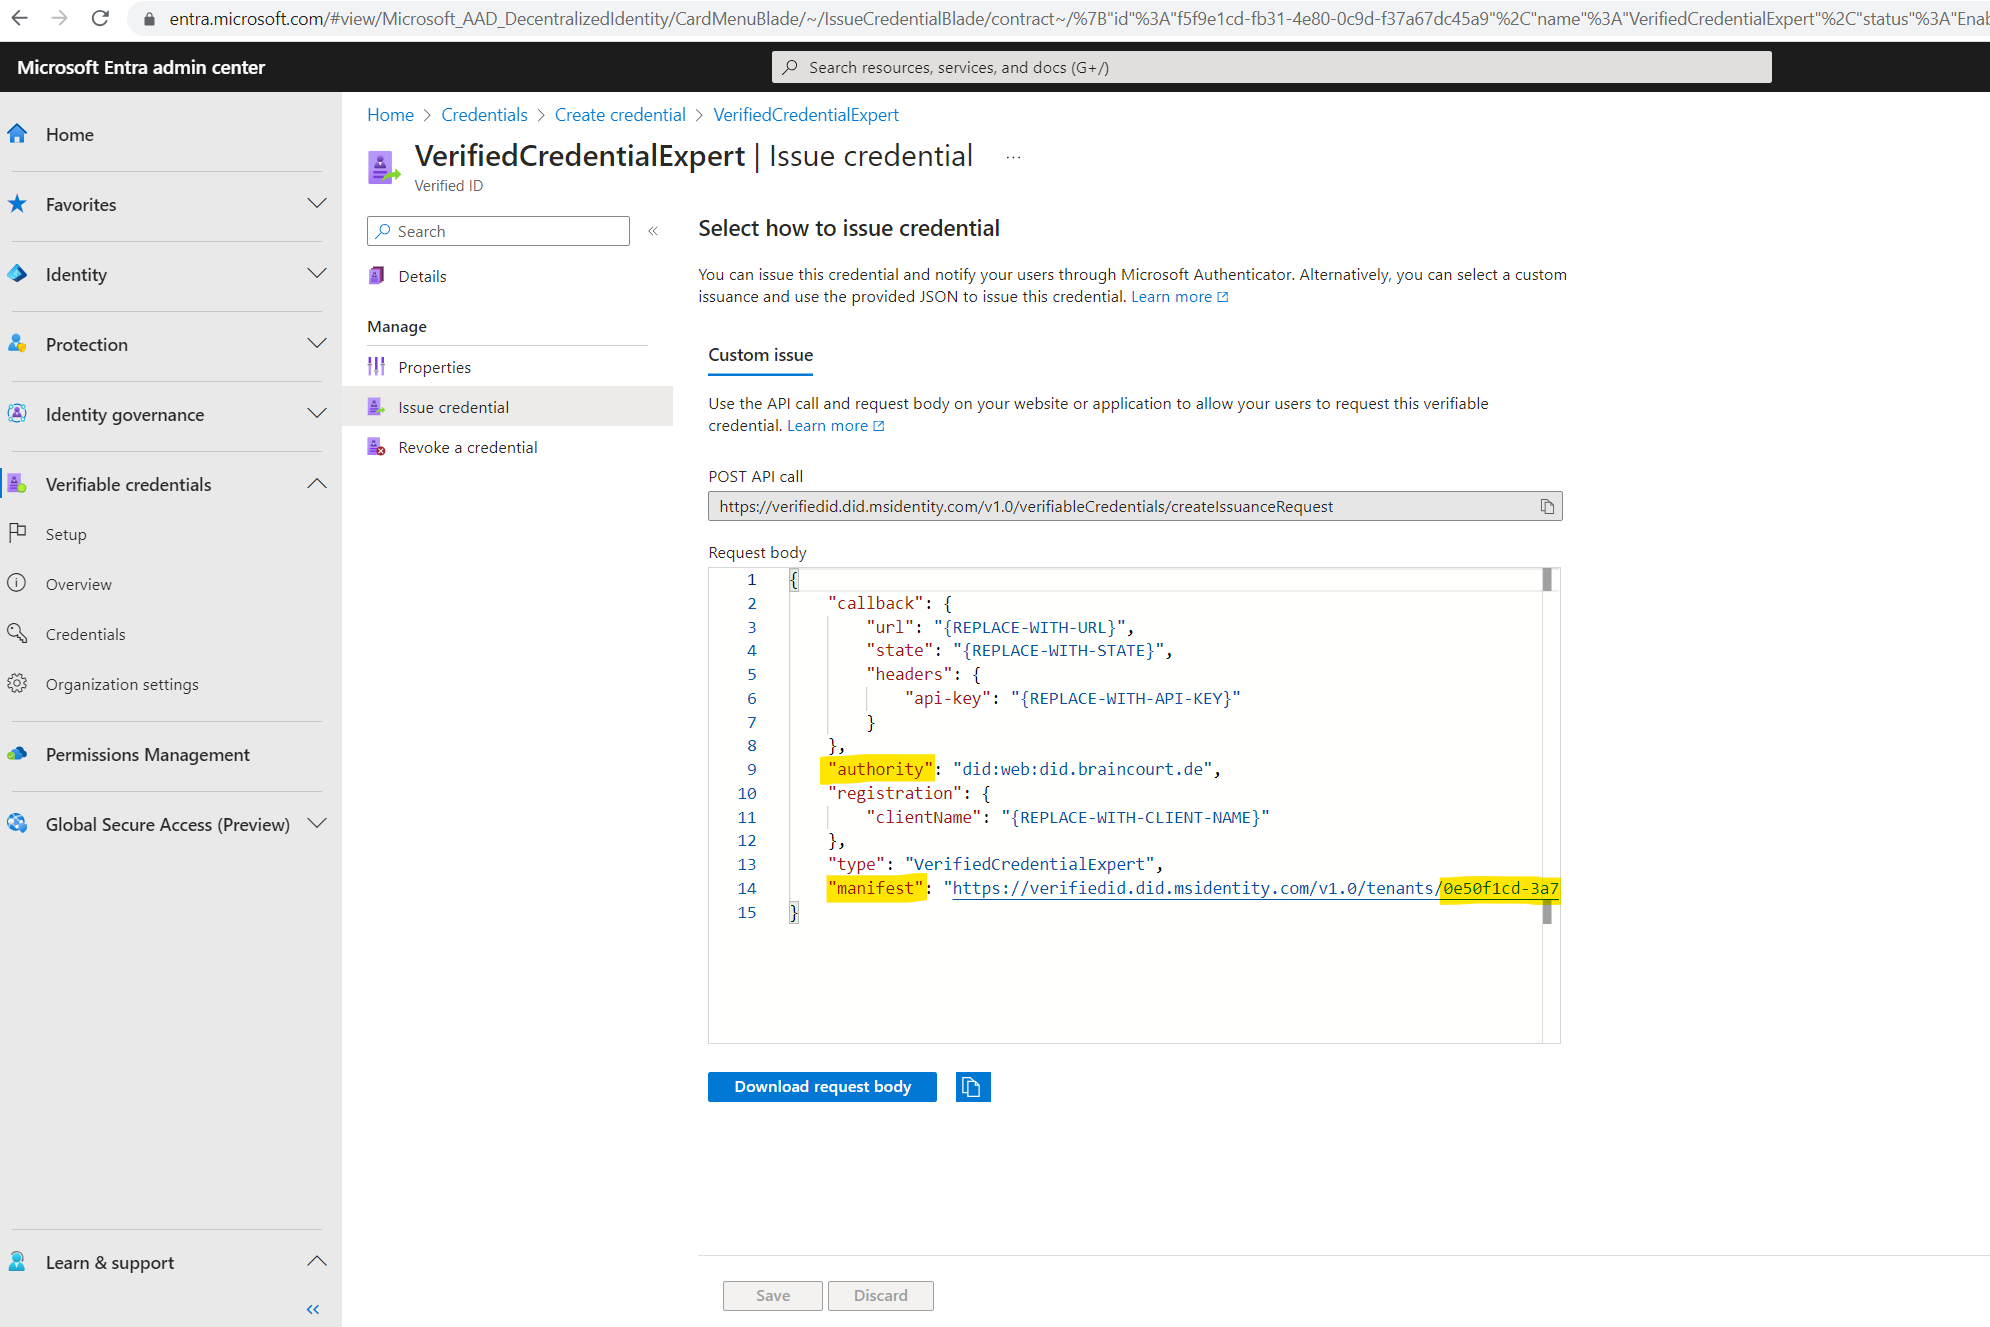
Copy the authority, which is the Decentralized Identifier, and record it for later.
Copy the manifest URL. It’s the URL that Authenticator evaluates before it displays to the user verifiable credential issuance requirements. Record it for later use.
Copy your Tenant ID, and record it for later. The Tenant ID is the guid in the manifest URL highlighted above.
As mentioned previously Microsoft provides a sample ASP.NET Core Web App to demonstrate Verified ID. The sample application is available in .NET, and the code is maintained in a GitHub repository. Download the sample code from GitHub, or clone the repository to your local machine:
git clone https://github.com/Azure-Samples/active-directory-verifiable-credentials-dotnet.git
We also need to create a client secret for the registered application we created previously. This application uses the client secret to prove its identity when it requests tokens.
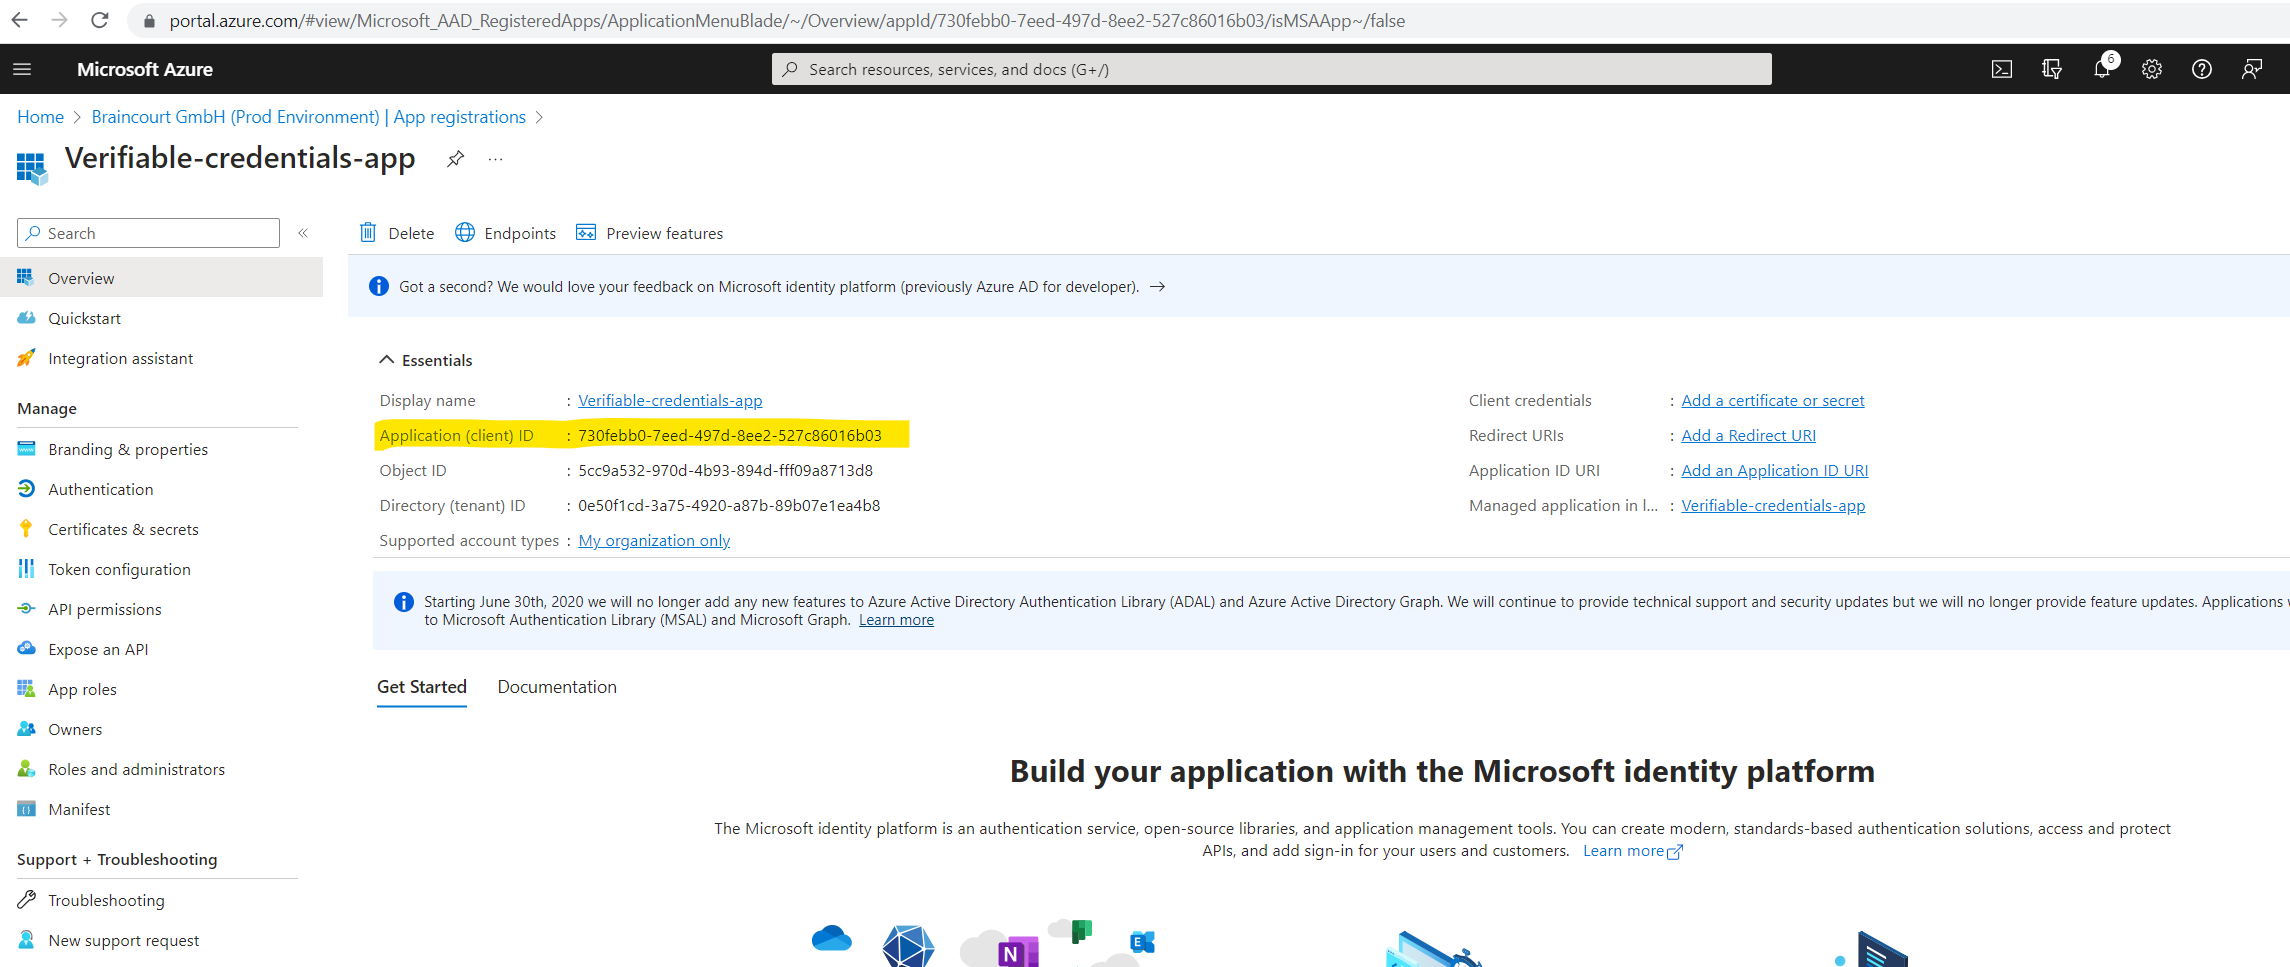
Sign in to the Azure portal as at least a Global Administrator.
Select Microsoft Entra ID and select the application under App registrations.
Copy the Application (client) ID, and store it for later.
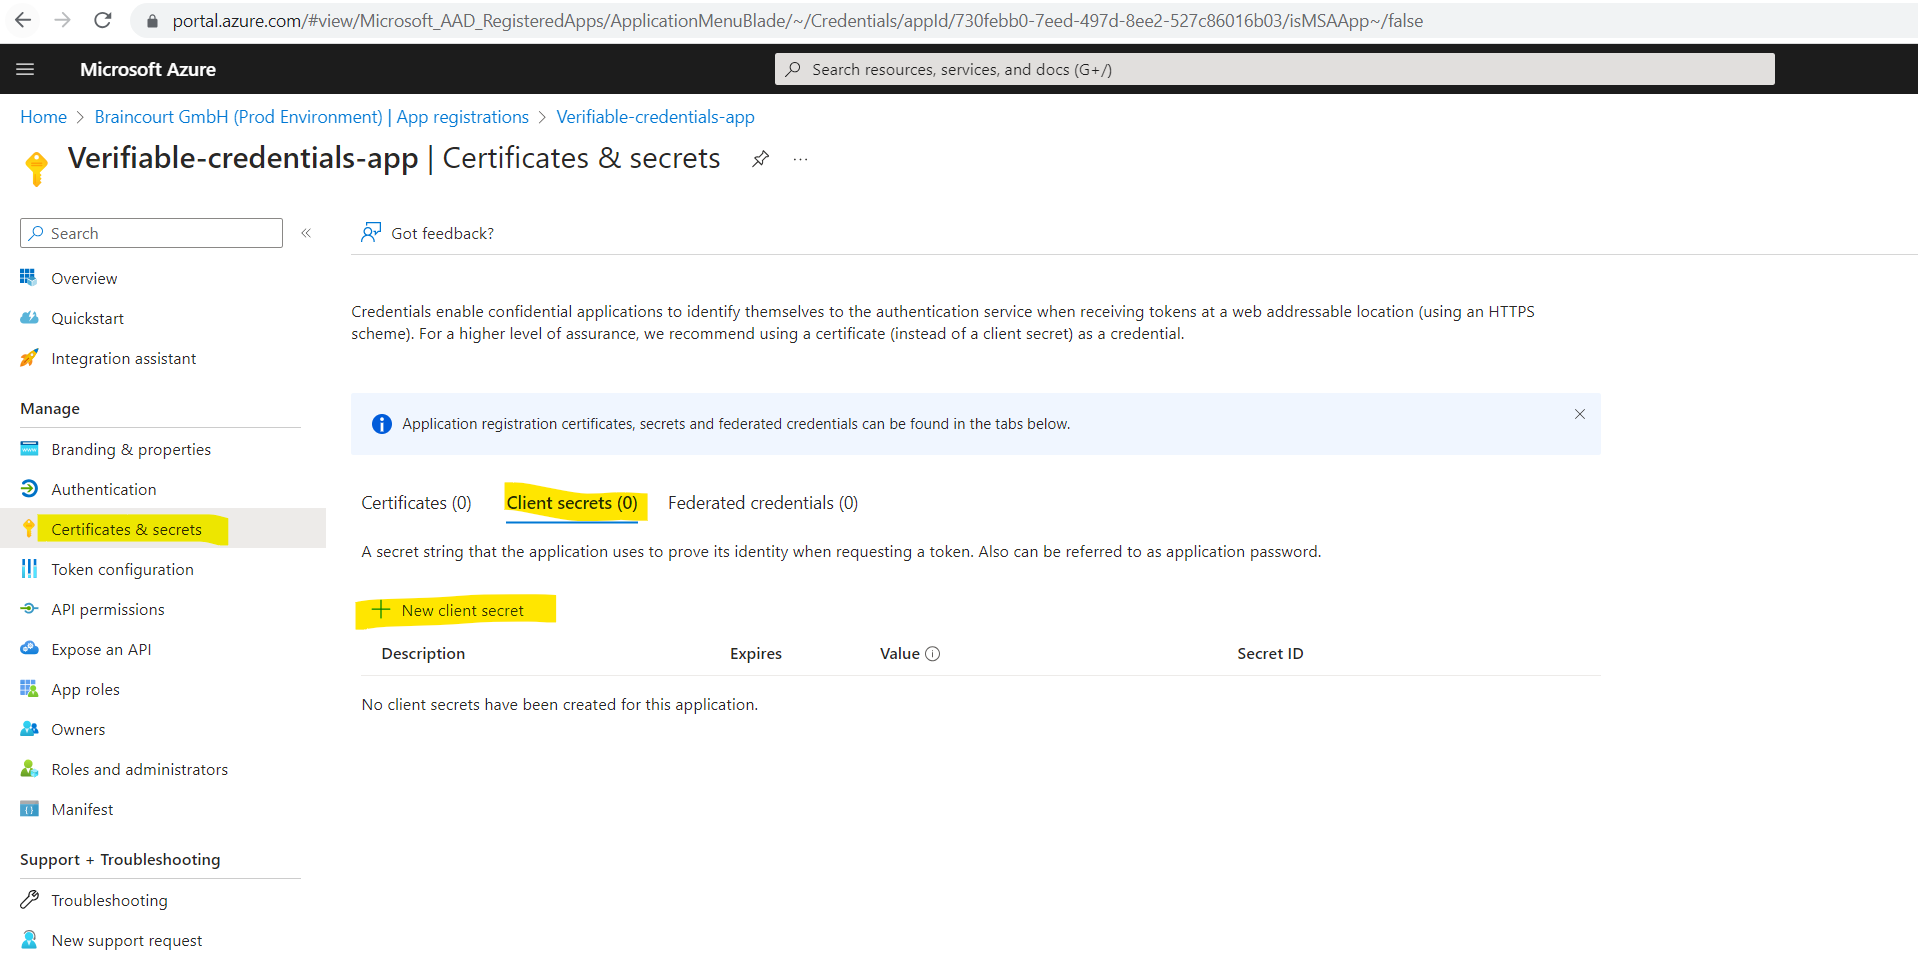
From the main menu, under Manage, select Certificates & secrets.
Select New client secret.
In Description, enter a description for the client secret (for example, vc-sample-secret).
Under Expires, select a duration for which the secret is valid (for example, six months). Then select Add.
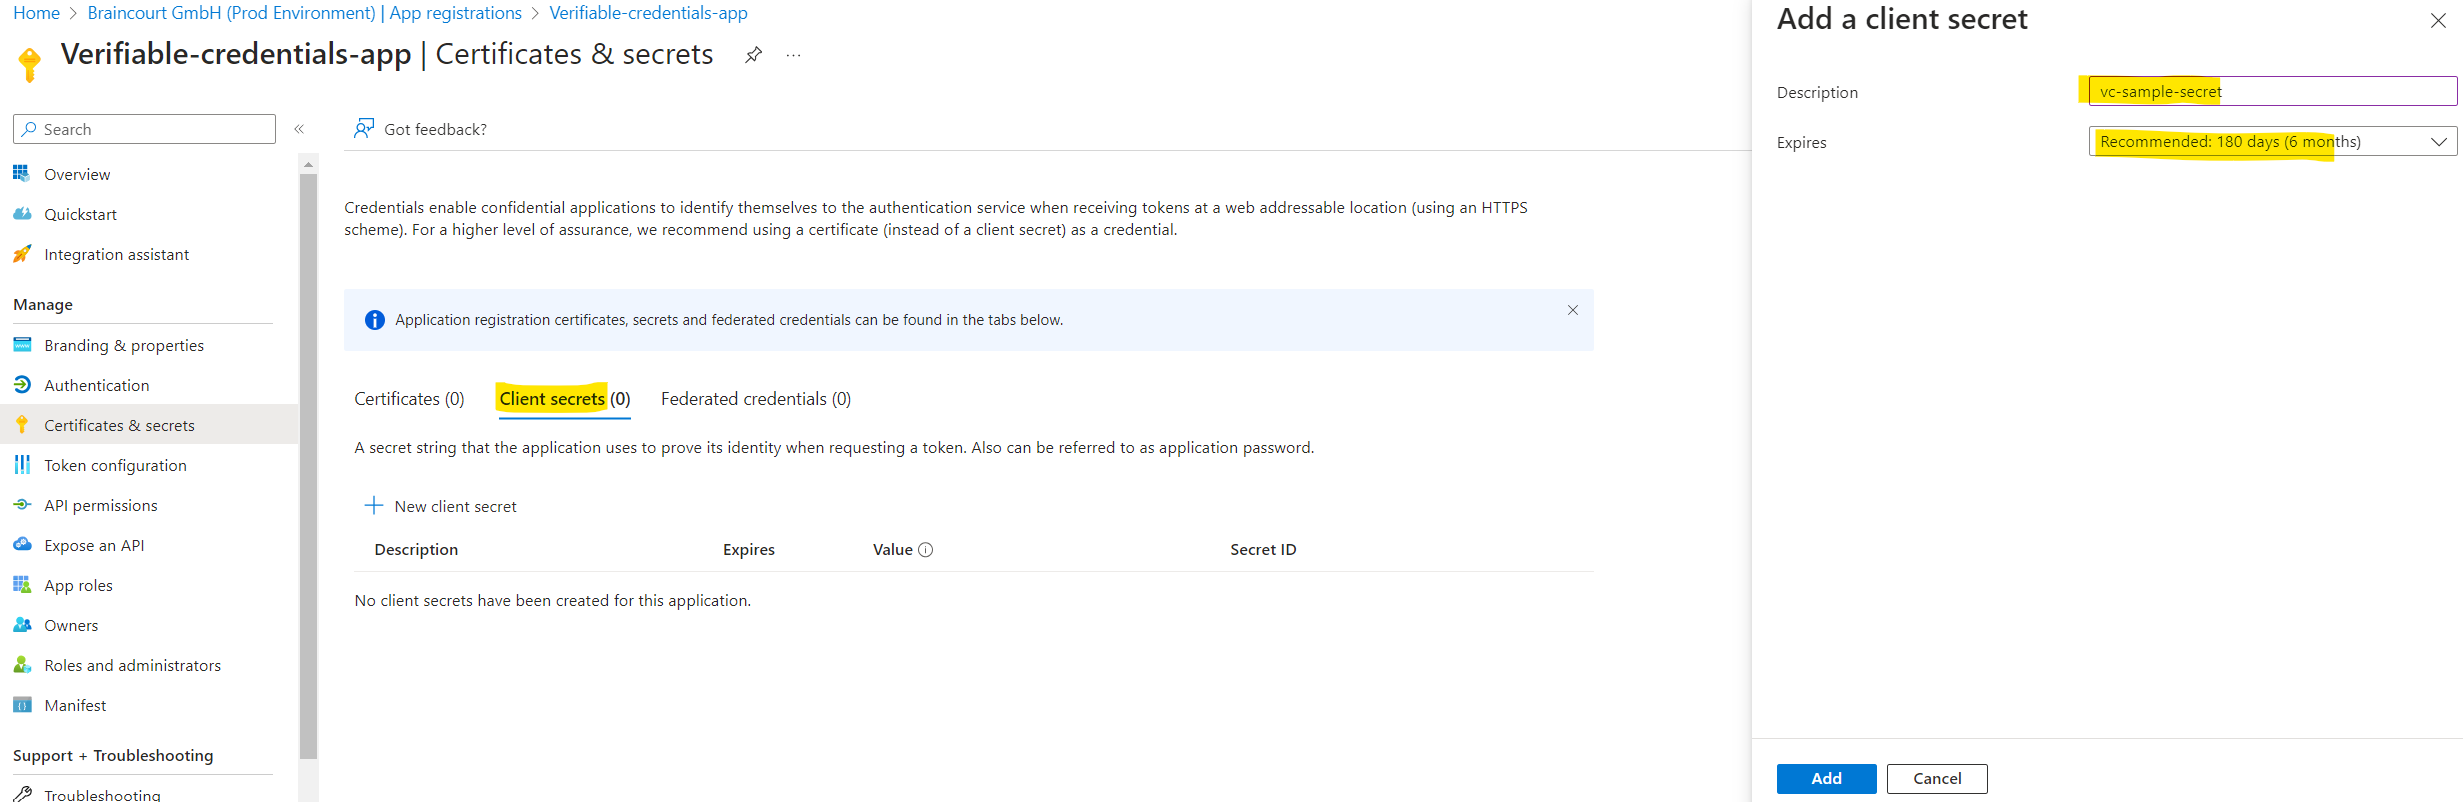
Record the secret’s Value. You’ll use this value for configuration in a later step.
The secret’s value won’t be displayed again, and isn’t retrievable by any other means. Record it as soon as it’s visible.

At this point, we should have all the required information that we need to set up our web app to issue and verify a verified credential expert card (Verified Credentials).
Therefore we will open the sample application in Visual Studio in order to update and make modifications to its issuer code to update it with your verifiable credential URL. This step allows you to issue verifiable credentials by using your own tenant.
Open the project by selecting the project inside the 1-asp-net-core-api-idtokenhint folder.
Under the project root folder, open the appsettings.json file. This file contains information about your Microsoft Entra Verified ID environment. Update the following properties with the information that you recorded in earlier steps:
Tenant ID: your tenant ID
Client ID: your client ID
Client Secret: your client secret
IssuerAuthority: Your Decentralized Identifier (you will find in the Microsoft Entra admin center under Verifiable credentials -> Organization settings)
VerifierAuthority: Your Decentralized Identifier
Credential Manifest: Your manifest URL
Finally the appsettings.json file will looks like this.
CertificateName”: “[Or instead of client secret: Enter here the name of a certificate (from the user cert store) as registered with your application]”,
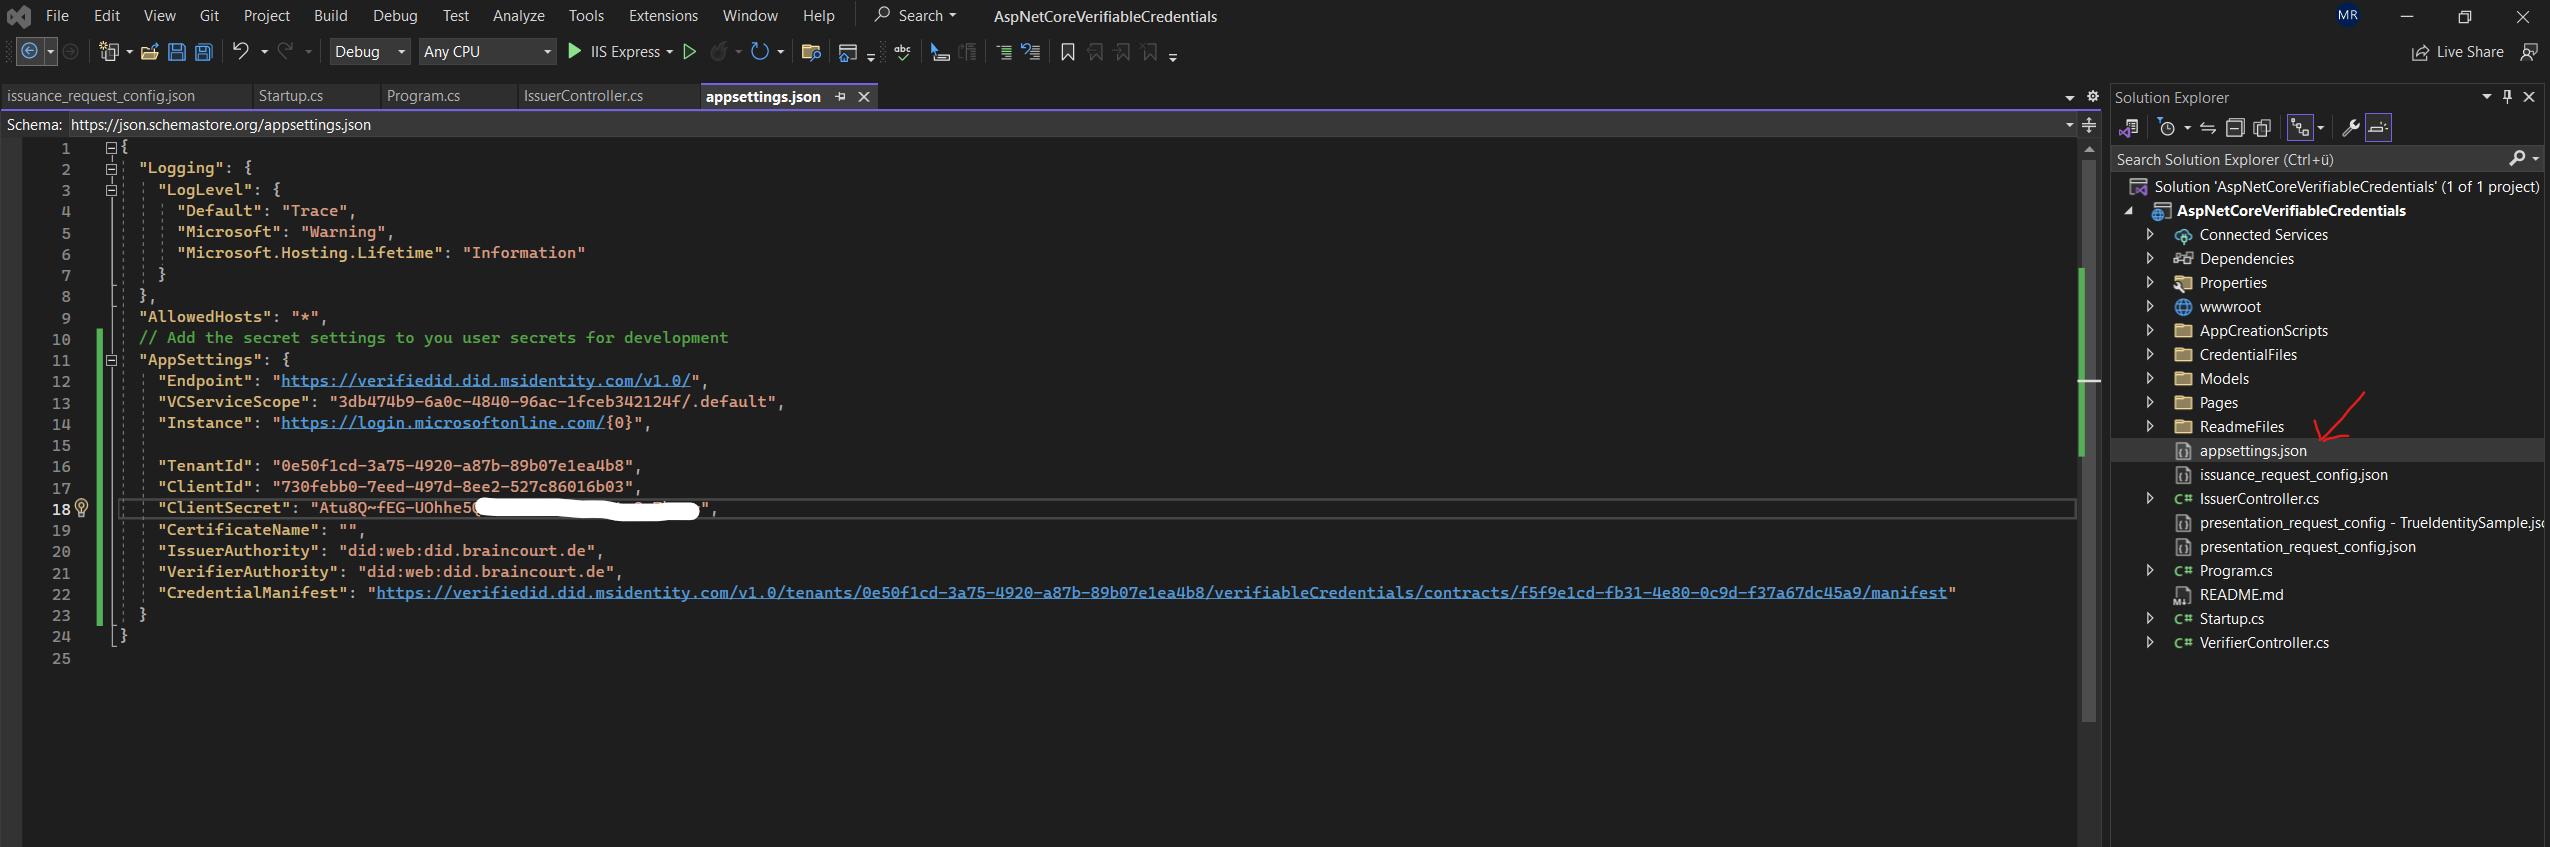
Save the appsettings.json file.
Source: https://learn.microsoft.com/en-us/entra/verified-id/verifiable-credentials-configure-issuer
In the next section we issue our first verified credential expert card by running the sample application.
Issue your first verified credential expert card
From Visual Studio, run the Verifiable_credentials_DotNet project. Or, from your operating system’s command line, run:
cd active-directory-verifiable-credentials-dotnet/1-asp-net-core-api-idtokenhint
dotnet build "AspNetCoreVerifiableCredentials.csproj" -c Debug -o .\bin\Debug\netcoreapp3.
dotnet run
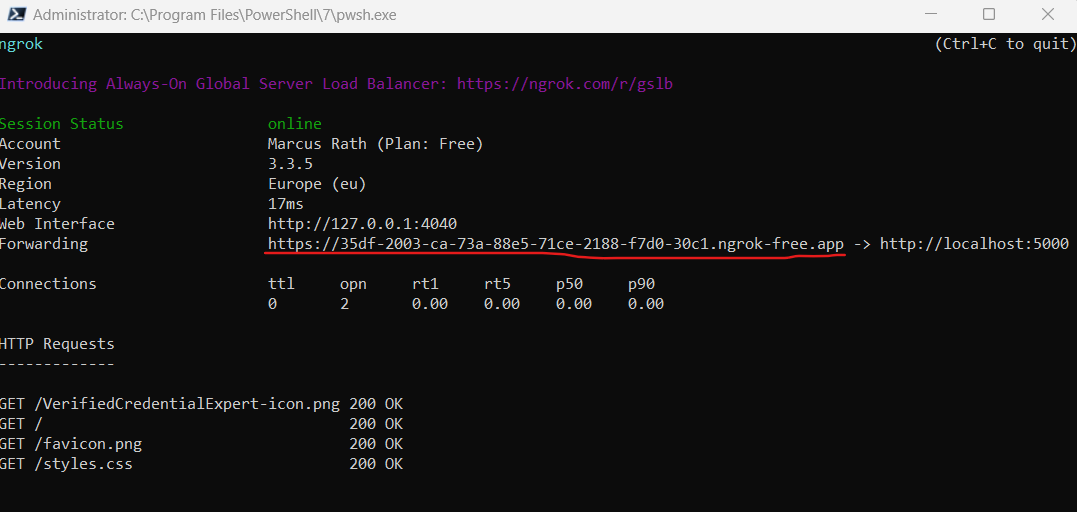
In another command prompt window, run the following command. This command runs ngrok to set up a URL on 5000, and make it publicly available on the internet.
ngrok http 5000
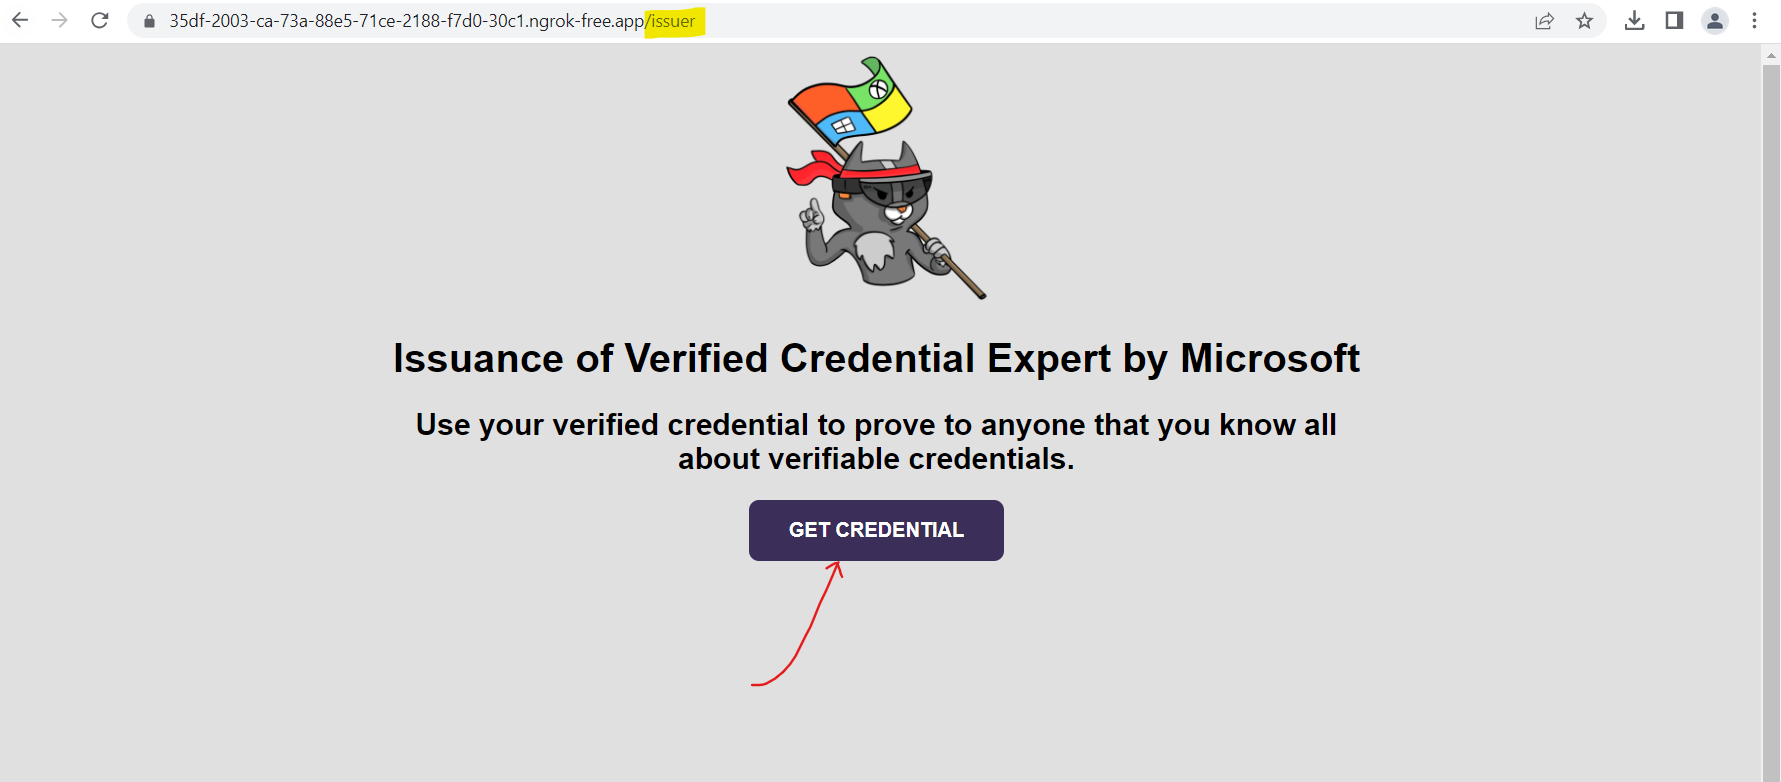
Open the HTTPS URL generated by ngrok.
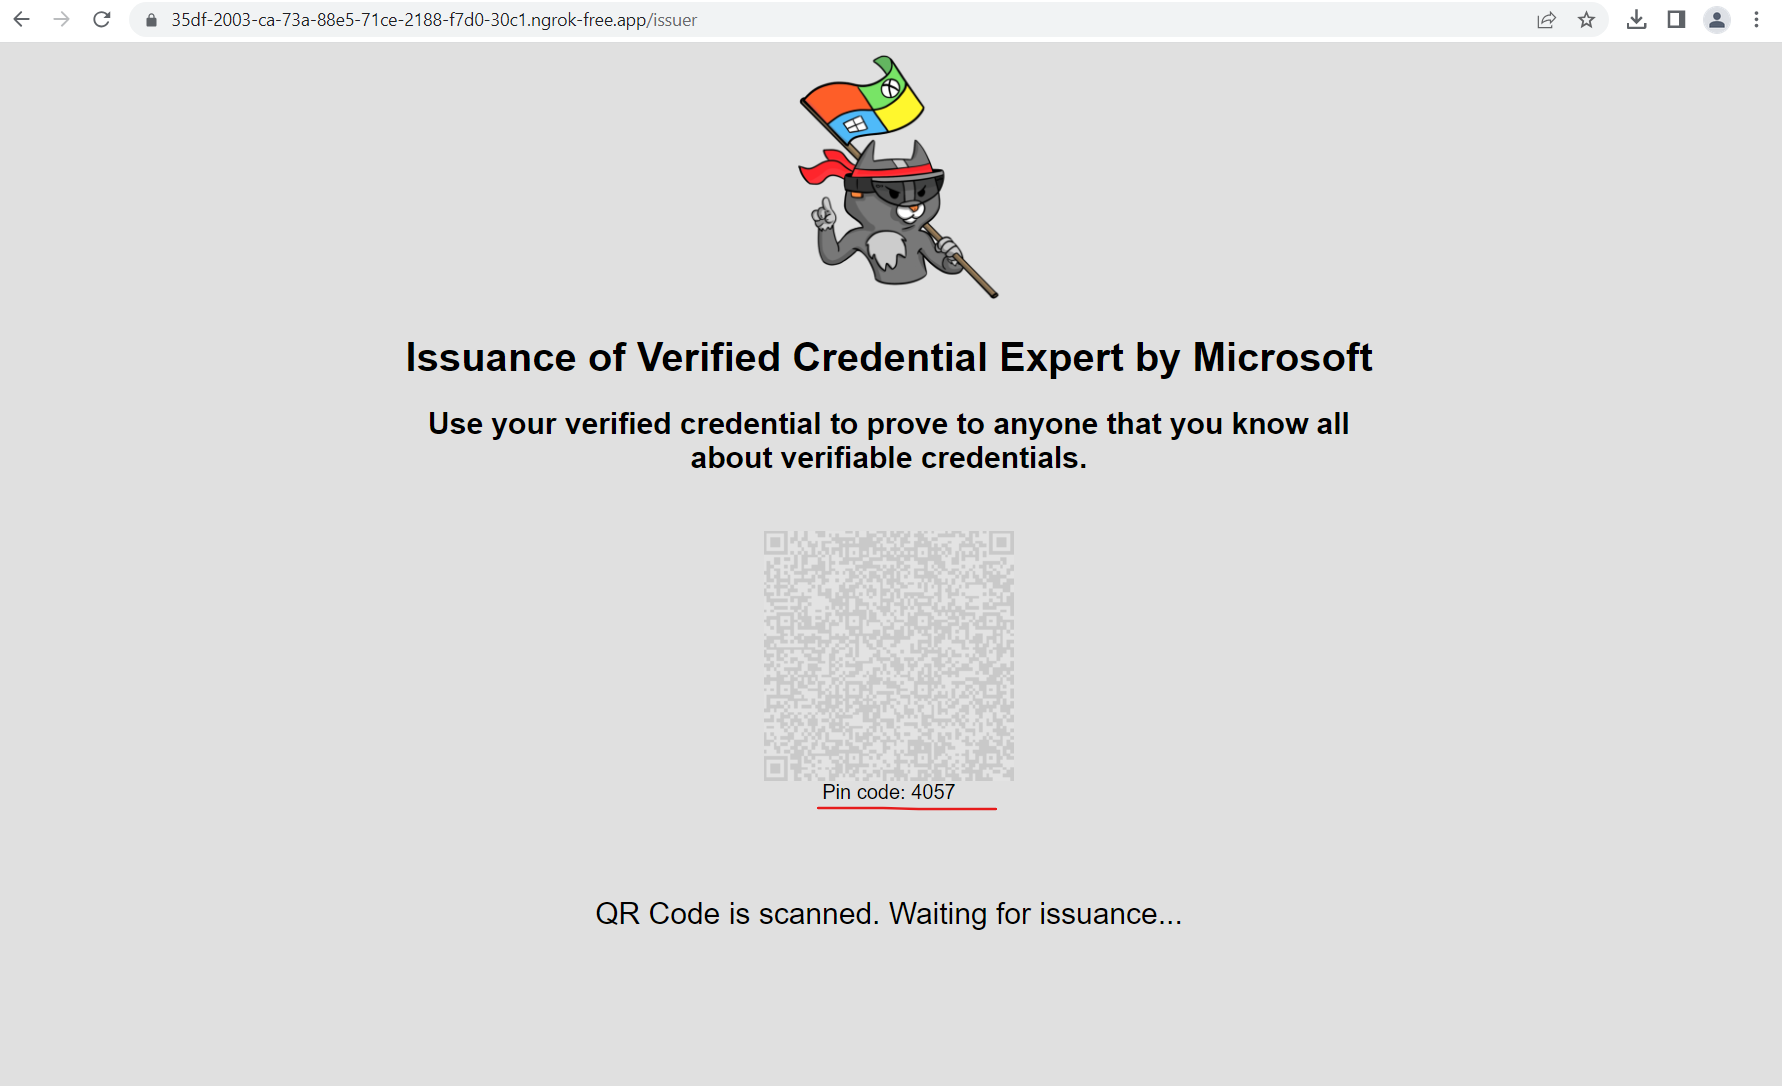
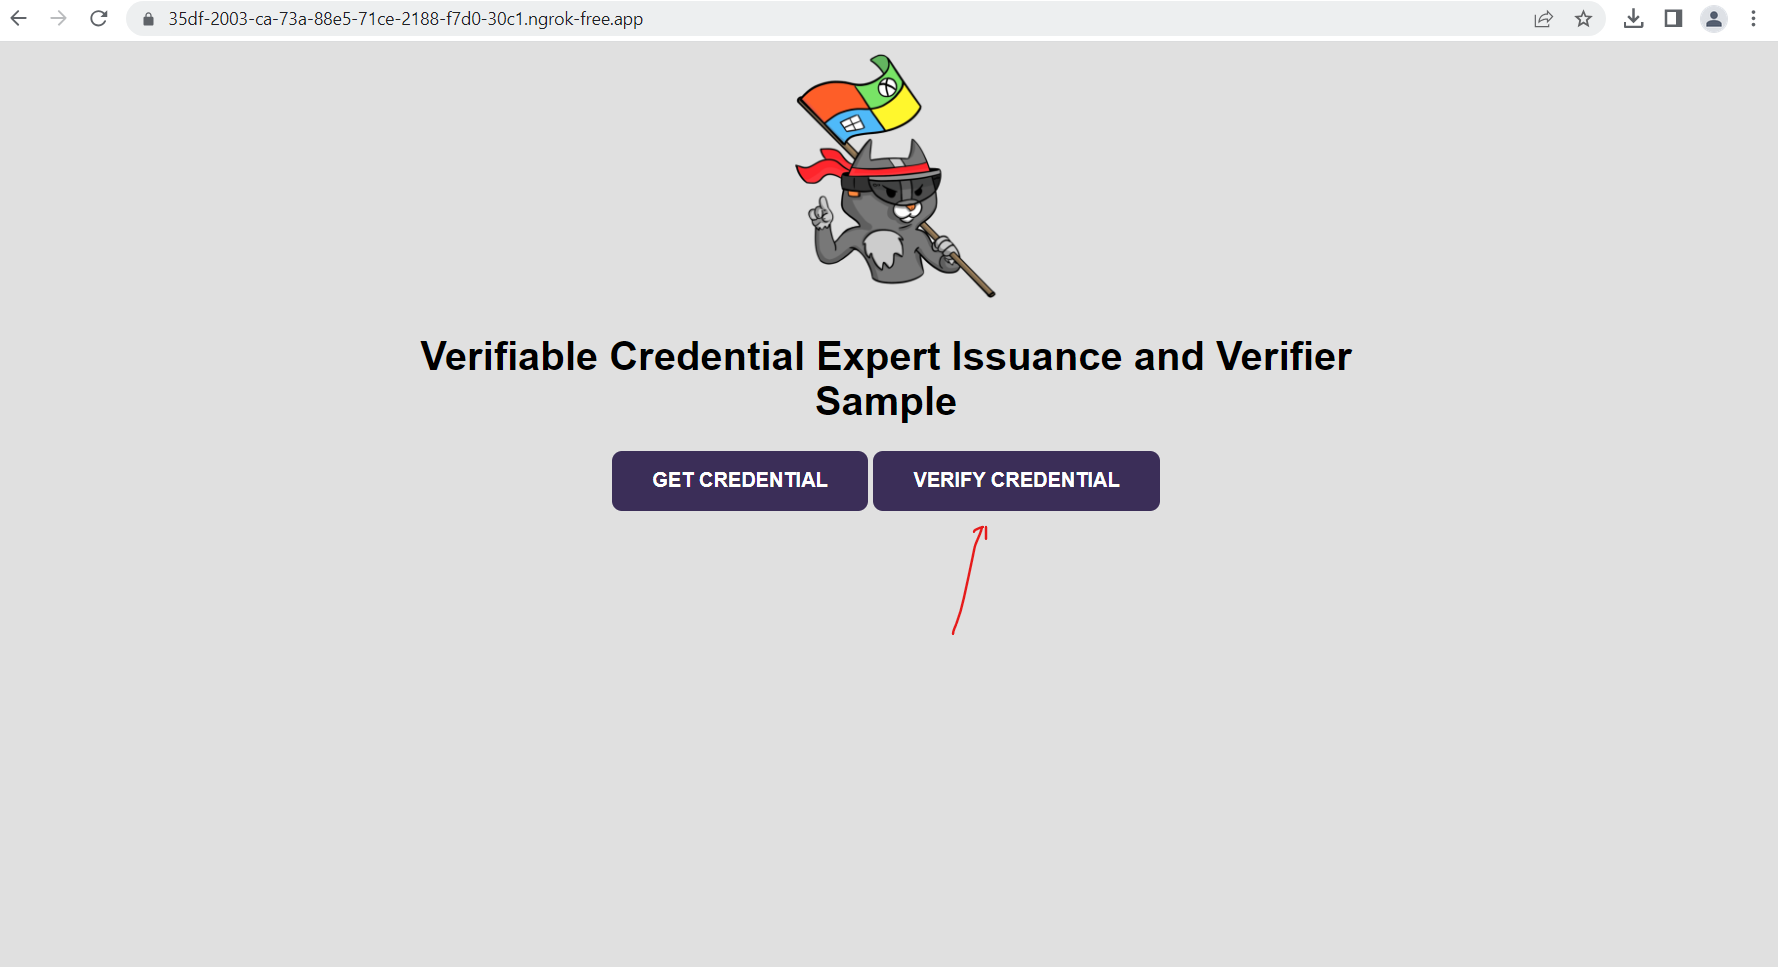
From a web browser, select Get Credential.

Using your mobile device, scan the QR code with the Authenticator app. You can also scan the QR code directly from your camera, which will open the Authenticator app for you.
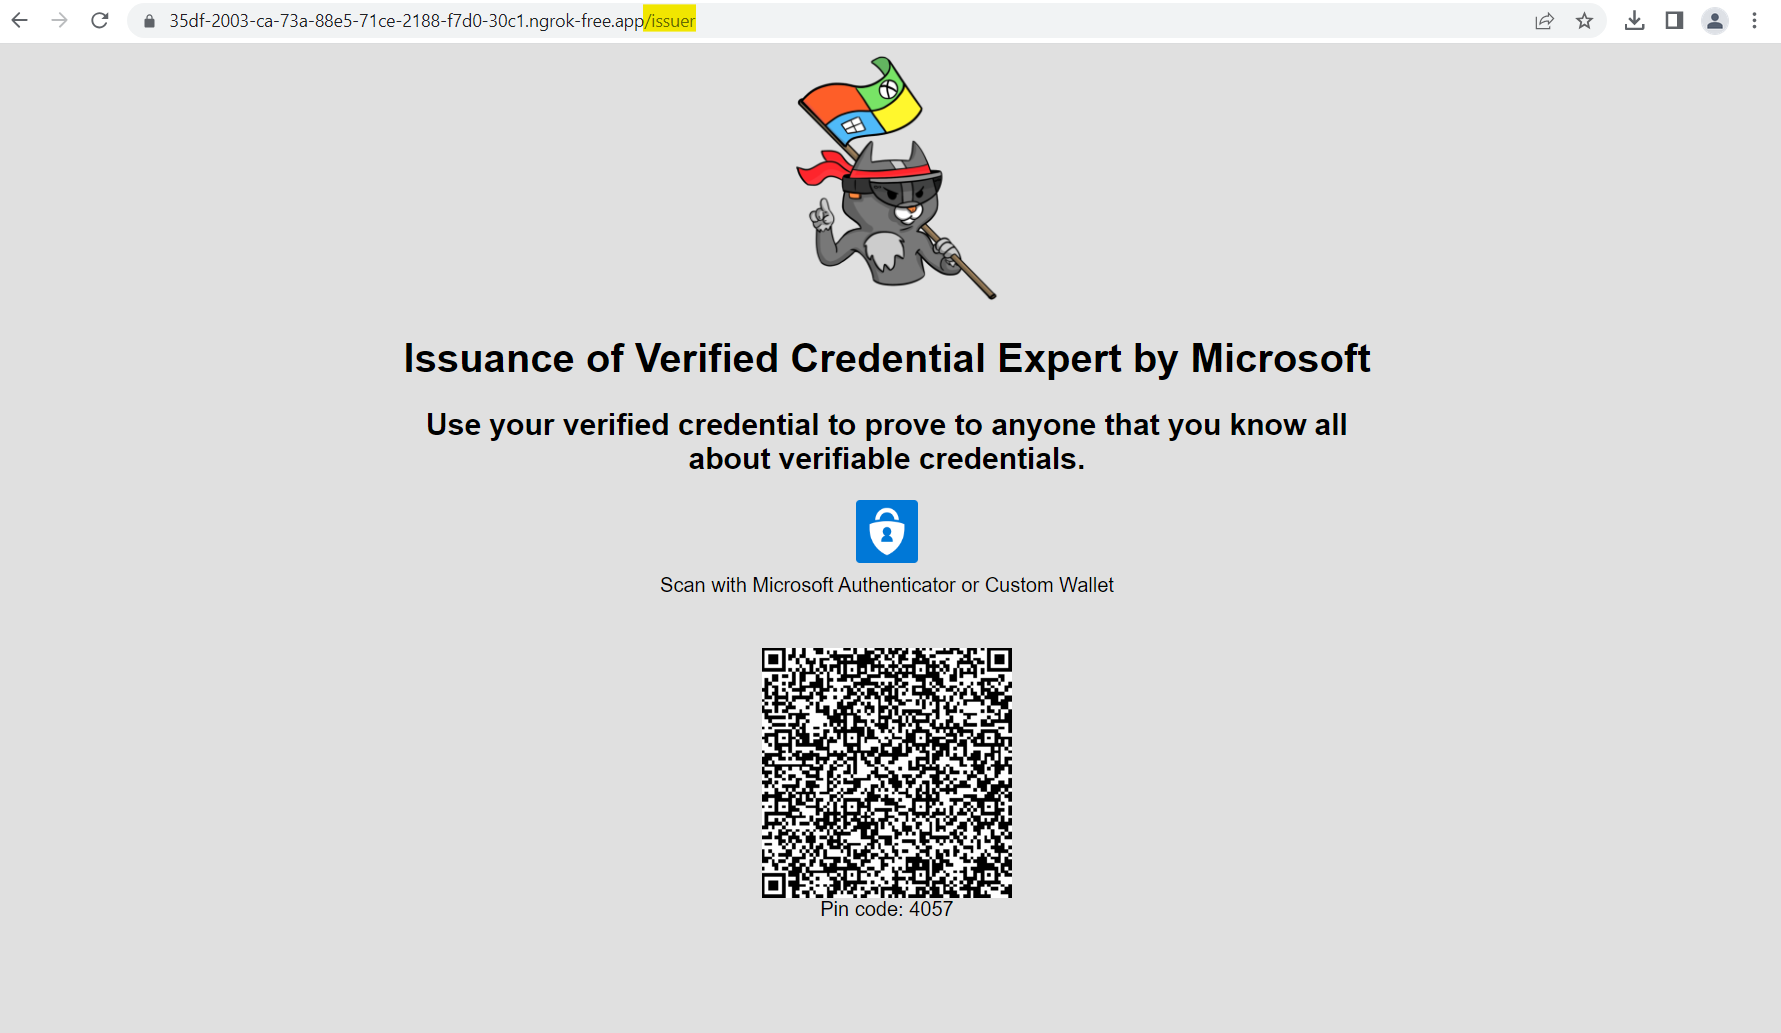
Enter the shown pin code in your Authenticator app.
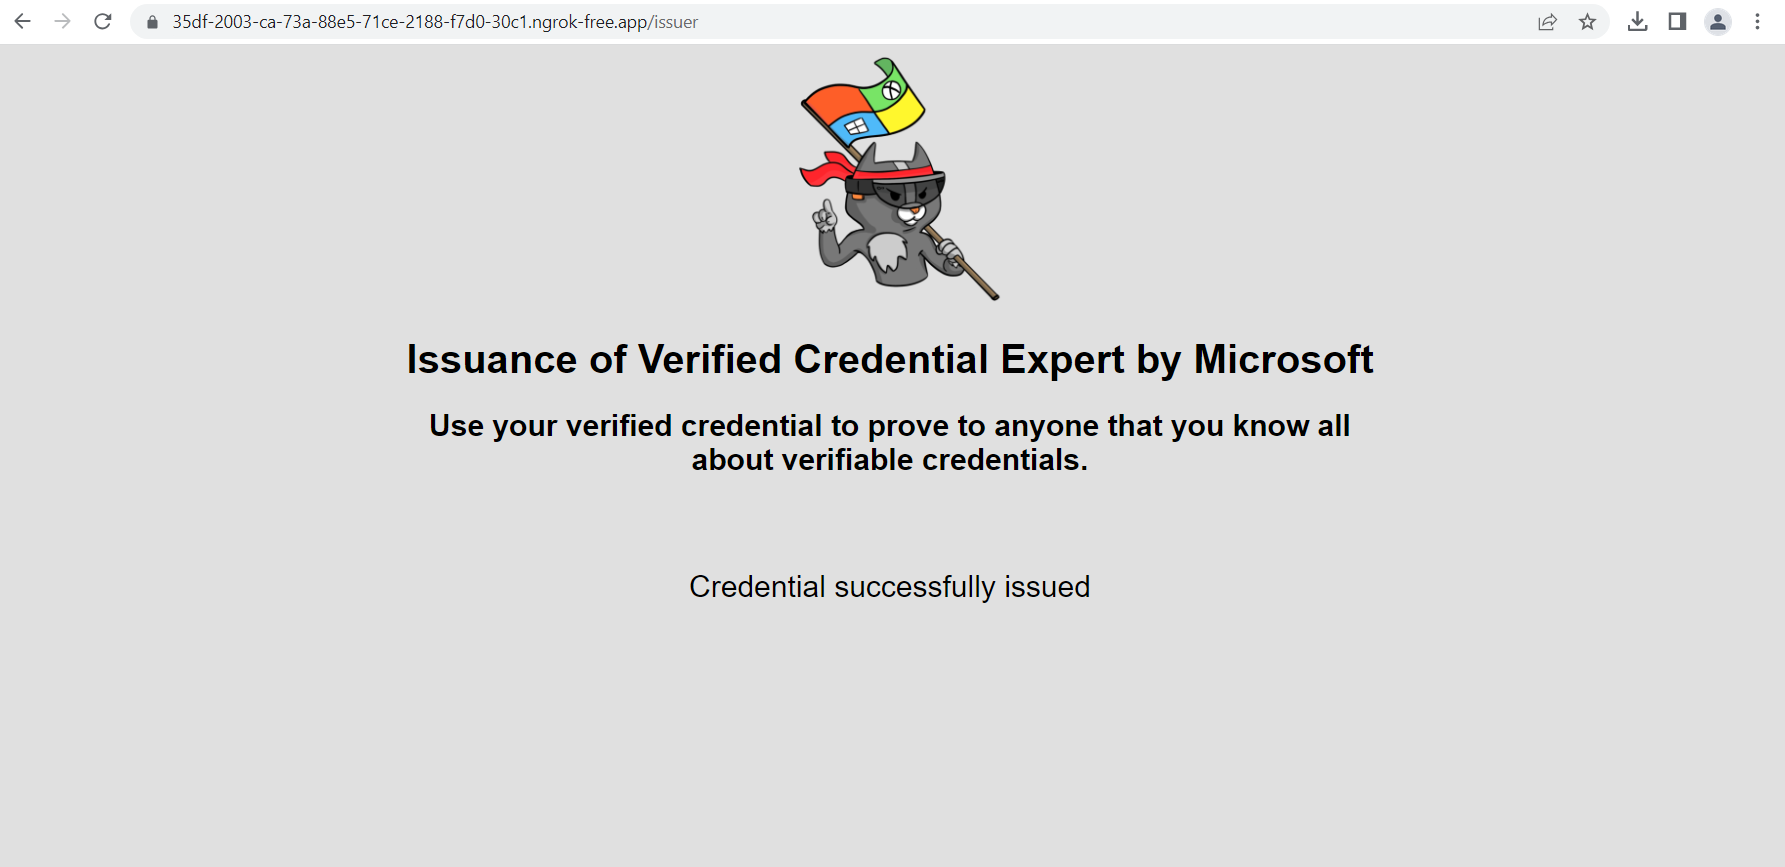
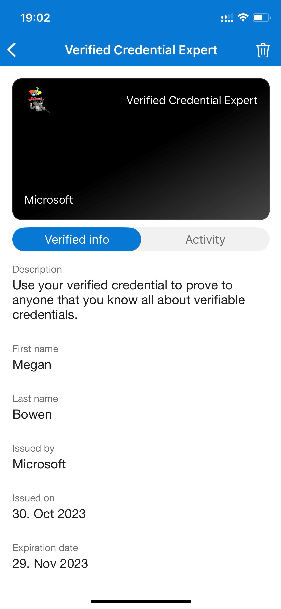
Finally we have the verified credential expert verifiable credential in our Authenticator app.
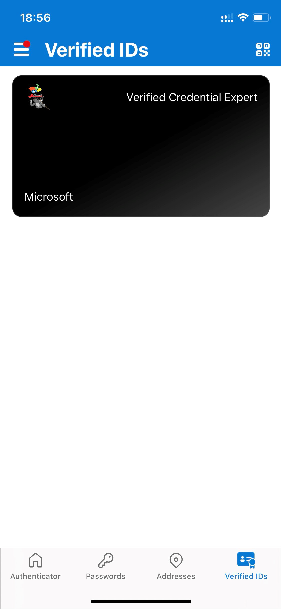
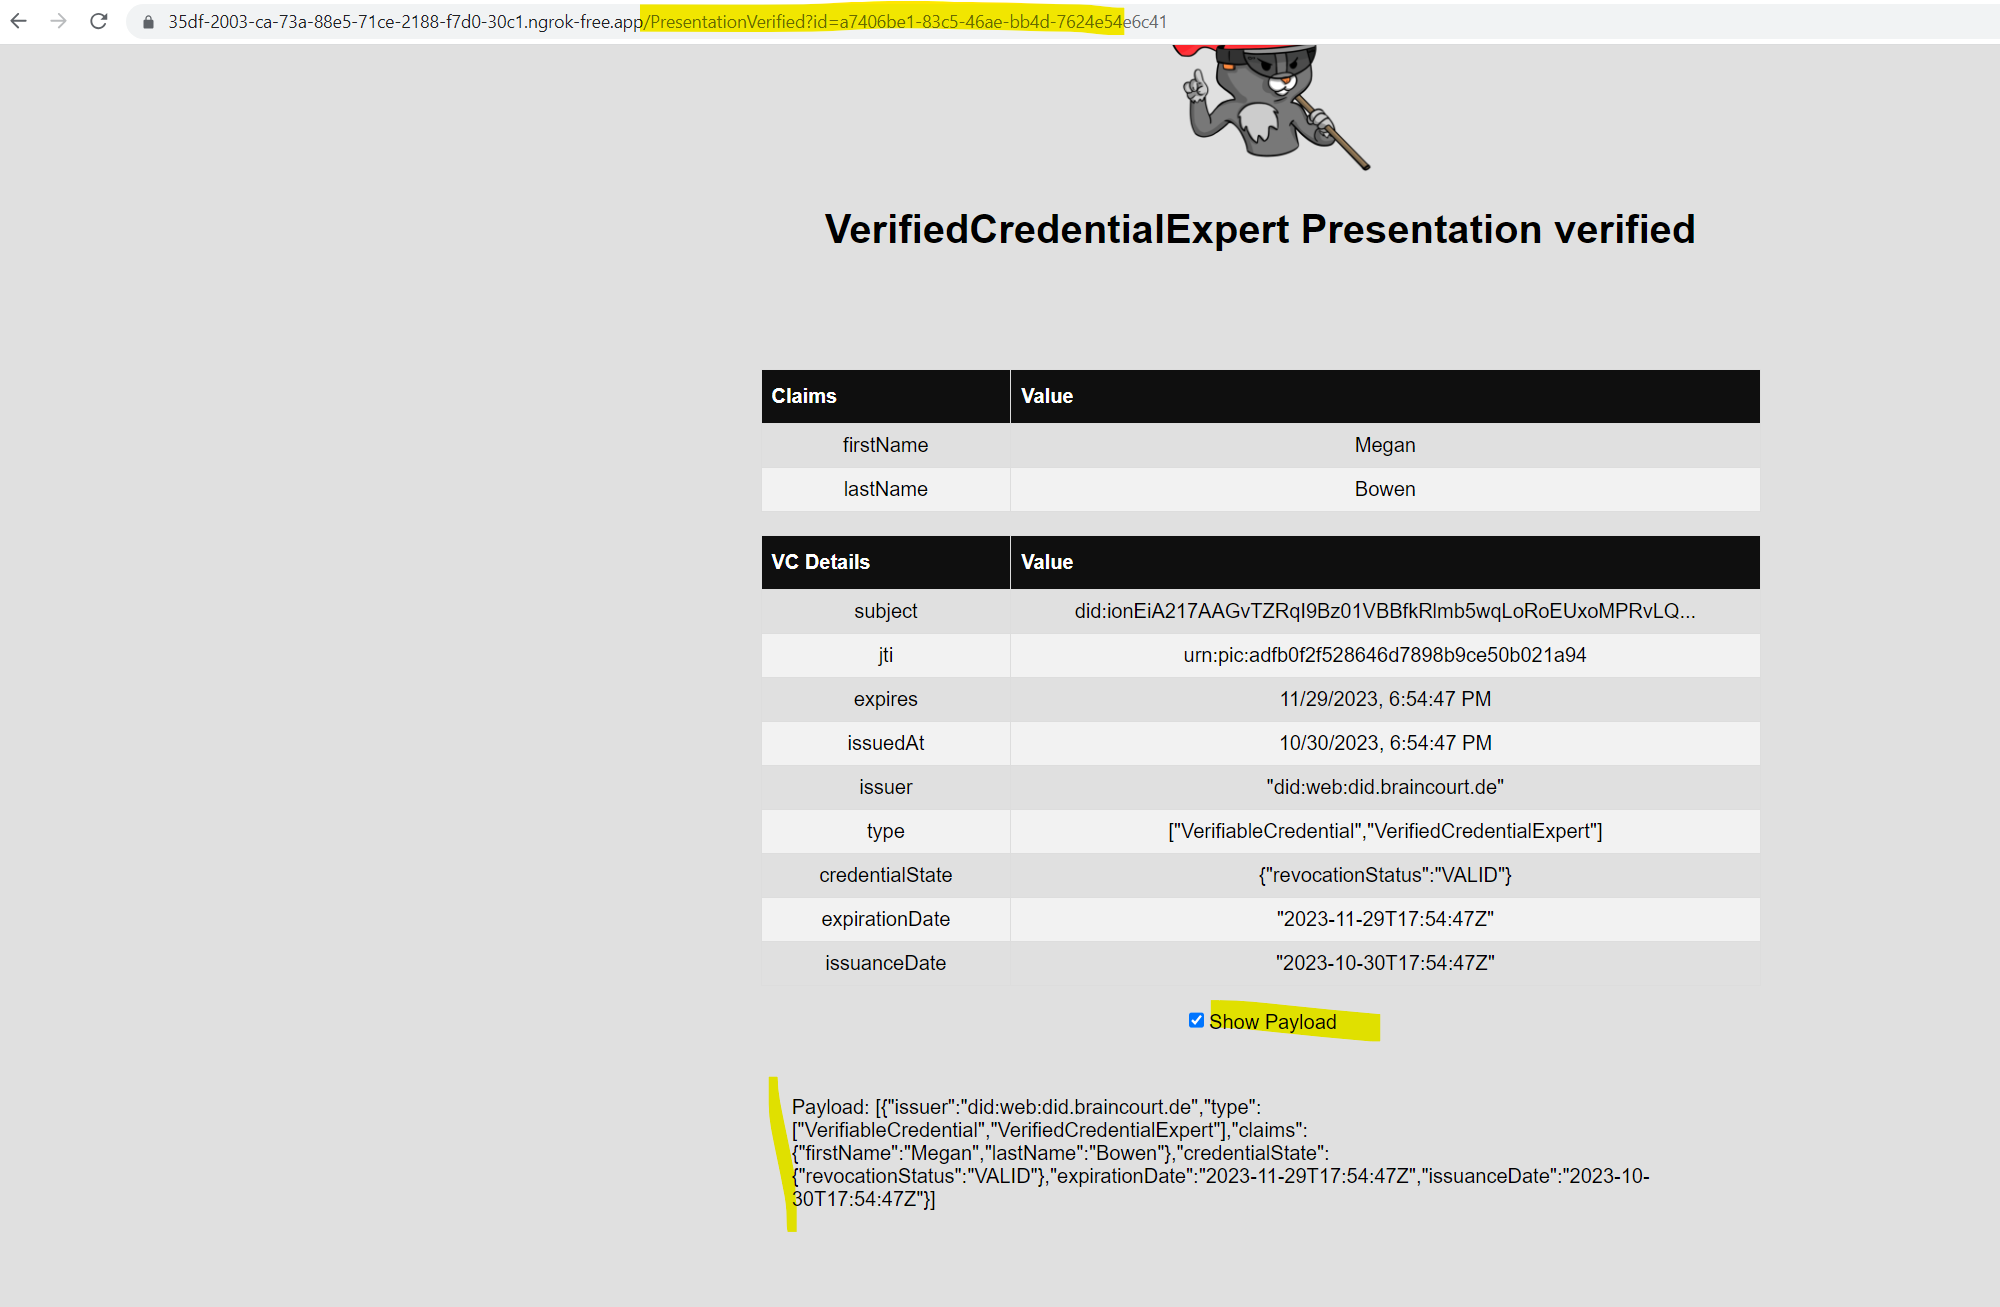
Your verifiable credential contains Megan Bowen for the first name and last name values in the credential. These values were hardcoded in the sample application, and were added to the verifiable credential at the time of issuance in the payload.
In real scenarios, your application pulls the user details from an identity provider. The following code snippet shows where the name is set in the sample application.
//file: IssuerController.cs
[HttpGet("/api/issuer/issuance-request")]
public async Task<ActionResult> issuanceRequest()
  {
    ...
    // Here you could change the payload manifest and change the first name and last name.
    payload["claims"]["given_name"] = "Megan";
    payload["claims"]["family_name"] = "Bowen";
    ...
}
Source: https://learn.microsoft.com/en-us/entra/verified-id/verifiable-credentials-configure-issuer
Verify Microsoft Entra Verified ID credentials from an application
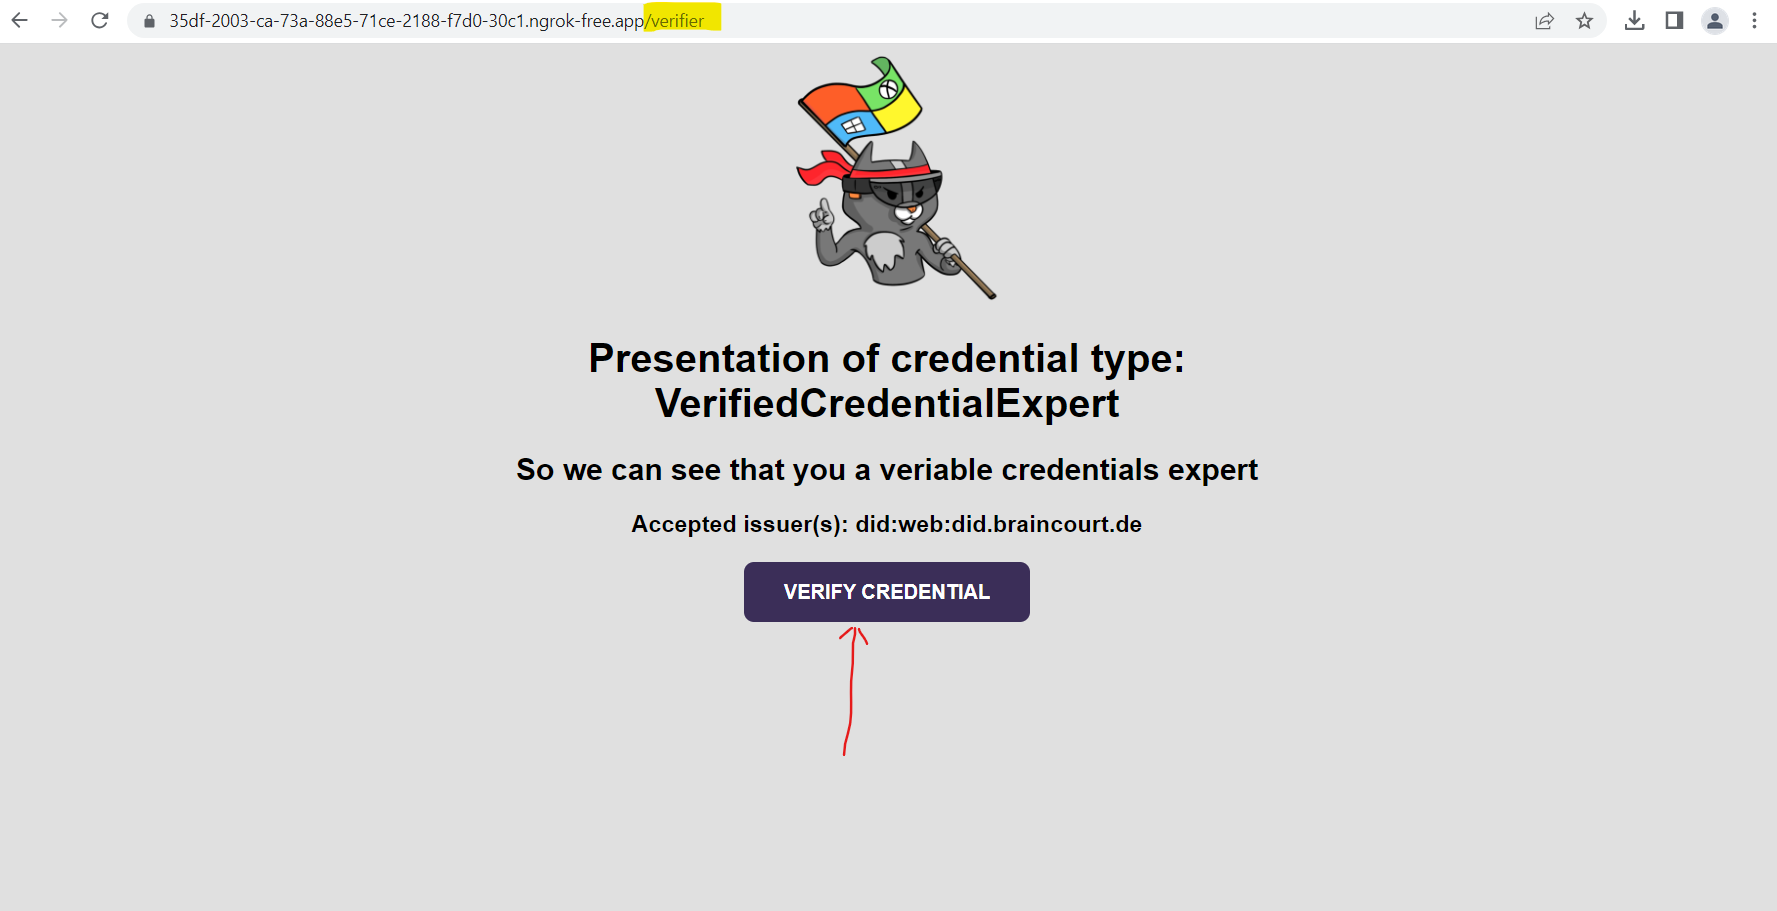
In the last section we learned how to issue and verify credentials by using the same Microsoft Entra tenant. In a real-world scenario, where the issuer and verifier are separate organizations, the verifier uses their own Microsoft Entra tenant to perform the verification of the credential that was issued by the other organization. Below we go over the steps needed to present and verify our first verifiable credential: a verified credential expert card.
As a verifier, we unlock privileges to subjects that possess verified credential expert cards. Below we run again our previous sample application from our local computer that asks you to present a verified credential expert card, and then verifies it.
About how to run the application you can use the steps in the previous section.
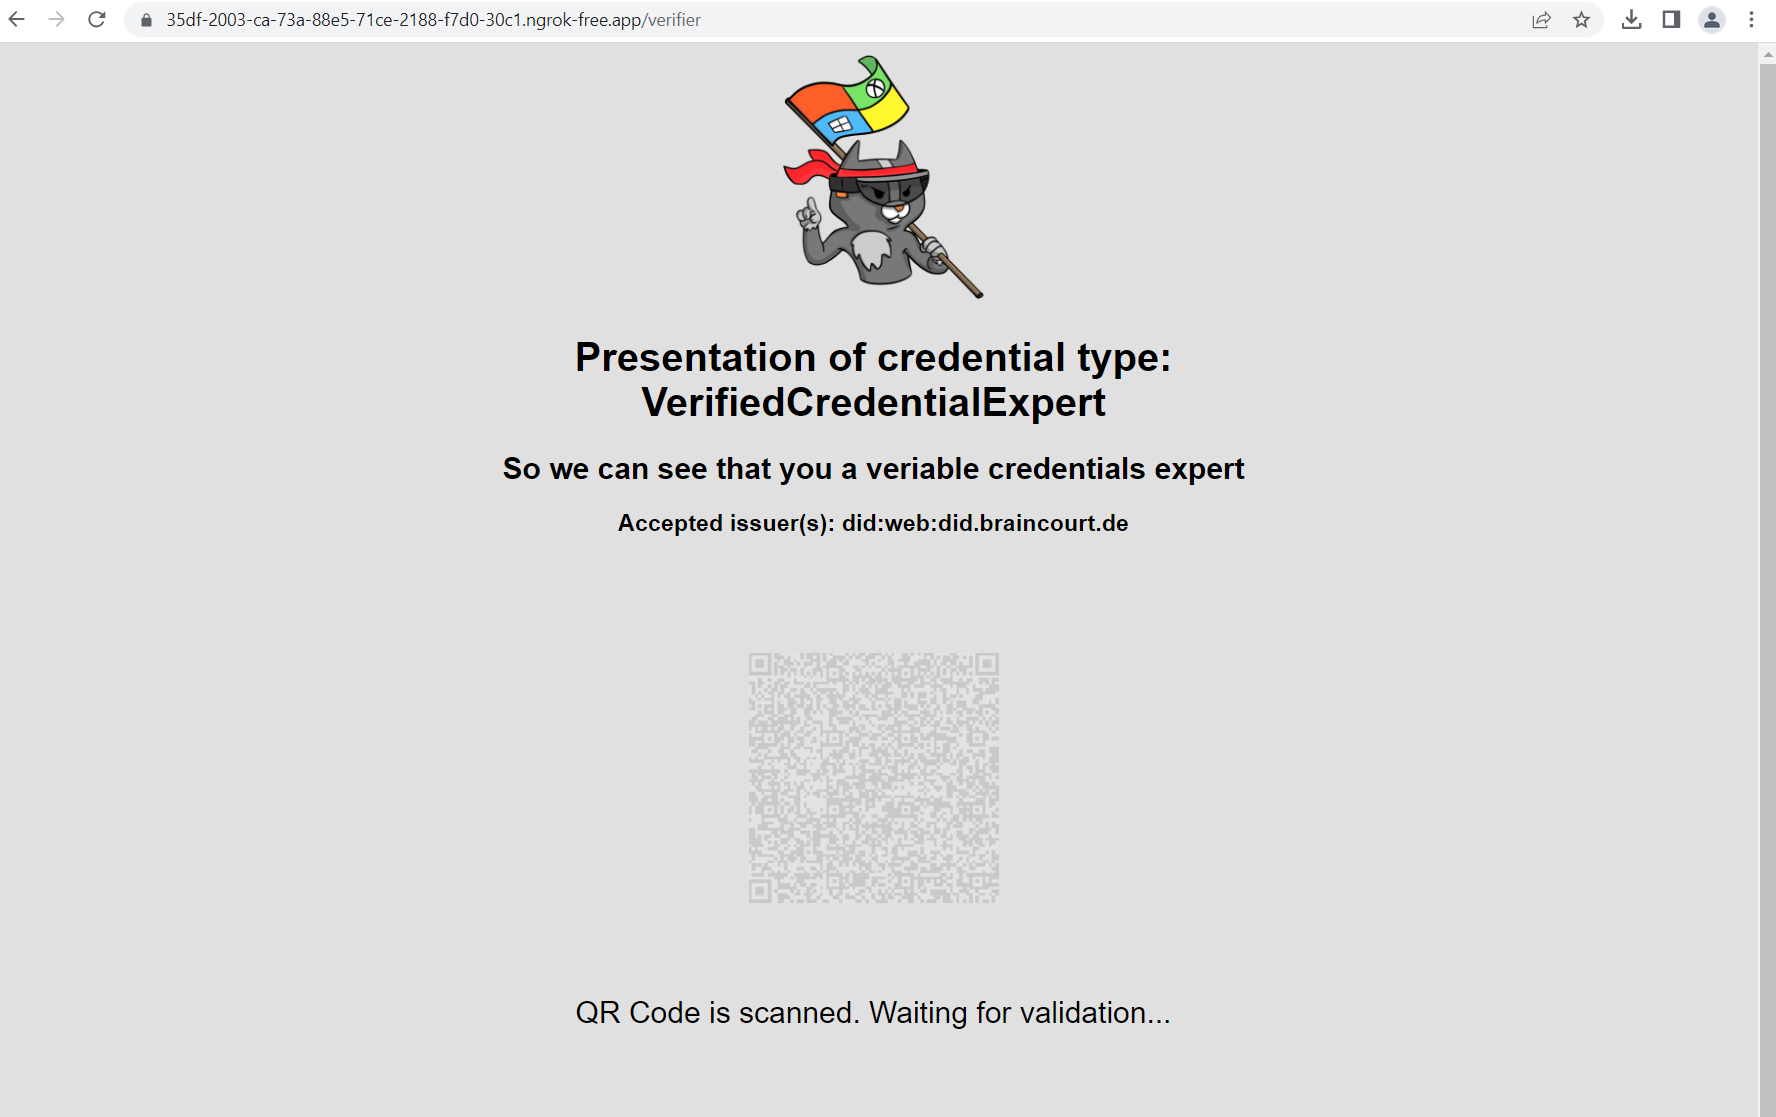
From the web browser, select Verify Credential.
Using Authenticator, scan the QR code, or scan it directly from your mobile camera.
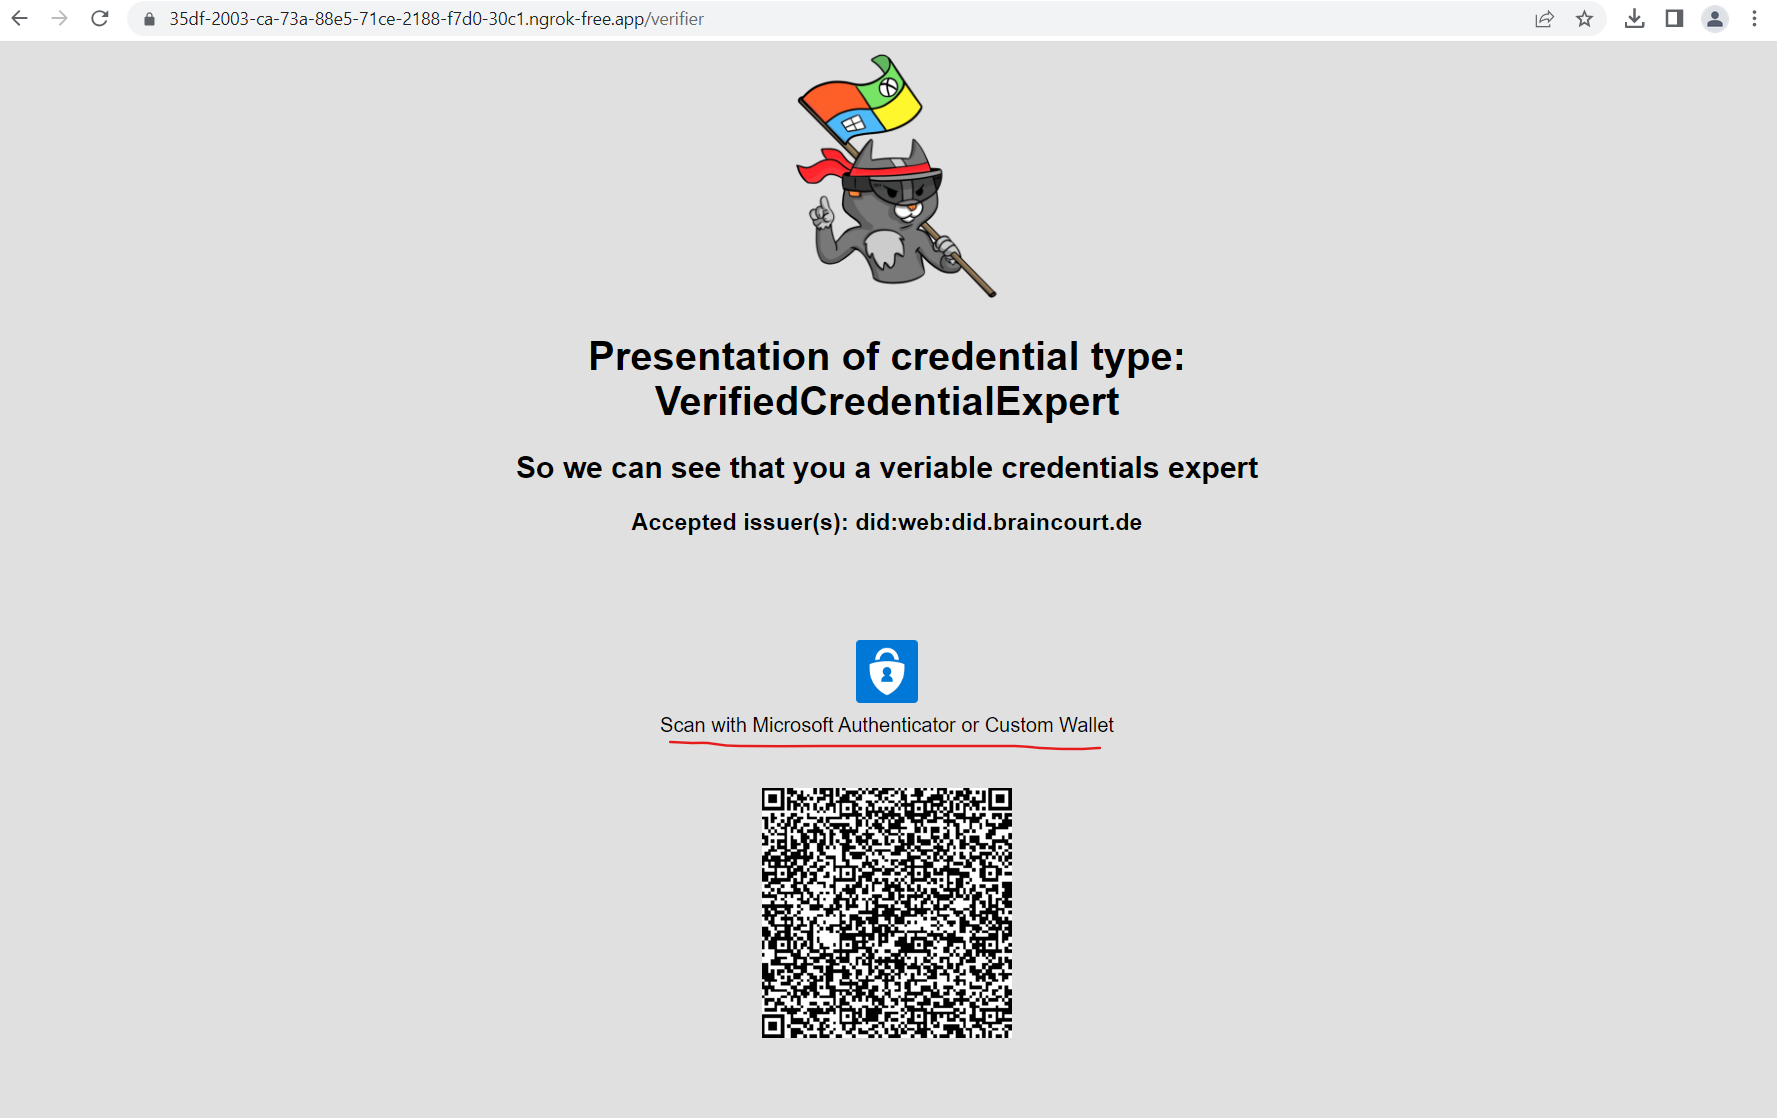
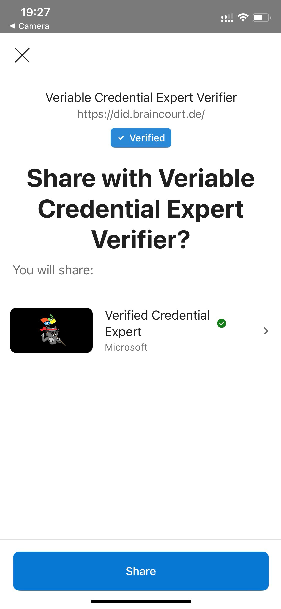
Click on Share in the Authenticator.
Go back to the sample app. It shows you that the presentation of the verifiable credentials was received.

Source: https://learn.microsoft.com/en-us/entra/verified-id/verifiable-credentials-configure-verifier
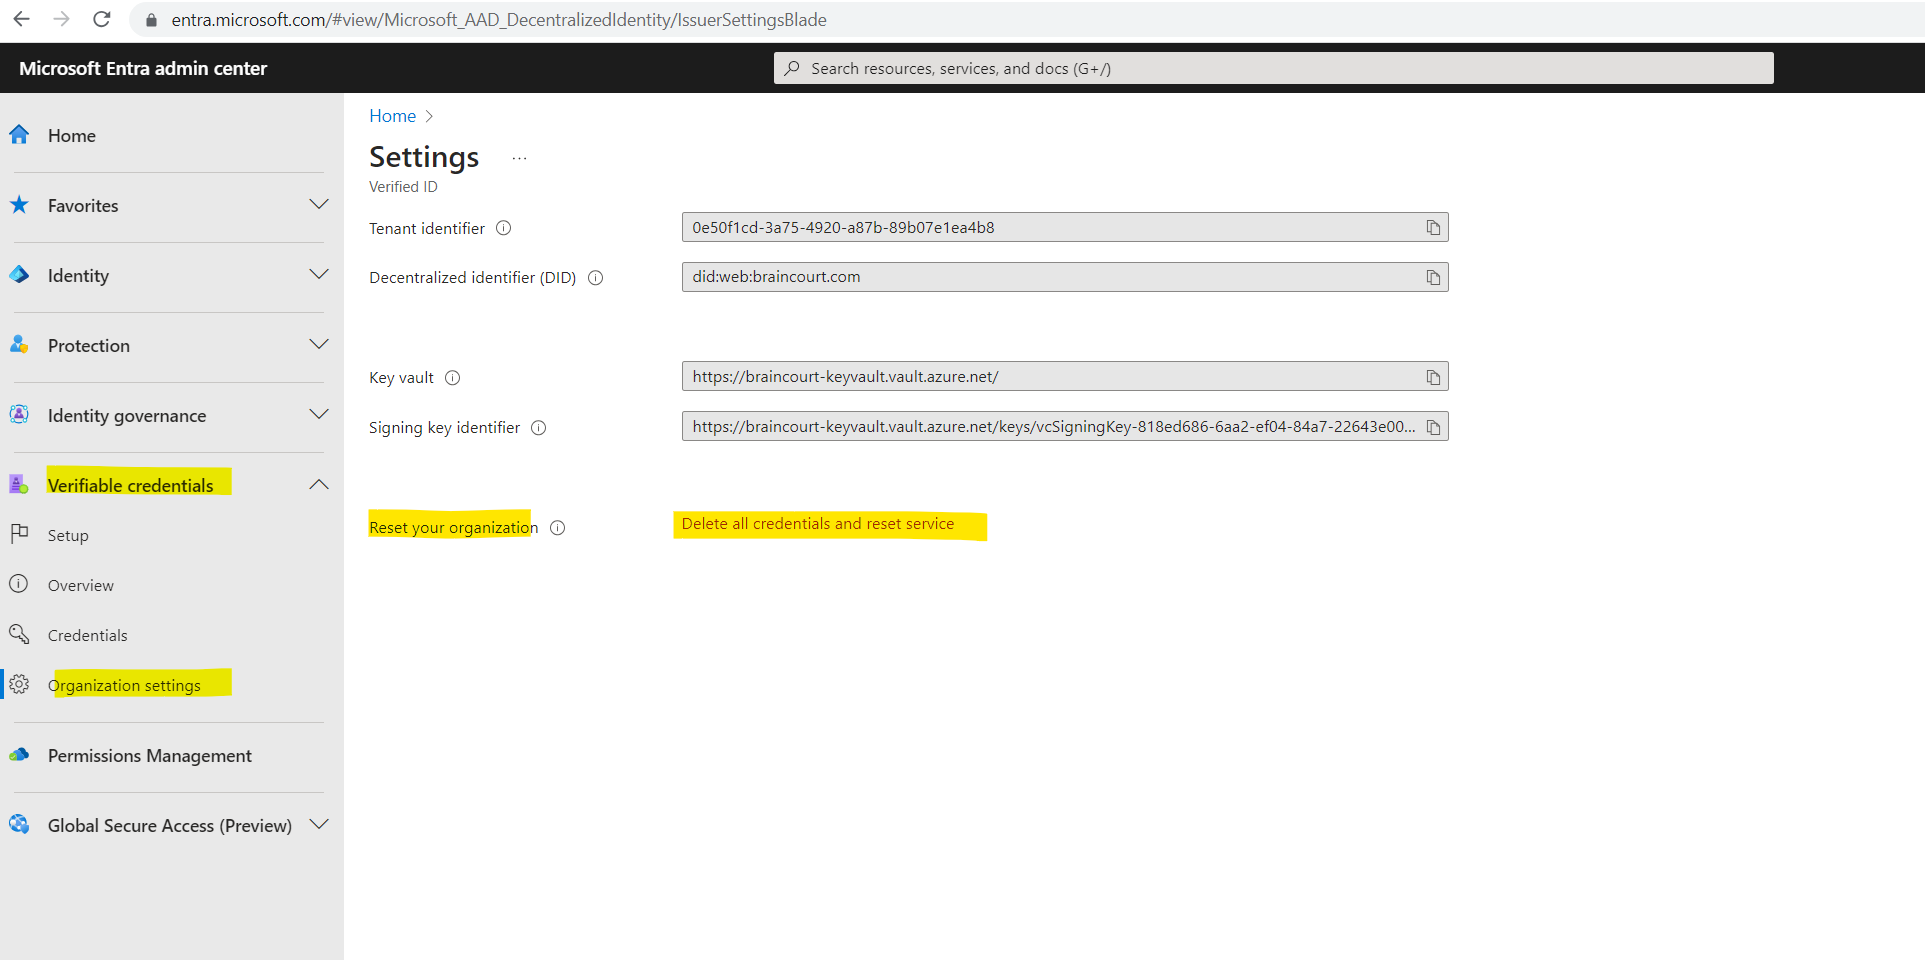
Reset your Organization
What is Microsoft Entra?
To see all products included in the unifying brand named Microsoft Entra please take a look at my following post.
Links
Introduction to Microsoft Entra Verified ID
https://learn.microsoft.com/en-us/azure/active-directory/verifiable-credentials/decentralized-identifier-overviewUnderstanding and Using Verifiable Credentials
https://www.youtube.com/watch?v=BxLSSH_EHjongrok
https://ngrok.com/