What is Microsoft Entra Workload ID?
In this post we will take a look at a further service from the Microsoft Entra product family called Microsoft Entra Workload Identities.
A workload identity is an identity you assign to a software workload (such as an application, service, script, or container) to authenticate and access other services and resources.
In a nutshell, most identity and access management solutions on the market today are focused only on securing human identities and not workload identities.
Microsoft Entra Workload ID helps resolve these issues when securing workload identities.
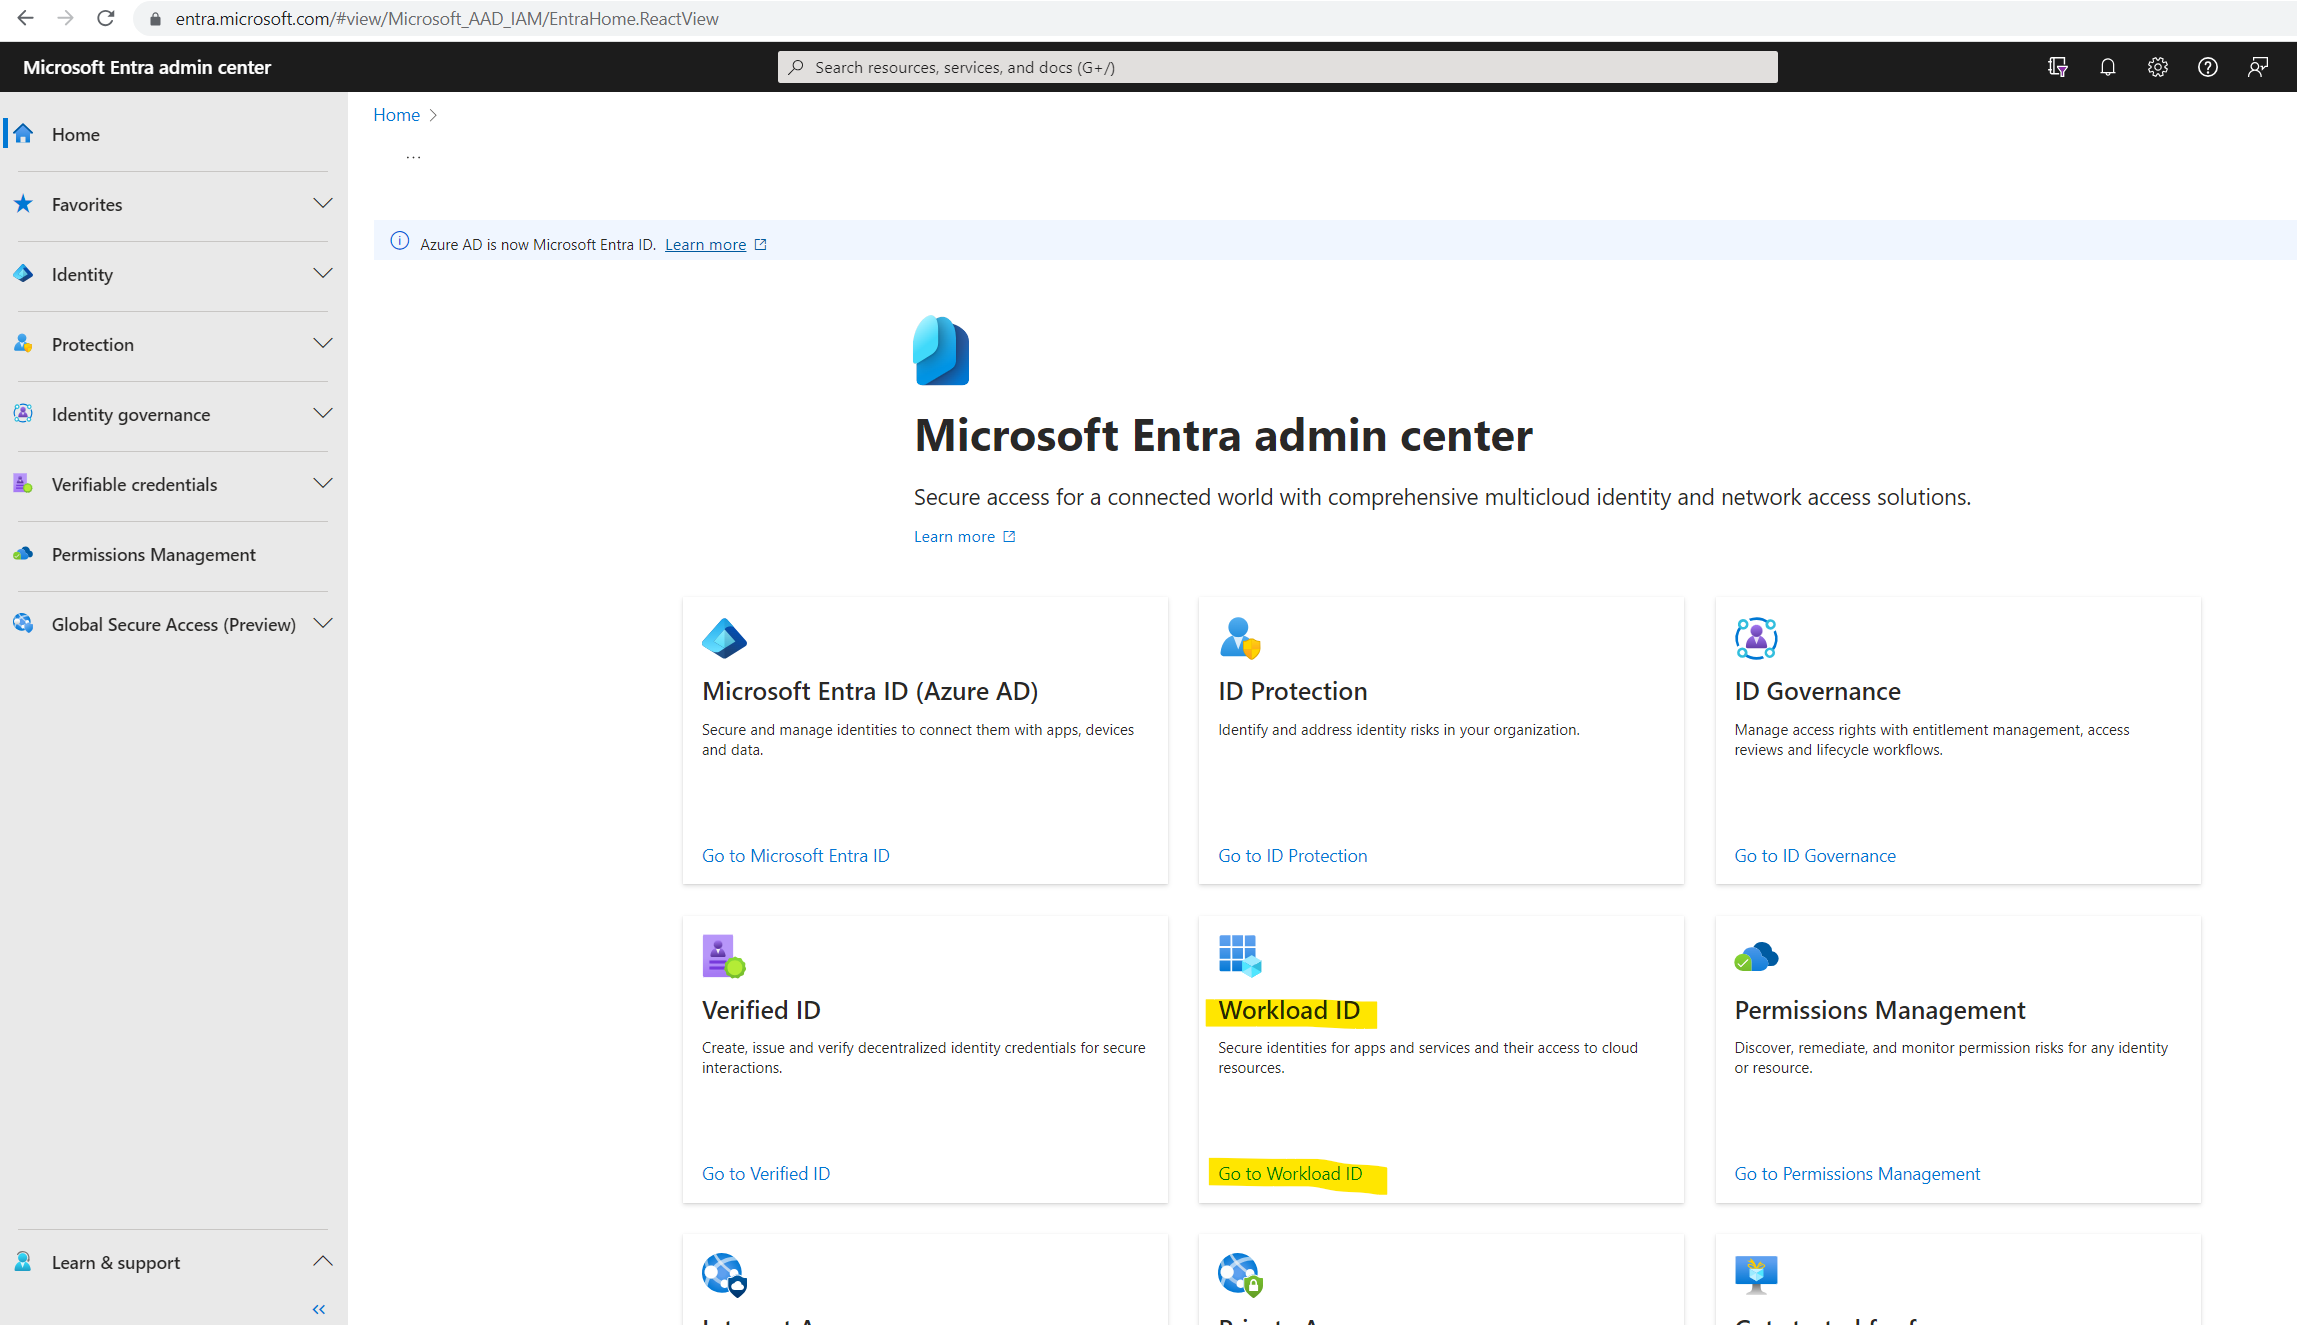
You can manage your workload identities by using the Microsoft Entra admin center.
- Introduction
- Workload identities in Microsoft Entra
- Creating a Console App which is acting as Workload Identity
- Securing Workload Identities by using Microsoft Entra Workload ID
- What is Microsoft Entra?
- Links
Introduction
A workload identity is an identity that is used by non-human entities like applications, services, virtual machines, containers etc., to authenticate and gaining access to other services.
For example, in order for GitHub Actions to access Azure subscriptions the action needs a workload identity which has access to those subscriptions.
Workload identities these days becoming increasingly targets for attackers. Most identity and access management solutions on the market today are focused only on securing human identities and not workload identities.
Microsoft Entra Workload ID helps resolve these issues when securing workload identities.
Workload identities in Microsoft Entra
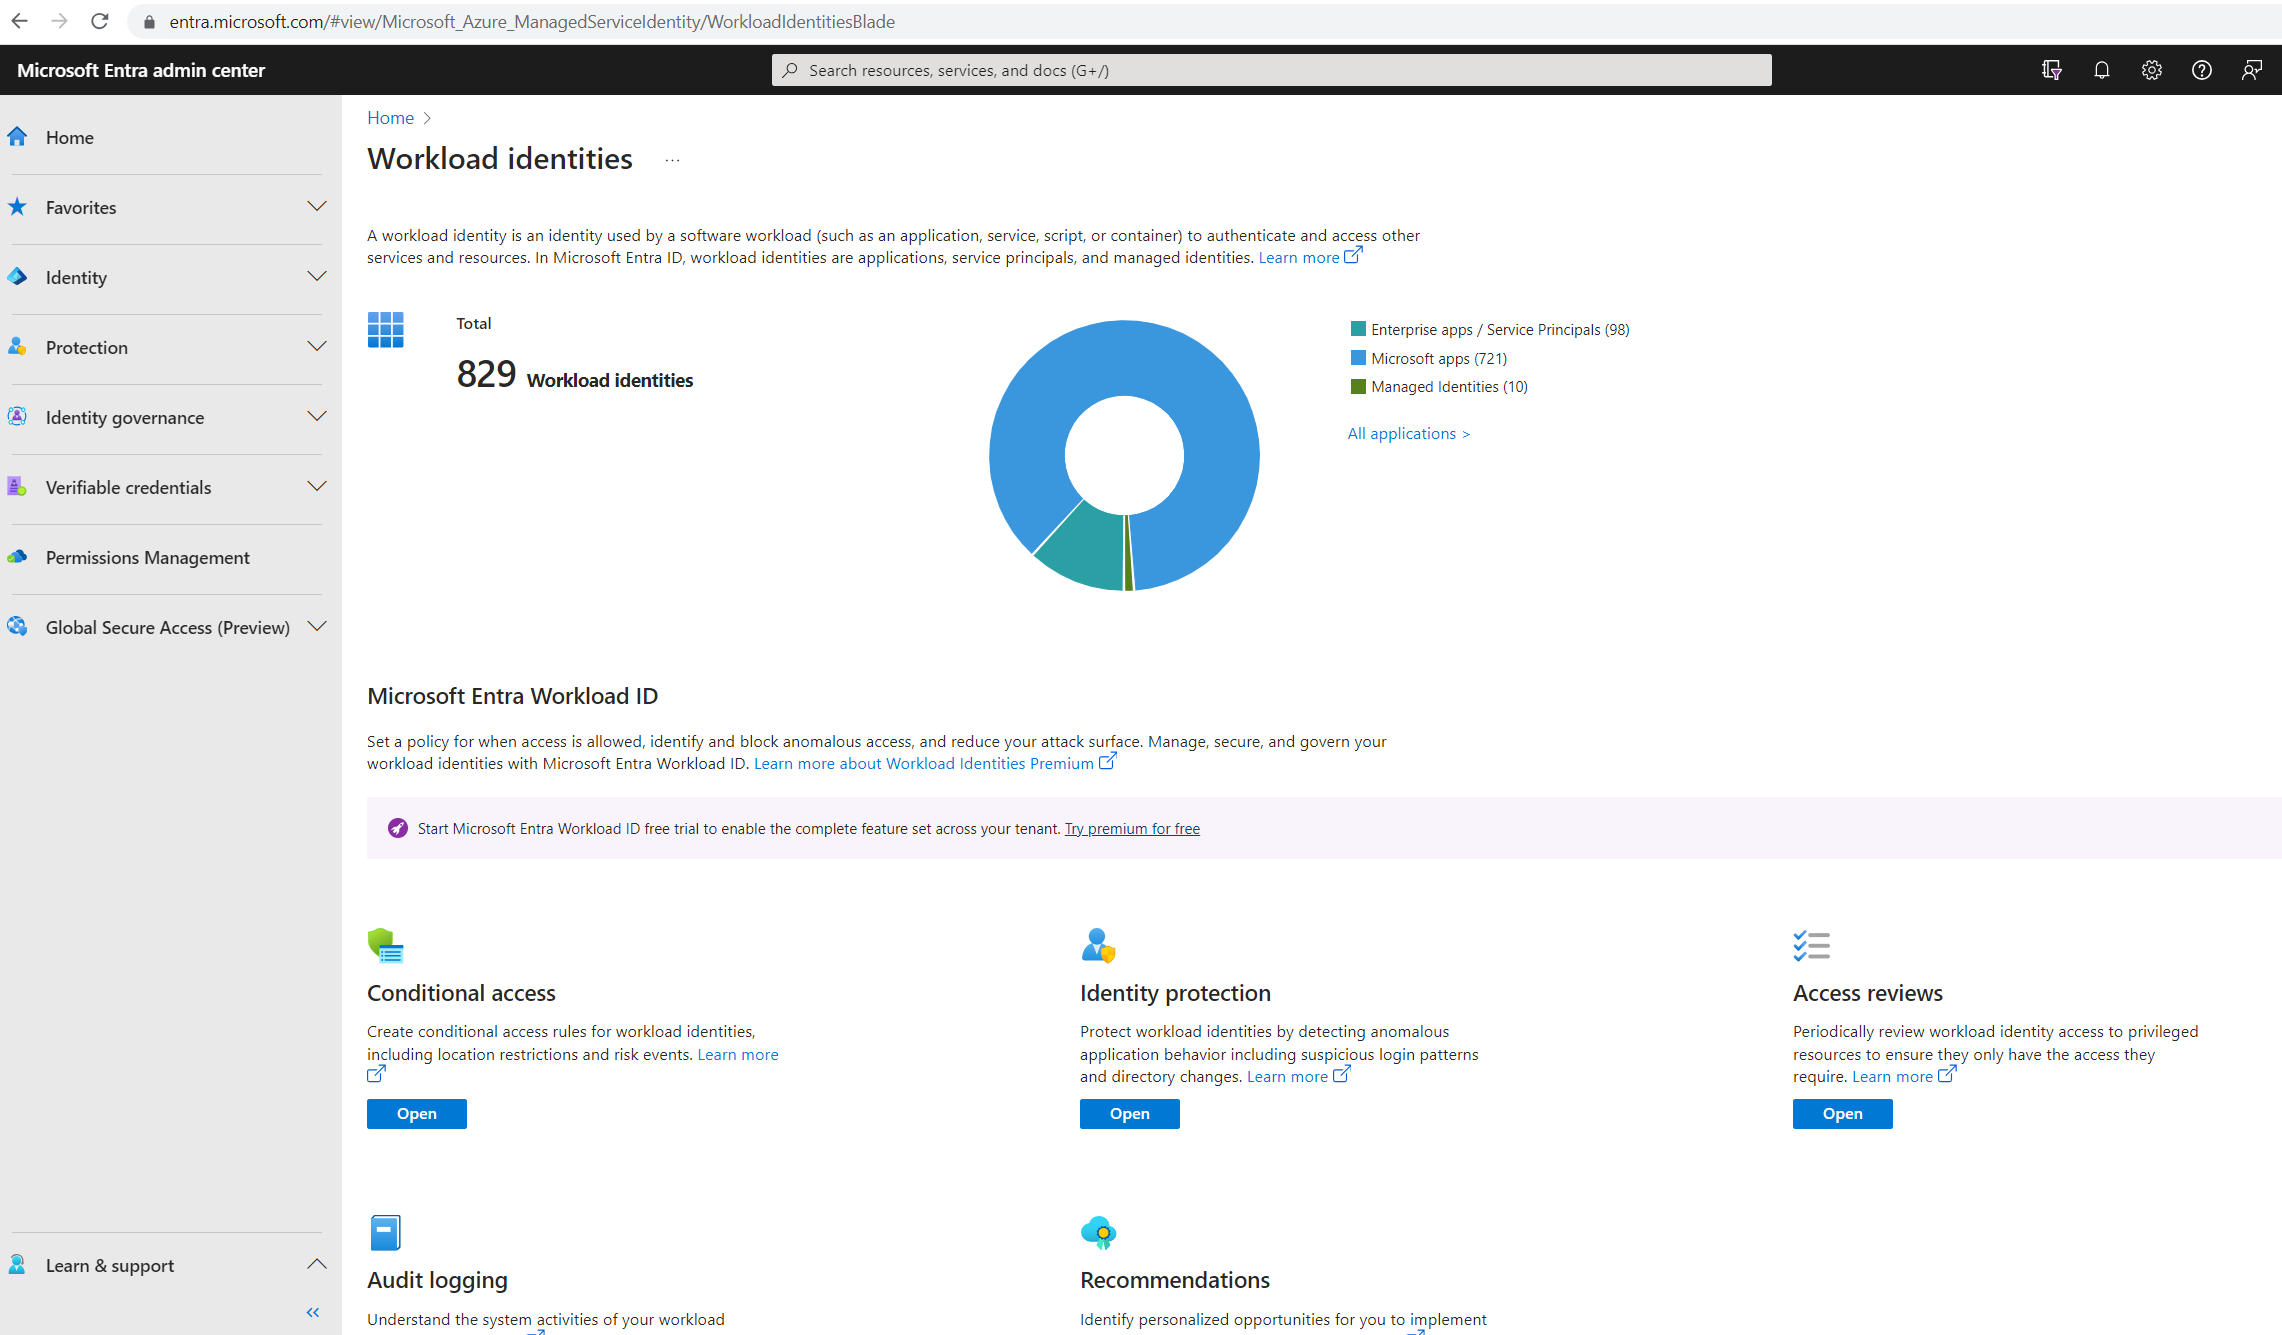
In Microsoft Entra, workload identities are applications, service principals, and managed identities.
In order to understand the difference between applications and service principals in Microsoft Entra ID, you should read my following post. Finally both are instances in an Azure tenant which are referencing to a real application.
The application object is registered in Microsoft Entra ID under the App registrations blade, the service principals are registered instances in the local tenant of the application object and homed in the Enterprise applications blade.
A managed identity is a special type of service principal that eliminates the need for developers to manage credentials.
More about what are workload identities you will find in the following article from Microsoft https://learn.microsoft.com/en-us/entra/workload-id/workload-identities-overview.
Below I will demonstrate how you can use Microsoft Entra Workload ID to secure workload identities. Therefore I will first create a new Console App which then acts as my workload identity I want to secure.
Creating a Console App which is acting as Workload Identity
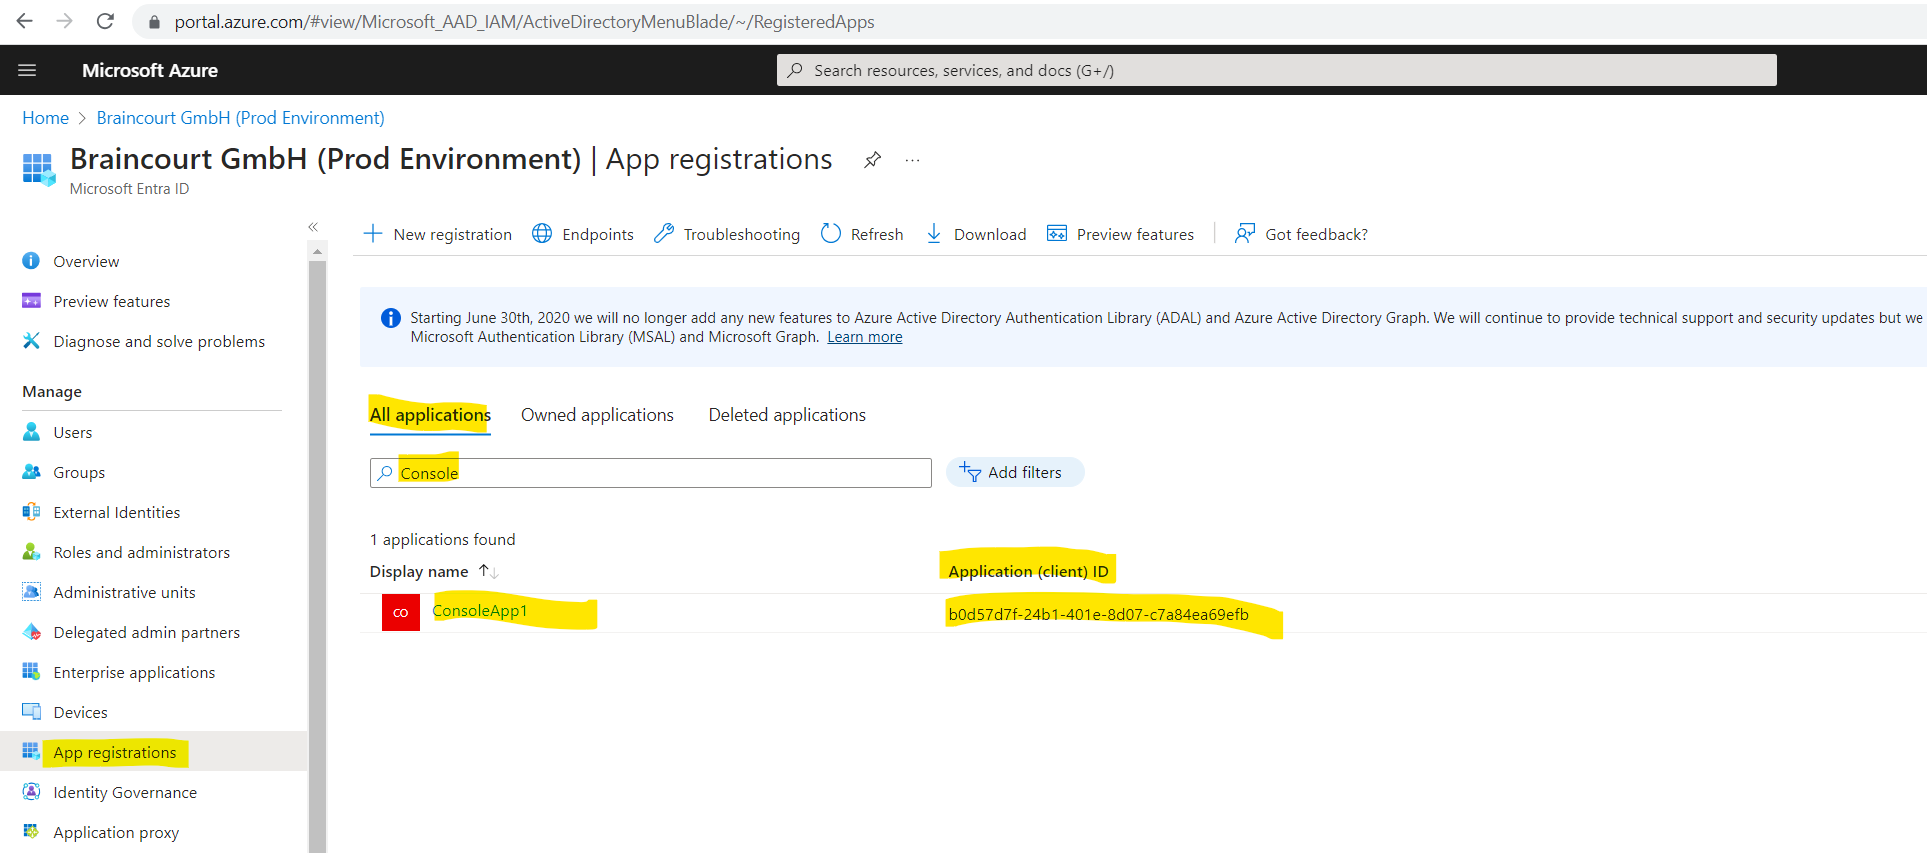
In order to demonstrate workload identities, I will create a new Console App and register it under App registrations in Microsoft Entra ID (formerly Azure AD).
The registration will also create by default automatically a service principal object in Enterprise applications.
This service principal object is finally our workload identity we want to secure by using Microsoft Entra Workload ID.
About how to create (register) a Microsoft Entra application and service principal, you can read the following post https://learn.microsoft.com/en-us/entra/identity-platform/howto-create-service-principal-portal and my post about App Registrations vs. Enterprise Applications.
I have already registered my Console App which was also creating a corresponding service principal object.
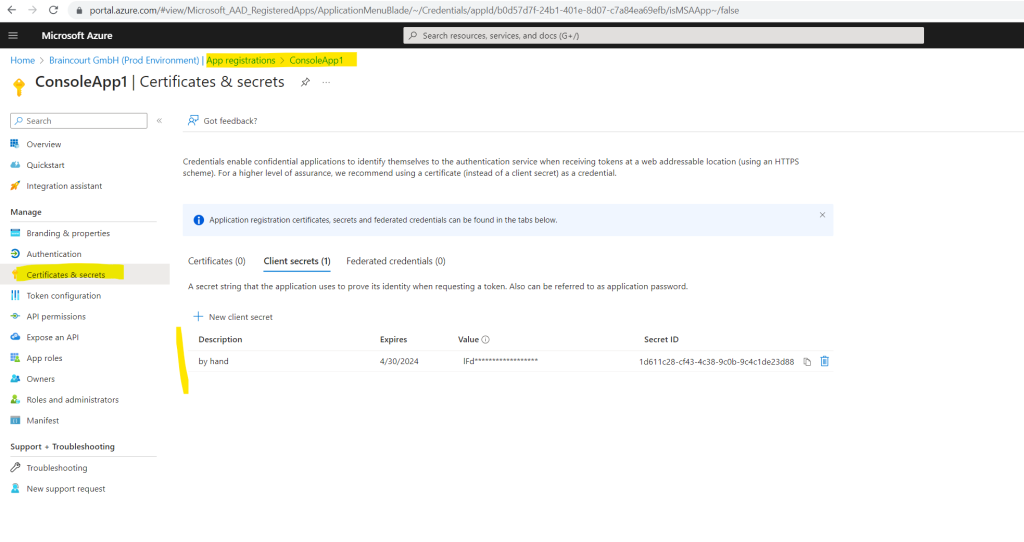
In order the application can prove its identity and requesting a token to access Azure resources, I will also create a new client secret under App registrations.
Because my new Console App will later access and manage a key vault in Azure, I need to assign the owner and key vault administrator role for the key vault under Access control (IAM) to the application (service principal) as shown below.

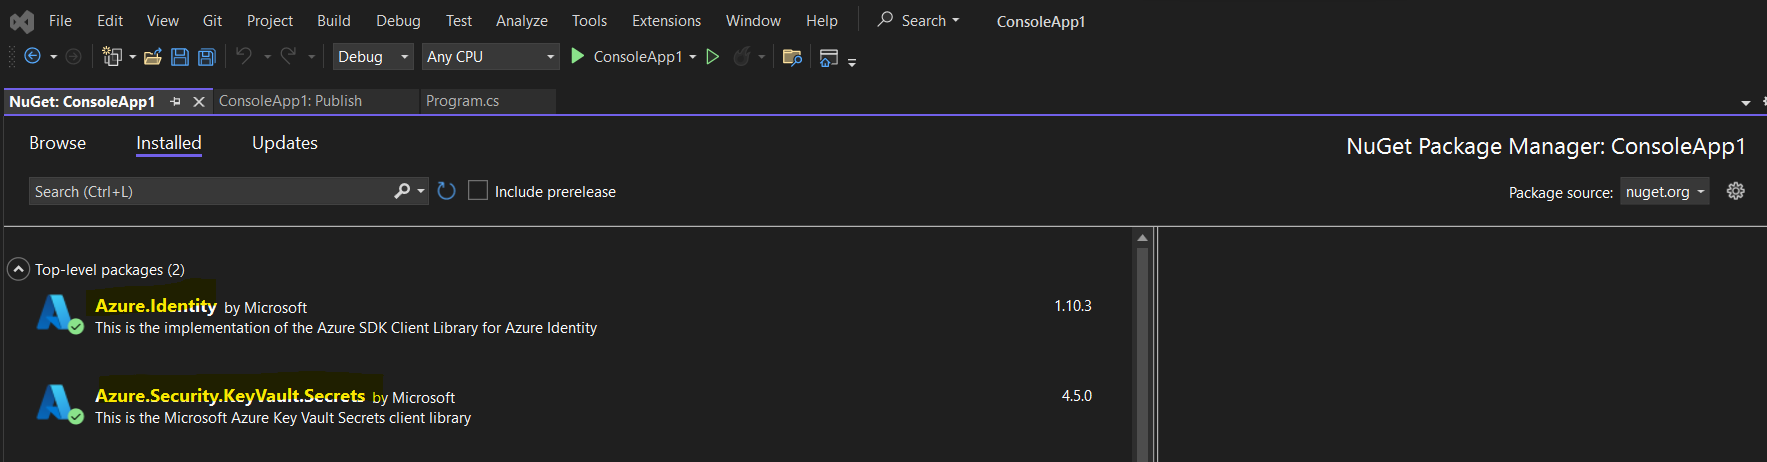
In order our console app can later authenticate to Azure by using the previously created client secret and to be able to access and store secrets in the key vault, we also need to add the following two packages to our console app.
Azure.Identity
Azure.Security.KeyVaults.Secrets
I will also add the following code to the Program.cs file.
Adjust the Uri, tenantId, clientId and clientSecret according to your environment.
The Uri is always https://<key vault name>.vault.azure.net/
using System;
using Azure.Identity;
using Azure.Security.KeyVault.Secrets;
var client = new SecretClient(new Uri("https://testingworkloadidentity.vault.azure.net/"),
new ClientSecretCredential(tenantId: "0e50f1cd-3a75-4920-a87b-89b07e1ea4b8",
clientId: "b0d57d7f-24b1-401e-8d07-c7a84ea69efb",
clientSecret: "lFd8Q~xms4wCGPEd-lVBSFW2JJ0A_D.E2x7.qc_h"));
Console.Write("Input the Name of your secret > ");
var secretName = Console.ReadLine();
Console.Write("Input the value of your secret > ");
var secretValue = Console.ReadLine();
await client.SetSecretAsync(secretName, secretValue);
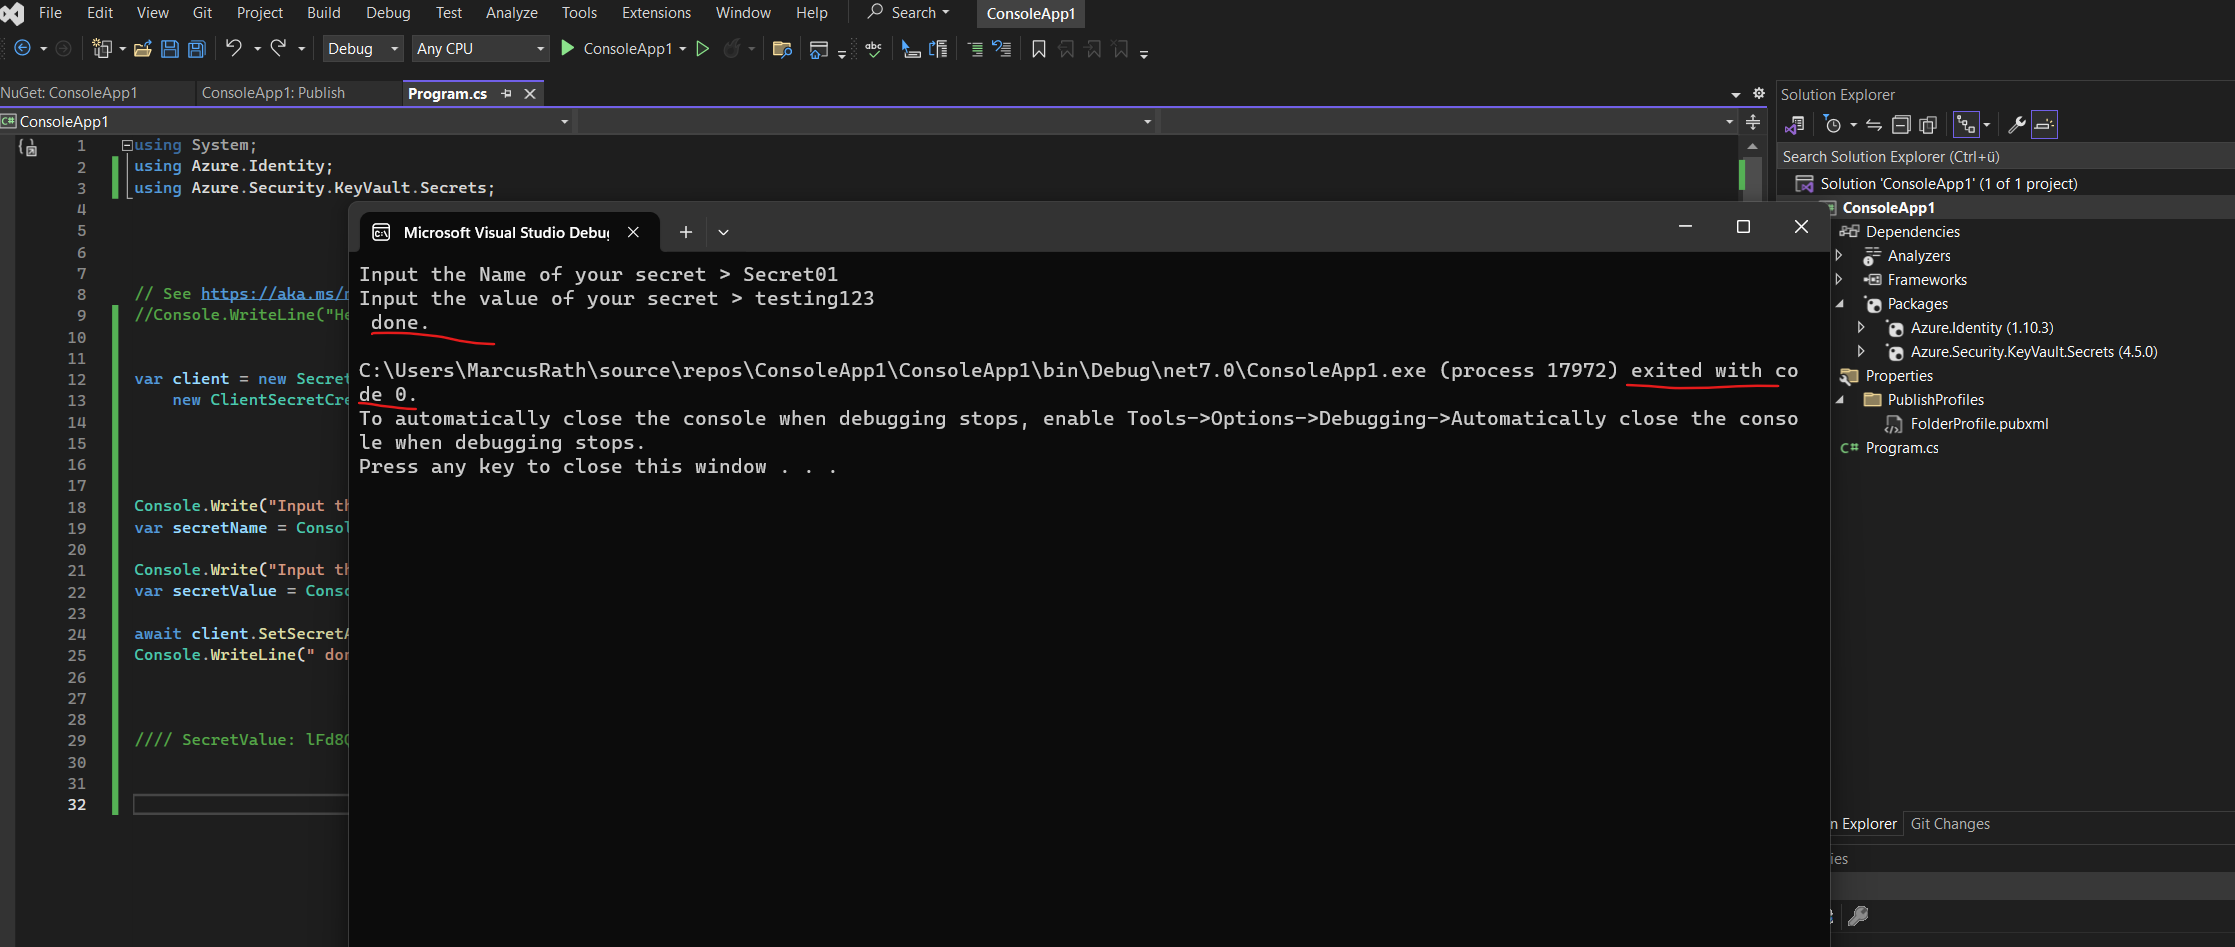
Console.WriteLine(" done.");The code will first create a new SecretClient class instance which will store the Uri from the key vault to access it, the tenantId, the clientId from our service principal and the client secret.
The SecretClient provides synchronous and asynchronous methods to manage KeyVaultSecret in the Azure Key Vault. The client supports creating, retrieving, updating, deleting, purging, backing up, restoring, and listing KeyVaultSecret. The client also supports listing DeletedSecret for a soft-delete enabled Azure Key Vault.
Then the console app will ask for a secret key pair including the name and value for the secret and stores it into implicitly-typed variables.
Finally the console app will use the client object to access and store the new secret in the key vault.
More about accessing a key vault in Azure by using the Azure Key Vault secret client library for .NET, you will find in the following post https://learn.microsoft.com/en-us/azure/key-vault/secrets/quick-create-net?tabs=azure-cli.
Securing Workload Identities by using Microsoft Entra Workload ID
You can use Microsoft Entra Workload ID to secure access, detect compromised identities and to simplify lifecycle management.
Secure access
To secure access we can apply conditional access policies to service principals owned by our organization using Conditional Access for workload identities.
Conditional Access policies have historically applied only to users when they access apps and services like SharePoint Online. Microsoft has now extending the support for Conditional Access policies to be applied to service principals owned by the organization. Microsoft is calling this capability Conditional Access for workload identities.
A workload identity is an identity that allows an application or service principal access to resources, sometimes in the context of a user. These workload identities differ from traditional user accounts as they:
- Can’t perform multifactor authentication.
- Often have no formal lifecycle process.
- Need to store their credentials or secrets somewhere.
These differences make workload identities harder to manage and put them at higher risk for compromise.
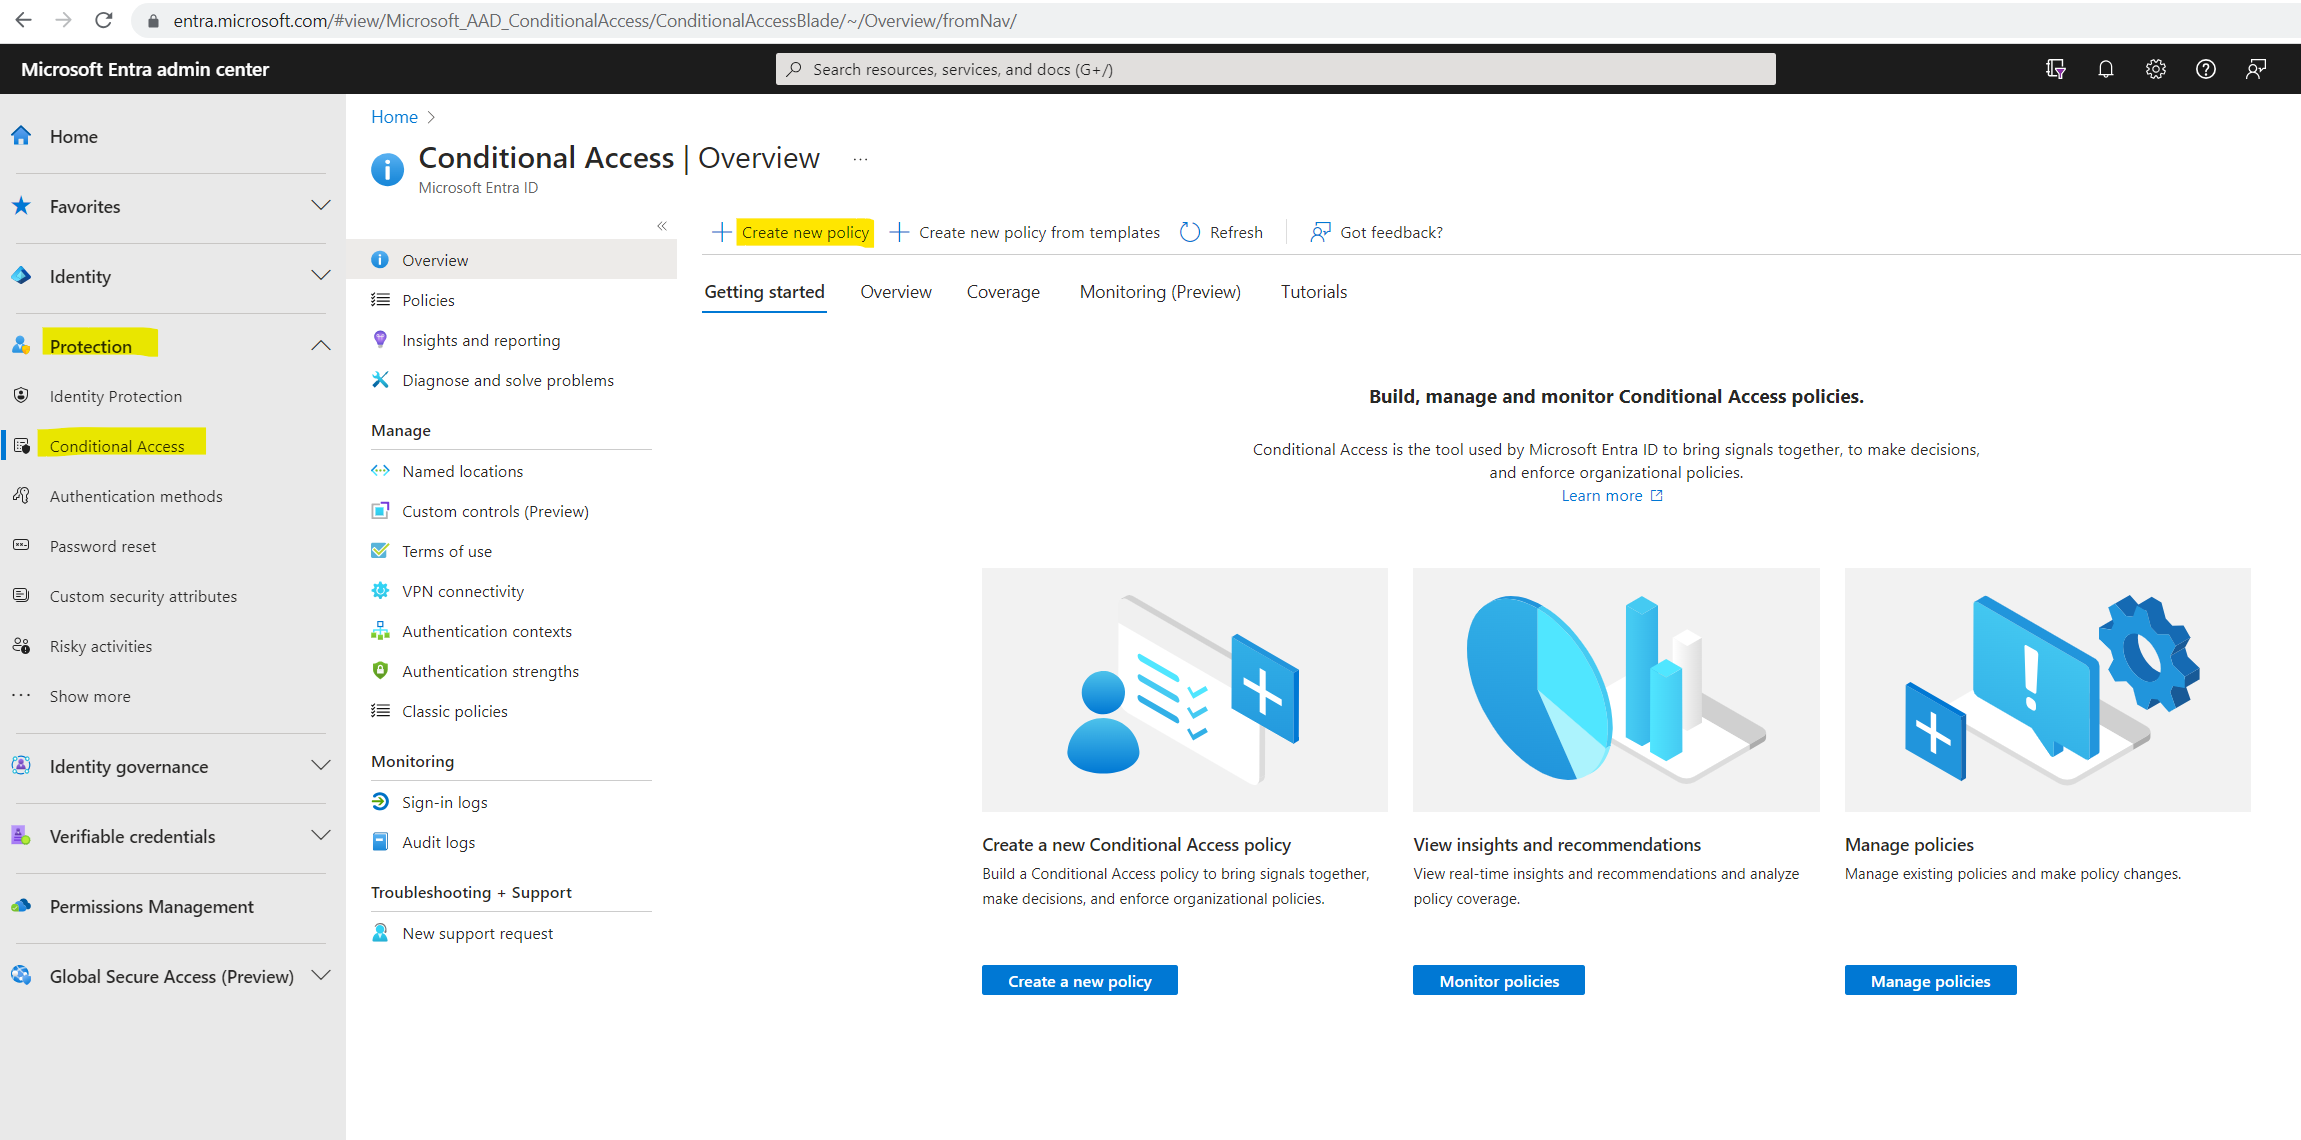
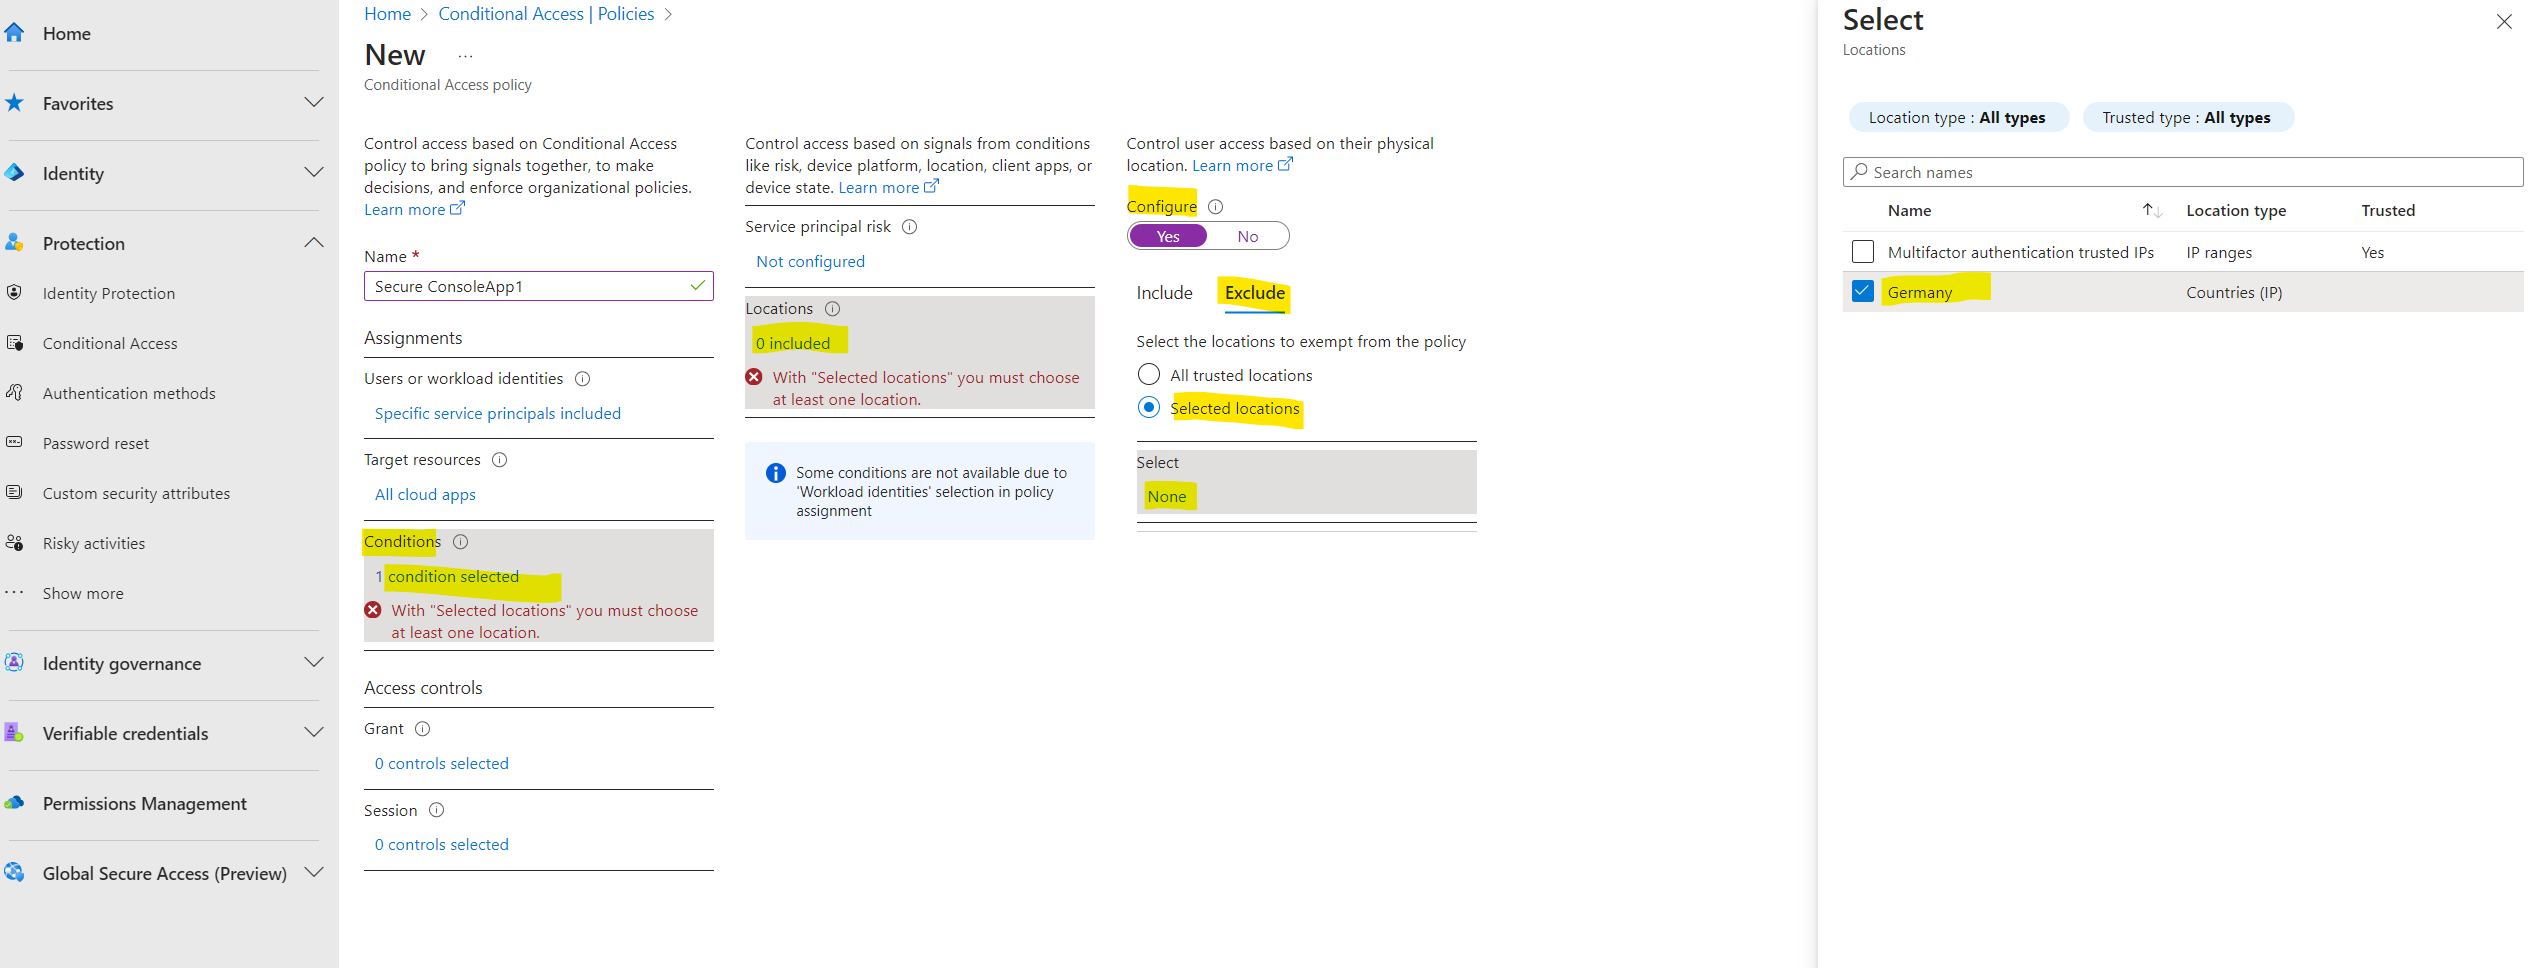
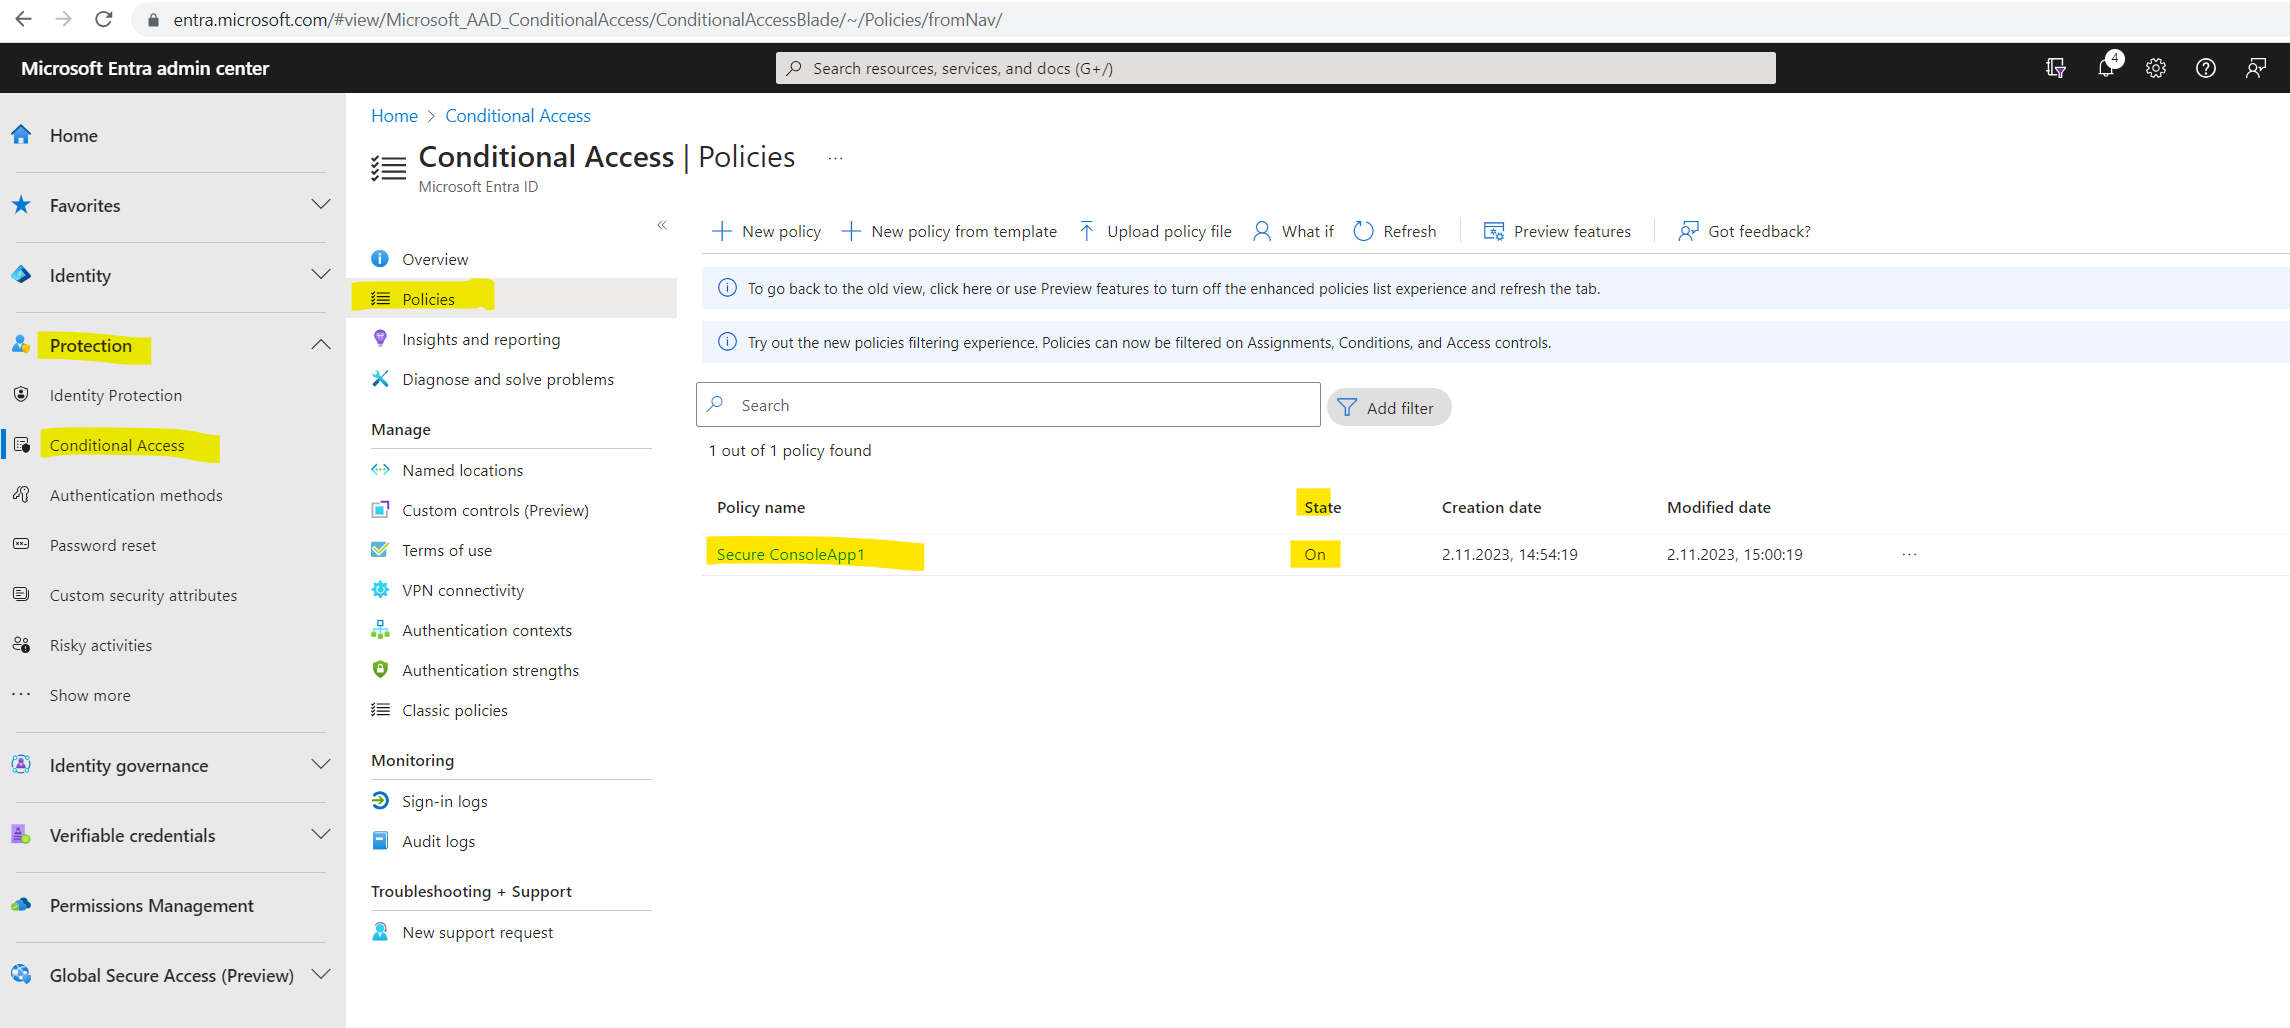
Below I will show how you can create a conditional access policy to only allow access to an application (service principal) from a specific location, in my case here access is just allowed from Germany.
Sign in to the Microsoft Entra admin center as at least a Conditional Access Administrator.
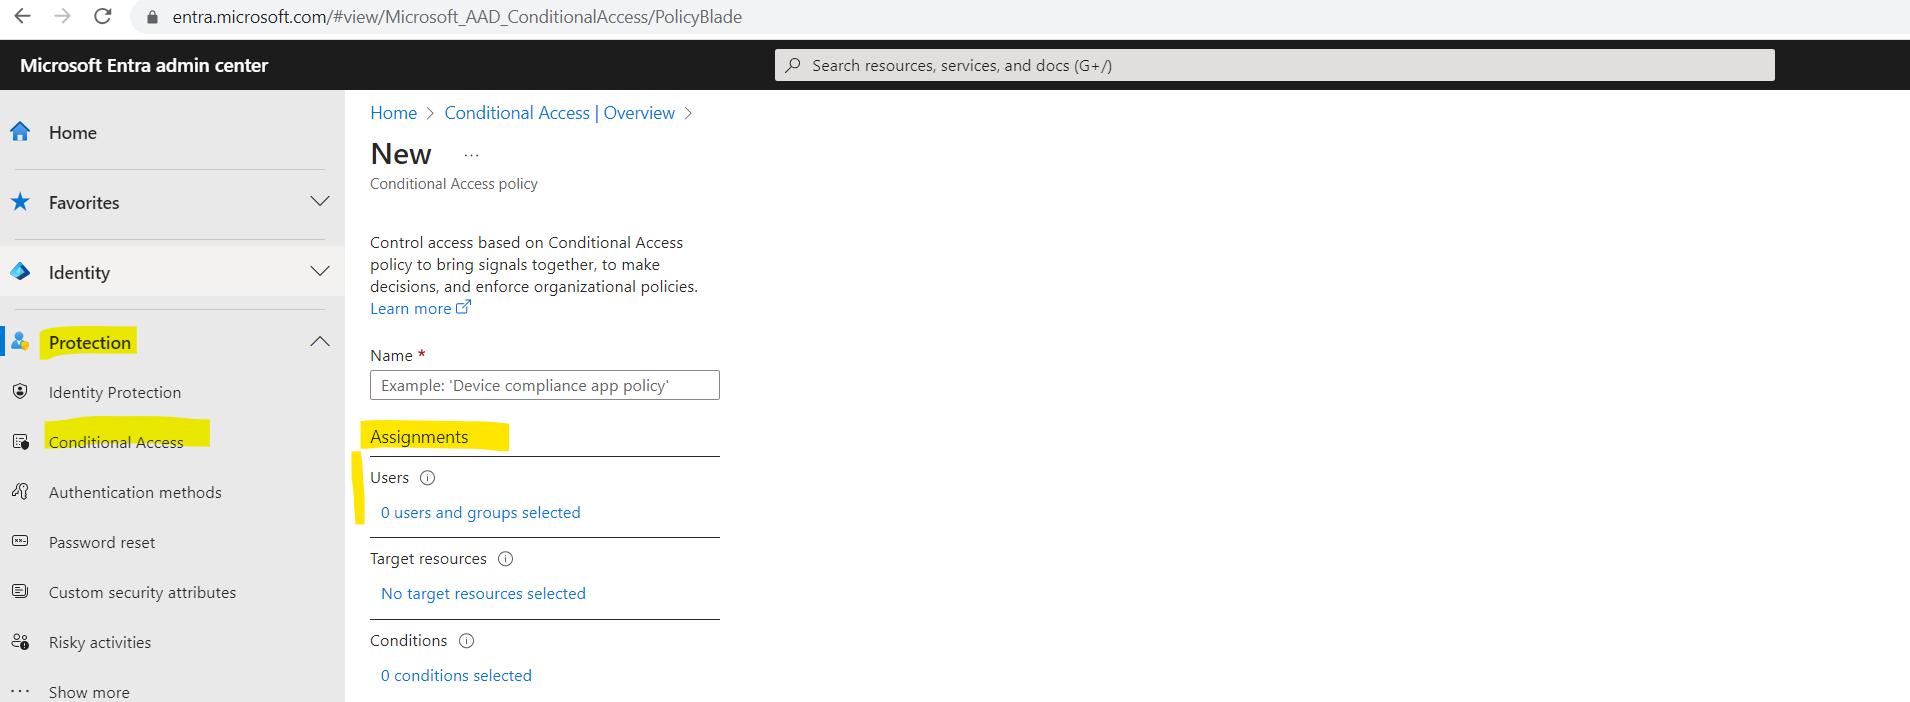
Browse to Protection > Conditional Access and select Create new policy
Give your policy a name. Microsoft recommends that organizations create a meaningful standard for the names of their policies.
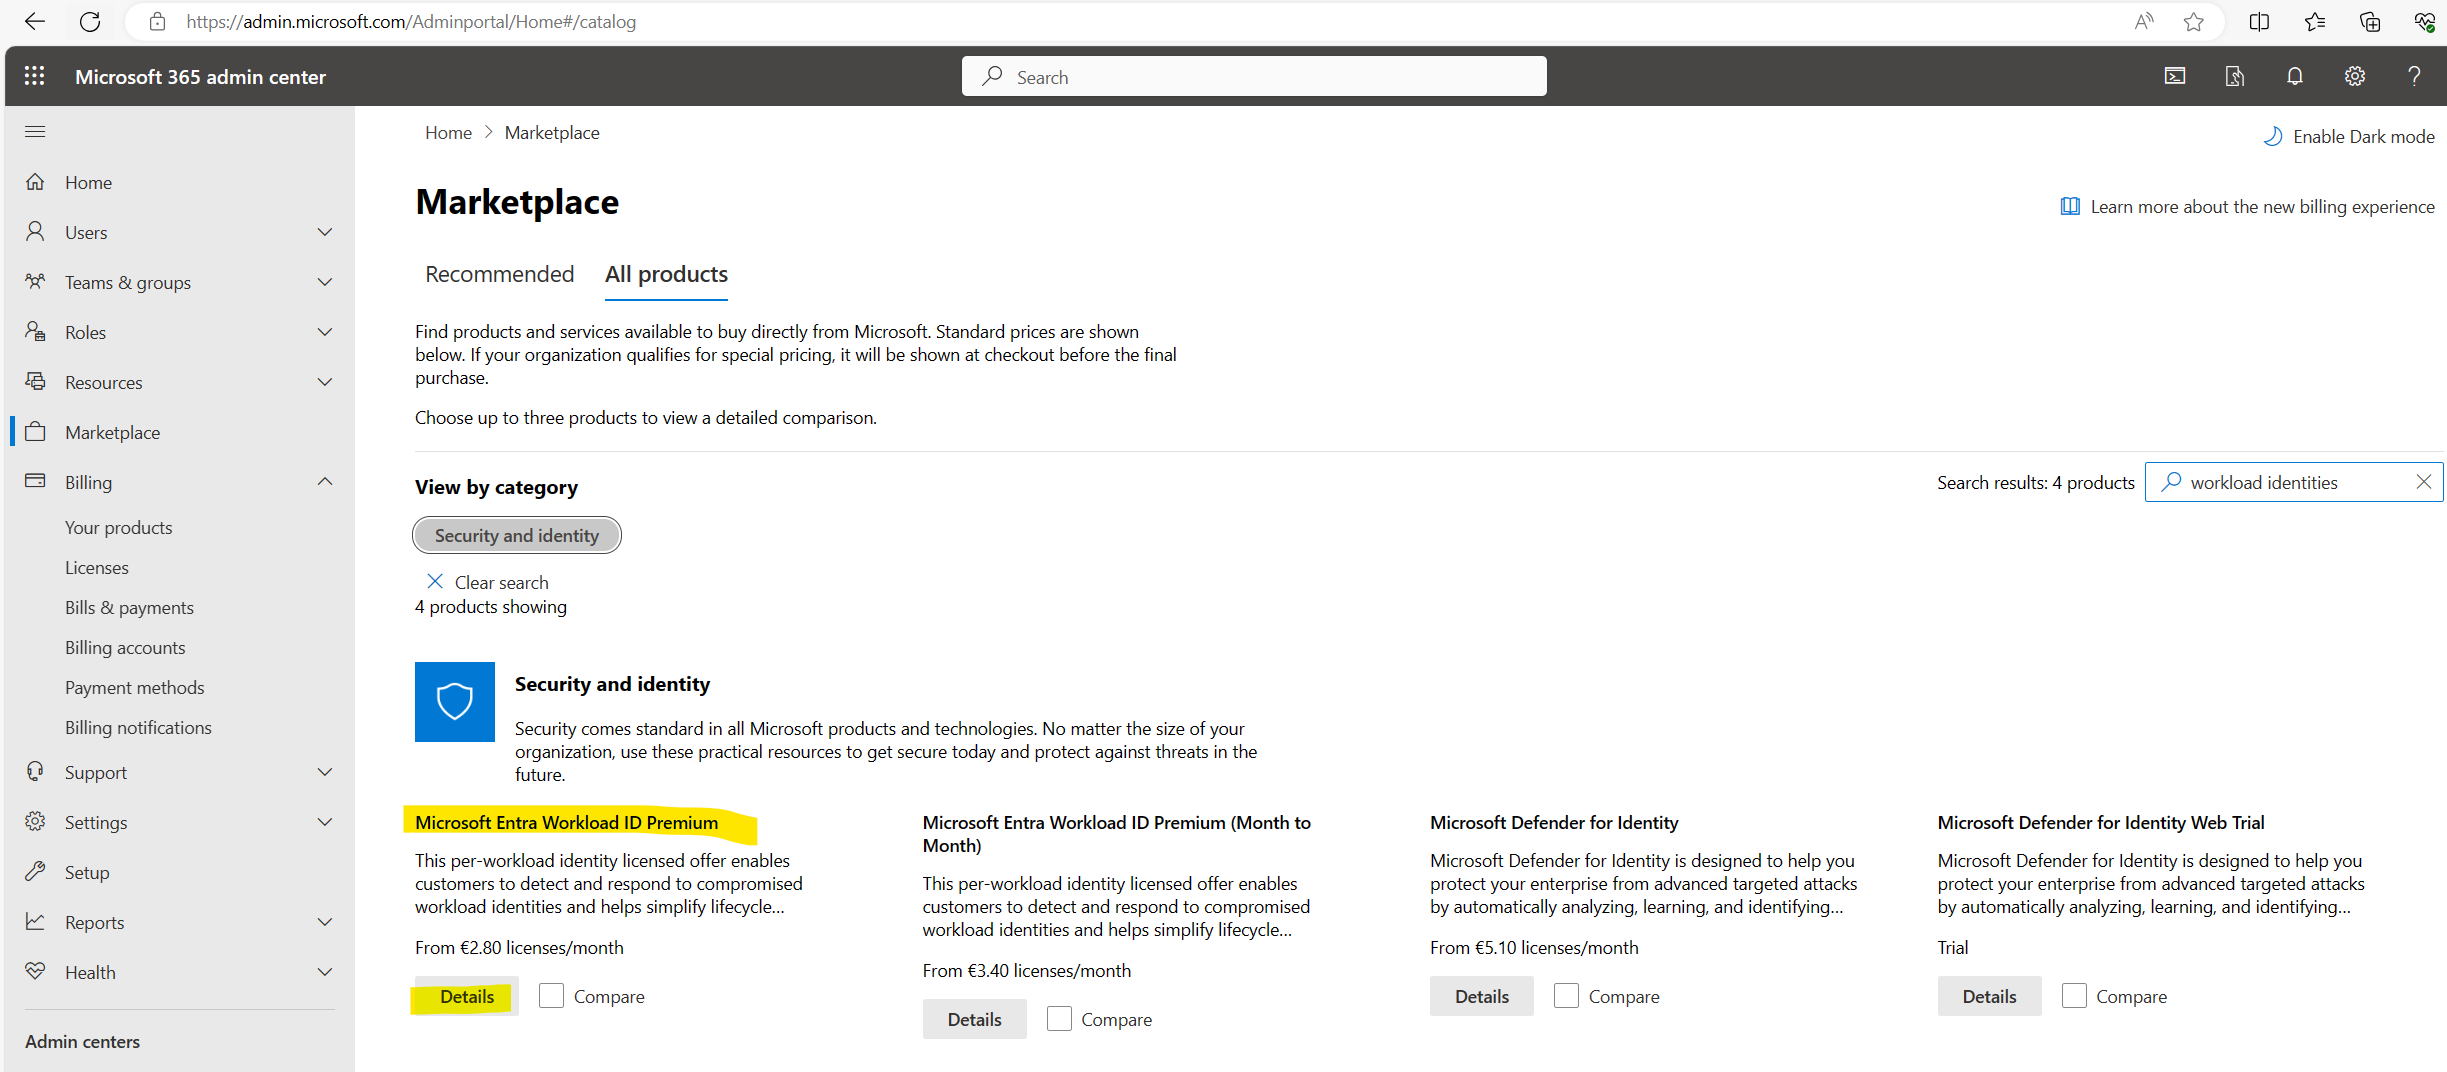
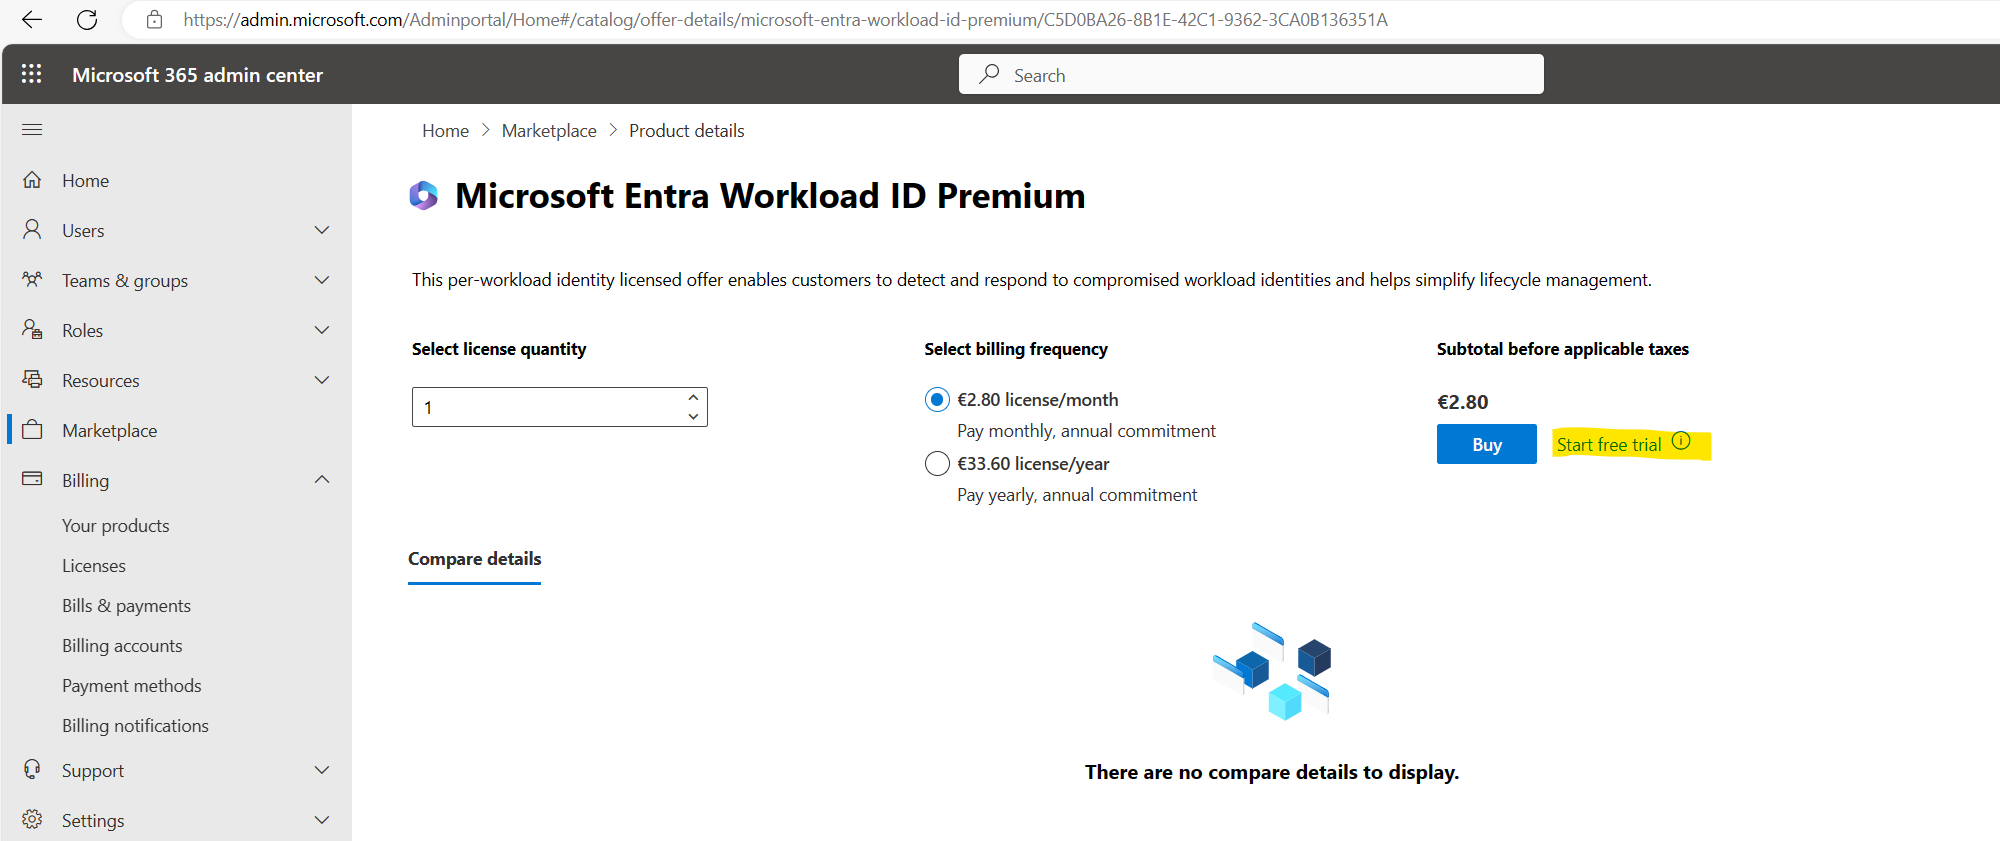
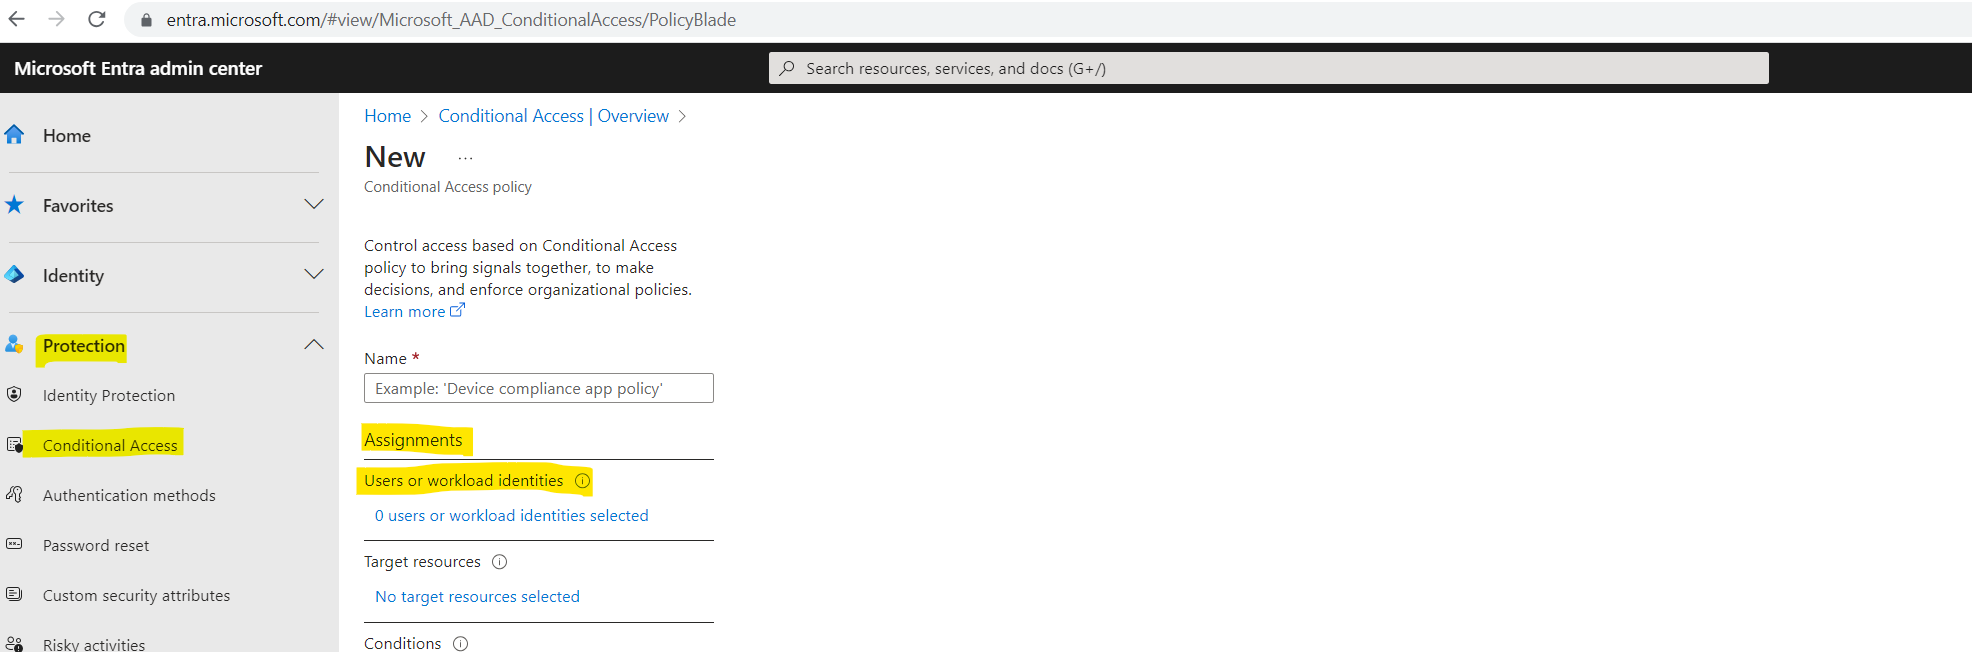
Workload Identities Premium licenses are required to create or modify Conditional Access policies scoped to service principals.
Without these license you will find when creating a new policy under Assignments just Users and no workload identities like shown below.
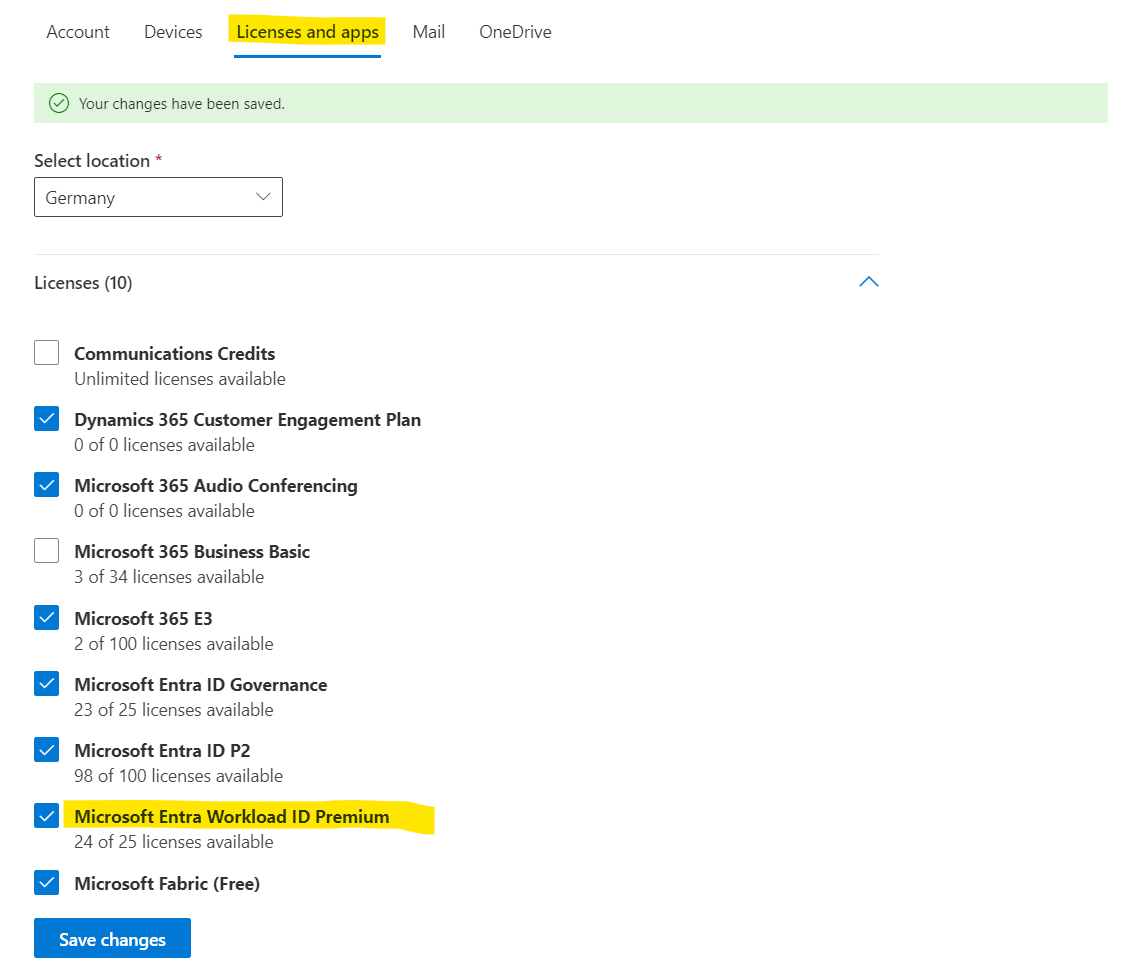
In order to demonstrate workload identities in this post I will just start a free trial for the Microsoft Entra Workload ID Premium license and assign it to my user.
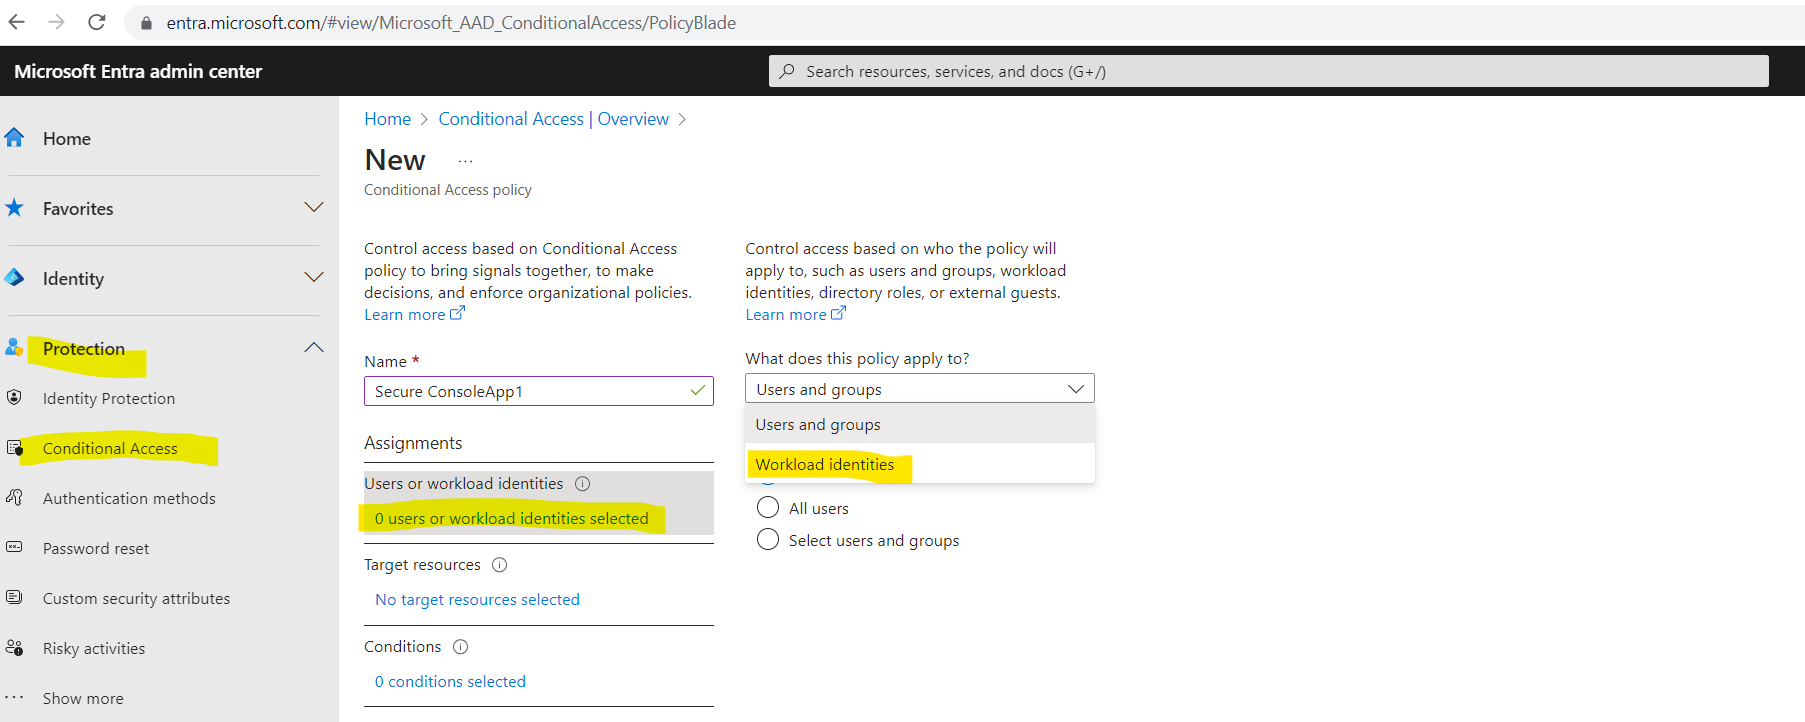
Now let’s see if I can now choose between users and workload identities under Assignments.
Looks good!
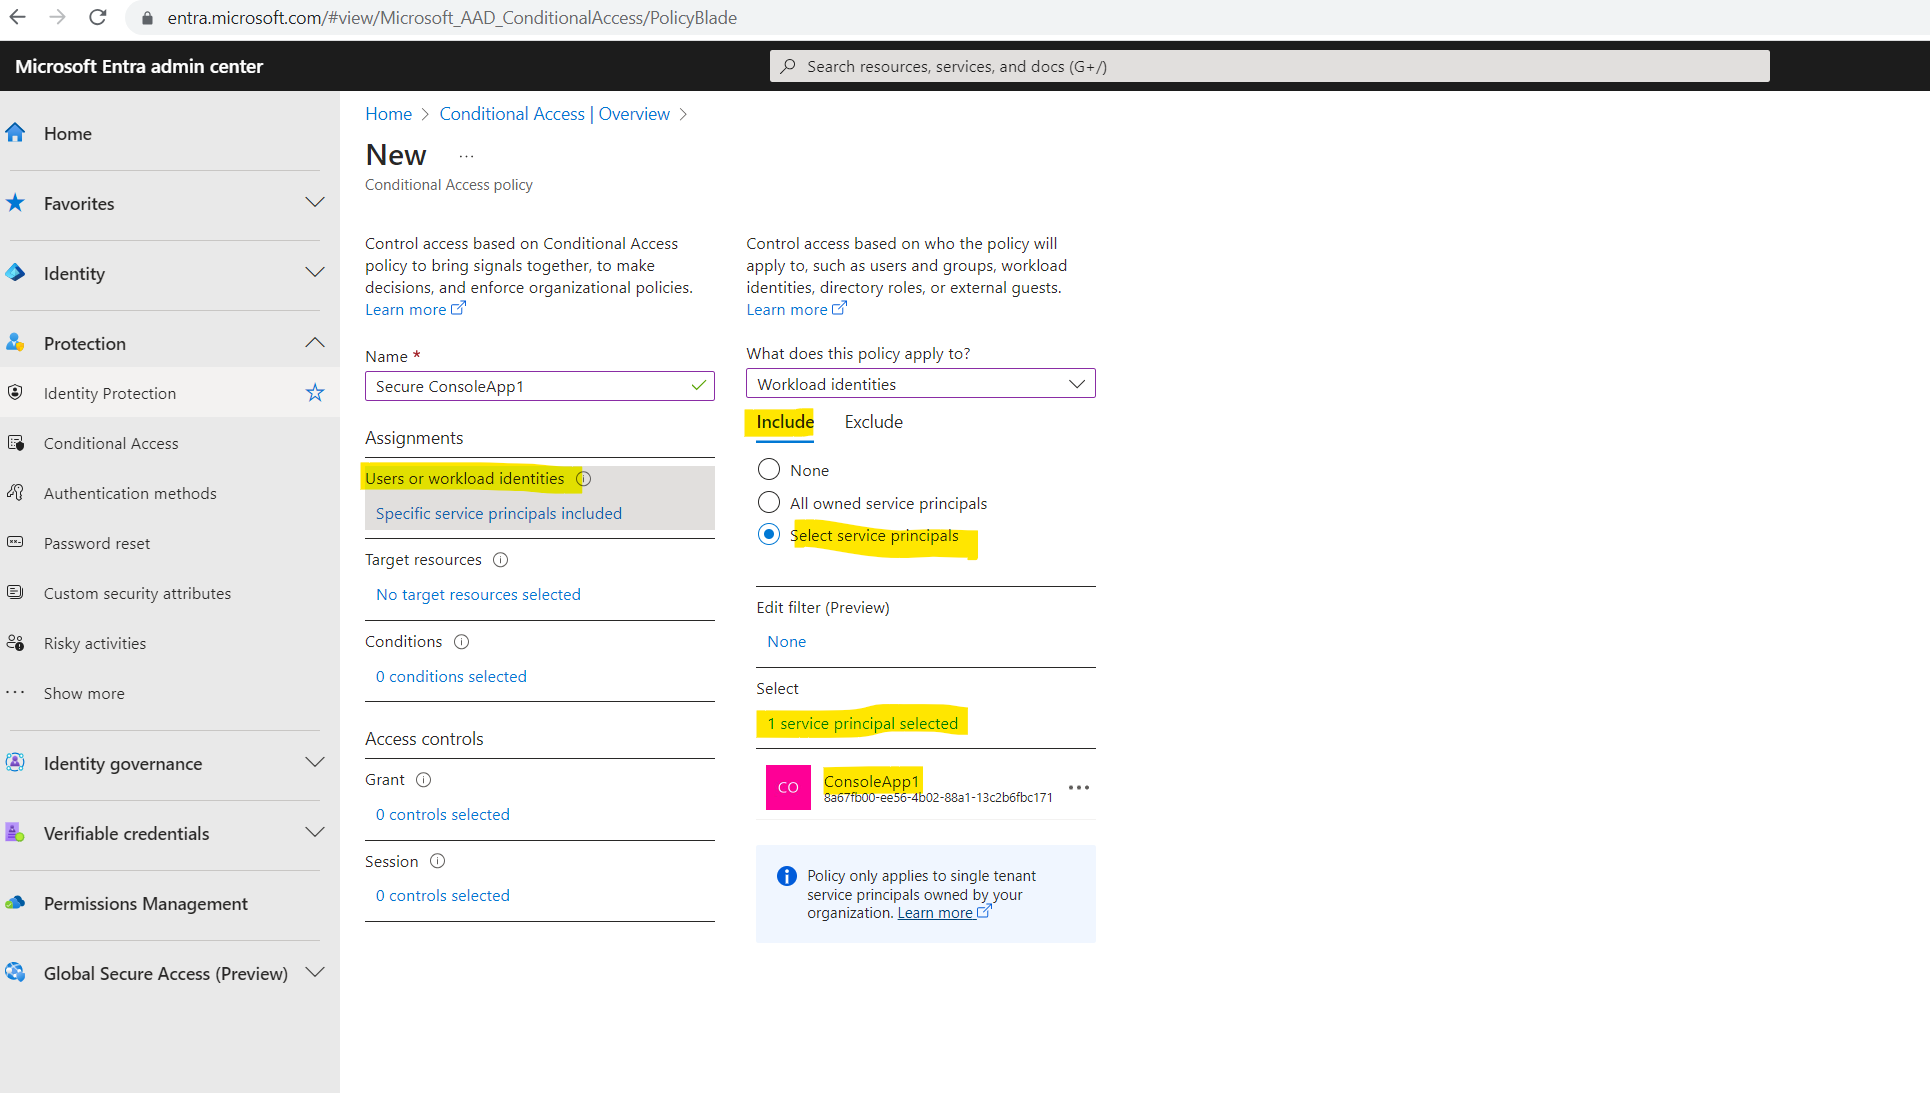
Under Assignments, select workload identities.
Under Include, choose Select service principals, and select the appropriate service principals from the list.
Below I will select a Console App which will access a key vault to store secrets in it. Further down I will show this app in detail.
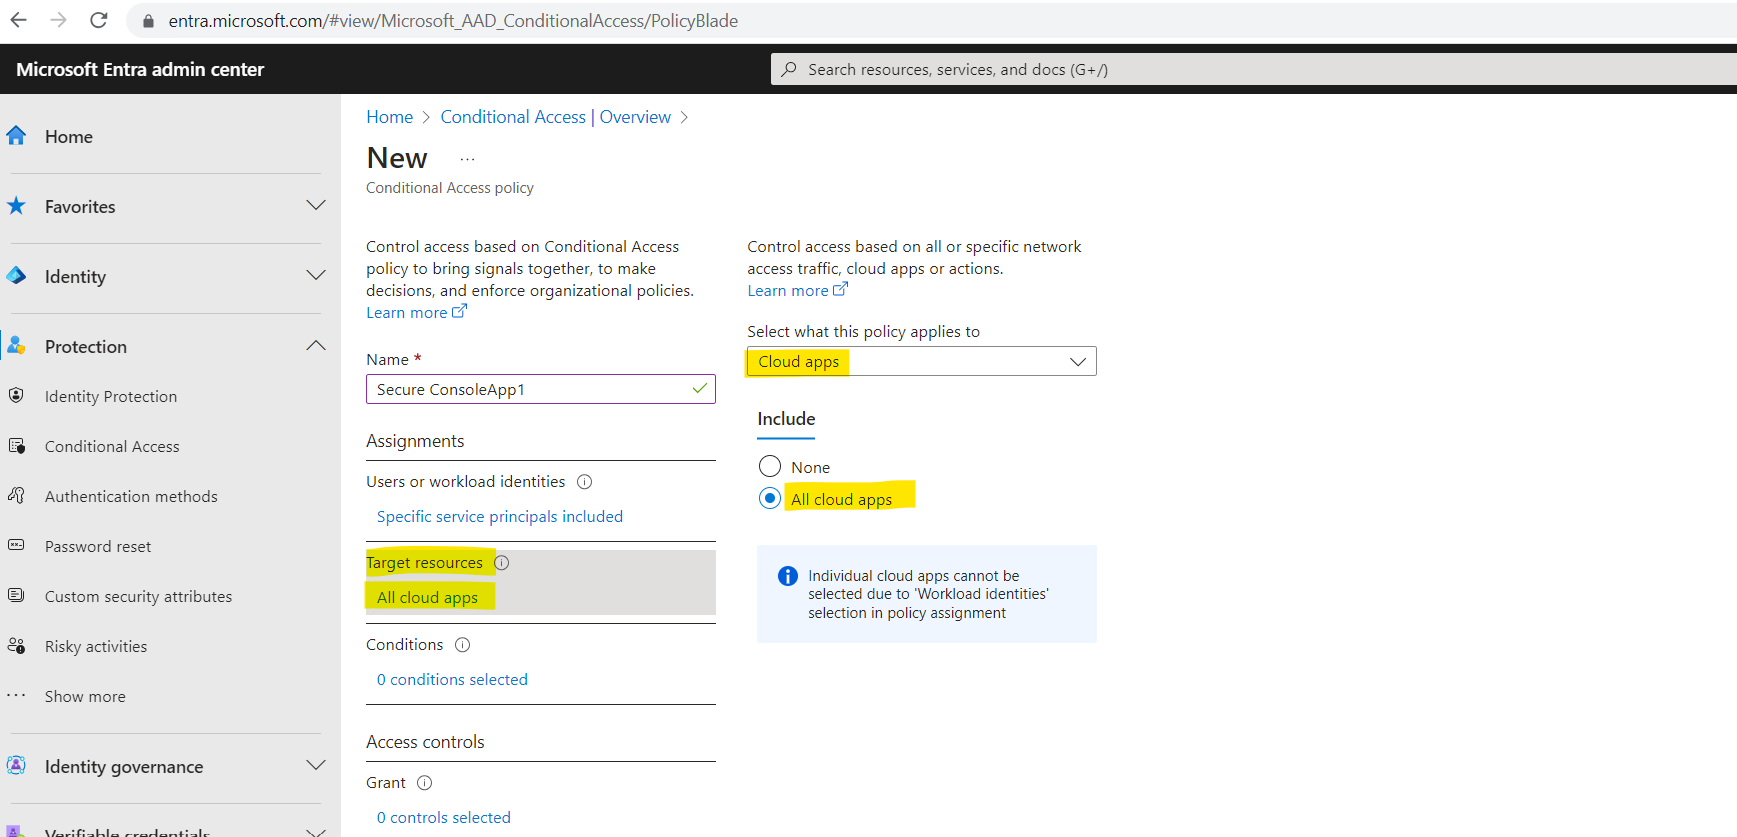
Under Target resources > Cloud apps > Include, select All cloud apps. The policy applies only when a service principal requests a token.
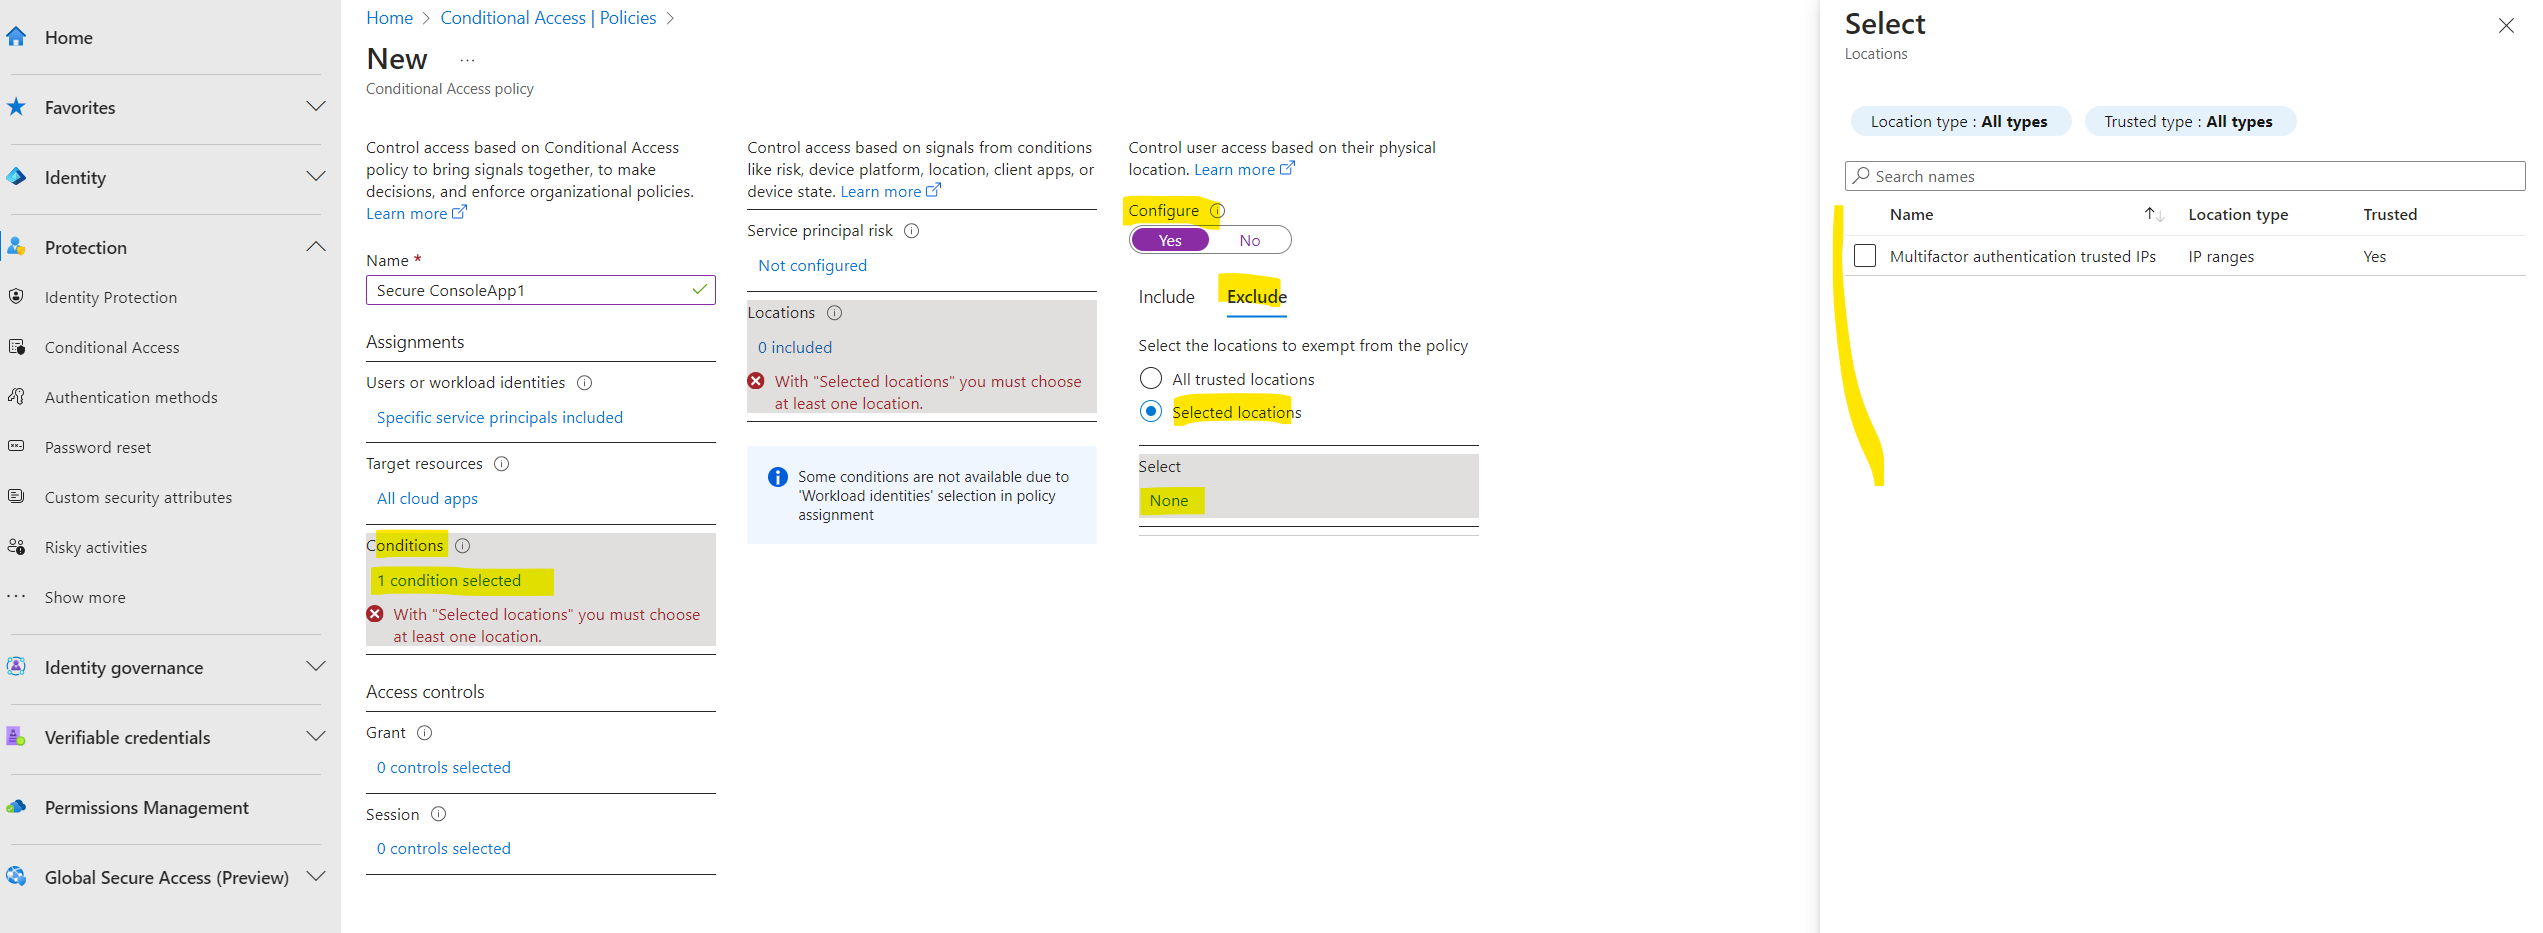
Under Conditions > Locations, include Any location and exclude Selected locations where you want to allow access.
Excluding here means that the policy will not applied to any access attempts from these selected (excluded) locations.
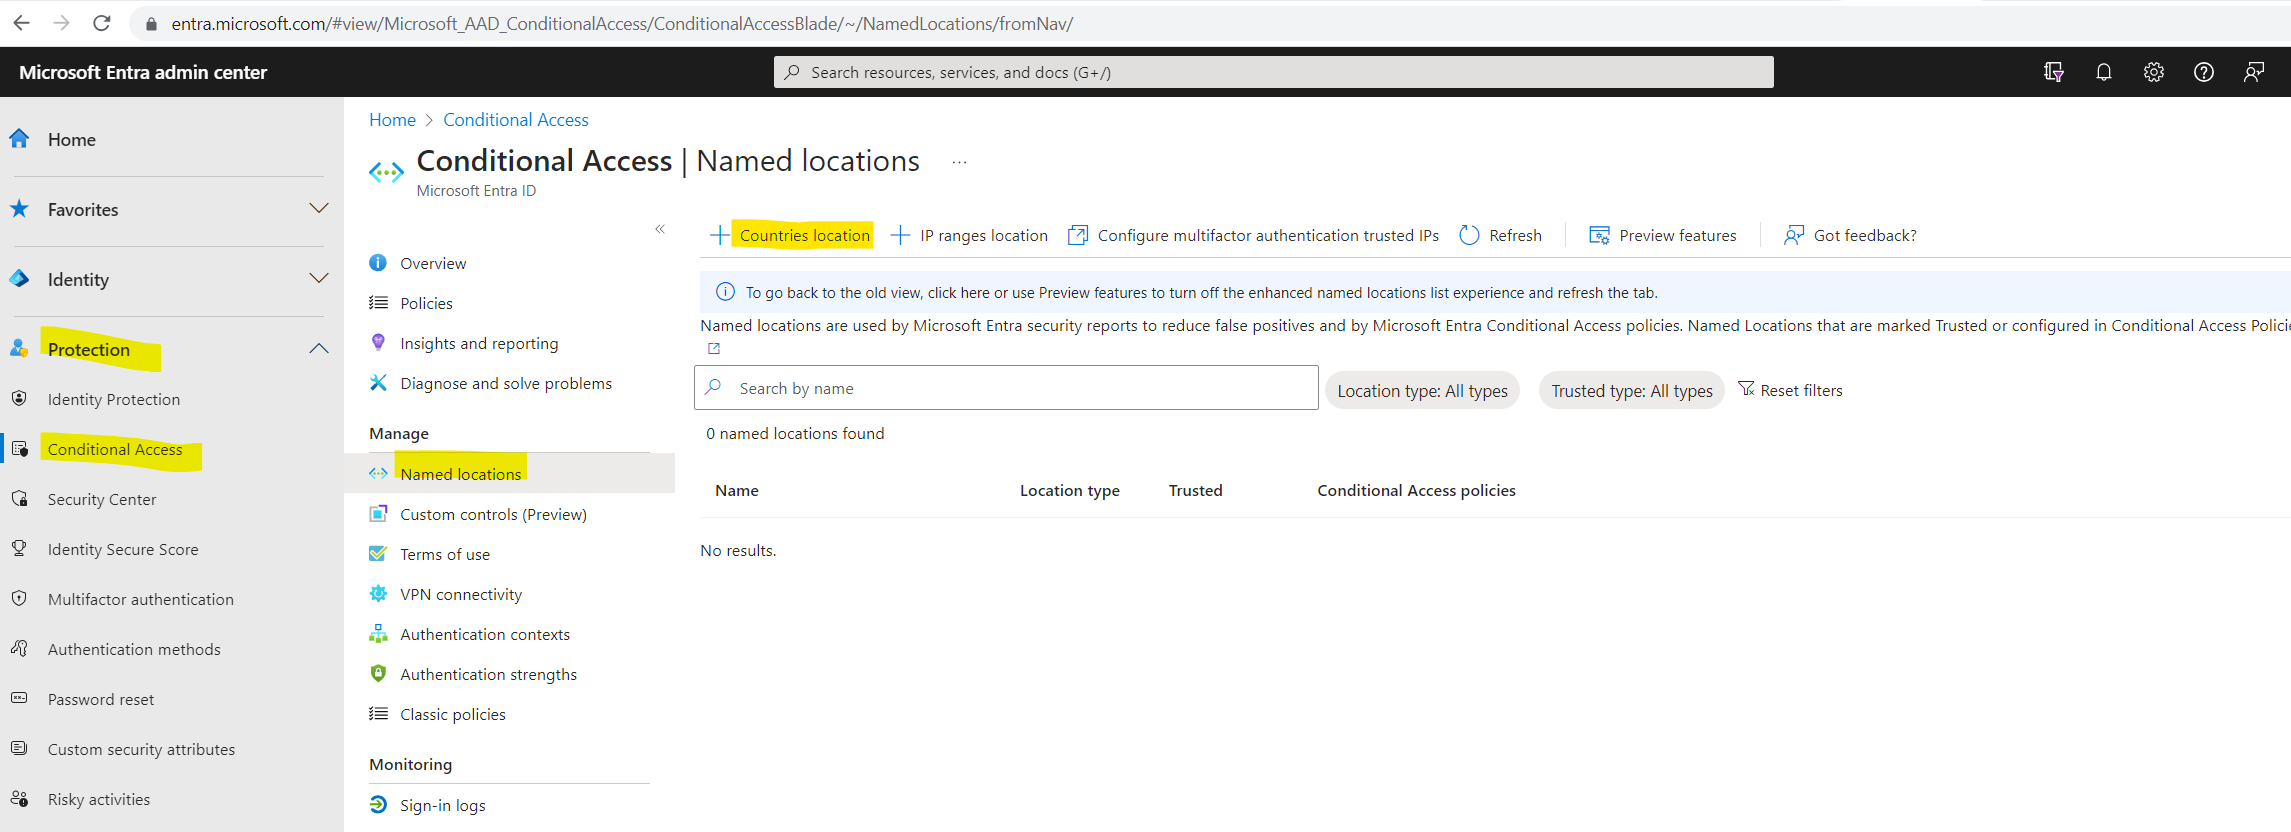
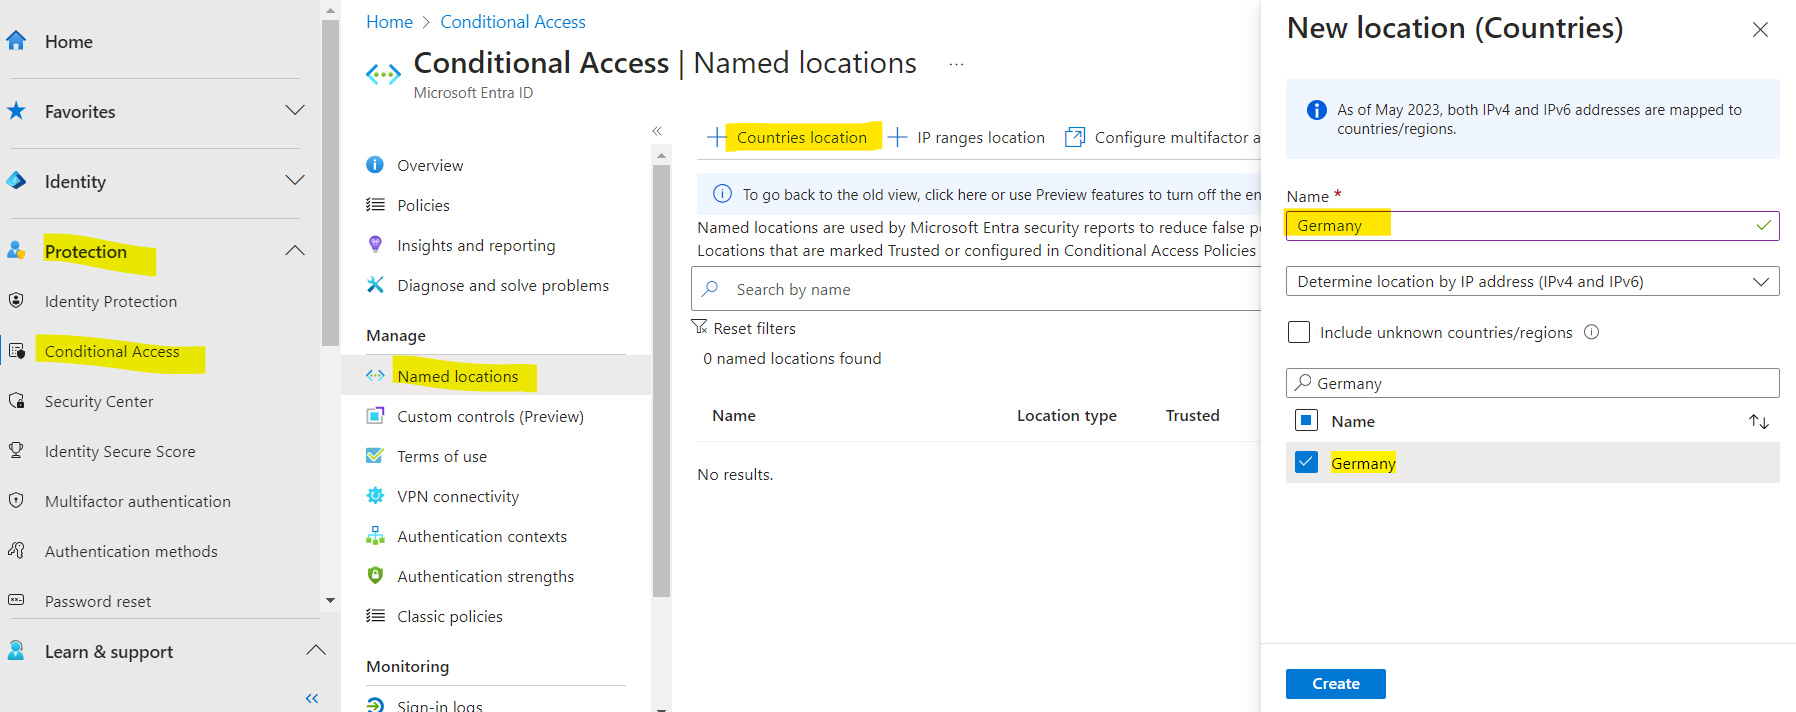
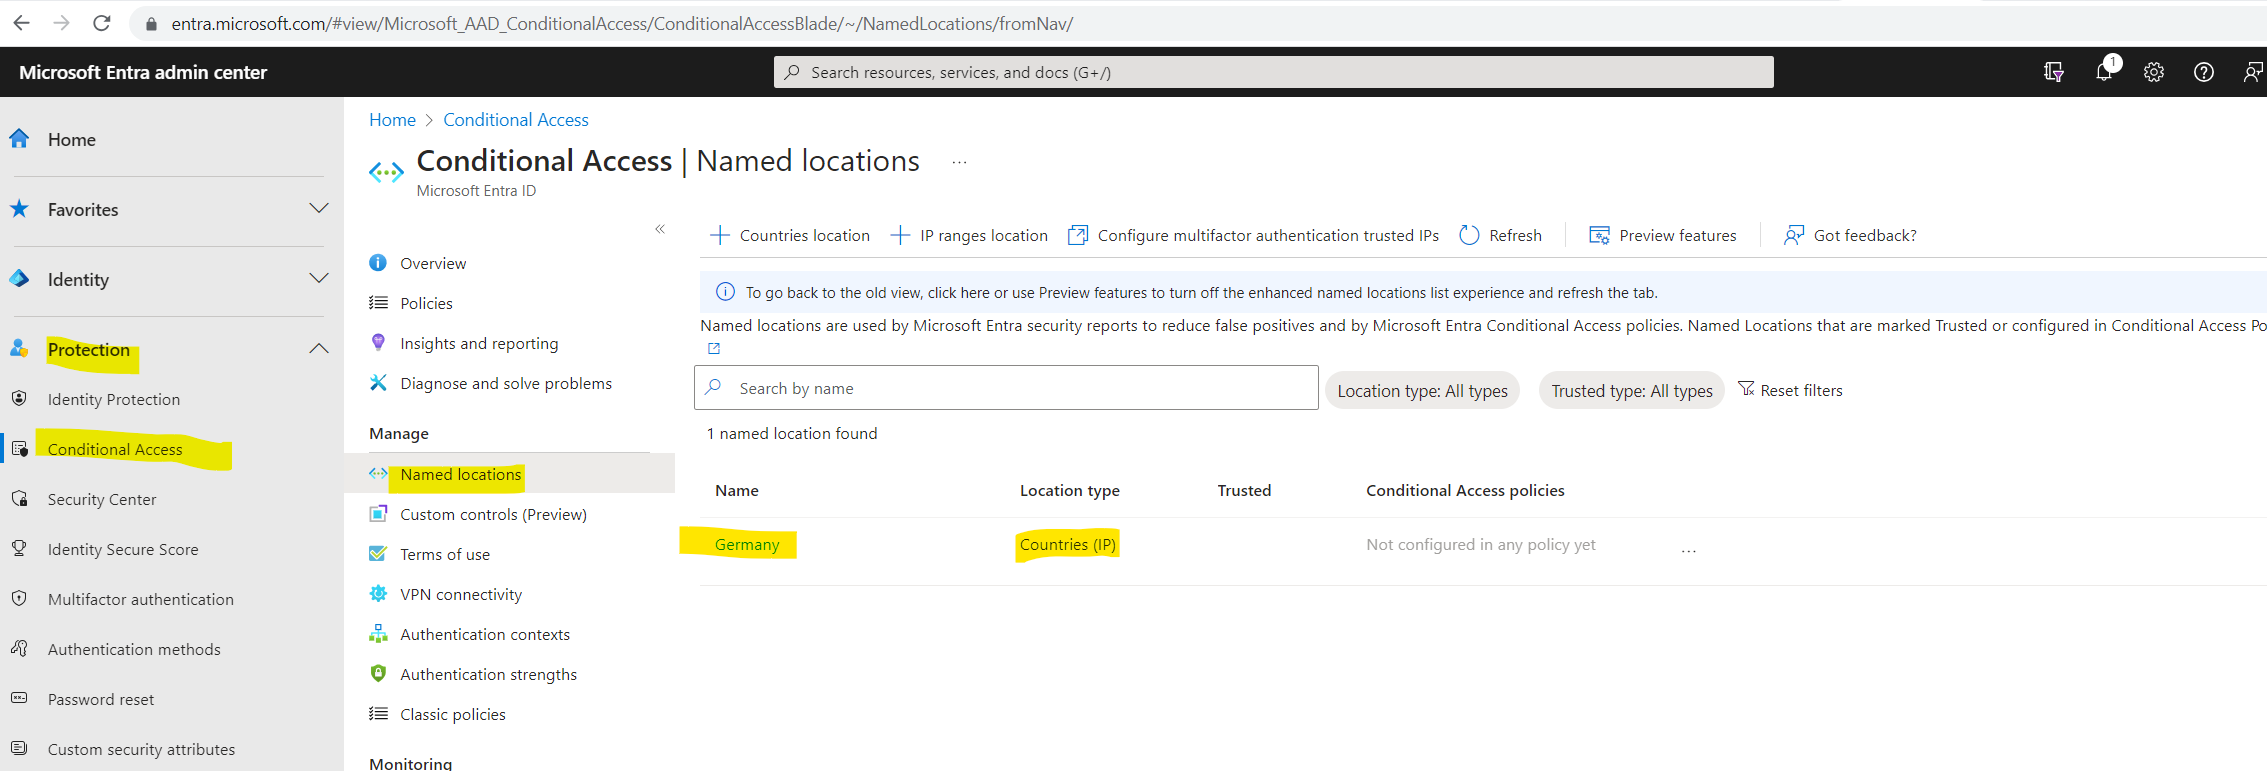
In order to be able to filter for locations, we first need to add these locations under Protection > Conditional Access > Named locations.
Here I will add a new location for Germany. In my case to demonstrate conditional access for workload identities, I will later block access for all countries besides Germany.
From now on I can select Germany as location for my conditional access policy. Under Exclude I will click on Selected locations and select my previously created location Germany.
As mentioned previously, because I excluded the location Germany, the policy will not be applied if the application is trying to access the key vault from Germany.
For all other countries I want to block access, therefore I will select under Include – Any location. This will apply the policy to all countries besides Germany.
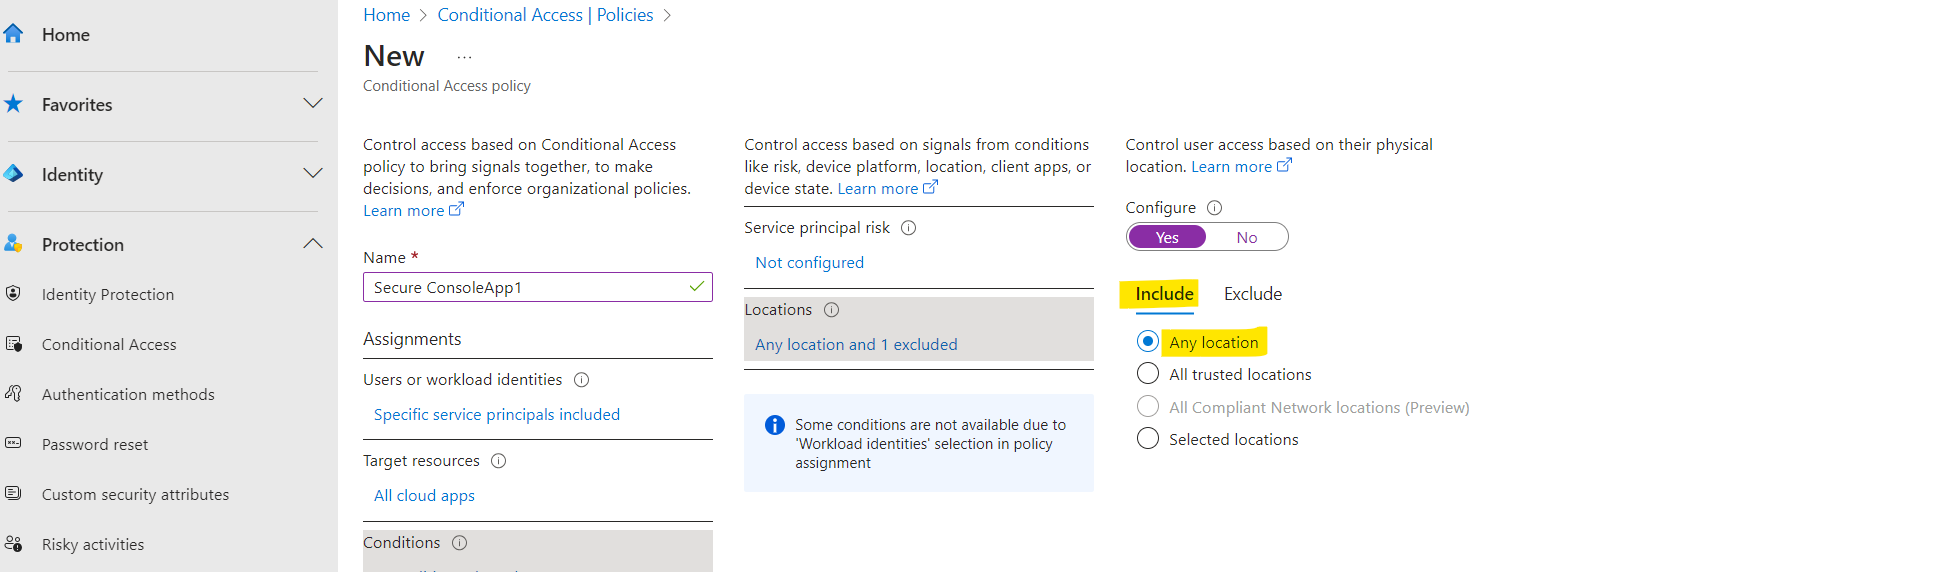
Under Grant, Block access is the only available option. Access is blocked when a token request is made from outside the allowed range.
Because we included above any location, the policy which will block access, will be applied to all applications trying to access the key vault from outside Germany.
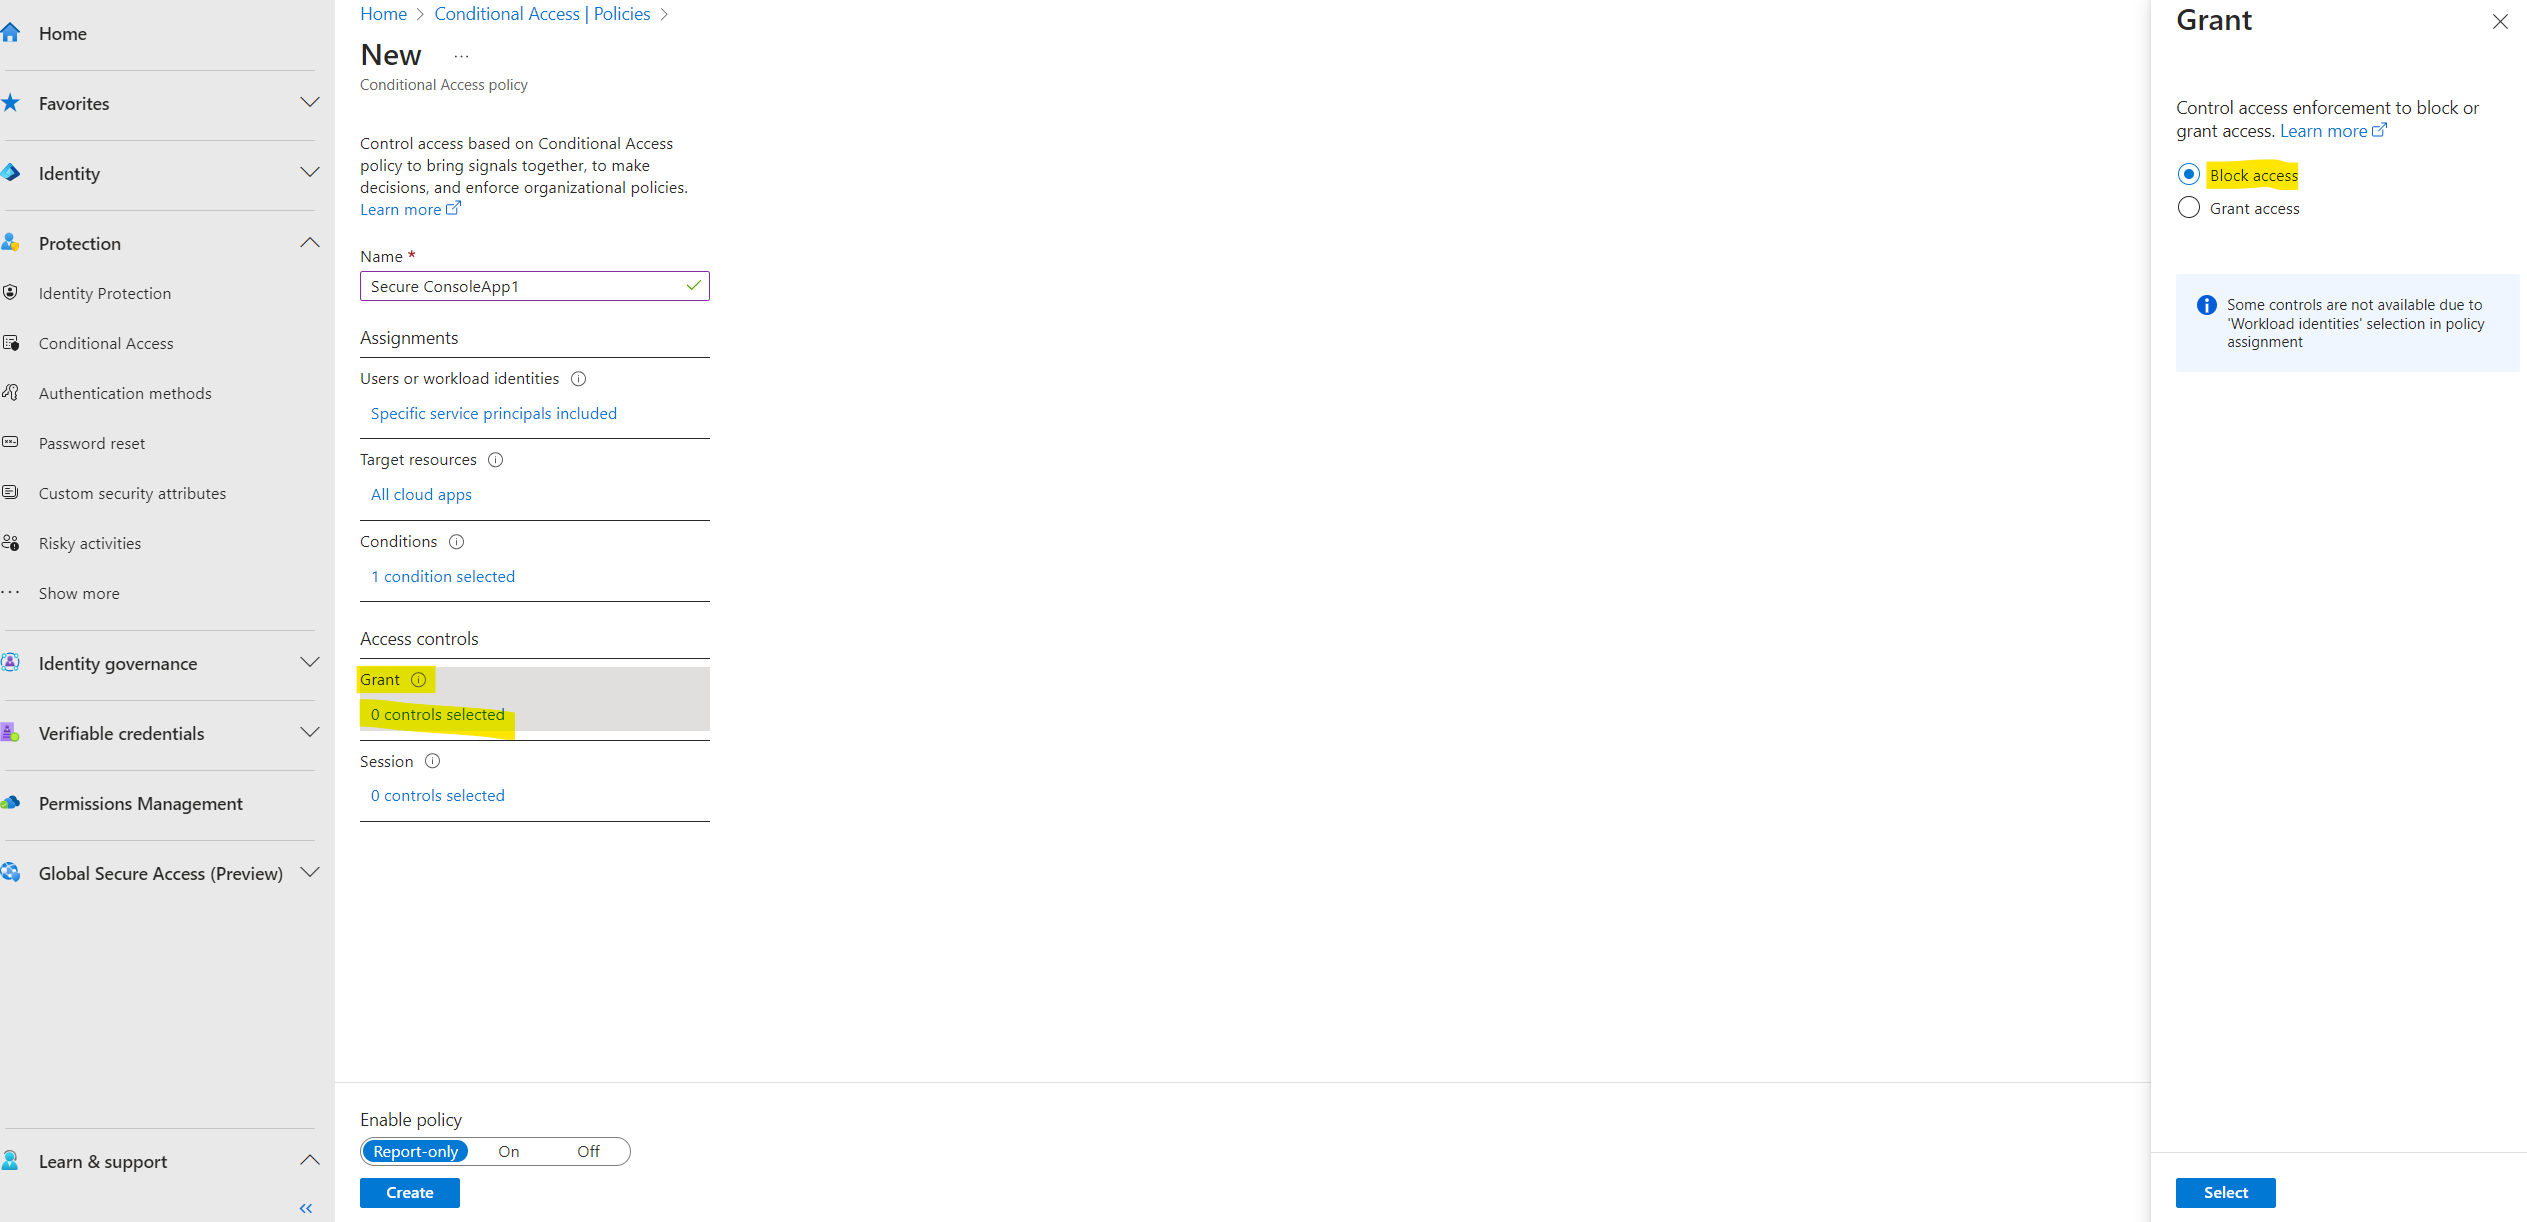
Your policy can be saved in Report-only mode, allowing administrators to estimate the effects, or policy is enforced by turning policy On.
I will enable the policy by clicking the On switch.
Finally select Create to complete your policy.
Source: https://learn.microsoft.com/en-us/entra/identity/conditional-access/workload-identity
Unhandled exception. Azure.Identity.AuthenticationFailedException: ClientSecretCredential authentication failed: AADSTS53003: Access has been blocked by Conditional Access policies. The access policy does not allow token issuance.
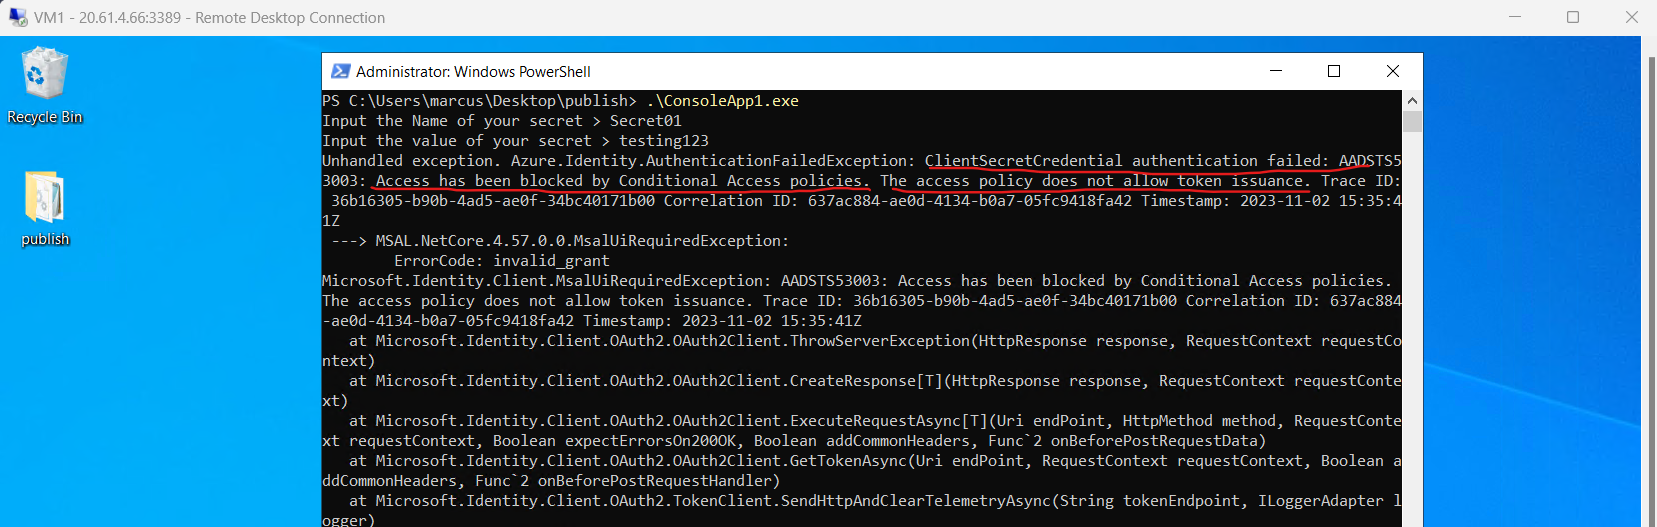
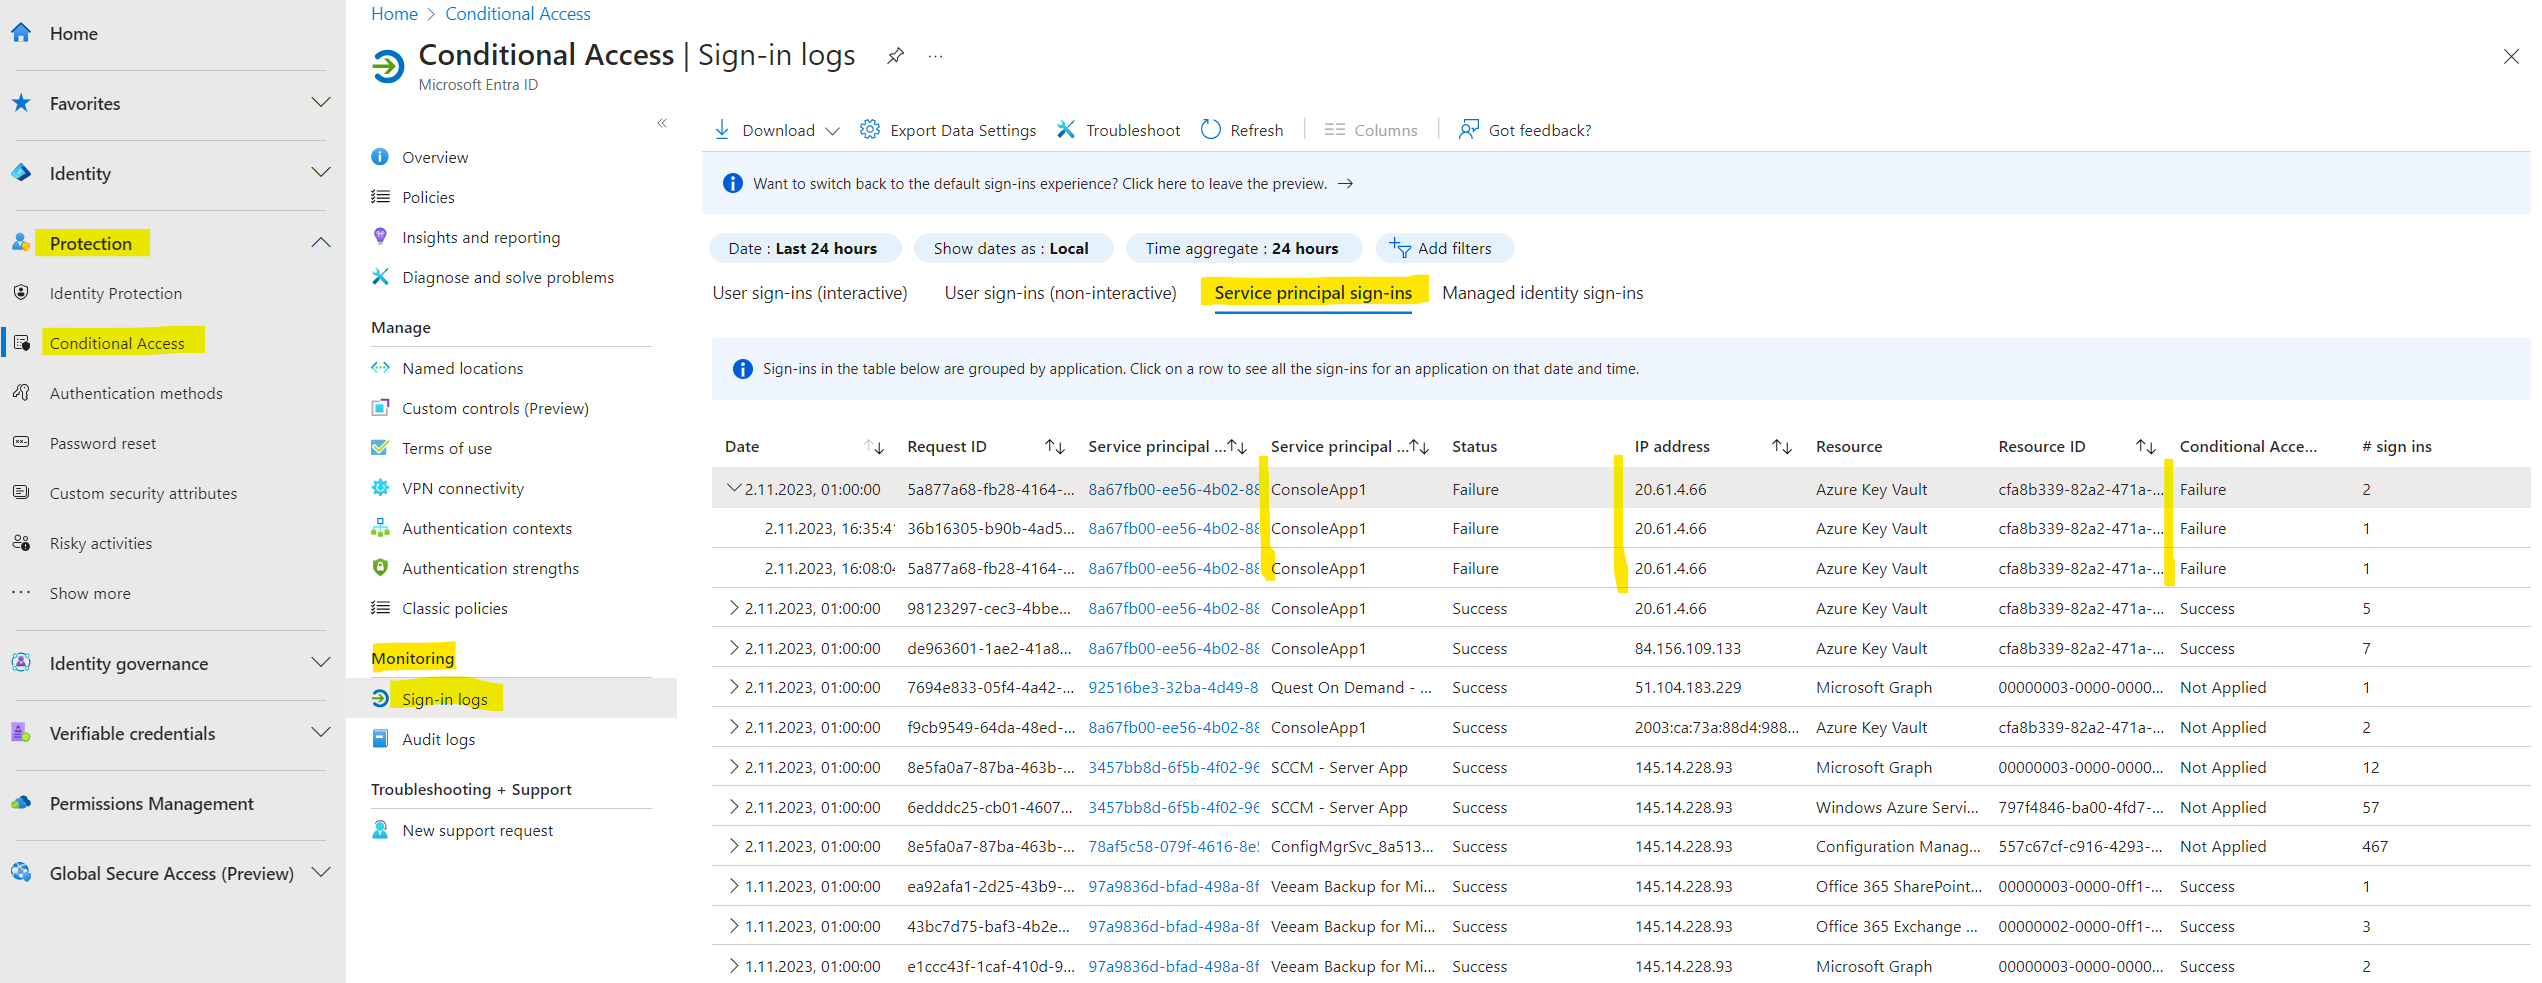
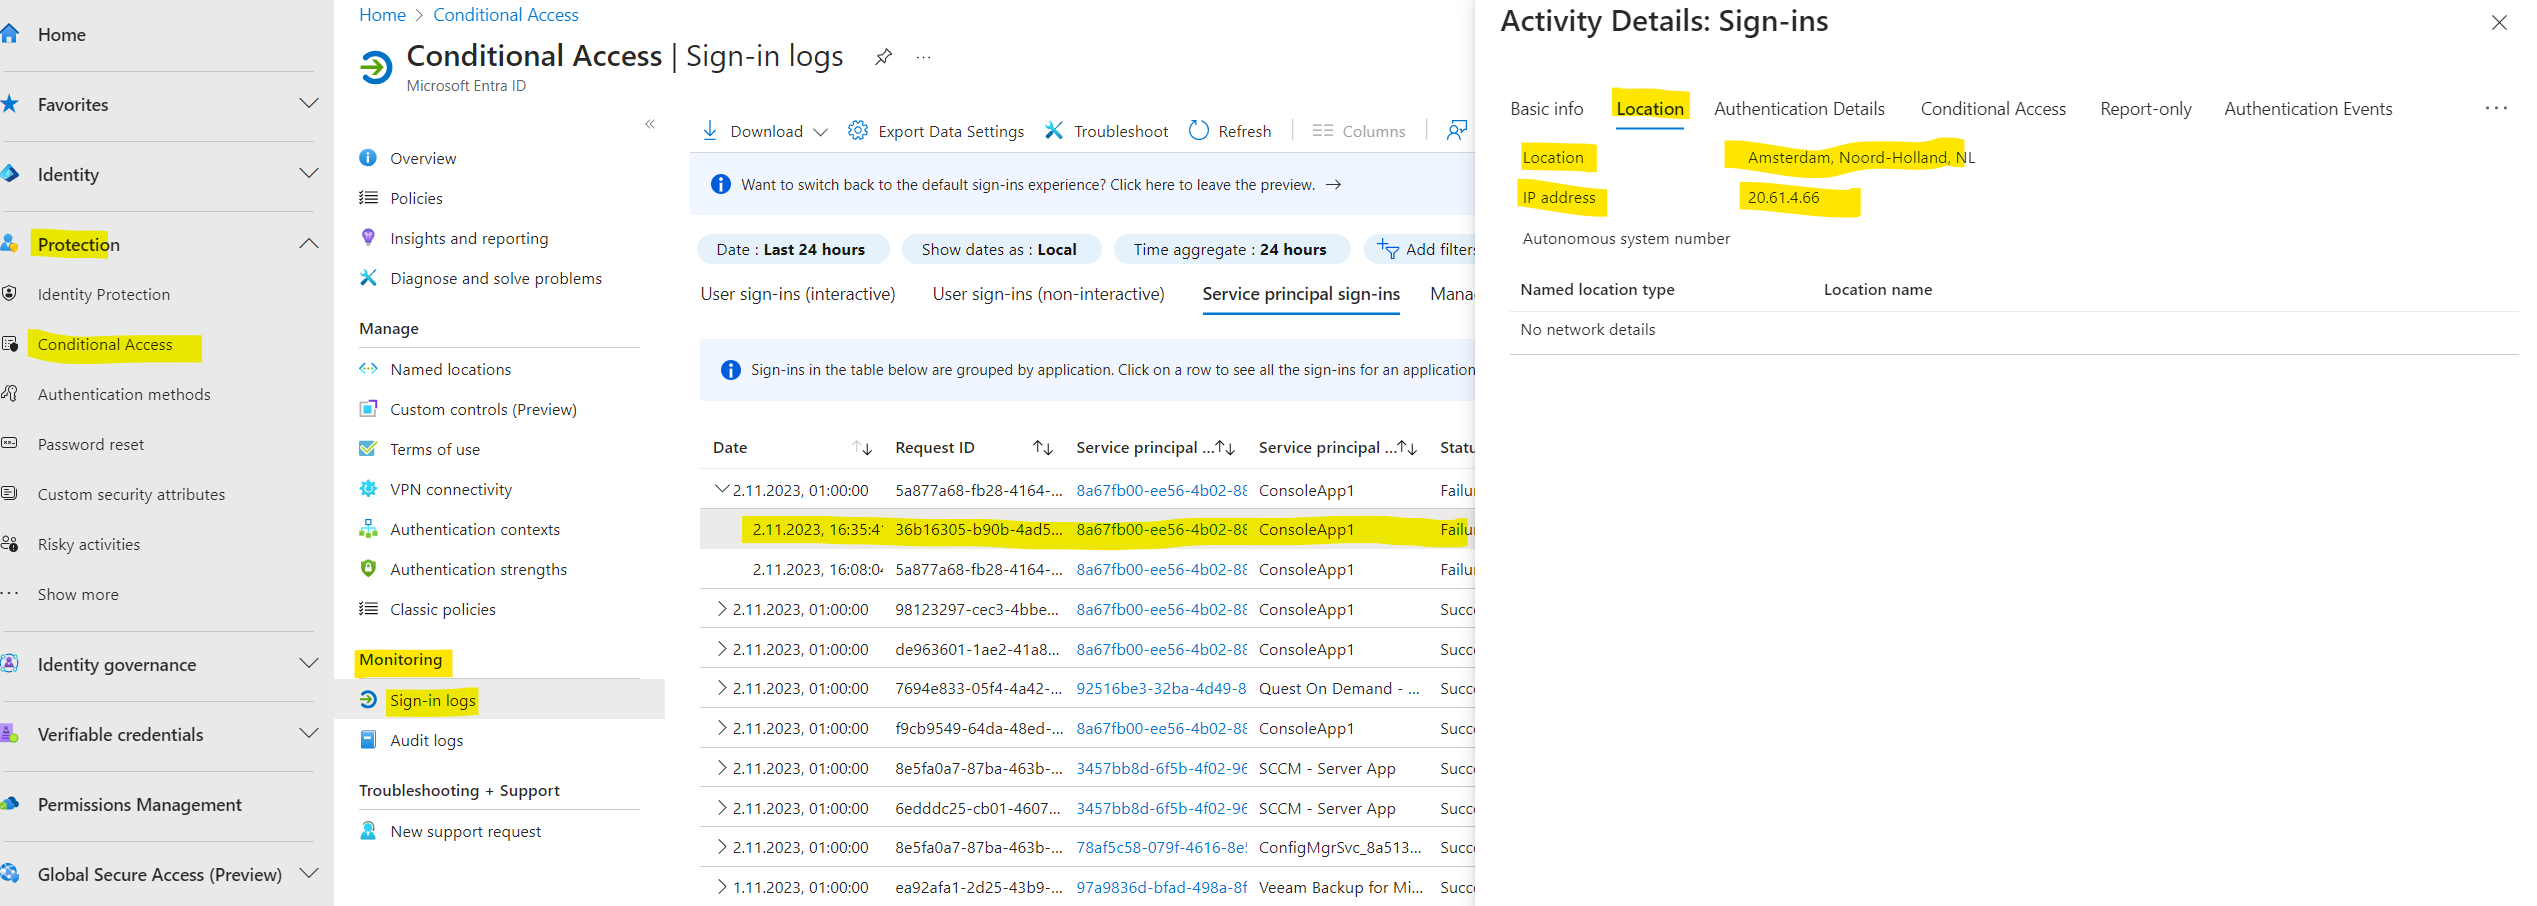
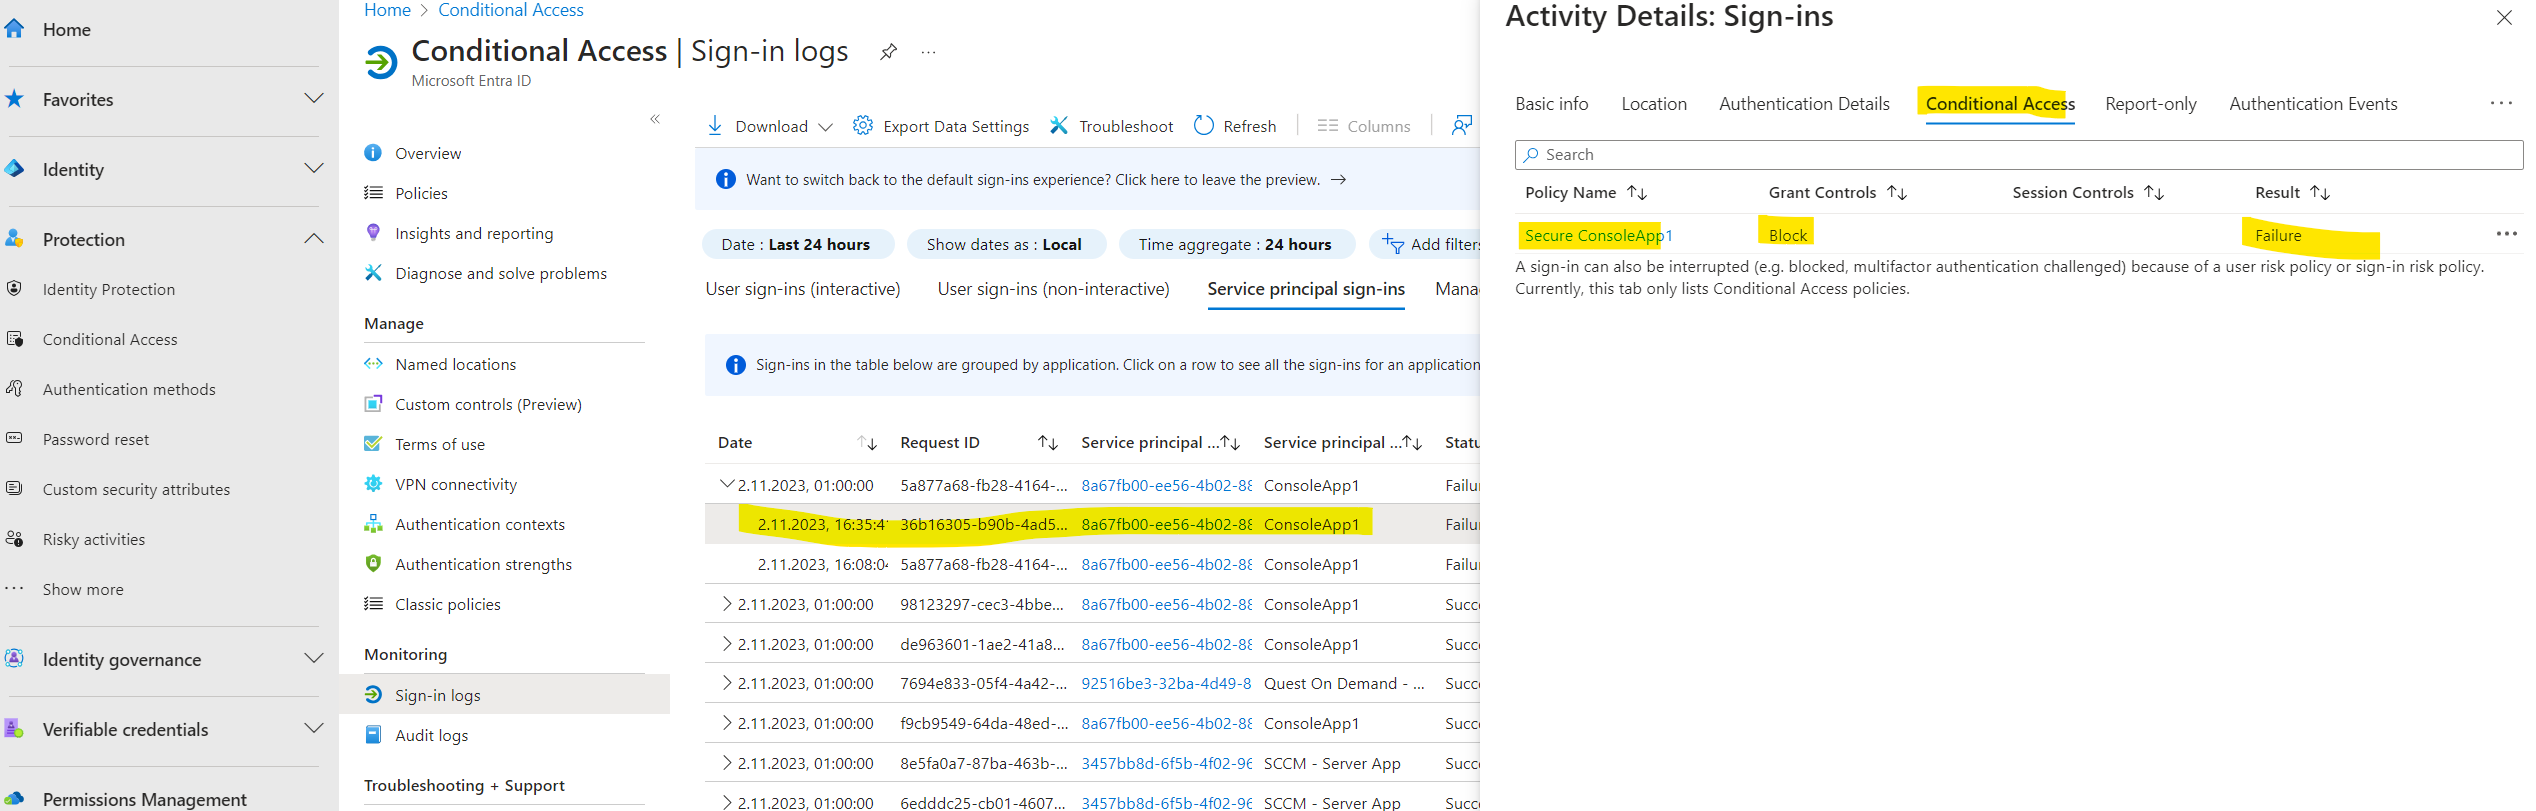
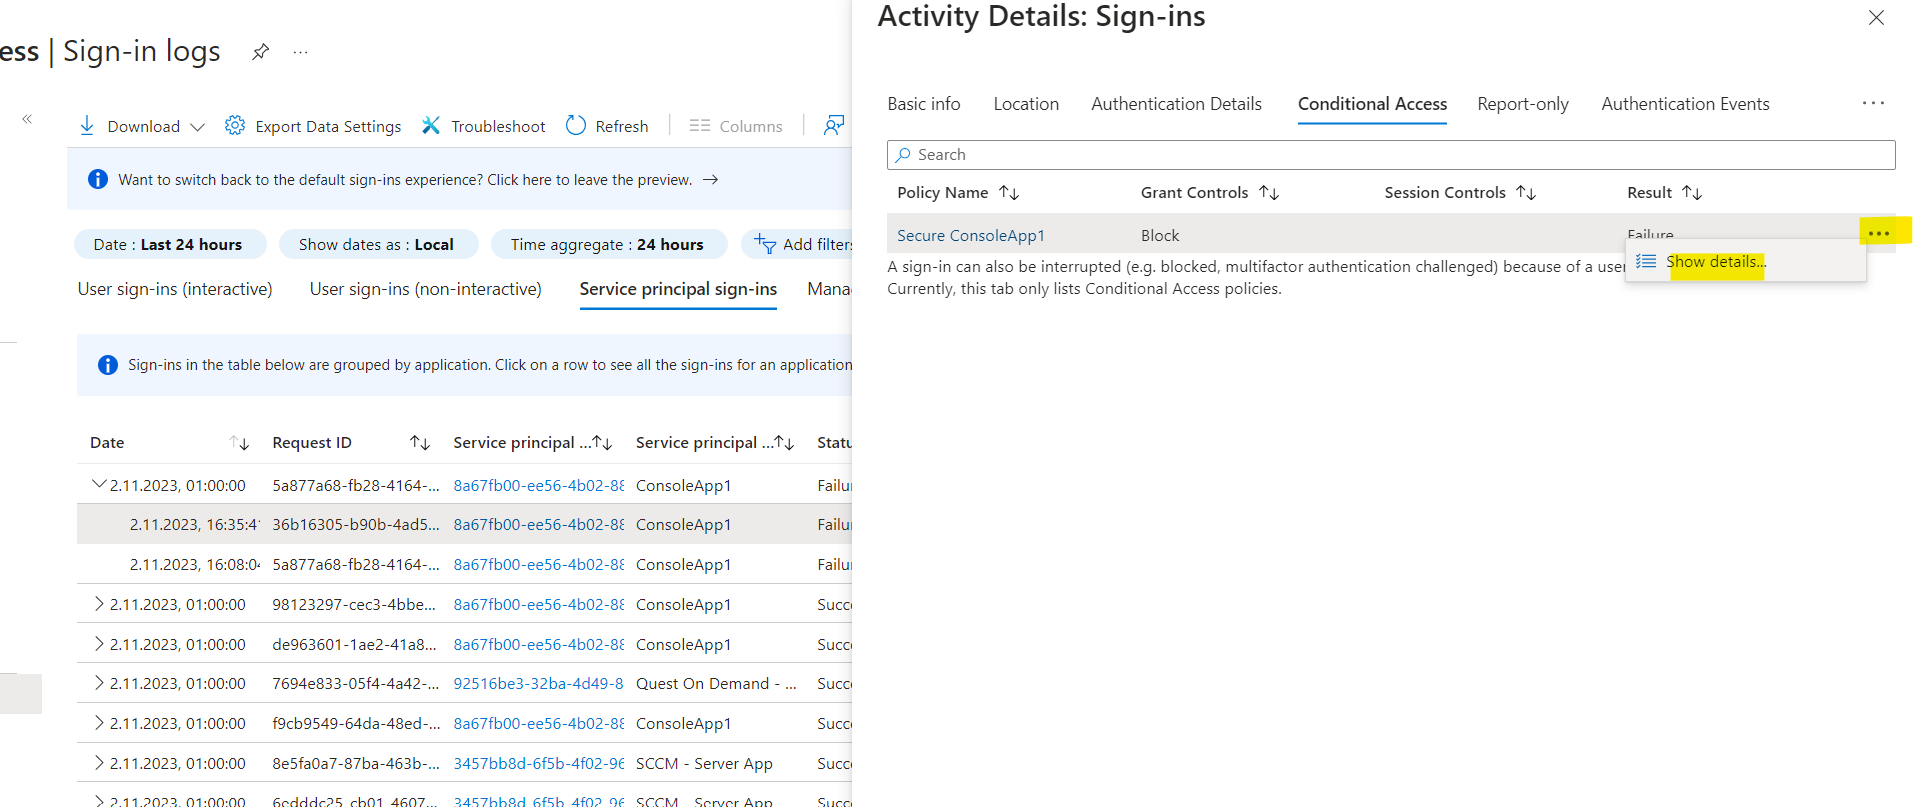
Here you can see that the policy matched for the configured conditions to apply it to all access attempts from outside Germany.
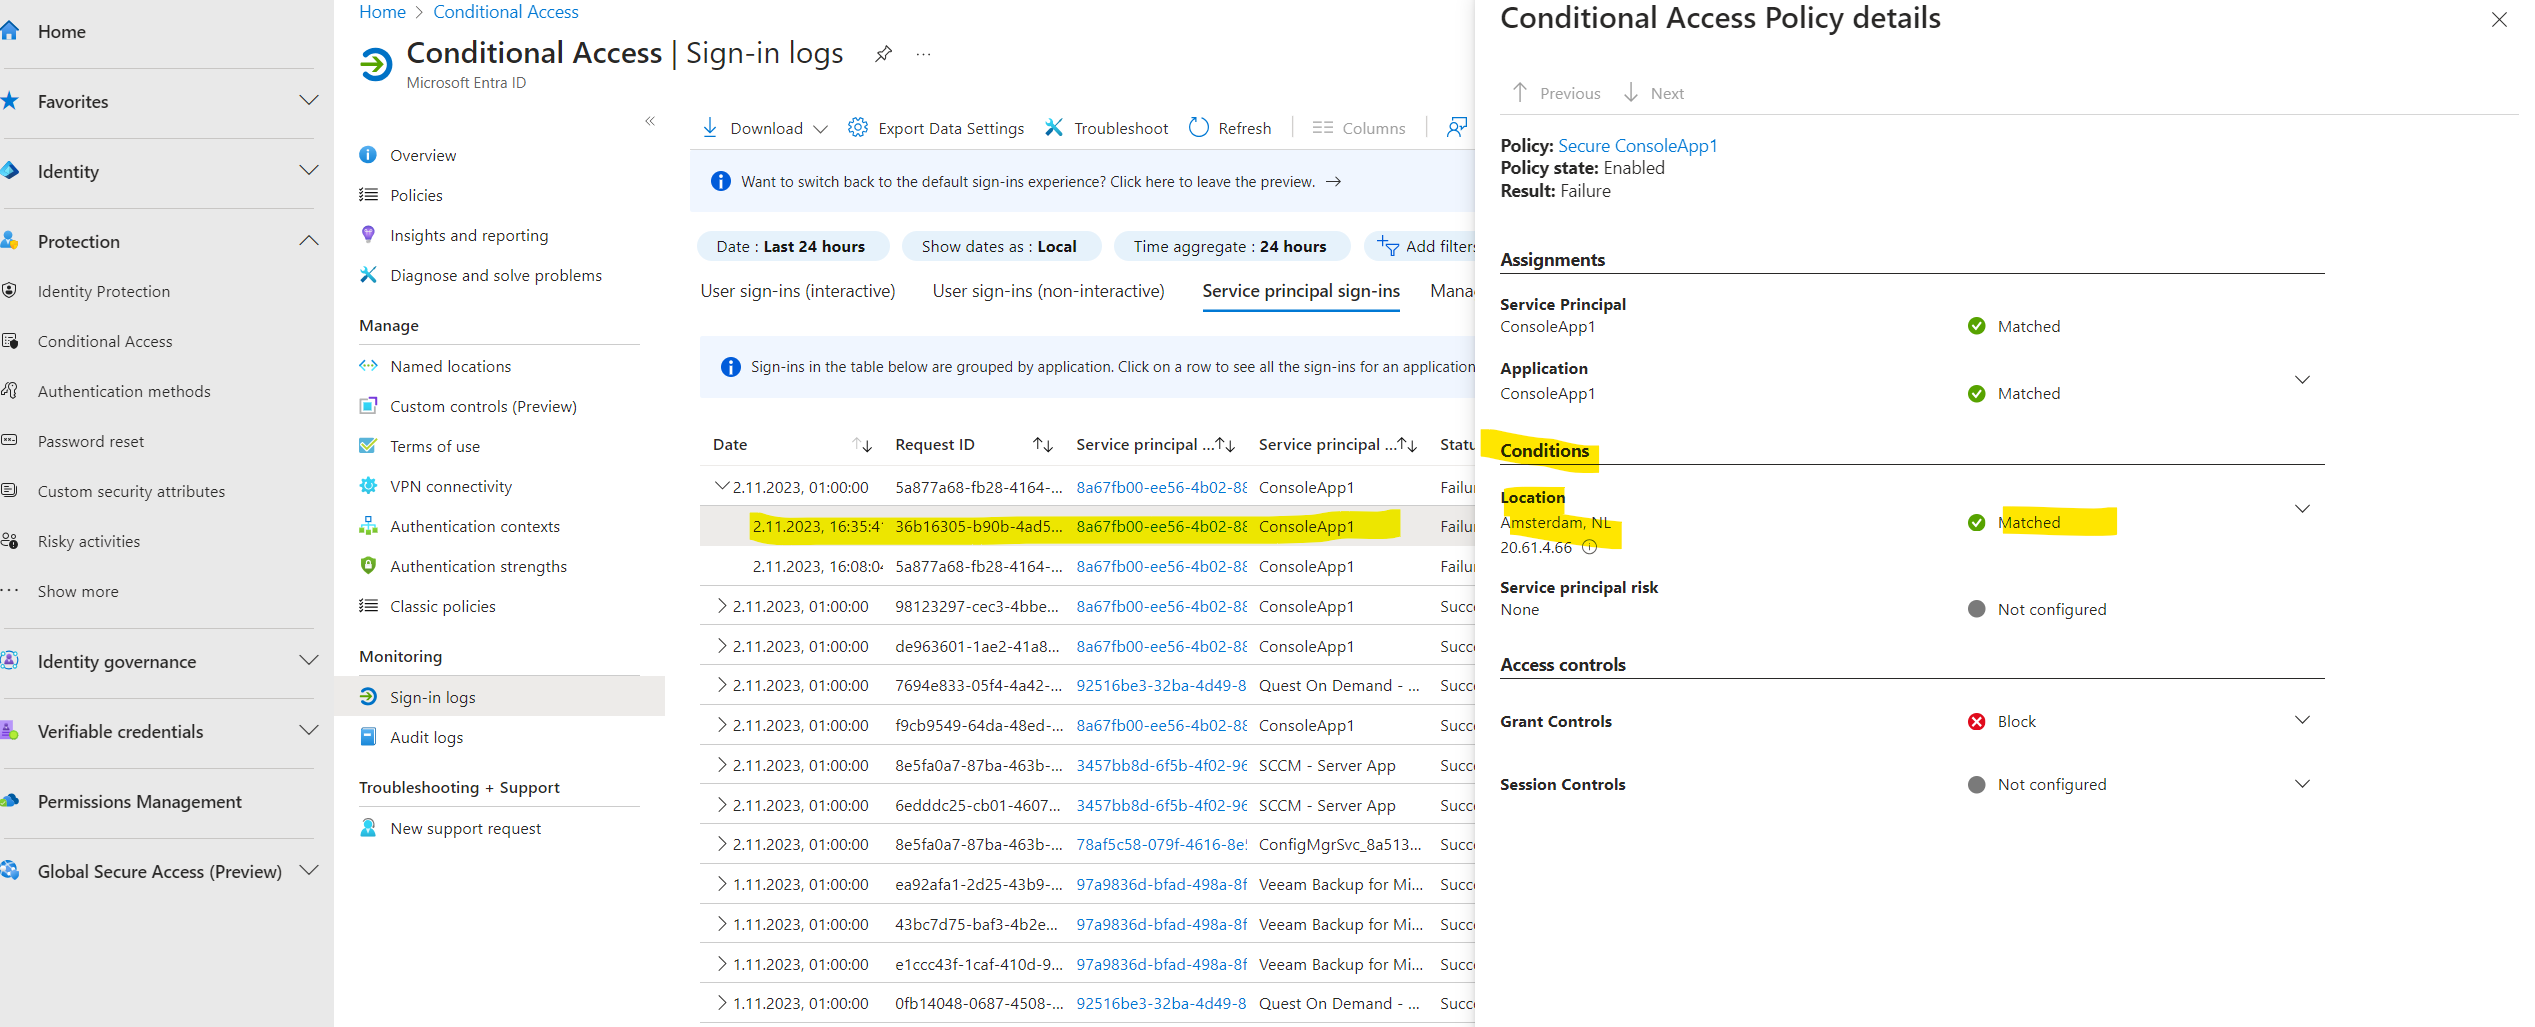
Regarding logs in Azure please note that an event doesn’t occurs immediately in the logs.
Microsoft doesn’t guarantee a specific time after an event occurs for the corresponding audit record to be returned in the results of an audit log search. For core services (such as Exchange, SharePoint, OneDrive, and Teams), audit record availability is typically 60 to 90 minutes after an event occurs. For other services, audit record availability may be longer. However, some issues that are unavoidable (such as a server outage) may occur outside of the audit service that delays the availability of audit records. For this reason, Microsoft doesn’t commit to a specific time.
Continuous access evaluation for workload identities
You maybe saw previously, that when we created a new conditional access policy, the last configuration step was named Session. There you can also enable Continuous Access Evaluation (CAE).
Continuous Access Evaluation (CAE) allows access tokens to be revoked based on critical events and policy evaluation in real time rather than relying on token expiration based on lifetime.
- “Disable” works correctly when “All cloud apps” is selected, and no condition has been chosen.
- This setting does not work with report-only mode, but there are pre-published workbooks with data insights.
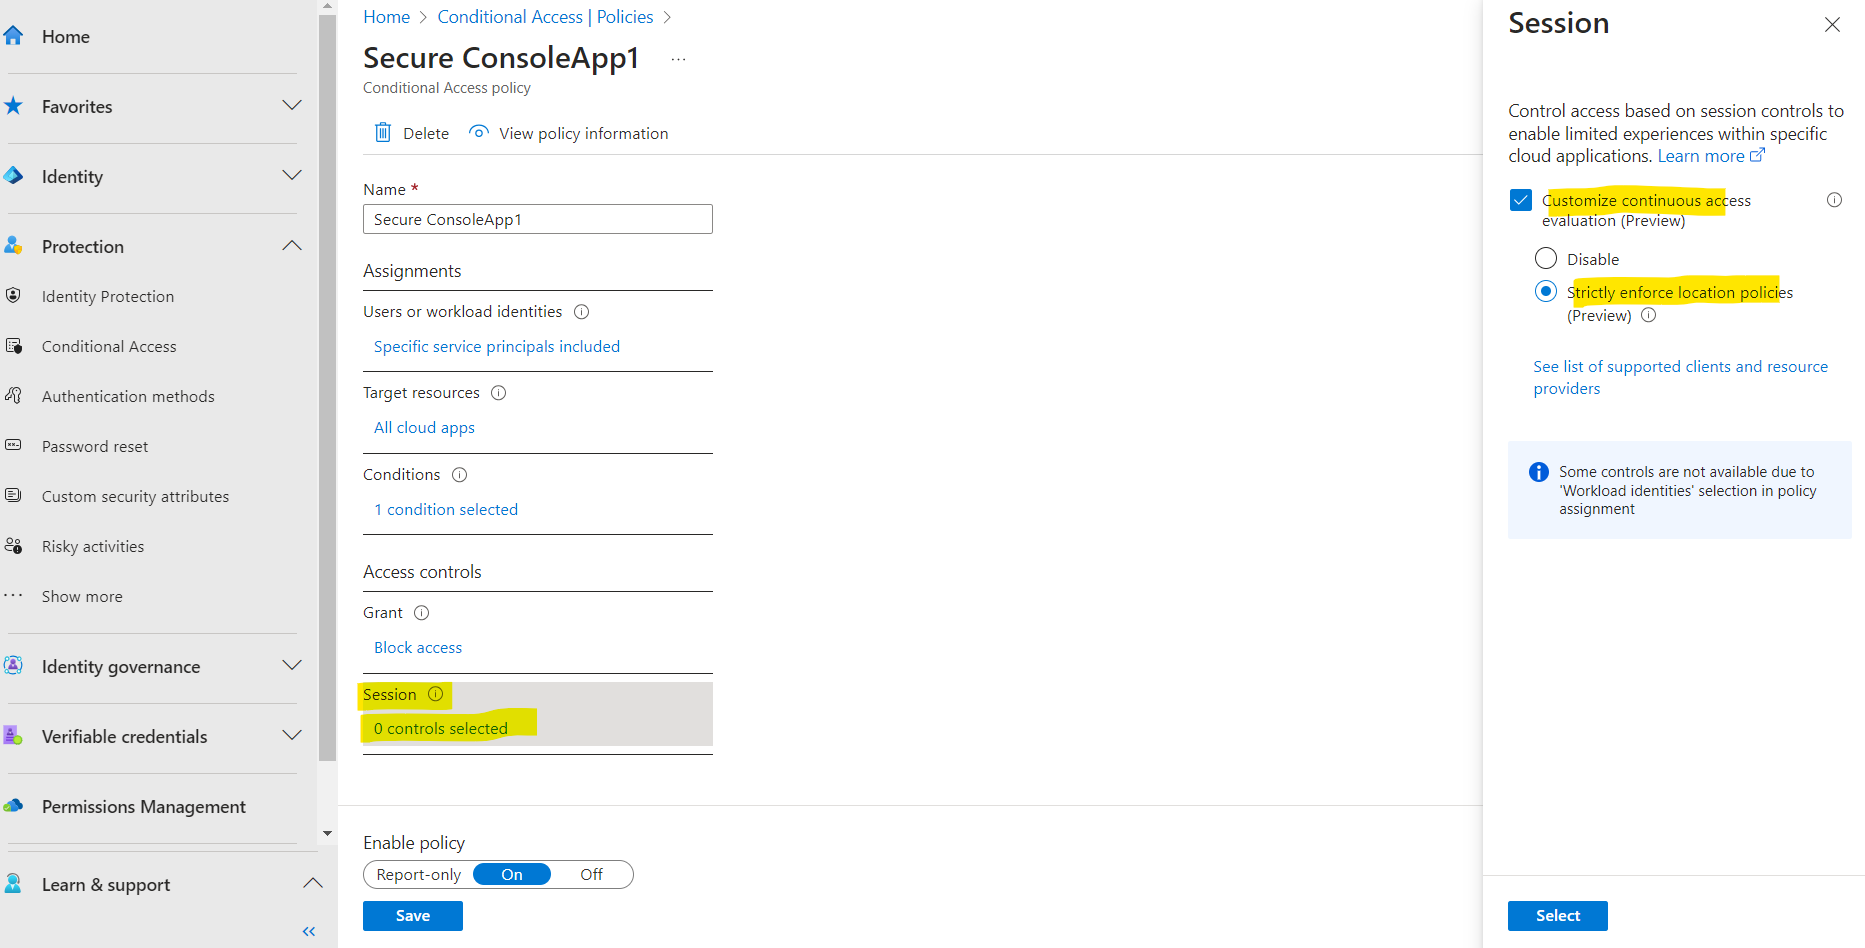
The continuous access evaluation for workload identities is supported only on access requests sent to Microsoft Graph as a resource provider. More resource providers will be added over time.
Service principals for line of business (LOB) applications are supported
We support the following revocation events:
- Service principal disable
- Service principal delete
- High service principal risk as detected by Microsoft Entra ID Protection
Continuous access evaluation for workload identities supports Conditional Access policies that target location and risk.
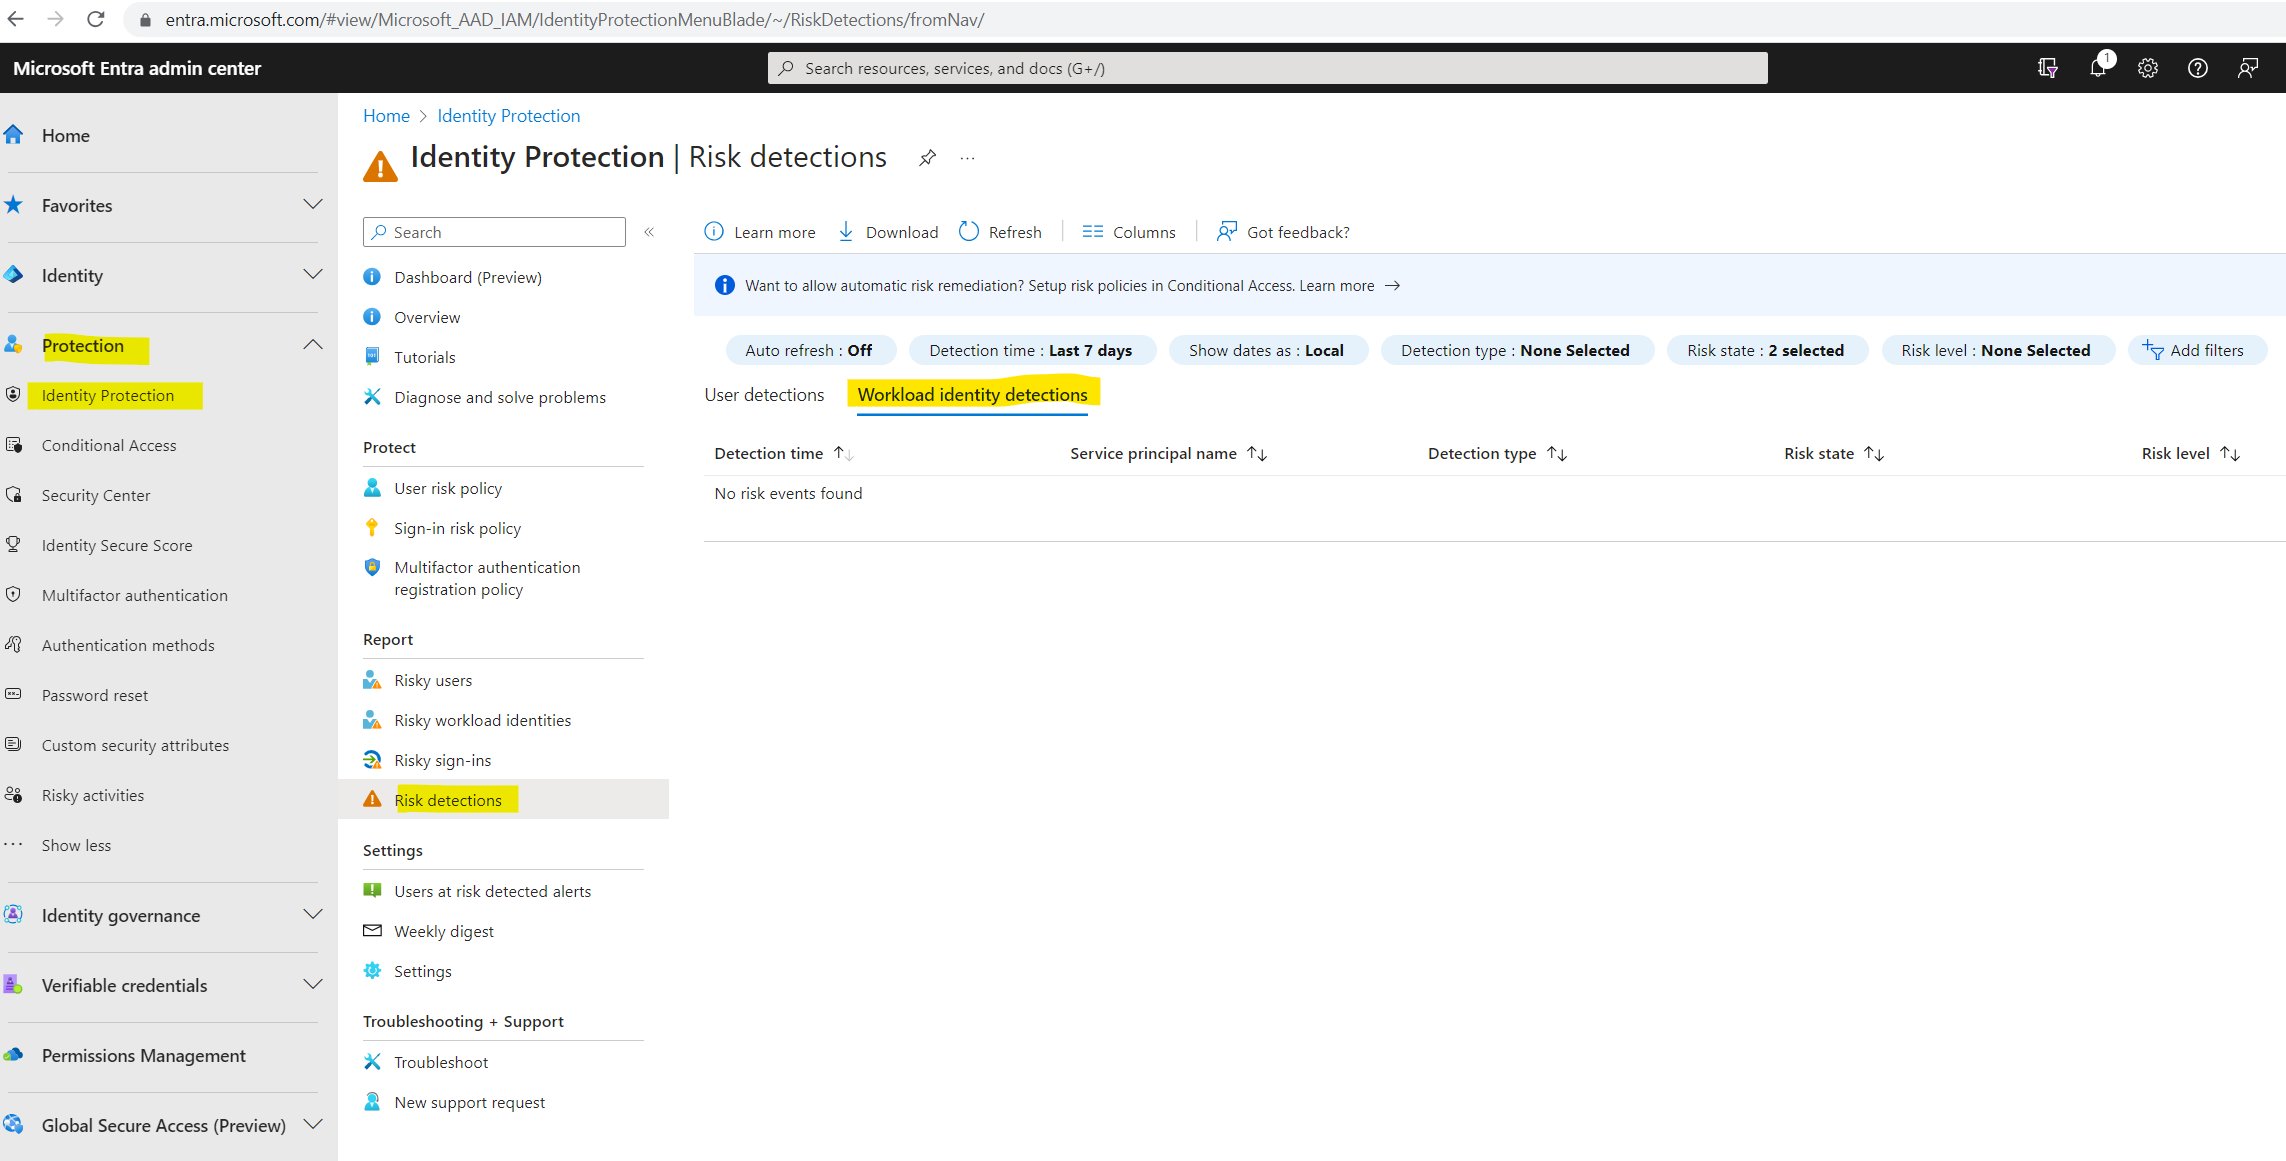
Detect compromised identities
Microsoft Entra ID Protection has historically protected users in detecting, investigating, and remediating identity-based risks. We’re now extending these capabilities to workload identities to protect applications and service principals.
To make use of workload identity risk, including the new Risky workload identities blade and the Workload identity detections tab in the Risk detections blade in the portal, you must have the following.
- Workload Identities Premium licensing: You can view and acquire licenses on the Workload Identities blade.
- One of the following administrator roles assigned
- Security Administrator
- Security Operator
- Security Reader Users assigned the Conditional Access administrator role can create policies that use risk as a condition.
- Global Administrator
Microsoft can detect risk on workload identities across sign-in behavior and offline indicators of compromise. All detections are described in the following article from Microsoft https://learn.microsoft.com/en-us/entra/id-protection/concept-workload-identity-risk#workload-identity-risk-detections.
Organizations can find workload identities that have been flagged for risk in one of two locations:
Sign in to the Microsoft Entra admin center as at least a Security Reader.
Browse to Protection > Identity Protection > Risky workload identities.
More about securing workload identities you will find in the following article https://learn.microsoft.com/en-us/entra/id-protection/concept-workload-identity-risk.
Simplify Lifecycle Management for Workload Identities
Instead of using and manage secrets for workloads like using in my Console App previously, we can also use managed identities or workload identity federation.
Managed Identities
A common challenge for developers is the management of secrets, credentials, certificates, and keys used to secure communication between services. Managed identities eliminate the need for developers to manage these credentials.
While developers can securely store the secrets in Azure Key Vault, services need a way to access Azure Key Vault. Managed identities provide an automatically managed identity in Microsoft Entra ID for applications to use when connecting to resources that support Microsoft Entra authentication. Applications can use managed identities to obtain Microsoft Entra tokens without having to manage any credentials.
Here are some of the benefits of using managed identities:
- You don’t need to manage credentials. Credentials aren’t even accessible to you.
- You can use managed identities to authenticate to any resource that supports Microsoft Entra authentication, including your own applications.
- Managed identities can be used at no extra cost.
Managed identities for Azure resources is the new name for the service formerly known as Managed Service Identity (MSI).
There are two types of managed identities:
- System-assigned. Some Azure resources, such as virtual machines allow you to enable a managed identity directly on the resource. When you enable a system-assigned managed identity:
- A service principal of a special type is created in Microsoft Entra ID for the identity. The service principal is tied to the lifecycle of that Azure resource. When the Azure resource is deleted, Azure automatically deletes the service principal for you.
- By design, only that Azure resource can use this identity to request tokens from Microsoft Entra ID.
- You authorize the managed identity to have access to one or more services.
- The name of the system-assigned service principal is always the same as the name of the Azure resource it is created for. For a deployment slot, the name of its system-assigned identity is <app-name>/slots/<slot-name>.
- User-assigned. You may also create a managed identity as a standalone Azure resource. You can create a user-assigned managed identity and assign it to one or more Azure Resources. When you enable a user-assigned managed identity:
- A service principal of a special type is created in Microsoft Entra ID for the identity. The service principal is managed separately from the resources that use it.
- User-assigned identities can be used by multiple resources.
- You authorize the managed identity to have access to one or more services.
Source: https://learn.microsoft.com/en-us/entra/identity/managed-identities-azure-resources/overview
Using a user-assigned Managed Identity for our Console App to access Azure Resources
Unfortunately our ConsoleApp1 cannot use a user-assigned managed identity if running on a host outside of Azure like in on-premises. In order to use a managed identity, our ConsoleApp1 must be running on a Azure host like a virtual machine in Azure, Azure functions or within the Azure App service.
In general, you cannot use a Managed Identity (both system assigned or user assigned) outside of Azure. They can only be used with resources running in Azure. This will also reflect the new name Managed identities for Azure resources (formerly Managed Service Identity (MSI).
To authenticate workloads running outside of Azure, you will need to register your App under App registrations in Microsoft Entra ID (this will create a corresponding service principal) and create either certificates or client secrets for in order the workload can prove its identity when requesting an access token for the Azure resource it wants to access.
How to use client secrets for the workloads (our ConsoleApp1) outside of Azure we already saw previously.
Below I will demonstrate how we can use a user-assigned managed identity or system-assigned managed identity in case our ConsoleApp1 is running on a virtual machine in Azure. Actually therefore a system-assigned managed identity is more suitable.
Use a System-assigned managed identity in case:
- Workloads contained within a single Azure resource. (My Console App1 running on a single virtual machine in Azure)
- Workloads needing independent identities. For example, an application that runs on a single virtual machine.
Use a user-assigned managed identity in case:
- Workloads that run on multiple resources and can share a single identity.
- Workloads needing pre-authorization to a secure resource, as part of a provisioning flow.
- Workloads where resources are recycled frequently, but permissions should stay consistent.
For example, a workload where multiple virtual machines need to access the same resource.
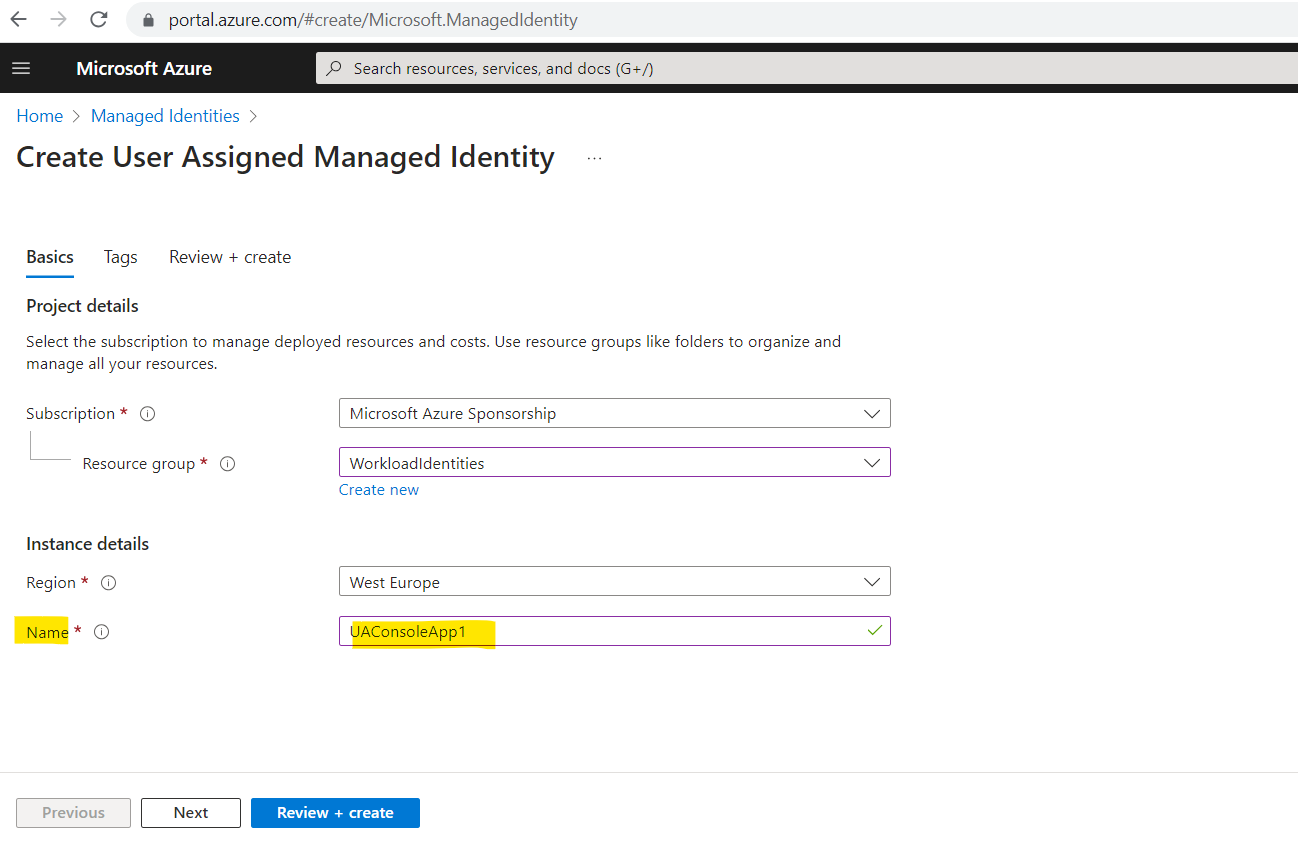
So now I will first create a new user-assigned managed identity to use it for my ConsoleApp1 (workload) running on a virtual machine in Azure.
In the Azure portal search for managed identity.
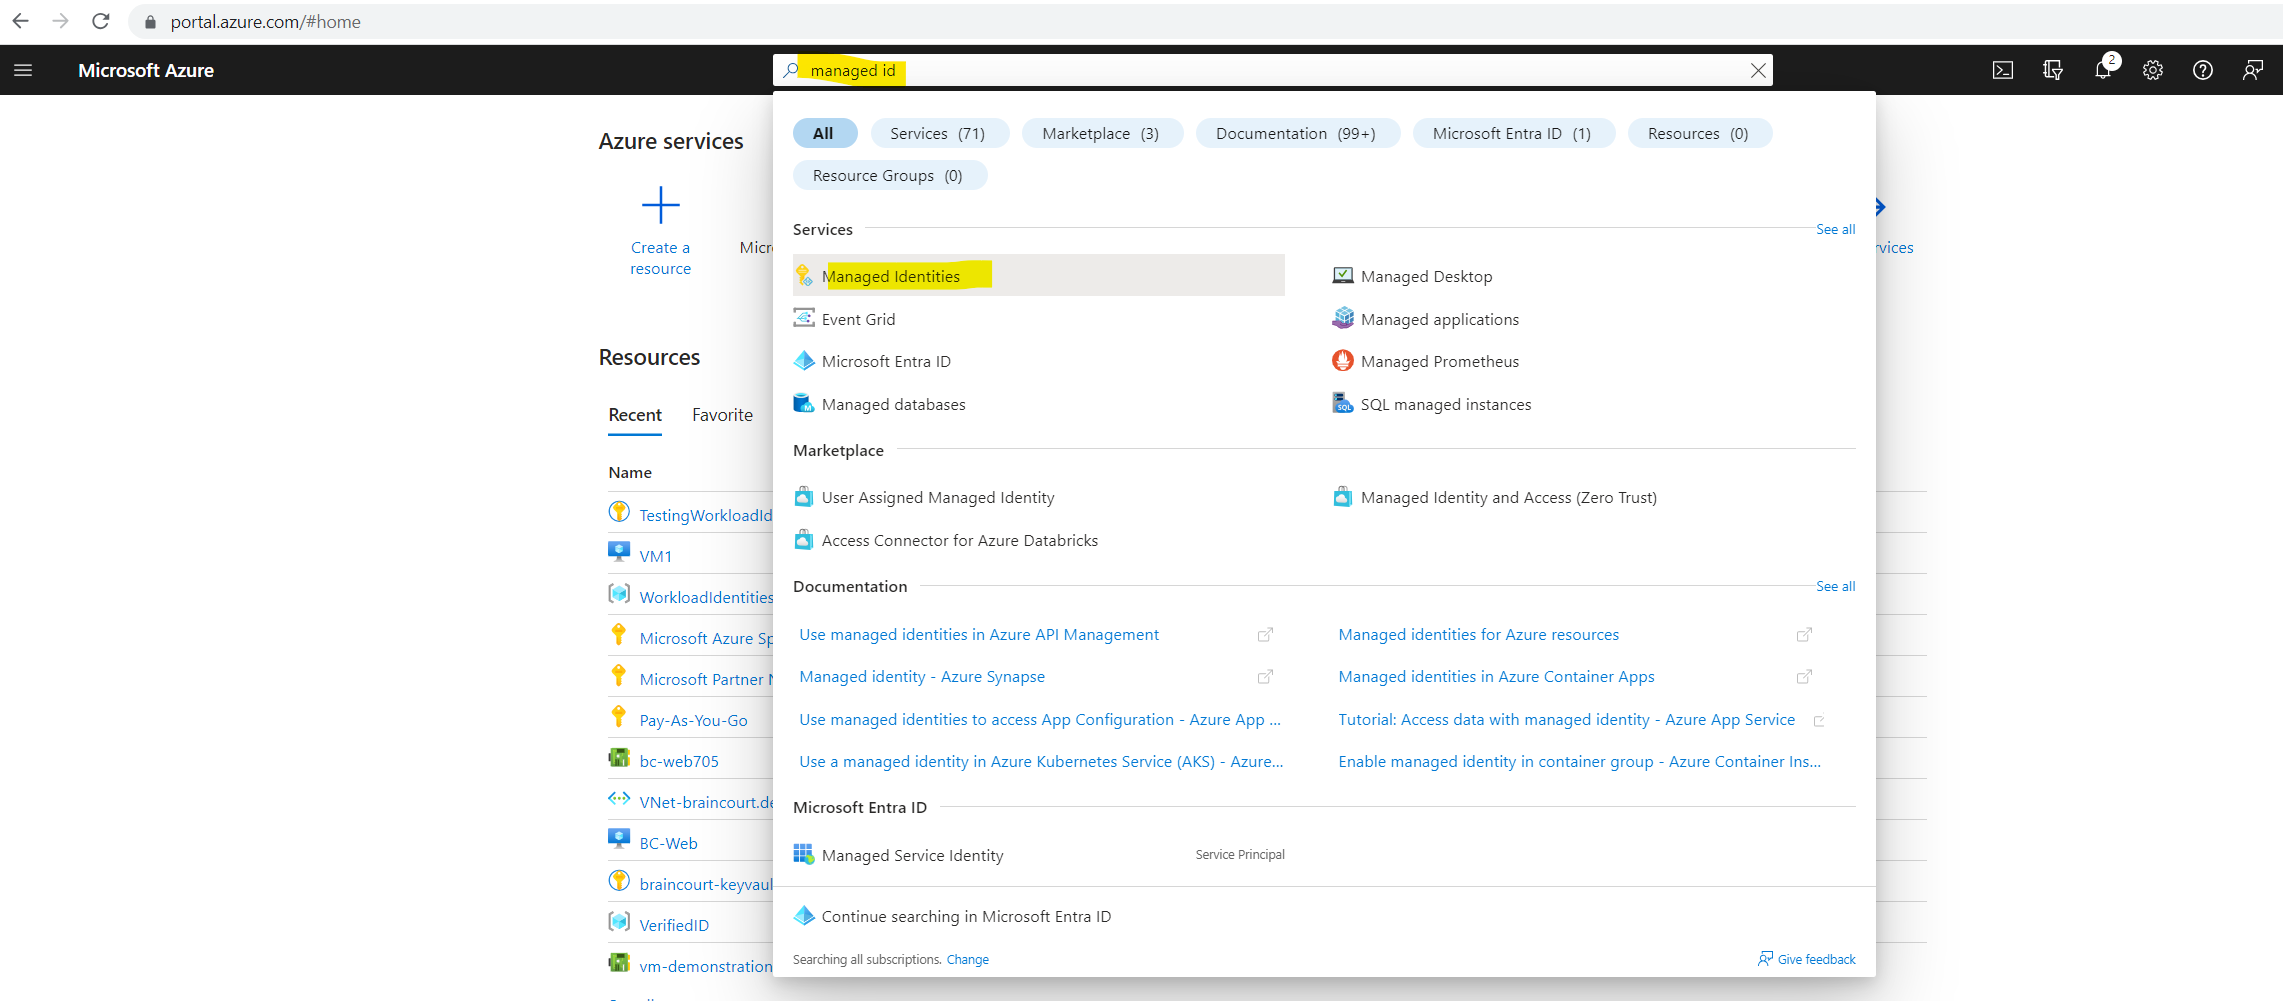
Within the Managed Identities blade click on Create to create a new user-assigned managed identity.
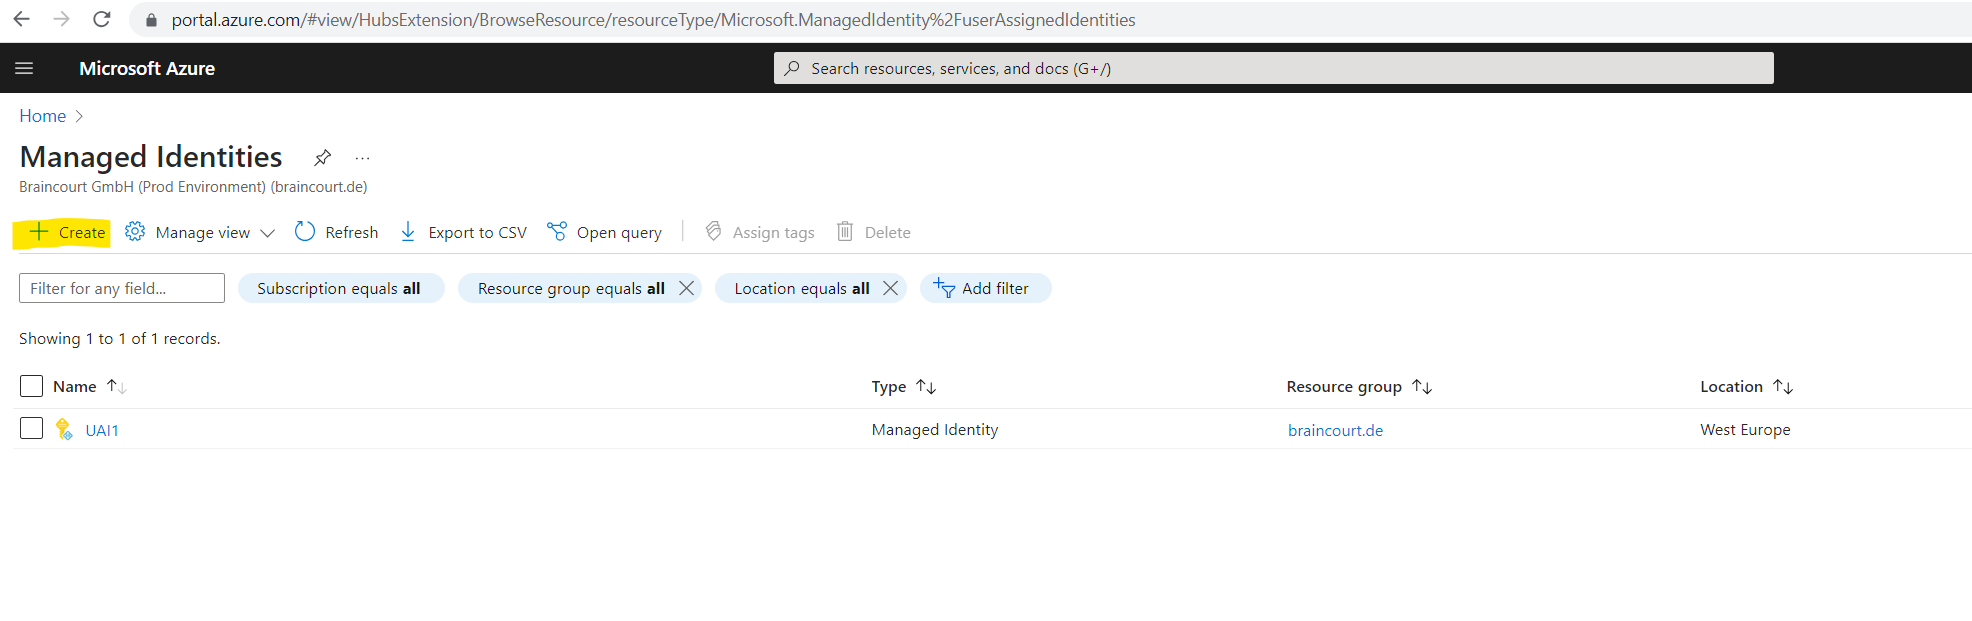
I will use UAConsoleApp1 for the name of my new user-assigned managed identity.
I will use this managed identity just for my ConsoleApp1 but in general a user-assigned managed identity can be used by multiple resources.

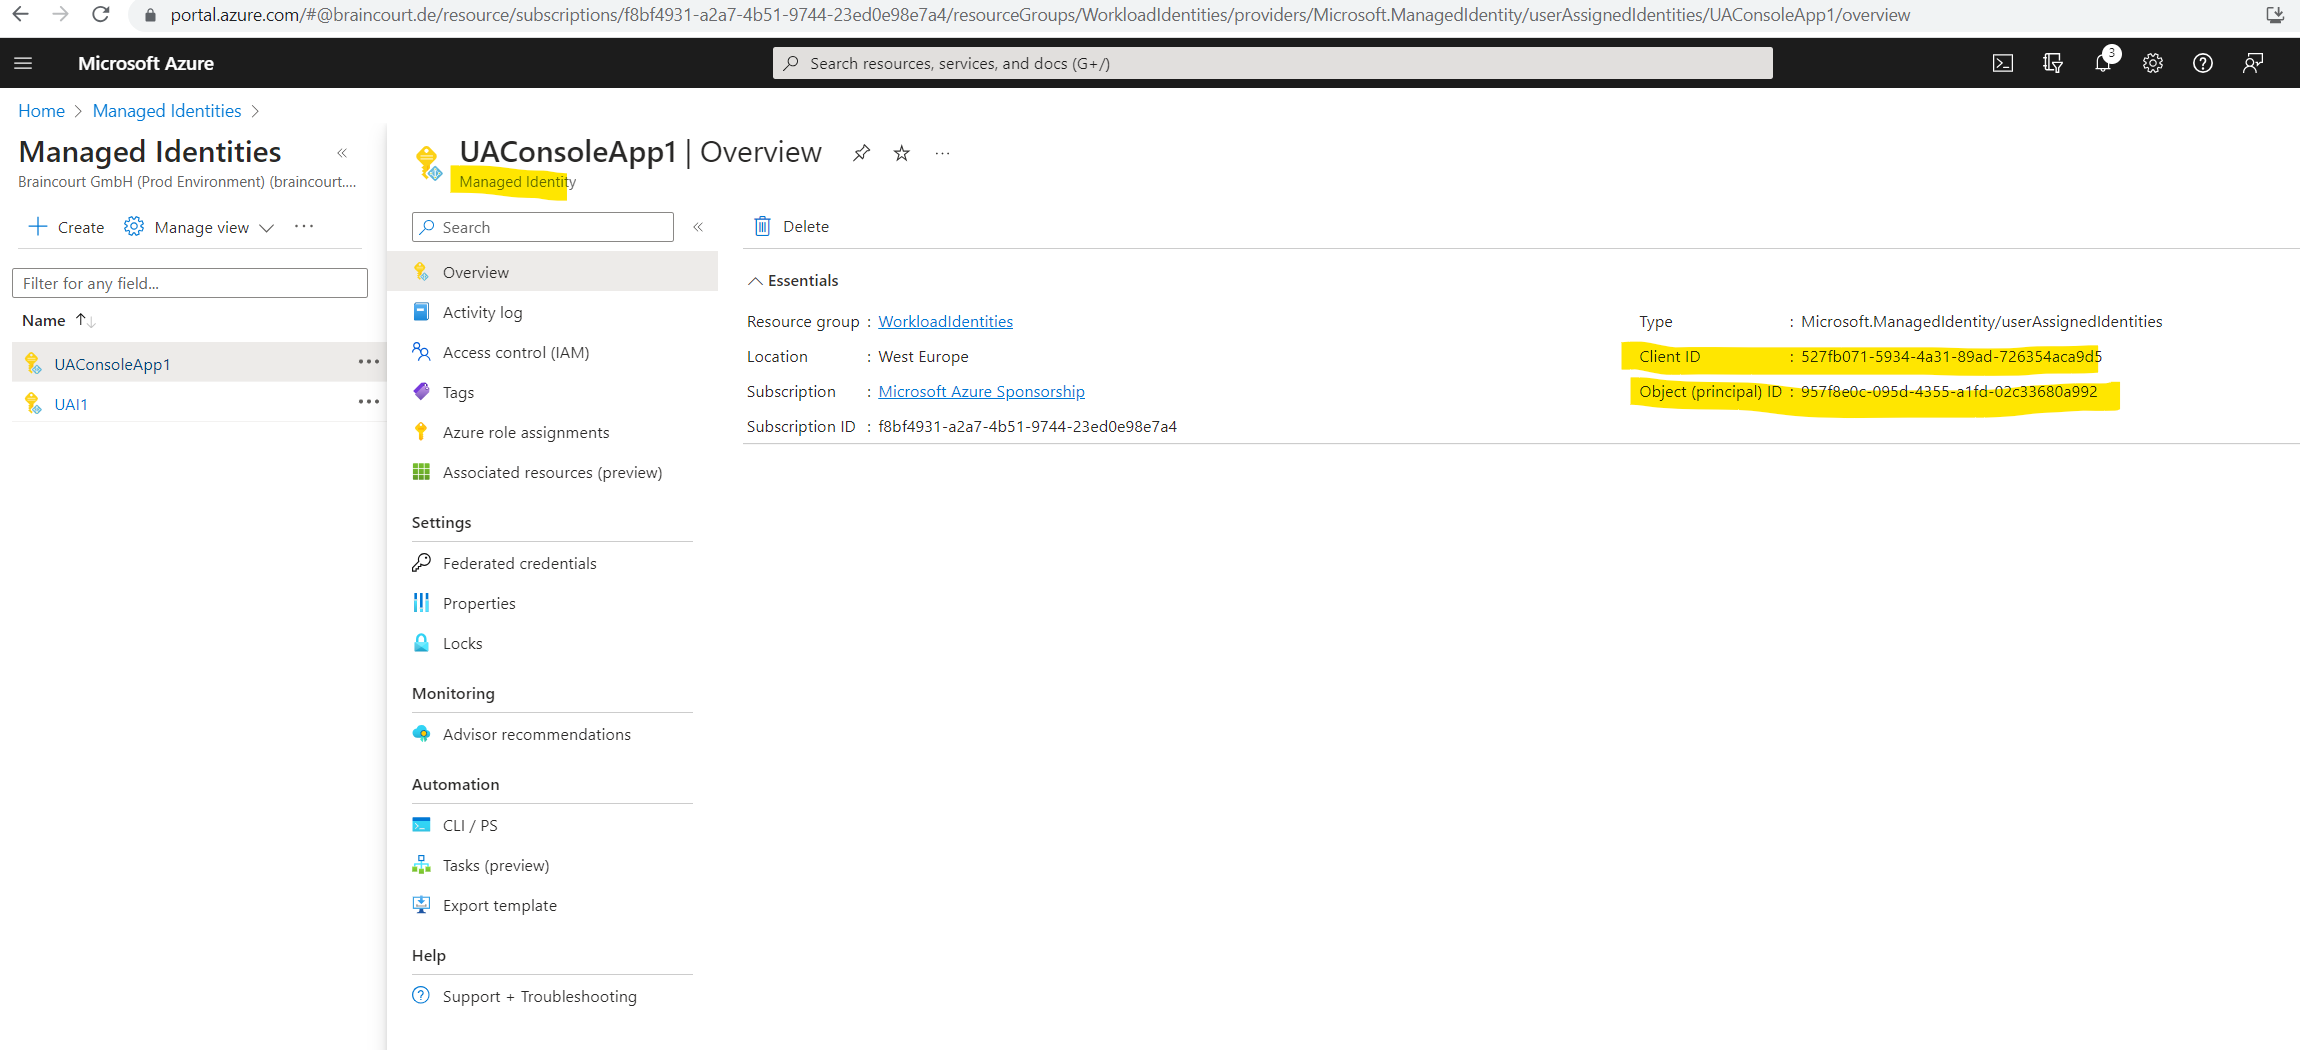
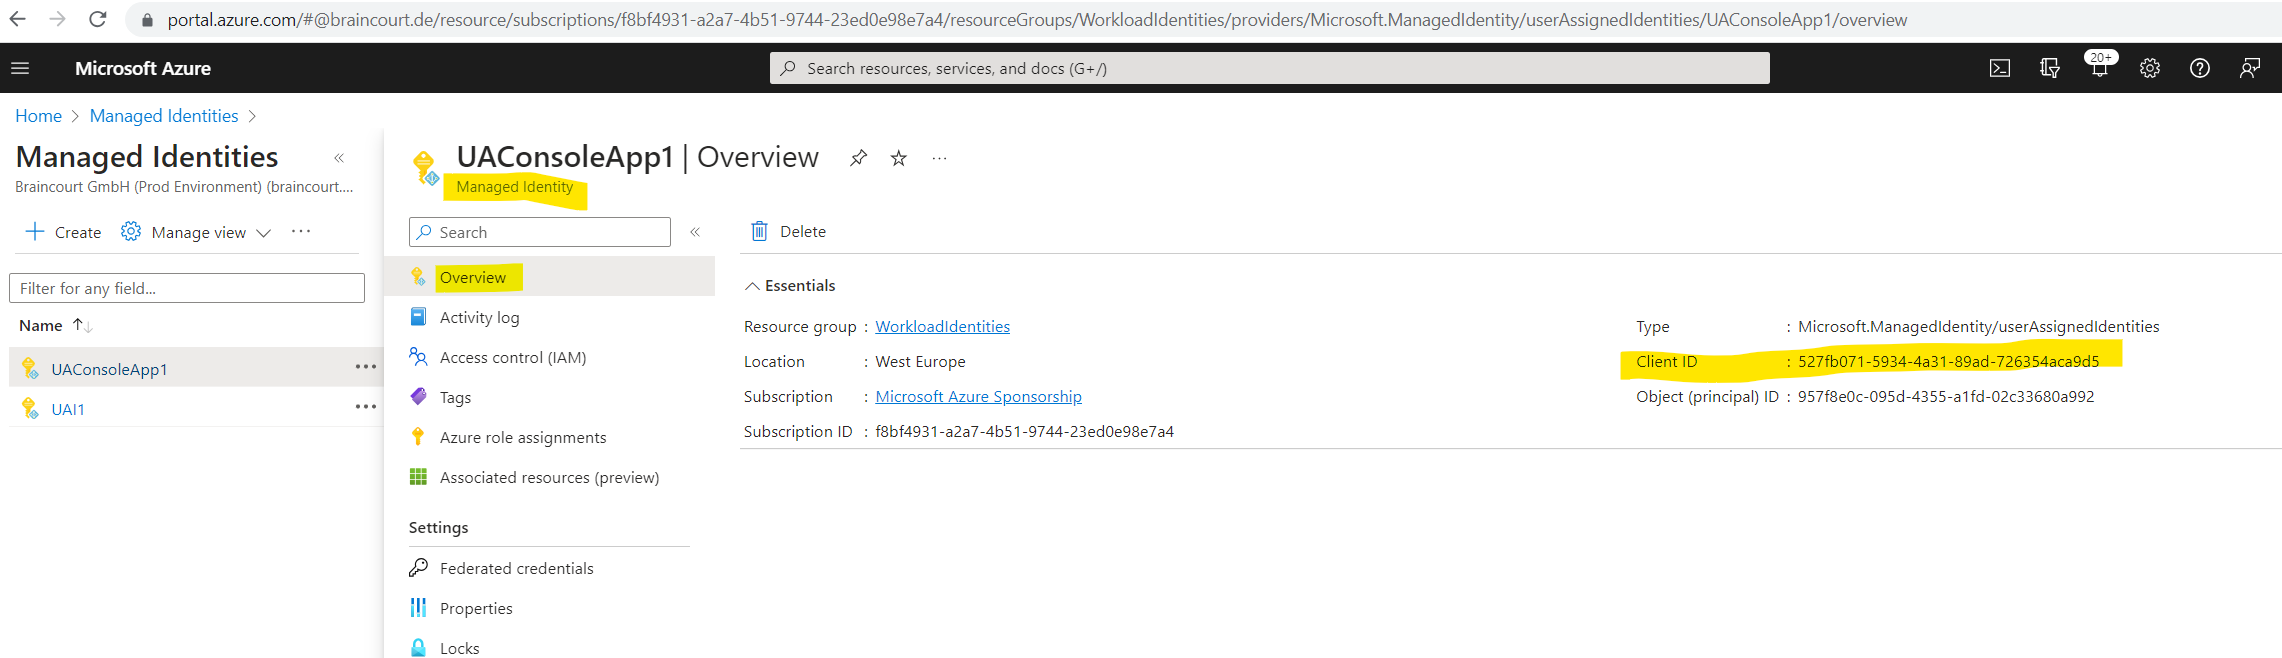
The new user-assigned managed identity is finally nothing else than a service principal object in Azure which have also an Object ID and Client ID like Enterprise applications.
You can also read the following interesting article about Service Principals vs. Managed Identities.
Demystifying Service Principals – Managed Identities
https://devblogs.microsoft.com/devops/demystifying-service-principals-managed-identities/
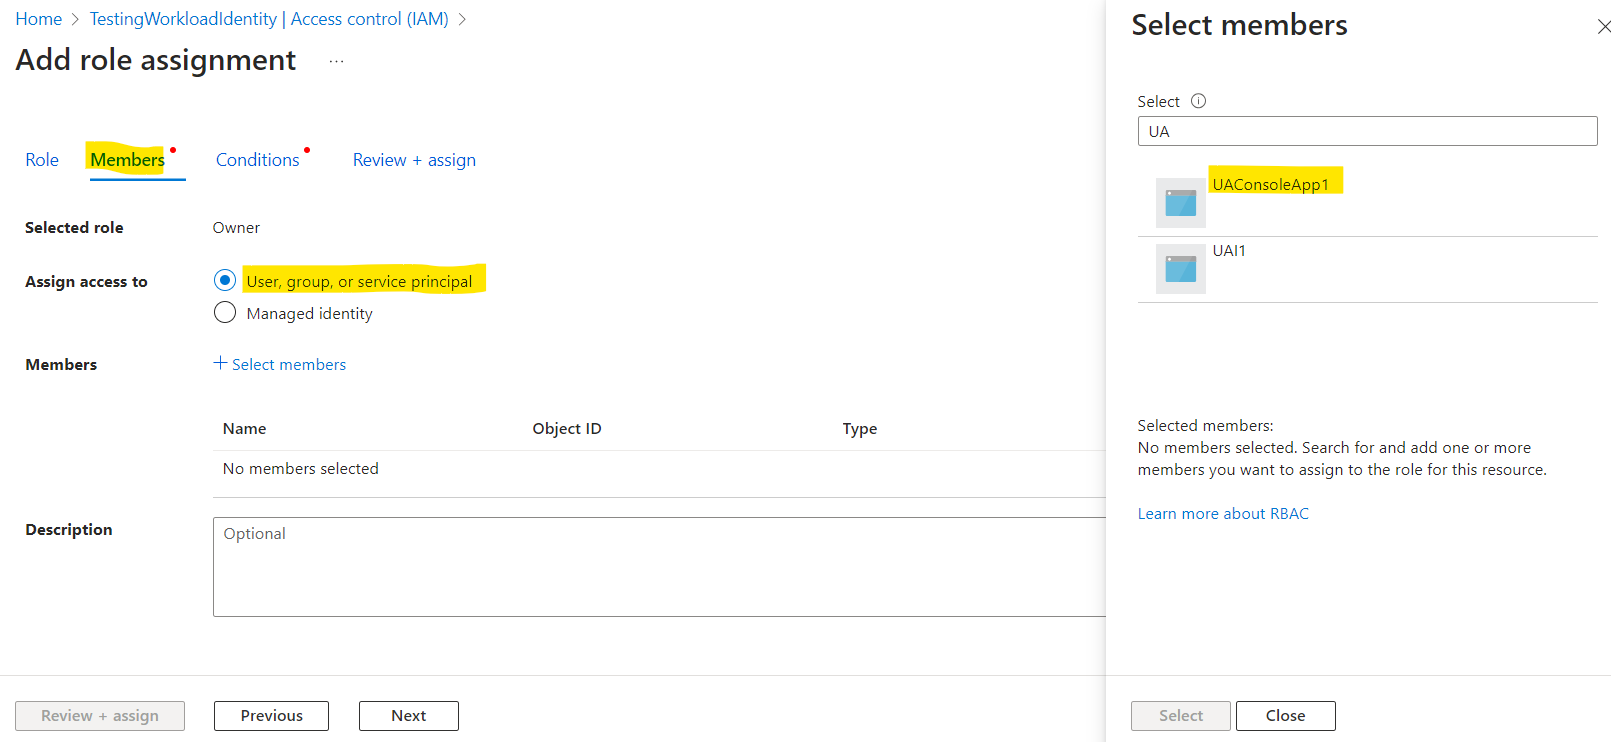
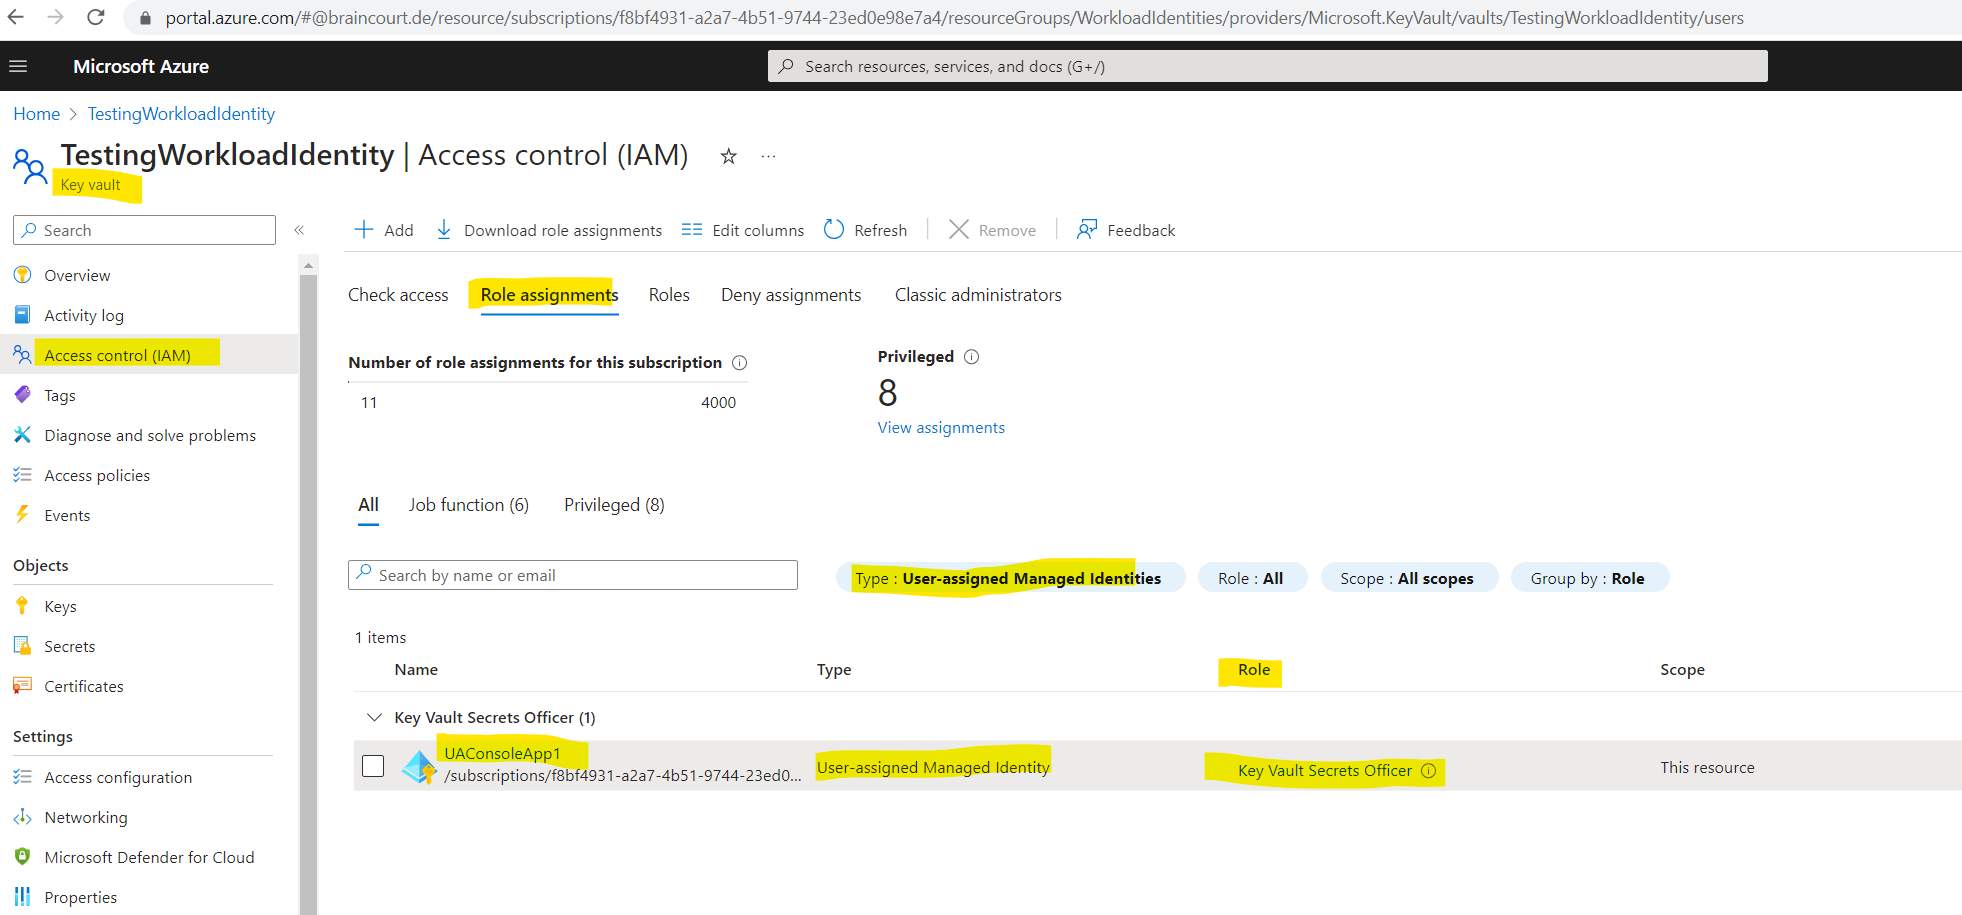
Now I will assign permissions to the managed identity to have access to my key vault. Therefore I will have to go to my key vault and its Access control (IAM) blade to add a new role assignment.
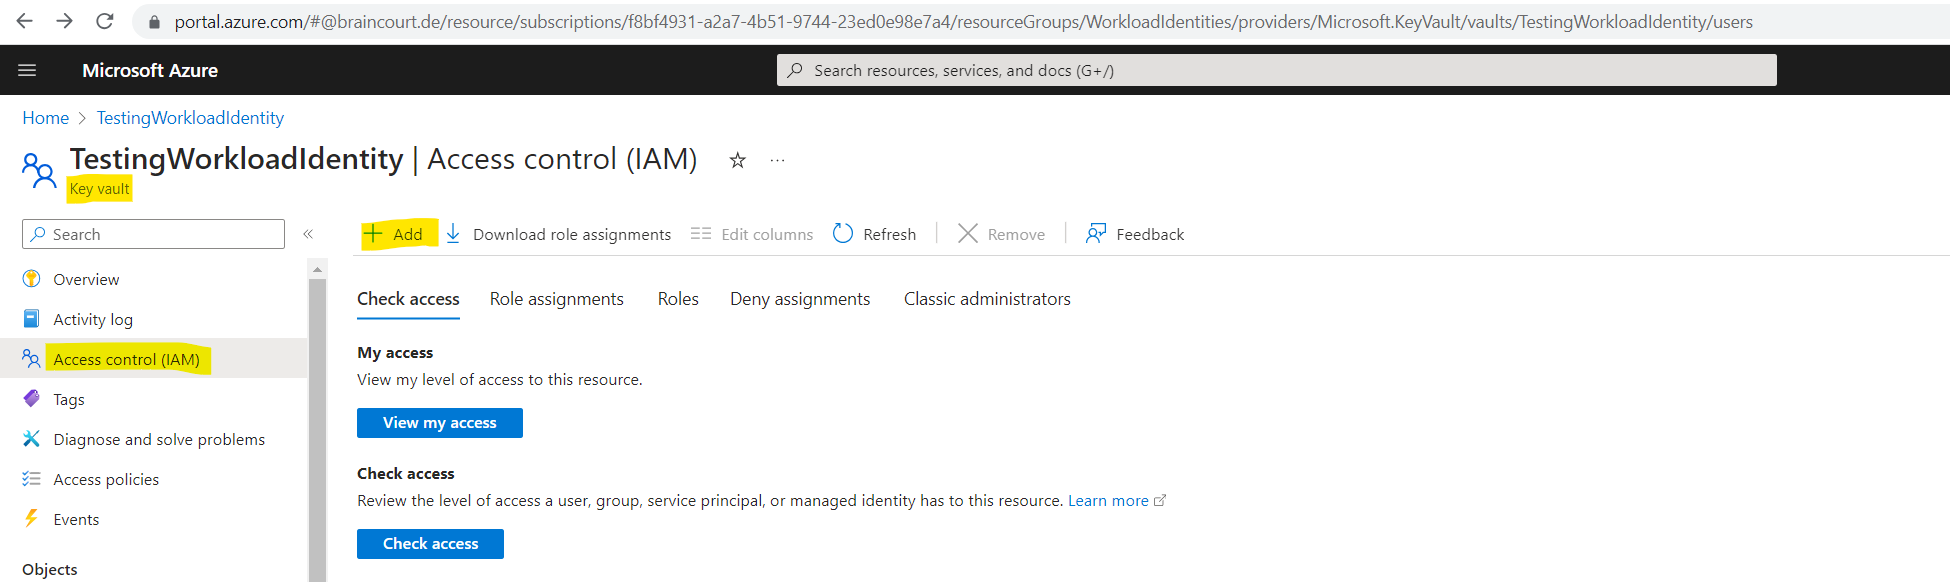
For a key vault in Azure you can use either Azure role-based access control which is recommended by Microsoft or you can also use access policies. By default the permission model is set to Azure role-based access control as shown below. Under Access configuration in the Settings section you can switch between these two permission models.
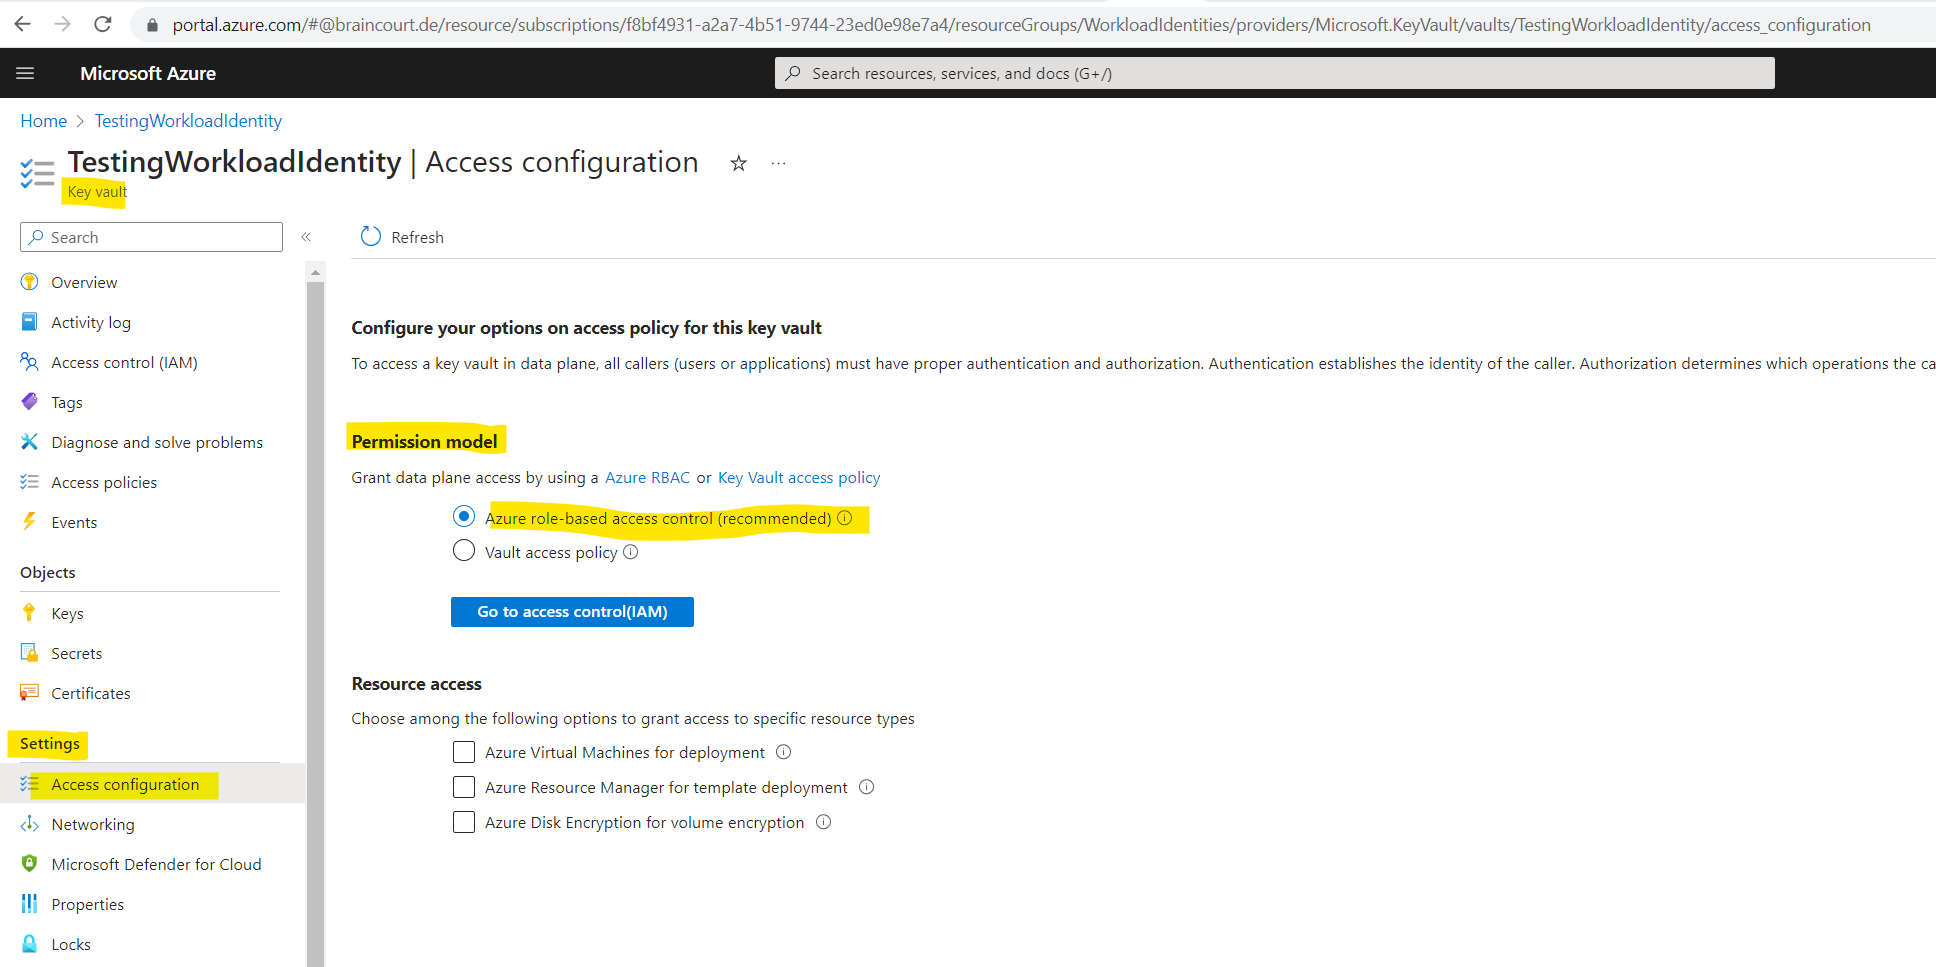
For the role I will assign the Key Vault Secrets Officer role to my managed identity in order to access the data plane and to create and read secrets.
!!! Note !!!
The Key Vault Contributor role is for management plane operations only to manage key vaults. It does not allow access to keys, secrets and certificates.Key Vault Secrets Officer -> Perform any action on the secrets of a key vault, except manage permissions.
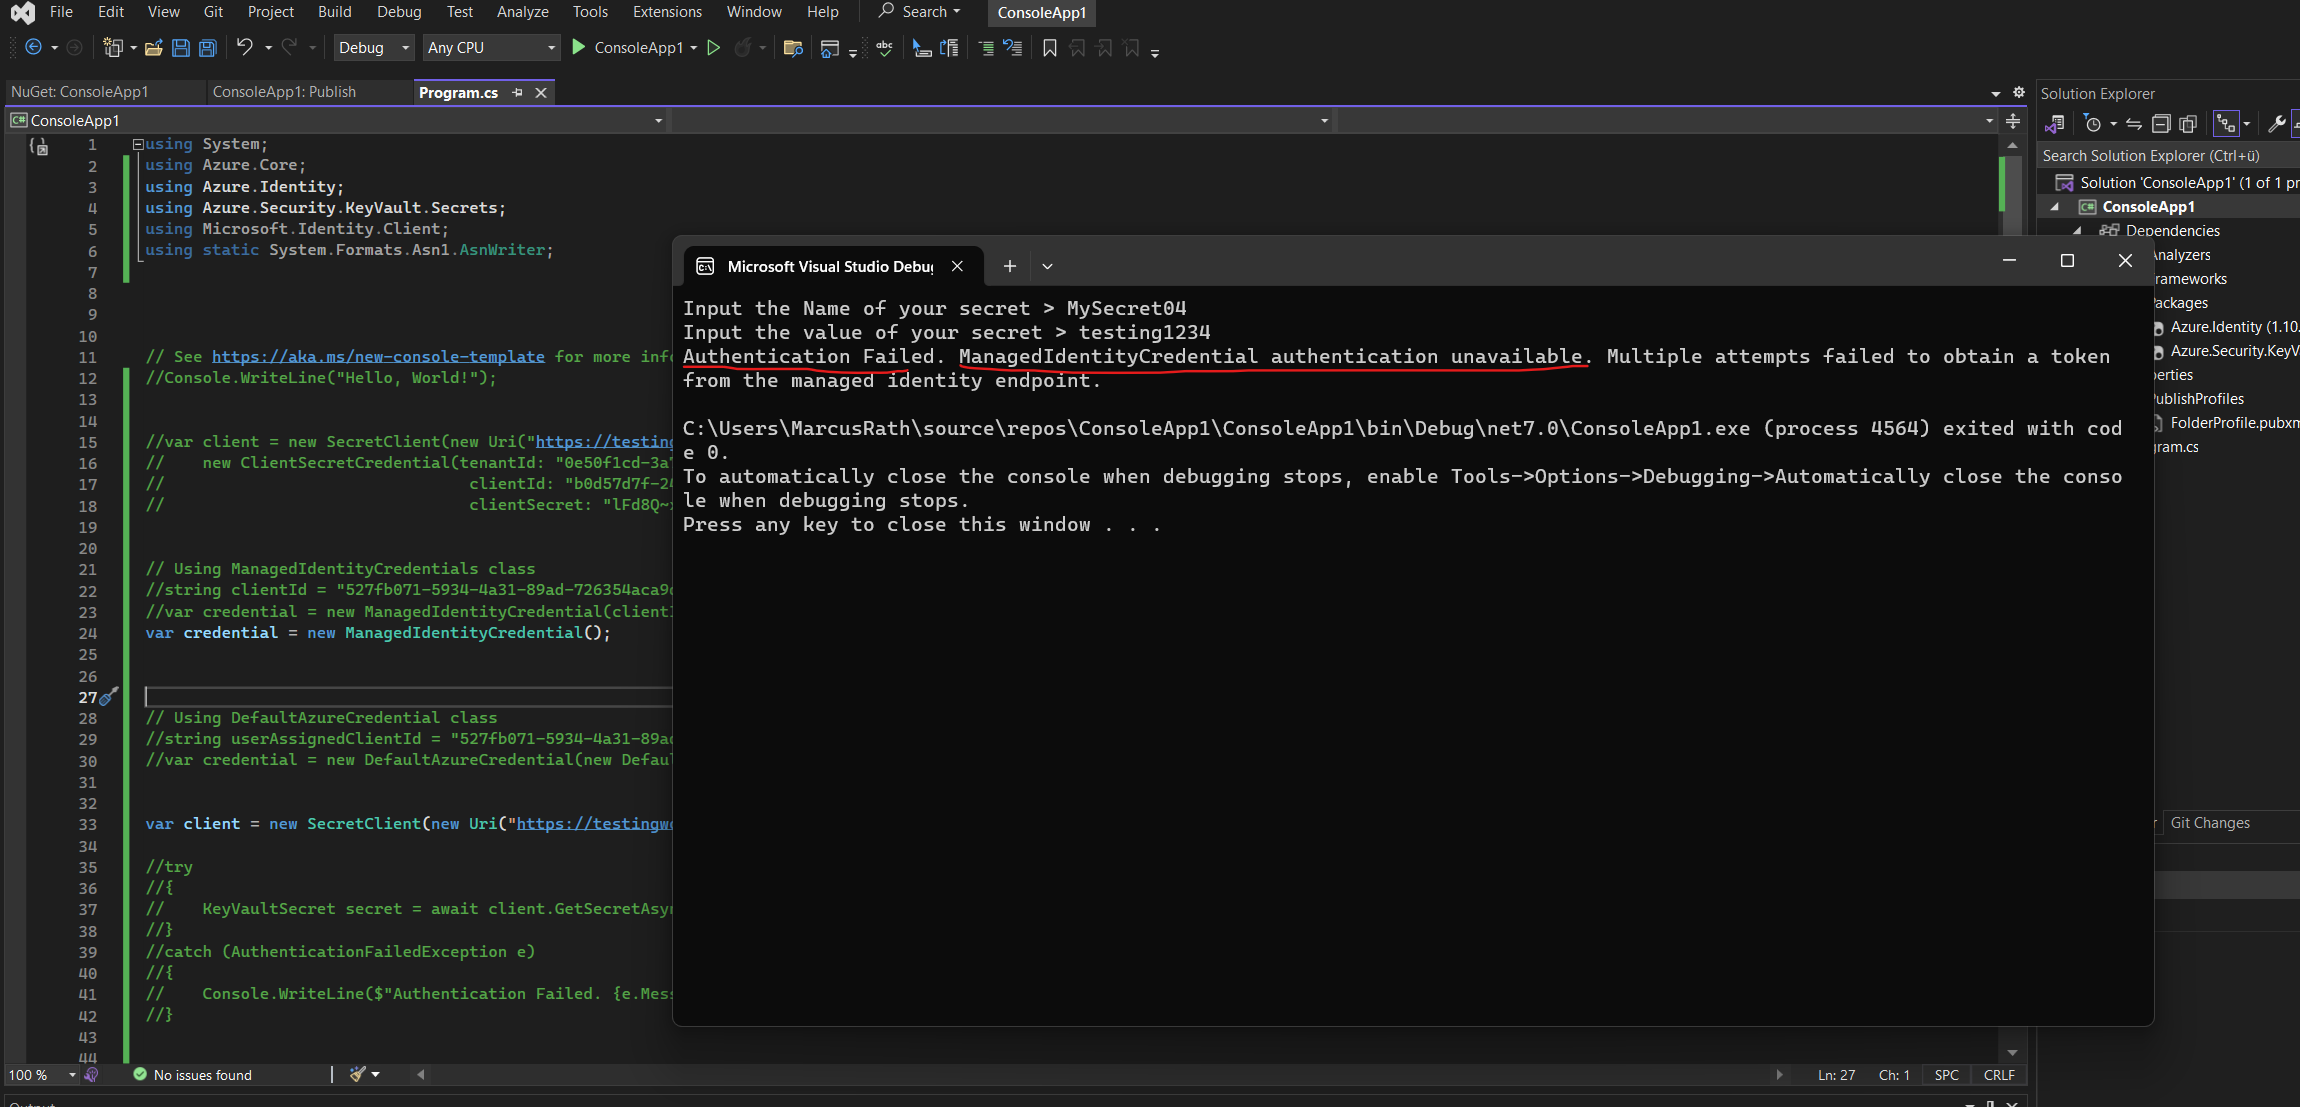
We also need to assign the user-assigned managed identity to our virtual machine in Azure where our ConsoleApp1 (workload) is running. If not the application will run into the following error.
Authentication Failed. ManagedIdentityCredential authentication unavailable. The requested identity has not been assigned to this resource.
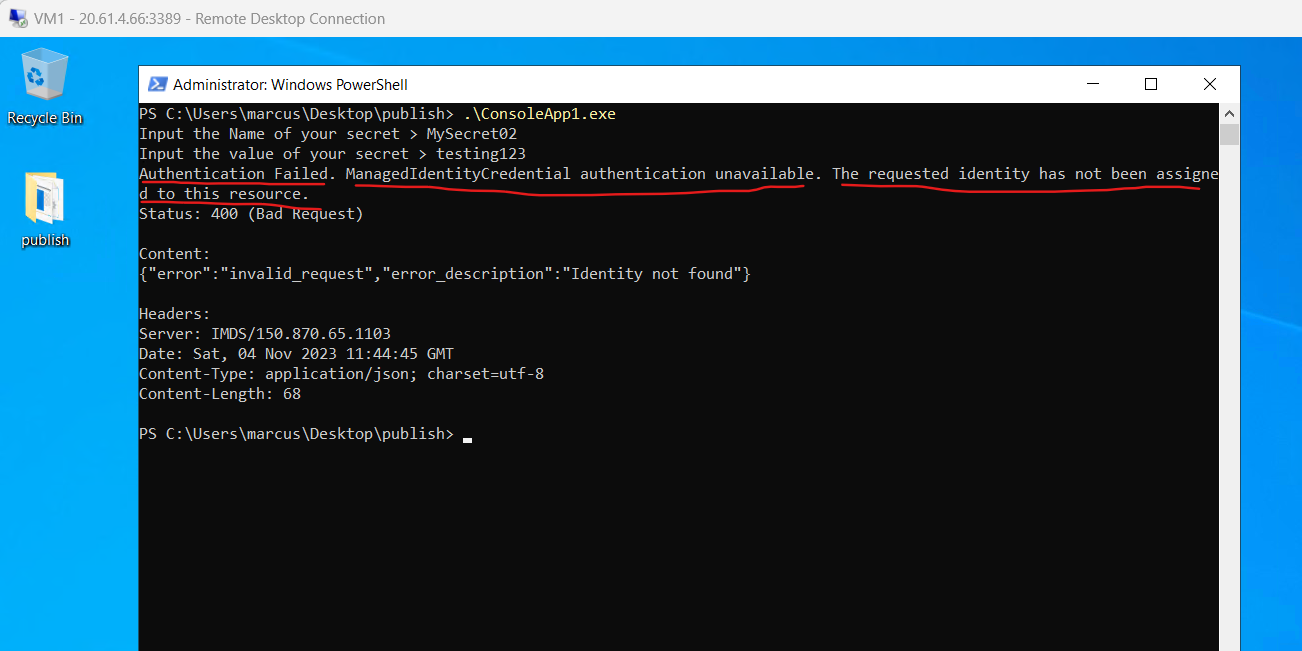
So I will also have to assign my user-assigned managed identity to the virtual machine where my ConsoleApp1 (workload) is running.
Go to your virtual machine -> Identity -> User assigned and select your user-assigned managed identity.
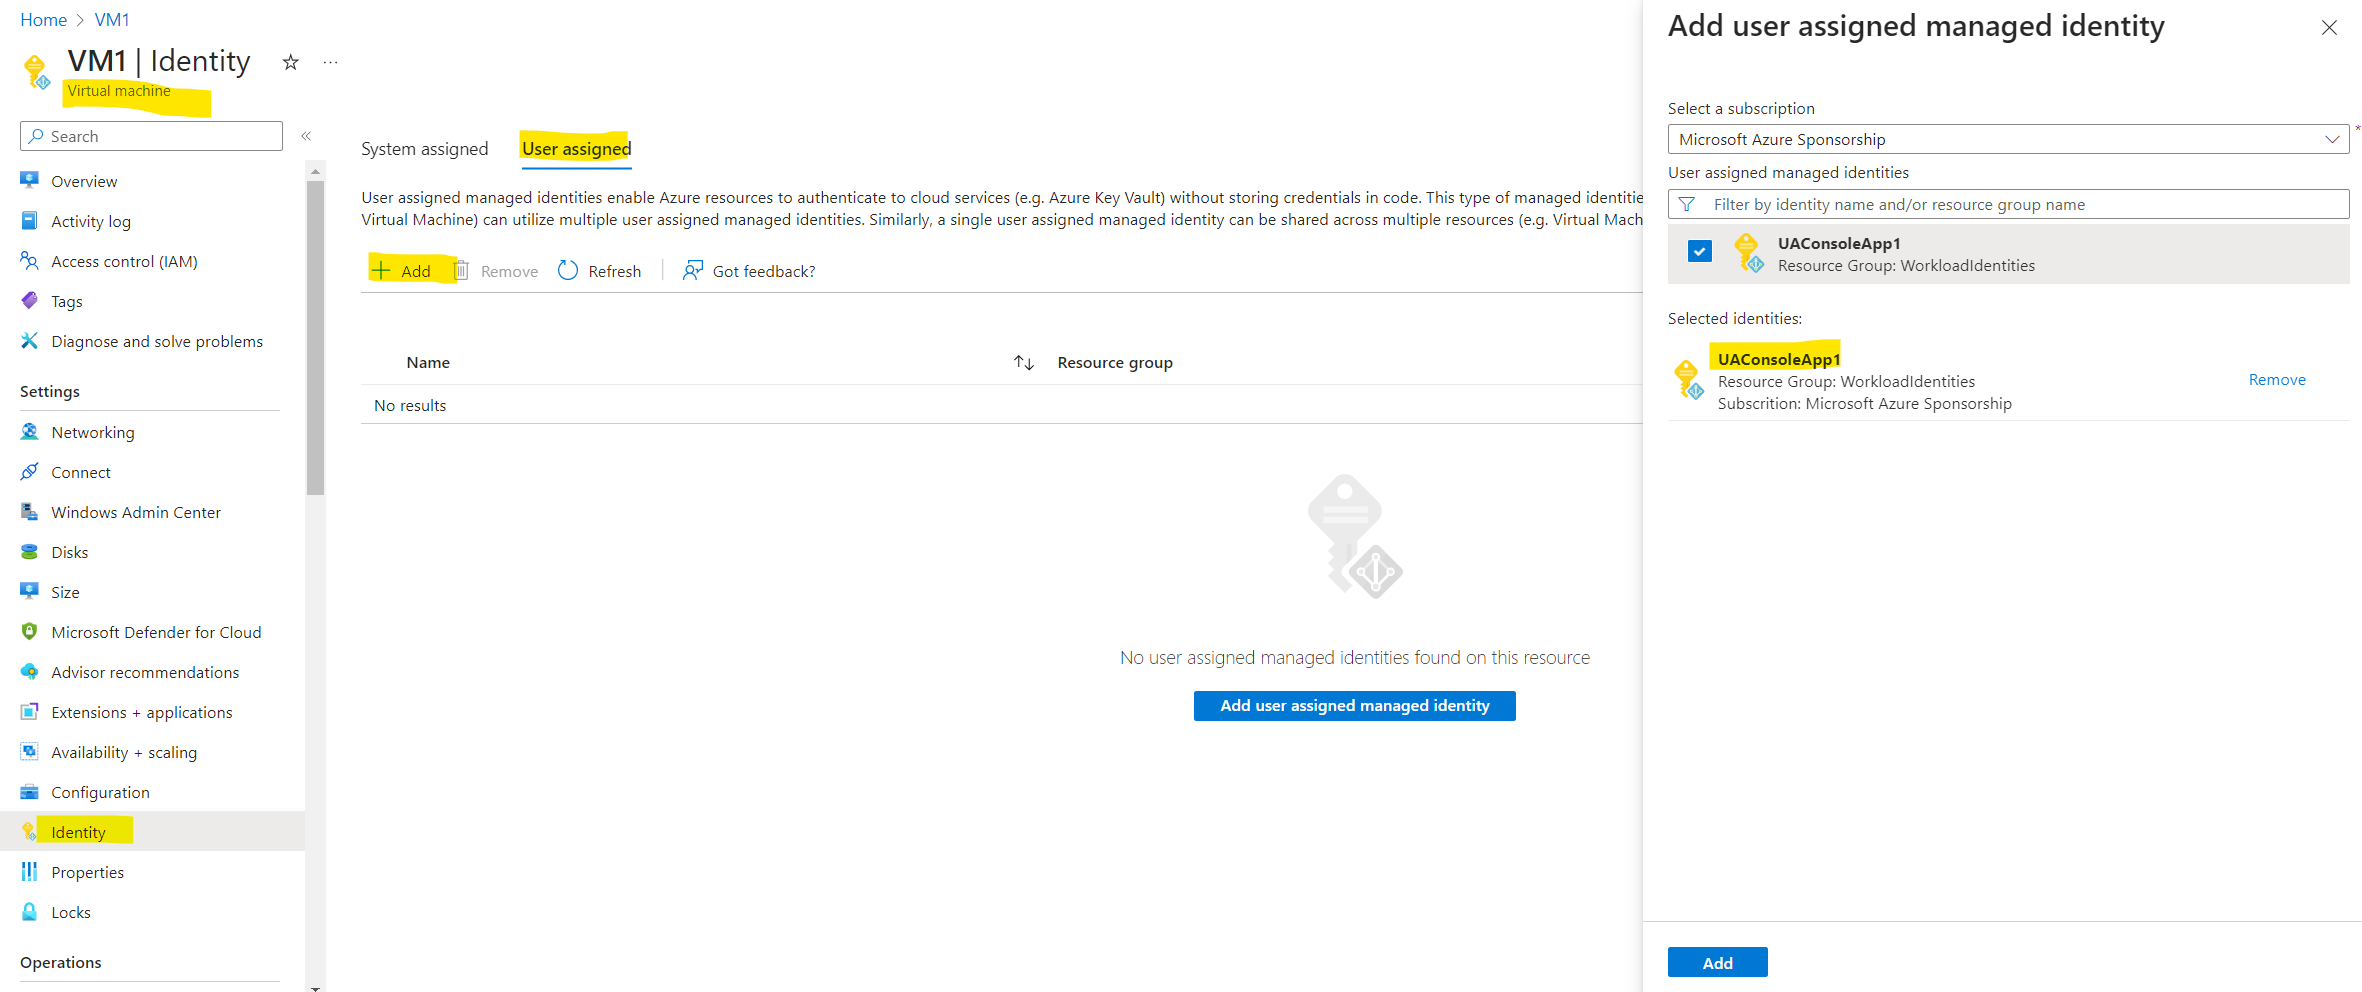
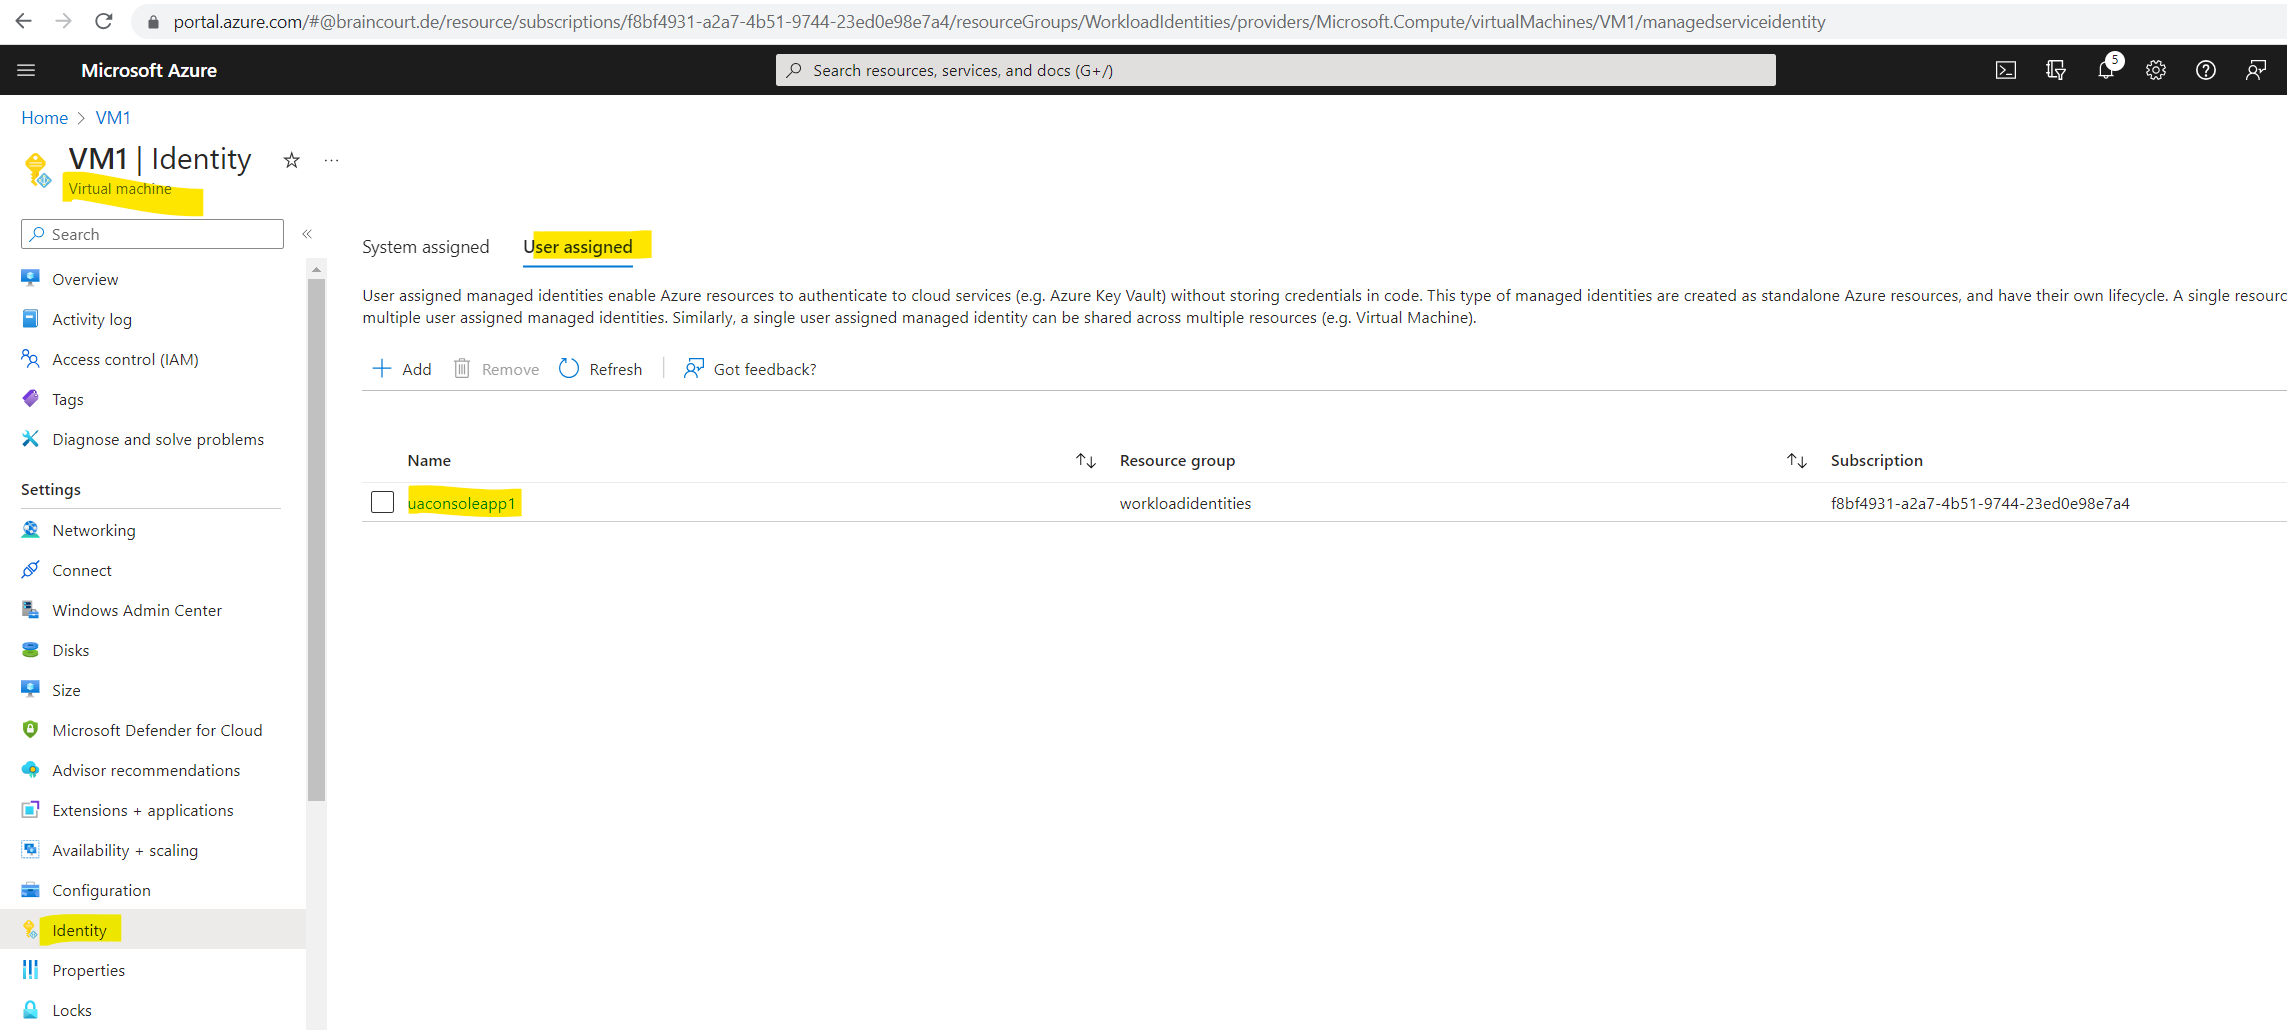
From now on I can use the managed identity to access my key vault. Therefore I will go back to my ConsoleApp1 and adjust the code to use this new user-assigned managed identity to access the key vault.
I just have to replace the ClientSecretCredentials class with the ManagedIdentityCredential class like shown below. For the new class I just have to submit the Client ID from the managed identity.
using System;
using Azure.Identity;
using Azure.Security.KeyVault.Secrets;
//var client = new SecretClient(new Uri("https://testingworkloadidentity.vault.azure.net/"),
// new ClientSecretCredential(tenantId: "0e50f1cd-3a75-4920-a87b-89b07e1ea4b8",
// clientId: "b0d57d7f-24b1-401e-8d07-c7a84ea69efb",
// clientSecret: "lFd8Q~xms4wCGPEd-lVBSFW2JJ0A_D.E2x7.qc_h"));
string clientId = "527fb071-5934-4a31-89ad-726354aca9d5";
var credential = new ManagedIdentityCredential(clientId, null);
var client = new SecretClient(new Uri("https://testingworkloadidentity.vault.azure.net/"), credential);
Console.Write("Input the Name of your secret > ");
var secretName = Console.ReadLine();
Console.Write("Input the value of your secret > ");
var secretValue = Console.ReadLine();
try
{
await client.SetSecretAsync(secretName, secretValue);
Console.WriteLine(" done.");
}
catch (AuthenticationFailedException e)
{
Console.WriteLine($"Authentication Failed. {e.Message}");
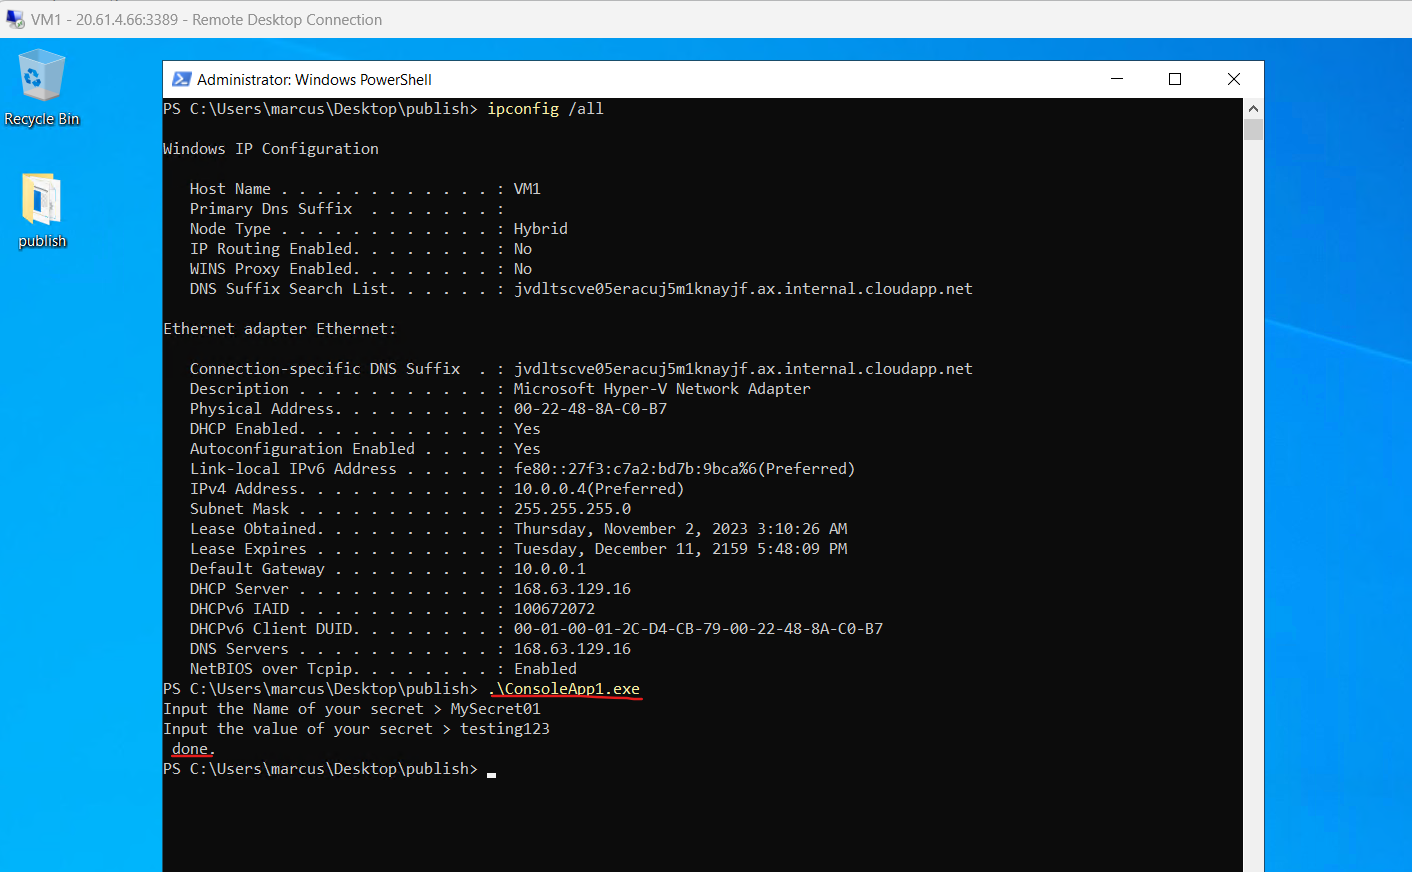
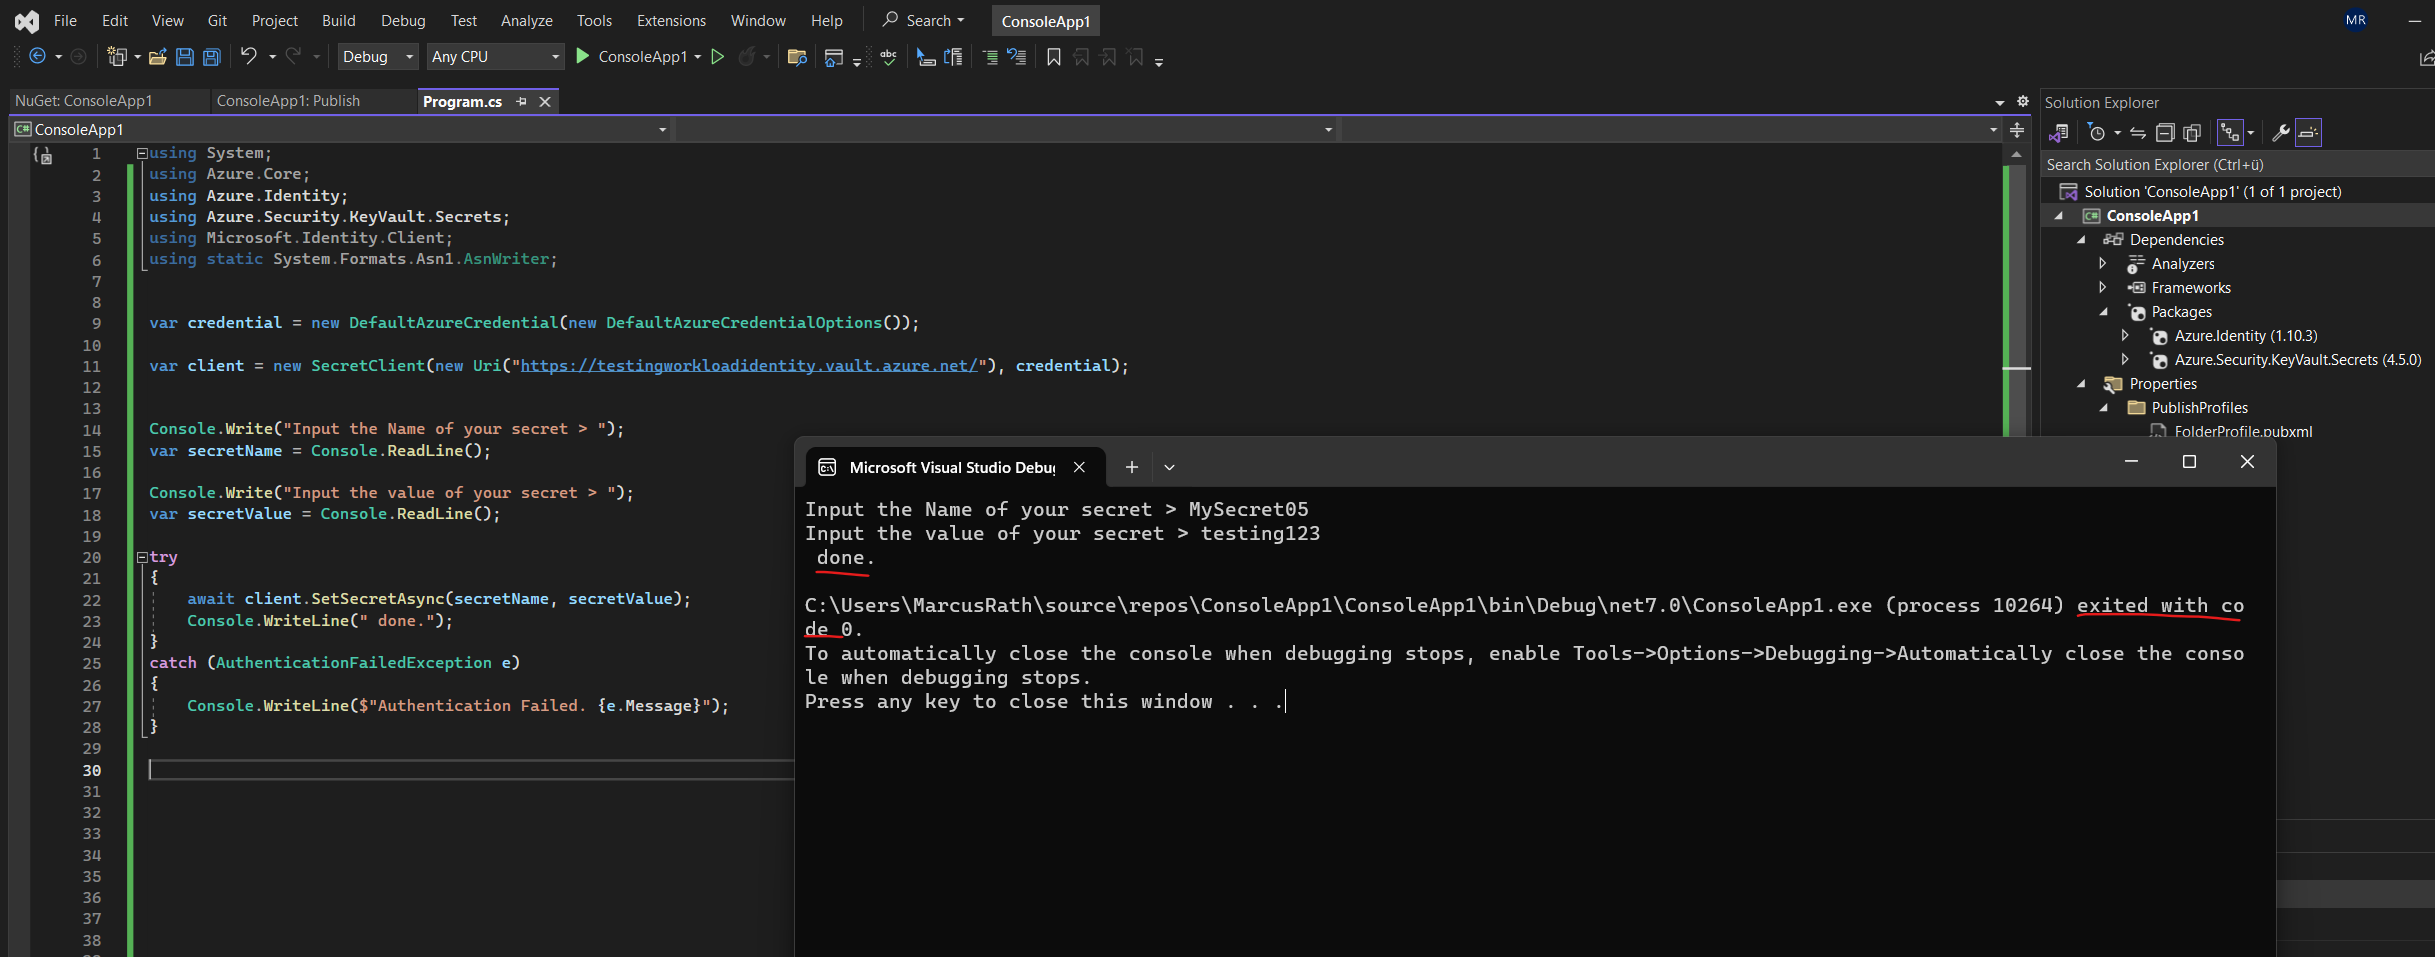
}Finally I will publish the ConsoleApp1 on a virtual machine in Azure. In order to demonstrate workload identities I will just copy the publish folder from Visual Studio to my virtual machine in Azure.
Now I will run the app to create a new secret in my key vault and to see which authentication the app was using to access the key vault.
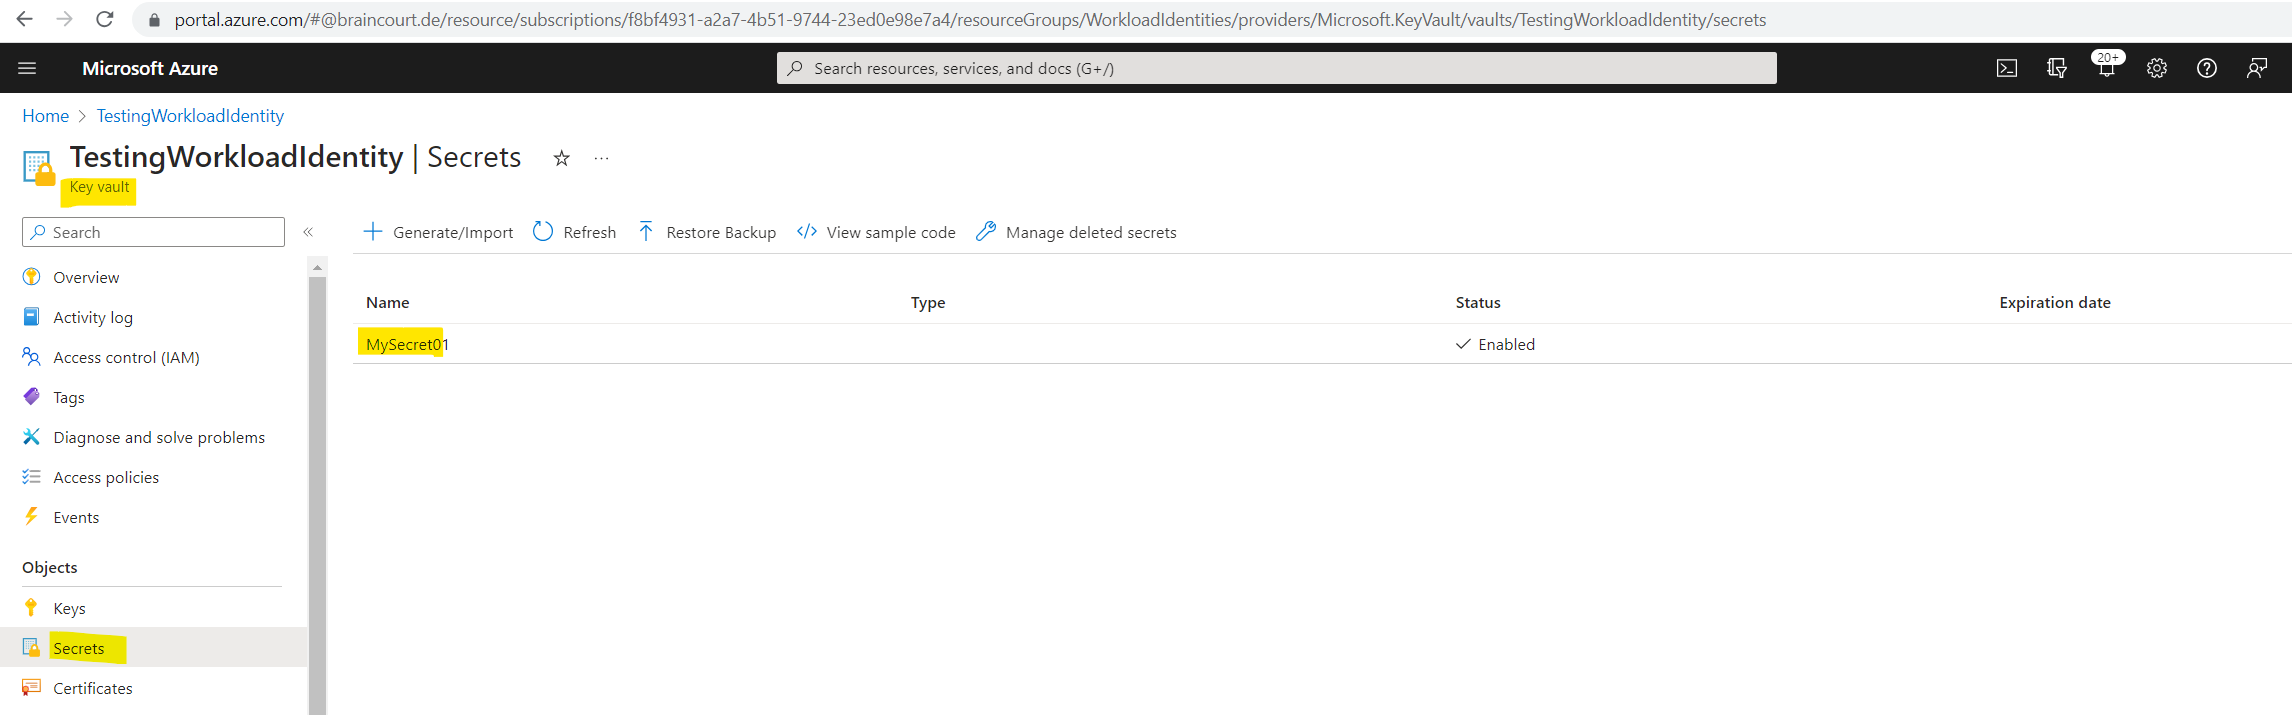
Here you can see the created secret in the key vault by my ConsoleApp1.
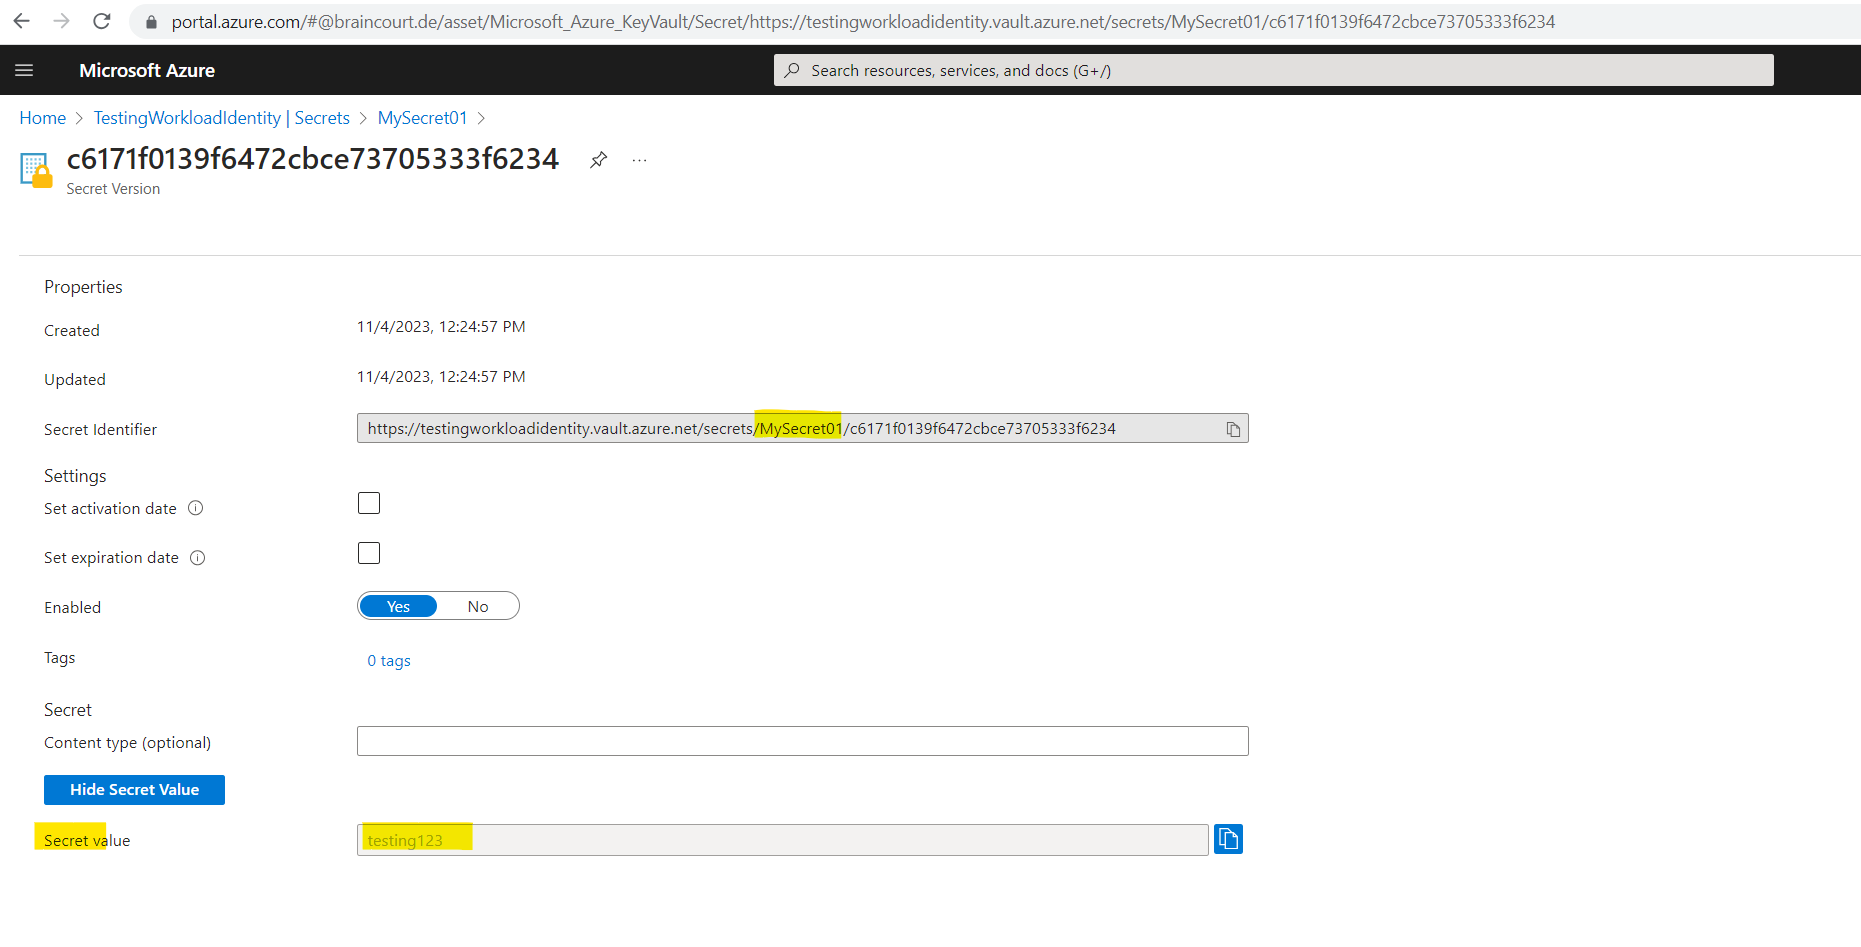
When clicking above on the secret you will also see the value of the secret in the Azure portal.
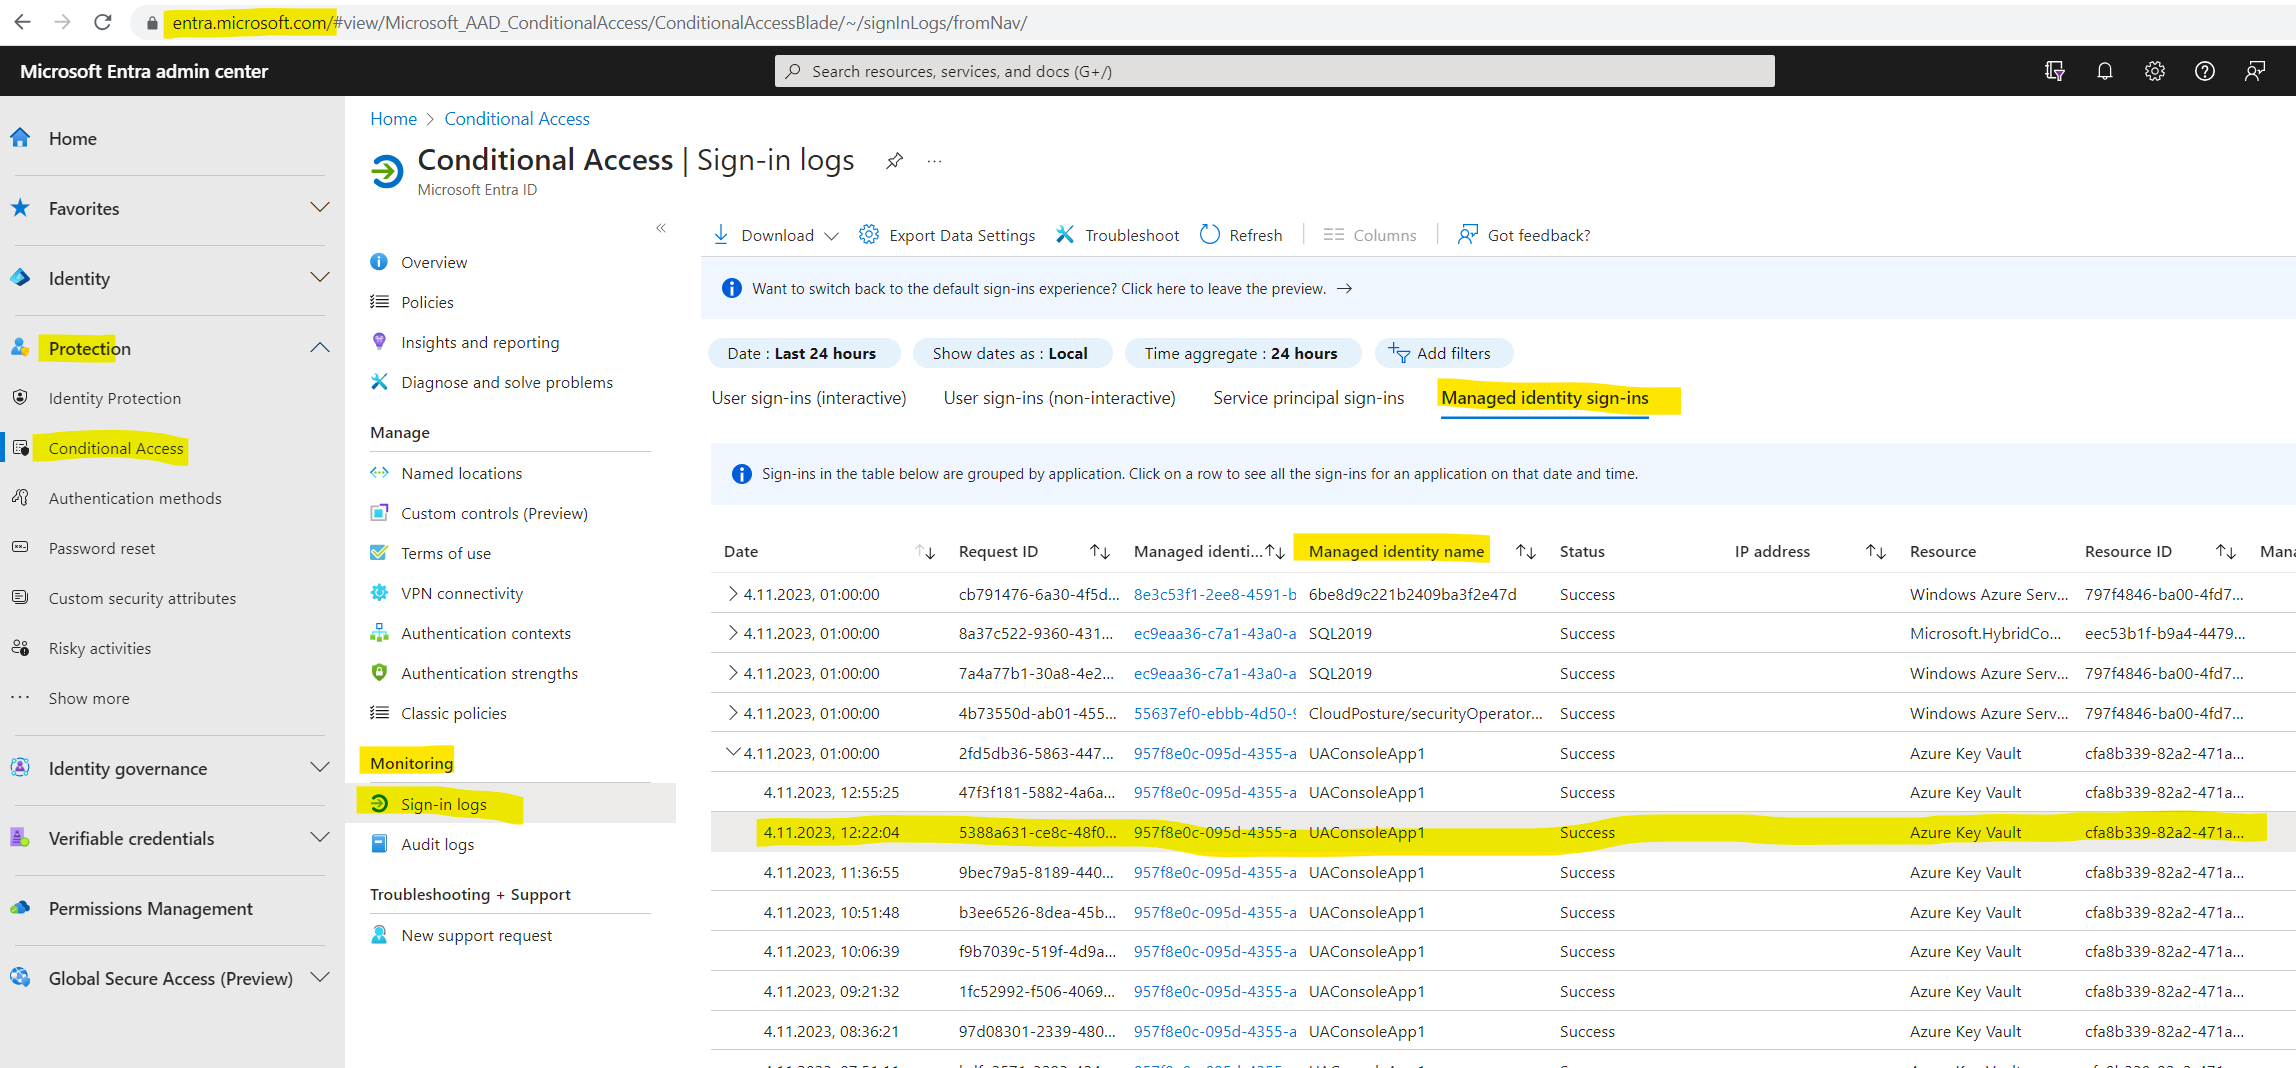
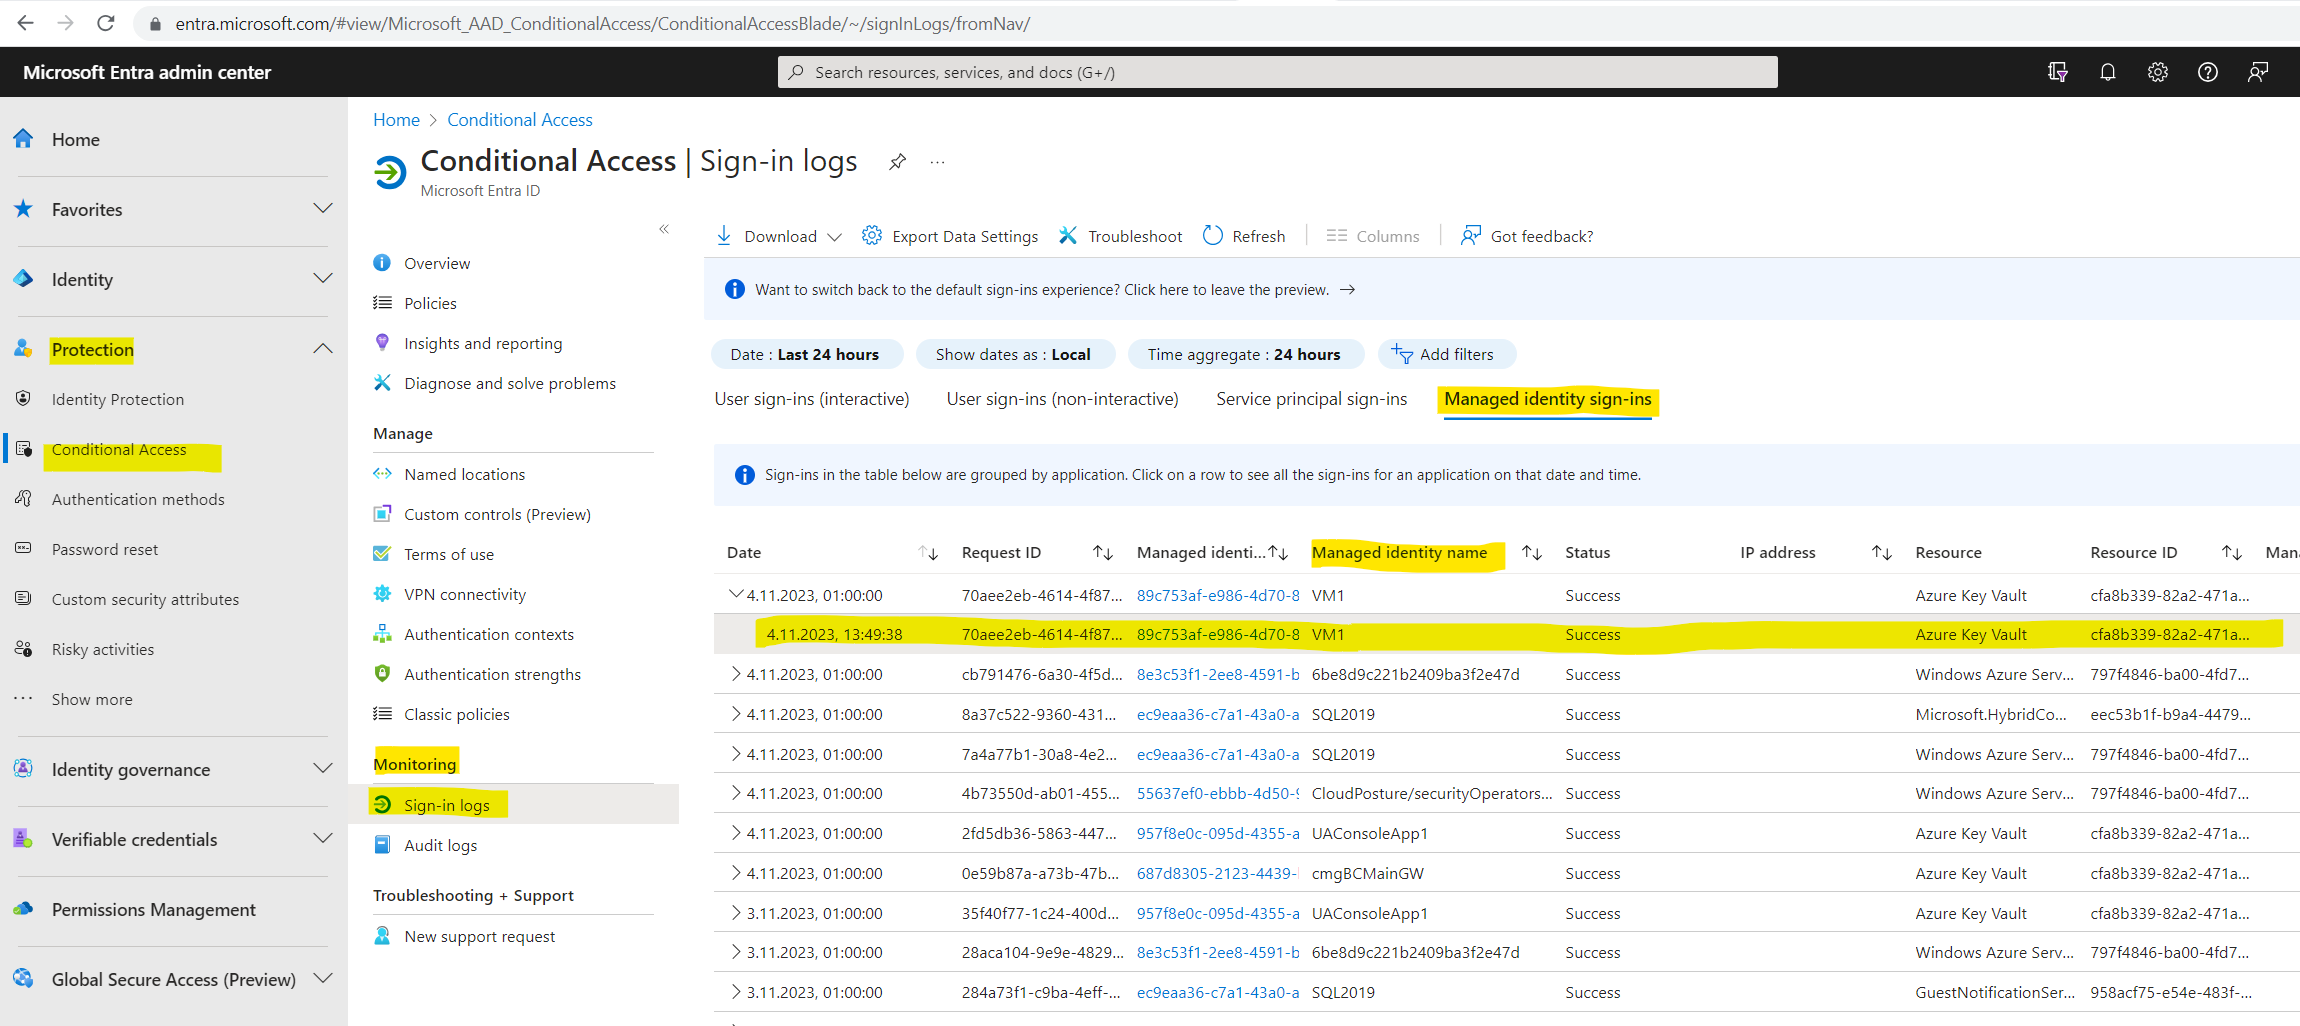
To check which authentication finally was used by our ConsoleApp1, we can use the Sign-in logs in Microsoft Entra admin center -> Protection -> Conditional Access -> Sign-in logs -> Managed identity sign-ins.
Here we can see under Managed identity sign-ins the previous access from our ConsoleApp1 to the key vault by using the user-assigned managed identity named UAConsoleApp1.
But as mentioned further above, if you have just one workload on a dedicated single virtual machine in Azure, it’s actually more suitable to use therefore a system-assigned managed identity instead a user-assigned managed identity.
A user-assigned managed identity is preferred when workloads needs to run on multiple resources and can share a single identity and where resources are recycled frequently, but permissions should stay consistent.
Below we will see how to use a system-assigned managed identity for our Console App.
Using a system-assigned Managed Identity for our Console App to access Azure Resources
In order to use a system-assigned managed identity for my ConsoleApp1 I will have to do the following steps.
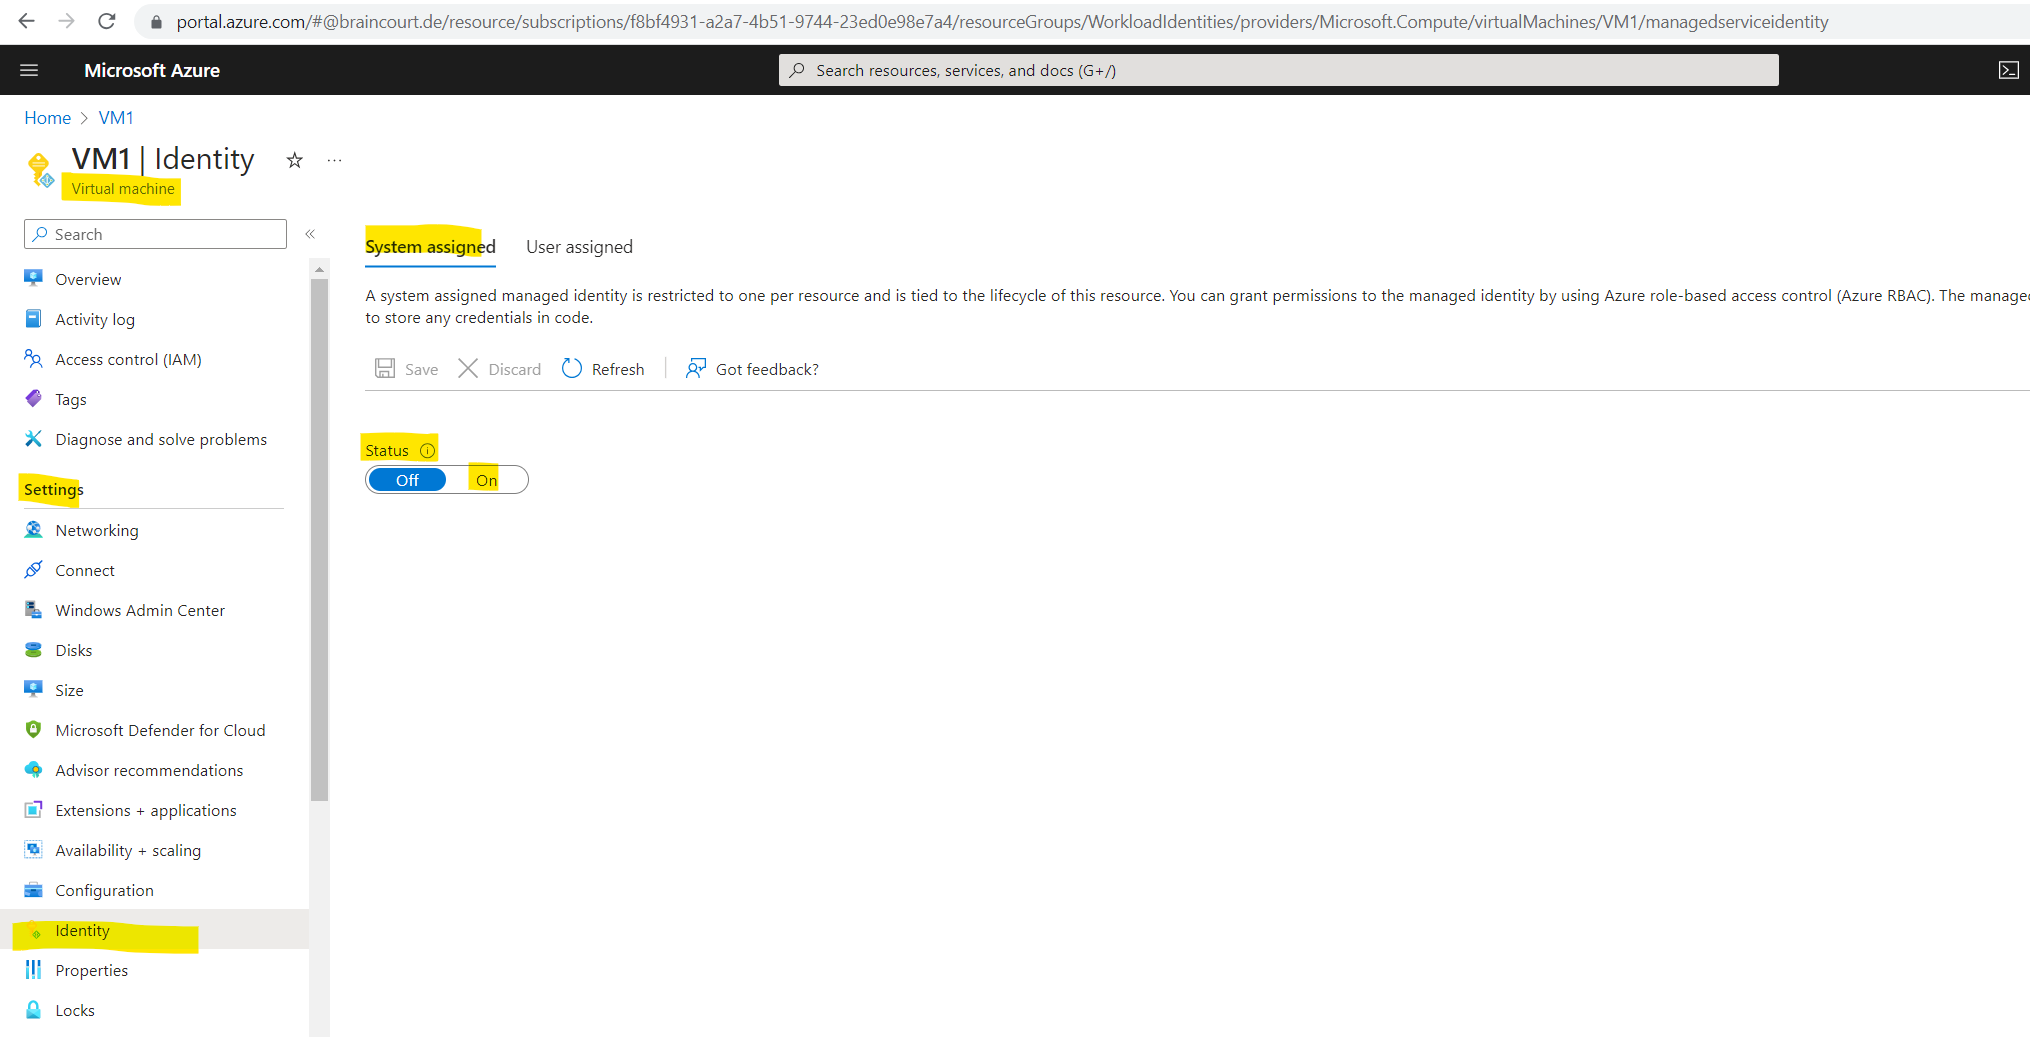
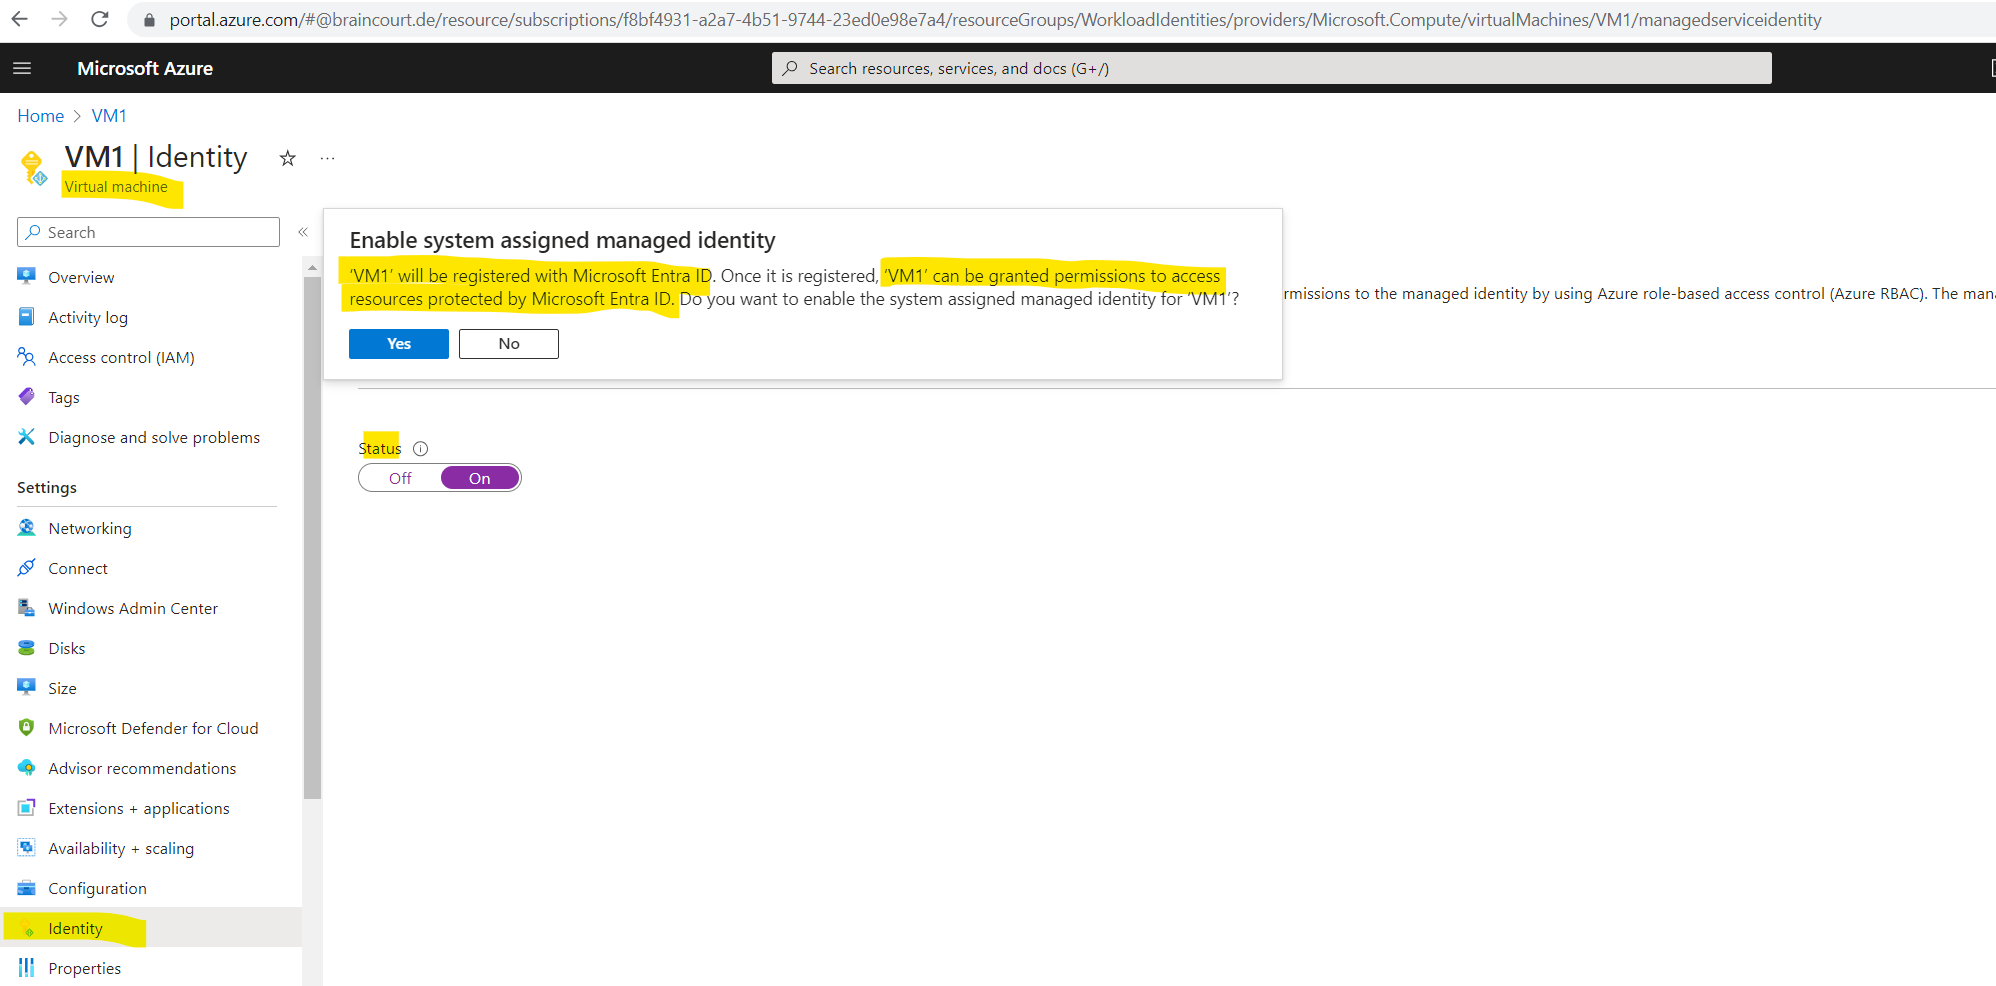
For the virtual machine I will first remove the previously assigned user identity and then I will enable the system assigned identity. These steps you will configure in the virtual machine blade in the Settings section under the Identity menu point as shown below
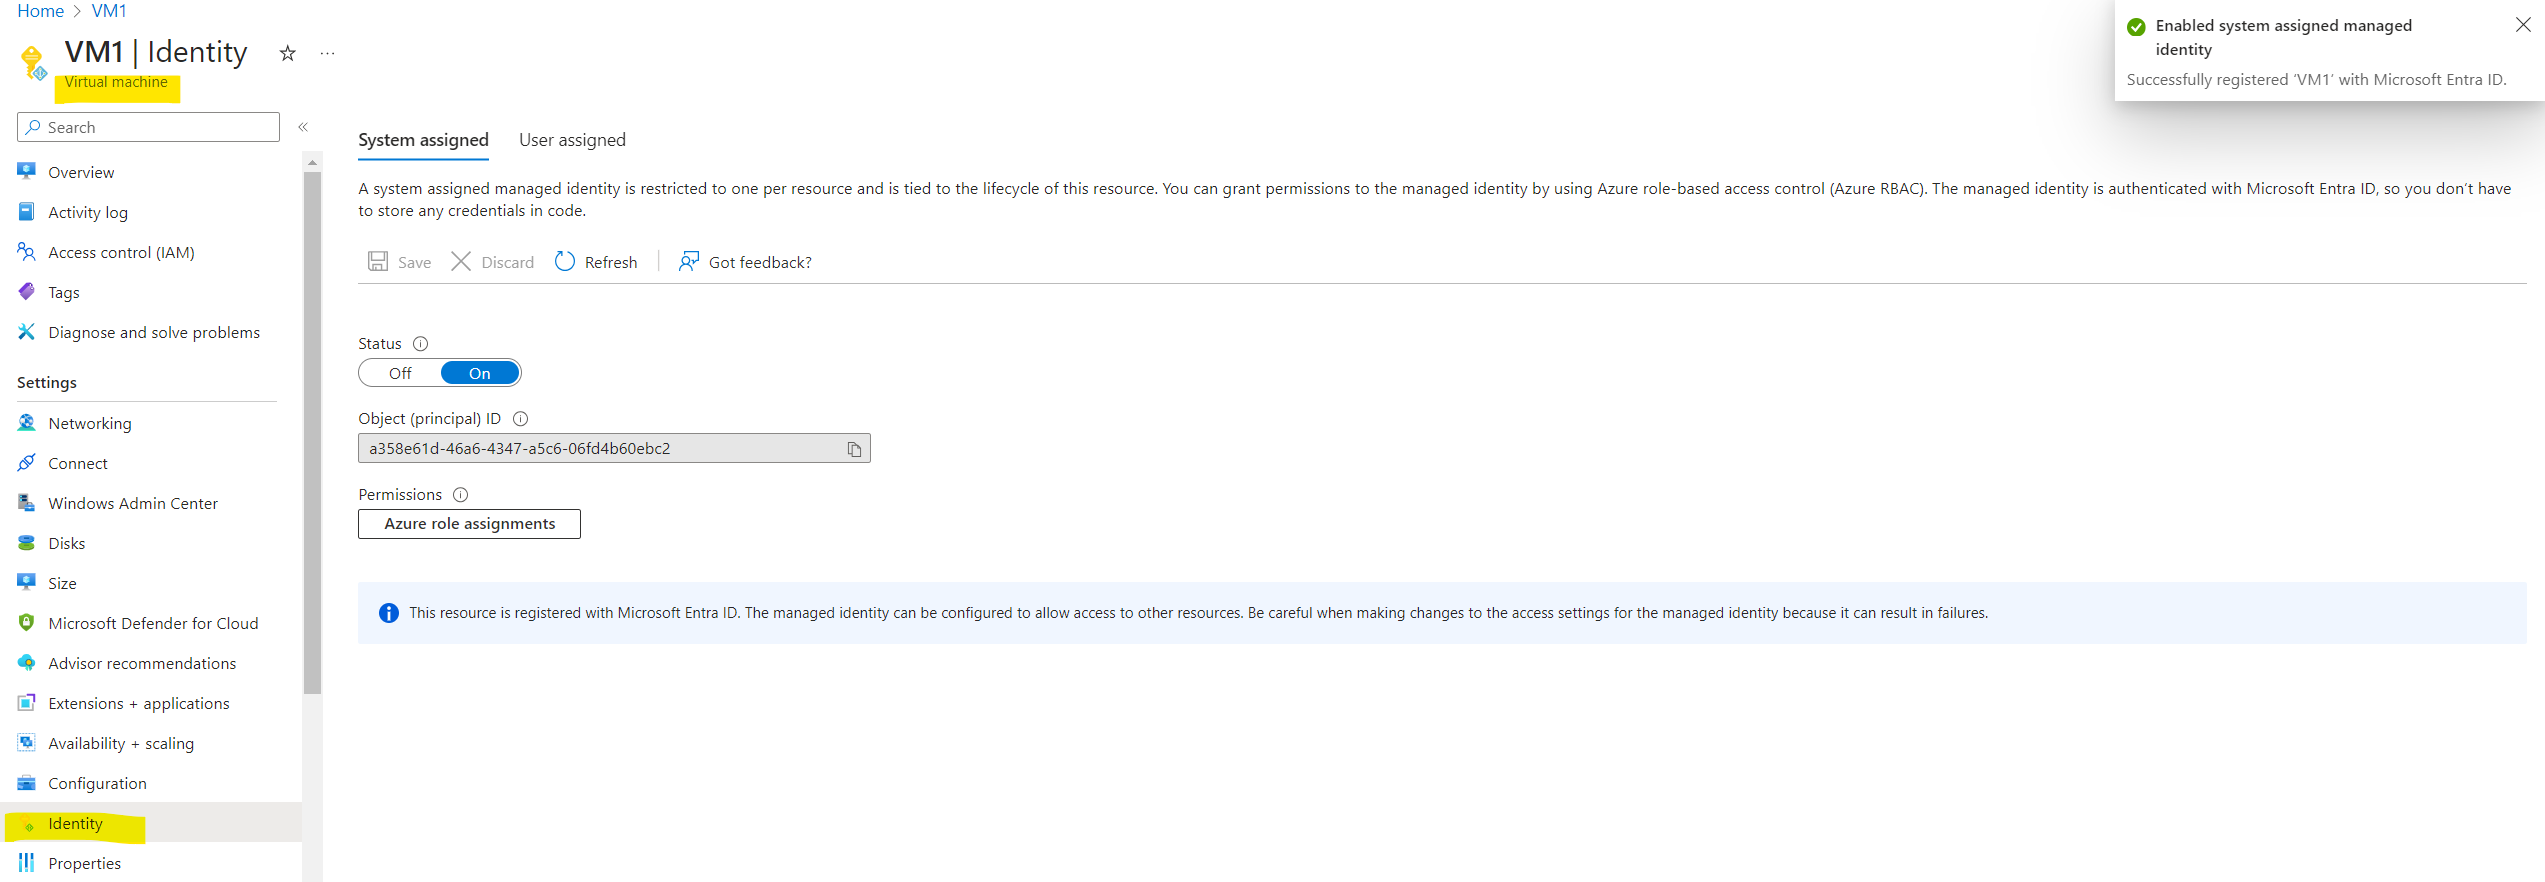
Here first remove under the User assigned tab the previously assigned user identity and then on the System assigned tab switch the Status toggle button to On which will register the virtual machine in Microsoft Entra ID in order to grant permissions to access resources in Azure.
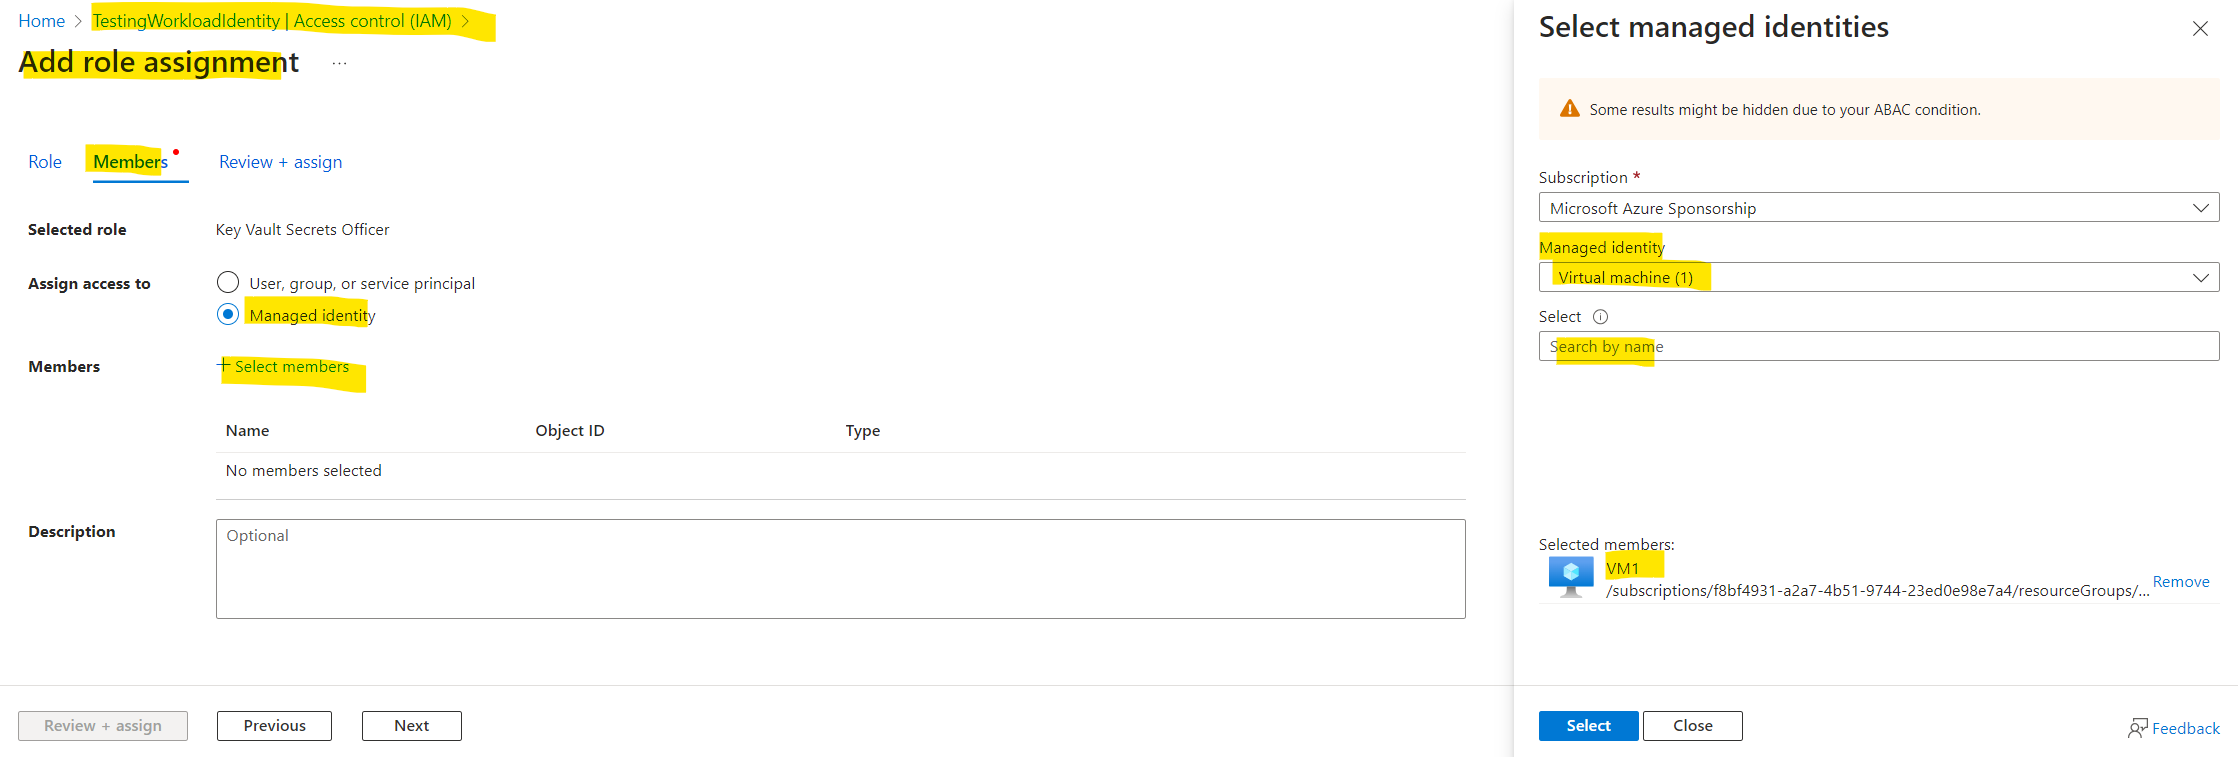
Next we have to grant permissions for the key vault to the system-assigned managed identity which you will find as managed identity from type virtual machine under Access control (IAM) in the key vault.

Finally we also need to adjust our code from the ConsoleApp1 in order to use the system-assigned managed identity from the virtual machine itself.
Here we can comment the string with the clientID from the previous user-assigned managed identity.
Then we can remove both parameters (clientID and TokenCredentialOptions with null) from the ManagedIdentityCredential class instance. We don’t need to specify here explicit the service principal for the system-assigned managed identity from the virtual machine.
That’s all, if we now copy the ConsoleApp1 to our virtual machine in Azure and run it, from now on the system-assigned managed identity should be used to access the key vault.
using System;
using Azure.Identity;
using Azure.Security.KeyVault.Secrets;

// string clientId = "527fb071-5934-4a31-89ad-726354aca9d5";
// var credential = new ManagedIdentityCredential(clientId, null);
var credential = new ManagedIdentityCredential();

var client = new SecretClient(new Uri("https://testingworkloadidentity.vault.azure.net/"), credential);

Console.Write("Input the Name of your secret > ");
var secretName = Console.ReadLine();

Console.Write("Input the value of your secret > ");
var secretValue = Console.ReadLine();

try
{
    await client.SetSecretAsync(secretName, secretValue);
    Console.WriteLine(" done.");
}
catch (AuthenticationFailedException e)
{
    Console.WriteLine($"Authentication Failed. {e.Message}");
}
A quick check by using the Sign-in logs again will show me that this time the system-assigned managed identity from the virtual machine was used to access the key vault.
Microsoft Entra admin center -> Protection -> Conditional Access -> Sign-in logs -> Managed identity sign-ins.
Using the DefaultAzureCredential .NET class for the Console App to access Azure Resources
For managed identities, either user or system assigned we used previously the ManagedIdentityCredential class in our ConsoleApp1 to access Azure resources.
One big disadvantage by using this .NET class is that if we debug the app from on-premises, we couldn’t use either managed identities. They could only be assigned to a workload hosted and running directly in Azure.
So far only registering the console app under App registrations in Microsoft Entra ID and using certificates or client secrets worked from on-premises to access Azure resources.
In order to use managed identities for our console app but also be able to debug the app from on-premises outside from Azure, we can use another .NET class which is called DefaultAzureCredential.
The DefaultAzureCredential is appropriate for most scenarios where the application is intended to ultimately be run in Azure. This is because the DefaultAzureCredential combines credentials commonly used to authenticate when deployed, with credentials used to authenticate in a development environment.
Note: DefaultAzureCredential is intended to simplify getting started with the SDK by handling common scenarios with reasonable default behaviors. Developers who want more control or whose scenario isn’t served by the default settings should use other credential types.
So for production use and in case you want to be sure which credentials your workload is finally using to authenticate against your Azure resources, I would prefer to use the ManagedIdentityCredential class over the DefaultAzureCredential class which combines all credentials the workload has access to.
The DefaultAzureCredential attempts to authenticate via the following mechanisms, in this order, stopping when one succeeds:
- Environment – The DefaultAzureCredential will read account information specified via environment variables and use it to authenticate.
- Workload Identity – If the application is deployed to an Azure host with Workload Identity enabled, the DefaultAzureCredential will authenticate with that account.
- Managed Identity – If the application is deployed to an Azure host with Managed Identity enabled, the DefaultAzureCredential will authenticate with that account.
- Visual Studio – If the developer has authenticated via Visual Studio, the DefaultAzureCredential will authenticate with that account.
- Visual Studio Code – Currently excluded by default as SDK authentication via Visual Studio Code is broken due to issue #27263. The VisualStudioCodeCredential will be re-enabled in the DefaultAzureCredential flow once a fix is in place. Issue #30525 tracks this. In the meantime Visual Studio Code users can authenticate their development environment using the Azure CLI.
- Azure CLI – If the developer has authenticated an account via the Azure CLI
az logincommand, the DefaultAzureCredential will authenticate with that account. - Azure PowerShell – If the developer has authenticated an account via the Azure PowerShell Connect-AzAccount command, the DefaultAzureCredential will authenticate with that account.
- Azure Developer CLI – If the developer has authenticated via the Azure Developer CLI
azd auth login command, the DefaultAzureCredential will authenticate with that account. - Interactive browser – If enabled, the DefaultAzureCredential will interactively authenticate the developer via the current system’s default browser. By default, this credential type is disabled.
Source: https://www.nuget.org/packages/Azure.Identity
To use the DefaultAzureCredential class we need to adjust our code as shown below.
When preferring to use a user-assigned managed identity we also need to pass the clientID from our user managed identity to the DefaultAzureCredential class.
using System;
using Azure.Identity;
using Azure.Security.KeyVault.Secrets;


string userAssignedClientId = "527fb071-5934-4a31-89ad-726354aca9d5";
var credential = new DefaultAzureCredential(new DefaultAzureCredentialOptions { ManagedIdentityClientId = userAssignedClientId });

var client = new SecretClient(new Uri("https://testingworkloadidentity.vault.azure.net/"), credential);

Console.Write("Input the Name of your secret > ");
var secretName = Console.ReadLine();

Console.Write("Input the value of your secret > ");
var secretValue = Console.ReadLine();

try
{
    await client.SetSecretAsync(secretName, secretValue);
    Console.WriteLine(" done.");
}
catch (AuthenticationFailedException e)
{
    Console.WriteLine($"Authentication Failed. {e.Message}");
}
When preferring to use a system-assigned managed identity we just need to remove the clientID from above.
using System;
using Azure.Identity;
using Azure.Security.KeyVault.Secrets;


// string userAssignedClientId = "527fb071-5934-4a31-89ad-726354aca9d5";
var credential = new DefaultAzureCredential(new DefaultAzureCredentialOptions());

var client = new SecretClient(new Uri("https://testingworkloadidentity.vault.azure.net/"), credential);

Console.Write("Input the Name of your secret > ");
var secretName = Console.ReadLine();

Console.Write("Input the value of your secret > ");
var secretValue = Console.ReadLine();

try
{
    await client.SetSecretAsync(secretName, secretValue);
    Console.WriteLine(" done.");
}
catch (AuthenticationFailedException e)
{
    Console.WriteLine($"Authentication Failed. {e.Message}");
}
When I will now start debugging in Visual Studio from on-premises and using a system-assigned managed identity by excluding the clientID for the DefaultAzureCredential class like shown below, I will be able to access my key vault and store a new secret in it.
In this case the DefaultAzureCredential class will use my account I am using to authenticate via Visual Studio. This account is my work account to which is also granted access to the key vault.
In order that you can access the key vault when debugging with Visual Studio by using the DefaultAzureCredential class, the account which is finally used by the class must be authorized also on the key vault of course.
Workload Identity Federation
You can use workload identity federation in scenarios such as GitHub Actions, workloads running on Kubernetes, or workloads running in compute platforms outside of Azure.
More you will find in the following article from Microsoft https://learn.microsoft.com/en-us/entra/workload-id/workload-identity-federation.
Access Reviews for Service Principals and Applications
The need for access to privileged Azure resource and Microsoft Entra roles by employees changes over time. To reduce the risk associated with stale role assignments, you should regularly review access. You can use Microsoft Entra Privileged Identity Management (PIM) to create access reviews for privileged access to Azure resource and Microsoft Entra roles. You can also configure recurring access reviews that occur automatically.
About Access Reviews you can read my following post.
What is Microsoft Entra?
To see all products included in the unifying brand named Microsoft Entra please take a look at my following post.
Links
Microsoft Entra Workload ID documentation
https://learn.microsoft.com/en-us/entra/workload-id/What are workload identities?
https://learn.microsoft.com/en-us/azure/active-directory/workload-identities/workload-identities-overviewApplication and service principal objects in Microsoft Entra ID
https://learn.microsoft.com/en-us/entra/identity-platform/app-objects-and-service-principalsWhat are managed identities for Azure resources?
https://learn.microsoft.com/en-us/entra/identity/managed-identities-azure-resources/overview