Load a custom Assembly in SQL Server Integration Services (SSIS) Script Task that is not or cannot be stored in the GAC
If you need to reference a custom assembly from a SSIS Script Task, the recommended and easiest way is to install the custom assembly in the Global Assembly Cache (GAC).
But what if we do not have access and permissions to install the custom assembly in the GAC?
Therefore we can use a simple workaround for loading an assembly from an arbitrary location with an AppDomain.AssemblyResolve event handler.
How to load an Assembly in a SSIS script task that isn’t in the GAC
https://docs.microsoft.com/en-us/archive/blogs/dbrowne/how-to-load-an-assembly-in-a-ssis-script-task-that-isnt-in-the-gac
The idea is to register an AppDomain.AssemblyResolve event handler.
The .NET Framework provides the AppDomain.AssemblyResolve event for applications that require greater control over assembly loading. By handling this event, your application can load an assembly into the load context from outside the normal probing paths, select which of several assembly versions to load, emit a dynamic assembly and return it, and so on. This topic provides guidance for handling the AssemblyResolve event.
Resolve assembly loads
https://msdn.microsoft.com/en-us/library/ff527268(v=vs.110).aspxNormal probing path to find referenced assemblies
Which does just what we need. The question is where and how to wire it up. The trick is to realize that .NET’s Just-in-Time (JIT) compilation is responsible for loading dependent assemblies, and therefore guarantees that the assemblies referenced in a type’s method won’t be loaded until just before the method is executed.
This means that in the type’s static constructor we can reliably wire up the AssemblyResolve event that will supply the referenced types.
When you create an SSIS Script Task or Script Component SSIS generates a class for you called ScriptMain, and you can wire-up the event in a Static Constructor for that type. A Static Constructor is guaranteed to be called exactly once before the first instance is created or any static members are referenced, so therefore before the dependent assemblies are loaded.
Enough theory, we will see this below in action with a custom assembly I wrote to download files from an Azure Storage Account File Share.
In this post you will see more about accessing Azure Storage Account File Shares.
First you will see the recommend way to install the assembly in the GAC.
Recommended way using the GAC
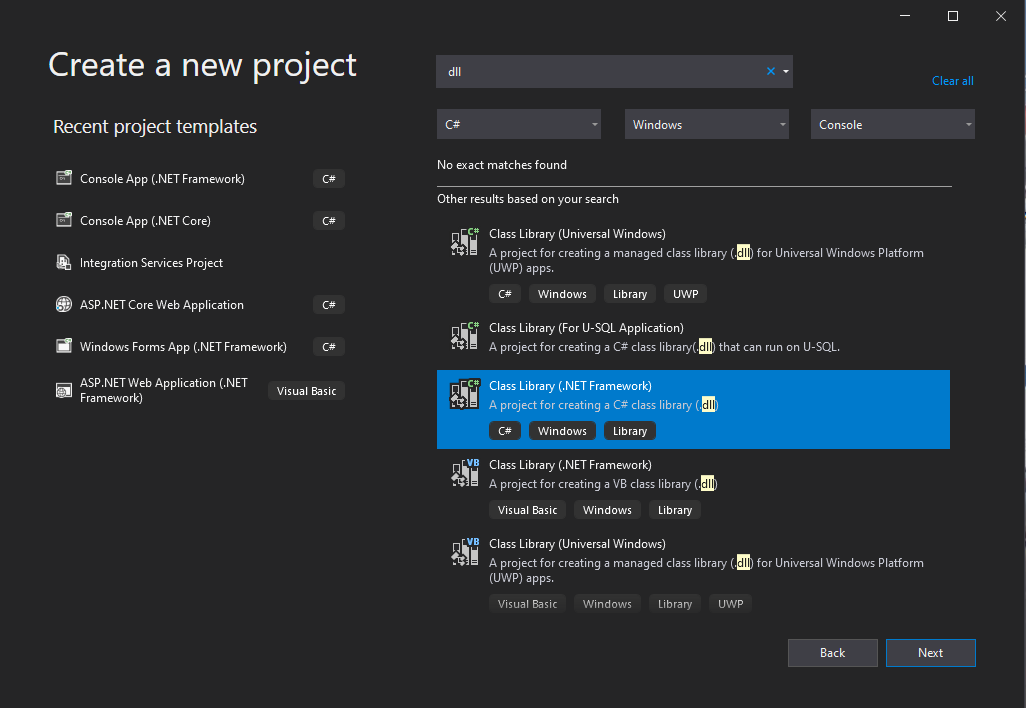
First we need to create our custom assembly.
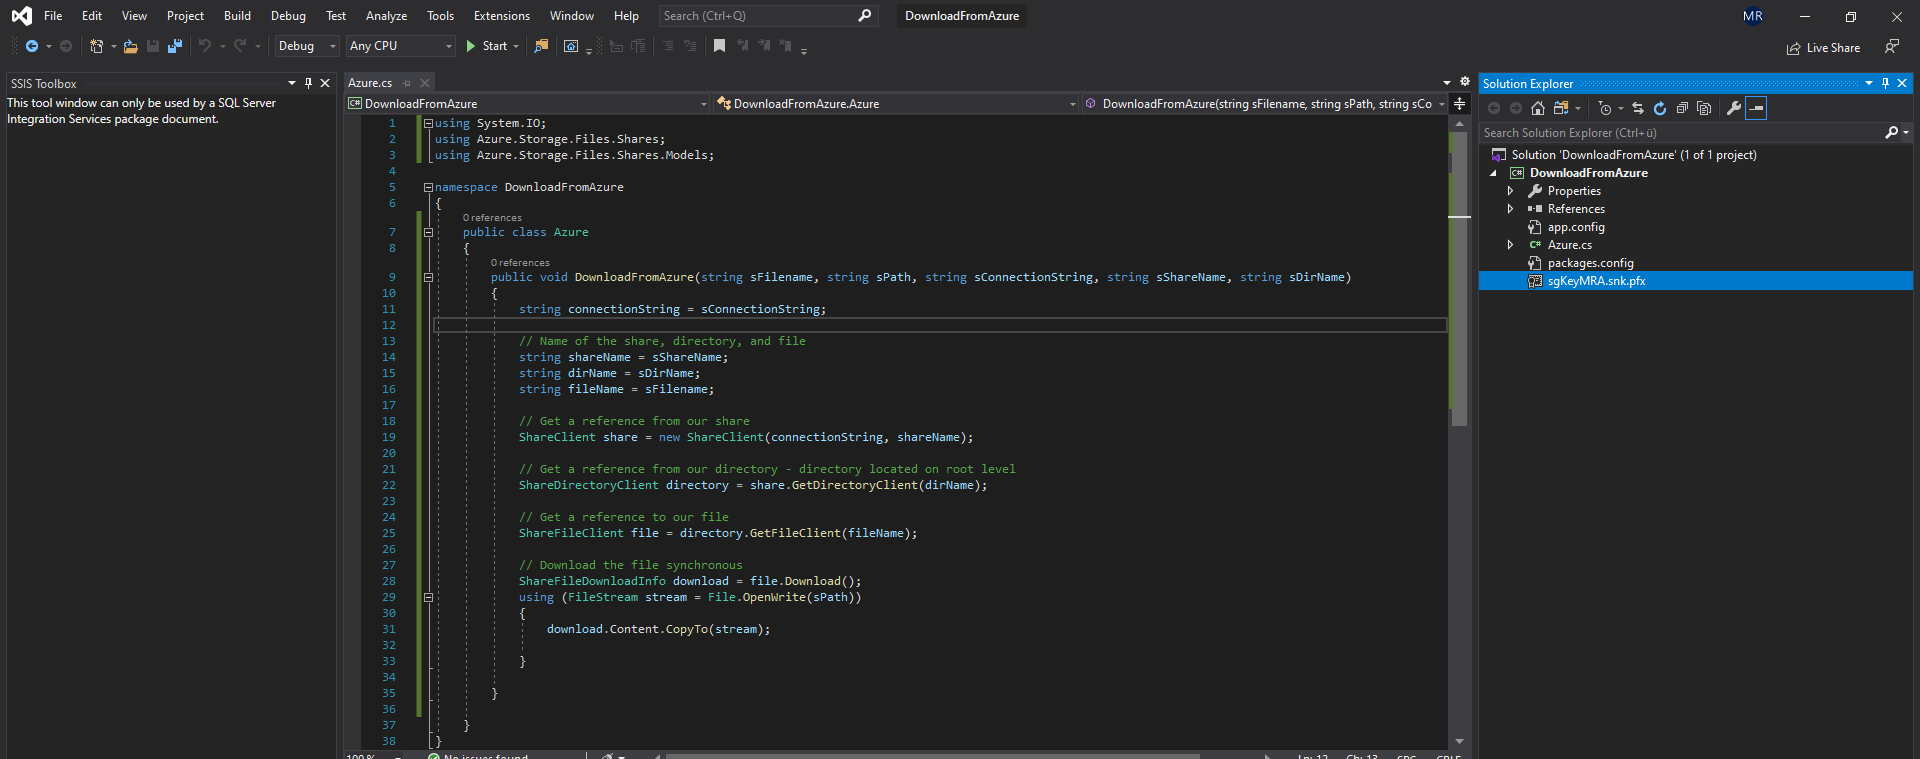
In the screenshot above you can see the strong name key file I used to sign the assembly with a strong name.
Assemblies deployed in the Global Assembly Cache must have a strong name
How to: Sign an assembly with a strong name
https://docs.microsoft.com/en-us/dotnet/standard/assembly/sign-strong-name
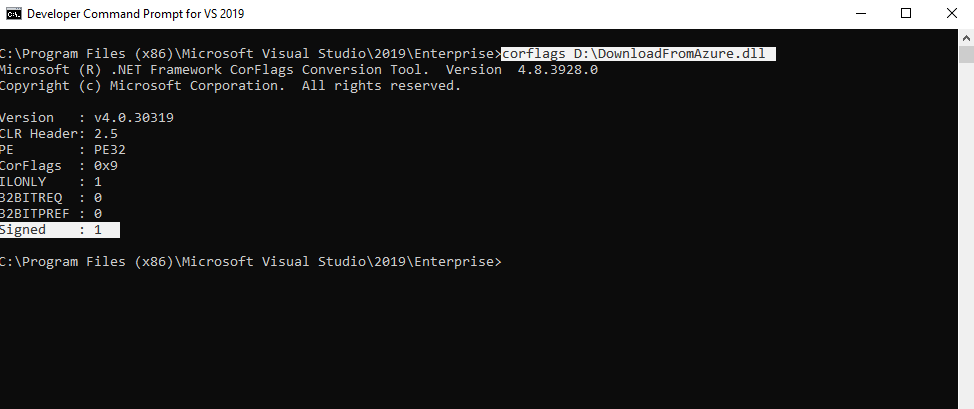
You can check if the assembly was assigned with a strong name using the corflags.exe utility.
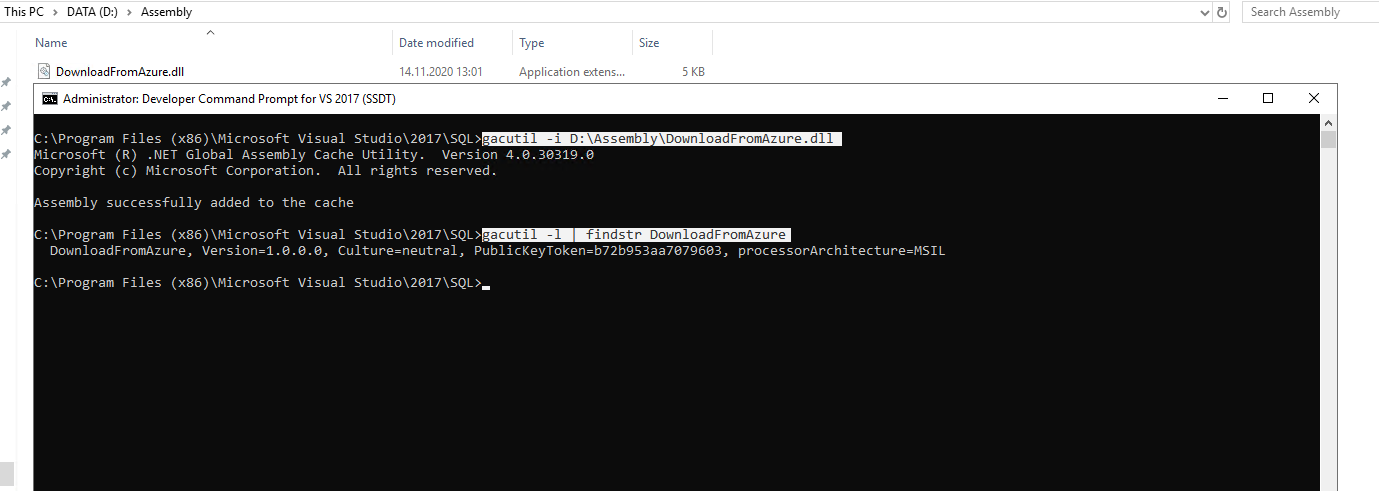
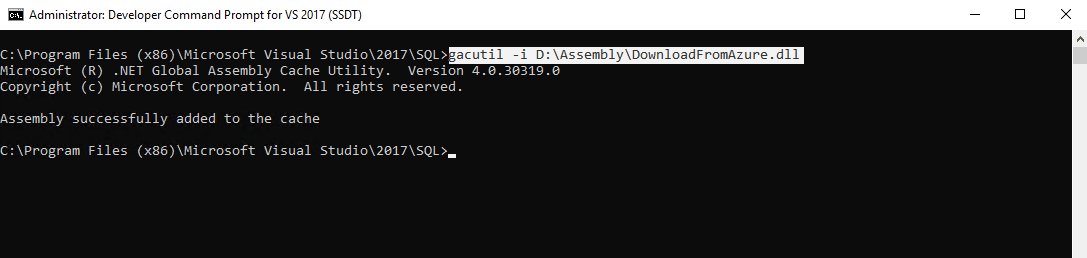
Now we can install our custom assembly in the GAC as follows.
gacutil.exe -i <Assembly>
you can check it afterwards with the flag -l
gacutil.exe -l | findstr <part of the name>
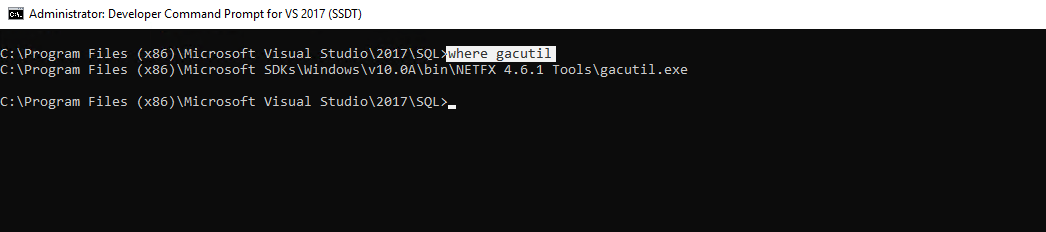
If you run the gacutil.exe tool from the Developer Command Prompt, there is no need to set the path in the environment variables, otherwise if you want to run it from the command prompt, you need to know the path where gacutil is located to run it.
To determine the path gacutil was installed, you can use inside the Developer Command prompt the following command.
where gacutil
Now you can create a new Integration Services Project in Visual Studio.
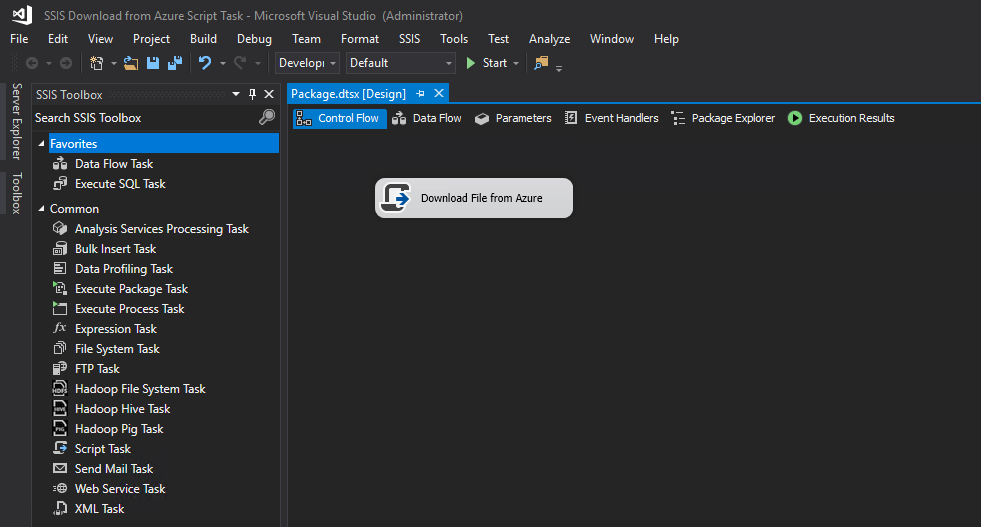
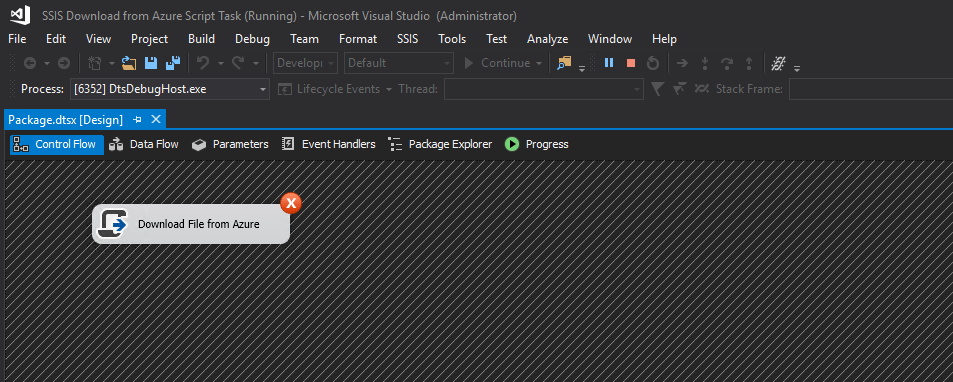
First we drag a new Script Task from the SSIS Toolbox to the Control Flow panel and rename it to a useful name regarding his task.
Second right or double-click on the task to open the Script Task Editor.
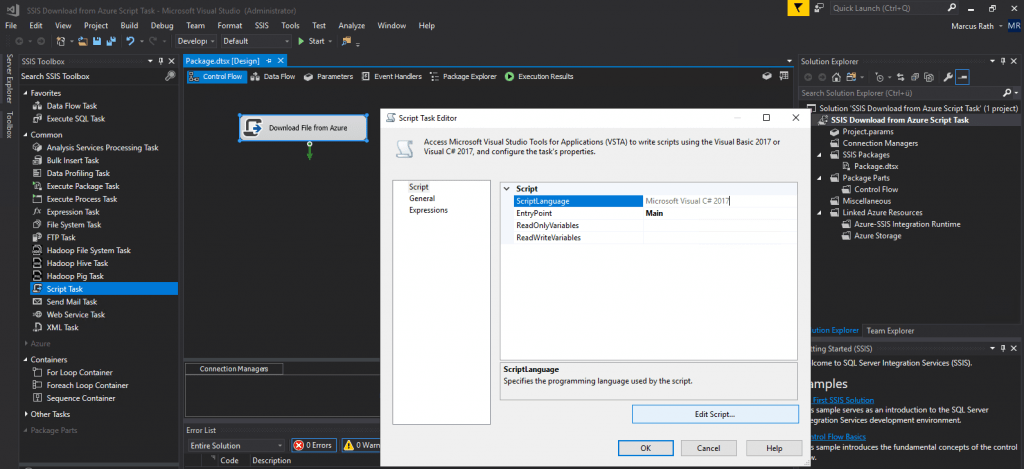
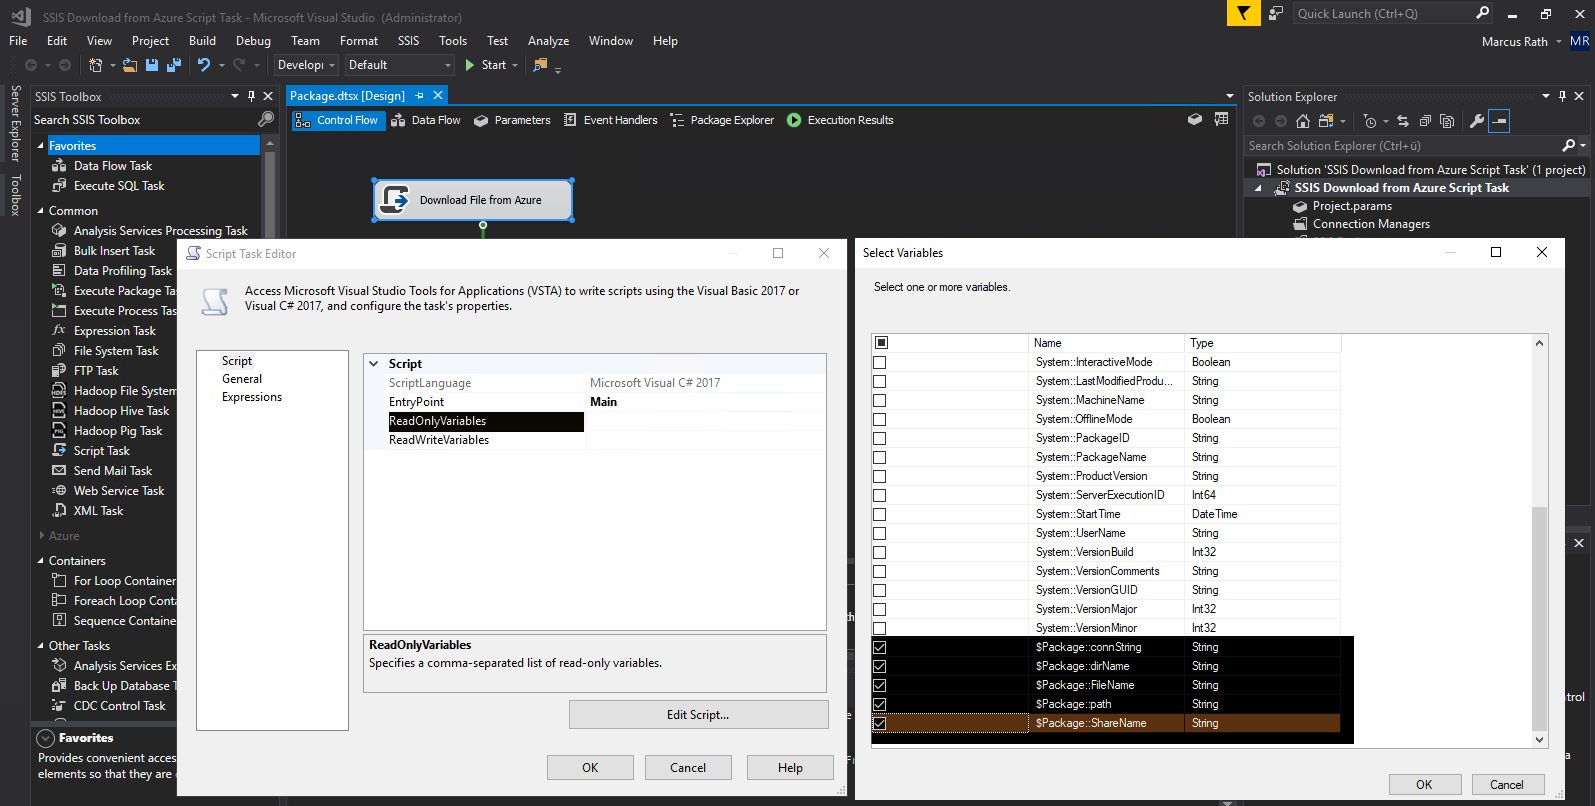
In the Script Task Editor we can select between C# and Visual Basic as Script Language and also can pass variables and parameters to our Script.
To edit the Script click on the Edit Script … button to open Visual Studio for Tools (Vsta).
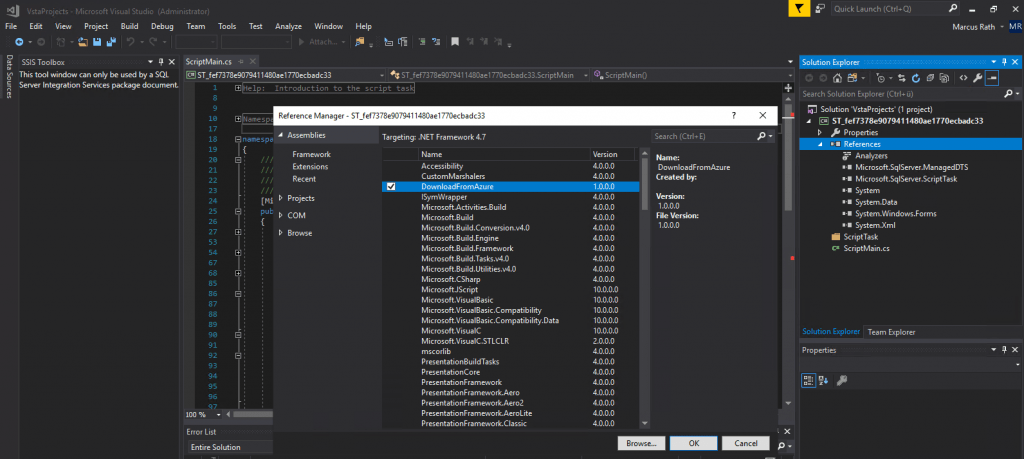
Right-Click on References and browse to your custom assembly, in my case DownloadFromAzure.dll.
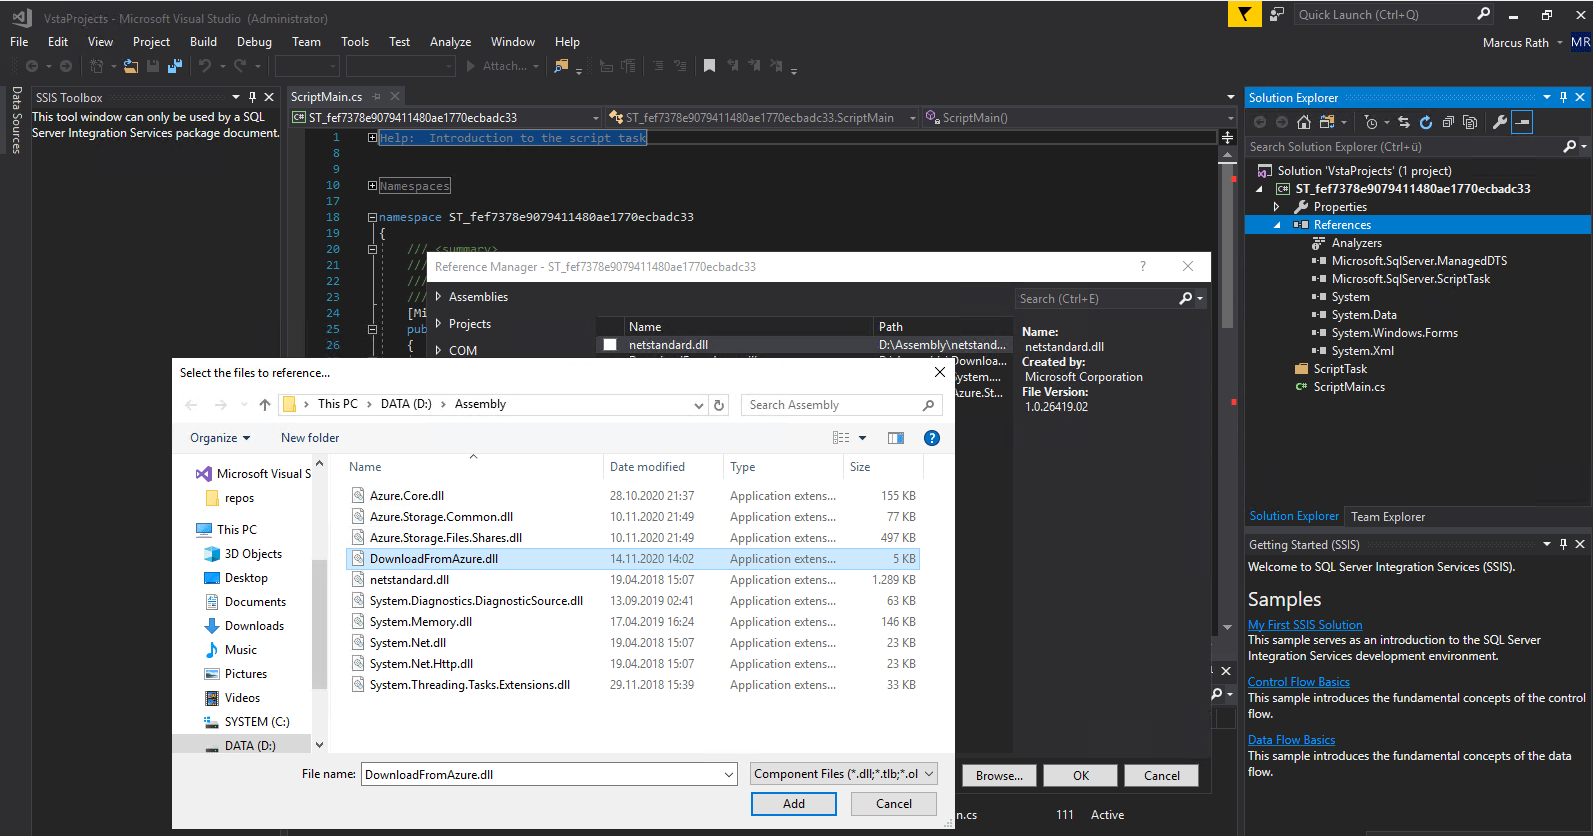
You can also copy your custom assembly to the default Reference Path from Visual Studio. In my case
C:Program Files (x86)Reference AssembliesMicrosoftFramework.NETFrameworkv4.7
To determine the path, click on an existing default reference in your project and check the path in the properties.
If you place your custom assembly there, you can search for the assembly directly as shown in the screenshot below.
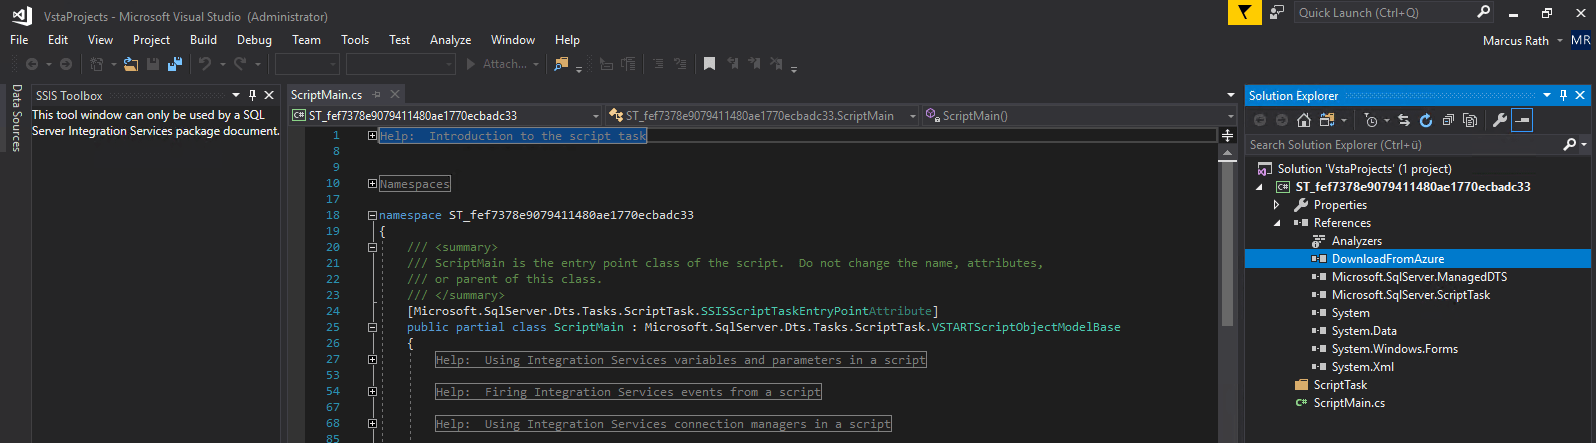
As we now have a reference set to our custom assembly, we should further add an using directive for that assembly, otherwise we need to enter the full namespace to our custom method.

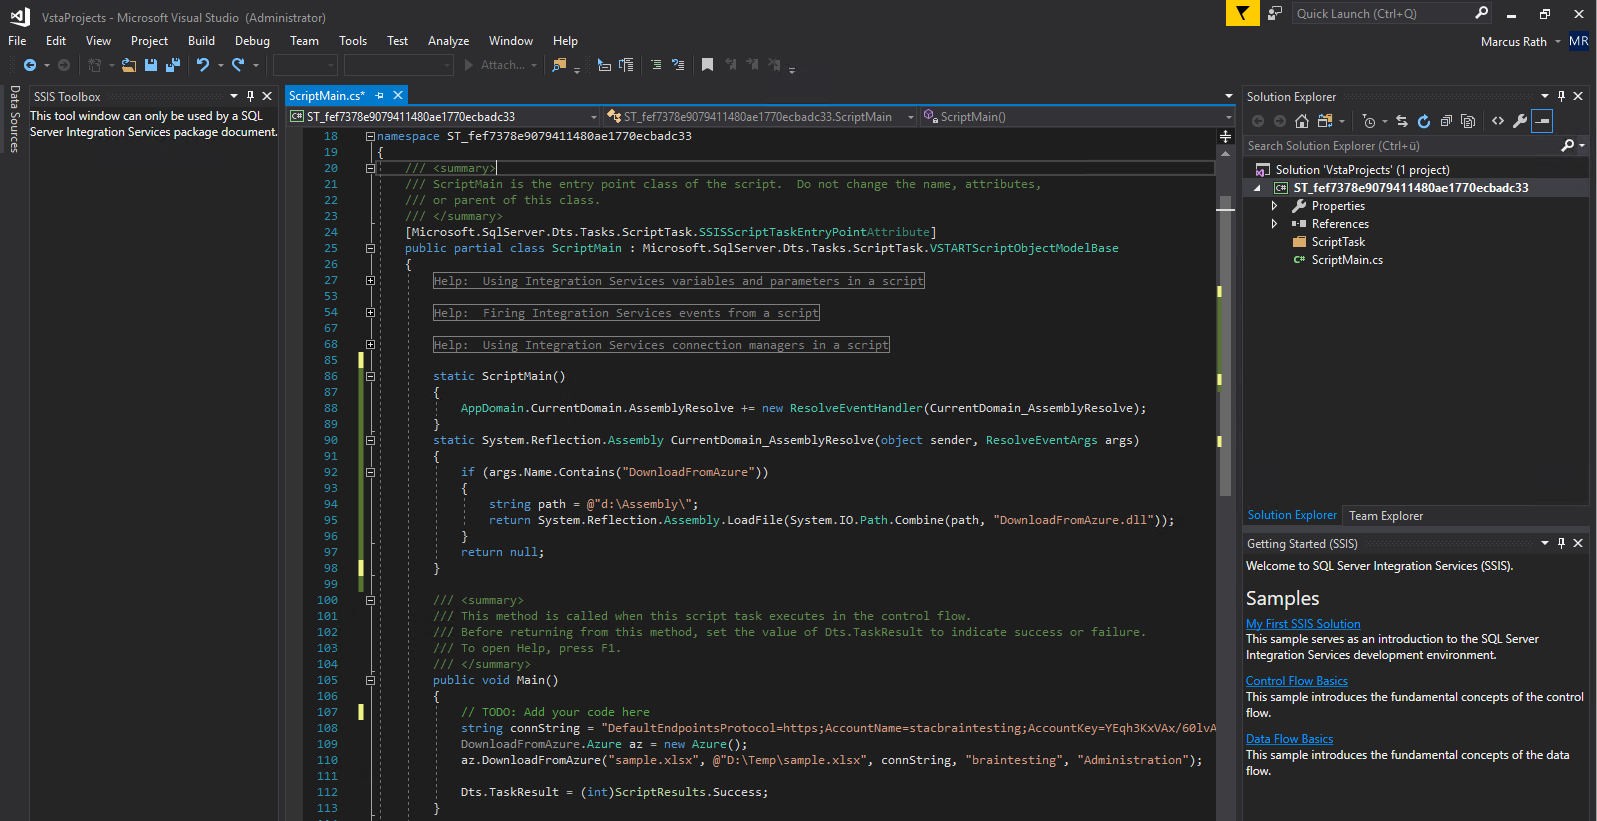
Now we can add code to the Main() method inside the ScriptMain.cs partial class, which is called when SSIS runs the Script Task, to call the method DownloadFromAzure() inside our custom assembly.
I will pass the connection string to my Azure Storage Account, the filename I want to download , the local path to store the download, the share name from the Storage Account and the folder in this share.
These parameters can also be passed through the Main() method with the variables and parameters from the Script Task Editor, I will show this at the end, also the differences between parameters and variables in context of SSIS.
string connString = "DefaultEndpointsProtocol=https;AccountName=<your account name>;AccountKey=<your account key>;EndpointSuffix=core.windows.net";
DownloadFromAzure.Azure az = new Azure();
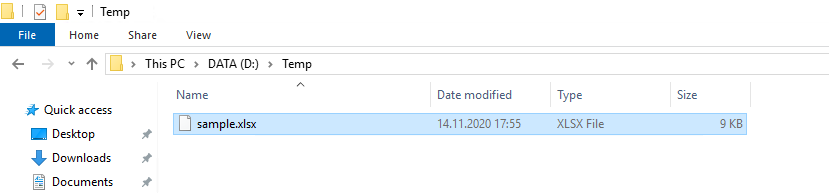
az.DownloadFromAzure("sample.xlsx", @"D:Tempsample.xlsx", connString, "braintesting", "Administration");
So far we’re done and could run the Script Task to test if the download will work.
Before closing Vsta we first need to click on Save All of course! After closing we also need to click on OK at the Script Task Editor to switch back to the Control Flow panel.
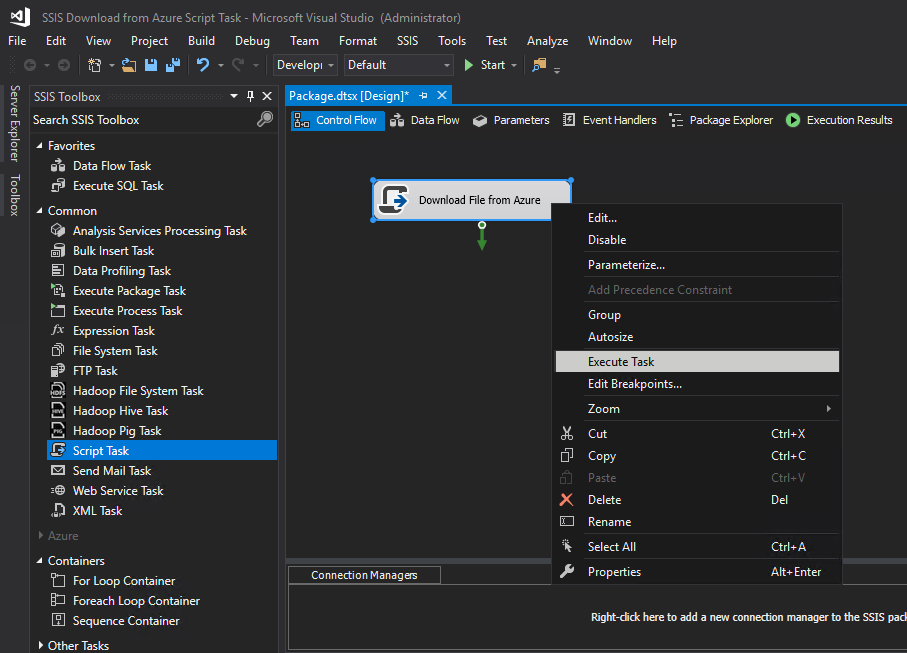
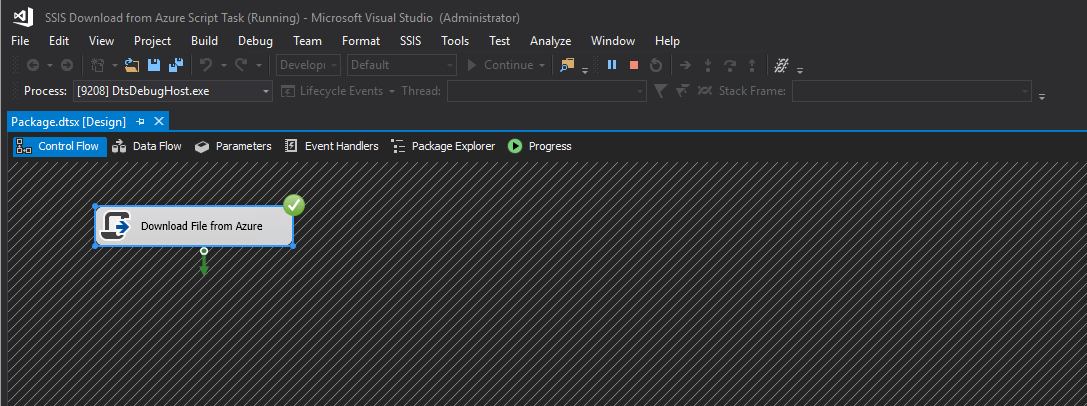
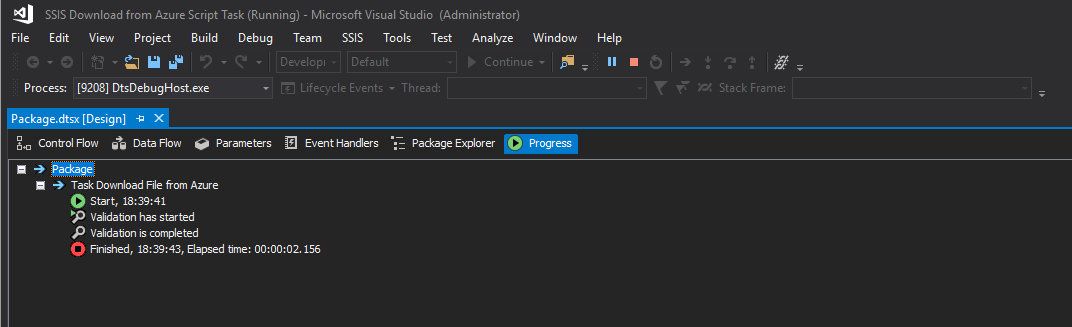
Now we can right-click on our Script Task and click on Execute Task.
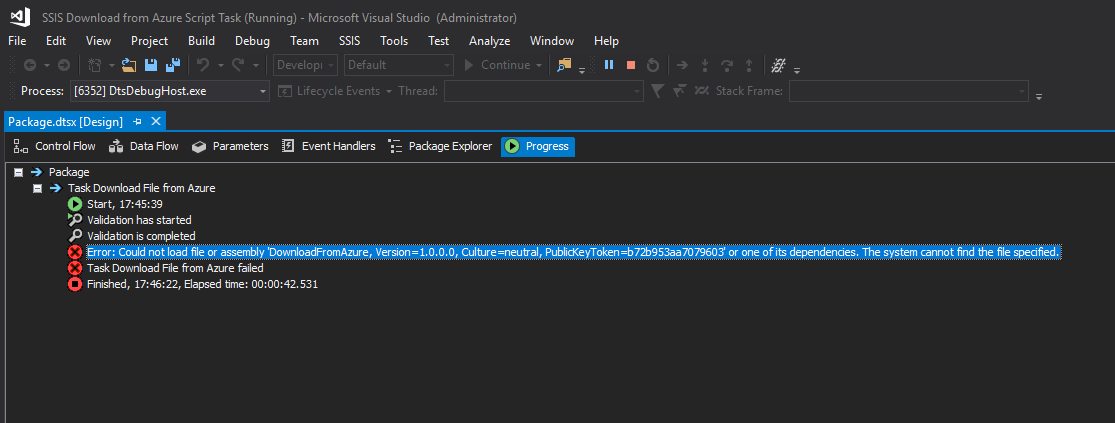
To show you what happens, when your Script Task could not load the referenced assembly, I intentionally deleted the custom assembly DownloadFromAzure.dll from the GAC again.
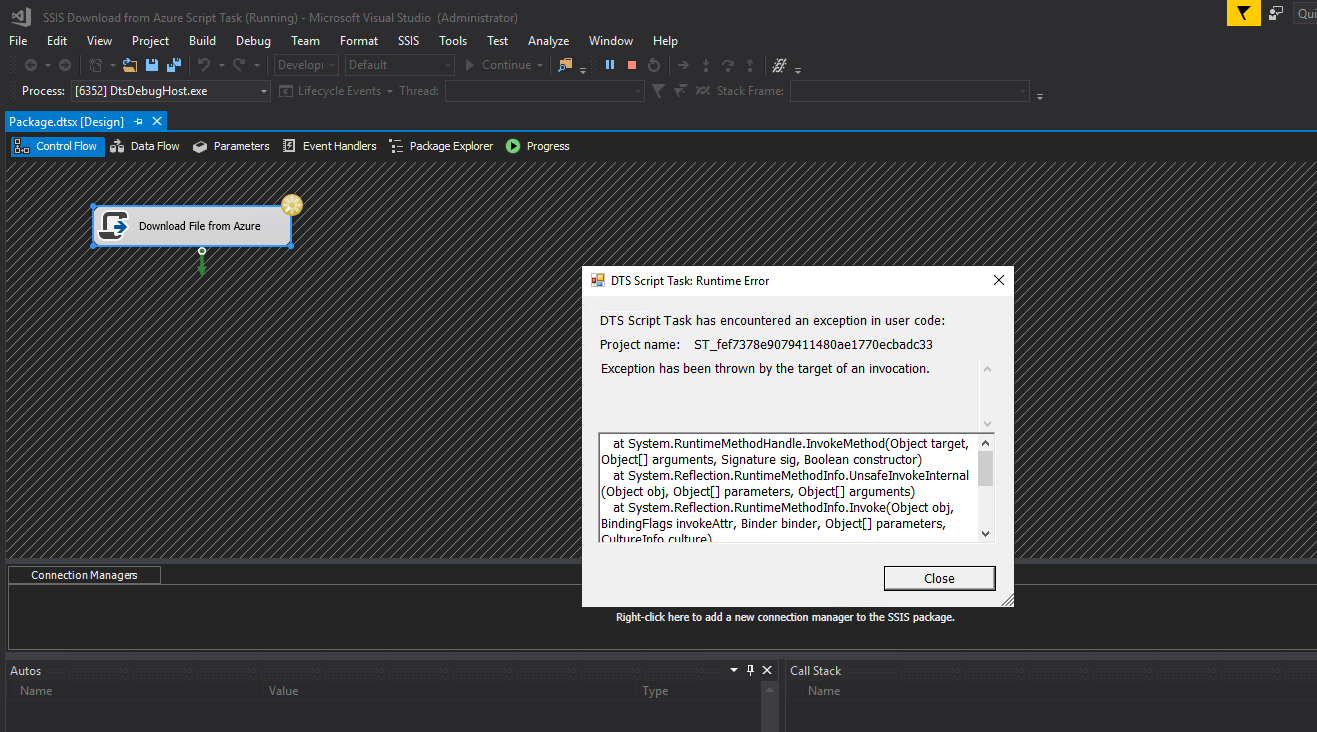
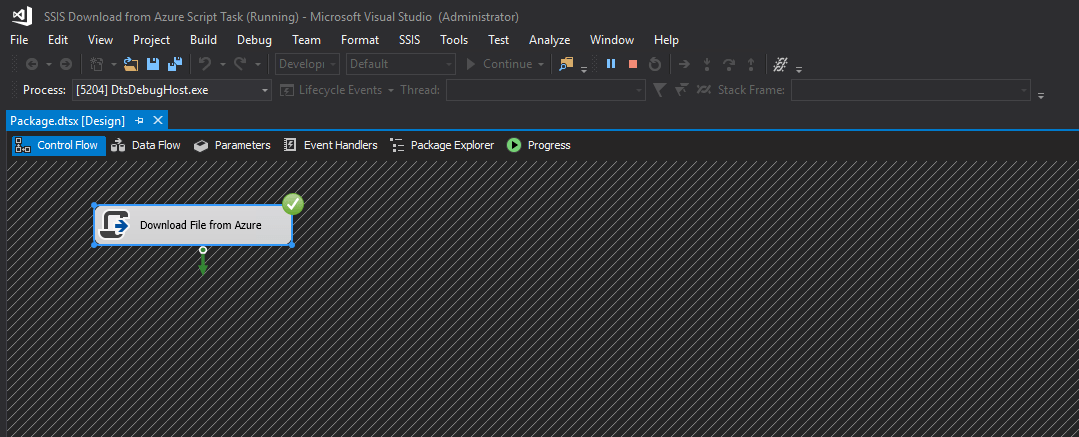
After installing the assembly in the GAC, our Script Task runs successfully and downloaded our sample.xlsx file from the Azure Storage Account File Share.

Now as mentioned at the beginning, we will load our custom assembly with the AppDomain.AssemblyResolve event handler instead installing it in the GAC.
Workaround if you cannot install the Assembly in the GAC
In my case to show you that this workaround really works, I first need to deinstall my custom assembly from the GAC again.

Now we can open our Script Editor again and should add the following code lines inside the public partial class ScriptMain block.
args.Name.Contains = <filename of your Assembly without extension>
static ScriptMain()
{
   AppDomain.CurrentDomain.AssemblyResolve += new ResolveEventHandler(CurrentDomain_AssemblyResolve);
}
static System.Reflection.Assembly CurrentDomain_AssemblyResolve(object sender, ResolveEventArgs args)
{
    if (args.Name.Contains("DownloadFromAzure"))
    {
        string path = @"d:Assembly";
        return System.Reflection.Assembly.LoadFile(System.IO.Path.Combine(path, "DownloadFromAzure.dll"));
    }
    return null
}
The complete ScriptMain.cs partial class will looks like the screenshot below.
Save All and close Vsta to go back to Control Flow again and try to execute the Script Task. Now the custom assembly should be loaded from the CLR with our AppDomain.AssemblyResolve Event handler.
Looking good 🙂
If you need to reference multiple assemblies, you need to add further Resolve Event Args statements to detect the names of the requested assemblies at runtime.
Depending on how much further assemblies you need, you may use better else if or switch statements.
static ScriptMain()
{
   AppDomain.CurrentDomain.AssemblyResolve += new ResolveEventHandler(CurrentDomain_AssemblyResolve);
}
static System.Reflection.Assembly CurrentDomain_AssemblyResolve(object sender, ResolveEventArgs args)
{
    if (args.Name.Contains("DownloadFromAzure"))
    {
        string path = @"d:Assembly";
        return System.Reflection.Assembly.LoadFile(System.IO.Path.Combine(path, "DownloadFromAzure.dll"));
    }


    // further dll to reference
    if (args.Name.Contains("Azure.Core"))
    {
        string path = @"d:Assembly";
        return System.Reflection.Assembly.LoadFile(System.IO.Path.Combine(path, "Azure.Core.dll"));
    }
    // end further dll

    return null
}
Using Variables and Parameters in Script Task
Finally as mentioned above, we can pass parameters and variables to the Main() method with the ReadOnlyVariables or ReadWriteVariables from the Script Task Editor.
SSIS Variables vs Parameters
Parameters cannot be modified within the SSIS Package, so they were designed to pass some values into the SSIS package. They also where exposed to the SSIS catalog and can be modified there with SSMS.
Variables in contrast can be modified within the SSIS Package and where not exposed to the SSIS catalog.
We only need the ReadOnlyVariables and therefore parameters to pass the following values to the Main() method.
- Connection String from the Azure Storage Account
- FileName we want to download
- Local path we want to store the downloaded file
- ShareName from the Azure Storage Account File Share
- Directory at the root level of the share the file is located
First we have to create these parameters in our package. Therefore click on the Parameters panel in your package and add the above parameters.
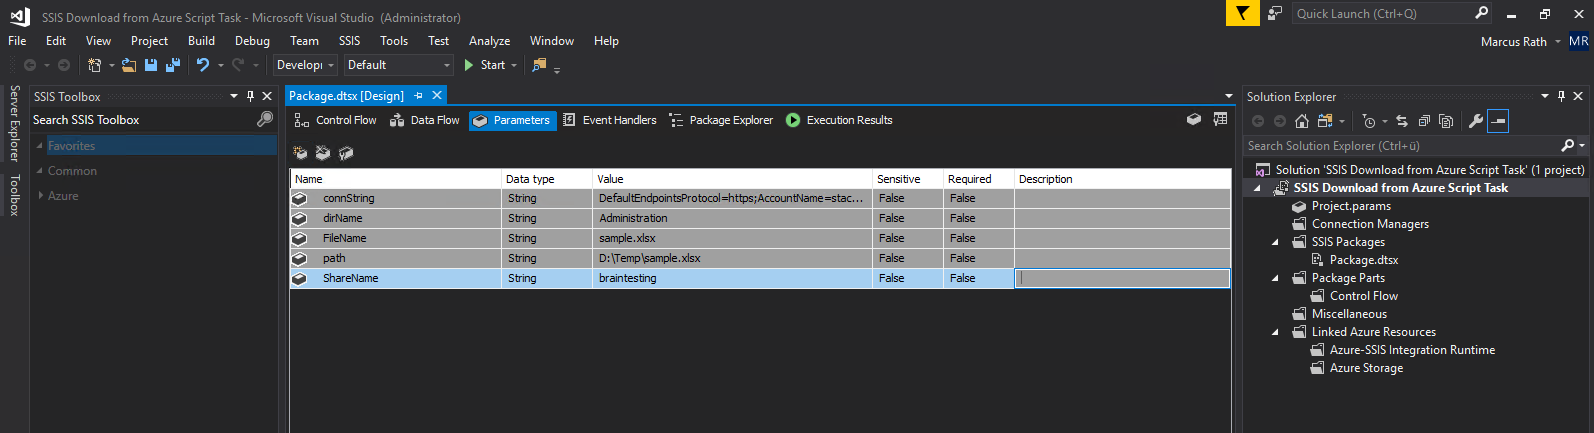
Now these parameters/variables are available in the Script Task Editor as ReadOnlyVariables. So select them and click on OK.
Click on Edit Script … to open Vsta.
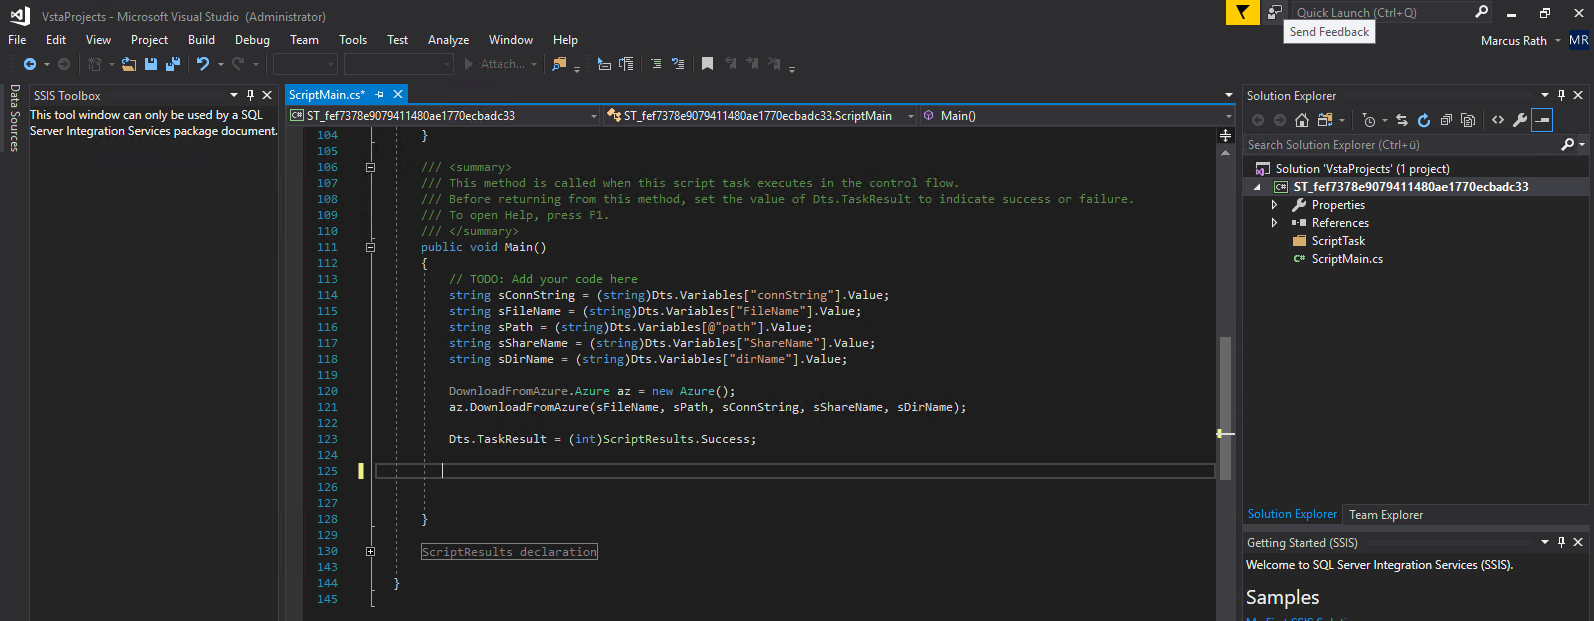
Now we can modify our Main() method to request these values from the variables instead assigning them directly in the script.
As we assigned the path parameter without disabled escape sequence, we need to disabling them in the script with the prefixed @ sign.
 public void Main()
		{
            // TODO: Add your code here
            string sConnString = (string)Dts.Variables["connString"].Value;
            string sFileName = (string)Dts.Variables["FileName"].Value;
            string sPath = (string)Dts.Variables[@"path"].Value;
            string sShareName = (string)Dts.Variables["ShareName"].Value;
            string sDirName = (string)Dts.Variables["dirName"].Value;

            DownloadFromAzure.Azure az = new Azure();
            az.DownloadFromAzure(sFileName, sPath, sConnString, sShareName, sDirName);

            Dts.TaskResult = (int)ScriptResults.Success;

        }
One short last example how to use variables instead parameters and how to access and change them inside the script.
First we add two new variables to our package, value1 as int32 and value 2 as string. For value1 we set the value initial to 200.
If the Variables Window is not showing up in Visual Studio, click on the SSIS menu and Variables.
From now on we can select them in the Script Task Editor. Note that under ReadWriteVariables, only variables can be selected, the parameters as they cannot be modified inside the package, only will appear under ReadOnlyVariables.
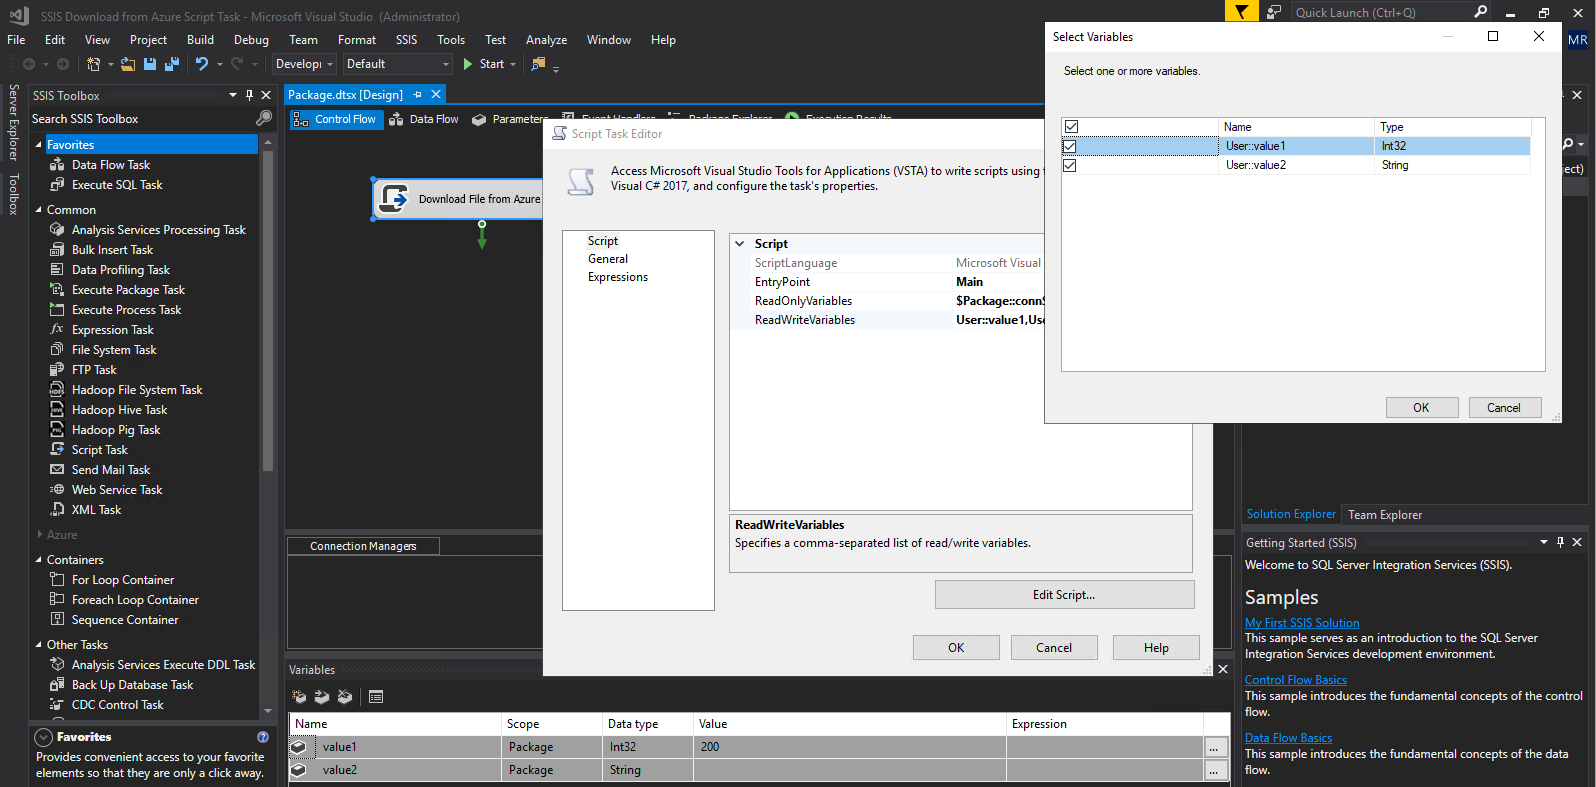
We can access them the same way as for parameters. So I will add the following code to my Main() method.
public void Main()
{
            // TODO: Add your code here
            int myValue = (int)Dts.Variables["value1"].Value;
            string myValue2 = (string)Dts.Variables["value2"].Value;

            myValue += 500;
            myValue2 = "The new value is now: ";

            MessageBox.Show(myValue2 + myValue);

            Dts.TaskResult = (int)ScriptResults.Success;
 }

Deploying the SSIS Project in SQL Server
I will deploy the project in SQL Server to show you how to change the parameters using the SSIS catalog in SQL Server Management Studio (SSMS).

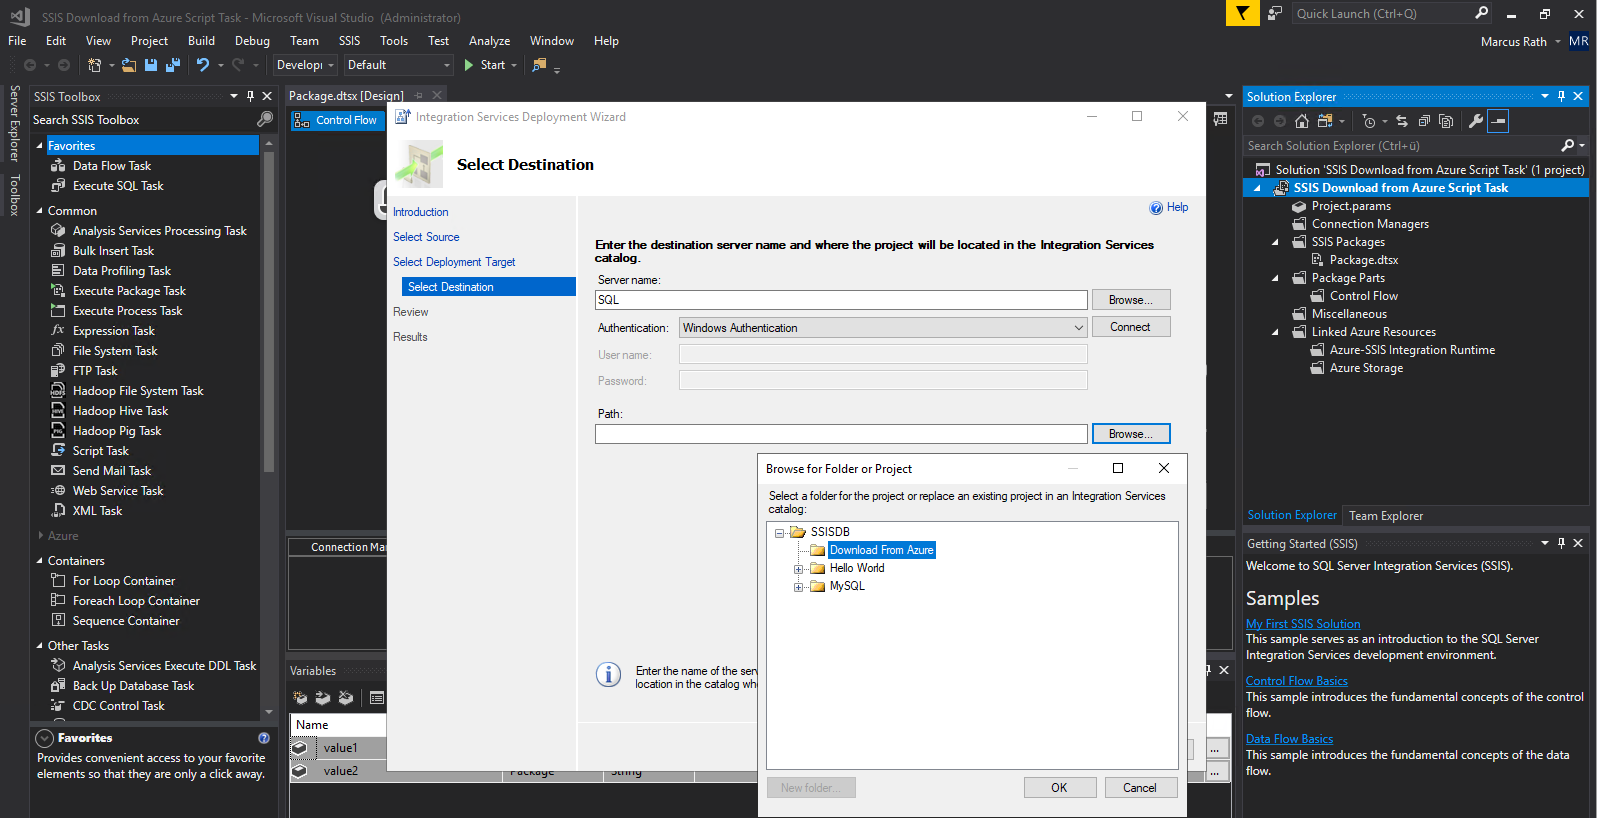

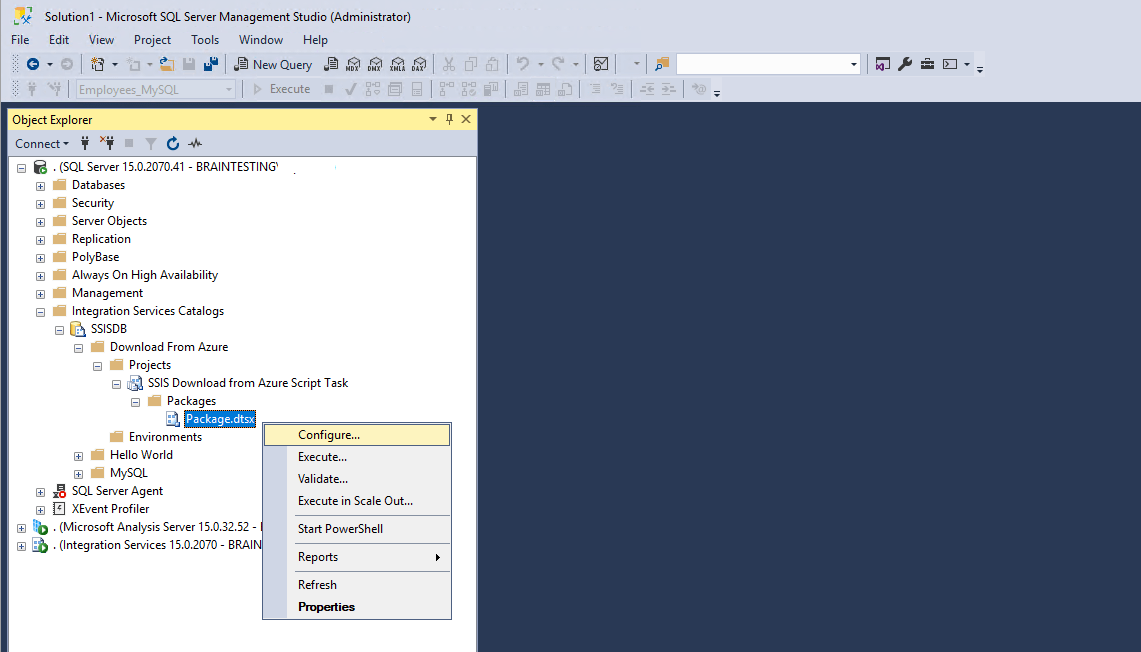
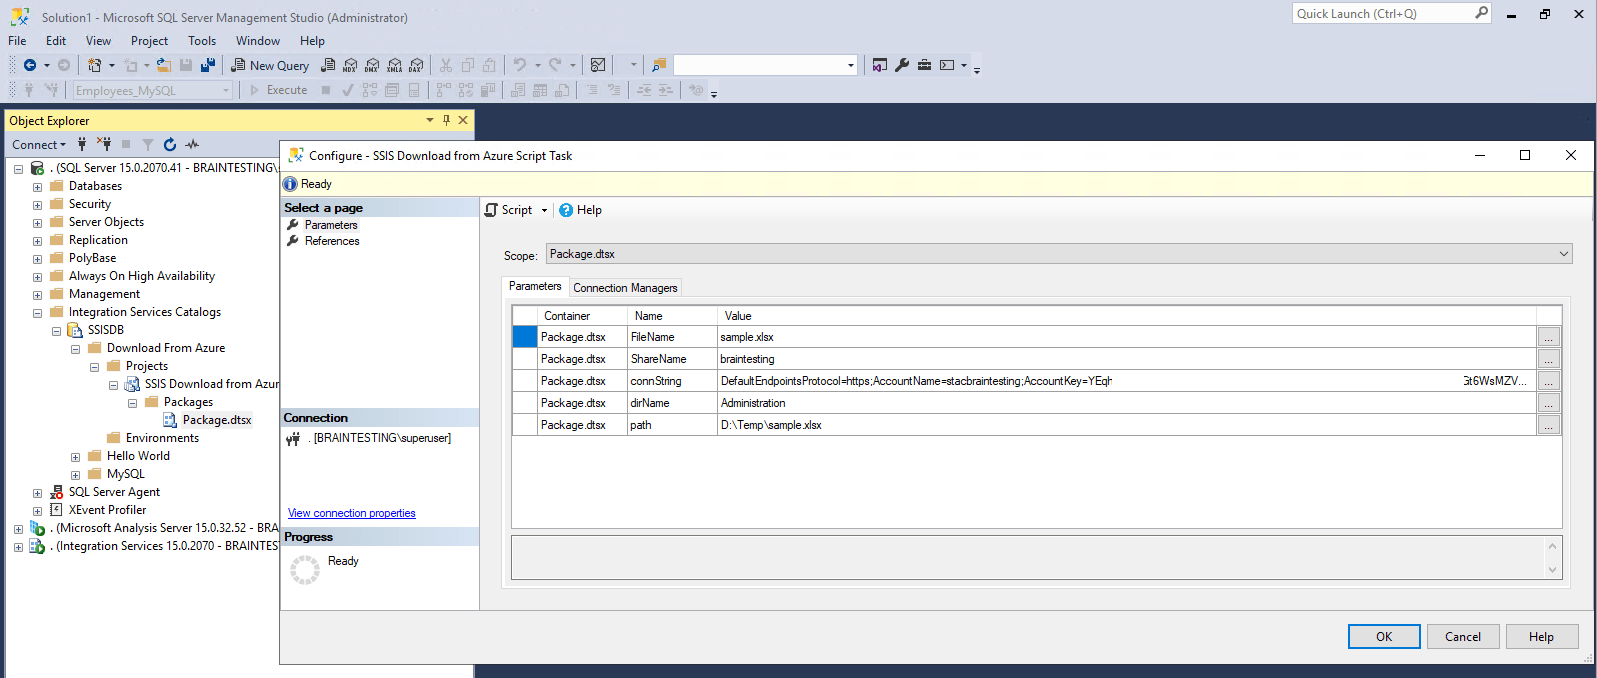
After successfully deployed to SQL Server we can open SSMS to configure the parameters using the SSIS catalog as follows.
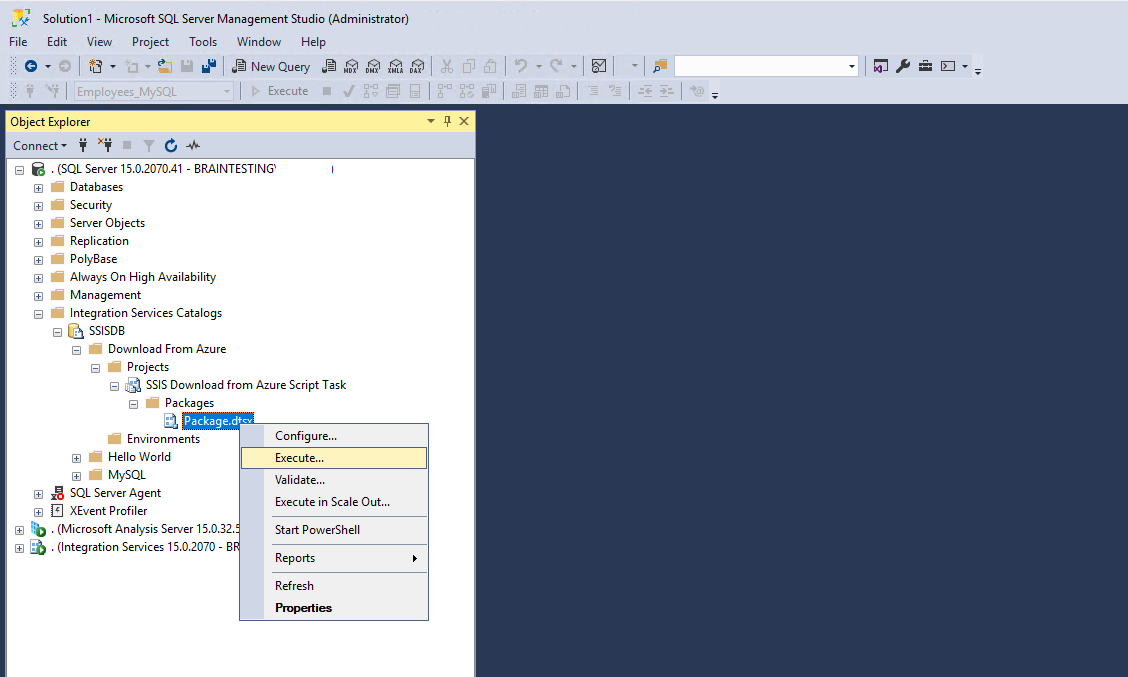
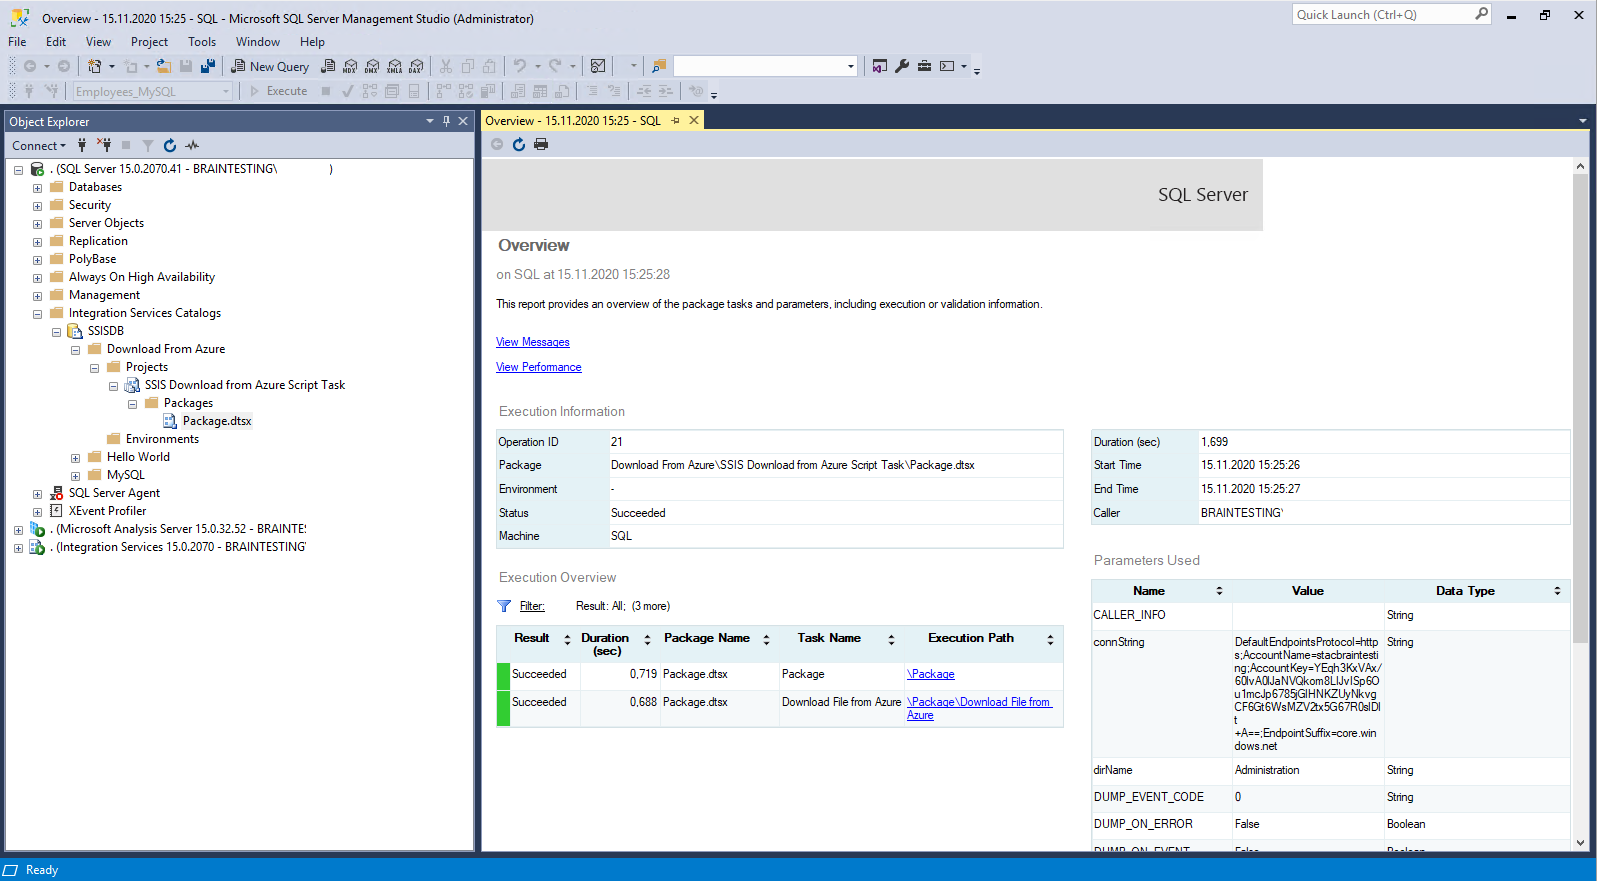
Finally we can test if it also works from the deployed project in SQL Server.
Looking also good 🙂
Fuslogvw.exe (Assembly Binding Log Viewer)
https://docs.microsoft.com/en-us/dotnet/framework/tools/fuslogvw-exe-assembly-binding-log-viewer
The Assembly Binding Log Viewer displays details for assembly binds. This information helps you diagnose why the .NET Framework cannot locate an assembly at run time. These failures are usually the result of an assembly deployed to the wrong location, a native image that is no longer valid, or a mismatch in version numbers or cultures. The common language runtime’s failure to locate an assembly typically shows up as a TypeLoadException in your application.
You must run fuslogvw.exe with administrator privileges.
This tool is automatically installed with Visual Studio. To run the tool, use the Developer Command Prompt for Visual Studio (or the Visual Studio Command Prompt in Windows 7) with administrator credentials. For more information, see Command Prompts.
At the command prompt, type the following:
fuslogvw
The viewer displays an entry for each failed assembly bind. For each failure, the viewer describes the application that initiated the bind; the assembly the bind is for, including name, version, culture and public key; and the date and time of the failure.
Links
How to load an Assembly in a SSIS script task that isn’t in the GAC
https://docs.microsoft.com/en-us/archive/blogs/dbrowne/how-to-load-an-assembly-in-a-ssis-script-task-that-isnt-in-the-gac
Global Assembly Cache
https://docs.microsoft.com/en-us/dotnet/framework/app-domains/gac
Visual Studio Tools for Applications (Vsta)
https://en.wikipedia.org/wiki/Visual_Studio_Tools_for_Applications
Fuslogvw.exe (Assembly Binding Log Viewer)
https://docs.microsoft.com/en-us/dotnet/framework/tools/fuslogvw-exe-assembly-binding-log-viewer
Gacutil.exe (Global Assembly Cache Tool)
https://docs.microsoft.com/en-us/dotnet/framework/tools/gacutil-exe-gac-tool
Working with Assemblies and the Global Assembly Cache
https://docs.microsoft.com/en-us/dotnet/framework/app-domains/working-with-assemblies-and-the-gac
Strong-named assemblies
https://docs.microsoft.com/en-us/dotnet/standard/assembly/strong-named
CorFlags.exe (CorFlags Conversion Tool)
https://docs.microsoft.com/en-us/dotnet/framework/tools/corflags-exe-corflags-conversion-tool