Mastering Microsoft Entra Application Proxy
This post will walk you through each step of setting up the Microsoft Entra Application Proxy to publish on-premise web applications and Remote Desktop which doesn’t requires you to open any inbound connections through your firewall.
The only cost for Application Proxy is the Microsoft Entra ID P1 licence, there are no other costs.
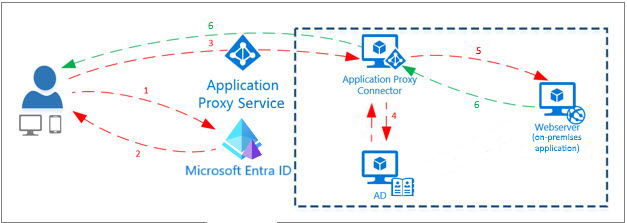
Microsoft Entra application proxy provides secure remote access to on-premises web applications. After a single sign-on to Microsoft Entra ID, users can access both cloud and on-premises applications through an external URL or an internal application portal. For example, application proxy can provide remote access and single sign-on to Remote Desktop, SharePoint, Teams, Tableau, Qlik, and line of business (LOB) applications.
Application proxy includes both the application proxy service, which runs in the cloud, and the private network connector, which runs on an on-premises server.
Microsoft Entra ID, the application proxy service, and the private network connector work together to securely pass the user sign-on token from Microsoft Entra ID to the web application.
Source: https://learn.microsoft.com/en-us/entra/identity/app-proxy/overview-what-is-app-proxy
About publishing Remote Desktop (RDS) by using the Microsoft Entra Application Proxy we will see in my next post.
Introduction
Users can access your on-premises applications the same way they access Microsoft 365 and other SaaS apps integrated with Microsoft Entra ID. You don’t need to change or update your applications to work with application proxy.
On-premises applications can use Azure’s authorization controls and security analytics. For example, on-premises applications can use Conditional Access and two-step verification.
Application proxy doesn’t require you to open inbound connections through your firewall.
On-premises solutions typically require you to setup and maintain demilitarized zones (DMZs), edge servers, or other complex infrastructures.
Application proxy runs in the cloud, which makes it easy to use. To use application proxy, you don’t need to change the network infrastructure or install more appliances in your on-premises environment.
Source: https://learn.microsoft.com/en-us/entra/identity/app-proxy/overview-what-is-app-proxy
About how application proxy works in detail you will find here more information https://learn.microsoft.com/en-us/entra/identity/app-proxy/overview-what-is-app-proxy#overview-of-how-application-proxy-works.
Remote access in the past
Previously, your control plane for protecting internal resources from attackers while facilitating access by remote users was all in the DMZ or perimeter network. But the VPN and reverse proxy solutions deployed in the DMZ used by external clients to access corporate resources aren’t suited to the cloud world. They typically suffer from the following drawbacks:
- Hardware costs
- Maintaining security (patching, monitoring ports, and so on)
- Authenticating users at the edge
- Authenticating users to web servers in the perimeter network
- Maintaining VPN access for remote users with the distribution and configuration of VPN client software. Also, maintaining domain-joined servers in the DMZ, which can be vulnerable to outside attacks.
In today’s cloud-first world, Microsoft Entra ID is best suited to control who and what gets into your network. Microsoft Entra application proxy integrates with modern authentication and cloud-based technologies, like SaaS applications and identity providers. This integration enables users to access apps from anywhere. Not only is application proxy more suited for today’s digital workplace, it’s more secure than VPN and reverse proxy solutions and easier to implement.
Set up Application Proxy
Application proxy is a Microsoft Entra service you configure in the Microsoft Entra admin center.
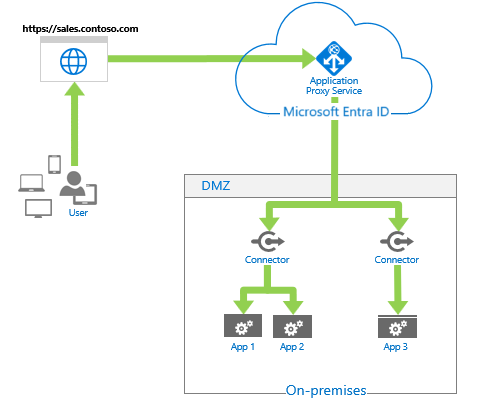
It enables you to publish an external public HTTP/HTTPS URL endpoint in the Azure Cloud, which connects to an internal application server URL in your organization.
These on-premises web apps can be integrated with Microsoft Entra ID to support single sign-on. Users can then access on-premises web apps in the same way they access Microsoft 365 and other SaaS apps.
Components of this feature include the application proxy service, which runs in the cloud, the private network connector, which is a lightweight agent that runs on an on-premises server, and Microsoft Entra ID, which is the identity provider. All three components work together to provide the user with a single sign-on experience to access on-premises web applications.
After a user authenticates, external users can access on-premises web applications by using a display URL or My Apps from their desktop or iOS/MAC devices.
Prerequisites
To add an on-premises application to Microsoft Entra ID, you need:
- An Microsoft Entra ID P1 or P2 subscription.
- An application administrator account.
- A synchronized set of user identities with an on-premises directory. Or create them directly in your Microsoft Entra tenants. Identity synchronization allows Microsoft Entra ID to preauthenticate users before granting them access to application proxy published applications. Synchronization also provides the necessary user identifier information to perform single sign-on (SSO).
- An understanding of application management in Microsoft Entra, see View enterprise applications in Microsoft Entra.
- An understanding of single sign-on (SSO), see Understand single sign-on.
Install and verify the Microsoft Entra private network connector
Application proxy uses the same connector as Microsoft Entra Private Access. The connector is called Microsoft Entra private network connector.
More about Microsoft Entra Global Secure Access (Private Access) you will find in my following post.
Sign in to the Microsoft Entra admin center as an Application Administrator of the directory that uses Application Proxy.
Select your username in the upper-right corner. Verify you’re signed in to a directory that uses Application Proxy. If you need to change directories, select Switch directory and choose a directory that uses Application Proxy.
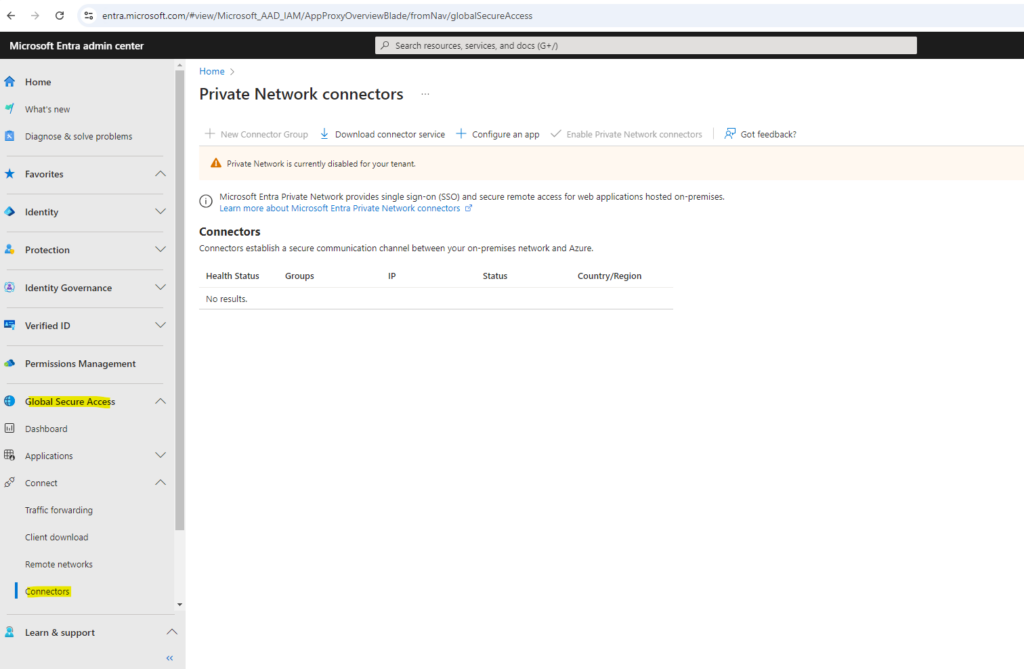
Browse to Global Secure Access > Connect > Connectors.
Select Download connector service.
The warning notification about Private Network is currently disabled for your tenant will disappear after installing the connector successfully in your on-premise environment.
Download and install the Private Network connector to enable a secure connection between applications inside your network and the Private Network connector. Only one installation is necessary to service all your published applications; a second connector can be installed for high availability purposes.
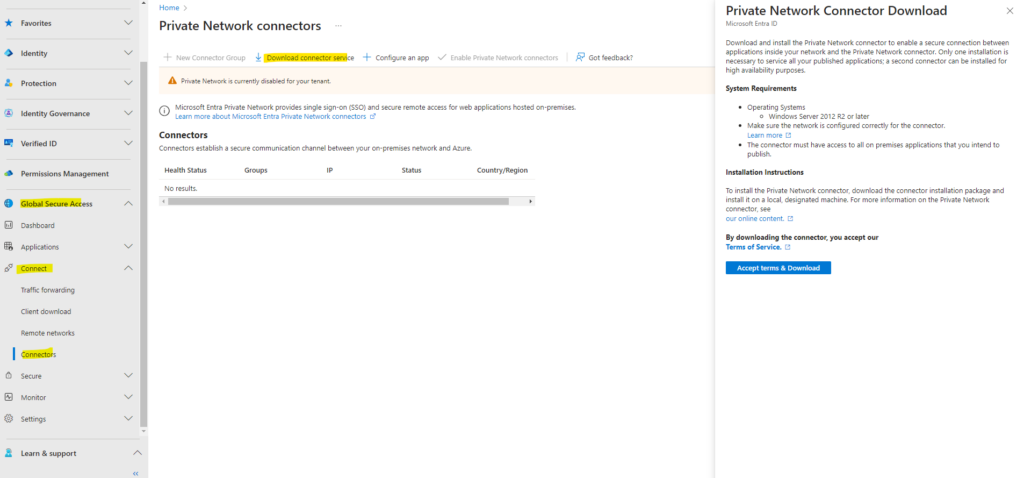
The Private Network connector I will install on a Window Server 2022 located in my internal LAN of my vSphere lab environment.
If there’s a firewall in the path, make sure it’s open. An open firewall allows the connector to make HTTPS (TCP) requests to the Application Proxy.
Open the following ports to outbound traffic.
-> TCP 80 Downloading certificate revocation lists (CRLs) while validating the TLS/SSL certificate
-> TCP 443 All outbound communication with the Application Proxy serviceAllow access to a set of URLs outbound as shown here https://learn.microsoft.com/en-us/entra/global-secure-access/how-to-configure-connectors#allow-access-to-urls.
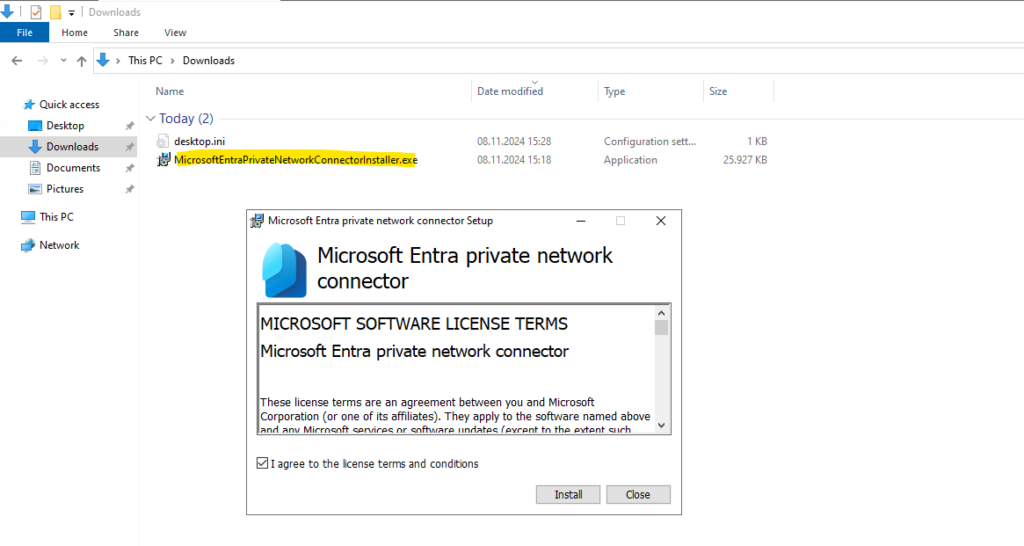
Sign-in to Azure.
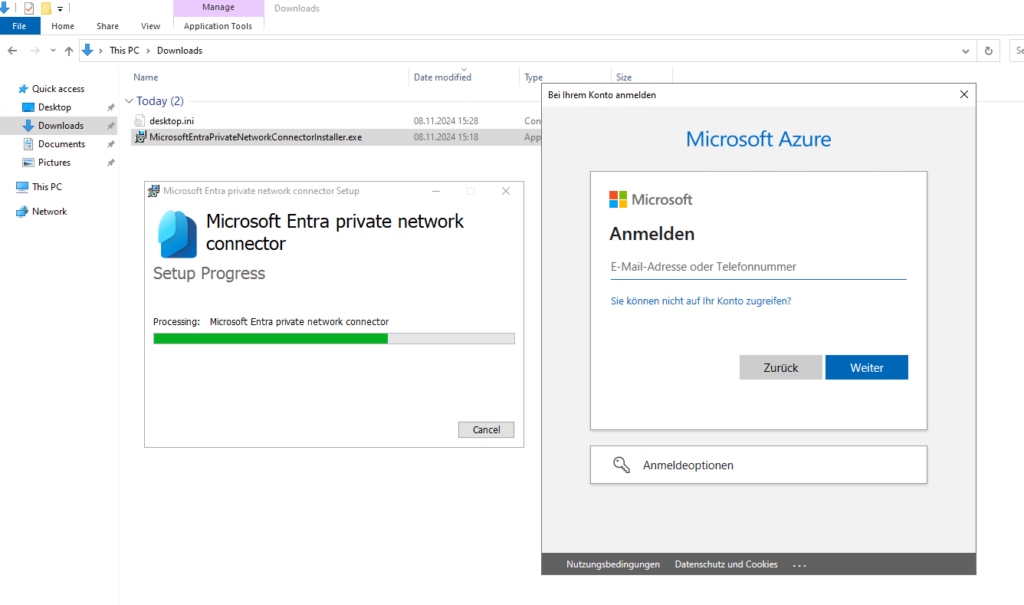
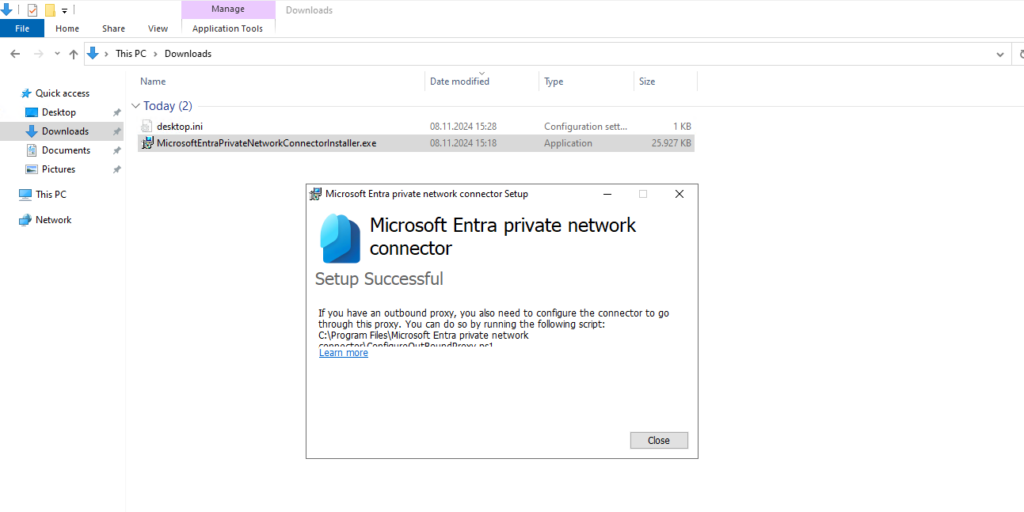
Verify that the following both services are running after the installation.
- Microsoft Entra private network connector
- Microsoft Entra private network connector updater

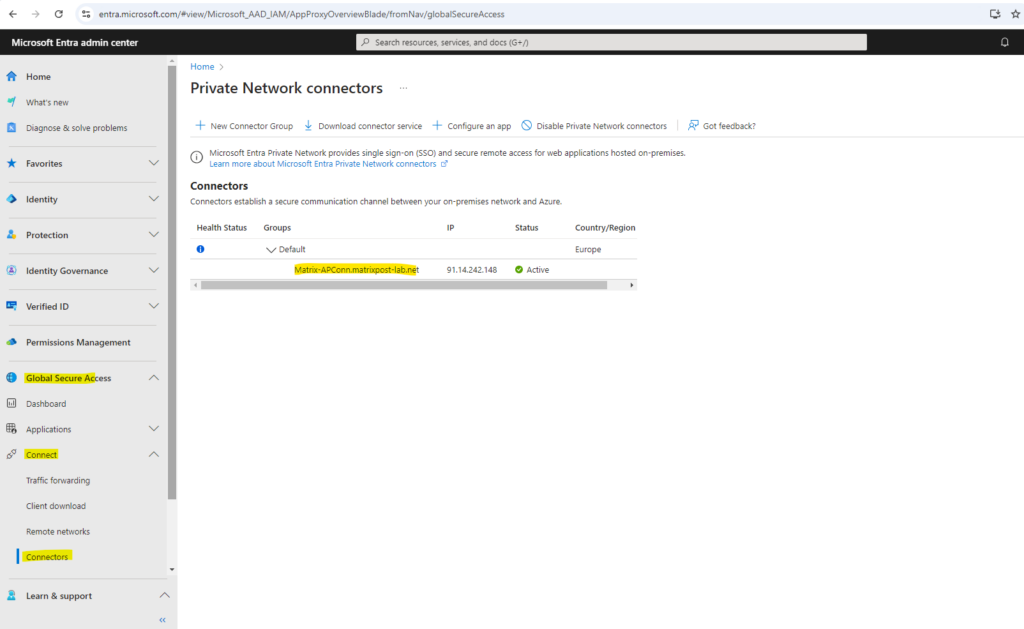
To confirm the connector is installed and registered correctly:
Back to the Microsoft Entra admin center where the warning notification about Private Network is currently disabled for your tenant is gone and we will therefore see our newly installed private network connector which runs in our on-premise environment.
An active green label indicates that your connector can connect to the service. However, even though the label is green, a network issue could still block the connector from receiving messages.
Add an on-premises web app to Microsoft Entra ID
Add on-premises applications to Microsoft Entra ID.
More about App Registrations vs. Enterprise Applications you will find in my following post.
Sign in to the Microsoft Entra admin center as at least an Application Administrator.
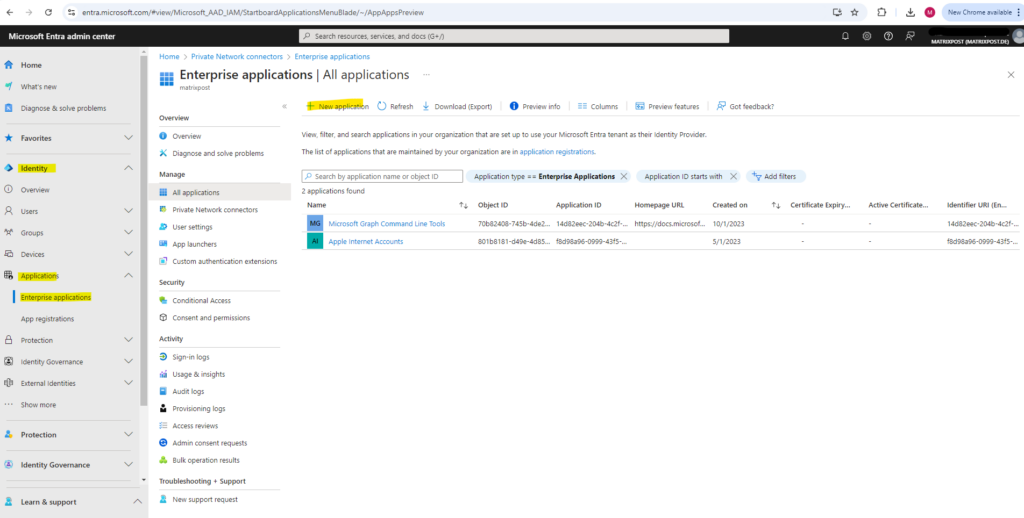
Browse to Identity > Applications > Enterprise applications.
Select New application.
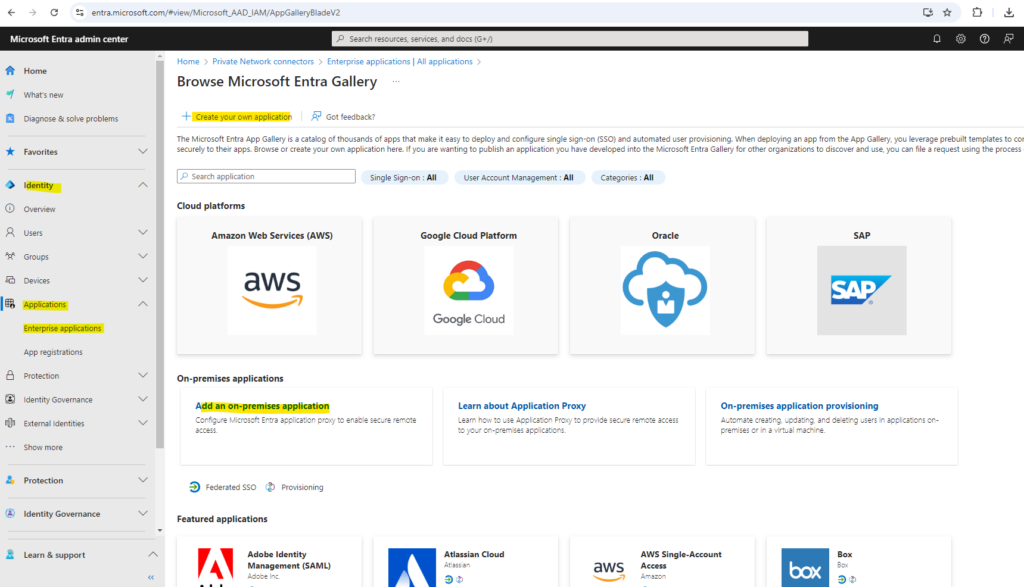
Select Add an on-premises application button below.
Alternatively, you can select Create your own application at the top of the page and then select Configure application proxy for secure remote access to an on-premises application.
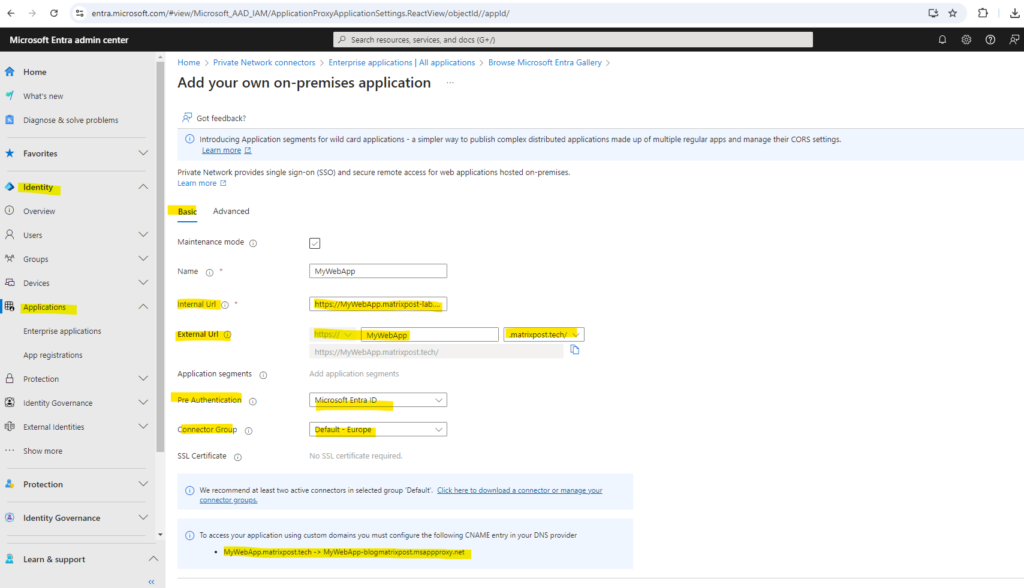
In the Add your own on-premises application section, provide the following information about your application:
- Internal Url: https://MyWebApp.matrixpost-lab.net
- External Url: https://MyWebApp.matrixpost.tech
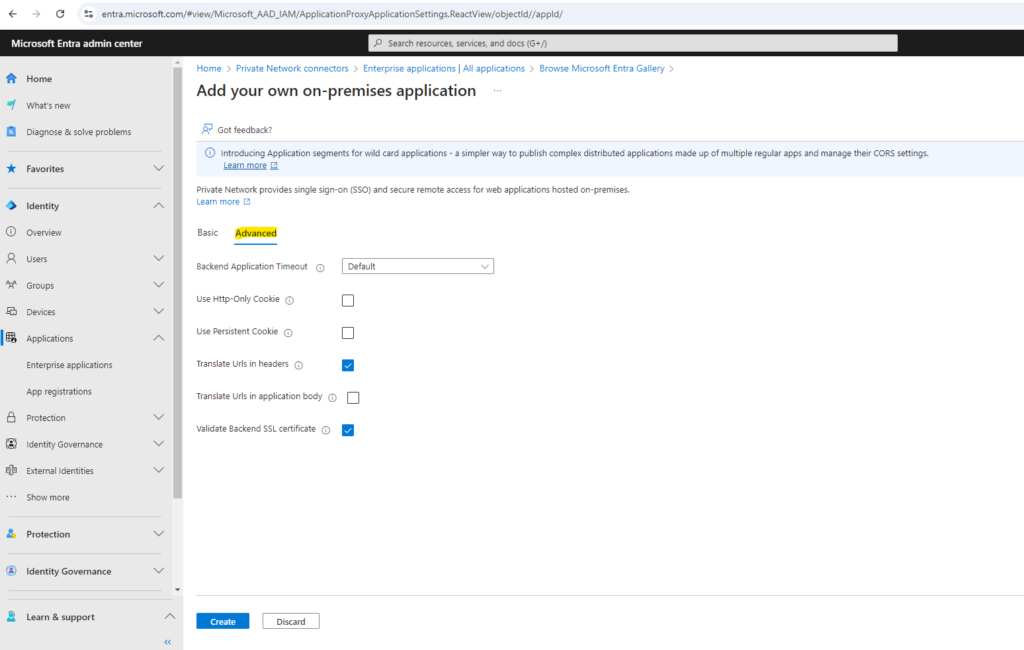
On the Advanced tab I will leave the default settings as shown below. Finally we can click on Create.
The application will now appear under All applications.
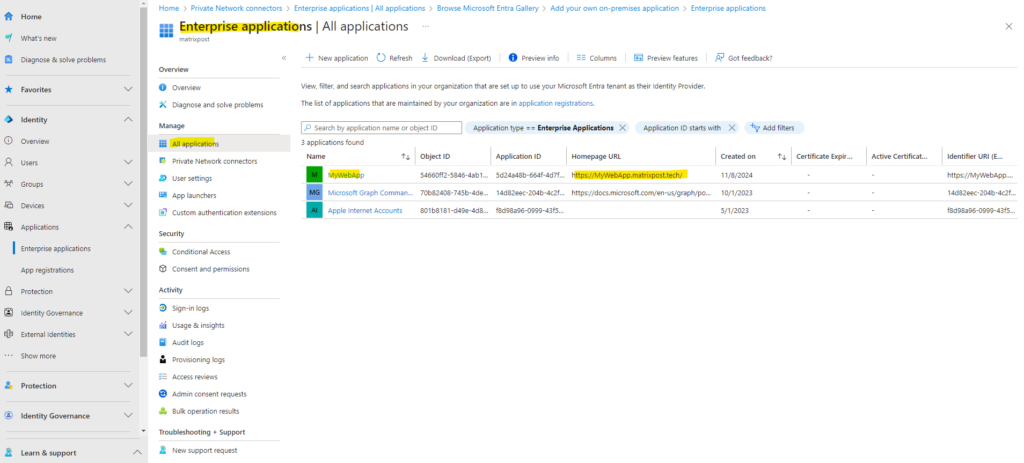
We also need to upload a SSL certificiate for the application. So above under All applications click on the application and then under Application proxy click on Add SSL Certficate as shown below.
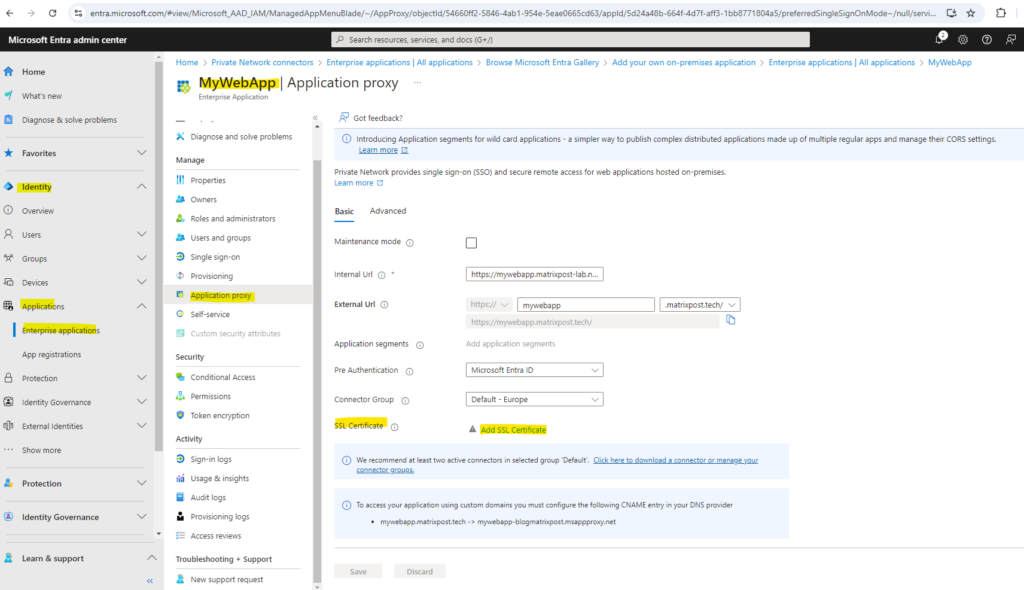
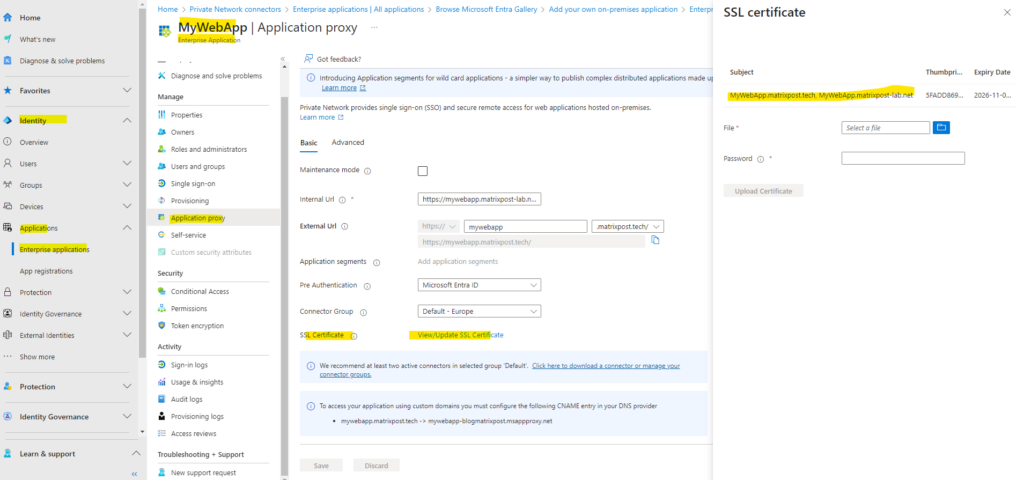
Upload the SSL certificate from your on-premise web app and be sure to also include the FQDN of the external URL as subject alternative name.
I will use here SSL certificates from my own PKI in Active Directory. More about how to set up a PKI in Active Directory Certificate Services (AD CS) you will find in my following post.
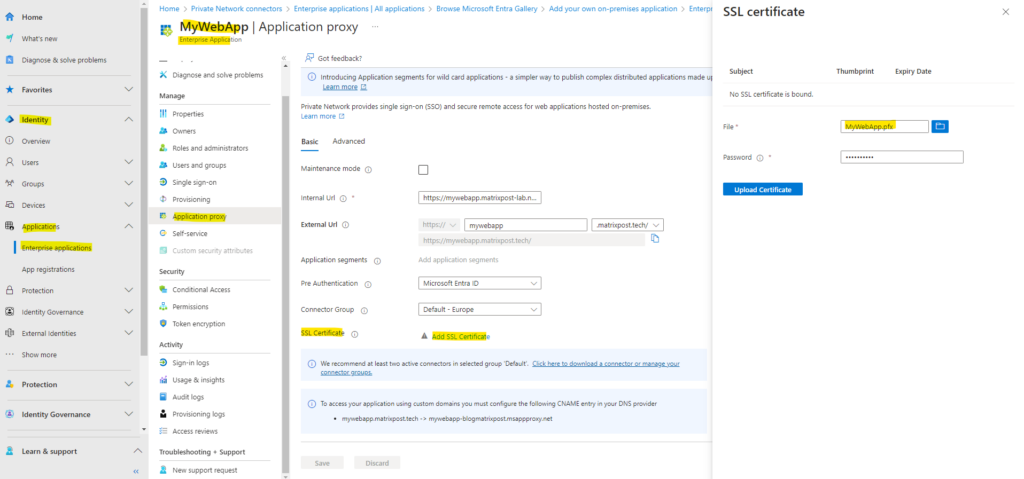
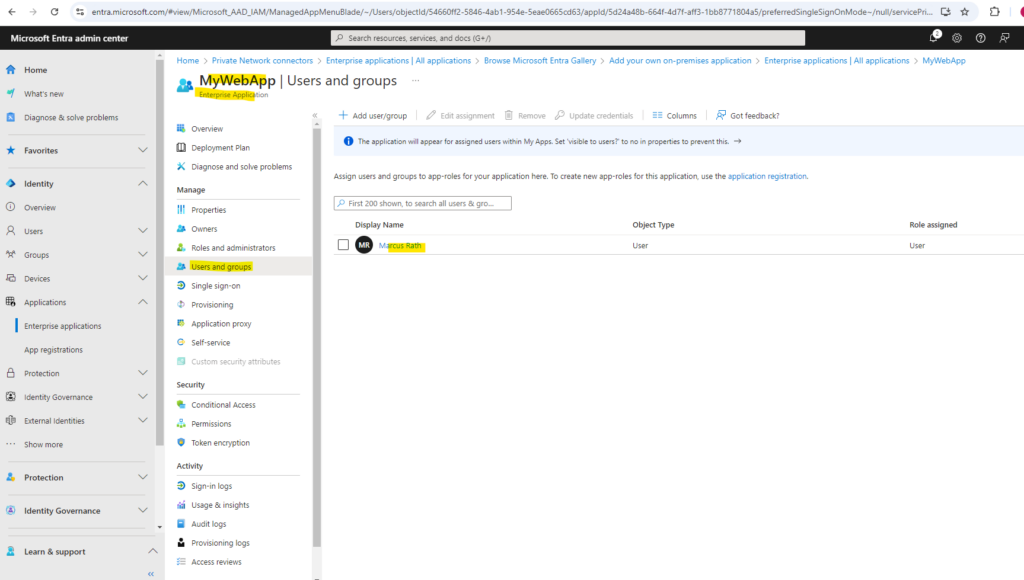
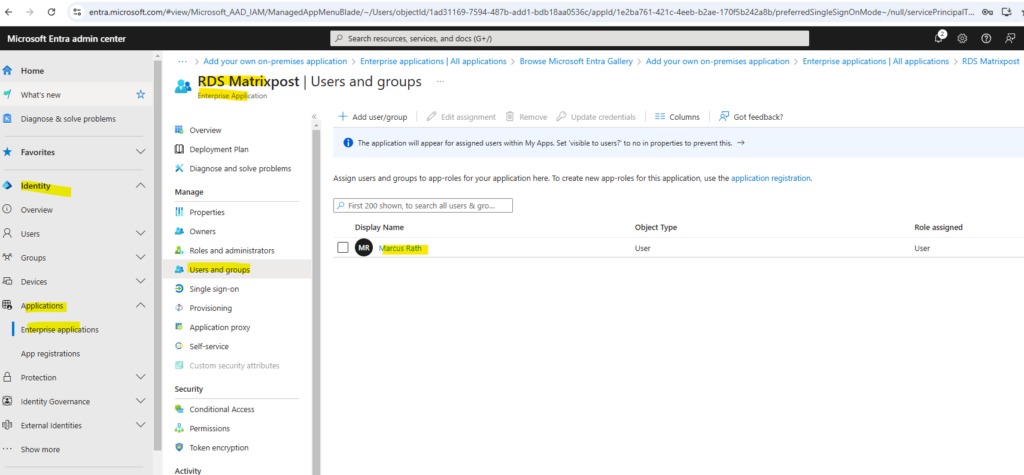
And because we set for pre authentication above Microsoft Entra ID, we also need to add the users we want to authorize for the application under Users and groups as shown below.
To access my application by using custom domains we need to configure the following CNAME entry in our DNS provider. (shown above in the output when configuring the web app in Microsoft Entra ID.
MyWebApp.matrixpost.tech -> MyWebApp-blogmatrixpost.msappproxy.net
After adding the above CNAME record within my matrixpost.tech domain, I will first check if the public FQDN of my web app will be resolved successful into one of Microsoft’s chained CNAME records.
Looks good!
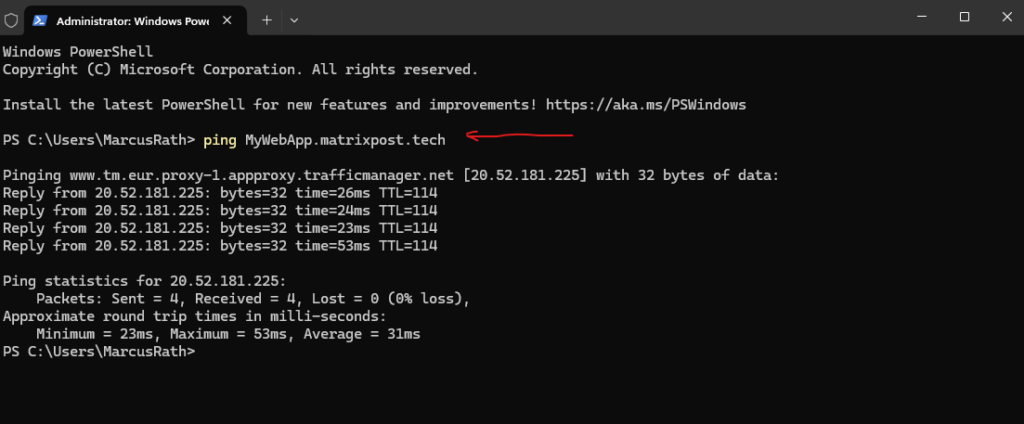
I will now try if it works and browse to my previously defined external URL.

Because pre-authentication was set we first need to provide our credentials to access the web app.
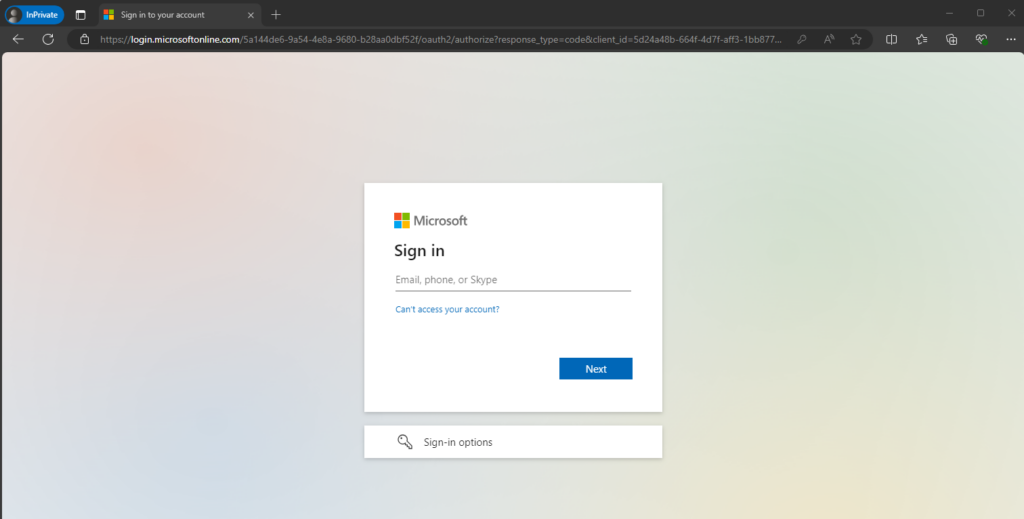
Looks good!

Analyze the HTTP Request to the Web App from external
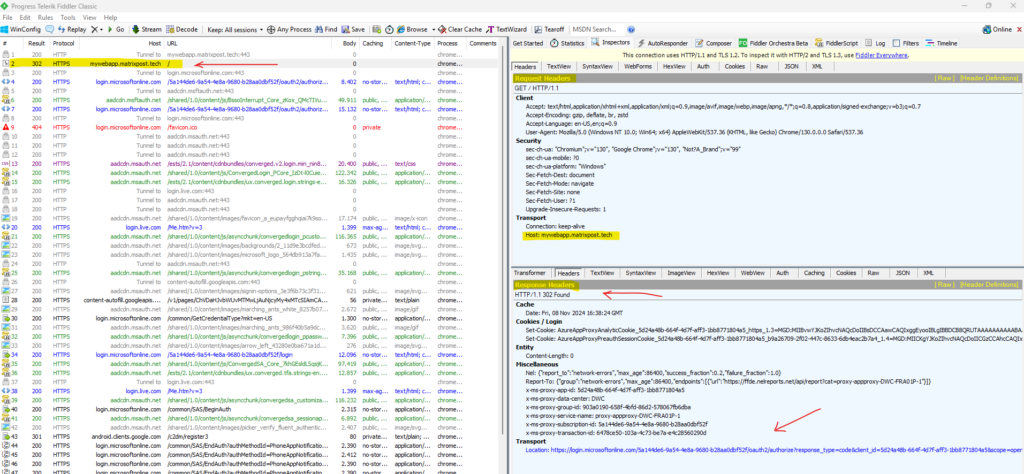
During the above test accessing my on-premise web app from external through the internet and Microsoft Entra Application Proxy, I was capturing the session by using Fiddler.
More about Fiddler you will also find in my following post.
Below we can see, that when browsing to our web app’s external URL, the Microsoft Entra Application Proxy endpoint will first redirect us to the authorization server from Microsoft and its Url https://login.microsoftonline.com.
More about OAuth authorization server and how OAuth 2.0 and OpenID Connect works, you will find in my following post.
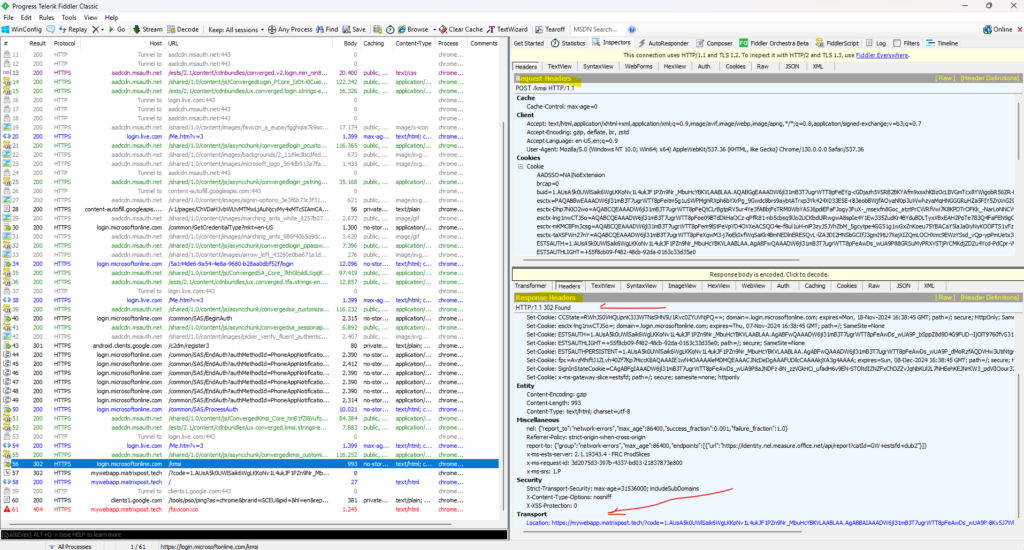
The HTTP response status code 302 Found is a common way of performing URL redirection. The HTTP/1.0 specification (RFC 1945) initially defined this code, and gave it the description phrase Moved Temporarily rather than Found.
After a successful authorization against the authorization server from Microsoft, we finally get redirected back to our on-premise web app.
Troubleshooting
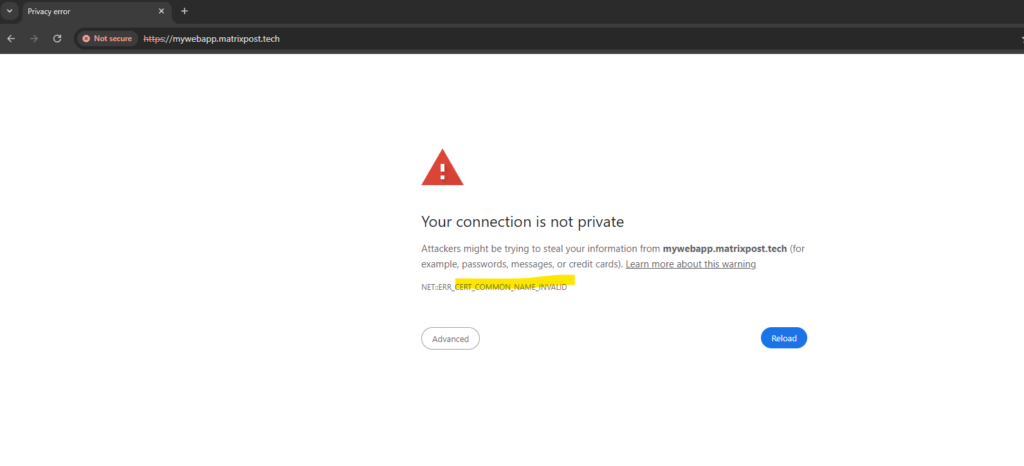
net::ERR_CERT_COMMON_NAME_INVALID
You will run into this error when:
- you forgot to upload a SSL certificate for the created web app in Azure
- the FQDN from the external URL is not included as subject alternative name on the certificate
- the assigned certificate on your IIS web server running the web app doesn’t include the FQDN from the external URL
In my case here I just doesn’t uploaded the certificate in Azure. Go to the application and under Application proxy we can upload the certificate as shown below.


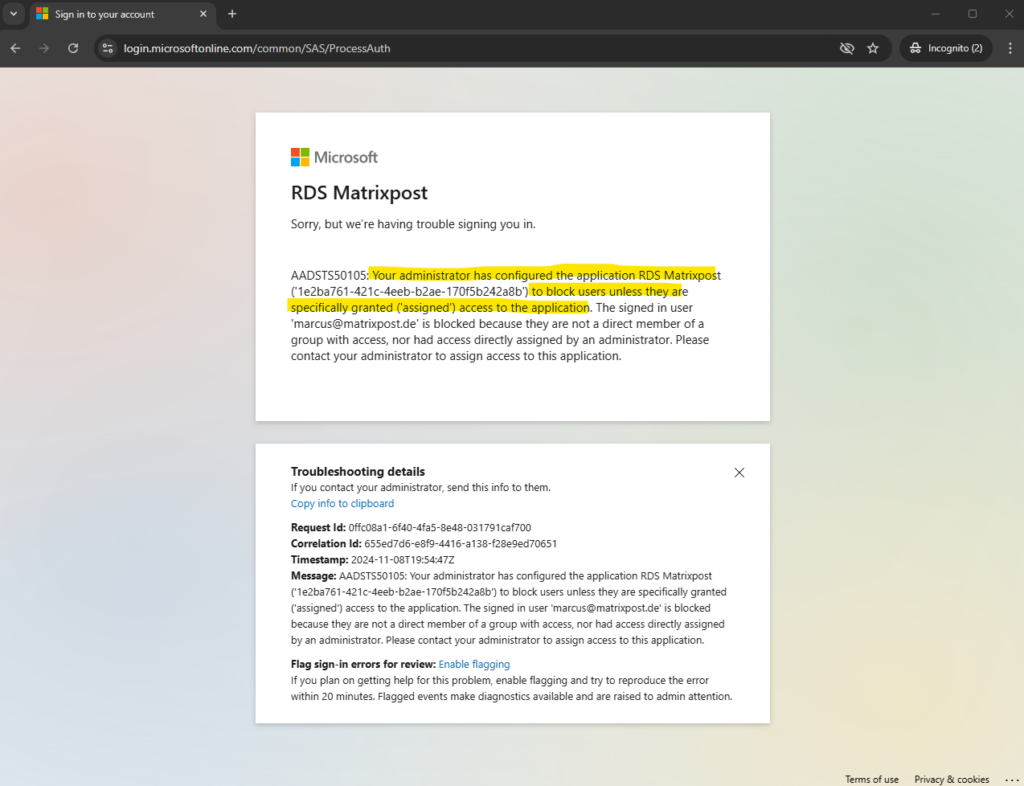
Your administrator has configured the application to block users unless they are specifically granted (‘assigned’) access to the application
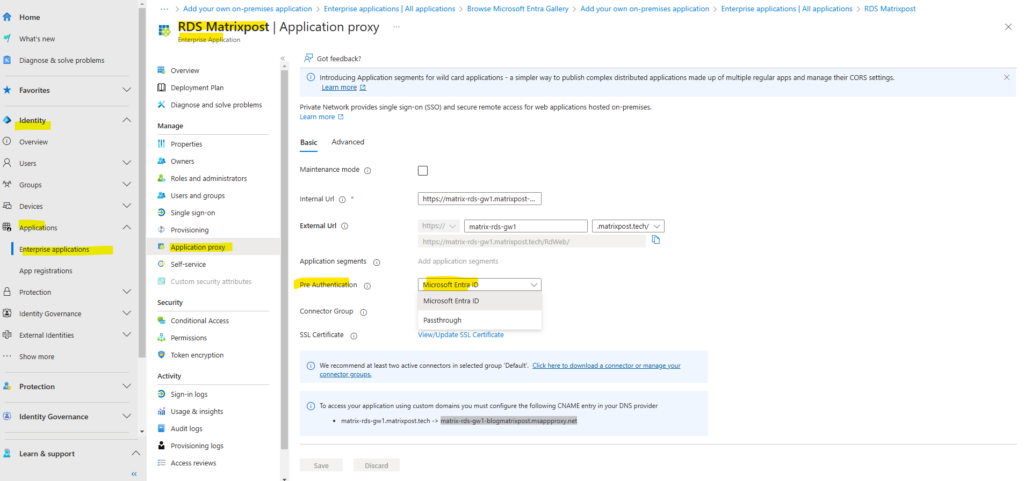
This error indicates that you have enabled pre-authentication for the application in Azure and the user which is trying to authenticate is not added under users and groups for the application to access.
Here you can see that pre-authentication is enabled for the application.
Within the application in Azure navigate to Users and groups and add the desired users which should have access to this application.
About publishing Remote Desktop (RDS) by using the Microsoft Entra Application Proxy we will see in my next post.
Links
Using Microsoft Entra application proxy to publish on-premises apps for remote users
https://learn.microsoft.com/en-us/entra/identity/app-proxy/overview-what-is-app-proxyAdd an on-premises application for remote access through application proxy in Microsoft Entra ID
https://learn.microsoft.com/en-us/entra/identity/app-proxy/application-proxy-add-on-premises-applicationHow to configure private network connectors for Microsoft Entra Private Access and Microsoft Entra application proxy
https://learn.microsoft.com/en-us/entra/global-secure-access/how-to-configure-connectorsTroubleshoot application proxy problems and error messages
https://learn.microsoft.com/en-us/entra/identity/app-proxy/application-proxy-troubleshootPublish Remote Desktop with Microsoft Entra application proxy
https://learn.microsoft.com/en-us/entra/identity/app-proxy/application-proxy-integrate-with-remote-desktop-servicesRemote Desktop Services overview in Windows Server
https://learn.microsoft.com/en-us/windows-server/remote/remote-desktop-services/remote-desktop-services-overviewAzure AD Application Proxy
https://www.msxfaq.de/cloud/azure/azure_ad_application_proxy.htm
Tags In
Related Posts
Latest posts
Deploying NetApp Cloud Volumes ONTAP (CVO) in Azure using NetApp Console (formerly BlueXP) – Part 5 – Backup and Recovery
Follow me on LinkedIn


