Using Azure File Sync in combination with an on-premise DFS Domain Namespace
In this post I want to show how to set up Azure File Sync in combination with an on-premise DFS domain namespace.
Azure File Sync enables centralizing your organization’s file shares in Azure Files, while keeping the flexibility, performance, and compatibility of a Windows file server.
Azure File Sync has the ability to transform Windows Server into a quick cache of your Azure file share. You can use any protocol that’s available on Windows Server to access your data locally, including SMB, NFS, and FTPS.
Source: https://learn.microsoft.com/en-us/azure/storage/file-sync/file-sync-introduction
Azure File Sync is a service that allows you to cache several Azure file shares on on-premises Windows Server or cloud VM.
The files will be stored in the cloud in Azure file shares. Azure file shares can be used in two ways: by directly mounting these serverless Azure file shares (SMB) or by caching Azure file shares on-premises using Azure File Sync.
Which deployment option you choose changes the aspects you need to consider as you plan for your deployment.
- Direct mount of an Azure file share: Since Azure Files provides SMB access, you can mount Azure file shares on-premises or in the cloud using the standard SMB client available in Windows, macOS, and Linux. Because Azure file shares are serverless, deploying for production scenarios does not require managing a file server or NAS device. This means you don’t have to apply software patches or swap out physical disks.
- Cache Azure file share on-premises with Azure File Sync: Azure File Sync enables you to centralize your organization’s file shares in Azure Files, while keeping the flexibility, performance, and compatibility of an on-premises file server. Azure File Sync transforms an on-premises (or cloud) Windows Server into a quick cache of your
An Azure File Sync deployment has three fundamental management objects:
- Azure file share: An Azure file share is a serverless cloud file share, which provides the cloud endpoint of an Azure File Sync sync relationship. Files in an Azure file share can be accessed directly with SMB or the FileREST protocol, although we encourage you to primarily access the files through the Windows Server cache when the Azure file share is being used with Azure File Sync. This is because Azure Files today lacks an efficient change detection mechanism like Windows Server has, so changes to the Azure file share directly will take time to propagate back to the server endpoints.
- Server endpoint: The path on the Windows Server that is being synced to an Azure file share. This can be a specific folder on a volume or the root of the volume. Multiple server endpoints can exist on the same volume if their namespaces do not overlap.
- Sync group: The object that defines the sync relationship between a cloud endpoint, or Azure file share, and a server endpoint. Endpoints within a sync group are kept in sync with each other. If for example, you have two distinct sets of files that you want to manage with Azure File Sync, you would create two sync groups and add different endpoints to each sync group.
Source: https://learn.microsoft.com/en-us/azure/storage/file-sync/file-sync-planning
Create On-Premise DFS Namespace
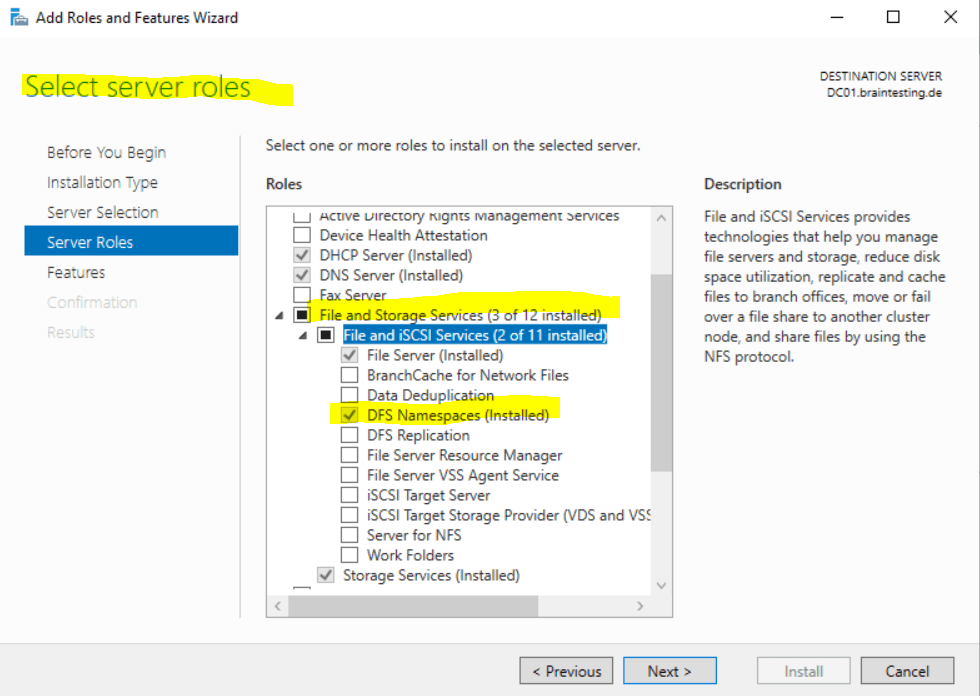
First I will set up a new DFS namespace in my lab environment. Therefore we need to install the server role DFS Namspace within the File and Storage Services.
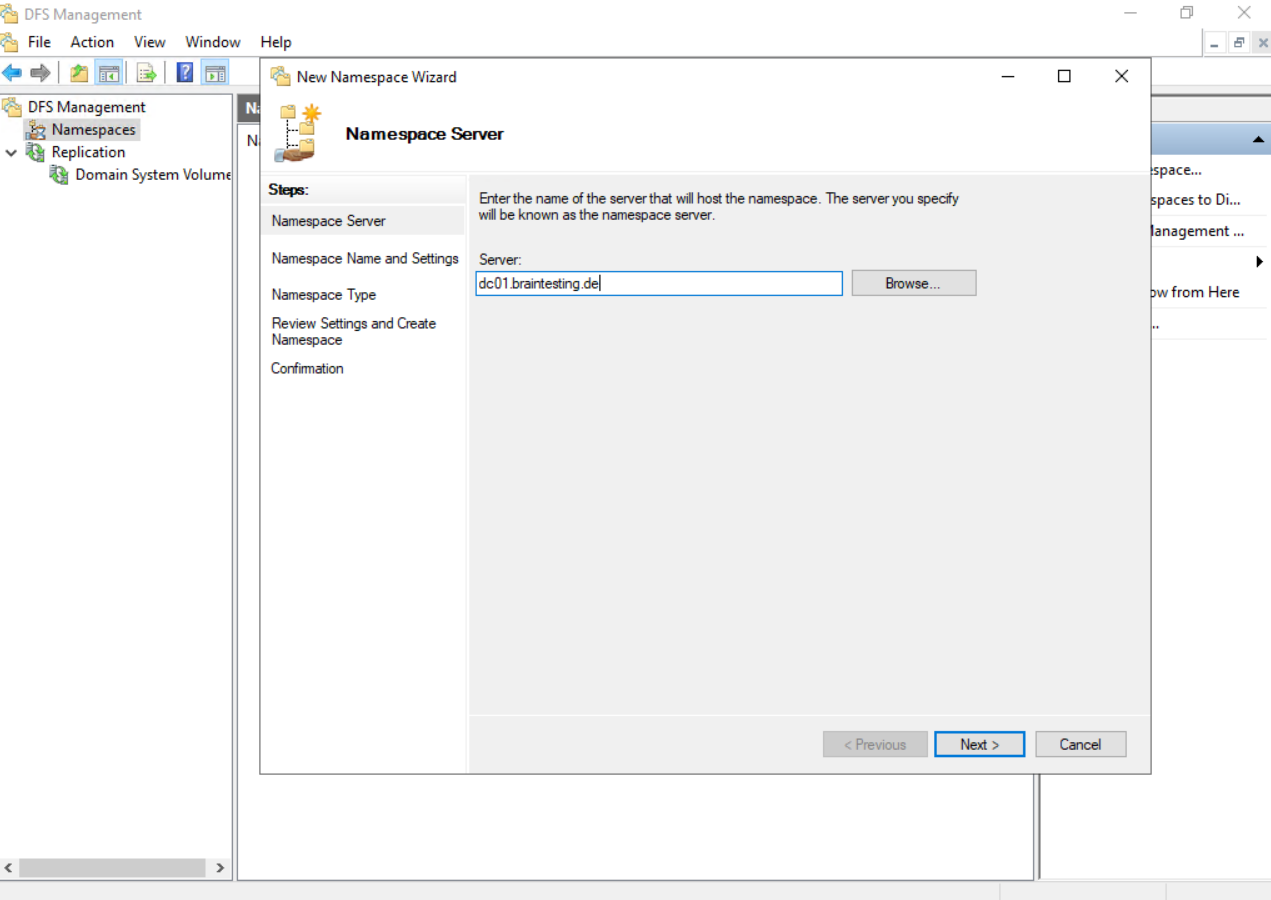
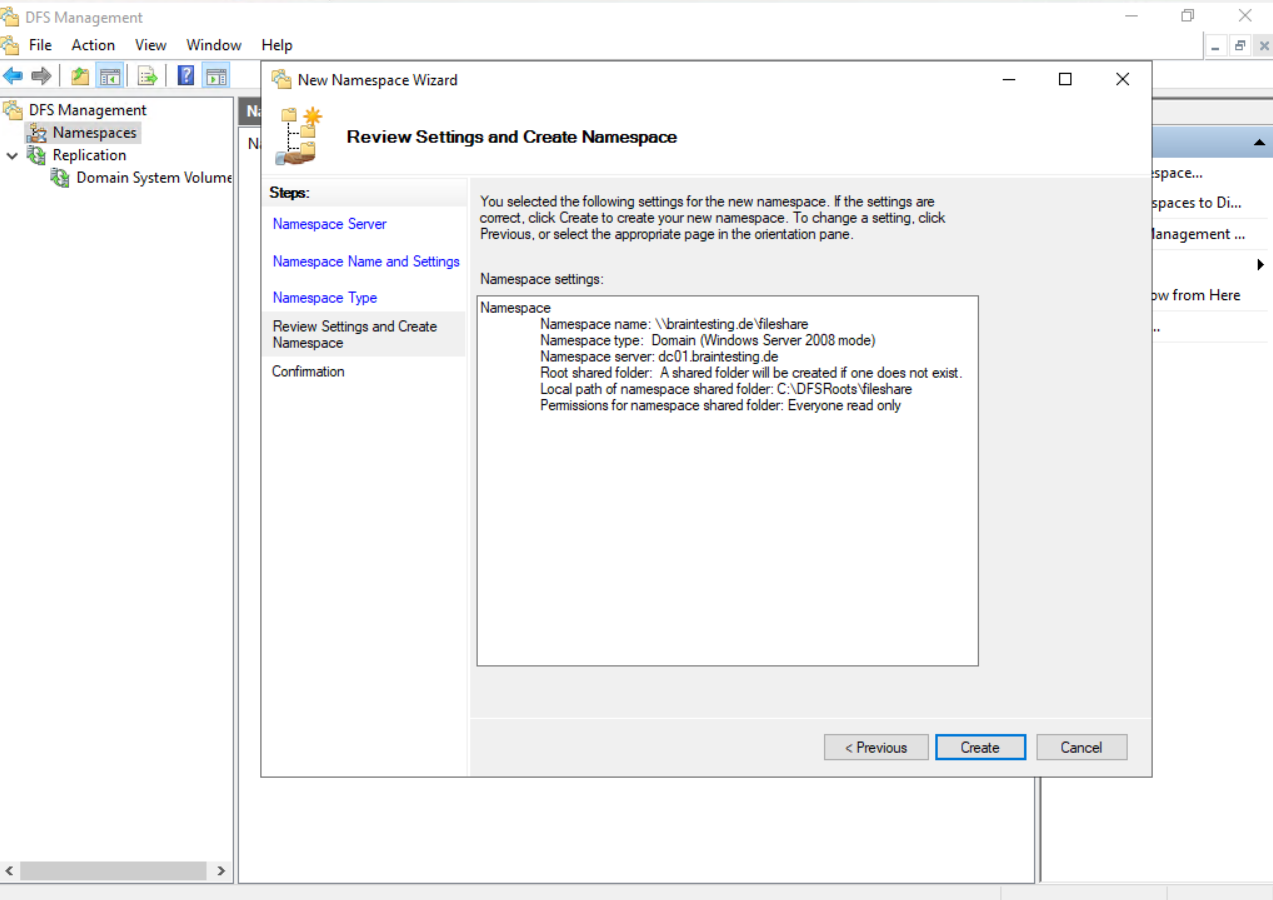
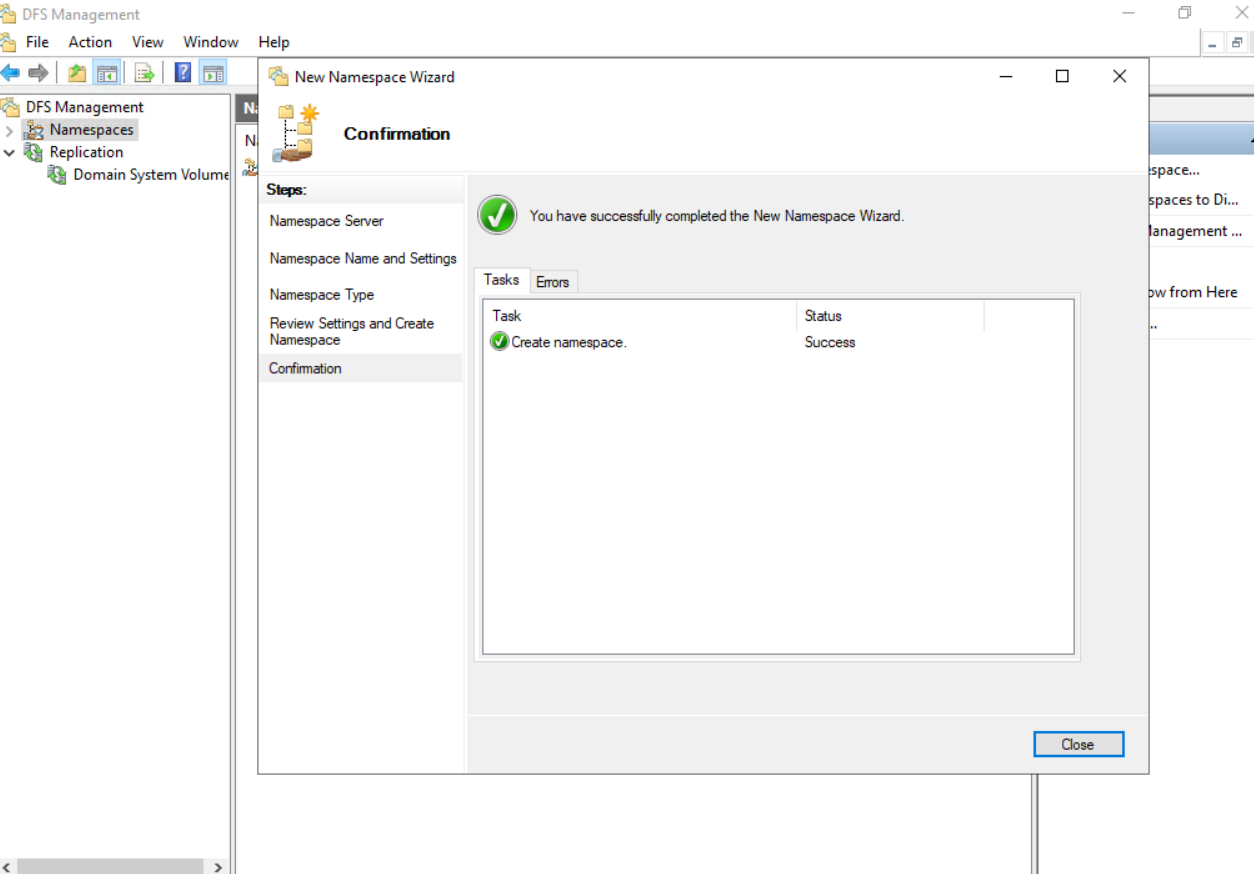
In the DFS Management console right click on Namespaces –> New Namespace …
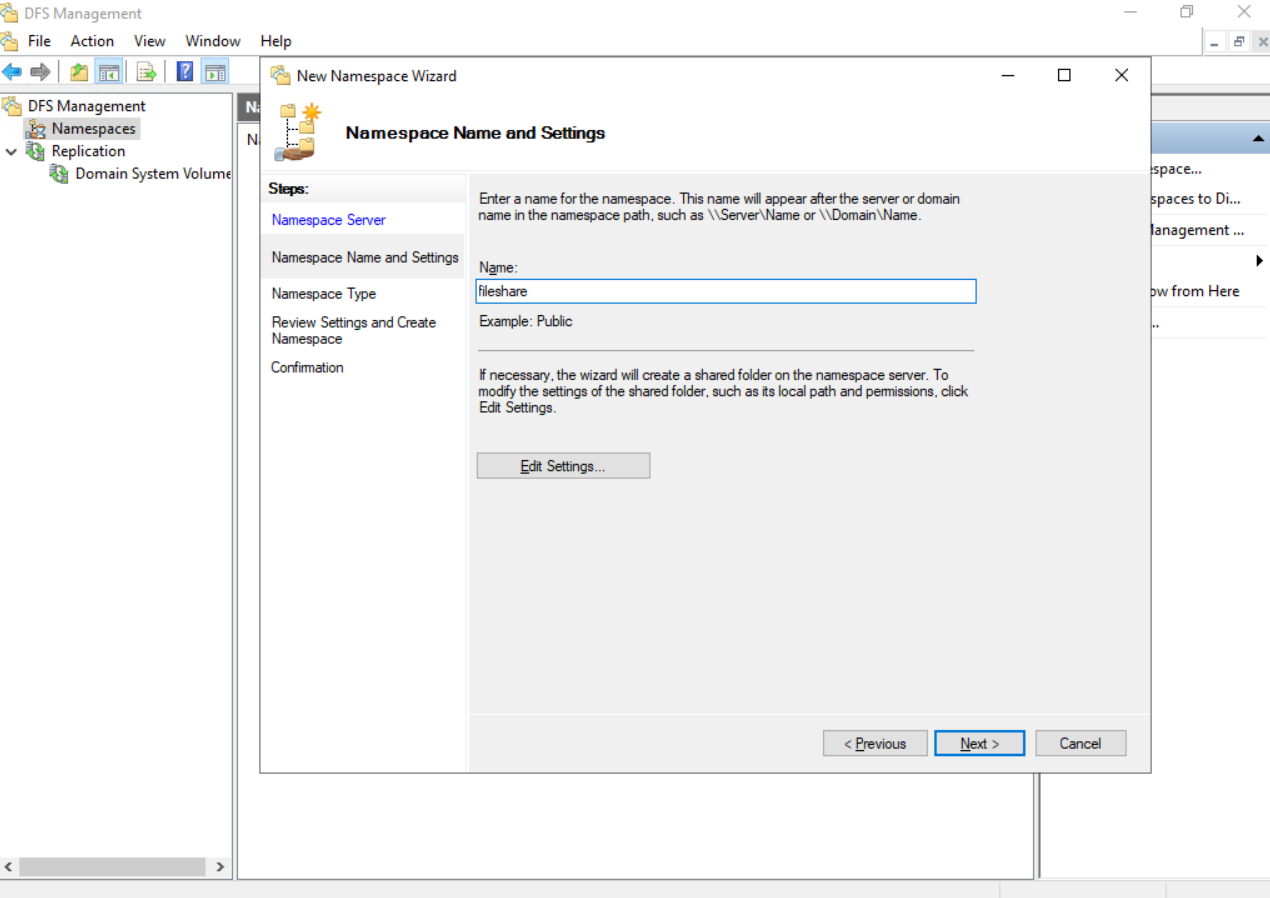
Enter a name for the namespace.
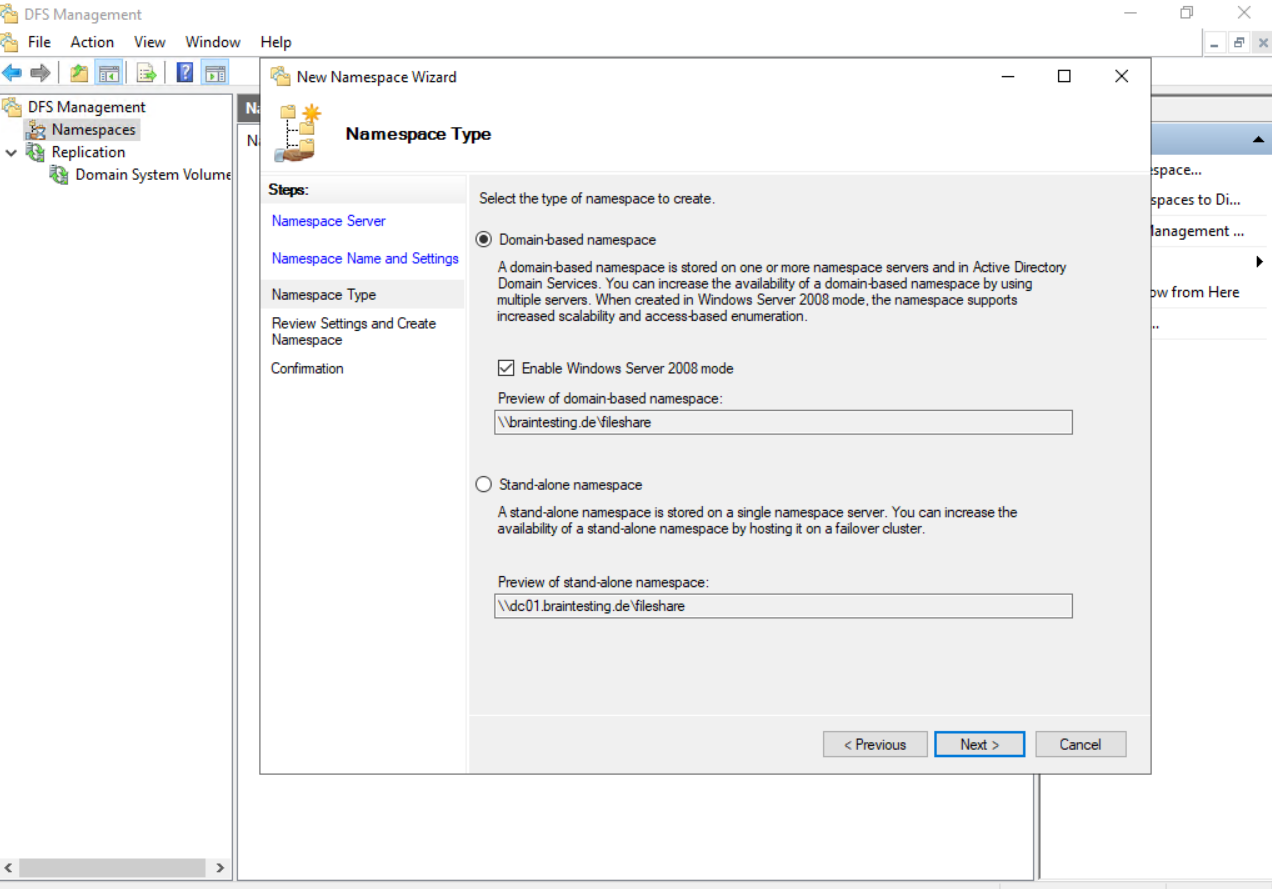
For the Type I will create a domain-based namespace which is stored in Active Directory.
Choose a namespace type
https://learn.microsoft.com/en-us/windows-server/storage/dfs-namespaces/choose-a-namespace-type
Now after the namespace is created, which is the root of our shares, we need to create for each share a dedicated folder.
So right click on the namespace and click on New Folder …
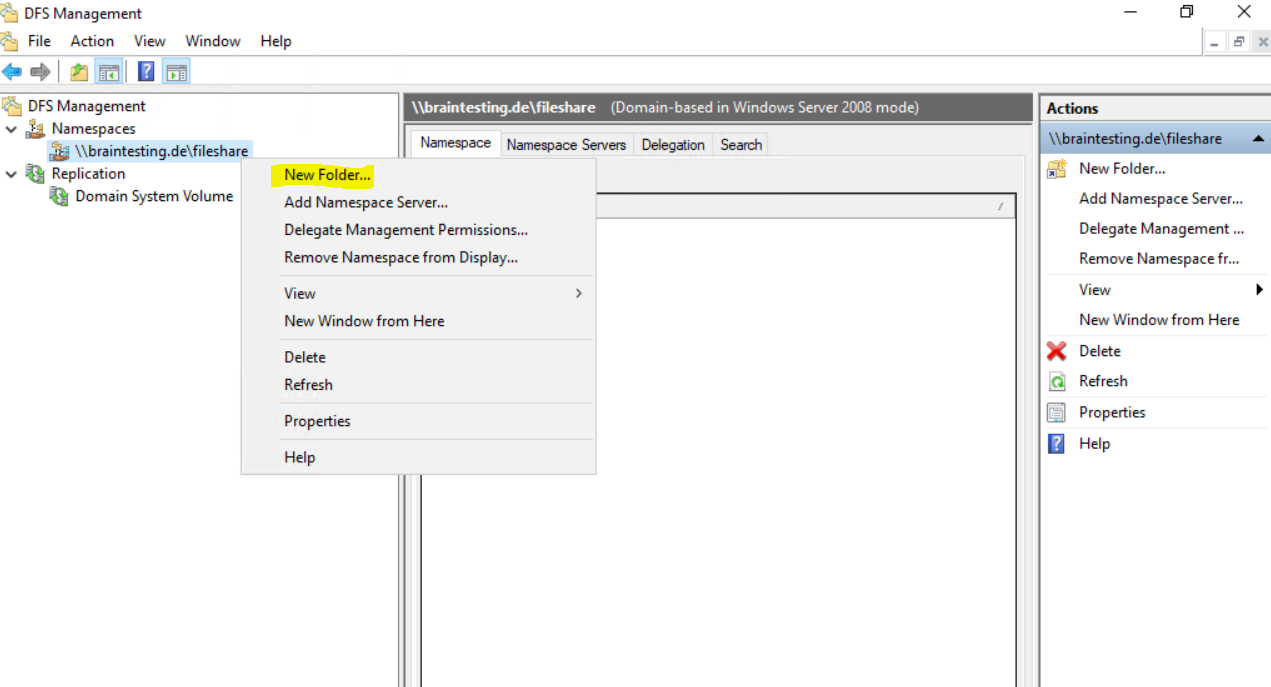
Enter a name for the new folder (share) and also a target which points to the actual folder in your network where the data is located.
The target is on a member server in the network with the FQDN sql.braintesting.de on which I createda shared folder named _BRAIN_FILESSHARES. Within this shared folder the folders from my DFS Namespace will be created.
You can of course also use several servers in your network to distribute the folders created under this DFS Namespace which actually is the intention to use a namespace.

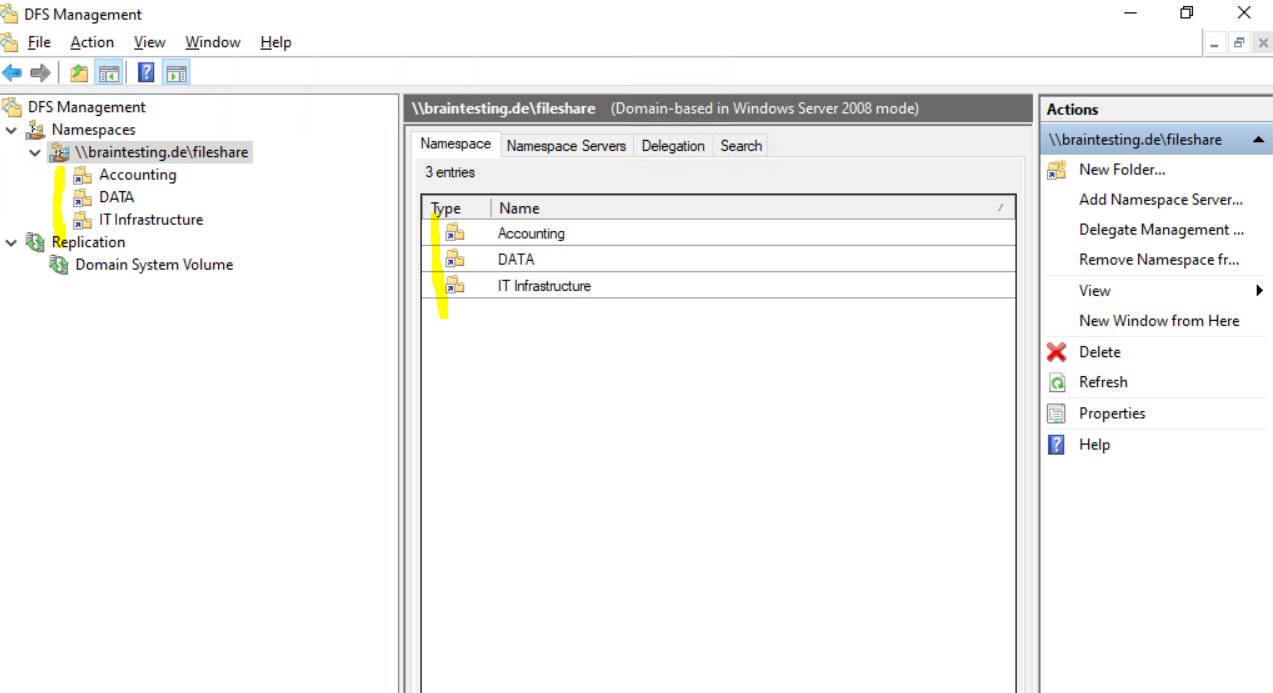
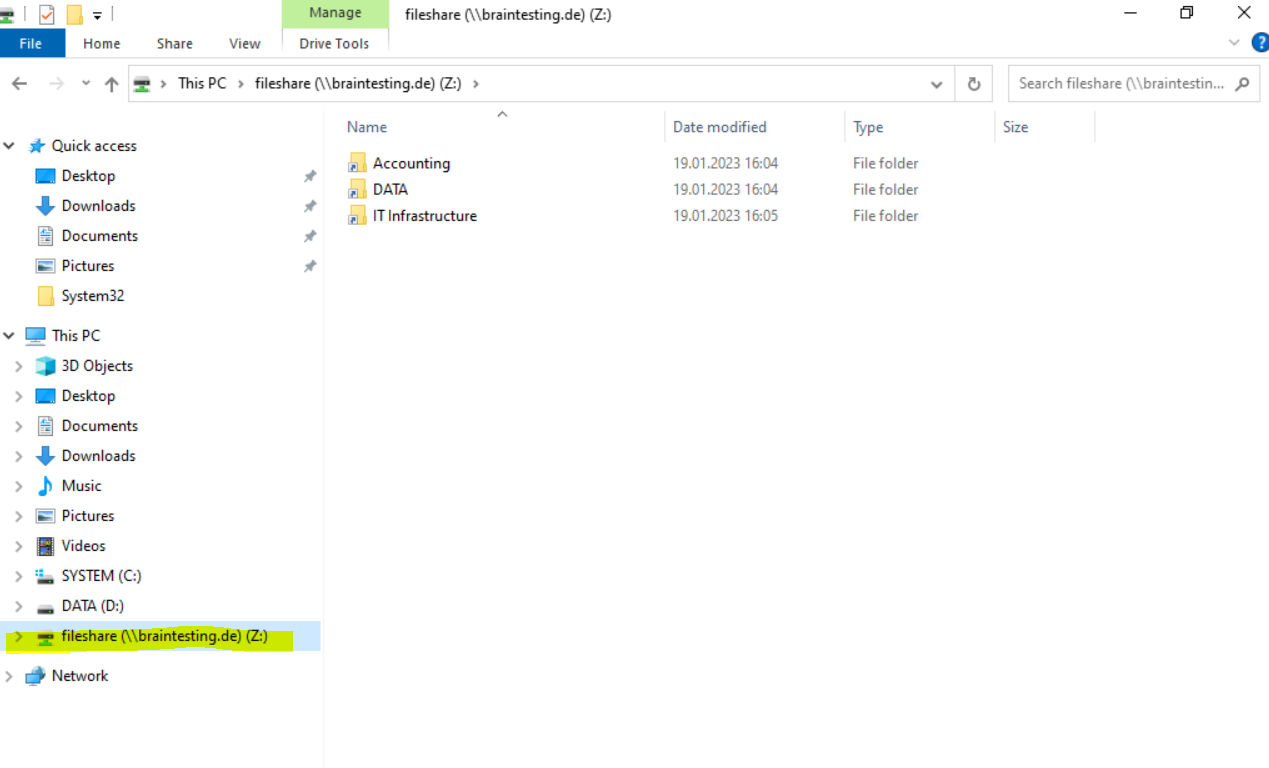
For testing purpose I created the following three folders (shares).
On a client I can now add the domain namespace as new network drive as shown below.
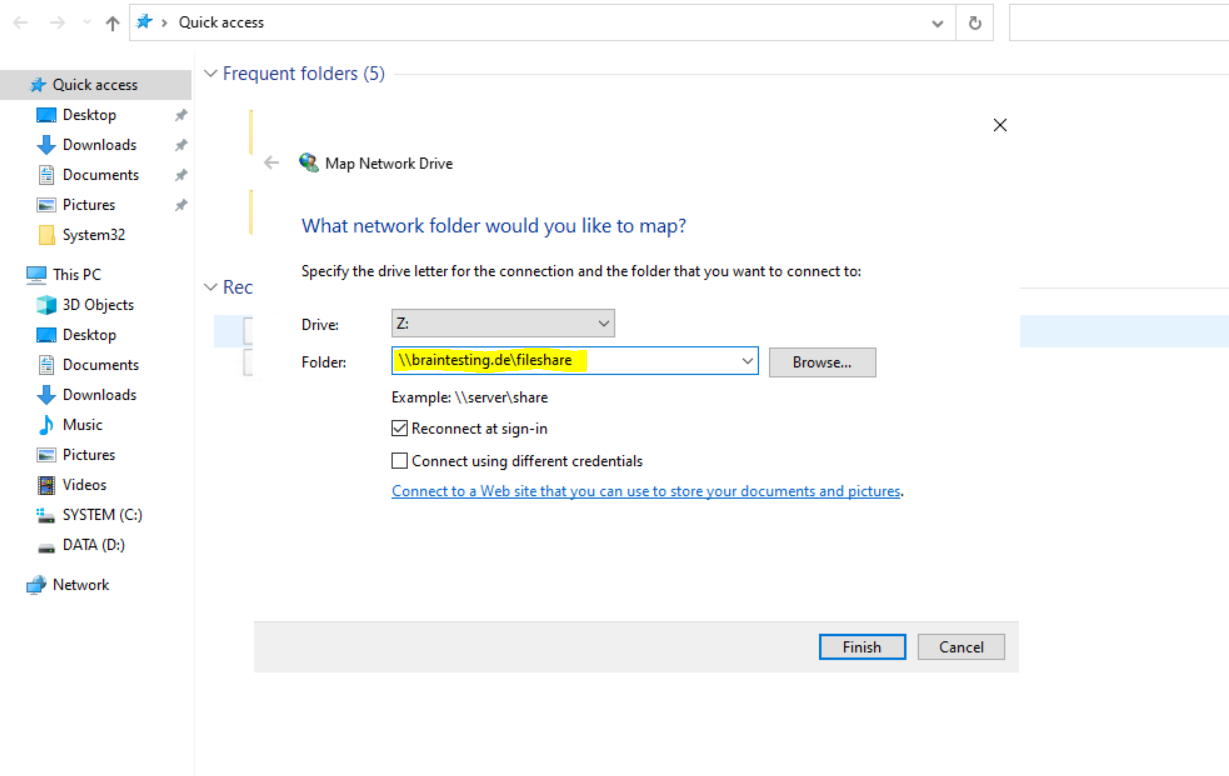
Within the domain namespace I can see my previously created three shares.
Now as we finally created our on-premise DFS Namespace and the Windows file server(s) behind, like my sql.braintesting.de server, we need to create an Azure File Sync Service (Storage Sync service).
Later we also need to install the Storage Sync Agent on all Windows file server.
In my case as I will use just one Windows file server, I only have to install the agent on this one.
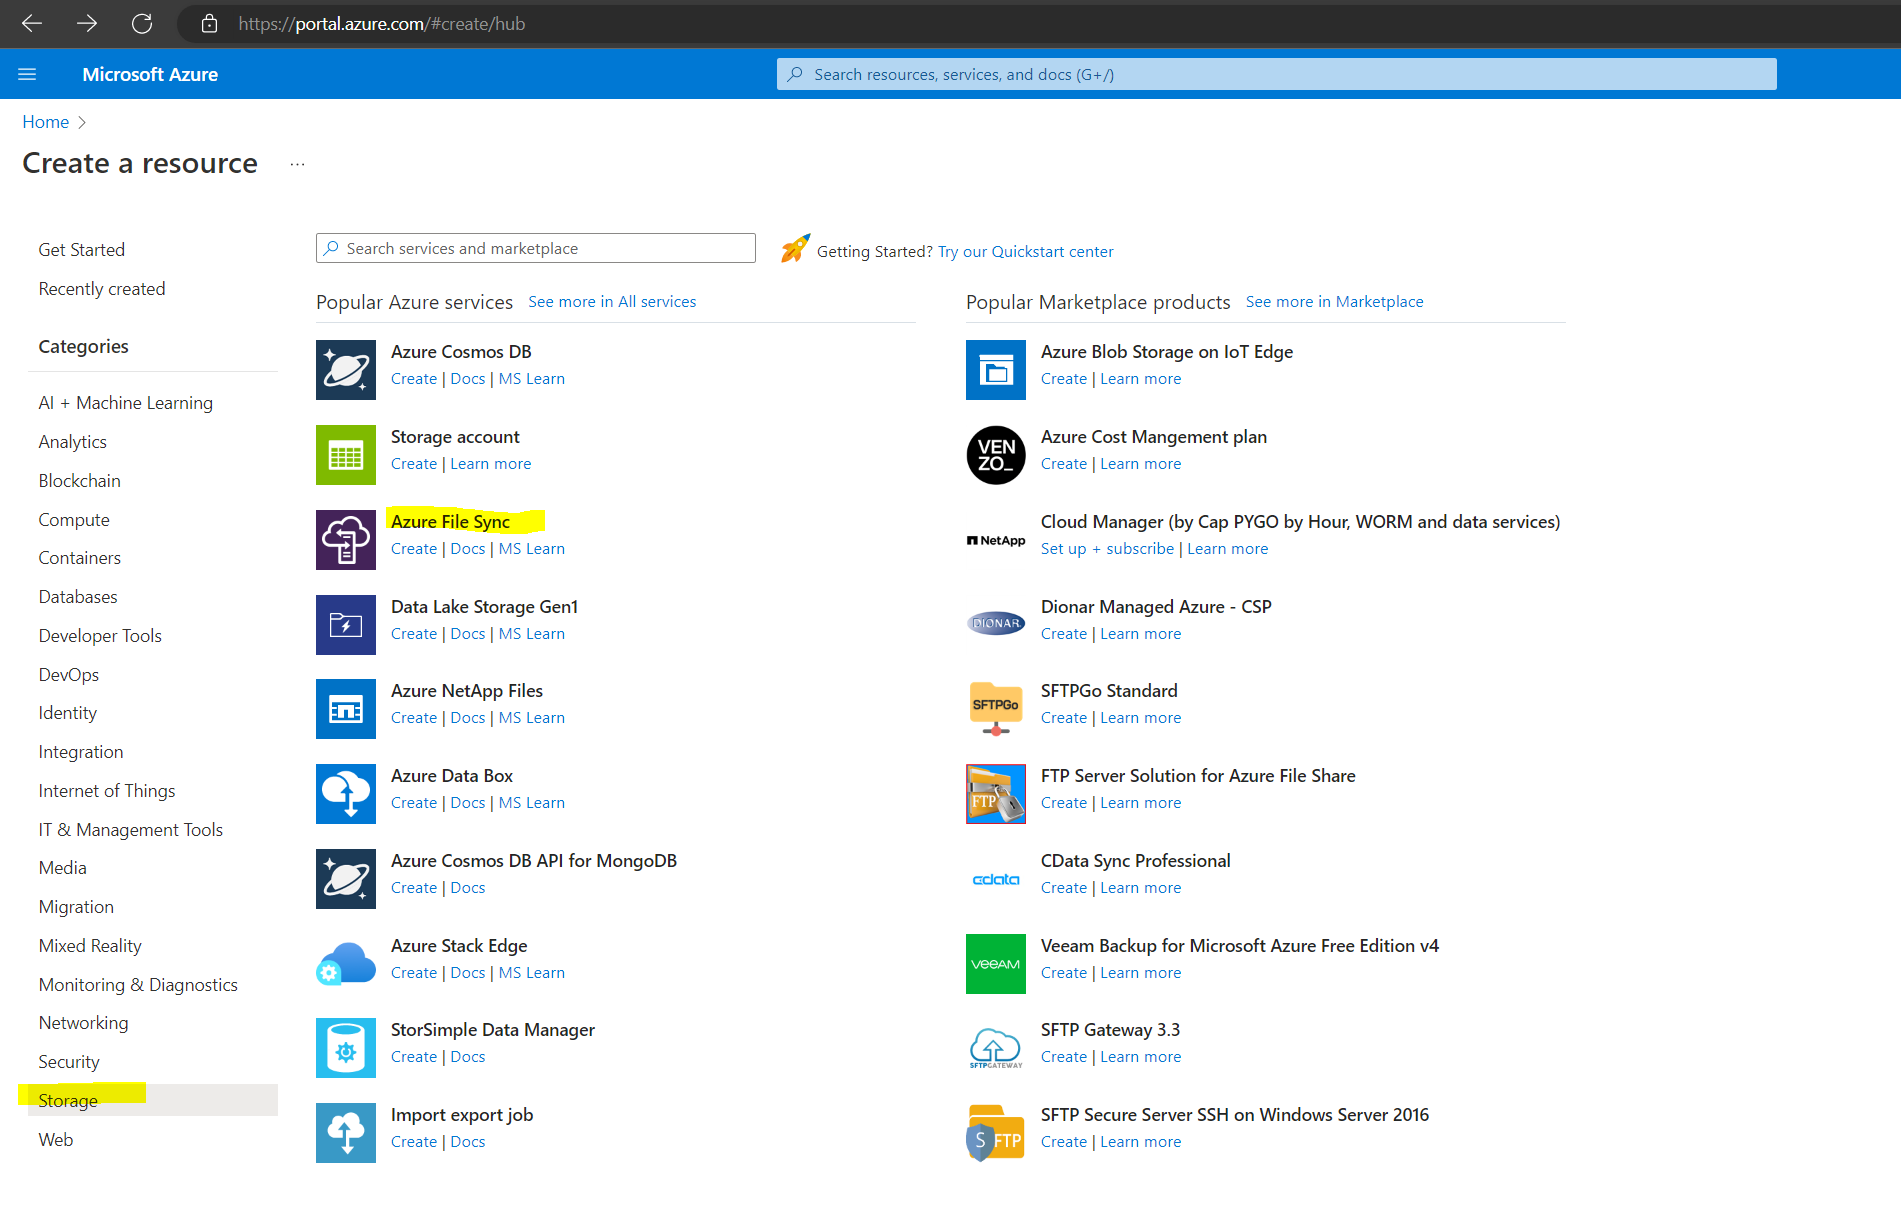
Create the Azure File Sync Service
Azure File Sync extends on-premises files servers into Azure providing cloud benefits while maintaining performance and compatibility.
What is Azure File Sync?
https://learn.microsoft.com/en-us/azure/storage/file-sync/file-sync-introductionDeploy Azure File Sync
https://learn.microsoft.com/en-us/azure/storage/file-sync/file-sync-deployment-guide

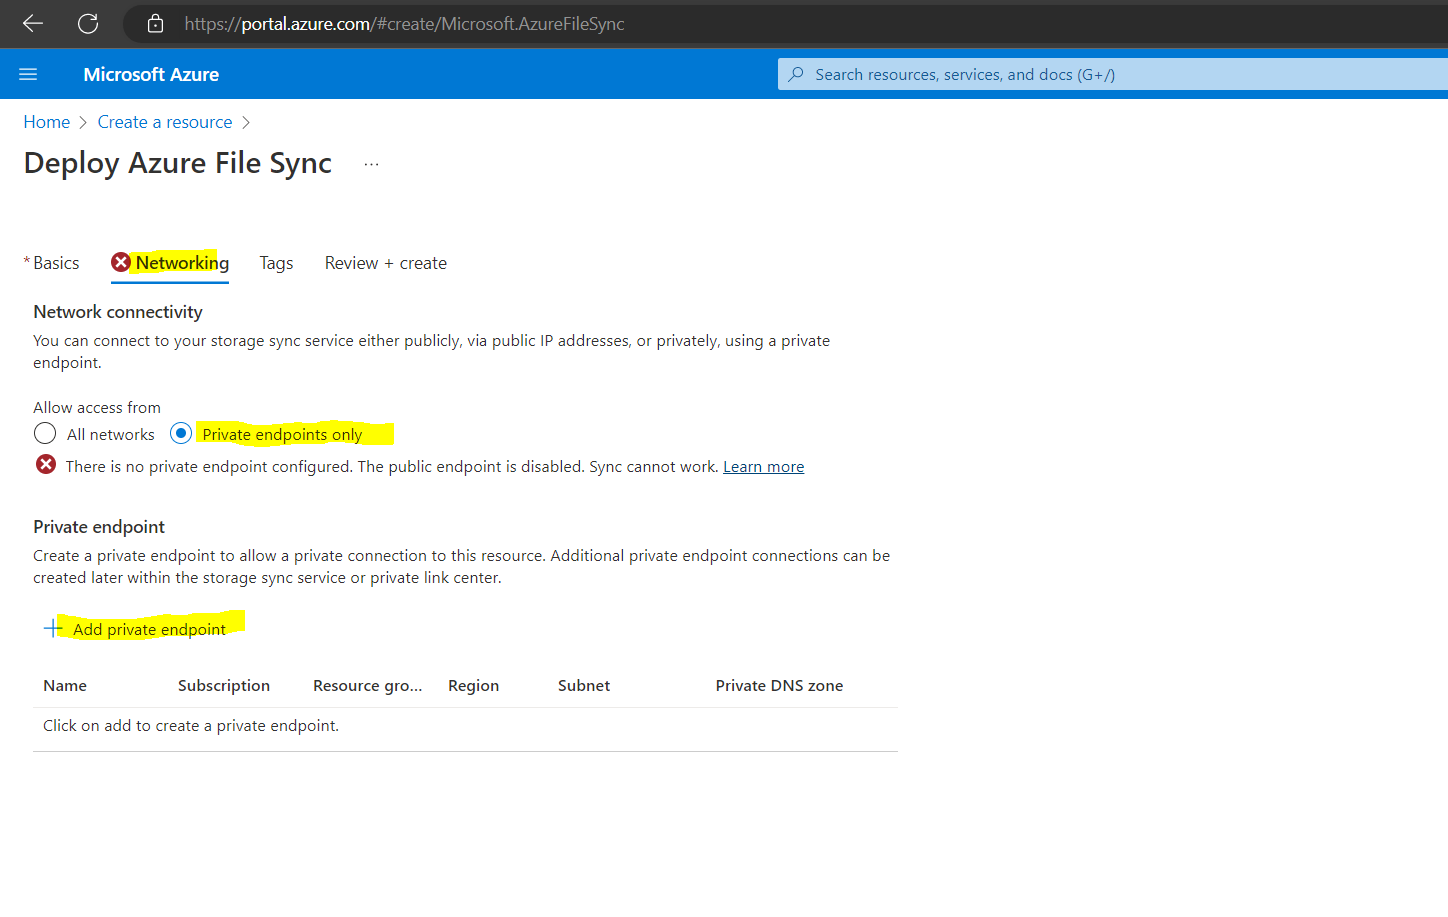
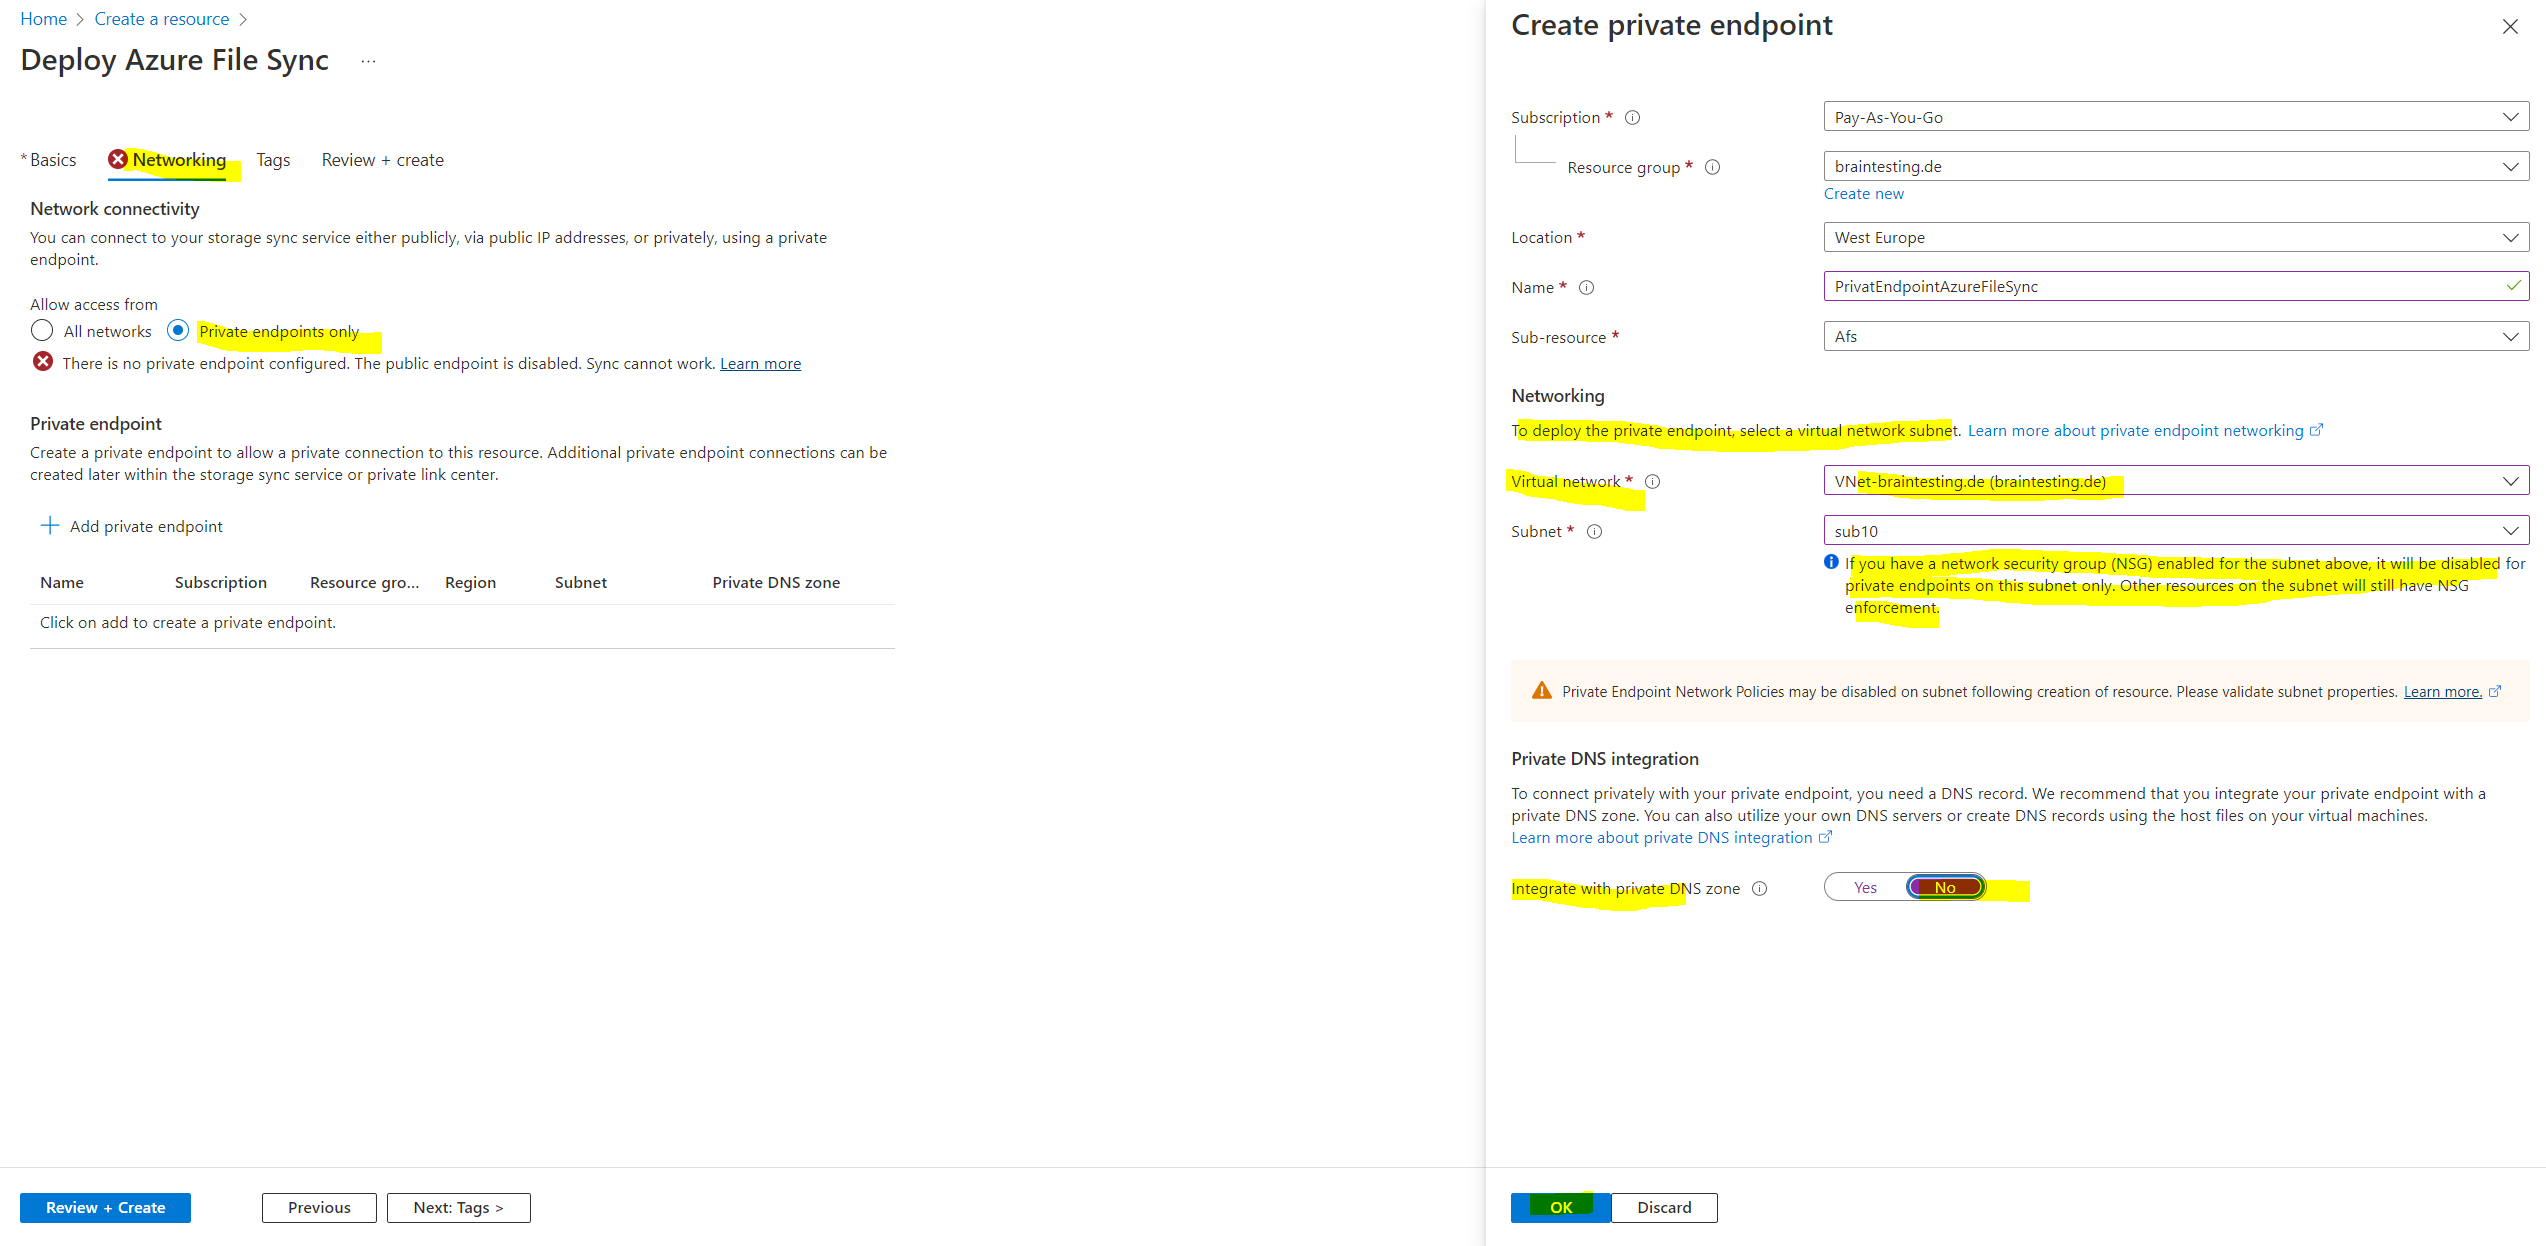
Below for the next tab Networking we need to choose how clients can connect to our storage sync service, either publicly via public IP addresses or privately using a private endpoint.
Azure File Sync networking considerations
https://learn.microsoft.com/en-us/azure/storage/file-sync/file-sync-networking-overview
I will use only private endpoints to connect to the Azure Storage Sync Service via my IPSec S2S VPN Tunnel.
About how to set up an IPSec S2S VPN Tunnel between your on-premise network and your Azure VNet, you can read my following posts.
So here I will choose Private endpoints only. So far I haven’t configured any private endpoints and therefore first need to create a new one by clicking below on Add private endpoint.
In order to deploy the private endpoint, we need to select a virtual network subnet. I will select my 172.16.10.0/24 subnet (sub10) from my VNet named VNet-braintesting.de.
For this VNet I have already configured an IPSec S2S VPN Tunnel which connects my on-premise network with my Azure VNet as described in the posts above.
I also will switch off Integrate with private DNS zone, so I selected below No. I will us my own DNS servers from my on-premise Active Directory network as shown further below.
Note!
As noted below, if you have a network security group (NSG) enabled for your selected subnet, it will be disabled for private endpoints on this subnet only. Other resources on the subnet will still have NSG enforcement.
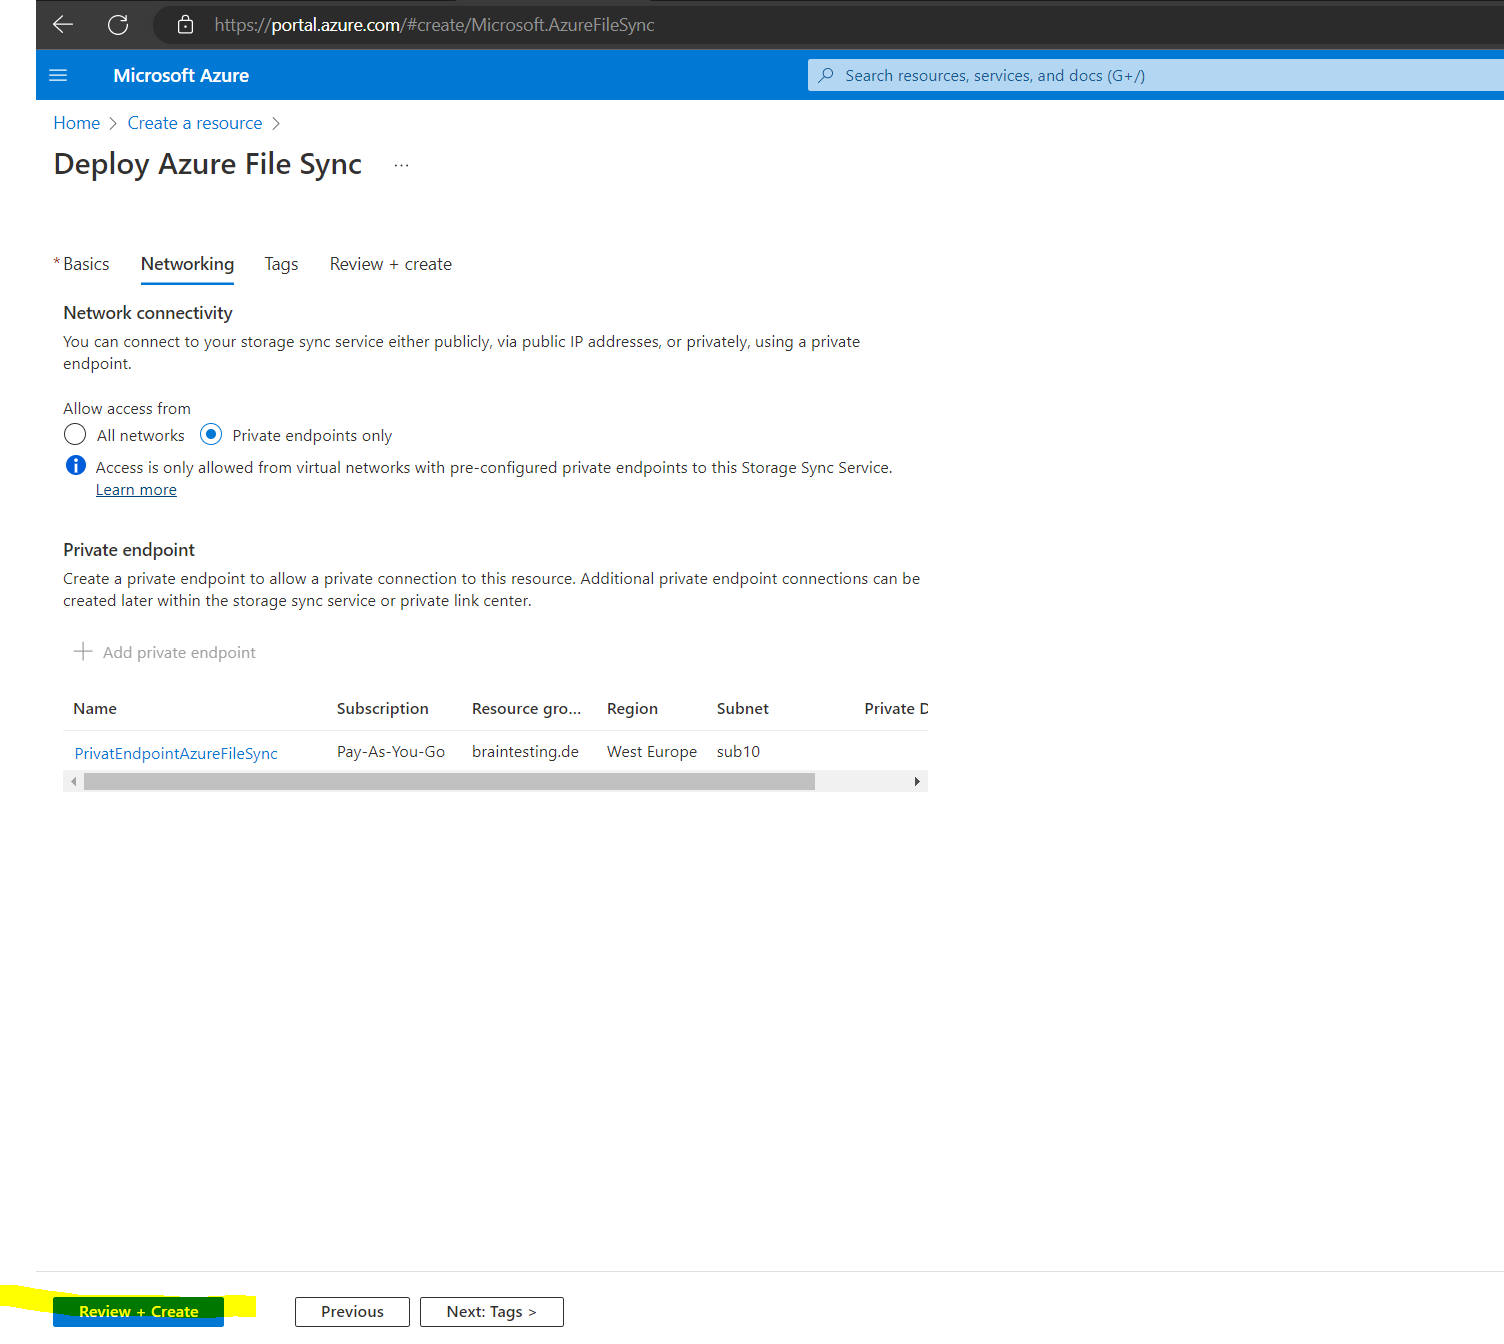
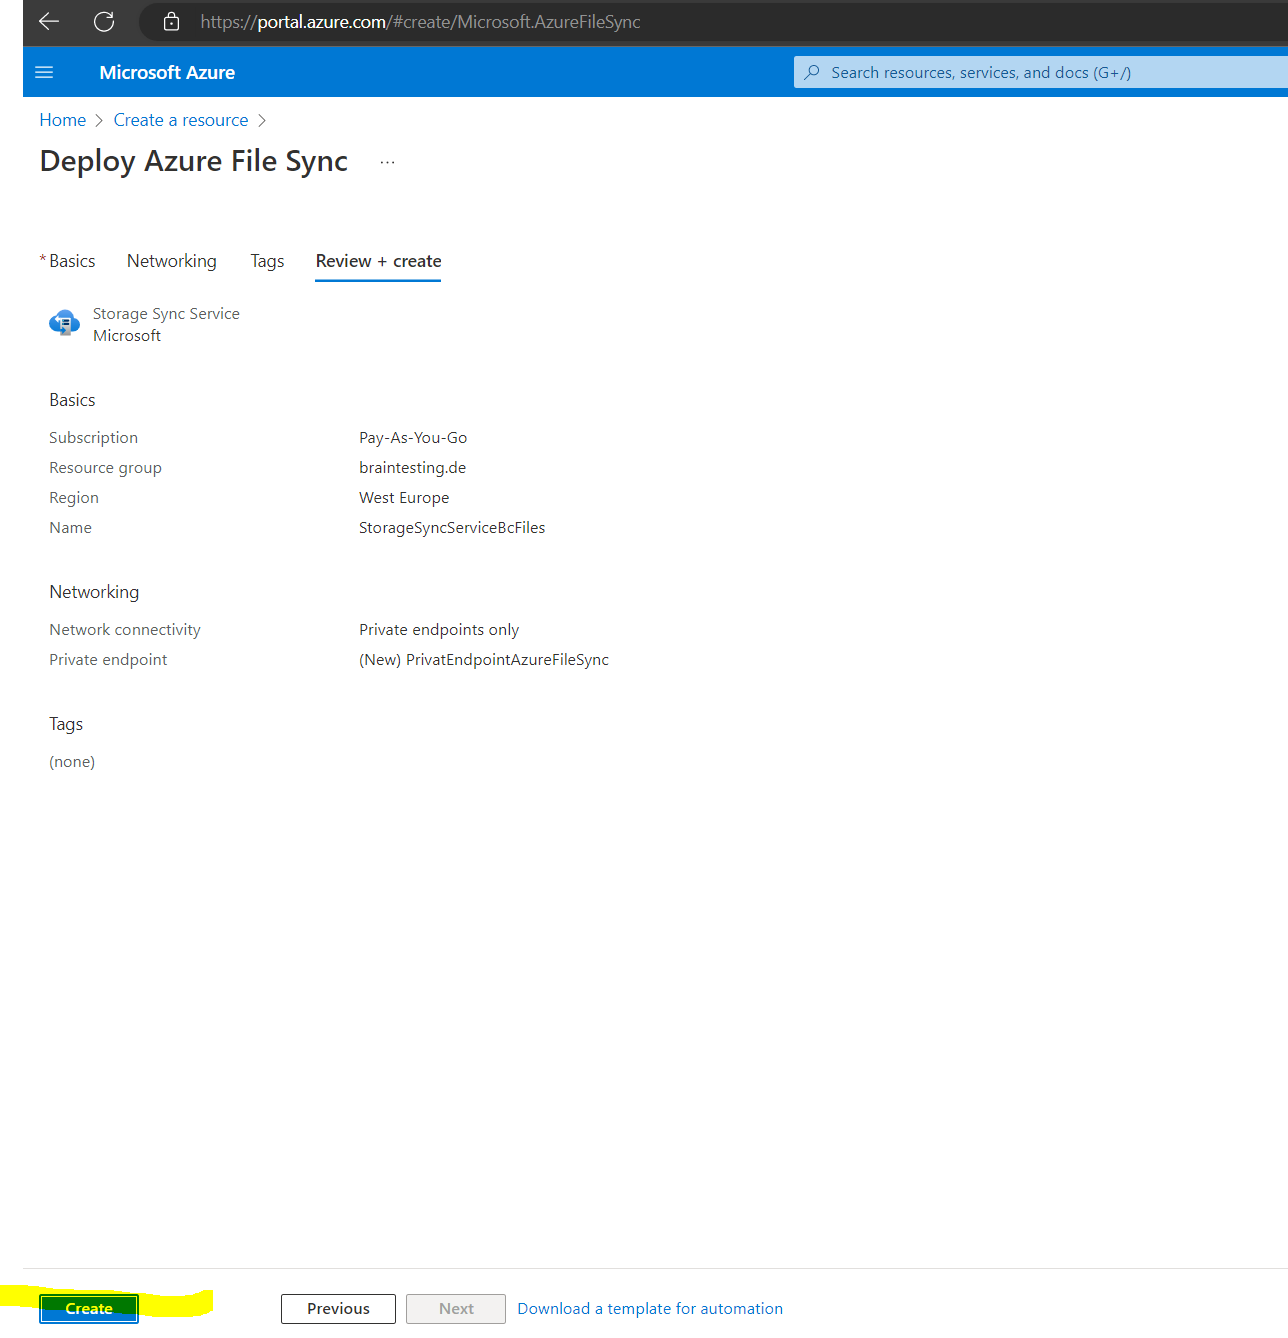
Finally we can create our new Azure File Sync service, so click on Create.
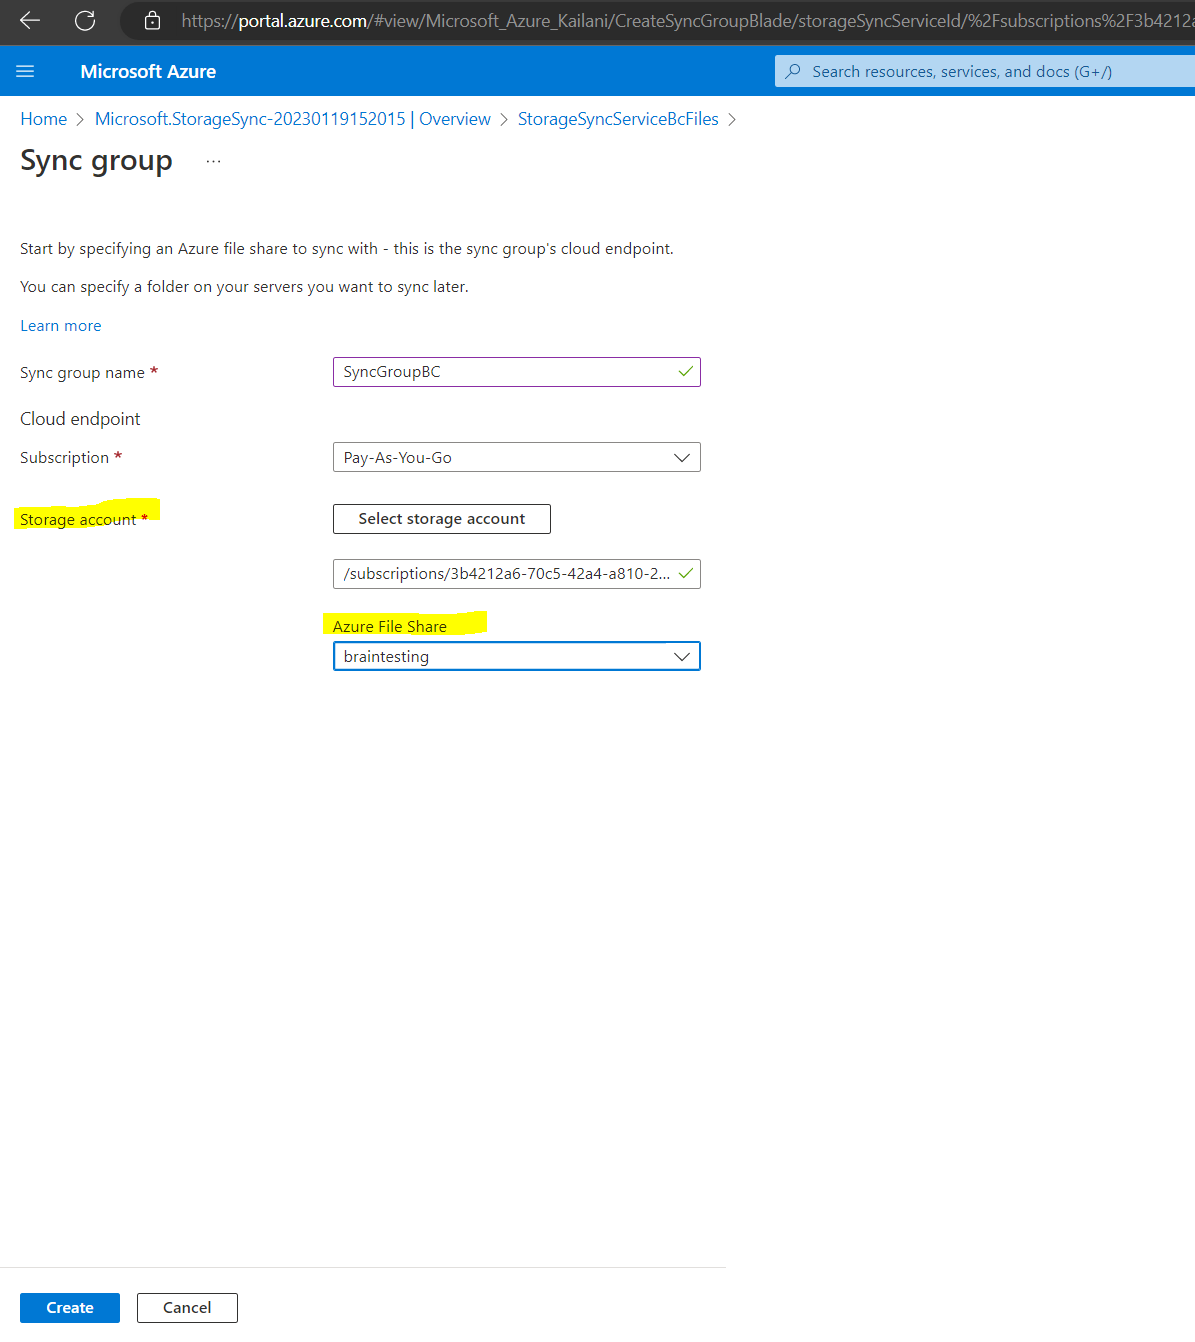
Now after you have successfully deployed the Azure File Sync Service, you first need to add a new sync group.
A sync group defines the sync topology for a set of files. Endpoints within a sync group are kept in sync with each other. A sync group must contain one cloud endpoint, which represents an Azure file share and one or more server endpoints. A server endpoint represents a path on a registered server. A server can have server endpoints in multiple sync groups. You can create as many sync groups as you need to appropriately describe your desired sync topology.

For the sync group you need to select an existing storage account and Azure File Share from. If not already created, you first have to create one.
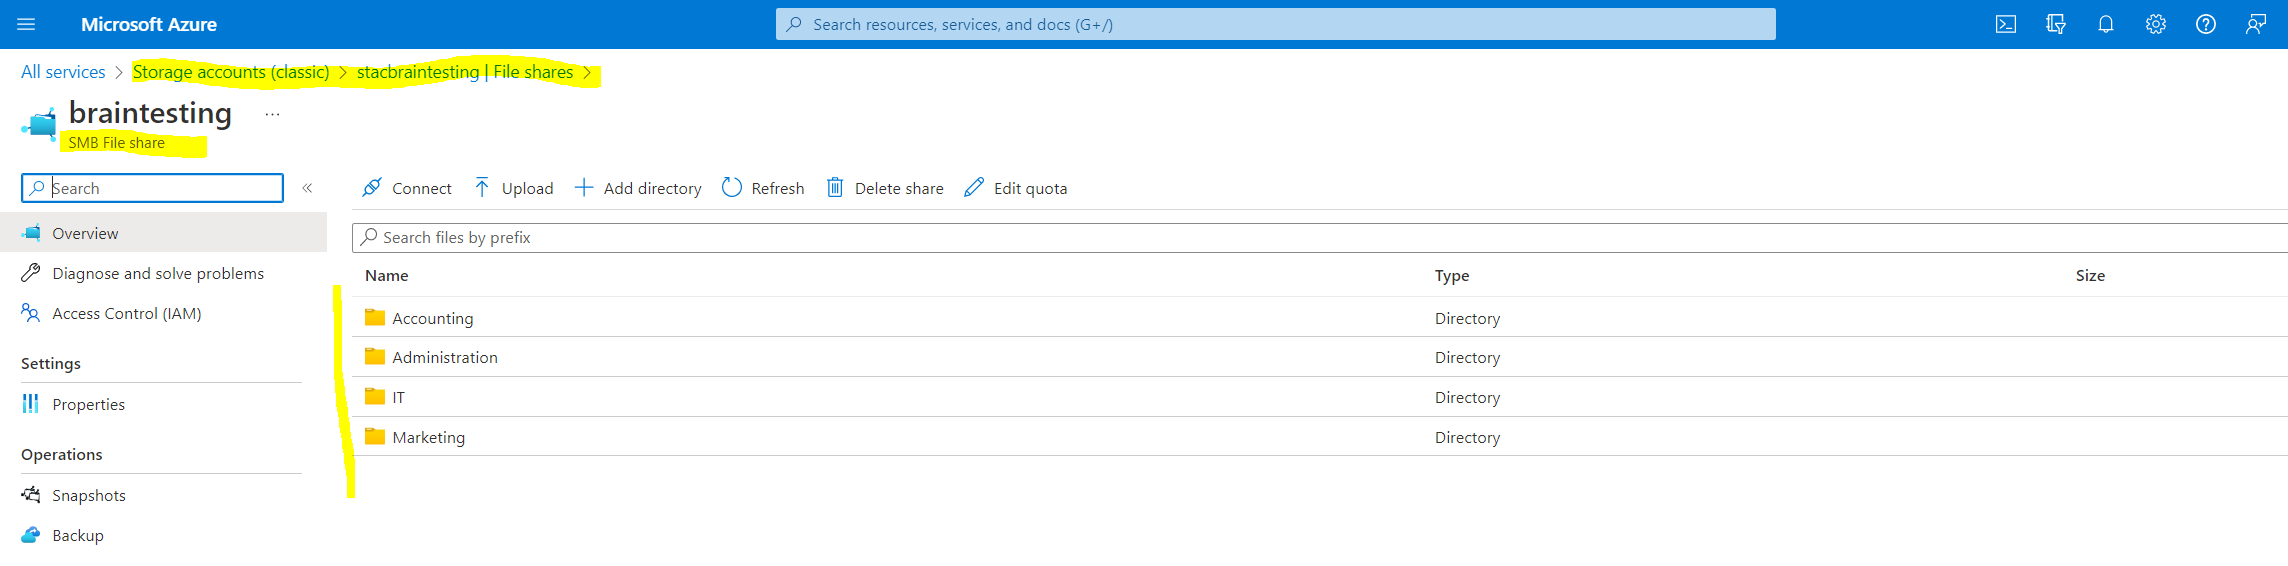
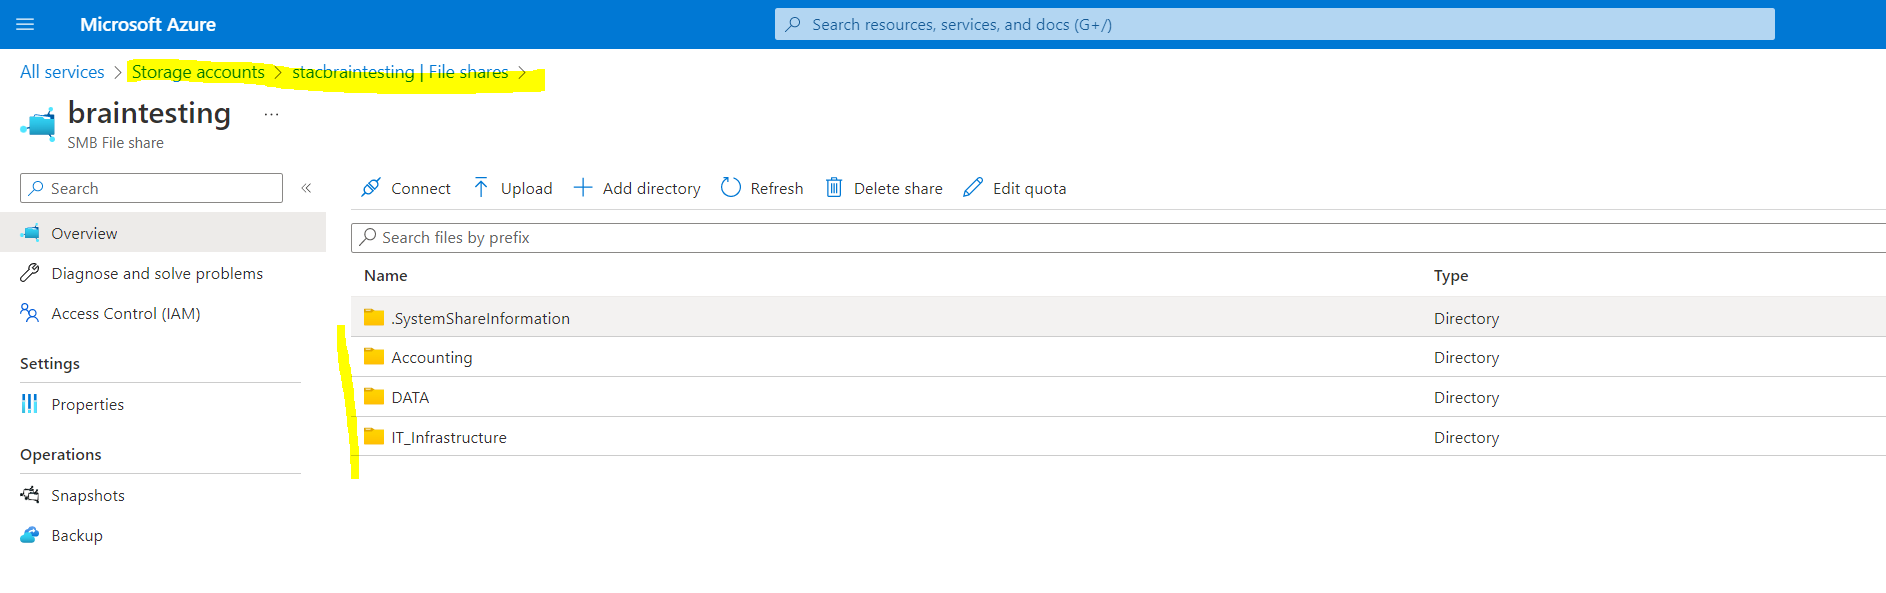
Here you can see my existing Azure File Share within my existing Storage Account. The folders are just native in Azure and have nothing to do with my on-premise DFS namespace shares.
Click on Create.
Private DNS Integration
You remember? We previously configured only private endpoints to access the Azure File Sync service, further we disabled the Integrate with private DNS zone, so we need to configure our own DNS servers in the on-premise Active Directory network as shown below.
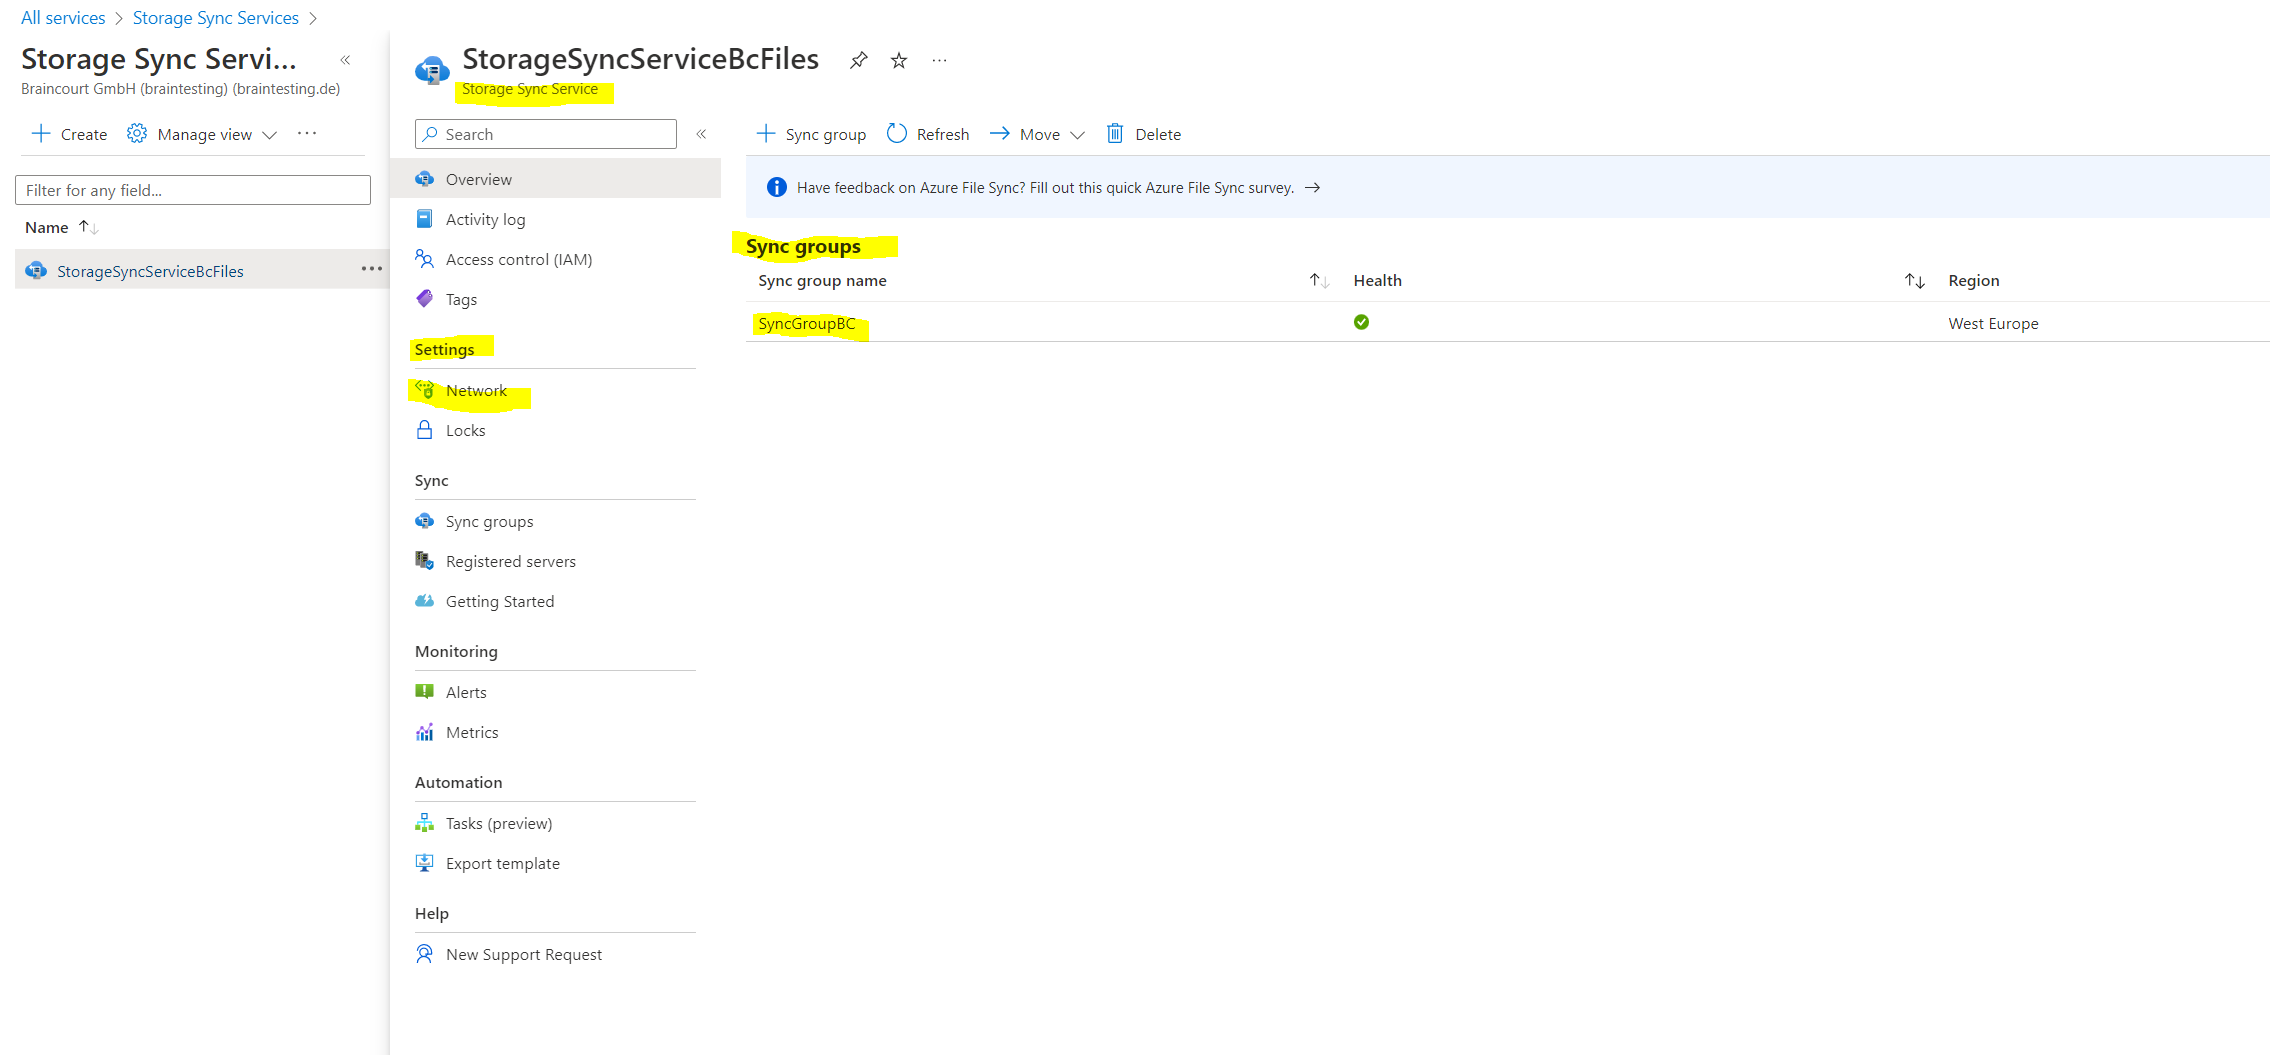
In order to configure our own DNS servers, we first need to determine the custom DNS records we need to create. Therefore we can click on the Network settings within our Storage Sync Service as shown below.
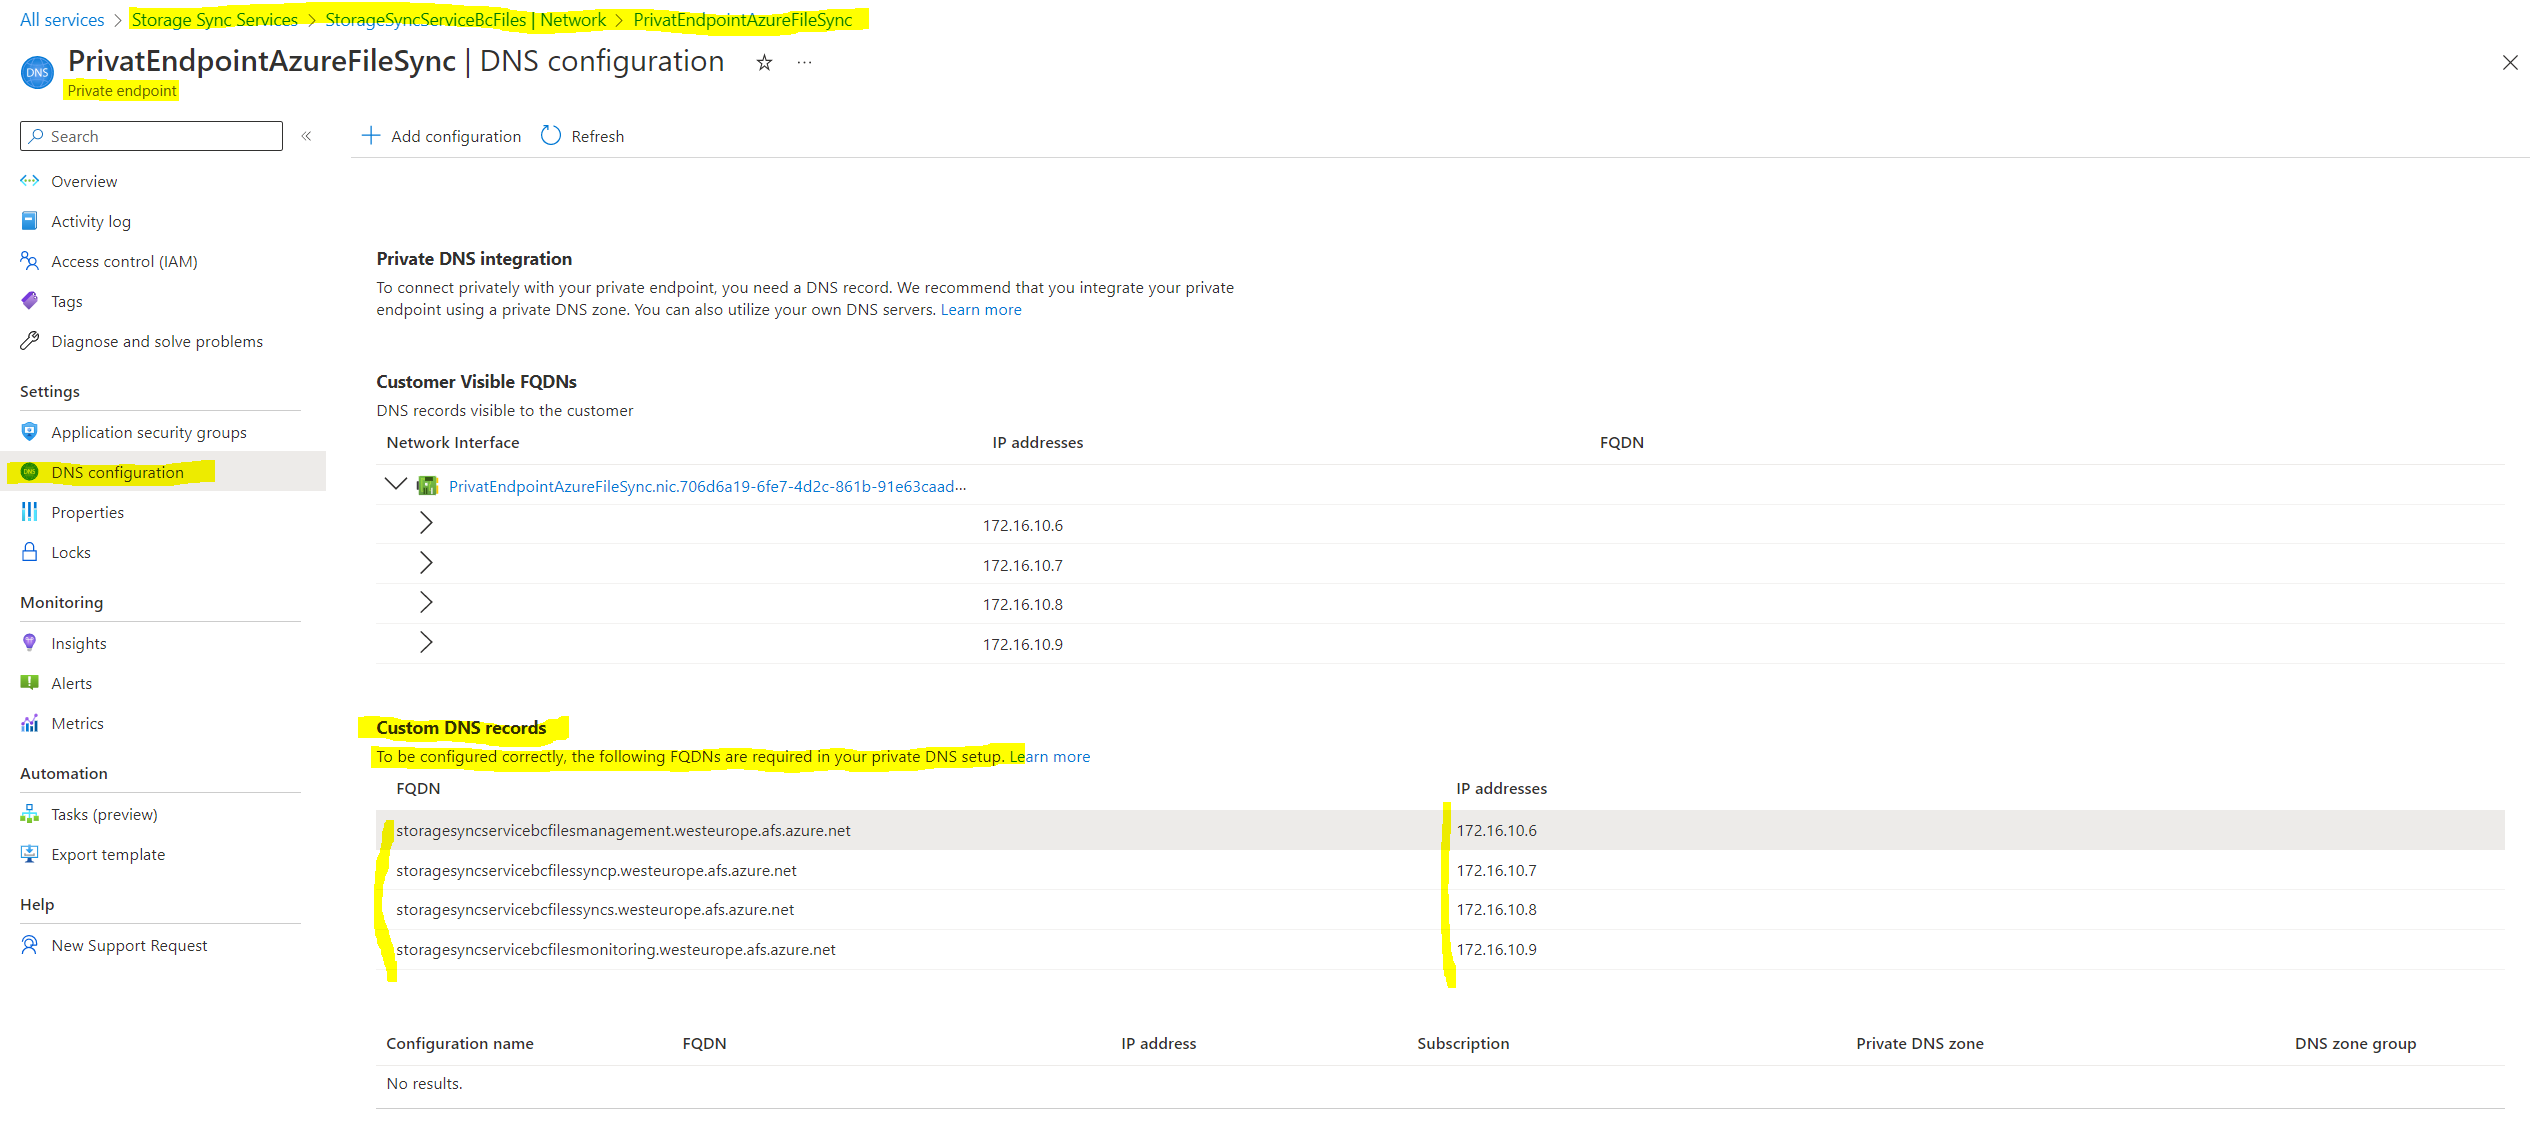
Click on your private endpoint.

Within the private endpoint menu, click on DNS configuration.
Here you can see all custom DNS records you need to create on your own DNS servers in the internal network. The assigned internal IP addresses are from my subnet I assigned previously for the private endpoint.
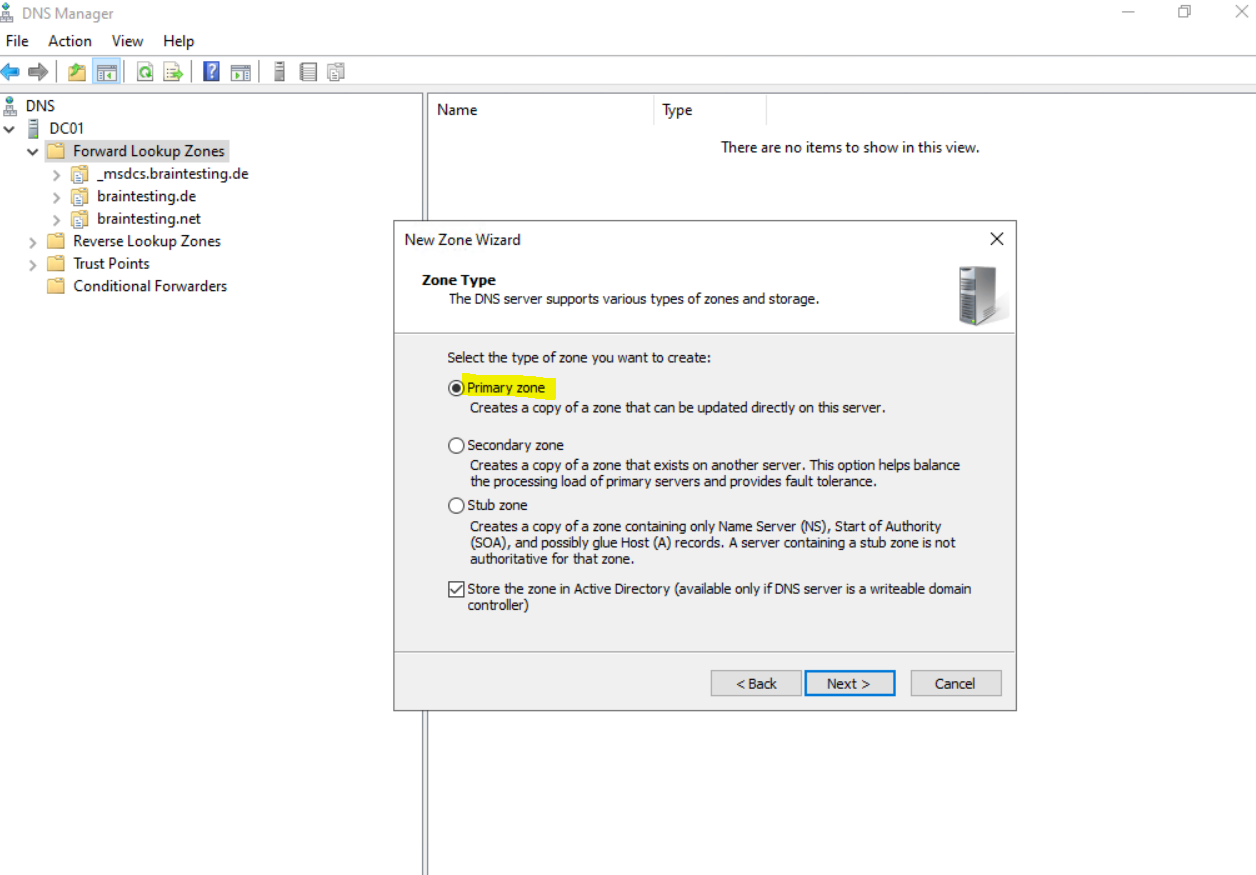
On my internal DNS servers I will create a new primary zone.
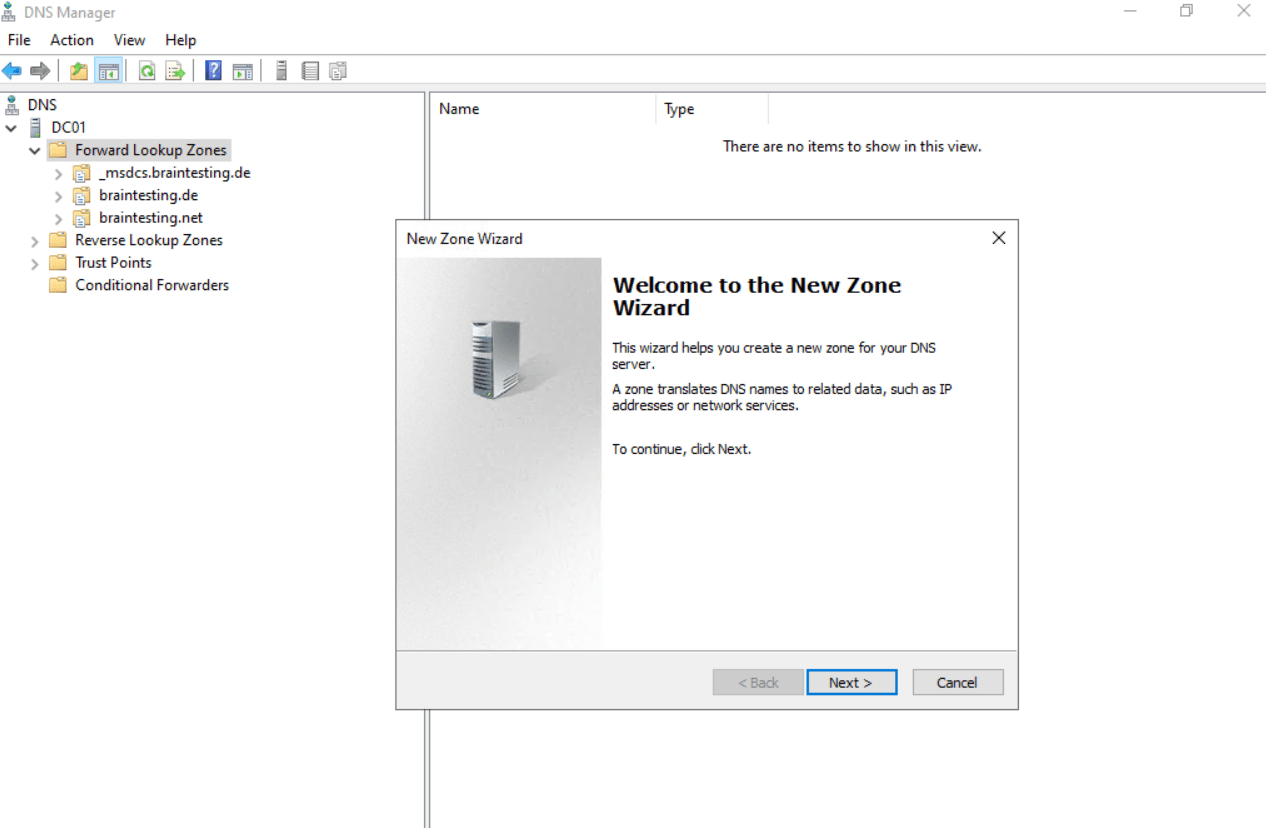
Select Primary zone.
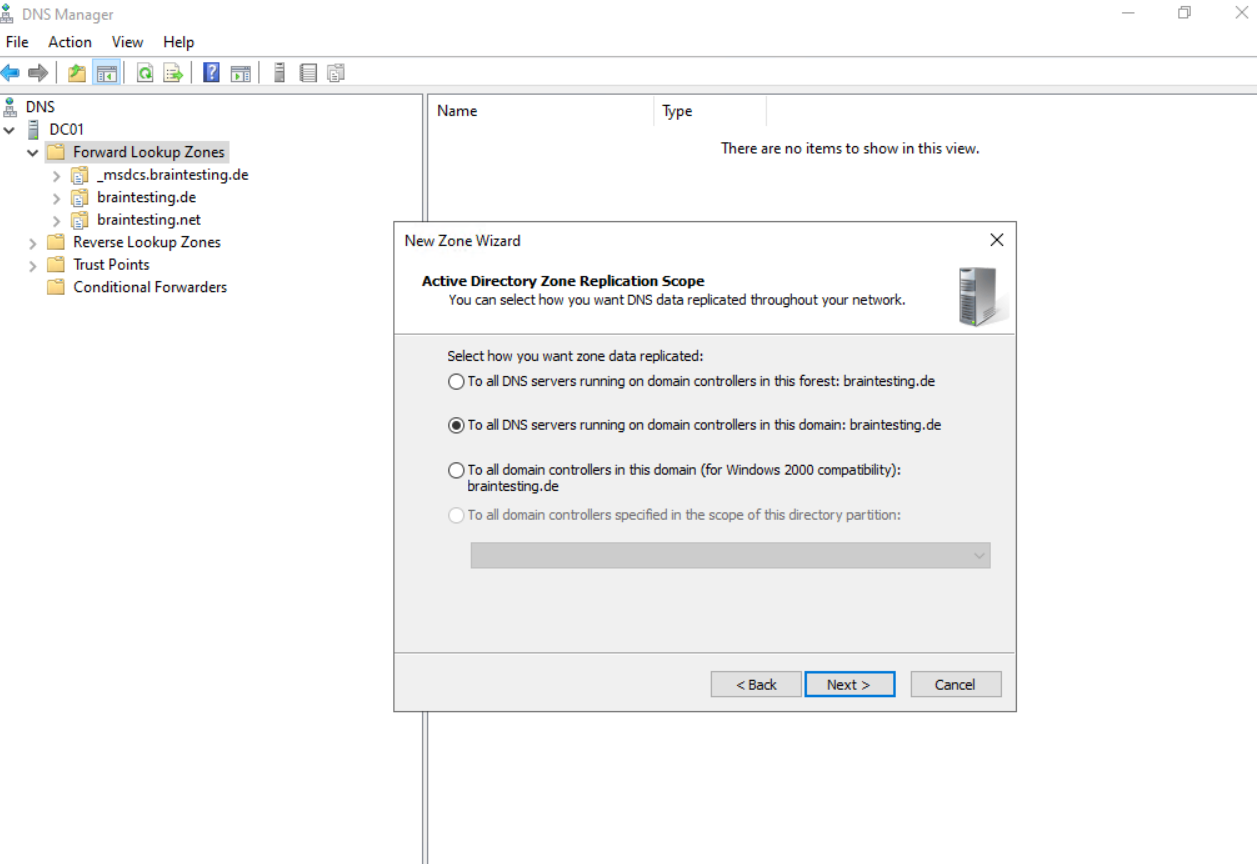
I will replicate the zone to all DNS servers within the braintesting.de domain.
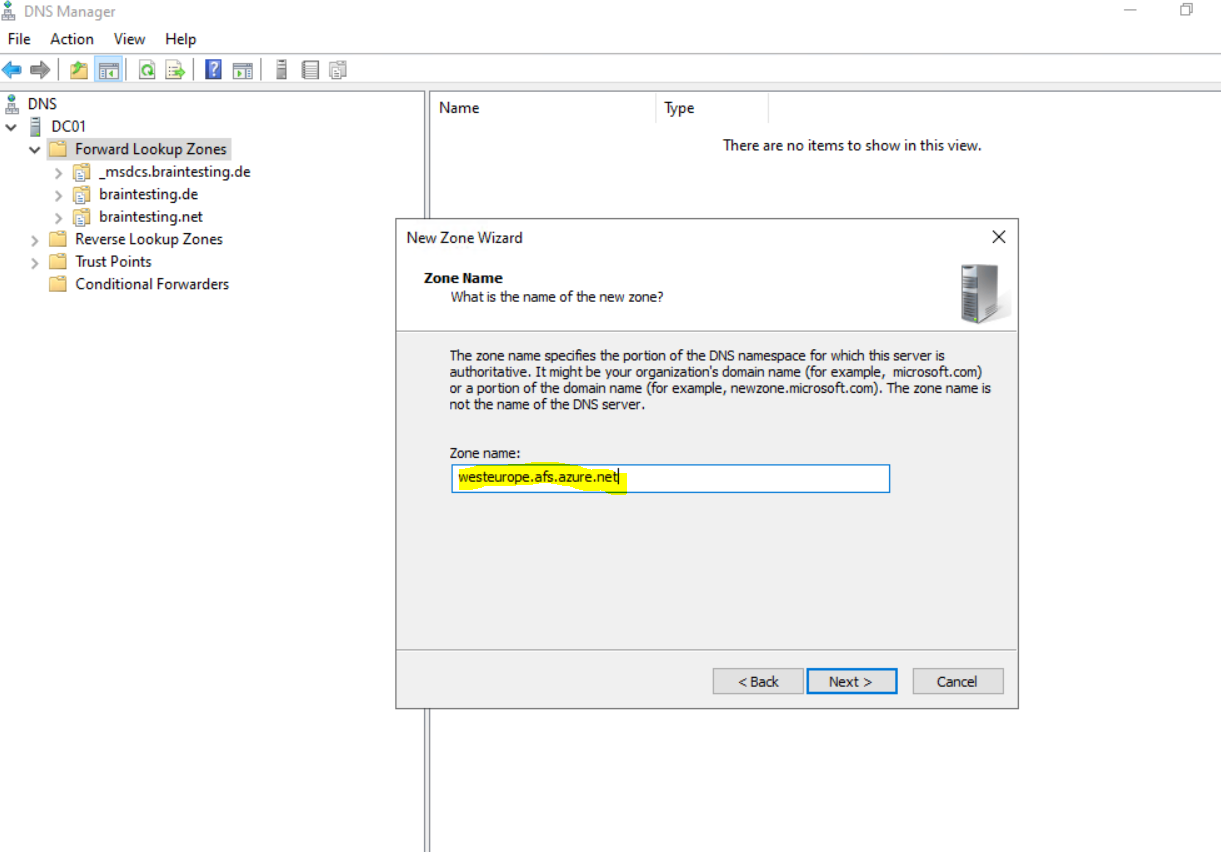
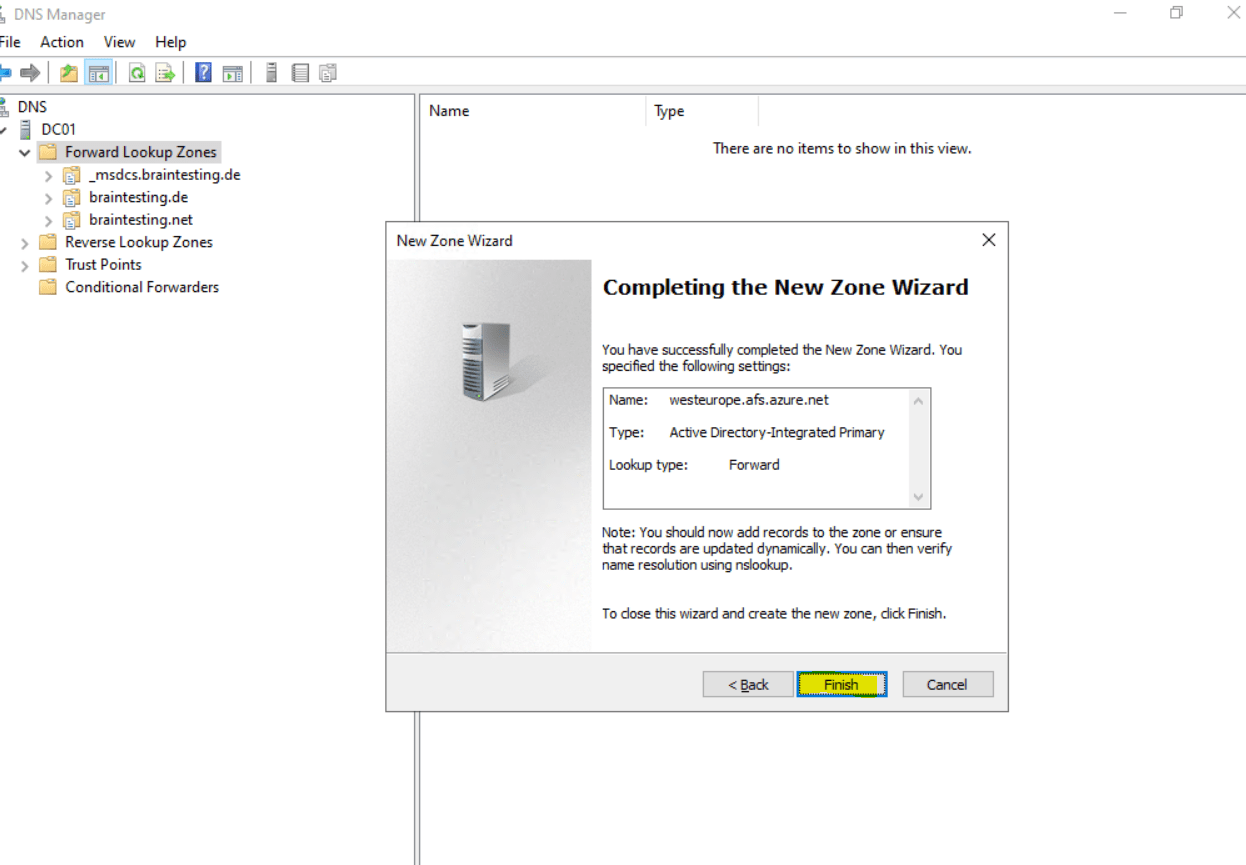
Fore the zone name I have to enter westeurope.afs.azure.net, which is the lowest common domain portion from the custome records shown above without the hostnames.
I will just allow secure dynamic updates.
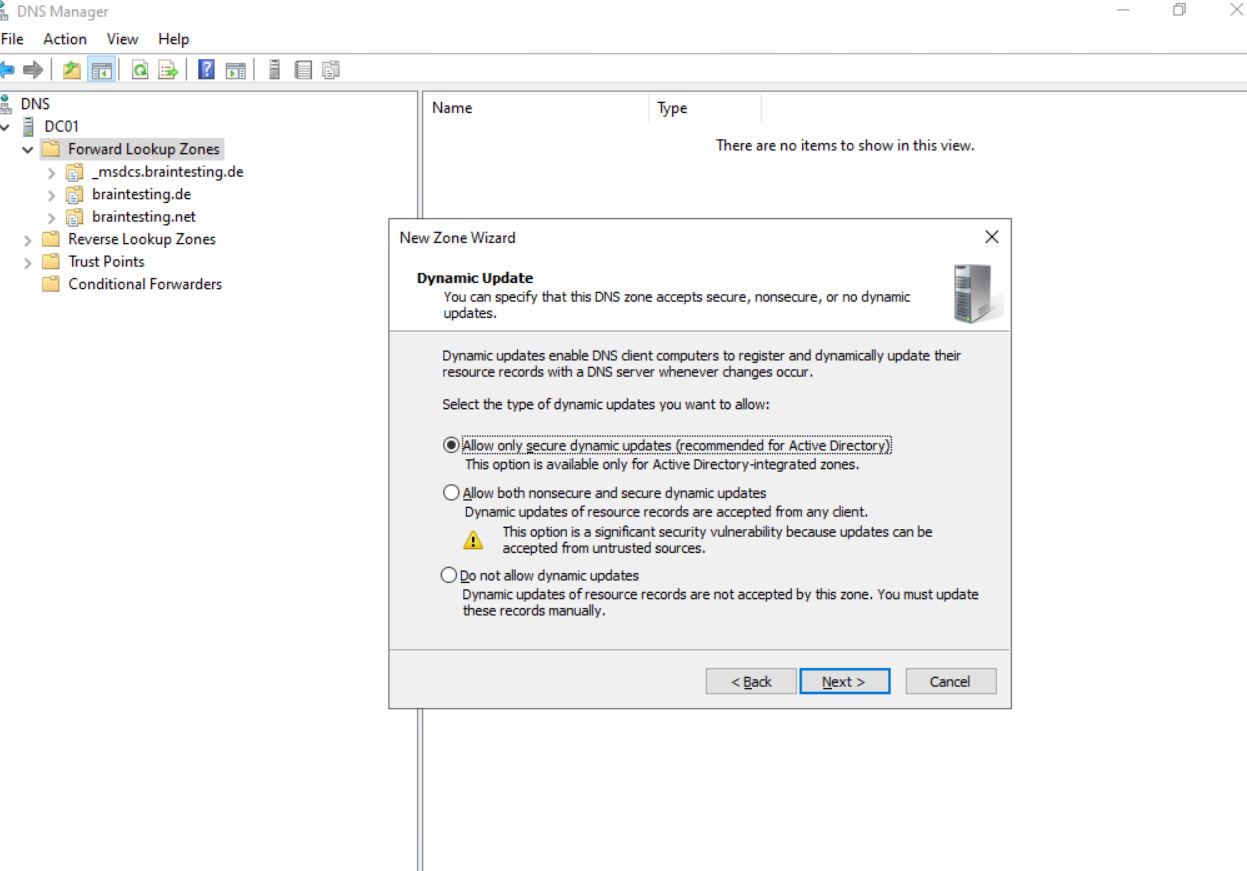
Finally click on Finish.
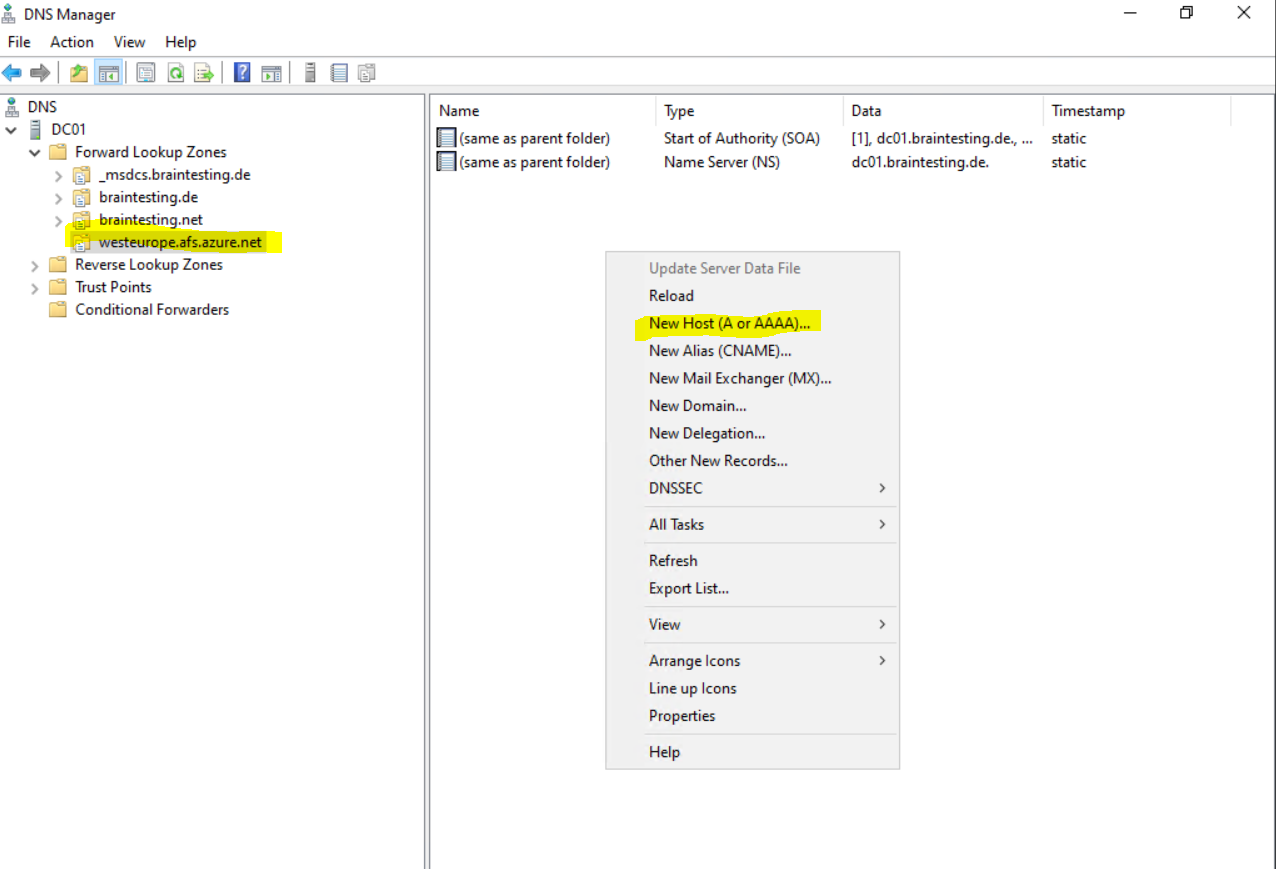
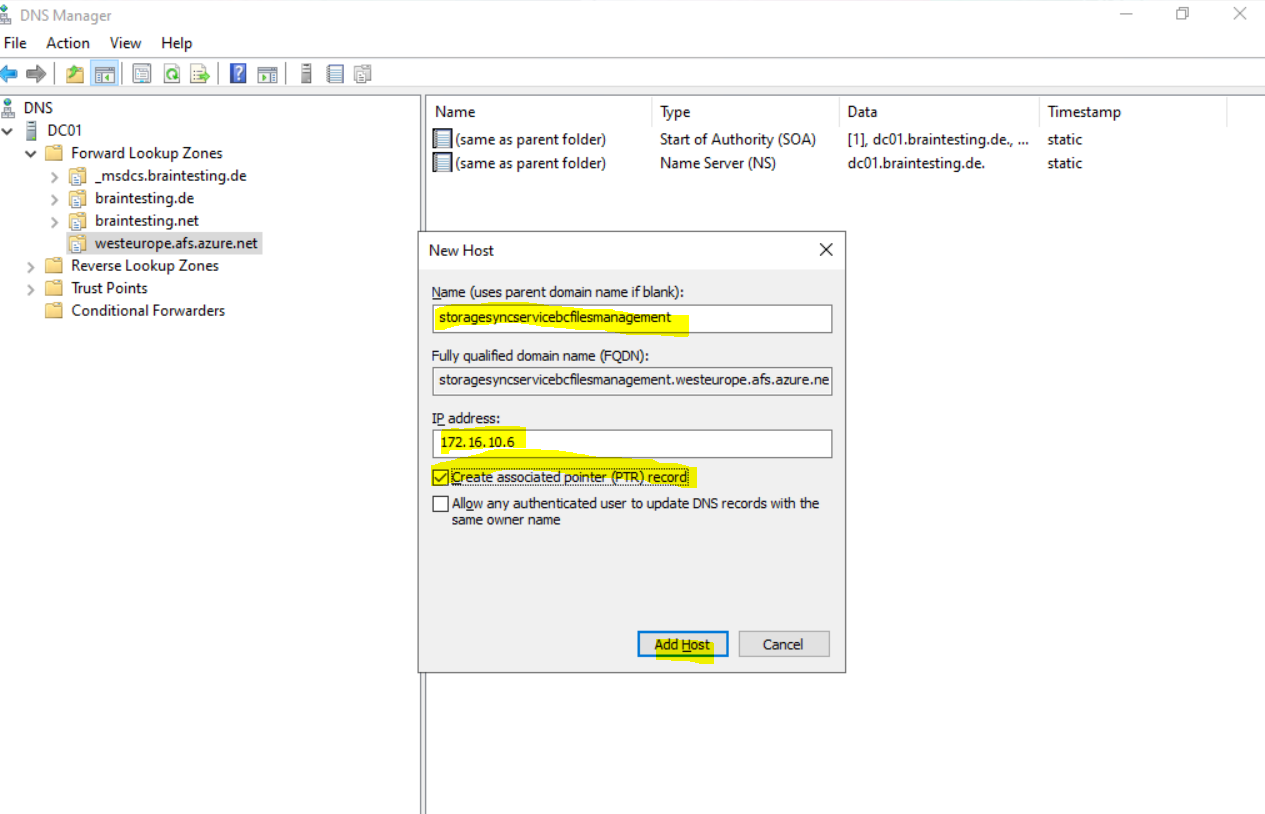
Now we can add our custom DNS records to our new zone. Therefore we can create A records.
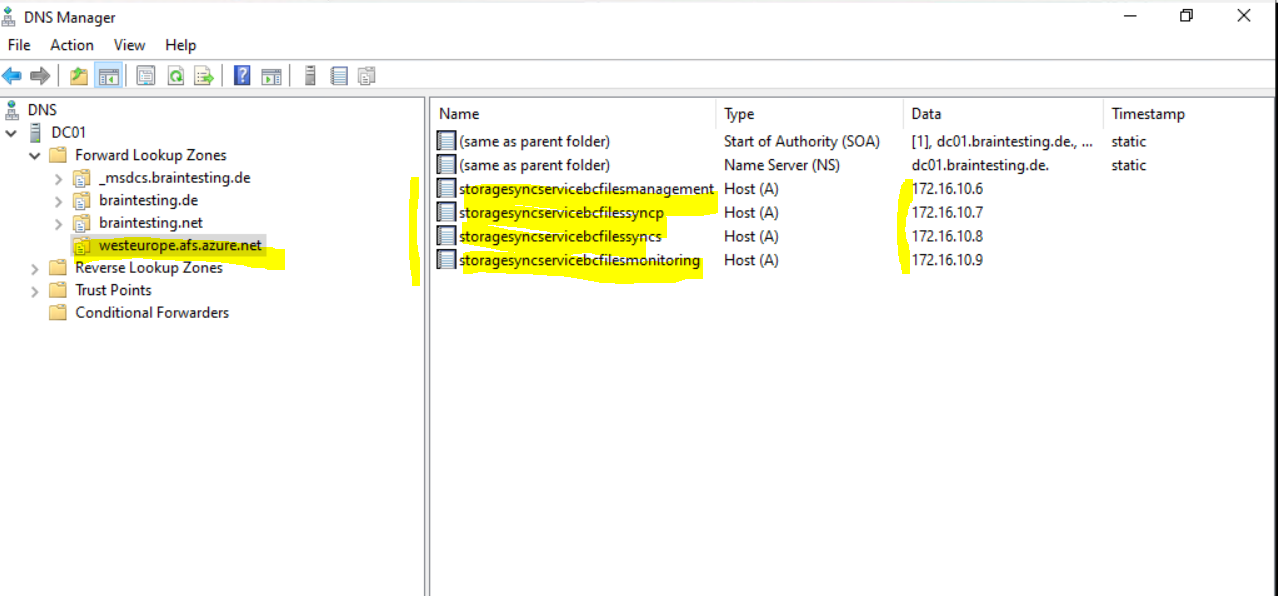
Finally all four custom DNS records are created.
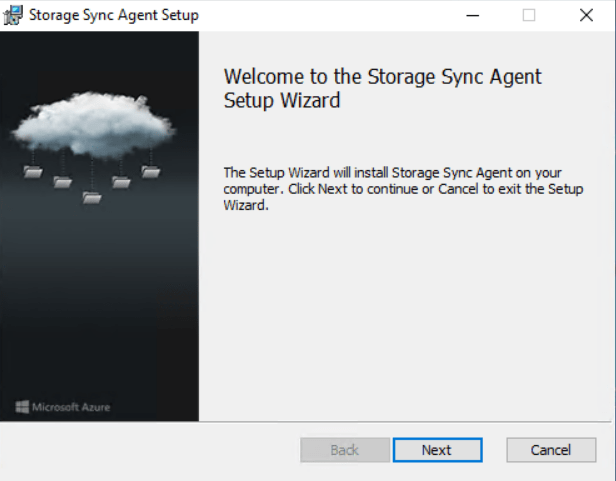
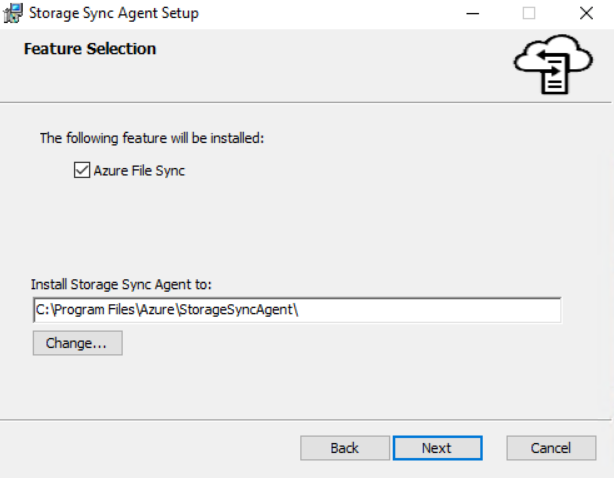
As mentioned at the beginning, next we need to install the Storage Sync Agent on all Windows file servers we use for our DFS namespace and want to use with Azure File Sync.
Install the Storage Sync Agent on your on-premise File Server
First download and install the agent by using the link below.
Azure File Sync Agent
https://www.microsoft.com/en-us/download/details.aspx?id=57159
I will install the agent on my internal Windows File Server where also the target folders from my DFS domain namespace are hosted.
If there is a new version, you can update the agent here.
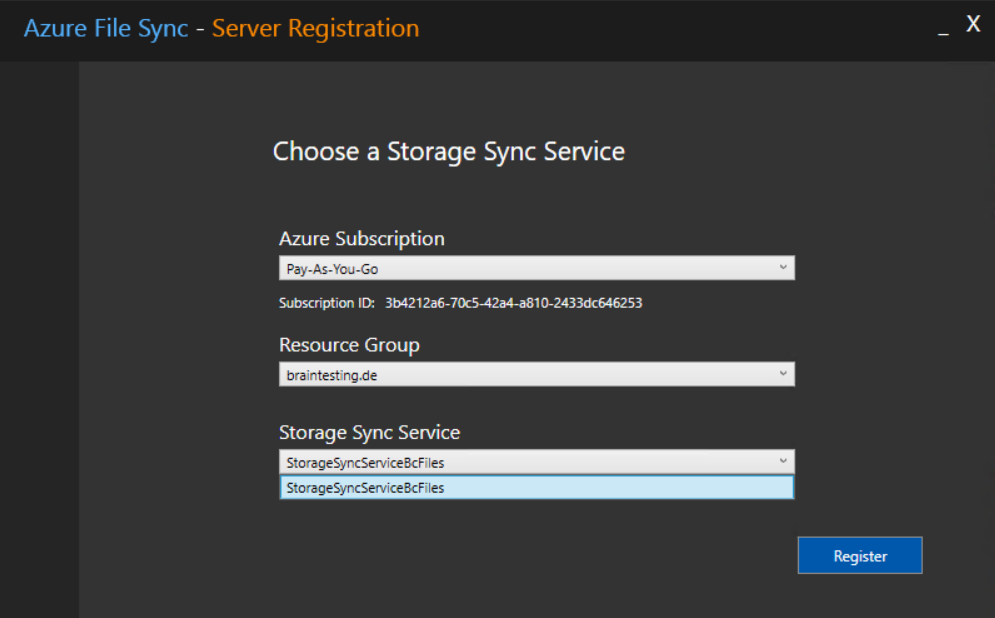
We need to register each agent with an existing Storage Sync Service. So we first need to sign in to Azure.
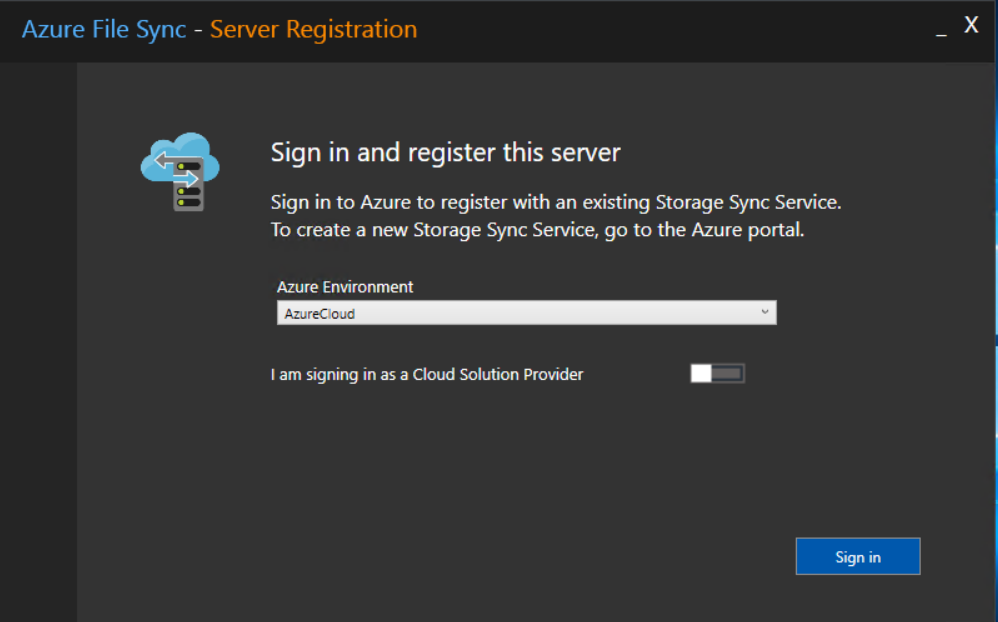
Below we need to select our previouly created Azure File Sync service (Storage Sync Service).
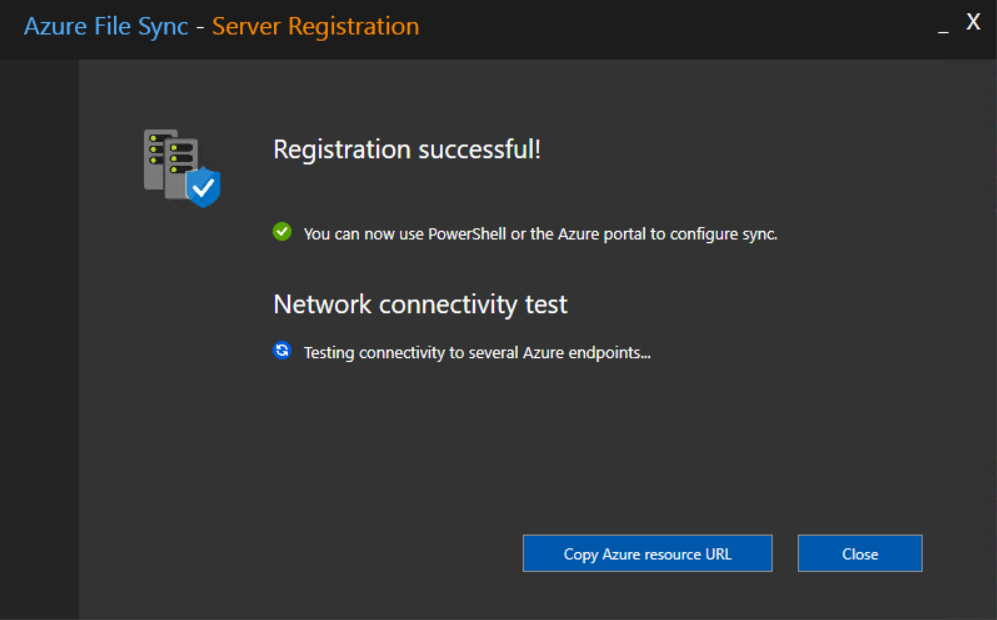
After the agent is registered successfully with our Azure File Sync service, we can verify the status in the storage sync service.

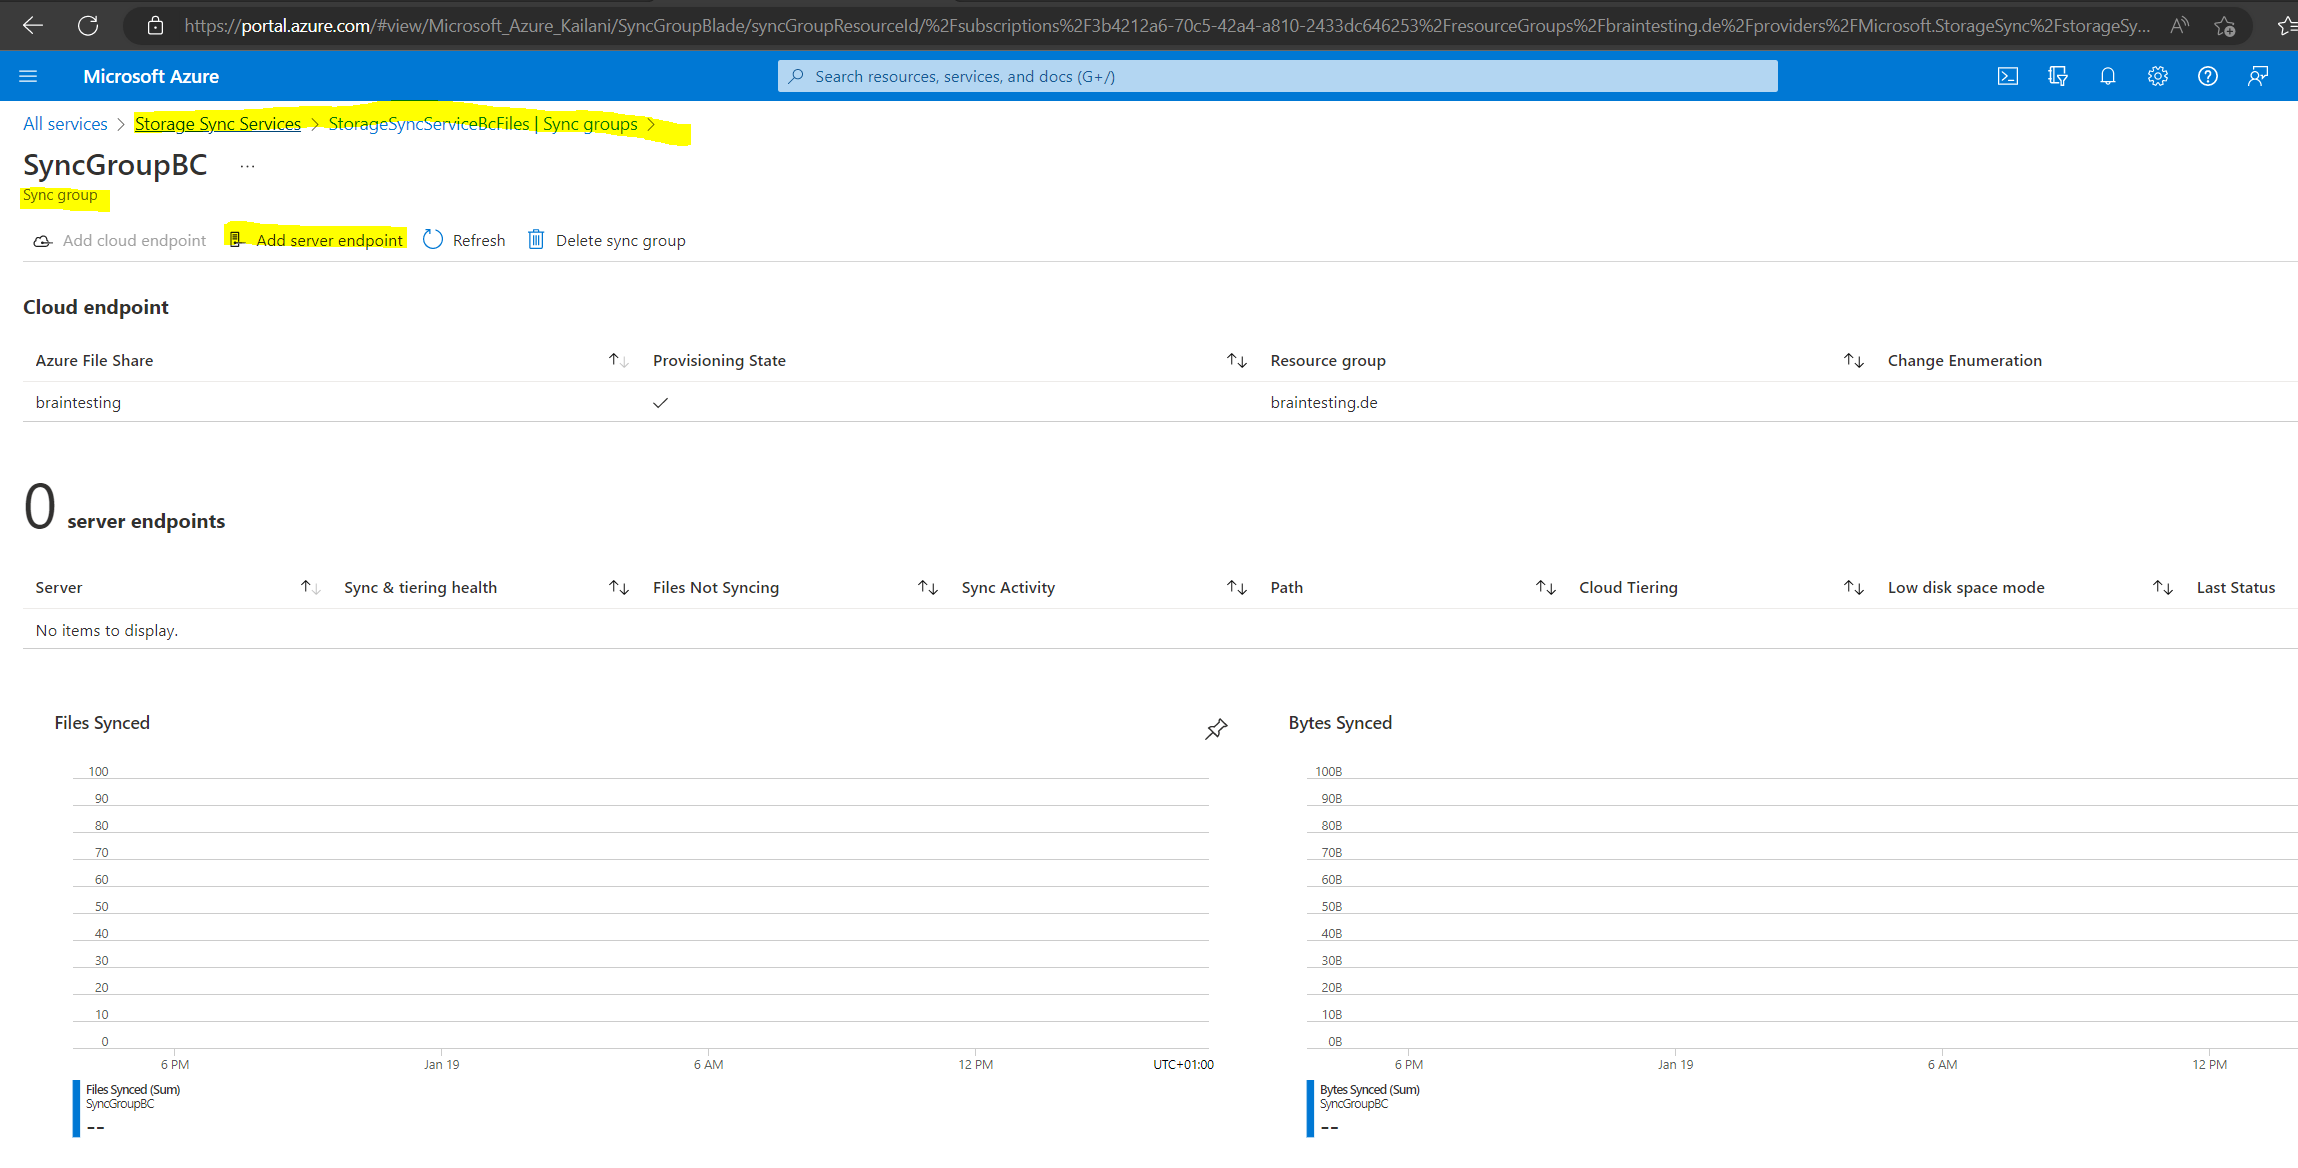
Now I can add the server endpoint by clicking on Sync groups within the storage sync service.
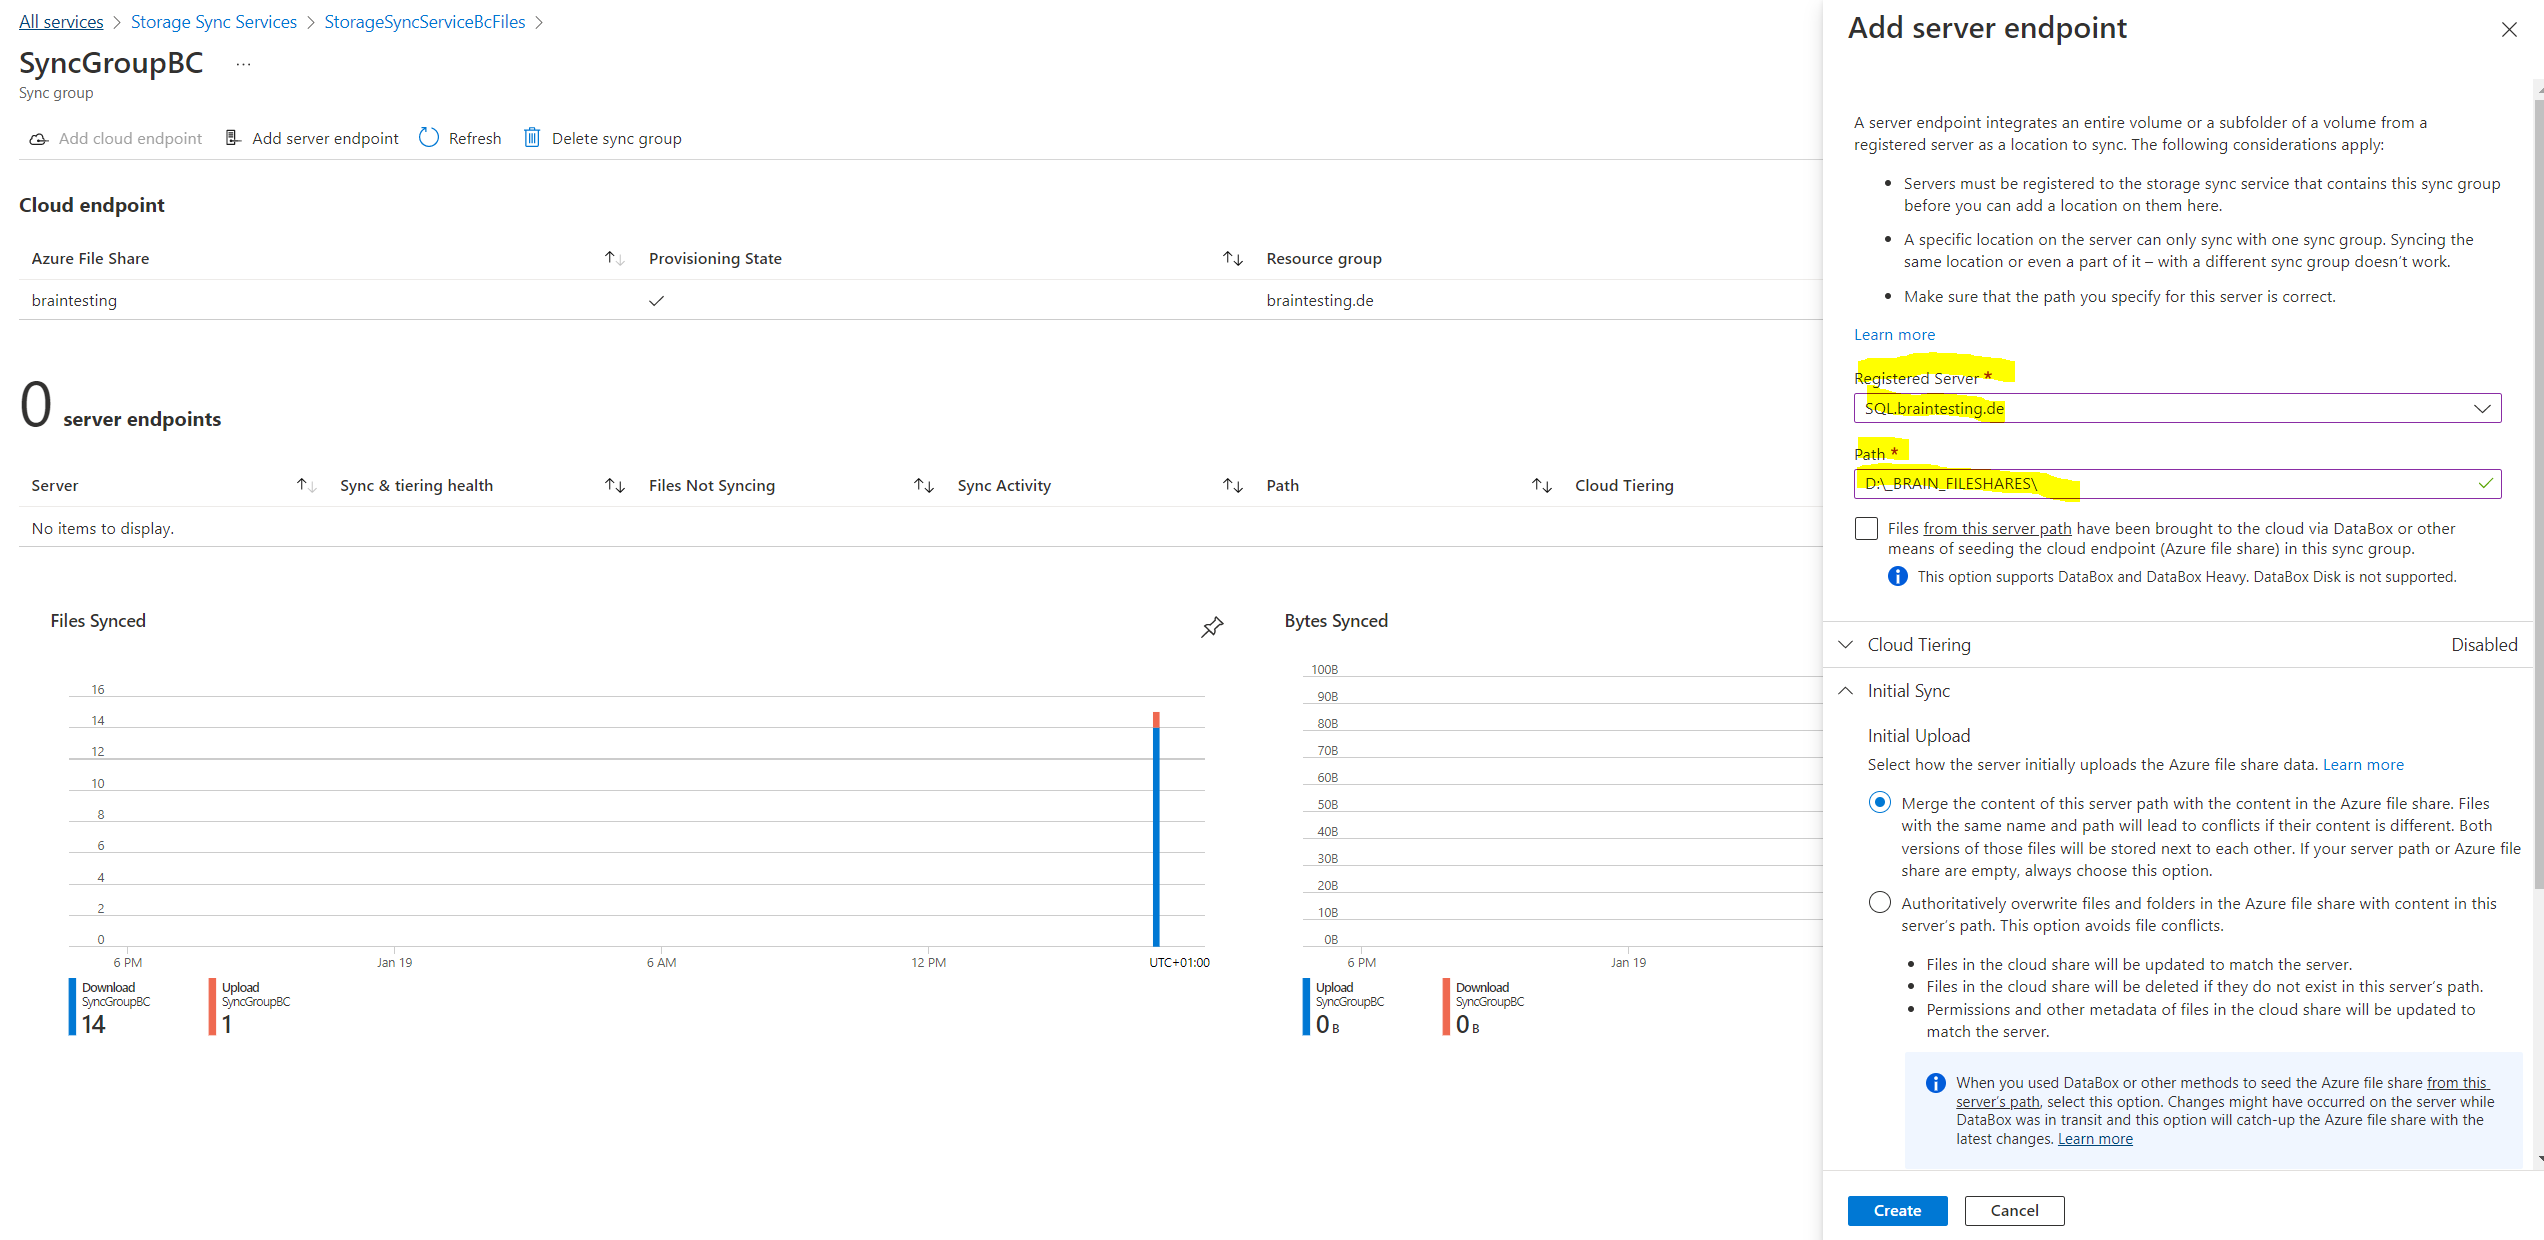
Here I will select my registered server and also enter the path where the shares are hosted on.


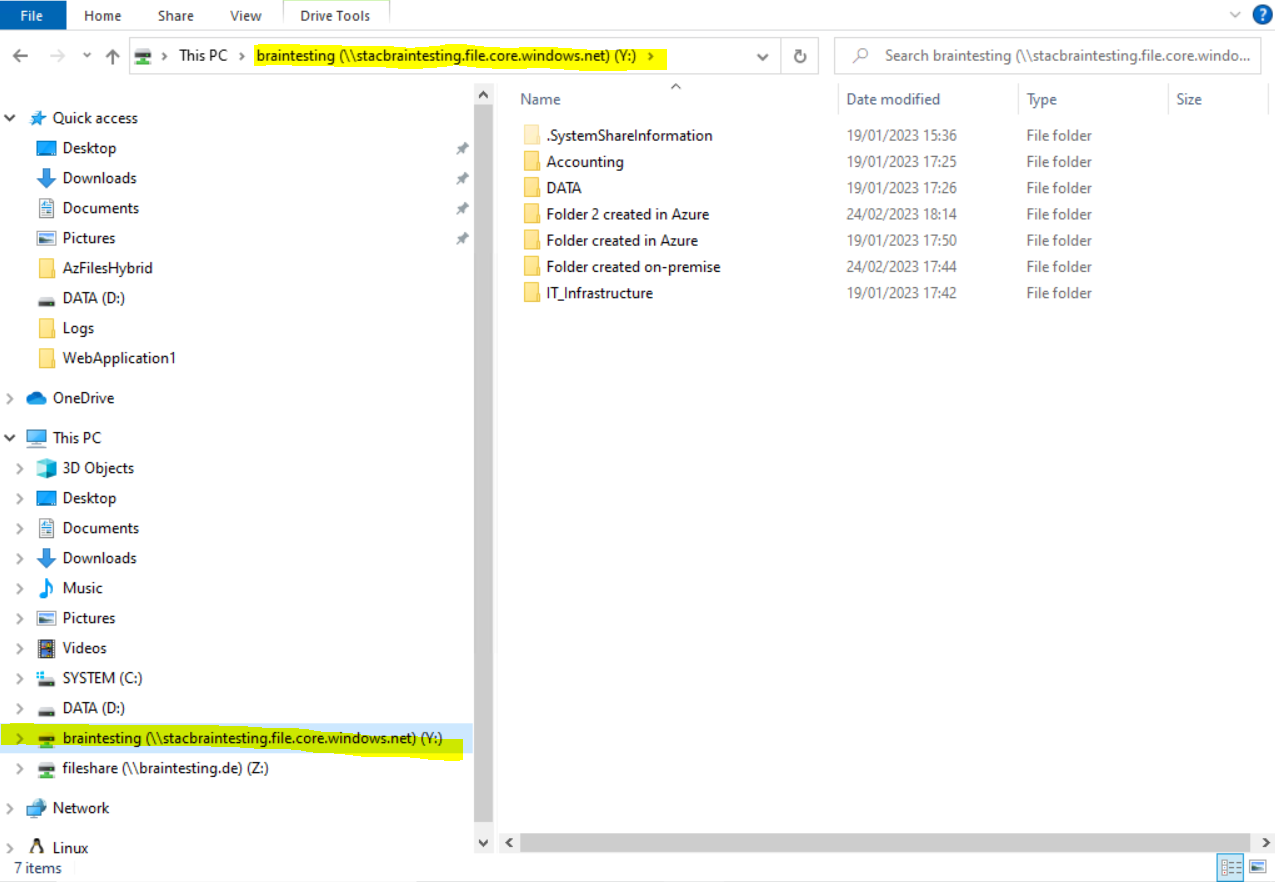
Here you can see that my on-premise file shares are already synced to Azure.
Mount SMB Azure file share on Windows
Azure file shares can be seamlessly used in Windows and Windows Server.
In order to use an Azure file share via the public endpoint outside of the Azure region it is hosted in, such as on-premises or in a different Azure region, the OS must support SMB 3.x. Older versions of Windows that support only SMB 2.1 can’t mount Azure file shares via the public endpoint.
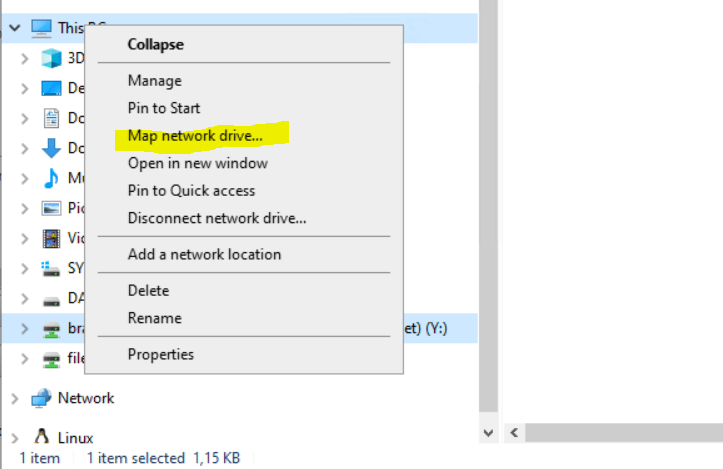
Right click on This PC in the File Explorer and choose Map network drive …
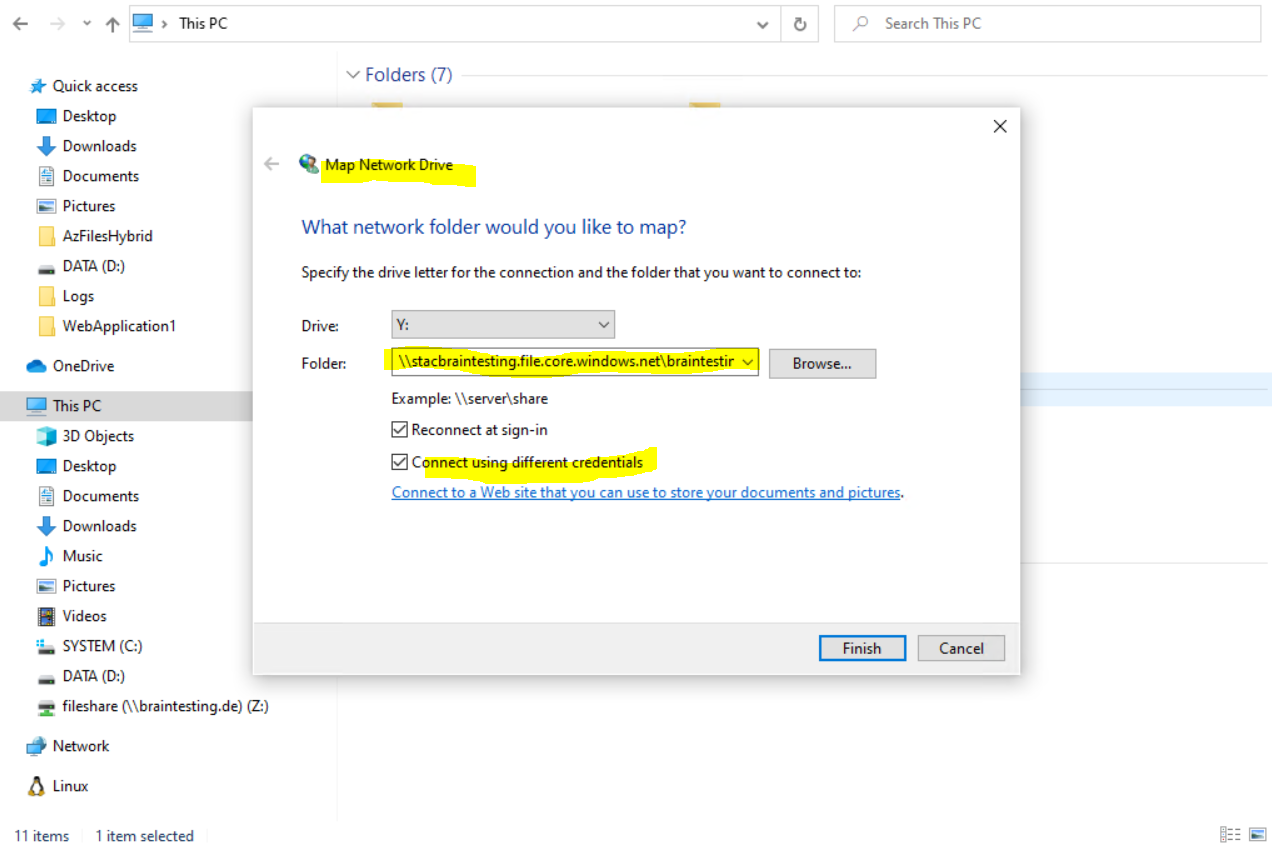
Select the drive letter and enter the UNC path to your Azure file share. The UNC path format is \<storageAccountName>.file.core.windows.net<fileShareName>.
Check the Connect using different credentials checkbox.
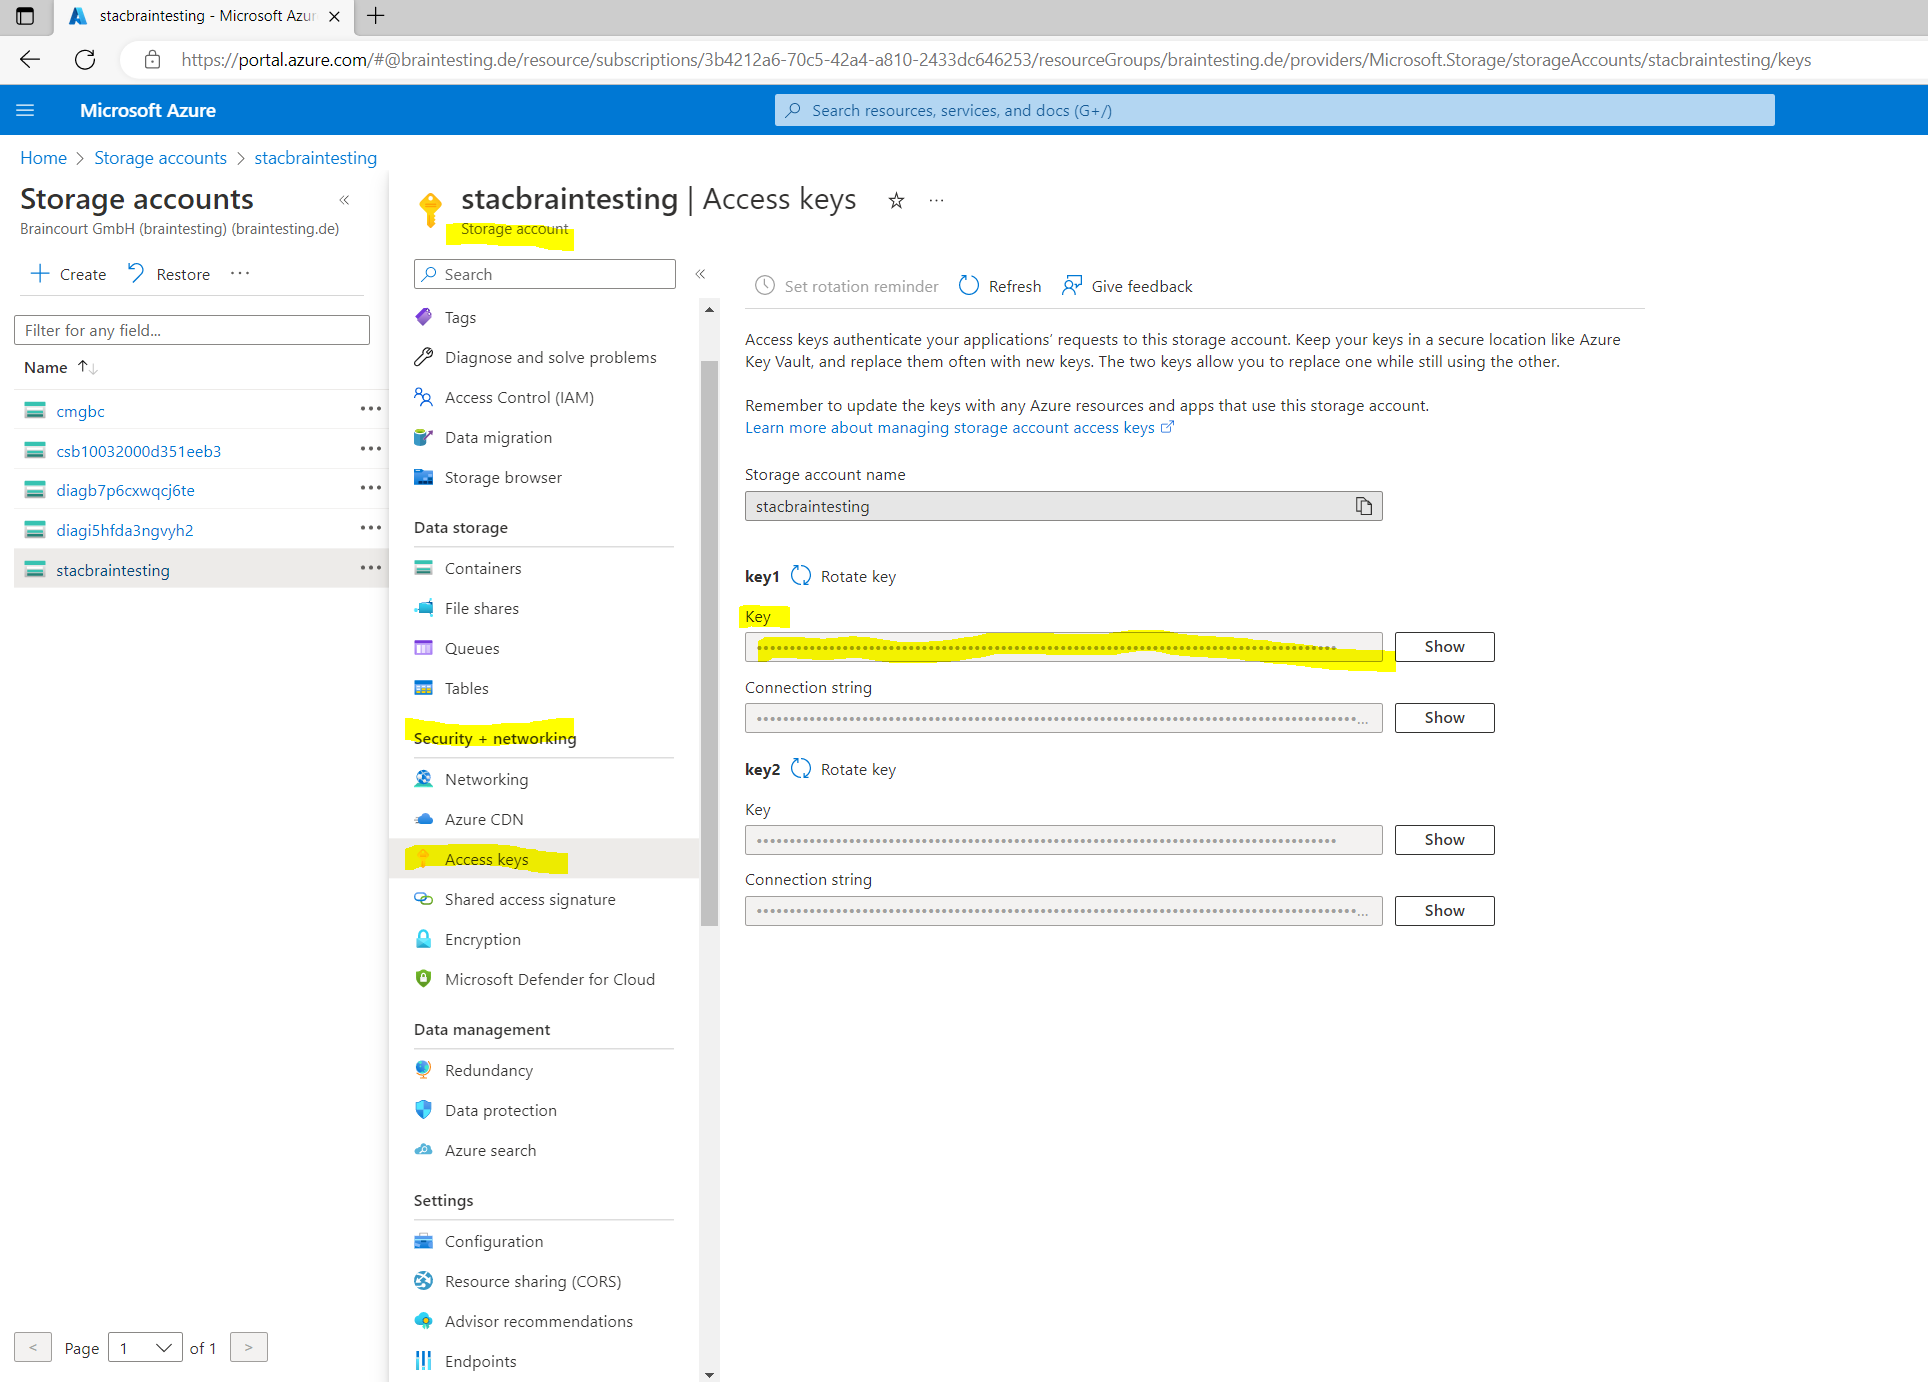
Use a different account. Under Email address, use the storage account name, and use a storage account key as the password. Select OK.
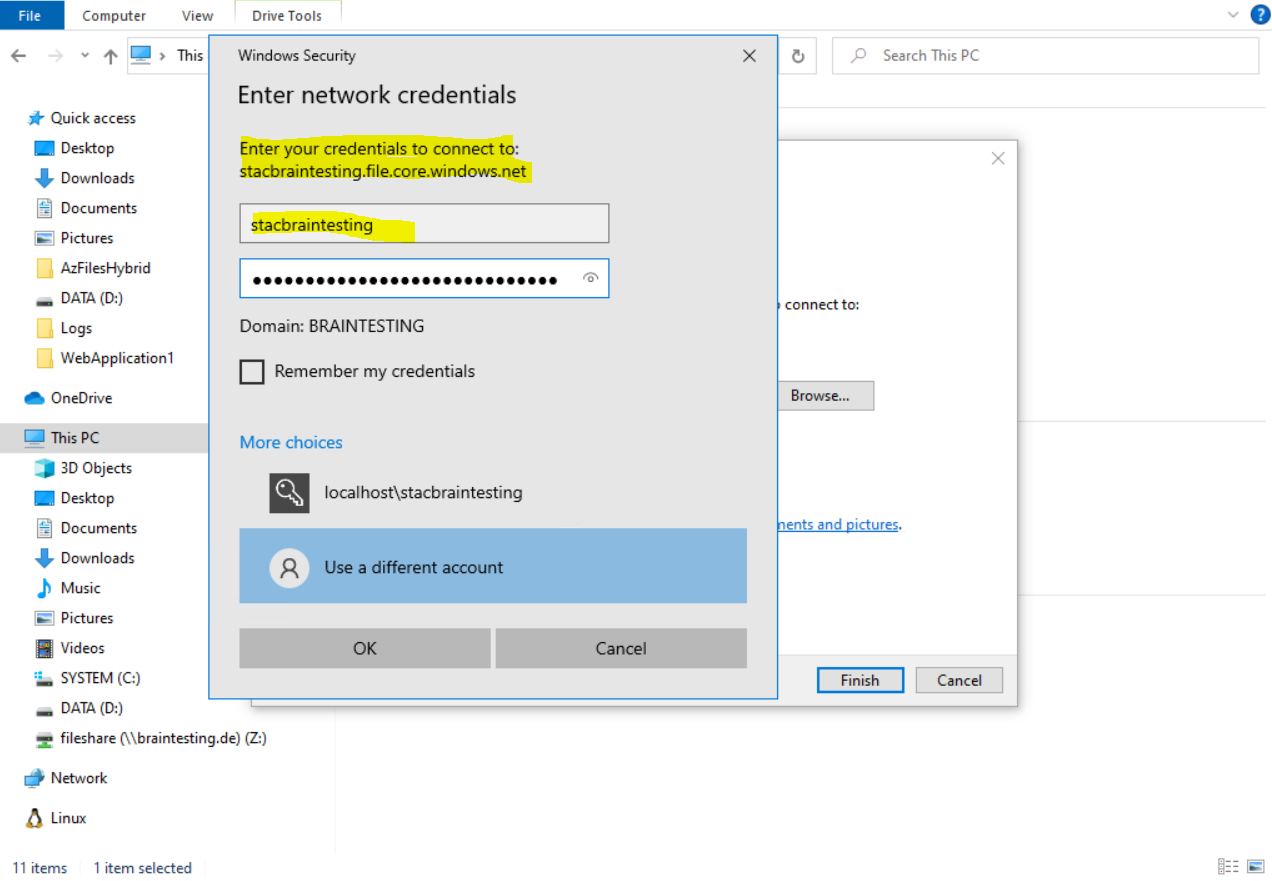
The account name is stacbraintesting and the storage account key you will find under Security + networking and here in the Access keys menu.
Source: https://learn.microsoft.com/en-us/azure/storage/files/storage-how-to-use-files-windows
Troubleshooting
Delay in Syncing from Azure to on-premise Windows File Servers
While syncing files from on-premise to Azure will happen immediately, syncing files down from Azure to your server will take some time. Changes made to the Azure file share by using the Azure portal or SMB are not immediately detected and replicated like changes to the server endpoint.
Azure Files does not yet have change notifications or journaling, so there’s no way to automatically initiate a sync session when files are changed. On Windows Server, Azure File Sync uses Windows USN journaling to automatically initiate a sync session when files change.
To detect changes to the Azure file share, Azure File Sync has a scheduled job called a change detection job. A change detection job enumerates every file in the file share, and then compares it to the sync version for that file. When the change detection job determines that files have changed, Azure File Sync initiates a sync session. The change detection job is initiated every 24 hours. Because the change detection job works by enumerating every file in the Azure file share, change detection takes longer in larger namespaces than in smaller namespaces. For large namespaces, it might take longer than once every 24 hours to determine which files have changed.
To immediately sync files that are changed in the Azure file share, the Invoke-AzStorageSyncChangeDetection PowerShell cmdlet can be used to manually initiate the detection of changes in the Azure file share. This cmdlet is intended for scenarios where some type of automated process is making changes in the Azure file share or the changes are done by an administrator (like moving files and directories into the share). For end user changes, the recommendation is to install the Azure File Sync agent in an IaaS VM and have end users access the file share through the IaaS VM. This way all changes will quickly sync to other agents without the need to use the Invoke-AzStorageSyncChangeDetection cmdlet. To learn more, see the Invoke-AzStorageSyncChangeDetection documentation.
Server endpoint creation failed
In case you will get the following error message after trying to add a server endpoint, check if you published the required FQDNs in your private DNS setup.
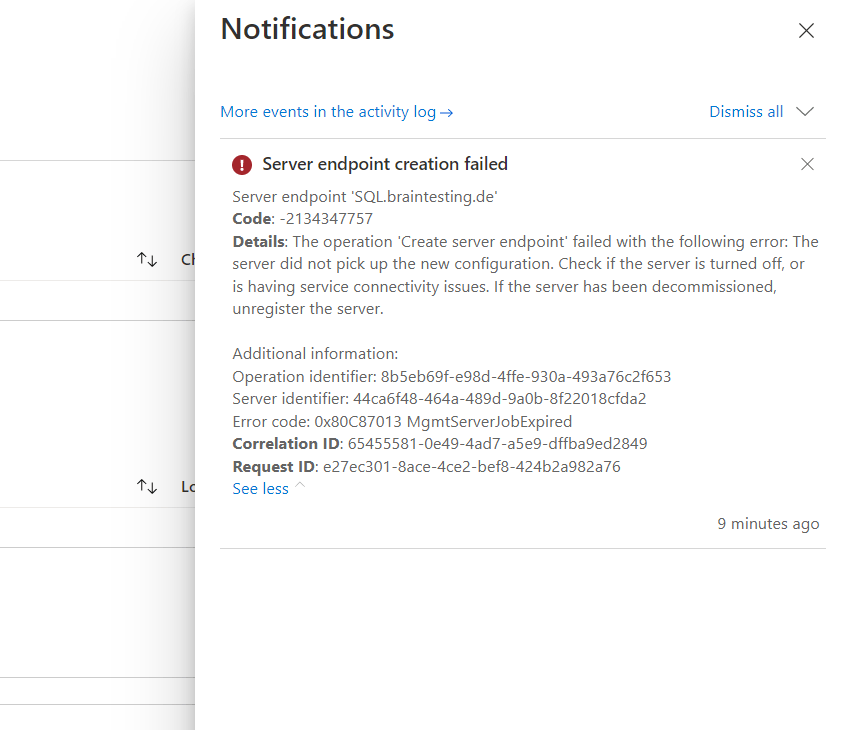
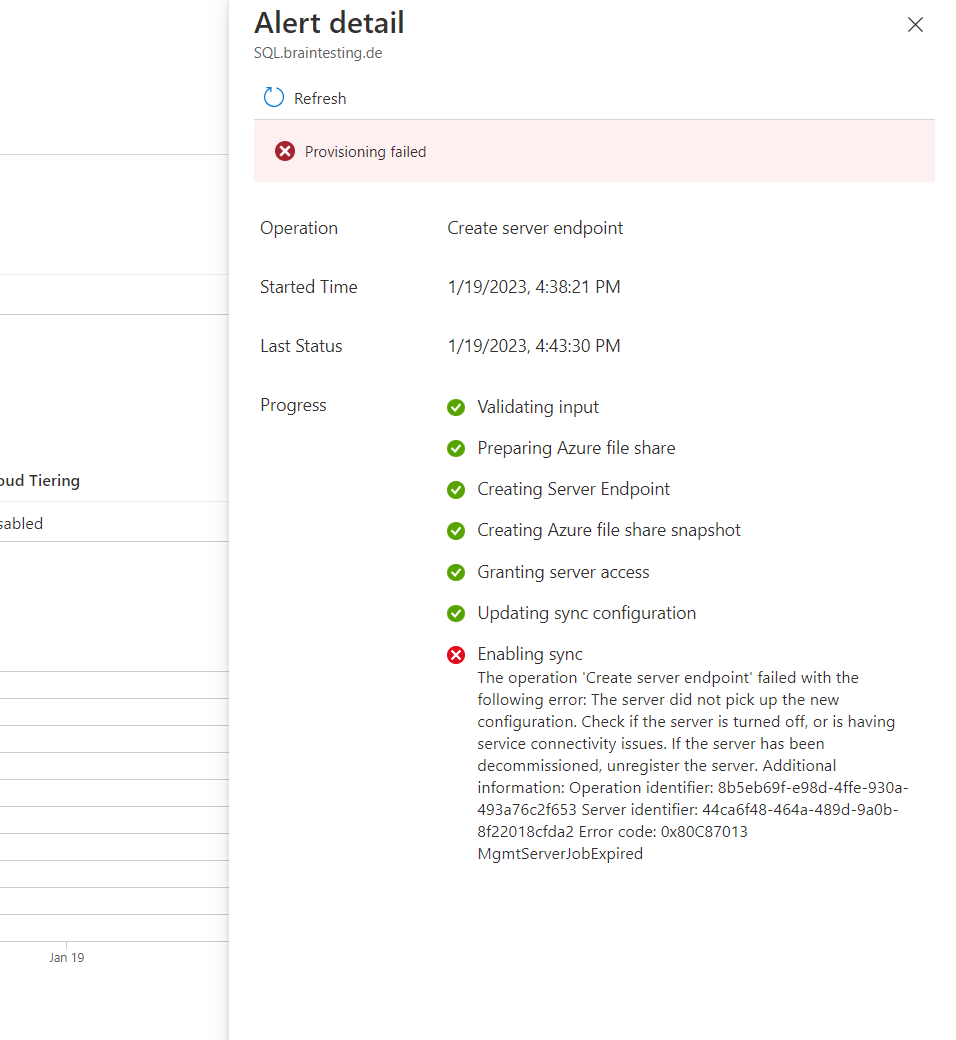
In my case I needed to publish the following FQDNs and IPs on my on-premise DNS server as shown further above.
After publishing the required DNS records in my on-premise network, I first have to delete the failed server endpoint and then re-adding it.

Links
What is Azure File Sync?
https://learn.microsoft.com/en-us/azure/storage/file-sync/file-sync-introductionPlanning for an Azure File Sync deployment
https://learn.microsoft.com/en-us/azure/storage/file-sync/file-sync-planningDeploy Azure File Sync
https://learn.microsoft.com/en-us/azure/storage/file-sync/file-sync-deployment-guideTroubleshoot Azure File Sync sync health and errors
https://learn.microsoft.com/en-us/azure/storage/file-sync/file-sync-troubleshoot-sync-errorsDeploying DFS Namespaces
https://learn.microsoft.com/en-us/windows-server/storage/dfs-namespaces/deploying-dfs-namespaces#:~:text=Deploying%20DFS%20Namespaces,-ArticleMount SMB Azure file share on Windows
https://learn.microsoft.com/en-us/azure/storage/files/storage-how-to-use-files-windows
The best home for modern WordPress sites built on the Google Cloud Platform