

Mastering vSphere Lifecycle Management (vLCM)
The vSphere Lifecycle Management (vLCM), a powerful feature designed to simplify and streamline the lifecycle management of your vSphere environments.
Whether you’re managing a single cluster or a large-scale data center, vLCM provides a centralized, automated approach to handle firmware, driver, and software updates across your entire infrastructure.
By integrating hardware and software management into a single workflow, vLCM ensures consistency, reduces operational overhead, and minimizes the risk of downtime.
In this post we will see step by step how to use vLCM to update and upgrade our ESXi hosts.
!!! Note !!!
If you upgrade hosts managed by vCenter Server, you must upgrade vCenter Server
before you upgrade the ESXi hosts. If you do not upgrade your environment in the correct order,
you can lose data and lose access to servers.Source: https://docs.vmware.com/en/VMware-vSphere/8.0/vsphere-esxi-80-upgrade-guide.pdf
About upgrading the vCenter Server (VCSA) you can also read my following post.
Upgrading and Patching the ESXi Hosts by using vLCM
Click on the main menu and select the Lifecycle Manager.
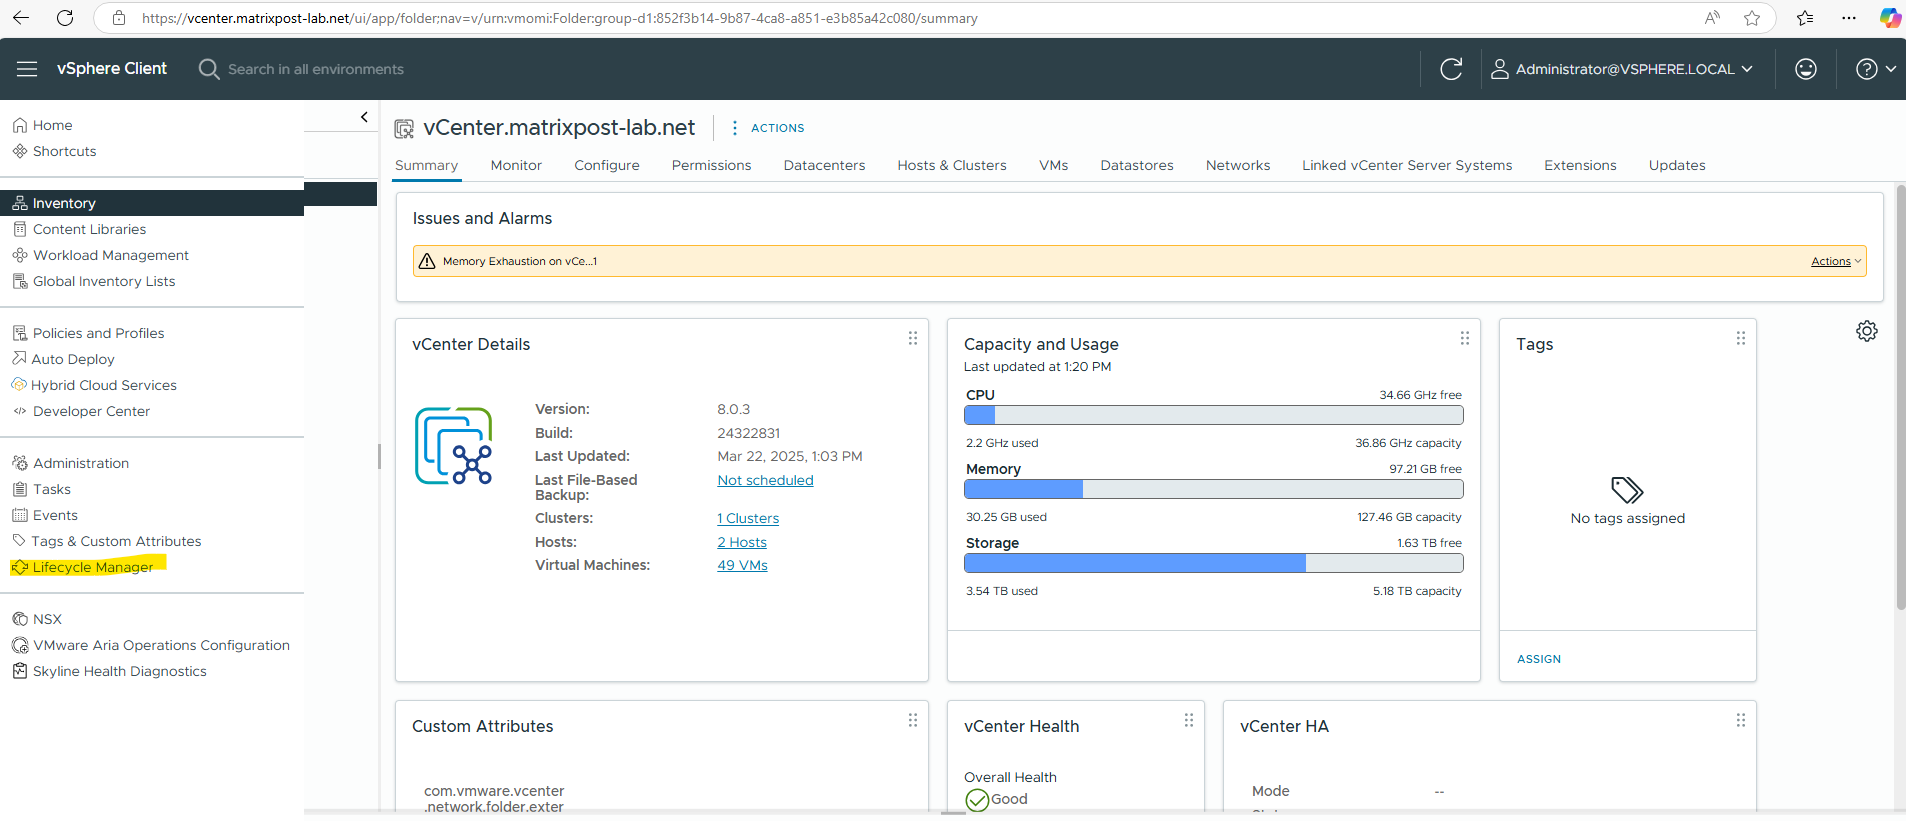
With vSphere 7.0, VMware launched a feature called vSphere Lifecycle Manager Images (vLCM), which uses a declarative model, to holistically define the desired state of the ESXi host image; including the target ESXi version, firmware & drivers.
This feature enables all the ESXi hosts, to adhere to the desired state; by enforcing consistency across the cluster. When a host drifts from the desired state, the host can be ‘remediated’ to become compliant to the desired state, once again.
So below in this post I will use this new vSphere Lifecycle Manager Images (vLCM) feature to update and upgrade my ESXi hosts.
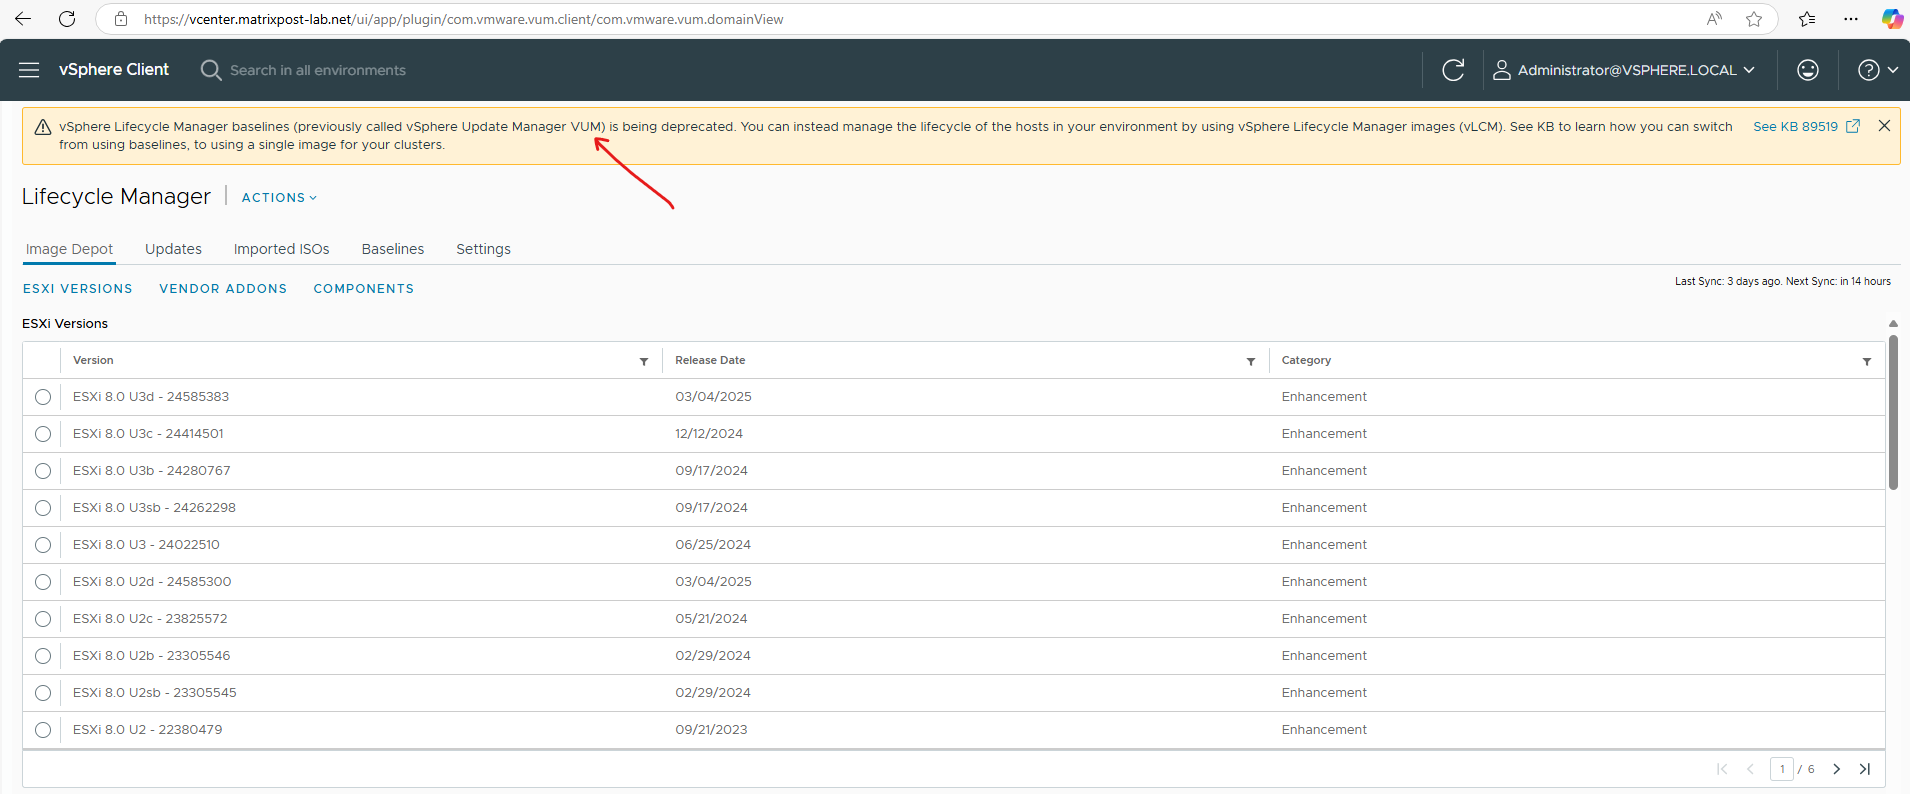
With the launch of vSphere 8.0, Broadcom is announcing the deprecation of vSphere Lifecycle Manager Baselines (previously known as vSphere Update Manager VUM).
The capability will continue to be supported, and will remain in the product, and is available for use in vSphere 8, until its removal in the next Major release of vSphere.
Customers should transition from using vSphere Lifecycle Manager Baselines (VUM), to instead using vSphere Lifecycle Manager Images (vLCM) for managing the lifecycle of ESXi hosts.
Source: https://knowledge.broadcom.com/external/article?legacyId=89519
Here we can see all available ESXi versions in the repository.
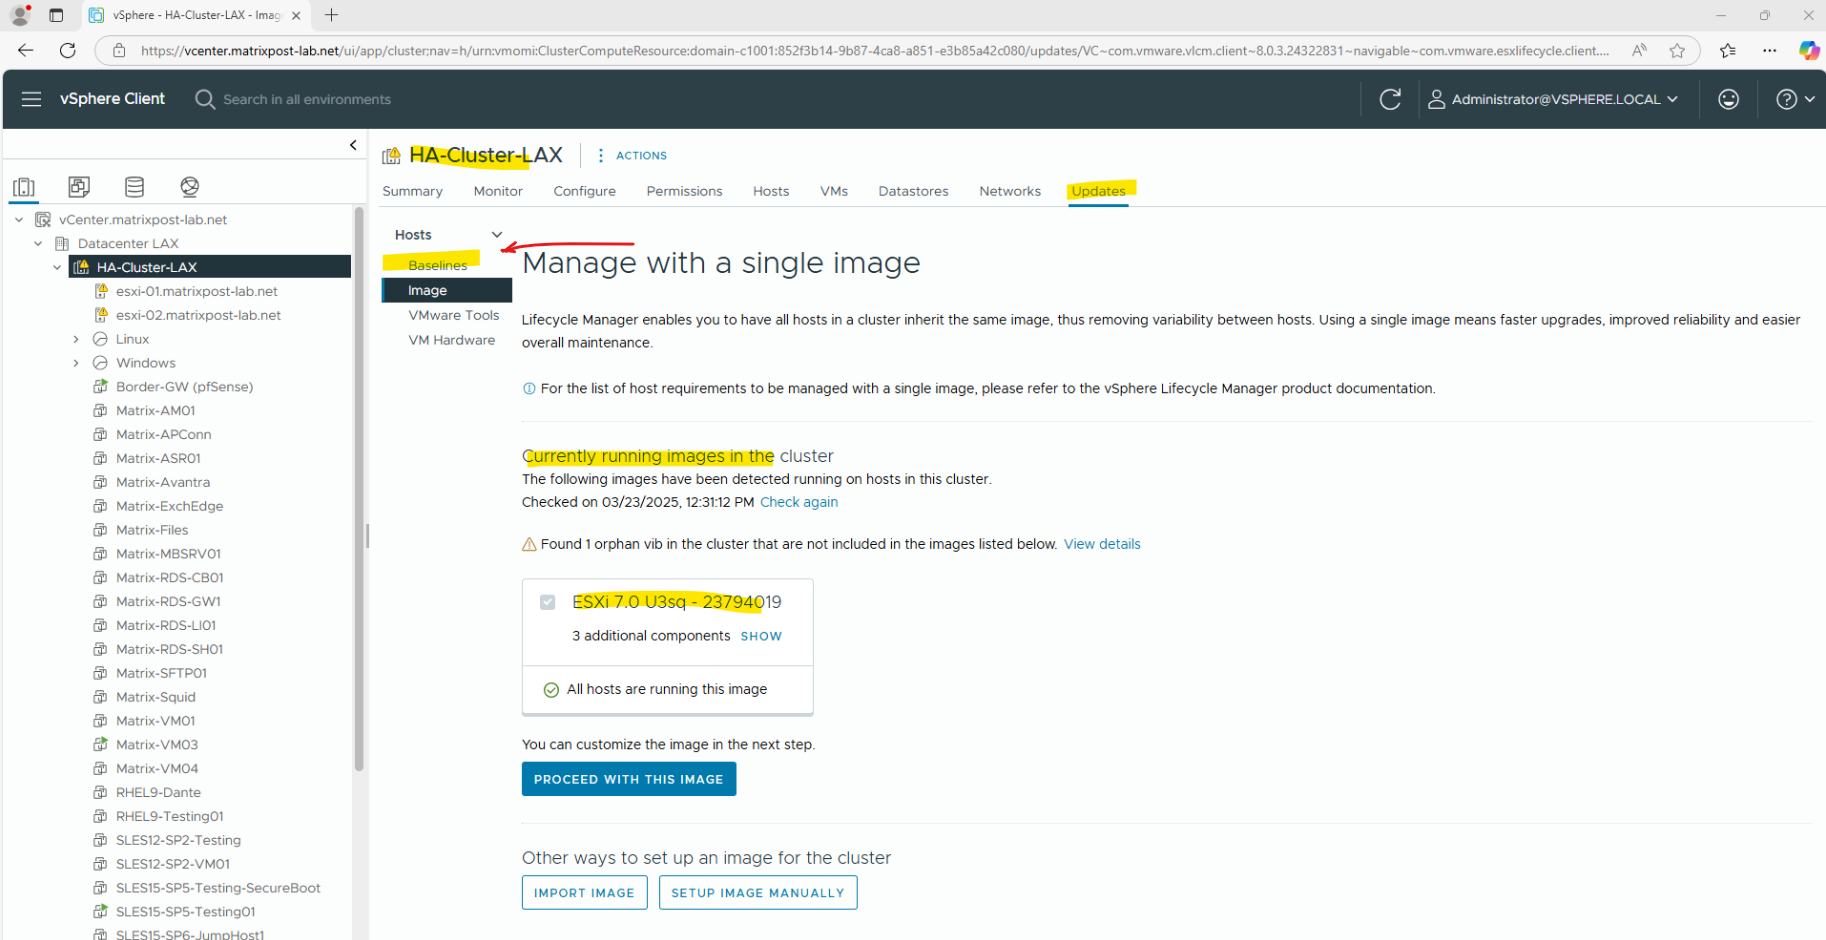
To upgrade/update our ESXi hosts, we need to navigate to Hosts and Clusters -> Updates -> Images as shown below. We can also see here that currently the cluster is running with the ESXi image version 7.0 U3sq – 23794019.
Note: Although we are viewing the Images page, the highlighted Baselines tab indicates that the cluster is still managed using the traditional vSphere Lifecycle Manager Baselines.
At this stage, the Images view is only used to prepare the desired image. Later in this post, we will complete the one-time transition to the new image-based lifecycle management, after which the Baselines tab will no longer be available.
Unlike baselines, which only define which updates should be applied, image-based lifecycle management defines the complete desired software composition of an ESXi host. During compliance checks, vSphere Lifecycle Manager validates the entire software stack against this desired image rather than only checking for missing updates.
As mentioned to the beginning, when upgrading the ESXi hosts, we must upgrade vCenter Server
first at least to the version we want to upgrade the ESXi hosts. My vCenter Server I was already upgraded to the latest version as of today is 8.0.3.
About how to update and upgrade the vCenter Server you can also read my following post.
In my case before I can upgrade and remediate the ESXi hosts to the latest version, I will first need to add the Flings USB NICs component drivers to the image.
For my lab environment I will use two notebooks for the ESXi hosts and they will use USB NICs which by default is not be supported for all models by the out-of-the box ESXi images.
Therefore I will first need to download the latest version from the new Broadcom Flings Site.
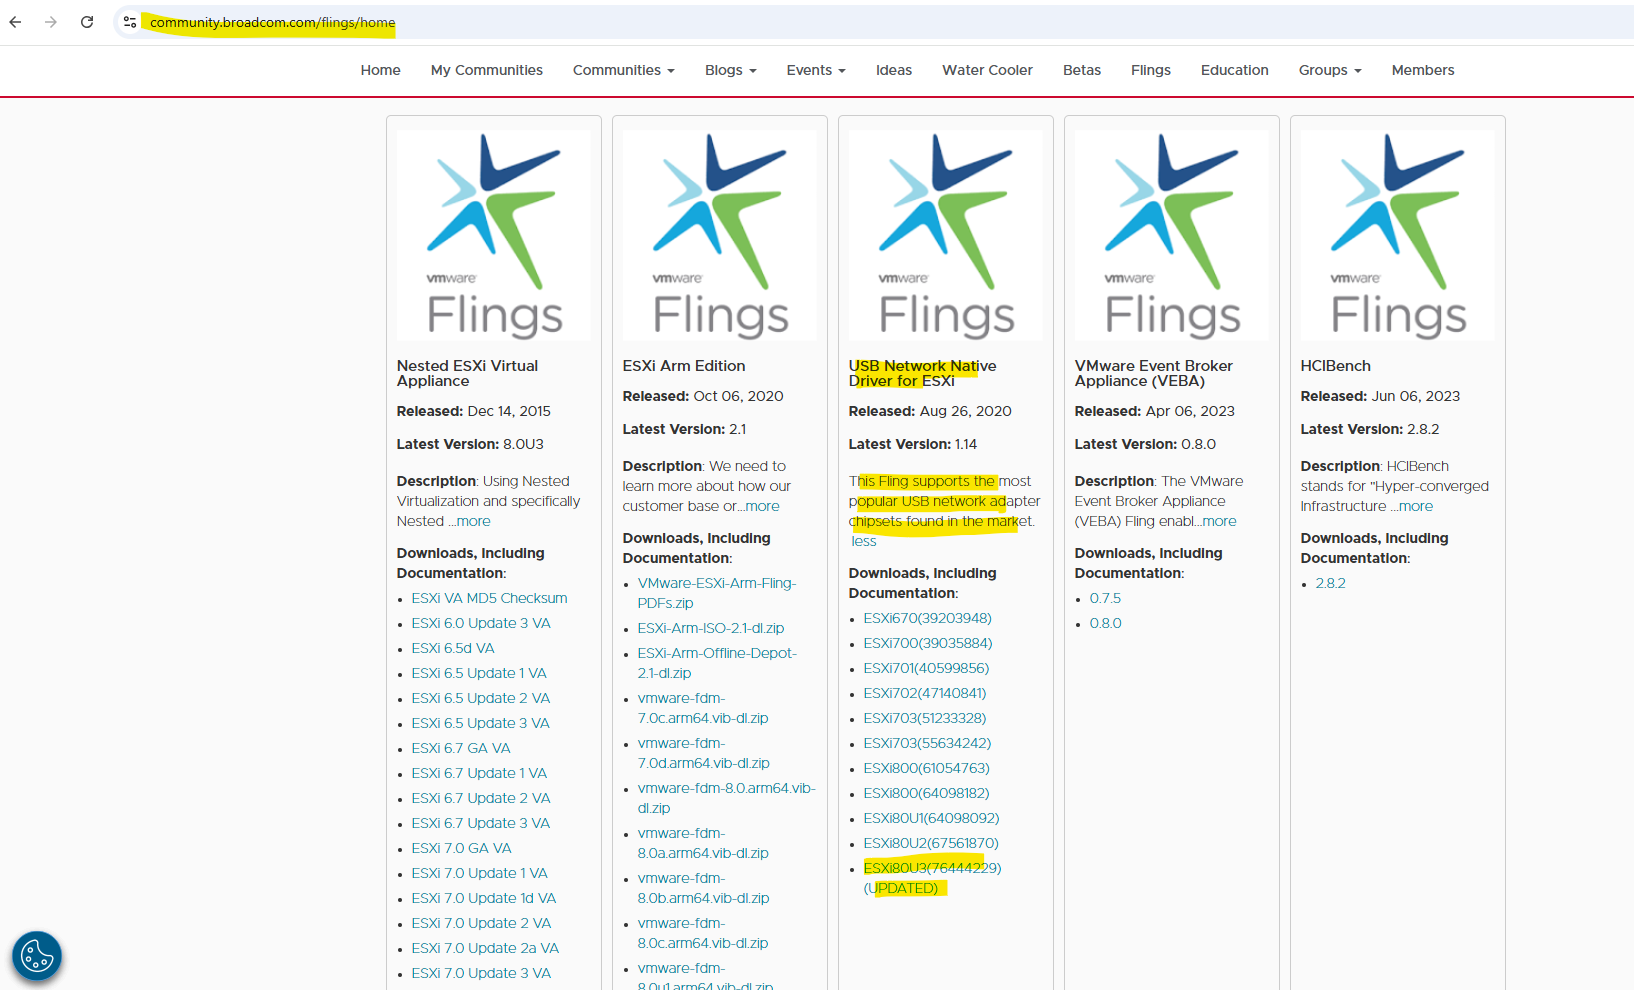
And surprise also for the Flings site as of Mai 16, 2025 we will be required to login to the support.broadcom.com portal by either using your enterprise ID or by creating a basic user profile (the same used to access Broadcom Communities) to download the Flings files.
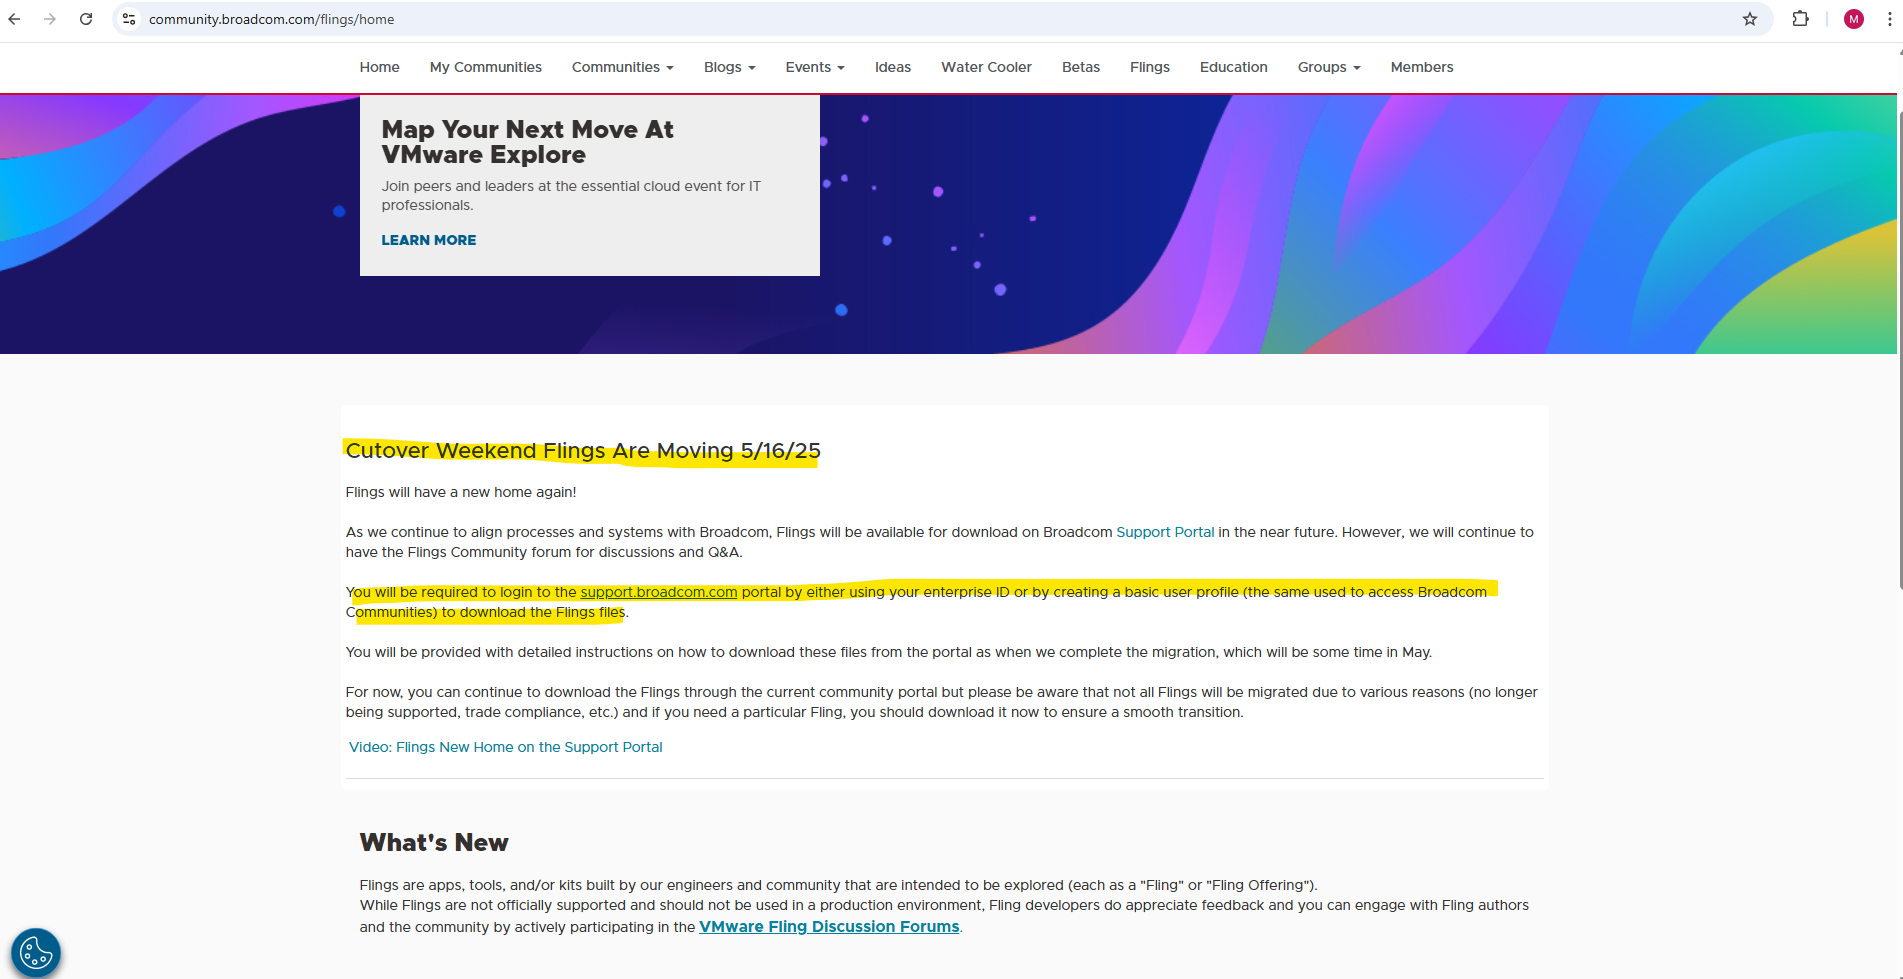
In the support.broadcom.com portal navigate to My Downloads, here click on Free Software Downloads available HERE link.
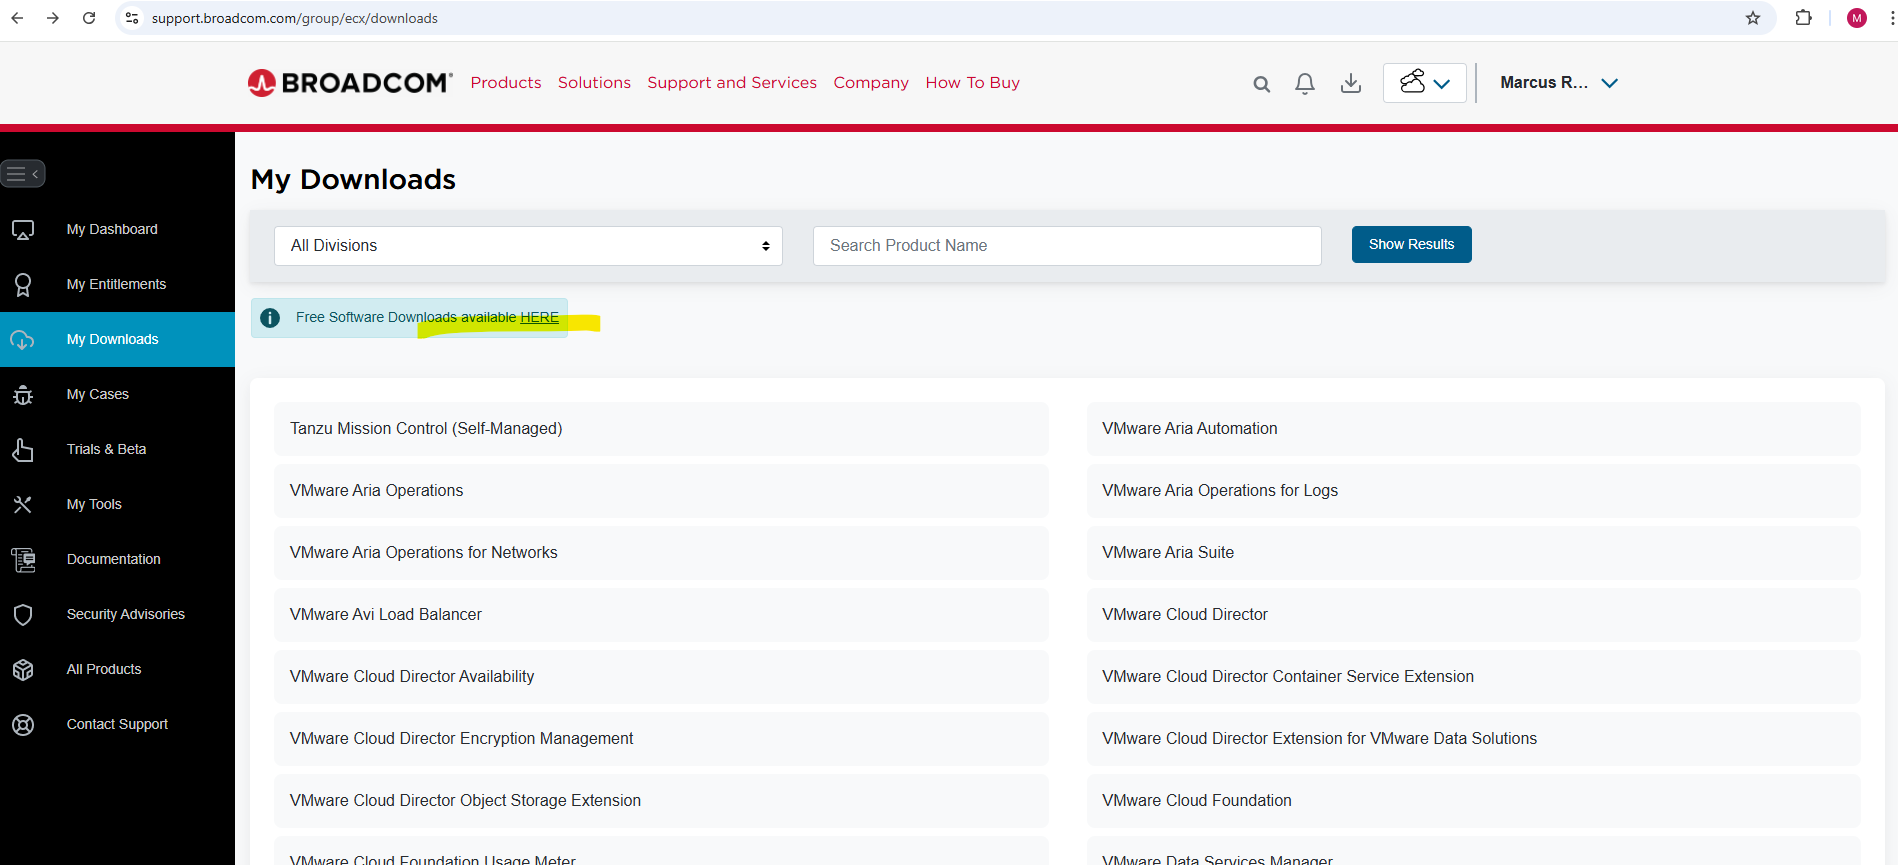
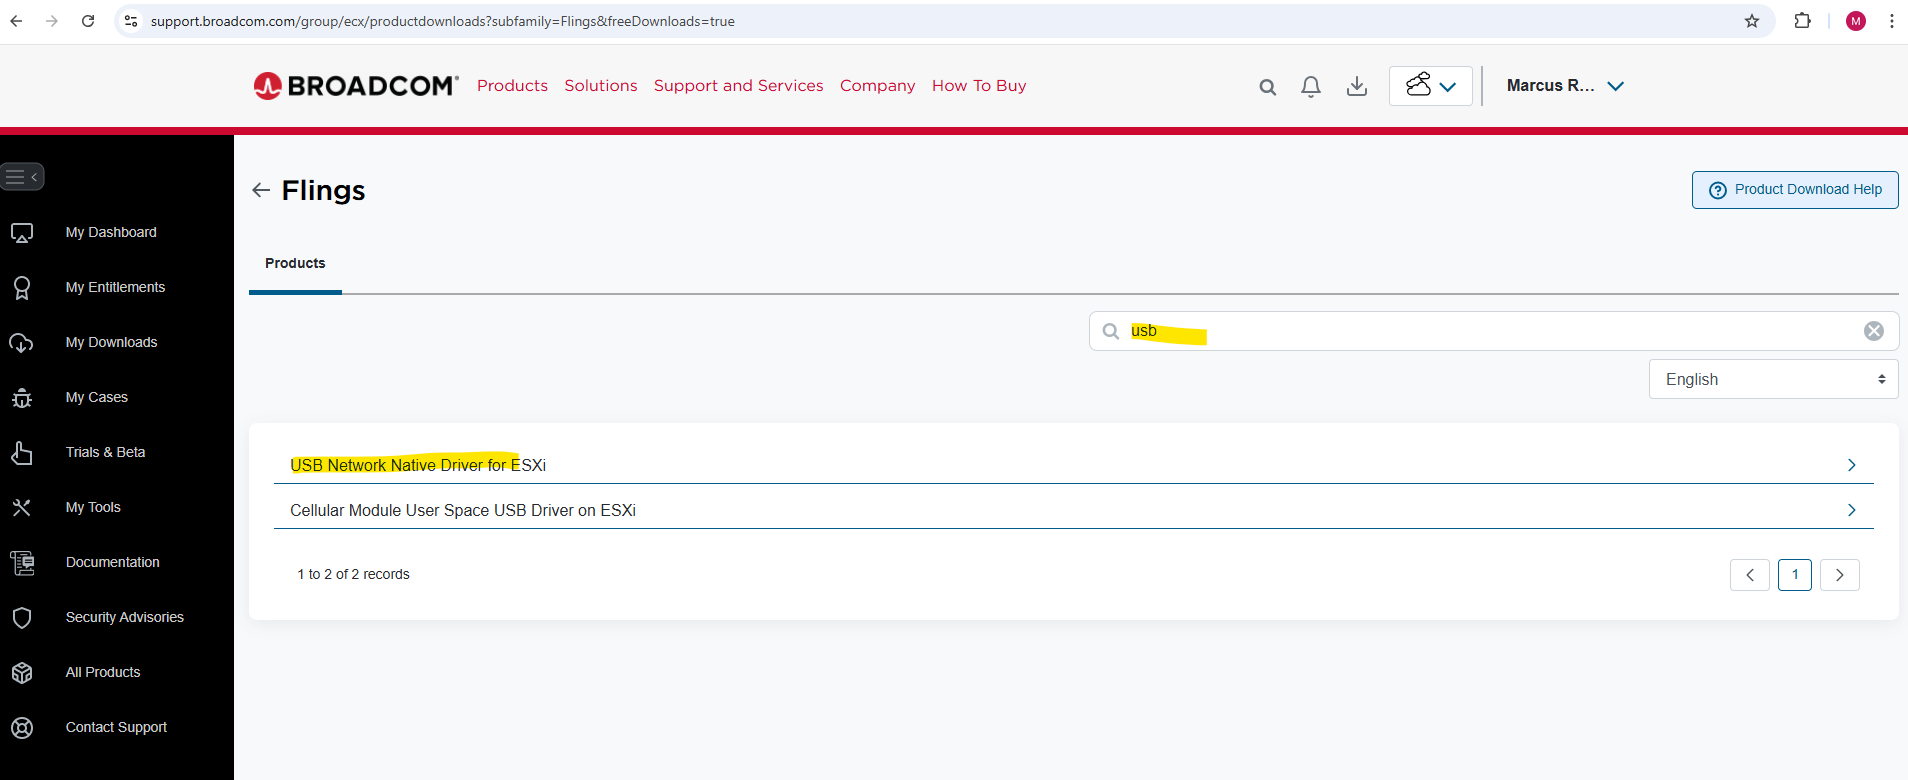
Click on Flings.
Search for usb and select USB Network Native Driver for ESXi.
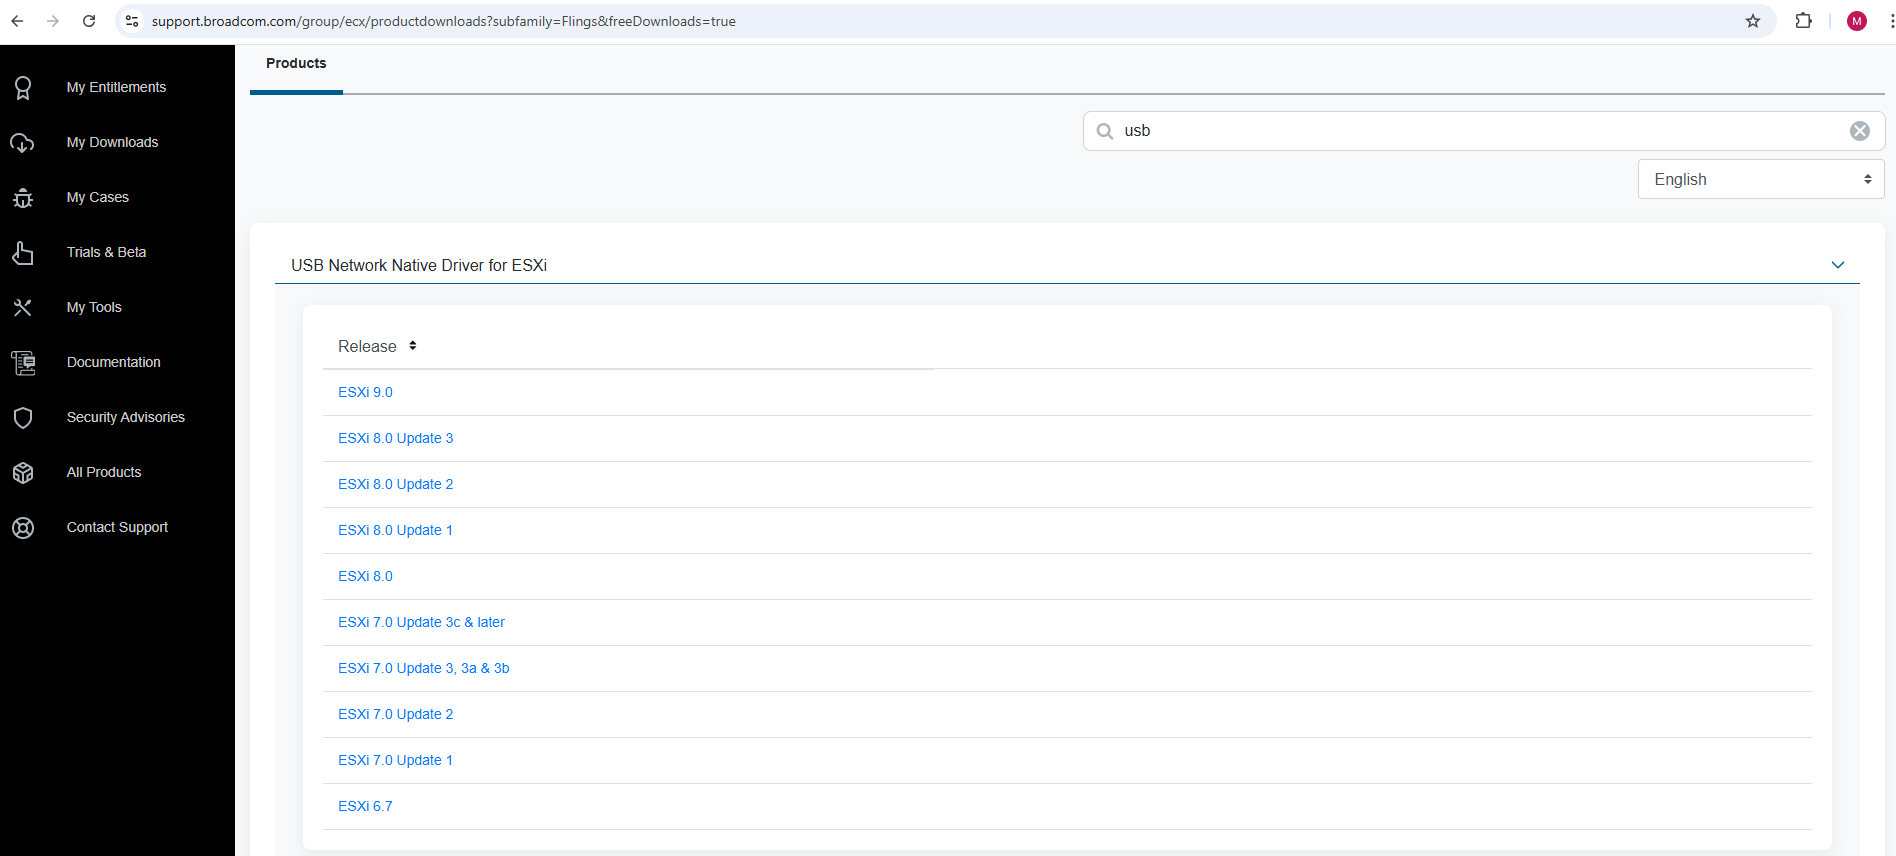
Select the version you want to download.
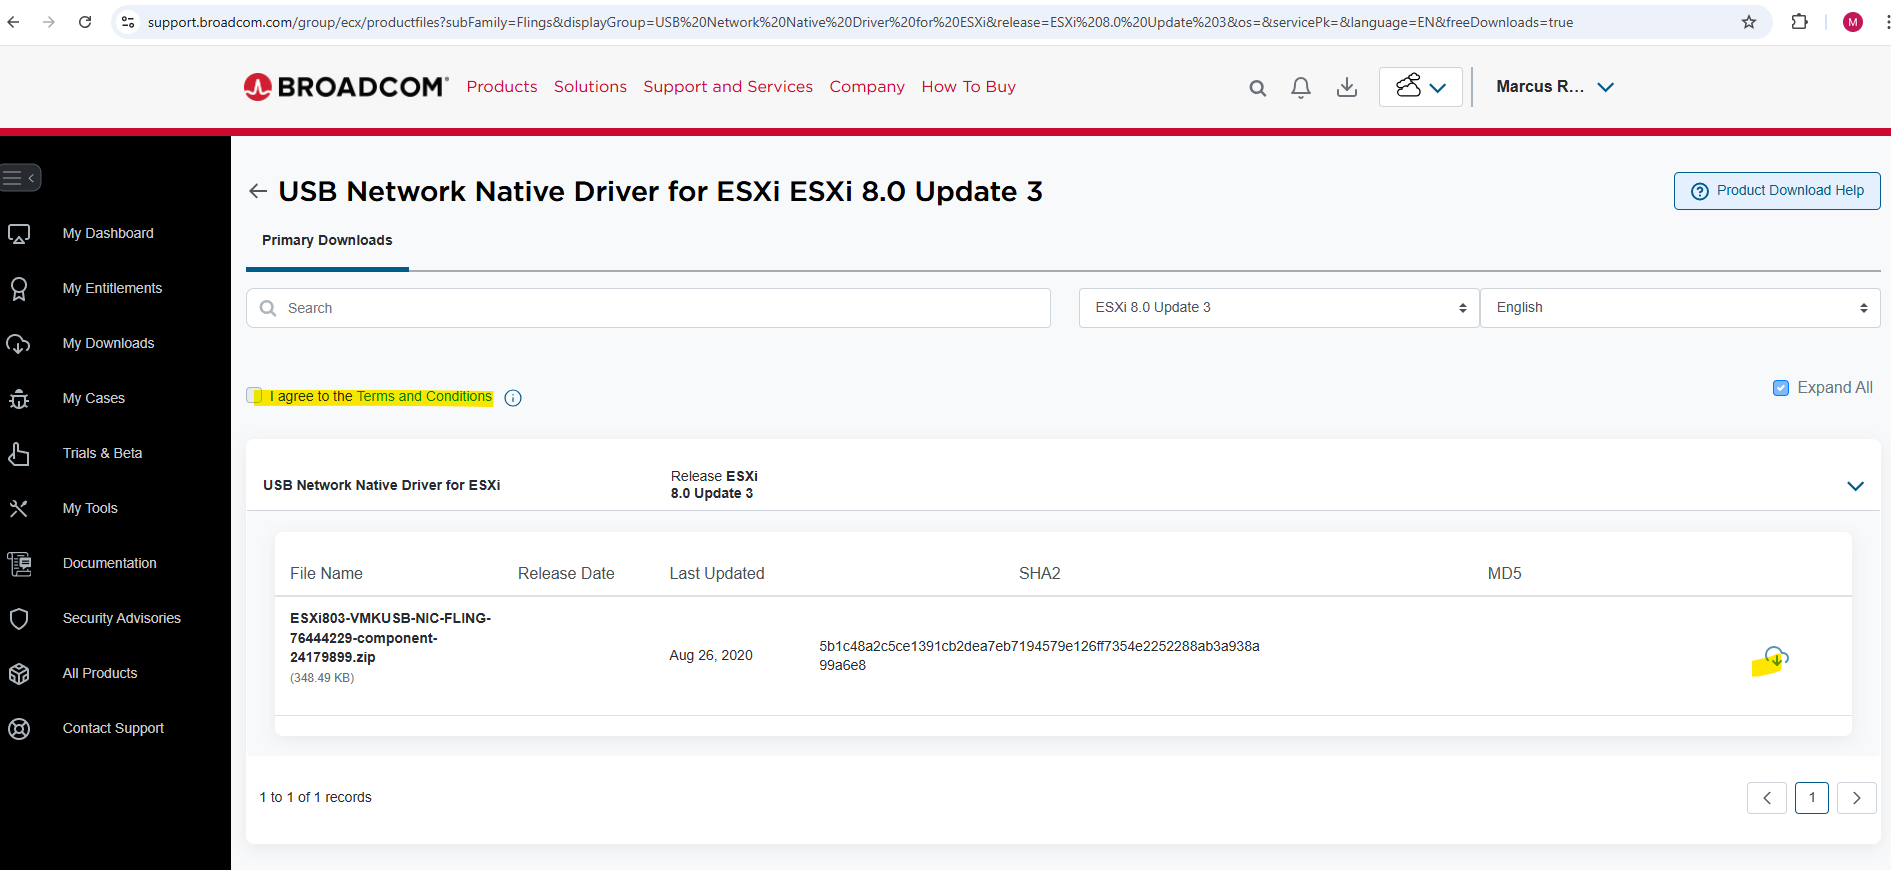
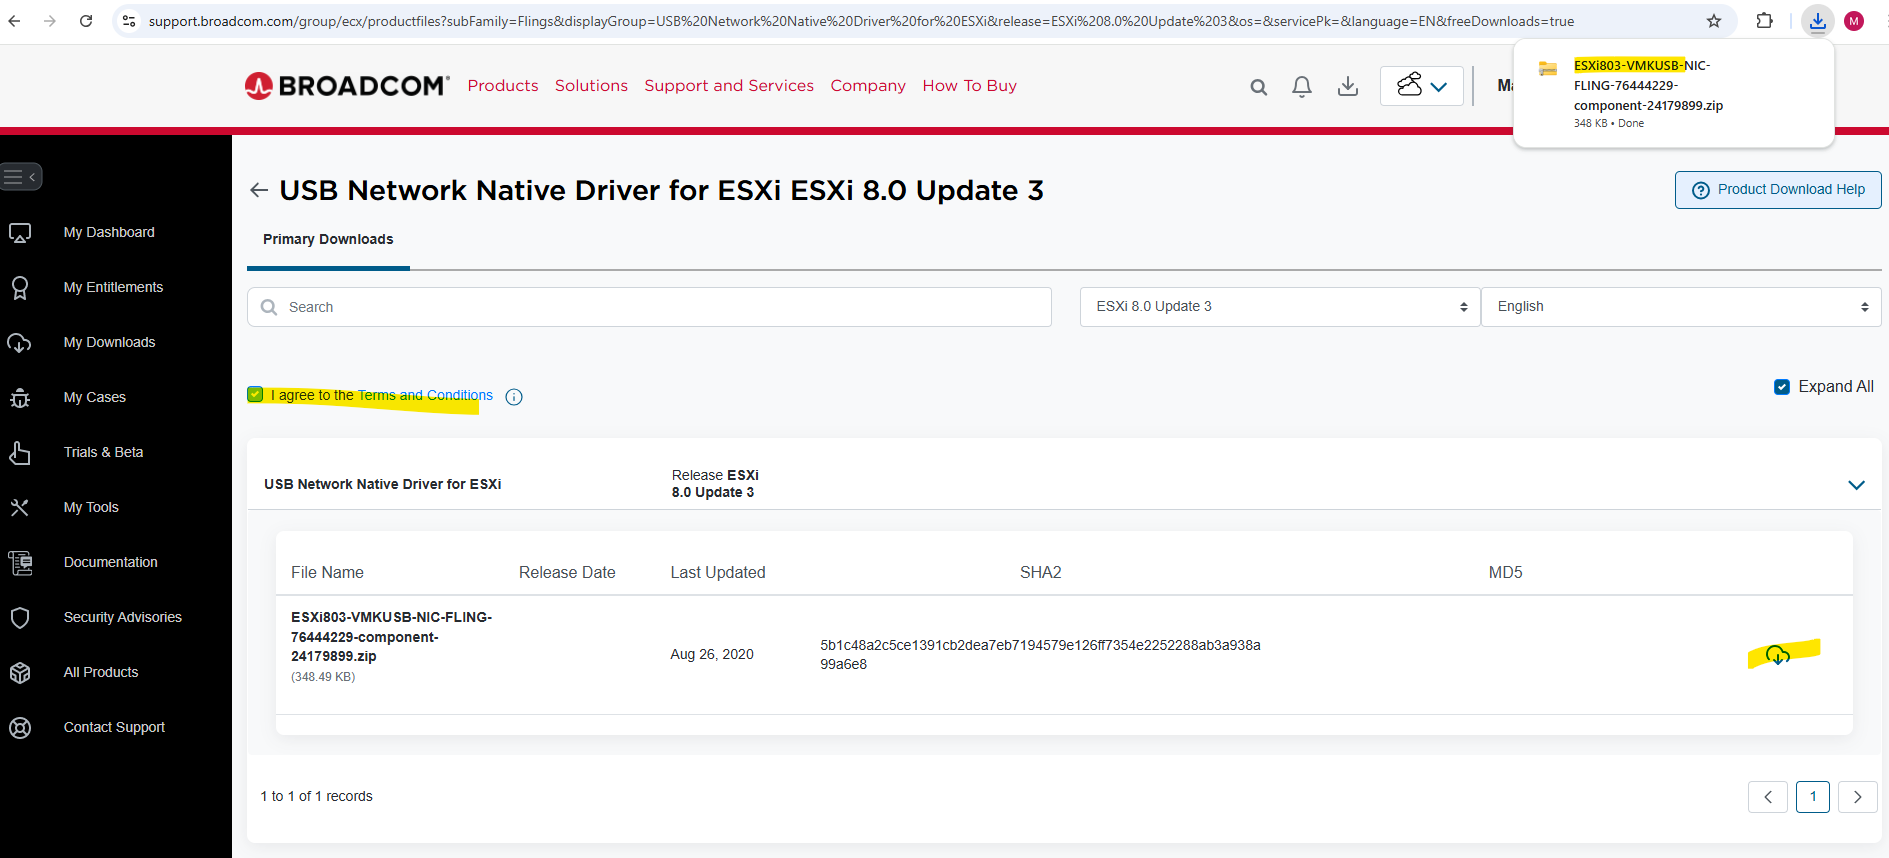
Finally we can download the desired version.
But first we need to click on the Terms and Conditions link, read it and then are able to check it before we can download the software.
To import them we need to navigate to the Lifecycle Manager back, here from the Actions menu select Import Updates.
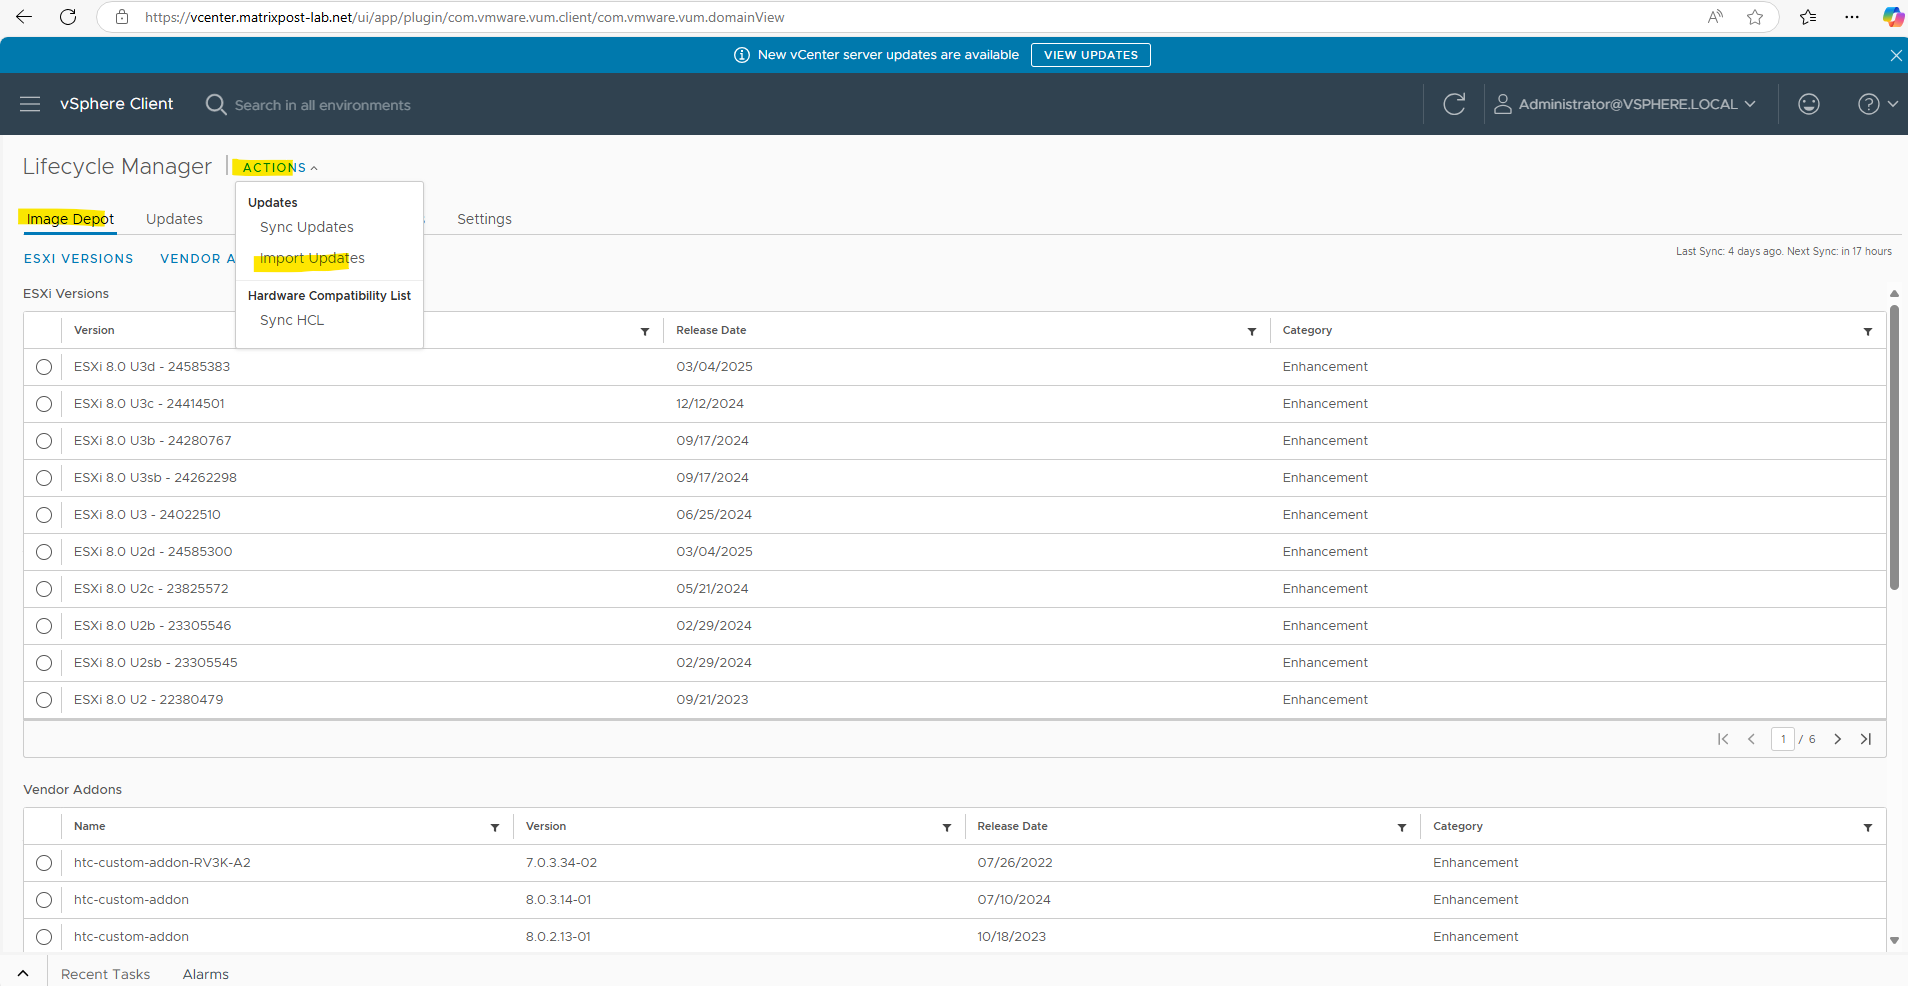
Now we need to select our downloaded Flings zip file.
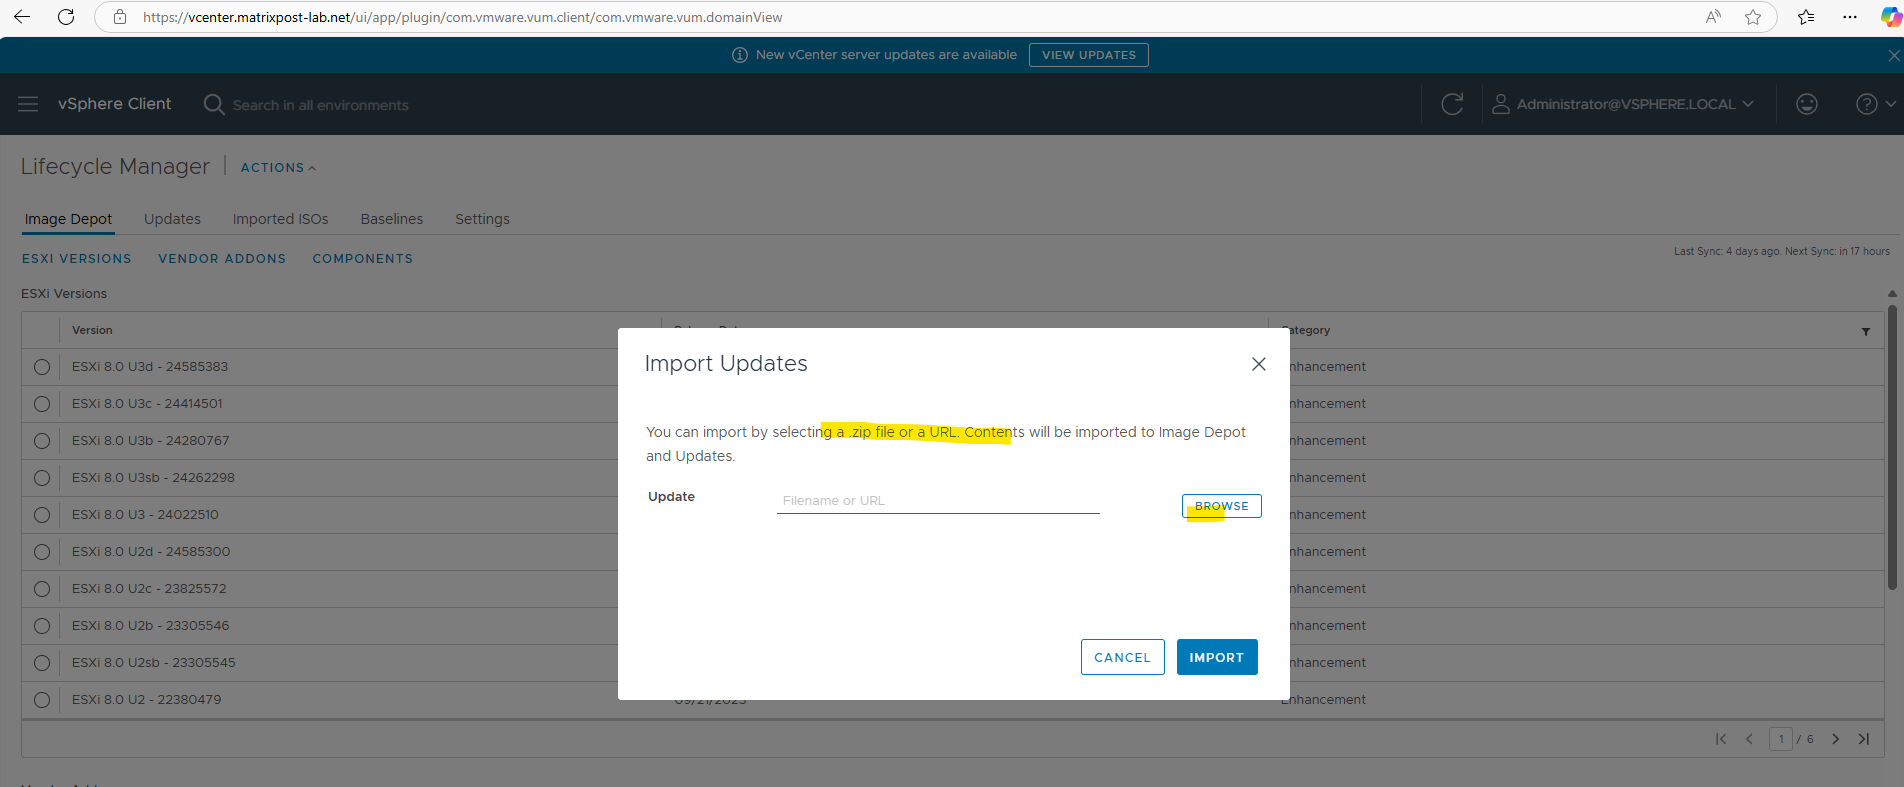
Afterwards we will find the imported update under Components -> Independent components as shown below.
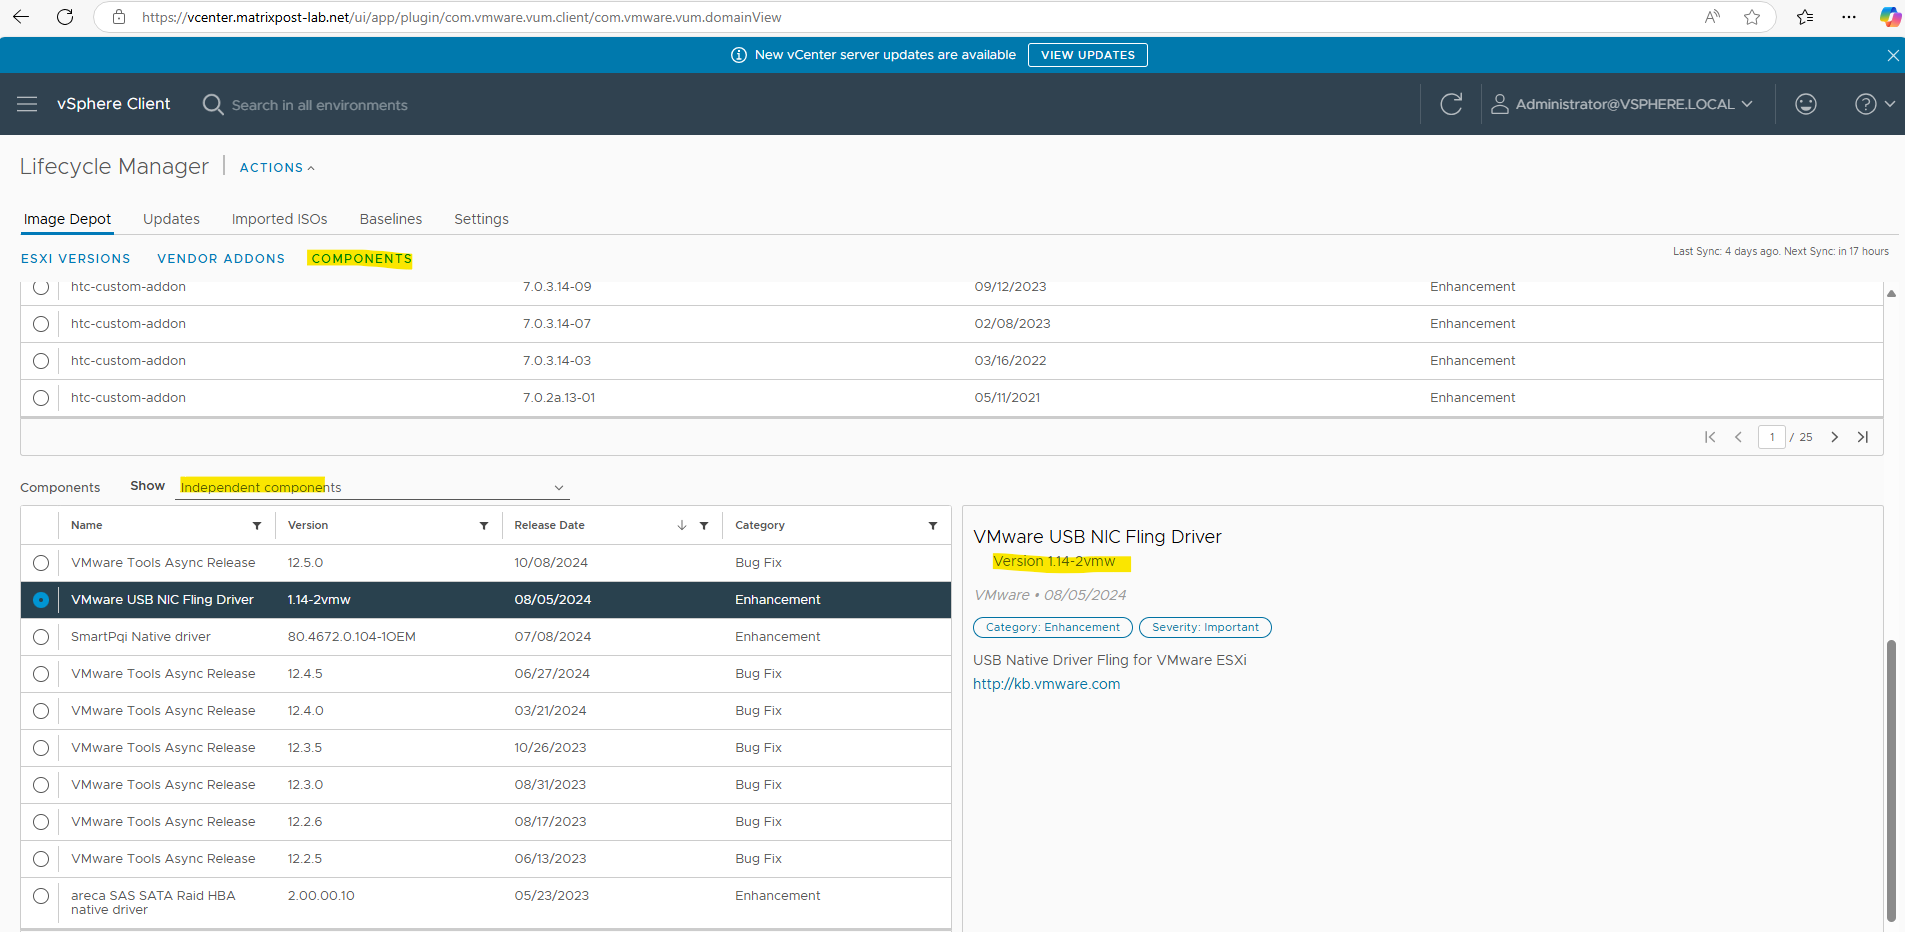
A quick check if this is really the *.vib I was importing, looks good!

The VMware USB NIC Fling Driver component is critical for my ESXi hosts because as mentioned they will use USB NICs which by default are not supported by the ESXi images.
More about you will find in my following post.
Back on the Cluster node we can now add this component to the latest ESXi image. Here we can click on Setup Image Manually.
Note: As shown by the highlighted Baselines tab, the cluster was still managed using the traditional vSphere Lifecycle Manager Baselines while the desired image was being configured.
The one-time migration to image-based lifecycle management takes place further down after clicking Finish Image Setup and confirming the dialog.
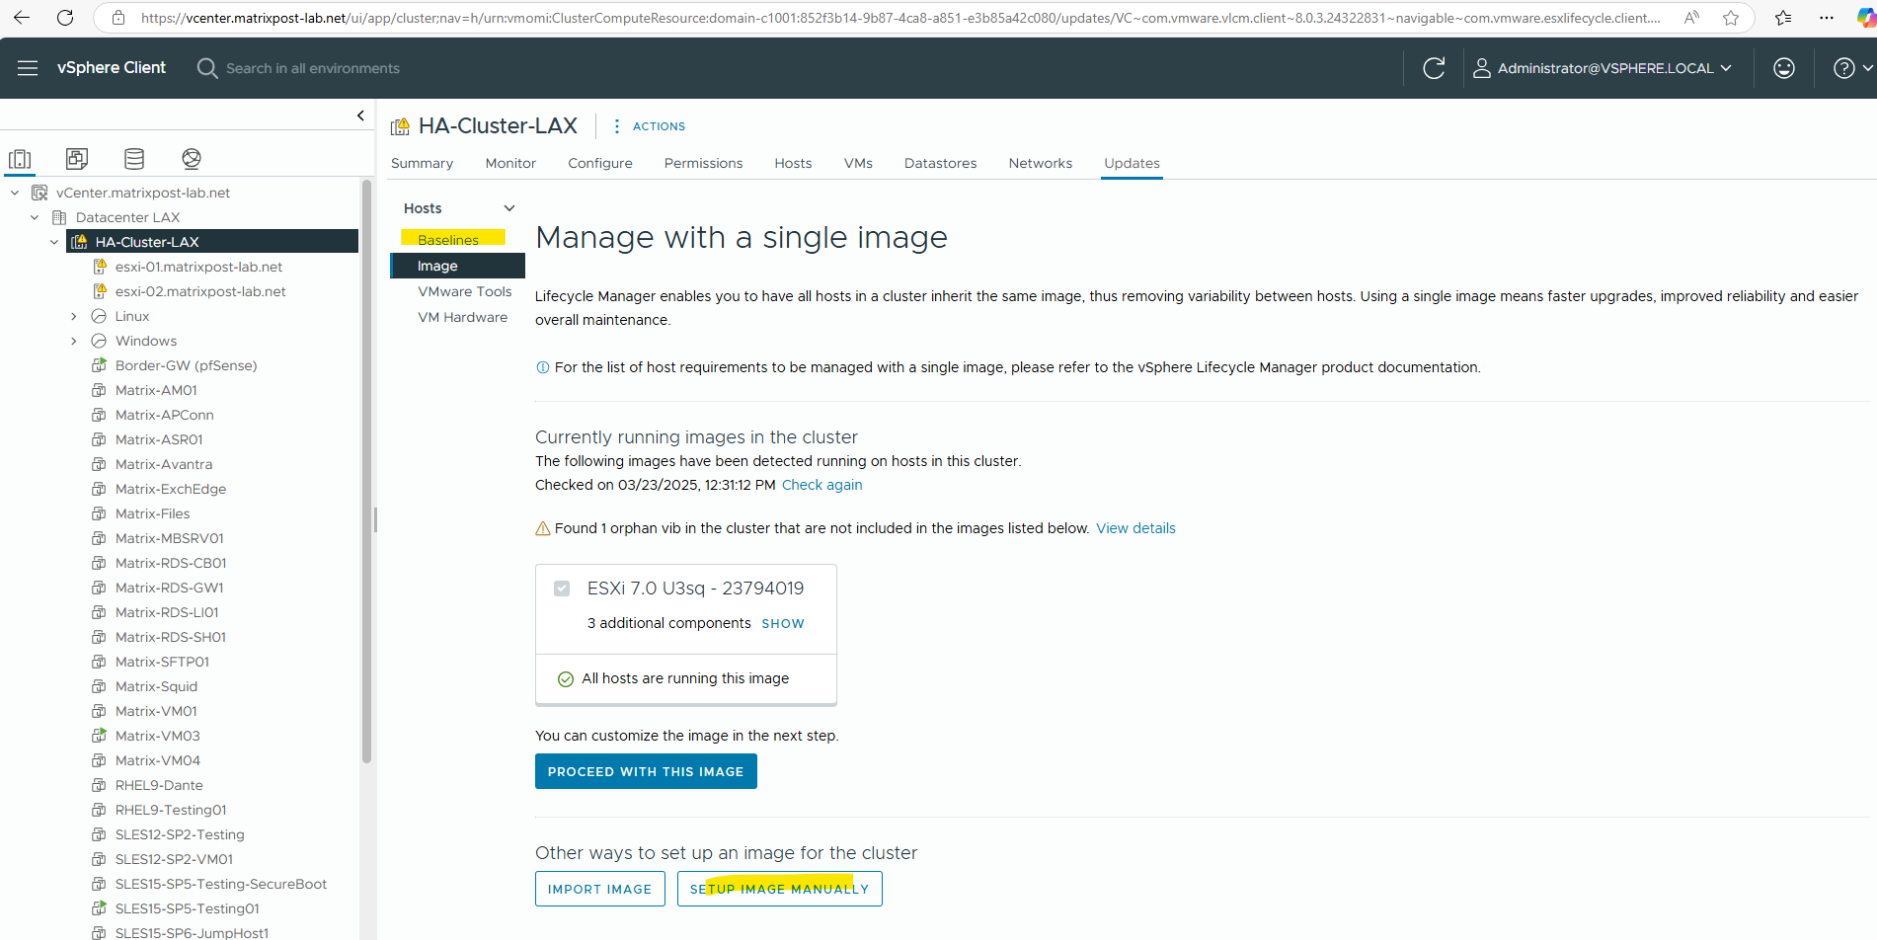
Click on Edit.
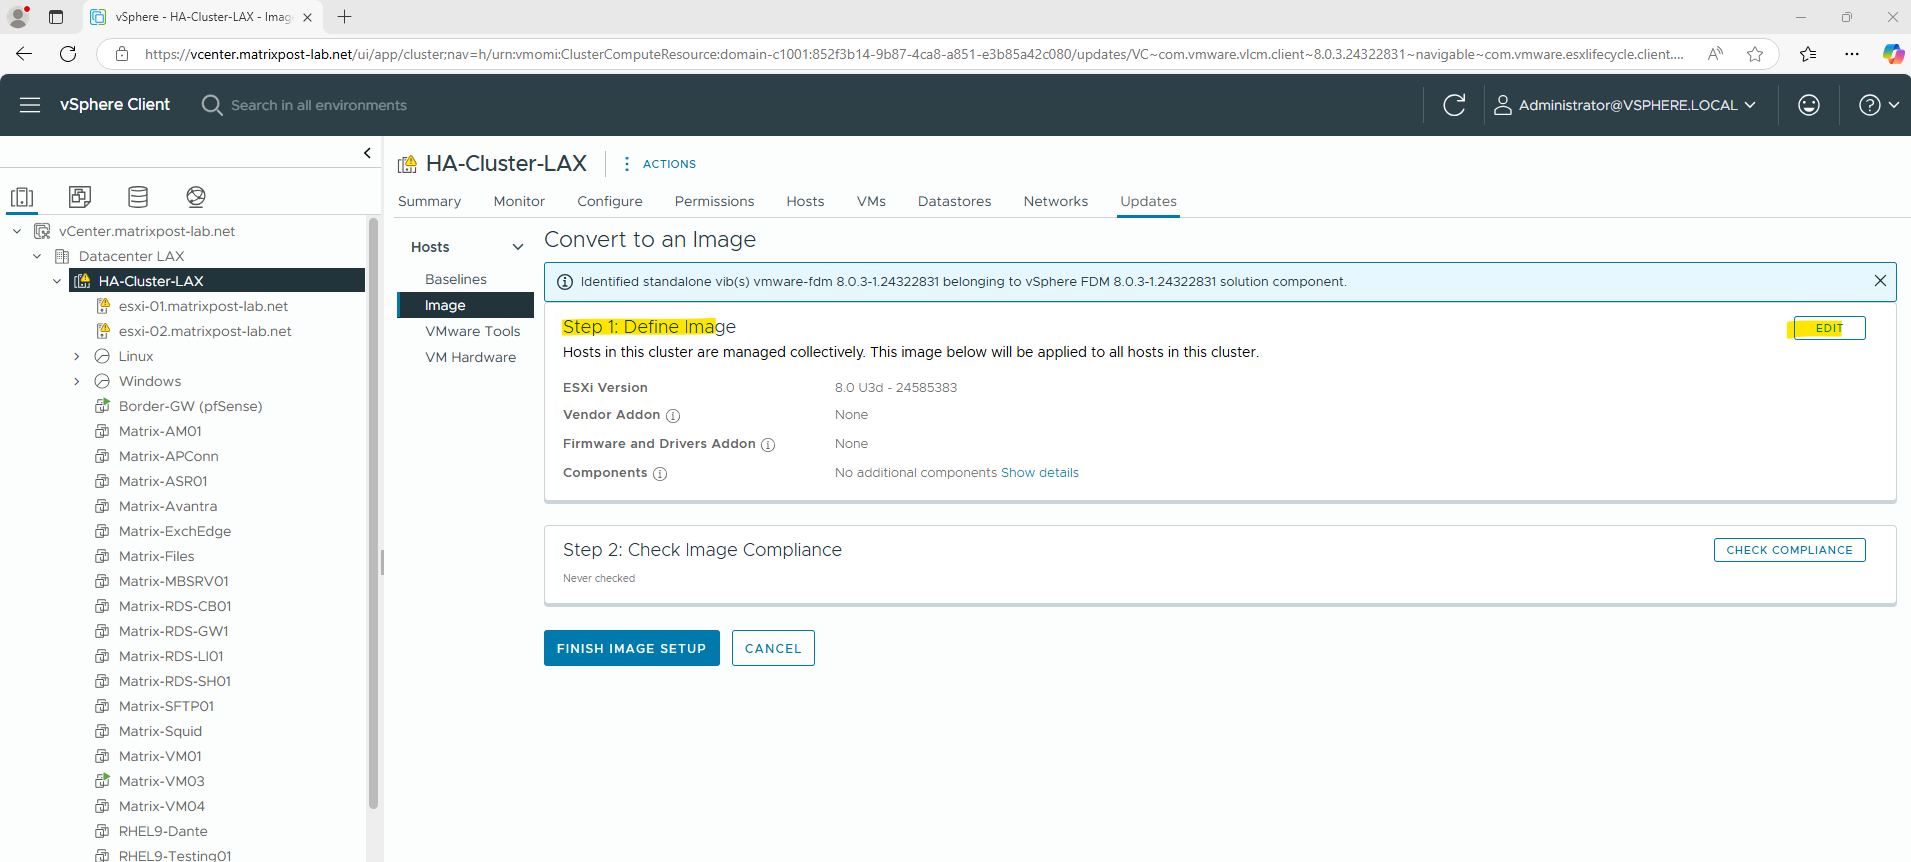
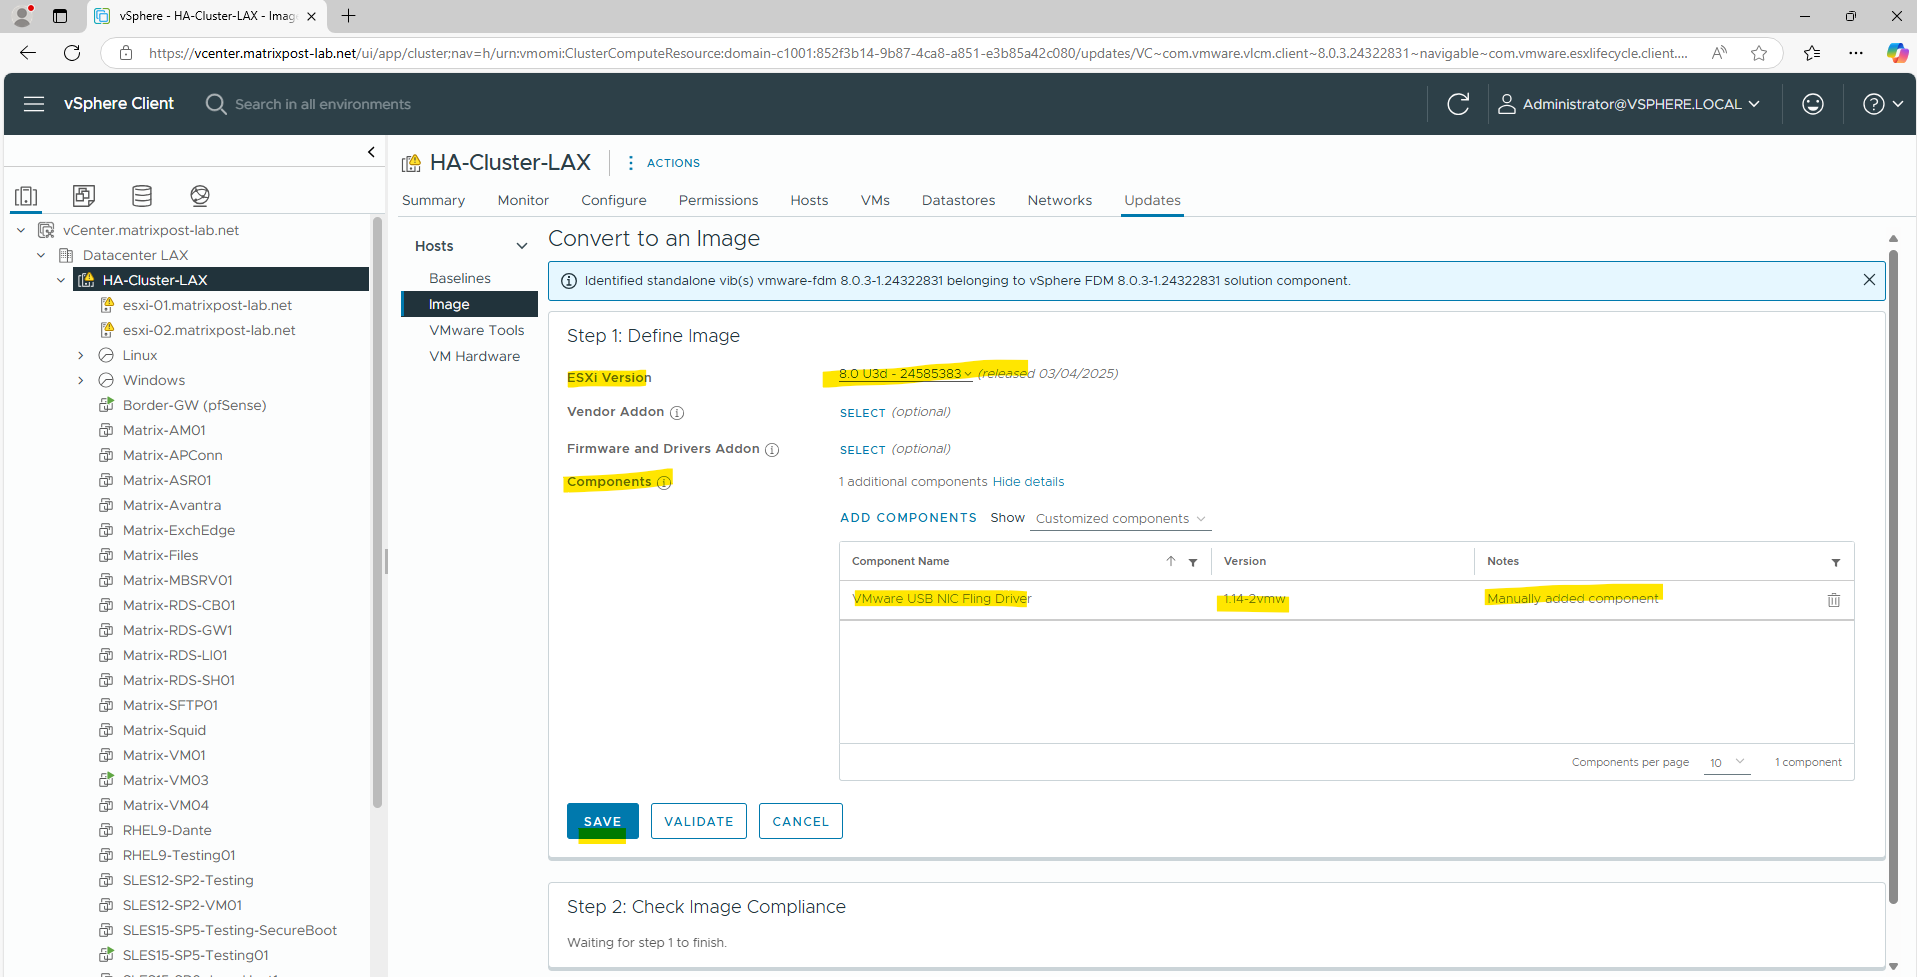
Below I will first select the latest ESXi version and then I will click on Show details under Components in order to add my Flings USB NIC component drivers.
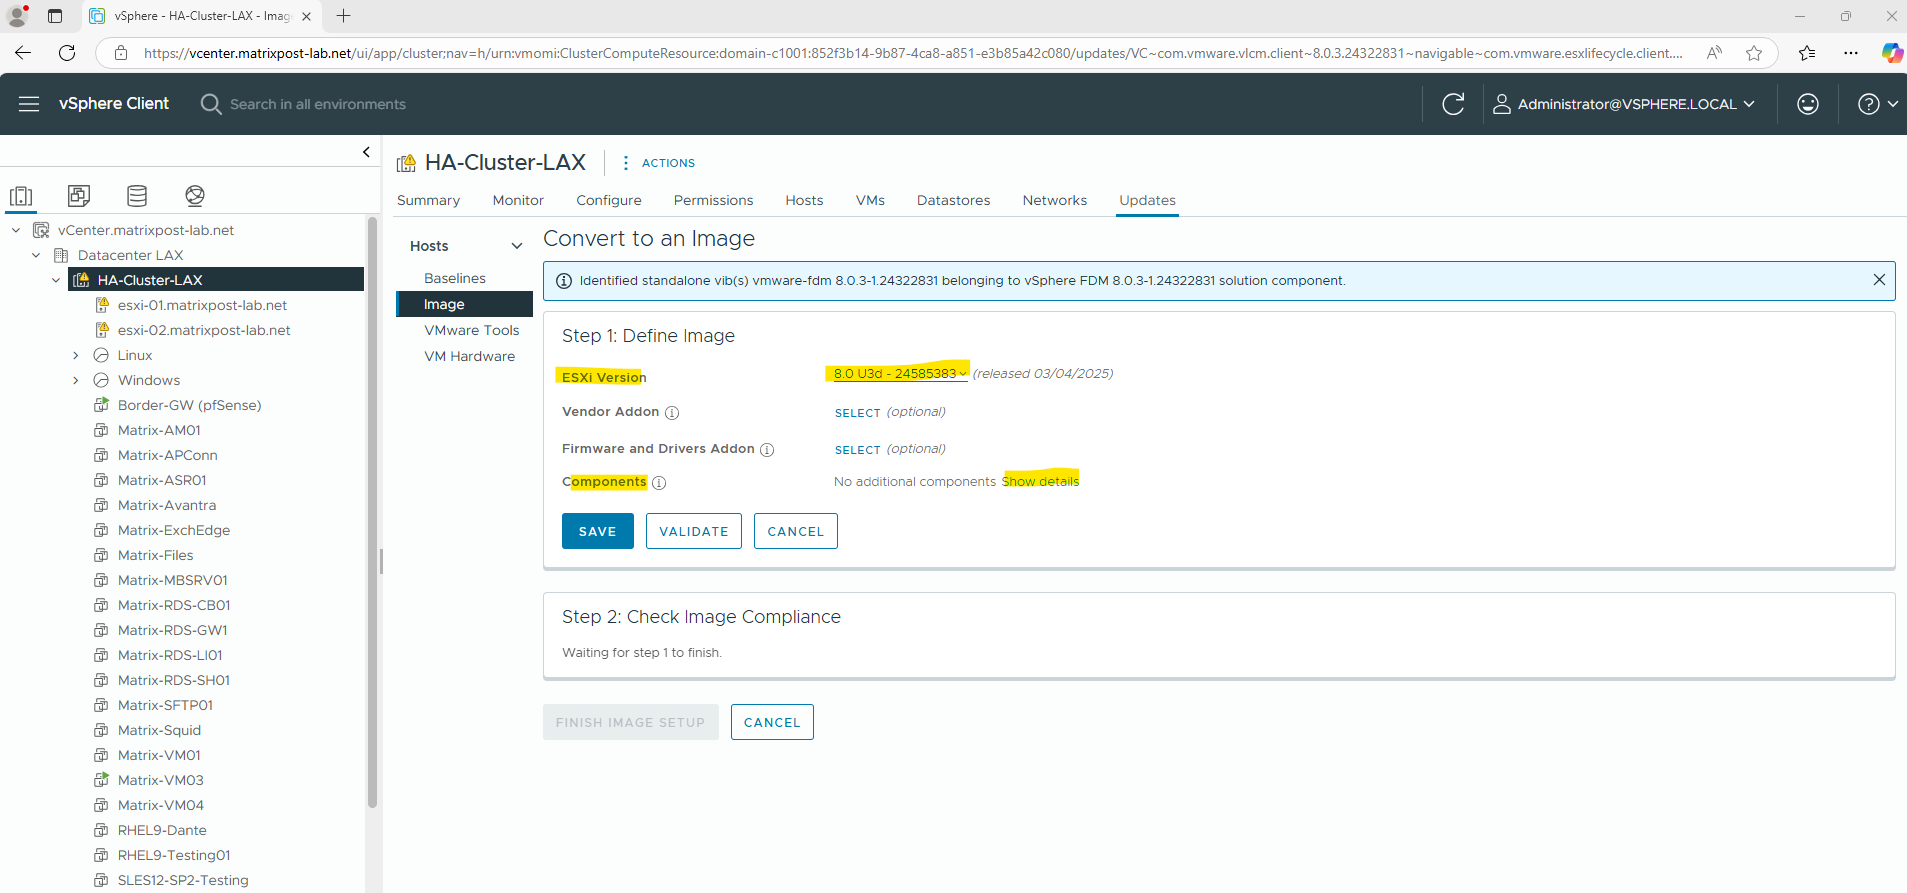
Click on Add Components.
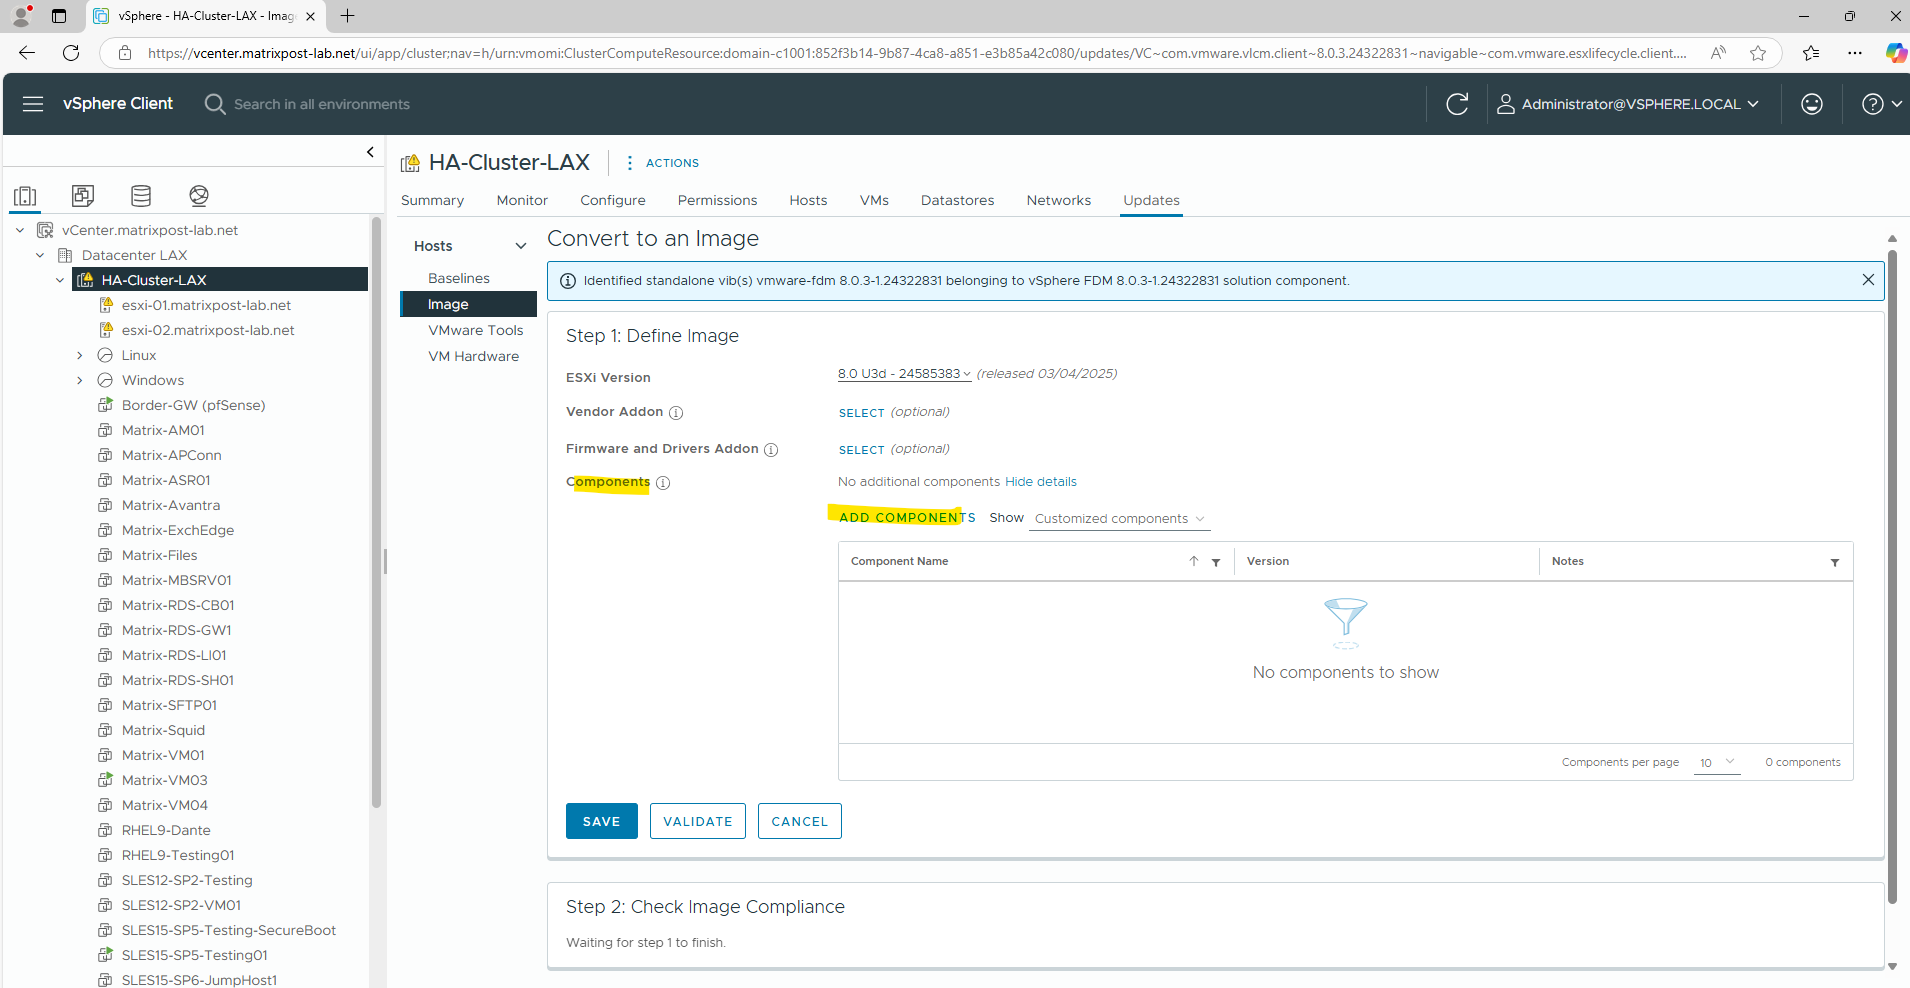
Then I will select the previously added Flings USB NIC drivers.
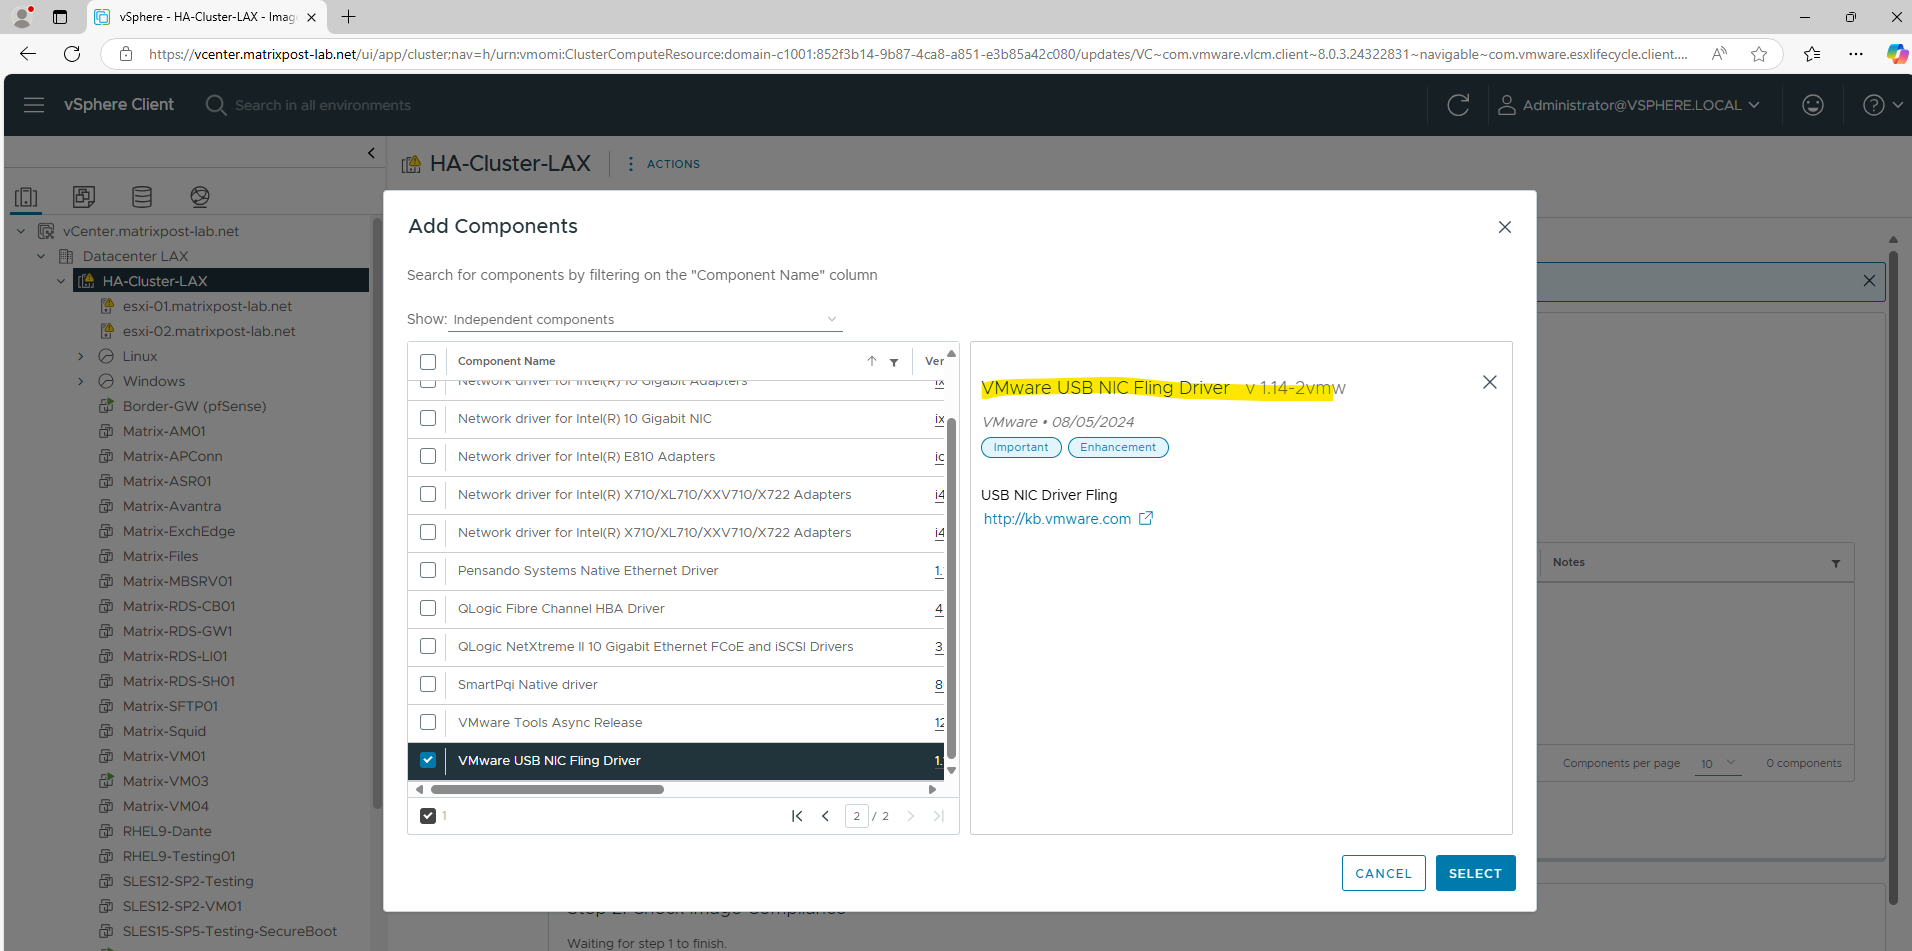
Click on Save.
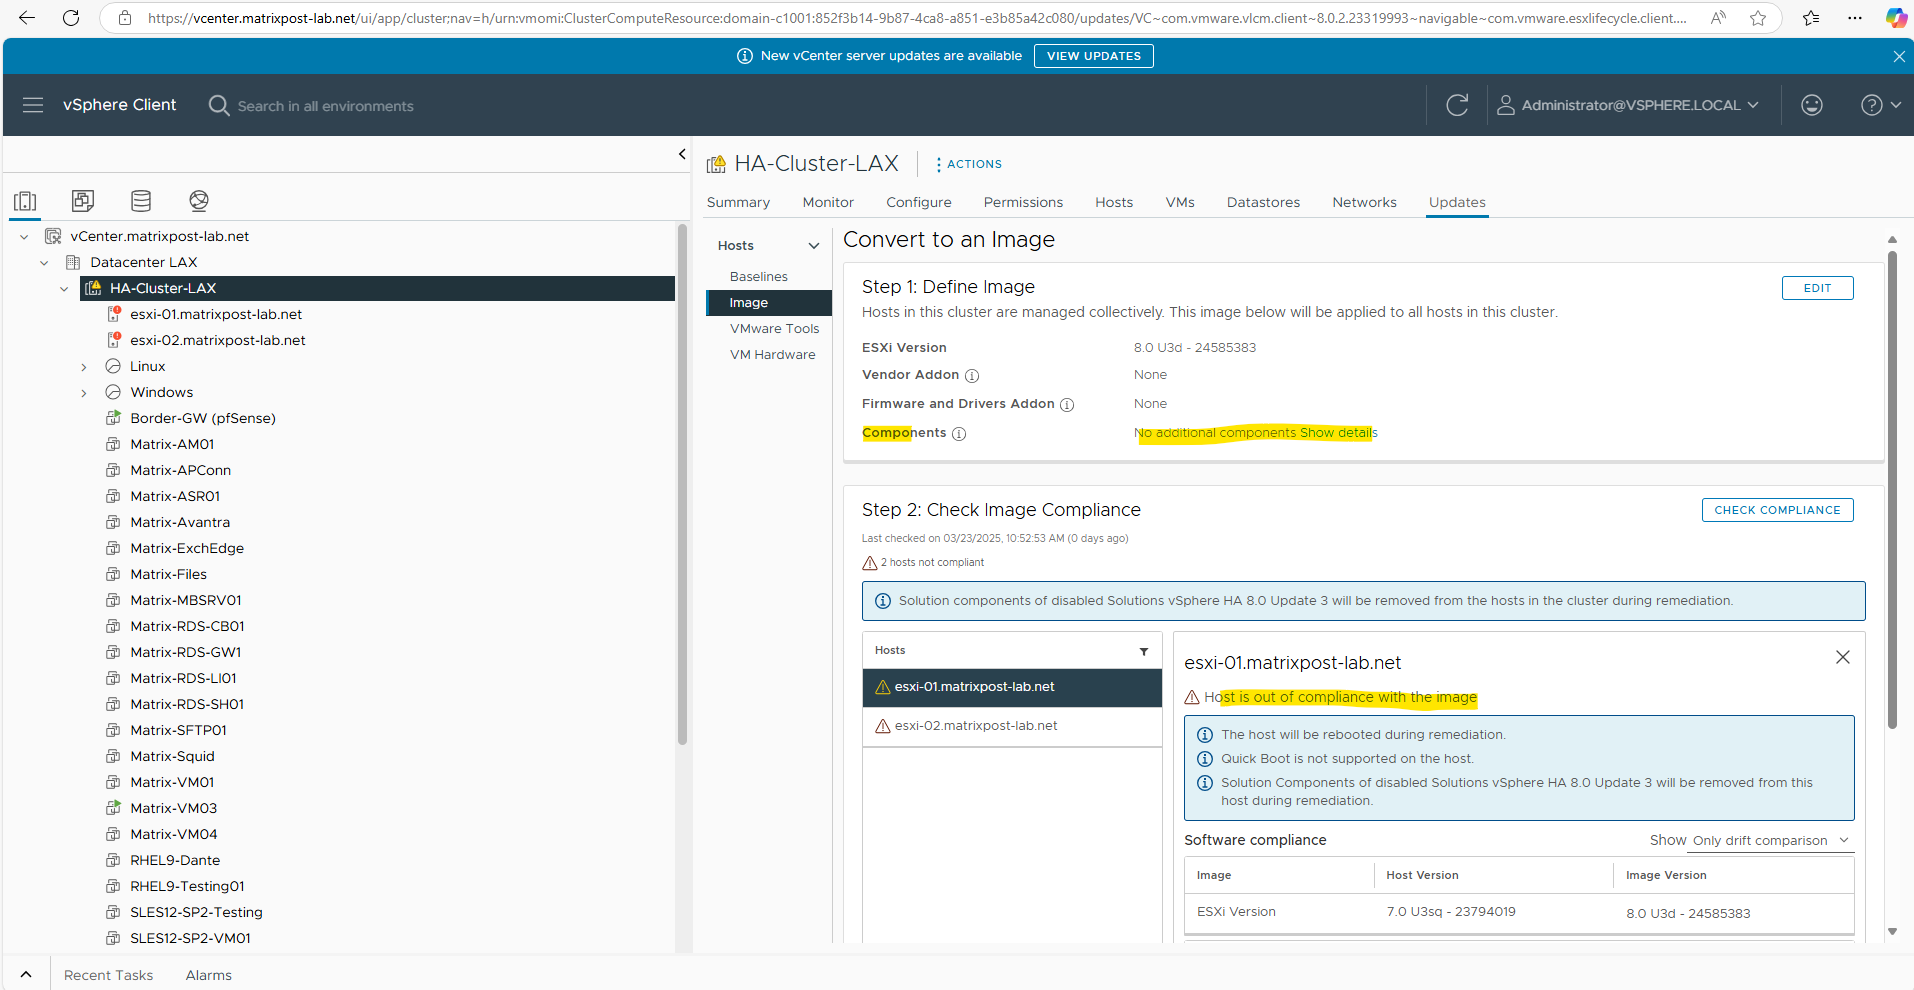
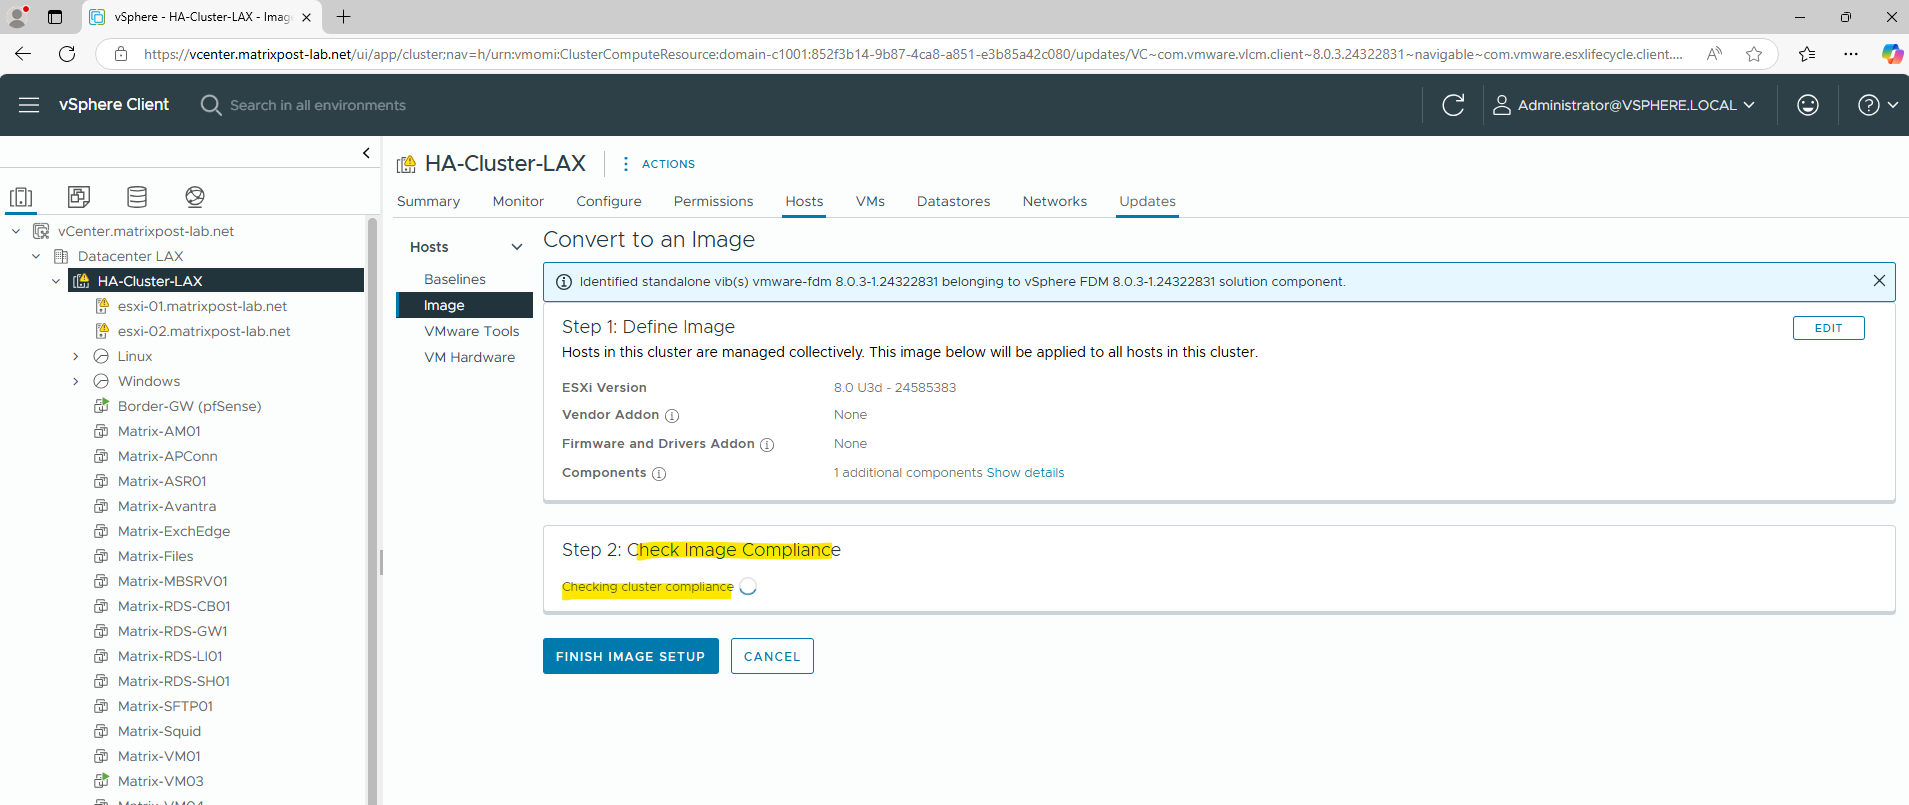
vCenter Server will then check the image compliance to see if all hosts in the cluster will run on this latest ESXi image.
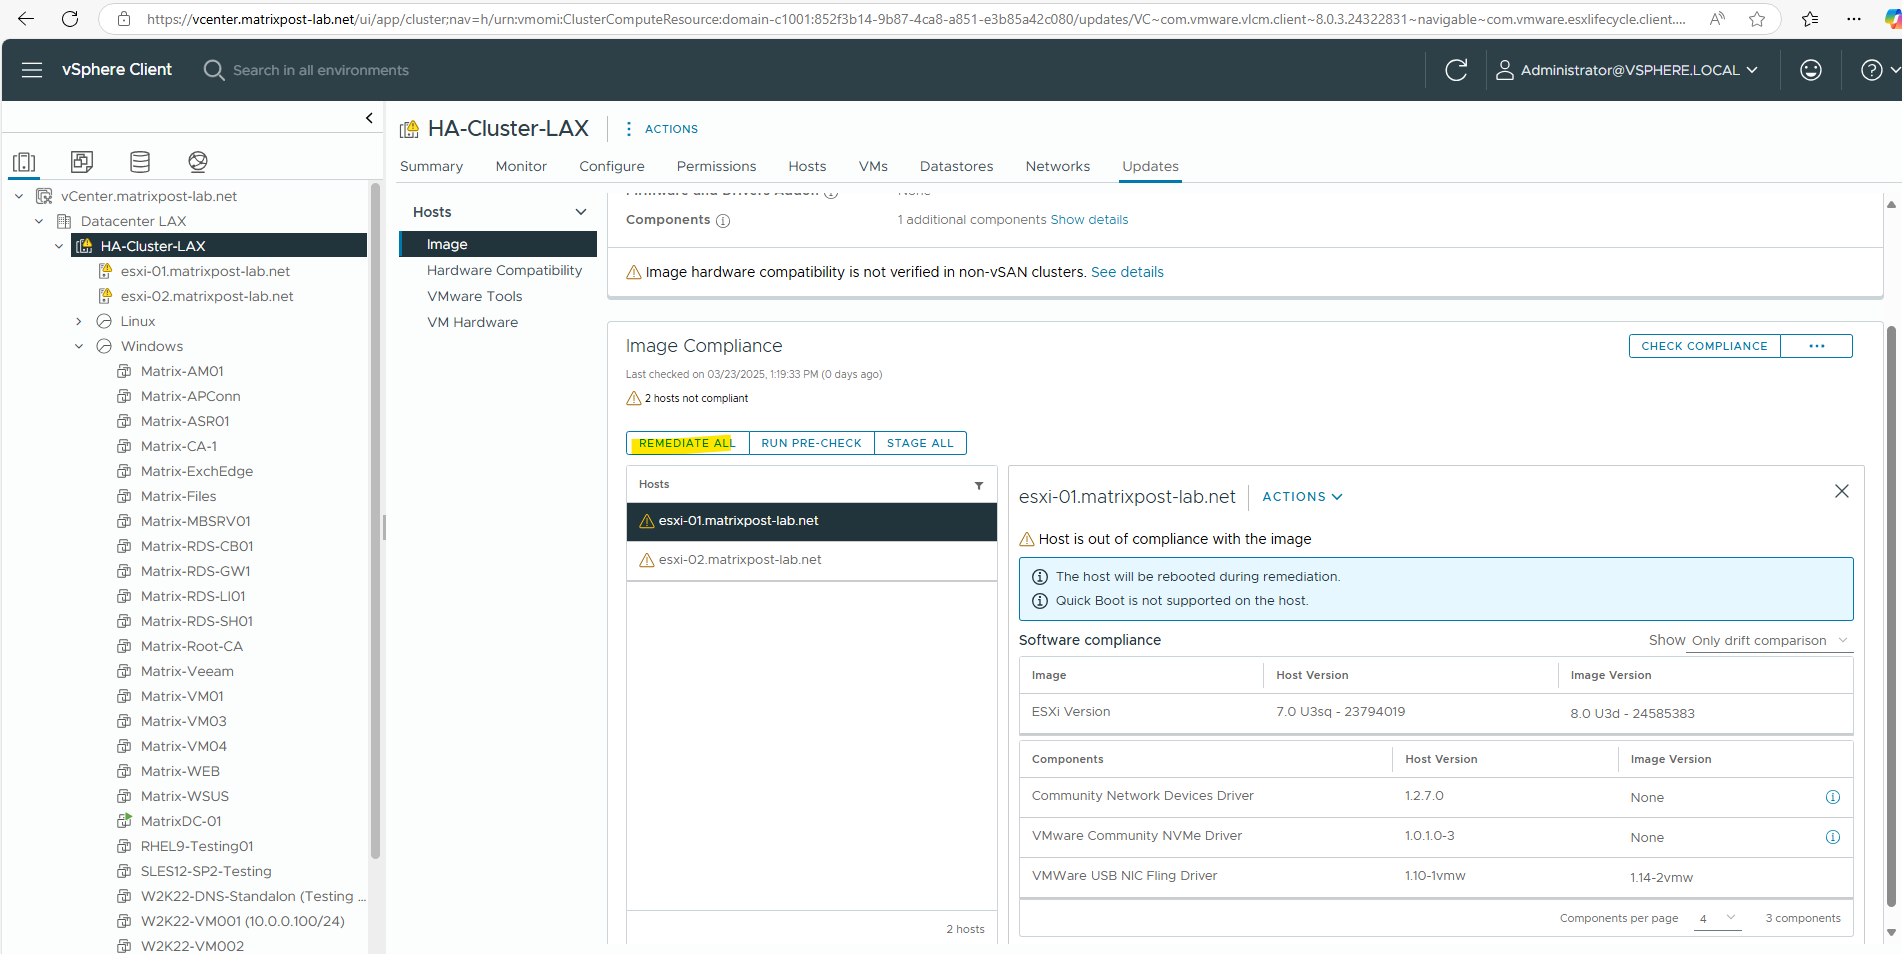
Because my ESXi hosts currently are running version 7.0 U3sq they are of course out of compliance with the latest selected image version 8.0 U3d.
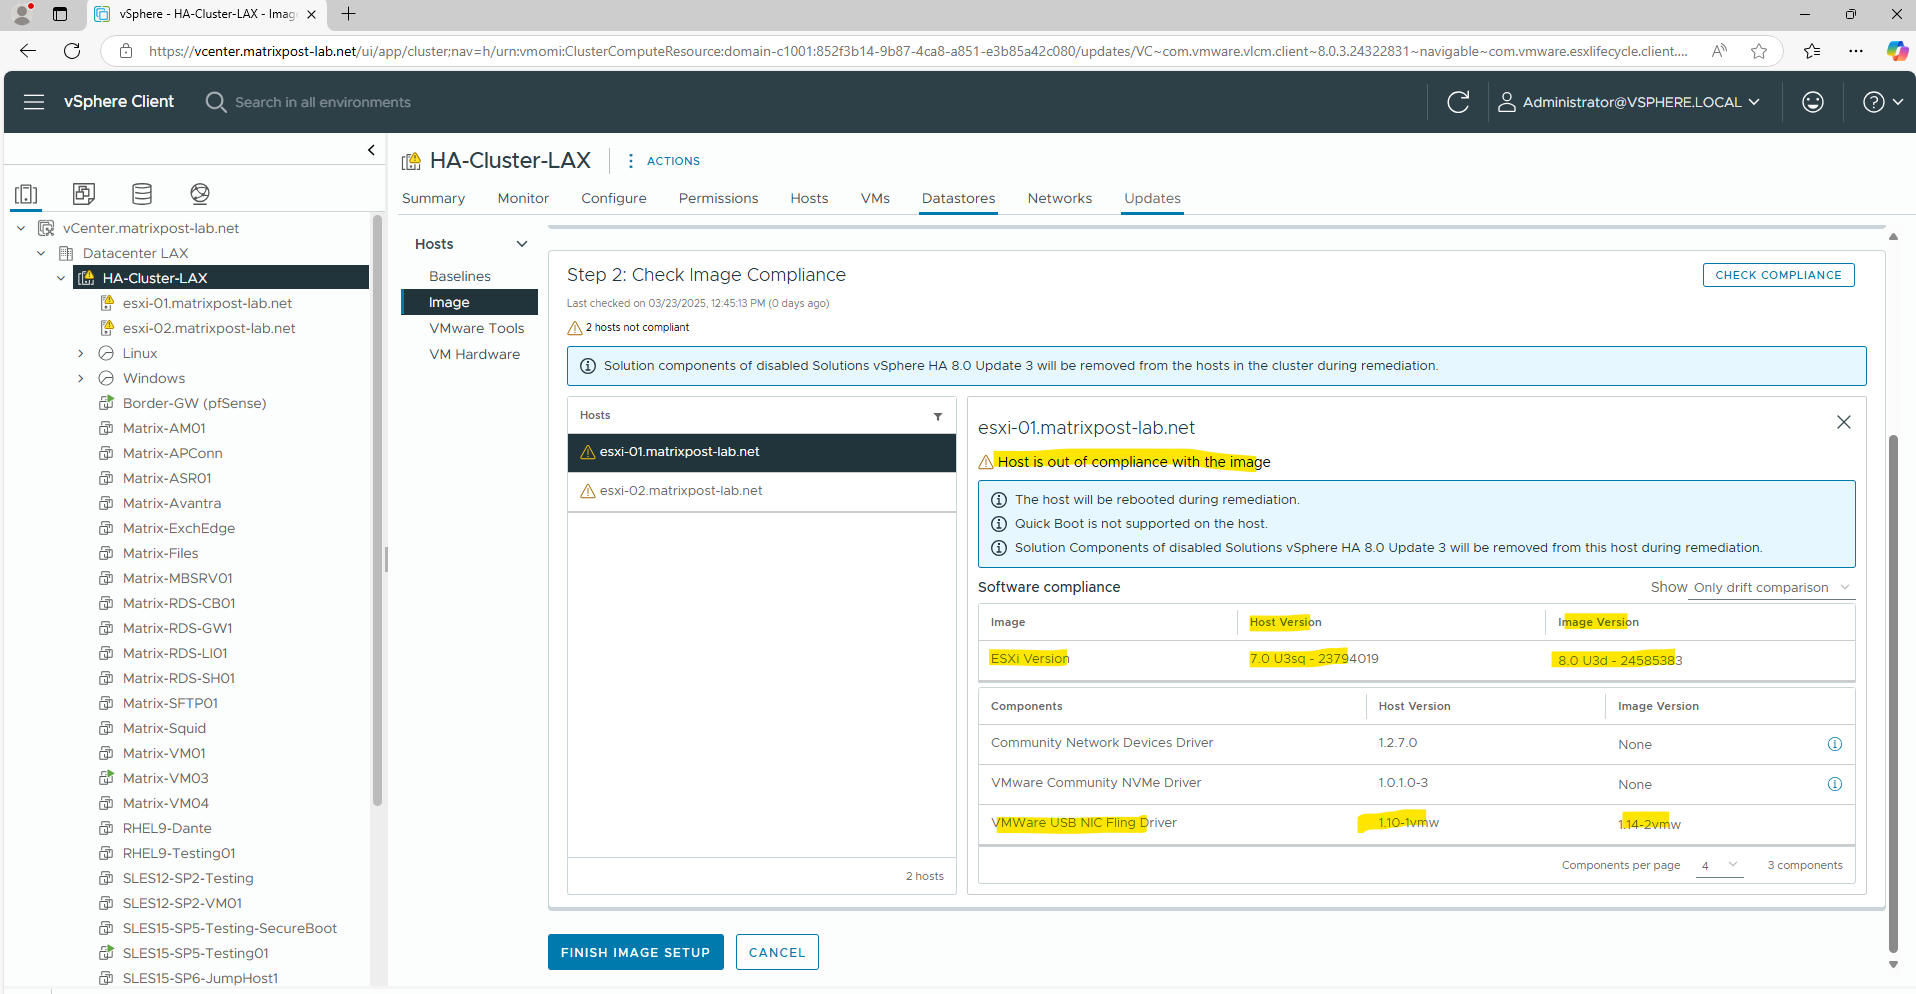
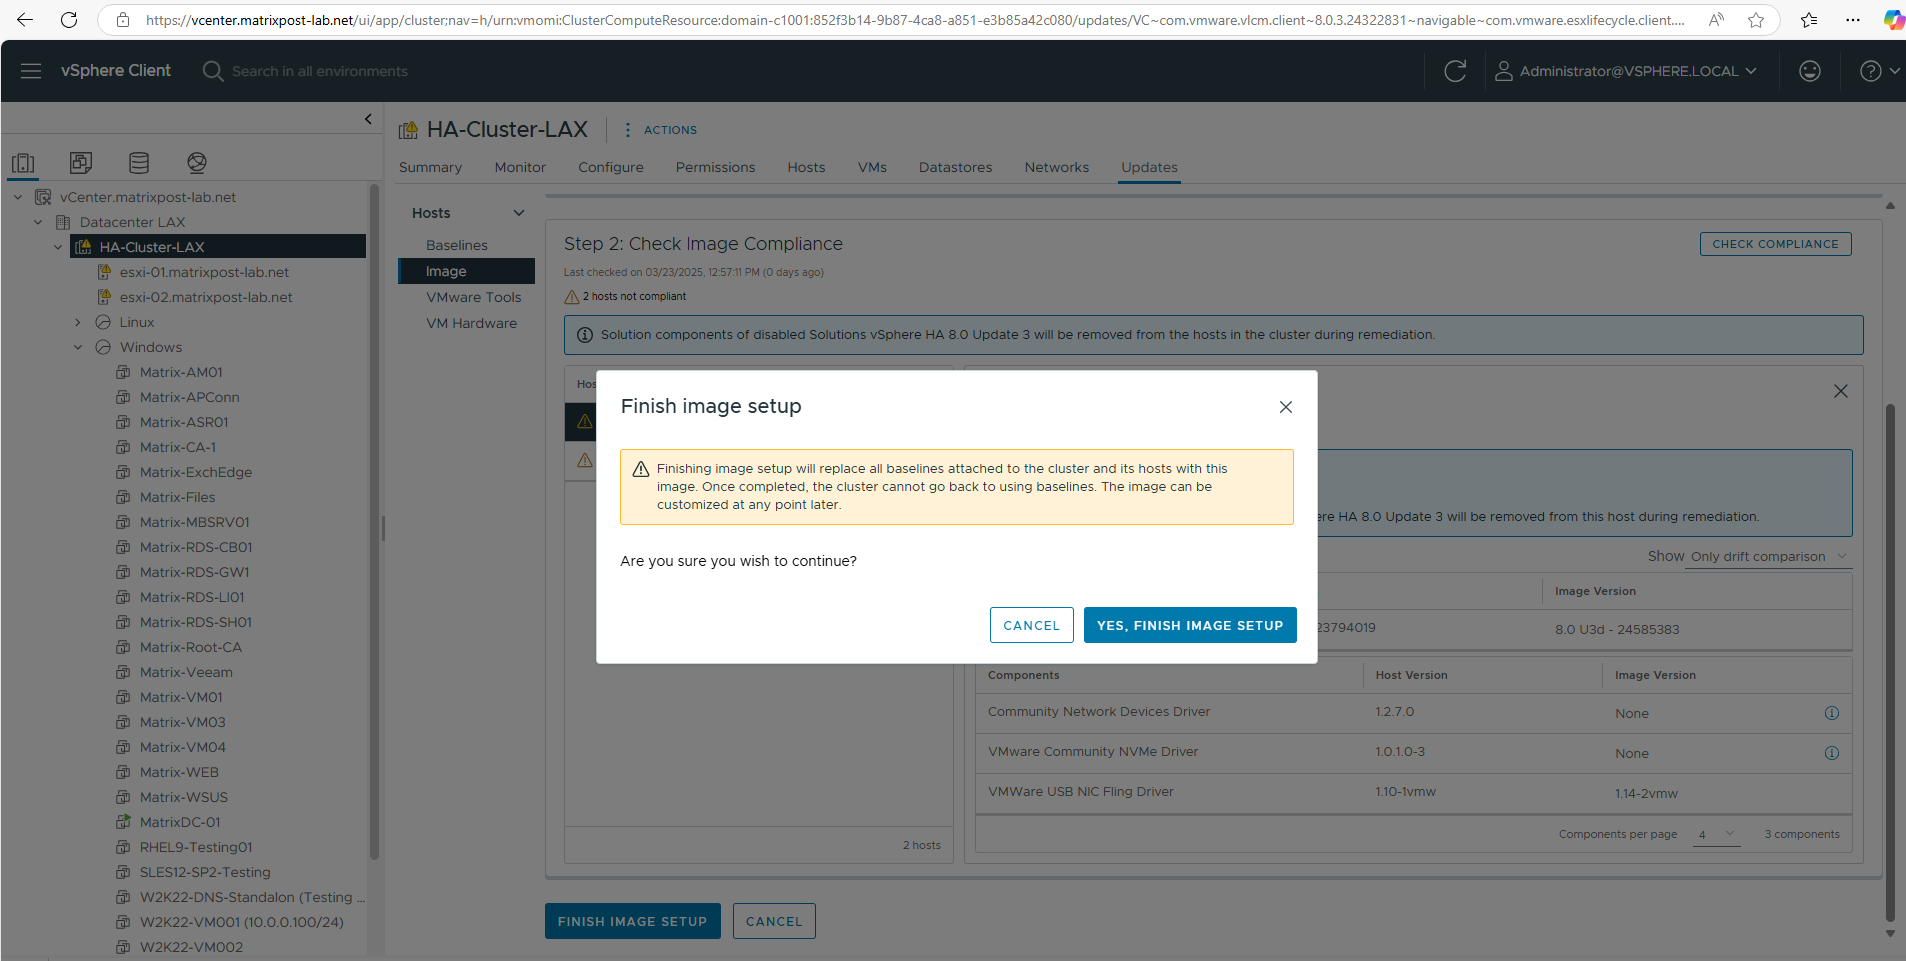
We can now click on Finish Image Setup above. Click on Yes, Finish Image Setup to switch to the new image update method instead of the deprecated baselines.
From this point onward, the cluster is managed using a declarative desired image, consisting of the ESXi base image, optional vendor add-ons, firmware packages, and any manually added components.
One of the key advantages of image-based lifecycle management is that manually added components become part of the cluster’s desired image definition and are therefore automatically retained when selecting newer ESXi base images. Only if a newer ESXi base image or vendor add-on already includes the same component should it be reviewed and, if appropriate, removed to avoid duplicate or overlapping component definitions.
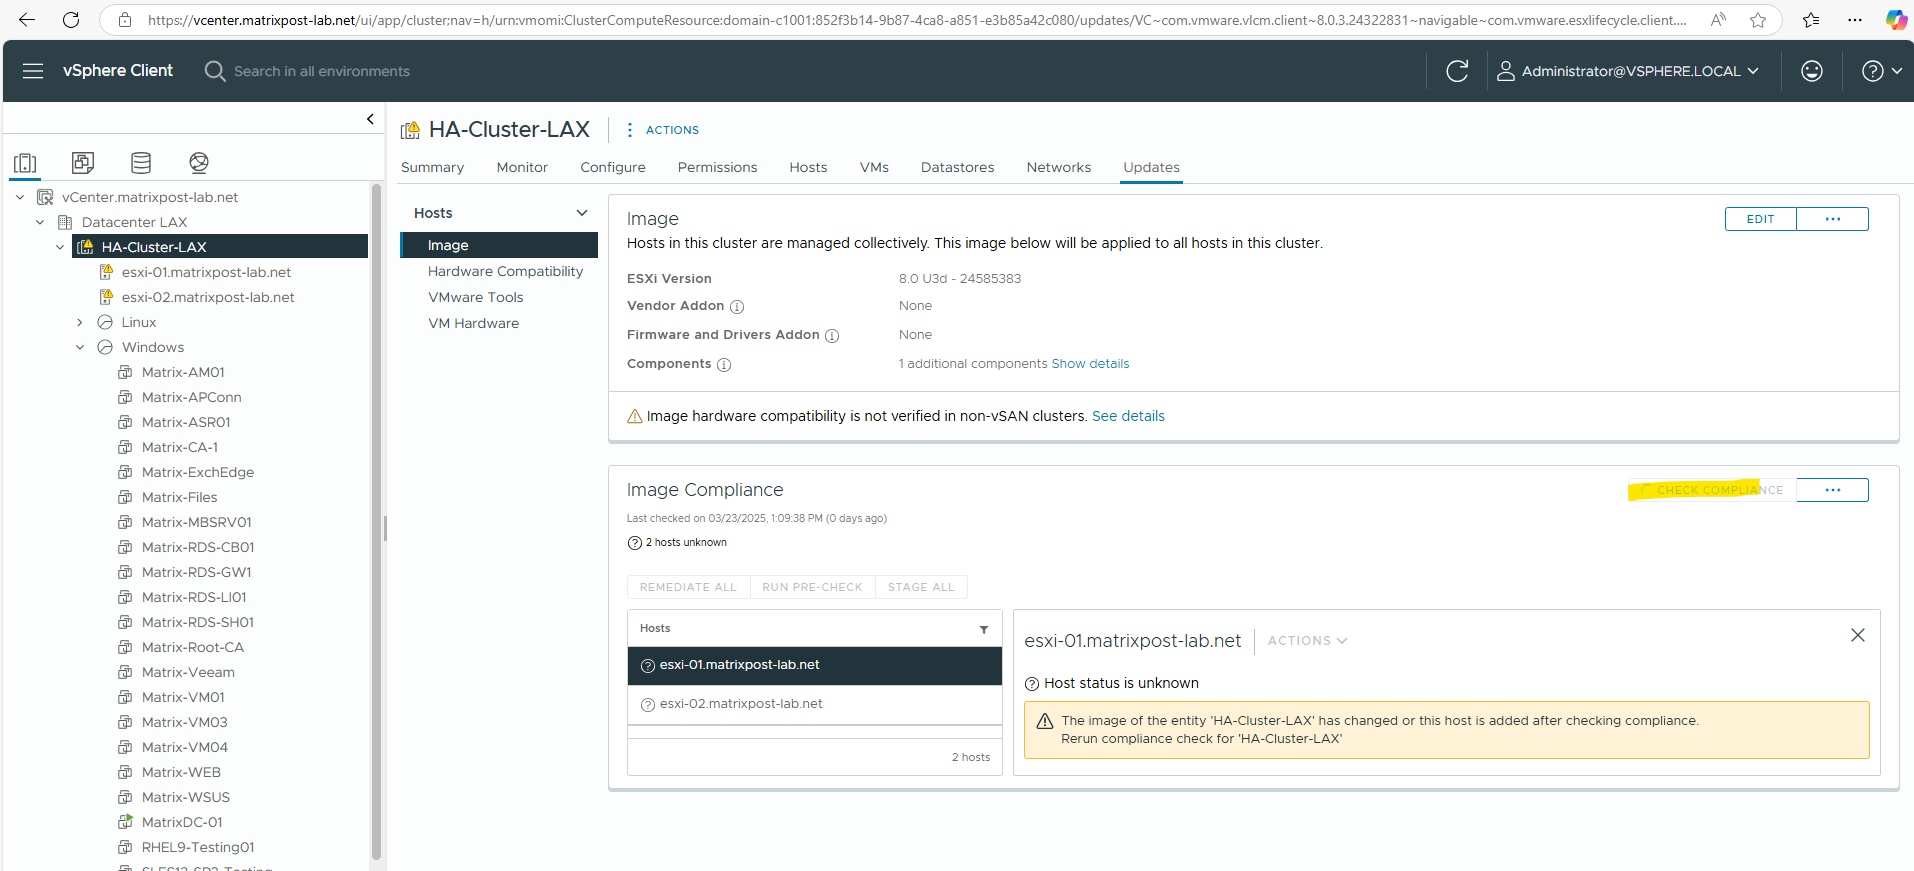
The compliance will be checked again.
After the image setup has been completed, vSphere Lifecycle Manager performs another compliance check against the newly defined desired image. The Baselines tab is no longer available, as the cluster is now managed exclusively using the new image-based lifecycle management.
We can now remediate all of the ESXi hosts to finally upgrade them to version 8.0. U3d.
!!! Note !!!
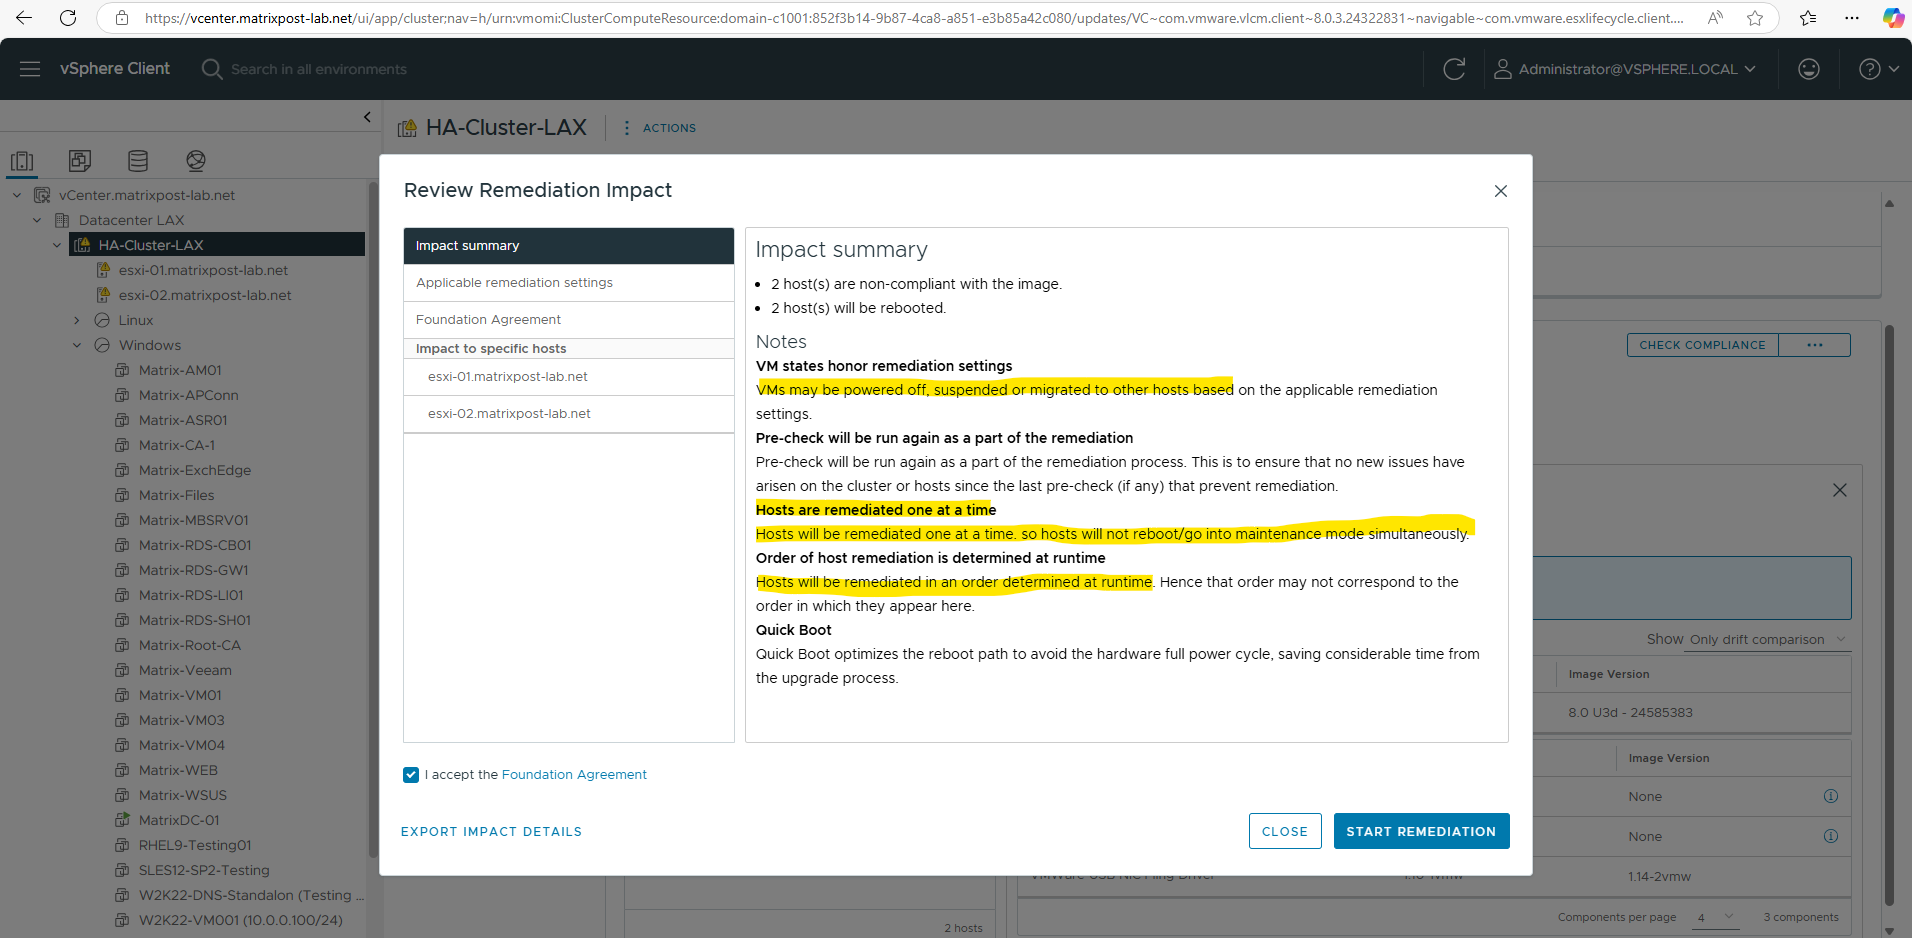
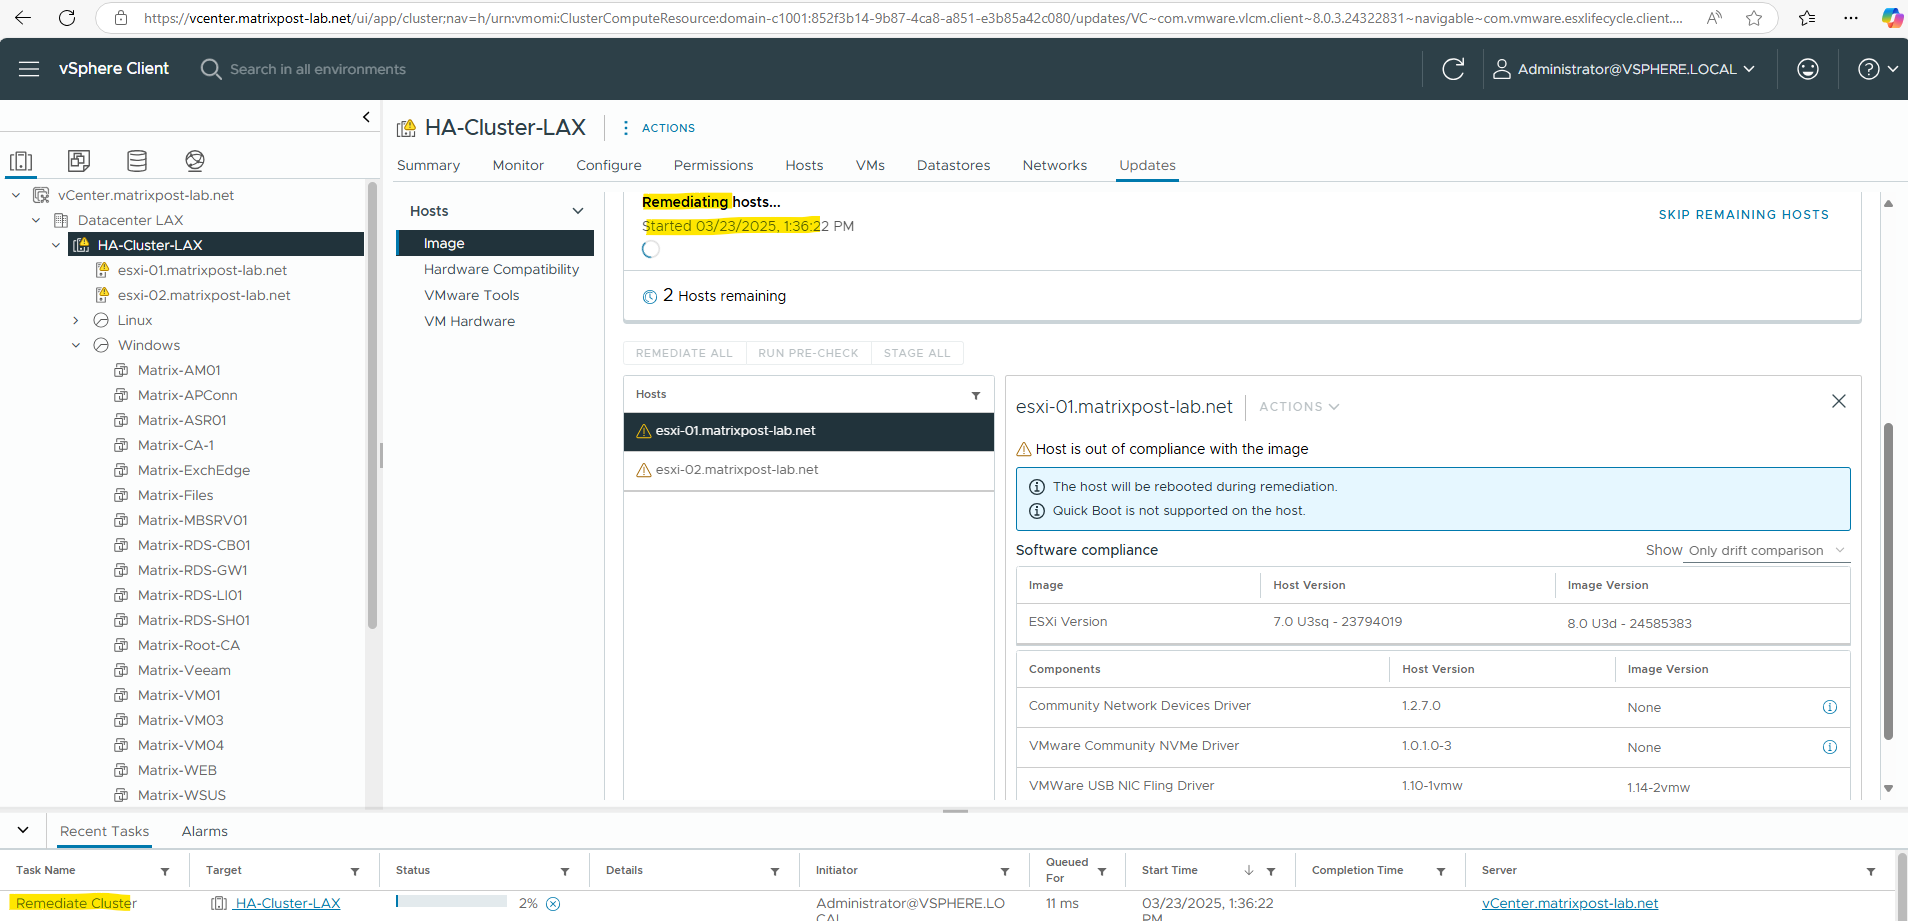
As shown on the next dialog, Hosts will be remediated one at a time. so hosts will not reboot/go into maintenance mode simultaneously.
Finally click on Start Remediation.
VMs may be powered off, suspended or migrated to other hosts based on the applicable remediation settings.
Hosts will be remediated one at a time. so hosts will not reboot/go into maintenance mode simultaneously.
Hosts will be remediated in an order determined at runtime.
!!! Note !!!
vSphere Lifecycle Manager remediation requires both DNS resolution and network connectivity to perform validation and compliance checks. If these services are provided by virtual machines running within the vSphere environment itself, such as a DNS server or Internet gateway, they must remain powered on during the remediation process.During remediation, in my case in past the task became stuck at 2% while the lab’s pfSense gateway and Domain Controller were powered off.
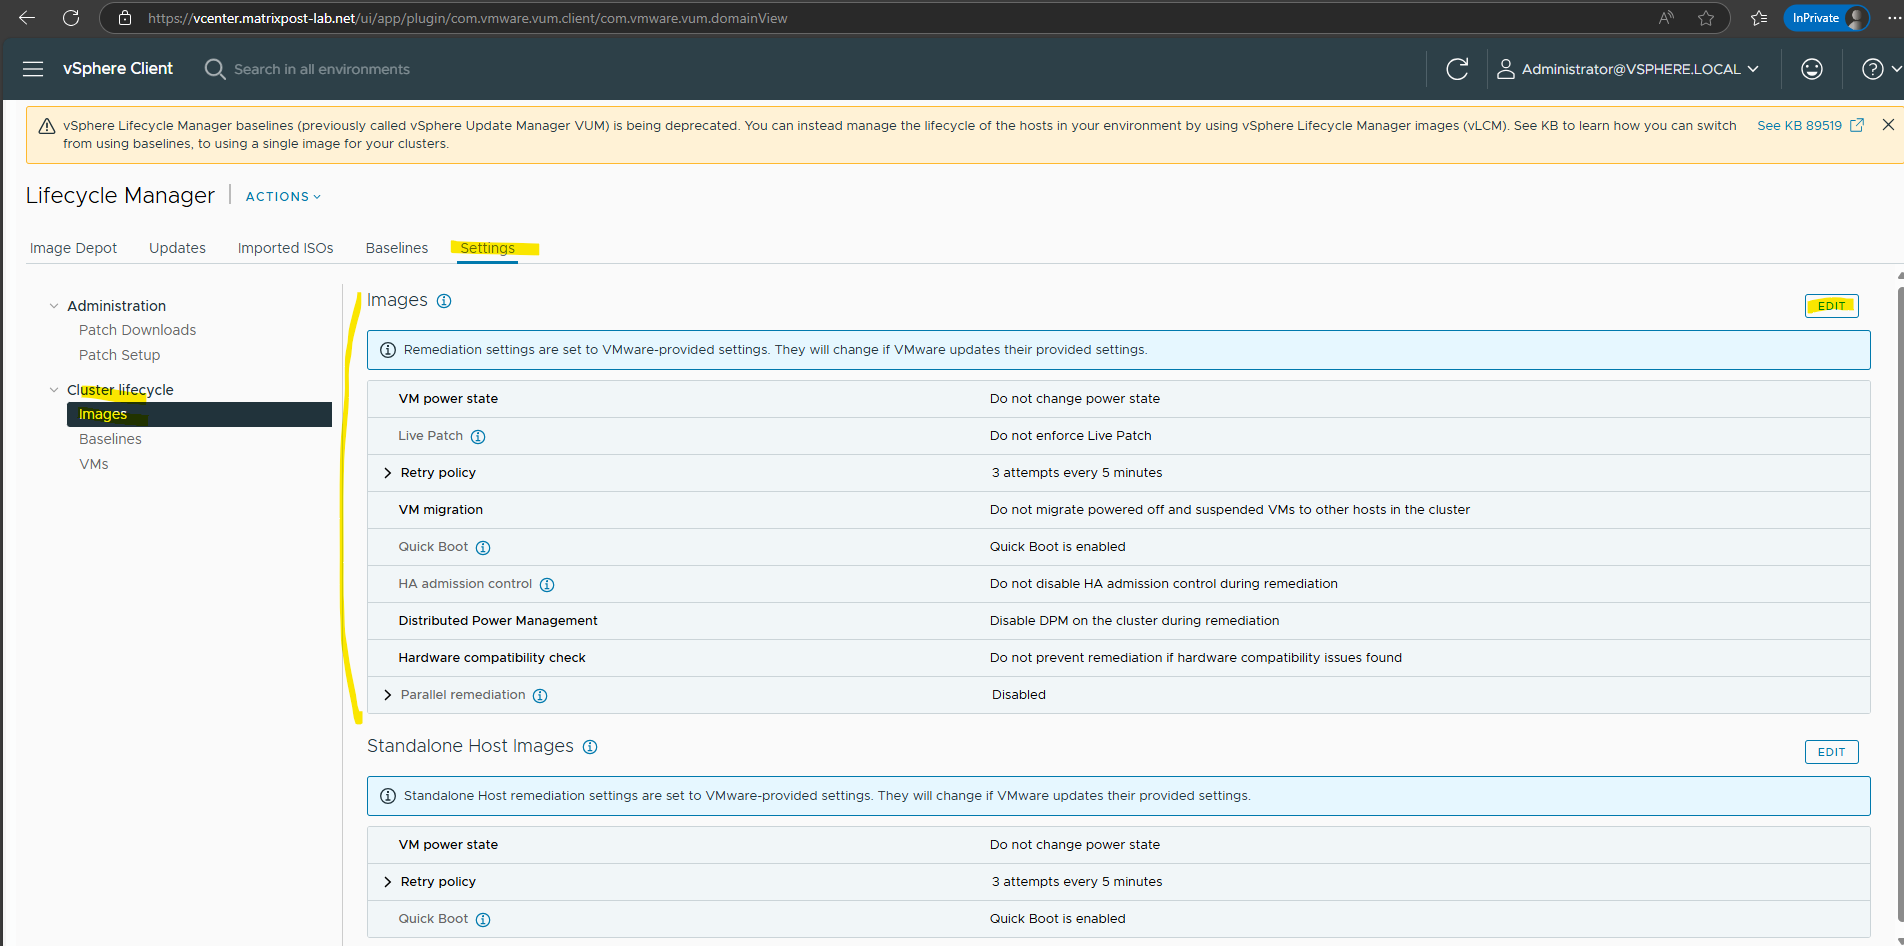
The remediation settings you can change or adjust under vSphere Lifecycle Manager -> Settings -> Cluster lifecycle -> Images as shown below.
More about the remediation settings in detail you will find here https://techdocs.broadcom.com/us/en/vmware-cis/vsphere/vsphere/8-0/managing-host-and-cluster-lifecycle-8-0/configuring-vlcm-remediation-settings-1/configure-the-vlcm-remediation-settings.html.
The remediation of the hosts will start …
vLCM automatically retries failed vMotion migrations
During host remediation, vSphere Lifecycle Manager first evacuates all running virtual machines from the selected ESXi host by using vMotion. Only after the last VM has been migrated successfully does the host enter Maintenance Mode and the image installation begin.For a customer production environment, one vMotion migration initially failed with a timeout: Failed waiting for data. Connection closed by remote host, possibly due to timeout.
Instead of aborting the remediation process, vLCM continued migrating the remaining virtual machines and later automatically retried the failed migration. After the retry completed successfully, the host entered Maintenance Mode and the remediation continued without any manual intervention.
This behavior demonstrates that a transient vMotion failure does not necessarily cause the entire remediation job to fail.
vLCM is able to recover from temporary migration problems before proceeding with the host upgrade.
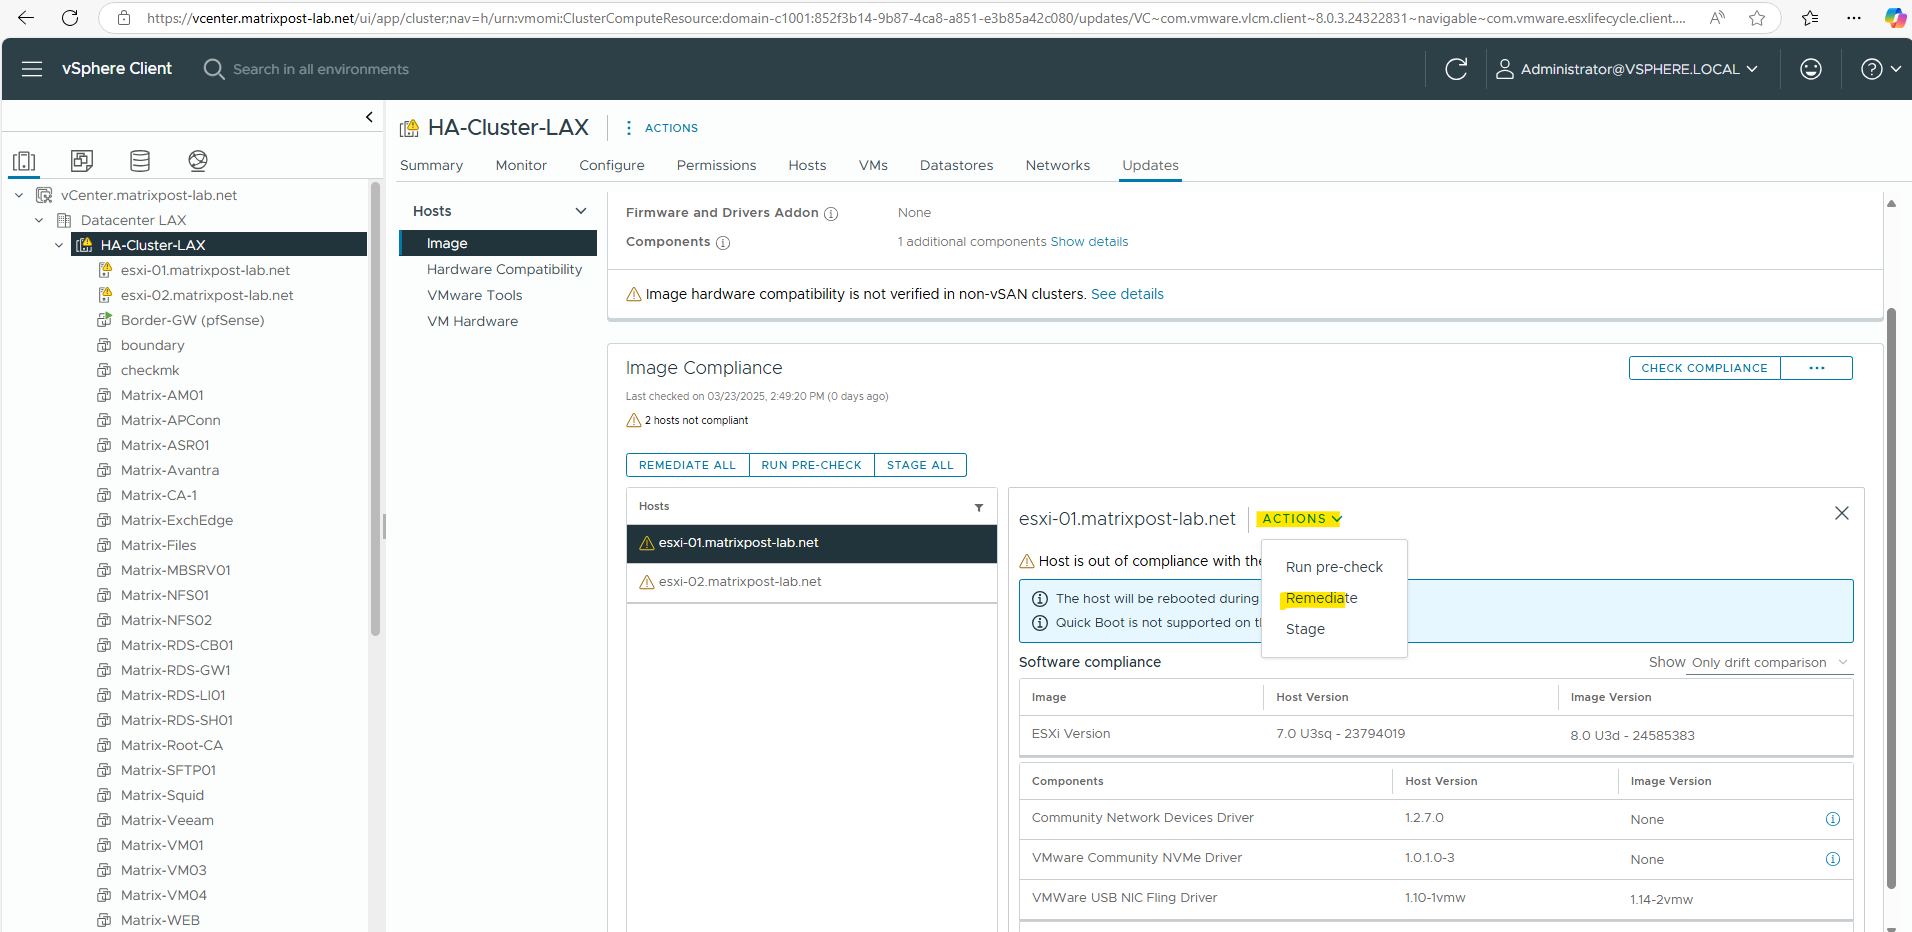
Alternatively we can also remediate the hosts separately by clicking on the Actions menu below and selecting Remediate. Here just the selected host will be remediated.
Tip: If the host currently being remediated is also running the vCenter Server Appliance (VCSA), consider live migrating the VCSA to another healthy host before starting vLCM remediation.
While vLCM and DRS are fully capable of migrating the VCSA automatically, performing this migration in advance can reduce temporary vSphere Client reconnects and avoid additional load on the management plane during the evacuation process.
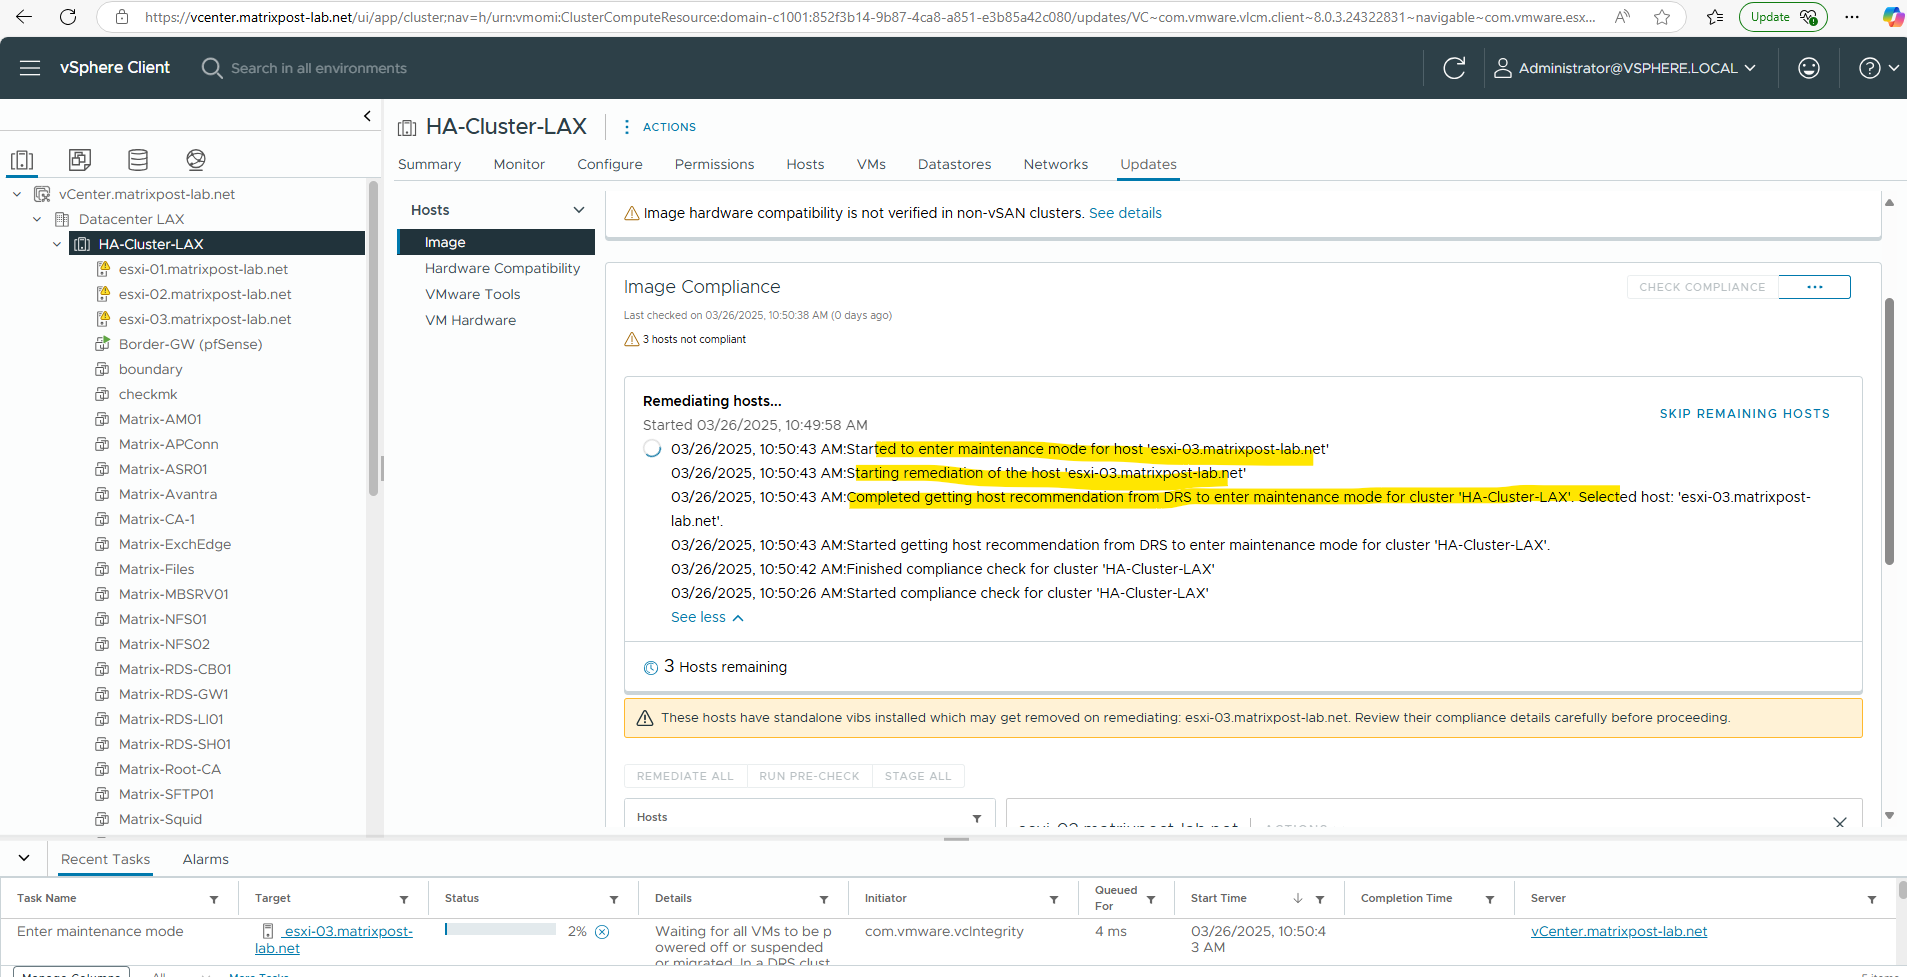
Below I will remediate all 3 ESXi hosts. We can see the steps which will be performed currently, first my host ‘esxi-03.matrixpost-lab.net’ will be remediated.
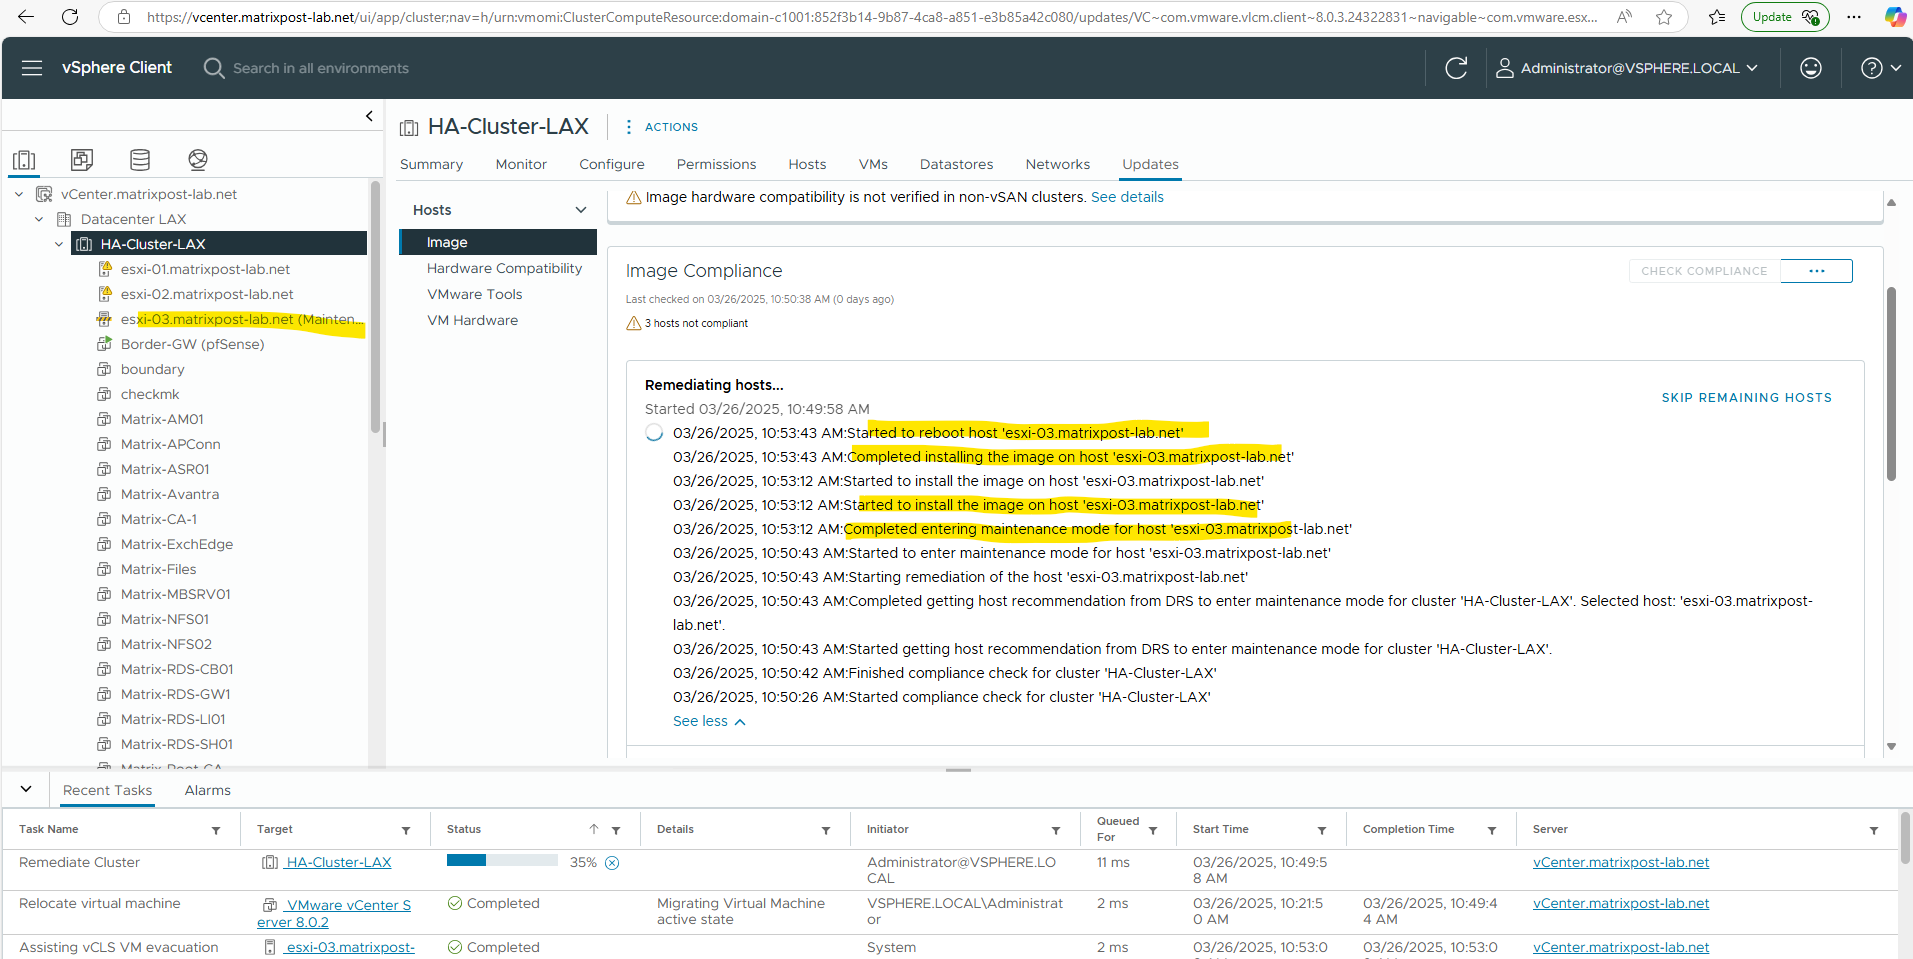
So far installing the image on host ‘esxi-03.matrixpost-lab.net’ is completed and the host will be restarted.
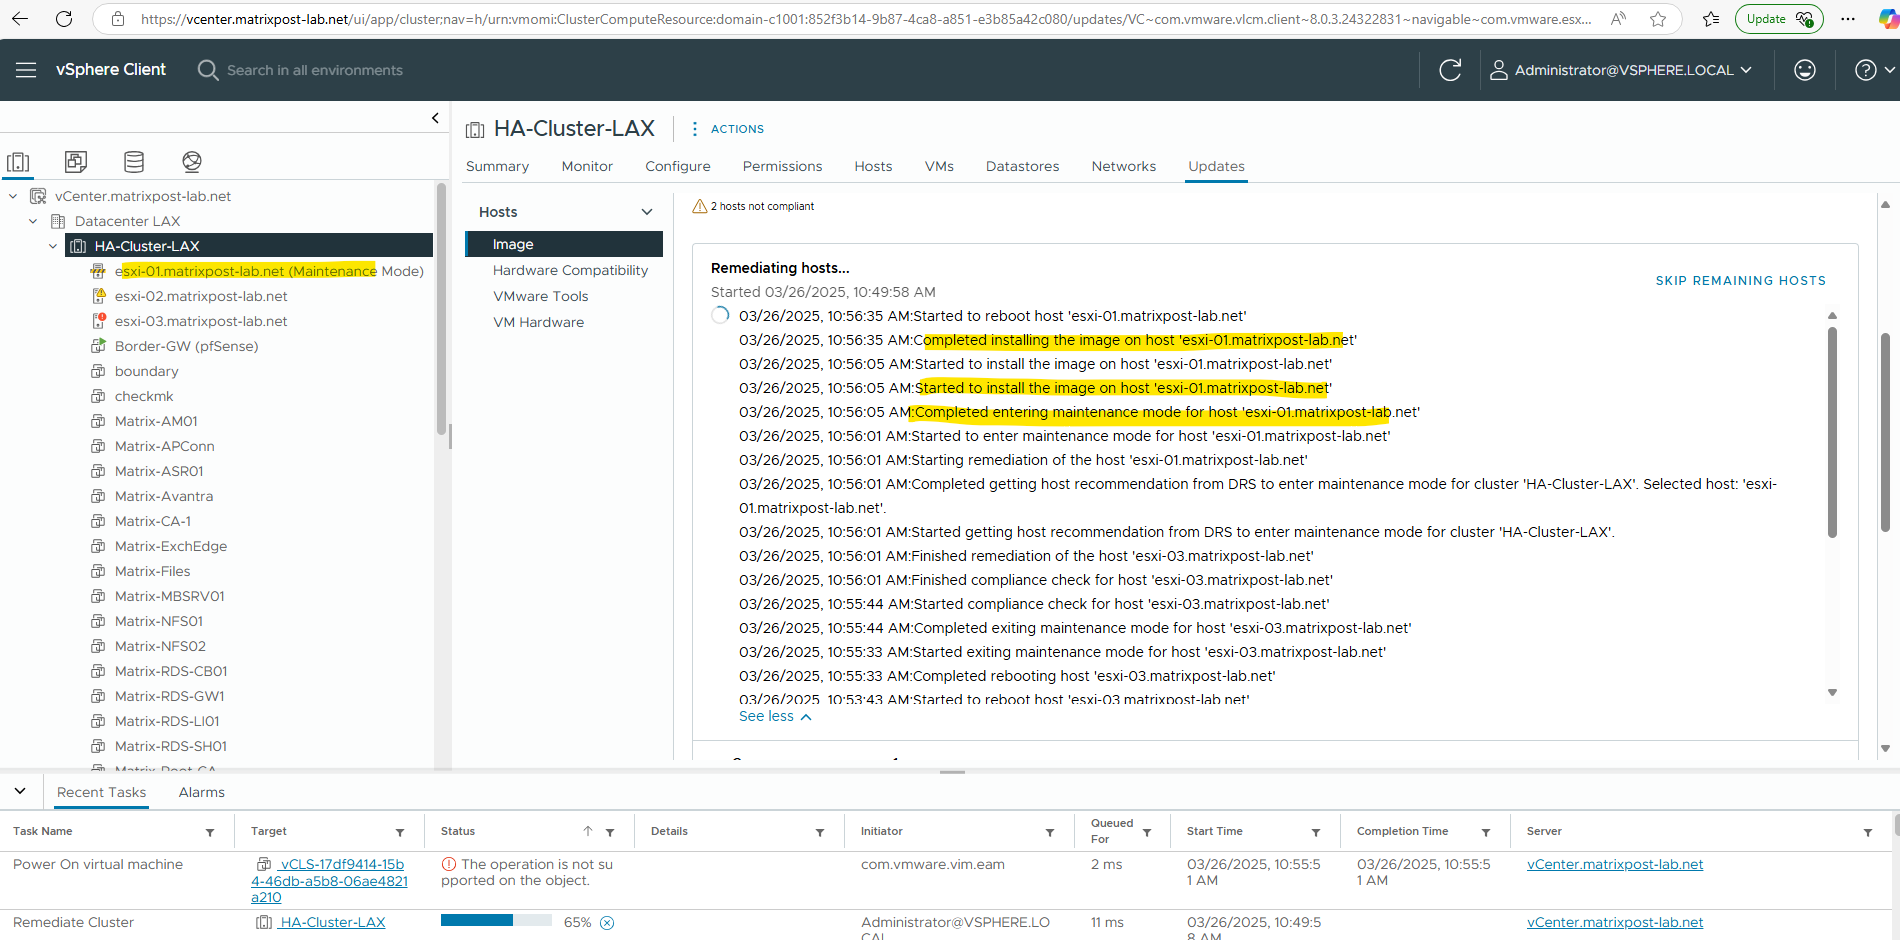
Next the host ‘esxi-01.matrixpost-lab.net’ will be remediated.
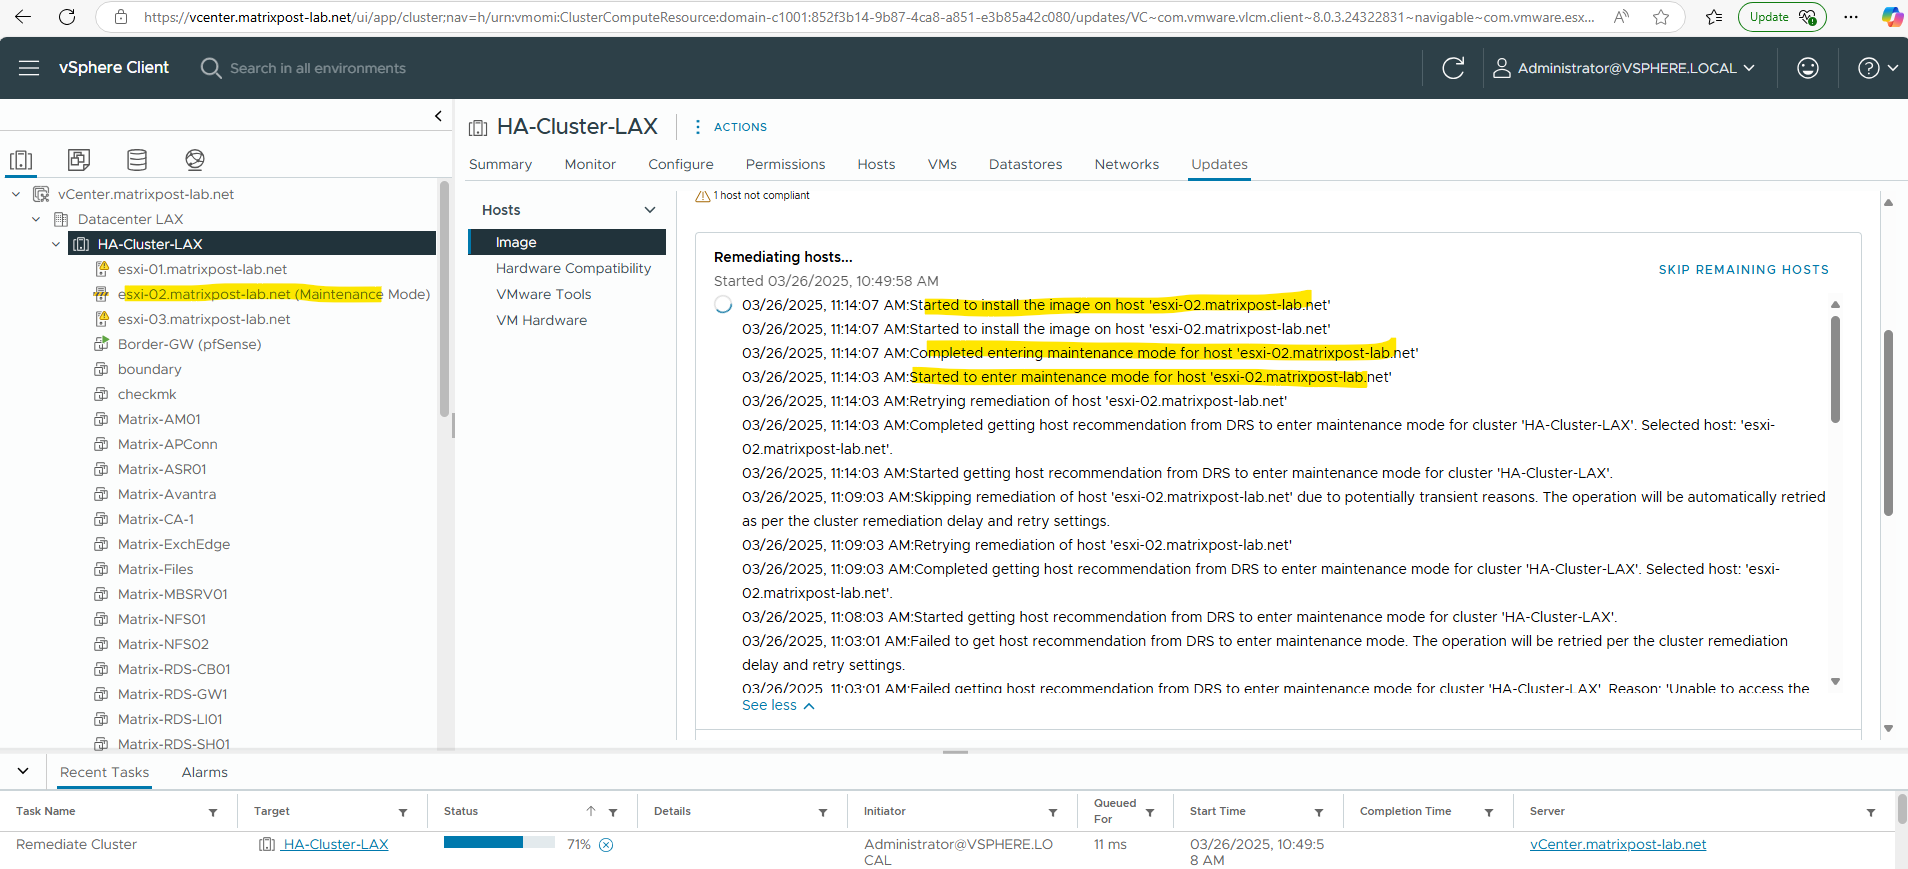
Finally the last host ‘esxi-02.matrixpost-lab.net’ will be remediated.
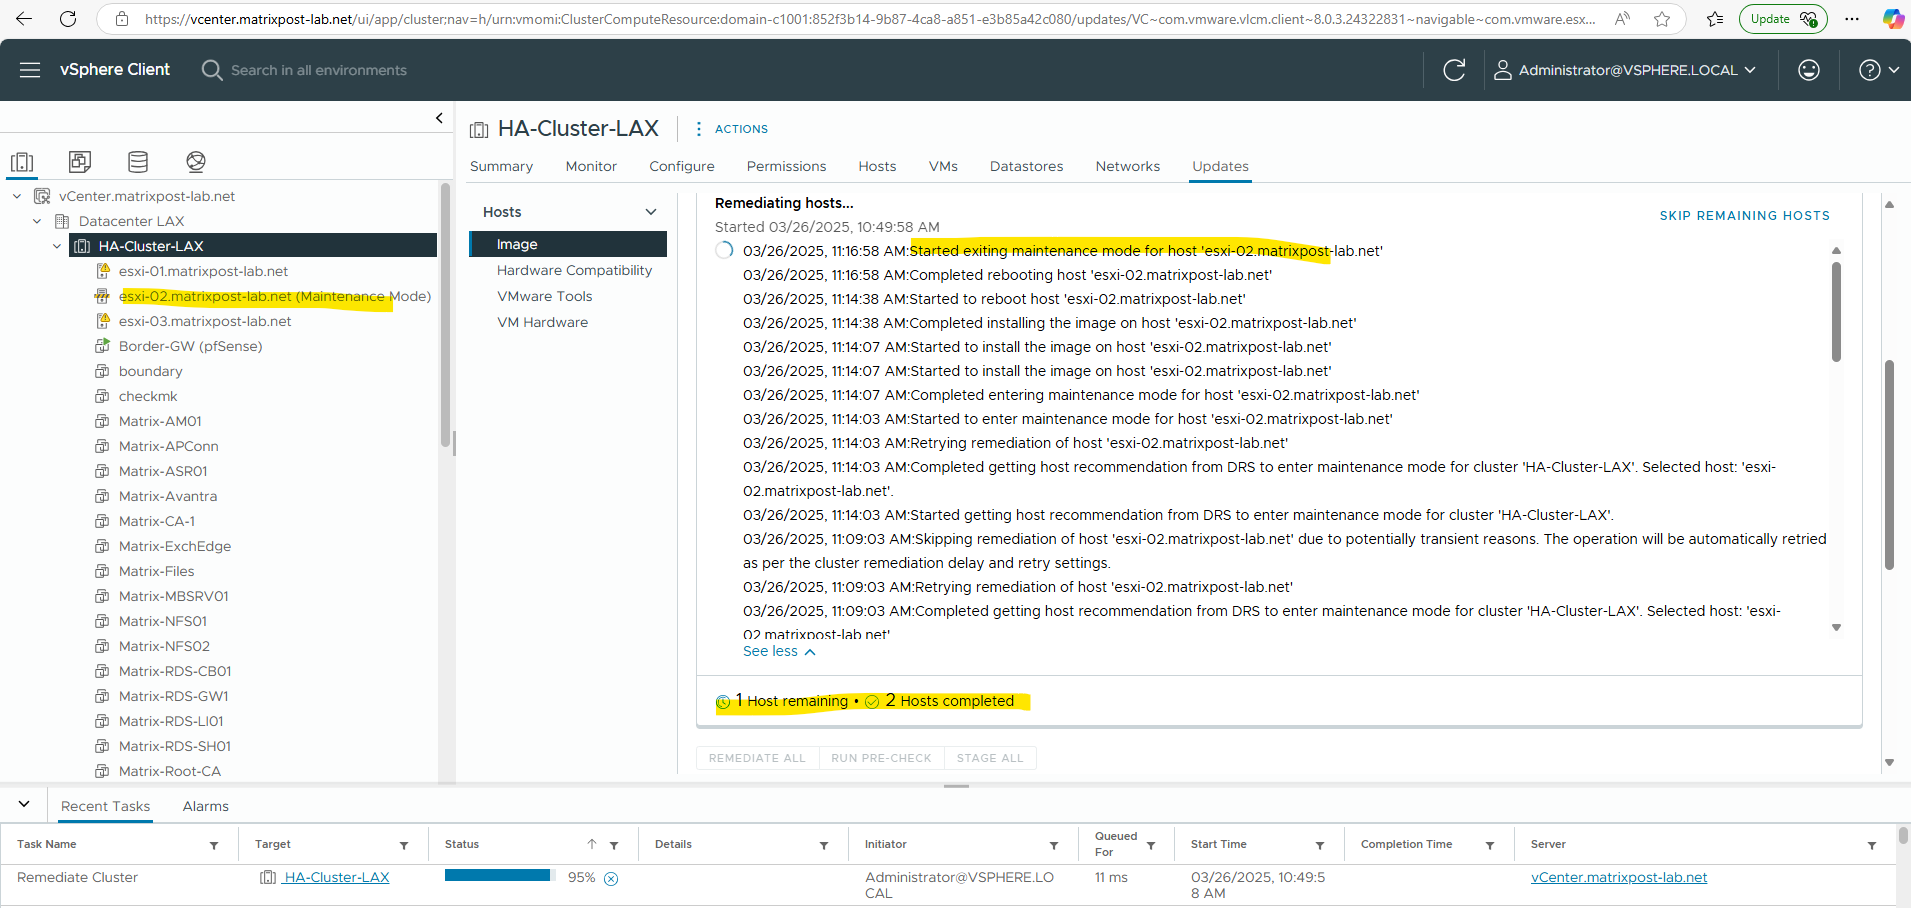
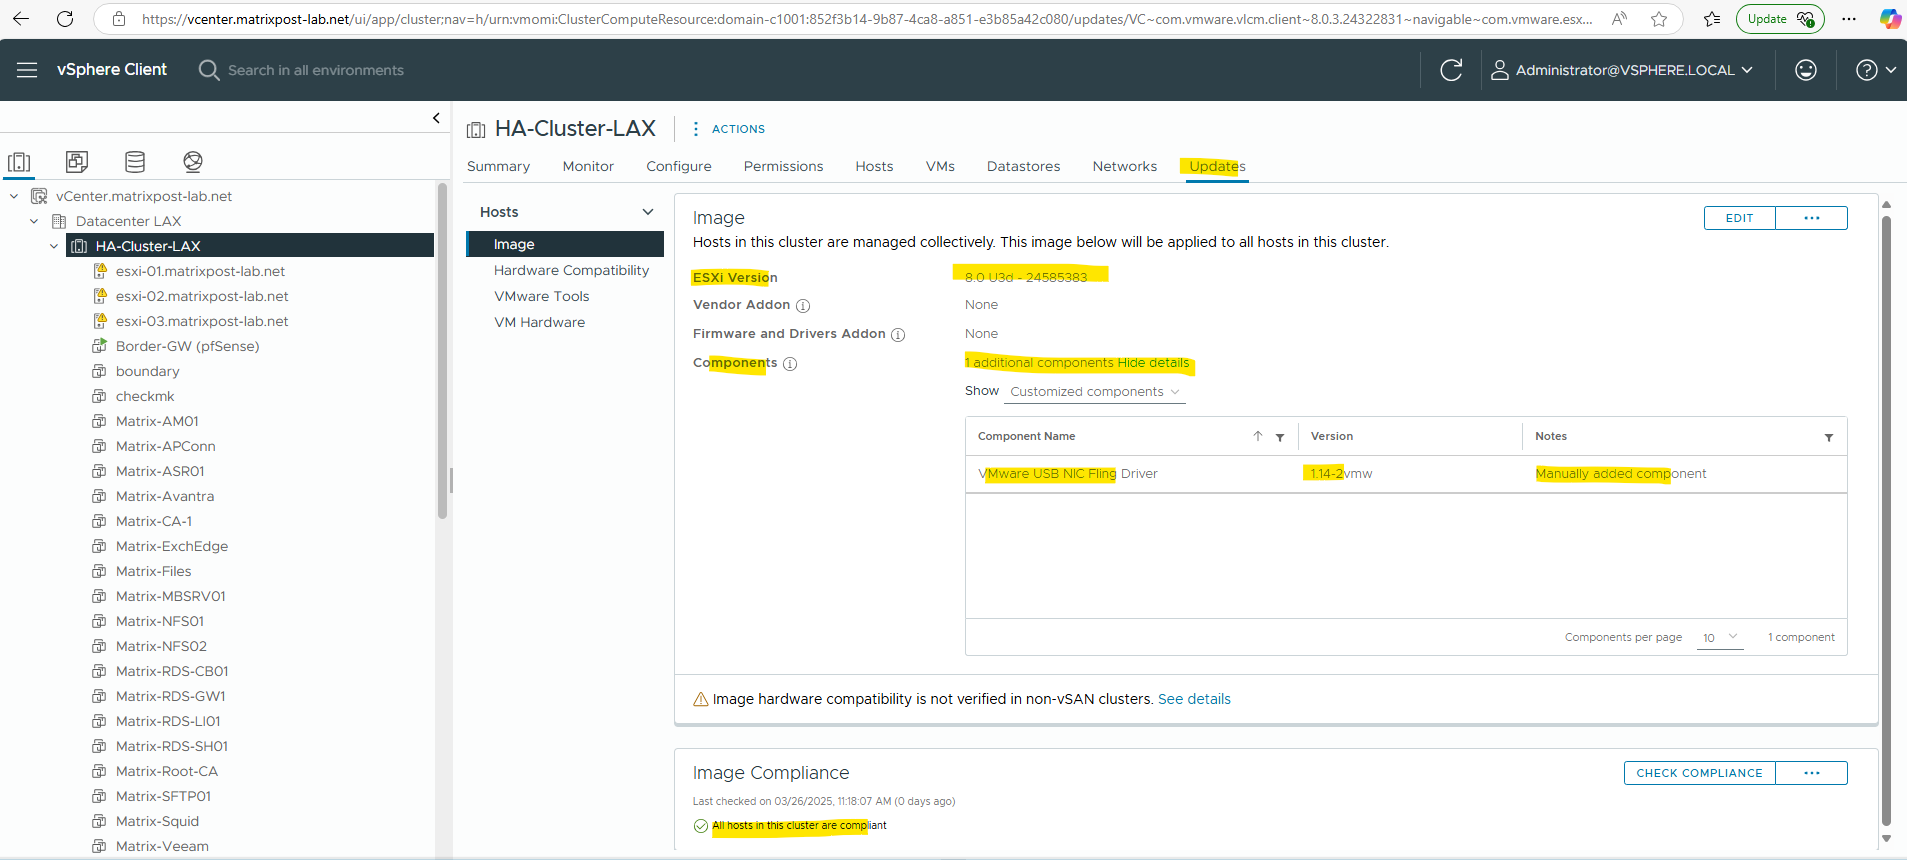
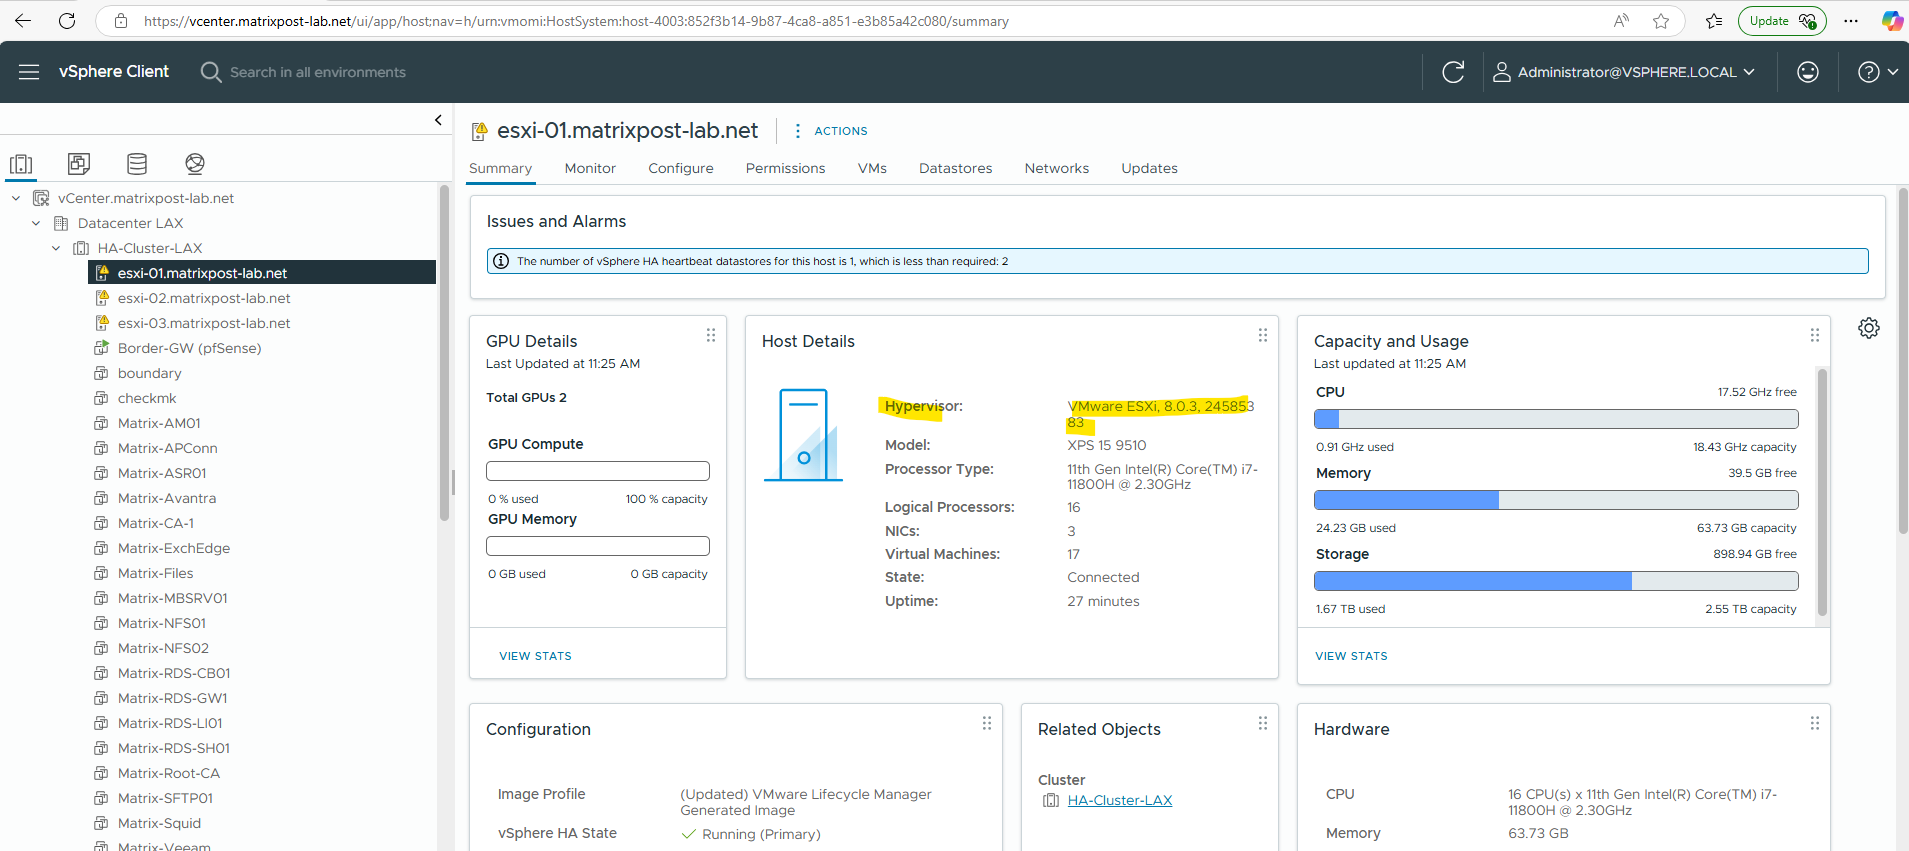
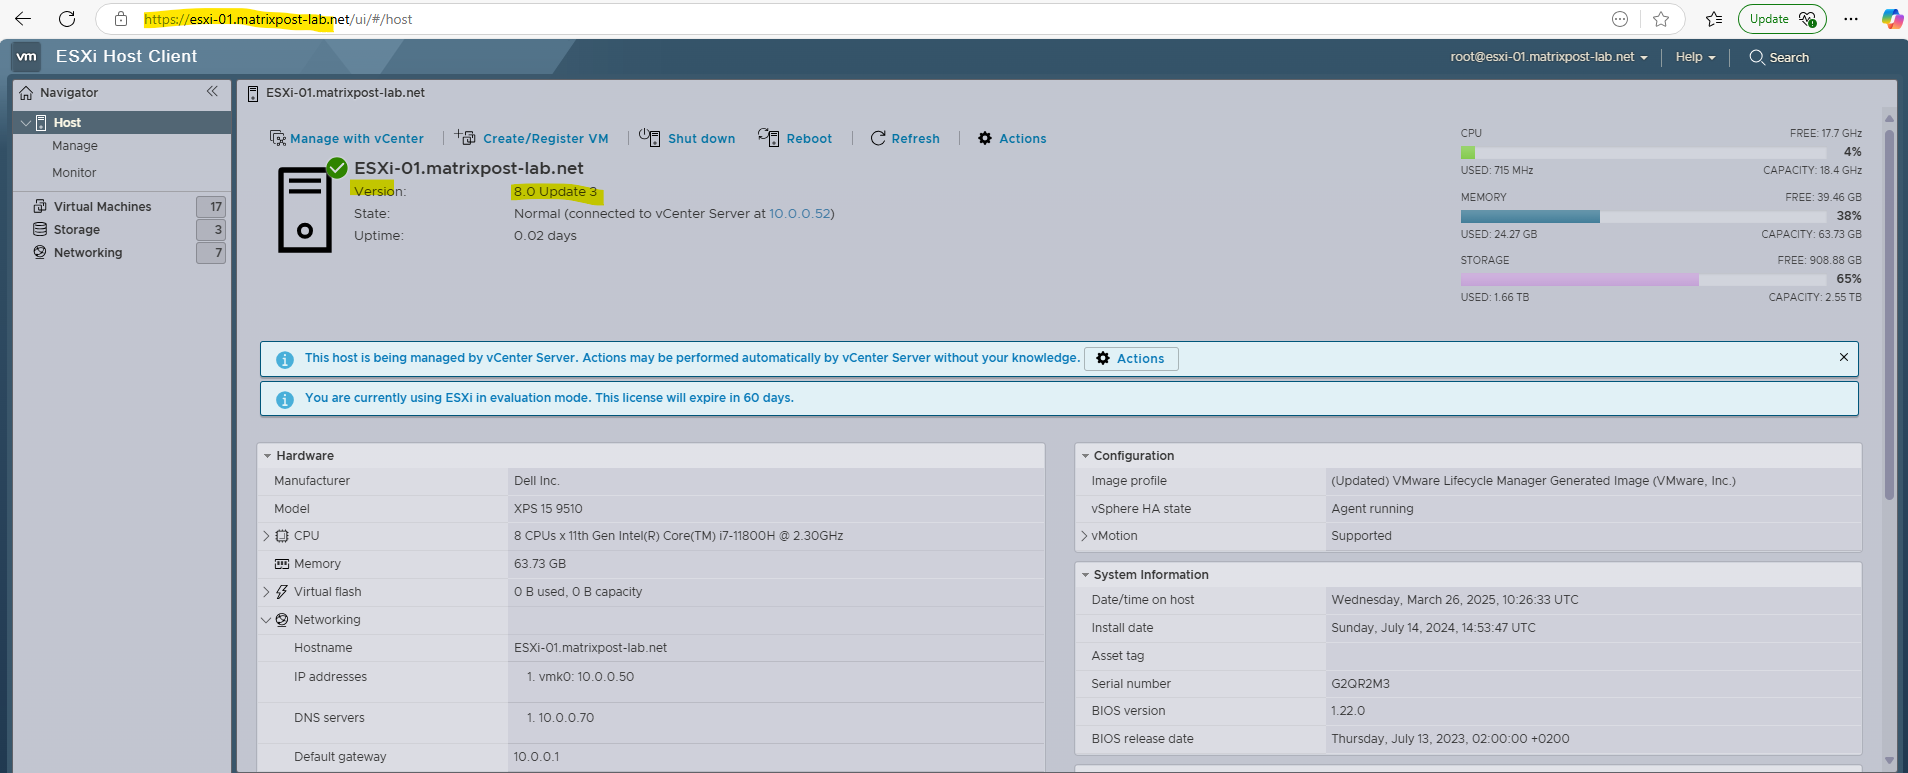
Finally all three ESXi hosts completed the remediation with upgrading the hosts to ESXi vesion 8.0 U3d – 24585383 completed successfully.
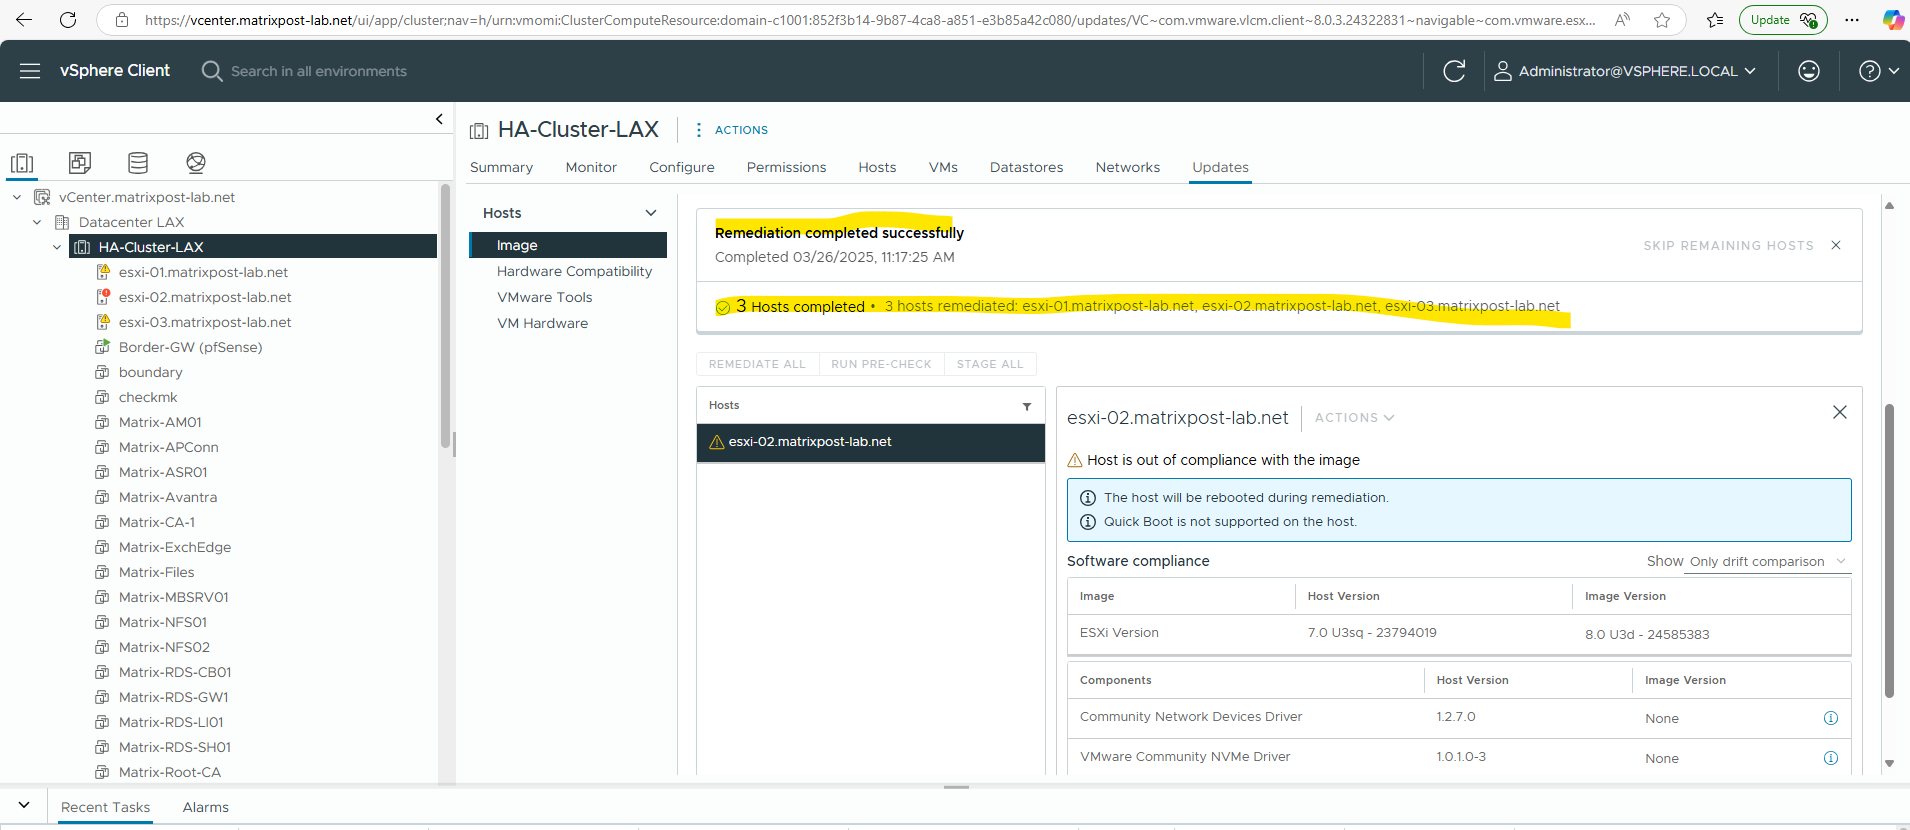
In my case because of using USB NICs in my lab environment as the hosts running on Dell XPS notebooks, also the integration of the Flings USB NIC drivers works for the new image.
Links
How to Upgrade ESXi Host with Lifecycle Manager
https://vmcloud.pl/2023/03/13/how-to-upgrade-esxi-host-with-lifecycle-manager/Introducing vSphere Lifecycle Management (vLCM)
https://www.vmware.com/docs/introducing-vsphere-lifecycle-management-vlcm
