Renew Edge Subscription in Exchange Server after Cumulative Update
Last weekend I was updating my on-premises Exchange Servers with the new cumulative update and therefore had to renew the Edge Subscription in order the new version and build number of the Edge Server in the perimeter network will be displayed in the Exchange admin center (EAC) from the internal servers.
In this post I will go through the separate steps to do so.
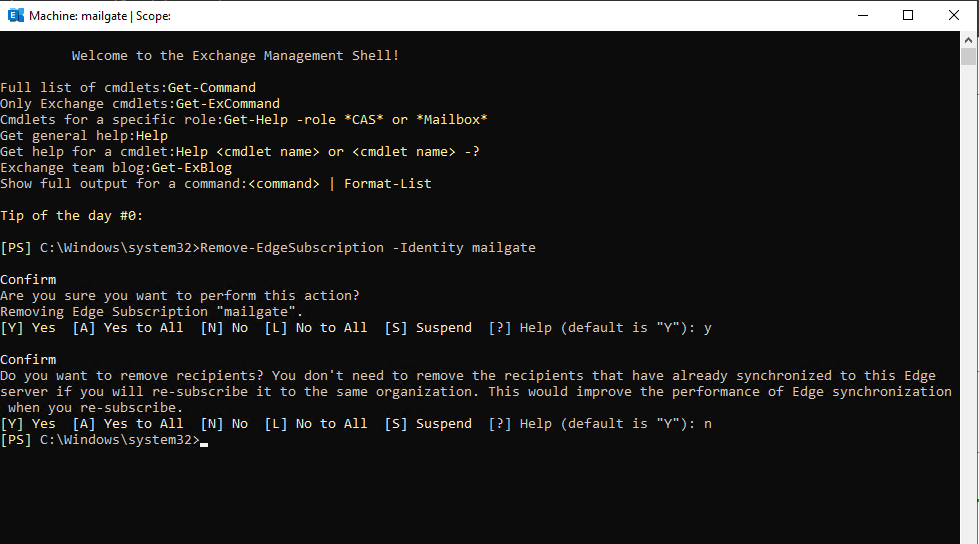
First I will remove the Edge Subscription on the Edge Server as follows. We need to remove the Edge Subscription on the Edge Server and on one of the Mailbox Servers.
Execute the following command by using the Exchange Management Shell on the Edge Server.
Remove-EdgeSubscription -Identity <Hostname Edge>
For Do you want to remove recipients? I will enter No! In this case the edge server will not refuse incoming mails for your recipients because it didn’t know them during the update.
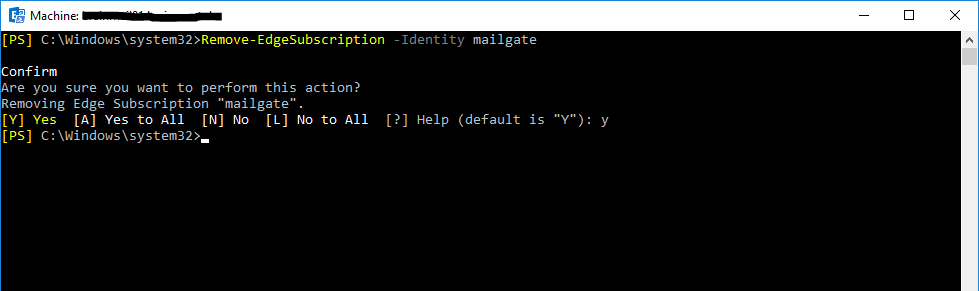
Next I will remove the Edge Subscription also from the internal Mailbox Servers. Execute the following command by using the Exchange Management Shell on one of the Mailbox Servers. This will remove the Subscription for the whole Active Directory Site they assigned to.
In my case I have two AD Sites and therefore also two Edge Subscriptions, one Edge Server for each AD Site. So I have to do this for each of the AD Sites.
Remove-EdgeSubscription -Identity <Hostname Edge>
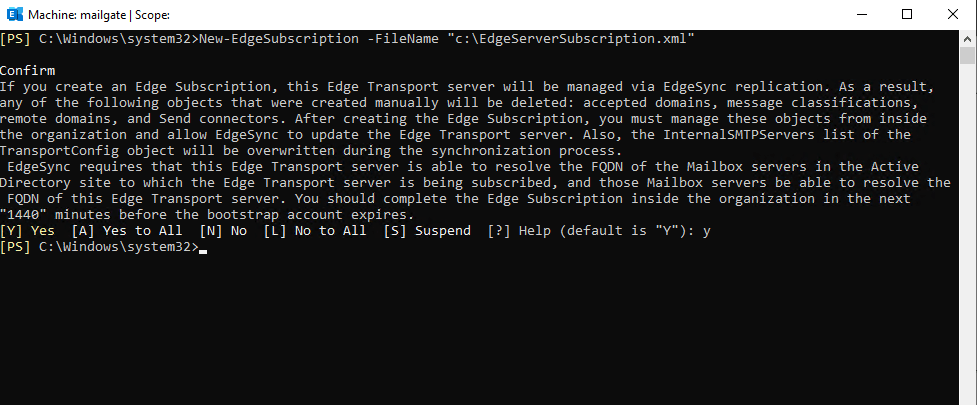
Now that the Edge Subscription is removed, we need to create a new Edge Subscription on the Edge Server and afterwards import that on one of the internal Mailbox Servers.
Execute the following command to create the new Edge Subscription in the Exchange Management Shell on the Edge Server.
New-EdgeSubscription -FileName “c:EdgeServerSubscription.xml”
Next I will copy the created Edge Subscription file (EdgeServerSubscription.xml) to one of my internal Mailbox Servers in order to import that subscription.
Now I have to run the following command on that internal Mailbox Server and its Exchange Management Shell.
New-EdgeSubscription -FileData ([byte[]]$(Get-Content -Path "C:EdgeServerSubscription.xml" -Encoding Byte -ReadCount 0)) -Site "Default-First-Site-Name"
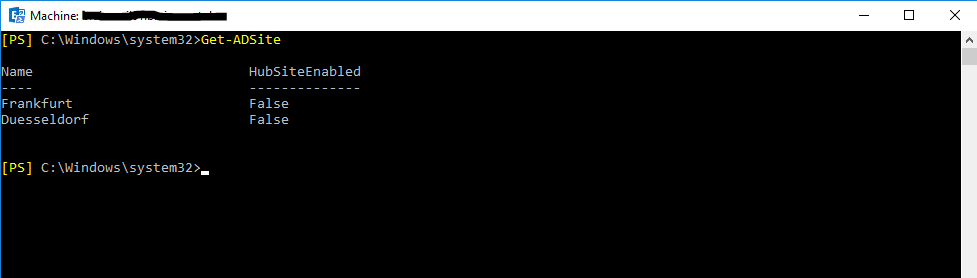
Replace Default-First-Site-Name with your AD Site, in my case it is Frankfurt for the main site I want to renew the subscription.
You can determine the names of your AD Sites by using the Get-ADSite command as follows.
That will import the Edge Subscription file generated on the Edge Server from the AD Site Frankfurt and will import it to this site.
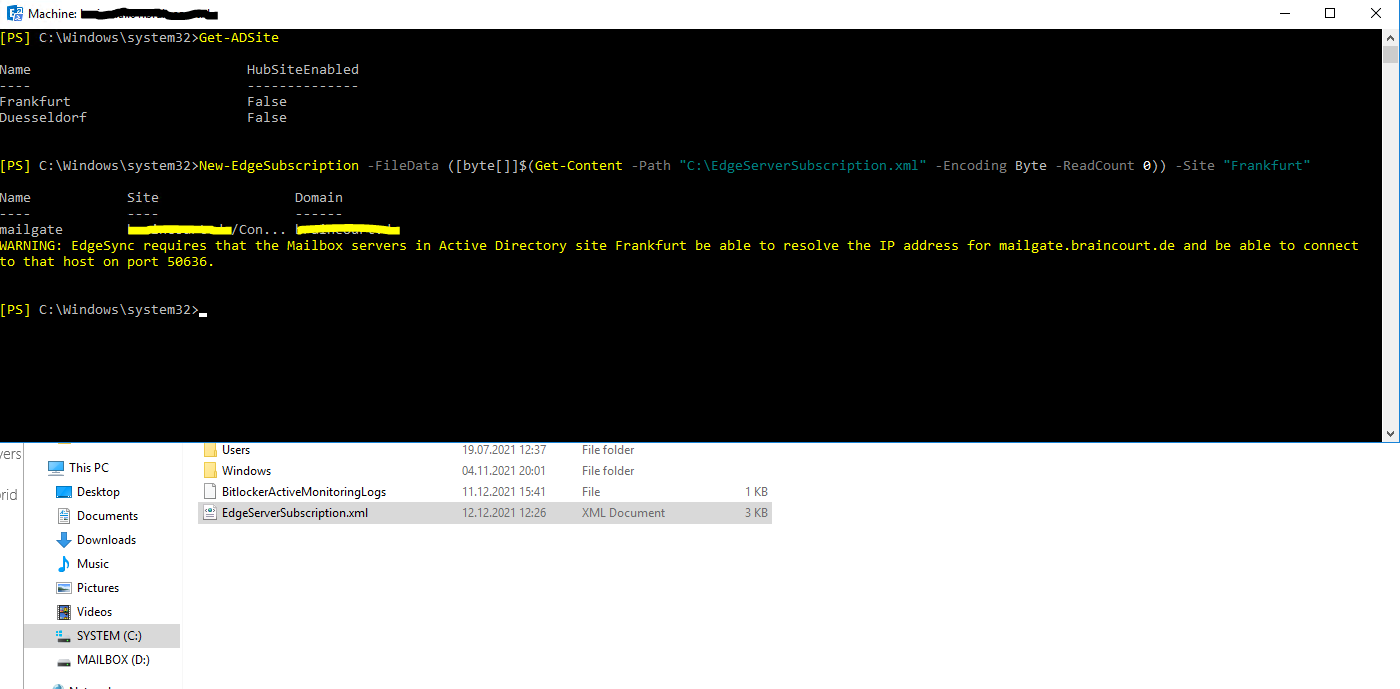
As shown in the warning, the internal Mailbox Servers needs to be able to resolve the FQDN of the Edge Server into its correct IP and also needs to be able to connect to it through TCP Port 50636.
As I will only update the subscription, these requirements are of course still in place.
To check them anyway, I prefer to use the good old telnet tool which will perform by default a TCP three–way–handshake to the destination FQDN or IP and port number.
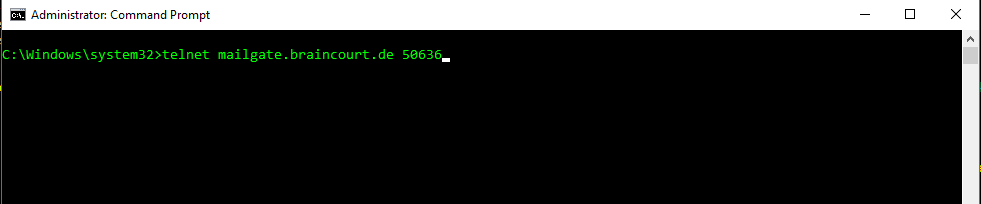
The blinking cursor btw. will show you that the TCP connection is established successfully here on port 50636.

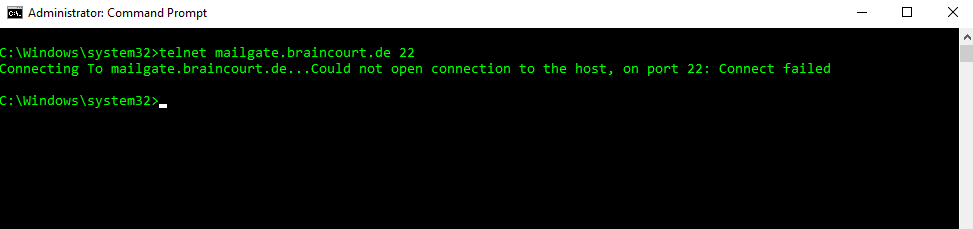
Otherwise you will get the following message displayed, to demonstrate I was using the well-known TCP Port 22 for SSH, which you normally won’t find on windows systems.
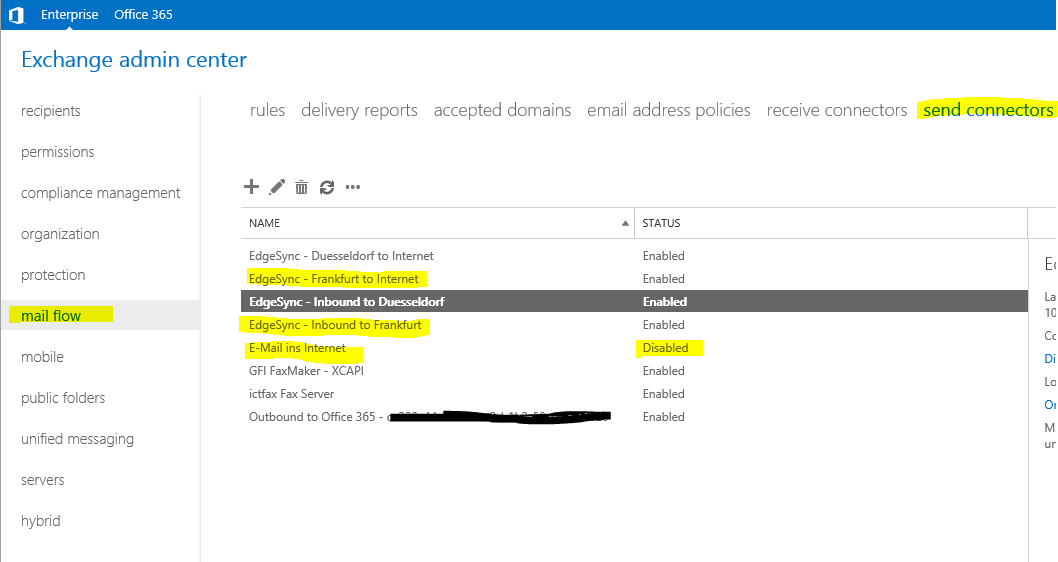
After the import from the subscription, you will see in the Exchange admin center under mail flow -> send connectors two new send connectors, one of them will handle inbound traffic from the Edge Server and one outbound traffic to the Edge Server.
Send connectors created automatically by the Edge Subscription
https://docs.microsoft.com/en-us/exchange/architecture/edge-transport-servers/edge-subscriptions?view=exchserver-2019#send-connectors-created-automatically-by-the-edge-subscription
Also, subscribing an Edge Transport server to the Exchange organization allows the Mailbox servers in the subscribed Active Directory site to use the invisible and implicit intra-organization Send connector to relay messages to the Edge Transport server.
The default send connector for sending mails to the internet you have to remove or disable in case of using an Edge Server!
You will also see here the send connector Outbound to Office 365 … as this is an Exchange Hybrid Classic Full environment.
More about Exchange Hybrid Classic Full btw. you will find in my following post:
https://blog.matrixpost.net/migration-from-exchange-and-skype-for-business-onpremise-to-office-365-exchange-online-and-teams-step-by-step-part-2/
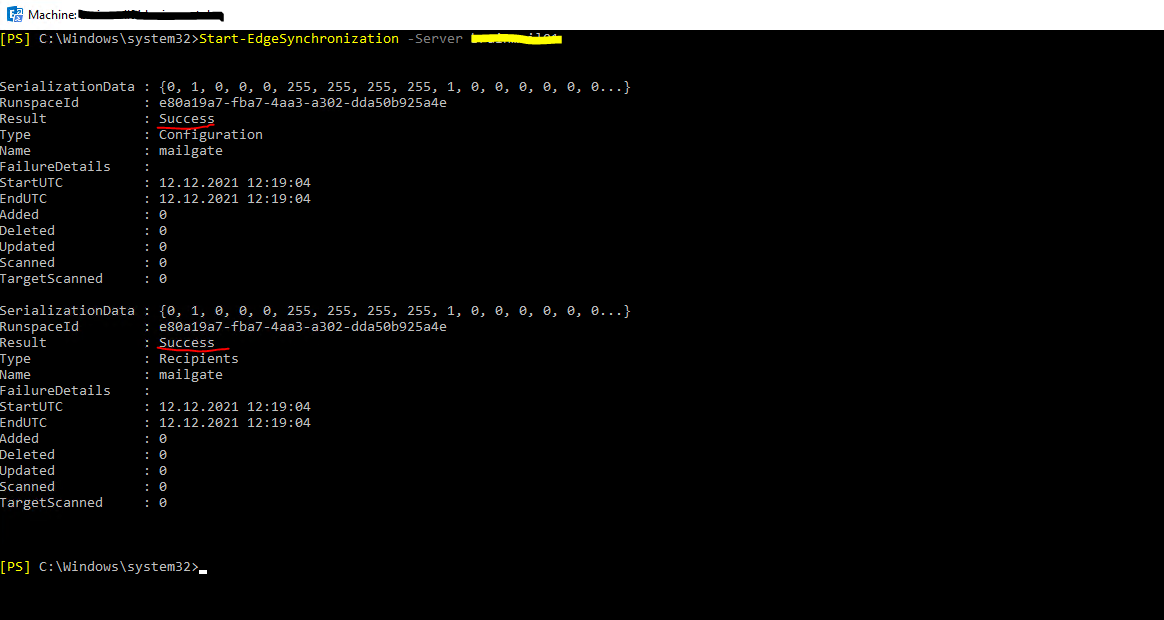
Now we can start the sync with the Edge Server on one of the internal Mailbox Server as follows to check if it works.
Start-EdgeSynchronization -Server Mailbox01
In my case the same procedure I also have to do for the second AD Site Duesseldorf in order to update both Edge Subscriptions.
Further If you also have an Exchange Hybrid Classic Full environment, if you renew your Edge Subscription, you have to rerun the Hybrid Configuration Wizard, otherwise you will run into the A local loop was detected error on your Edge and Mailbox Server, when you try to send an email from an on-premises mailbox to an online mailbox or vice versa.

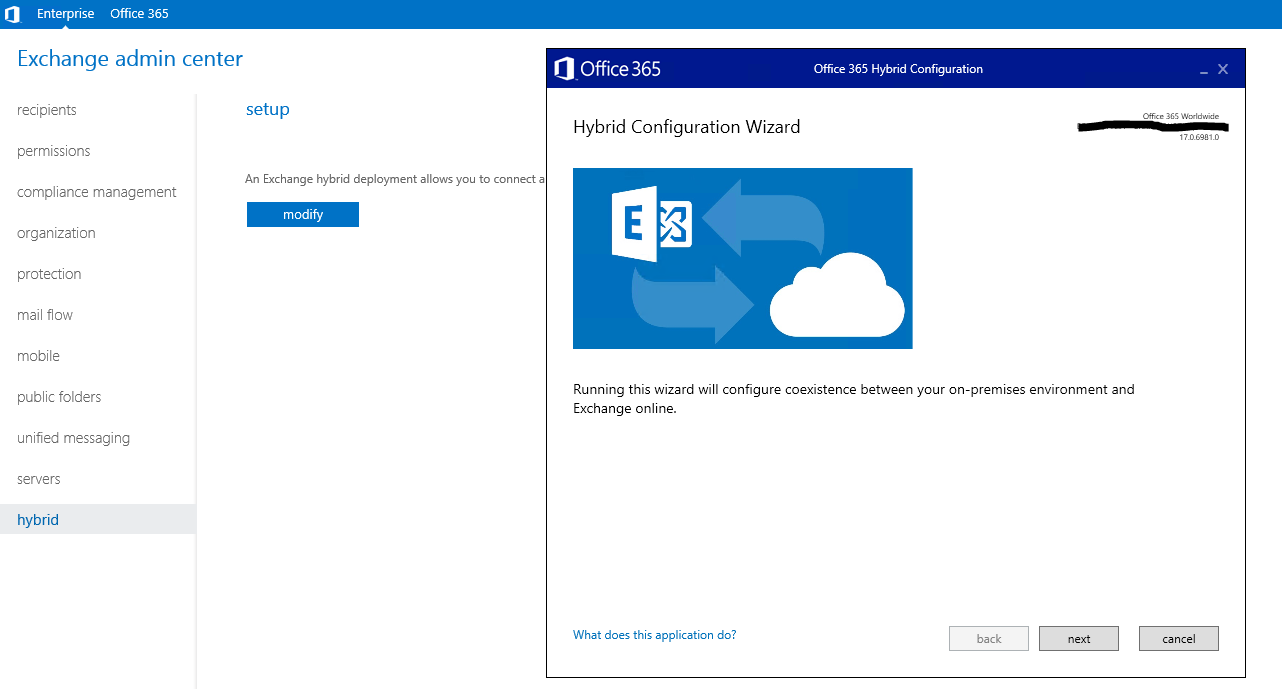
After the Hybrid Configuration Wizard runs successfully, the mails from the internal queues of the Mailbox Servers should immediately send out as they get the changes from the wizard also immediately, in order the Edge Server is also getting the changes immediately and will be able to send out the queued mails, you should run the Start-EdgeSynchronization command on one of the internal Mailbox Servers.
As already mentioned, about Exchange Hybrid Classic Full you can also read my following post.
Links
Edge Subscriptions in Exchange Server
https://docs.microsoft.com/en-us/exchange/architecture/edge-transport-servers/edge-subscriptions?view=exchserver-2019
Configure internet mail flow through Edge Transport servers without using EdgeSync
https://docs.microsoft.com/en-us/exchange/architecture/edge-transport-servers/configure-without-edgesync?view=exchserver-2019
Receive connectors in Exchange Server
https://docs.microsoft.com/en-us/exchange/mail-flow/connectors/receive-connectors?view=exchserver-2019