Replicate Virtual Machines between different Data Center by using Veeam Backup and Replication
In this post I want to show step by step how we can replicate virtual machines from one Data Center, here my on-premise lab environment and running on Microsoft Hyper-V, to another Data Center resp. the Azure Cloud and Azure Hyper-V Server 2022 for nested virtualization.
Finally the process is always the same, no matter if you are using a Microsoft Hyper-V environment, VMware vSphere environment, Nutanix AHV or KVM, all of them are supported by Veeam Backup & Replication.
However it is not possible to replicate virtual machines between different hypervisors, so you just can replicate from Microsoft Hyper-V to another Hyper-V environment or between different VMware vSphere environments. Same is true for Nutanix AHV and KVM.
In order to migrate virtual machines between different hypervisor environments, like between Microsoft Hyper-V and VMware vSphere, we can instead perform Instant VM Recovery with Veeam Backup and Replication and shown in my following post.
Source: https://helpcenter.veeam.com/archive/backup/100/vsphere/performing_instant_recovery_vm.html
- Adding VMware vSphere to Veeam Backup and Replication
- Replicate Virtual Machines to another Data Center and/or Host
- Azure Hyper-V Server 2022 for Nested Virtualization as DR Site for Veeam
- Add the newly created Azure Hyper-V Nested Virtual Machine as new Hyper-V host (Managed Servers) in Veeam Backup and Replication
- Replicate Hyper-V on-premise Virtual Machines to Azure Hyper-V Nested Virtualization
- Failover to the Replica Virtual Machine
- Veeam Backup Proxies
- Links
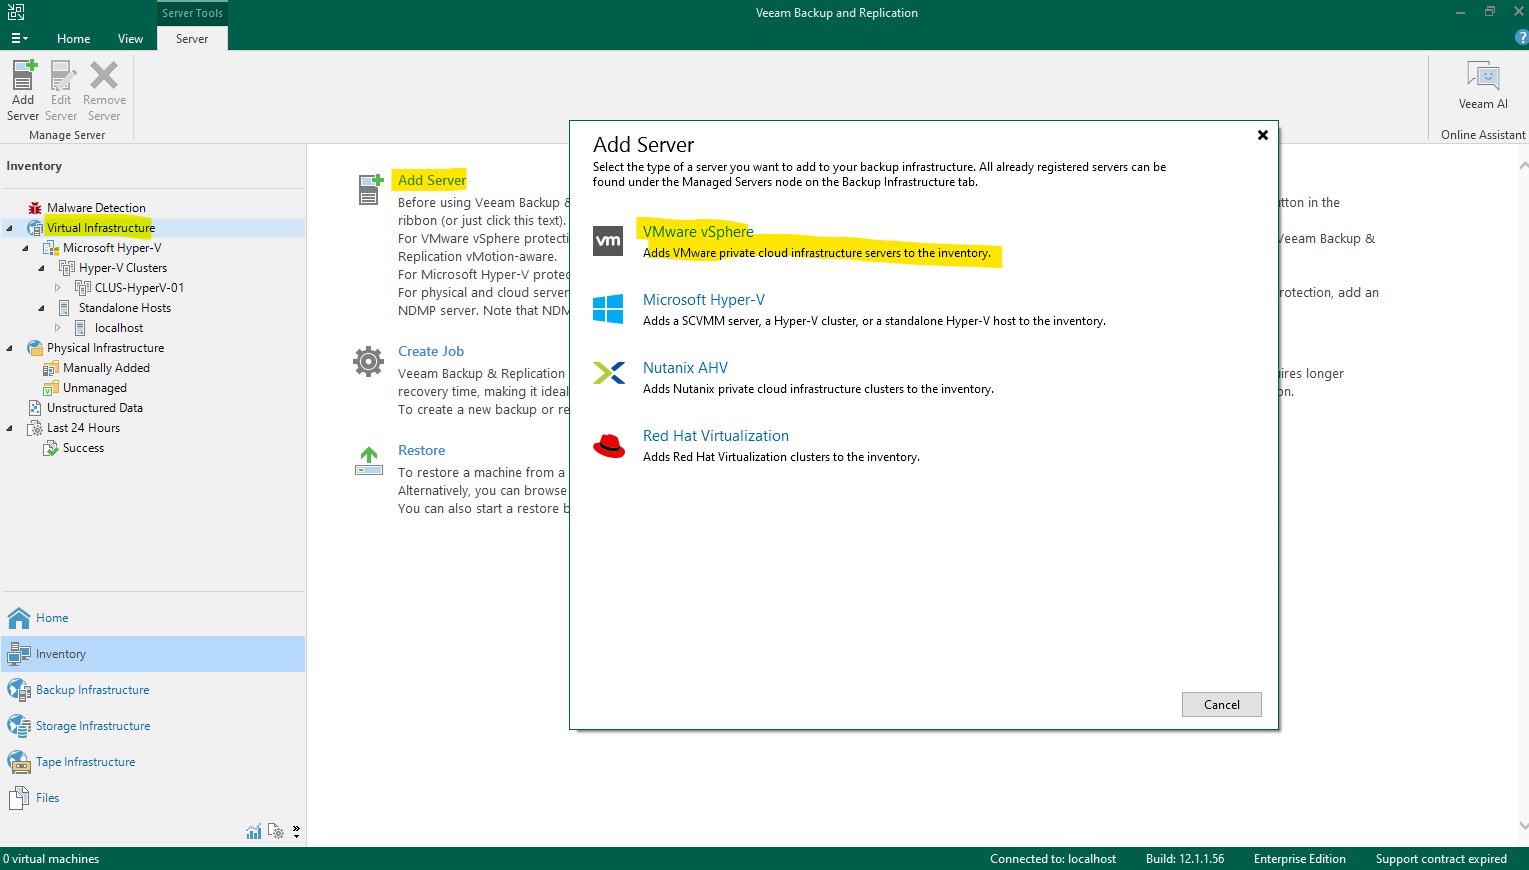
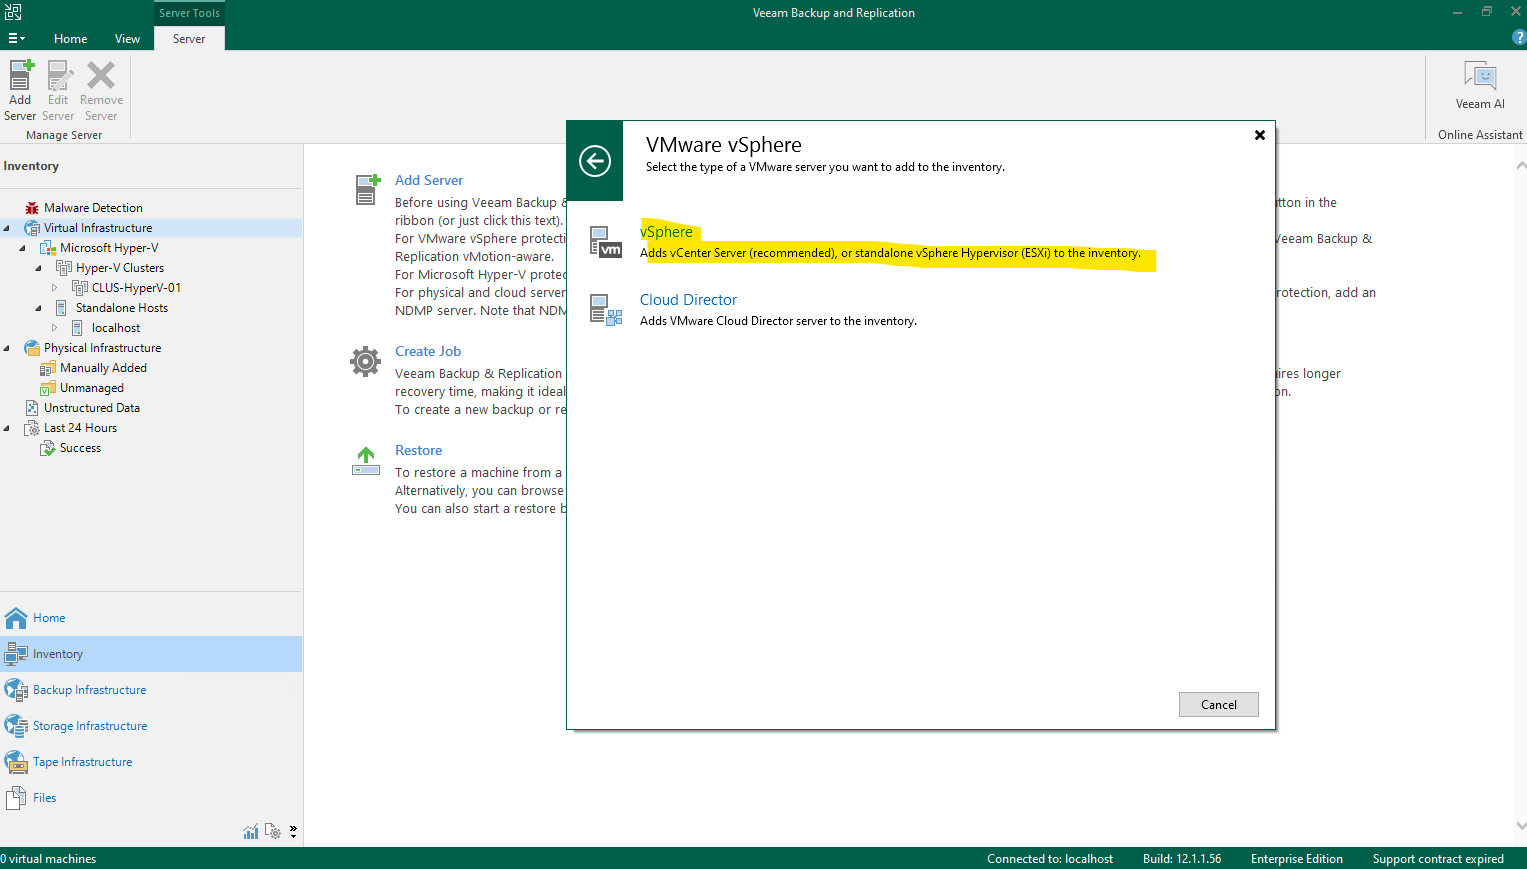
Adding VMware vSphere to Veeam Backup and Replication
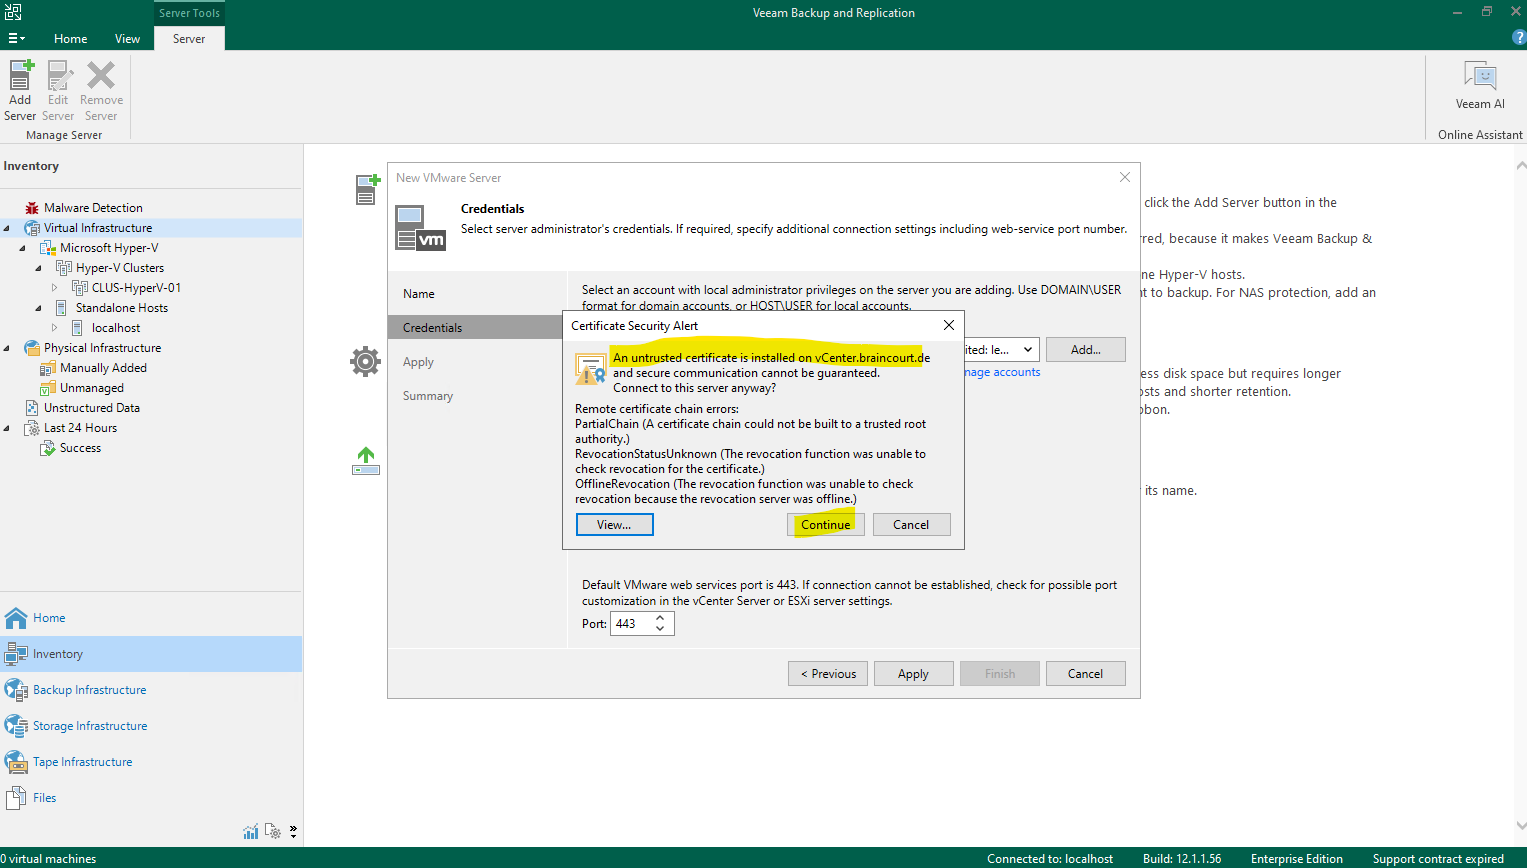
In order to replicate virtual machines within a specific environment/vendor (Microsoft Hyper-V, VWware, Nutanix AHV or KVM), we first need to add the hypervisor servers or clusters to Veeam Backup and Replication as managed servers and shown below for a VMware vSphere environment.
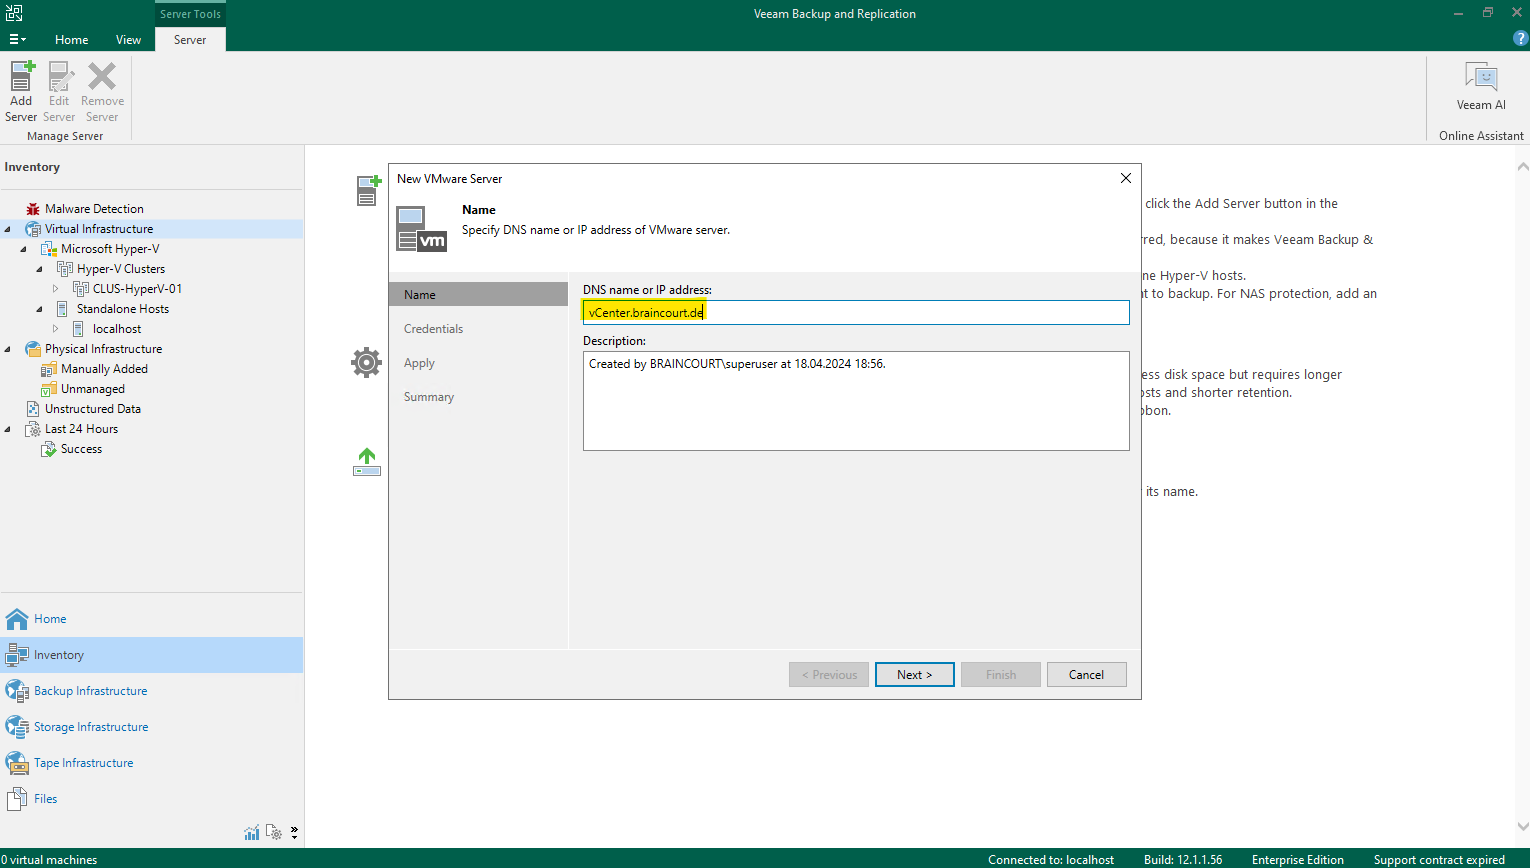
Provide credentials with administrative privileges for your environment.
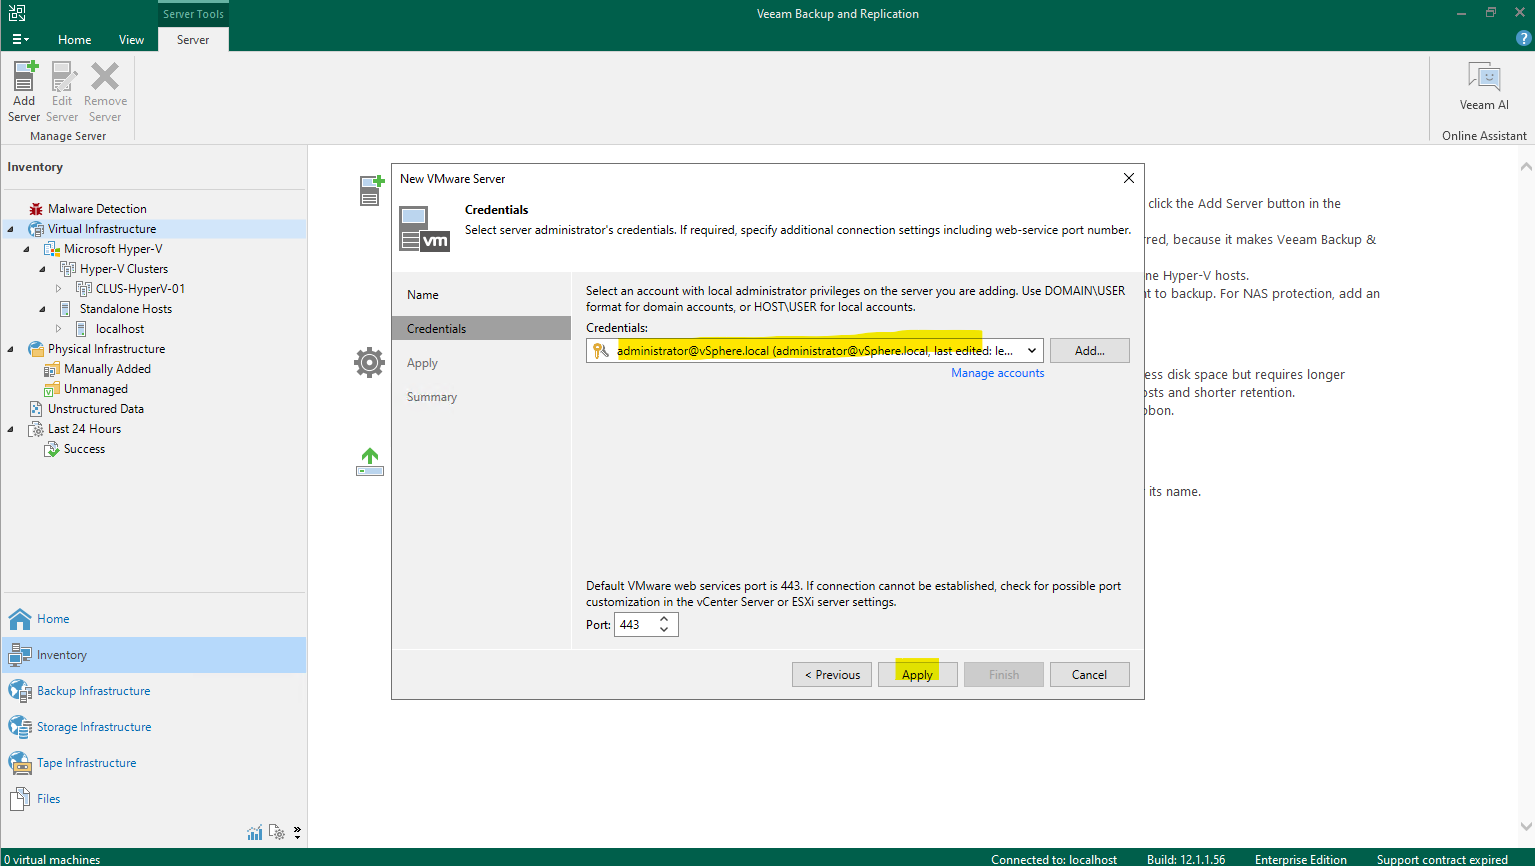
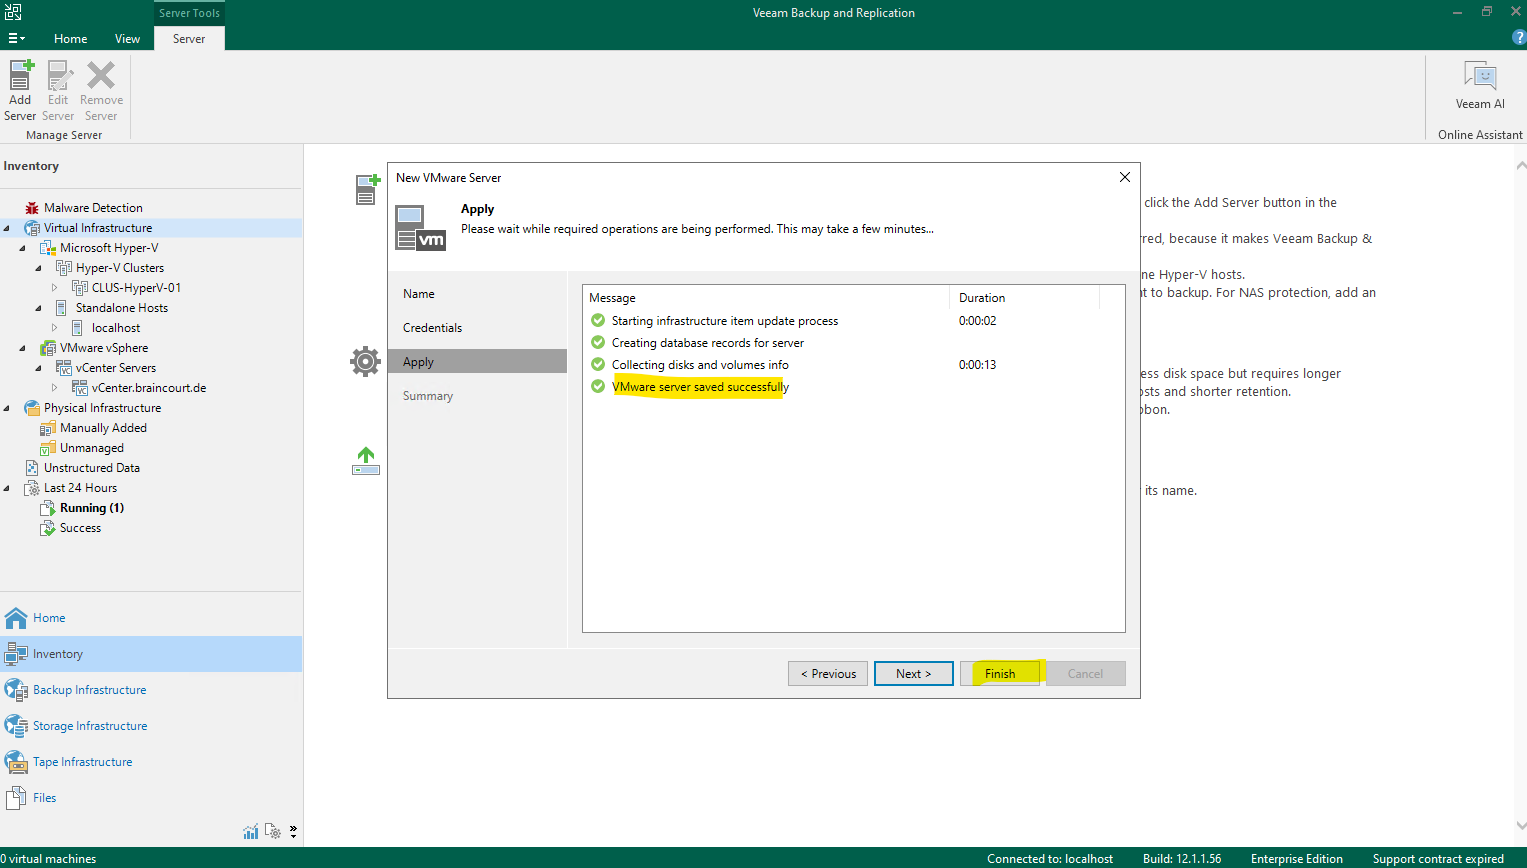
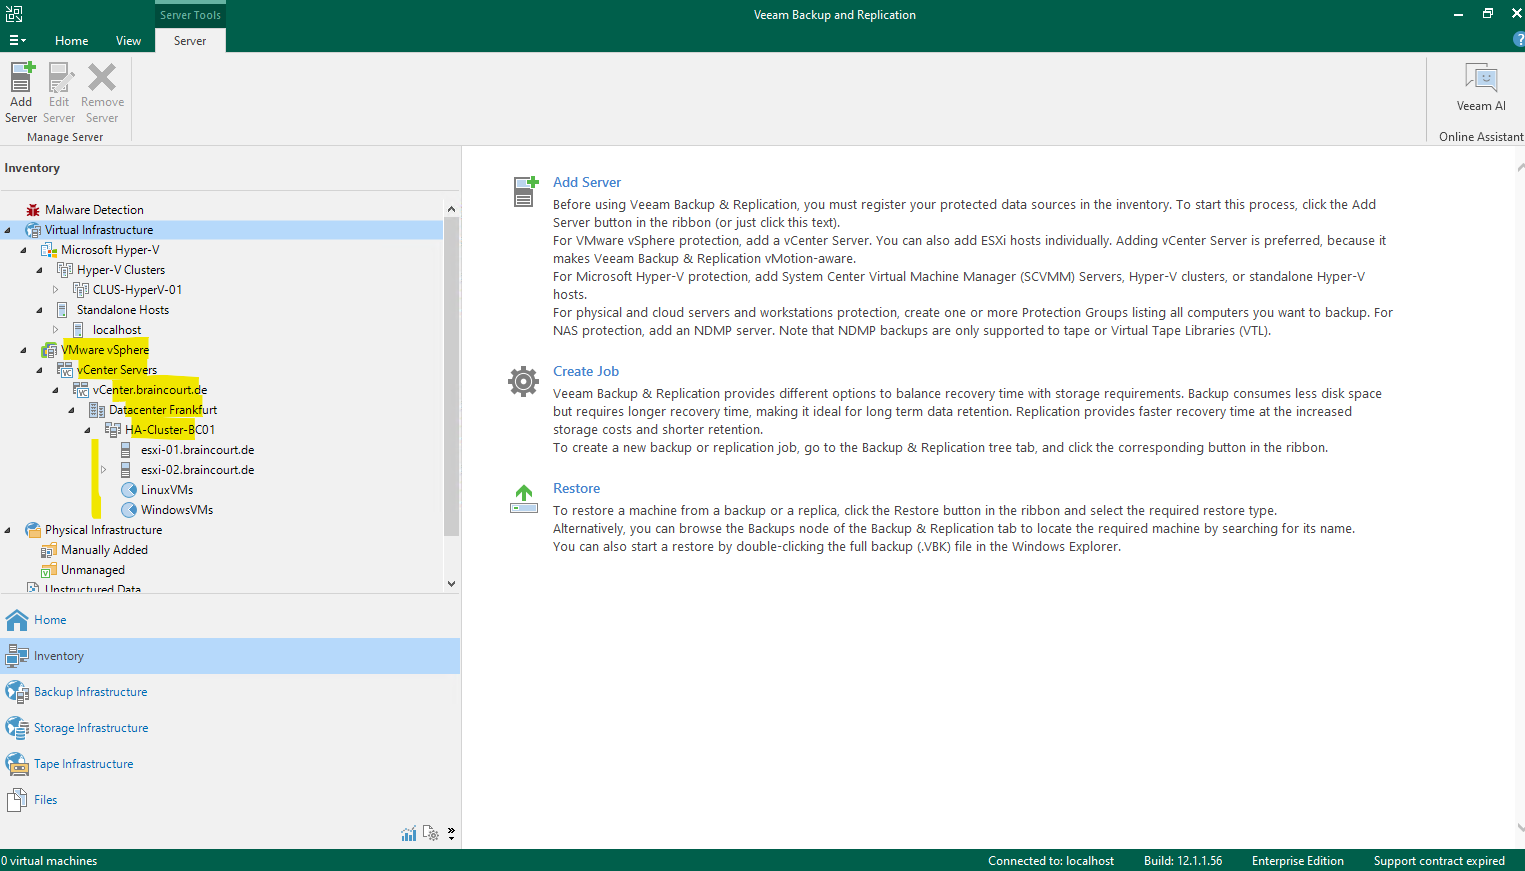
From now on we can backup and replicate virtual machines for the VMware vSphere environment.
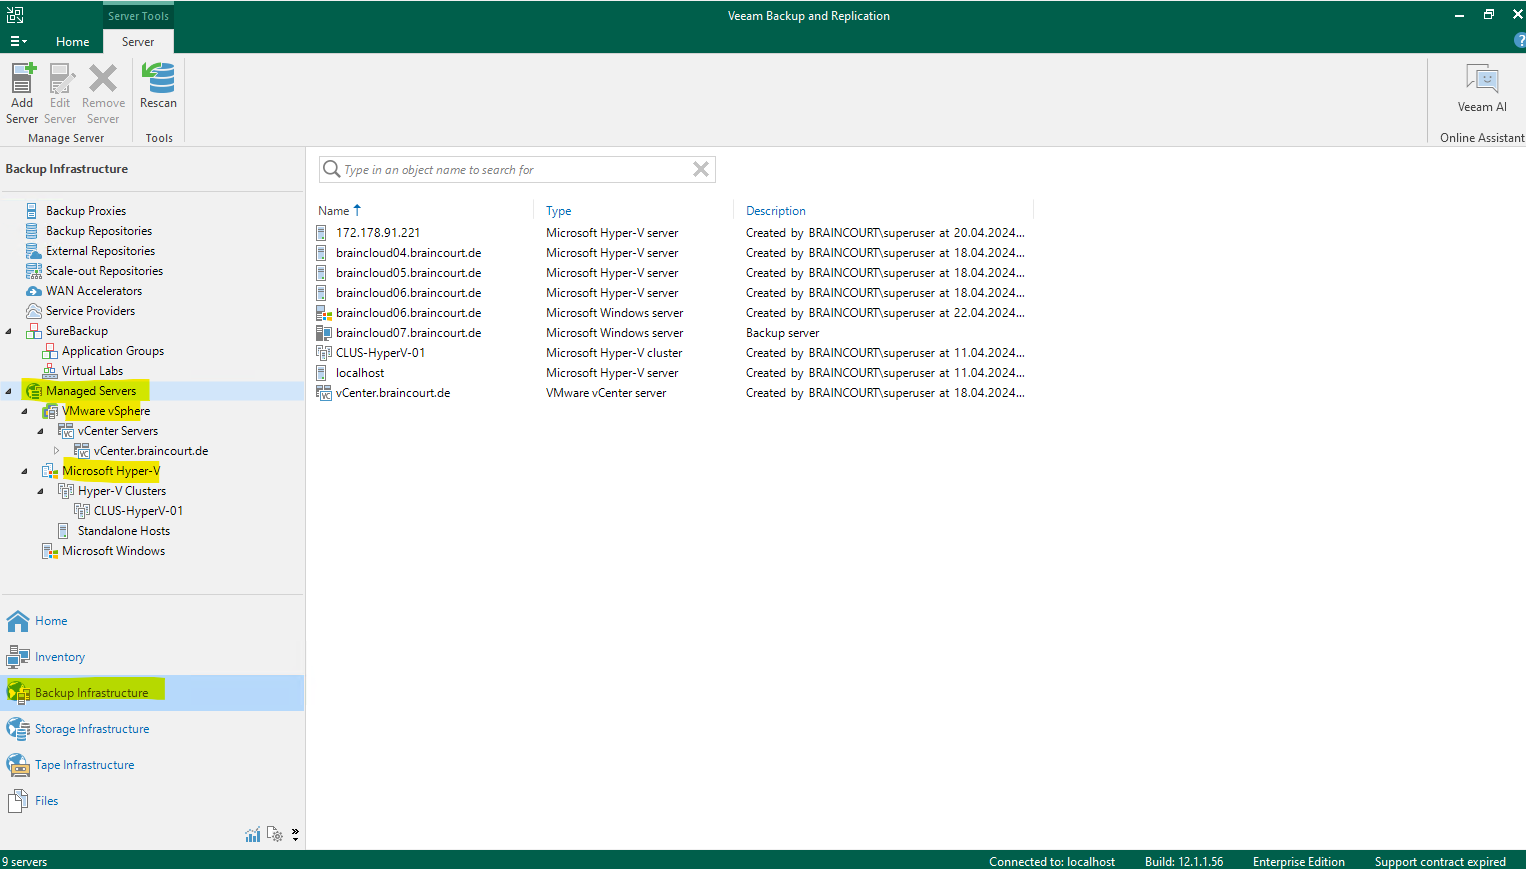
My Microsoft Hyper-V lab environment I had already added in Veeam Backup and Replication as shown below.
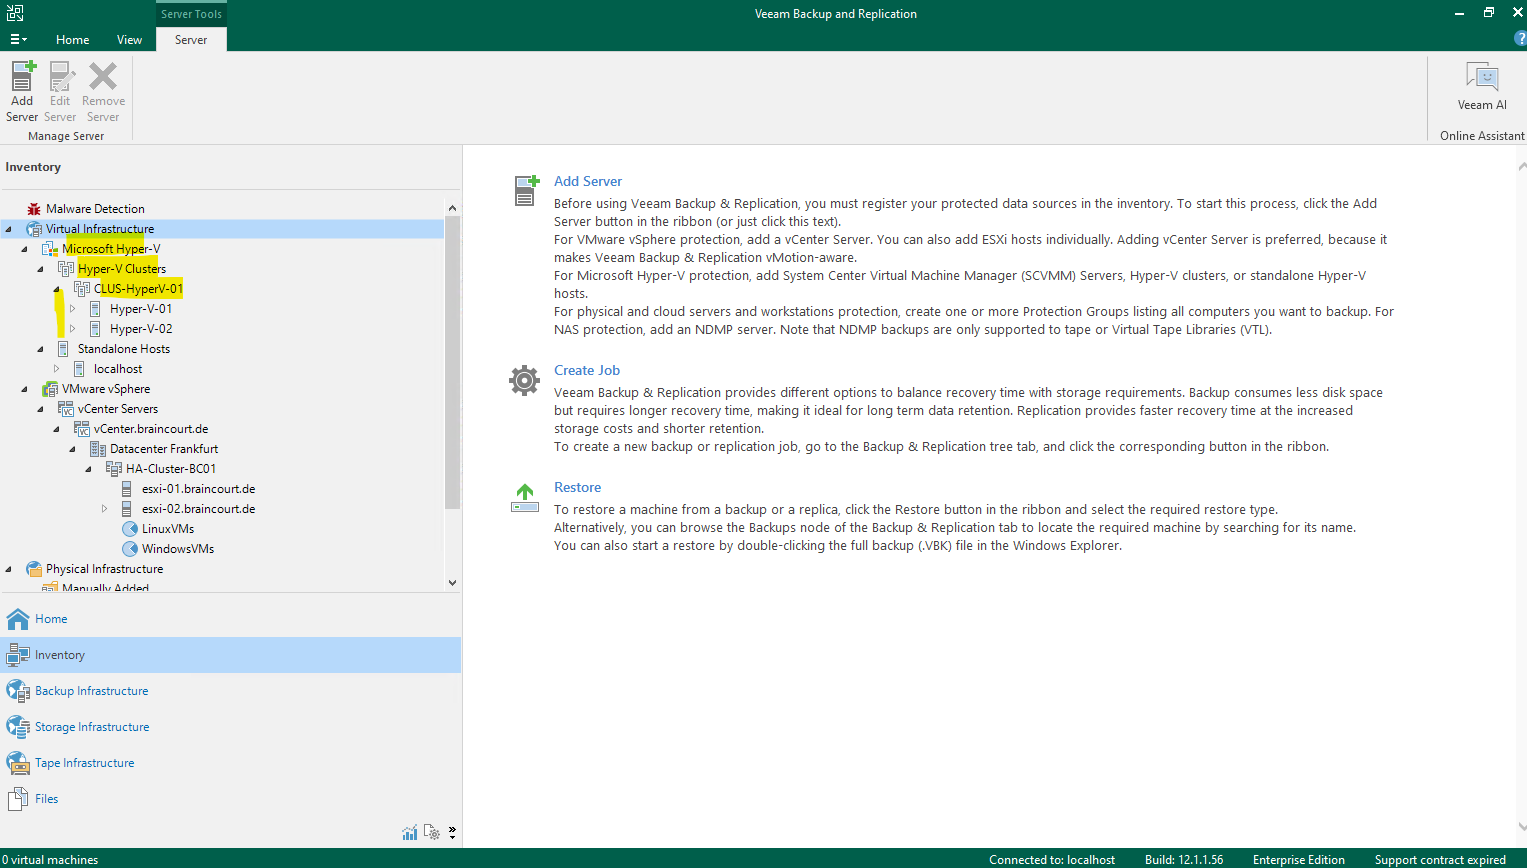
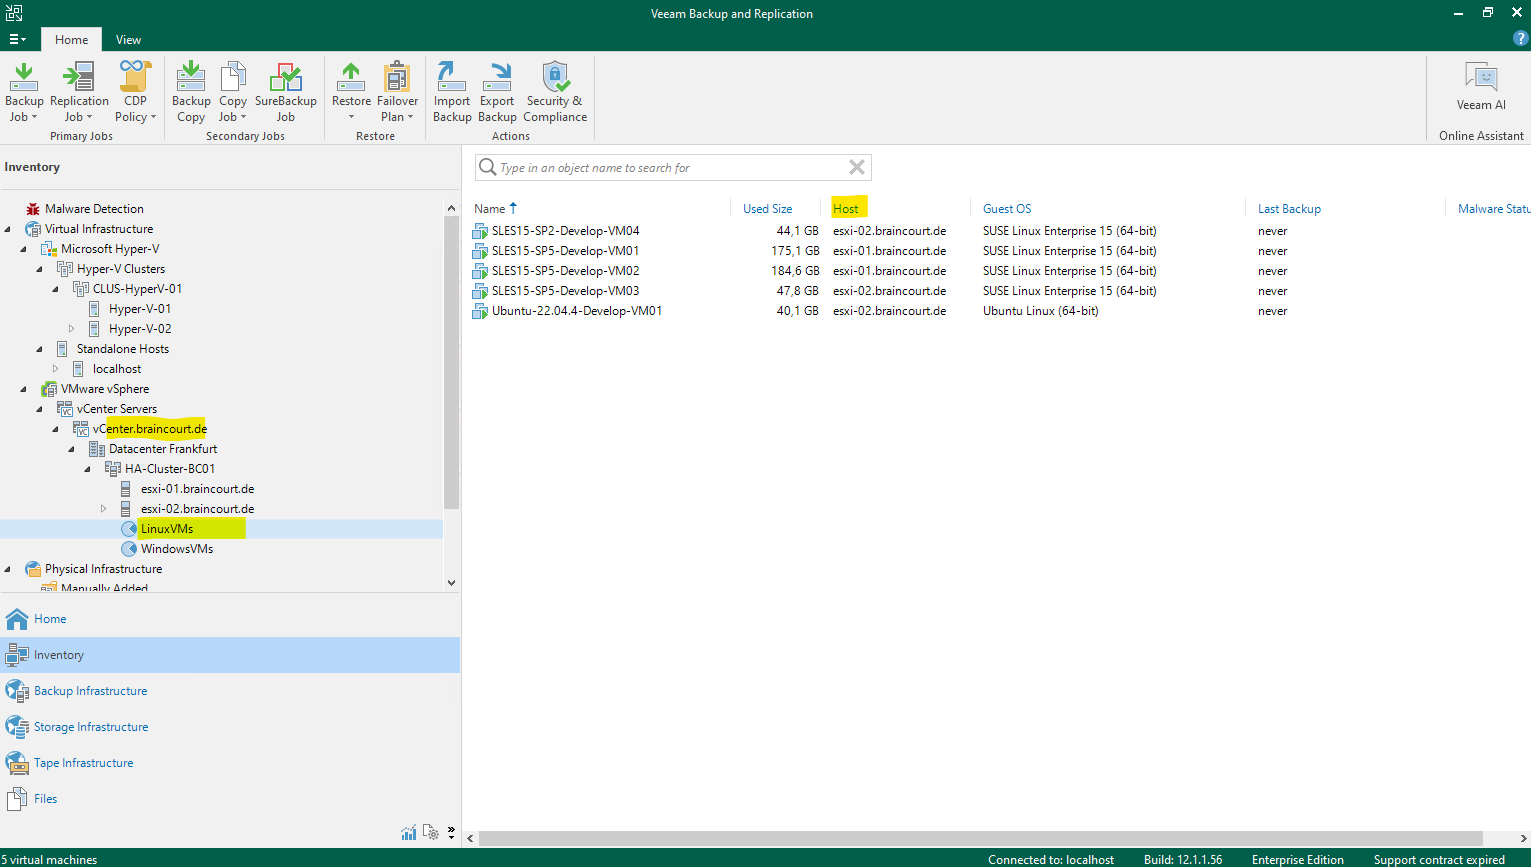
You will also find your hypervisor environments under Backup Infrastructure and here under Managed Servers as shown below.
Replicate Virtual Machines to another Data Center and/or Host
First of all we can’t do real time migrations between different vendors like from VMware vSphere to Microsoft Hyper-V or vice versa as already mentioned to the beginning. Therefore we can perform Instant VM Recovery as shown in my following post.
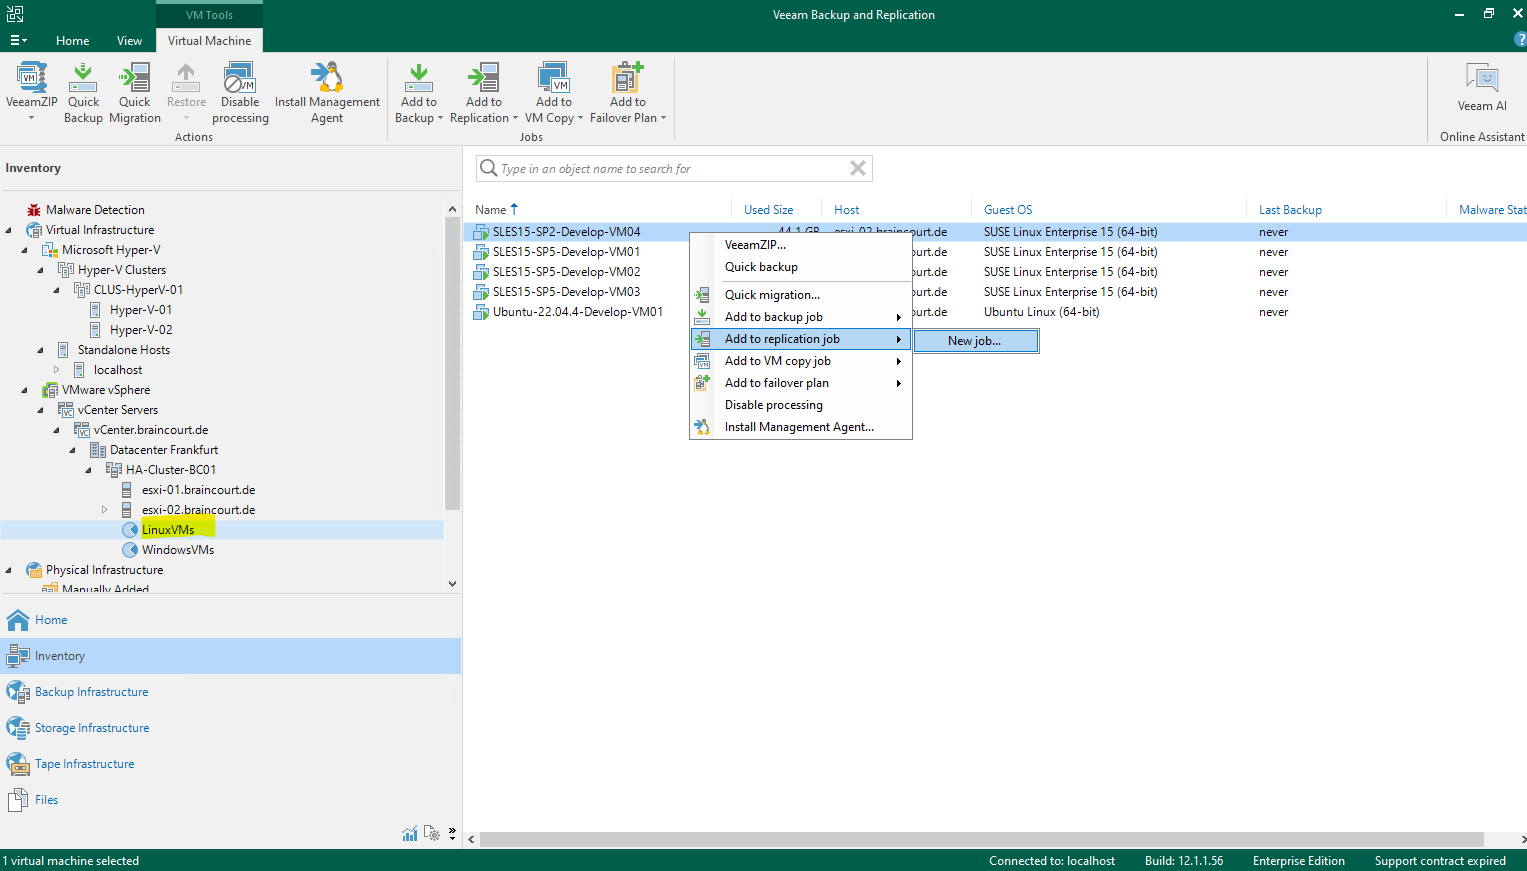
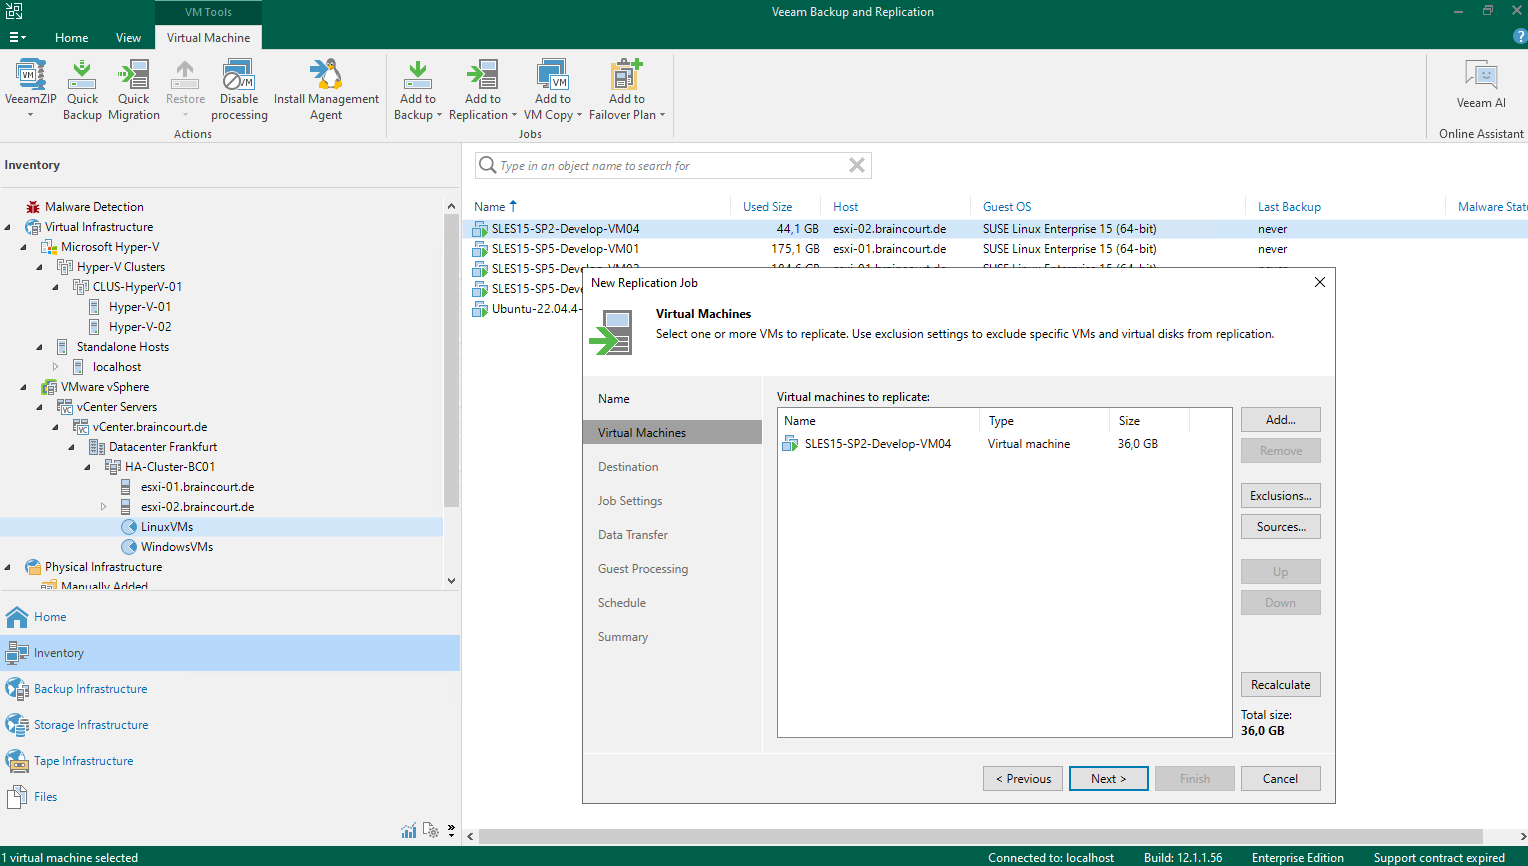
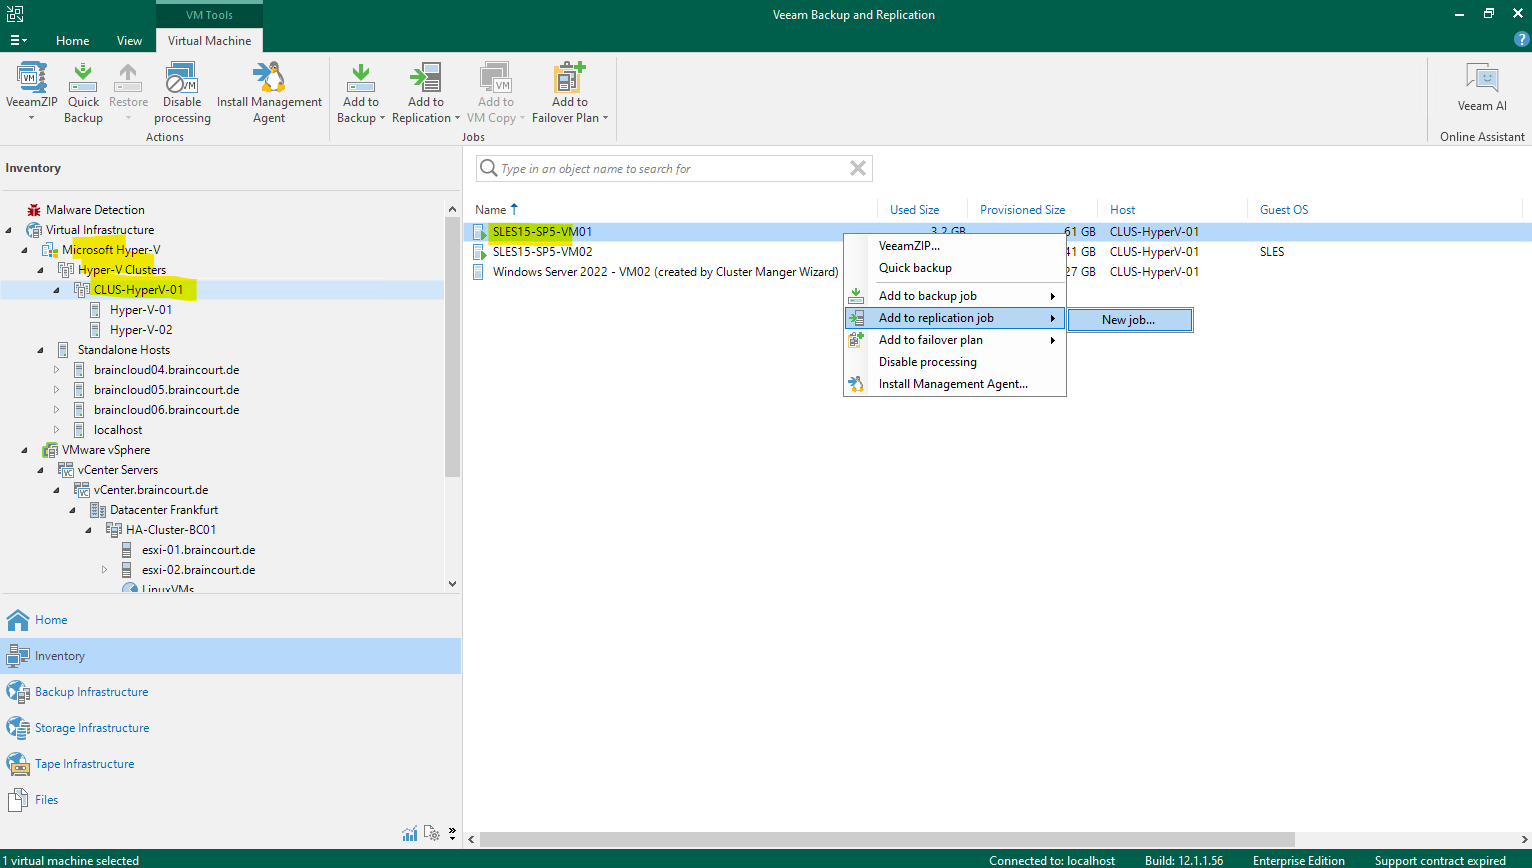
To replicate a virtual machine from one environment (Data Center) to another we can create a new replication job as shown below.
Right click on the virtual machine you want to replicate to another host or environment and select Add to replication job -> New job …
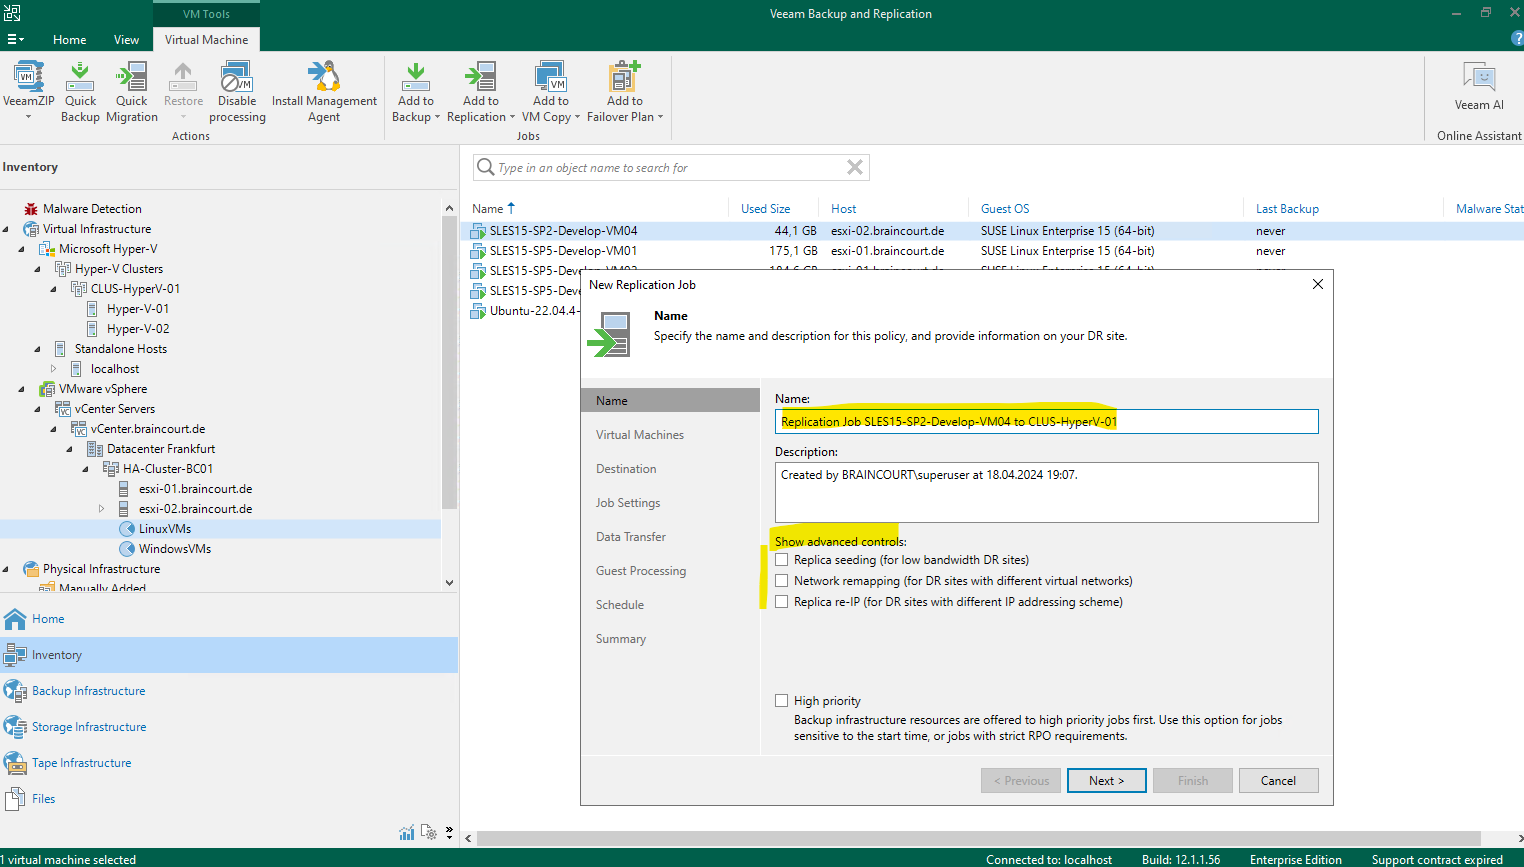
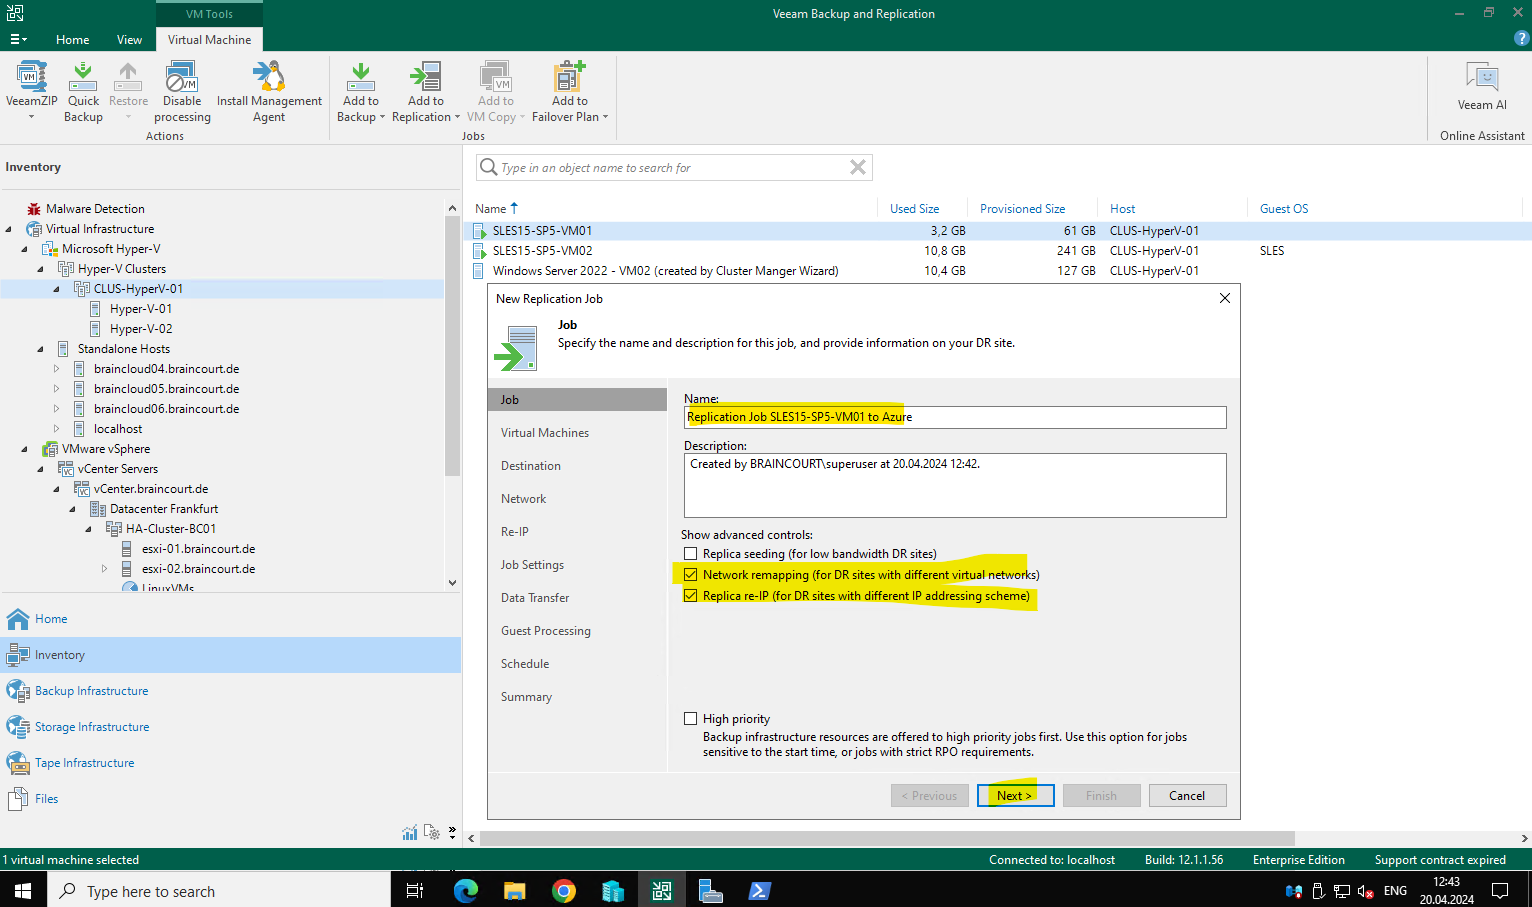
Enter a name for the new replication job and optional select the following advanced controls:
- Replica seeding (for low bandwith DR sites)
If a network between your production and disaster recovery (DR) sites has low bandwidth, and you want to reduce the amount of traffic sent during the first run of the replication job, select the Replica seeding (for low bandwidth DR sites) check box. - Network remapping (for DR sites with different virtual networks)
If your DR site networks do not match your production site networks, select the Network remapping (for DR sites with different virtual networks) check box. - Replica re-IP (for DR sites with different IP addressing scheme)
If the IP addressing scheme in your production site differs from the scheme in the DR site, select the Replica re-IP (for DR sites with different IP addressing scheme) check box.
Now I first need to create a second data center, in my case just for demonstration purpose I will use here Azure Hyper-V and nested virtualization as shown in the next section.
Azure Hyper-V Server 2022 for Nested Virtualization as DR Site for Veeam
In order to demonstrate replication of virtual machines between different data center, I will therefore use in Azure a new Hyper-V server 2022 (virtual machine) for nested virtualization which will then act as a second data center besides my on-premise lab environment.
In my following post you will see how to set up this Azure Hyper-V Server 2022 for Nested Virtualization.
Add the newly created Azure Hyper-V Nested Virtual Machine as new Hyper-V host (Managed Servers) in Veeam Backup and Replication
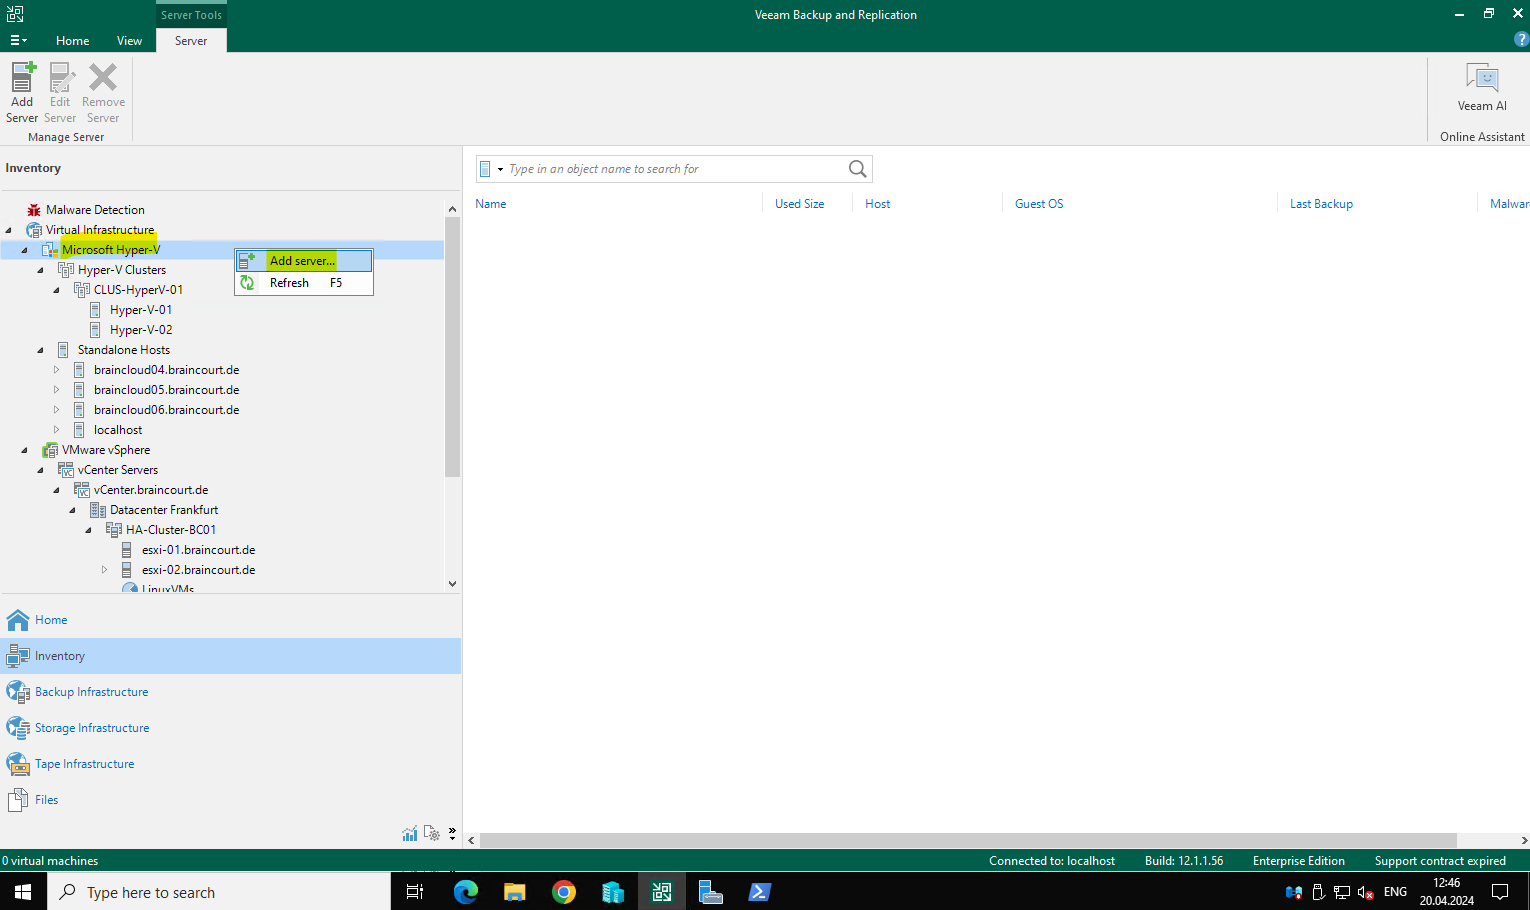
We can now add the Azure Hyper-V virtual machine as a managed server in Veeam Backup and Replication in order to replicate virtual machines from my on-premise lab environment to.
Usually you would use here a site-to-site VPN Tunnel between the on-premise network and the Azure VNet our Azure Hyper-V virtual machine is running as shown in my following post.
Just for demonstration purpose and my lab environment I will connect here from Veeam (on-premise site) to the Azure Hyper-V virtual Machine by using its public IP address and restricting access to by using a network security group and allowing access just by the public IPv4 prefix of my lab environment.
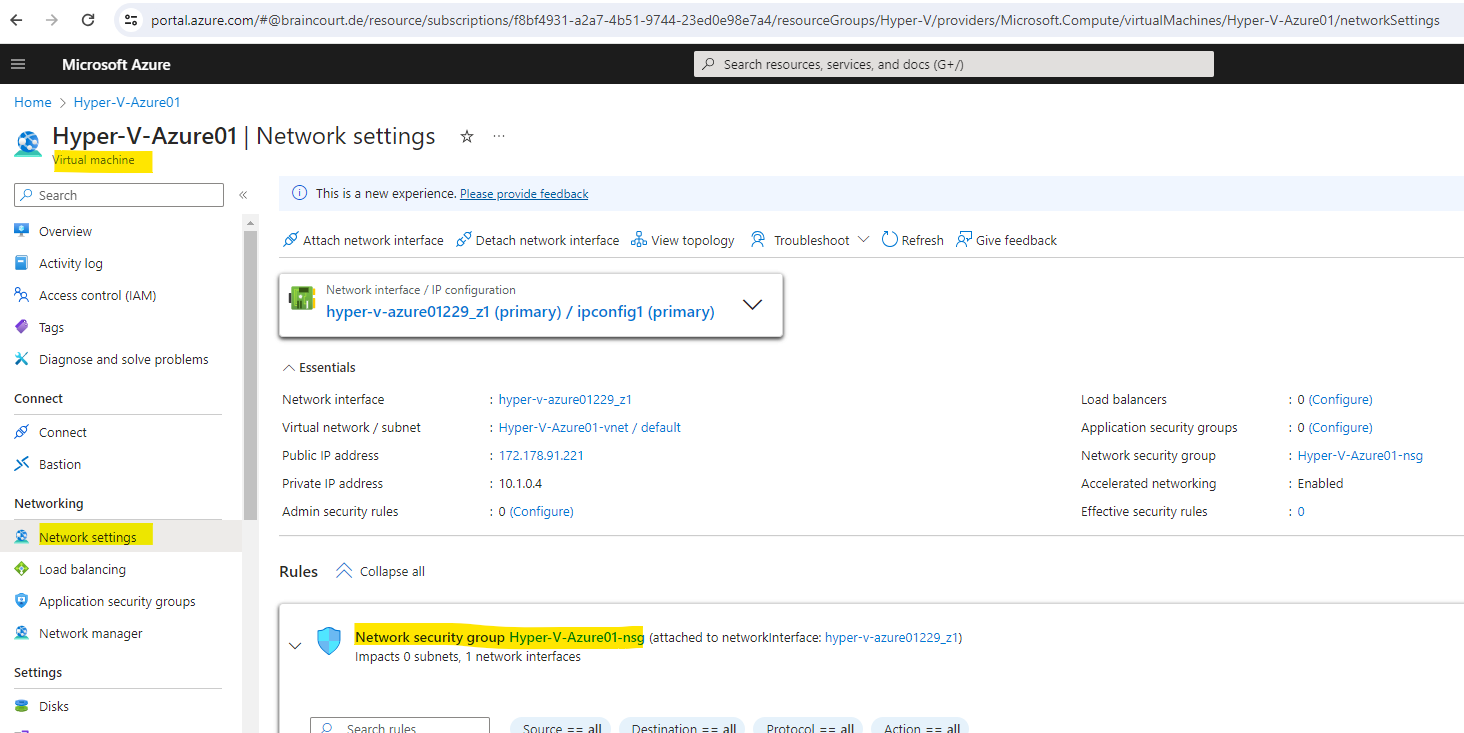
So first I need to check which public IPv4 address the Azure Hyper-V virtual machine is using as shown below.
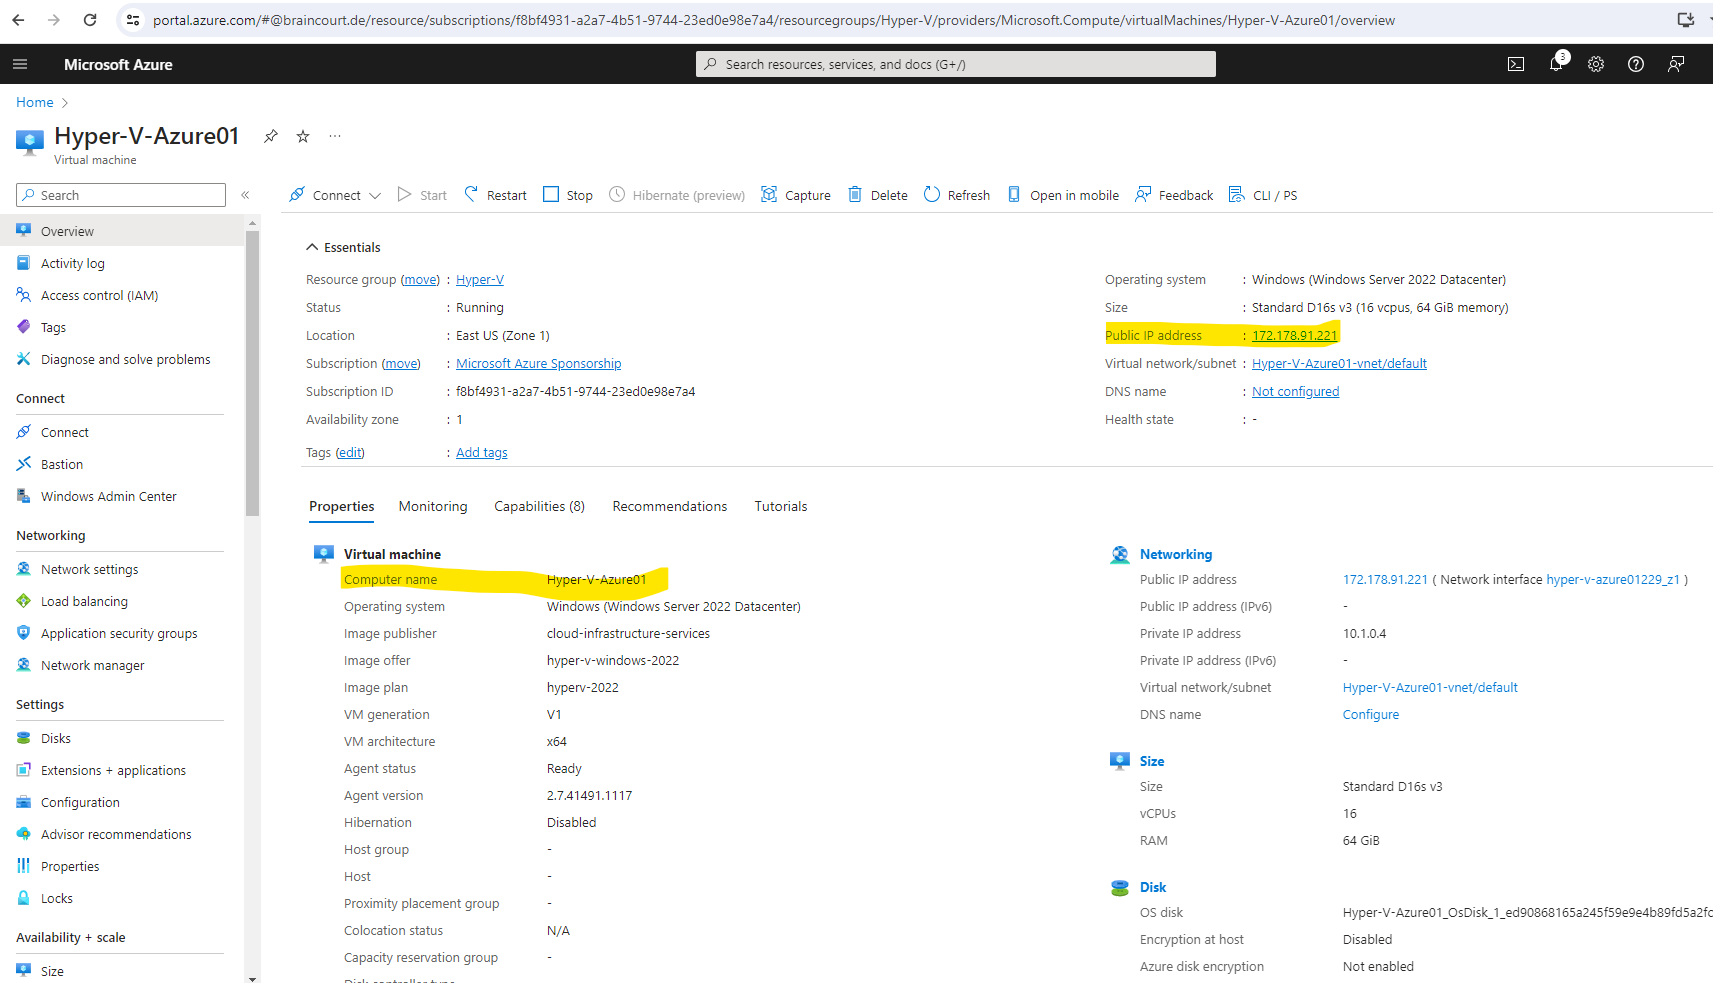
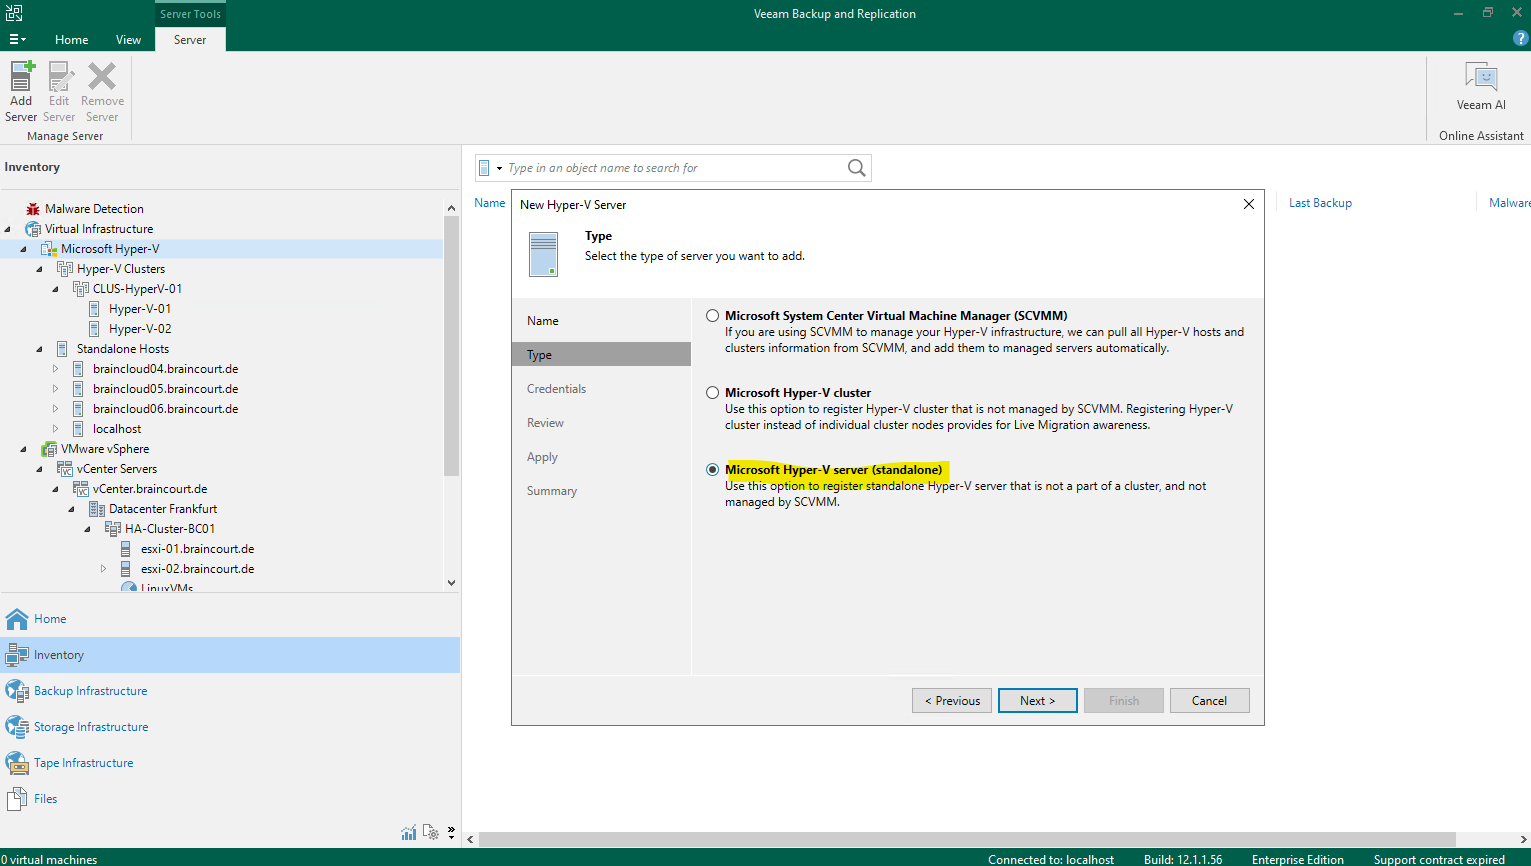
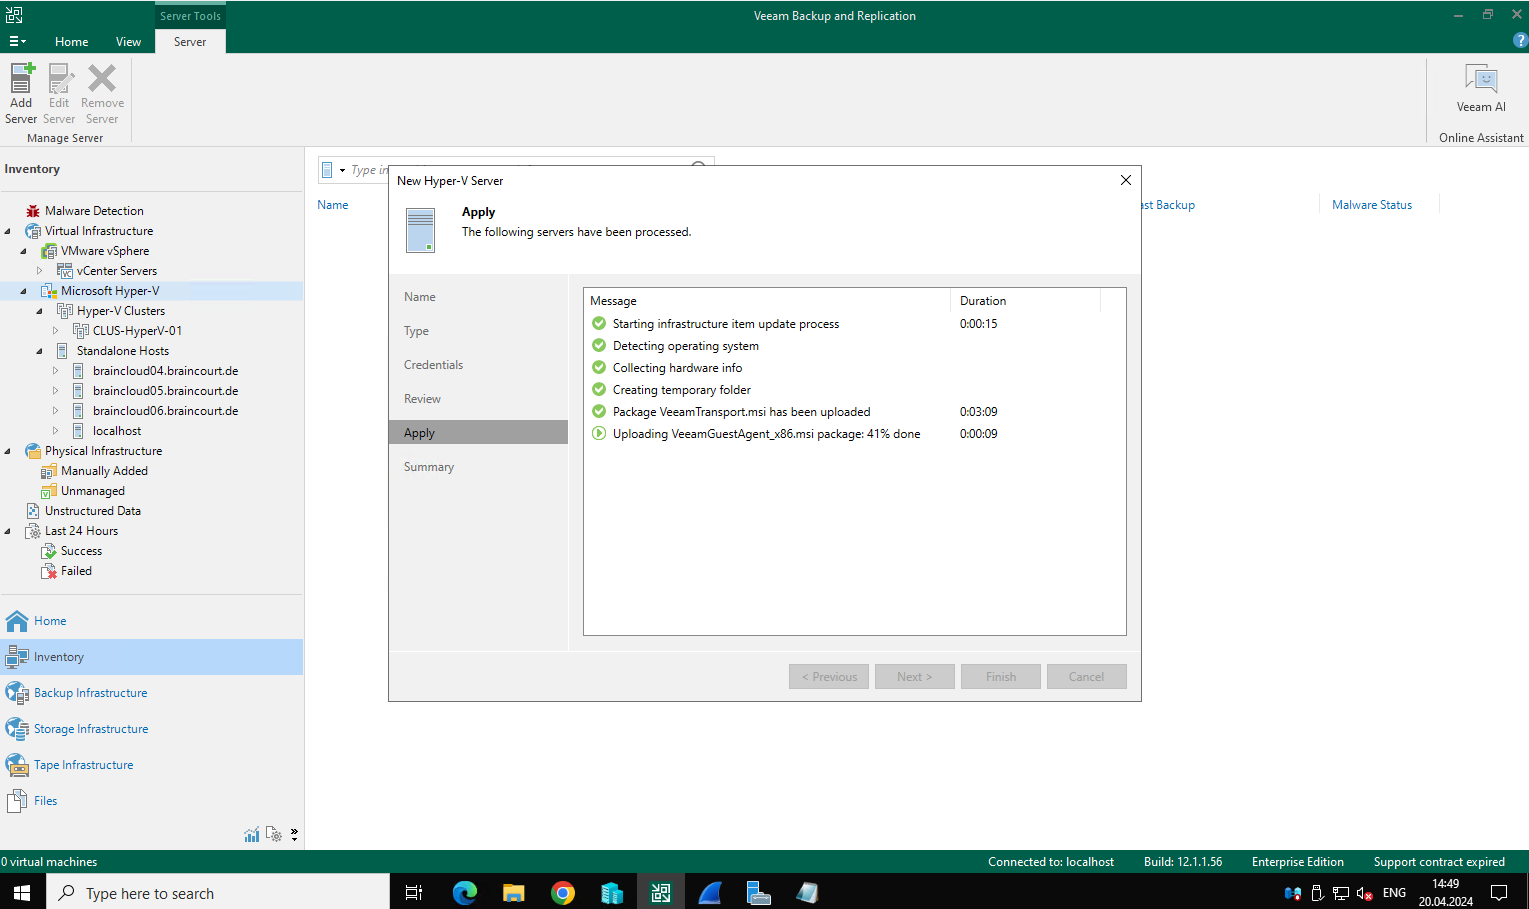
Then I can add the server as usual in Veeam Backup and Replication as managed server and shown below.
Here as mentioned just for demonstration purpose I will use the public IPv4 address of the Azure Hyper-V virtual machine.
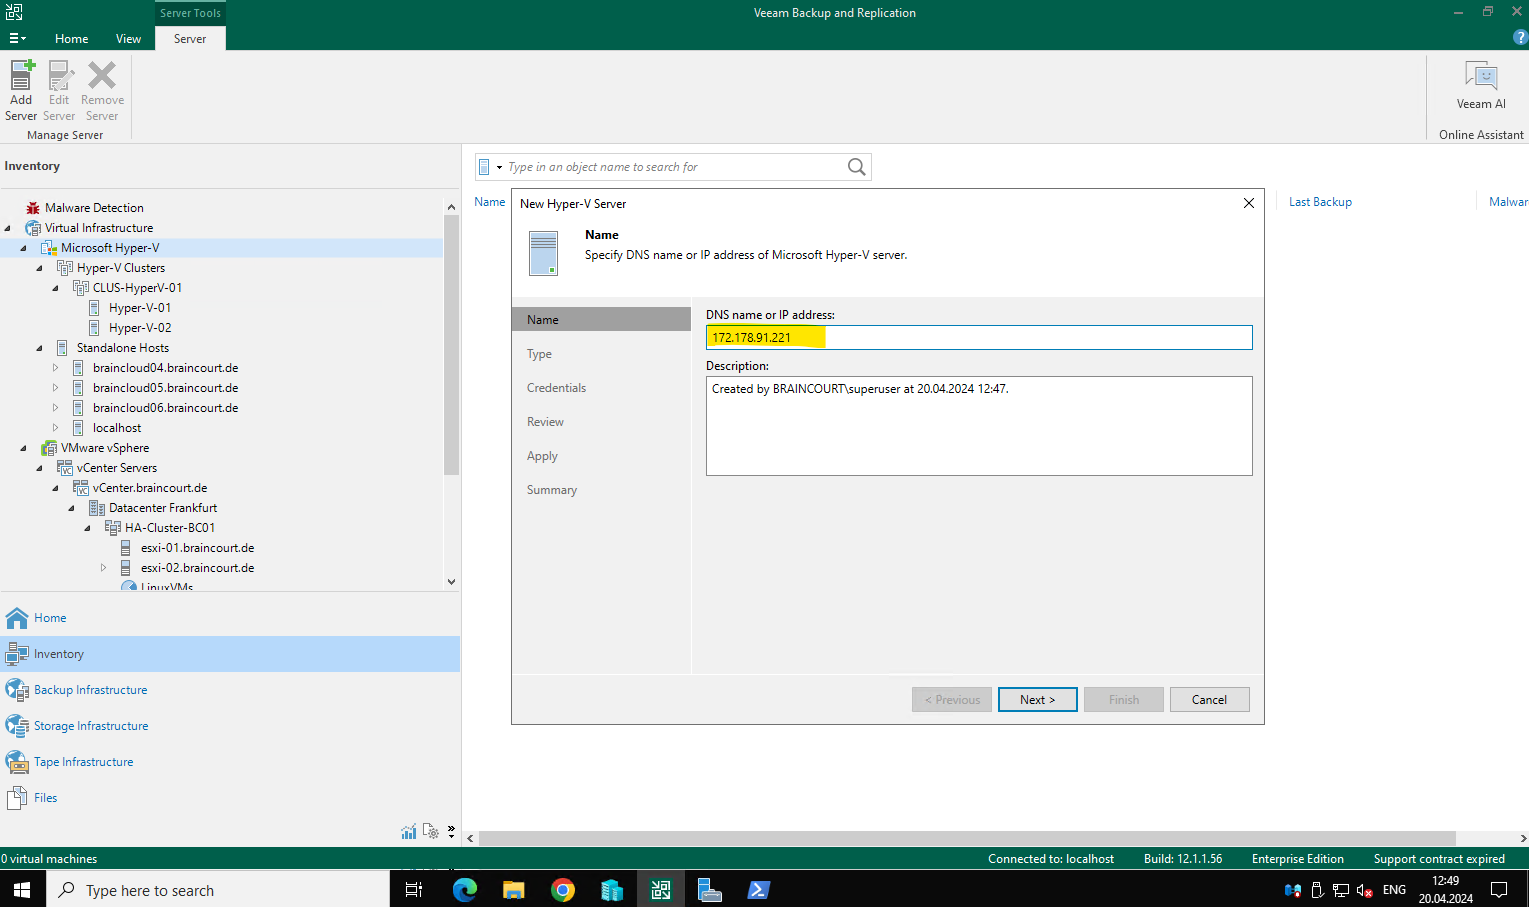
I will add the server as Microsoft Hyper-V server (standalone).
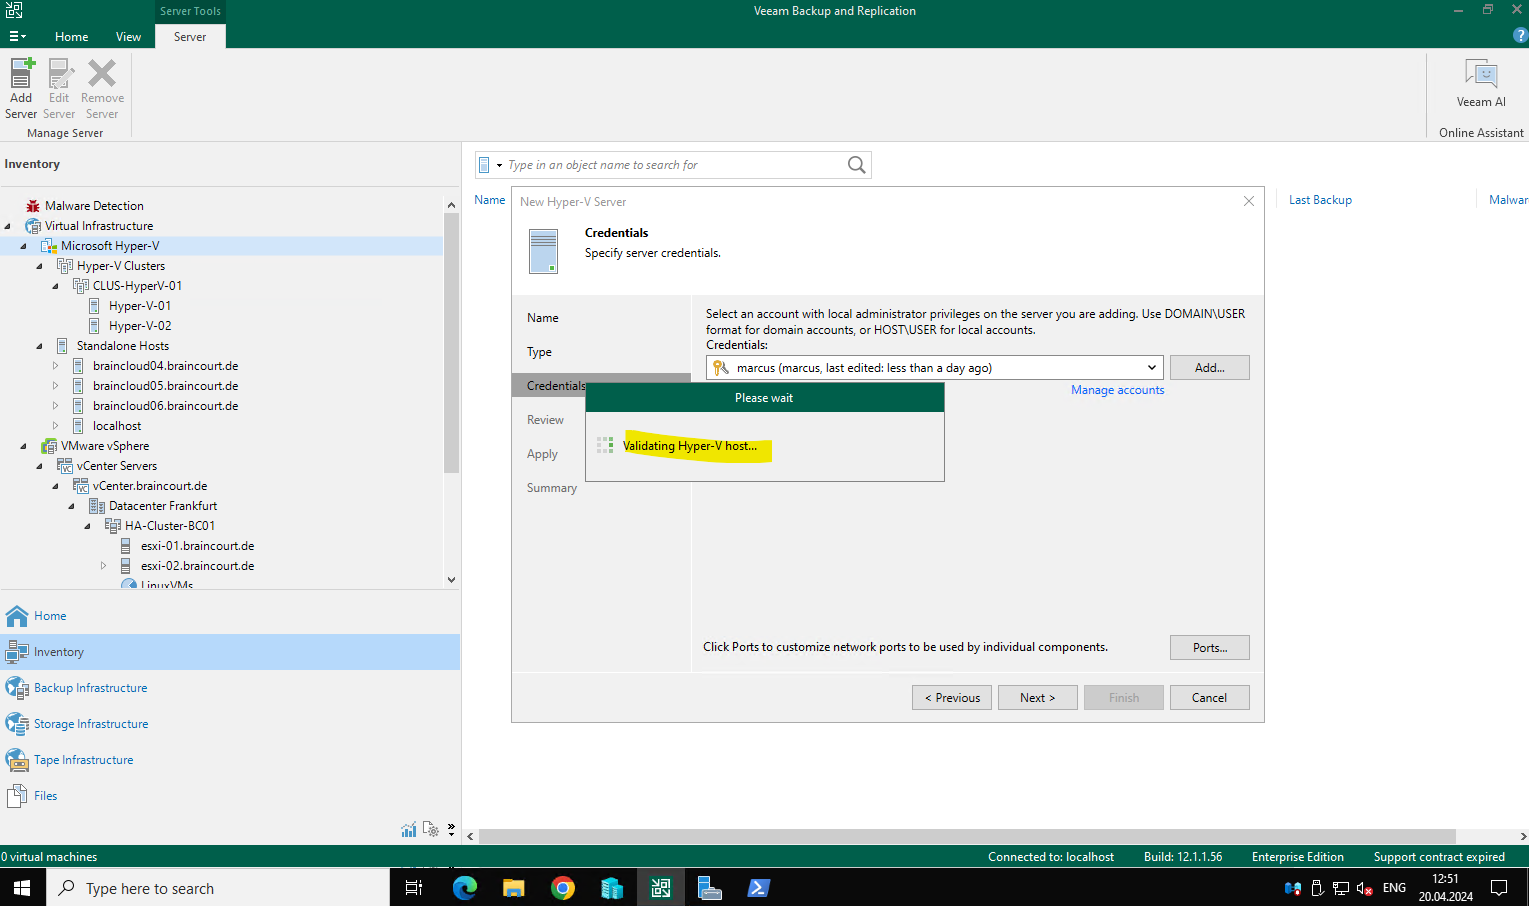
Provide local administrative privileges for the Azure Hyper-V server.

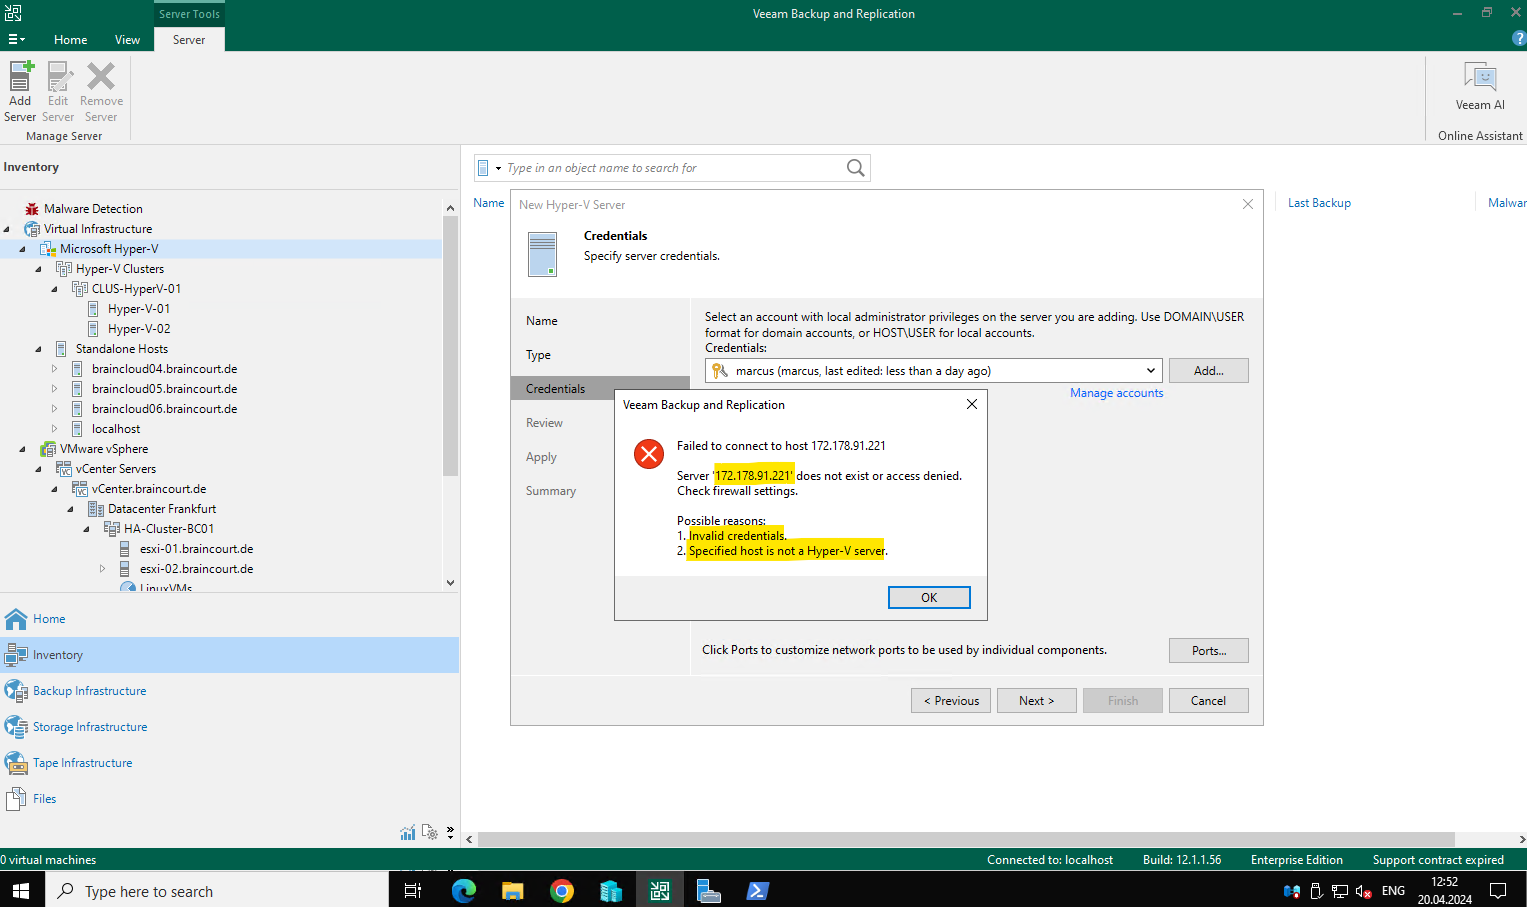
To make it short the reason for I couldn’t connect to the Azure Hyper-V virtual machine at the first try, was because we first need to open some ports resp. configure some inbound port rules on the network security group by which our Azure virtual machine is protected from unauthorized access.
Which ports you need to open you will find in the following article by Veeam. Below I was convenient and generous regarding RDP and ICMP traffic which you should restrict, but in my case, just for demonstration purpose and a short period the system will exist, this is also acceptable.
Planning and Preparation > Ports
https://helpcenter.veeam.com/docs/backup/hyperv/used_ports.html?ver=120
To allow inbound traffic and configure the rules we need to click on the network security group which is assigned to the virtual machine and available by default for virtual machines using a public IP address in Azure.
For the inbound rules I am allowing RDP and ICMP in general and the specific ports needed by Veeam Backup and Replication to access the Azure Hyper-V virtual machine I will restrict to my public prefix (/27 subnet) as shown below.
TCP Ports inbound needed by Veeam to access and add Hyper-V as managed server:
135,445,6160,6162,6163,2500-3300,49152-65535,6210

Outbound traffic from the Azure VM is allowed by default any.

More about Azure VNets and routing you will find in my following post.
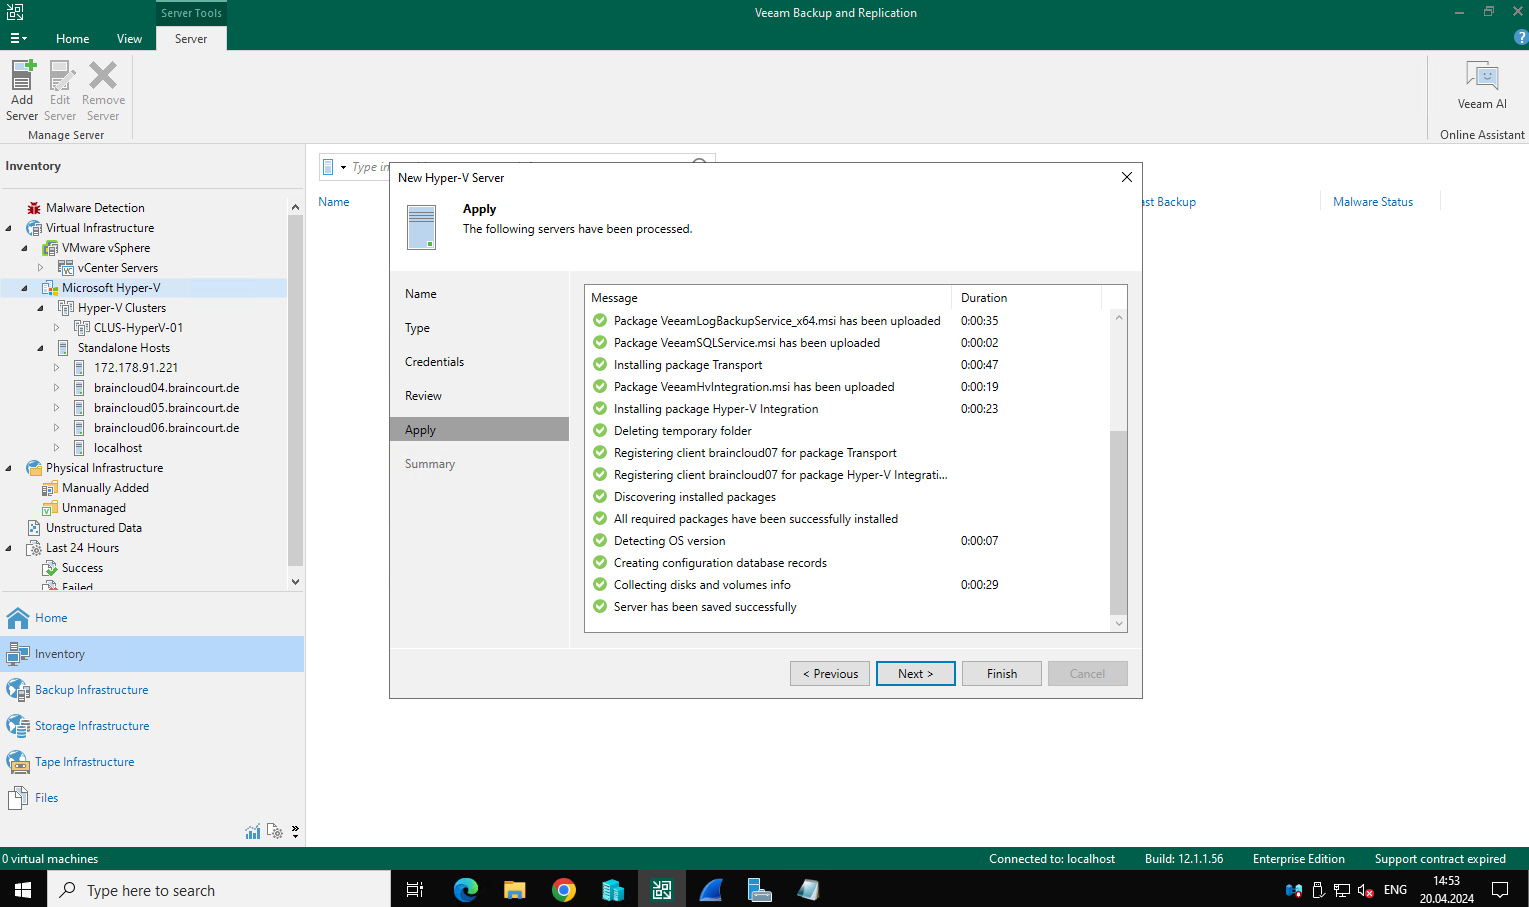
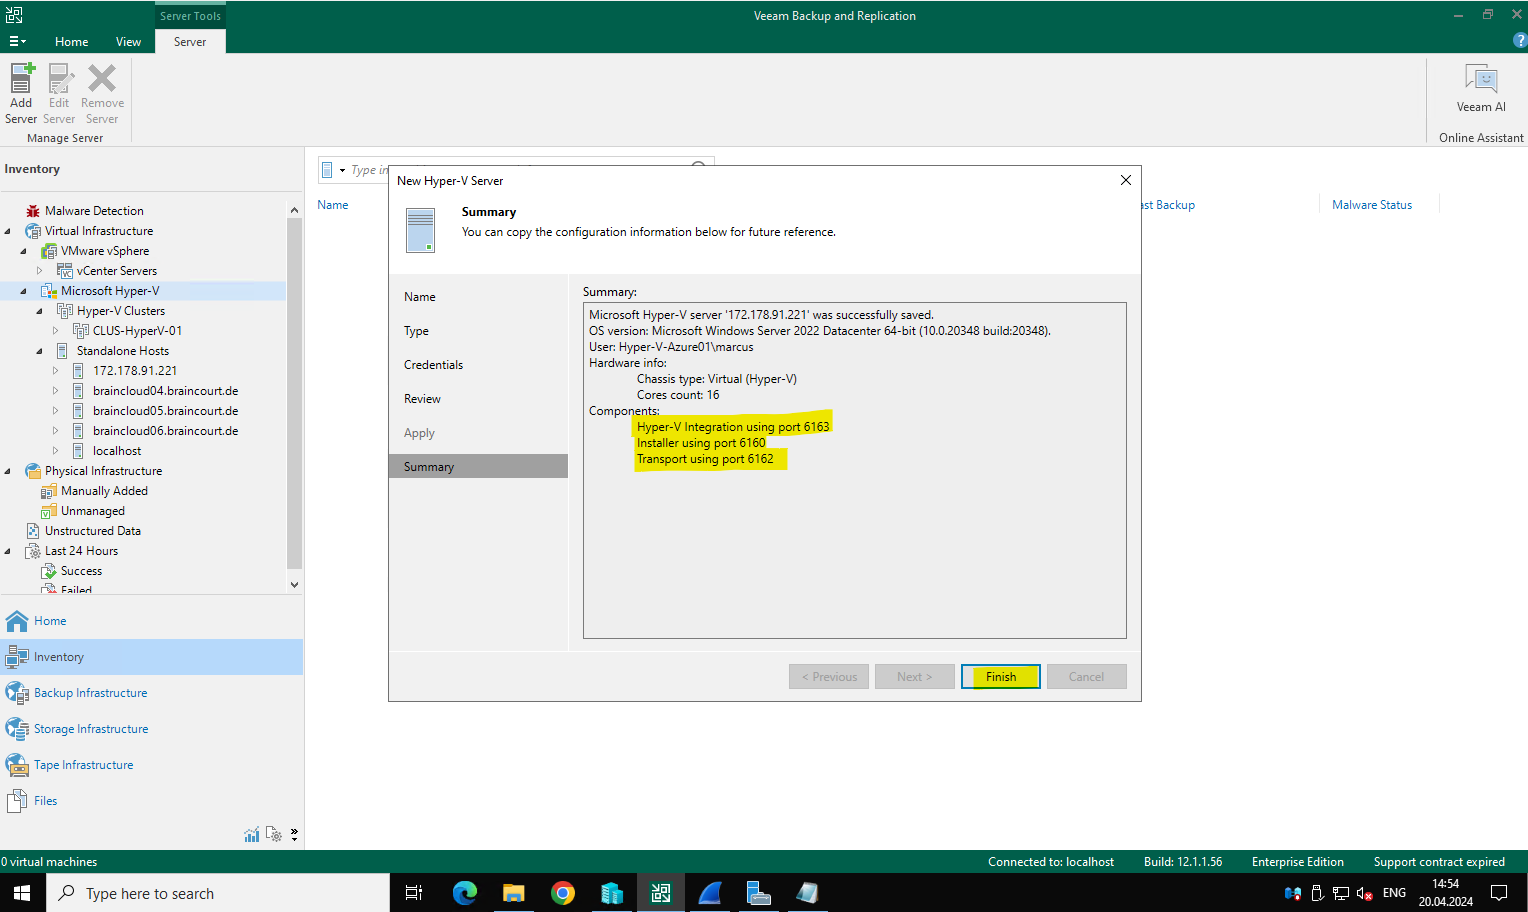
After opening the ports inbound to my Azure virtual machine, I was finally able to add the Azure Hyper-V nested virtual machine as a new Hyper-V host to Veeam Backup & Replication.
Hyper-V Integration is using TCP Port 6163
Installer is using TCP Port 6160
Transport is using TCP Port 6162
Later I also wanted to replicate virtual machines from my Azure Hyper-V nested virtualization VM to my on-premise Hyper-V cluster. Therefore I then needed to setup a site-to-site IPSec VPN tunnel between Azure (VNet the VM is running) and my on-premise lab environment as shown in the following post.
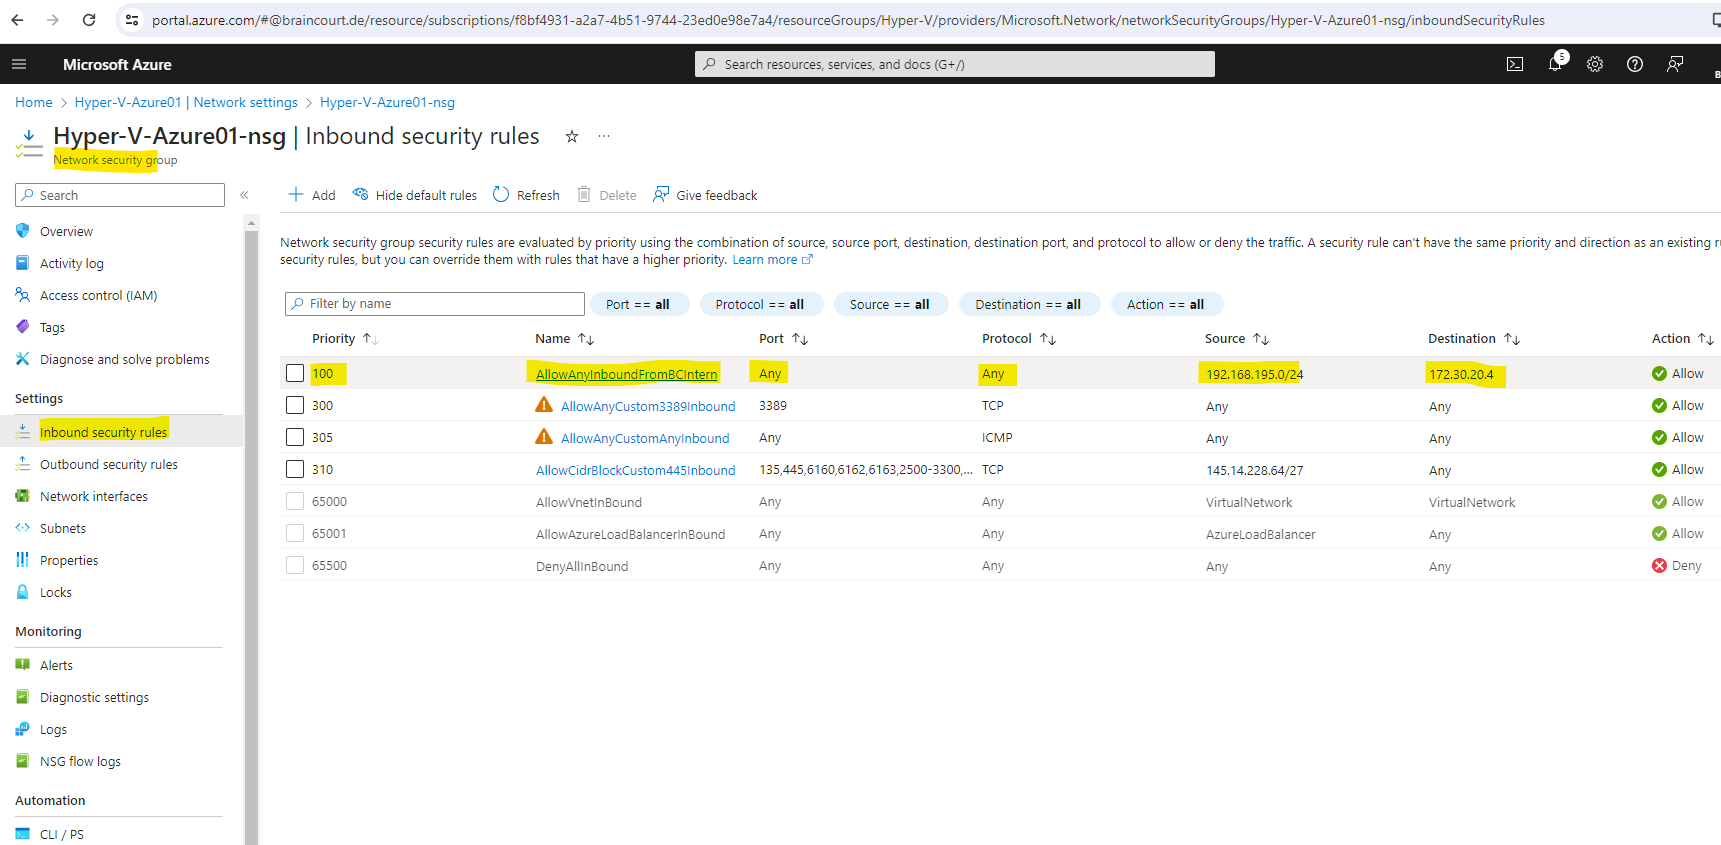
What I also needed to change resp. add, was a new inbound security rule for the network security group (NSG) in Azure. Because I also added during the creation of the Azure VM a public IP address, by default a NSG is added to the NIC on which the private and public IP address is configured.
So also the private IP Address is secured inbound by default and this NSG and I first have to allow inbound traffic from my on-premise lab network. For my internal on-premise lab network I will allow any inbound traffic to my Azure Hyper-V virtual machine as shown below.
Replicate Hyper-V on-premise Virtual Machines to Azure Hyper-V Nested Virtualization
So now I will create a new replication job in order to replicate a virtual machine from my on-premise lab environment to my Azure lab environment and to be exact to the previously created Azure Hyper-V virtual machine.
The Re-IP option is just working if the source virtual machine have a static IP address! Also as of today it is just supported for Windows VMs.
Below I will show nevertheless the steps how to configure it even that in my case it will not working for the Linux virtual machine.
Below I will select my Azure Hyper-V nested virtual machine as destination Hyper-V server.
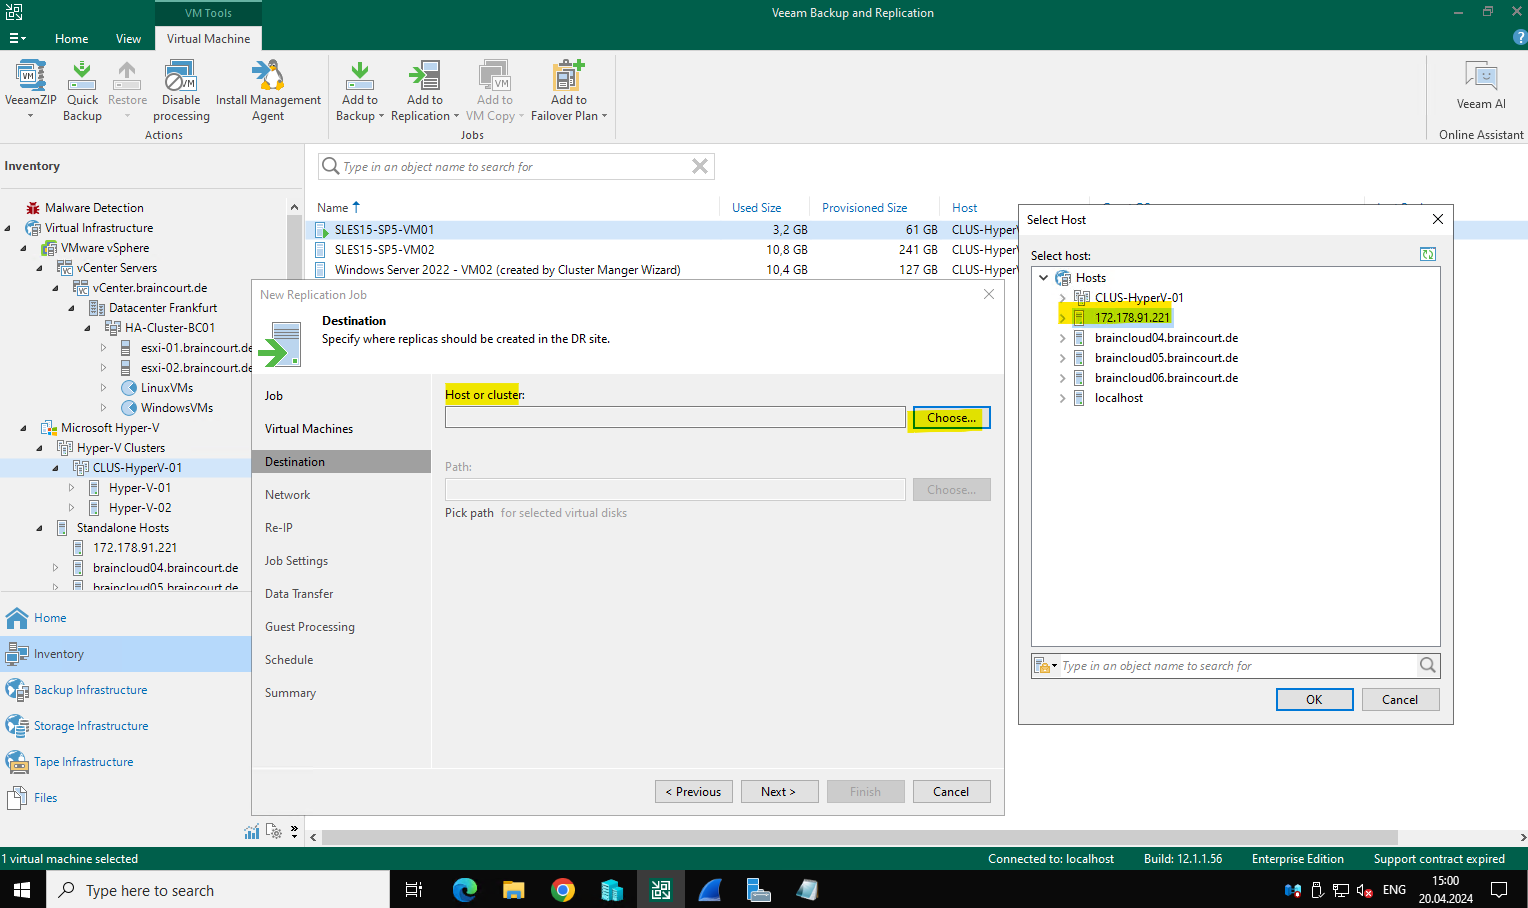
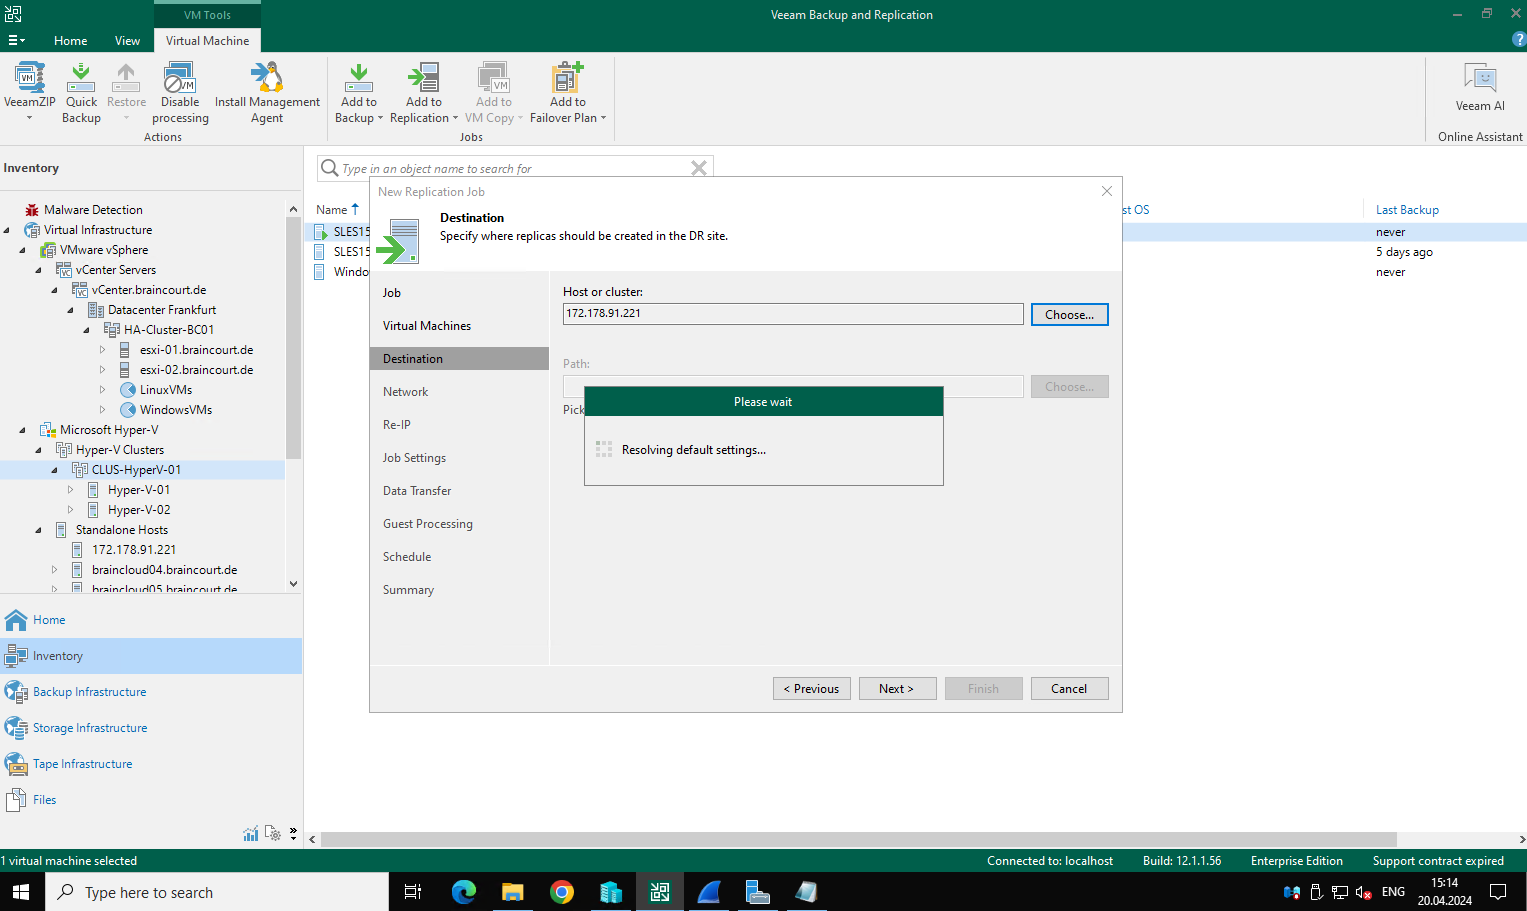
Next we need to specify a destination where the replicated virtual machines should be stored on.
In Veeam terminology the remote site is called DR site (Data recovery site).
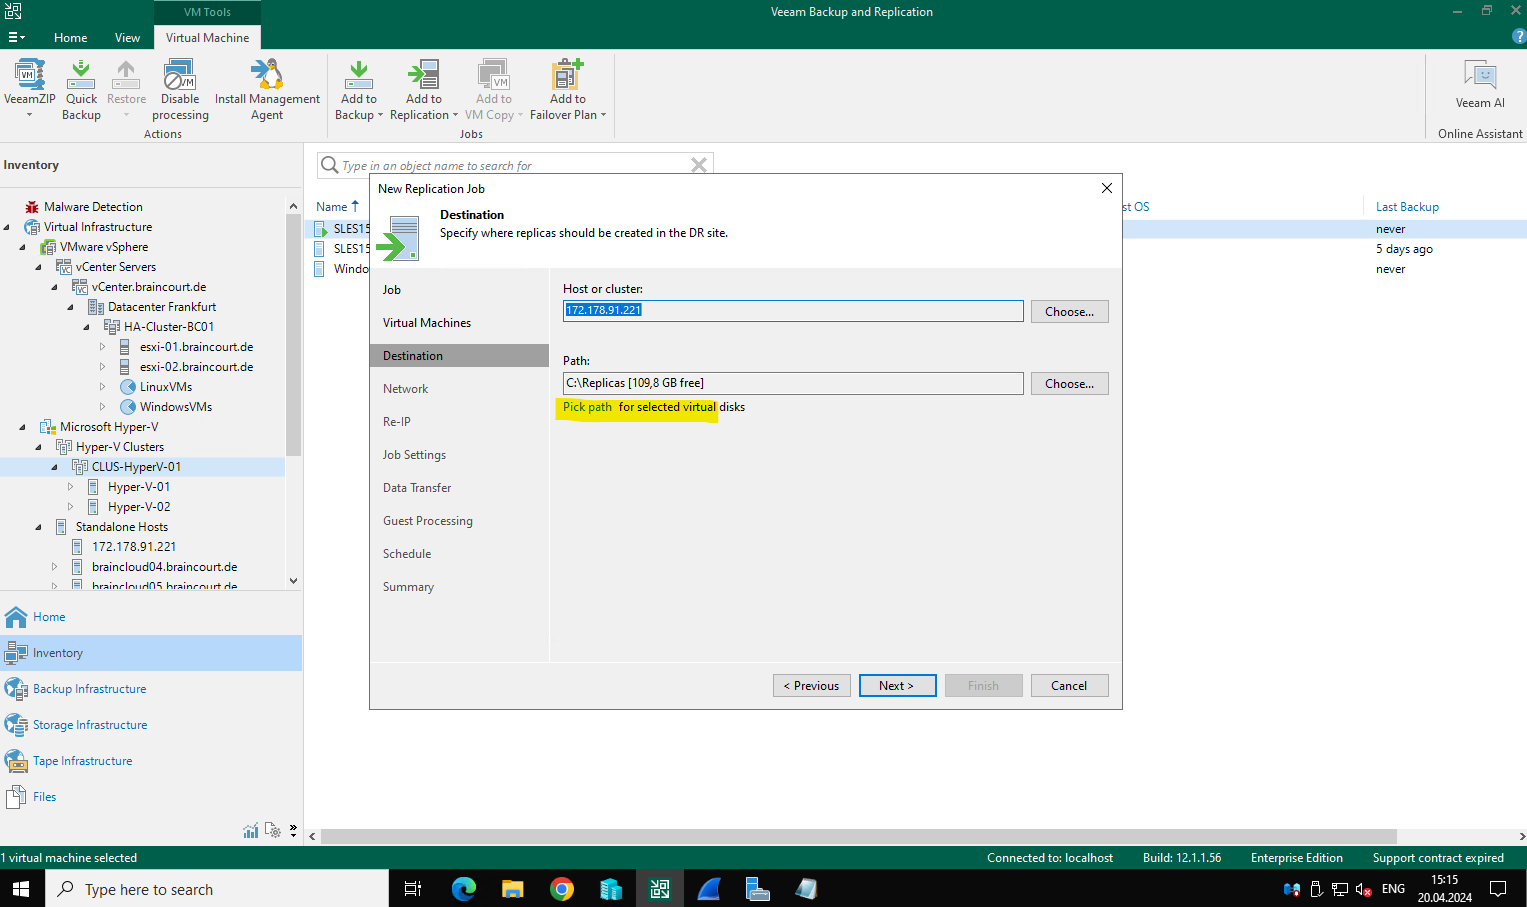
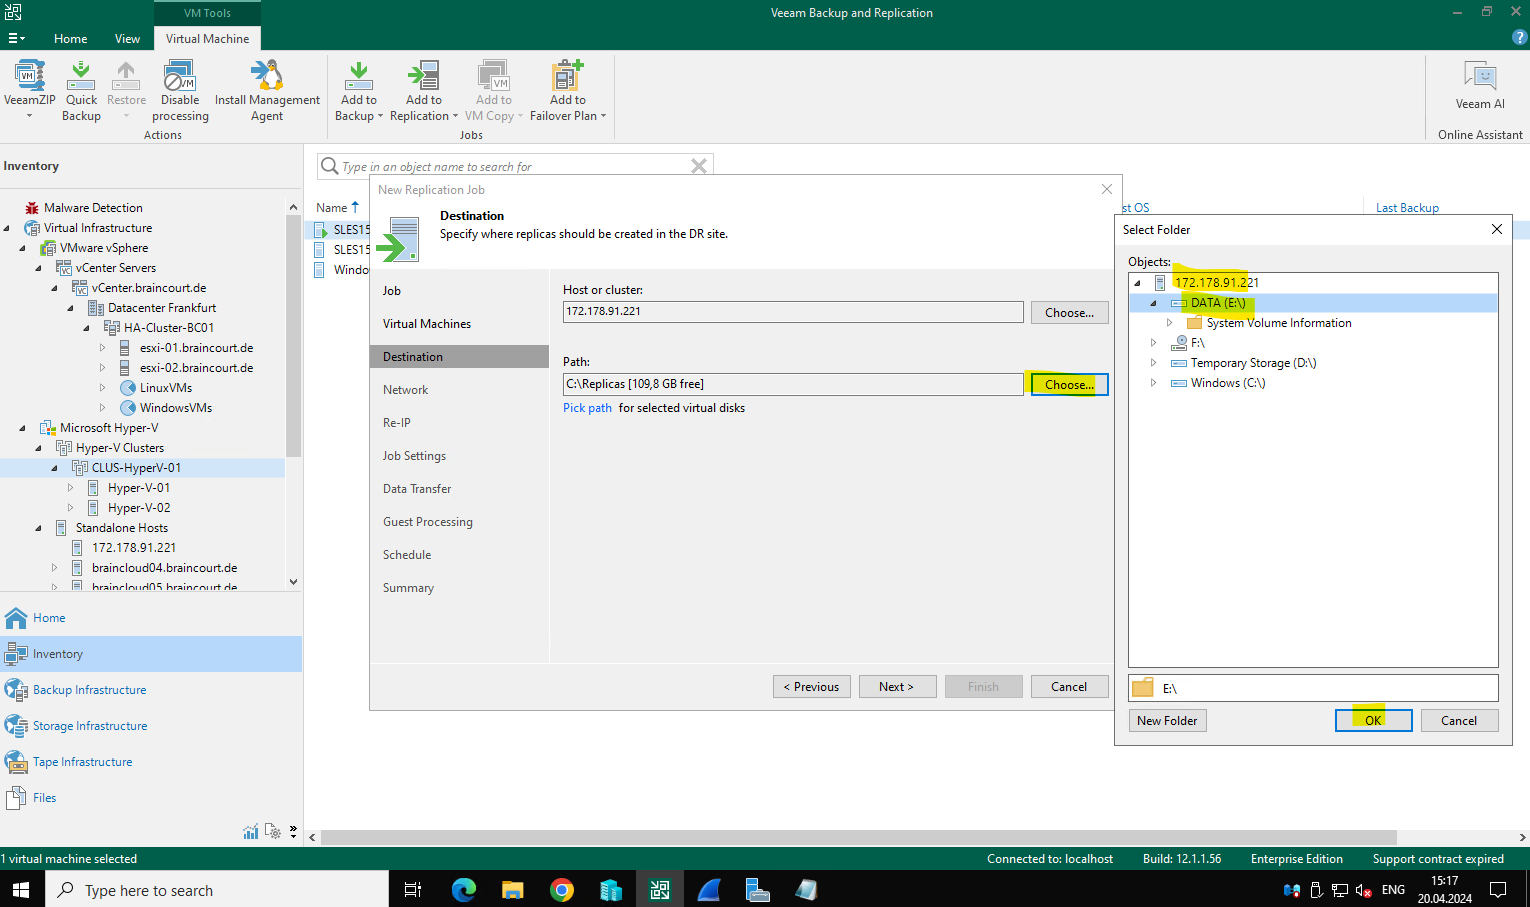
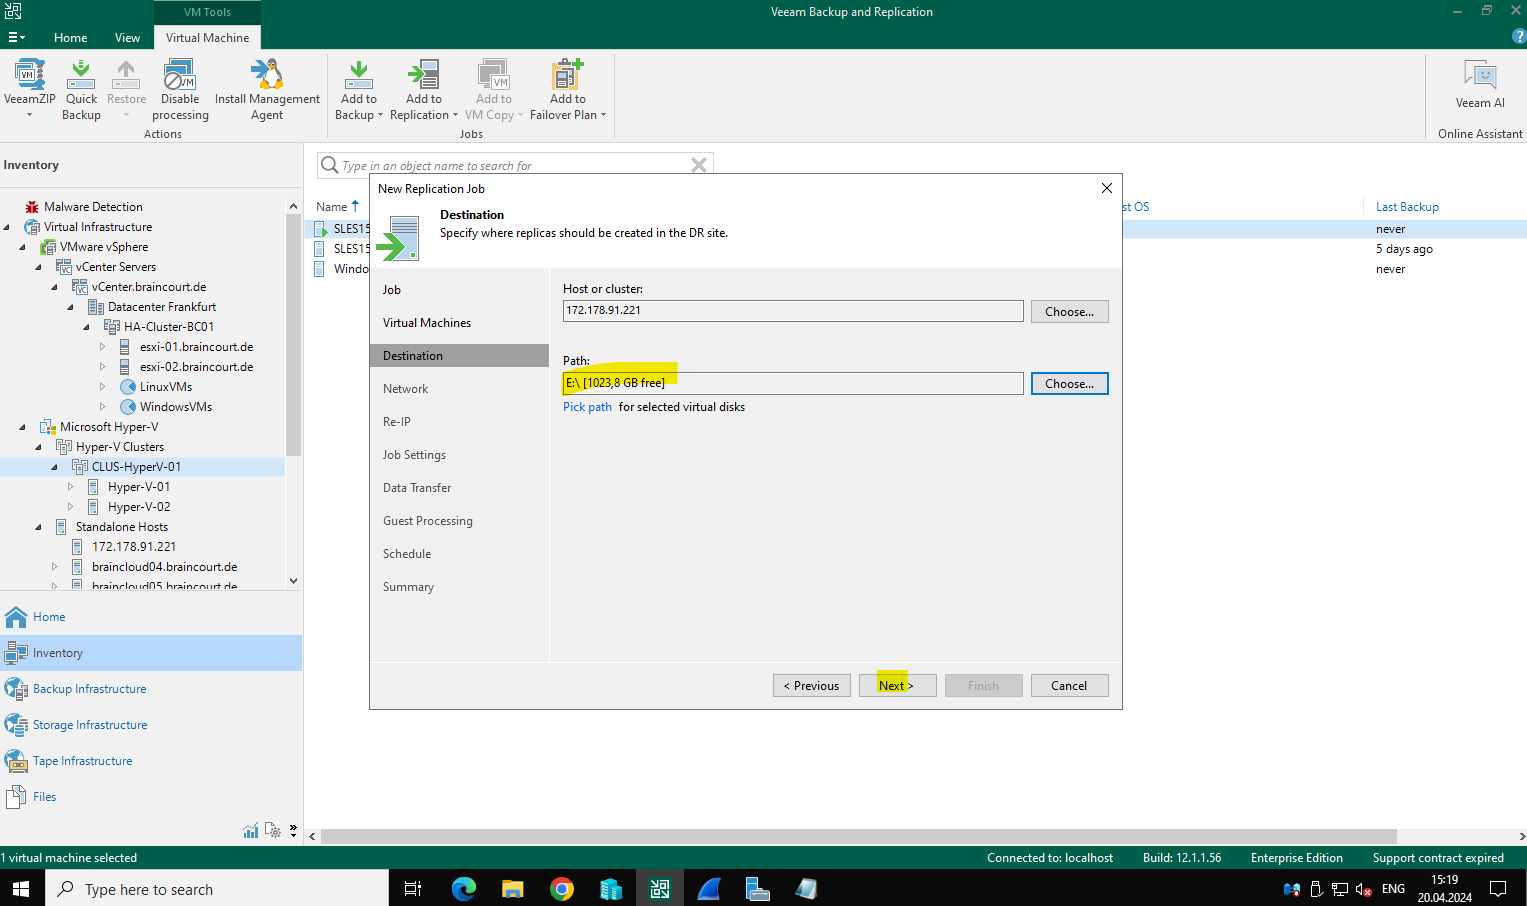
For the replicas (virtual machines) I will choose here the dedicated 1 TB SSD disk we previously added as new volume for the Azure Hyper-V VM.
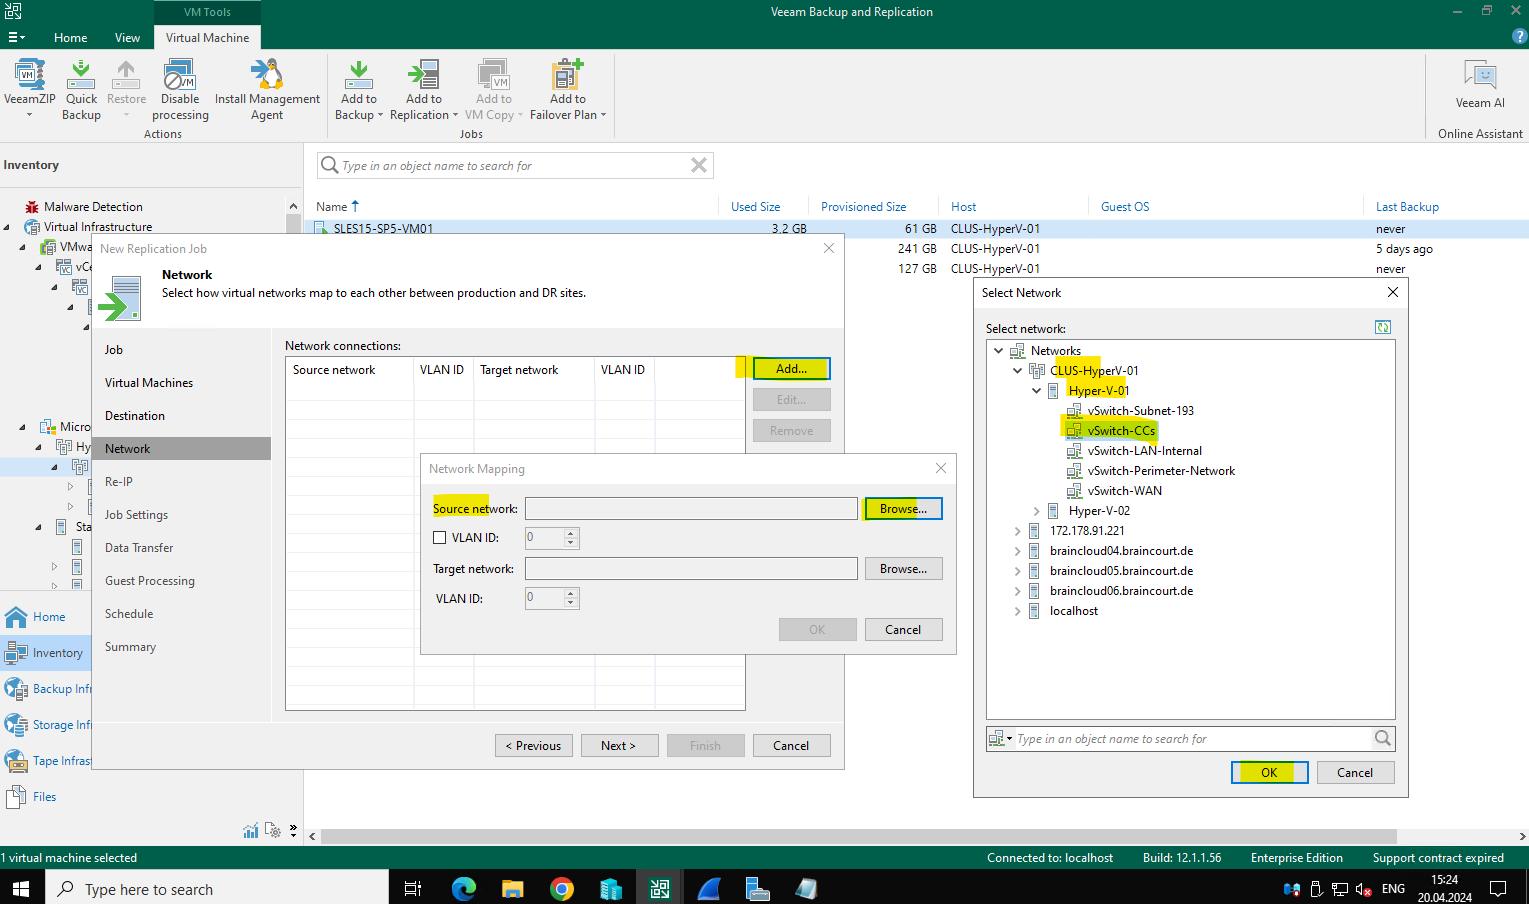
Because we previously checked the network mapping option, we can now map the source network from our on-premise network to the new virtual switch and network on the Azure Hyper-V VM.
I will first select the source network for the network mapping.
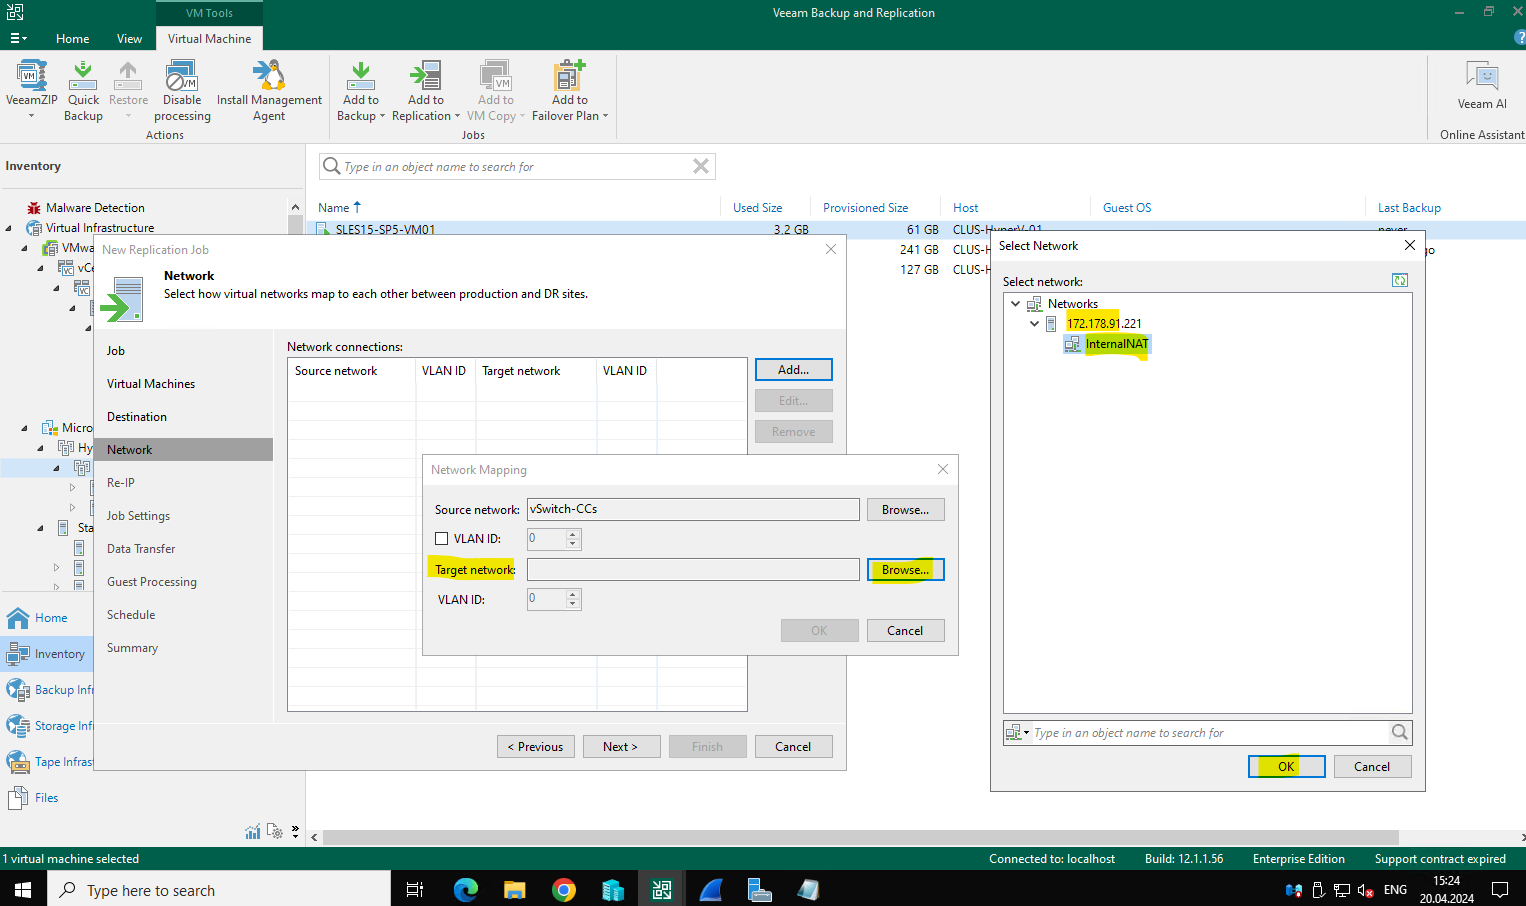
Secondly I will select the destination network for the network mapping.

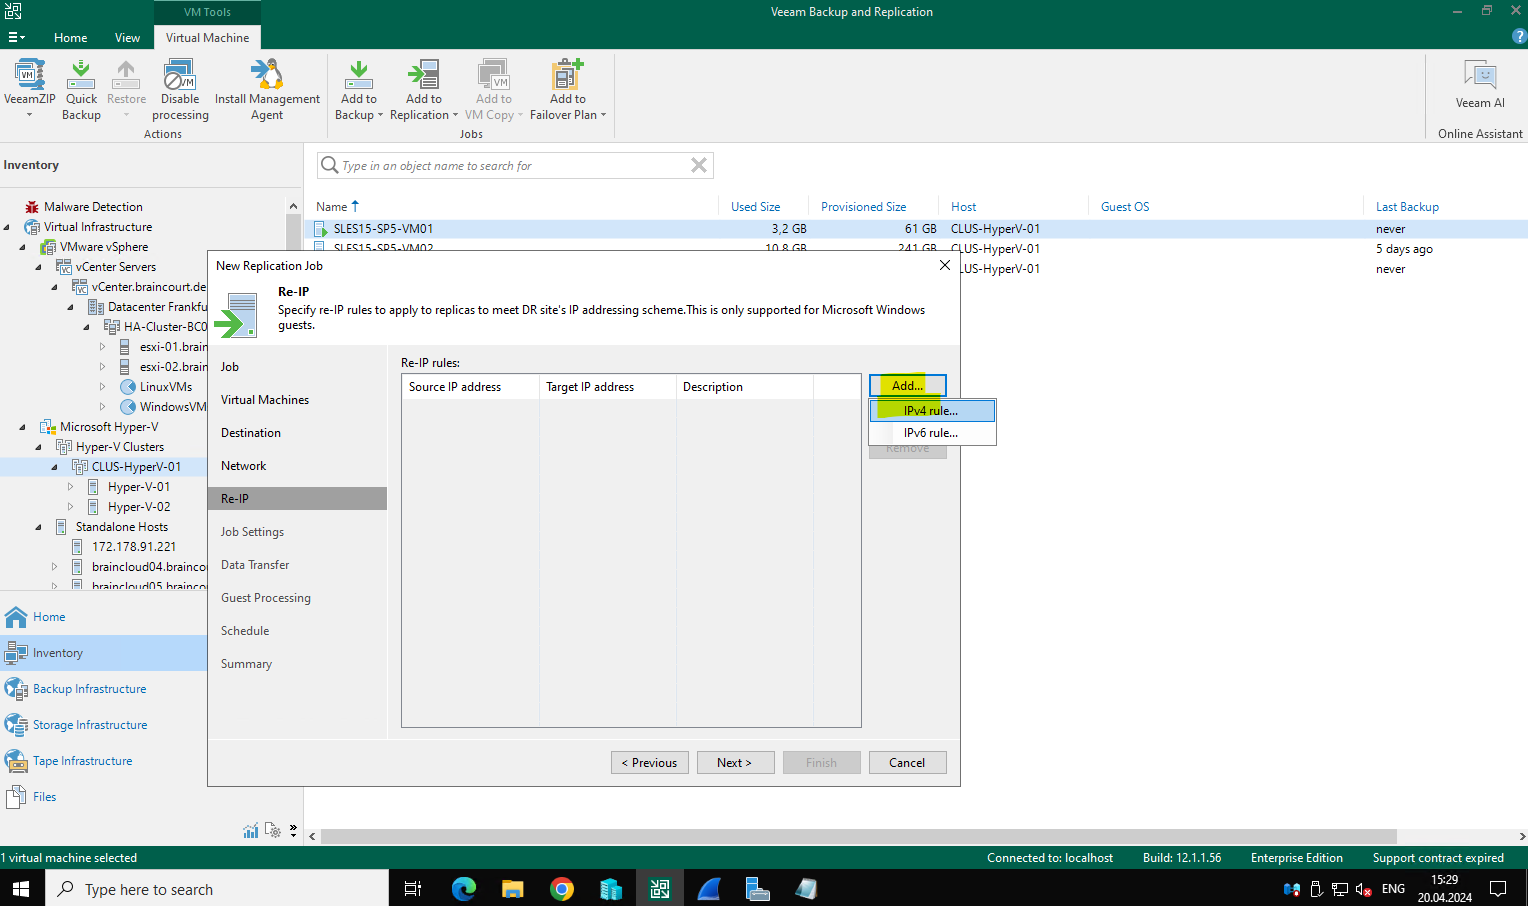
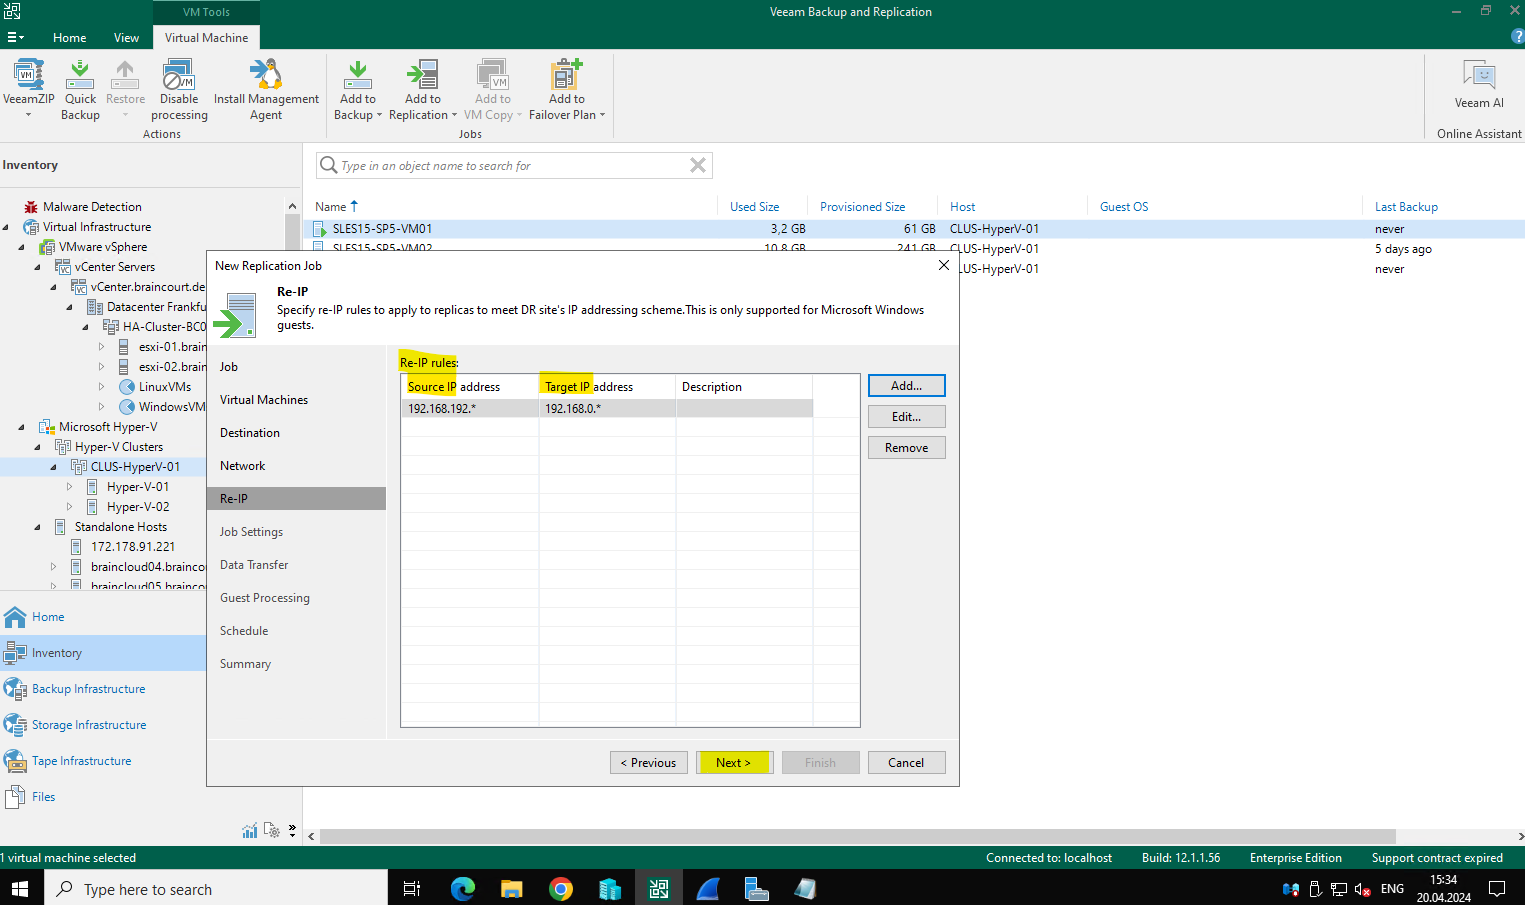
And because we also checked to the beginning the option Re-IP we can now specify re-IP rules for the replicas on the Azure Hyper-V VM.
As already mentioned, the Re-IP option is just working if the source virtual machine is using a static IP address! Also as of today it is just supported for Windows VMs. Below I will nevertheless show the steps how to configure it but will finally not work for my Linux virtual machine.
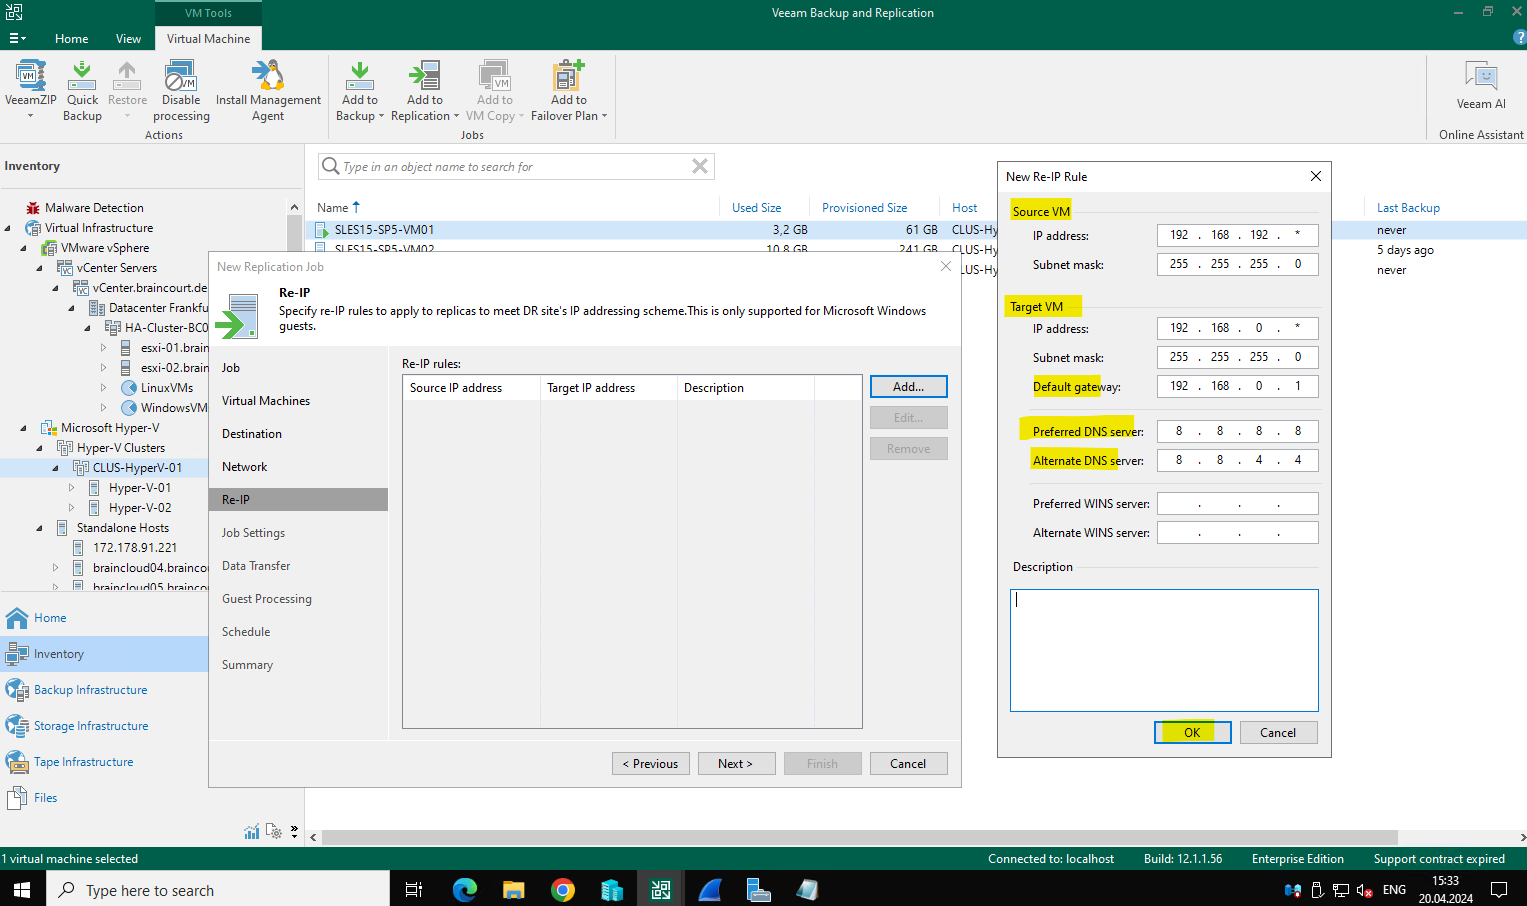
Instead of a wildcard below we have to enter the complete source IP address and the new target IP address. As mentioned the Re-IP option is just supported for static IP addresses and just for Windows VMs.
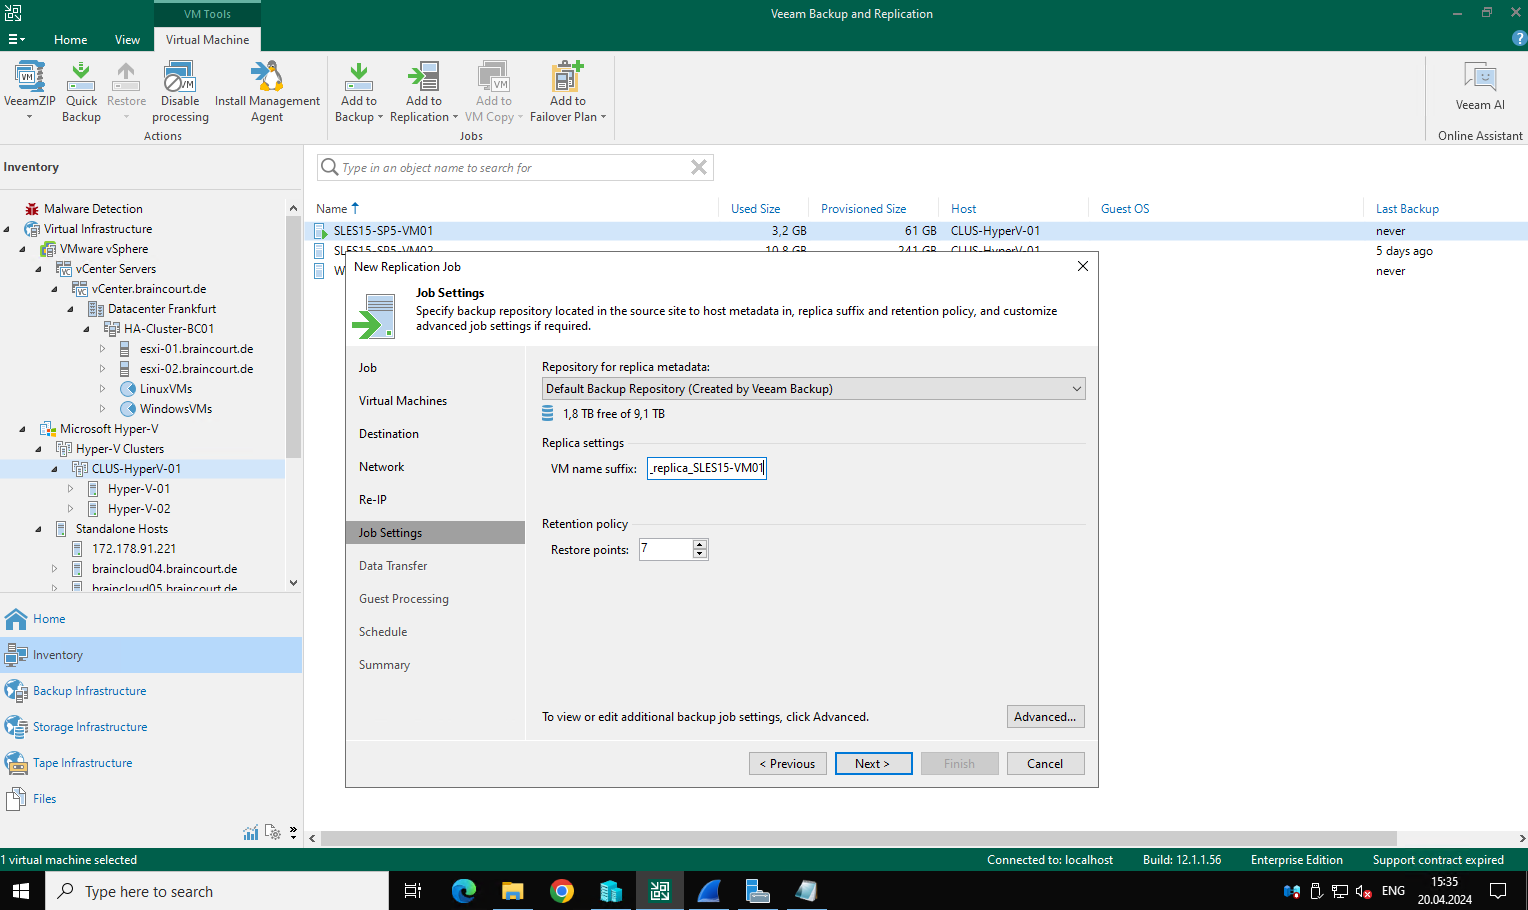
We can also set restore points for a replication job.
By default, Veeam Backup & Replication uses 7 restore points for a replication job.
The retention policy defines how many restore points you want to retain on disk and thus how far you can roll back. After the allowed number of restore points is exceeded, Veeam Backup & Replication applies the retention policy — so it removes the earliest restore point from the backup chain.
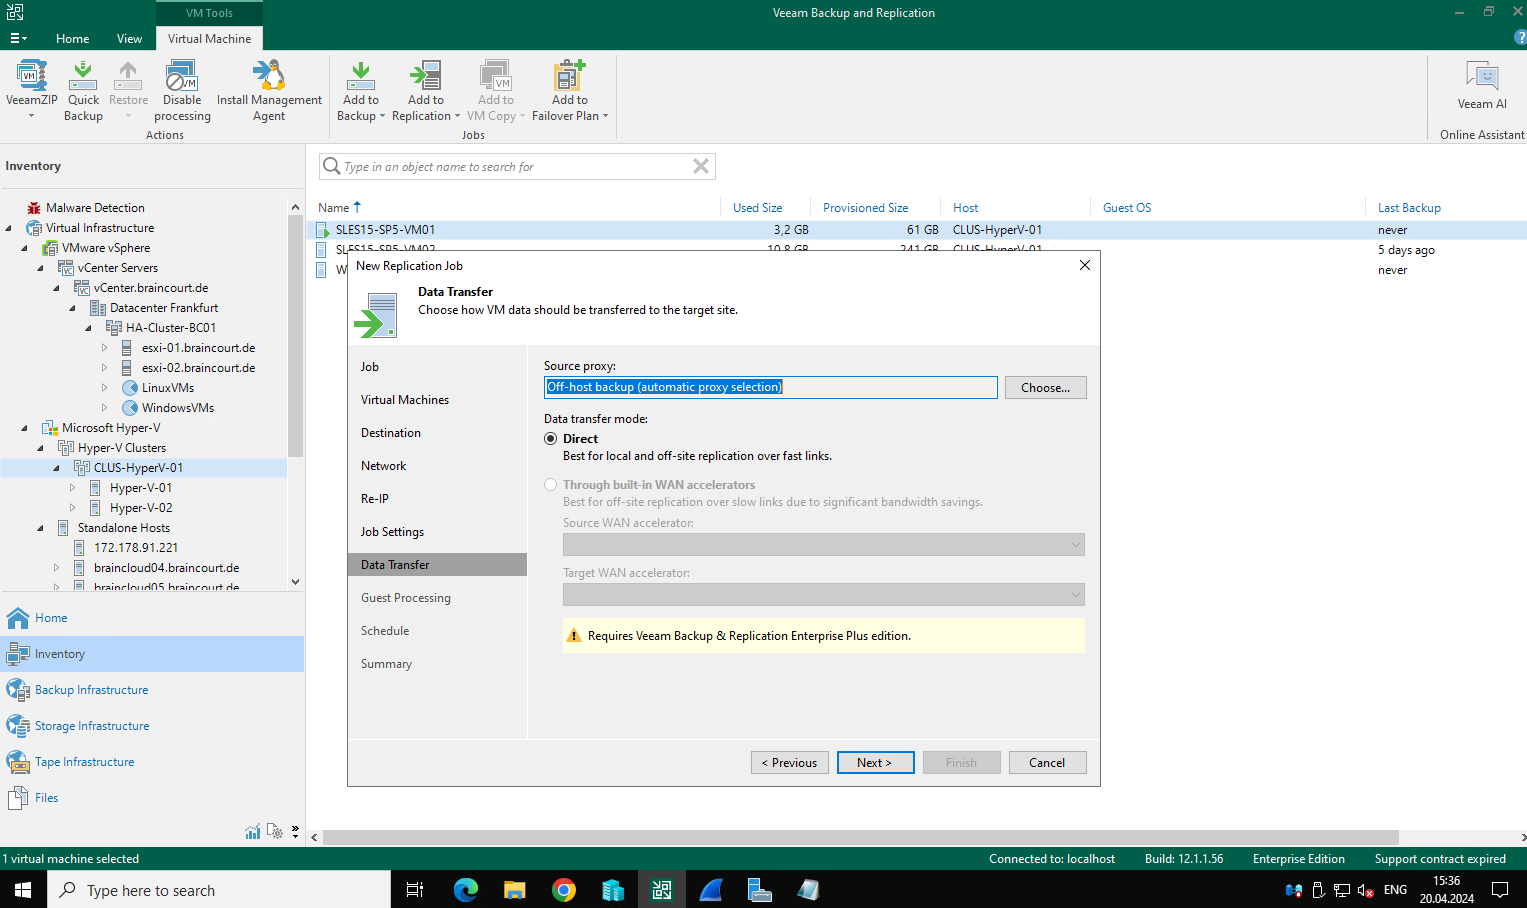
Below we can set the backup proxies and data transfer mode, more about further down.
Finally apply the new replication job.
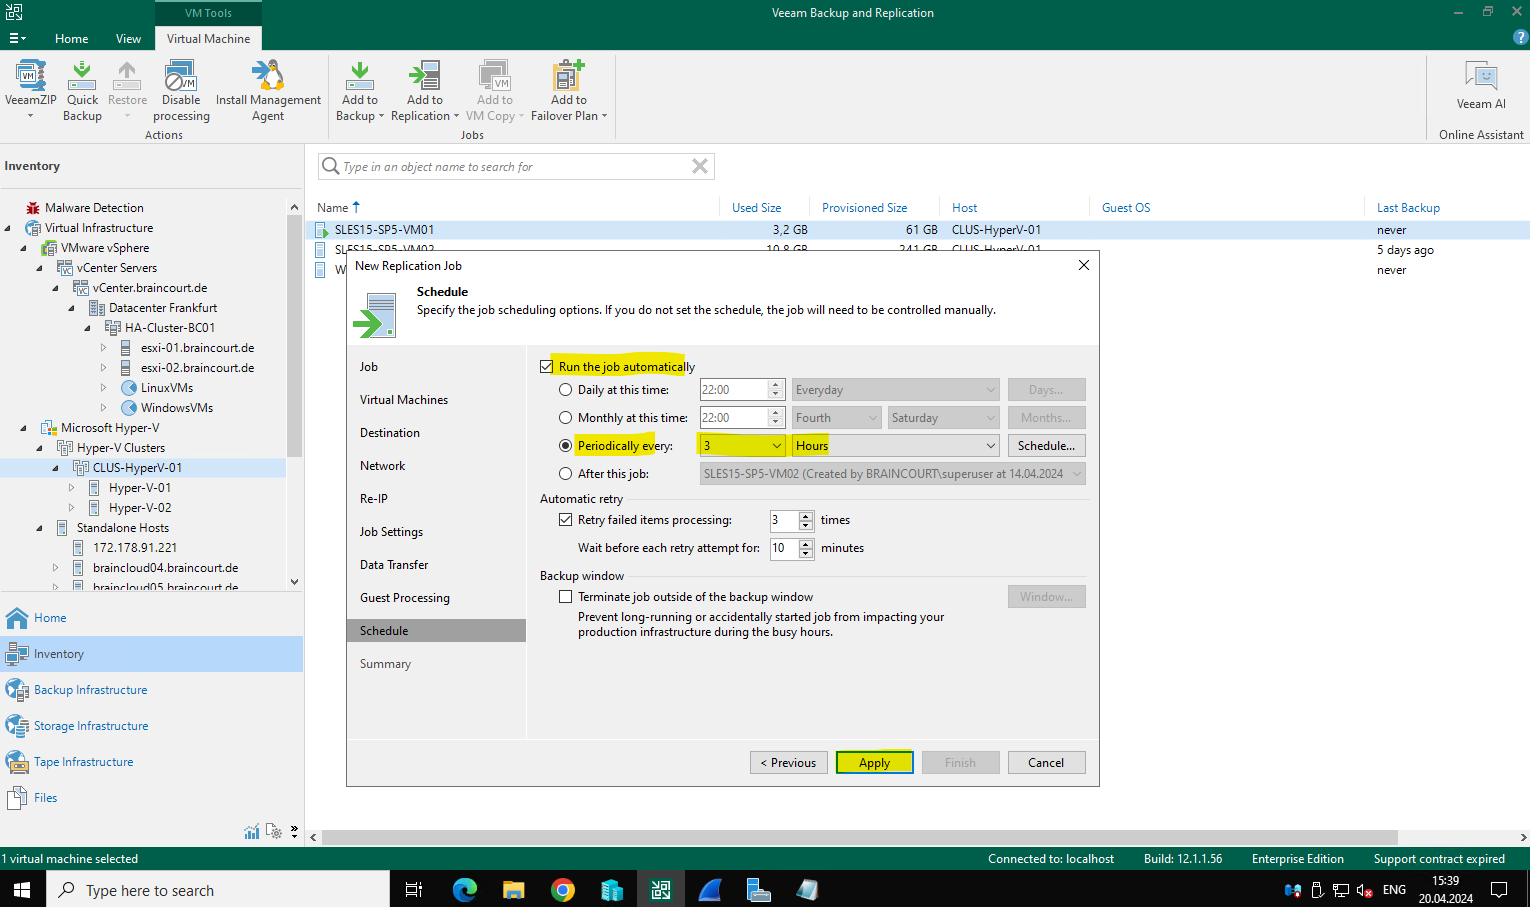
Below I will also check to run the replication job when I click on Finish.
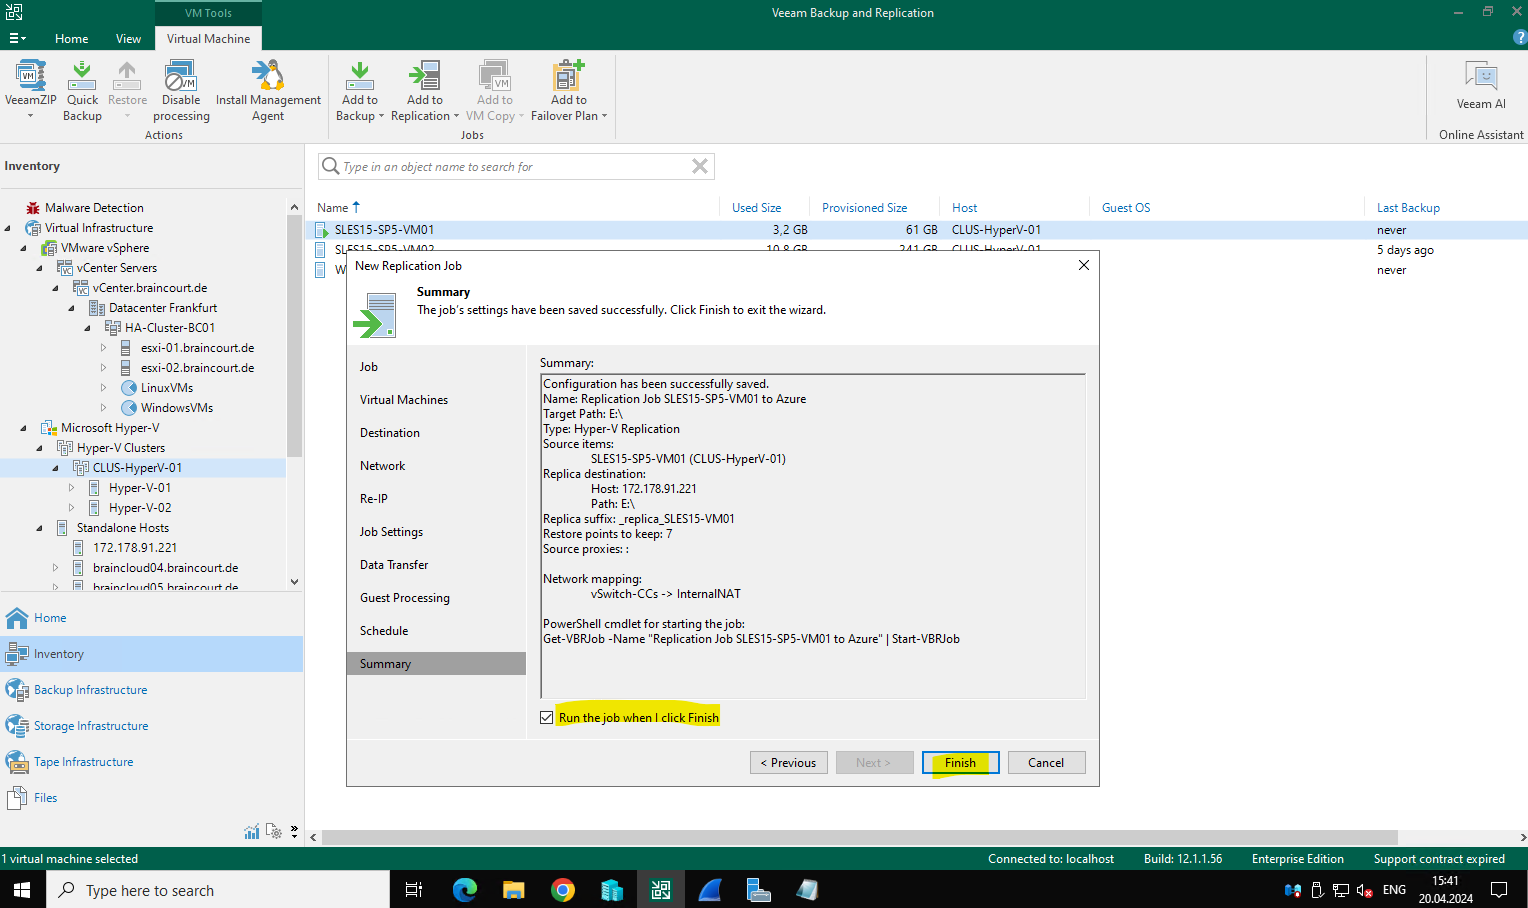
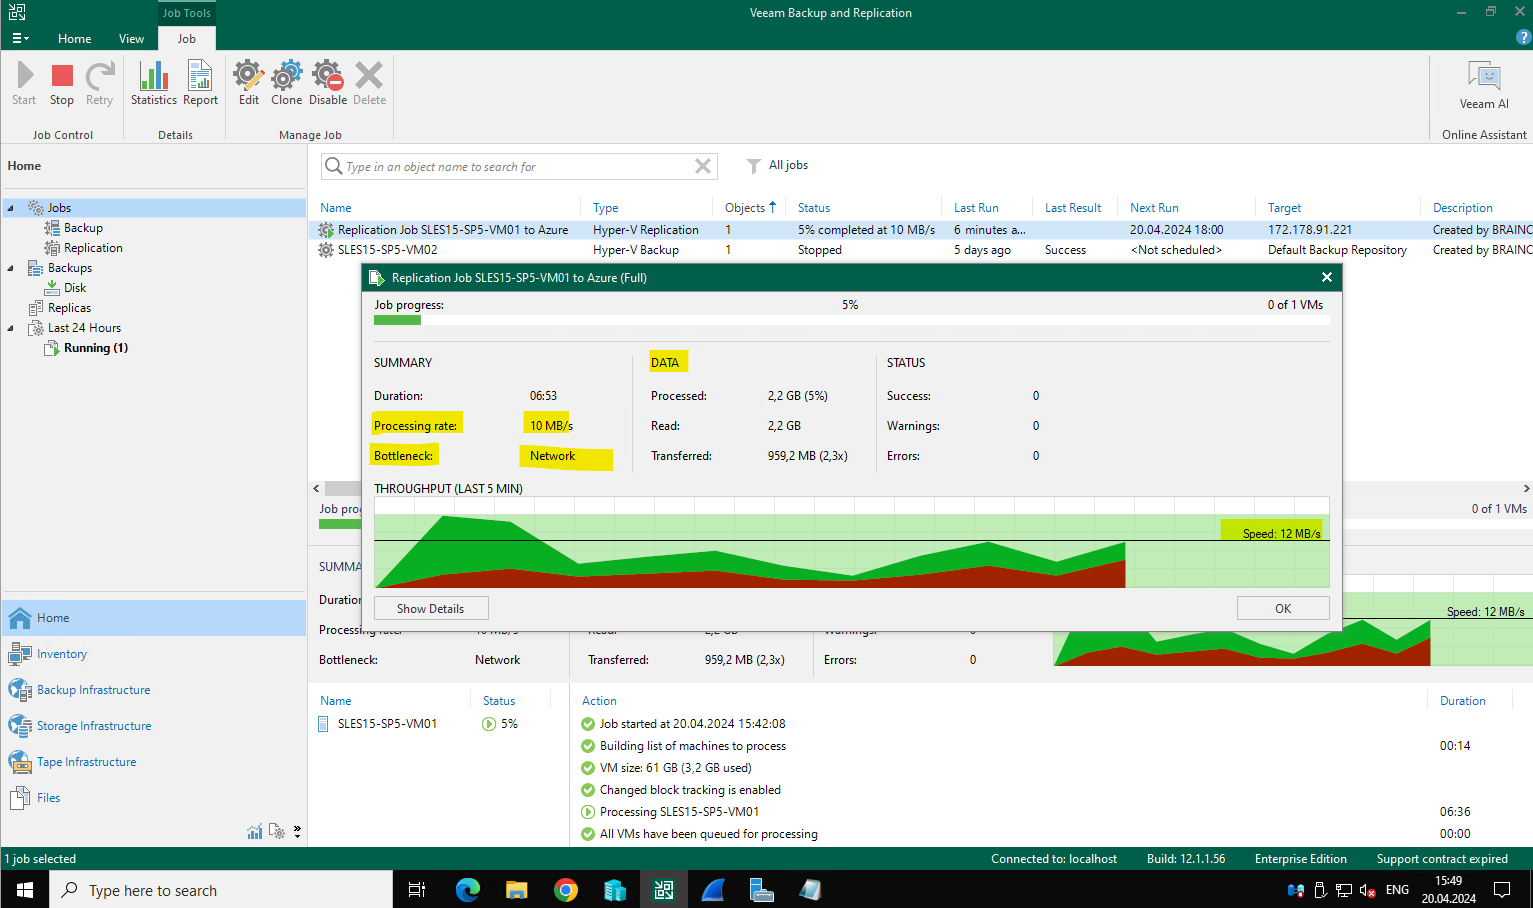
Veeam will also show below where the bottleneck for the replication will be, if it is reading the data or the network transfer to the destination.
Finally the replication is finished.
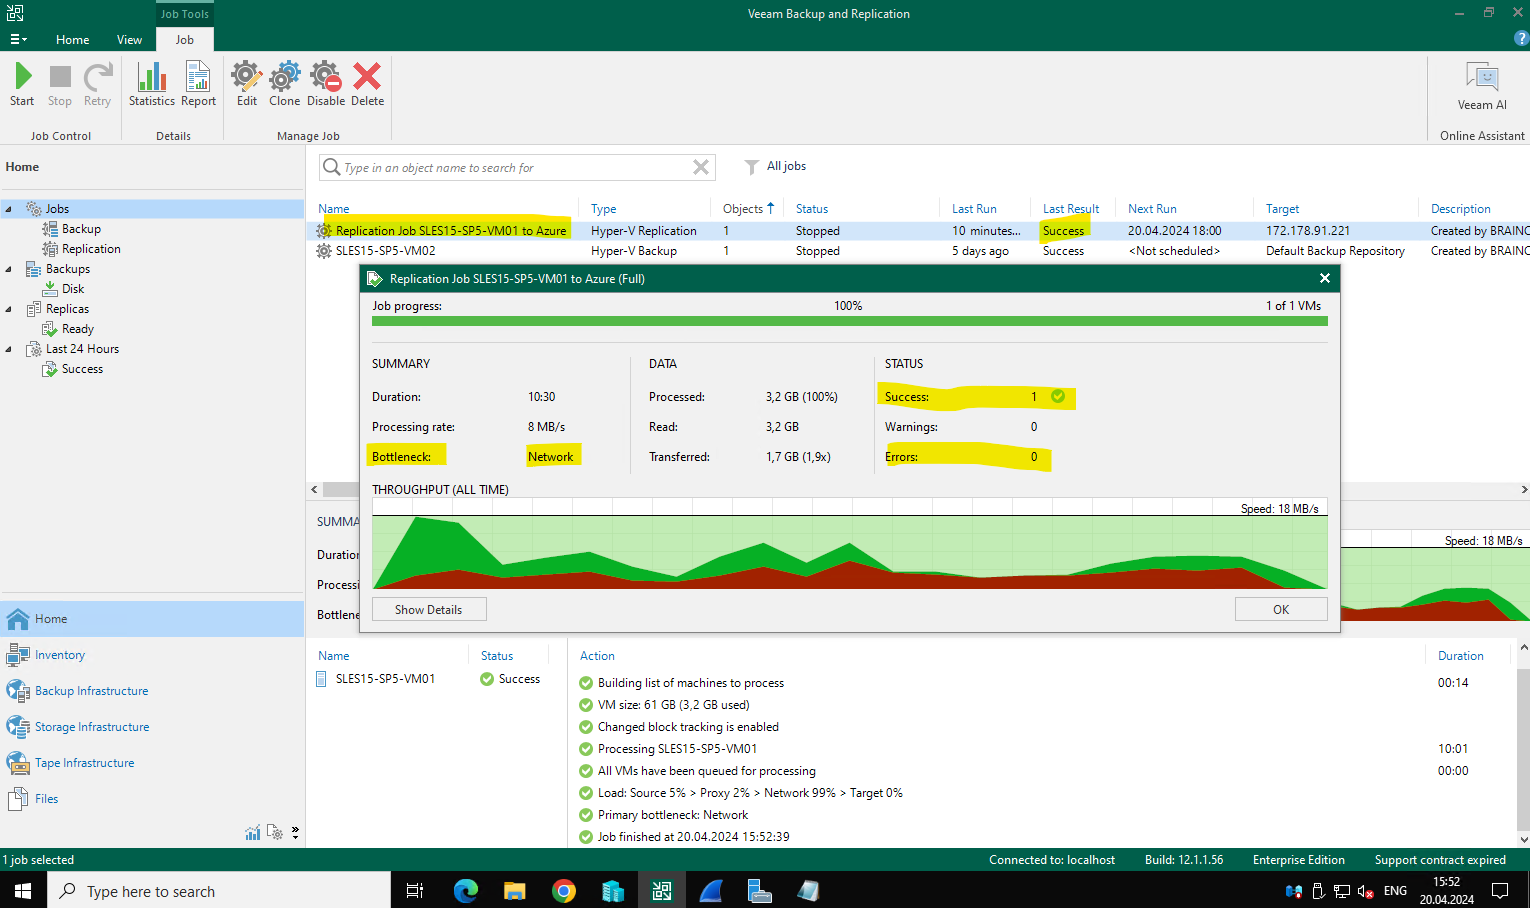
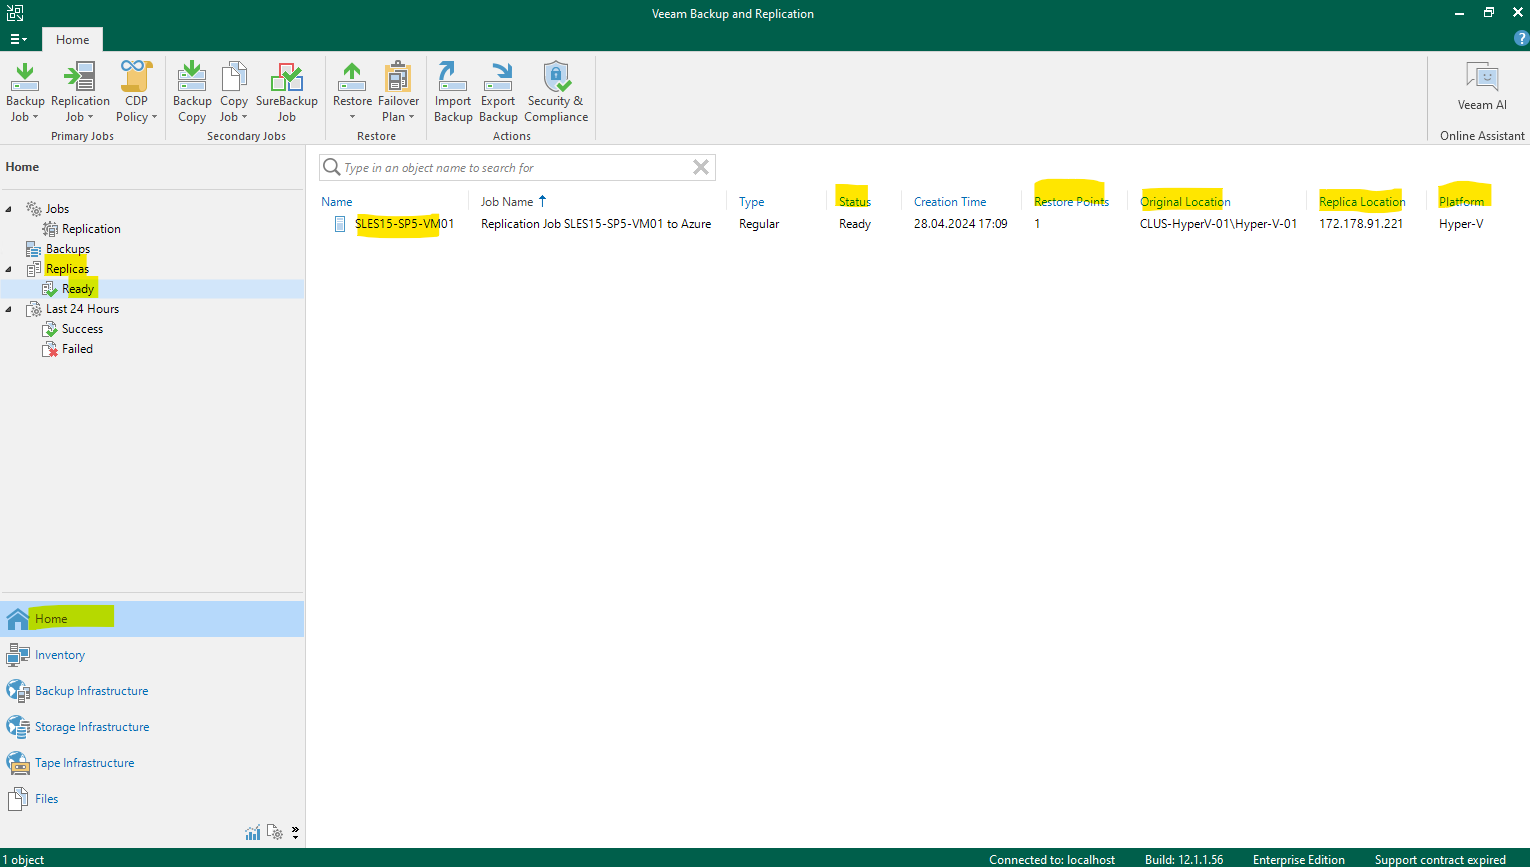
In Veeam Backup and Replication we will see all replicated virtual machines under Home -> Replicas -> Ready as shown below.
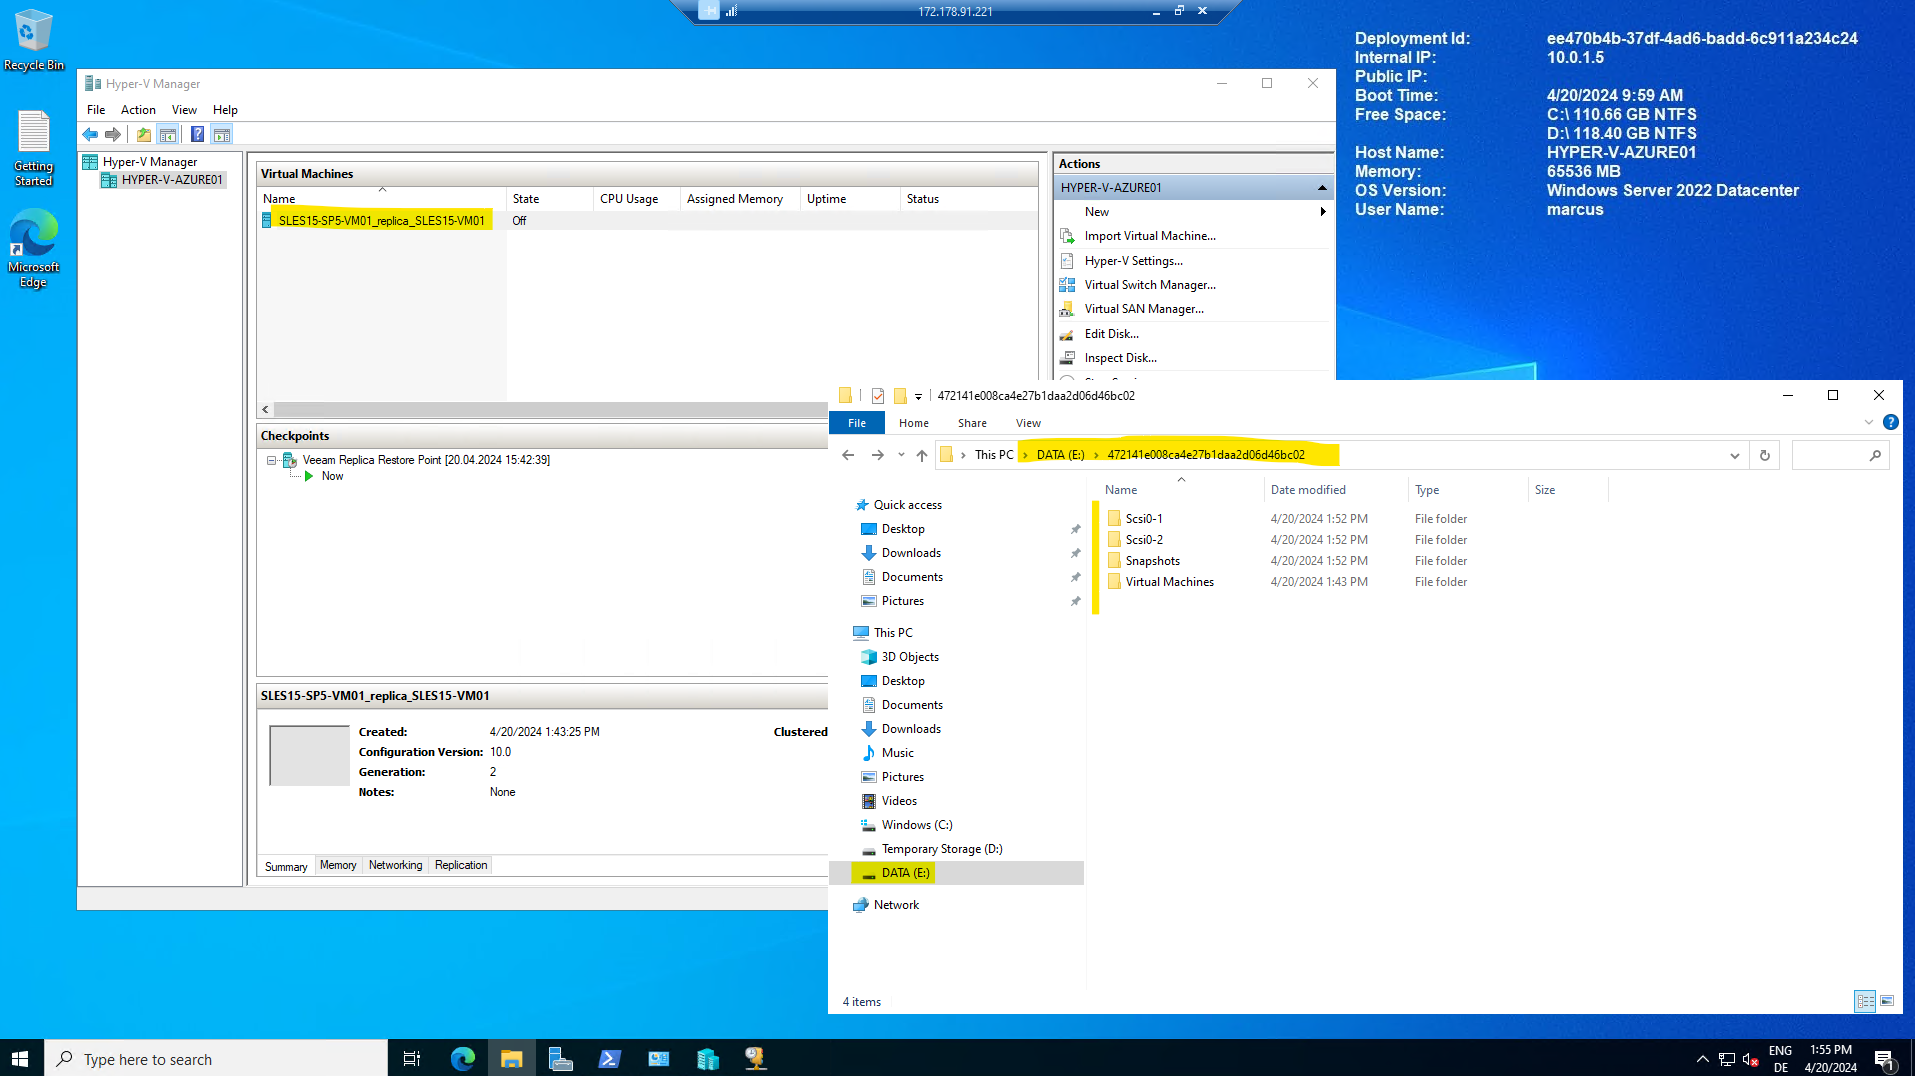
We can now also see the virtual machine replica on the Azure Hyper-V nested virtual machine as shown below.
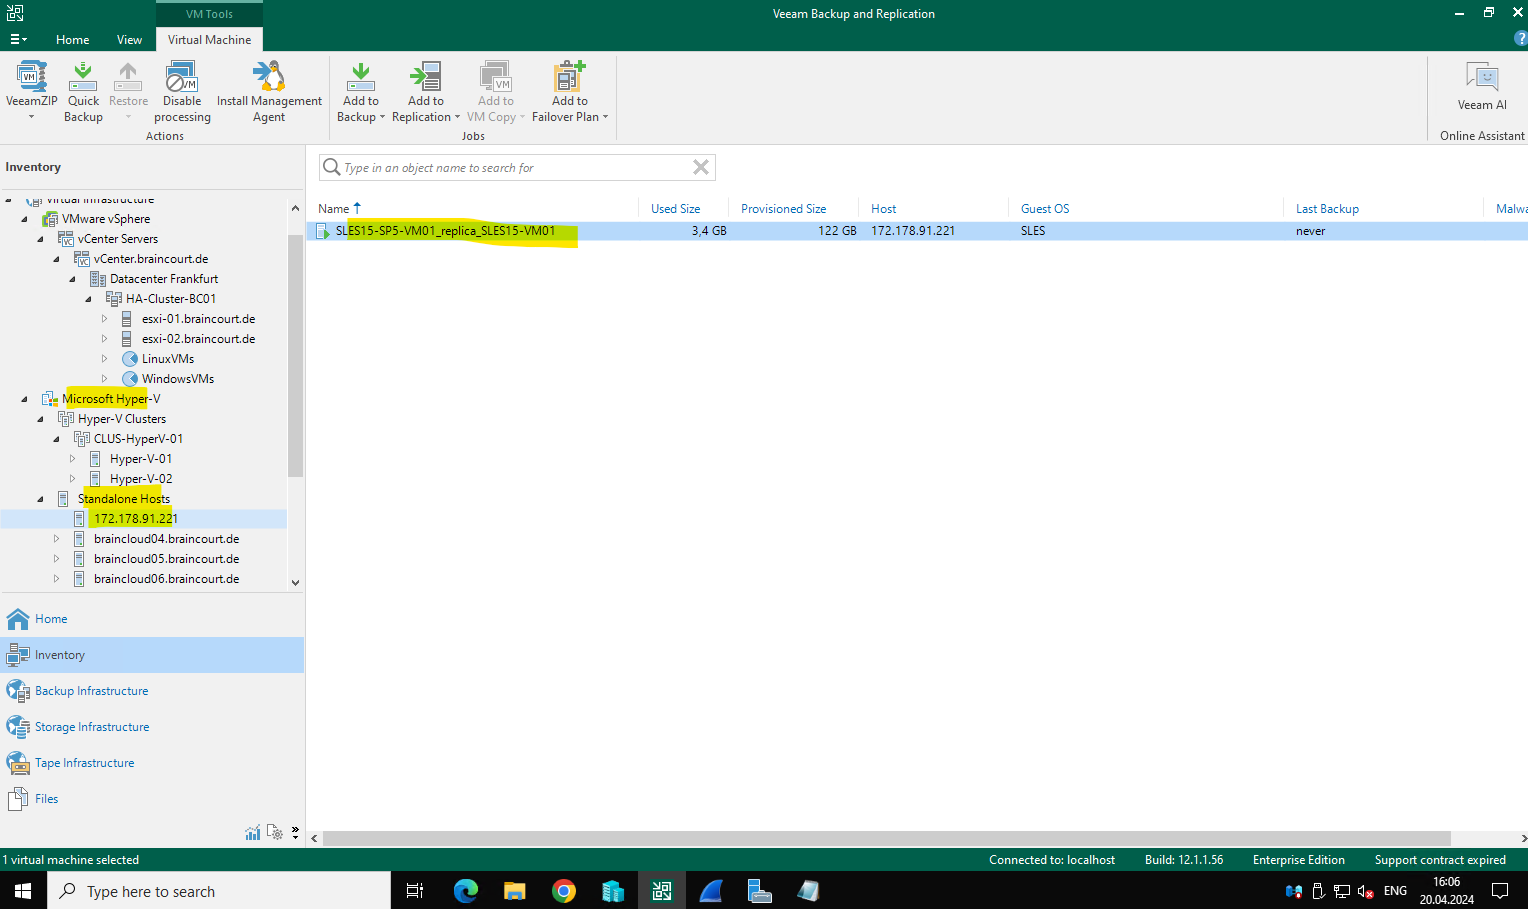
The virtual machine replica now also appears in Veeam Backup and Replication on the Azure Hyper-V VM host (managed server in Veeam).
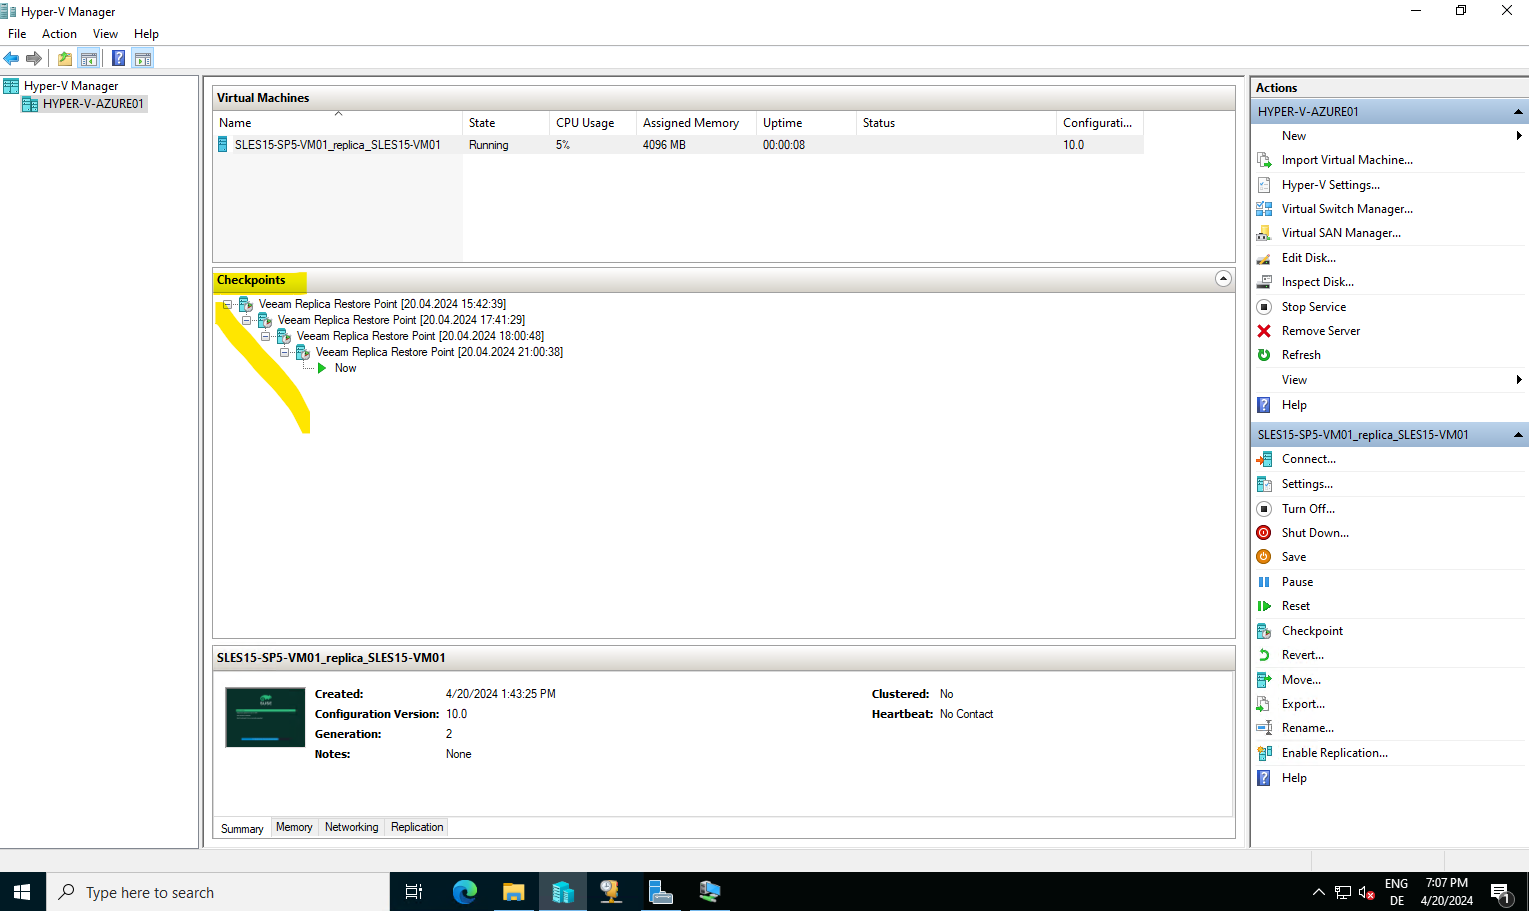
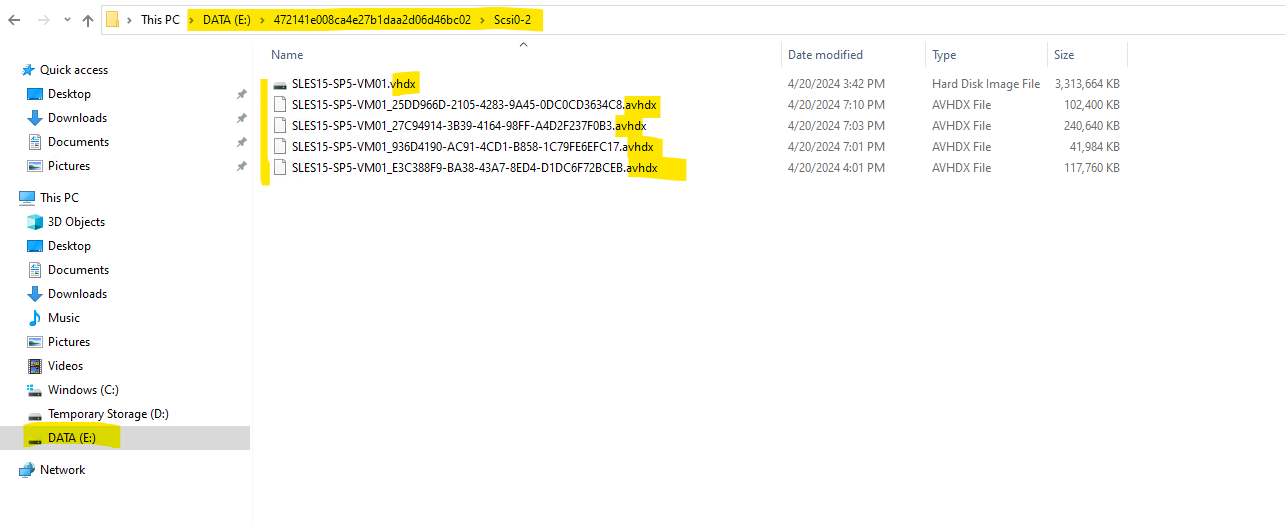
As already mentioned further above there is with each replication a new snapshot created on the destination Hyper-V server and here on the Azure Hyper-V virtual machine.
By default, Veeam Backup & Replication uses 7 restore points for a replication job.
The retention policy defines how many restore points you want to retain on disk and thus how far you can roll back. After the allowed number of restore points is exceeded, Veeam Backup & Replication applies the retention policy — so it removes the earliest restore point from the backup chain.
Below we will see the *.avhdx files of the second virtual disk from the snapshots and connected to the virtual SCSI bus 0:2.
Failover to the Replica Virtual Machine
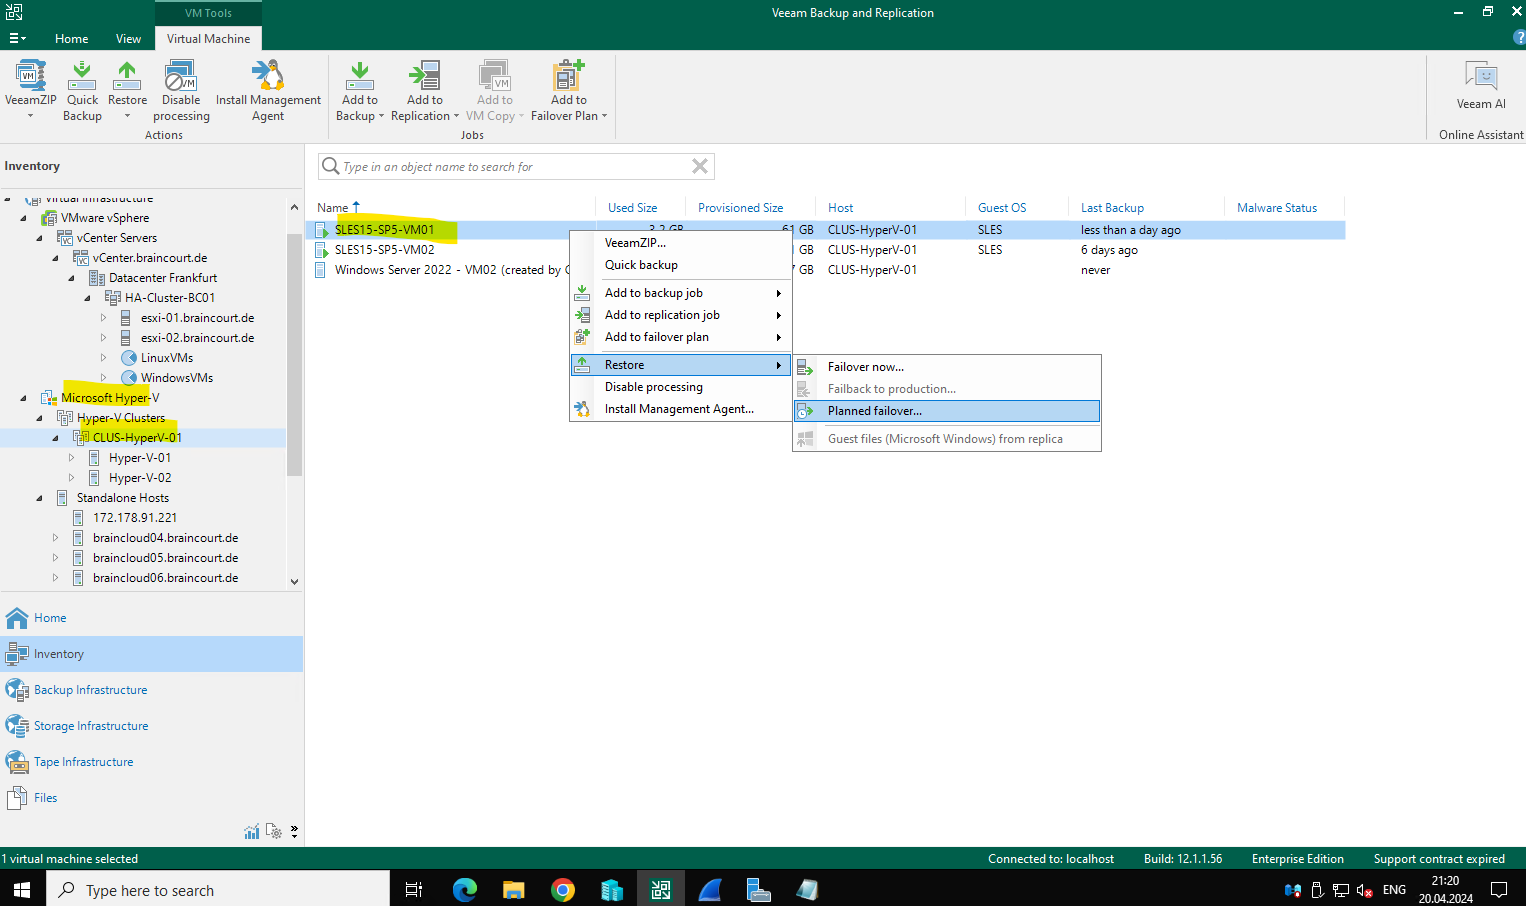
In order to failover to the replica virtual machine on the Azure Hyper-V host, we can either select the source virtual machine under Inventory or we can also use the replica under Home -> Replicas.
By using the source virtual machine under Inventory, I first have to select my on-premise virtual machine (production source of the replica) which I want to failover to the replica and click on Restore -> Planned Failover … as shown below.
Failover now … -> Turns on the latest replica. Workload from source VM is not migrated so we actually have some data loss depends on when the last replication was done.
Planned failover … -> During planned failover, Veeam Backup & Replication always retrieves VM data from the production infrastructure, even if the replication job uses the backup as a data source. This approach helps Veeam Backup & Replication synchronize the VM replica to the latest state of the production VM.
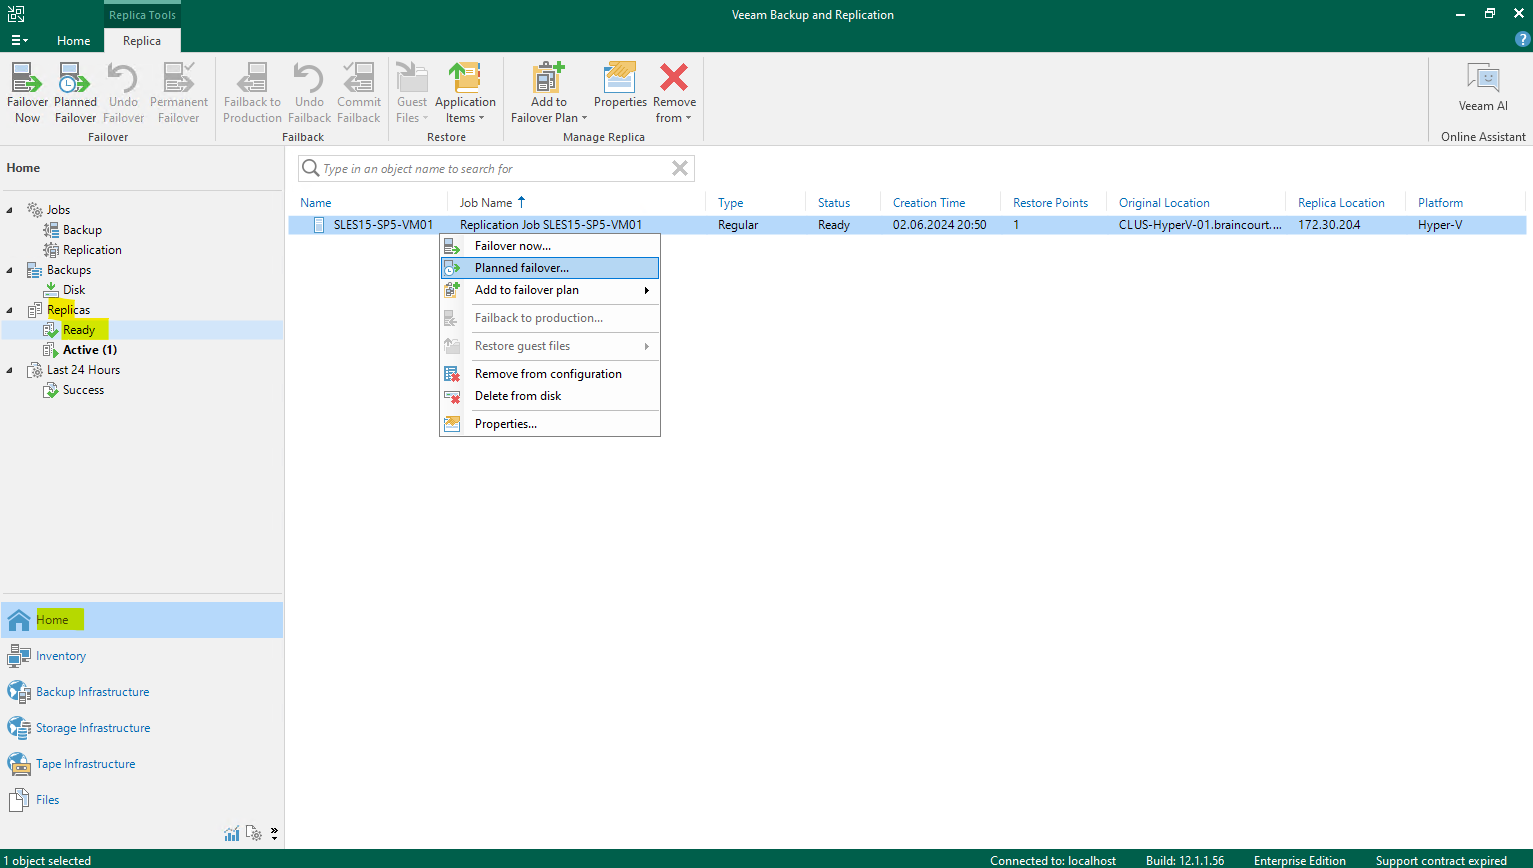
Or as mentioned we can also just right click under Home -> Replicas -> Ready on the virtual machine as show below to perform either a planned failover or failover now.
Below we can optional also add further virtual machines to failover.
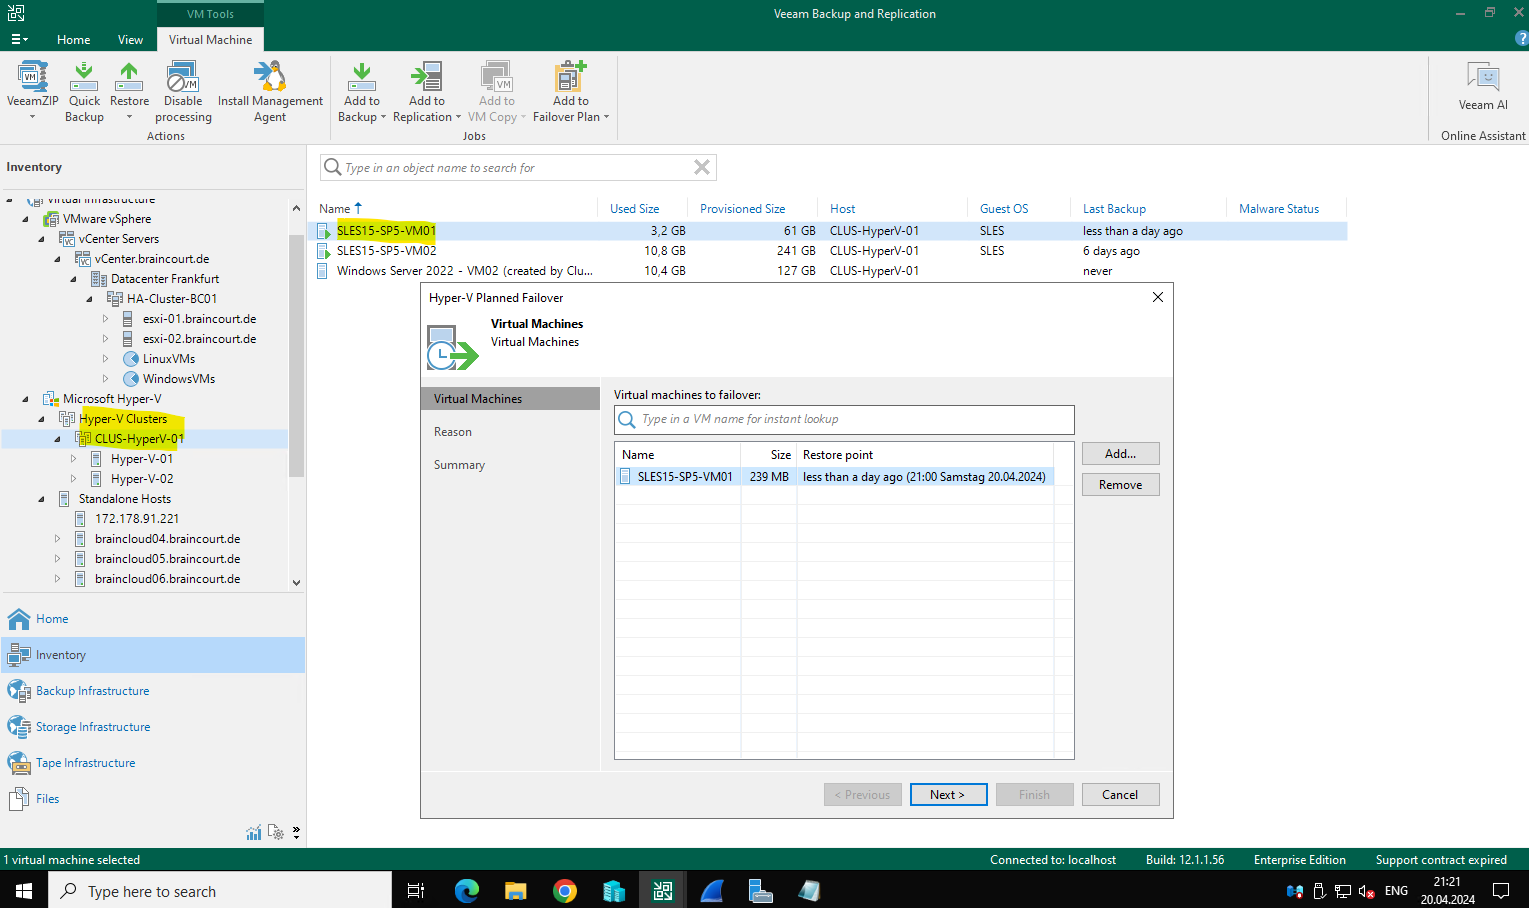
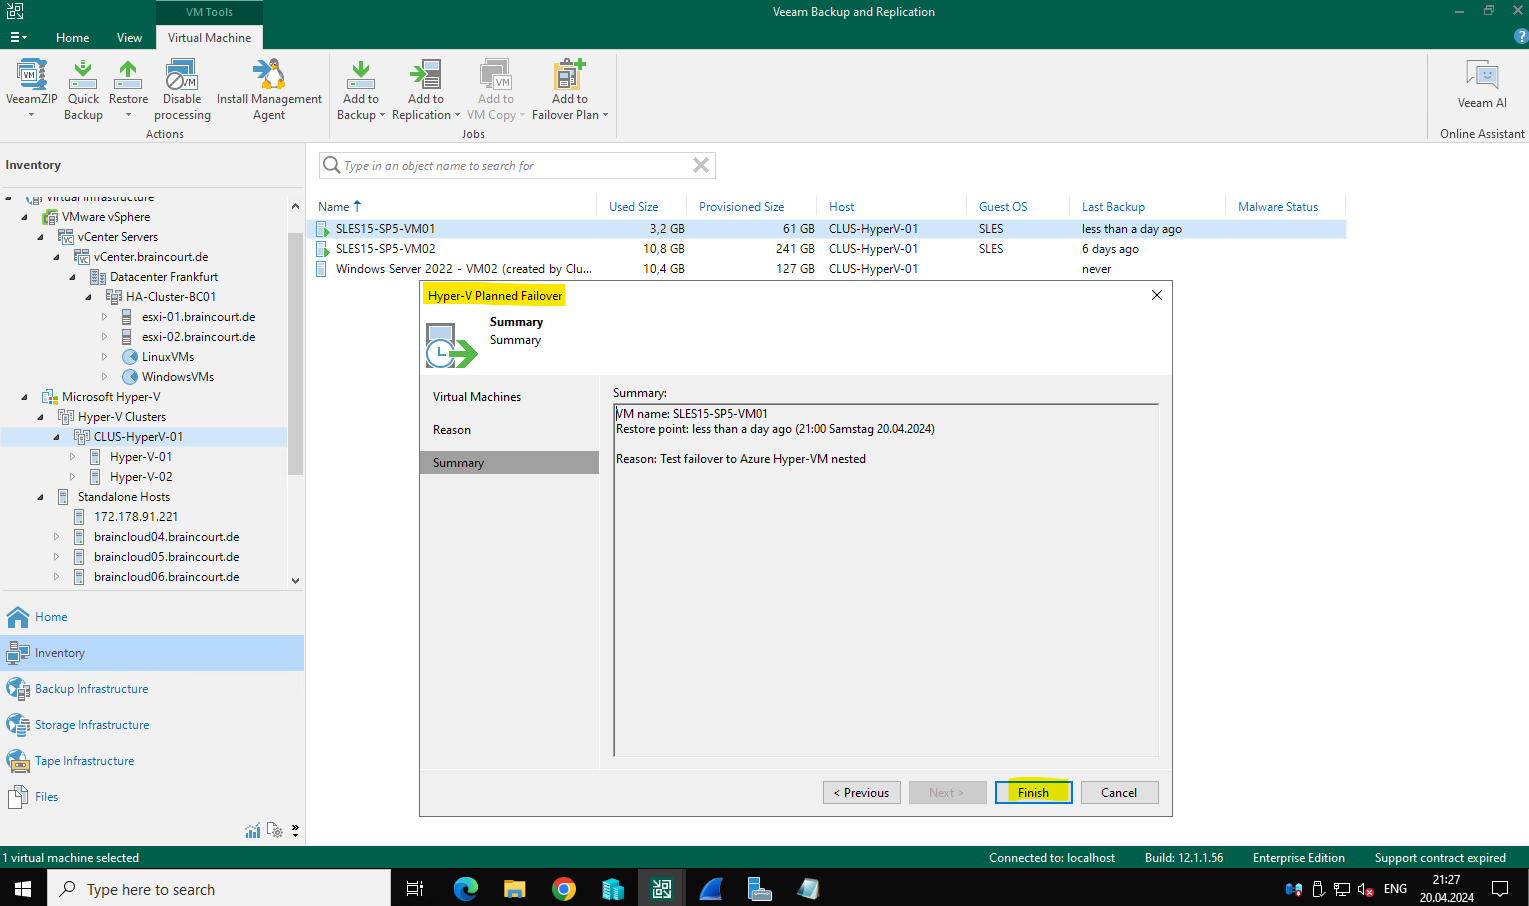
Optionally we can provide a reason for the failover.
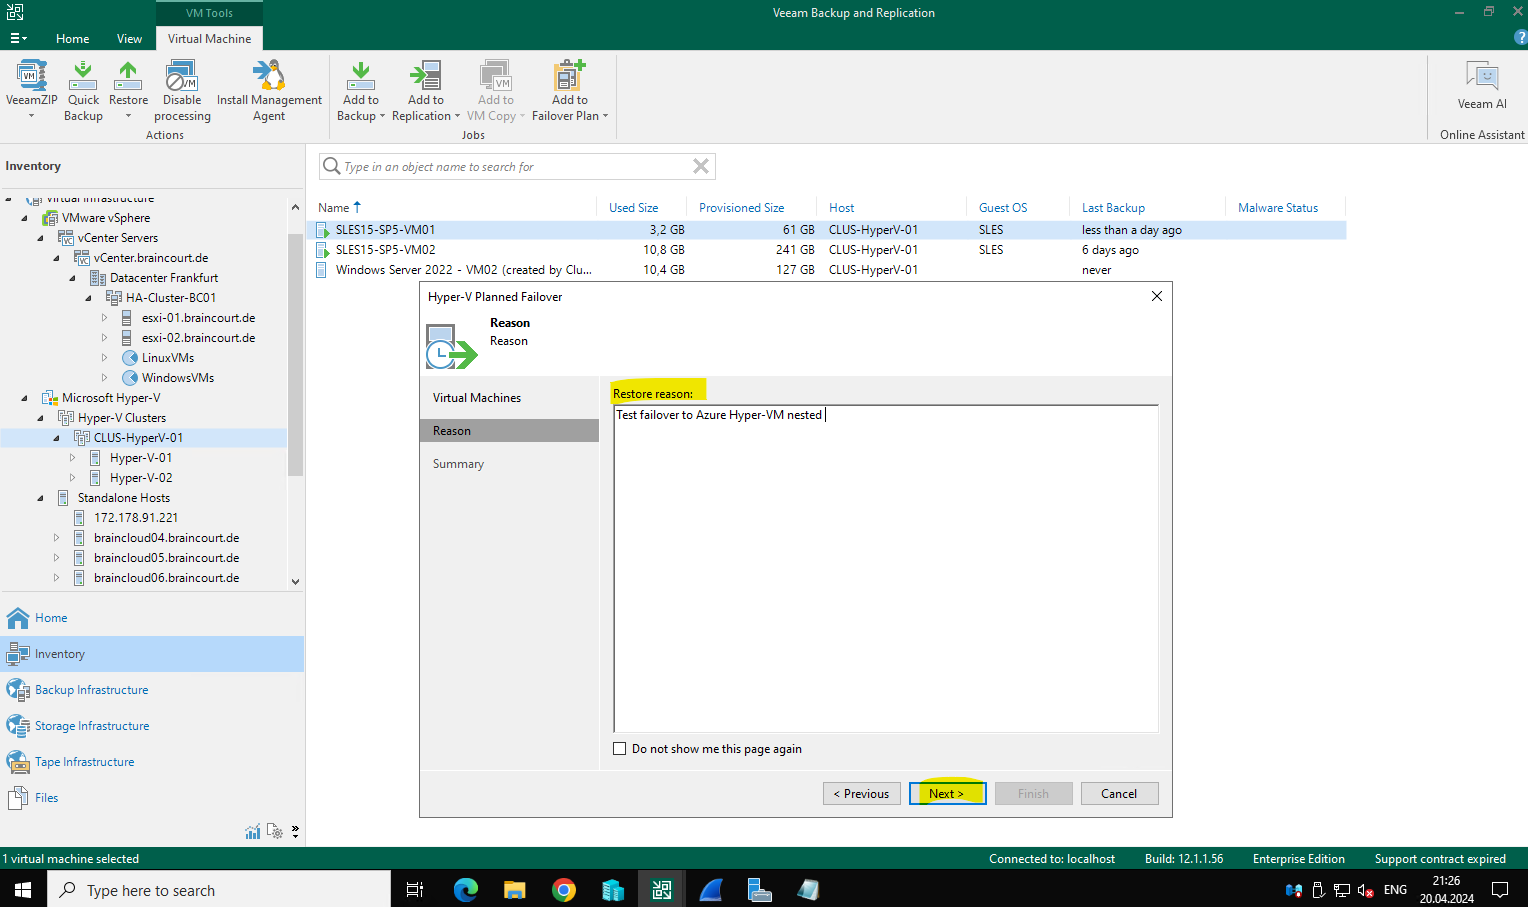
Finally we can failover the virtual machine to Azure.
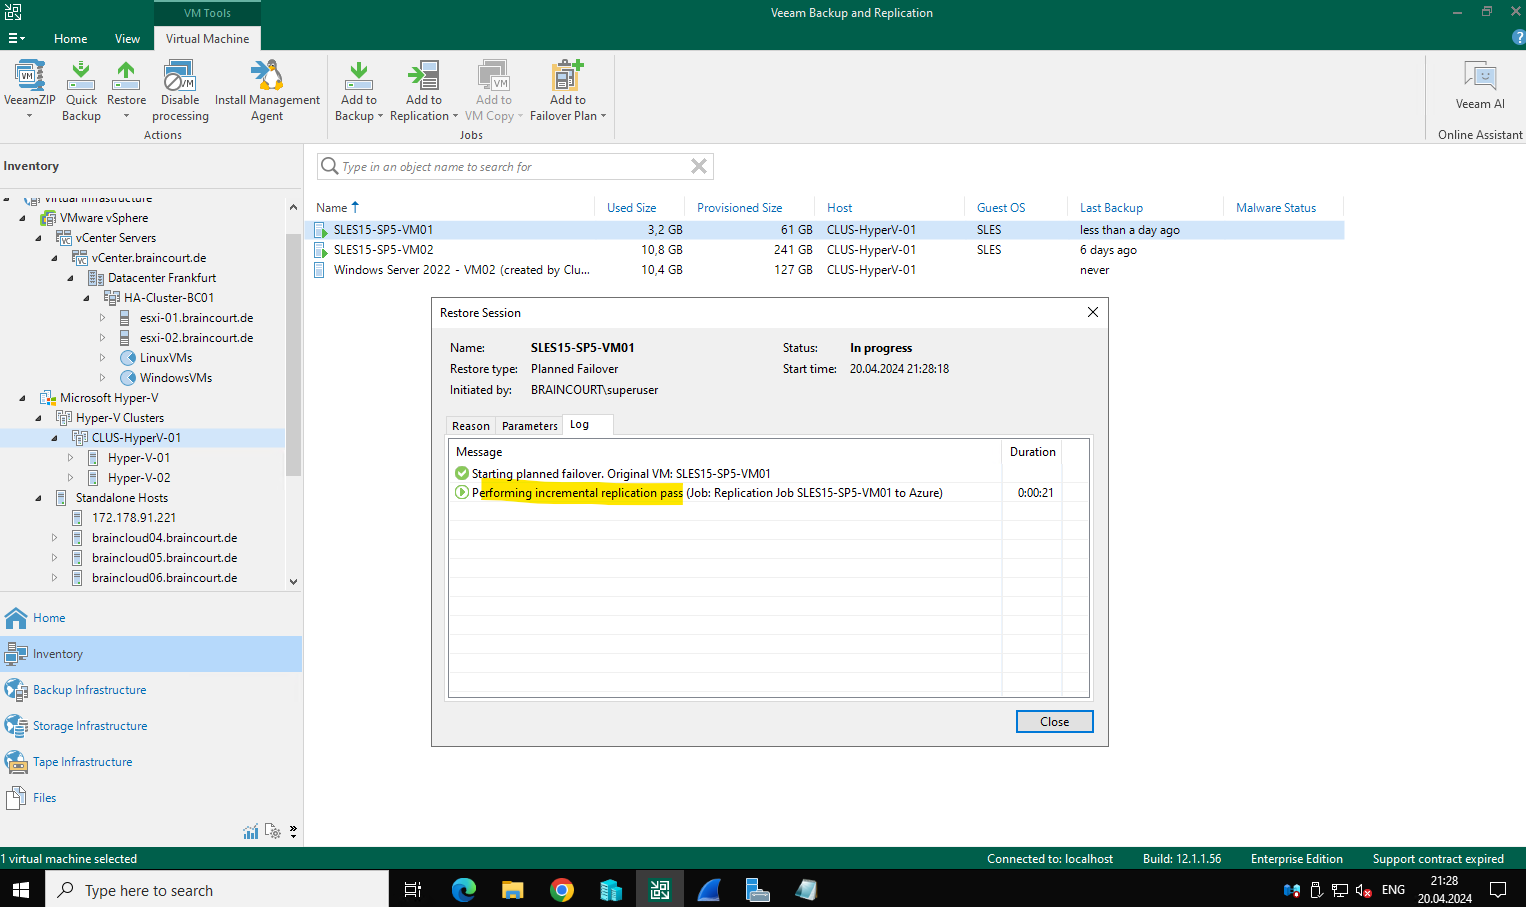
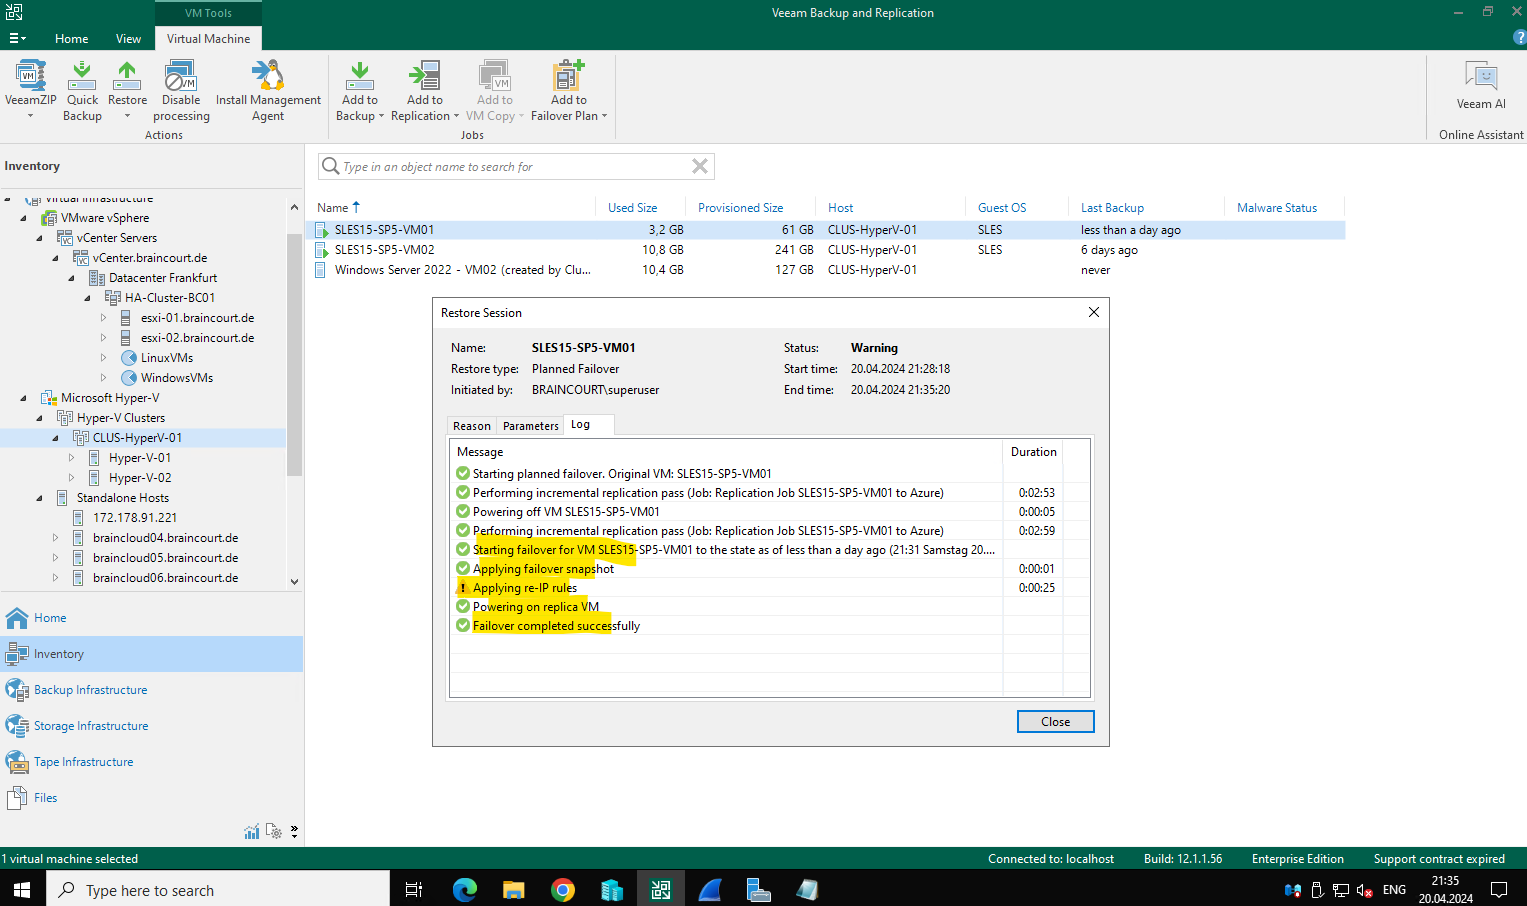
For a planned failover first an incremental replication is done from the source to the destination before failover will finally triggered. So the latest state of the production VM will be first synchronized to the replica.
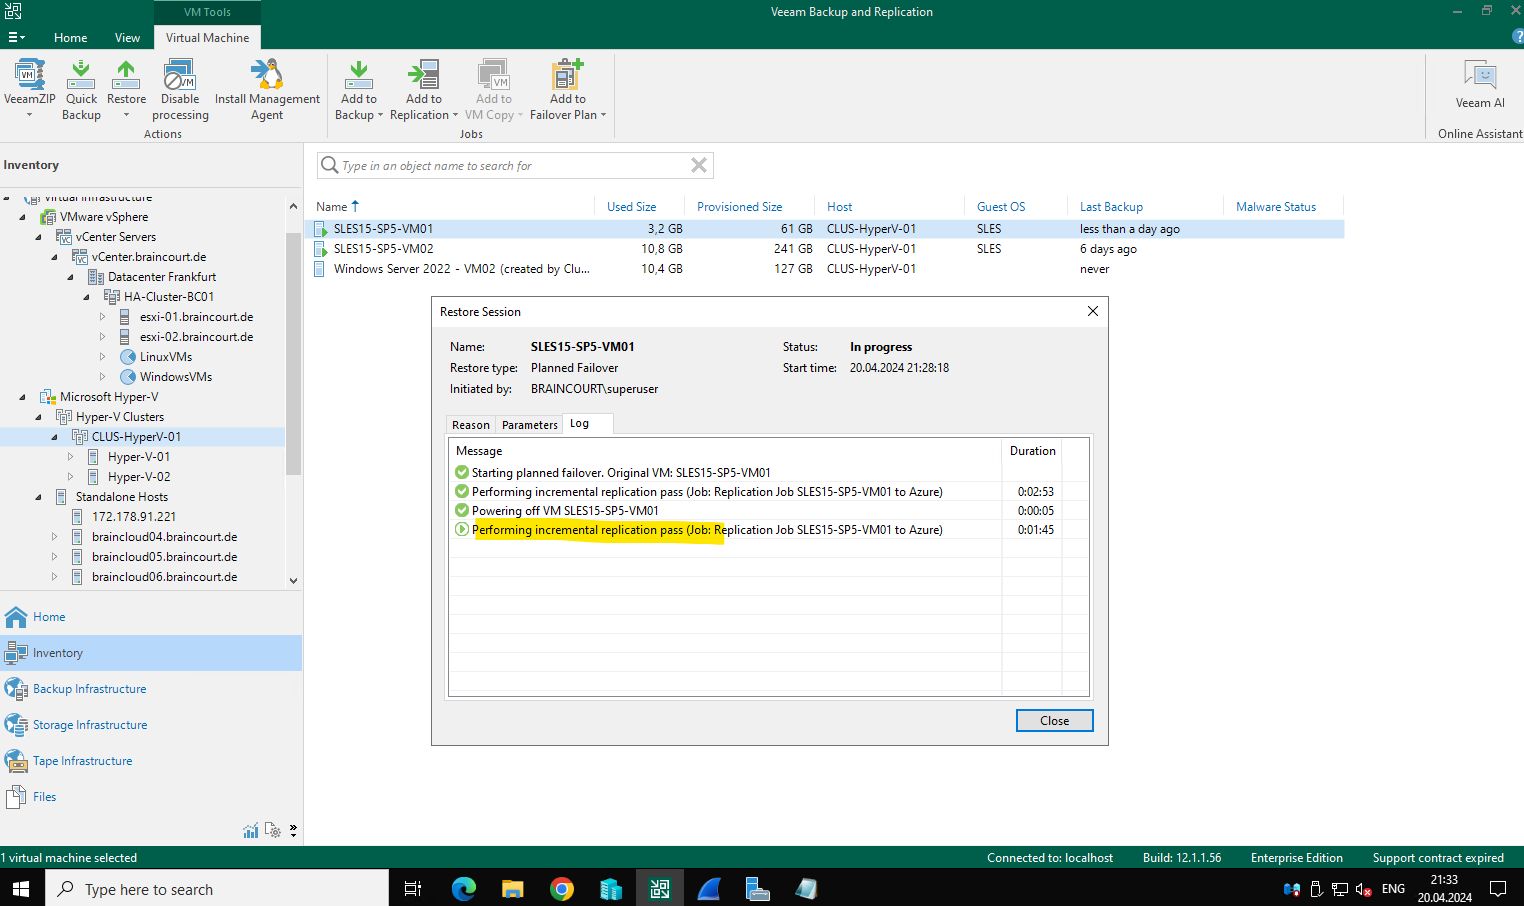
Next the source virtual machine will be powered off.

Another incremental replication from the powered off source virtual machine will be processed finally before the failover.
Next the failover is starting by first applying the failover snapshot, then applying the re-IP rules, which in my case will fail here because just Windows VMs are supported and finally the replica VM on the Azure Hyper-V virtual machine is powered on.
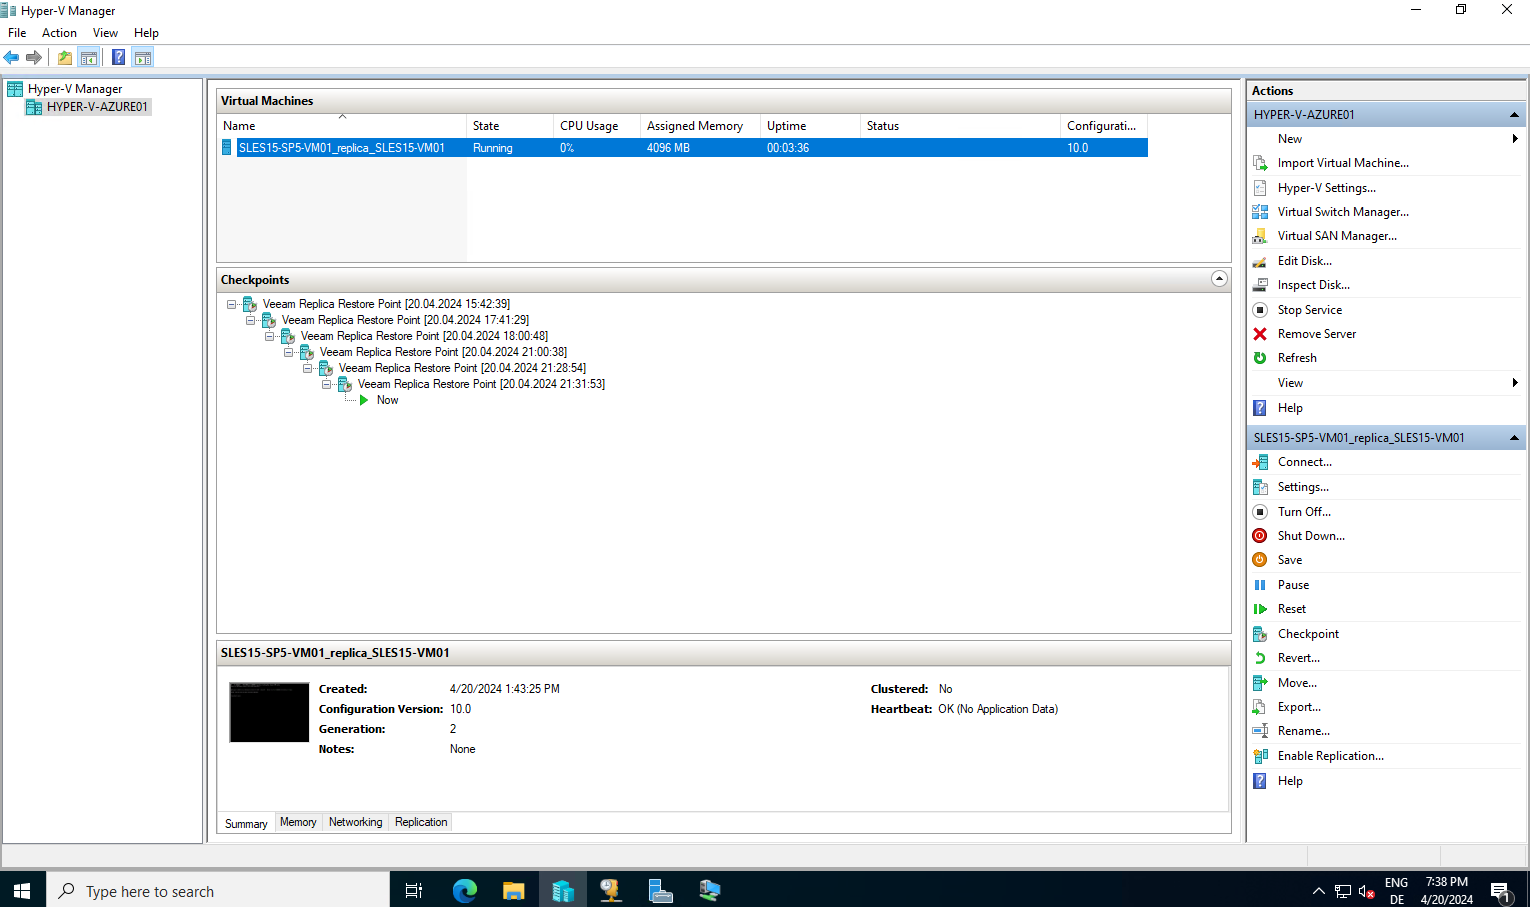
The virtual machine is now running on the Azure Hyper-V virtual machine nested as shown below.
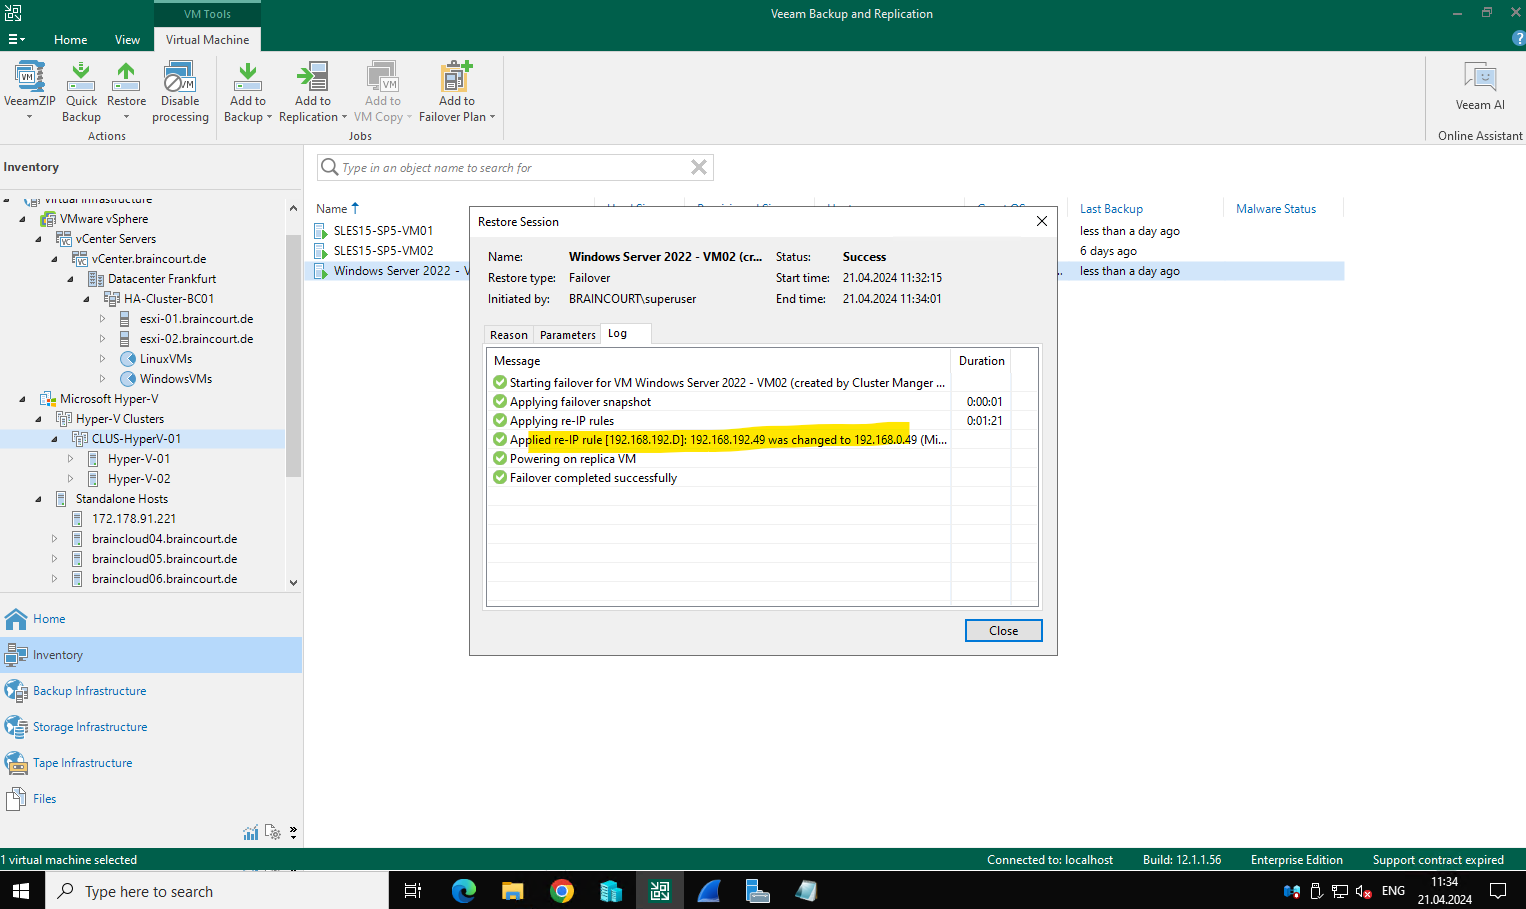
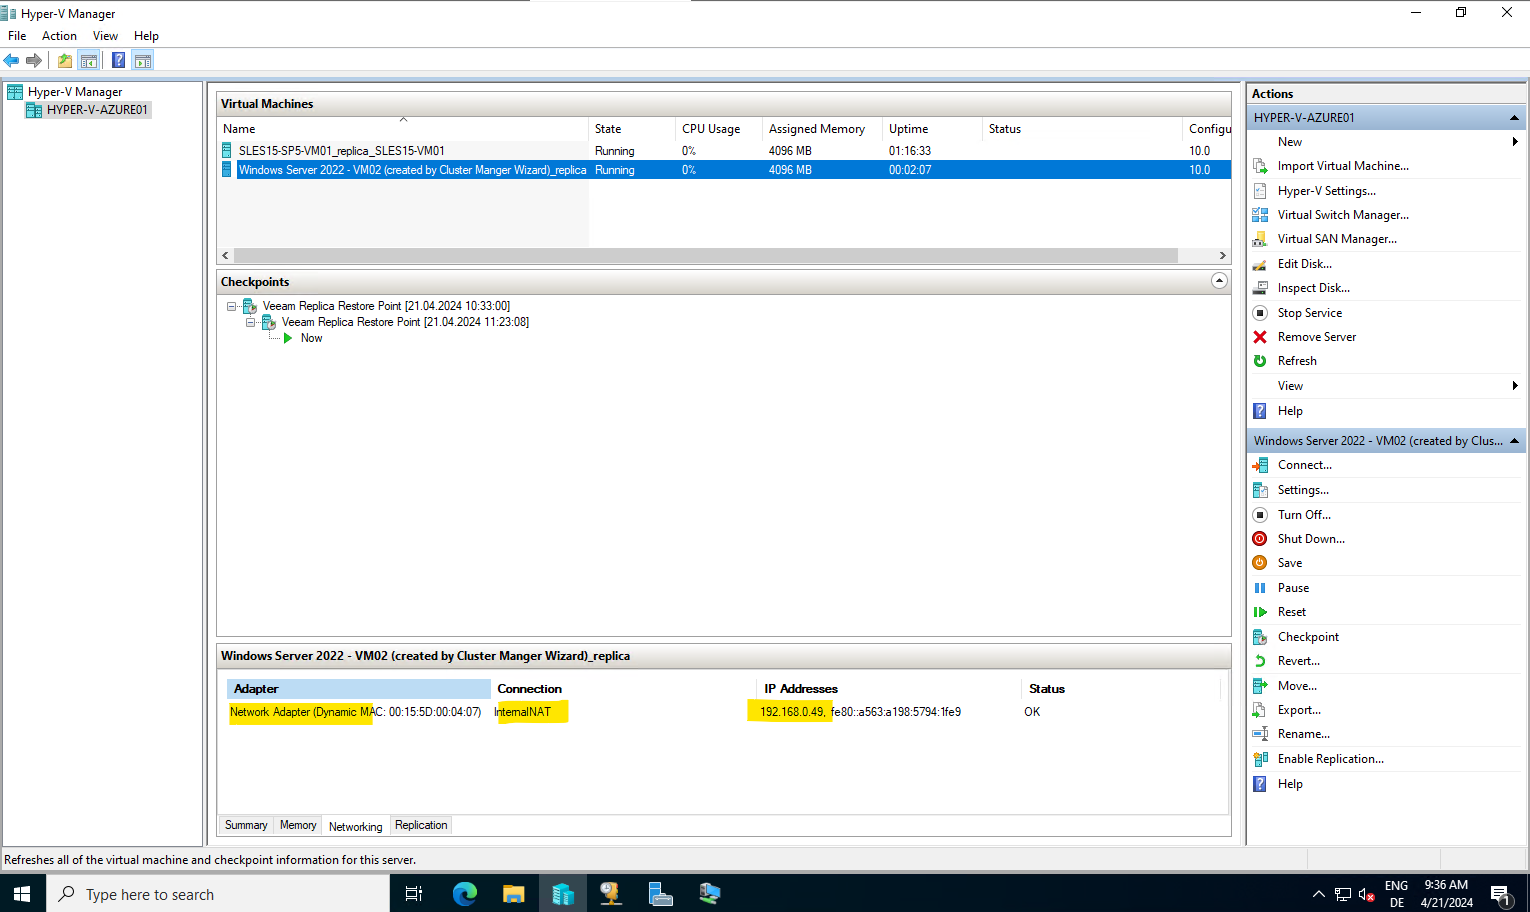
When using the re-IP rules for Windows VMs which also have assigned a static IP address, the re-IP option finally works.
Source Windows VM with static IP was changed successfully.
Undo Failover
In case something went wrong with the virtual machine (replica) on the data recovery site after the failover from the source and production site and before you already performed a permanent failover as shown in the next section, you can always go back to the state before the failover.
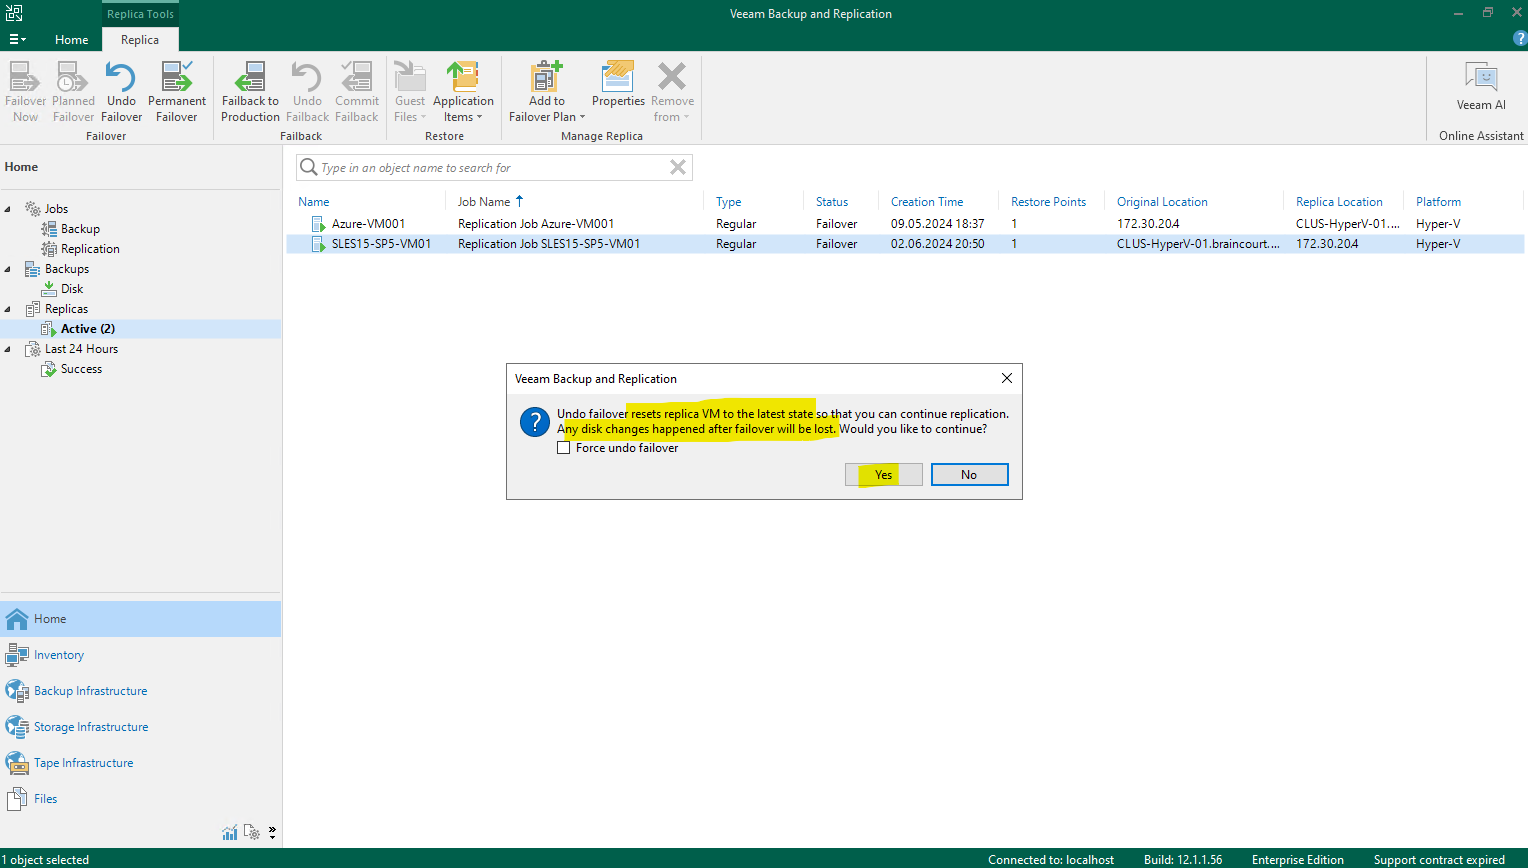
When you undo failover, you switch back from a VM replica to the source VM. Veeam Backup & Replication discards all changes made to the VM replica while it was in the Failover state.
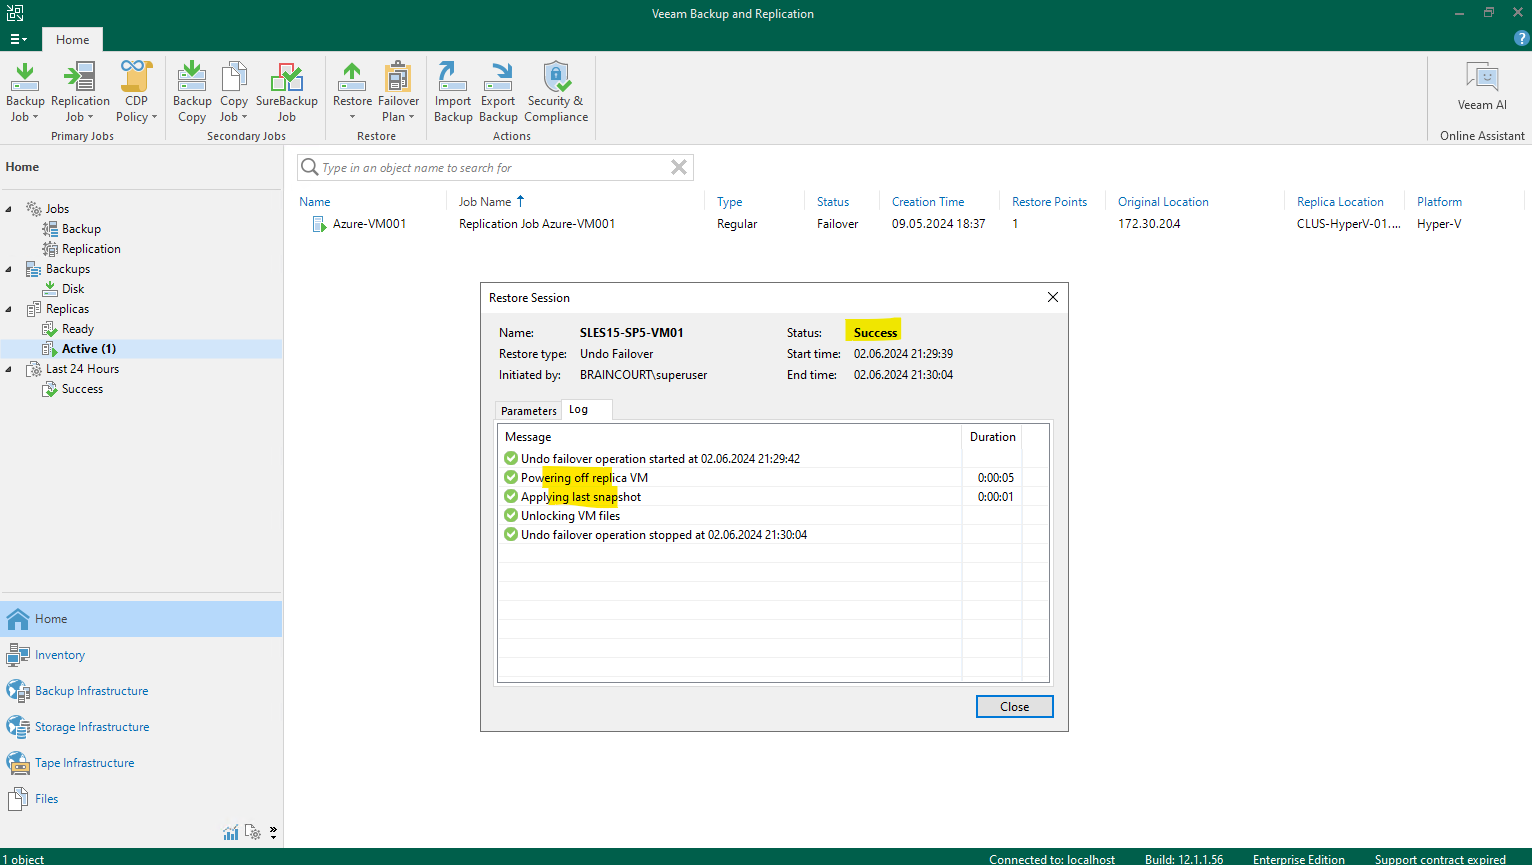
Veeam Backup & Replication reverts the VM replica to its pre-failover state. To do this, Veeam Backup & Replication powers off the VM replica and gets it back to the state of the latest snapshot in the snapshot chain. Changes that were written to the snapshot delta file while the VM replica was in the Failover state are discarded.
The state of the VM replica gets back to Ready, and Veeam Backup & Replication resumes replication activities for the source VM on the source host.
Source: https://helpcenter.veeam.com/docs/backup/vsphere/undo_failover.html?ver=120
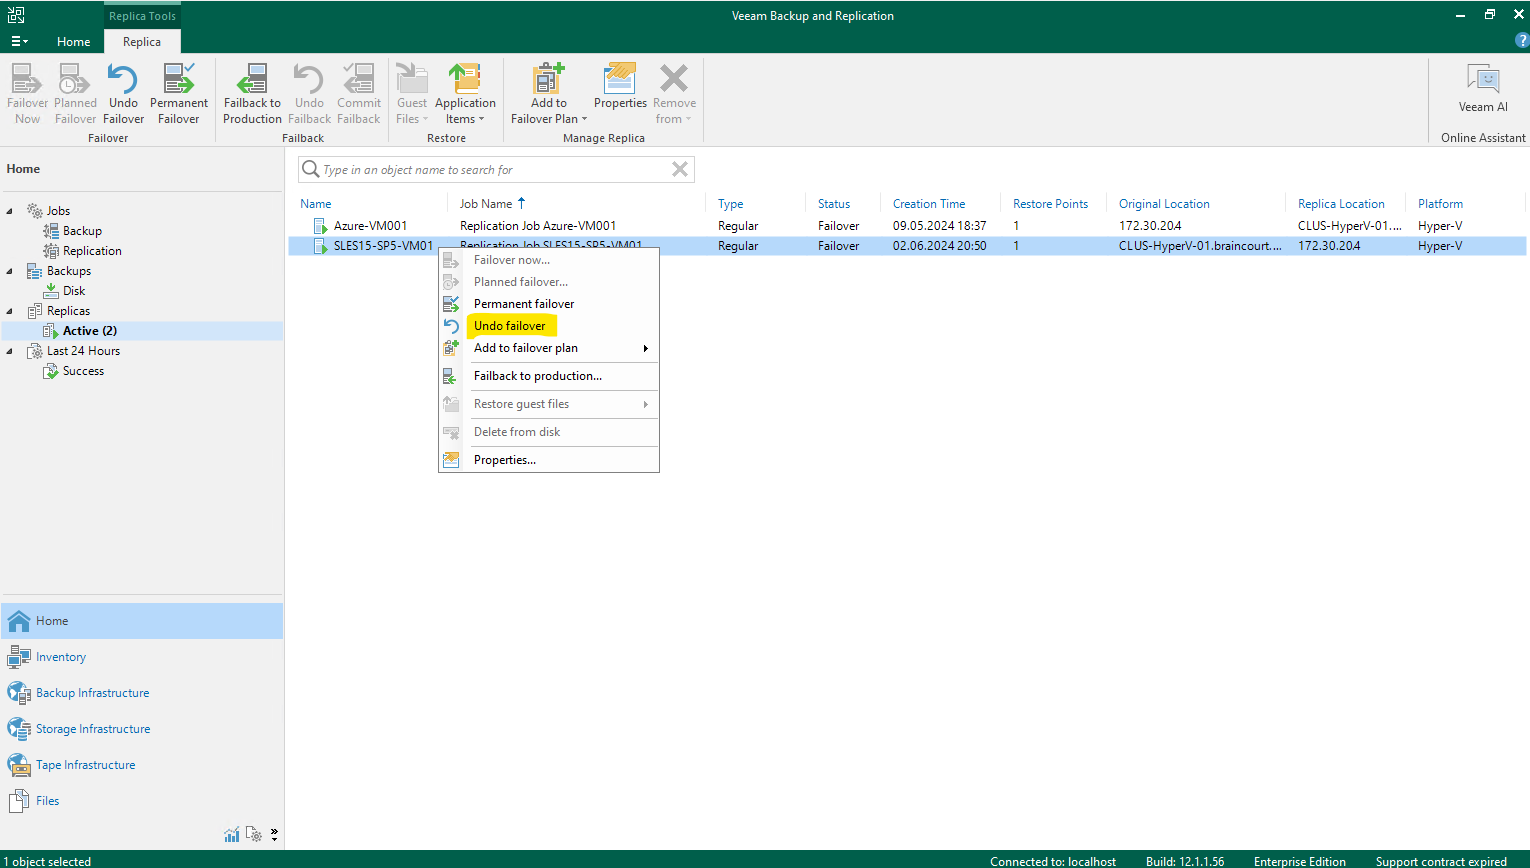
Right click on the failover virtual machine under Home -> Replicas -> Active and select Undo failover as shown below.
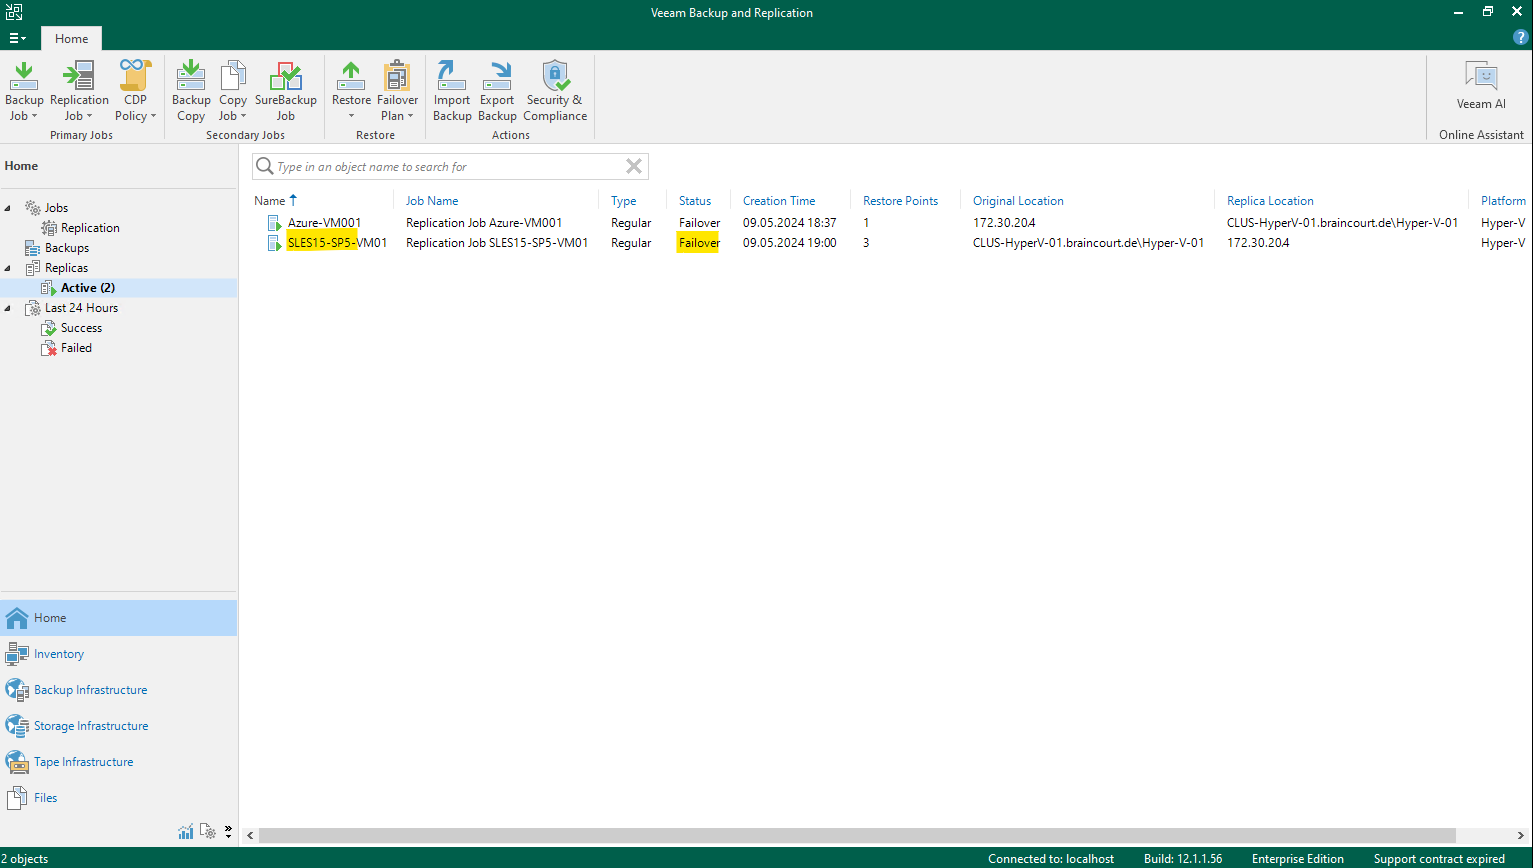
After successfully undo the failover operation, the replica also disappeared from the active replicas below.
Performing Permanent Failover
After the failover to the Azure Hyper-V server (VM), the virtual machine now appears in Veeam Backup and Replication under Home -> Replicas -> Active with the status Failover as shown below.
To finalize our failover from the on-premise network to my Azure VNet and Hyper-V nested virtualization VM, we now finally need to perform a permanent failover.
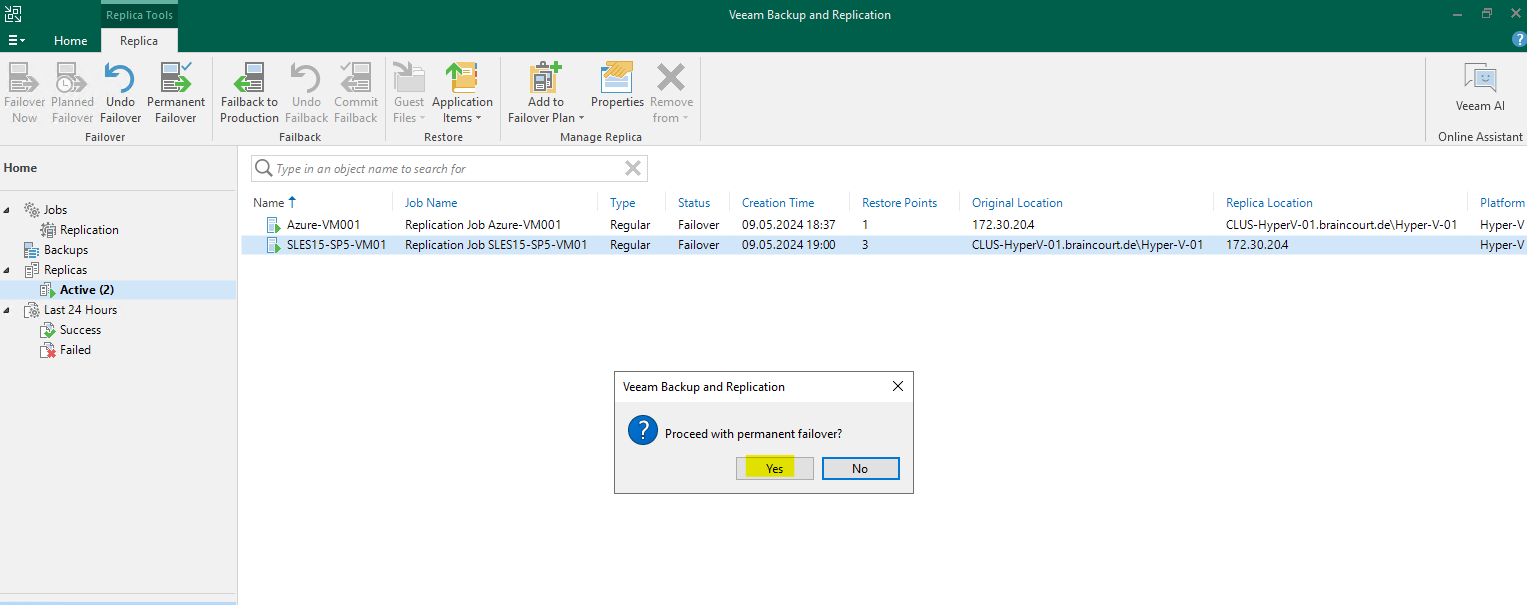
Permanent failover is one of the ways to finalize failover. When you perform permanent failover, you permanently switch from the source VM to its replica. As a result of permanent failover, the VM replica stops acting as a replica and starts acting as the production VM.
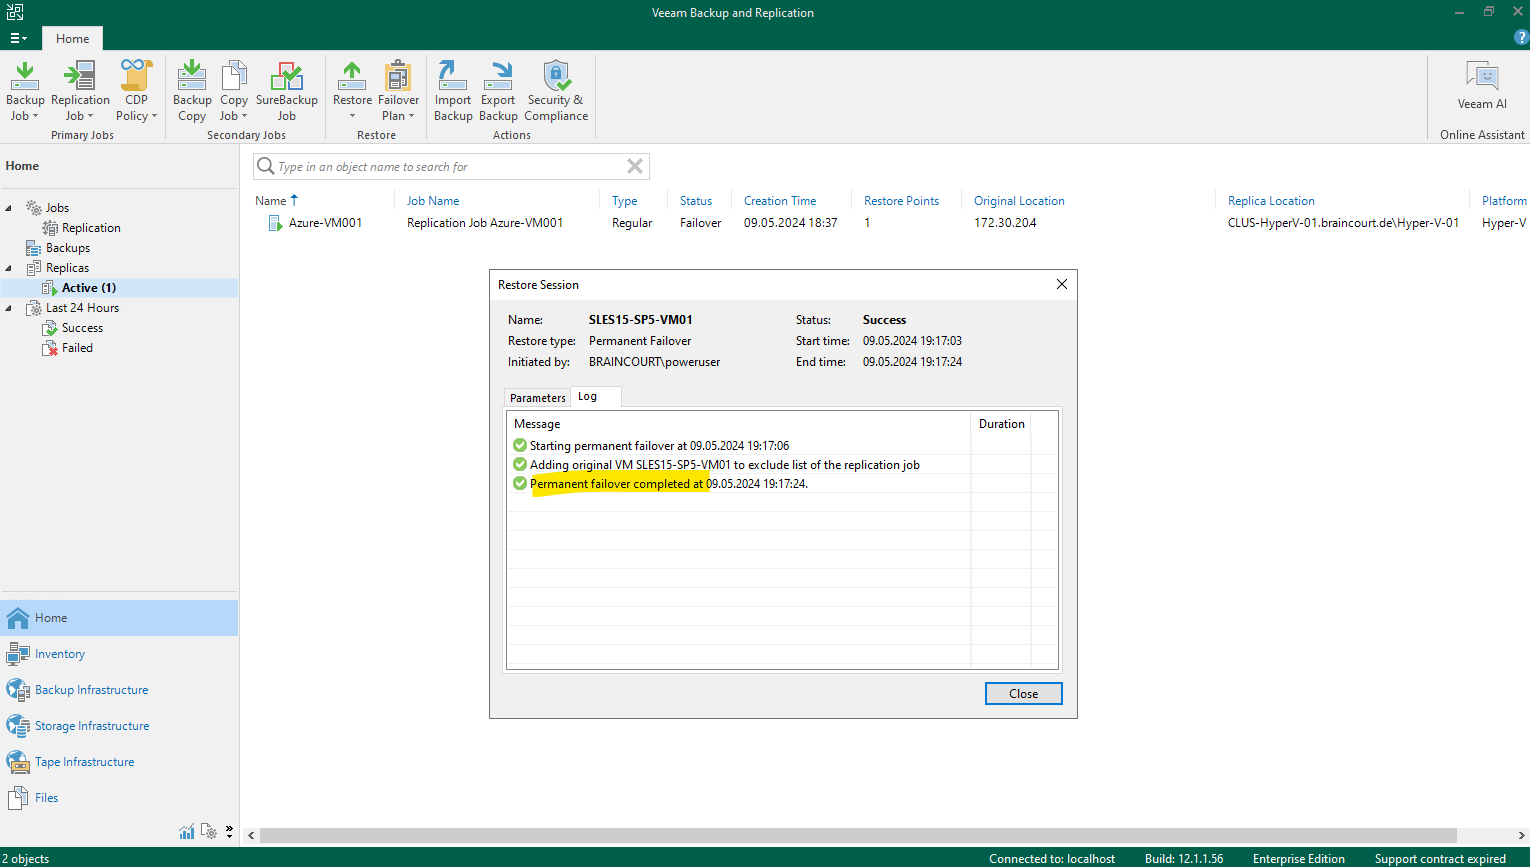
Veeam Backup & Replication removes snapshots (restore points) of the VM replica from the snapshot chain and deletes associated files from the datastore. Changes that were written to the snapshot delta file are committed to the VM replica disk files to bring the VM replica to the most recent state.
Veeam Backup & Replication removes the VM replica from the list of replicas in the Veeam Backup & Replication console.
To protect the VM replica from corruption after permanent failover is complete, Veeam Backup & Replication reconfigures the current replication job by adding the source VM to the list of exclusions. Note that other jobs are not modified automatically. When the replication job starts, the source VM is skipped from processing. As a result, no data is written to the working VM replica.
Source: https://helpcenter.veeam.com/docs/backup/vsphere/permanent_failover.html?ver=120
Open the Home view. In the inventory pane navigate to the Replicas > Active node. In the working area, right-click the necessary replica and select Permanent failover.
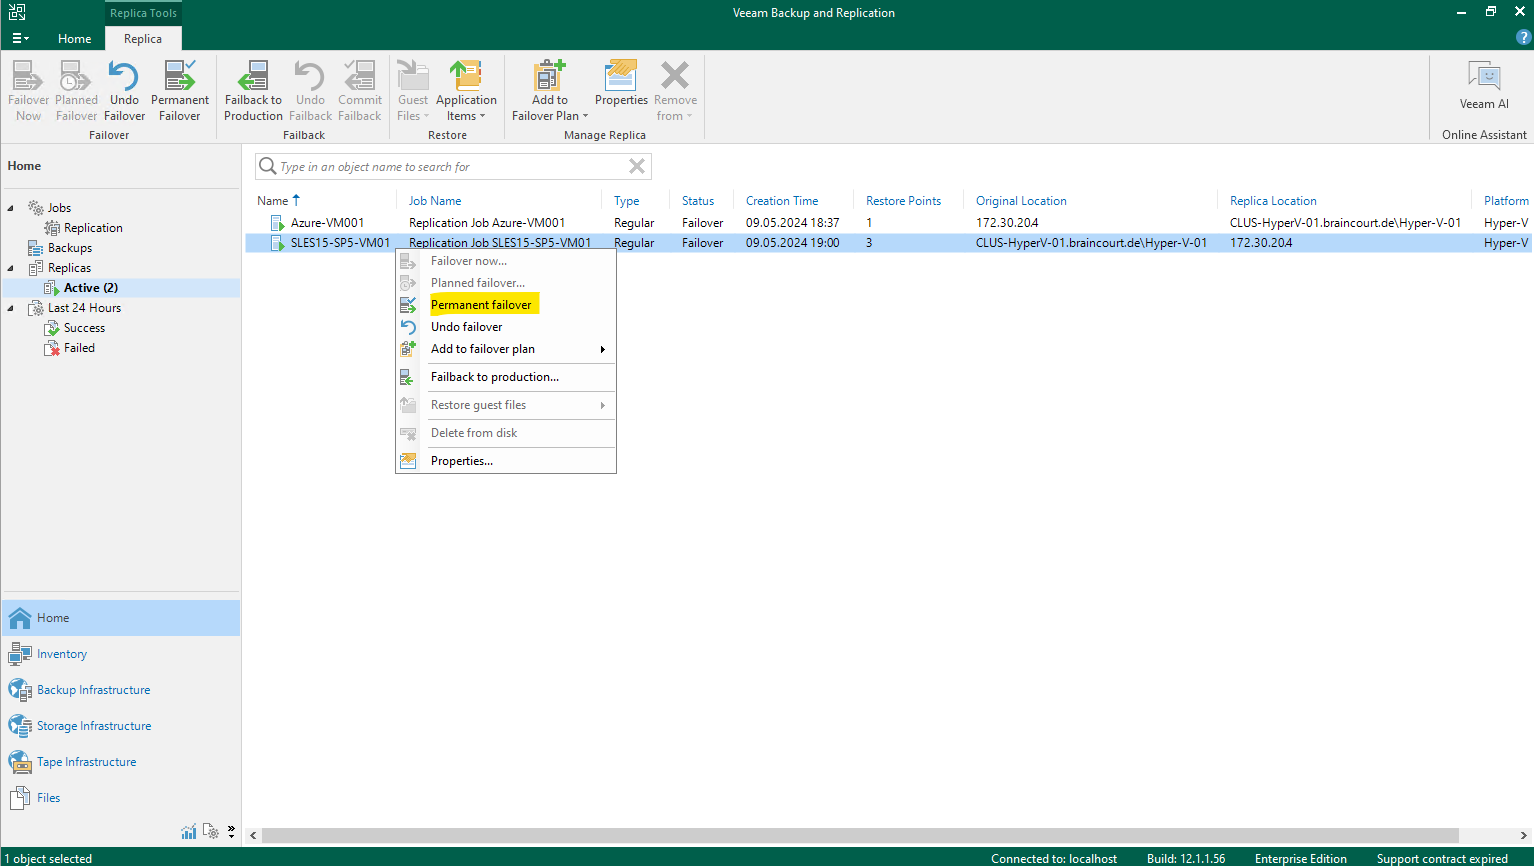
Source: https://helpcenter.veeam.com/docs/backup/vsphere/failover_permanent.html?ver=120
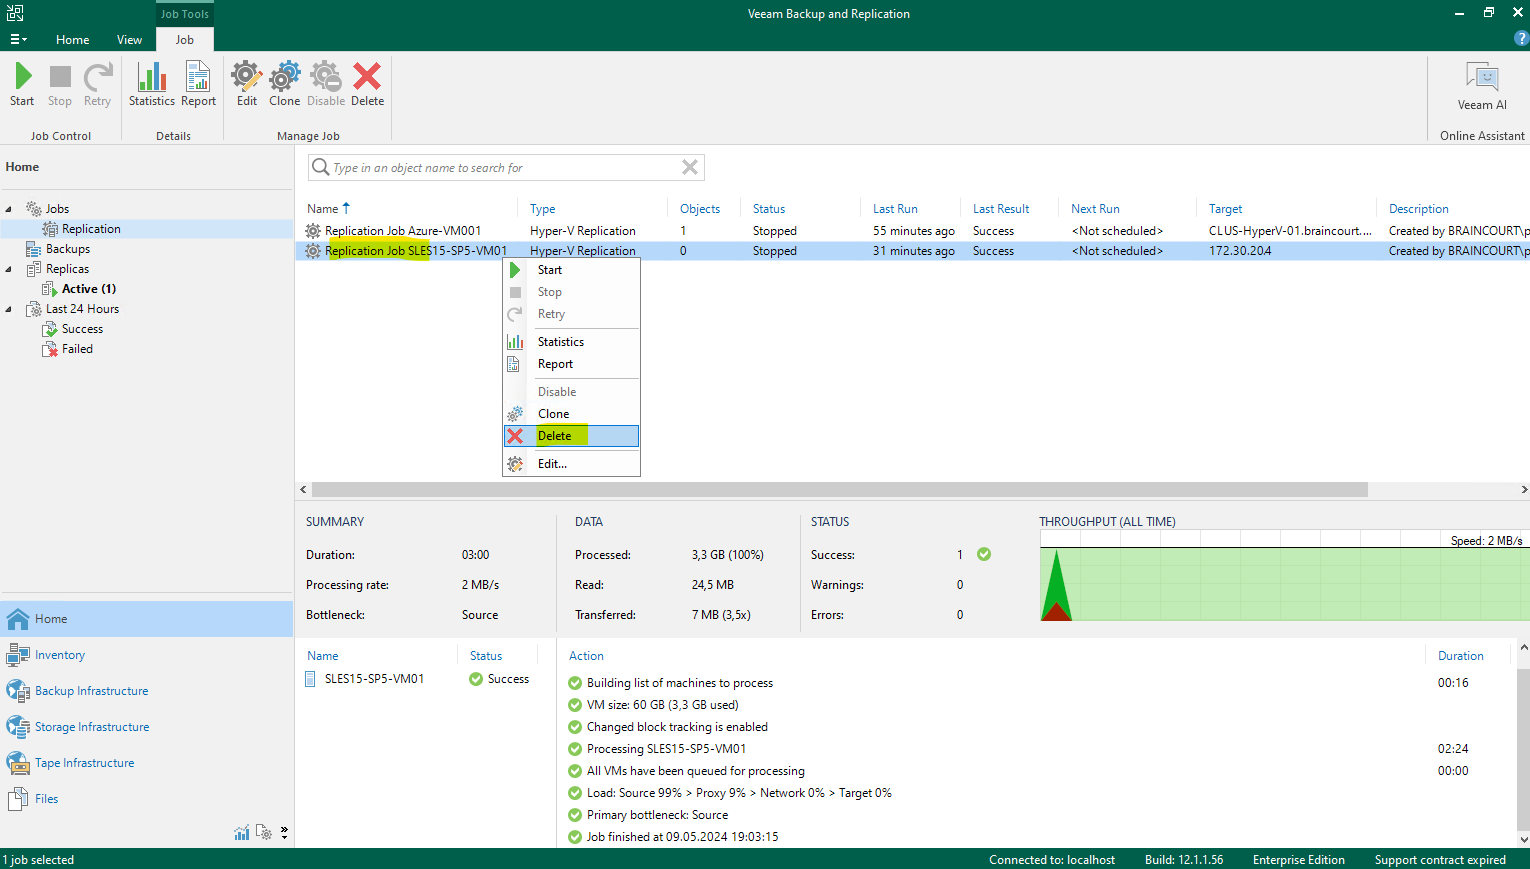
As mentioned to protect the VM replica from corruption after permanent failover is complete, Veeam Backup & Replication reconfigures the current replication job by adding the source VM to the list of exclusions. When the replication job starts, the source VM is skipped from processing. As a result, no data is written to the working VM replica.
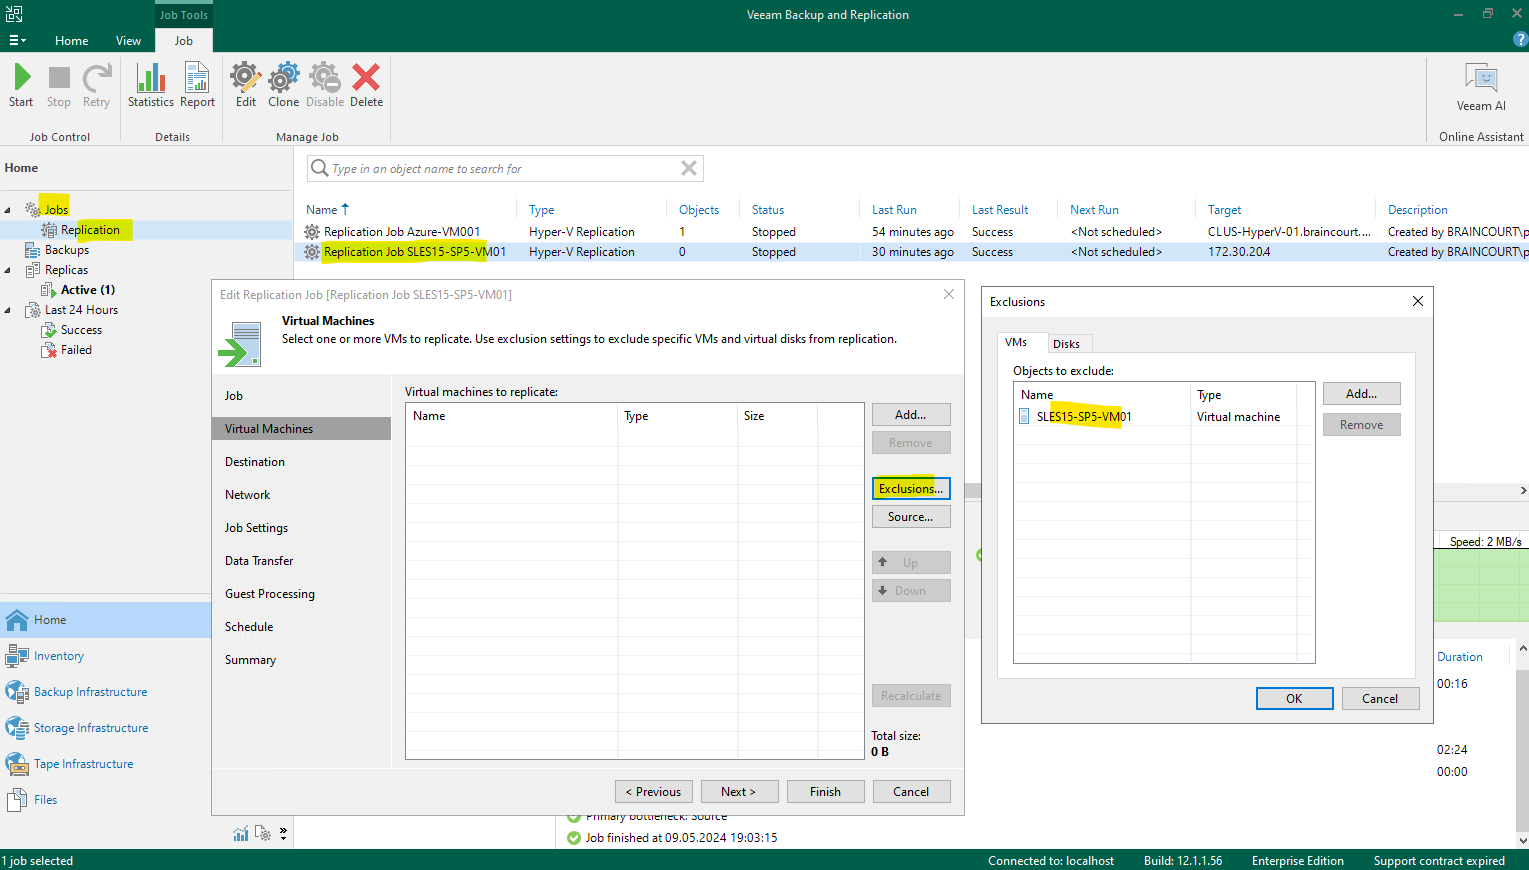
I will nevertheless finally delete the replication job.
Veeam Backup Proxies
The backup server is a Windows-based physical or virtual machine on which Veeam Backup & Replication is installed. It is the core component in the backup infrastructure that fills the role of the “configuration and control center”. The backup server performs all types of administrative activities:
- Coordinates backup, replication, recovery verification and restore tasks
- Controls job scheduling and resource allocation
- Is used to set up and manage backup infrastructure components as well as specify global settings for the backup infrastructure
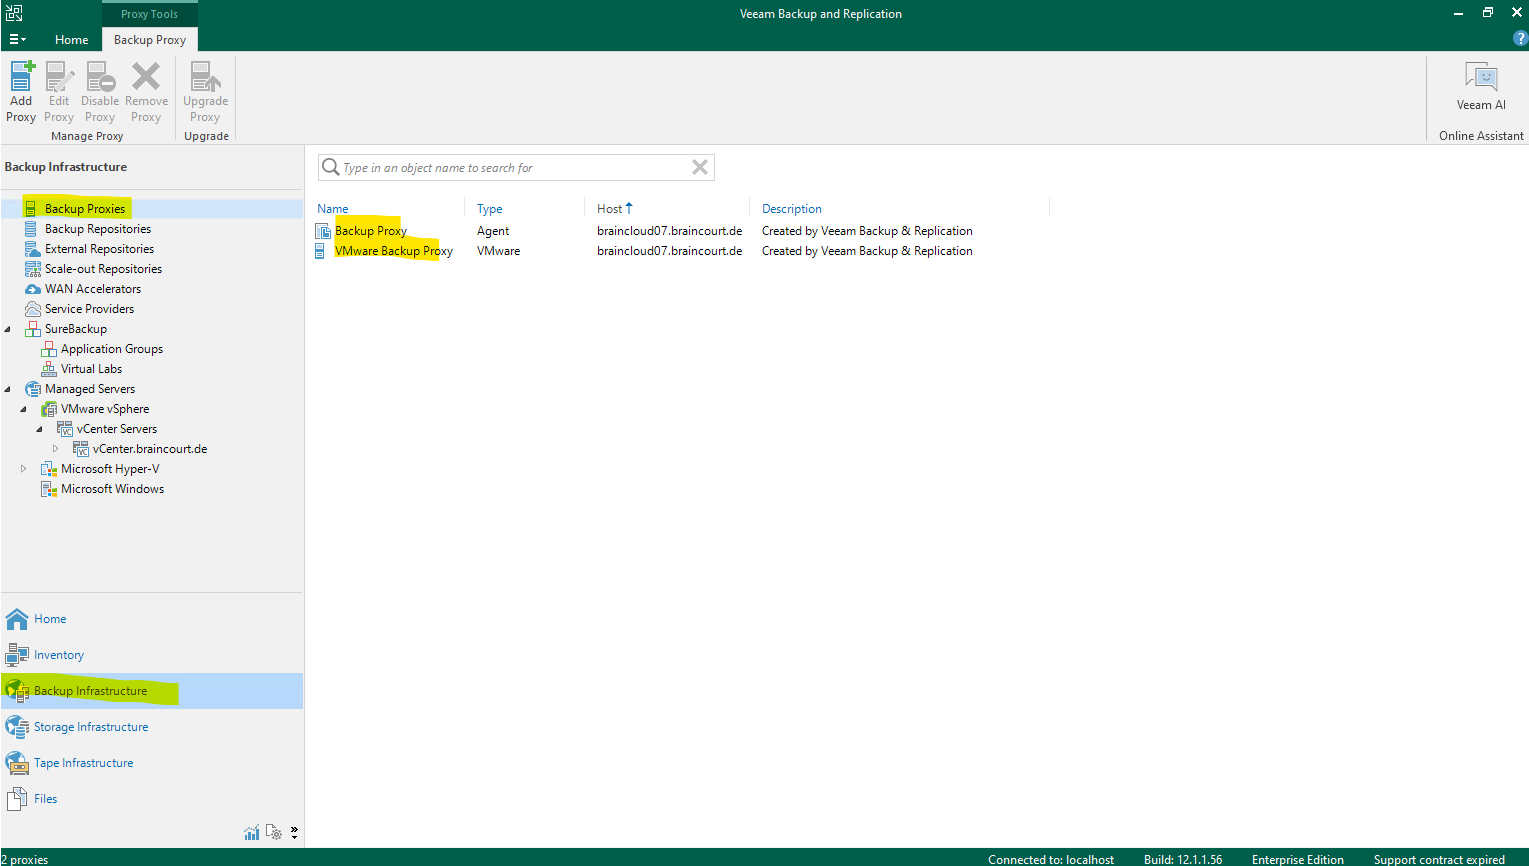
In addition to its primary functions, a newly deployed backup server also performs the roles of the default VMware backup proxy and the backup repository (it manages data handling and data storing tasks).
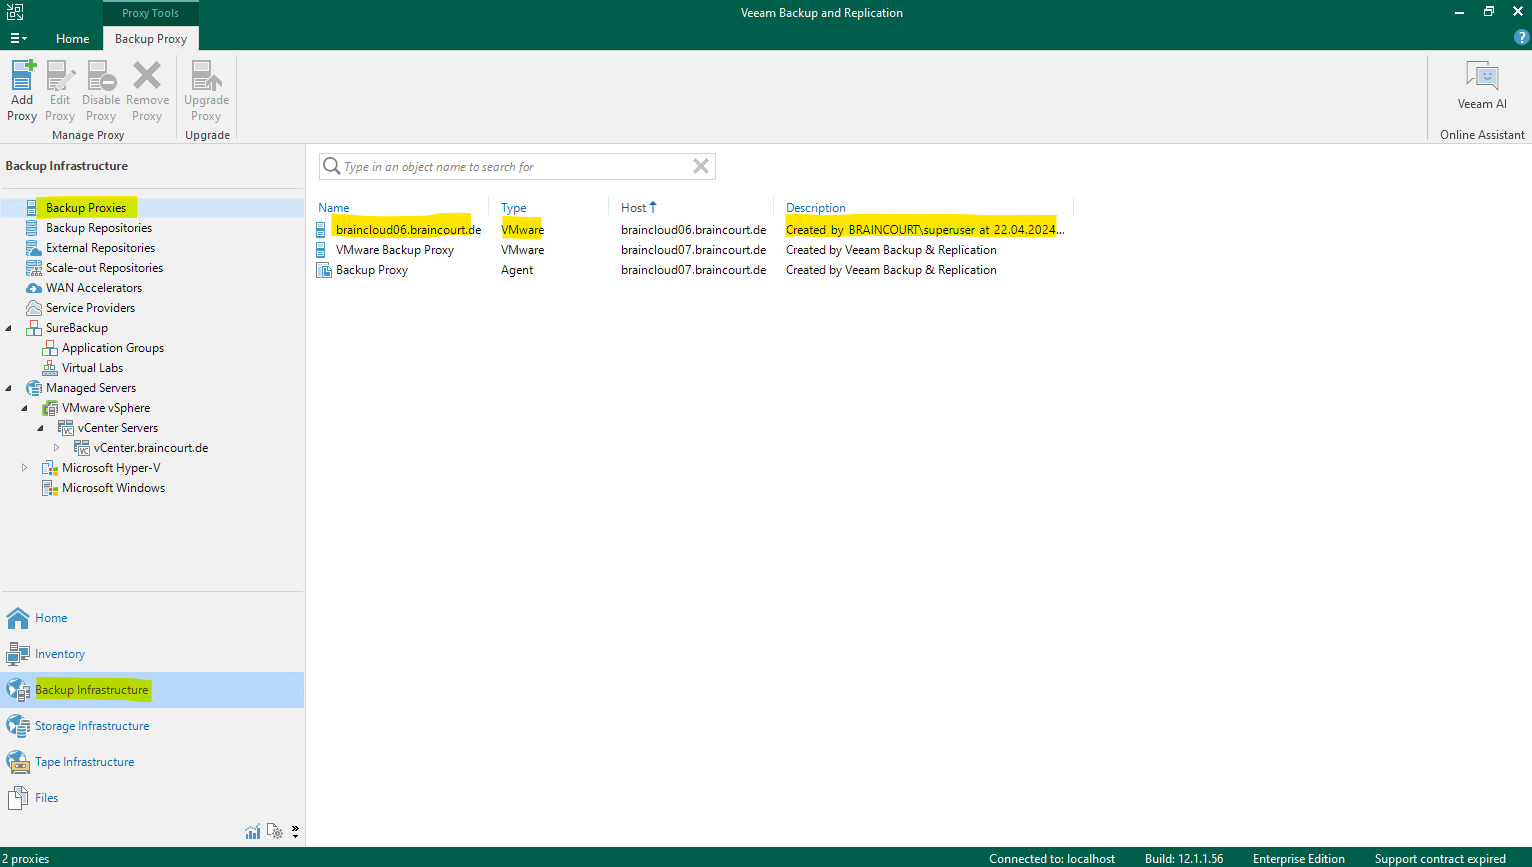
On the screenshot below you can see the by default created proxies on the backup server itself.
Source: https://helpcenter.veeam.com/archive/backup/110/vsphere/backup_proxy.html
VMware Backup Proxy
A VMware backup proxy is an architecture component that sits between the backup server and other components of the backup infrastructure. While the backup server administers tasks, the proxy processes jobs and delivers backup traffic.
Basic VMware backup proxy tasks include the following:
- Retrieving VM data from the production storage
- Compressing
- Deduplicating
- Encrypting
- Sending it to the backup repository (for example, if you run a backup job) or another VMware backup proxy (for example, if you run a replication job)
By default, the role of the proxy is assigned to the backup server itself (screenshot below). However, this is sufficient only for small installations with low traffic load. For large installations, it is recommended to deploy dedicated backup proxies.
To optimize performance of several concurrent jobs, you can use several backup proxies. In this case, Veeam Backup & Replication will distribute the backup workload between available backup proxies. You can deploy backup proxies both in the primary site and in remote sites.
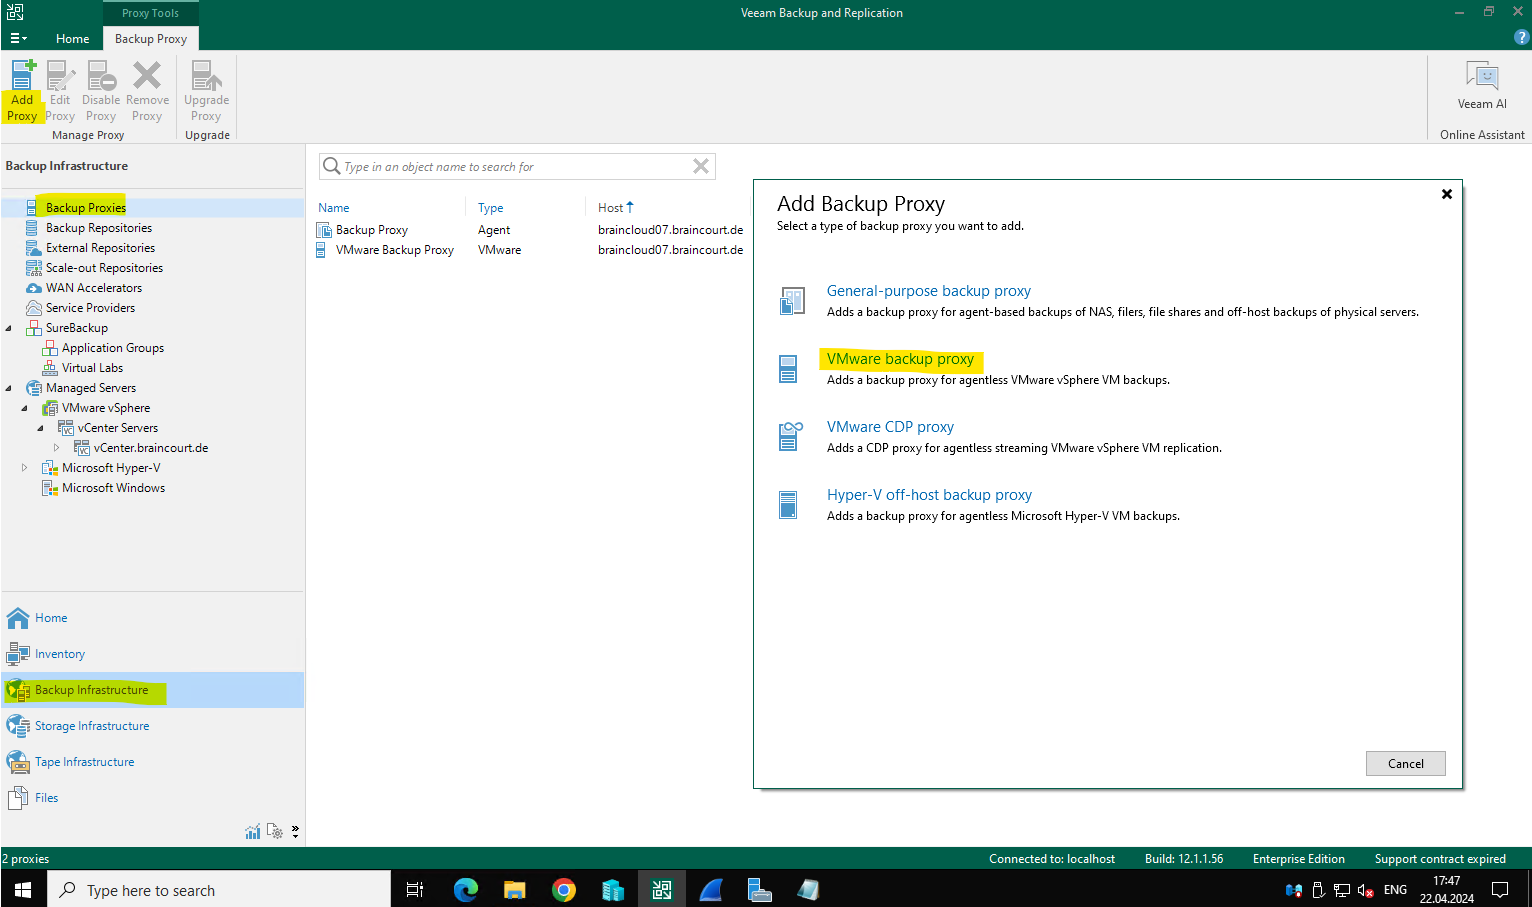
To deploy a proxy, you need to add a Windows-based or Linux-based server to Veeam Backup & Replication and assign the role of the VMware backup proxy to the added server. For requirements and limitations that backup proxies have, see Requirements and Limitations for Backup Proxies.
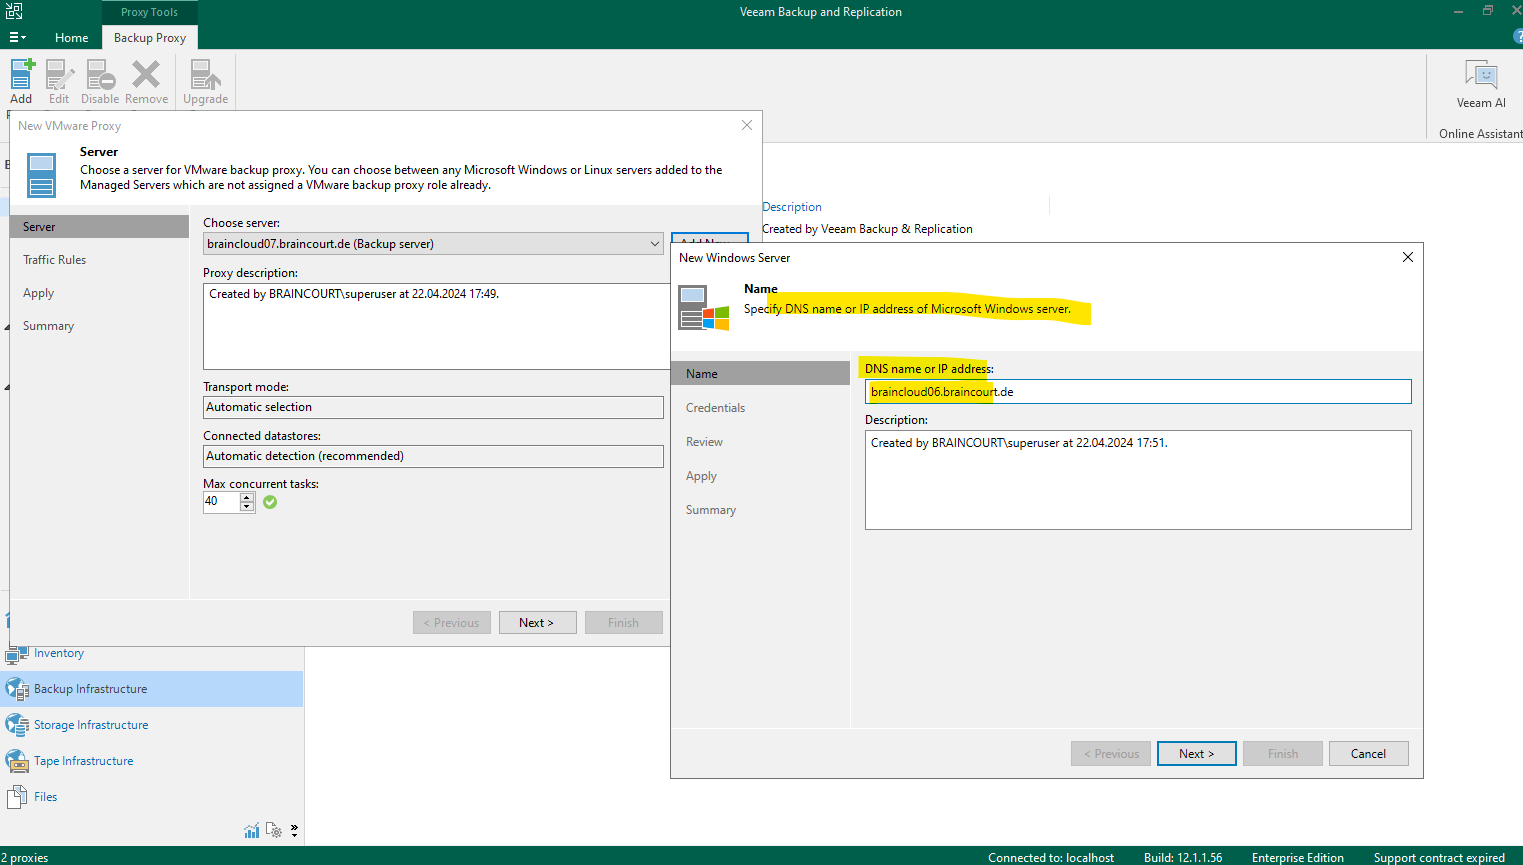
Adding/deploying a dedicated VMware Backup Proxy.
We can also add already registered servers under the Managed Servers node.
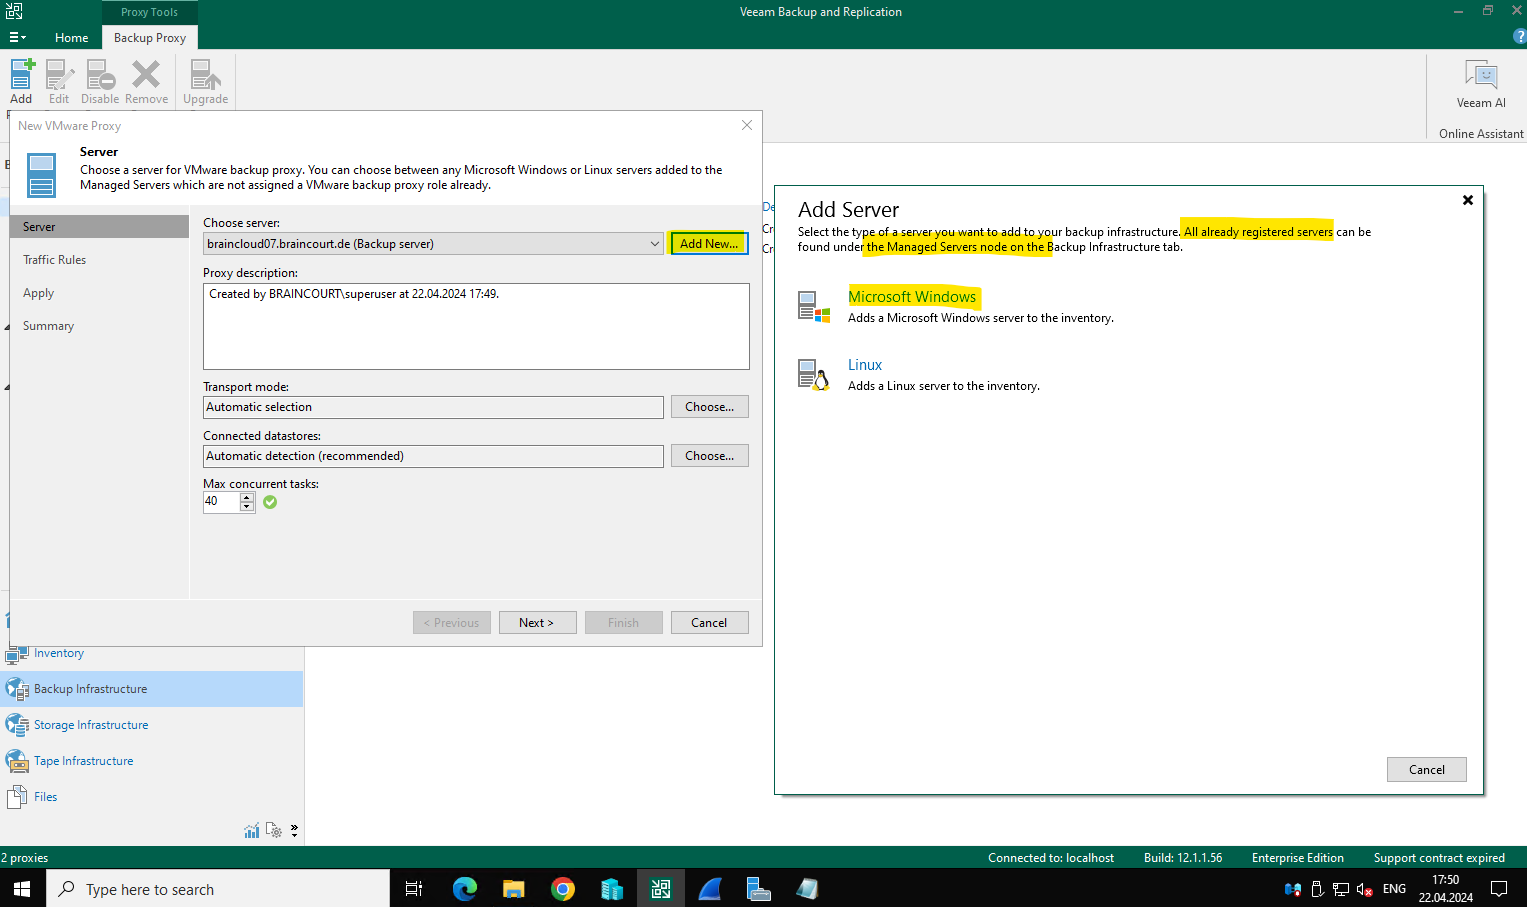
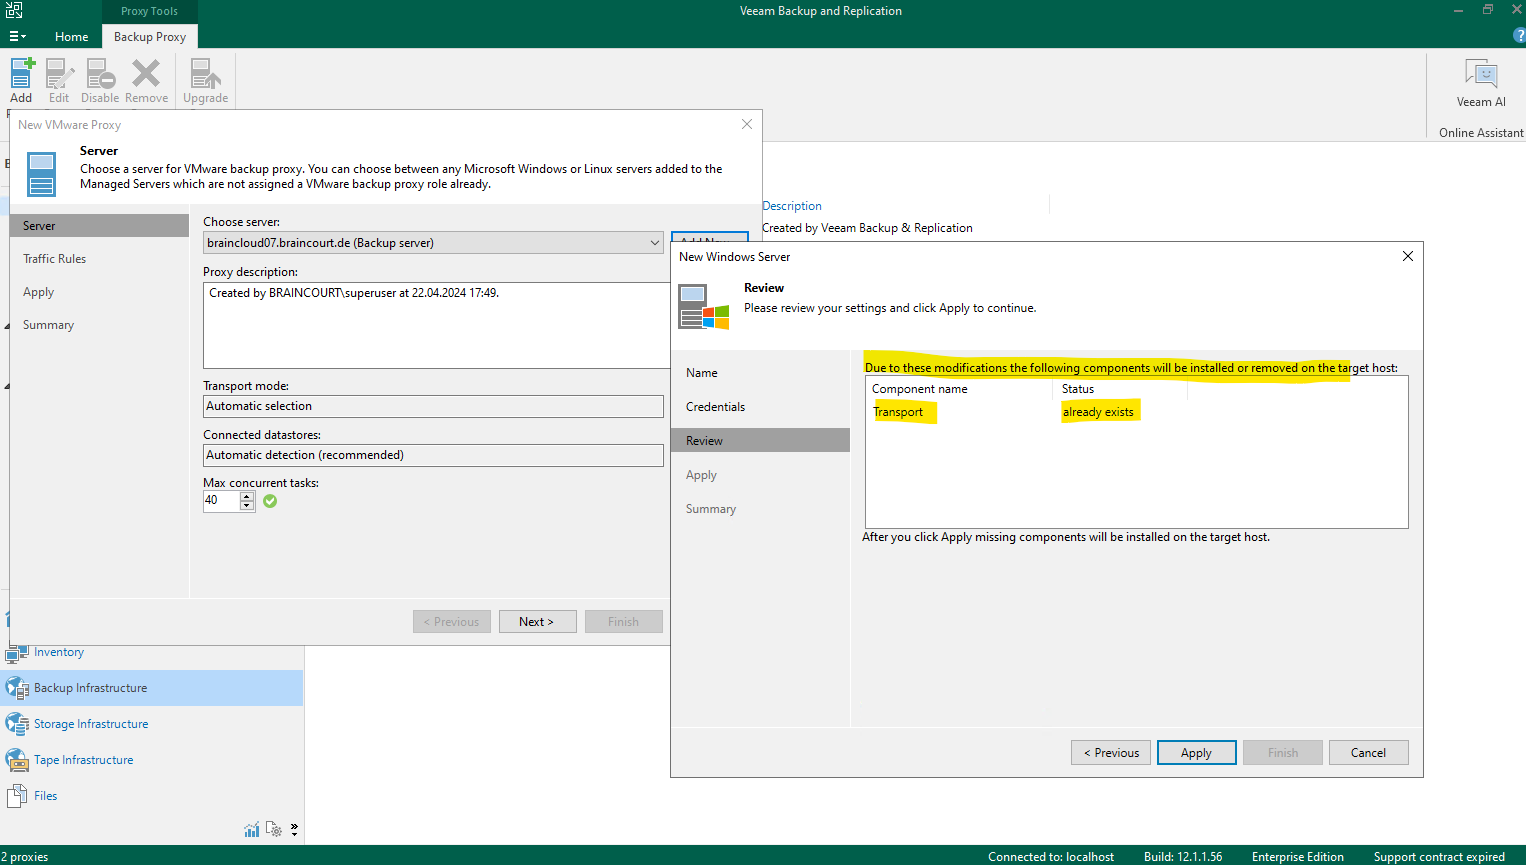
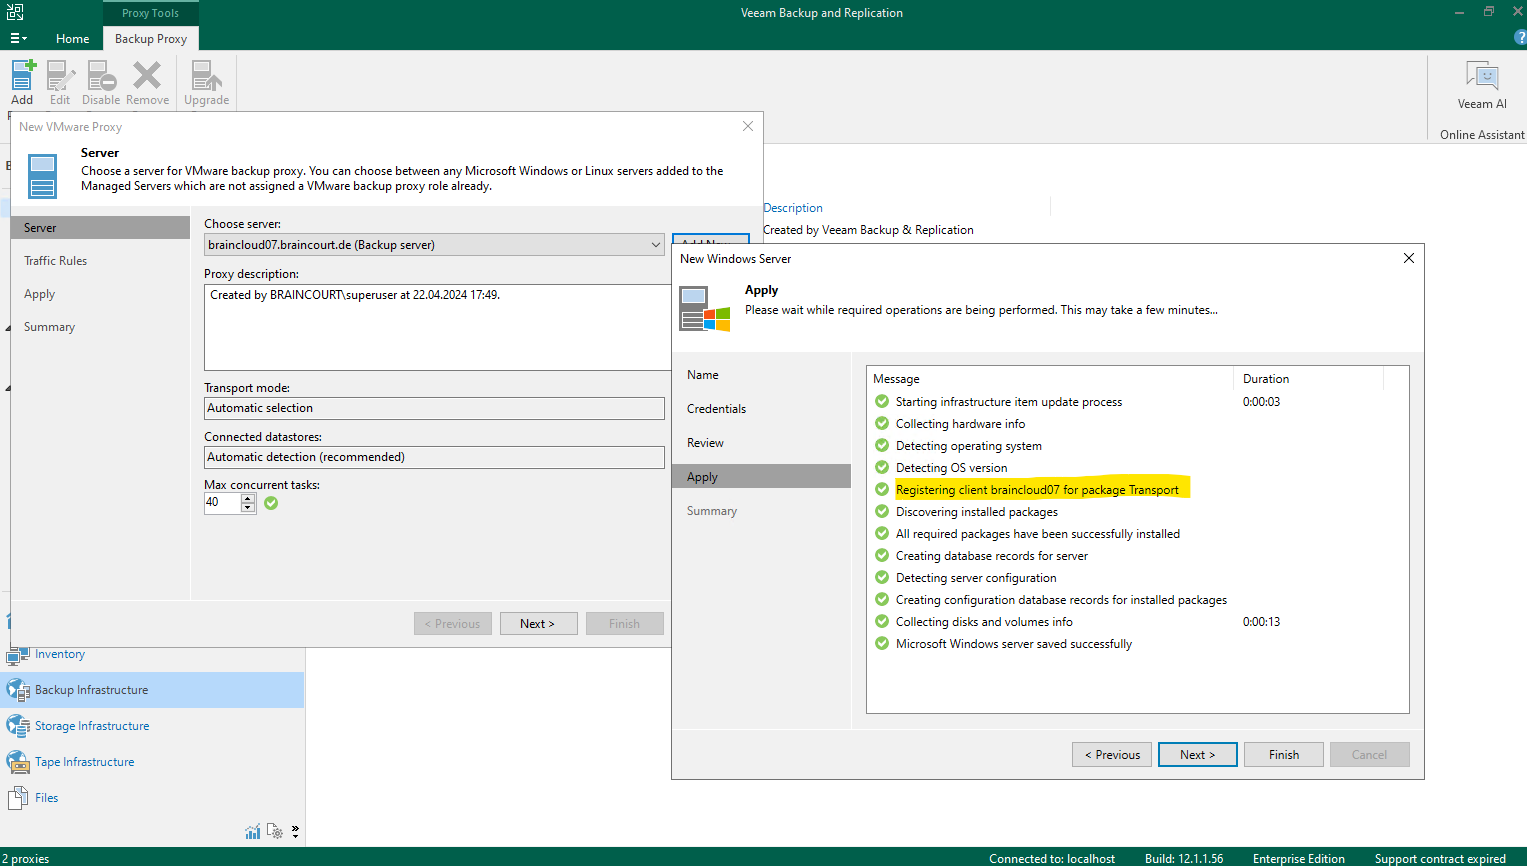
Because on this further server also Veeam Backup and Replication is installed, the Transport component is already by default installed.
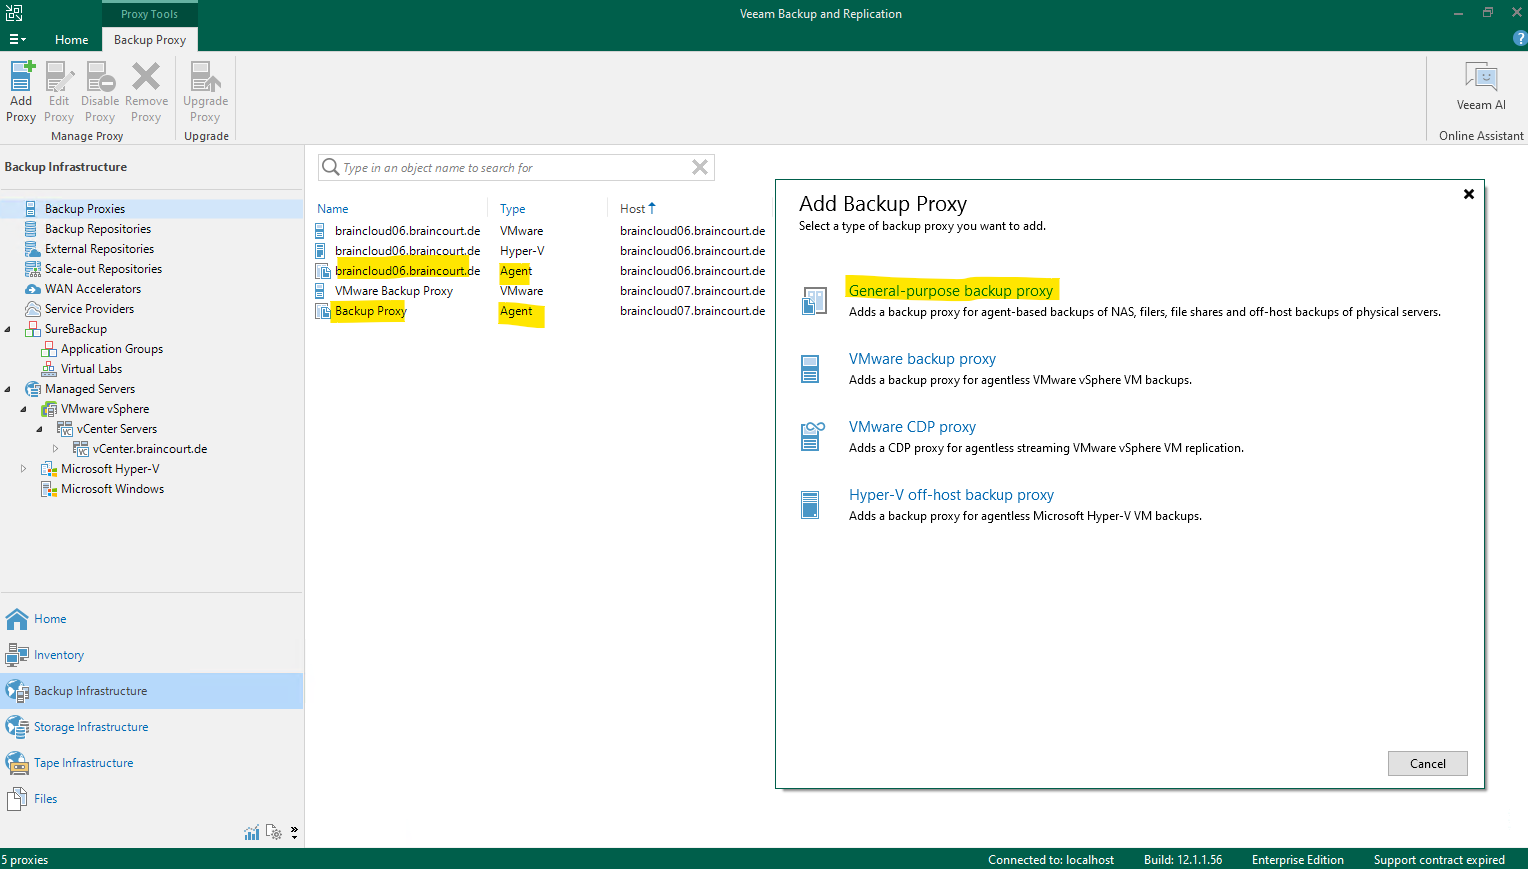
General purpose Backup Proxy
Further we can add a general purpose backup proxy for agent-based backups of NAS, file shares and off-host backups of physical servers.
Below in the screenshot you will see two general purpose backup proxies with the Type Agent.
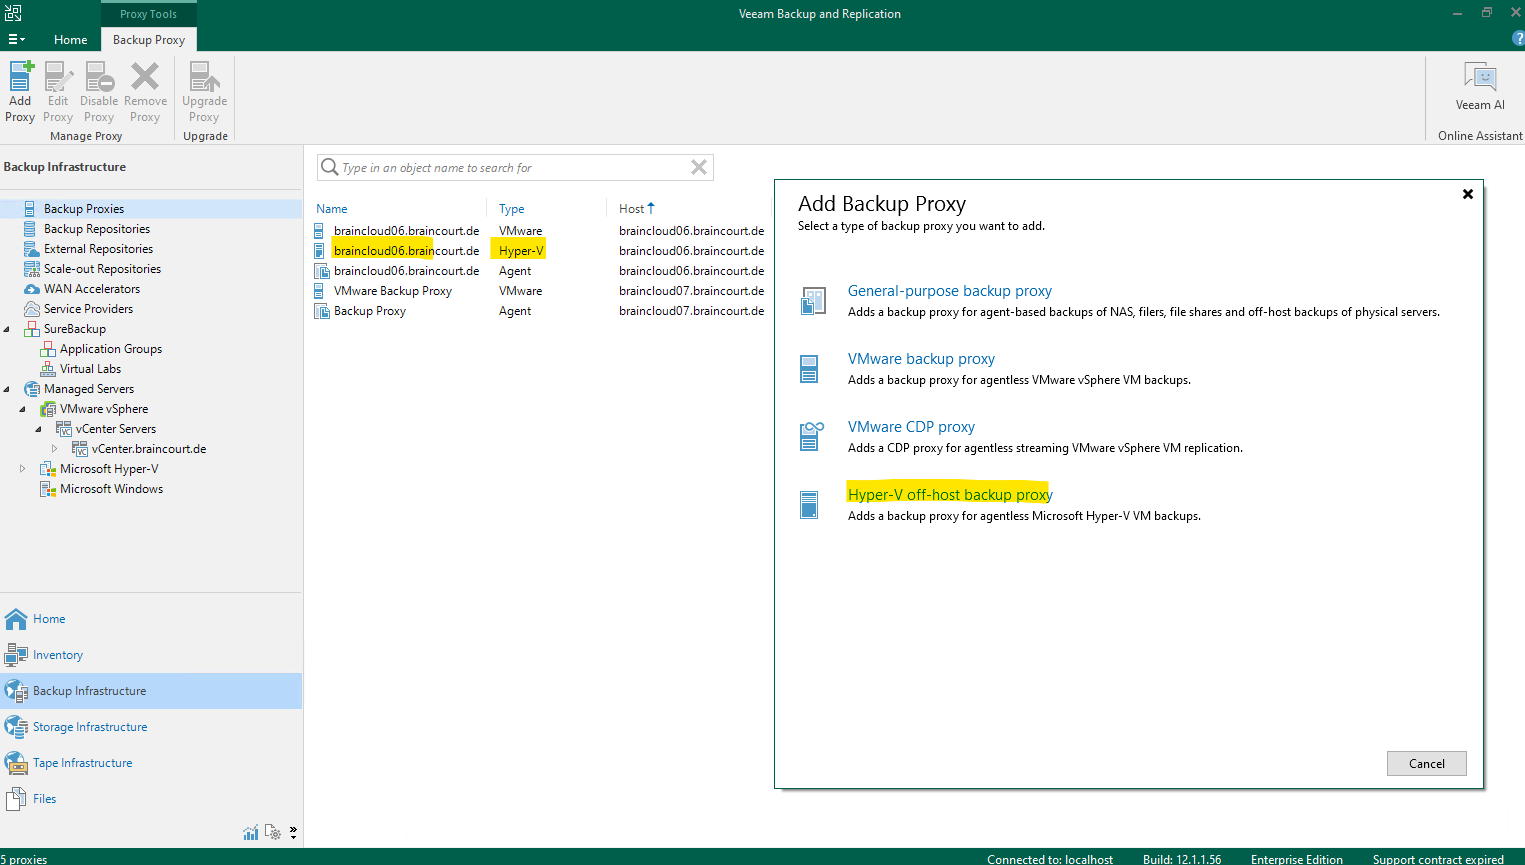
Hyper-V off-host backup proxy
For agentless Microsoft Hyper-V VM backups we can add the Hyper-V off-host backup proxy.
Source: https://bp.veeam.com/vbr/2_Design_Structures/D_Veeam_Components/D_backup_proxies/hyperv_proxies.html
Links
Veeam Backup & Replication 12 Replication
https://helpcenter.veeam.com/docs/backup/vsphere/replication.html?ver=120Performing Instant VM Recovery of Workloads to VMware vSphere VMs
https://helpcenter.veeam.com/archive/backup/100/vsphere/performing_instant_recovery_vm.htmlVeeam Backup & Replication Supported Environments
https://www.veeam.com/backup-replication-system-requirements.html
Related Posts
Latest posts
Protecting NetApp ONTAP Workloads with Autonomous Ransomware Protection (ARP) – Part 4 – Detecting and Recovering SMB Workloads from Ransomware
Follow me on LinkedIn