Set up a 2-tier PKI in Active Directory Certificate Services (AD CS) – Part 3
In this part of my blog post series we will set up the Subordinate CA (Intermediate CA) which will be domain joined.
Subordinate CAs are responsible for issuing certificates directly to end-entities such as users, computers, and devices.
Subordinate CAs are cryptographically signed by a parent CA, which is often the root CA. As a result, systems that trust the root CA, automatically trust the subordinate CAs and the end-entity certificates that the subordinate CAs issue.
Source: https://cloud.google.com/certificate-authority-service/docs/create-subordinate-ca
- Introduction
- Set up the Subordinate CA (Intermediate CA)
- Secure the CA Web Enrollment role service pages with SSL/TLS
- CA Web Enrollment Page prompts for Authentication
- Deploy Root CA Certificate for Domain Members
- Troubleshooting
- How to remove a Enterprise Windows Certificate Authority
- Blog Post Series – Parts Summary
- Links
Introduction
CAs that are not root CAs are considered subordinate. The first subordinate CA in a hierarchy obtains its CA certificate from the root CA. This first subordinate CA can use this key to issue certificates that verify the integrity of another subordinate CA. These higher subordinate CAs are referred to as intermediate CAs. An intermediate CA is subordinate to a root CA, but it serves as a higher certifying authority to one or more subordinate CAs.
An intermediate CA is often referred to as a policy CA because it is typically used to separate classes of certificates that can be distinguished by policies. For example, policy separation includes the level of assurance that a CA provides or the geographical location of the CA to distinguish different end-entity populations. A policy CA can be online or offline.
Set up the Subordinate CA (Intermediate CA)
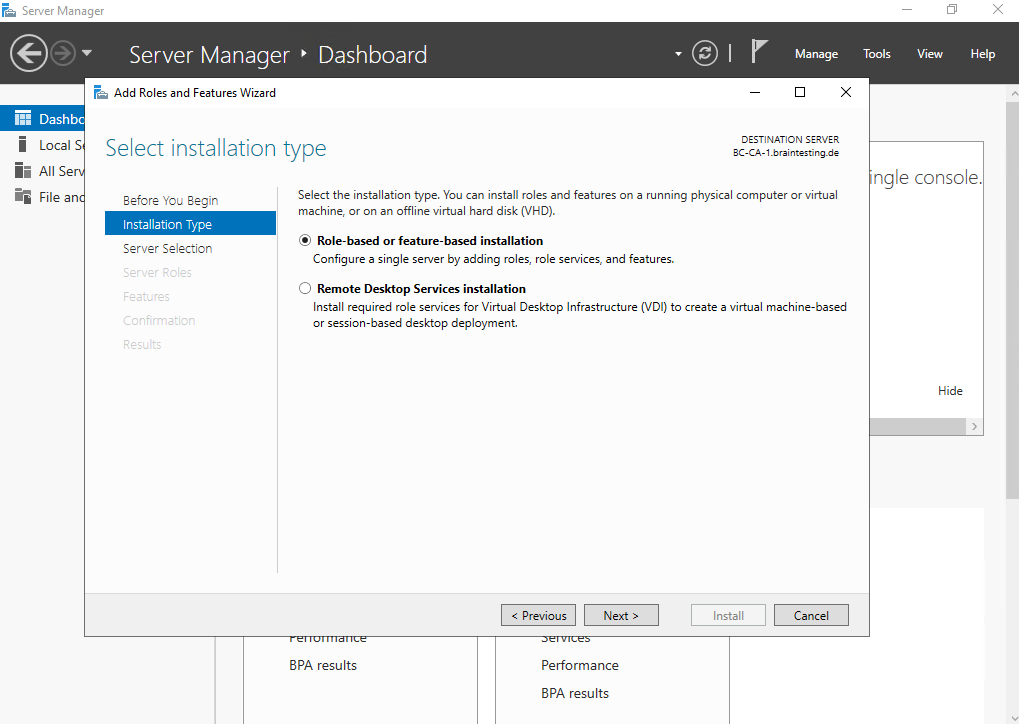
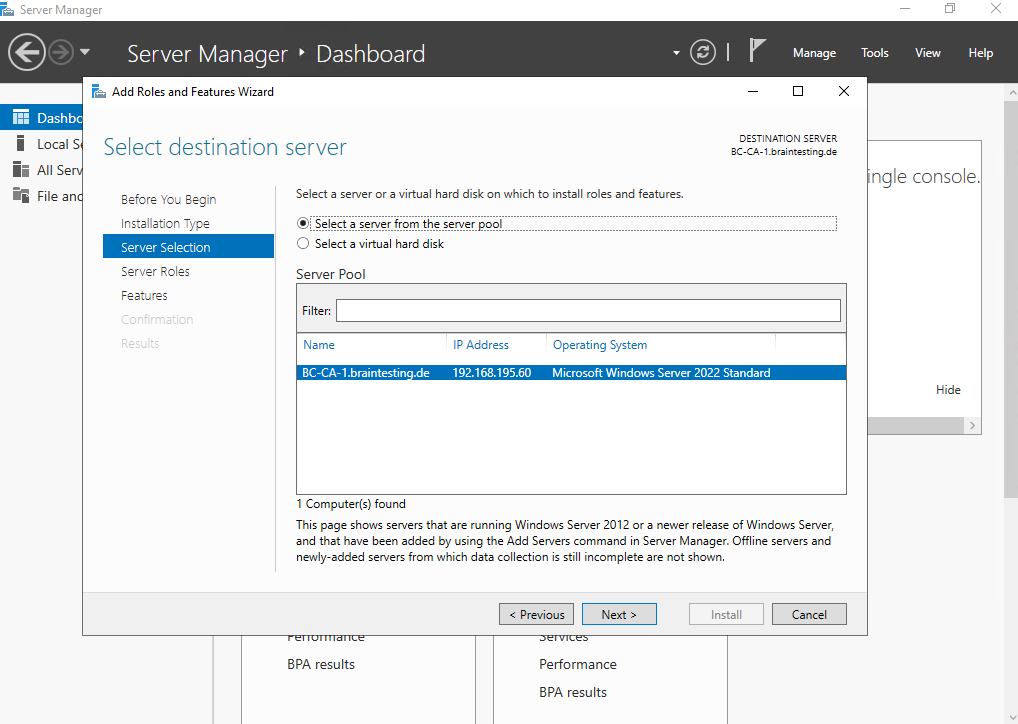
As previously in Part 2 for the Root CA, we will now also install the the AD CS server role on another dedicated Windows Server 2022.
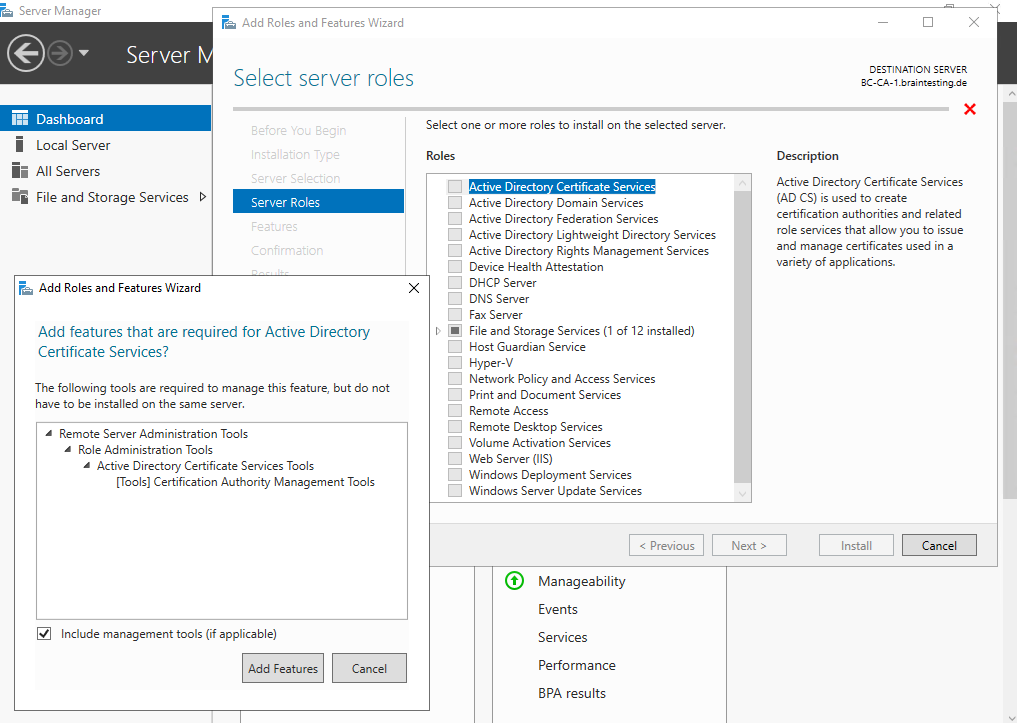
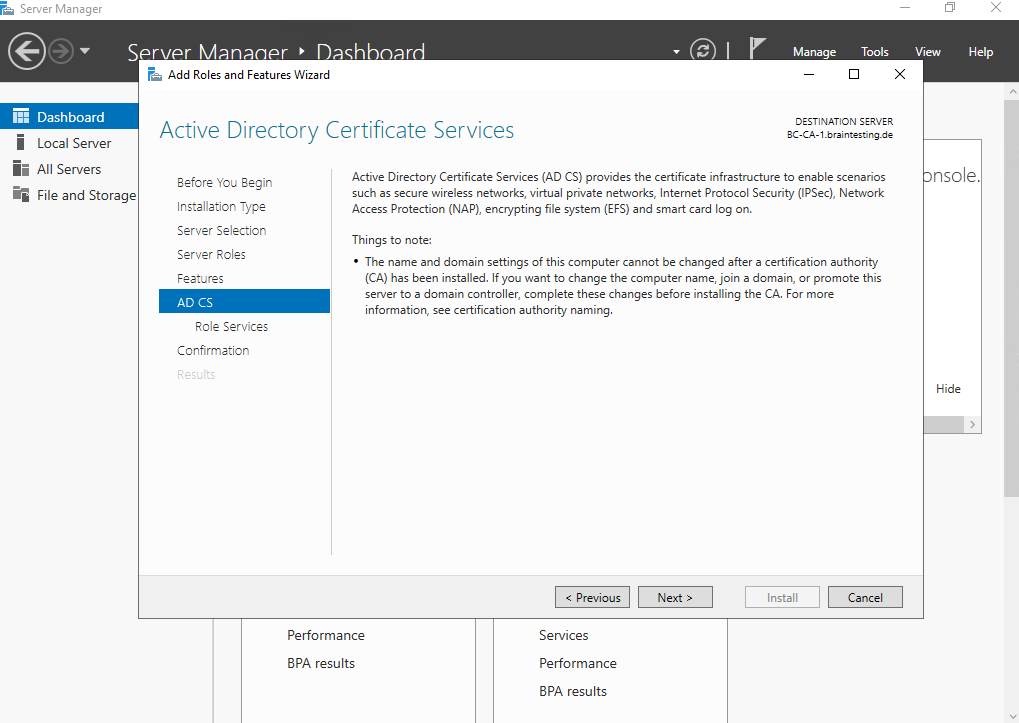
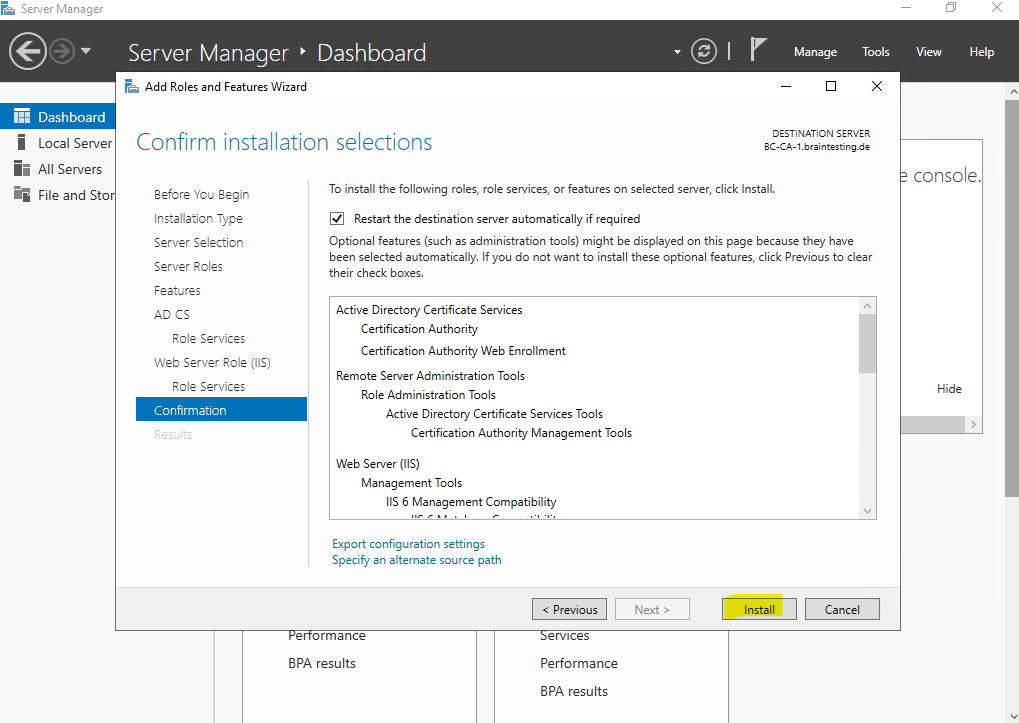
For the Subordinate CA (Intermediate CA) we select the Certificate Authority and Certification Authority Web Enrollment role to install.
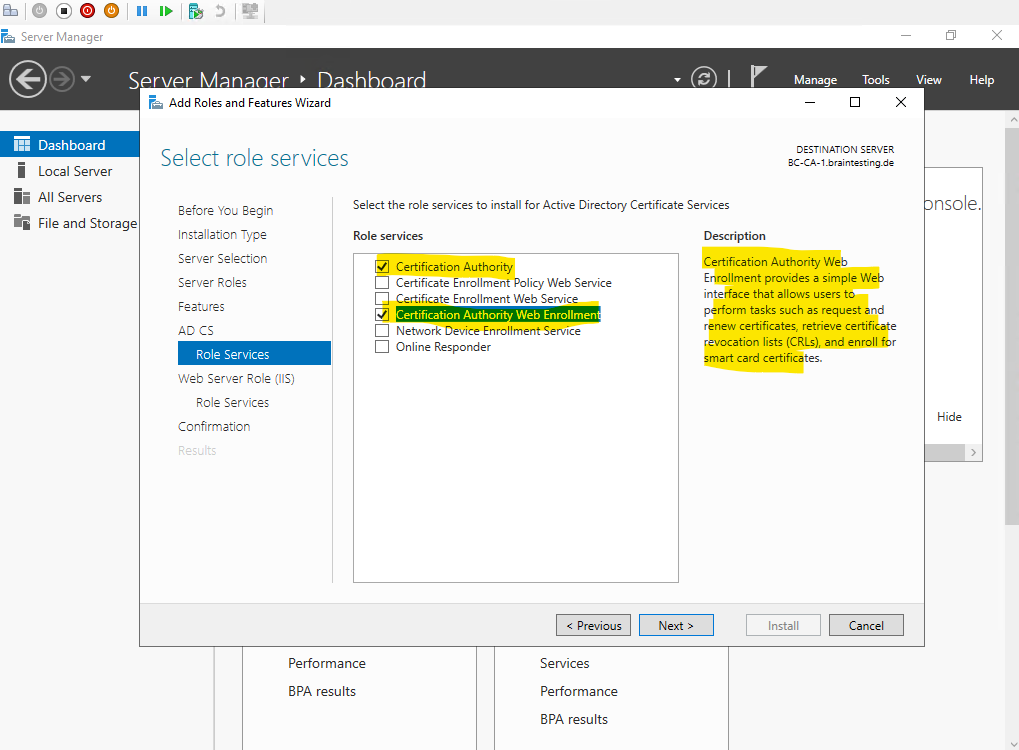
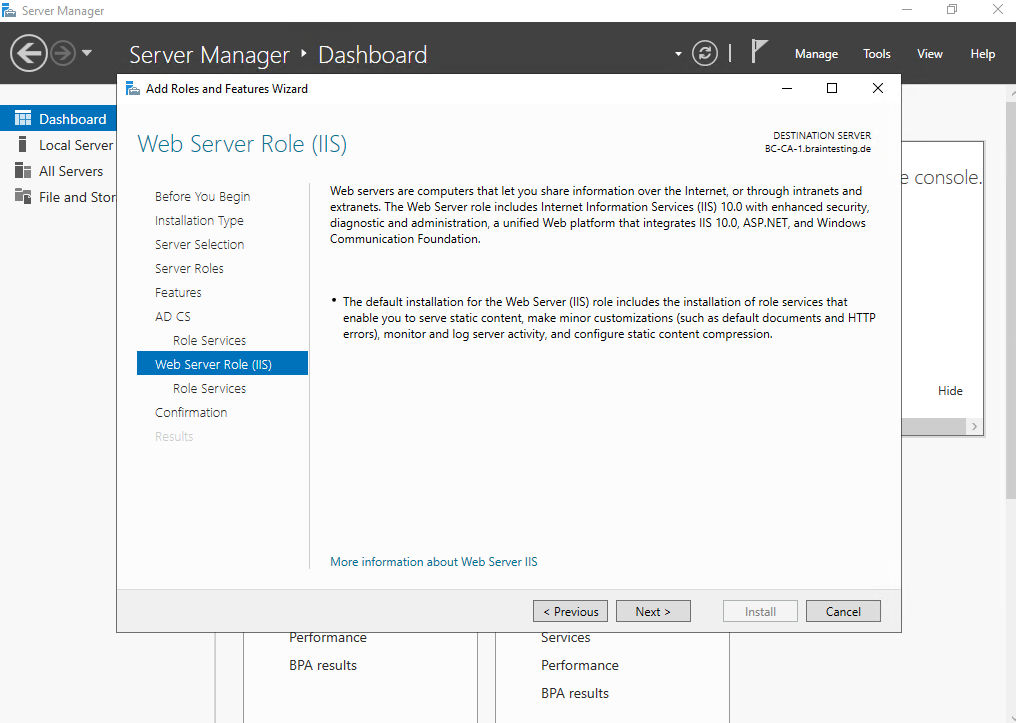
For the Certification Authority Web Enrollment role also the Web Server Role (IIS) role is required and will be installed along with the CA.
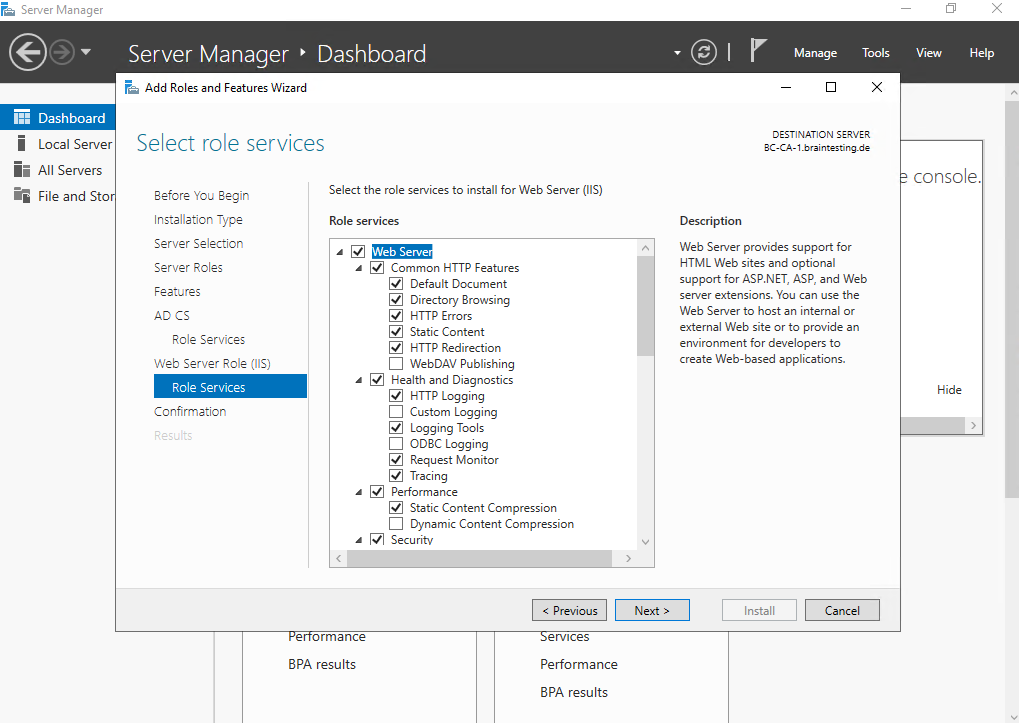
Leave the role services as checked by default.
Finally click on Install.
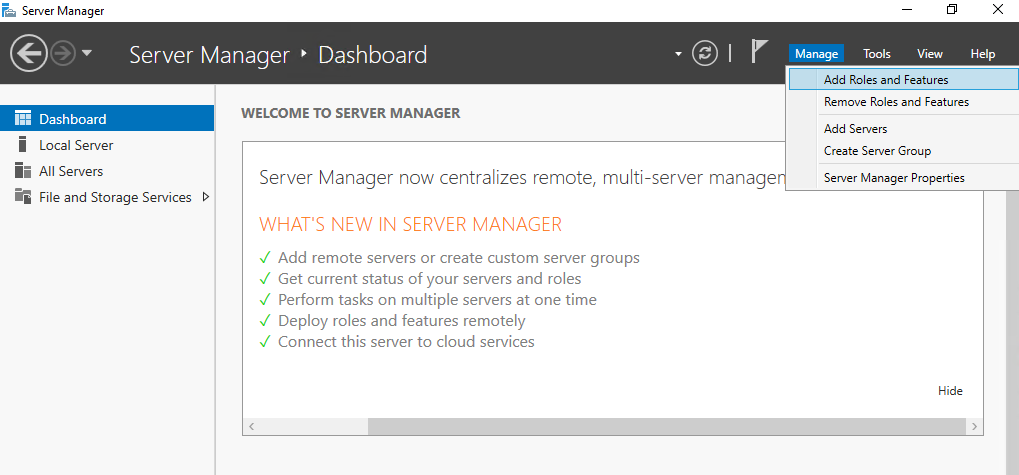
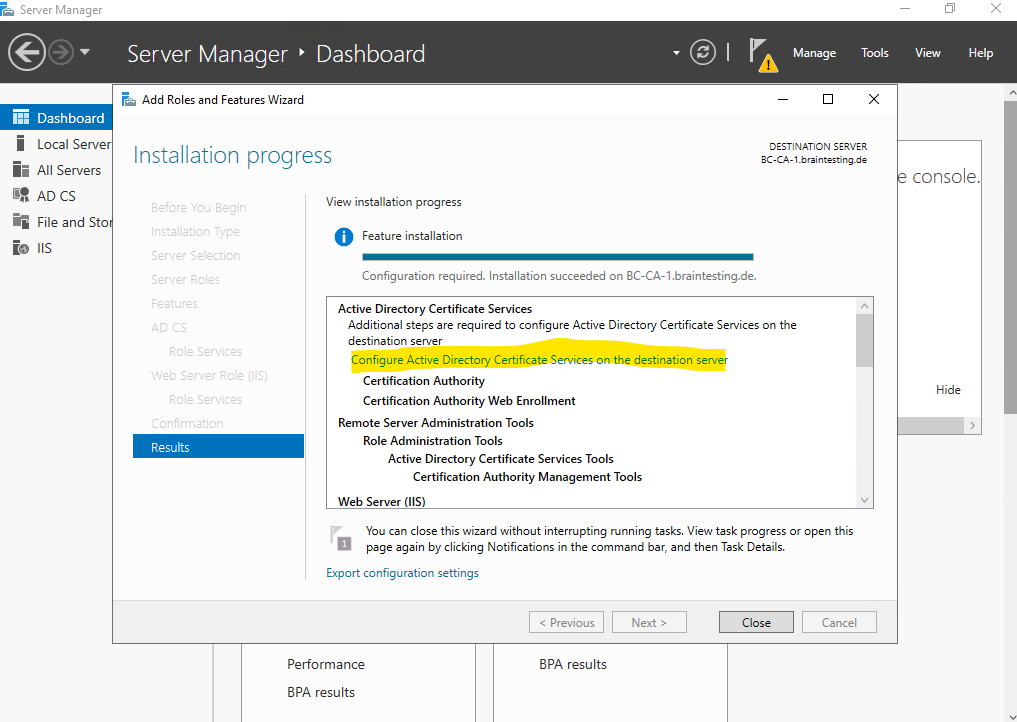
Now we can configure the CA as usually by either clicking on the link below or by clicking on the yellow warning triangle icon.
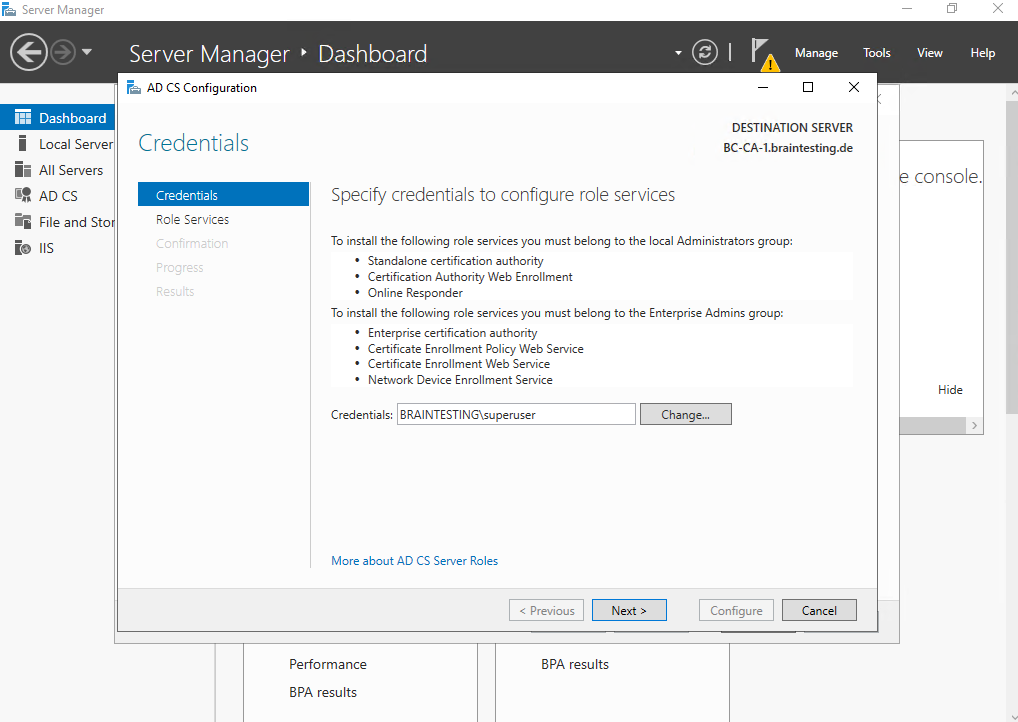
Under Credentials I will use my Enterprise Admin of the domain.
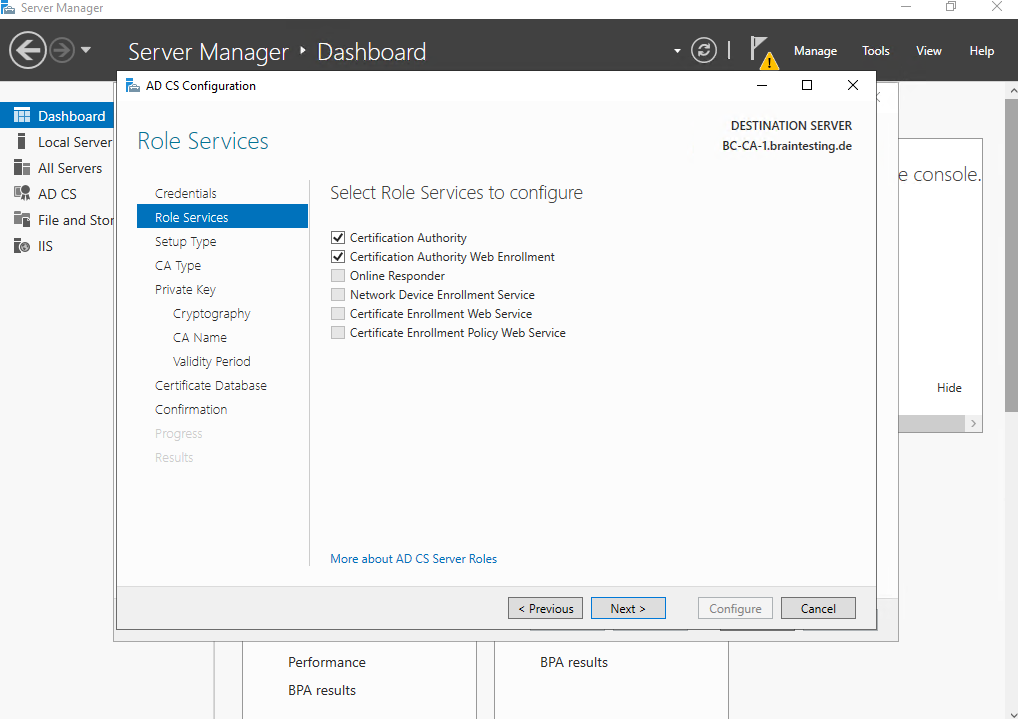
I will select and configure both roles services we installed previously.
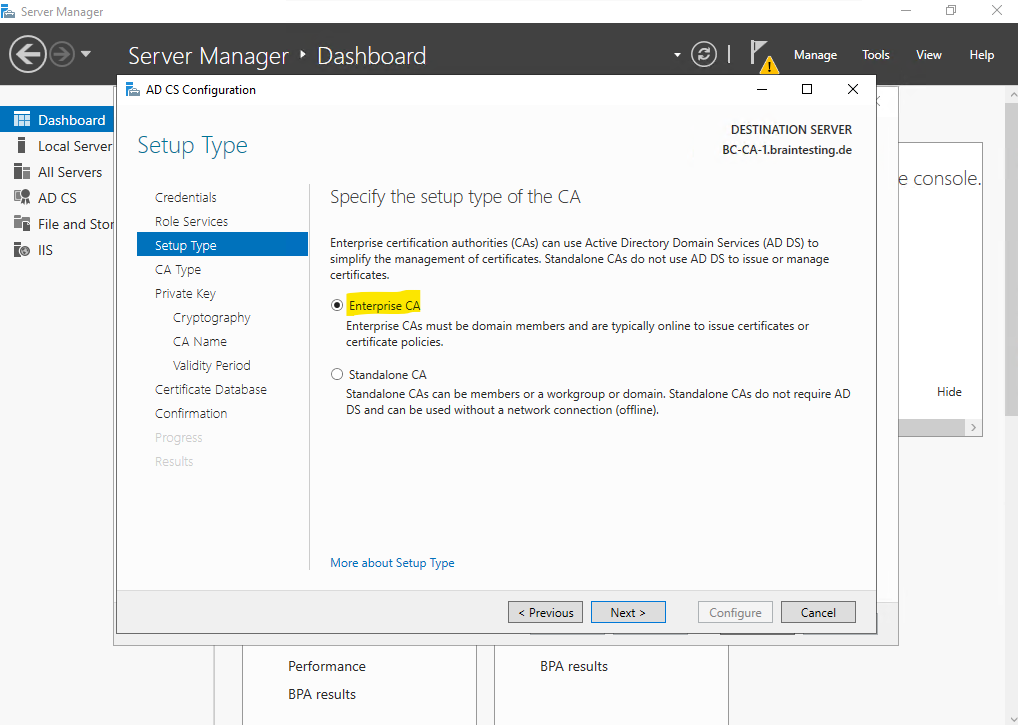
This time we need to select Enterprise CA as type for our Subordinate CA (Intermediate CA) which is a member our Active Directory domain and is online.
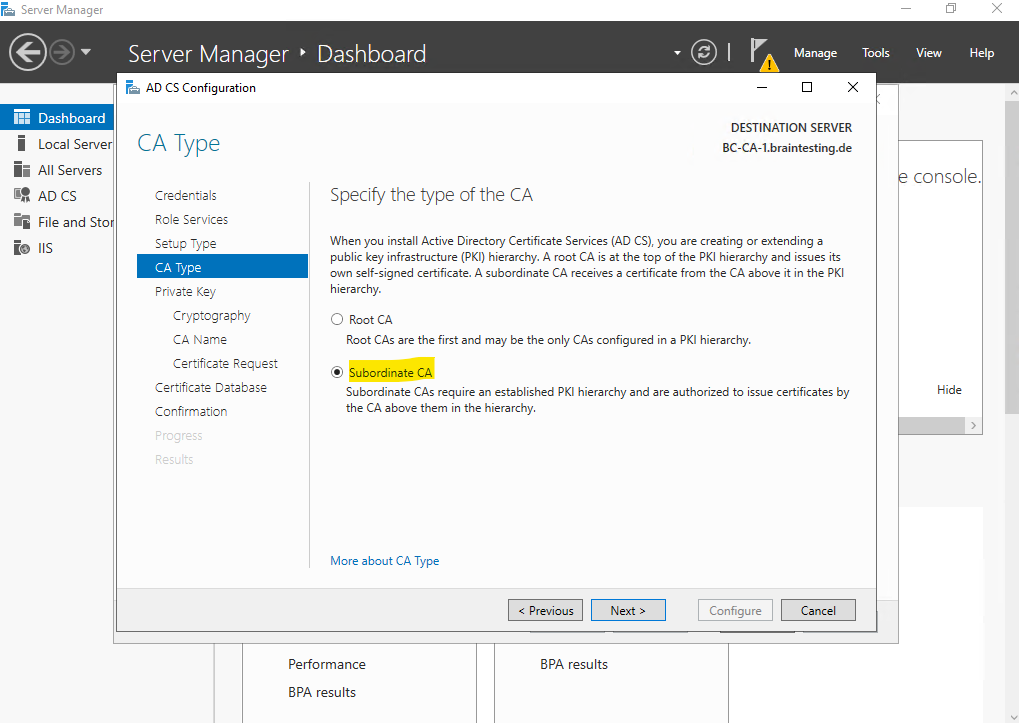
For the CA type we select Subordinate CA.
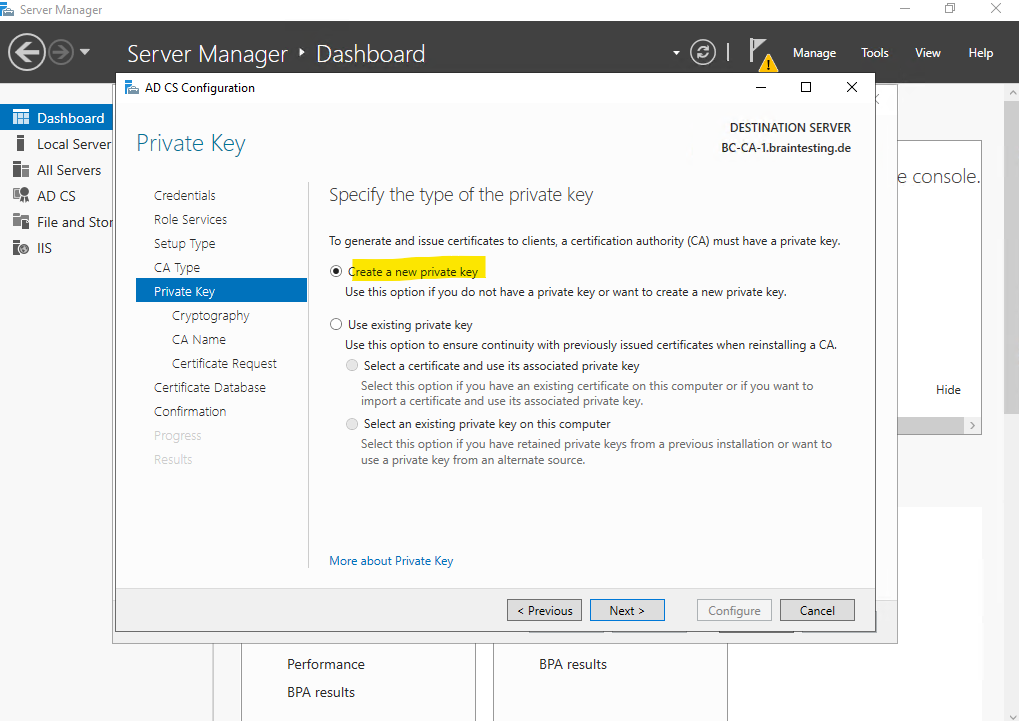
In order to generate and issue certificates to clients, our Subordinate CA (Intermediate CA) must have a private key. Because we build this PKI from the scratch, I will select to create a new private key below.
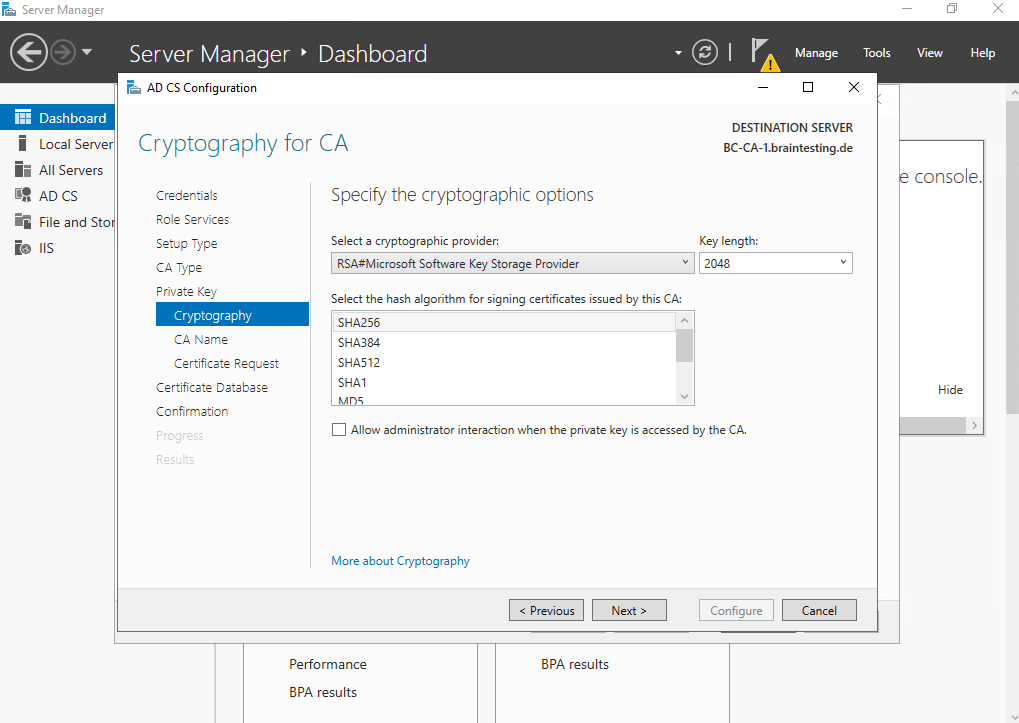
As already previously for the Root CA, we also need to specify the cryptographic options for our Subordinate CA (Intermediate CA) below. I will use here also the options selected by default.
More about the built-in cryptographic providers you will find on the following article by Microsoft https://learn.microsoft.com/en-us/previous-versions/windows/it-pro/windows-server-2012-R2-and-2012/hh831574(v=ws.11)#select-cryptographic-options.
Allow administrator interaction when the private key is accessed by the CA is an option that is typically used with hardware security modules (HSMs). This allows the cryptographic provider to prompt the user for additional authentication when the private key of the CA is accessed. This option can be used to help prevent unapproved use of the CA and its private key by requiring the administrator to enter a password before every cryptographic operation.
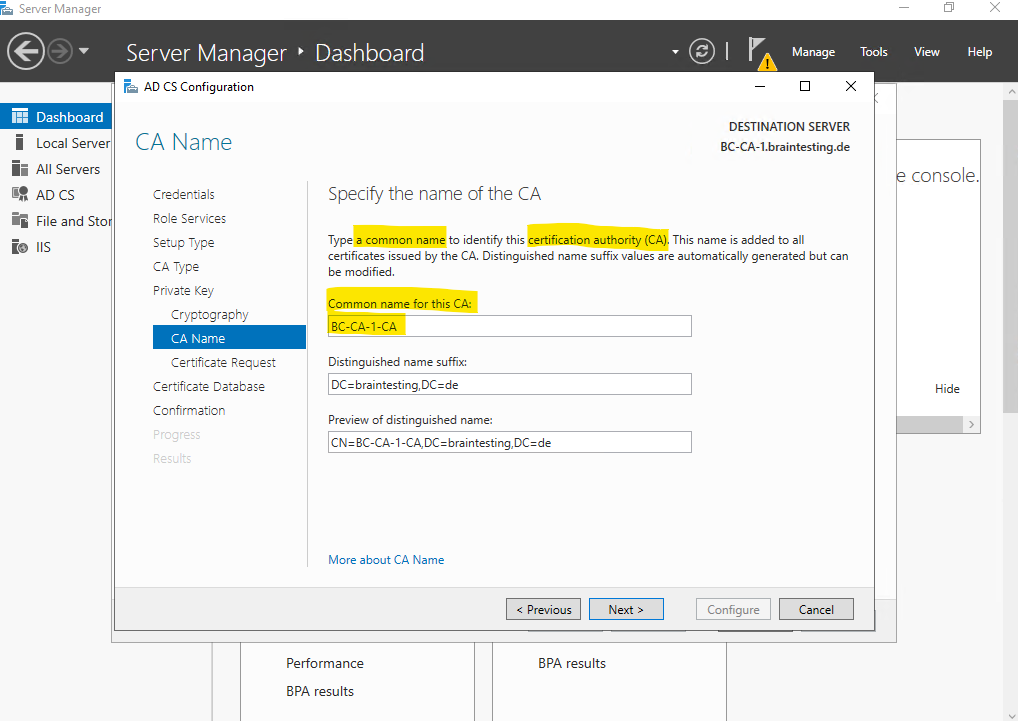
As previously for our Root CA, we also need to specify a name for our Subordinate CA (Intermediate CA).
More about CA naming conventions you will find in the following article by Microsoft https://learn.microsoft.com/en-us/previous-versions/windows/it-pro/windows-server-2012-R2-and-2012/hh831574(v=ws.11)#establish-a-ca-name.
Because we are using an offline standalone Root CA which is not accessible by this Subordinate CA (Intermediate CA), we to request manually a certificate from our parent CA (Root CA) to make this Subordinate CA (Intermediate CA) finally operational.
Adjust the path to save the certificate request file if needed.

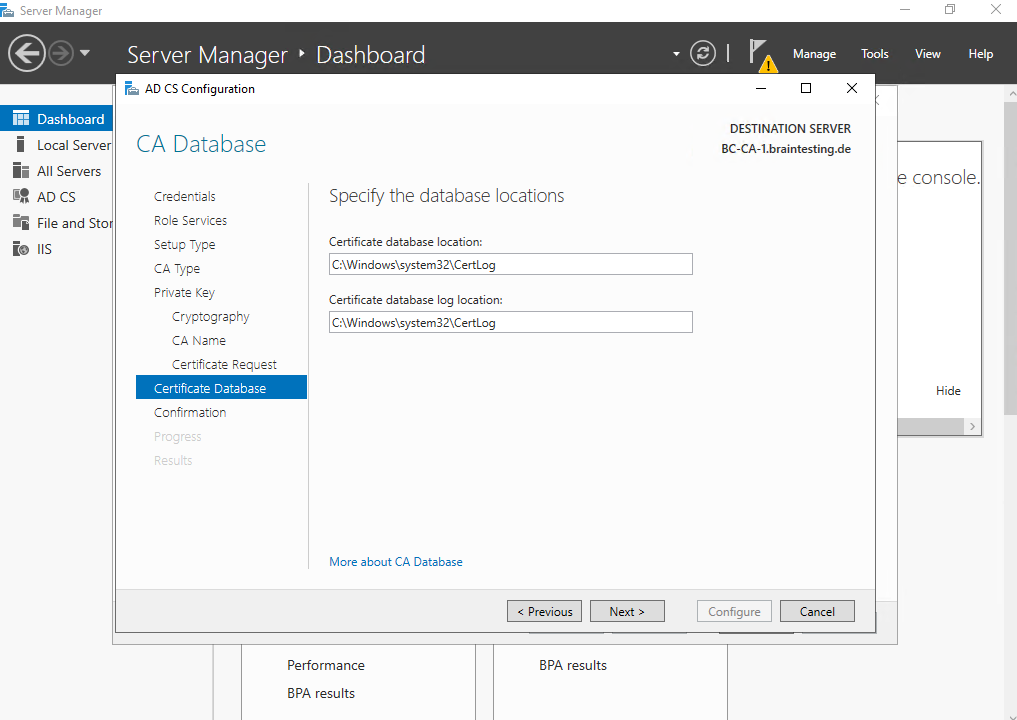
I have no specific requirements about the database and therefore will leave the default location below.
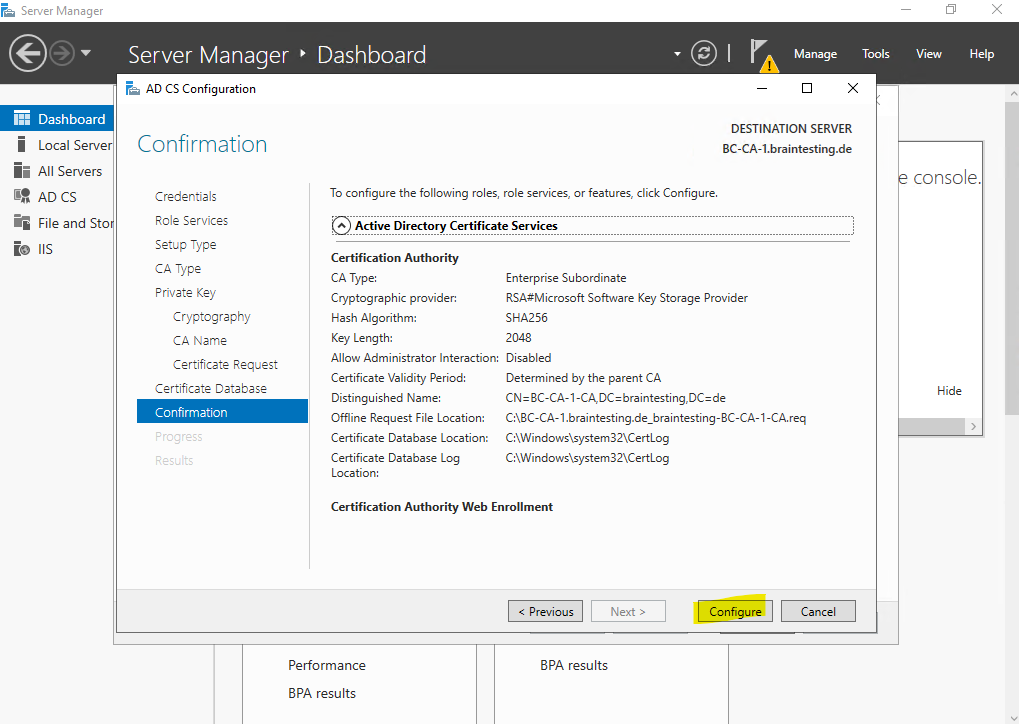
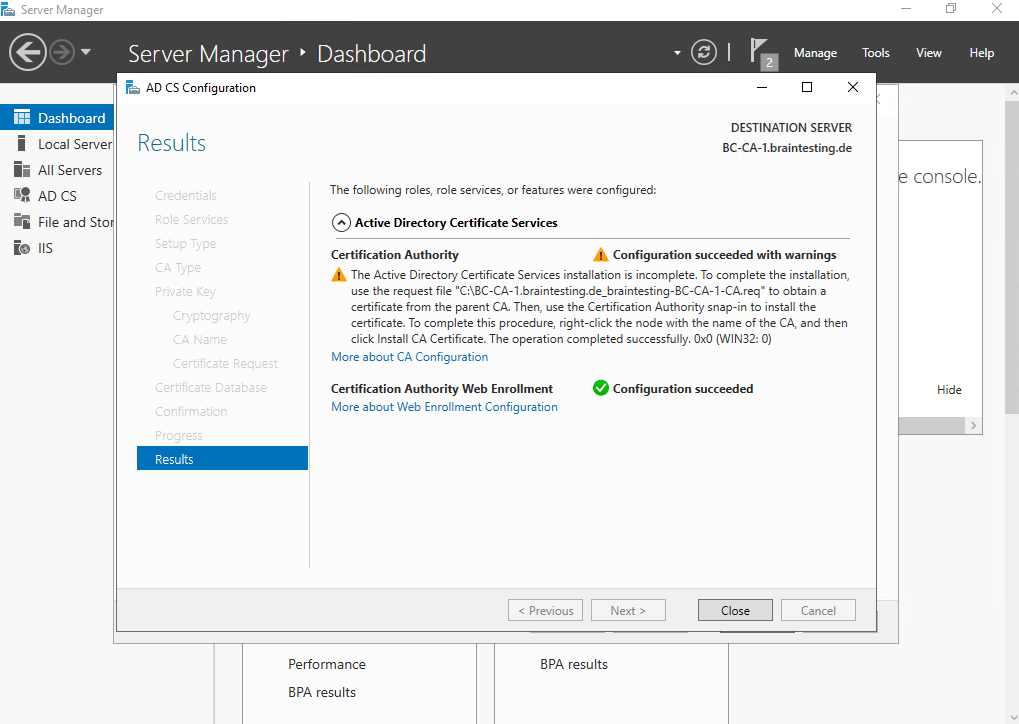
Finally we can click on Configure.
For the actual CA we will get a warning because so far we are not completed the installation. We first need to obtain a certificate from the parent CA (our standalone offline Root CA) and install this on our Subordinate CA (Intermediate CA).
We now first need to copy the certificate request file to our Root CA in order to create a certificate for our Subordinate CA (Intermediate CA) on the Root CA.
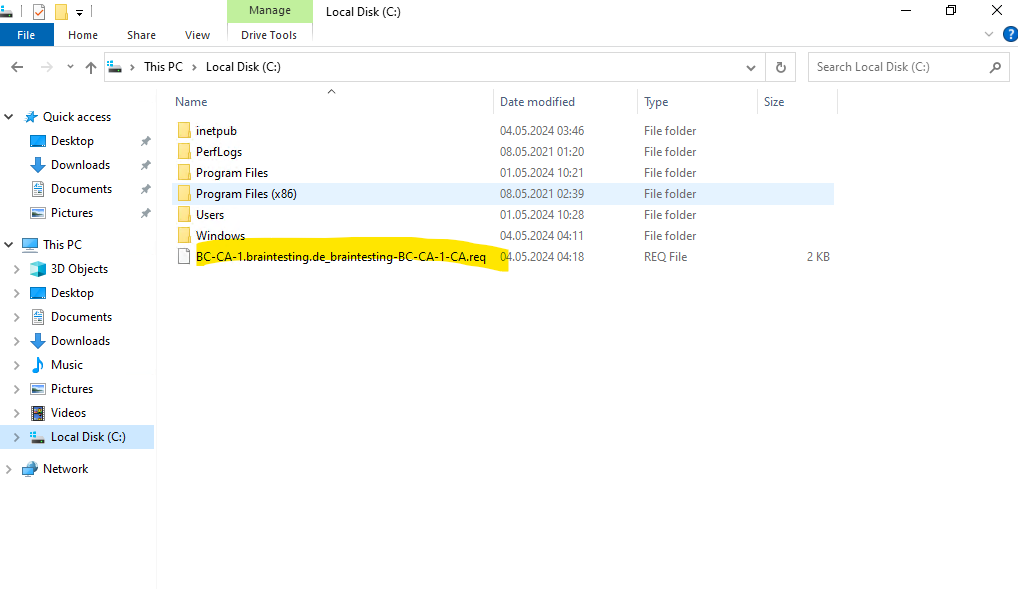
Because both virtual machines, the Root CA and the Subordinate CA (Intermediate CA) are running within the same subnet and on both using the same local Administrator account/password, I can access the certificate request file from the Root CA by using the default admin shares.
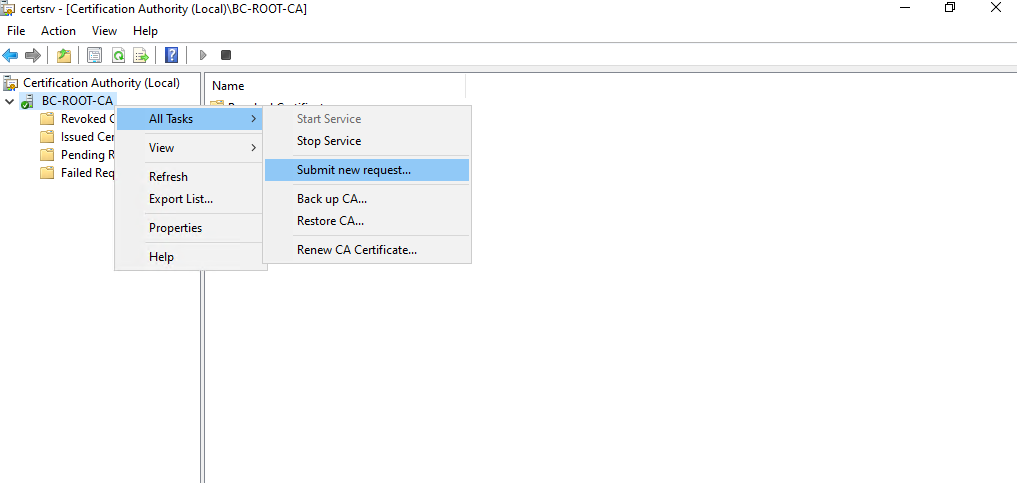
On the Root CA we can now submit a new request by right clicking on the CA node -> All Tasks -> Submit new request … as shown below.
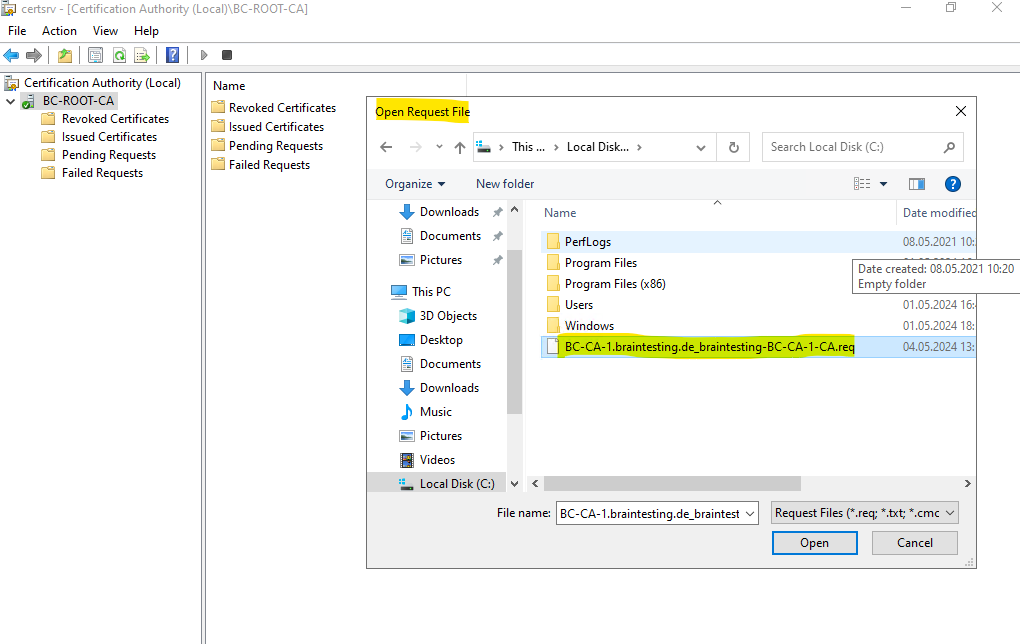
Select the certificate request file from the Subordinate CA (Intermediate CA). As mentioned I already copied it to the Root CA by using the default admin shares.
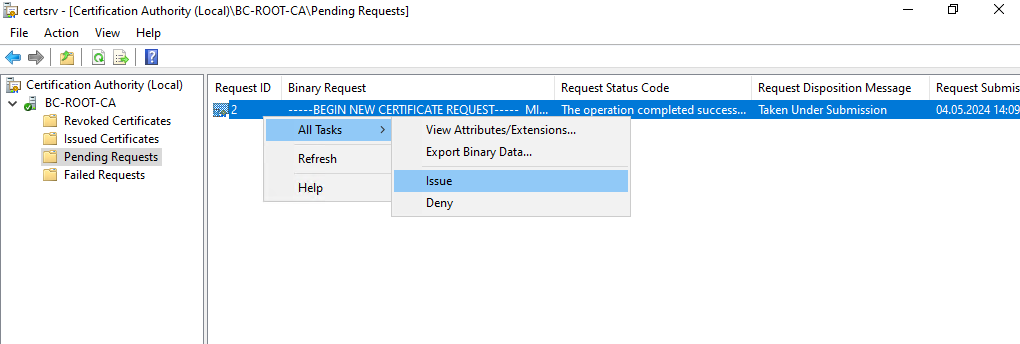
There will be no response message about the successful request but instead it will appear now under Pending Requests as shown below. Here we need to right click on the request and select All Tasks -> Issue.
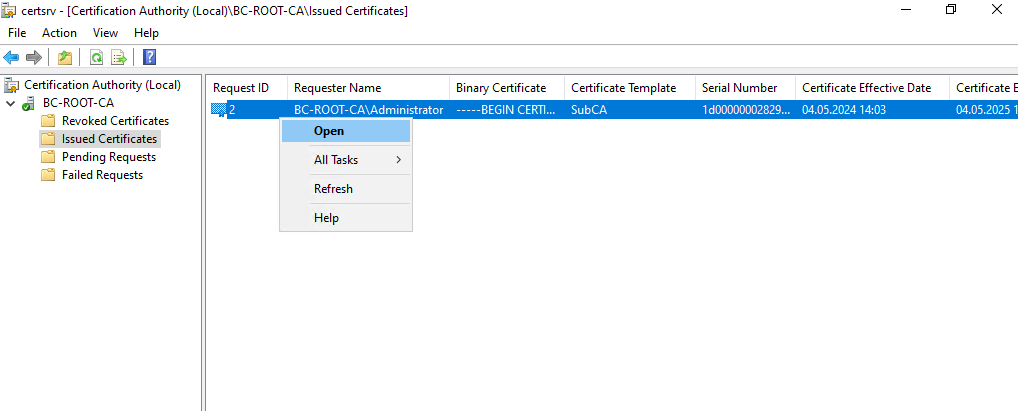
After that the pending request is removed and under Issued Certificates our newly created certificate for our Subordinate CA (Intermediate CA) is showing up.
We now have to export the certificate in order to later import it to our Subordinate CA (Intermediate CA). Therefore right click on the certificate and select Open.
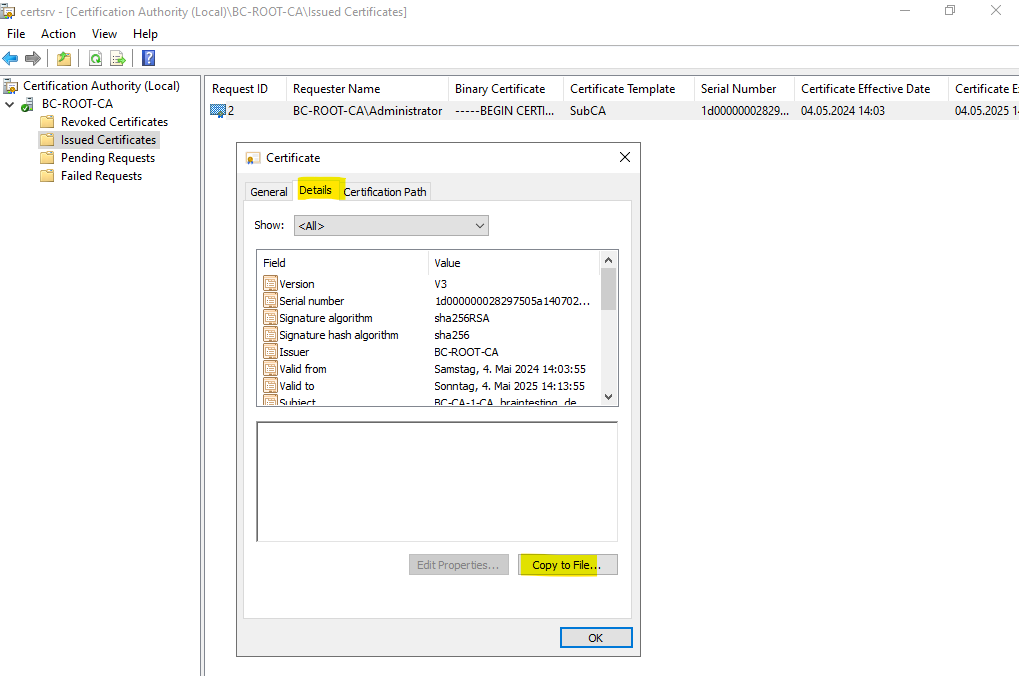
Select the Details tab and click on Copy to File …
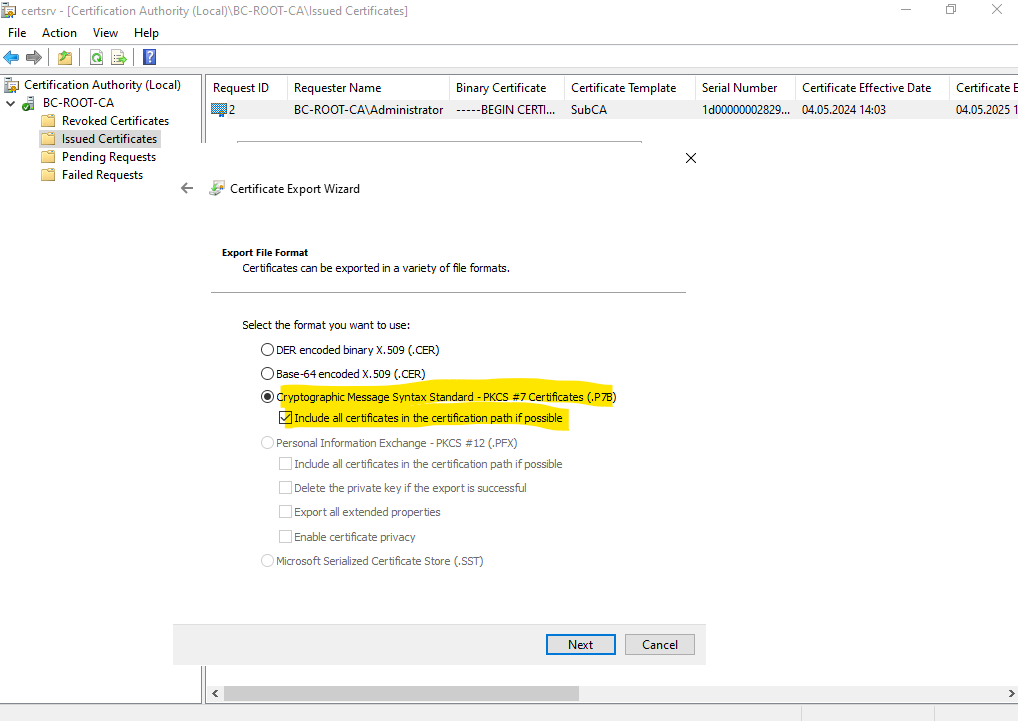
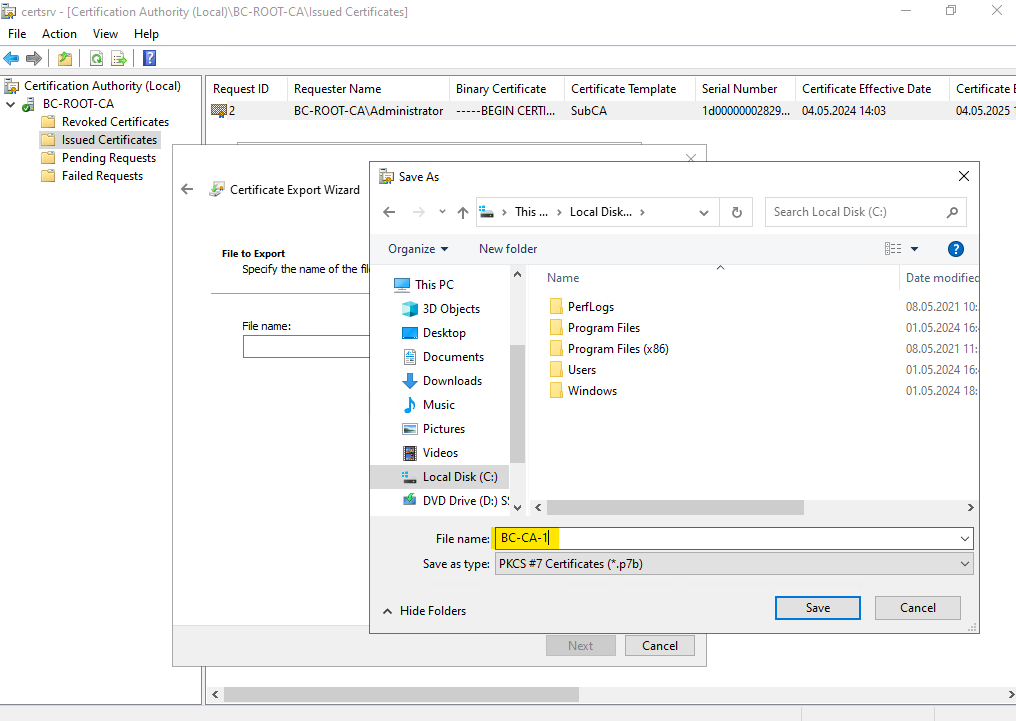
In the wizard select the Cryptographic Message Syntax Stanard – PKCS #7 Certificates (.P7B) format to export the certificate as shown below.
Name the file for the certificate and select a path to save to.
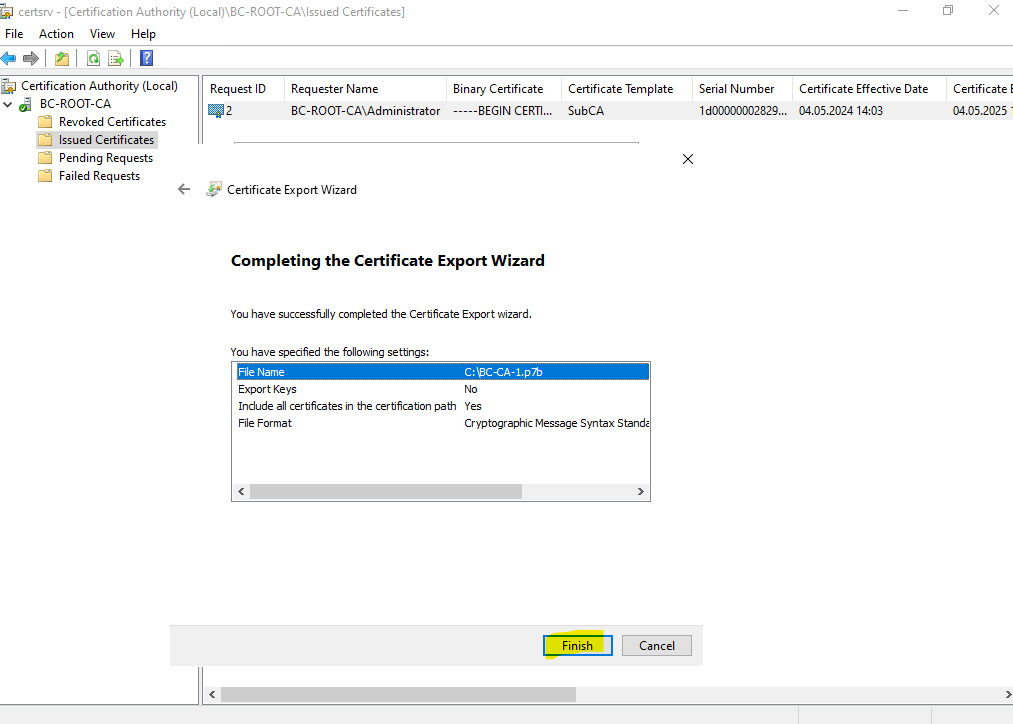
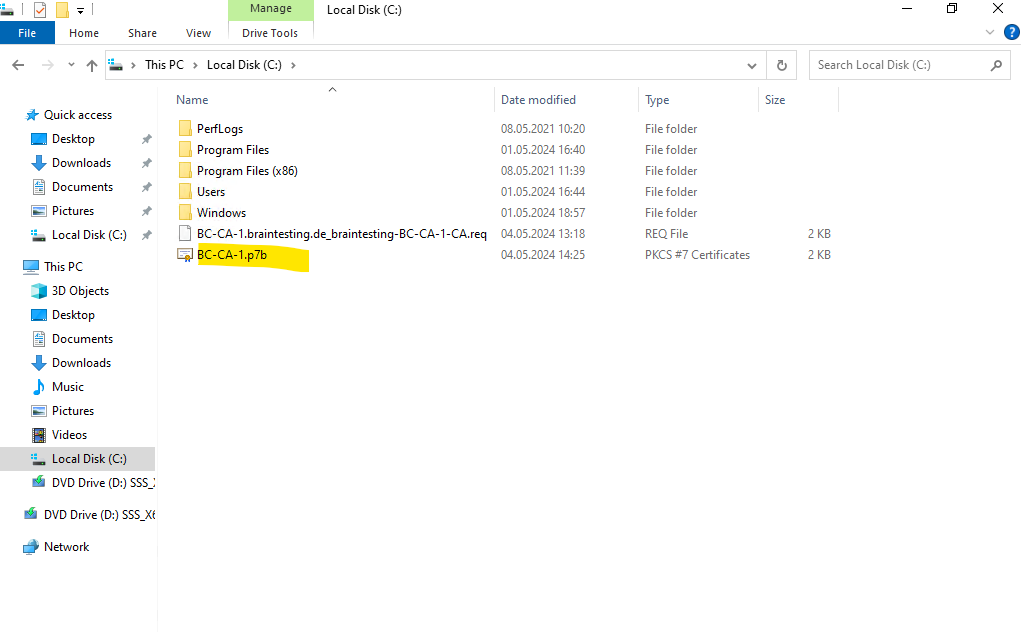
Finally we have our new certificate for the Subordinate CA (Intermediate CA) we need to install on.
Besides the certificate for our Subordinate CA (Intermediate CA) we also need the Root CA certificate and its revocation list file.
Both files are stored under C:Windows\System32\CertSrv\CertEnroll on the Root CA server.
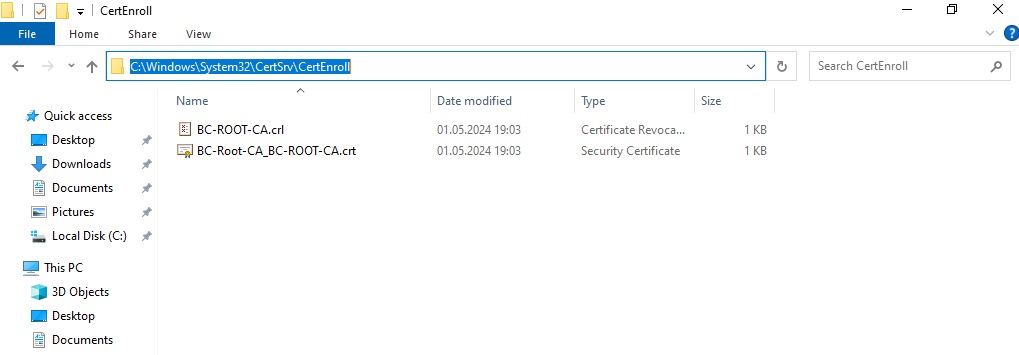
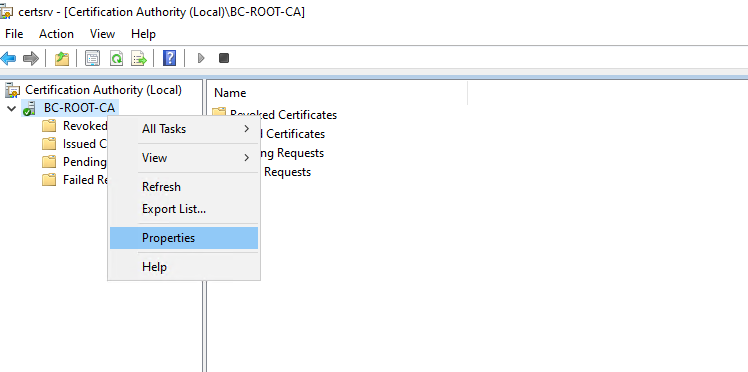
The Root CA certificate you can also obtain by using the Certificate Authority console as shown below.
Right click on the CA node and select Properties.
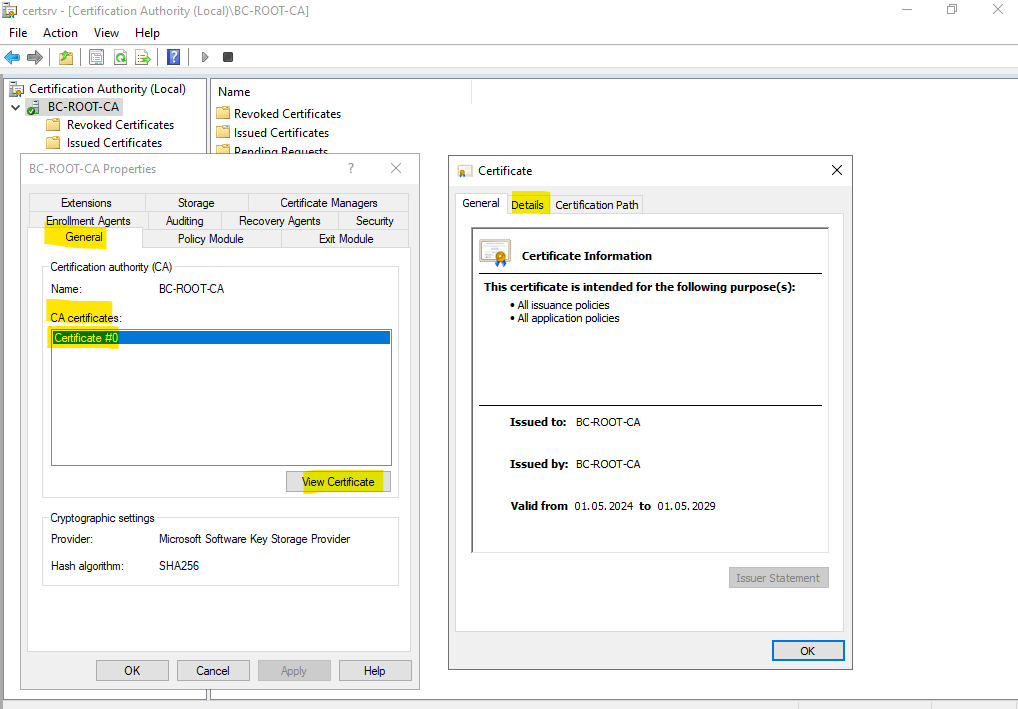
On the General tab select the latest valid CA certificate, because I have installed the Root CA newly, so far just one Root CA certificate is shown here. Click on View Certificate and select the Details tab.
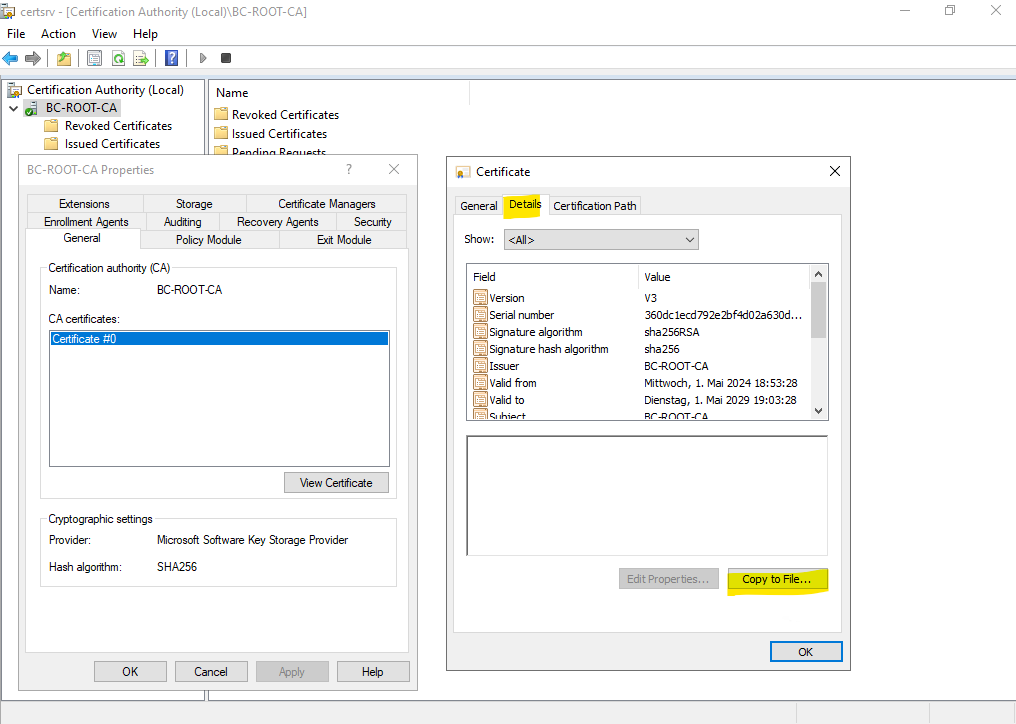
Copy the Root CA certificate to a file as previously also done for the Subordinate CA (Intermediate CA) certificate file.
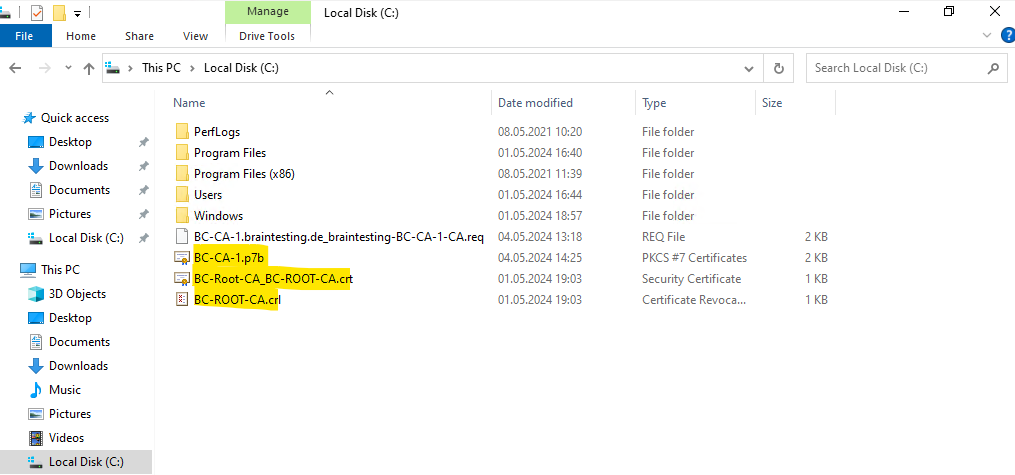
So finally we need to copy these three files to our Subordinate CA (Intermediate CA).
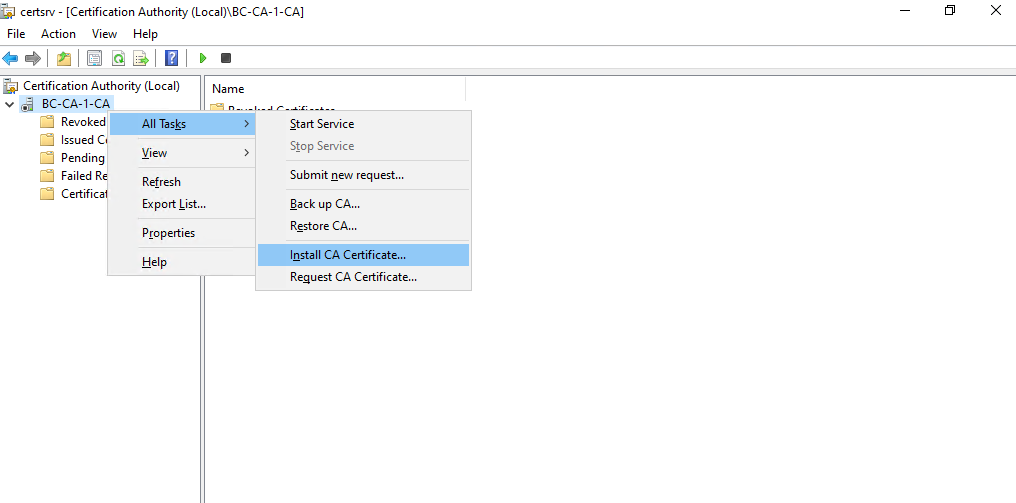
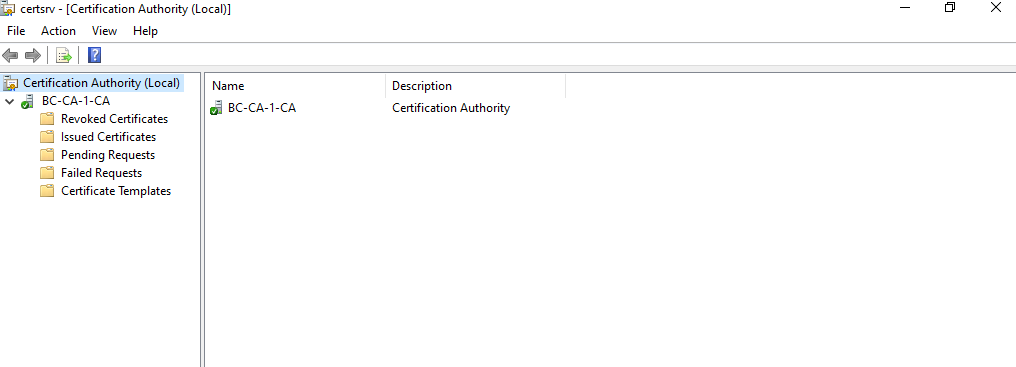
Back on the Subordinate CA (Intermediate CA) and its Certification Authority console we need to install the certificate for as shown below. By the way you can also see here that the CA service so far is not running because without these certificates not operational as mentioned.
Right click on the CA node and select All Tasks -> Install CA Certificate …
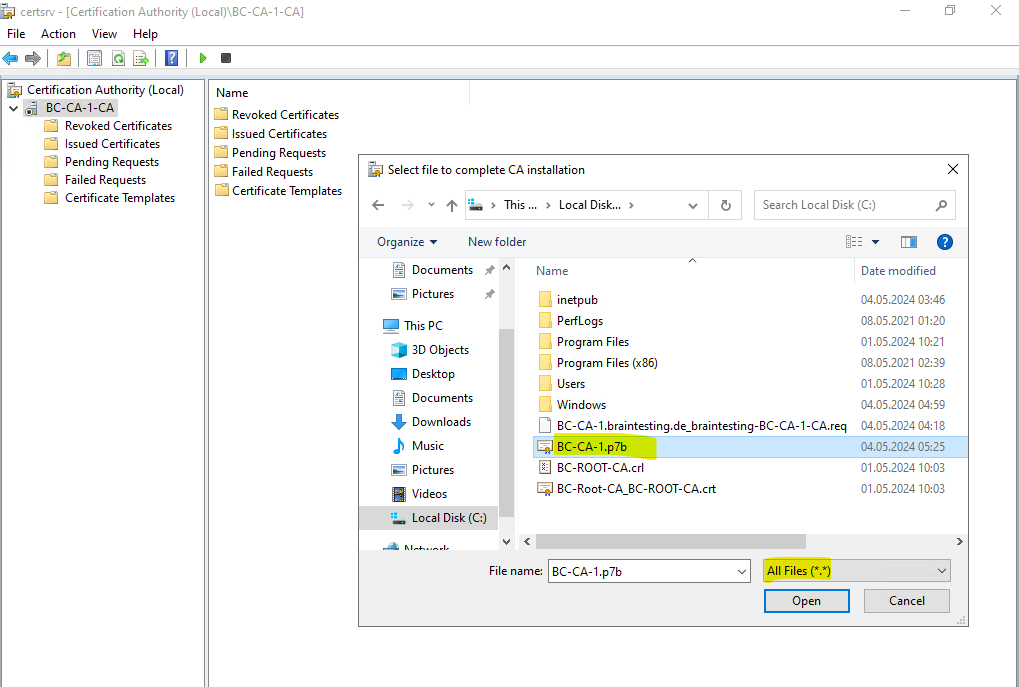
Select the *.p7b file we previously exported on the Root CA server.
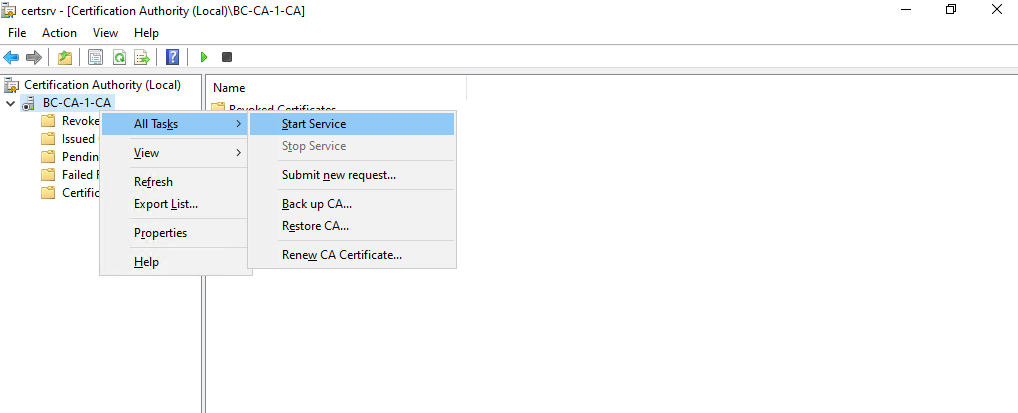
Now we can start the CA by right click on the CA node and select All Tasks -> Start Service.
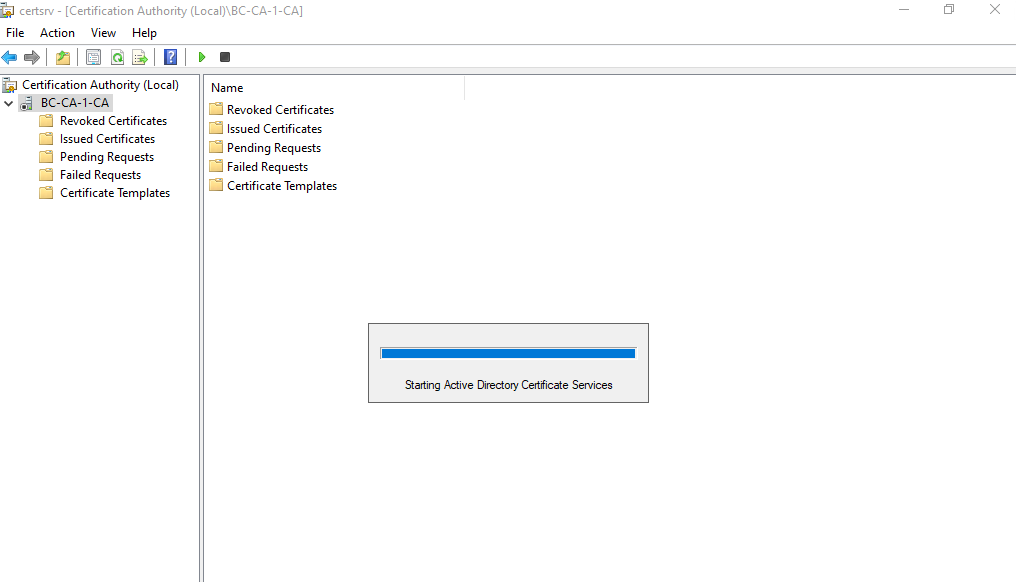
Finally our new CA is running.
Configure the Certification Revocation List (CRL) on the Subordinate CA
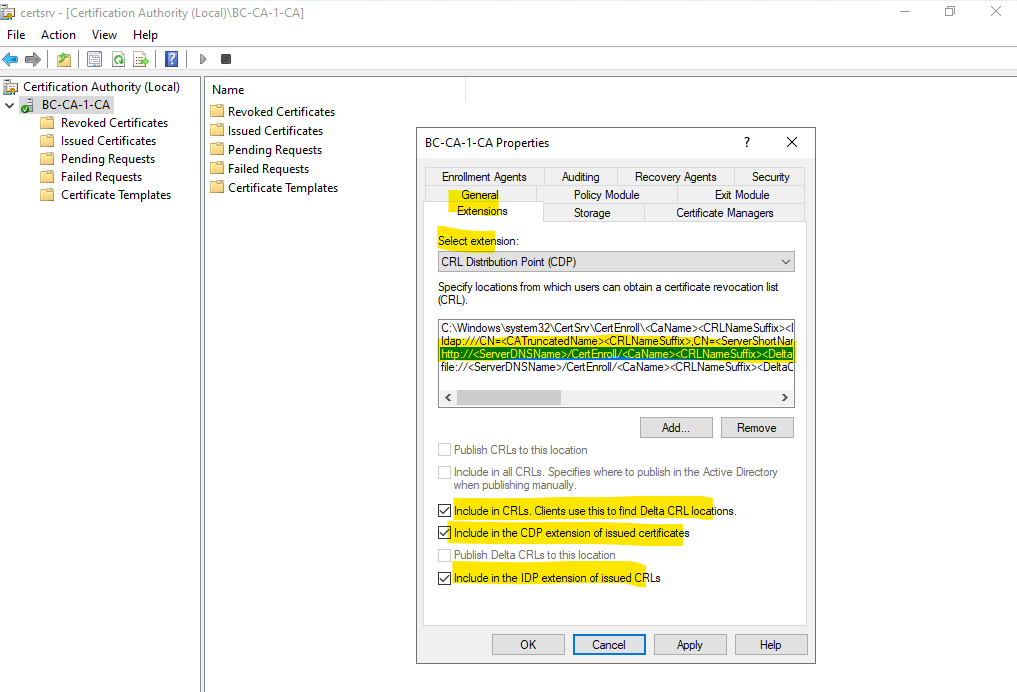
By default on our Subordinate CA (Intermediate CA) there are configured the same locations for the CRL Distribution Point (CDP) as previously on the Root CA.
On the Root CA we adjusted the http location to fit with the Subordinate CA (Intermediate CA) server’s FQDN because the Root CA is offline and therefore can’t serve any CRLs.
So here on the Subordinate CA (Intermediate CA) by default for the http location the server’s FQDN will be used and therefore we don’t need to change here anything besides checking also to include in CRLs, CDP and IDP as shown below.
Finally click on Apply.
From now on our new Subordinate CA (Intermediate CA) is in operational state.
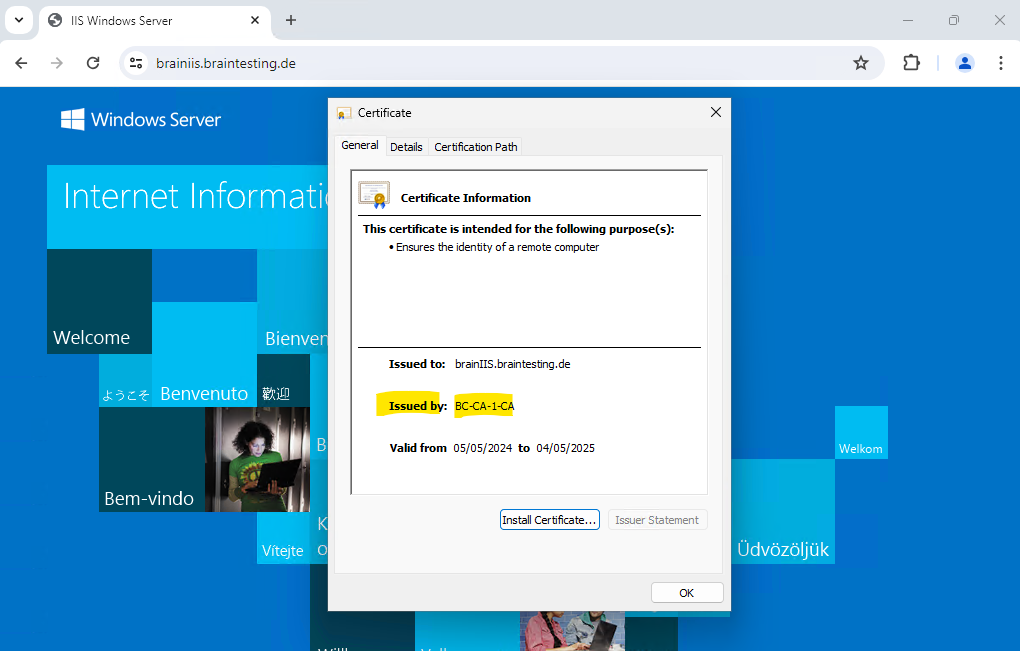
Certificates issues by our Subordinate CA (Intermediate CA) will looks like below for example. This certificate was issued to my Windows Server 2022 IIS web server for testing.
On the Certification Path tab you will see the CA hierarchy of this certificate beginning with my standalone offline Root CA.
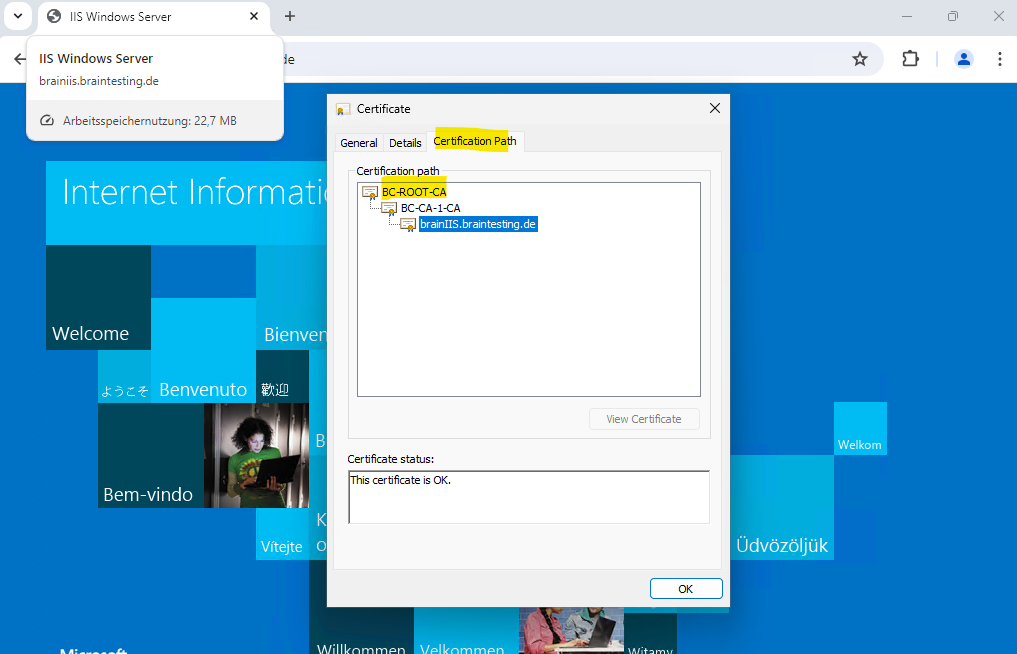
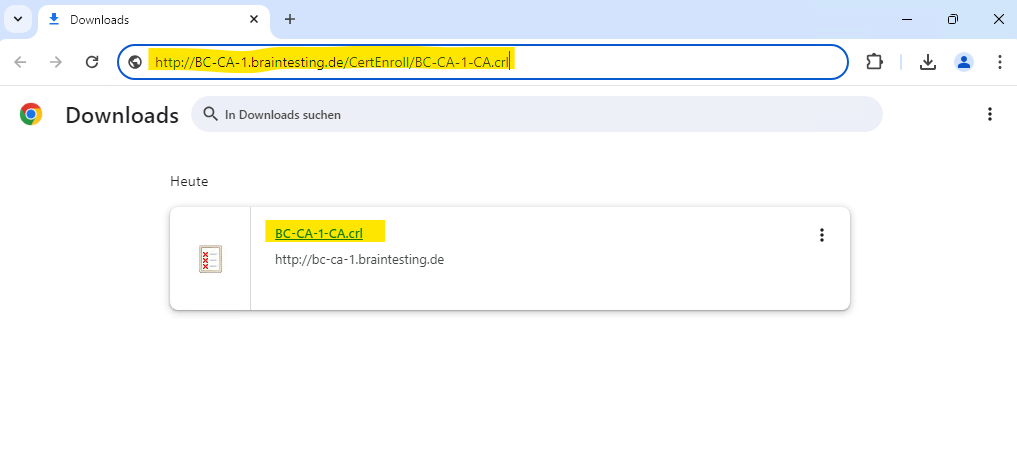
And on the Details tab you will see the CRL Distribution Points to check if the certificate was revoked or not.
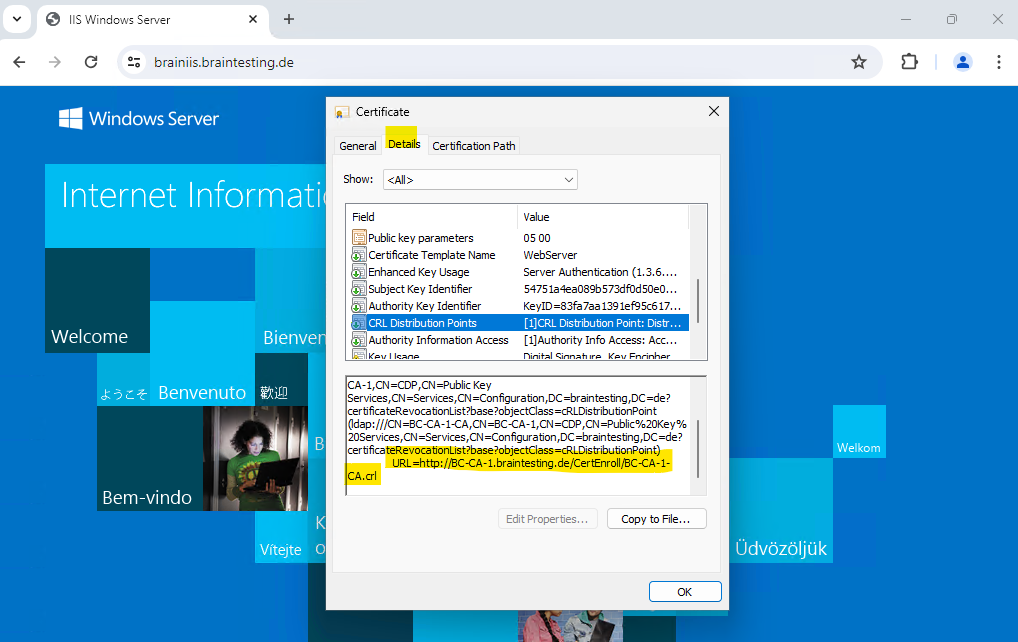
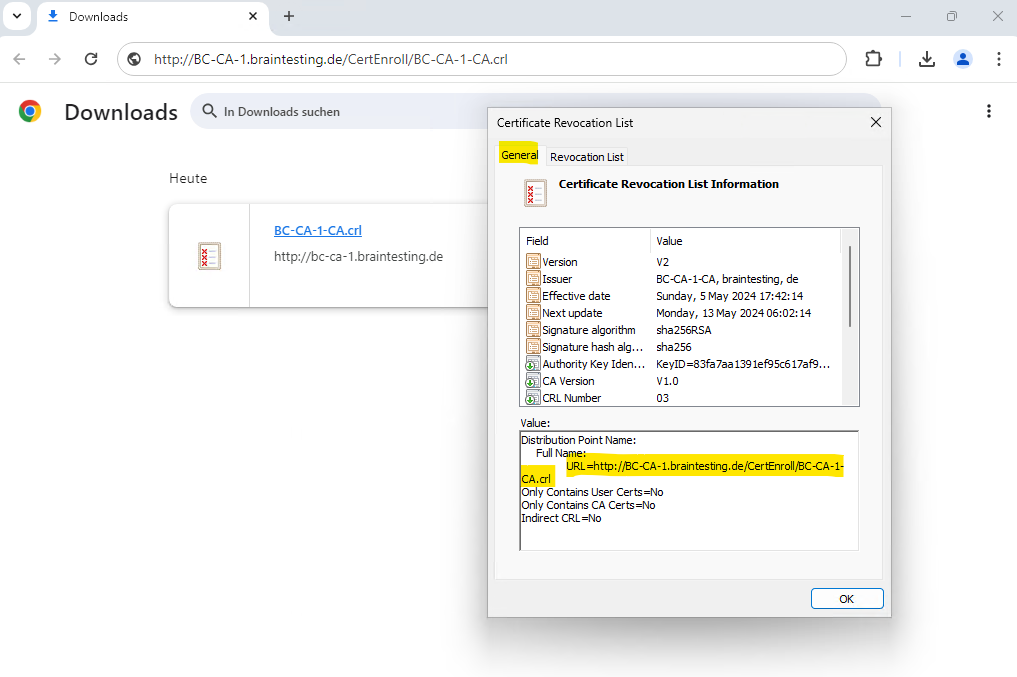
So far I didn’t have revoked any certificates.
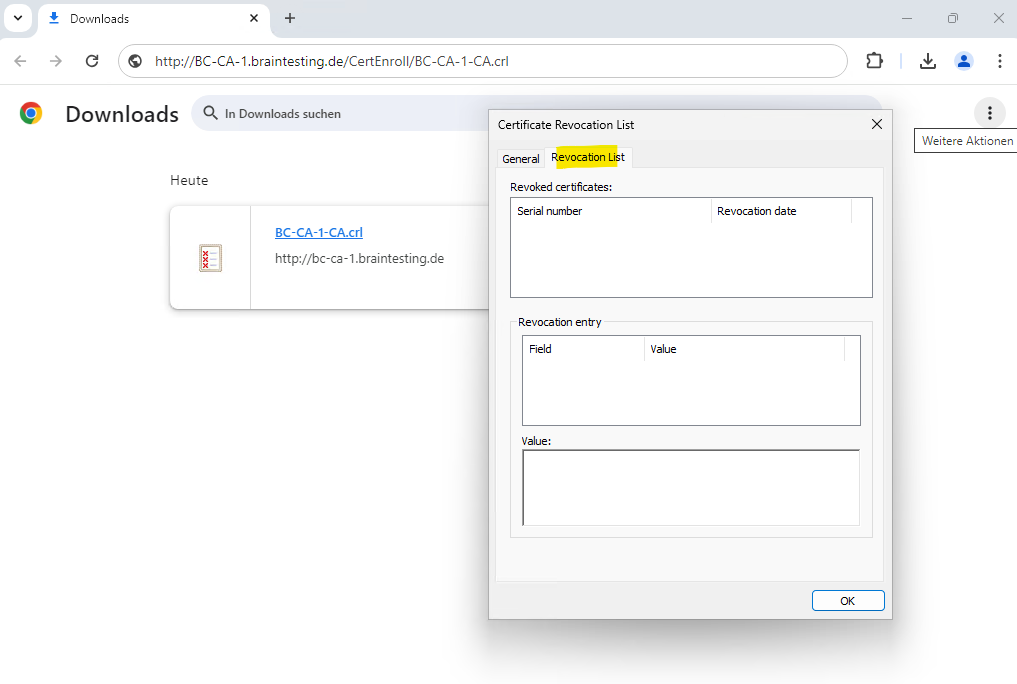
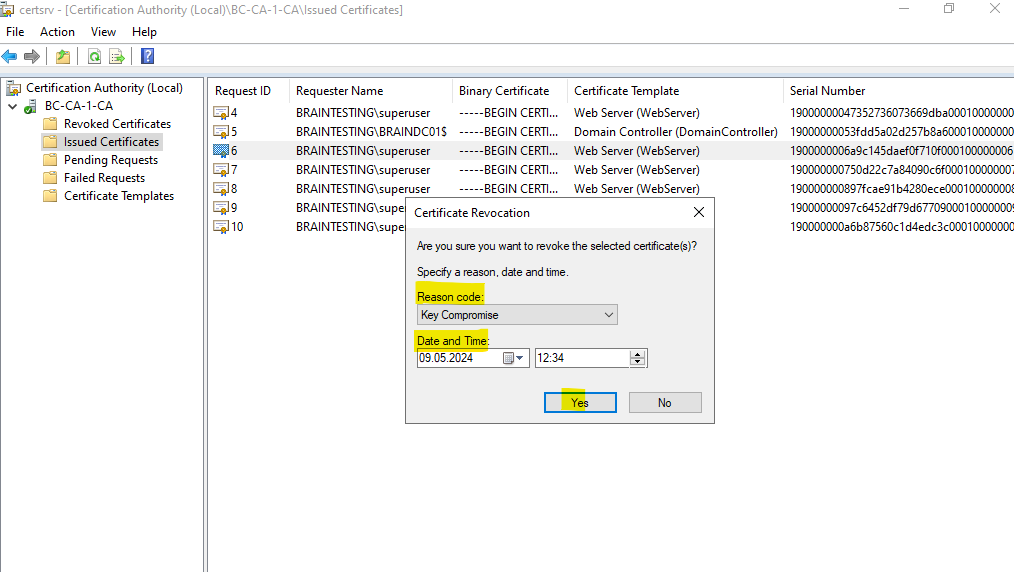
For testing I will now revoke some certificates on the Subordinate CA (Intermediate CA).
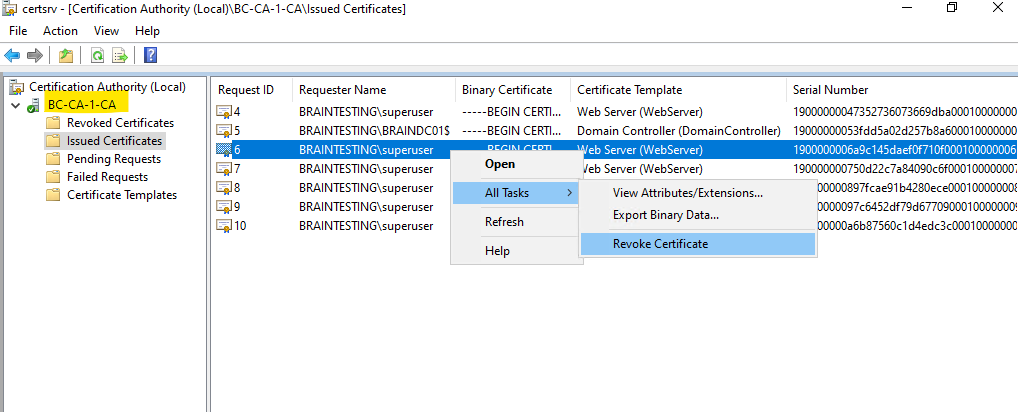
You can set a reason code why you revoke the certificate and you can also set a specific date and time from when the certificate should be effective in state revoked.
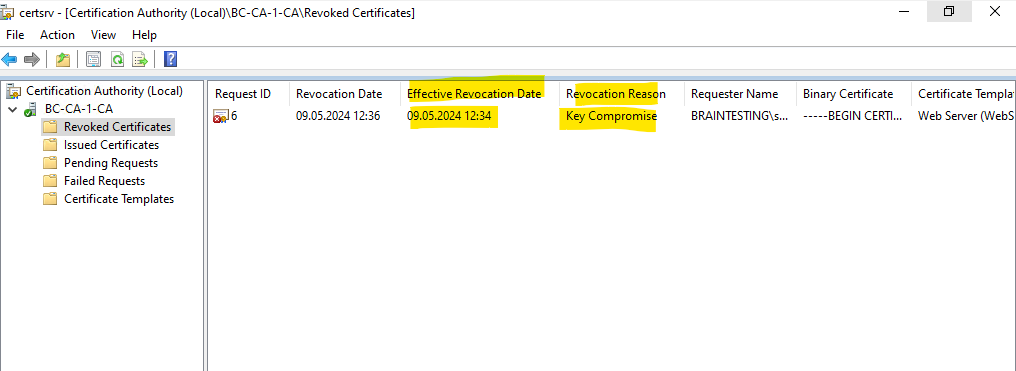
From now the revoked certificate will shown up under Revoked Certificates on the Subordinate CA (Intermediate CA) as shown below.
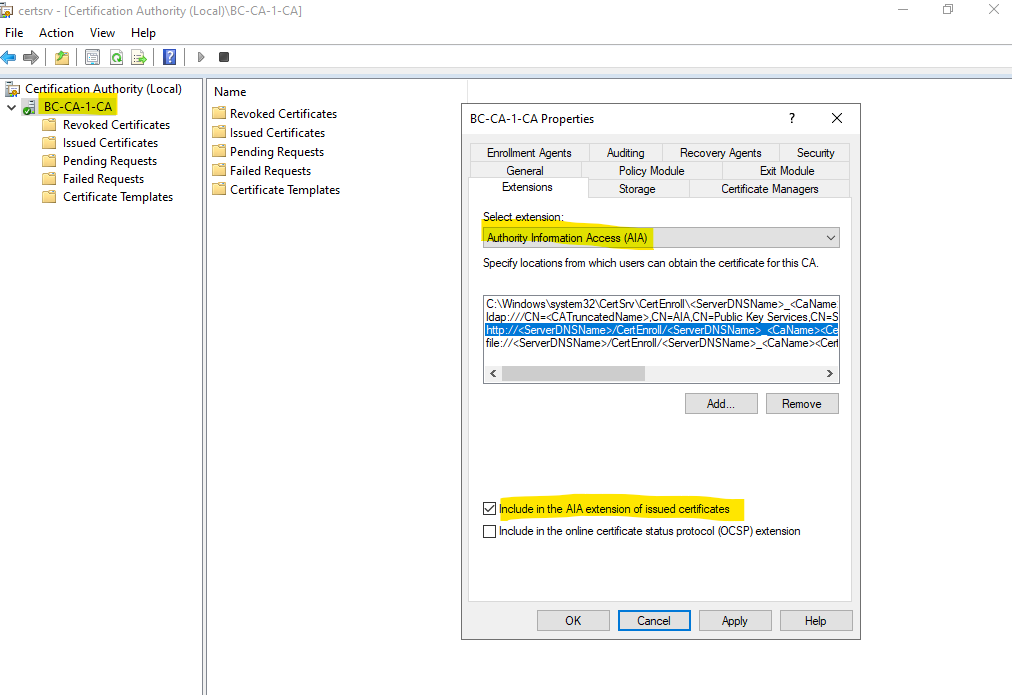
Publish the AIA extension
The AIA extension tells the client computers where they can find the certificate to be verified. This allows the client to confirm whether the certificate can be trusted.
You can configure the AIA extension by using the Certification Authority interface, Windows PowerShell, or the certutil command.
Below I will use the Certification Authority interface to configure the AIA extension.
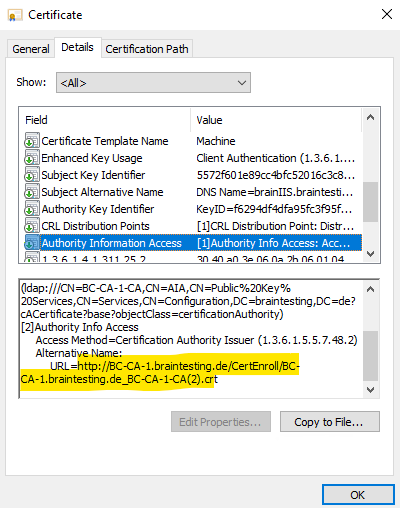
Right click on the subordinate CA and within the Extensions tab select the Authority Information Access (AIA) extension.
Also check to include the AIA extension in issued certificates.
On issued certificates you will now also have the Authority Information Access (AIA) for the http location.
Secure the CA Web Enrollment role service pages with SSL/TLS
The Certification Authority (CA) Web Enrollment role service provides a set of web pages that allow interaction with the Certification Authority role service. These web pages are located at https://<servername>/certsrv, where <servername> is the name of the server that hosts the hosts the CA Web Enrollment pages. The certsrv portion of the URL should always be in lowercase letters; otherwise, users may have trouble checking and retrieving pending certificates.
The CA Web Enrollment role service pages require that you secure them with secure sockets layer (SSL) / transport layer security (TLS). If you do not, you will see an error: “In order to complete the certificate enrollment, the Web site for the CA must be configured to use HTTPS authentication.” To resolve this issue, you must configure HTTPS authentication, which is discussed in the TechNet Wiki article: Active Directory Certificate Services (AD CS): Error: “In order to complete certificate enrollment, the Web site for the CA must be configured to use HTTPS authentication”.
By default the CA Web Enrollment role service pages on the Subordinate CA (Intermediate CA) server is just configured for the insecure plaintext HTTP protocol as shown below.
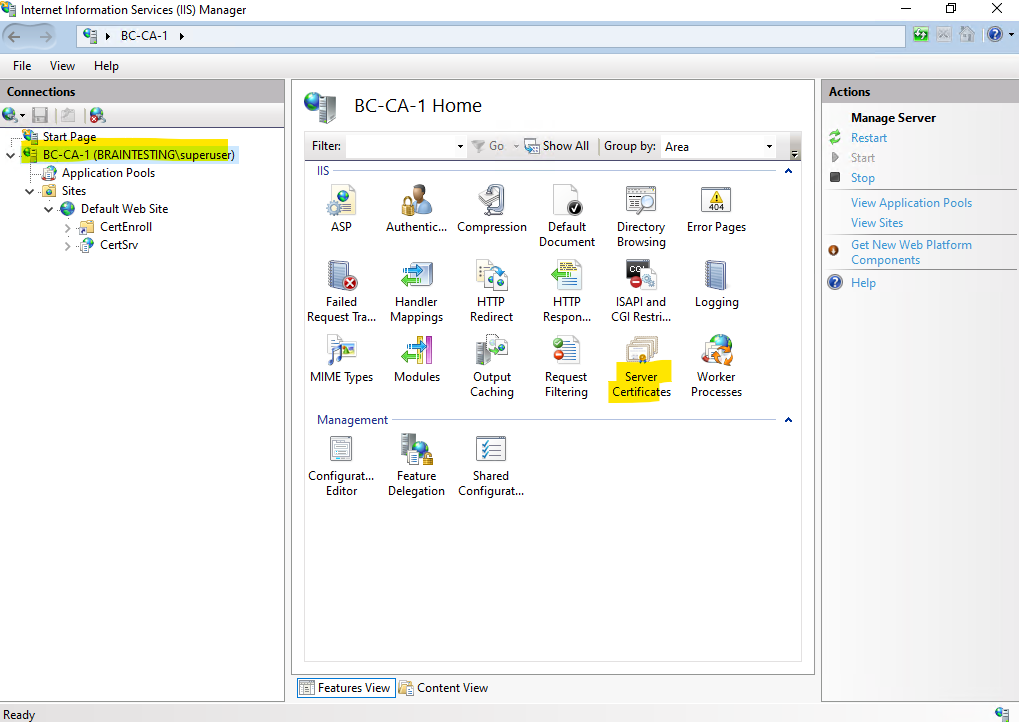
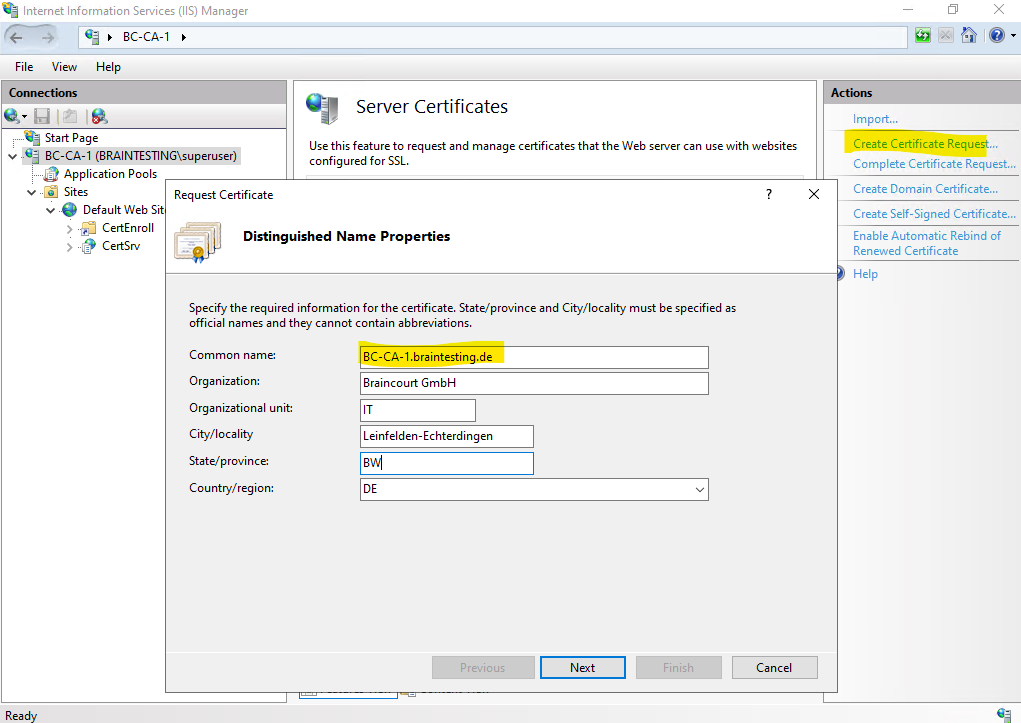
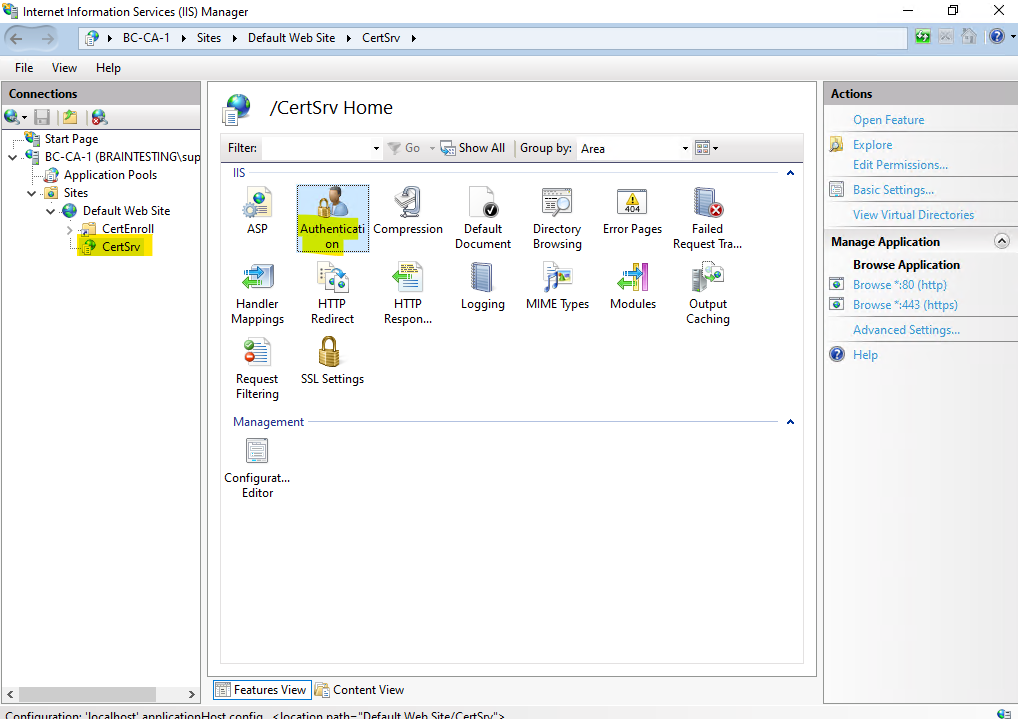
To secure the page by using the SSL/TLS protocol, open the IIS Manager and click on the server node and here on Server Certificates to request a new certificate for the CA Web Enrollment role service page.
For the common name of the new certificate enter the FQDN of the Subordinate CA (Intermediate CA) server.
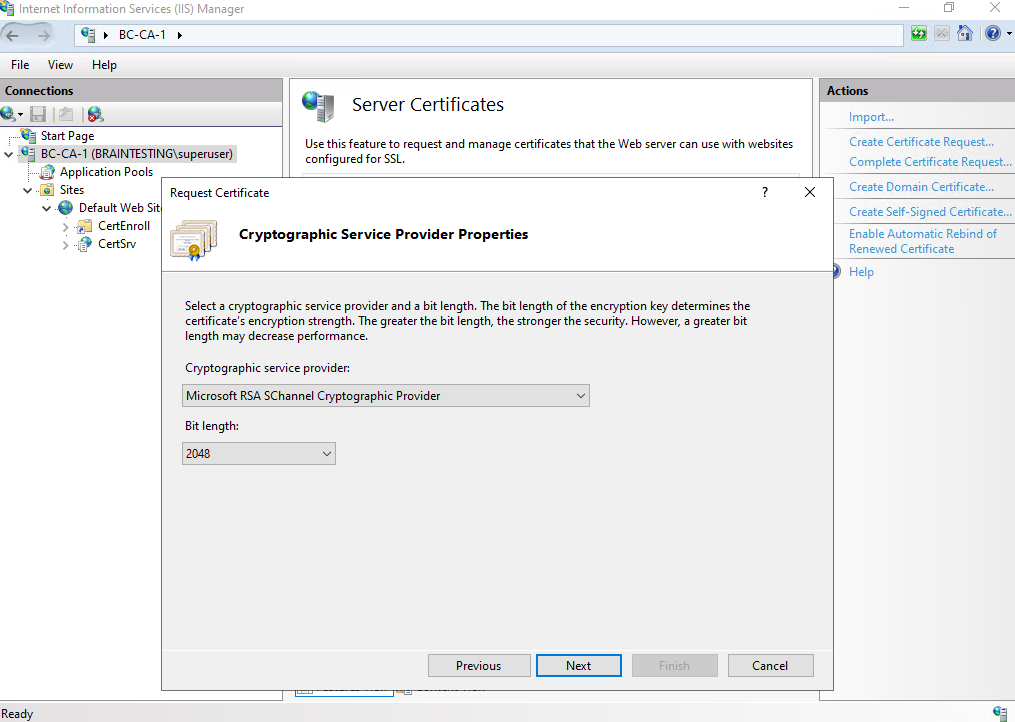
Select a cryptographic service provider and bit length for the certificate.
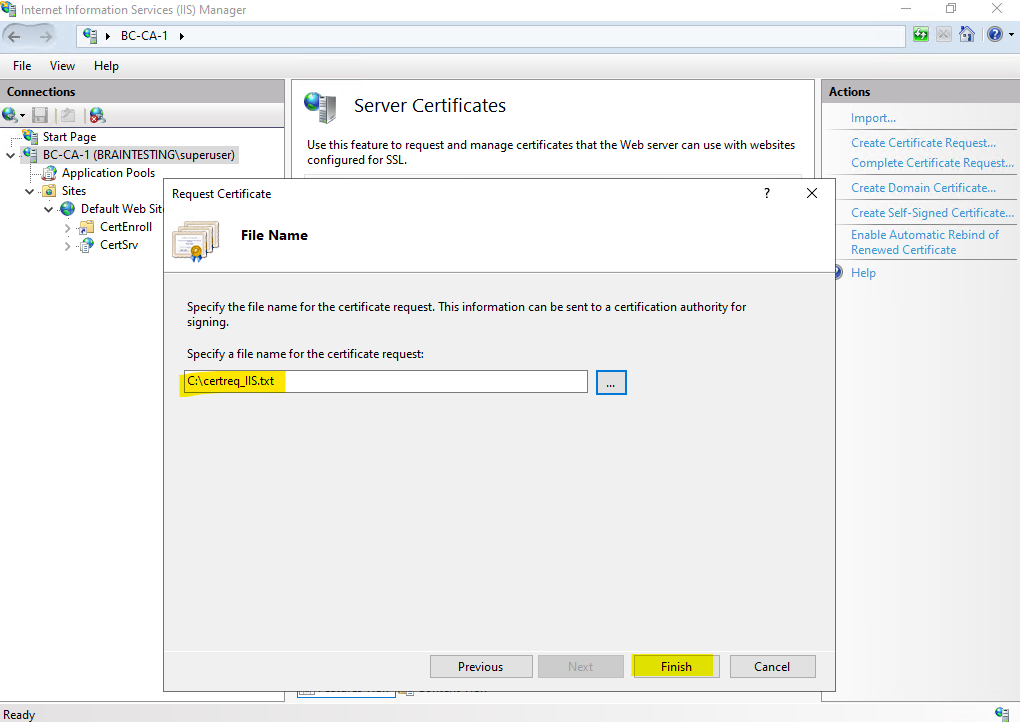
Specify a file name for the certificate request and path to save the file to.
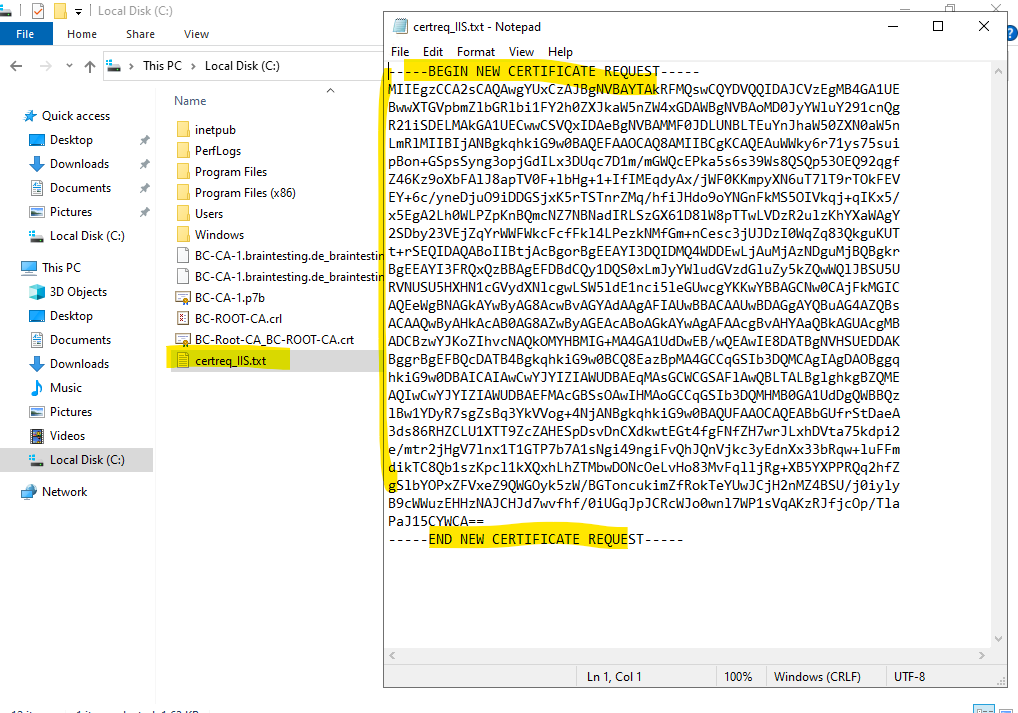
Copy the content of the certificate request file to the clipboard.
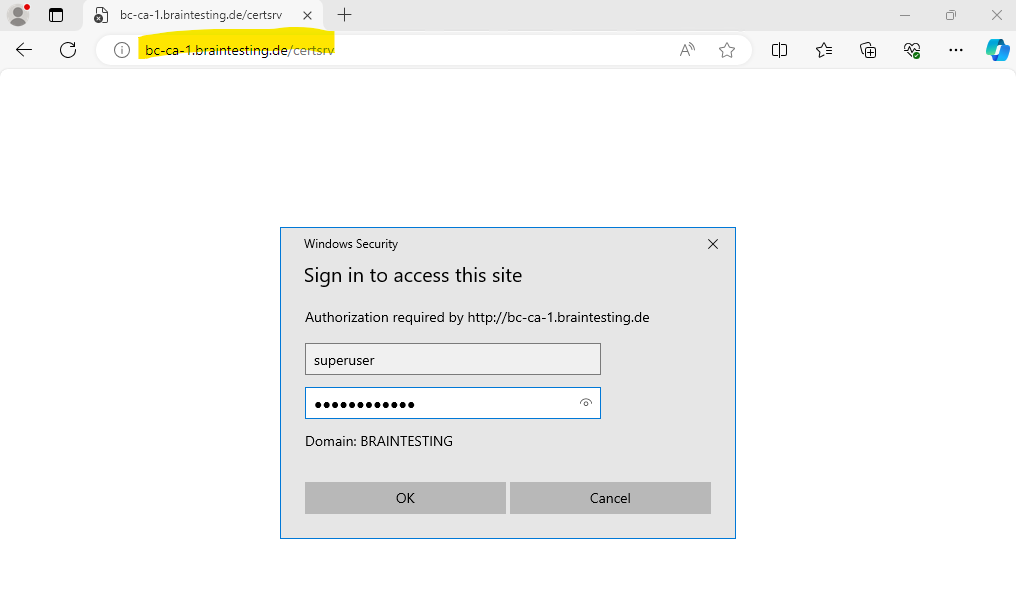
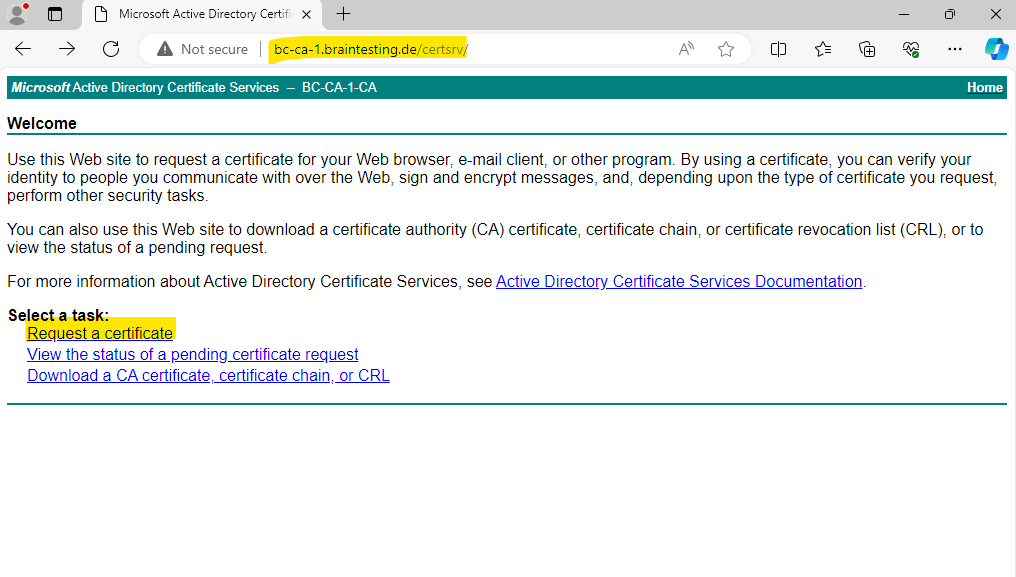
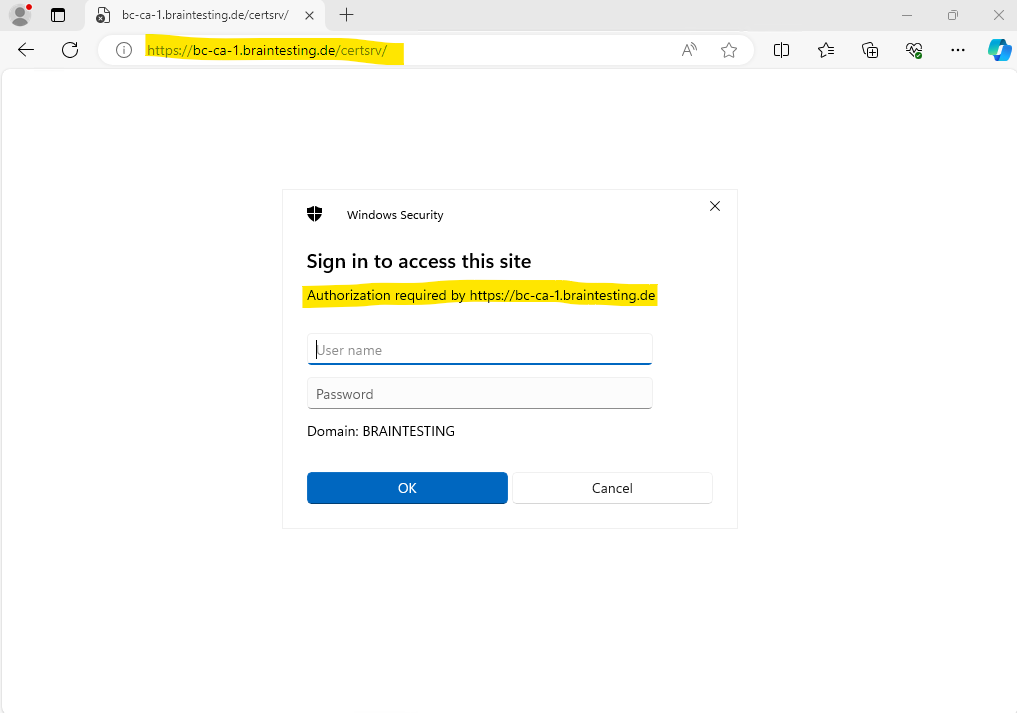
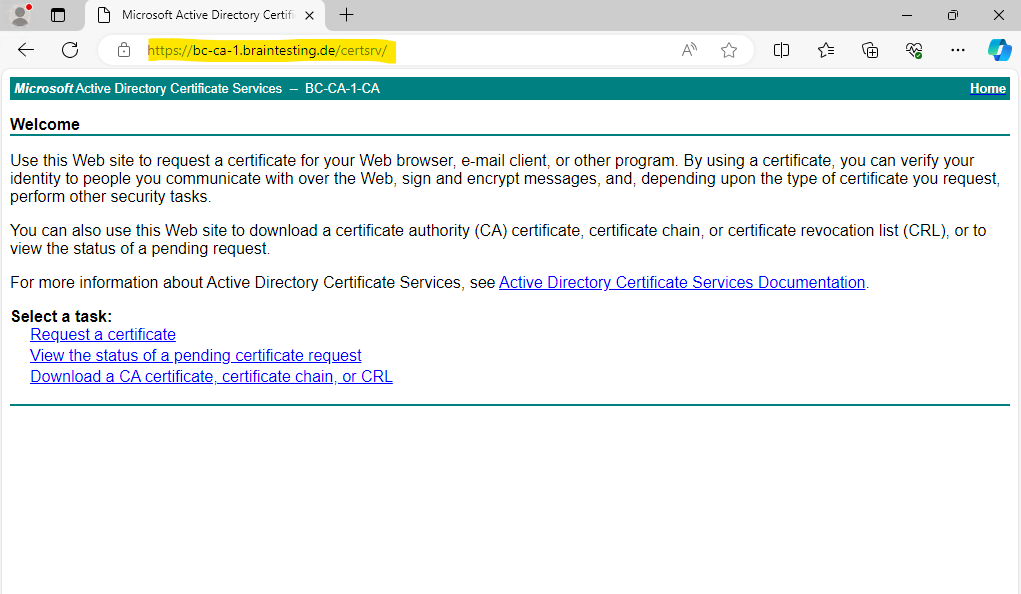
Browse to the CA Web Enrollment role service page and enter the credentials of an account which is a member of either Domain Admins or Enterprise Admins.
So far we need to use the HTTP protocol, in my case http://bc-ca-1.braintesting.de/certsrv
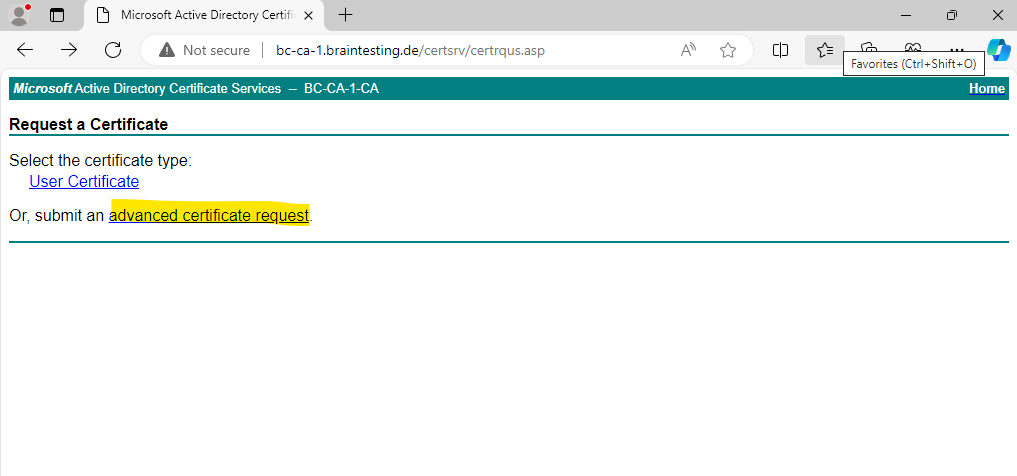
Click on Request a certificate.
Click on advanced certificate request.
Next before I will request the certificate for the CA Web Enrollment role service page, I will first enable the use of user-defined SANs on my Subordinate CA (Intermediate CA).
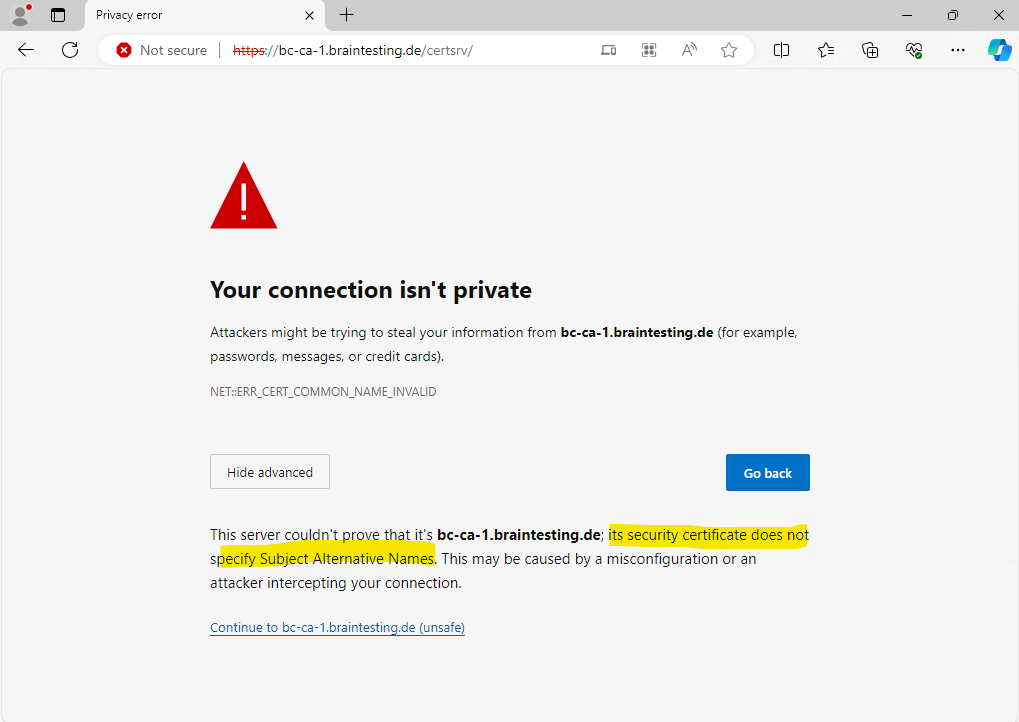
The reason for is that by default the FQDN of our CA Web Enrollment role service page will not be included as a Subject Alternative Name (SAN) in the certificate which will lead to the following warning message shown in the screenshot below in recent web browsers.
Actually web browsers should match a domain name against a certificate by using the subjectAlternativeName extension. Then published in 2000 the RFC 2818 describes two methods to match a domain name against a certificate – using the available names within the subjectAlternativeName extension, or, in the absence of a SAN extension, falling back to the commonName.
The fallback to the commonName now was deprecated in RFC 2818, but support still remains in a number of TLS clients, often incorrectly.
Source: https://chromestatus.com/feature/4981025180483584
Chrome browser requires the subjectAlternativeName since version 58
Firefox since version 48
Chromium (Microsoft Edge) since version 66
https://source.chromium.org/chromium/chromium/src/+/main:chrome/test/data/policy/policy_test_cases.json;drc=8fc422f8b81ebe66b35918c426c2b46cfba96e24;l=871
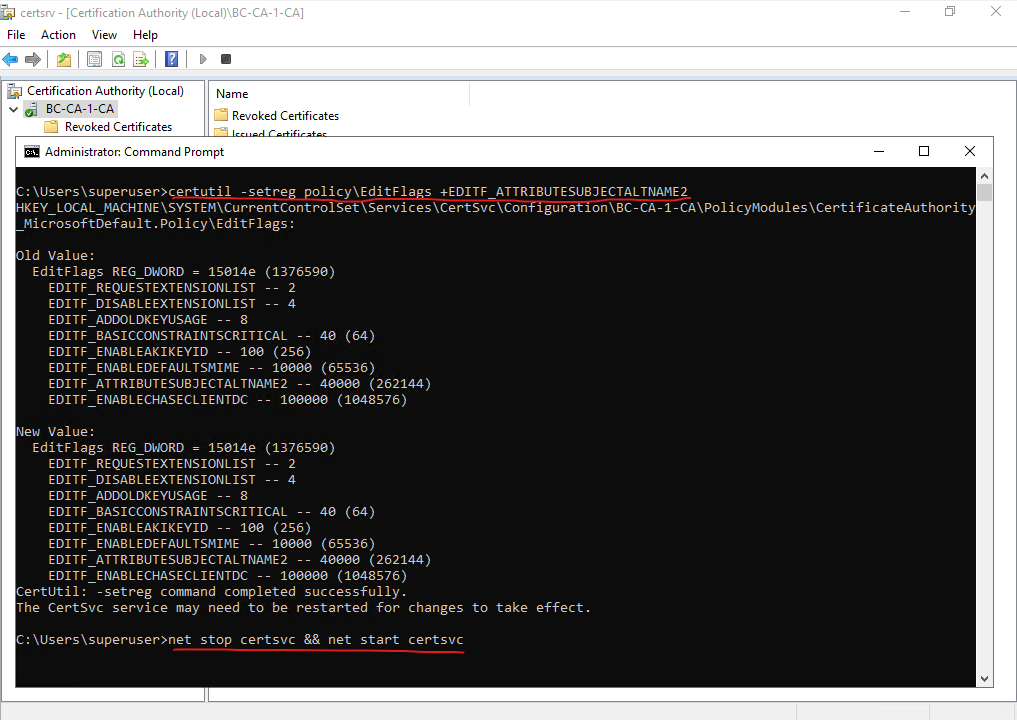
Keep in mind that this can increase the risk of impersonation attacks as described in the following article by Microsoft. To mitigate the risk when enabled we should held certificates that contains SANs in a pending state until they can be reviewed.
In general, the use of user-defined SANs can increase the risk of impersonation attacks because it allows a user to specify arbitrary names in a certificate request. Because user input can be abused by persons with malicious intent, precautions should be taken to mitigate the risks associated with the use of user-defined SANs and protect the integrity of your public key infrastructure (PKI).
Certificate requests that contain SANs should be held in a pending state until they can be reviewed by a certificate manager. For information about configuring certificate templates to require certificate manager approval, see Issuance Requirements.
certutil -setreg policyEditFlags +EDITF_ATTRIBUTESUBJECTALTNAME2
net stop certsvc && net start certsvc
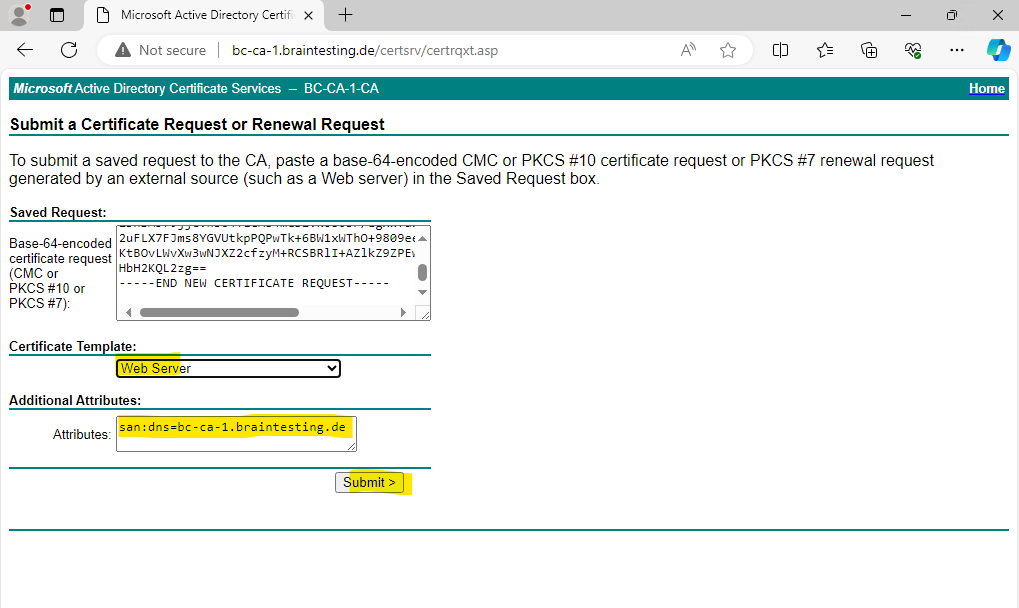
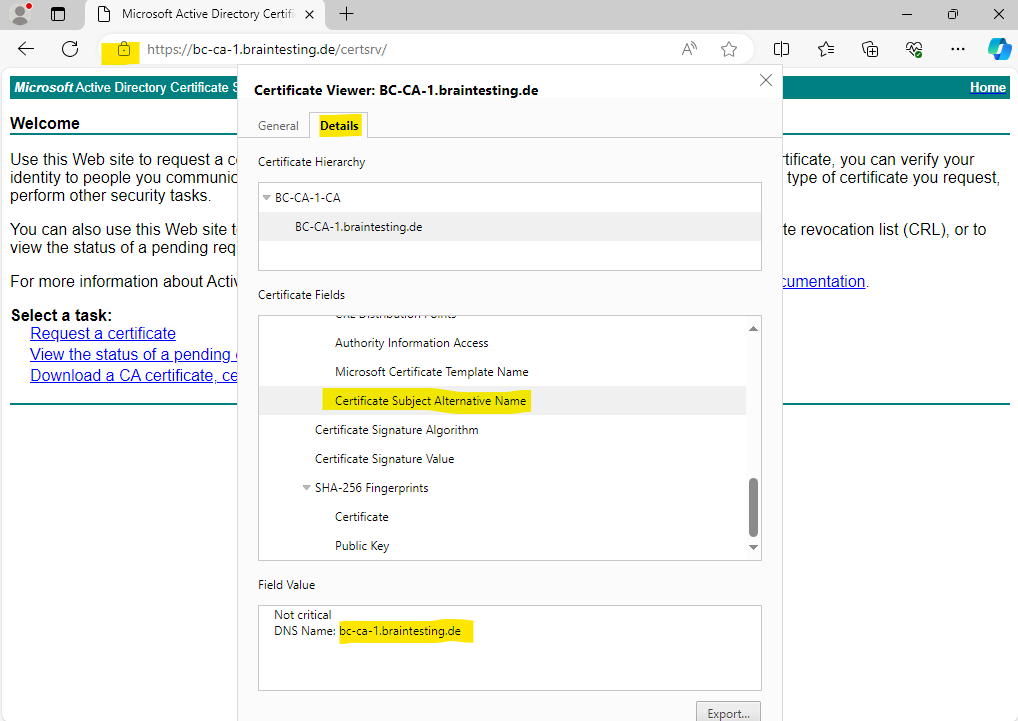
Now we can paste the previously copied content of the certificate request file into the Saved Request field below, further we need to select the Web Server certificate template and because we enabled user-defined SANs we can now also enter the FQDN of our CA Web Enrollment role service page as SAN. Finally we can click on Submit.
san:dns=bc-ca-1.braintesting.de
Multiple DNS names are separated by an ampersand (&). For example, if the name of the domain controller is corpdc1.fabrikam.com and the alias is ldap.fabrikam.com, both names must be included in the SAN attributes. The resulting attribute string is displayed as follows:
san:dns=corpdc1.fabrikam.com&dns=ldap.fabrikam.com
For Windows OS we can use and download the DER encoded certificate which is a binary format. For Linux OS you will use usally the Base64 encoded format which converts the binary certificate into ASCII format.

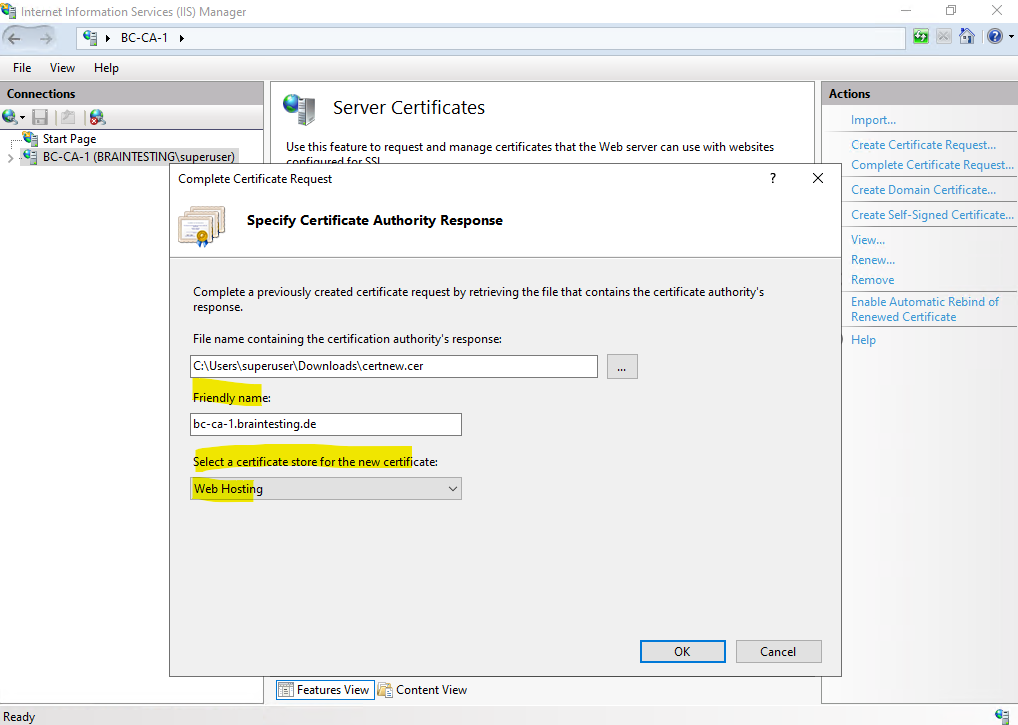
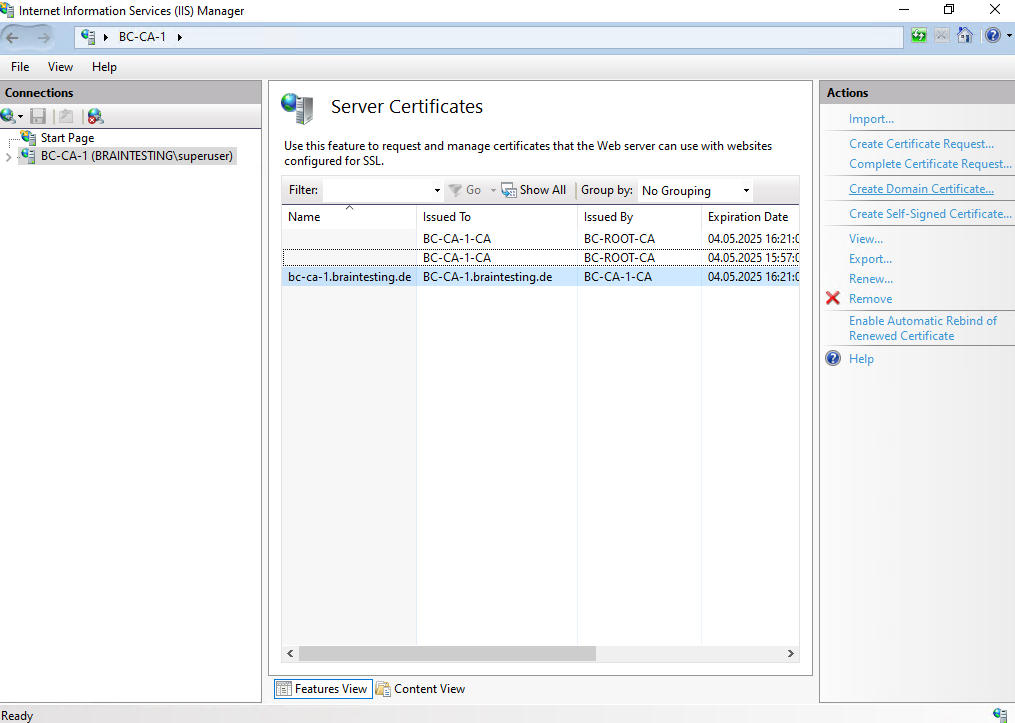
We now need to complete the certificate request by clicking on Complete Certificate Request … under IIS Manager console -> CA node -> Server Certificates as shown below.
We can now use this certificate to create a new HTTPS binding for the CA Web Enrollment role service page.
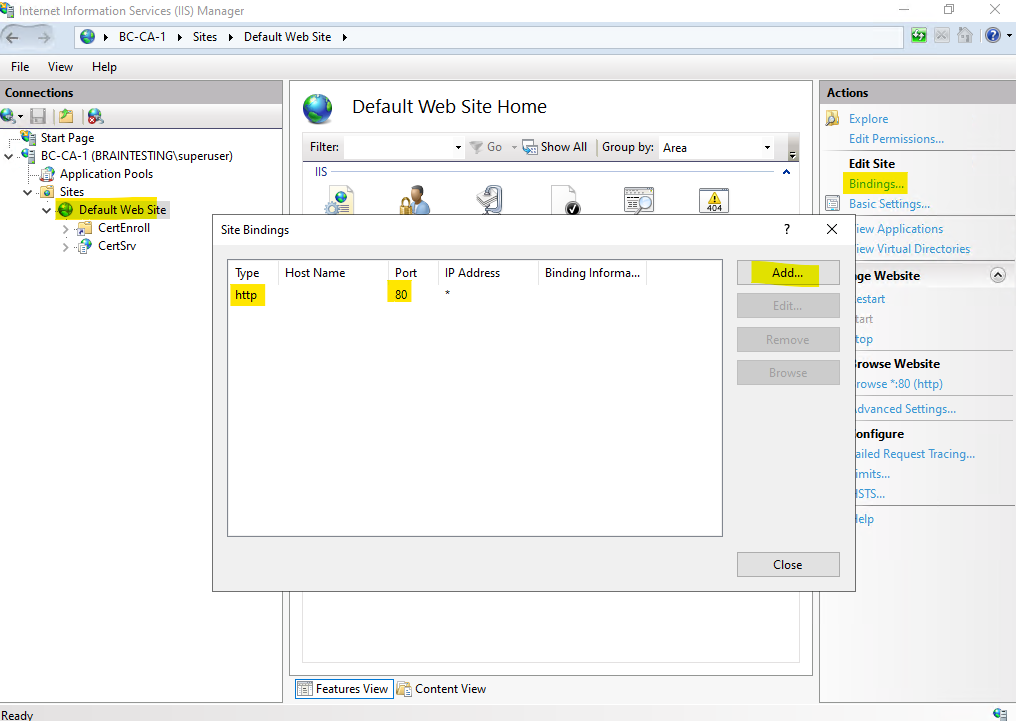
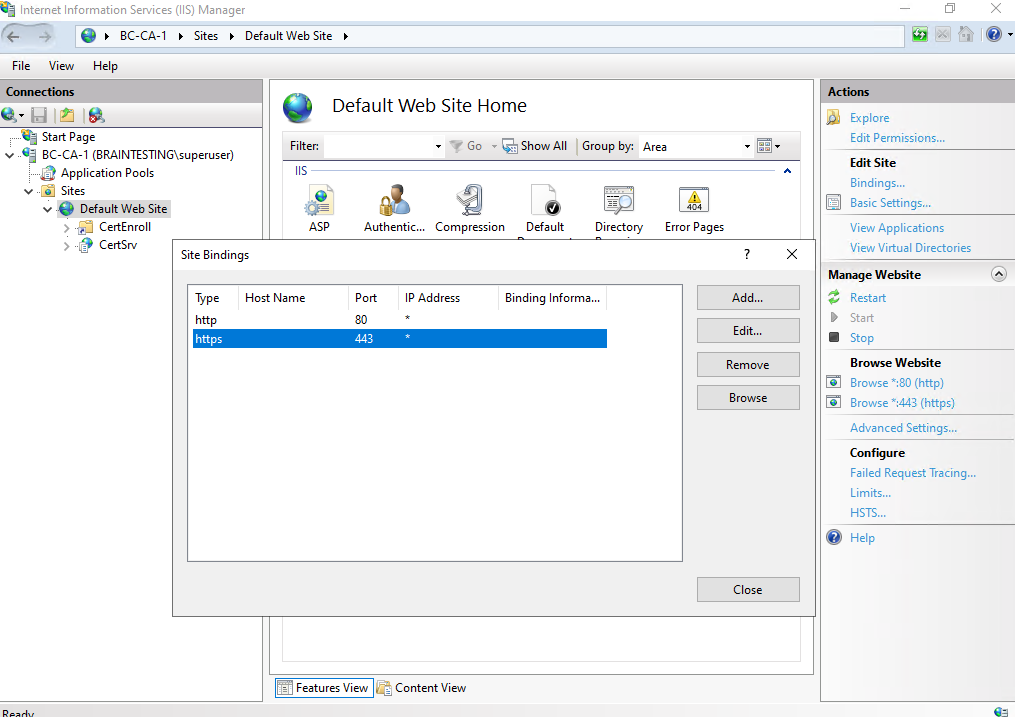
Select the Default Web Site and click on Bindings and then on Add … as shown below.
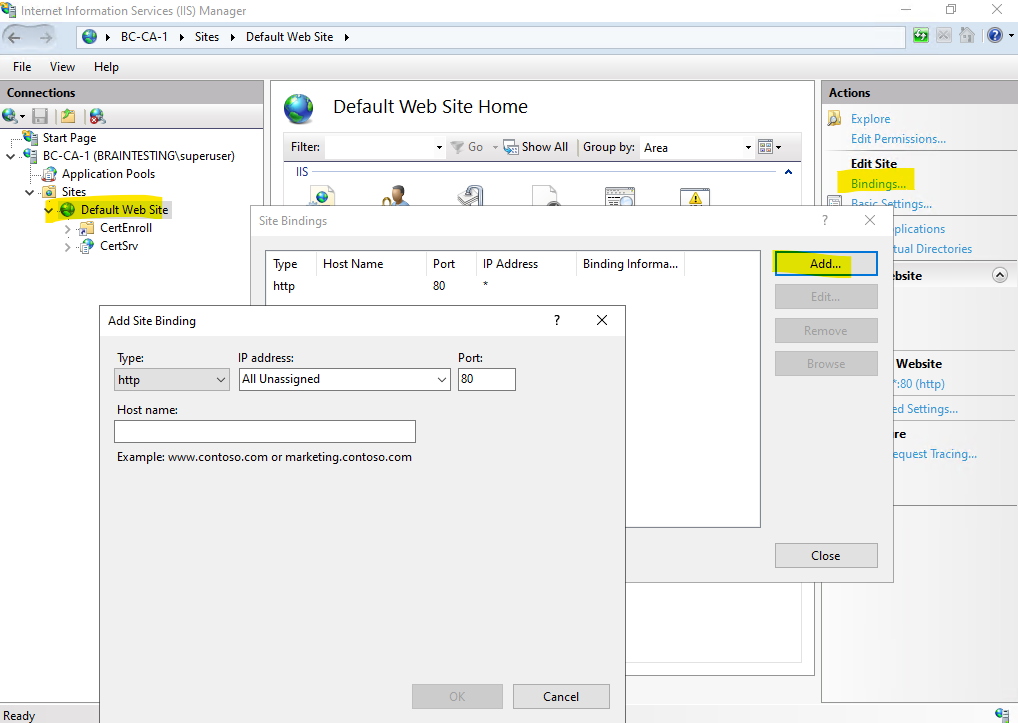
Select https for the new binding type and under SSL certificates select our newly created certificate.

Finally we have two bindings for the page, by default http port 80 and now also https port 443.
Instead of using the former http://servername/certsrv location, you must connect now to https://servername/certsrv to request a certificate.
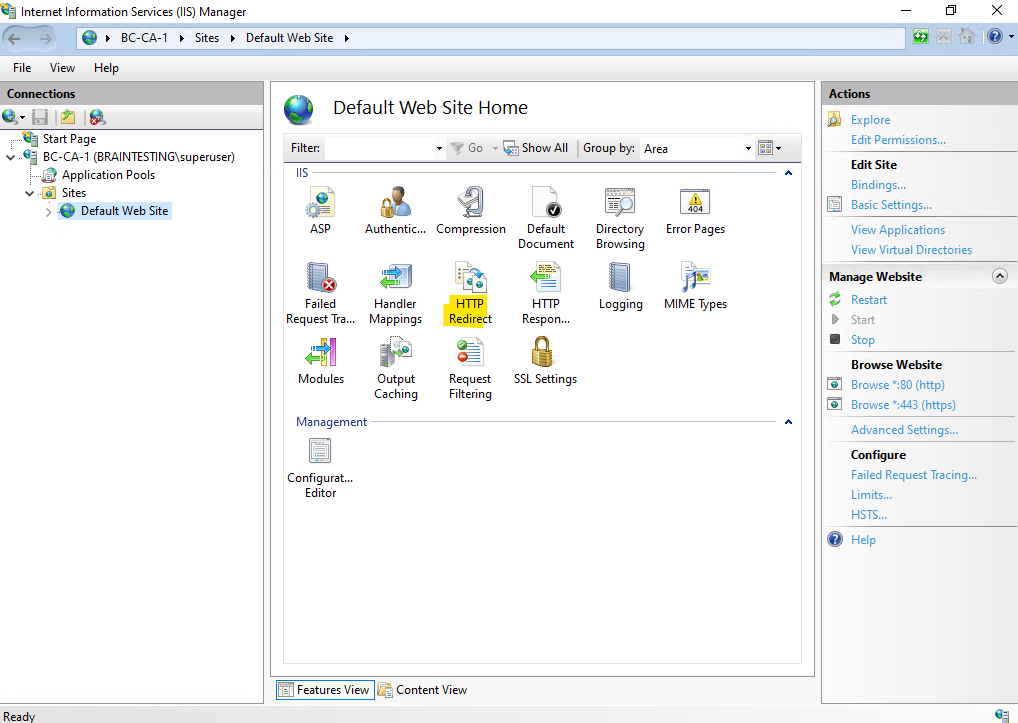
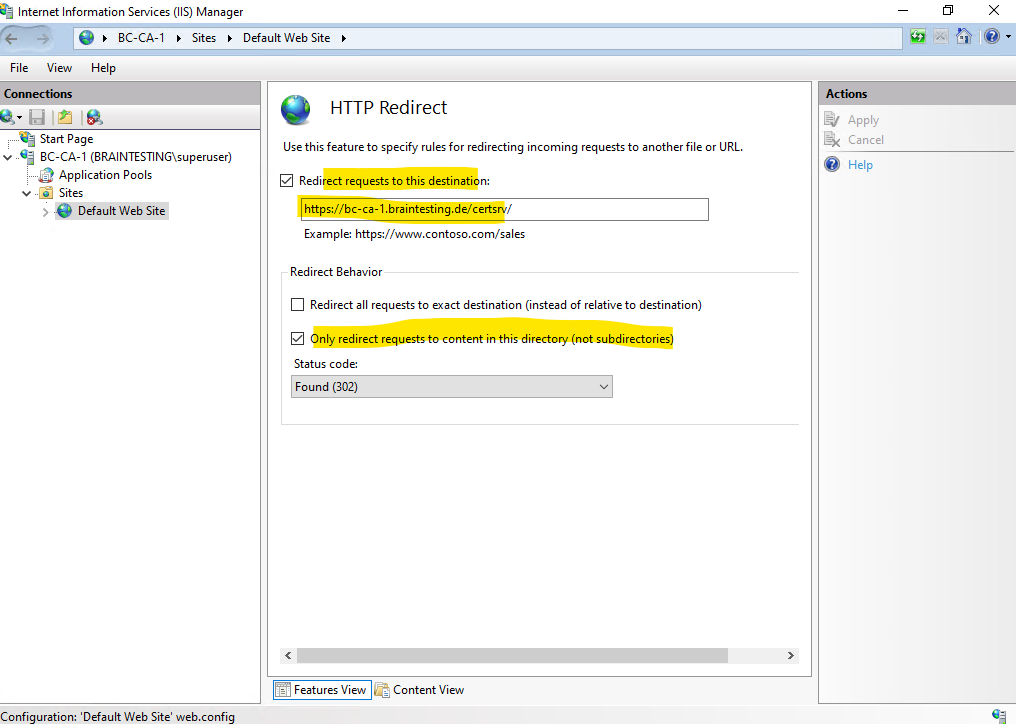
I will also configure a HTTP Redirect to redirect requests directly to https://bc-ca-1.braintesting.de/certsrv.
The FQDN is now also added as SAN and therefore no warning message appears.
CA Web Enrollment Page prompts for Authentication
So far when browsing to my CA Web Enrollment role service page, I always get prompted to authenticate myself, despite that my Windows account which I am signed in to my computer, already have permissions to access the page.
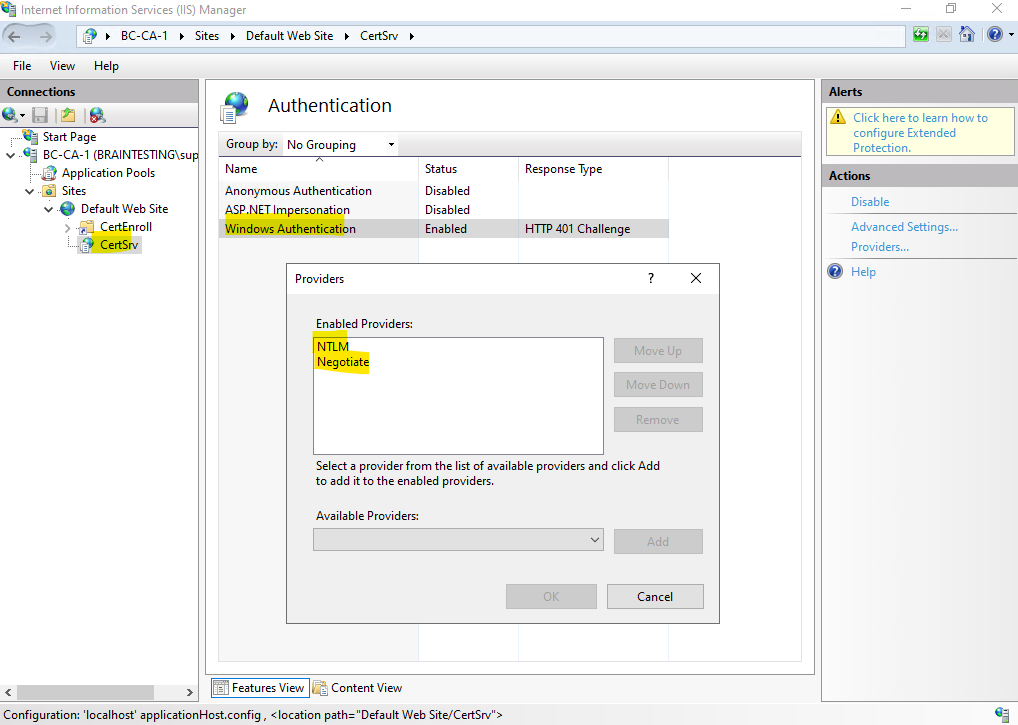
The Authentication settings on the IIS of my Subordinate CA (Intermediate CA) are also set correctly to Windows Authentication and using either NTLM or Kerberos.
Negotiate is a provider or container which supports Kerberos protocol and it also contains NTLM as a backup when Kerberos fails due to some reason. When we want to use Kerberos “Negotiate” should be at the top.
The reason for that I will get prompted nevertheless to authenticate myself against the CA Web Enrollment role service page, is that in past the Internet Explorer and now the Microsoft Edge (Chromium) browser do not pass Kerberos tickets or NTLM sessions to websites in the Internet zone.
Therefore we first need to add the all websites and here specifically our CA Web Enrollment role service page we want to pass Kerberos tickets and NTLM session to, into the Intranet zone on each client computer and domain member we want to enable for.
We can do this by using either the default domain group policy or we create a dedicated group policy if we want to restrict this to specific OUs and then just link the policy to these OUs.
GPO -> Computer Configuration -> Administrative Templates -> Windows Components -> Internet Explorer -> Internet Control Panel -> Security Page -> Site to Zone Assignment List
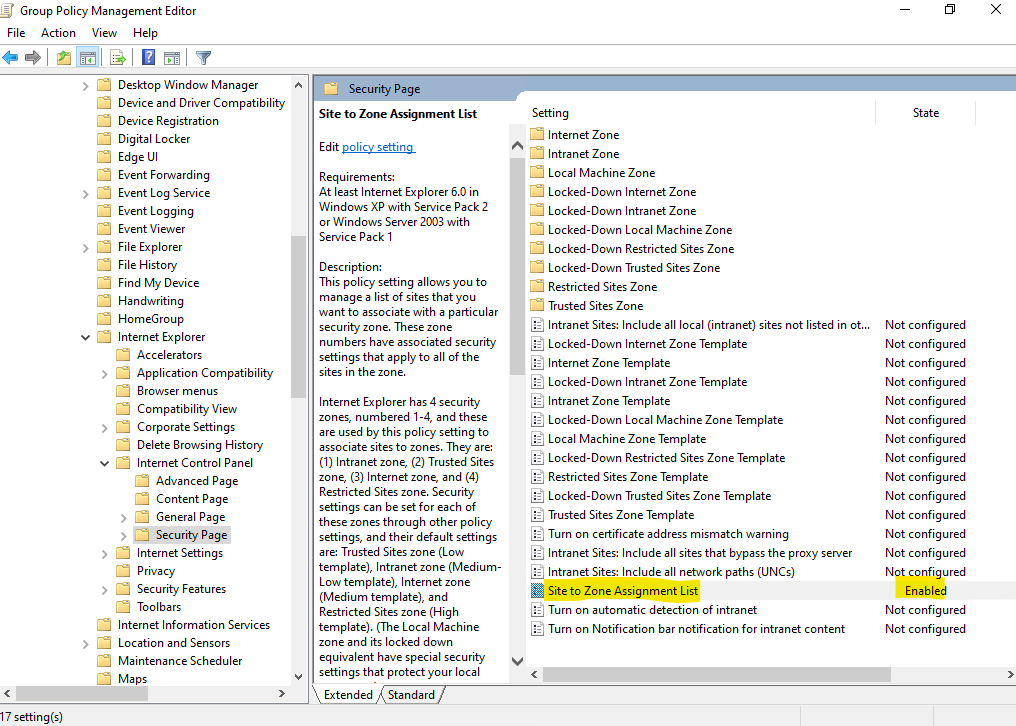
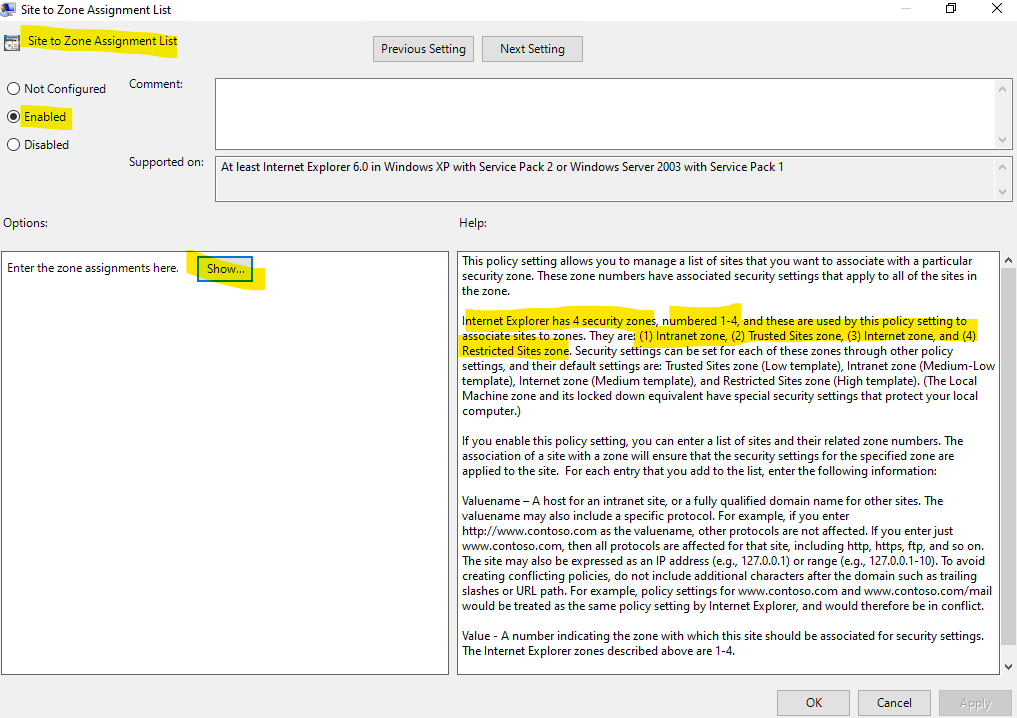
I will use below a wildcard to allow all sites using the internal braintesting.de domain.

Finally we can execute on the client the gpudate /force command to reapply all policy settings immediately and that we can test if now our local Windows authentication is passed automatically to the CA Web Enrollment role service page so that we doesn’t need to authenticate again to access the page.
Now it works and I will get signed in without first prompting for authentication.
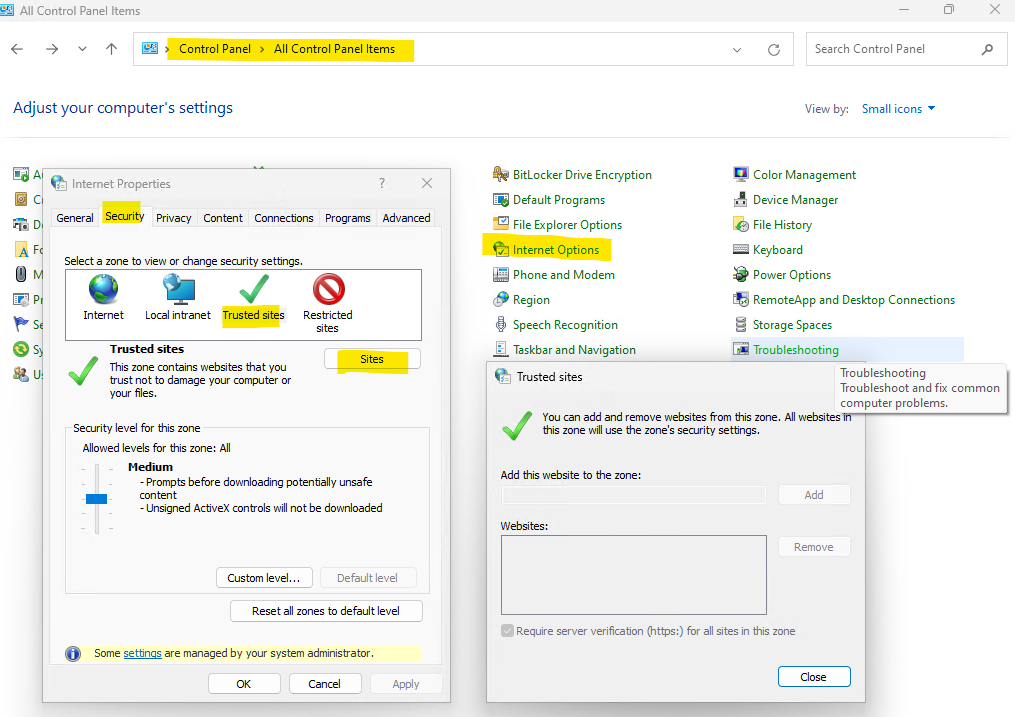
The trusted sites you can usually check on Windows Clients under the Internet Options in the control panel as shown below. In my case I won’t see them because they are now managed by the organization and its group policies.
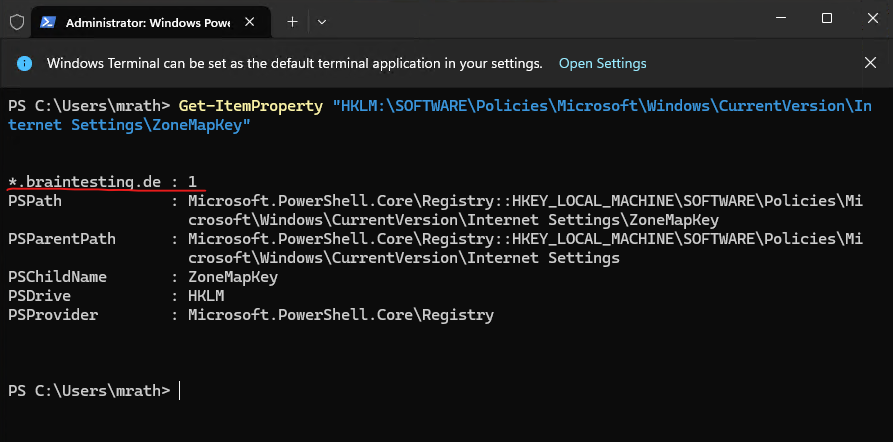
In case they are managed by the organization you can use the following command on clients to check which sites are added.
Get-ItemProperty "HKLM:SOFTWAREPoliciesMicrosoftWindowsCurrentVersionInternet SettingsZoneMapKey"
Deploy Root CA Certificate for Domain Members
In case you have a online enterprise root CA, the root CA certificate will be published to domain members by default.
When using a standalone offline root CA we can publish the root CA certificate either directly into Active Directory by using the following command or by using a group policy.
When publishing the CA certificate directly to Active Directory, the certificate is trusted by each member in the domain. When using a group policy, we can limit its trust to specific OUs or sites within the domain.
We must run the command below from a computer which is a member of the domain and by using an account that is a member of either Domain Admins or Enterprise Admins.
certutil -f -dspublish <RootCACertificate> RootCA
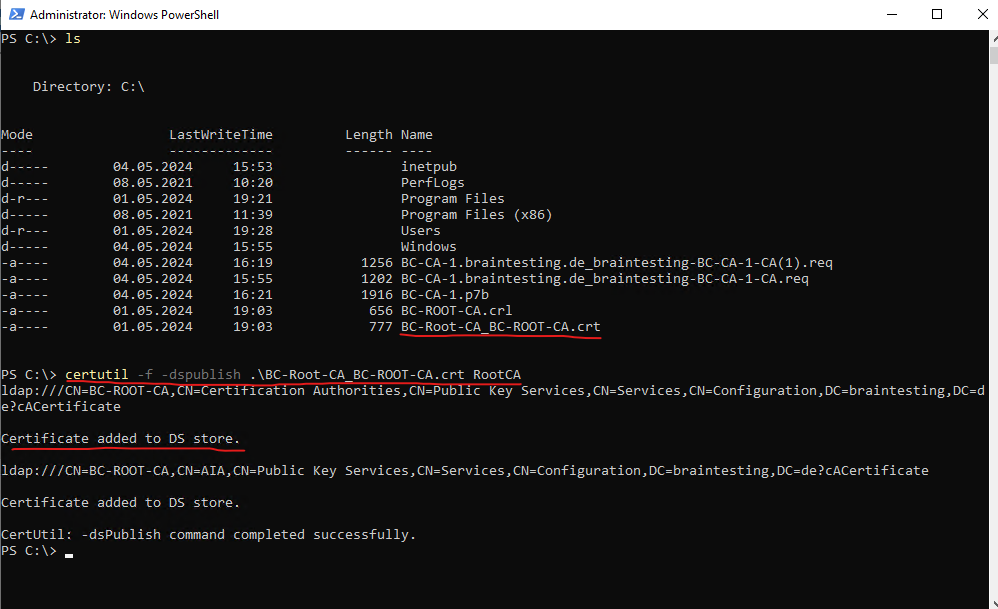
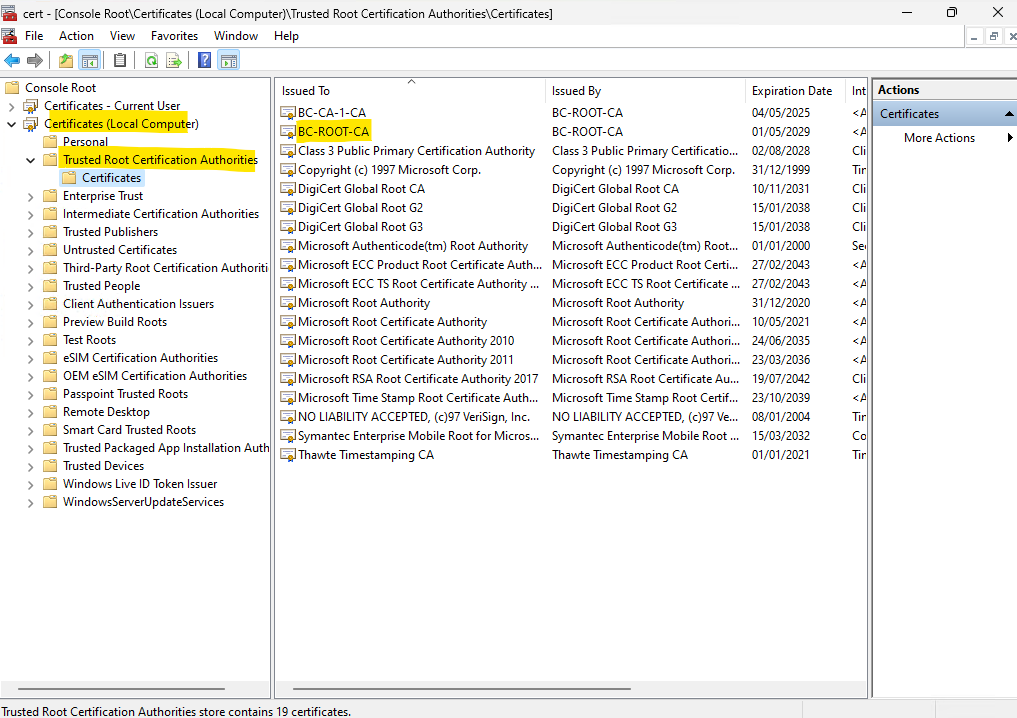
To force the deployment on domain members, we can afterwards execute the gpupdate /force command on domain members. Afterwards the Root CA certificate is shown up in the Trusted Root Certification Authorities store (current user and local computer) as shown below.
Further we can see below the certificate of our Subordinate CA (Intermediate CA) with BC-CA-1-CA. It is also deployed to the Intermediate Certification Authorities store.
This is because our Subordinate CA (Intermediate CA) is a enterprise online CA and therefore the certificate will be published to Active Directory by default.
In case you also have a standalone offline subordinate CA , you can use the following command to publish the certificate to Active Directory or by using a group policy.
certutil –dspublish -f ca.cer SubCA
When using a group policy you can use either the default domain policy which will be applied to all domain members or by using a dedicated group policy and just link it to specific OUs to limit the deployment.
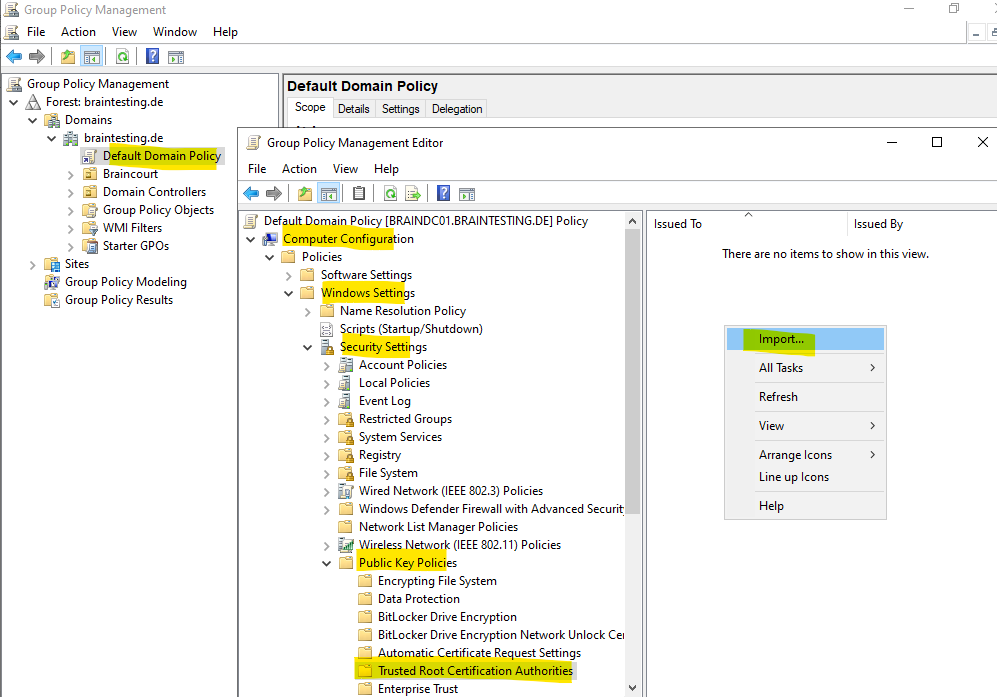
You can import CA certificates into a group policy in order to deploy it to domain members and OUs where the gpo is linked to as follows:
Computer Configuration -> Windows Settings -> Security Settings -> Public Key Policies -> Trusted Root Certification Authorities (or Intermediate Certification Authorities) -> Import … and then select the specific certification file.
The certification file will be imported and not just linked to a path.
Troubleshooting
A common issue when installing the CA certificate on the Subordinate CA (Intermediate CA) is the following when the certificate chain cannot be verified.
Cannot verify certificate chain. The revocation function was unable to check revocation because the revocation server was offline. 0x80092013 (-2146885613 CRYPT_E_REVOCATION_OFFLINE)
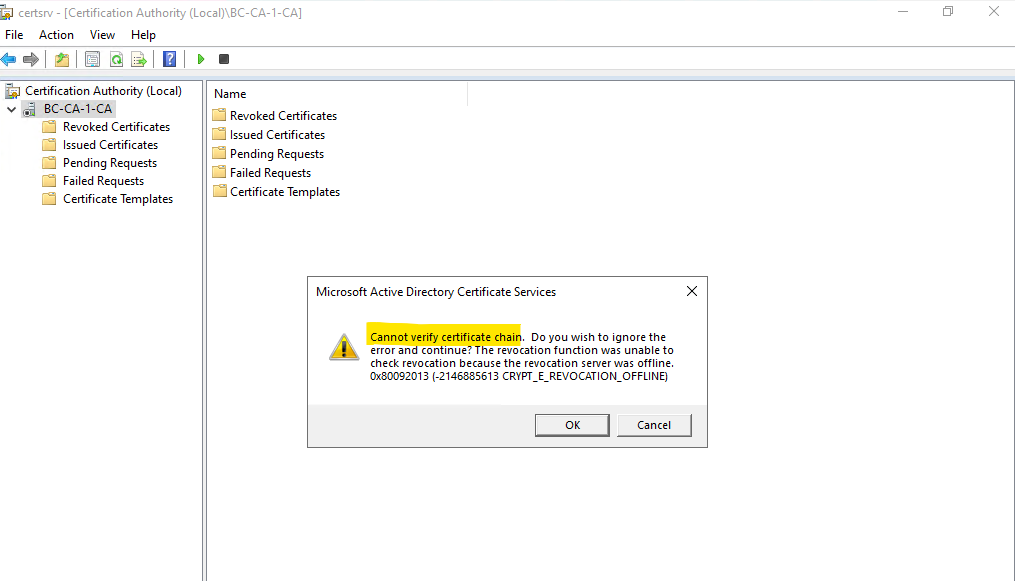
This issue will occur either when the CRL of the Root CA is expired as mentioned in Part 2 or when you forgot to include the CDP extension when you configure the CRL Distribution Point (CDP) and http location as also shown in Part 2 under Configure the Certification Revocation List (CRL).
To solve this issue go to your Root CA and CRL Distribution Point (CDP) settings and add the extensions for the http location.
Then repeat the steps starting with On the Root CA we can now submit a new request by … as shown further above.
In Part 4 we will see see the Active Directory Certificate Services (AD CS) in action.
How to remove a Enterprise Windows Certificate Authority
In some organizations, there are regular backup procedures for Enterprise Windows Certificate Authority. If there’s a server problem (software/hardware), you may need to reinstall the Enterprise Windows Certificate Authority. Before you can reinstall the Enterprise Windows Certificate Authority, you may need to manually delete objects and data that belong to the original Enterprise Windows and reside in the Windows Active Directory.
Enterprise Windows Certificate Authority saves the configurations settings and data in the Windows Active Directory.
To remove all Certification Services objects from Active Directory:
Start “Active Directory Sites and Services“.
Select the “View” menu option, and select “Show Services” Node
Expand the “Services“, and then expand “Public Key Services“.
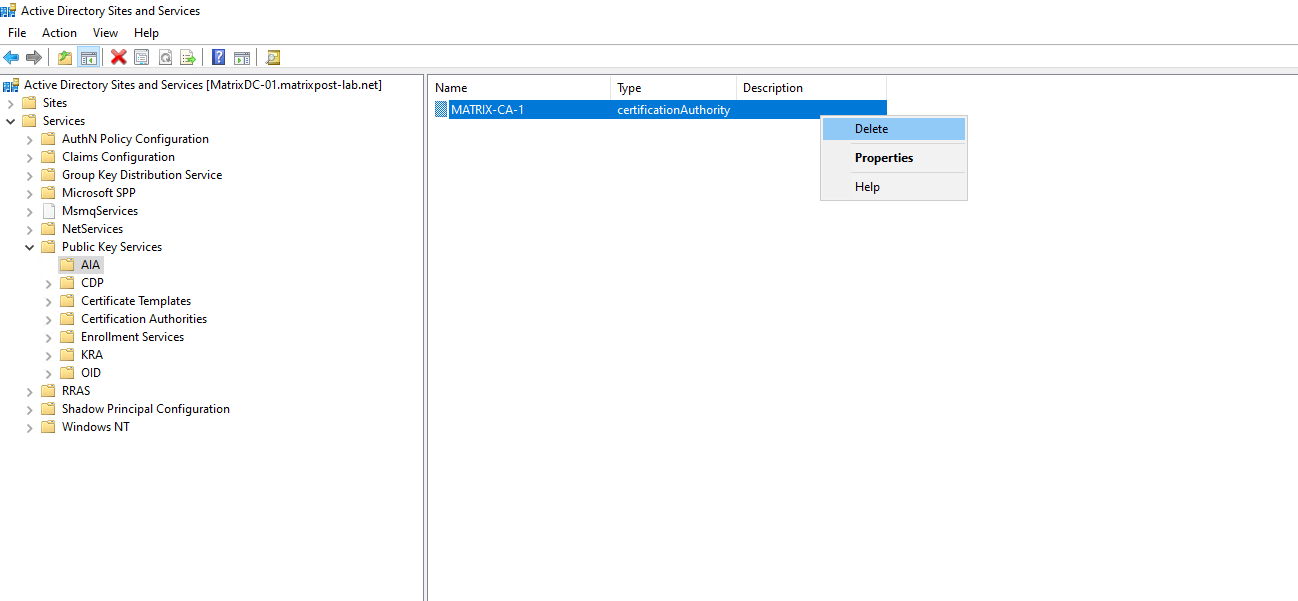
Select the “AIA” node.
In the right-hand pane, locate the “certificateAuthority” object for your Certification Authority. Delete the object.
Select the “CDP” node.
In the right-hand pane, locate the Container object for the server where Certification Services is installed. Delete the container and the objects it contains.

Select the “Certification Authorities” node.
In the right-hand pane, locate the “certificateAuthority” object for your Certification Authority. Delete the object.
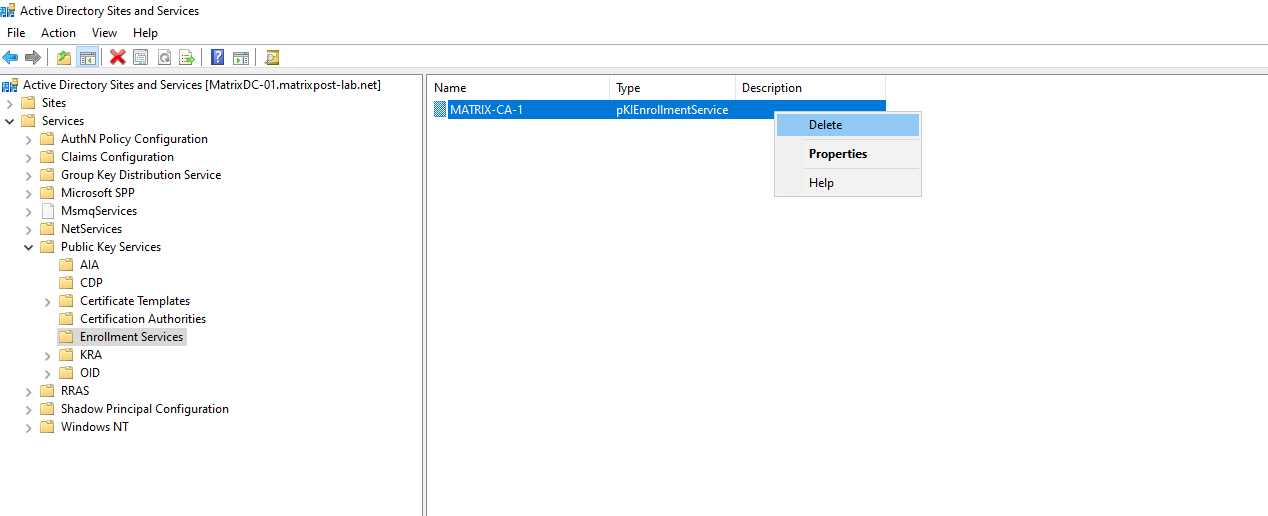
Select the “Enrollment Services” node.
In the right-hand pane, verify that the “pKIEnrollmentService” object for your Certification Authority, delete it.
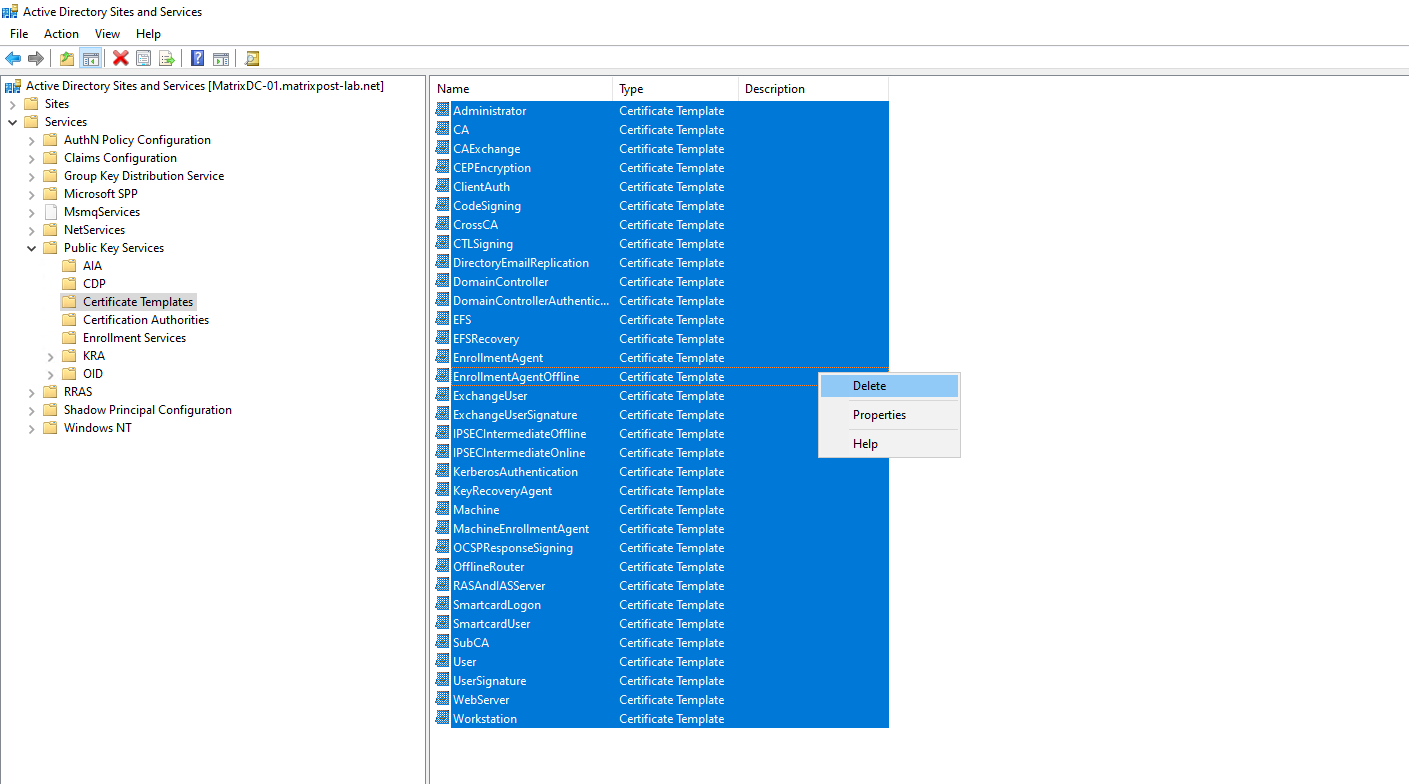
Select the “Certificate Templates” node.
In the right-hand pane, delete all the Certificate Templates.
Delete all the Certificate Templates only if no other Enterprise CAs are installed in the forest. If the templates are inadvertently deleted, restore the templates from backup.
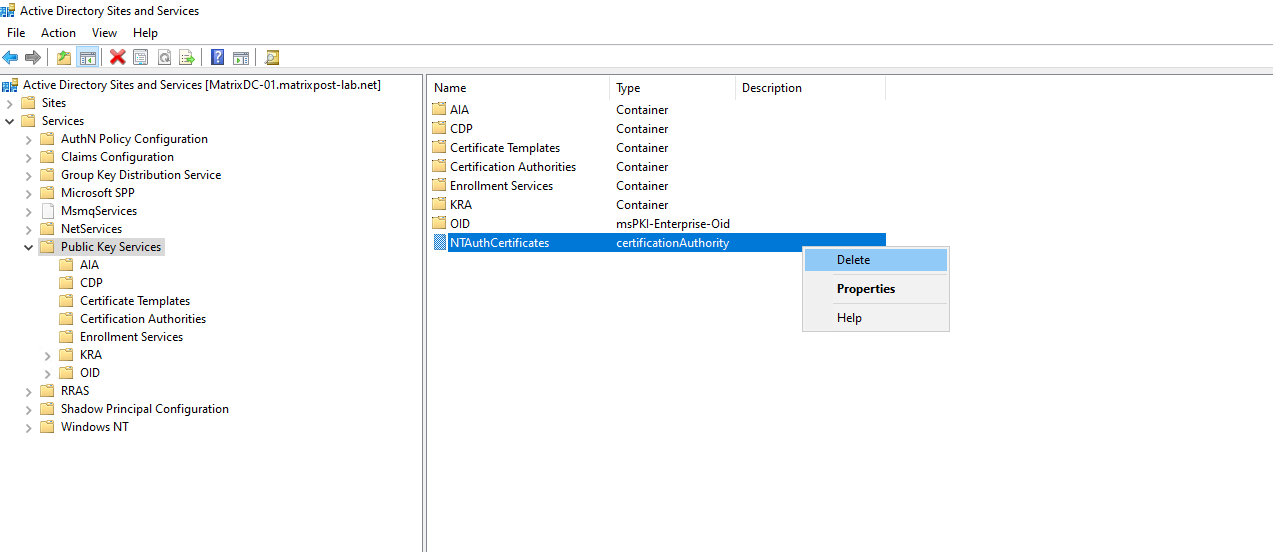
Select the “Public key Services” node and locate the “NTAuthCertificates” object.
If there are no other Enterprise or Stand-alone CAs installed in the forest, delete the object, otherwise leave it alone.
Use “Active Directory Sites and Services” or “Repadmin” command from the Windows resource kit to force replication to the other domain controllers in the domain/forest.
Domain Controller Cleanup
Once the CA has been taken down, the certificates that have been issued to all the domain controllers need to be removed. It can be done easily by using DSSTORE.EXE from the Resource Kit:
You can also remove old domain controller certificates by using certutil command:
At the command prompt, type gpupdate /target: computer.
At the command prompt on a domain controller, type: certutil -dcinfo deleteBad.
Certutil.exe will attempt to validate all the DC certificates issued to the domain controllers. Certificates that fail to validate will be removed. At this point, you can reinstall Certificate Services. After the installation is finished, the new root certificate will be published to Active Directory. When the domain
clients refresh their security policy, they’ll automatically download the new root certificate into their trusted root stores. o force application of the security policy.
Blog Post Series – Parts Summary
Set up a 2-tier PKI in Active Directory Certificate Services (AD CS) – Part 1
Set up a 2-tier PKI in Active Directory Certificate Services (AD CS) – Part 2
Set up a 2-tier PKI in Active Directory Certificate Services (AD CS) – Part 3
Set up a 2-tier PKI in Active Directory Certificate Services (AD CS) – Part 4
Links
What is Active Directory Certificate Services?
https://learn.microsoft.com/en-us/windows-server/identity/ad-cs/active-directory-certificate-services-overviewImplement and manage Active Directory Certificate Services
https://learn.microsoft.com/en-us/training/modules/implement-manage-active-directory-certificate-services/What is the Certification Authority Role Service?
https://learn.microsoft.com/en-us/windows-server/identity/ad-cs/certification-authority-roleRemoving old certification authority certificates from the configuration of a certification authority
https://www.gradenegger.eu/en/removing-old-certification-authority-certificates-from-the-configuration-of-a-certification-authority/
Tags In
Related Posts
Latest posts
Behind the Scenes: How Cloud Volumes ONTAP Handles Azure Scheduled Maintenance
Follow me on LinkedIn