Set up Office Master Gate 5.0 with Microsoft Teams Direct Routing and DTAG’s SIP Trunk
I will go through the steps to install the Office Master Gate 5.0 (Session Border Controller) from Ferrari electronic AG which supports since this version Microsoft Teams Direct Routing.
OfficeMaster Gate
https://www.ferrari-electronic.com/products/officemaster-gate.html
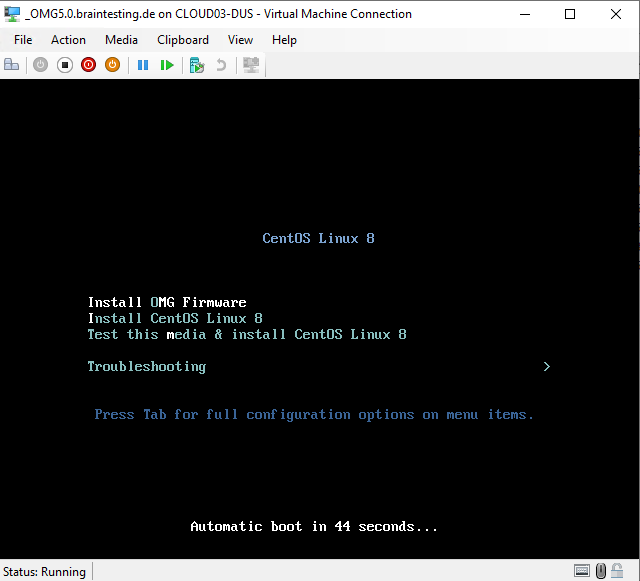
I will set up a Hyper-V virtual machine with an ISO image from Ferrari electronic.
Installationsimage for OfficeMaster Gate Firmware 5.0
(Image for installation of OfficeMaster Gate as virtual appliance)
https://www.ferrari-electronic.com/downloads/files/325004/5.0/OfficeMasterGate-5.0-10.iso
https://www.ferrari-electronic.com/downloads.html

After installation is done the vm will shut down itself.
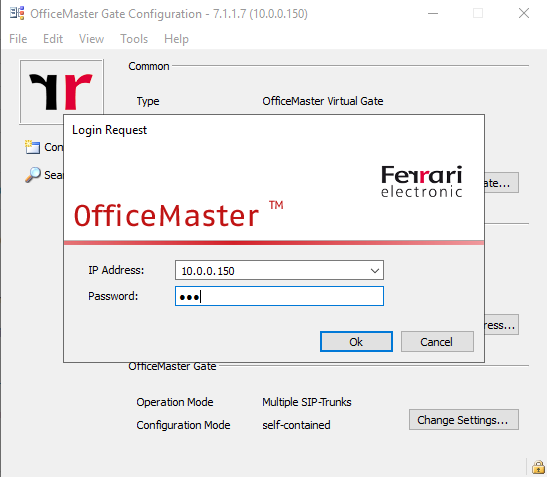
Now you can start the VM and login with the default credentials.
login: root
Password: omc
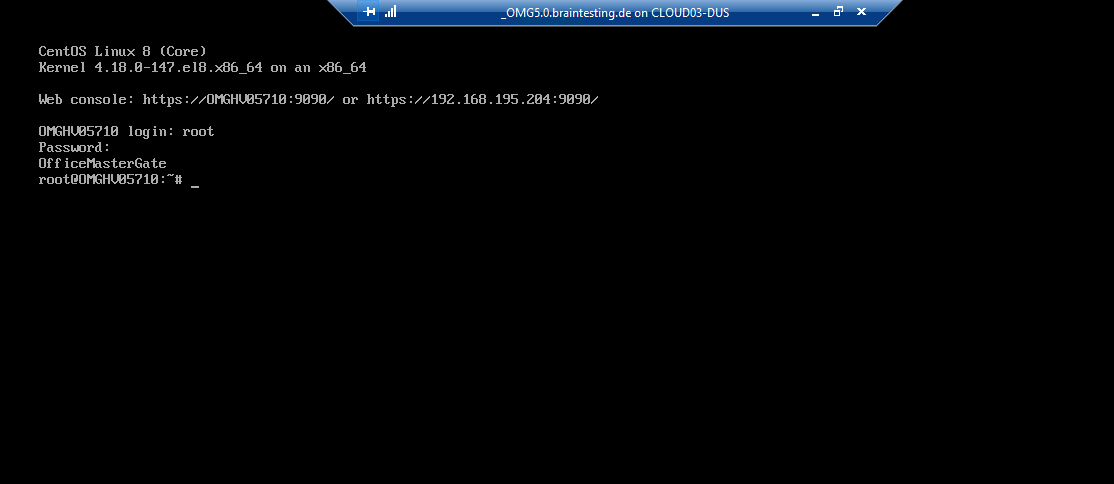
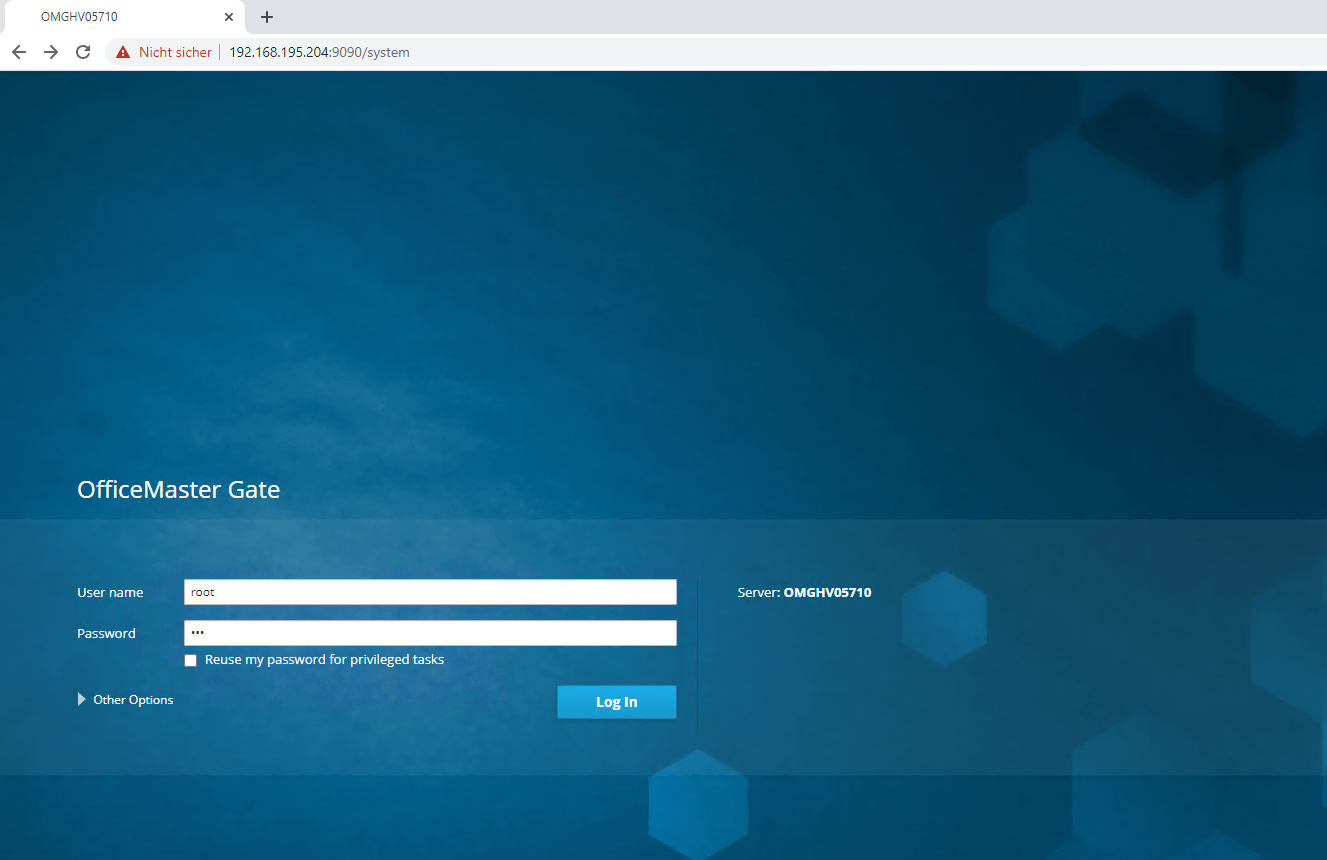
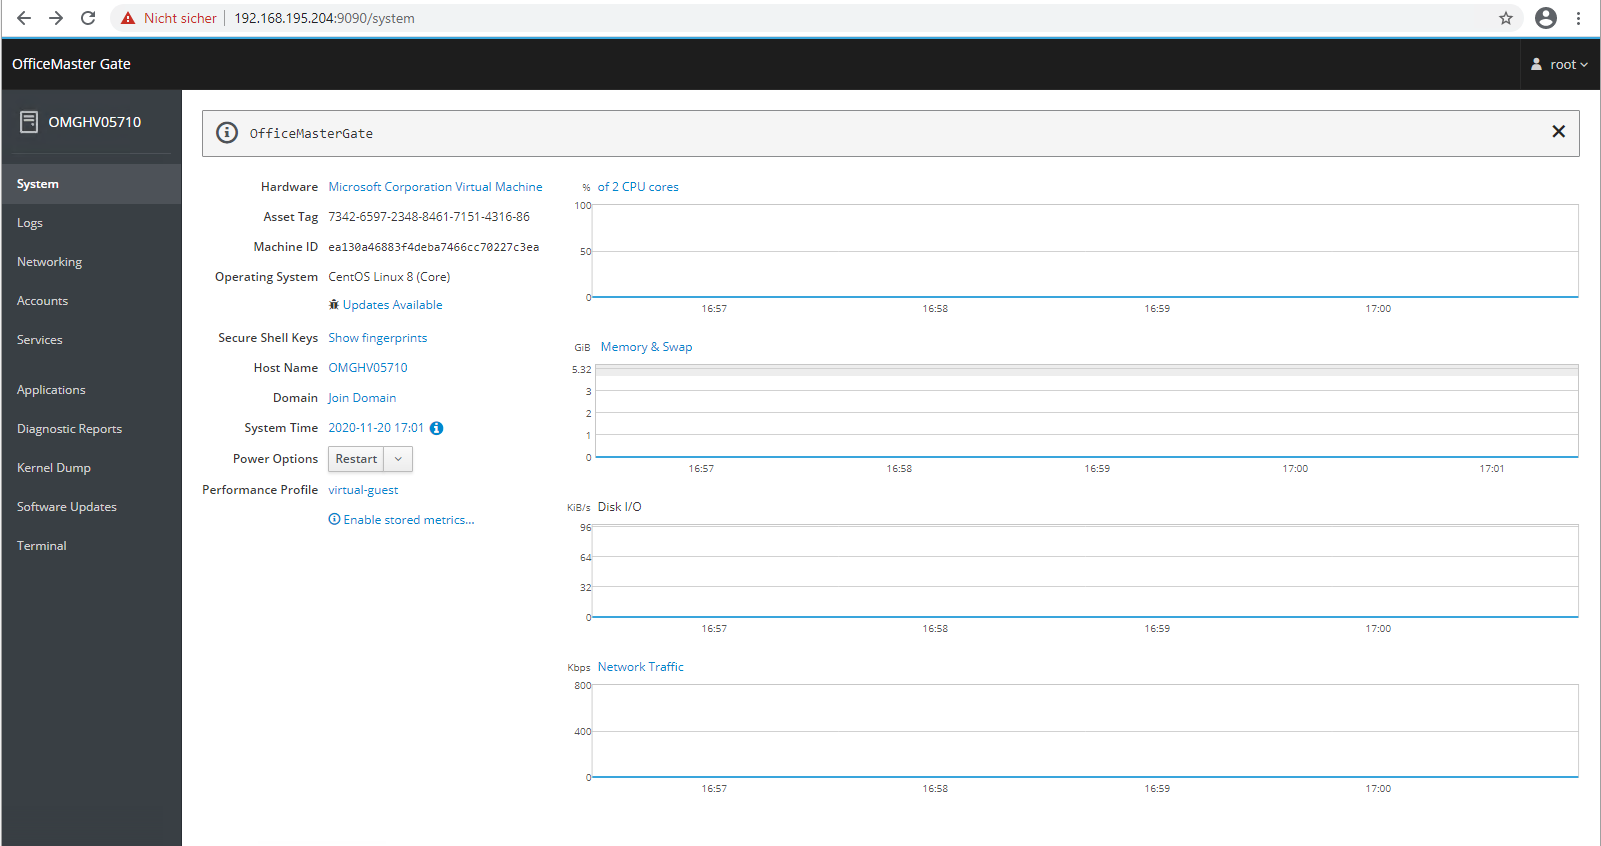
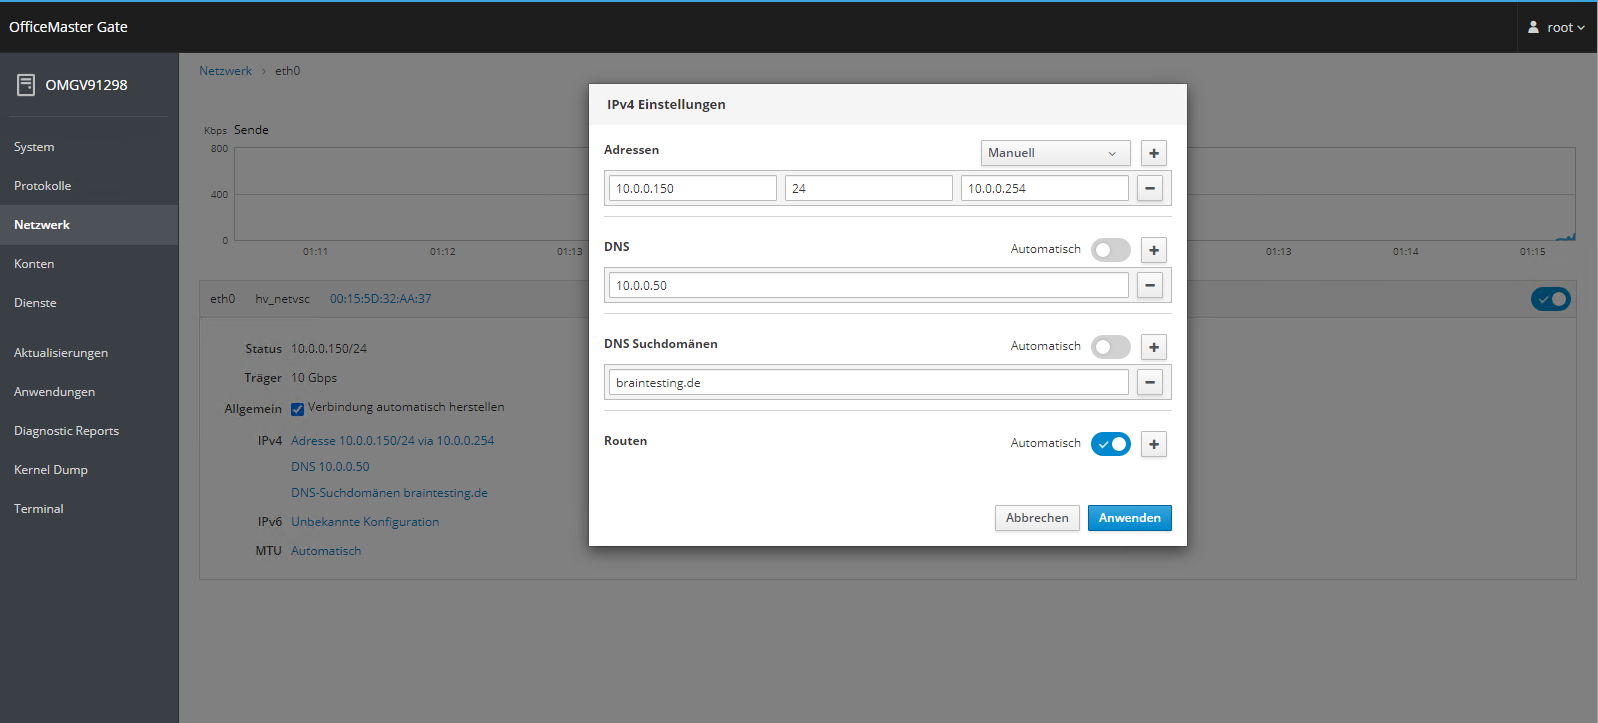
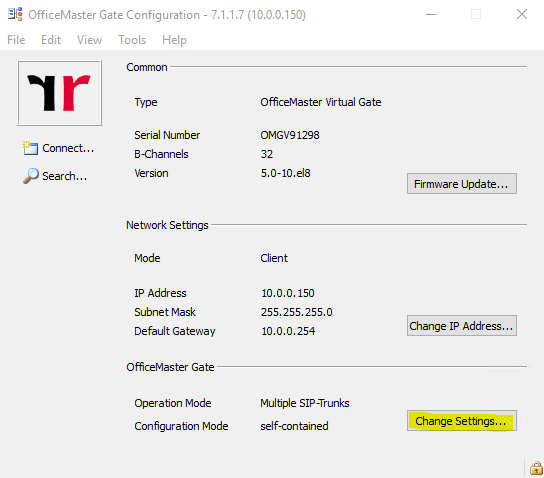
As you can see we can use the Web console under https://192.168.195.204:9090 to login and first configure the network settings from the OMG.
At the moment the appliance is using an IP from the DHCP server, so I want to change it to a fix IP.
From now on we can use the Office Master Gate Configuration Utility to set up Direct Routing with Microsoft Teams on the OMG.
OfficeMaster Gate configuration utility
https://www.ferrari-electronic.com/downloads/files/320002/7.1.1/OfficeMaster-Gate-Configuration-7.1.1-7.exe
Default password: omc
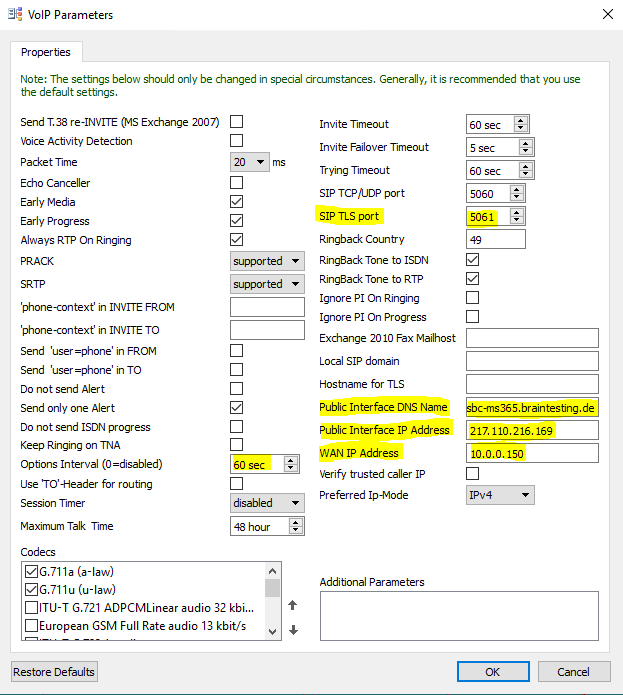
I will first configure the VOIP Parameters
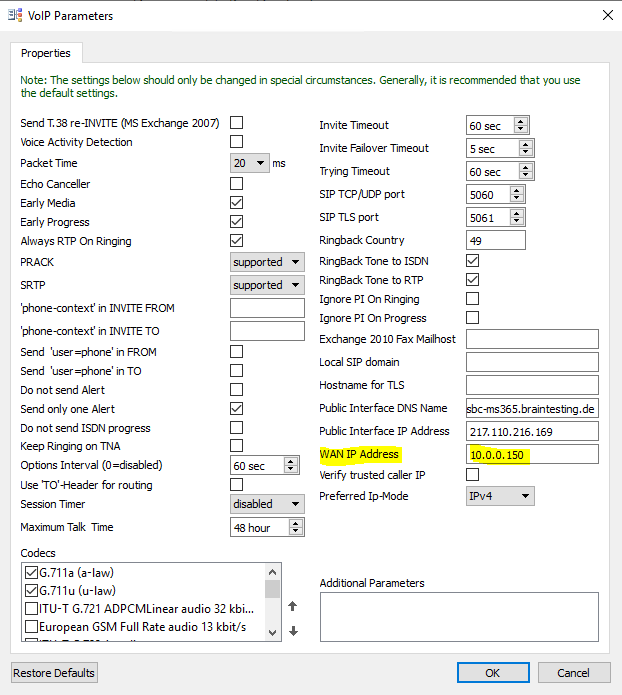
Here I will set the SIP TLS Port on which OMG is listen to 5061 and I also have to provide the public IP and FQDN of the OMG.
As I place the OMG inside my perimeter network with only one interface and an internal IP using 1:1 NAT, I have to set for the WAN IP Address this internal IP from the perimeter network.
Further we need to set the Options Interval to 60 sec in order that the OMG will send SIP OPTIONs messages.
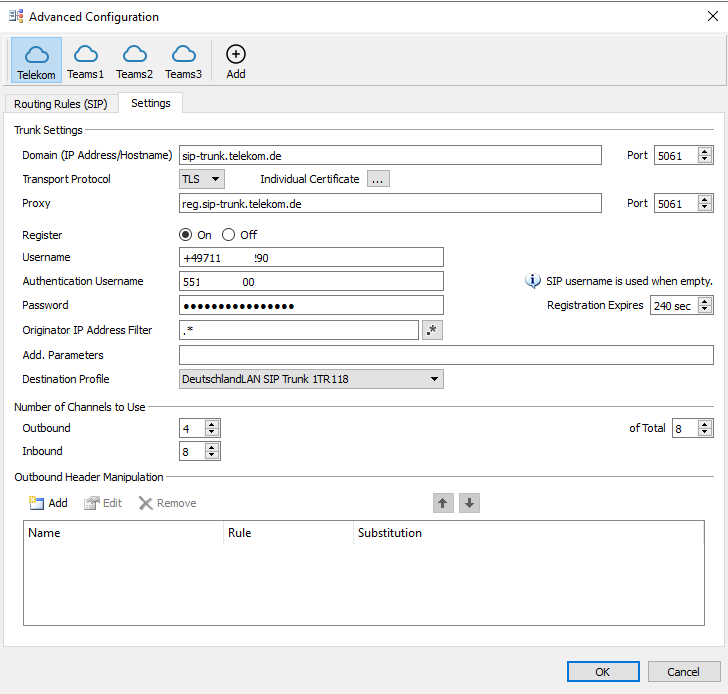
Set up the Connection to your SIP Trunk Provider
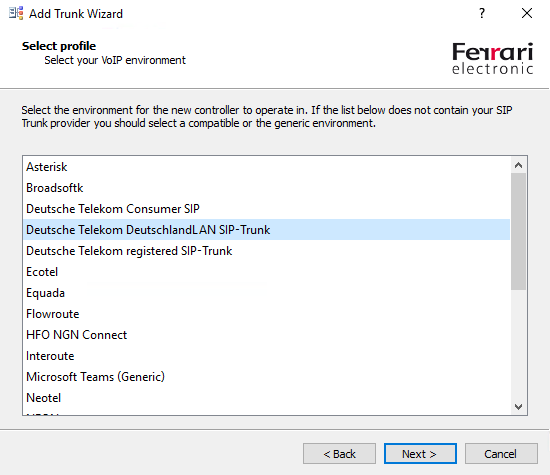
Now we can click on Change settings to add a connection to our SIP Trunk Providers SBC, in my case I will use the DeutschlandLAN SIP Trunk from Deutsche Telekom.
DeutschlandLAN SIP-Trunk
https://geschaeftskunden.telekom.de/internet-dsl/tarife/festnetz-internet-dsl/deutschlandlan-sip-trunk
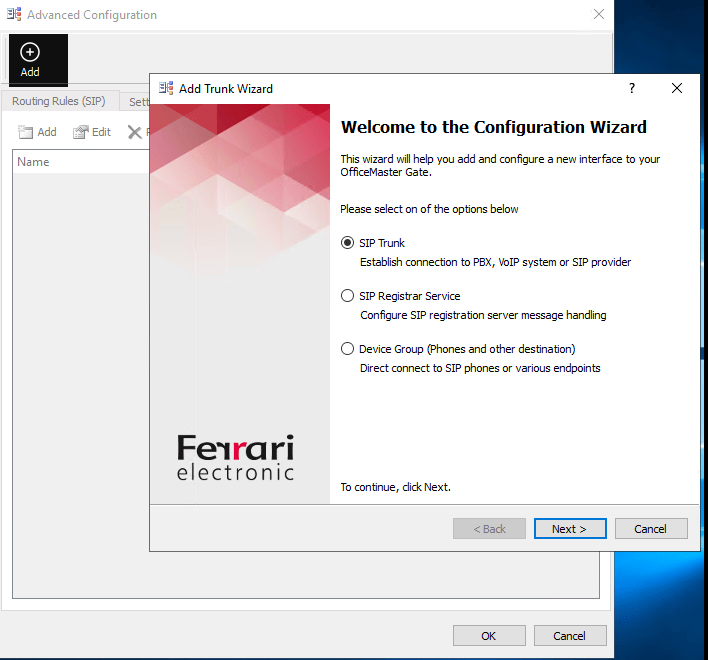
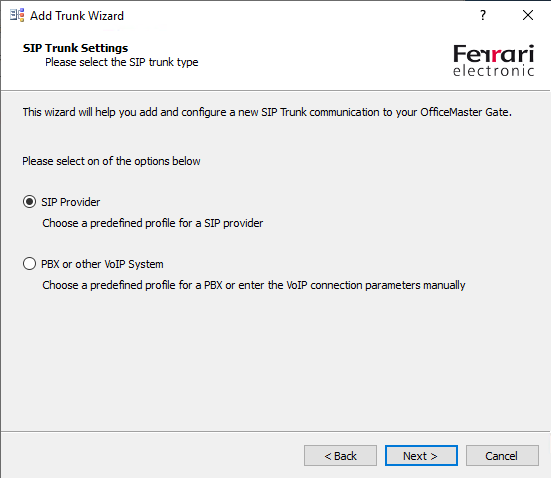
The OMG have predefined profiles for several SIP Trunk Providers, the profiles include the different parameters needed to establish a connection with their SBC.

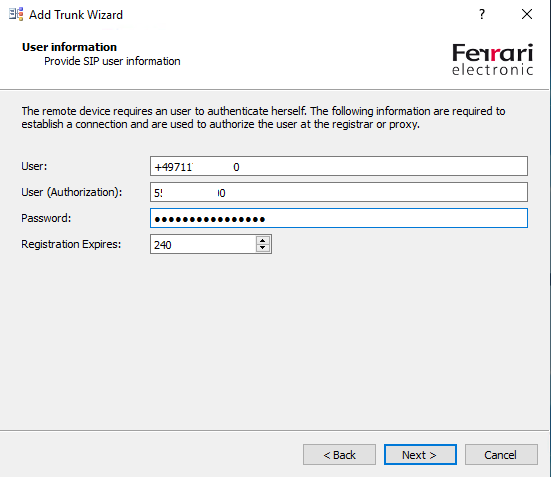
The Provider SIP user information you will get from your SIP Trunk Provider
For the DeutschlandLAN SIP-Trunk the user will be the line number of the connection and the User (Authorization) will be user name.

To check if the OMG can successfully connect to the SBC of your SIP Trunk Provider, you can use the OfficeMaster Syslog Service.
The Syslog Service listens per default on all IPs and Port 514 of the computer it is installed and will store the logs into C:ProgramDataFFUMSsyslog
If you still have an Syslog Server in your network, you can of course use them also or if you want to set up first a dedicated central log server in your network you can read my following posts.
Set up a Central Log Server with Rsyslog on Ubuntu
https://blog.matrixpost.net/set-up-a-central-log-server-with-rsyslog-on-ubuntu
Set up a Central Log Server with syslog-ng daemon on FreeBSD
https://blog.matrixpost.net/set-up-a-central-monitoring-server-with-syslog-ng-on-freebsd
To tell OMG where to send the logs we click in the OMG Configuration Utility on Edit – Logging …
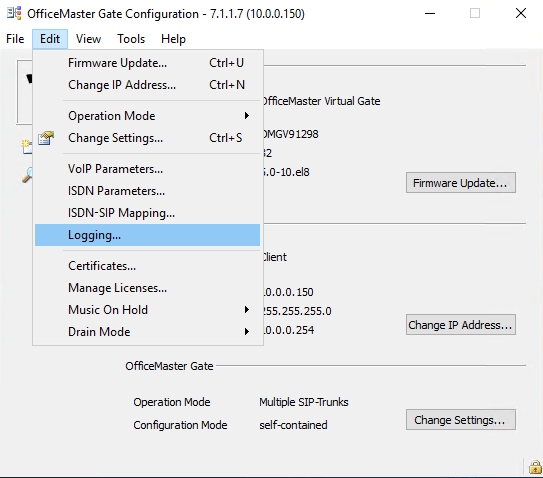
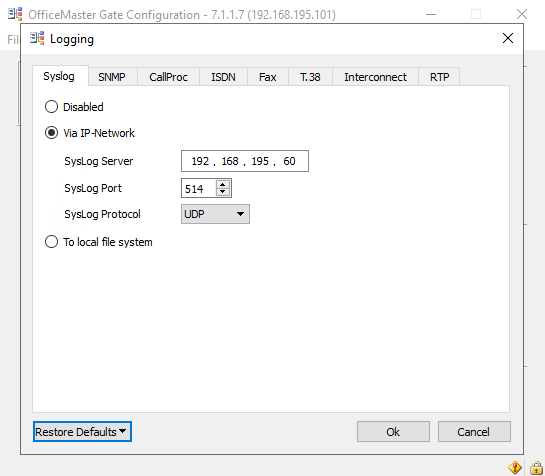
Enter the IP where the Syslog service or your dedicated internal Syslog server is located and the protocol and port it is listening. By default UDP 514.
From now on logs from the OMG should appear in the configured path. In my case as I use the Syslog service and the default path C:ProgramDataFFUMSsyslog the first log is appeared.

To open the logs you can use the Syslog Analyzer which will installed with the OMG Configuration Utility.

Here you can see that the OMG successfully registered to the SBC from the Deutsche Telekom.

Set up the Connection to Microsoft Teams
Now we can configure the connection to Microsoft Teams.
Quickstart: OfficeMaster Gate with Microsoft Teams Direct Routing PDF
https://www.ferrari-electronic.com/downloads/files/501013/1/EN_QS_SBC-Teams-5-0.pdf
We have to add a further connection, so click on the plus sign besides your previously created connection to your SIP Trunk Provider.
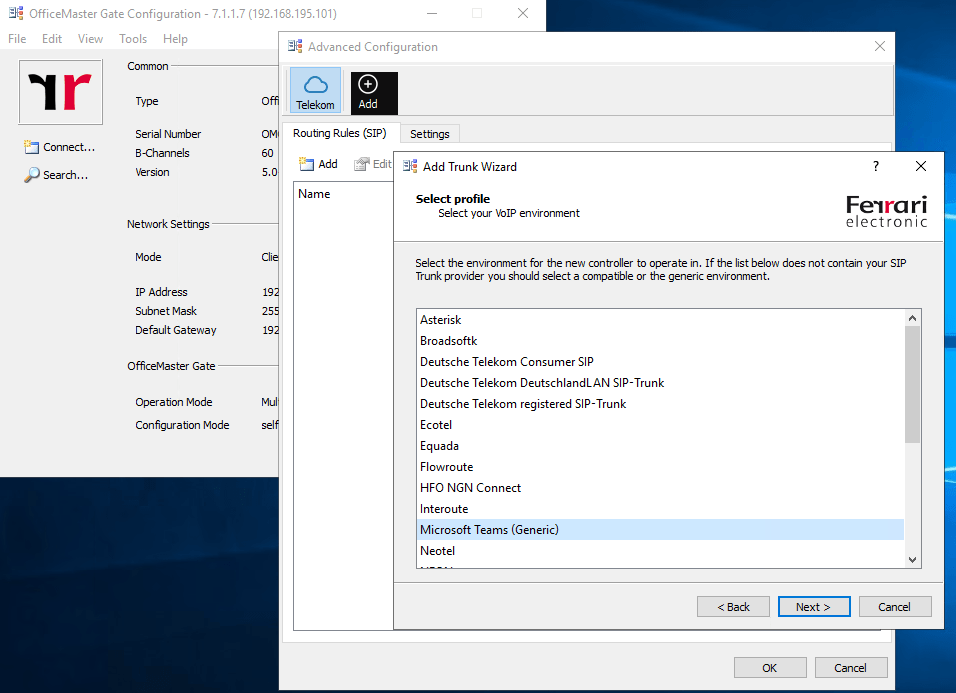
We also need to add a further SIP Trunk to Microsoft Teams.

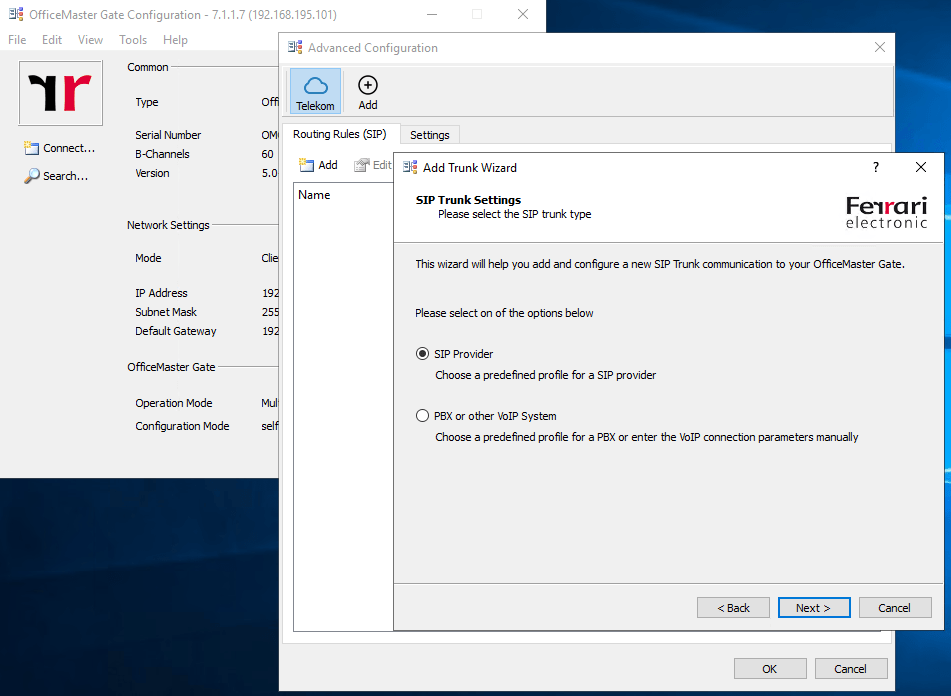
This time we select Microsoft Teams (Generic)
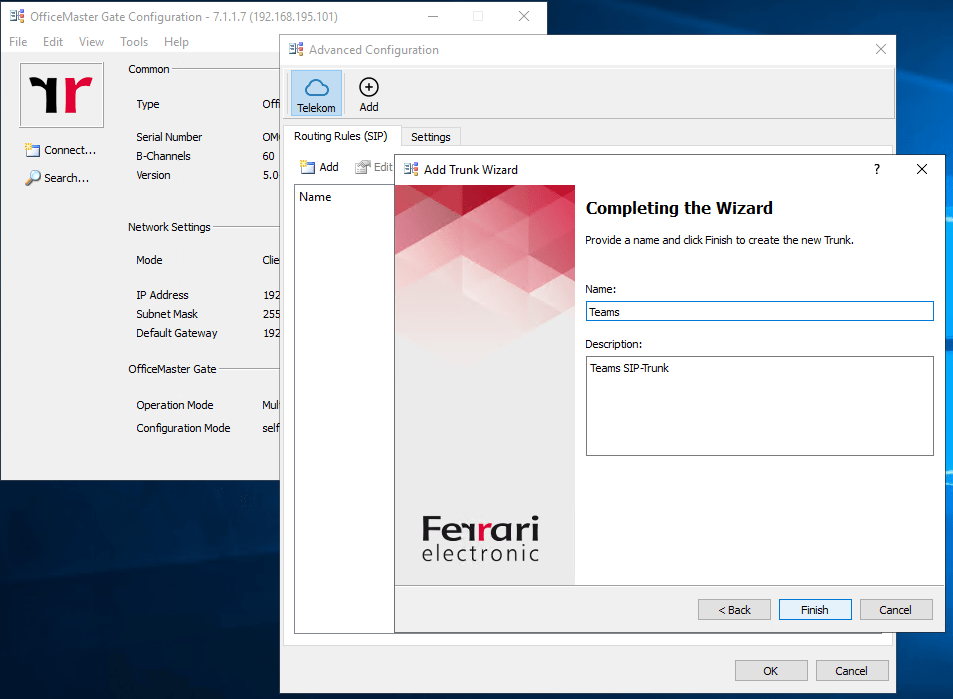
After clicking on Finish you will have three Teams1, Teams2 and Teams3 connections, so what’s behind that 🙂 ?
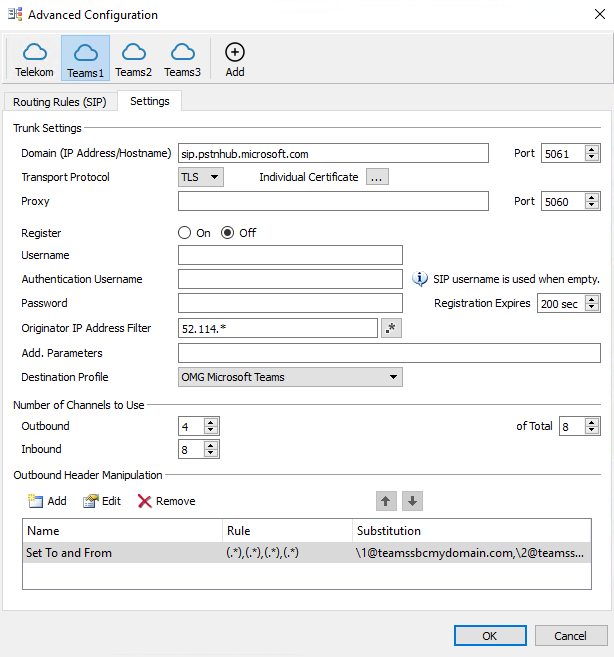
The connection points for Direct Routing are the following three FQDNs, so therefore you will have three connections for each FQDN in your OMG configuration. The main connection is to sip.pstnhub.microsoft.com and the other ones are backup connections.
https://docs.microsoft.com/en-us/MicrosoftTeams/direct-routing-plan#microsoft-365-office-365-and-office-365-gcc-environments
- sip.pstnhub.microsoft.com – Global FQDN – must be tried first. When the SBC sends a request to resolve this name, the Microsoft Azure DNS servers return an IP address pointing to the primary Azure datacenter assigned to the SBC. The assignment is based on performance metrics of the datacenters and geographical proximity to the SBC. The IP address returned corresponds to the primary FQDN.
- sip2.pstnhub.microsoft.com – Secondary FQDN – geographically maps to the second priority region.
- sip3.pstnhub.microsoft.com – Tertiary FQDN – geographically maps to the third priority region.
Placing these three FQDNs in order is required to:
- Provide optimal experience (less loaded and closest to the SBC datacenter assigned by querying the first FQDN).
- Provide failover when connection from an SBC is established to a datacenter that is experiencing a temporary issue. For more information, see Failover mechanism below.
The FQDNs – sip.pstnhub.microsoft.com, sip2.pstnhub.microsoft.com and sip3.pstnhub.microsoft.com – will be resolved to one of the following IP addresses:
- 52.114.148.0
- 52.114.132.46
- 52.114.75.24
- 52.114.76.76
- 52.114.7.24
- 52.114.14.70
- 52.114.16.74
- 52.114.20.29
You need to open ports for all these IP addresses in your firewall to allow incoming and outgoing traffic to and from the addresses for signaling. If your firewall supports DNS names, the FQDN sip-all.pstnhub.microsoft.com resolves to all these IP addresses.
Further you should allow connections from
Microsoft 365, Office 365, and Office 365 GCC environments
- 52.112.0.0/14 (IP addresses from 52.112.0.1 to 52.115.255.254).
- 52.120.0.0/14 (IP addresses from 52.120.0.1 to 52.123.255.254).
Office 365 GCC High environment (by default used)
- 52.127.88.0/2
Also keep in mind to open the following Ports for the above IPs from Microsoft.
Port range (applicable to all environments)
The port range of the Media Processors is shown in the following table:
| Traffic | From | To | Source port | Destination port |
|---|---|---|---|---|
| UDP/SRTP | Media Processor | SBC | 3478-3481 and 49152 – 53247 | Defined on the SBC |
| UDP/SRTP | SBC | Media Processor | Defined on the SBC | 3478-3481 and 49152 – 53247 |
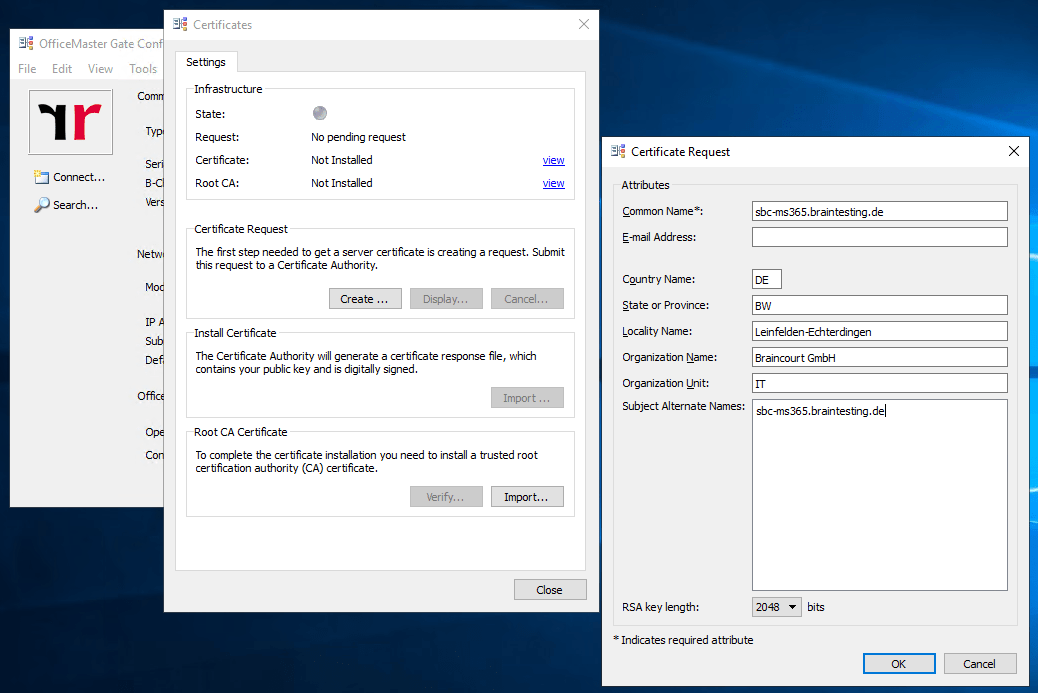
Configure the OMG with a trusted public TLS Certificate
In order to provide mutual TLS authentication and the Microsoft Teams SBC is also able to establish an outbound connection to the OMG , we need to install a trusted certificate from an public CA.
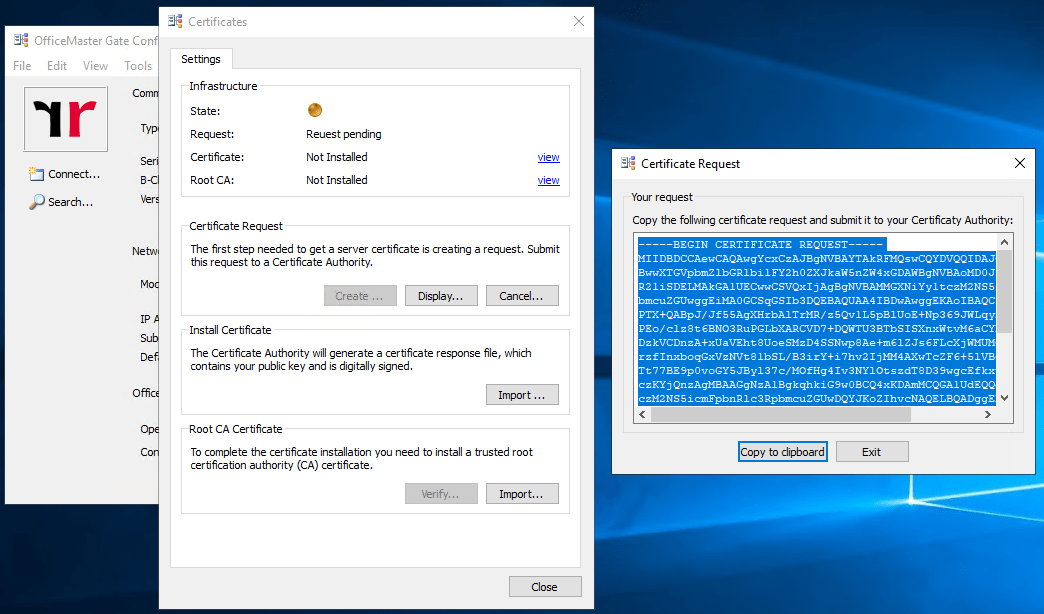
Therefore we create a new certificate signing request on the OMG.
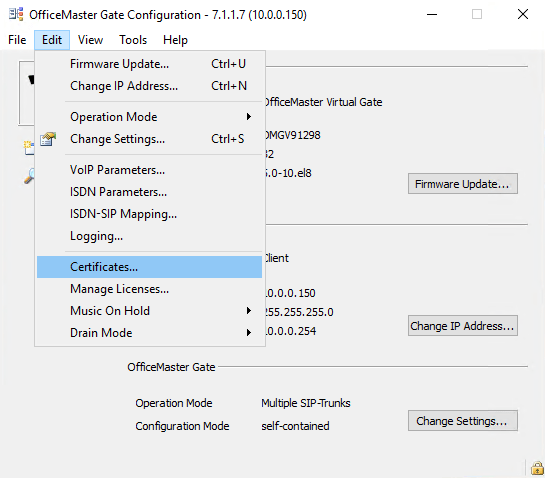
Click on Edit – Certficates
Click on Create …
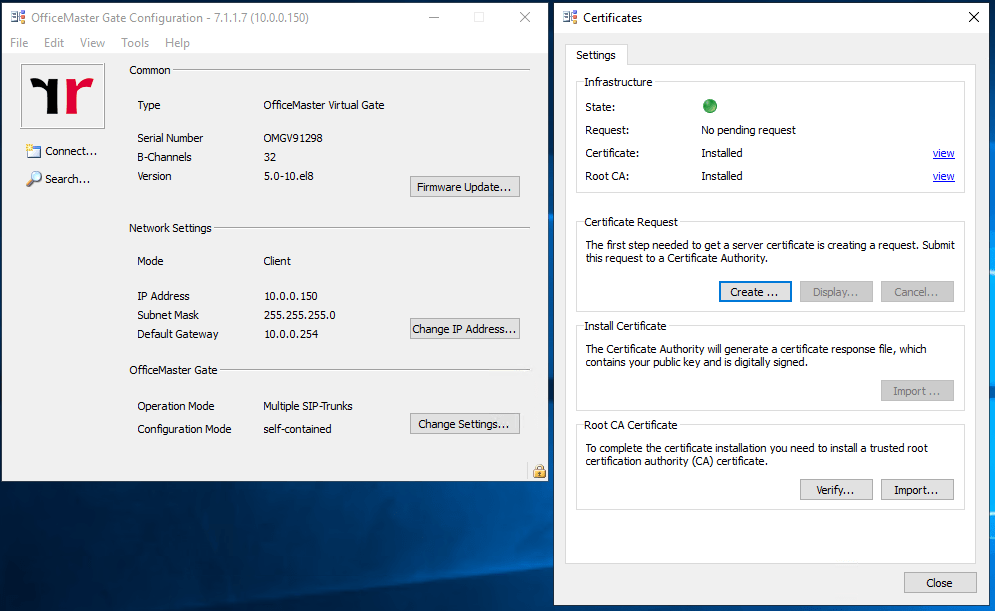
After importing the new certificate and it’s corresponding Root CA, the status should switch to green.
The import of the two certificates can be a little bit tricky sometimes. If the certificates after the import not showing up, restart the OMG and try it again.
At this point you can check to establish a connection to one of the three Microsoft Teams SBC connection point FQDNs and TLS Port 5061.
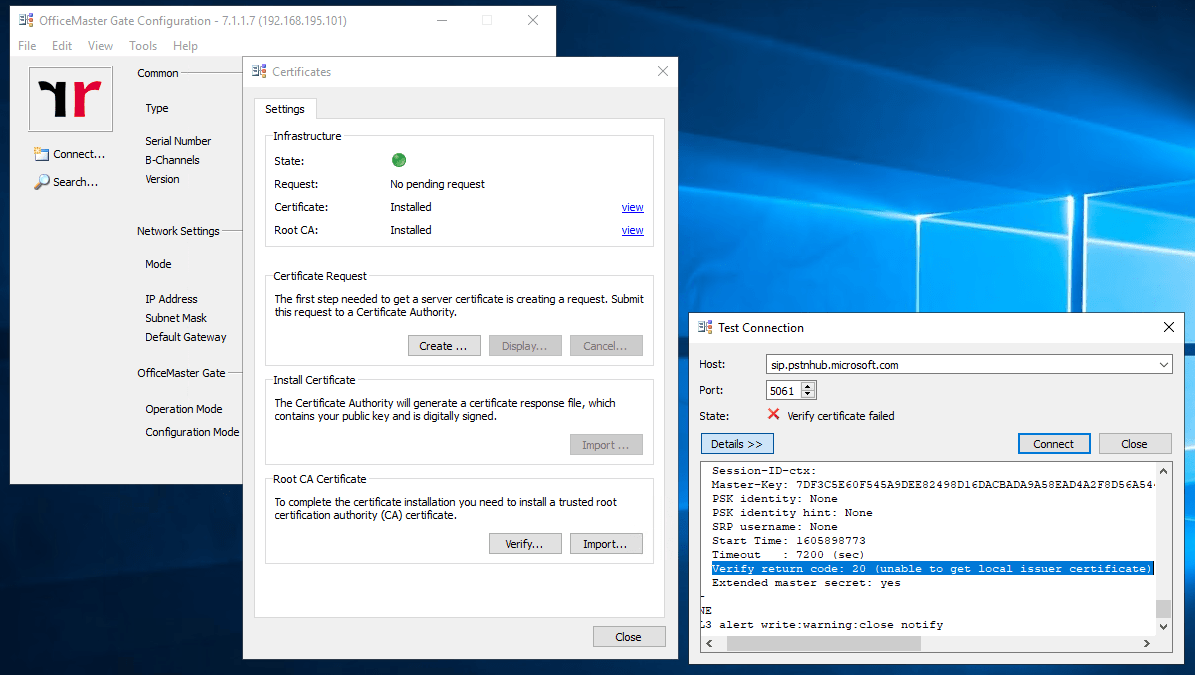
Server certificate
subject=CN = sip.pstnhub.microsoft.com
issuer=C = US, ST = Washington, L = Redmond, O = Microsoft Corporation, OU = Microsoft IT, CN = Microsoft IT TLS CA 4
No client certificate CA names sent
Verify return code: 20 (unable to get local issuer certificate)
The error indicates that the OMG did not trust the Root Certificate from the Microsoft Teams SBC. In the below PDF from Ferrari electronic they mentioned this case.
Quickstart: OfficeMaster Gate with Microsoft Teams Direct Routing PDF
https://www.ferrari-electronic.com/downloads/files/501013/1/EN_QS_SBC-Teams-5-0.pdf
The Microsoft Teams Session Border Controllers use certificates from Baltimore for TLS communications. The root certificate of Baltimore must be added to the trusted root certificates on the SBC. First download the root CAcertificate via https://cacert.omniroot.com/bc2025.pem
The pem-file is a base64 encoded text file starting with —–BEGIN CERTIFICATE—– and ending with — –END CERTIFICATE—–.
To add this certificate, open (or create, if not existing) the file /data/ca.pem on the SBC (using WinSCP or similar tools) and append the text downloaded from above.

After adding the Root CA from Baltimore the connection should be established successful as follows.

Set up the OMG as SBC in Microsoft Teams
Before adding the OMG as SBC in the Microsoft Teams admin center, be sure that the FQDN of the OMG can be resolved in DNS to your public IP previously set in the VOIP Parameters.
Further check the firewall requirements, to be sure that you allow traffic from and to your OMG and Microsoft Teams. As in the Quickstart PDF from Ferrari electronic documented, you can restrict access directly on the OMG, but in my case I will filter the traffic on the firewalls in my perimeter network.
My OMG deployment have only one network interface on which an IP from my perimeter network is assigned.
So access from and to the SBC will using NAT
Allow inbound
TCP 5061
from 52.114.148.0, 52.114.132.46, 52.114.75.24, 52.114.76.76, 52.114.7.24, 52.114.14.70
plus
52.112.0.0/14
52.120.0.0/14
52.127.88.0/2
Allow outbound
TCP 5061
If so login to your Microsoft Teams admin center and go to the menu point Voice – Direct Routing
Here click on Add and enter the settings of your OMG SBC.
- Enable the SBC
- FQDN for the SBC
- SIP signalling port
- Concurrent call capacity
- Other settings can be on default
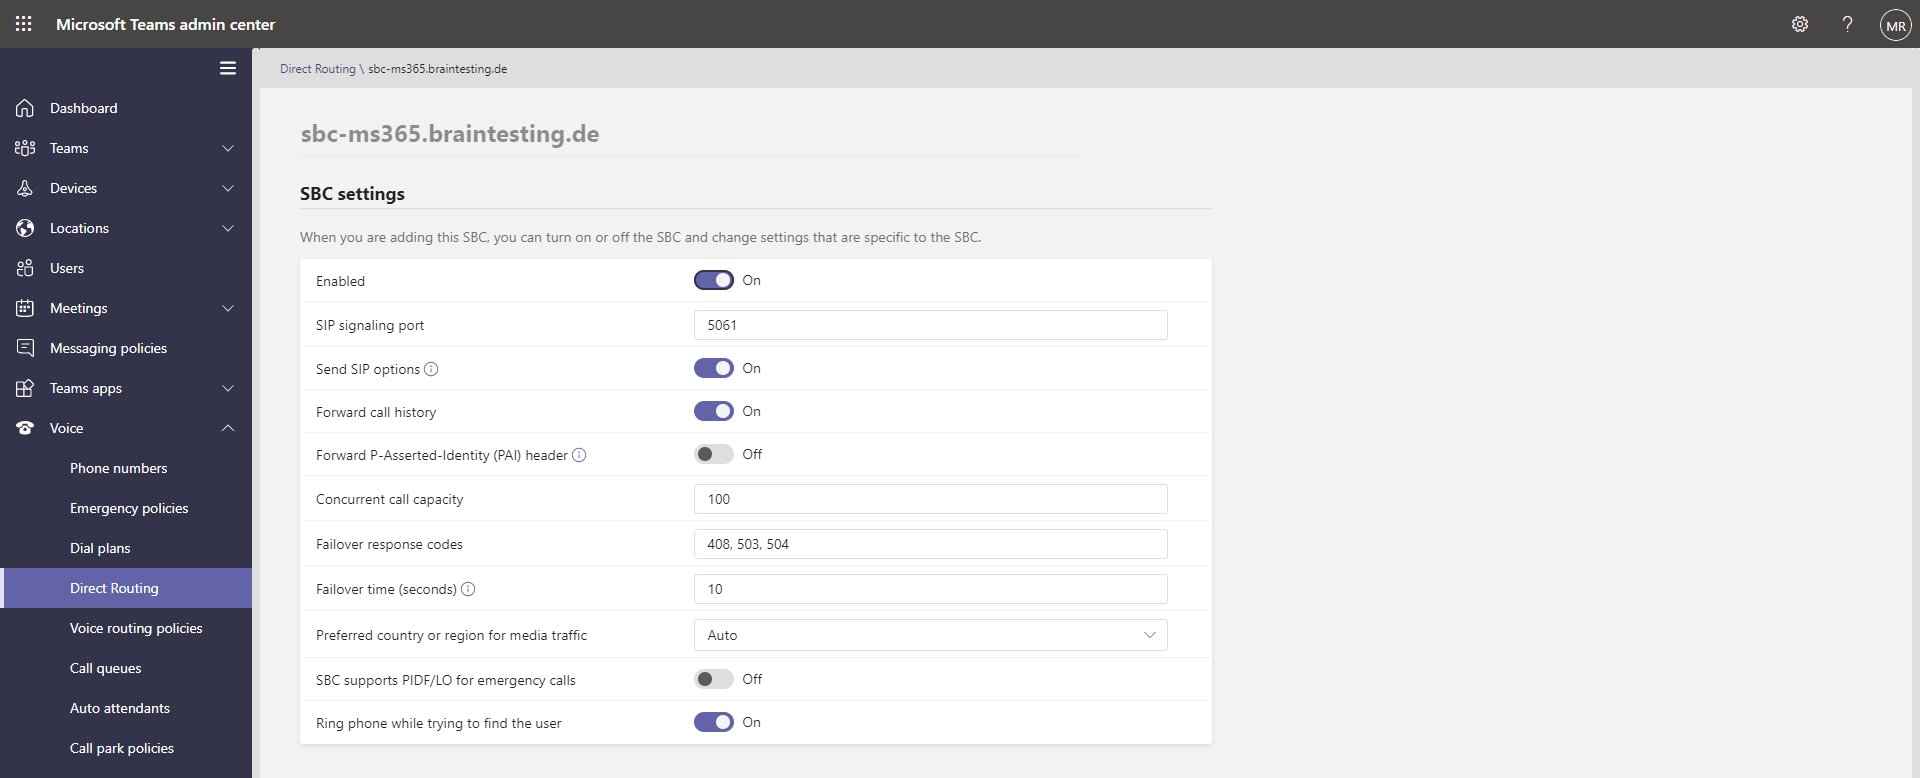
You can also use PowerShell to add your OMG as SBC in Microsoft Teams as follows.
New-CsOnlinePSTNGateway -Fqdn sbc-ms365.braintesting.de-SipSignalingPort 5061 -MaxConcurrentSessions 100 -ForwardCallHistory $true -MediaBypass $true -Enabled $true
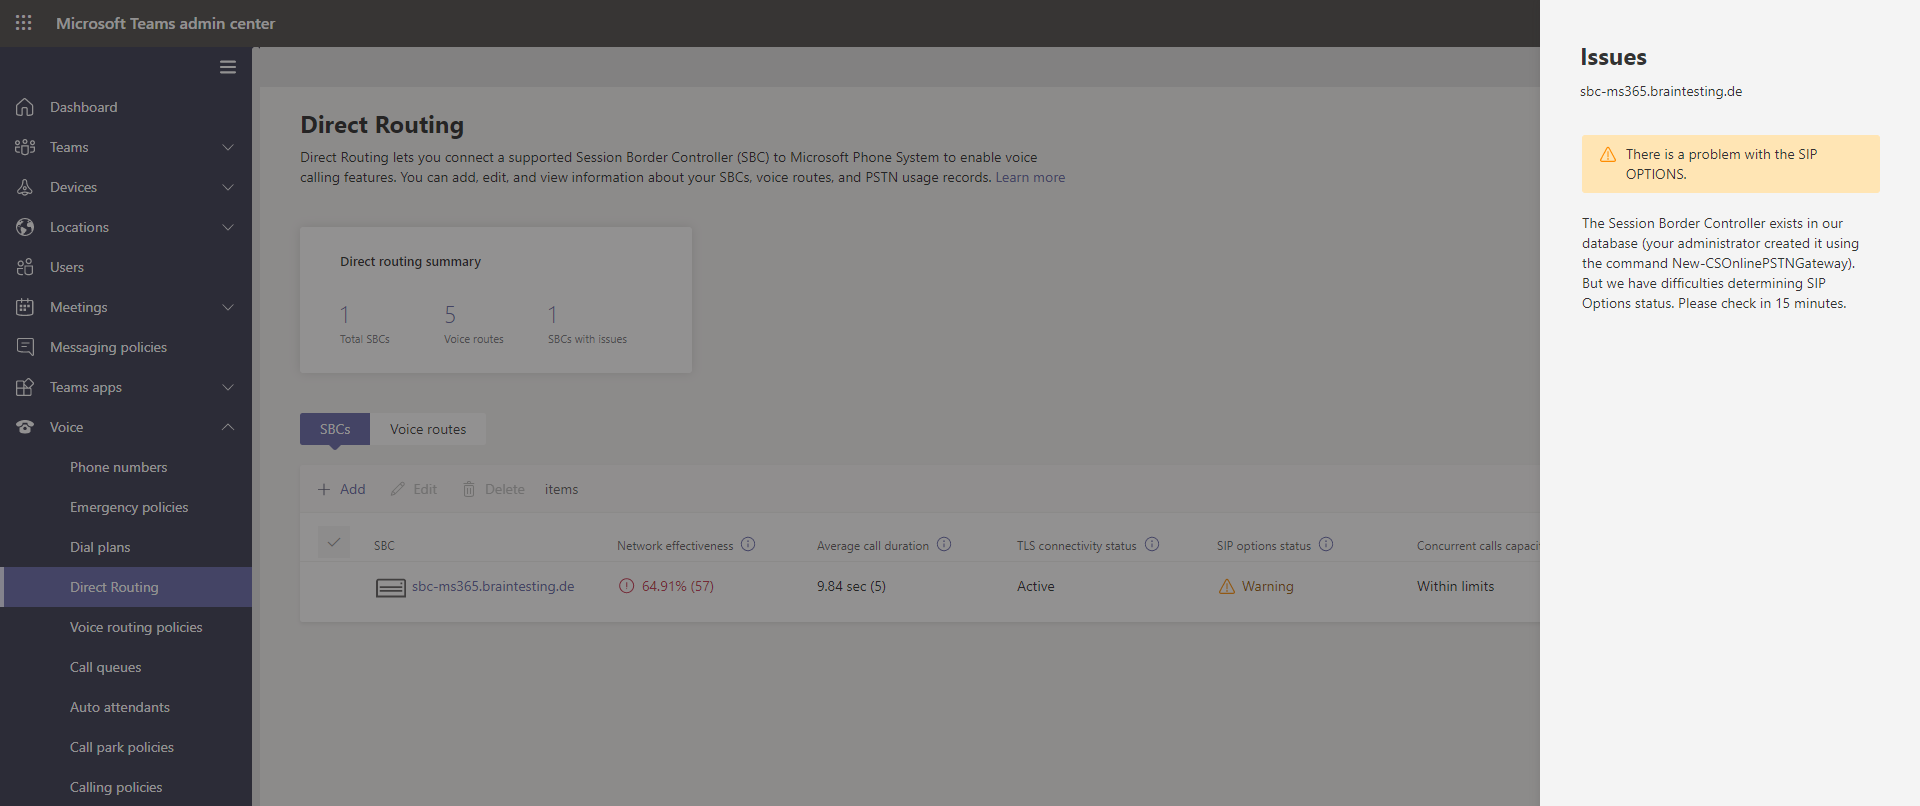
Finally if it shows the following status as shown below, everything is fine.
The first two ones are AudioCodes Mediant VE SBC virtual machines, which were not online at the moment. I also tested them for Microsoft Teams Direct Routing in the following post.

Configure Routing Rules on OMG
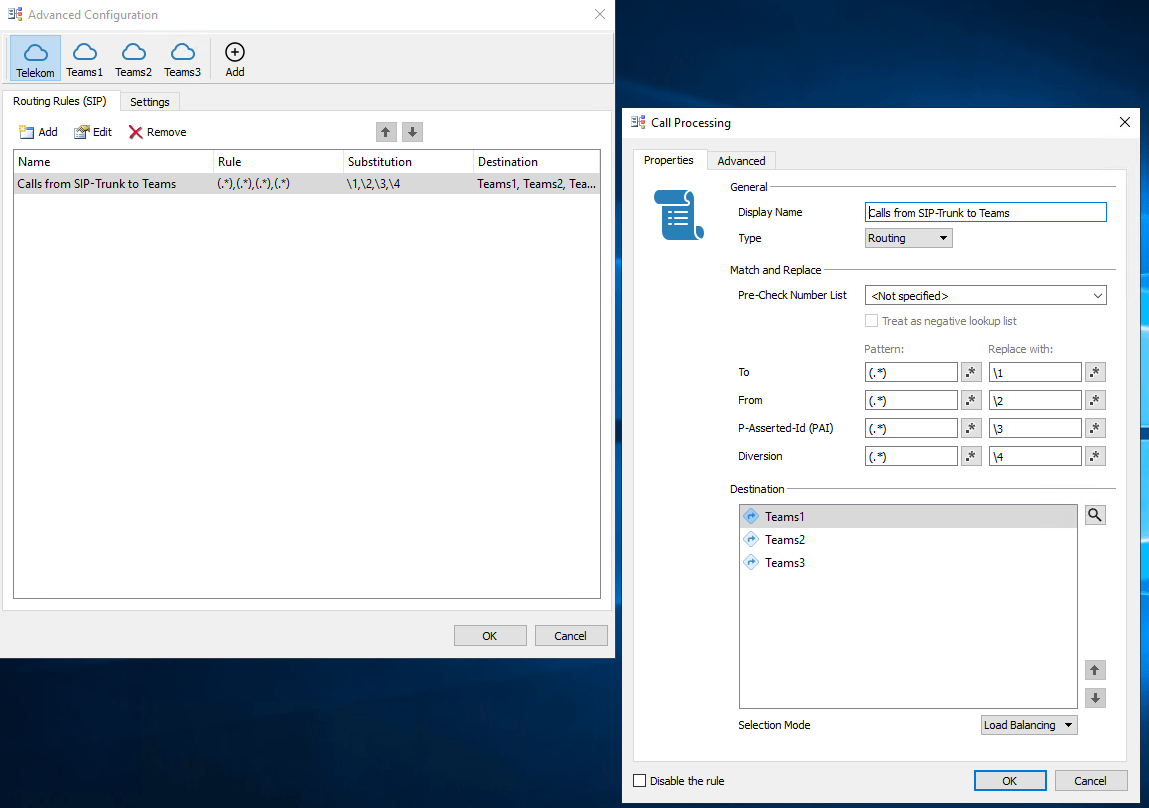
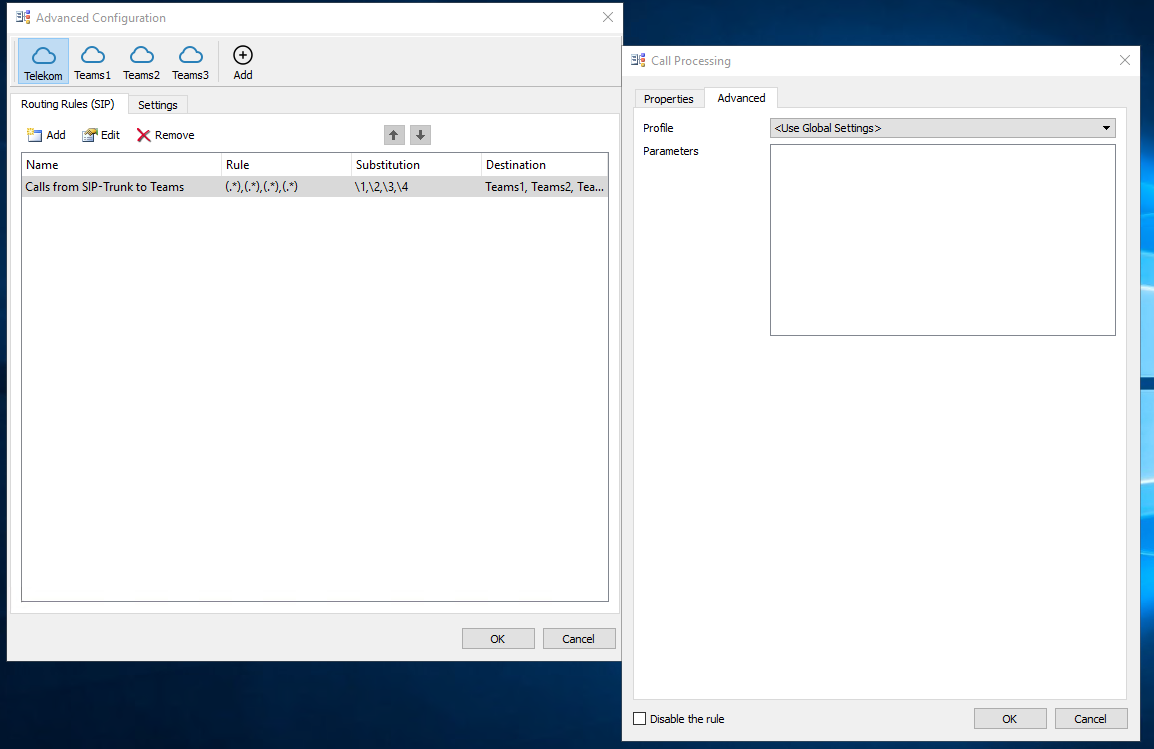
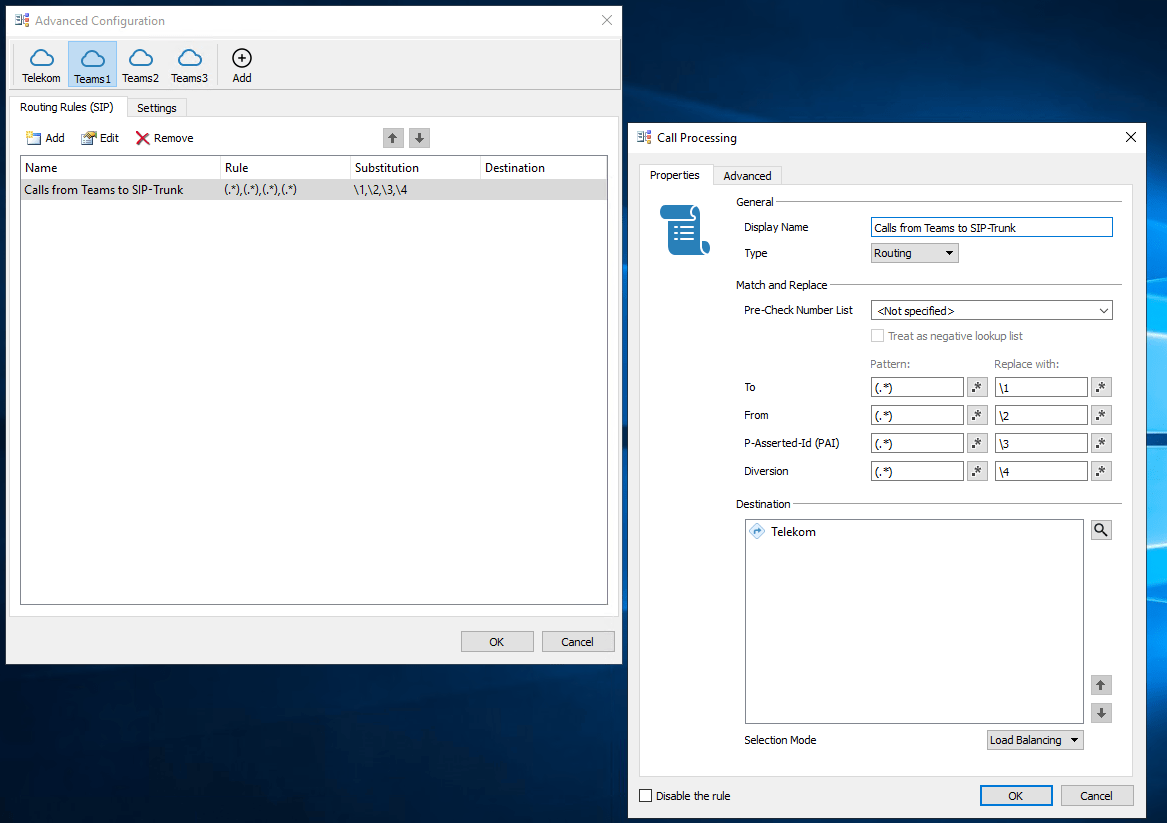
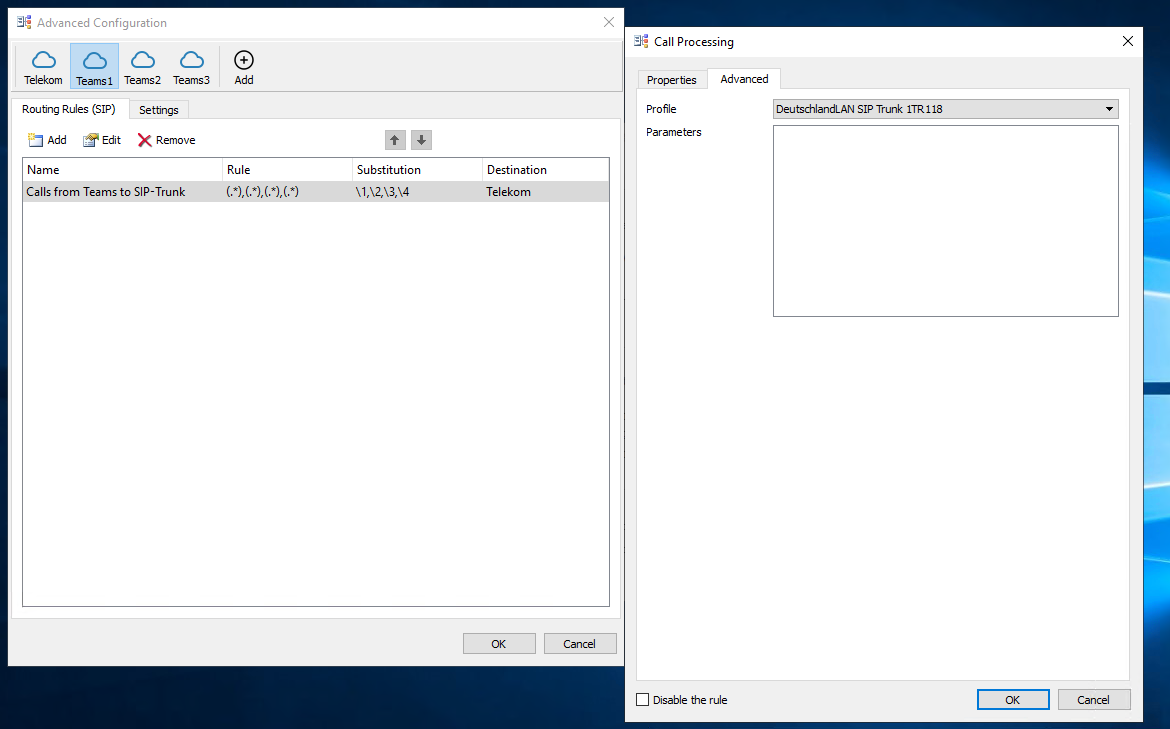
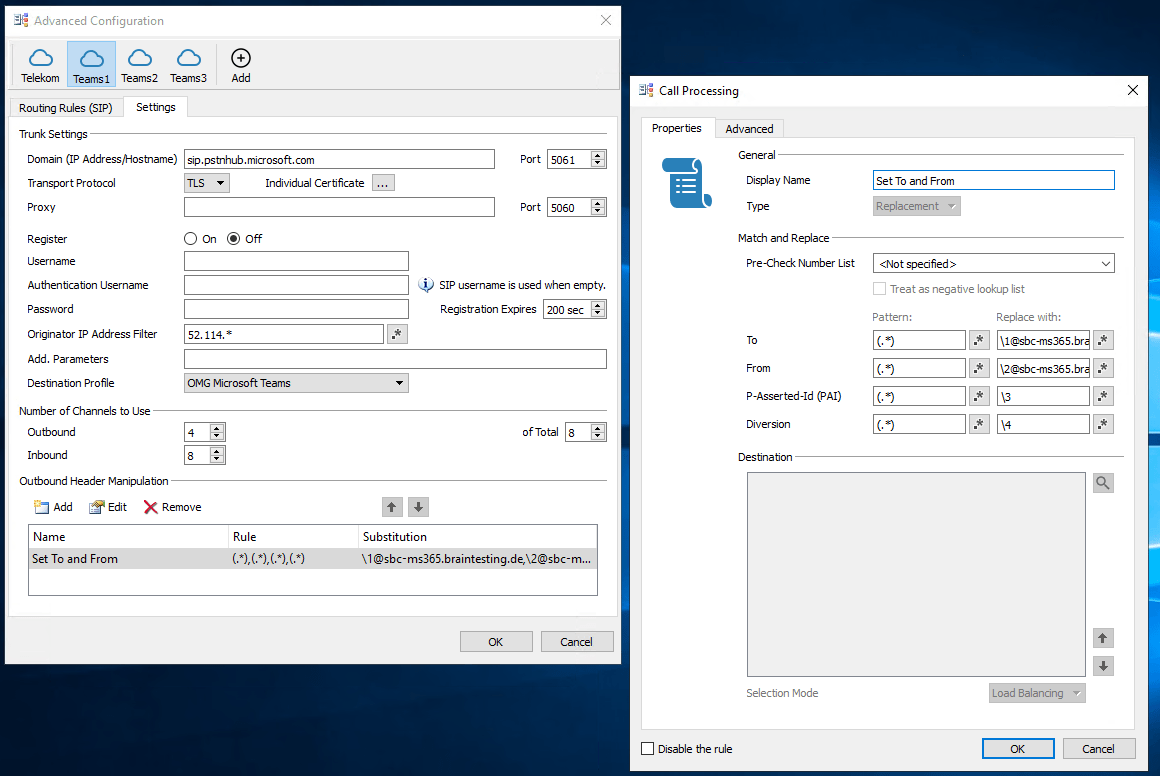
Repeat the steps from Teams1 also for Teams2 and Teams3.
Troubleshooting
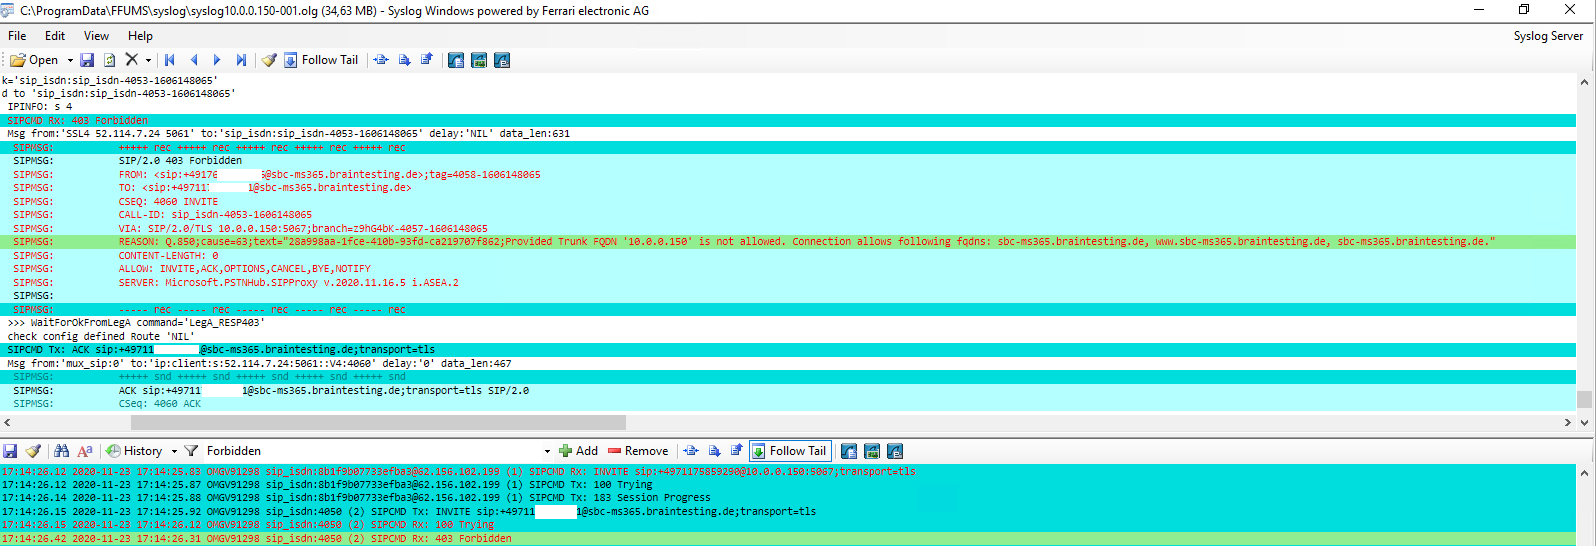
When calling from the PSTN to Teams, getting the following error in the logs from the OMG.
Provided Trunk FQDN ‘<your sbc IP>’ is not allowed. Connection allow following fqdns: <FQDNs listed in your TSL certificate>
Microsoft requires that a client SBC sends SIP OPTIONS requests. Otherwise the SBC will be considered as “Inactive” and Microsoft will ignore any traffic coming from the SBC.
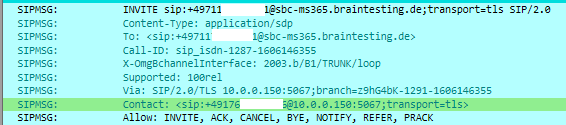
Further Microsoft Teams Phone System require us to send From and Contact header host as FQDN.
Contact: <sip:SBC_FQDN:5061;transport=tls>
In my case the Contact header includes the IP of the SBC instead the FQDN sbc-ms365.braintesting.de. Don’t be confused about Port 5067 in the Contact header, this must be regarding the SIP TLS Port configuration at VOIP Parameters at the beginning and above Port 5061. The Screenshot is from my first configuration where I used Port 5067 for SIP TLS, but more on this below 🙂
Solution:
Therefore you should set the WAN IP Address in the VoIP Parameters from OMG as follows. As I will use NAT 1:1 and the OMG only has an internal IP address from my perimeter network, I will enter the internal IP address. Further you will see the Public Interface IP Address which is an NAT 1:1 mapping on my firewall.
SIP options status warning
Another problem often occurs is the SIP options status warning message as follows.

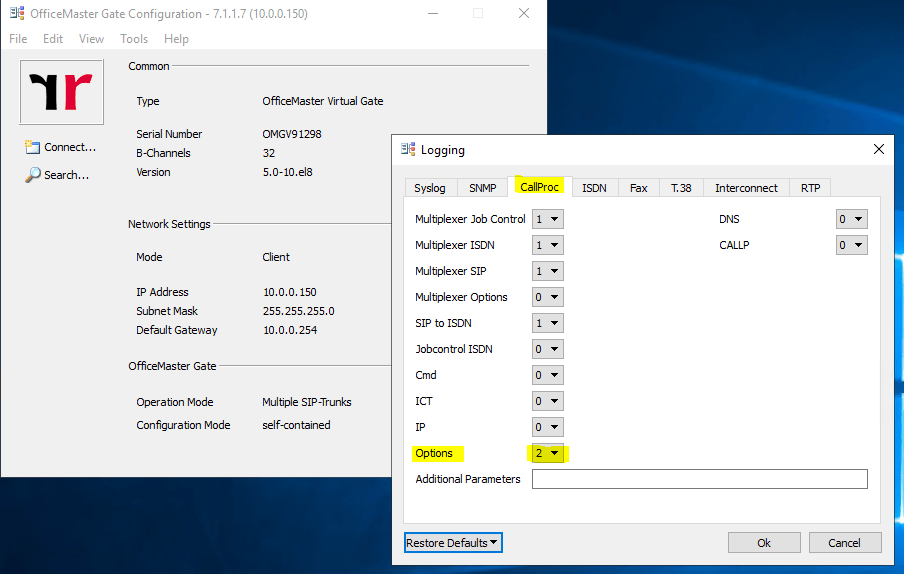
Enable SIP OPTIONS Logging on OMG
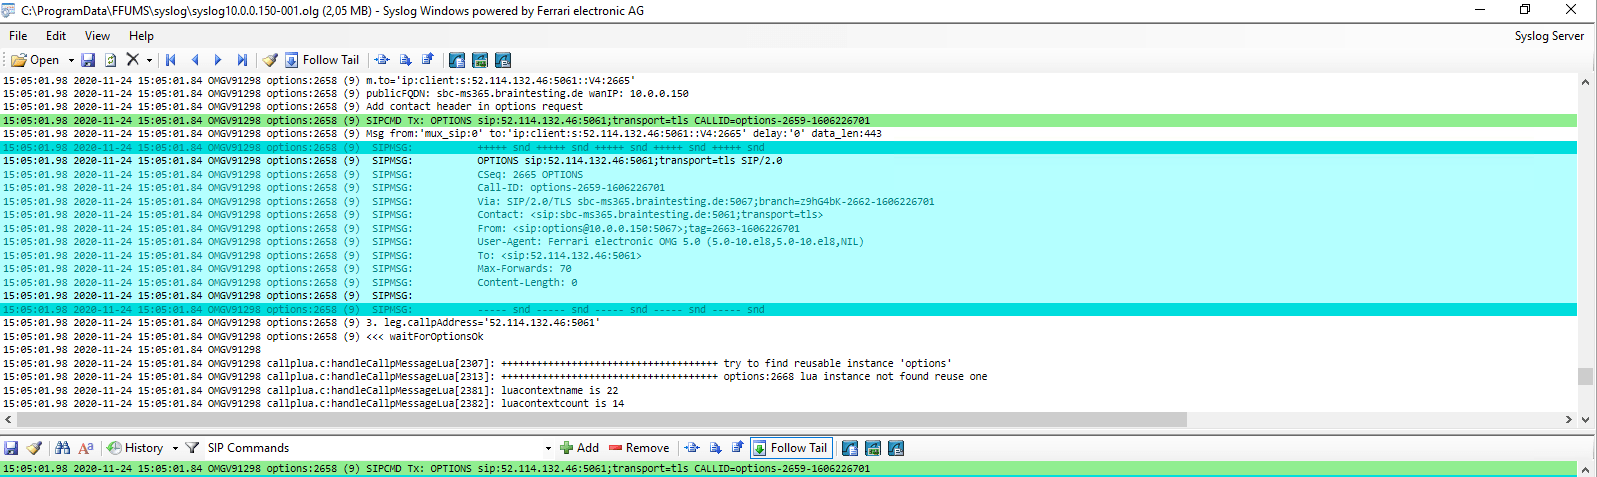
Sending SIP OPTIONS to Microsoft Teams
Receiving Reply 200 OK from Microsoft Teams to our SIP OPTIONS message.

So we see that OMG will send SIP OPTIONS to Teams and Teams will reply to them.
But what we are not seeing is any SIP OPTIONS messages coming from Teams.
In this case I first configured OMG to listen on TLS Port 5067 in the VOIP Parameters for SIP Communication. All SIP Headers are using this TLS Port 5067 except the SIP OPTIONS messages, which will using Port 5061 even nowhere at the OMG configured. You can see it on the Screenshot below. Via and From correctly state the configured TLS Port 5067 except Contact which will state Port 5061.

Needless to say that Teams in this case is trying to send its own SIP OPTIONS messages to Port 5061 at my OMG and because the OMG is listen on Port 5067 for incoming SIP traffic, these SIP OPTIONS messages from Teams never hit the OMG.
I have no idea why OMG is using only for SIP OPTIONS messages this Port, I suppose this is a Bug in Version 5.0 and hard coded in OMG for SIP OPTIONS as Port 5061 is default for SIP TLS.
So finally I configured to use the TLS Port 5061 in the VOIP parameters and from now on the SIP OTIONS messages from Teams will hit the OMG.

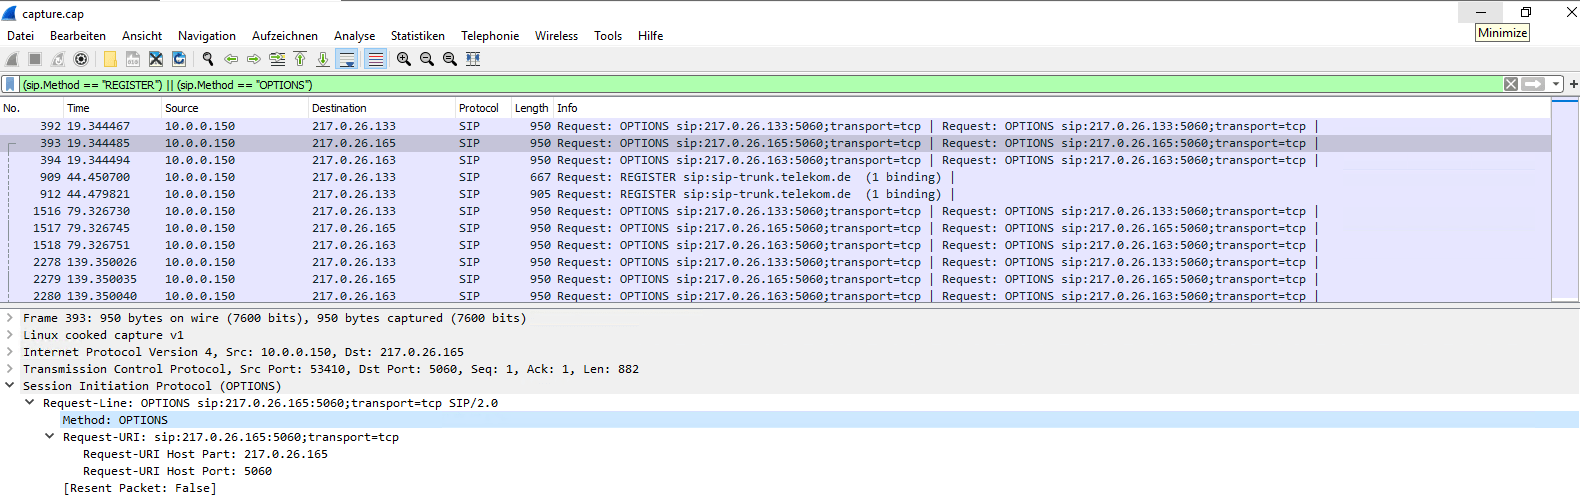
Capture and analyze SIP OPTIONS with WireShark
You can also analyze SIP OPTIONS or generally SIP Traffic with WireShark instead with the out of the box Syslog Analyzer from OMG , you can start a trace with the WebGUI from OMG under http://<ip omg>/#/tracing
But keep in mind, that in order to analyze the logs with WireShark, the trunk connection cannot use TLS encryption, except you’re in possession of the private key and able to resp disable Diffi-Hellman key exchange from DTAG’s SBC, well done 🙂

After the trace you can click on Download Logs. The logs include a WireShark capture file under /tmp/logs/capture.cap.
(sip.Method == “REGISTER”) || (sip.Method == “OPTIONS”)
above ones are not filtering all OPTIONS and 200 OK response to OPTIONS message. But below one is working for that.
sip && !(sip.CSeq.method == “OPTIONS”)