

Understanding Remote Procedure Calls (RPC) on Windows – Building a Simple Client and Server and Analyzing the Network Traffic
Remote Procedure Call (RPC) is a general communication paradigm used by many operating systems and distributed systems, including Windows, Linux, BSD, macOS, and countless modern frameworks such as gRPC.
Although each implementation differs in its protocol details, they all share the same fundamental idea: enabling an application to invoke a procedure on a remote system as if it were a local function call.
In this article, we’ll first explore the general RPC concept before diving into Microsoft’s implementation of DCE/RPC by building a small C++ client/server application in a vSphere lab environment.
We’ll then capture and analyze the complete network conversation with Wireshark, following the communication from the Endpoint Mapper on TCP port 135 through the dynamic endpoint negotiation to the actual remote procedure calls.
The RPC Endpoint Mapper listening on TCP port 135 is dedicated to Microsoft RPC. It does not execute remote procedures itself; instead, it acts as a directory service that allows clients to resolve an RPC interface UUID to the dynamically assigned TCP port on which the corresponding RPC server is listening. Once the client has obtained the endpoint information, all subsequent RPC communication takes place over the returned dynamic port rather than TCP 135.
By the end of this walkthrough, you’ll not only understand the underlying RPC concepts but also know exactly what to look for when troubleshooting RPC-related connectivity issues in enterprise environments.
For readers interested in the Linux counterpart, I also published a companion article demonstrating ONC RPC (rpcgen) on Ubuntu and comparing its implementation and network communication with Microsoft’s DCE/RPC.
- What is RPC?
- RPC implementations (ONC RPC, DCE/RPC, gRPC, etc.)
- Common RPC components and terminology
- Microsoft's DCE/RPC architecture
- Building the C++ Client/Server Application
- Running the Demo Locally from Visual Studio
- Modifying the RPC Client Application to Accept Command-Line Arguments
- Deploying the RPC Demo in the vSphere Lab
- Analyzing the Network Traffic with Wireshark
- Links
What is RPC?
A Remote Procedure Call (RPC) is a communication mechanism that allows an application to invoke a function or procedure on another computer as if it were a local function call. The complexity of establishing a network connection, transmitting parameters, executing the requested procedure on the remote system, and returning the result is hidden from the application developer.
The RPC concept was introduced in the early 1980s and has since become one of the fundamental building blocks of distributed computing. Rather than exchanging low-level network messages directly, applications simply call remote procedures through well-defined interfaces. The underlying RPC framework transparently handles tasks such as data serialization, network communication, authentication, and error handling.
Over the years, numerous RPC implementations have emerged, each optimized for different platforms and use cases. Examples include ONC RPC (Sun RPC) commonly used by UNIX/Linux systems, DCE/RPC developed by the Open Software Foundation (OSF), Microsoft RPC (MSRPC), which is based on DCE/RPC and forms the communication backbone of many Windows services, and modern frameworks such as gRPC, which is widely used in cloud-native applications and microservices.
Although these implementations differ in their protocol details and capabilities, they all share the same fundamental goal: enabling applications running on different systems to communicate through remote function calls instead of manually exchanging network messages.
RPC implementations (ONC RPC, DCE/RPC, gRPC, etc.)
Since the RPC concept was introduced in the early 1980s, numerous implementations have been developed for different operating systems, programming languages, and use cases. While they all follow the same fundamental principle, invoking procedures on a remote system as if they were local function calls, they differ in their protocols, transports, serialization formats, authentication mechanisms, and supported features.
The following table provides an overview of some of the most common RPC implementations.
| Implementation | Introduced | Typical Platforms | Common Use Cases |
|---|
| ONC RPC (Sun RPC) | 1984 | UNIX, Linux, BSD, macOS | NFS, NIS, rpcbind |
| DCE/RPC | Early 1990s | Cross-platform | Distributed enterprise applications |
| Microsoft RPC (MSRPC) | 1990s | Windows | Active Directory, WMI, DCOM, Group Policy, Exchange, DFS Replication, Hyper-V and many other Windows services |
| XML-RPC | Late 1990s | Cross-platform | Web services |
| JSON-RPC | 2000s | Cross-platform | REST-like APIs, lightweight services |
| Apache Thrift | 2007 | Cross-platform | Distributed services |
| gRPC | 2015 | Cross-platform | Microservices, cloud-native applications, Kubernetes environments |
Although these implementations evolved independently and often target different environments, they all solve the same fundamental problem: allowing software components running on different systems to communicate through remote procedure calls instead of exchanging low-level network messages.
The implementation used depends largely on the underlying platform and application architecture. Traditional UNIX and Linux environments have historically relied on ONC RPC, which forms the basis for technologies such as the Network File System (NFS).
Microsoft adopted and extended DCE/RPC, making it one of the core communication mechanisms within Windows. Modern distributed applications increasingly use frameworks such as gRPC, which combines HTTP/2 with Protocol Buffers to provide high-performance communication between services.
In this article, we’ll focus on Microsoft RPC (MSRPC) because it is one of the most widely deployed RPC implementations in enterprise environments. It is used extensively throughout Windows and can be easily demonstrated in a small vSphere lab using a custom C# application and Wireshark packet captures. Nevertheless, understanding the broader RPC landscape helps illustrate that Microsoft’s implementation is just one member of a much larger family of RPC technologies.
Common RPC components and terminology
Although RPC implementations differ in their protocol details, they all share a common set of building blocks. Understanding these components makes it much easier to follow how remote procedure calls are established and processed, regardless of whether the underlying implementation is ONC RPC, DCE/RPC, Microsoft RPC, or gRPC.
Client
The client is the application that initiates the remote procedure call. From the developer’s perspective, calling a remote function should feel nearly identical to calling a local function. The underlying RPC framework takes care of communicating with the remote system.
Server
The server hosts one or more procedures that can be invoked remotely. After receiving a request, it validates the incoming data, executes the requested procedure, and returns the result to the client.
Interface
An interface defines the procedures that a server exposes, including their names, parameters, and return values. Both the client and the server must agree on this interface so they can communicate correctly.
Client Stub (Proxy)
The client stub, also referred to as a proxy, acts as an intermediary between the application and the network. When the application invokes a remote procedure, the client stub converts the function call into a network request and sends it to the remote server.
Server Stub (Skeleton)
The server stub, sometimes called the skeleton, performs the reverse operation. It receives the network request, reconstructs the original procedure call, invokes the appropriate server-side function, and prepares the response for transmission back to the client.
Marshalling and Unmarshalling
Before parameters can be transmitted over the network, they must be converted into a platform-independent format. This process is called marshalling (or serialization). On the receiving side, the original data structures are reconstructed during unmarshalling (or deserialization).
This abstraction allows applications running on different operating systems, processor architectures, or programming languages to exchange data reliably.
Transport Protocol
RPC itself does not define a single transport protocol. Instead, different implementations use different transports depending on their requirements. Common examples include TCP, UDP, HTTP/2, named pipes, or Unix domain sockets.
Endpoint
An endpoint identifies where a particular RPC service can be reached. Depending on the implementation, this may be a TCP port, a named pipe, a Unix socket, or another communication endpoint.
Authentication and Authorization
Many RPC implementations support authentication to verify the identity of the client before a procedure is executed. Enterprise environments also commonly perform authorization checks to determine whether the authenticated client is permitted to invoke a specific procedure.
Putting It All Together
The following diagram illustrates the typical flow of a remote procedure call, independent of any specific RPC implementation.
+-------------+                                    +-------------+
|   Client    |                                    |    Server   |
+-------------+                                    +-------------+
       |                                                  |
       | 1. Call remote procedure                         |
       |------------------------------------------------->|
       |                                                  |
       | Client Stub (Proxy)                              |
       | 2. Marshal parameters                            |
       |------------------------------------------------->|
       |                                                  |
       |                                  Server Stub (Skeleton)
       |                                  3. Unmarshal parameters
       |                                  4. Execute procedure
       |                                  5. Marshal return value
       |<-------------------------------------------------|
       | 6. Unmarshal return value                        |
       |                                                  |
       | Application receives the result                  |
Regardless of the underlying RPC implementation, the overall process remains remarkably similar. The client invokes a procedure, the RPC framework transparently handles parameter conversion and network communication, the server executes the requested operation, and the result is returned to the caller. The next section shows how Microsoft implements these concepts through its DCE/RPC-based architecture, including the Endpoint Mapper, interface UUIDs, and dynamic endpoint allocation.
Microsoft’s DCE/RPC architecture
Microsoft’s Remote Procedure Call (MSRPC) implementation is based on the Distributed Computing Environment Remote Procedure Call (DCE/RPC) specification developed by the Open Software Foundation (OSF). While Microsoft adopted the core concepts of DCE/RPC, it significantly extended the protocol to meet the requirements of the Windows operating system and enterprise environments.
Today, Microsoft RPC serves as one of the most important communication mechanisms within Windows. Numerous services and applications rely on it, including Active Directory Domain Services (AD DS), Group Policy, Windows Management Instrumentation (WMI), Distributed Component Object Model (DCOM), DFS Replication, Hyper-V, Failover Clustering, Exchange Server, and many administrative tools.
Unlike some RPC implementations that expose services on fixed ports, Microsoft RPC introduces an additional abstraction layer through the RPC Endpoint Mapper. Rather than requiring clients to know the listening port of every service, a client first contacts the Endpoint Mapper on TCP port 135. The Endpoint Mapper maintains a database of registered RPC interfaces and returns the network endpoint where the requested service is currently listening.
This architecture allows services to use dynamic TCP ports, reducing the need to reserve well-known ports for every RPC-based service while enabling multiple independent RPC services to coexist on the same system.
Each RPC interface is uniquely identified by a Universally Unique Identifier (UUID) and an interface version. Instead of requesting a specific TCP port, the client requests a particular interface by its UUID. The Endpoint Mapper then resolves this request and directs the client to the appropriate endpoint.
The communication process can therefore be summarized as follows:
- The client contacts the RPC Endpoint Mapper on TCP port 135.
- The client requests the endpoint associated with a specific RPC interface (UUID).
- The Endpoint Mapper returns the dynamically assigned endpoint.
- The client establishes a new connection to that endpoint.
- The actual remote procedure calls are exchanged between the client and the server.
The following simplified diagram illustrates this process.
                    +----------------------------------+
                    |          RPC Server              |
                    |----------------------------------|
                    | Endpoint Mapper (TCP 135)        |
                    | Interface A → TCP 49721          |
                    | Interface B → TCP 49742          |
                    | Interface C → TCP 49803          |
                    +----------------------------------+
                               ▲
                               │
                 (1) Query Interface UUID
                               │
+-------------+                │
| RPC Client  |----------------+
+-------------+
                               │
                 (2) Return TCP 49742
                               │
                               ▼
                 (3) Connect to TCP 49742
                               │
                               ▼
                    Actual Remote Procedure Calls
From an application’s perspective, however, none of these steps are visible. The client simply invokes a remote procedure through the RPC runtime, while the framework automatically performs endpoint discovery, establishes the network connection, marshals the parameters, executes the remote procedure, and returns the result.
In the following sections, we’ll build a small C# client/server application that uses Microsoft RPC concepts and then analyze the complete communication with Wireshark, observing exactly how the Endpoint Mapper, dynamic endpoint allocation, and remote procedure calls appear on the network.
Building the C++ Client/Server Application
Understanding RPC is much easier when observing it in action. Rather than relying solely on diagrams and protocol descriptions, we’ll build a small client/server application that allows us to examine the communication from both the application’s and the network’s perspective.
The application itself will intentionally remain simple, as the primary objective is not to develop a feature-rich distributed application but to understand the mechanisms behind remote procedure calls.
Throughout the following sections, we’ll use this application in a dedicated vSphere lab environment to capture and analyze the complete network communication with Wireshark, correlating each packet with the individual stages of the RPC communication process explained earlier.
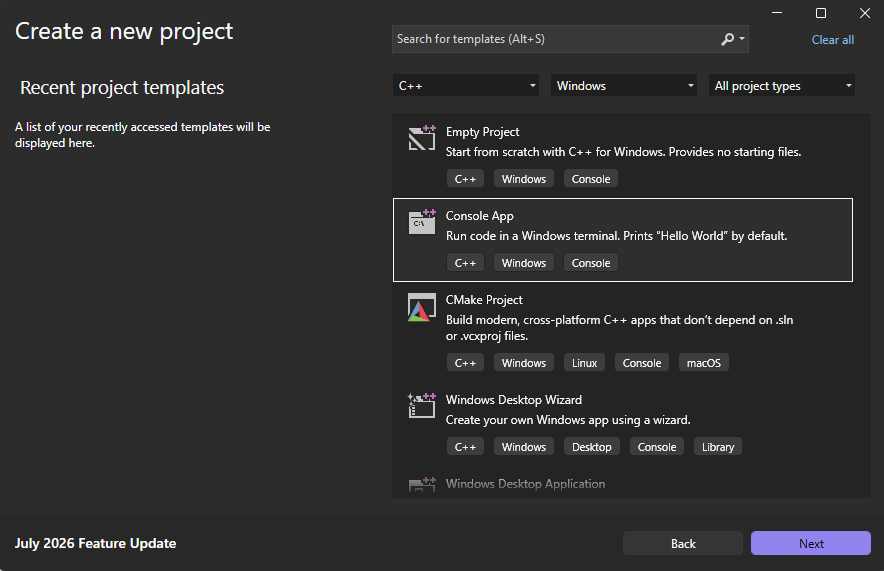
To demonstrate Microsoft’s native DCE/RPC implementation rather than a custom protocol, I created a new C++ Console Application in Visual Studio 2026 Professional.
This provides the foundation for building a genuine Windows RPC client and server using MIDL-generated stubs and the native Windows RPC runtime.
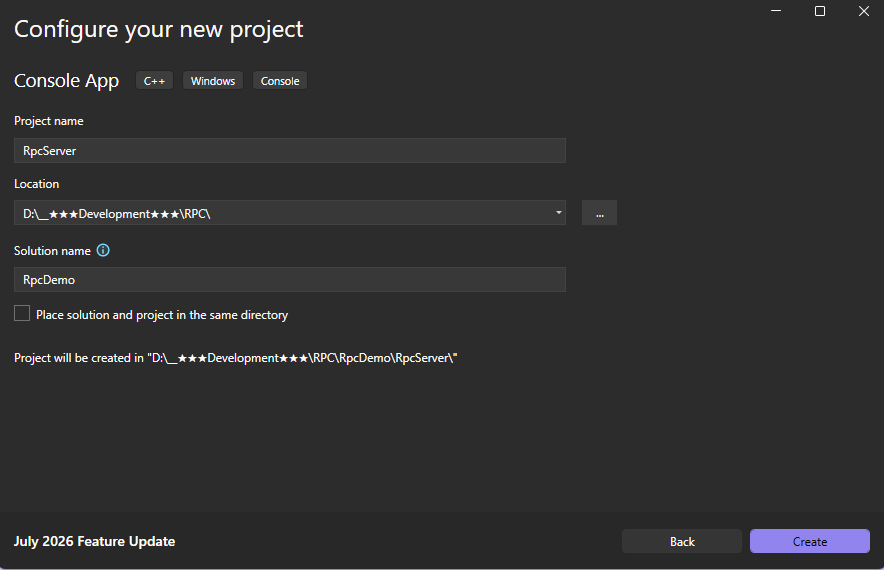
I created a new Visual Studio solution named RpcDemo and added the first project, RpcServer.
Using a dedicated solution allows us to organize the RPC server, client, and shared components in a single workspace as the project evolves.
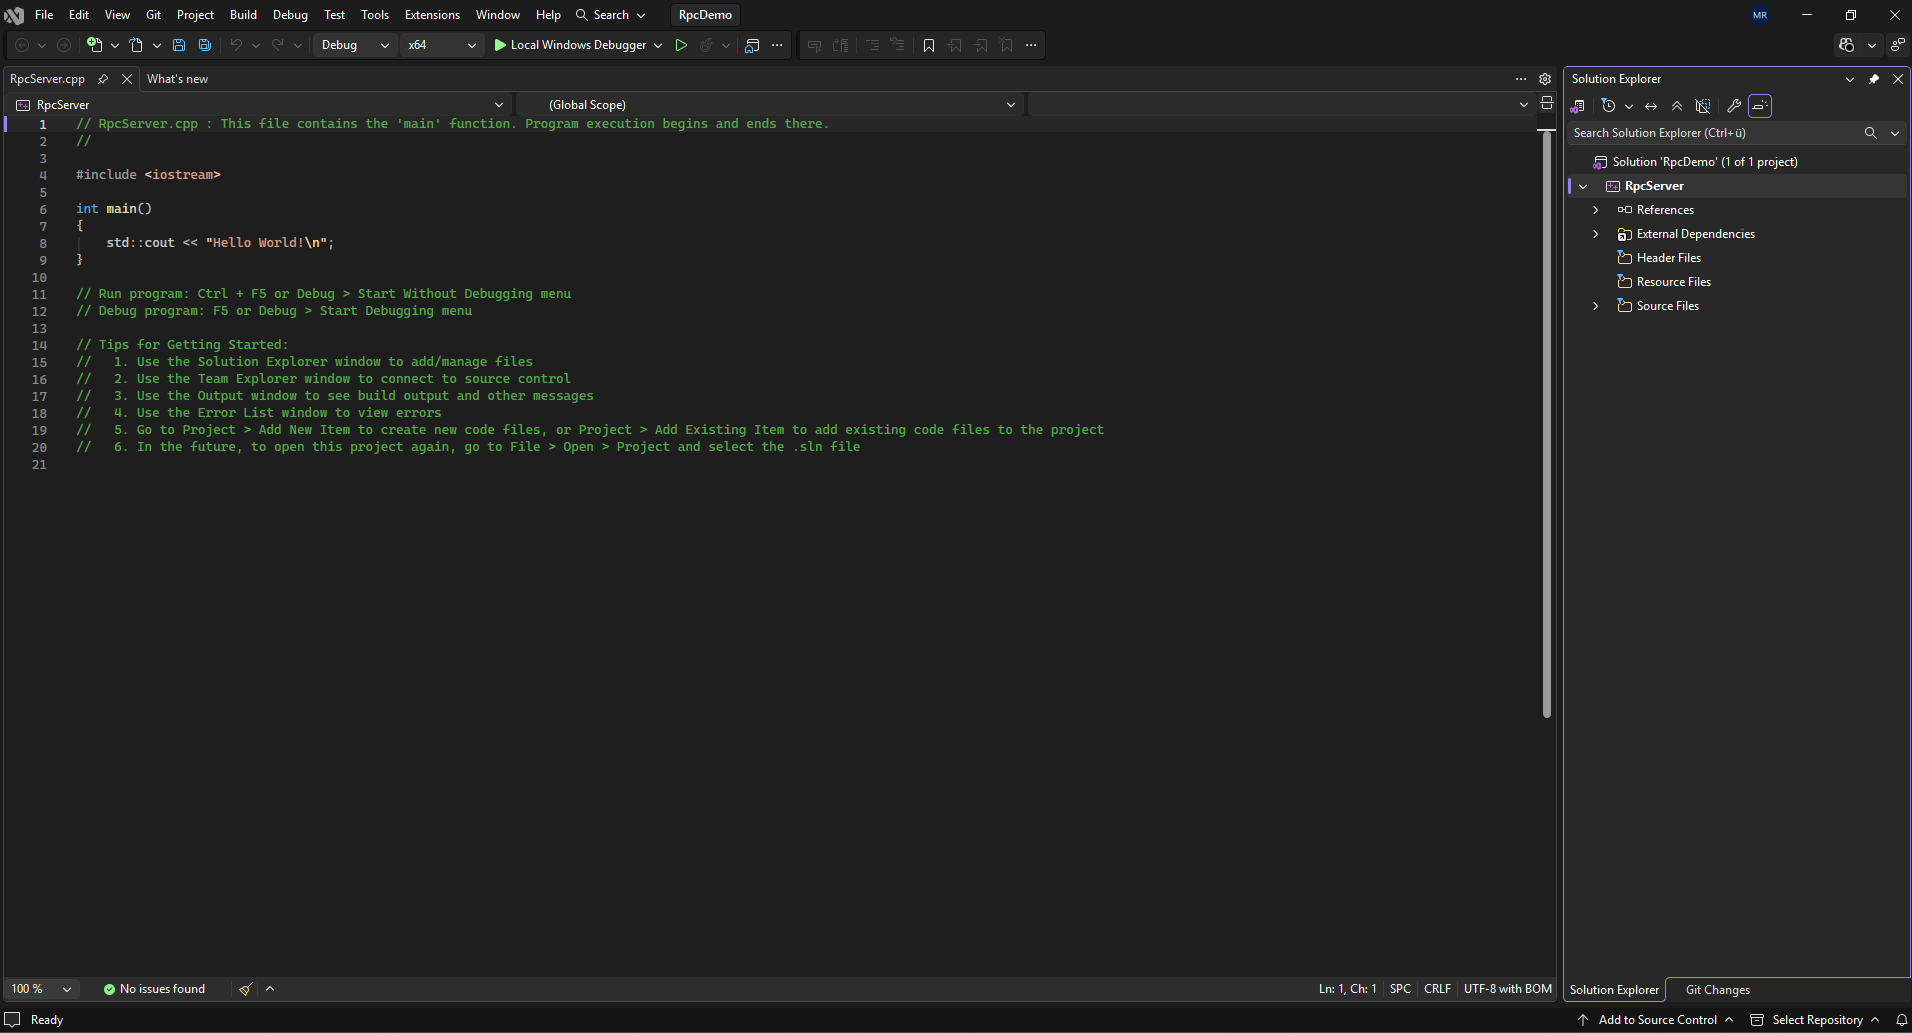
After creating the project, Visual Studio generated the initial solution structure, including a minimal C++ console application with the default Hello World entry point.
At this stage, the project simply provides the foundation on which we’ll build our native Microsoft RPC server by adding the required interface definition, generated stubs, and server implementation.
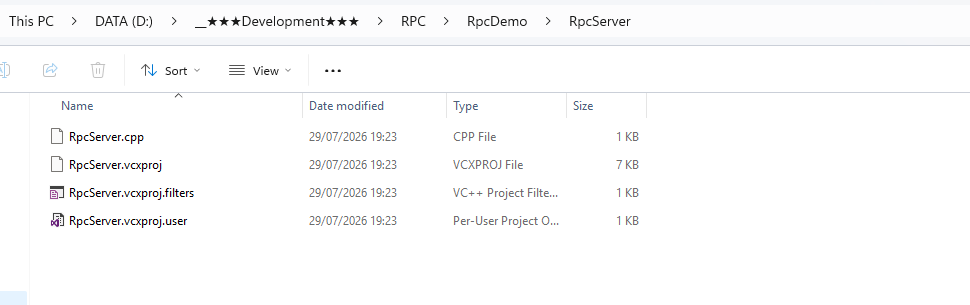
Although I’m generally much more familiar with C# and Visual Basic .NET, Microsoft’s native DCE/RPC implementation is built around native C++ and the Microsoft Interface Definition Language (MIDL).
Since C++ differs significantly from C# and Visual Basic .NET in both syntax and project structure, I’ll explain C++-specific concepts and project components in more detail throughout this walkthrough, making the article accessible even for readers who primarily work with .NET languages.
*.cppis simply the standard file extension for C++ source code.
| Extension | Language | Purpose |
|---|---|---|
.c | C | C source code |
.cpp | C++ | C++ source code |
.h | C/C++ | Header file (declarations) |
.hpp | C++ | C++ header file (less common, but popular) |
.idl | MIDL | RPC interface definition |
.rc | Resource Script | Icons, version info, dialogs |
This contains the application’s entry point:
int main()
{
    std::cout << "Hello World!\n";
}
which is the equivalent of C#’s:
static void Main(string[] args)
{
    Console.WriteLine("Hello World!");
}
For our RPC project we’ll soon have something like this:
RpcServer
│
├── RpcServer.cpp     ← Server implementation
├── RpcServer.h       ← Server declarations
├── RpcDemo.idl       ← RPC interface definition
├── RpcDemo_c.c       ← Client stub (generated by MIDL)
├── RpcDemo_s.c       ← Server stub (generated by MIDL)
├── RpcDemo.h         ← Generated declarations
└── RpcDemo.acf       ← Optional RPC configuration
The really interesting file won’t be RpcServer.cpp, it will be the .idl file. That’s where we define the remote procedures, and Microsoft provides the MIDL compiler to generate most of the RPC plumbing automatically.
In other words, unlike many other programs where you start by writing code in
main(), with native Microsoft RPC you start by defining the interface contract in an.idlfile. The code comes afterwards. That’s one of the elegant aspects of the Windows RPC development model.
Defining the RPC Interface with MIDL
Unlike many other applications where development begins by writing the program logic, Microsoft RPC development starts with defining the communication contract between the client and the server. This contract is described using the Microsoft Interface Definition Language (MIDL), which specifies the remote procedures, their parameters, return values, and a unique interface identifier (UUID).
The MIDL compiler then generates much of the required RPC infrastructure automatically, including the client and server stubs responsible for parameter marshalling, network communication, and invoking the appropriate procedures. As a result, both the client and the server share a common interface definition, ensuring that they communicate using the same contract.
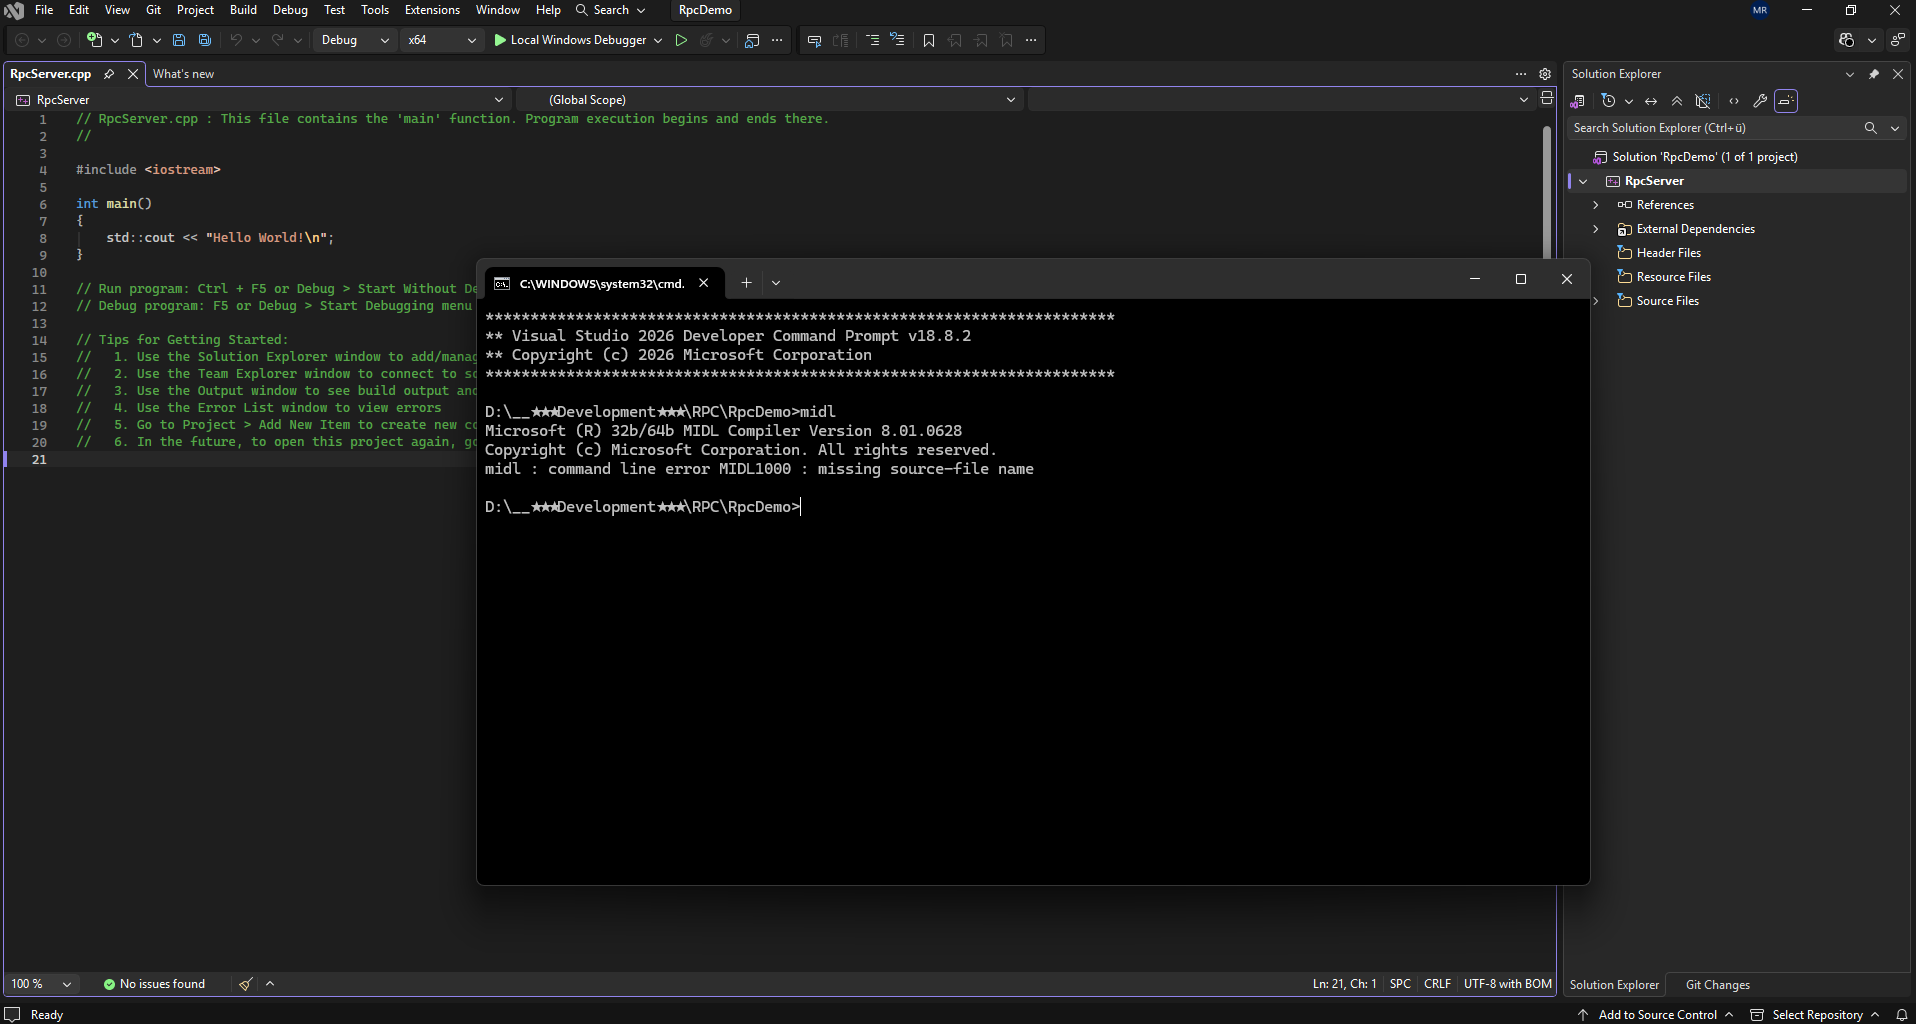
To verify that the required RPC development tools were available, I launched the Visual Studio Developer Command Prompt and executed midl. The Microsoft MIDL compiler responded successfully, confirming that the Windows SDK toolchain required to generate the RPC client and server stubs was installed.
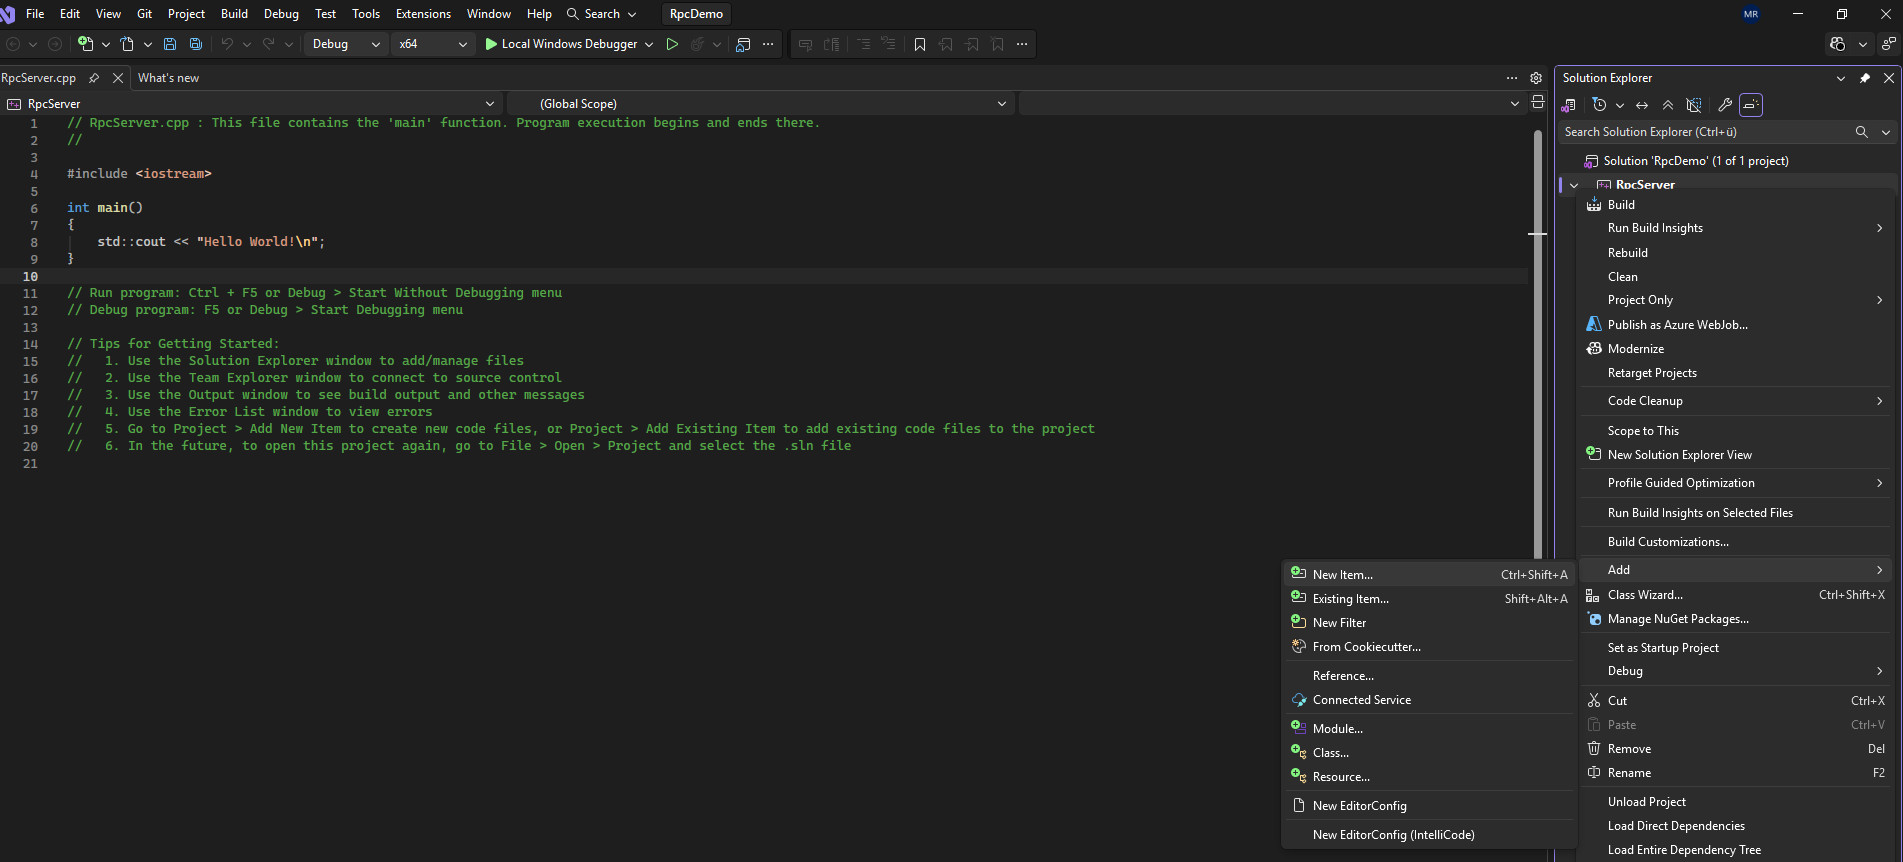
To create the actual interface, right-click RpcServer and select Add → New Item…
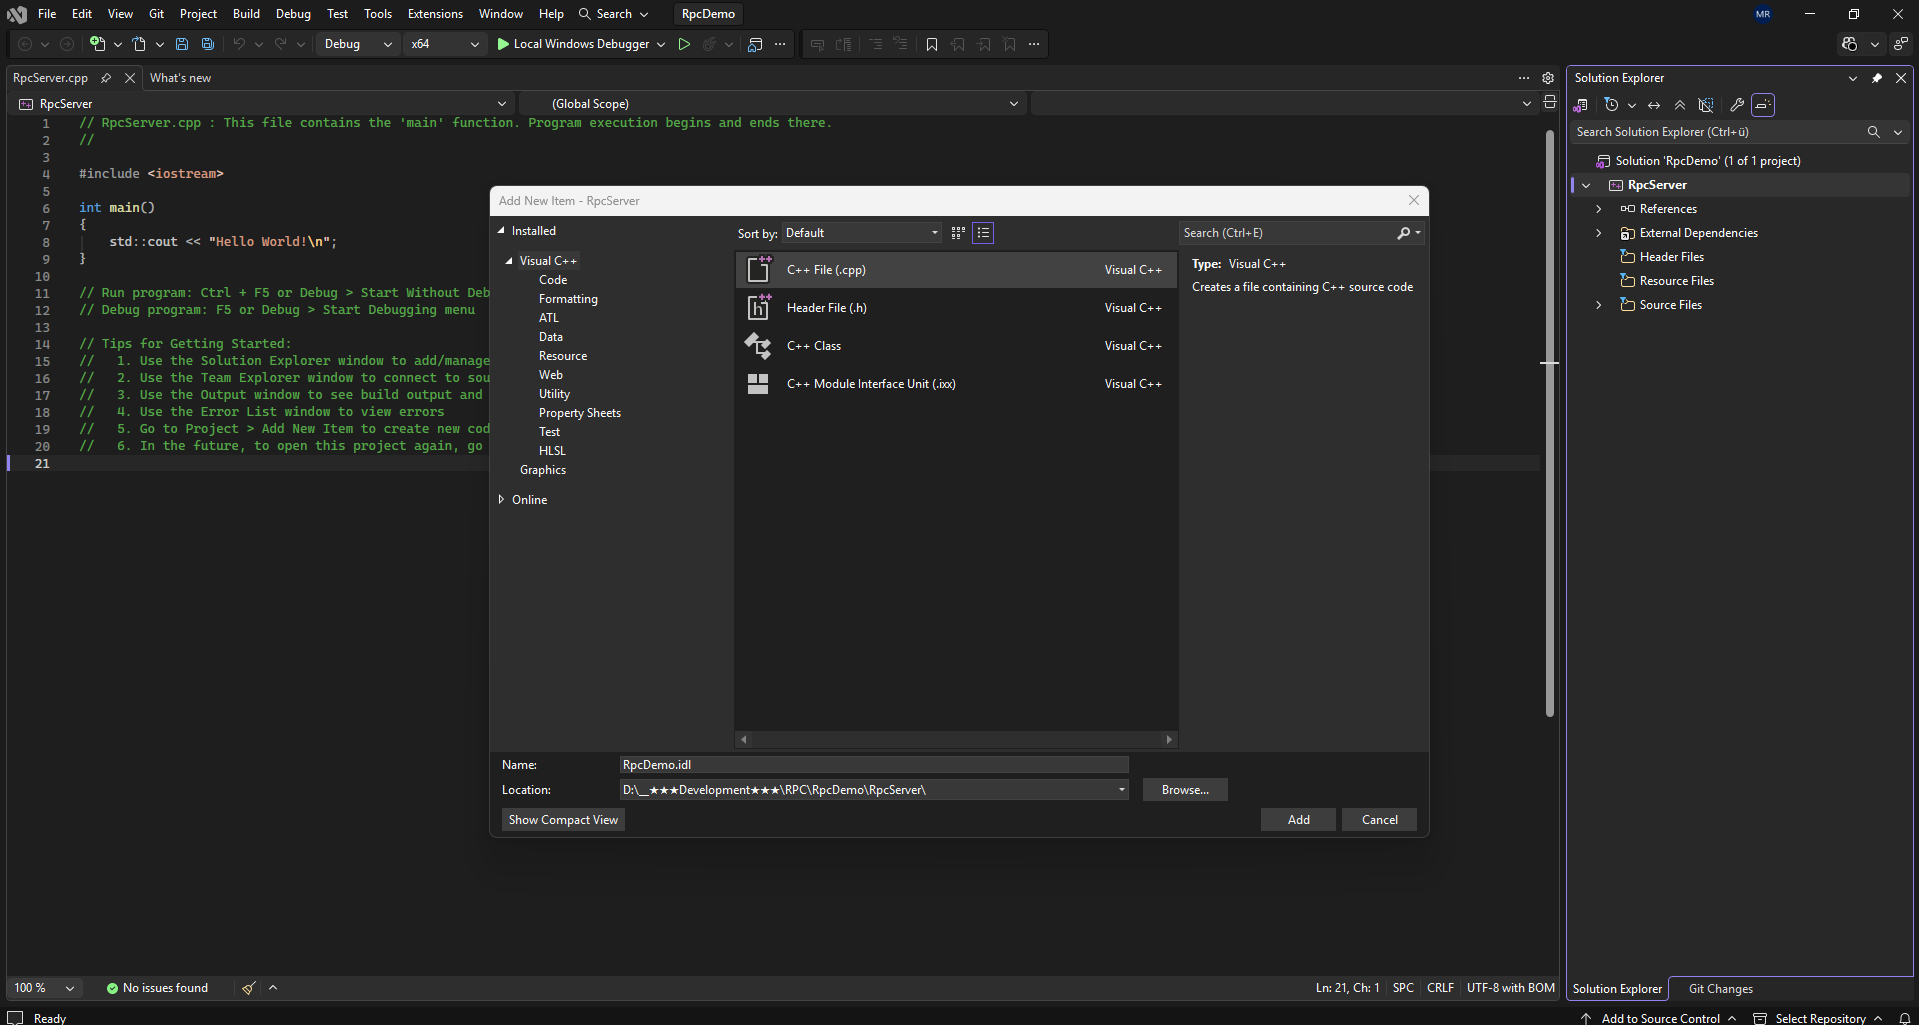
Select C++ File (.cpp) and name it RpcDemo.idl. Click on Add.
Since Visual Studio 2026 no longer provides a dedicated IDL File template by default, I created the interface definition as a new item and simply changed the file extension to .idl. The Microsoft Interface Definition Language (MIDL) compiler recognizes the file based on its extension, so no special project template is required.
The first thing we’ll do is define the interface.
Paste the following minimal skeleton into our new RpcDemo.idl file.
[
    uuid(12345678-1234-1234-1234-123456789ABC),
    version(1.0)
]
interface RpcDemo
{
}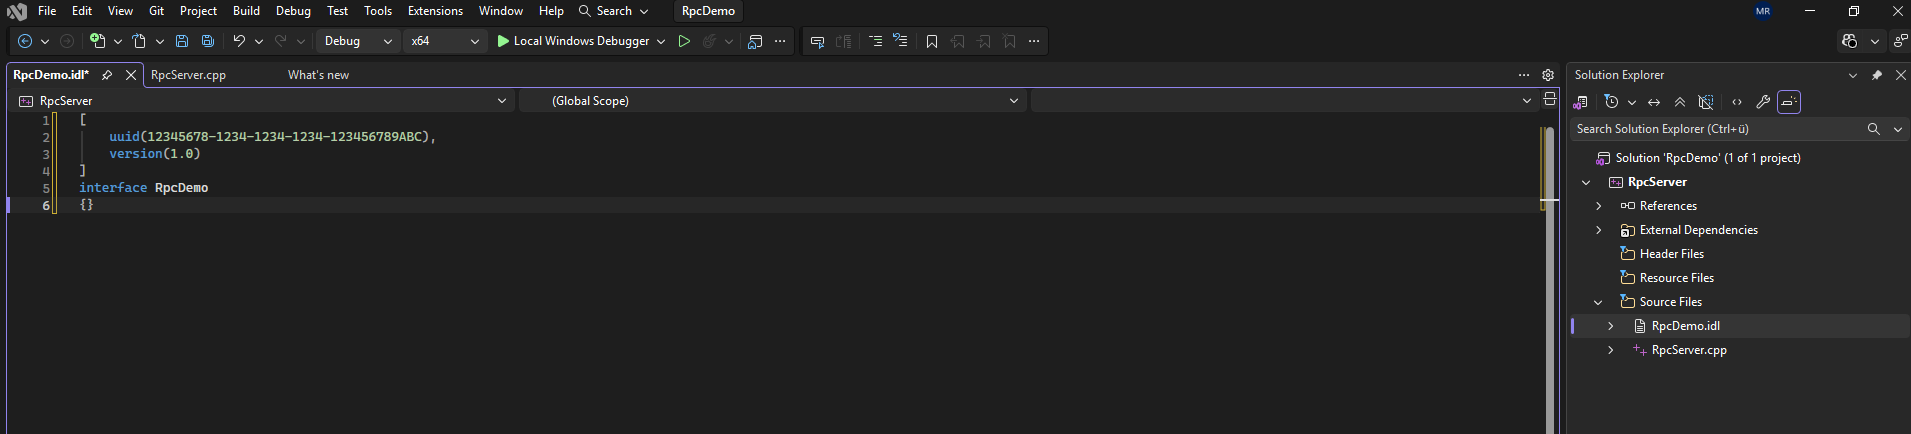
- uuid – A globally unique identifier for the RPC interface. Clients don’t connect to “port 49732”; they request this interface UUID from the Endpoint Mapper.
- version – The interface version. Clients and servers use this to ensure compatibility.
- interface RpcDemo – Defines the RPC contract. All remotely callable procedures will be declared inside the braces.
Every Microsoft RPC application begins with an Interface Definition Language (IDL) file. Rather than implementing the client or server first, the IDL file defines the communication contract between both components, including a globally unique interface identifier (UUID), version information, and the remote procedures that will be available to clients. The MIDL compiler then uses this definition to generate the required client and server stubs automatically.
Instead of inventing our own UUID, let’s generate a real one.
Open the Developer Command Prompt:
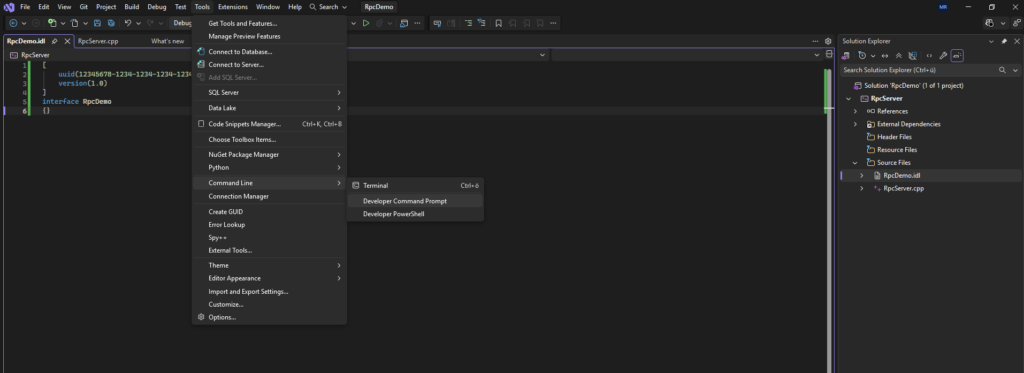
Then run:
The
uuidgencommand created the unique interface UUID.
> uuidgen
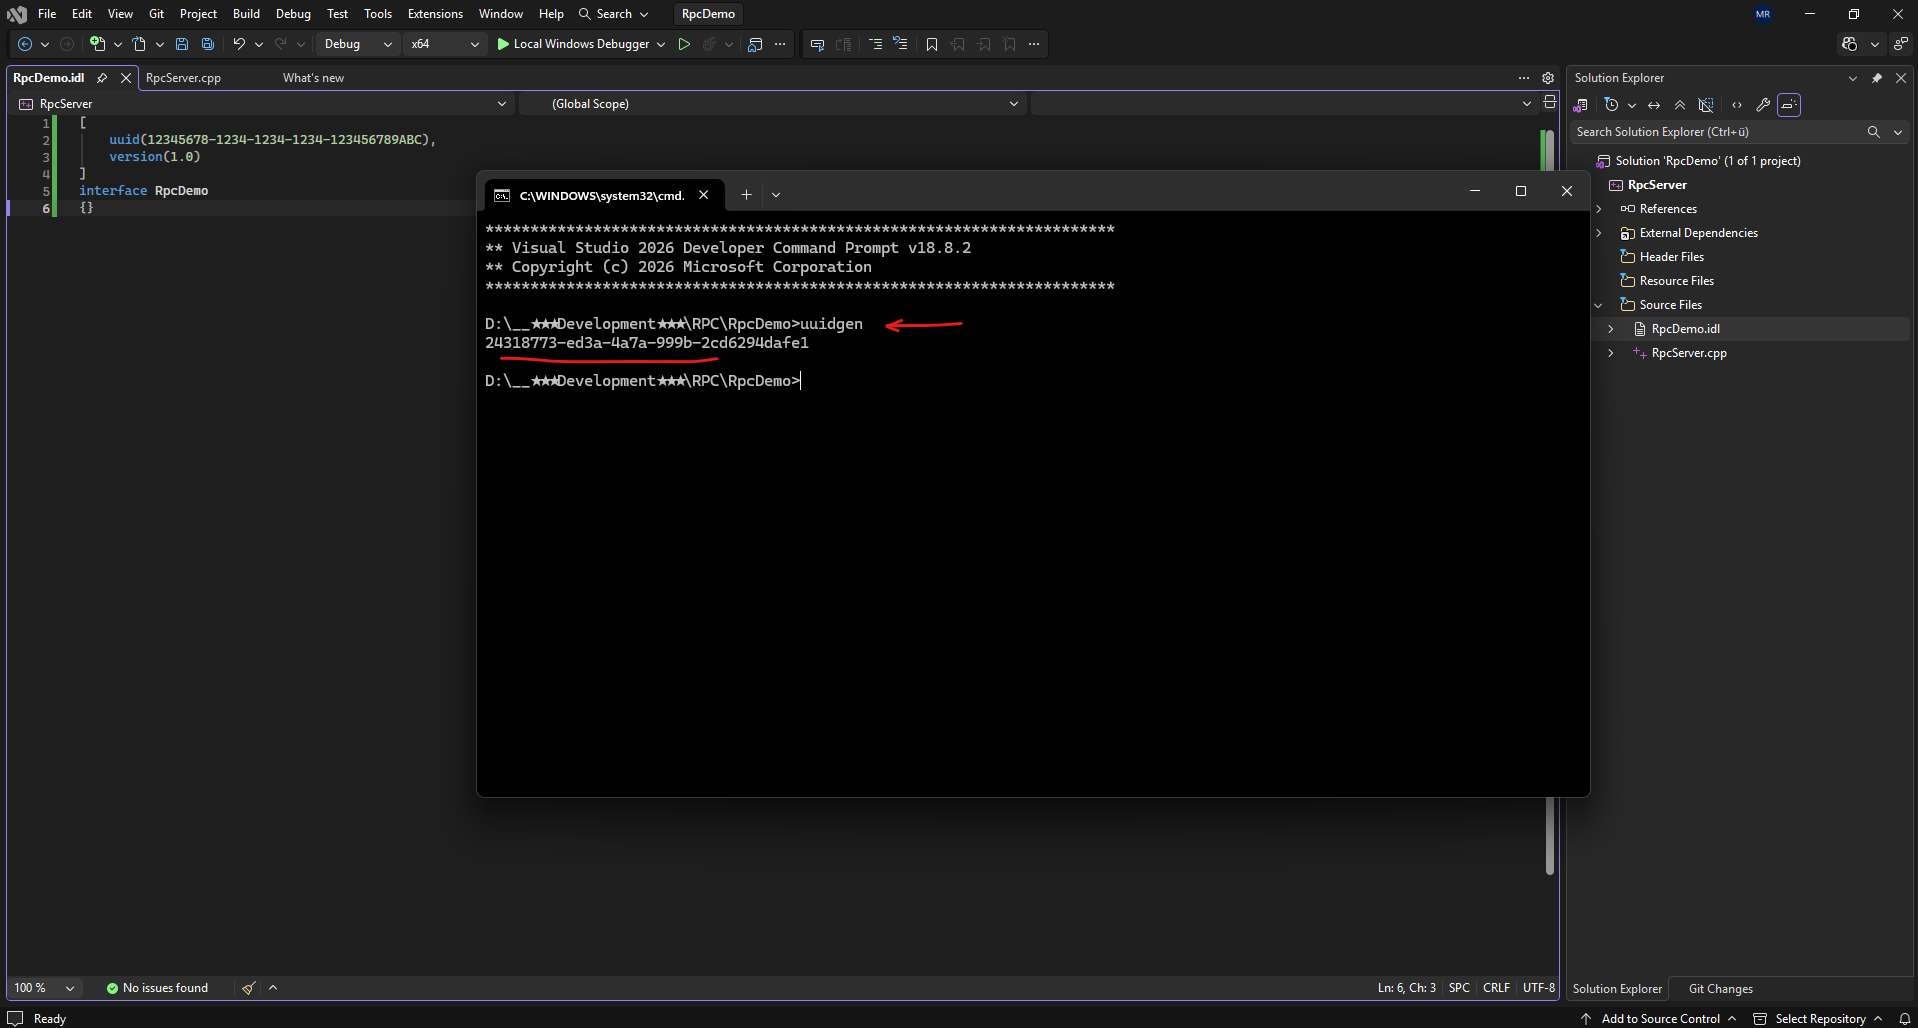
Replace the placeholder UUID and extend the interface with our first remote procedure:
This identifier distinguishes our interface from every other RPC interface registered with the Windows Endpoint Mapper and allows clients to locate the correct service independently of its dynamically assigned TCP port.
[
    uuid(24318773-ed3a-4a7a-999b-2cd6294dafe1),
    version(1.0),
    implicit_handle(handle_t RpcDemoBindingHandle)
]
interface RpcDemo
{
    long AddNumbers(
        [in] long number1,
        [in] long number2
    );

    void Shutdown();
}
AddNumbers() will execute on the remote server and return the calculated result, while Shutdown() will later allow the client to stop the demo server cleanly.
The implicit_handle defines the RPC binding handle used by the generated client stub without requiring us to pass it to every remote procedure explicitly.
Save RpcDemo.idl, then open the Developer Command Prompt for Visual Studio and change to the folder containing the file. Run:
The
midl /app_config RpcDemo.idlcommand compiled the interface definition and automatically generated the client and server stub code required by Microsoft’s RPC runtime. Instead of manually implementing the communication protocol, we only need to provide the server-side implementation of the remote procedures while the generated stubs transparently handle the network communication.MIDL requires the
/app_configswitch.
This tells MIDL to allow attributes such asimplicit_handle,auto_handle, andexplicit_handledirectly in the IDL file instead of requiring a separate.acffileSource: https://learn.microsoft.com/en-us/windows/win32/midl/using-acf-attributes-in-an-idl-file
> midl /app_config RpcDemo.idl
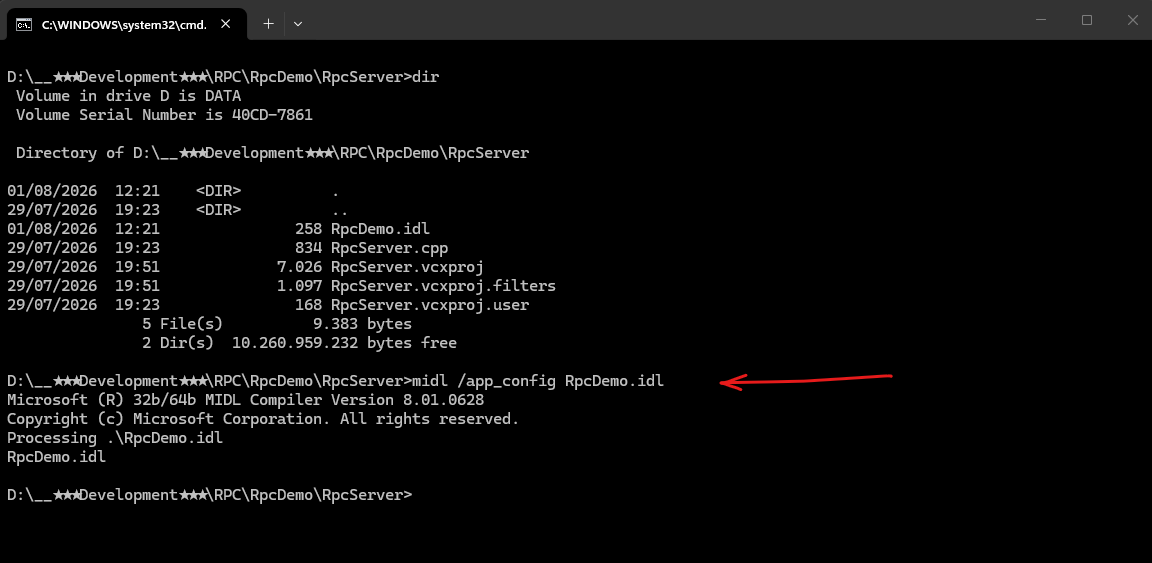
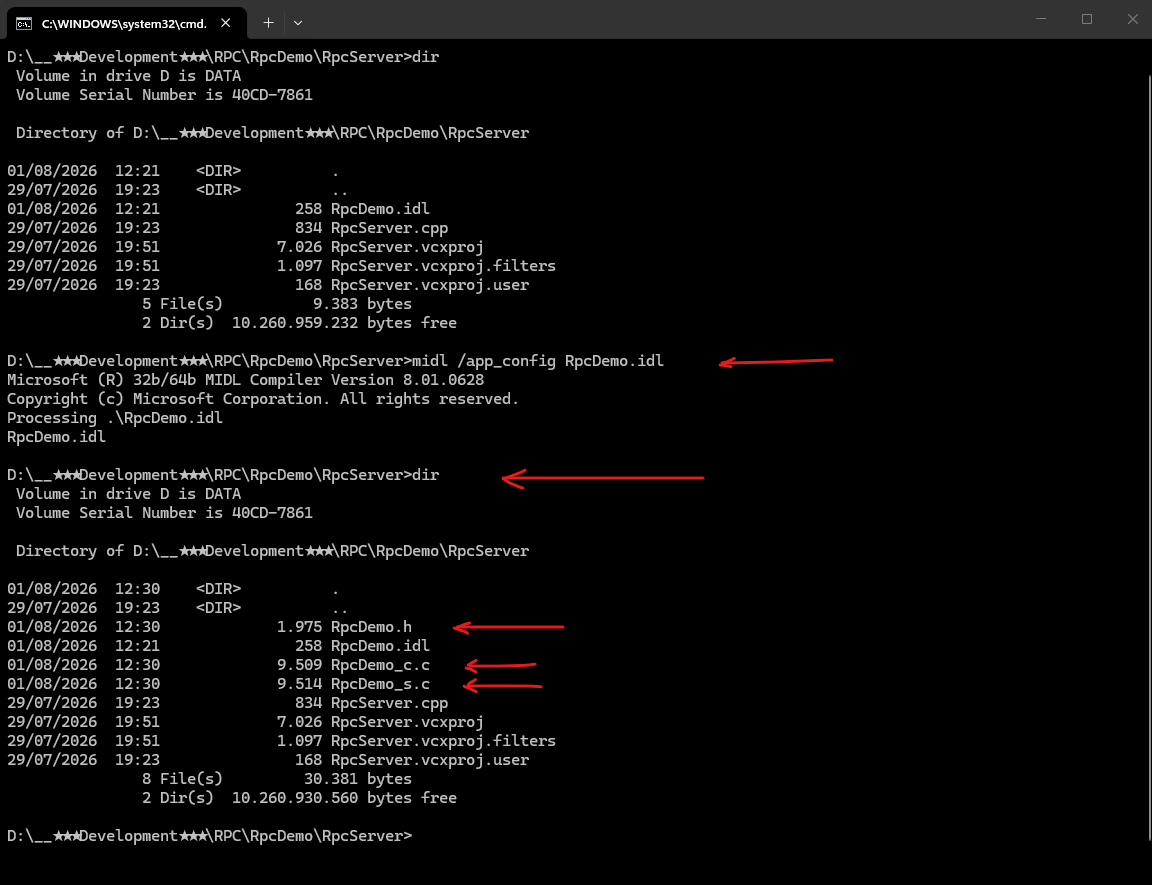
MIDL should generate files such as:
RpcDemo.h
RpcDemo_c.c
RpcDemo_s.c
Depending on the compiler version and options, you may also see additional support files.
This is actually one of the coolest parts of Microsoft RPC. We wrote one
.idlfile, and MIDL generates the “plumbing” for us.
RpcDemo.h→ This is the shared header that both the client and server include. It contains the declarations generated from our IDL like long AddNumbers( …). It also contains the interface UUID, RPC function declarations, data type definitions and required RPC headers.
RpcDemo_c.c→ This is the client stub (also called the proxy). This file is linked into the client application. e.g when the client writesresult = AddNumbers(5,7);. It is not calling the server directly. To the client application, it appears to be nothing more than an ordinary function call. Behind the scenes, however, the generated RPC stub transparently marshals the parameters, transmits the request across the network to the remote server, waits for the response, and finally returns the result to the caller.
RpcDemo_s.c→ This is the server stub (sometimes called the skeleton). It receives the incoming RPC request, automatically unmarshals the transmitted parameters, invokes the corresponding server-side implementation of the requested procedure, marshals the return value, and finally sends the response back to the client through the Windows RPC runtime.
The generated code acts as translators between your application and the network.
 Client                           Server

Your Code                        Your Code
AddNumbers()                     AddNumbers()
      │                               ▲
      ▼                               │
RpcDemo_c.c                    RpcDemo_s.c
(Client Stub)                  (Server Stub)
      │                               ▲
      ▼                               │
========== Microsoft RPC Runtime ==========
               TCP/IP
Understanding Network Data Representation (NDR)
One of the key components of Microsoft DCE/RPC is Network Data Representation (NDR).
NDR defines a standardized binary format for transmitting data structures, primitive data types, pointers, arrays, and strings across the network.
Before a remote procedure call is sent, the MIDL-generated client stub marshals the function parameters into the NDR format. On the receiving side, the server stub unmarshals the NDR-encoded data back into native C++ objects before invoking the actual server implementation.
This abstraction allows both client and server to exchange complex data structures without requiring the application developer to perform any manual serialization or deserialization.
Serialization and Deserialization
Serialization is the process of converting data structures or objects stored in memory into a sequence of bytes that can be transmitted over a network, written to a file, or stored in a database.
Deserialization performs the reverse operation by reconstructing the original data structures from the received byte stream.
For example, consider the following RPC function:
</> C++
long AddNumbers(long number1, long number2);
When the client executes
</> C++
AddNumbers(40, 50);
the values 40 and 50 initially exist only as native C++ variables in the client’s memory. Before they can be transmitted to the server, the client stub serializes these values into the standardized NDR binary format.
The DCE/RPC runtime then sends this binary representation over the network. After receiving the packet, the server stub deserializes the NDR data, reconstructs the original parameters (40 and 50), and finally invokes the server-side implementation of AddNumbers().
Once the function returns (90), the same process occurs in reverse: the return value is serialized into NDR, transmitted back to the client, and deserialized before being returned to the calling application.
Conceptually, the communication flow looks as follows:
Client Memory
--------------
long number1 = 40;
long number2 = 50;

        │
        ▼
Serialization (Marshaling)
        │
        ▼
Network Data Representation (NDR)
        │
~~~~~~~~ Network ~~~~~~~~
        │
        ▼
Deserialization (Unmarshaling)
        │
        ▼
Server Memory
--------------
long number1 = 40;
long number2 = 50;
One important advantage of this approach is platform independence. Different computer architectures may represent data differently, for example, using different byte orders (little-endian versus big-endian), different memory alignment requirements, or different compiler-specific structure layouts.
NDR defines a common binary representation that both communication partners understand, ensuring that transmitted data is interpreted correctly regardless of the underlying platform.
NDR Compared to Modern Serialization Formats
Although most developers today associate serialization with formats such as JSON, Protocol Buffers, FlatBuffers, MessagePack, or Apache Avro, the underlying concept is exactly the same. All of these technologies transform in-memory objects into a portable representation that can later be reconstructed by another application.
The main difference is the representation itself:
| Format | Representation | Typical Usage |
|---|---|---|
| JSON | Human-readable text | REST APIs, web applications |
| XML | Human-readable text | SOAP, configuration files |
| Protocol Buffers | Compact binary | gRPC, distributed systems |
| FlatBuffers | Zero-copy binary | Games, embedded systems |
| MessagePack | Compact binary | High-performance messaging |
| NDR | Compact binary | Microsoft DCE/RPC |
NDR was specifically designed for Microsoft DCE/RPC and is tightly integrated into the RPC runtime and the code generated by the Microsoft Interface Definition Language (MIDL) compiler. Unlike general-purpose serialization formats, application developers rarely interact with NDR directly, the generated client and server stubs perform all serialization and deserialization automatically.
Why Is It Called Serialization?
The origin of the term comes from “serial”, meaning one item after another in sequence.
Inside a computer, objects and variables are not stored as one continuous sequence. They are scattered throughout memory:
Memory
----------------------------------------------------

number1 (40)         0x7FFE12345000

...

number2 (50)         0x7FFE1234A800

...

string               0x7FFE56781230

...
The network, however, cannot transmit “memory”. It can only send a stream of bytes, one byte after another:
40 50
or, more realistically:
28 00 00 00
32 00 00 00
for two 32-bit little-endian integers.
Byte Order (Endianness)
Multi-byte values can be stored in different byte orders. Intel x86/x64 processors use Little Endian, where the least significant byte is stored first (e.g., the decimal value40becomes28 00 00 00as a 32-bit integer). Other architectures may use Big Endian, where the most significant byte comes first (00 00 00 28).NDR defines a standardized representation so that both systems interpret transmitted values consistently.
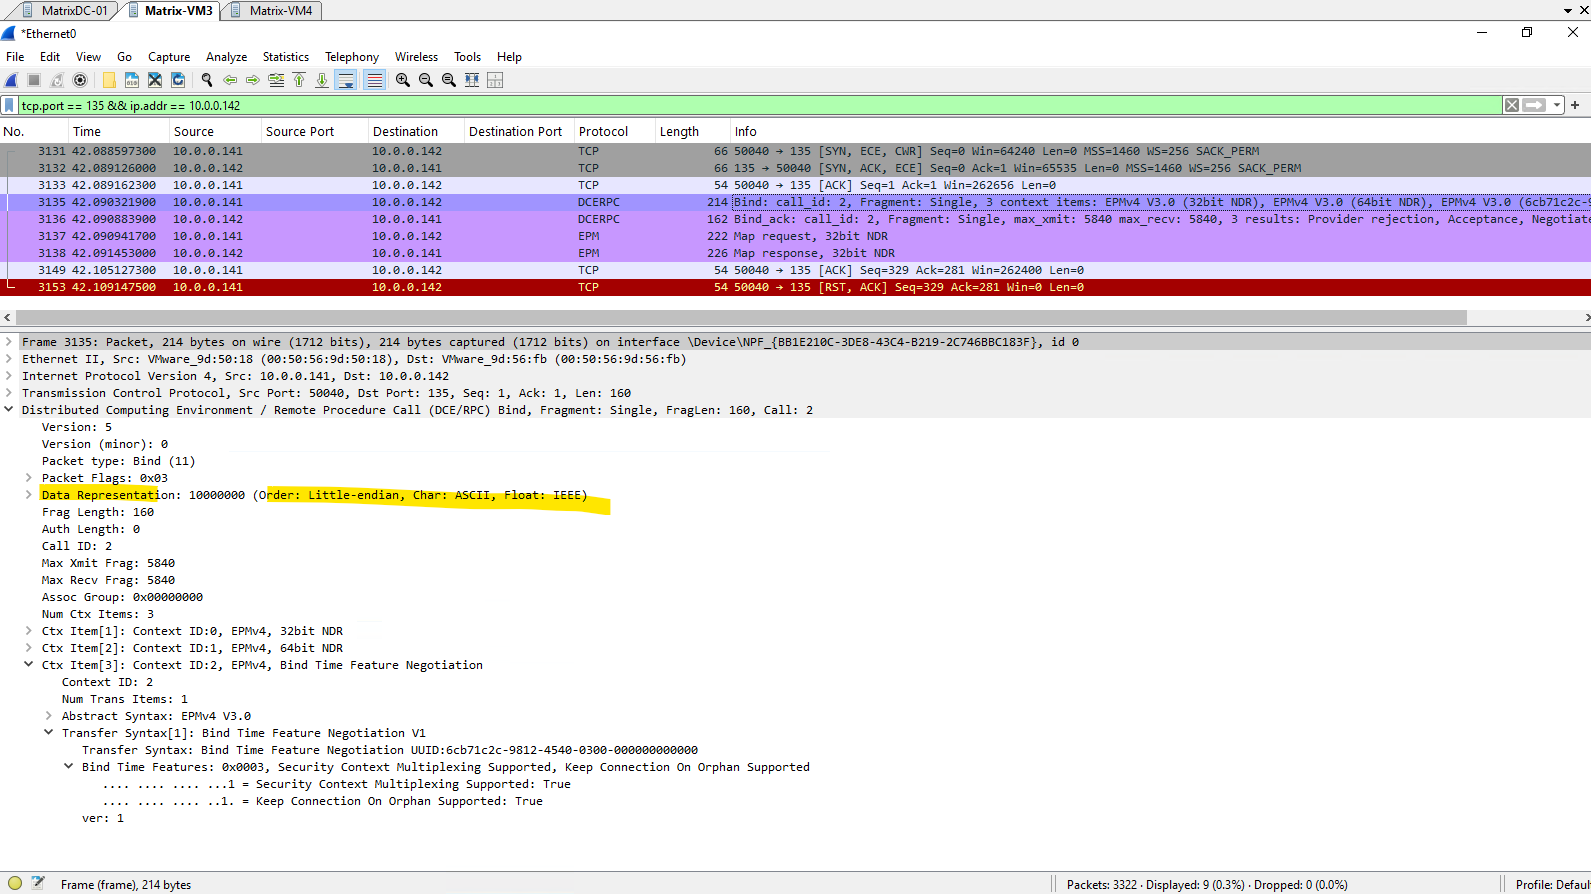
Although Network Data Representation (NDR) is capable of describing different byte orders, Microsoft DCE/RPC communication on modern Windows systems almost exclusively uses little-endian encoding because all supported Windows processor architectures store multi-byte values in little-endian format. Nevertheless, each RPC message includes a Data Representation (DREP) field that specifies the byte order and other data representation characteristics, allowing the protocol to support heterogeneous systems.
Later, when analyzing the captured DCE/RPC traffic with Wireshark, we can observe the Data Representation (DREP) field within the RPC packets. As shown below, the packet explicitly specifies Little-endian byte order, which is the standard data representation used by modern Windows systems.
So before sending anything, the runtime must:
- Read the values from memory.
- Arrange them in a well-defined order.
- Convert them into one continuous sequence (a serial stream) of bytes.
- Send those bytes over the network.
That’s exactly why it’s called serialization.
On the receiving side, the reverse happens:
- read the byte stream,
- interpret it according to the agreed format (NDR),
- reconstruct the original variables in memory.
Hence the opposite term deserialization.
Implementing the RPC Server
With the RPC interface defined and the required client and server stubs generated by MIDL, we can now begin implementing the actual RPC server.
In this section, we’ll integrate the generated files into our Visual Studio project, implement the remote procedures declared in the IDL file, and configure the Windows RPC runtime to listen for incoming client connections.
Adding the Generated RPC Files to the Project
The MIDL compiler generated the source and header files required to integrate our interface definition with the Windows RPC runtime. Before implementing the server logic, these generated files must be added to the Visual Studio project so they are compiled together with the application.
Right-click RpcServer, Add → Existing Item…
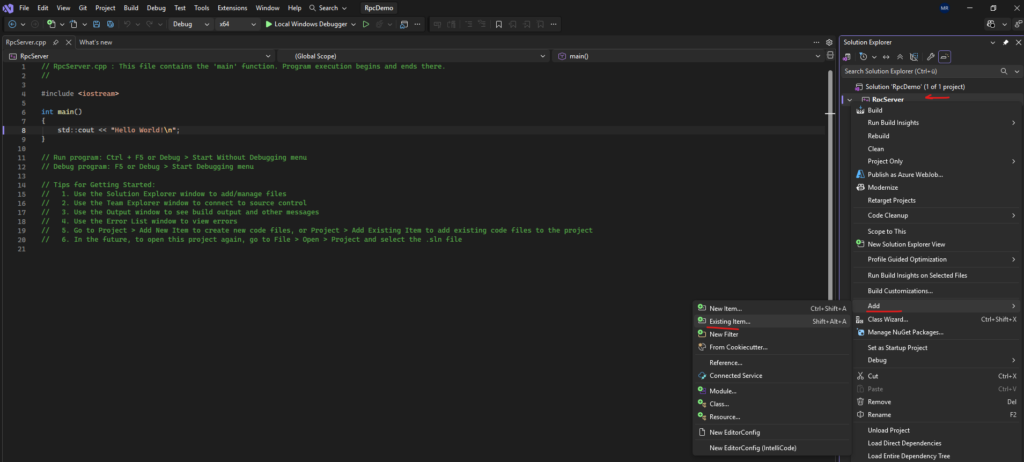
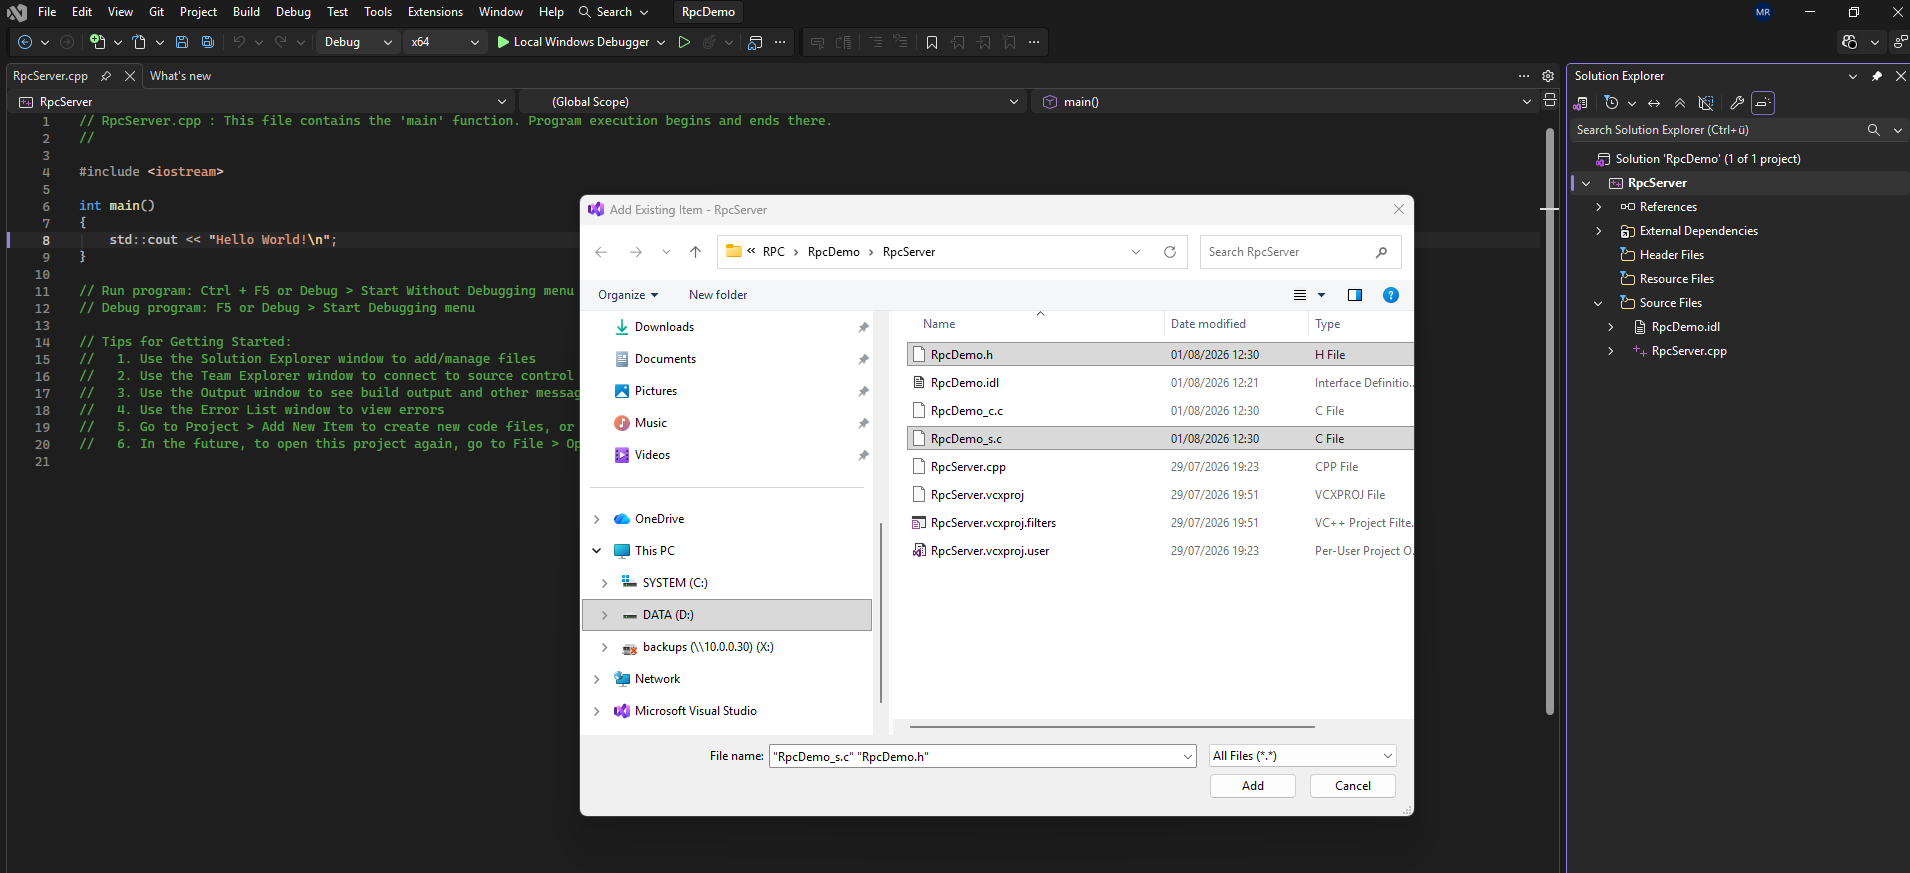
Select RpcDemo.h and RpcDemo_s.c.
We’ll add
RpcDemo_c.clater to the client project.
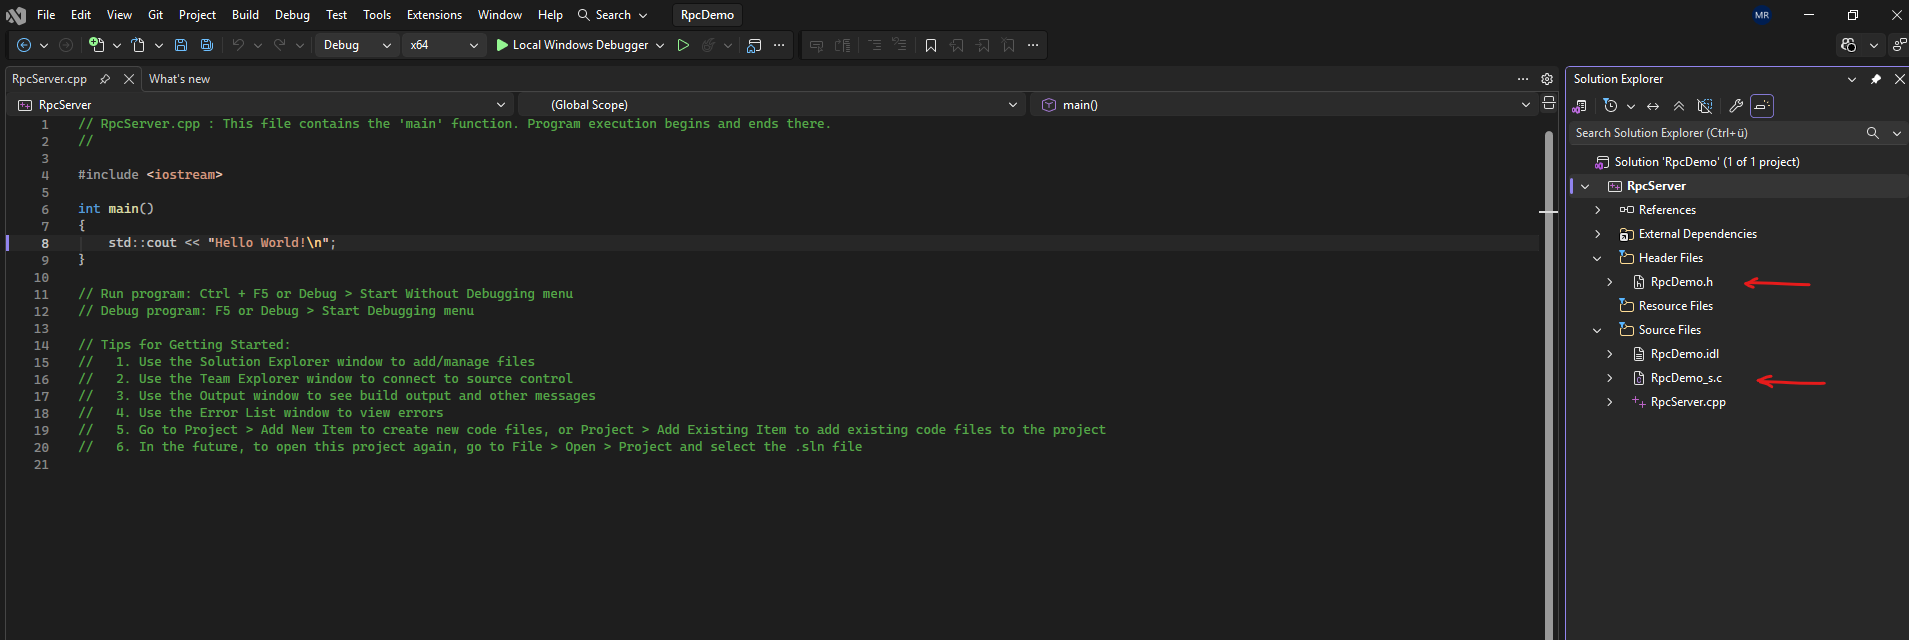
Since the generated server stub (
RpcDemo_s.c) contains the code responsible for receiving incoming RPC requests and dispatching them to our server-side implementation, it must be compiled as part of the RPC server application. The shared header (RpcDemo.h) provides the declarations required by both the generated stub and our own server implementation.
Implementing the Remote Procedures
With the generated RPC infrastructure integrated into the project, the next step is to implement the remote procedures declared in the IDL file.
These functions contain the actual business logic that will be executed on the server whenever a client invokes the corresponding remote procedure.
During the initial implementation, the client was able to resolve the server’s dynamic endpoint successfully, but the first remote procedure call failed with
RPC_S_ACCESS_DENIED.Although Microsoft DCE/RPC supports different security models,
authenticated RPC communicationis the standard and recommended approach on modern Windows systems, and many RPC interfaces or security configurations require it.To establish an authenticated connection, the server is configured to register the Negotiate authentication service using
RpcServerRegisterAuthInfoW(), while the client configured its binding handle withRpcBindingSetAuthInfoW(). Using Negotiate allows Windows to automatically select the most appropriate authentication protocol, typically Kerberos in an Active Directory environment or NTLM as a fallback.Note: In this demonstration, enabling RPC authentication was mandatory to successfully invoke the remote procedures. Without configuring authentication, the client received the
RPC_S_ACCESS_DENIEDexception when attempting to execute the first remote procedure call.Source: https://learn.microsoft.com/en-us/windows/win32/api/rpcdce/nf-rpcdce-rpcserverregisterauthinfow
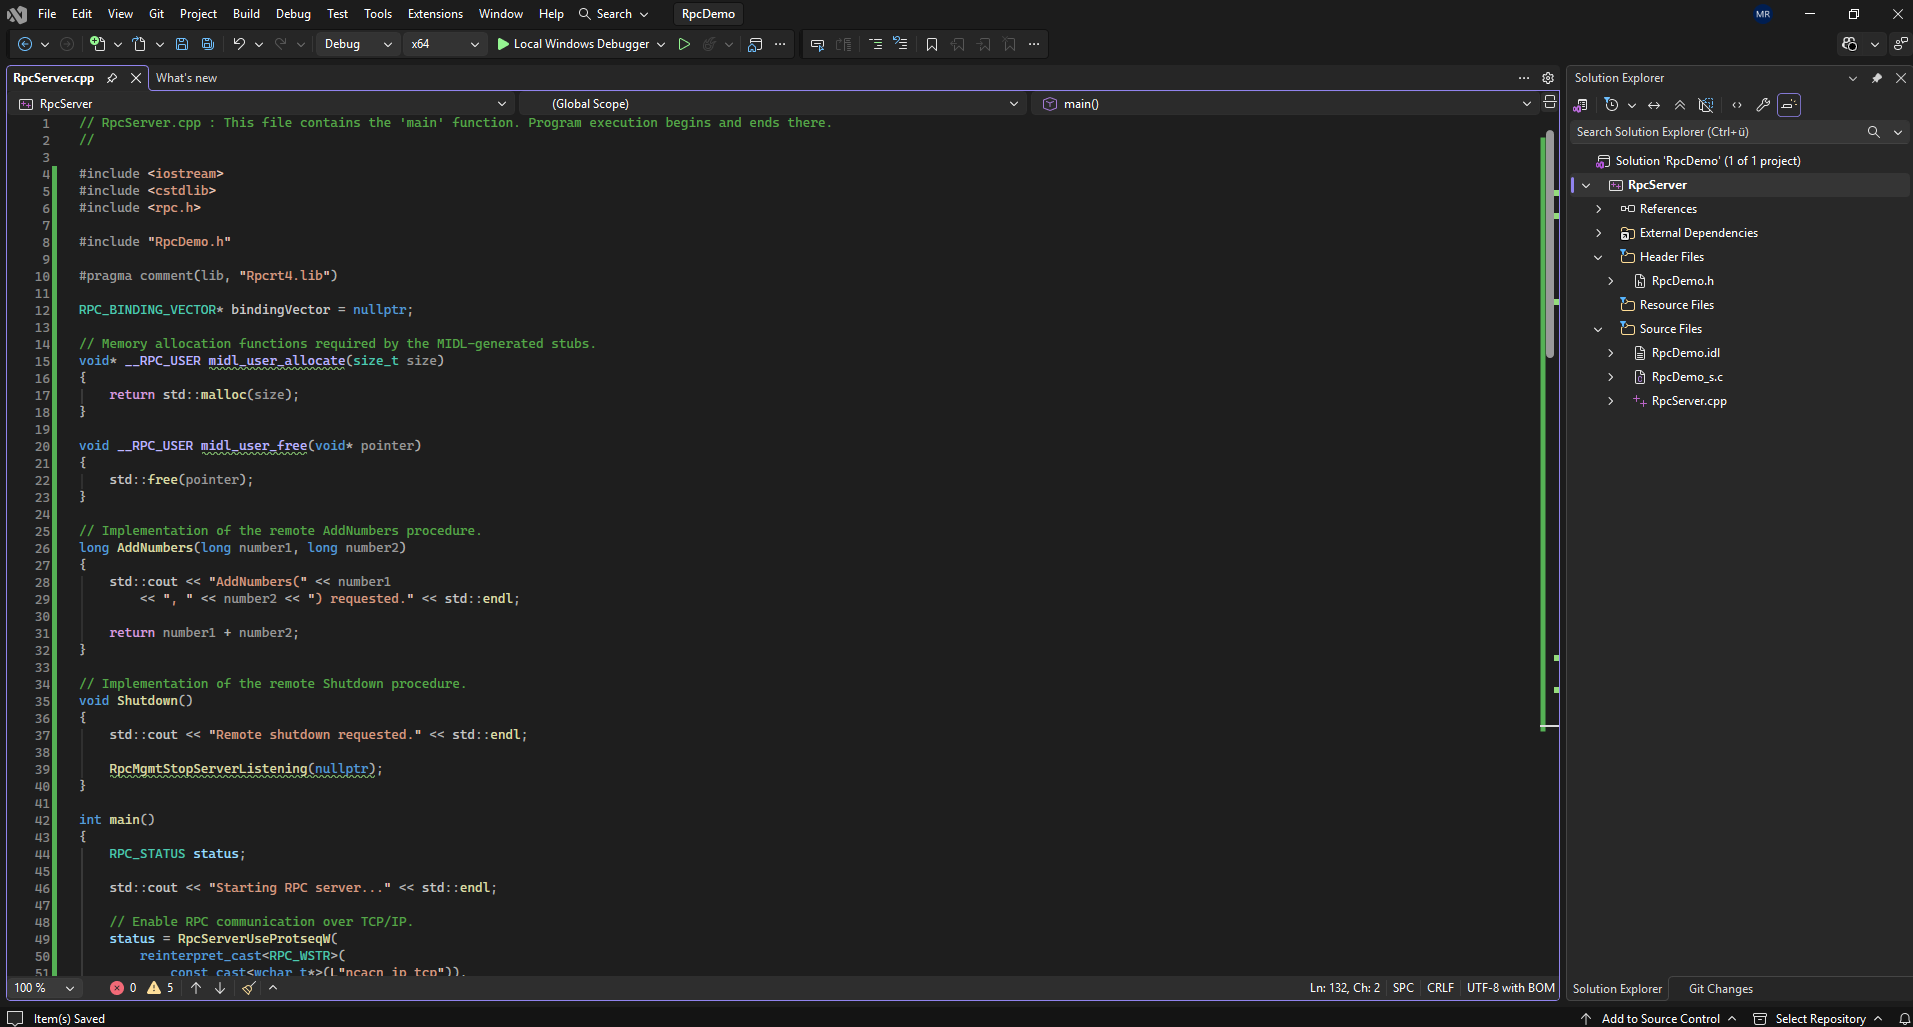
Now we will replace the default Hello World code in RpcServer.cpp with the skeleton for our server implementation.
The
main()function starts the application, initializes the Windows RPC runtime, registers the generated RPC interface, and then waits for client requests.The
AddNumbers()andShutdown()functions are not called directly bymain(); they are invoked later byRpcDemo_s.cwhenever the corresponding RPC request arrives.The two
midl_user_allocate()andmidl_user_free()functions provide the memory-management callbacks expected by MIDL-generated code. The#pragma comment(lib, "Rpcrt4.lib")directive tells the linker to include the import library for the native Windows RPC runtime.
#include <iostream>
#include <cstdlib>
#include <rpc.h>

#include "RpcDemo.h"

#pragma comment(lib, "Rpcrt4.lib")

RPC_BINDING_VECTOR* bindingVector = nullptr;

// Memory-management callbacks required by the MIDL-generated stubs.
void* __RPC_USER midl_user_allocate(size_t size)
{
    return std::malloc(size);
}

void __RPC_USER midl_user_free(void* pointer)
{
    std::free(pointer);
}

// Implementation of the remote AddNumbers procedure.
long AddNumbers(long number1, long number2)
{
    std::cout
        << "AddNumbers("
        << number1
        << ", "
        << number2
        << ") requested."
        << std::endl;

    return number1 + number2;
}

// Implementation of the remote Shutdown procedure.
void Shutdown()
{
    std::cout
        << "Remote shutdown requested."
        << std::endl;

    const RPC_STATUS status =
        RpcMgmtStopServerListening(nullptr);

    if (status != RPC_S_OK)
    {
        std::cerr
            << "RpcMgmtStopServerListening failed with RPC status "
            << status
            << '.'
            << std::endl;
    }
}

int main()
{
    RPC_STATUS status;

    std::cout
        << "Starting RPC server..."
        << std::endl;

    /*
     * Enable connection-oriented Microsoft RPC over TCP/IP.
     *
     * No fixed endpoint is specified, so the RPC runtime assigns
     * a dynamic TCP port.
     */
    status = RpcServerUseProtseqW(
        reinterpret_cast<RPC_WSTR>(
            const_cast<wchar_t*>(L"ncacn_ip_tcp")),
        RPC_C_PROTSEQ_MAX_REQS_DEFAULT,
        nullptr);

    if (status != RPC_S_OK)
    {
        std::cerr
            << "RpcServerUseProtseqW failed with RPC status "
            << status
            << '.'
            << std::endl;

        return static_cast<int>(status);
    }

    /*
     * Register Windows Negotiate authentication.
     *
     * Kerberos is used where possible. Otherwise, Windows can
     * negotiate another supported SSPI authentication mechanism,
     * typically NTLM.
     */
    status = RpcServerRegisterAuthInfoW(
        nullptr,
        RPC_C_AUTHN_GSS_NEGOTIATE,
        nullptr,
        nullptr);

    if (status != RPC_S_OK)
    {
        std::cerr
            << "RpcServerRegisterAuthInfoW failed with RPC status "
            << status
            << '.'
            << std::endl;

        return static_cast<int>(status);
    }

    // Register the interface generated from RpcDemo.idl.
    status = RpcServerRegisterIf(
        RpcDemo_v1_0_s_ifspec,
        nullptr,
        nullptr);

    if (status != RPC_S_OK)
    {
        std::cerr
            << "RpcServerRegisterIf failed with RPC status "
            << status
            << '.'
            << std::endl;

        return static_cast<int>(status);
    }

    // Retrieve the dynamically generated server bindings.
    status = RpcServerInqBindings(&bindingVector);

    if (status != RPC_S_OK)
    {
        std::cerr
            << "RpcServerInqBindings failed with RPC status "
            << status
            << '.'
            << std::endl;

        RpcServerUnregisterIf(
            RpcDemo_v1_0_s_ifspec,
            nullptr,
            FALSE);

        return static_cast<int>(status);
    }

    /*
     * Publish the interface UUID and generated bindings through
     * the local Windows RPC Endpoint Mapper.
     */
    status = RpcEpRegisterW(
        RpcDemo_v1_0_s_ifspec,
        bindingVector,
        nullptr,
        reinterpret_cast<RPC_WSTR>(
            const_cast<wchar_t*>(L"RpcDemo Interface")));

    if (status != RPC_S_OK)
    {
        std::cerr
            << "RpcEpRegisterW failed with RPC status "
            << status
            << '.'
            << std::endl;

        RpcBindingVectorFree(&bindingVector);

        RpcServerUnregisterIf(
            RpcDemo_v1_0_s_ifspec,
            nullptr,
            FALSE);

        return static_cast<int>(status);
    }

    std::cout
        << "RPC interface registered successfully."
        << std::endl
        << "Negotiate authentication enabled."
        << std::endl
        << "Waiting for client requests..."
        << std::endl;

    /*
     * Start listening for RPC requests.
     *
     * FALSE causes this call to block until Shutdown() calls
     * RpcMgmtStopServerListening().
     */
    status = RpcServerListen(
        1,
        RPC_C_LISTEN_MAX_CALLS_DEFAULT,
        FALSE);

    if (status != RPC_S_OK &&
        status != RPC_S_ALREADY_LISTENING)
    {
        std::cerr
            << "RpcServerListen failed with RPC status "
            << status
            << '.'
            << std::endl;
    }

    // Remove the published endpoint-map entries.
    const RPC_STATUS unregisterEndpointStatus =
        RpcEpUnregister(
            RpcDemo_v1_0_s_ifspec,
            bindingVector,
            nullptr);

    if (unregisterEndpointStatus != RPC_S_OK)
    {
        std::cerr
            << "RpcEpUnregister failed with RPC status "
            << unregisterEndpointStatus
            << '.'
            << std::endl;
    }

    // Release the binding vector returned by RpcServerInqBindings().
    if (bindingVector != nullptr)
    {
        const RPC_STATUS freeBindingStatus =
            RpcBindingVectorFree(&bindingVector);

        if (freeBindingStatus != RPC_S_OK)
        {
            std::cerr
                << "RpcBindingVectorFree failed with RPC status "
                << freeBindingStatus
                << '.'
                << std::endl;
        }
    }

    // Remove the interface from the server runtime.
    const RPC_STATUS unregisterInterfaceStatus =
        RpcServerUnregisterIf(
            RpcDemo_v1_0_s_ifspec,
            nullptr,
            FALSE);

    if (unregisterInterfaceStatus != RPC_S_OK)
    {
        std::cerr
            << "RpcServerUnregisterIf failed with RPC status "
            << unregisterInterfaceStatus
            << '.'
            << std::endl;
    }

    std::cout
        << "RPC server stopped."
        << std::endl;

    return status == RPC_S_OK ||
           status == RPC_S_ALREADY_LISTENING
        ? 0
        : static_cast<int>(status);
}
The sequence is now:
Windows starts RpcServer.exe
        ↓
main() initializes the RPC runtime
        ↓
TCP/IP is enabled for RPC
        ↓
RpcDemo_v1_0_s_ifspec is registered
        ↓
The dynamic endpoint is published through TCP 135
        ↓
RpcServerListen() waits for requests
        ↓
RpcDemo_s.c dispatches calls to AddNumbers() or Shutdown()
RPC itself is transport-independent. The interface definition in our .idl file doesn’t care whether the communication happens over TCP, UDP, named pipes, or another supported transport. The transport is chosen when the server registers its protocol sequence.
For Microsoft RPC, common protocol sequences include:
| Protocol Sequence | Transport | Typical Use |
|---|---|---|
ncacn_ip_tcp | TCP/IP | Most common, connection-oriented |
ncadg_ip_udp | UDP/IP | Connectionless RPC |
ncacn_np | Named Pipes (SMB) | File and printer sharing, some management services |
ncalrpc | Local RPC (same machine) | High-performance local communication |
In our example, we’re using:
RpcServerUseProtseqW(
    L"ncacn_ip_tcp",
    ...
);
If we wanted to use UDP instead, we’d simply register:
RpcServerUseProtseqW(
    L"ncadg_ip_udp",
    ...
);
The rest of the application, including the generated MIDL stubs, would remain essentially unchanged.
Historically, Microsoft RPC supported both TCP and UDP. However, TCP is by far the preferred transport today because:
The application logic is independent of the underlying transport. Whether the remote procedure calls are transmitted over TCP, UDP, named pipes, or local RPC is largely hidden from both the client and the server by the RPC runtime.
UDP is connectionless and doesn’t guarantee delivery or ordering, so it’s only suitable for certain lightweight scenarios.
- It provides reliable, ordered delivery.
- It supports larger messages.
- It handles retransmissions automatically.
- Most Windows services (Active Directory, WMI, DCOM, Hyper-V, etc.) use TCP.
Initializing and Starting the RPC Server
The remote procedures alone do not make the application an RPC server. The main() function must initialize the Windows RPC runtime, enable the ncacn_ip_tcp protocol sequence, register the generated interface, publish its dynamically assigned endpoint through the Endpoint Mapper, and finally wait for incoming client requests.
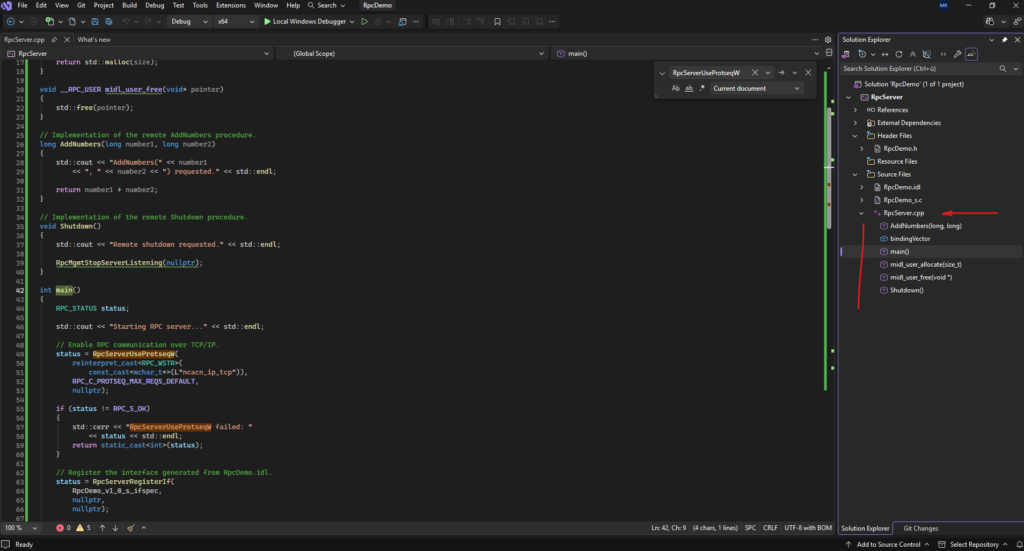
Visual Studio automatically parses the source code and lists all global variables and functions contained in the current source file in the navigation bar (highlighted on the right). This provides a quick overview of the application’s structure and allows you to jump directly to a specific function, which becomes particularly useful as projects grow in size.
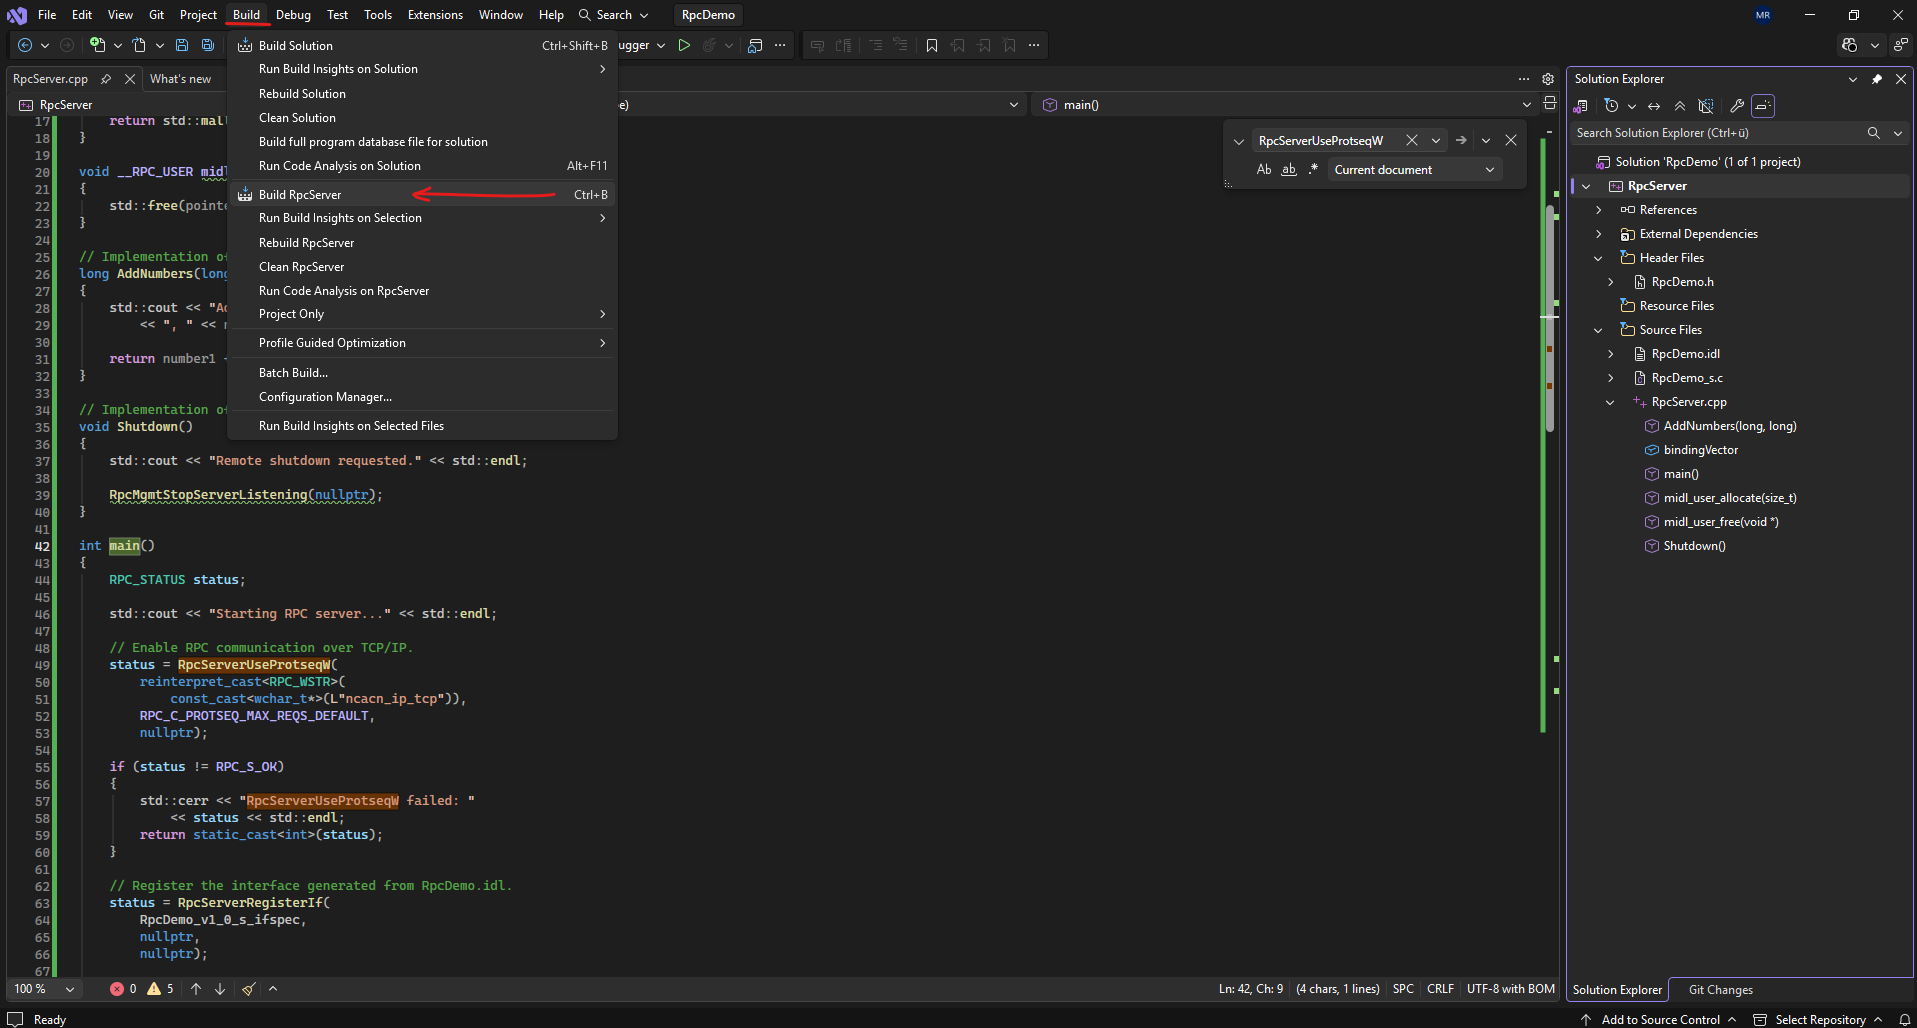
We now build the project by using Build → Build RpcServer.
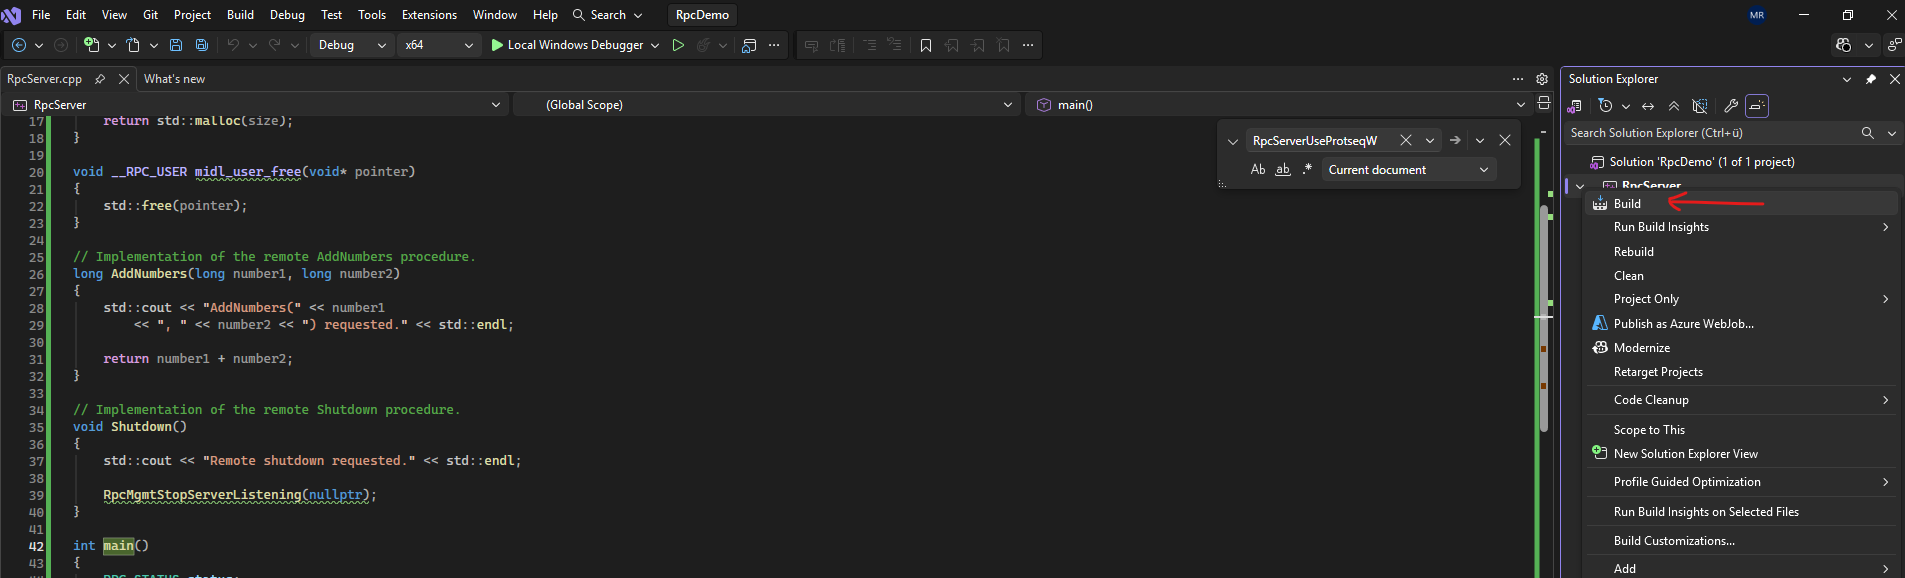
Or just Ctrl + B or right click on the RpcServer as shown below and select Build.
Visual Studio is compiling
RpcDemo.idlagain during every project build, but without the/app_configoption. Running MIDL manually generated the files successfully, but it did not change Visual Studio’s build configuration.Source: https://learn.microsoft.com/en-us/windows/win32/midl/using-acf-attributes-in-an-idl-file
https://learn.microsoft.com/en-us/windows/win32/midl/-app-config
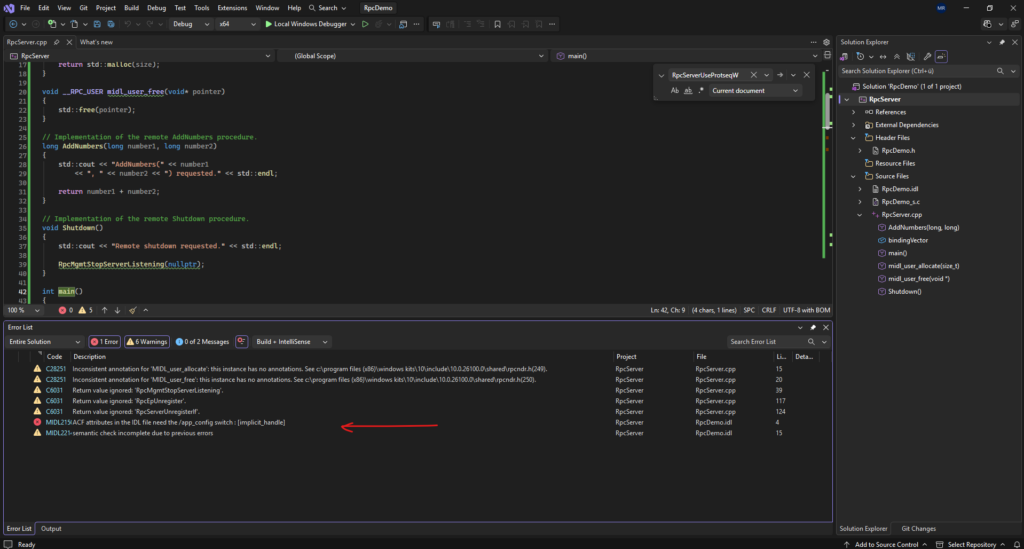
Right-click RpcDemo.idl in Solution Explorer → Properties. Ensure All Configurations and All Platforms are selected, then under MIDL → General set: Application Configuration Mode: Yes (/app_config)
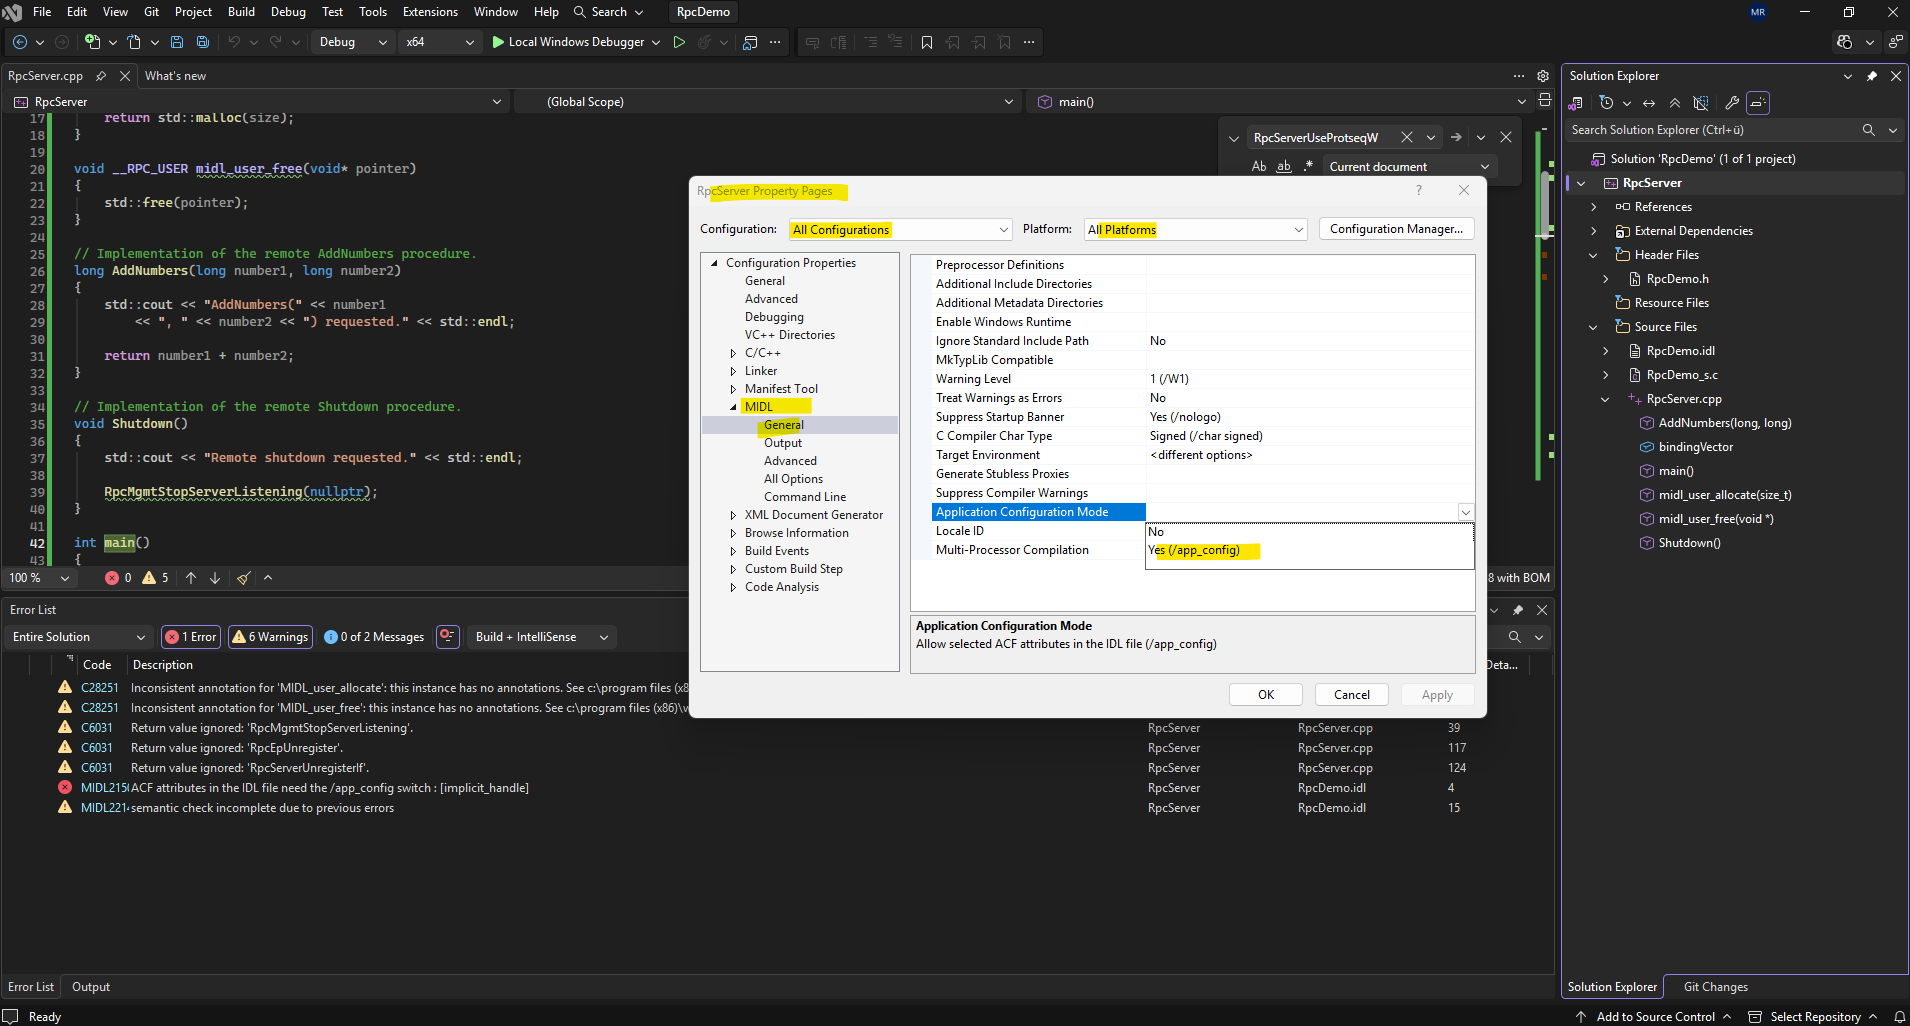
Then rebuild the solution. Visual Studio will invoke MIDL with /app_config, allowing implicit_handle to remain directly inside the IDL file.
Source: https://learn.microsoft.com/en-us/windows/win32/midl/-app-config
Although the IDL file had already been compiled successfully from the command line, Visual Studio processes it again during every project build. Therefore, the
/app_configoption also had to be enabled in the file’s MIDL properties; otherwise, the build continued to reject theimplicit_handleattribute.
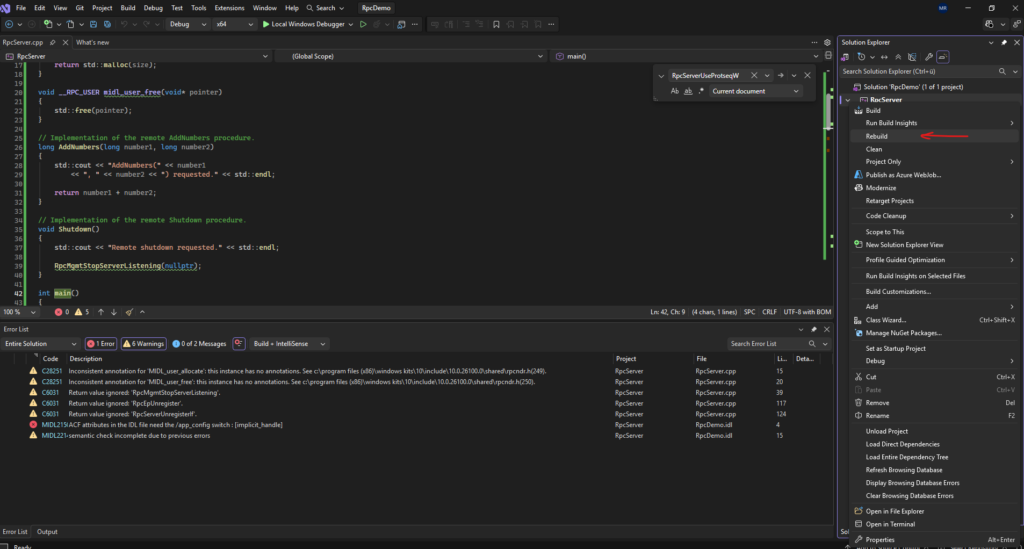
After enabling
/app_configin the Visual Studio MIDL properties, the complete project rebuilt successfully. Visual Studio processed the IDL file, compiled both our custom server implementation and the generated server stub, linked them with the Windows RPC runtime, and produced the final nativeRpcServer.exeexecutable.
Now that the project builds successfully, we can start the server for the first time and verify that it registers the interface and begins listening for incoming requests.
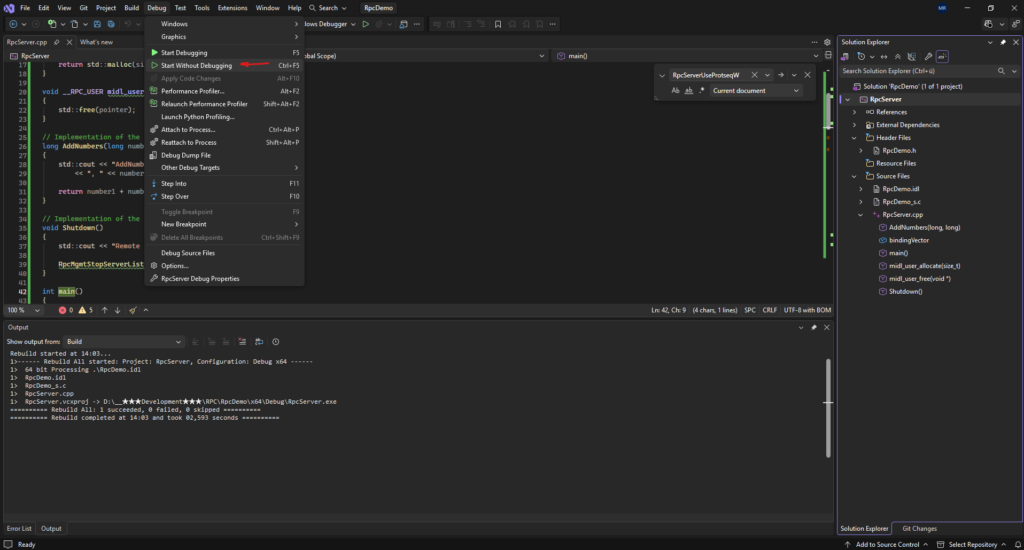
Run it using: Debug → Start Without Debugging
Using Start Without Debugging keeps the console window open independently of the debugger, which is convenient while we later start the client separately.
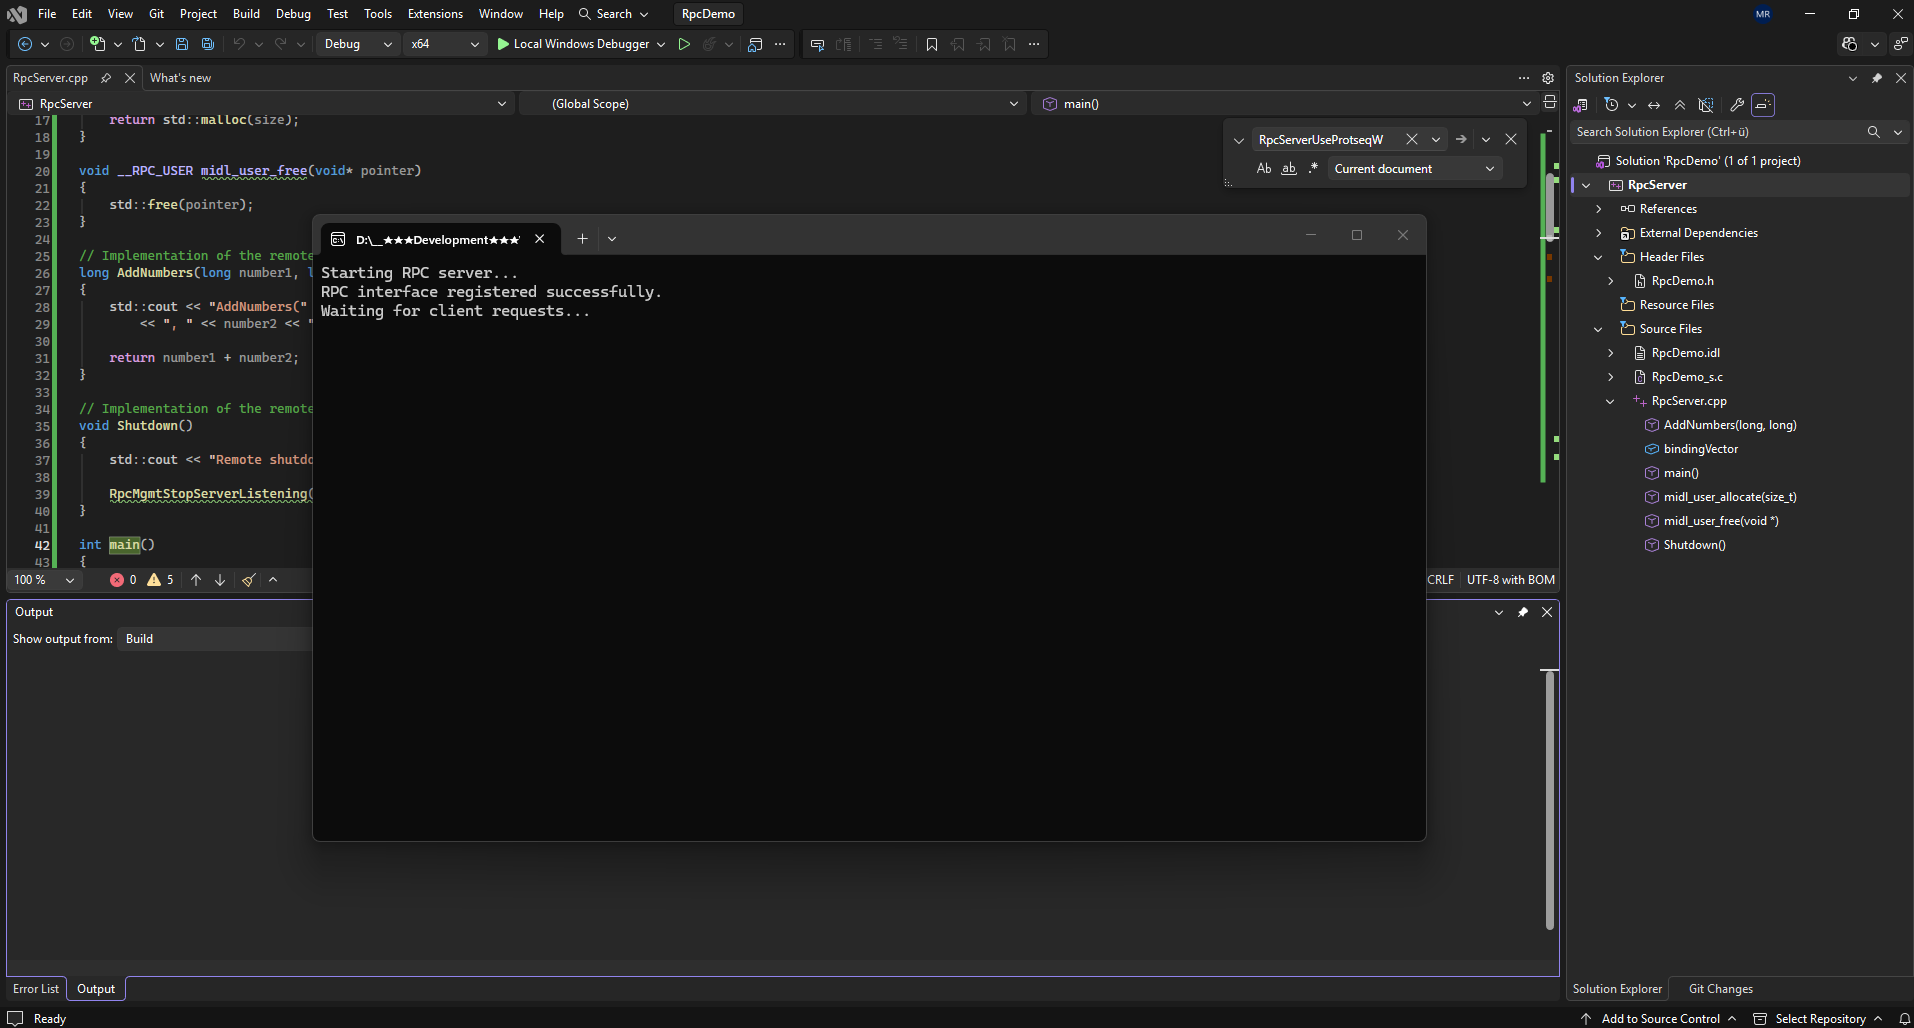
Starting
RpcServer.exeinitializes the Windows RPC runtime, registers theRpcDemointerface with the Endpoint Mapper, and then blocks insideRpcServerListen()while waiting for incoming requests.The remote procedures themselves are only executed when the generated server stub receives and dispatches a corresponding call from a client.
Verifying the Endpoint Mapper Registration
At this point, the RPC server reports that it has successfully registered its interface with the Windows Endpoint Mapper.
But what exactly was registered, and which TCP endpoint was assigned? Instead of relying on third-party utilities, we’ll build our own lightweight inspection tool using the official Windows RPC Management API to explore the Endpoint Mapper database and verify the registration from within our own application.
Creating the Endpoint Mapper Viewer
To verify the registration programmatically, we’ll create a second C++ console application that queries the local Windows RPC Endpoint Mapper using the official RPC Management API.
This utility is independent of our RPC server and demonstrates how Windows itself can enumerate registered RPC interfaces, their protocol sequences, annotations, and dynamically assigned endpoints.
Create a second Console App (C++) project and add it to the existing solution.
Right click on Solution → Add → New Project …, choose Console App – C++ and name it RpcEndpointViewer.
Replace the default contents of RpcEndpointViewer.cpp with:
#include <iostream>
#include <string>
#include <rpc.h>

#pragma comment(lib, "Rpcrt4.lib")

namespace
{
    constexpr wchar_t TargetInterfaceUuid[] =
        L"24318773-ed3a-4a7a-999b-2cd6294dafe1";

    void PrintRpcError(
        const char* functionName,
        RPC_STATUS status)
    {
        std::cerr
            << functionName
            << " failed with RPC status "
            << status
            << '.'
            << std::endl;
    }
}

int main()
{
    RPC_STATUS status;
    RPC_EP_INQ_HANDLE inquiryContext = nullptr;

    std::cout
        << "Querying the local RPC Endpoint Mapper..."
        << std::endl
        << std::endl;

    /*
     * Create an inquiry context for all entries stored in the
     * local Endpoint Mapper database.
     *
     * Passing nullptr as EpBinding queries the local computer.
     */
    status = RpcMgmtEpEltInqBegin(
        nullptr,
        RPC_C_EP_ALL_ELTS,
        nullptr,
        RPC_C_VERS_ALL,
        nullptr,
        &inquiryContext);

    if (status != RPC_S_OK)
    {
        PrintRpcError(
            "RpcMgmtEpEltInqBegin",
            status);

        return static_cast<int>(status);
    }

    bool interfaceFound = false;

    while (true)
    {
        RPC_IF_ID interfaceId{};
        RPC_BINDING_HANDLE bindingHandle = nullptr;
        UUID objectUuid{};
        RPC_WSTR annotation = nullptr;

        status = RpcMgmtEpEltInqNextW(
            inquiryContext,
            &interfaceId,
            &bindingHandle,
            &objectUuid,
            &annotation);

        if (status == RPC_X_NO_MORE_ENTRIES)
        {
            break;
        }

        if (status != RPC_S_OK)
        {
            PrintRpcError(
                "RpcMgmtEpEltInqNextW",
                status);

            break;
        }

        RPC_WSTR interfaceUuidString = nullptr;
        RPC_WSTR bindingString = nullptr;

        RPC_STATUS uuidStatus = UuidToStringW(
            &interfaceId.Uuid,
            &interfaceUuidString);

        if (uuidStatus == RPC_S_OK &&
            interfaceUuidString != nullptr)
        {
            const std::wstring currentUuid(
                reinterpret_cast<wchar_t*>(
                    interfaceUuidString));

            if (_wcsicmp(
                    currentUuid.c_str(),
                    TargetInterfaceUuid) == 0)
            {
                interfaceFound = true;

                std::wcout
                    << L"RpcDemo interface found"
                    << std::endl
                    << L"-----------------------"
                    << std::endl
                    << L"Interface UUID : "
                    << currentUuid
                    << std::endl
                    << L"Version        : "
                    << interfaceId.VersMajor
                    << L"."
                    << interfaceId.VersMinor
                    << std::endl;

                RPC_STATUS bindingStatus =
                    RpcBindingToStringBindingW(
                        bindingHandle,
                        &bindingString);

                if (bindingStatus == RPC_S_OK &&
                    bindingString != nullptr)
                {
                    std::wcout
                        << L"Binding        : "
                        << reinterpret_cast<wchar_t*>(
                            bindingString)
                        << std::endl;
                }
                else
                {
                    std::wcout
                        << L"Binding        : "
                        << L"<unavailable>"
                        << std::endl;
                }

                if (annotation != nullptr &&
                    annotation[0] != L'\0')
                {
                    std::wcout
                        << L"Annotation     : "
                        << reinterpret_cast<wchar_t*>(
                            annotation)
                        << std::endl;
                }
                else
                {
                    std::wcout
                        << L"Annotation     : "
                        << L"<none>"
                        << std::endl;
                }

                std::wcout << std::endl;
            }
        }

        /*
         * RpcMgmtEpEltInqNextW allocates the returned binding
         * and annotation. The UUID and binding conversion
         * functions also allocate their returned strings.
         */
        if (bindingString != nullptr)
        {
            RpcStringFreeW(&bindingString);
        }

        if (interfaceUuidString != nullptr)
        {
            RpcStringFreeW(&interfaceUuidString);
        }

        if (annotation != nullptr)
        {
            RpcStringFreeW(&annotation);
        }

        if (bindingHandle != nullptr)
        {
            RpcBindingFree(&bindingHandle);
        }
    }

    RPC_STATUS doneStatus =
        RpcMgmtEpEltInqDone(&inquiryContext);

    if (doneStatus != RPC_S_OK)
    {
        PrintRpcError(
            "RpcMgmtEpEltInqDone",
            doneStatus);
    }

    if (!interfaceFound)
    {
        std::wcout
            << L"The RpcDemo interface is not currently "
            << L"registered."
            << std::endl
            << L"Start RpcServer.exe and run this utility again."
            << std::endl;
    }

    return status == RPC_X_NO_MORE_ENTRIES ||
           status == RPC_S_OK
        ? 0
        : static_cast<int>(status);
}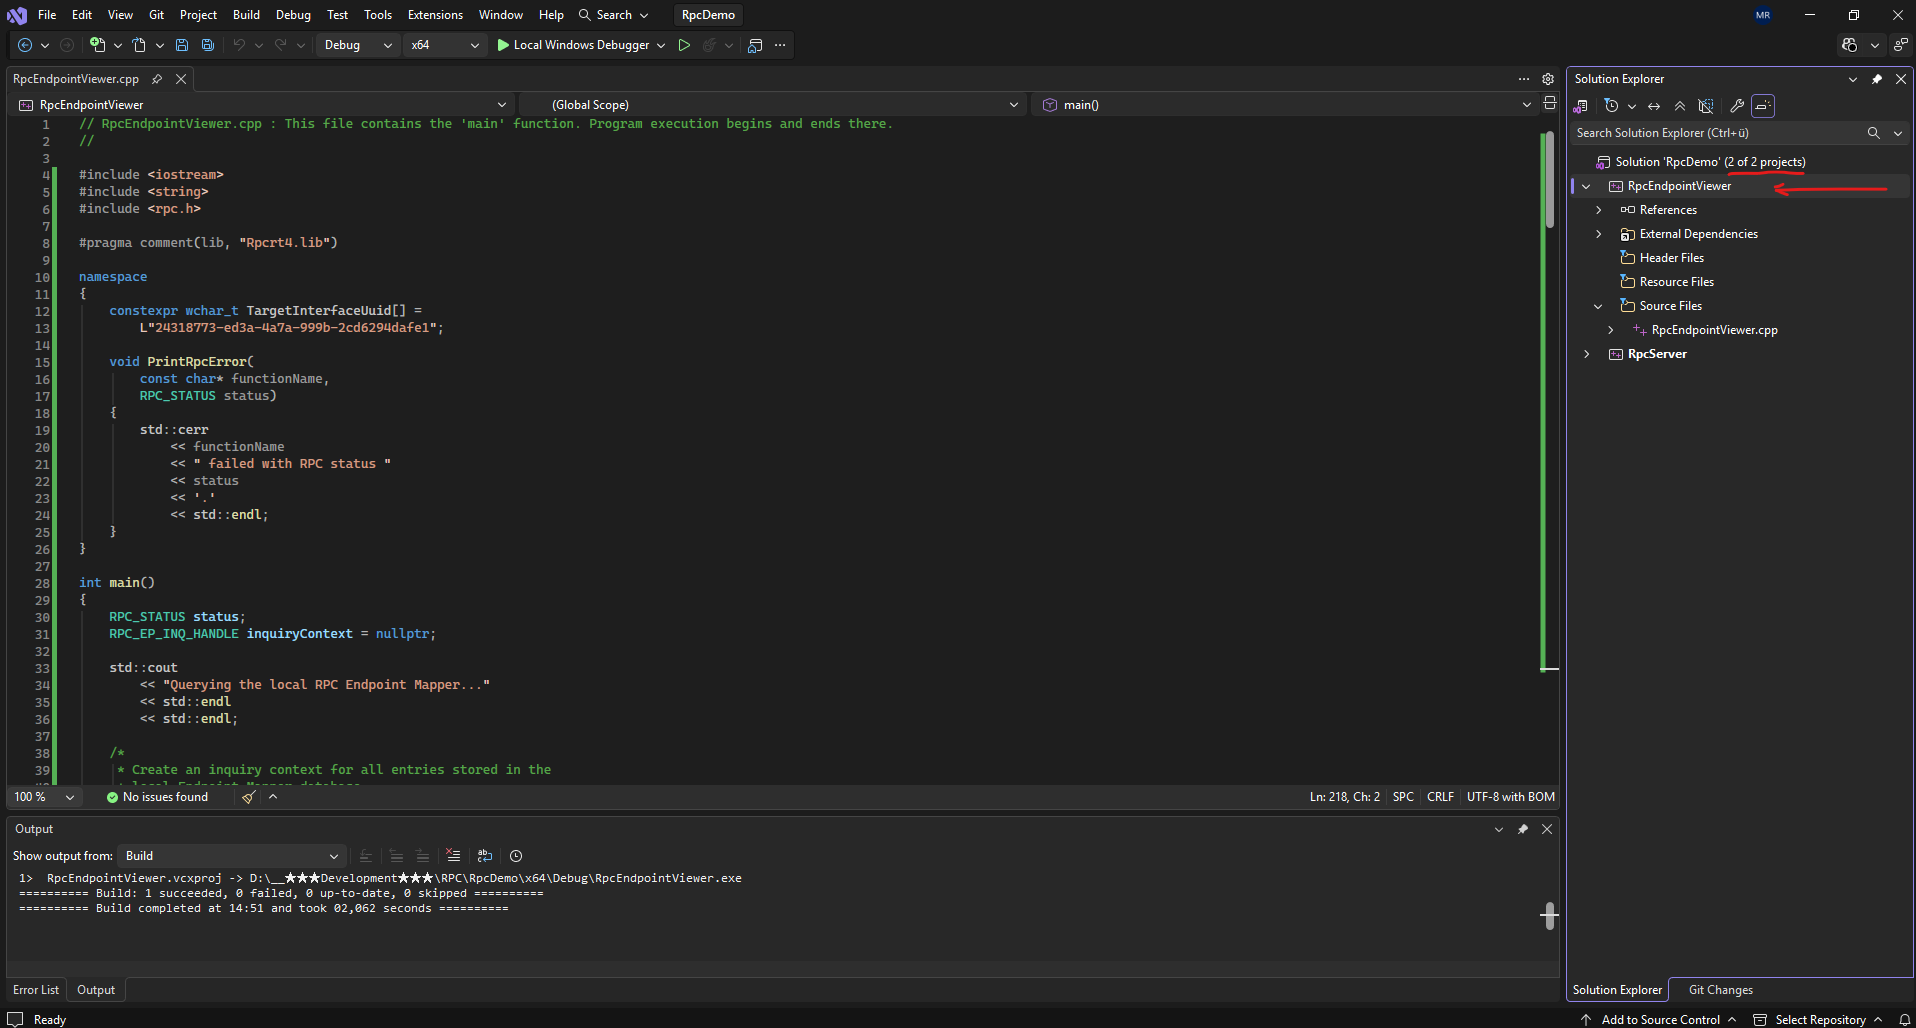
RpcMgmtEpEltInqNextW returns one endpoint-map entry per invocation. The returned binding and annotation are allocated by the RPC runtime, so the application must release them with RpcBindingFree and RpcStringFree; the enumeration finishes when the function returns RPC_X_NO_MORE_ENTRIES.
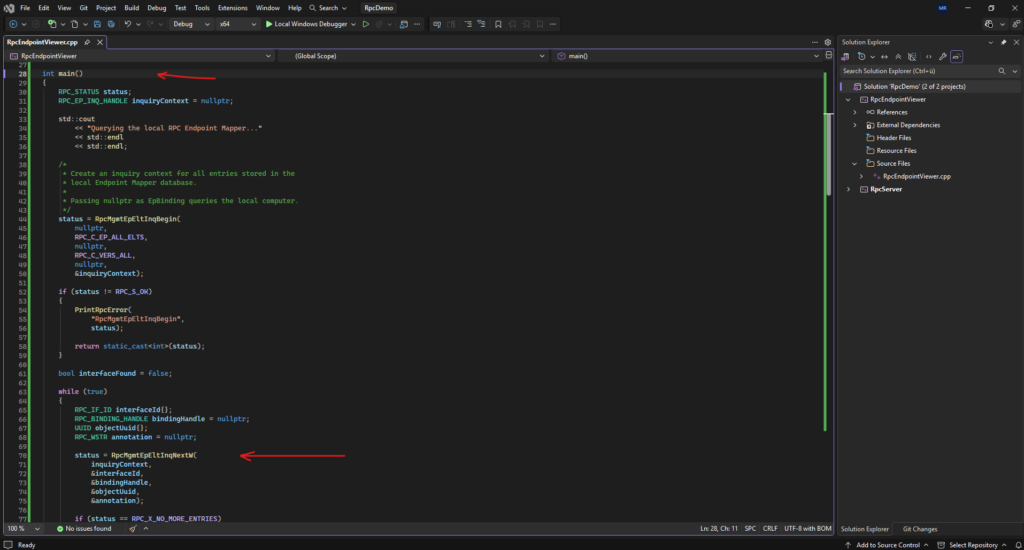
The solution should now contain two projects:
RpcDemo
├── RpcServer
└── RpcEndpointViewer
The RpcEndpointViewer is intentionally implemented as a separate application rather than being integrated into RpcServer. This demonstrates that any application can use the Windows RPC Management API to inspect the local Endpoint Mapper independently of the RPC server itself, making it a useful diagnostic and troubleshooting tool.
Running the Viewer
First we start the RpcServer.exe.
Right click on RpcServer → Debug → Start Without Debugging.

Then right-click on RpcEndpointViewer.
Debug → Start Without Debugging.
The exact binding may additionally contain the notebook hostname or one of its IP addresses. The important information is the
ncacn_ip_tcpprotocol sequence and the dynamically assigned endpoint.
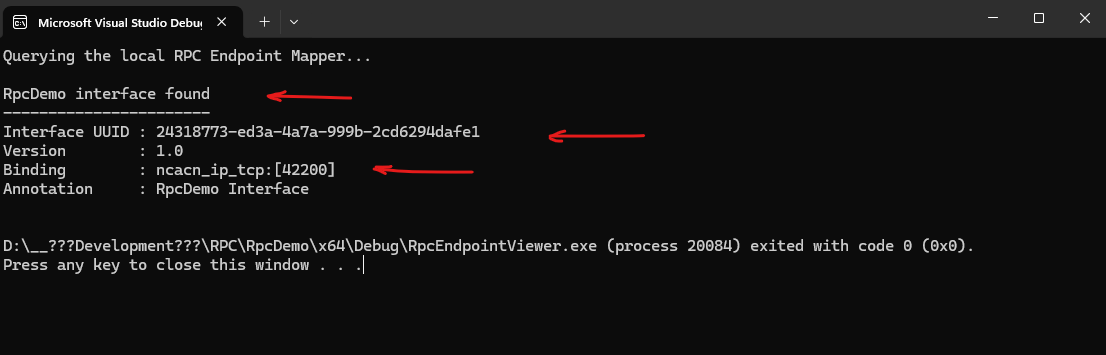
Now we already know that the Endpoint Mapper has assigned TCP Port 42200.
So when we later run the client, we should see exactly this sequence:
Client
      │
      │ TCP 135
      ▼
Endpoint Mapper
      │
      │ "Use port 42200"
      ▼
Client
      │
      │ TCP 42200
      ▼
RpcServer.exe
The custom RpcEndpointViewer revealed that the Windows RPC runtime assigned the dynamic TCP endpoint 42200 to our interface.
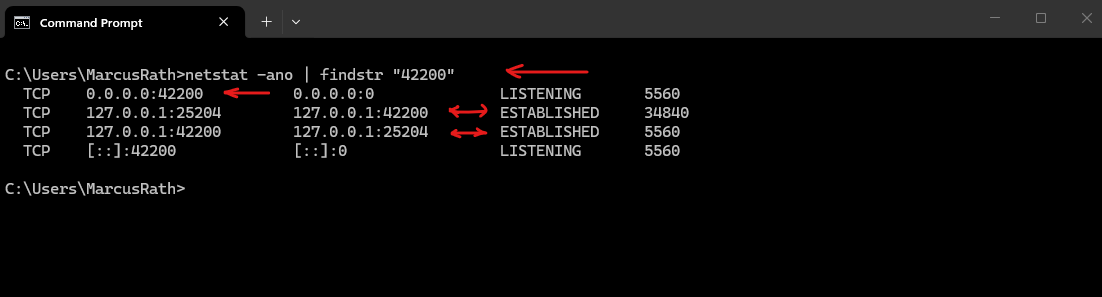
After establishing a TCP connection to the endpoint using telnet, netstat confirms that RpcServer.exe is listening on the dynamically assigned TCP port 42200.
The wildcard bindings
0.0.0.0and[::]indicate that the RPC endpoint is listening on all available IPv4 and IPv6 network interfaces, while theESTABLISHEDentries verify the successful Telnet connection to the endpoint.
> telnet 127.0.0.1 42200

> netstat -ano | findstr "42200"
Building the RPC Client
With the server running and its dynamically assigned endpoint successfully registered and verified, we can now implement the client side of the application.
The client will use the MIDL-generated client stub to contact the Endpoint Mapper, resolve the RpcDemo interface, establish a connection to the server’s dynamic TCP endpoint, and invoke the remote AddNumbers() and Shutdown() procedures as if they were ordinary local functions.
Creating the RPC Client Project
To keep the client and server components clearly separated, we will create another native C++ console application within the existing RpcDemo solution.
This project will contain the client-specific application logic together with the MIDL-generated client stub required to invoke the remote procedures exposed by RpcServer.
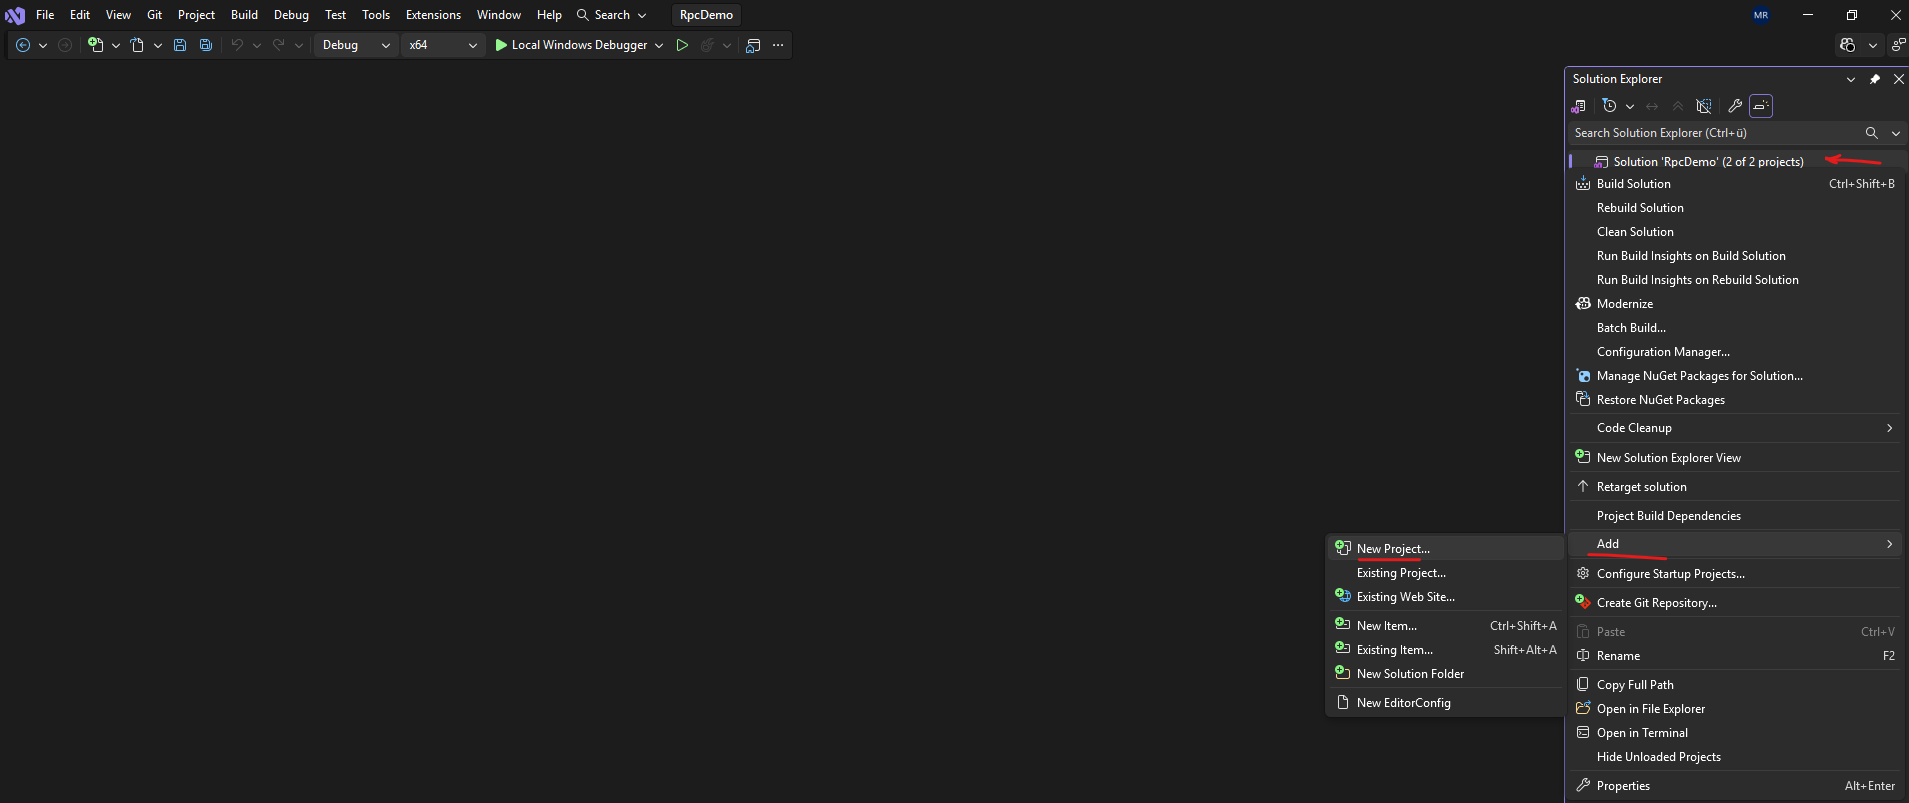
Right-click the RpcDemo solution.
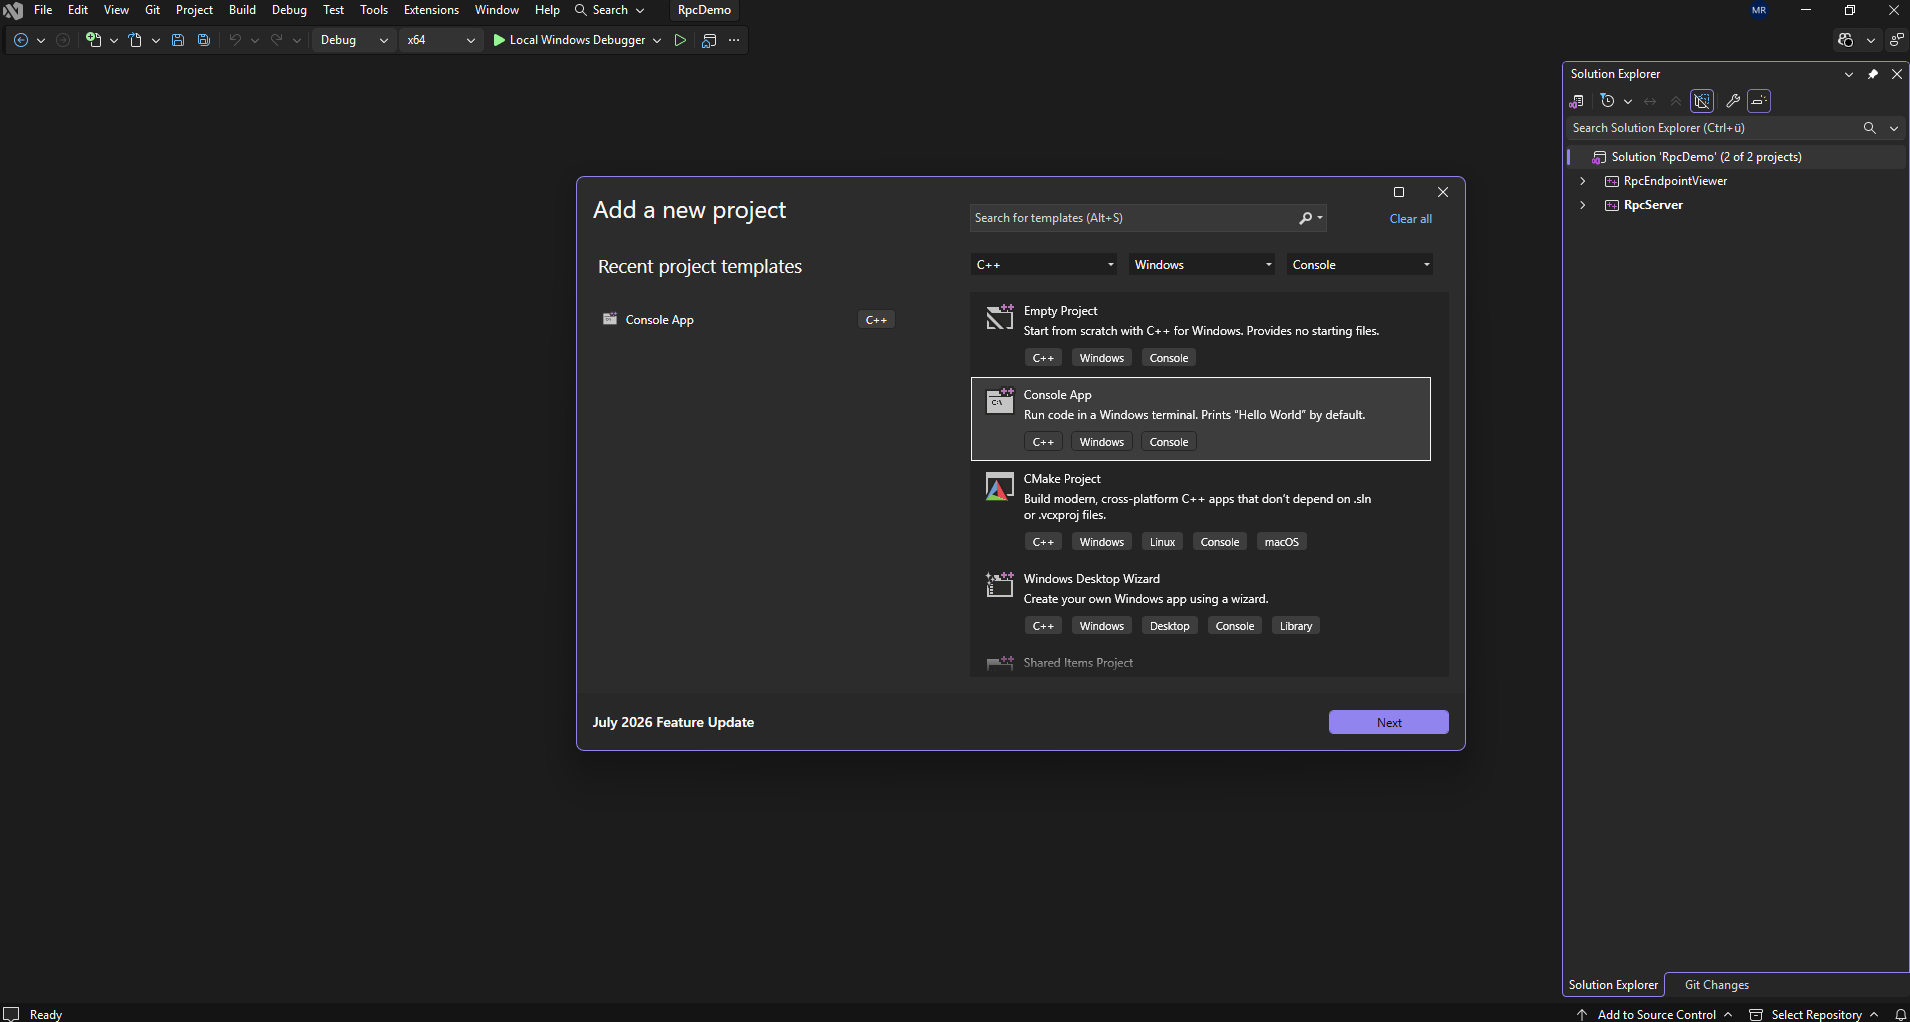
Select Add → New Project and choose Console App (C++).
Name the project RpcClient.
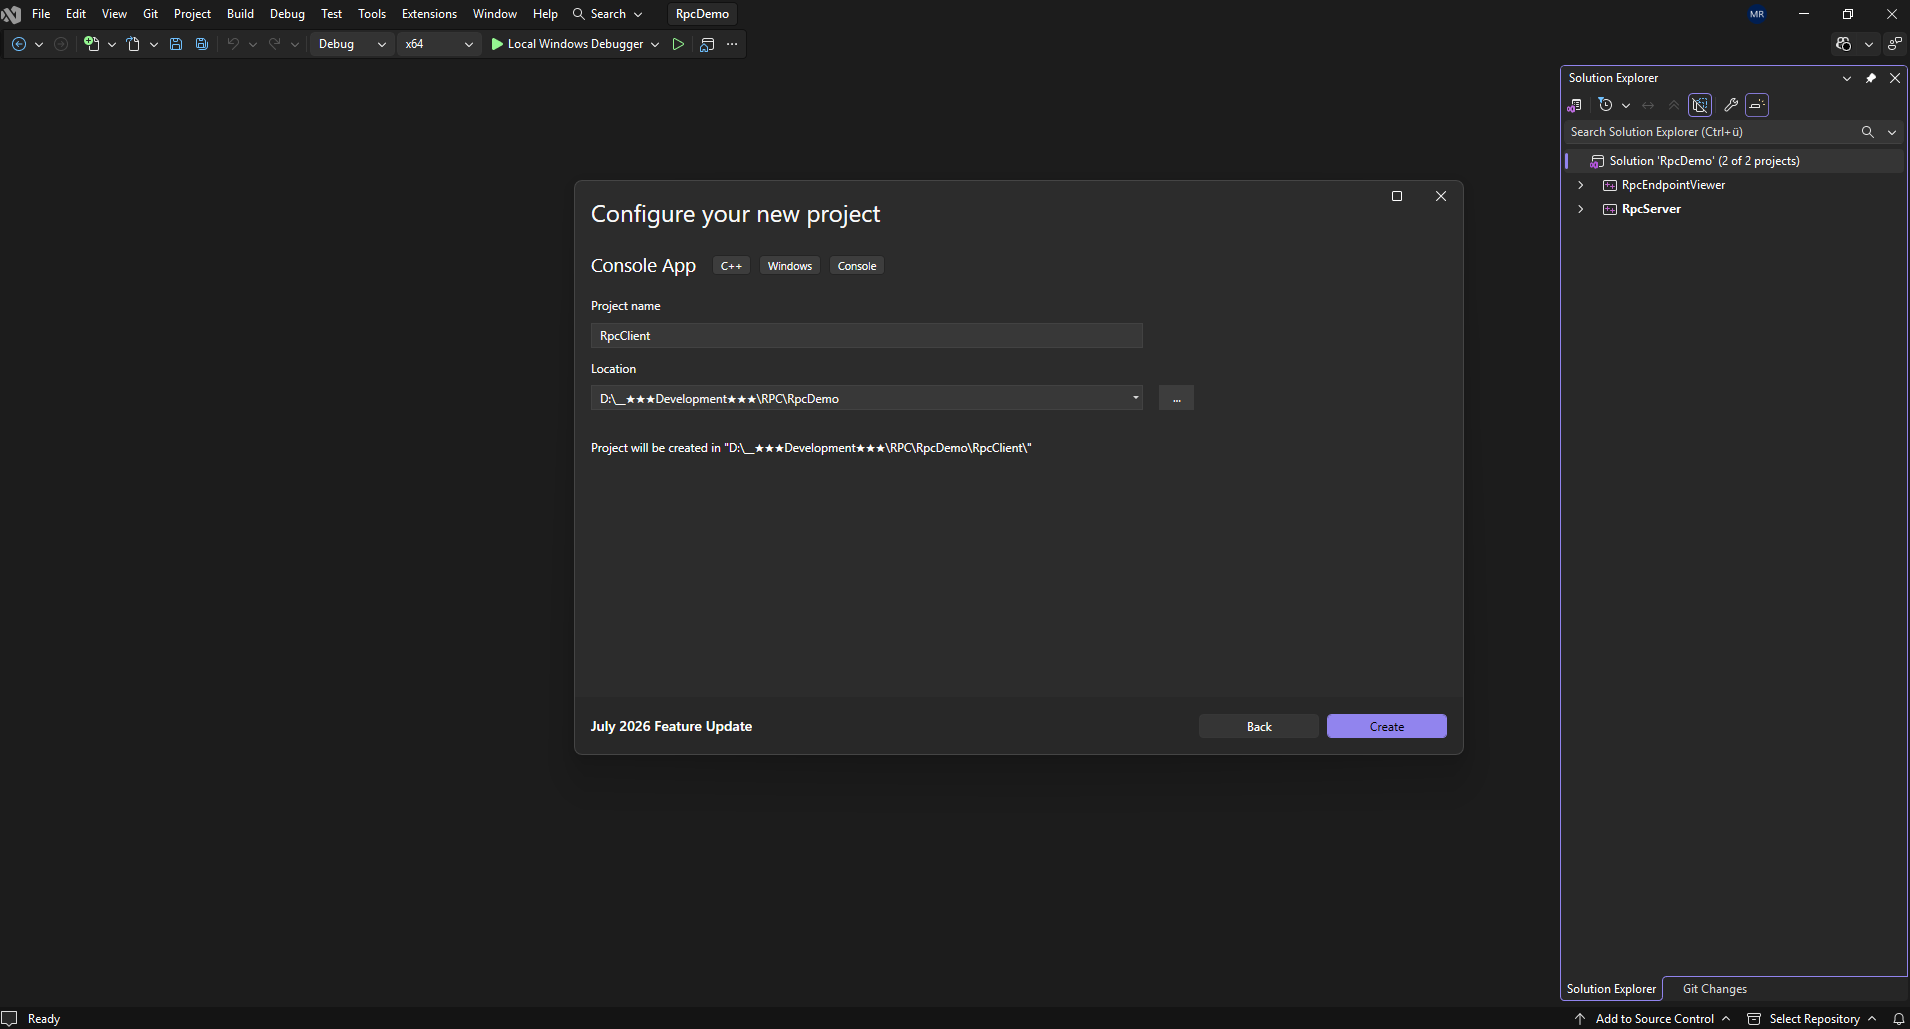
The solution should then contain:
RpcDemo
├── RpcServer
├── RpcEndpointViewer
└── RpcClient
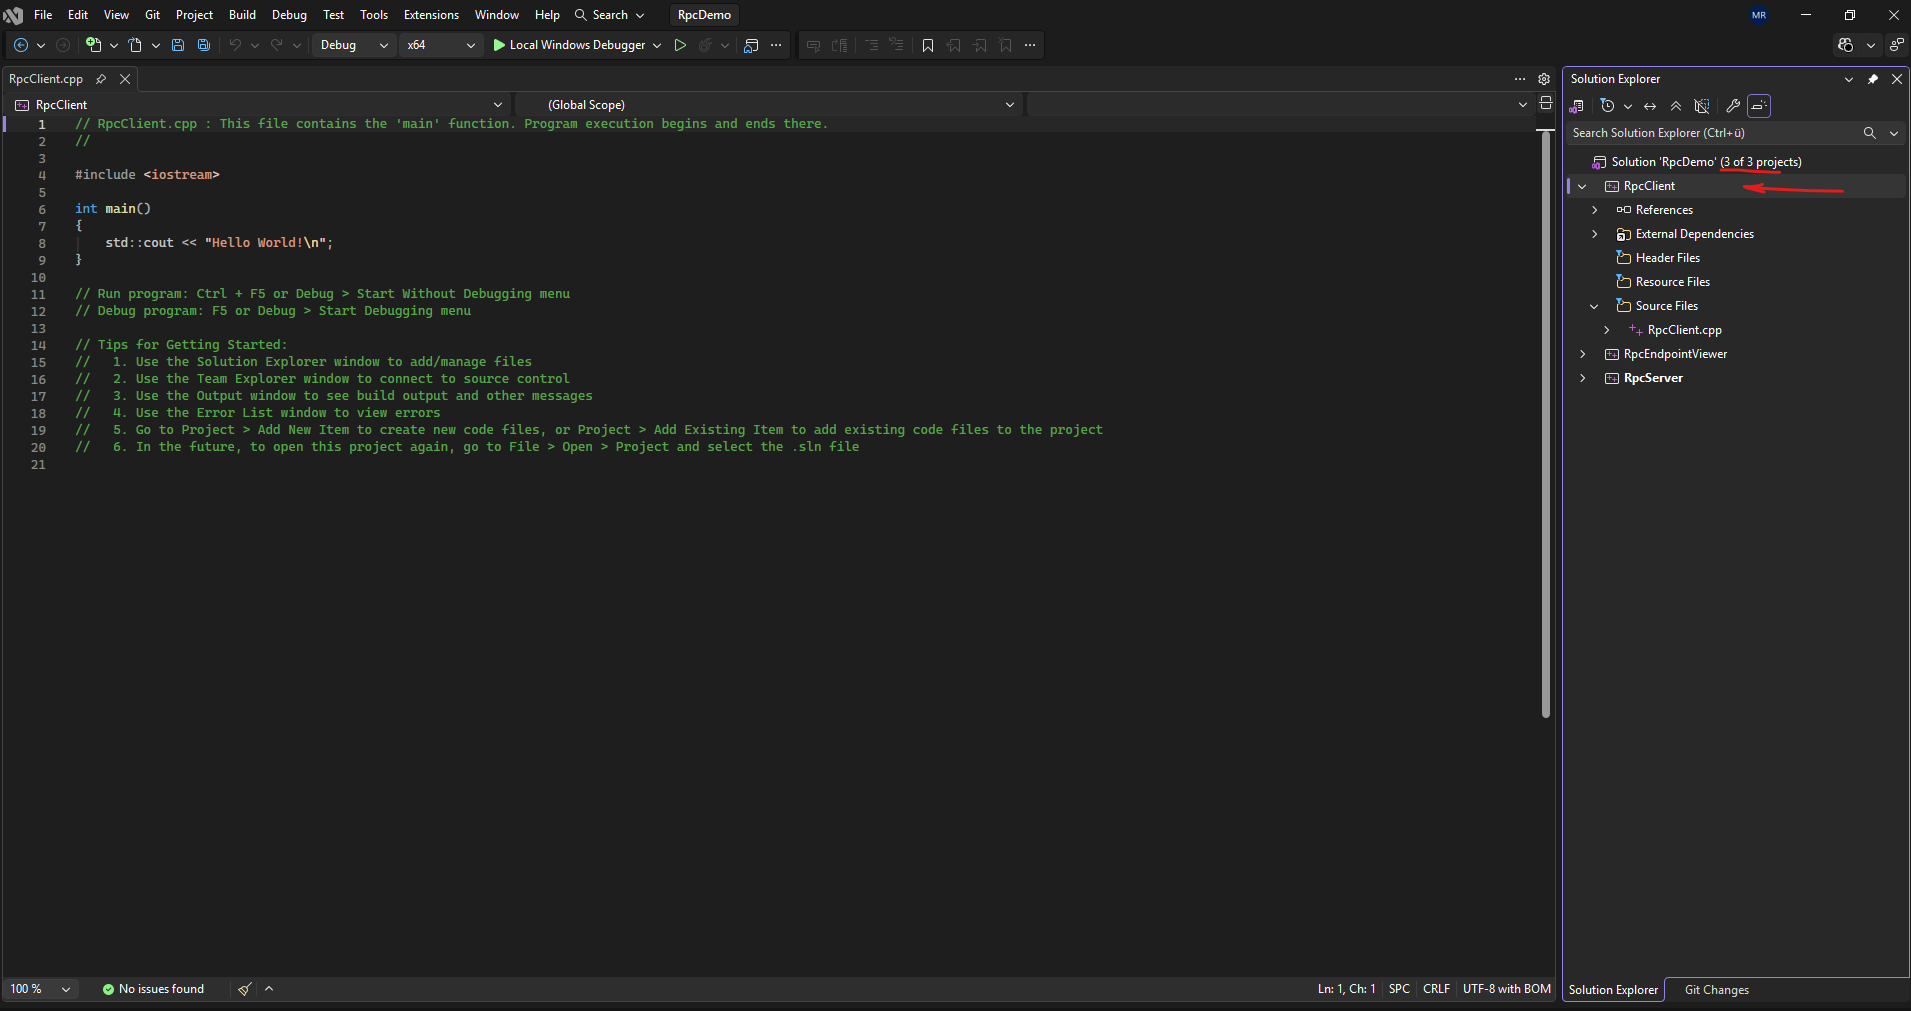
Adding the Generated Client Stub
The client does not communicate with the RPC server directly through sockets. Instead, it calls the functions exposed by the MIDL-generated client stub, which marshals the parameters, sends the RPC request through the Windows RPC runtime, receives the response, and returns the result to the application.
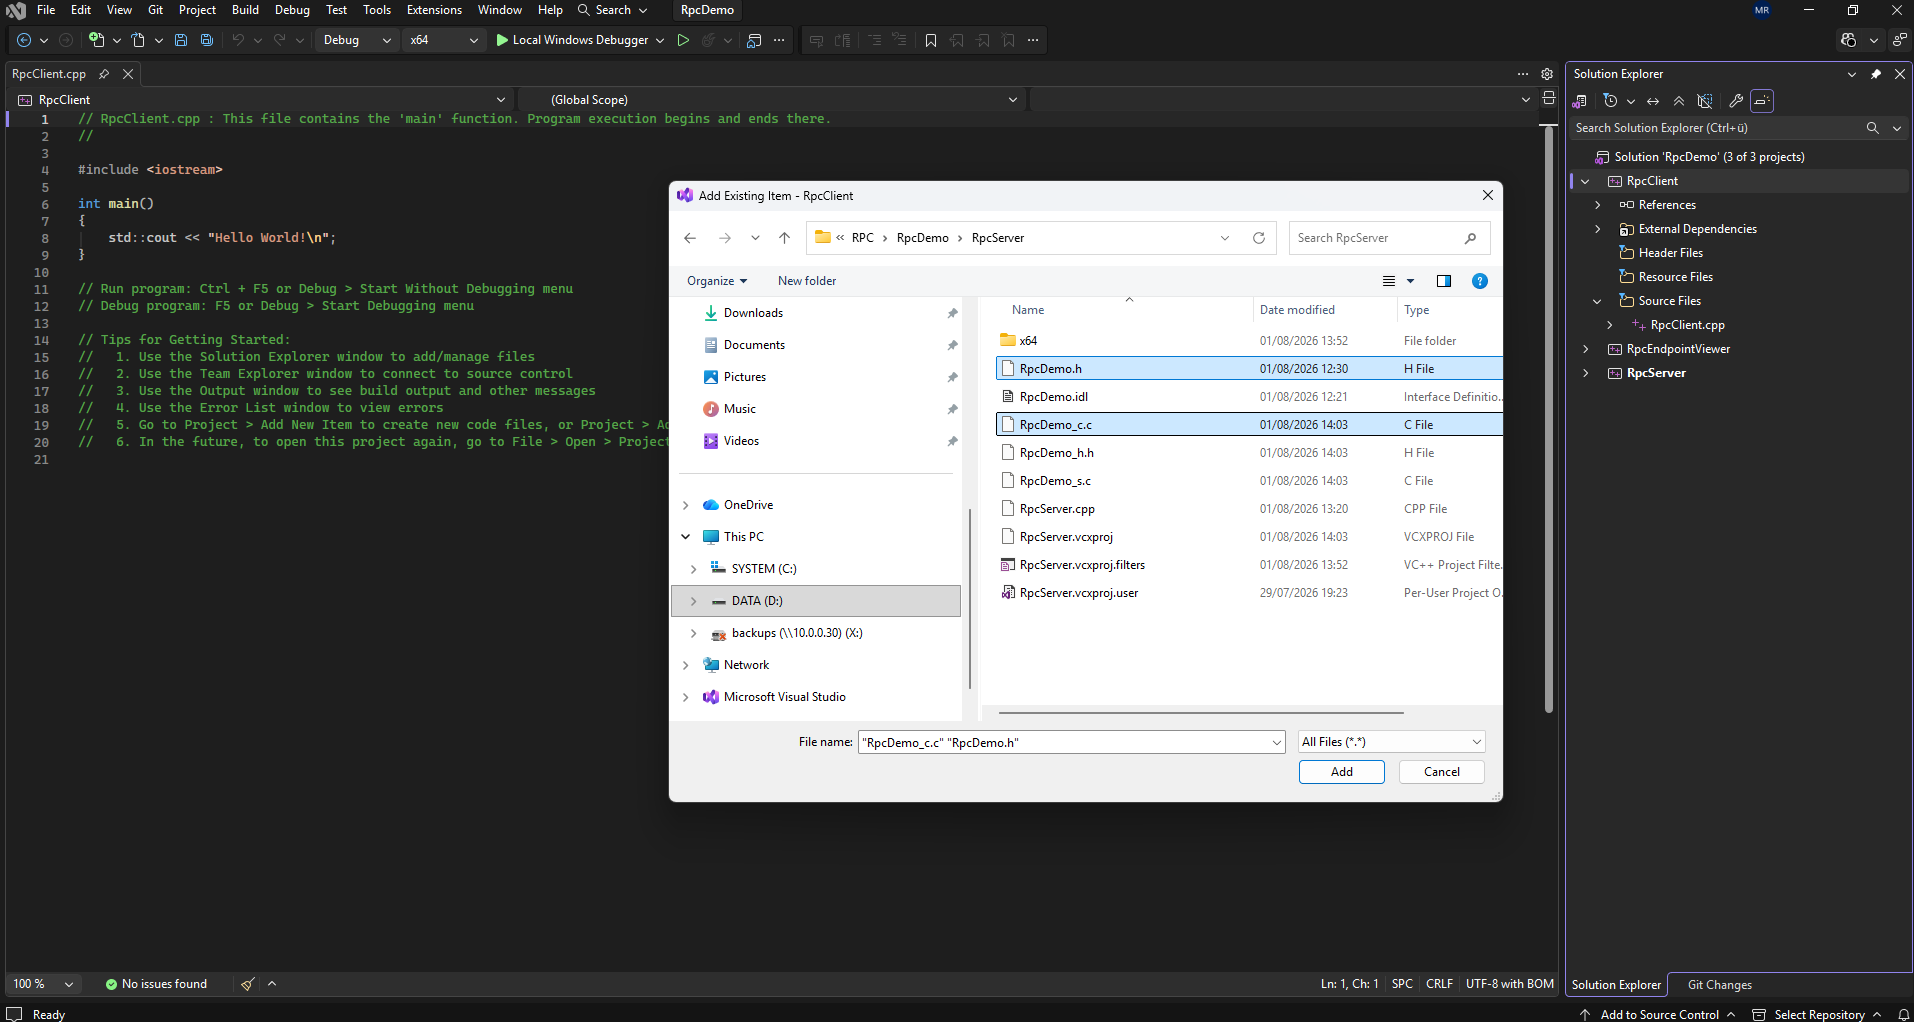
Right-click the RpcClient project and select Add → Existing Item…
Add the following files generated earlier from RpcDemo.idl and stored inthe RpcServer folder.
Because the MIDL-generated files already exist in the
RpcServerproject, add the existingRpcDemo.handRpcDemo_c.cfiles to theRpcClientproject. Both projects will therefore reference the same generated files, ensuring that the client and server always use the identical RPC interface definition.
RpcDemo.h
RpcDemo_c.c
Creating the RPC Binding
Now that the generated client stub is part of the project, the client needs a binding handle that identifies how to reach the RPC server. We will create a partially bound TCP/IP binding containing the protocol sequence and the server address, while leaving the endpoint unspecified so that the Windows RPC runtime resolves the dynamically assigned port through the Endpoint Mapper.
Replace the default contents of RpcClient.cpp with:
#include <iostream>
#include <cstdlib>
#include <rpc.h>

#include "RpcDemo.h"

#pragma comment(lib, "Rpcrt4.lib")

// Global handle referenced by implicit_handle in RpcDemo.idl.
handle_t RpcDemoBindingHandle = nullptr;

// Memory-management callbacks required by the MIDL-generated stub.
void* __RPC_USER midl_user_allocate(size_t size)
{
    return std::malloc(size);
}

void __RPC_USER midl_user_free(void* pointer)
{
    std::free(pointer);
}

void PrintRpcException(RPC_STATUS exceptionCode)
{
    std::cerr
        << "RPC call failed with exception: "
        << exceptionCode;

    switch (exceptionCode)
    {
    case RPC_S_ACCESS_DENIED:
        std::cerr << " (RPC_S_ACCESS_DENIED)";
        break;

    case RPC_S_SERVER_UNAVAILABLE:
        std::cerr << " (RPC_S_SERVER_UNAVAILABLE)";
        break;

    case RPC_S_UNKNOWN_IF:
        std::cerr << " (RPC_S_UNKNOWN_IF)";
        break;

    case RPC_S_CALL_FAILED:
        std::cerr << " (RPC_S_CALL_FAILED)";
        break;

    case RPC_S_CALL_FAILED_DNE:
        std::cerr << " (RPC_S_CALL_FAILED_DNE)";
        break;

    case RPC_S_PROTOCOL_ERROR:
        std::cerr << " (RPC_S_PROTOCOL_ERROR)";
        break;

    default:
        std::cerr << " (unhandled RPC status)";
        break;
    }

    std::cerr << std::endl;
}

int wmain(int argc, wchar_t* argv[])
{
    RPC_STATUS status;
    RPC_WSTR stringBinding = nullptr;
    int exitCode = 0;

    /*
     * The target server must be supplied dynamically.
     *
     * Examples:
     *   RpcClient.exe localhost
     *   RpcClient.exe 10.0.0.170
     *   RpcClient.exe rpcserver.example.local
     */
    if (argc != 2)
    {
        std::wcerr
            << L"Usage: RpcClient.exe <server-name-or-ip>"
            << std::endl
            << L"Example: RpcClient.exe localhost"
            << std::endl;

        return 1;
    }

    const wchar_t* serverAddress = argv[1];

    std::wcout
        << L"Connecting to RPC server "
        << serverAddress
        << L"..."
        << std::endl;

    /*
     * Create a partially bound string binding.
     *
     * No endpoint is provided. The RPC runtime resolves the
     * dynamic TCP endpoint through the Endpoint Mapper when
     * the first remote call is made.
     */
    status = RpcStringBindingComposeW(
        nullptr,
        reinterpret_cast<RPC_WSTR>(
            const_cast<wchar_t*>(L"ncacn_ip_tcp")),
        reinterpret_cast<RPC_WSTR>(
            const_cast<wchar_t*>(serverAddress)),
        nullptr,
        nullptr,
        &stringBinding);

    if (status != RPC_S_OK)
    {
        std::cerr
            << "RpcStringBindingComposeW failed with RPC status "
            << status
            << '.'
            << std::endl;

        return static_cast<int>(status);
    }

    // Convert the textual binding into an RPC binding handle.
    status = RpcBindingFromStringBindingW(
        stringBinding,
        &RpcDemoBindingHandle);

    if (status != RPC_S_OK)
    {
        std::cerr
            << "RpcBindingFromStringBindingW failed with RPC status "
            << status
            << '.'
            << std::endl;

        RpcStringFreeW(&stringBinding);

        return static_cast<int>(status);
    }

    std::wcout
        << L"RPC binding created: "
        << reinterpret_cast<wchar_t*>(stringBinding)
        << std::endl;

    /*
     * Configure authentication for the binding.
     *
     * RPC_C_AUTHN_GSS_NEGOTIATE negotiates Kerberos or NTLM.
     * RPC_C_AUTHN_LEVEL_PKT_PRIVACY authenticates and encrypts
     * each RPC call.
     */
    status = RpcBindingSetAuthInfoW(
        RpcDemoBindingHandle,
        nullptr,
        RPC_C_AUTHN_LEVEL_PKT_PRIVACY,
        RPC_C_AUTHN_GSS_NEGOTIATE,
        nullptr,
        RPC_C_AUTHZ_NONE);

    if (status != RPC_S_OK)
    {
        std::cerr
            << "RpcBindingSetAuthInfoW failed with RPC status "
            << status
            << '.'
            << std::endl;

        RpcBindingFree(&RpcDemoBindingHandle);
        RpcStringFreeW(&stringBinding);

        return static_cast<int>(status);
    }

    std::cout
        << "RPC authentication configured successfully."
        << std::endl;

    /*
     * Invoke the remote procedures.
     *
     * The MIDL-generated client stub uses RpcDemoBindingHandle
     * automatically because implicit_handle was declared in
     * RpcDemo.idl.
     */
    RpcTryExcept
    {
        const long result = AddNumbers(5, 7);

        std::cout
            << "AddNumbers(5, 7) returned: "
            << result
            << std::endl;

        std::cout
            << "Requesting remote server shutdown..."
            << std::endl;

        Shutdown();

        std::cout
            << "Remote shutdown request completed."
            << std::endl;
    }
    RpcExcept(1)
    {
        const RPC_STATUS exceptionCode =
            RpcExceptionCode();

        PrintRpcException(exceptionCode);
        exitCode = static_cast<int>(exceptionCode);
    }
    RpcEndExcept

    if (RpcDemoBindingHandle != nullptr)
    {
        status = RpcBindingFree(
            &RpcDemoBindingHandle);

        if (status != RPC_S_OK)
        {
            std::cerr
                << "RpcBindingFree failed with RPC status "
                << status
                << '.'
                << std::endl;

            if (exitCode == 0)
            {
                exitCode =
                    static_cast<int>(status);
            }
        }
    }

    if (stringBinding != nullptr)
    {
        status = RpcStringFreeW(
            &stringBinding);

        if (status != RPC_S_OK)
        {
            std::cerr
                << "RpcStringFreeW failed with RPC status "
                << status
                << '.'
                << std::endl;

            if (exitCode == 0)
            {
                exitCode =
                    static_cast<int>(status);
            }
        }
    }

    return exitCode;
}
RpcDemo.h is displayed inside RpcClient, but the physical file still resides here:
$(SolutionDir)RpcServer\RpcDemo.h
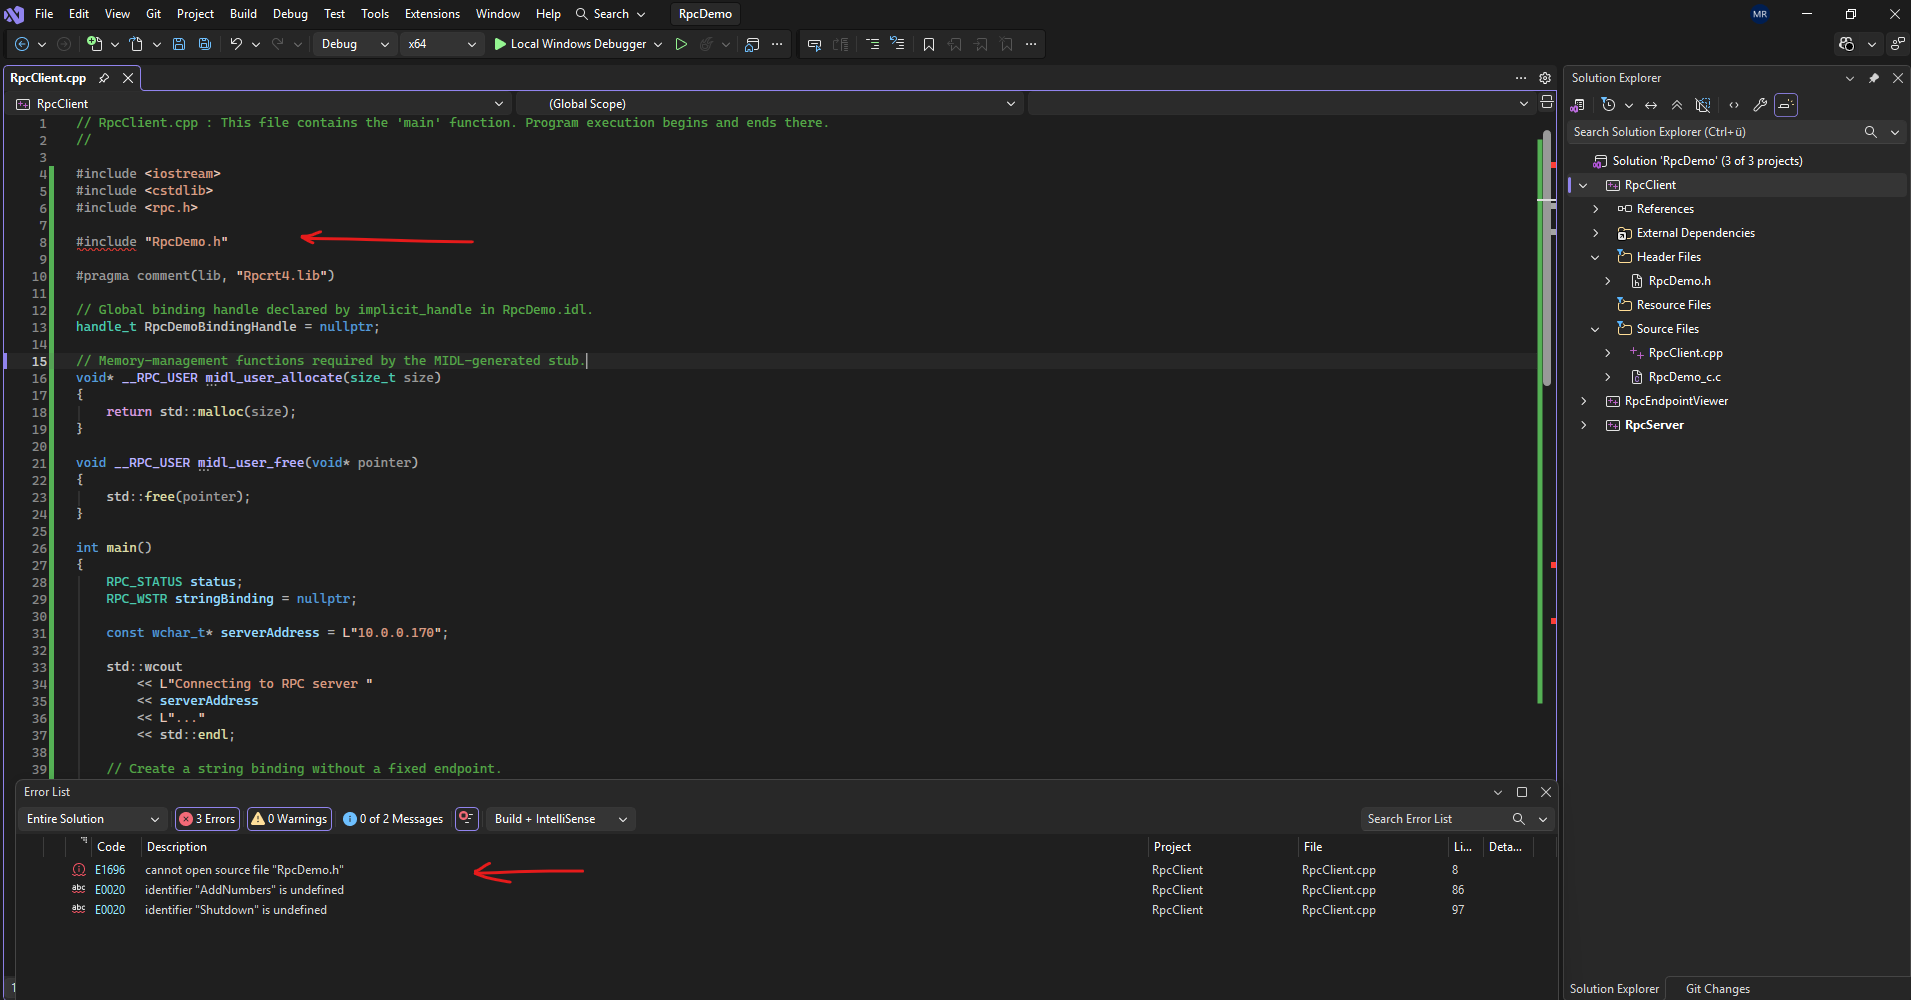
Visual Studio’s Header Files and Source Files nodes are only organizational filters. Adding a file there does not automatically add its physical directory to the compiler’s #include search path.
Source: https://learn.microsoft.com/en-us/cpp/build/reference/i-additional-include-directories?view=msvc-170
To fix htis right-click on RpcClient → Properties, then select:
→ Additional Include Directories
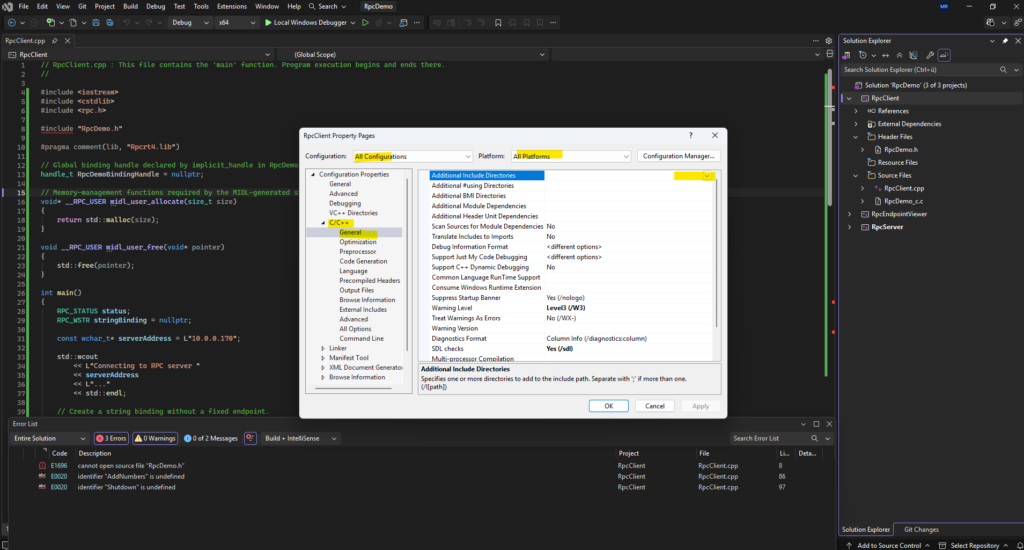
Click on New Line.
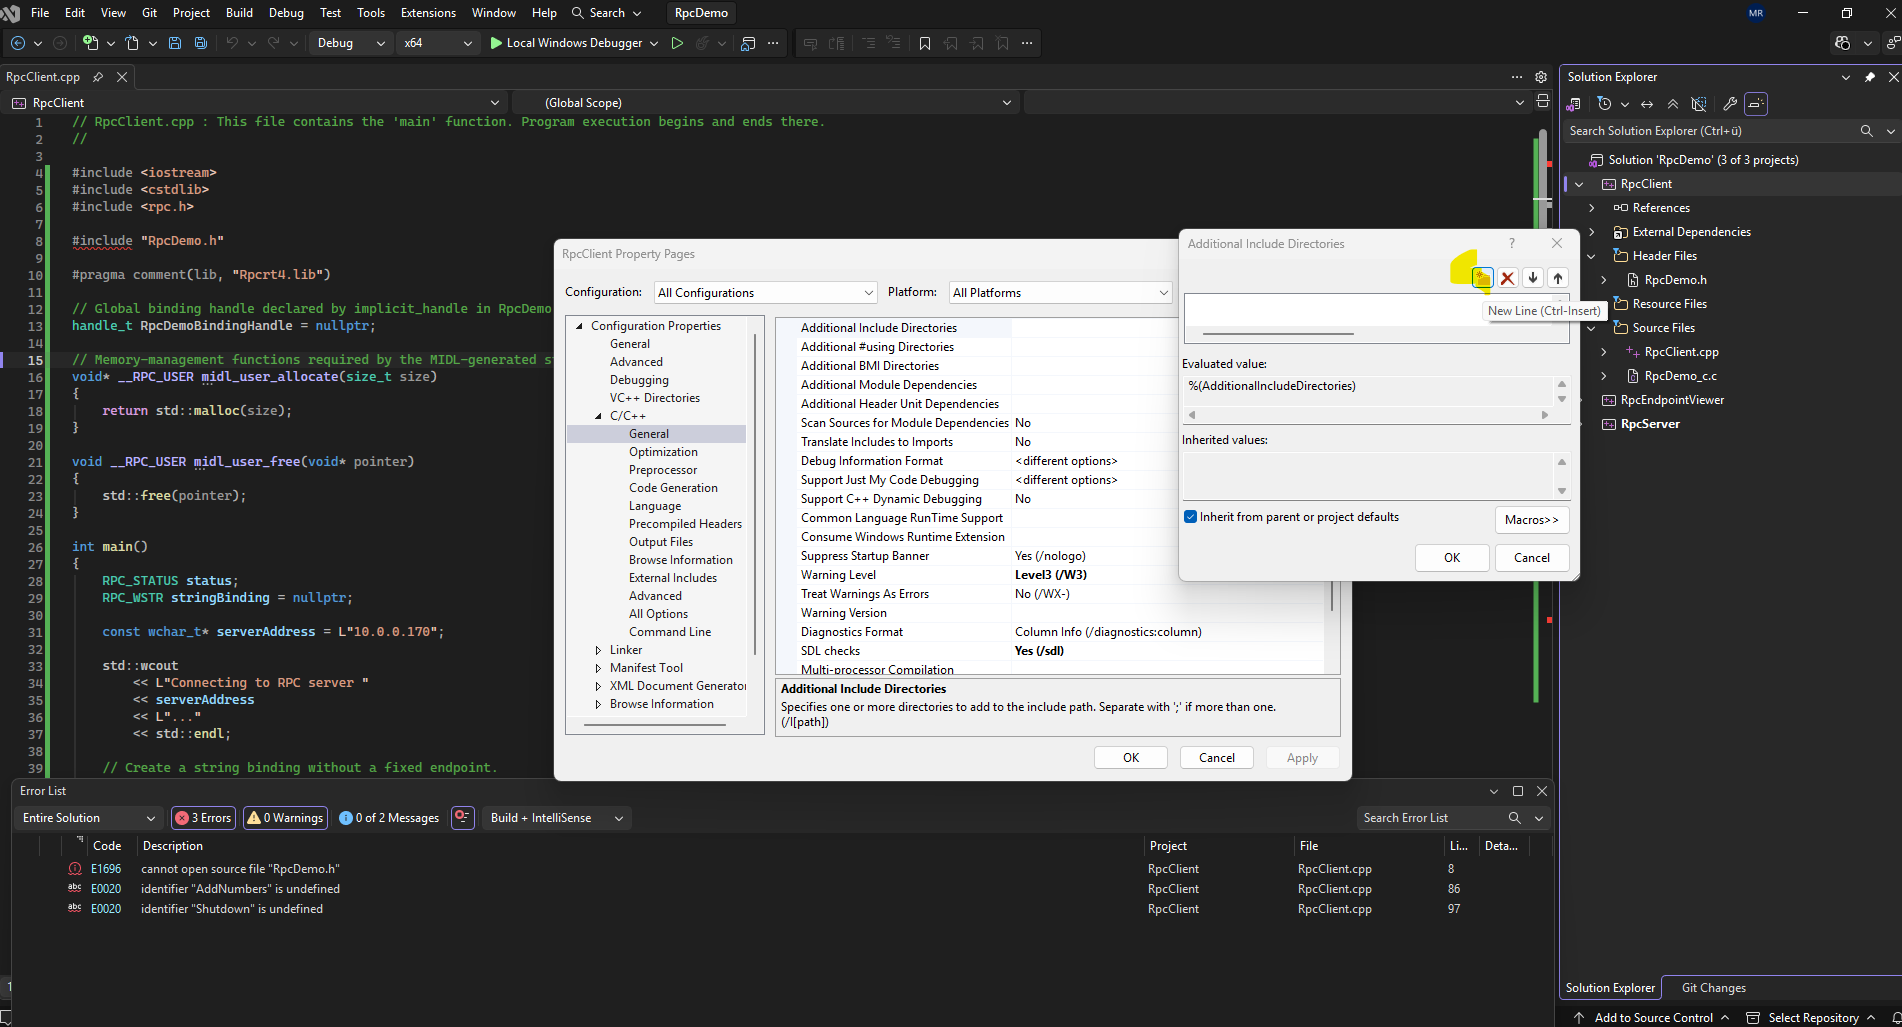
In the Additional Include Directories dialog, add a new entry:
$(SolutionDir)RpcServer
Leave Inherit from parent or project defaults enabled, then click OK, Apply.
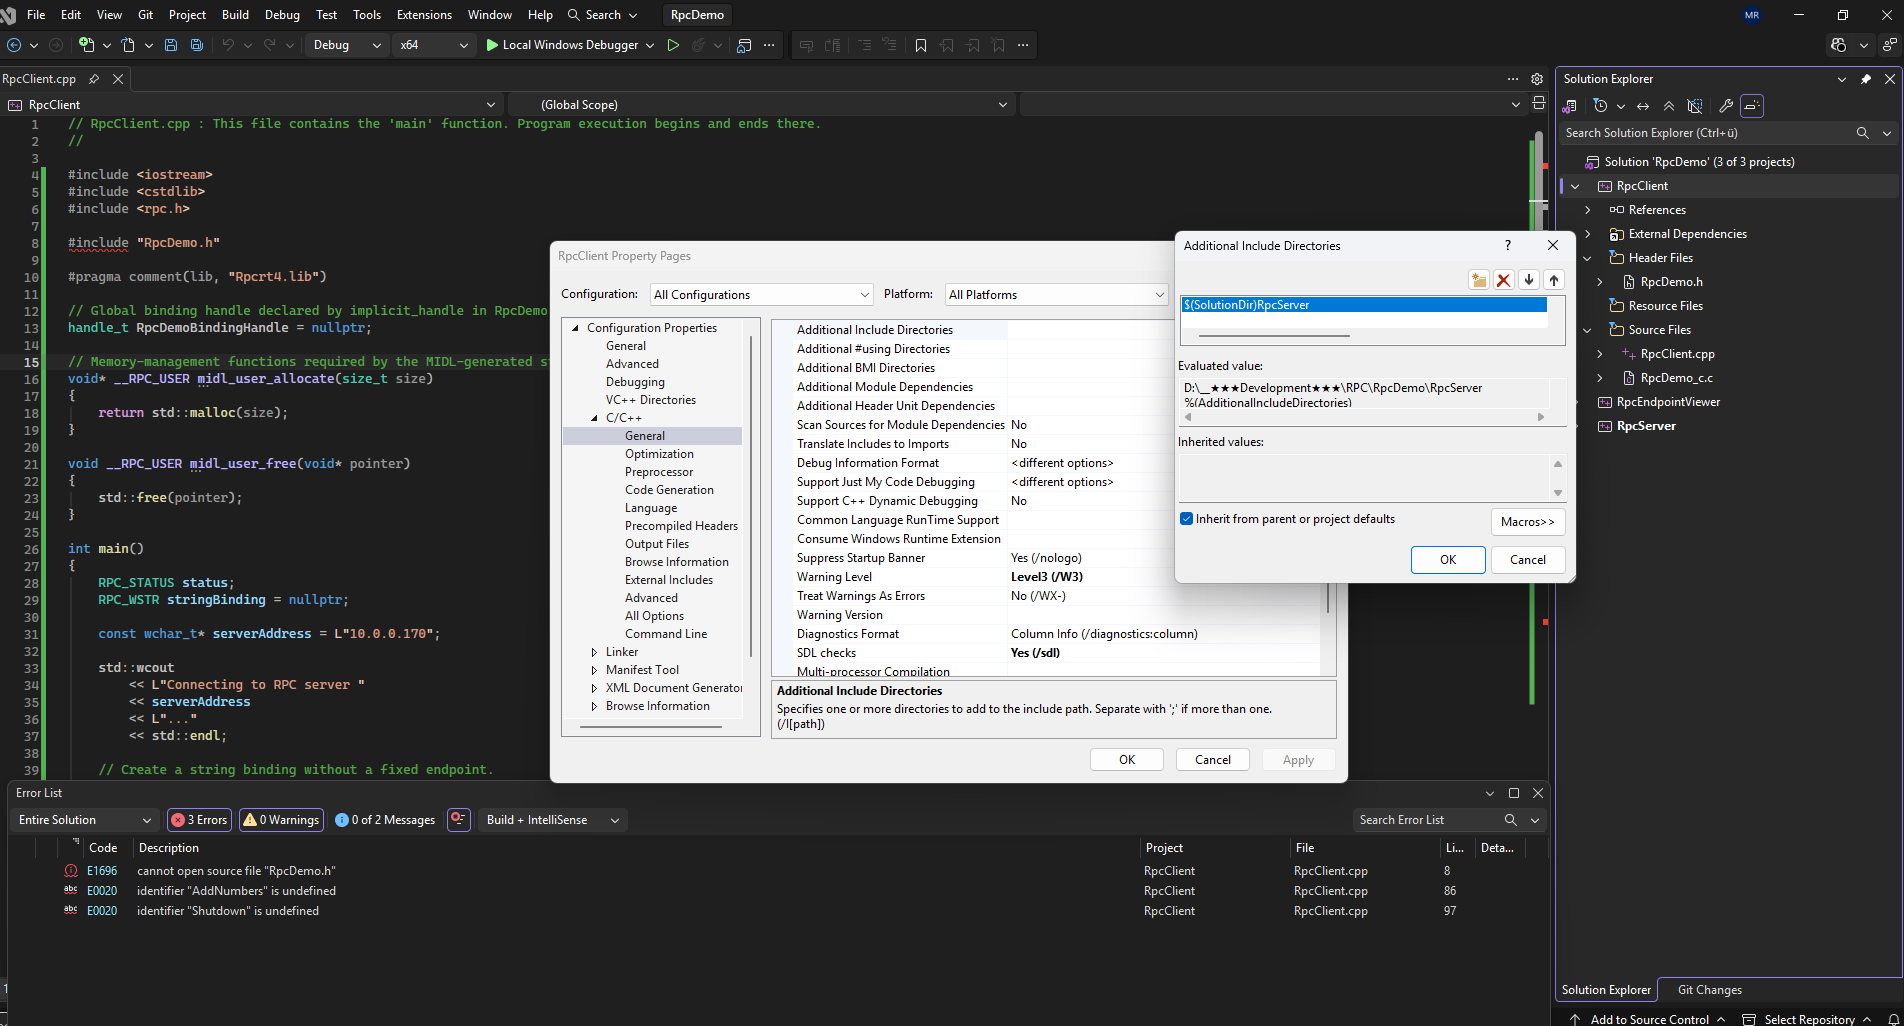
The resulting value should effectively be:
$(SolutionDir)RpcServer;%(AdditionalIncludeDirectories)
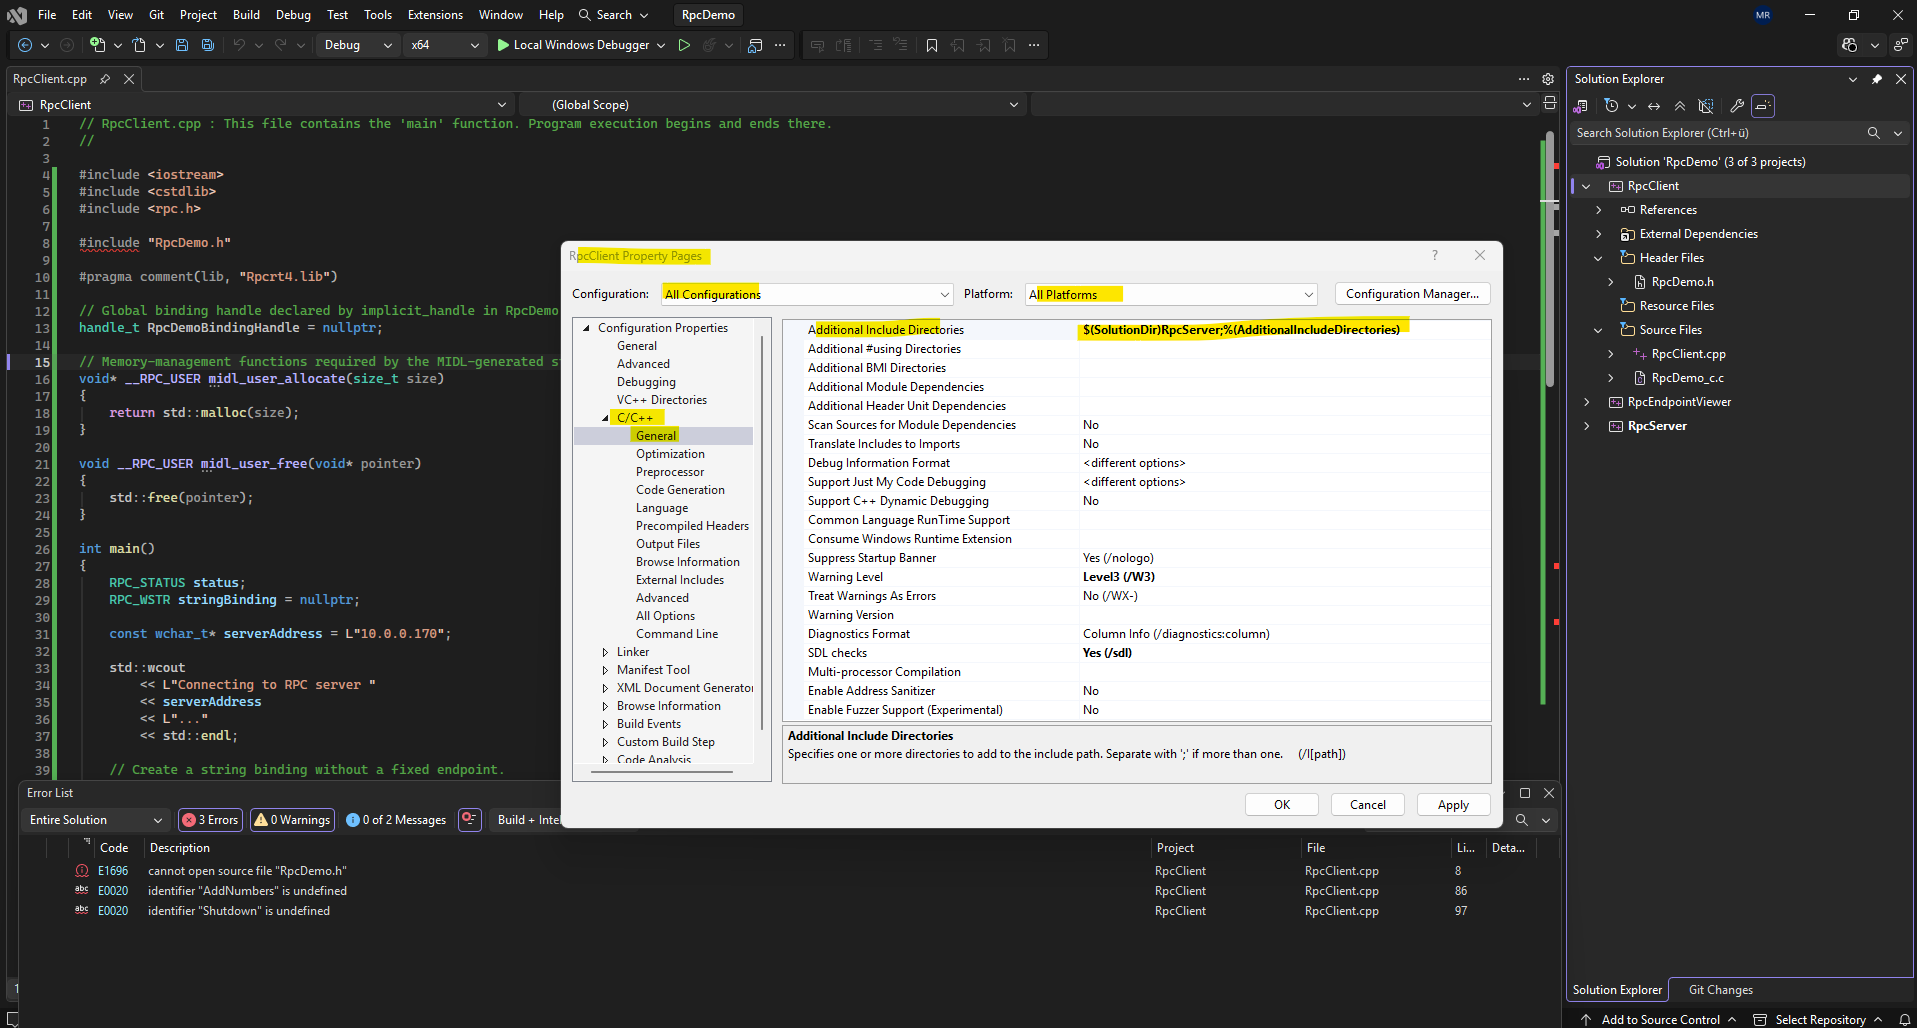
Now you only have the two warnings:
C28251 Inconsistent annotation for 'MIDL_user_allocate'
C28251 Inconsistent annotation for 'MIDL_user_free'
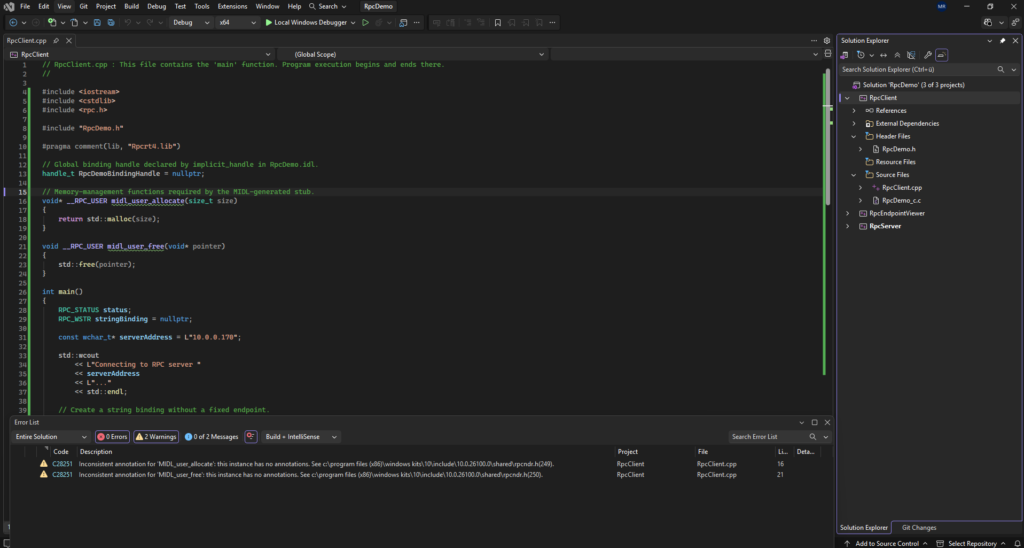
We already saw exactly the same warnings in the server project.
They are SAL (Source Annotation Language) warnings from IntelliSense because the Windows SDK decorates these functions with additional annotations. They are harmless and can safely be ignored for this demo.
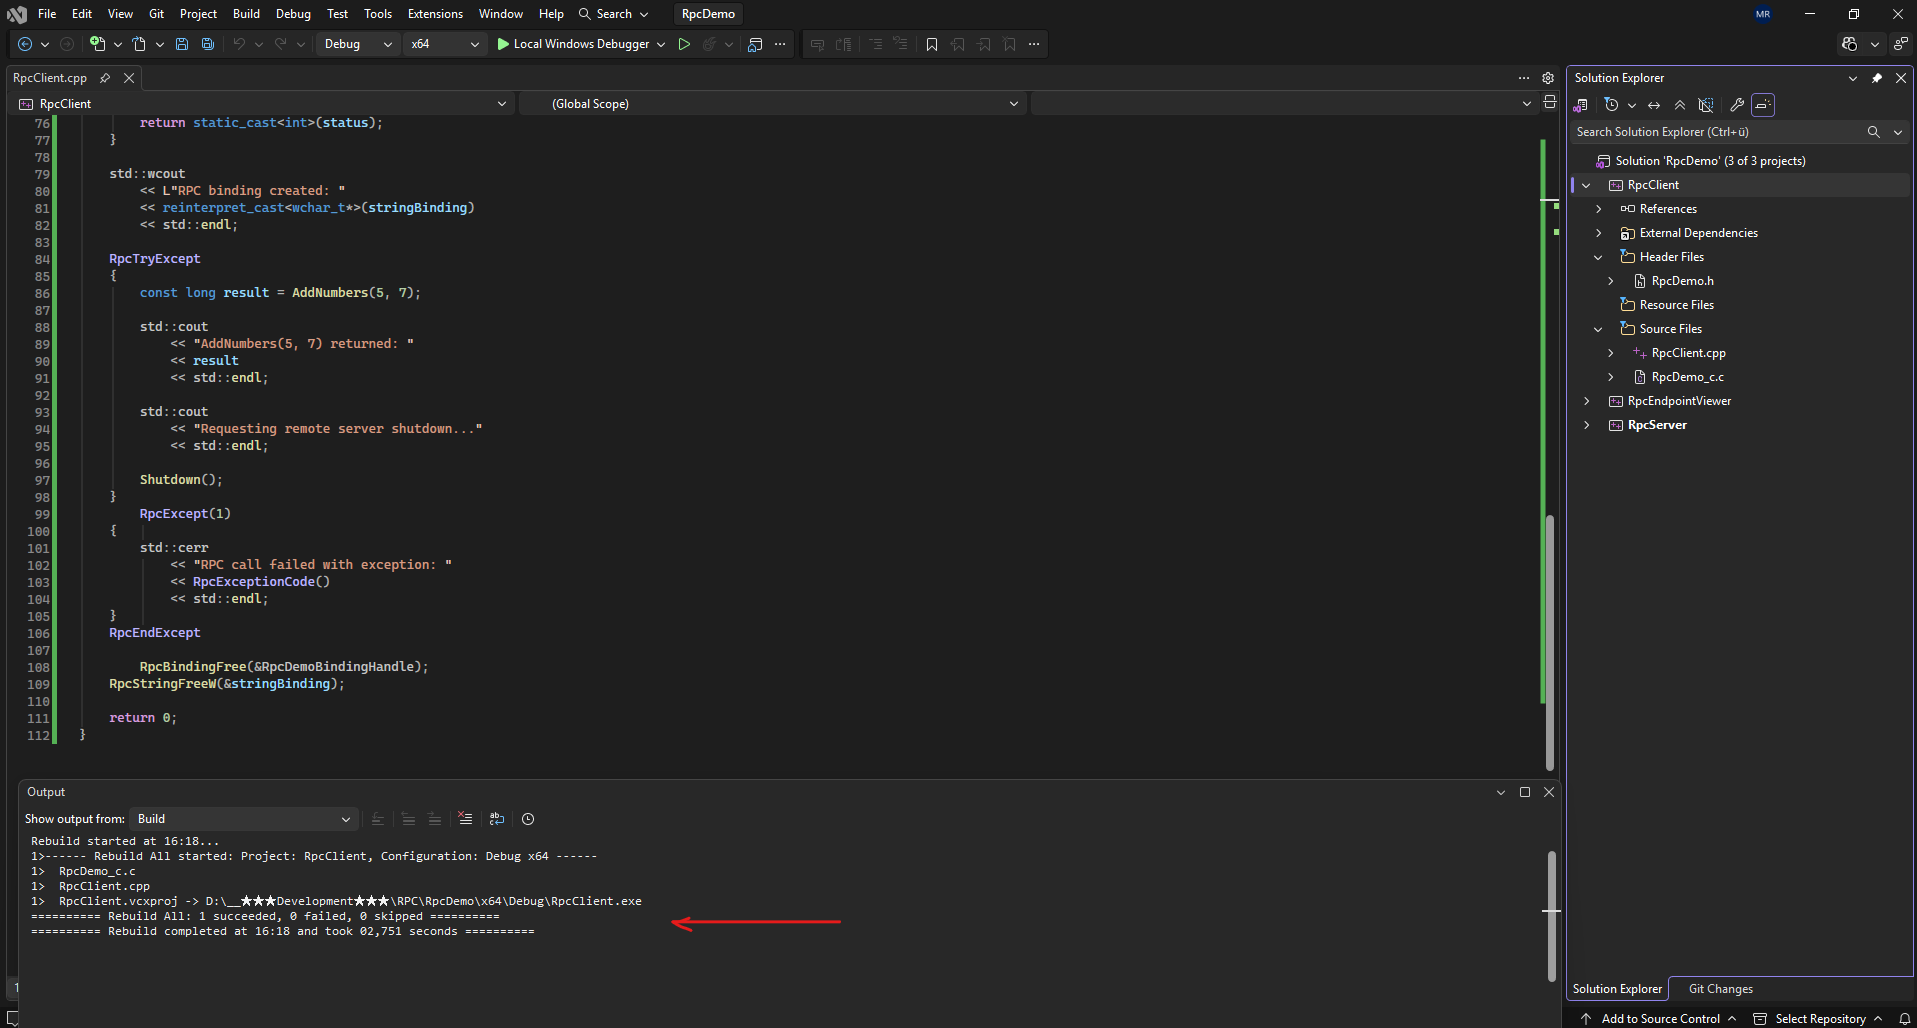
Finally build the RpcClient.
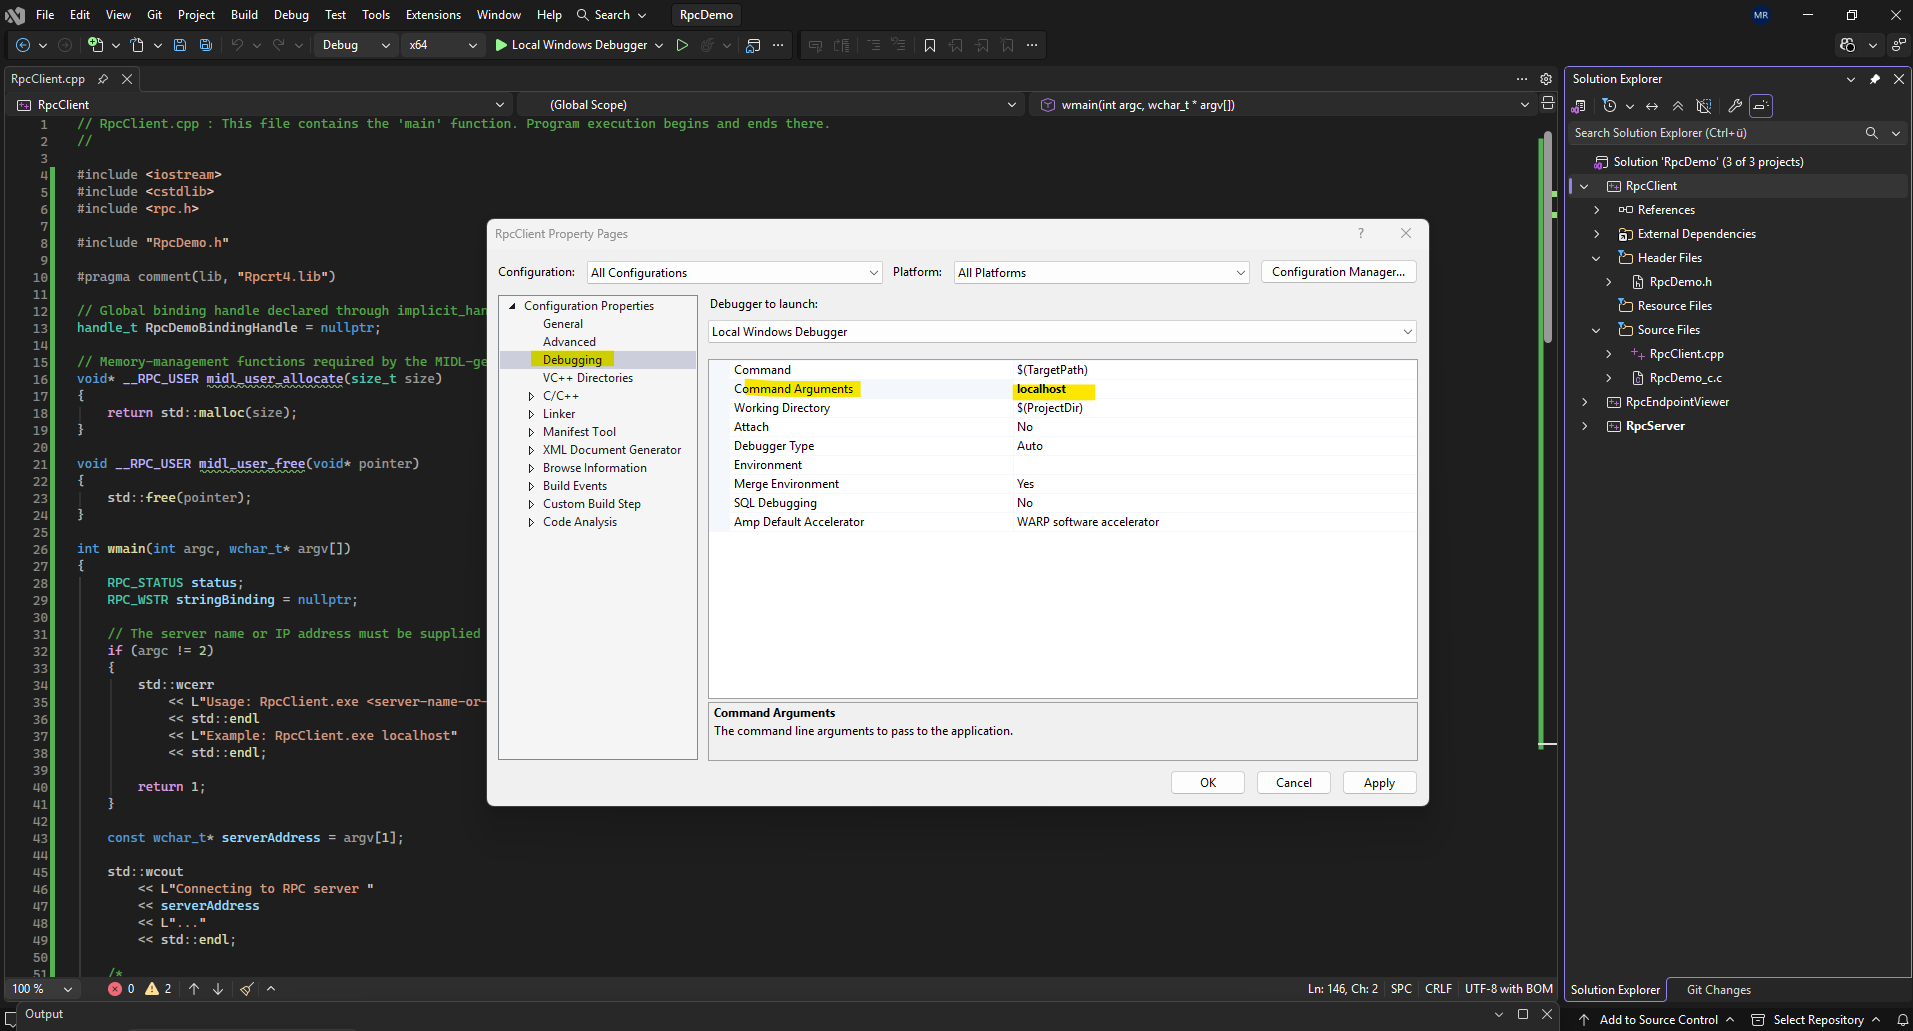
Because the RPC client accepts the target server as a command-line argument, we need to provide it when starting the application from Visual Studio.
For the local demonstration, configure Properties → Debugging → Command Arguments and specify localhost, allowing the client to connect to the RPC server running on the same machine.
Invoking the Remote Procedures
After creating the binding handle, the client enters the RpcTryExcept block and invokes the two procedures declared in RpcDemo.idl. Although AddNumbers(5, 7) and Shutdown() appear to be ordinary local C++ function calls, the MIDL-generated client stub transparently sends them to the remote RPC server for execution.
This RpcTryExcept block is already part of RpcClient.cpp
RpcTryExcept
{
    const long result = AddNumbers(5, 7);

    std::cout
        << "AddNumbers(5, 7) returned: "
        << result
        << std::endl;

    std::cout
        << "Requesting remote server shutdown..."
        << std::endl;

    Shutdown();
}
RpcExcept(1)
{
    std::cerr
        << "RPC call failed with exception: "
        << RpcExceptionCode()
        << std::endl;
}
RpcEndExcept
AddNumbers() returns the result calculated by the server, while Shutdown() sends a second RPC request that stops the server’s listening state. The surrounding RPC exception handler catches communication failures such as an unavailable server, an unsuccessful Endpoint Mapper lookup, or a blocked dynamic RPC port.
Running the Demo Locally from Visual Studio
With both the RPC server and client implementations complete, we can now perform our first end-to-end test directly from Visual Studio.
Running both applications locally allows us to verify that the implementation works as expected before deploying the executables to separate virtual machines in the vSphere lab for a more realistic client/server demonstration and network traffic analysis.
Starting the RPC Server
In Visual Studio, right-click the RpcServer project and select:
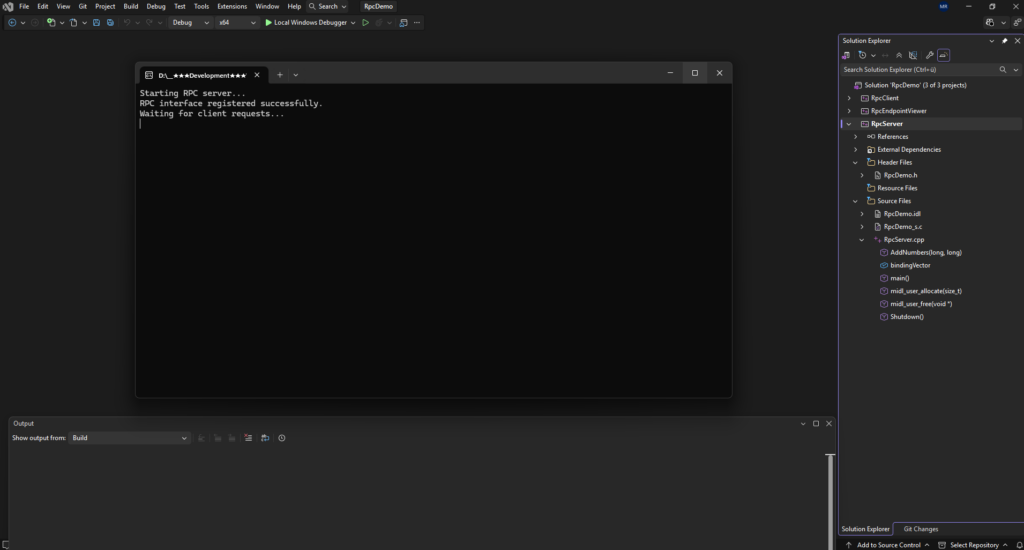
At this point, the server has successfully registered its interface with the Windows RPC Endpoint Mapper and is waiting for incoming client requests.
Debug → Start Without Debugging
Verify the Assigned RPC Endpoint
Next, start the RpcEndpointViewer project using:
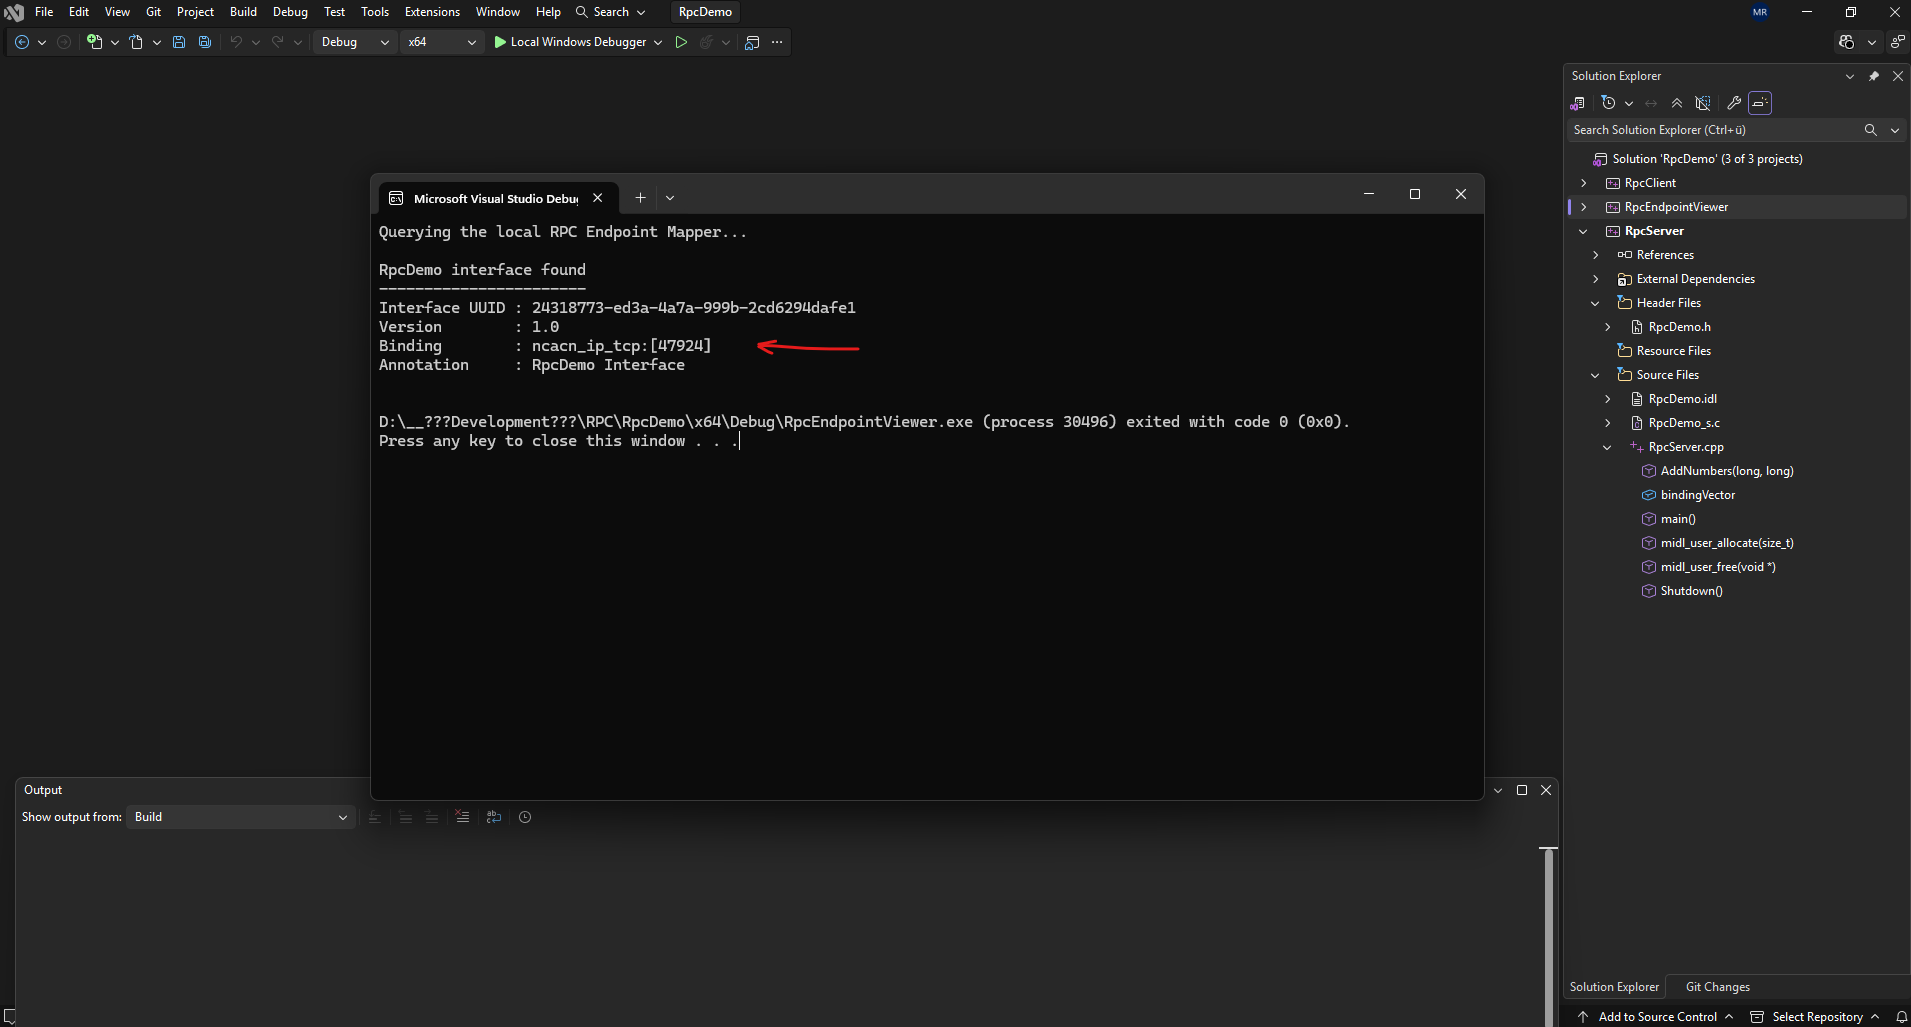
n our example, the Windows RPC Endpoint Mapper assigned the dynamic TCP port 47924 to the
RpcDemointerface. We’ll remember this port because the client should later connect to exactly this endpoint after resolving the interface UUID through the Endpoint Mapper.
Debug → Start Without Debugging
Start the RPC Client
Finally, right-click the RpcClient project and select:
Debug → Start Without Debugging
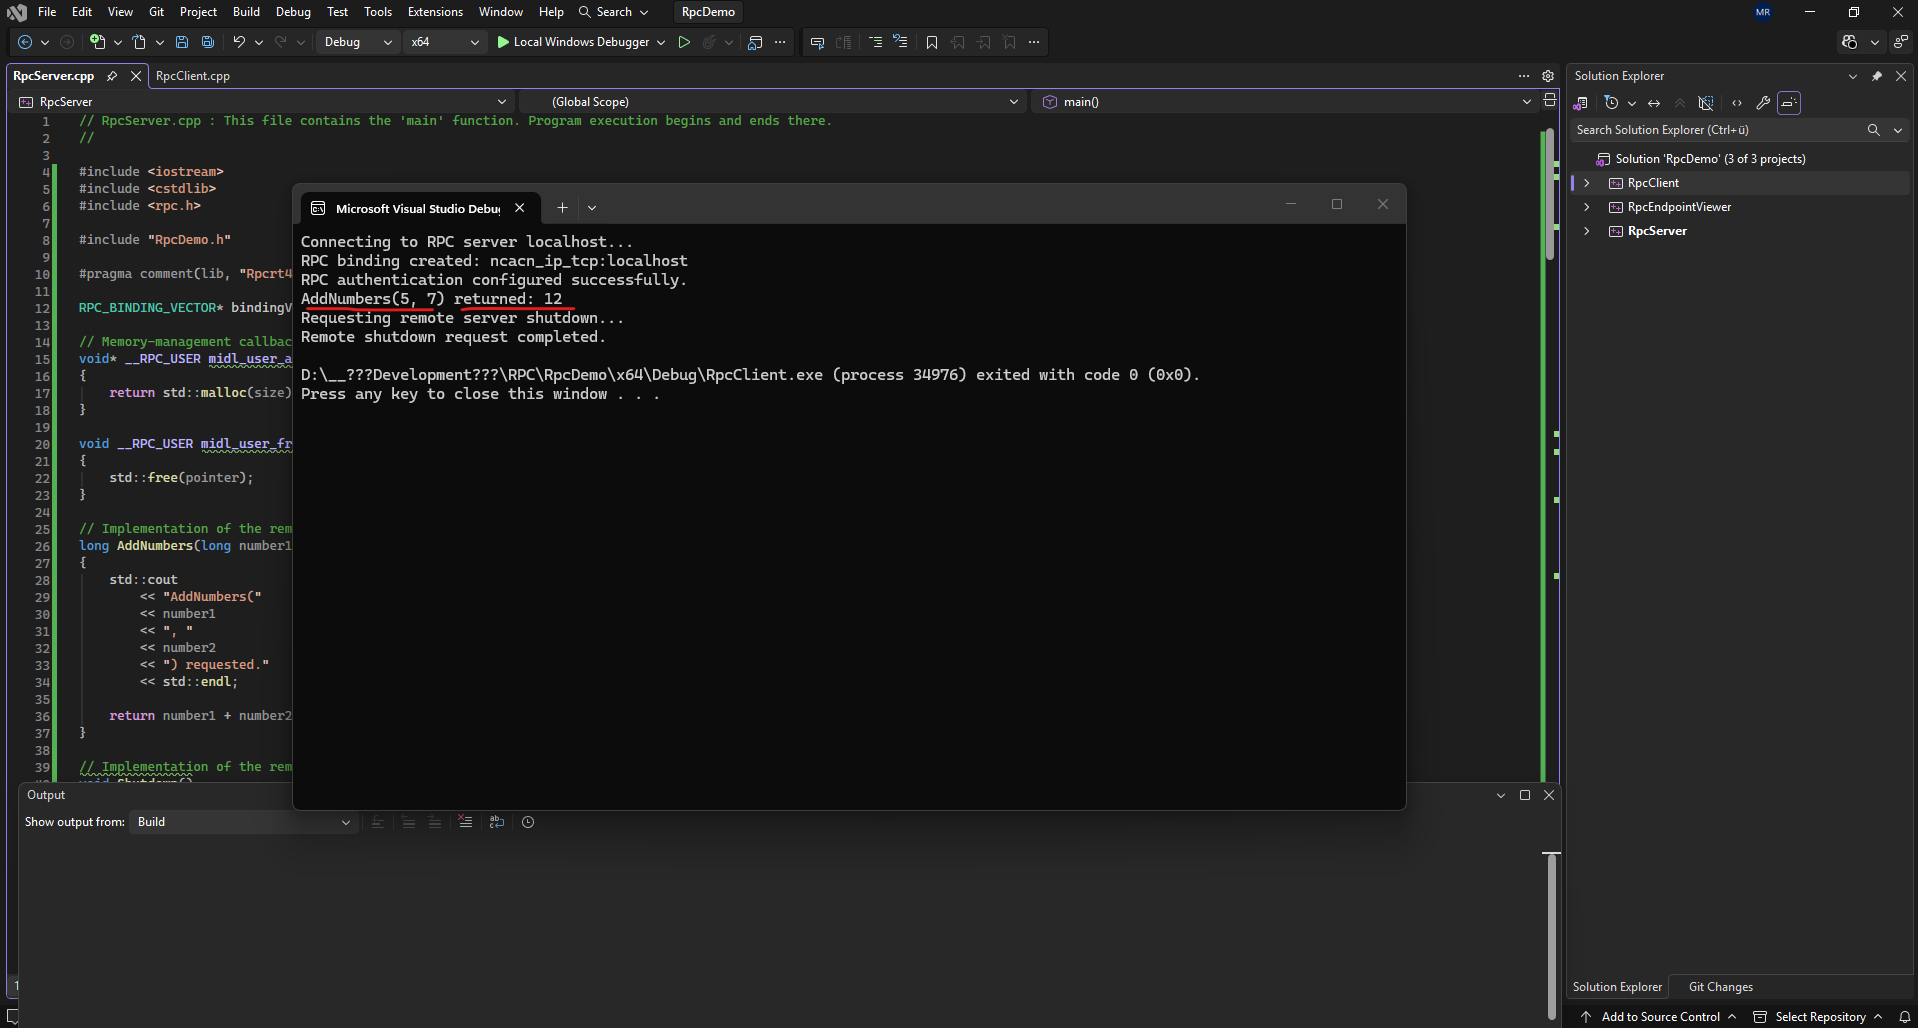
The client establishes an authenticated RPC binding to the server, invokes the remote AddNumbers() procedure, receives the result returned by the server, and finally calls the remote Shutdown() procedure to terminate the server gracefully.
Although these function calls appear identical to ordinary local C++ function calls, the MIDL-generated client stub transparently marshals the parameters, communicates with the server over the network using Microsoft DCE/RPC, and unmarshals the returned result.
The client invokes AddNumbers() exactly like an ordinary local C++ function and passes the values 5 and 7 as arguments. The MIDL-generated client stub transparently handles the remote communication, so no networking code is required here.
// RpcClient.cpp

const long result = AddNumbers(5, 7);

std::cout
    << "AddNumbers(5, 7) returned: "
    << result
    << std::endl;
On the server, the actual implementation of AddNumbers() receives the parameters transmitted by the client, performs the performs the addition calculation, and returns the result. The returned value (12) is then automatically marshaled back to the client by the RPC runtime.
// RpcServer.cpp

long AddNumbers(long number1, long number2)
{
    std::cout
        << "AddNumbers("
        << number1
        << ", "
        << number2
        << ") requested."
        << std::endl;

    return number1 + number2;
}
Modifying the RPC Client Application to Accept Command-Line Arguments
To make the subsequent Wireshark analysis more meaningful, we will modify the RPC client application to accept the target server and the two numbers as command-line arguments instead of using hard-coded values.
This allows us to vary the input for each test run and later correlate the chosen values with the corresponding remote procedure call during the network traffic analysis.
Replace RpcClient.cpp with this version:
#include <iostream>
#include <cstdlib>
#include <cerrno>
#include <climits>
#include <rpc.h>

#include "RpcDemo.h"

#pragma comment(lib, "Rpcrt4.lib")

// Global handle referenced by implicit_handle in RpcDemo.idl.
handle_t RpcDemoBindingHandle = nullptr;

// Memory-management callbacks required by the MIDL-generated stub.
void* __RPC_USER midl_user_allocate(size_t size)
{
    return std::malloc(size);
}

void __RPC_USER midl_user_free(void* pointer)
{
    std::free(pointer);
}

void PrintRpcException(RPC_STATUS exceptionCode)
{
    std::cerr
        << "RPC call failed with exception: "
        << exceptionCode;

    switch (exceptionCode)
    {
    case RPC_S_ACCESS_DENIED:
        std::cerr << " (RPC_S_ACCESS_DENIED)";
        break;

    case RPC_S_SERVER_UNAVAILABLE:
        std::cerr << " (RPC_S_SERVER_UNAVAILABLE)";
        break;

    case RPC_S_UNKNOWN_IF:
        std::cerr << " (RPC_S_UNKNOWN_IF)";
        break;

    case RPC_S_CALL_FAILED:
        std::cerr << " (RPC_S_CALL_FAILED)";
        break;

    case RPC_S_CALL_FAILED_DNE:
        std::cerr << " (RPC_S_CALL_FAILED_DNE)";
        break;

    case RPC_S_PROTOCOL_ERROR:
        std::cerr << " (RPC_S_PROTOCOL_ERROR)";
        break;

    default:
        std::cerr << " (unhandled RPC status)";
        break;
    }

    std::cerr << std::endl;
}

bool TryParseLong(
    const wchar_t* value,
    long& result)
{
    if (value == nullptr || *value == L'\0')
    {
        return false;
    }

    wchar_t* endPointer = nullptr;
    errno = 0;

    const long parsedValue =
        std::wcstol(value, &endPointer, 10);

    if (errno == ERANGE ||
        endPointer == value ||
        *endPointer != L'\0')
    {
        return false;
    }

    result = parsedValue;
    return true;
}

int wmain(int argc, wchar_t* argv[])
{
    RPC_STATUS status;
    RPC_WSTR stringBinding = nullptr;
    int exitCode = 0;

    if (argc != 4)
    {
        std::wcerr
            << L"Usage: RpcClient.exe "
            << L"<server-name-or-ip> <number1> <number2>"
            << std::endl
            << L"Example: RpcClient.exe localhost 25 17"
            << std::endl;

        return 1;
    }

    const wchar_t* serverAddress = argv[1];

    long number1;
    long number2;

    if (!TryParseLong(argv[2], number1) ||
        !TryParseLong(argv[3], number2))
    {
        std::wcerr
            << L"Both number arguments must be valid integers."
            << std::endl;

        return 1;
    }

    std::wcout
        << L"Connecting to RPC server "
        << serverAddress
        << L"..."
        << std::endl;

    status = RpcStringBindingComposeW(
        nullptr,
        reinterpret_cast<RPC_WSTR>(
            const_cast<wchar_t*>(L"ncacn_ip_tcp")),
        reinterpret_cast<RPC_WSTR>(
            const_cast<wchar_t*>(serverAddress)),
        nullptr,
        nullptr,
        &stringBinding);

    if (status != RPC_S_OK)
    {
        std::cerr
            << "RpcStringBindingComposeW failed with RPC status "
            << status
            << '.'
            << std::endl;

        return static_cast<int>(status);
    }

    status = RpcBindingFromStringBindingW(
        stringBinding,
        &RpcDemoBindingHandle);

    if (status != RPC_S_OK)
    {
        std::cerr
            << "RpcBindingFromStringBindingW failed with RPC status "
            << status
            << '.'
            << std::endl;

        RpcStringFreeW(&stringBinding);
        return static_cast<int>(status);
    }

    std::wcout
        << L"RPC binding created: "
        << reinterpret_cast<wchar_t*>(stringBinding)
        << std::endl;

    status = RpcBindingSetAuthInfoW(
        RpcDemoBindingHandle,
        nullptr,
        RPC_C_AUTHN_LEVEL_PKT_PRIVACY,
        RPC_C_AUTHN_GSS_NEGOTIATE,
        nullptr,
        RPC_C_AUTHZ_NONE);

    if (status != RPC_S_OK)
    {
        std::cerr
            << "RpcBindingSetAuthInfoW failed with RPC status "
            << status
            << '.'
            << std::endl;

        RpcBindingFree(&RpcDemoBindingHandle);
        RpcStringFreeW(&stringBinding);

        return static_cast<int>(status);
    }

    std::cout
        << "RPC authentication configured successfully."
        << std::endl;

    RpcTryExcept
    {
        const long result =
            AddNumbers(number1, number2);

        std::cout
            << "AddNumbers("
            << number1
            << ", "
            << number2
            << ") returned: "
            << result
            << std::endl;

        std::cout
            << "Requesting remote server shutdown..."
            << std::endl;

        Shutdown();

        std::cout
            << "Remote shutdown request completed."
            << std::endl;
    }
        RpcExcept(1)
    {
        const RPC_STATUS exceptionCode =
            RpcExceptionCode();

        PrintRpcException(exceptionCode);
        exitCode = static_cast<int>(exceptionCode);
    }
    RpcEndExcept

        if (RpcDemoBindingHandle != nullptr)
        {
            status = RpcBindingFree(
                &RpcDemoBindingHandle);

            if (status != RPC_S_OK && exitCode == 0)
            {
                exitCode = static_cast<int>(status);
            }
        }

    if (stringBinding != nullptr)
    {
        status = RpcStringFreeW(
            &stringBinding);

        if (status != RPC_S_OK && exitCode == 0)
        {
            exitCode = static_cast<int>(status);
        }
    }

    return exitCode;
}
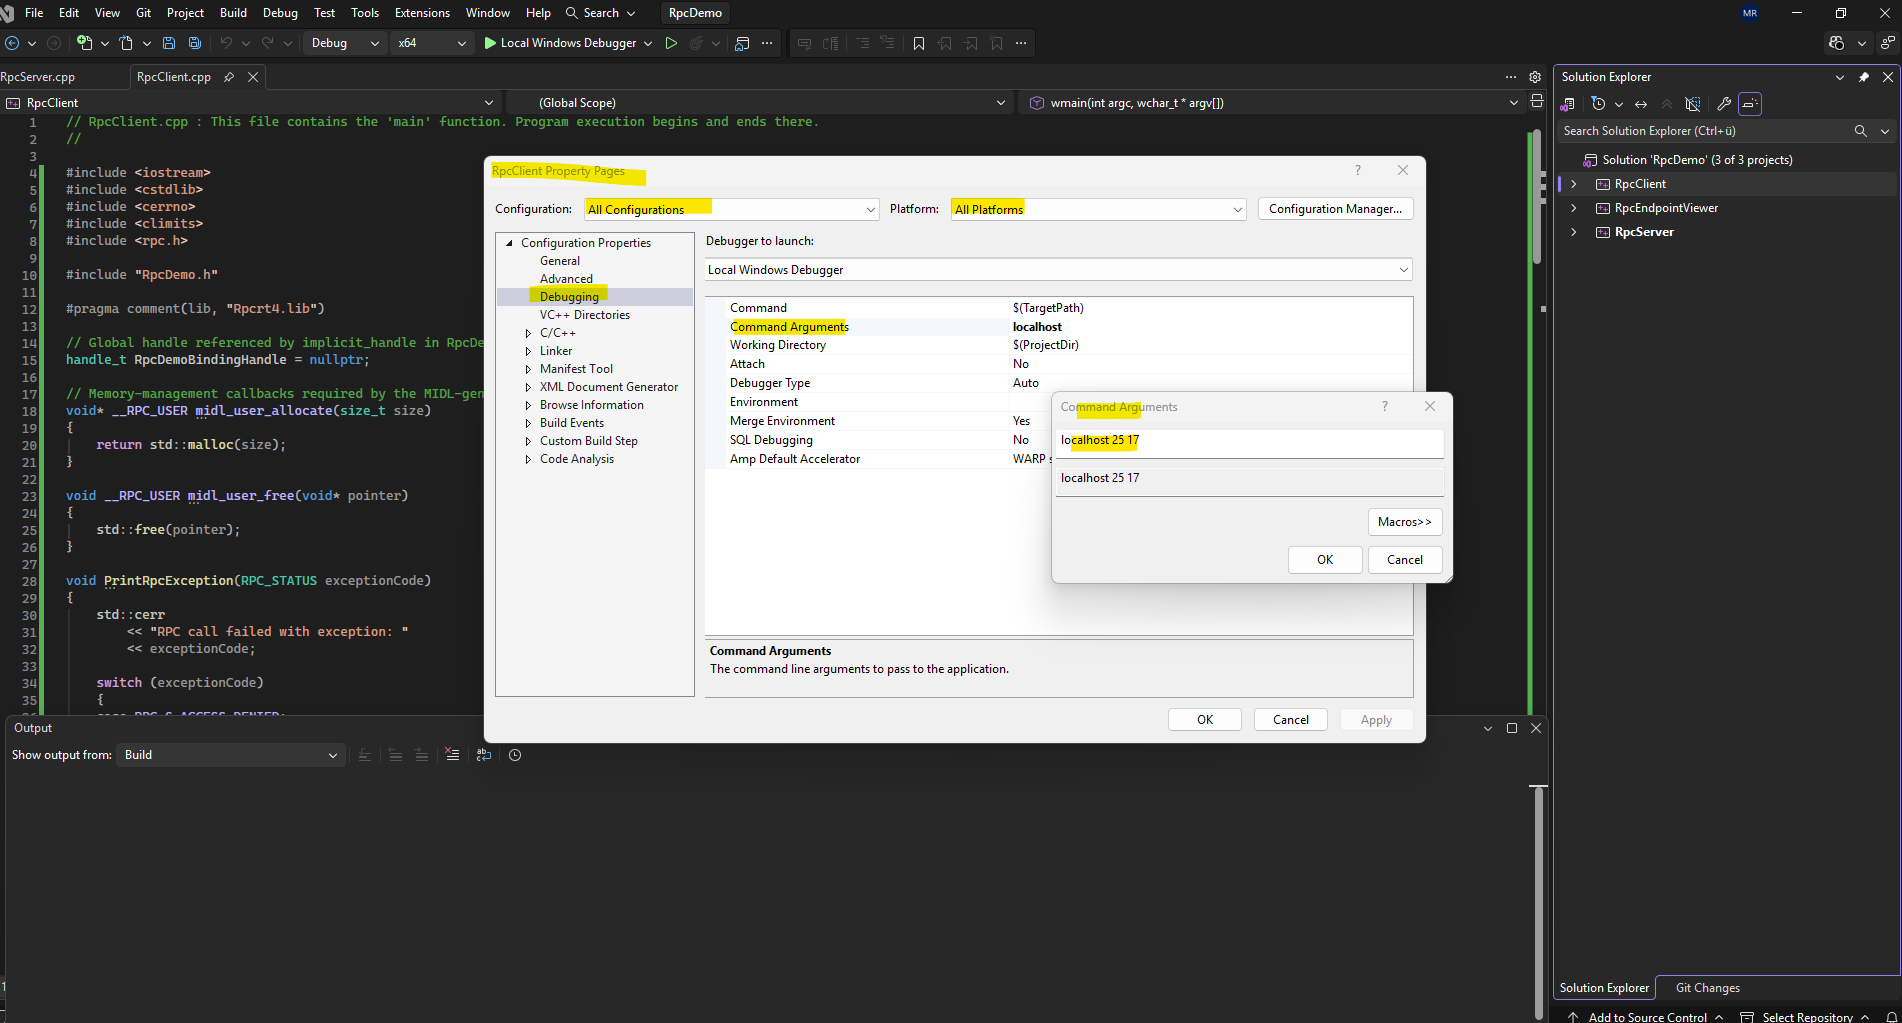
Since the RPC client now expects the target server and the two numbers as command-line arguments, these values must also be configured when starting the application directly from Visual Studio.
Open the RpcClient project properties, navigate to Debugging → Command Arguments, and specify the required arguments, for example: localhost 25 17.
When you start an executable directly from Visual Studio,
argv[]is empty unless you explicitly configure command-line arguments under Project → Properties → Debugging → Command Arguments. That’s why your new argument check immediately printed the usage message.
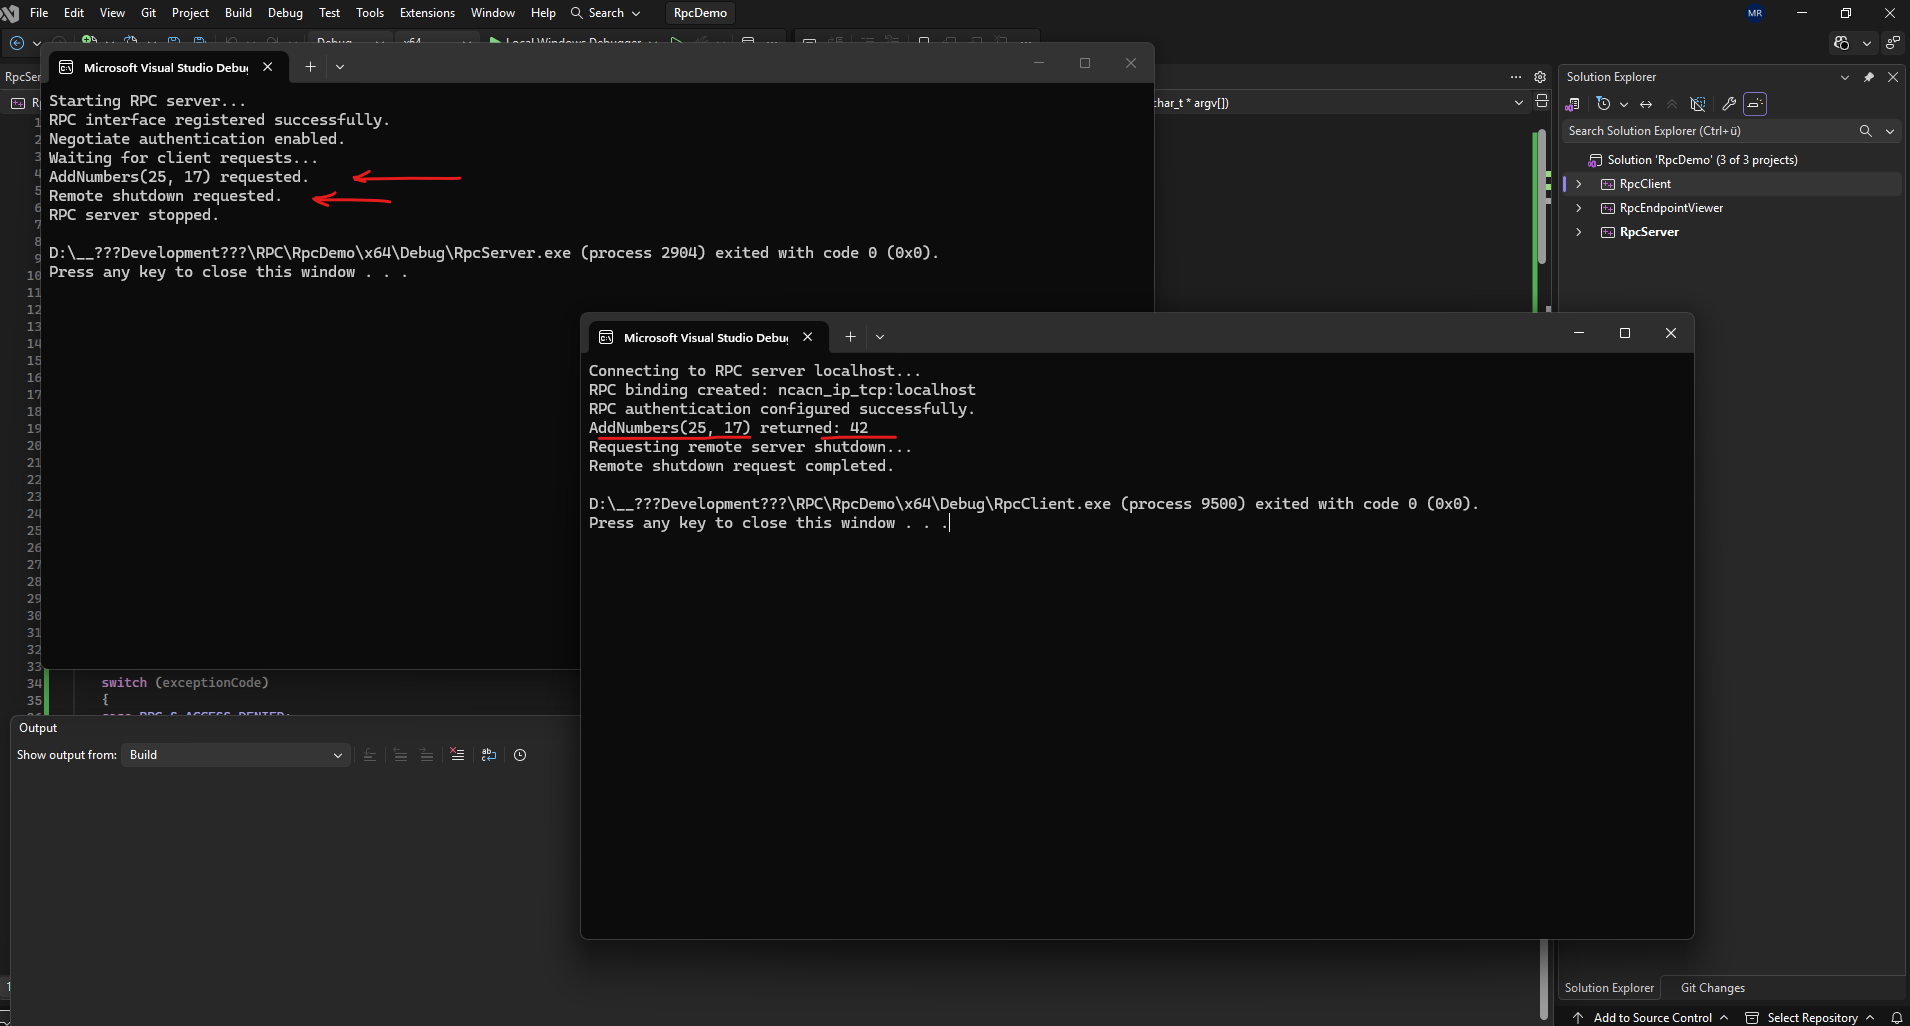
The output confirms that the client successfully established an authenticated RPC connection, invoked the remote AddNumbers() procedure with the command-line arguments (25 and 17), and received the expected result (42) from the server.
At the same time, the server console shows that the request was processed remotely before executing the Shutdown() procedure, proving that both procedure calls were executed inside the server process rather than locally on the client.
Deploying the RPC Demo in the vSphere Lab
So far, both the RPC server and client have been executed on the same computer (my notebook and running dirctly from VS) to verify the implementation and simplify debugging.
To demonstrate Microsoft DCE/RPC communication under realistic conditions, we will now deploy the applications to two separate Windows Server 2022 virtual machines in my vSphere lab, with one VM hosting the RPC server and the other acting as the RPC client.
This setup allows us to capture the complete network communication between both systems with Wireshark and analyze the Microsoft DCE/RPC protocol as it traverses the network.
Building the Release Version
Up to this point, all applications have been executed directly from Visual Studio, resulting in Debug builds intended for development and troubleshooting.
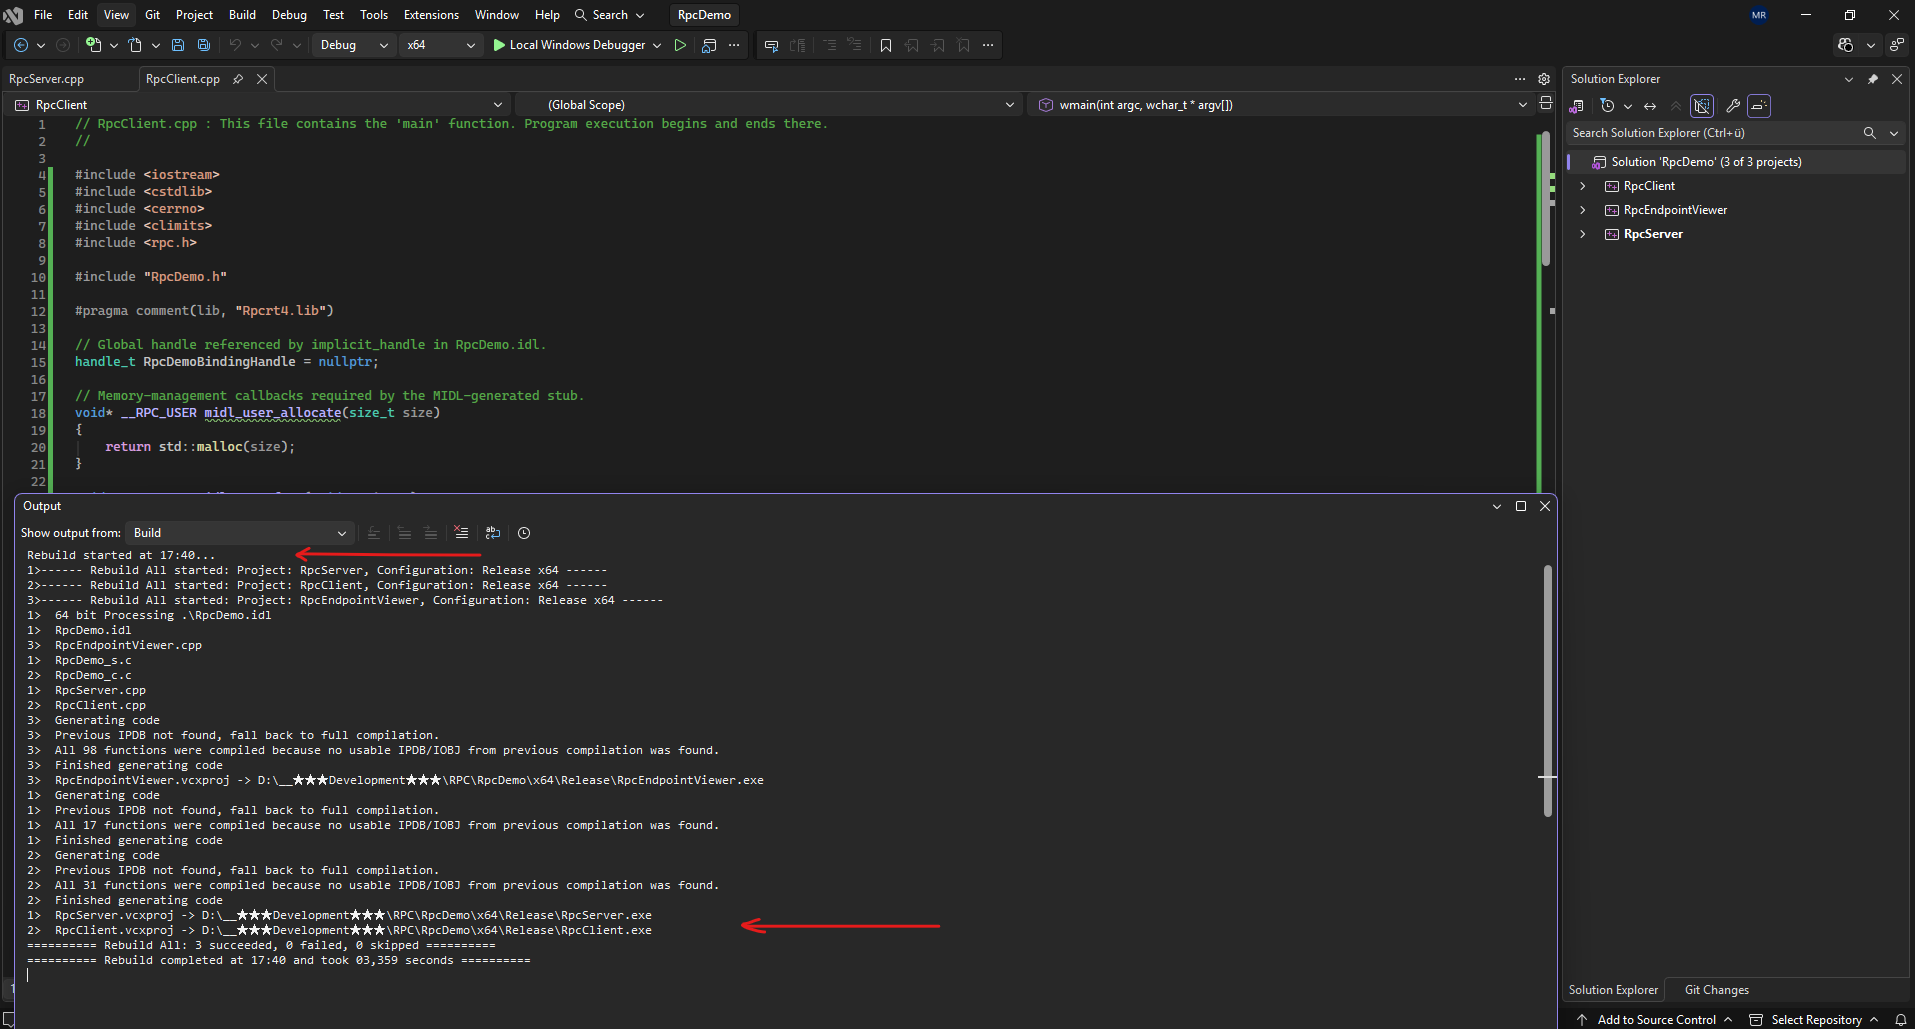
Before deploying the RPC demo to separate Windows Server 2022 virtual machines in the vSphere lab, we will switch the solution configuration to Release and rebuild all projects to produce optimized binaries without the additional debugging information.
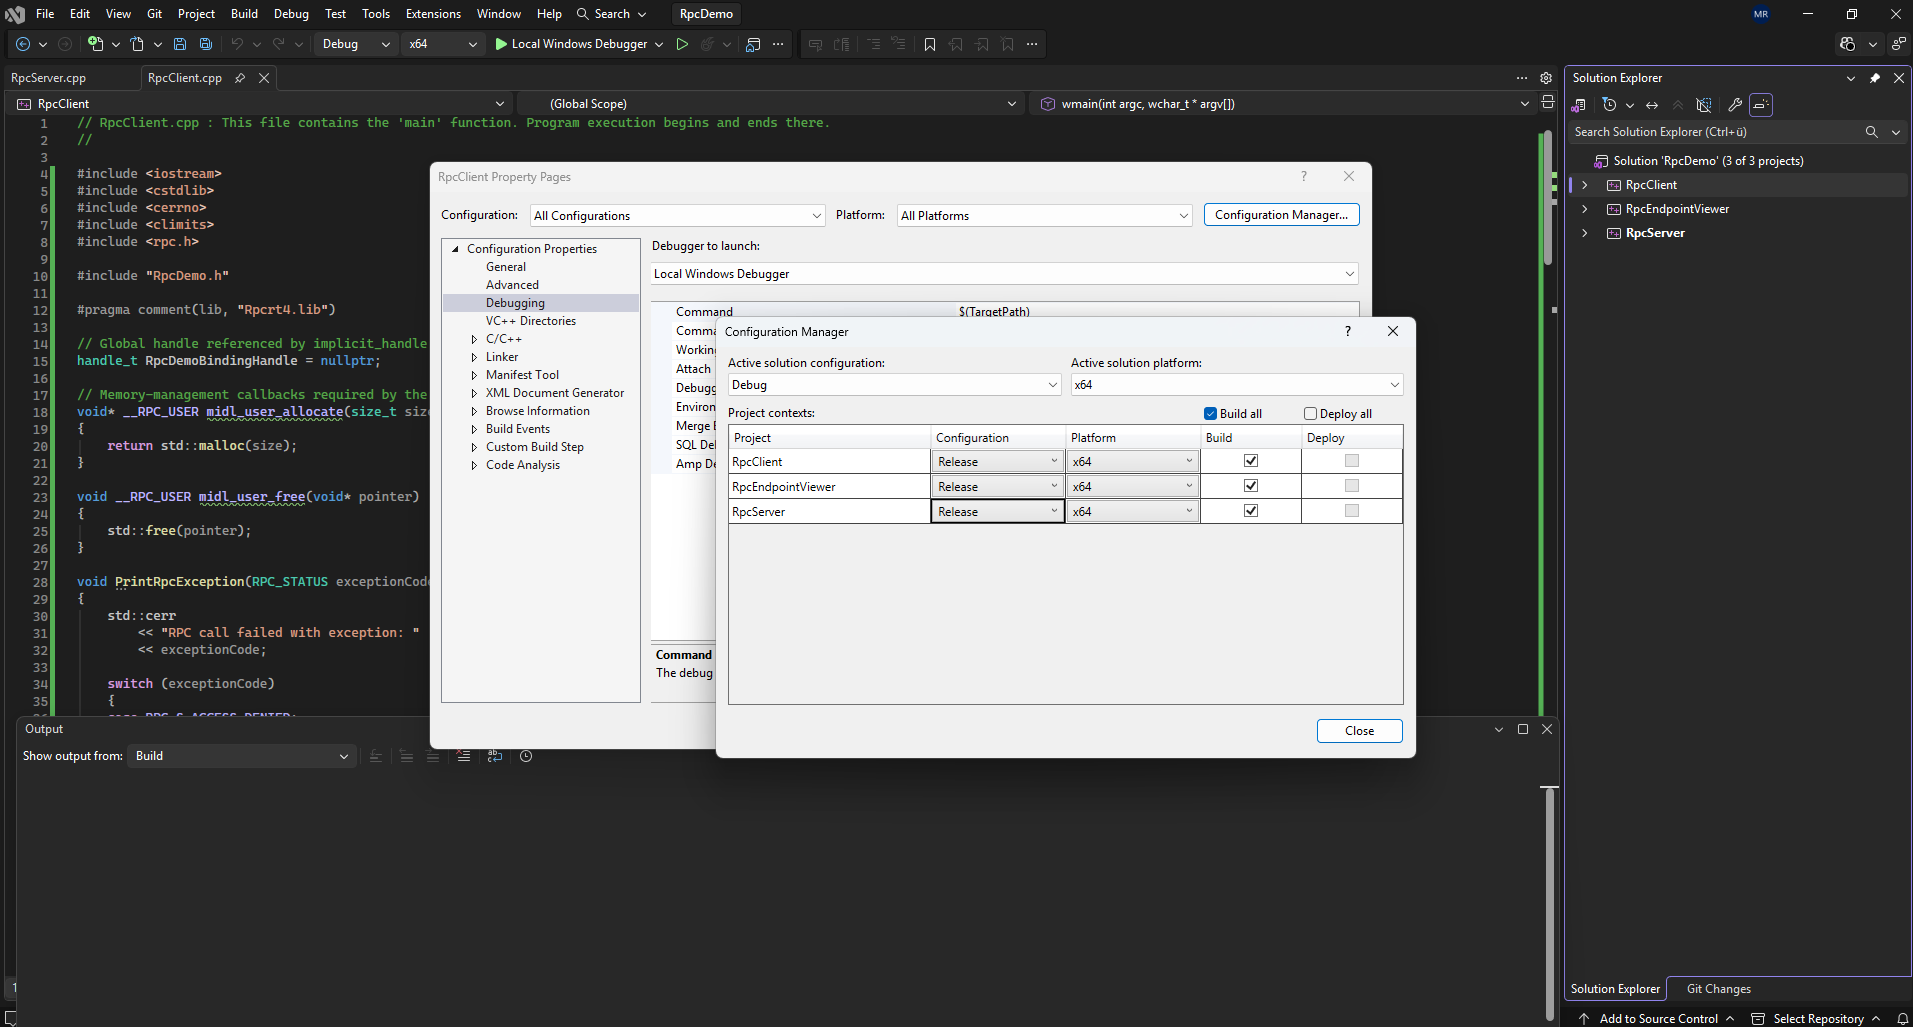
Open the Configuration Manager, change the Configuration of all projects from Debug to Release, and close the dialog. Afterwards, rebuild the complete solution using Build → Rebuild Solution to generate the release binaries for all three applications.
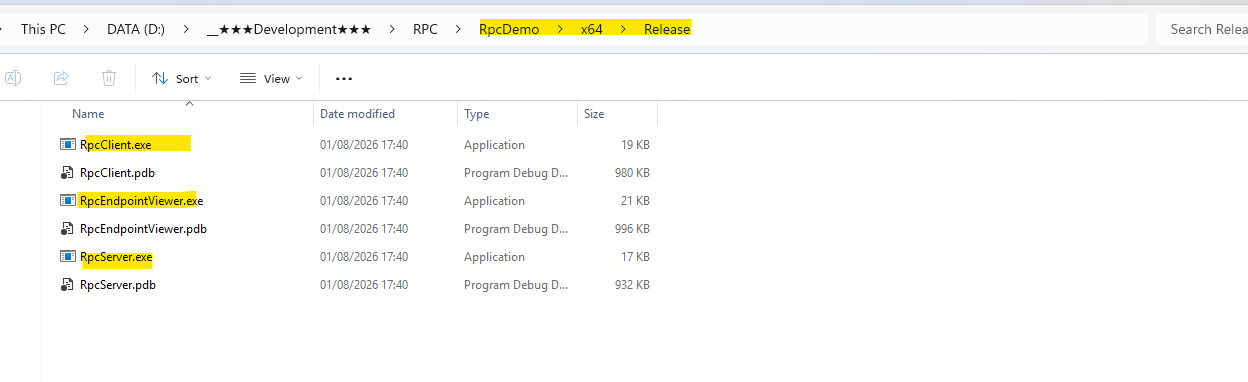
After rebuilding the solution in the Release x64 configuration, Visual Studio stores the final RpcServer.exe, RpcClient.exe, and RpcEndpointViewer.exe binaries together in the solution-level x64\Release directory. The accompanying .pdb files contain debugging symbols and are not required for simply running the applications on the lab VMs.
Deploying the RPC Demo in the vSphere Lab
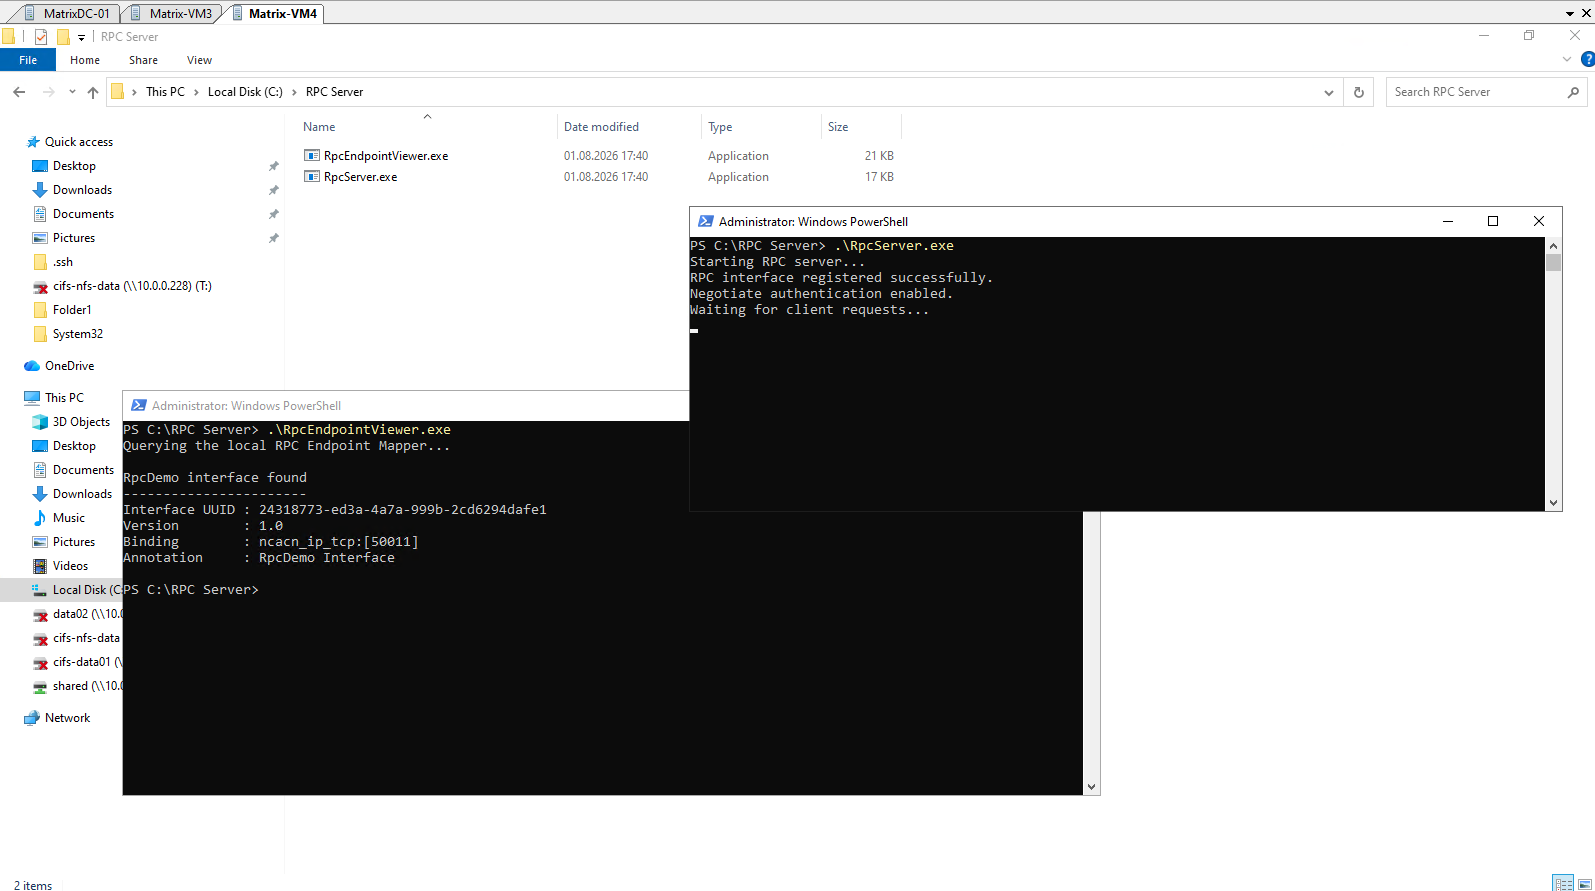
After copying only the RpcServer.exe and RpcEndpointViewer.exe executables to a clean Windows Server 2022 virtual machine, both applications started successfully without requiring any additional files.
This confirms that all application-specific code, including the MIDL-generated RPC stubs, is compiled directly into the executables, while the required Microsoft DCE/RPC runtime is already provided by Windows Server.
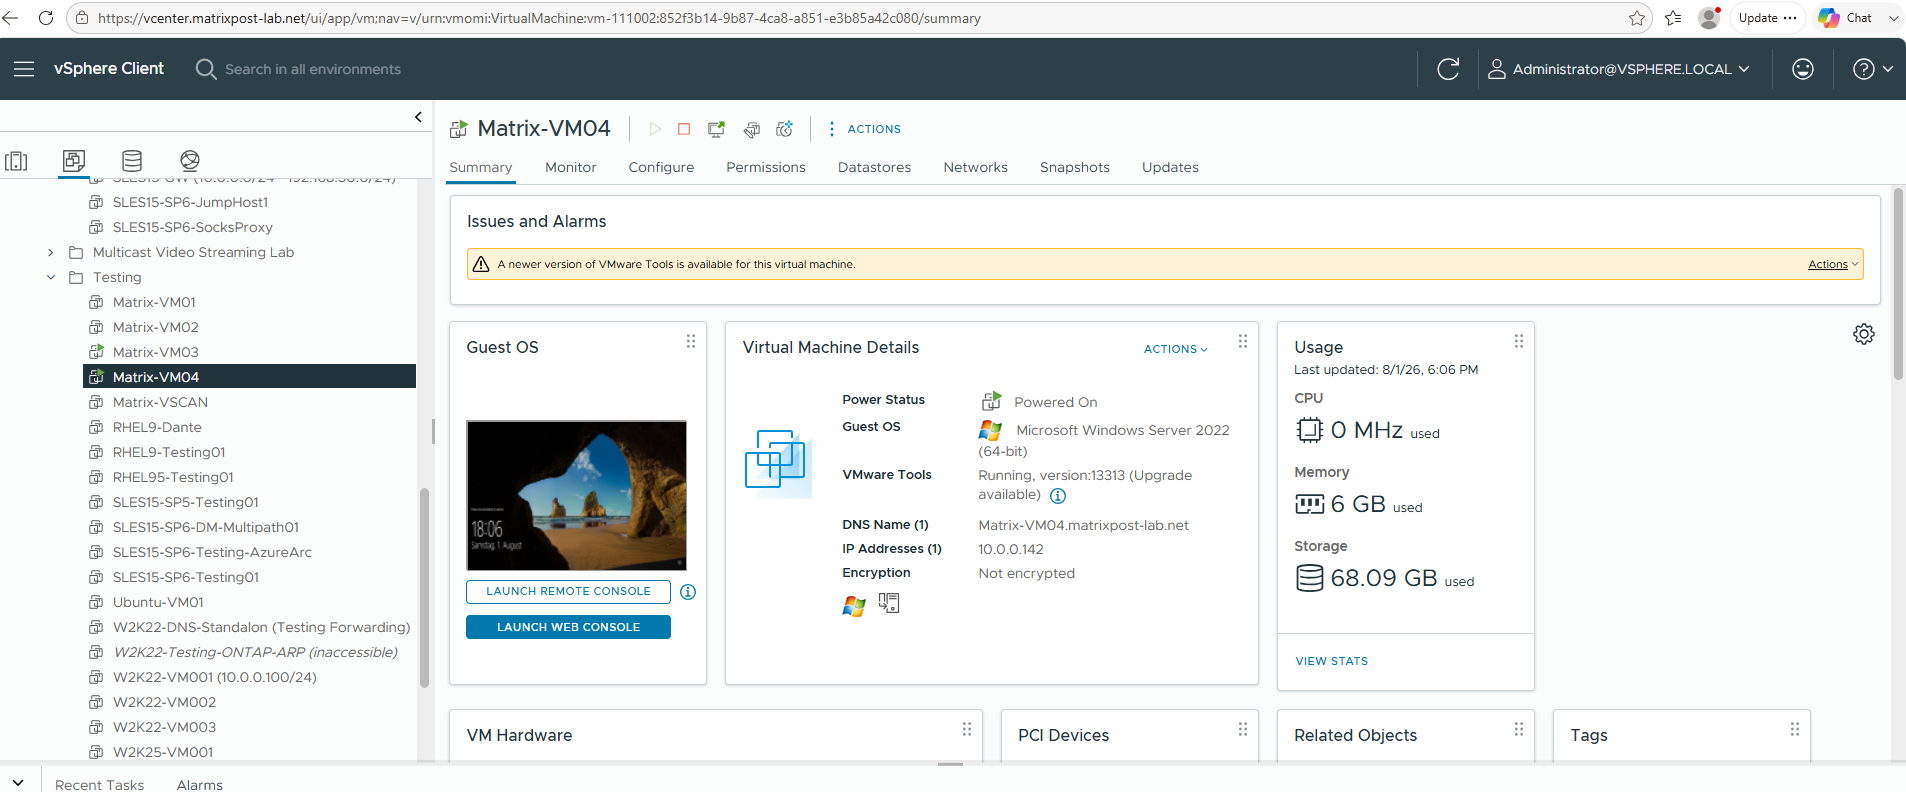
Both RpcServer.exe and RpcEndpointViewer.exe are now running on the Windows Server 2022 virtual machine Matrix-VM4.matrixpost-lab.net (10.0.0.142) in my vSphere lab.
This system will serve as the RPC server in my lab.
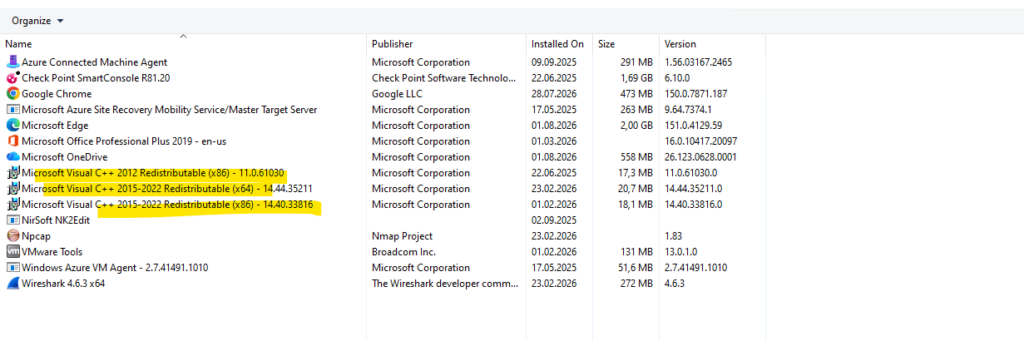
Since the applications were built with the default Visual Studio settings, they dynamically link against the Microsoft Visual C++ Runtime.
The target Windows Server 2022 virtual machines already have the required Microsoft Visual C++ 2015–2022 Redistributable (x64) installed, so copying the executables alone was sufficient to run the RPC demo successfully.
> .\RpcServer.exe
The Microsoft Visual C++ 2015–2022 Redistributable is required because the RPC demo was built with the default Visual Studio settings, which dynamically link against the Microsoft C and C++ runtime libraries instead of embedding them into the executable.
These runtime libraries provide the Standard C Library, the C++ Standard Library, exception handling, memory management, and other compiler-generated runtime support. The Microsoft DCE/RPC implementation itself, however, is not part of the Redistributable but is provided natively by Windows through the RPC Runtime (
rpcrt4.dll) and related system libraries.
The Windows Server 2022 virtual machine Matrix-VM3.matrixpost-lab.net now acts as the RPC client and hosts the RpcClient.exe application.
Instead of connecting to localhost, the client establishes an authenticated RPC connection to the remote server at 10.0.0.142, invokes the AddNumbers(20, 30) procedure, receives the expected result (50), and finally requests the remote server to shut down.
This confirms that the complete Microsoft DCE/RPC communication is now taking place between two separate systems over the network, providing the ideal setup for the following Wireshark analysis.
If the required command-line arguments are omitted, the client displays the expected usage syntax and exits without attempting to establish an RPC connection.
> .\RpcClient.exe 10.0.0.142 20 30
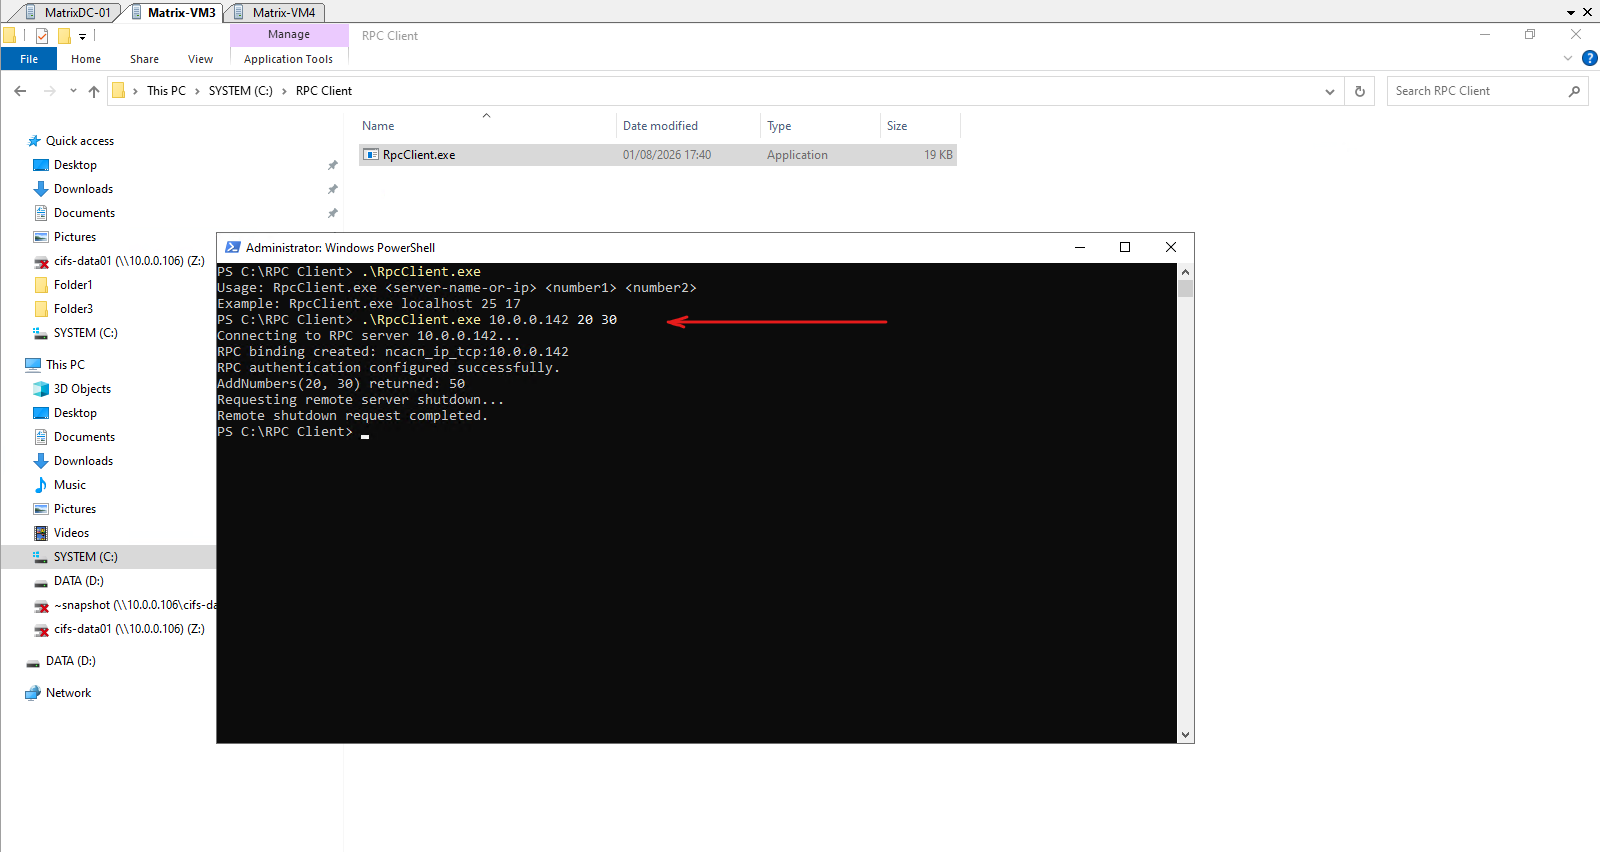
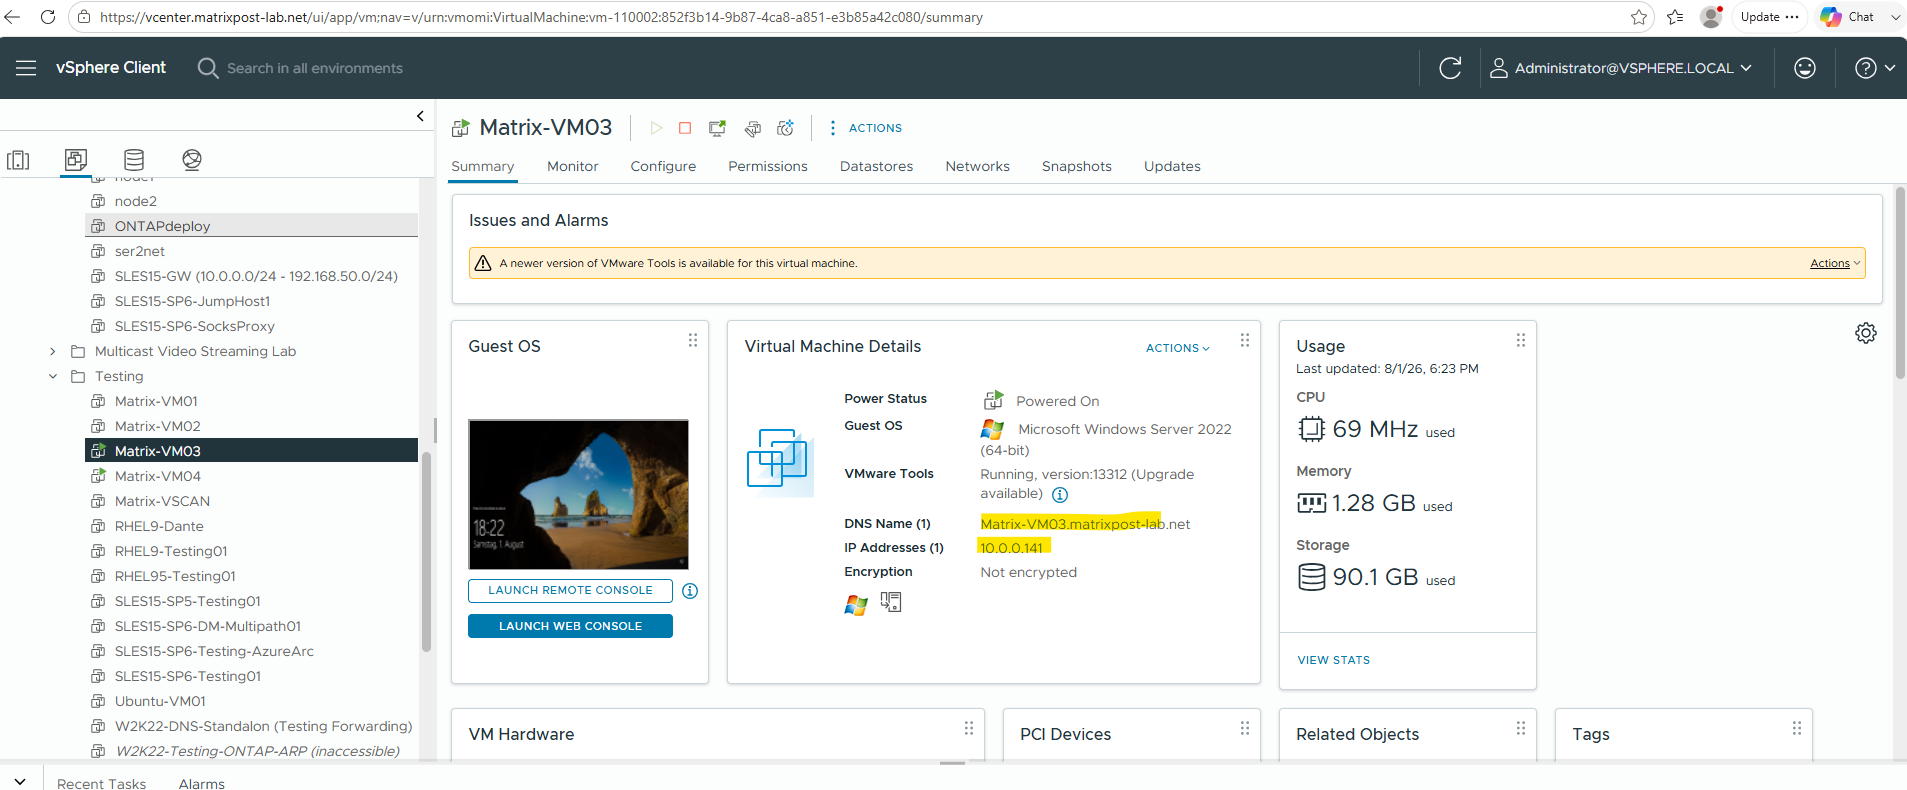
As expected, the server console also reflects the incoming remote procedure calls issued by the client.
Besides the
AddNumbers(20, 30)request, it also shows theShutdown()request, which is currently hardcoded into the demo application to terminate the server automatically after a successful test run.In a real-world RPC application, the server would typically continue running and process requests from multiple clients until it is stopped administratively or by the operating system.
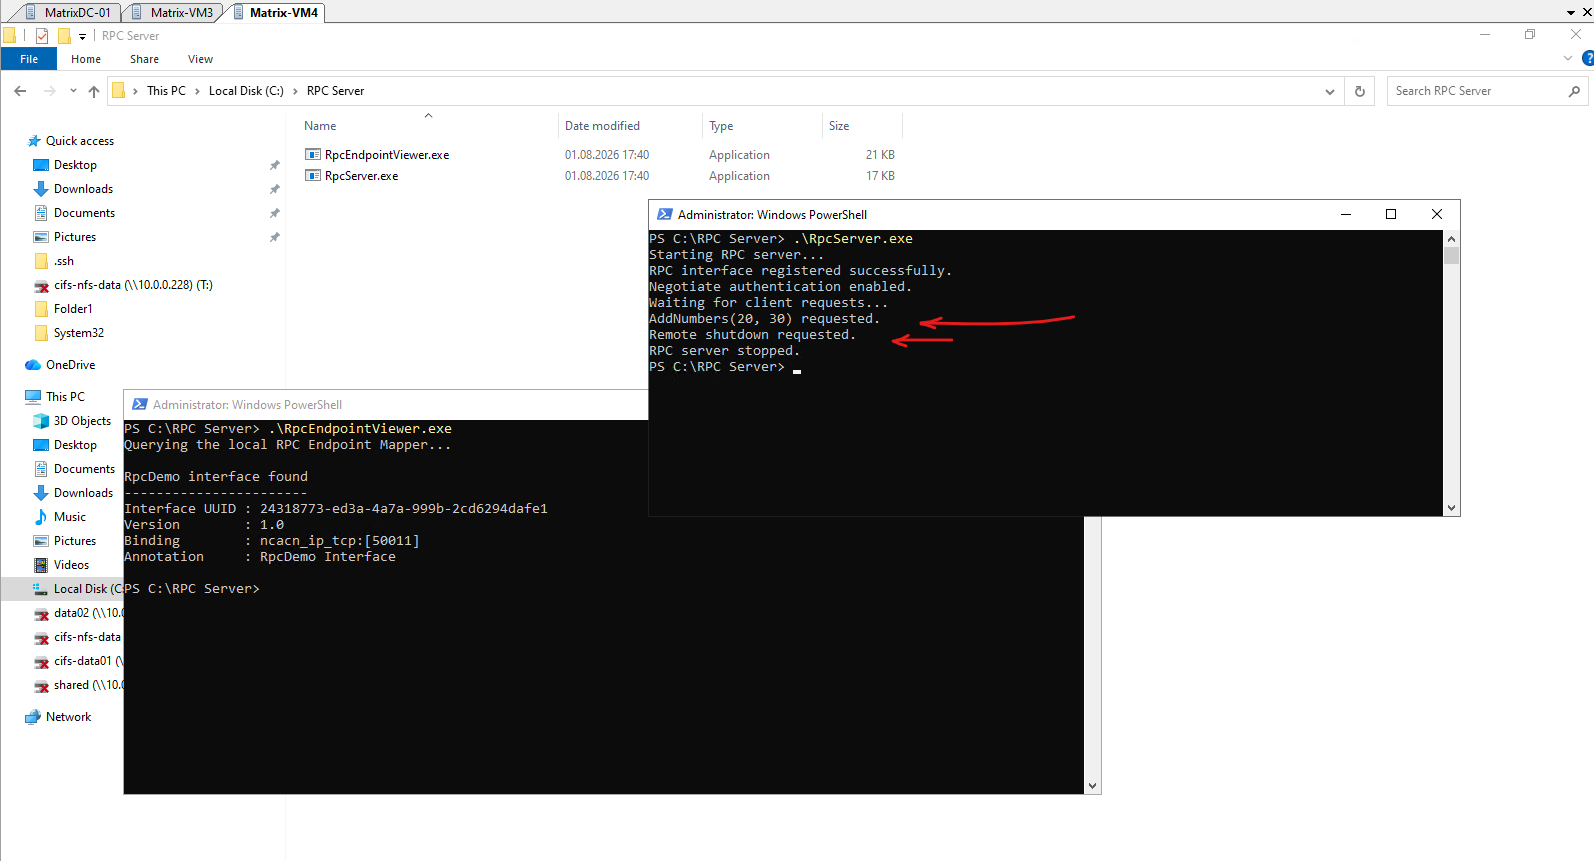
Analyzing the Network Traffic with Wireshark
So far, we have built a working Microsoft DCE/RPC client and server and successfully executed remote procedure calls between two Windows Server 2022 virtual machines.
In this final section, we will capture the network traffic with Wireshark and examine the complete RPC communication, rom the initial connection to the Endpoint Mapper on TCP port 135, through endpoint resolution, authentication, and finally the remote procedure calls exchanged between the client and server.
This provides a practical understanding of how Microsoft DCE/RPC operates at the network protocol level.
Before starting the client, I first launched the RpcServer and the custom RpcEndpointViewer on the server to determine which dynamic TCP endpoint had been assigned by the RPC Endpoint Mapper.
> .\RpcServer.exe
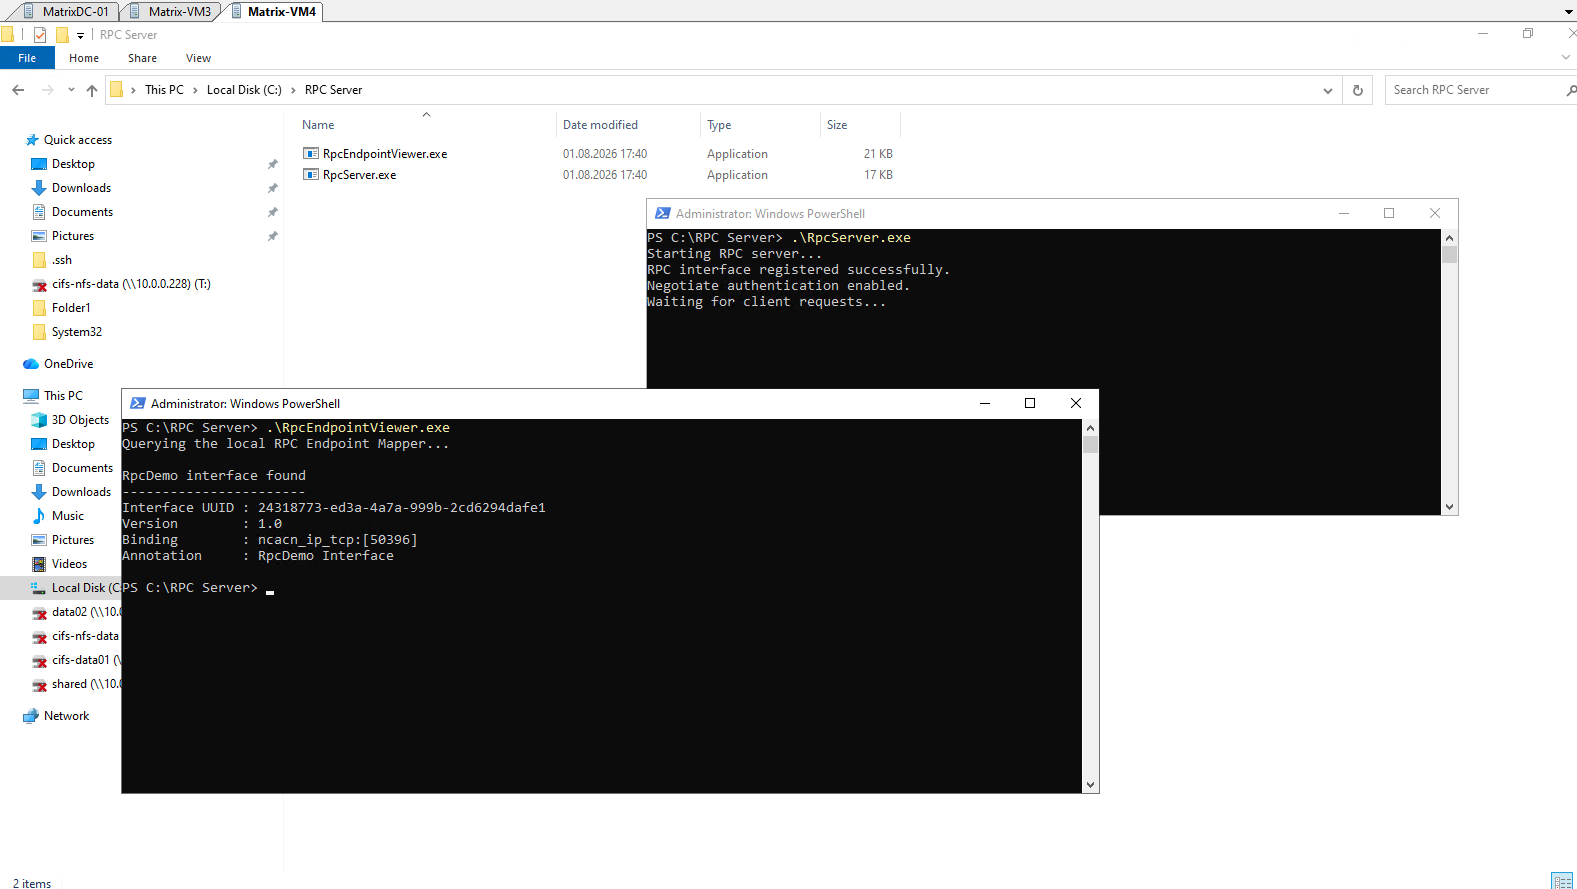
Before launching the client application, I started a Wireshark capture on the client virtual machine. I then executed RpcClient.exe 10.0.0.142 40 50, which initiated the complete Microsoft DCE/RPC communication that we will analyze below, including the connection to the Endpoint Mapper, dynamic endpoint resolution, authentication, and the invocation of the AddNumbers() and Shutdown() remote procedures.
This generates the complete Microsoft DCE/RPC exchange, allowing us to analyze every stage of the communication from both the client and server viewpoints.
> .\RpcClient.exe 10.0.0.142 40 50
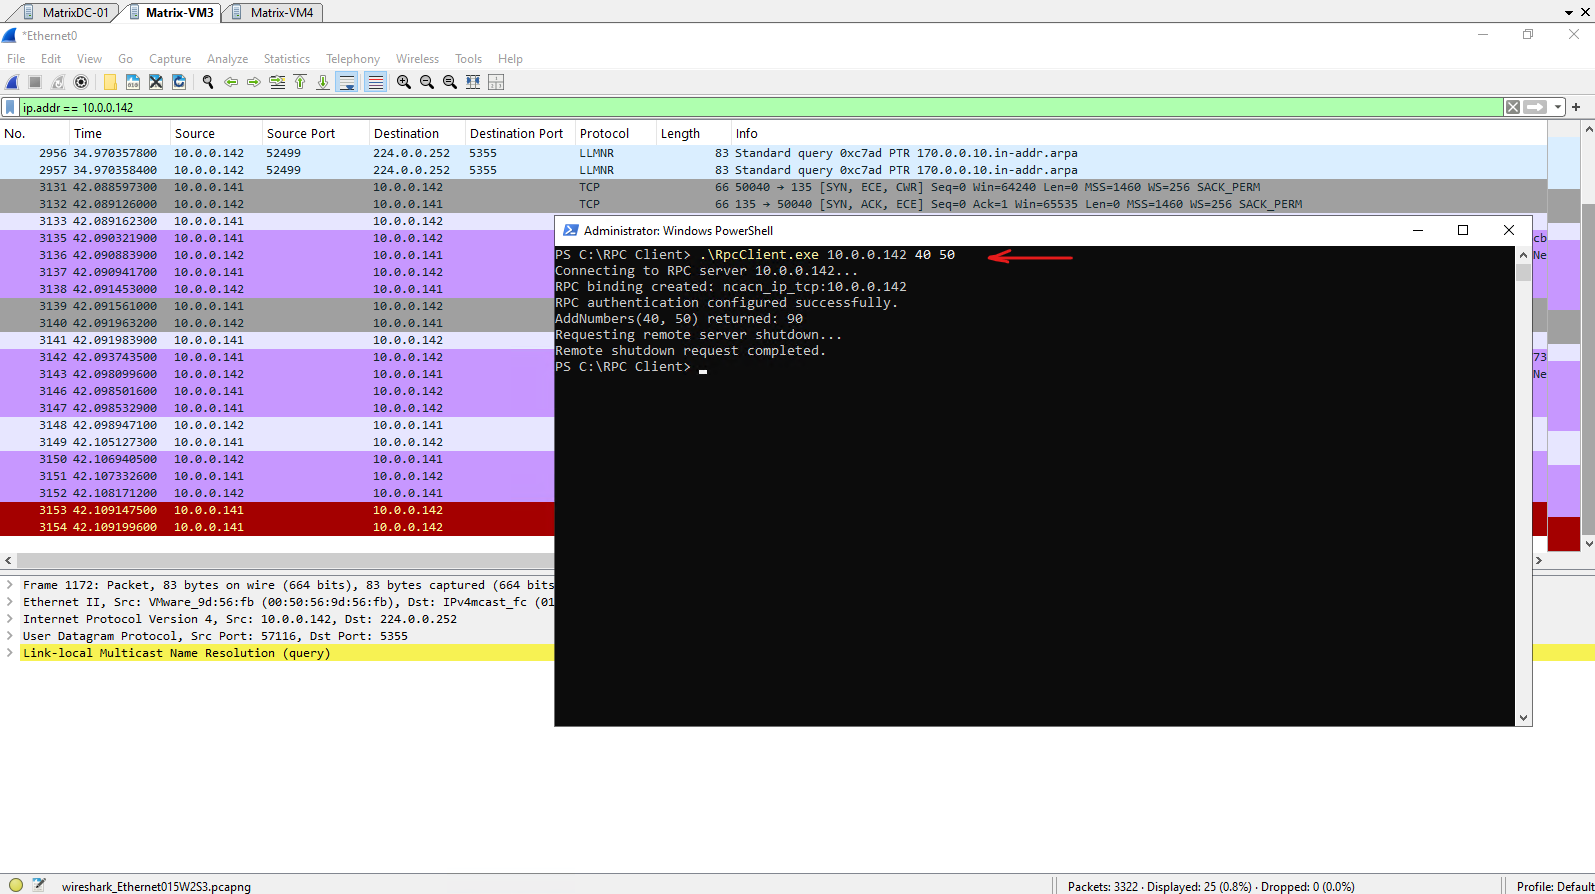
Analyzing the Client Network Capture
The client-side packet capture provides the best results because it shows how a Microsoft DCE/RPC conversation is initiated.
We will follow the complete communication from the initial connection to the RPC Endpoint Mapper on TCP port 135, through dynamic endpoint resolution and authentication, to the actual remote procedure calls exchanged with the RPC server.
Applying the Wireshark display filter
tcp.port == 135shows all communication with the Microsoft RPC Endpoint Mapper, not just the traffic generated by our custom RPC application. Since many Windows components rely on Microsoft DCE/RPC, the capture also contains communication between the client and the Active Directory domain controller (10.0.0.70).The selected packet shows a DCE/RPC Bind Acknowledgement (Bind Ack) returned by the domain controller. This packet is part of the initial protocol negotiation, during which the server accepts the client’s DCE/RPC Bind request and confirms the supported protocol features, transfer syntaxes (NDR), and other communication capabilities that will be used for the remainder of the session. This illustrates that the same Microsoft DCE/RPC protocol used by our custom RPC application is also extensively employed by native Windows services such as Active Directory.
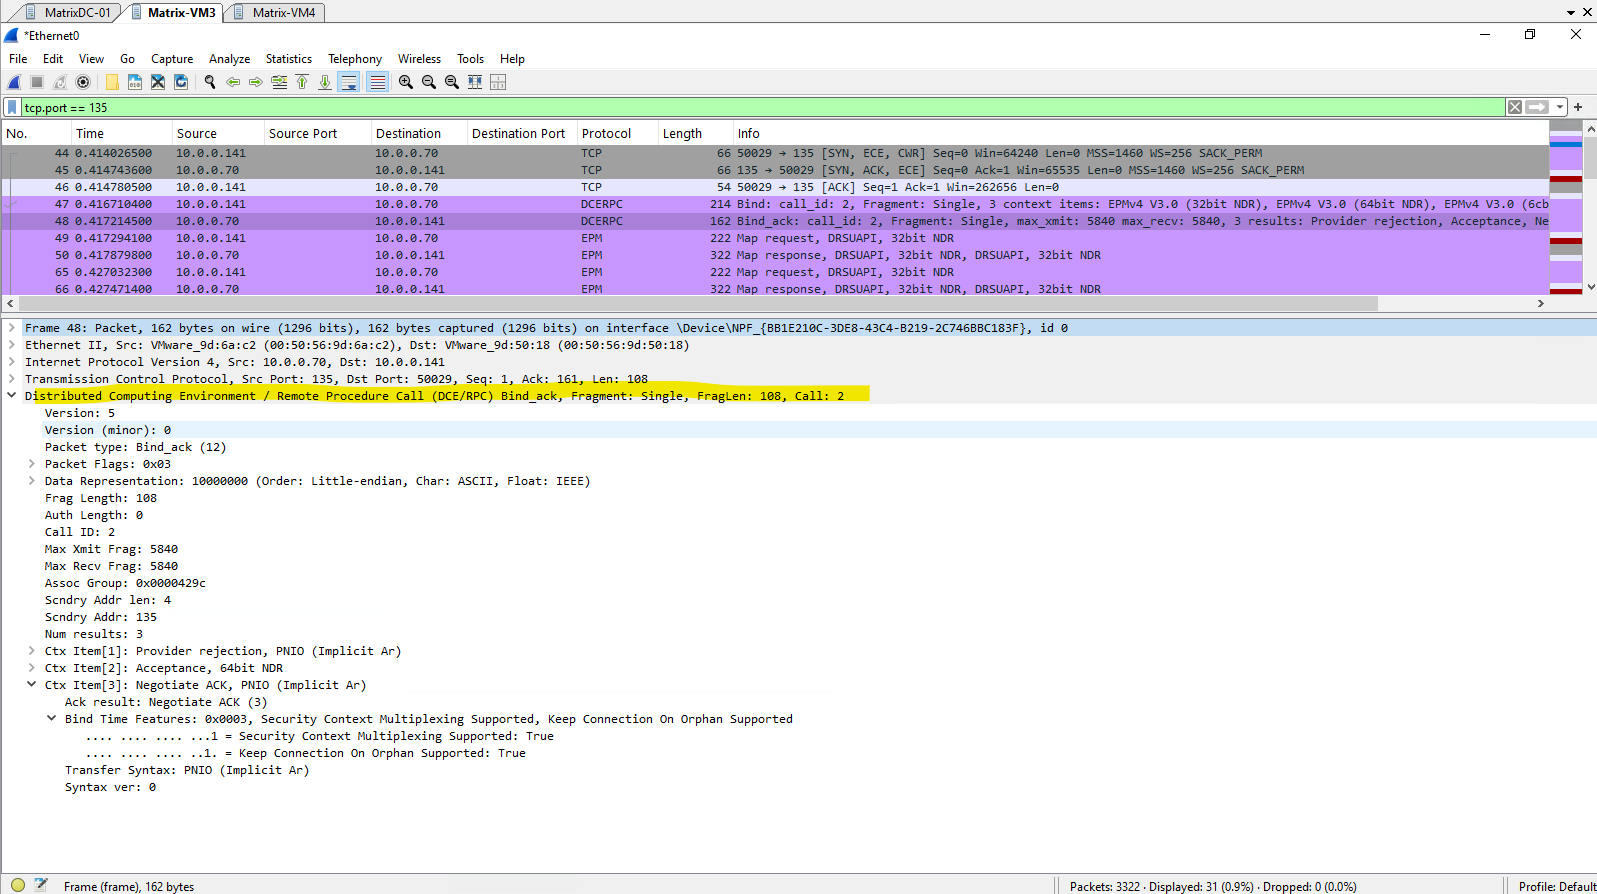
To isolate the communication with our custom RPC server, I refined the display filter to tcp.port == 135 && ip.addr == 10.0.0.142.
This removes the RPC traffic exchanged with other systems, such as the Active Directory domain controller, and leaves only the communication between the RPC client and our custom RPC server.
As expected, the client first establishes a standard TCP connection to the Microsoft RPC Endpoint Mapper on TCP port 135 (packets 3131–3133).
Immediately afterwards, the client sends a DCE/RPC Bind request (packet 3135) to negotiate the RPC protocol version, supported transfer syntaxes (NDR), and communication capabilities with the Endpoint Mapper.
The server acknowledges these parameters in the subsequent Bind Ack (packet 3136), completing the initial DCE/RPC protocol negotiation before the client requests the dynamic endpoint for our
RpcDemointerface.
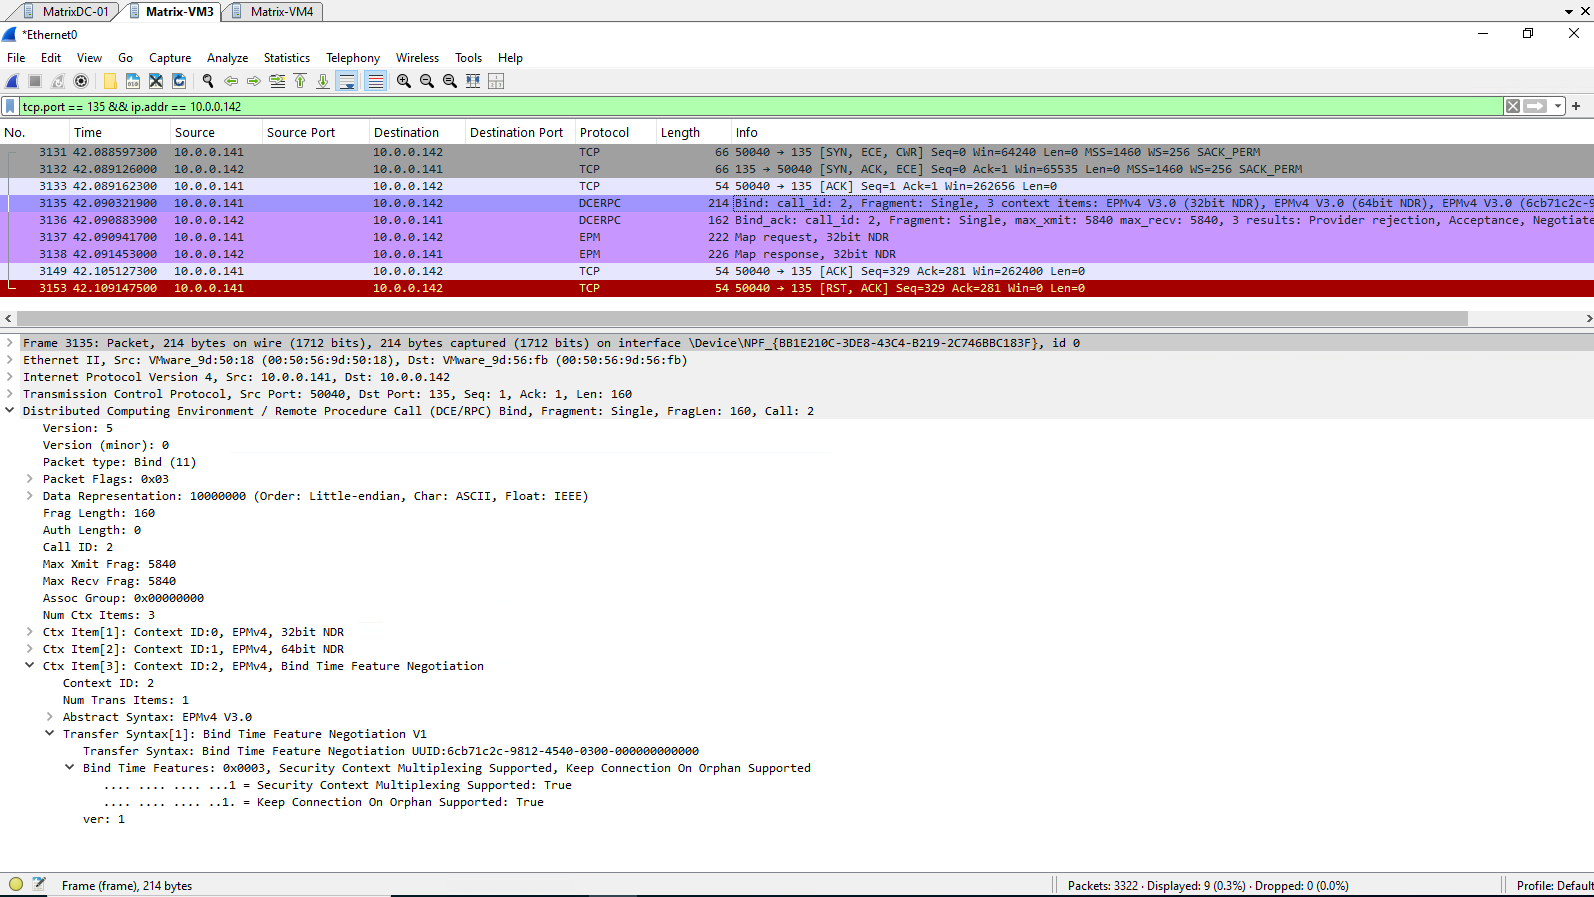
The EPM Map Response returned by the Microsoft RPC Endpoint Mapper contains the information the client was requesting. Besides confirming the interface UUID, it also provides the dynamically assigned TCP endpoint (50396) together with the server’s IP address (10.0.0.142). The client will now close the connection to the Endpoint Mapper on TCP port 135 and establish a new TCP connection directly to the RPC server on the returned dynamic port.
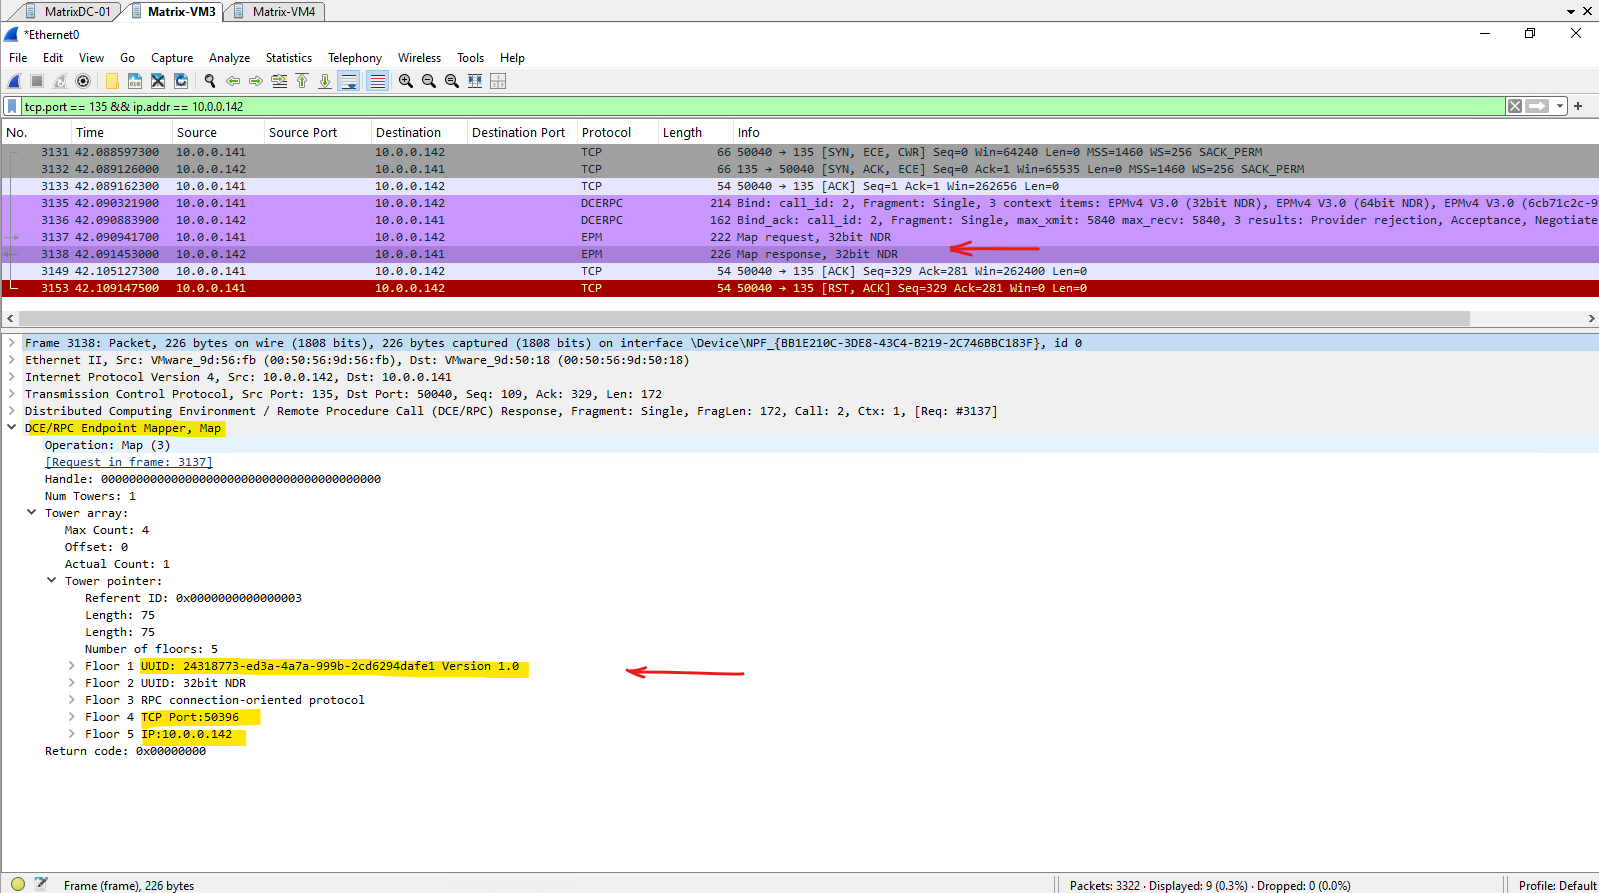
To verify that the Endpoint Mapper returned the correct endpoint, we can compare the interface UUID shown in the RpcEndpointViewer with the UUID contained in the EPM Map Response captured in Wireshark.
As shown below, both UUIDs are identical (
24318773-ed3a-4a7a-999b-2cd6294dafe1), confirming that the Endpoint Mapper successfully resolved ourRpcDemointerface and returned the correct dynamically assigned TCP endpoint.
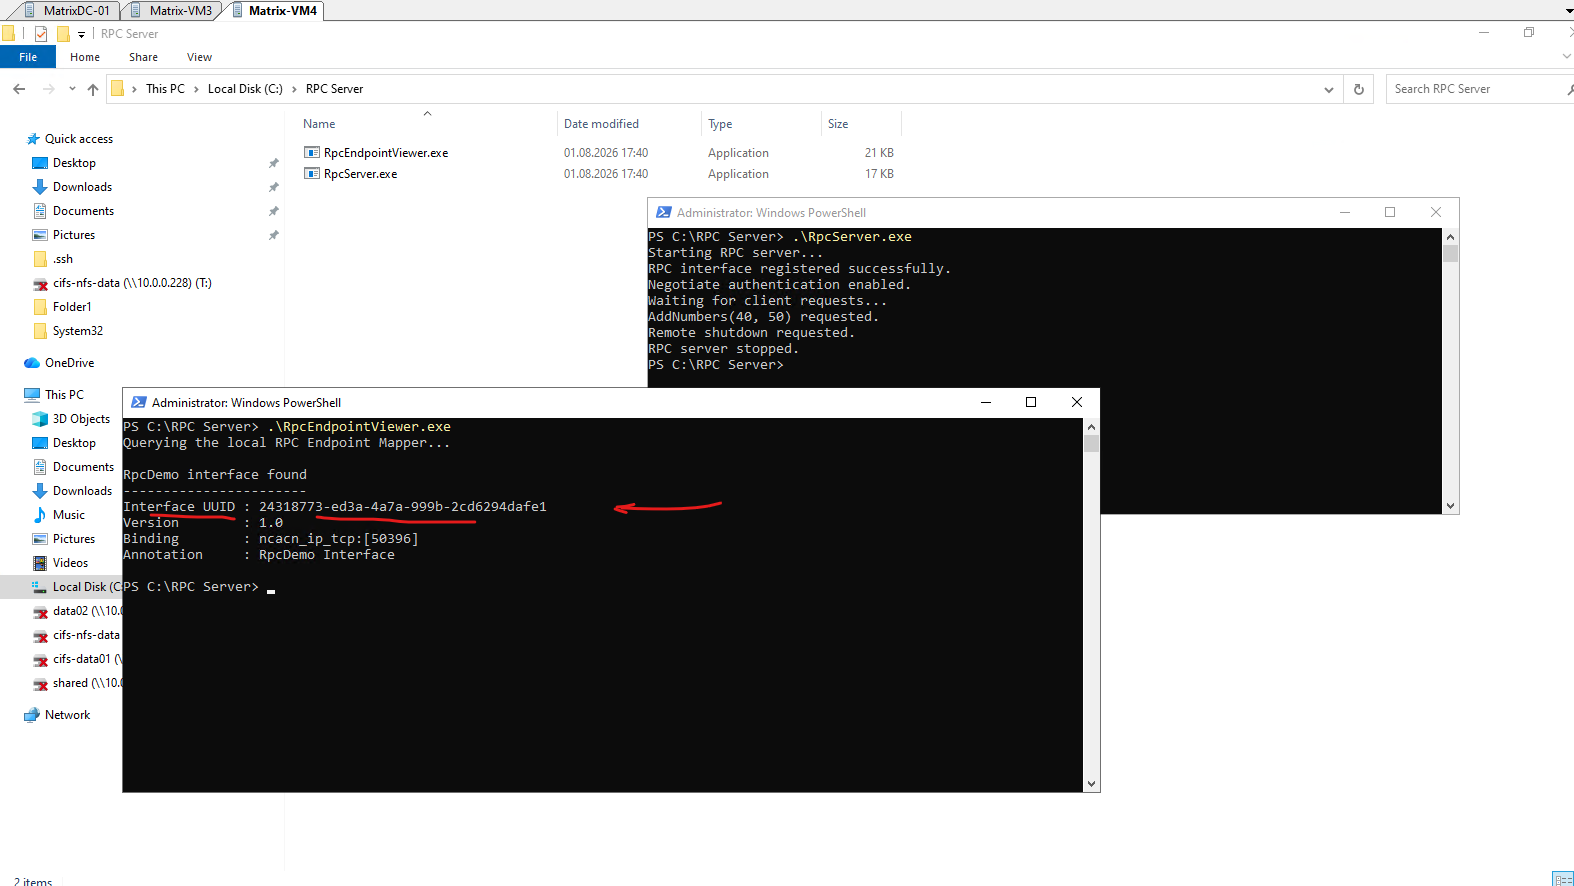
So next we filter for ip.addr == 10.0.0.142 && tcp.port == 50396 on the client.
After receiving the dynamically assigned endpoint (10.0.0.142:50396) from the Endpoint Mapper, the client establishes a new TCP connection to the RPC server.
Packets 3139–3141 show the standard TCP three-way handshake (SYN, SYN/ACK, ACK), which completes the transport-layer connection before any DCE/RPC messages are exchanged.
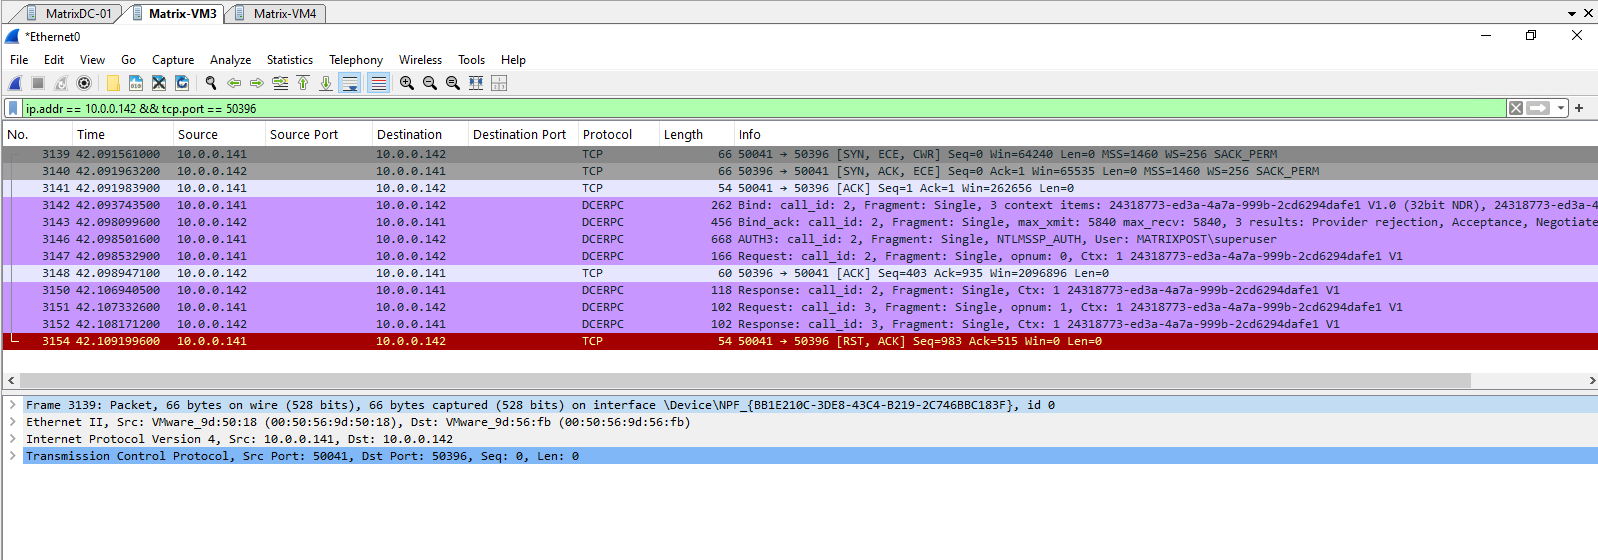
With the TCP connection established, the client initiates the DCE/RPC session by sending a Bind request (Packets 3142–3143). The server responds with a Bind Ack, confirming the negotiated protocol version, supported transfer syntaxes (NDR), and the RpcDemo interface.
In this packet, the client proposes the
RpcDemointerface identified by its UUID (24318773-ed3a-4a7a-999b-2cd6294dafe1), negotiates the supported transfer syntaxes (32-bit and 64-bit NDR), and requests the Bind Time Feature Negotiation.Since our application is configured to use Microsoft DCE/RPC authentication, the packet also carries the initial NTLMSSP Negotiate message. This begins the NTLM authentication handshake, during which the client advertises its supported authentication capabilities before the server responds with its challenge.
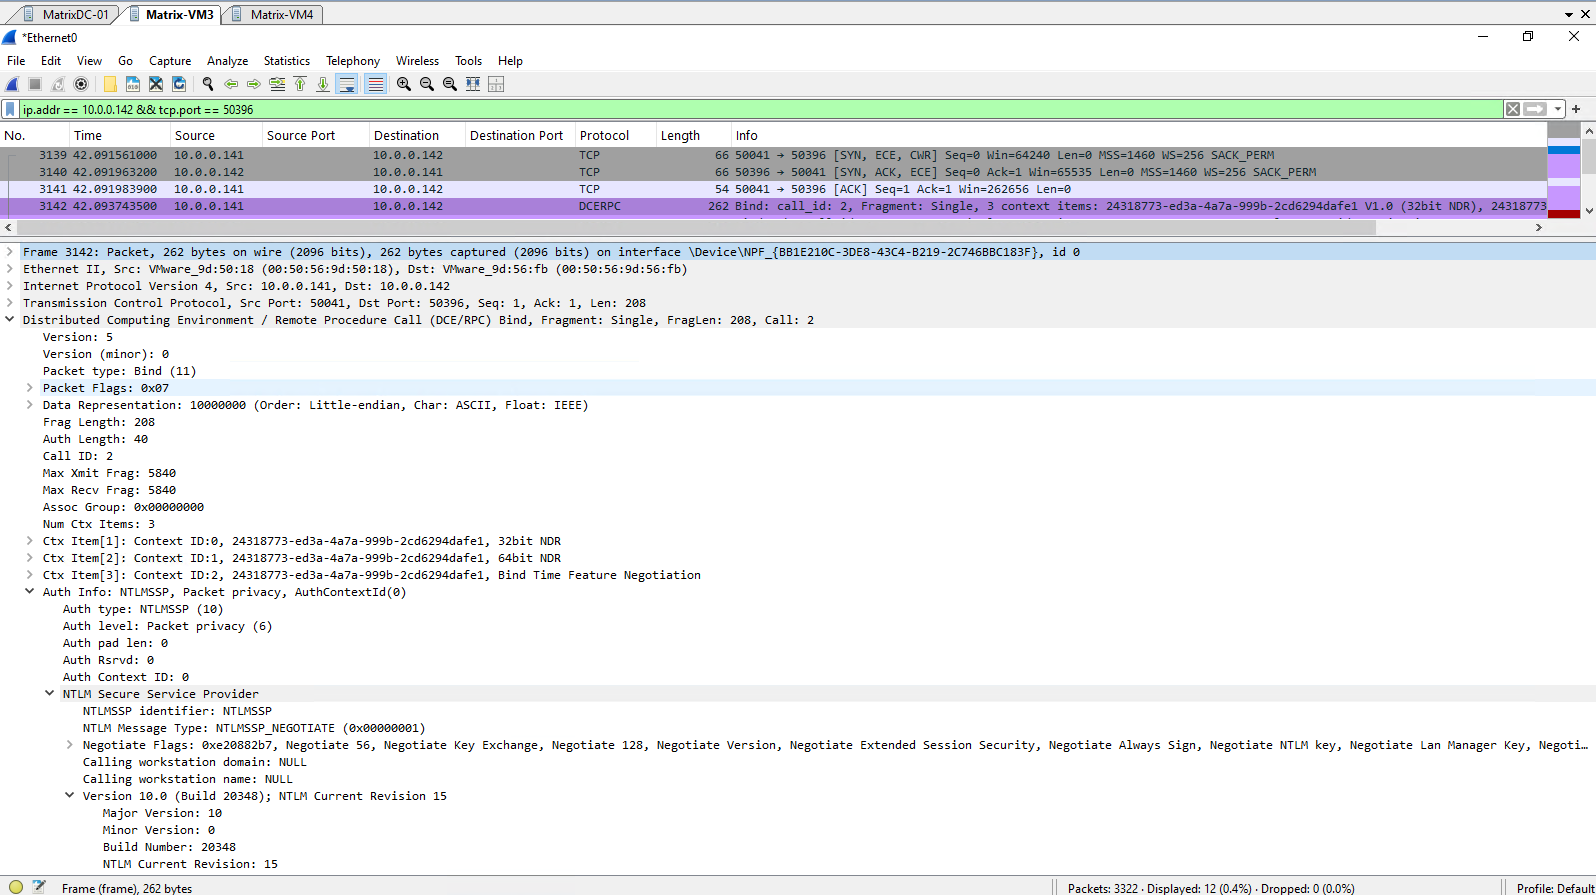
Before any remote procedures can be executed, the client authenticates using NTLMSSP, as required by Microsoft DCE/RPC (Packets 3146). Once the authentication exchange completes successfully, the session is ready to invoke remote procedures.
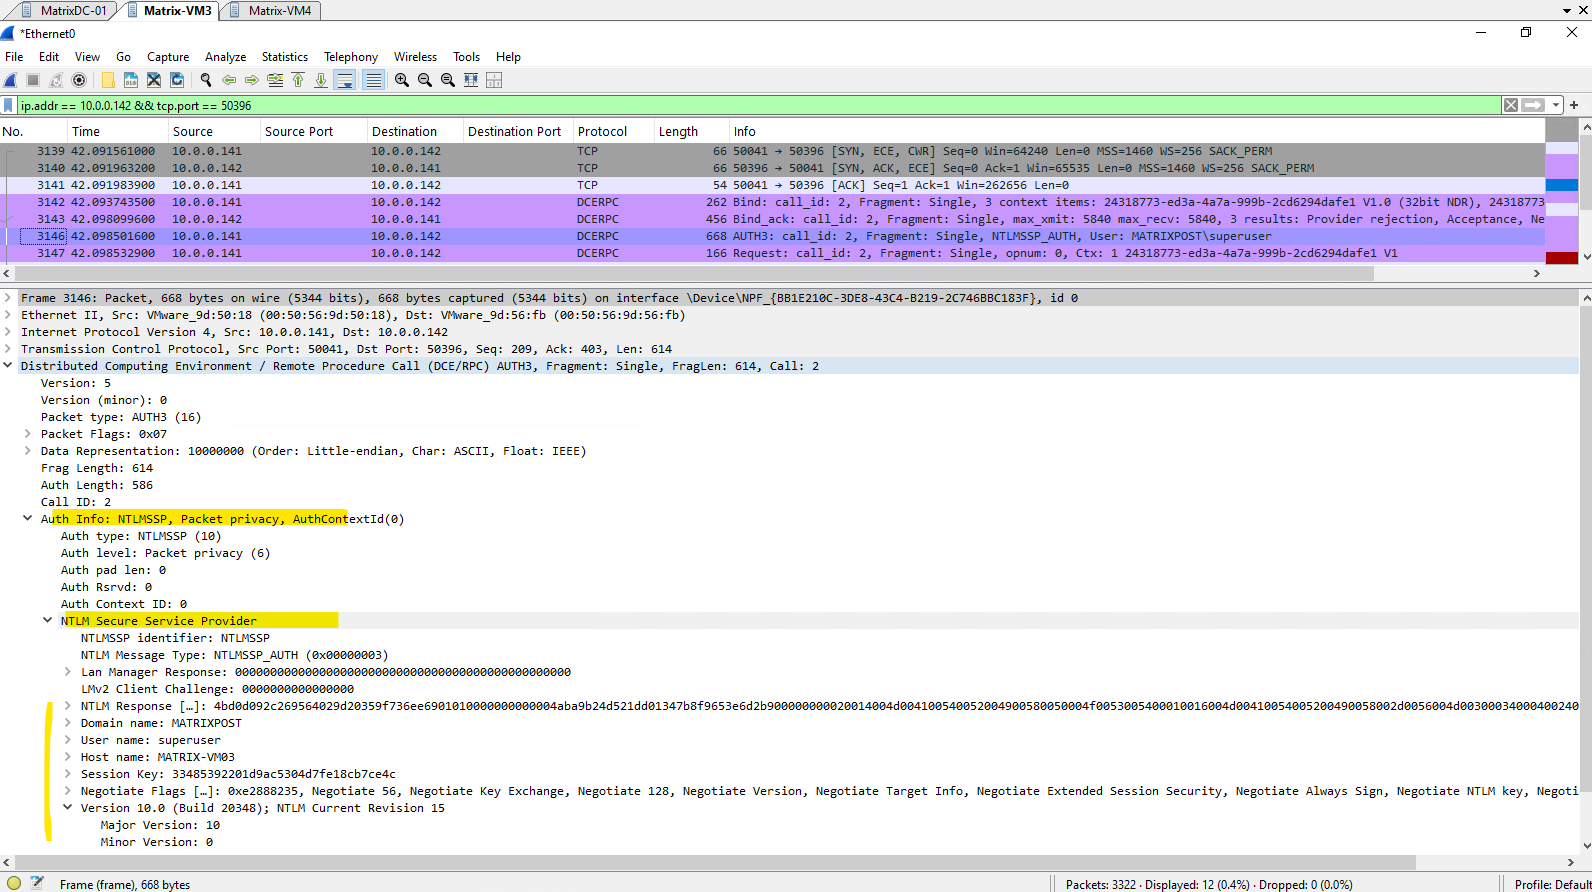
Finally, the client invokes the AddNumbers() and Shutdown() procedures. The server processes both requests, returns the corresponding responses, and the session is completed before the TCP connection is closed.
Once the DCE/RPC session has been established and the client has successfully authenticated, it can invoke remote procedures on the server. Packet 3147 contains the request to execute the
AddNumbers()procedure, which returns the calculated result in packet 3150. The client then invokes theShutdown()procedure in packet 3151, and the server confirms its successful execution in packet 3152, after which the RPC server terminates.
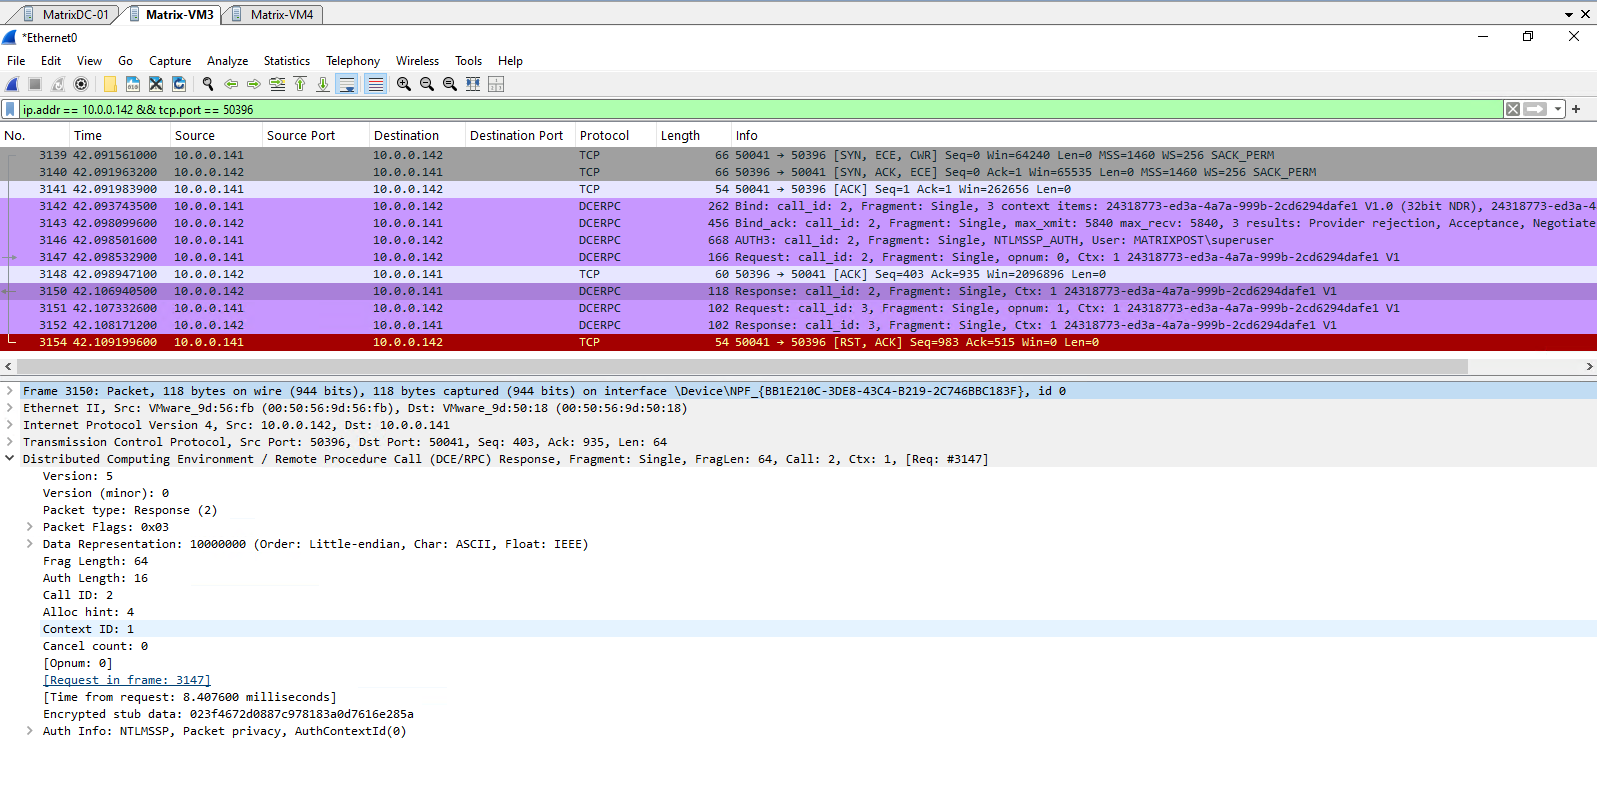
Although Wireshark correctly identifies these packets as DCE/RPC Requests and Responses, it cannot decode the procedure names or their parameters because our custom RpcDemo interface is unknown to the dissector. We can nevertheless correlate the packets with the client and server console output, which confirms that AddNumbers(40, 50) returned 90 before the Shutdown() procedure was executed.
Links
Remote Procedure Call (RPC)
https://en.wikipedia.org/wiki/Remote_procedure_callRPC-Modell
https://www.ibm.com/docs/en/aix/7.2.0?topic=call-rpc-modelRemote procedure call (RPC) – efficient communication in client-server architectures
https://www.ionos.com/digitalguide/server/know-how/what-is-a-remote-procedure-call/Distributed Computing Environment/Remote Procedure Call (DCE/RPC)
https://wiki.wireshark.org/DCE/RPCDCE/RPC
https://en.wikipedia.org/wiki/DCE/RPCONC and DCE
https://www.ibm.com/docs/en/cics-ts/6.x?topic=interfaces-onc-dce
