Google Cloud – Connect to Linux VMs using SSH OS Login
In my last post I was showing how to create a new Linux VM instance in Google Cloud and connect to using SSH Metadata. In this post we will see how to connect to by using SSH OS Login.
Google will recommend in most scenarios using the OS Login.
Access to VMs through OS Login
You can also use for OS Login-managed SSH connections the Google Cloud console, gcloud CLI or third party tools.
At the following Link you will see a short instruction about how to use them.
OS Login-managed SSH connections
https://cloud.google.com/compute/docs/instances/ssh?hl=en#os-login
When you enable OS Login for a VM, metadata SSH keys will be disabled.
So first I wanted to test if SSH Metadata really doesn’t work anymore.
Therefore I added a public SSH key to my instance-5 virtual Ubuntu machine where OS Login is enabled.
So I was still able to add SSH Keys under the Security and access section for the VM as shown below. For the public key I was using the username fred.
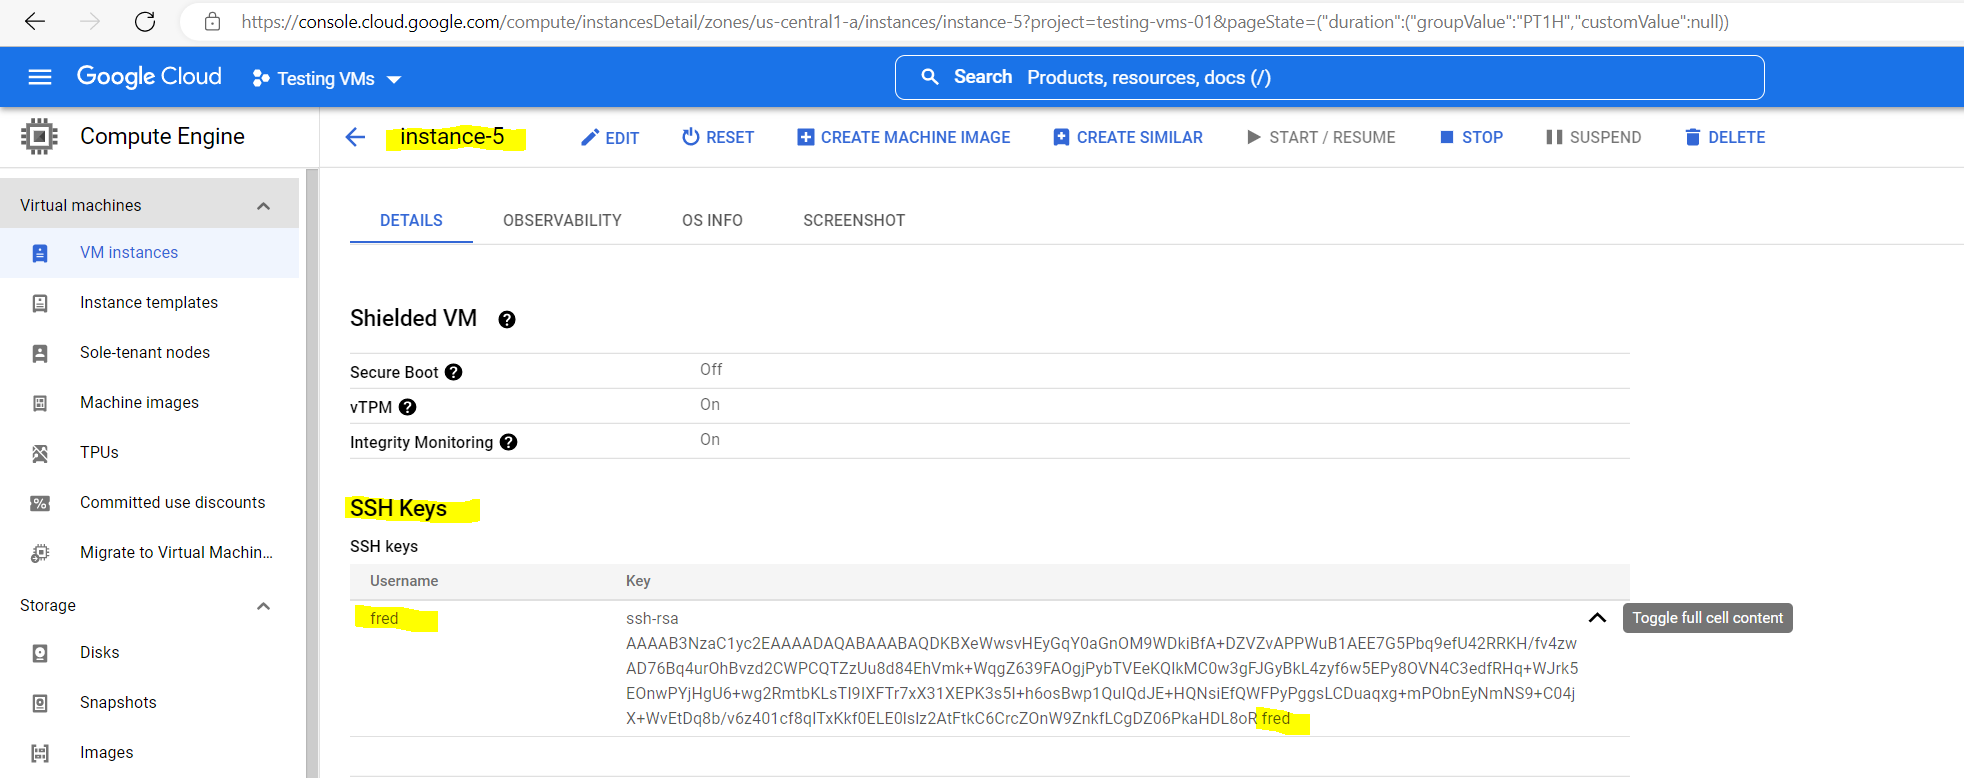
By default when OS Login is not enabled, after adding and saving the SSH Key to metadata, Compute Engine will create the user account and home directory including the .ssh directory on your Linux VM instance. Further the uploaded public key to metadata will be added to the authorized_keys file.
Compute Engine will also add the user to the google_sudoers group which itself is granted root permissions in the /etc/sudoers.d/google_sudoers file.
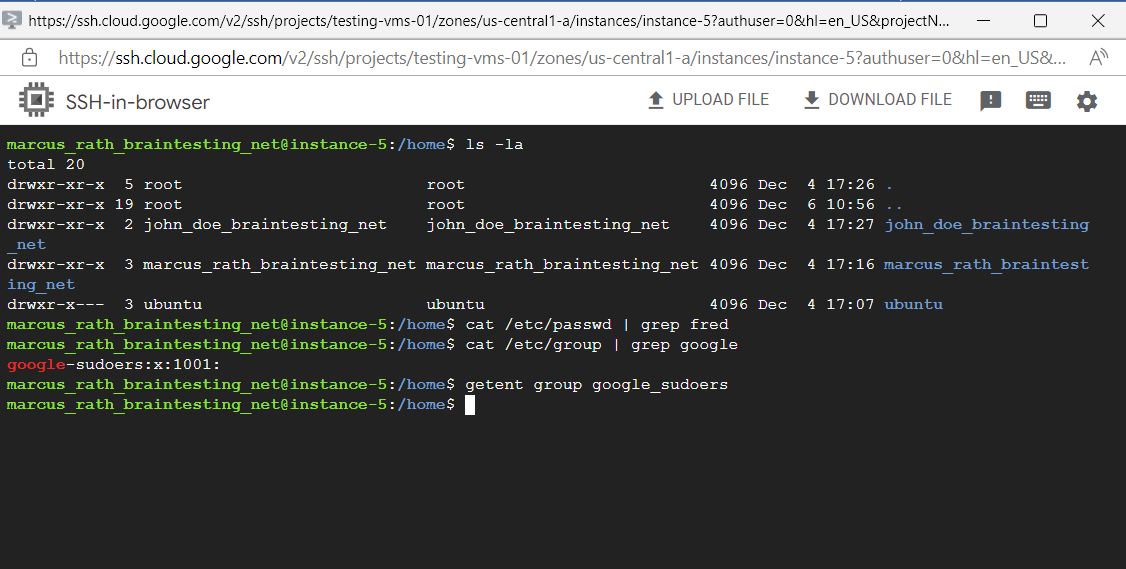
Now I will check on the VM instance if the home directory and user was created and what members in the google_sudoers group will be.
As you can see there is no home directory or user for my testuser fred created on the VM. Also you can see that the google_sudoers group doesn’t contain any members but created on the system.
Even the existing users like John Doe and me are not members in the google_sudoers group, the reason for is that the VM is enabled for OS Login and SSH keys stored in metadata are disabled.
Just for VMs where metadata SSH keys are enabled (by default if OS Login is not enabled), Compute Engine will add the user to the sudoers_group and therefore will have root permissions on the system.
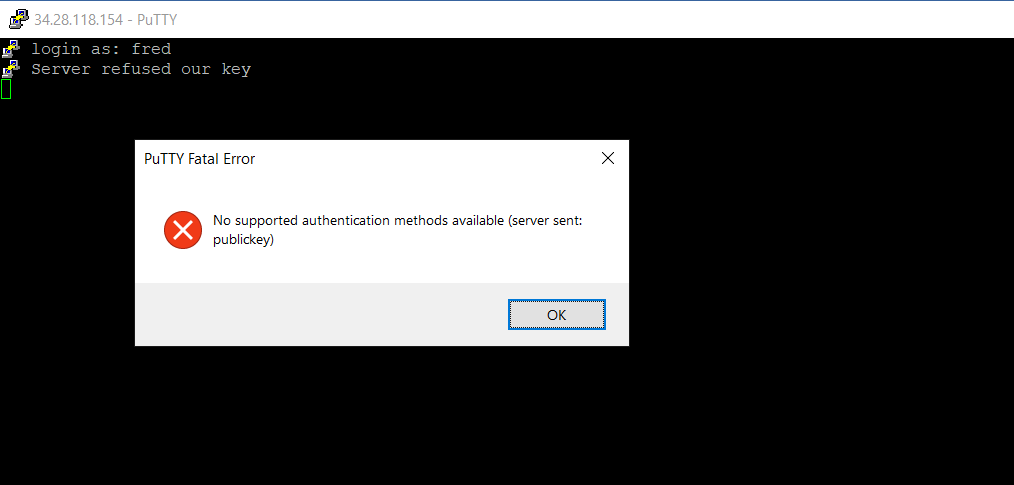
When I now will try to login by using the private SSH key, the key will get refused by the VM as expected.
So how does OS Login handle the SSH keys to connect to a Linux VM instance?
VMs that use OS Login accept SSH keys that are associated with your Google account. You can associate a public SSH key with your Google account using the gcloud CLI or using the OS Login API. If you’re an administrator for your organization, you can add SSH keys to user accounts using the Directory API.
When you add SSH keys to your Google account, Compute Engine generates a username for you by combining the username and domain from the email associated with your Google Account. For example, if your email address is cloudysanfrancisco@gmail.com, your username is cloudysanfrancisco_gmail_com. If you add an SSH key in a project that is outside of your organization, your username is prefixed with ext_, for example, ext_cloudysanfrancisco_gmail_com. Your organization administrator can customize your username using the Directory API. If you already have a username configured, Compute Engine uses that username when you add SSH keys.
Source: https://cloud.google.com/compute/docs/connect/add-ssh-keys#os-login
And how does OS Login works?
When OS Login is enabled, Compute Engine performs configurations on VMs and the Google accounts of OS Login users.
Google-provided public images include utilities and components to manage VM access. When you enable OS Login, the following components and configurations are setup on the VM:
- Configures an OpenSSH server with the AuthorizedKeysCommand option. This command retrieves the SSH keys associated with the Linux user account to authenticate the login attempt.
- Configures NSS (Name Service Switch) functionality to provide the OS Login user information to the operating system.
- Adds a set of Pluggable Authentication Modules (PAM) configurations to authorize the user login. PAM configurations perform IAM permission checks for login and administrative access. These PAM configurations also perform other tasks such as setting up the Linux user account’s home directory.
For more information about the OS Login components, review the OS Login GitHub page.
OS Login configures your Google account with POSIX information, including a username, when you do any of the following:
- Connect to an OS Login-enabled VM using the Google Cloud console
- Connect to an OS Login-enabled VM using the gcloud CLI
- Import a public SSH key using the gcloud CLI
- Import a public SSH key using the OS Login API
OS Login configures POSIX accounts with the following values:
- UID: a unique, randomly-generated POSIX-compliant user ID.
- Username: a username in the format of USERNAME_DOMAIN_SUFFIX. If the user is from a different Google Workspace organization than the one hosting their OS Login-enabled VMs, their username is prefixed with ext_. If the user is a service account, its username is prefixed with sa_.
Cloud Identity administrators can modify usernames and Google Workspace super administrators can change the username format to remove the domain suffix. - GID: a POSIX-compliant group ID that is the same as the UID.
- Home directory: the path to the user’s home directory.
Organization administrators can configure and update a user’s POSIX account information. For more information, see Modify user accounts using the Directory API.
Source: https://cloud.google.com/compute/docs/oslogin
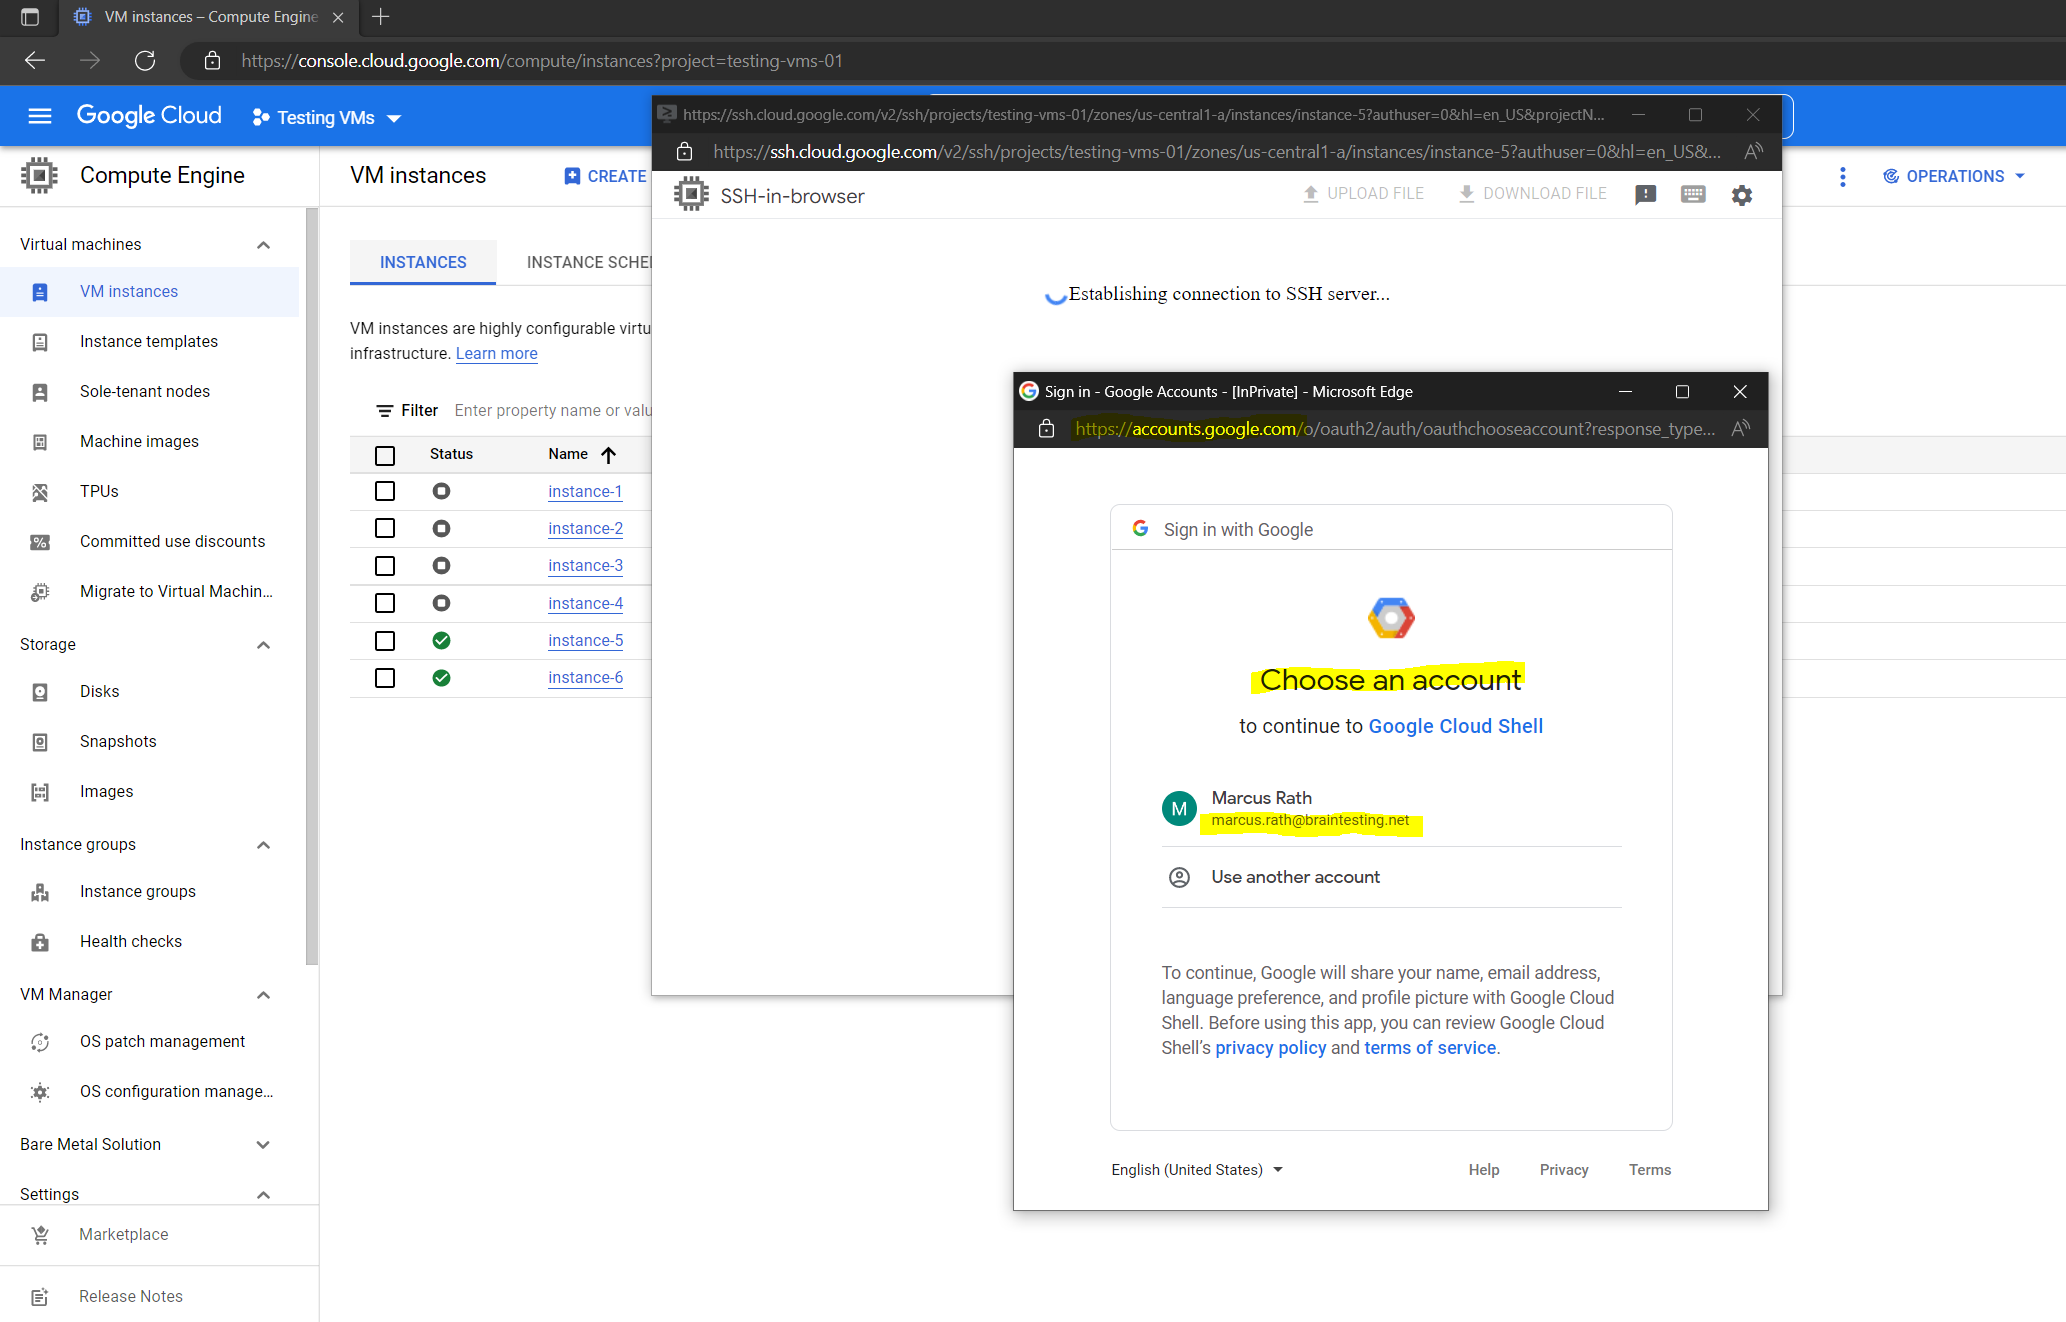
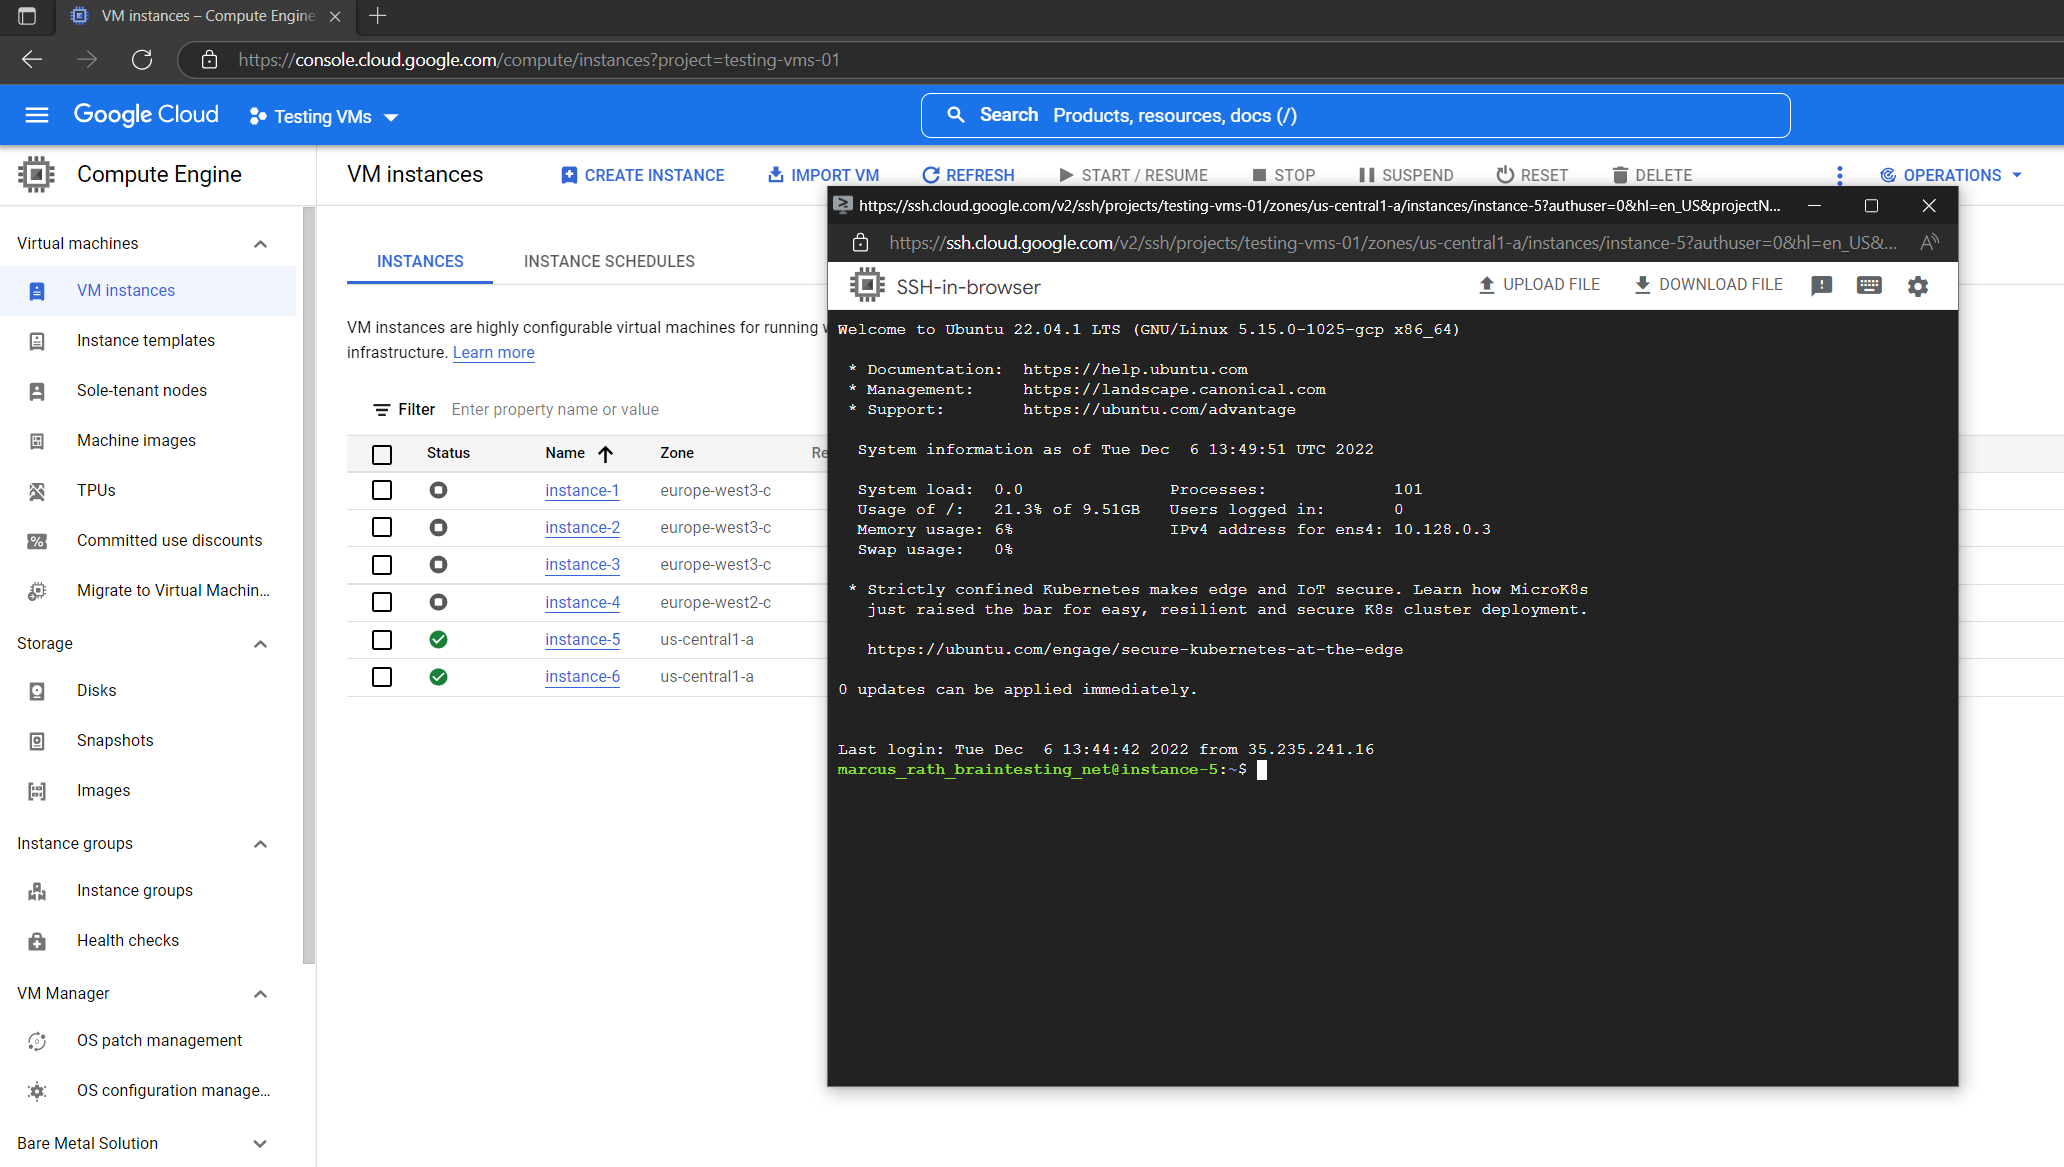
Connecting by using the Google Cloud Console (OS Login)
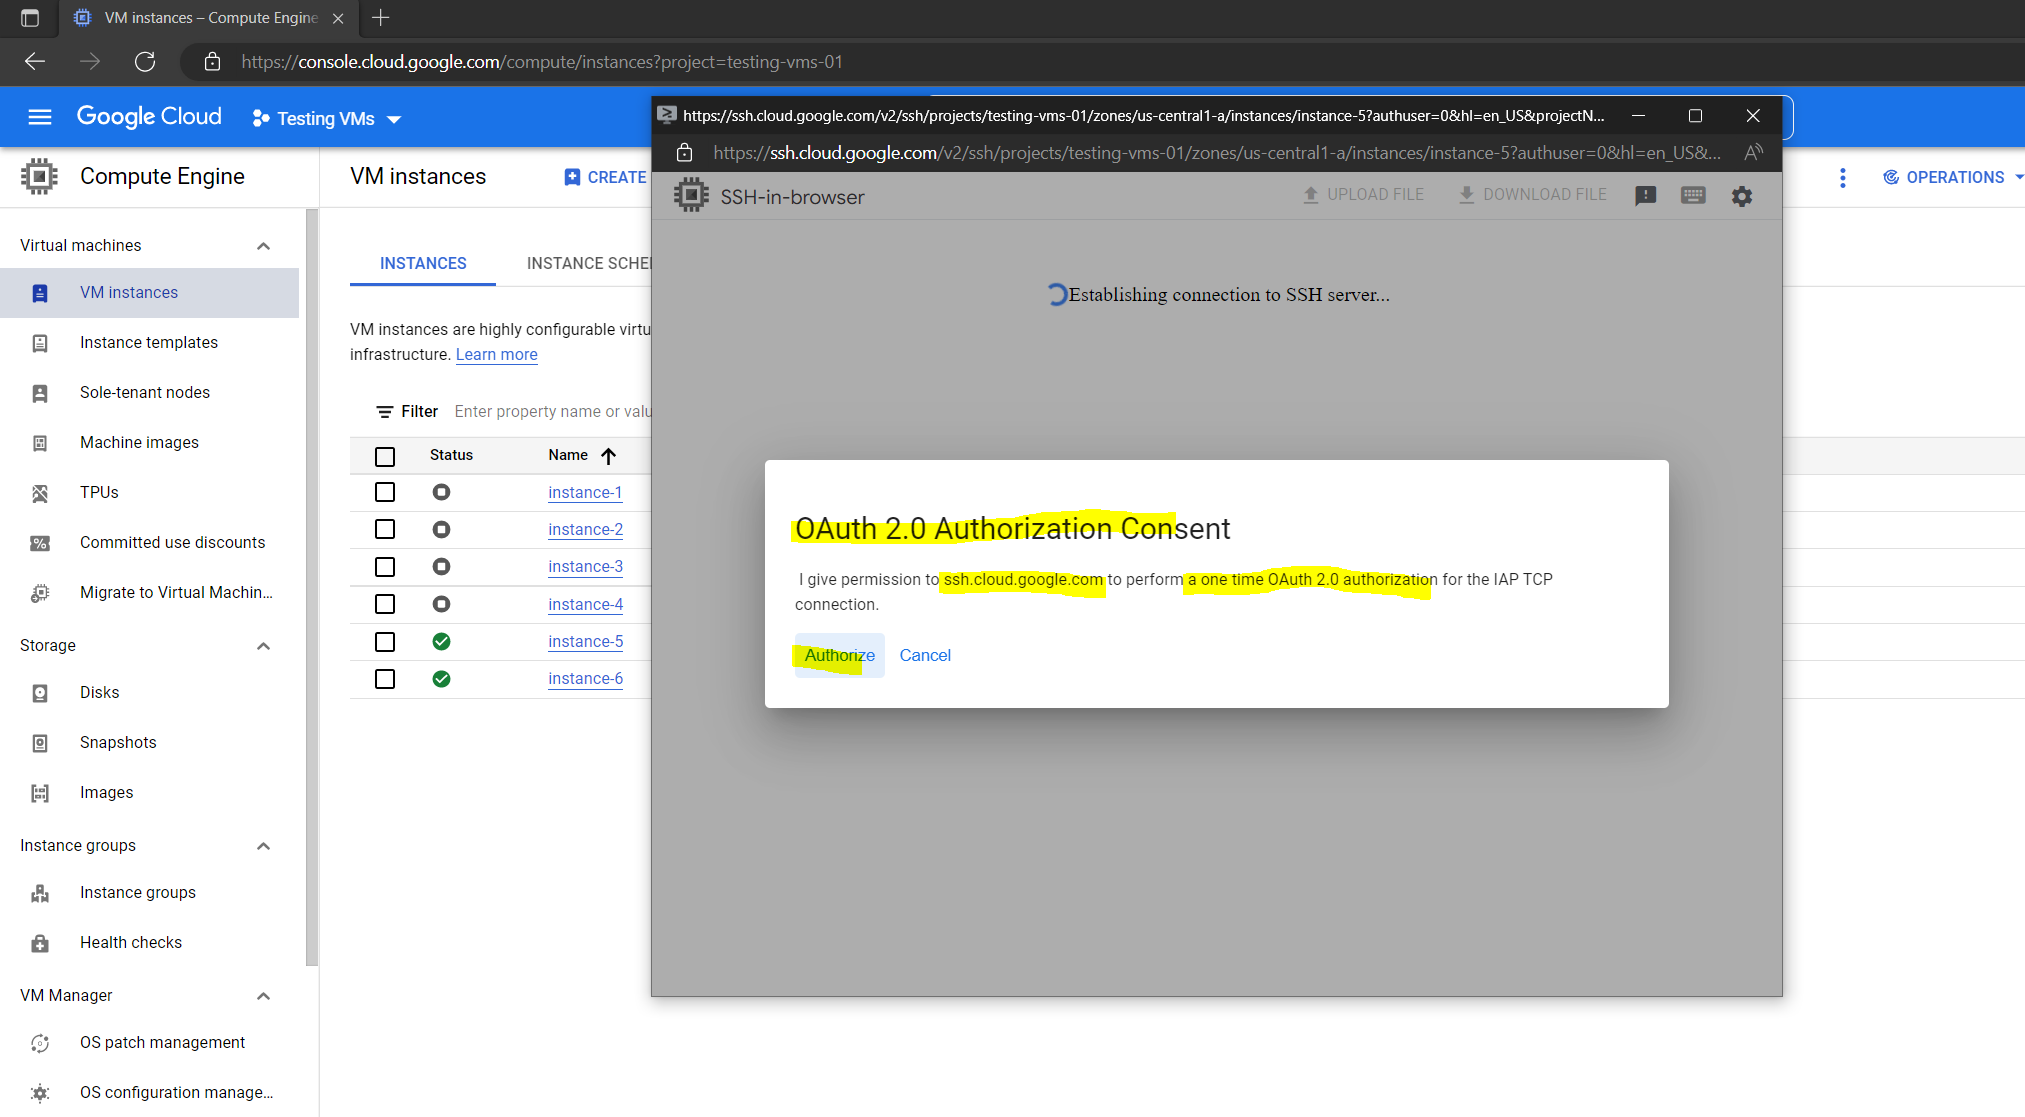
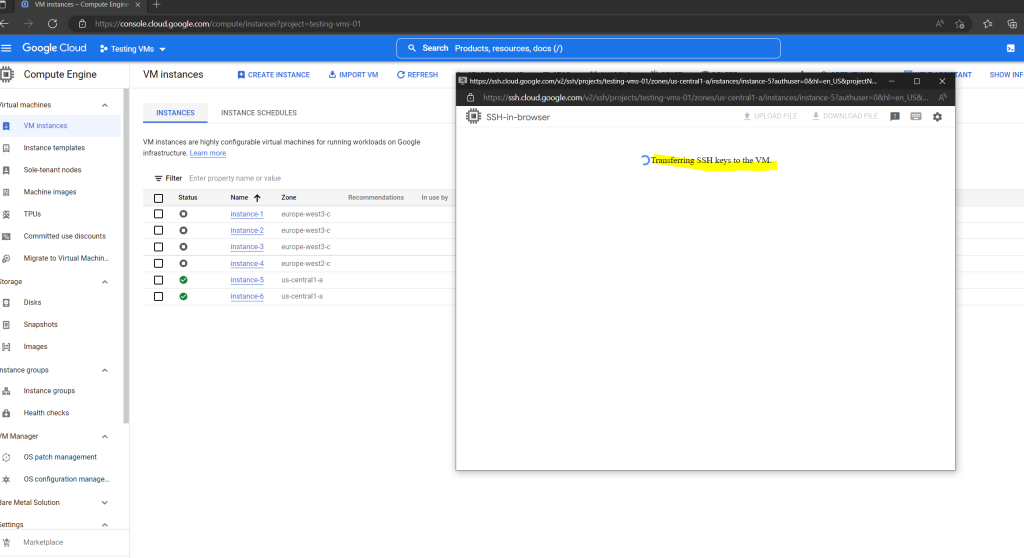
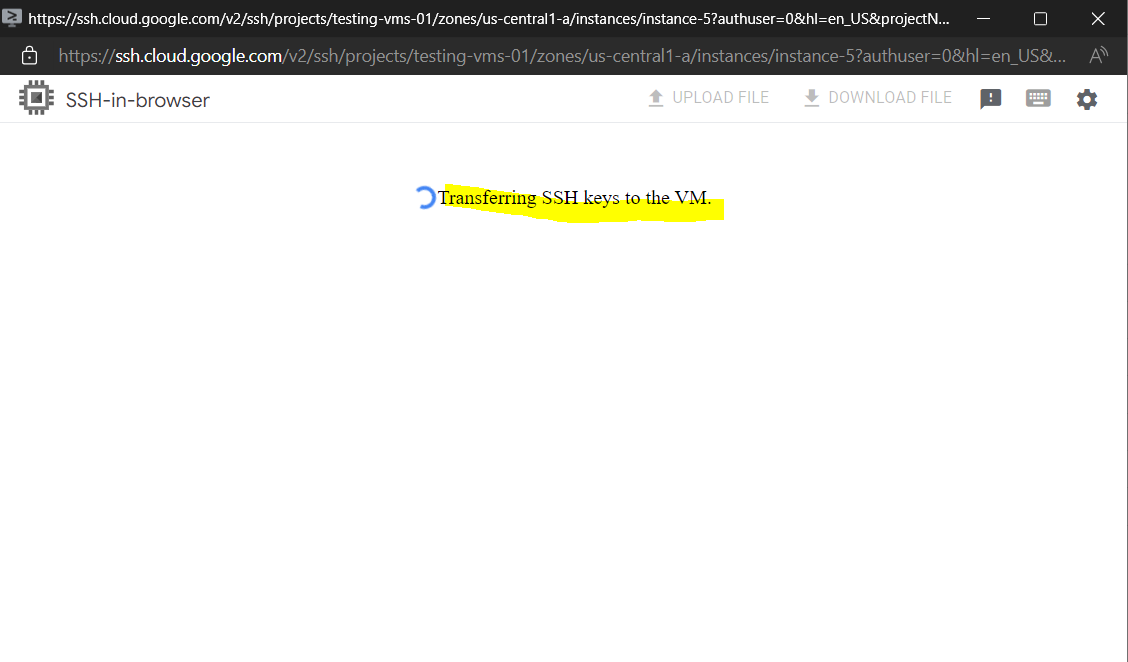
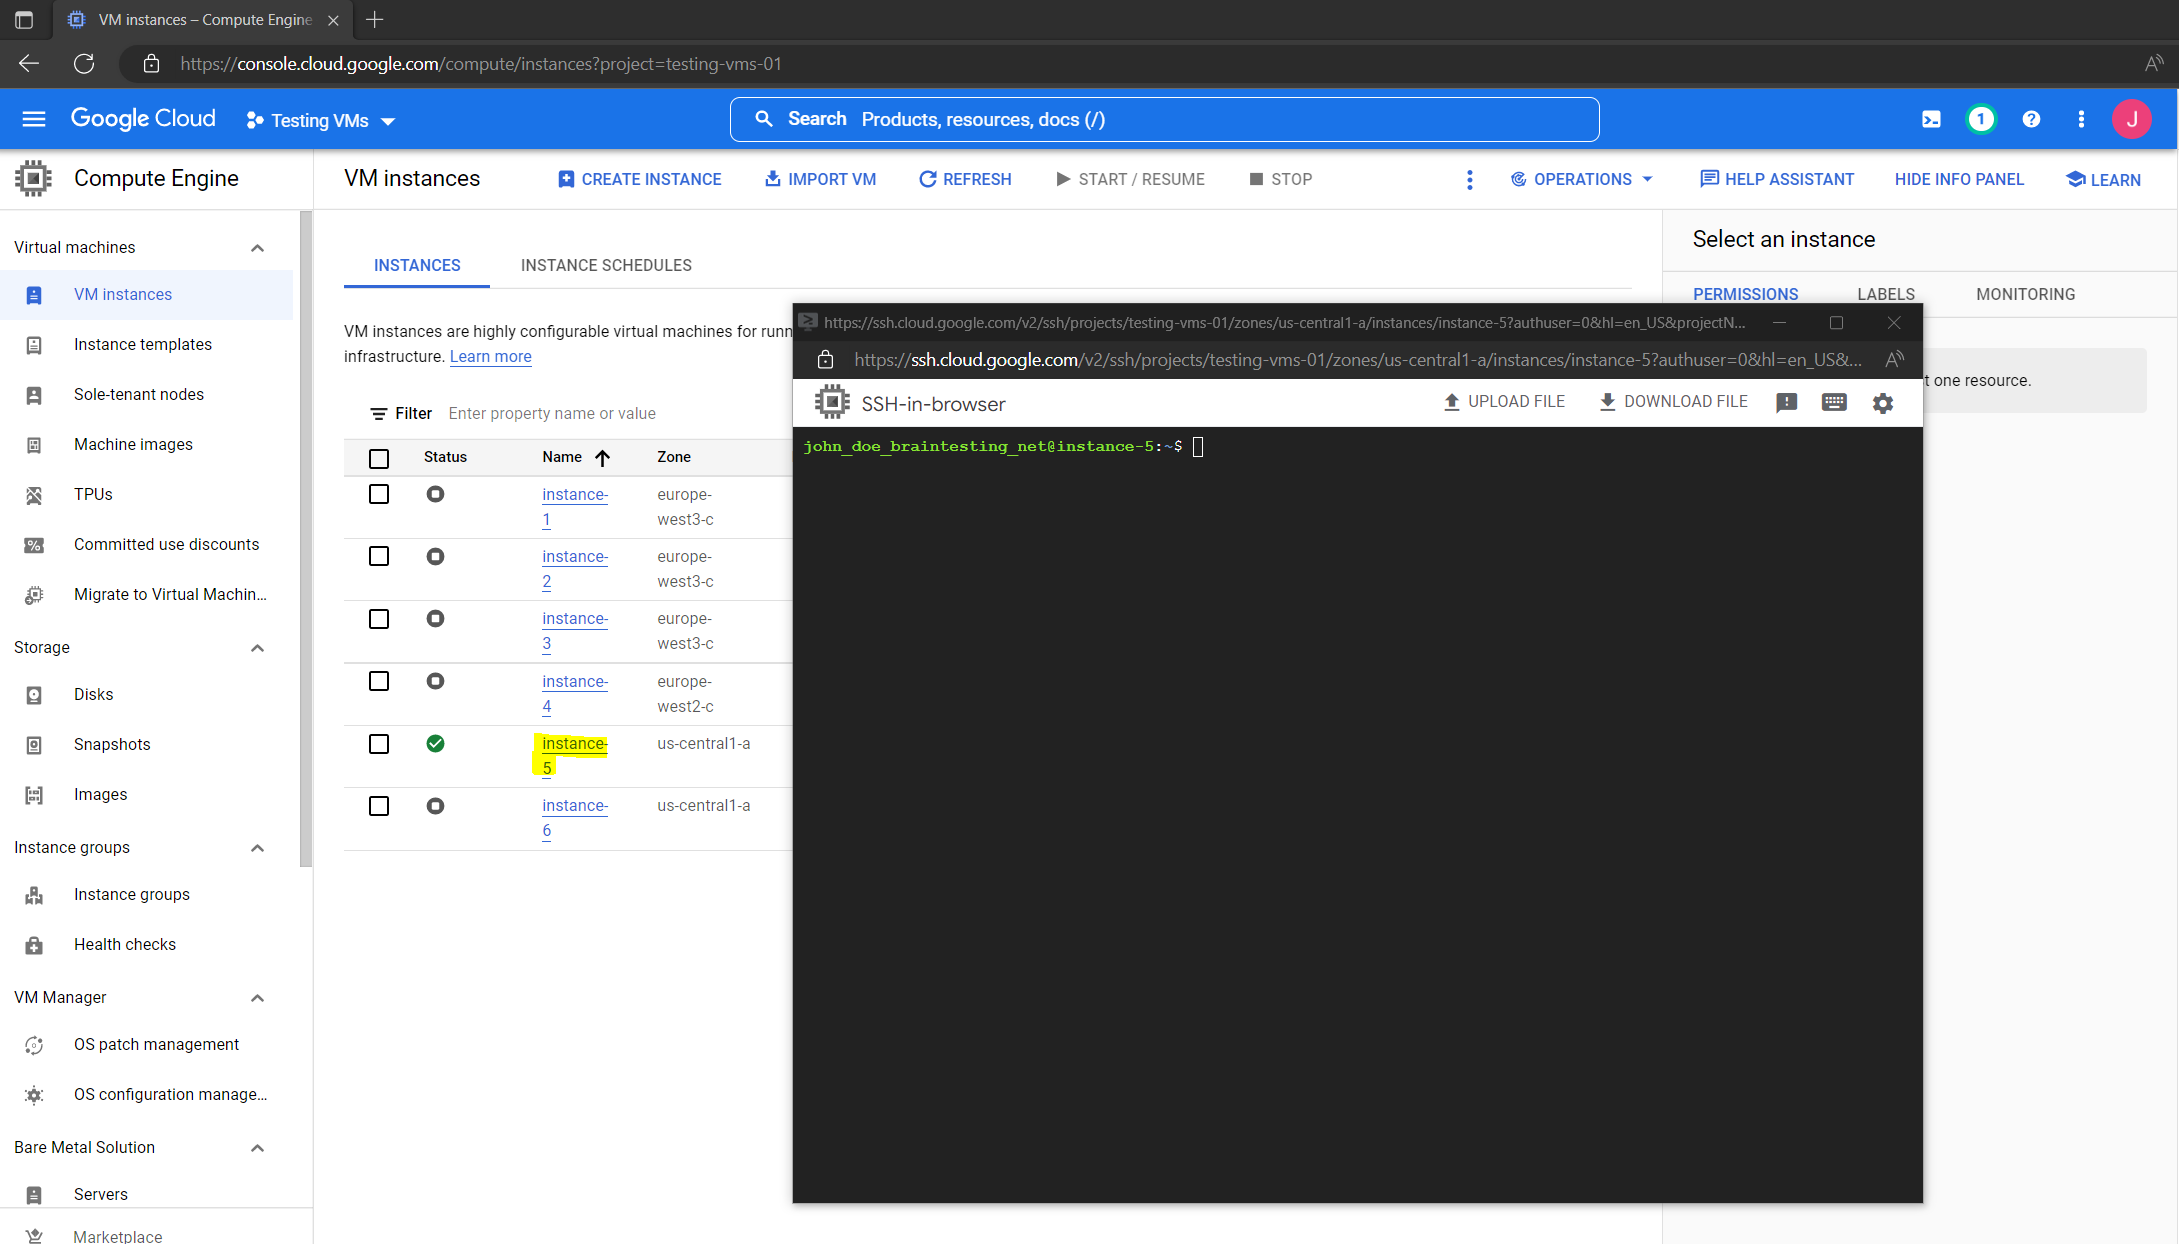
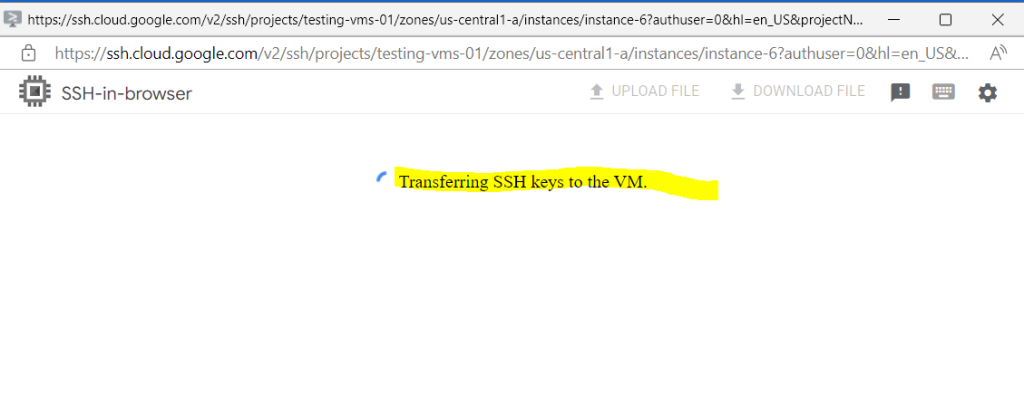
The easiest and fastest way is to use the Google Cloud Console. Below I will connect to my OS Login enabled Linux instance (instance-5) by using the browser window (SSH-in-browser).

The following steps doesn’t really looks fast 🙂
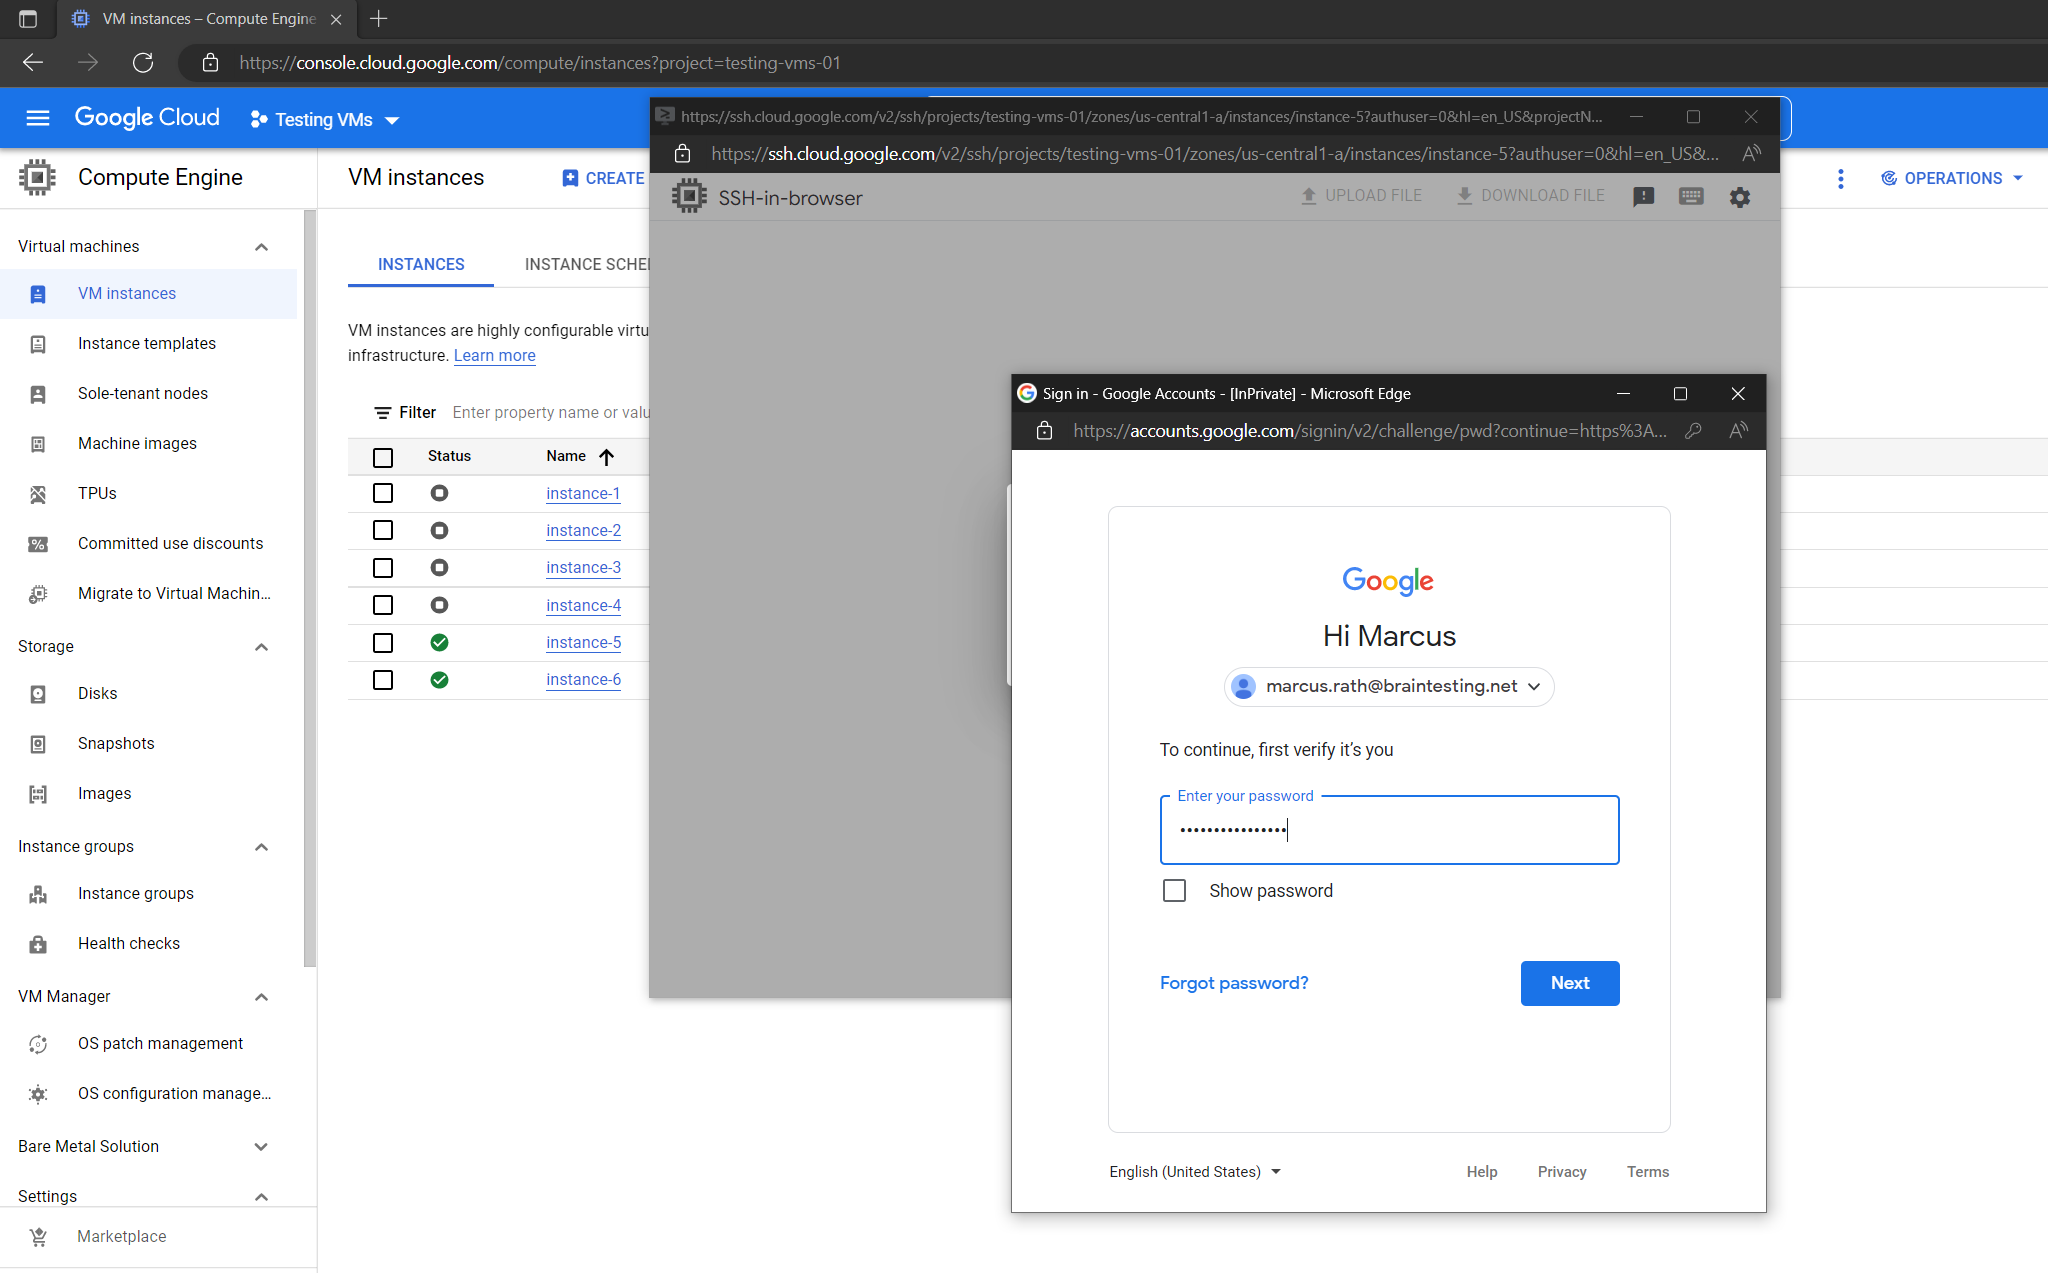
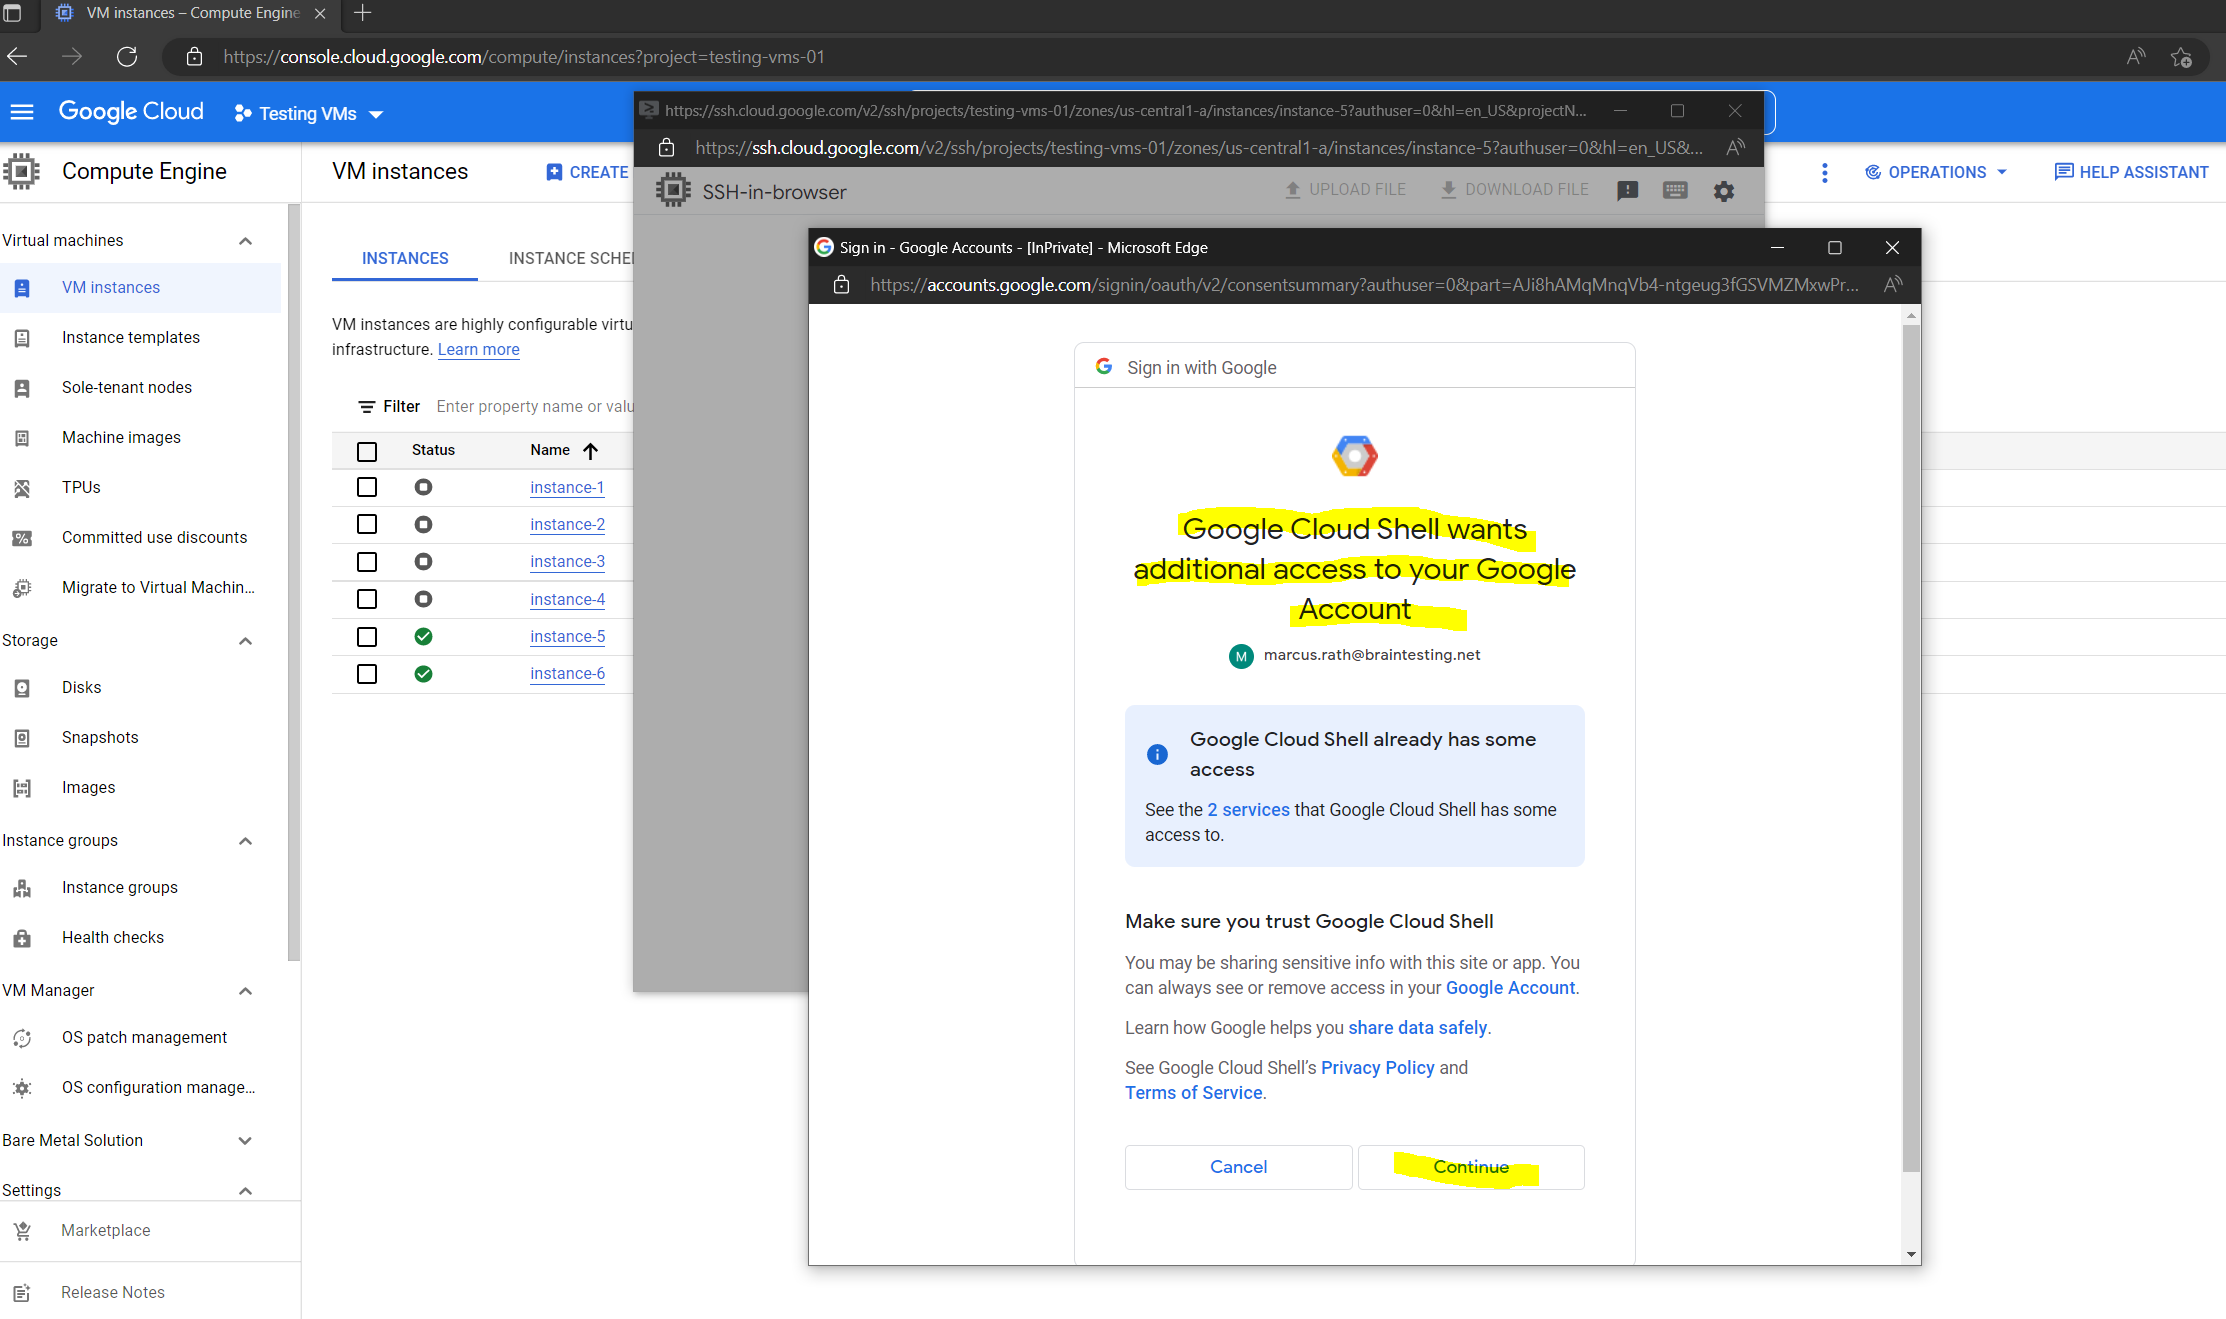
The reason for is that I started an incognito window to show the initial logon steps. These steps include the OAuth 2.0 Authorization flow and just needed to be executed the first time.
After you had successfully authenticated against the Google authorization server (https://accounts.google.com), you resp. your browser will get an access and refresh token in form of a cookie which will be used for further access.
More about OAuth 2.0 Authorization you can read in my following post.
Compute Engine sets a username and creates an ephemeral SSH key pair. Your username is the username set by your organization’s Cloud Identity or Google Workspace administrator. If your organization hasn’t configured a username for you, Compute Engine uses your Google Account email, in the following format:
USERNAME_DOMAIN_SUFFIX
Your public SSH key is stored in your browser session and in your Google Account.
Your private SSH key is stored in your browser session.Your SSH key has an expiry of three minutes. Three minutes after Compute Engine creates the key, you can’t use the SSH key to connect to the VM anymore.
Compute Engine resolves your provided username to your OS Login account in the VM using NSS service modules.
Compute Engine performs IAM authorization using PAM configurations, to ensure you have the required permissions to connect.
Compute Engine retrieves the SSH key from your user account and provides it to OpenSSH in the VM using the SSH authorized keys command
Compute Engine grants your connection.
So for the next logons the OAuth 2.0 access token will be used to authenticate your Google Account user and the following screen will immediatly appear after opening the browser window to connect to the VM.
The OAuth 2.0 Authorization is to logon to your Google Account and is not used for the SSH Login into the Linux VM instance itself.
OS Login ties your Linux user account to your Google identity.
Connecting by using the Google Cloud CLI (OS Login)
To connect using the CLI and glcoud command you need to enter the following command.
gcloud compute ssh --project=<PROJECT_ID> --zone=<ZONE> <VM_NAME>
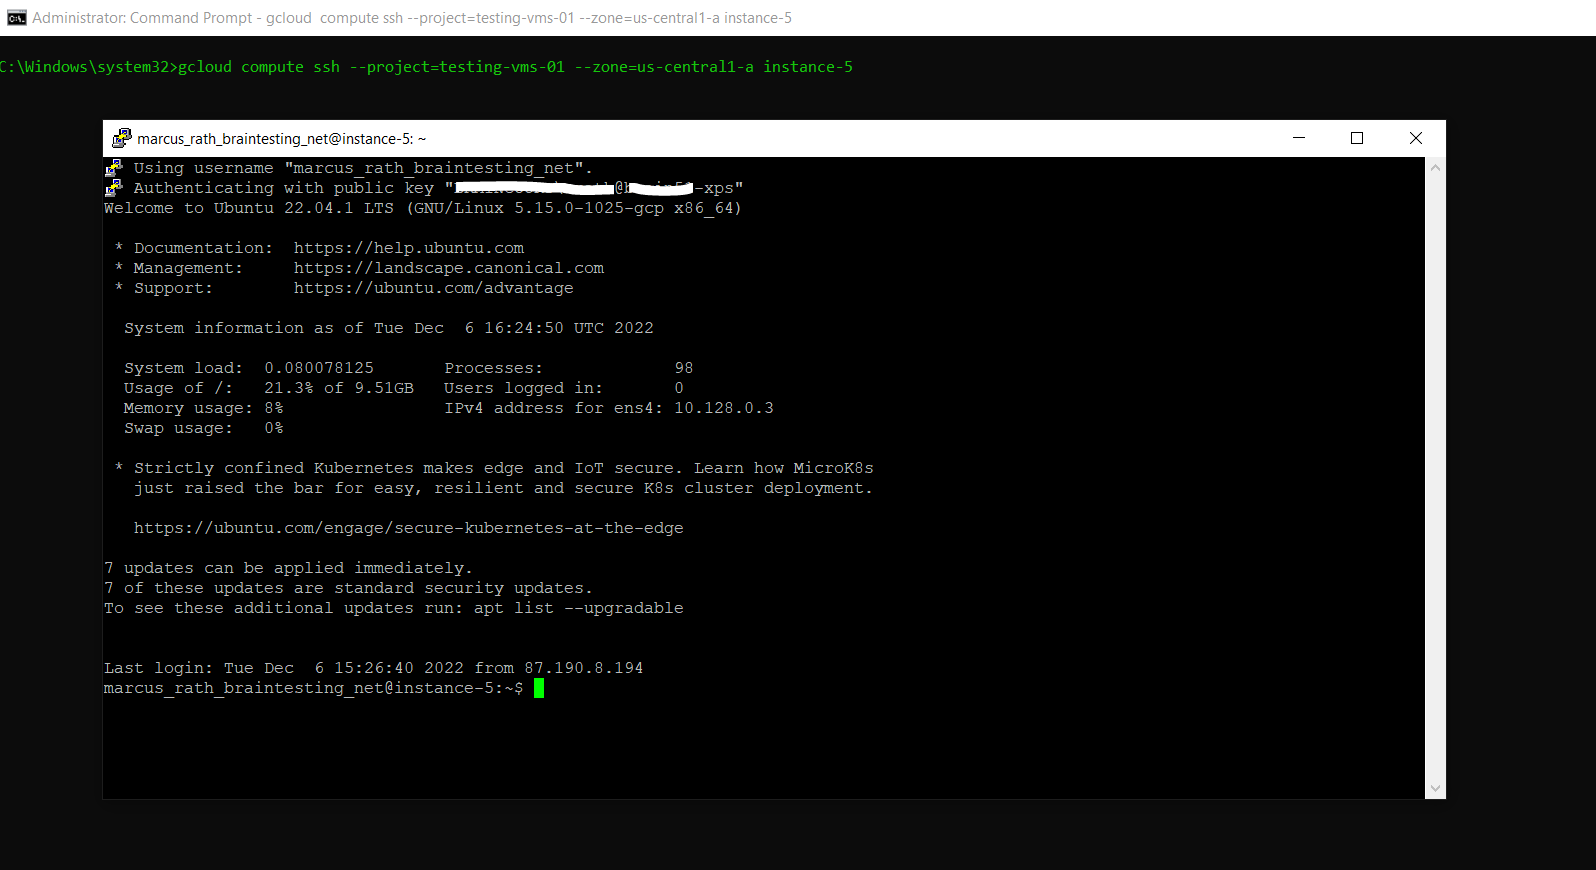
When you connect to VMs using the gcloud CLI, Compute Engine creates a persistent SSH key for you.
Your username is the username set by your organization’s Cloud Identity or Google Workspace administrator. If your organization hasn’t configured a username for you, Compute Engine uses your Google Account email, in the following format:
USERNAME_DOMAIN_SUFFIX
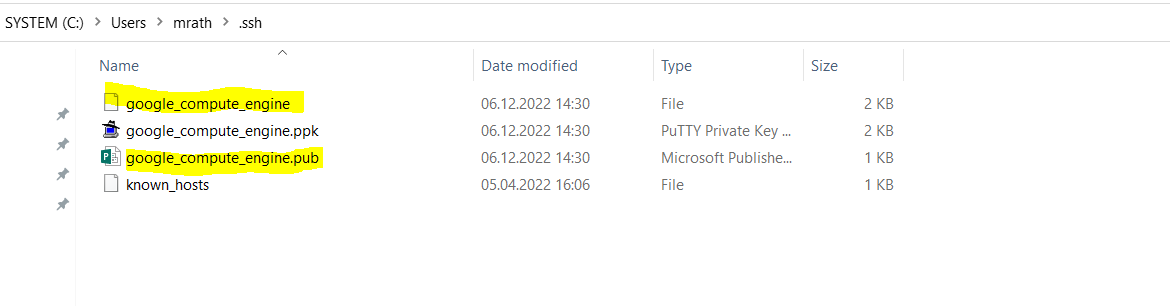
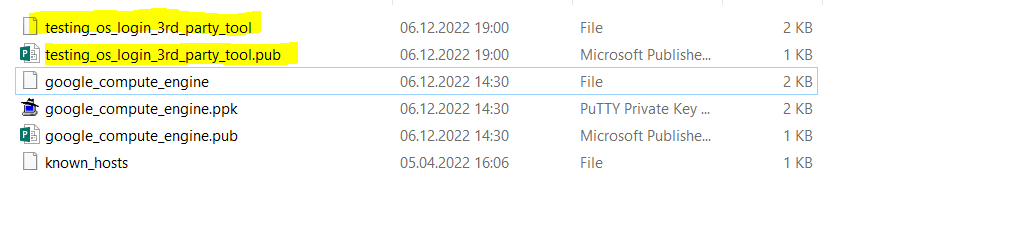
You private SSH key is stored on your local machine in the google_compute_engine file. As you can see in the screenshot below, also the from Compute Engine generated public key will be stored here but not used for futher processing. Compute Engine will store the public key in your Google Account.
Your SSH key doesn’t have an expiry. It is used for all future SSH connections you make, unless you configure a new key.
Compute Engine resolves your provided username to your OS Login account in the VM using NSS service modules.
Compute Engine performs IAM authorization using PAM configurations, to ensure you have the required permissions to connect.
Compute Engine will retrieve the public SSH key from your user account and provides it to OpenSSH in the VM using the SSH authorized keys command.
Compute Engine grants your connection
Connecting by using 3rd party tools – PuTTY (OS Login)
If you connect to VMs without using the Google Cloud console or the gcloud CLI, like using PuTTY, you must perform some configurations yourself.
Don’t be confused that when using gcloud CLI also a PuTTY session will get opened. As already mentioned in the Metadata-managed SSH connections section.
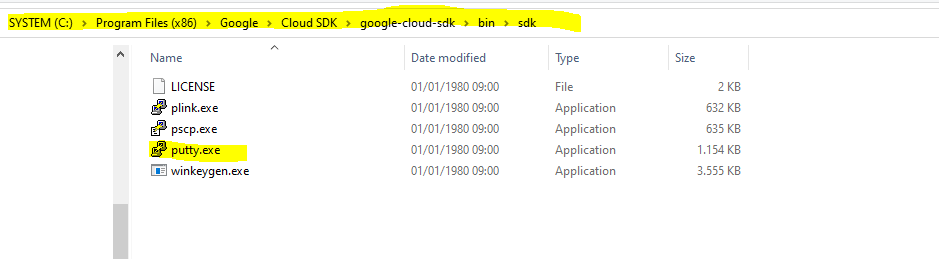
In case you will using a Windows Computer, whether putty is installed or not, the Google Cloud CLI will launch putty when executing the gcloud compute ssh command as shown below.
The reason for is that recent releases of Google Cloud SDK for Windows come with prepackaged putty executables as shown below.
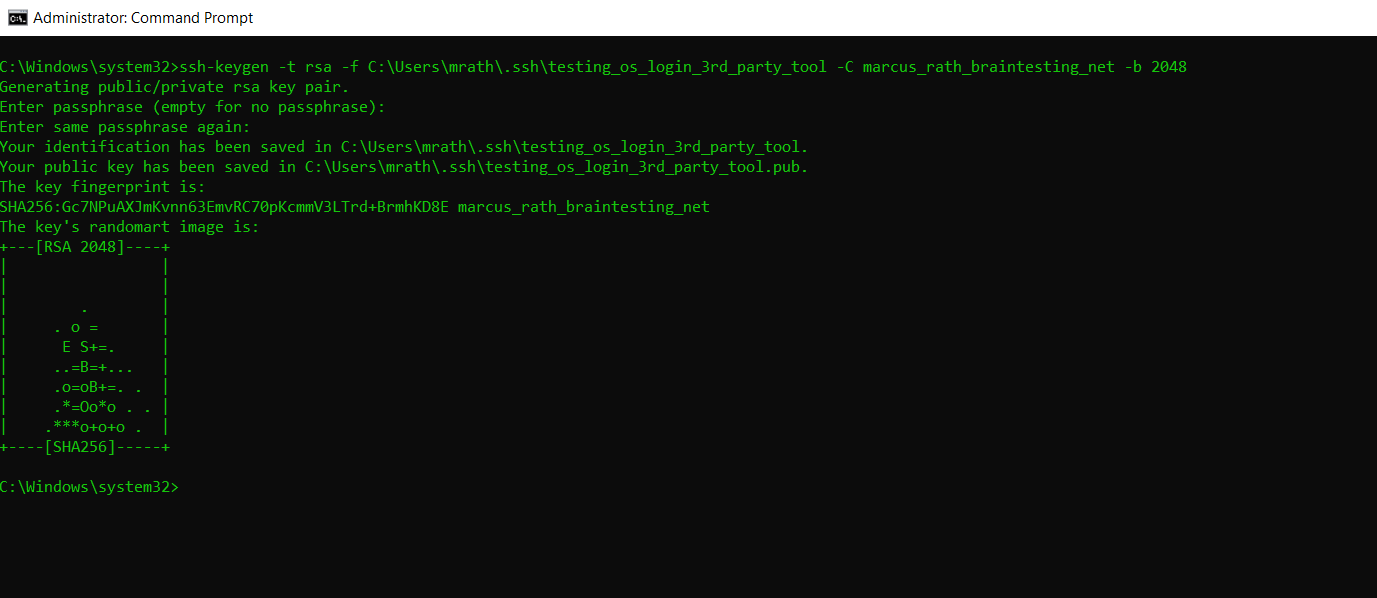
Create a new SSH key pair.
Create SSH keys
https://cloud.google.com/compute/docs/connect/create-ssh-keys
ssh-keygen -t rsa -f C:UsersWINDOWS_USER.sshKEY_FILENAME -C USERNAME -b 2048
WINDOWS_USER: your username on the Windows machine.
KEY_FILENAME: the name for your SSH key file.
For example, a filename of my-ssh-key generates a private key file named my-ssh-key and a public key file named my-ssh-key.pub.
USERNAME: your username on the VM. For example, cloudysanfrancisco, or cloudysanfrancisco_gmail_com.For Linux VMs, the USERNAME can’t be root, unless you configure your VM to allow root login. For more information, see Connecting to instances as the root user.
For Windows VMs that use Active Directory (AD), the username must be prepended with the AD domain, in the format of DOMAIN. For example, the user cloudysanfrancisco within the ad.example.com AD has a USERNAME of examplecloudysanfrancisco.
ssh-keygen saves your private key file to C:UsersWINDOWS_USER.sshKEY_FILENAME and your public key file to C:UsersWINDOWS_USER.sshKEY_FILENAME.pub.
The ssh-keygen command is built in in OpenSSH for Windows.
https://man.openbsd.org/ssh-keygen
OpenSSH is the open-source version of the Secure Shell (SSH) tools used by administrators of Linux and other non-Windows for cross-platform management of remote systems. OpenSSH has been added to Windows (as of autumn 2018), and is included in Windows Server and Windows client.
Source: https://learn.microsoft.com/en-us/windows-server/administration/openssh/openssh_overview
Now Upload your created public SSH key to your OS Login profile. See Add keys to VMs that use OS Login for details.
VMs that use OS Login accept SSH keys that are associated with your Google account. You can associate a public SSH key with your Google account using the gcloud CLI or using the OS Login API. If you’re an administrator for your organization, you can add SSH keys to user accounts using the Directory API.
When you add SSH keys to your Google account, Compute Engine generates a username for you by combining the username and domain from the email associated with your Google Account. For example, if your email address is cloudysanfrancisco@gmail.com, your username is cloudysanfrancisco_gmail_com. If you add an SSH key in a project that is outside of your organization, your username is prefixed with ext_, for example, ext_cloudysanfrancisco_gmail_com. Your organization administrator can customize your username using the Directory API. If you already have a username configured, Compute Engine uses that username when you add SSH keys.
Source: https://cloud.google.com/compute/docs/connect/add-ssh-keys#os-login
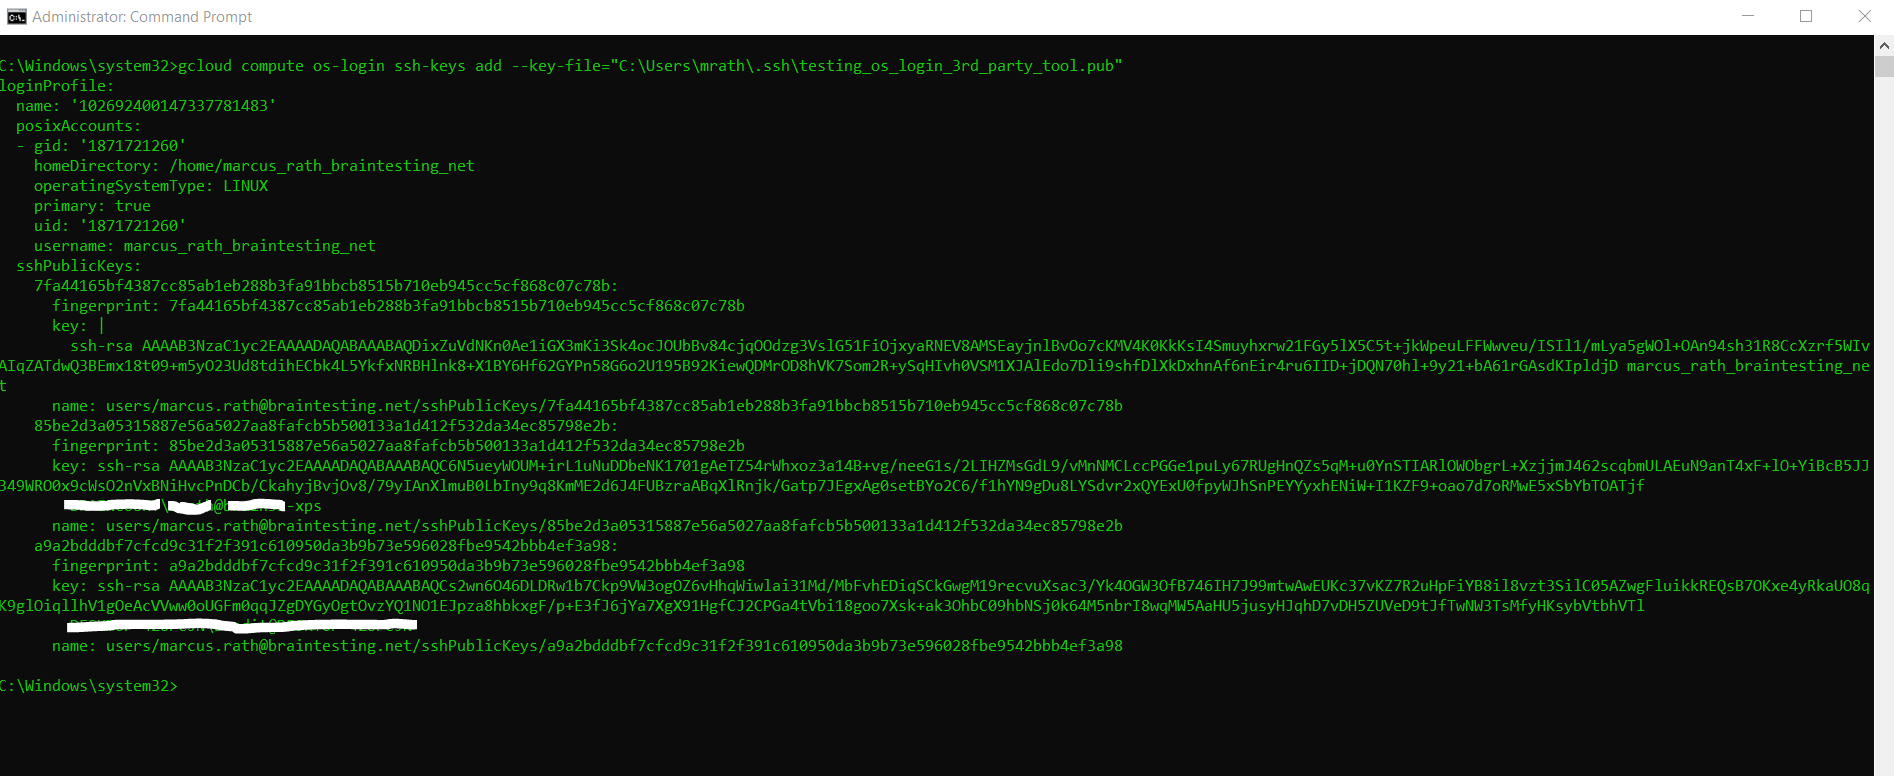
To add a public SSH key to your account use the gcloud compute os-login ssh-keys add command:
key-file –> Path to your public key file
project –> Optional: a project where you intend to use your SSH key. Specify this field to use your SSH key in a project outside of your organization, or you are not a member of a Cloud Identity organization
ttl –> Optional the expiration time for the SSH key
For example, if you specify 30m the SSH key expires after 30 minutes.
gcloud compute os-login ssh-keys add --key-file="C:Usersmrath.sshtesting_os_login_3rd_party_tool.pub"
If you want to remove the key from the OS Login profile, run the followin
gcloud compute os-login ssh-keys remove
https://cloud.google.com/sdk/gcloud/reference/compute/os-login/ssh-keys/remove
gcloud compute os-login ssh-keys remove --key-file="C:Usersmrath.sshtesting_os_login_3rd_party_tool.pub"
Compute Engine stores your key in your Google Account.
Compute Engine configures your username in the default format: USERNAME_DOMAIN_SUFFIX
You optionally set a username with the Google Workspace Admin SDK Directory API.
Now I can try to connect to the VM using PuTTY directly as shown below.
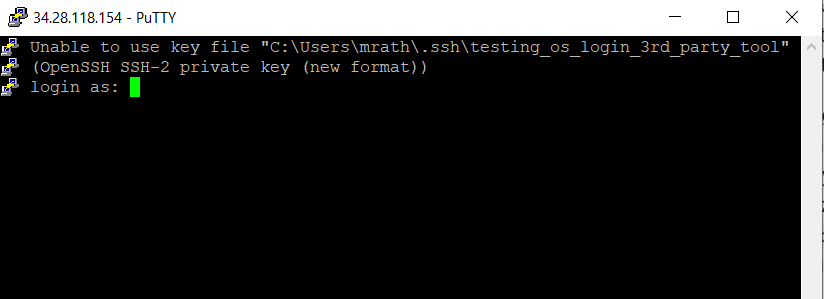
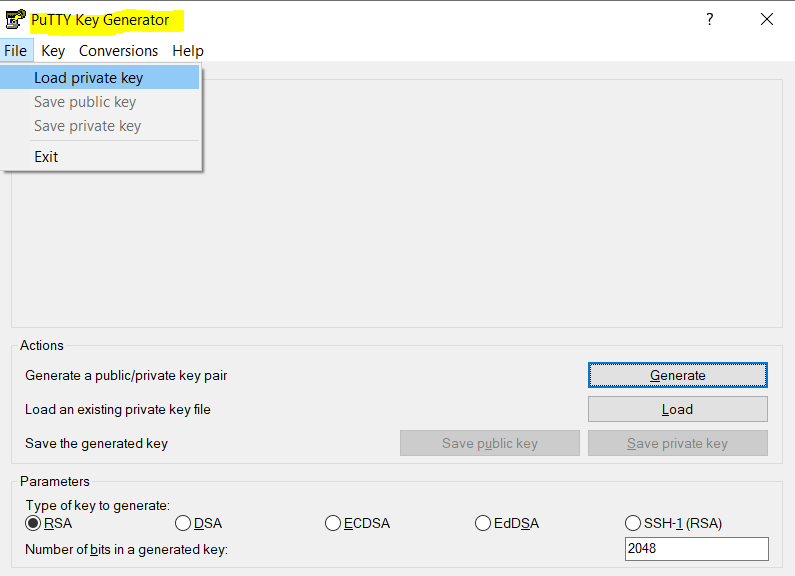
We first need to convert the SSH private key in PuTTYgen to use is with PuTTY.
PuTTY doesn’t support the SSH private key format created by the ssh-keygen tool from the Windows OpenSSH Client.
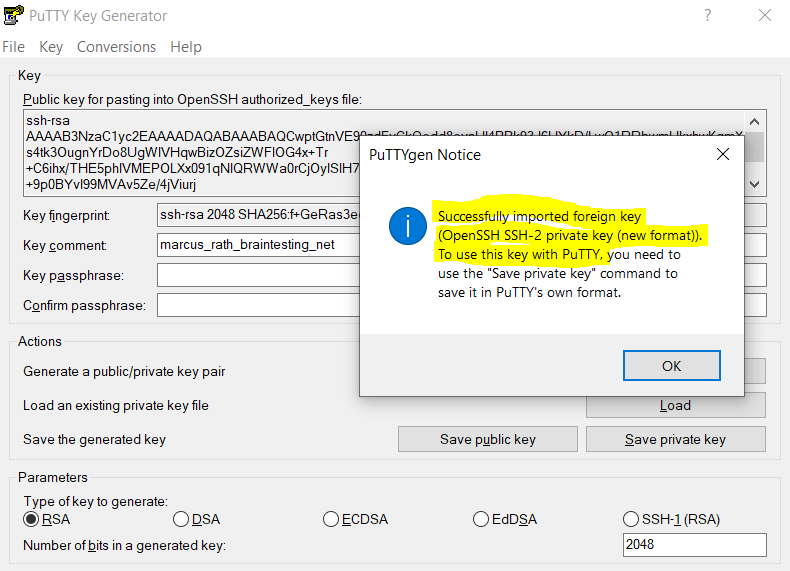
To convert the key into the PuTTY .ppk format, just load the SSH private key into PuTTY Key Generator.
Click on OK and Save private key.
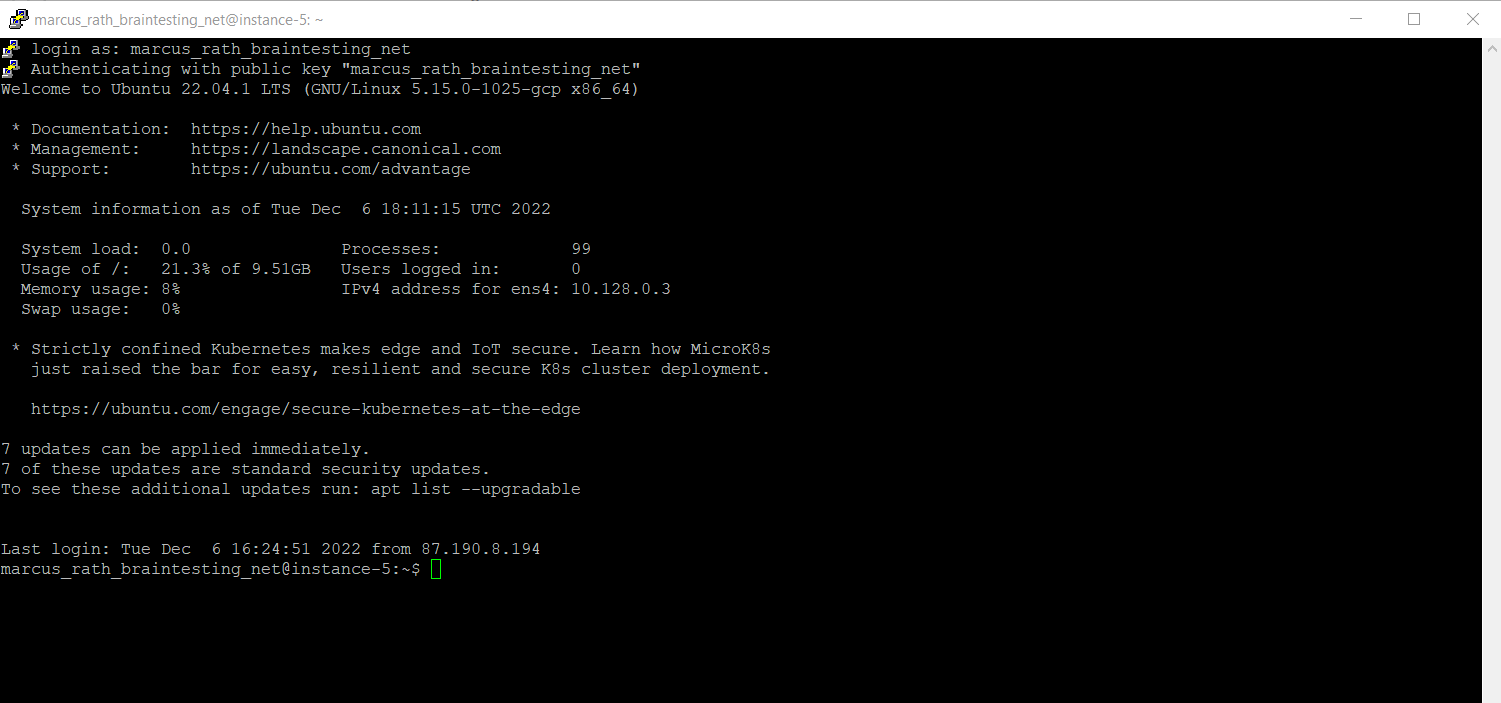
After converting the private key, I was able to connect directly to my OS Login enabled Linux instance.
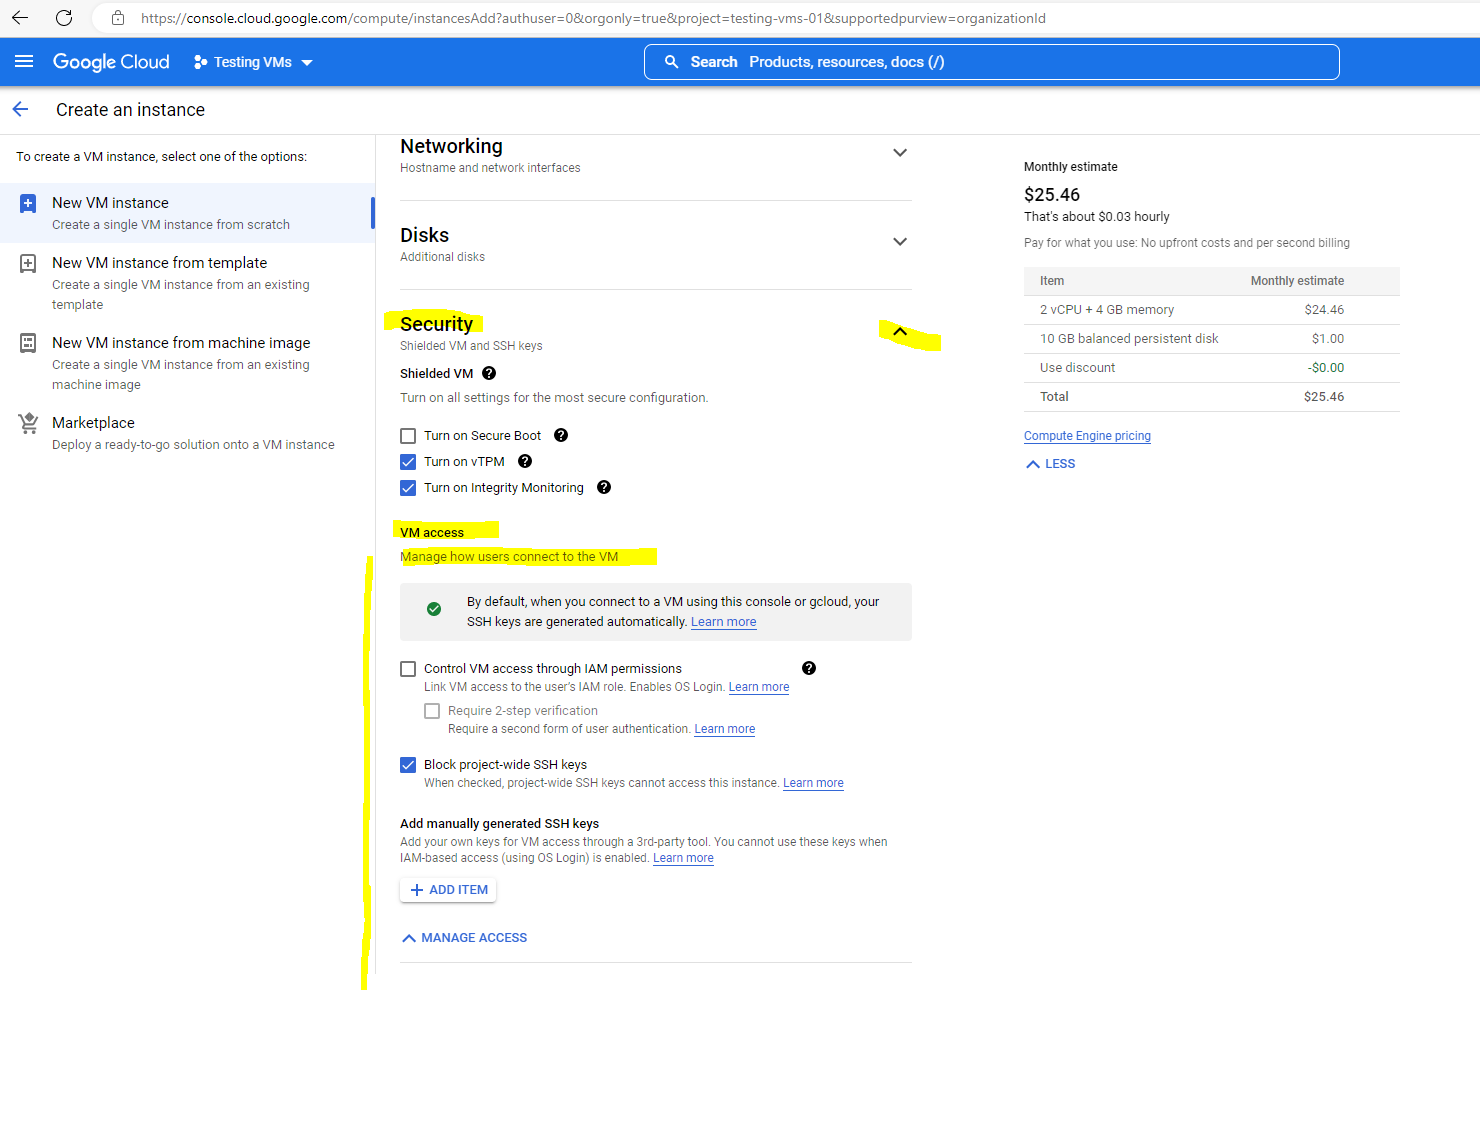
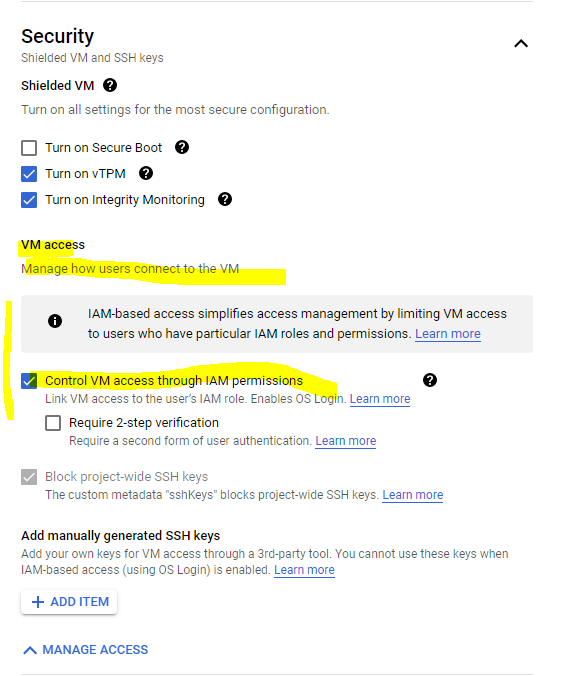
Enable OS Login during VM creation
In the Networking, disks, security, management, sole tenancy section, expand the Security section.
Expand the Manage access section.
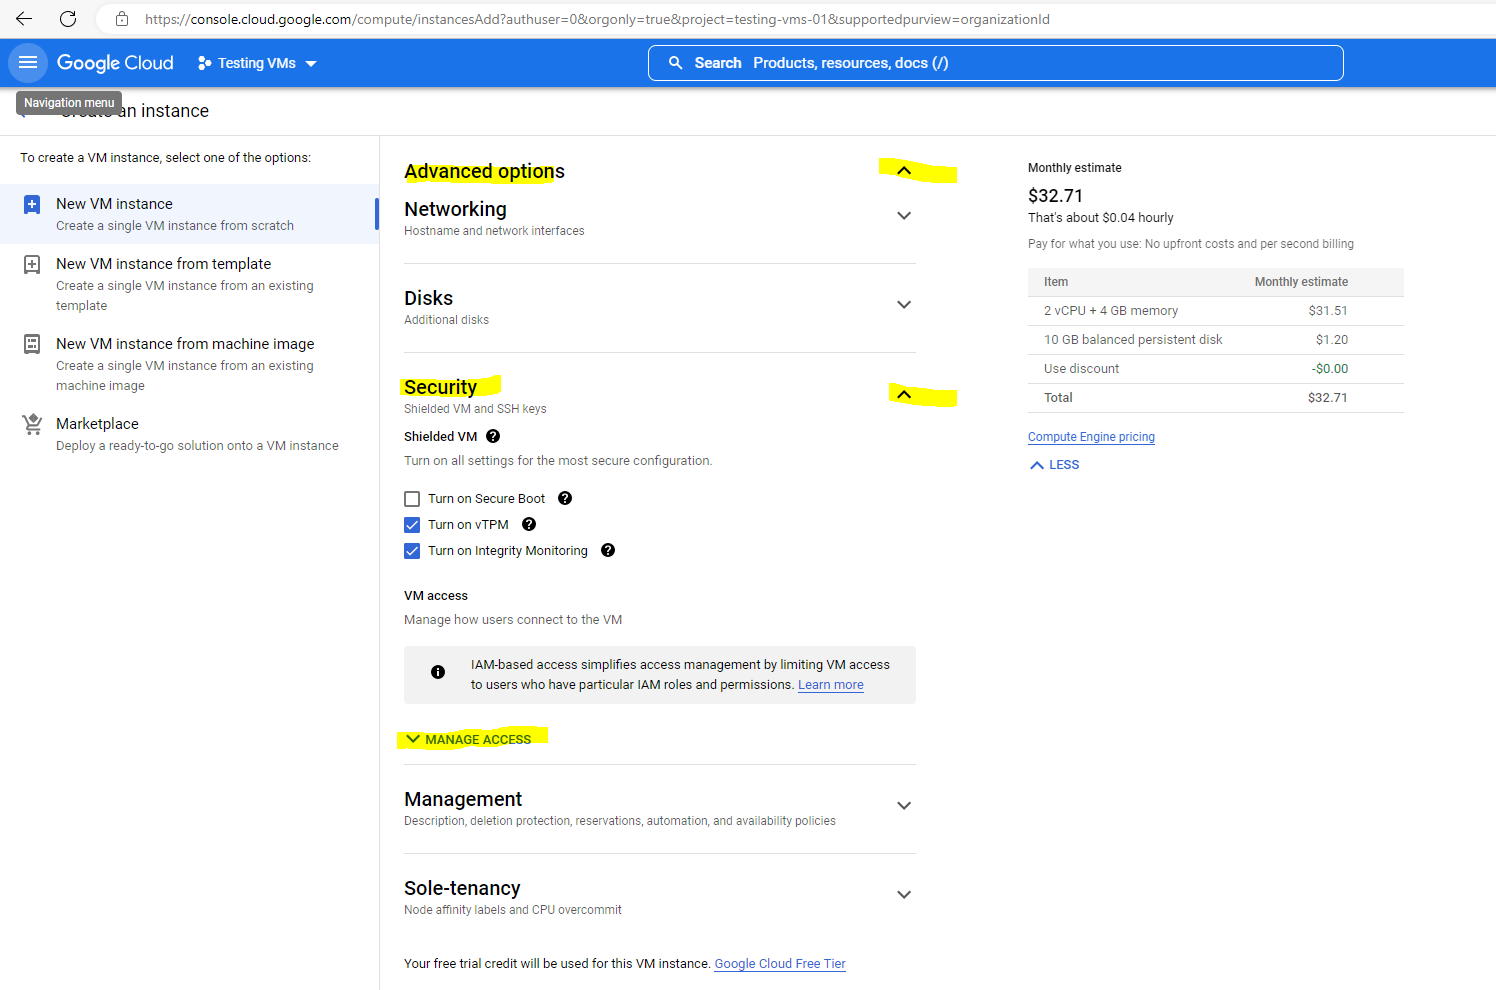
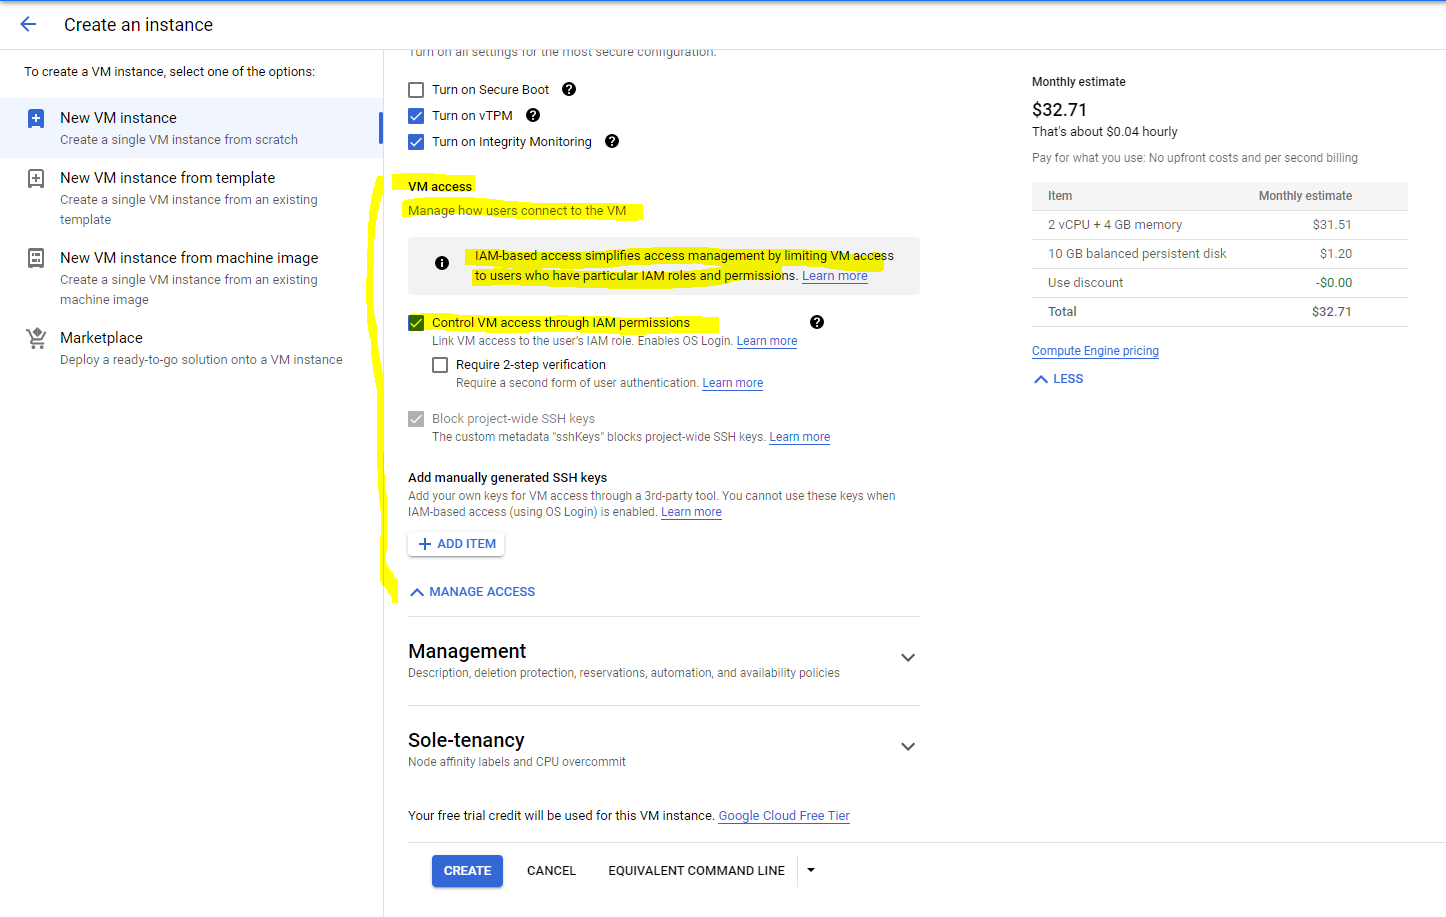
Select Control VM access through IAM permissions.
Optional: If you want to enable OS Login 2FA, select Require two-step verification.
Click Create to create and start the VM.
Source: https://cloud.google.com/compute/docs/oslogin/set-up-oslogin#enable_os_login_during_vm_creation
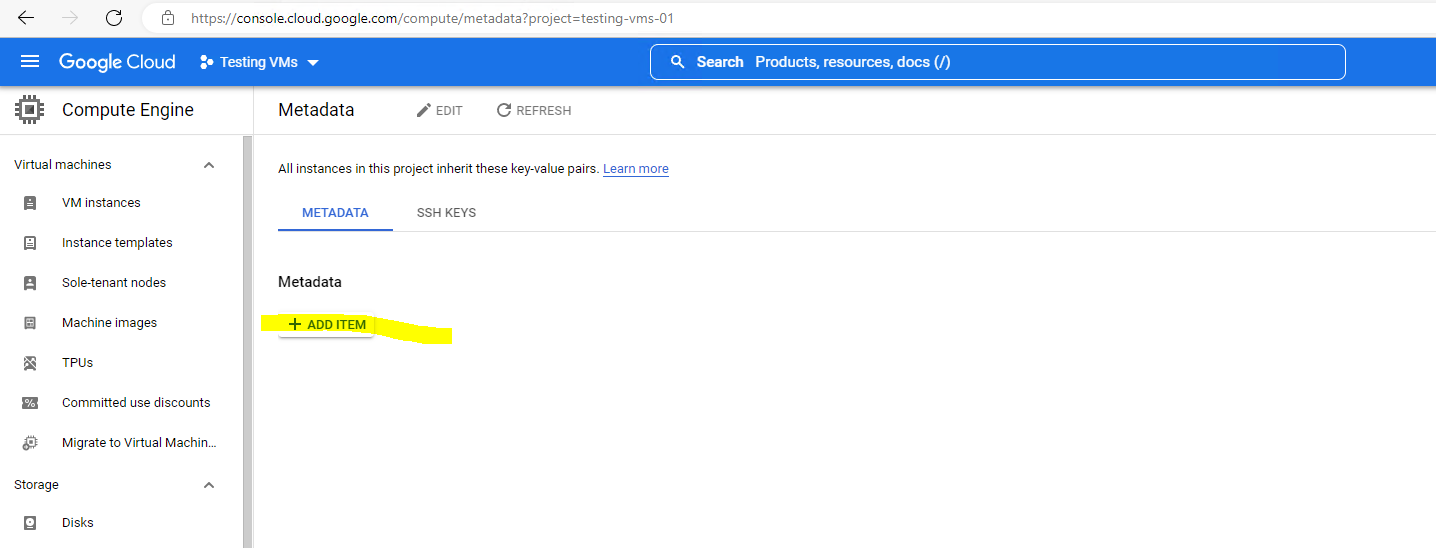
Set up OS Login for a Project
Apply metadata settings to all VMs in the project.
Click on Edit
Click on ADD ITEM
Enter for the Key 1: enable-oslogin and for the Value: TRUE
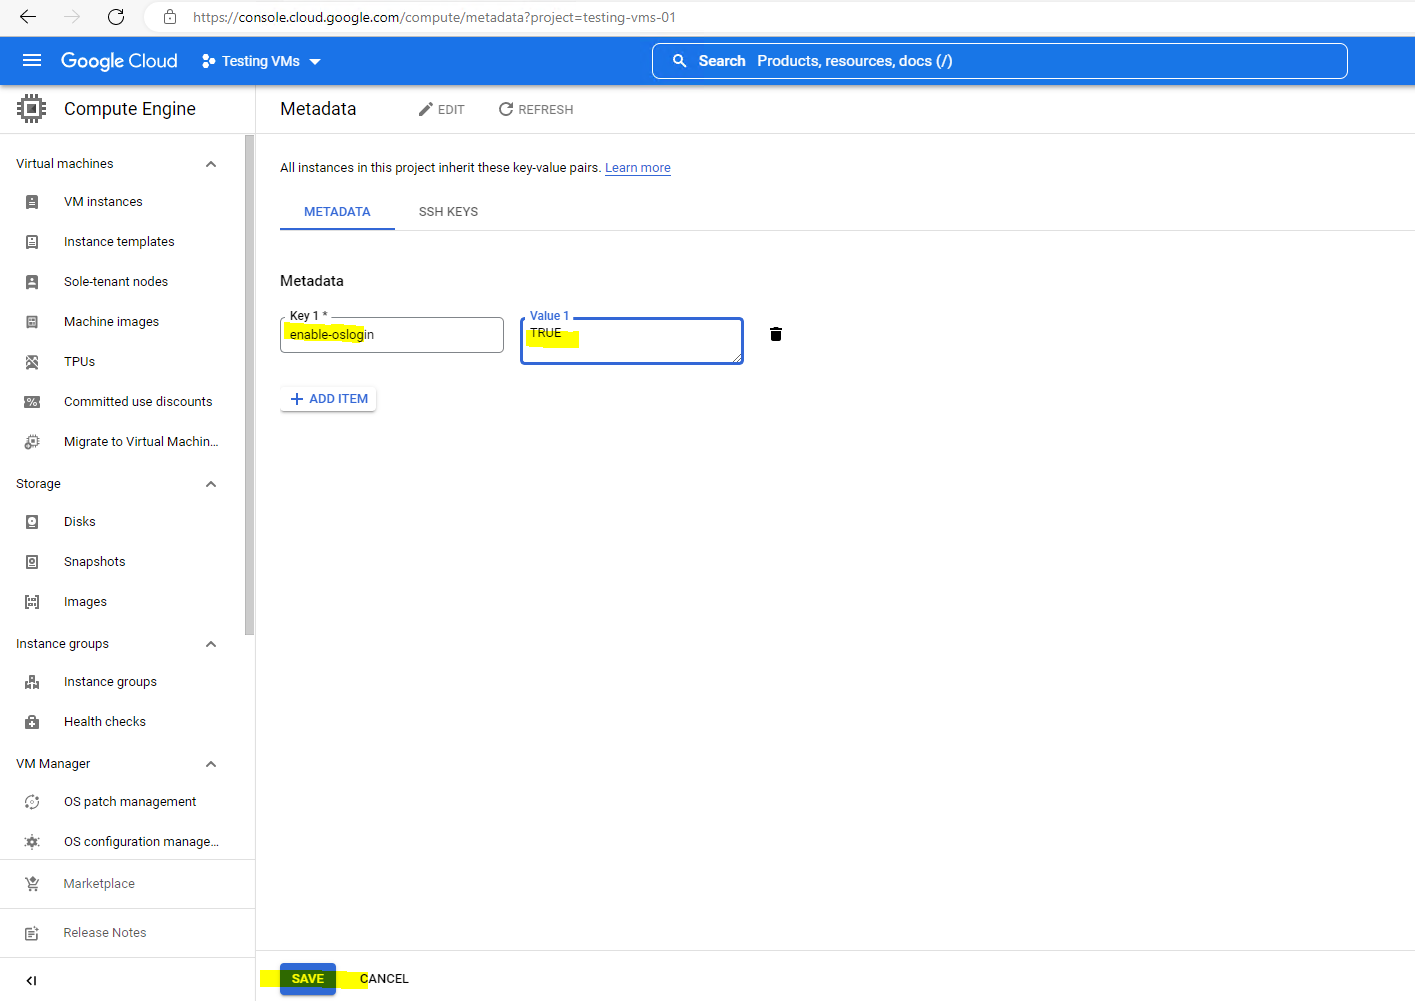
Optional you can also enable OS Login 2FA
Enter for the Key 1: enable-oslogin-2fa and for the Value: TRUE
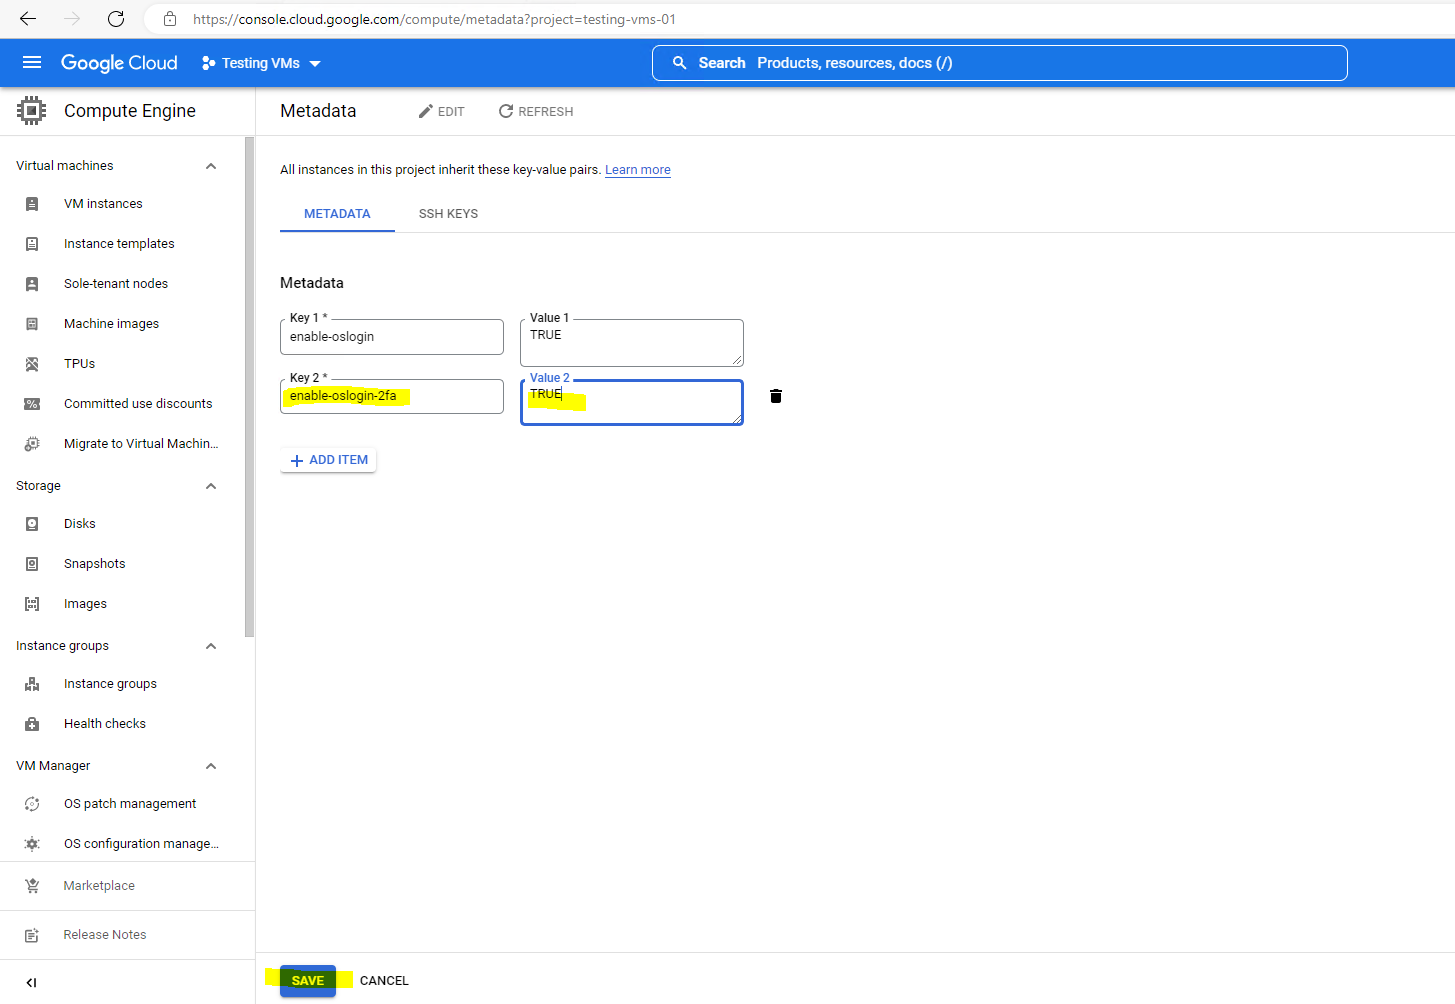
You can also edit the Metadata later.
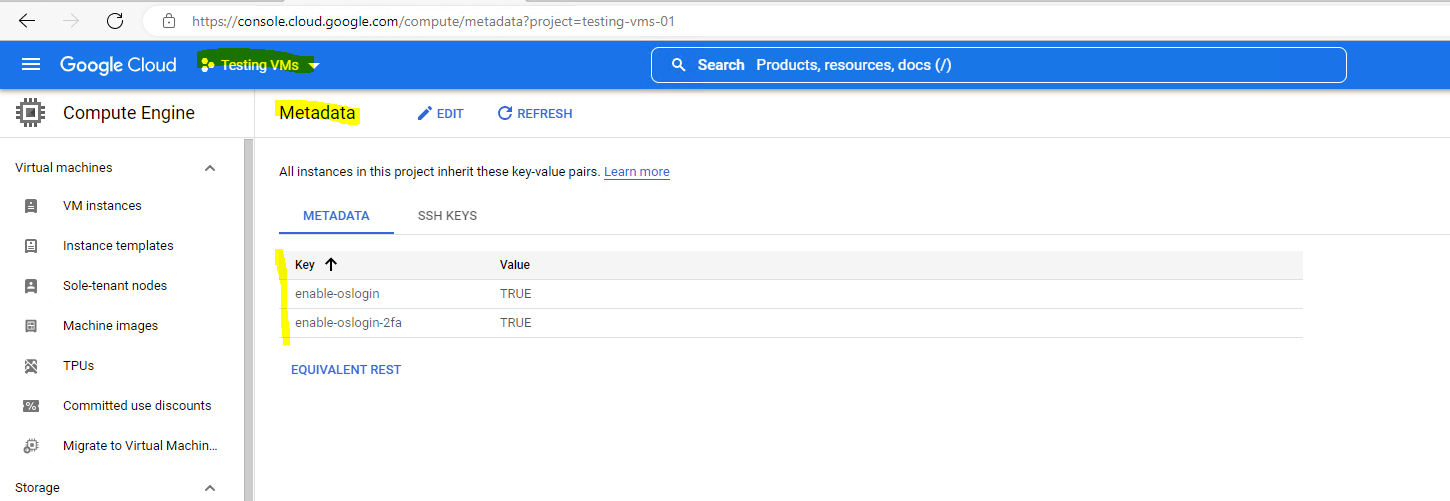
When you set OS Login metadata, OS Login is enabled immediately.
Note: When OS Login 2FA is enabled on your VM, you must have 2-step verification set up on your Google Account or domain to connect. Otherwise, any attempts to access these VMs are denied. 2-step verification is not enforced on service account users.
Source: https://cloud.google.com/compute/docs/oslogin/set-up-oslogin
So from now on when you create a new VM instance in your project, the checkbox below Control VM access through IAM permissions are checked by default and OS Login is enabled.
Without enabling OS Login project wide, you need to enable OS Login manual by checking the box below.
Enabled by default after the set up above
Assign OS Login IAM roles
When using OS Login, all users who wants to connect to the Linux VM instance, needs the required IAM roles assigned to.
This is also one advantage over Metadata based SSH keys, where all users by default have sudo access to the VM. With OS Login you can control what permissions a user will have by assigning different IAM roles to.
Assign all of the required IAM roles to users who connect to VMs that have OS Login enabled.
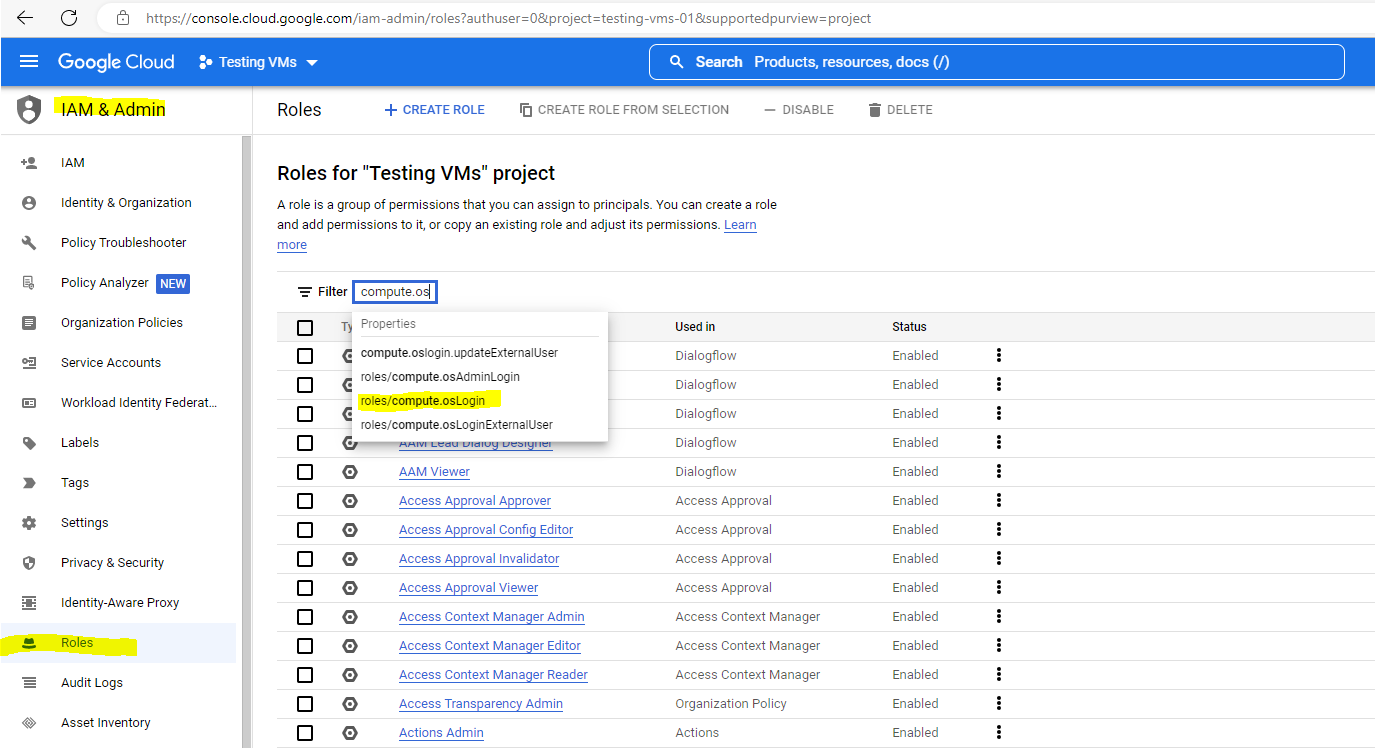
roles/compute.osLogin or
roles/compute.osAdminLoginOn the Project or instance. If a user requires SSH access from Google Cloud console or Google Cloud CLI, you must grant these roles at the project level, or additionally grant a role at the project level that contains the compute.projects.get permission.
roles/iam.serviceAccountUser
On the Service account. All users, if the VM has a service account
Source: https://cloud.google.com/compute/docs/oslogin/set-up-oslogin#configure_users
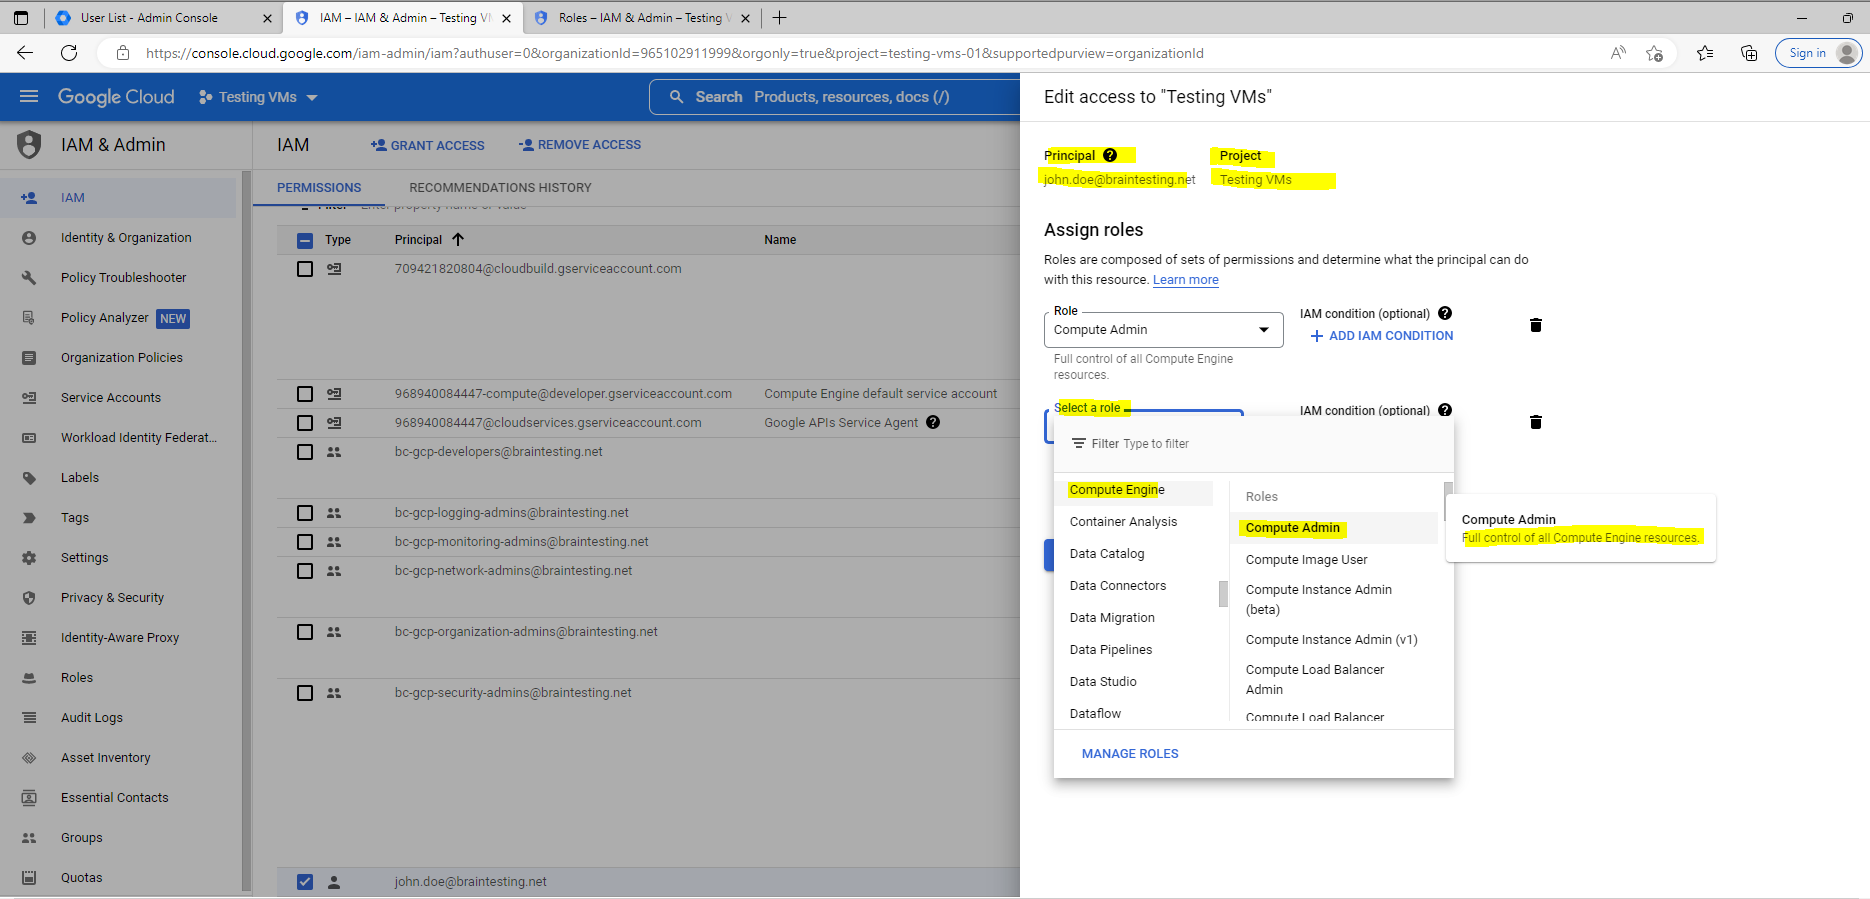
All available roles for the project you will see under IAM & Admin –> Roles
To grant a role to a principal (group or user), click on Grant Access below, select a principal and add the role and finally save it.
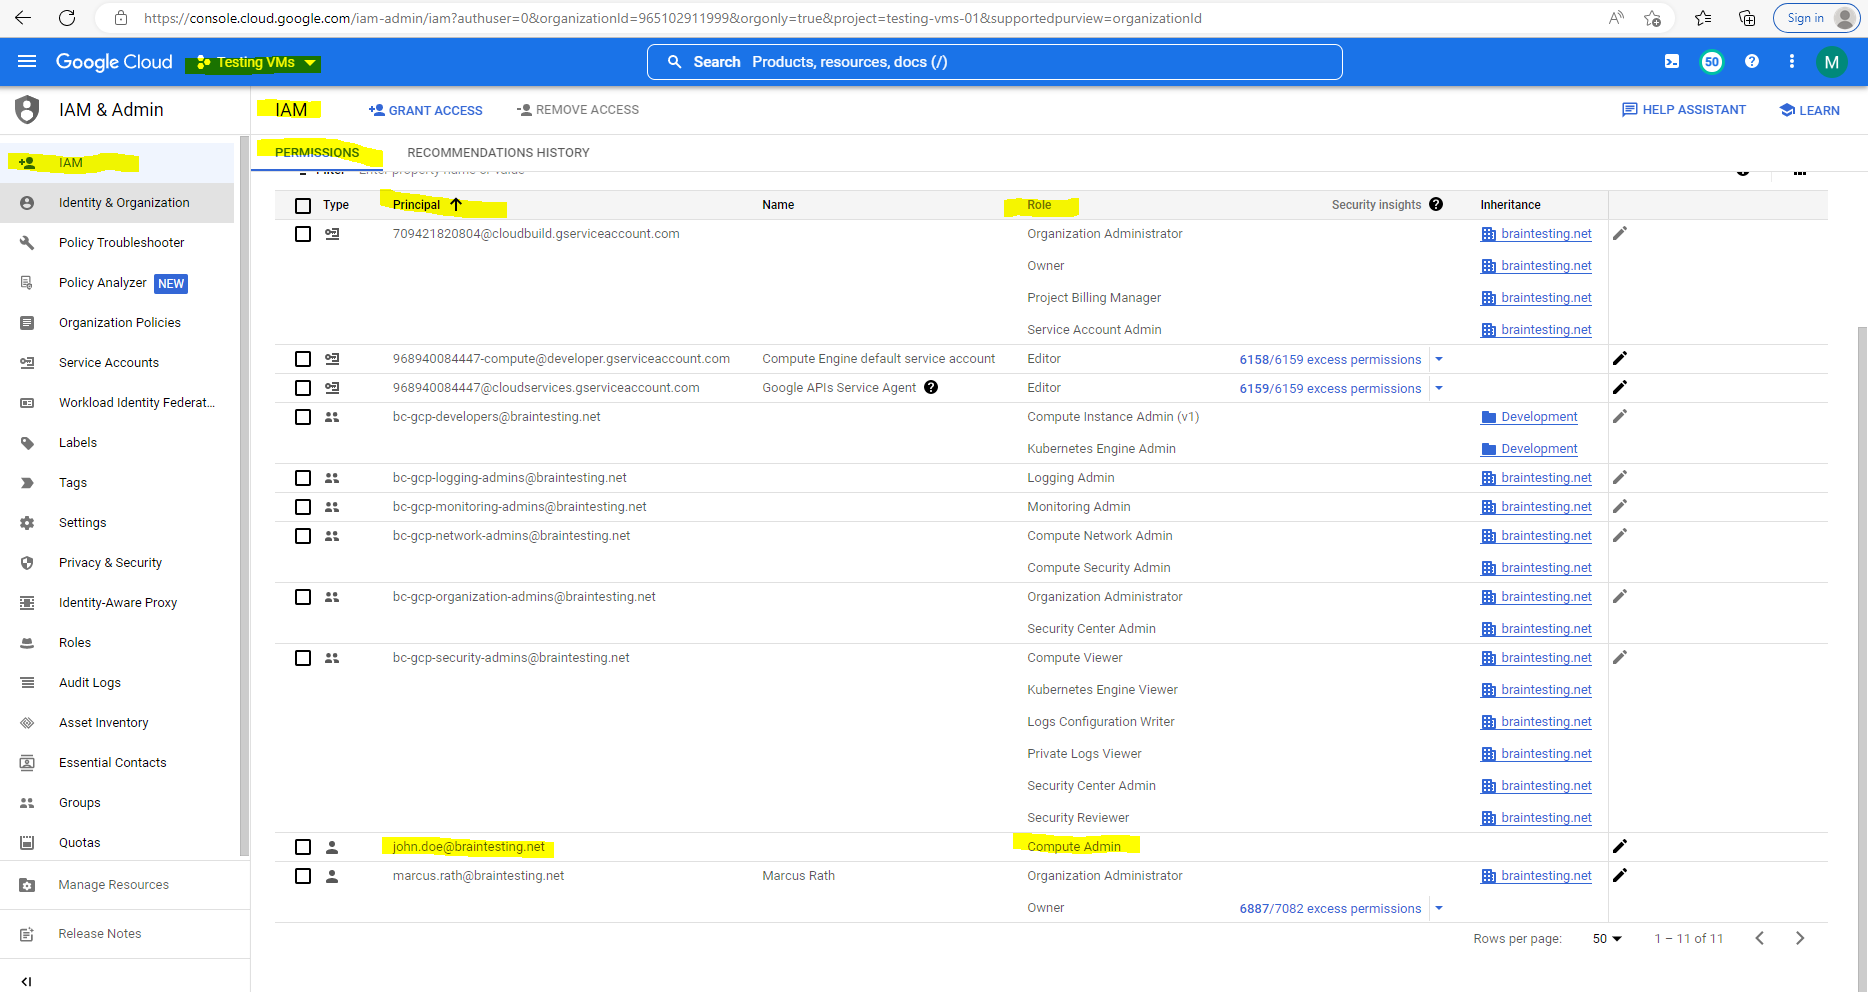
The Compute Admin role will grant the user full control of all Compute Engine ressources.
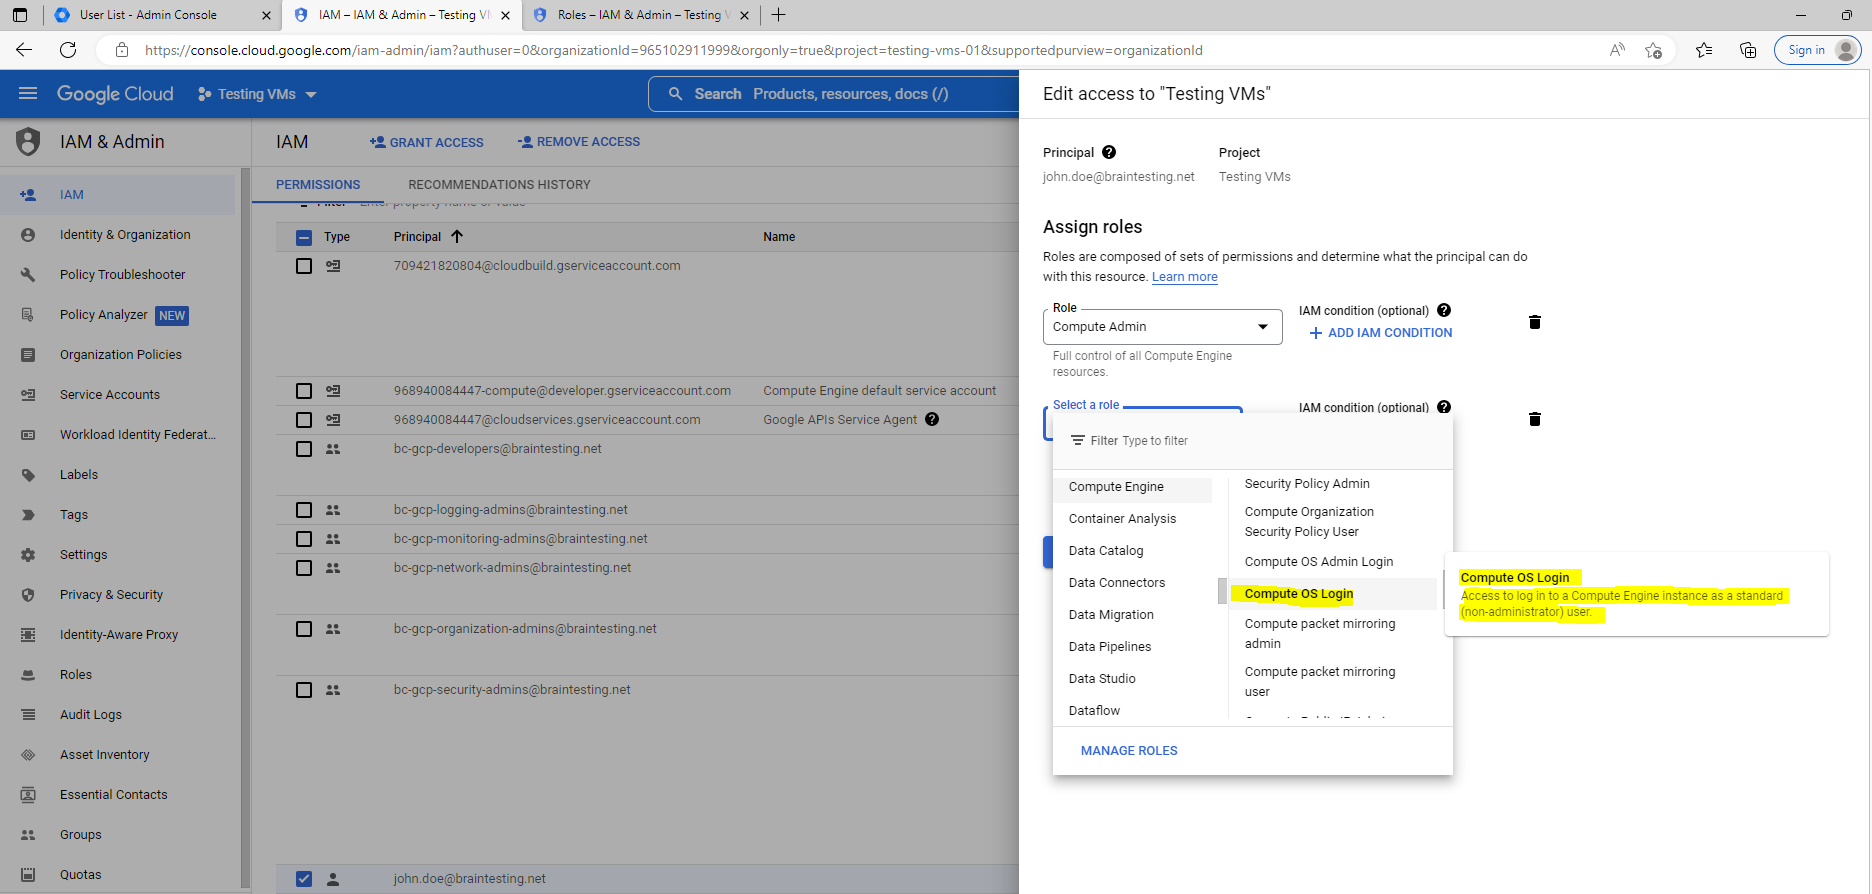
The Compute OS Login role will grant the user access to log in to a Compute Engine instance as as standard (non-administrator) user.
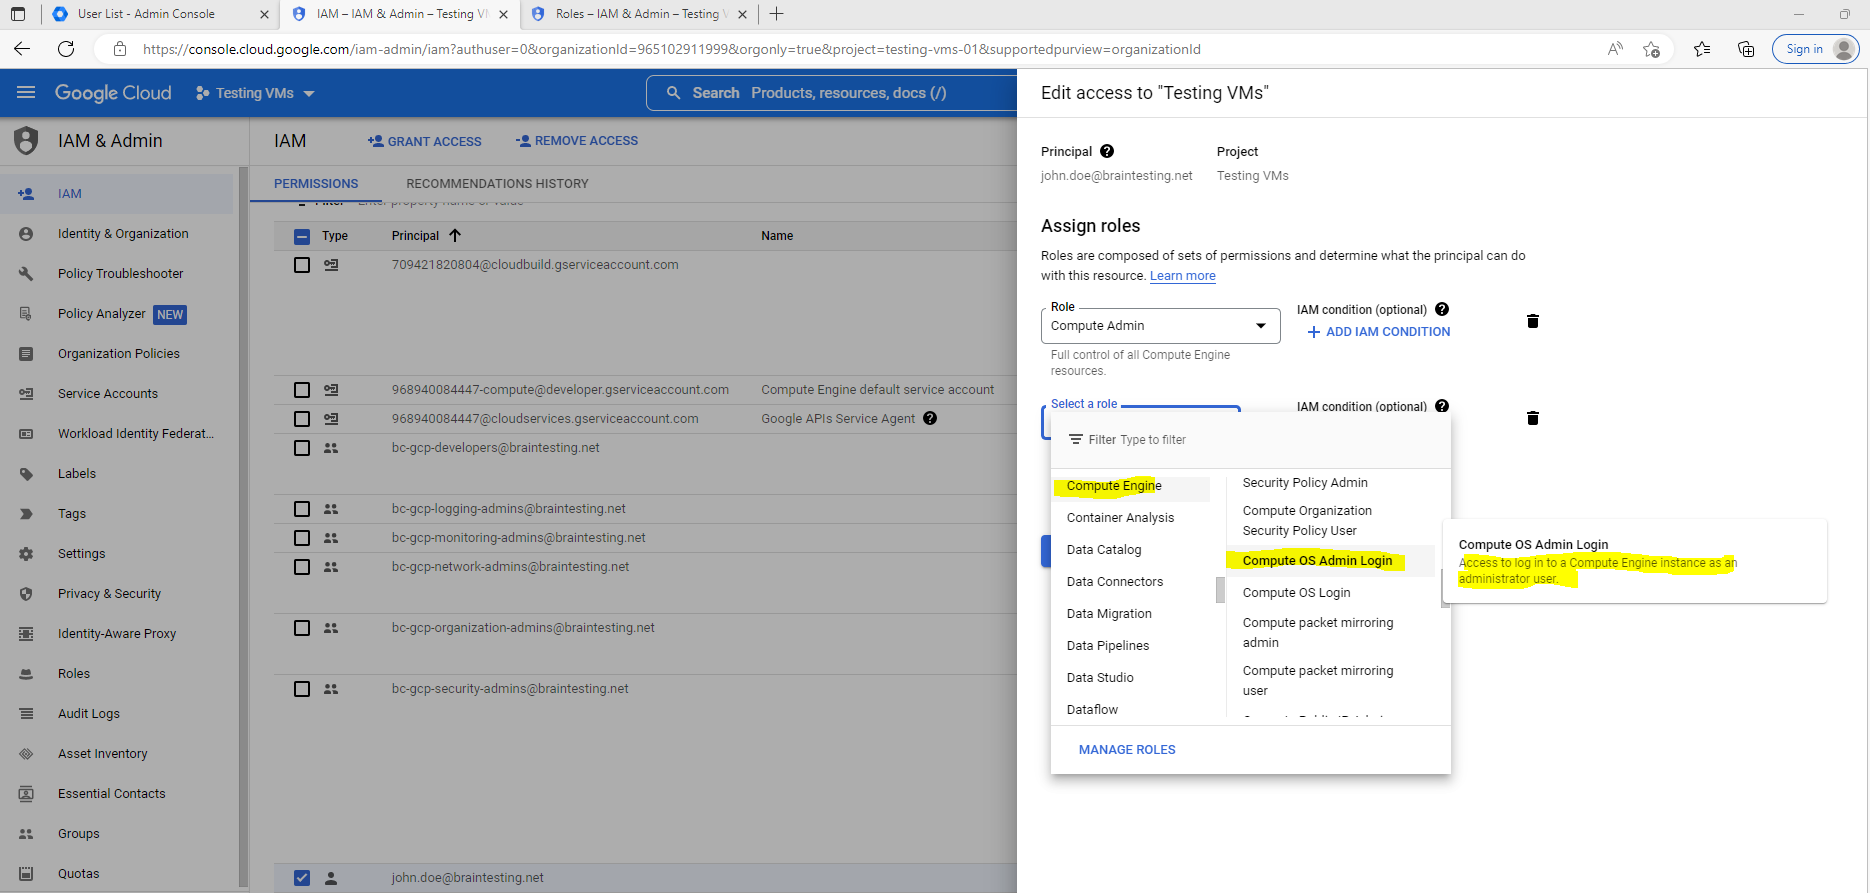
The Compute OS Admin Login role will grant the user acces to log into a Compute Engine instance as an administrator user.
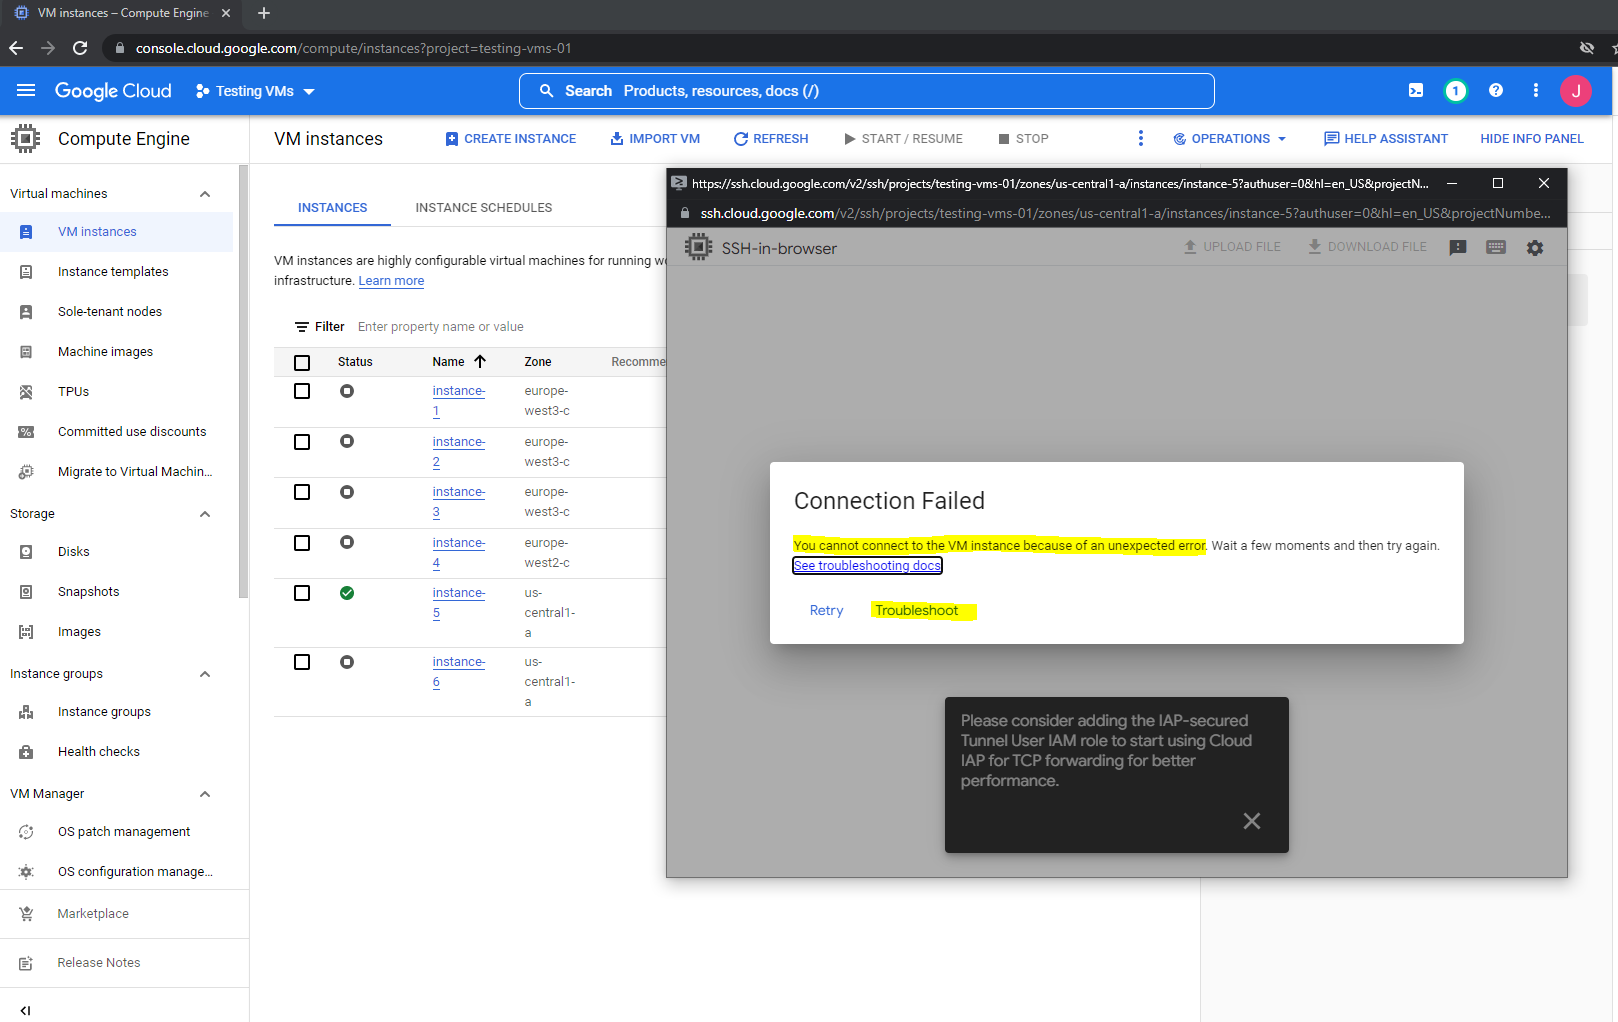
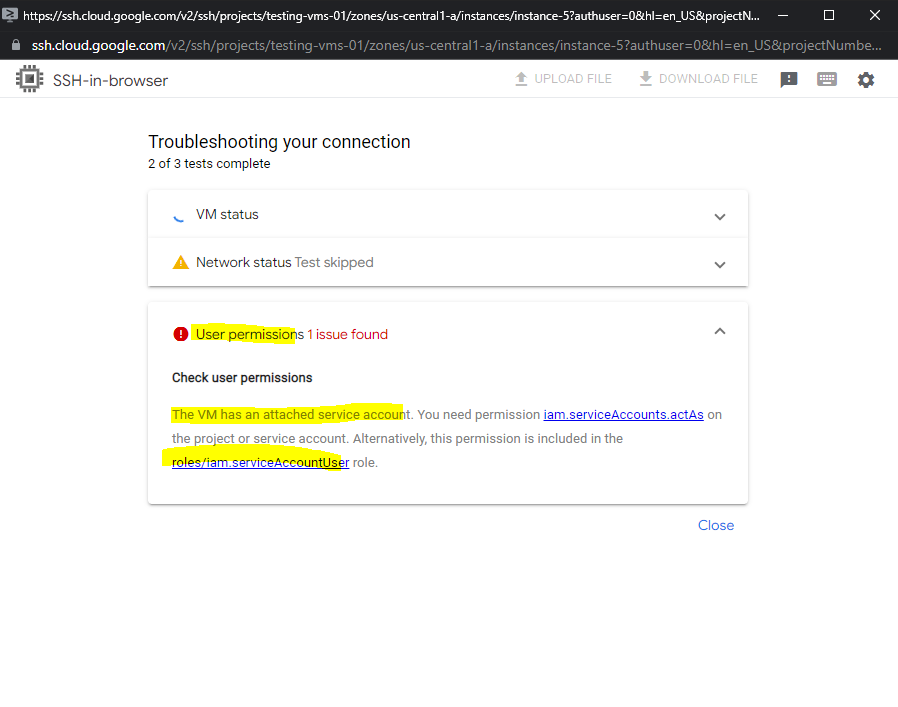
When you try to login using the Google Cloud console and browser window to establish a SSH connection and encounter the following error.
You can click on the Troubleshoot link to do some tests as shown below.
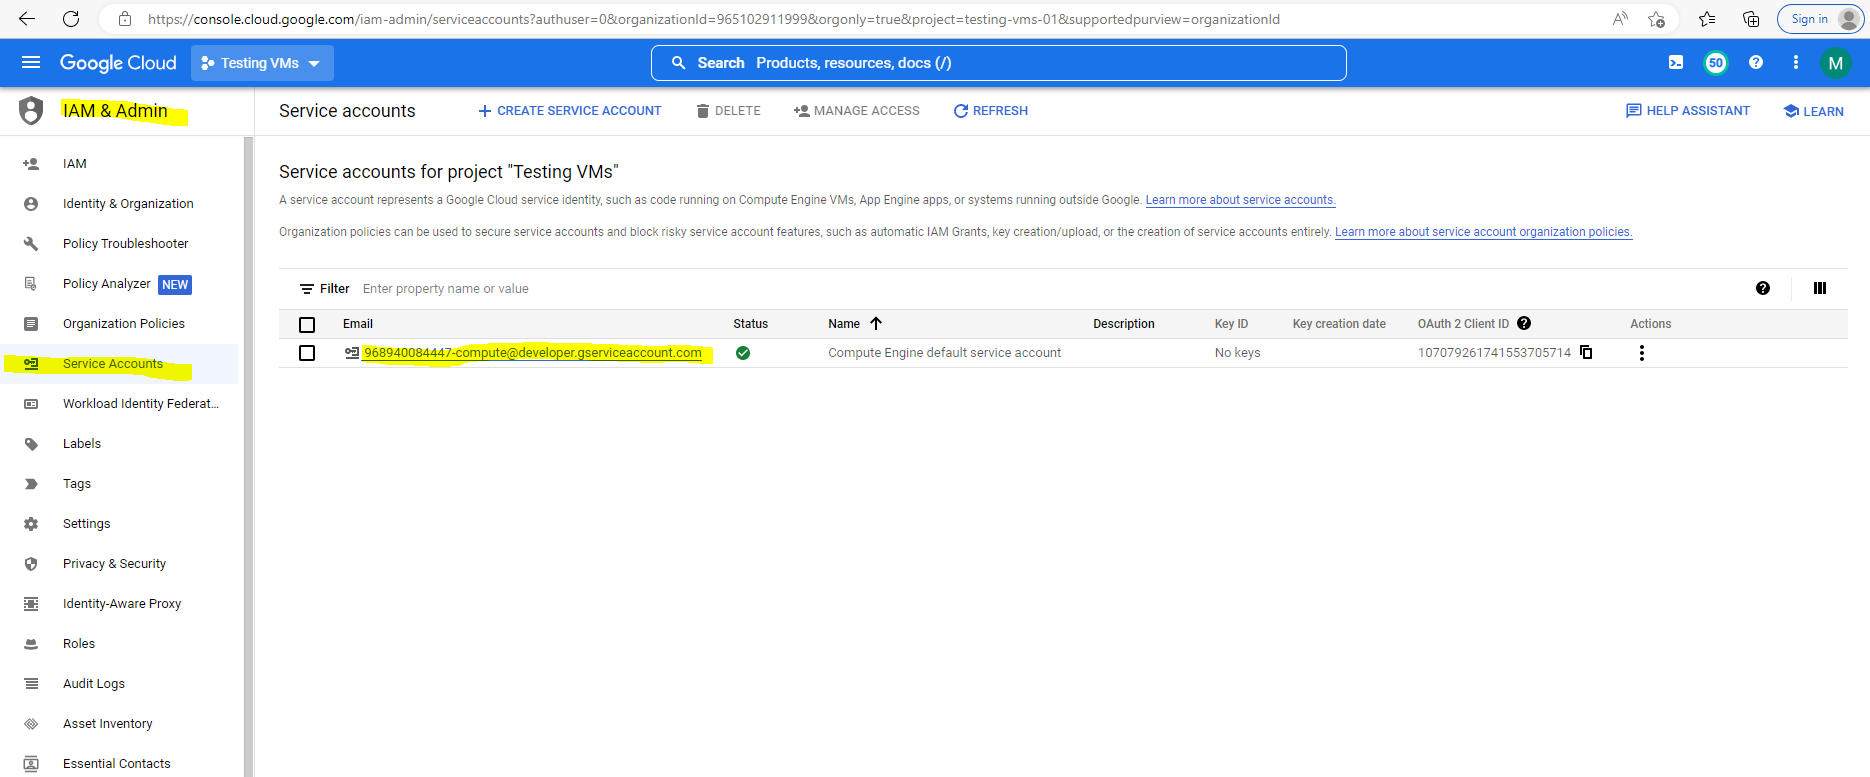
As mentioned further above if the VM has attached a service account, you need to assign the permission iam.serviceAccounts.actAs to the user who wants to access the VM.
The iam.serviceAccounts.actAs permission is included in the Service Account User role.
When you create certain Google Cloud resources, you have the option to attach a service account. The attached service account acts as the identity of any jobs running on the resource, allowing the jobs to authenticate to Google Cloud APIs.
For most Google Cloud services, users need permission to impersonate a service account in order to attach that service account to a resource. This means that the user needs the iam.serviceAccounts.actAs permission on the service account.
However, in the past, certain services allowed users to attach service accounts to resources even if the users didn’t have permission to impersonate the service accounts. This configuration might have made it possible for users of these services to gain elevated, non-obvious permissions.
Source: https://cloud.google.com/iam/docs/service-accounts-actas
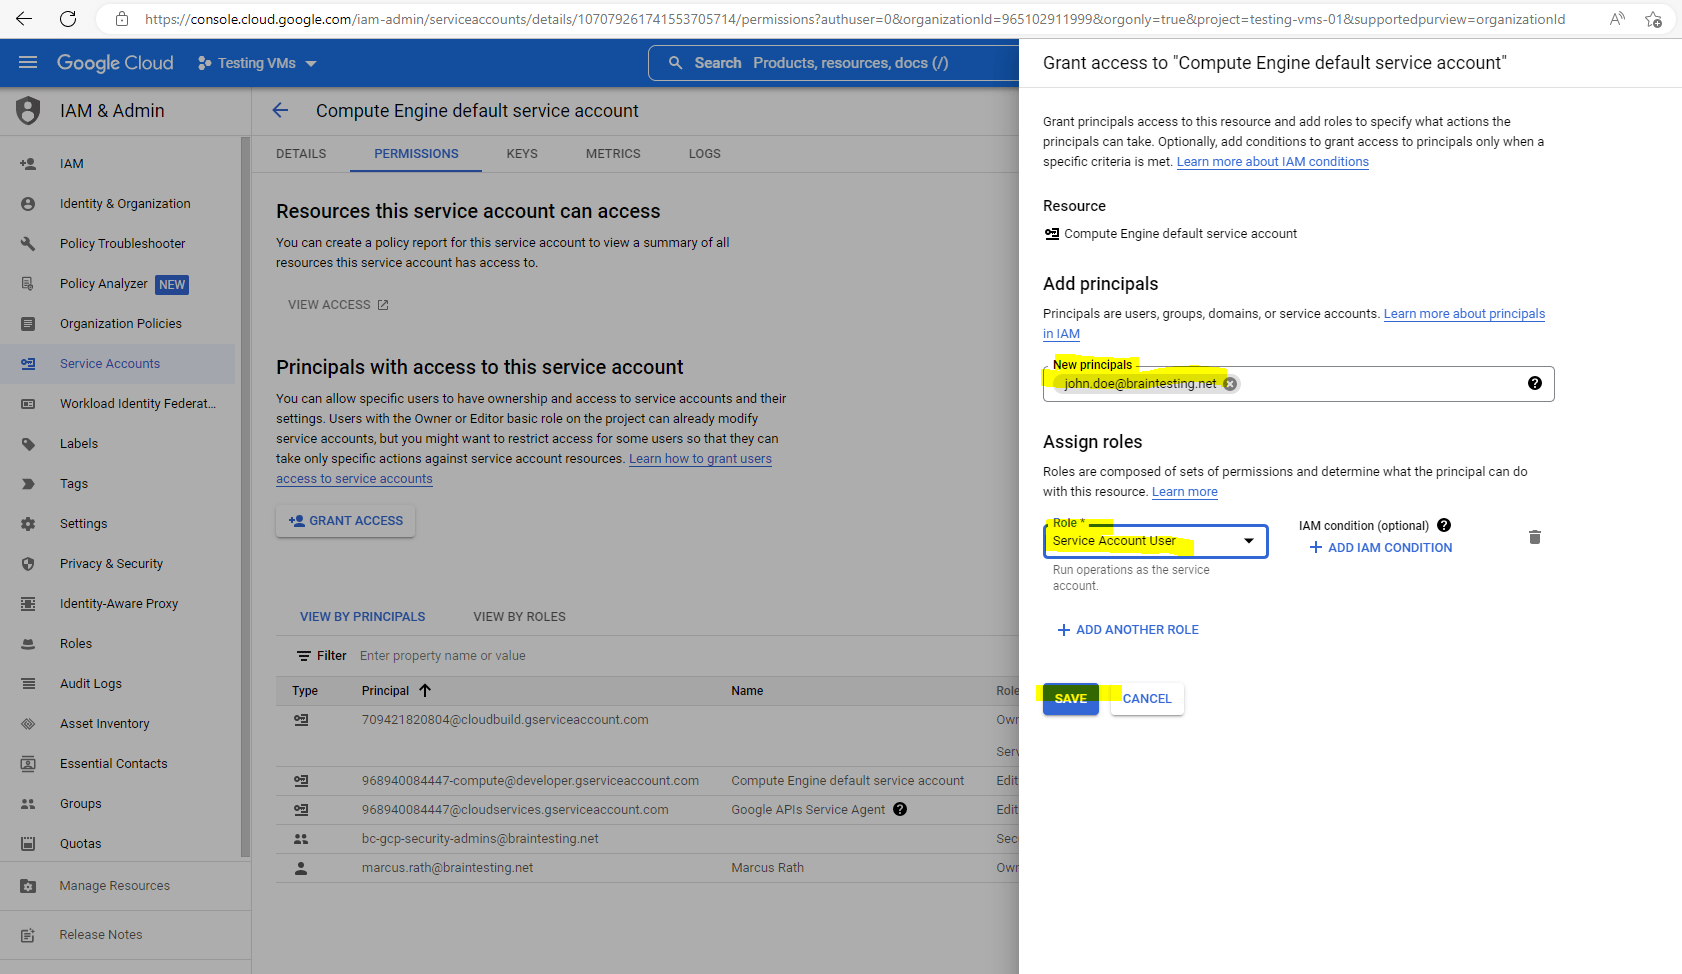
So to be able to connect to the VM instance I have also to assign the permission iam.serviceAccounts.actAs to my user John Doe to access the VM.
Therefore I need to click the email address of the service account that I want to allow the principal to impersonate.
Under Principals with access to this service account, click Grant Access.
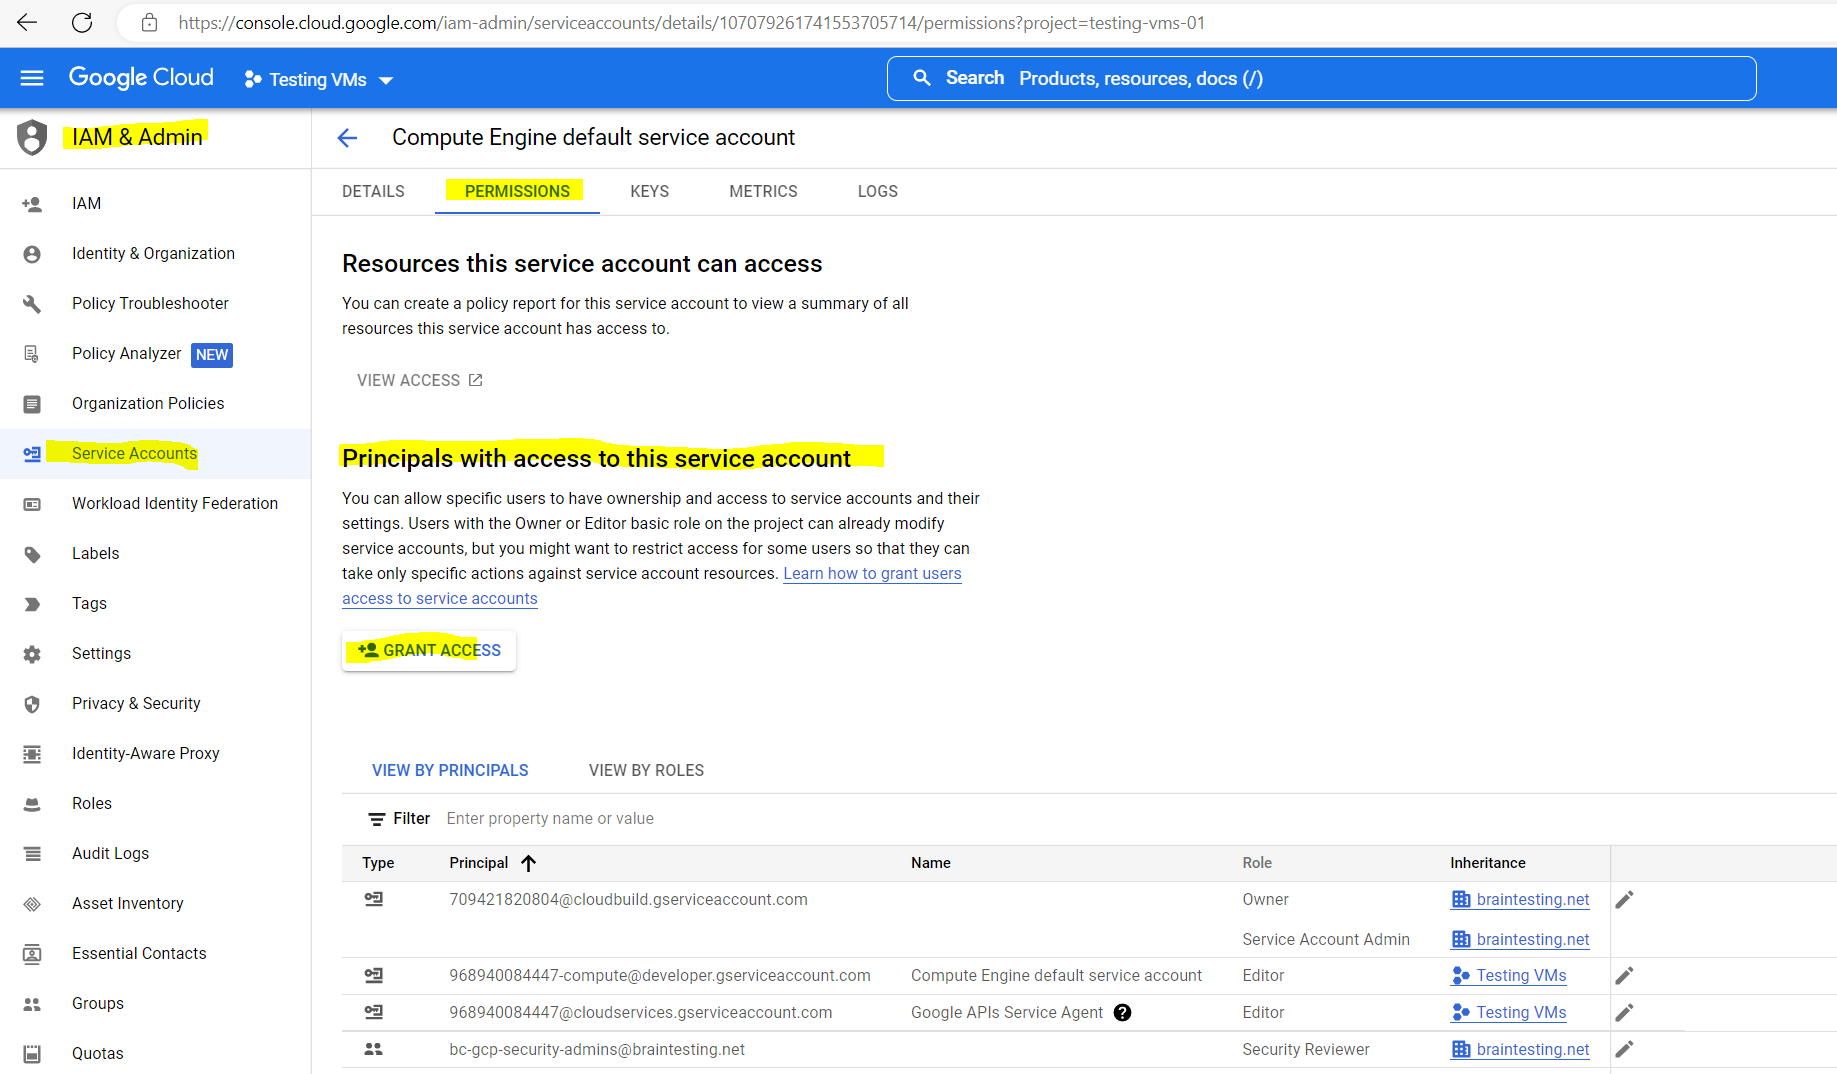
Select the Service Account User role
So now the next try to connect to the instance will work.
As already mentioned, OS Login will use PAM configurations to perform IAM permission checks for login and administrative access.
Therefore you can now also control access to the VM by using IAM and the admin console as shown below.
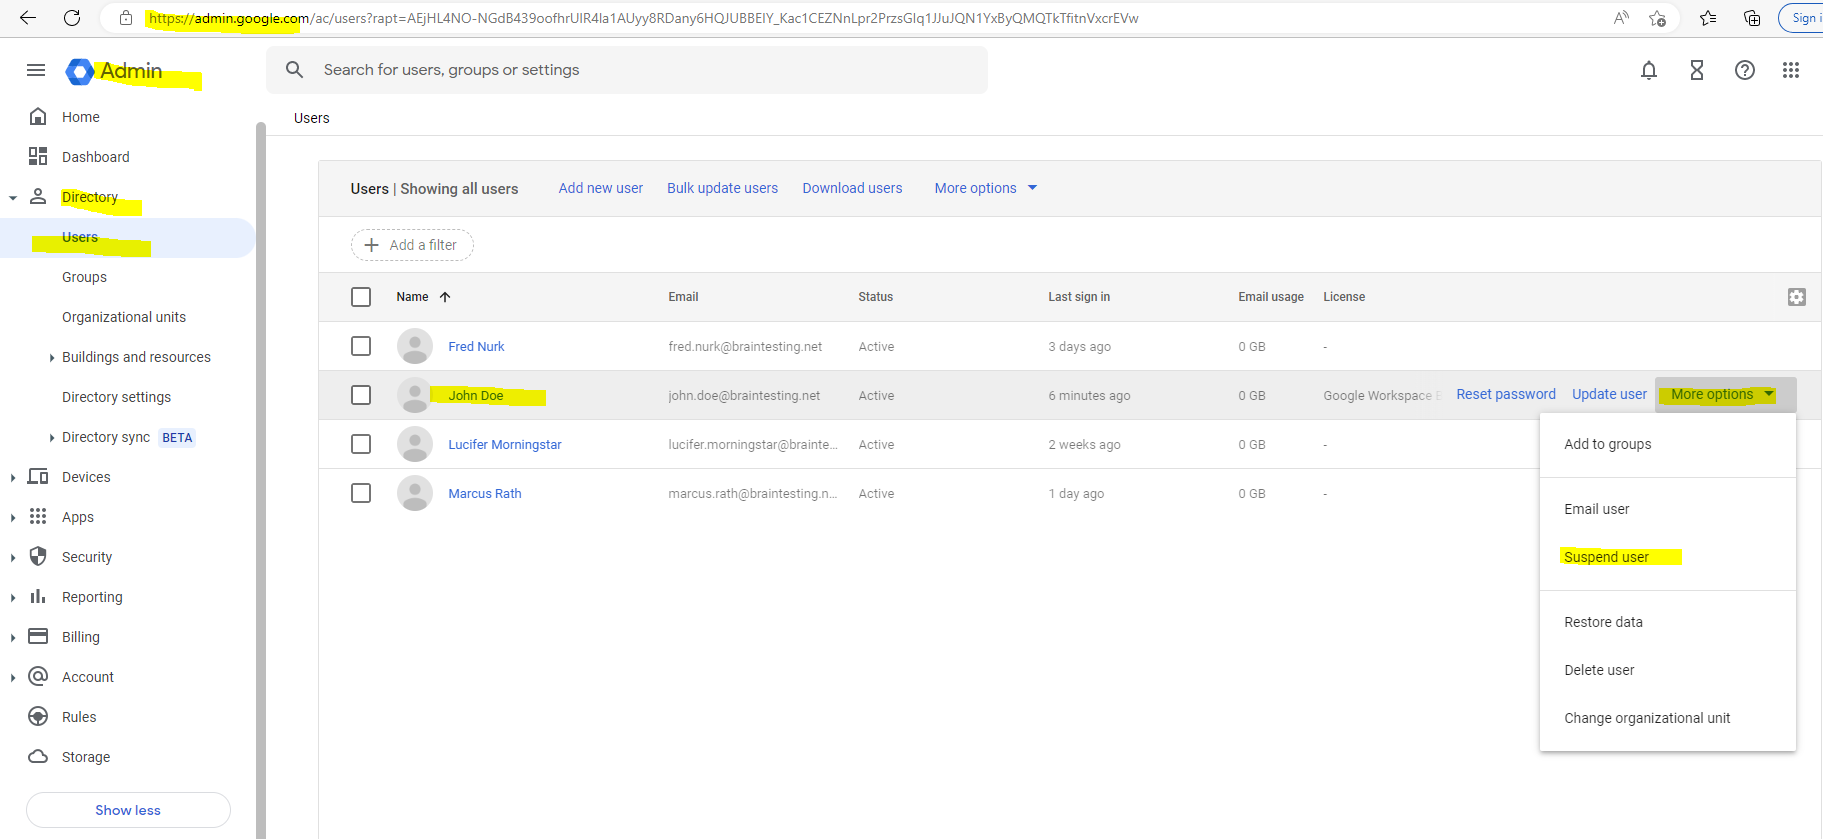
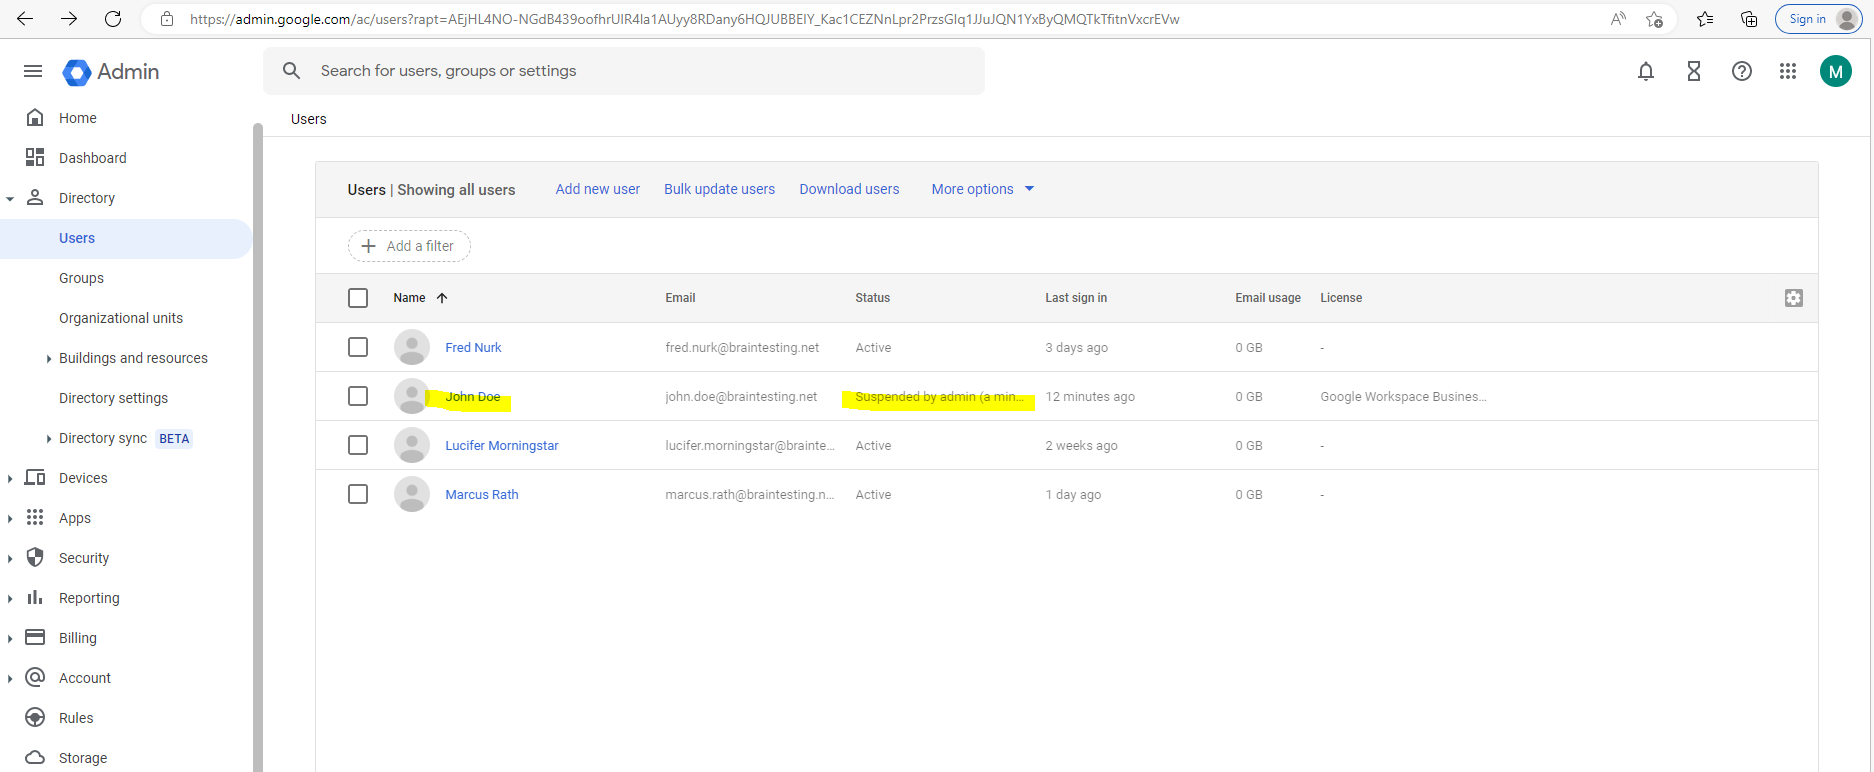
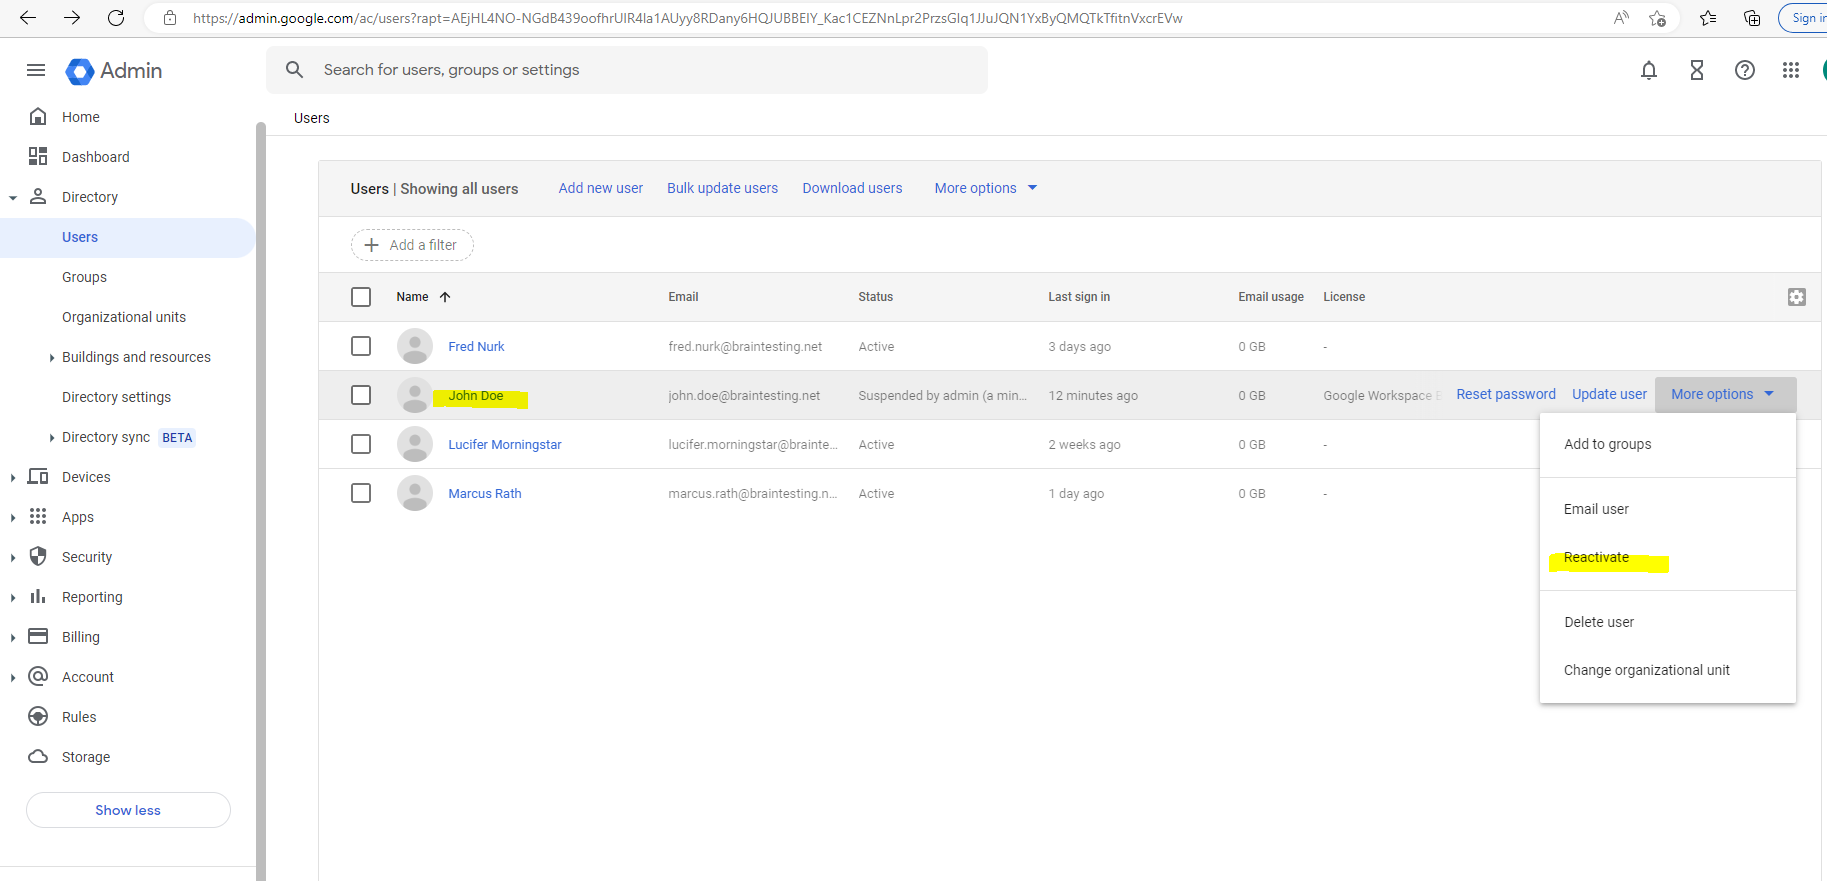
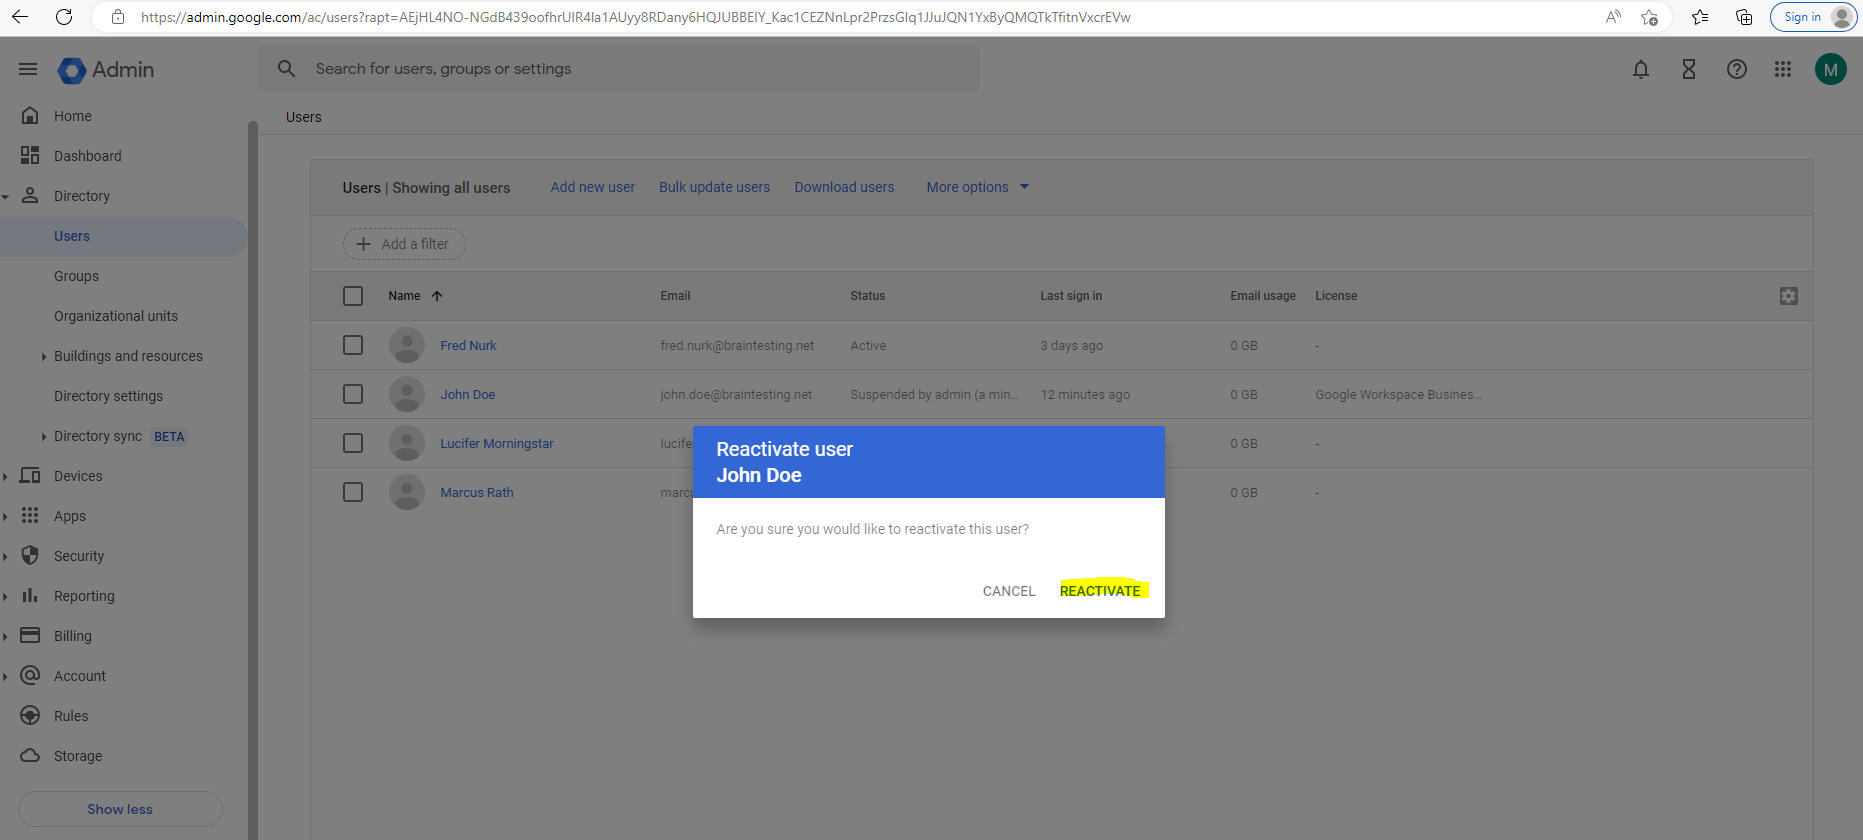
Besides assigning IAM roles which defines the permissions a user have, you can also suspend users in the admin console and therefore they can’t access the OS Login enabled VMs anymore.
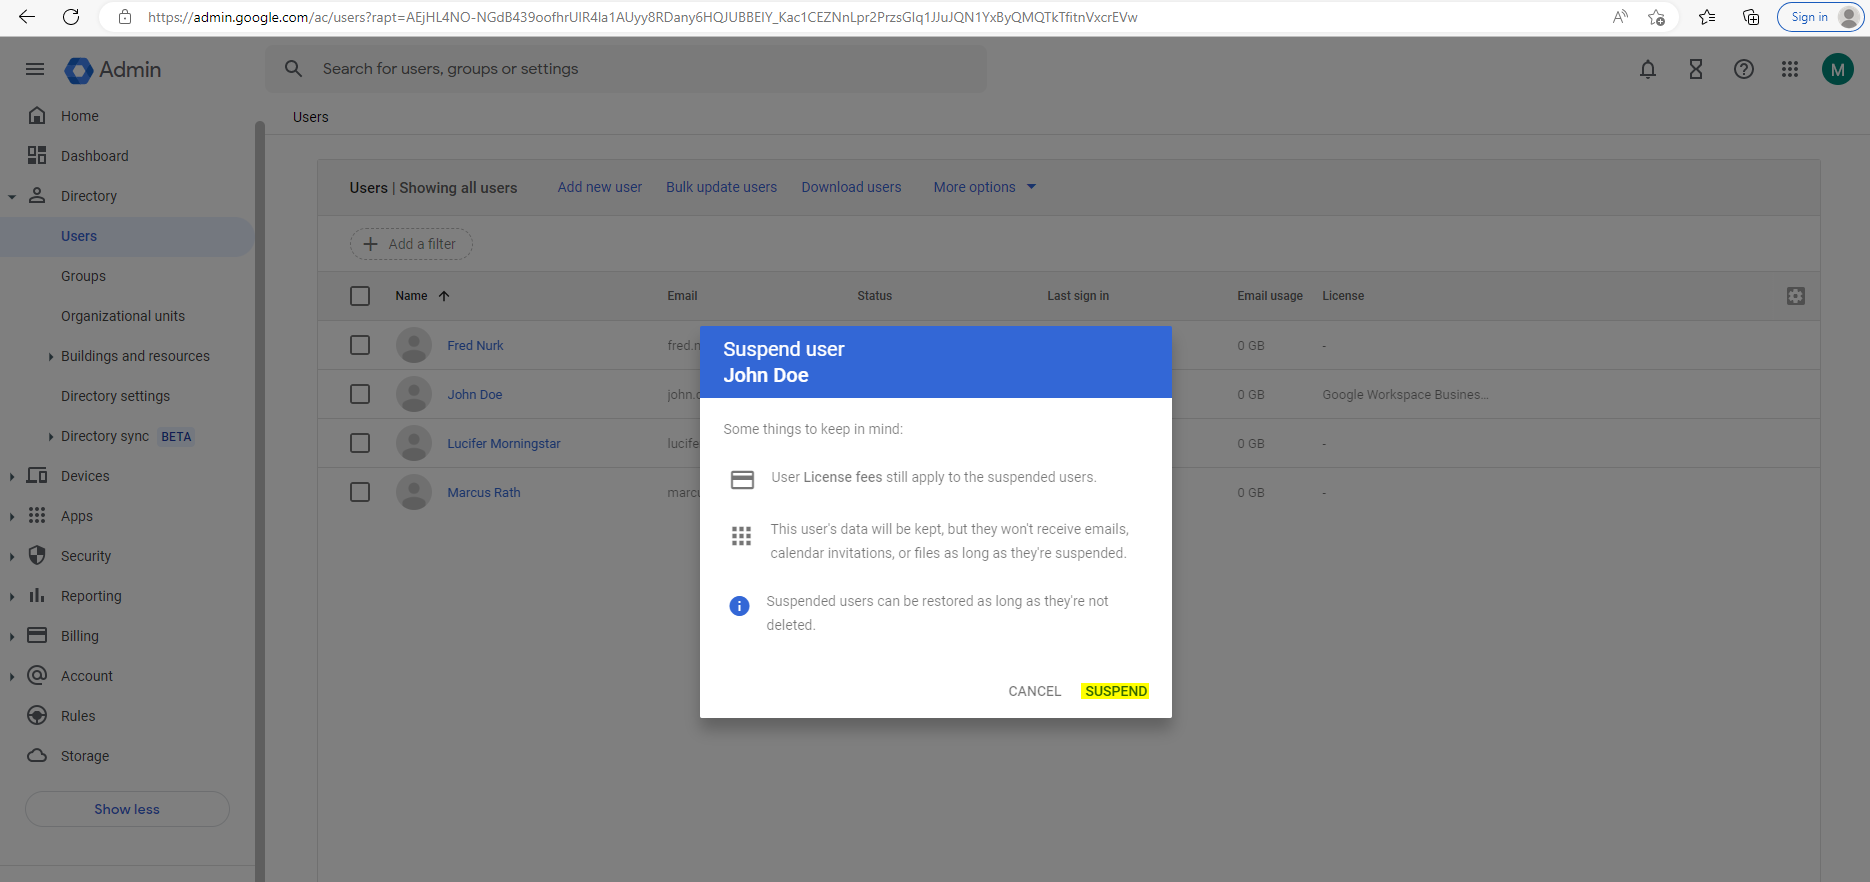
When the user John Doe now tries to connect to the VM with its suspended account , the following error will appear.
401. That’s an error.
The server cannot process the request because it is malformed. It should not be retried. That’s all we know.
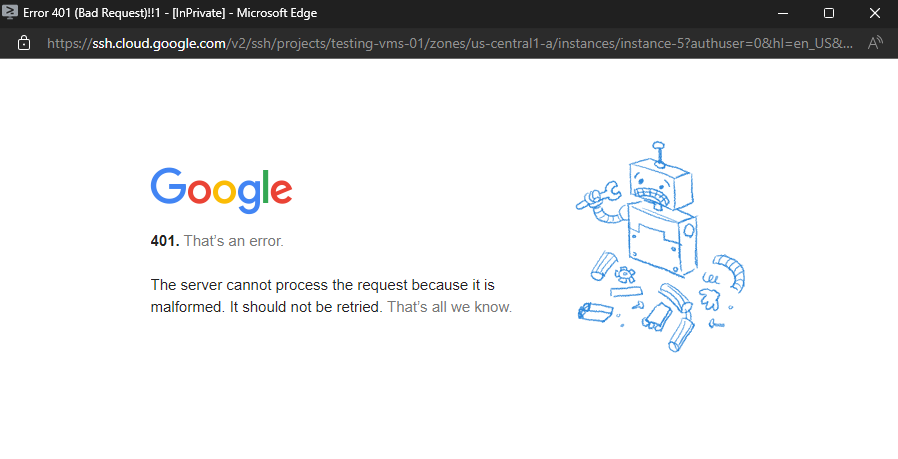
Further the user will get logged out of the Google Cloud console.
We can also reactivate the user anytime.
Checking if OS Login is configured
Use the Google Cloud console or Google Cloud CLI to query metadata to determine if OS Login is enabled. OS Login is enabled when the enable-oslogin metadata key is set to TRUE in project or instance metadata.
If both instance and project metadata are set, the value set in instance metadata takes precedence.
Use the Google Cloud console or gcloud CLI to query metadata
https://cloud.google.com/compute/docs/metadata/querying-metadata#console-gcloud
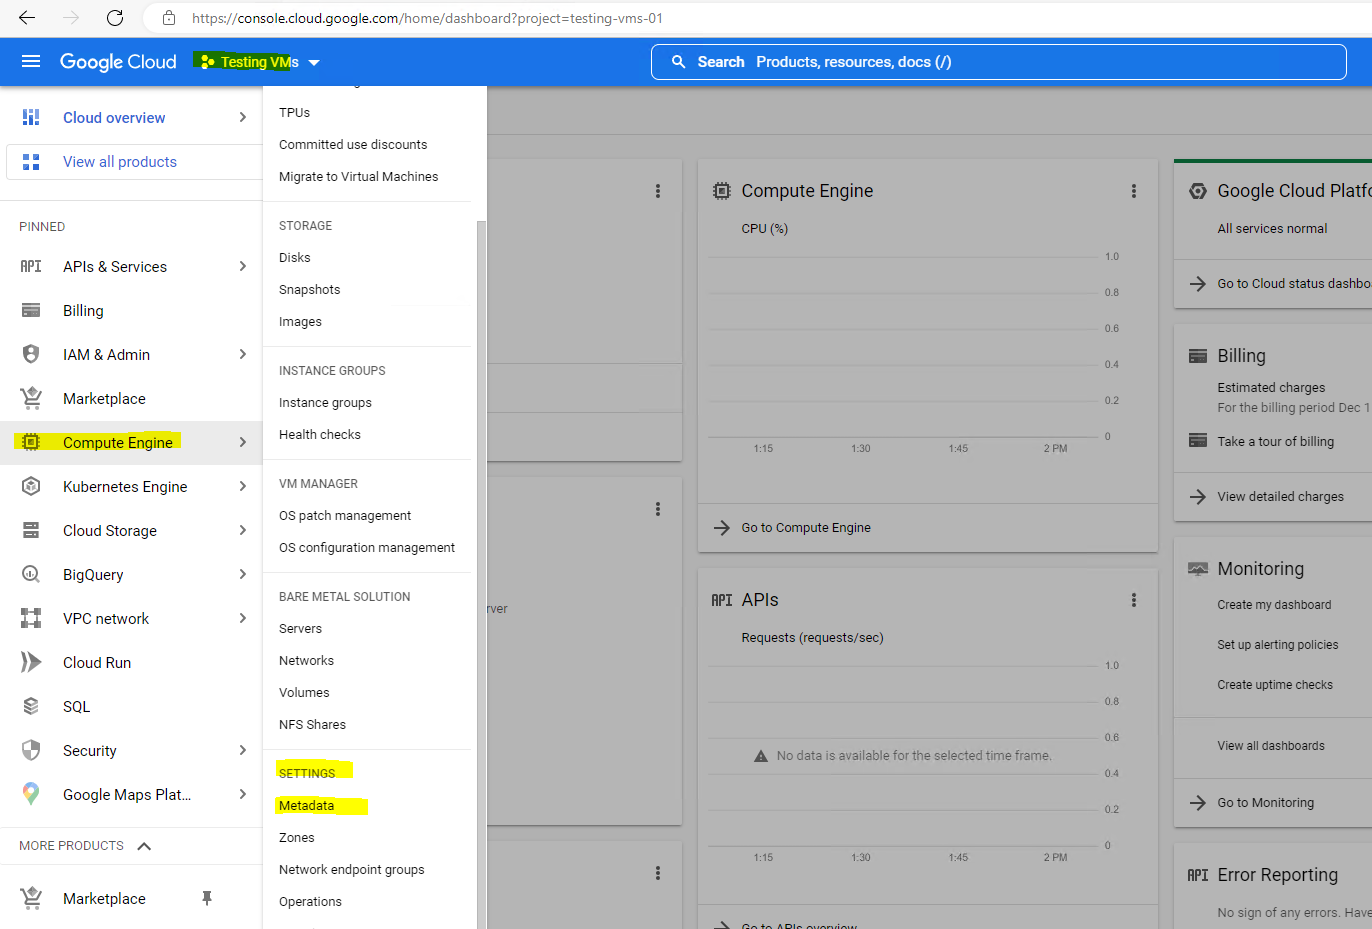
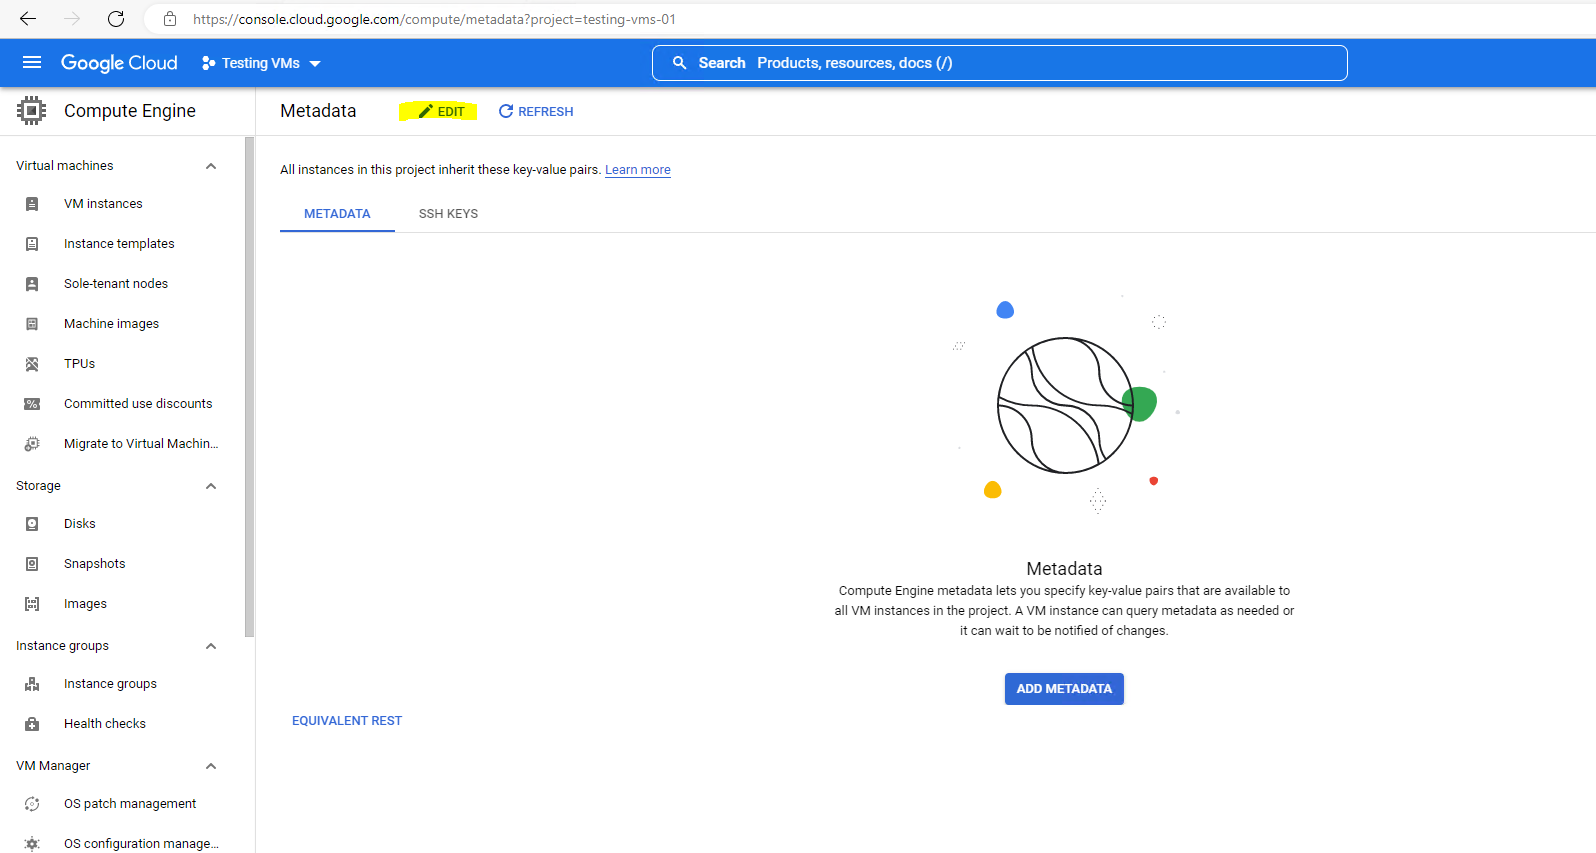
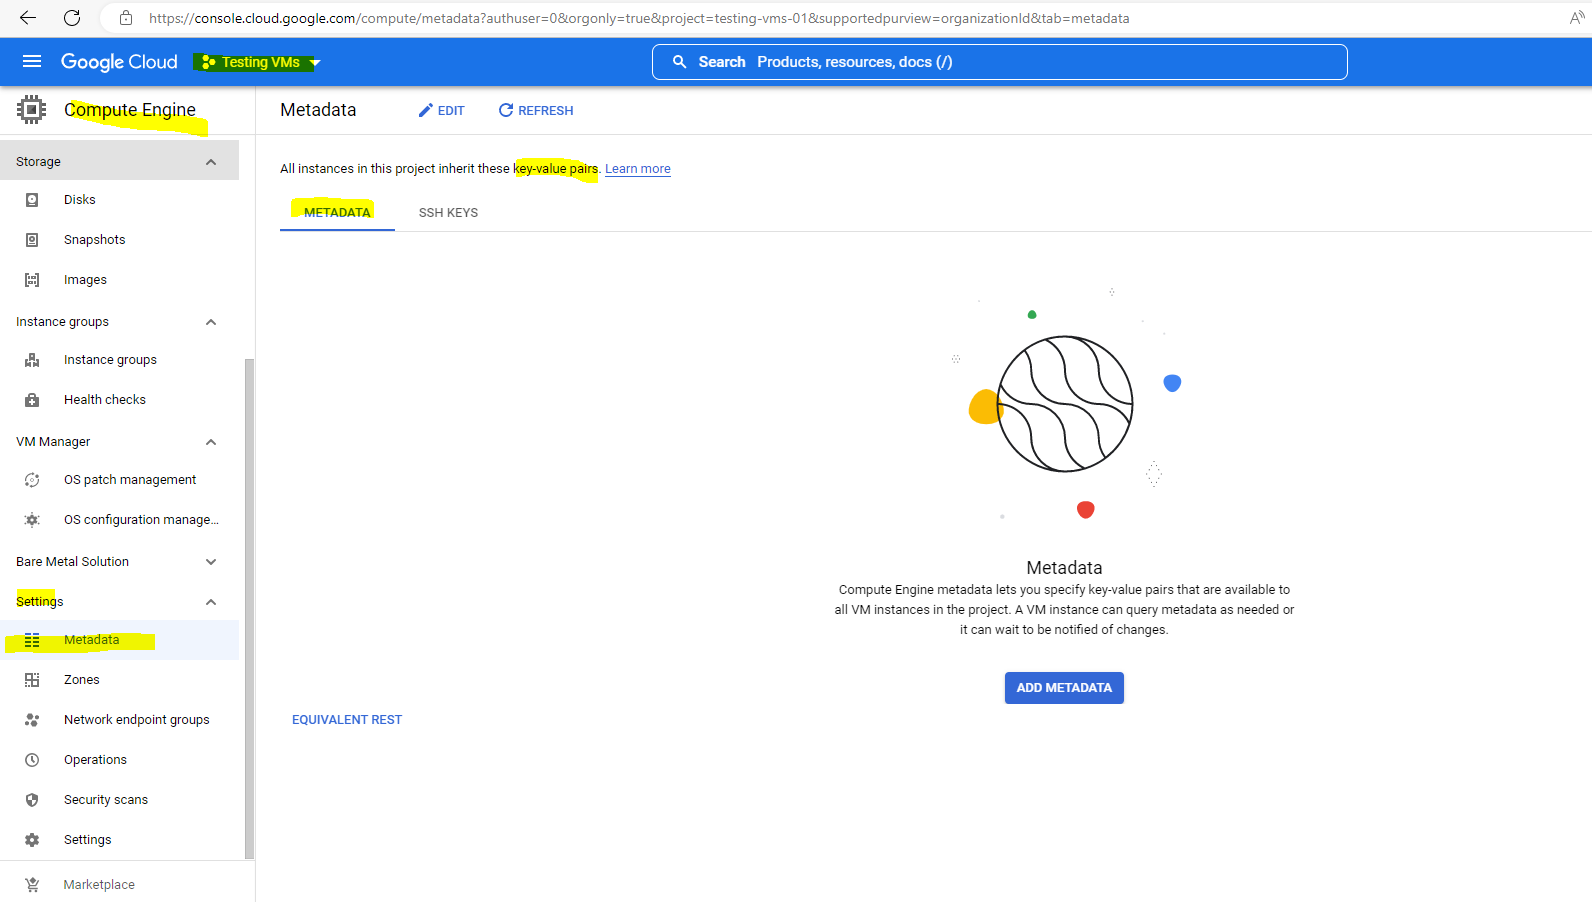
To check if OS Login is enabled on project level you can navigate in the GCP console to your project, then switch to Compute Engine and in the settings menu click on Metadata.
So you can see for my project Testing VMs OS Login is not enabled because the enable-oslogin=TRUE key pair is missing.
In case it is enabled it will looks like this below. Here further Multi-factor authentication is enabled by the key pair enable-oslogin-2fa.
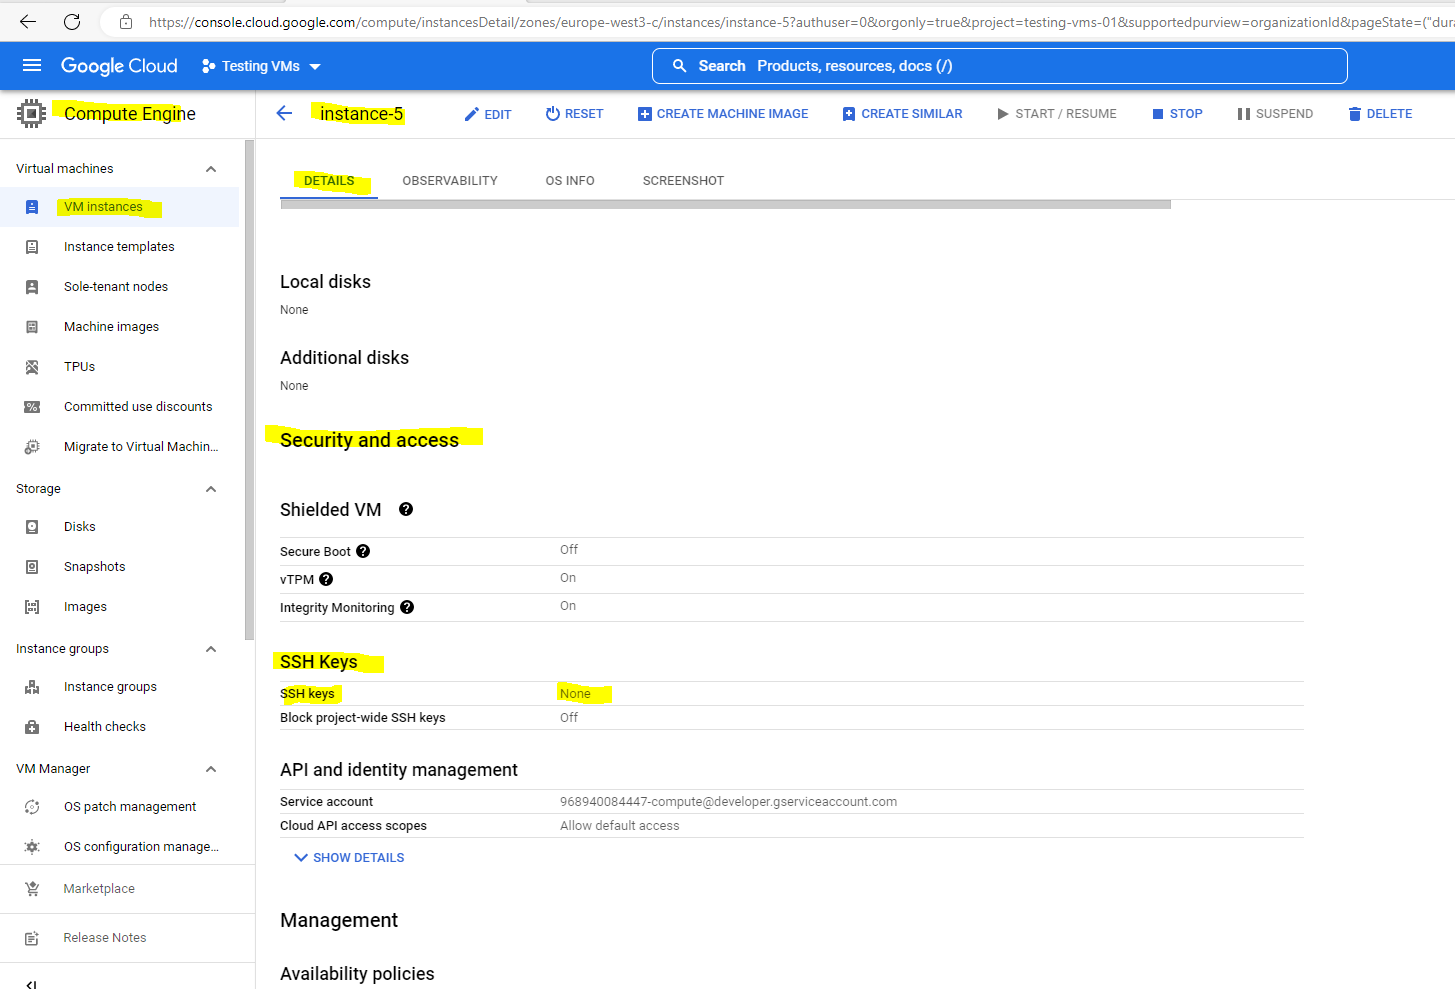
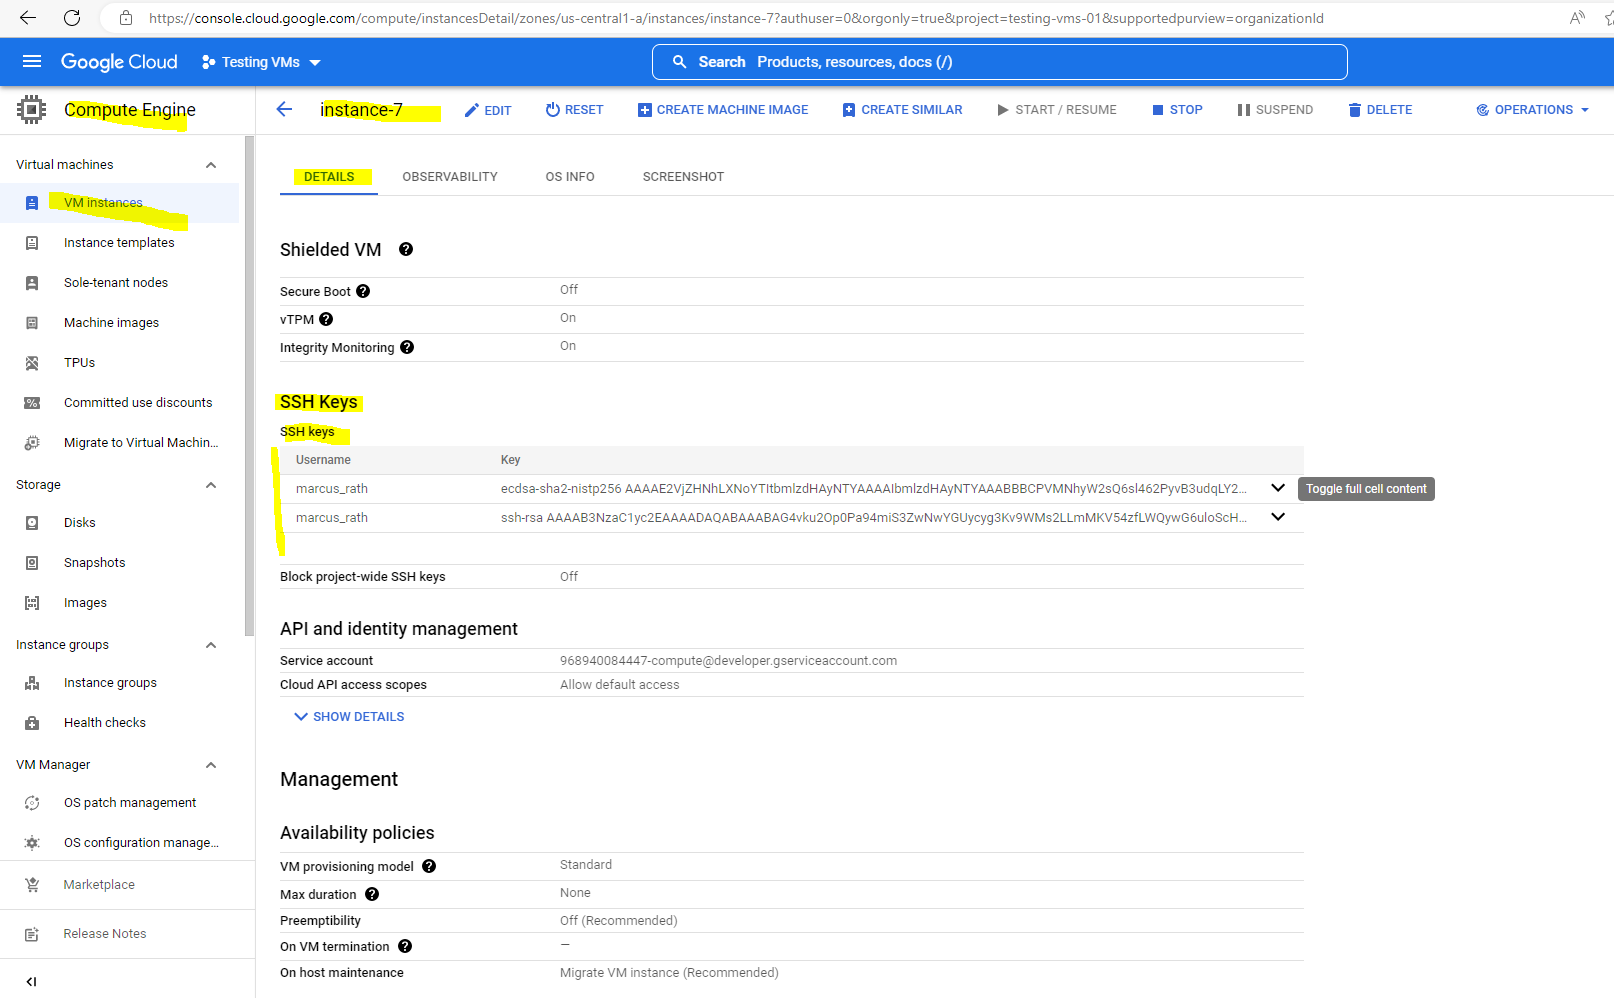
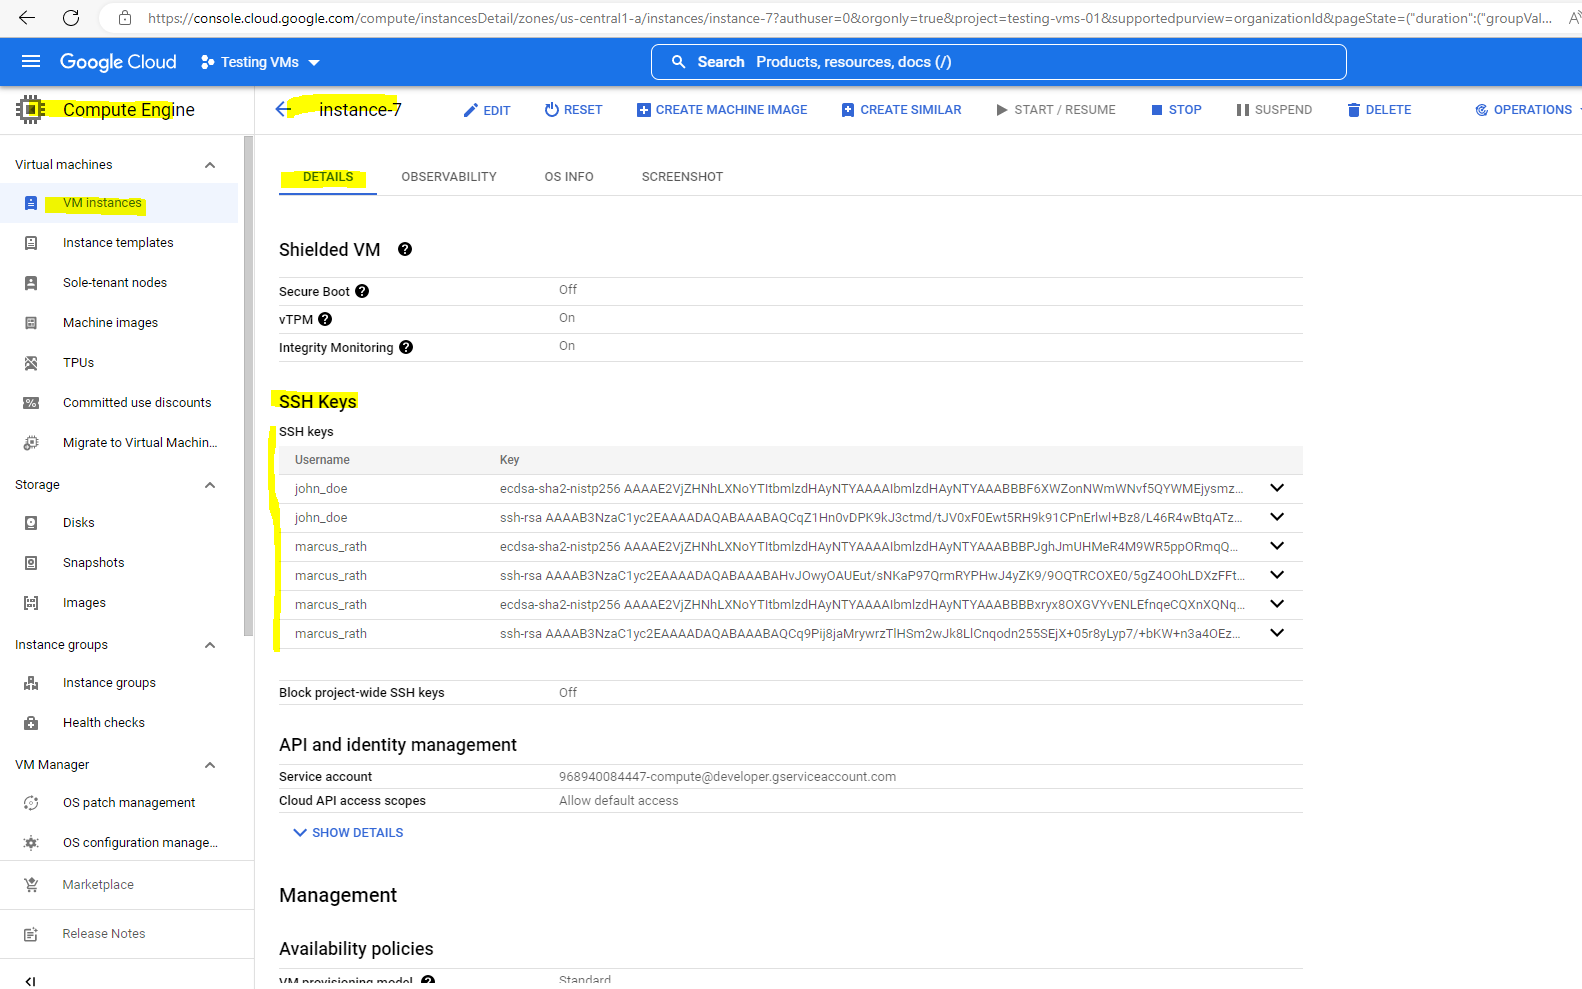
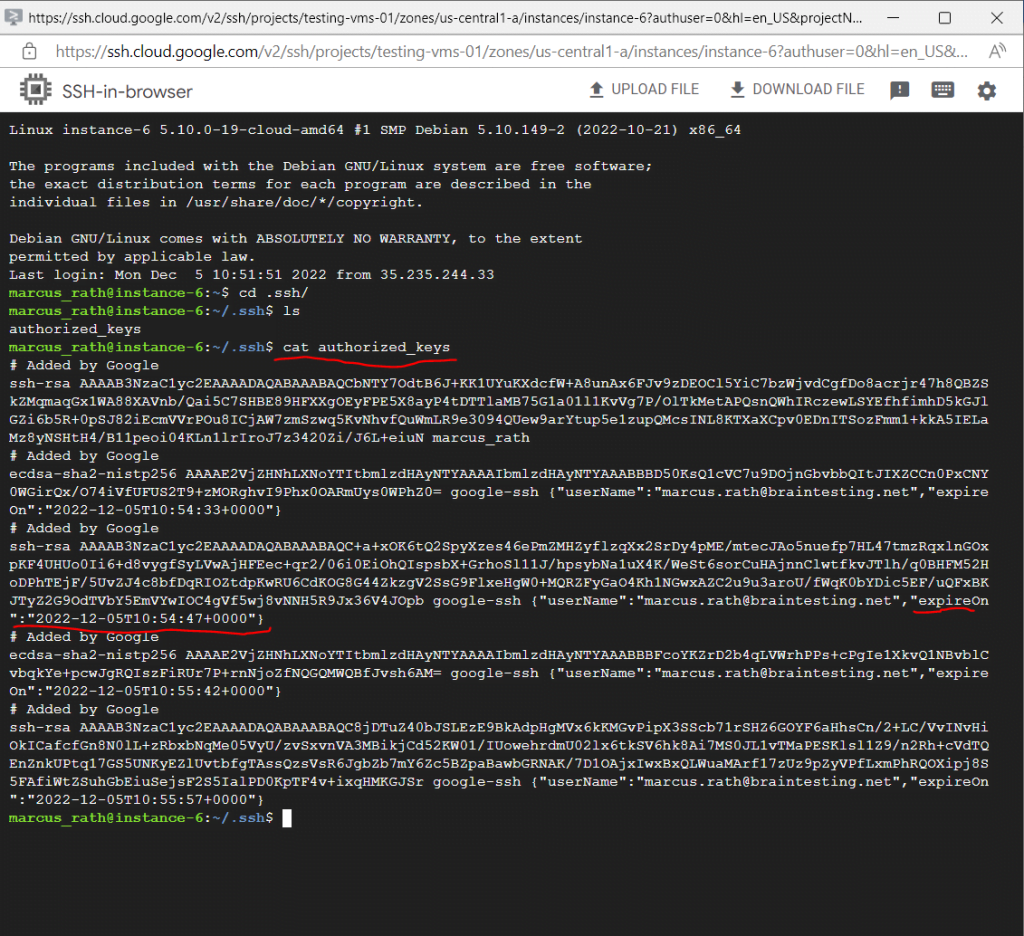
To check if OS Login is enabled directly on the instance you can navigate in the GCP console to your VM instance. In the Security and access section, view the SSH keys field.
- A value of None indicates there are no SSH keys stored in instance metadata –> OS Login is enabled.
!!! Note: In case you never logged on by using SSH to the VM instance no matter if OS Login is enabled or not, there will be no SSH keys stored! - Any other value indicates that there are SSH keys stored in instance metadata –> OS Login is not enabled.
So for my instance-5 virtual machine OS Login is enabled because there are no SSH keys stored in metadata.
In contrast my instance-7 virtual machine OS Login is not enabled because there are SSH keys stored in metadata.
When a further user is connected to the VM instance by using Metadata-managed SSH connections over OS Login, the SSH keys will also appended to the Metadata.
Guest environment
When you start a virtual machine (VM) instance using Google-provided public images, a guest environment is automatically installed on the VM instance. The guest environment is a set of scripts, daemons, and binaries that read the content of the metadata server to make a VM run properly on Compute Engine. A metadata server is a communication channel for transferring information from a client to the guest operating system.
This document provides an overview of the components of the guest environment, supported operating systems, and explains how to learn when you need to manually install or update the guest environment.
VM instances created using Google-provided public images include a guest environment that is installed by default.
To check if the guest environment is running on your instance, see validate the guest environment.
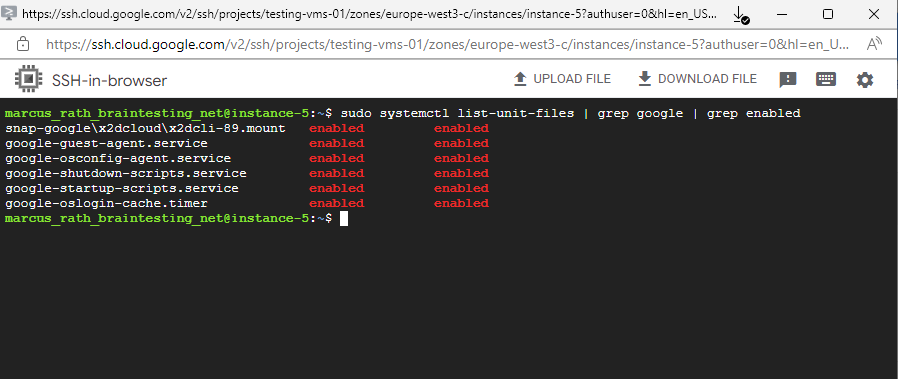
The presence of a guest environment can be determined by either inspecting system logs emitted to the console while an instance starts up, or by listing the installed packages while connected to the instance.
Loaded services for the guest environment
$ sudo systemctl list-unit-files | grep google | grep enabled
Source: https://cloud.google.com/compute/docs/images/install-guest-environment#wgei_services
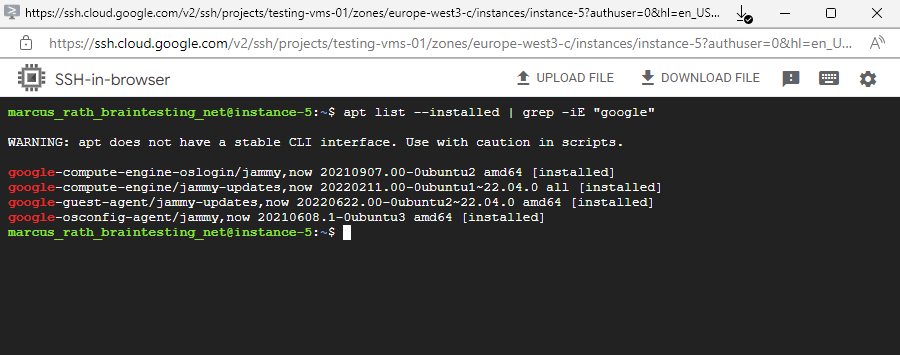
Installed packages for the guest environment
$ apt list –installed | grep -iE “google”
Source: https://cloud.google.com/compute/docs/images/install-guest-environment#wgei_packages
Source: https://cloud.google.com/compute/docs/images/guest-environment
About VM metadata
Every virtual machine (VM) instance stores its metadata on a metadata server. Your VM automatically has access to the metadata server API without any additional authorization. Metadata is stored as key:value pairs.
There is a default set of metadata keys that are available for VMs running on Compute Engine. For a list of these default metadata keys, see Default metadata values. You can also use your own custom metadata keys on an individual VM or project. For more information, see Setting custom metadata.
After setting a default or custom metadata entry, you can review the metadata information for that VM or project. To view metadata, see Querying VM metadata.
Source: https://cloud.google.com/compute/docs/metadata/overview
Links
About OS Login
https://cloud.google.com/compute/docs/osloginOS Login-managed SSH connections
https://cloud.google.com/compute/docs/instances/ssh?hl=en#os-loginGuest environment
https://cloud.google.com/compute/docs/images/guest-environmentAbout SSH connection
https://cloud.google.com/compute/docs/instances/sshConnect to Linux VMs using Google tools
https://cloud.google.com/compute/docs/instances/connecting-to-