Infrastructure as Code (IaC) – Part 2 – Azure Resource Manager (ARM) templates
In this post I want to summarize about what Azure Resource Manager templates (ARM templates) are and how you can use them to automize the deployment of Azure resources. This topic is well documented from Microsoft and I will use the following article to show how you can deploy a storage account by using them.
Quickstart: Create ARM templates with Visual Studio Code
https://learn.microsoft.com/en-us/azure/azure-resource-manager/templates/quickstart-create-templates-use-visual-studio-code
Azure Resource Manager templates (ARM templates) is a Infrastructure as code (IaC) solution for Microsoft Azure.
ARM templates offer a declarative syntax to define the infrastructure and resources for Azure deployment. Instead of detailing the implementation steps, you specify the desired outcome. An ARM template is a JSON file containing customized template expressions. In the template expressions, you define dynamic values and logic that determine the Azure resources to deploy.
We’ve introduced a new language named Bicep that offers the same capabilities as ARM templates but with a syntax that’s easier to use. Each Bicep file is automatically converted to an ARM template during deployment. If you’re considering infrastructure as code options, we recommend looking at Bicep. For more information, see What is Bicep?.
Source: https://learn.microsoft.com/en-us/azure/azure-resource-manager/templates/overview
ARM templates vs. Desired State Configuration (DSC)
In a nutshell, ARM Templates deploy and configure Azure resources (like networking, storage, sql, vms, redis, webapp, etc) from the scratch.
PowerShell Desired State Configuration (DSC) in contrast can be used to automate the configuration of already deployed Windows and Linux operating systems.
Why choose ARM templates?
There are several benefits of using ARM templates for your infrastructure management.
- Authoring tools: With Visual Studio Code and the Azure Resource Manager template tools extension, you get intellisense, syntax highlighting, and in-line help.
- Declarative syntax: Define the desired state of your resources. Azure Resource Manager handles the deployment process.
- Create any Azure resource: Support for all Azure resource types and continuous updates as new resources are introduced.
- Repeatable results: Ensure consistency across environments by reusing the same template for multiple deployments.
- Modular files: Break down large templates into smaller, reusable modules for better maintainability.
- Easier maintenance: Update your infrastructure by updating your ARM template.
- Reduced human error: Avoid errors that are more likely with manual infrastructure management. Reduce the likelihood of security vulnerabilities and downtime.
- Orchestration: Simplify complex deployments by defining dependencies and relationships between resources. Azure Resource Manager orchestrates the deployment of interdependent resources so they’re created in the correct order. When possible, Azure Resource Manager deploys resources in parallel so your deployments finish faster than serial deployments. You deploy the template through one command, rather than through multiple imperative commands.
More under the following link https://learn.microsoft.com/en-us/azure/azure-resource-manager/templates/overview#why-choose-arm-templates
Template file
ARM templates consist of several sections, including:
- Parameters: Provide values during deployment that customize the deployment for different environments. For example, you can define parameters such as storage account names with minimum and maximum length constraints.
- Variables: Define reusable values within the template to simplify complex expressions and improve readability. For example, you can declare a variable for the storage account type.
- User-defined functions: Create custom functions to encapsulate complex logic or calculations. You can define a function with a namespace, members, parameters, and output.
- Resources: Define the Azure resources to deploy or update. Resource definitions can include the resource type, API version, name, location, SKU, kind, and resource-specific properties.
- Outputs: Return values from the deployed resources for further processing or display. You can define output types and values, such as the storage account endpoint.
Source: https://learn.microsoft.com/en-us/azure/azure-resource-manager/templates/overview#template-file
Template design
To create a maintainable and modular ARM template, you can organize and manage your templates in the following ways:
- Single template: All resources are defined within a single template file.
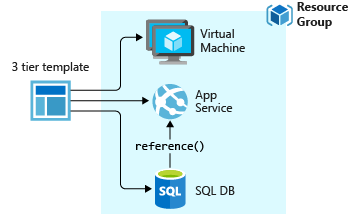
- Nested templates: Include templates within other templates to create a modular and reusable design.
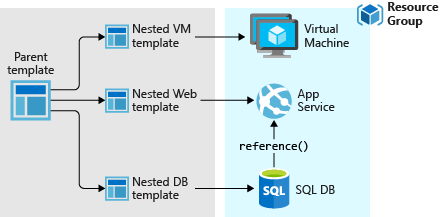
For information about nested templates, see Using linked templates with Azure Resource Manager.
- Separate resource groups: Group resources based on their lifecycle or functionality.
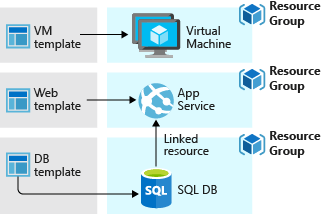
Source: https://learn.microsoft.com/en-us/azure/azure-resource-manager/templates/overview#template-design
Share templates
To share your ARM templates with others in your organization, use Template specs. Template specs enable you to store a template as a resource type. You use role-based access control to manage access to the template spec. Users with read access to the template spec can deploy it, but not change the template.
Source: https://learn.microsoft.com/en-us/azure/azure-resource-manager/templates/overview#share-templates
Create and deploy an ARM template
Prerequisites
Templates are JavaScript Object Notation (JSON) files. To create templates, you need a good JSON editor. We recommend Visual Studio Code with the Azure Resource Manager Tools extension. If you need to install these tools, see Quickstart: Create ARM templates with Visual Studio Code.
You also need either Azure PowerShell or Azure Command-Line Interface (CLI) to deploy the template. If you use Azure CLI, you need to have version 2.37.0 or later. For the installation instructions, see:
After installing either Azure PowerShell or Azure CLI, make sure you sign in for the first time. For help, see Sign in – PowerShell or Sign in – Azure CLI.
If you’re using Azure CLI, make sure you have version 2.37.0 or later. If you’re using Azure PowerShell, make sure you have version 7.2.4 or later. The commands shown in this tutorial don’t work if you’re using earlier versions. To check your installed version, use: az –version.
Installing Azure Resource Manager (ARM) Tools in Visual Studio Code
You can browse and install extensions from within VS Code. Bring up the Extensions view by clicking on the Extensions icon in the Activity Bar on the side of VS Code or the View: Extensions command (Ctrl+Shift+X).
Finally click on Install.
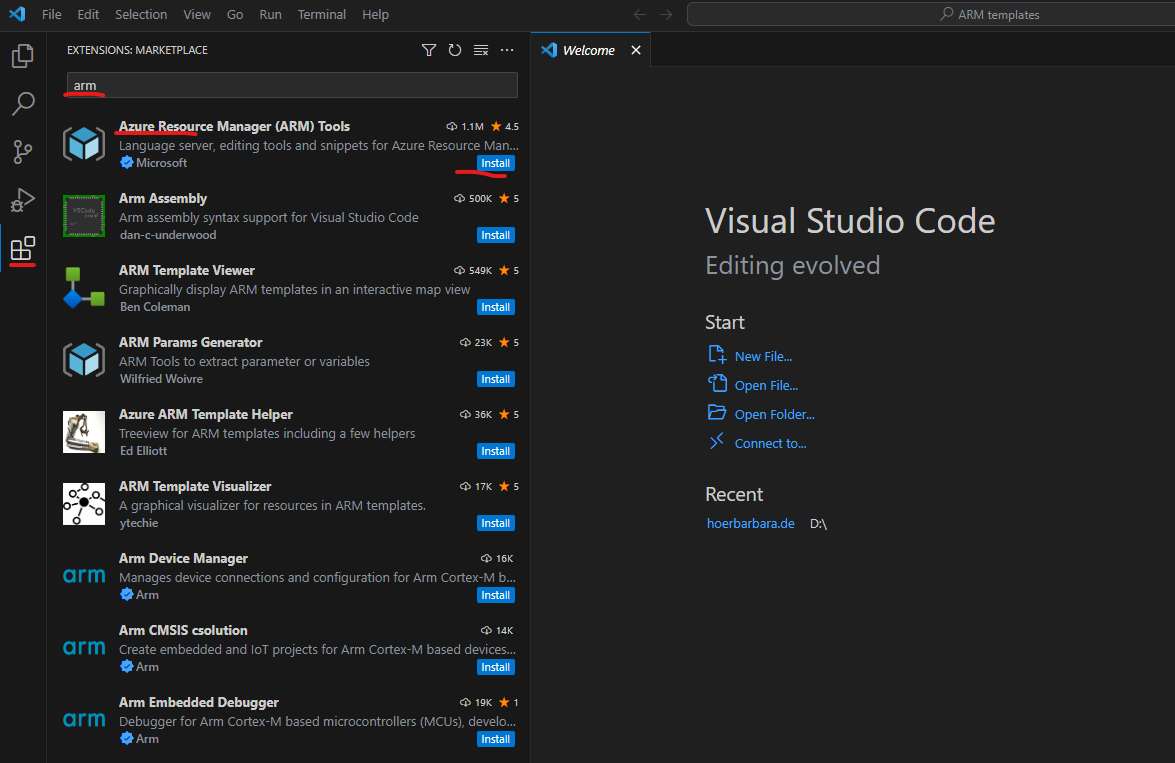
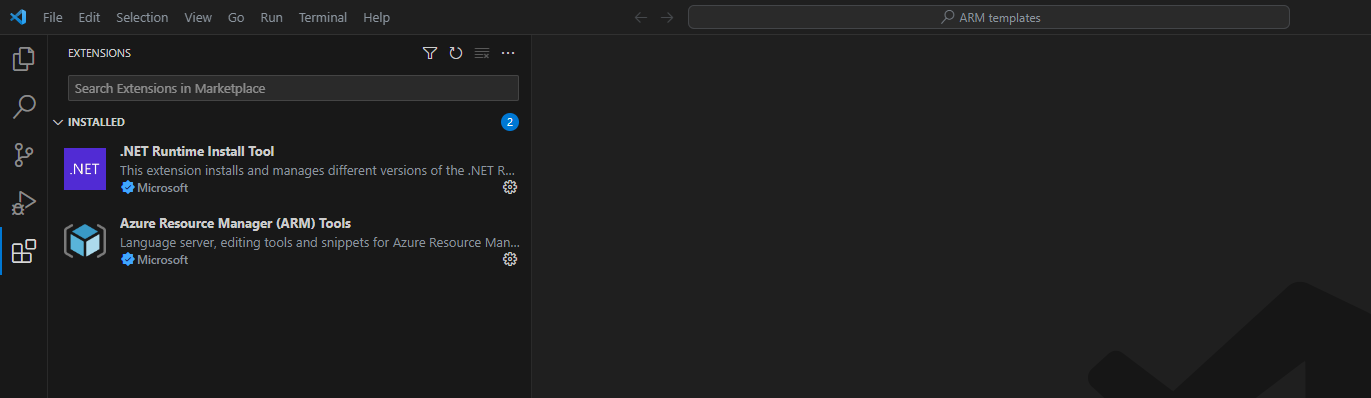
More about Visual Studio Code and the Extension Marketplace you will find under the following link https://code.visualstudio.com/docs/editor/extension-marketplace.
Create an ARM template
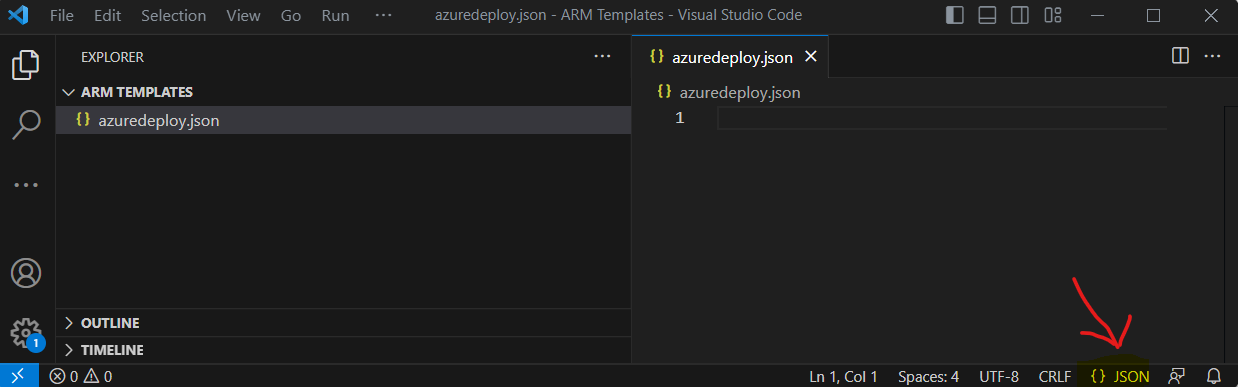
Create and open with Visual Studio Code a new file named azuredeploy.json. As you can see the Visual Studio Code language mode is now set to JSON.
Hundreds of programming languages supported
In Visual Studio Code, we have support for almost every major programming language.
https://code.visualstudio.com/docs/languages/overview
Enter arm into the code editor, which initiates Azure Resource Manager snippets for scaffolding out an ARM template.
Select arm! to create a template scoped for an Azure resource group deployment.
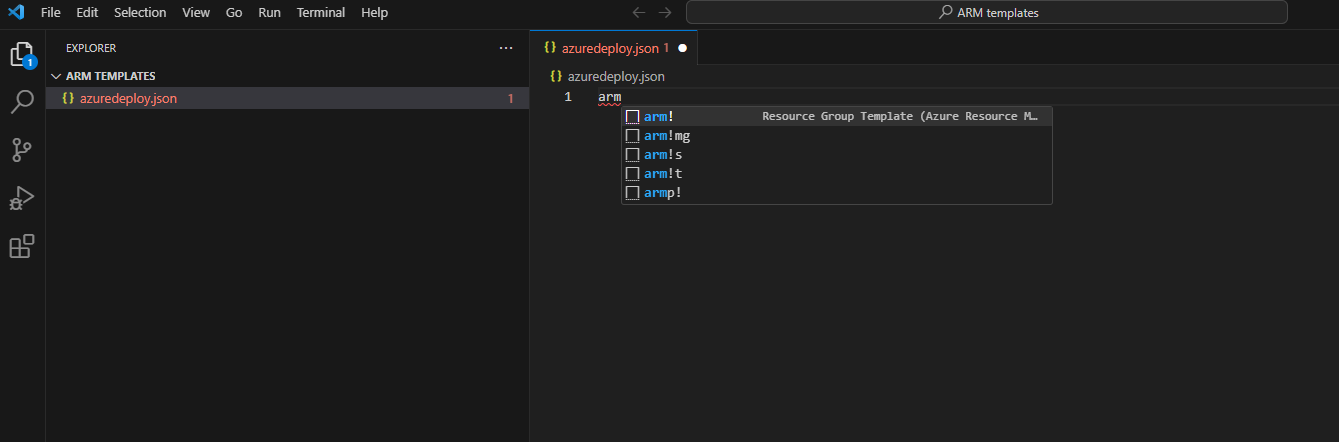
This snippet creates the basic building blocks for an ARM template.
Here you can see the several sections an ARM template consists of as shown further above.
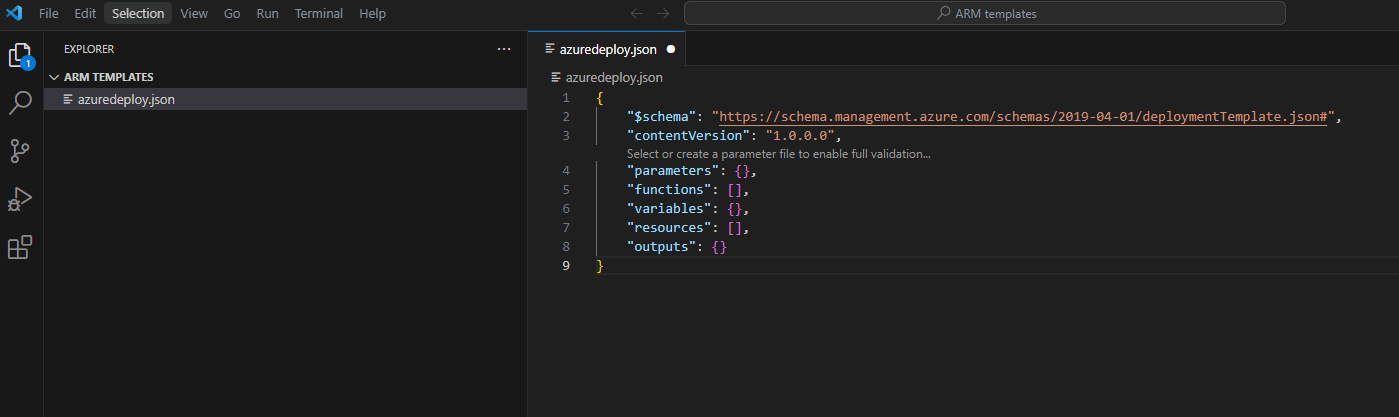
Notice that the Visual Studio Code language mode has changed from JSON to Azure Resource Manager Template. The extension includes a language server specific to ARM templates that provides ARM template-specific validation, completion, and other language services.

Add an Azure resource
The extension includes snippets for many Azure resources. These snippets can be used to easily add resources to your template deployment.
Place the cursor in the template resources block, type in storage, and select the arm-storage snippet.

This action adds a storage resource to the template.
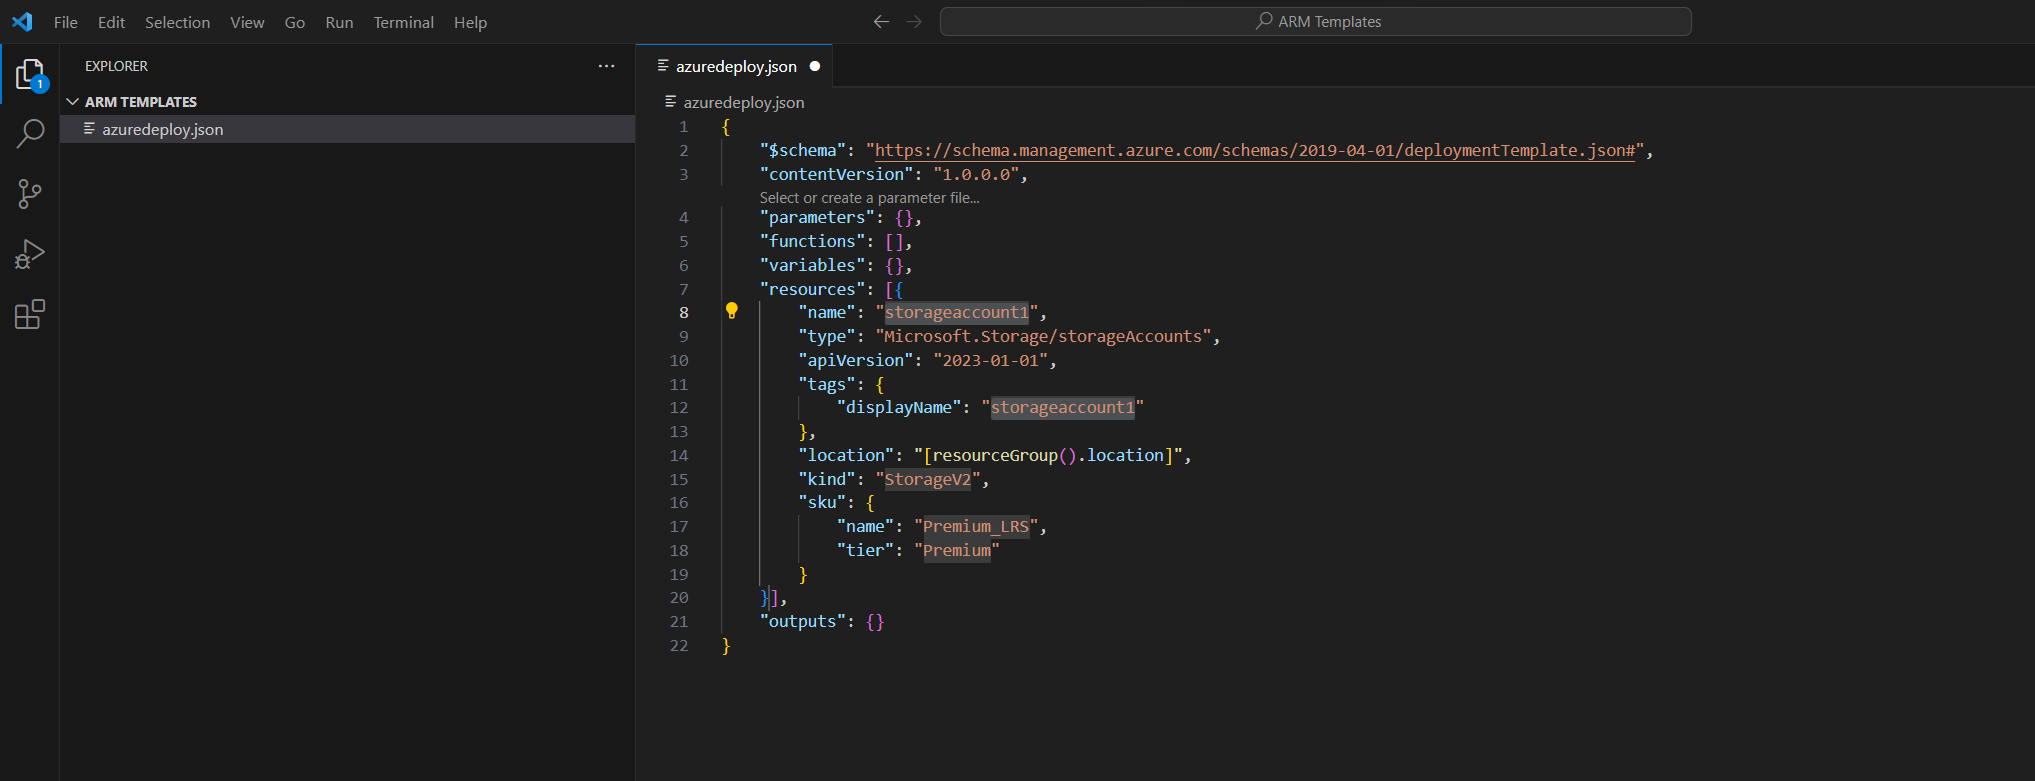
As you can see in the figure above, there are some configurable properties highlighted, the tab key can now be used to tab through and change them.
Completion and validation
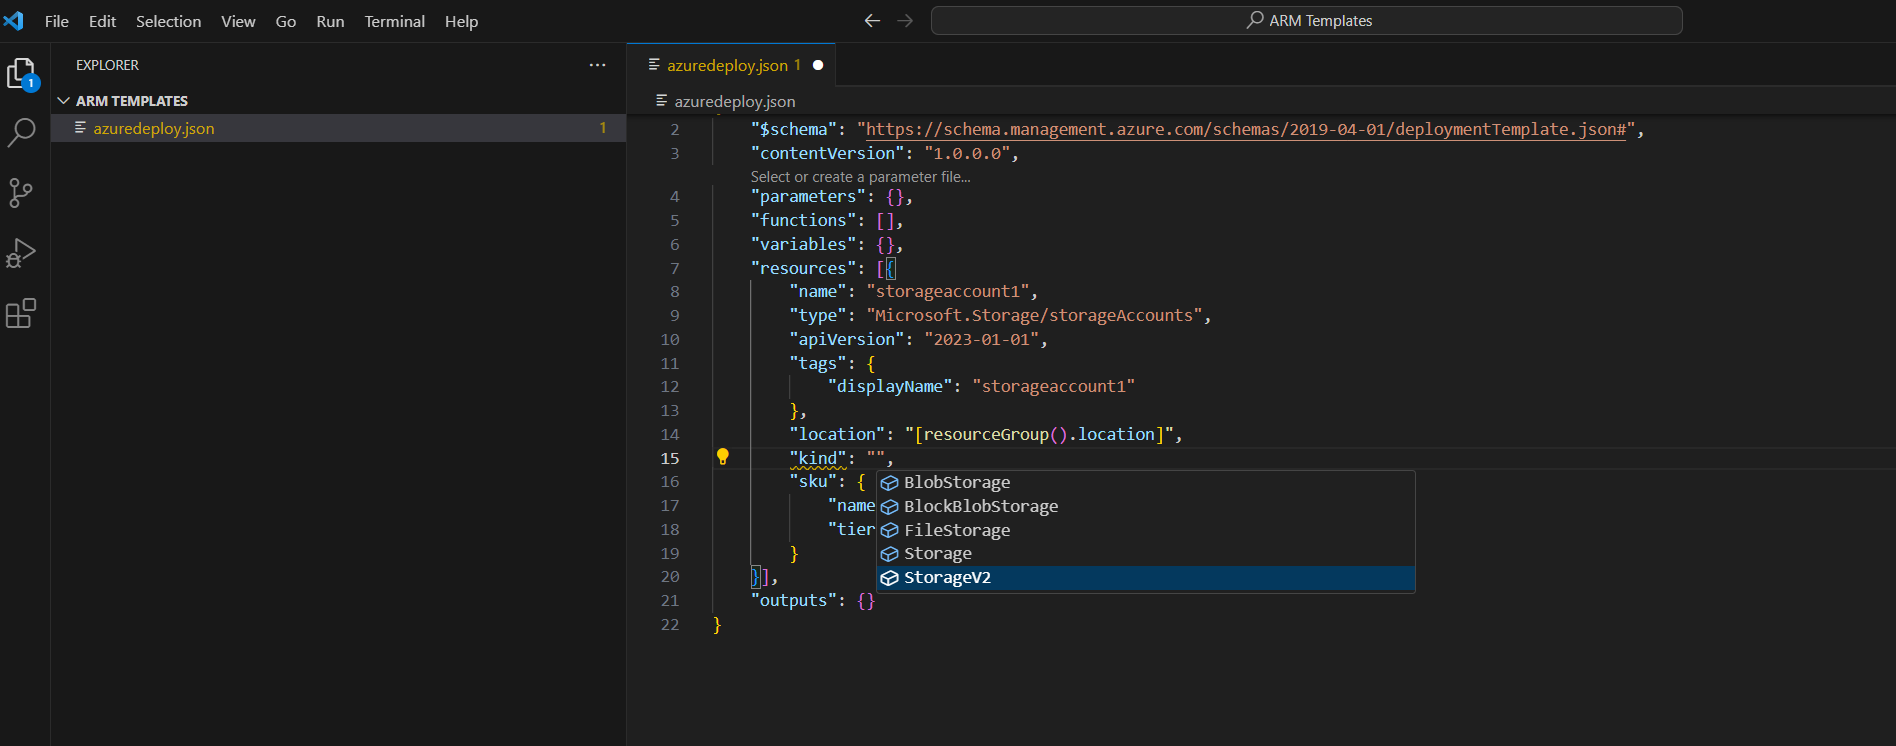
One of the most powerful capabilities of the extension is its integration with Azure schemas. Azure schemas provide the extension with validation and resource-aware completion capabilities. Let’s modify the virtual machine to see validation and completion in action.
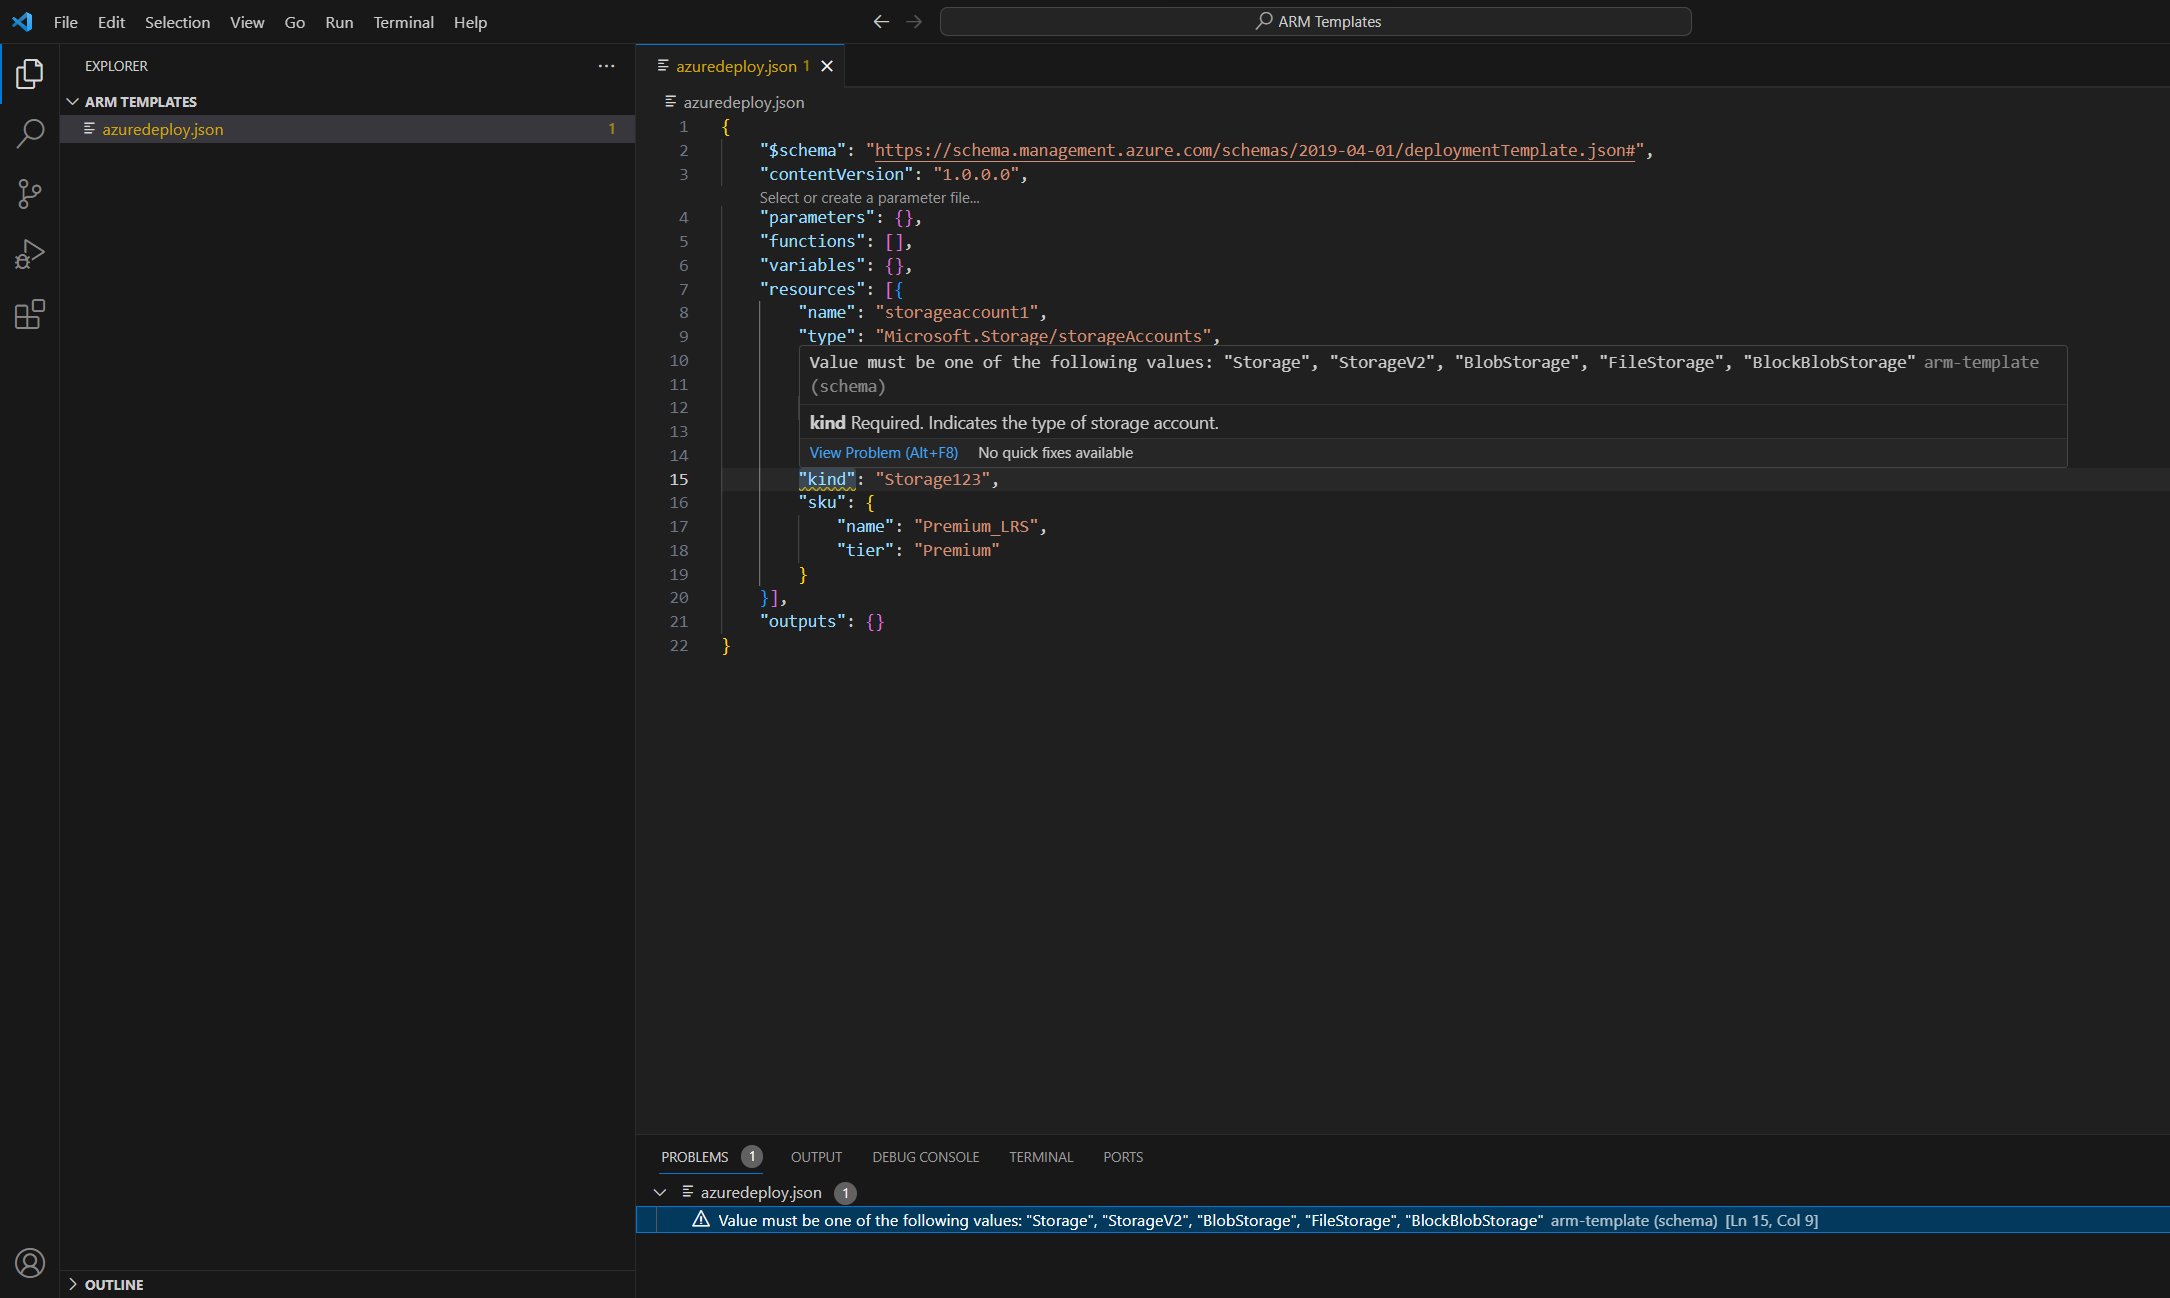
First, I will update the storage account kind to an invalid value such as Storage123. Notice that this action produces a warning indicating that Storage123 isn’t a valid value.
To use the completion capabilities, remove Storage123, place the cursor inside of the double quotes, and press ctrl + space. This action presents a completion list of valid values.
Add template parameters
Now create and use a parameter to specify the storage account name.
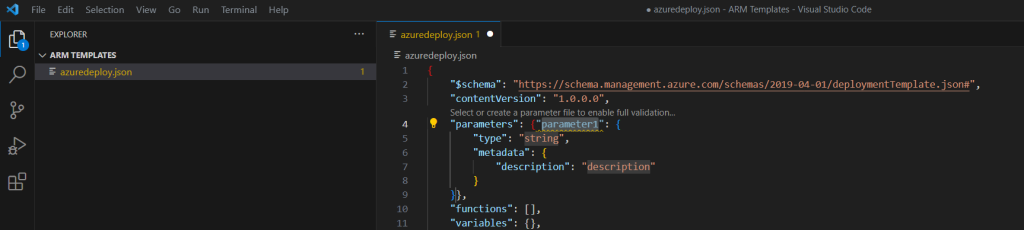
Place your cursor in the parameters block, add a carriage return, type “, and then select the new-parameter snippet. This action adds a generic parameter to the template.
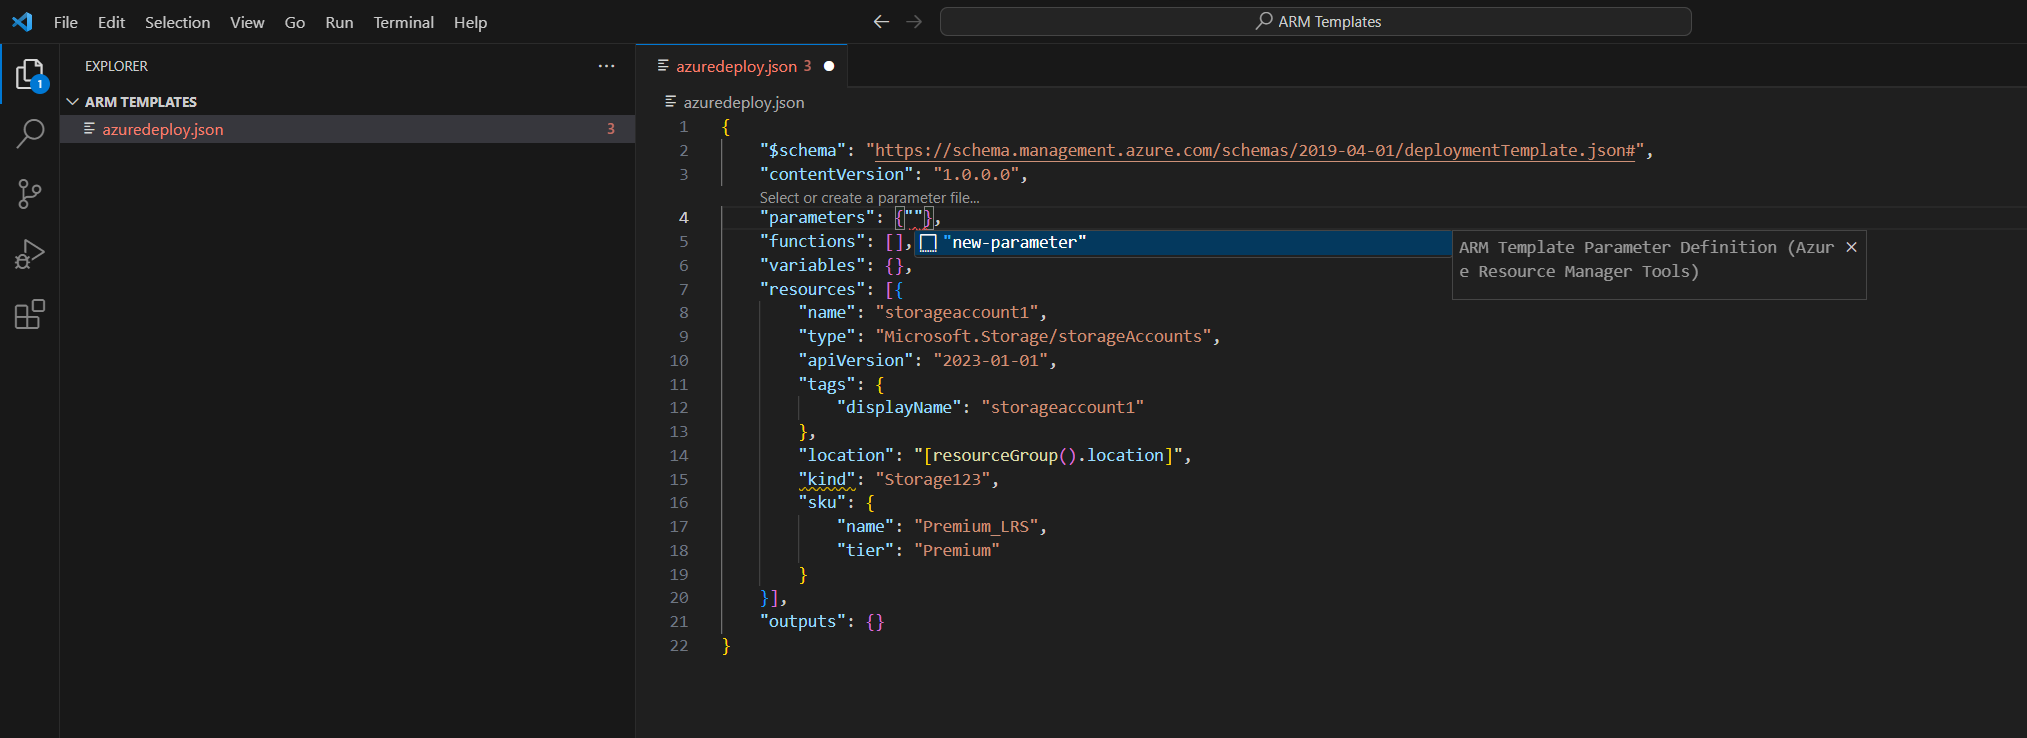
Update the name of the parameter to storageAccountName and the description to Storage Account Name.
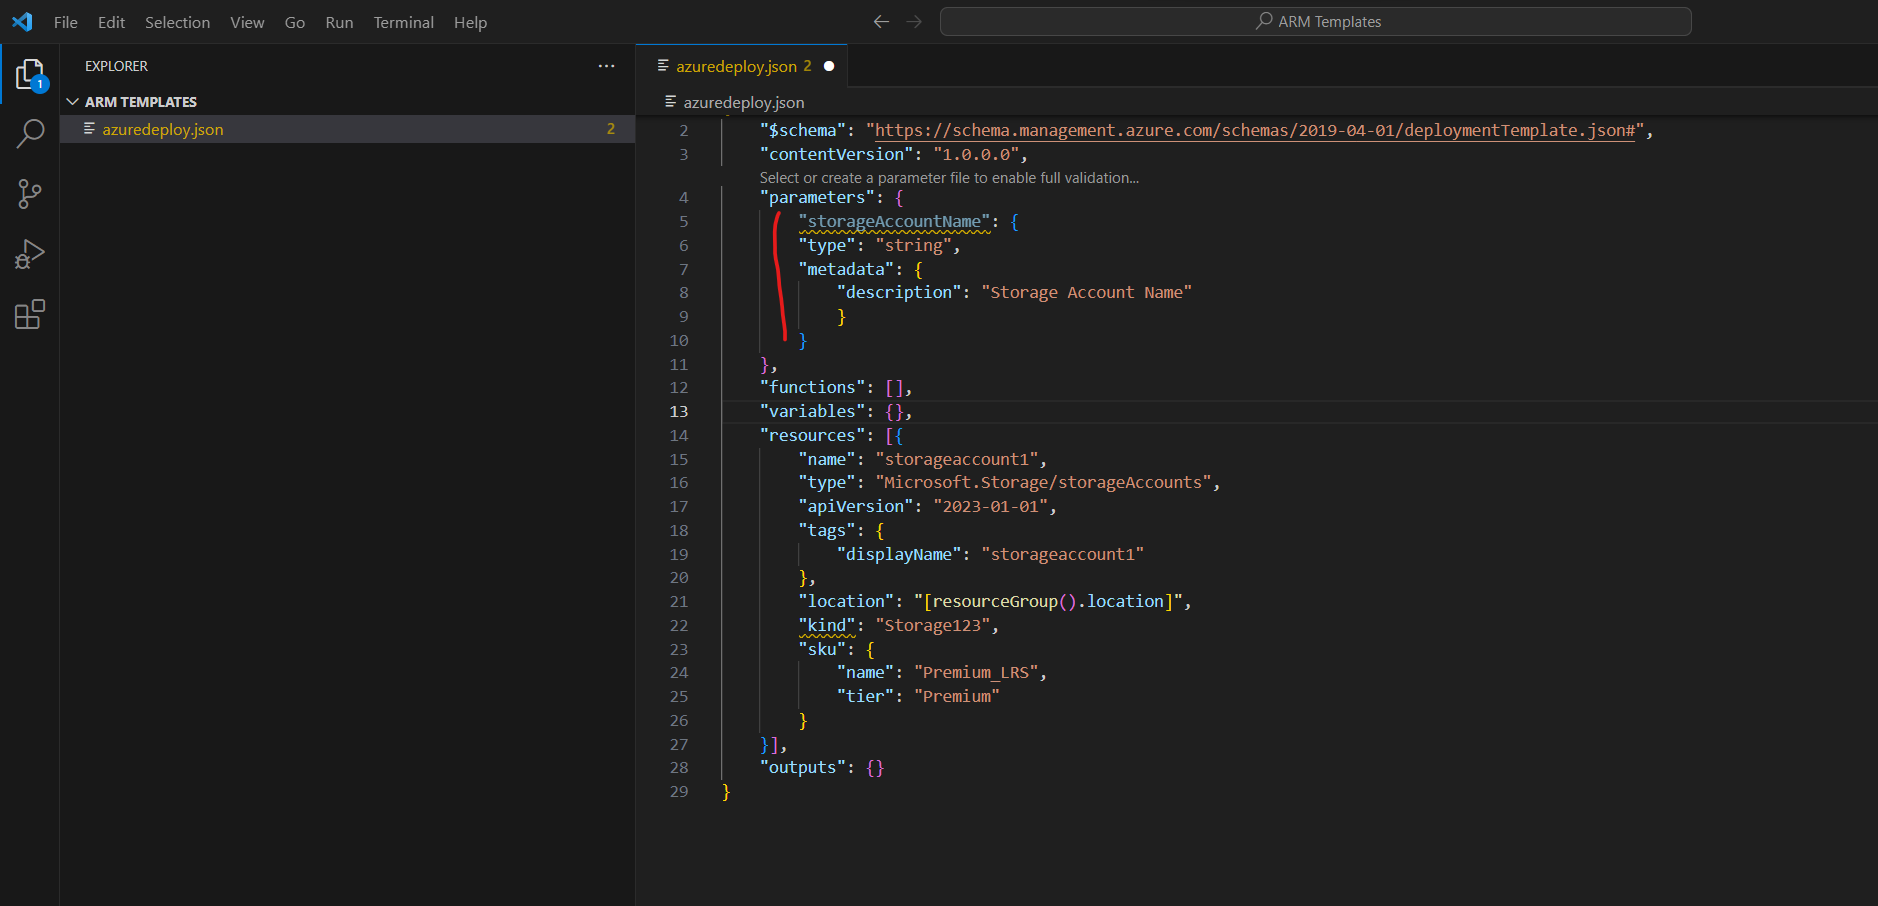
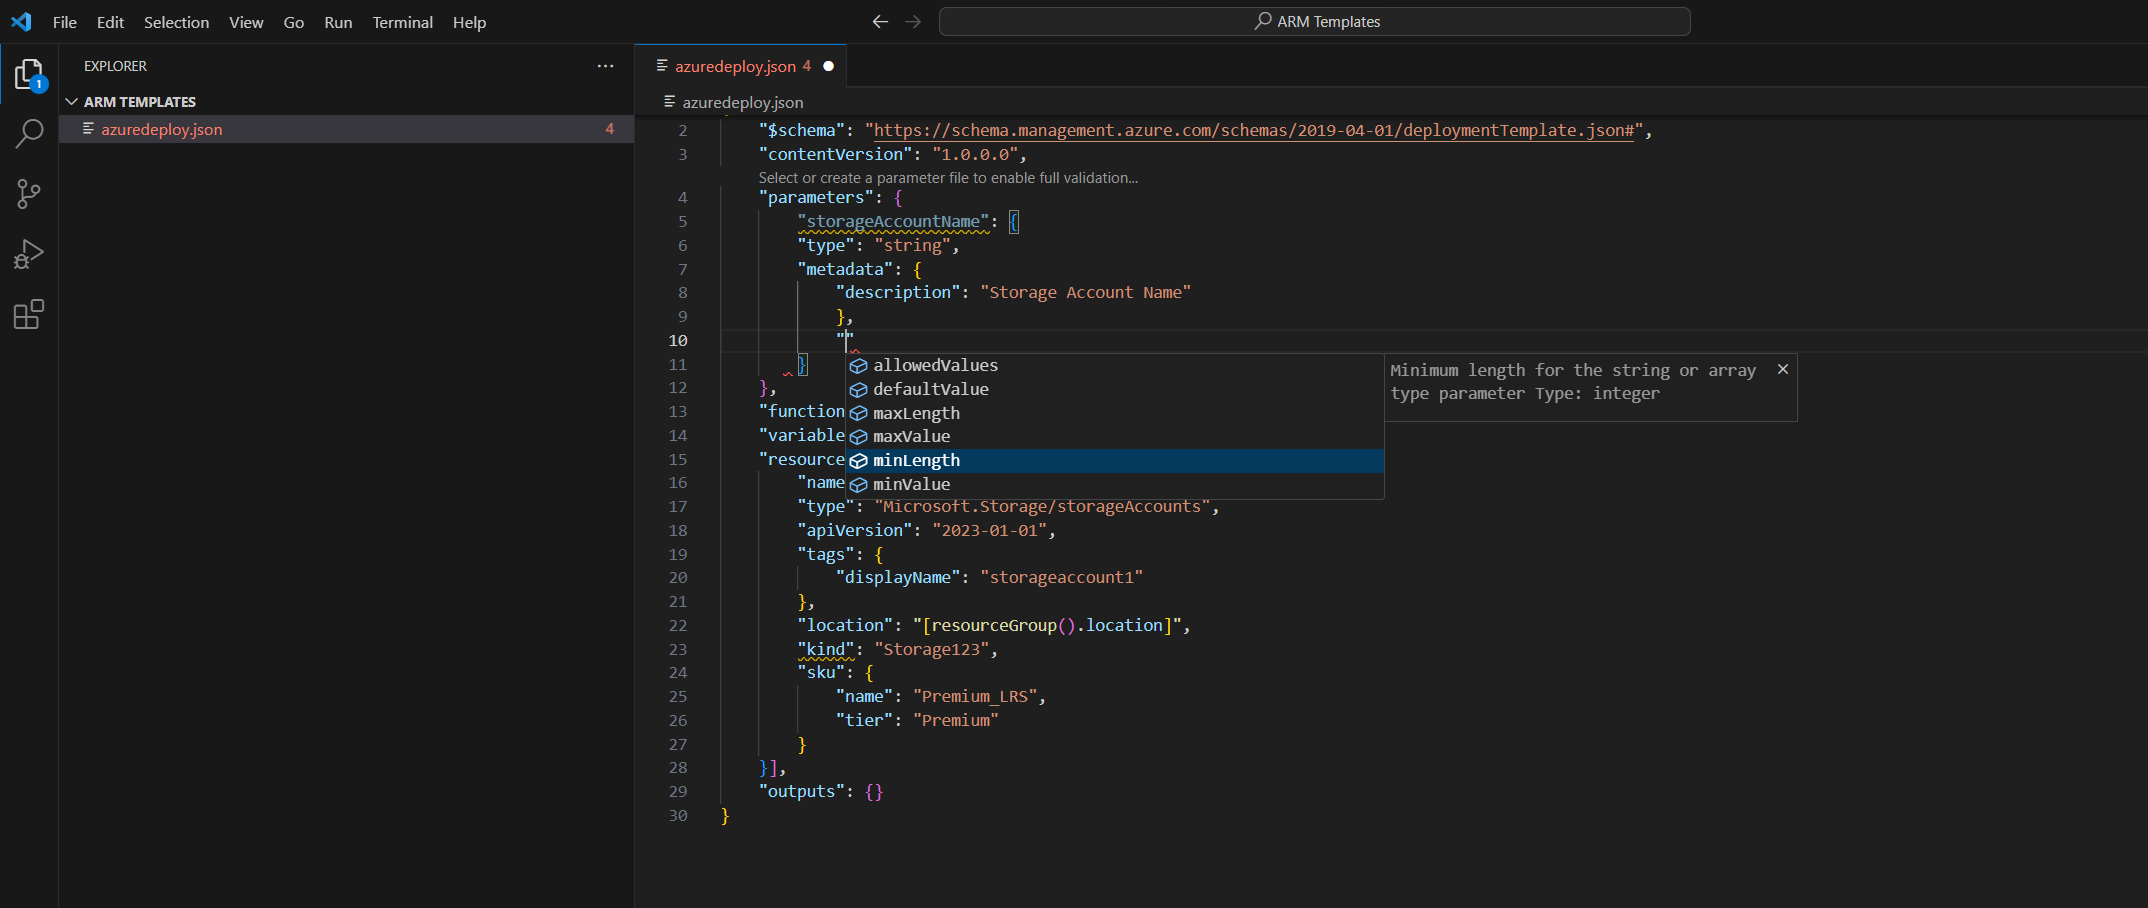
Azure storage account names have a minimum length of 3 characters and a maximum of 24. Add both minLength and maxLength to the parameter and provide appropriate values.
You can also use the completion capabilities again, when you type the first double quote all available values will appear. The completion will also appear by placing the cursor inside of the double quotes, and pressing ctrl + space.

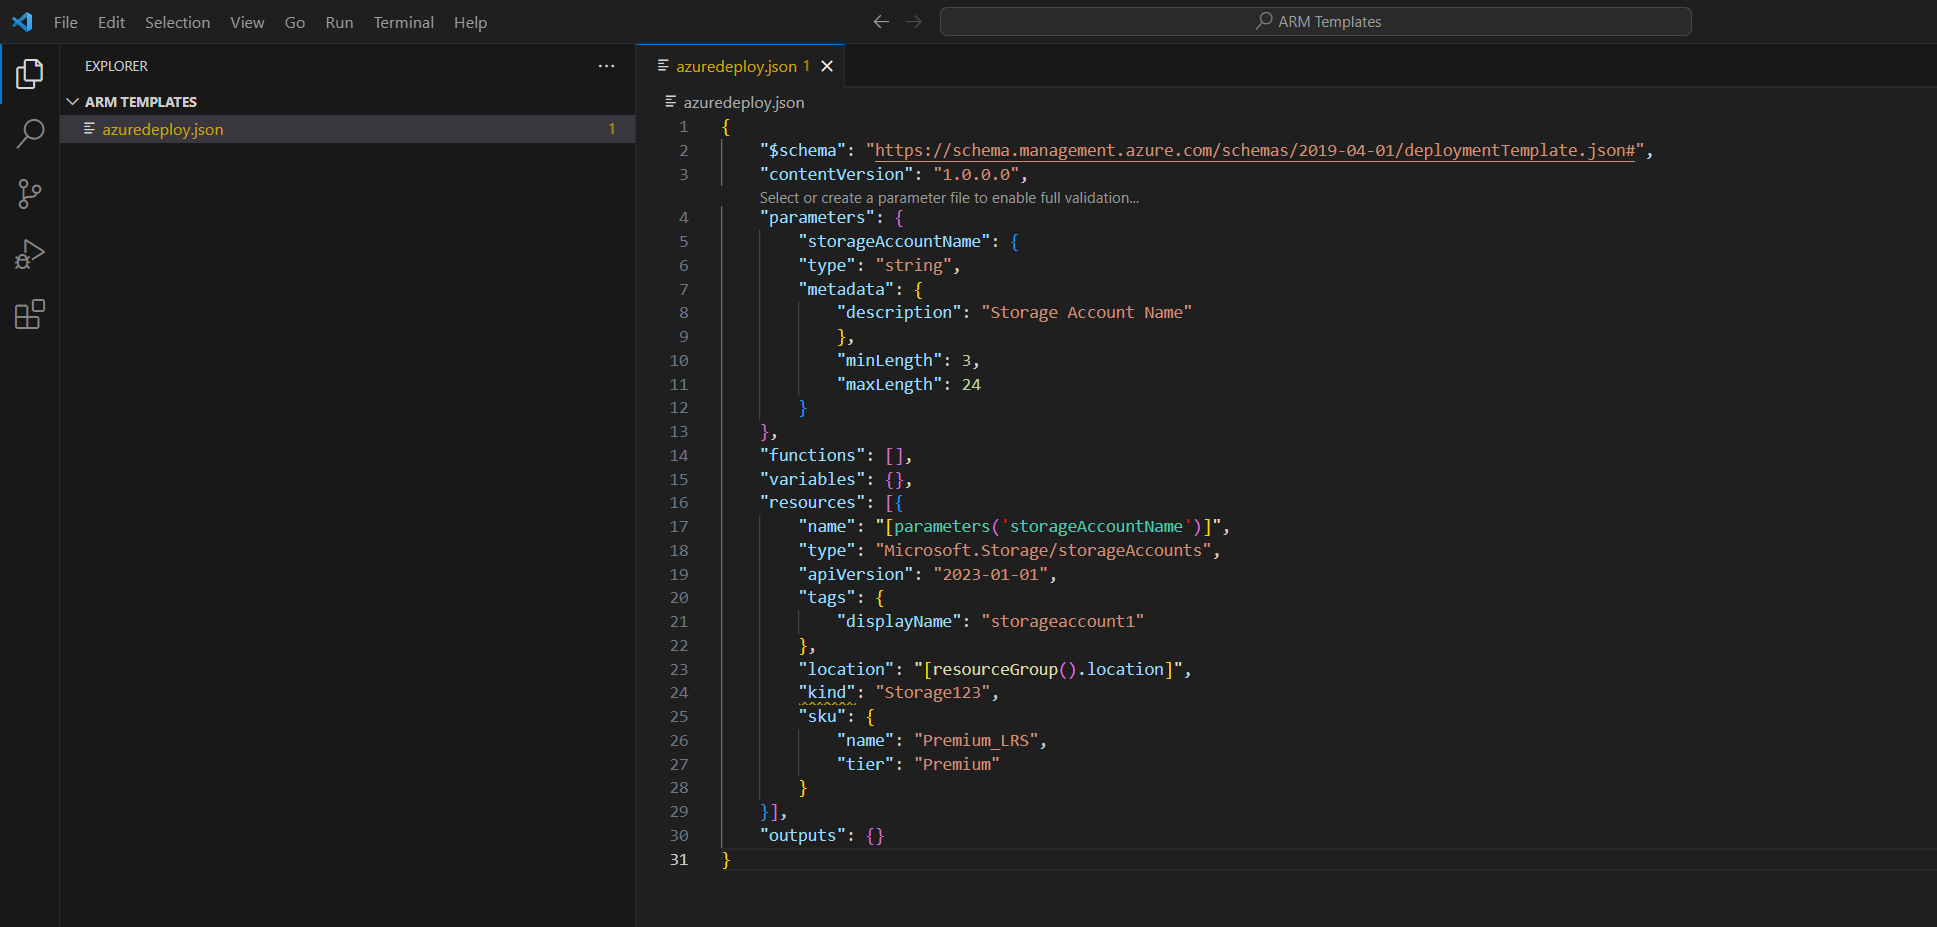
Now, on the storage resource, update the name property to use the parameter. To do so, remove the current name. Enter a double quote and an opening square bracket [, which produces a list of ARM template functions. Select parameters from the list.
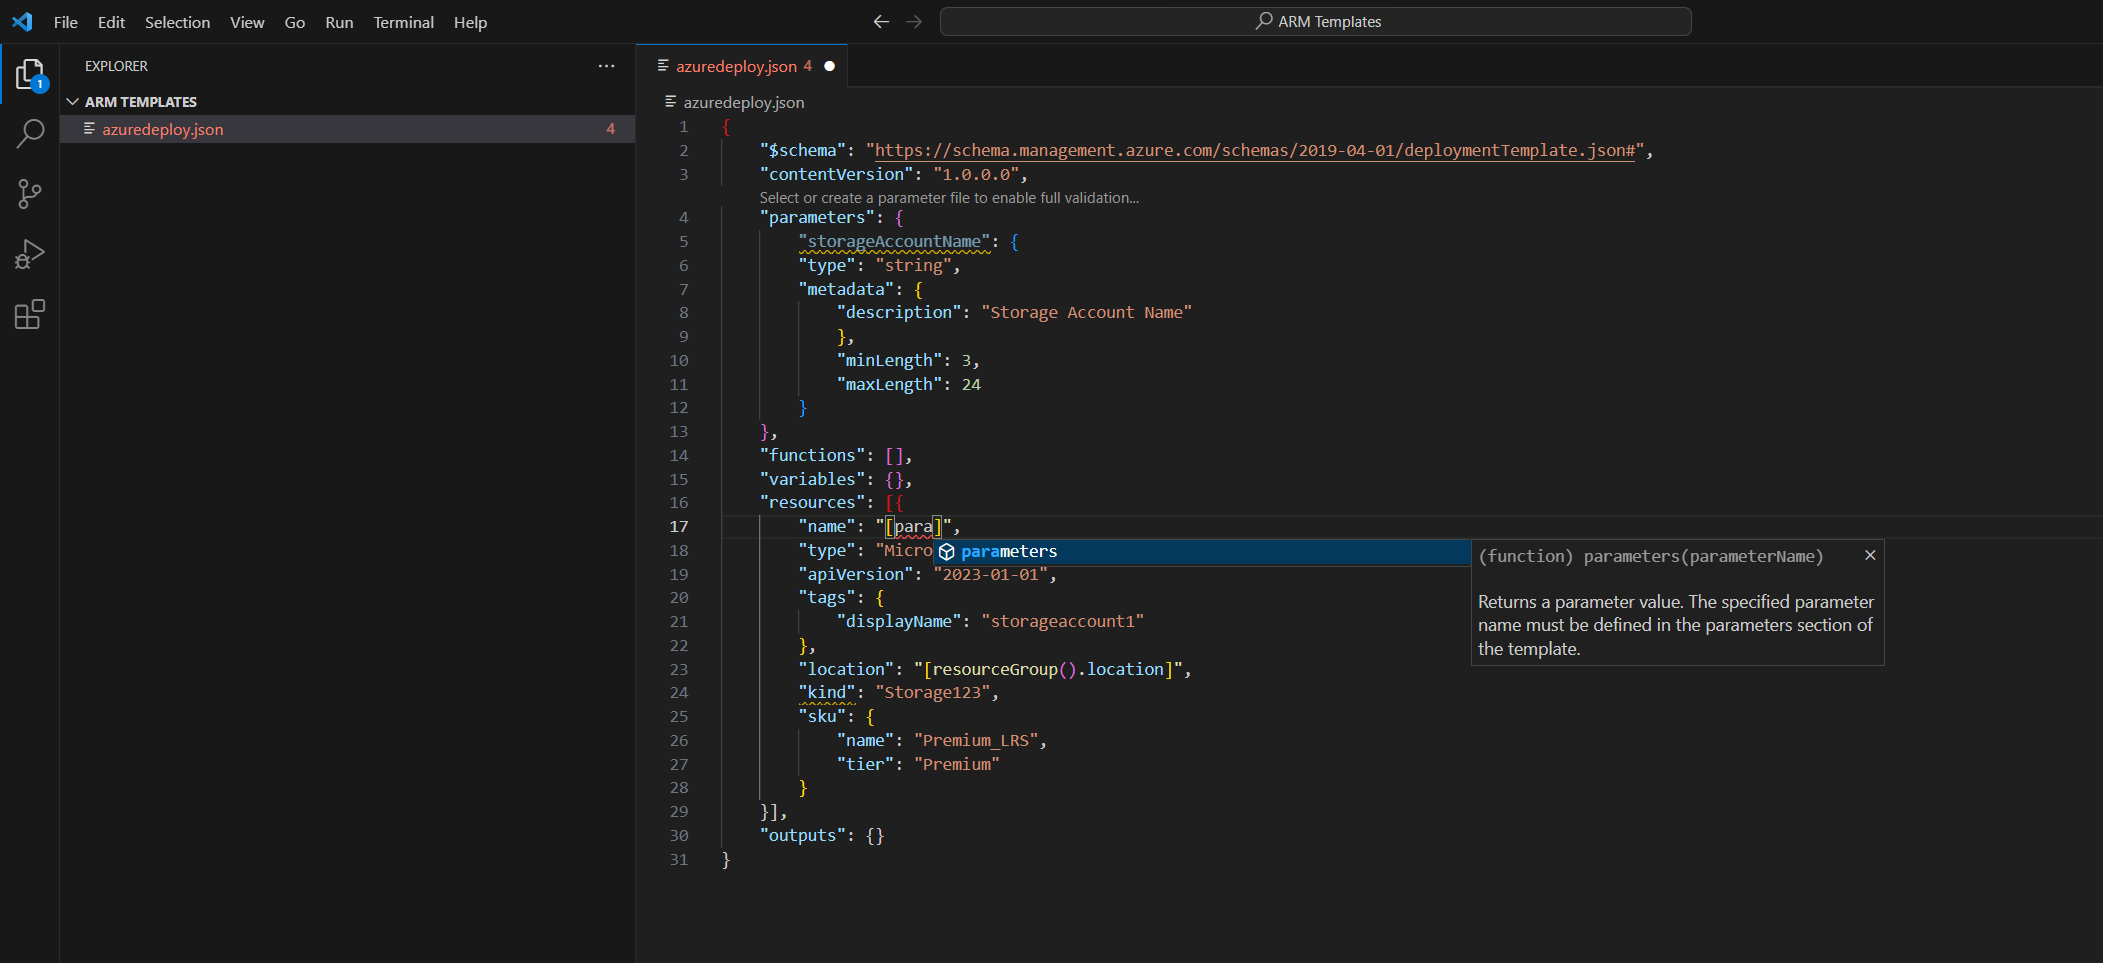
Entering a single quote ‘ inside of the round brackets produces a list of all parameters defined in the template, in this case, storageAccountName. Select the parameter.
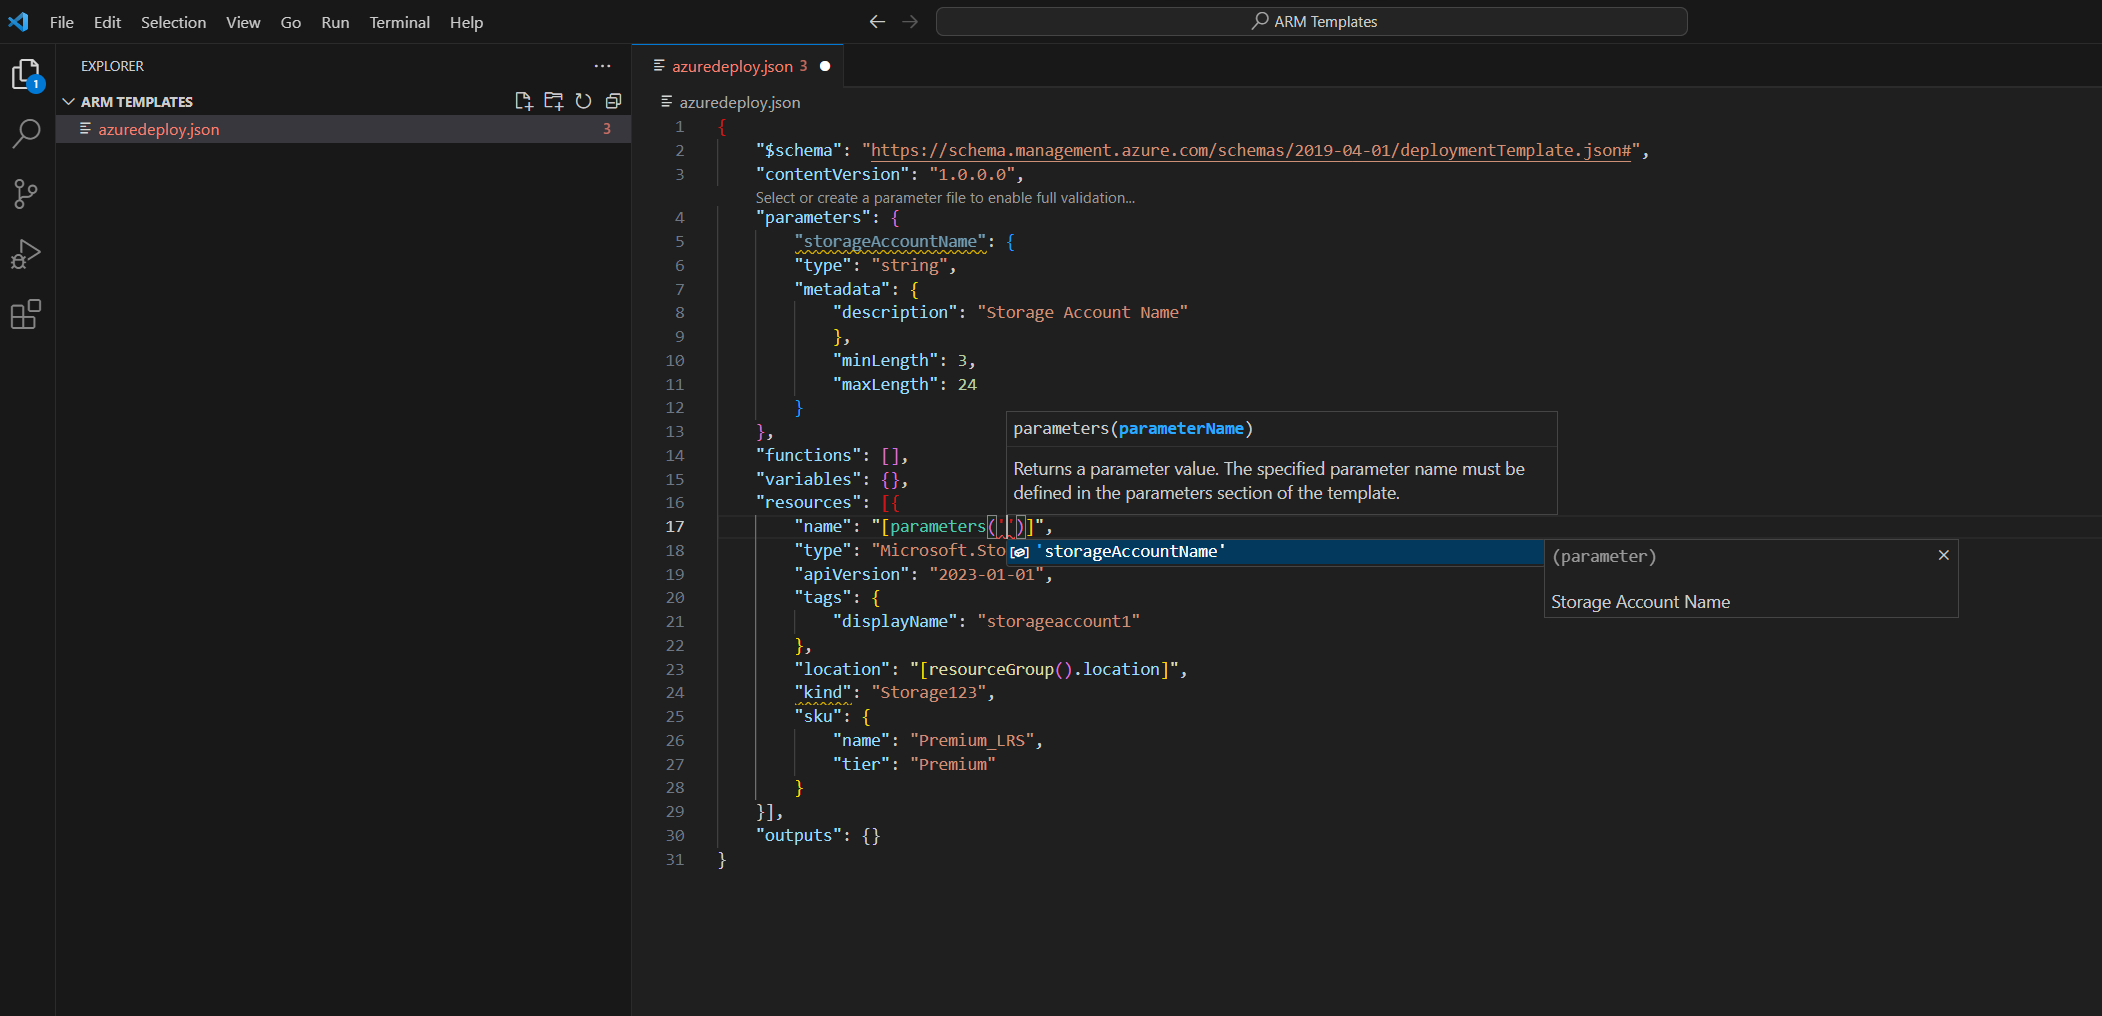
You can also add a fix string to the parameter value by using the concat function.
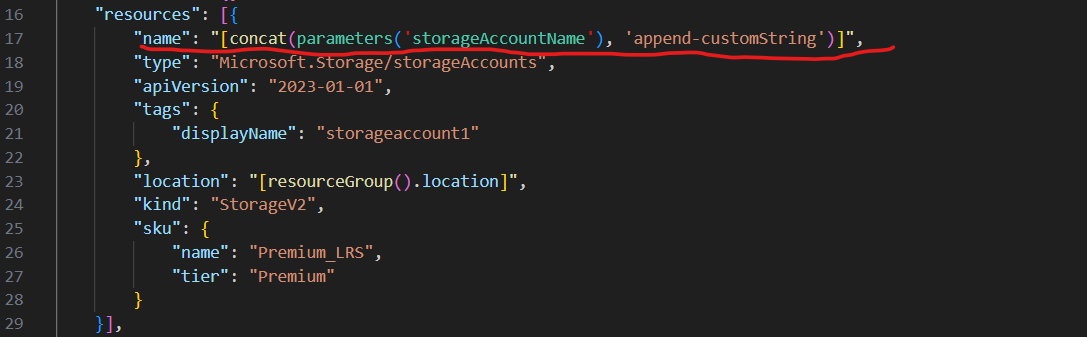
String functions for ARM templates
https://learn.microsoft.com/en-us/azure/azure-resource-manager/templates/template-functions-string
Create a parameter file
An ARM template parameter file allows you to store environment-specific parameter values and pass these values in as a group at deployment time. For example, you may have a parameter file with values specific to a test environment and another for a production environment.
The extension makes it easy to create a parameter file from your existing templates. To do so, right-click on the template in the code editor and select Select/Create Parameter File.
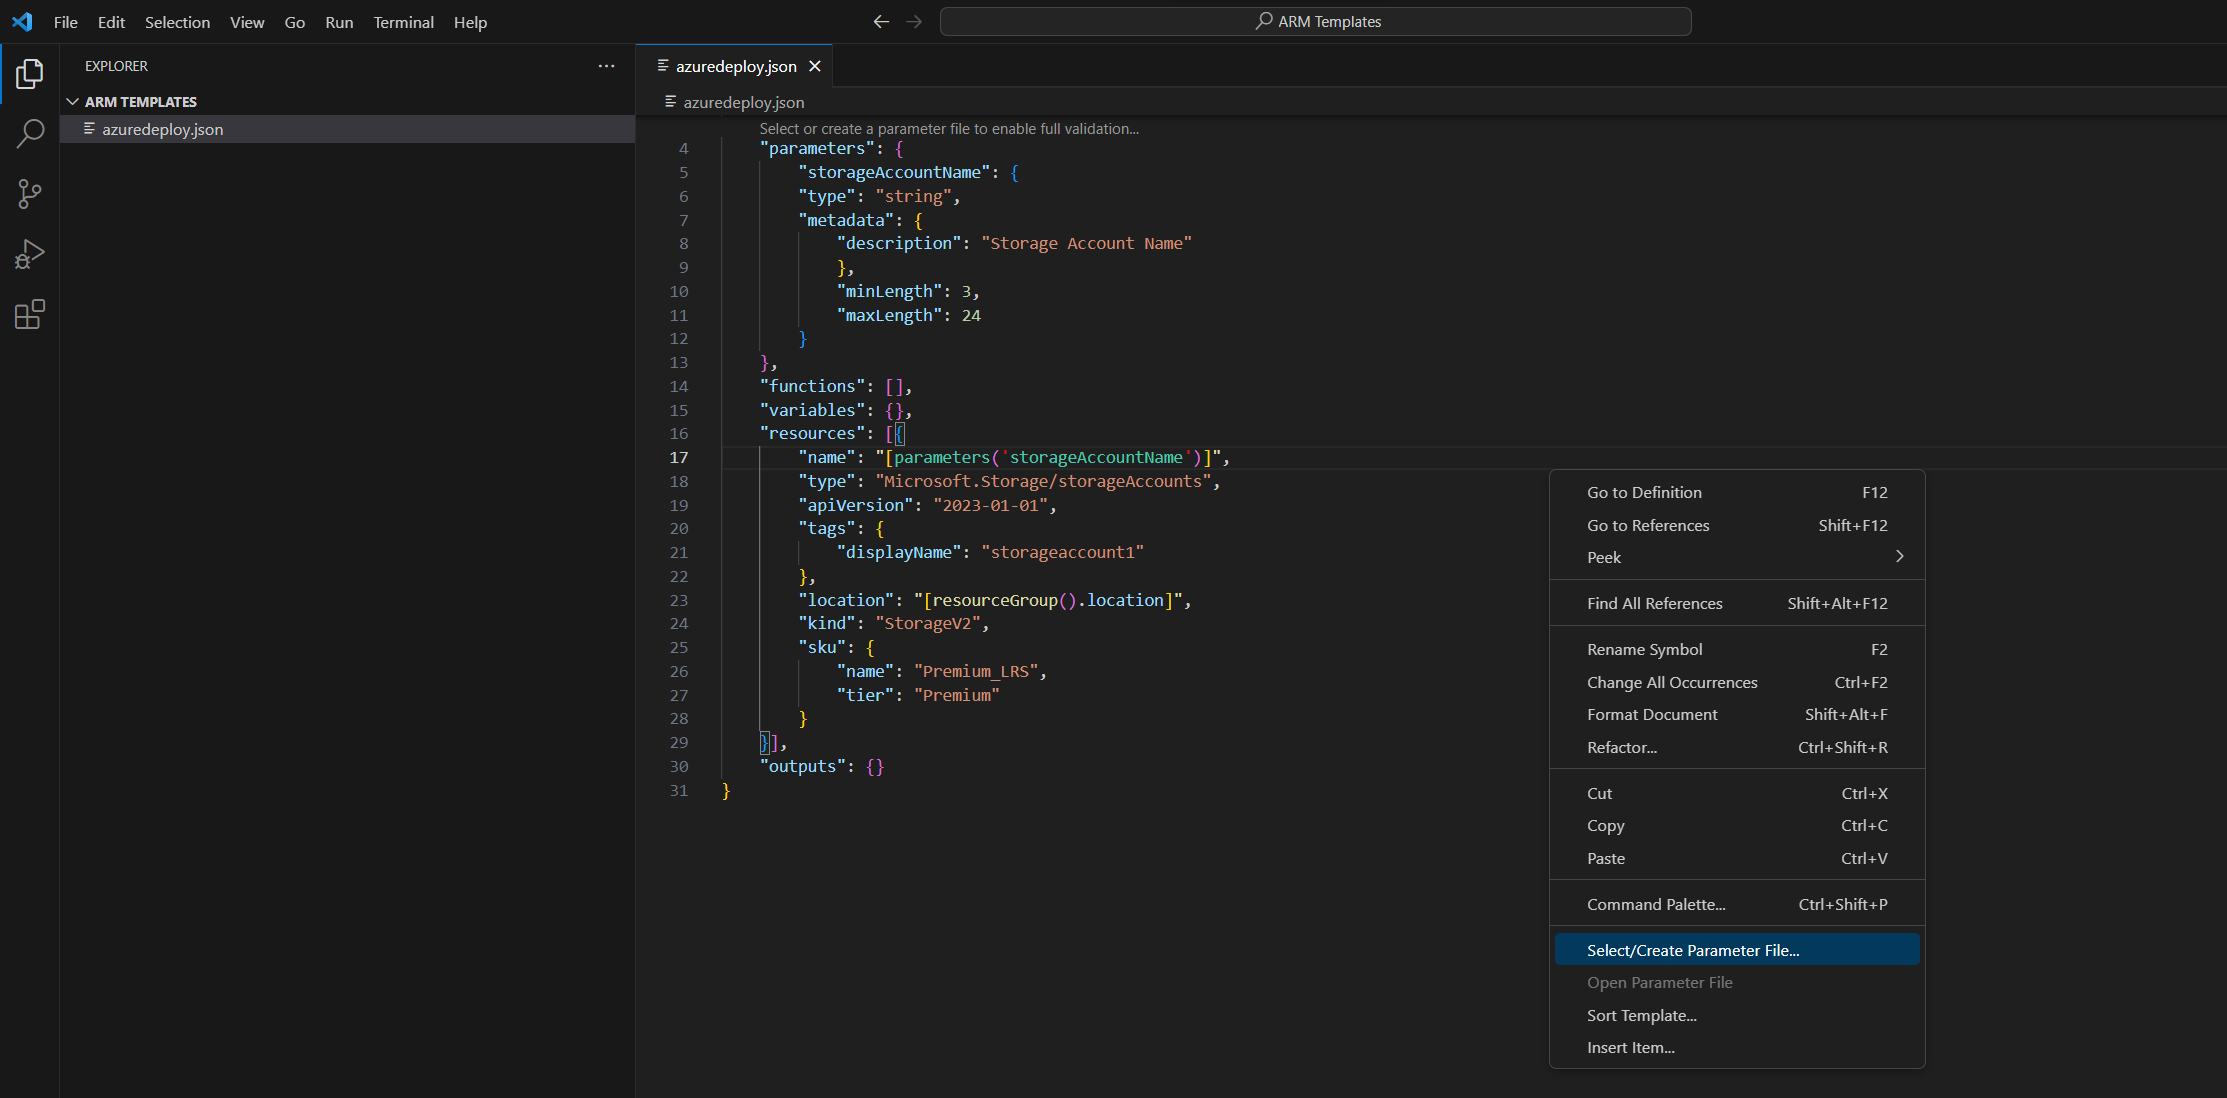
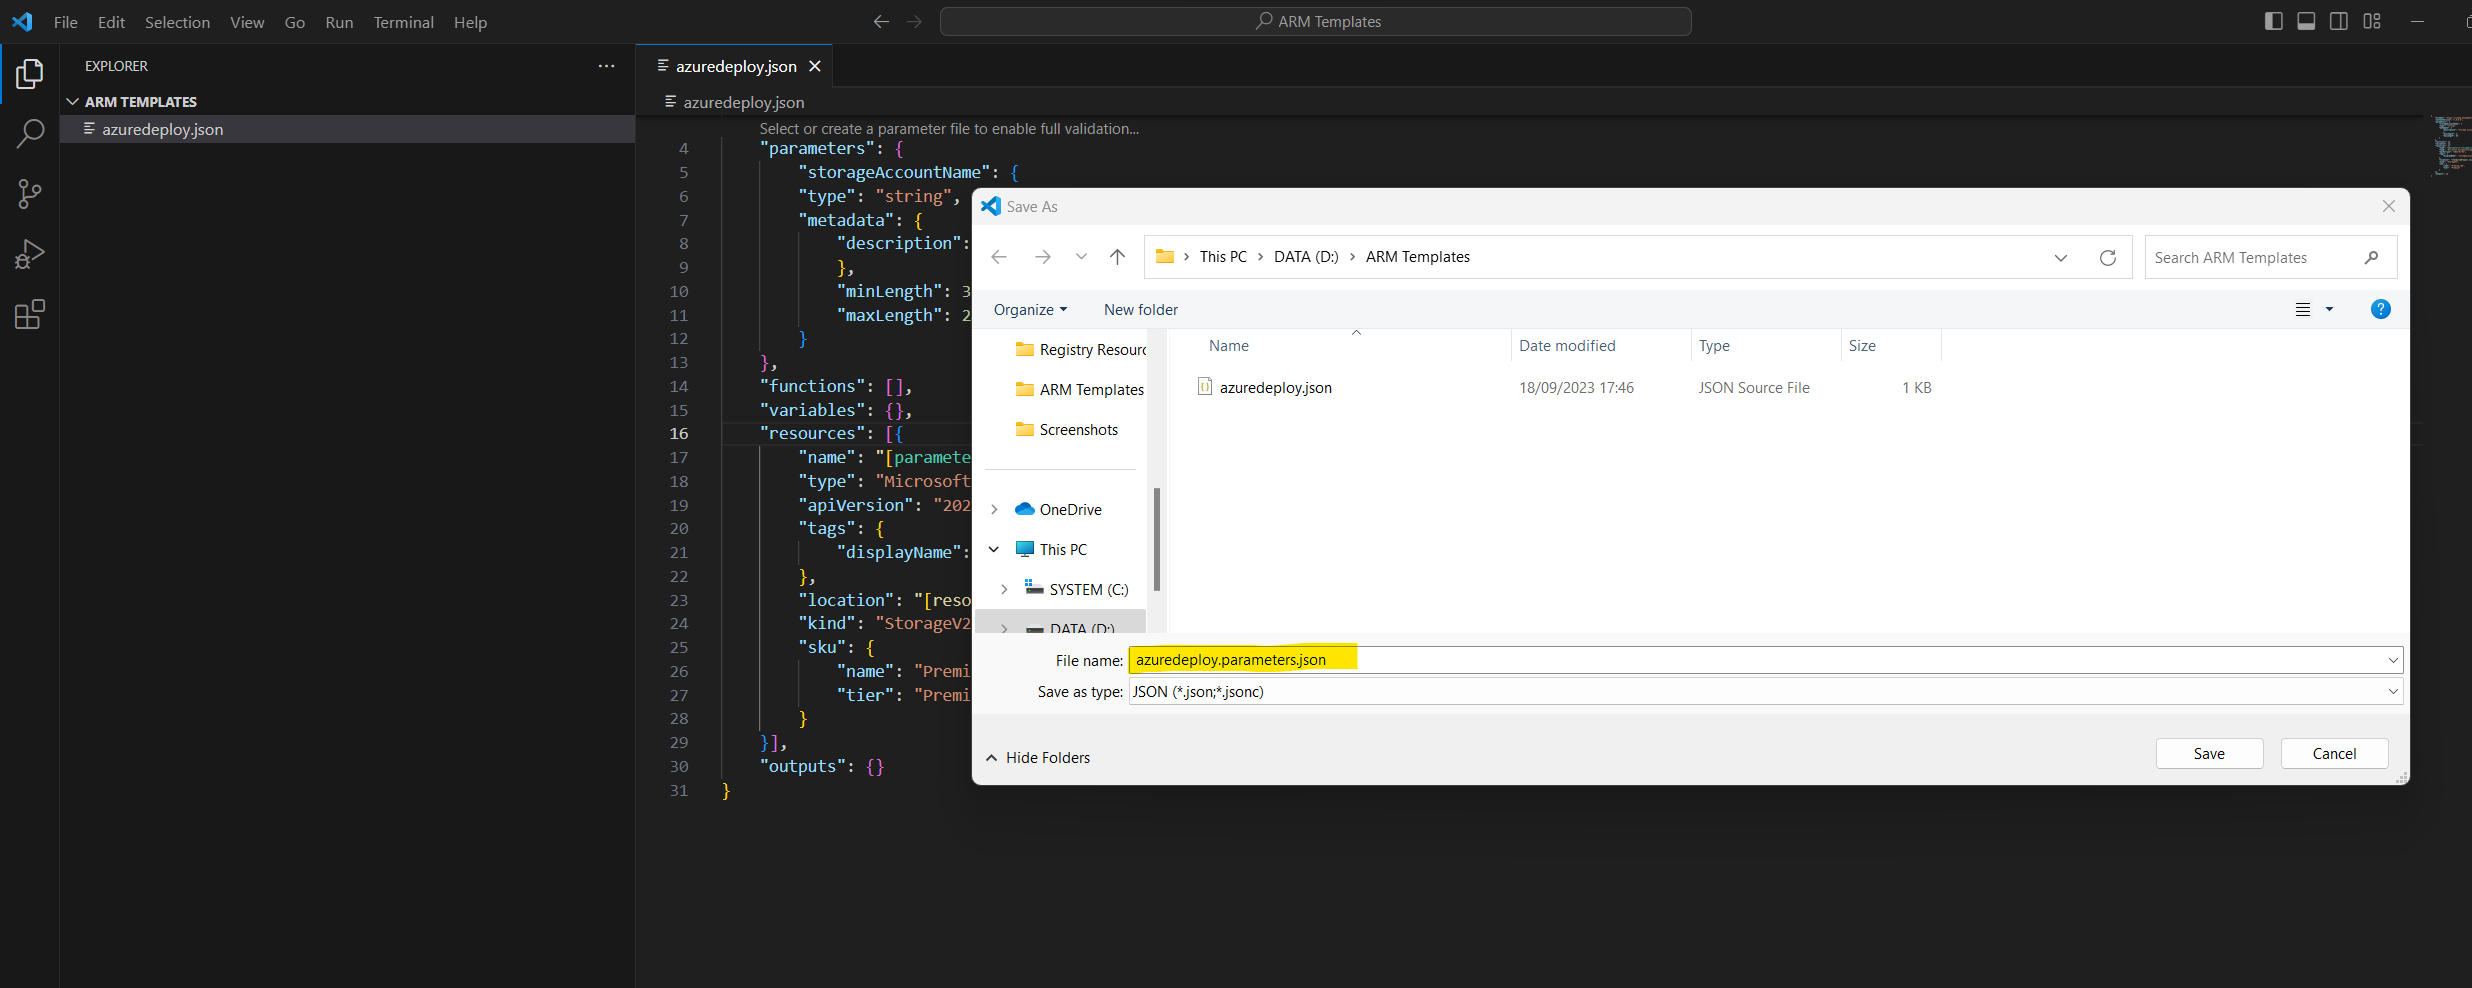
Select New > All Parameters > Select a name and location for the parameter file.
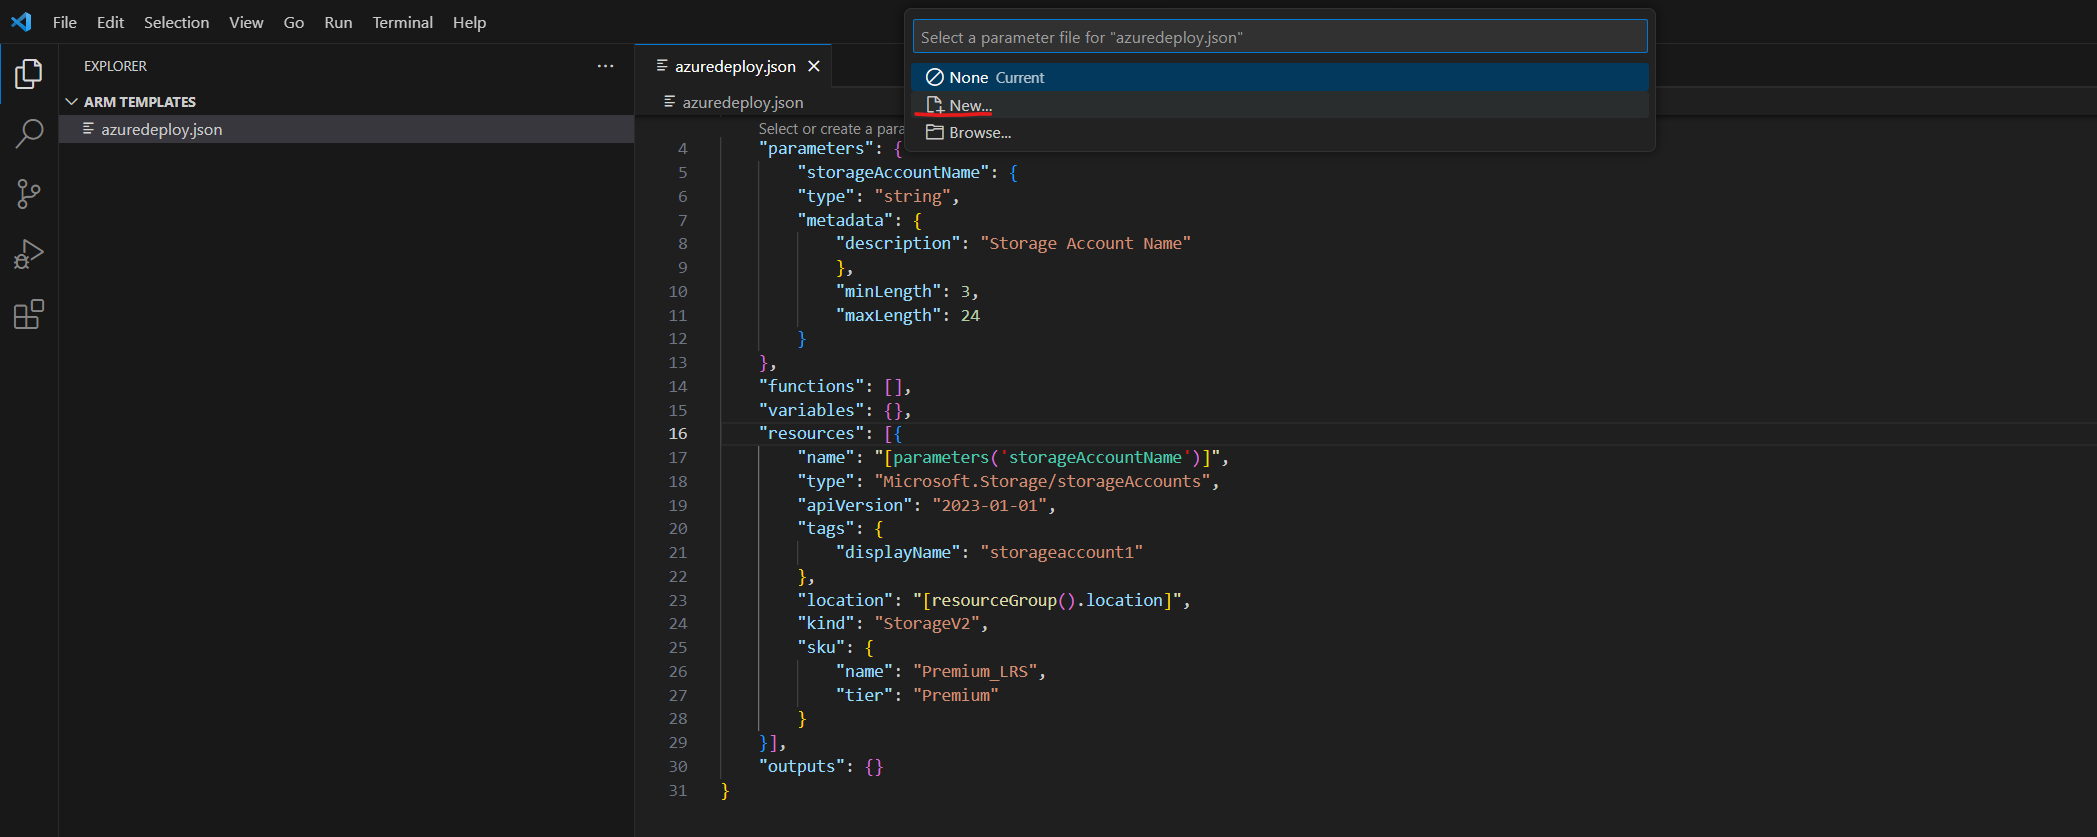

By default the name <your existing template name>.parameters.json will be used.
This action creates a new parameter file and maps it with the template from which it was created. You can see and modify the current template/parameter file mapping in the Visual Studio Code status bar while the template is selected.
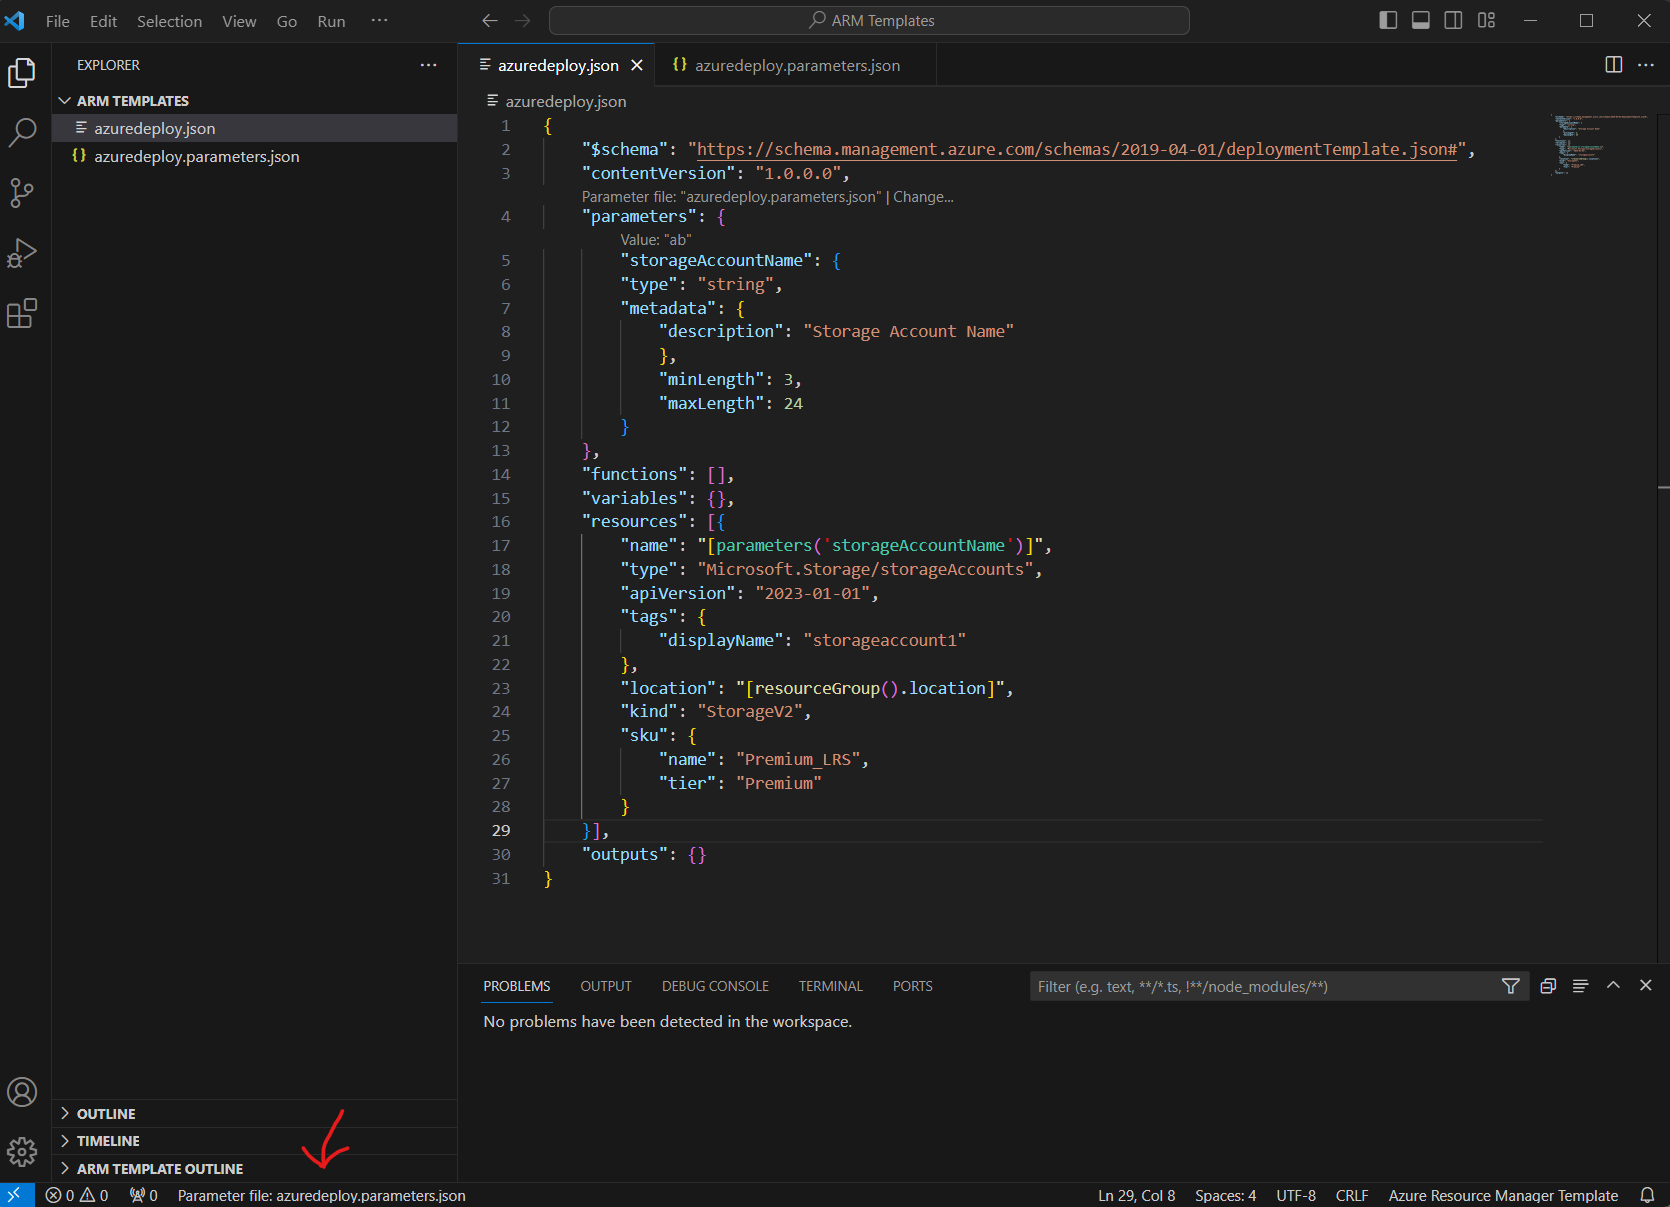
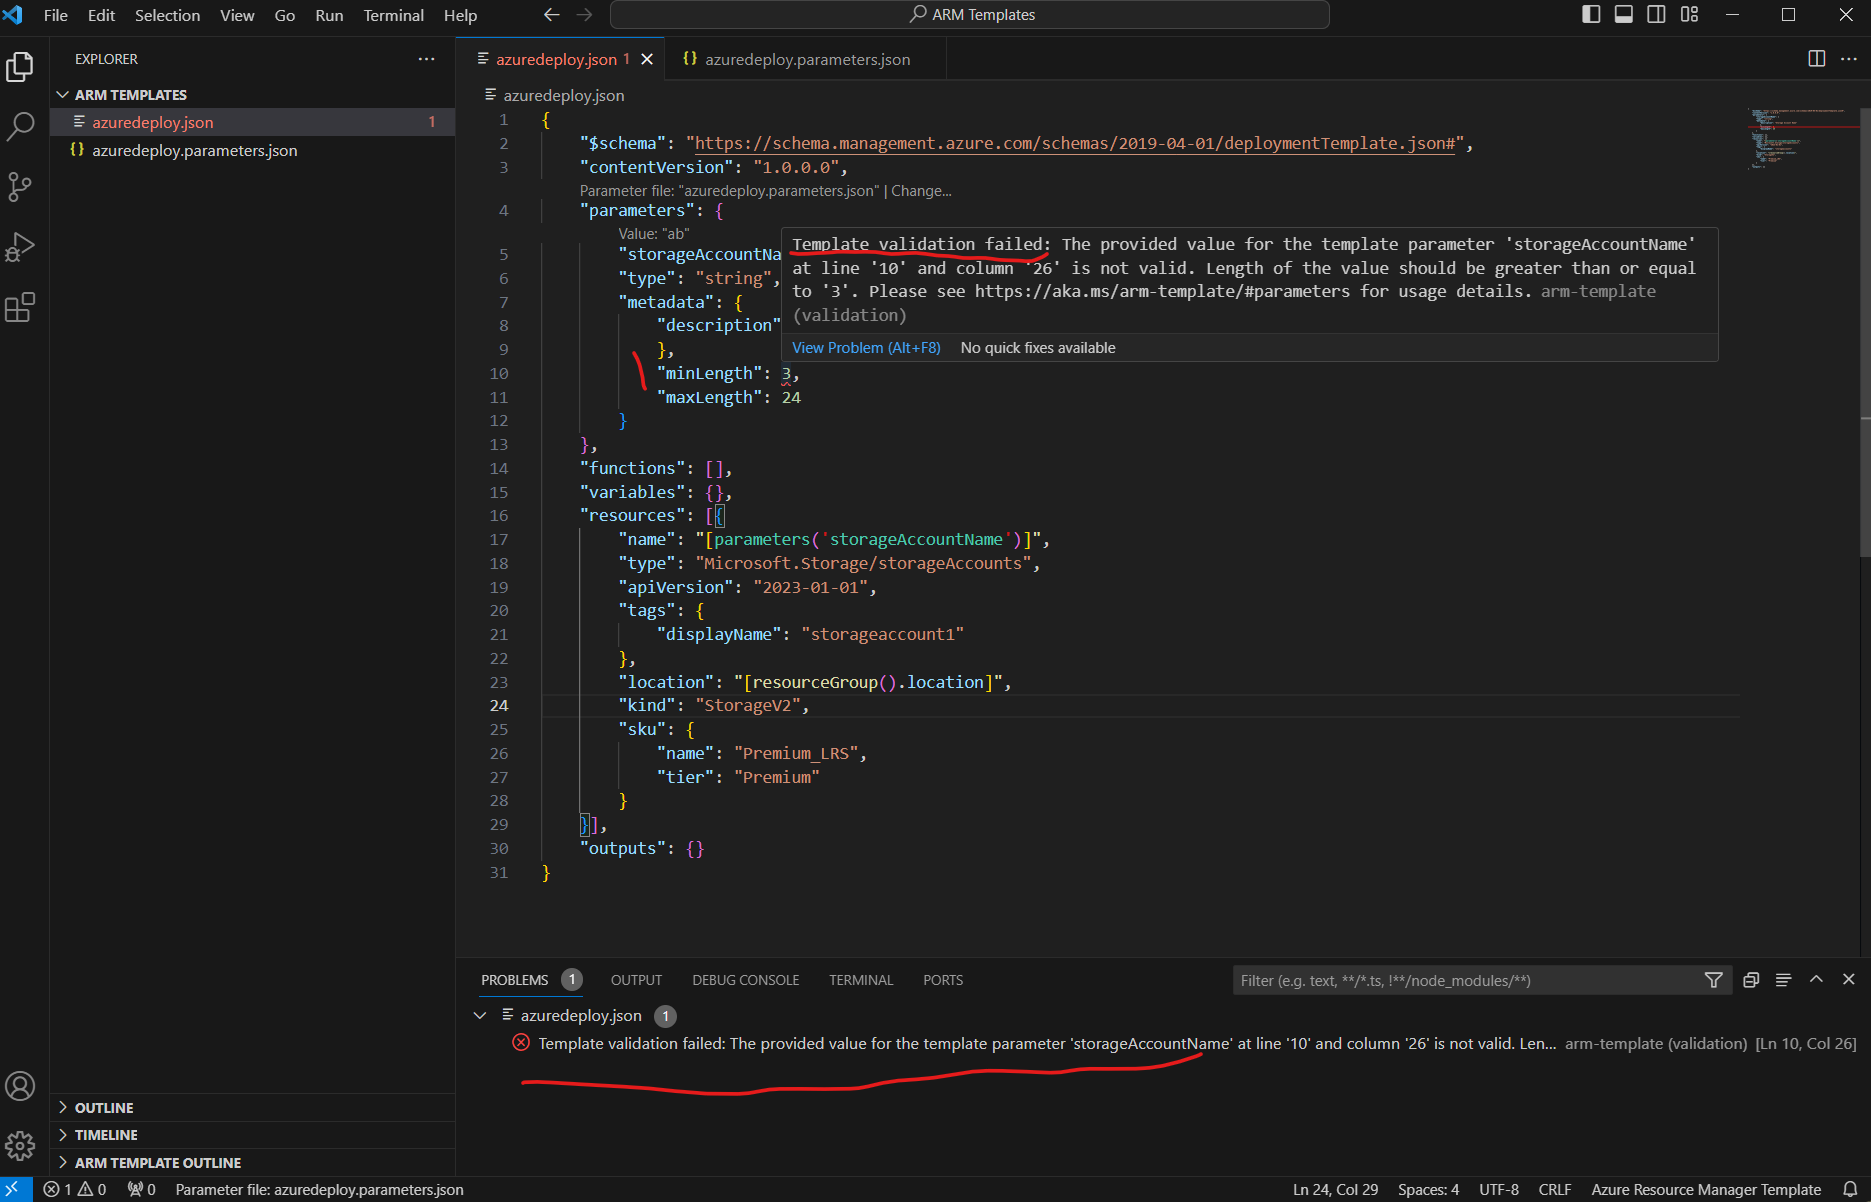
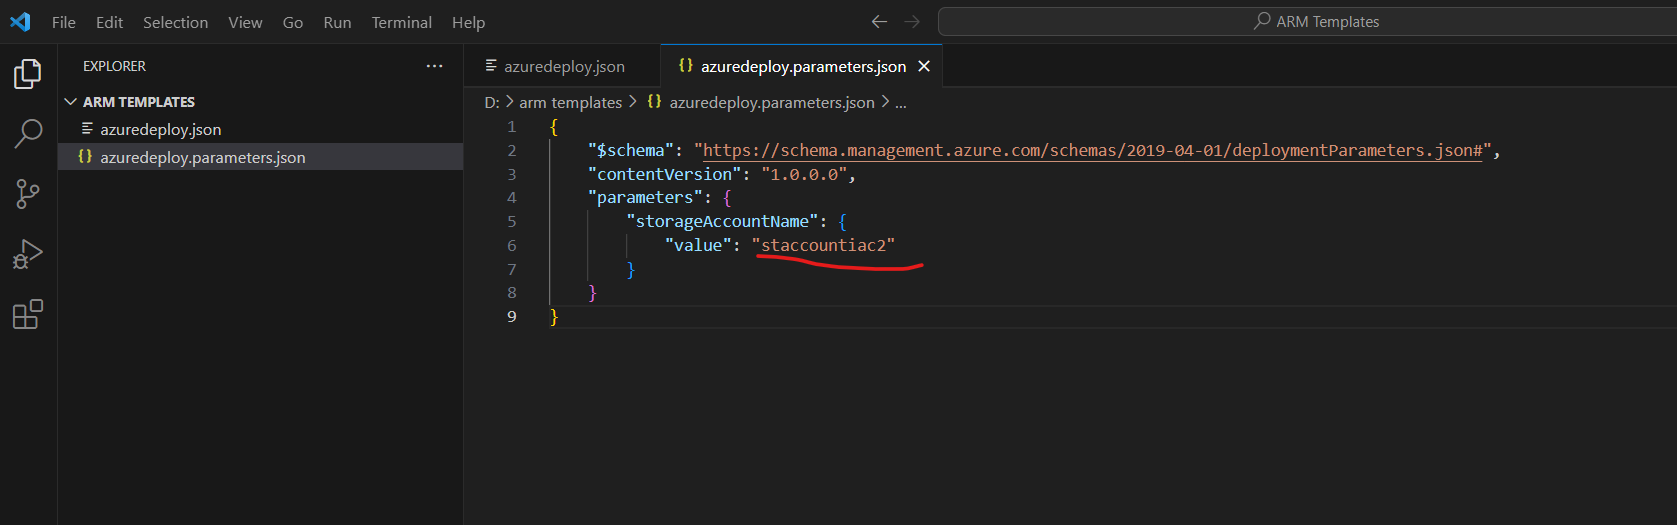
Now that the parameter file has been mapped to the template, the extension validates both the template and parameter file together. To see this validation in practice, add a two-character value to the storageAccountName parameter in the parameter file and save the file.

Navigate back to the ARM template and notice that an error has been raised indicating that the value doesn’t meet the parameter criteria.
Update the value to something appropriate, save the file, and navigate back to the template. Notice that the error on the parameter has been resolved.
Btw. I encountered here the issue that Visual Studio Code resp. the extension not immediately updates the error status and I first have to release and remap the parameter file.
More about parameters you will find in the following article.
Parameters in ARM templates
https://learn.microsoft.com/en-us/azure/azure-resource-manager/templates/parameters
Deploy the template
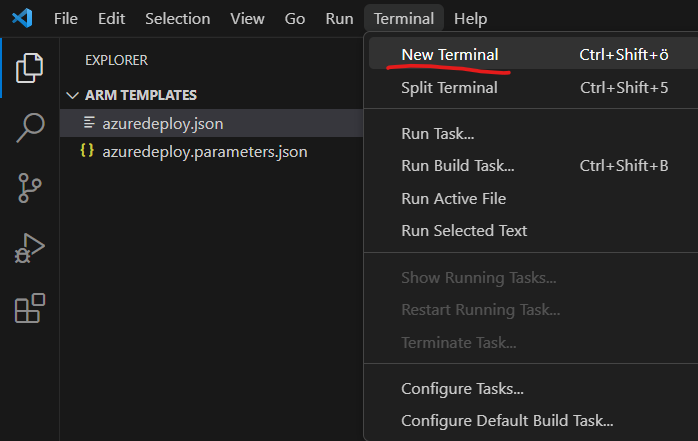
Open the integrated Visual Studio Code terminal and use either the Azure CLI or Azure PowerShell module to deploy the template.
I will use below the Azure PowerShell module.
First I will connect to my Azure tenant by using the following command.
Connect-AzAccount -Tenant <Tenant ID>
To connect directly to a specific tenant and subscription use the following command:
Connect-AzAccount -Tenant ‘xxxx-xxxx-xxxx-xxxx’ -SubscriptionId ‘yyyy-yyyy-yyyy-yyyy’Connect-AzAccount cmdlet
https://learn.microsoft.com/en-us/powershell/module/az.accounts/connect-azaccountMore about Sign in with Azure PowerShell and how you can automate it by using scripts, you will find in the following article from Microsoft.
https://learn.microsoft.com/en-us/powershell/azure/authenticate-azureps
Then I will change the active subscription which should be used for this deployment by executing the following command.
Set-AzContext -Subscription <subscription name or id>
To override which subscription Connect-AzAccount selects by default, use Update-AzConfig -DefaultSubscriptionForLogin 00000000-0000-0000-0000-000000000000
To check the AzContext in order to see to which tenant and subscription you are connected, you can use Get-AzContext | fl Name,Account,SubscriptionName,Subscription,Environment,TenantId
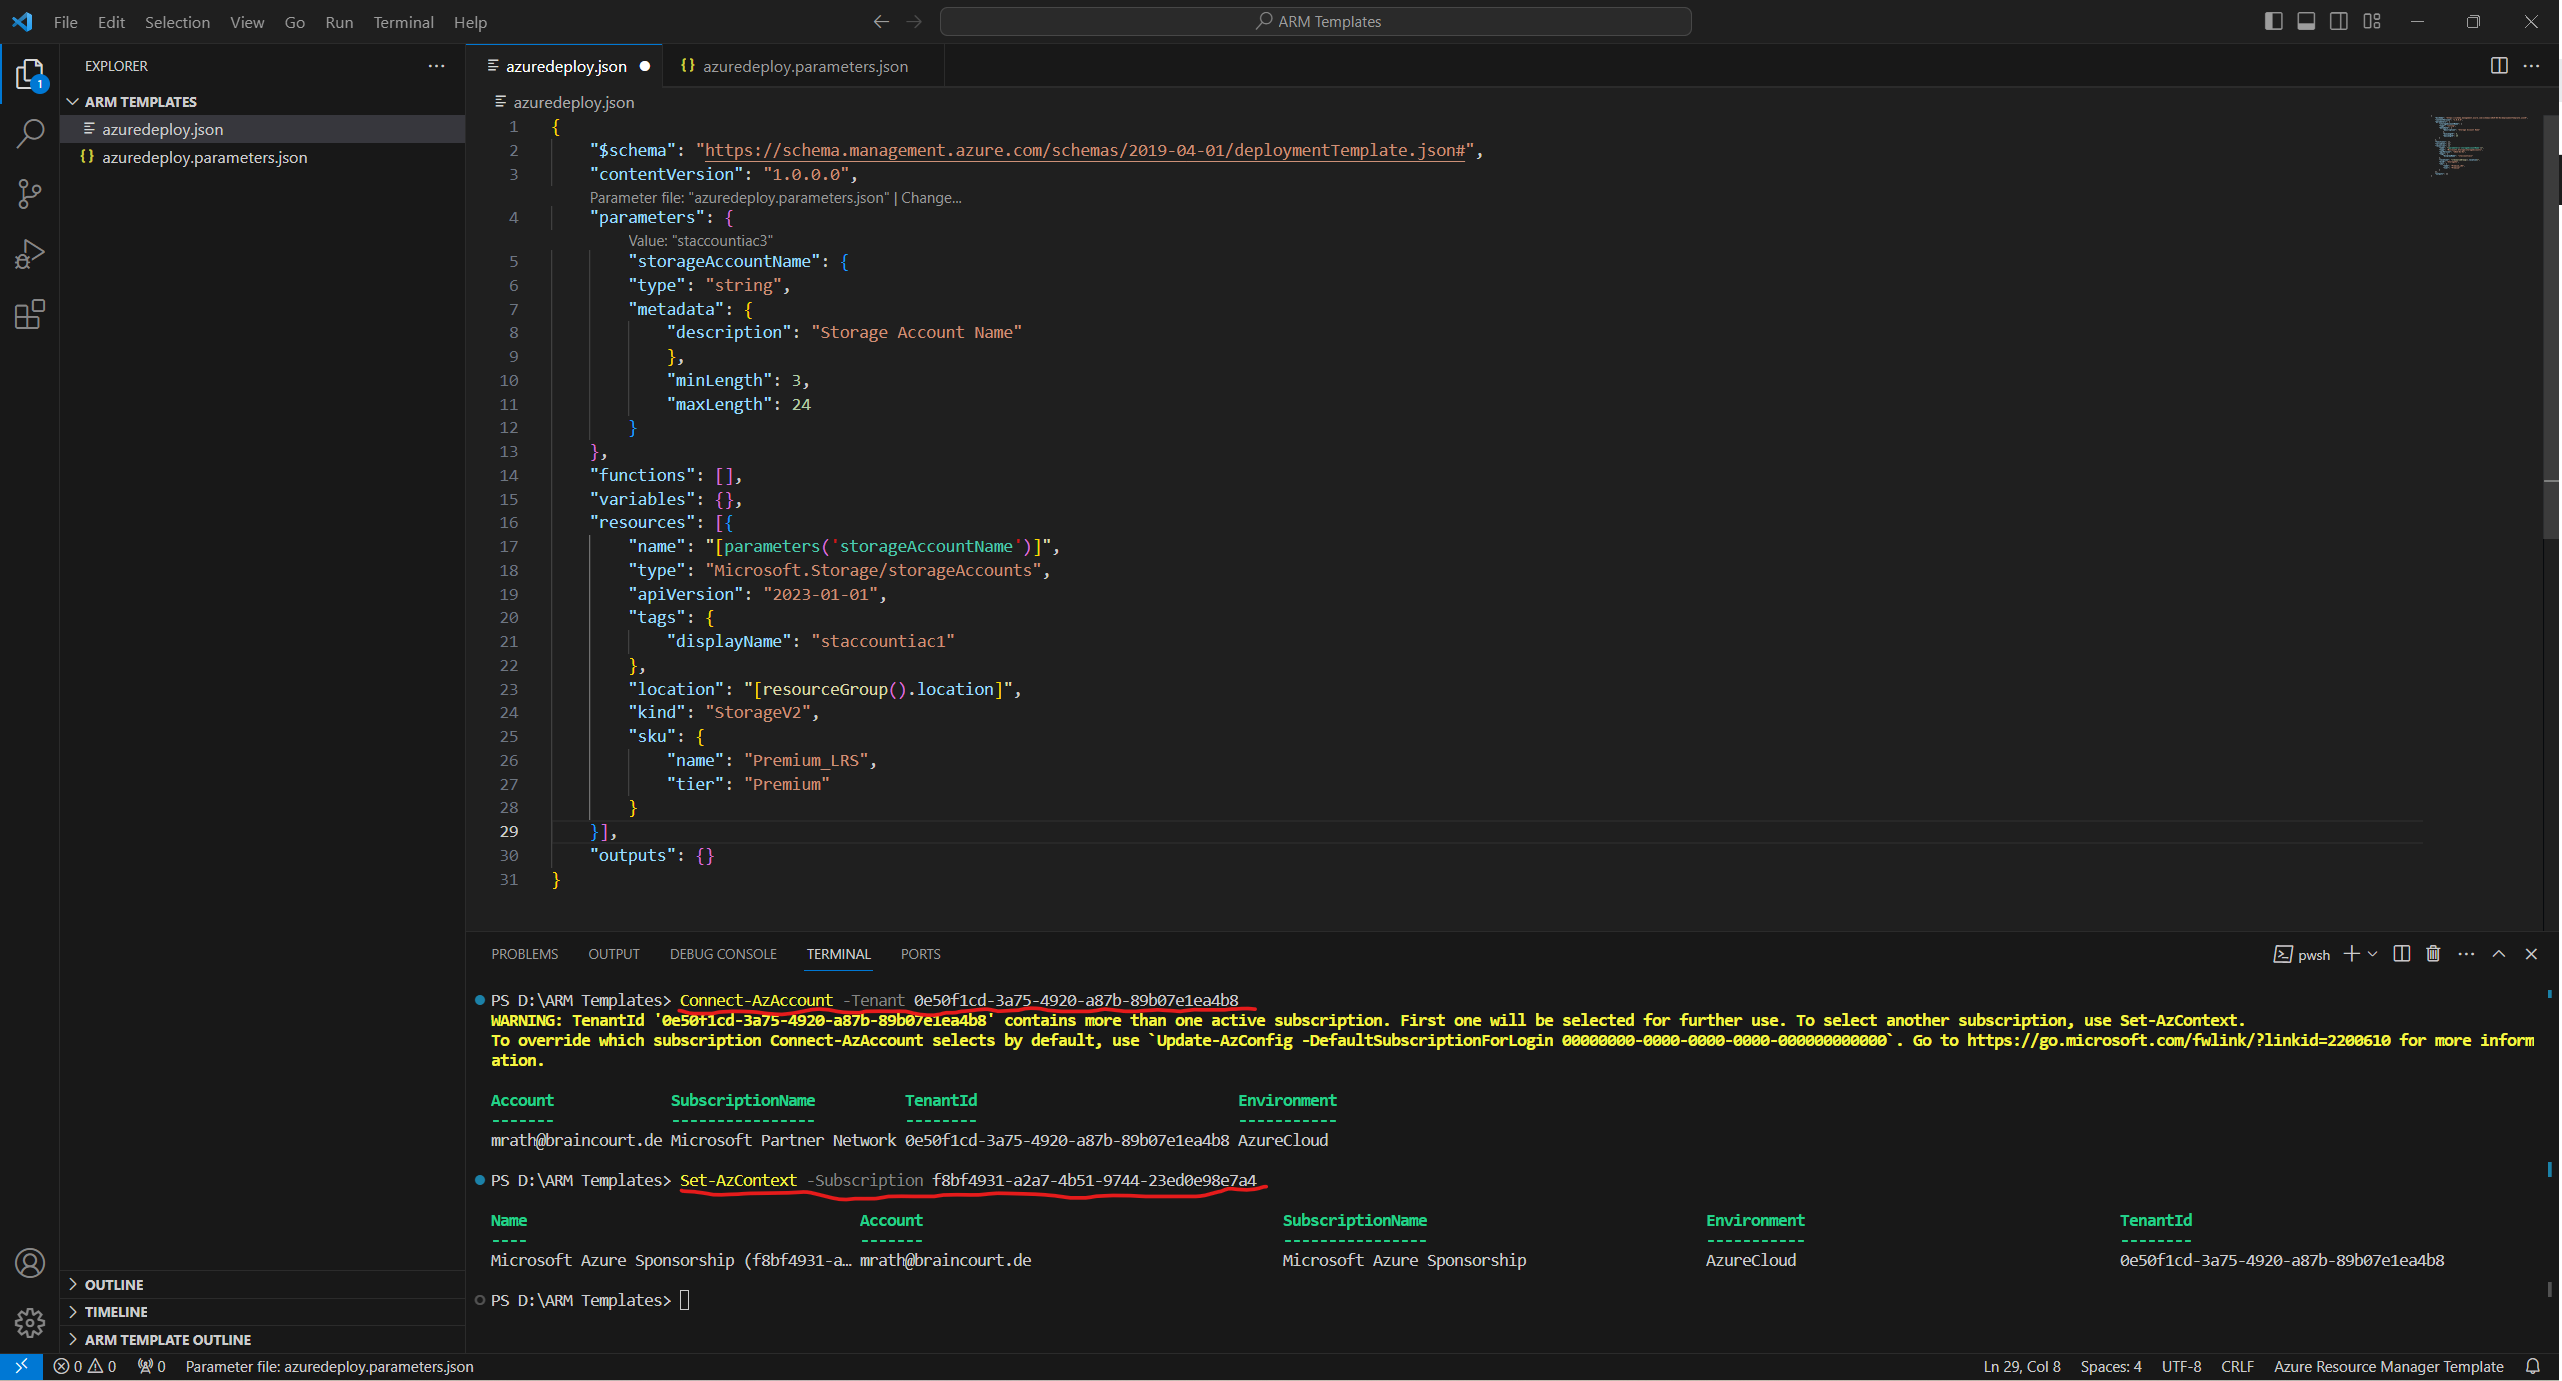
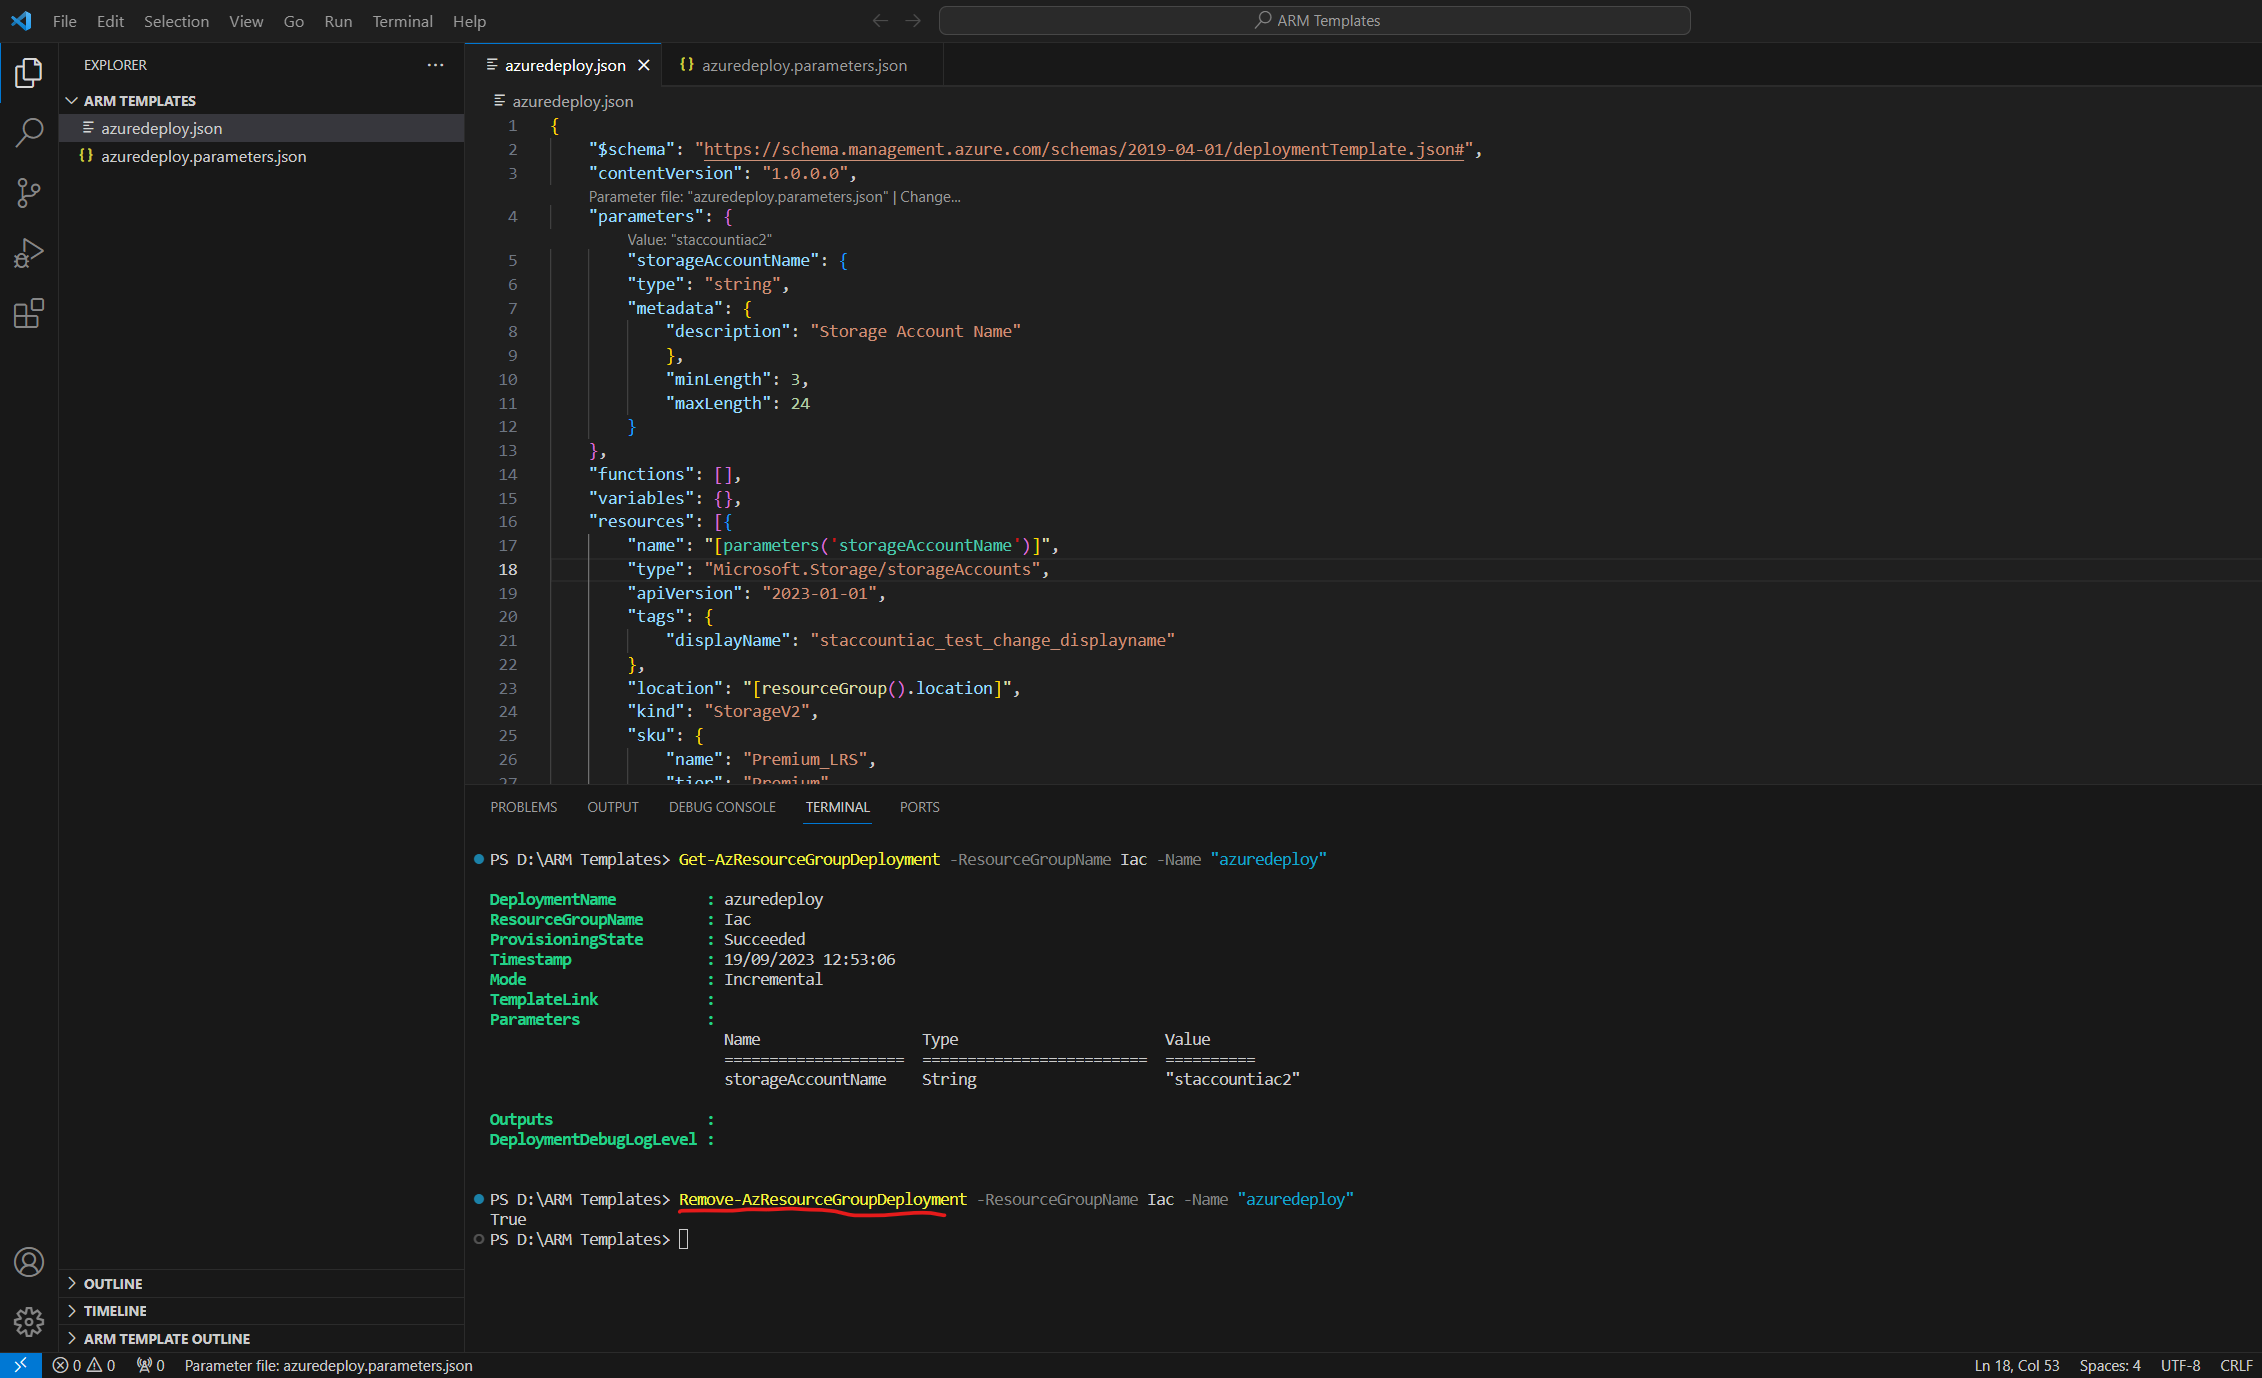
Then I will deploy the template by executing the following command. I already have created a resource group named Iac to use for.
New-AzResourceGroupDeployment -ResourceGroupName Iac -TemplateFile ./azuredeploy.json -TemplateParameterFile ./azuredeploy.parameters.json
# to first create a new resoure group
New-AzResourceGroup -Name arm-vscode -Location eastus
So my first try promptly run into the following error.
New-AzResourceGroupDeployment: 19:07:03 – Error: Code=InvalidTemplateDeployment; Message=The template deployment ‘azuredeploy’ is not valid according to the validation procedure. The tracking id is ‘a59da1a6-76d2-4910-868e-76193804ce59’. See inner errors for details.
New-AzResourceGroupDeployment: 19:07:03 – Error: Code=PreflightValidationCheckFailed; Message=Preflight validation failed. Please refer to the details for the specific errors.
New-AzResourceGroupDeployment: 19:07:03 – Error: Code=StorageAccountTypeConversionNotAllowed; Message=Storage account type Standard_RAGRS cannot be changed to Premium_LRS.
New-AzResourceGroupDeployment: The deployment validation failed
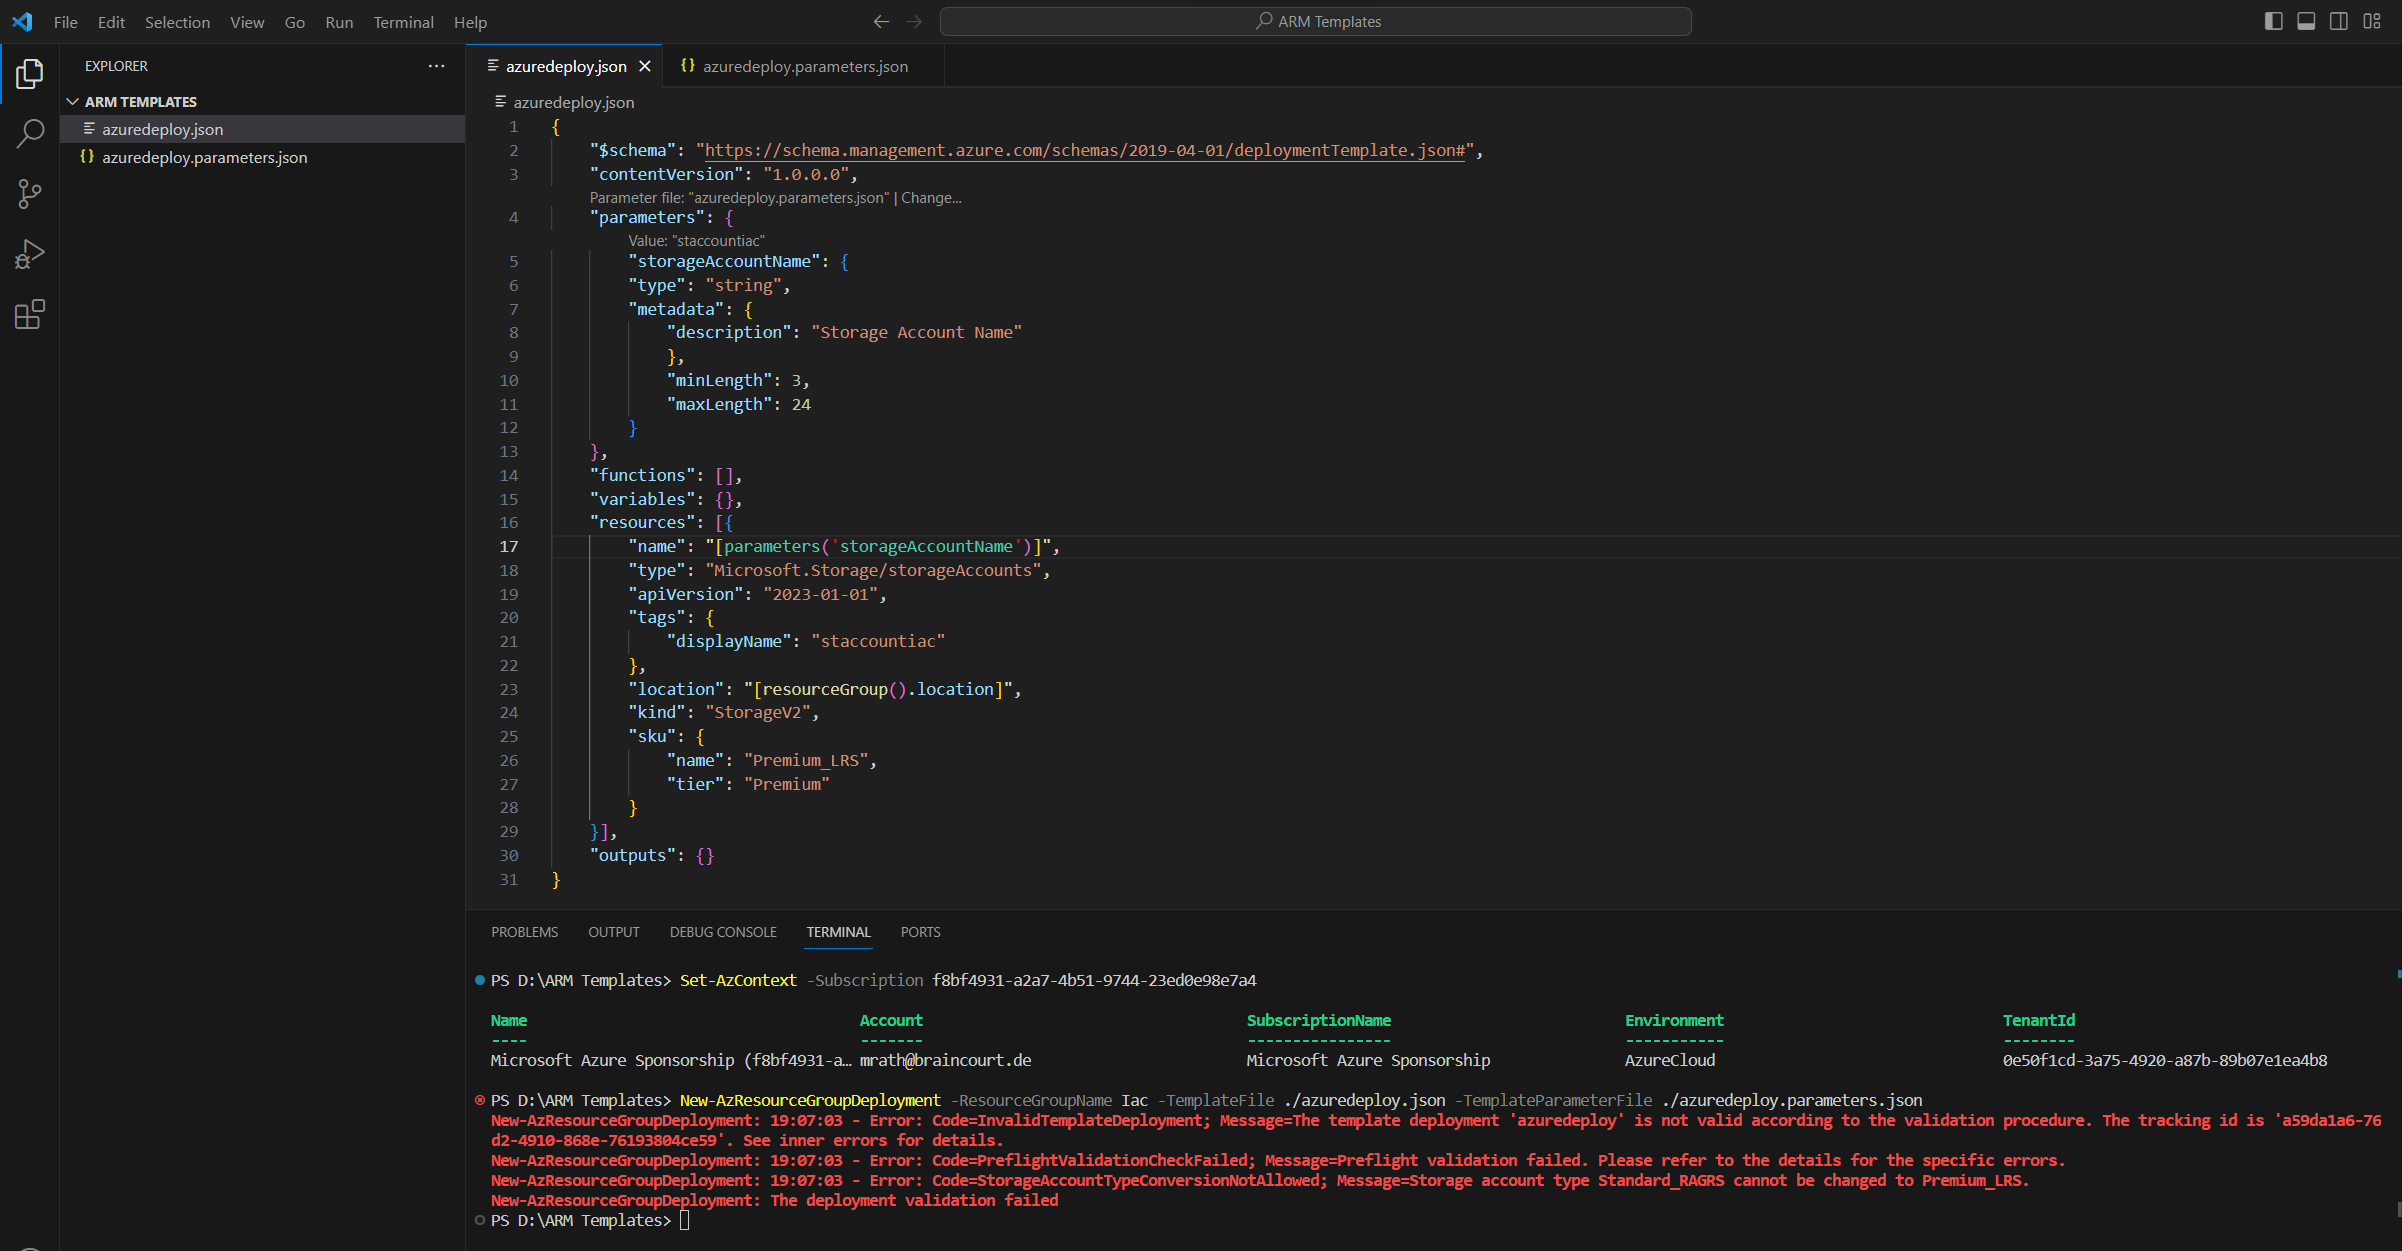
The interesting point here is
Code=StorageAccountTypeConversionNotAllowed; Message=Storage account type Standard_RAGRS cannot be changed to Premium_LRS.
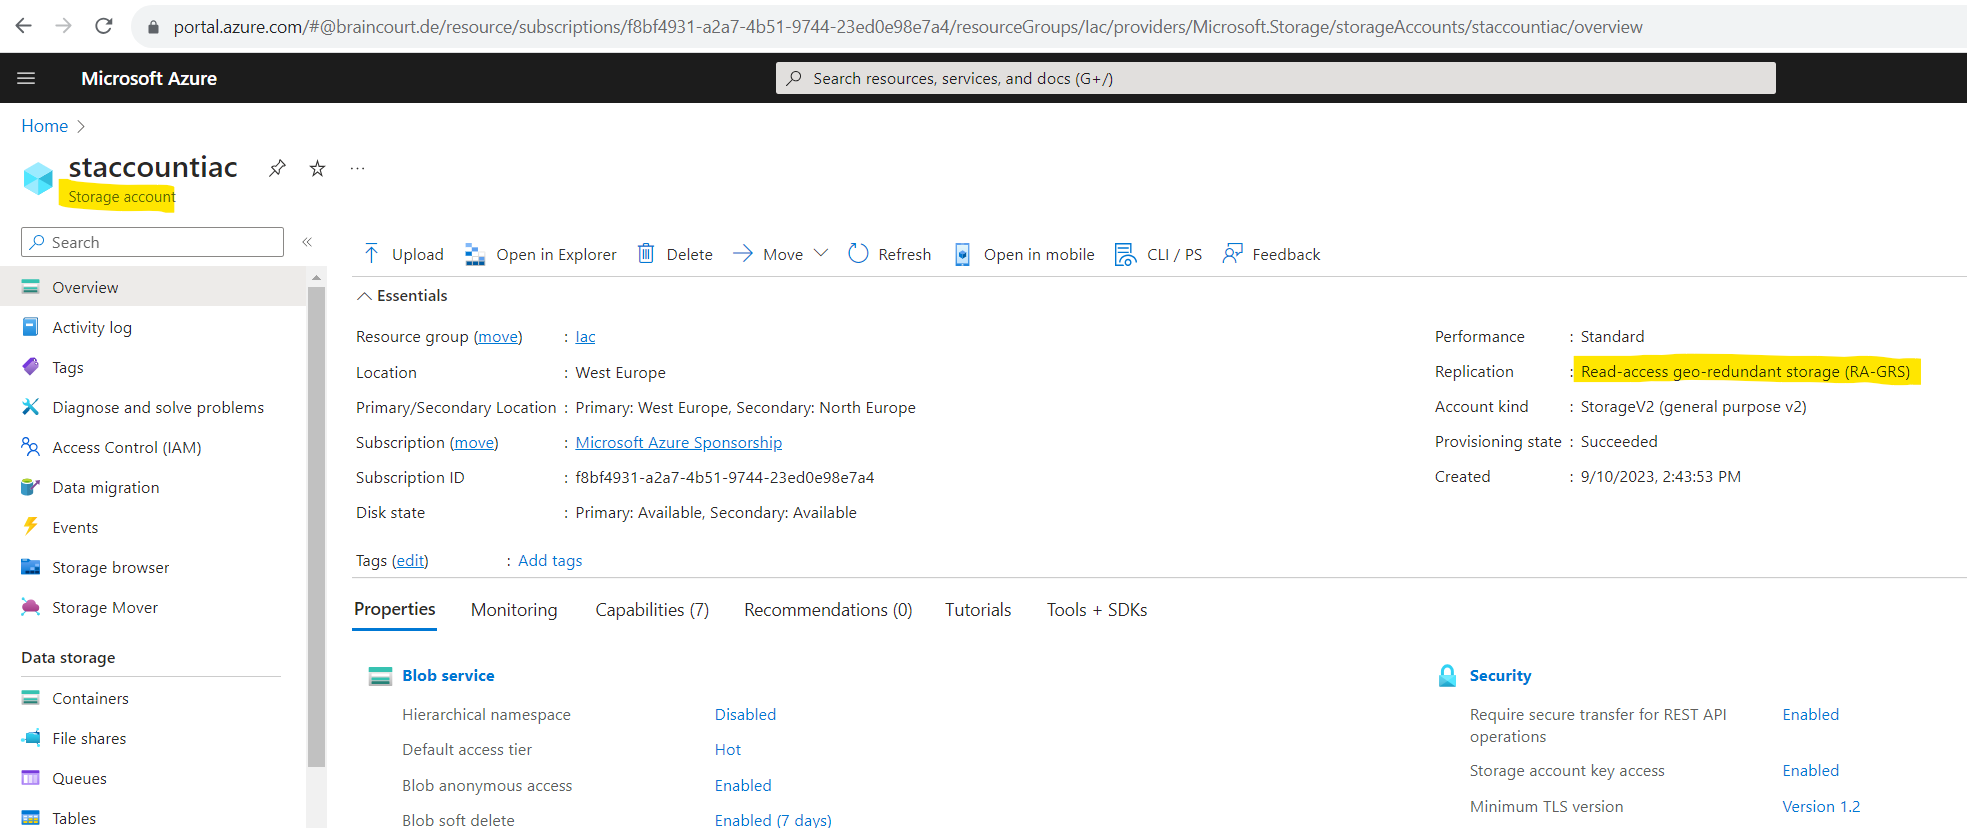
The reason for is that I already had an storage account named staccountiac in the resource group Iac I used for the deployment. This storage accounts replication type is set to Standard RA-GRS. So because the storage account already exists, the New-AzResourceGroupDeployment cmdlet then tries to update the replication type from the existing storage account into Premium_LRS from my ARM template but failed because the conversion from the replication type is not supported.
In general change of location or type of an existing resource is not supported and you will get a deployment error. Property values in contrast can be changed and updated. More about in the following article from Microsoft about the deployment modes with complete mode and incremental mode.
Azure Resource Manager deployment modes
For both modes, Resource Manager adds new resources for resources defined in the template that aren’t in the resource group. If a resource already exists in the resource group and its settings are unchanged, Resource Manager takes no action. If a resource’s property values are modified, Resource Manager updates the existing resource. If you attempt to change the location or type of an existing resource, you get a deployment error. In such cases, you should deploy a new resource with the desired location or type.By default, the deployment mode is incremental.
https://learn.microsoft.com/en-us/azure/azure-resource-manager/templates/deployment-mode
In order to create/deploy a new storage account, I will just change the value for the storageAccountName parameter in my parameters file.
Then the second try finally works.
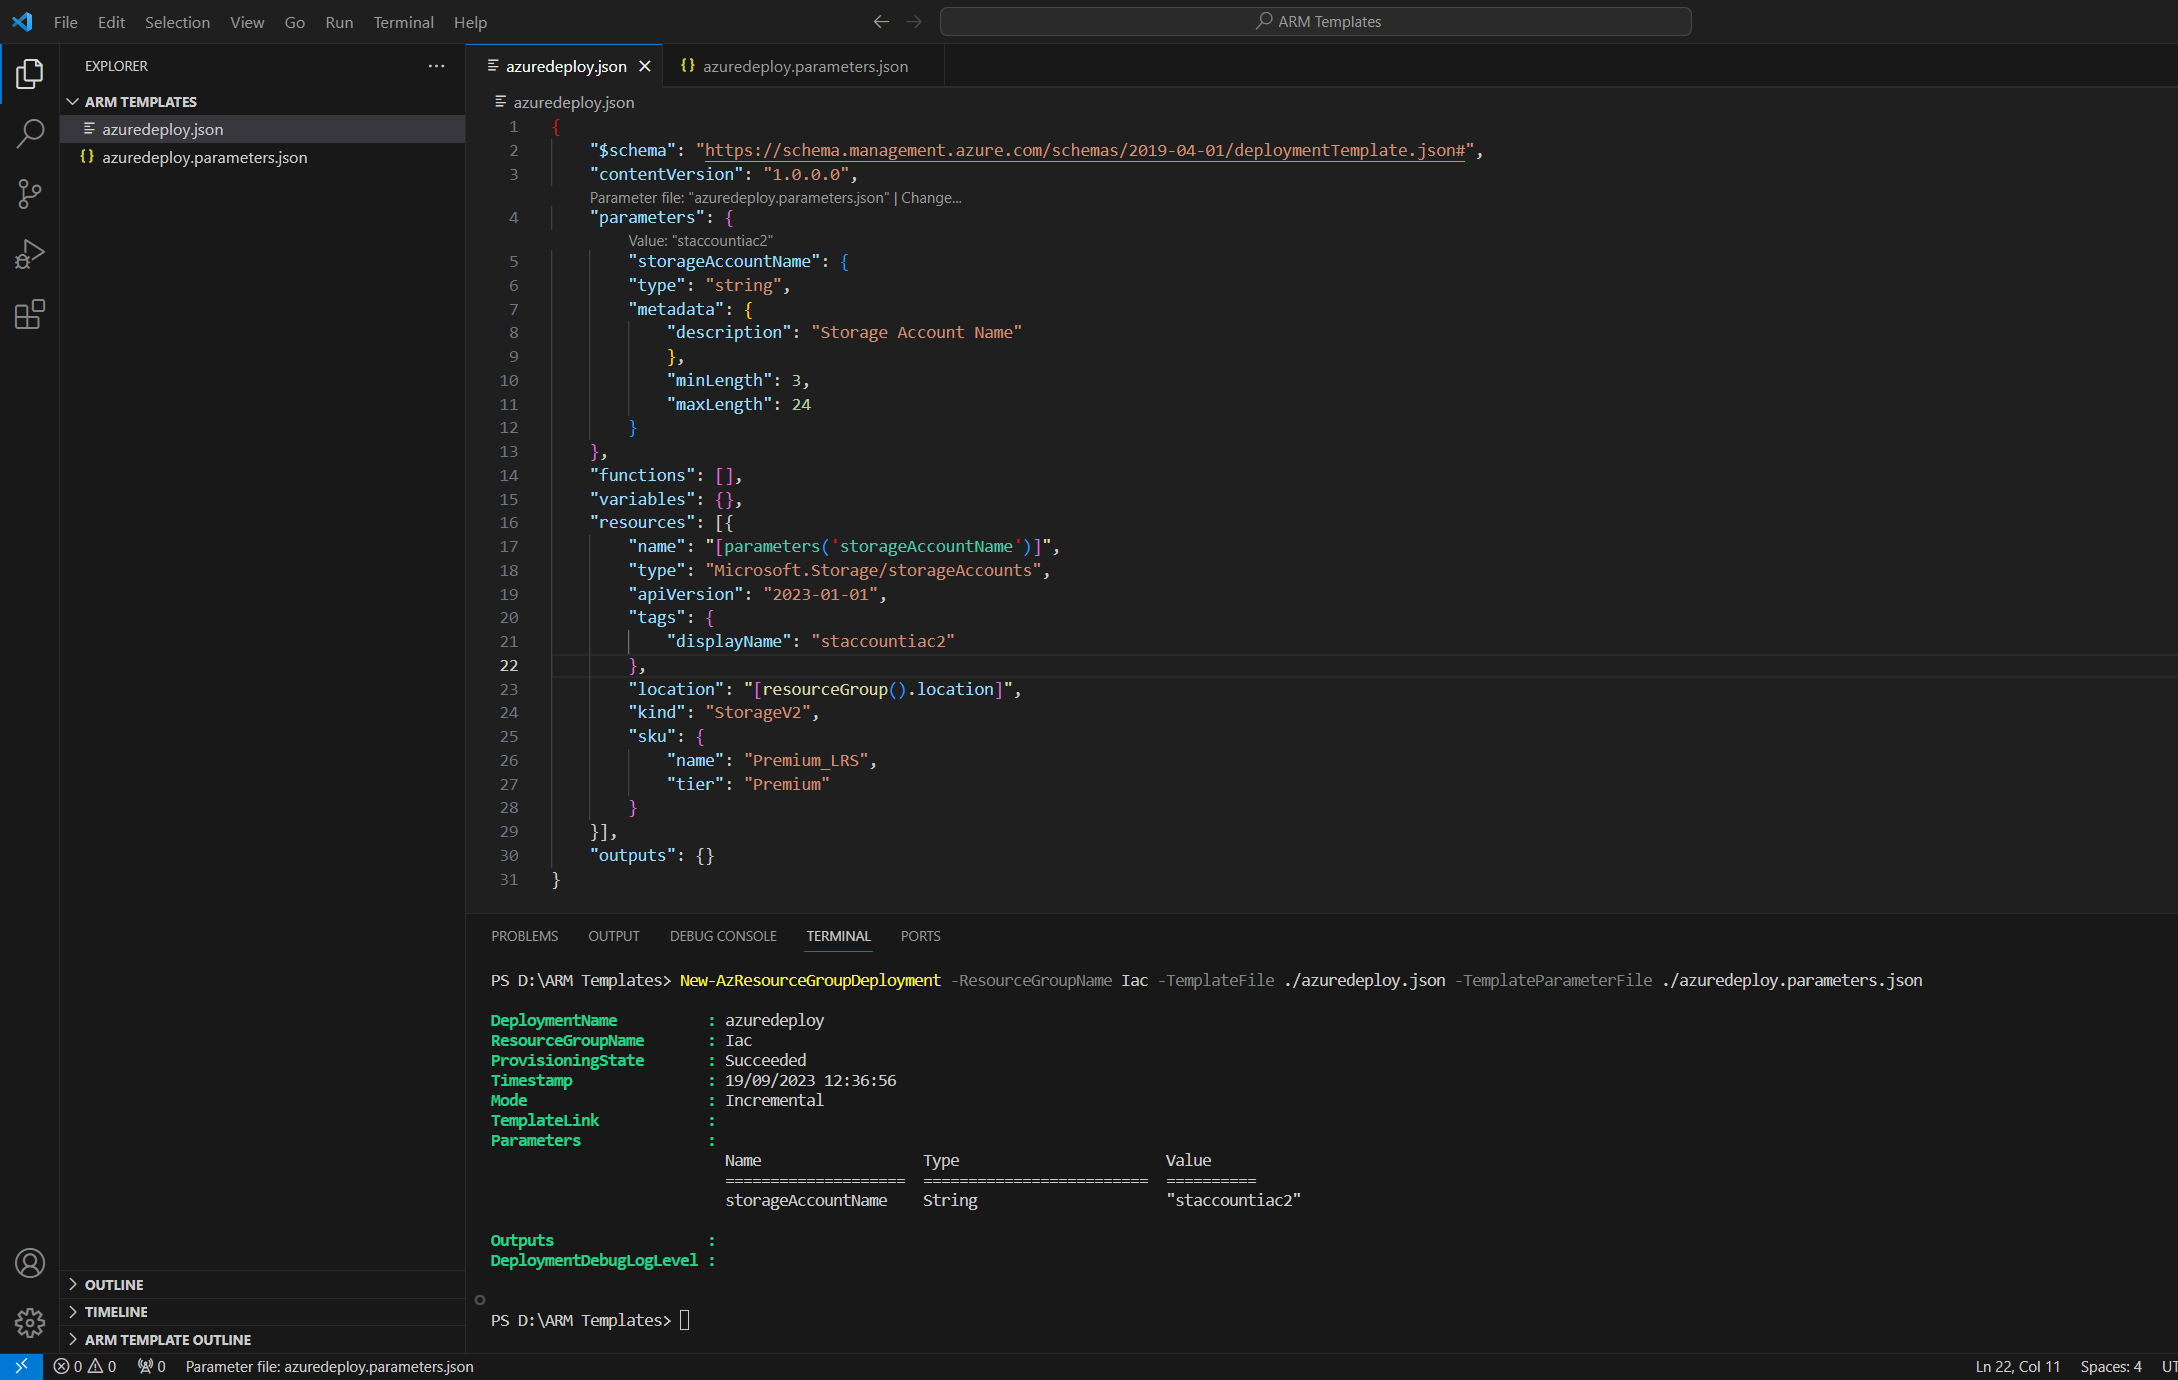
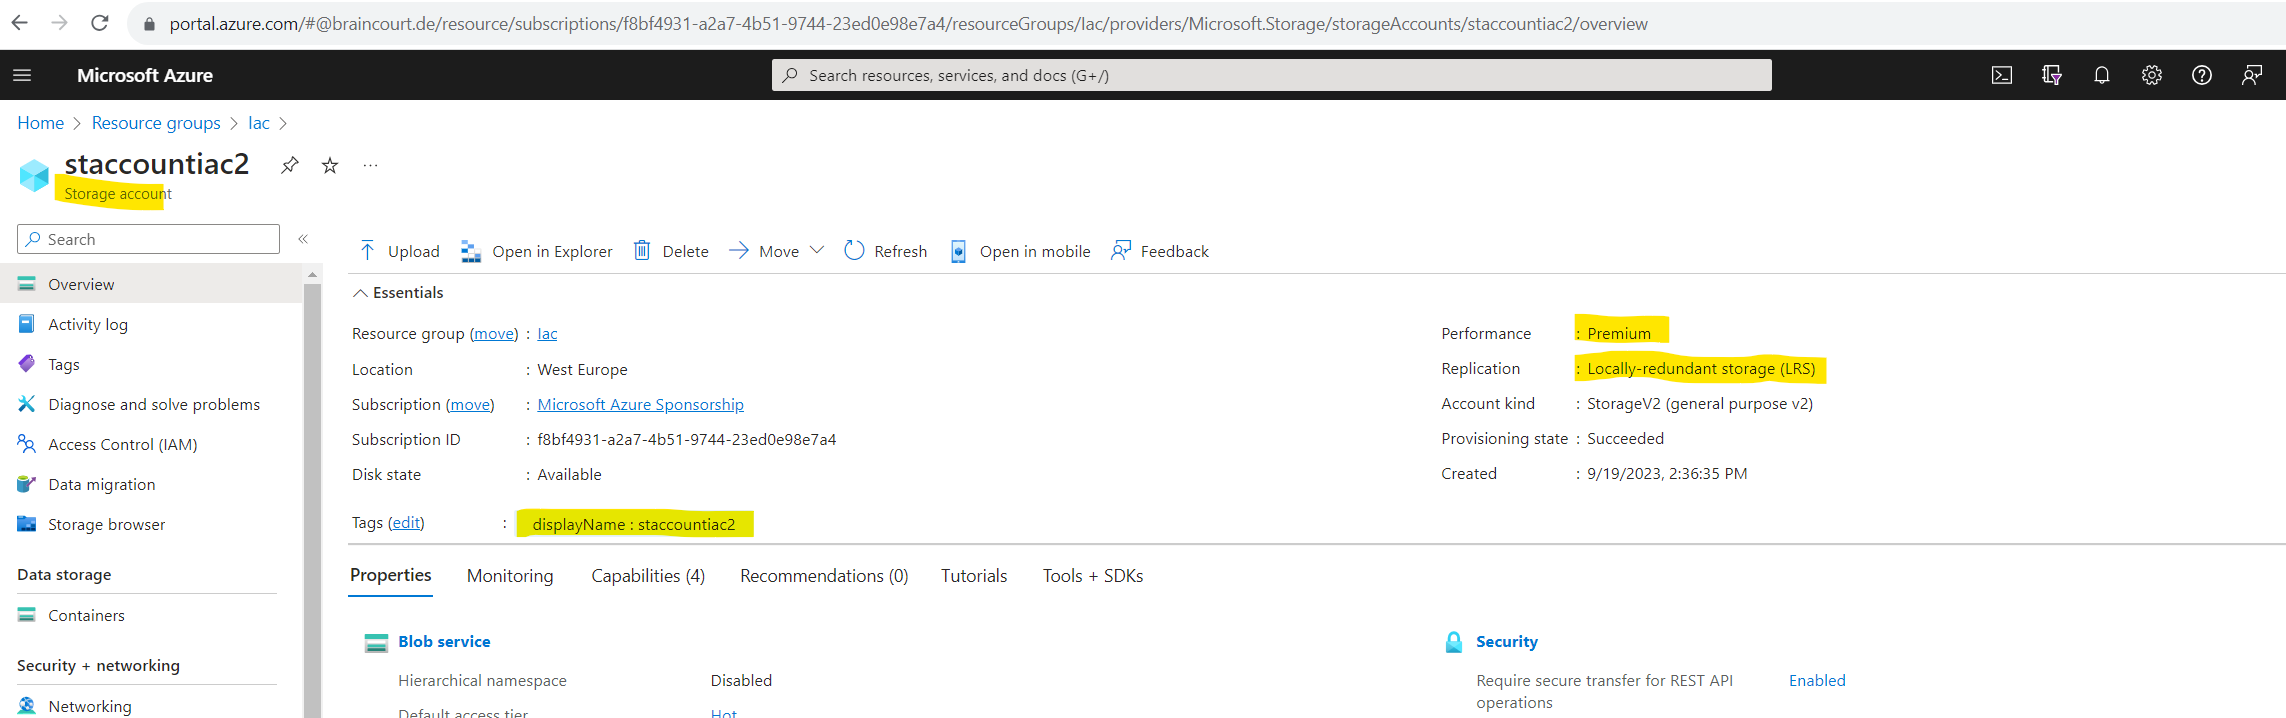
Storage account is deployed successfully.
So by re-run the same ARM template using the New-AzResourceGroupDeployment cmdlet, you can also update and redeploy your ARM template and resource.
Keep in mind that as you could saw in my example, some properties can’t be change or converted after the resource was initial created like the replication type in case of a storage account.
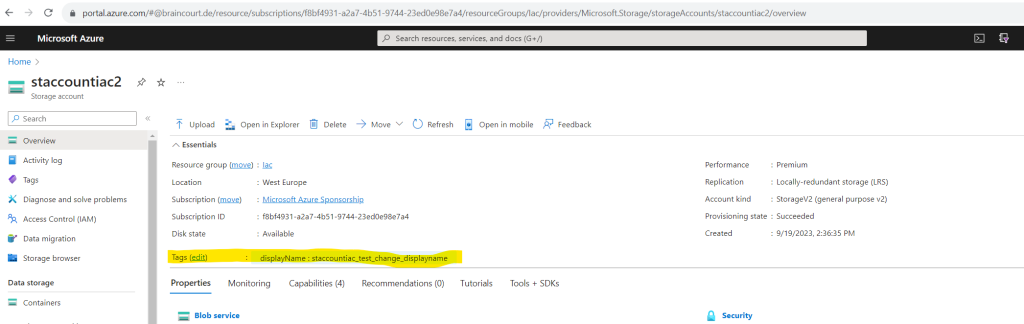
In order to test updating my newly create storage account, I just changed the displayName property as shown below and triggered a re-run from the ARM template.
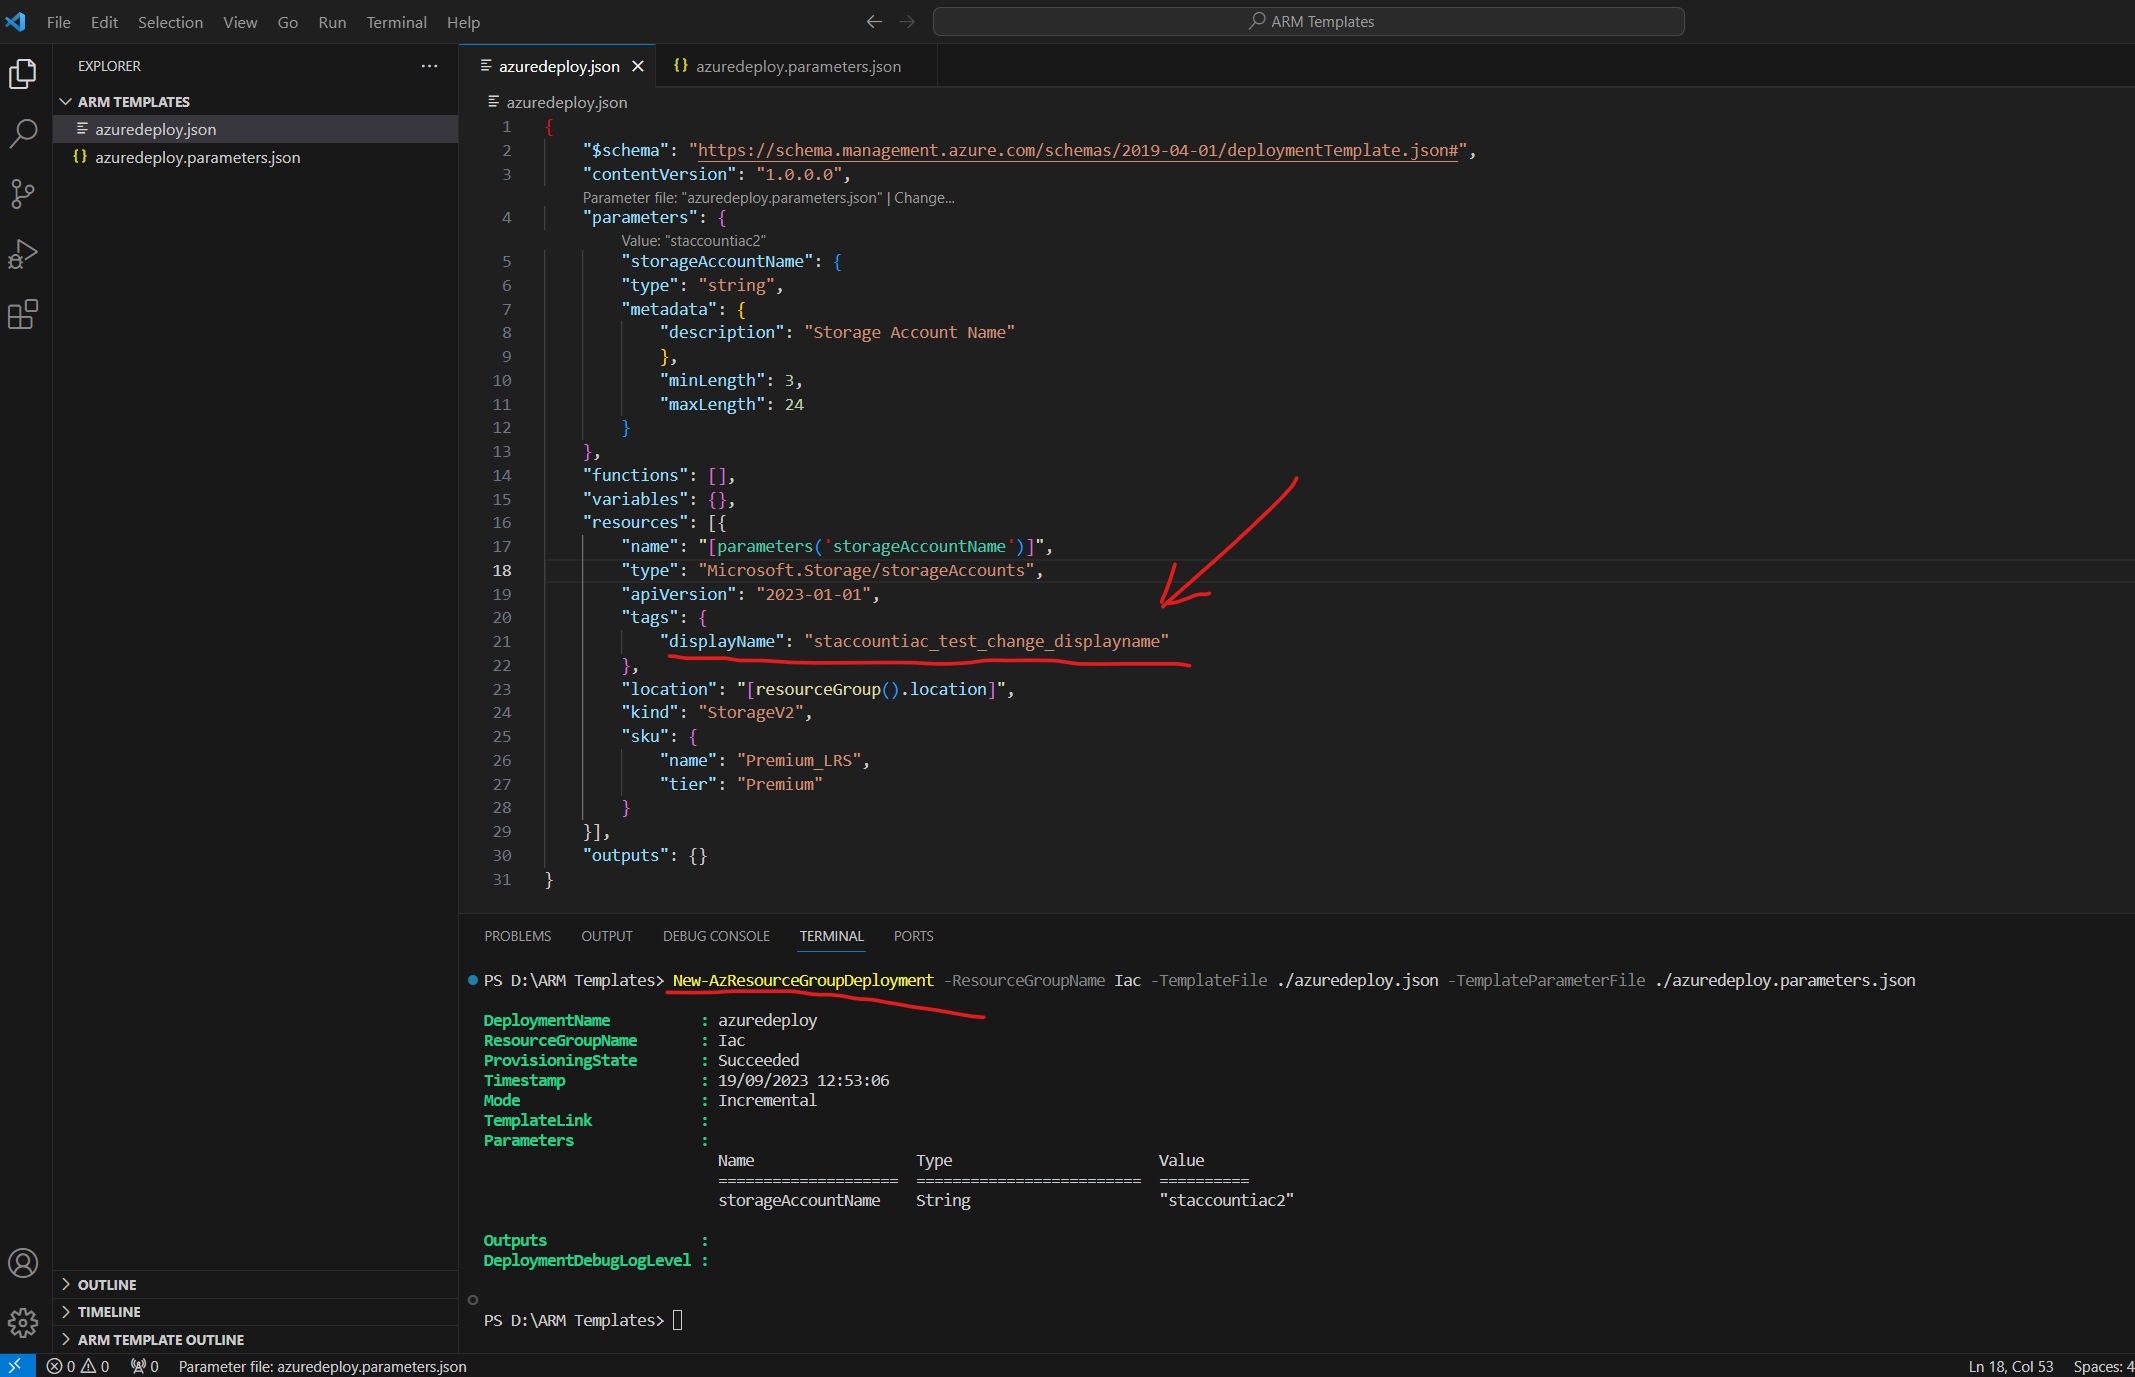
Successfully updated the displayName property.
Remove a Resource Group Deployment
You can also simply remove your deployment by using the following command.
Remove-AzResourceGroupDeployment -ResourceGroupName <your resource group name> -Name <your deployment name>
!! Note !!
Removing a deployment does not automatically delete or affect the state of the resources created by that deployment. The resources themselves remain intact unless you explicitly delete them separately. This is an important distinction to understand.Deployments – Delete
Deleting a template deployment does not affect the state of the resource group. This is an asynchronous operation that returns a status of 202 until the template deployment is successfully deleted.
Source: https://learn.microsoft.com/en-us/rest/api/resources/deployments/delete
When you remove a deployment in an Azure resource group using the Remove-AzResourceGroupDeployment cmdlet or a similar method, several things happen:
- Deletion of Deployment Configuration: The deployment configuration or template used to create and manage resources in the deployment is deleted. This means that the blueprint or definition of the resources is removed from Azure’s management plane.
- No Impact on Resource State: Removing a deployment does not automatically delete or affect the state of the resources created by that deployment. The resources themselves remain intact unless you explicitly delete them separately. This is an important distinction to understand.
- Resources Continue to Incur Charges: The resources created by the deployment will continue to incur charges as long as they exist, even if you remove the deployment. You are billed for the resources you use, regardless of whether they were created as part of a deployment.
- Resource Cleanup Is Manual: To clean up the resources created by the deployment, you will need to manually delete them using Azure PowerShell, the Azure portal, or other Azure management tools. The specific steps to delete resources depend on the resource type (e.g., virtual machines, databases, storage accounts, etc.). Deleting resources can result in data loss, so exercise caution.
- Resource Dependencies: Be aware that resources may have dependencies on one another. For example, a virtual machine may have a dependency on a virtual network or a storage account. You need to delete resources in the correct order to avoid issues.
- Resource Group Remains: The resource group itself, which serves as a logical container for resources and deployments, will not be deleted automatically when you remove a deployment. You can choose to delete the entire resource group if you want to remove all resources and deployments within it.
Create multiple resource instances using ARM templates
You can iterate in your Azure Resource Manager template (ARM template) to create multiple instances of an Azure resource
To show how we can create multiple resource instances with ARM templates, I will use my existing ARM Template where we previously deployed a storage account.
This template creates one storage account. We customize the template to create finally three storage accounts.
Here is my existing ARM template we need to adjust in order to finally create three storage accounts (instances).
{
"$schema": "https://schema.management.azure.com/schemas/2019-04-01/deploymentTemplate.json#",
"contentVersion": "1.0.0.0",
"parameters": {
"storageAccountName": {
"type": "string",
"metadata": {
"description": "Storage Account Name"
},
"minLength": 3,
"maxLength": 24
}
},
"functions": [],
"variables": {},
"resources": [{
"name": "[parameters('storageAccountName')]",
"type": "Microsoft.Storage/storageAccounts",
"apiVersion": "2023-01-01",
"tags": {
"displayName": "storageaccount1"
},
"location": "[resourceGroup().location]",
"kind": "StorageV2",
"sku": {
"name": "Premium_LRS",
"tier": "Premium"
}
}],
"outputs": {}
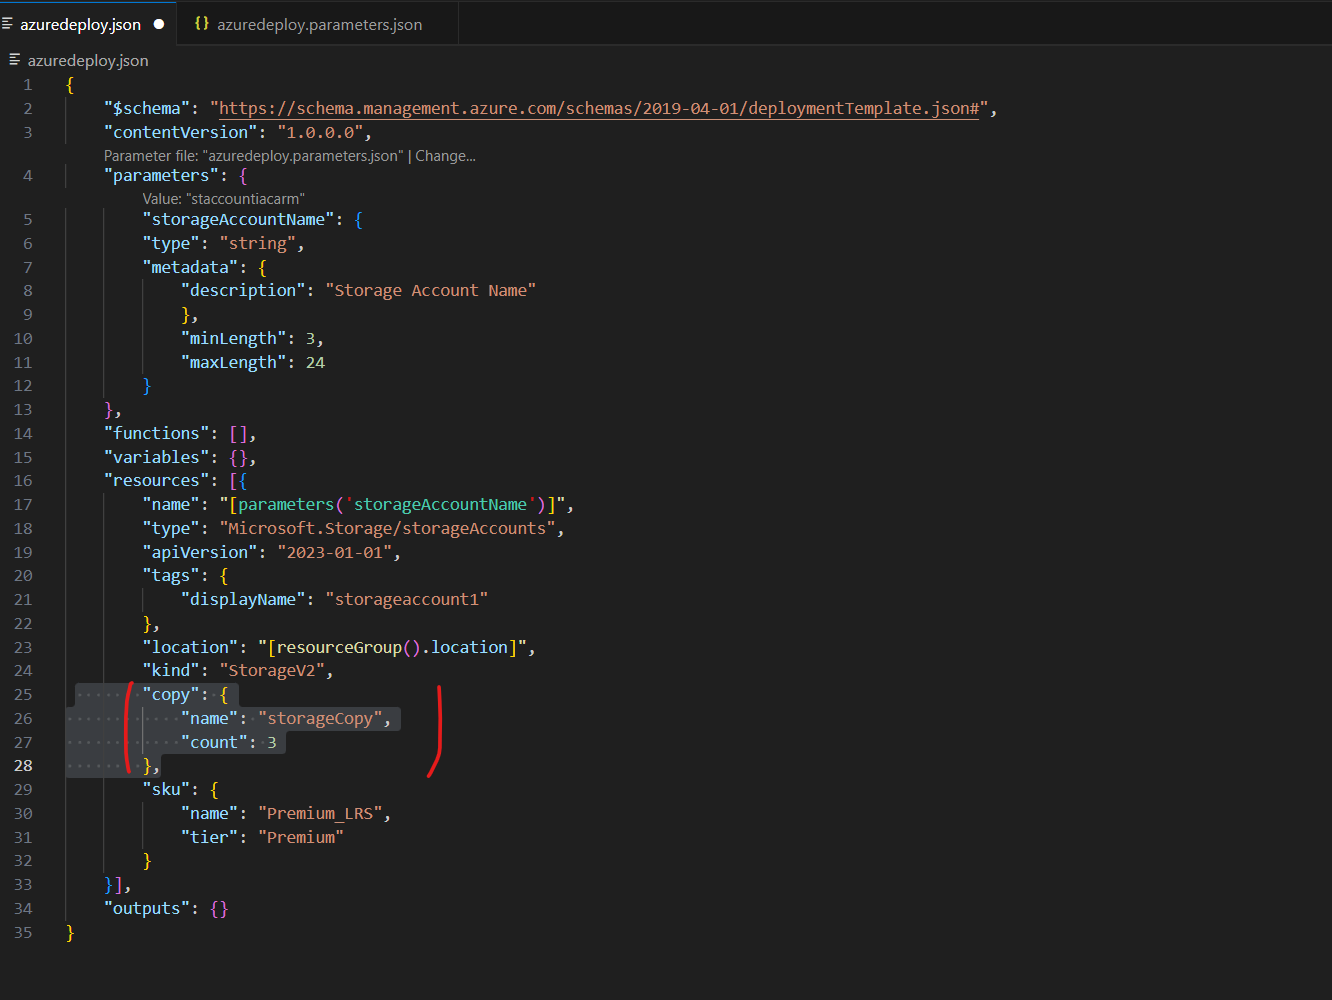
} The first step is to add a copy element to the storage account resource definition. In the copy element, you specify the number of iterations and a variable for this loop. The count value must be a positive integer and can’t exceed 800.
"copy": {
  "name": "storageCopy",
  "count": 3
},
Insert this element in the resources section after the kind property.
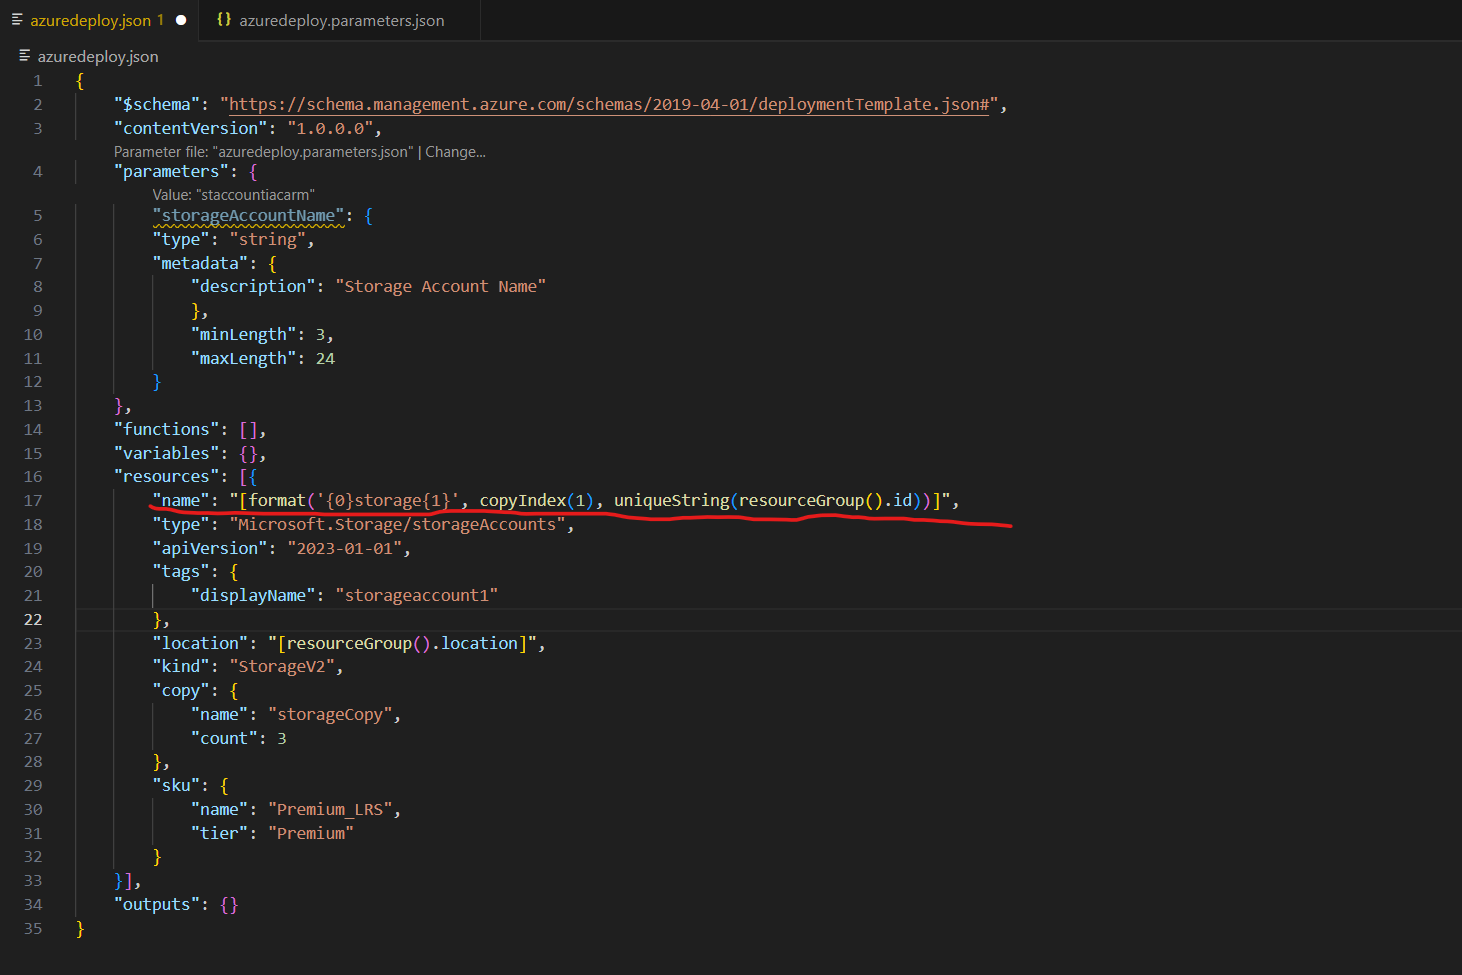
The second step is to replace the name property in the resource section with the following copyIndex() function.
The copyIndex() function returns the current iteration in the loop. You use the index as the name prefix. copyIndex() is zero-based. To offset the index value, you can pass a value in the copyIndex() function. For example, copyIndex(1).
"name": "[format('{0}storage{1}', copyIndex(), uniqueString(resourceGroup().id))]",I am using the offset with copyIndex(1) in order to name the three storage accounts storage1, storage2 and storage3.
The same I will also do for the displayName tag like shown below. Replace the value also by using the copyIndex() function with or without offset.
"name": "[format('{0}storage{1}', copyIndex(), uniqueString(resourceGroup().id))]",
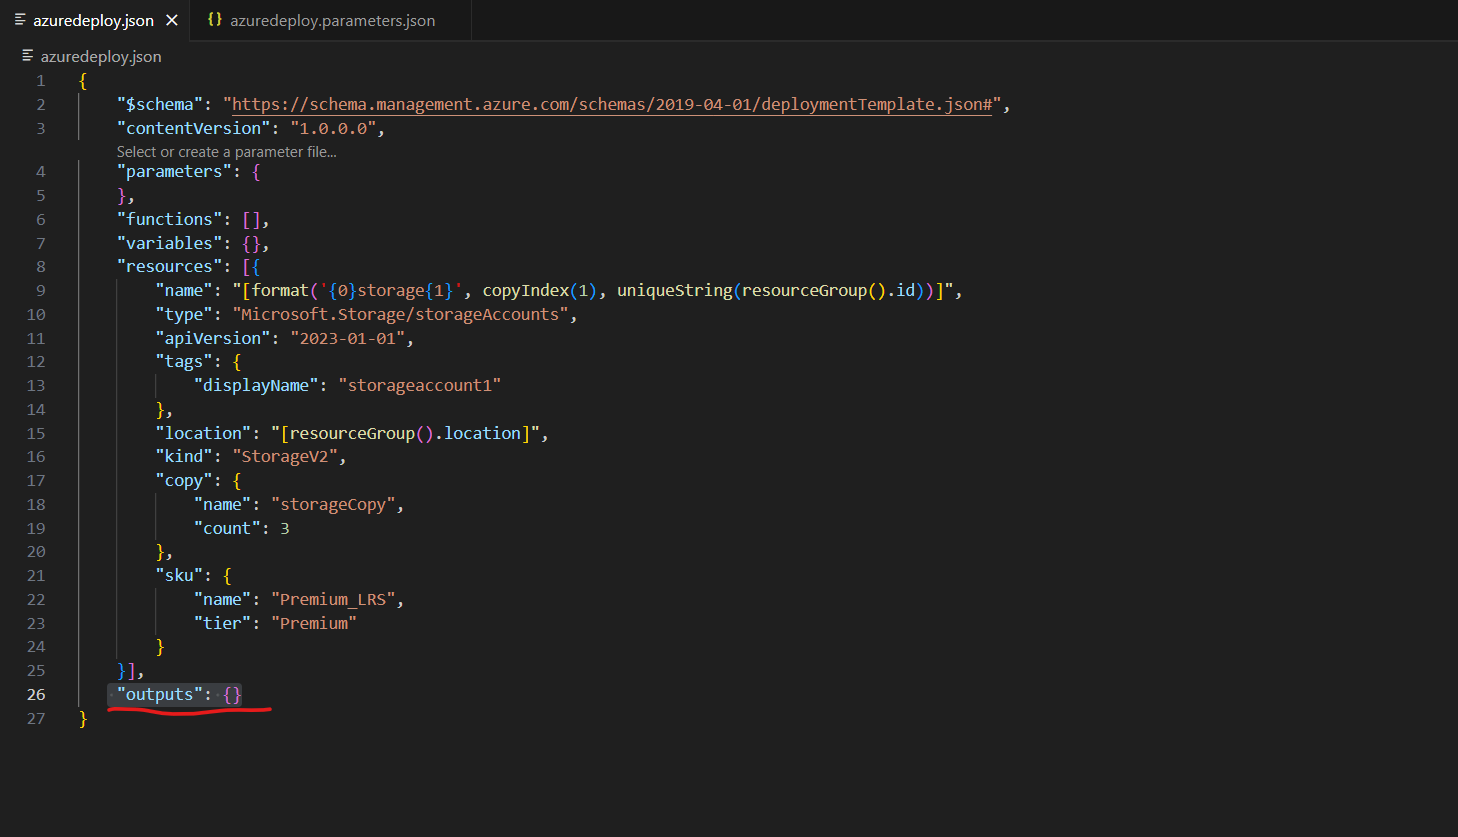
The third step is to delete the storageAccountName parameter definition, because it’s not used anymore.
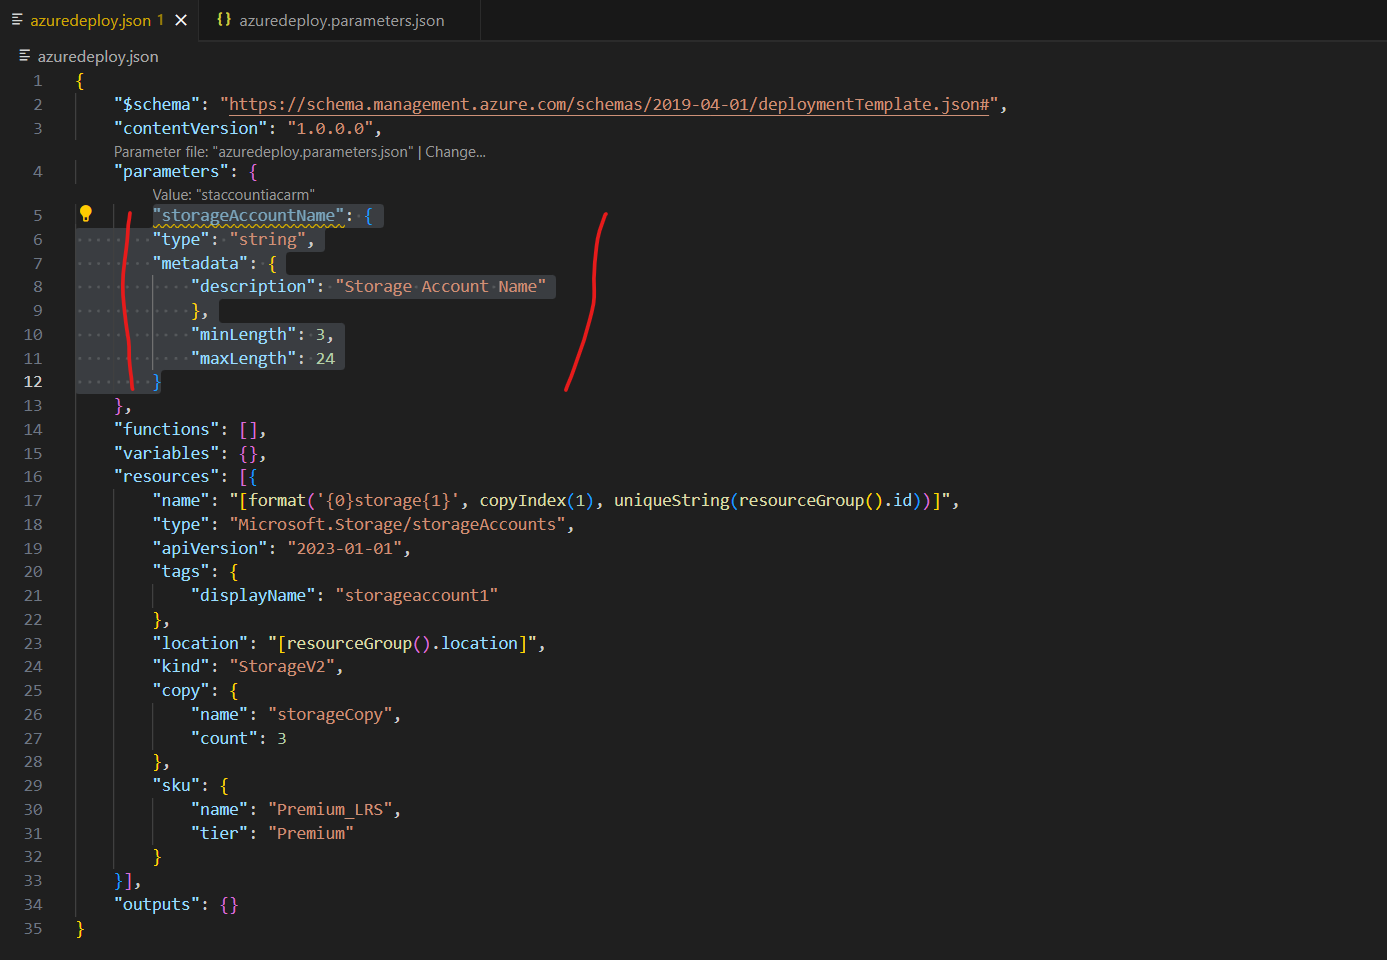
We also can delete the outputs element and is no longer needed. Further if existing the metadata element at the beginning of the ARM template.
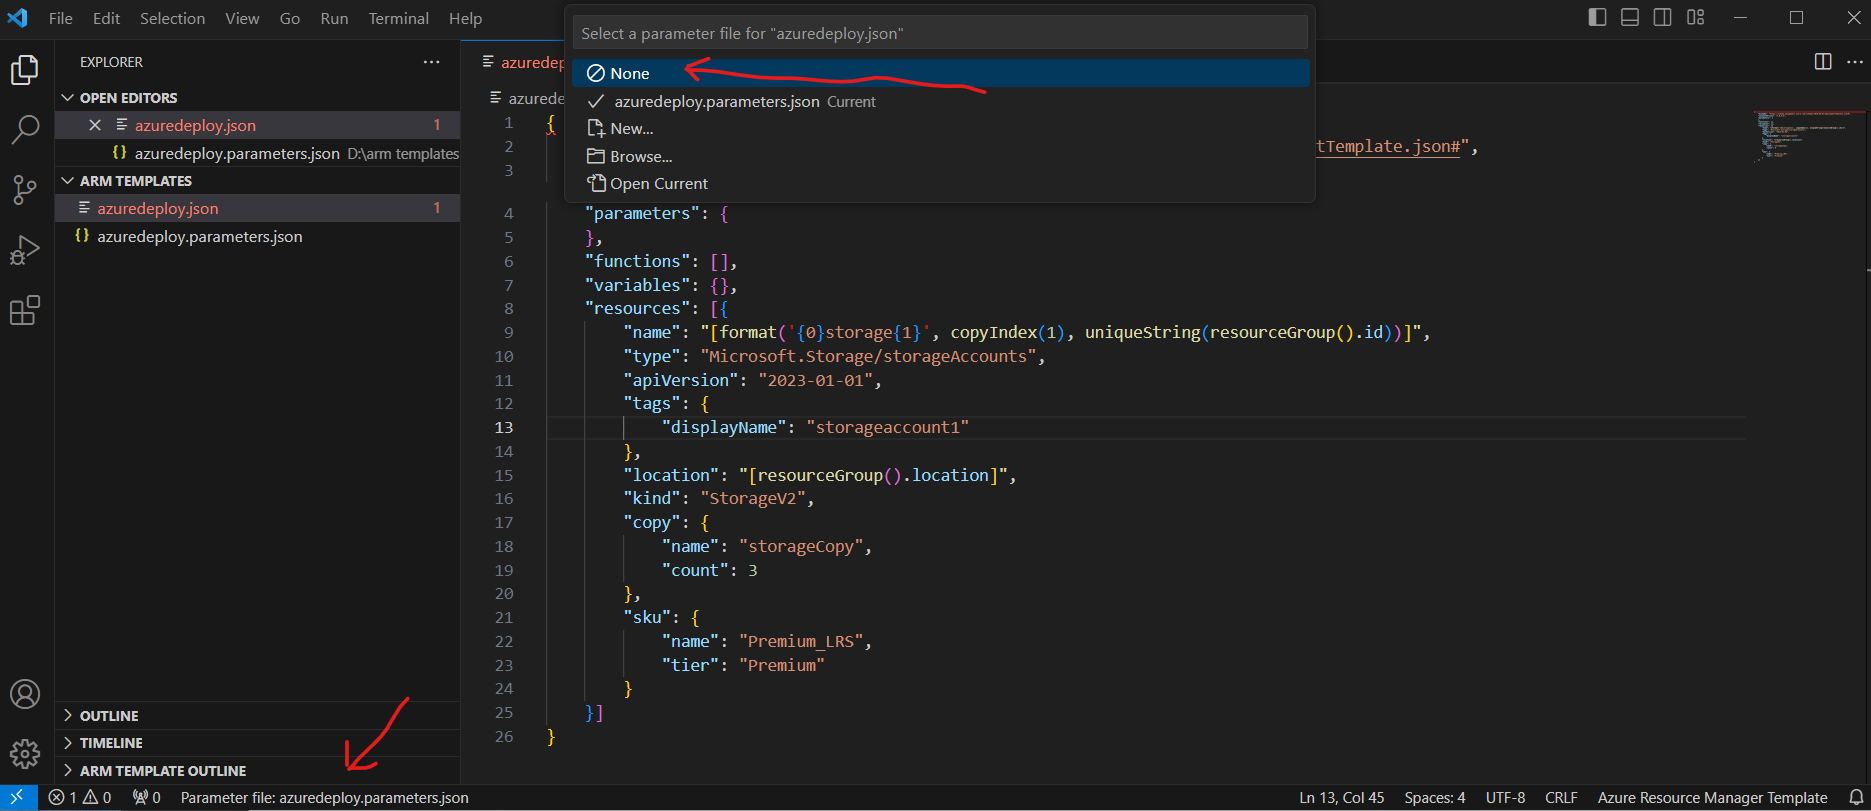
Previously I used for the resources name property a parameter file which was mapped to the template. As we replaced the name property with the copyIndex() function, we finally also need to remove the mapping with the parameter file.
The completed and adjusted ARM template looks now like this:
{
    "$schema": "https://schema.management.azure.com/schemas/2019-04-01/deploymentTemplate.json#",
    "contentVersion": "1.0.0.0",
    "parameters": {
    },
    "functions": [],
    "variables": {},
    "resources": [{
        "name": "[format('{0}storage{1}', copyIndex(1), uniqueString(resourceGroup().id))]",
        "type": "Microsoft.Storage/storageAccounts",
        "apiVersion": "2023-01-01",
        "tags": {
            "displayName": "[format('{0}storage{1}', copyIndex(1), uniqueString(resourceGroup().id))]"
        },
        "location": "[resourceGroup().location]",
        "kind": "StorageV2",
        "copy": {
            "name": "storageCopy",
            "count": 3
        },
        "sku": {
            "name": "Premium_LRS",
            "tier": "Premium"
        }
    }]
}
Now we can deploy our ARM Template to create our three storage accounts.
I will first login to Azure again and set my active subscription I want to use by executing the following commands.
Connect-AzAccount
Set-AzContext -Subscription

Then I will deploy the template by executing the following command. I already have created a resource group named Iac to use for. This time we don’t need to specify a parameter file.
New-AzResourceGroupDeployment -ResourceGroupName Iac -TemplateFile ./azuredeploy.json
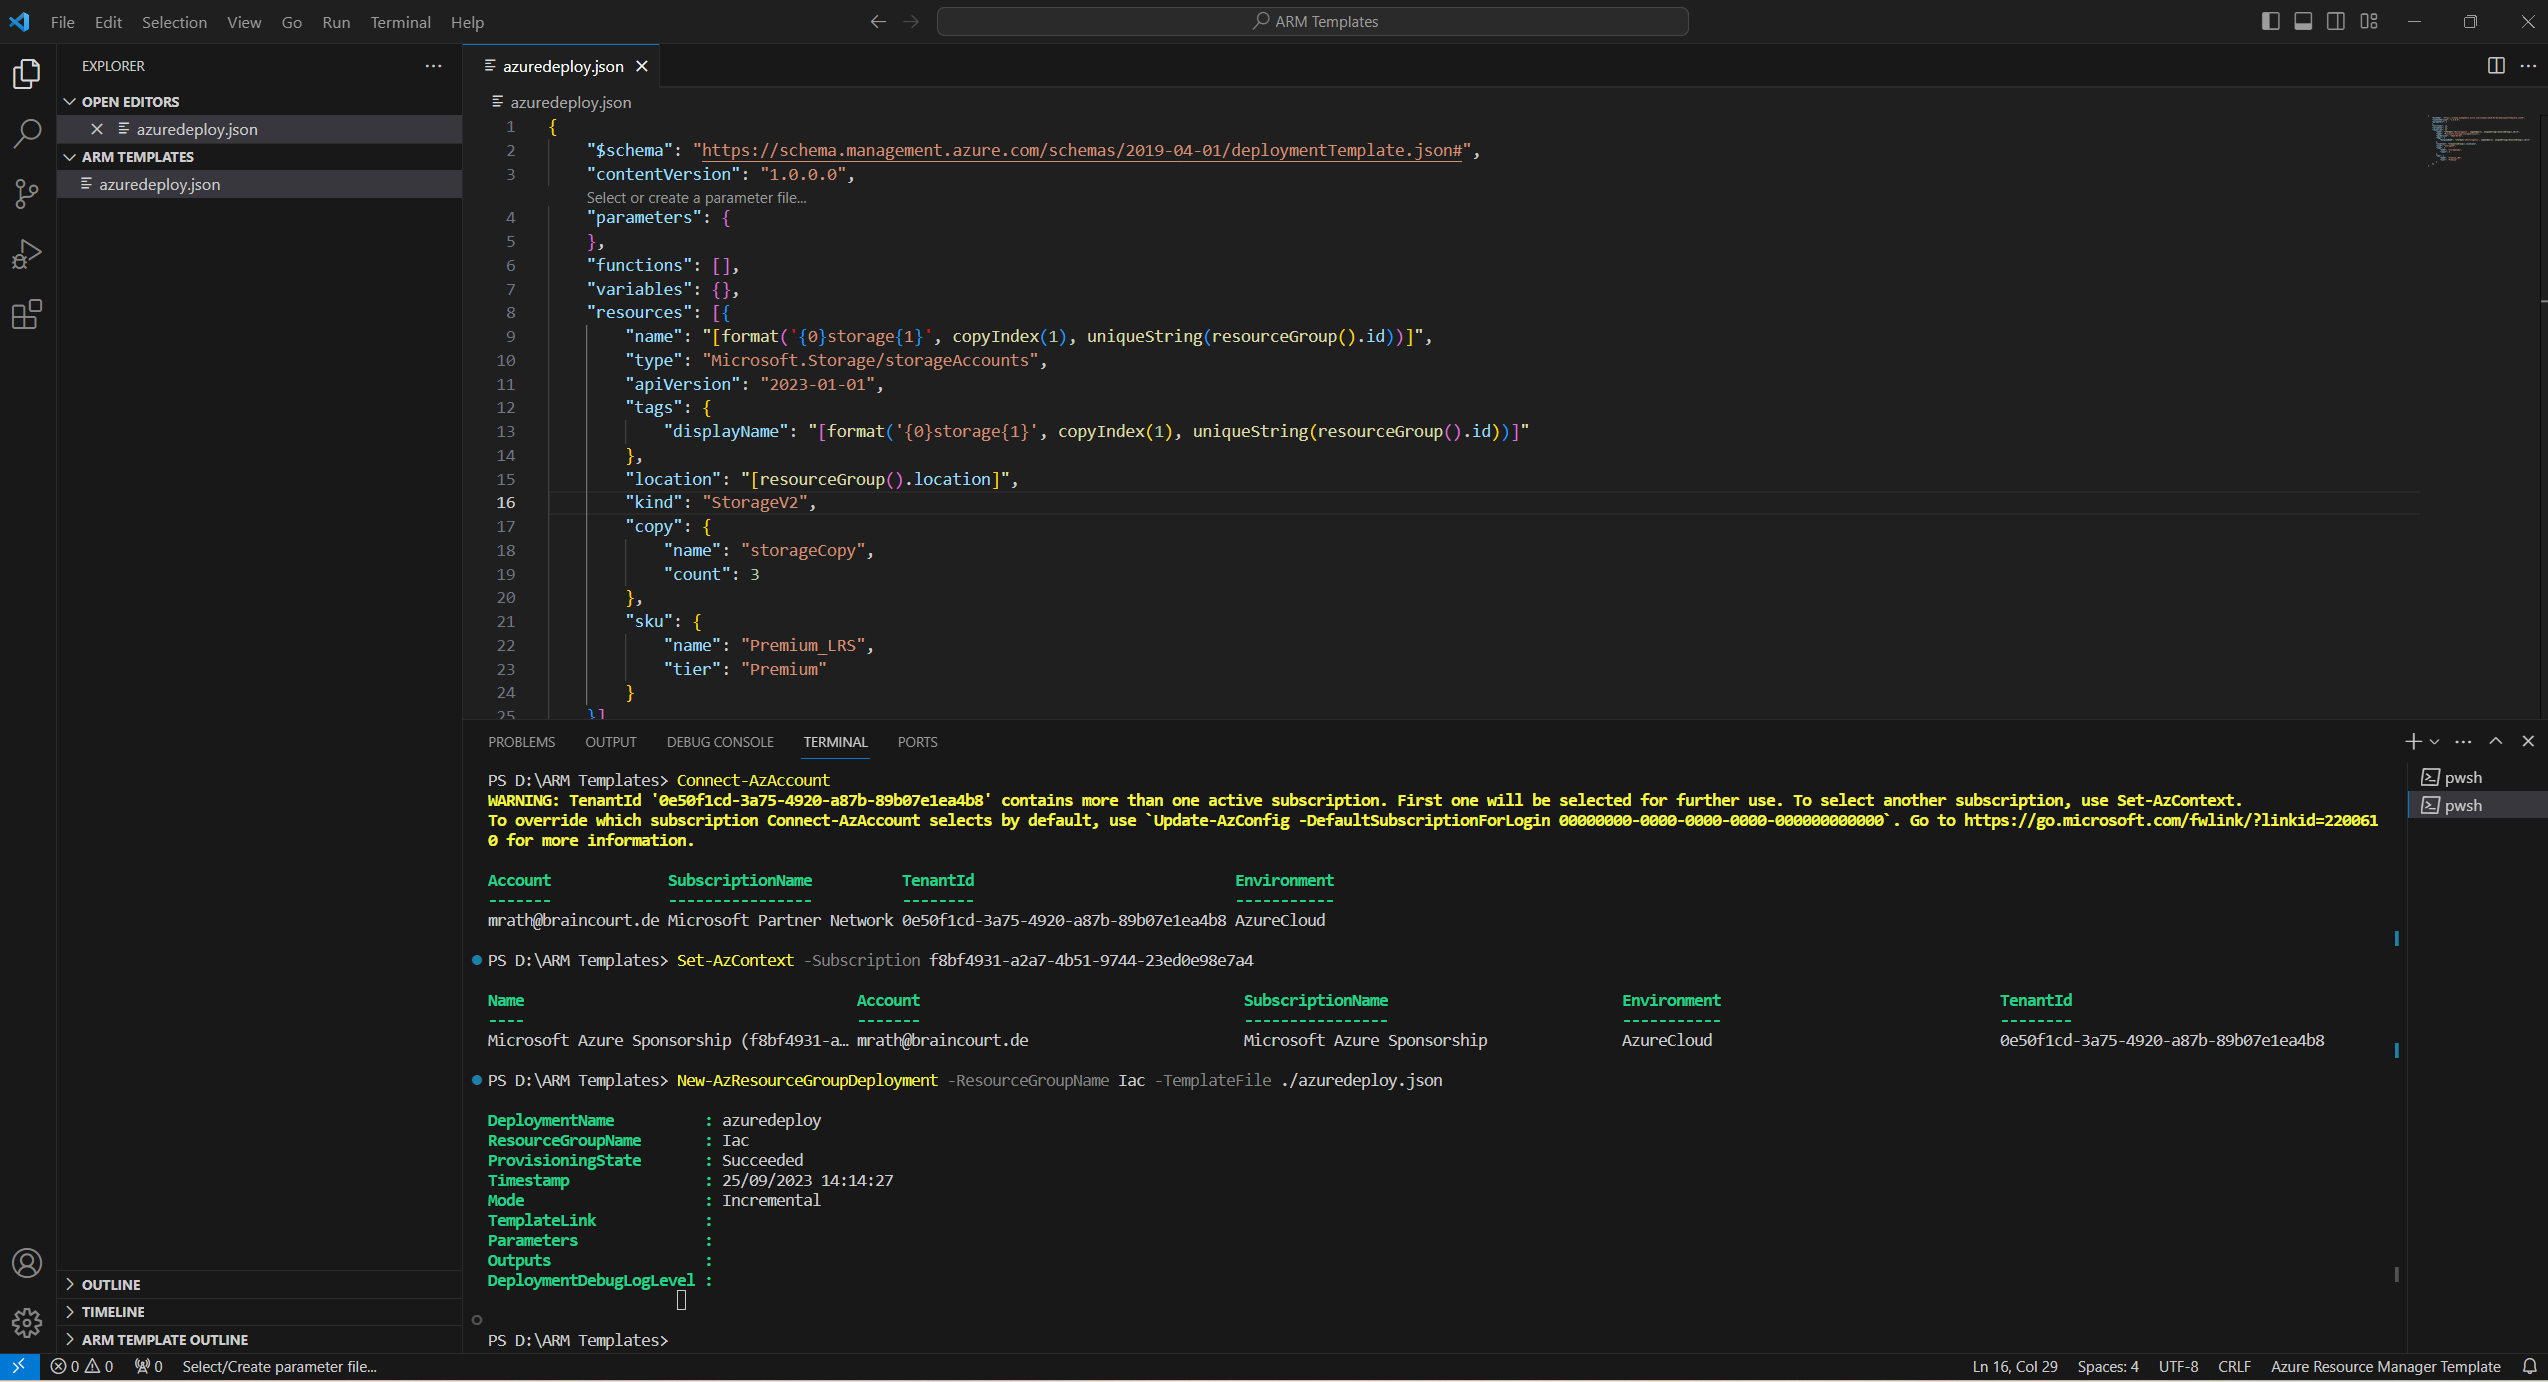
Finally the adjusted ARM template created my three storage accounts.
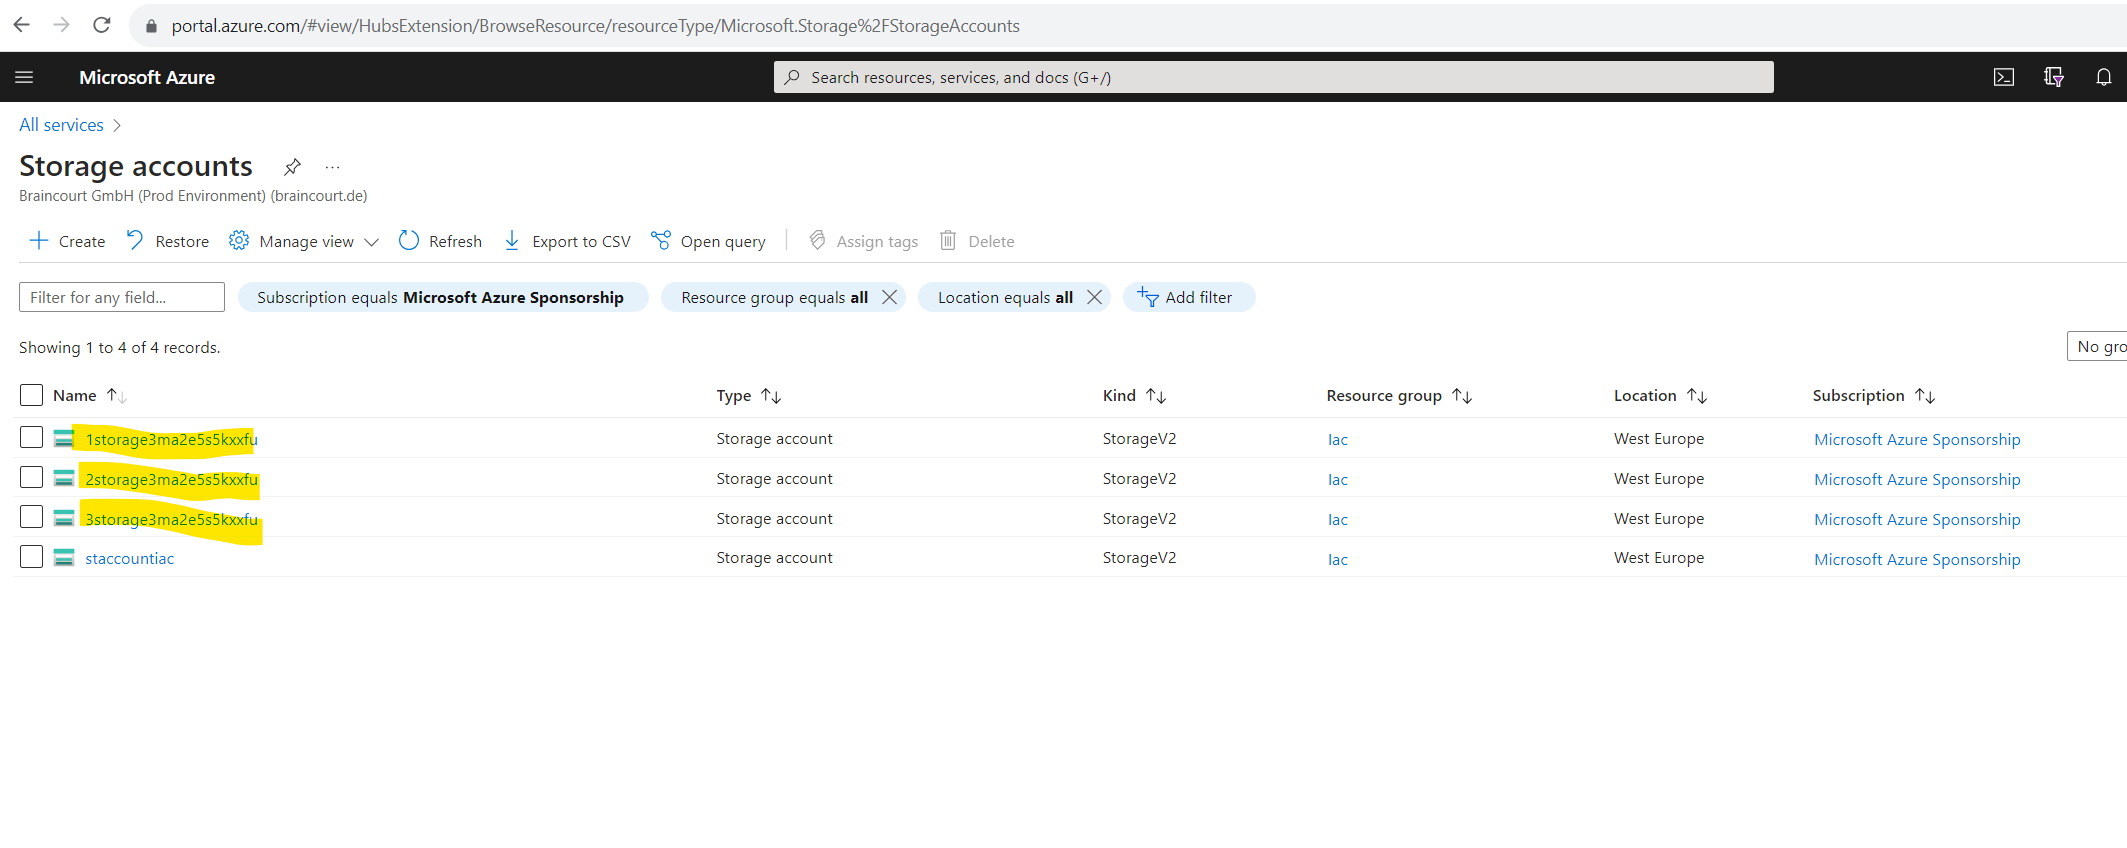
You can also see above the unique string part from each storage account in its name with 3ma2e5s5kxxfu which is the ID from the resource group we used to deploy for.
"[format('{0}storage{1}', copyIndex(), uniqueString(resourceGroup().id))]"I don’t want to use this string part in my names for the storage accounts, so I changed the code line above for example into.
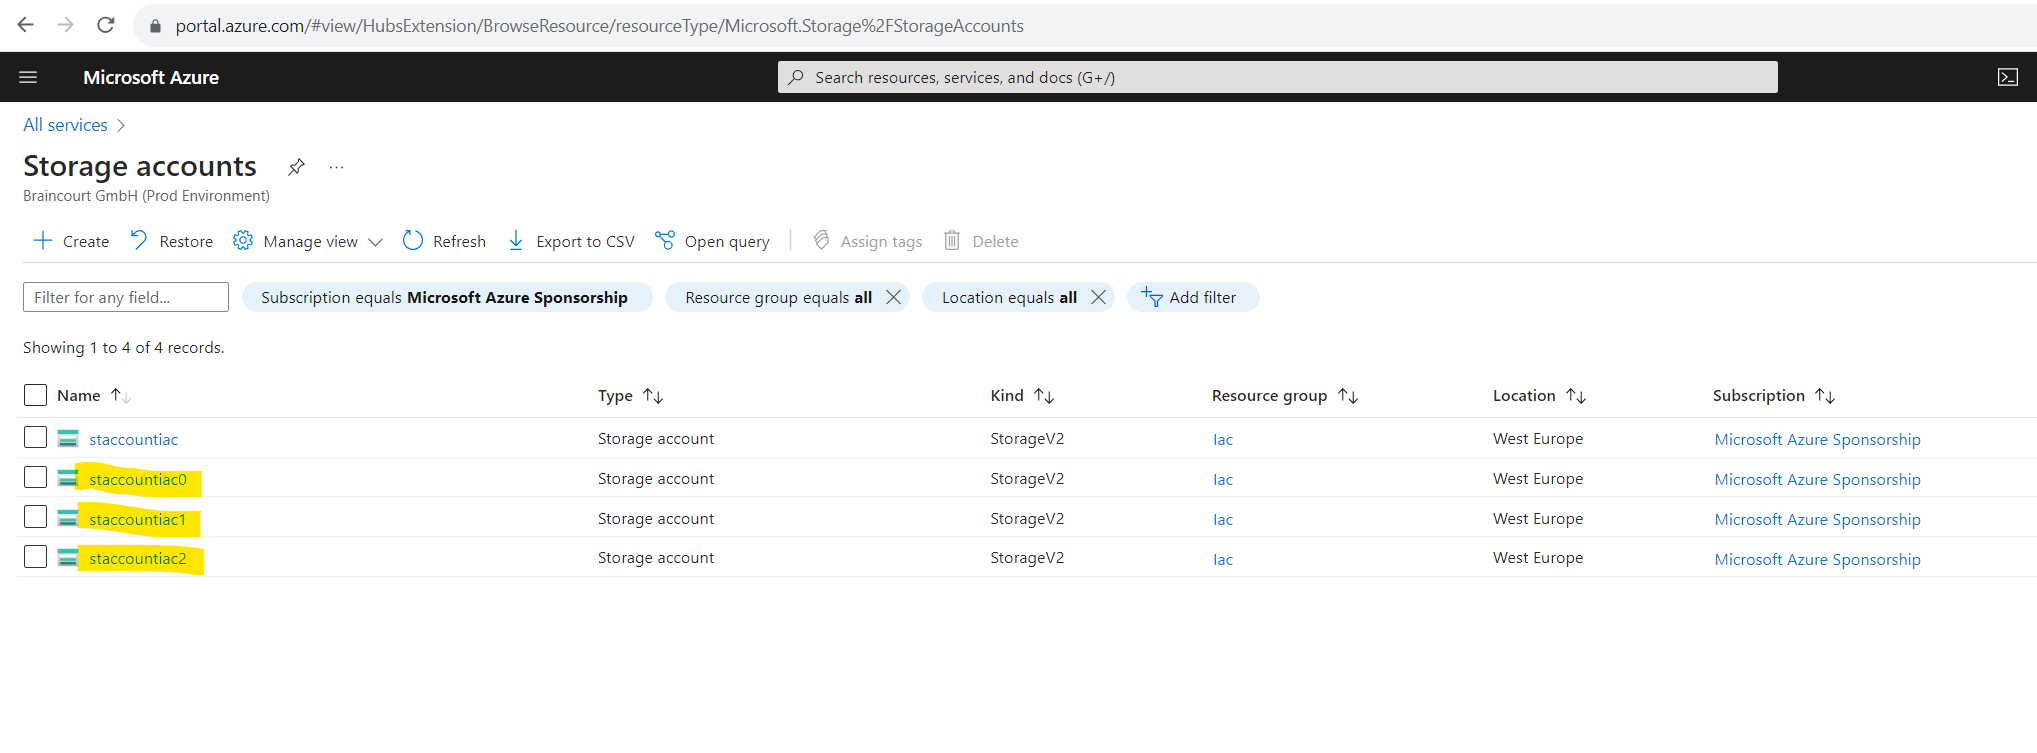
"[format('staccountiac{0}', copyIndex())]"Finally the name doesn’t matter at least when not still used in the tenant, so you can build the string like you want and use the copyIndex() function to iterate through the names.
My example will finally create these names for the three storage accounts.
Remove a Resource
You can delete a resource by using the Remove-AzResource cmdlet like shown below.
Remove-AzResource -ResourceGroupName ExampleResourceGroup -ResourceName ExampleVM -ResourceType Microsoft.Compute/virtualMachines
In order to get a detailed list about what is stored in a specific resource group first you can run the Get-AzResource cmdlet like shown below.
Get-AzResource -ResourceGroupName ExampleResourceGroup

To delete a resource group use the Remove-AzResourceGroup cmdlet.
Remove-AzResourceGroup -Name ExampleResourceGroup
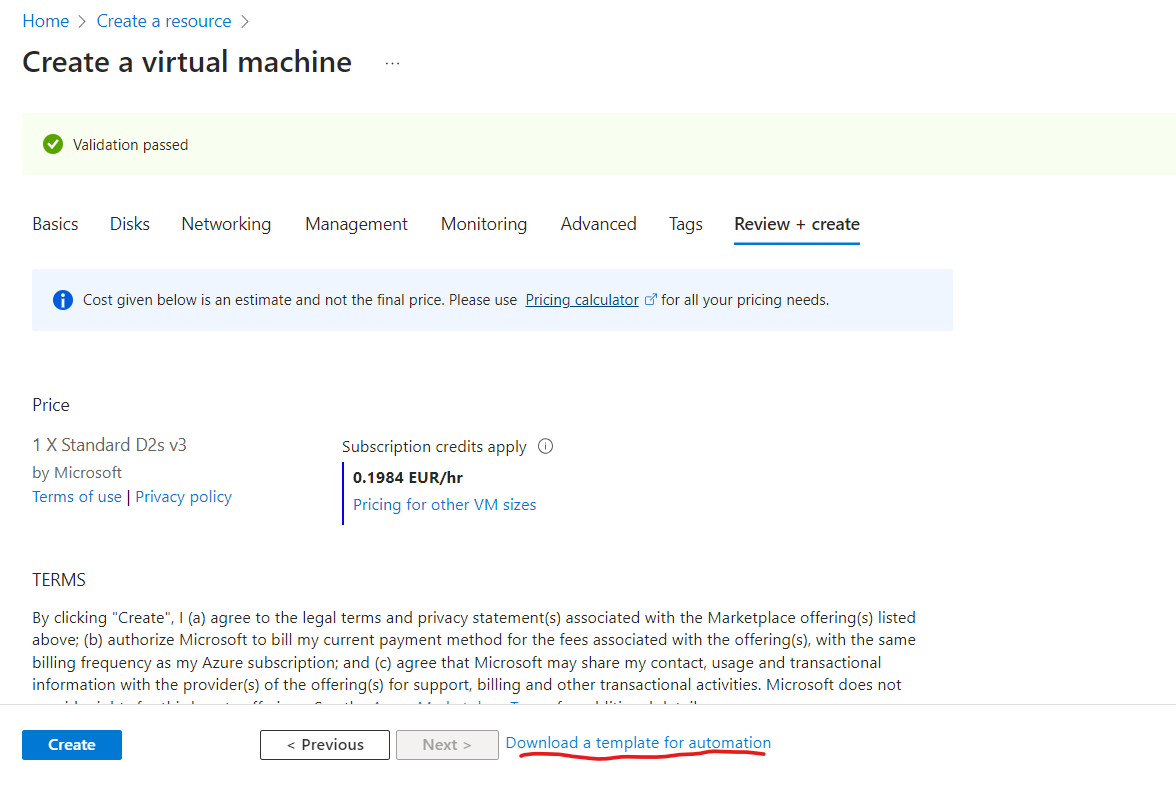
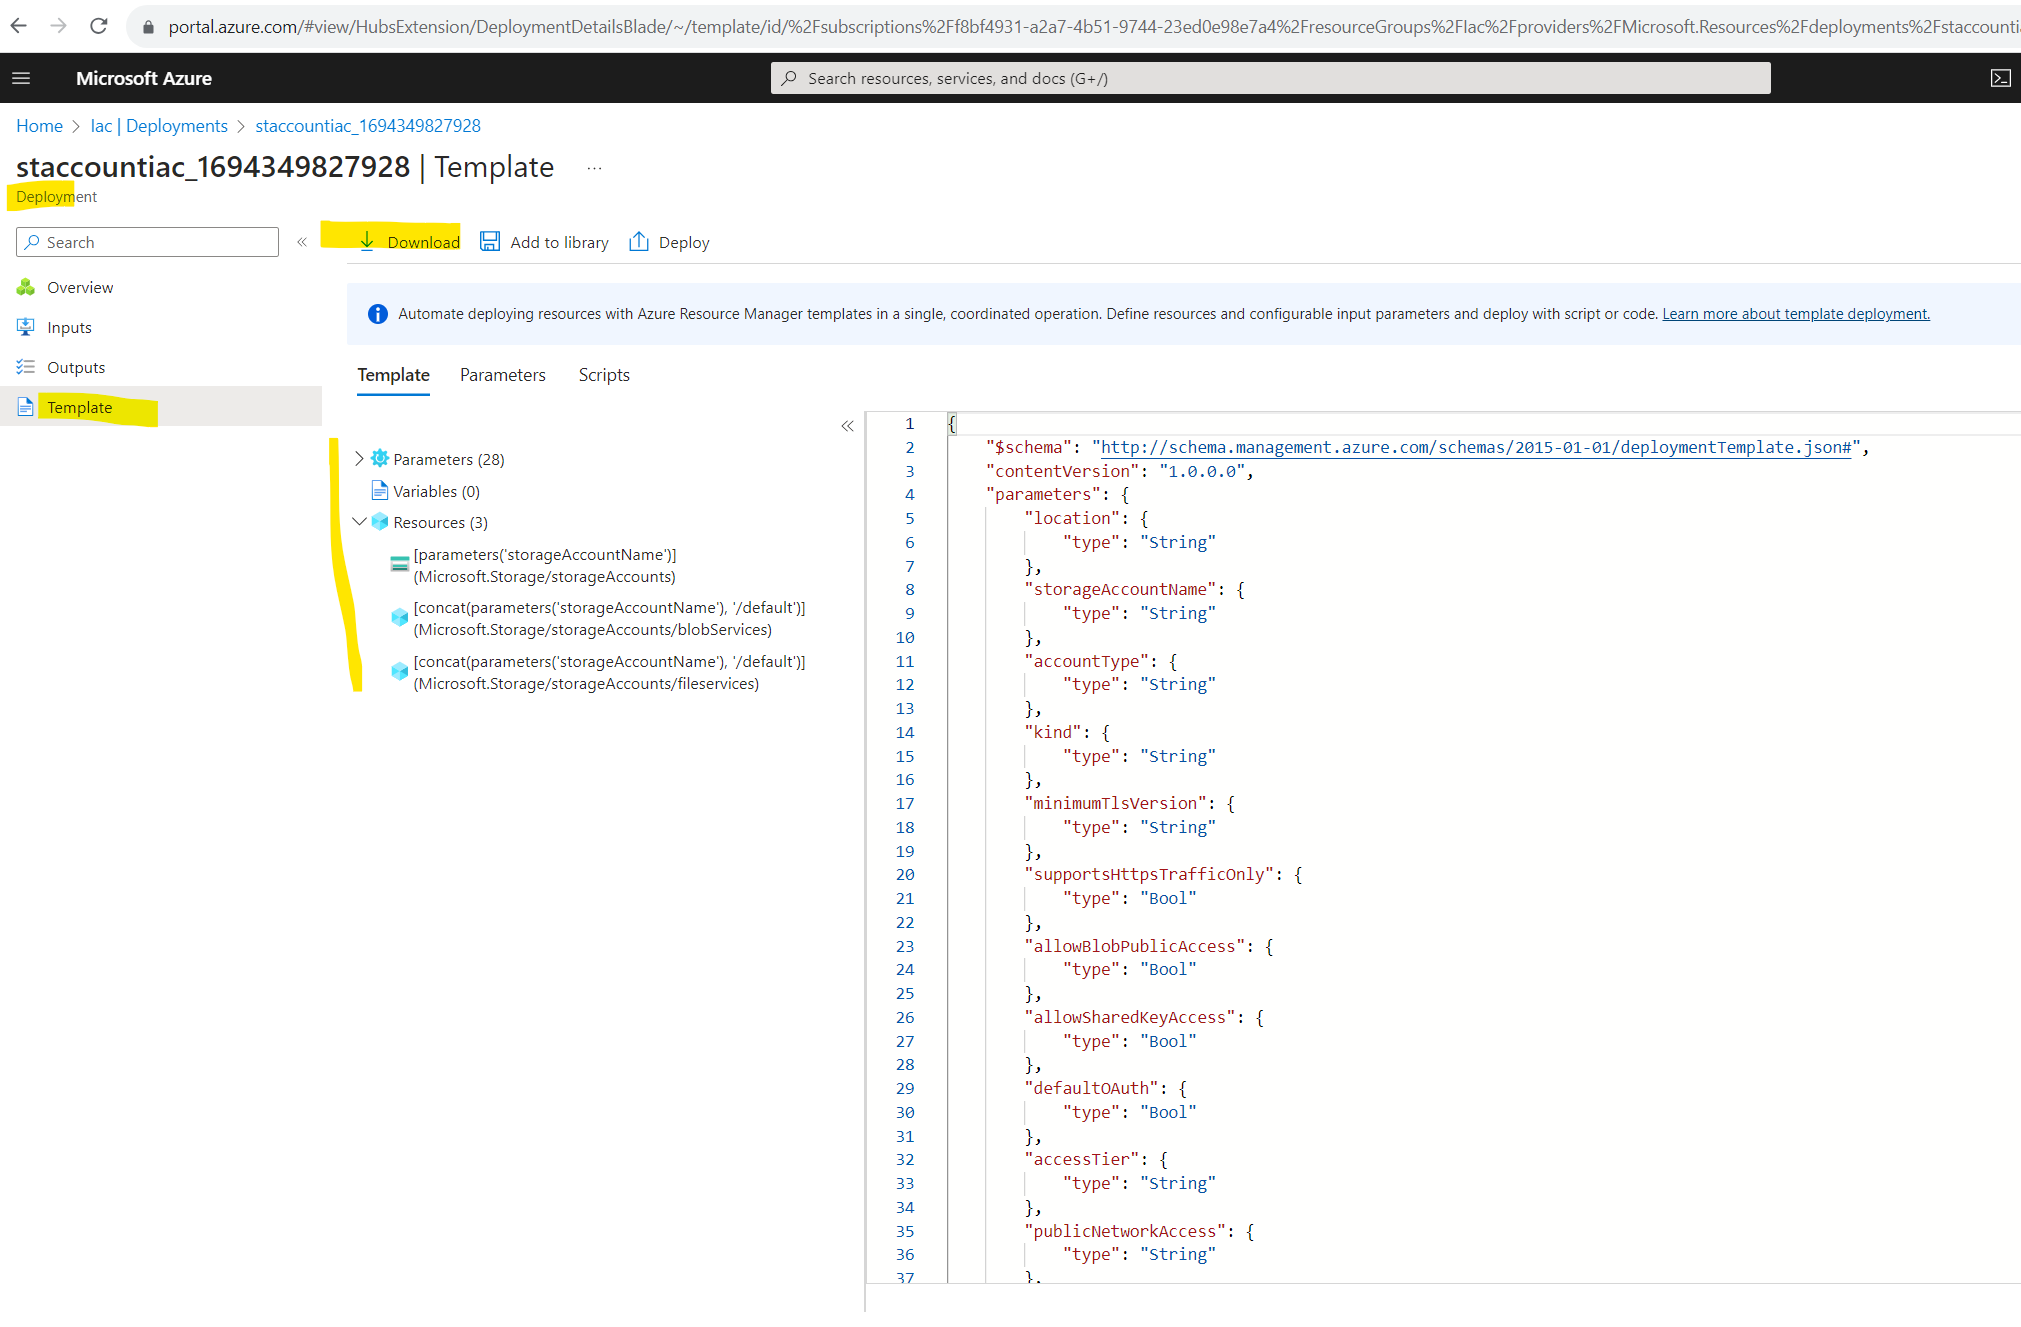
Download a Template for Automation
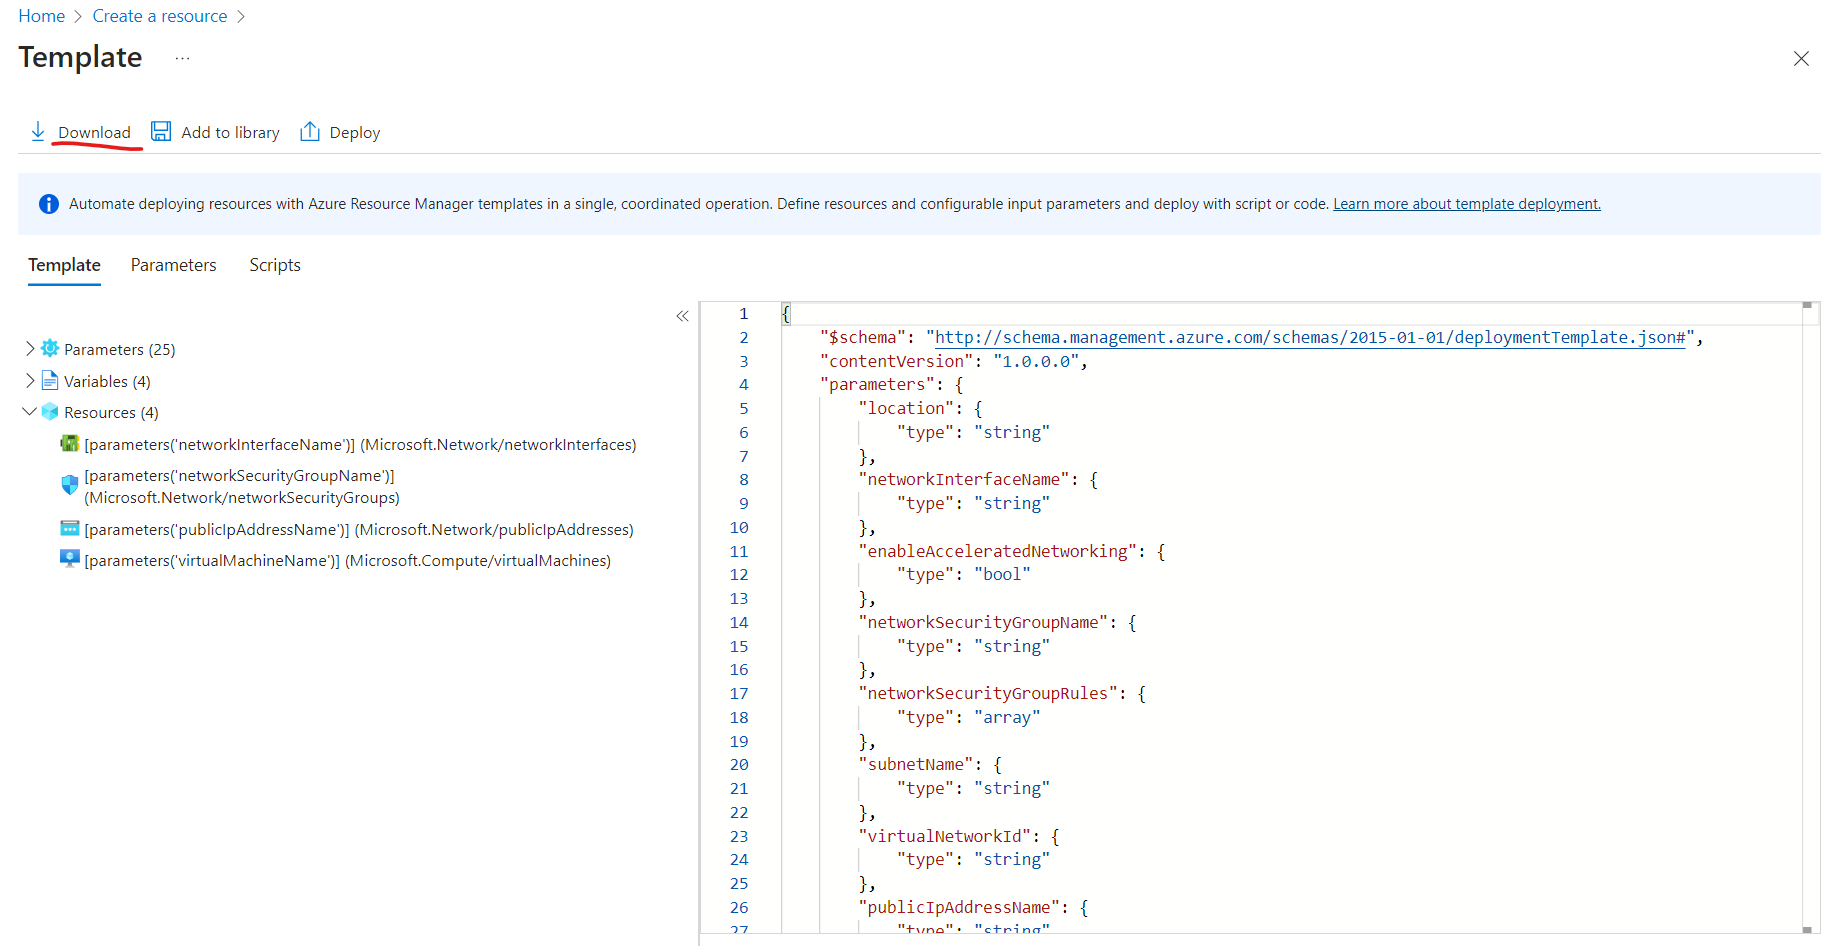
When you create a resource using the Azure Portal you can also download a template before deploying it. This option isn’t available in PowerShell or Azure CLI.
Download template before deployment
https://learn.microsoft.com/en-us/azure/azure-resource-manager/templates/export-template-portal#download-template-before-deployment
You can also export a template from the deployment history. The template you get is identical to the one used for deployment.
Export template after deployment
https://learn.microsoft.com/en-us/azure/azure-resource-manager/templates/export-template-portal#export-template-after-deployment
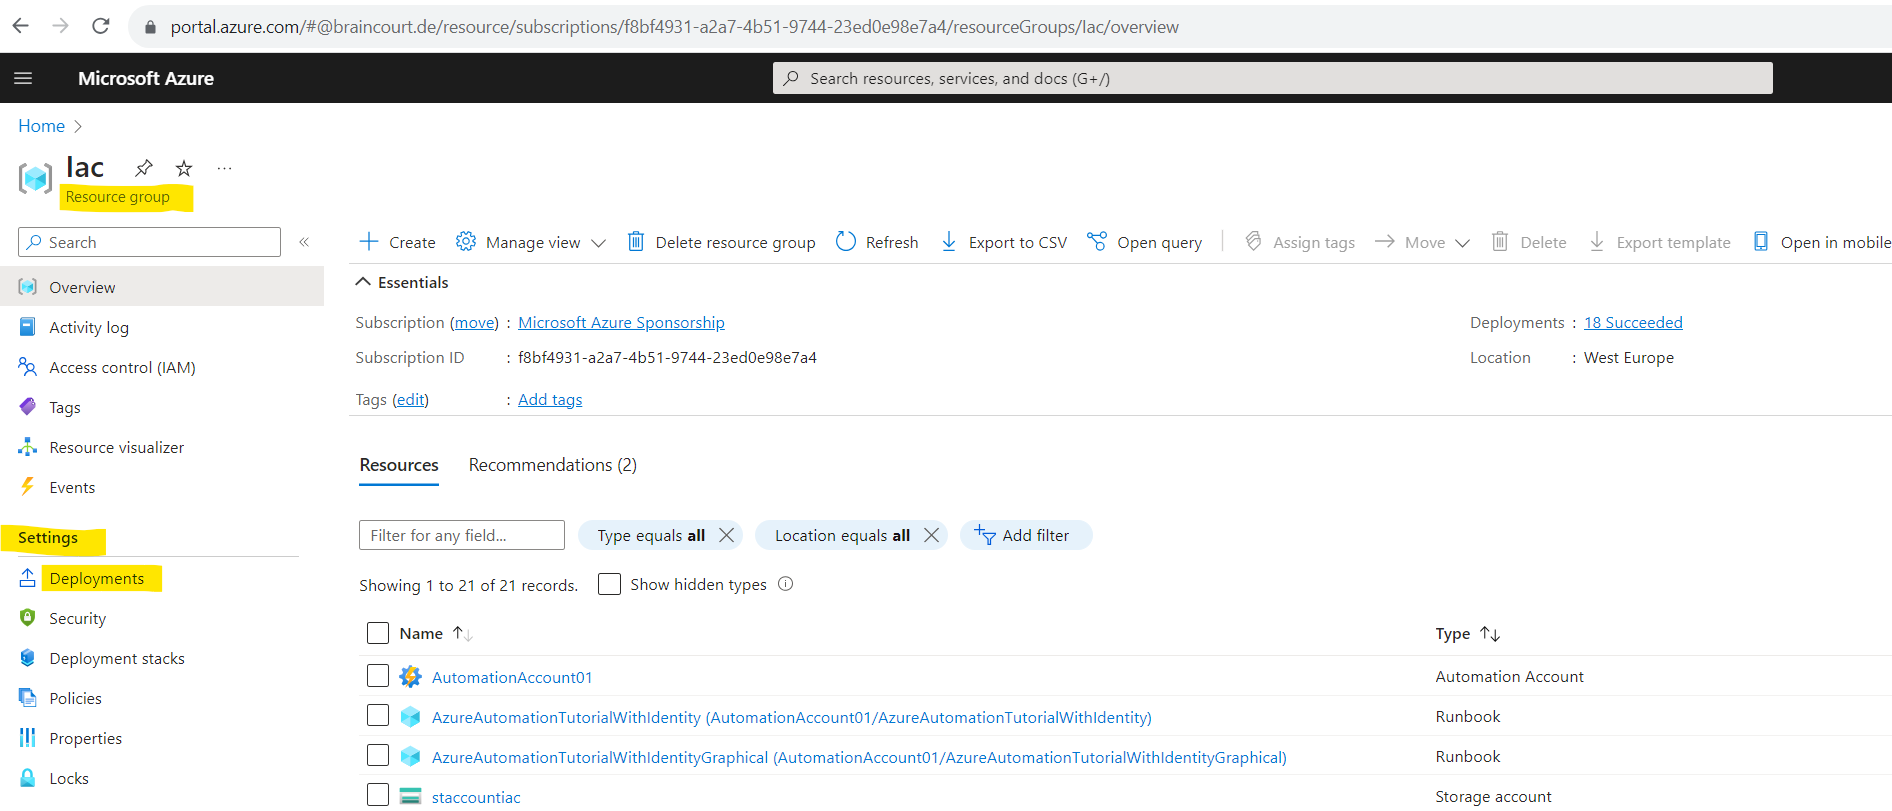
Select your resource group you want to export a deployment from and click on the link under Deployments.
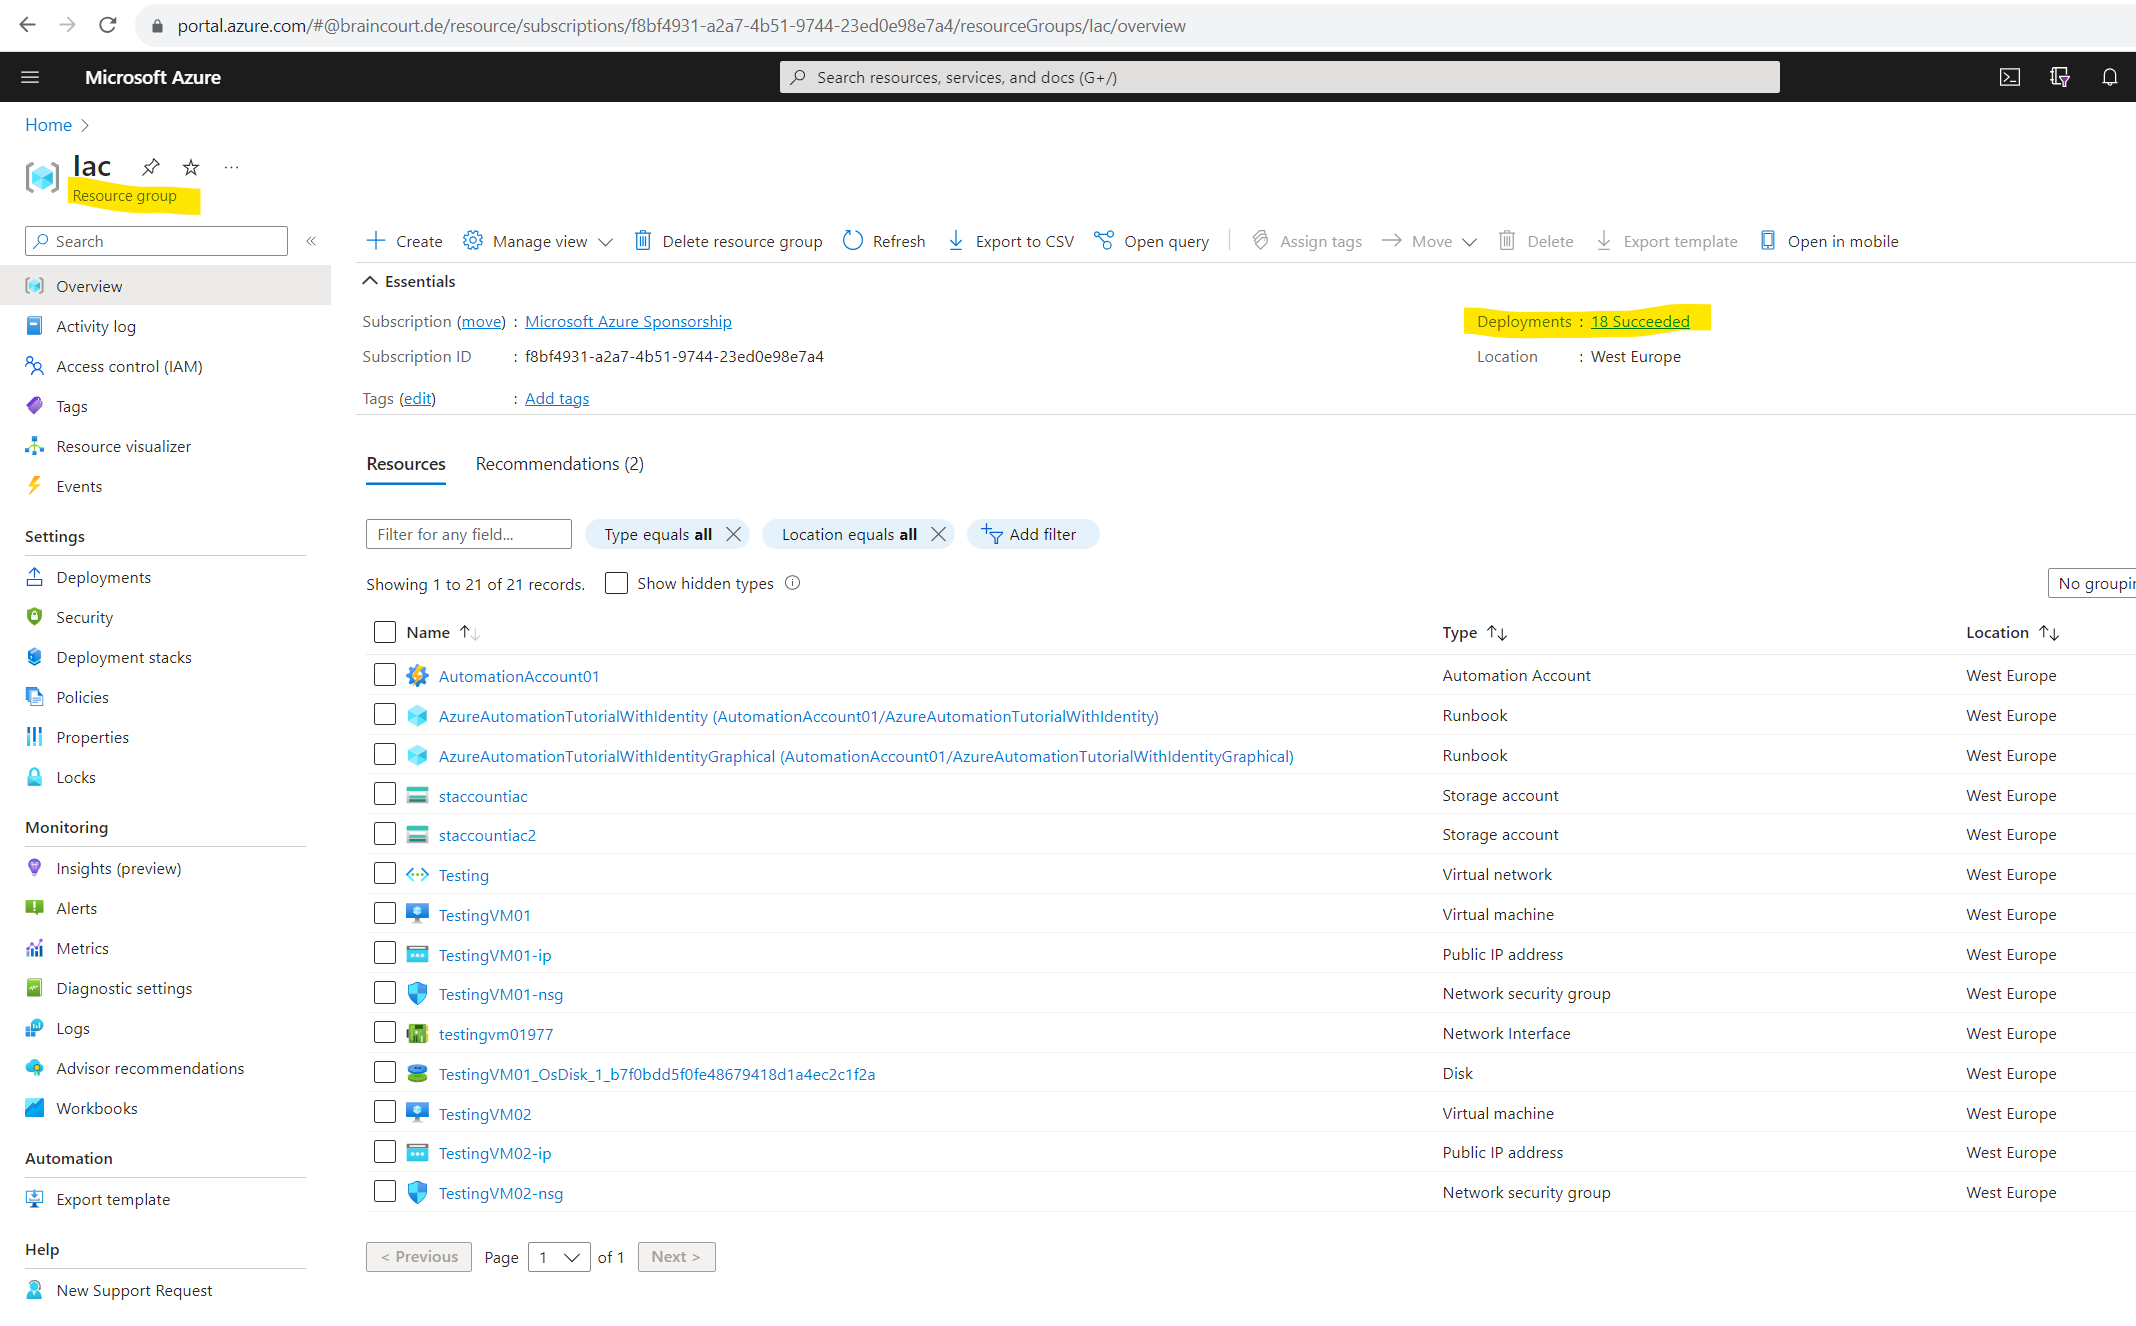
You can also directly click at the left menu on Deployments in the Settings section.
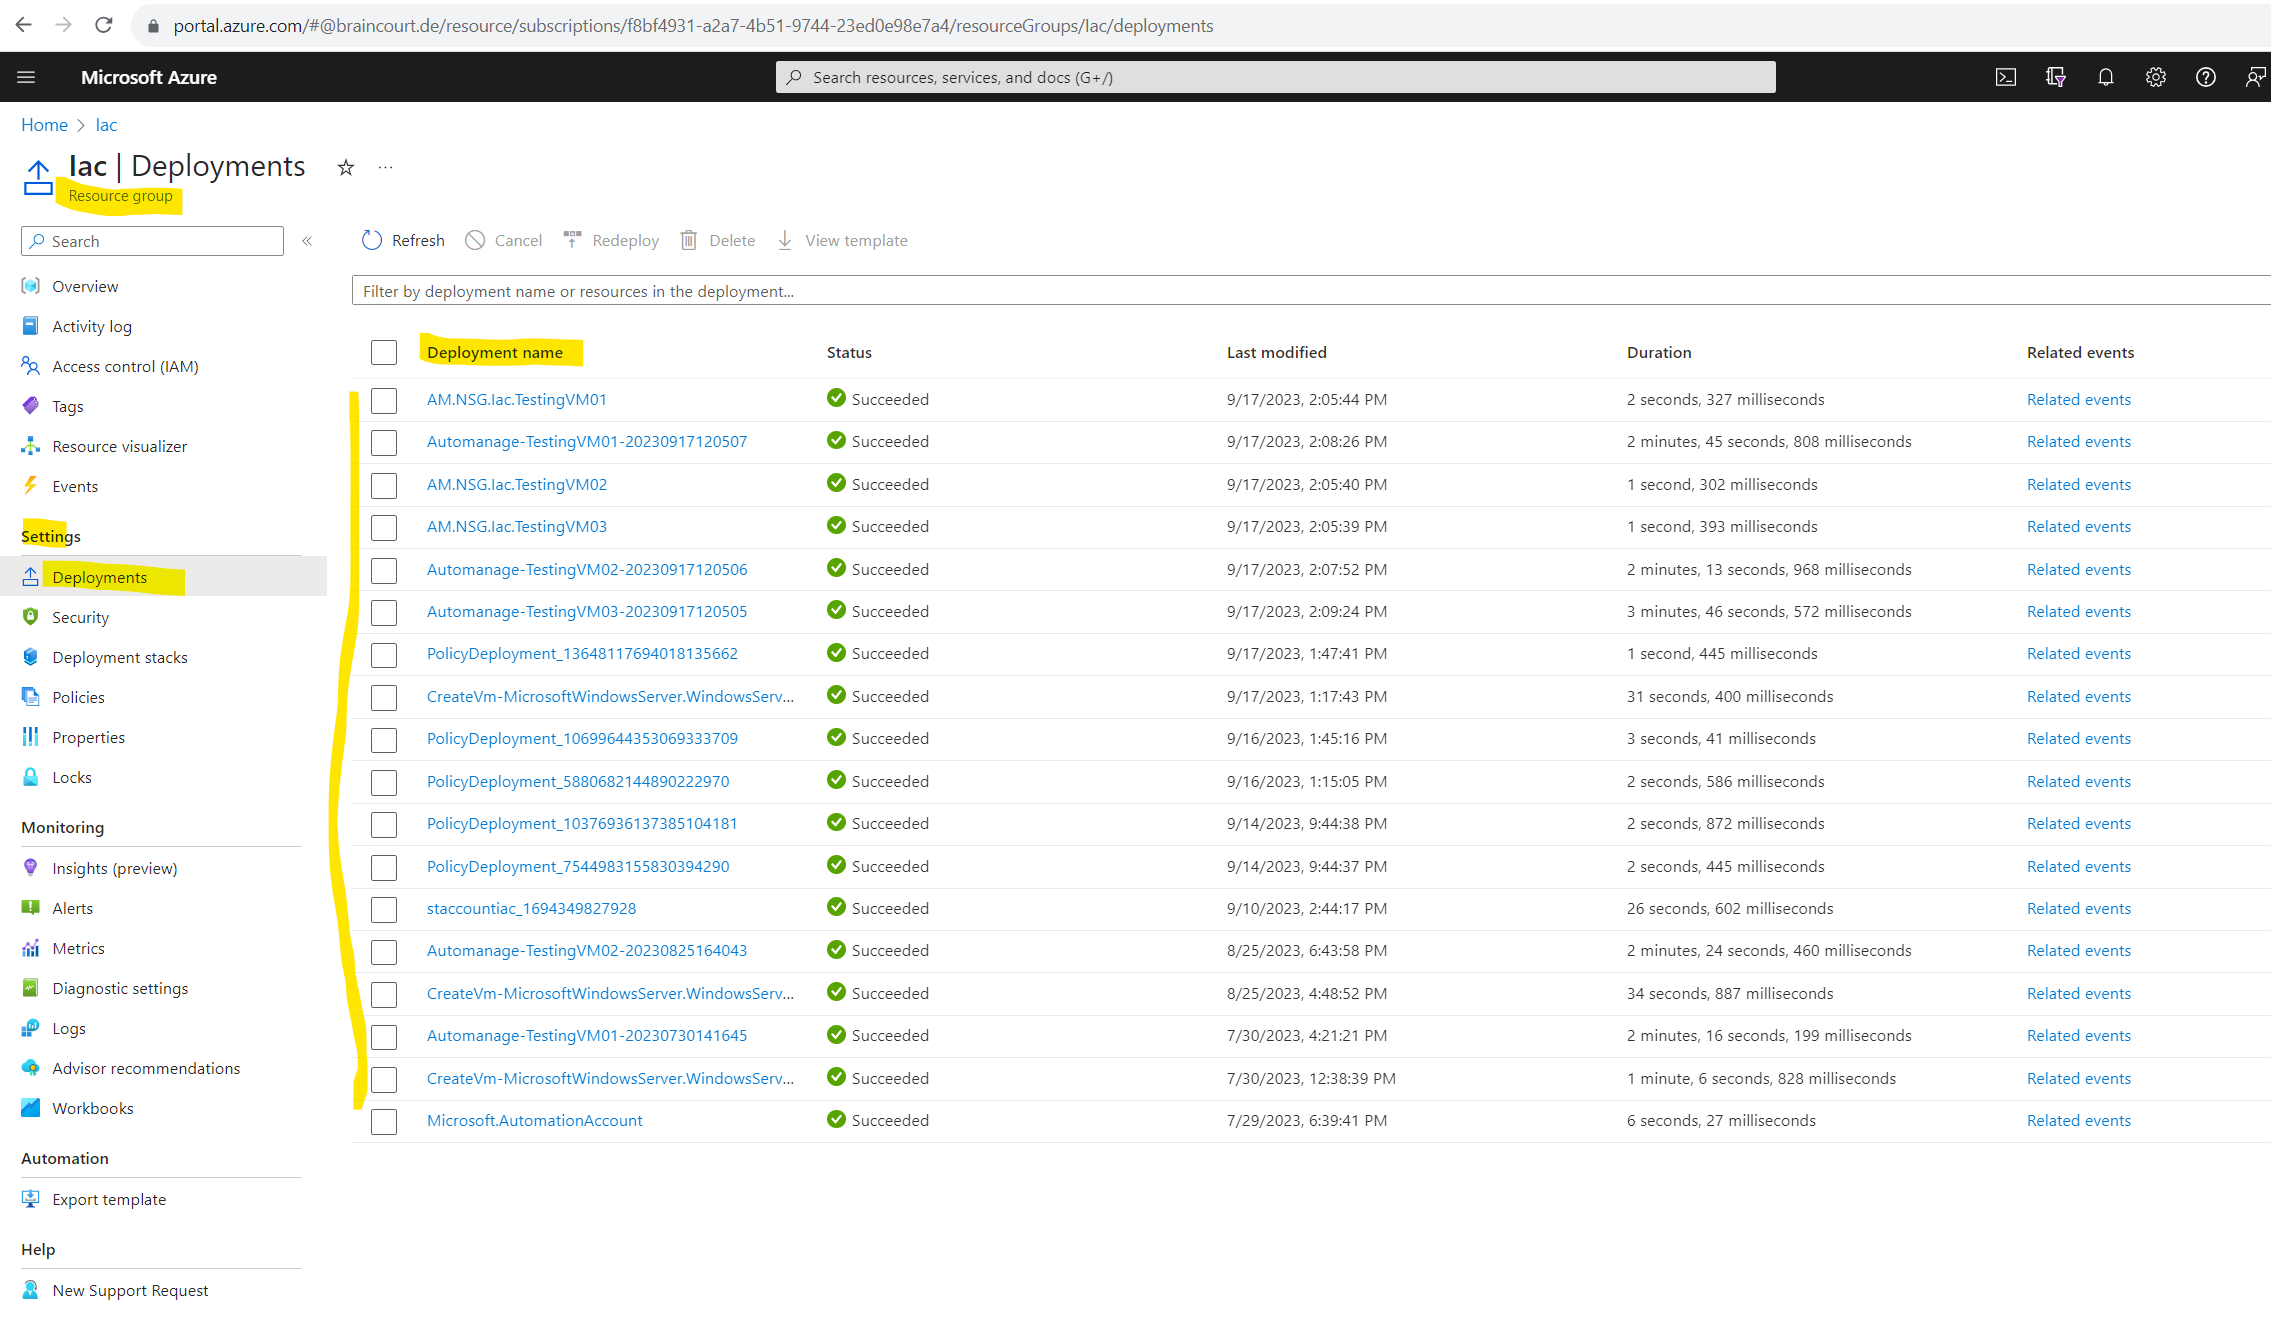
Choose one of the deployments from the deployment history.
Select Template. The template used for this deployment is displayed, and is available for download.
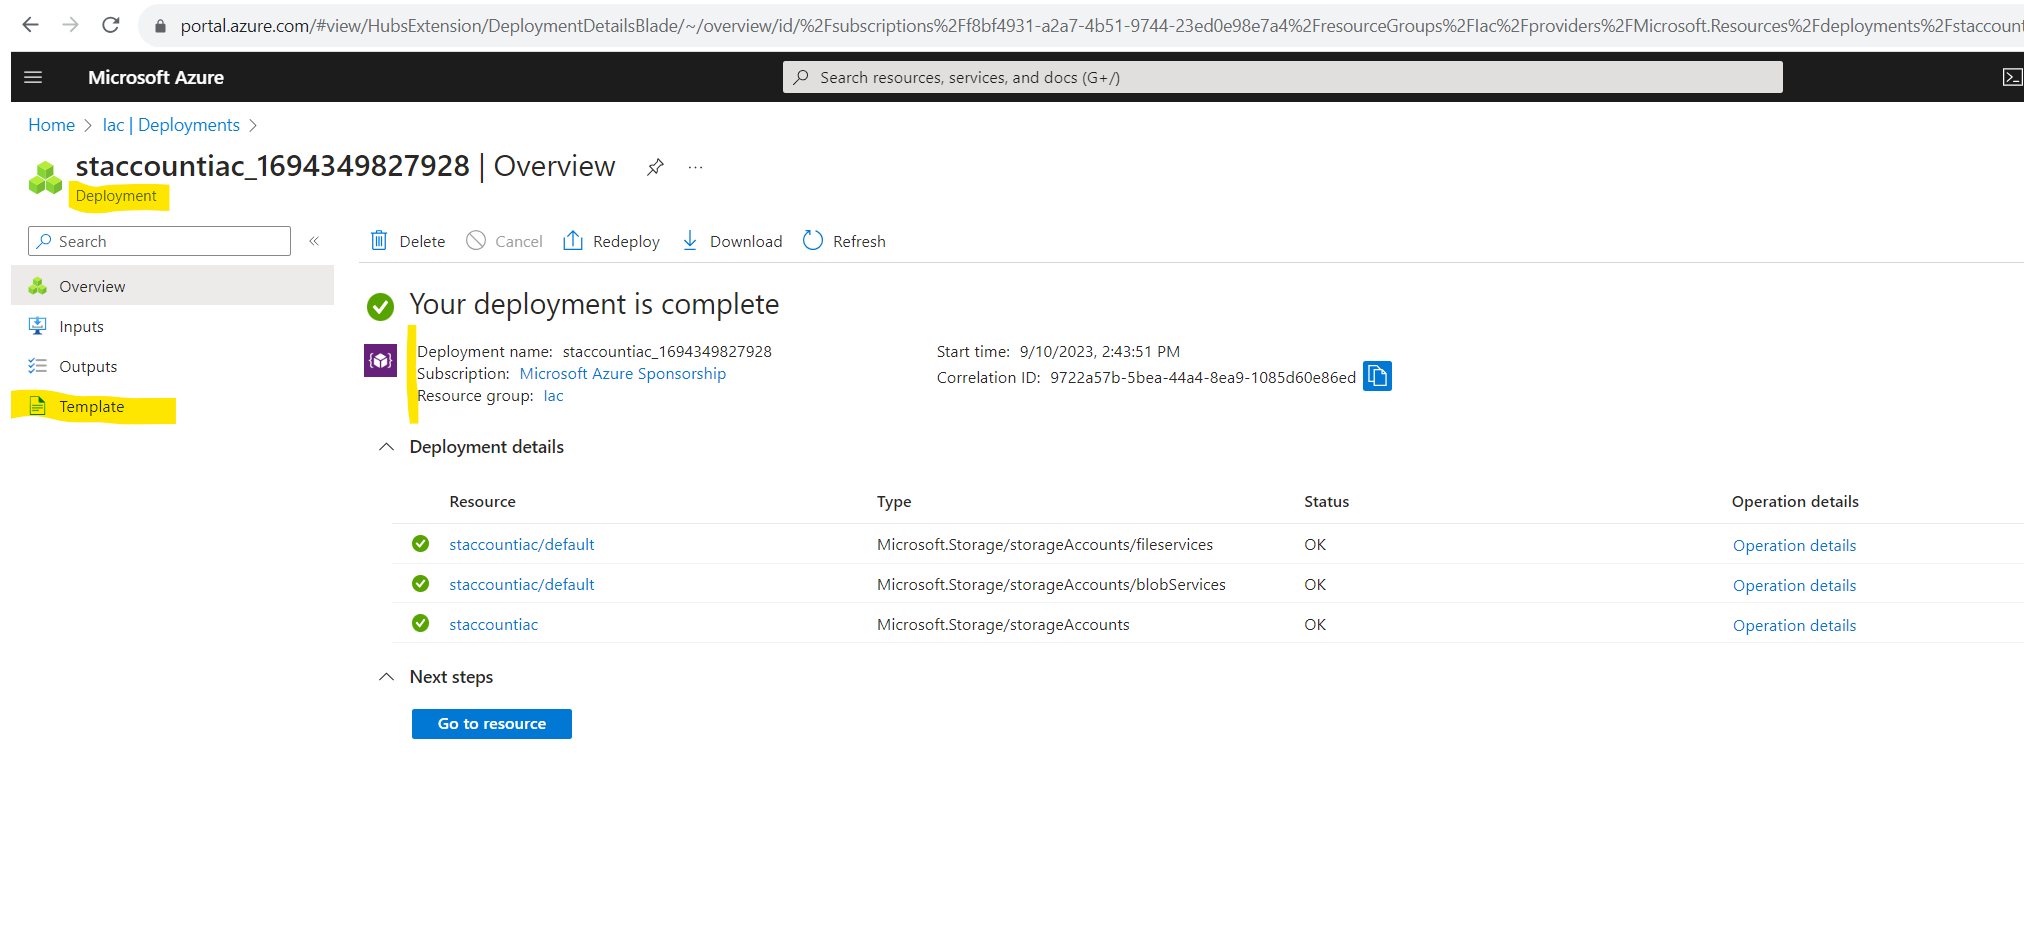
Click on Download.
Deployment Modes
When deploying resources with Azure Resource Manager templates (ARM templates), you have two options for deployment mode: incremental or complete. The difference between these modes is how the Azure Resource Manager handles existing resources in the resource group that aren’t included in the template.
In complete mode, Resource Manager deletes resources in the resource group that aren’t specified in the template. In incremental mode, Resource Manager leaves unchanged resources in the resource group that aren’t defined in the template.
For both modes, Resource Manager adds new resources for resources defined in the template that aren’t in the resource group. If a resource already exists in the resource group and its settings are unchanged, Resource Manager takes no action. If a resource’s property values are modified, Resource Manager updates the existing resource. If you attempt to change the location or type of an existing resource, you get a deployment error. In such cases, you should deploy a new resource with the desired location or type.
By default, the deployment mode is incremental.
Source: https://learn.microsoft.com/en-us/azure/azure-resource-manager/templates/deployment-modes
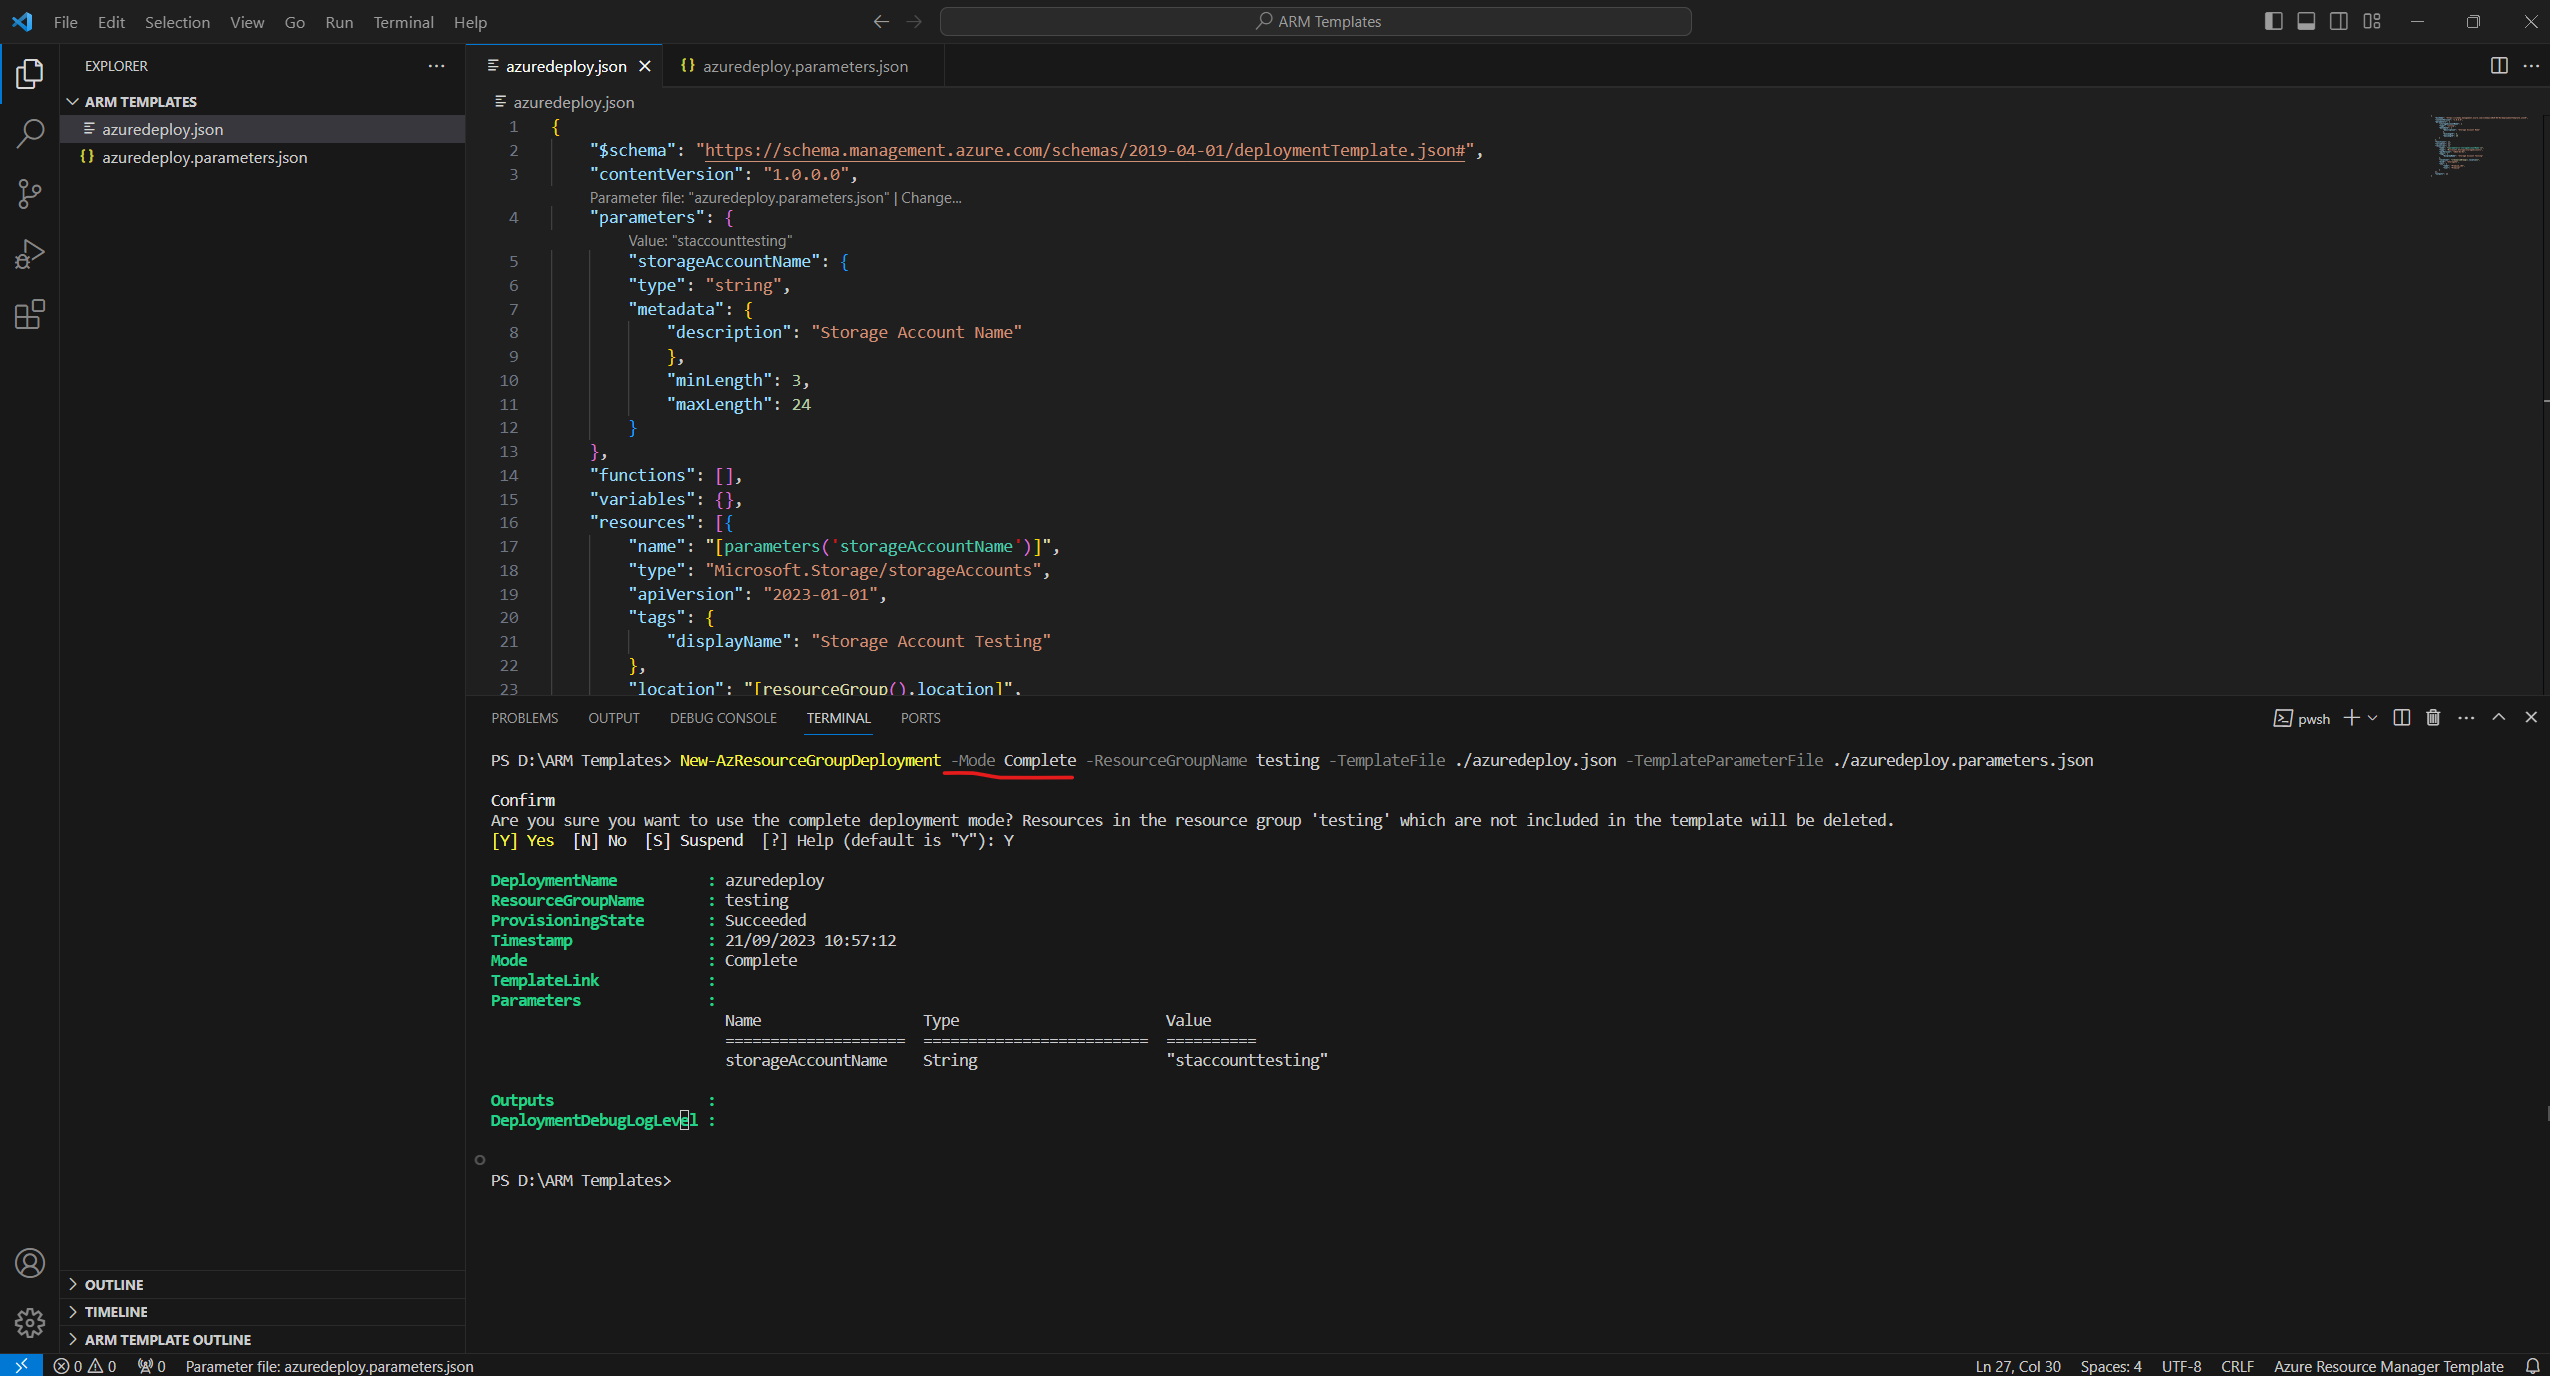
In order to use the complete mode you need to specify the mode parameter with complete like shown below, without setting explicit to complete by default incremental mode will be used.
New-AzResourceGroupDeployment -Mode Complete -ResourceGroupName testing -TemplateFile ./azuredeploy.json -TemplateParameterFile ./azuredeploy.parameters.json
Series Summary
- Infrastructure as Code (IaC) – Part 1
- Infrastructure as Code (IaC) – Part 2 – Azure Resource Manager (ARM) templates
- Infrastructure as Code (IaC) – Part 3 – Desired State Configuration (DSC)
- Infrastructure as Code (IaC) – Part 4 – Azure Automation State
- Infrastructure as Code (IaC) – Part 5 – Azure Automanage Machine Configuration (formerly called Azure Policy Guest Configuration)
- Infrastructure as Code (IaC) – Part 6 – Terraform
Links
ARM template documentation
https://learn.microsoft.com/en-us/azure/azure-resource-manager/templates/Tutorial: Create and deploy your first ARM template
https://learn.microsoft.com/en-us/azure/azure-resource-manager/templates/template-tutorial-create-first-templateQuickstart: Create ARM templates with Visual Studio Code
https://learn.microsoft.com/en-us/azure/azure-resource-manager/templates/quickstart-create-templates-use-visual-studio-codeParameters in ARM templates
https://learn.microsoft.com/en-us/azure/azure-resource-manager/templates/parametersTutorial: Add parameters to your ARM template
https://learn.microsoft.com/en-us/azure/azure-resource-manager/templates/template-tutorial-add-parametersString functions for ARM templates
https://learn.microsoft.com/en-us/azure/azure-resource-manager/templates/template-functions-stringUse Azure portal to export a template
https://learn.microsoft.com/en-us/azure/azure-resource-manager/templates/export-template-portalAzure Resource Manager deployment modes
https://learn.microsoft.com/en-us/azure/azure-resource-manager/templates/deployment-modesCreate multiple resource instances with ARM templates
https://learn.microsoft.com/en-us/azure/azure-resource-manager/templates/template-tutorial-create-multiple-instances