Infrastructure as Code (IaC) – Part 4 – Azure Automation State
Azure Automation State Configuration is an Azure configuration management service that allows you to write, manage, and compile PowerShell Desired State Configuration (DSC) configurations for nodes in any cloud or on-premises datacenter. The service also imports DSC Resources, and assigns configurations to target nodes, all in the cloud.
You can use Azure Automation State Configuration to manage a variety of machines:
- Azure virtual machines
- Azure virtual machines (classic)
- Physical/virtual Windows machines on-premises, or in a cloud other than Azure (including AWS EC2 instances)
- Physical/virtual Linux machines on-premises, in Azure, or in a cloud other than Azure
Desired state configuration VM Extension for Linux, and Azure Automation DSC support for Linux, will be retired on 30 September 2023
Source: https://azure.microsoft.com/de-de/updates/migrate-from-linux-dsc-extension-to-the-guest-configuration-feature-of-azure-policy-by-may-1-2025/
Managing Azure VMs with Azure Automation State Configuration is included at no extra charge if the installed Azure VM Desired State Configuration extension version is greater than 2.70. For more information, see Automation pricing page.
Azure Automation State Configuration provides several advantages over the use of DSC outside of Azure. This service enables scalability across thousands of machines quickly and easily from a central, secure location. You can easily enable machines, assign them declarative configurations, and view reports showing each machine’s compliance with the desired state you specify.
Azure Automation State Configuration provides a DSC pull server similar to the Windows Feature DSC-Service. Target nodes can automatically receive configurations, conform to the desired state, and report on their compliance. The built-in pull server in Azure Automation eliminates the need to set up and maintain your own pull server. Azure Automation can target virtual or physical Windows or Linux machines, in the cloud or on-premises.
Source: https://learn.microsoft.com/en-us/azure/automation/automation-dsc-overview
Azure Automation State Configuration is built on PowerShell Desired State Configuration (DSC). You can find the documentation for the DSC language and syntax in the PowerShell DSC Docs.
Before you enable Automation State Configuration, we would like you to know that a newer version of DSC is now generally available, managed by a feature of Azure Policy named guest configuration.
The guest configuration service combines features of DSC Extension, Azure Automation State Configuration, and the most commonly requested features from customer feedback. Guest configuration also includes hybrid machine support through Arc-enabled servers.
Source: https://learn.microsoft.com/en-us/azure/automation/automation-dsc-getting-started
As usually nothing in cloud computing and especially Microsoft Azure lasts for long, also the successor (Azure Policy Guest Configuration) of Azure Automation State meanwhile changed its name and is moving under the Automanage brand umbrella.
!!! Note !!!
Azure Policy Guest Configuration is now called Azure Automanage Machine Configuration.
Source: https://learn.microsoft.com/en-us/azure/governance/machine-configuration/overview
More about Azure Automanage Machine Configuration you will find in my following post.
- Prerequisites
- Create Automation account
- Create a DSC configuration
- Import a configuration into Azure Automation
- View a configuration in Azure Automation
- Compile a configuration in Azure Automation
- Enable an Azure Resource Manager VM for management with State Configuration
- View reports for managed nodes
- Reassign a node to a different node configuration
- Unregister a node
- Delete a configuration from the node
- Reset Local Configuration Manager
- Enable an On-Premise Hyper-V VM for management with State Configuration
- Troubleshooting
- Series Summary
- Links
Prerequisites
To complete the examples in this article, the following are required:
- An Azure Automation account. To learn more about an Automation account and its requirements, see Automation Account authentication overview.
- An Azure Resource Manager VM (not Classic) running a supported operating system. For instructions on creating a VM, see Create your first Windows virtual machine in the Azure portal
Source: https://learn.microsoft.com/en-us/azure/automation/automation-dsc-getting-started#prerequisites
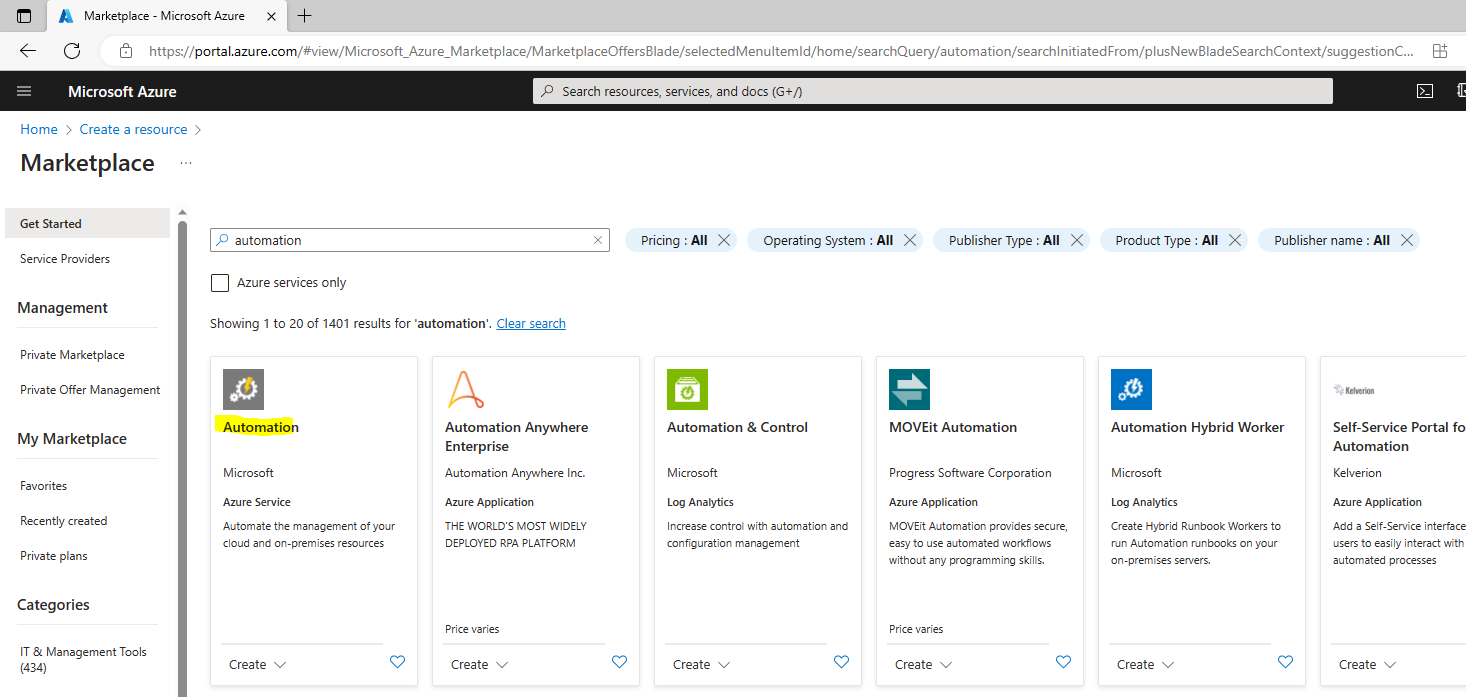
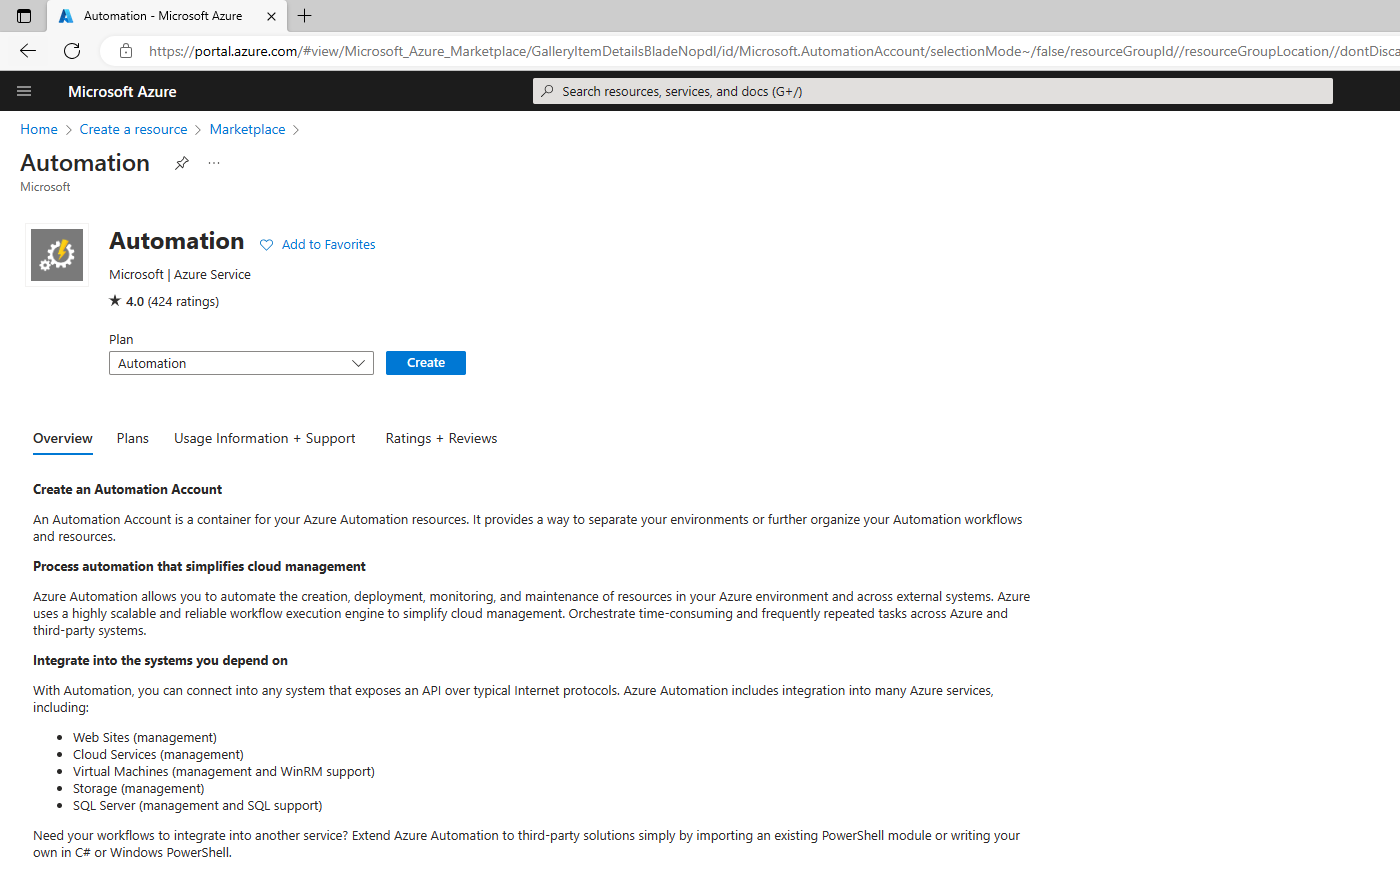
Create Automation account
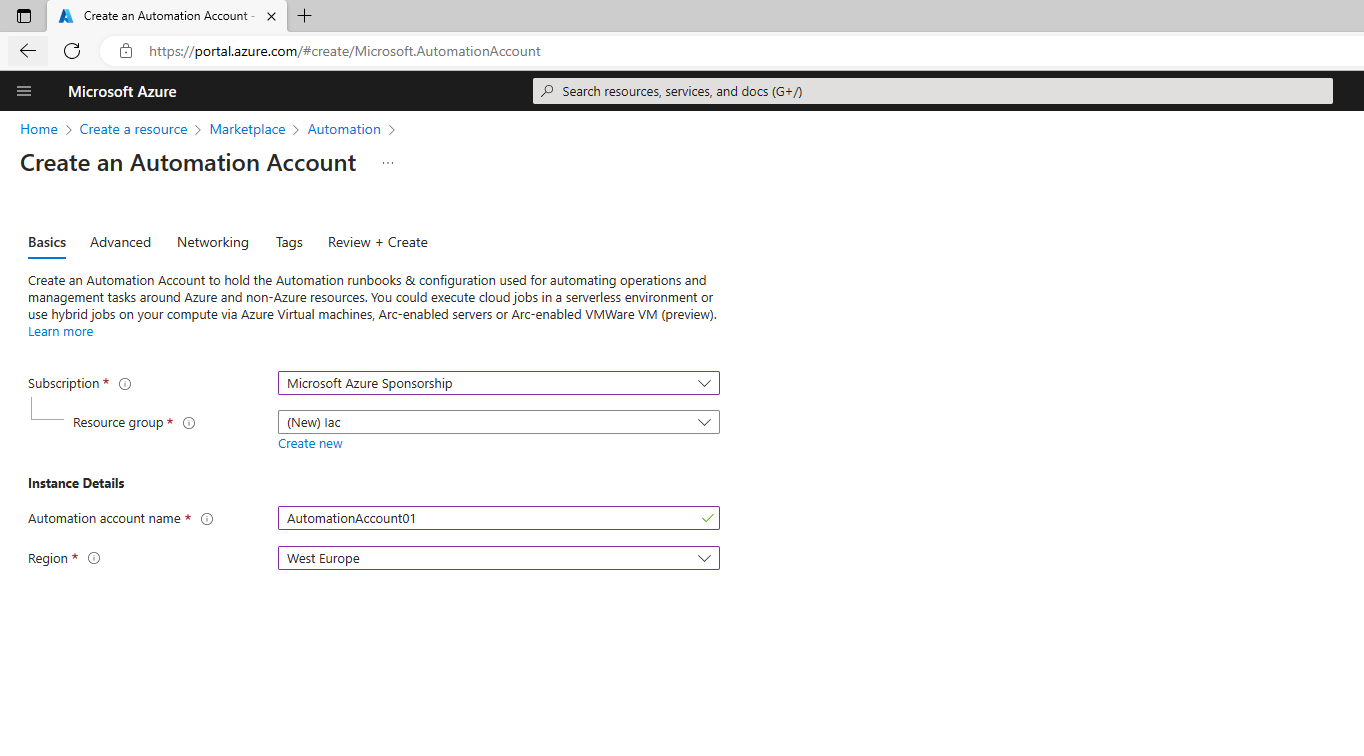
When you start Azure Automation for the first time, you must create at least one Automation account. Automation accounts allow you to isolate your Automation resources, runbooks, assets, and configurations from the resources of other accounts.
You can use Automation accounts to separate resources into separate logical environments or delegated responsibilities.
For example, you might use one account for development, another for production, and another for your on-premises environment. Or you might dedicate an Automation account to manage operating system updates across all of your machines with Update Management.
An Azure Automation account is different from your Microsoft account or accounts created in your Azure subscription. For an introduction to creating an Automation account, see Create an Automation account.
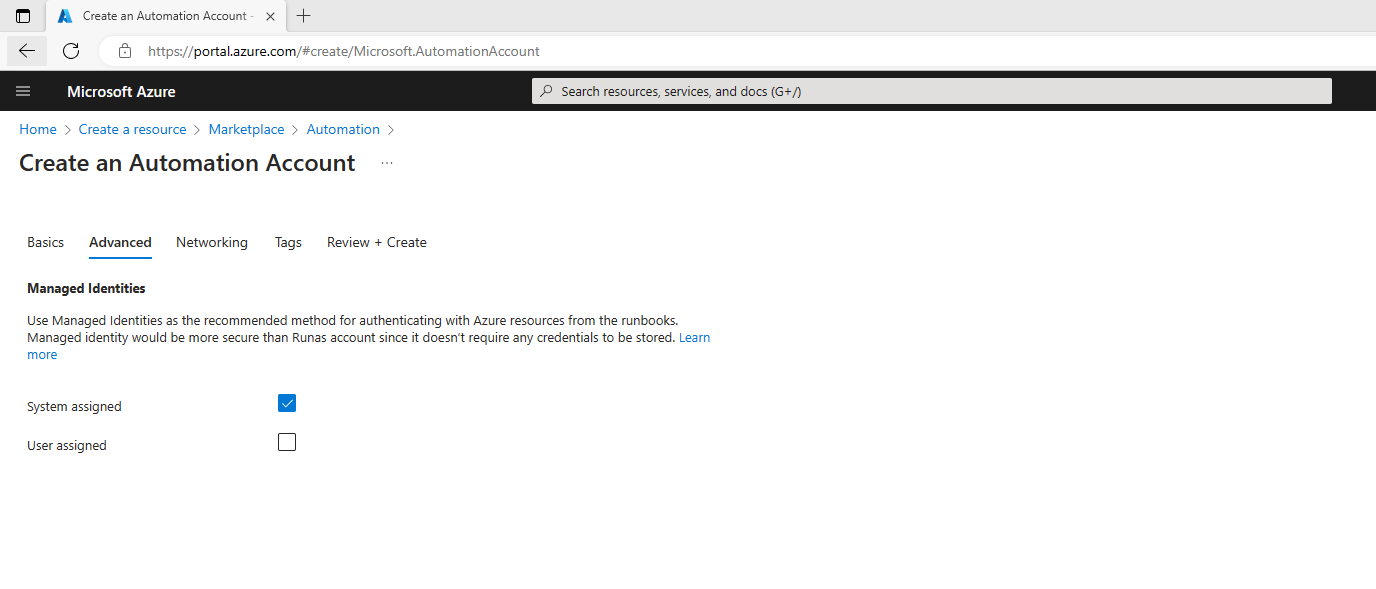
On the Advanced tab, you can configure the managed identity option for your new Automation account. The user-assigned managed identity option can also be configured after the Automation account is created.
Managed identities provide a secure way for resources within Azure to authenticate and interact with other Azure services, without needing to store credentials or secrets in your code or scripts. By using Managed Identities, you enhance the security and manageability of your automation tasks in Azure, reducing the risk associated with managing credentials and making it easier to follow security best practices.
What are managed identities for Azure resources?
https://learn.microsoft.com/en-us/azure/active-directory/managed-identities-azure-resources/overview
For instructions on how to create a user-assigned managed identity, see Create a user-assigned managed identity.
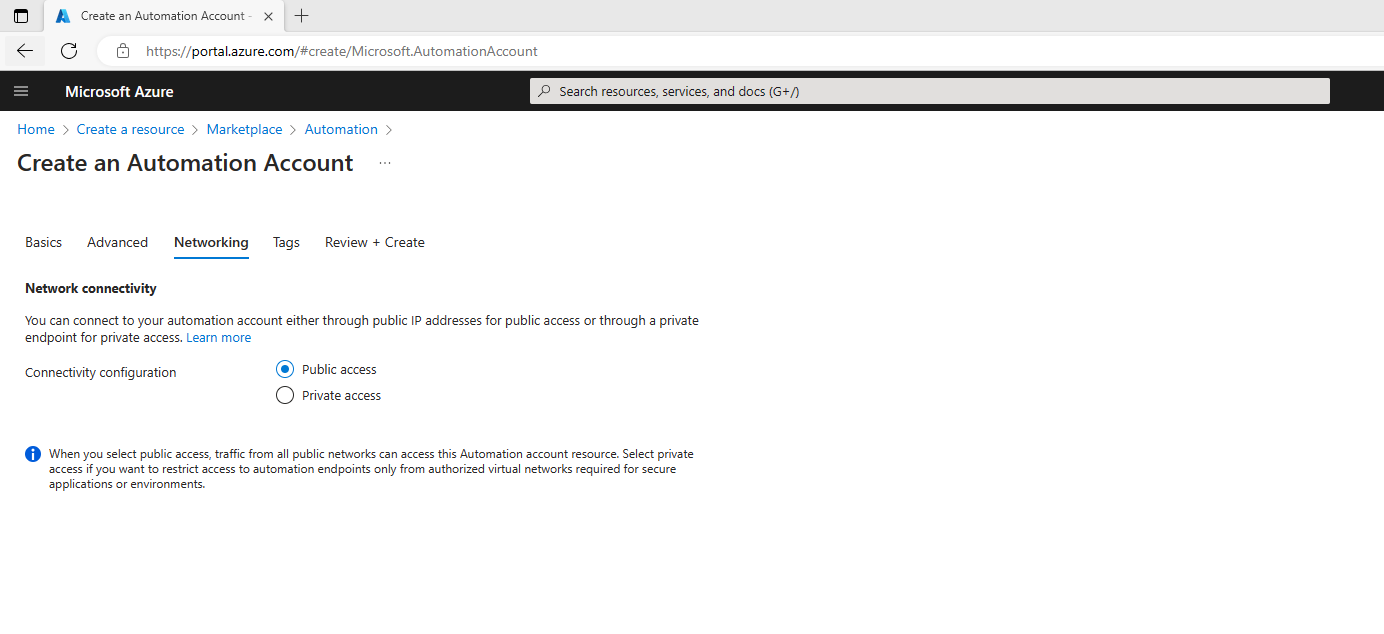
On the Networking tab, you can connect to your automation account either publicly (via public IP addresses), or privately, using a private endpoint. The following image shows the connectivity configuration that you can define for a new automation account.
- Public Access – This default option provides a public endpoint for the Automation account that can receive traffic over the internet and does not require any additional configuration. However, we don’t recommend it for private applications or secure environments. Instead, the second option Private access, a private Link mentioned below can be leveraged to restrict access to automation endpoints only from authorized virtual networks. Public access can simultaneously coexist with the private endpoint enabled on the Automation account. If you select public access while creating the Automation account, you can add a Private endpoint later from the Networking blade of the Automation Account.
- Private Access – This option provides a private endpoint for the Automation account that uses a private IP address from your virtual network. This network interface connects you privately and securely to the Automation account. You bring the service into your virtual network by enabling a private endpoint. This is the recommended configuration from a security point of view; however, this requires you to configure Hybrid Runbook Worker connected to an Azure virtual network & currently does not support cloud jobs.
The Automation resources for each Automation account are associated with a single Azure region, but the account can manage all the resources in your Azure subscription. The main reason to create Automation accounts in different regions is if you have policies that require data and resources to be isolated to a specific region.
All tasks that you create against resources using Azure Resource Manager and the PowerShell cmdlets in Azure Automation must authenticate to Azure using Azure Active Directory (Azure AD) organizational identity credential-based authentication.
Source: https://learn.microsoft.com/en-us/azure/automation/automation-security-overview
Create a DSC configuration
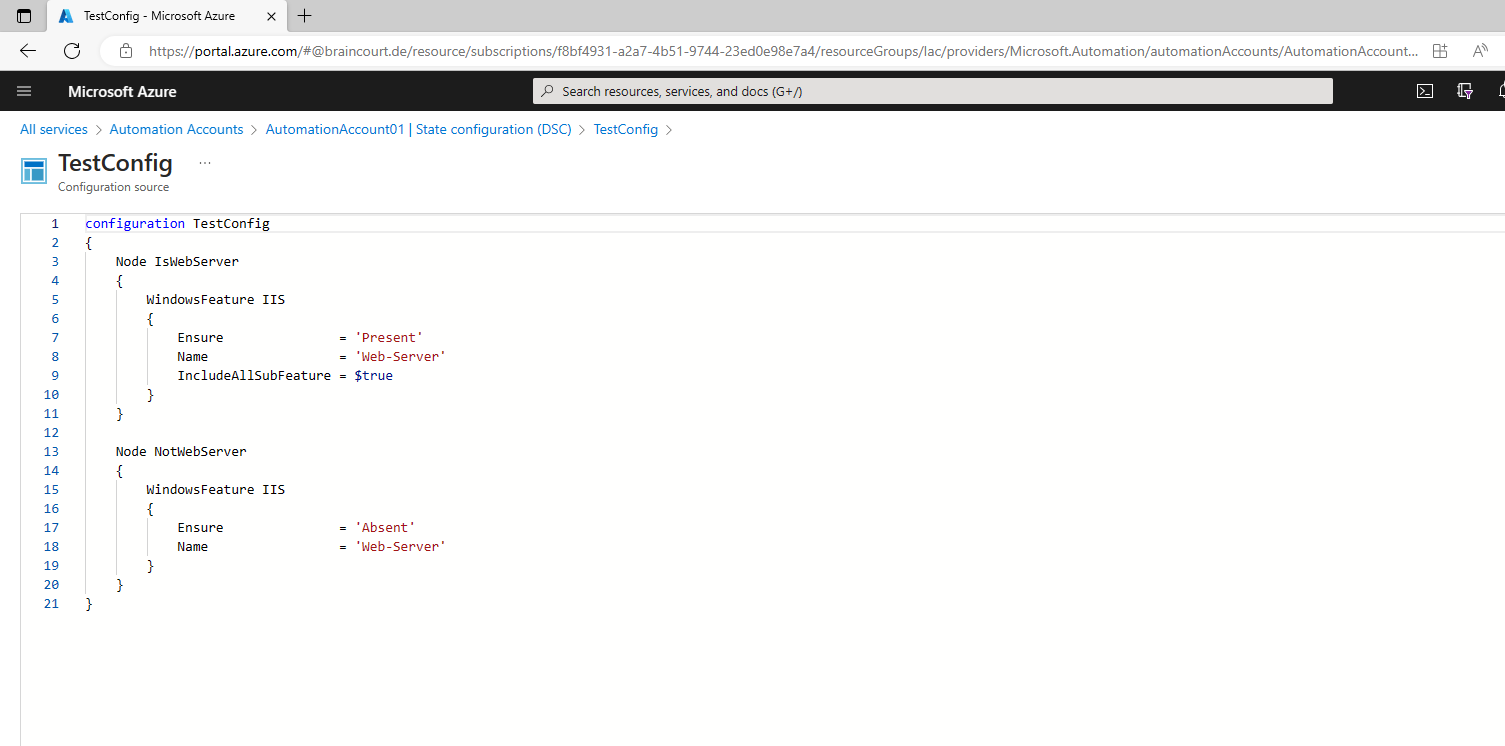
You create a simple DSC configuration that ensures either the presence or absence of the Web-Server Windows Feature (IIS), depending on how you assign nodes.
Configuration names in Azure Automation must be limited to no more than 100 characters.
configuration TestConfig
{
    Node IsWebServer
    {
        WindowsFeature IIS
        {
            Ensure               = 'Present'
            Name                 = 'Web-Server'
            IncludeAllSubFeature = $true
        }
    }

    Node NotWebServer
    {
        WindowsFeature IIS
        {
            Ensure               = 'Absent'
            Name                 = 'Web-Server'
        }
    }
}
Save the file as TestConfig.ps1
The file name must match the configuration name in the script! Otherwise you will run during adding the configuration to Azure Automation State into the following error message:
An error occurred while import the DSC configuration ‘<file name>’. Error details: The configuration name in the script must match the configuration name.. Error code: BadRequest..
This configuration calls one resource in each node block, the WindowsFeature resource. This resource ensures either the presence or absence of the Web-Server feature.
Source: https://learn.microsoft.com/en-us/azure/automation/automation-dsc-getting-started
Import a configuration into Azure Automation
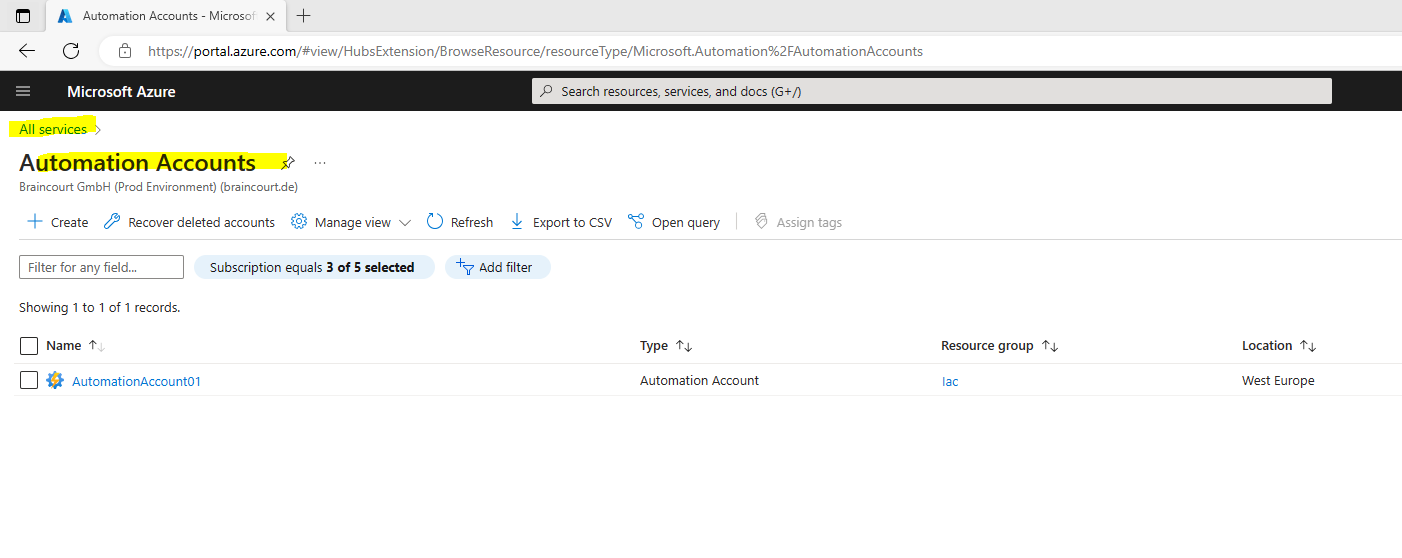
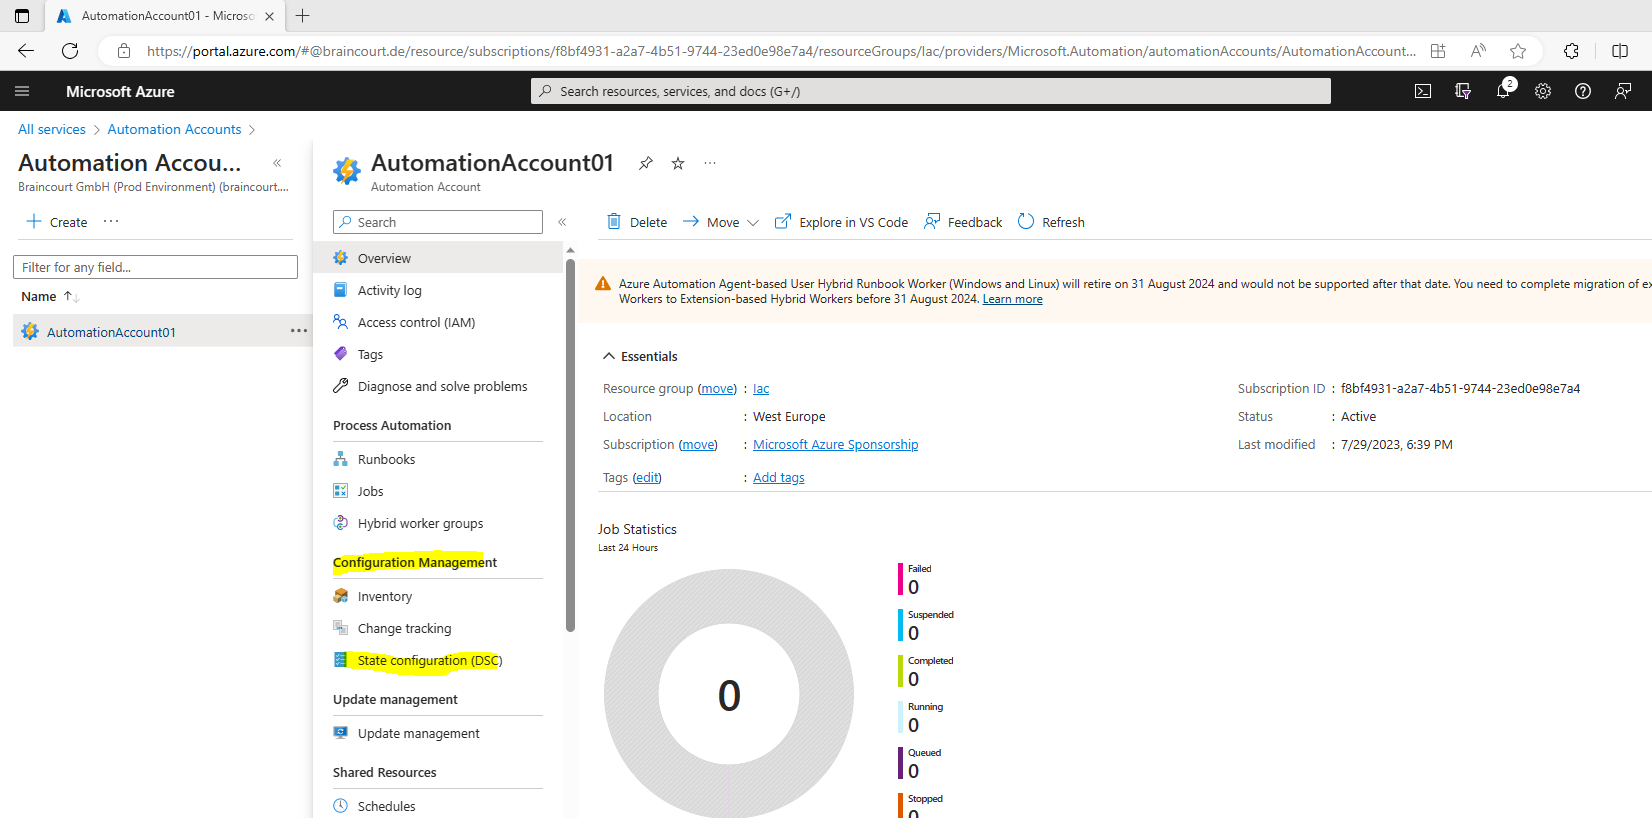
Select your Automation Account.
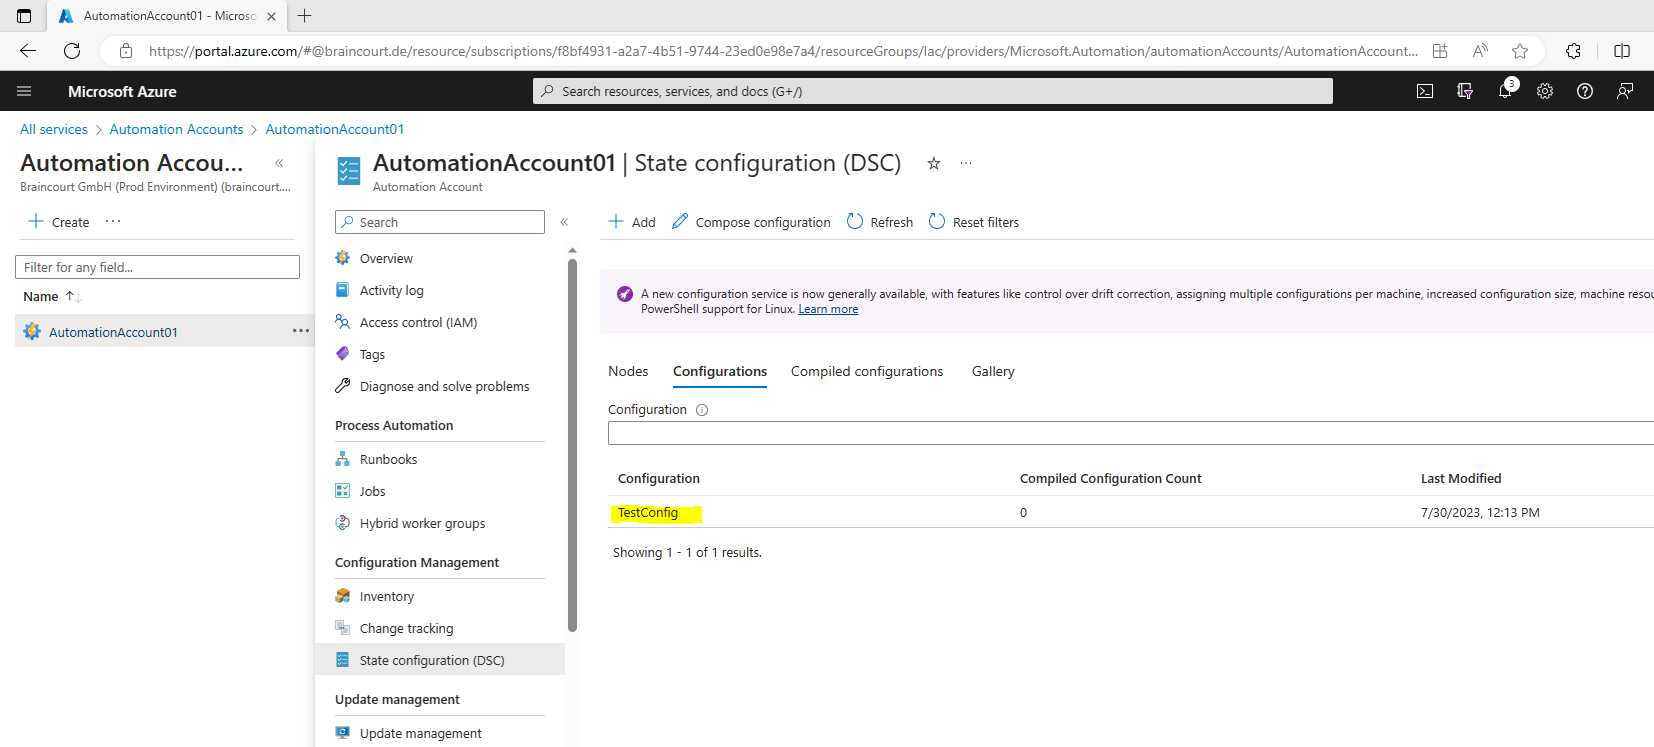
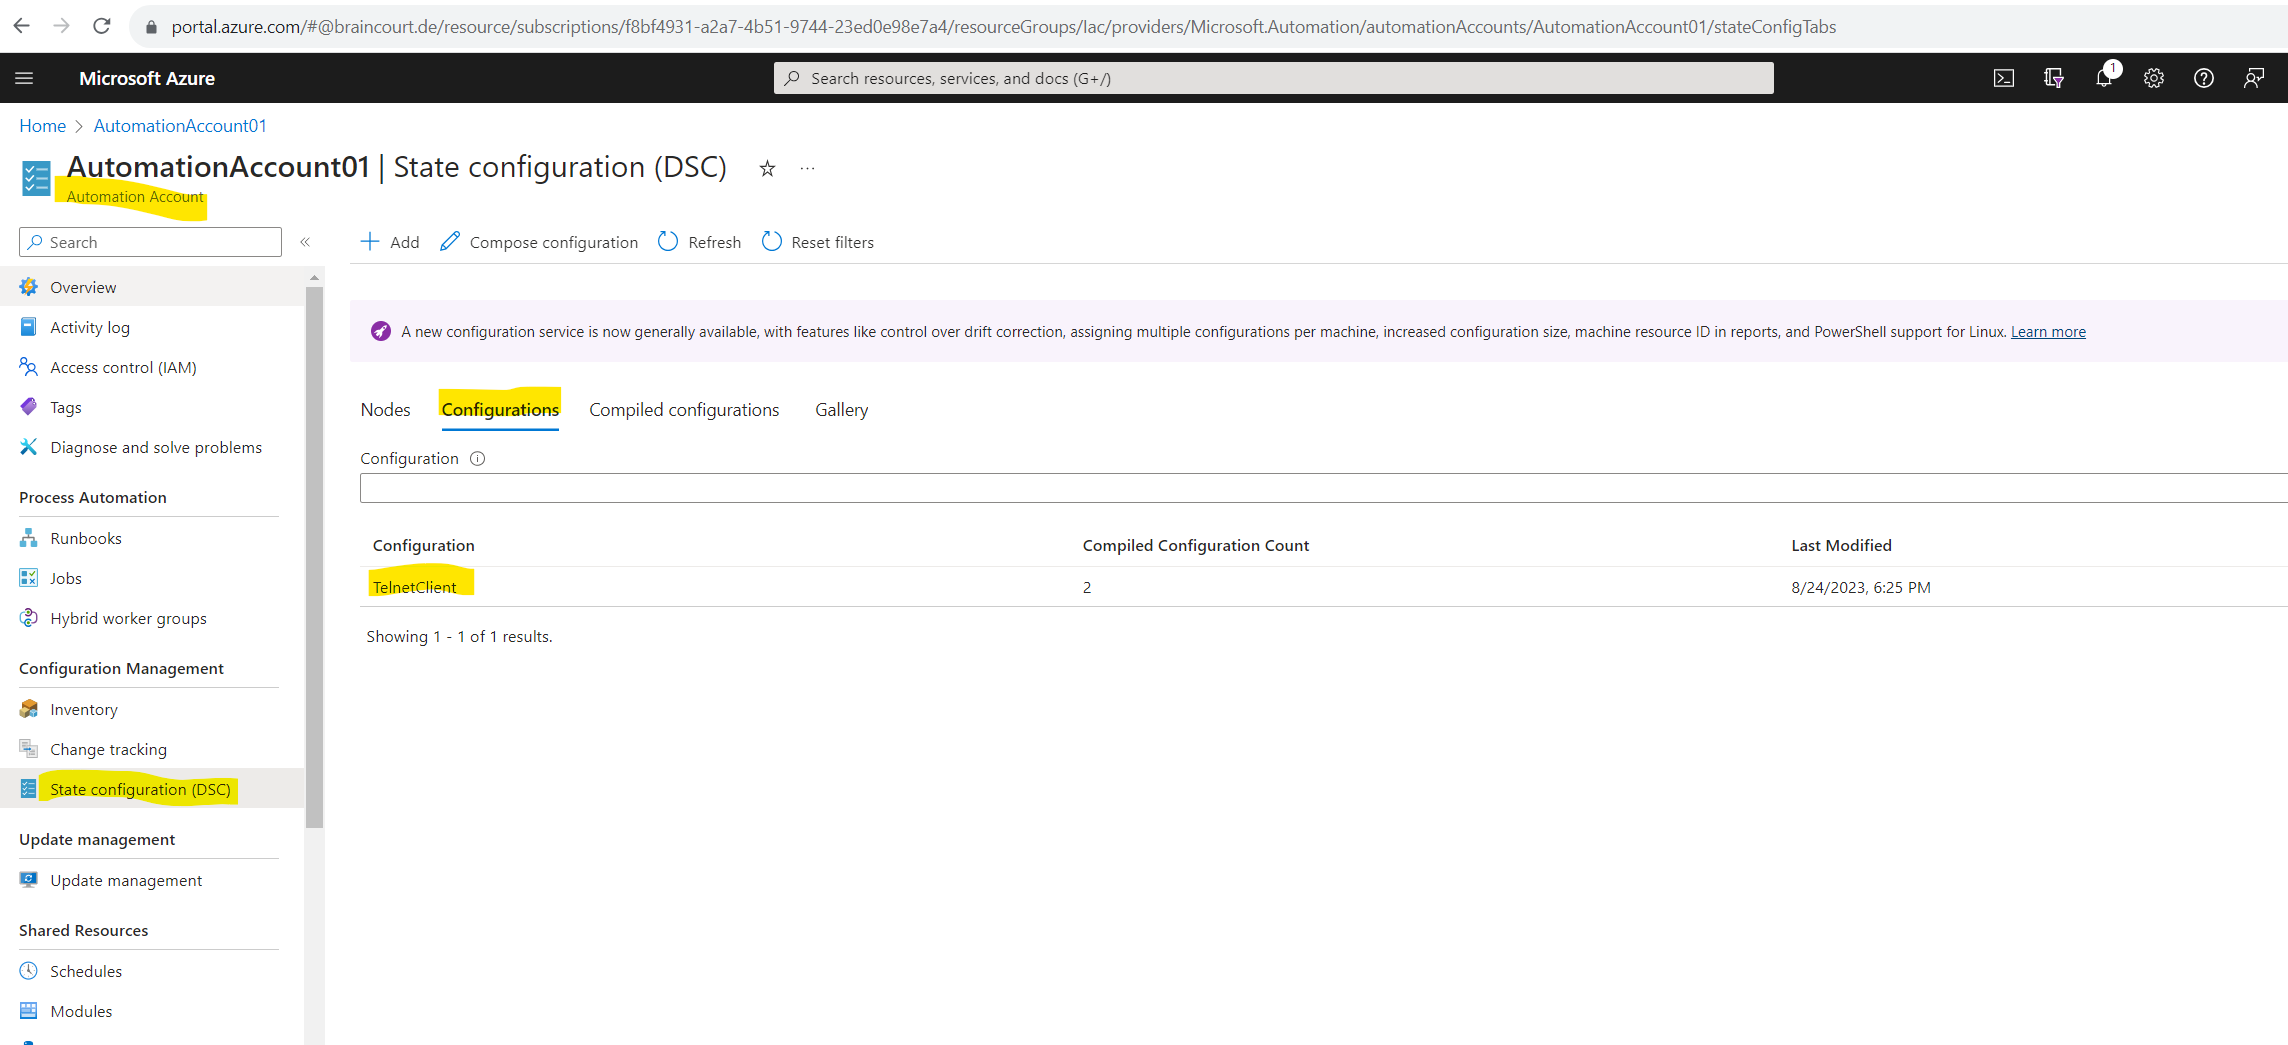
On the Automation account page, select State configuration (DSC) under Configuration Management.
On the State configuration (DSC) page, click the Configurations tab, then click Add.
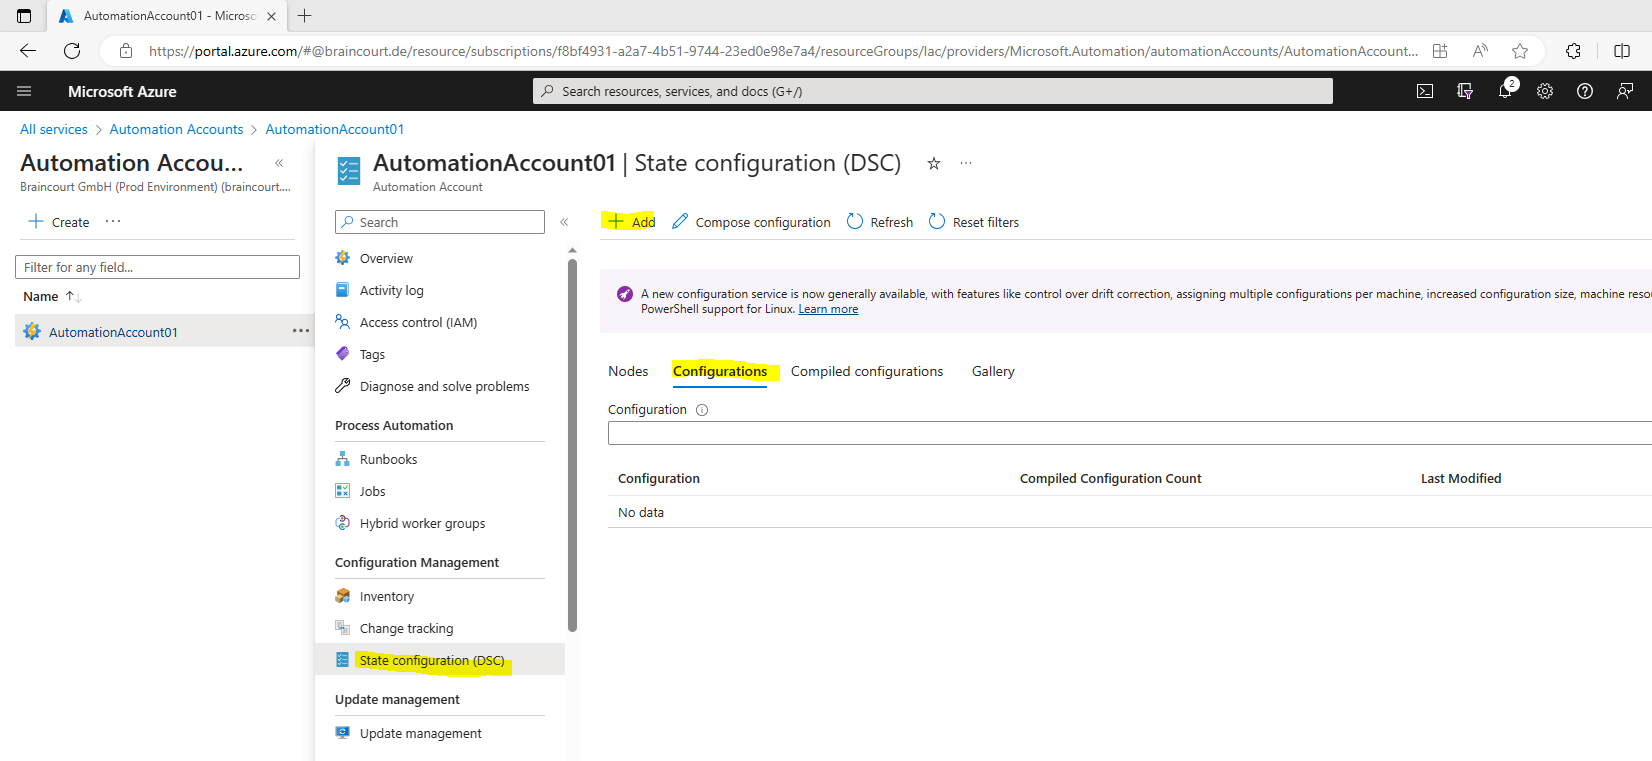
On the Import Configuration pane, browse to the TestConfig.ps1 file on your computer.
Finally click on OK.

View a configuration in Azure Automation
After you have imported a configuration, you can view it in the Azure portal.
On the State configuration (DSC) page, click the Configurations tab, then click TestConfig. This is the name of the configuration you imported in the previous procedure.
On the TestConfig Configuration pane, click View configuration source.
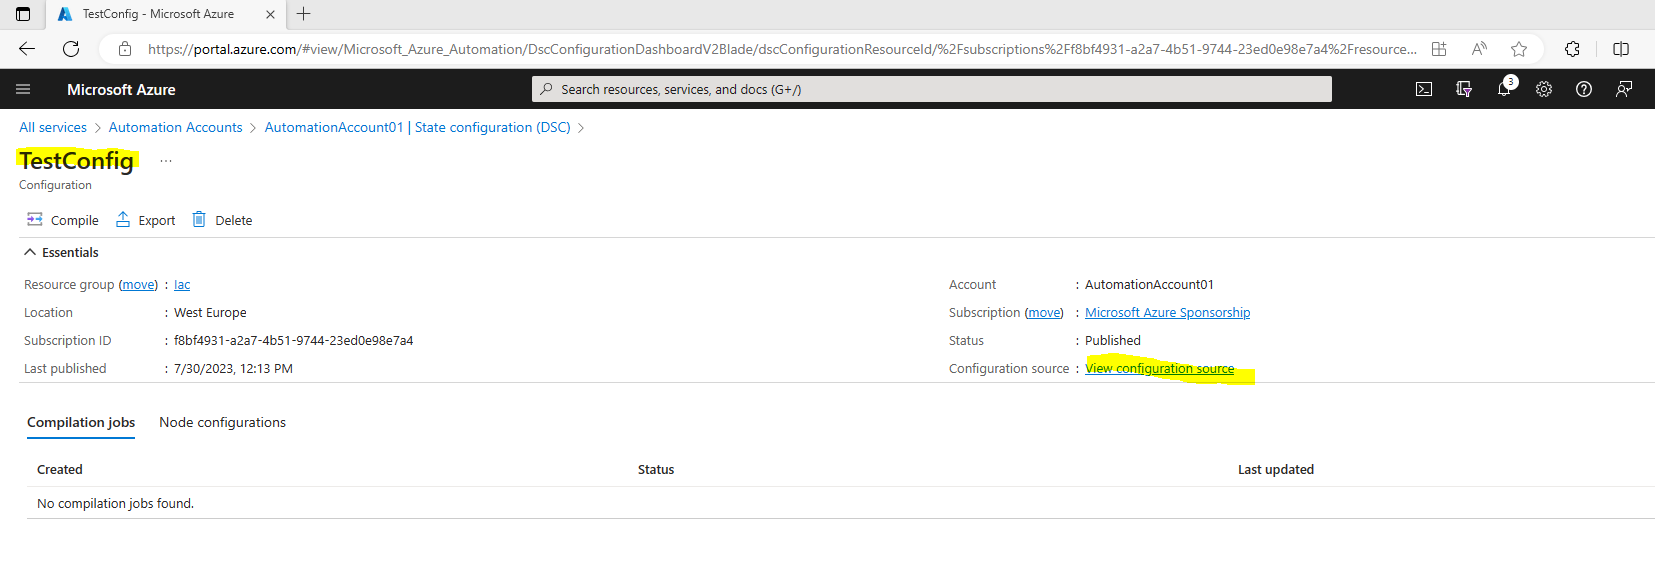
A TestConfig Configuration source pane opens, displaying the PowerShell code for the configuration.
Compile a configuration in Azure Automation
Before you can apply a desired state to a node, a DSC configuration defining that state must be compiled into one or more node configurations (MOF document), and placed on the Automation DSC Pull Server. For a more detailed description of compiling configurations in State Configuration (DSC), see Compile configurations in Azure Automation State Configuration. For more information about compiling configurations, see DSC Configurations.
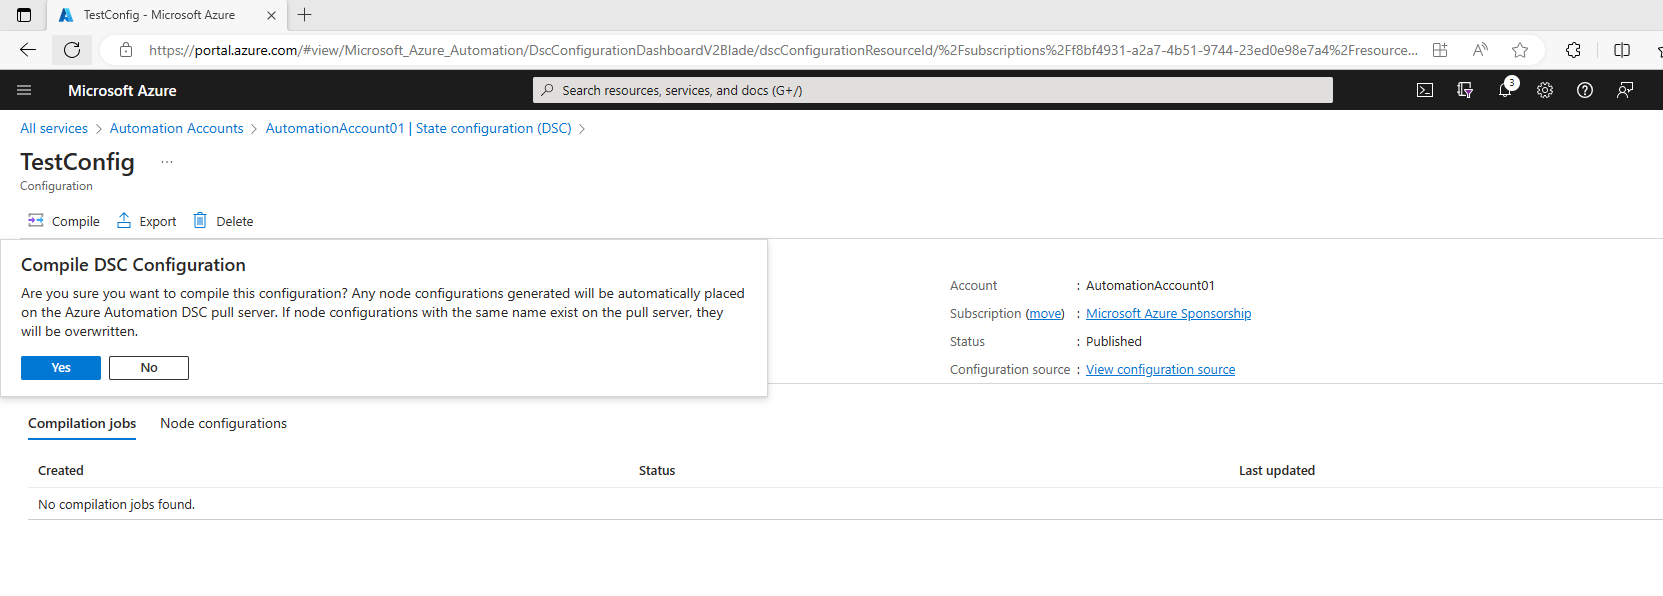
On the TestConfig Configuration pane, click Compile, and then click Yes. This starts a compilation job.
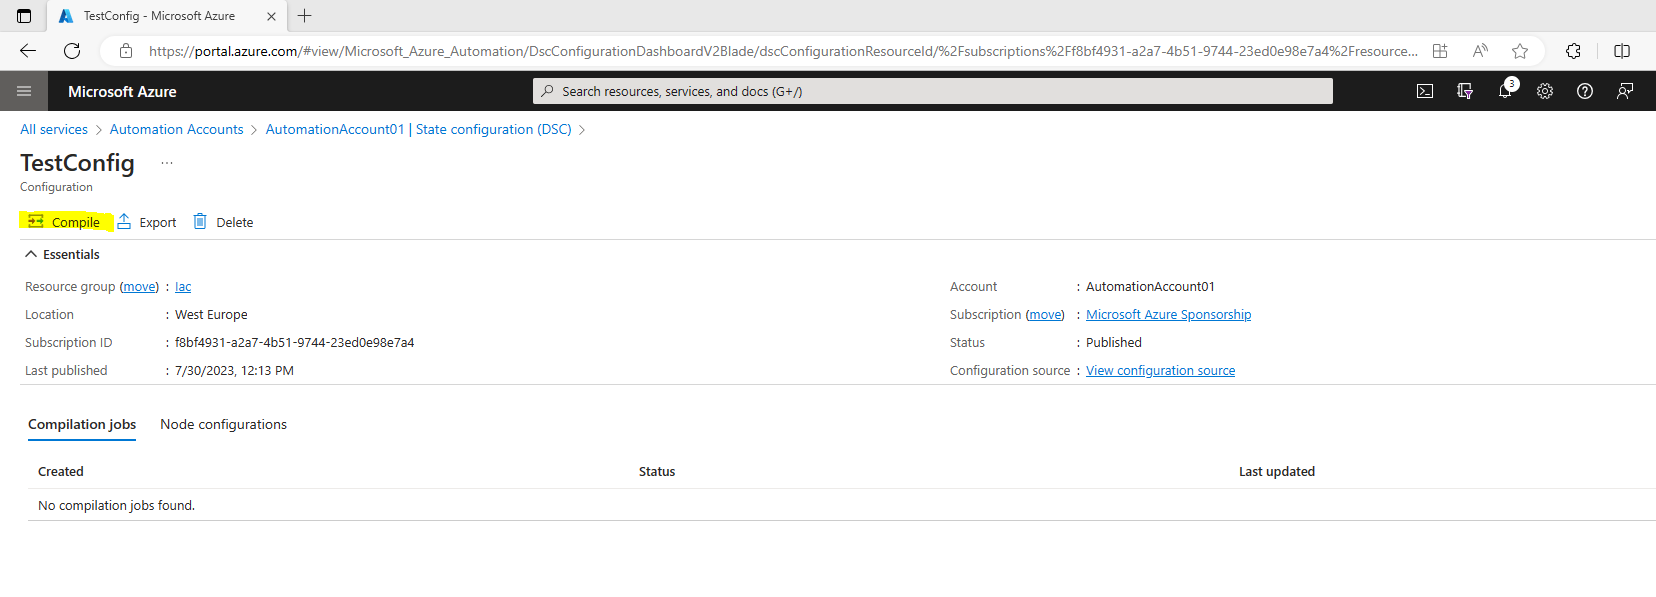
When you compile a configuration in Azure Automation, it automatically deploys any created node configuration MOF files to the pull server.
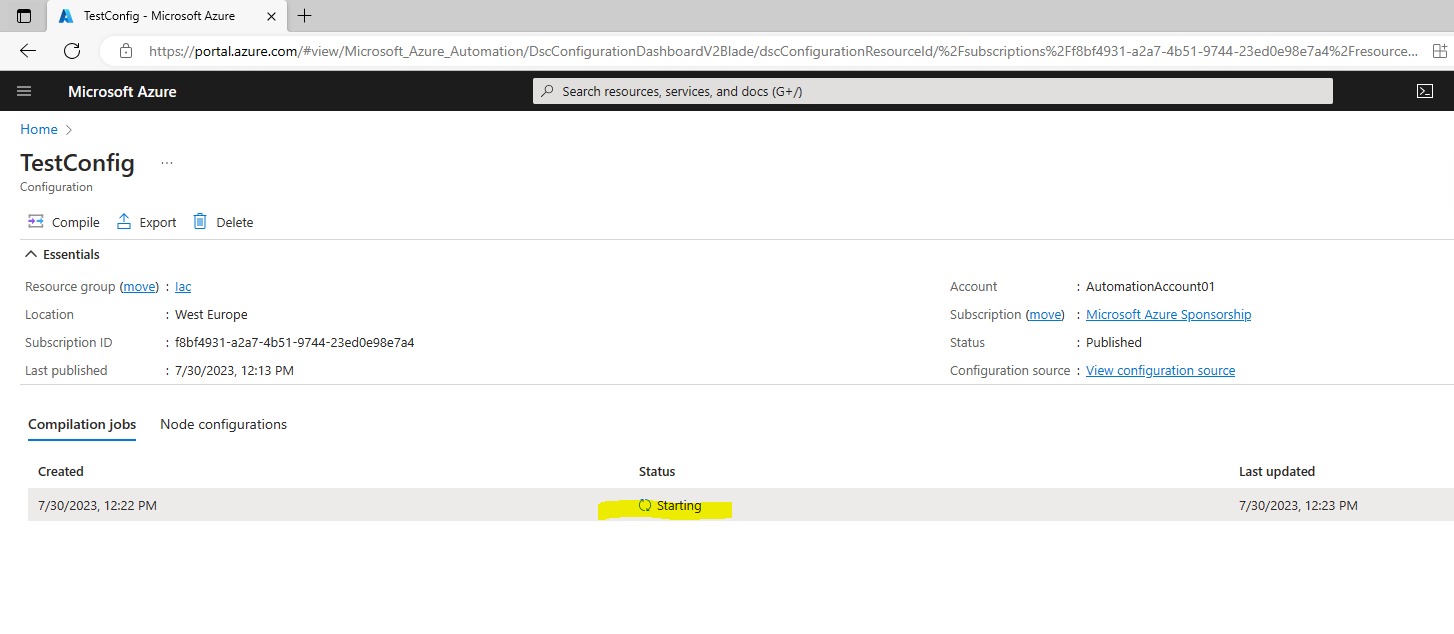
After you start a compilation, you can view it in the Compilation Jobs tile on the Configuration page. The Compilation Jobs tile shows currently running, completed, and failed jobs. When you open a compilation job pane, it shows information about that job including any errors or warnings encountered, input parameters used in the configuration, and compilation logs.
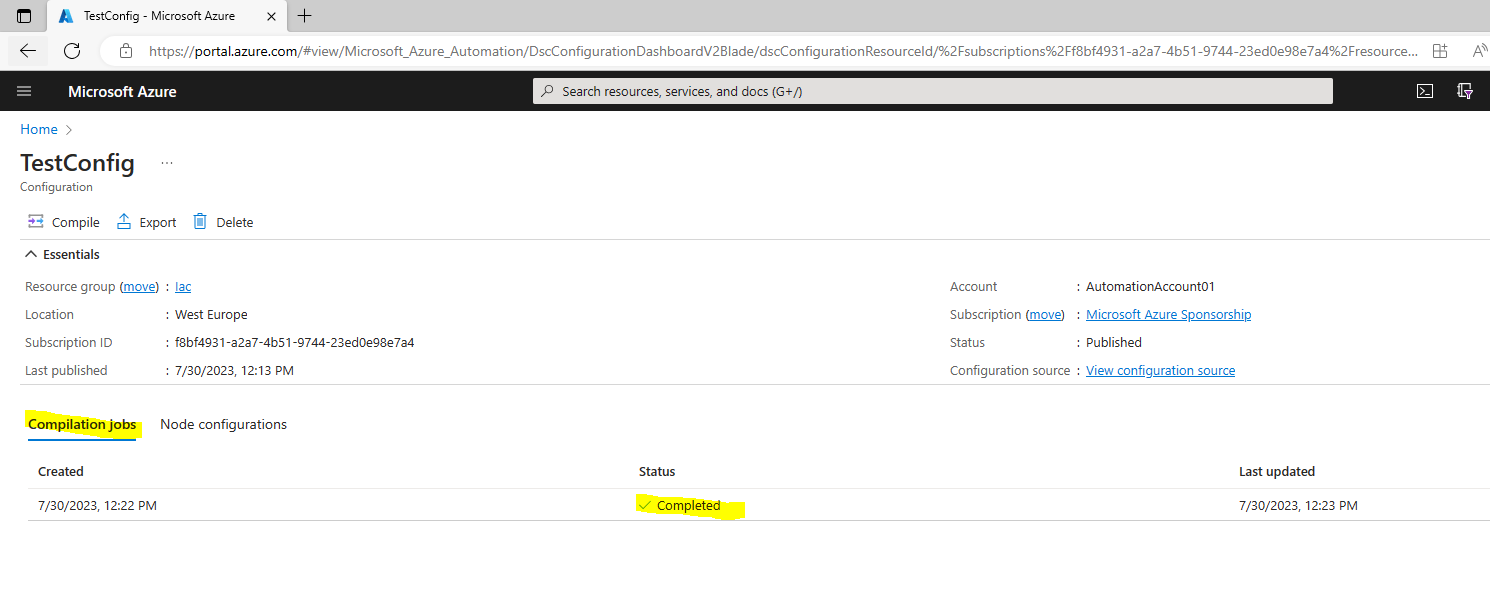
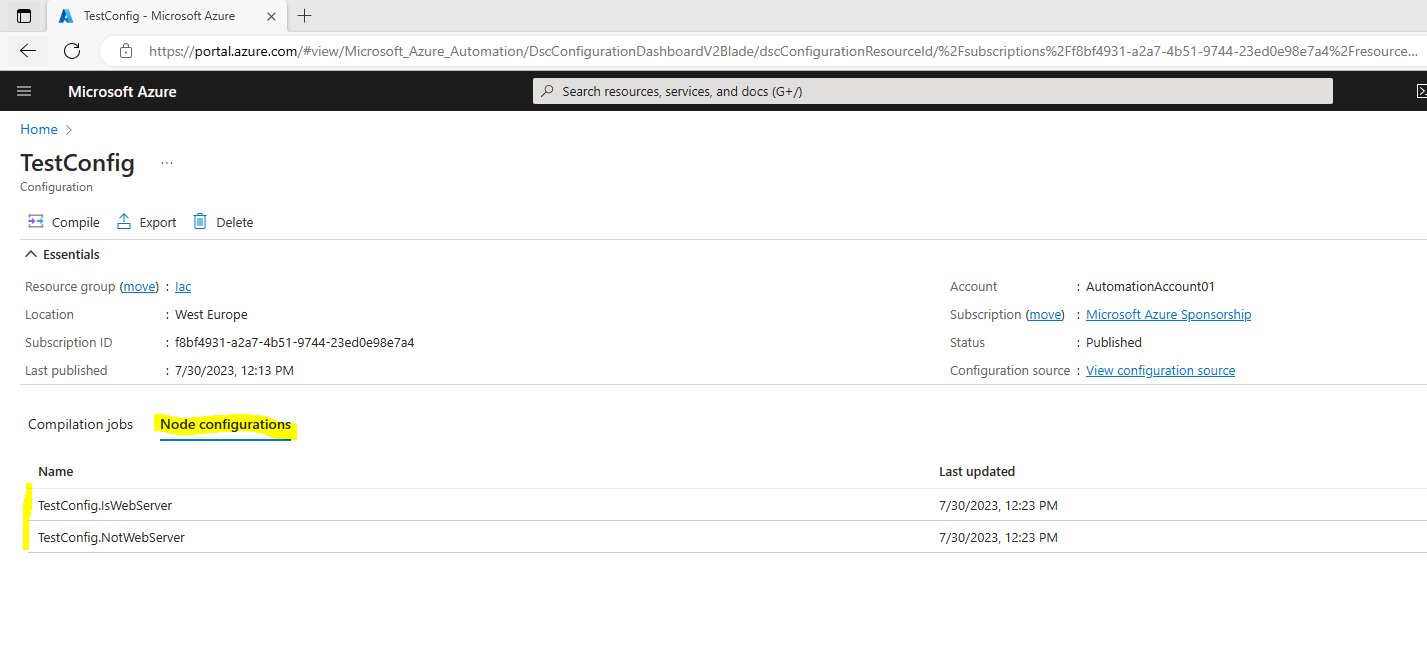
Successful completion of a compilation job creates one or more new node configurations. A node configuration is a MOF document that is deployed to the pull server and ready to be pulled and applied by one or more nodes. You can view the node configurations in your Automation account on the State configuration (DSC) page.
A node configuration has a name with the form ConfigurationName.NodeName.
Enable an Azure Resource Manager VM for management with State Configuration
You can use State Configuration to manage Azure VMs (both classic and Resource Manager), on-premises VMs, Linux machines, AWS VMs, and on-premises physical machines. In this article, you learn how to enable only Azure Resource Manager VMs. For information about enabling other types of machines, see Enable machines for management by Azure Automation State Configuration.
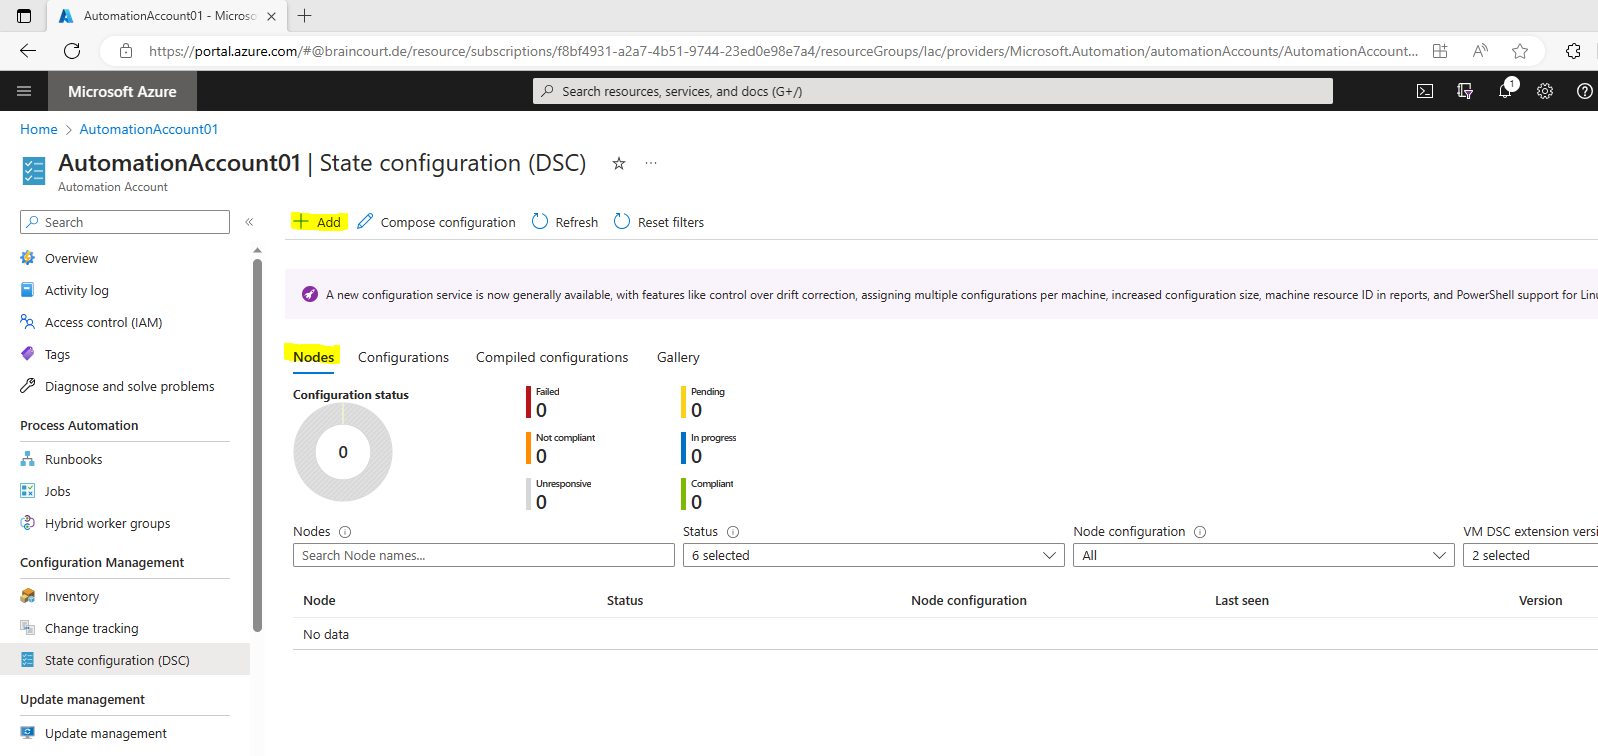
On the Automation account page, click State configuration (DSC) under Configuration Management.
On the State configuration (DSC) page, select the Nodes tab, then click + Add.
On the Virtual Machines pane, select your VM.
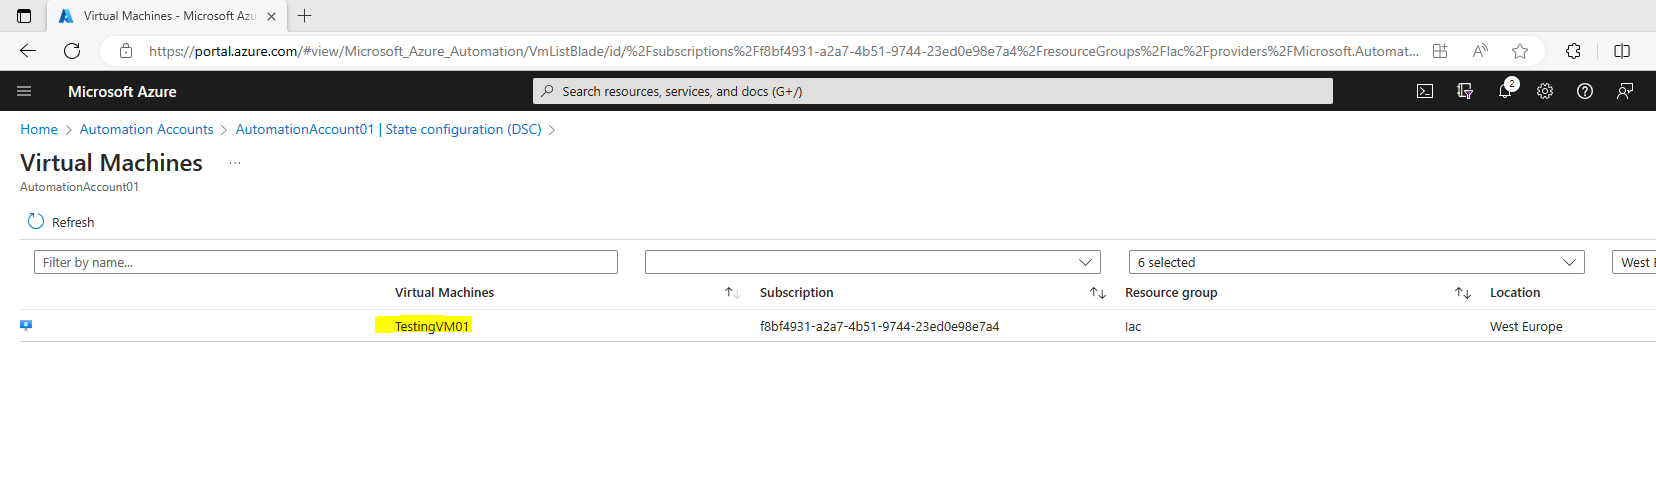
On the Virtual machine detail pane, click + Connect.
The VM must be an Azure Resource Manager VM running a supported operating system.

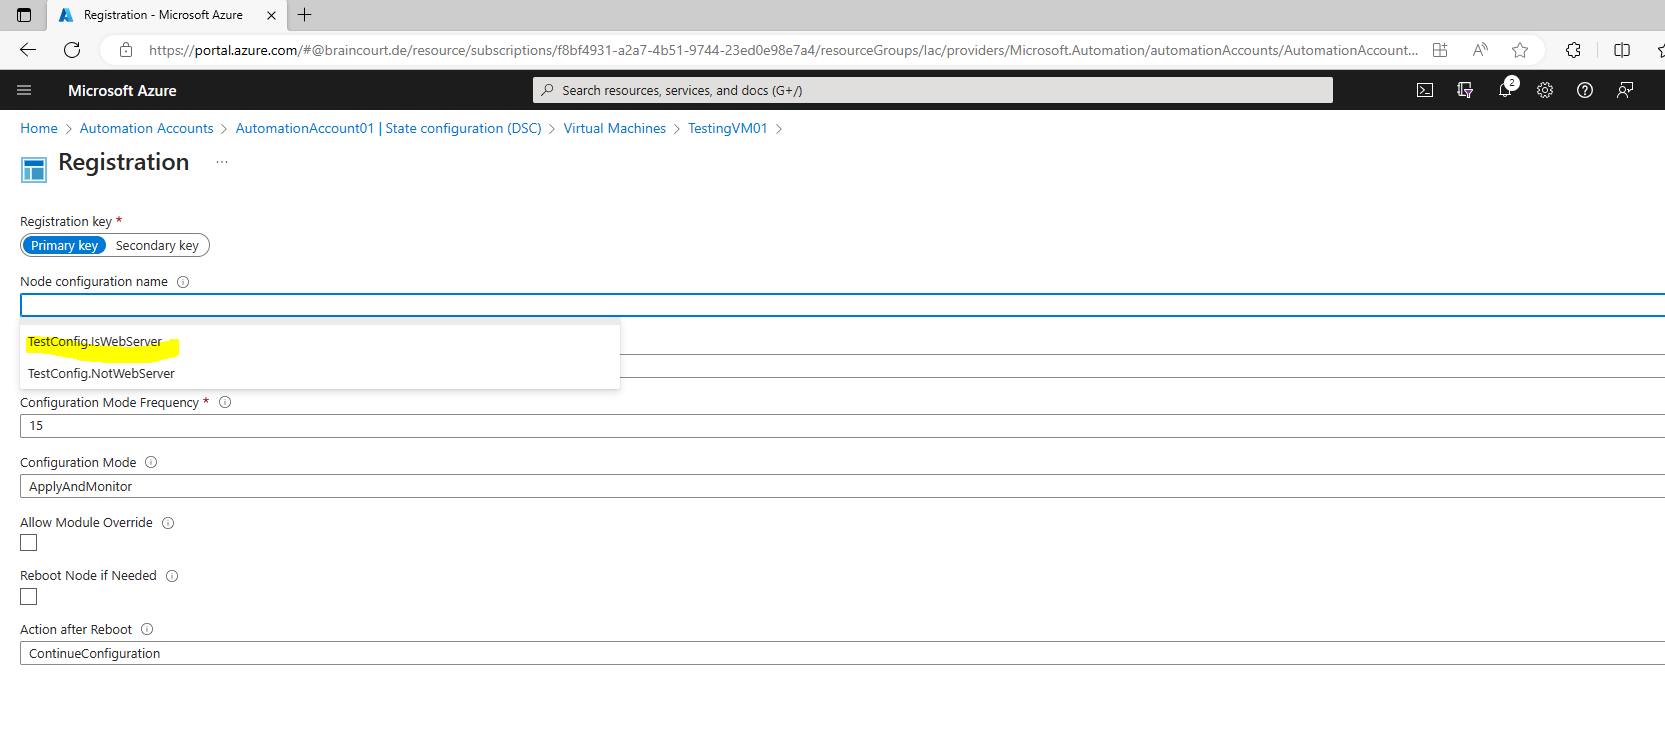
On the Registration page, select the name of the node configuration to apply to the VM in the Node configuration name field. You can change the assigned node configuration after enabling the node.
Check Reboot Node if Needed, then click OK.
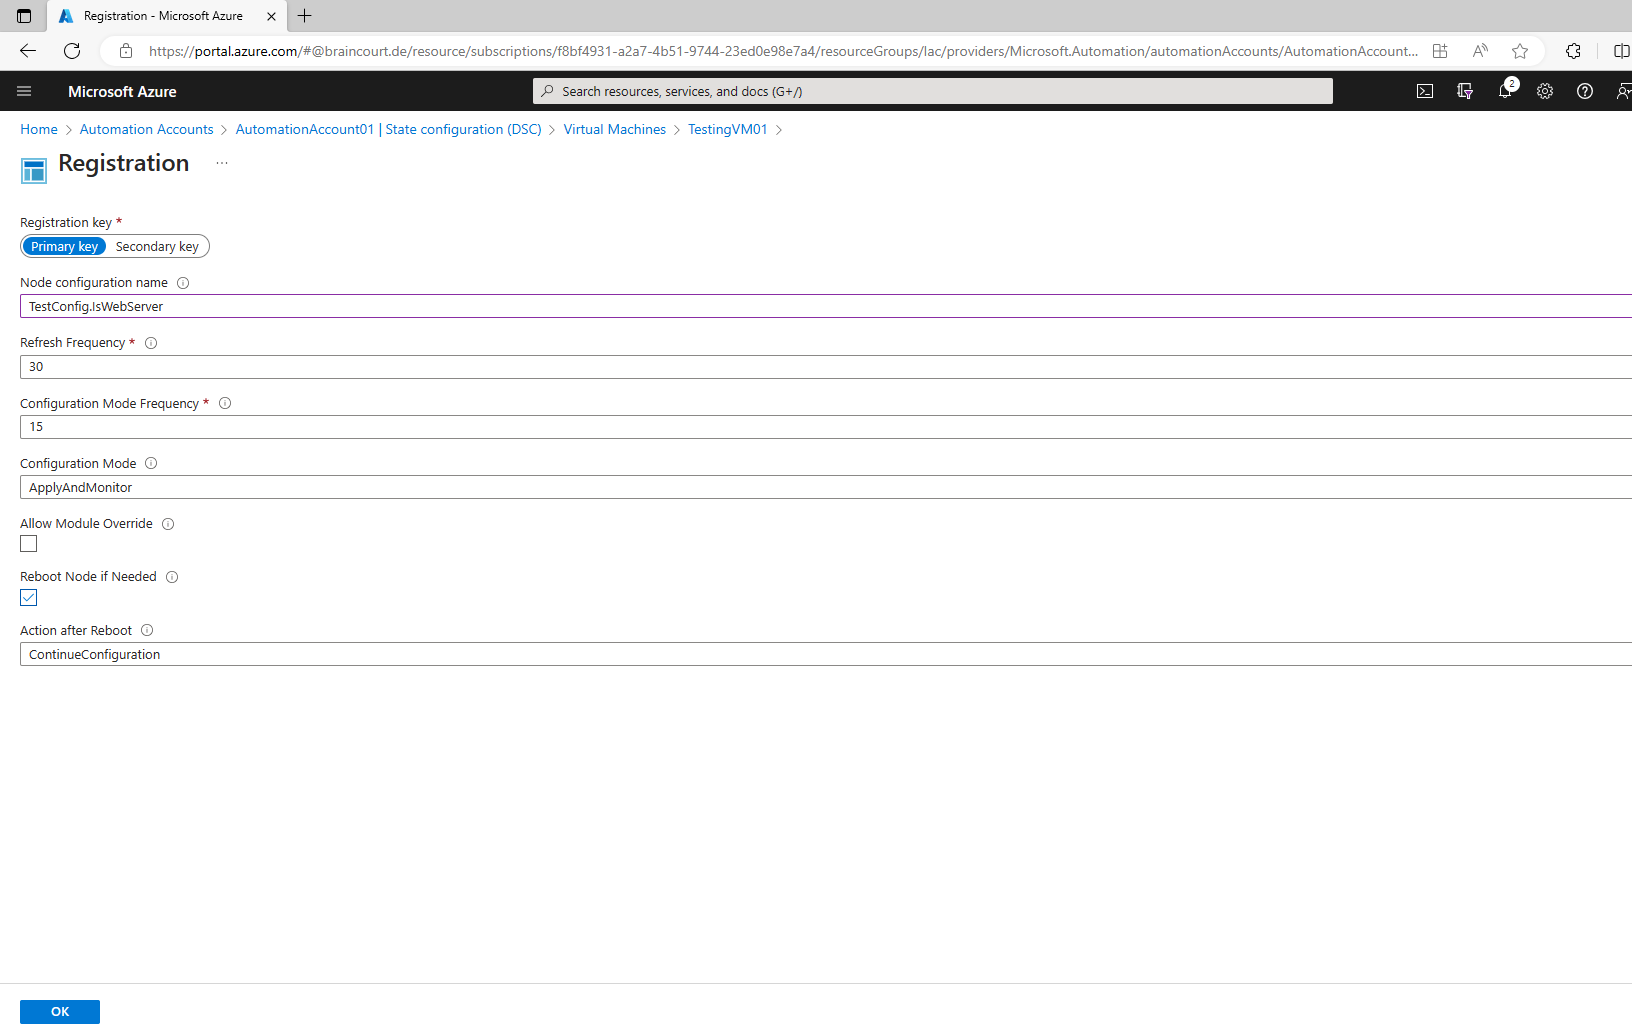
The node configuration you specified is applied to the VM at intervals specified by the value provided for Configuration Mode Frequency. The VM checks for updates to the node configuration at intervals specified by the Refresh Frequency value. For more information about how these values are used, see Configuring the Local Configuration Manager.
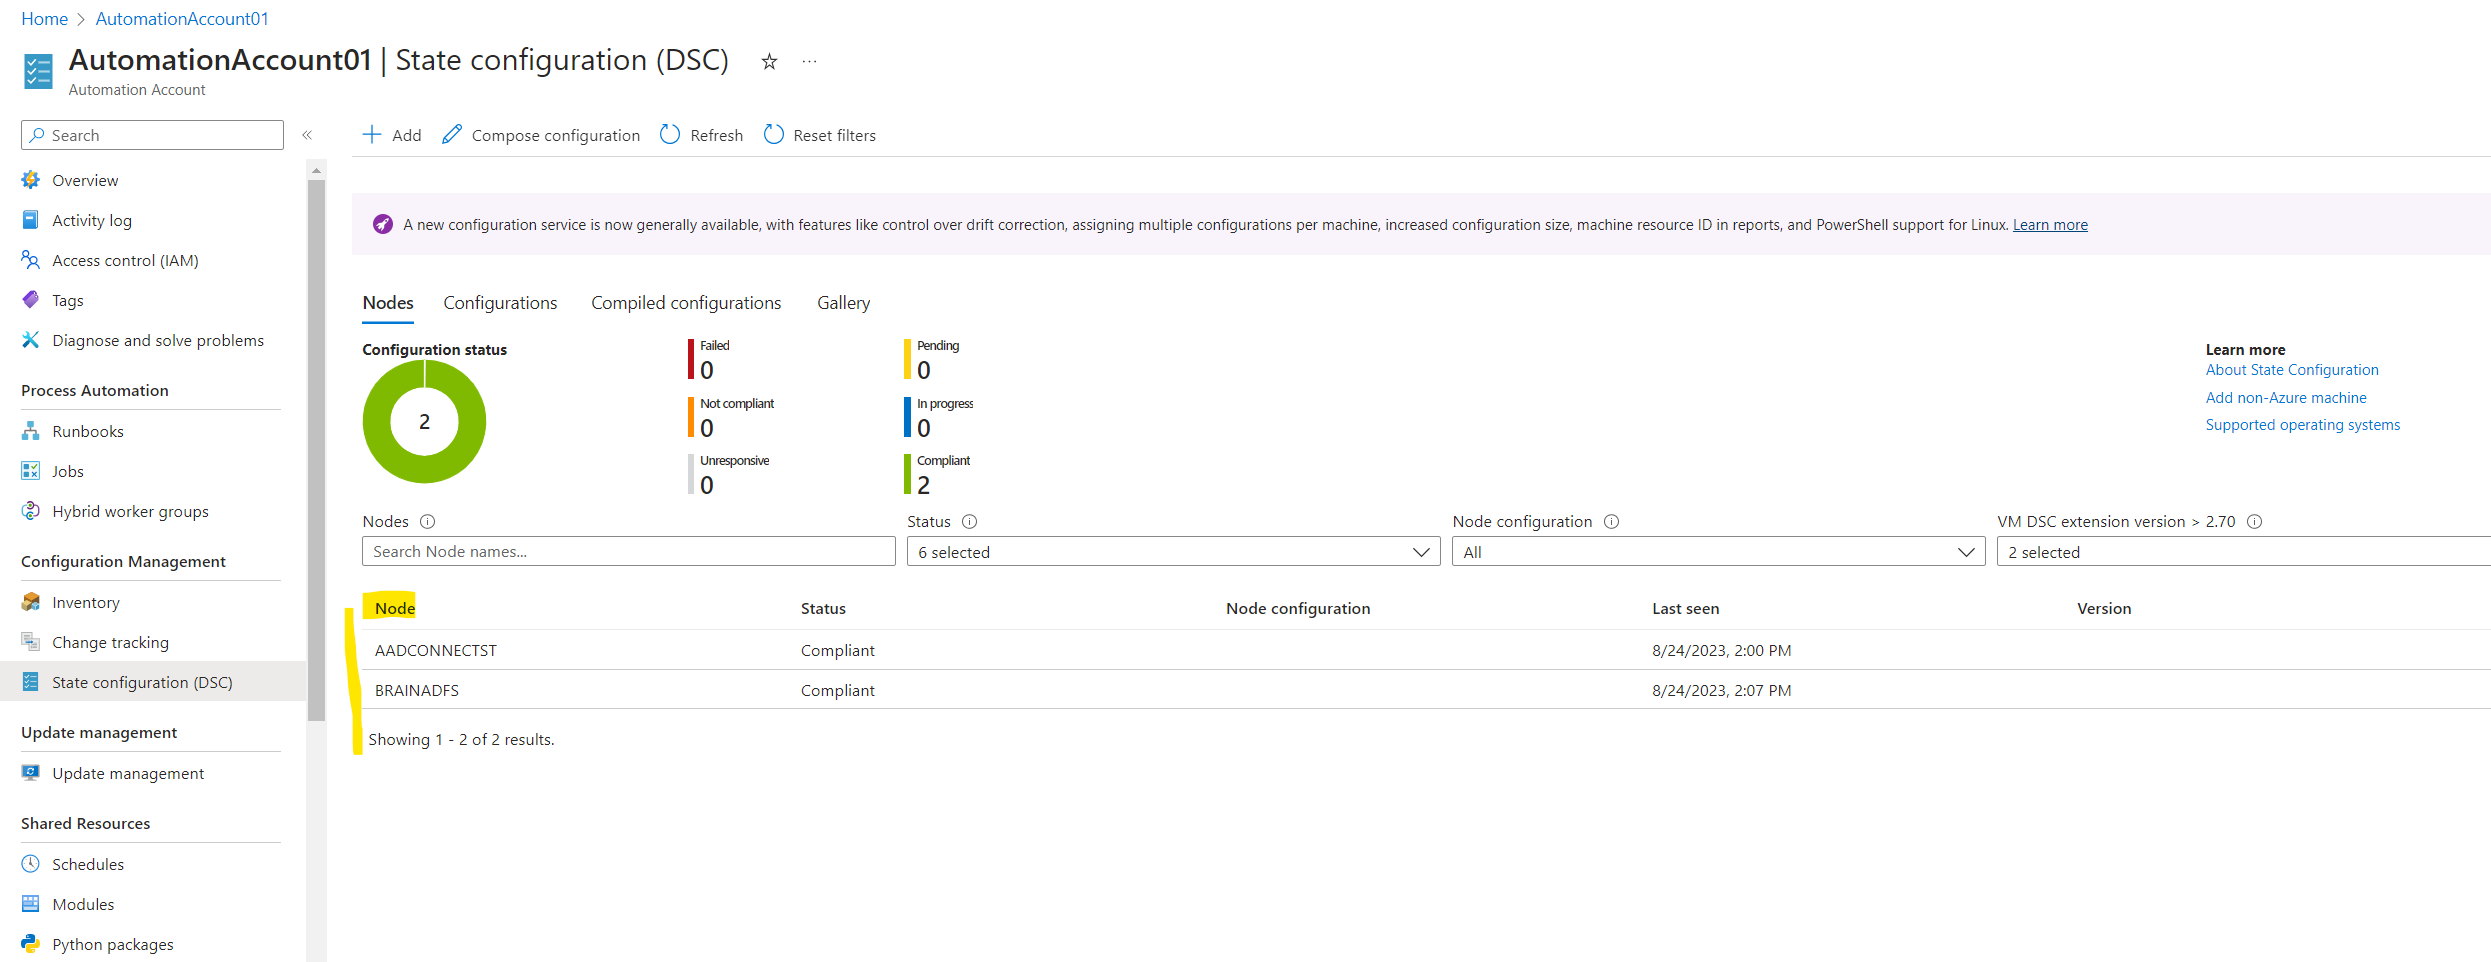
Azure starts the process of enabling the VM. When it is complete, the VM shows up in the Nodes tab of the State configuration (DSC) page in the Automation account.
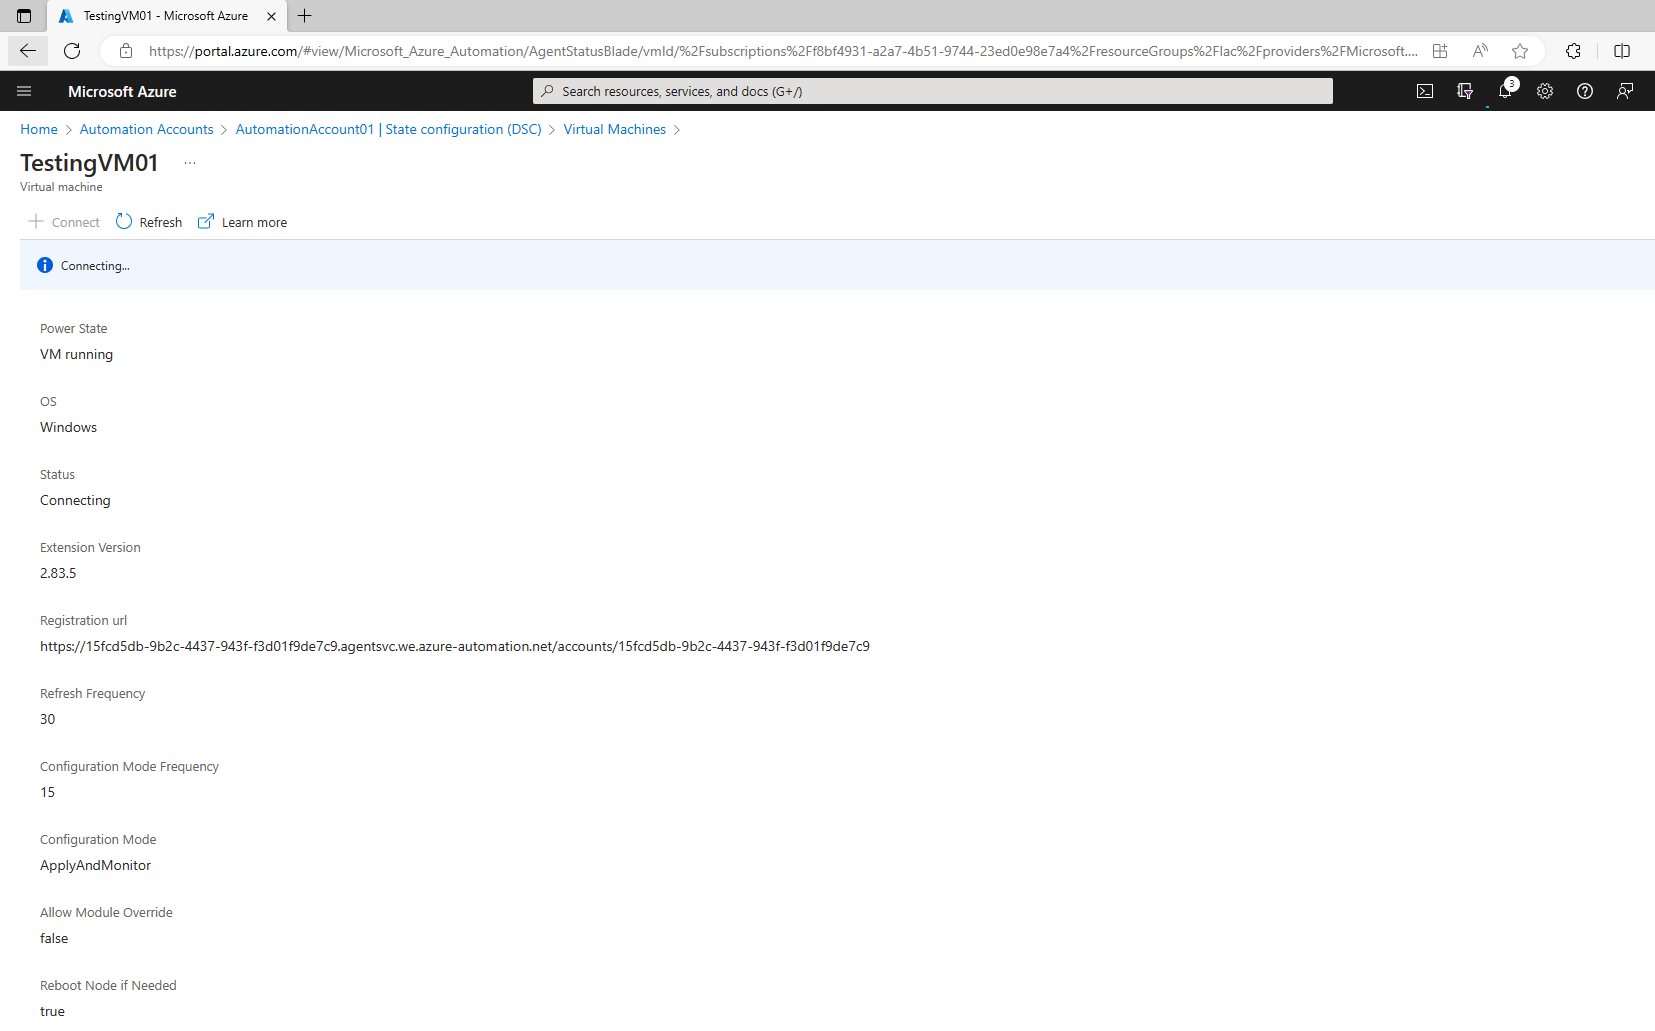
You can view the list of all machines that have been enabled for management in your Automation account in the Nodes tab of the State configuration (DSC) page.
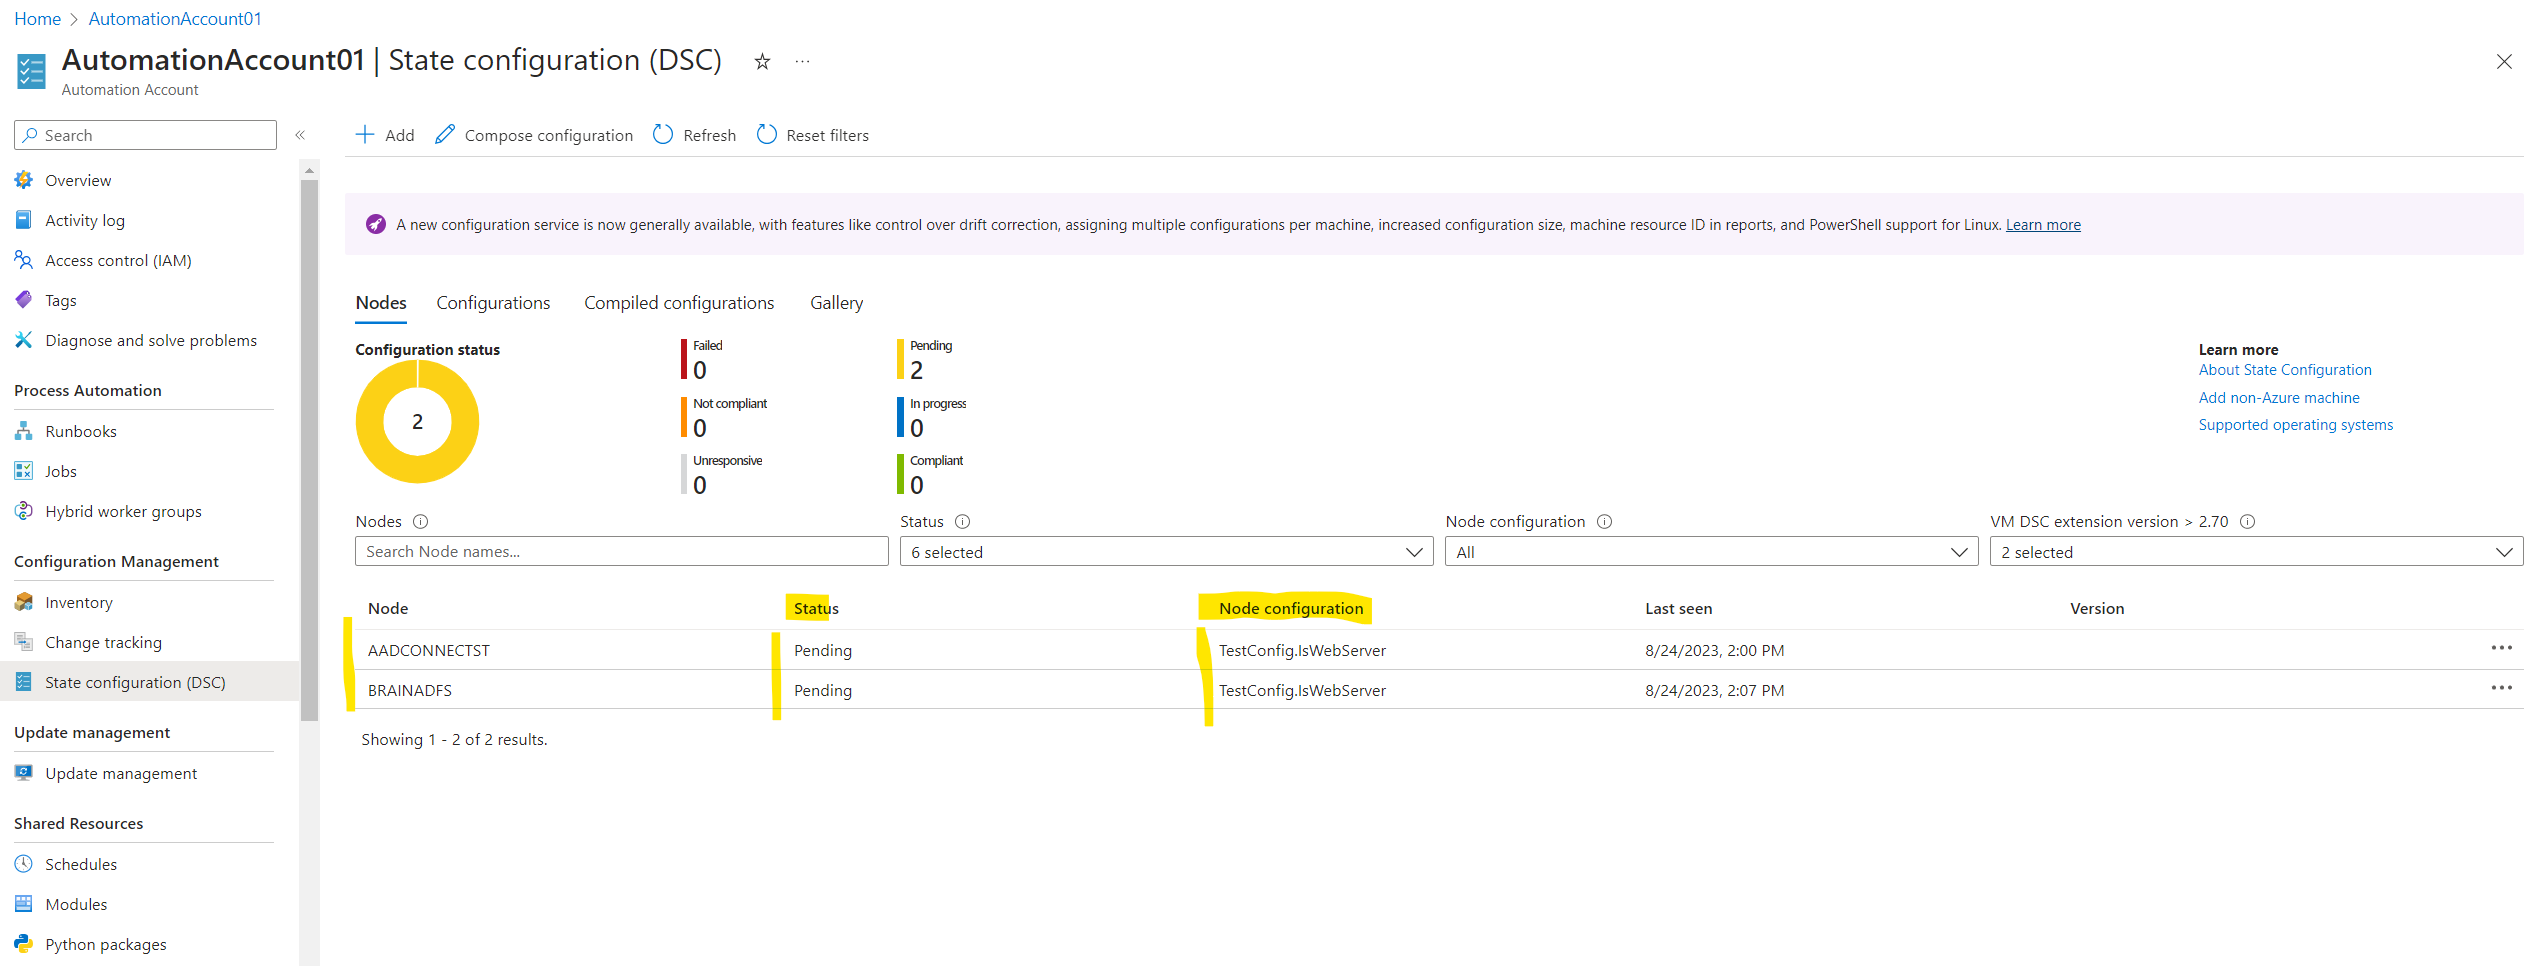
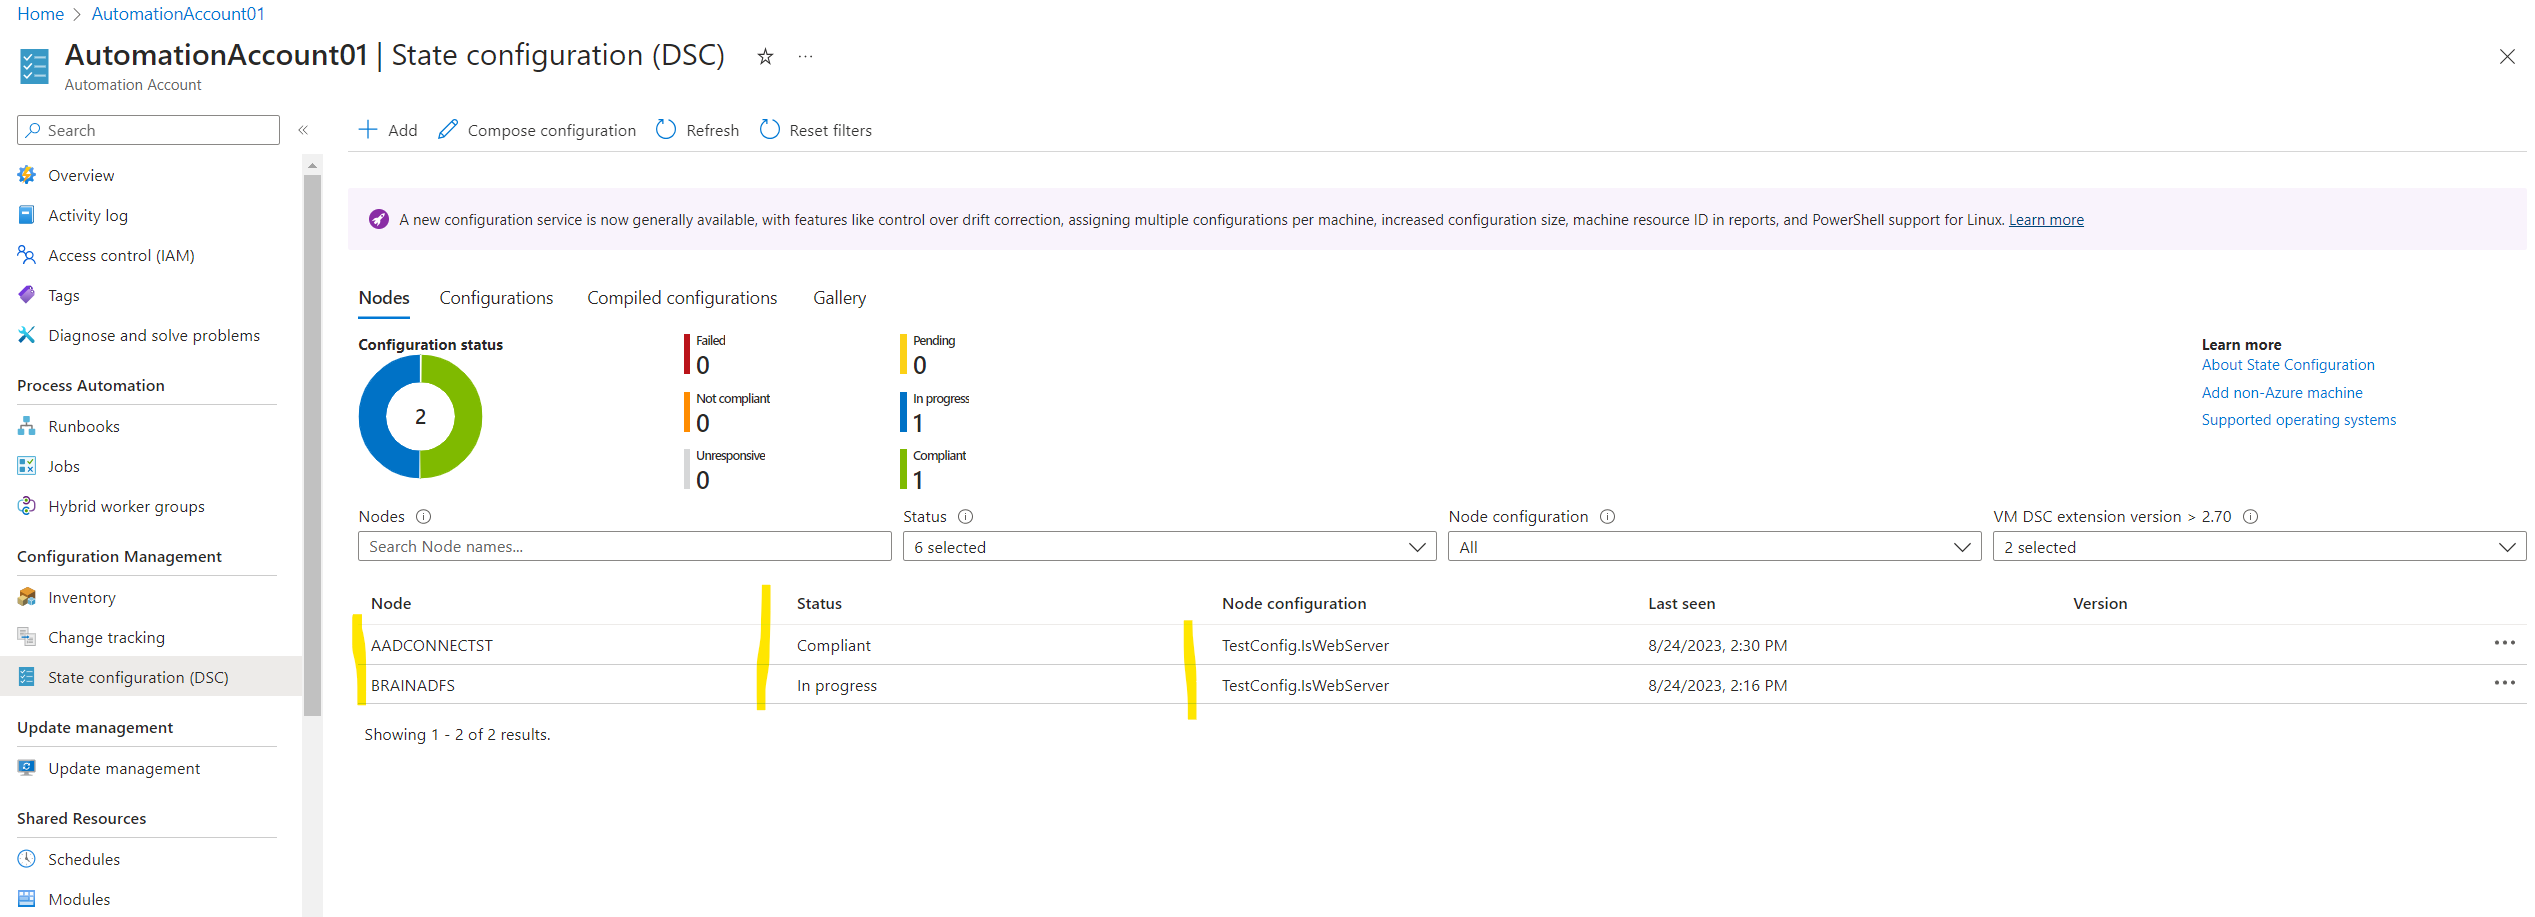
So far the state for my testing VM is in progress.
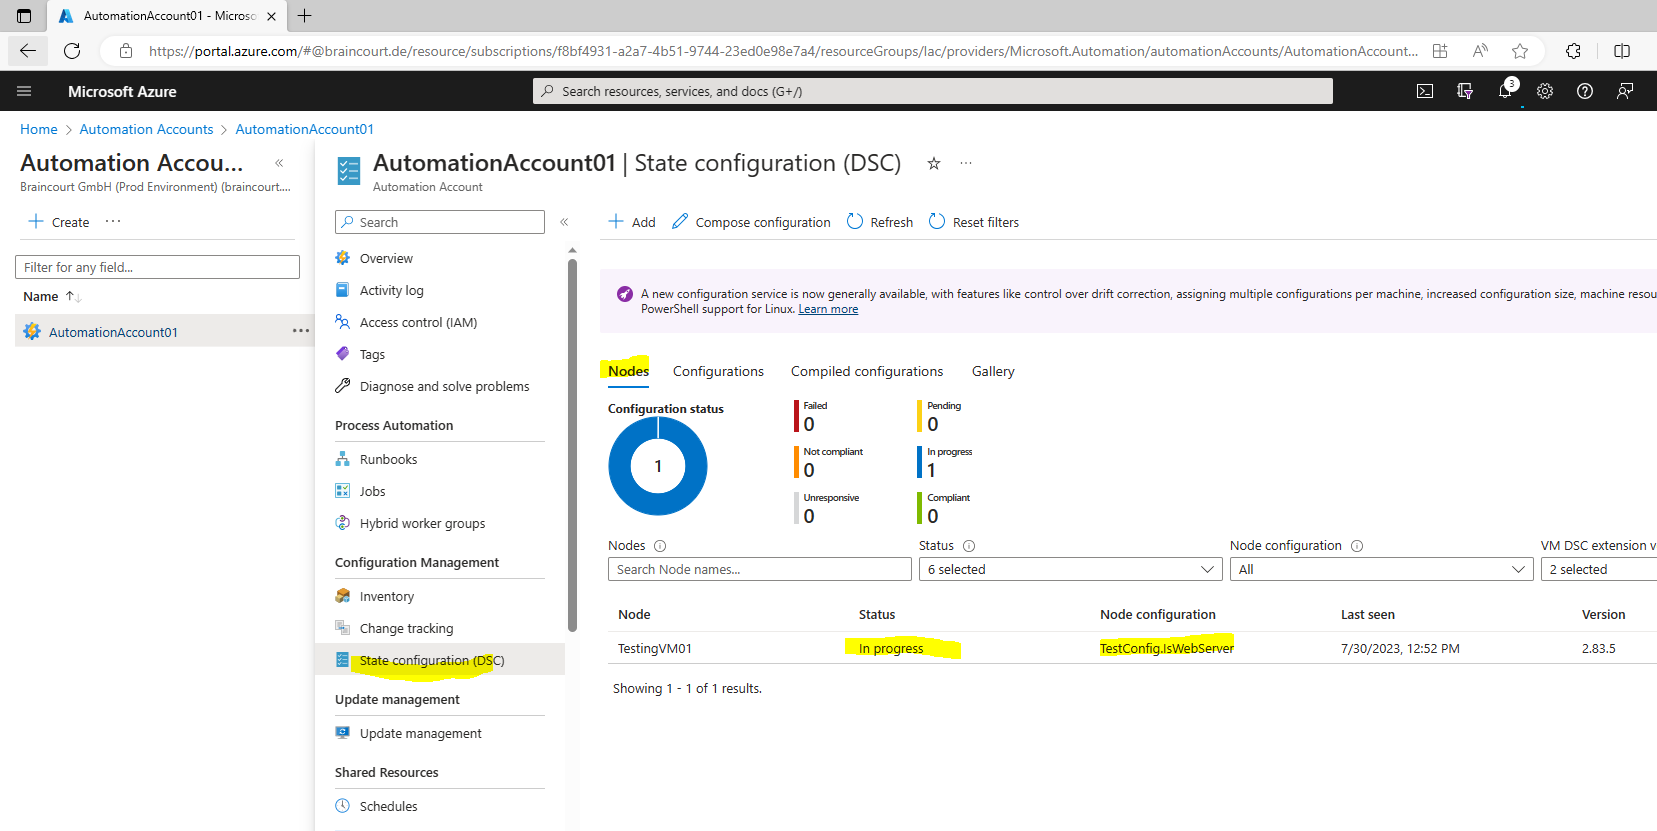
The DSC node can take any of the following six values as follows:
- Failed – This status is displayed when an error occurs while applying one or more configurations on a node.
- Not compliant – This status is displayed when drift occurs on a node and it requires a close review if it is systematic.
- Unresponsive – This status is displayed when a node has not been checked in for more than 24 hours.
- Pending – This status is displayed when a node has a new configuration to apply and the pull server is awaiting node check in.
- In progress – This status is displayed when a node applies configuration, and the pull server is awaiting status.
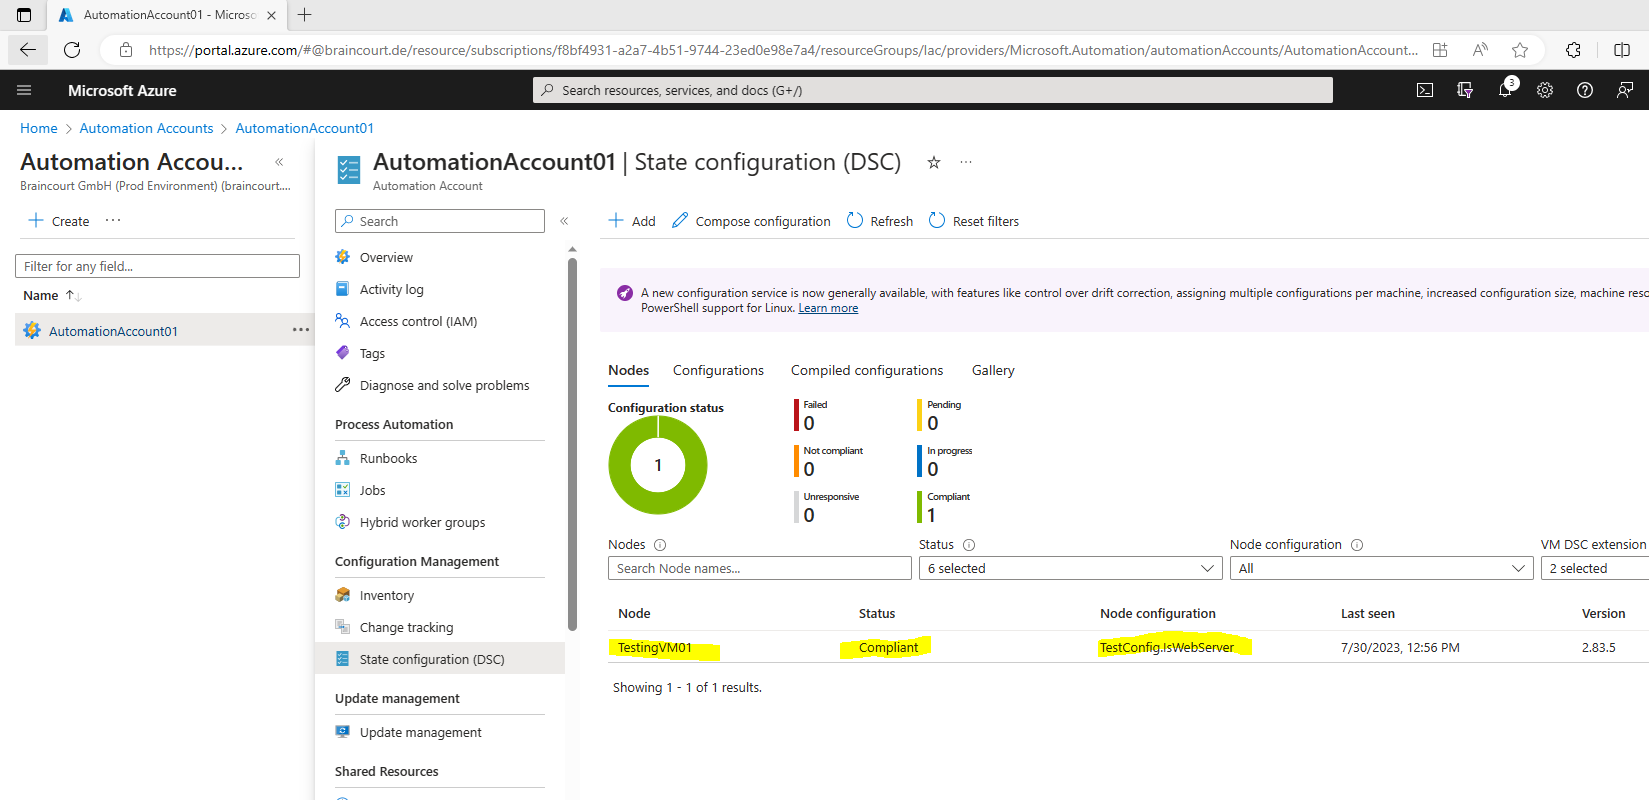
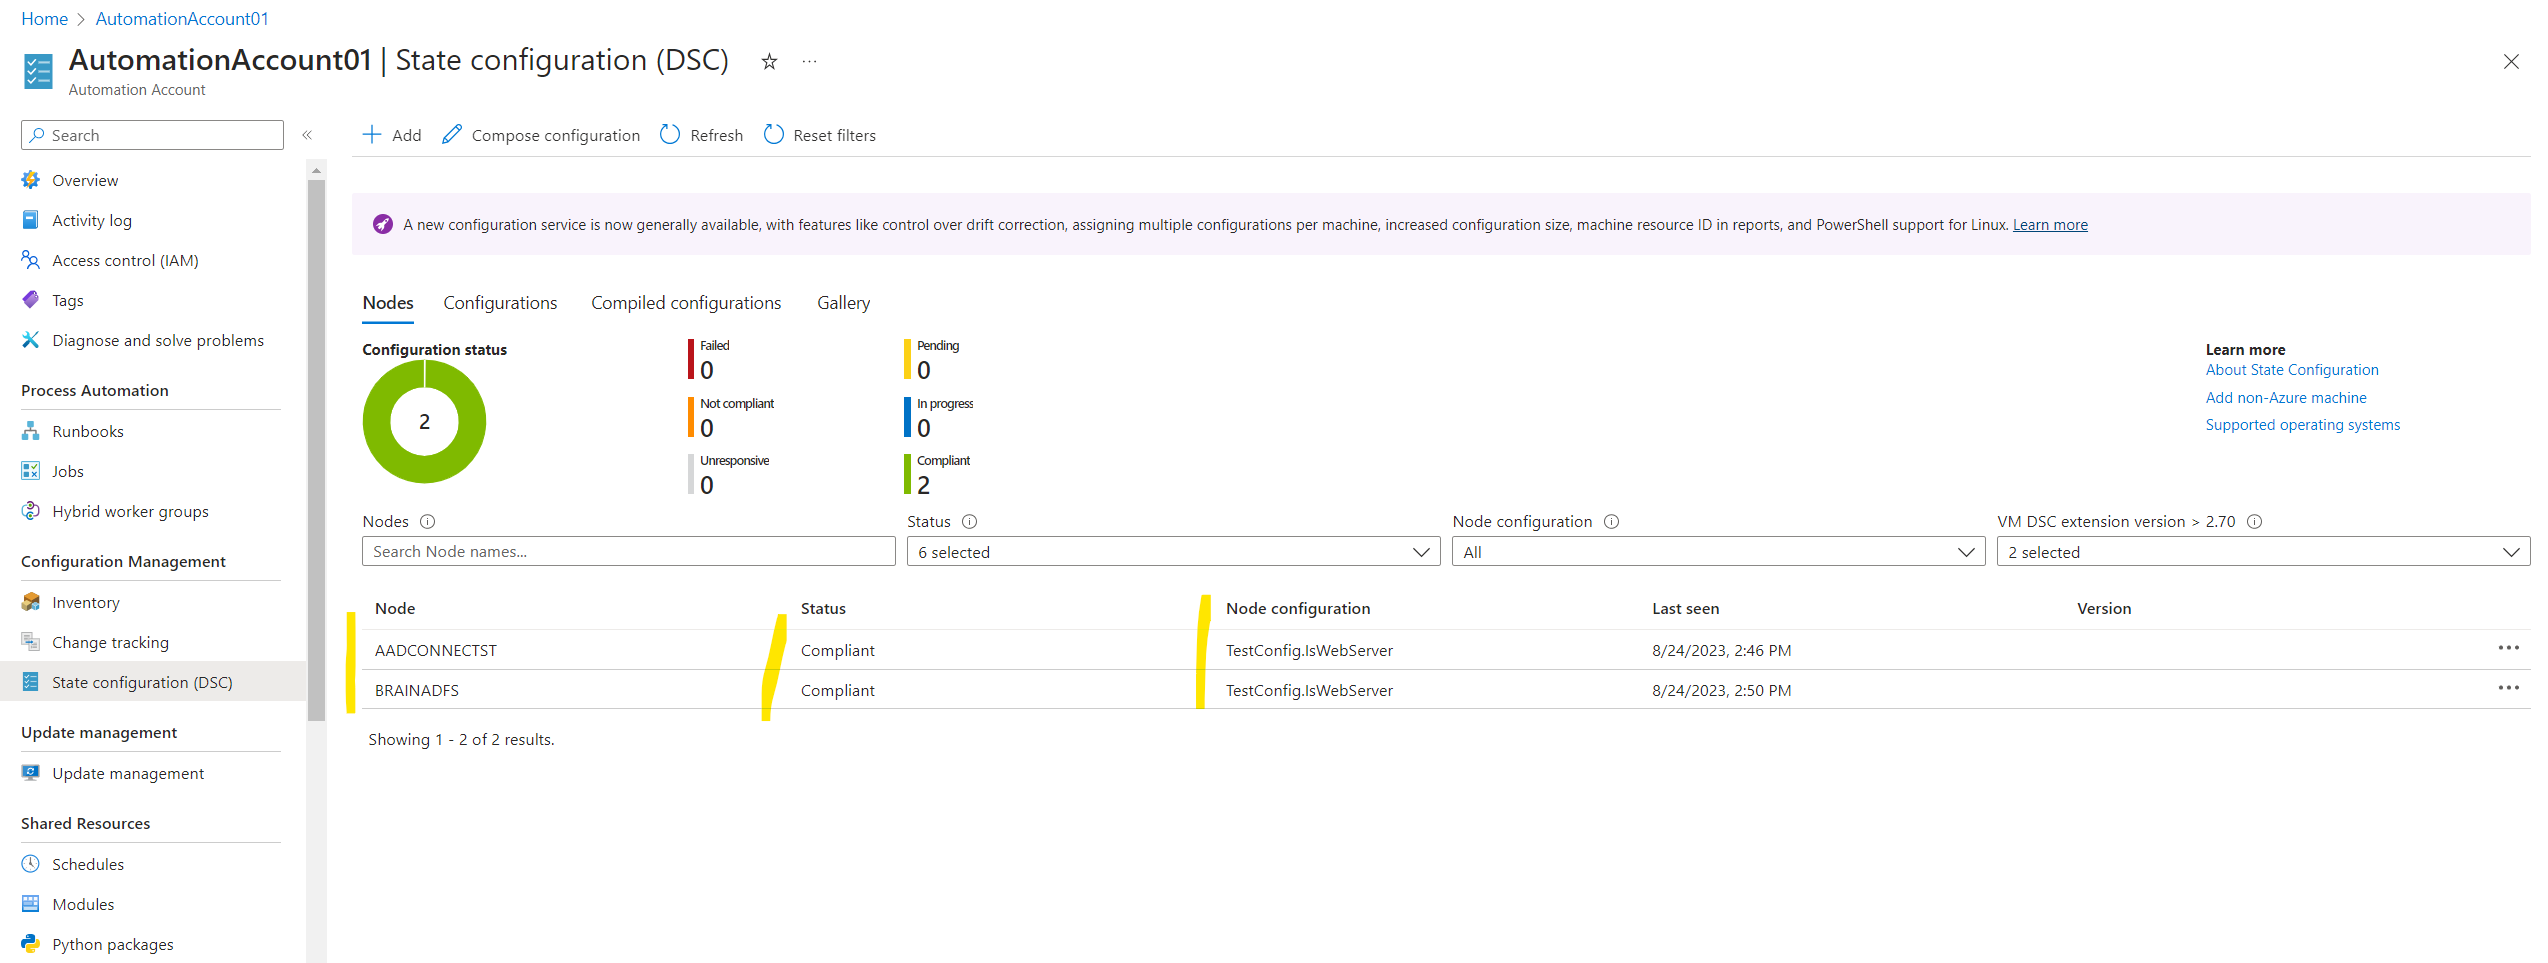
- Compliant – This status is displayed when a node has a valid configuration, and no drift occurs presently.
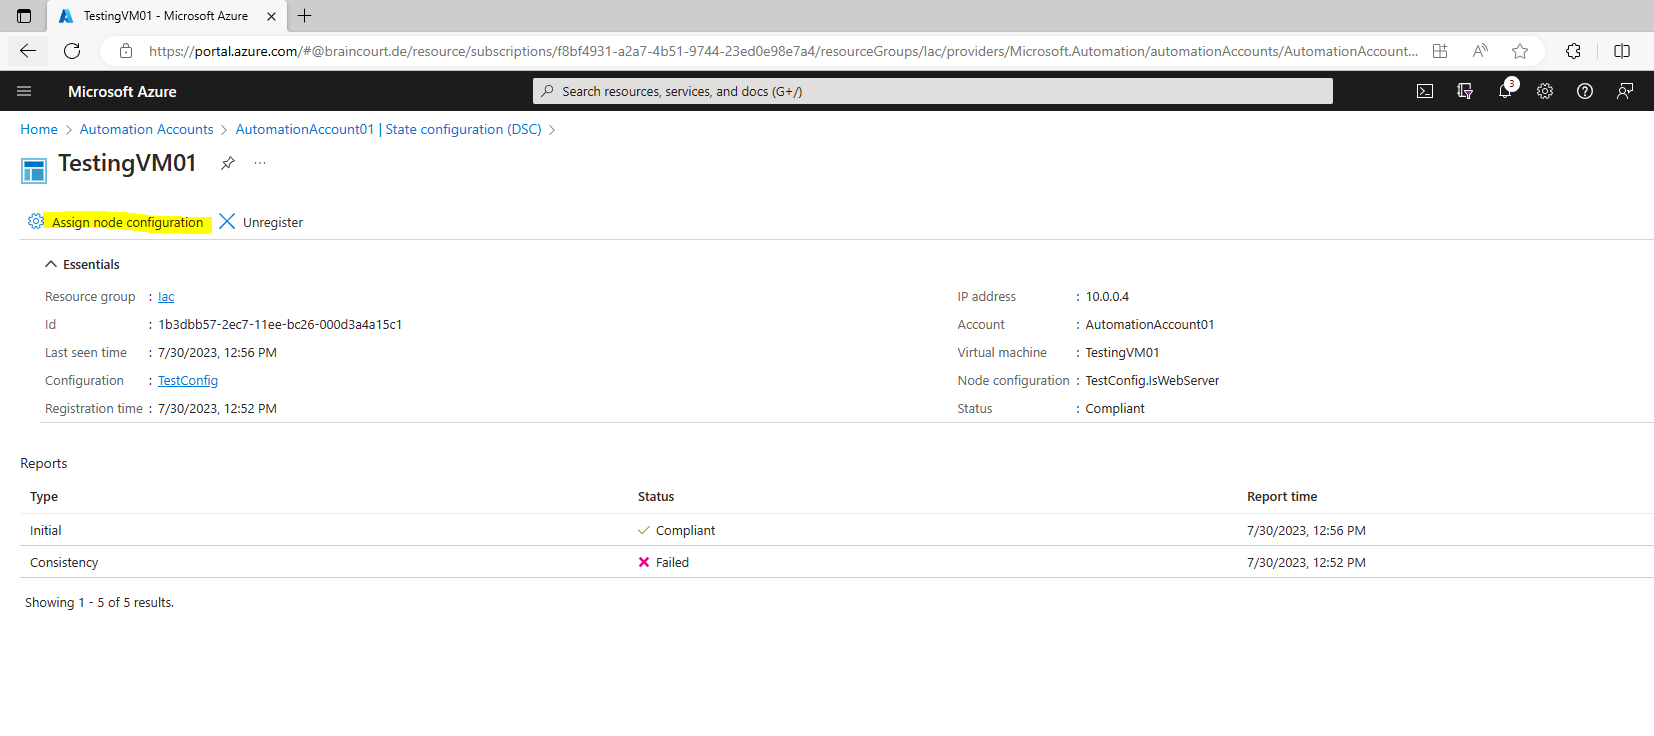
A few minutes later the state switched to Compliant.
- RefreshFrequencyMins – It defines the frequency of node contacting the agent service and can be provided as part of onboarding to DSC. It takes a maximum value of 10080 minutes.
- Node will be marked as Unresponsive if the node does not contact the agent service for 1440 minutes (1 Day). We recommend that you use RefreshFrequencyMins value < 1440 minutes, else the node would show in a false Unresponsive state.
View reports for managed nodes
Each time State Configuration performs a consistency check on a managed node, the node sends a status report back to the pull server. You can view these reports on the page for that node.
On the State configuration (DSC) page, click the Nodes tab. Here, you can see the overview of Configuration state and the details for each node.
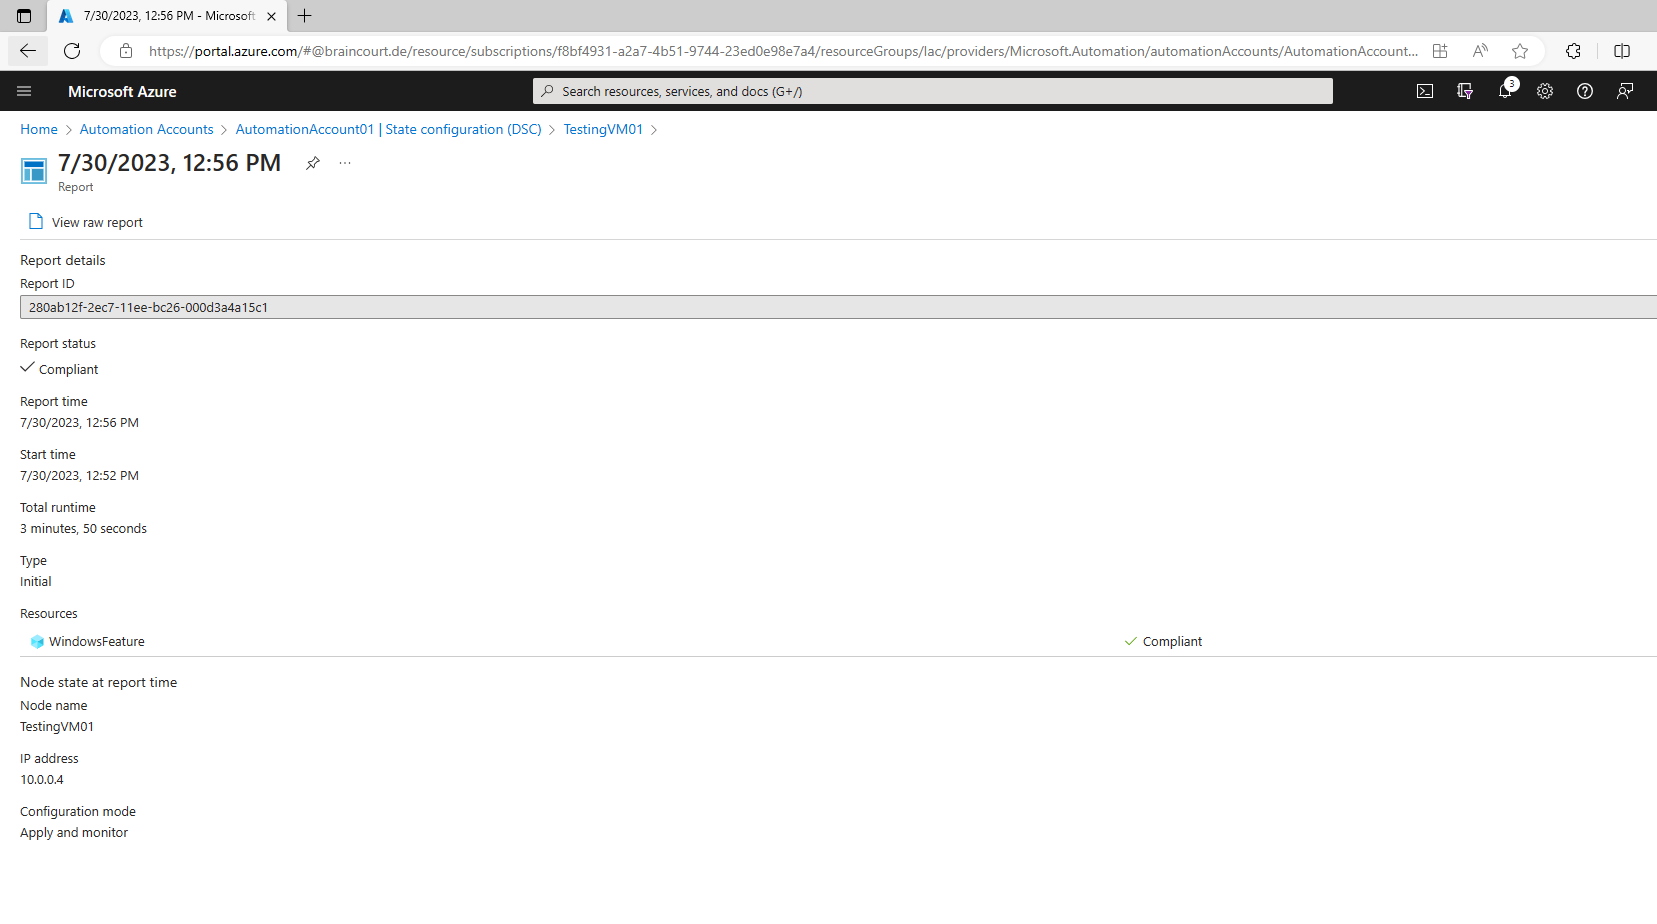
While on the Nodes tab, click the node record to open the reporting. Click the report you want to view additional reporting details.
Click on the report to see more details
On the blade for an individual report, you can see the following status information for the corresponding consistency check:
- The report status. Possible values are:
- Compliant – the node is compliant with the check.
- Failed – the configuration failed the check.
- Not Compliant – the node is in ApplyandMonitor mode and the machine is not in the desired state.
- The start time for the consistency check.
- The total runtime for the consistency check.
- The type of consistency check.
- Any errors, including the error code and error message.
- Any DSC resources used in the configuration, and the state of each resource (whether the node is in the desired state for that resource). You can click on each resource to get more detailed information for that resource.
- The name, IP address, and configuration mode of the node.
You can also click View raw report to see the actual data that the node sends to the server. For more information about using that data, see Using a DSC report server.
It can take some time after a node is enabled before the first report is available. You might need to wait up to 30 minutes for the first report after you enable a node.
Reassign a node to a different node configuration
You can assign a node to use a different node configuration than the one you initially assigned.
On the State configuration (DSC) page, click the Nodes tab.
On the Nodes tab, click on the name of the node you want to reassign.
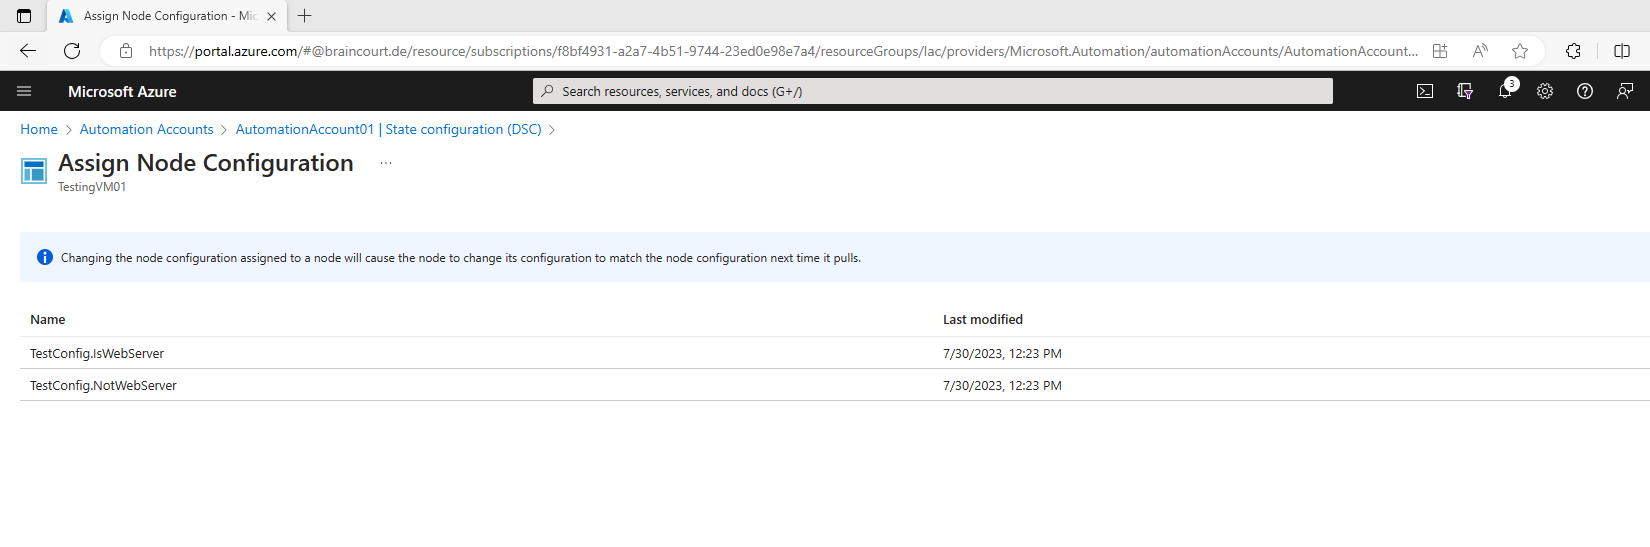
On the page for that node, click Assign node configuration.
On the Assign Node Configuration page, select the node configuration to which you want to assign the node, and then click OK.
Unregister a node
If you no longer want a node to be managed by State Configuration, you can unregister it and safely remove a PowerShell Desired State Configuration (DSC) configuration from managed nodes. For both Windows and Linux nodes, you need to unregister the node and Delete a configuration from the node. For Linux nodes only, you can optionally delete the DSC packages from the nodes as well. See Remove the DSC package from a Linux node.
Unregistering a node from the service only sets the Local Configuration Manager settings so the node is no longer connecting to the service. This does not effect the configuration that’s currently applied to the node, and leaves the related files in place on the node. After you unregister/delete the node, to re-register it, clear the existing configuration files. See Delete a configuration from the node.
If you no longer want a node to be managed by State Configuration (DSC), you can unregister it from the Azure portal or with Azure PowerShell using the following steps.
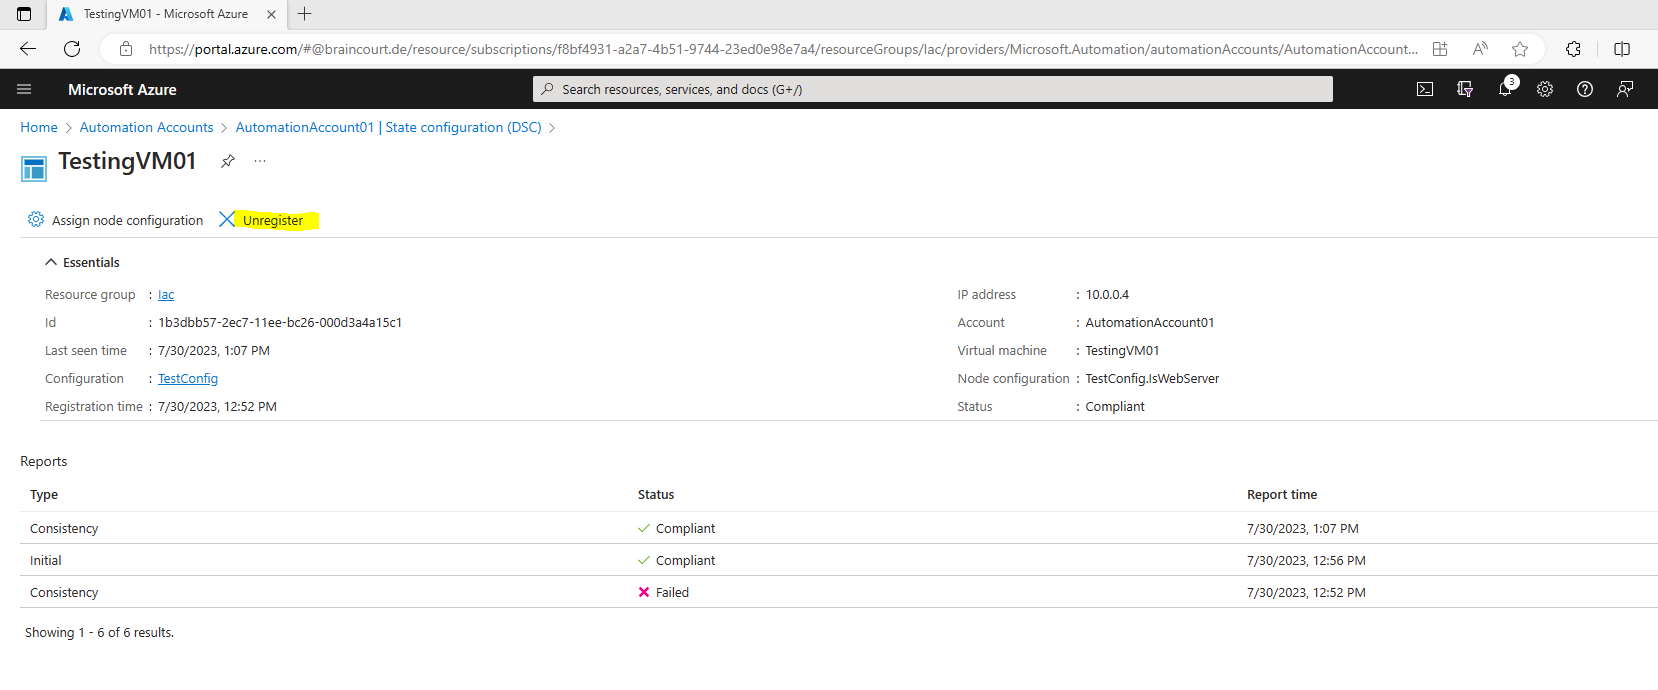
On the Nodes tab, select the name of the node you want to unregister.
On the pane for that node, click Unregister.
Actually clicking the Unregister link should set the Local Configuration Manager settings so the node is no longer connecting to the service according to my understandig when reading the following Microsoft article.
How to remove a configuration and node from Automation State Configuration
https://learn.microsoft.com/en-us/azure/automation/state-configuration/remove-node-and-configuration-package?tabs=azureportal%2Cdelete-azureportal
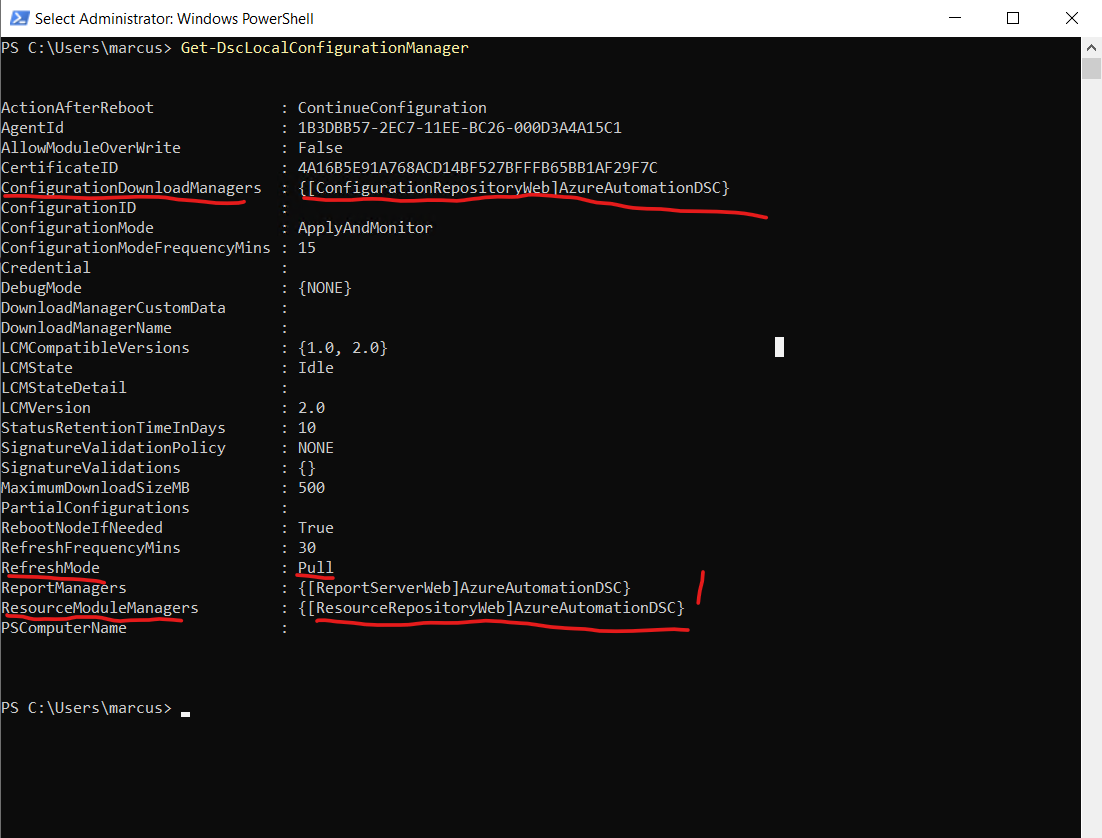
In my case unfortunately neither Windows Azure Resource Manager VMs nor Windows on-premises VMs will change the Local Configuration Manager settings event after waiting the Refresh Frequency Minutes to determine and update the changes.
The LCM settings still list the Azure Automation DSC Pull server and also the refresh mode is still set to Pull, by default it is Push.
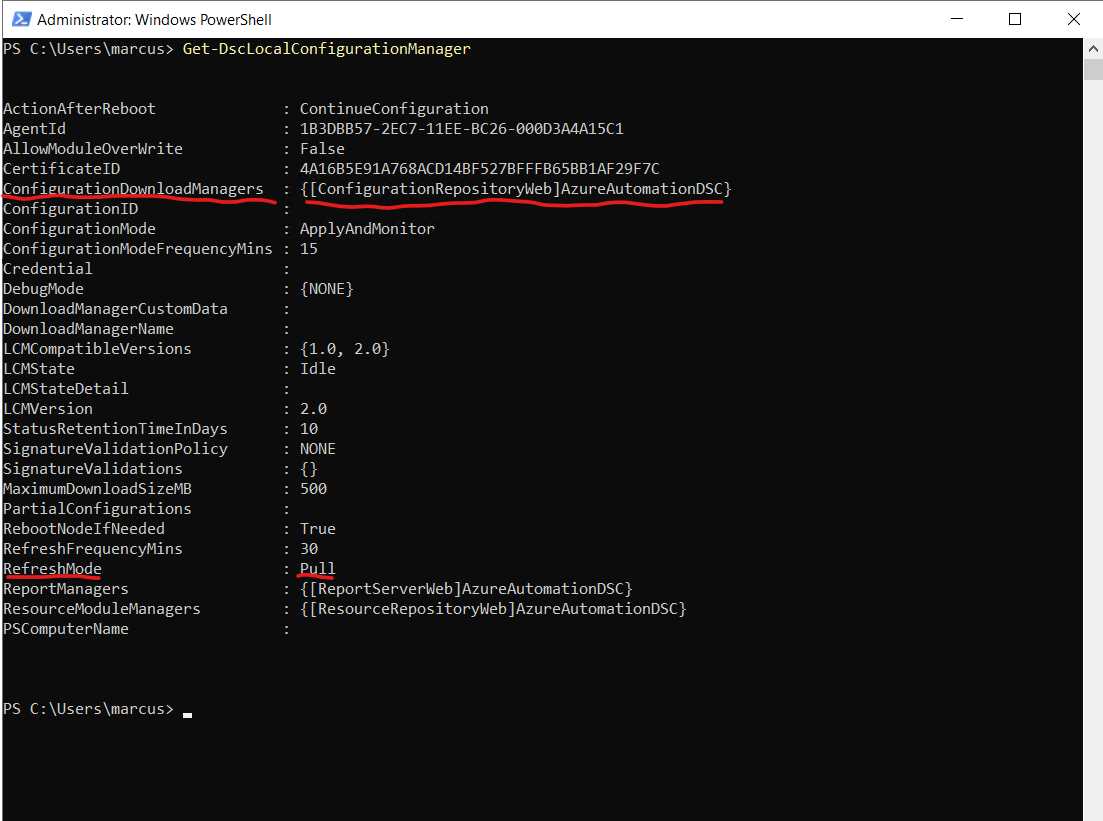
In order to successfully change the LCM settings on the node to not longer connect to the Azure Pull server, you can read the section Reset Local Configuration Manager further below.
Delete a configuration from the node
When you’re ready to remove an imported DSC configuration document (which is a Managed Object Format (MOF) or .mof file) that’s assigned to one or more nodes, follow either of these steps.
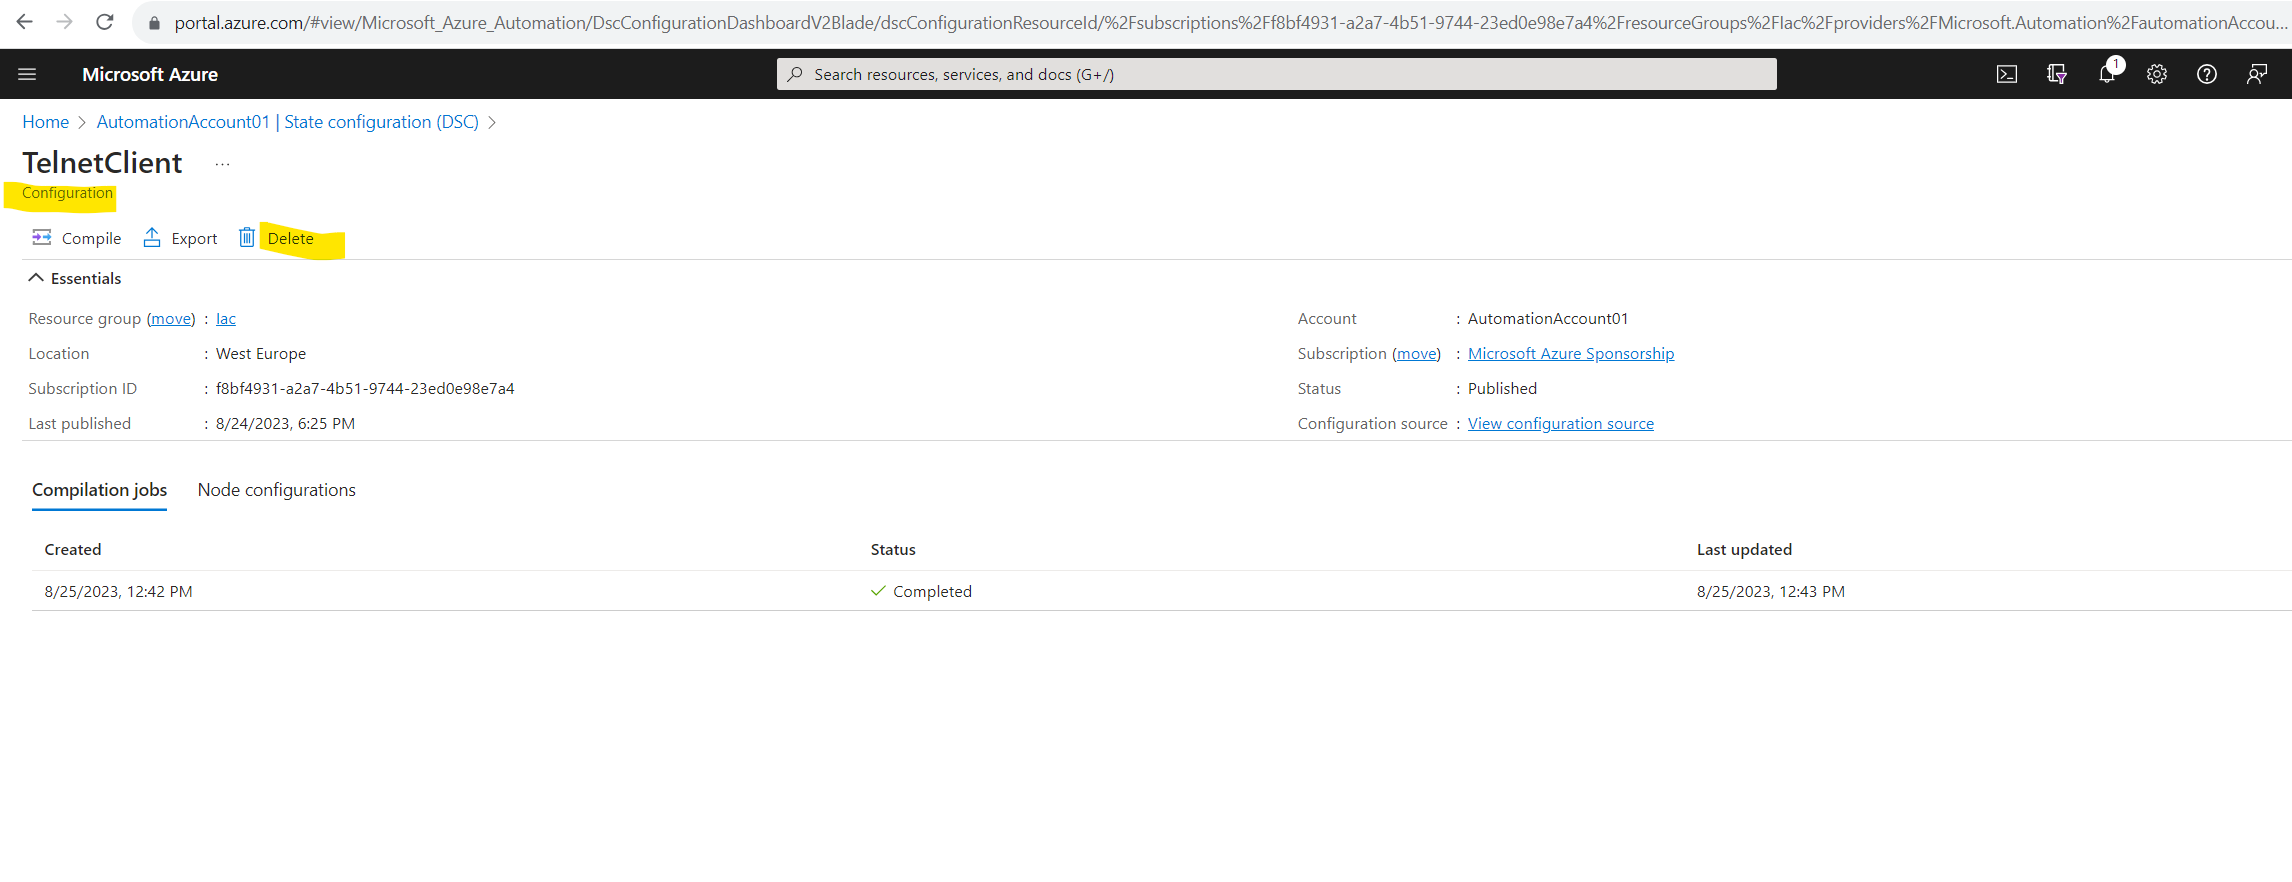
On the State configuration (DSC) page, click the Configurations tab, then select the name of the configuration you want to delete.
On the configuration’s detail page, click Delete to remove the configuration.
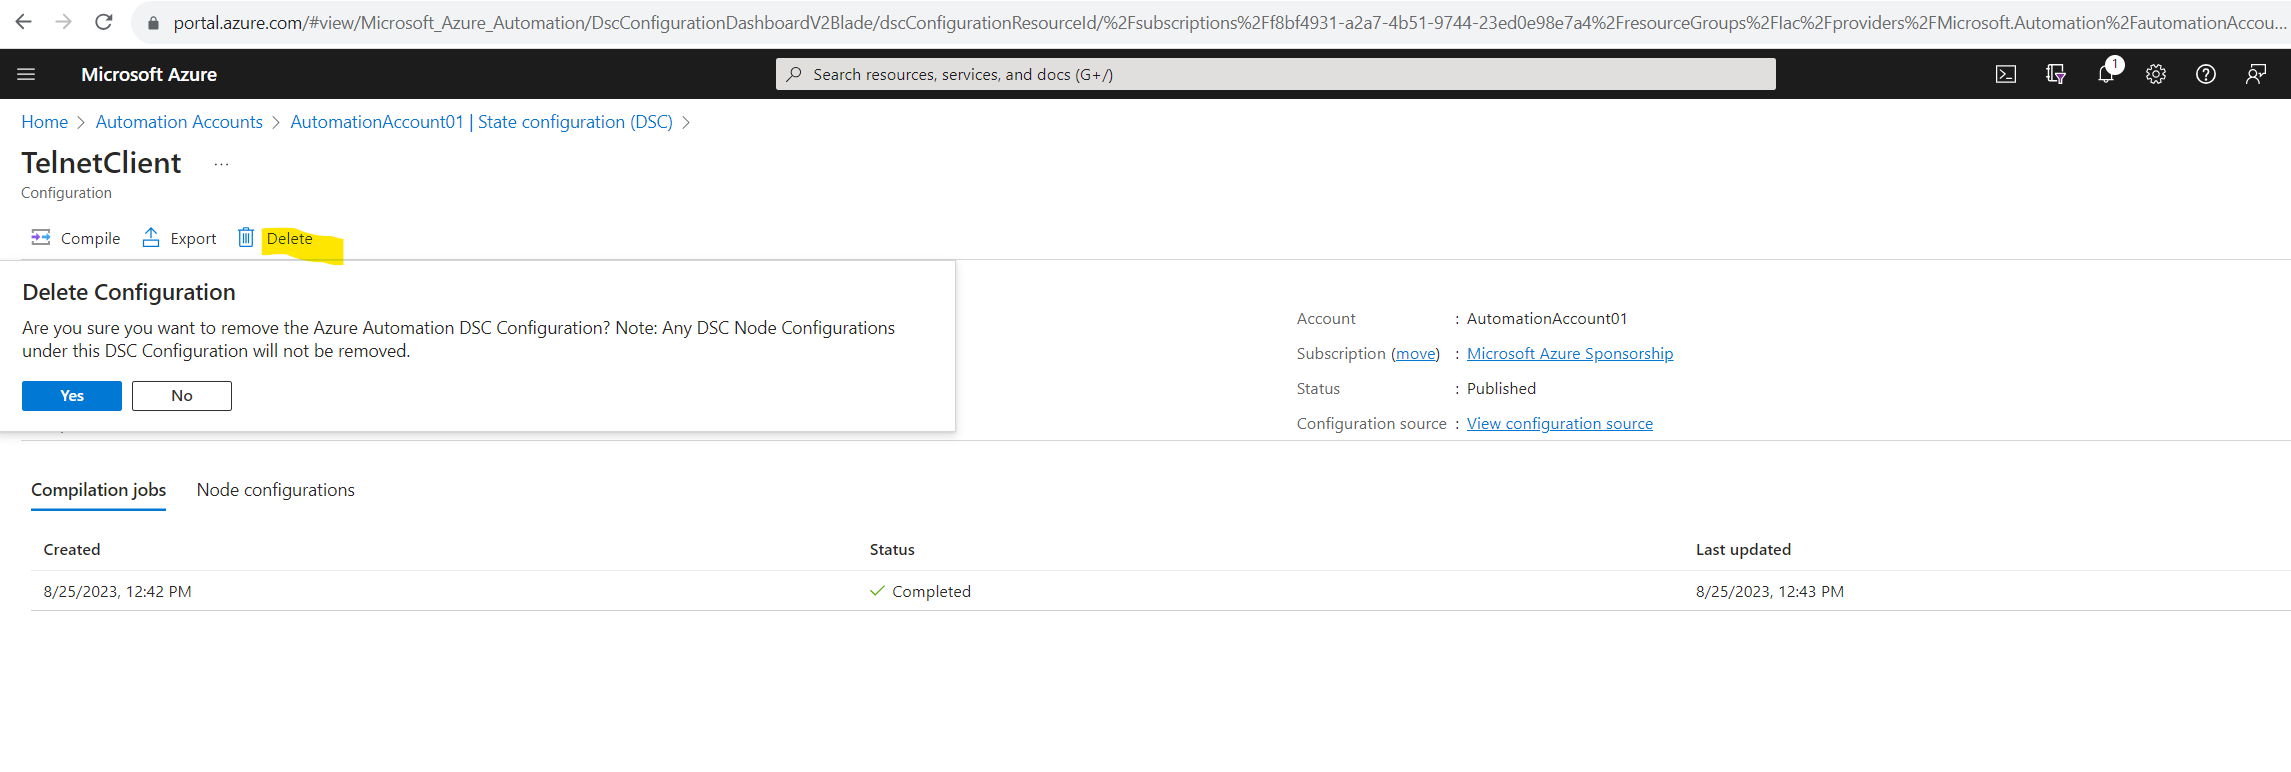
Here I encounter the same strange behavior as previously for unregister the node from Azure Automation State Configuration.
Actually clicking the Delete link should not just remove the configuration files from the Azure Pull server but also remove the configuration from the node to my understandig when reading the mentioned Microsoft article.
In my case unfortunately also here neither on the Windows Azure Resource Manager VMs nor on the Windows on-premises VMs the configuration was removed from the nodes and is still present on.
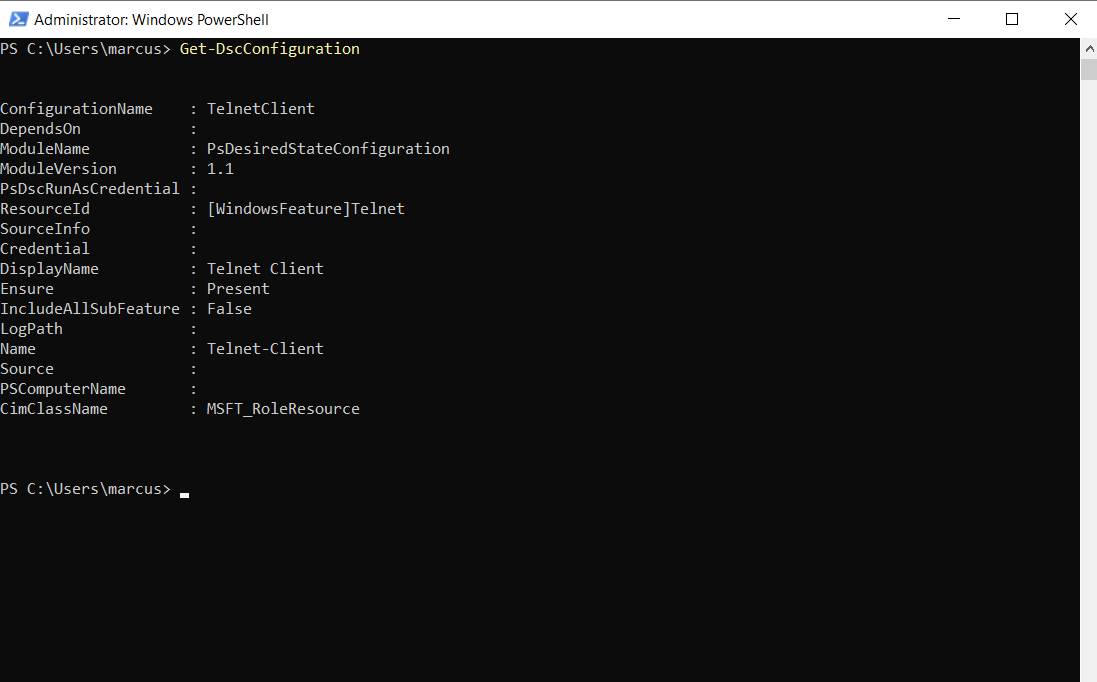
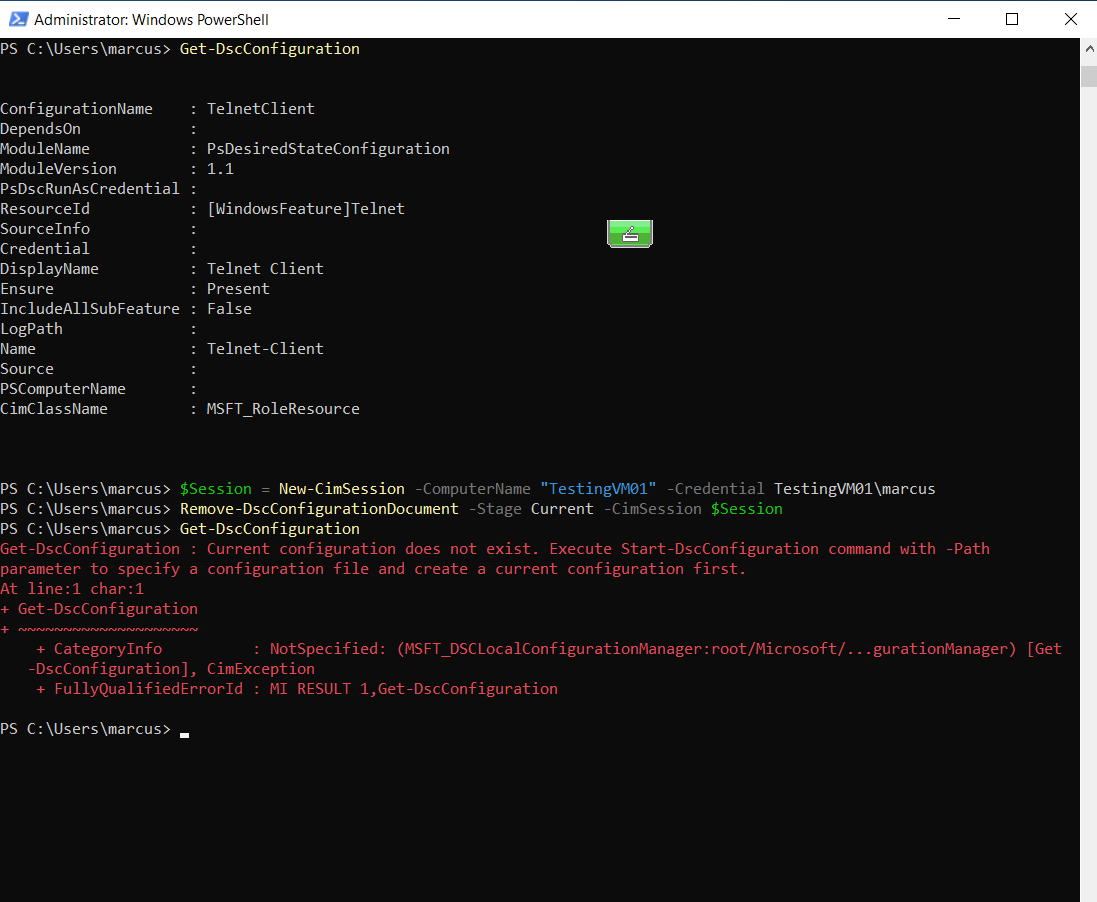
The only way I could remove the configuration from the nodes is by executing the following PowerShell cmdlet on them as showed already in Part 3 for Desired State Configuration (DSC).
The cmdlet removes that configuration document (.mof file) from the Windows PowerShell Desired State Configuration (DSC) configuration store and does additional cleanup. Adjust the computer name and credentials to your need.
$Session = New-CimSession -ComputerName “Server01” -Credential ACCOUNTSPattiFuller
Remove-DscConfigurationDocument -Stage Current -CimSession $Session
After executing the Remove-DscConfigurationDocument cmdlet the configuration was removed from the node.
Reset Local Configuration Manager
In order to reset the LCM including the pull server listed in the screenshot below, we can execute the following PowerShell script.
Adjust <hostname> and path.
Param(
[string[]]$Computername = "<hostname>"
)

[DscLocalConfigurationManager()]
Configuration ResetLCM {

Param([string[]]$Computername)

Node $Computername {

Settings {
    RebootNodeIfNeeded = $True
    ConfigurationMode = 'ApplyAndMonitor'
    RefreshMode = 'Push'
    ActionAfterReboot = 'ContinueConfiguration'

}
}

}

ResetLCM -computername $Computername -out C:ResetLCM

Set-DscLocalConfigurationManager -Path C:ResetLCM -ComputerName $Computername -Force -Verbose
I will save the script on the affected node C:ResetLCM.ps1 and run it.
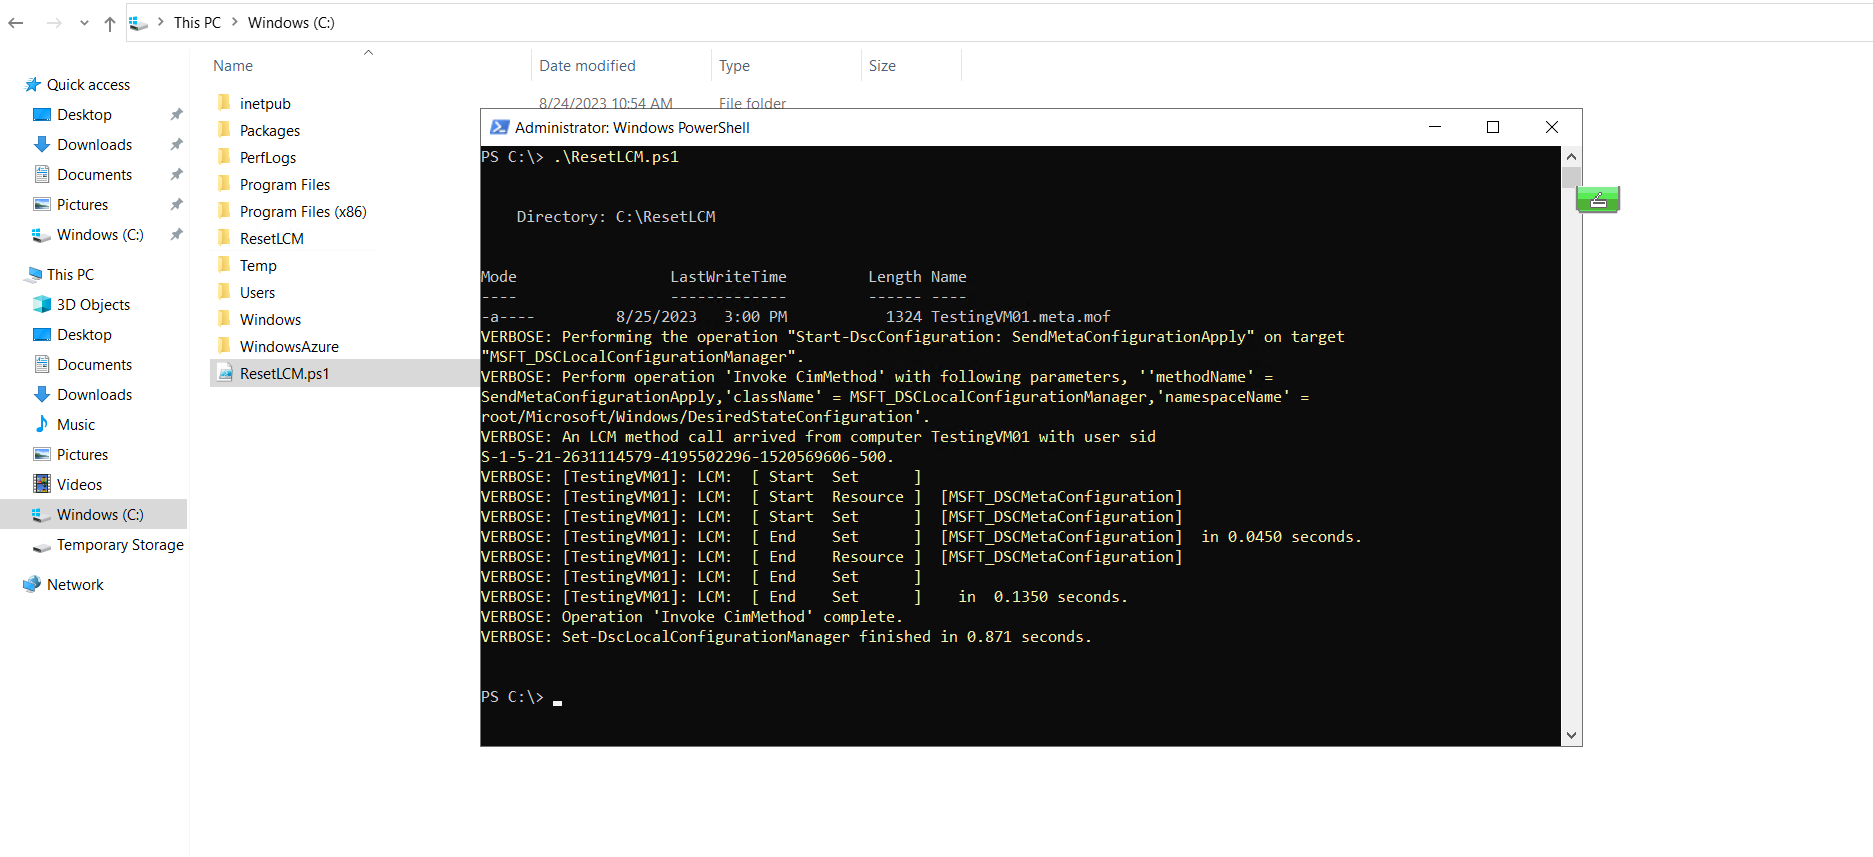
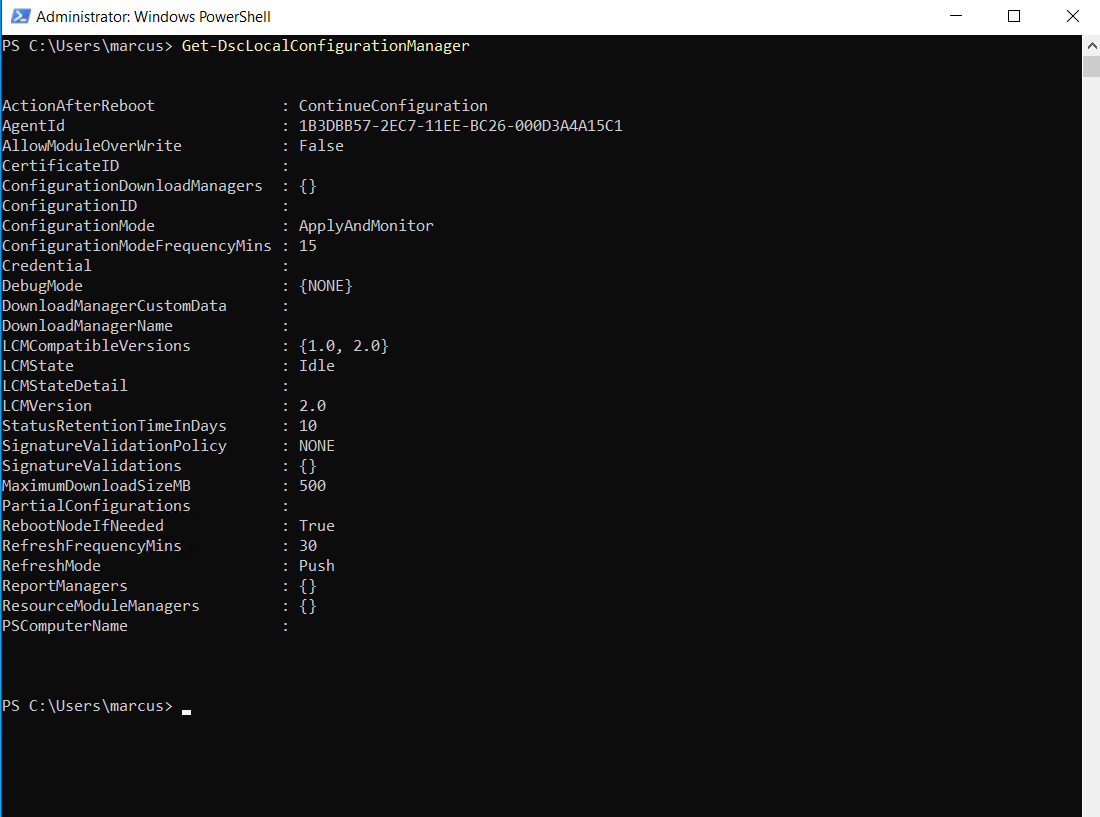
After executing the script above, the LCM is reset to its default settings. Pull server (ConfigurationDownloadManagers) is set to blank and RefreshMode is changed from Pull to Push.
Enable an On-Premise Hyper-V VM for management with State Configuration
We can also enable on-premise Windows servers to Azure Automation State Configuration. Make sure that the latest version of WMF 5 is installed on the machines to enable for State Configuration. In addition, WMF 5 must be installed on the computer that you are using for enabling the machines.
To enable any machine for State Configuration, you can generate a DSC metaconfiguration. This configuration tells the DSC agent to pull from and/or report to Azure Automation State Configuration. You can generate a DSC metaconfiguration for Azure Automation State Configuration using either a PowerShell DSC configuration or the Azure Automation PowerShell cmdlets.
DSC metaconfigurations contain the secrets needed to enable a machine in an Automation account for management. Make sure to properly protect any DSC metaconfigurations you create, or delete them after use.
Proxy support for metaconfigurations is controlled by the Local Configuration Manager, which is the Windows PowerShell DSC engine. The LCM runs on all target nodes and is responsible for calling the configuration resources that are included in a DSC metaconfiguration script. You can include proxy support in a metaconfiguration by including definitions of ProxyURL and ProxyCredential properties as needed in the ConfigurationRepositoryWeb, ResourceRepositoryWeb, and ReportServerWeb blocks. An example of the URL setting is ProxyURL = “http://172.16.3.6:3128”;. The ProxyCredential property is set to a PSCredential object, as described in Manage credentials in Azure Automation.
Generate DSC metaconfigurations using a DSC configuration
Open VSCode (or your favorite editor) as an administrator on a machine in your local environment. The machine must have the latest version of WMF 5 installed.
Copy the following script locally. This script contains a PowerShell DSC configuration for creating metaconfigurations, and a command to kick off the metaconfiguration creation.
# The DSC configuration that will generate metaconfigurations
[DscLocalConfigurationManager()]
Configuration DscMetaConfigs
{
param
(
[Parameter(Mandatory=$True)]
[String]$RegistrationUrl,
[Parameter(Mandatory=$True)]
[String]$RegistrationKey,
[Parameter(Mandatory=$True)]
[String[]]$ComputerName,
[Int]$RefreshFrequencyMins = 30,
[Int]$ConfigurationModeFrequencyMins = 15,
[String]$ConfigurationMode = 'ApplyAndMonitor',
[String]$NodeConfigurationName,
[Boolean]$RebootNodeIfNeeded= $False,
[String]$ActionAfterReboot = 'ContinueConfiguration',
[Boolean]$AllowModuleOverwrite = $False,
[Boolean]$ReportOnly
)
if(!$NodeConfigurationName -or $NodeConfigurationName -eq '')
{
$ConfigurationNames = $null
}
else
{
$ConfigurationNames = @($NodeConfigurationName)
}
if($ReportOnly)
{
$RefreshMode = 'PUSH'
}
else
{
$RefreshMode = 'PULL'
}
Node $ComputerName
{
Settings
{
RefreshFrequencyMins = $RefreshFrequencyMins
RefreshMode = $RefreshMode
ConfigurationMode = $ConfigurationMode
AllowModuleOverwrite = $AllowModuleOverwrite
RebootNodeIfNeeded = $RebootNodeIfNeeded
ActionAfterReboot = $ActionAfterReboot
ConfigurationModeFrequencyMins = $ConfigurationModeFrequencyMins
}
if(!$ReportOnly)
{
ConfigurationRepositoryWeb AzureAutomationStateConfiguration
{
ServerUrl = $RegistrationUrl
RegistrationKey = $RegistrationKey
ConfigurationNames = $ConfigurationNames
}
ResourceRepositoryWeb AzureAutomationStateConfiguration
{
ServerUrl = $RegistrationUrl
RegistrationKey = $RegistrationKey
}
}
ReportServerWeb AzureAutomationStateConfiguration
{
ServerUrl = $RegistrationUrl
RegistrationKey = $RegistrationKey
}
}
}
# Create the metaconfigurations
# NOTE: DSC Node Configuration names are case sensitive in the portal.
# TODO: edit the below as needed for your use case
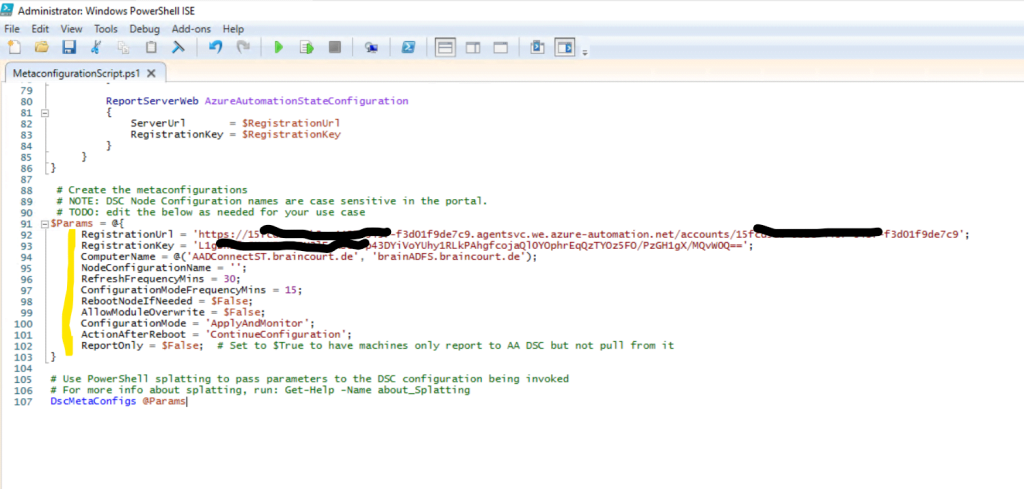
$Params = @{
RegistrationUrl = '<fill me in>';
RegistrationKey = '<fill me in>';
ComputerName = @('<some VM to onboard>', '<some other VM to onboard>');
NodeConfigurationName = '';
RefreshFrequencyMins = 30;
ConfigurationModeFrequencyMins = 15;
RebootNodeIfNeeded = $False;
AllowModuleOverwrite = $False;
ConfigurationMode = 'ApplyAndMonitor';
ActionAfterReboot = 'ContinueConfiguration';
ReportOnly = $False; # Set to $True to have machines only report to AA DSC but not pull from it
}
# Use PowerShell splatting to pass parameters to the DSC configuration being invoked
# For more info about splatting, run: Get-Help -Name about_Splatting
DscMetaConfigs @ParamsFill in the registration key and URL for your Automation account, as well as the names of the machines to enable.
All other parameters are optional. The NodeConfigurationName parameter I will leave blank as this will be set later when we assign a new node configuration to the machines.
To find the registration key and registration URL for your Automation account, see Use DSC metaconfiguration to register hybrid machines.
The ConfigurationModeFrequencyMins parameter will specify the time the node configuration is applied to the VM and the RefreshFrequencyMins parameter will specify the time the VM checks for updates to the node configuration.
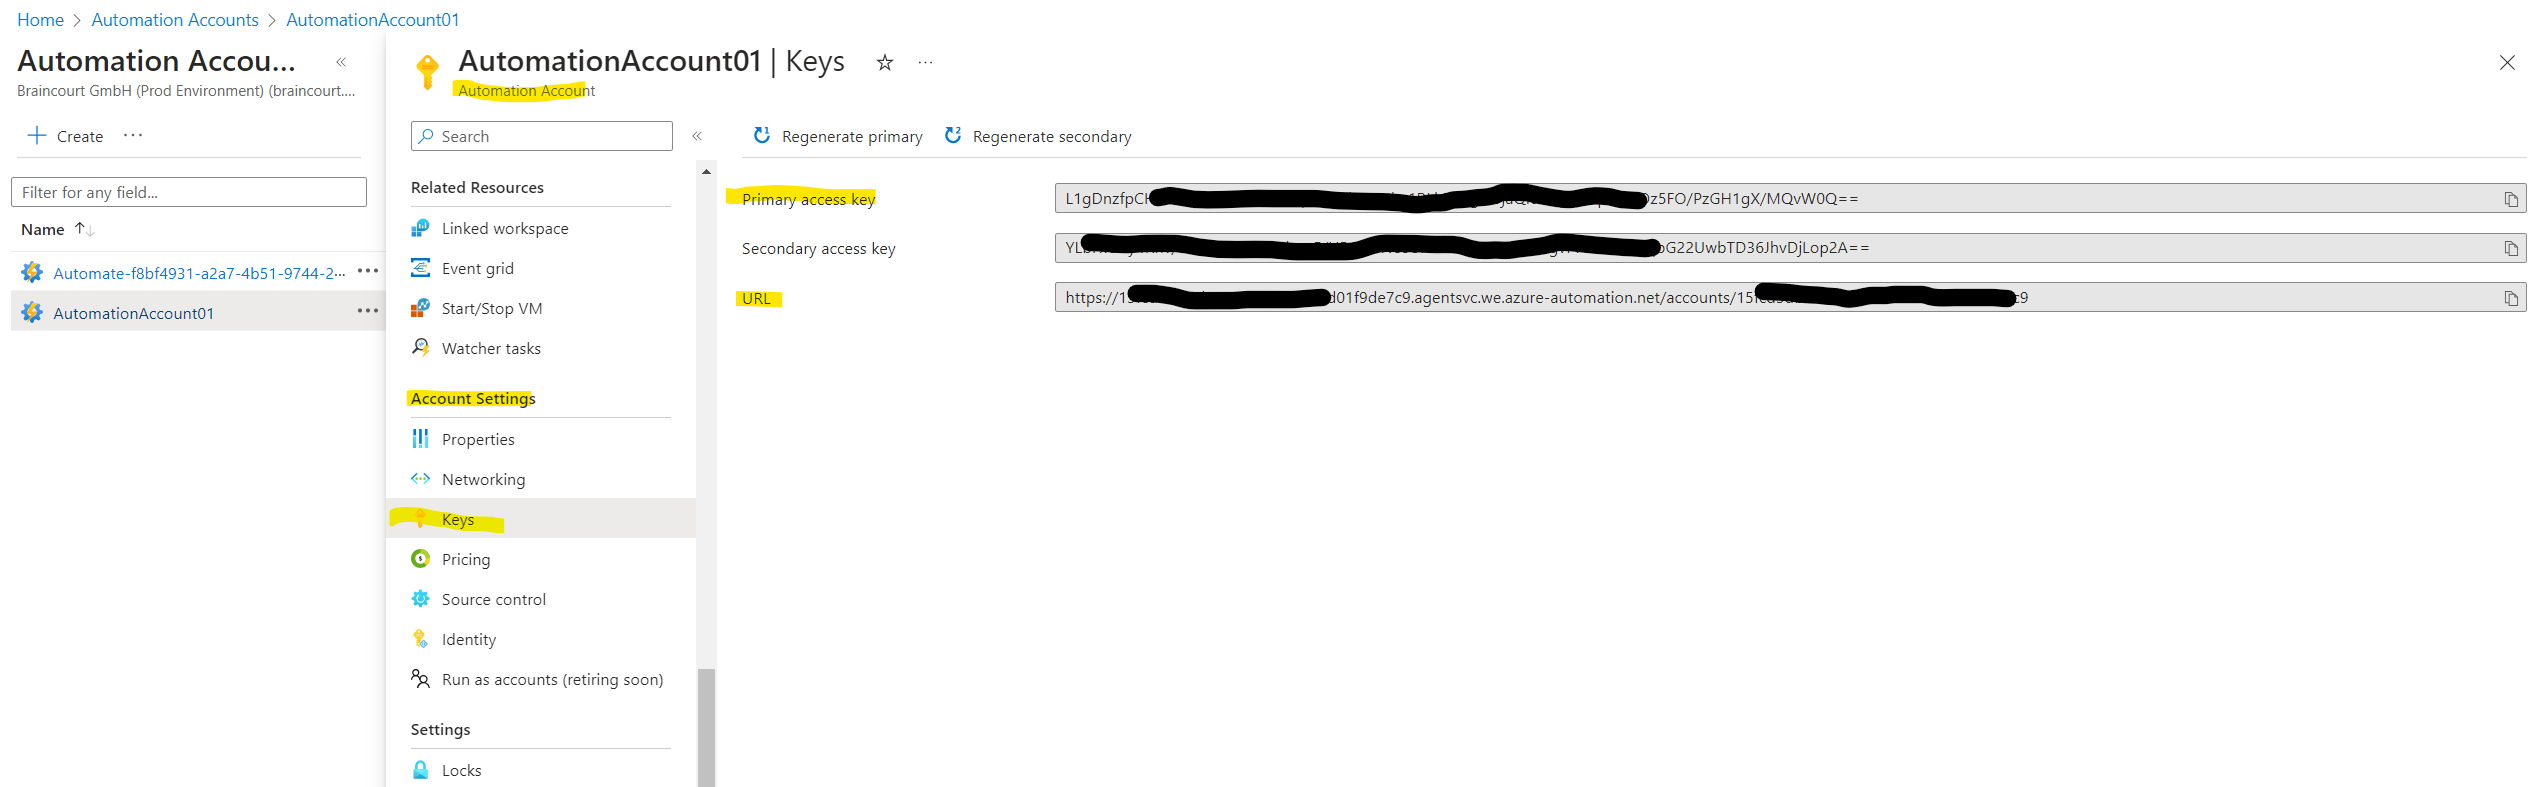
The registration key and registration URL you will find under Account Settings – Keys in your automation account like shown below.
Copy them and insert into the script above.
Further as mentioned we need to insert all machines we want to enable.
If you want the machines to report DSC status information to Azure Automation State Configuration, but not pull configuration or PowerShell modules, set the ReportOnly parameter to true.
If ReportOnly is not set, the machines report DSC status information to Azure Automation State Configuration and pull configuration or PowerShell modules. Set parameters accordingly in the ConfigurationRepositoryWeb, ResourceRepositoryWeb, and ReportServerWeb blocks.
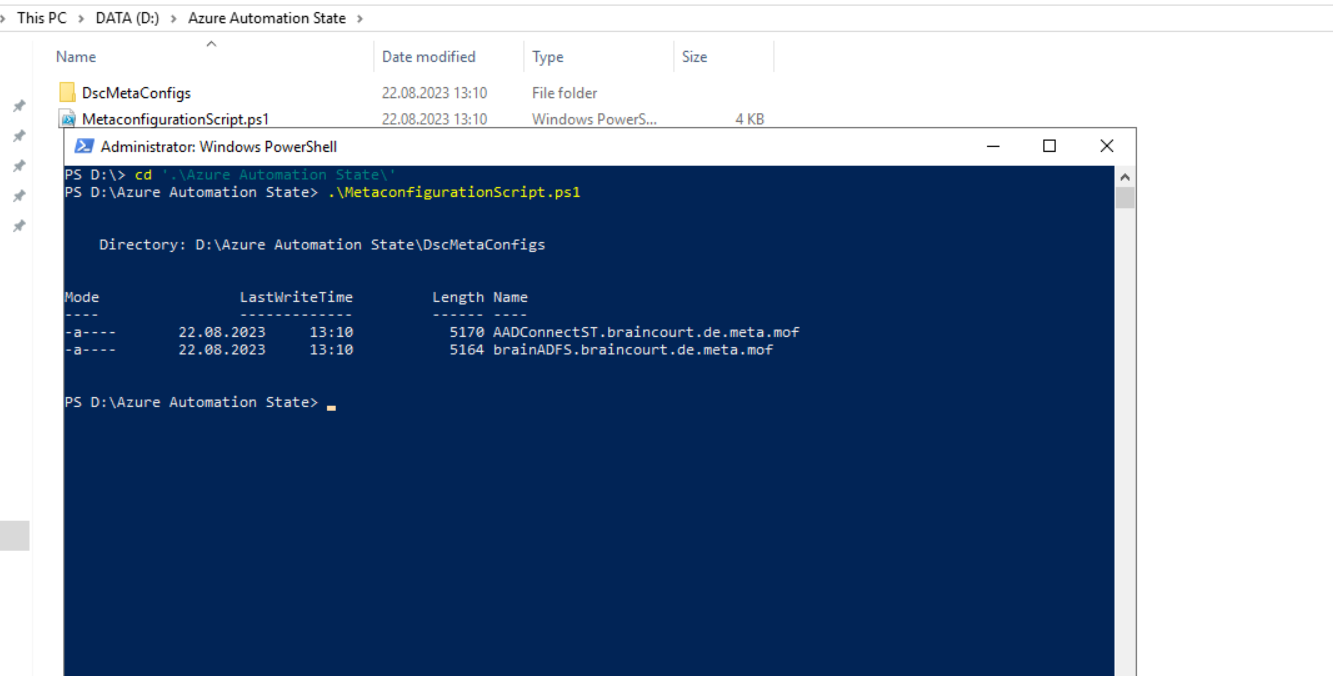
Run the script. You should now have a working directory folder called DscMetaConfigs, containing the PowerShell DSC metaconfigurations for the machines to enable (as an administrator).
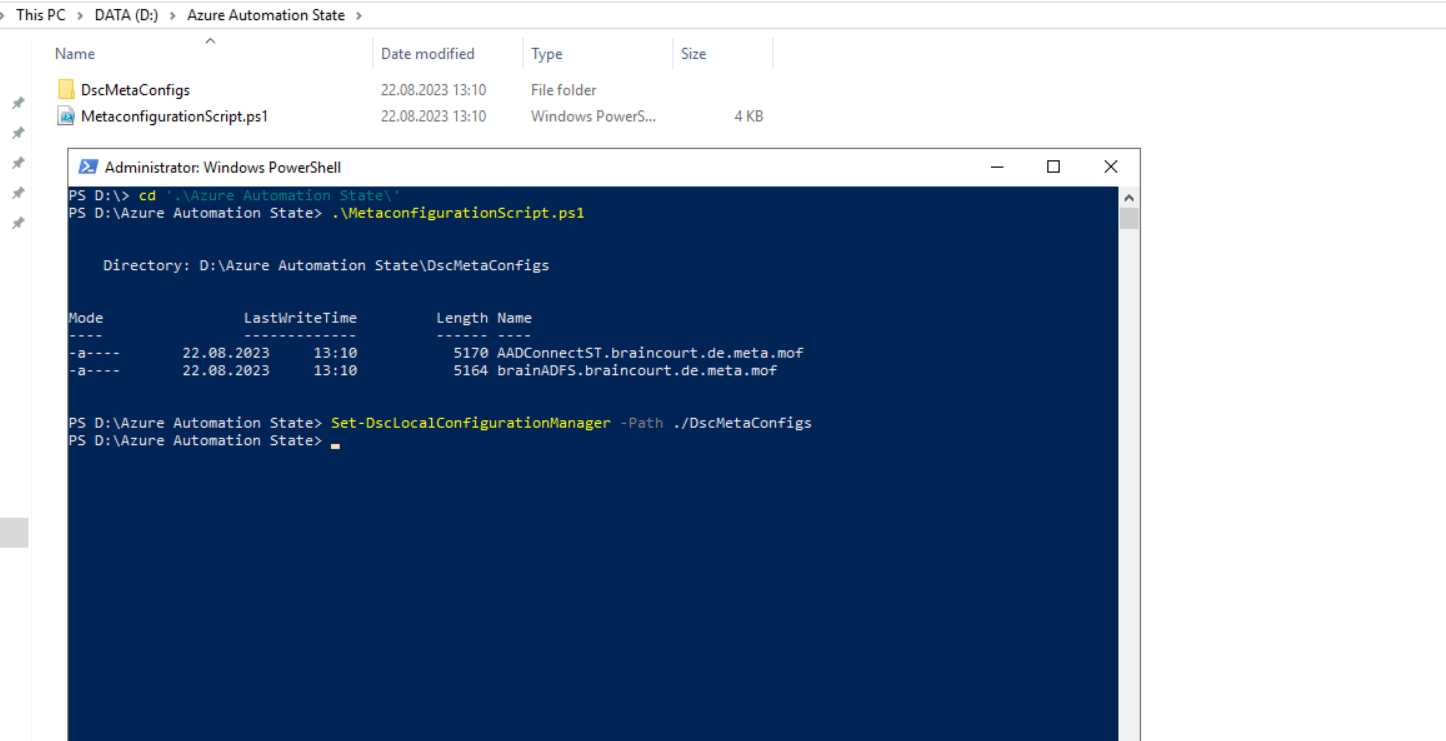
Now we can apply the meta-configuration to our listed nodes by executing the following cmdlet.
Set-DscLocalConfigurationManager -Path ./DscMetaConfigs
The Set-DscLocalConfigurationManager cmdlet applies LCM settings, or meta-configuration, to nodes.
After applying the meta-configuration to our nodes, we should see them listed under our Azure Automation Account and here under State configuration (DSC) – Nodes as shown below.
From now on we can assign a new node configuration to our on-premises VMs as previously for Azure Resource Manager VMs shown.
Finally the web server role will be installed on both of my assigned on-premises VMs.
A few minutes later on both on-premises VMs the web server role was successfully installed.
Check meta-configuration is applied
By executing the following cmdlet, we can check if the meta-configuration was applied to our nodes listed in the script above.
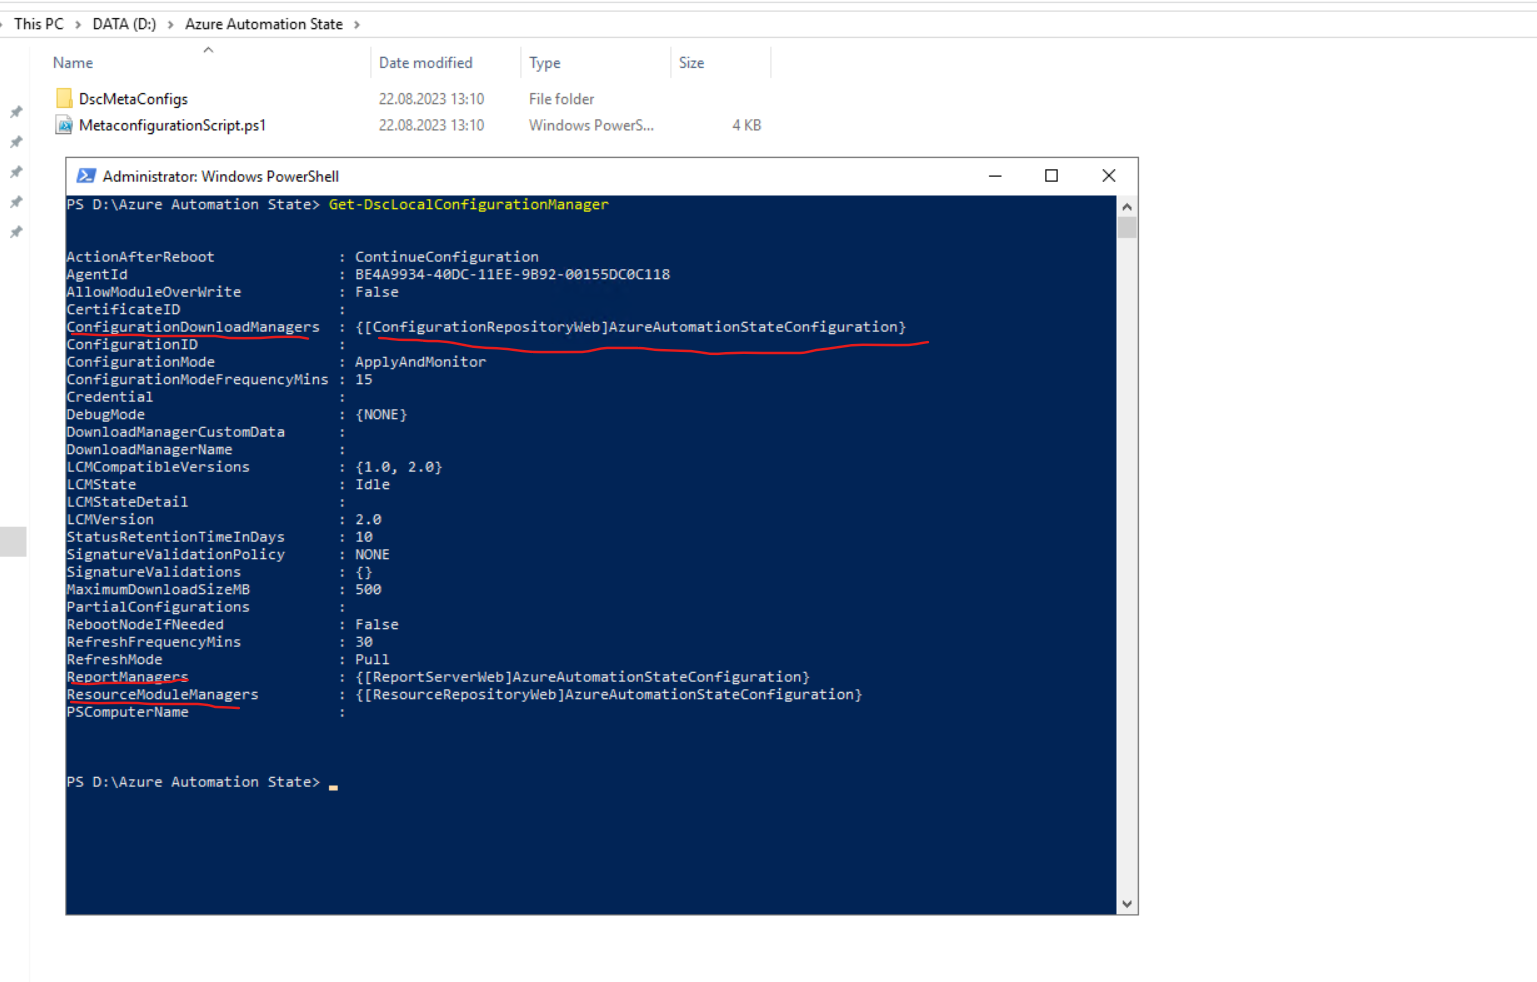
Get-DscLocalConfigurationManager
The Get-DscLocalConfigurationManager cmdlet gets LCM settings, or meta-configuration, and the states of LCM for the node.
Here you can see that the configuration pull service endpoint is set to Azure Automation State Configuration
Check configuration is applied
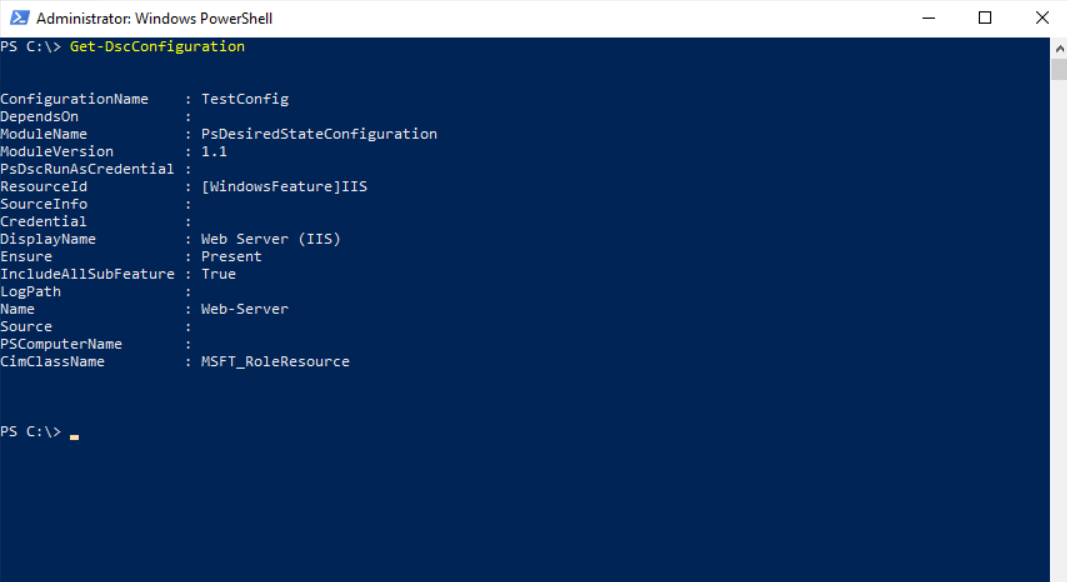
As shown in Part 3 for Desired State Configuration (DSC) you can also use here the Get-DscConfiguration cmdlet to get the current configuration of a node.
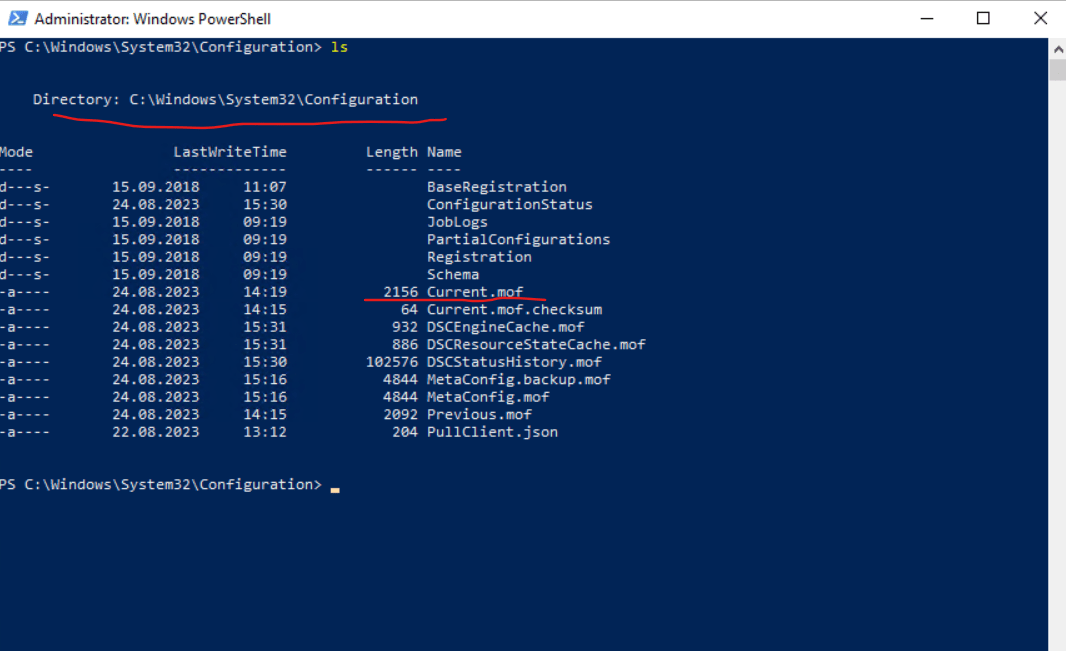
In order to check if a configuration is applied to the machine, you can also check the C:WindowsSystem32configuration folder as also shown in Part 3 for Desired State Configuration (DSC).
In case a configuration is applied to the machine, there must be a Current.mof file present in this path.
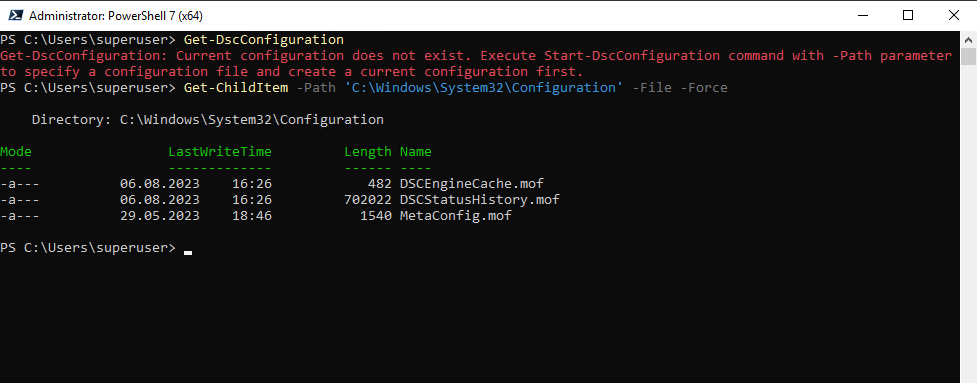
In case no current configuration is applied to the node, this folder will looks like this.
In this path you can also depending on the configuration state see the following .mof files which are self-explaining:
- Previous.mof
- Pending.mof
Force the PowerShell DSC Client to refresh configuration from pull server
Instead of waiting the configuration will be refreshed by the intervals set in meta-configuration, we can force the client to immediately refresh its configuration by executing and run the following command as administrator.
Start-DscConfiguration –UseExisting –Verbose –Wait
Generate DSC metaconfigurations using Azure Automation cmdlets
If PowerShell DSC LCM defaults match your use case and you want to enable machines to both pull from and report to Azure Automation State Configuration, you can generate the needed DSC metaconfigurations more simply using the Azure Automation cmdlets.
Open the PowerShell console or VSCode as an administrator on a machine in your local environment.
Connect to Azure Resource Manager using Connect-AzAccount.
Install and Import the Azure Module
PS> Install-Module -Name Az -AllowClobber -Scope CurrentUser
PS> Import-Module Az
Set the PowerShell execution policy to remote signed:
PS> Set-ExecutionPolicy -ExecutionPolicy RemoteSigned -Scope CurrentUserConnect to your tenant
PS> Connect-AzAccount
Download the PowerShell DSC metaconfigurations for the machines you want to enable from the Automation account in which you are setting up nodes.
# Define the parameters for Get-AzAutomationDscOnboardingMetaconfig using PowerShell Splatting
$Params = @{
ResourceGroupName = 'ContosoResources'; # The name of the Resource Group that contains your Azure Automation account
AutomationAccountName = 'ContosoAutomation'; # The name of the Azure Automation account where you want a node on-boarded to
ComputerName = @('web01', 'web02', 'sql01'); # The names of the computers that the metaconfiguration will be generated for
OutputFolder = "$env:UserProfileDesktop";
}
# Use PowerShell splatting to pass parameters to the Azure Automation cmdlet being invoked
# For more info about splatting, run: Get-Help -Name about_Splatting
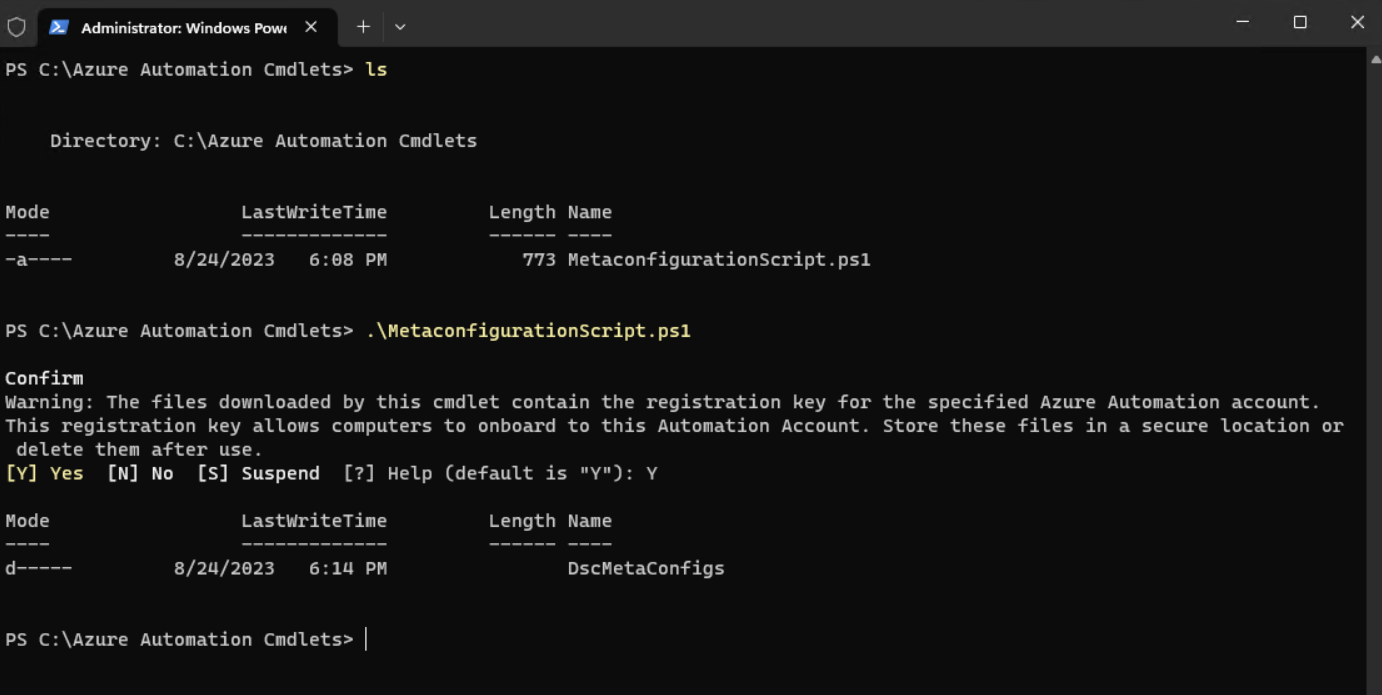
Get-AzAutomationDscOnboardingMetaconfig @ParamsI will save it on a domain joined VM under C:Azure Automation CmdletsMetaconfigurationScript.ps1
Run the script to create the DscMetaConfigs folder containing the PowerShell DSC metaconfigurations for the machines to enable (as an administrator).
PS> Set-DscLocalConfigurationManager -Path $env:UserProfileDesktopDscMetaConfigs
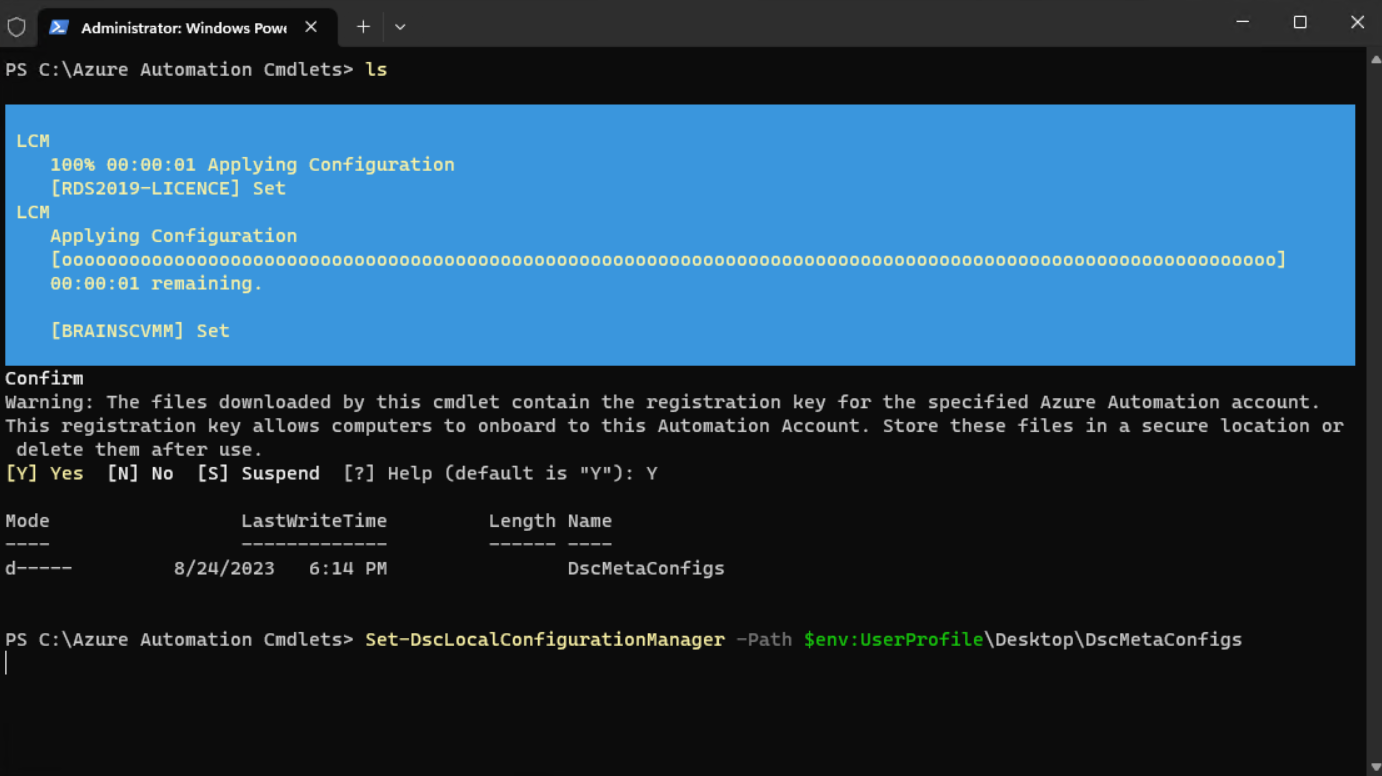
After that the VMs are also registered in Azure Automation State Configuration.

Troubleshooting
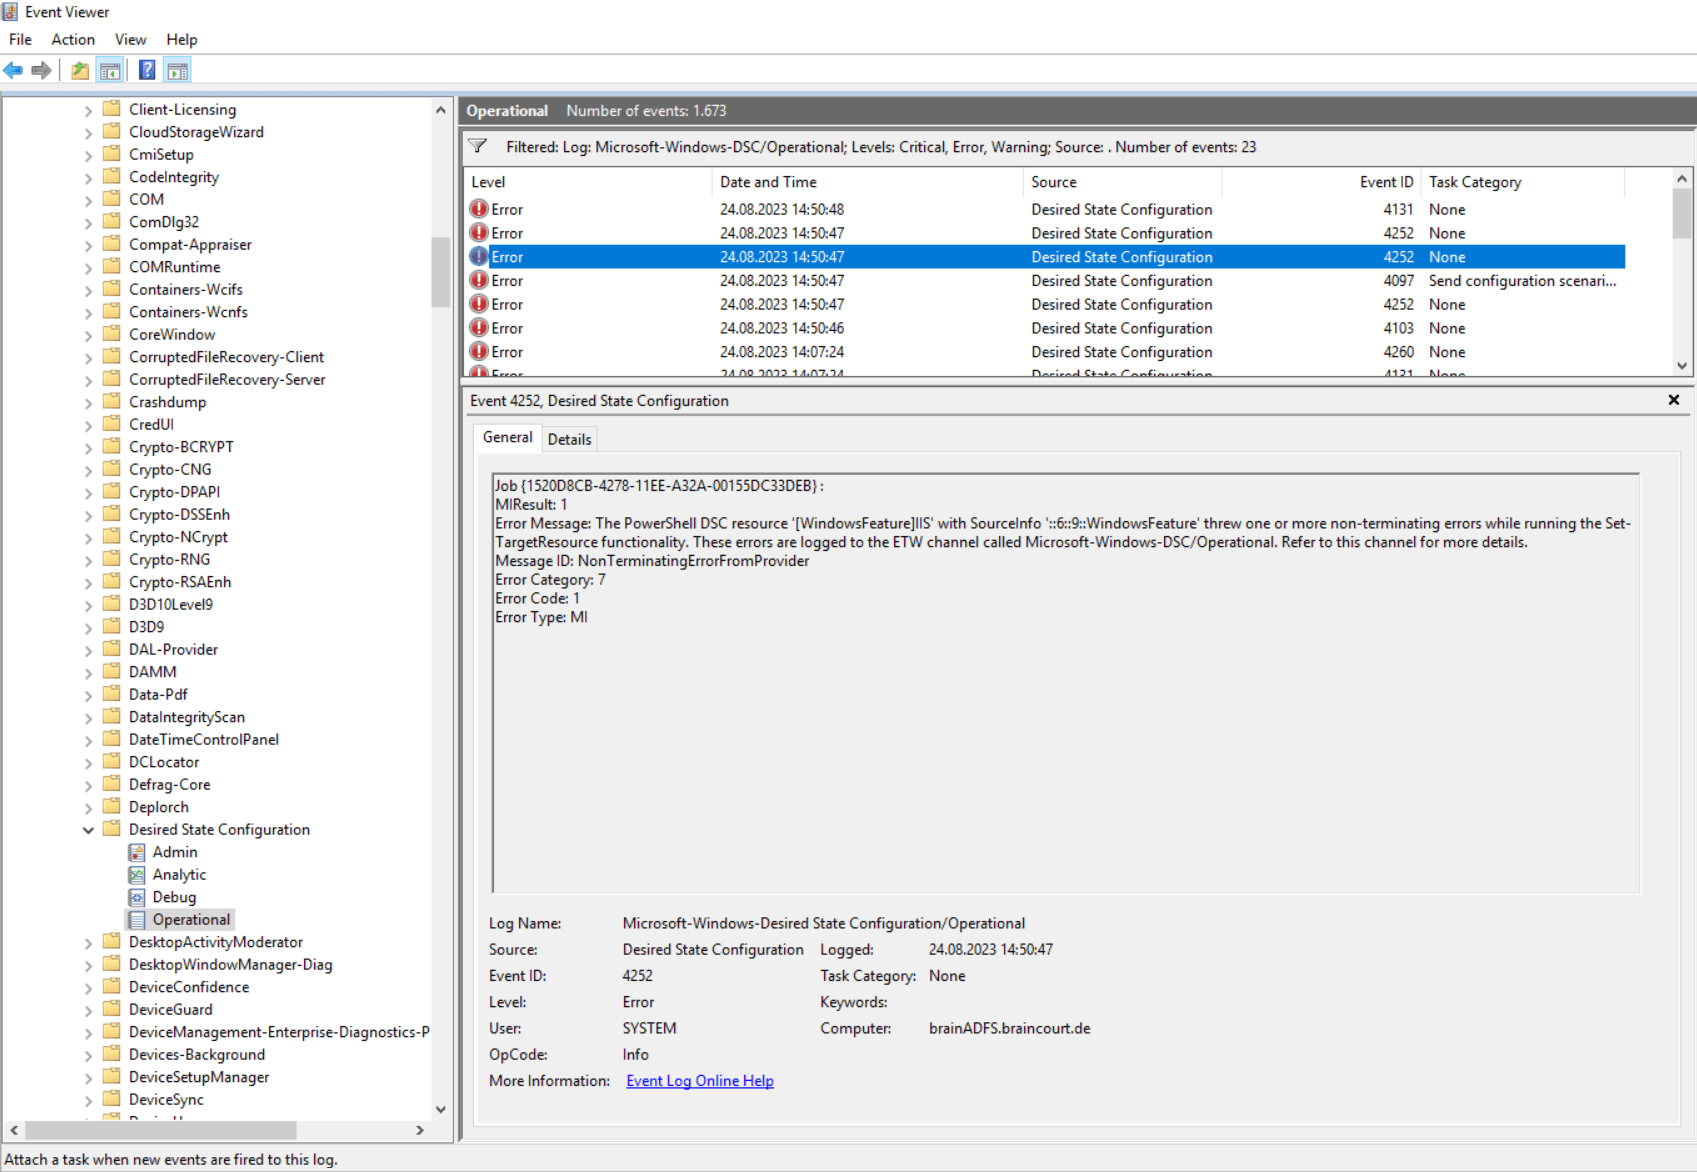
Windows PowerShell Desired State Configuration (DSC) is using the following section to log all events. You can use them for further troubleshooting.
Event Viewer: Applications and Services Logs/Microsoft/Windows/Desired State Configuration
Troubleshoot Azure Automation State Configuration issues
https://learn.microsoft.com/en-us/azure/automation/troubleshoot/desired-state-configuration
Series Summary
- Infrastructure as Code (IaC) – Part 1
- Infrastructure as Code (IaC) – Part 2 – Azure Resource Manager (ARM) templates
- Infrastructure as Code (IaC) – Part 3 – Desired State Configuration (DSC)
- Infrastructure as Code (IaC) – Part 4 – Azure Automation State
- Infrastructure as Code (IaC) – Part 5 – Azure Automanage Machine Configuration (formerly called Azure Policy Guest Configuration)
- Infrastructure as Code (IaC) – Part 6 – Terraform
Links
Get started with Azure Automation State Configuration
https://learn.microsoft.com/en-us/azure/automation/automation-dsc-getting-startedHow to remove a configuration and node from Automation State Configuration
https://learn.microsoft.com/en-us/azure/automation/state-configuration/remove-node-and-configuration-package?tabs=azureportal%2Cdelete-azureportalTroubleshoot Azure Automation State Configuration issues
https://learn.microsoft.com/en-us/azure/automation/troubleshoot/desired-state-configuration