Infrastructure as Code (IaC) – Part 5 – Azure Automanage Machine Configuration (formerly called Azure Policy Guest Configuration)
Azure Automanage is a service which will automatically onboard virtual machines to several services as shown in the figure below when using the Best Practices Configuration Profiles
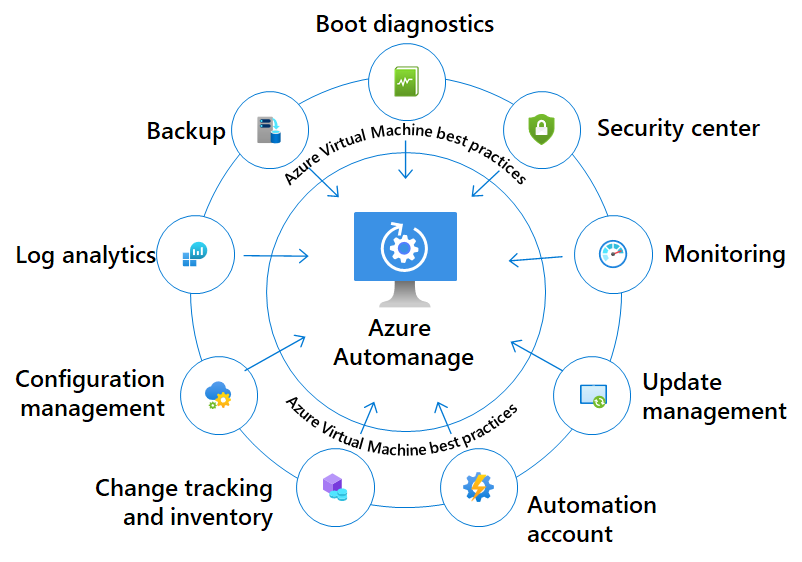
Source: https://learn.microsoft.com/en-us/azure/automanage/overview-about#participating-services
In this post I want to focus on Azure Automanage Machine configuration (formerly called Azure Policy Guest Configuration) and how we can use it to configure and deploy a desired state configuration (DSC) as in the previous posts when using native Desired State Configuration (DSC) or Azure Automation State.
In the end all of them using PowerShell DSC to apply and ensure the configuration.
In a nutshell, machine configuration uses desired state configuration (DSC) when auditing and configuring both Windows and Linux, so we still need to create a DSC configuration which is then compiled into a MOF file. The MOF file is then included in a so called configuration package artifact which we need to publish to a storage account in order it can be accessed automatically and dynamically by Azure Policy. Finally we need to create an Azure Definition and Policy which is in charge to apply the configuration to the virtual machines the Policy is assigned to.
Azure Automanage itself will monitor for drifts and corrects for it when detected. What this means is if your virtual machine or Arc-enabled server is onboarded to Azure Automanage, it will monitor the machines to ensure that it continues to comply with its configuration profile across its entire lifecycle.
If the virtual machine does drift or deviate from the profile (for example, if a service is off-boarded), it will correct it and pull the machine back into the desired state.
Not just the configuration profiles like the built-in best practices profiles from Automanage will be monitored and corrected in case of a drift but also the machine configuration (our PowerShell DSC)
Introduction
Azure Policy Guest Configuration is now called Azure Automanage Machine Configuration. Learn more about the recent renaming of Microsoft configuration management services.
Azure Policy’s machine configuration feature provides native capability to audit or configure operating system settings as code for machines running in Azure and hybrid Arc-enabled machines. You can use the feature directly per-machine, or orchestrate it at scale by using Azure Policy.
Configuration resources in Azure are designed as an extension resource. You can imagine each configuration as an extra set of properties for the machine. Configurations can include settings such as:
- Operating system settings
- Application configuration or presence
- Environment settings
Configurations are distinct from policy definitions. Machine configuration uses Azure Policy to dynamically assign configurations to machines. You can also assign configurations to machines manually, or by using other Azure services such as Automanage.
Source: https://learn.microsoft.com/en-us/azure/governance/machine-configuration/overview
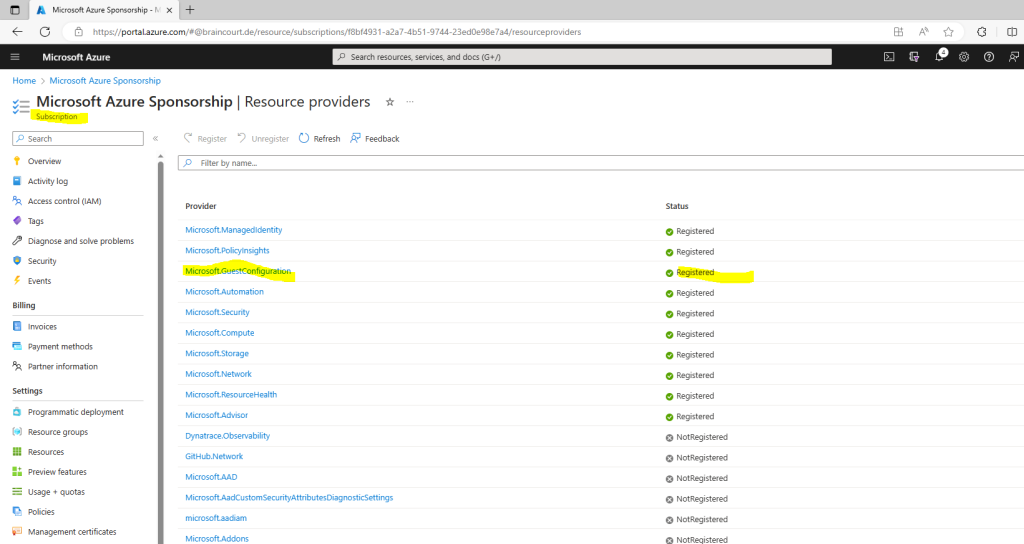
Before you can use the machine configuration feature of Azure Policy, you must register the Microsoft.GuestConfiguration resource provider. If assignment of a machine configuration policy is done through the portal, or if the subscription is enrolled in Microsoft Defender for Cloud, the resource provider is registered automatically. You can manually register through the portal, Azure PowerShell, or Azure CLI.
Deploy requirements for Azure virtual machines
To manage settings inside a machine, a virtual machine extension is enabled and the machine must have a system-managed identity. The extension downloads applicable machine configuration assignments and the corresponding dependencies. The identity is used to authenticate the machine as it reads and writes to the machine configuration service. The extension isn’t required for Arc-enabled servers because it’s included in the Arc Connected Machine agent.
The machine configuration extension and a managed identity are required to manage Azure virtual machines.
Deploy the virtual machine extension
To deploy the extension at scale across many machines, assign the policy initiative Virtual machines’ Guest Configuration extension should be deployed with system-assigned managed identity to a management group, subscription, or resource group containing the machines that you plan to manage.
If you prefer to deploy the extension and managed identity to a single machine, follow the guidance for each:
- Overview of the Azure Policy Guest Configuration extension
- Configure managed identities for Azure resources on a VM using the Azure portal
To use machine configuration packages that apply configurations, Azure VM guest configuration extension version 1.29.24 or later is required.
To limit the extension from impacting applications running inside the machine, the machine configuration agent isn’t allowed to exceed more than 5% of CPU. This limitation exists for both built-in and custom definitions. The same is true for the machine configuration service in Arc Connected Machine agent.
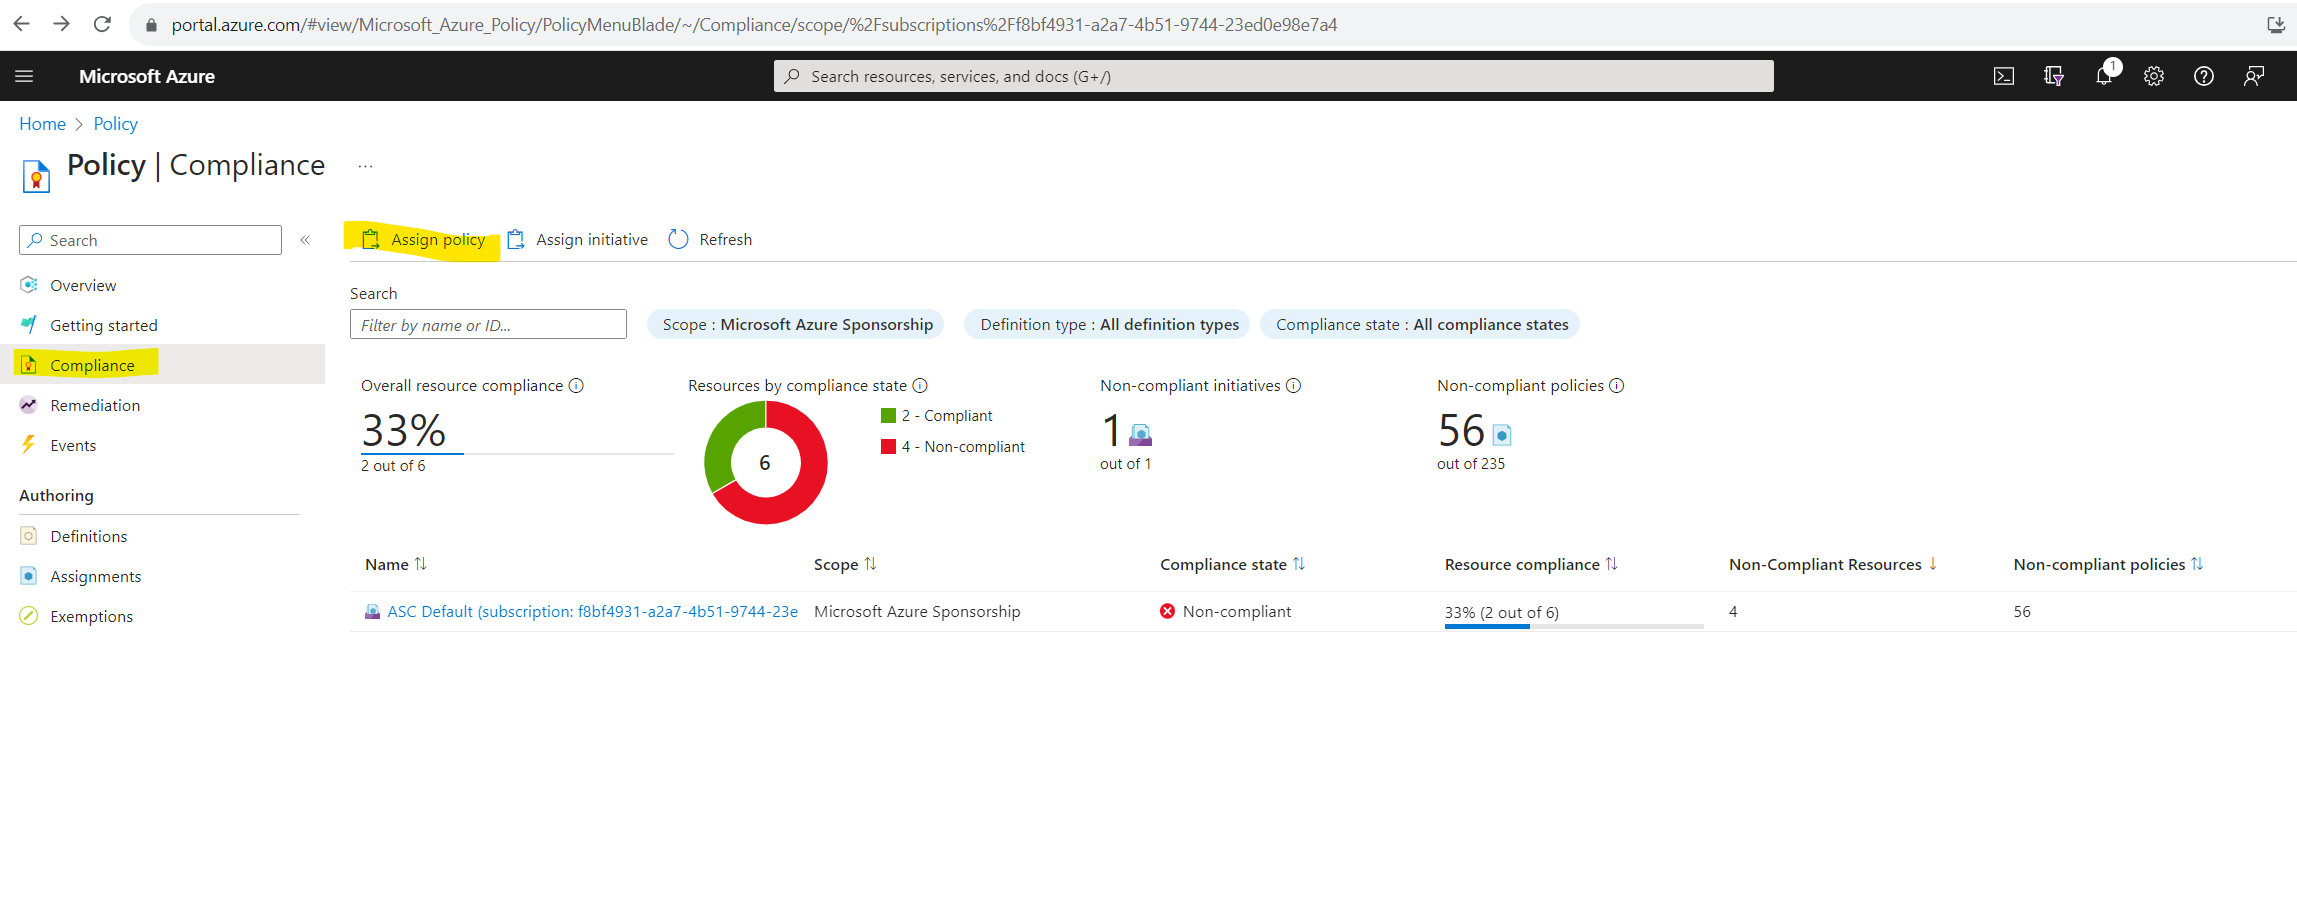
Assign the policy to a subscription
Click on Assign policy
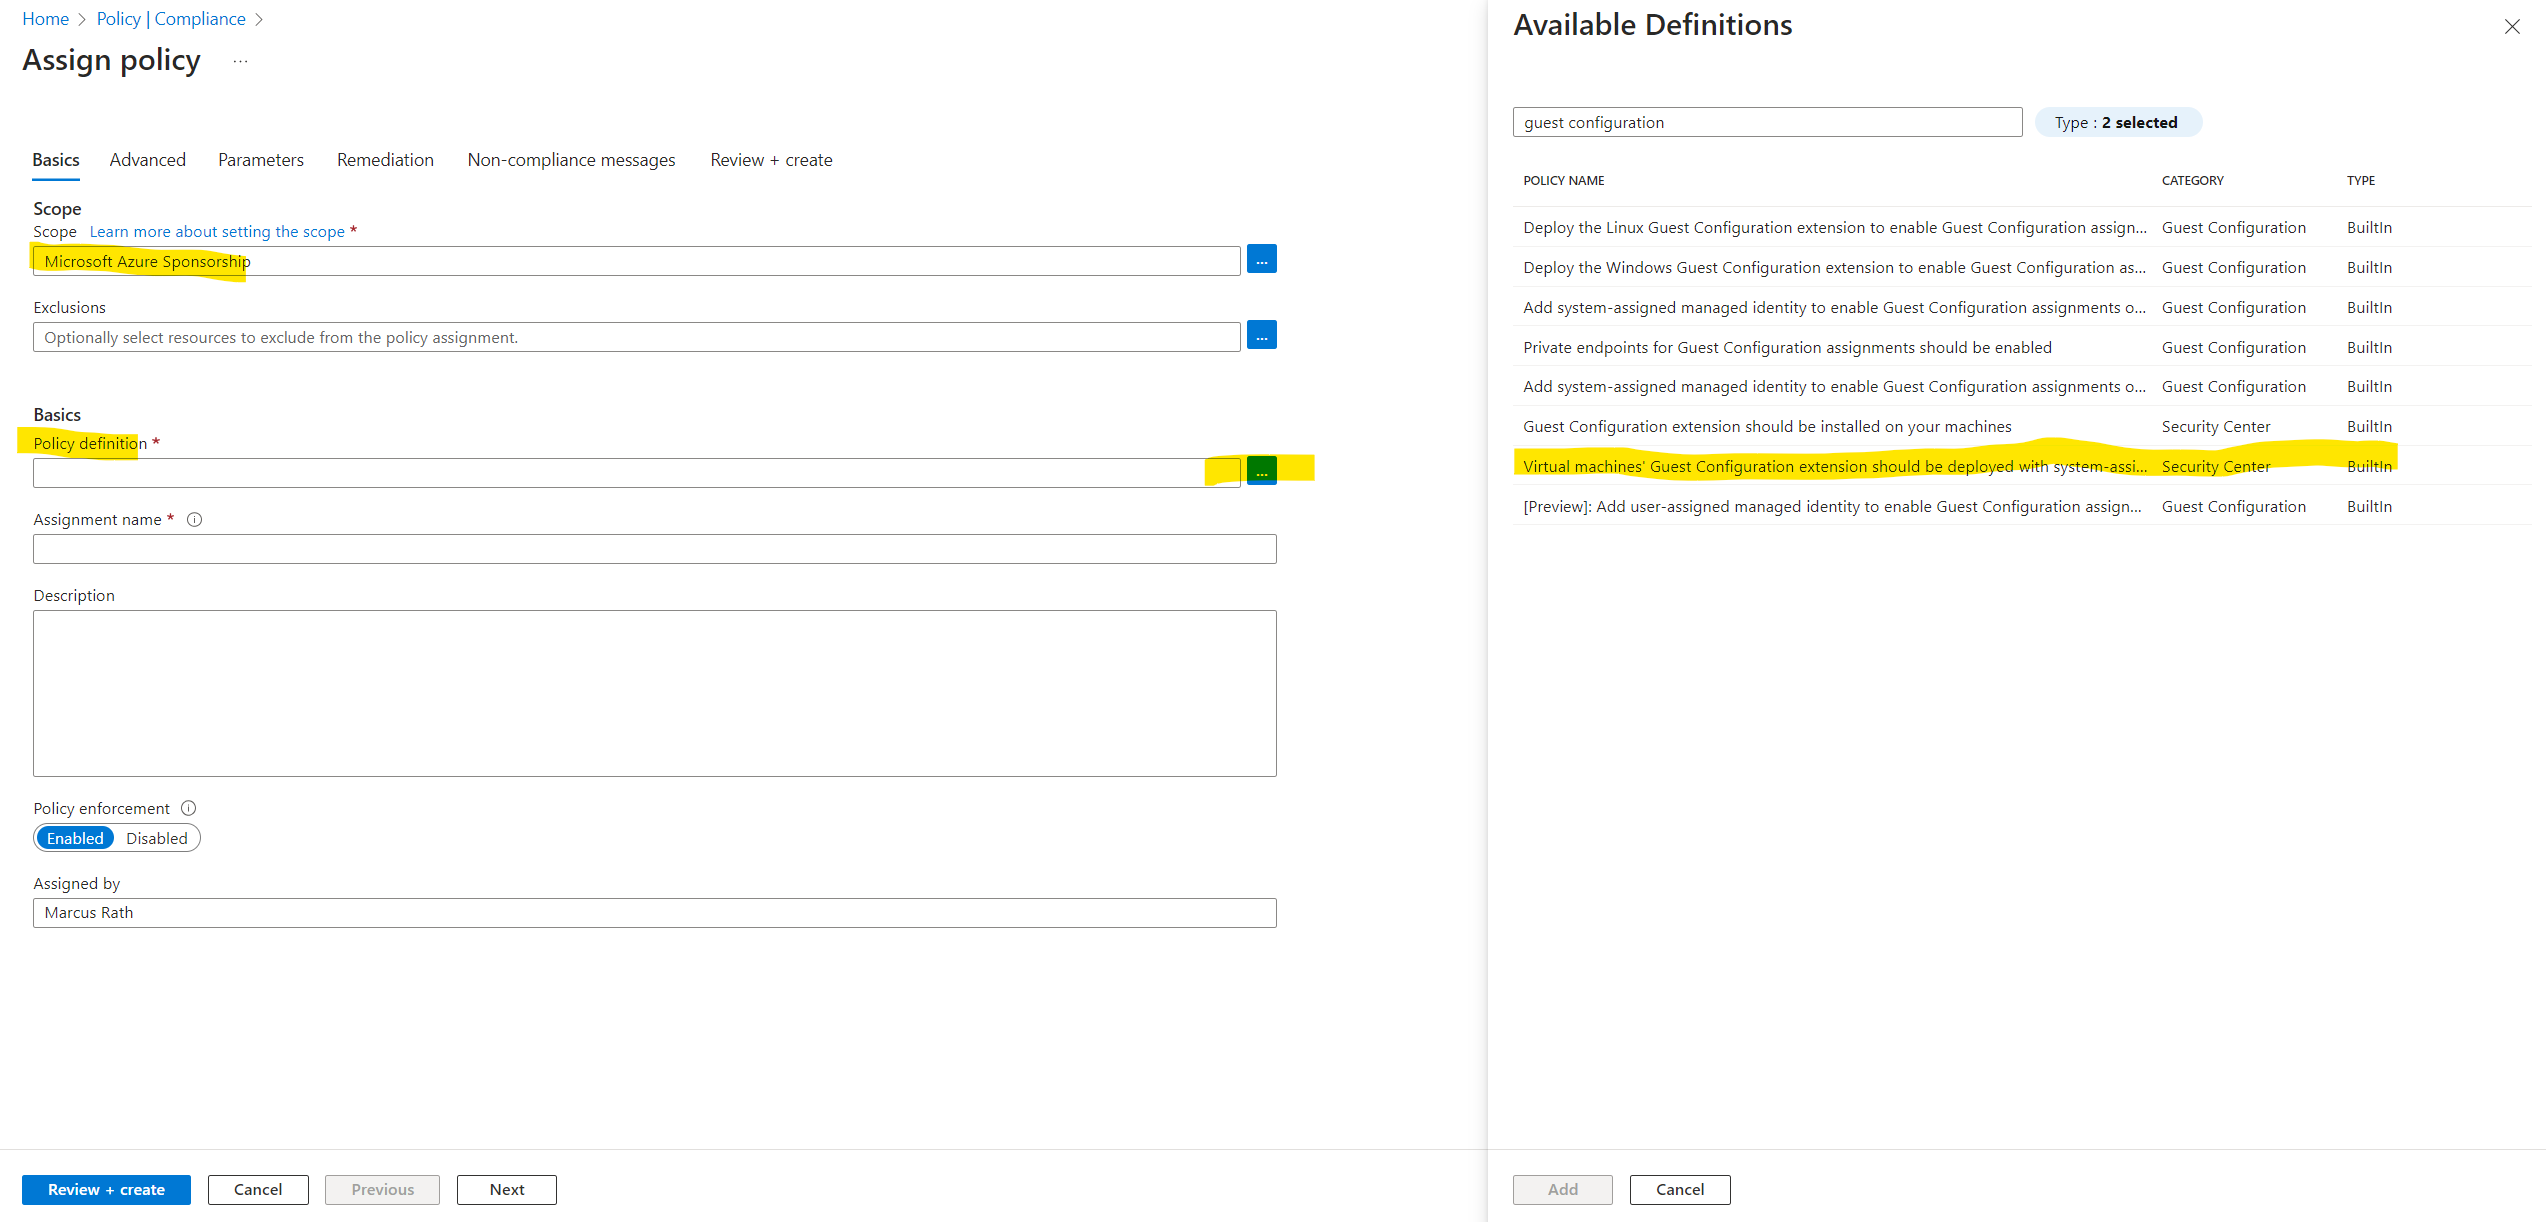
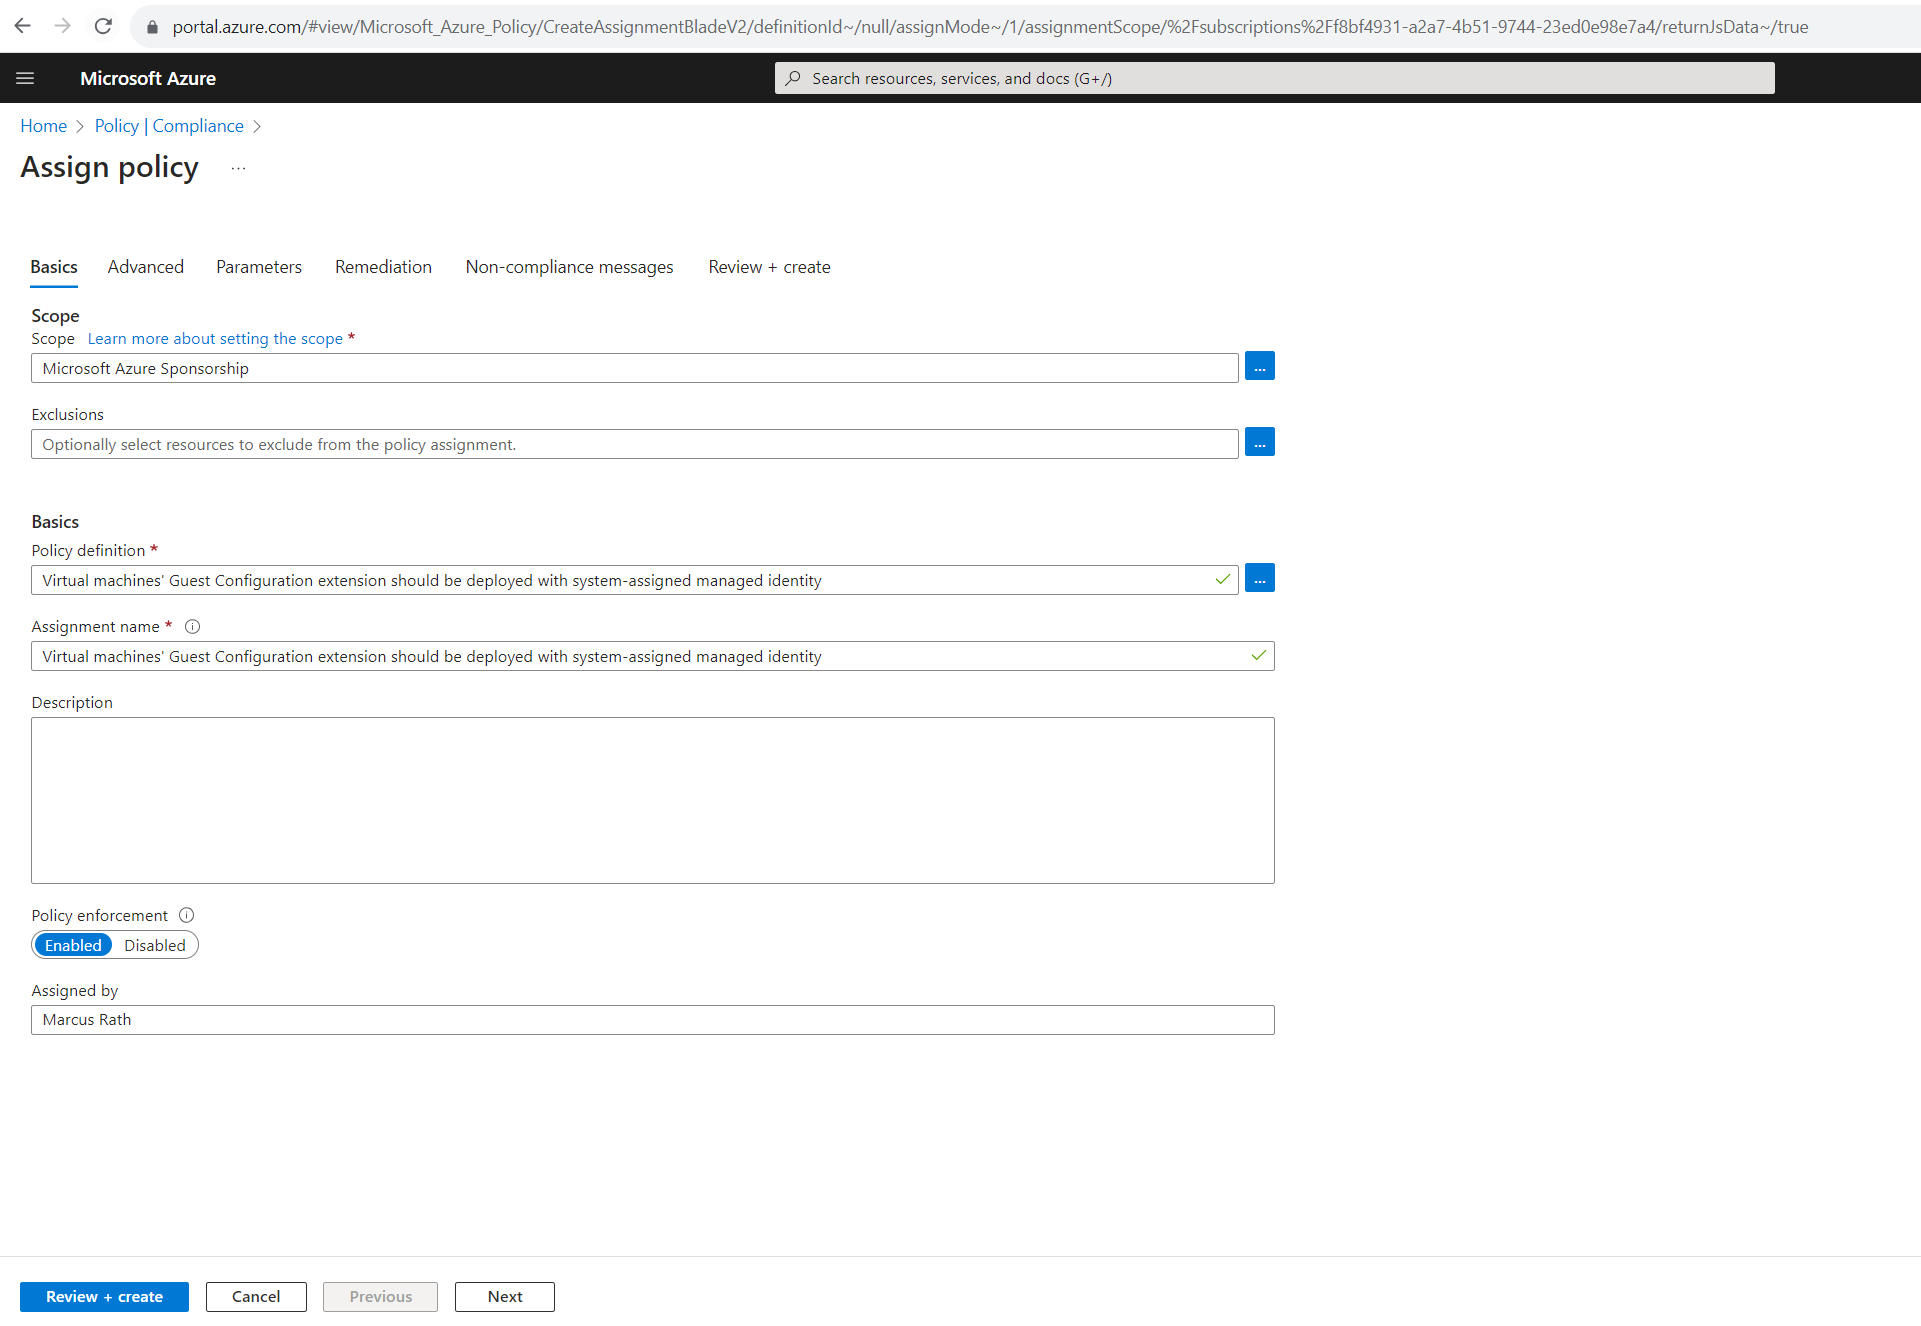
Check the correct subscription is selected and under Policy definition select the above mentioned Virtual machines’ Guest Configuration extension should be deployed with system-assigned managed identity extension and click on Add.
The extension downloads applicable machine configuration assignments and the corresponding dependencies. The identity is used to authenticate the machine as it reads and writes to the machine configuration service. The extension isn’t required for Arc-enabled servers because it’s included in the Arc Connected Machine agent.
The machine configuration extension and a managed identity are required to manage Azure virtual machines.
Click on Review + create.
Finally click on Create.

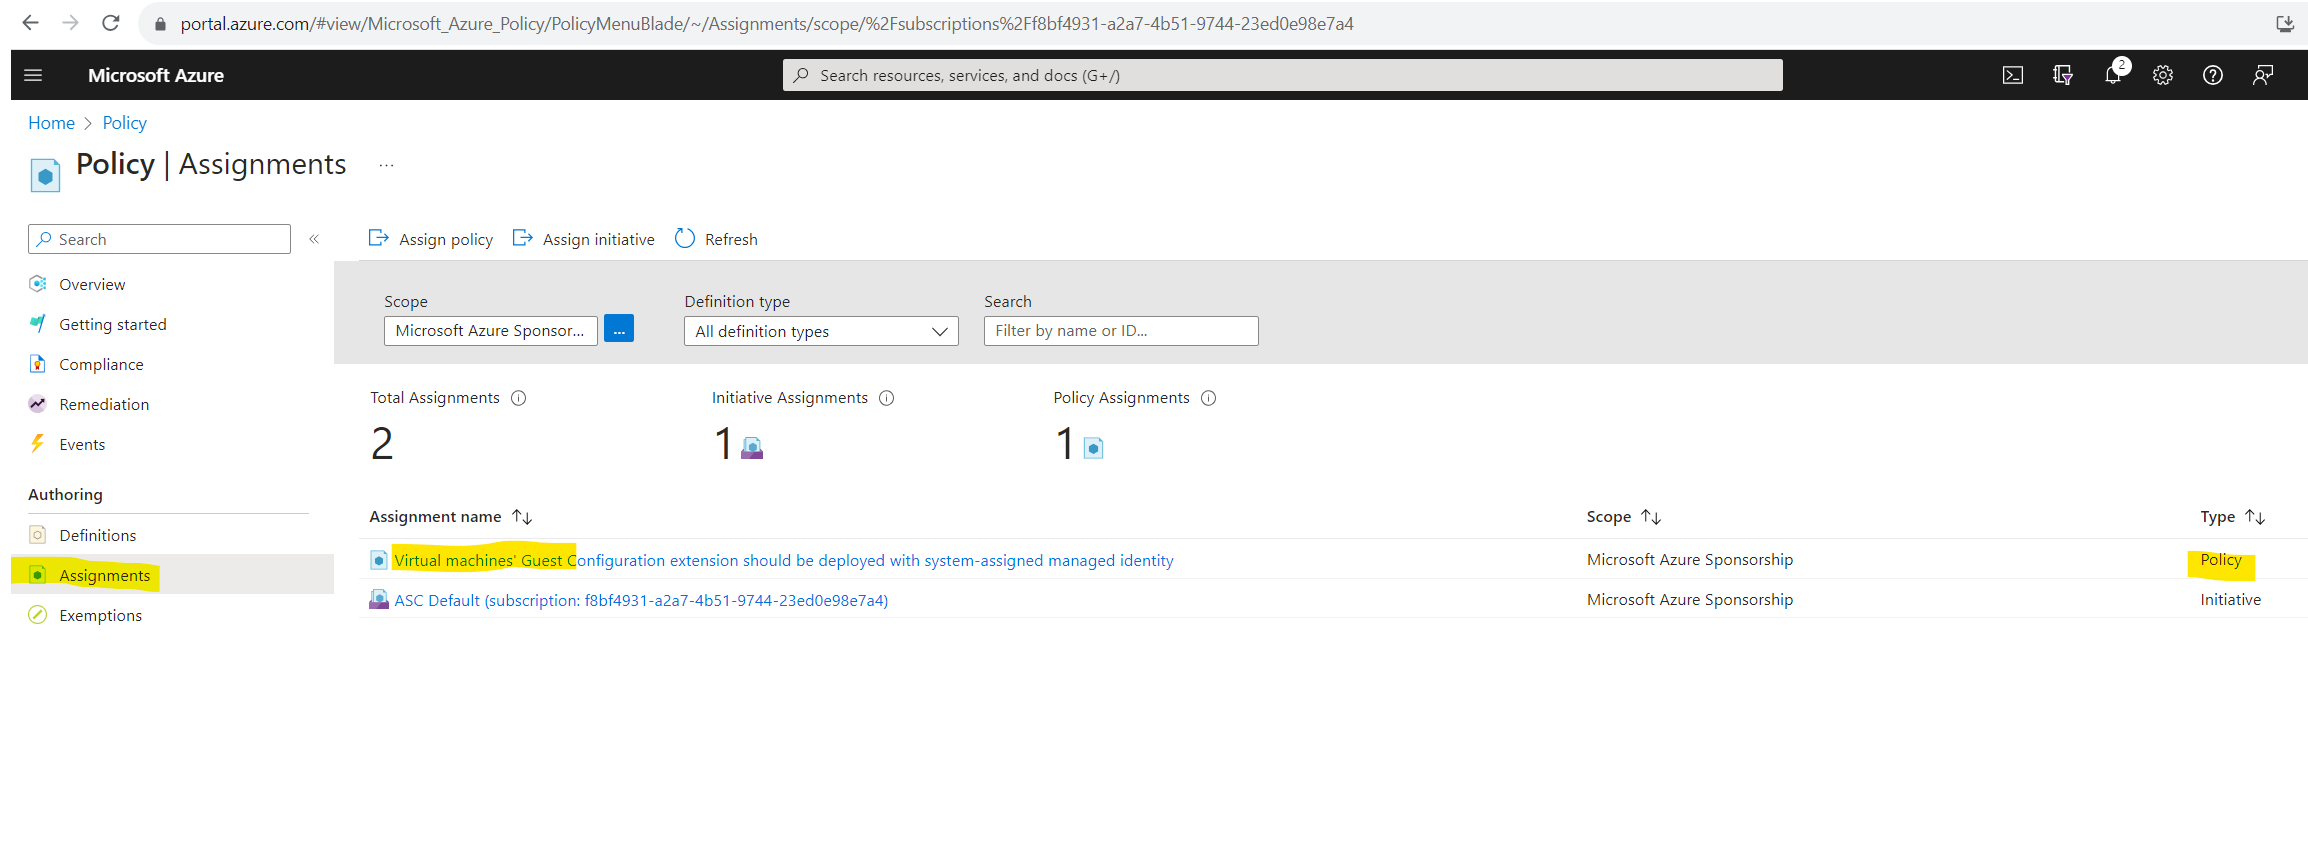
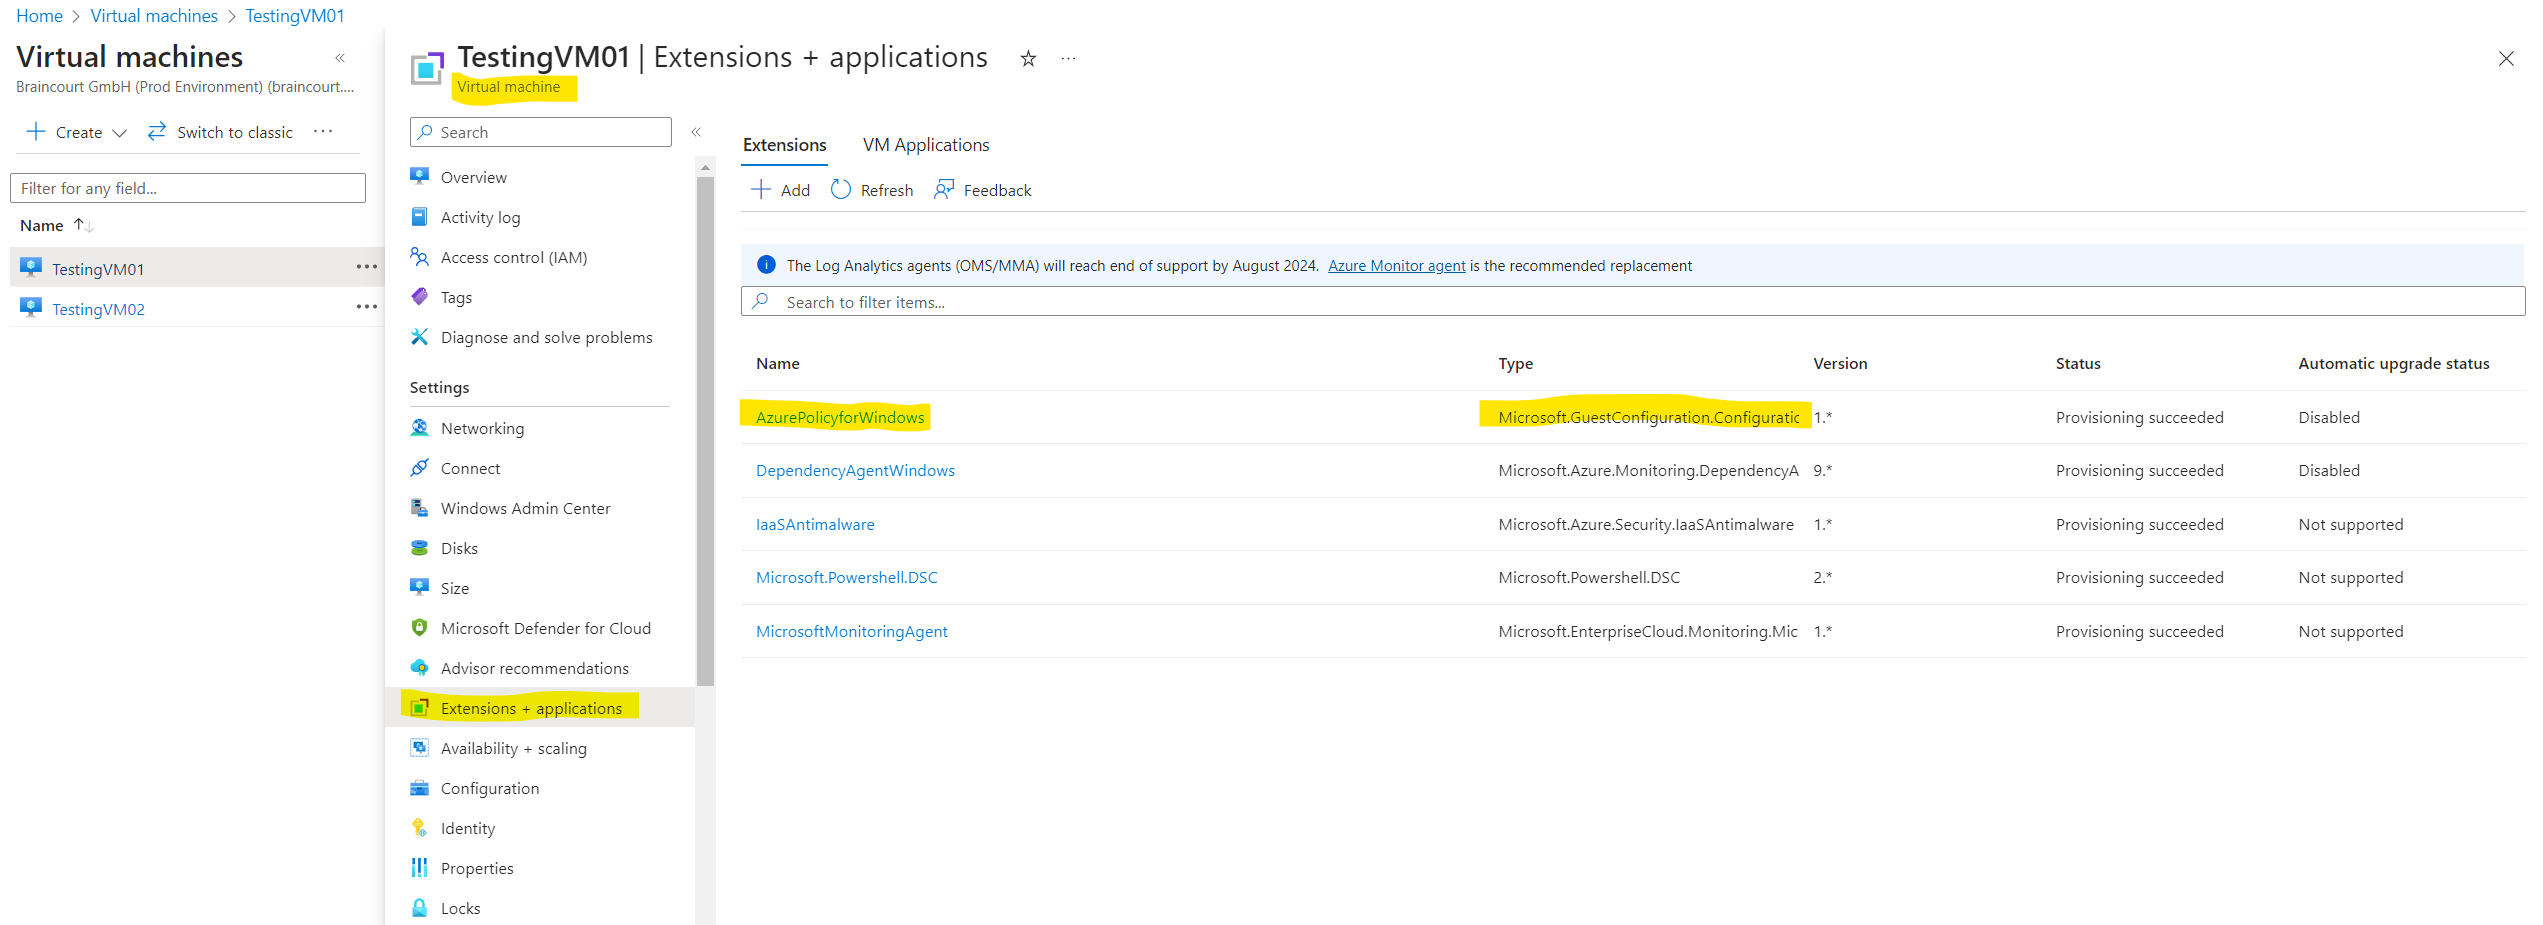
Check if extension was applied to the VM. You should see here the AzurePolicyforWindows extension listed.
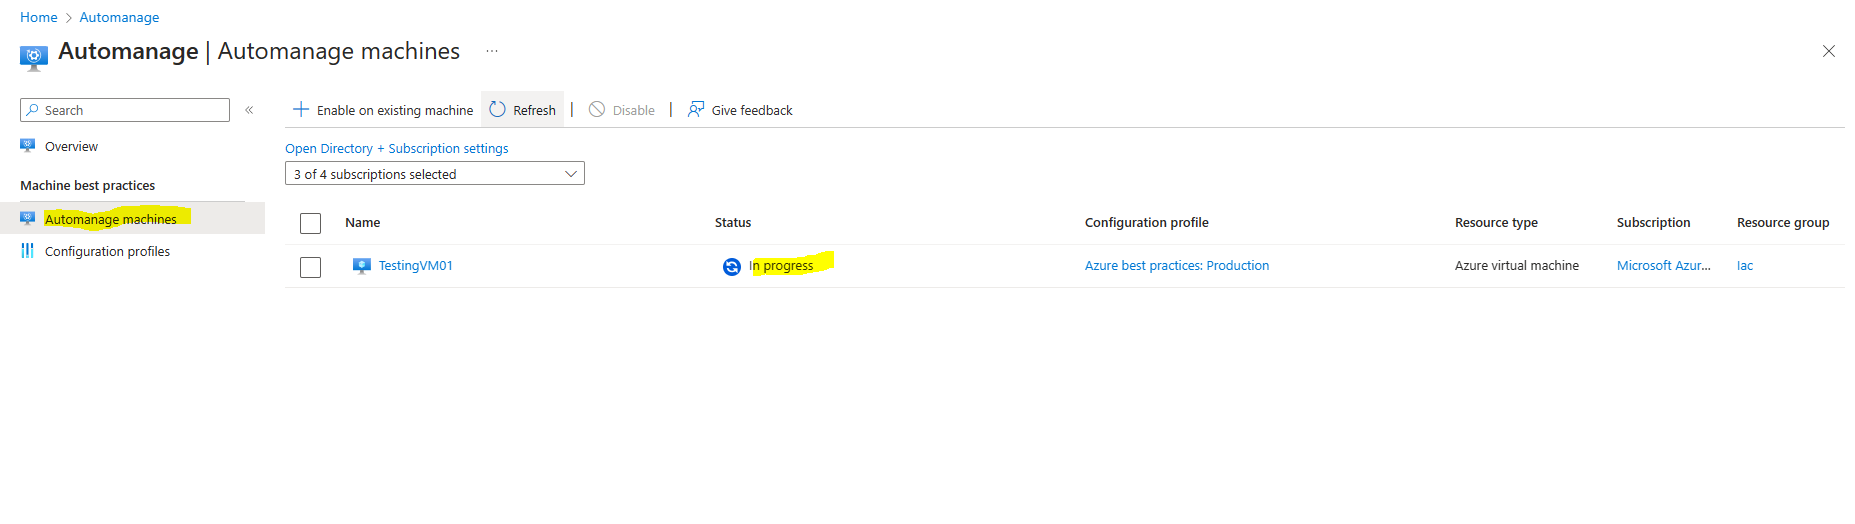
The VM also needs to be onboard in Automanage.
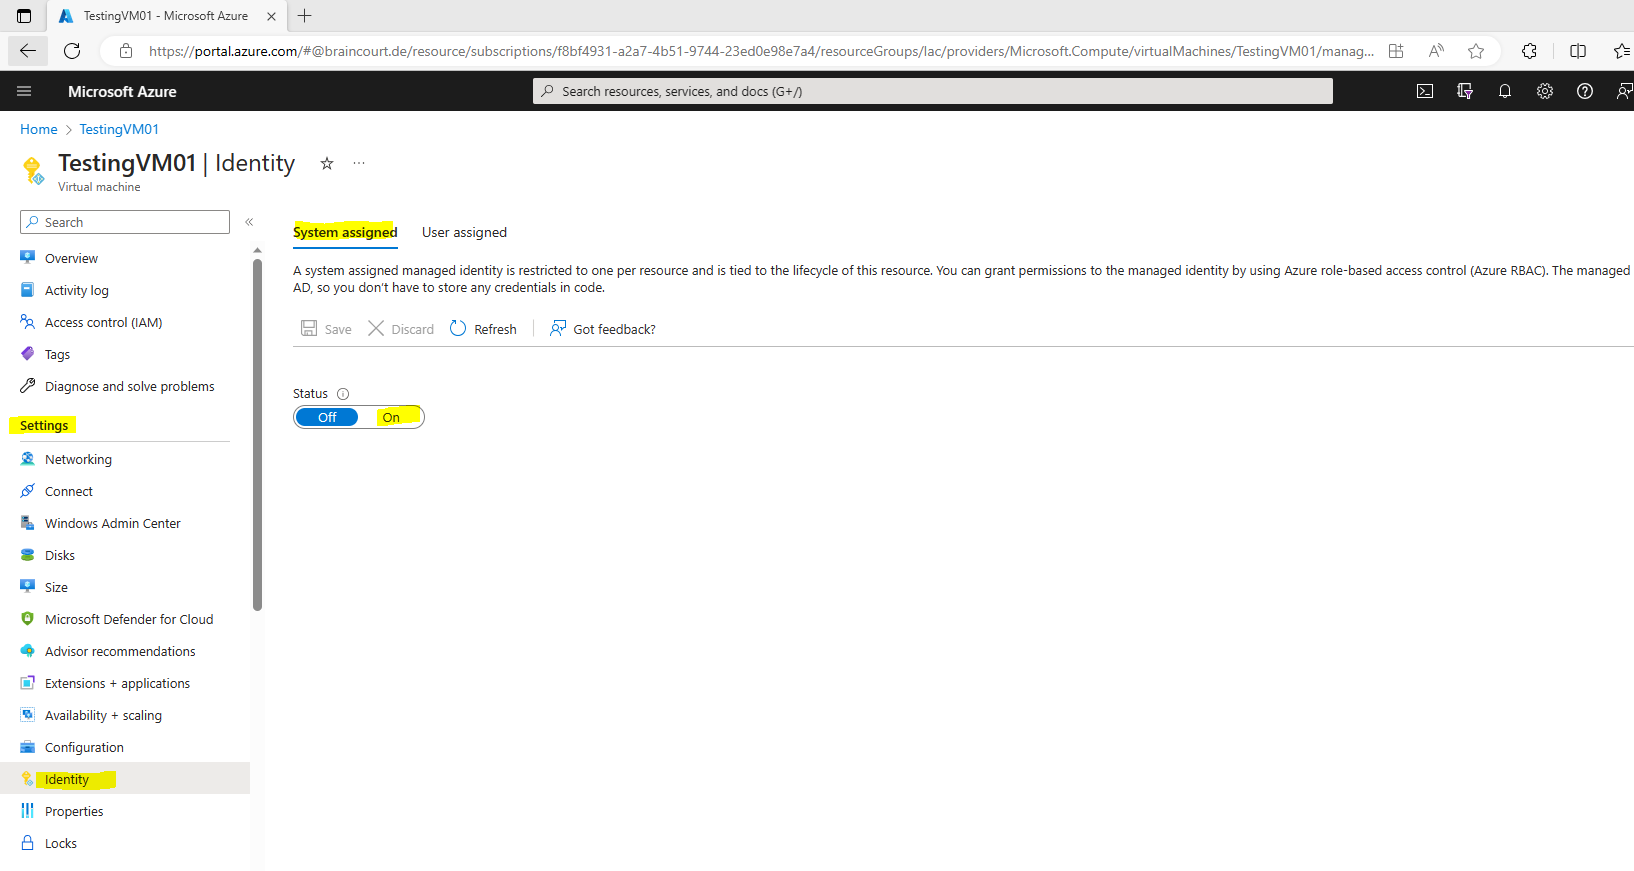
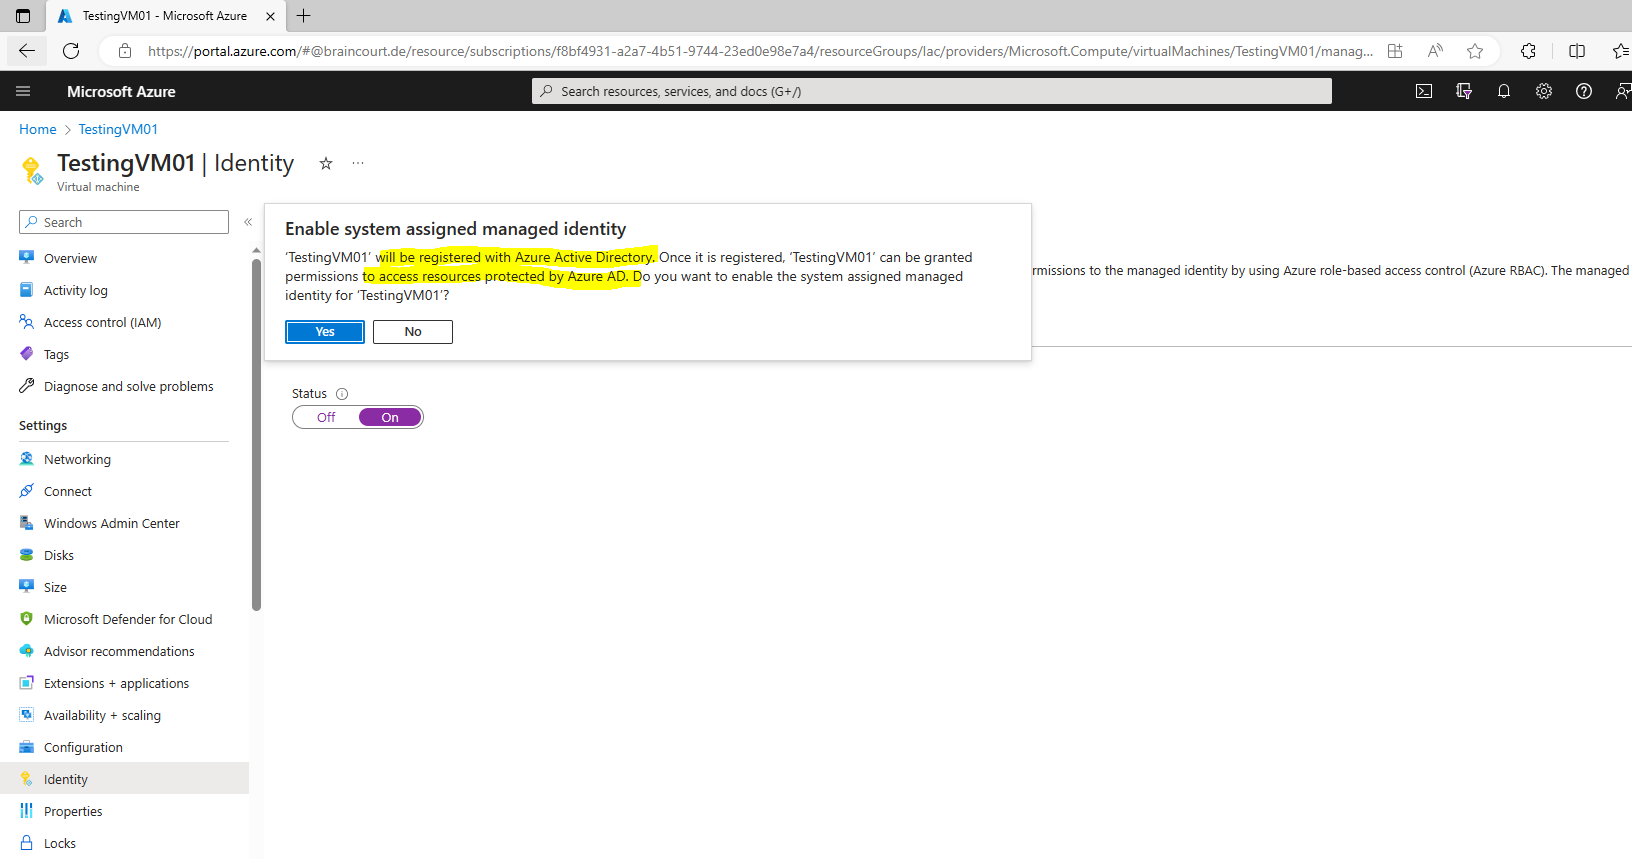
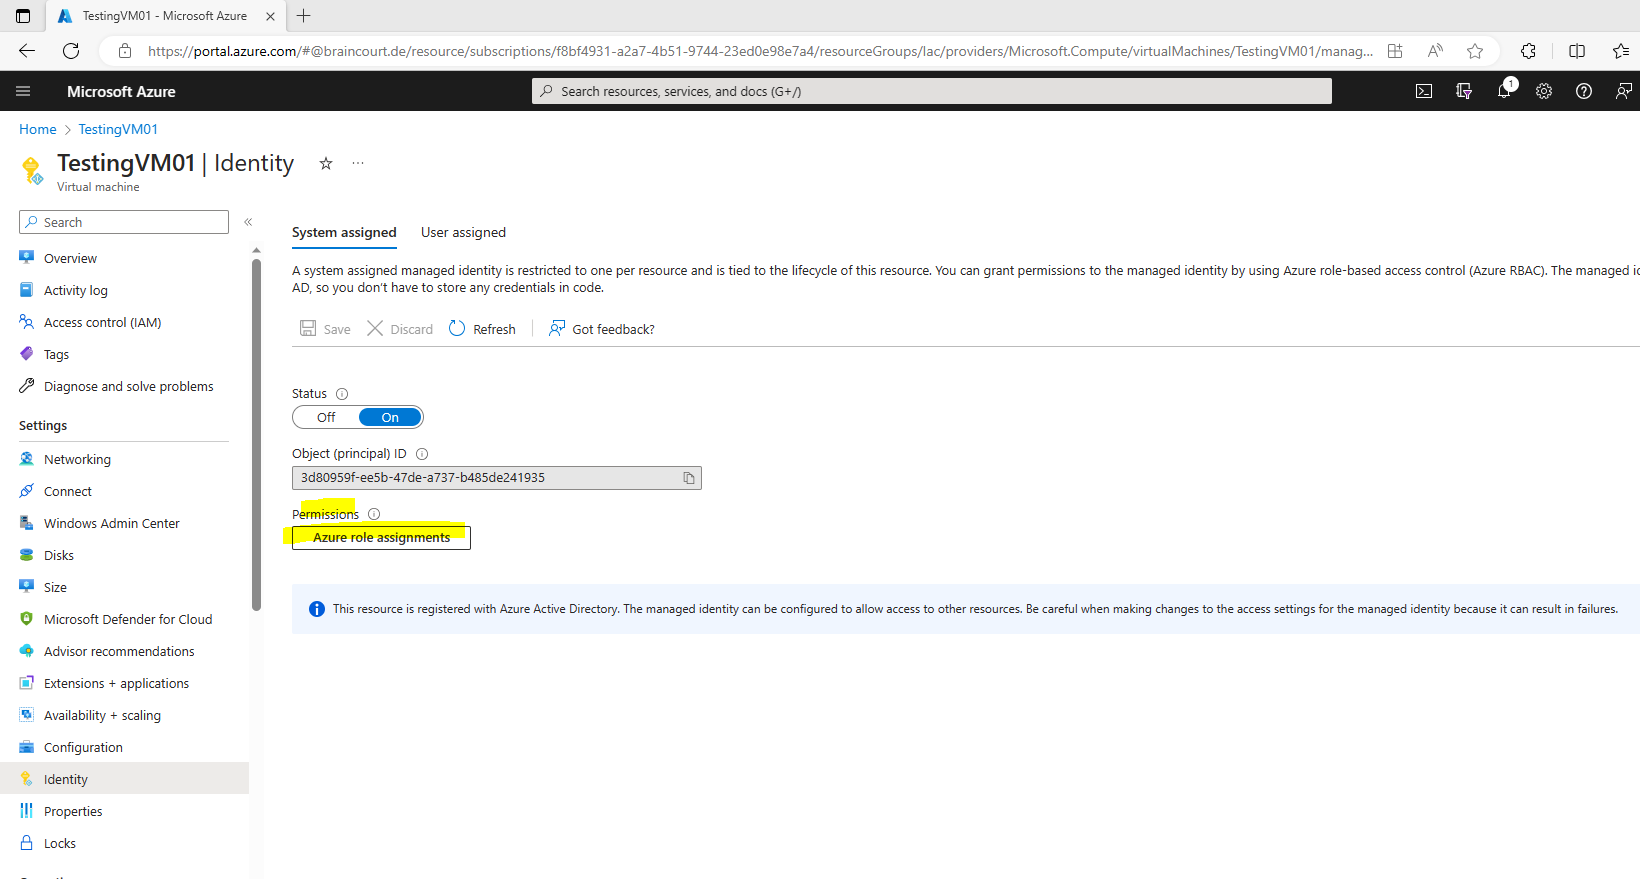
Adding a system managed identity to my testing VM
Managed identities for Azure resources provides Azure services with an automatically managed identity in Azure Active Directory. You can use this identity to authenticate to any service that supports Azure AD authentication, without having credentials in your code.
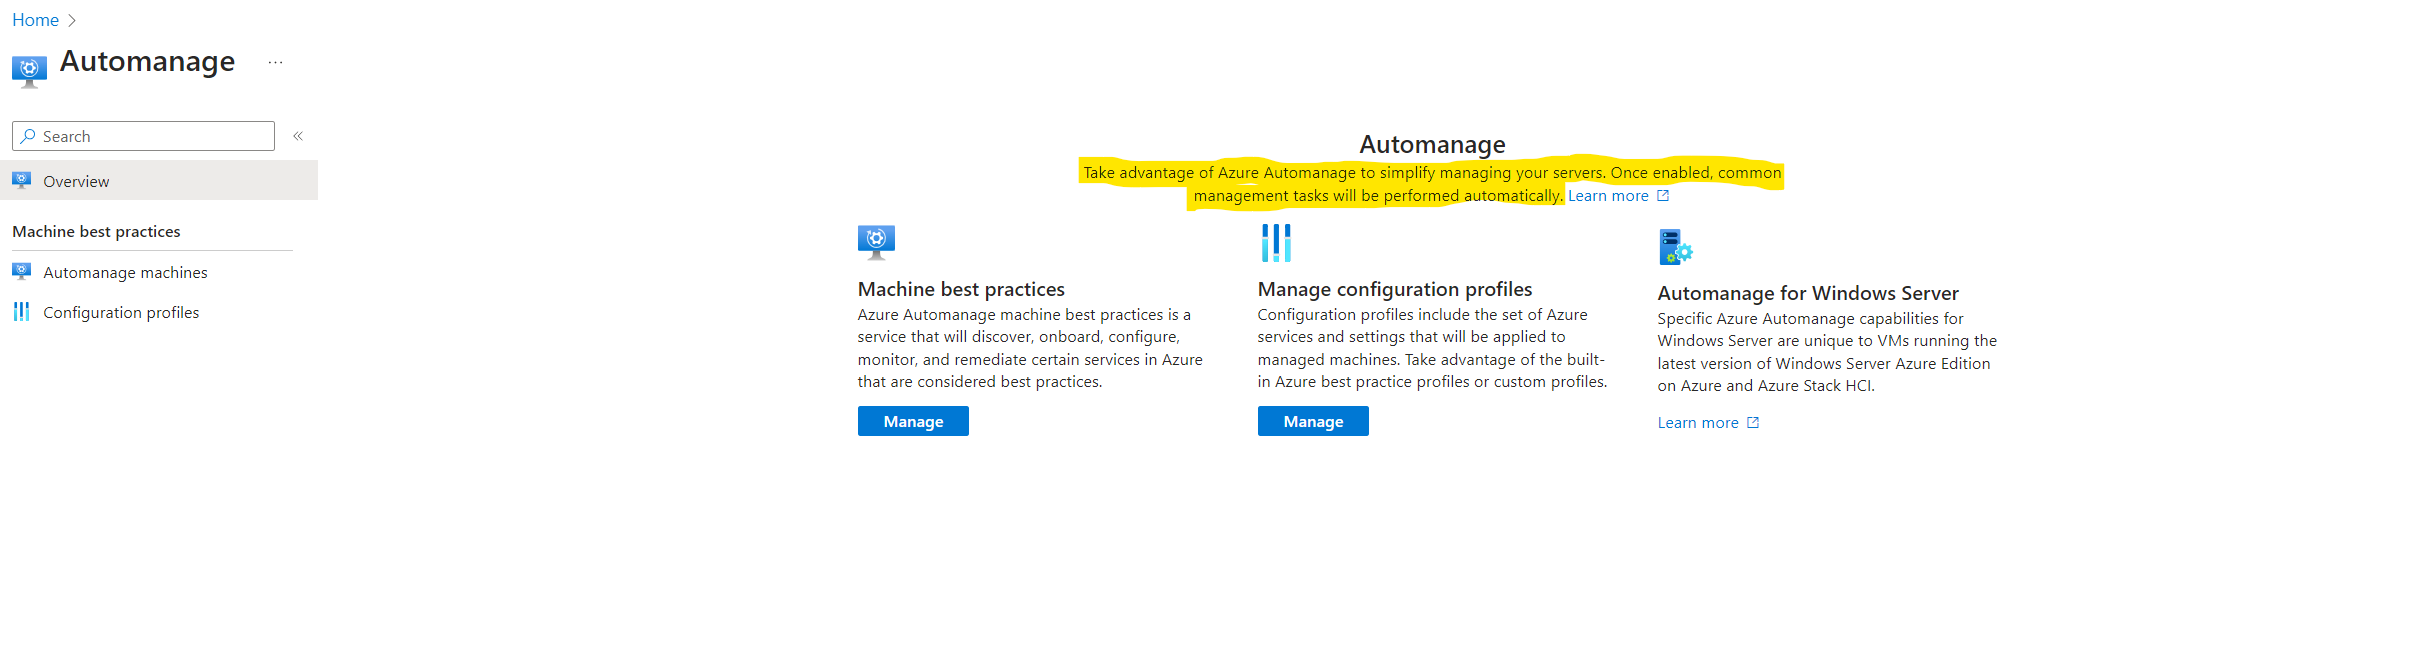
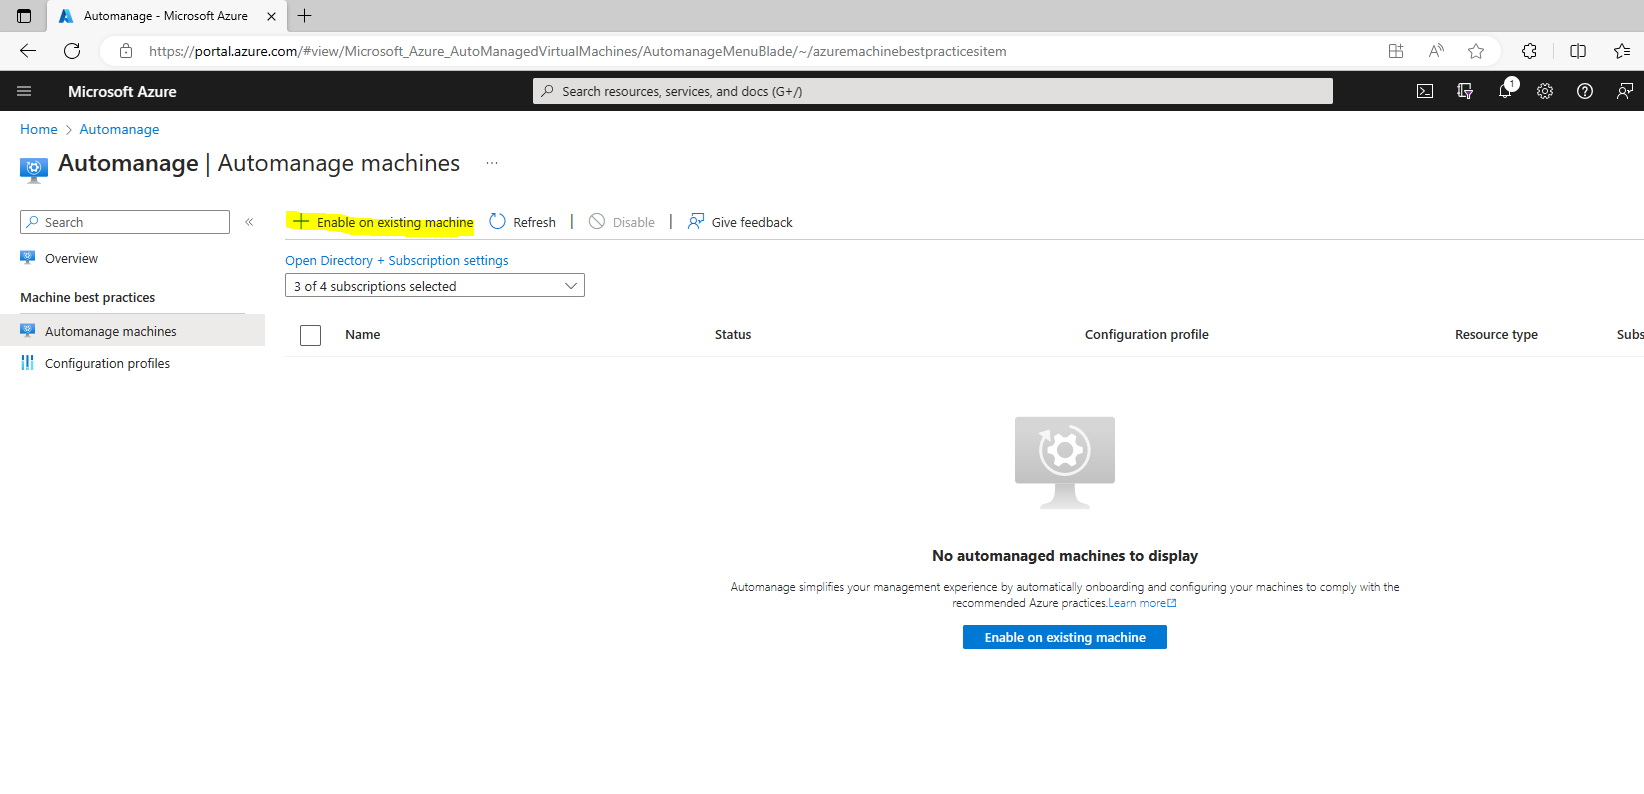
Enable Automanage for Virtual Machines in the Azure portal
In the search bar, search for and select Automanage

Click on Automanage machines and select the Enable on existing VM.
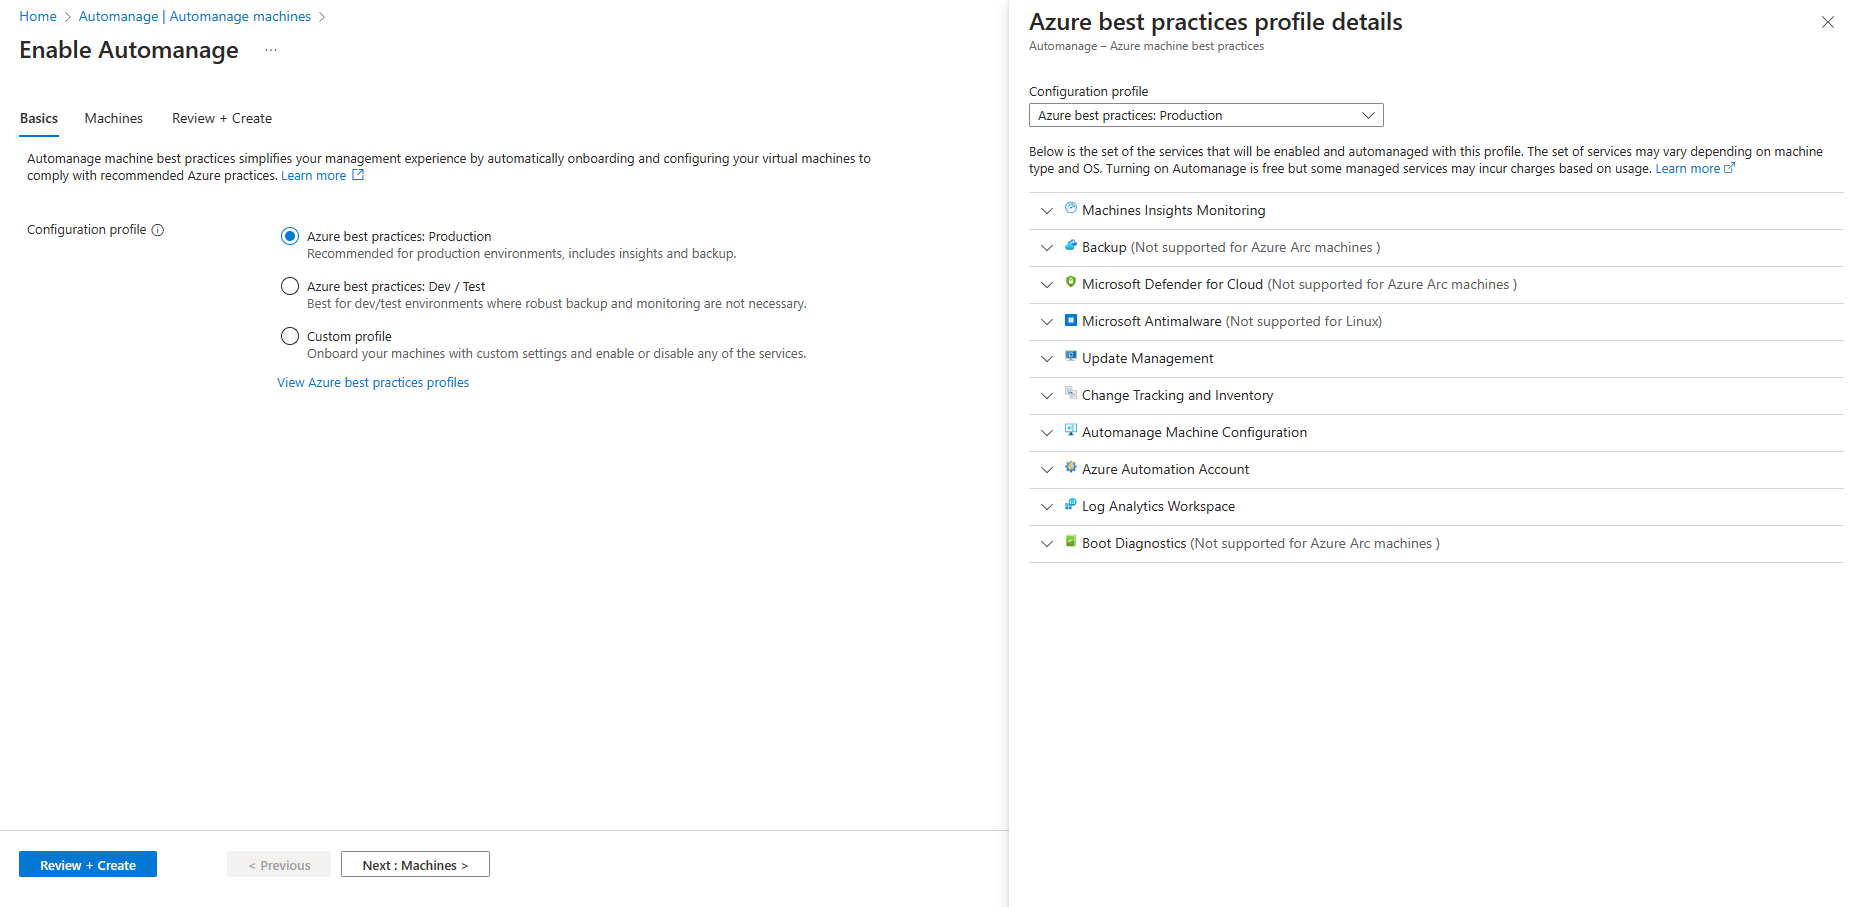
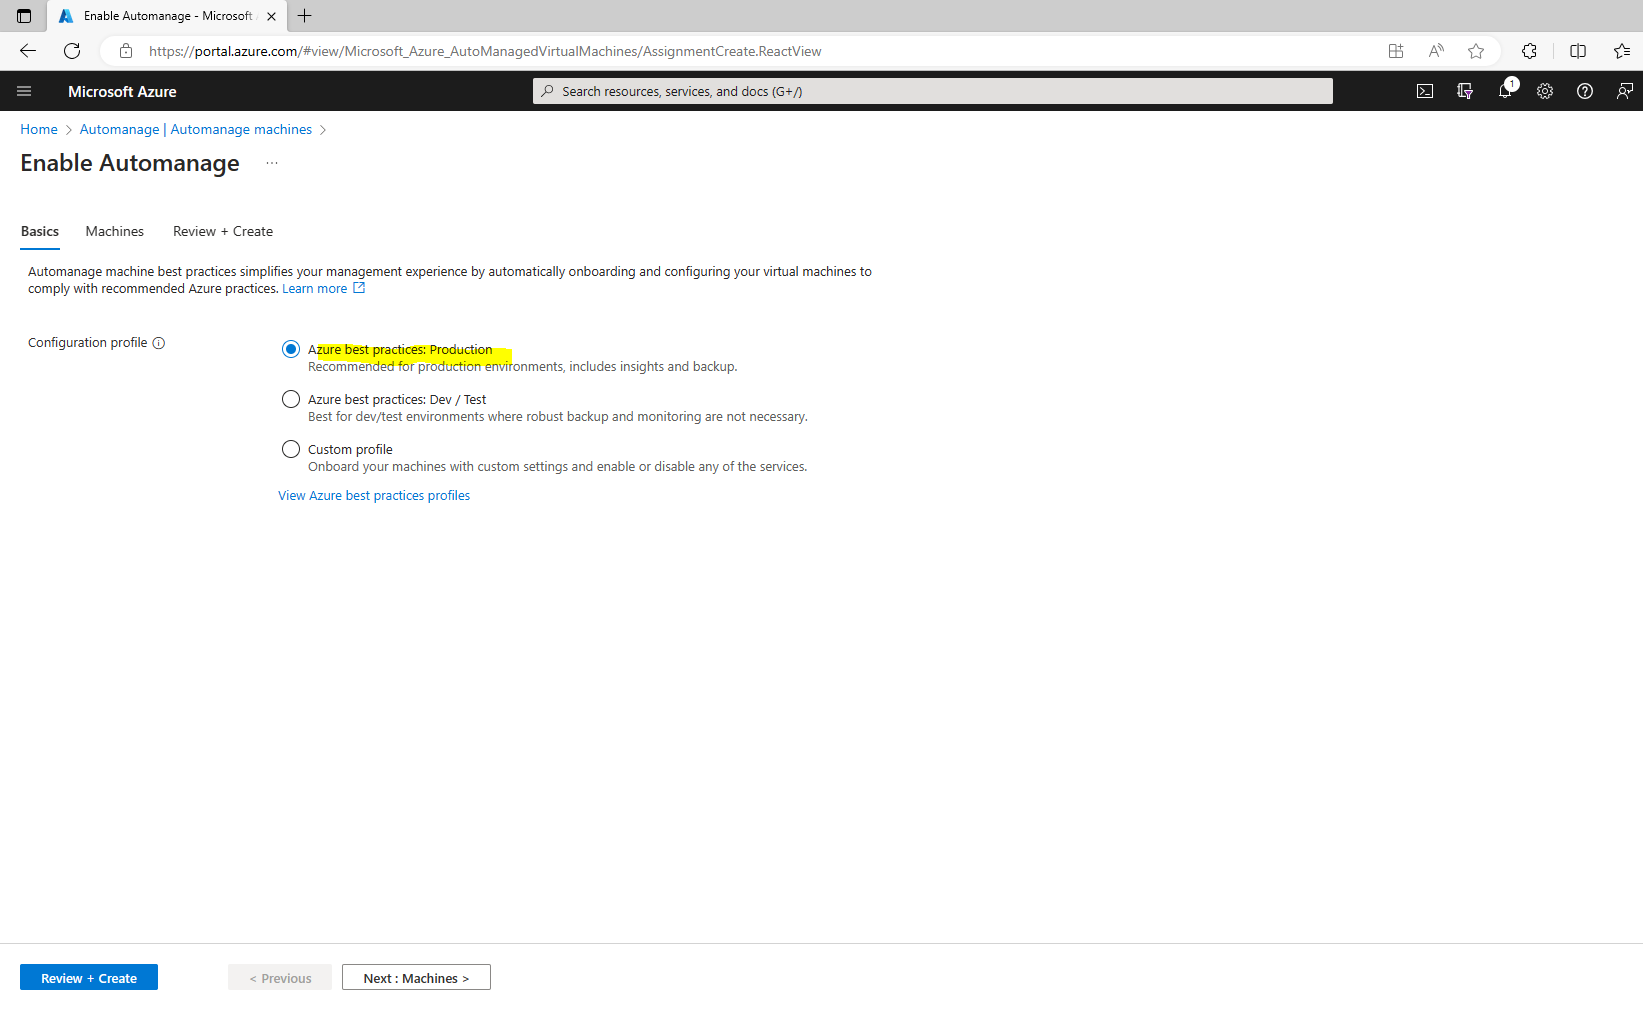
Under Configuration profile, select your profile type: Azure Best Practices – Production or Azure Best Practices – Dev/Test or Custom profile
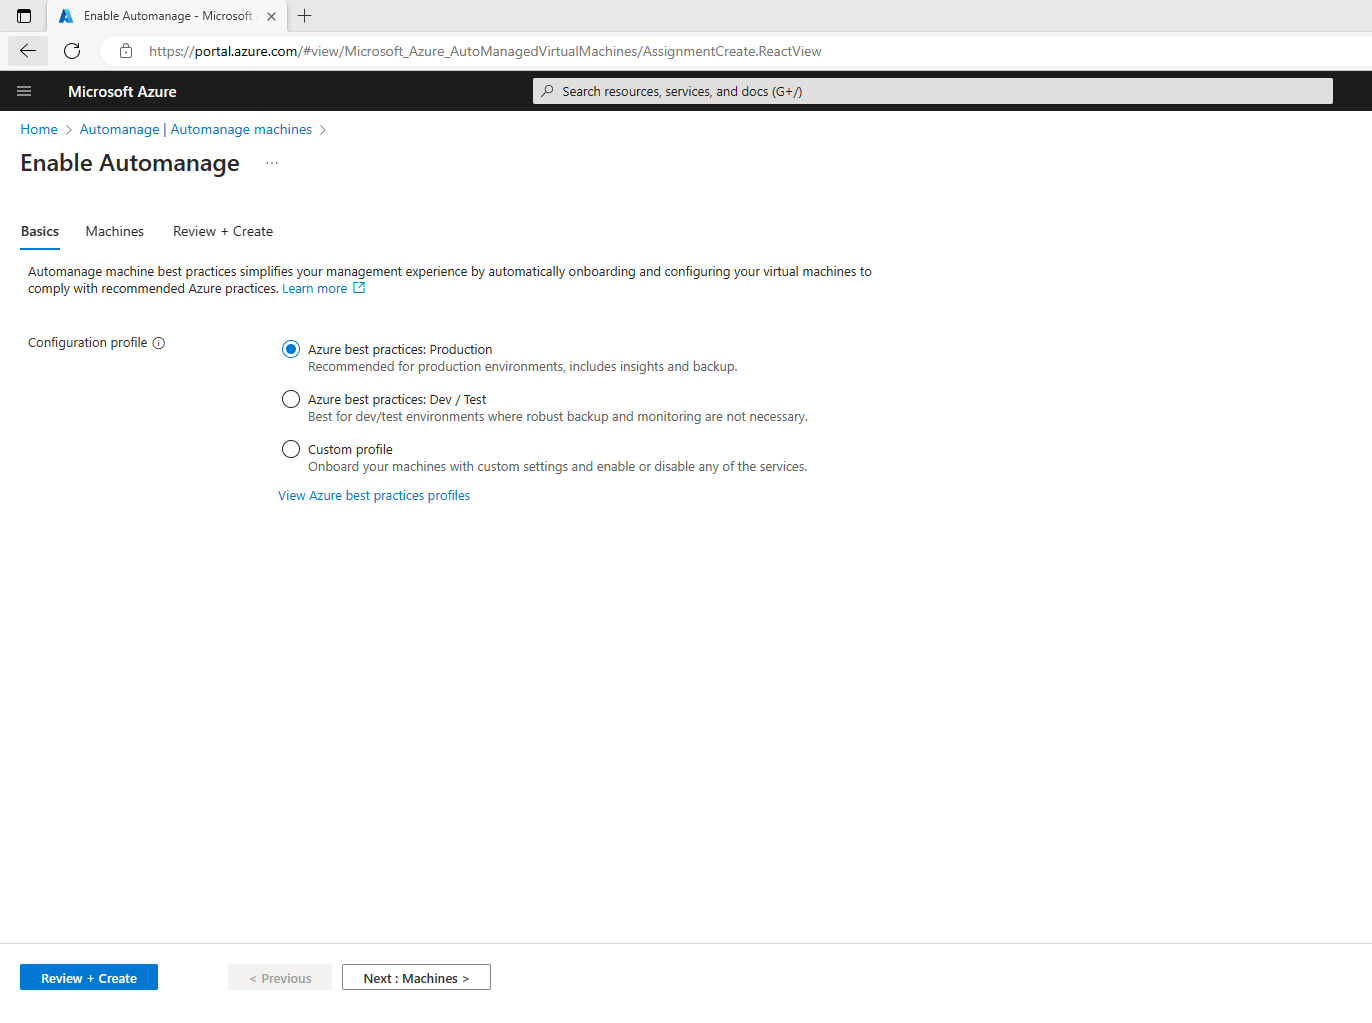
Click View best practice profiles to see the differences between the environments.
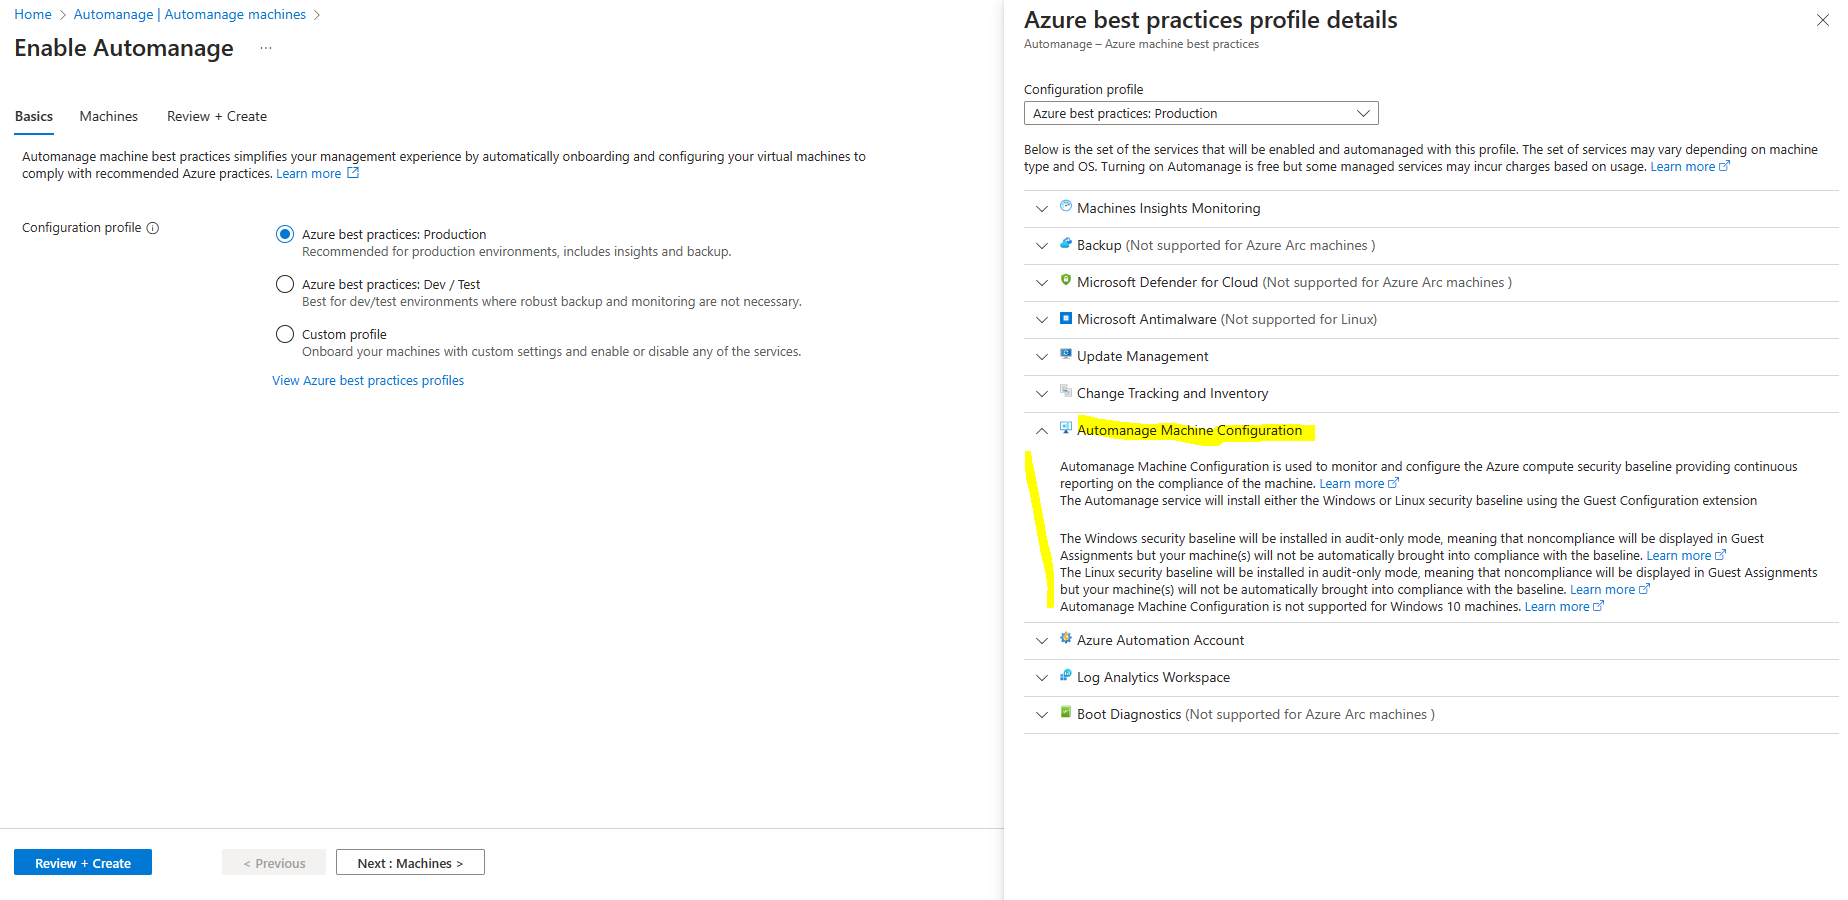

If you want to change the configuration profile of a machine, you can simply reenable it with the desired configuration profile. However, if your machine status is “Needs Upgrade” then you will need to disable first and then reenable Automanage.
Source: https://learn.microsoft.com/en-us/azure/automanage/overview-configuration-profiles#custom-profiles
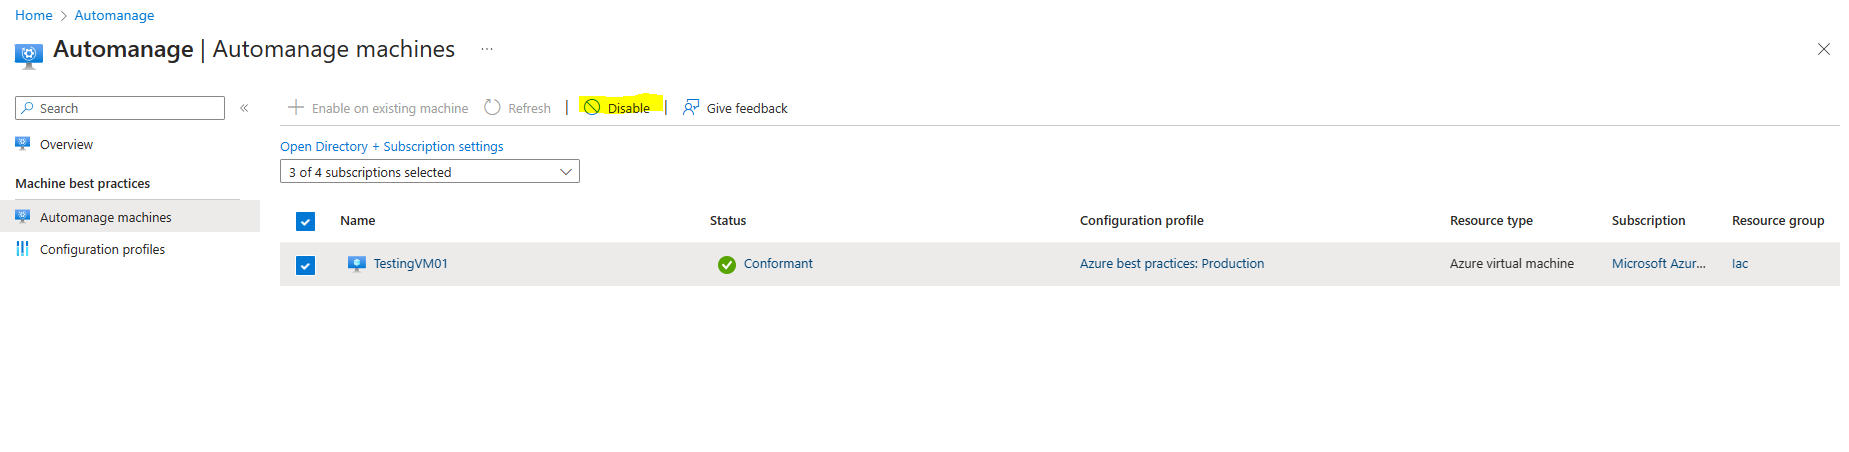
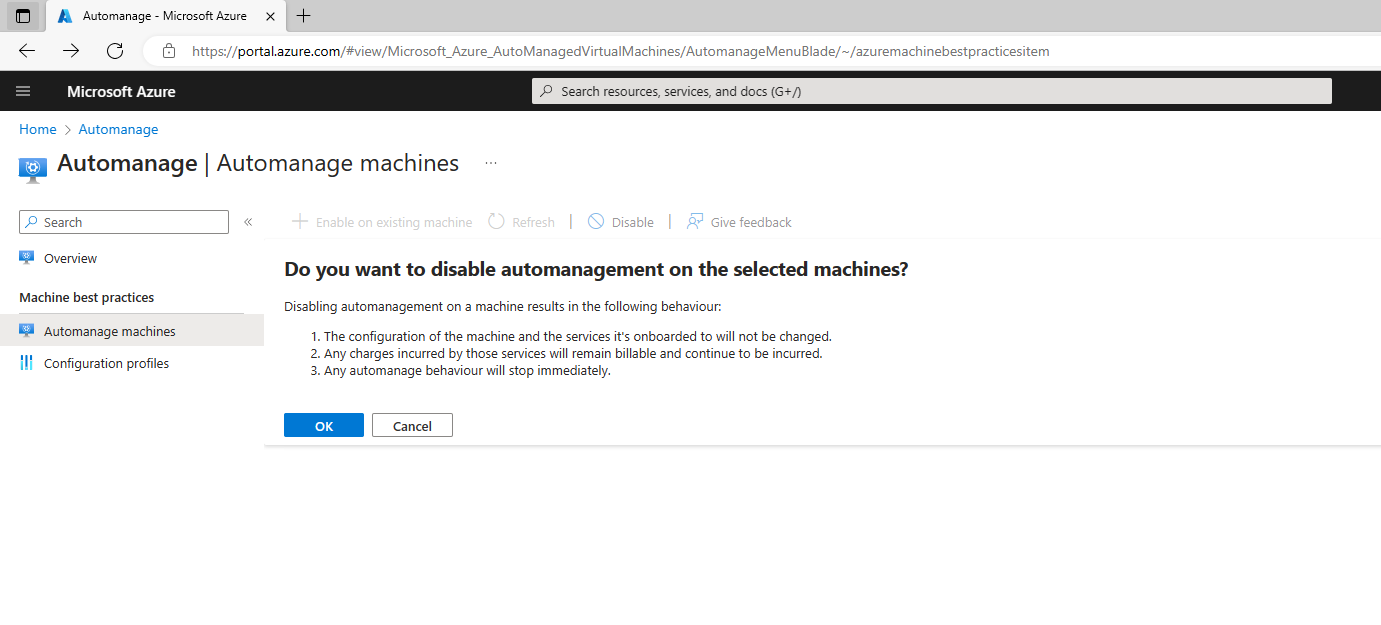
Disable Automanage for VMs
Quickly stop using Azure Automanage for virtual machines by disabling automanagement.
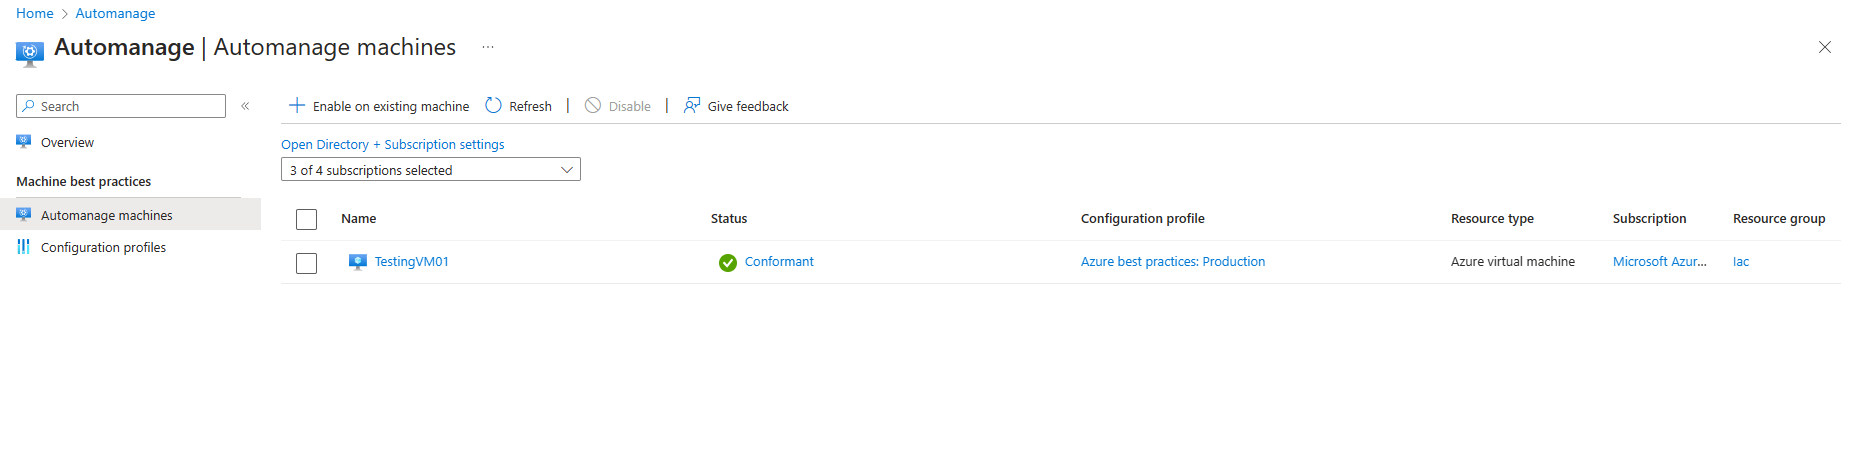
Go to the Automanage – Azure virtual machine best practices page that lists all of your auto-managed VMs.
Select the checkbox next to the virtual machine you want to disable.
Click on the Disable automanagent button
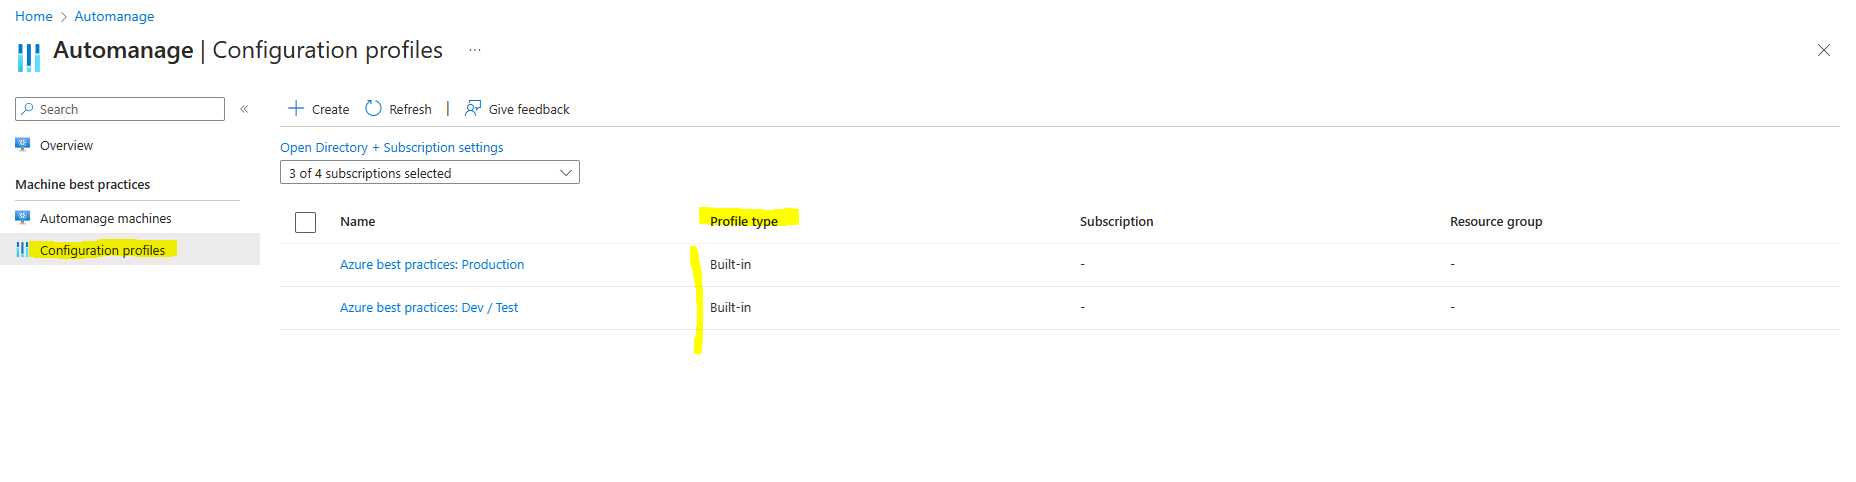
Create a custom profile in Azure Automanage for VMs
When you are enabling Automanage for your machine, a configuration profile is required. Configuration profiles are the foundation of this service. They define which services we onboard your machines to and to some extent what the configuration of those services would be.
There are two best practice configuration profiles currently available.
- Dev/Test profile is designed for Dev/Test machines.
- Production profile is for production.
The reason for this differentiator is because certain services are recommended based on the workload running. For instance, in a Production machine we will automatically onboard you to Azure Backup. However, for a Dev/Test machine, a backup service would be an unnecessary cost, since Dev/Test machines are typically lower business impact.
Custom profiles allow you to customize the services and settings that you want to apply to your machines. This is a great option if your IT requirements differ from the best practices. For instance, if you do not want to use the Microsoft Antimalware solution because your IT organization requires you to use a different antimalware solution, then you can simply toggle off Microsoft Antimalware when creating a custom profile.
In the Best Practices Dev/Test configuration profile, we will not back up the VM at all.
Source: https://learn.microsoft.com/en-us/azure/automanage/overview-configuration-profiles
Create custom machine configuration package
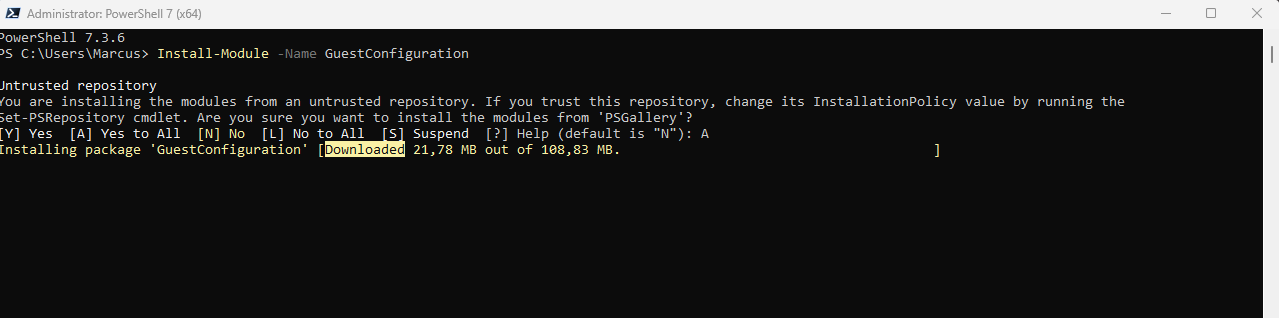
First install PowerShell 7 and the GuestConfiguration Module on the computer you want to create the package.
Installing PowerShell on Windows
https://learn.microsoft.com/en-us/powershell/scripting/install/installing-powershell-on-windows
Install-Module -Name GuestConfiguration -Scope AllUsers
The GuestConfiguration module requires the following software:
- Azure PowerShell 5.9.0 or higher. The required Az PowerShell modules are installed automatically with the GuestConfiguration module, or you can follow these instructions.
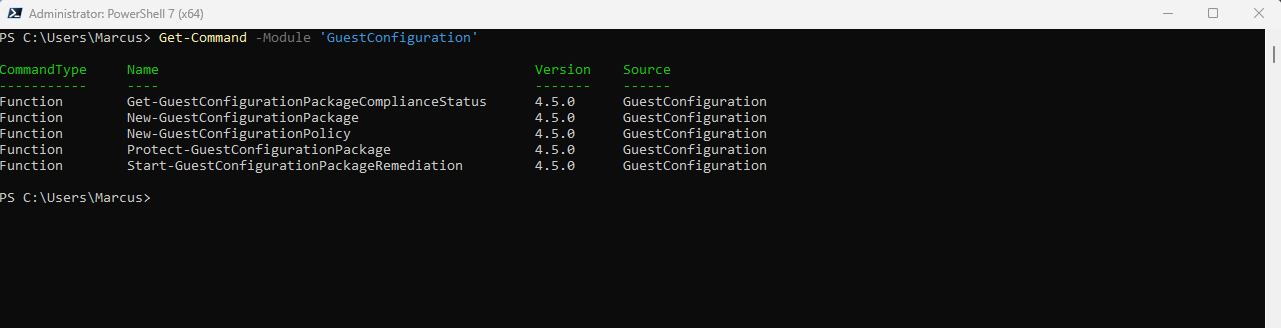
Validate that the module has been imported
Get-Command -Module ‘GuestConfiguration’
Machine configuration uses Desired State Configuration (DSC) when auditing and configuring both Windows and Linux. The DSC configuration defines the condition that the machine should be in.
!!! Note !!!
Custom packages that audit the state of an environment and apply configurations are in Generally Available (GA) support status. However, the following limitations apply:To use machine configuration packages that apply configurations, Azure VM guest configuration extension version 1.26.24 or later, or Arc agent 1.10.0 or later, is required.
The GuestConfiguration module is only available on Ubuntu 18 and later. However, the package and policies produced by the module can be used on any Linux distribution and version supported in Azure or Arc.
Testing packages on macOS isn’t available.
Don’t use secrets or confidential information in custom content packages.
Source: https://learn.microsoft.com/en-us/azure/governance/machine-configuration/how-to-create-package
Before we can create a configuration package, we first need to create and compile a DSC configuration. Example configurations are available for Windows and Linux. For Windows you will find some in my following post.
I will use one example from the post below which shows how to create a registry entry using DSC.
In the article from Microsoft is recommended to install the PSDesiredStateConfiguration version 2.0.7. When done I will run into the following error when trying to create the package artifact.
Found a dependency on resources from the PSDesiredStateConfiguration module, but we cannot copy these resources into the Guest Configuration package. Please switch these resources to using the PSDscResources module instead.
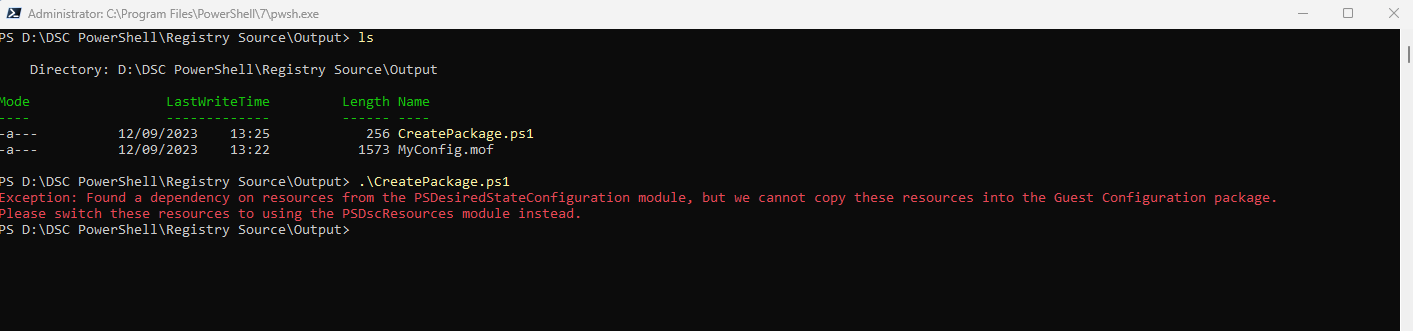
Microsoft itself is aware of that issue and in the article below recommends to use the PsDscResources module instead of the PSDesiredStateConfiguration.
Known compatibility issues with supported modules
The PsDscResources module in the PowerShell Gallery and the PSDesiredStateConfiguration module that ships with Windows are supported by Microsoft and have been a commonly used set of resources for DSC. Until the PSDscResources module is updated for DSCv3, be aware of the following known compatibility issues.
Don’t use resources from the PSDesiredStateConfiguration module that ships with Windows. Instead, switch to PSDscResources.
Don’t use the WindowsFeature, WindowsFeatureSet, WindowsOptionalFeature, and WindowsOptionalFeatureSet resources in PsDscResources. There’s a known issue loading the DISM module in PowerShell 7.1.3 on Windows Server that requires an update.
Therefore I will also install the PSDscResources module in PowerShell 7.
# Install-Module -Name PSDesiredStateConfiguration -Force -AllowClobber -Scope AllUsers
Install-Module -Name PSDscResources -Force -AllowClobber -Scope AllUsers
# The -Force and -AllowClobber flags ensure that the module is installed even if there are conflicts with existing modules.# Determine installed version
Get-InstalledModule
Create a Configuration
The next step is to create a configuration, therefore I will use one of the examples from my post below as mentioned, the one which shows how to create a file using DSC.
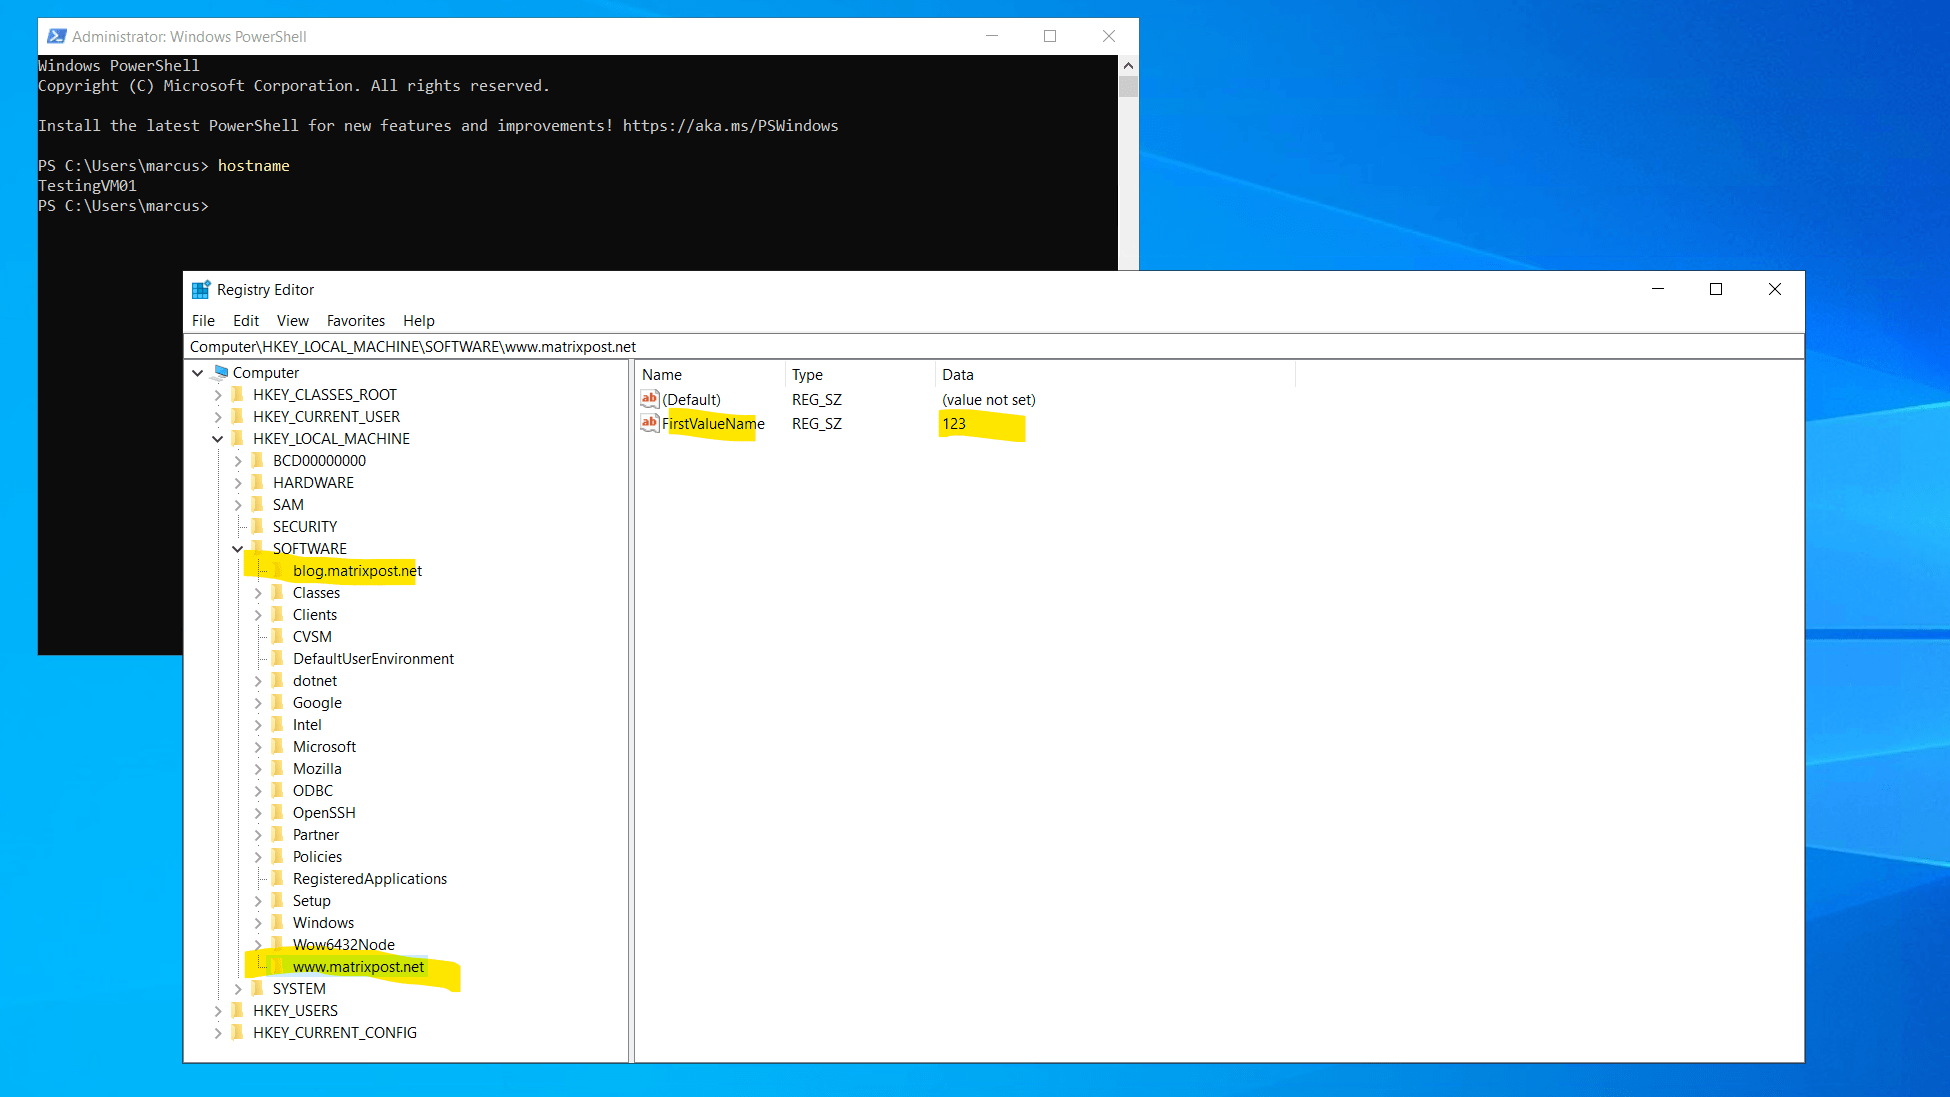
This will create two new registry keys on the computers the configuration is applied to.
Import-DscResource -Name -ModuleName -ModuleVersion
-Name: The DSC resource name(s) that you must import. If the module name is specified, the command searches for these DSC resources within this module; otherwise the command searches the DSC resources in all DSC resource paths. Wildcards are supported.-ModuleName: The module name, or module specification. If you specify resources to import from a module, the command will try to import only those resources. If you specify the module only, the command imports all the DSC resources in the module.
-ModuleVersion: Beginning in PowerShell 5.0, you can specify which version of a module a configuration should use. For more information, see Import a specific version of an installed resource.
configuration CreateRegistryEntries {

    # Import the module that contains the File resource.
    Import-DscResource -ModuleName PSDscResources

    # The Node statement specifies which targets to compile MOF files for, when
    # this configuration is executed.
    node localhost {

         Registry CreateFirstRegEntry {
         Ensure ="Present"
         Key ="HKEY_LOCAL_MACHINESOFTWAREblog.matrixpost.net"
         ValueName="FirstValueName"
         ValueData="123"
         }


          Registry CreateSecondRegEntry {
          Ensure ="Present"
          Key ="HKEY_LOCAL_MACHINESOFTWAREwww.matrixpost.net"
          ValueName="FirstValueName"
          ValueData="123"
          }

               }
}


CreateRegistryEntries -Output .Output
With that definition saved in the MyConfig.ps1 script file, you can run the script to compile the configuration
.MyConfig.ps1
The configuration is compiled into the localhost.mof file in the Output folder in the current working directory. Rename localhost.mof to the name you want to use as the package name, such as MyConfig.mof.
Rename-Item -Path .localhost.mof -NewName MyConfig.mof -PassThru
Source: https://learn.microsoft.com/en-us/azure/governance/machine-configuration/how-to-create-package#author-a-configuration
Create a configuration package artifact
Once the MOF is compiled, the supporting files must be packaged together. The completed package is used by machine configuration to create the Azure Policy definitions.
The New-GuestConfigurationPackage cmdlet creates the package. Modules required by the configuration must be in available in $Env:PSModulePath for the development environment so the commands in the module can add them to the package.
Parameters of the New-GuestConfigurationPackage cmdlet when creating Windows content:
- Name: machine configuration package name.
- Configuration: Compiled DSC configuration document full path.
- Path: Output folder path. This parameter is optional. If not specified, the package is created in current directory.
- Type: (Audit, AuditandSet) Determines whether the configuration should only audit or if the configuration should change the state of the machine if it’s out of the desired state. The default is Audit.
This step doesn’t require elevation. The Force parameter is used to overwrite existing packages, if you run the command more than once.
The following commands create a package artifact (the first will only audit compliance and the second will audit and apply the configuration).
# Create a package that will only audit compliance
$params = @{
    Name          = 'MyConfig'
    Configuration = './MyConfig.mof'
    Type          = 'Audit'
    Force         = $true
}
New-GuestConfigurationPackage @params
# Create a package that will audit and apply the configuration (Set)
$params = @{
Name = 'MyConfig'
Configuration = './MyConfig.mof'
Type = 'AuditAndSet'
Force = $true
}
New-GuestConfigurationPackage @paramsAn object is returned with the Name and Path of the created package.
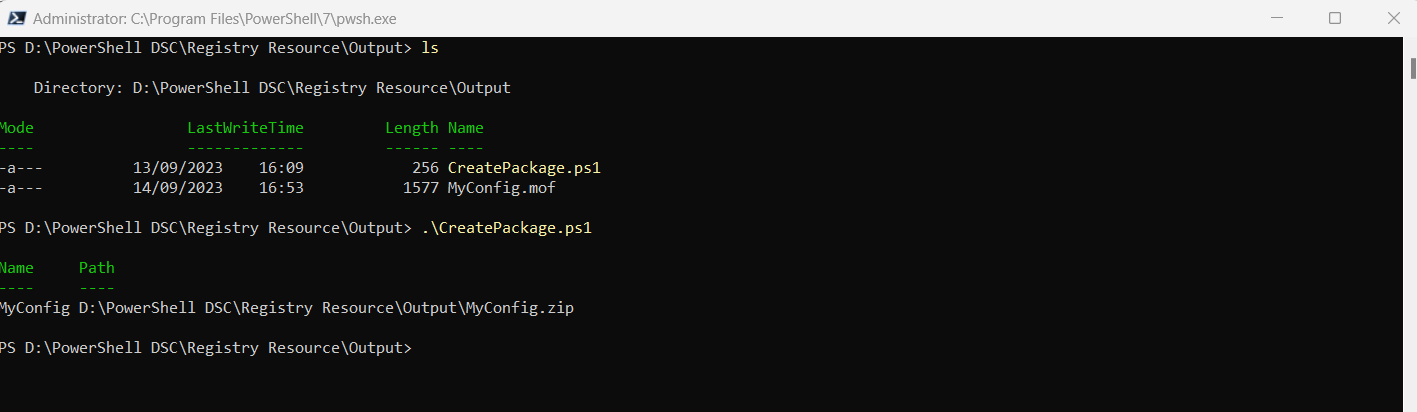
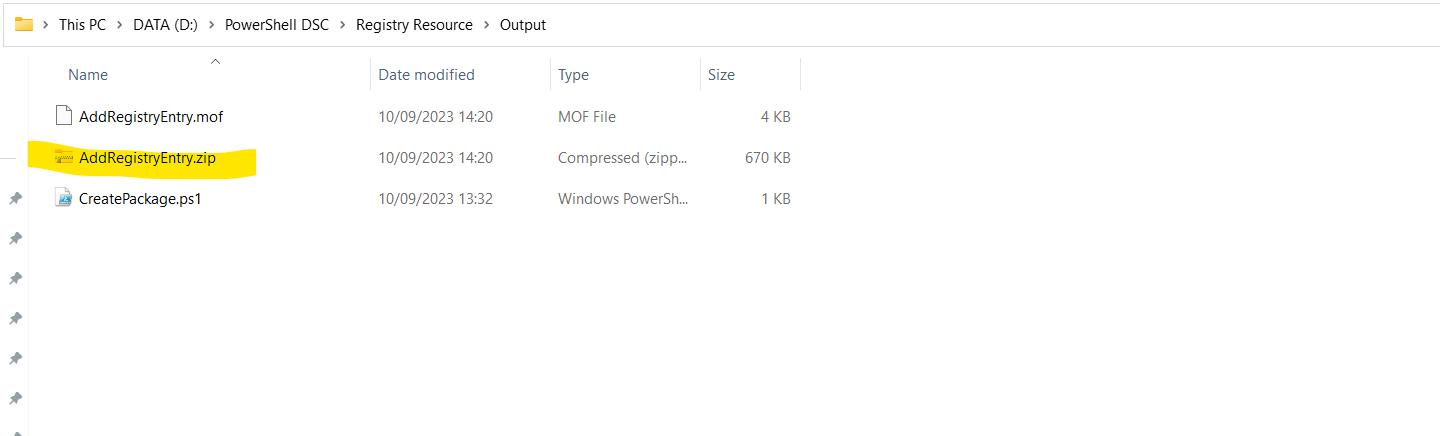
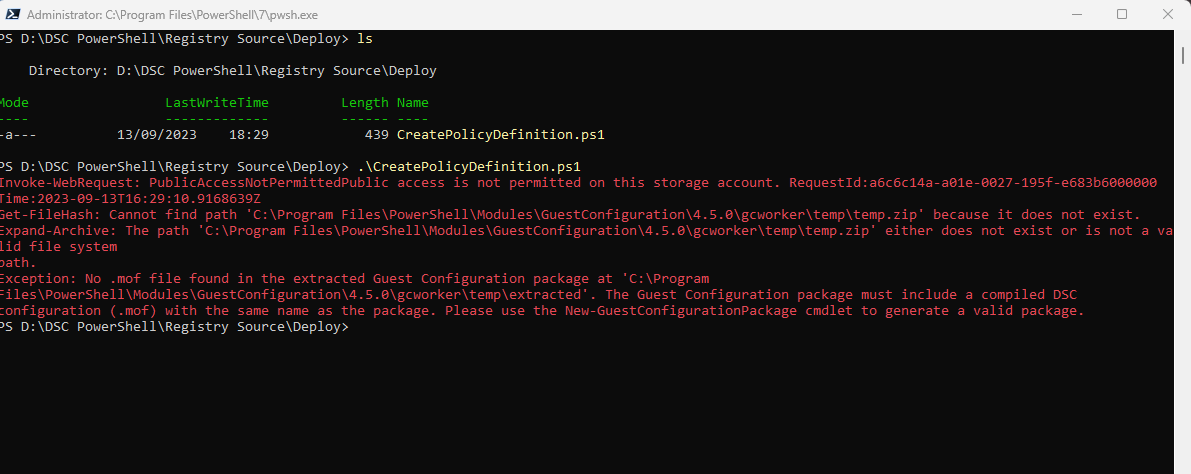
In my case the commands to create the package for my configuration which will add two registry keys will looks like shown below. I will save the file as CreatePackage.ps1.
# Create a package that will audit and apply the configuration (Set)
$params = @{
    Name          = 'AddRegistryEntry'
    Configuration = './AddRegistryEntry.mof'
    Type          = 'AuditandSet'
    Force         = $true
}
New-GuestConfigurationPackage @params
To create the package then I will run this CreatePackage.ps1 script as shown below. It will create the AddRegistryEntry.zip file.
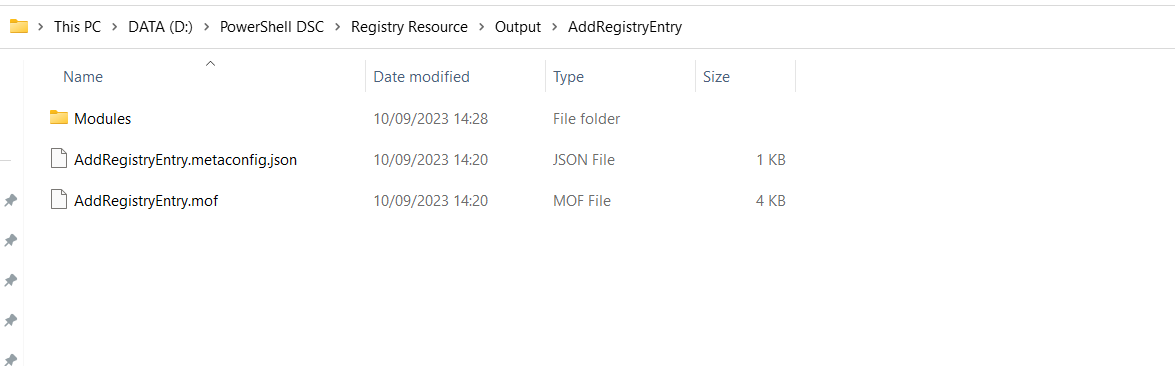
The completed package is used by machine configuration to create the Azure Policy definitions. The package consists of:
- The compiled DSC configuration as a MOF
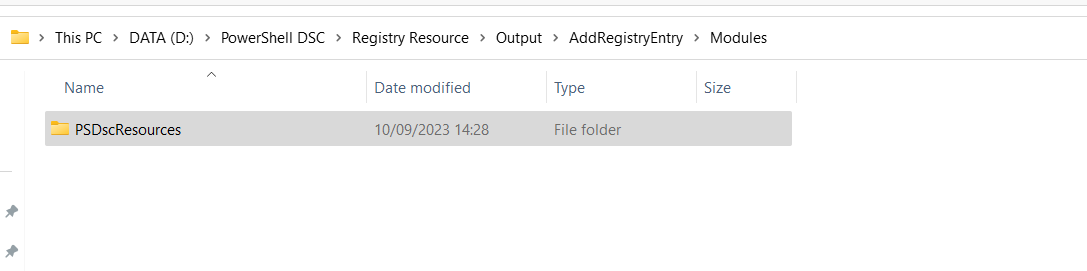
- Modules folder
- GuestConfiguration module
- DscNativeResources module
- DSC resource modules required by the MOF
- A metaconfig file that stores the package type and version
The PowerShell cmdlet creates the package .zip file. No root level folder or version folder is required. The package format must be a .zip file and can’t exceed a total size of 100 MB when uncompressed.
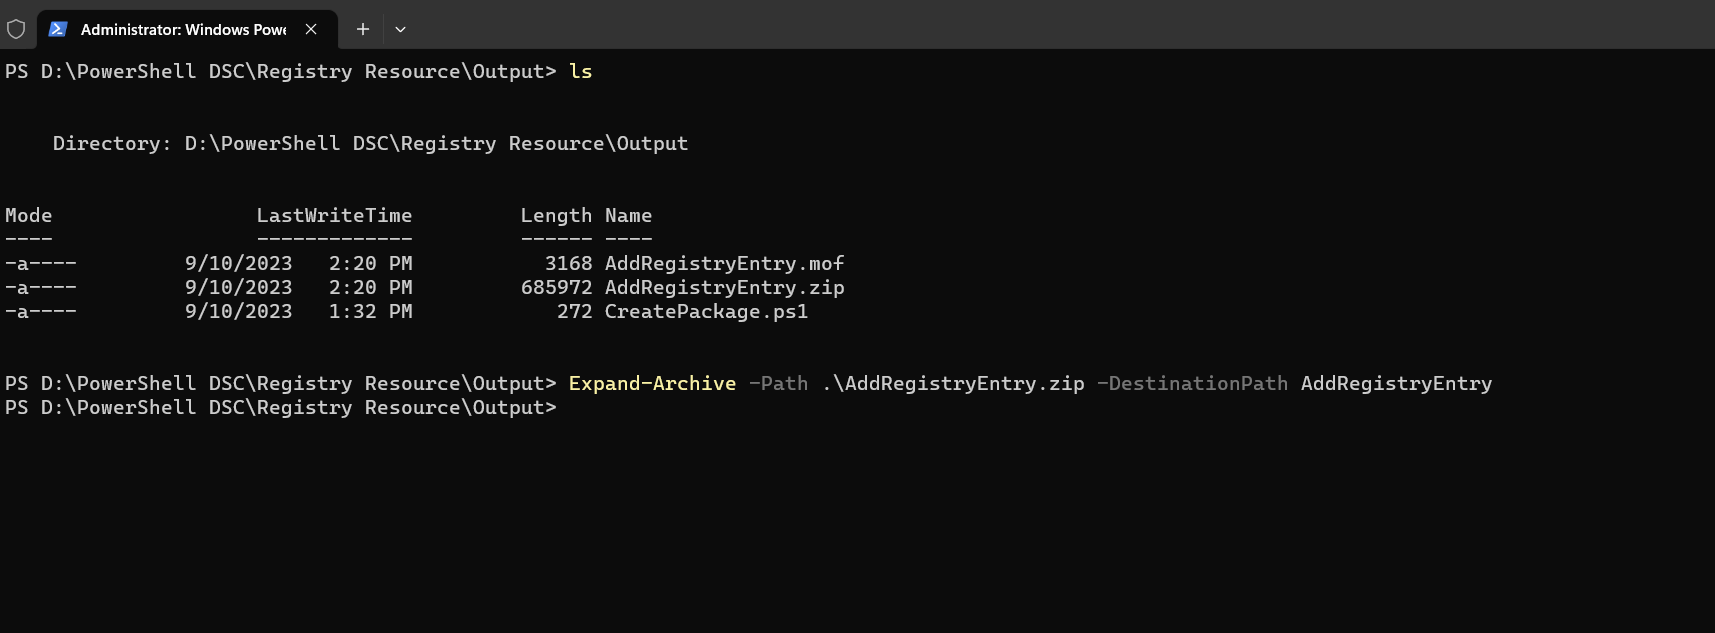
You can expand the archive to inspect it by using the Expand-Archive cmdlet.
Expand-Archive -Path .MyConfig.zip -DestinationPath MyConfigZip
The package also includes the PSDscResources module which will include and handle the registry resource.
Test a machine configuration package
# Get the current compliance results for the local machine
Get-GuestConfigurationPackageComplianceStatus -Path ./MyConfig.zip# Test applying the configuration to local machine
Start-GuestConfigurationPackageRemediation -Path ./MyConfig.zip
Source: https://learn.microsoft.com/en-us/azure/governance/machine-configuration/how-to-test-package
Publish a configuration package
Machine configuration custom .zip packages must be stored in a location that’s accessible via HTTPS by the managed machines. Examples include GitHub repositories, an Azure Repo, Azure storage, or a web server within your private datacenter.
Configuration packages that support Audit and AuditandSet are published the same way. There isn’t a need to do anything special during publishing based on the package mode.
The preferred location to store a configuration package is Azure Blob Storage. There are no special requirements for the storage account, but it’s a good idea to host the file in a region near your machines. If you prefer to not make the package public, you can include a SAS token in the URL or implement a service endpoint for machines in a private network.
To publish your configuration package to Azure blob storage, you can follow these steps, which use the Az.Storage module.
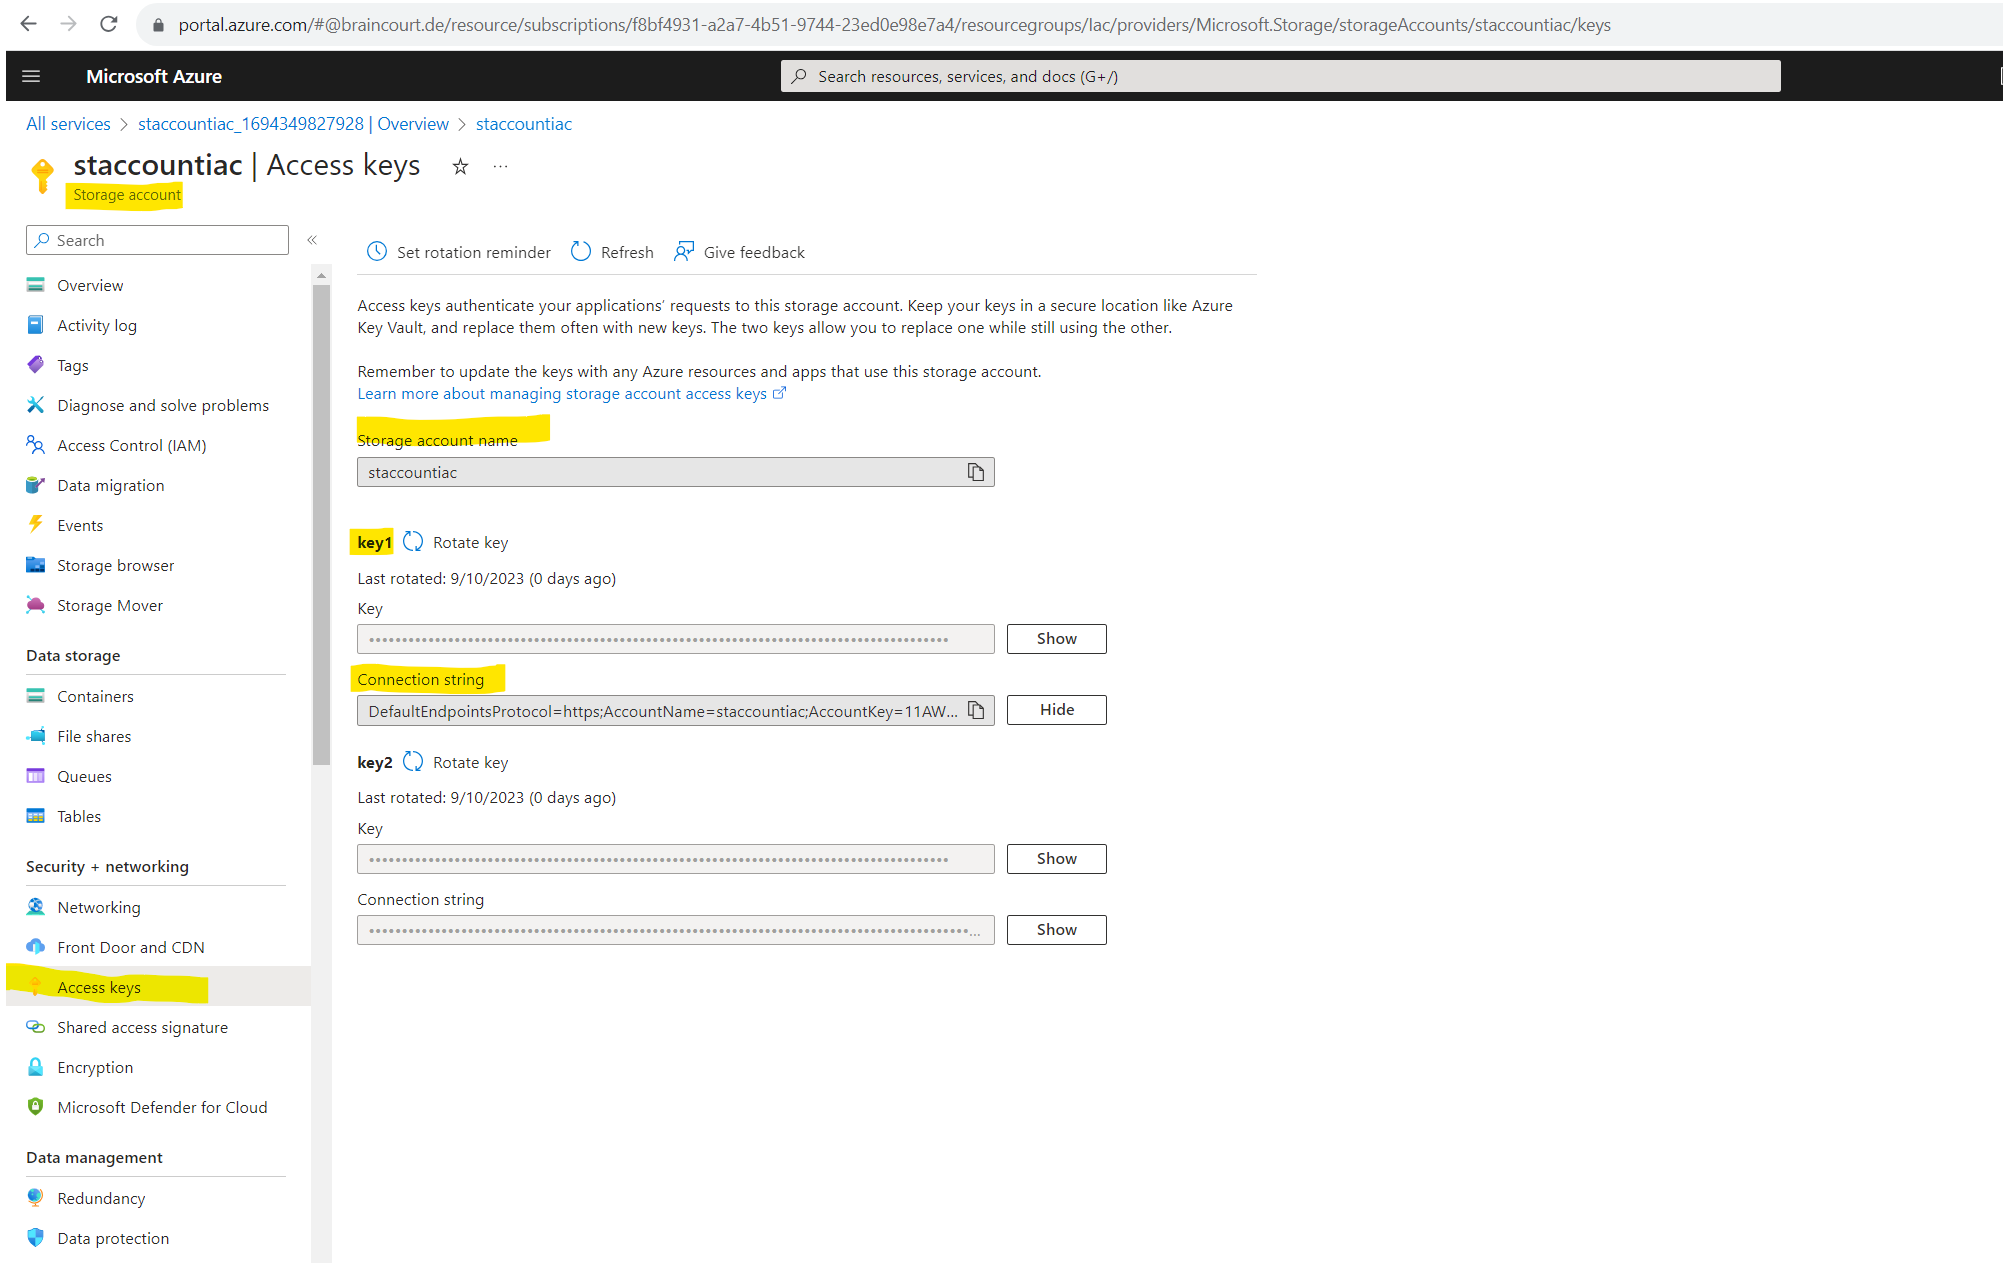
First I will create a new dedicated storage account to store the configuration packages.
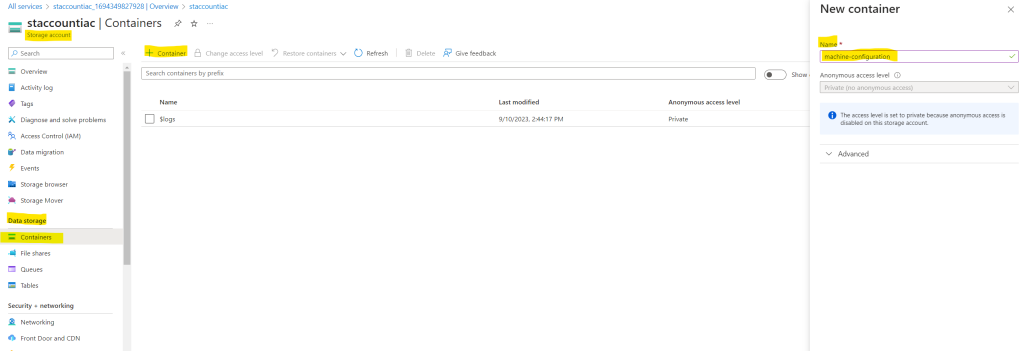
Add a new container where the configuration package will be stored.
If you want to publish your custom machine configuration package by using PowerShell, first copy the connection string from your storage account, you will need it later.
Publish your custom machine configuration package by using PowerShell
https://learn.microsoft.com/en-us/azure/governance/machine-configuration/how-to-create-policy-definition#create-and-publish-a-machine-configuration-package-artifact
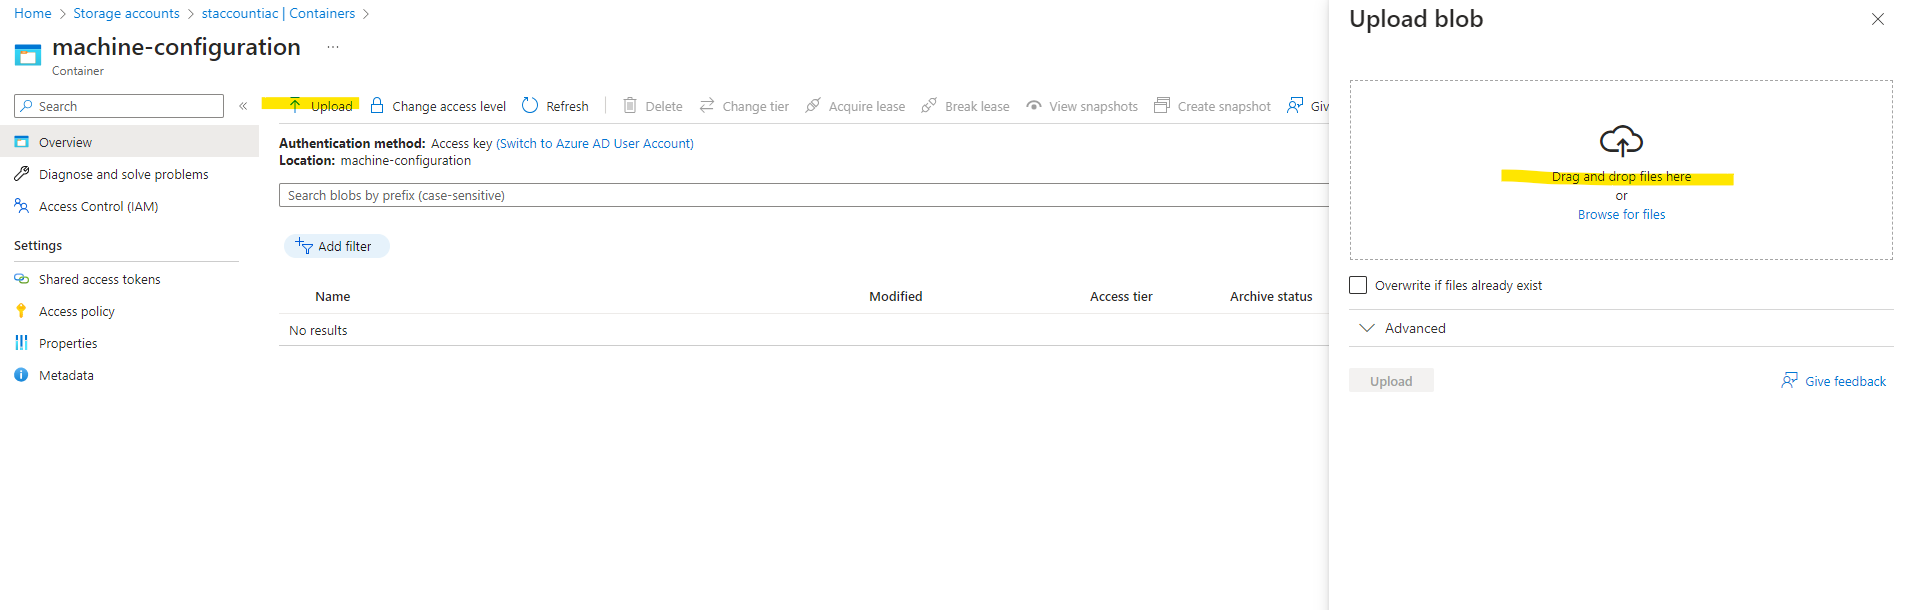
Create a new container where to store the configuration package.
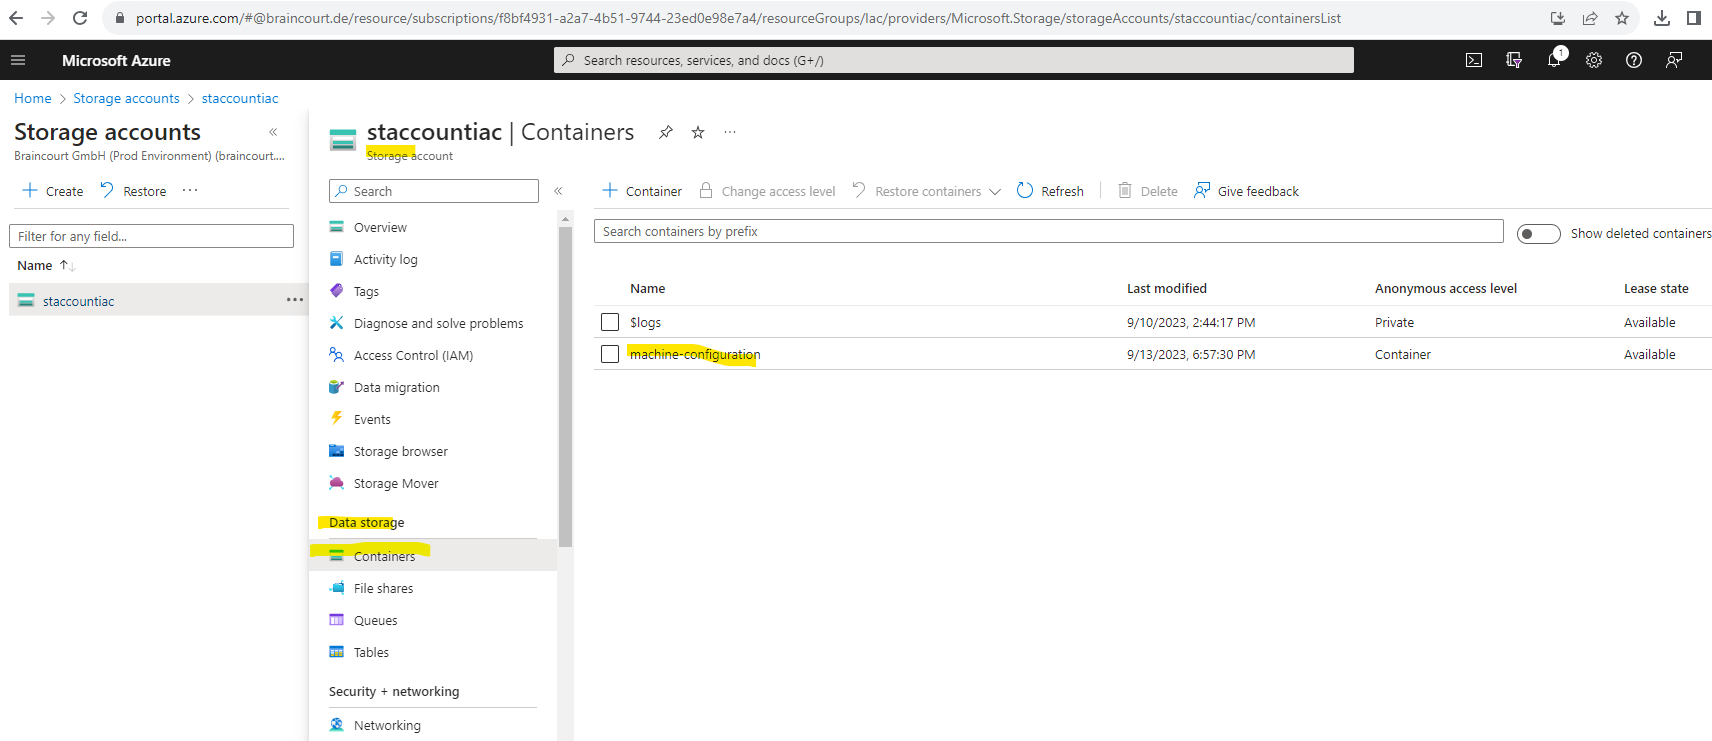
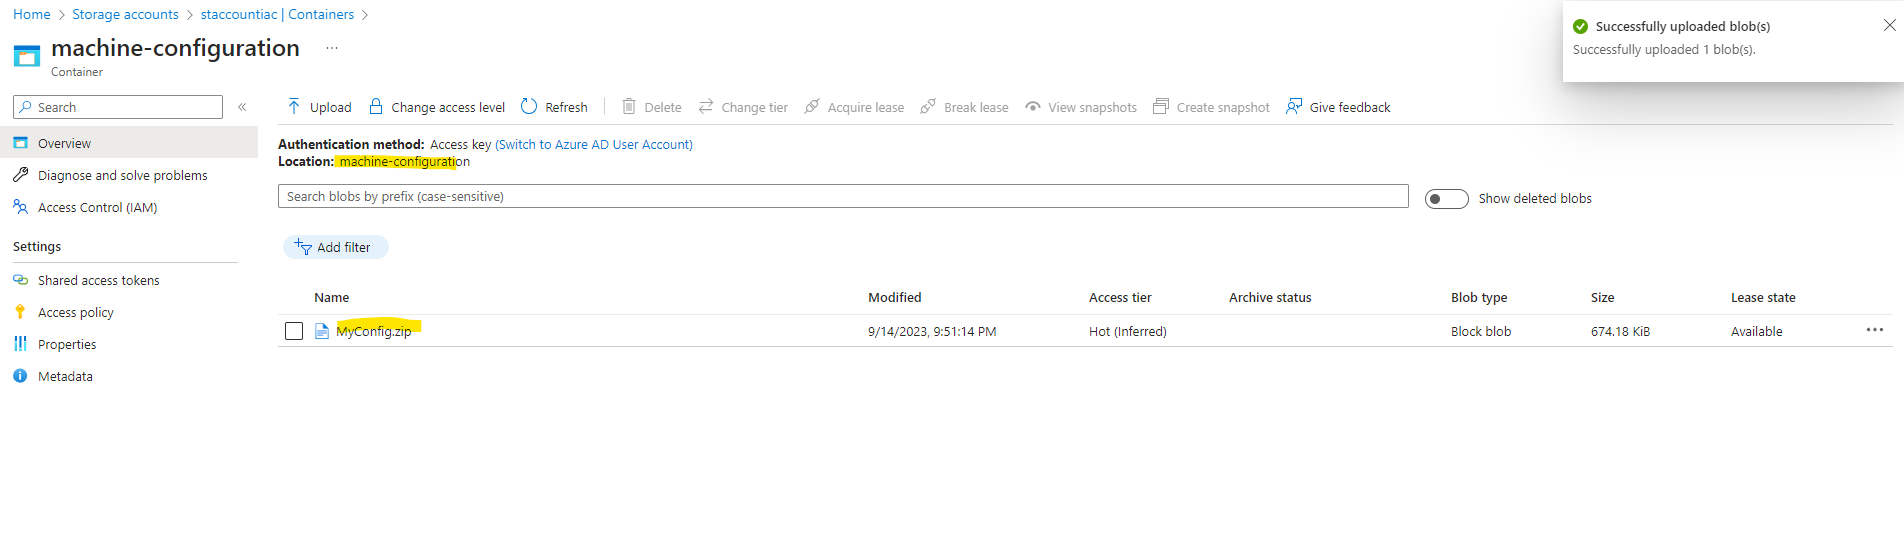
Upload the configuration package.
Source: https://learn.microsoft.com/en-us/azure/governance/machine-configuration/how-to-publish-package
Azure Policy
Create an Azure Policy definition
Now that we have uploaded our custom machine configuration package, the next step is to create a machine configuration policy definition.
The PolicyId parameter of New-GuestConfigurationPolicy requires a unique string. A globally unique identifier (GUID) is required. For new definitions, generate a new GUID using the New-GUID cmdlet. When making updates to the definition, use the same unique string for PolicyId to ensure the correct definition is updated.
Parameters of the New-GuestConfigurationPolicy cmdlet:
- PolicyId: A GUID.
- ContentUri: Public HTTP(s) URI of machine configuration content package.
- DisplayName: Policy display name.
- Description: Policy description.
- Parameter: Policy parameters provided in a hash table.
- PolicyVersion: Policy version.
- Path: Destination path where policy definitions are created.
- Platform: Target platform (Windows/Linux) for machine configuration policy and content package.
- Mode: (ApplyAndMonitor, ApplyAndAutoCorrect, Audit) choose if the policy should audit or deploy the configuration. The default is Audit.
- Tag adds one or more tag filters to the policy definition
- Category sets the category metadata field in the policy definition
For more information about the Mode parameter, see the page How to configure remediation options for machine configuration.
I will create a policy definition that deploys my custom configuration package stored in my specified path:
$PolicyConfig = @{
PolicyId = New-Guid
ContentUri = 'https://staccountiac.blob.core.windows.net/machine-configuration/MyConfig.zip'
DisplayName = 'Add Registry Entry'
Description = 'Adds two registry entries'
Path = './policies/deployIfNotExists.json'
Platform = 'Windows'
PolicyVersion = '1.0.0'
Mode = 'ApplyAndAutoCorrect'
}
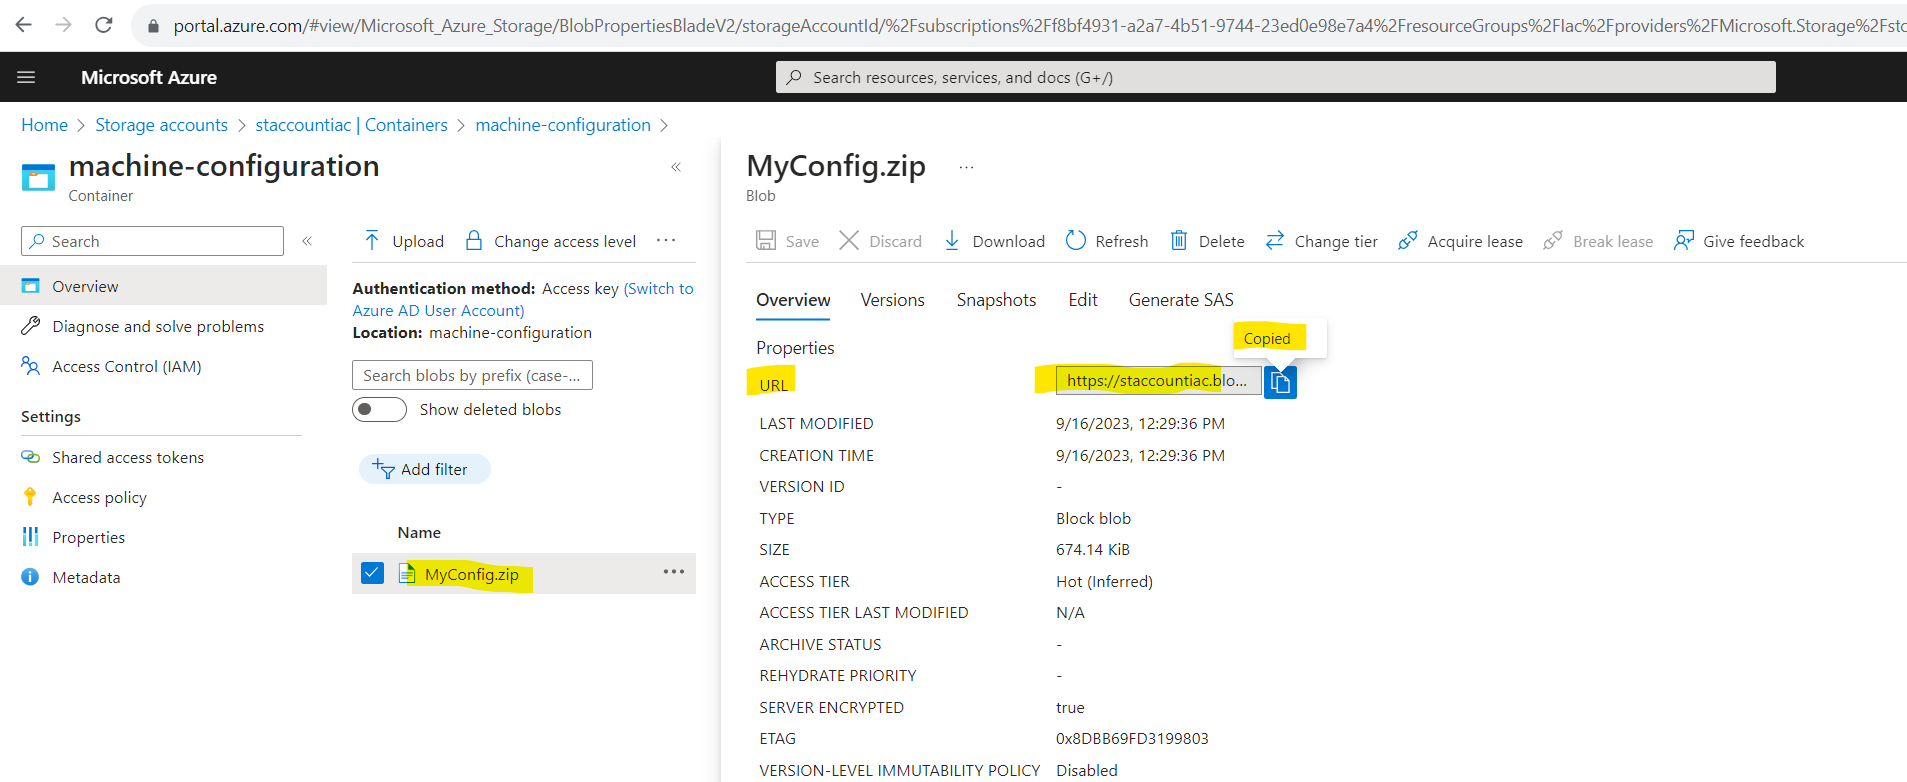
New-GuestConfigurationPolicy @PolicyConfigThe ContentUri you can copy from the uploaded machine configuration package. Therefore select the file and click on the dots to open the context menu of the uploaded file. Here select Properties.
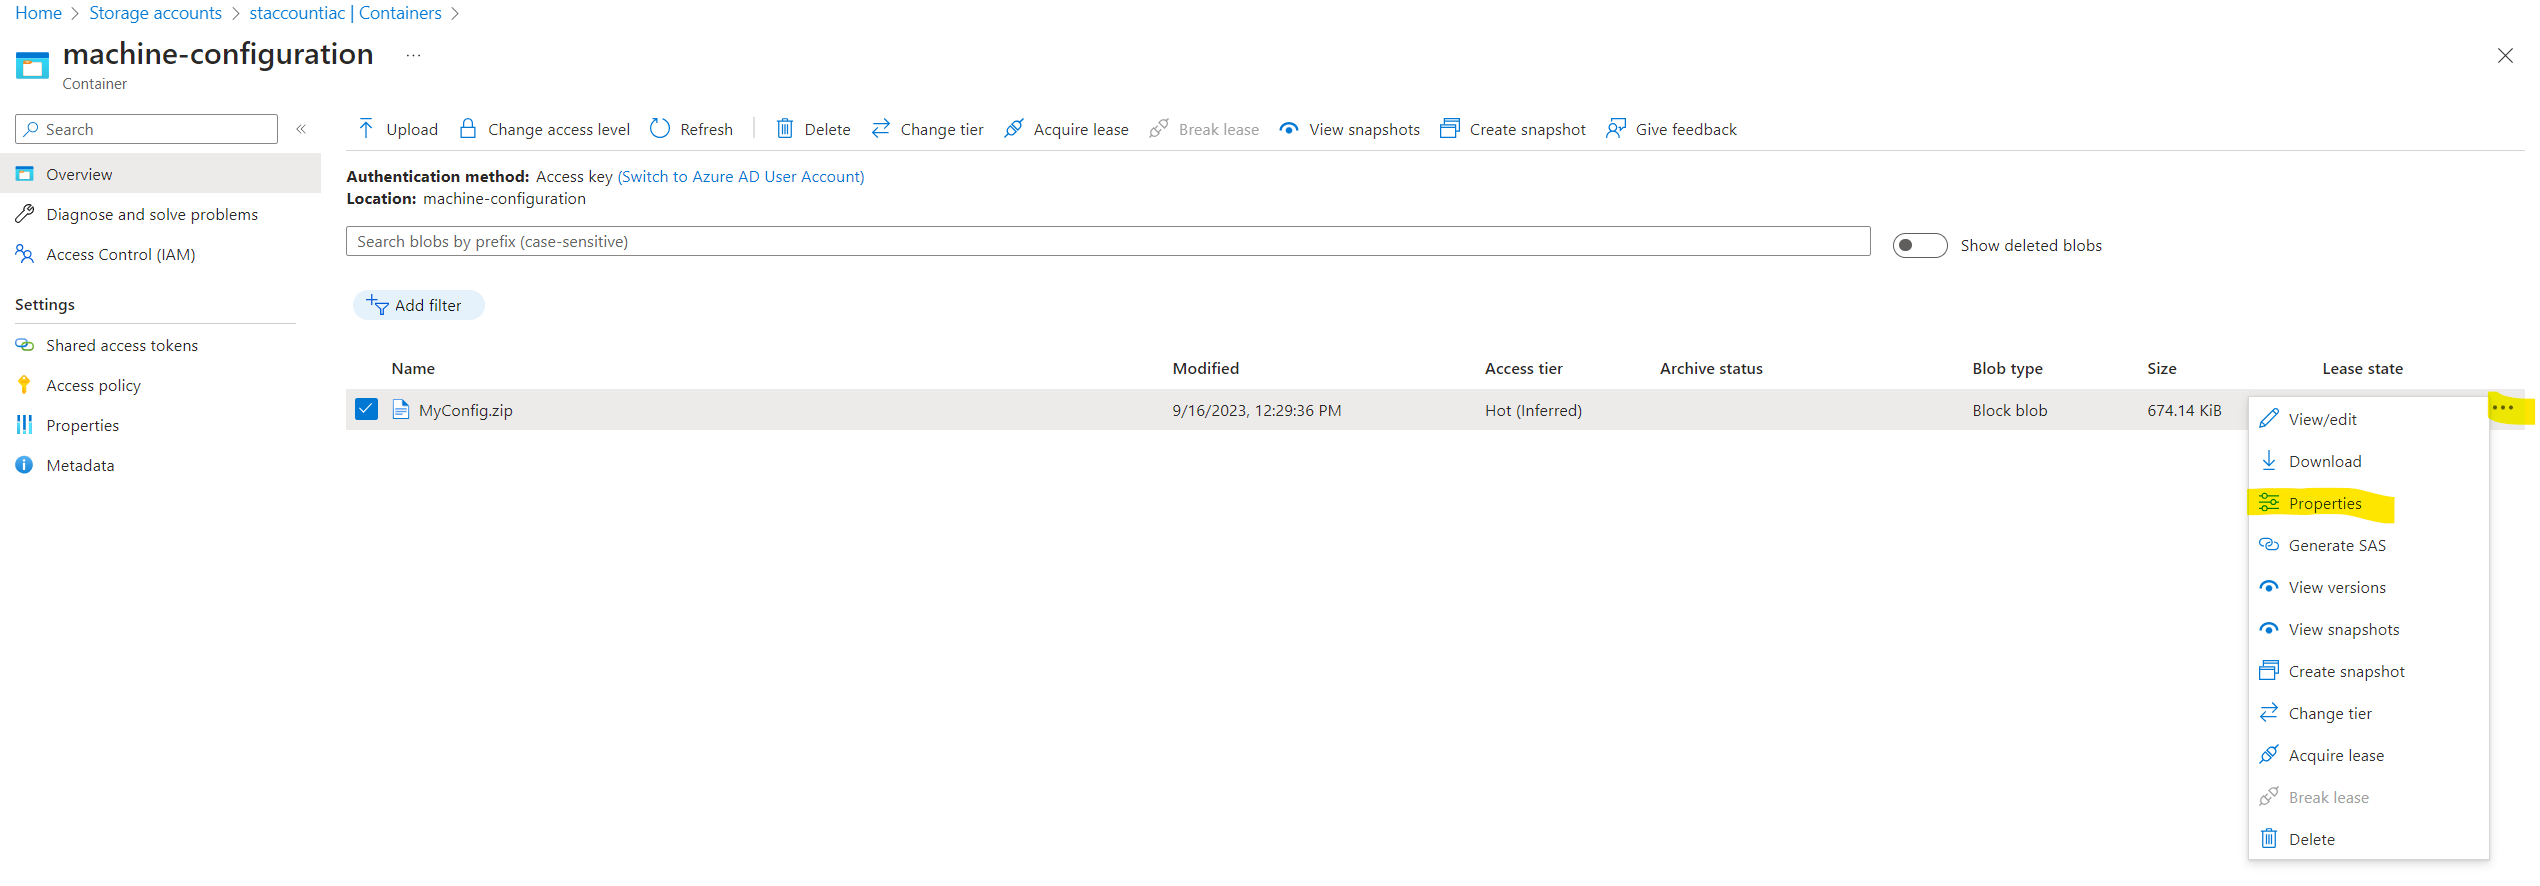
Here you can copy the URL from the uploaded machine configuration package which is our ContentUri parameter in the Azure Policy definition.
Creating the policy definition runs into an error because the ContentUri is not accessible.
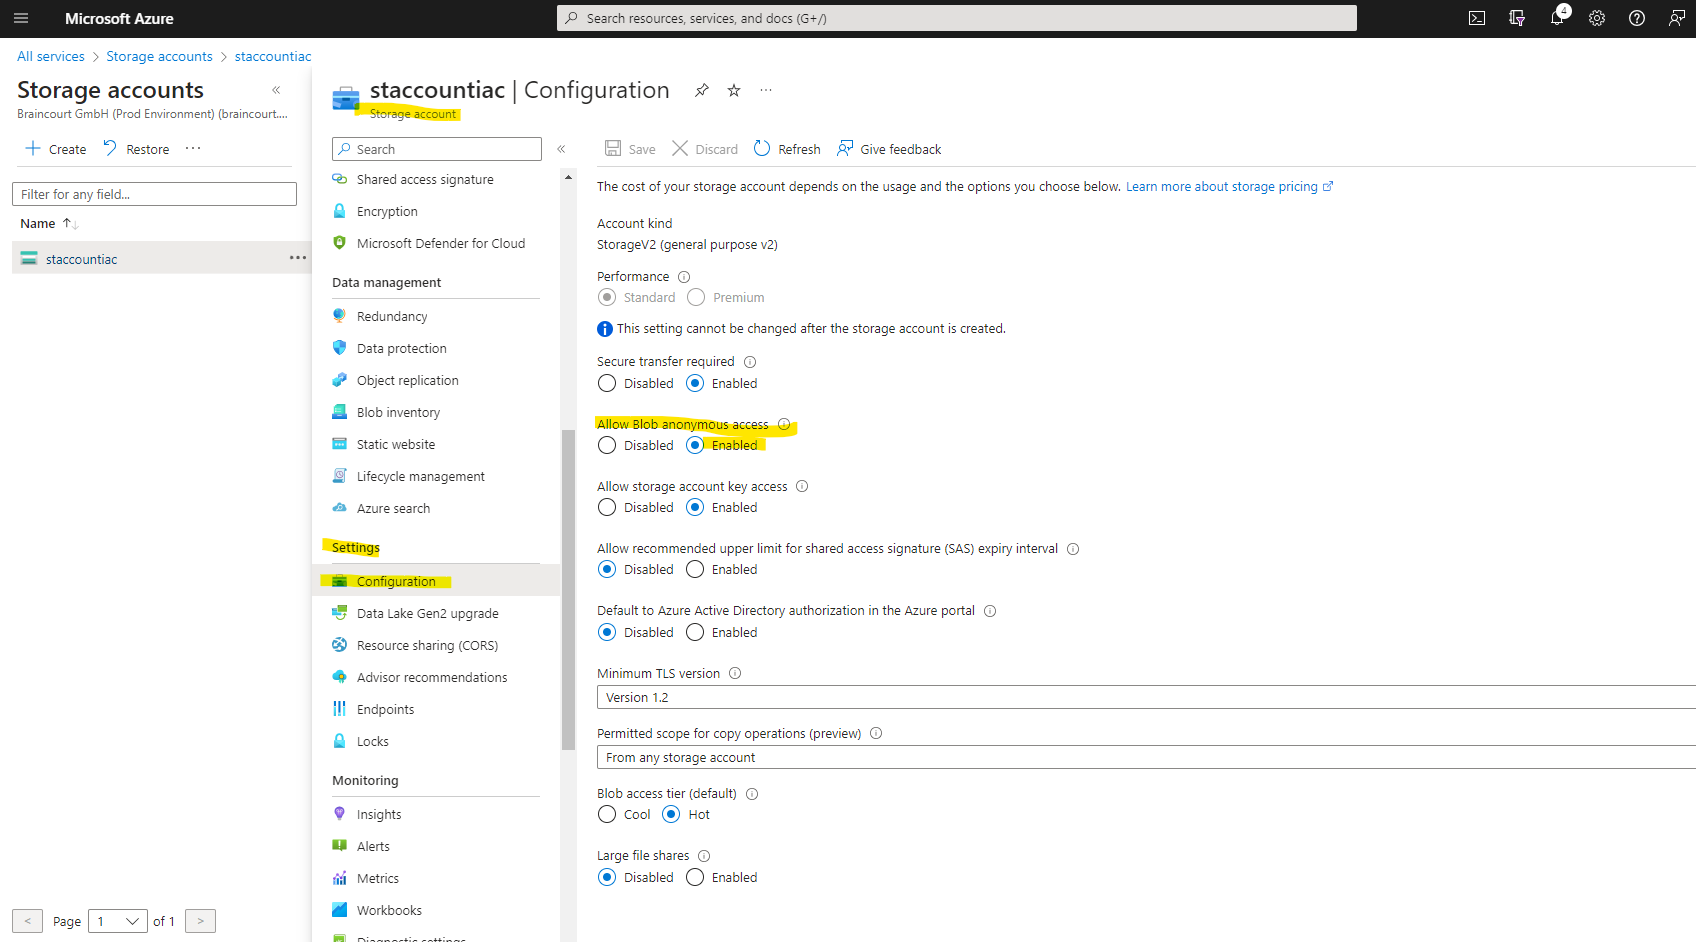
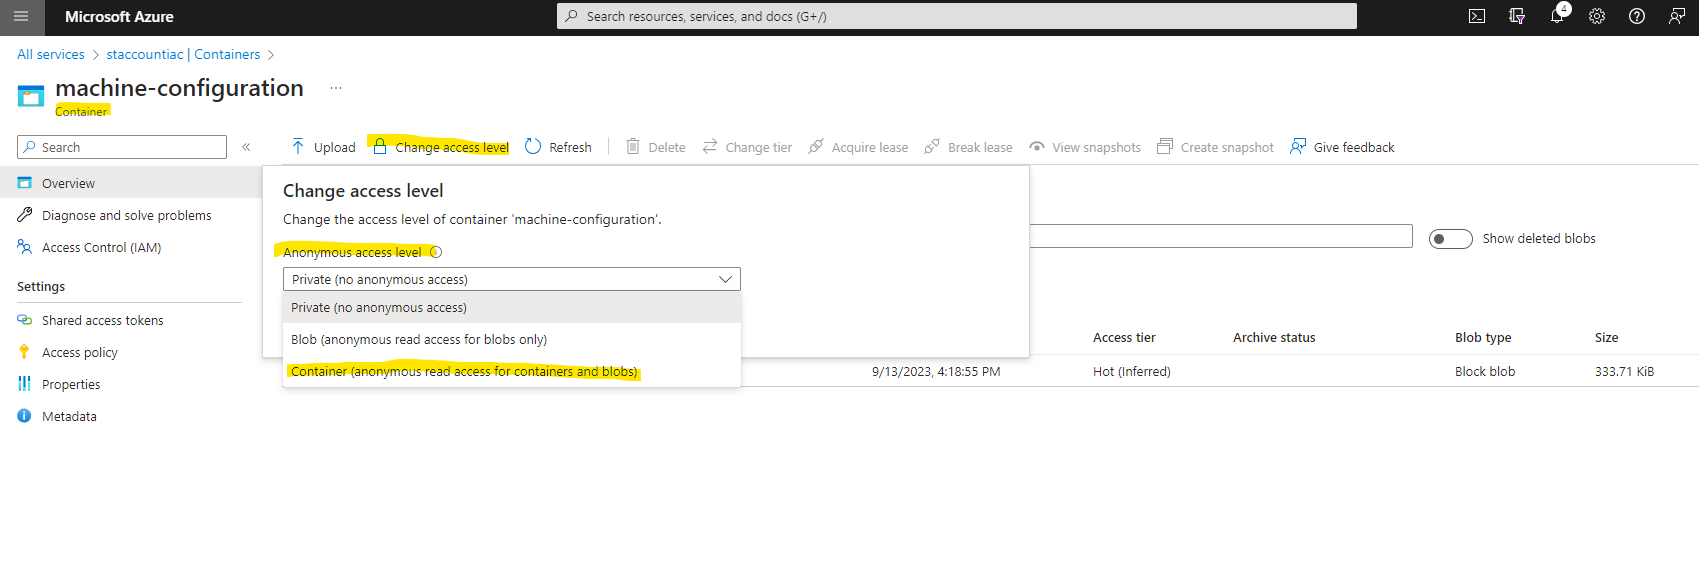
In order to allow anonymous access to our container in the storage account where we published our custom machine configuration package, we first need to enable it.
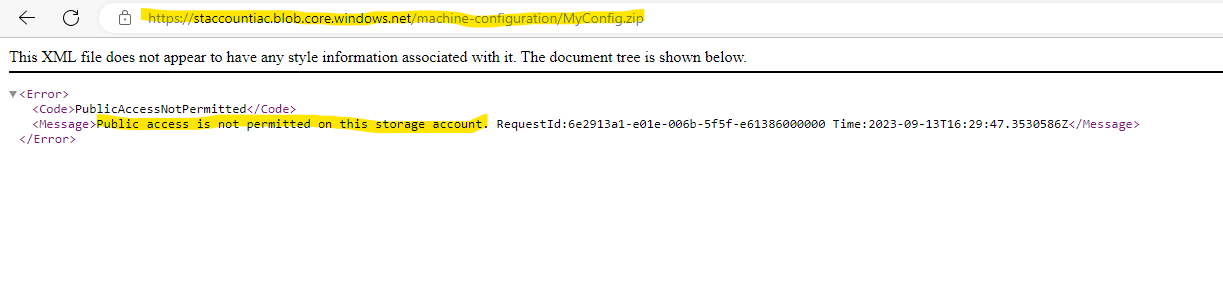
To allow or disallow public access for a storage account, configure the account’s AllowBlobPublicAccess property. This property is available for all storage accounts that are created with the Azure Resource Manager deployment model. For more information, see Storage account overview.
The AllowBlobPublicAccess property is not set for a storage account by default and does not return a value until you explicitly set it. The storage account permits public access when the property value is either null or true.
Select the container where you uploaded your machine configuration package.
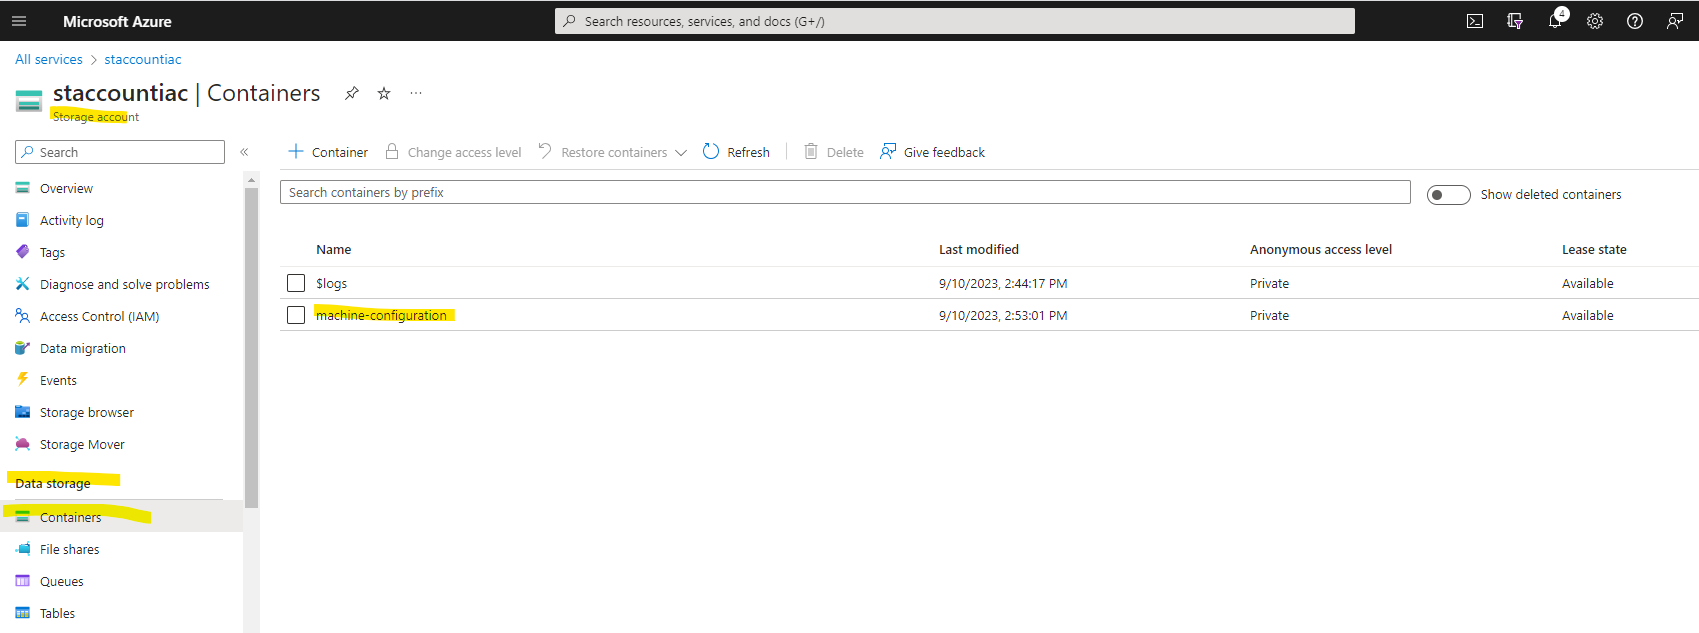
Select here Container (anonymous read access for containers and blobs)
Now creating the policy definition works.
The cmdlet output returns an object containing the definition display name and path of the policy files. Definition JSON files that create audit policy definitions have the name auditIfNotExists.json and files that create policy definitions to apply configurations have the name deployIfNotExists.json.

Publish the Azure Policy definition
Finally, you can publish the policy definitions using the New-AzPolicyDefinition cmdlet. The below commands publish your machine configuration policy to the policy center.
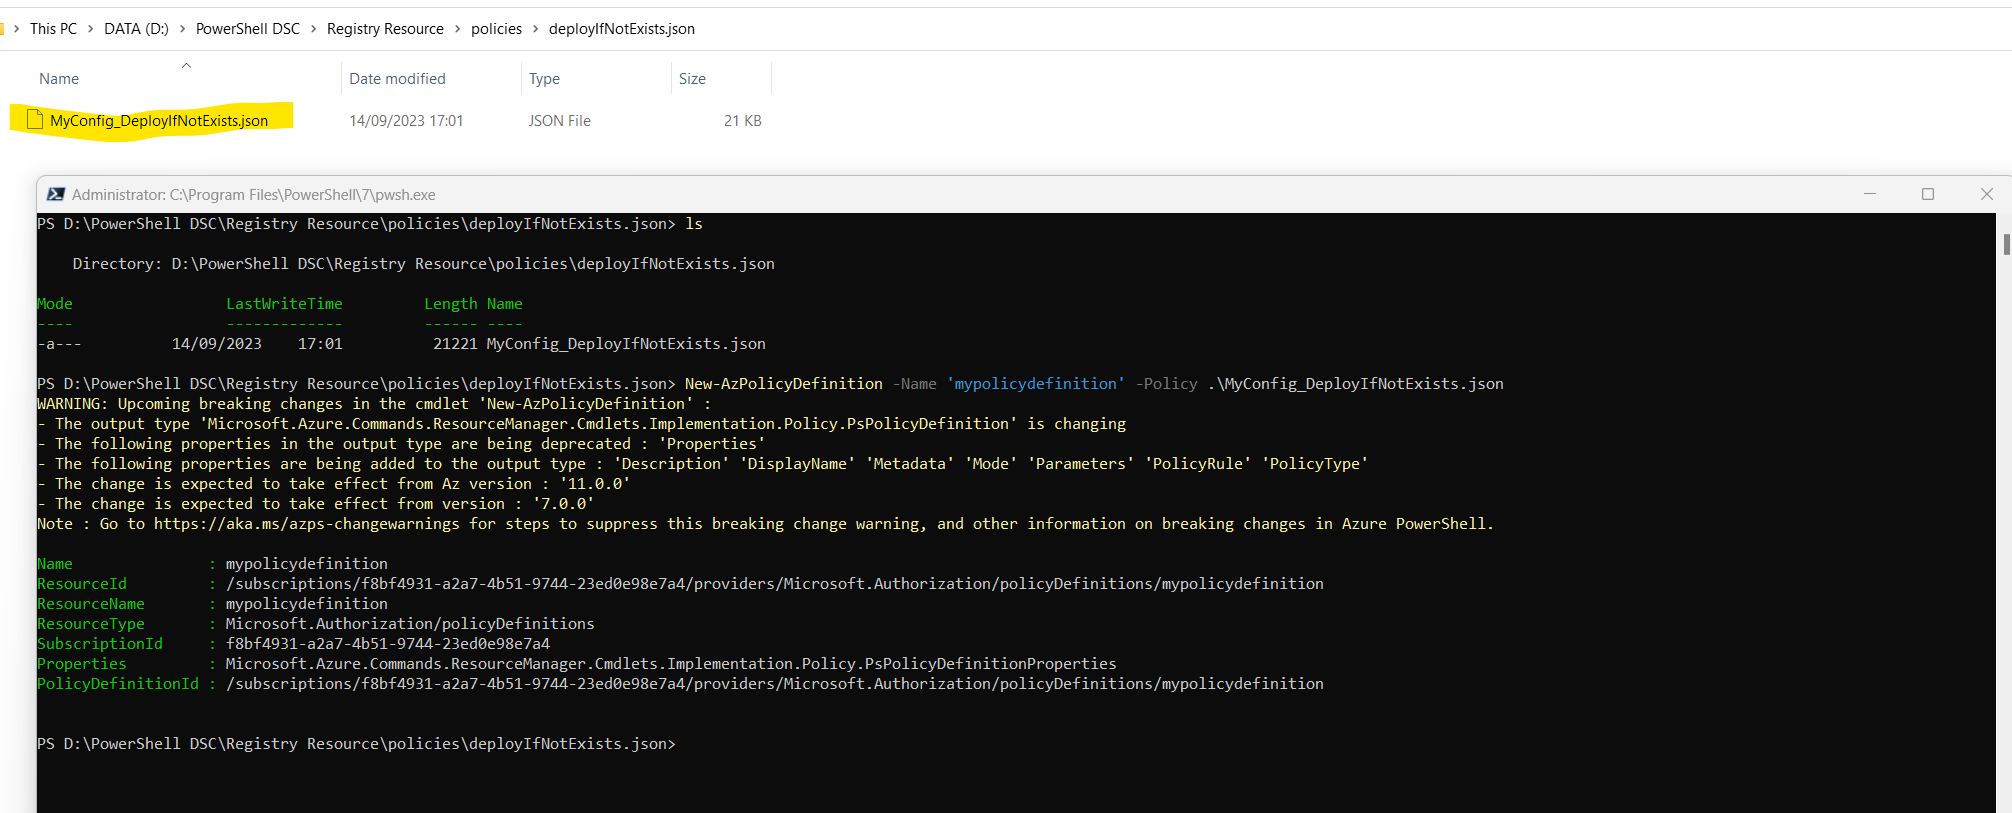
New-AzPolicyDefinition -Name ‘mypolicydefinition’ -Policy ‘.policiesauditIfNotExists.json’
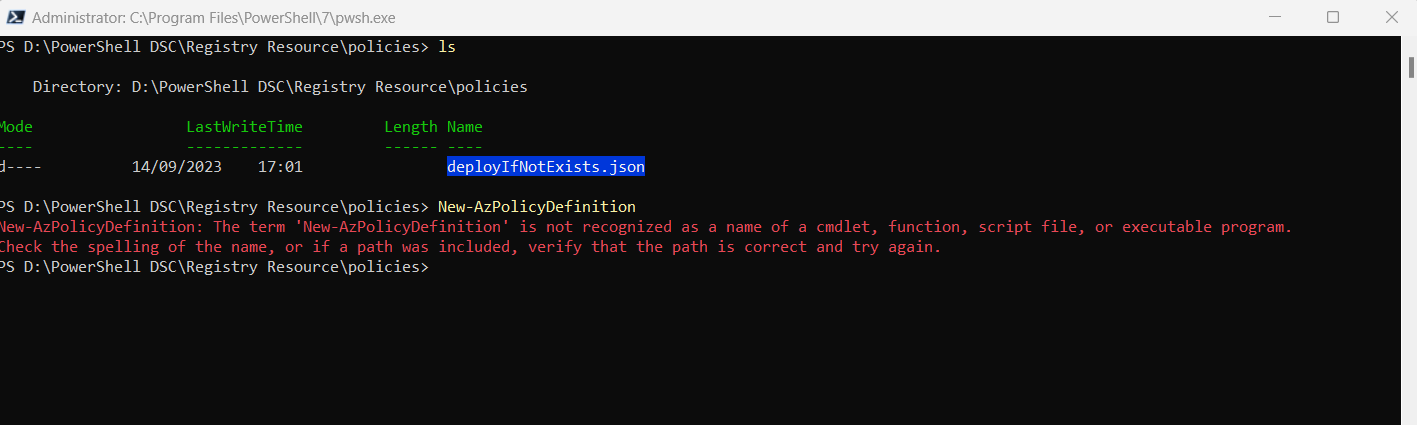
I first need to install the Az.Resources module in order to run the publish cmdlet.
Install-Module -Name Az.Resources
New-AzPolicyDefinition -Name ‘mypolicydefinition’ -Policy .MyConfig_DeployIfNotExists.json
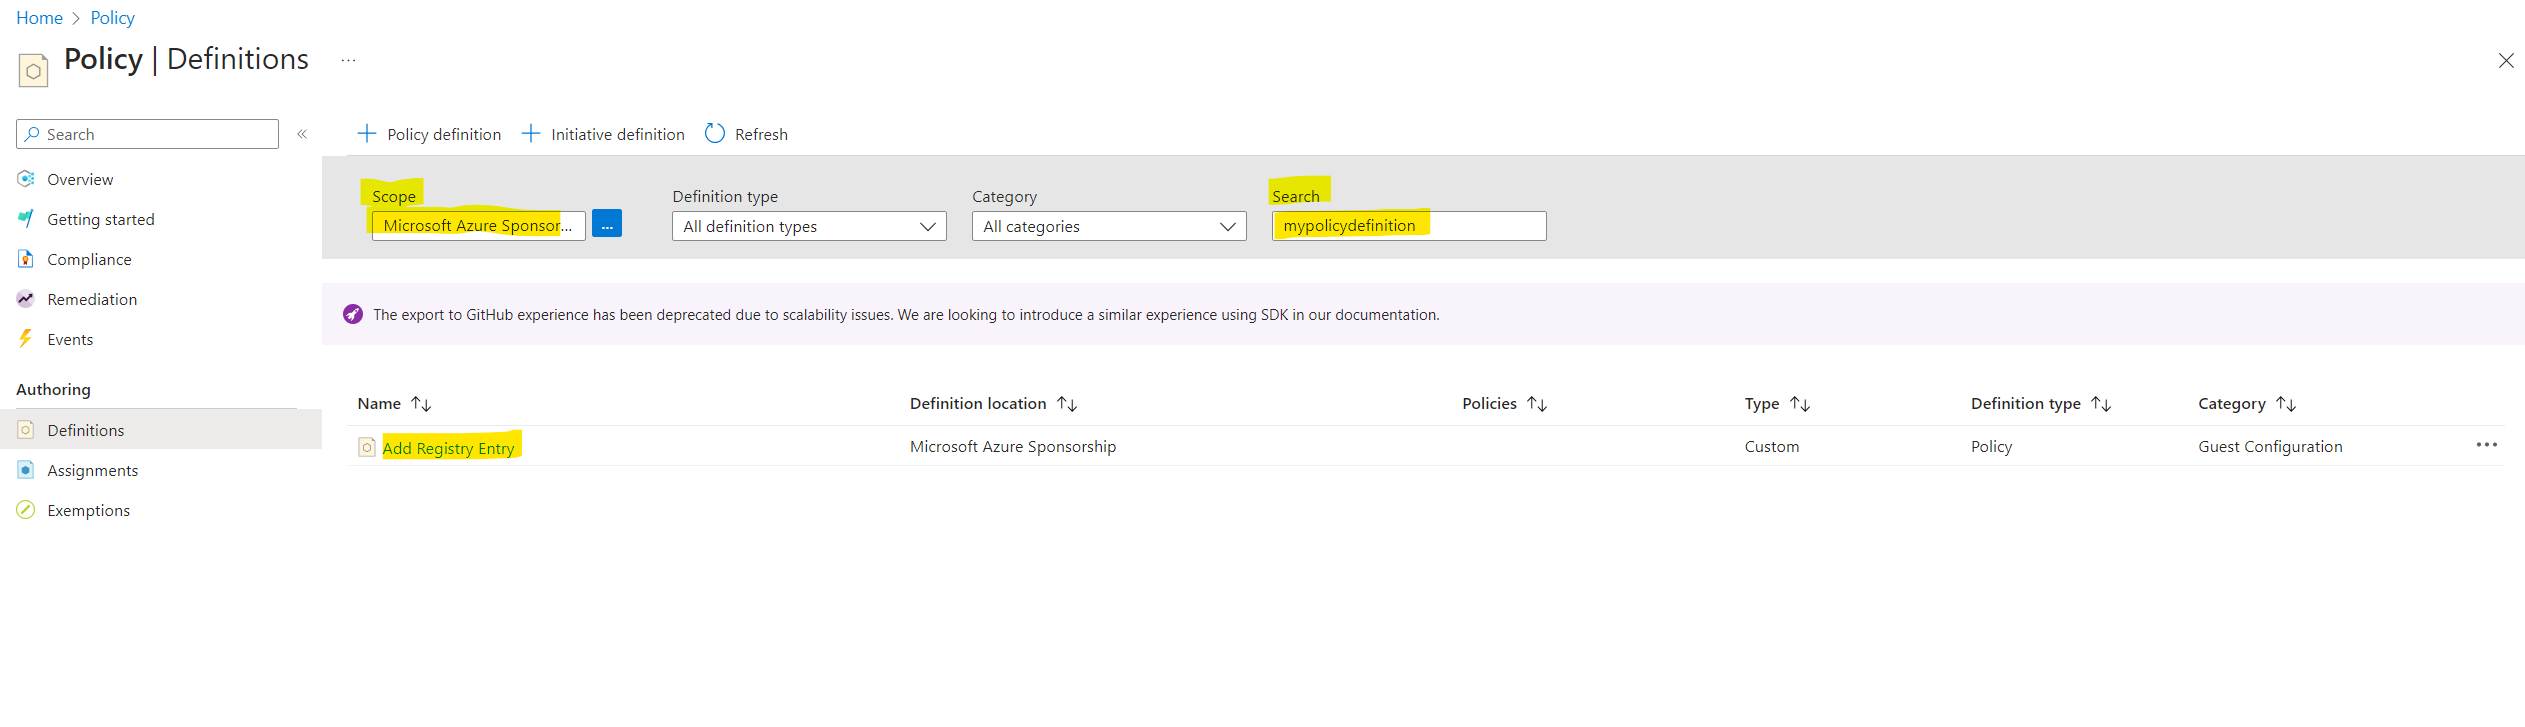
You will find the published Azure Policy definition in the Azure Portal under Policy -> Definitions
Be sure you selected under Scope the correct subscription!
Assign the Azure Policy definition
With the policy definition created in Azure, the last step is to assign the definition. See how to assign the definition with Portal, Azure CLI, and Azure PowerShell.
I will go through the steps by using the Azure Portal.
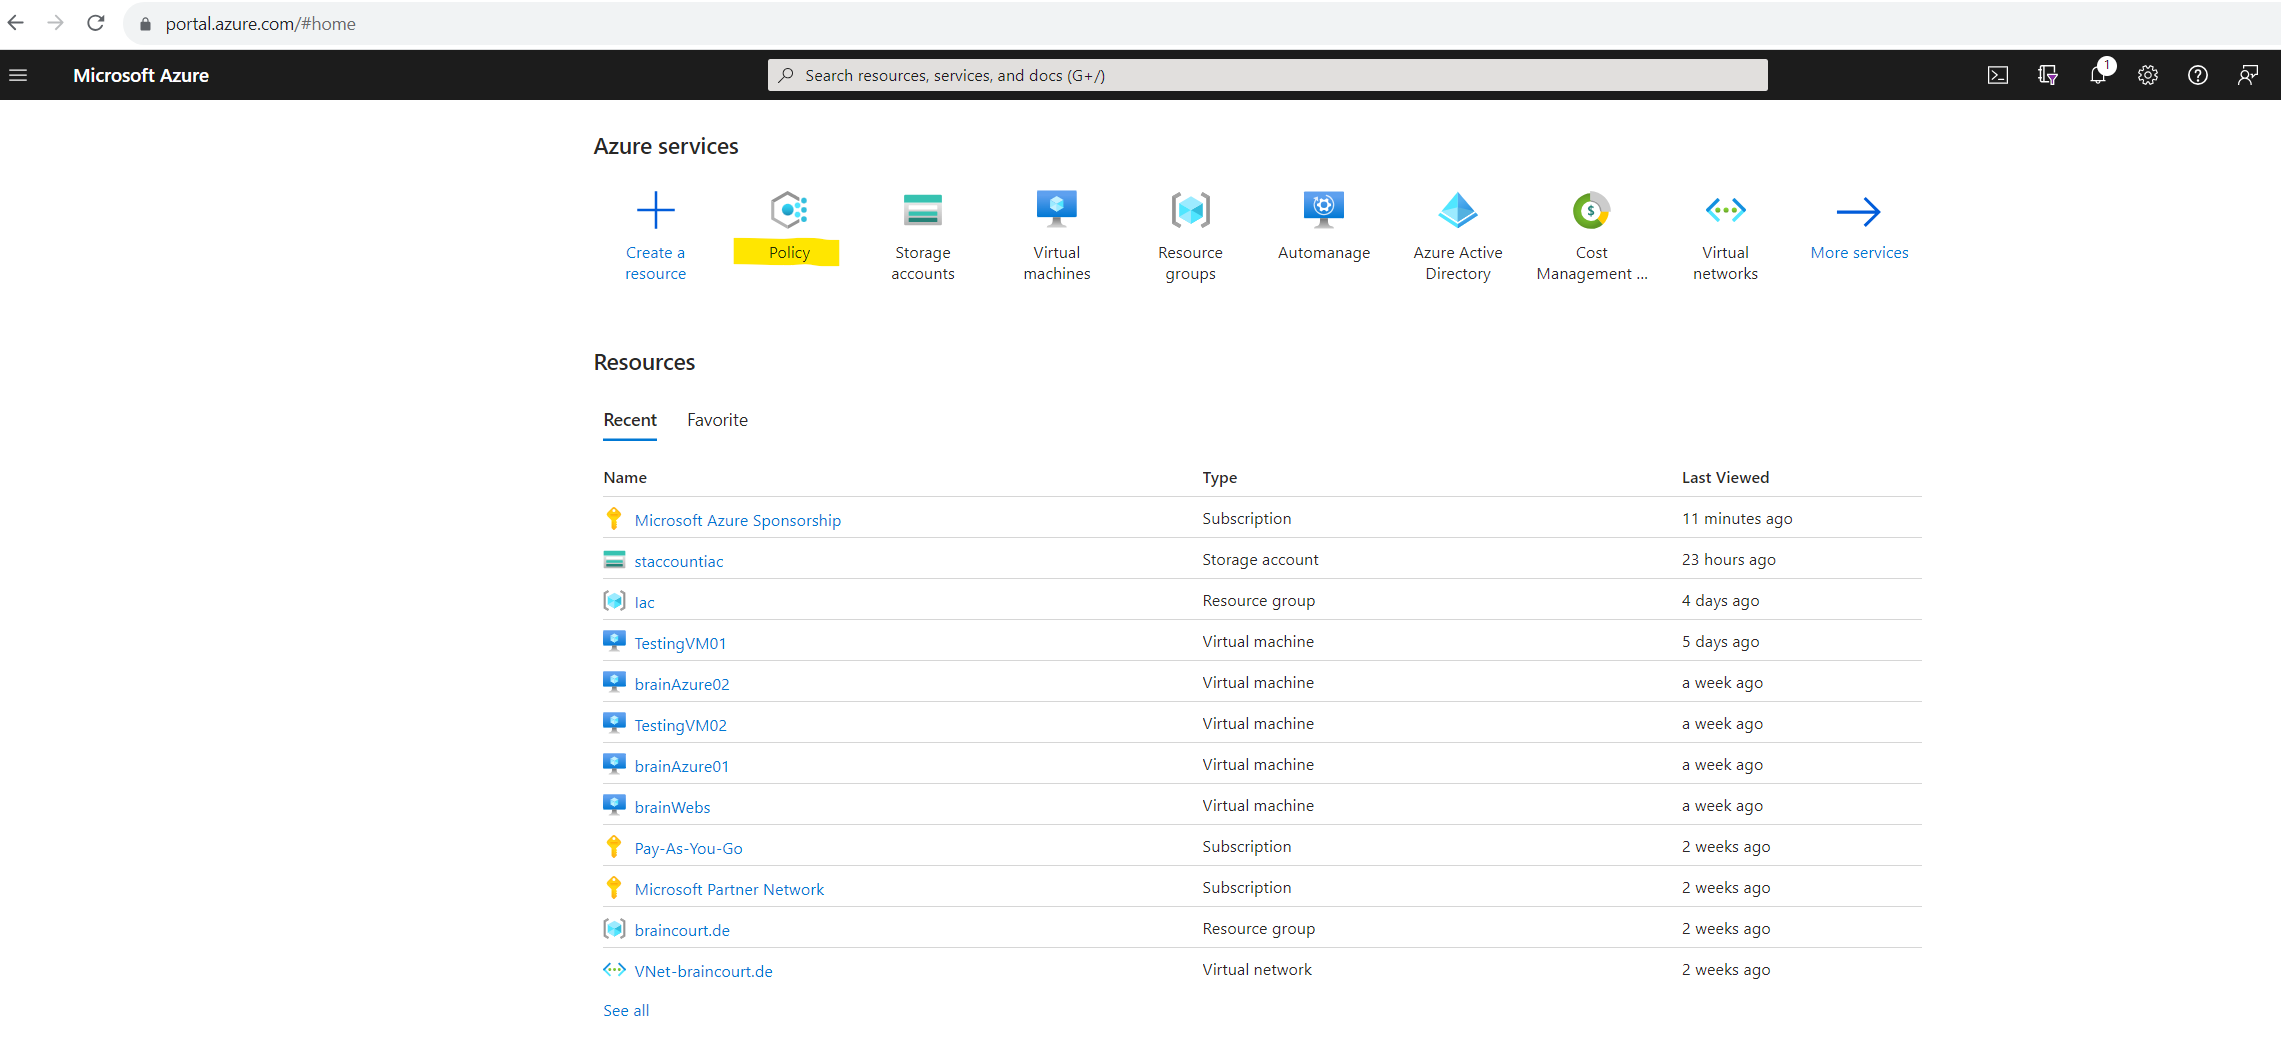
Launch the Azure Policy service in the Azure portal.
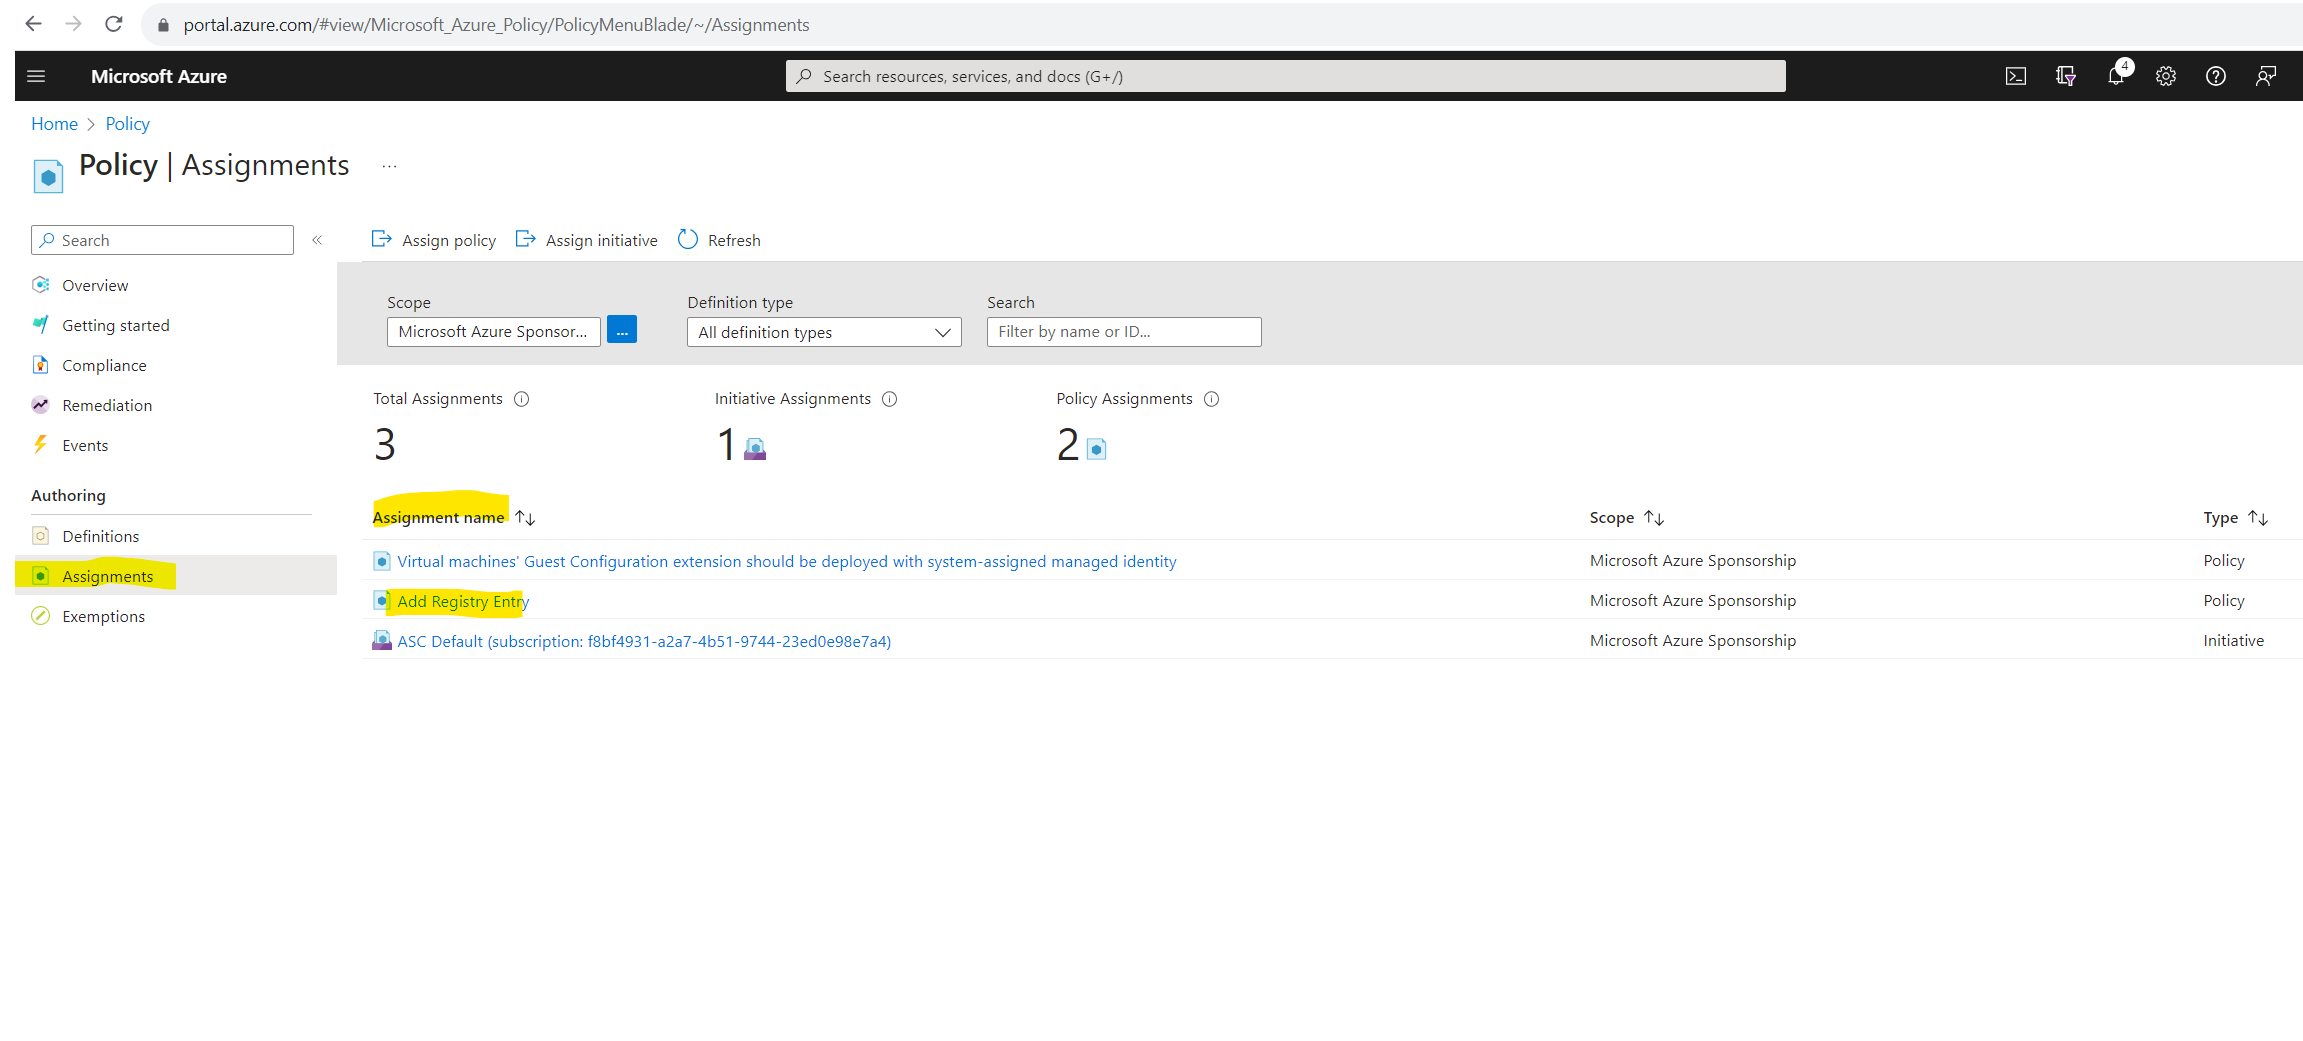
Select Assignments on the left side of the Azure Policy page. An assignment is a policy that has been assigned to take place within a specific scope.
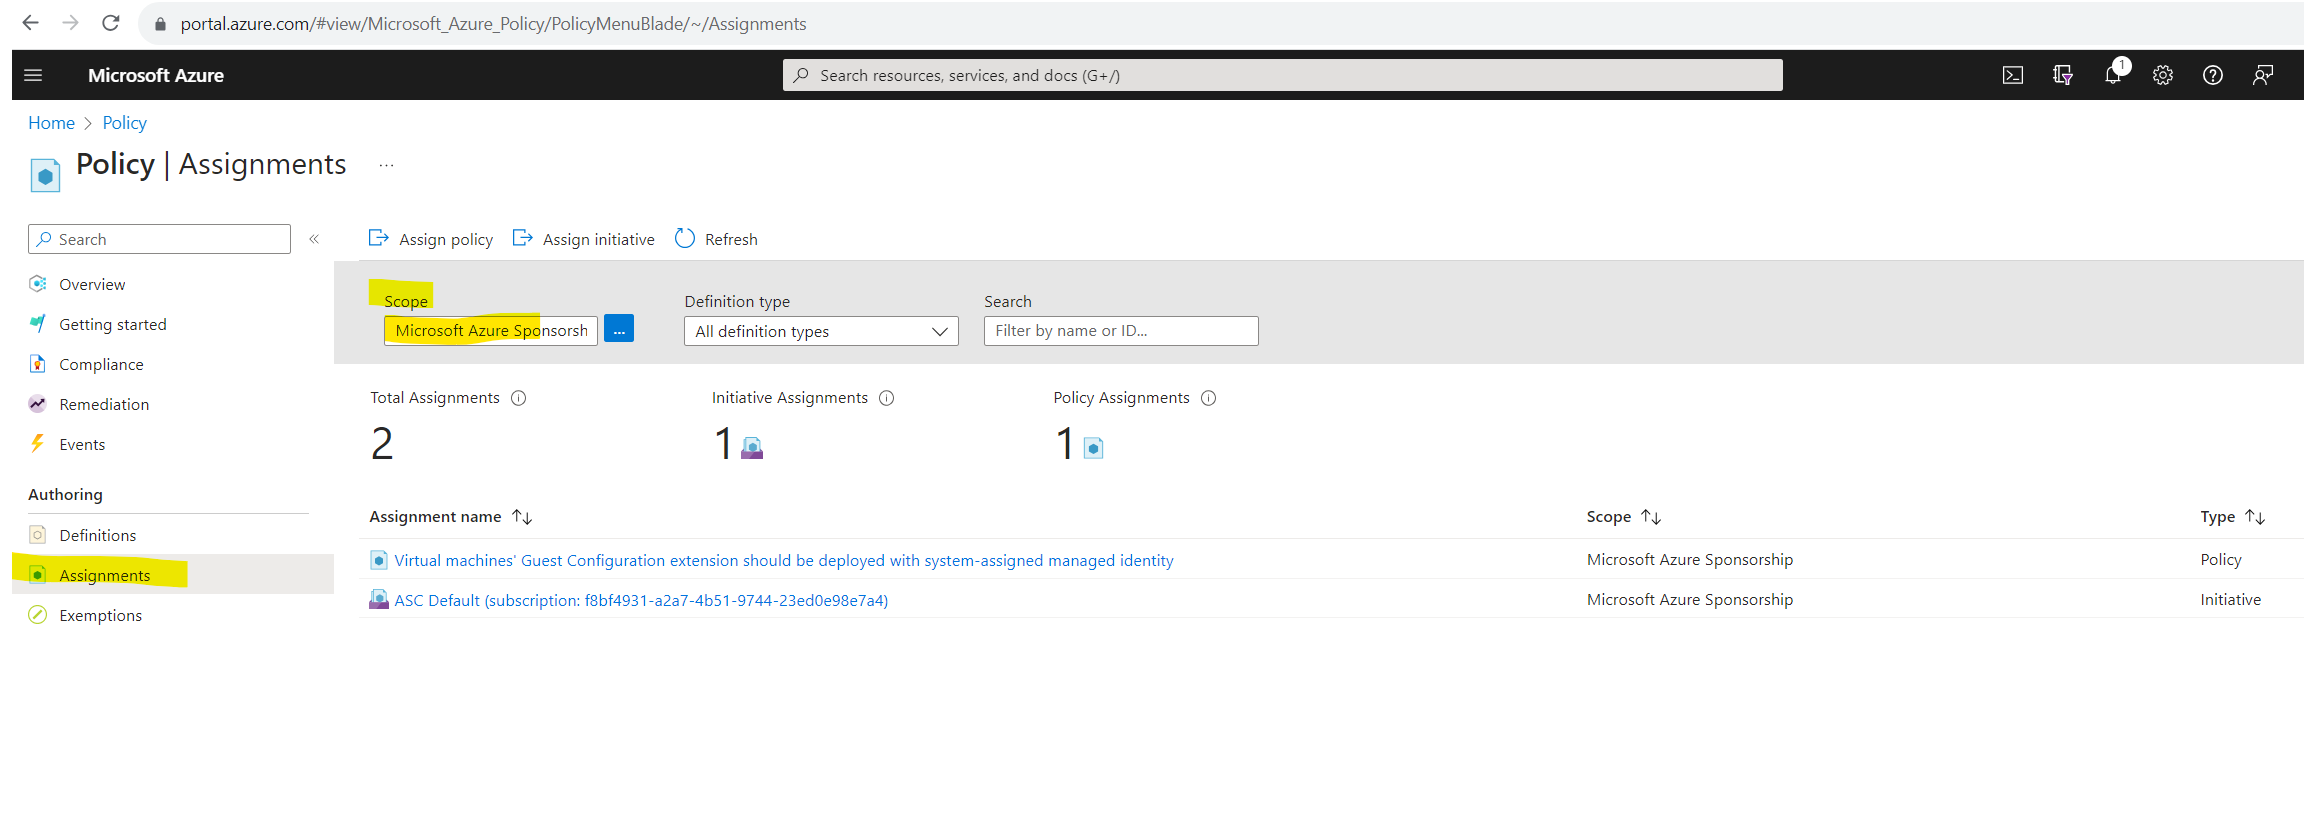
Select Assign Policy from the top of the Policy – Assignments page.
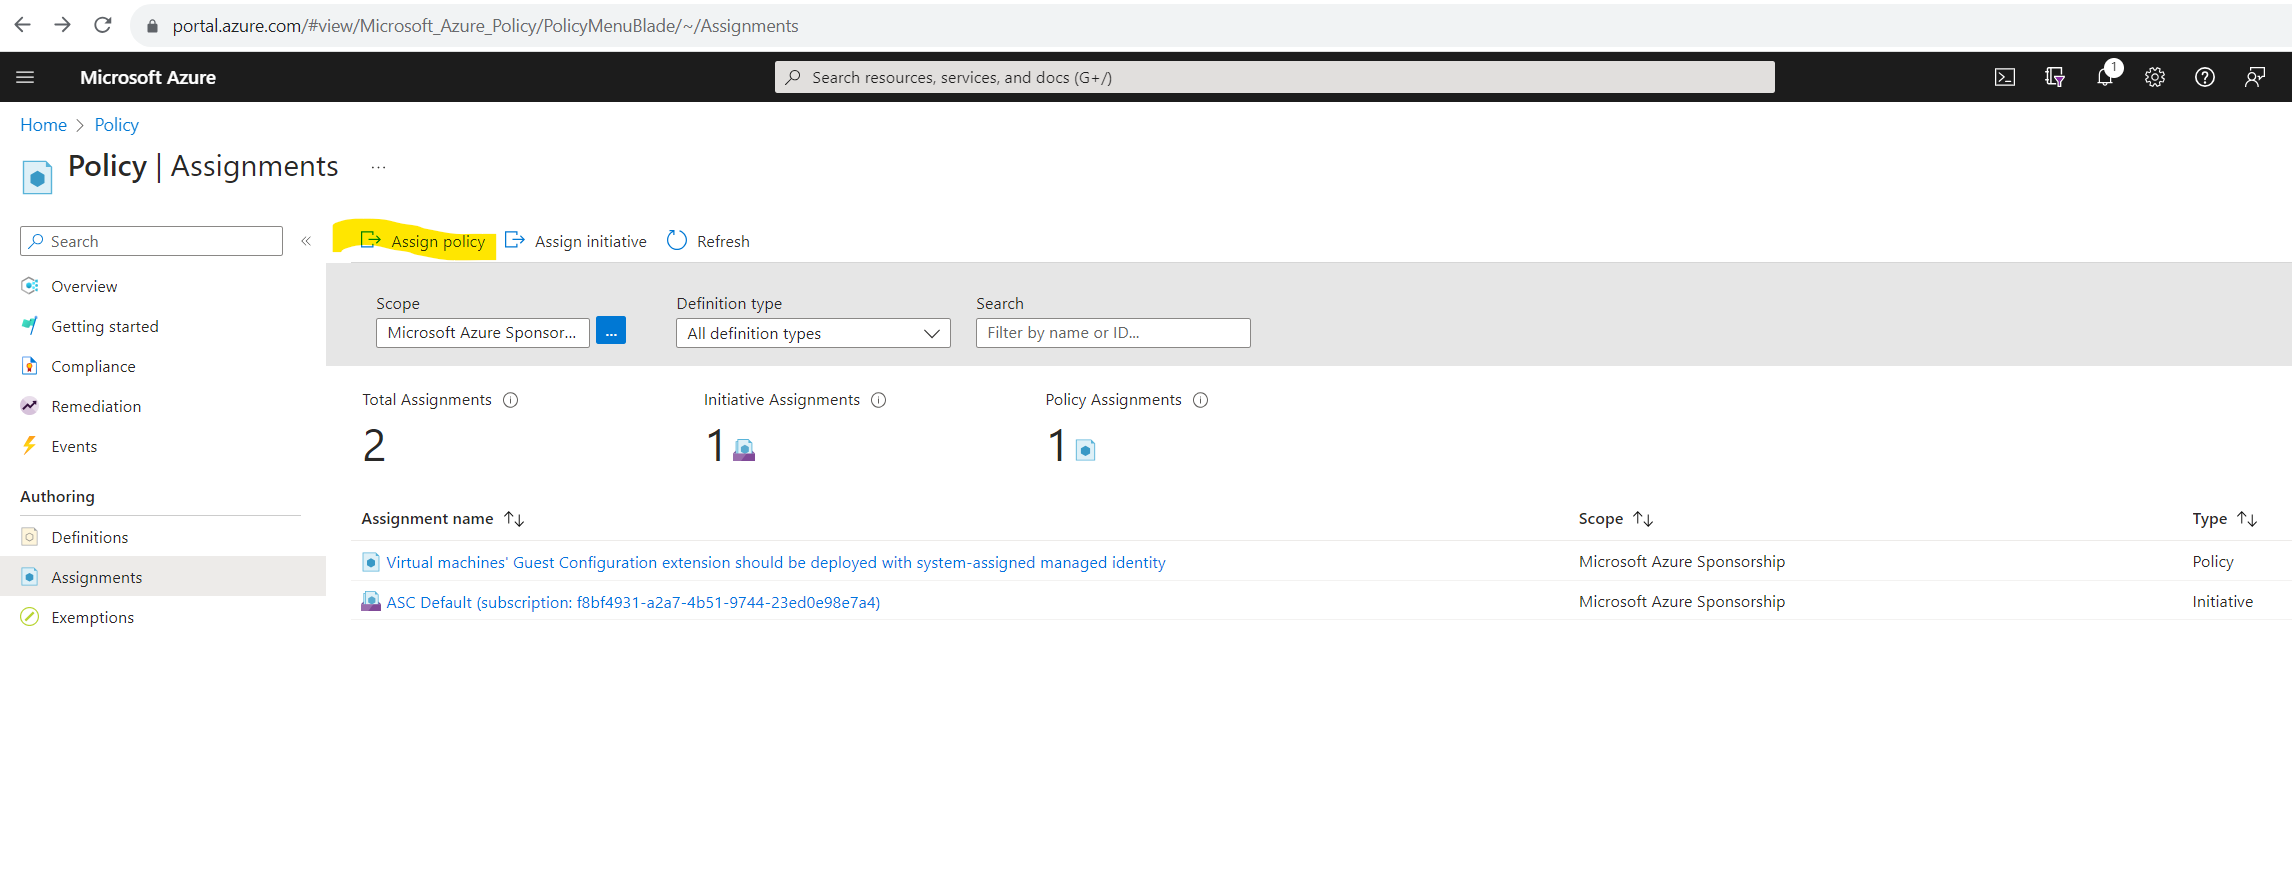
On the Assign Policy page, set the Scope by selecting the ellipsis and then selecting either a management group or subscription. Optionally, select a resource group. A scope determines what resources or grouping of resources the policy assignment gets enforced on. Then use the Select button at the bottom of the Scope page.
Resources can be excluded based on the Scope. Exclusions start at one level lower than the level of the Scope. Exclusions are optional, so leave it blank for now.
Select the Policy definition ellipsis to open the list of available definitions. Azure Policy comes with built-in policy definitions you can use.
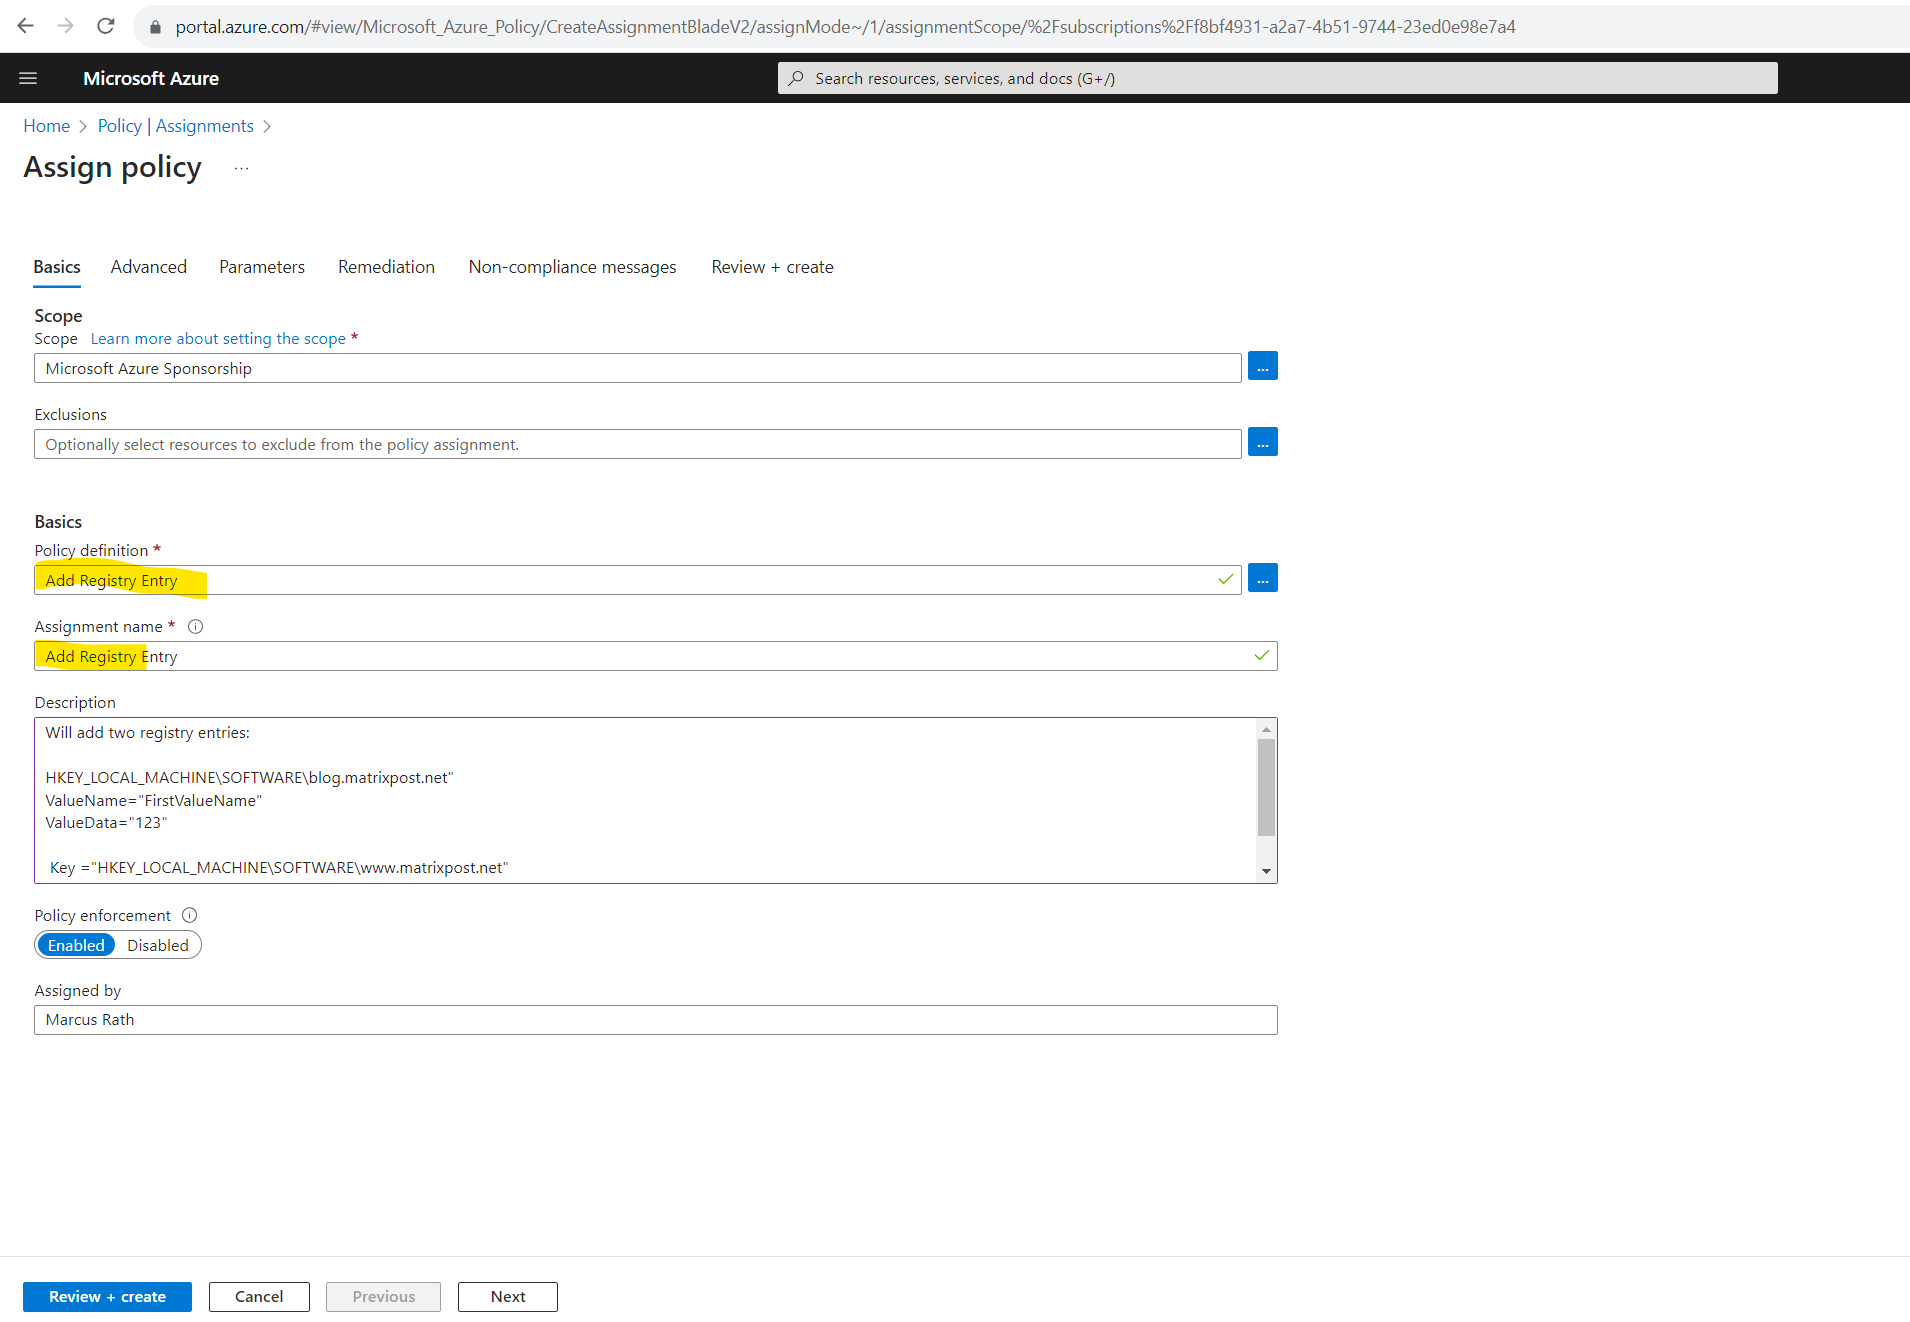
I will search here for my previously created and published Azure Policy definition named mypolicydefinition.
For the DisplayName we previously entered Add Registry Entry and for the published Name we used mypolicydefinition.
The Assignment name is automatically populated with the policy name you selected, but you can change it. The description provides details about this policy assignment. Assigned by will automatically fill based on who is logged in. This field is optional, so custom values can be entered.
Leave policy enforcement Enabled. For more information, see Policy assignment – enforcement mode.
Select Next at the bottom of the page or the Parameters tab at the top of the page to move to the next segment of the assignment wizard.
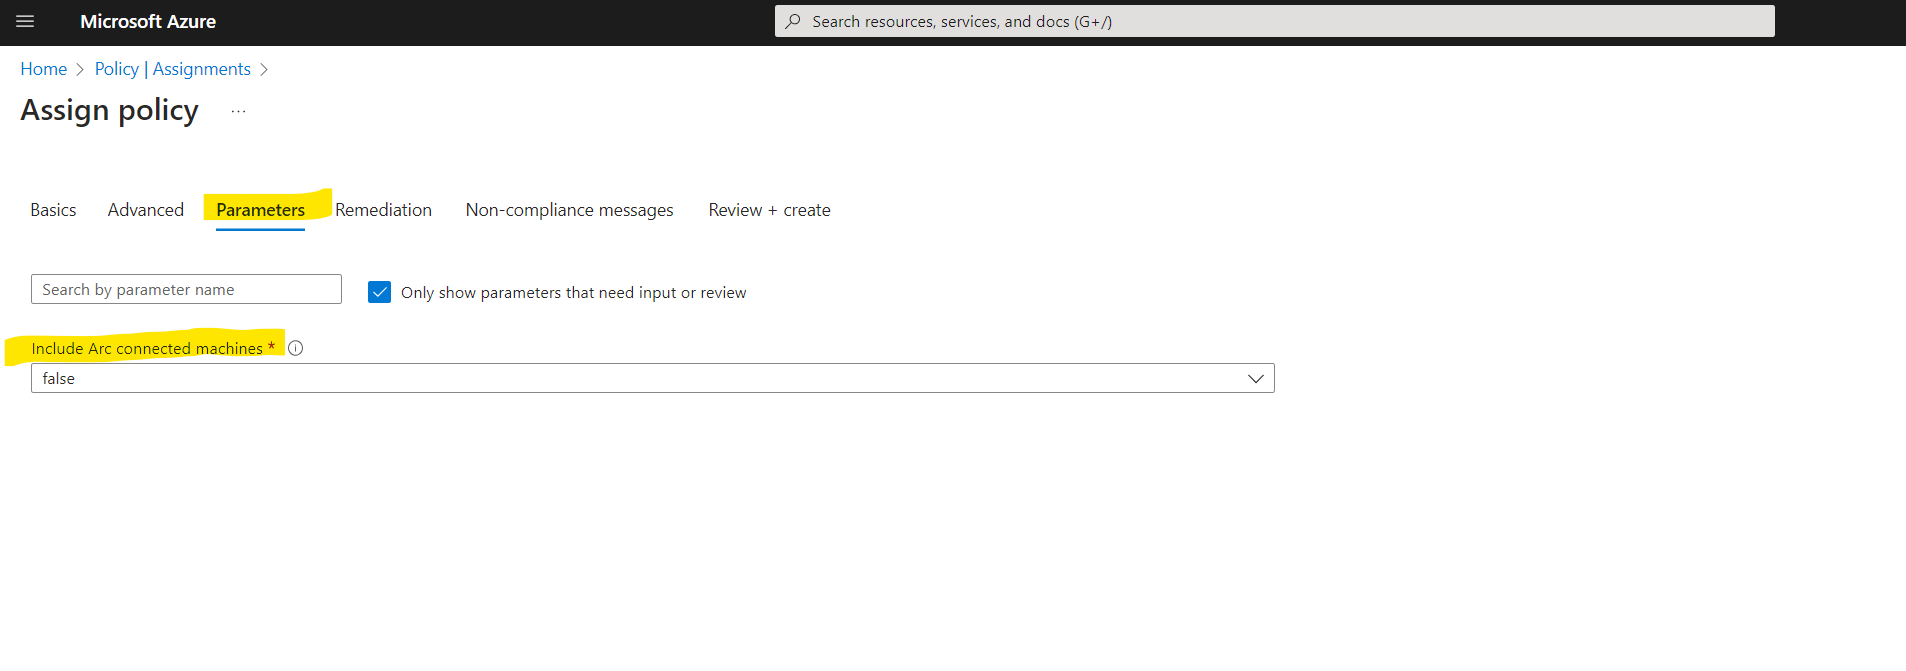
Here you can select if you want to include Arc connected machines.
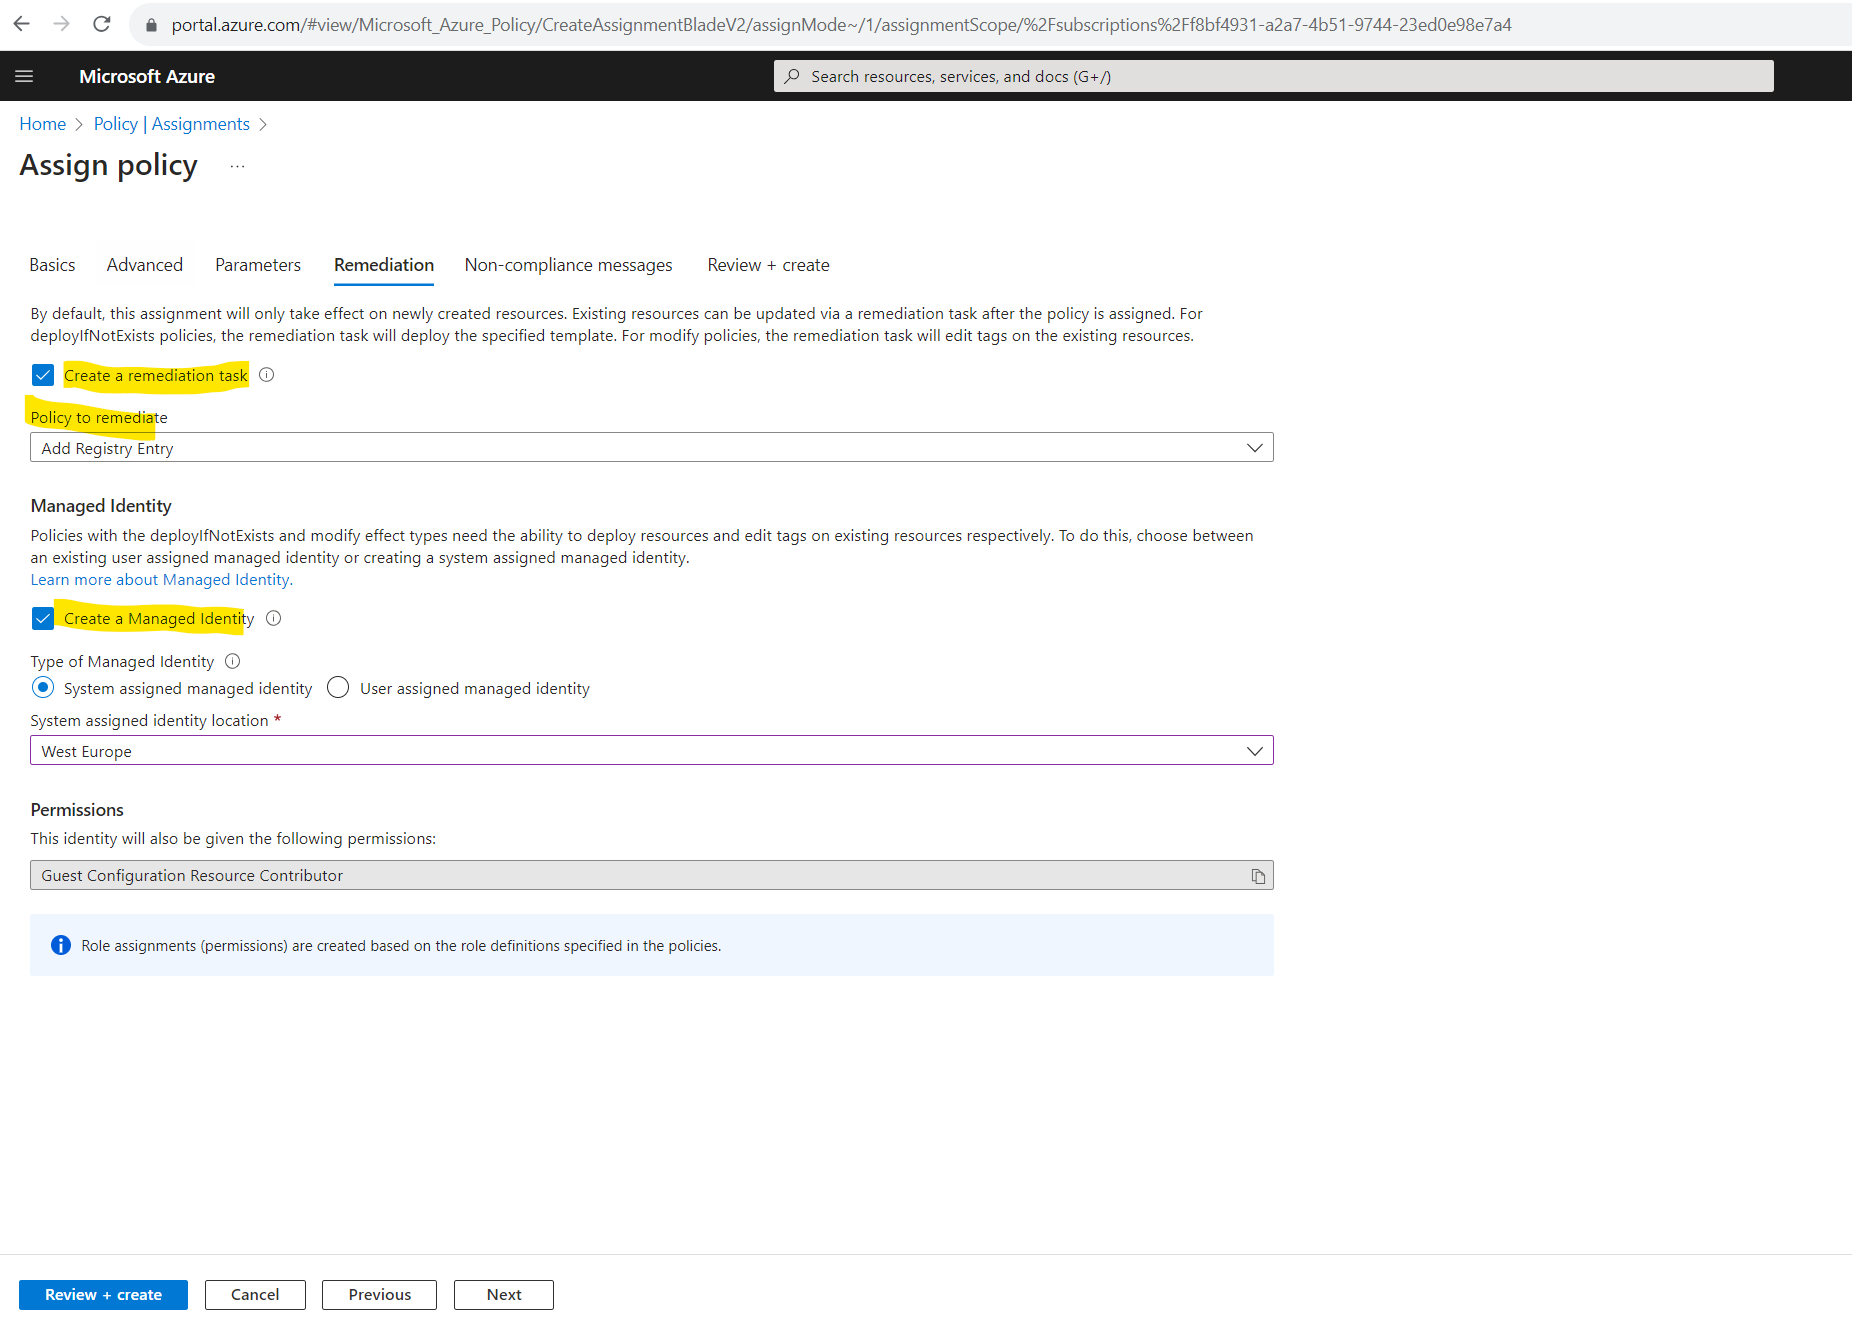
On the Remediation tab leave the Create a Managed Identity checked.
This box must be checked when the policy or initiative includes a policy with either the deployIfNotExists or modify effect.
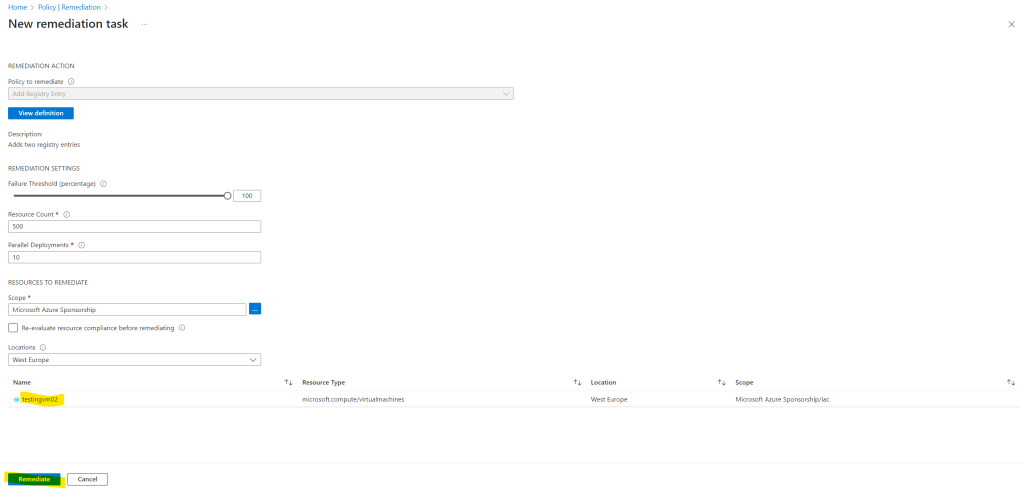
Further I will check Create a remediation task in order to evaluate this policy also against existing resources. In my case I have already created two lab virtual machines to which I want to apply the policy.
Select Next at the bottom of the page or the Non-compliance messages tab at the top of the page to move to the next segment of the assignment wizard.
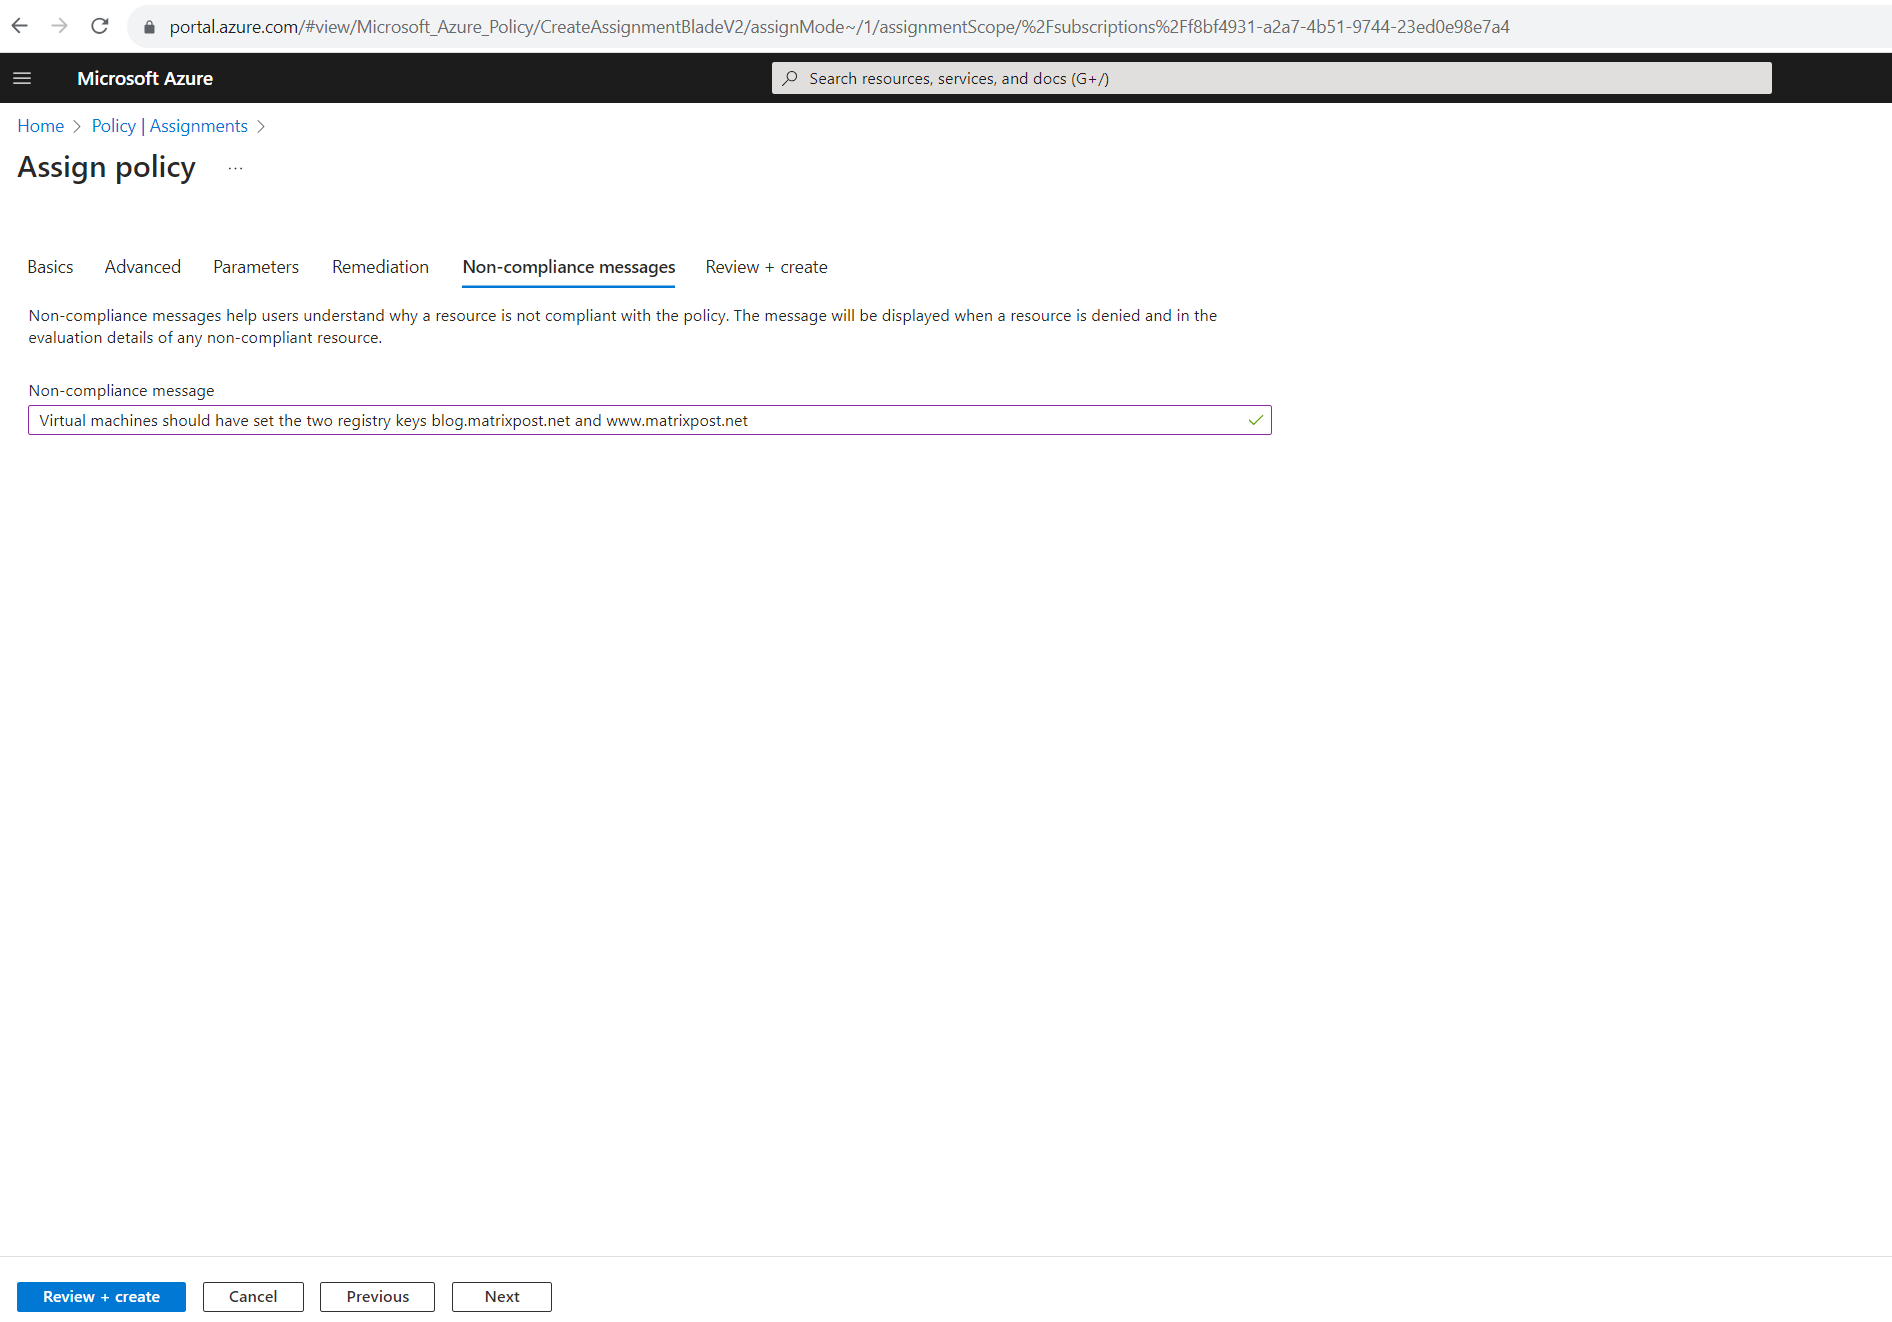
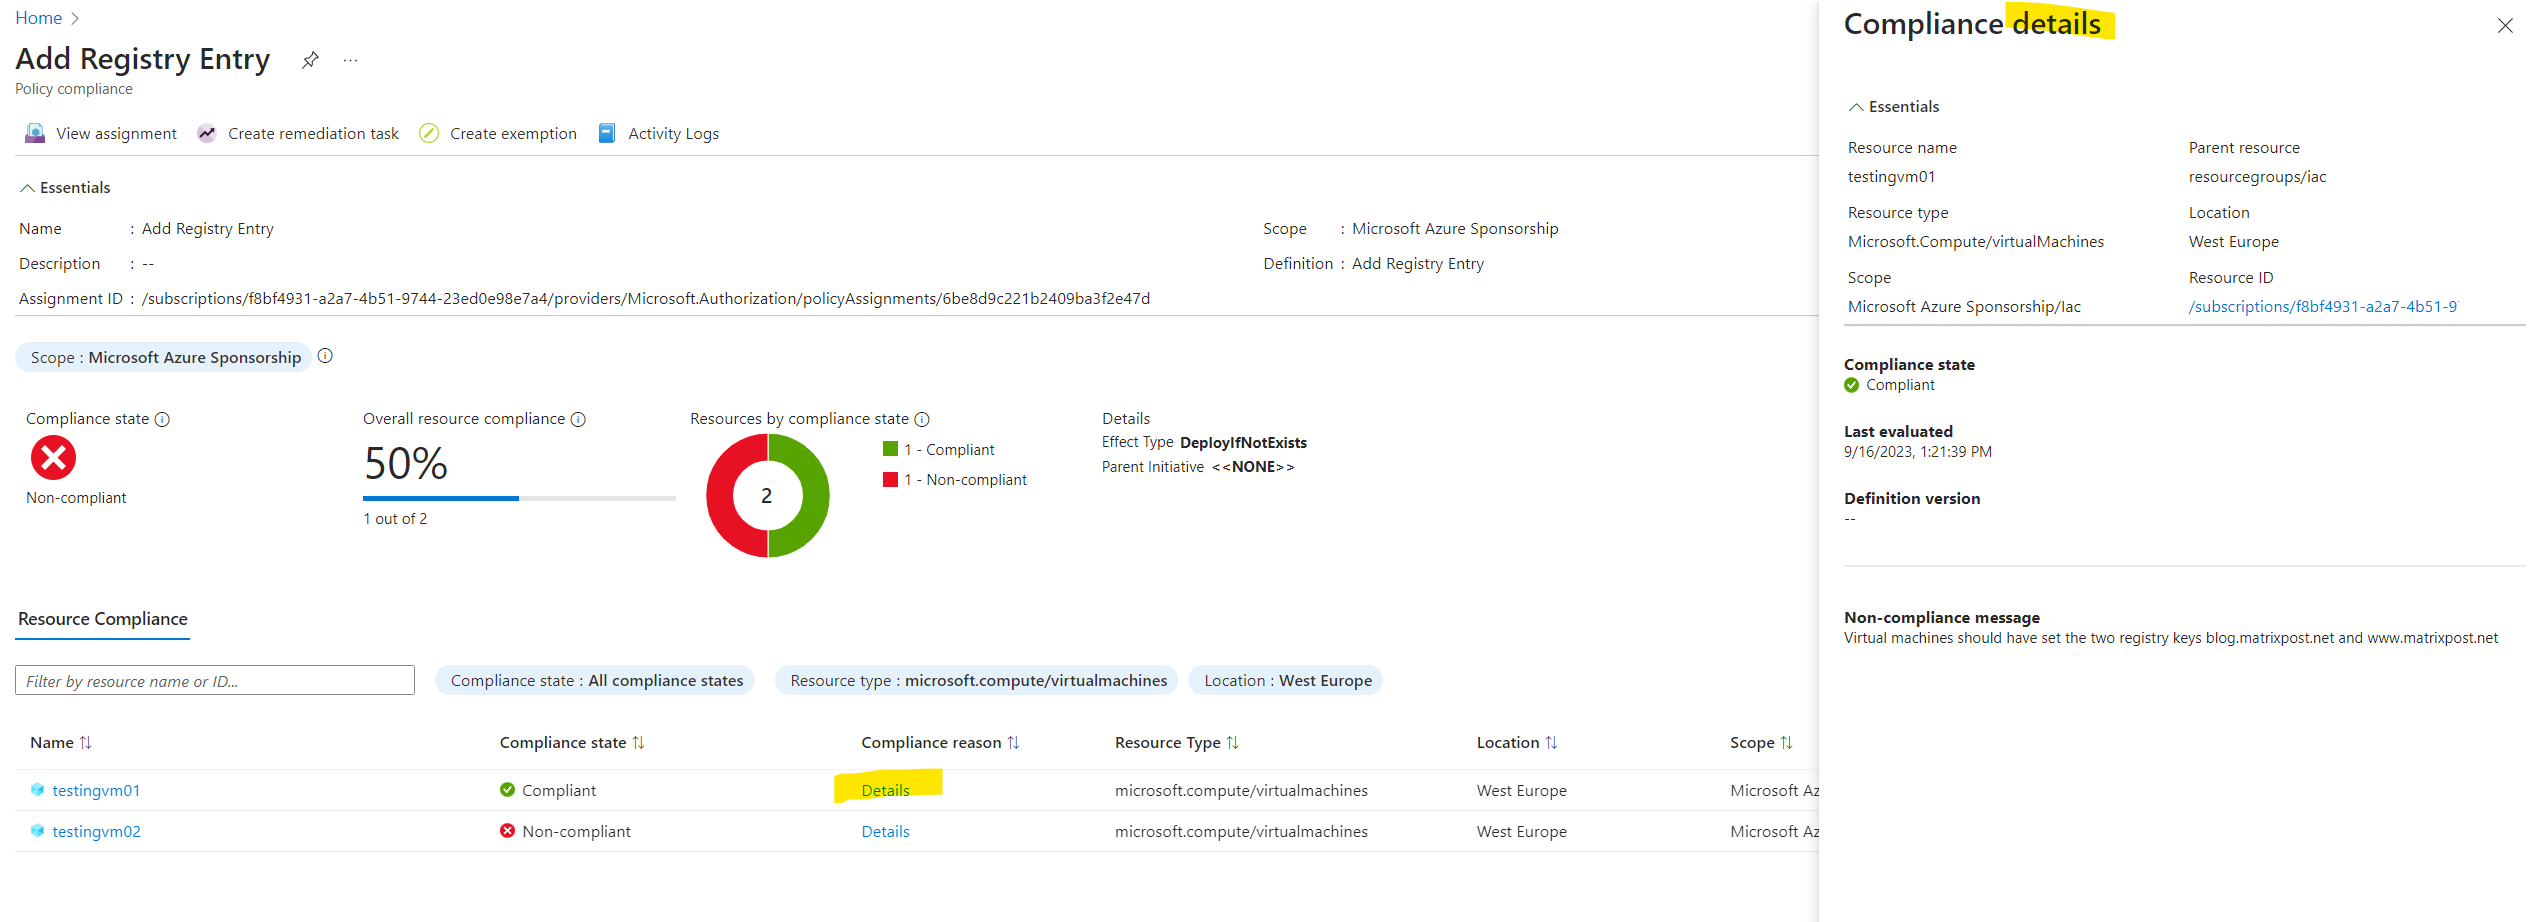
I will set the Non-compliance message to ‘Virtual machines should have set the two registry keys blog.matrixpost.net and www.matrixpost.net‘. This custom message is displayed when a resource is denied or for non-compliant resources during regular evaluation.
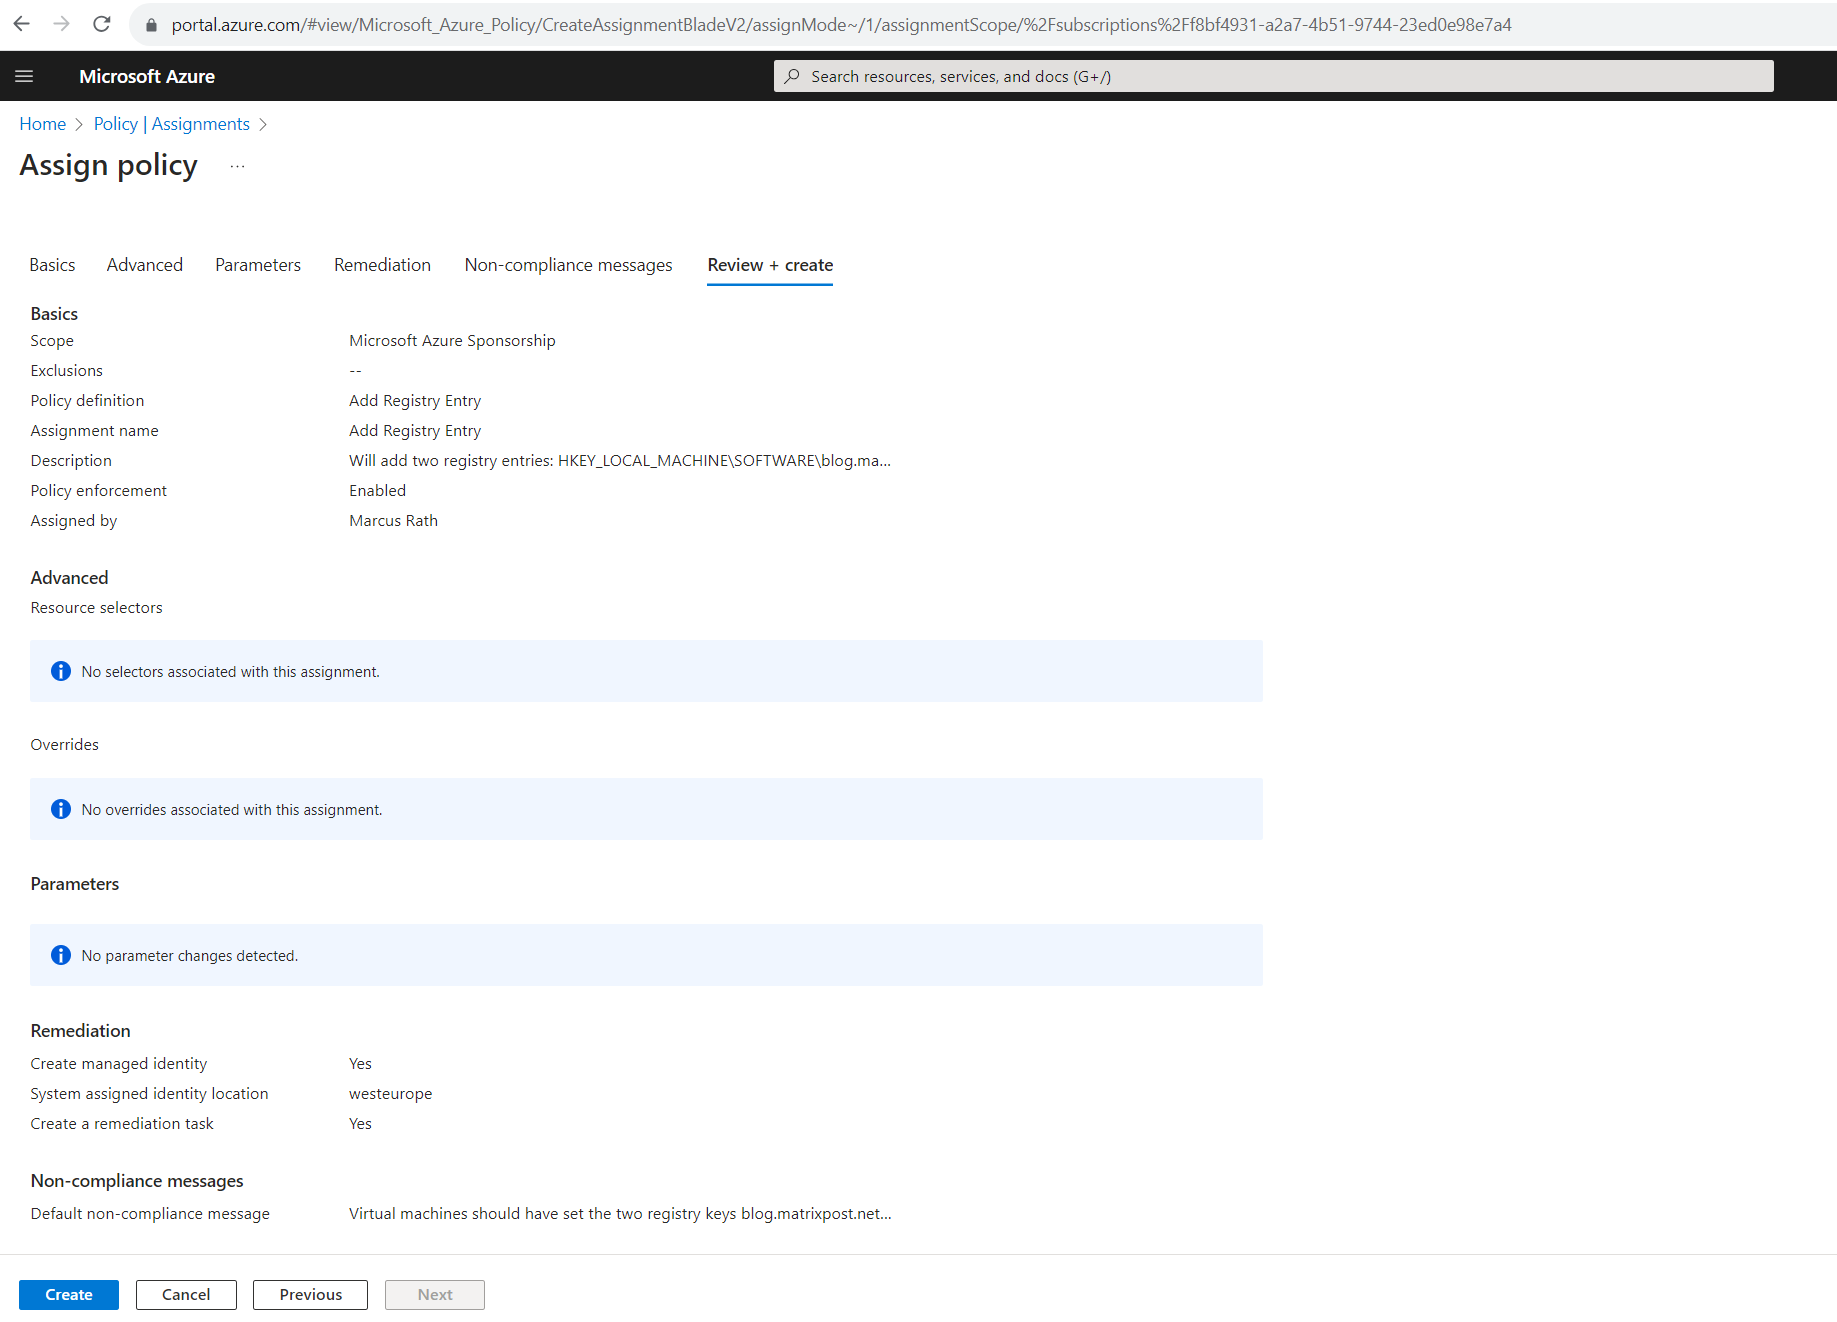
Select Next at the bottom of the page or the Review + Create tab at the top of the page to move to the next segment of the assignment wizard.
Review the selected options, then select Create at the bottom of the page.
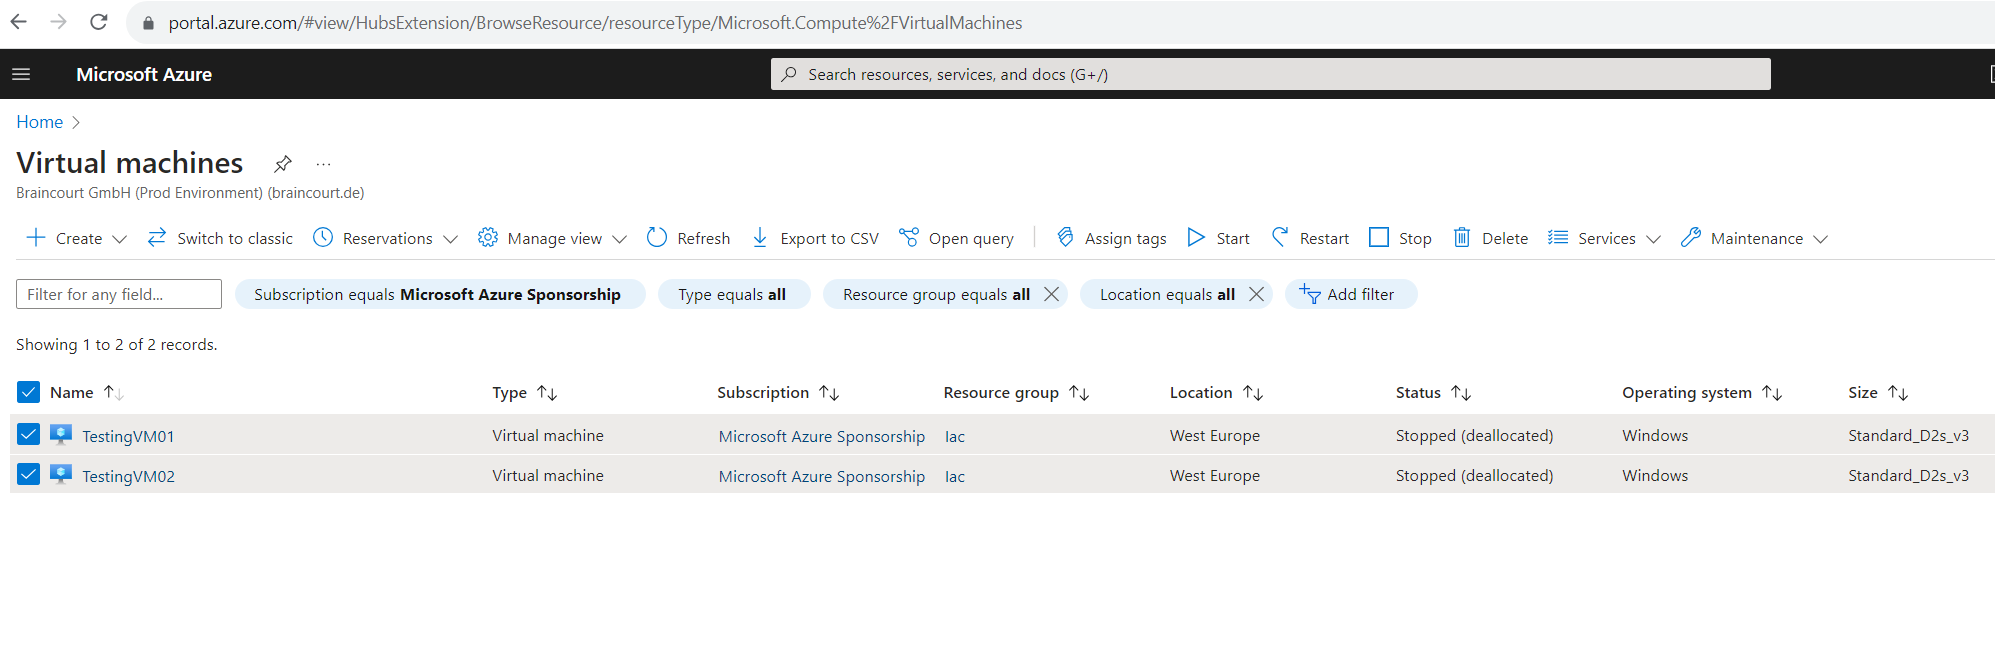
In order to test if the policy is applied to my two lab machines, I will first have to start them.

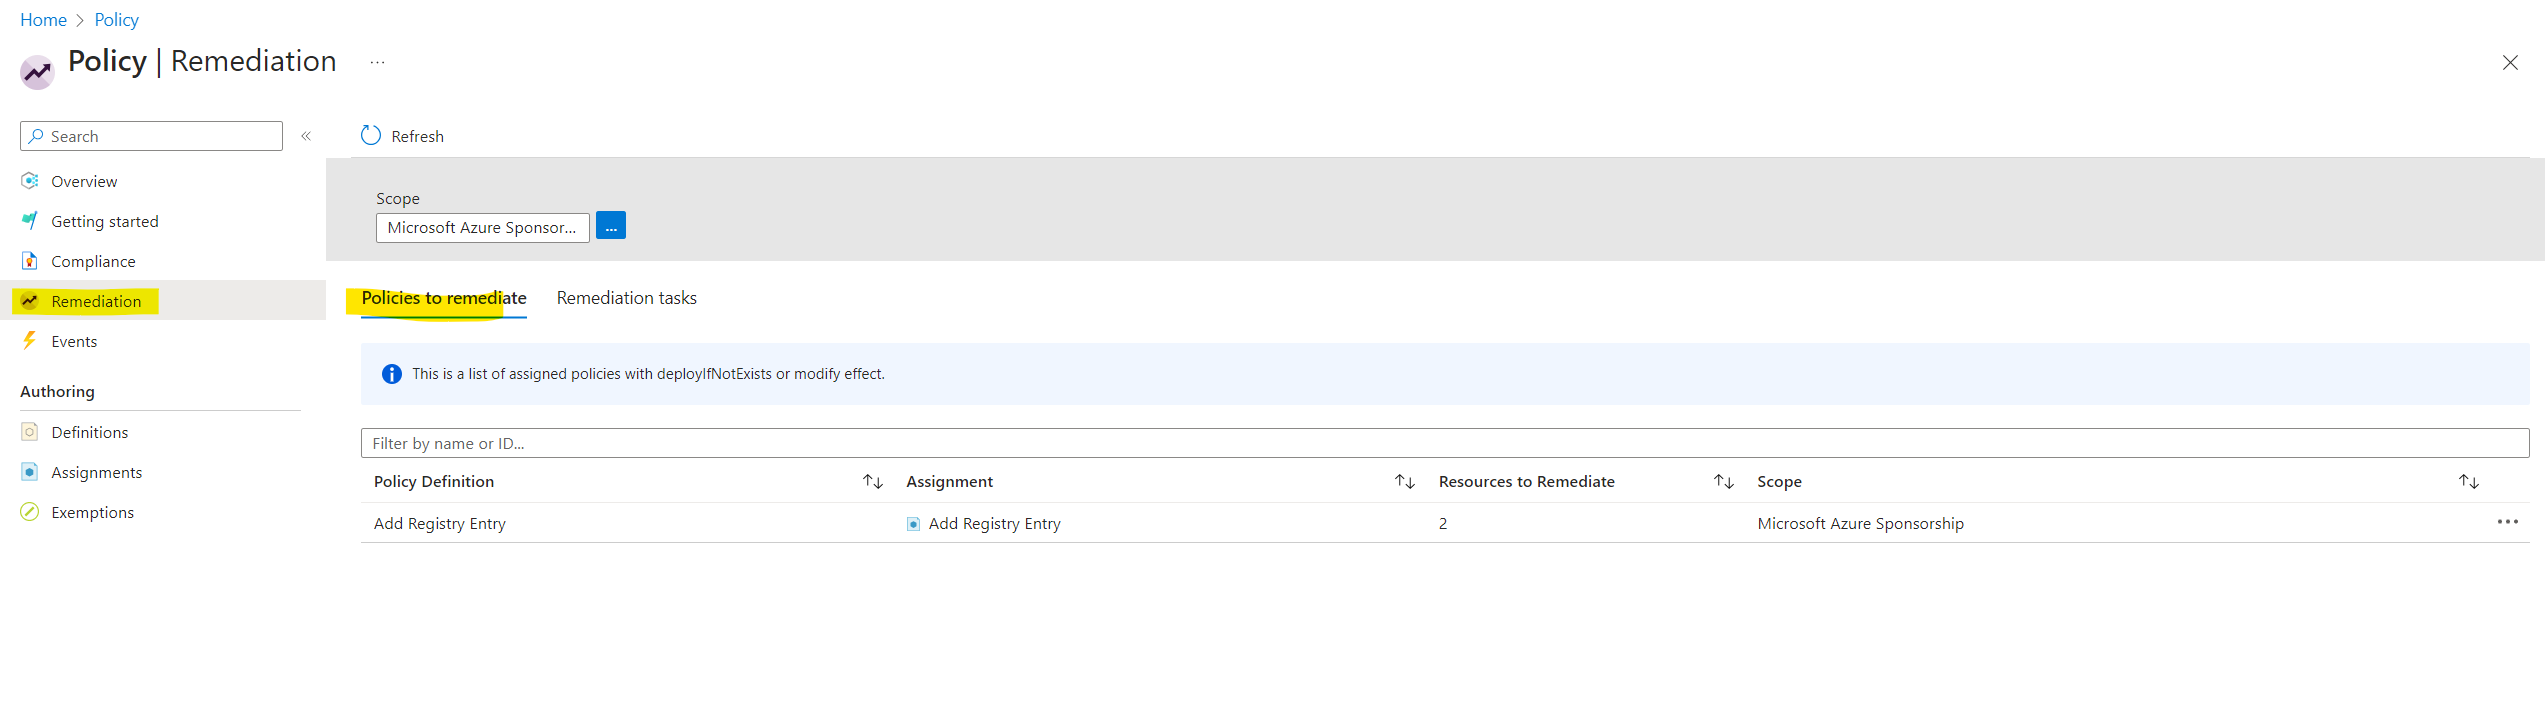
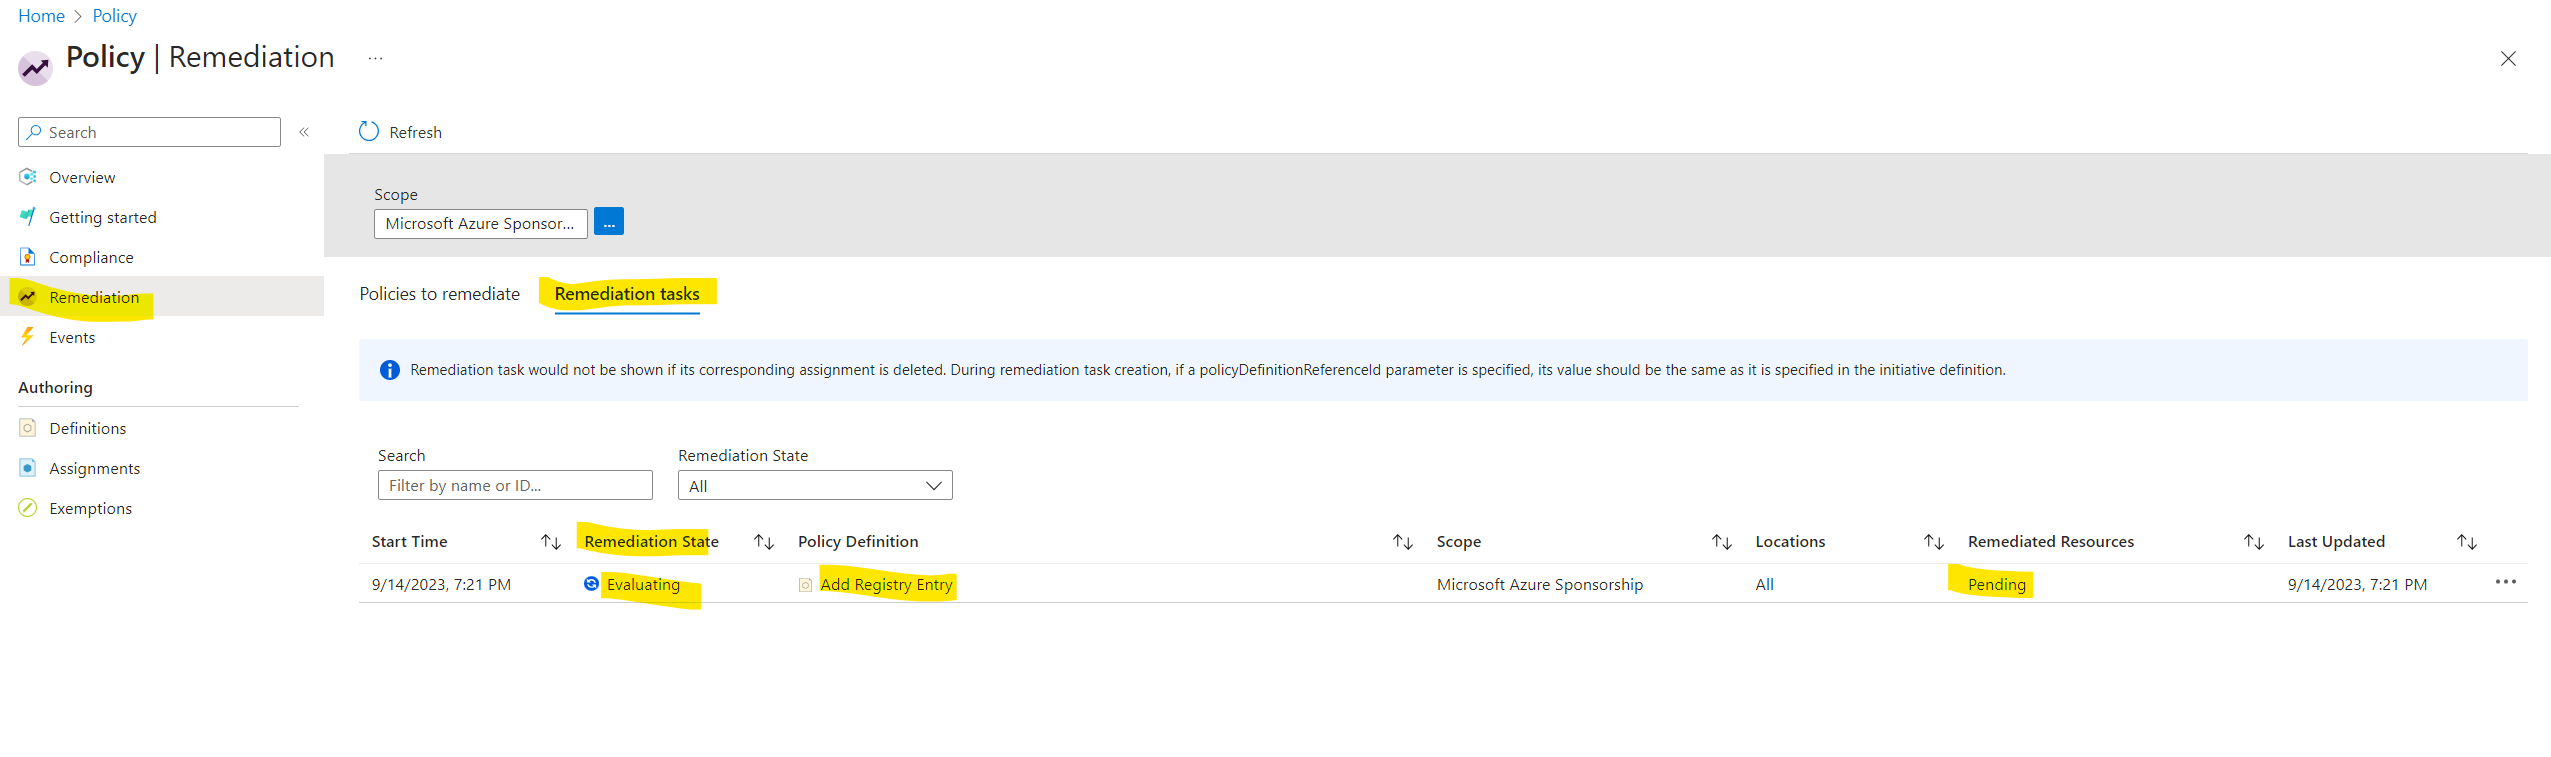
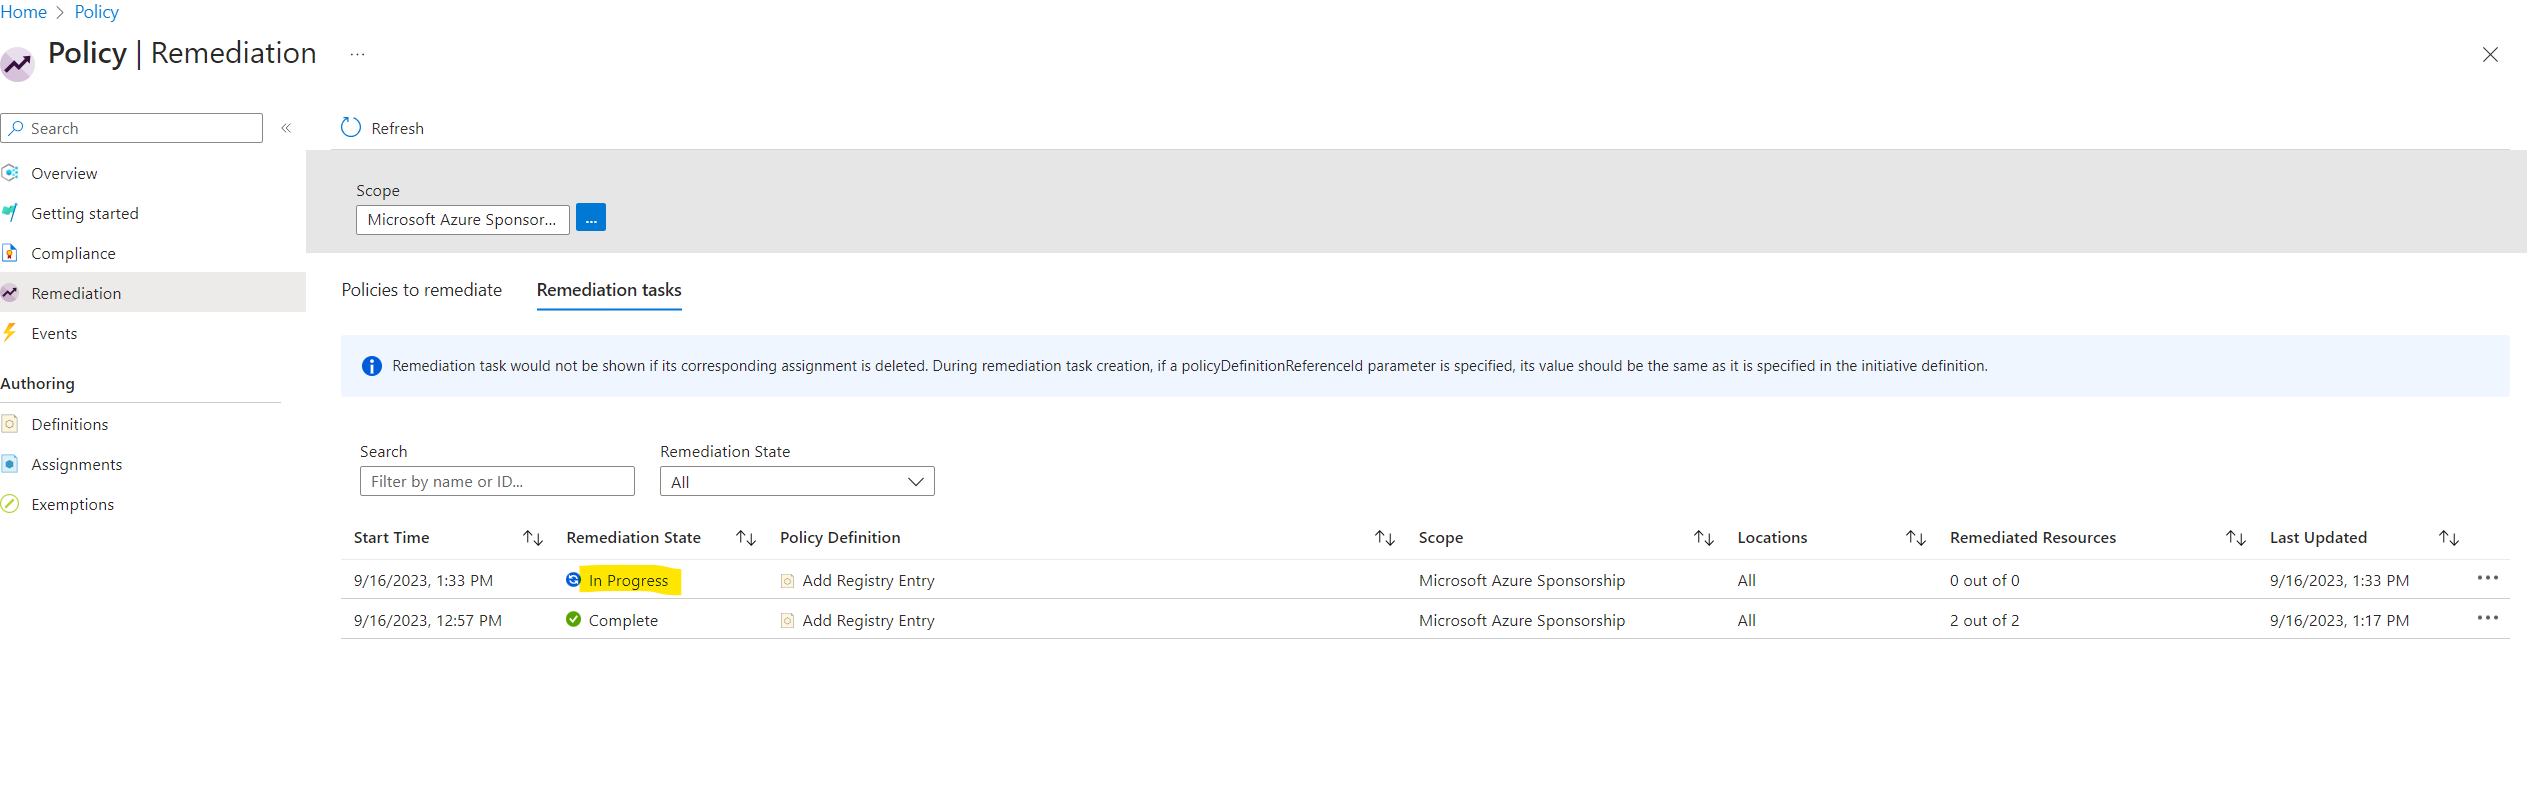
Because we previously checked Create a remediation task in the Assign Policy wizard, the task is here under Remediation still created. So far it is first evaluating the state of the policy definition.
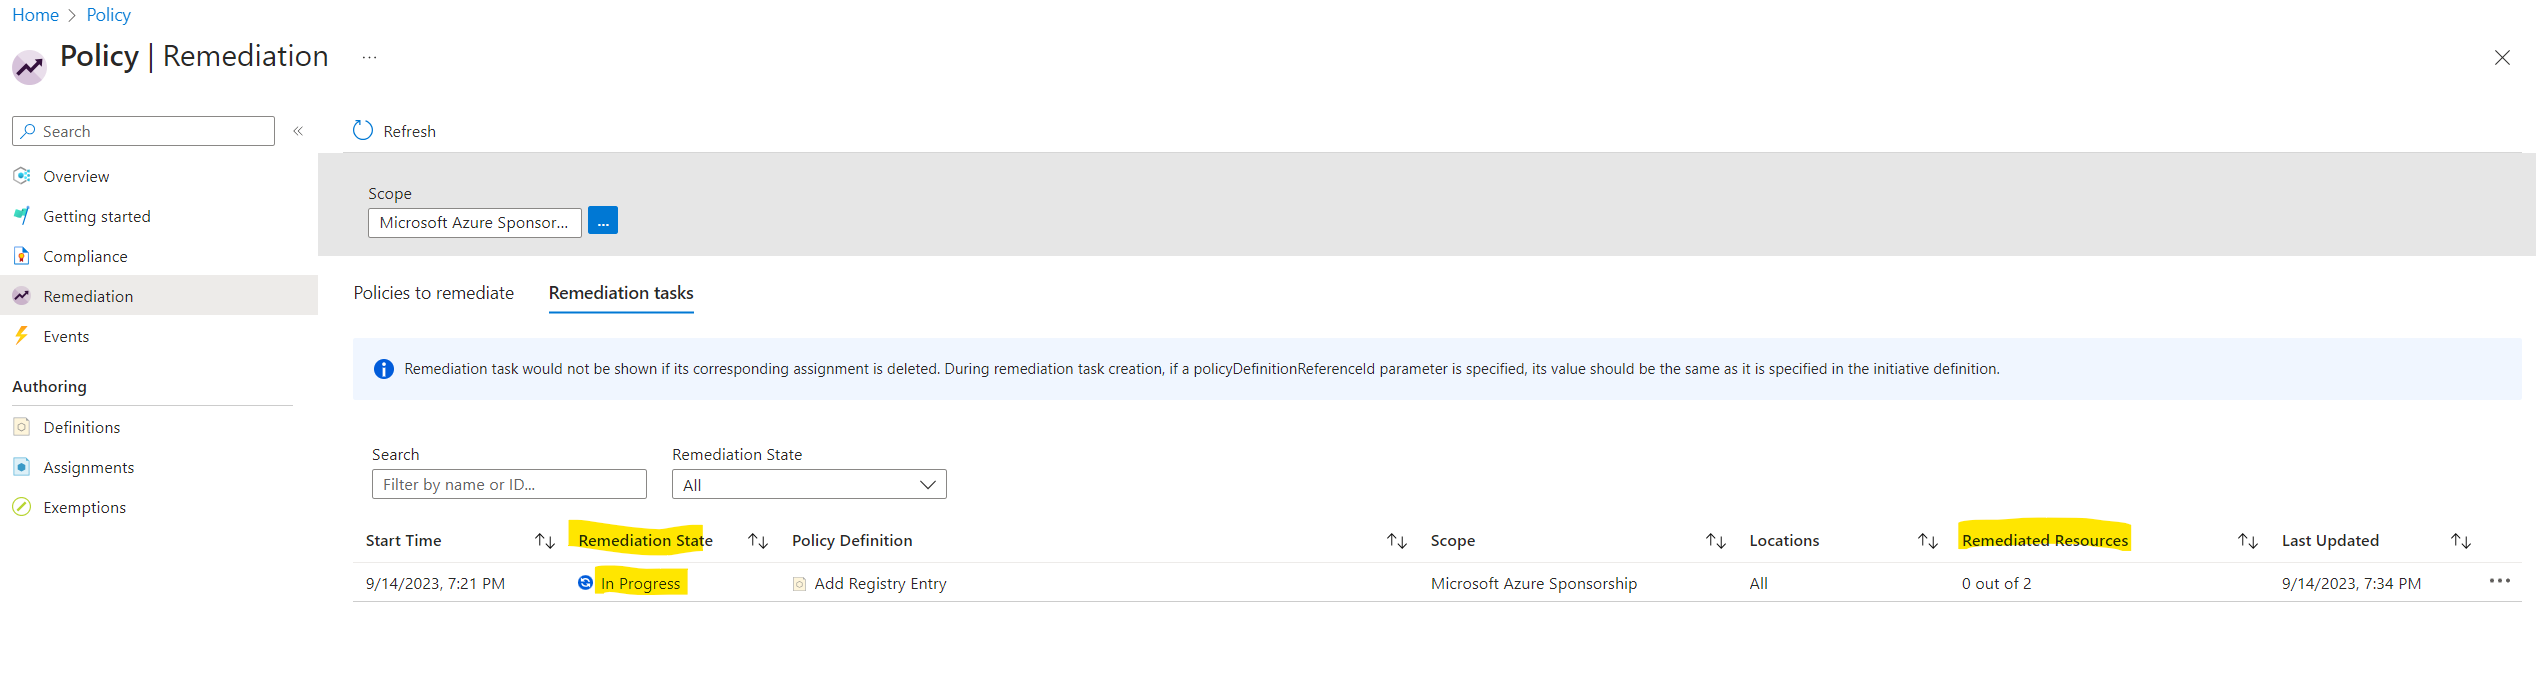
A few minutes later remediation starts and is in progress.
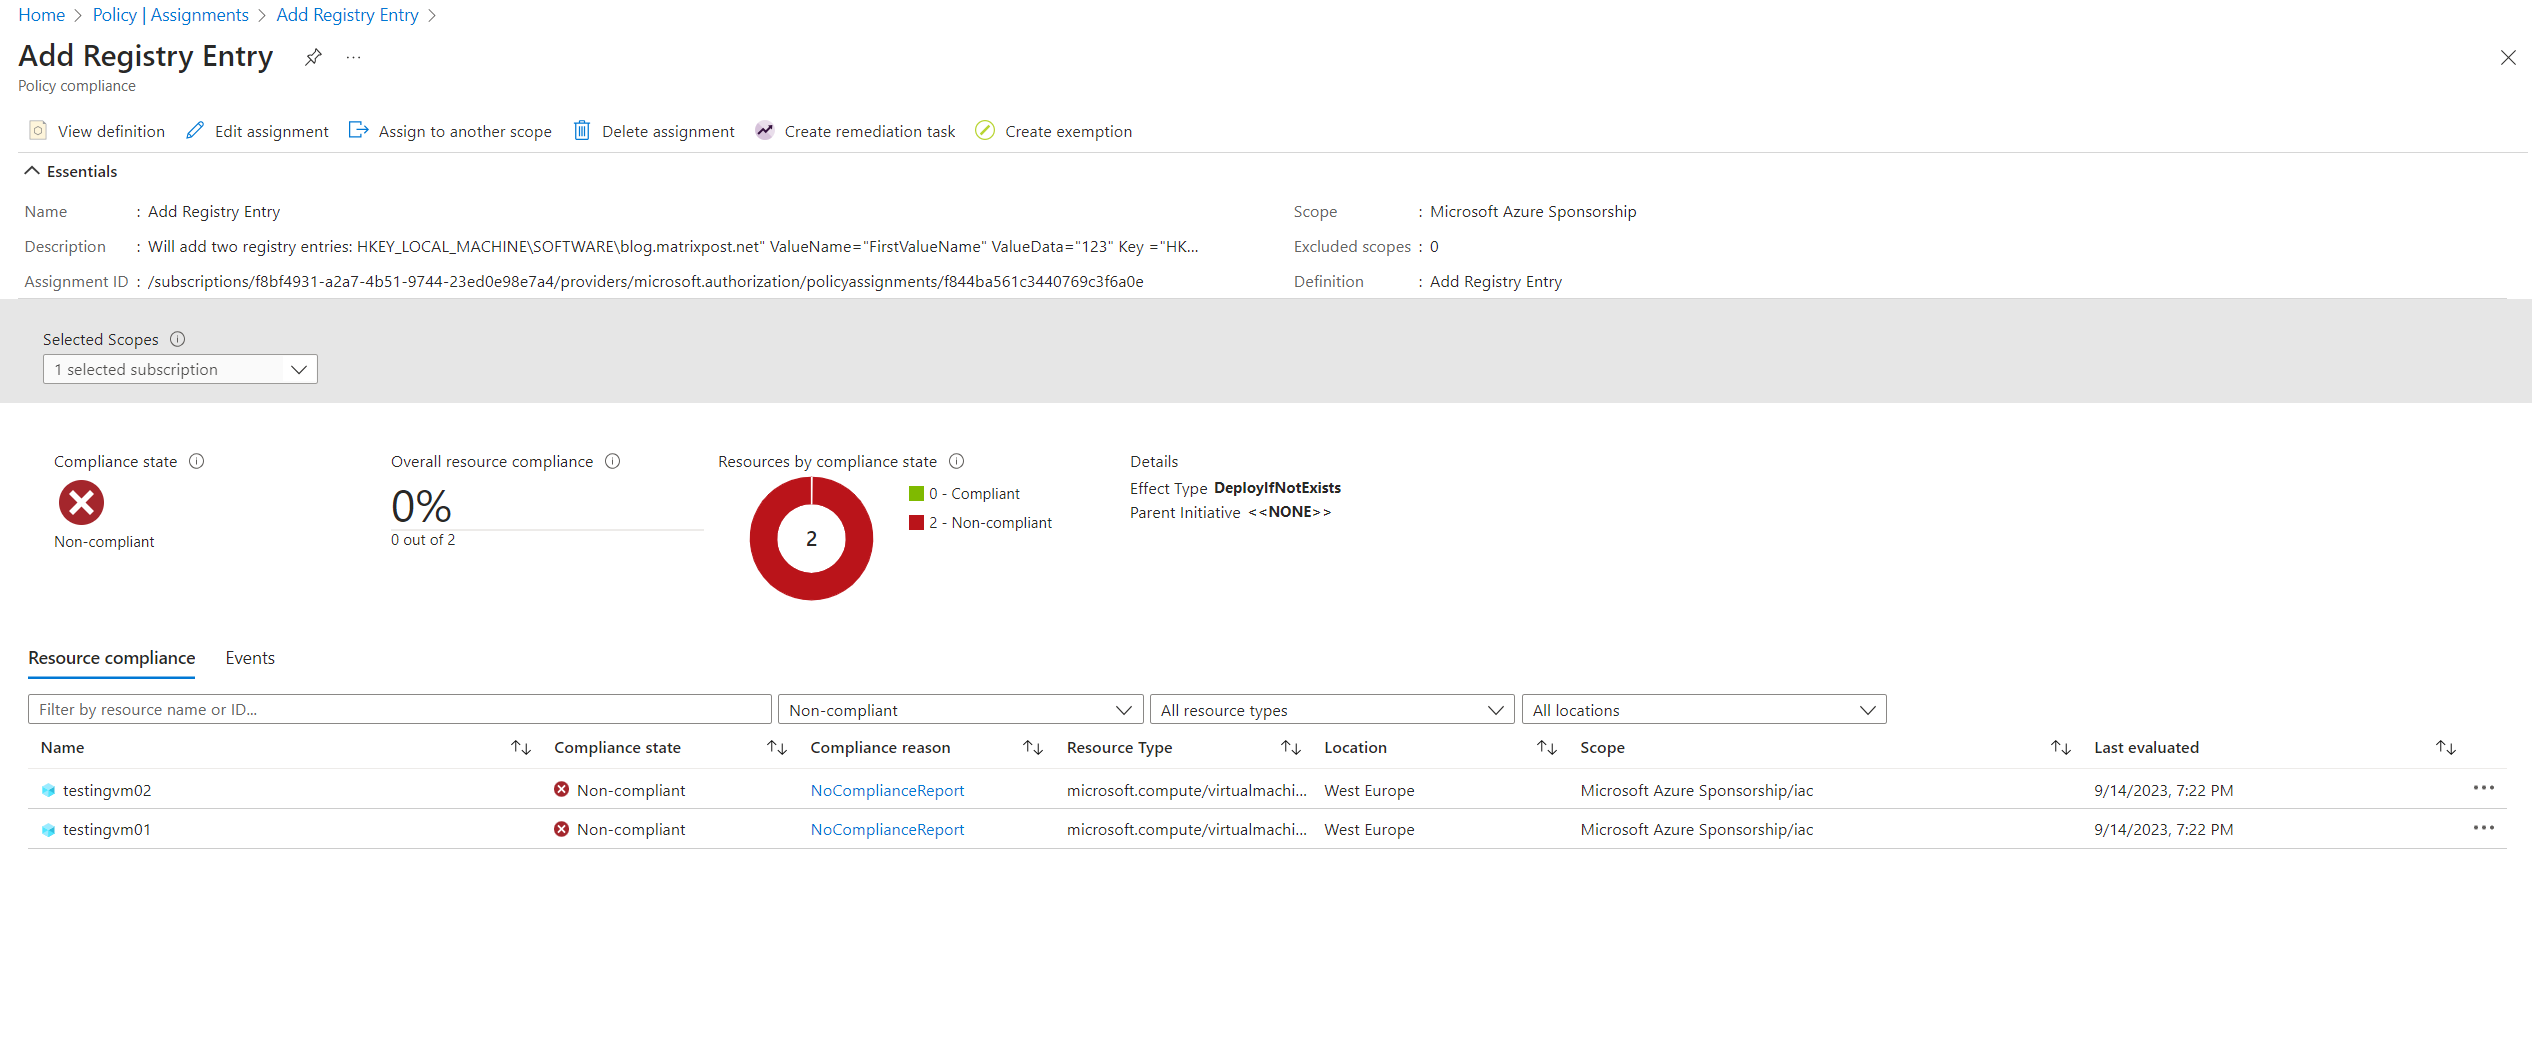
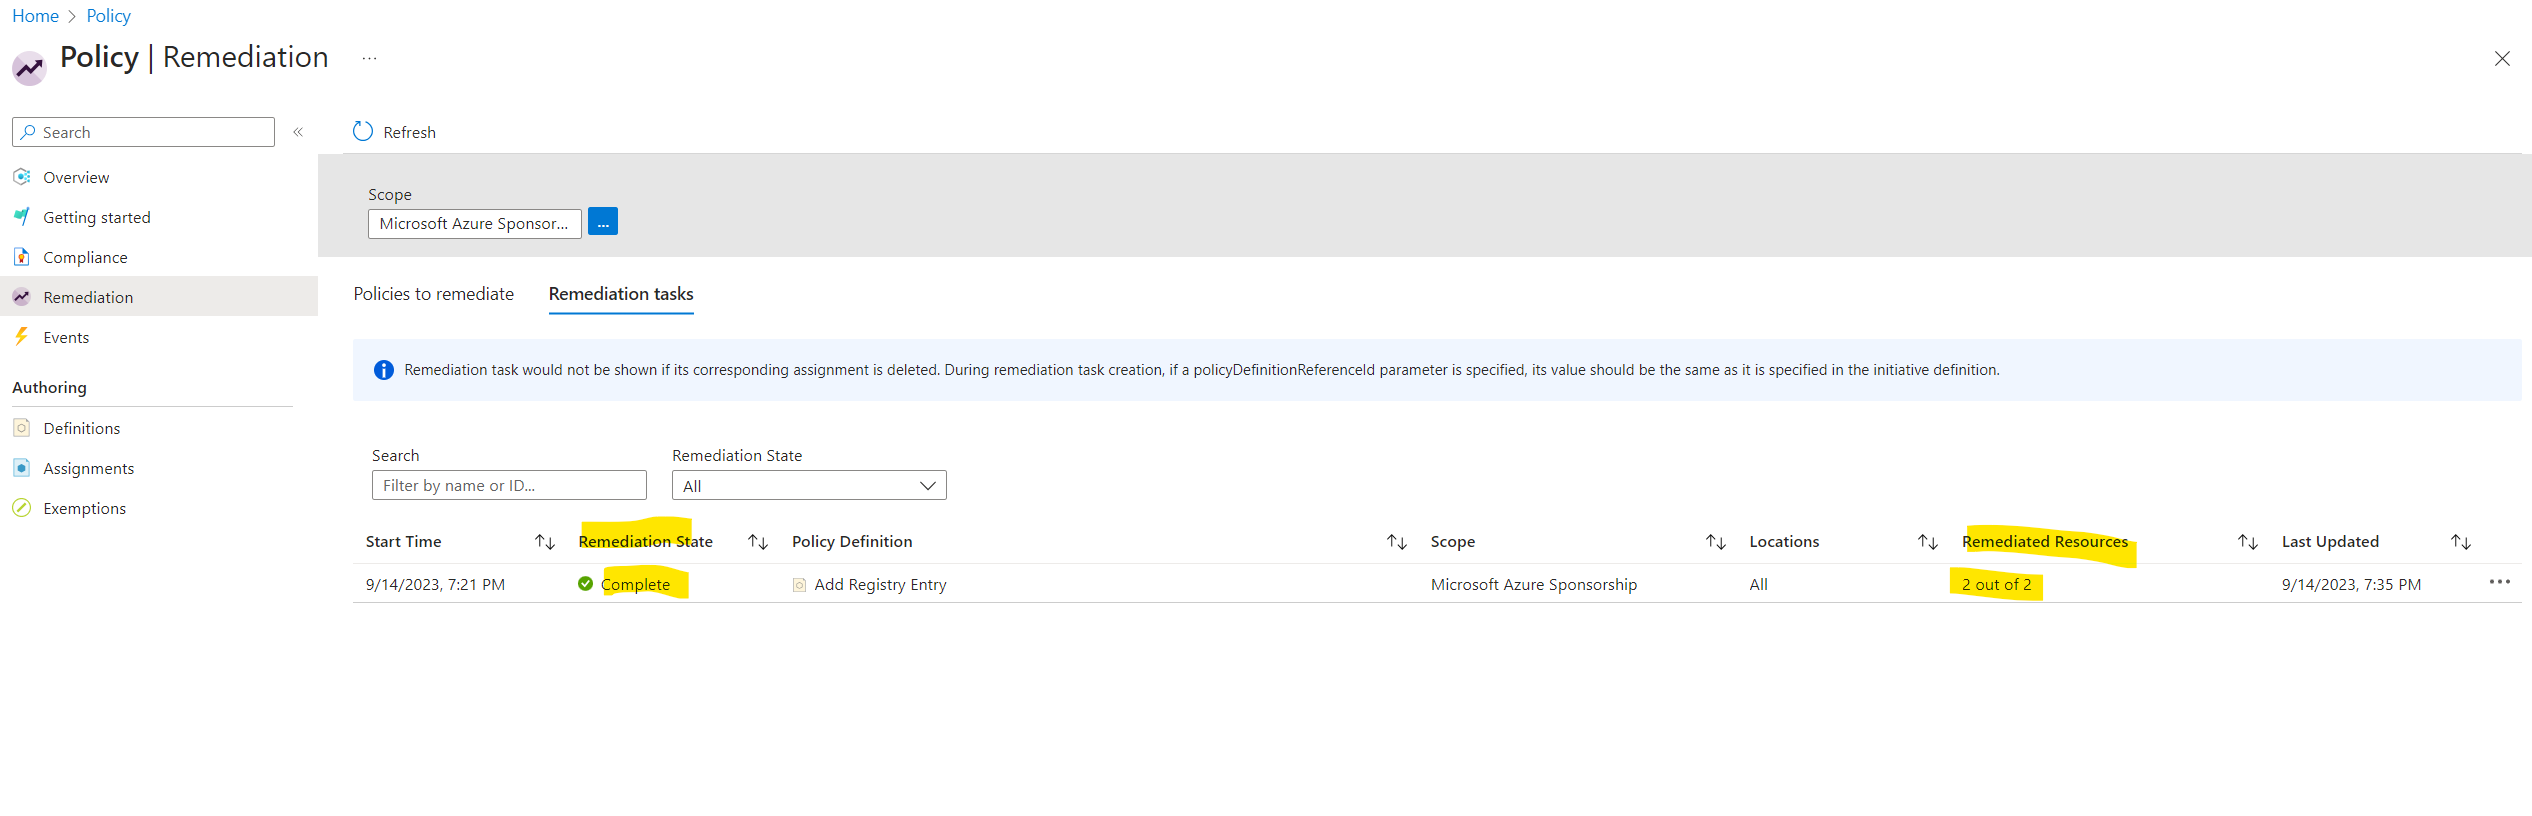
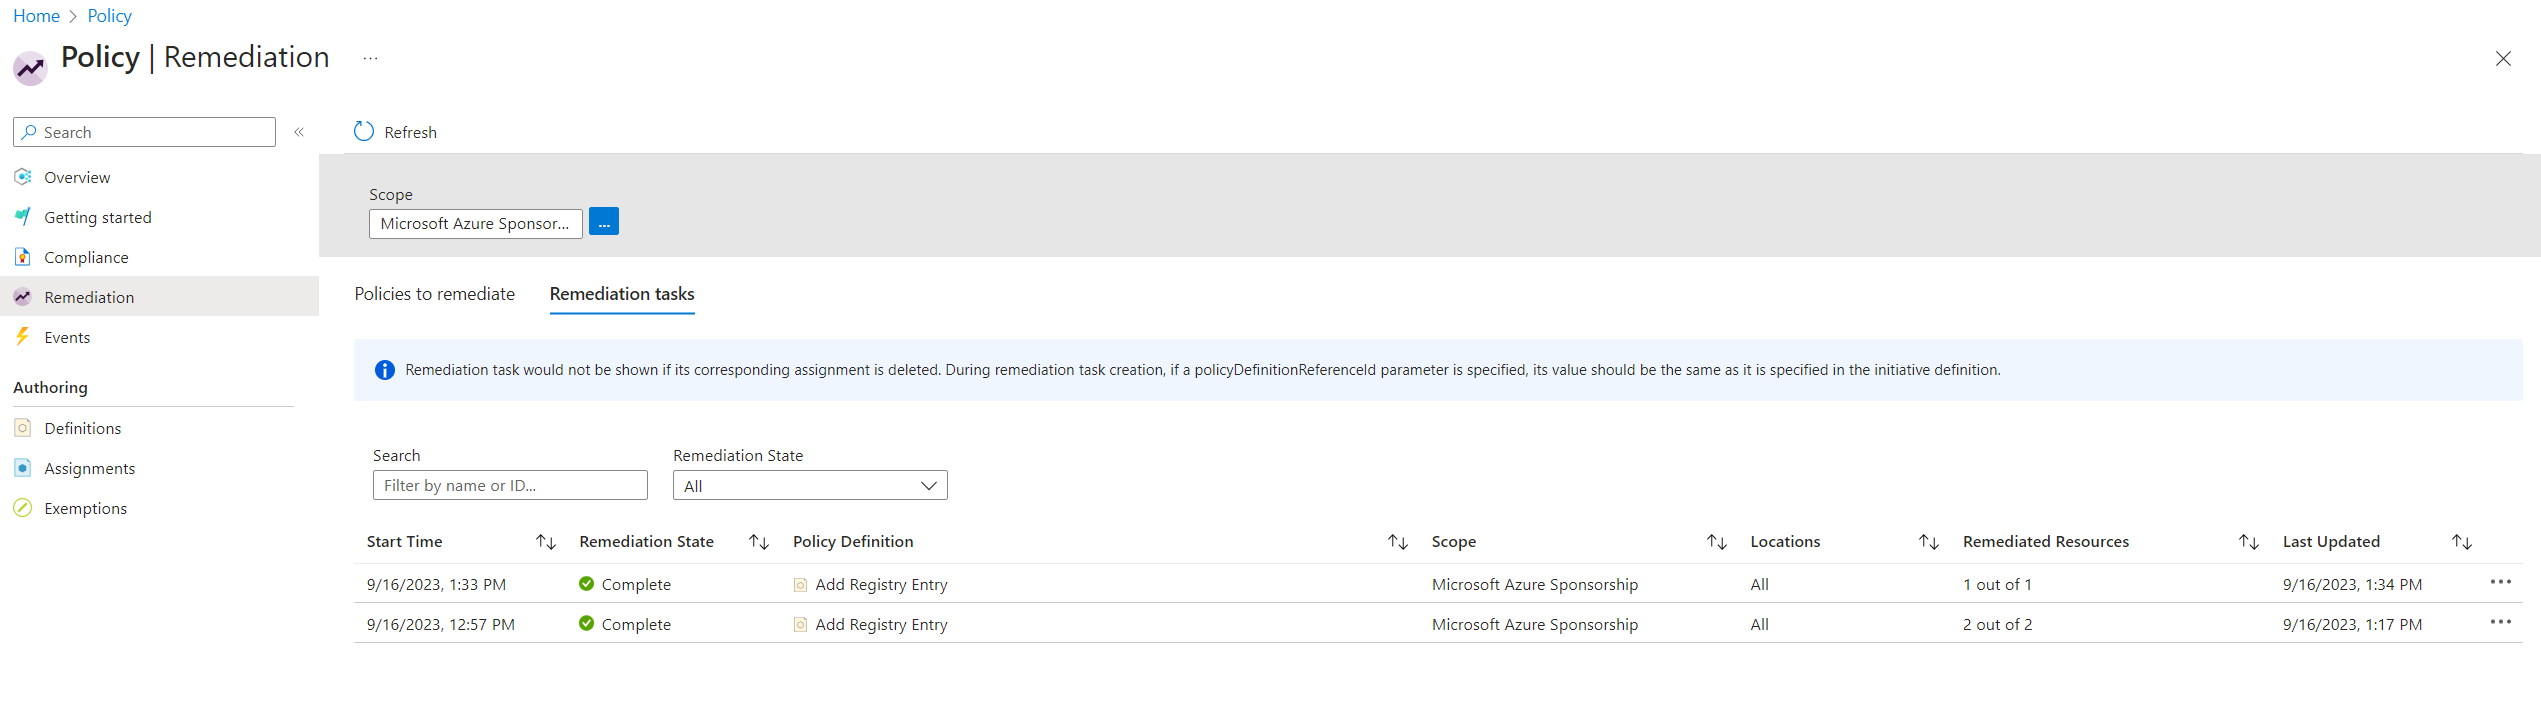
Finally it is completed and the two registry keys should be added on the two lab virtual machines.
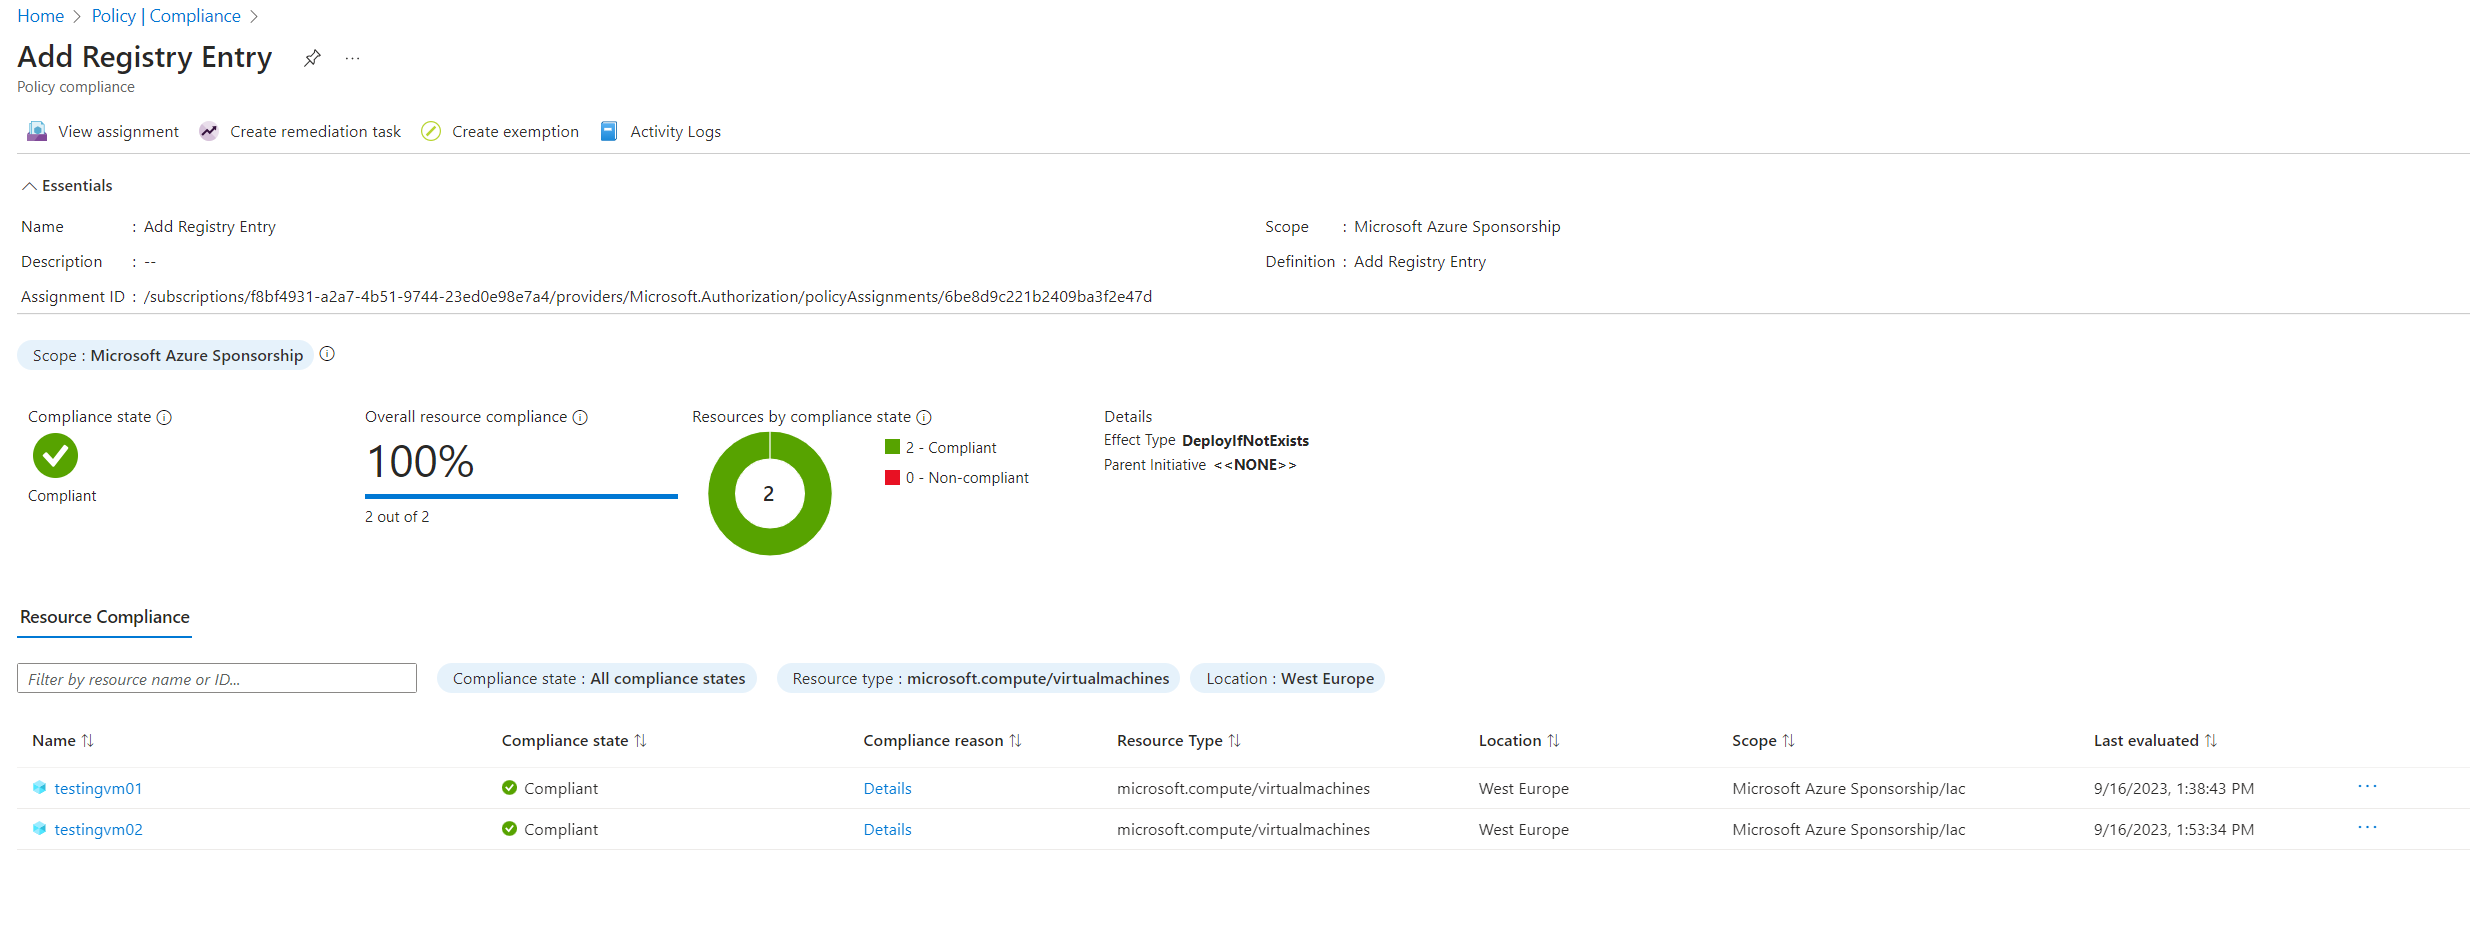
Here you can see that the policy reps. the machine configuration added successfully the two registry keys.

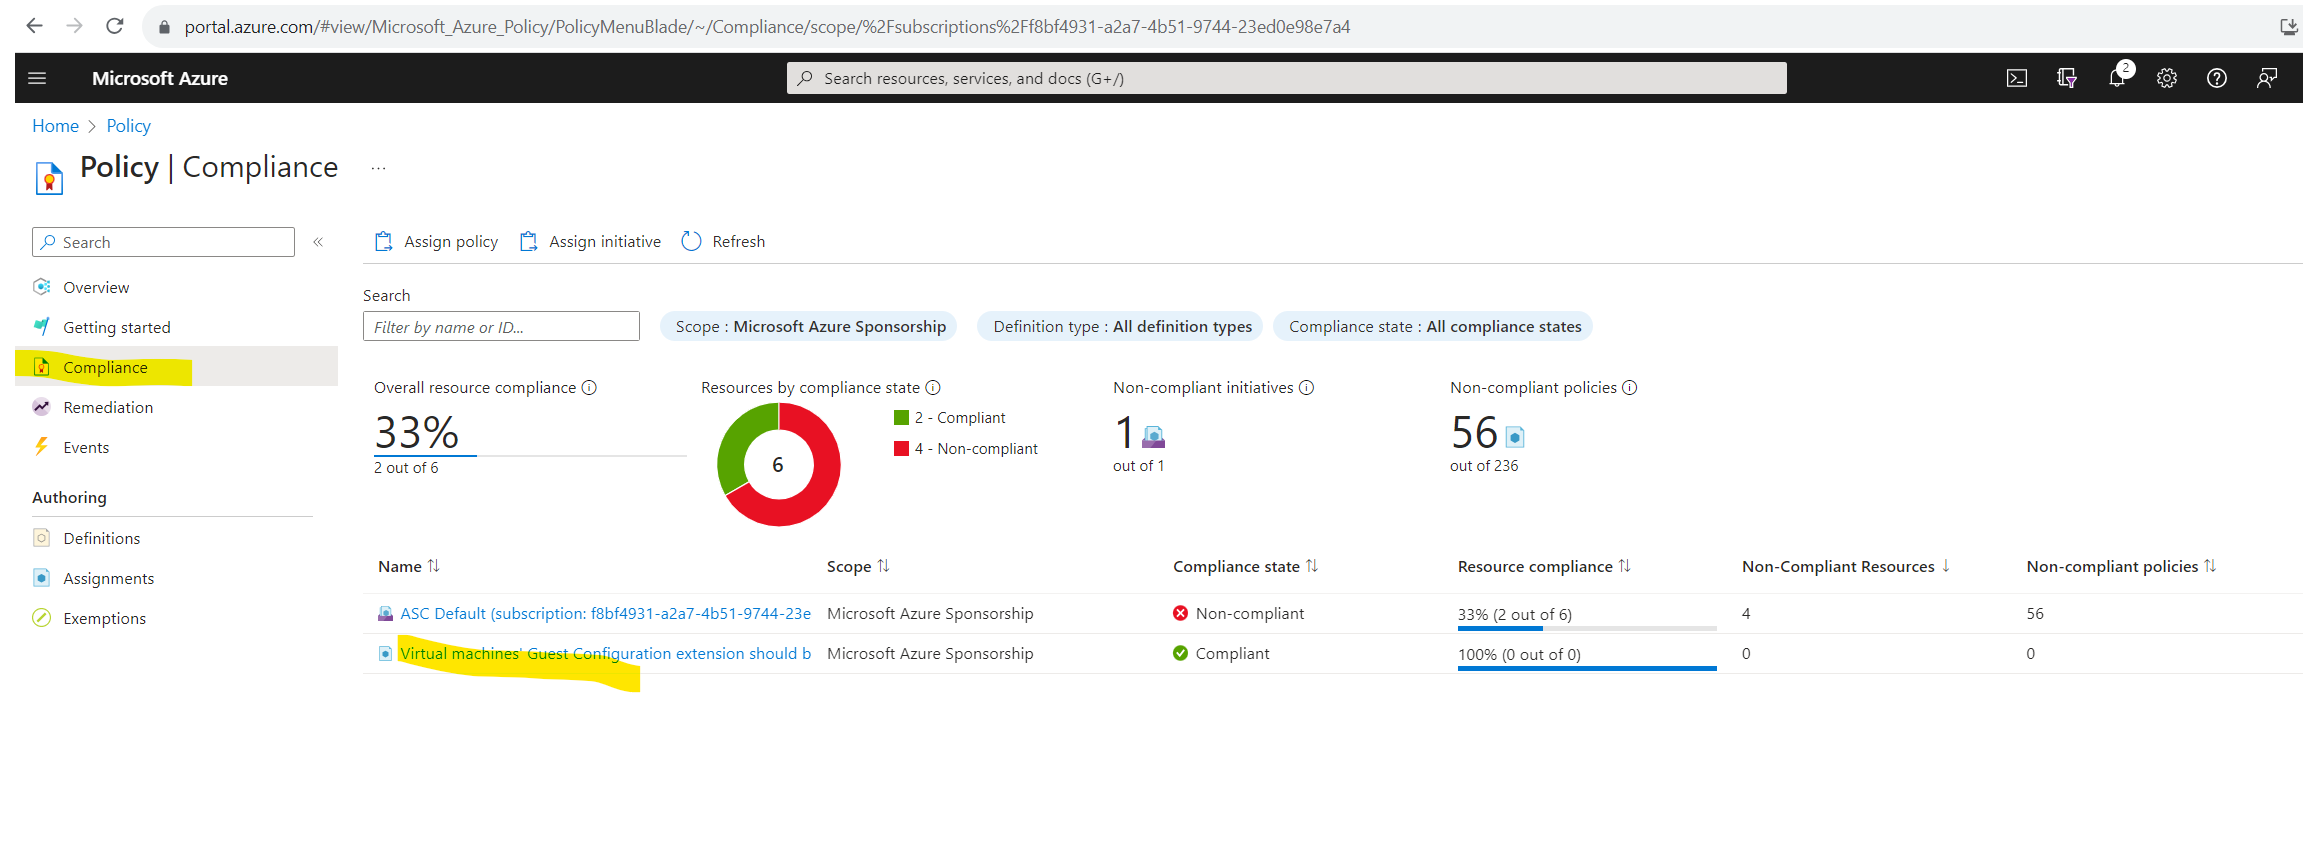
You can also see here under Policy – Compliance – Add Registry Entry (my definition) that one of my two lab virtual machines is compliant and the registry keys was added. So far my second lab virtual machine named TestingVM02 is in state Non-compliant and the the guest configuration wasn’t executed successfully.
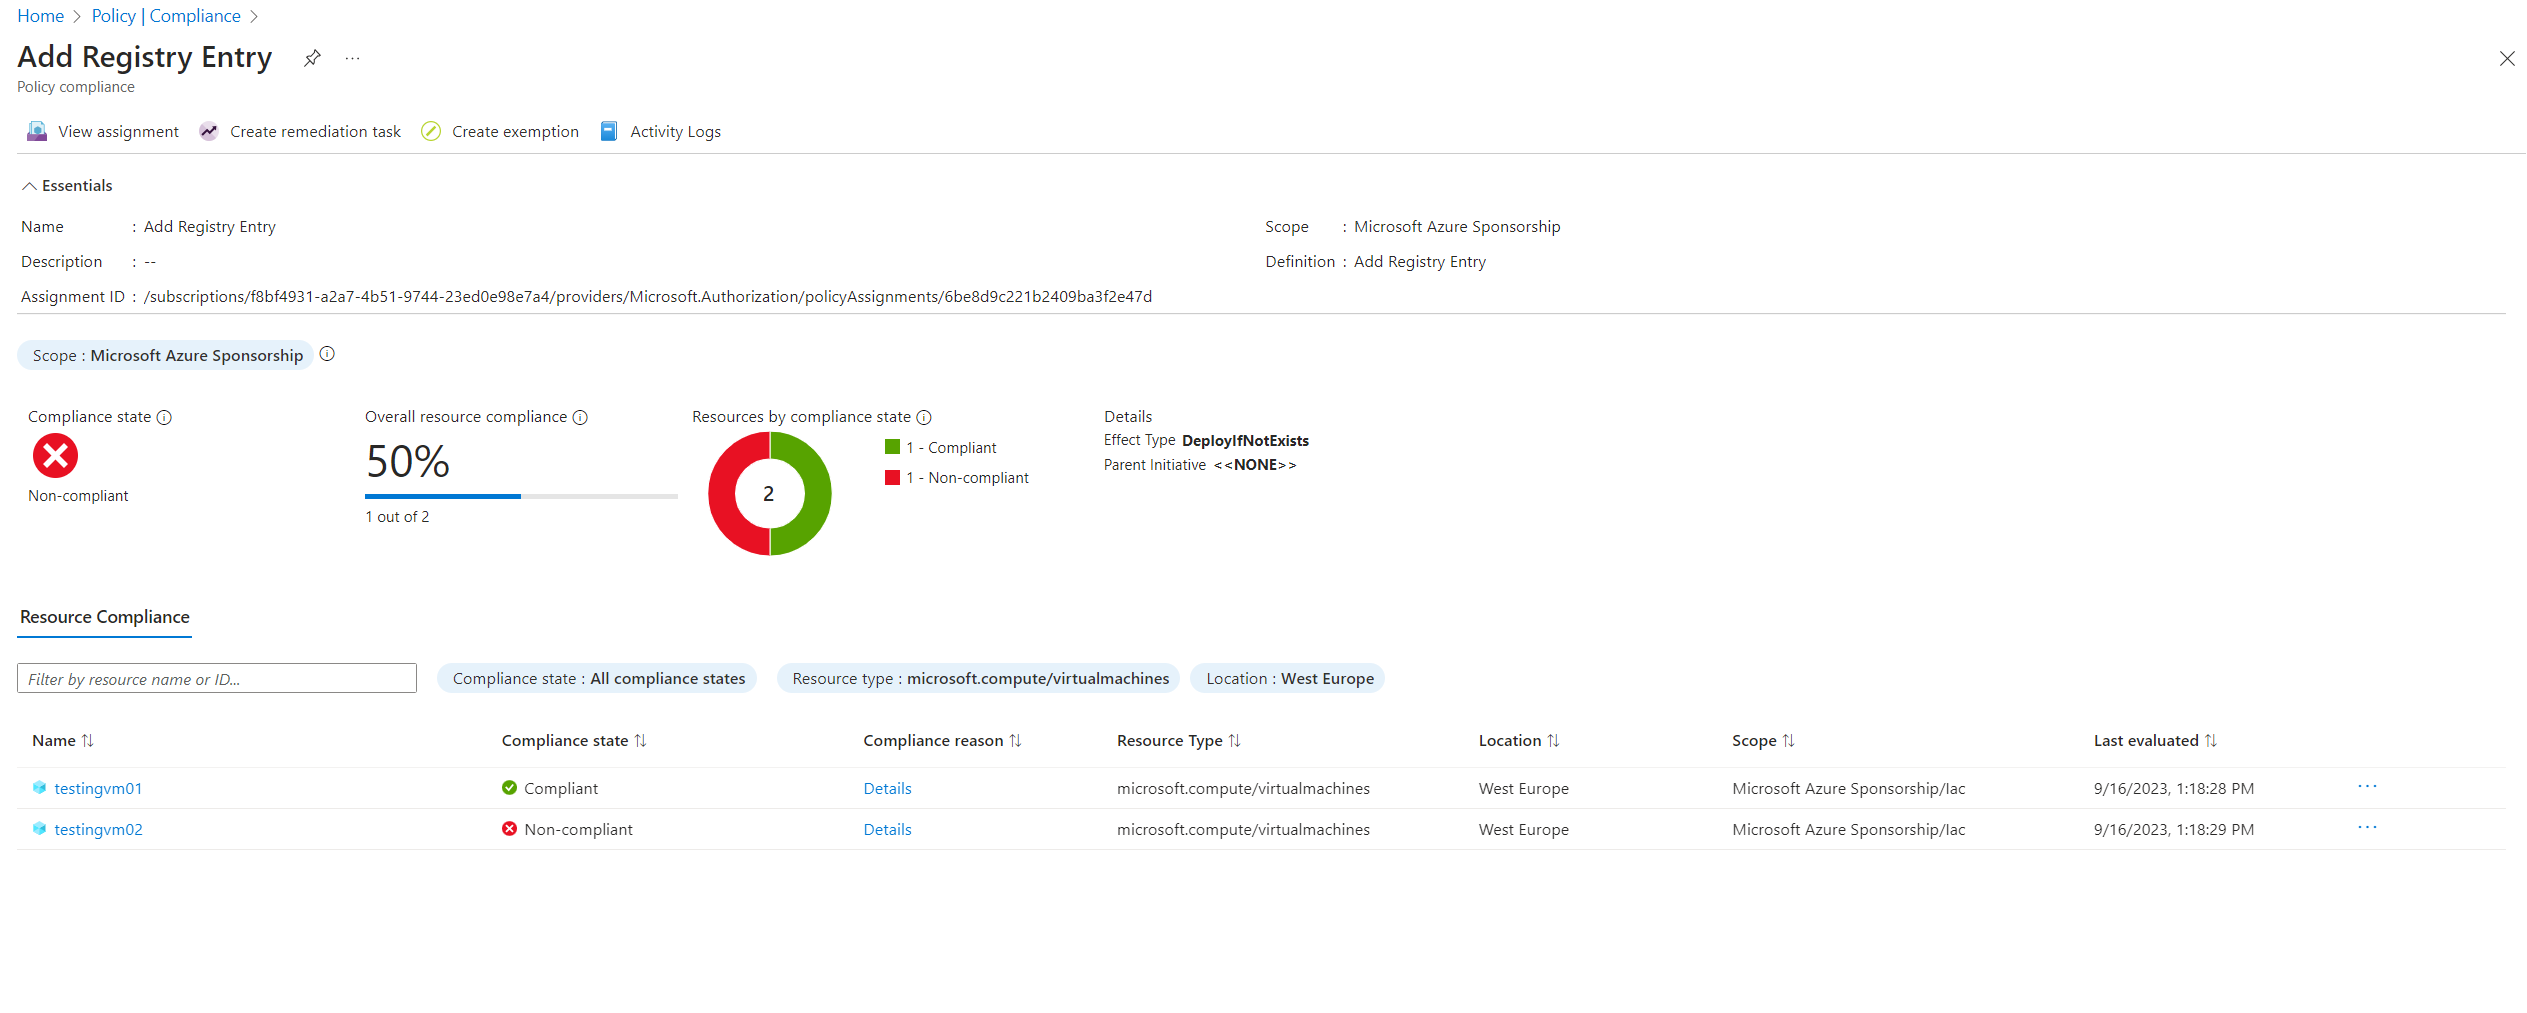
TestingVM01 is already in compliance state.
Therefore I will trigger a remediation by hand as follows.
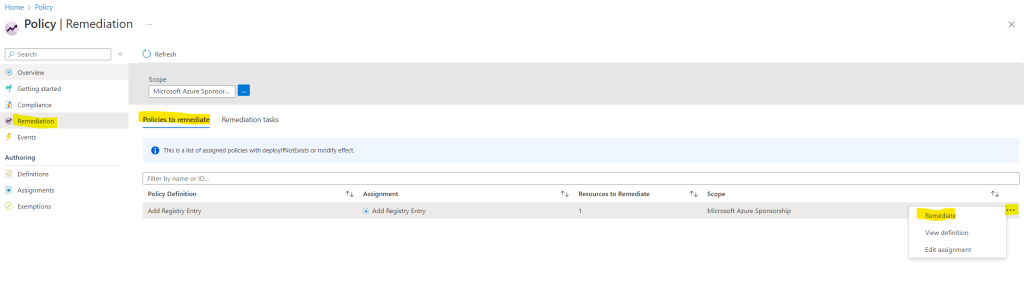
Here I will only get the virtual machines which is in Non-compliant state to remediate.
Trigger the remediation by hand for my second virtual machines also doesn’t help and was still in non-compliant state. After a restart and a third remediation the VM was finally in compliant state and my two registry keys was also add successfully.
Guest Configuration Extension on the Client
The guest configuration extension resp. the client agent is installed on the guest and the following path.
C:PackagesPluginsMicrosoft.GuestConfiguration.ConfigurationforWindows<version>
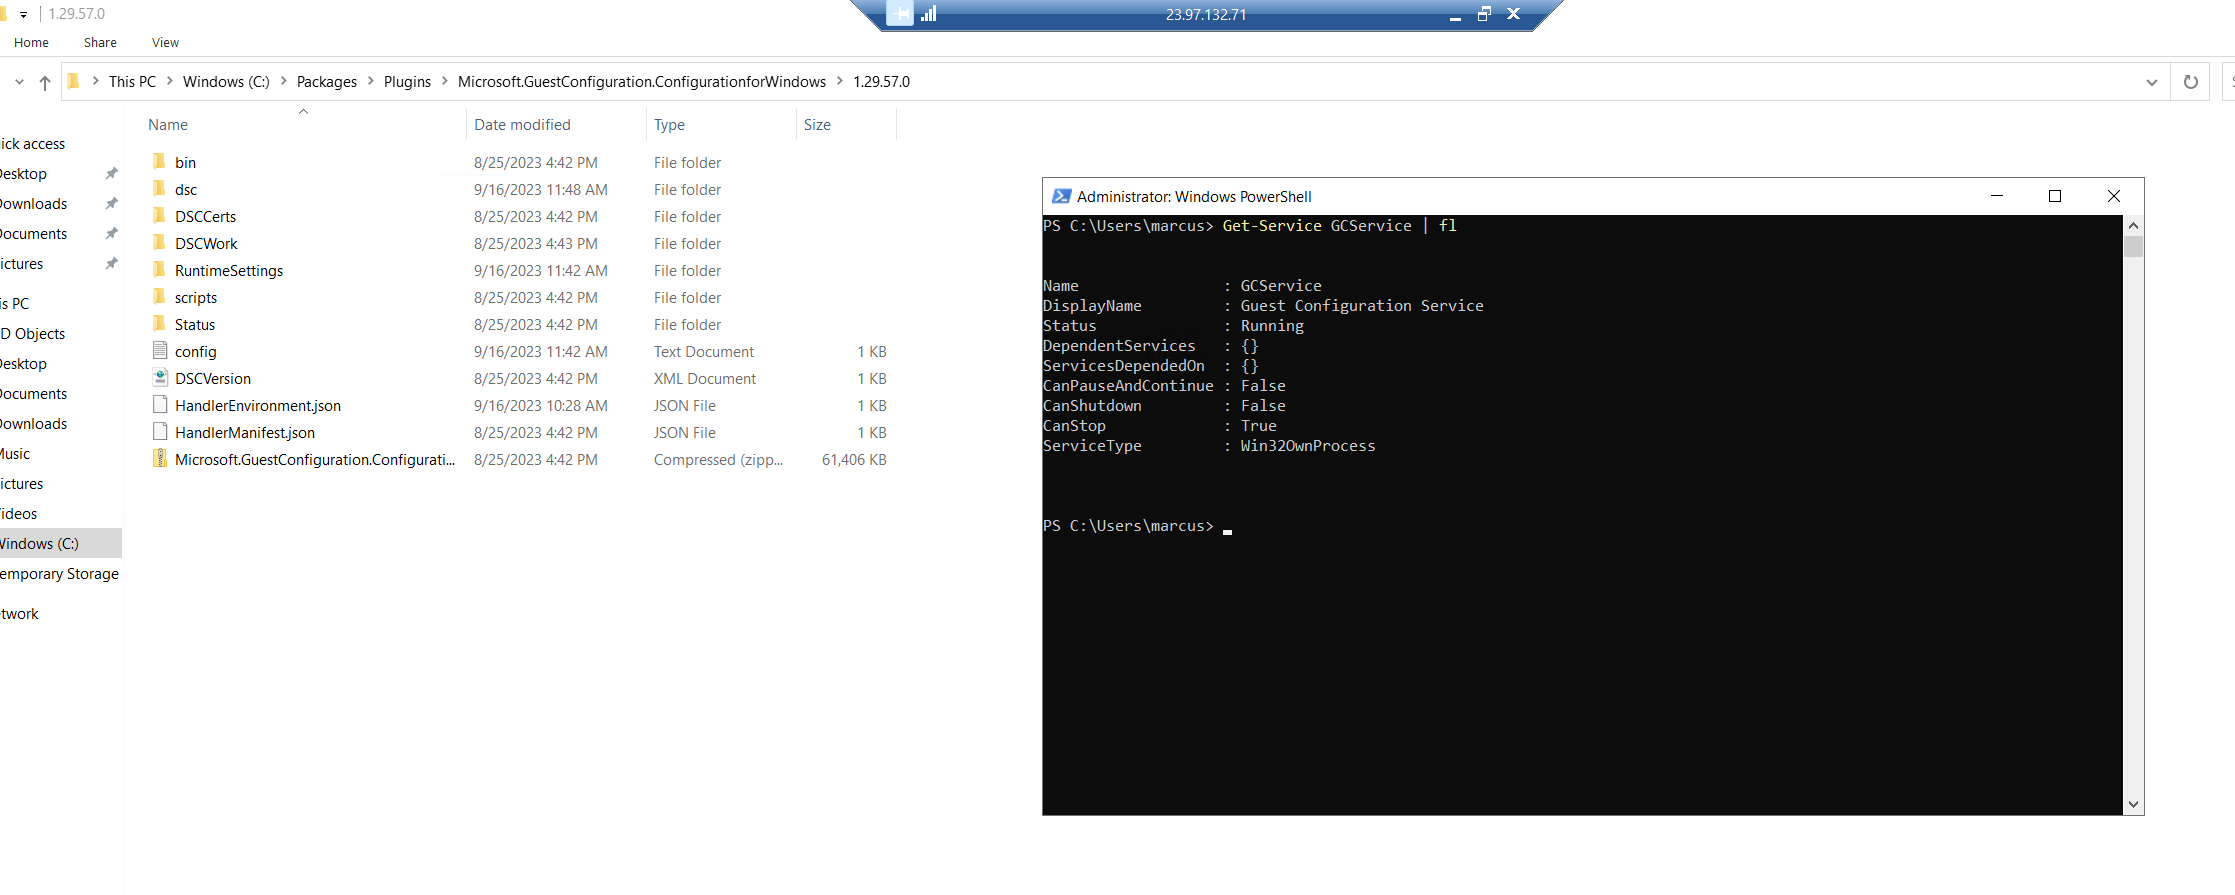
Details about Guest Configuration service (GCService) you can list with the following command.
Get-Service GCService
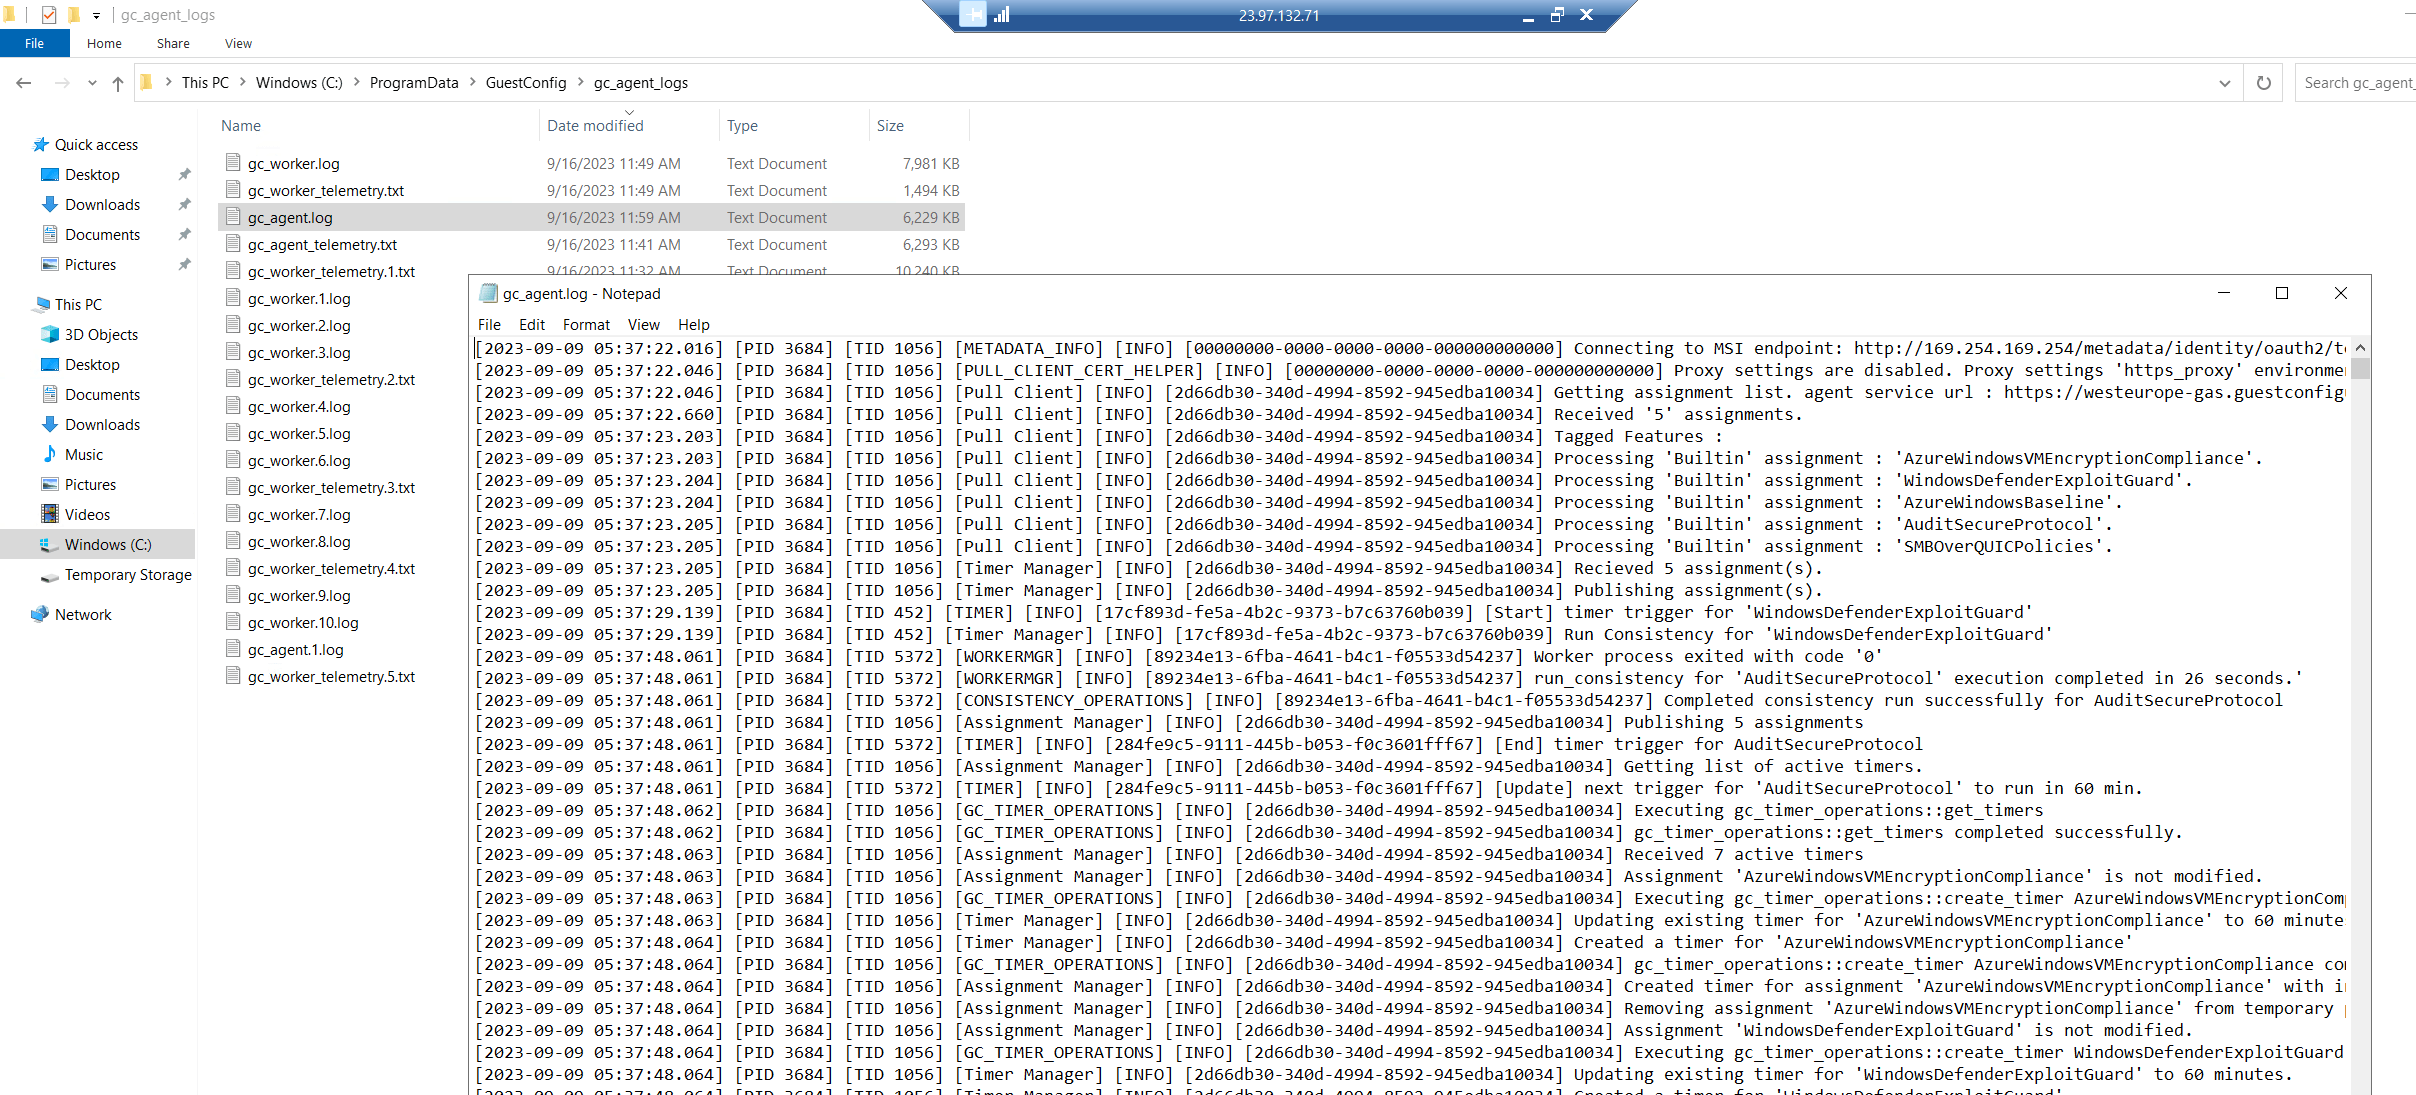
You will also find logs for the guest configuration agent under the following path and file
C:ProgramDataGuestConfiggc_agent.log
Series Summary
- Infrastructure as Code (IaC) – Part 1
- Infrastructure as Code (IaC) – Part 2 – Azure Resource Manager (ARM) templates
- Infrastructure as Code (IaC) – Part 3 – Desired State Configuration (DSC)
- Infrastructure as Code (IaC) – Part 4 – Azure Automation State
- Infrastructure as Code (IaC) – Part 5 – Azure Automanage Machine Configuration (formerly called Azure Policy Guest Configuration)
- Infrastructure as Code (IaC) – Part 6 – Terraform
Links
Azure Automanage Machine Configuration documentation
https://learn.microsoft.com/en-us/azure/governance/machine-configuration/Understand the machine configuration feature of Azure Automanage
https://learn.microsoft.com/en-us/azure/governance/machine-configuration/overviewWhat are managed identities for Azure resources?
https://learn.microsoft.com/en-us/azure/active-directory/managed-identities-azure-resources/overviewConfigure managed identities for Azure resources on a VM using the Azure portal
https://learn.microsoft.com/en-us/azure/active-directory/managed-identities-azure-resources/qs-configure-portal-windows-vmAzure Automanage
https://learn.microsoft.com/en-us/azure/automanage/Frequently asked questions for Azure Automanage for VMs
https://learn.microsoft.com/en-us/azure/automanage/faq