Azure Migrate – How to migrate on-premises Hyper-V Virtual Machines to Azure
In this post we will see how to migrate on-premises Hyper-V VMs to Azure by using Azure Migrate and the Migration and modernization tool.
This process is well documented by Microsoft in the following article on which I will refer in this post.
Migrate Hyper-V VMs to Azure
https://learn.microsoft.com/en-us/azure/migrate/tutorial-migrate-hyper-v
Introduction
Azure Migrate provides a simplified migration, modernization, and optimization service for Azure. All pre-migration steps such as discovery, assessments, and right-sizing of on-premises resources are included for infrastructure, data, and applications. Azure Migrate’s extensible framework allows for integration of third-party tools, thus expanding the scope of supported use-cases. It provides the following:
- Unified migration platform: A single portal to start, run, and track your migration to Azure.
- Range of tools: A range of tools for assessment and migration. Azure Migrate tools include Azure Migrate: Discovery and assessment and Migration and modernization. Azure Migrate also integrates with other Azure services and tools, and with independent software vendor (ISV) offerings.
- Assessment, migration, and modernization: In the Azure Migrate hub, you can assess, migrate, and modernize:
- Servers, databases and web apps: Assess on-premises servers including web apps and SQL Server instances and migrate them to Azure.
- Databases: Assess on-premises SQL Server instances and databases to migrate them to an SQL Server on an Azure VM or an Azure SQL Managed Instance or to an Azure SQL Database.
- Web applications: Assess on-premises web applications and migrate them to Azure App Service and Azure Kubernetes Service.
- Virtual desktops: Assess your on-premises virtual desktop infrastructure (VDI) and migrate it to Azure Virtual Desktop.
- Data: Migrate large amounts of data to Azure quickly and cost-effectively using Azure Data Box products.
Source: https://learn.microsoft.com/en-us/azure/migrate/migrate-services-overview
Create a new Azure Migrate Project
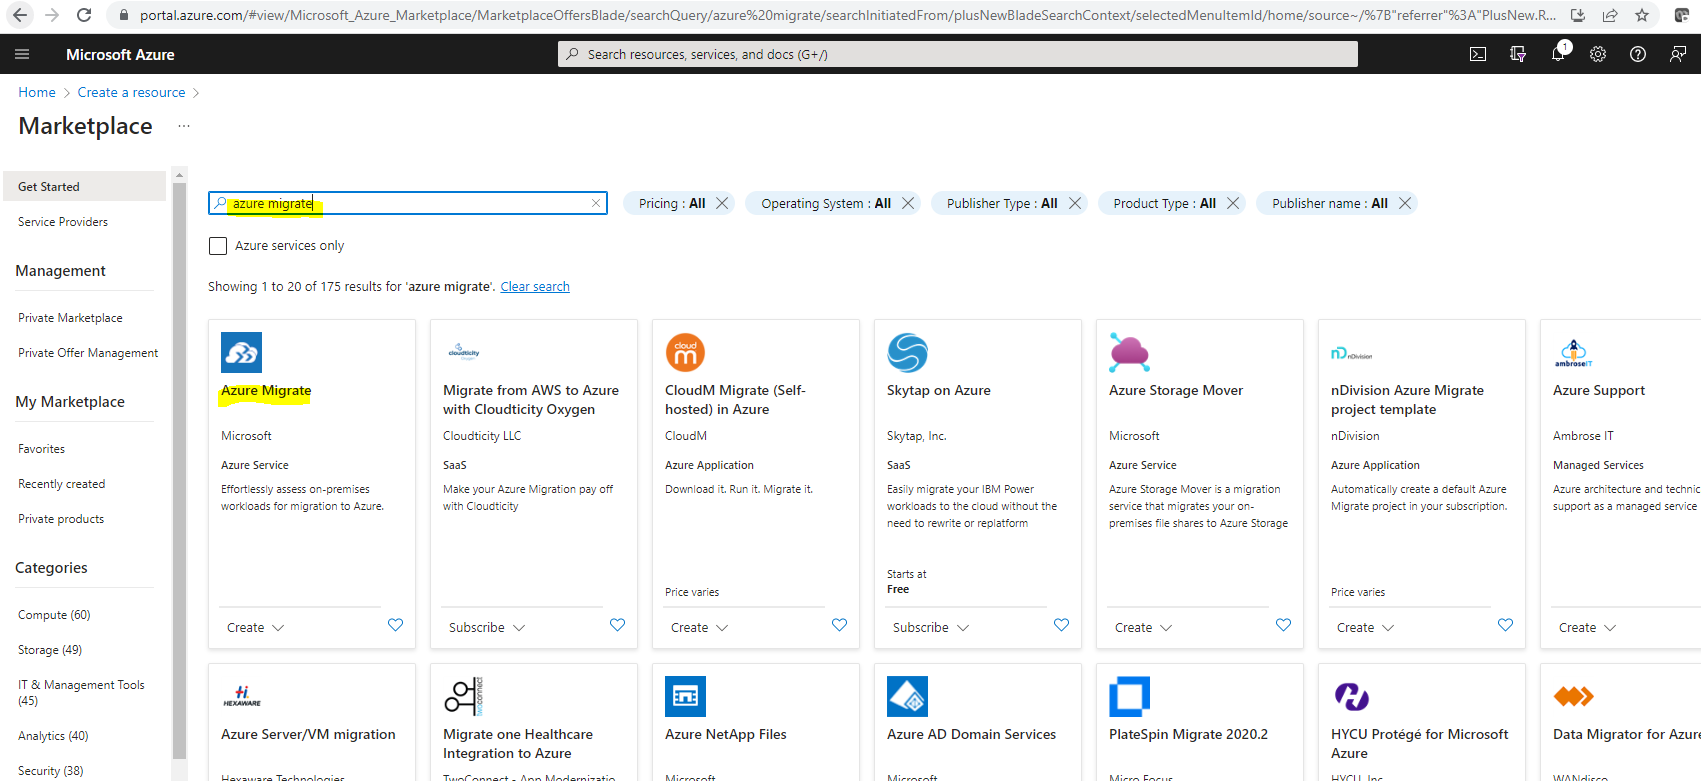
In order to move our on-premises virtual machines running on Hyper-V to Azure, we first need to create a new Azure Migrate Project.
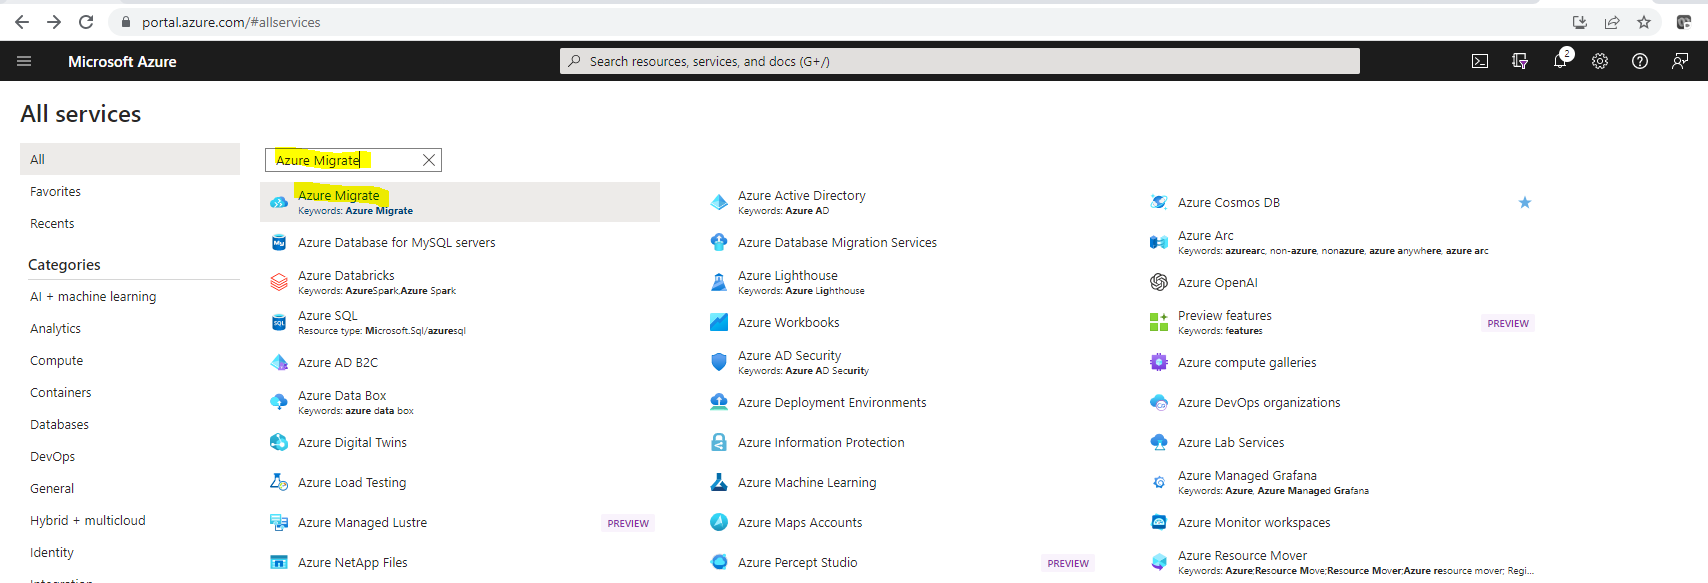
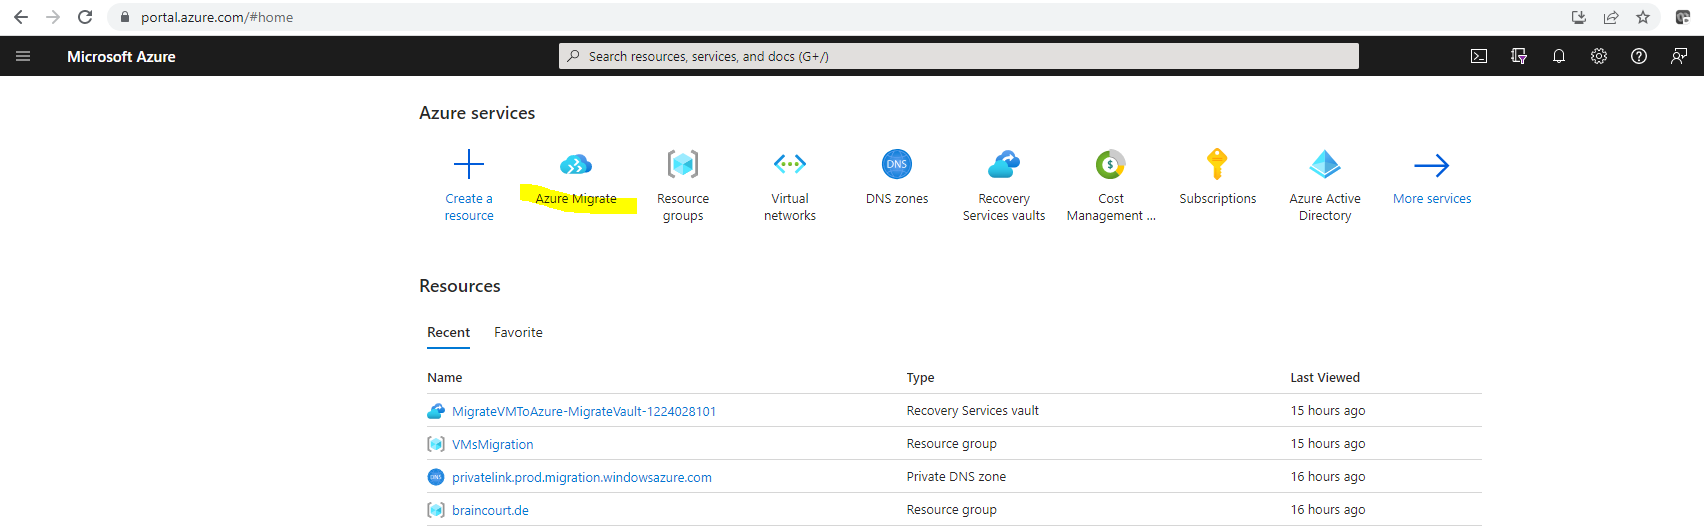
So search for azure migrate and select below the Azure Migrate tile.
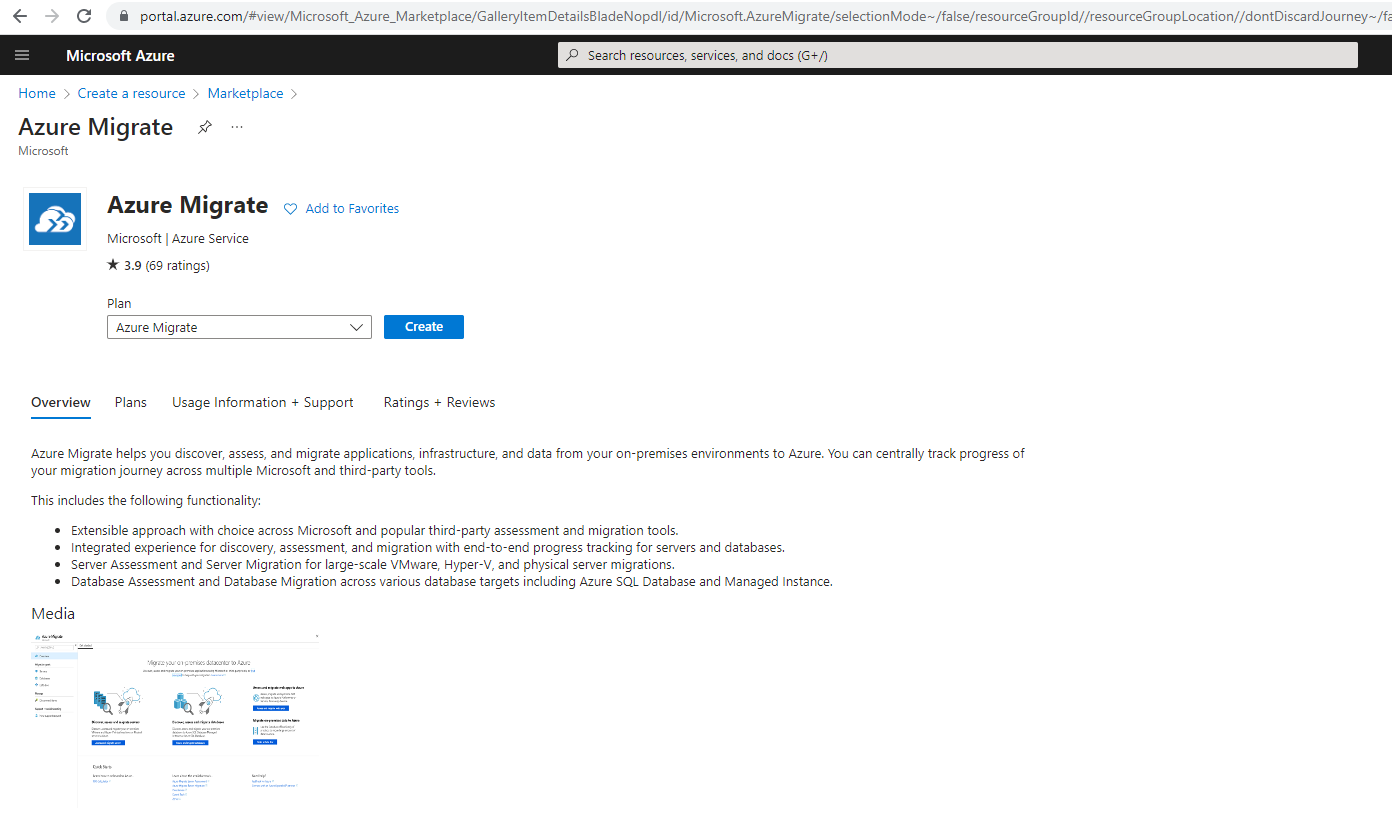
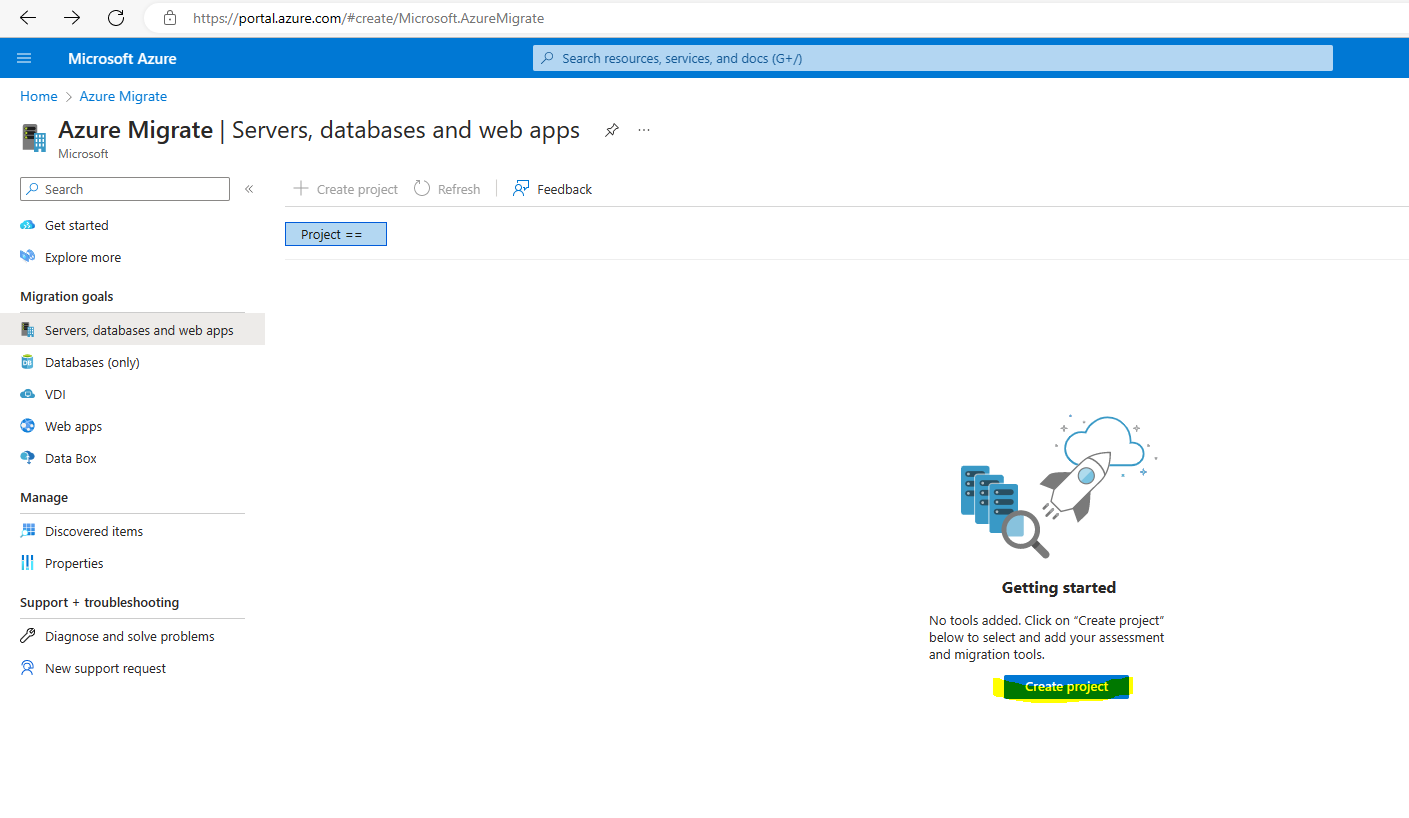
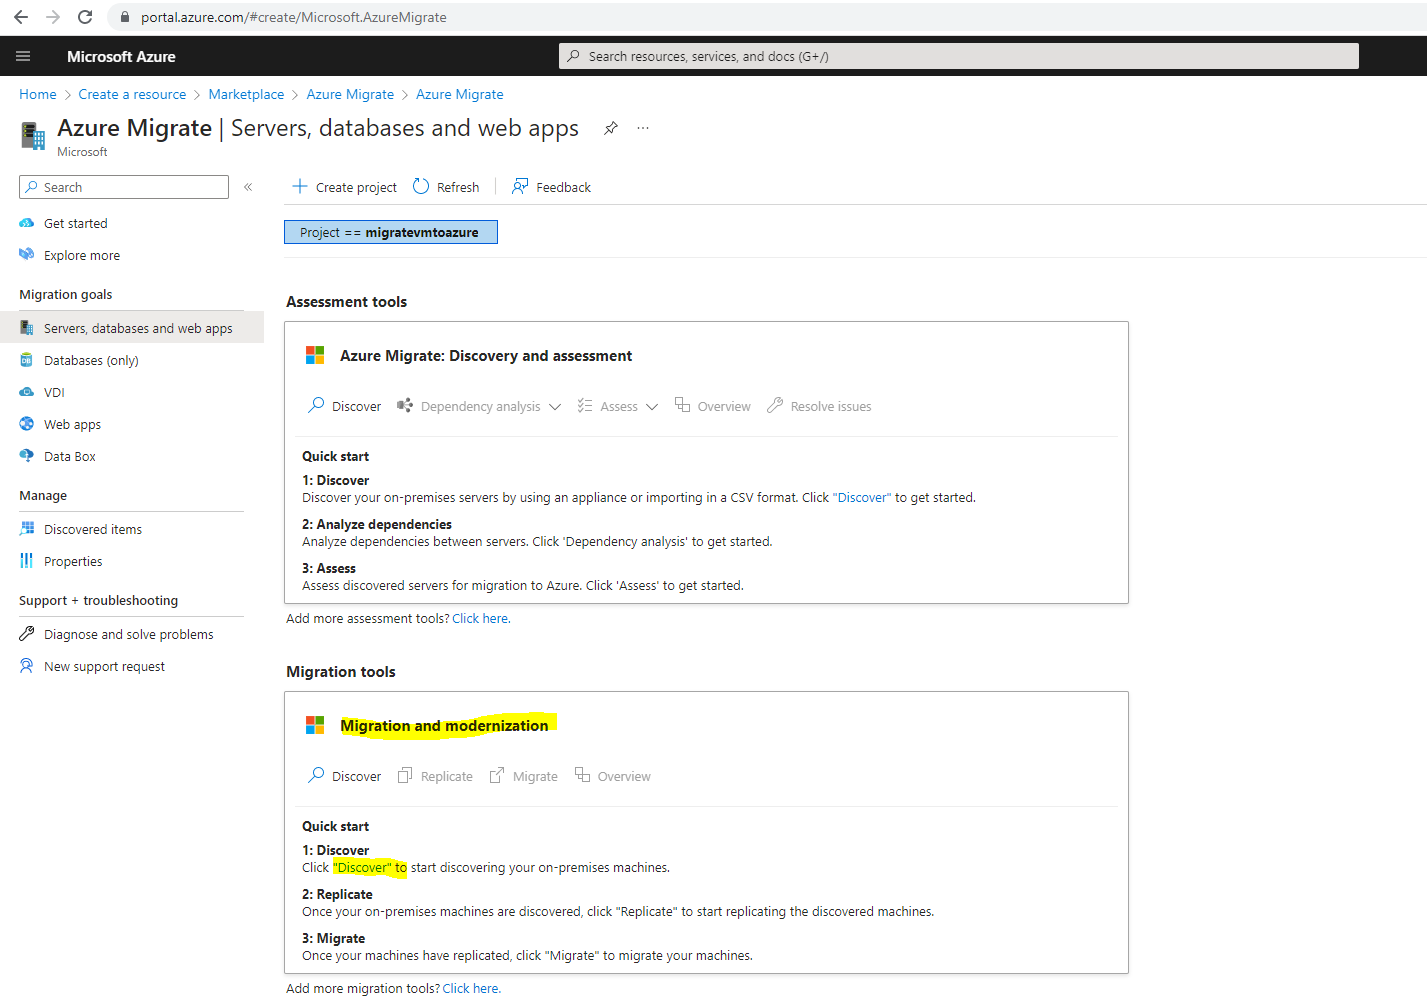
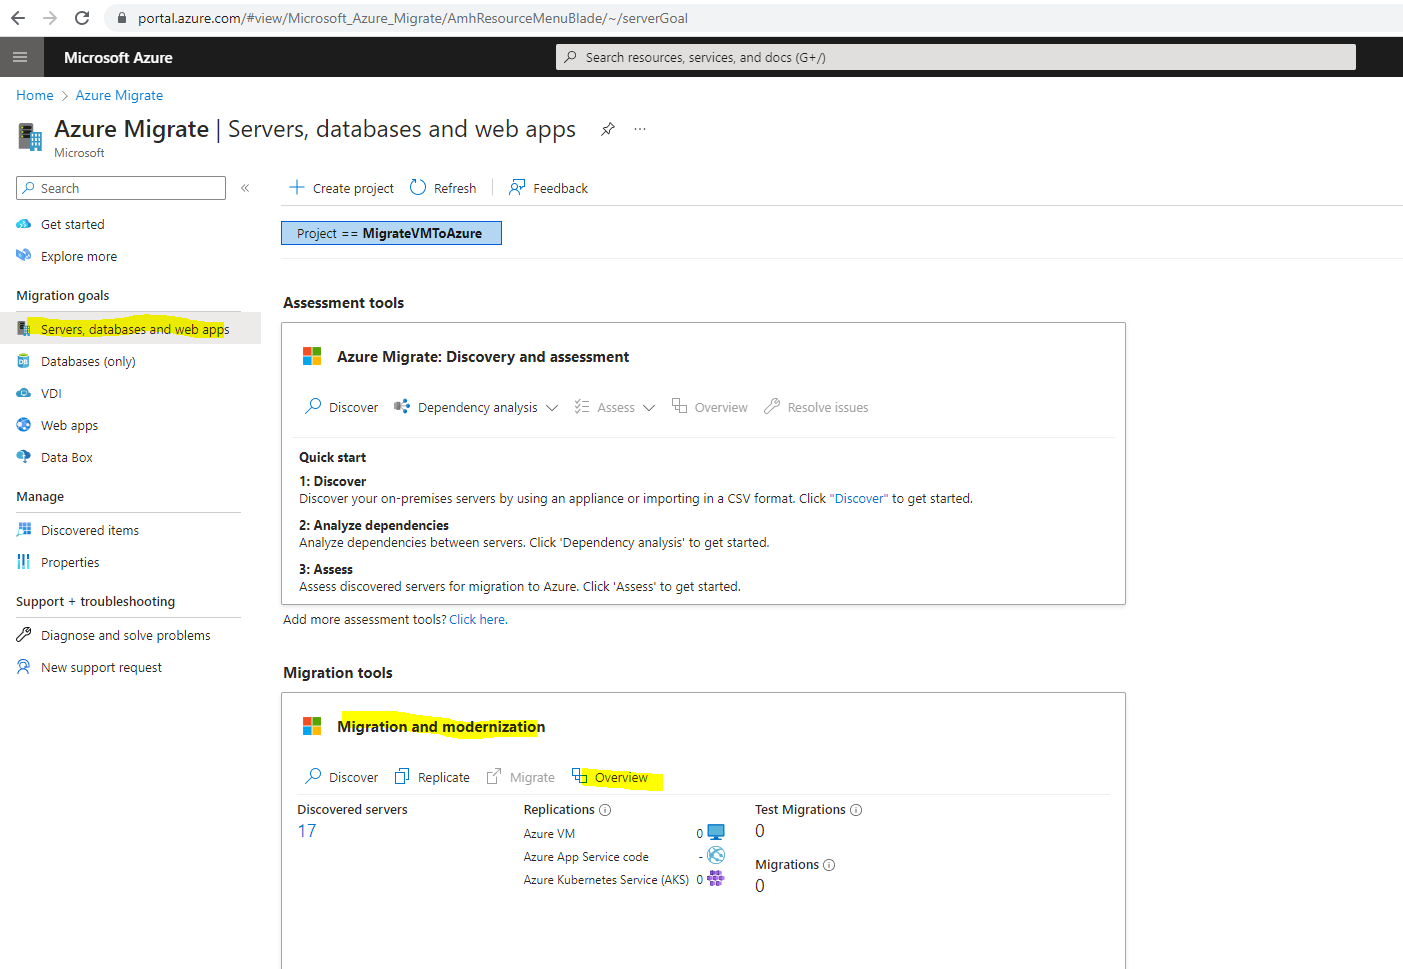
In the Azure Migrate project > Servers, databases and web apps > click on Create project.
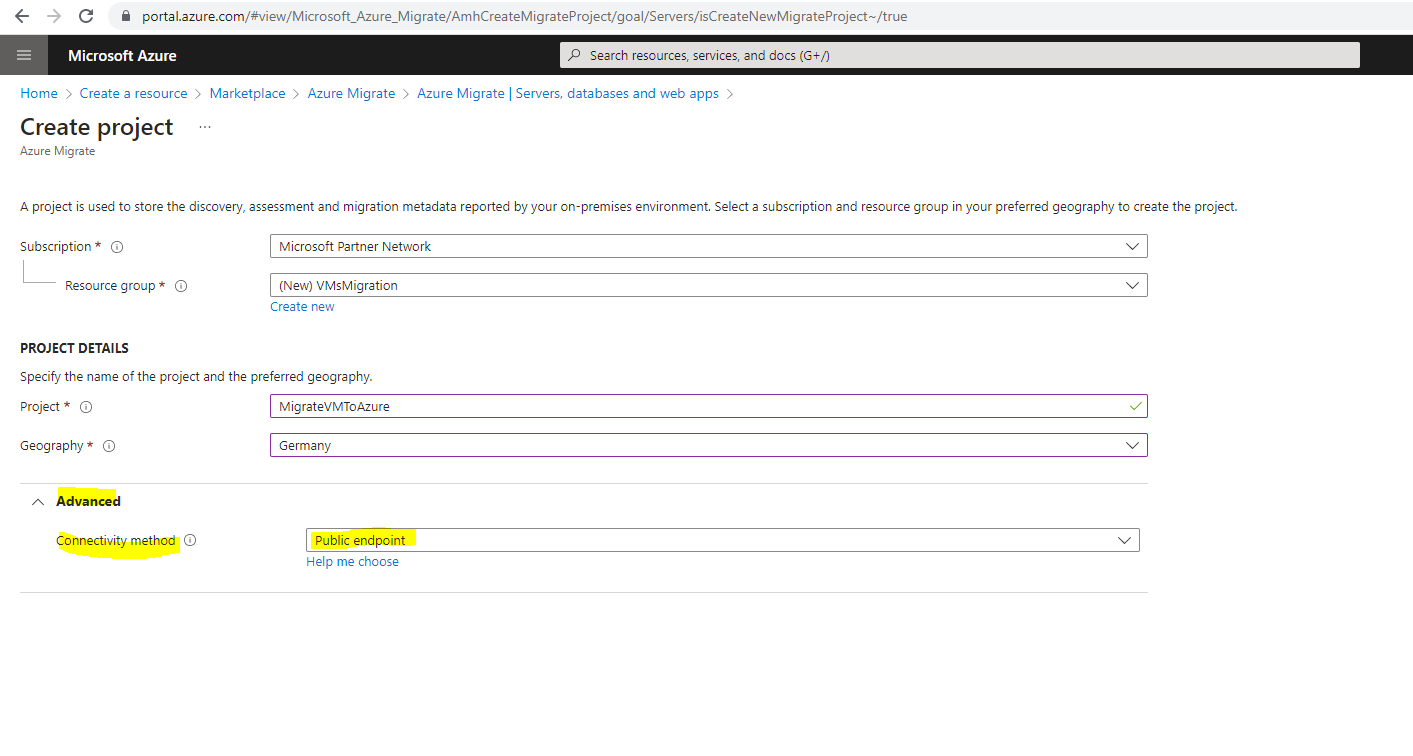
Enter a name for the project and the connectivity method.
In case you have connected your on-premise network directly with Azure by using an IPSec Site-to-Site VPN, you can also use a private endpoint here.
Support requirements and considerations for Private endpoint connectivity
https://learn.microsoft.com/en-us/azure/migrate/how-to-use-azure-migrate-with-private-endpointsTroubleshoot network connectivity
https://learn.microsoft.com/en-us/azure/migrate/troubleshoot-network-connectivity
In the Azure Migrate project > Servers, databases and web apps > Migration and modernization section click on Discover.
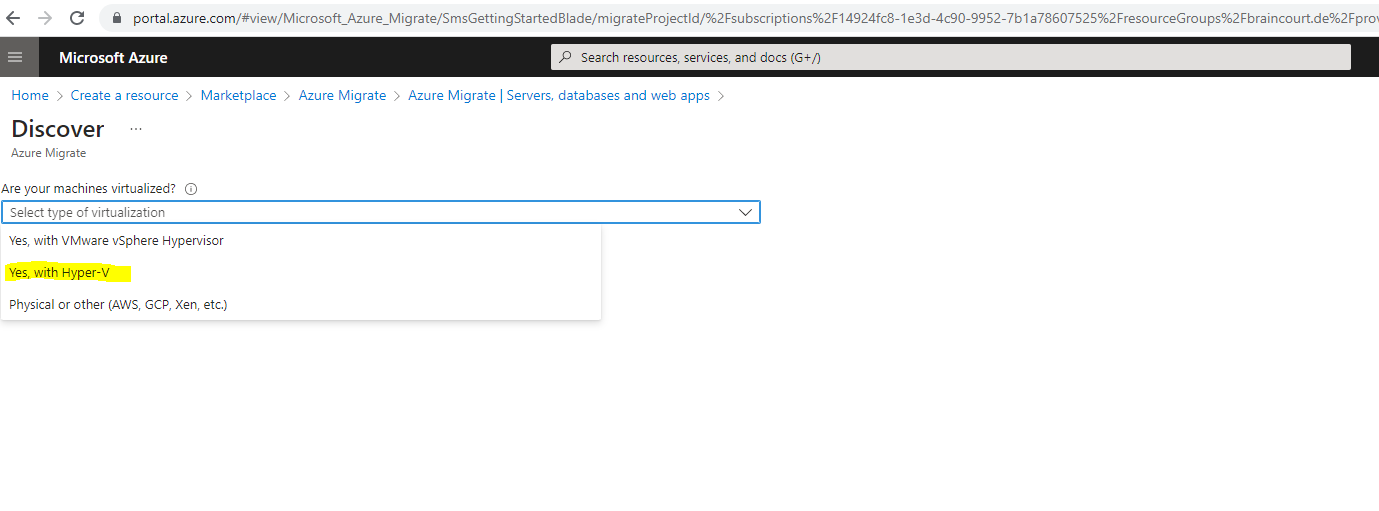
In Discover machines > Are your machines virtualized?, select Yes, with Hyper-V.
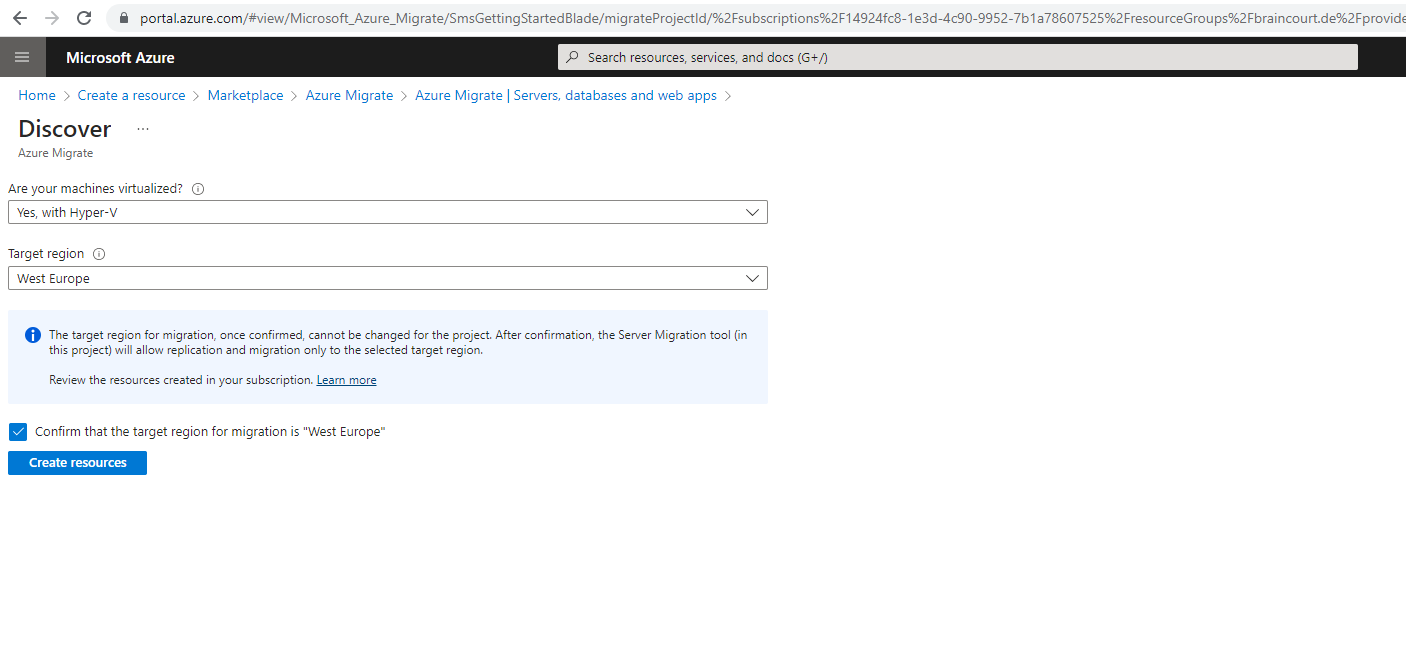
Click Create resources. This creates an Azure Site Recovery vault in the background.
- If you’ve already set up migration with the Migration and modernization tool, this option won’t appear since resources were set up previously.
- You can’t change the target region for this project after clicking this button.
- All subsequent migrations are to this region.
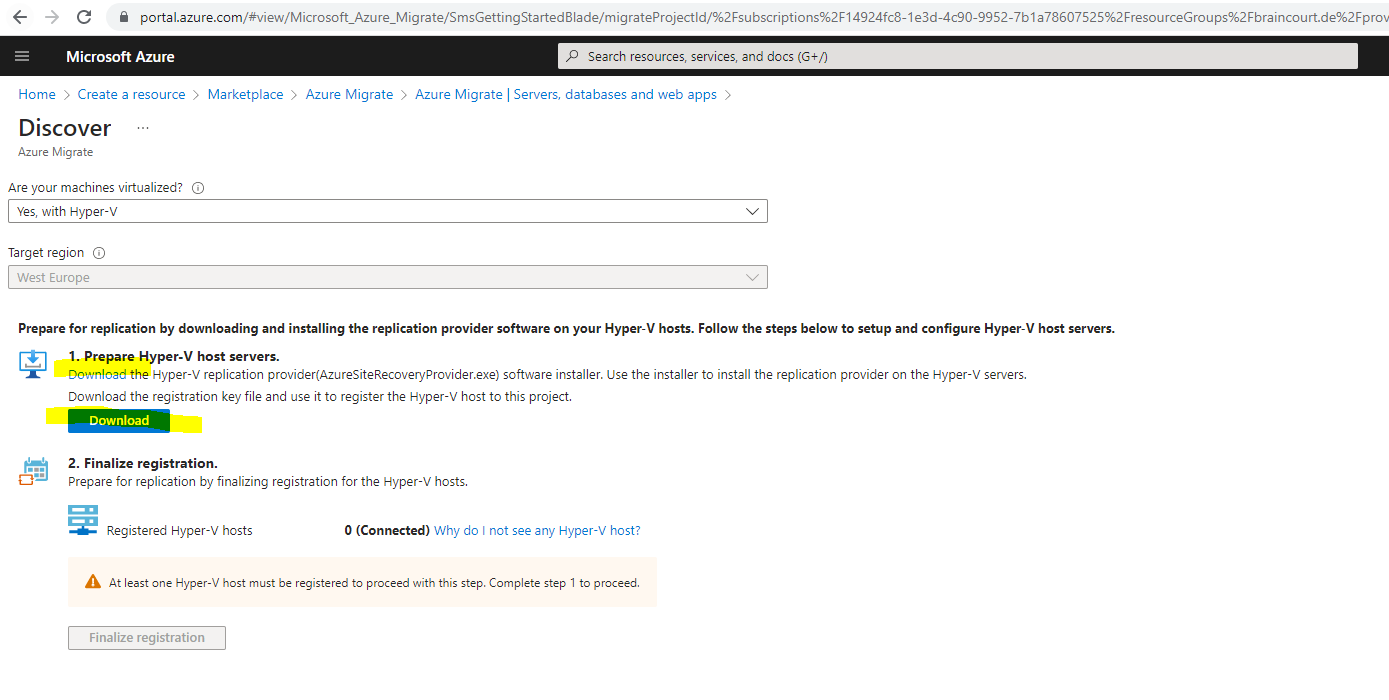
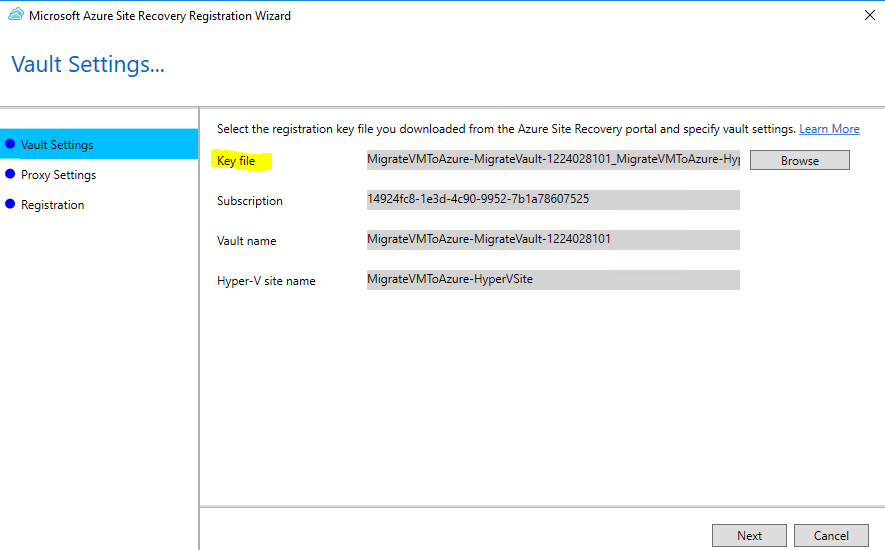
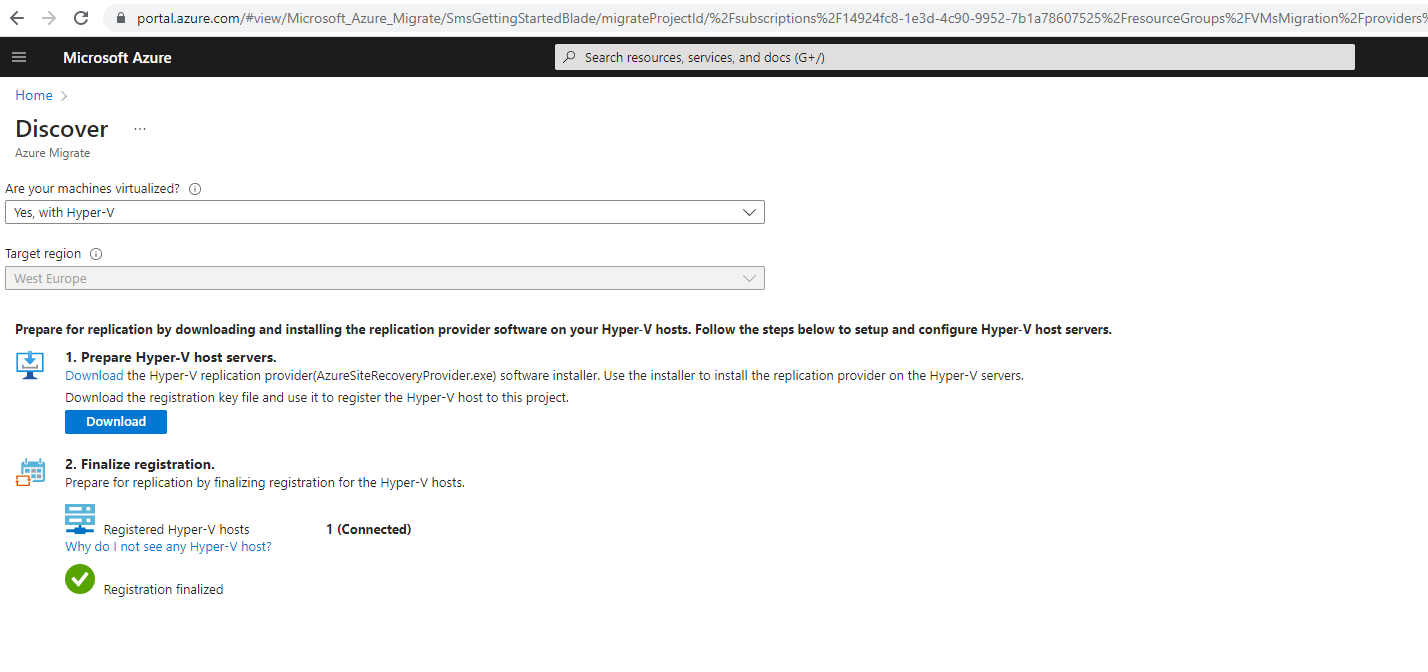
In Prepare Hyper-V host servers, download the Hyper-V Replication provider, and the registration key file.
- The registration key is needed to register the Hyper-V host with the Migration and modernization tool in Azure.
- The key is valid for five days after you generate it.
Copy the provider setup file and registration key file to each Hyper-V host (or cluster node) running VMs you want to replicate.
Run the provider setup file on each host, as described below:
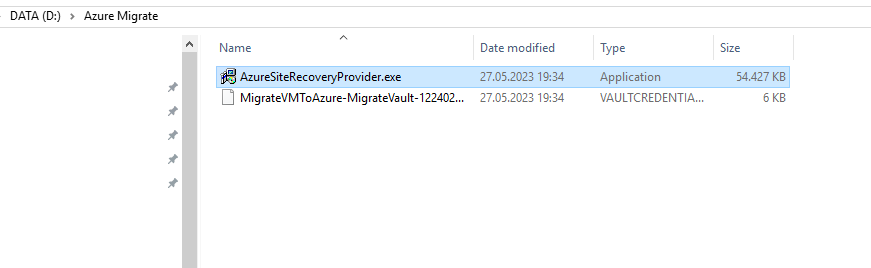
- Select the file icon in the taskbar to open the folder where the installer file and registration key are downloaded.
- Select AzureSiteRecoveryProvider.exe file.
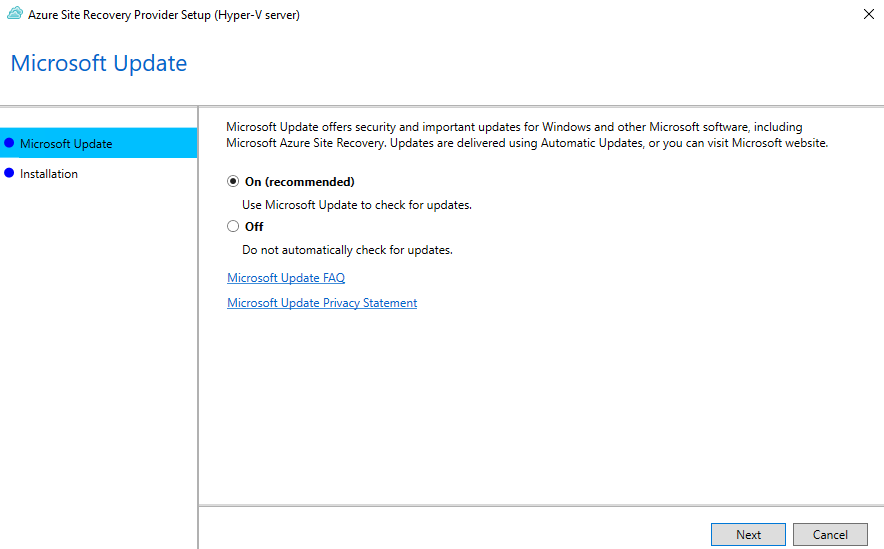
- In the provider installation wizard, ensure On (recommended) is checked, and then select Next.
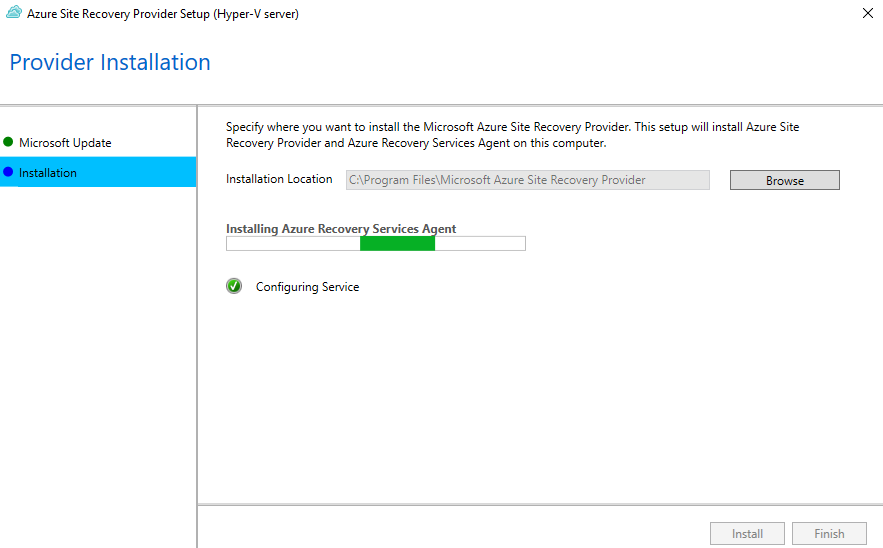
- Select Install to accept the default installation folder.
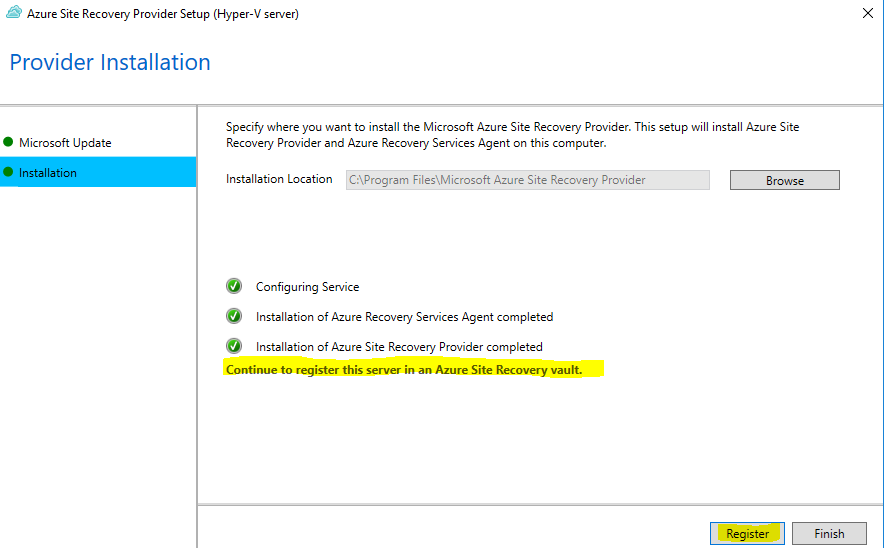
- Select Register to register this server in Azure Site Recovery vault.
- Select Browse.
- Locate the registration key and select Open.
- Select Next.
- Ensure Connect directly to Azure Site Recovery without a proxy server is selected, and then select Next.
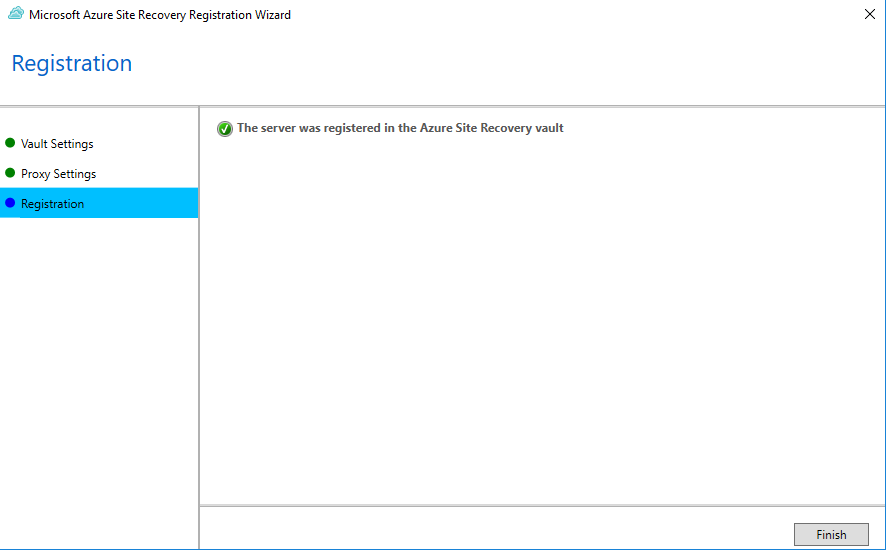
- Select Finish.

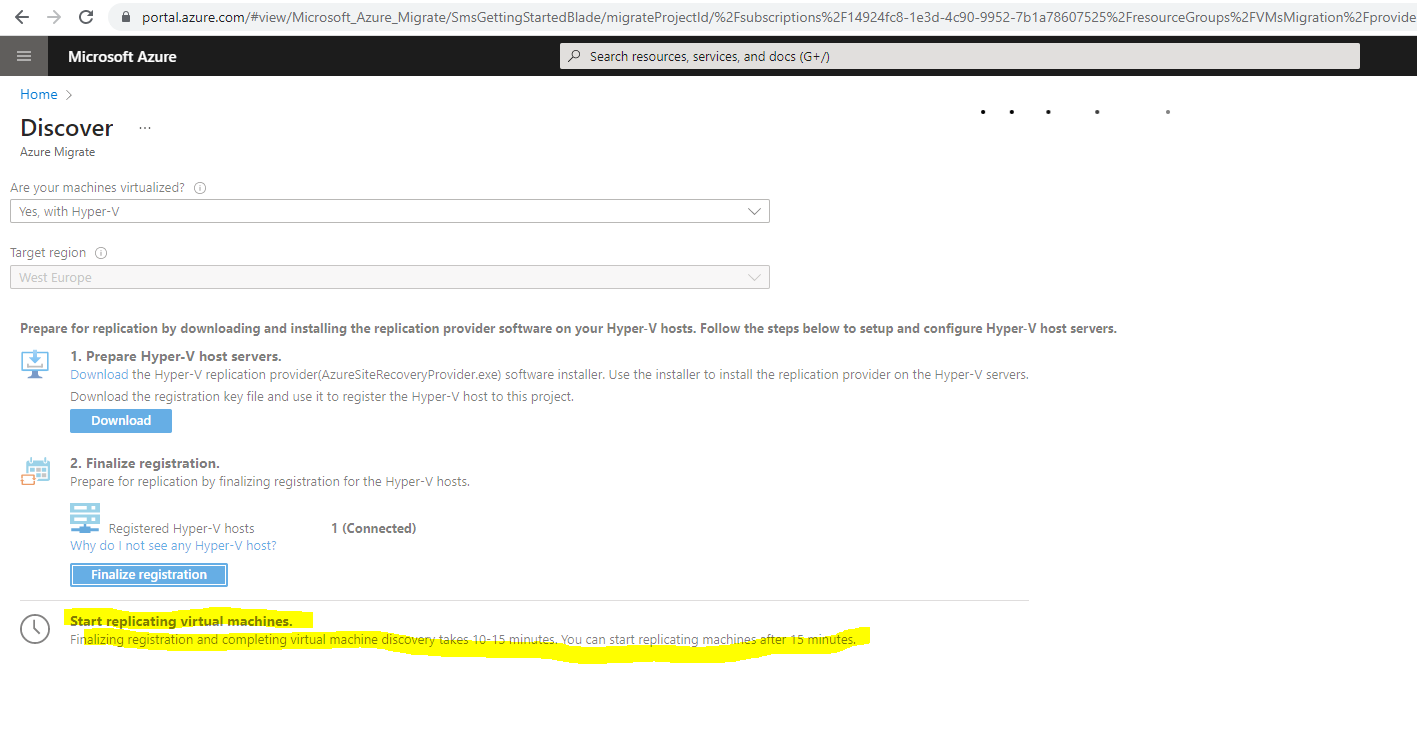
After installing the Azure Site Recovery Provider tool on our Hyper-V hosts, go back to the Azure portal and in Discover machines, select Finalize registration as shown below.
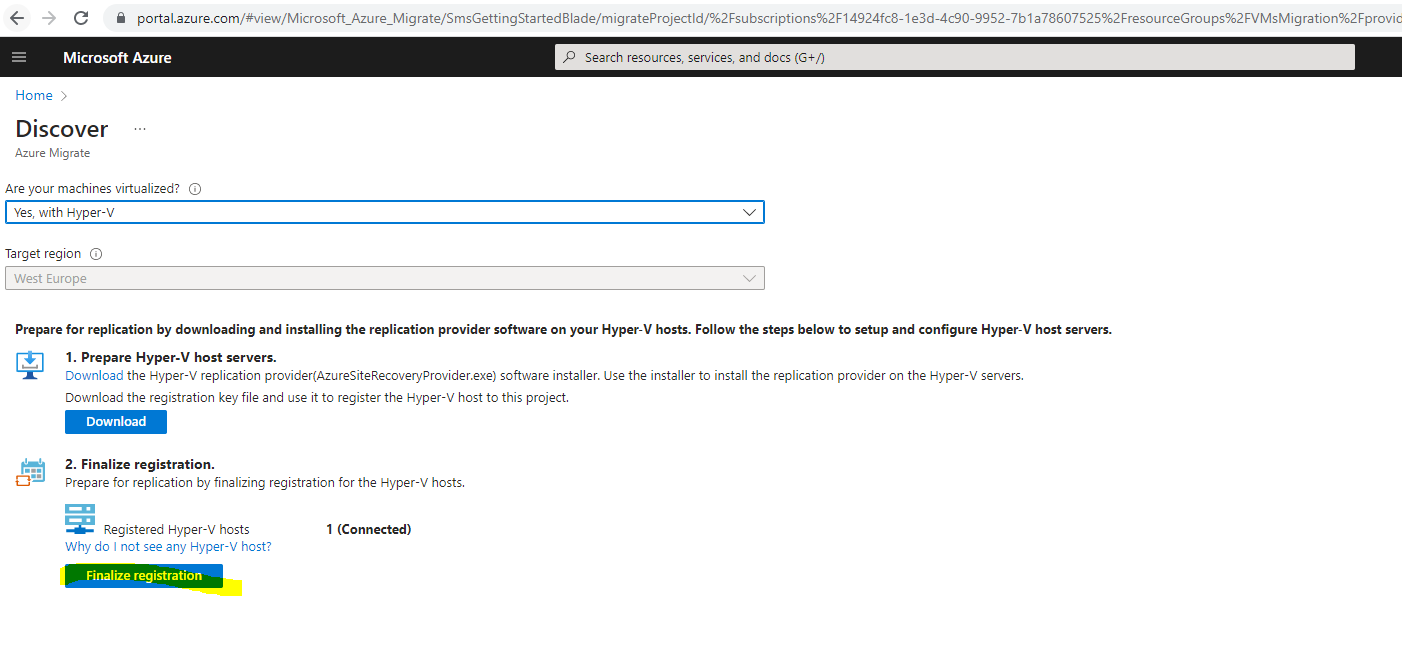
It can take up to 15 minutes after finalizing registration until discovered VMs appear in the Migration and modernization tile. As VMs are discovered, the Discovered servers count rises.
Source: https://learn.microsoft.com/en-us/azure/migrate/tutorial-migrate-hyper-v
Replicate Hyper-V VMs
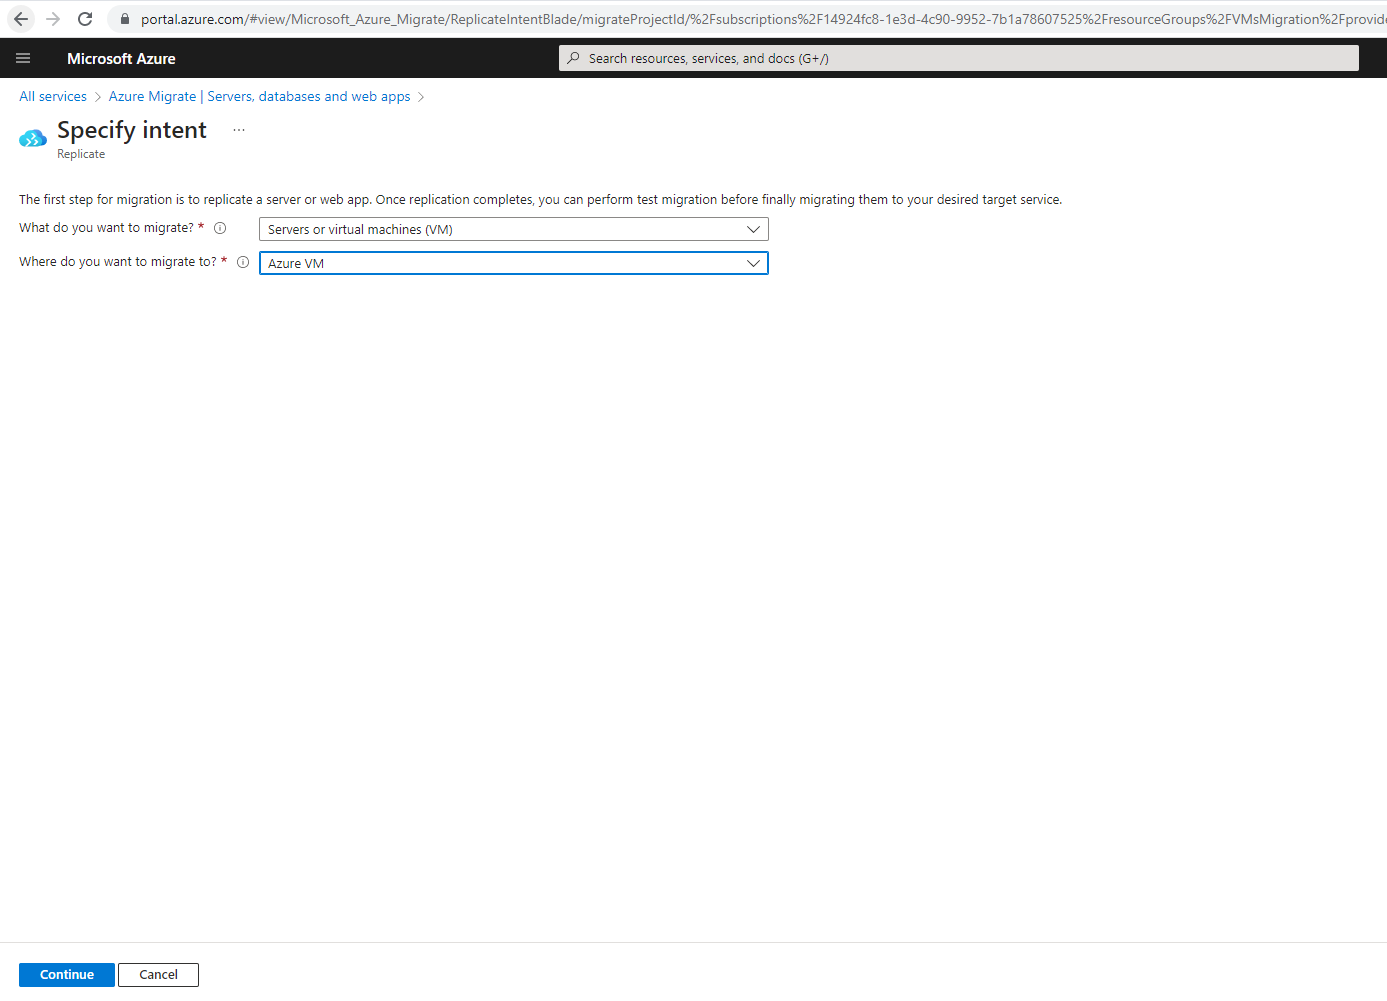
In the Azure Migrate project > Servers, databases and web apps > Migration and modernization, this time select Replicate.

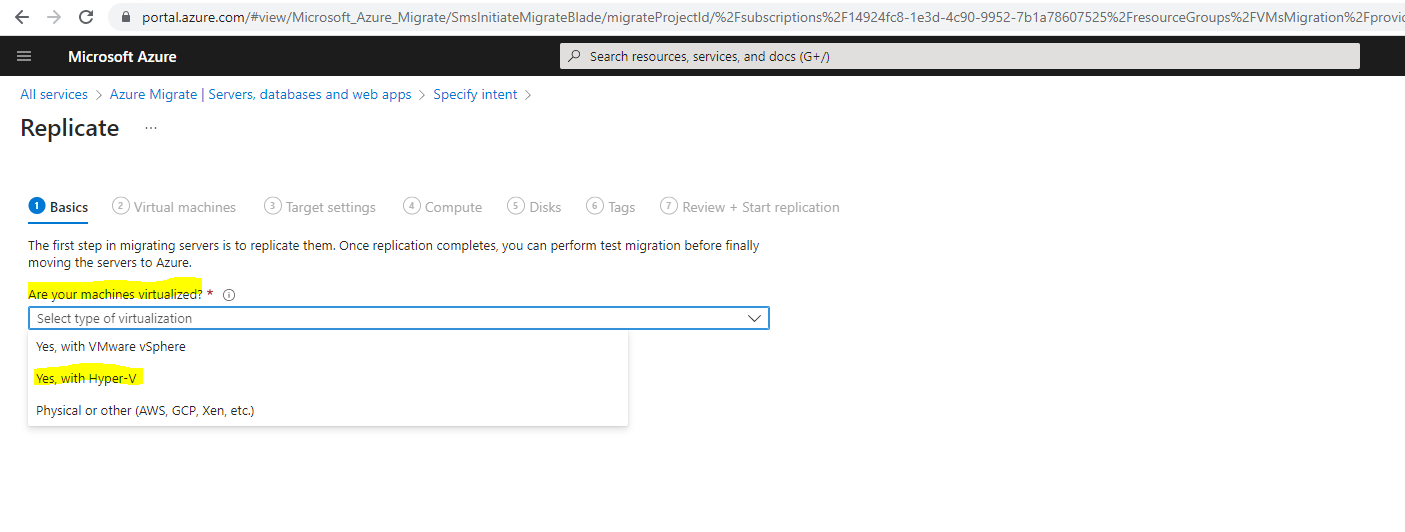
In Replicate > Source settings > Are your machines virtualized?, select Yes, with Hyper-V. Then click Next: Virtual machines.
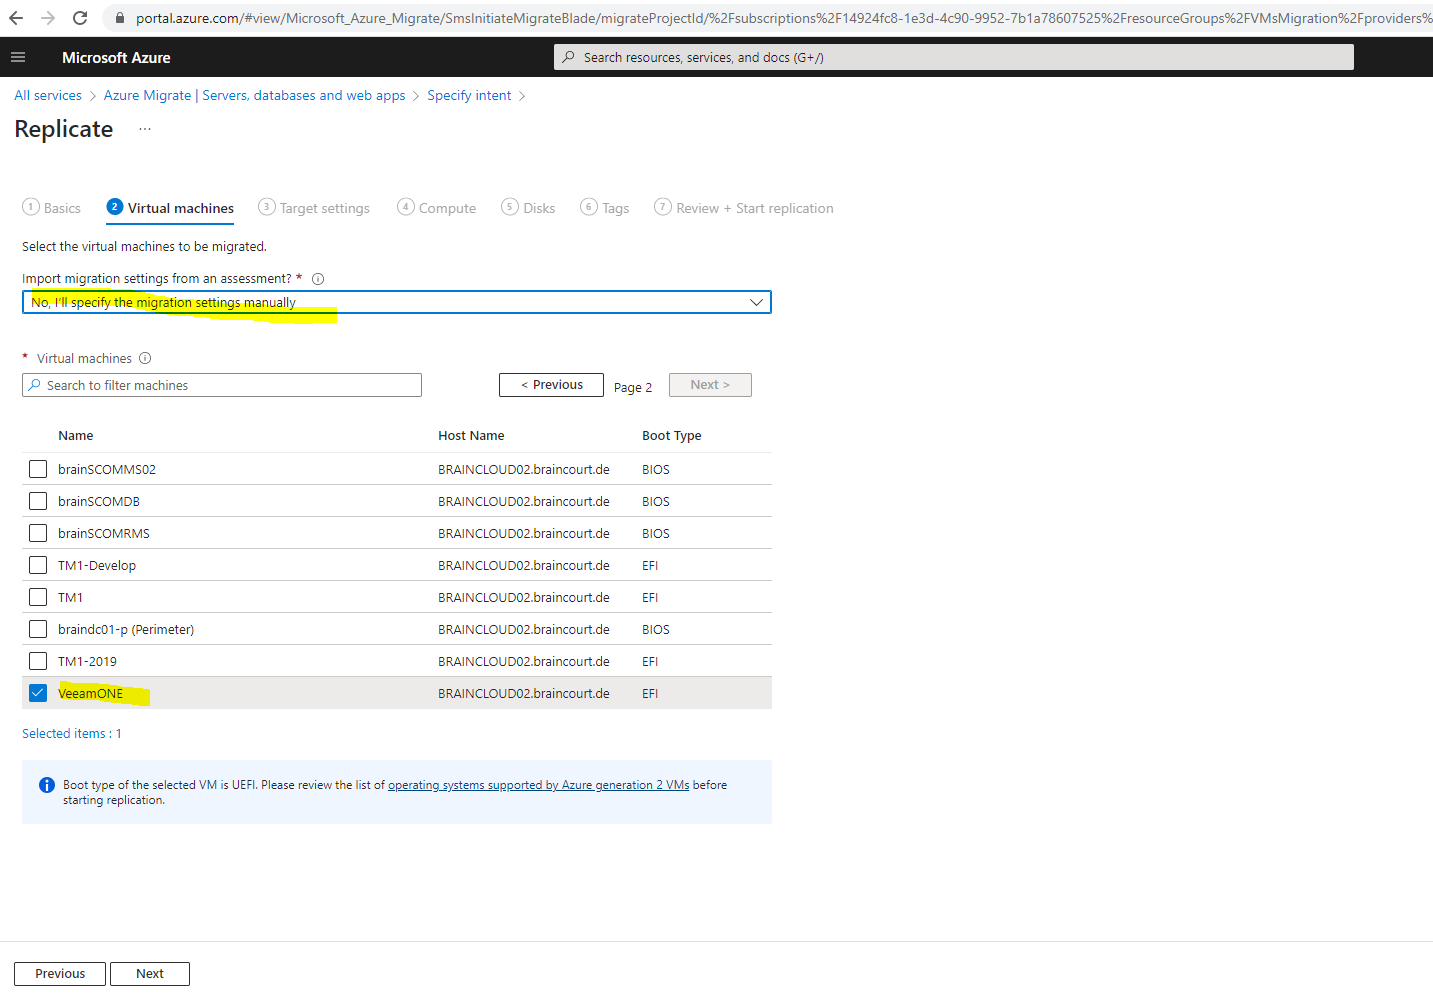
In Virtual machines, select the machines you want to replicate.
- If you’ve run an assessment for the VMs, you can apply VM sizing and disk type (premium/standard) recommendations from the assessment results. To do this, in Import migration settings from an Azure Migrate assessment?, select the Yes option.
- If you didn’t run an assessment, or you don’t want to use the assessment settings, select the No option.
- If you selected to use the assessment, select the VM group, and assessment name.
In Virtual machines, search for VMs as needed, and check each VM you want to migrate. Then, select Next: Target settings.
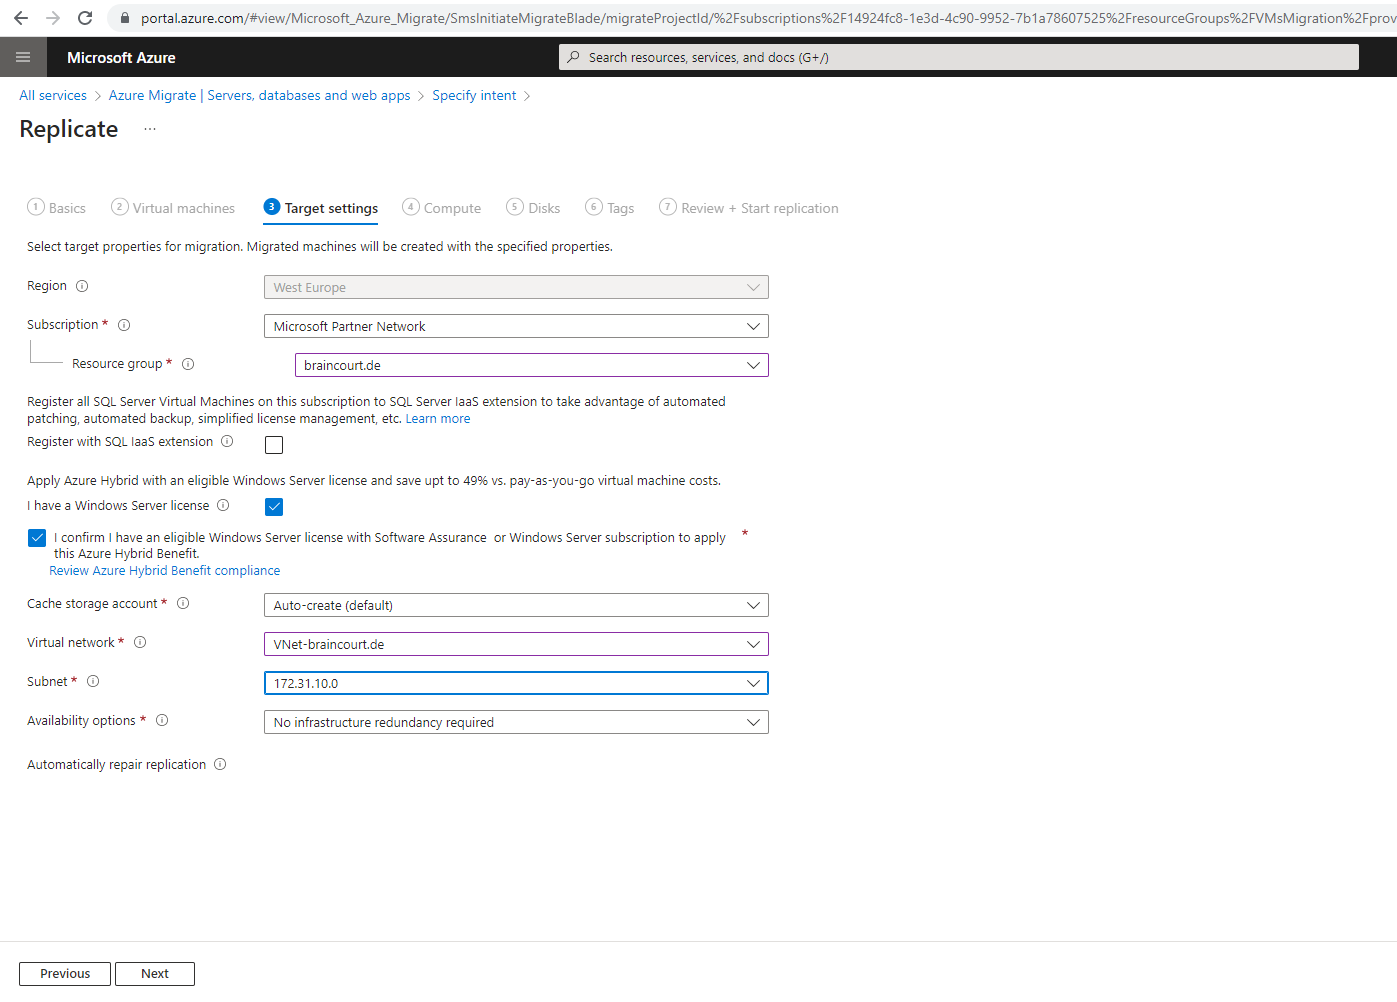
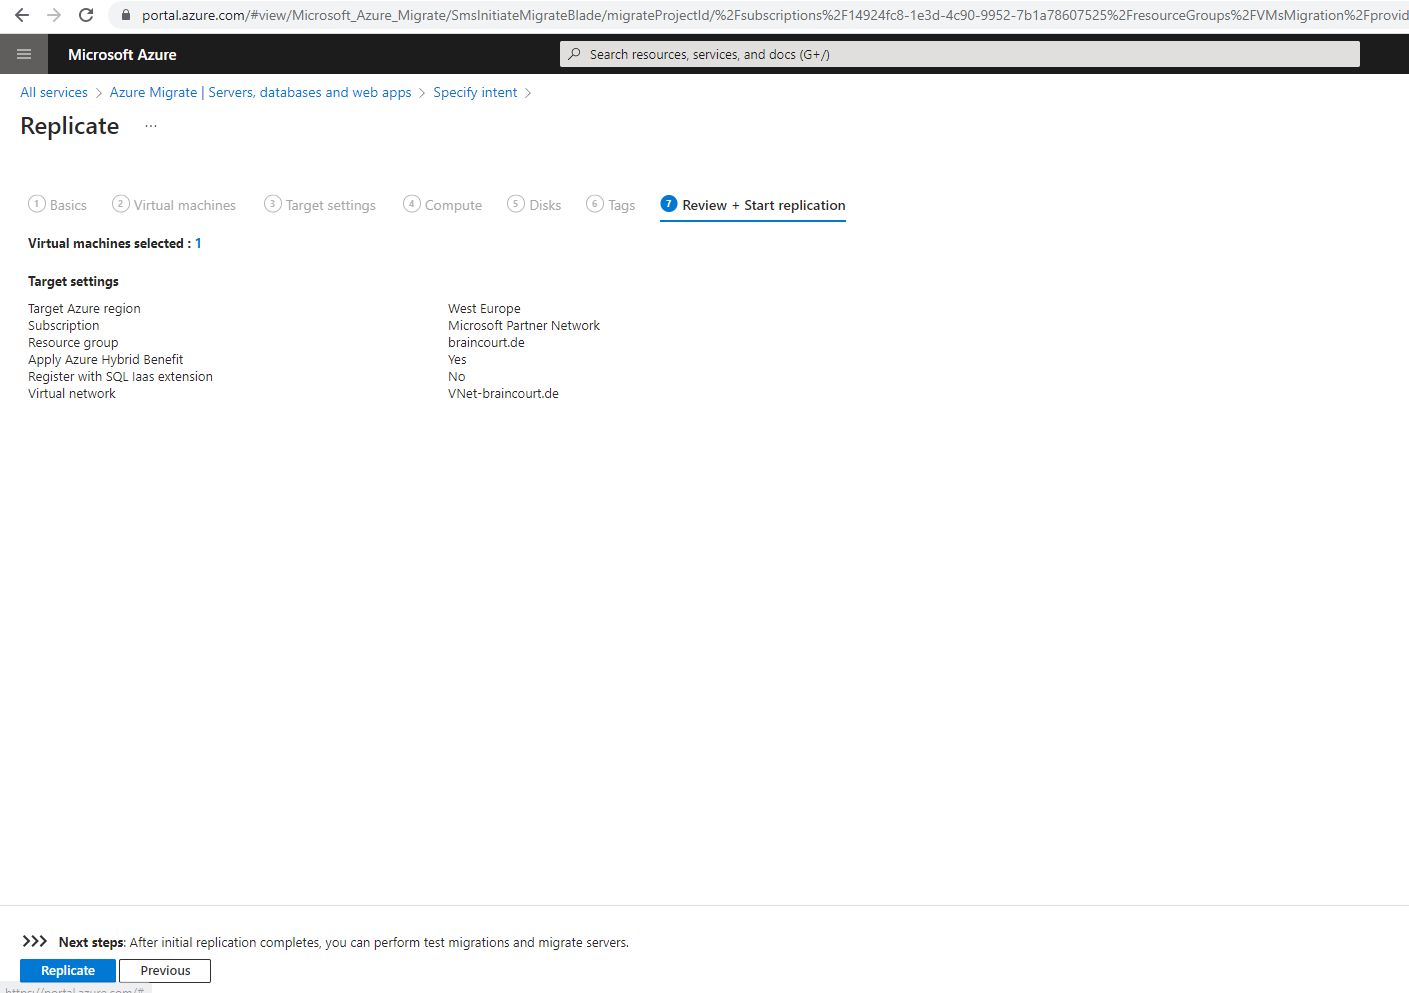
In Target settings, select the target region to which you’ll migrate, the subscription, and the resource group in which the Azure VMs will reside after migration.
In Replication Storage Account, select the Azure Storage account in which replicated data will be stored in Azure.
Virtual Network, select the Azure VNet/subnet to which the Azure VMs will be joined after migration.
- In Availability options, select:
- Availability Zone to pin the migrated machine to a specific Availability Zone in the region. Use this option to distribute servers that form a multi-node application tier across Availability Zones. If you select this option, you’ll need to specify the Availability Zone to use for each of the selected machine in the Compute tab. This option is only available if the target region selected for the migration supports Availability Zones
- Availability Set to place the migrated machine in an Availability Set. The target Resource Group that was selected must have one or more availability sets in order to use this option.
- No infrastructure redundancy required option if you don’t need either of these availability configurations for the migrated machines.
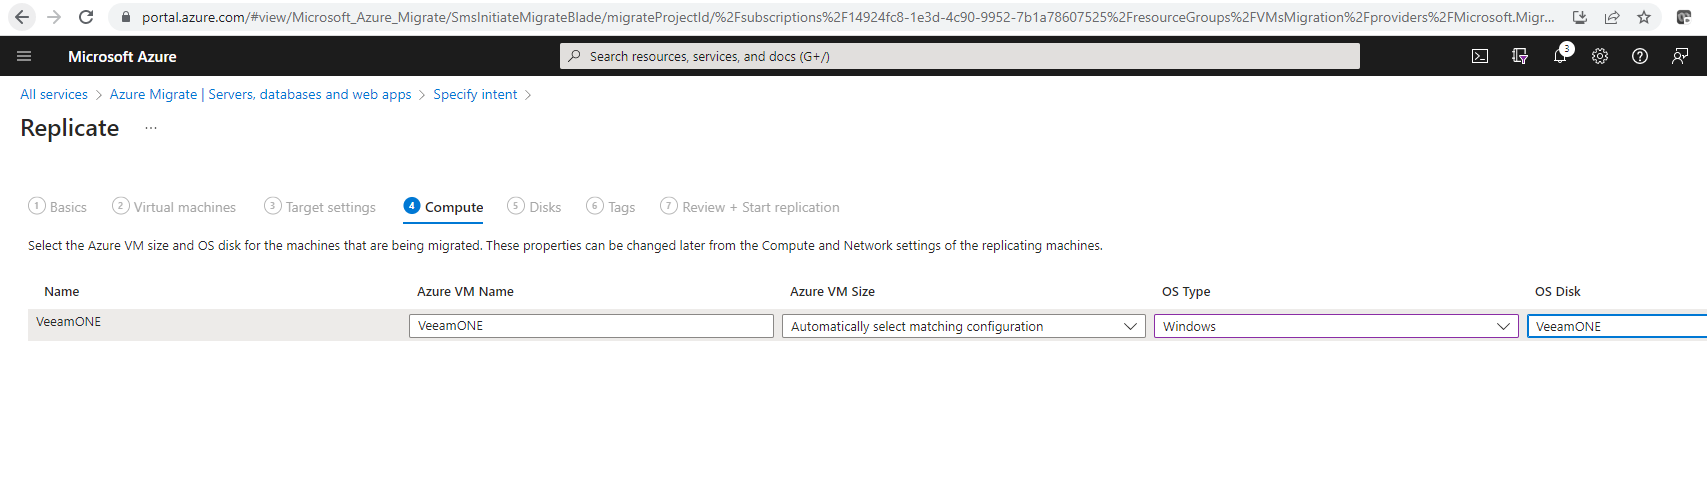
- In Compute, review the VM name, size, OS disk type, and availability configuration (if selected in the previous step). VMs must conform with Azure requirements.
- VM size: If you’re using assessment recommendations, the VM size dropdown will contain the recommended size. Otherwise Azure Migrate picks a size based on the closest match in the Azure subscription. Alternatively, pick a manual size in Azure VM size.
- OS disk: Specify the OS (boot) disk for the VM. The OS disk is the disk that has the operating system bootloader and installer.
- Availability Set: If the VM should be in an Azure availability set after migration, specify the set. The set must be in the target resource group you specify for the migration.
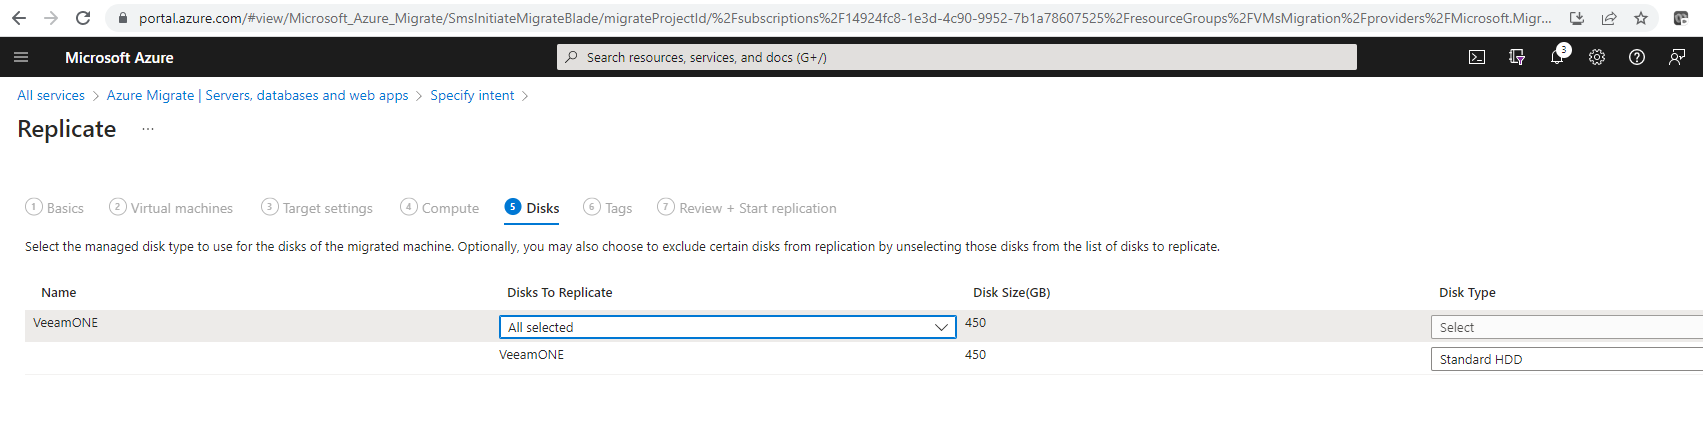
In Review and start replication, review the settings, and select Replicate to start the initial replication for the servers.
You can update replication settings any time before replication starts, in Manage > Replicating machines. Settings can’t be changed after replication starts.
When the Start Replication job finishes successfully, the machines begin their initial replication to Azure.
If this is the first VM you’re replicating in the Azure Migrate project, the Migration and modernization tool automatically provisions these resources in same resource group as the project.
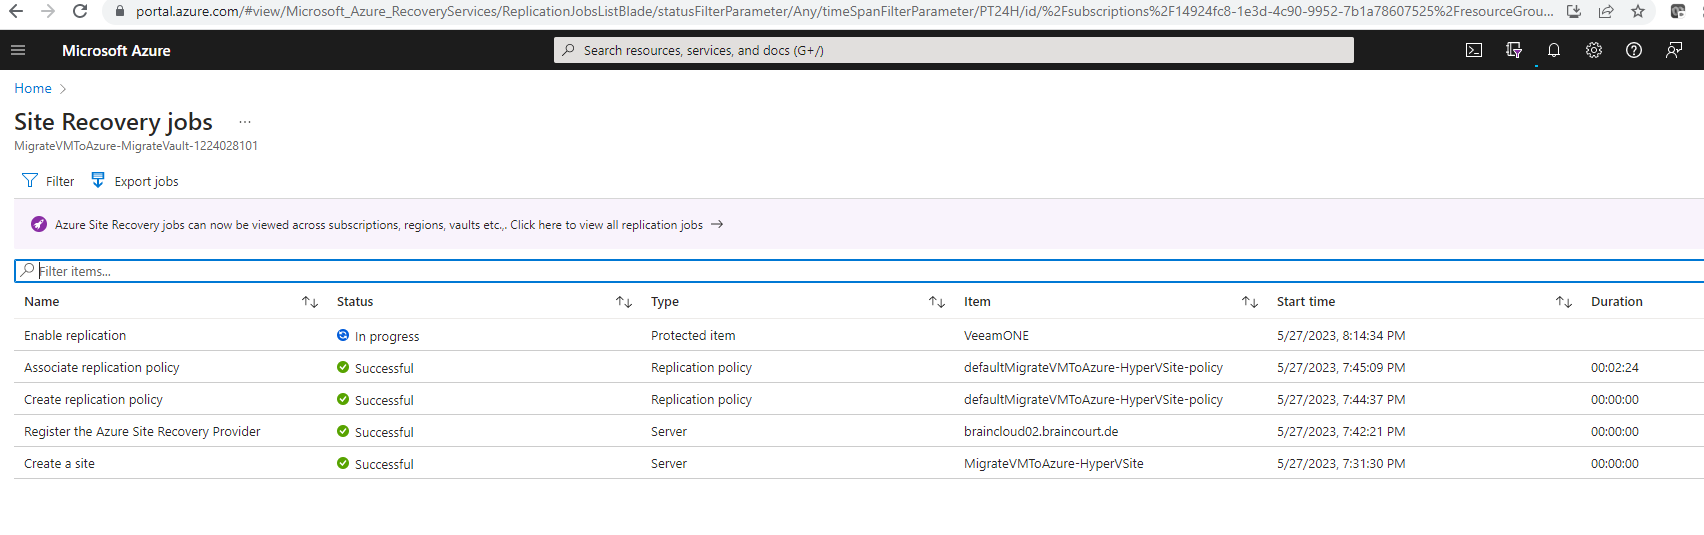
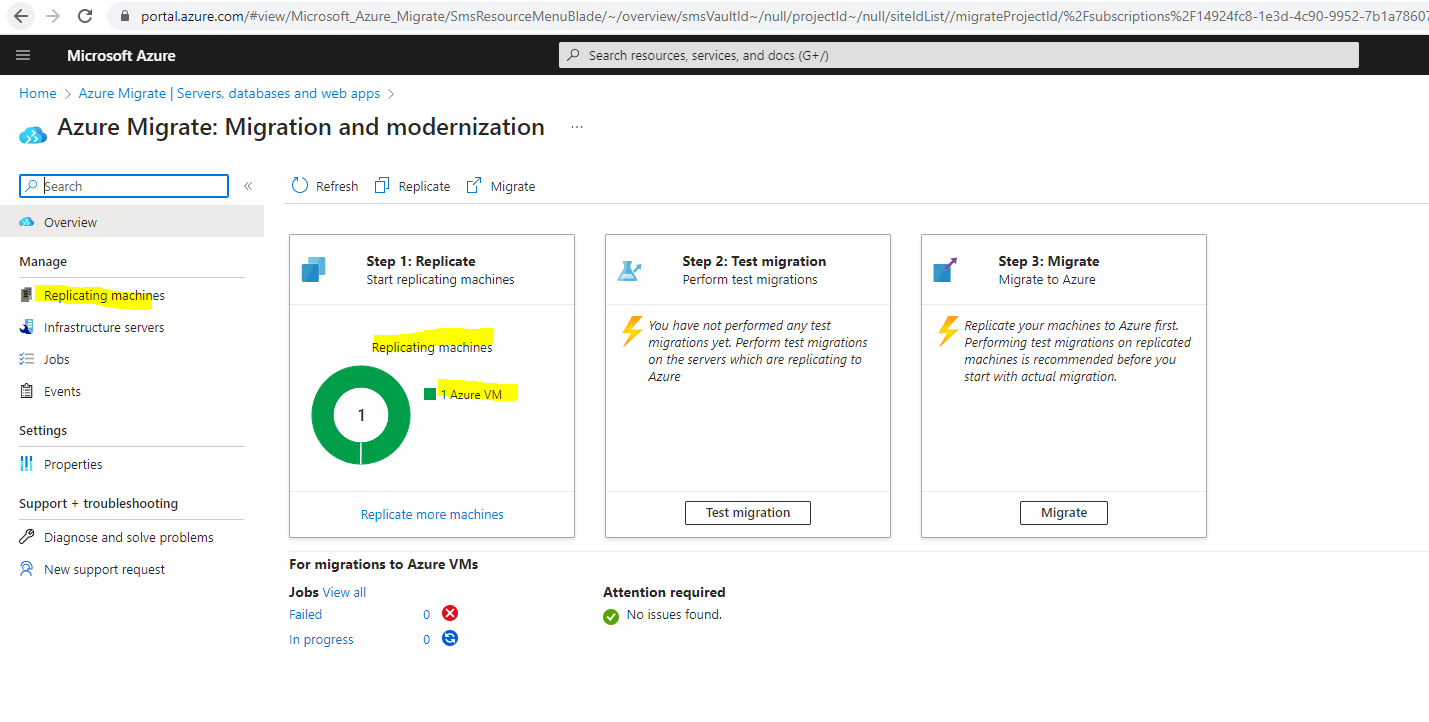
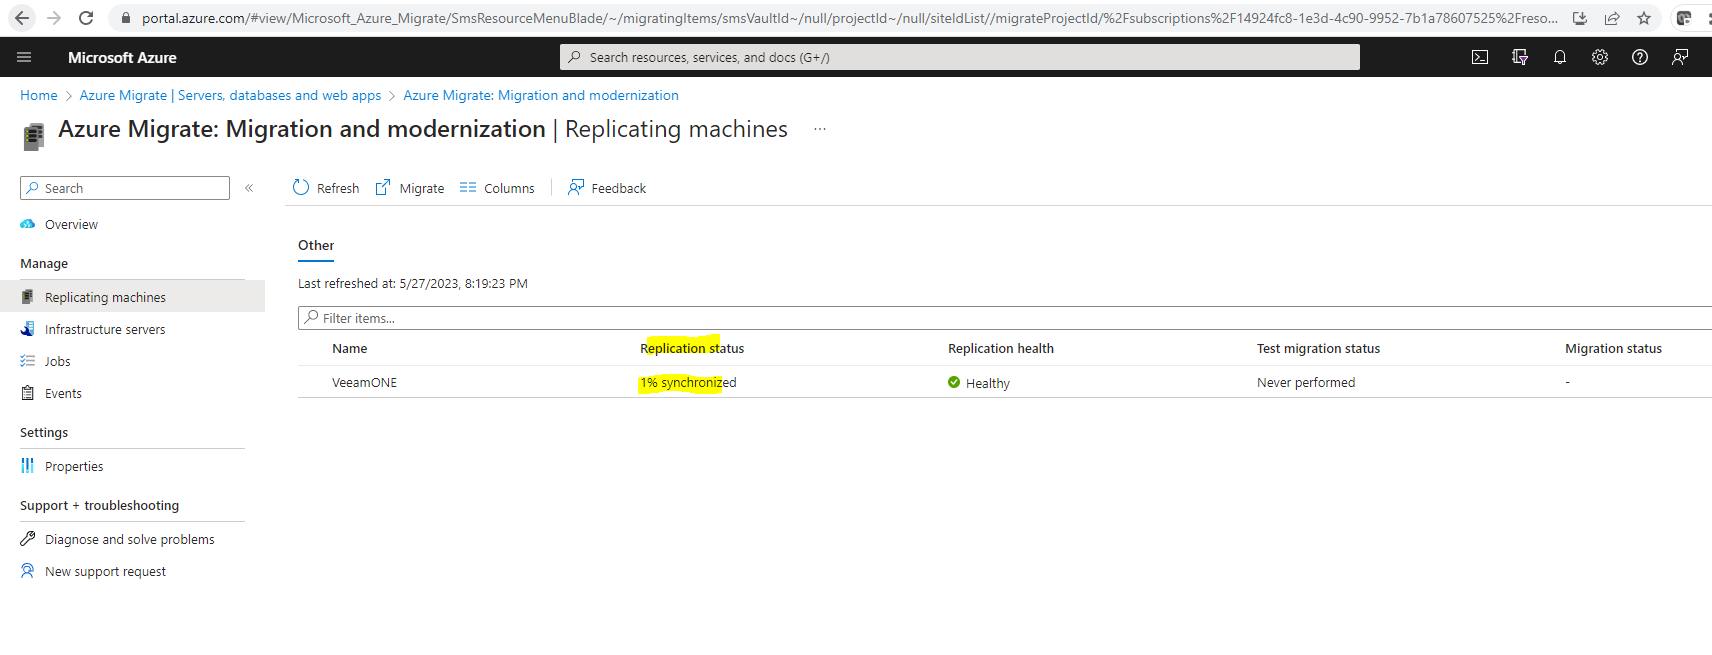
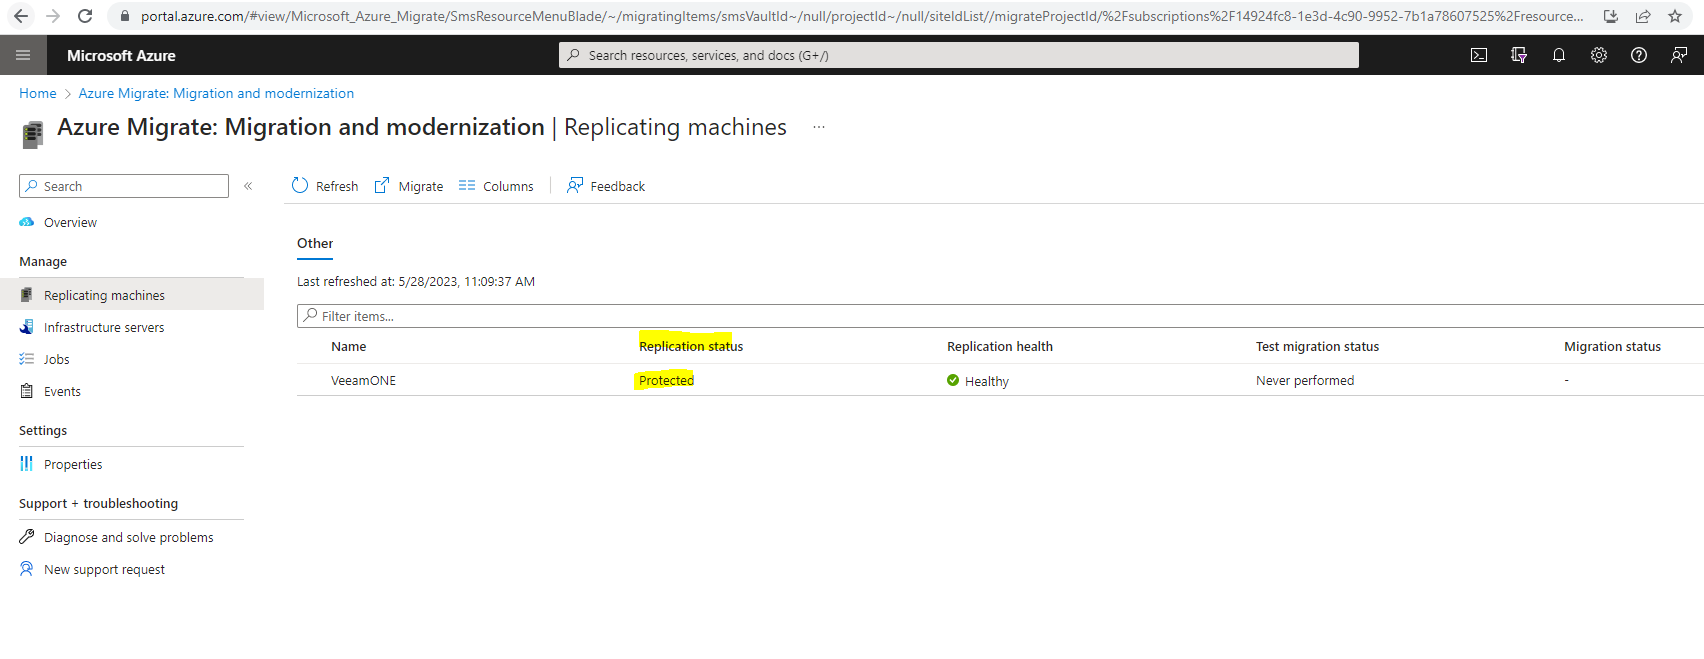
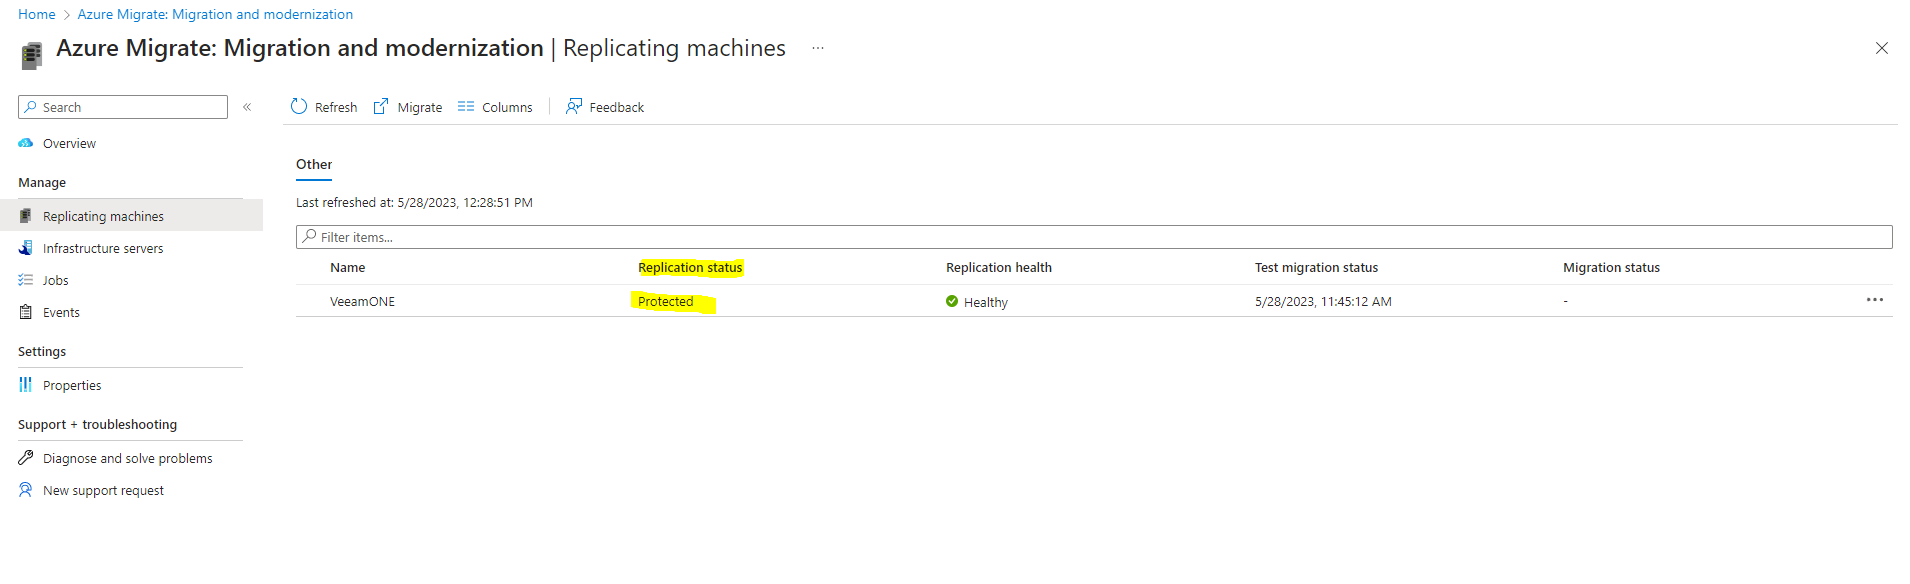
You can monitor replication status by clicking on Replicating servers in Migration and modernization.

Cache storage account: The Azure Site Recovery provider software installed on Hyper-V hosts uploads replication data for the VMs configured for replication to a storage account (known as the cache storage account, or log storage account) in your subscription. The Azure Migrate service then copies the uploaded replication data from the storage account to the replica-managed disks corresponding to the VM. The cache storage account needs to be specified while configuring replication for a VM and The Azure Migrate portal automatically creates one for the Azure Migrate project when replication is configured for the first time in the project.
After initial replication finishes, delta replication begins. Incremental changes to on-premises disks are periodically replicated to Azure.
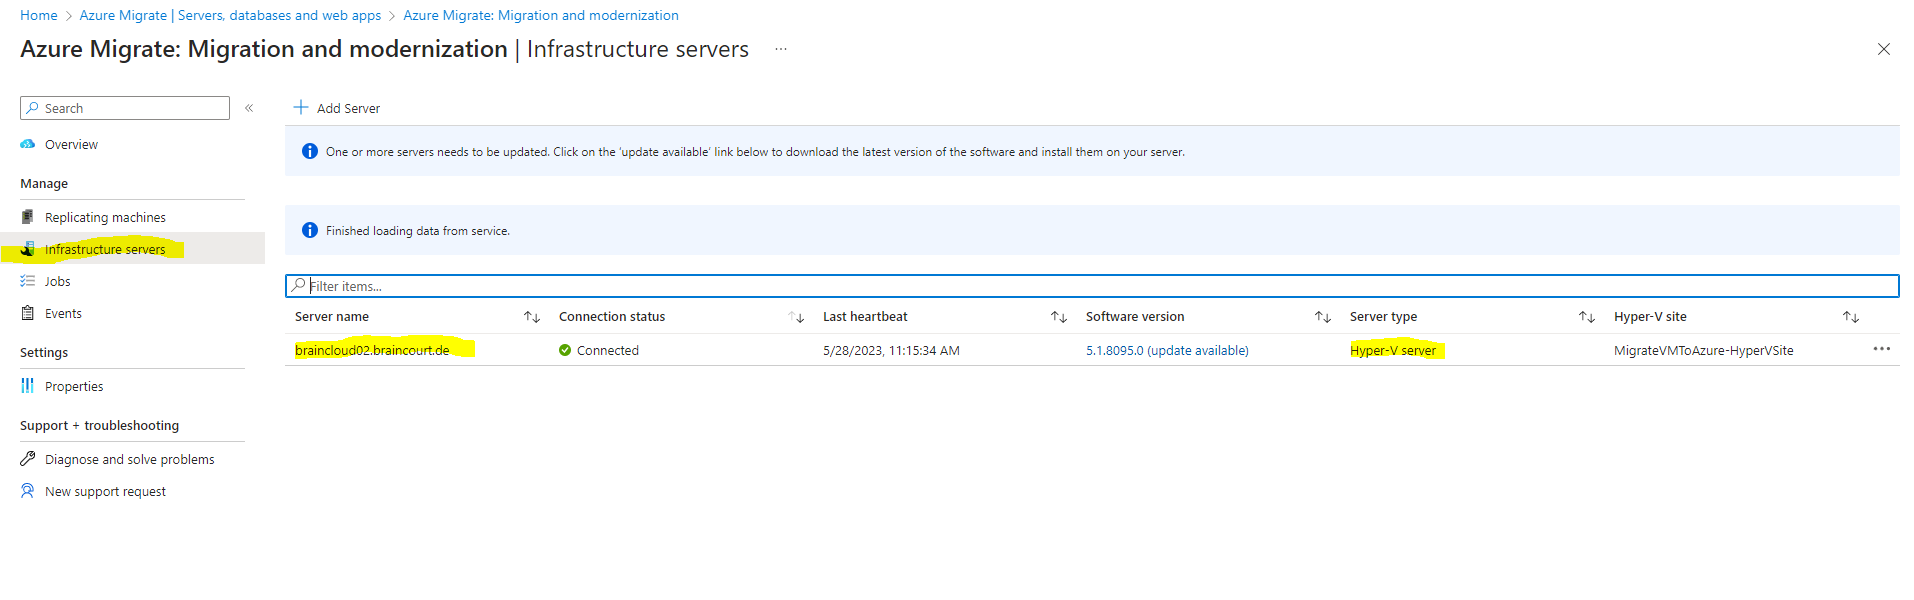
Under the Infrastructure server menu you will see all your Hyper-V server which are registered in Azure Migrate.
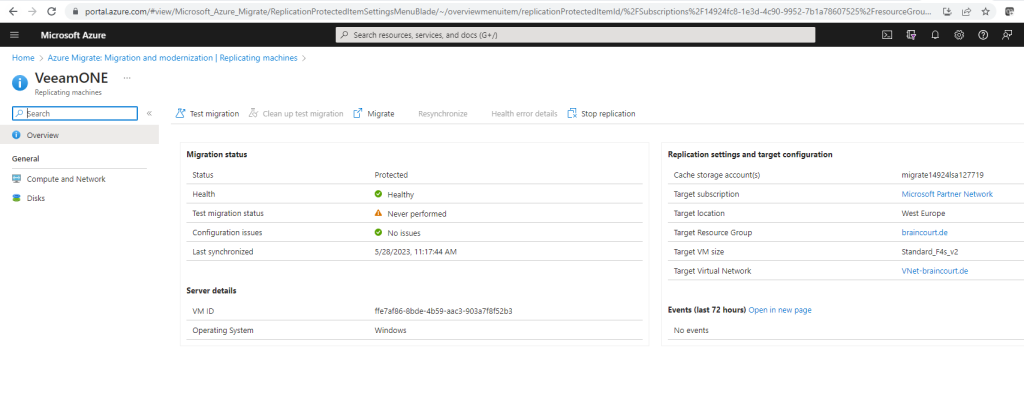
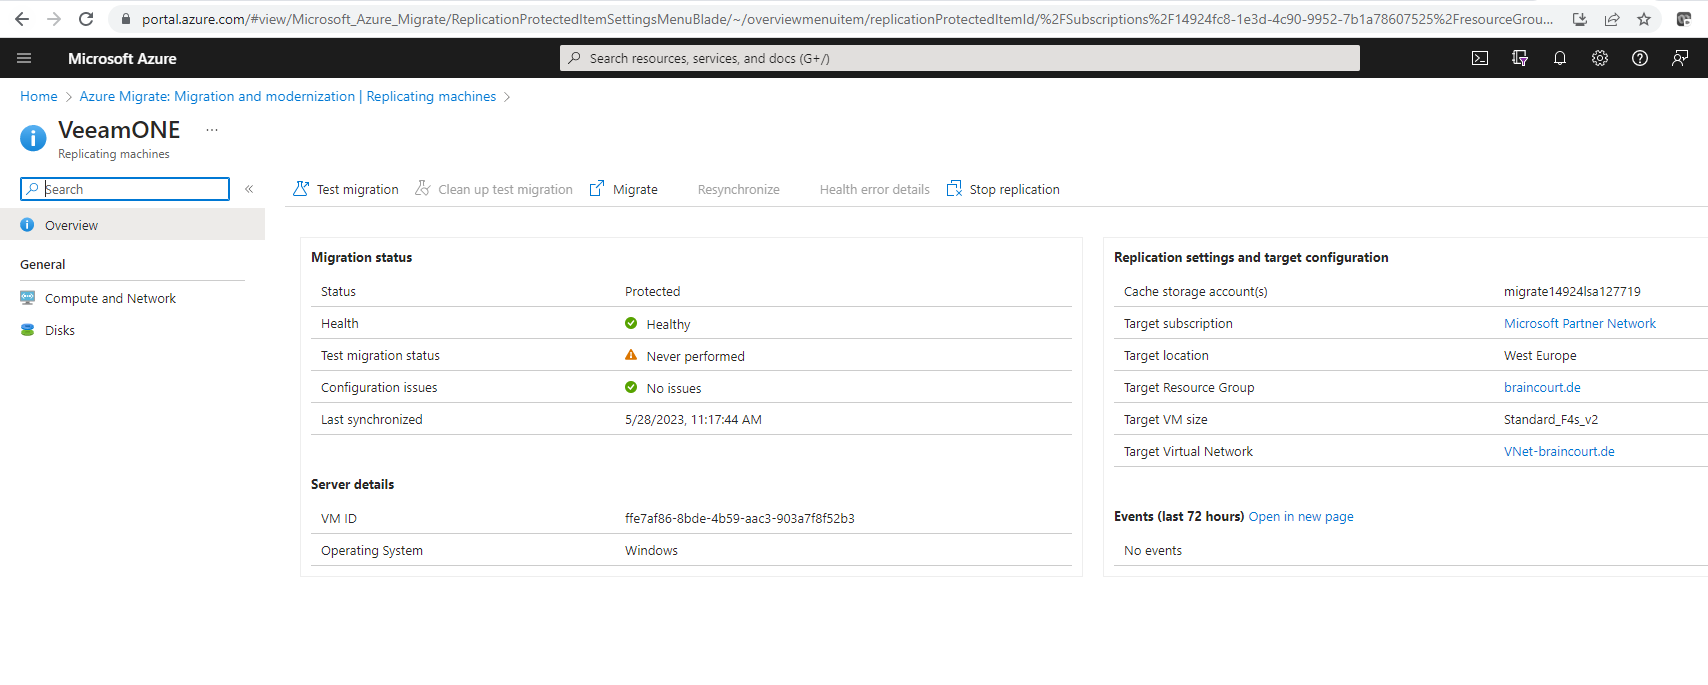
When you click on one of your replicated VMs, you will see all details about as shown below.
Source: https://learn.microsoft.com/en-us/azure/migrate/tutorial-migrate-hyper-v
Run a test migration
When delta replication begins, you can run a test migration for the VMs, before running a full migration to Azure. We highly recommend that you do this at least once for each machine, before you migrate it.
- Running a test migration checks that migration will work as expected, without impacting the on-premises machines, which remain operational, and continue replicating.
- Test migration simulates the migration by creating an Azure VM using replicated data (usually migrating to a non-production Azure VNet in your Azure subscription).
- You can use the replicated test Azure VM to validate the migration, perform app testing, and address any issues before full migration.
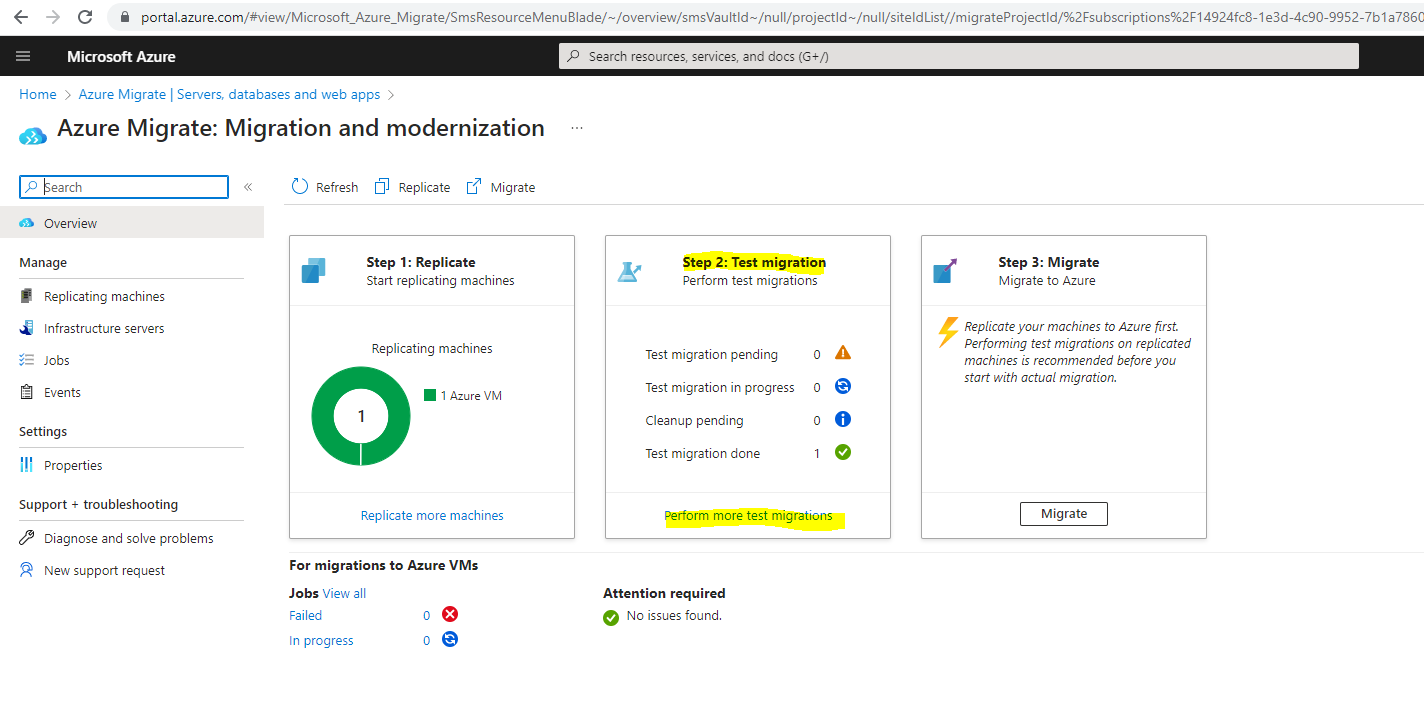
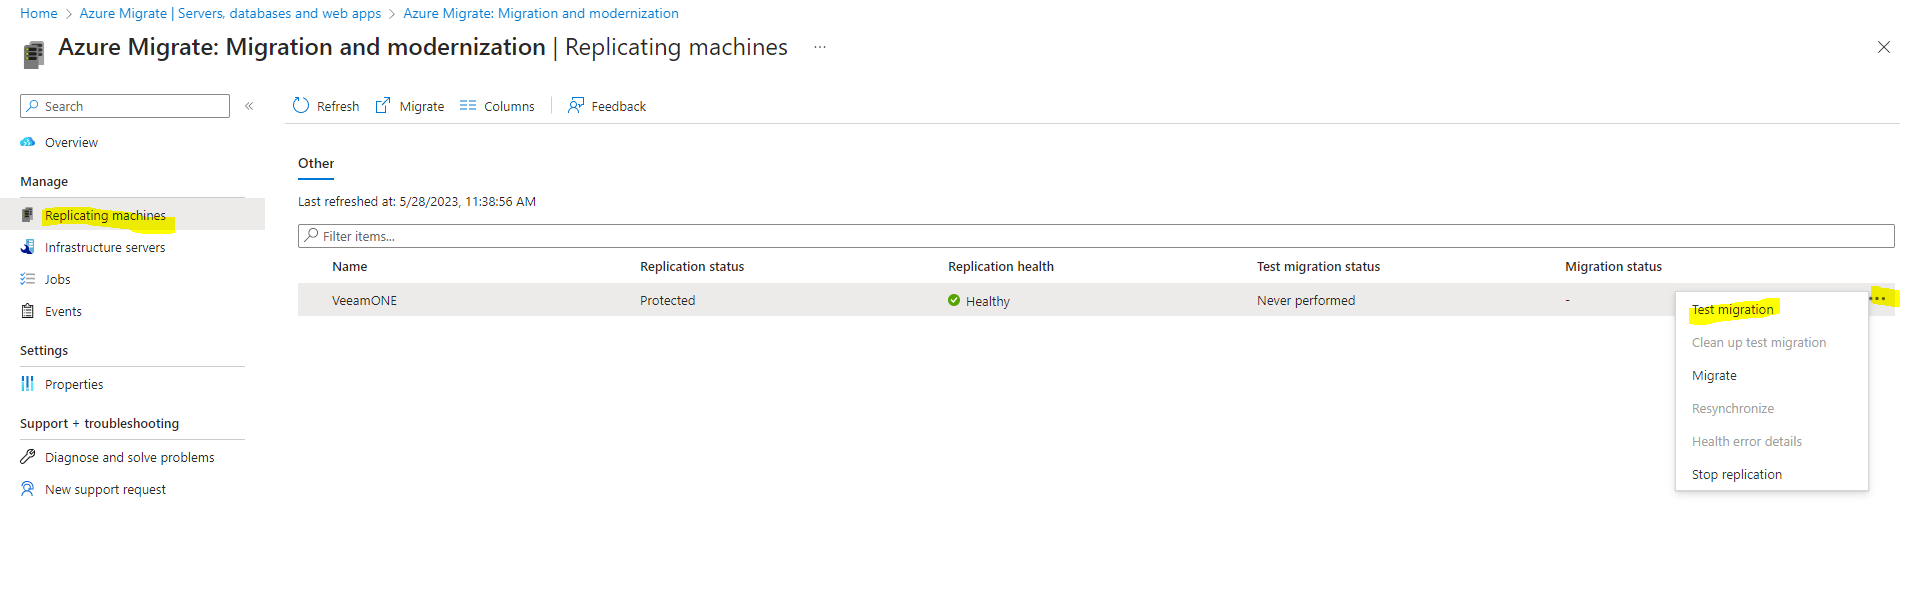
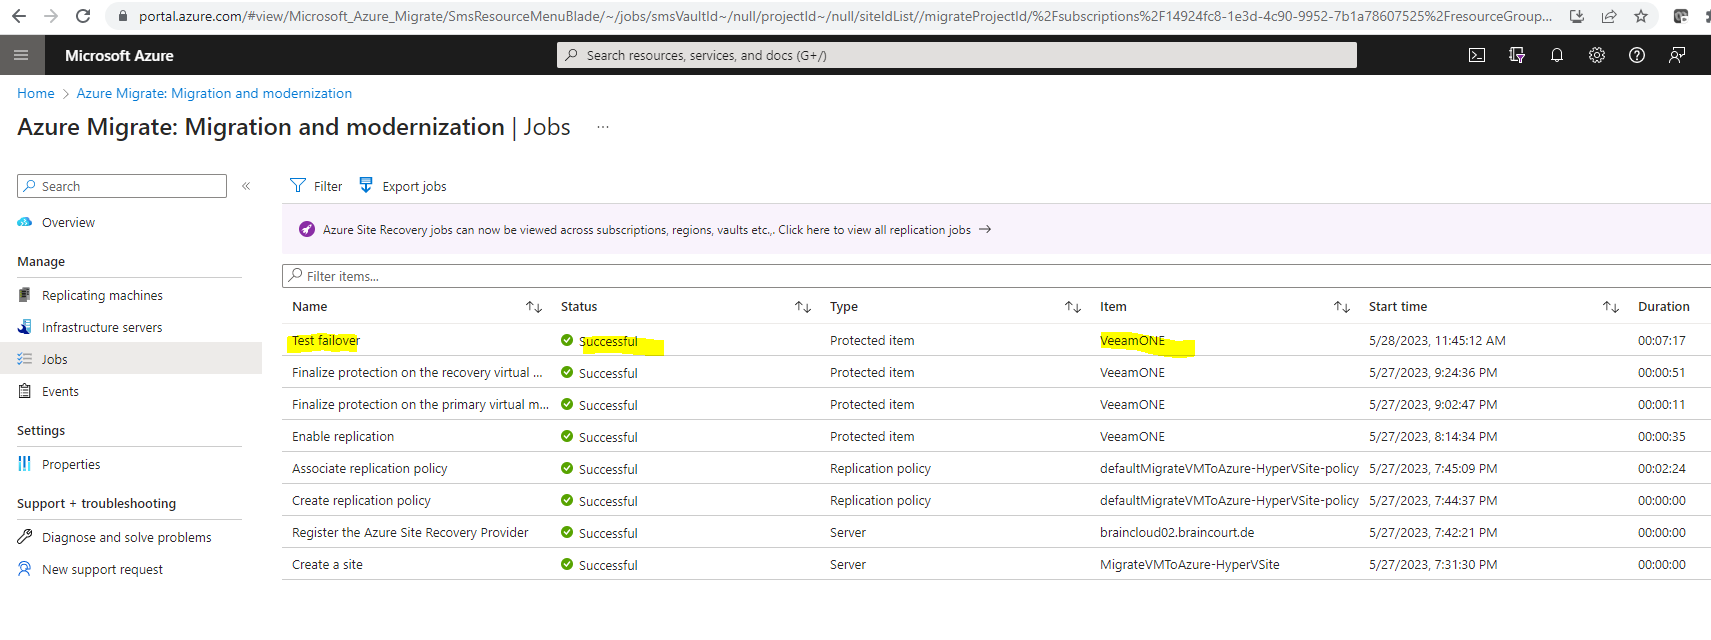
In Migration goals > Servers, databases and web apps > Migration and modernization, select Test migrated servers.
Click on Perform more test migrations
Click on the dots menu for the selected VM and click on Test migration.
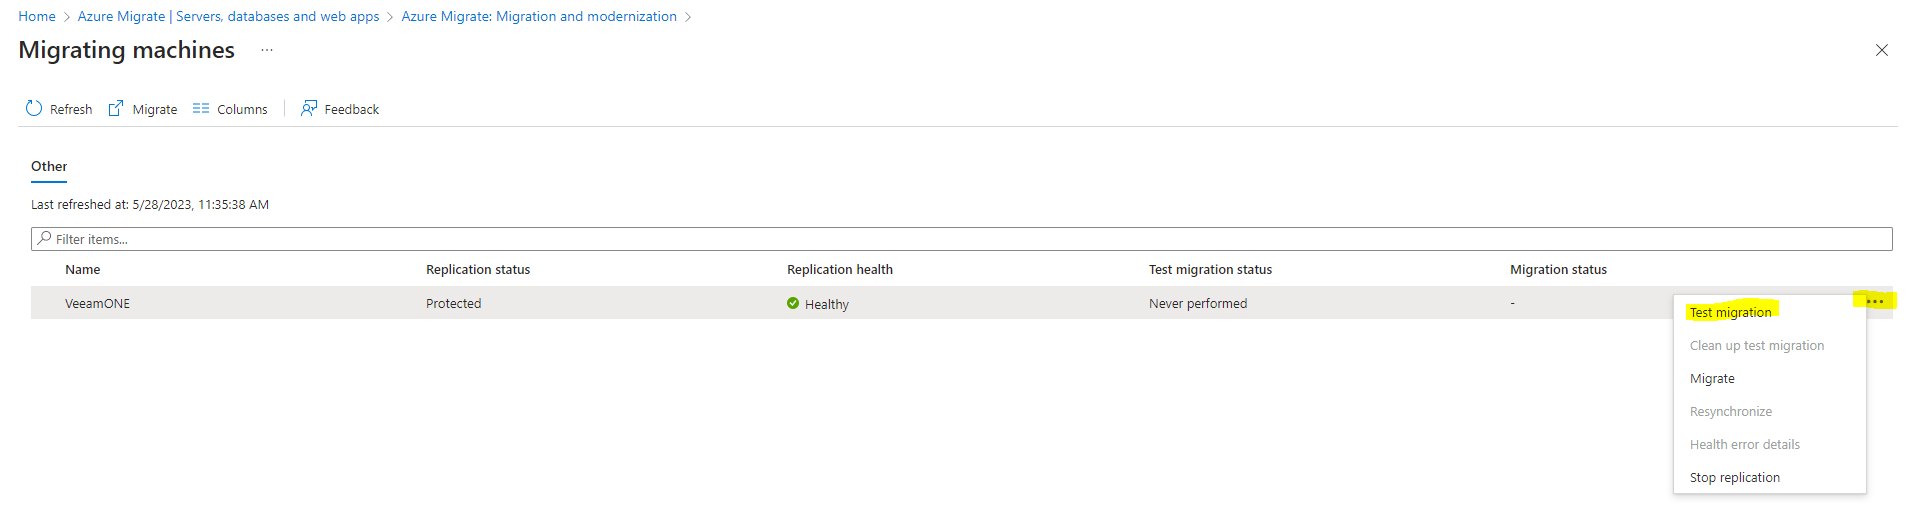
You can also start a Test migration from the Replicating machines menu as shown below.
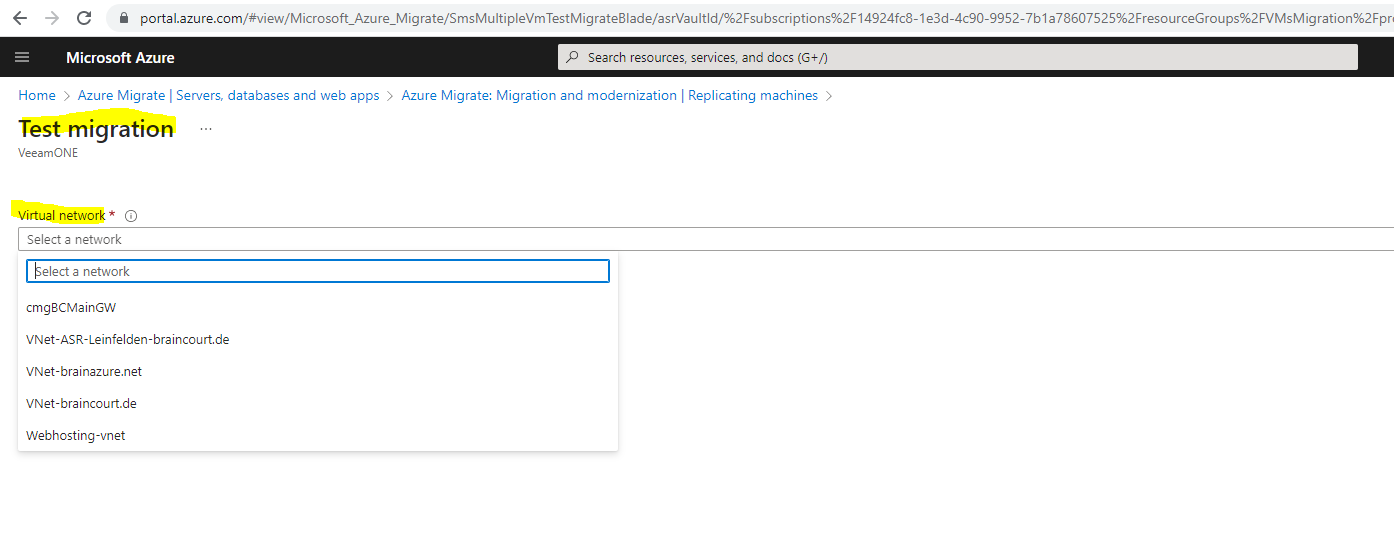
In Test Migration, select the Azure virtual network in which the Azure VM will be located after the migration. We recommend you use a non-production virtual network.
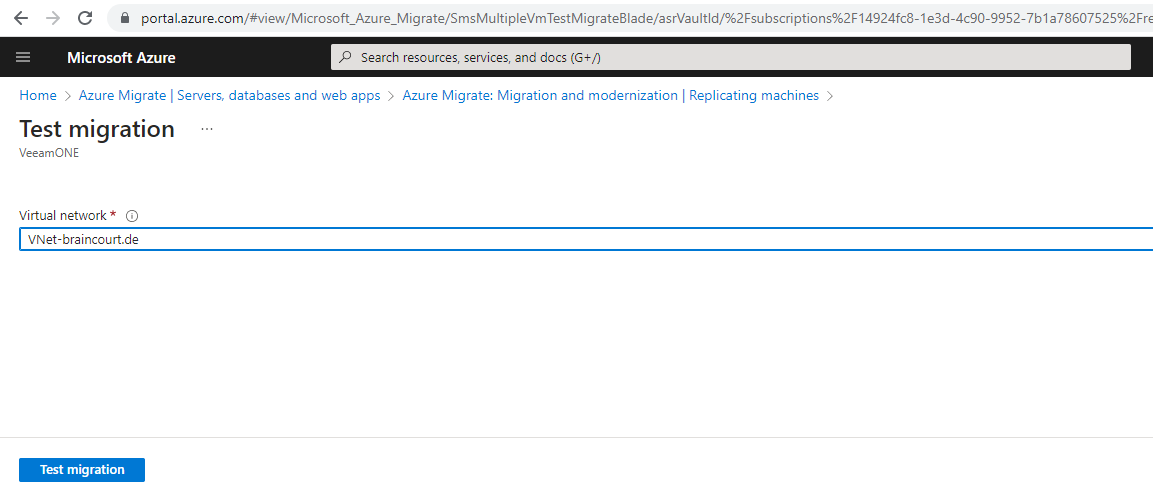
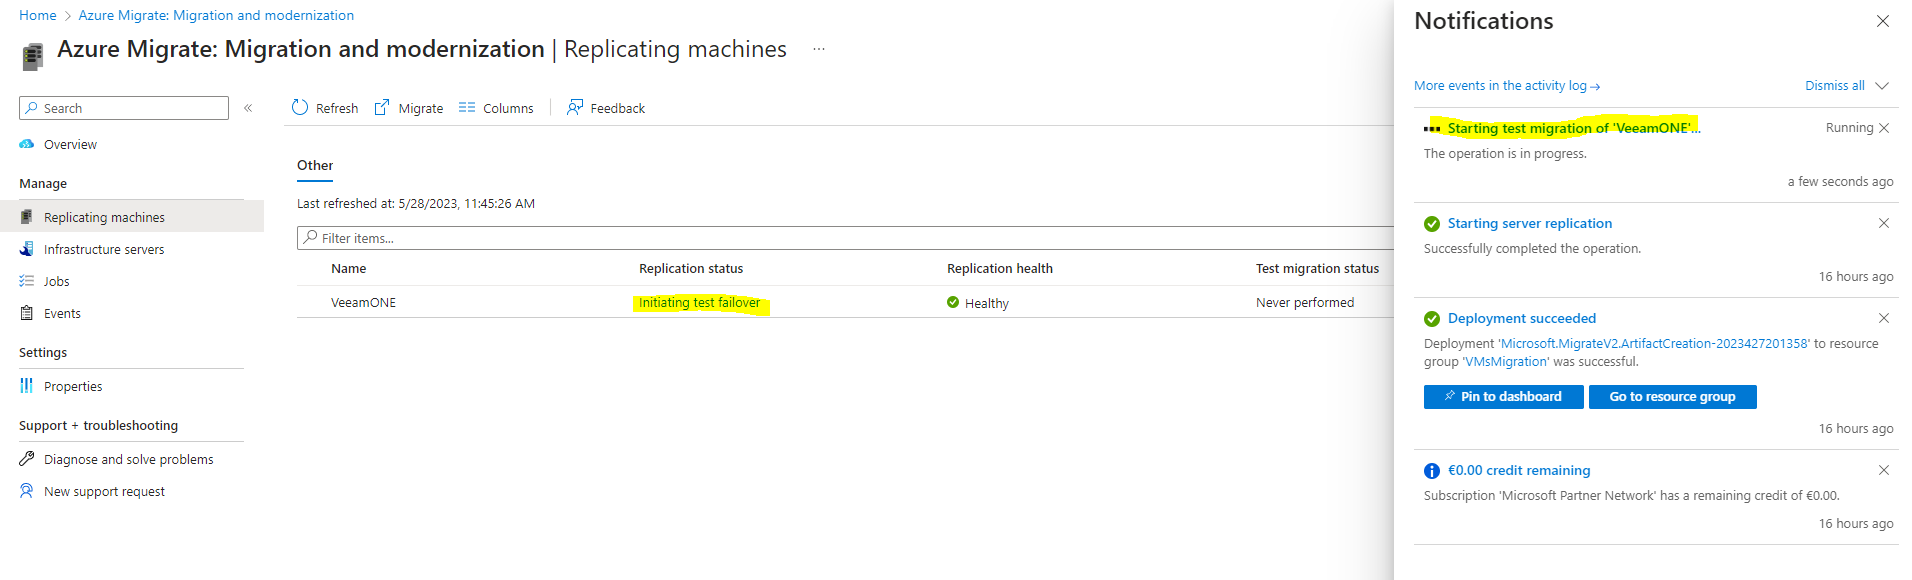
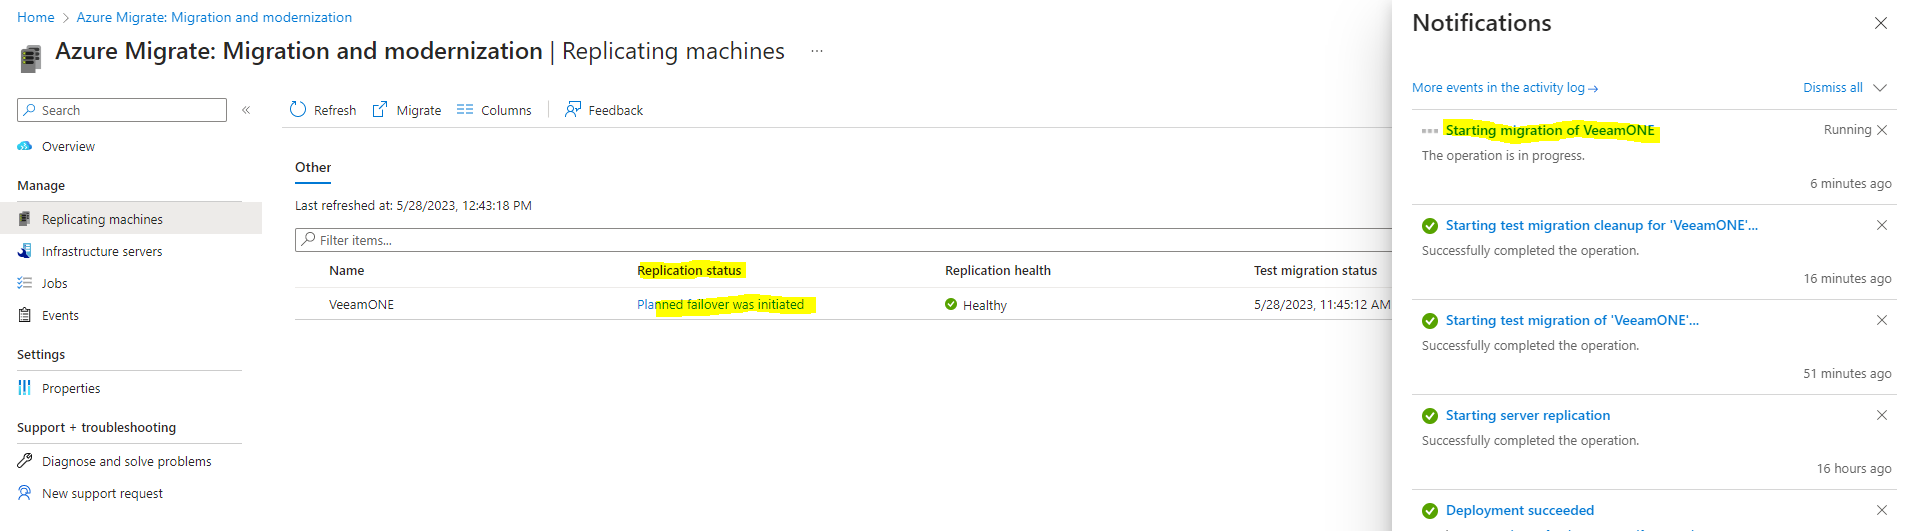
The Test migration job starts. Monitor the job in the portal notifications.
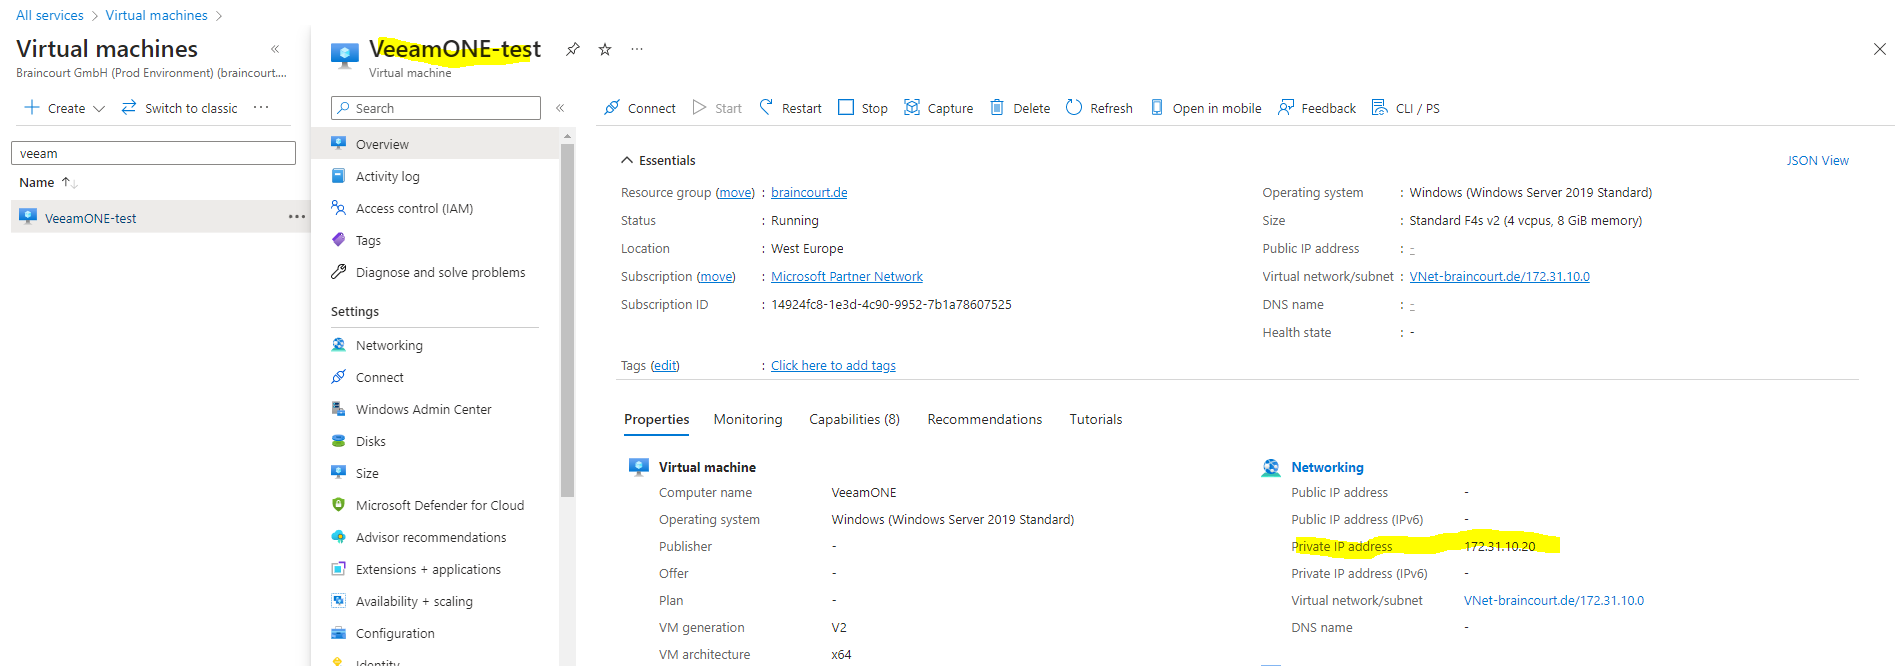
After the migration finishes, view the migrated Azure VM in Virtual Machines in the Azure portal. The machine name has a suffix -Test.

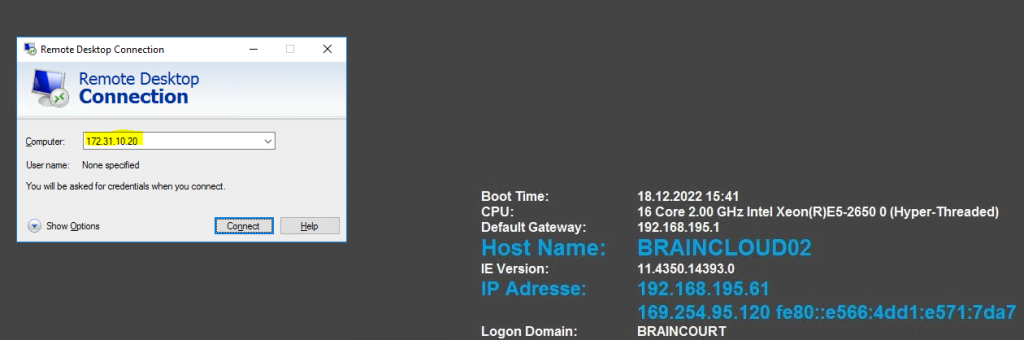
I will now test if I can connect to the VM through RDP, the virtual network VNet-braincourt.de is connected to my on-premise network by using a IPSec Site-to-Site VPN, therefore the VM just have a private IP address to connect to.
About how to set up an IPSec Site-to-Site VPN between your on-premise network and an Azure VNet, you can read my following post.
Here I will try to connect to the migrated VM directly from the Hyper-V host by using RDP.
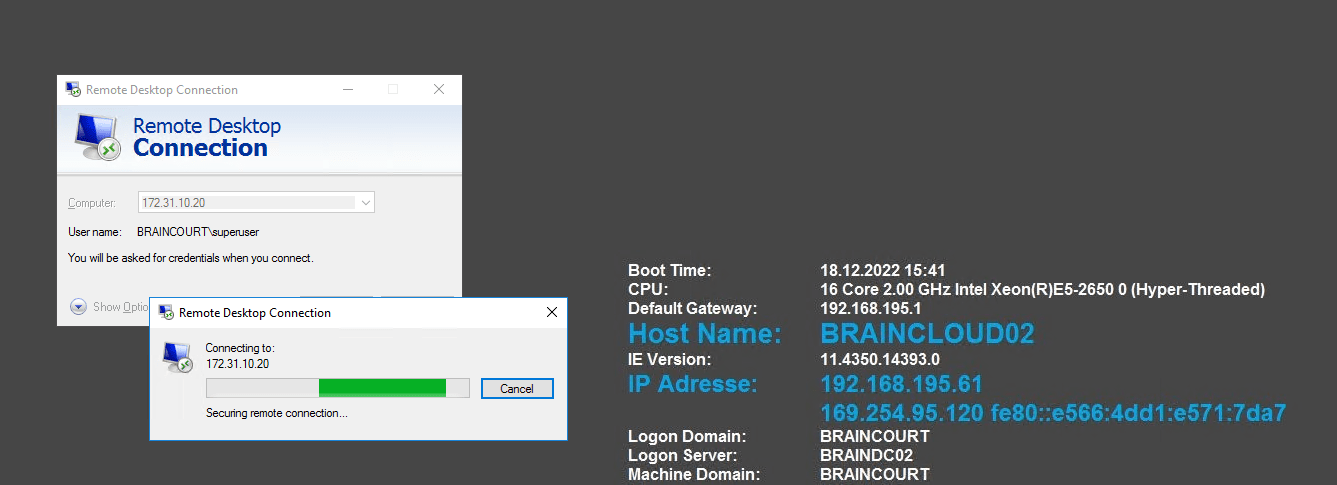
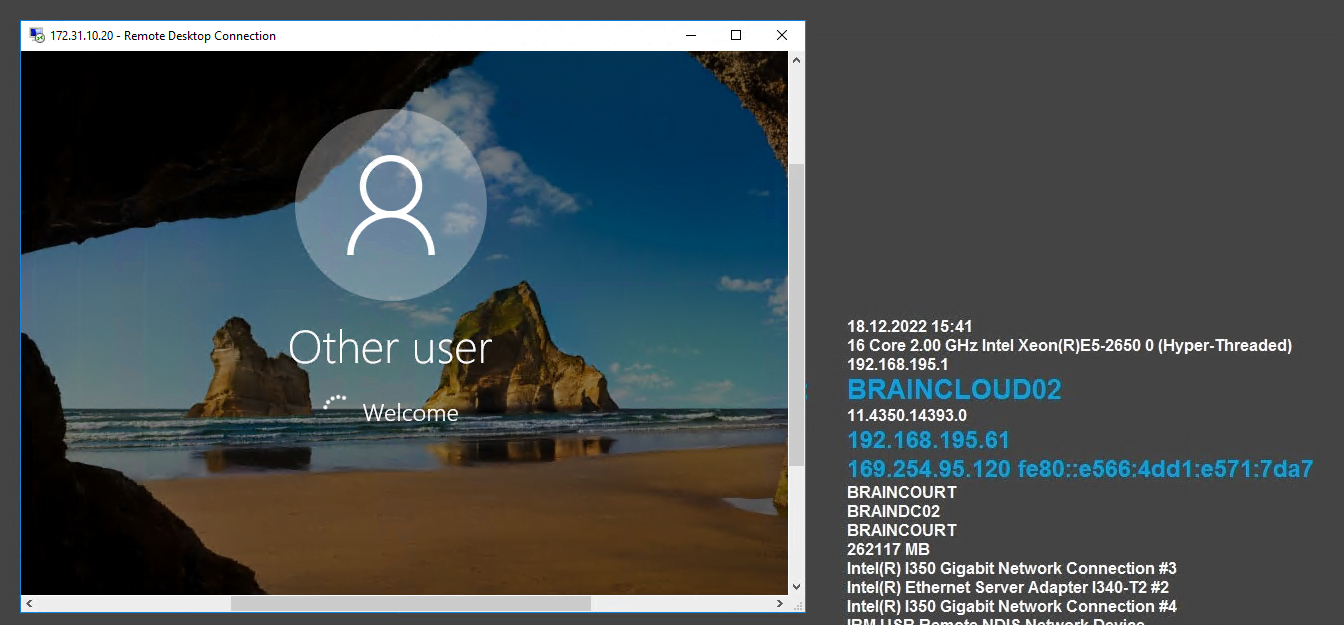
Looks good.

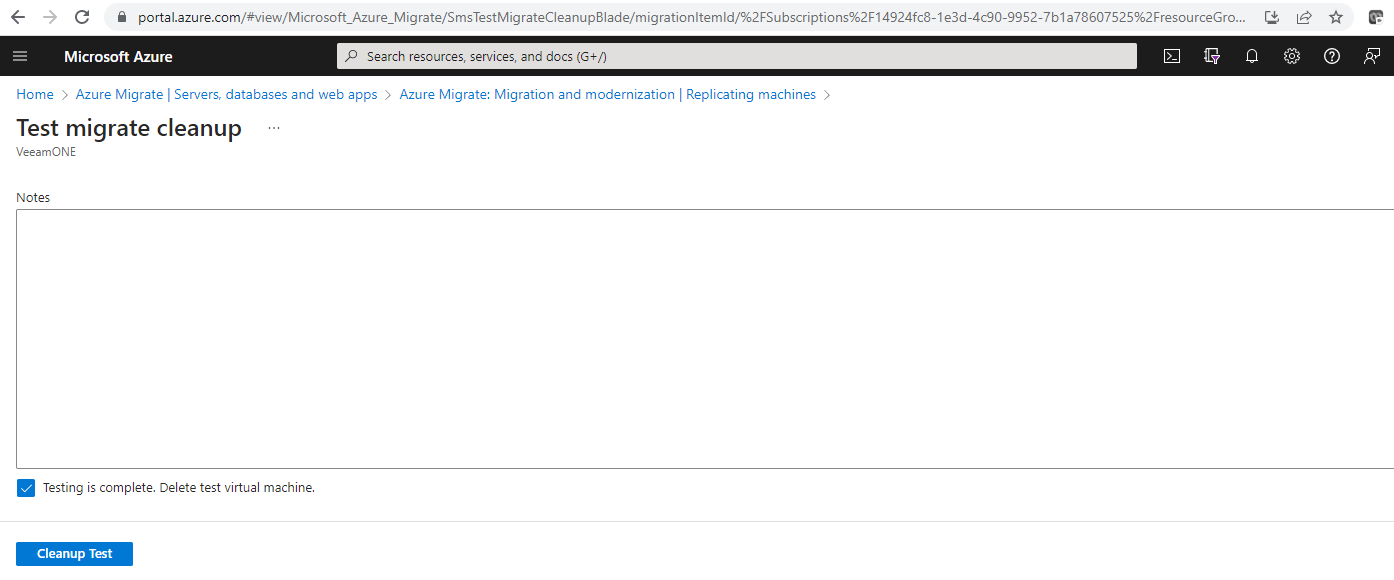
After the test is done, right-click the Azure VM in Replications, and select Clean up test migration.
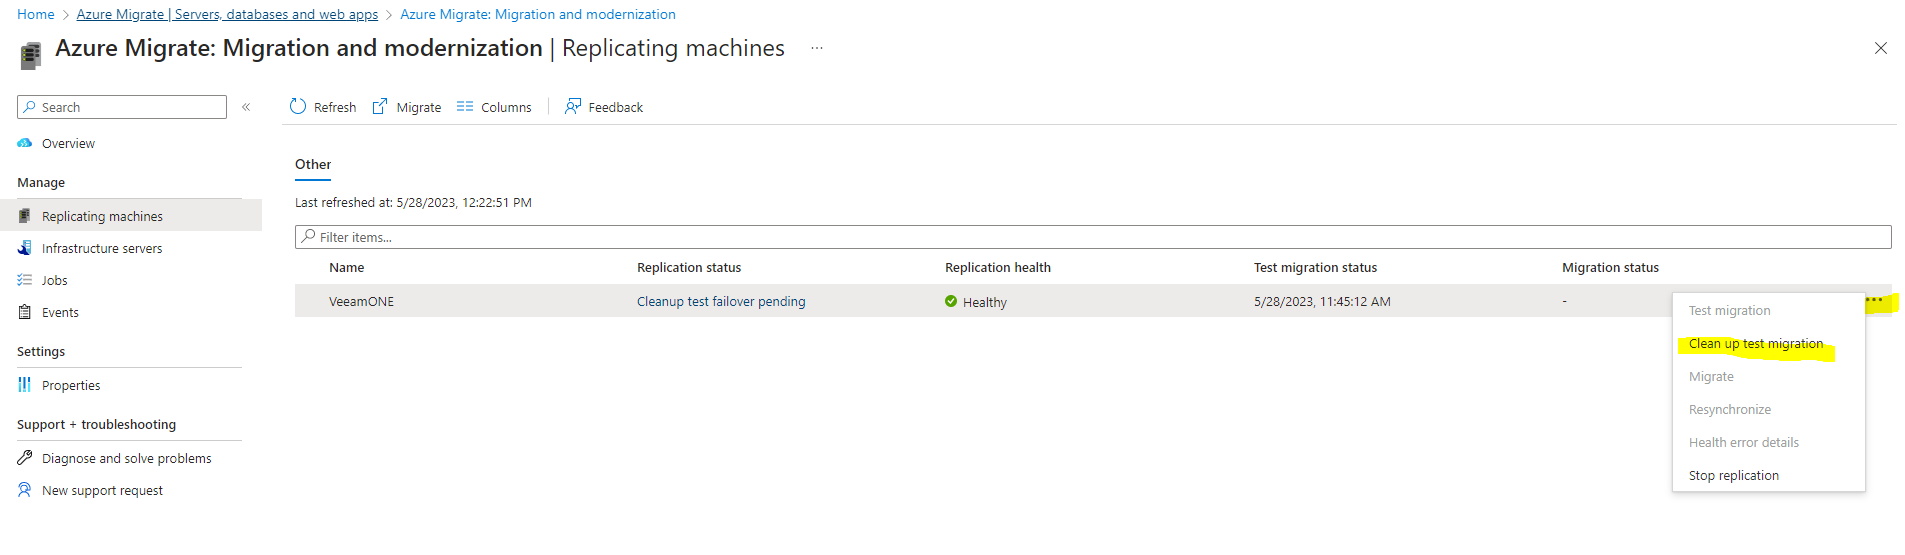
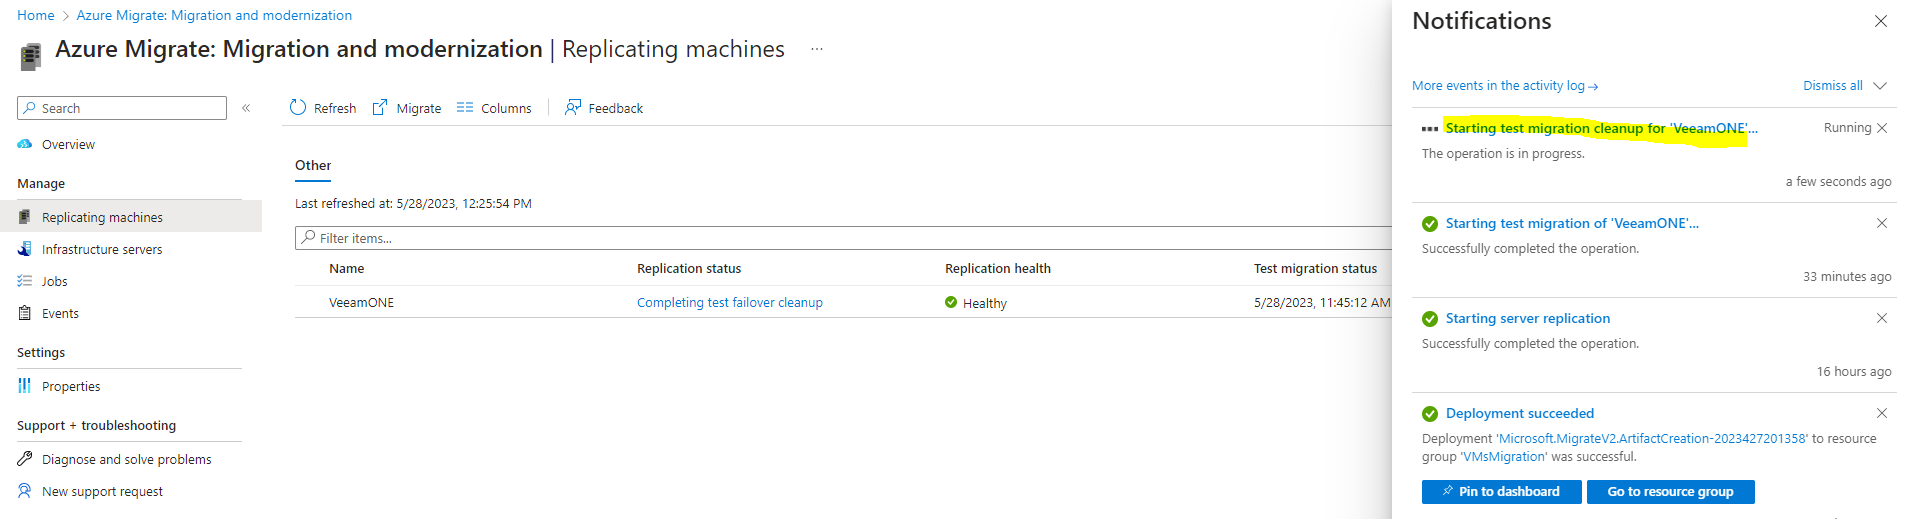
After the cleanup the replication status switches to protected again and the virtual machine is removed from Azure.
Source: https://learn.microsoft.com/en-us/azure/migrate/tutorial-migrate-hyper-v
Migrate VMs
After you’ve verified that the test migration works as expected, you can migrate the on-premises machines.
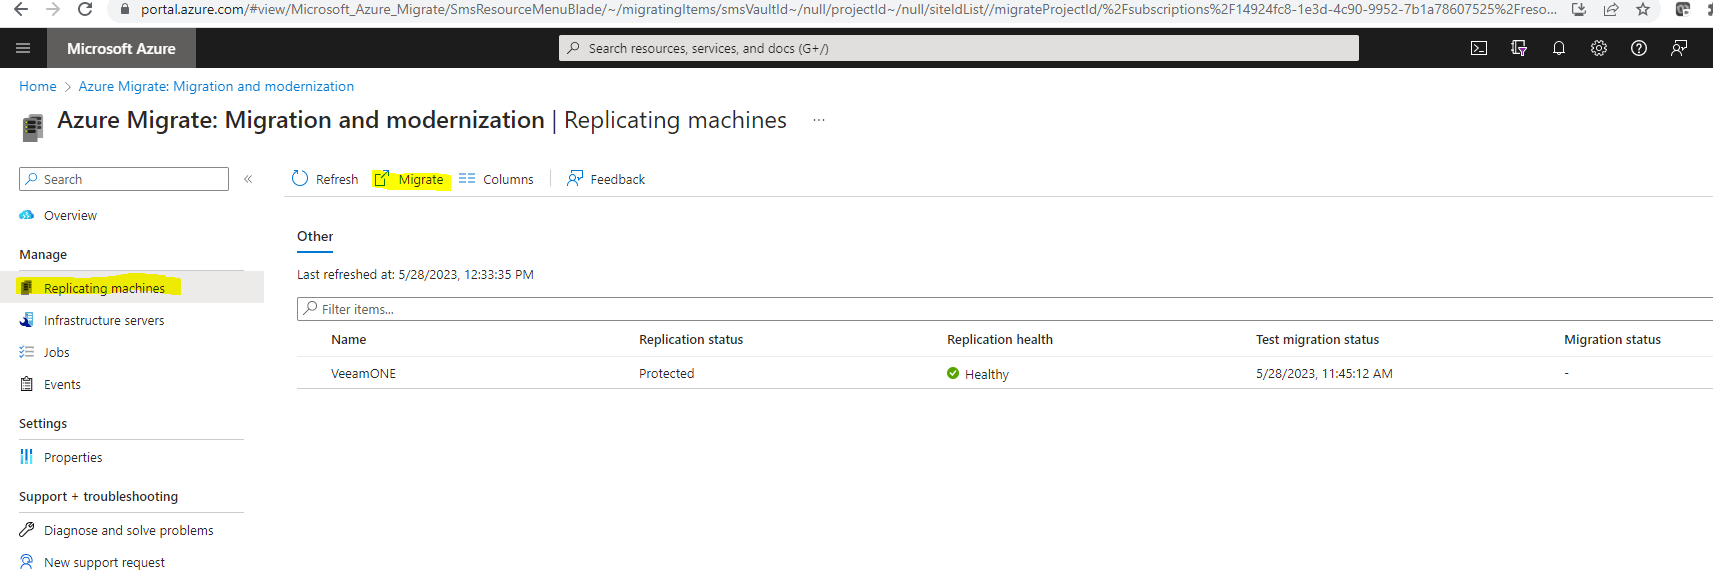
- In the Azure Migrate project > Servers, databases and web apps > Migration and modernization, select Migrate.
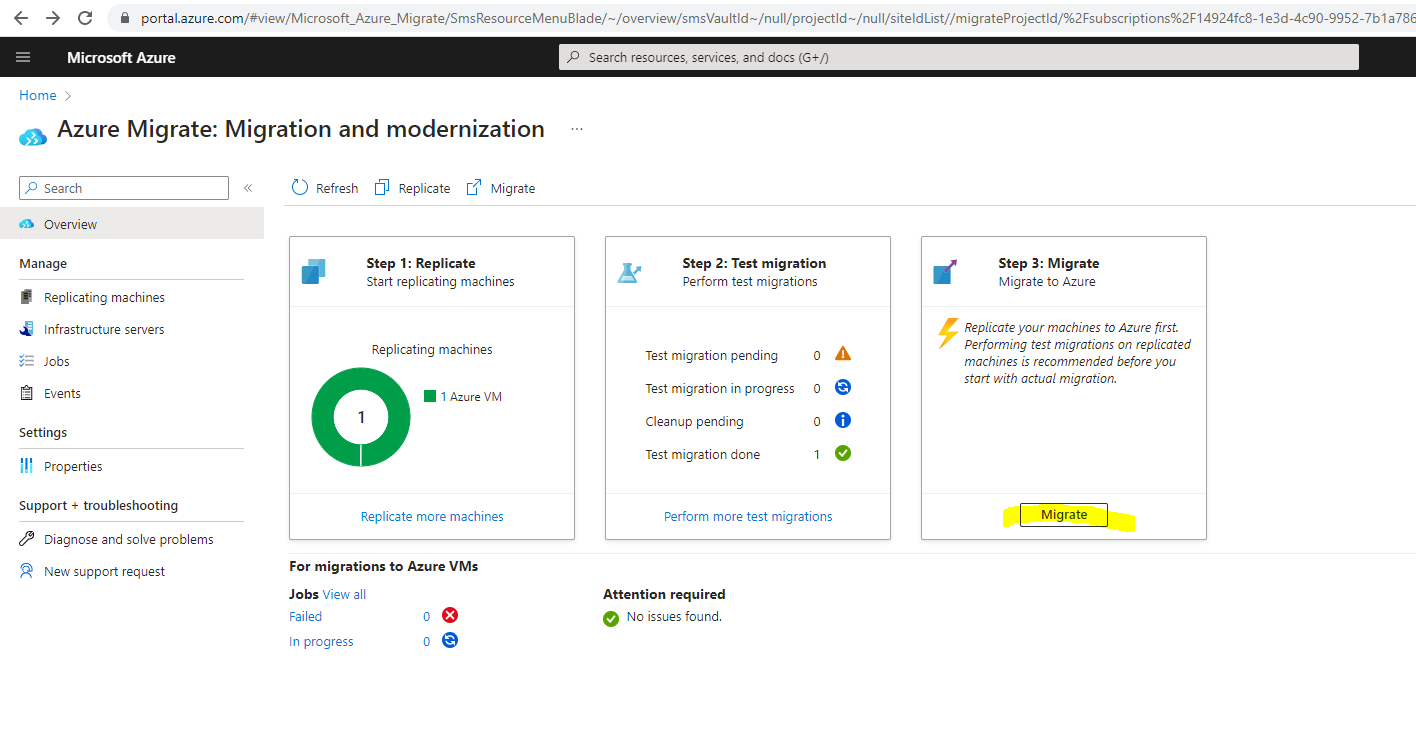
Or directly from the Replicating machines menu and click on Migrate as shown below.
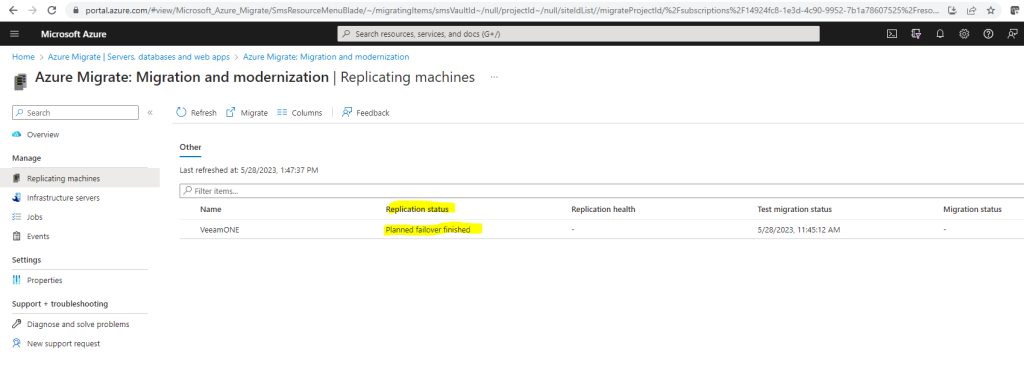
In Migrate > Shut down virtual machines and perform a planned migration with no data loss, select Yes > OK.
By default Azure Migrate shuts down the on-premises VM, and runs an on-demand replication to synchronize any VM changes that occurred since the last replication occurred. This ensures no data loss.
If you don’t want to shut down the VM, select No.
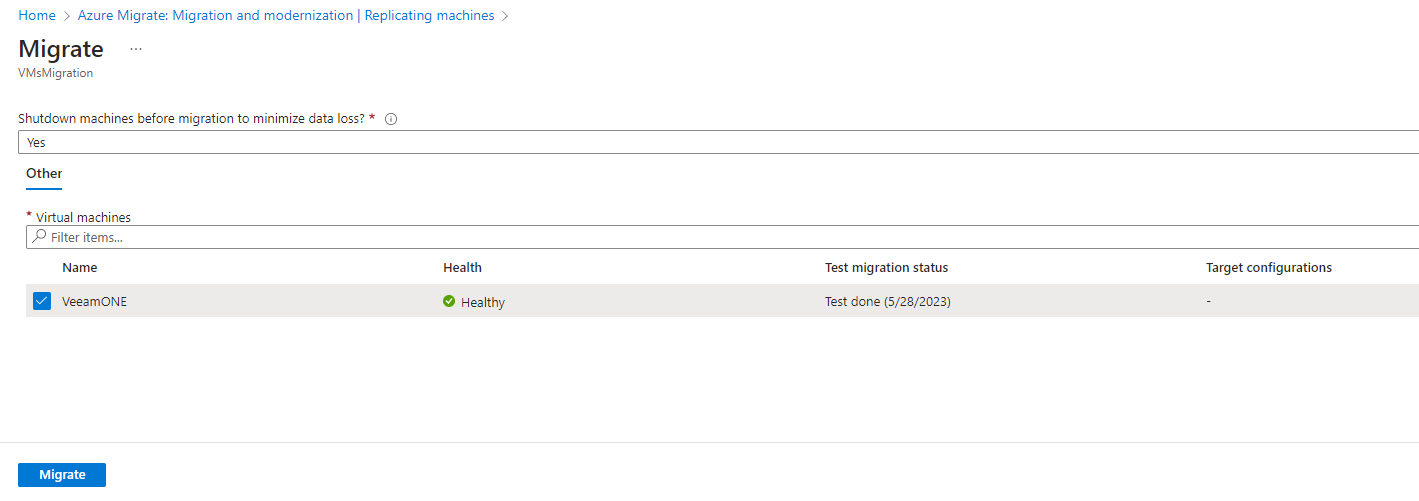
A migration job starts for the VM. Track the job in Azure notifications.
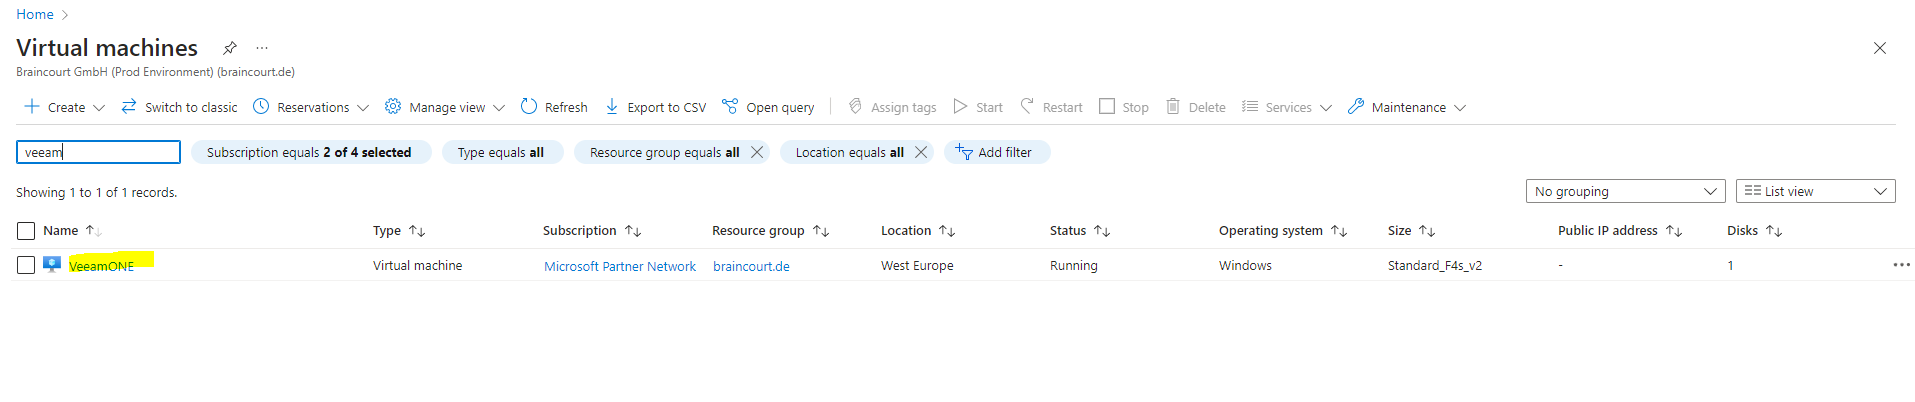
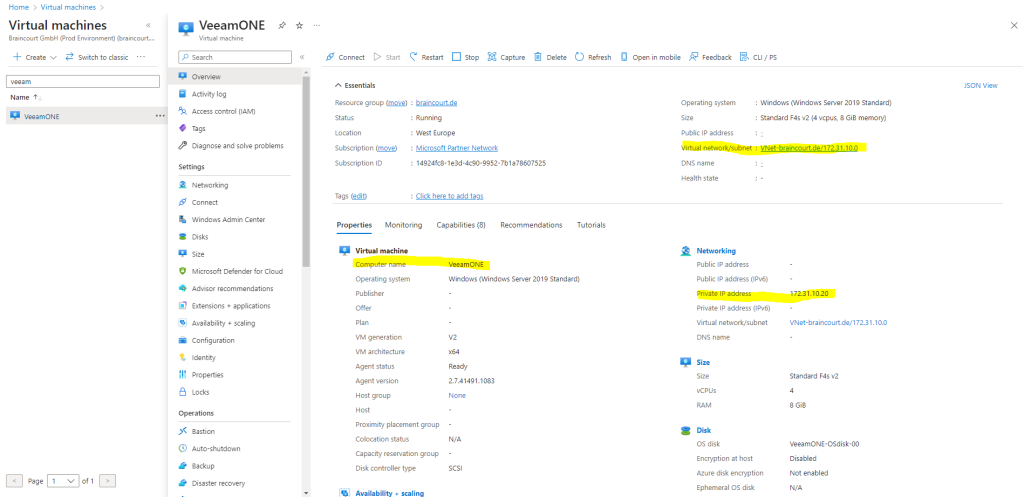
After the job finishes, you can view and manage the VM from the Virtual Machines page.
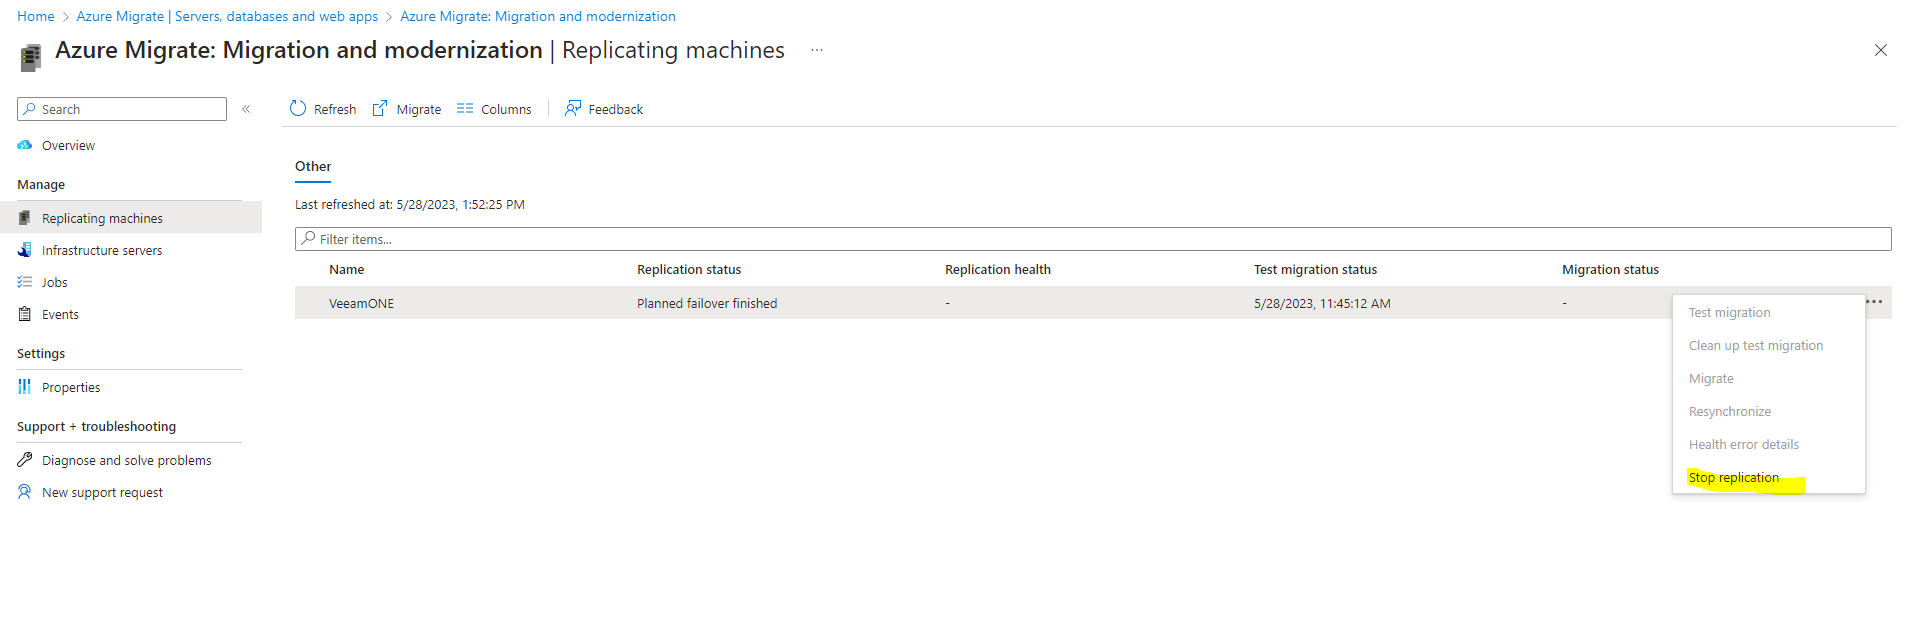
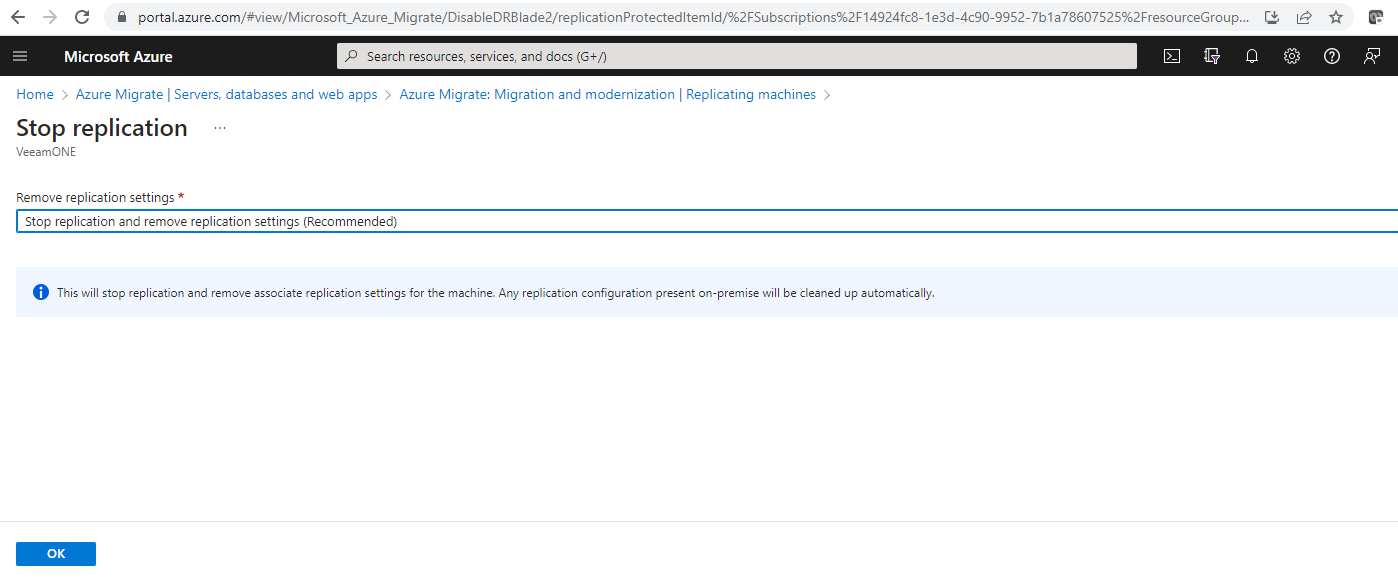
- After the migration is done, right-click the VM > Stop replication. This does the following:
- Stops replication for the on-premises machine.
- Removes the machine from the Replicating servers count in the Migration and modernization tool.
- Cleans up replication state information for the VM.
- Verify and troubleshoot any Windows activation issues on the Azure VM.
- Perform any post-migration app tweaks, such as updating host names, database connection strings, and web server configurations.
- Perform final application and migration acceptance testing on the migrated application now running in Azure.
- Cut over traffic to the migrated Azure VM instance.
- Remove the on-premises VMs from your local VM inventory.
- Remove the on-premises VMs from local backups.
- Update any internal documentation to show the new location and IP address of the Azure VMs.
Source: https://learn.microsoft.com/en-us/azure/migrate/tutorial-migrate-hyper-v
Post-migration best practices
- For increased resilience:
- Keep data secure by backing up Azure VMs using the Azure Backup service. Learn more.
- Keep workloads running and continuously available by replicating Azure VMs to a secondary region with Site Recovery. Learn more.
- For increased security:
- Lock down and limit inbound traffic access with Microsoft Defender for Cloud – Just in time administration.
- Restrict network traffic to management endpoints with Network Security Groups.
- Deploy Azure Disk Encryption to help secure disks, and keep data safe from theft and unauthorized access.
- Read more about securing IaaS resources, and visit the Microsoft Defender for Cloud.
- For monitoring and management:
- Consider deploying Azure Cost Management to monitor resource usage and spending.
Source: https://learn.microsoft.com/en-us/azure/migrate/tutorial-migrate-hyper-v
Delete an Azure Migrate project
Before you delete a project:
- When you delete a project, the project, and discovered machine metadata are deleted.
- If you’ve attached a Log Analytics workspace to the Server Assessment tool for dependency analysis, decide whether you want to delete the workspace.
- The workspace isn’t automatically deleted. Delete it manually.
- Verify what a workspace is used for before you delete it. The same Log Analytics workspace can be used for multiple scenarios.
- Before you delete the project, you can find a link to the workspace in Azure Migrate – Servers > Azure Migrate – Server Assessment, under OMS Workspace.
- To delete a workspace after deleting a project, find the workspace in the relevant resource group, and follow these instructions.
Delete a project
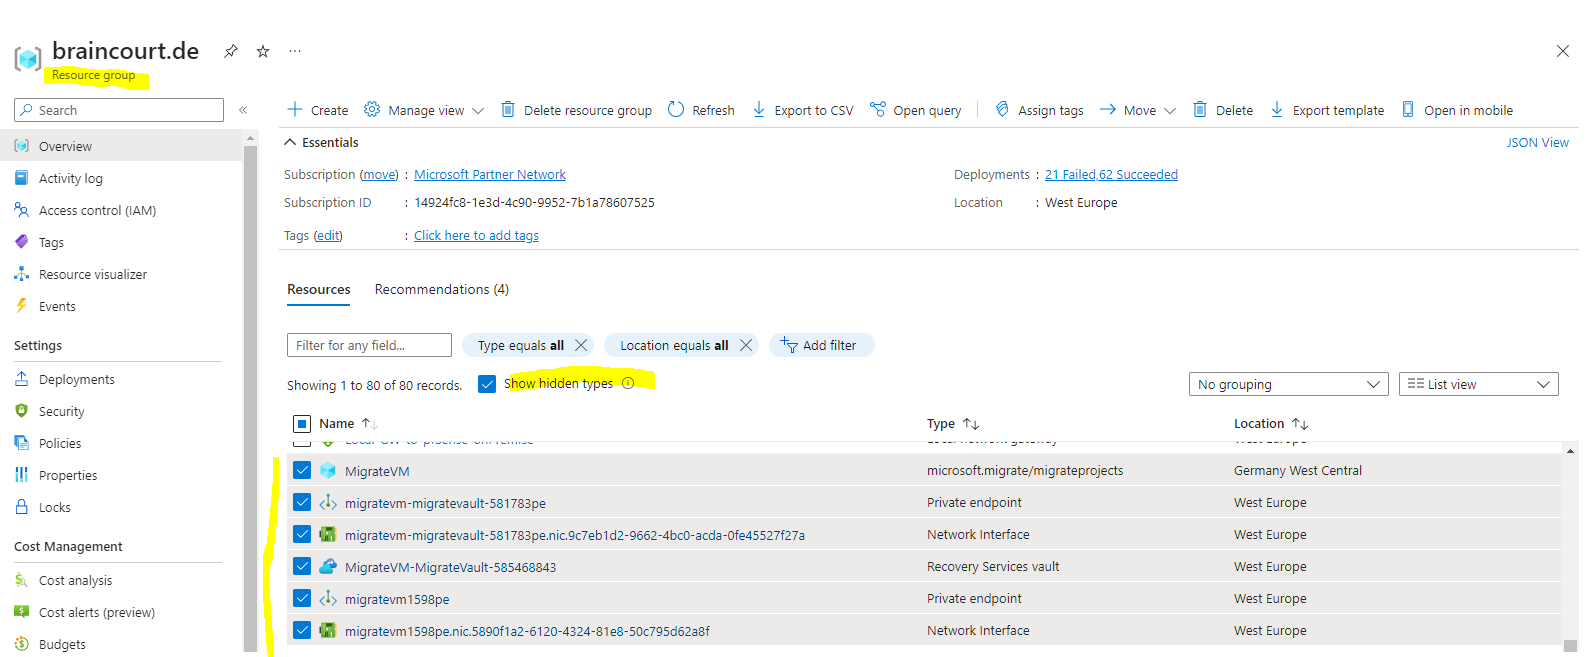
- In the Azure portal, open the resource group in which the project was created.
- In the resource group page, select Show hidden types.
- Select the project and the associated resources that you want to delete.
- The resource type for Azure Migrate projects is Microsoft.Migrate/migrateprojects.
- In the next section, review the resources created for discovery, assessment, and migration in an Azure Migrate project.
- If the resource group only contains the Azure Migrate project, you can delete the entire resource group.
- If you want to delete a project from the previous version of Azure Migrate, the steps are the same. The resource type for these projects is Migration project.
Source: https://learn.microsoft.com/en-us/azure/migrate/how-to-delete-project
Links
Azure Migrate documentation
https://learn.microsoft.com/en-us/azure/migrate/Migrate Hyper-V VMs to Azure
https://learn.microsoft.com/en-us/azure/migrate/tutorial-migrate-hyper-v?tabs=UIAssess Hyper-V VMs for migration to Azure
https://learn.microsoft.com/en-us/azure/migrate/tutorial-assess-hyper-vSupport requirements and considerations for Private endpoint connectivity
https://learn.microsoft.com/en-us/azure/migrate/how-to-use-azure-migrate-with-private-endpointsTroubleshoot network connectivity
https://learn.microsoft.com/en-us/azure/migrate/troubleshoot-network-connectivity
Related Posts
Follow me on LinkedIn