

How to Shrink a Linux VMware vSphere Virtual Disk (VMDK) and Its Associated Logical Volume
Allocating additional storage to a virtual machine in VMware vSphere is straightforward, you simply increase the size of the virtual disk and extend the guest operating system’s partition or logical volume.
More about extending disks and logical volumes in Linux in my following post.
Reducing storage, however, is a completely different story. VMware does not support shrinking virtual disks directly, making the process considerably more involved.
Fortunately, there is a safe and reliable way to reclaim unused storage. By first reducing the guest operating system’s logical volume and file system, and then replacing the oversized virtual disk with a smaller one, you can significantly reduce the VM’s storage footprint without rebuilding the system.
In this post, I’ll walk through the complete process step by step, explaining how to safely shrink both the guest operating system’s logical volume and the underlying VMware virtual disk while minimizing the risk of data loss.
Note: Although some third-party tools claim to shrink virtual disks in place, creating a new, smaller virtual disk and migrating the data is the recommended and best-practice approach. This method relies on supported VMware and Linux functionality, minimizes risk, and provides a straightforward rollback option until the migration has been fully verified.
For detailed instructions on shrinking a VMware vSphere virtual disk for Windows Server, refer to my following post
Introduction
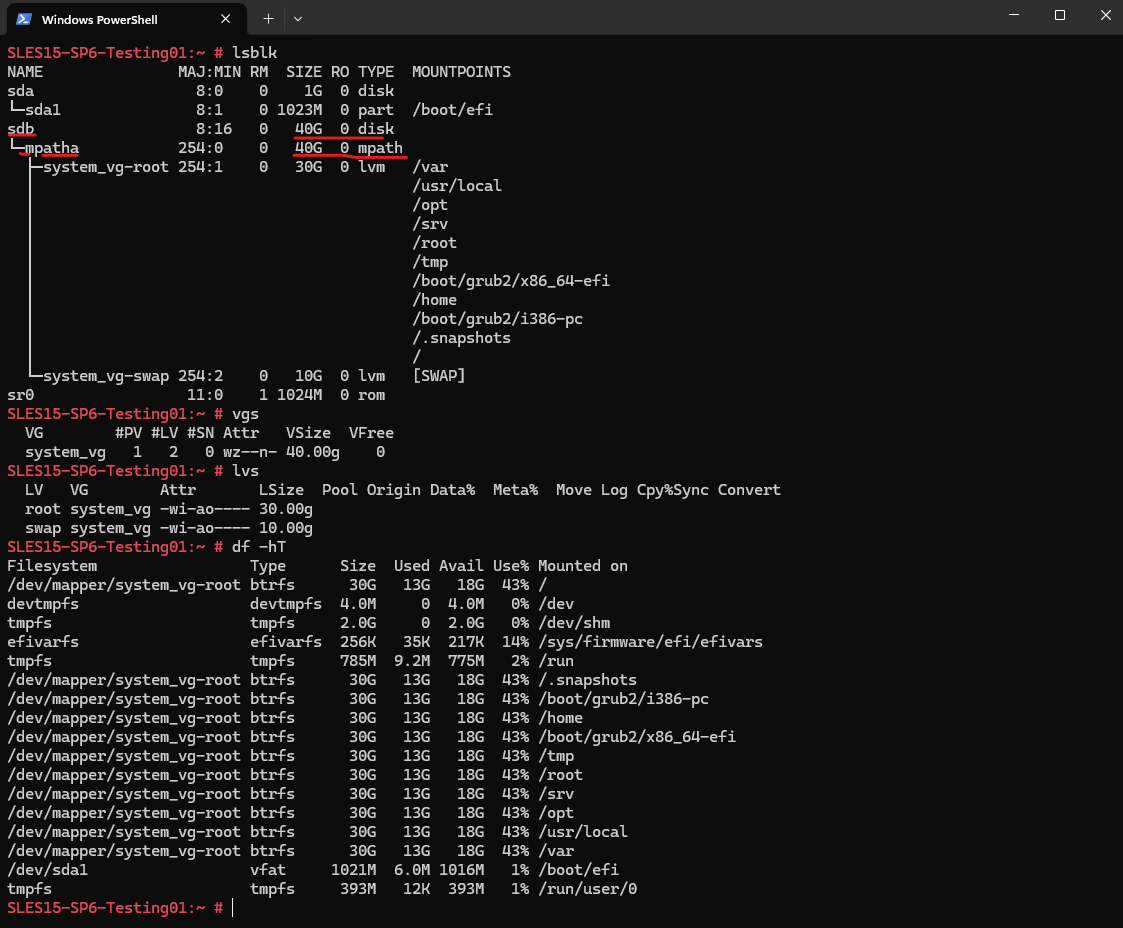
In this example, I will use a SUSE Linux Enterprise Server (SLES) 15 SP6 virtual machine running on VMware vSphere. The VM is configured with a dedicated 1 GB EFI boot disk (sda) and a separate 40 GB virtual disk (sdb) that contains the operating system. The operating system disk uses Linux LVM with a 30 GB root logical volume and a 10 GB swap logical volume, as shown in the following screenshot.
Although only about 13 GB of the root file system is currently in use, the virtual disk still occupies 40 GB. Since VMware vSphere does not support shrinking virtual disks directly, reducing the disk size requires migrating the operating system to a new, smaller virtual disk.
The goal of this post is to reduce the size of the operating system virtual disk from 40 GB to 30 GB by first shrinking the logical volumes within the guest operating system and then migrating them to a new 30 GB virtual disk. After completing the migration, the original 40 GB disk will be removed and replaced by the new, smaller disk while preserving the existing system configuration and data.
Note: Because DM Multipath is configured on this virtual machine, the
lsblkoutput shows thempathadevice beneath/dev/sdb. Thempathadevice is the logical multipath device created on top of the underlying disk and is the device used by the operating system.More about multipathing on SLES you will find in my following post https://blog.matrixpost.net/mastering-linux-dm-multipathing-and-iscsi-block-storage-suse/.
SLES15-SP6-Testing01:~ # lsblk
SLES15-SP6-Testing01:~ # vgs
SLES15-SP6-Testing01:~ # lvs
SLES15-SP6-Testing01:~ # df -hT
Reduce the Guest Logical Volume
Before the virtual disk itself can be reduced, the storage consumed within the guest operating system must first fit into the target disk size. Since the operating system resides on a 40 GB LVM physical volume, the root and swap logical volumes must be reduced accordingly, followed by shrinking the underlying physical volume.
In this post, the root logical volume will be reduced from 30 GB to 20 GB, while the swap logical volume will be reduced from 10 GB to 8 GB. This decreases the required LVM physical volume size to 28 GB, allowing it to fit comfortably on the new 30 GB virtual disk while leaving some room for the partition layout and LVM metadata.
For my SLES 15 SP6 (Btrfs + LVM) setup, the commands are relatively straightforward because Btrfs supports online shrinking.
First we check the filesystem usage on the root filesystem by running:
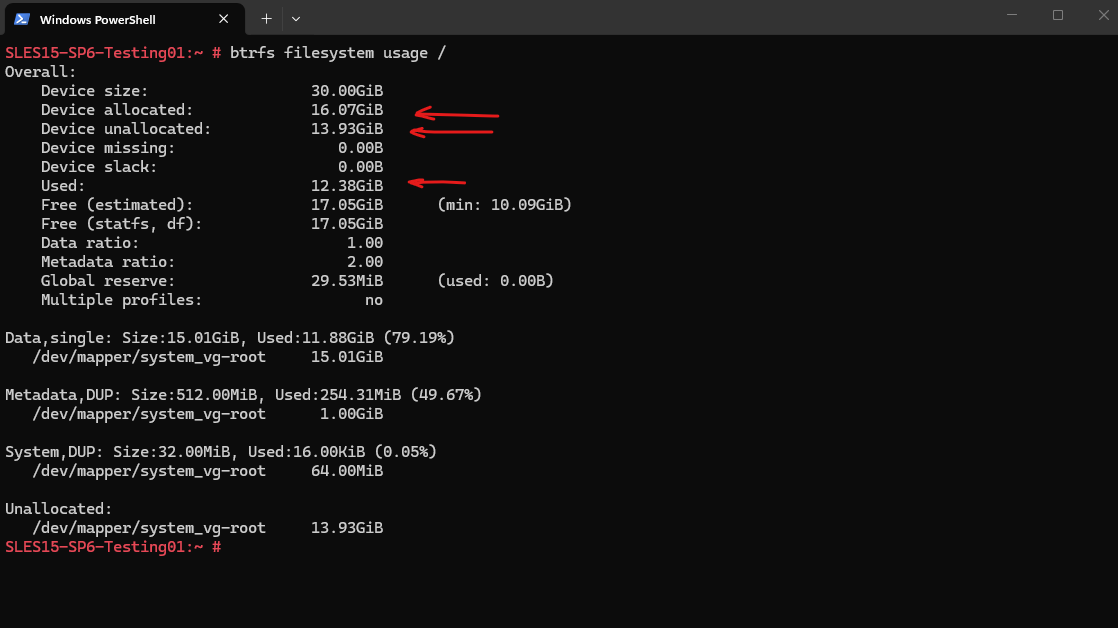
My Btrfs filesystem itself is already only using about 16.07 GiB of the 30 GiB logical volume:
Device allocated: 16.07 GiB
Used: 12.38 GiB
Unallocated inside the filesystem: 13.93 GiB
SLES15-SP6-Testing01:~ # btrfs filesystem usage /
Shrinking the File System
Before shrinking the file system, it is important to verify how much space is actually in use. The btrfs filesystem usage command provides a more detailed view than df, showing not only the amount of used data but also how much space has already been allocated internally by Btrfs. Since the filesystem currently occupies only about 16 GiB, it can safely be reduced to 20 GiB.
To shrink the file system run:
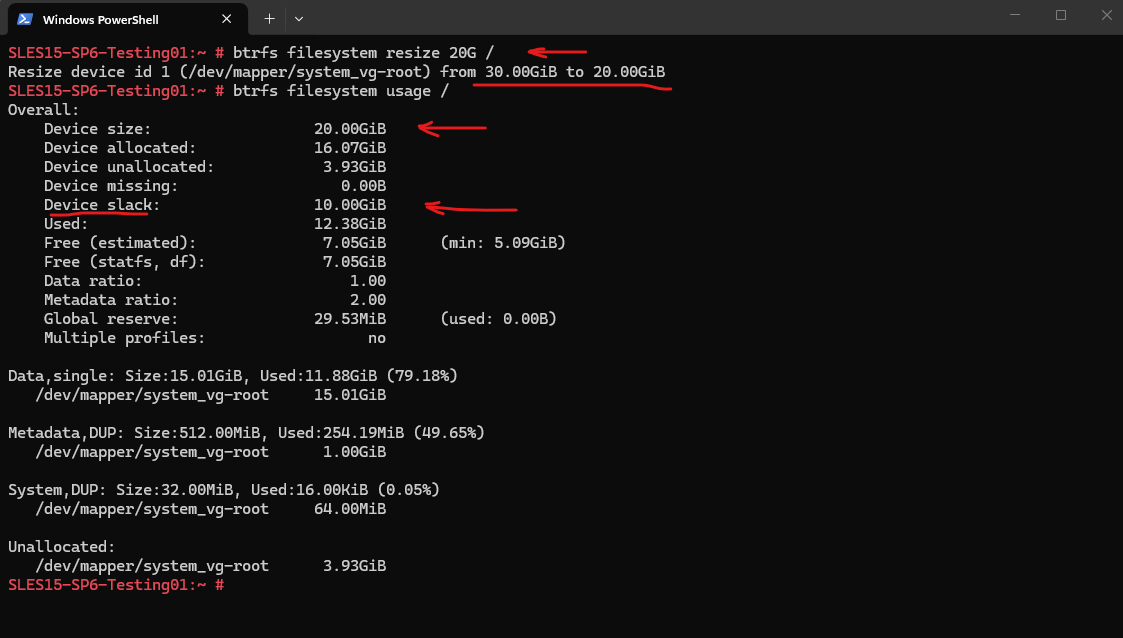
The filesystem has been reduced to 20 GiB, but the underlying logical volume is still 30 GiB. The remaining 10 GiB is now shown as device slack, space that exists in the block device but is no longer part of the filesystem. This is exactly what allows us to safely shrink the logical volume next.
SLES15-SP6-Testing01:~ # btrfs filesystem resize 20G /

# Verify
SLES15-SP6-Testing01:~ # btrfs filesystem usage /
Reducing the LVM Logical Volume
After shrinking the Btrfs file system to 20 GB, the underlying LVM logical volume can now be reduced to the same size. Since the file system no longer occupies the last 10 GB of the logical volume, this space can now safely be removed.
Since the Btrfs file system was already reduced to 20 GB in the previous step,
lvreducedetects that no further file system resize is necessary. It simply reduces the size of the logical volume to match the existing file system.
# Verify size before shrinking
SLES15-SP6-Testing01:~ # lvs

# Reduce logical volume from 30 GB to 20 GB
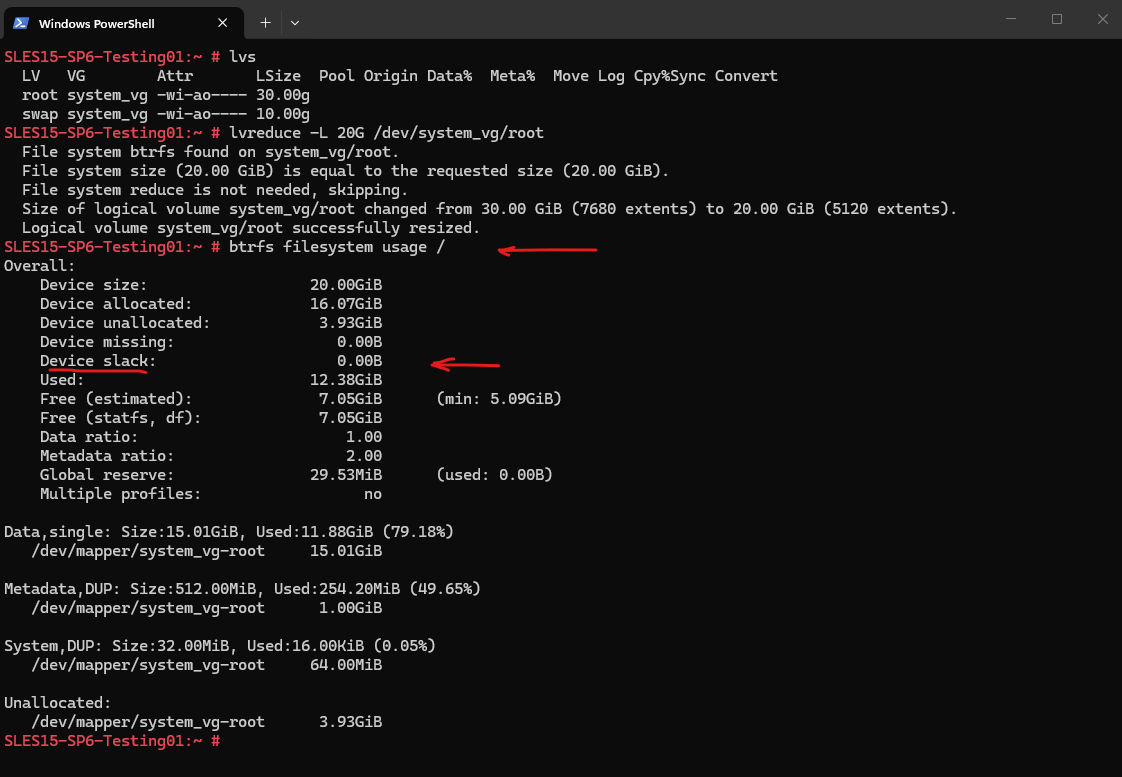
SLES15-SP6-Testing01:~ # lvreduce -L 20G /dev/system_vg/root
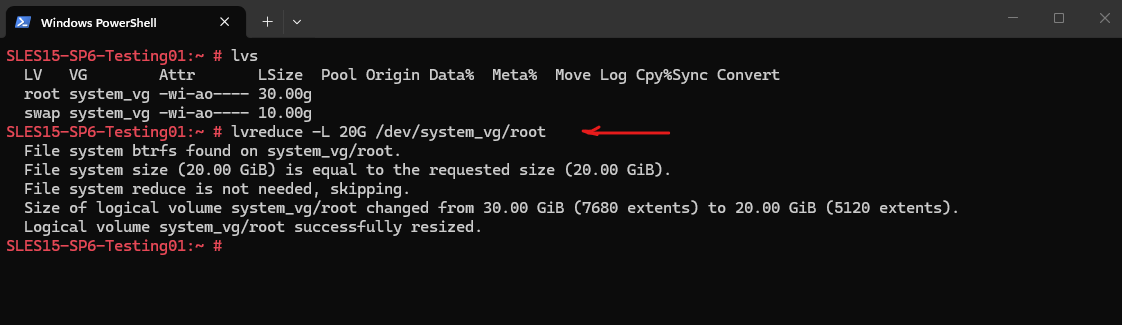
After reducing the logical volume, the Btrfs file system still reports a device size of 20 GB, but the previously reported 10 GB of Device slack has disappeared. This indicates that the underlying logical volume now matches the size of the file system exactly, leaving no unused space at the end of the logical volume. With the root logical volume successfully reduced, the next step is to shrink the swap logical volume before reducing the size of the LVM physical volume.
SLES15-SP6-Testing01:~ # btrfs filesystem usage /
Resizing the Swap Logical Volume
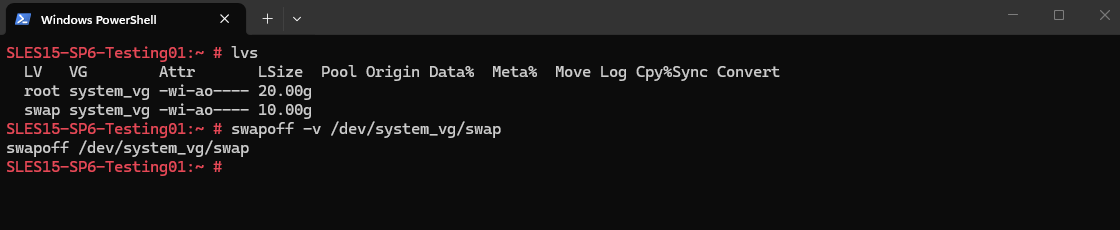
The swap logical volume must be deactivated before it can be resized.
/dev/<volume_group>/<logical_volume>
SLES15-SP6-Testing01:~ # swapoff -v /dev/system_vg/swap
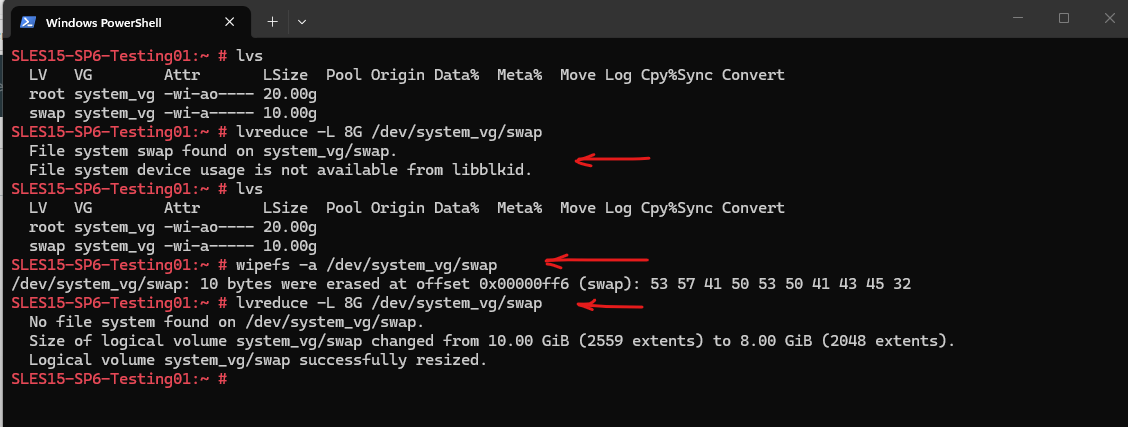
Next we reduce the logical volume from 10 GB to 8 GB:
Depending on the Linux distribution and LVM2 version, reducing a swap logical volume may not work immediately. As shown in the following example,
lvreducedetects the existing swap signature but cannot determine the usage of the swap area. Consequently, the logical volume is not resized and remains at 10 GB.To resolve this, remove the existing swap signature by using
wipefs:This command removes only the swap signature from the logical volume, it does not erase the logical volume itself. Since no file system or swap signature is present afterwards,
lvreduceno longer attempts to inspect the device and successfully reduces the logical volume from 10 GB to 8 GB.
SLES15-SP6-Testing01:~ # wipefs -a /dev/system_vg/swap
SLES15-SP6-Testing01:~ # lvreduce -L 8G /dev/system_vg/swap
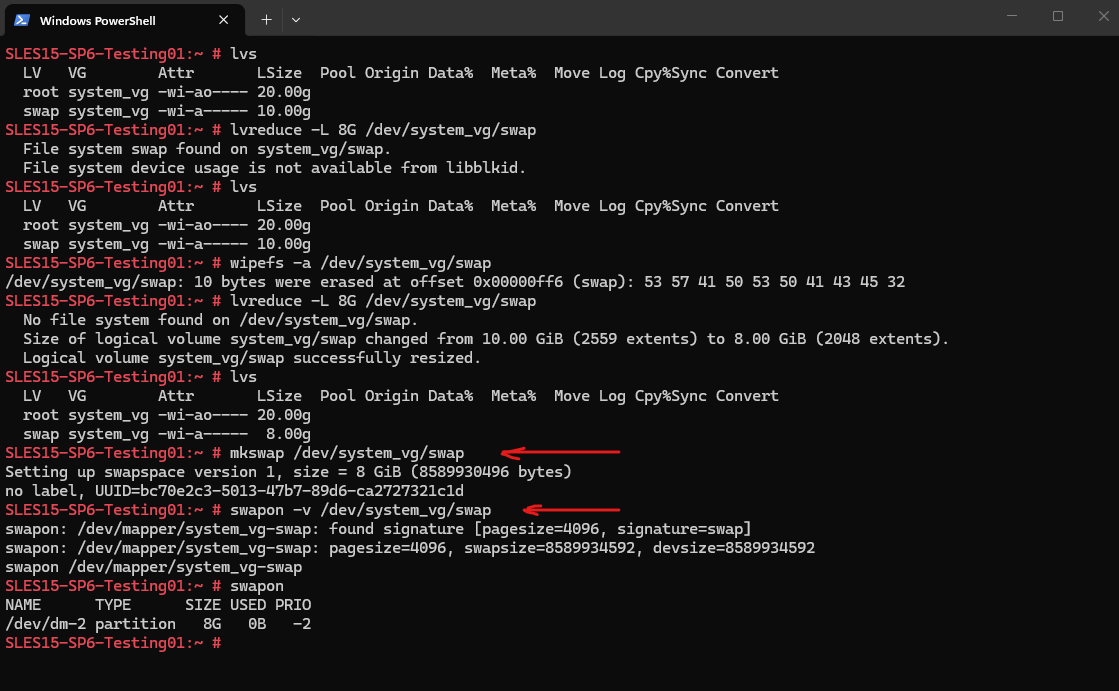
Finally, recreate the swap signature on the resized logical volume and enable swapping again:
The
mkswapcommand initializes the resized logical volume as a swap area and generates a new swap UUID. The subsequentswaponcommand activates the swap space again. The verbose output confirms that the new swap signature was detected successfully and that the 8 GB swap logical volume has been enabled.
SLES15-SP6-Testing01:~ # mkswap /dev/system_vg/swap
SLES15-SP6-Testing01:~ # swapon -v /dev/system_vg/swap

# Verify
SLES15-SP6-Testing01:~ # swapon
Shrinking the LVM Physical Volume
After reducing the root and swap logical volumes, the LVM physical volume can now be shrunk to fit within the target size of the new virtual disk. Since the combined size of both logical volumes is now 28 GB, the physical volume can safely be reduced while leaving sufficient space for the partition layout and LVM metadata.
Before shrinking the physical volume, verify that enough free space is available and that no allocated physical extents reside beyond the desired size.
SLES15-SP6-Testing01:~ # pvs
SLES15-SP6-Testing01:~ # vgs
SLES15-SP6-Testing01:~ # lvs
SLES15-SP6-Testing01:~ # pvdisplay -m
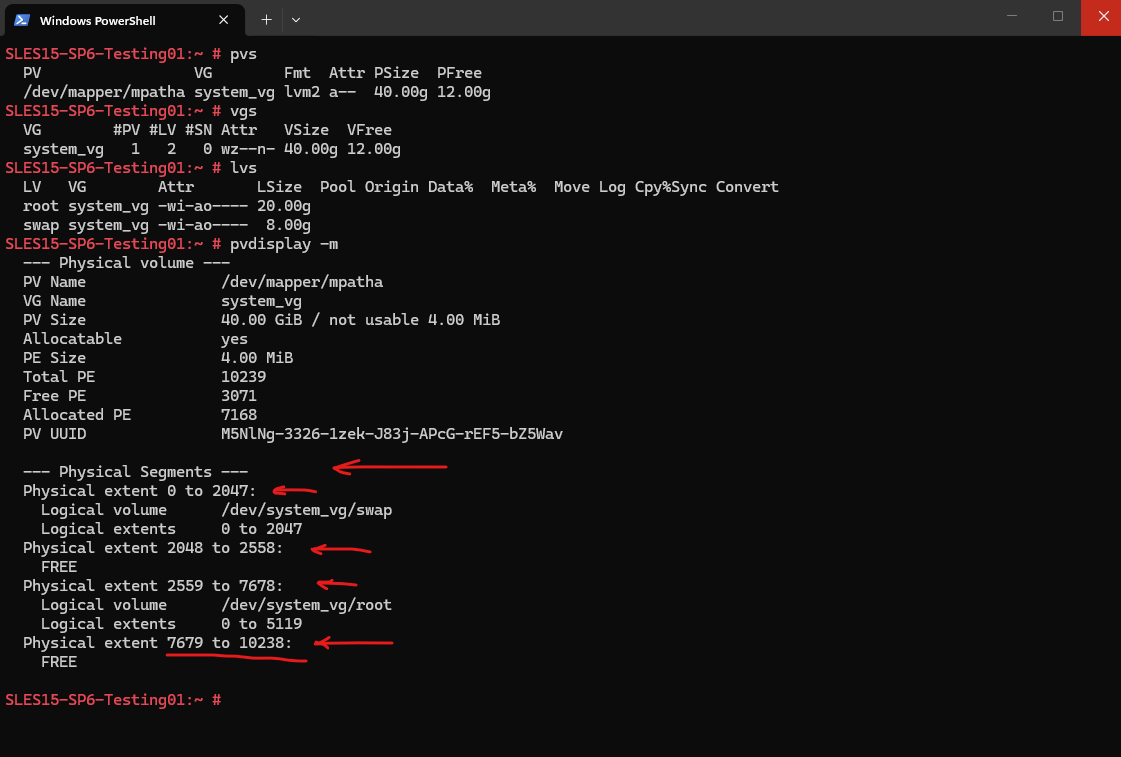
The output of pvdisplay -m shows how the logical volumes are mapped to the physical extents (PEs) of the physical volume. Although the combined size of the root and swap logical volumes is now only 28 GB, the allocated physical extents still extend to approximately the 30 GB boundary of the physical volume.
Therefore, the physical volume can currently only be reduced from 40 GB to 30 GB. Shrinking it further to 28 GB would first require relocating the allocated physical extents by using pvmove, which is beyond the scope of this post.
A physical volume (PV) is divided into Physical Extents (PEs). In my case:
PE Size      4 MiB
Total PE     10239
So the 40 GB PV consists of 10,239 extents, each 4 MiB in size.
Now look at the mapping:
Physical extent 0 to 2047:
  Logical volume /dev/system_vg/swap

Physical extent 2048 to 2558:
  FREE

Physical extent 2559 to 7678:
  Logical volume /dev/system_vg/root

Physical extent 7679 to 10238:
  FREE
This tells us exactly where the data resides on the physical volume.
|<---------------------- 40 GB PV ----------------------->|

0                                                        10239
|------swap------|--free--|---------root---------|---free---|
0              2047     2558                   7678      10238
The important part is this:
- Swap occupies PEs 0–2047
- Root occupies PEs 2559–7678
- Everything from 7679–10238 is already free
Now calculate the new PV size:
28 GiB / 4 MiB = 7168 PE
A 28 GB PV can only contain 7168 physical extents (0–7167).
Since the highest allocated physical extent is 7678, the physical volume cannot currently be reduced to 28 GB, which would provide only 7,168 physical extents (PEs 0–7167).
Therefore, the physical volume can only be reduced to 30 GB without first relocating the allocated physical extents.
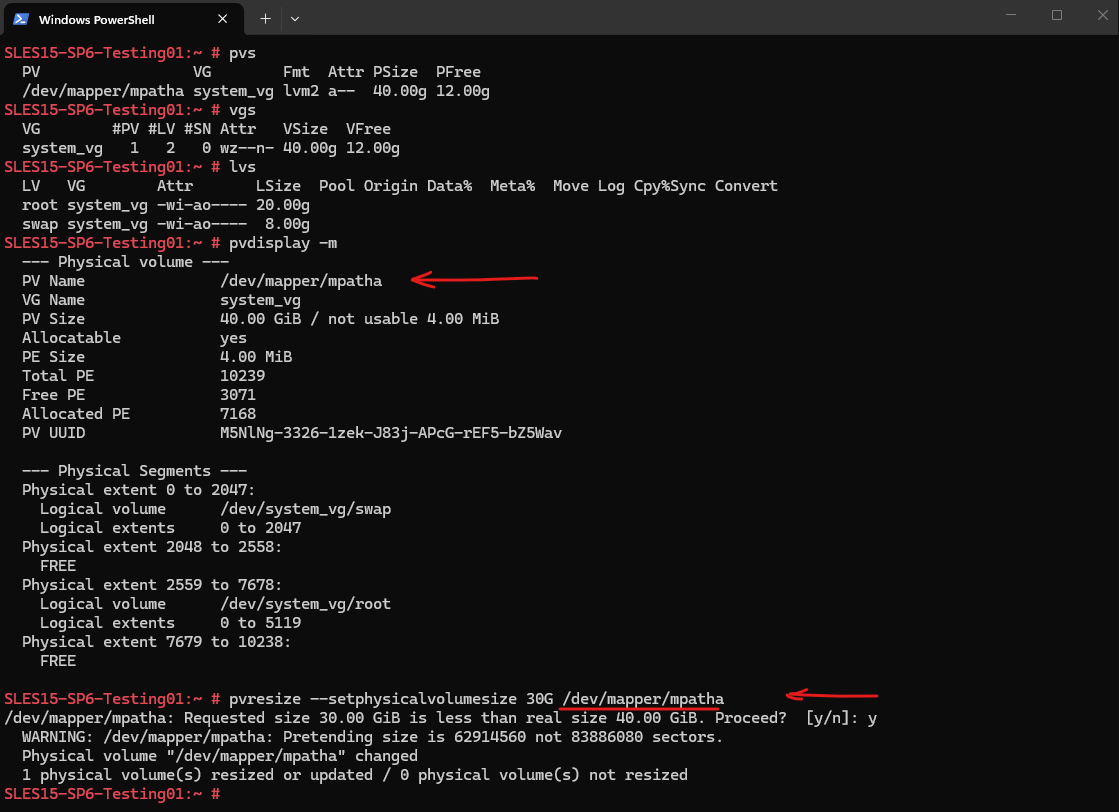
Since the physical volume cannot currently be reduced to 28 GB, it will instead be reduced to 30 GB, which corresponds to the highest allocated physical extent. This is sufficient for migrating the operating system to the new 30 GB virtual disk in the next section.
The path to the LVM physical volume was determined earlier by running the
pvscommand. This path is now used with thepvresizecommand to reduce the physical volume (pv) from 40 GB to 30 GB.Note: The original operating system disk uses DM Multipath as already shown to the beginning, so the LVM physical volume is created on the multipath device (
/dev/mapper/mpatha) rather than the underlying SCSI device (/dev/sdb). The newly added virtual disk is not configured for multipathing and therefore appears simply as/dev/sdc.
SLES15-SP6-Testing01:~ # pvresize --setphysicalvolumesize 30G /dev/mapper/mpatha
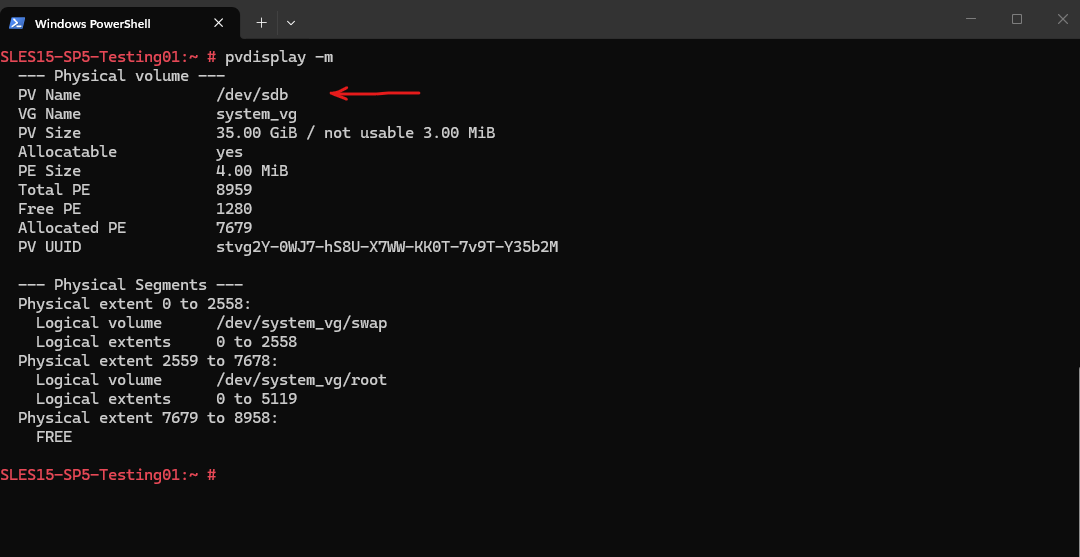
Without DM Multipath, the LVM physical volume is created directly on the underlying disk device. Consequently, the path used with the
pvresizecommand to reduce the physical volume (PV) would simply be/dev/sdb, as shown below for another virtual machine that is not configured with DM Multipath.
Create a Smaller Virtual Disk
With the storage layout inside the guest operating system now fitting within 30 GB, the next step is to add a new 30 GB virtual disk to the virtual machine. This disk will serve as the destination for migrating the LVM physical volume and will eventually replace the original 40 GB operating system disk.
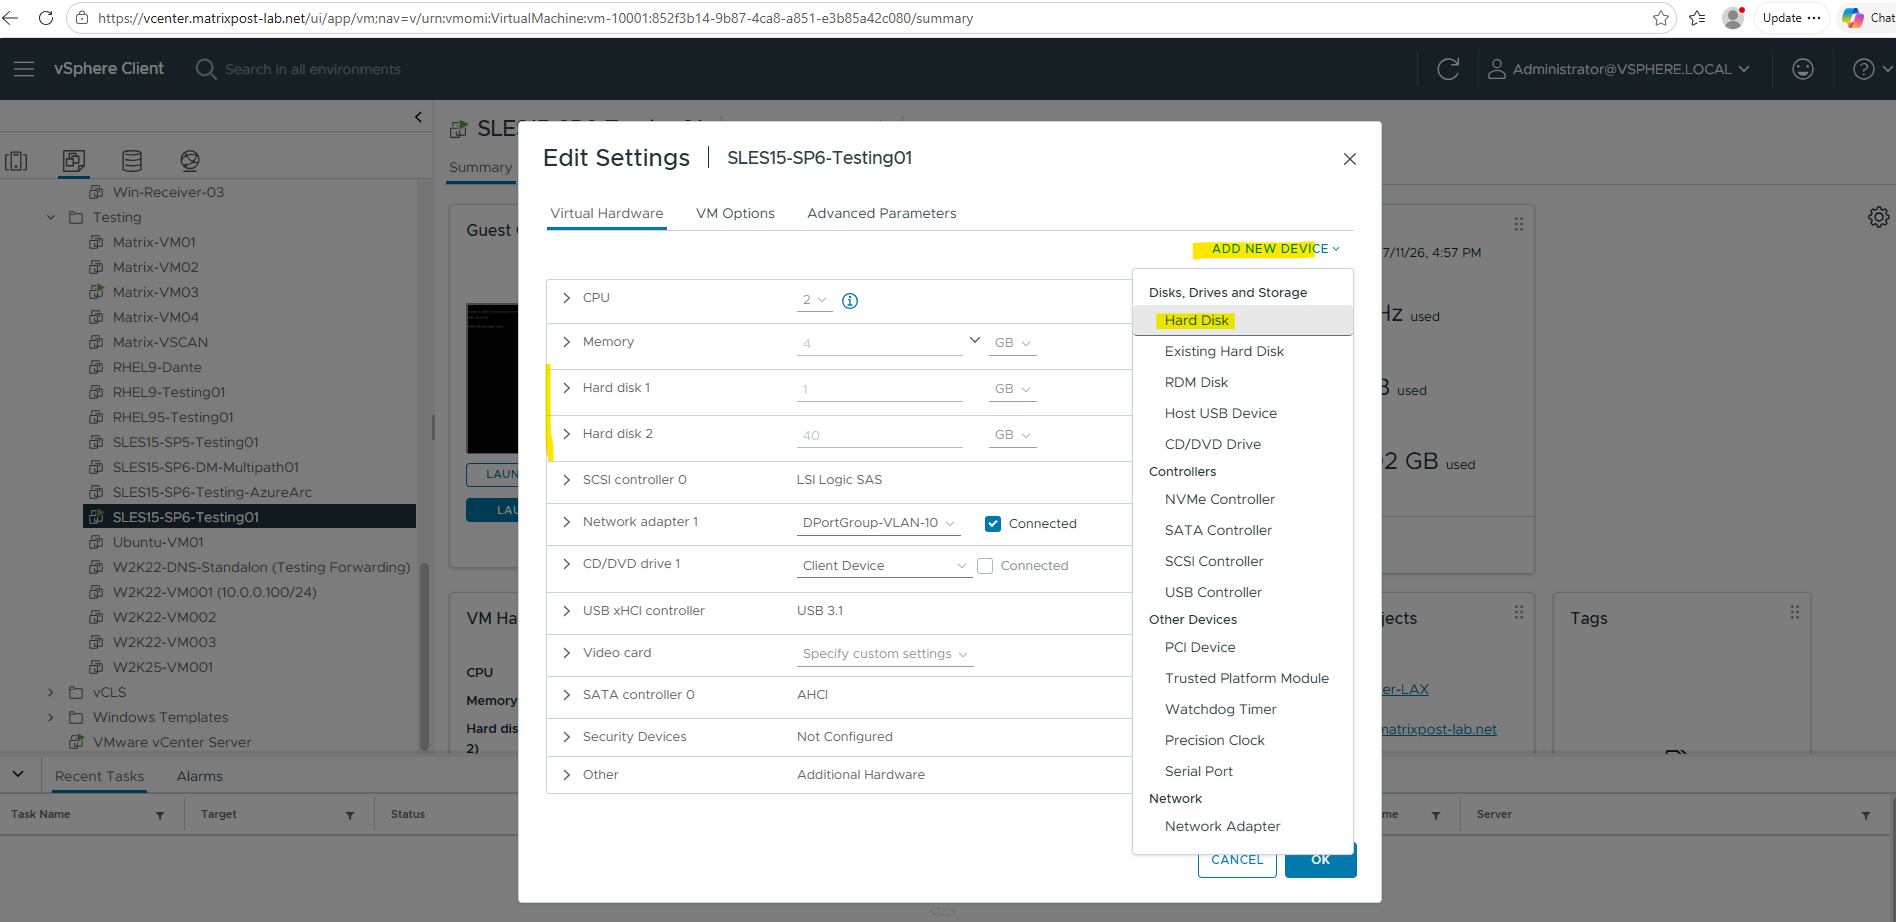
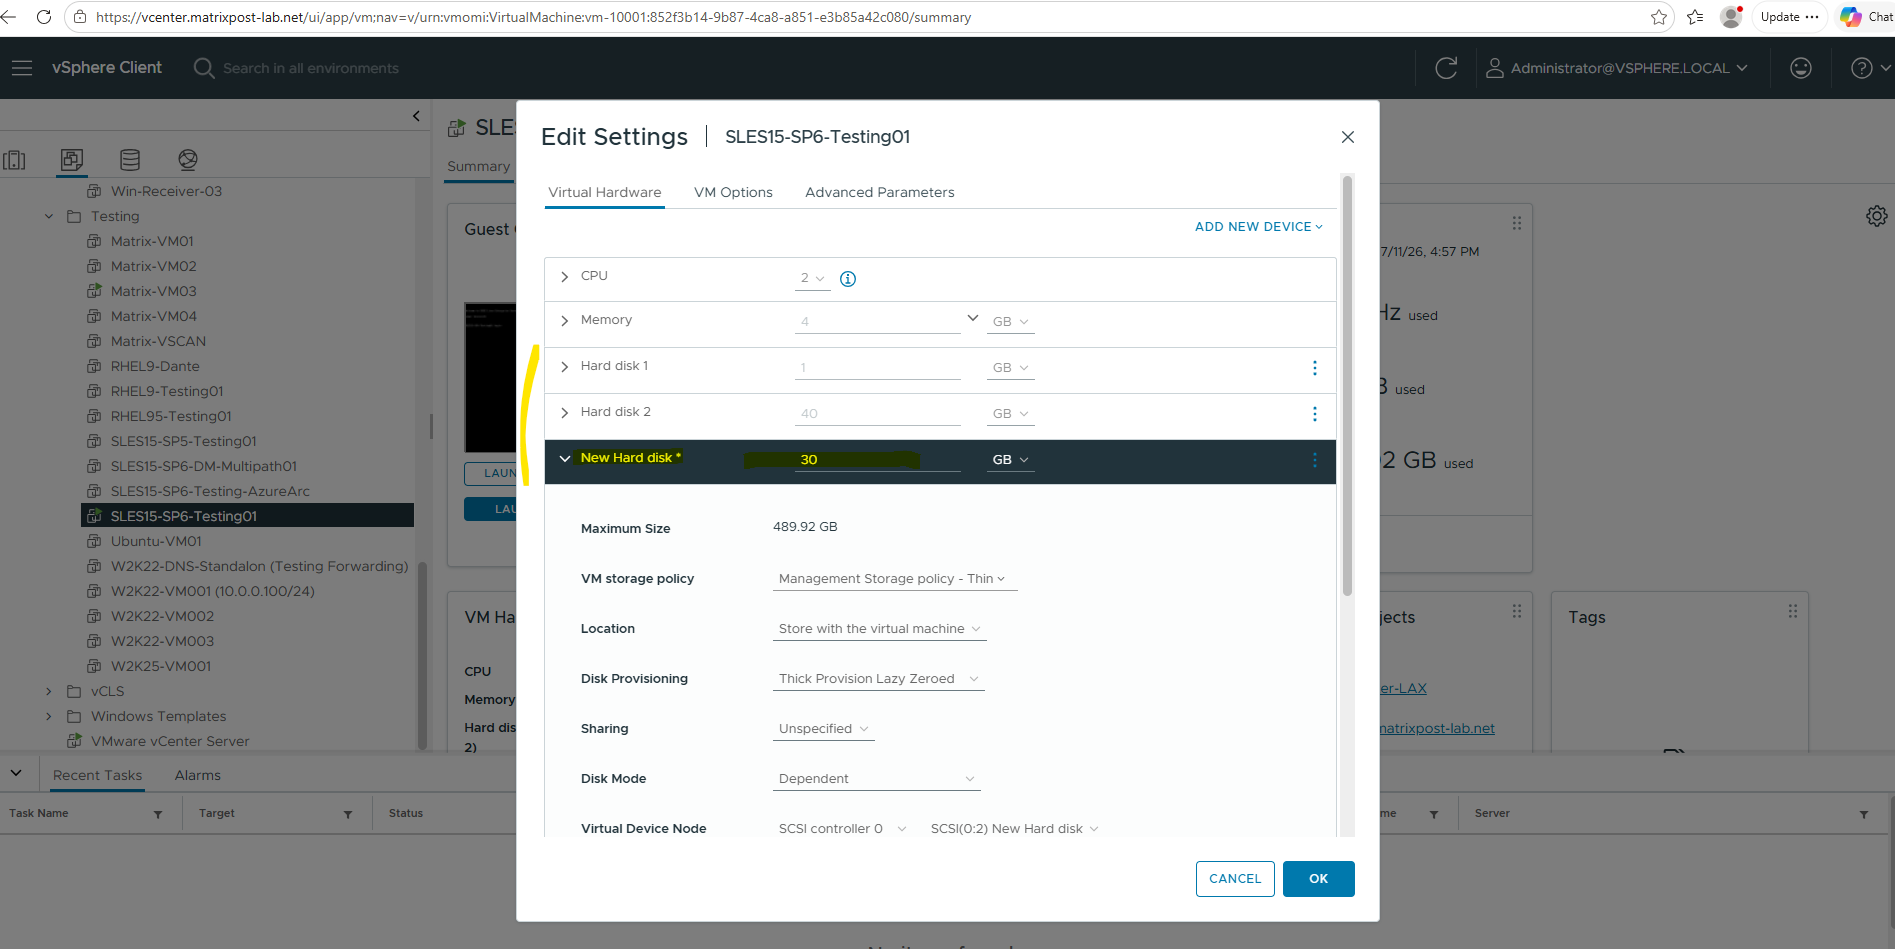
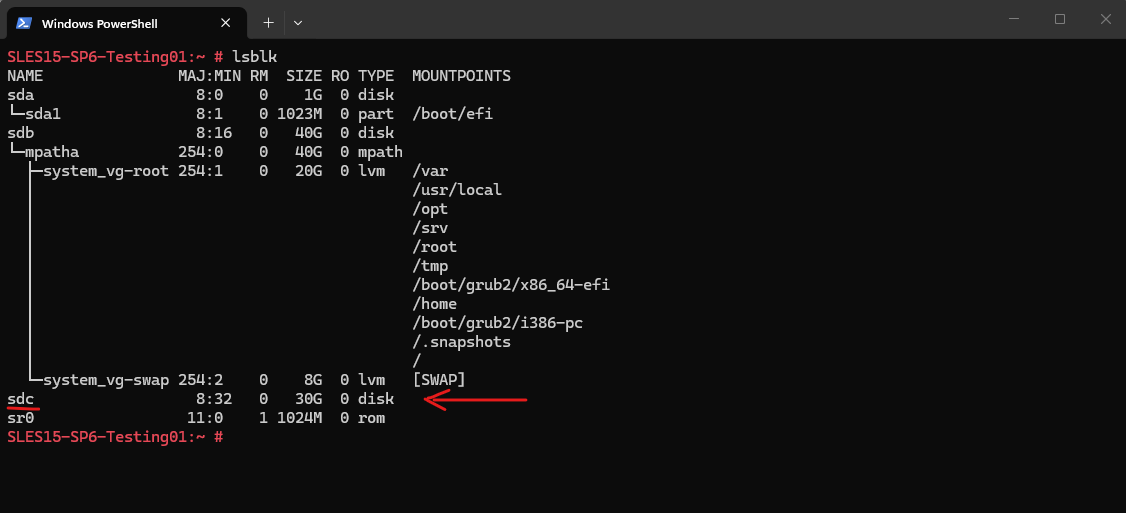
After adding the new 30 GB virtual disk in VMware vSphere, verify that the operating system detects the new disk. As shown below, the original operating system disk is still available as /dev/sdb, while the newly added 30 GB virtual disk appears as /dev/sdc. The new disk is currently unused and will now be initialized as a new LVM physical volume.
SLES15-SP6-Testing01:~ # lsblk
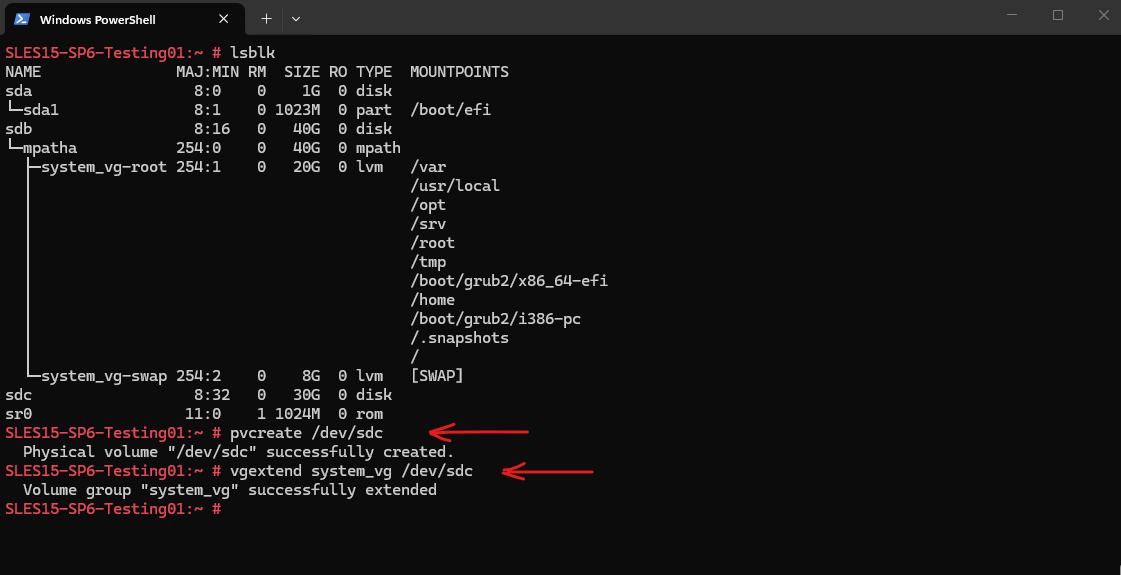
Next run:
SLES15-SP6-Testing01:~ # pvcreate /dev/sdc
SLES15-SP6-Testing01:~ # vgextend system_vg /dev/sdc
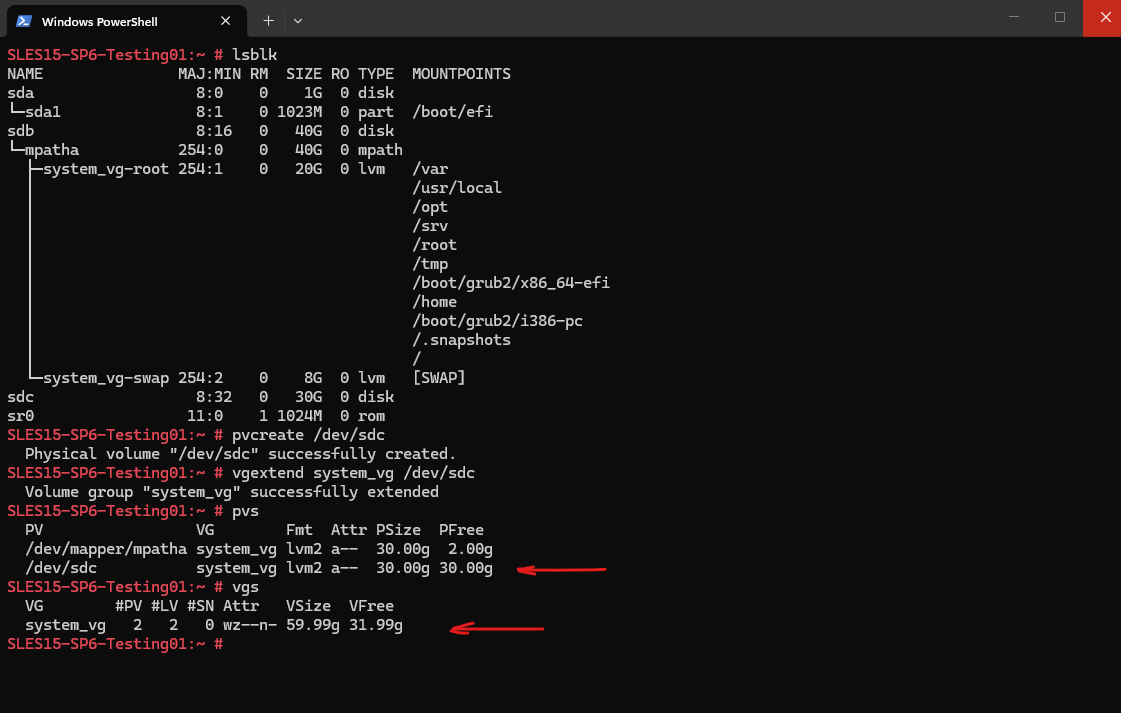
Verify by running:
After initializing the new virtual disk as an LVM physical volume and extending the existing volume group, the
system_vgvolume group now spans two physical volumes.As shown below, the original 30 GB physical volume (
/dev/mapper/mpatha) still contains the logical volumes, while the newly added 30 GB physical volume (/dev/sdc) is completely empty and provides 30 GB of free space. In the next step, the allocated physical extents will be migrated from the original physical volume to the new one.
SLES15-SP6-Testing01:~ # pvs
SLES15-SP6-Testing01:~ # vgs
Migrate the Data (Migrate the Physical Extents to the New Virtual Disk)
Migrate the Physical Extents
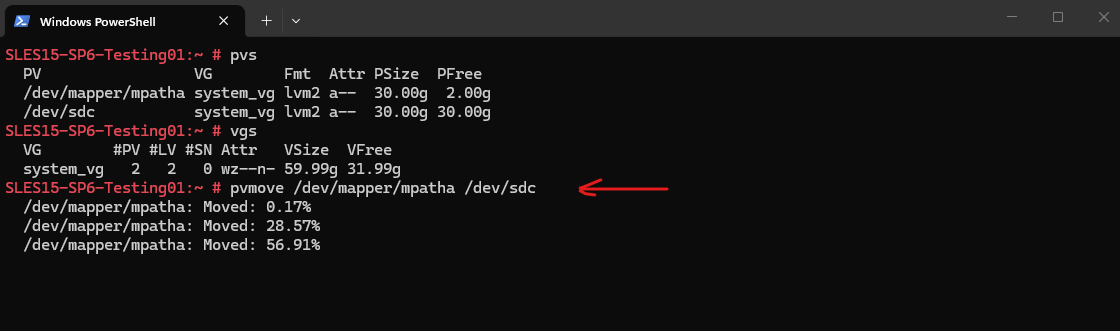
With both physical volumes now belonging to the same volume group, the allocated physical extents can be migrated from the original physical volume (/dev/mapper/mpatha) to the new one (/dev/sdc).
LVM performs this migration online by using the pvmove command, allowing the logical volumes to remain available throughout the process.
The
pvmovecommand now migrates all allocated physical extents from the original physical volume (/dev/mapper/mpatha) to the new physical volume (/dev/sdc).More about the
pvmovecommand you will find here https://docs.redhat.com/en/documentation/red_hat_enterprise_linux/7/html/logical_volume_manager_administration/online_relocation.During the migration, LVM transparently copies the data while updating its metadata, allowing the logical volumes to remain fully functional. Depending on the amount of allocated data and the storage performance, this operation may take several minutes to complete.
SLES15-SP6-Testing01:~ # pvmove /dev/mapper/mpatha /dev/sdc
After the pvmove operation has completed successfully, verify that all allocated physical extents have been migrated to the new physical volume.
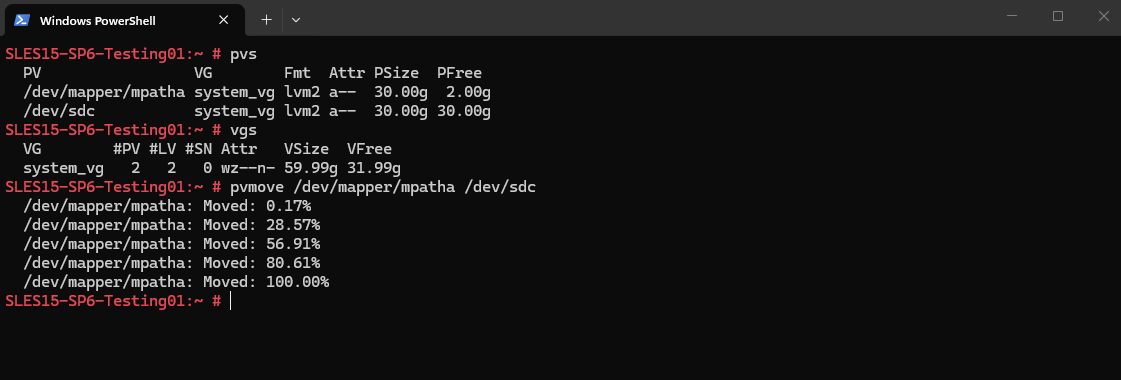
The following commands confirm that the original physical volume no longer contains any allocated extents, while the new physical volume now hosts the complete LVM configuration.
Note: As already mentioned, the original operating system disk uses DM Multipath, so the LVM physical volume is created on the multipath device (
/dev/mapper/mpatha) rather than the underlying SCSI device (/dev/sdb). The newly added virtual disk is not configured for multipathing and therefore appears simply as/dev/sdc.More about multipathing on SLES you will find in my following post https://blog.matrixpost.net/mastering-linux-dm-multipathing-and-iscsi-block-storage-suse/.
SLES15-SP6-Testing01:~ # pvs
SLES15-SP6-Testing01:~ # vgs
SLES15-SP6-Testing01:~ # lvs
SLES15-SP6-Testing01:~ # pvdisplay -m
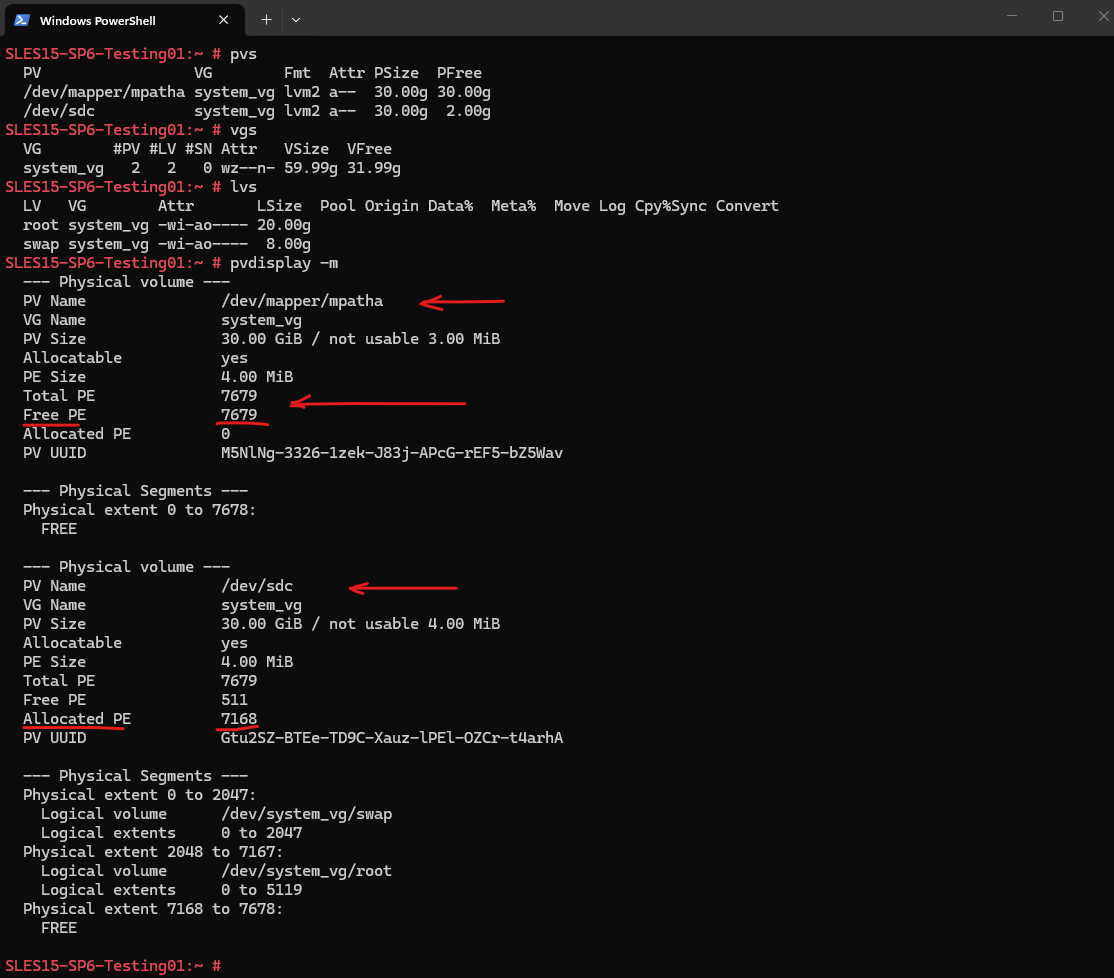
The verification confirms that the migration completed successfully. As shown above, the original physical volume (/dev/mapper/mpatha) no longer contains any allocated physical extents and is now completely free.
The new physical volume (/dev/sdc) now hosts both logical volumes (root and swap), while the logical volume sizes and the mounted file systems remain unchanged. The original physical volume can therefore be safely removed from the volume group in the next step.
Remove the Original Physical Volume
After all allocated physical extents have been successfully migrated to the new physical volume, the original physical volume no longer contains any data and can be safely removed from the volume group.
Once removed, it is no longer required by LVM and the corresponding virtual disk can be detached from the virtual machine in VMware vSphere.
Run:
SLES15-SP6-Testing01:~ # vgreduce system_vg /dev/mapper/mpatha
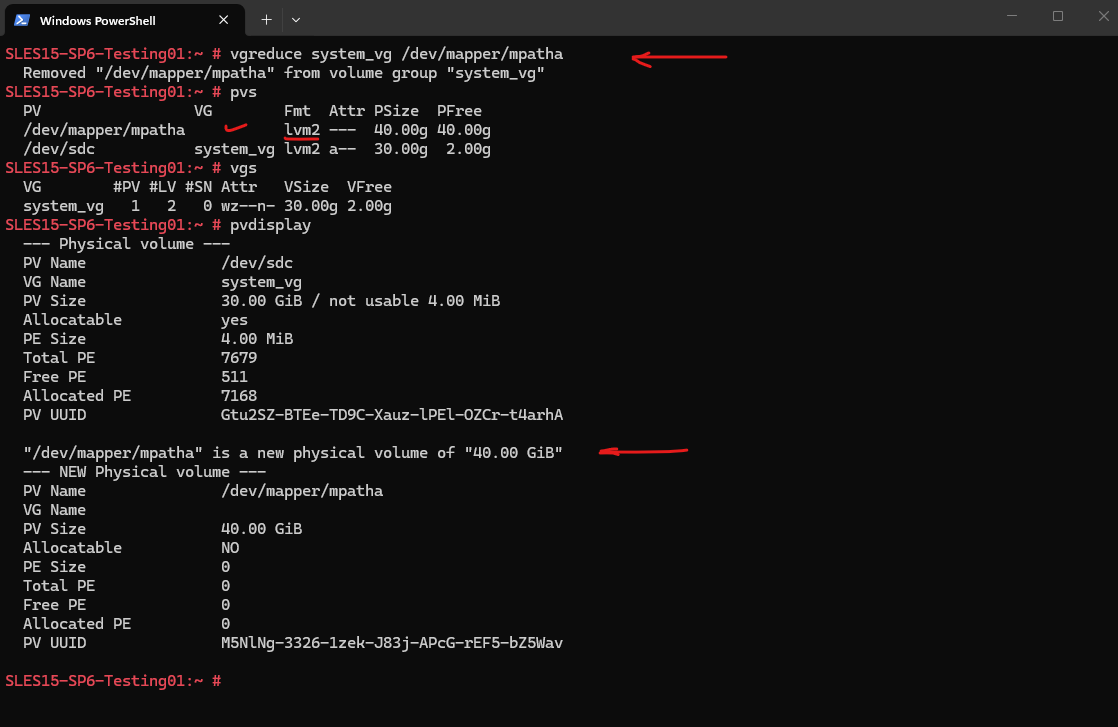
The vgreduce command removes the original physical volume from the volume group but leaves the LVM metadata on the disk.
As a result, the physical volume is no longer associated with system_vg, yet it is still recognized by LVM as an unused physical volume. In the next step, the remaining LVM metadata is removed by using the pvremove command before the original virtual disk is detached from the virtual machine.
Now run:
SLES15-SP6-Testing01:~ # pvremove /dev/mapper/mpatha

# Verify
SLES15-SP6-Testing01:~ # pvs
SLES15-SP6-Testing01:~ # pvdisplay
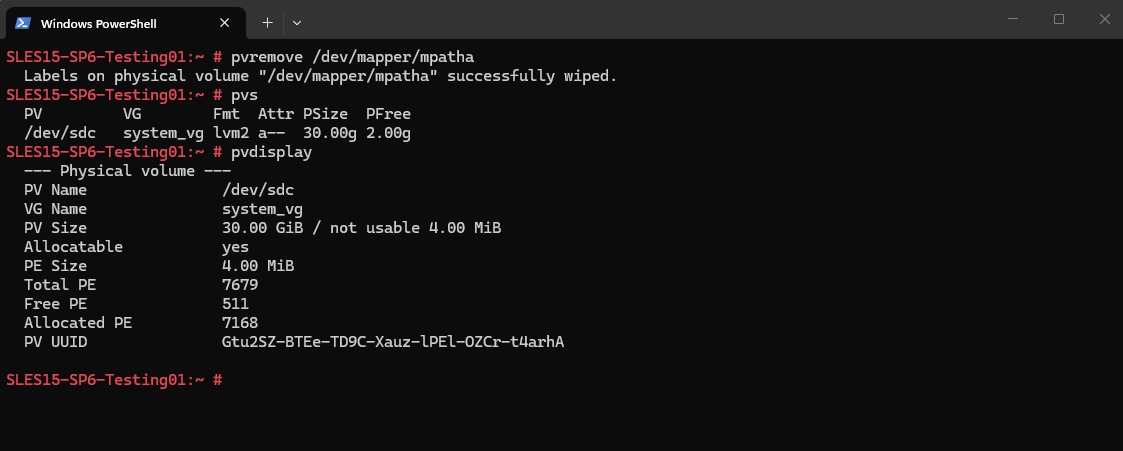
The verification confirms that the original physical volume has been successfully removed from LVM. As shown below, the system_vg volume group now consists of a single 30 GB physical volume (/dev/sdc), which contains both the root and swap logical volumes.
The original 40 GB physical volume is no longer recognized by LVM and the corresponding virtual disk can now be safely removed from the virtual machine.
Detach the Original Virtual Disk
With the LVM migration successfully completed, the final step is to replace the original 40 GB virtual disk with the new 30 GB virtual disk in VMware vSphere.
After updating the virtual machine’s disk configuration, verify that the operating system boots successfully and that all logical volumes and file systems are available as expected.
To detach the original 40 GB virtual disk, select it in the virtual machine’s Edit Settings dialog and click Remove Device.
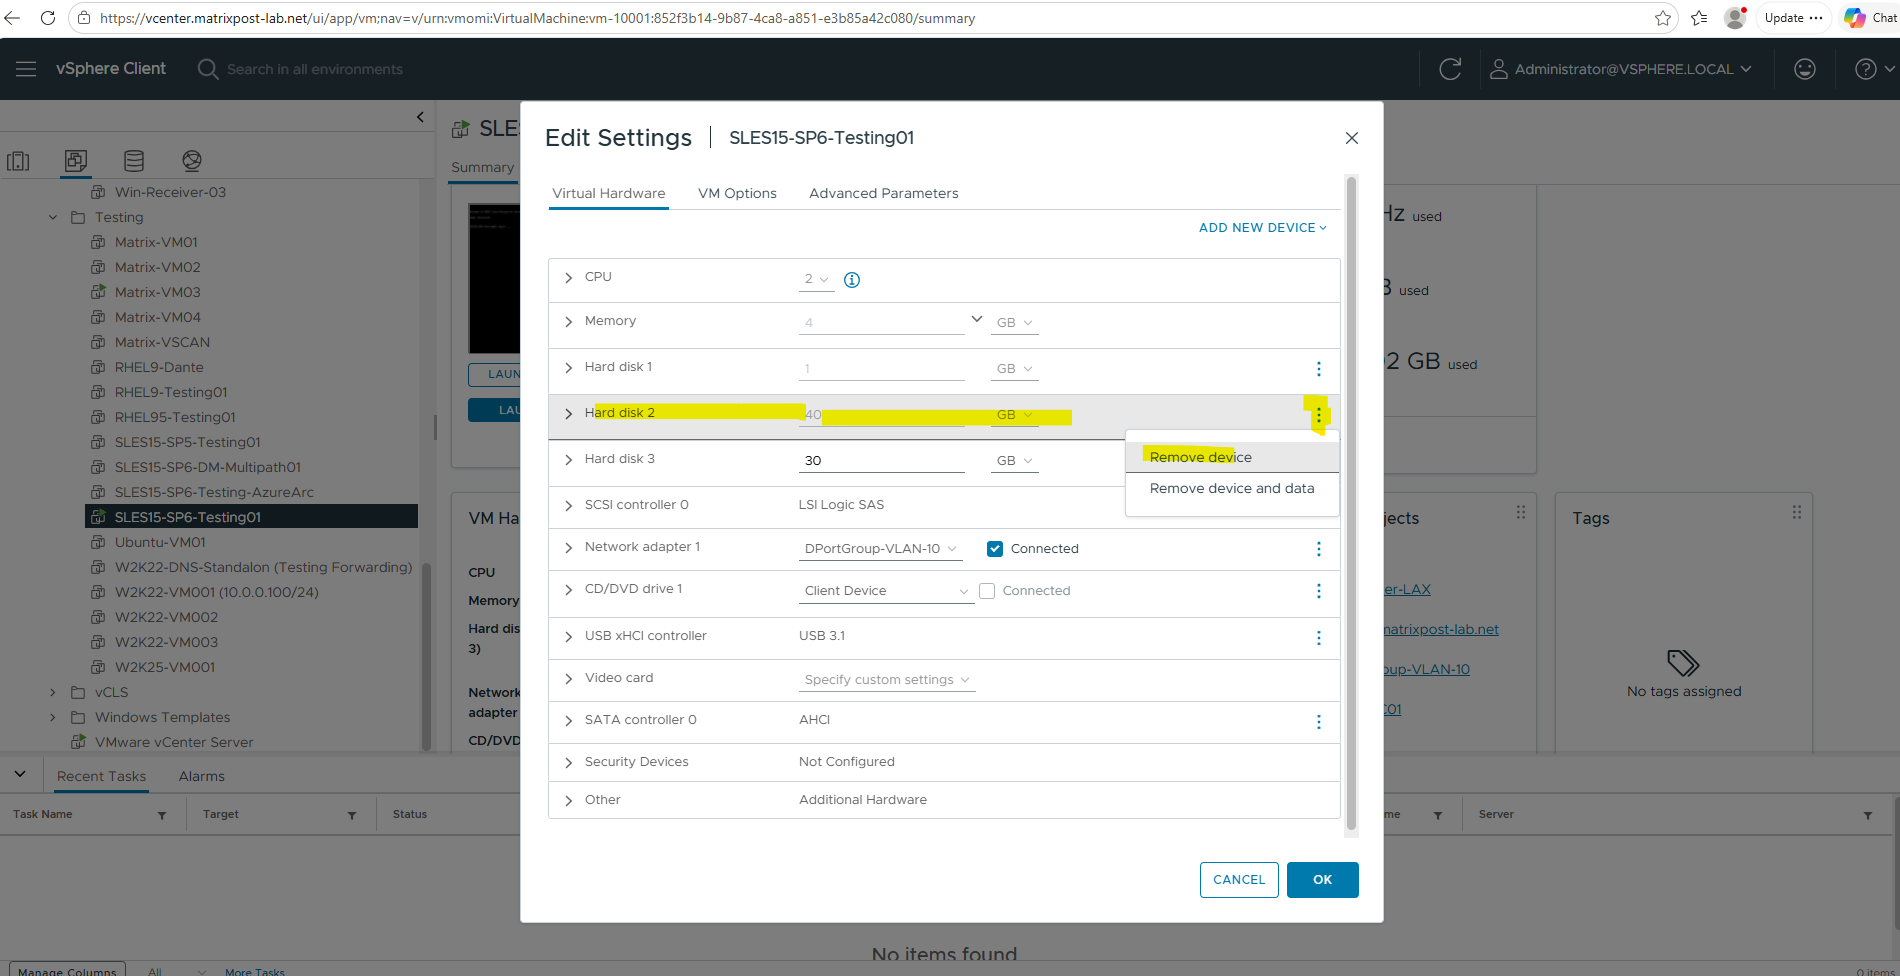
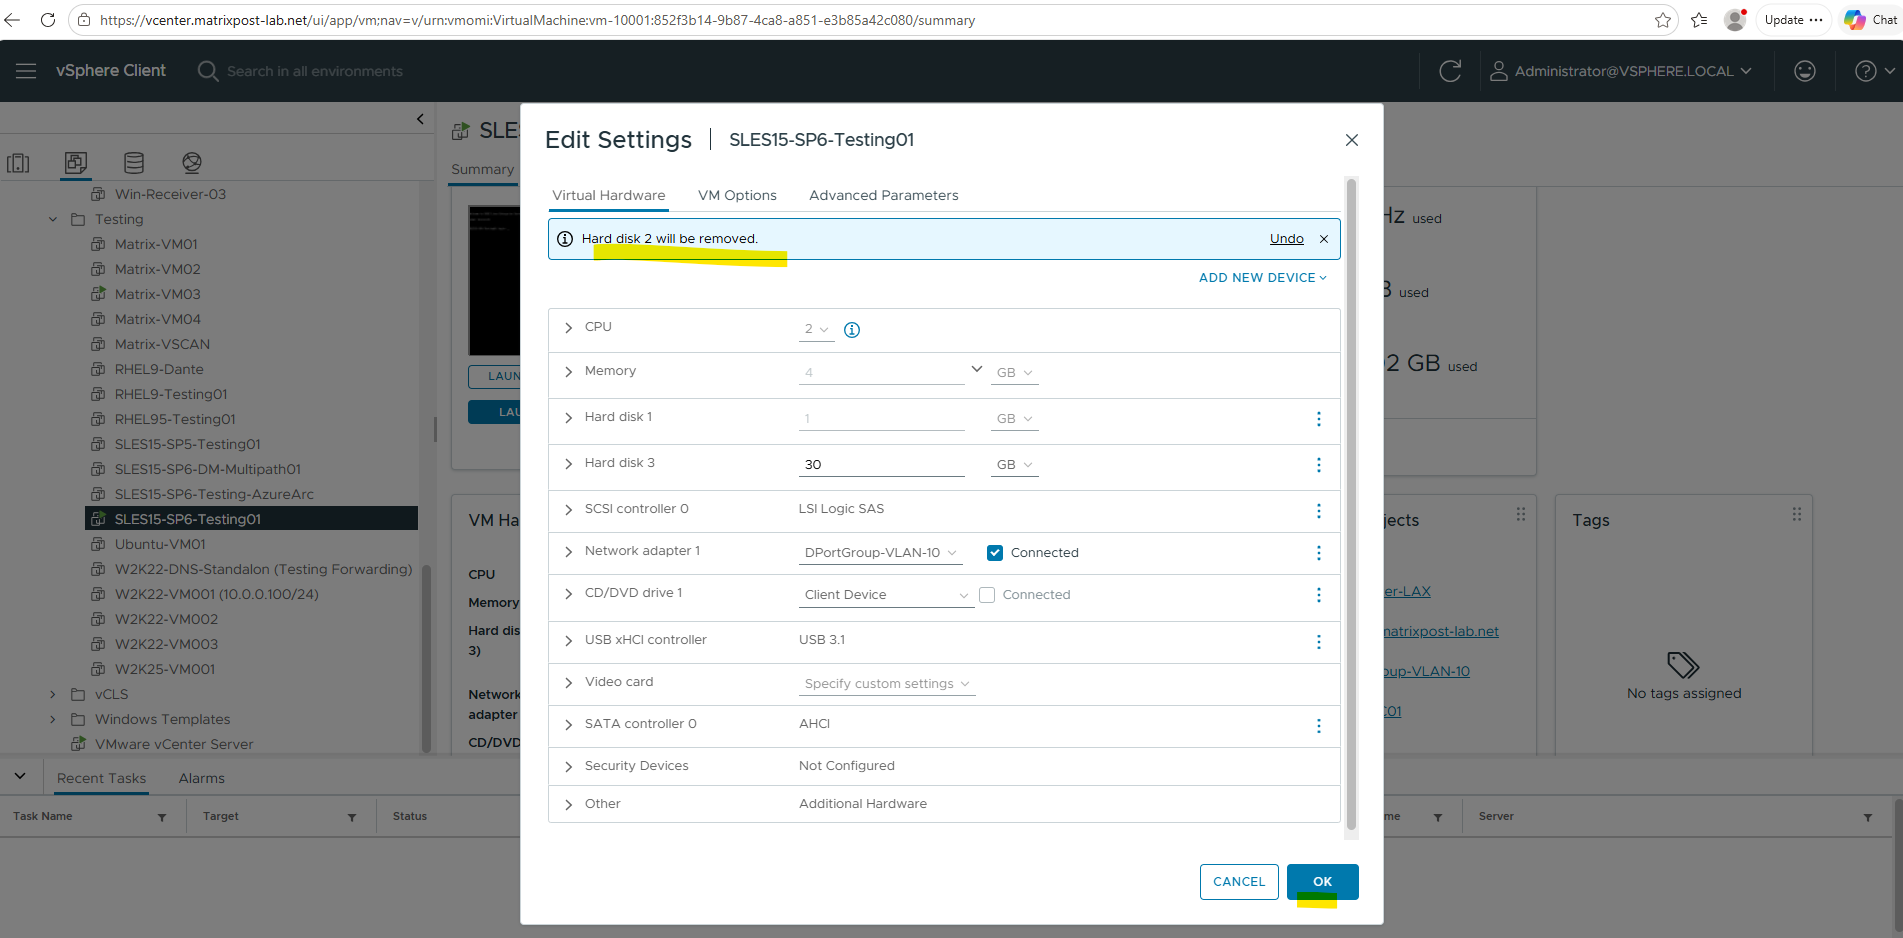
Click on OK finally.
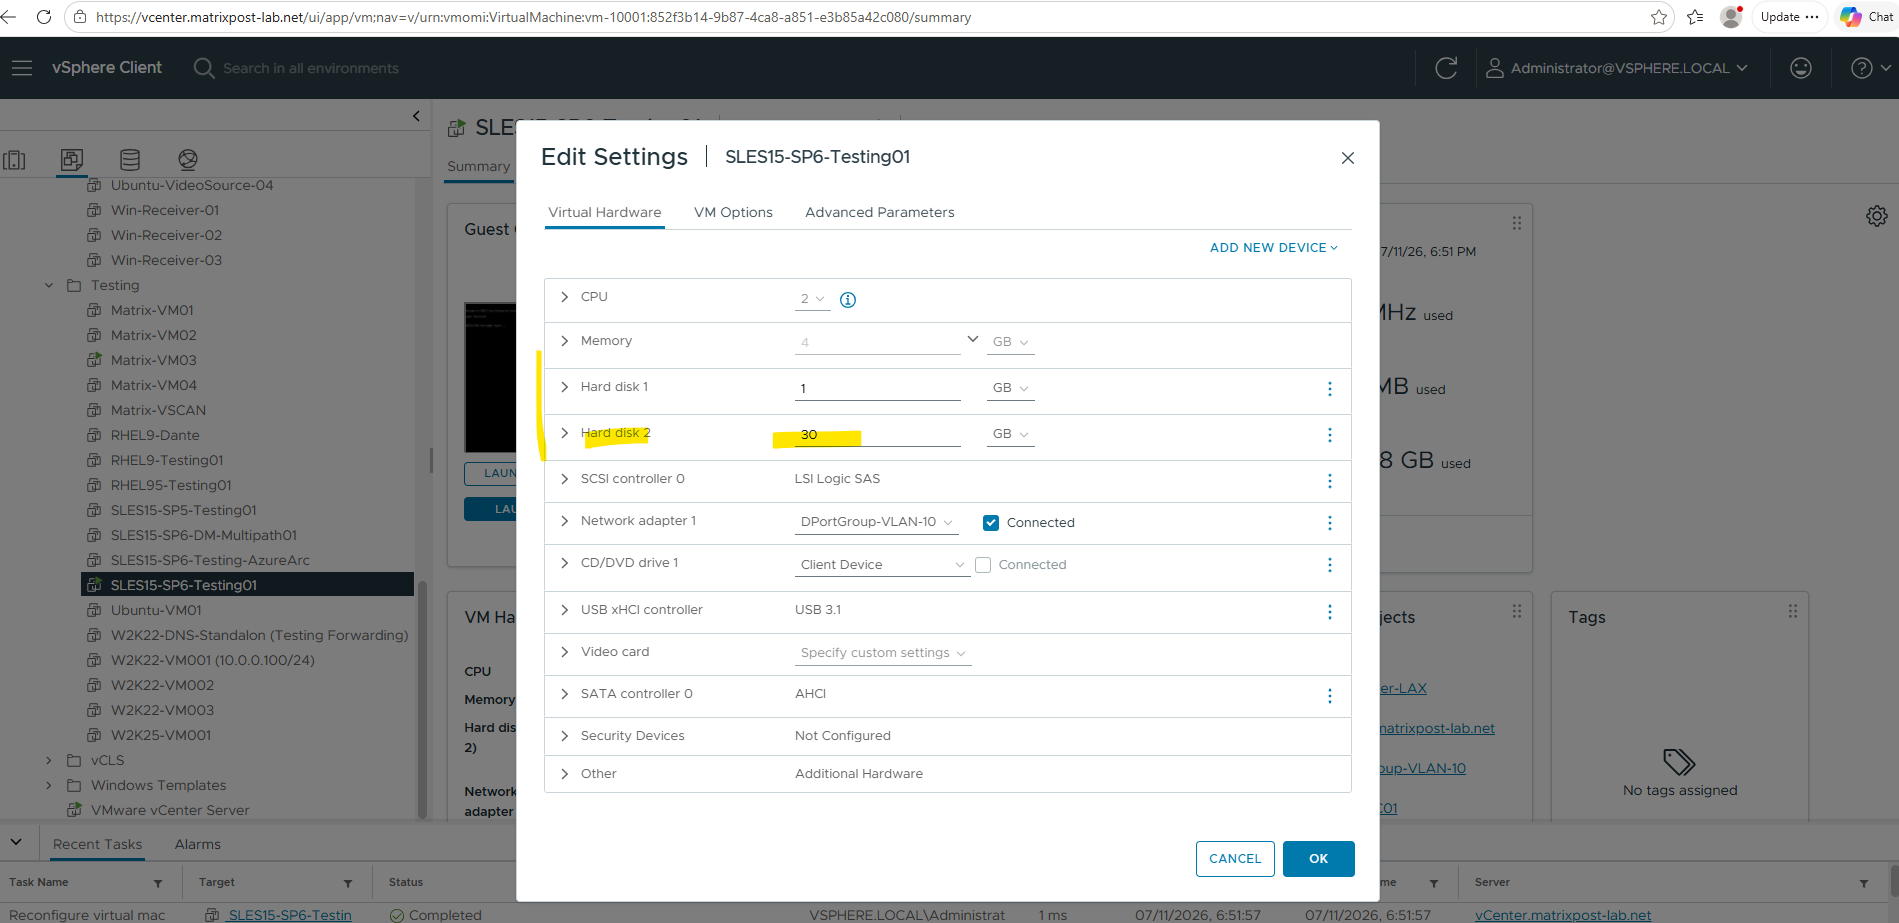
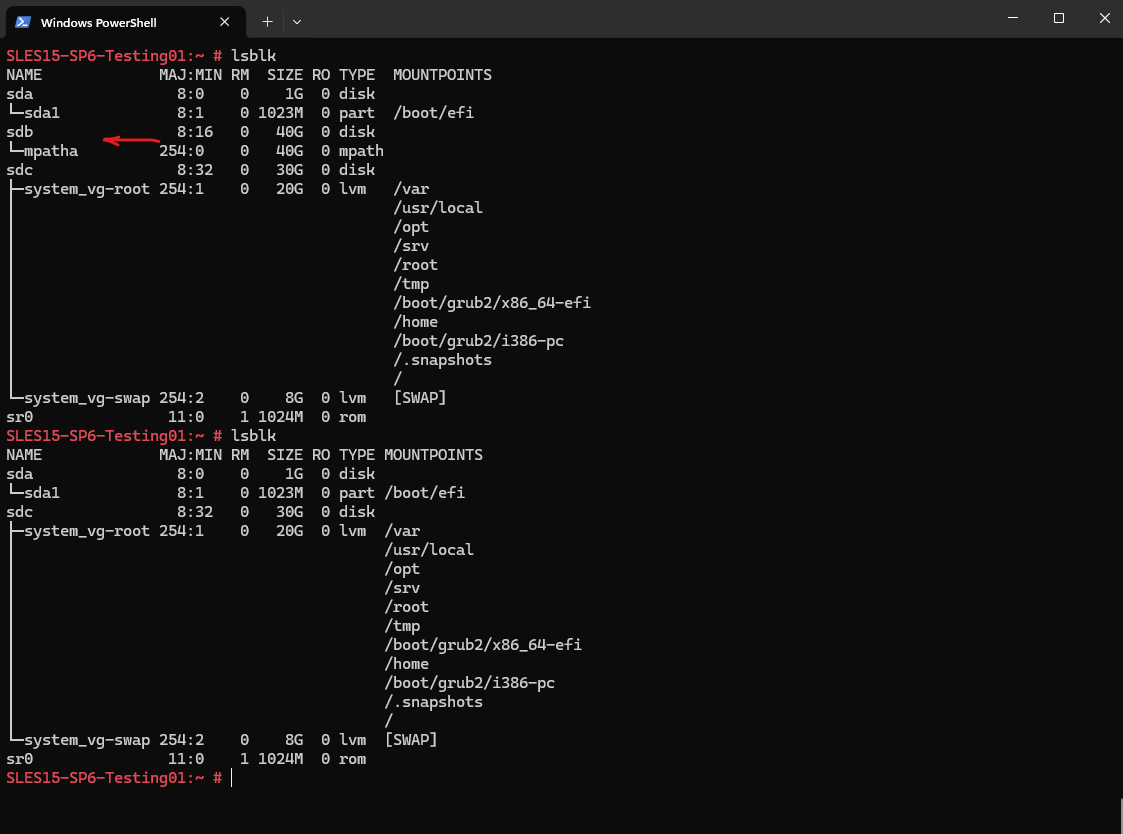
The final verification confirms that the original 40 GB virtual disk has been successfully removed from the virtual machine. As shown below, the operating system now uses only the new 30 GB virtual disk, which contains the system_vg volume group with the root and swap logical volumes, while all file systems remain mounted and fully operational.
SLES15-SP6-Testing01:~ # lsblk
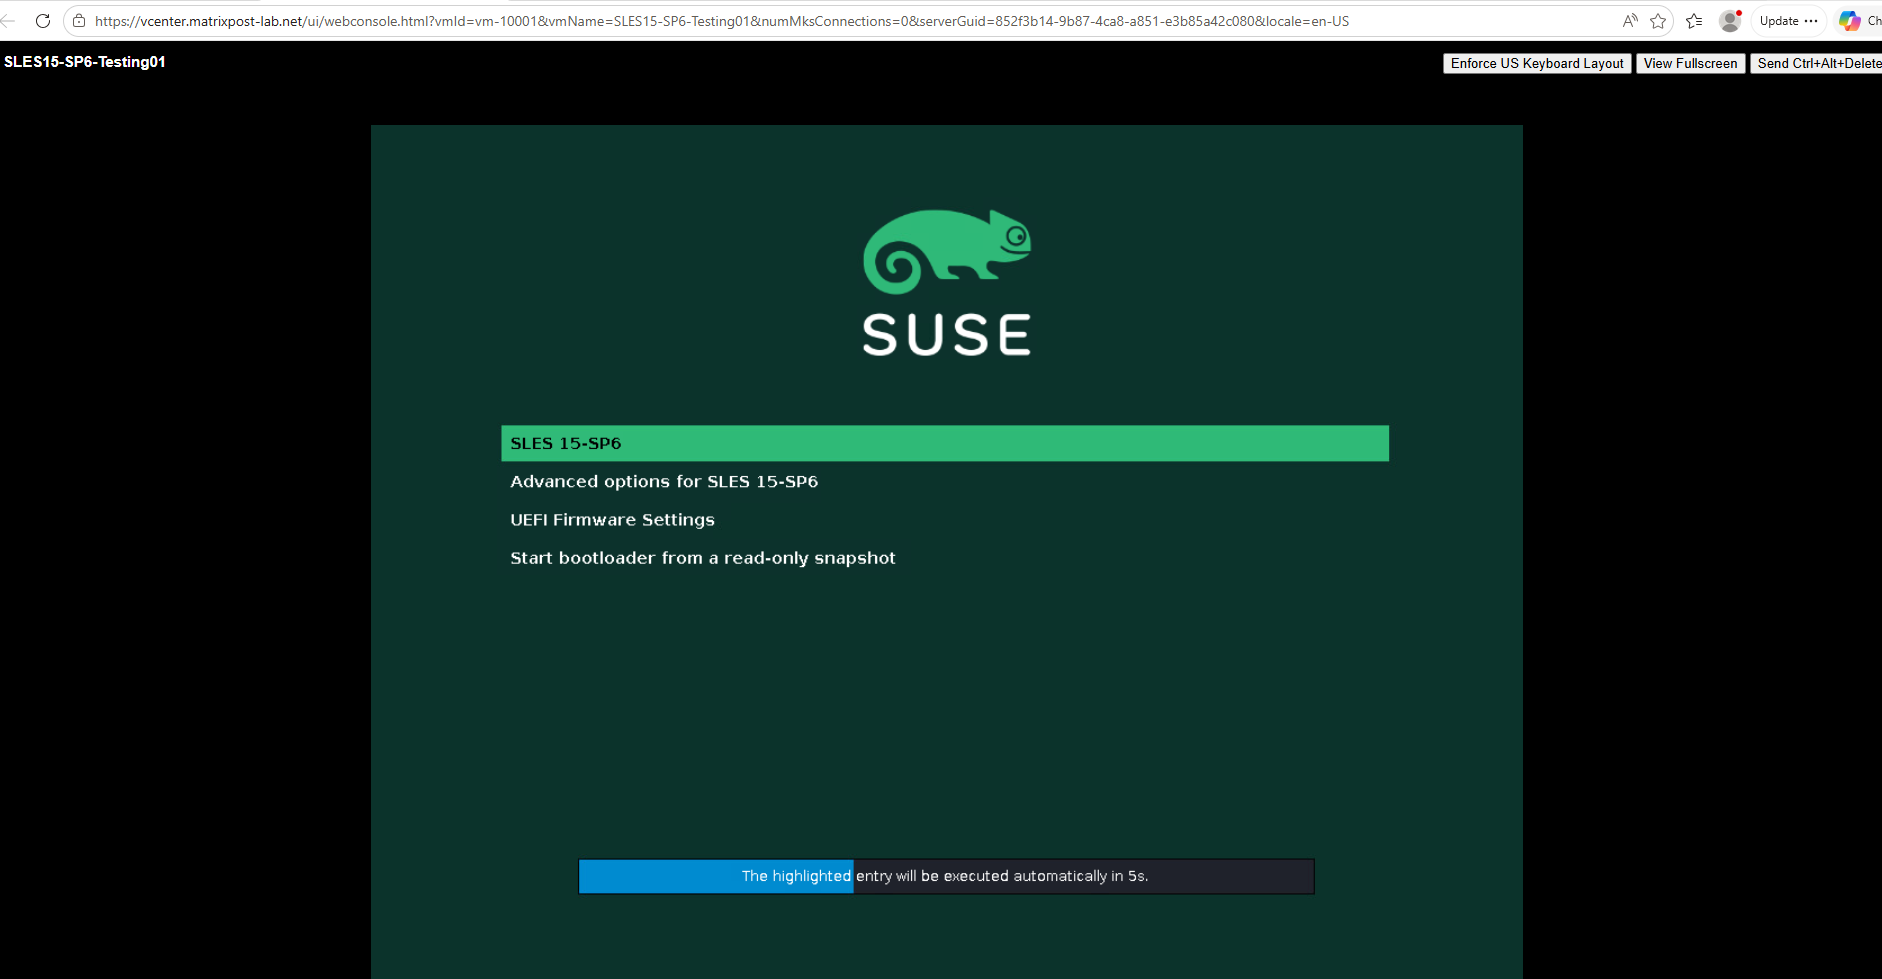
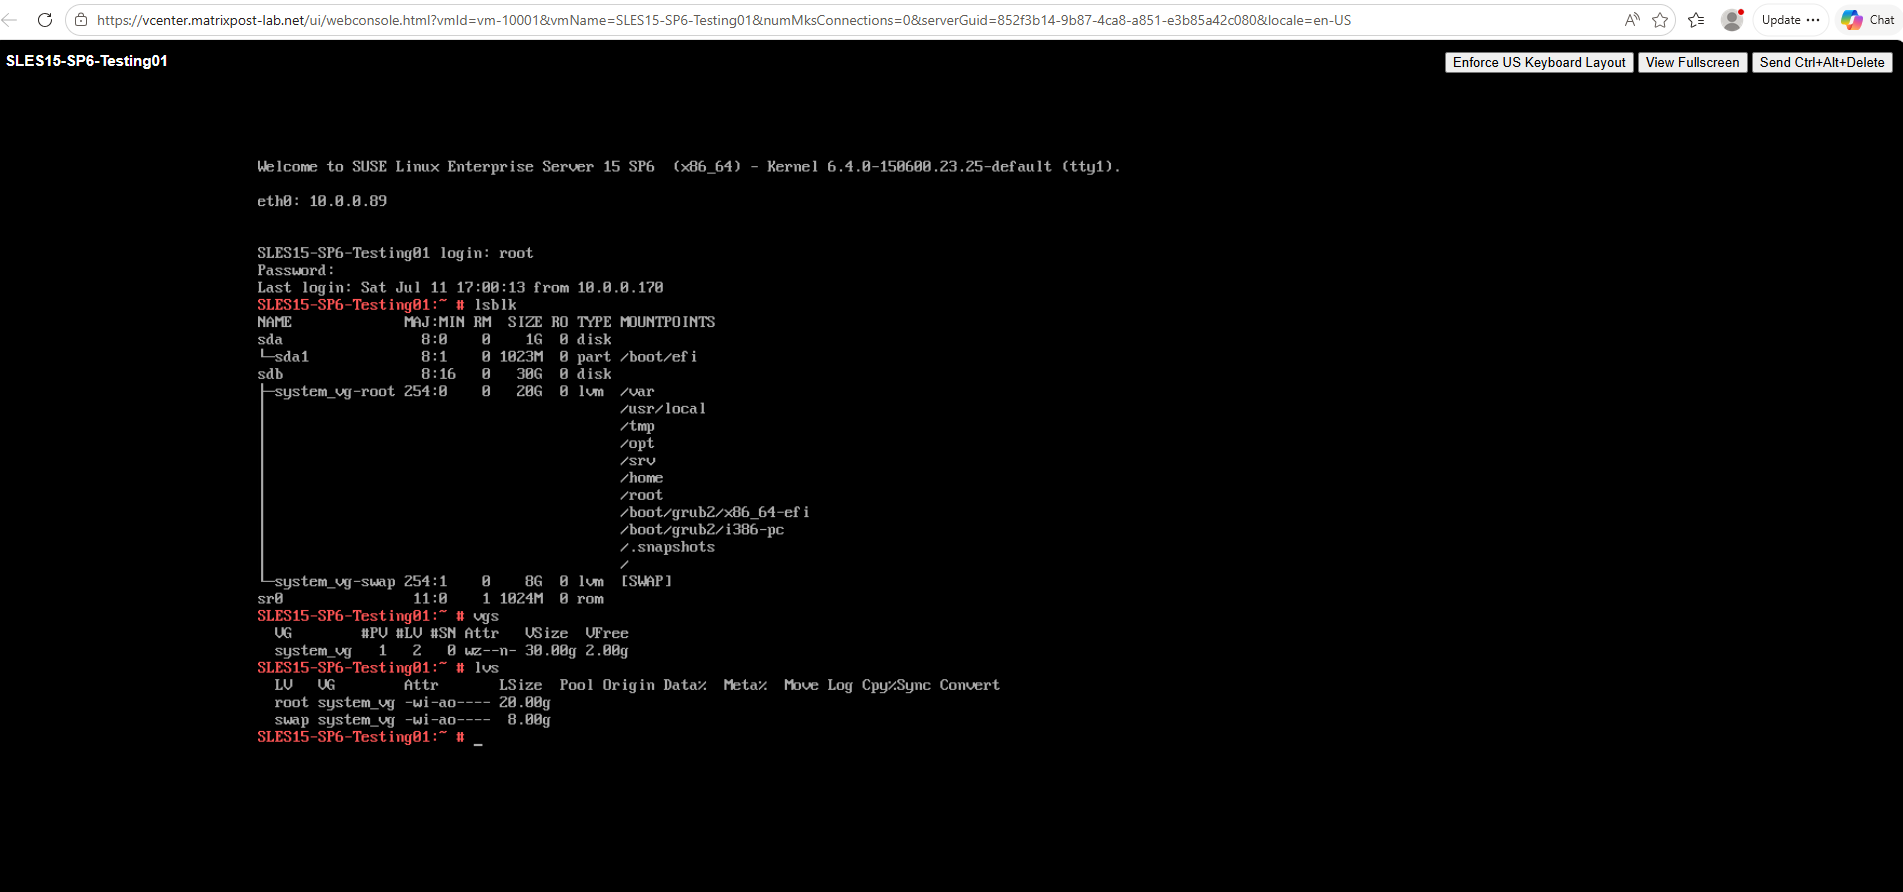
As a final verification step, reboot the virtual machine and confirm that the operating system starts successfully and that all file systems and logical volumes are available after the restart.

Looks good!
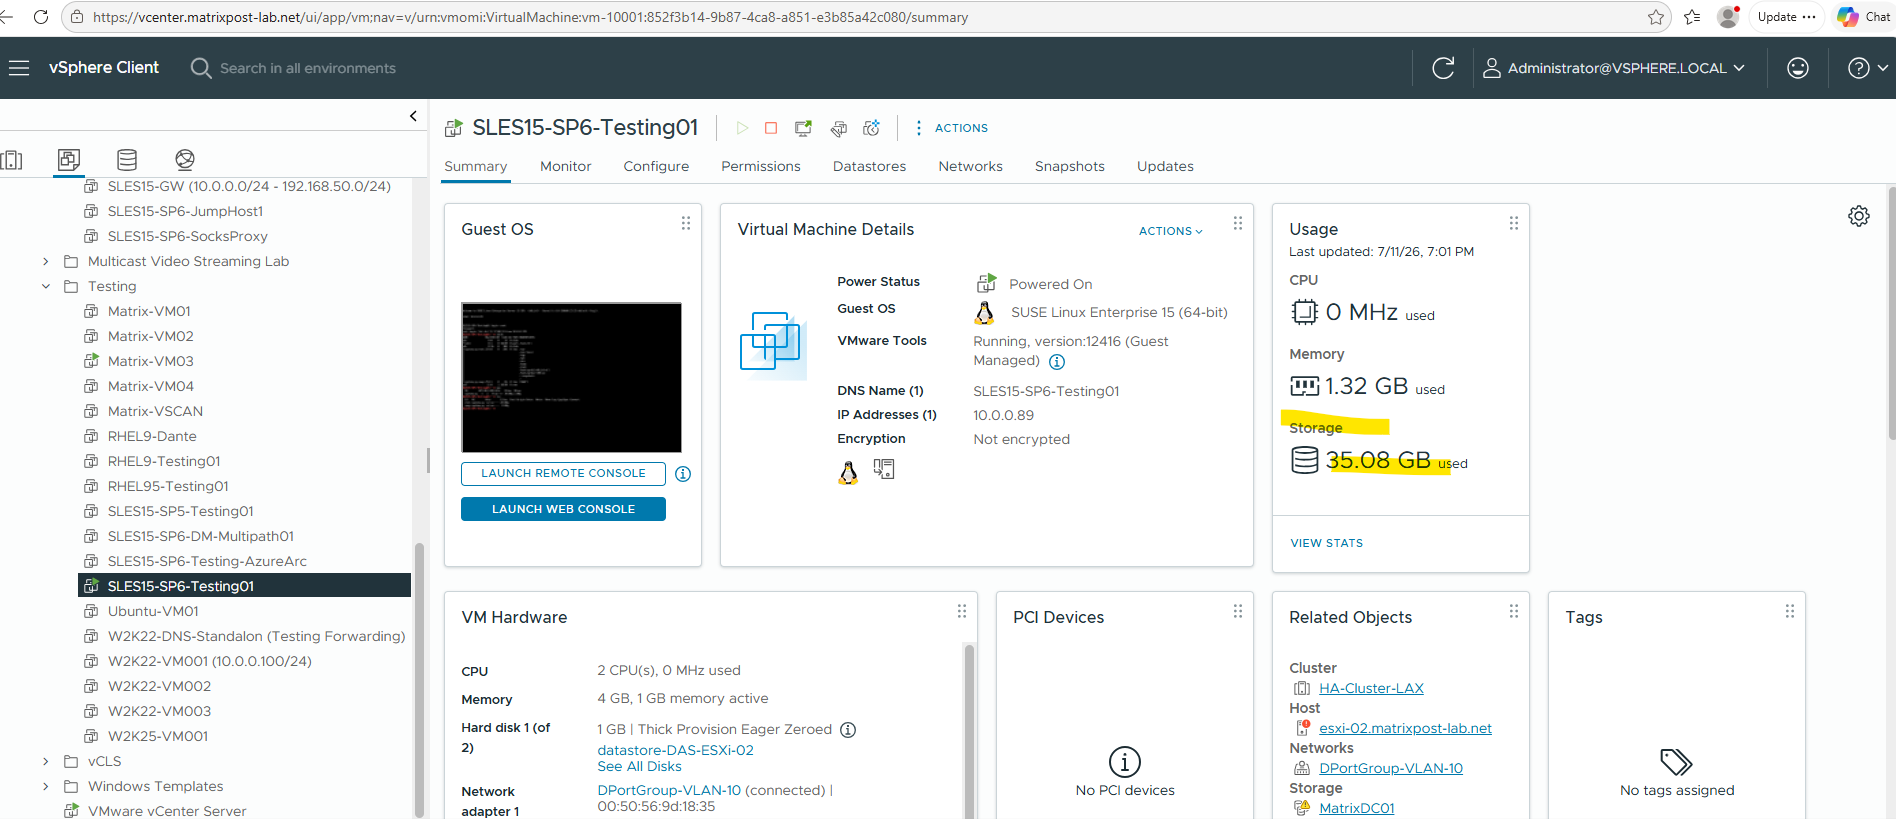
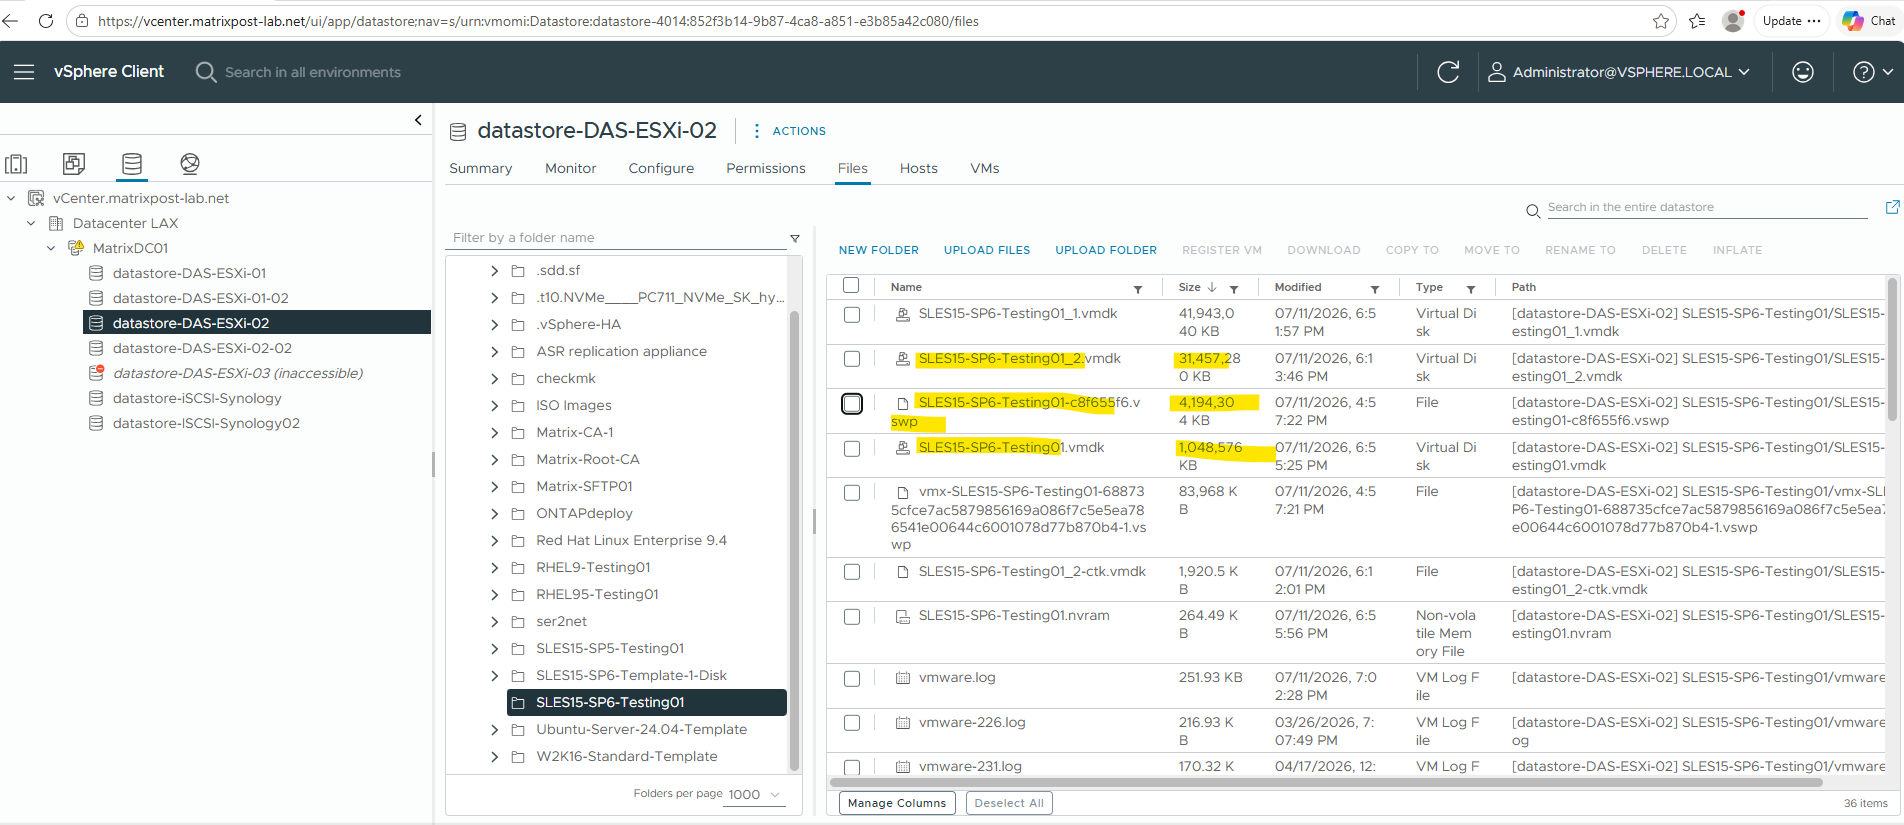
Note: Although the virtual machine now contains only a 30 GB operating system disk and a 1 GB EFI boot disk, VMware vSphere reports a storage usage of approximately 35 GB. This value represents the total storage consumed by the virtual machine, including additional files such as the VM swap file (
.vswp), configuration files, and virtual disk metadata, rather than just the combined capacity of the virtual disks.
Note: The datastore browser still contains the detached 40 GB virtual disk because it was removed only from the virtual machine configuration and not deleted from the datastore, providing a convenient rollback option until the migration has been fully verified.
In addition to the new 30 GB operating system disk and the dedicated 1 GB EFI boot disk, the datastore also contains the VMware swap file (
.vswp), which contributes to the total storage consumed by the virtual machine.The Linux swap logical volume resides on the 30 GB operating system disk and is used by the guest operating system, whereas the
.vswpfile is created separately on the datastore by ESXi and is used only if the host needs to swap the virtual machine’s memory.The VMware swap file (
.vswp) is created by ESXi independently of the guest operating system and exists even if no swap space is configured within the operating system itself.
Links
Storage Administration Guide
https://documentation.suse.com/sles/15-SP7/single-html/SLES-storage/index.htmlRemoving a disk from a virtual machine using the vSphere Client
https://knowledge.broadcom.com/external/article/419838/removing-a-disk-from-a-virtual-machine-u.htmlRed Hat Enterprise Linux 8 – Managing storage devices
https://docs.redhat.com/en/documentation/red_hat_enterprise_linux/8/pdf/managing_storage_devices/Red_Hat_Enterprise_Linux-8-Managing_storage_devices-en-US.pdf
