

How to Shrink a VMware vSphere Virtual Disk for Windows Server
Shrinking a virtual disk in VMware vSphere is considerably more challenging than extending one. While Windows allows you to reduce the size of partitions by using Disk Management or diskpart, VMware does not support shrinking an existing virtual disk. As a result, reducing the size of a VMDK requires migrating the operating system and its partitions to a new, smaller virtual disk.
In this post, I’ll demonstrate how to safely reduce a VMware vSphere virtual disk for a Windows Server virtual machine by shrinking the existing partitions, cloning the disk to a new, smaller virtual disk, and finally replacing the original disk with the cloned one.
Note: Although some third-party tools claim to shrink virtual disks in place, creating a new, smaller virtual disk and migrating the existing Windows installation to it is the recommended and best-practice approach. This method relies on supported VMware functionality and proven disk cloning techniques, minimizes risk, and provides a straightforward rollback option until the migration has been fully verified.
For detailed instructions on shrinking a VMware vSphere virtual disk for Linux LVM, refer to my following post
Shrink the Windows Partitions
Before the virtual disk can be migrated to a smaller VMDK, the existing Windows partitions must first fit within the target disk size. In this example, the operating system partition is reduced by using the built-in Disk Management console. If the Windows Recovery partition prevents further shrinking, it can be moved or recreated as described in my following post.
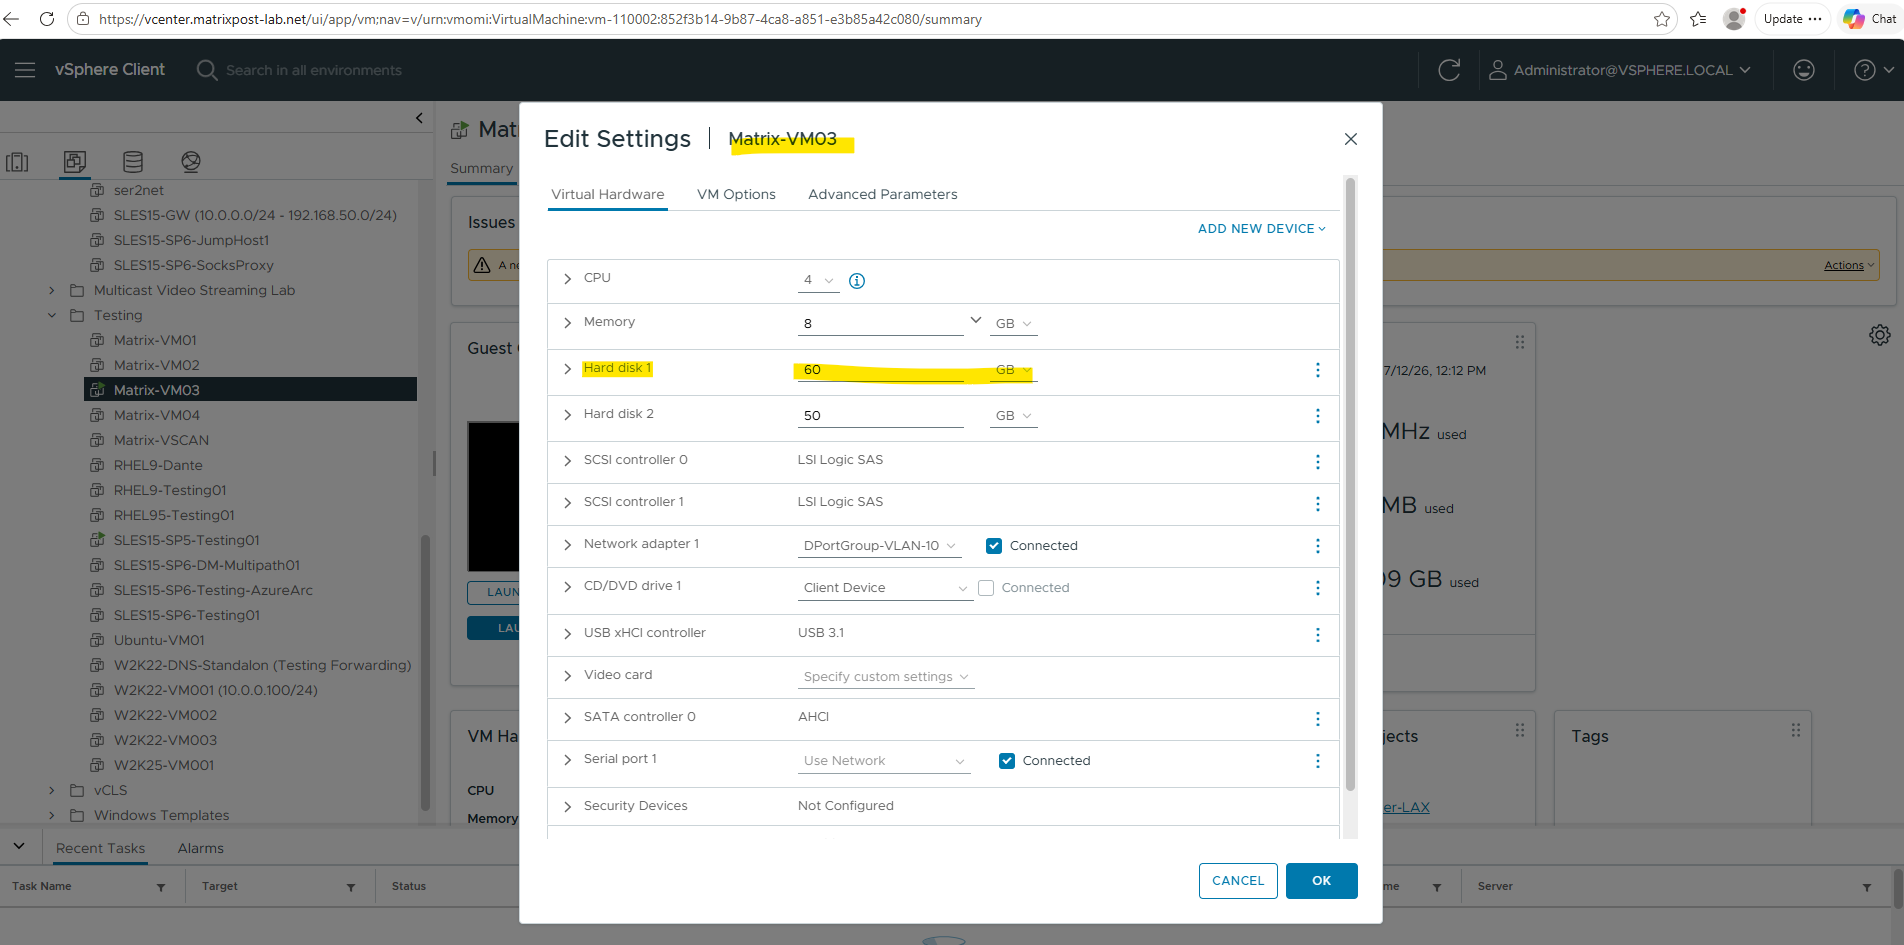
In this example, the Windows Server virtual machine is configured with two virtual disks: a 60 GB operating system disk and a separate 50 GB data disk. The objective is to reduce the size of the operating system disk as much as possible and migrate it to a new, smaller virtual disk while leaving the data disk unchanged.
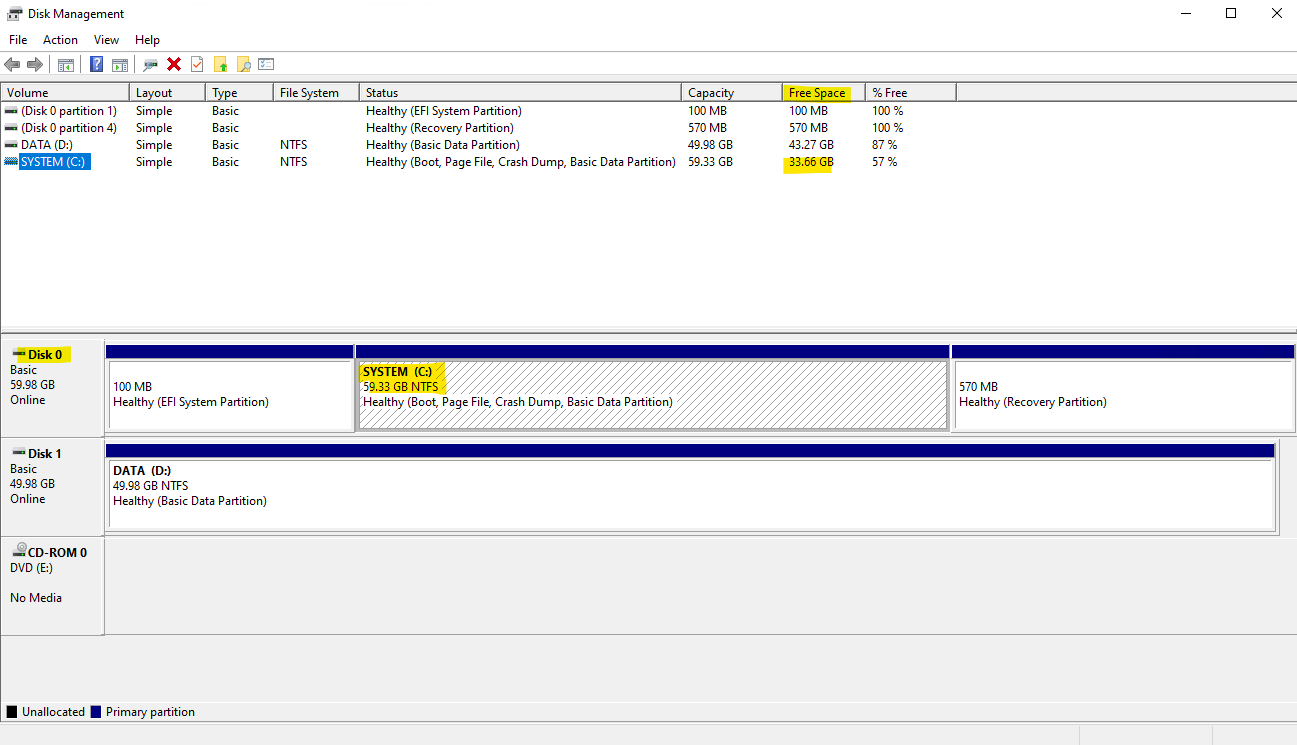
The Disk Management console shows that the C: partition on the 60 GB operating system disk currently has 33.66 GB of free space. This provides sufficient room to shrink the partition significantly before cloning it to a smaller virtual disk.
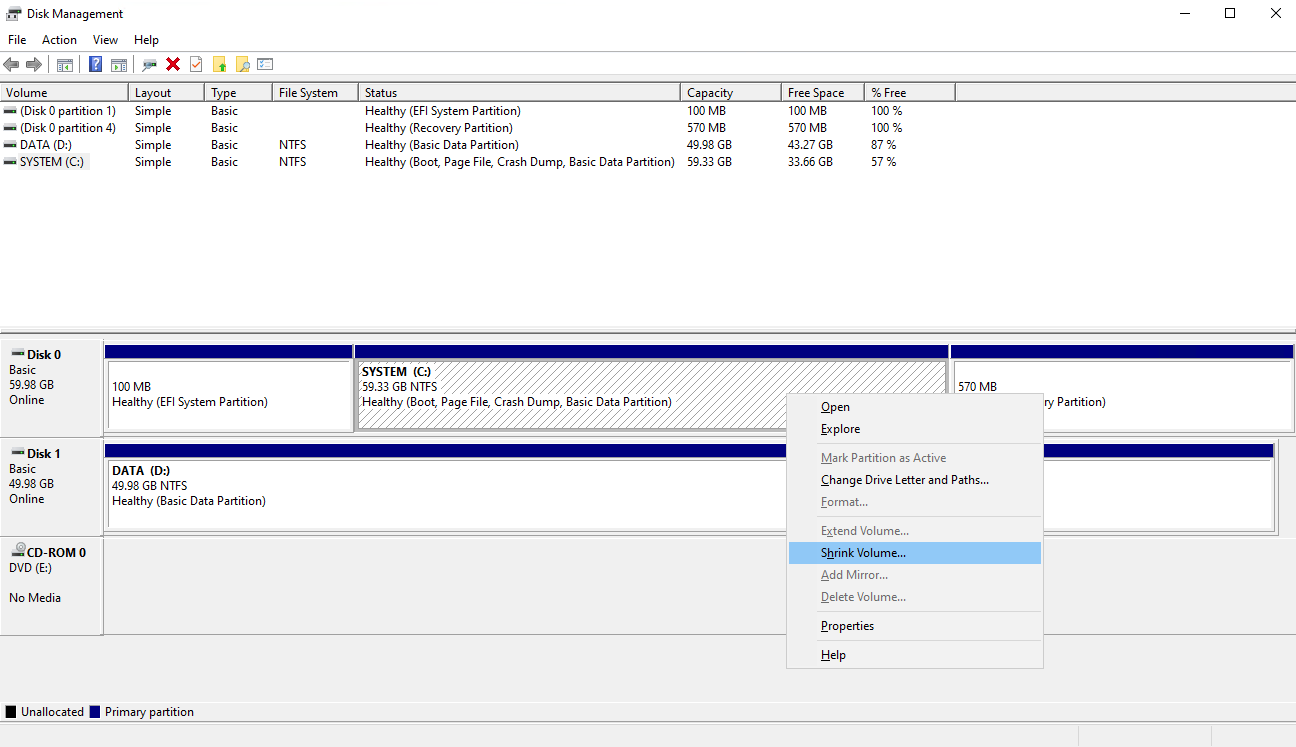
To shrink the operating system partition, right-click the C: volume in Disk Management and select Shrink Volume….
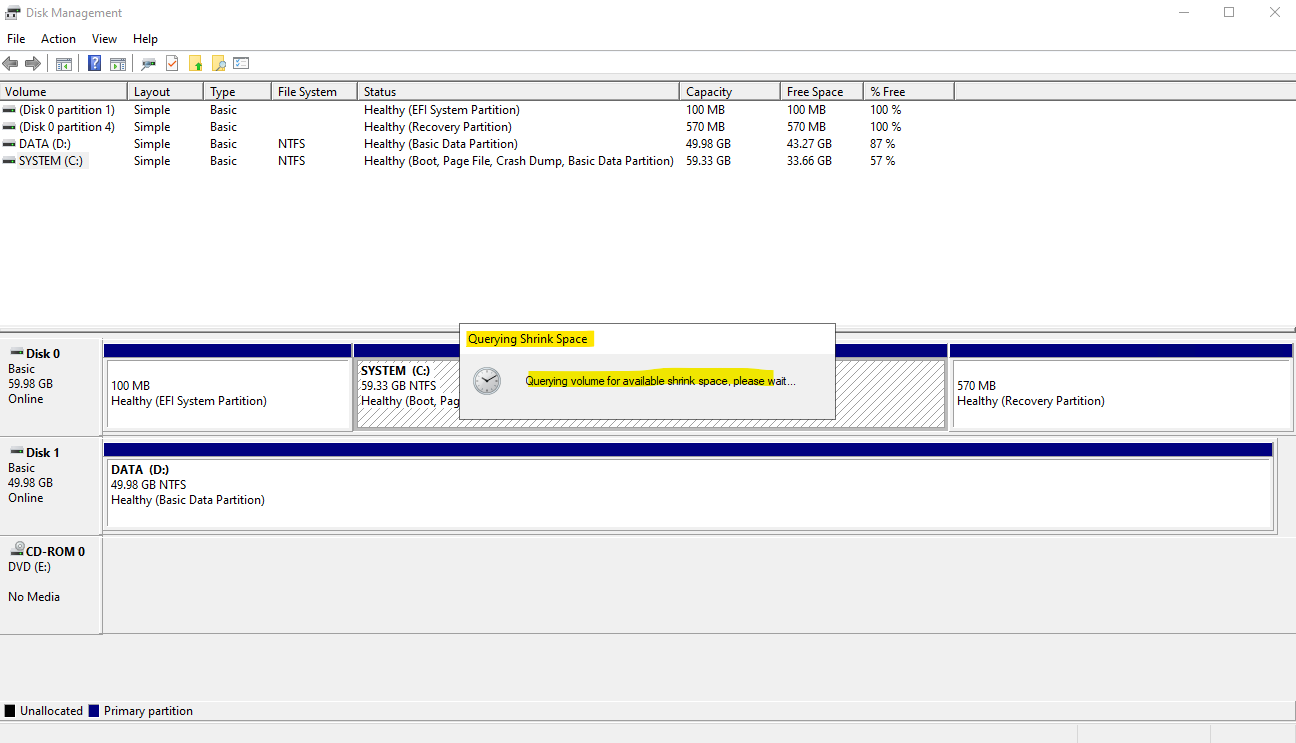
Windows first analyzes the selected volume to determine how much it can be safely reduced. During this process, the “Querying volume for available shrink space” dialog is displayed while Disk Management calculates the maximum shrinkable size.
The Shrink dialog displays the current size of the partition, the maximum amount of space that can be reclaimed, and the resulting partition size after the operation.
In this example, Windows reports that up to 34,407 MB (approximately 33.6 GB) can be removed, reducing the operating system partition from 60,751 MB (approximately 59.3 GB) to 26,344 MB (approximately 25.7 GB).
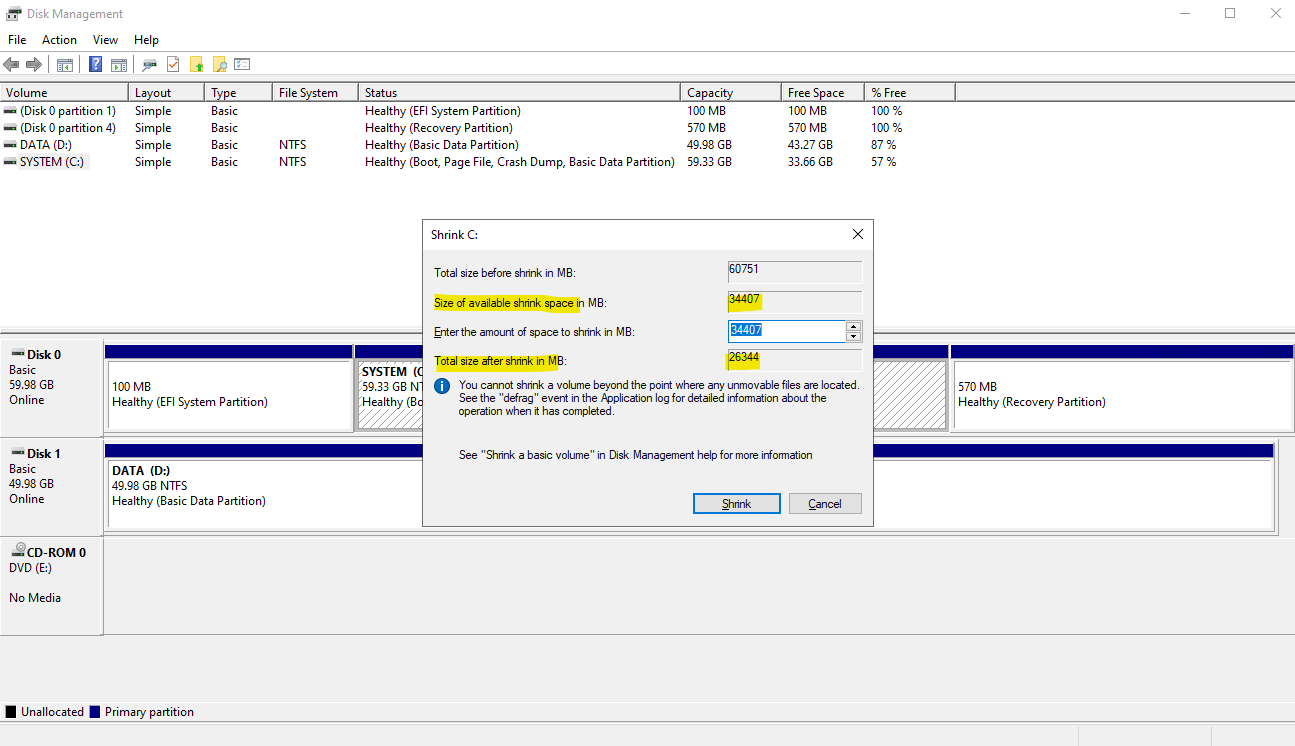
The same operation can also be performed from the command line by using the DiskPart utility. The shrink querymax command calculates the maximum amount of reclaimable space, which corresponds to the value displayed by the Disk Management console before shrinking the partition.
Note: The maximum reclaimable space reported by DiskPart may differ slightly from the value shown in Disk Management. Minor differences of a few megabytes are normal because both tools calculate the available shrink space at the time the query is executed and the NTFS file system may have changed slightly in the meantime.
PS> diskpart
DISKPART> list volume
DISKPART> select volume C
DISKPART> shrink querymax
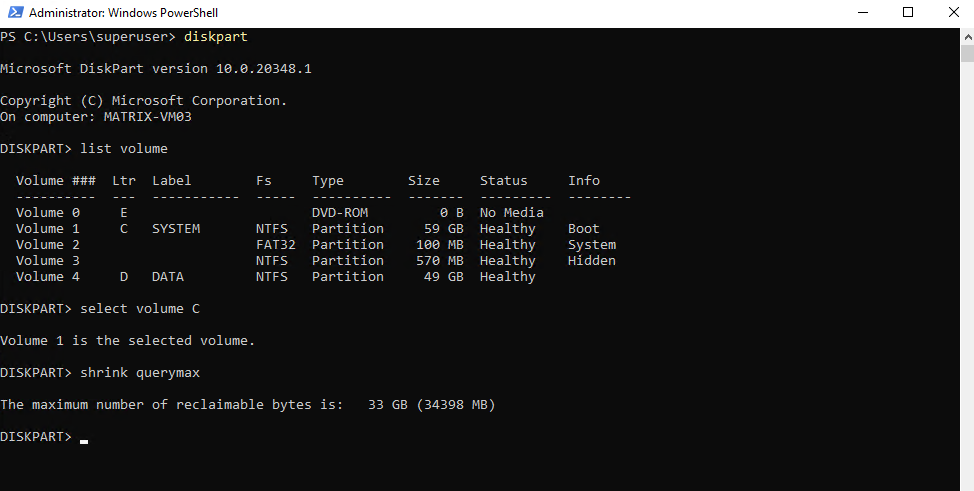
With DiskPart, instead of clicking Shrink in the Disk Management console, you execute the shrink command:
To shrink the partition by the maximum available amount, simply execute the shrink command. Alternatively, use shrink desired=<size in MB> to reduce the partition by a specific amount.
DiskPart will shrink the volume by the maximum amount it just calculated with
shrink querymax.Note: The maximum shrink size reported by Windows represents the largest amount of space that can currently be reclaimed, it does not include any reserve for future operating system updates, applications, or data growth. In production environments, it is generally advisable to leave sufficient free space on the operating system partition rather than shrinking it to the calculated maximum.
DISKPART> shrink
To reduce the partition by a specific amount.
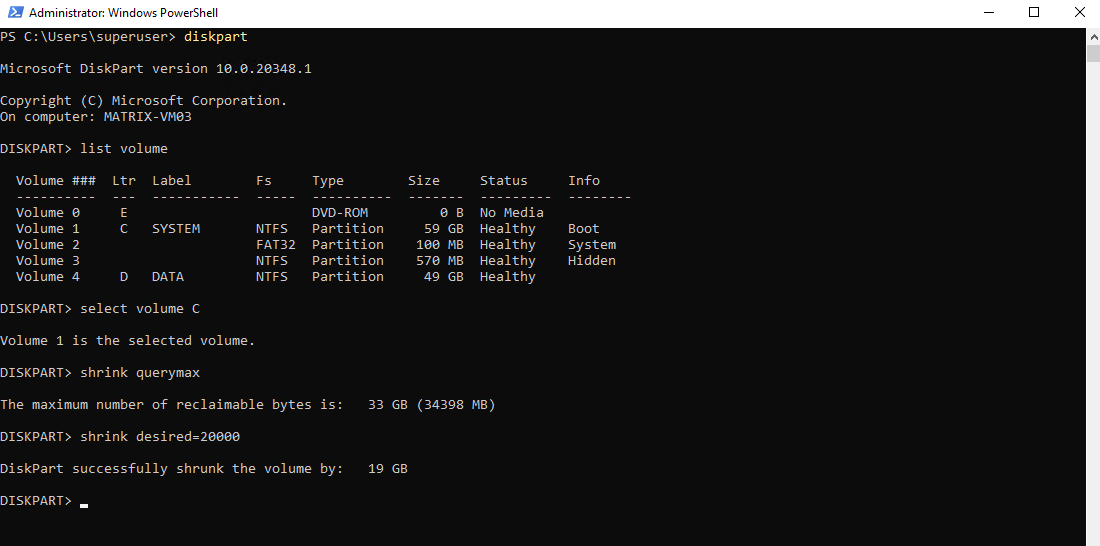
DISKPART> shrink desired=20000
Rather than shrinking the partition to the maximum possible size, this example reduces it by 20,000 MB using the shrink desired command. This leaves approximately 19 GB of free space on the C: partition, providing sufficient room for future Windows updates, applications, and data growth.
DISKPART> shrink desired=20000
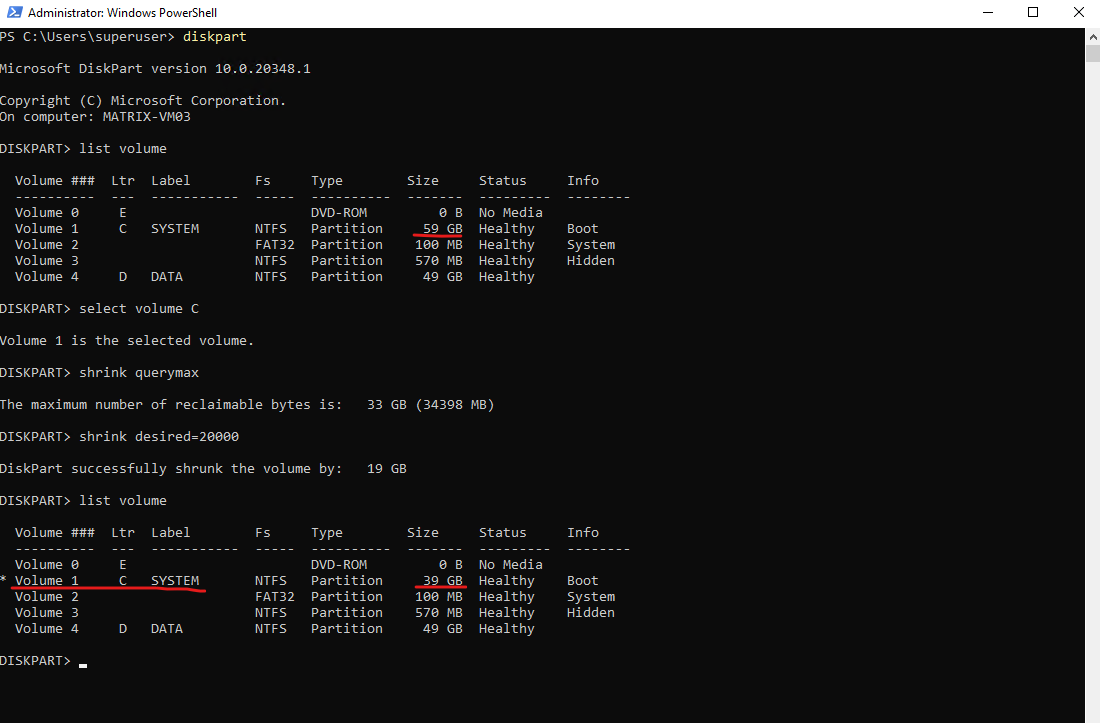
Running the list volume command again confirms that the operation completed successfully. As shown below, the C: partition has been reduced from 59 GB to 39 GB, while the remaining space is now available as unallocated disk space.
DISKPART> list volume
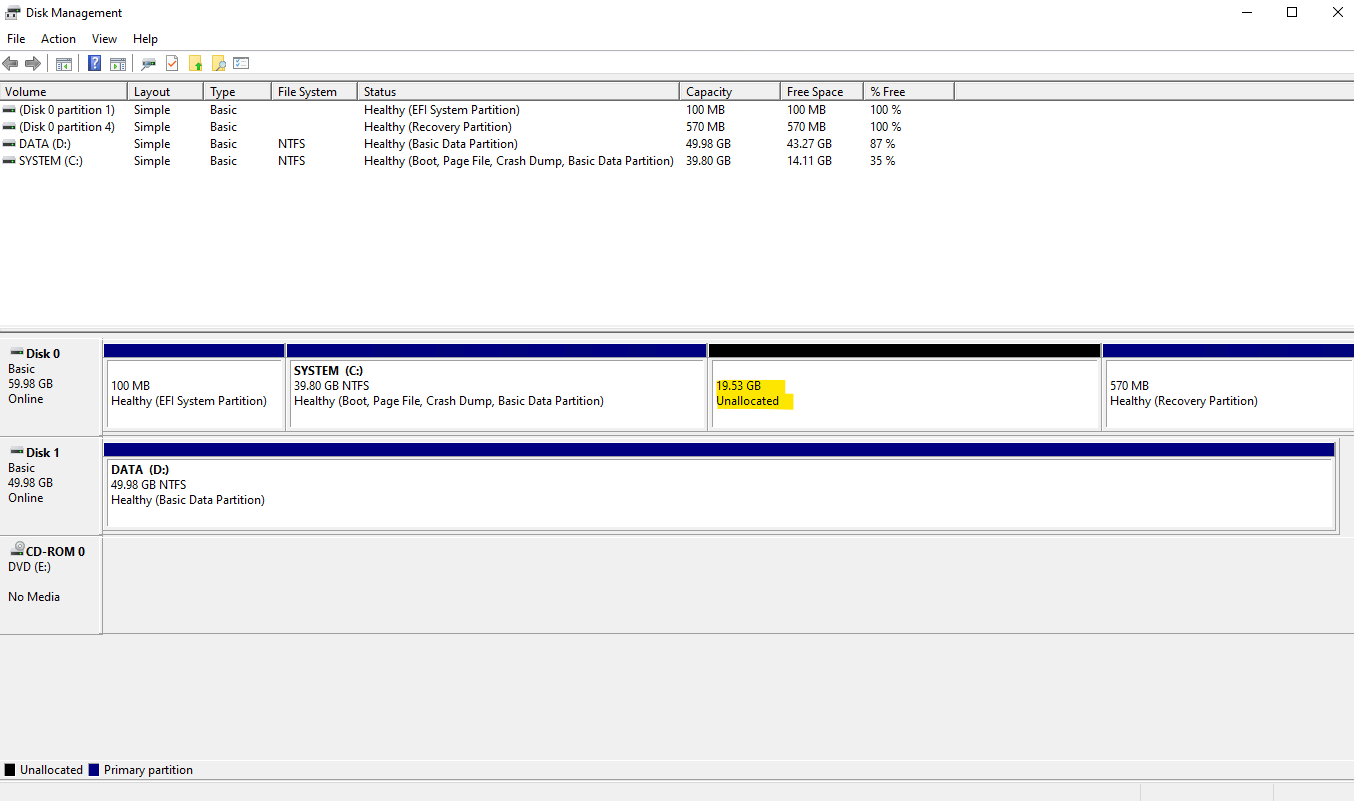
The Disk Management console now shows approximately 19.53 GB of unallocated disk space immediately following the C: partition. This unallocated space is no longer part of any partition and will be used when migrating the operating system to a new, smaller virtual disk.
Note: Unlike reducing the existing virtual disk in place, cloning to a new, smaller virtual disk does not require removing or recreating the Windows Recovery partition.
The cloning process copies only the existing partitions and allows them to be arranged compactly on the destination disk, while unallocated space is simply omitted.
Create a New Smaller Virtual Disk
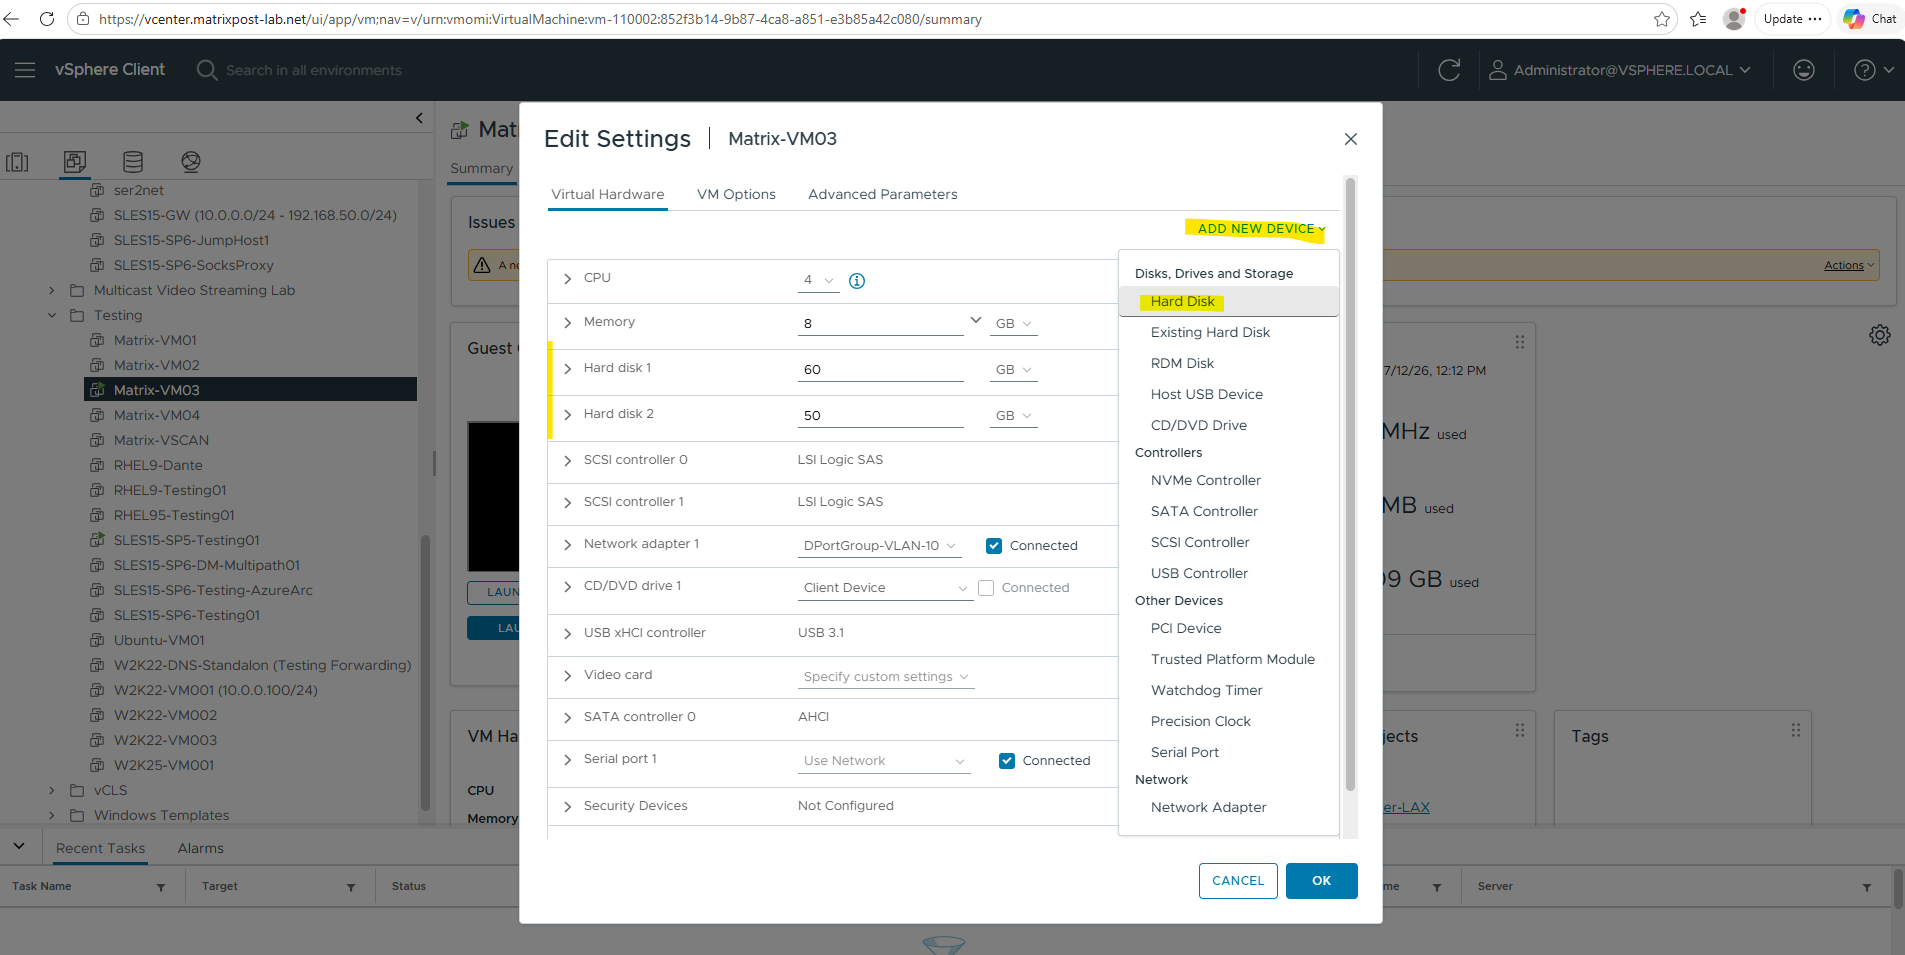
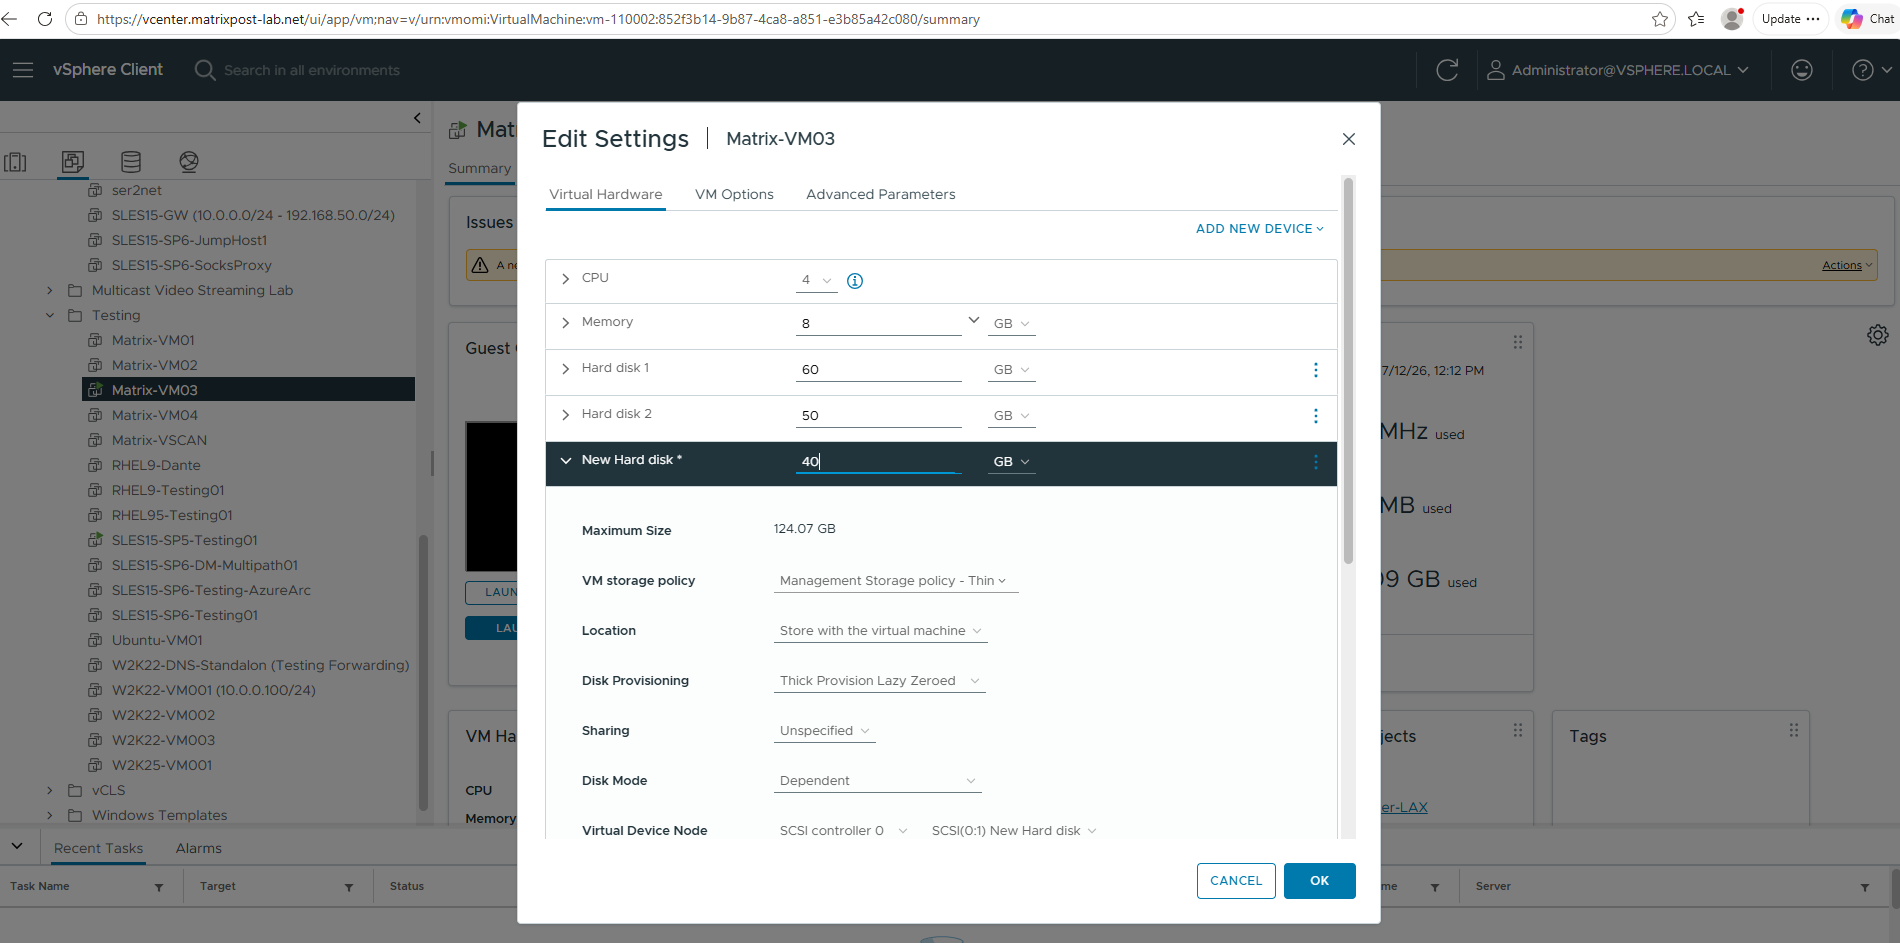
With the operating system partition successfully reduced, the next step is to create a new virtual disk that will hold the cloned Windows installation. In this example, a 40 GB virtual disk is added to the virtual machine, providing sufficient capacity for the existing partitions while eliminating the unused space from the original 60 GB operating system disk.
vSphere → Edit Settings → Add Hard Disk
Enter 40 GB for the size and click on OK.
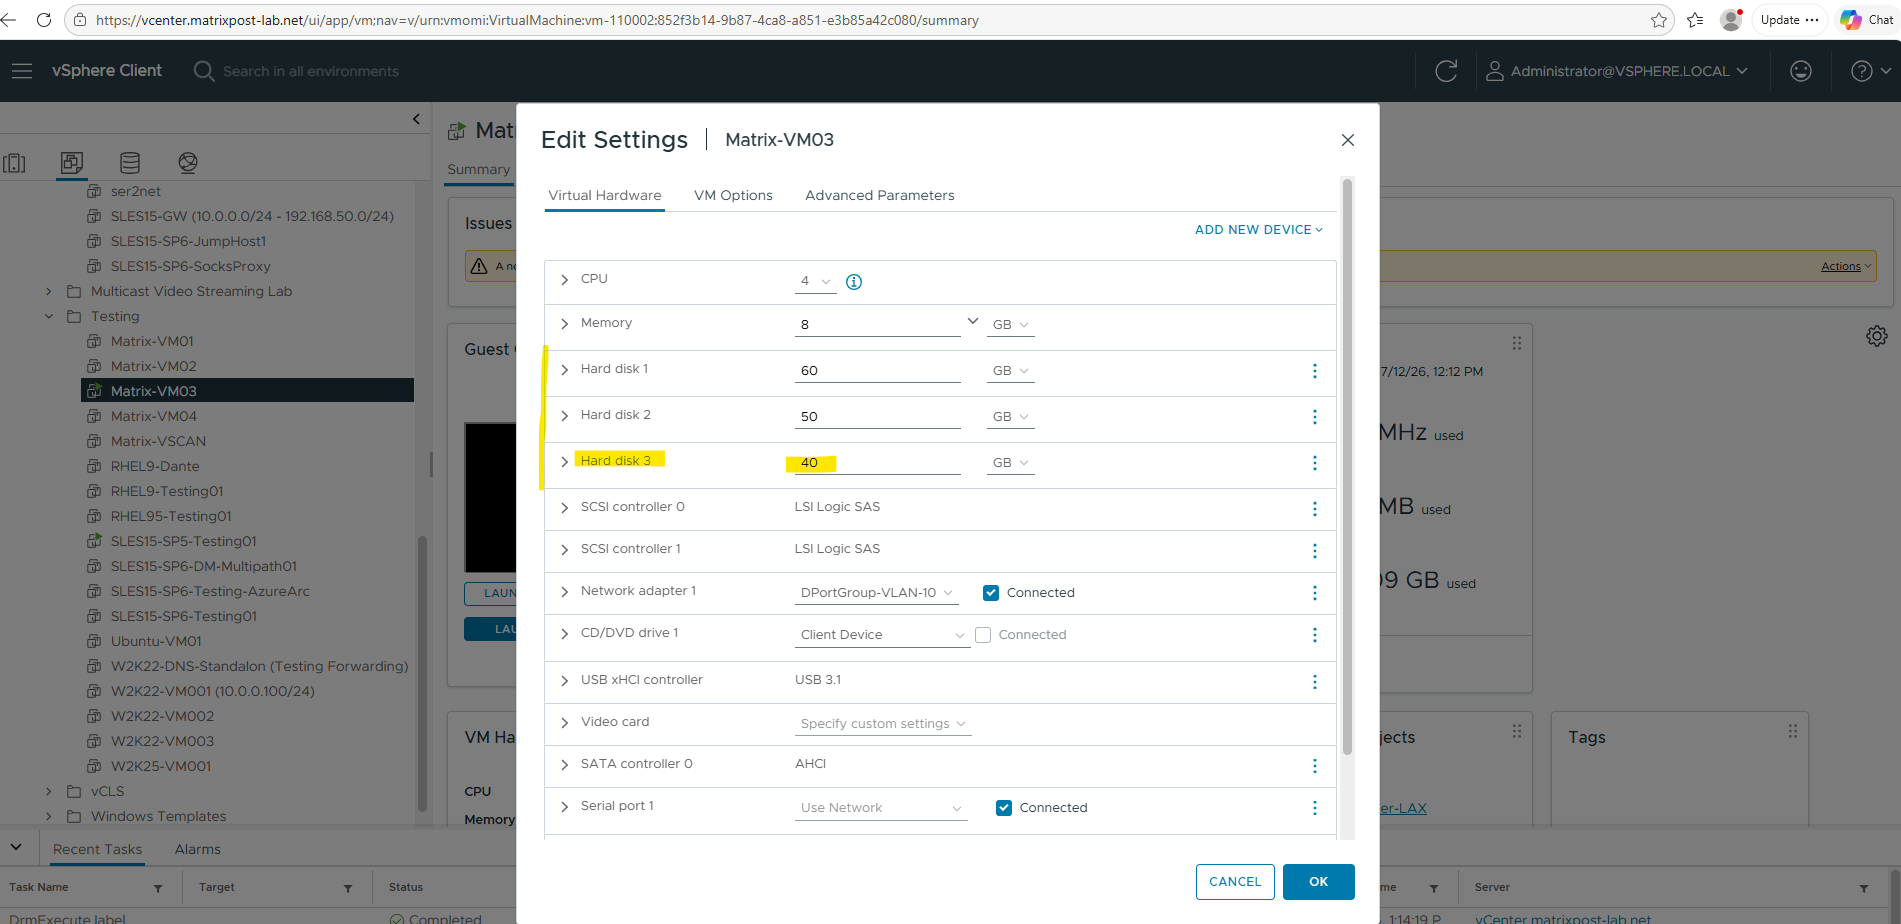
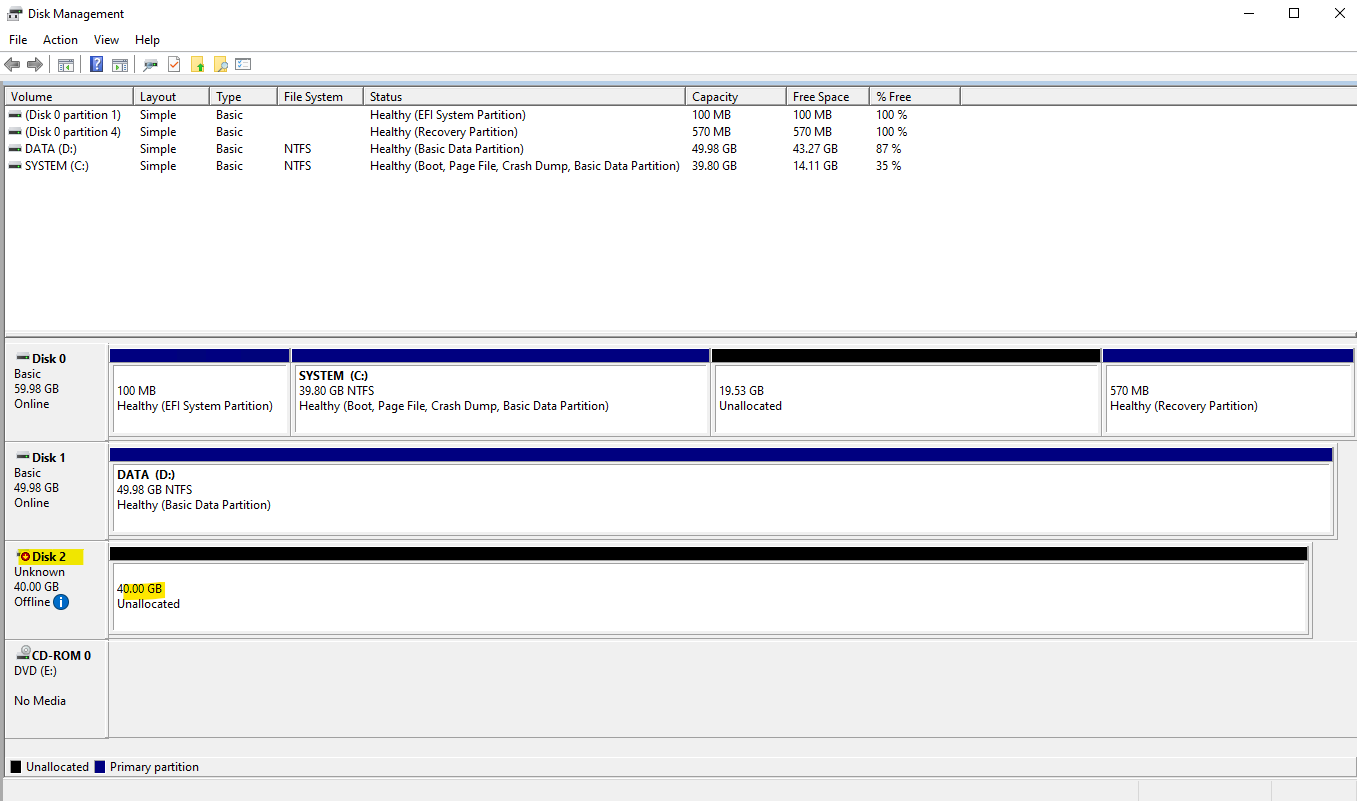
After adding the new virtual disk in VMware vSphere, Windows detects it automatically. As shown below, the 40 GB disk appears in the Disk Management console as Offline and Unallocated, ready to be initialized before the cloning process.
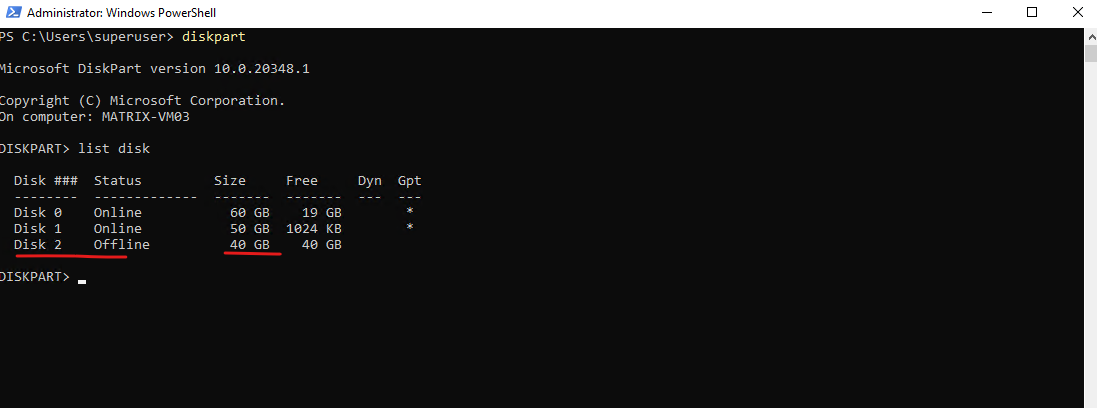
The same information can also be obtained by using the DiskPart utility. Unlike the list volume command, list disk displays physical disks and therefore already shows the newly added 40 GB virtual disk, even though it is still offline and unallocated.
DISKPART> list disk
The new virtual disk can be initialized either by using the Disk Management console or the DiskPart utility. In this example, the disk is brought online and initialized with a GUID Partition Table (GPT), making it ready for the cloning process.
Note: Do not create any partitions on the new virtual disk after initializing it. Leave the entire disk as unallocated, as Macrium Reflect will automatically create the required EFI, Windows, and Recovery partitions during the cloning process.
DISKPART> list disk
DISKPART> select disk 2
DISKPART> online disk
DISKPART> attributes disk clear readonly
DISKPART> convert gpt
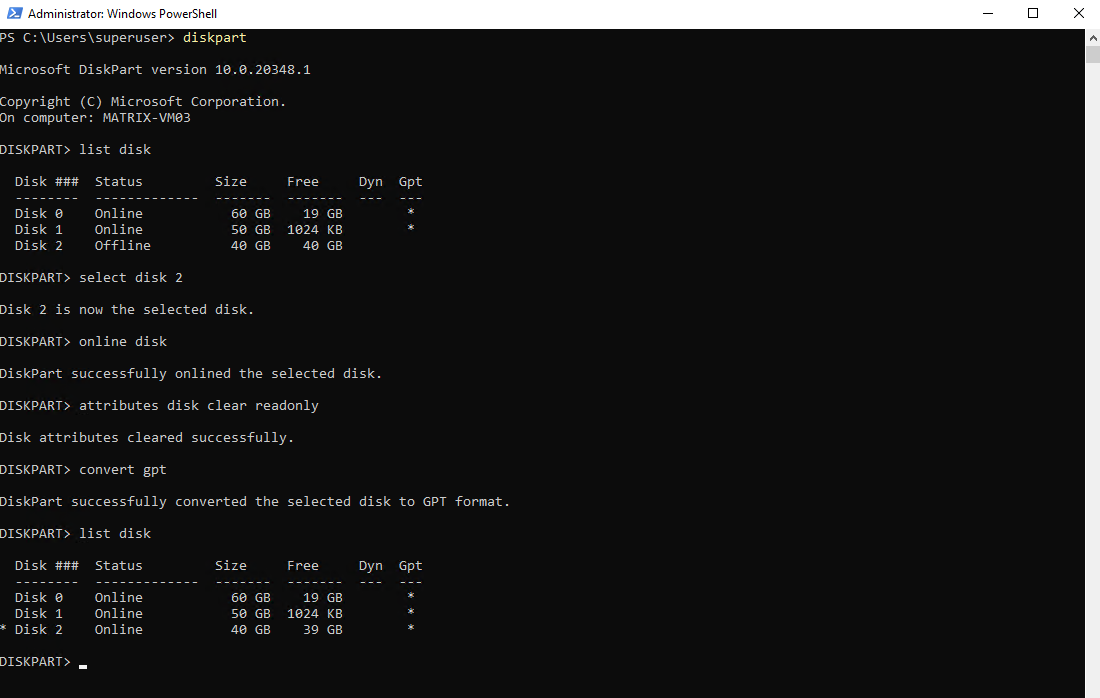
Note: On Windows Server systems using the default SAN Policy (Offline Shared), newly attached virtual disks may initially be marked as read-only. When using DiskPart, clear the read-only attribute before converting the disk to GPT. The Disk Management console performs this step automatically during disk initialization.
The
detail diskcommand displays detailed information about the selected physical disk, including its current status, read-only state, bus type, and whether it is used as a boot, pagefile, hibernation, or crash dump disk.
DISKPART> list disk
DISKPART> select disk 2
DISKPART> detail disk
DISKPART> san
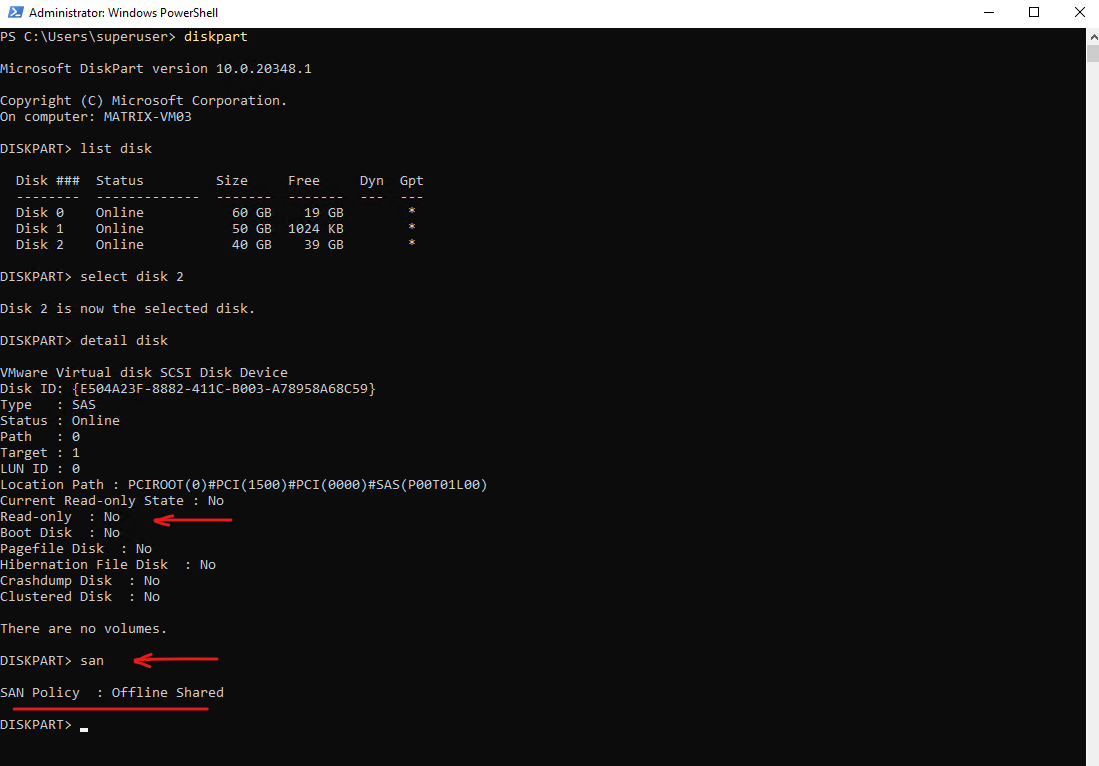
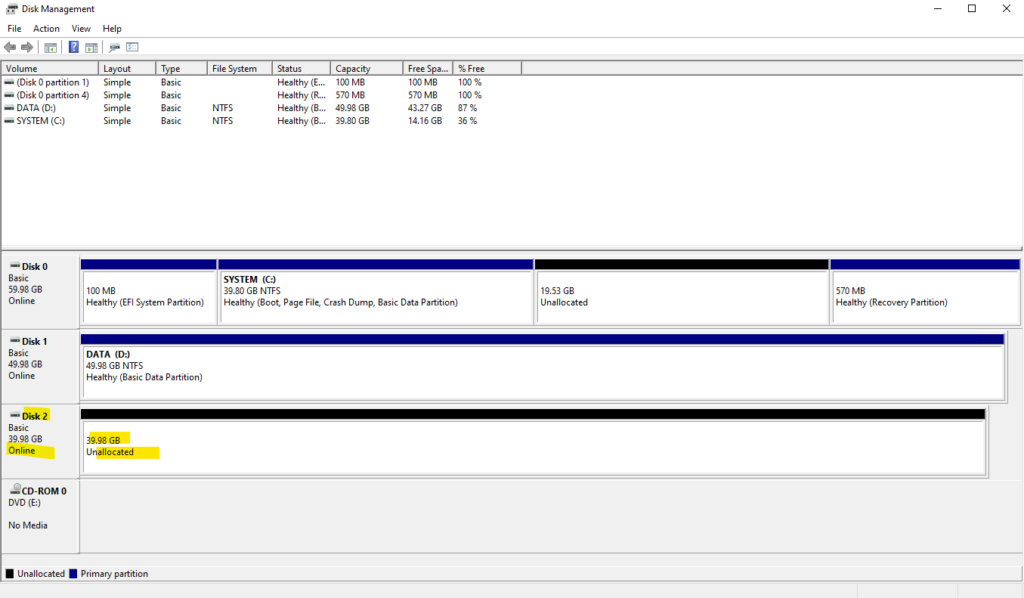
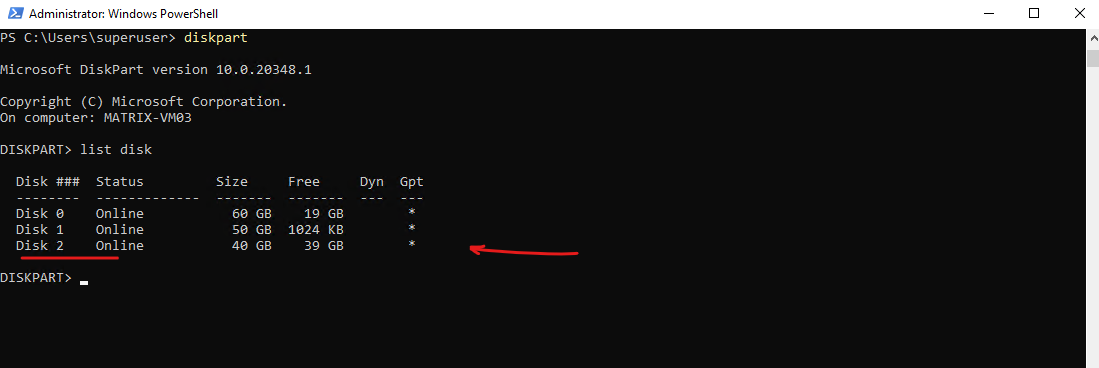
After bringing the disk online, clearing the read-only attribute, and converting it to GPT, the new virtual disk is ready for use. As shown below, both Disk Management and DiskPart now recognize the disk as Online and initialized with a GUID Partition Table (GPT), while the entire capacity remains unallocated for the upcoming cloning process.
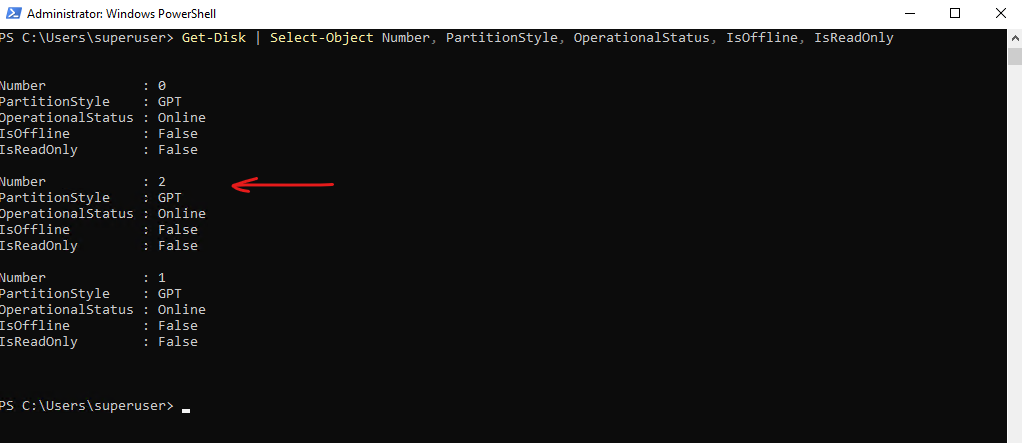
The Get-Disk PowerShell cmdlet provides another convenient way to verify the state of the virtual disks. As shown below, the newly added 40 GB virtual disk (disk 2) is now Online, initialized with the GPT partition style, and is no longer marked as Offline or Read-only, making it ready for the cloning process.
PS> Get-Disk | Select-Object Number, PartitionStyle, OperationalStatus, IsOffline, IsReadOnly
Remove the Windows Recovery Partition Before Cloning
Before cloning the operating system disk to a smaller virtual disk, the Windows Recovery partition must be removed. This is necessary because shrinking the C: partition leaves unallocated space between the operating system and Recovery partitions, preventing Rescuezilla from cloning the disk to a smaller destination while preserving the original partition layout. The Recovery partition can be recreated after the migration has been completed successfully.
About Disabling and Deleting the WinRE Partition you can refer to my following post.
PS> reagentc /disable

PS>diskpart
DISKPART> list disk
DISKPART> select disk 0
DISKPART> list partition
DISKPART> select partition 4
DISKPART> delete partition override
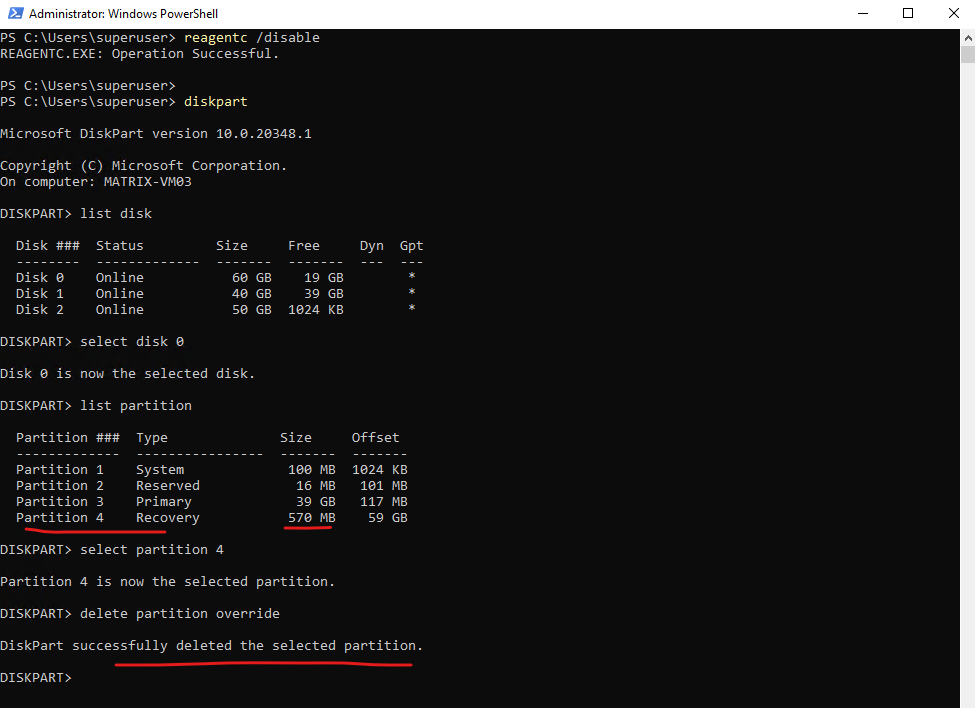
Looks good and the WinRE partition was deleted successfully.

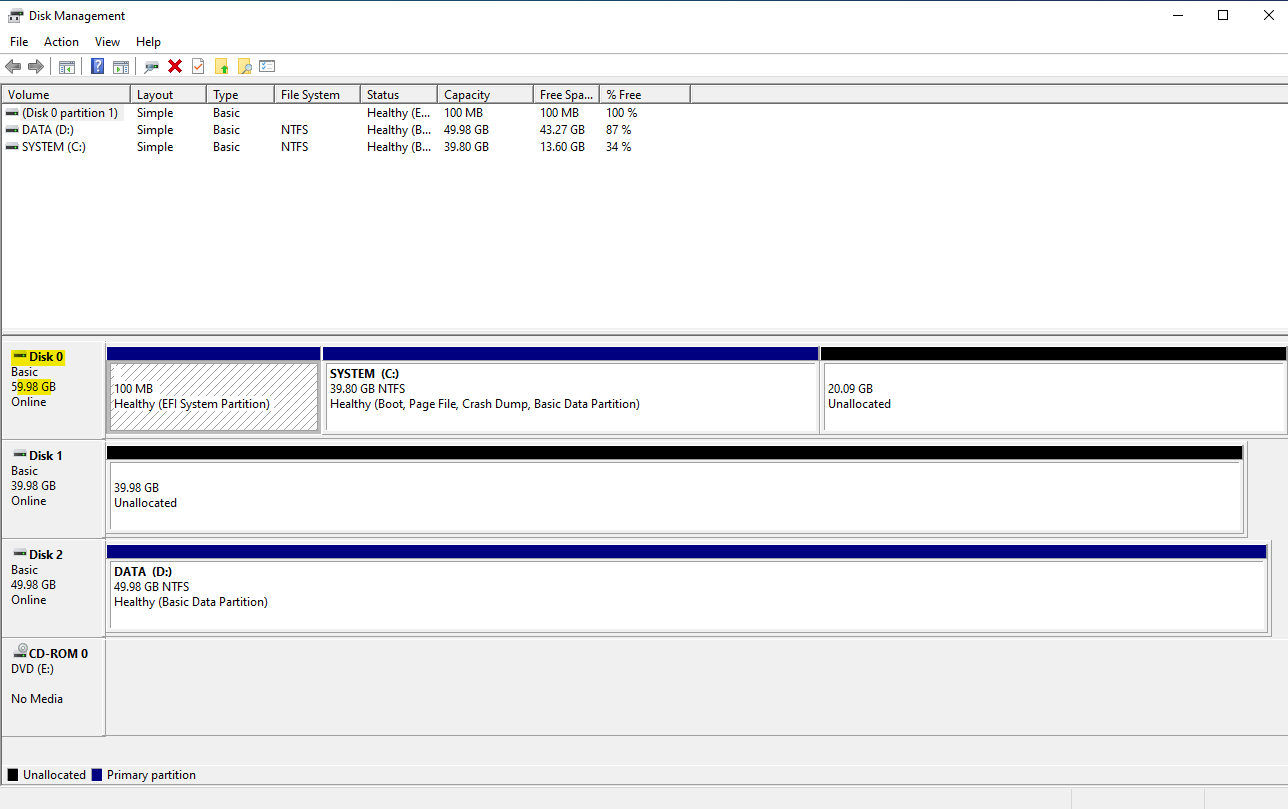
Now we disabled the Windows Recovery Environment (WinRE) and removed the Recovery partition.
This ensures that the operating system partition becomes the final partition on the disk, allowing Rescuezilla below to clone the disk to a smaller destination without encountering the partition layout limitation shown in the Troubleshooting section at the end of this post.
Clone the Existing Virtual Disk
With the new virtual disk initialized and ready for use, the next step is to clone the existing operating system disk to the new, smaller virtual disk.
In this example, Rescuezilla is used to copy the EFI, and Windows partitions while automatically omitting the unallocated space created during the partition shrinking process.
Rescuezilla does not run from within Windows or any other installed operating system because it is a bootable live operating system itself. Therefore, in my VMware vSphere lab environment, I simply mount the Rescuezilla ISO to the virtual machine’s virtual CD/DVD drive and boot the VM directly from the ISO image.
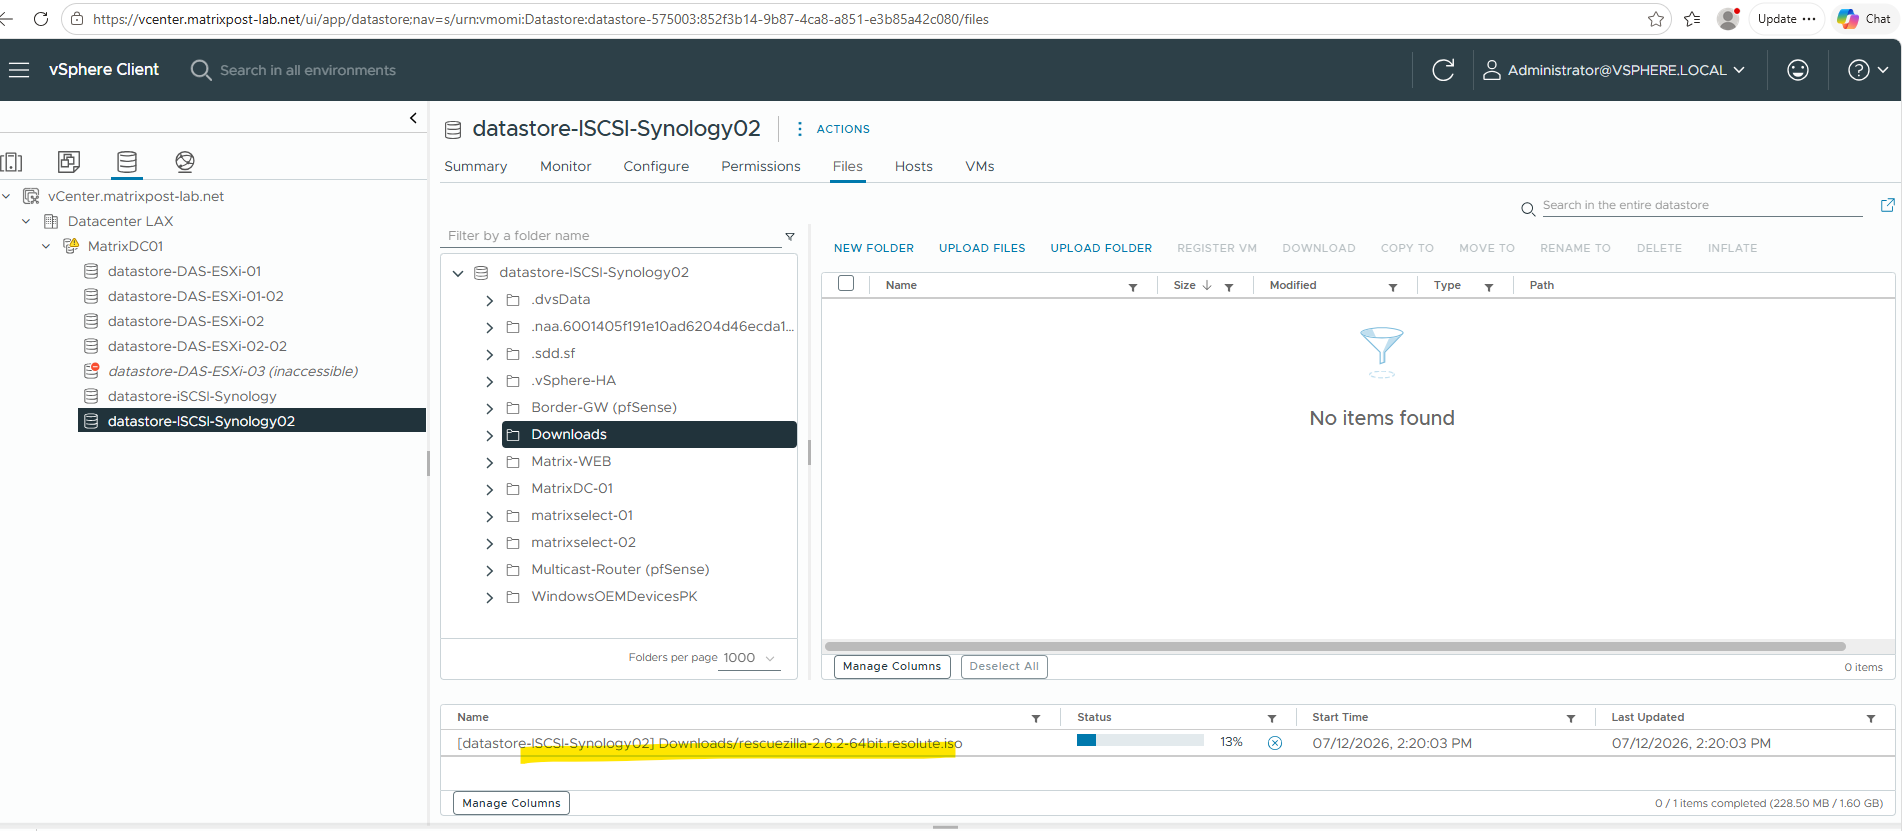
First I will upload the Rescuezilla ISO to one of my datastores in vSphere.
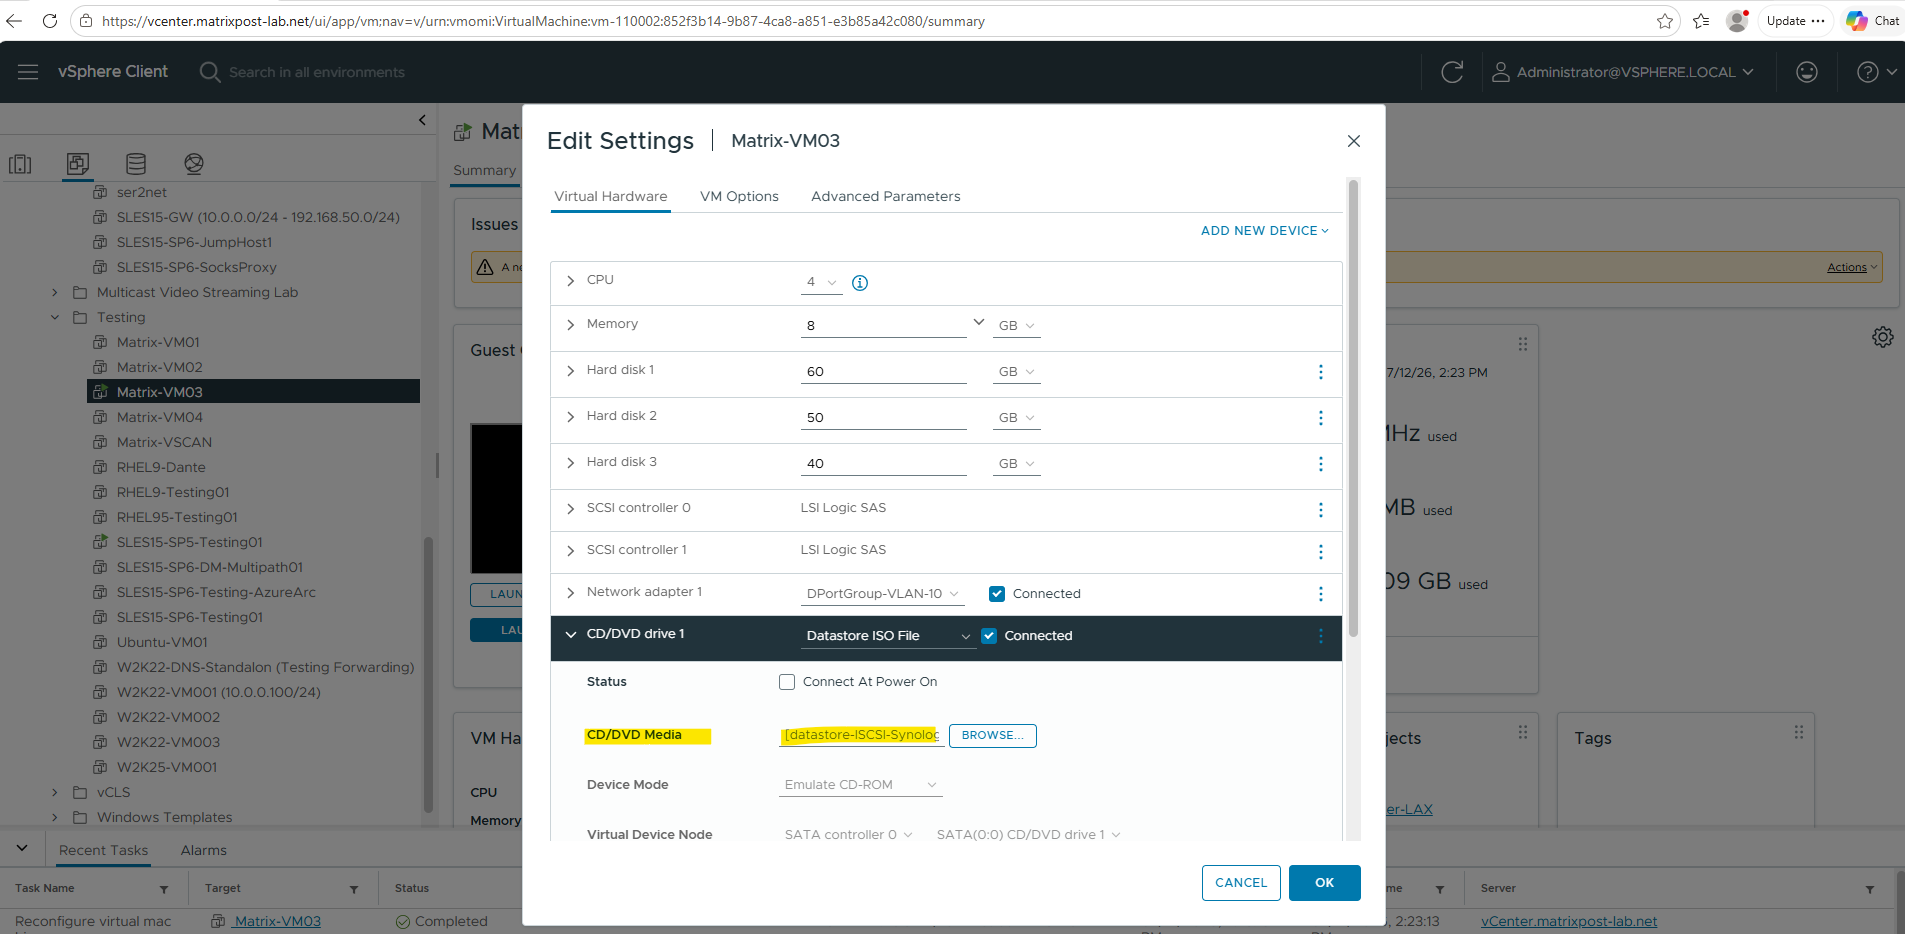
From there I can mount the Rescuezilla ISO to the virtual machine’s virtual CD/DVD drive.
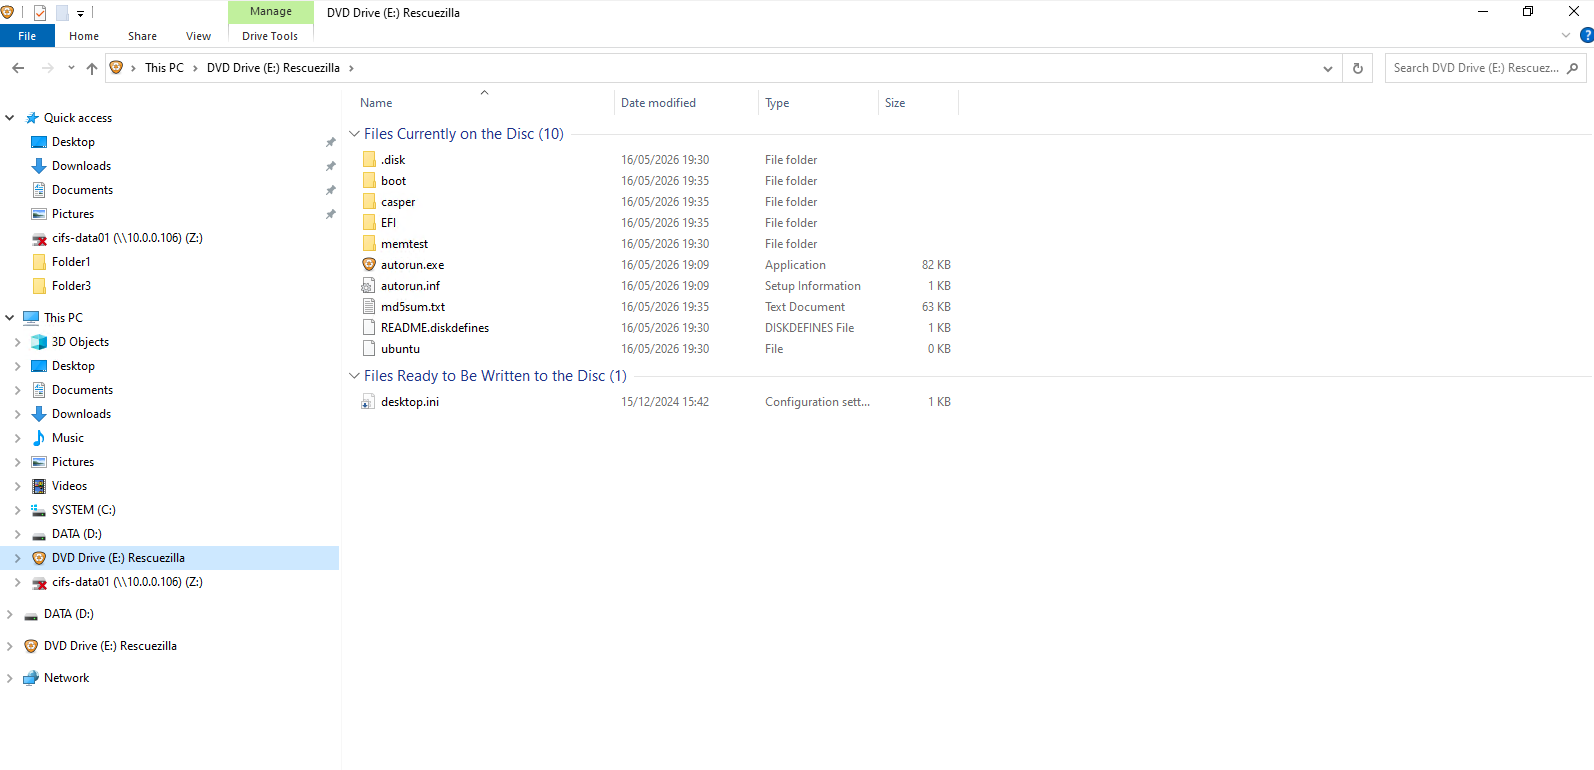
After booting the virtual machine from the Rescuezilla ISO, the next step is to clone the existing 60 GB operating system disk to the new 40 GB virtual disk. Rescuezilla guides you through the cloning process with a graphical interface, allowing you to select the source disk and destination disk before copying the operating system and all required boot partitions.
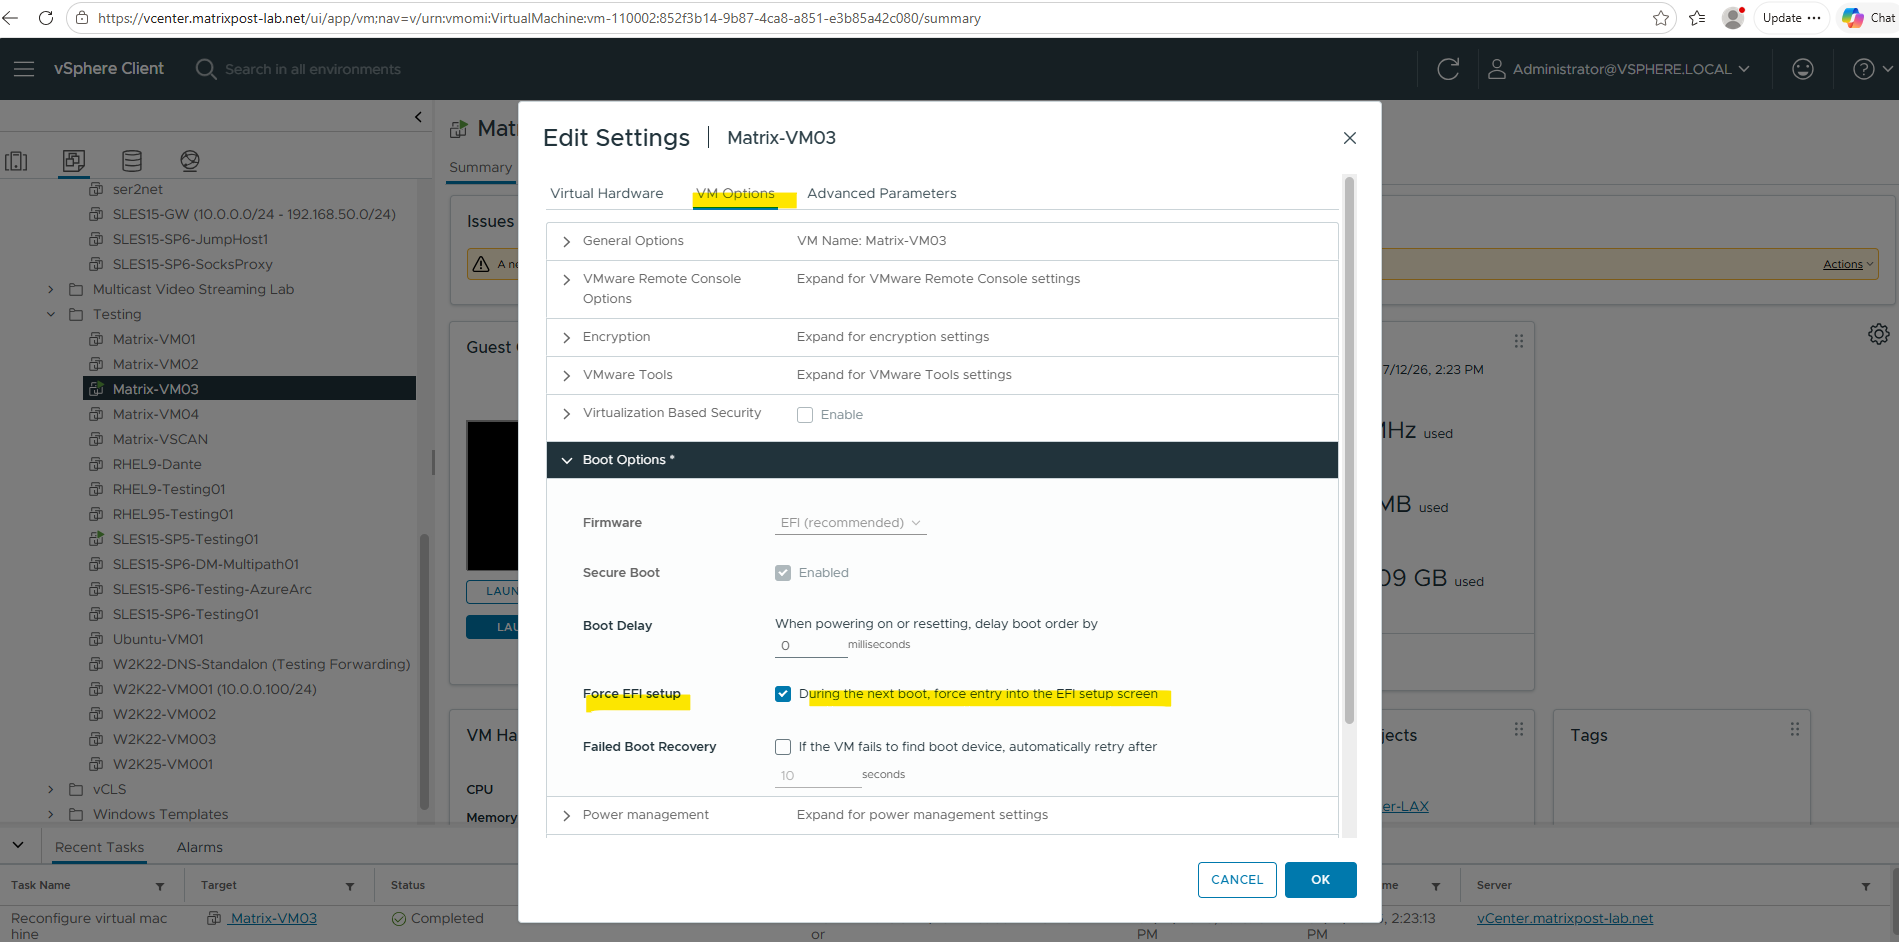
To boot the virtual machine from the Rescuezilla ISO, I temporarily force the VM to enter the EFI firmware setup during the next boot.
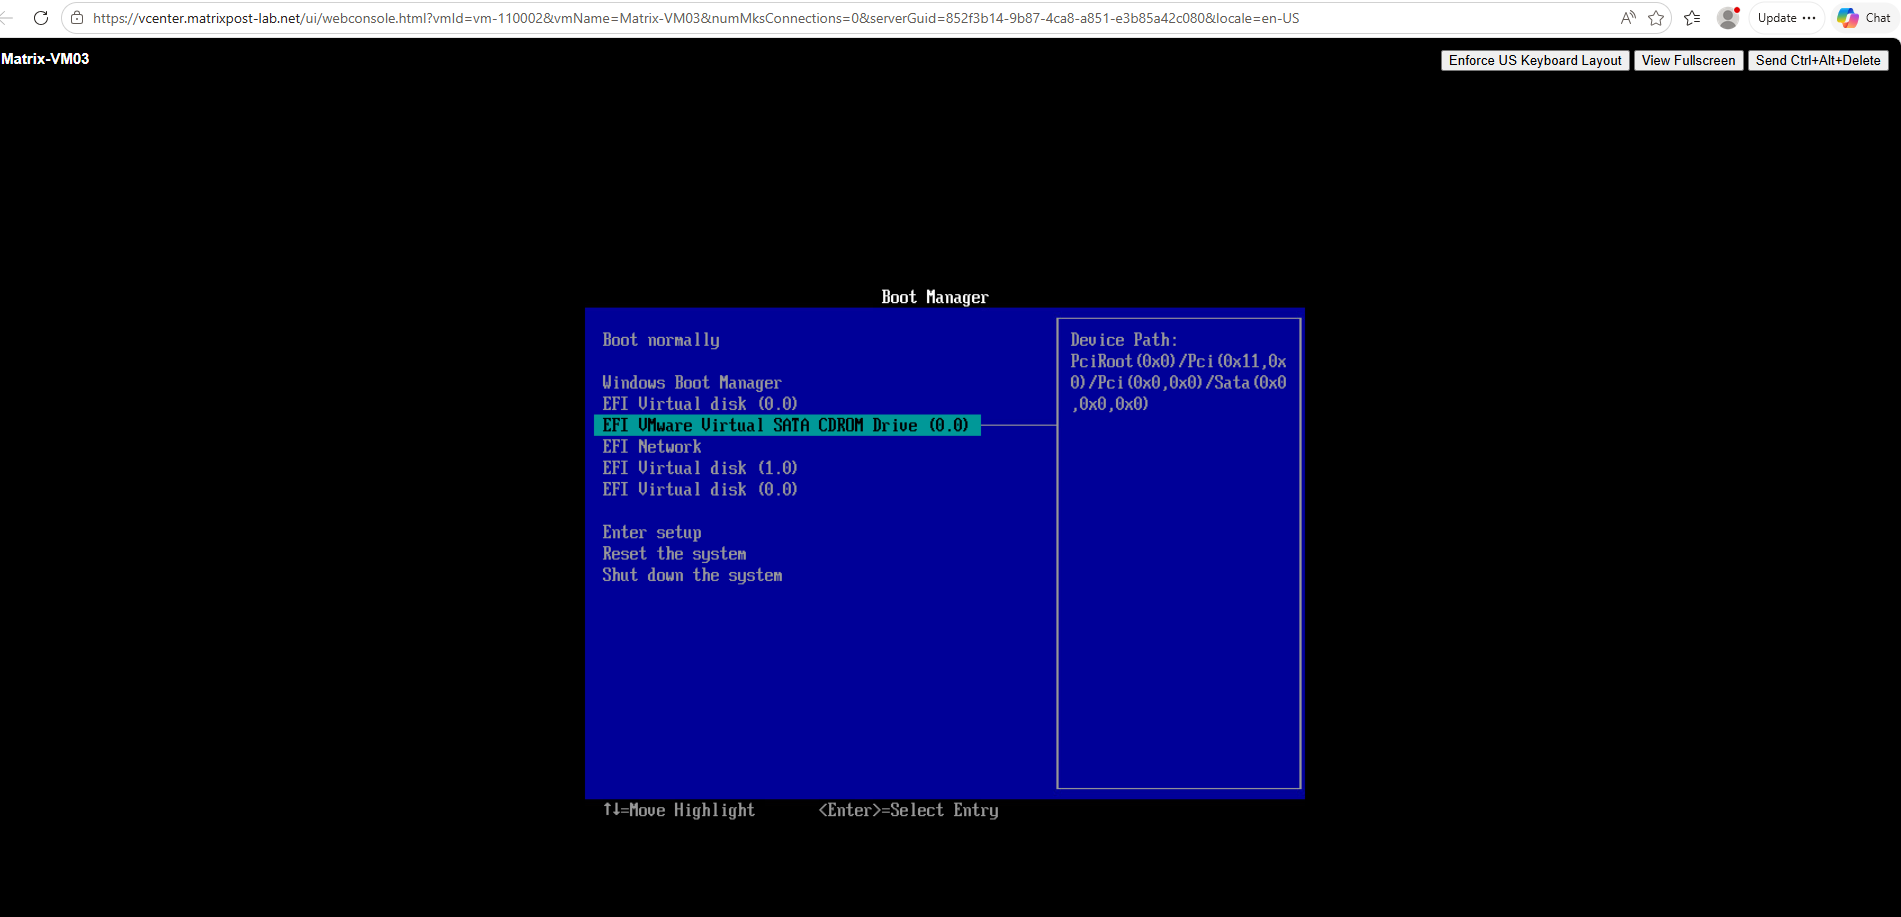
From there, I simply select the virtual CD/DVD drive as the boot device to launch the Rescuezilla live environment.
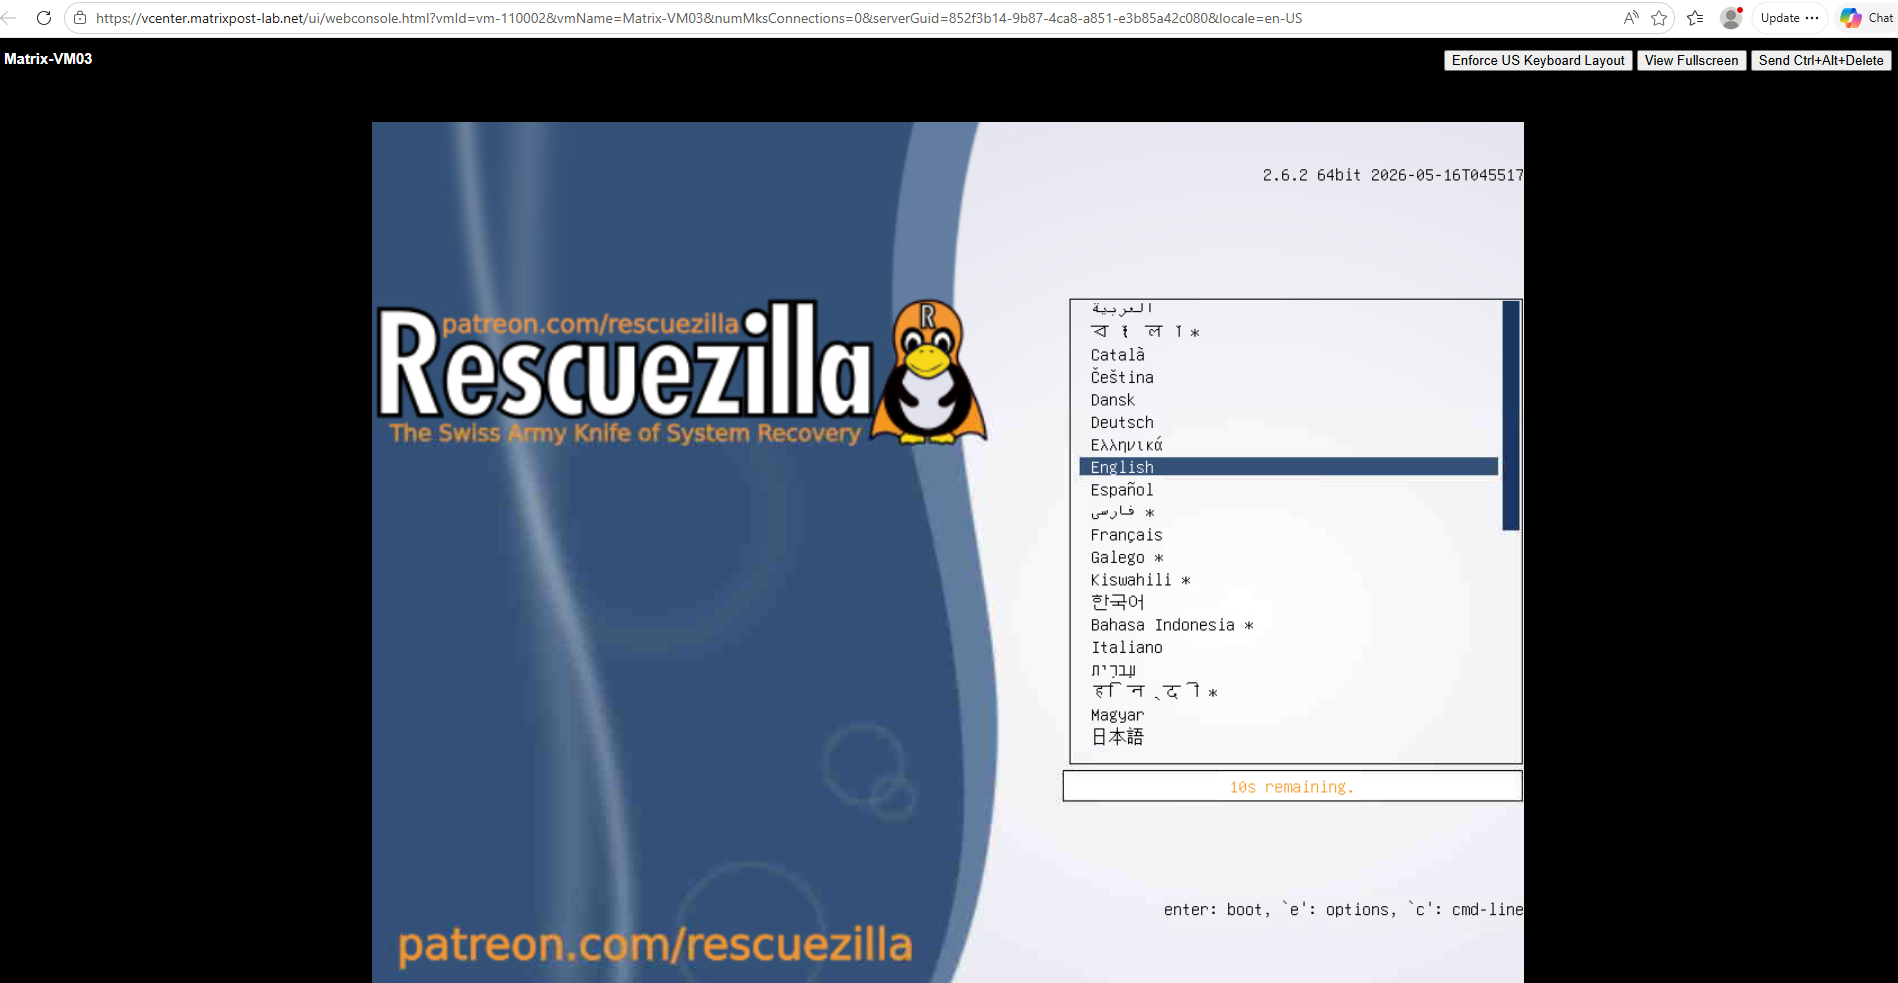
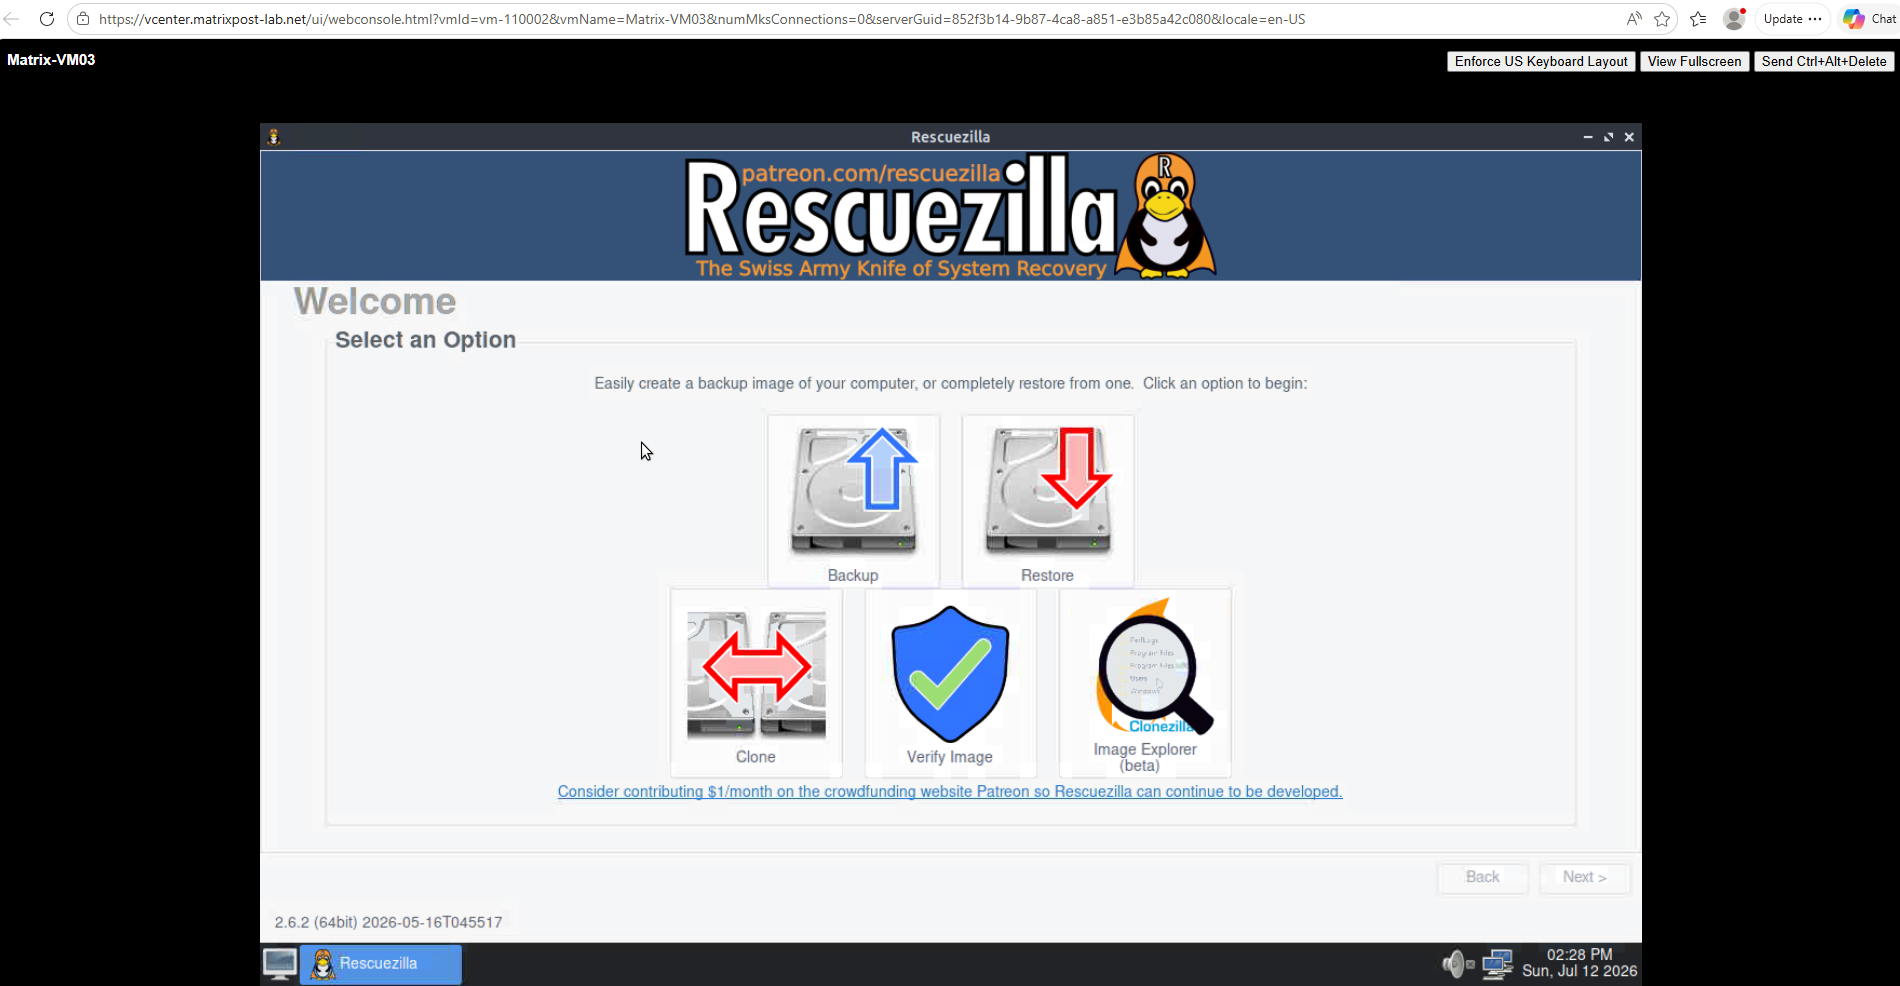
After booting from the ISO, the Rescuezilla welcome screen appears. To migrate the existing Windows installation to the new, smaller virtual disk, select the Clone option from the available tools.
Click on Next.
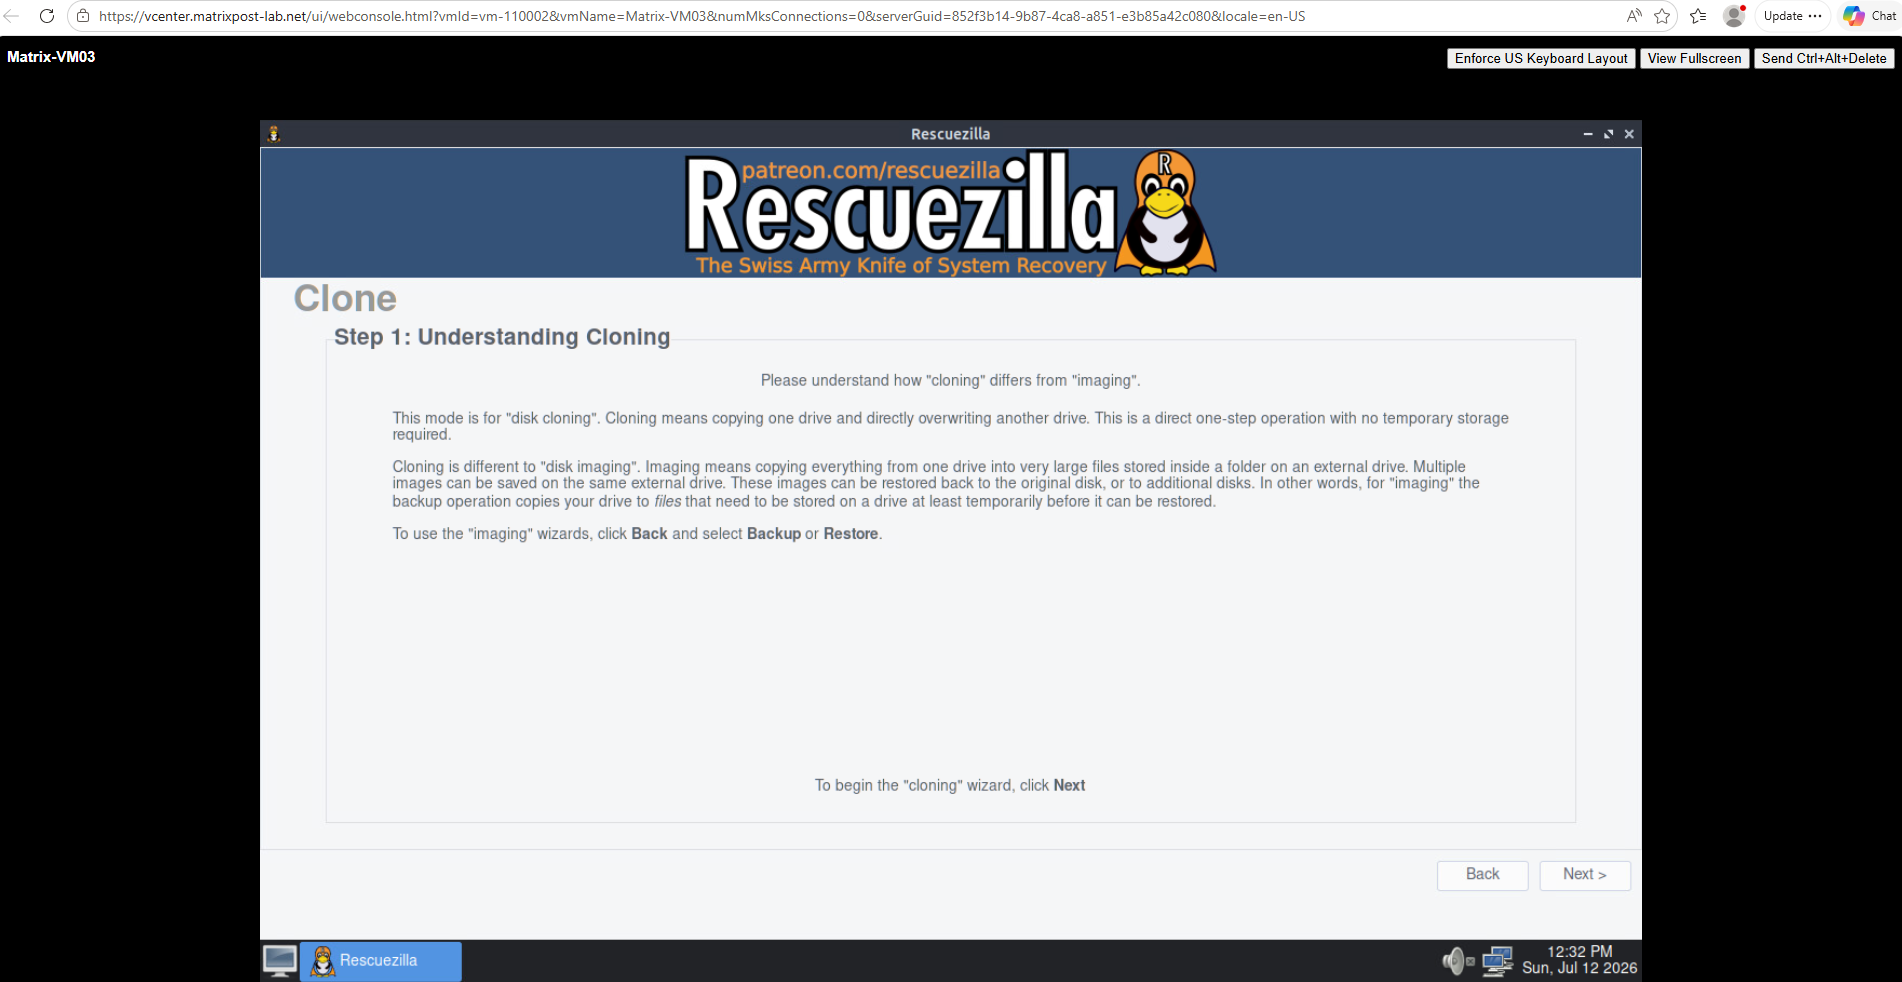
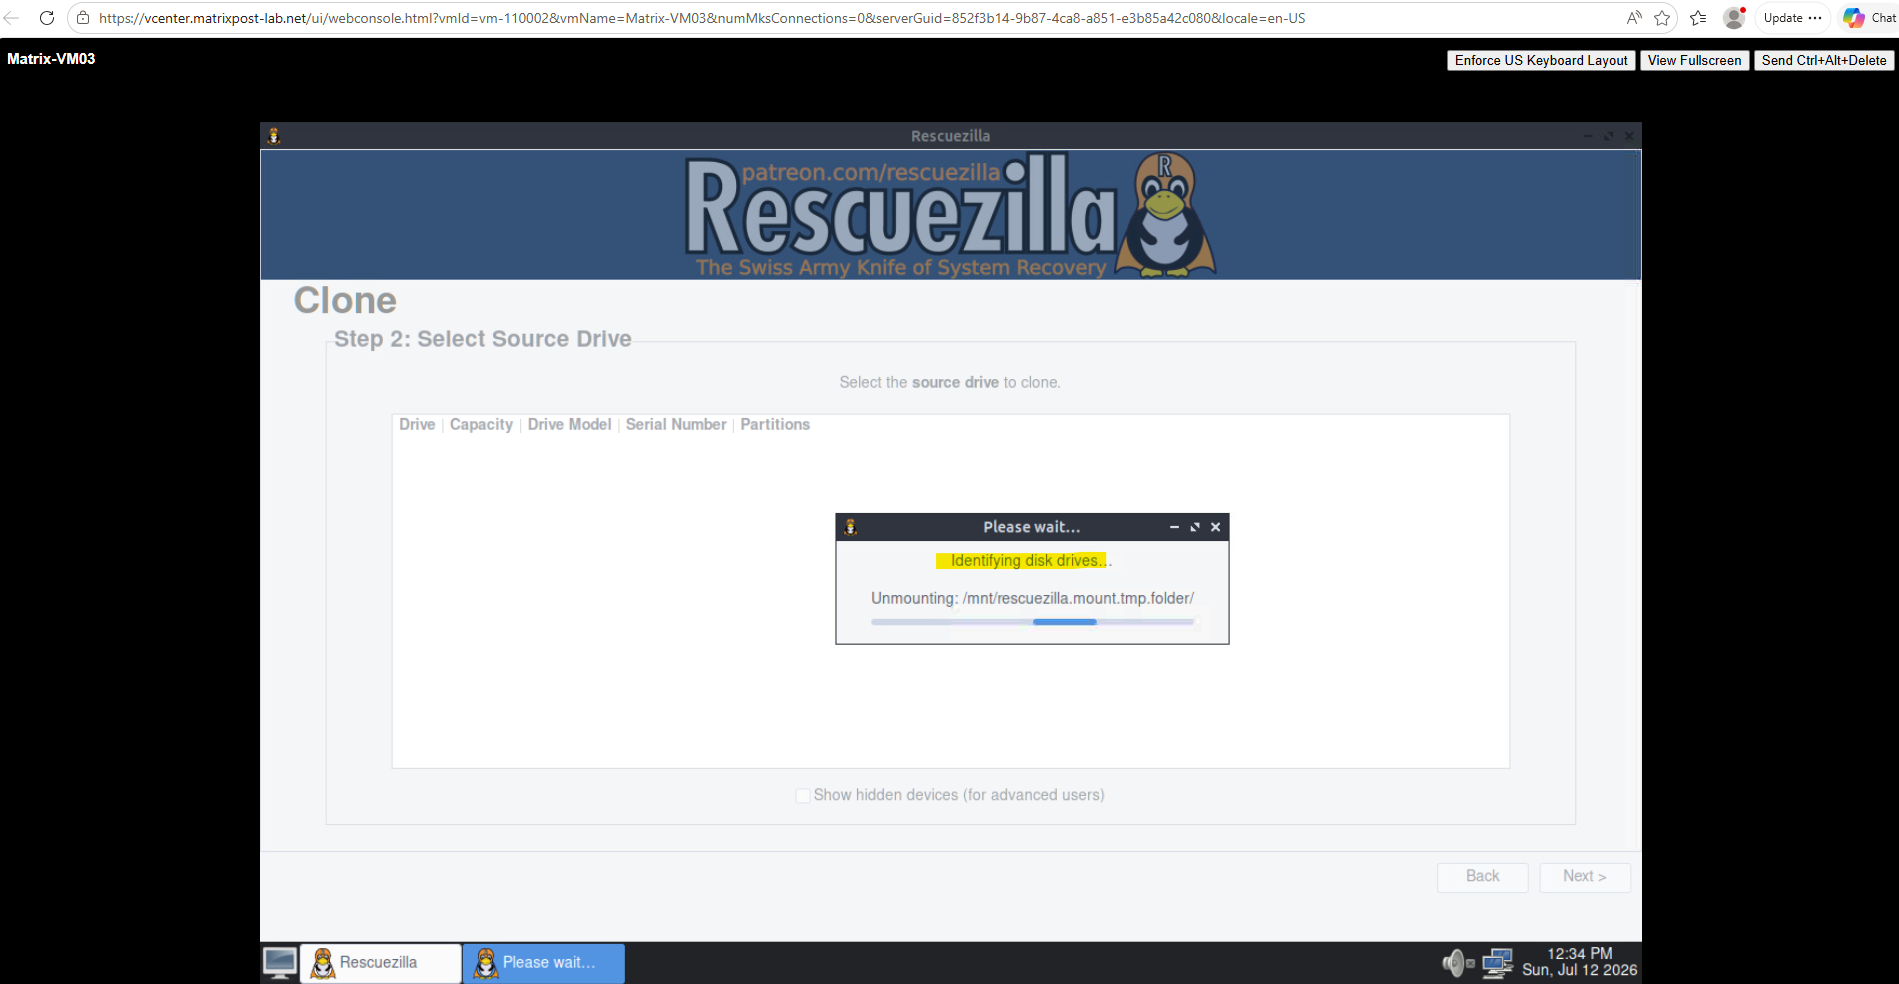
After confirming the initial cloning information by clicking Next, Rescuezilla scans the system and identifies the available disk drives.
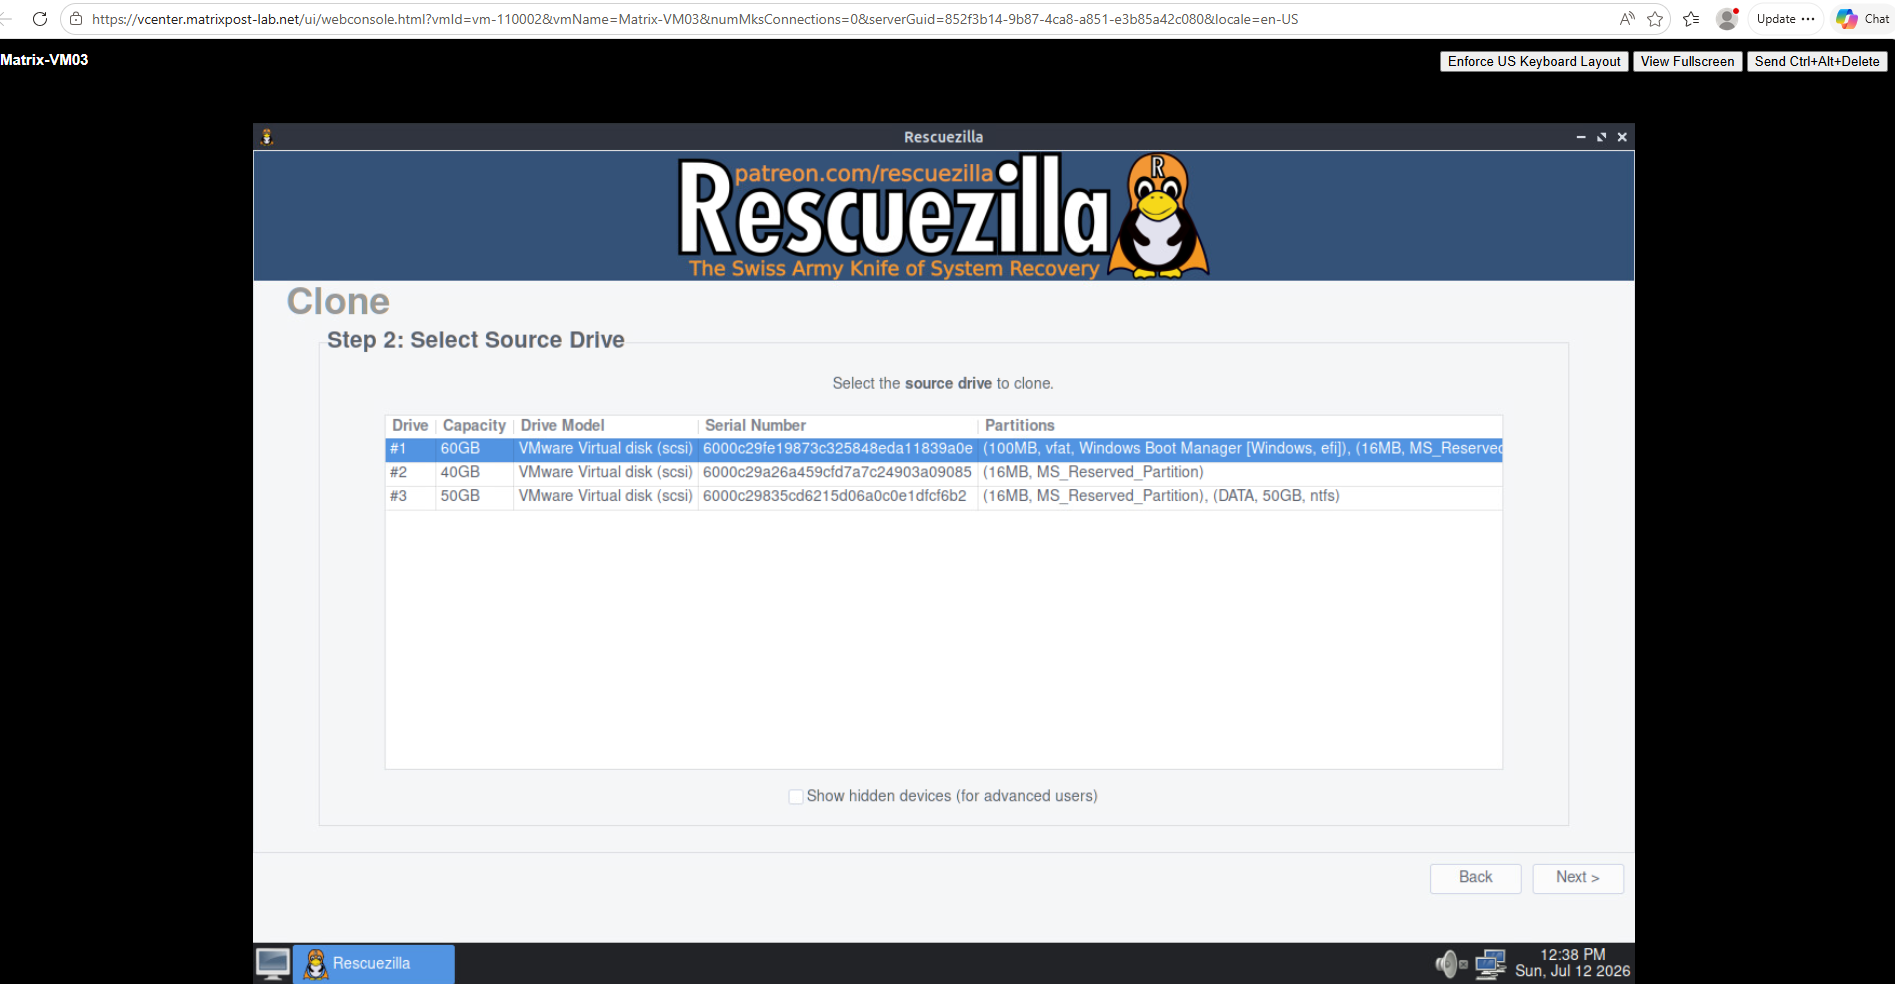
Once the available disk drives have been identified, the operating system disk, the newly added virtual disk (40 GB number 2), and the data disk are displayed.
Select the existing operating system disk as the source disk to be cloned to the new, smaller virtual disk and click on Next.
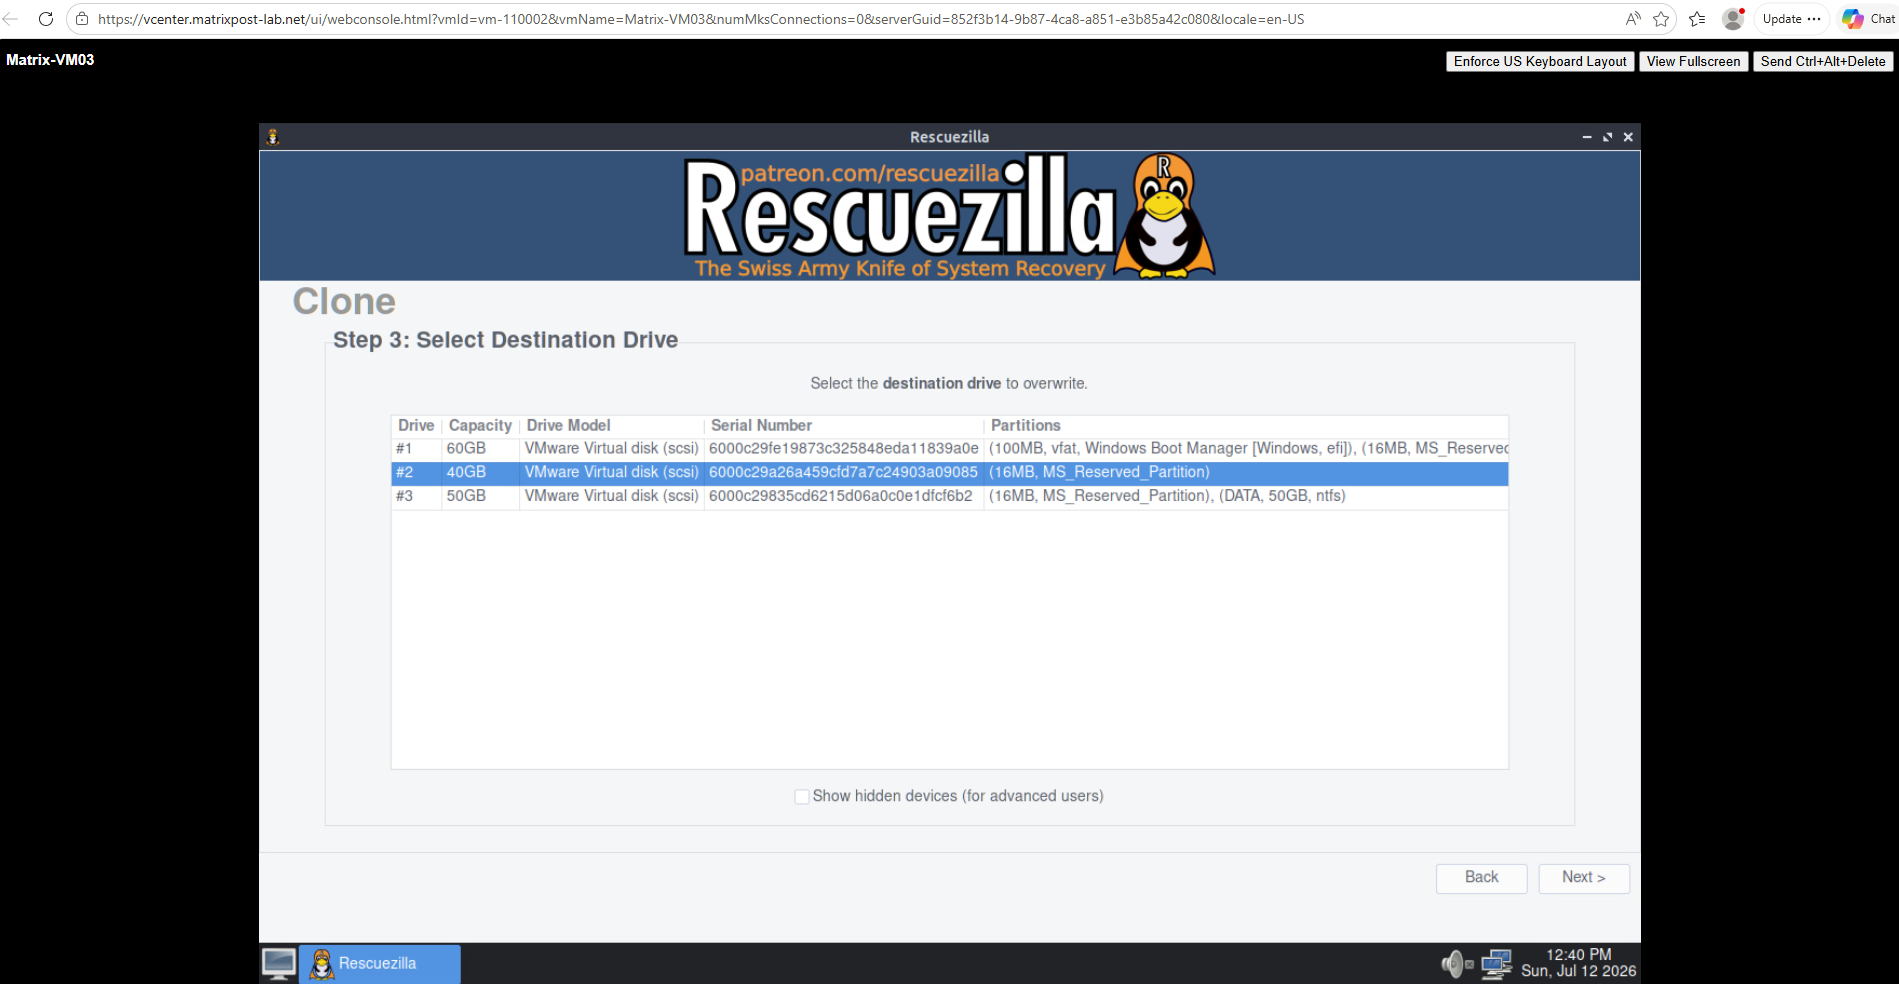
In the next step, Rescuezilla prompts you to select the destination drive. Choose the newly added 40 GB virtual disk, which will receive the cloned operating system and boot partitions and click on Next.
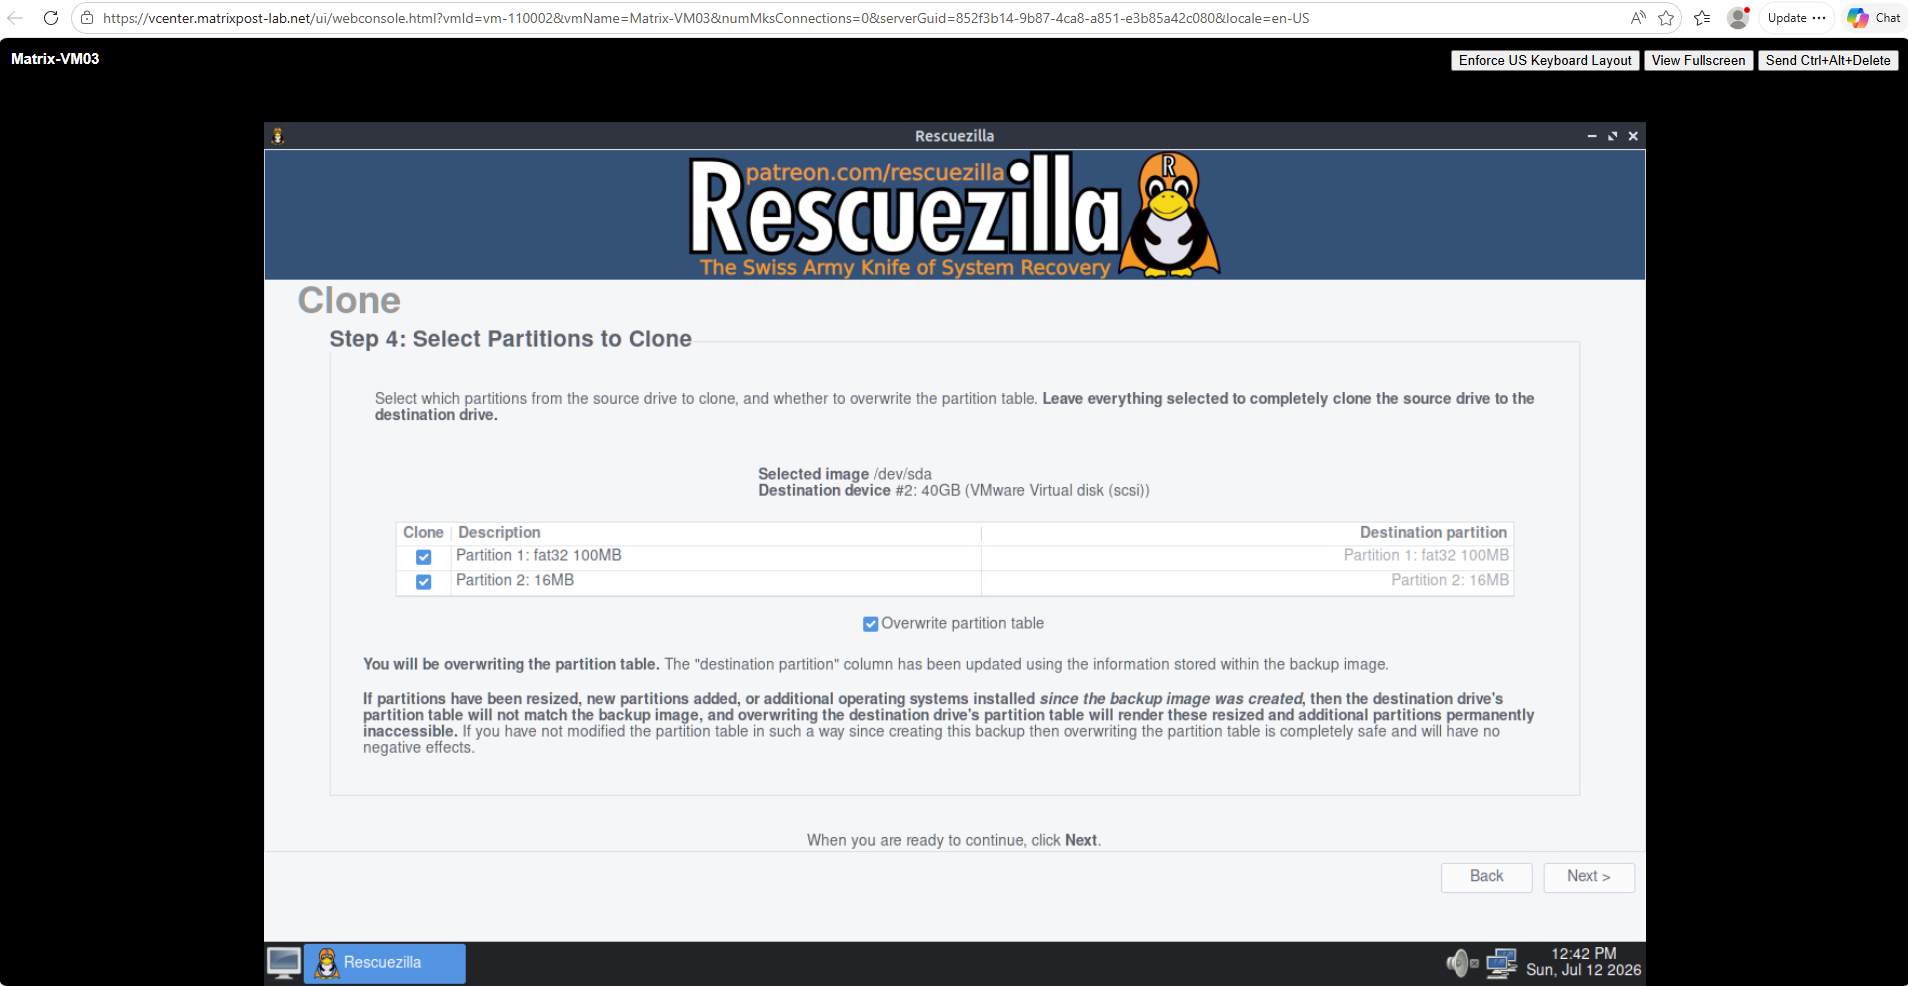
After selecting the source and destination disks, Rescuezilla displays the partition table that will be written to the destination disk. At this stage, only the EFI System Partition (100 MB, FAT32) and the Microsoft Reserved (MSR, 16 MB) partitions are listed, together with the option to Overwrite partition table, preparing the destination disk for the cloning process.
The Microsoft Reserved (MSR) partition is a special partition that exists on GPT-partitioned Windows disks. Unlike the EFI System Partition, it doesn’t contain a filesystem or user data and therefore doesn’t receive a drive letter.
Its purpose is to reserve space for Windows to perform future partition management operations.
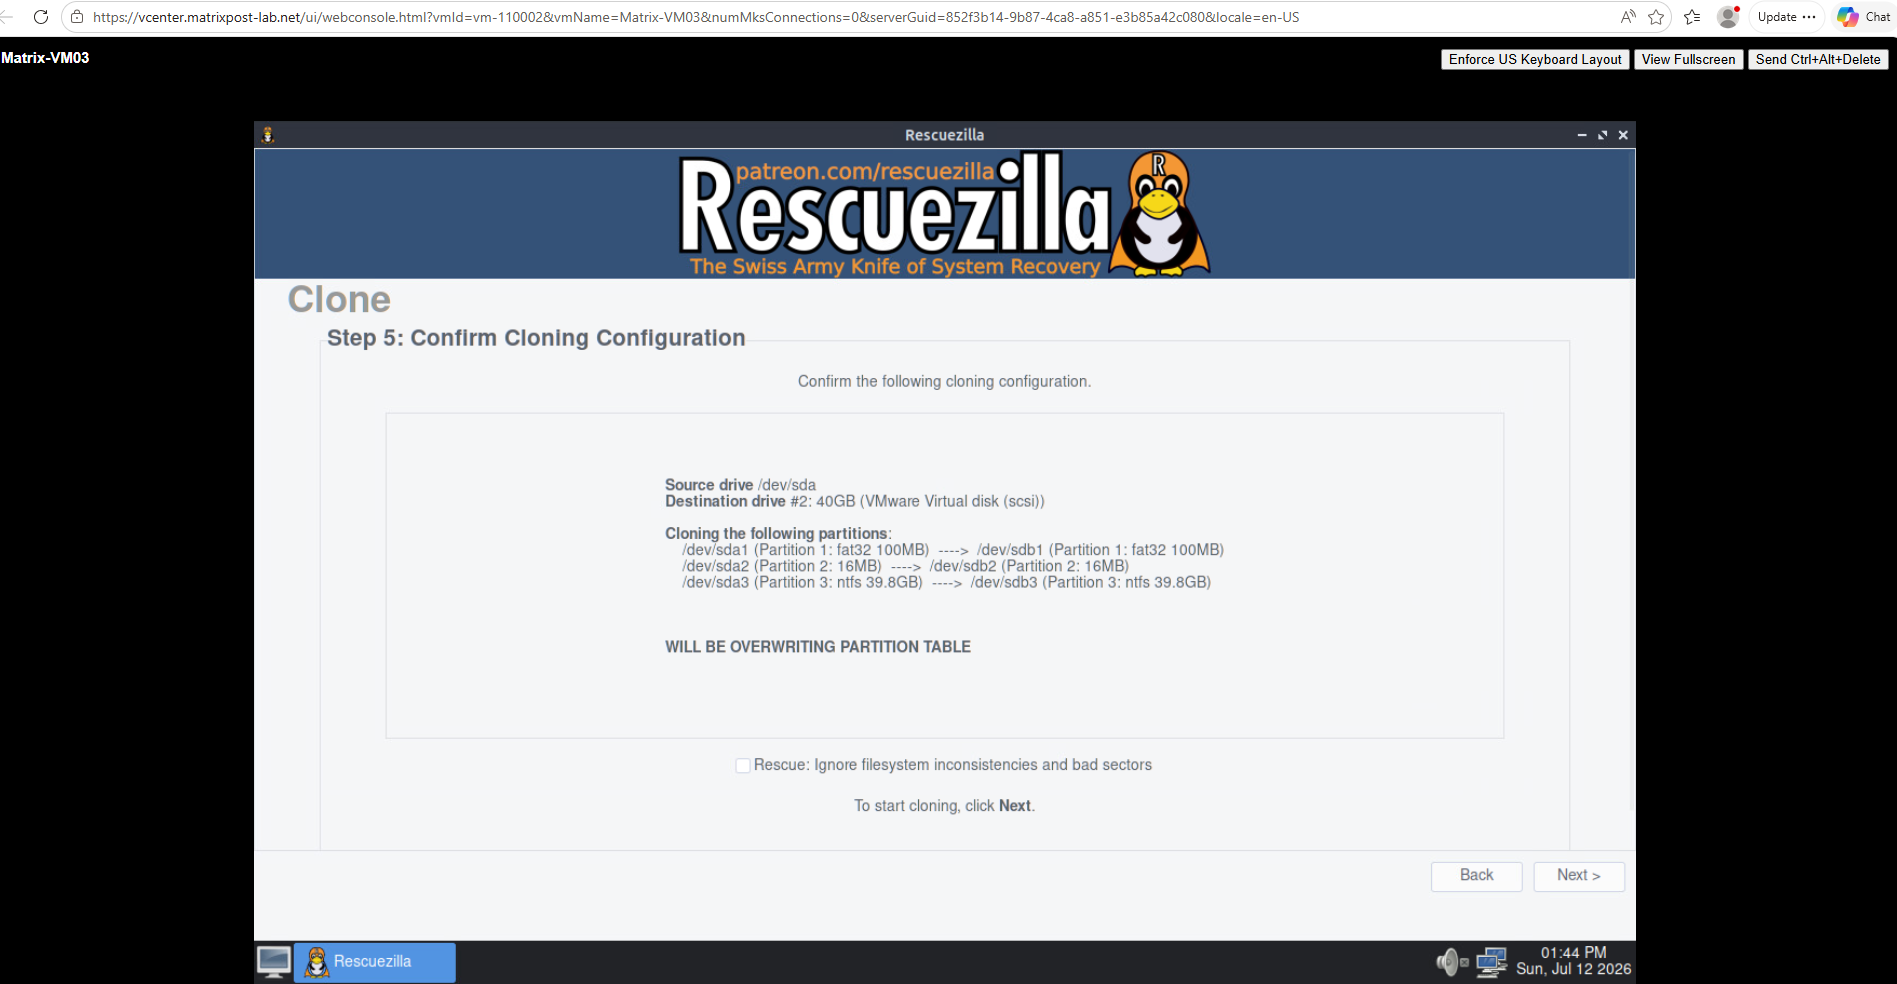
The Confirm Cloning Configuration dialog provides a final overview of the cloning operation.
As shown below, Rescuezilla will clone the EFI System, Microsoft Reserved (MSR), and Windows (C:) partitions from the original 60 GB virtual disk (/dev/sda) to the new 40 GB virtual disk (/dev/sdb), confirming that all remaining partitions fit within the capacity of the destination disk.
Note: Leave Ignore filesystem inconsistencies and bad sectors unchecked for healthy systems. This option is intended for recovery scenarios involving damaged or failing disks and is not required for routine disk cloning.
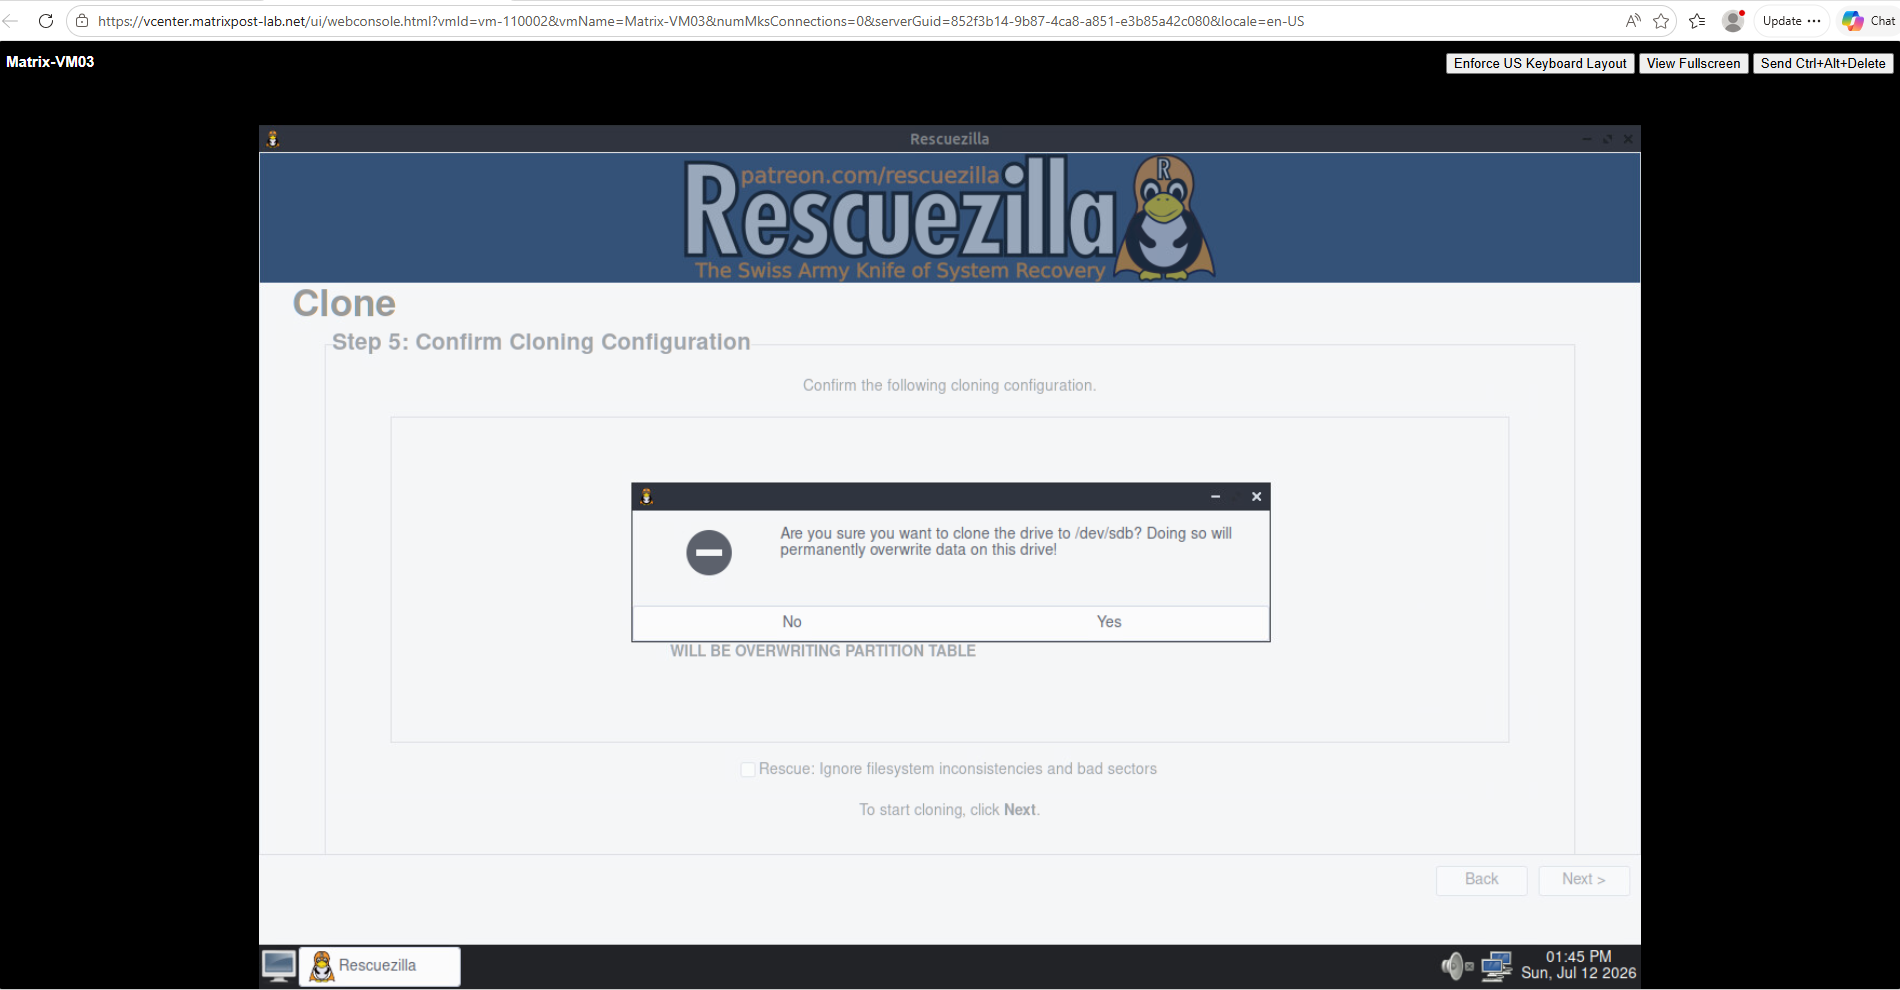
Confirm to clone the drive to /dev/sdb our new reduced 40 GB virtual disk.
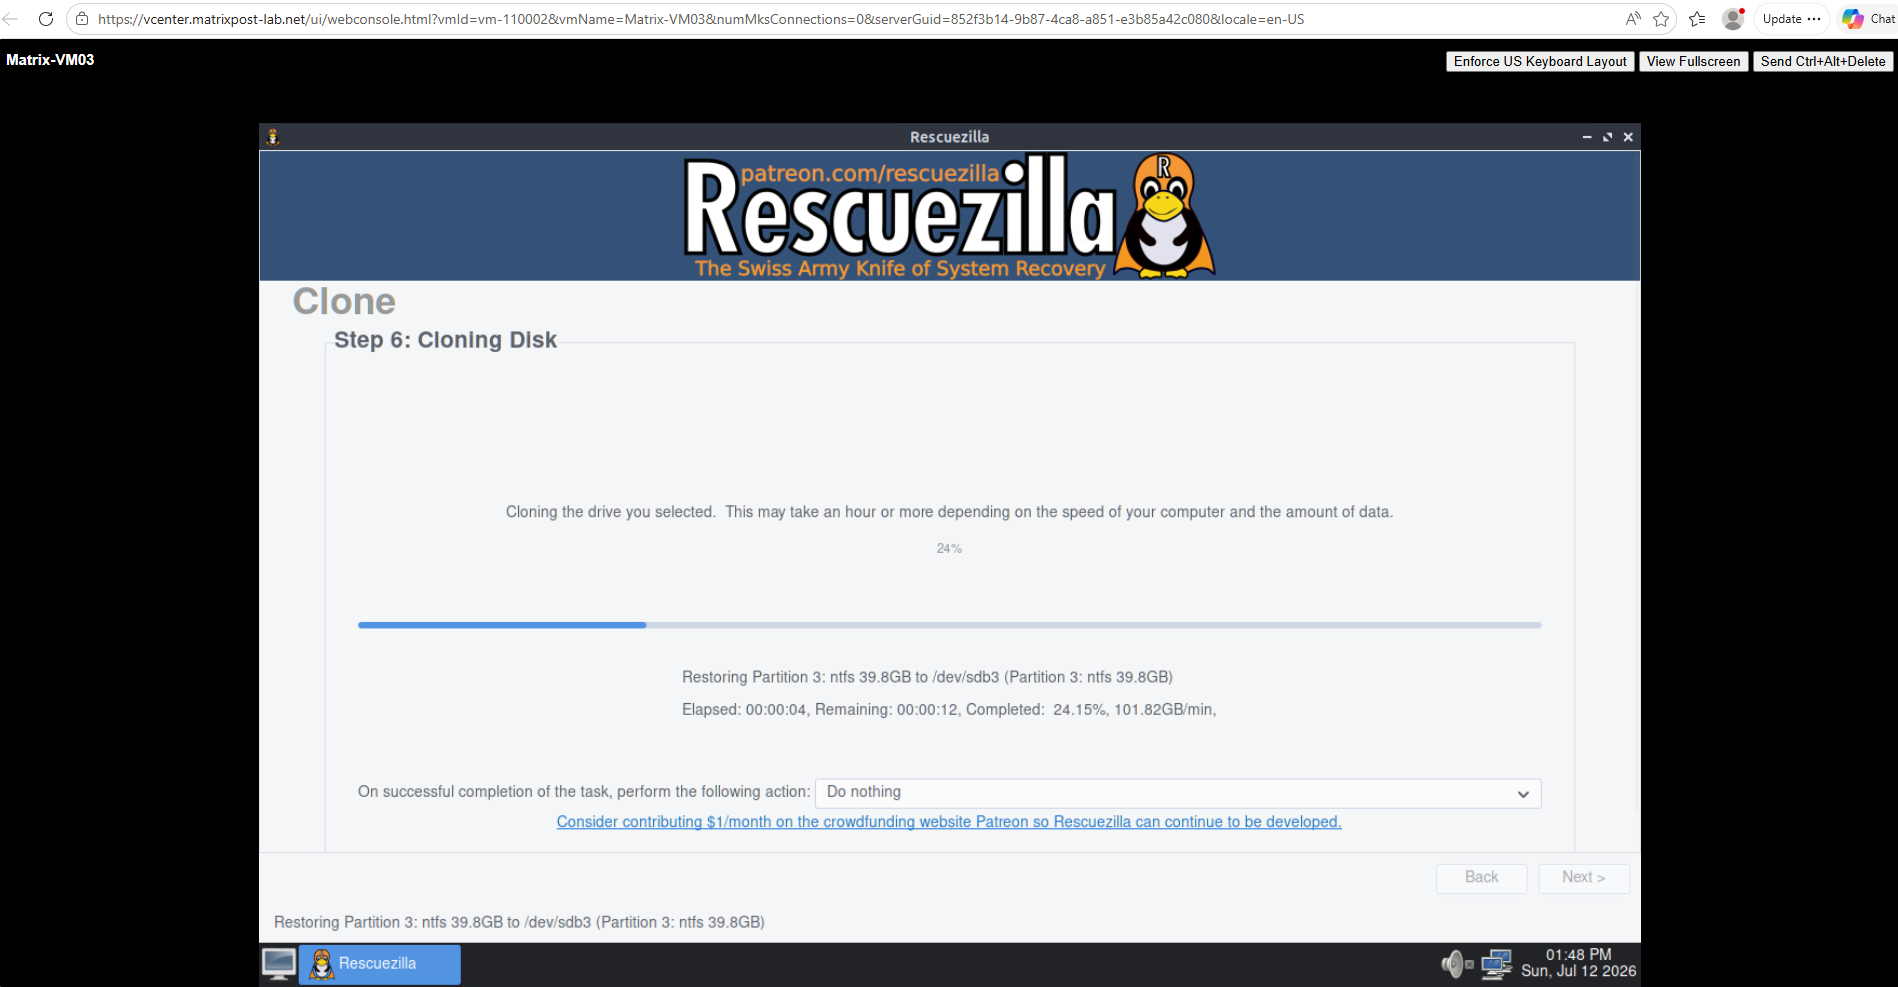
The cloning process starts.
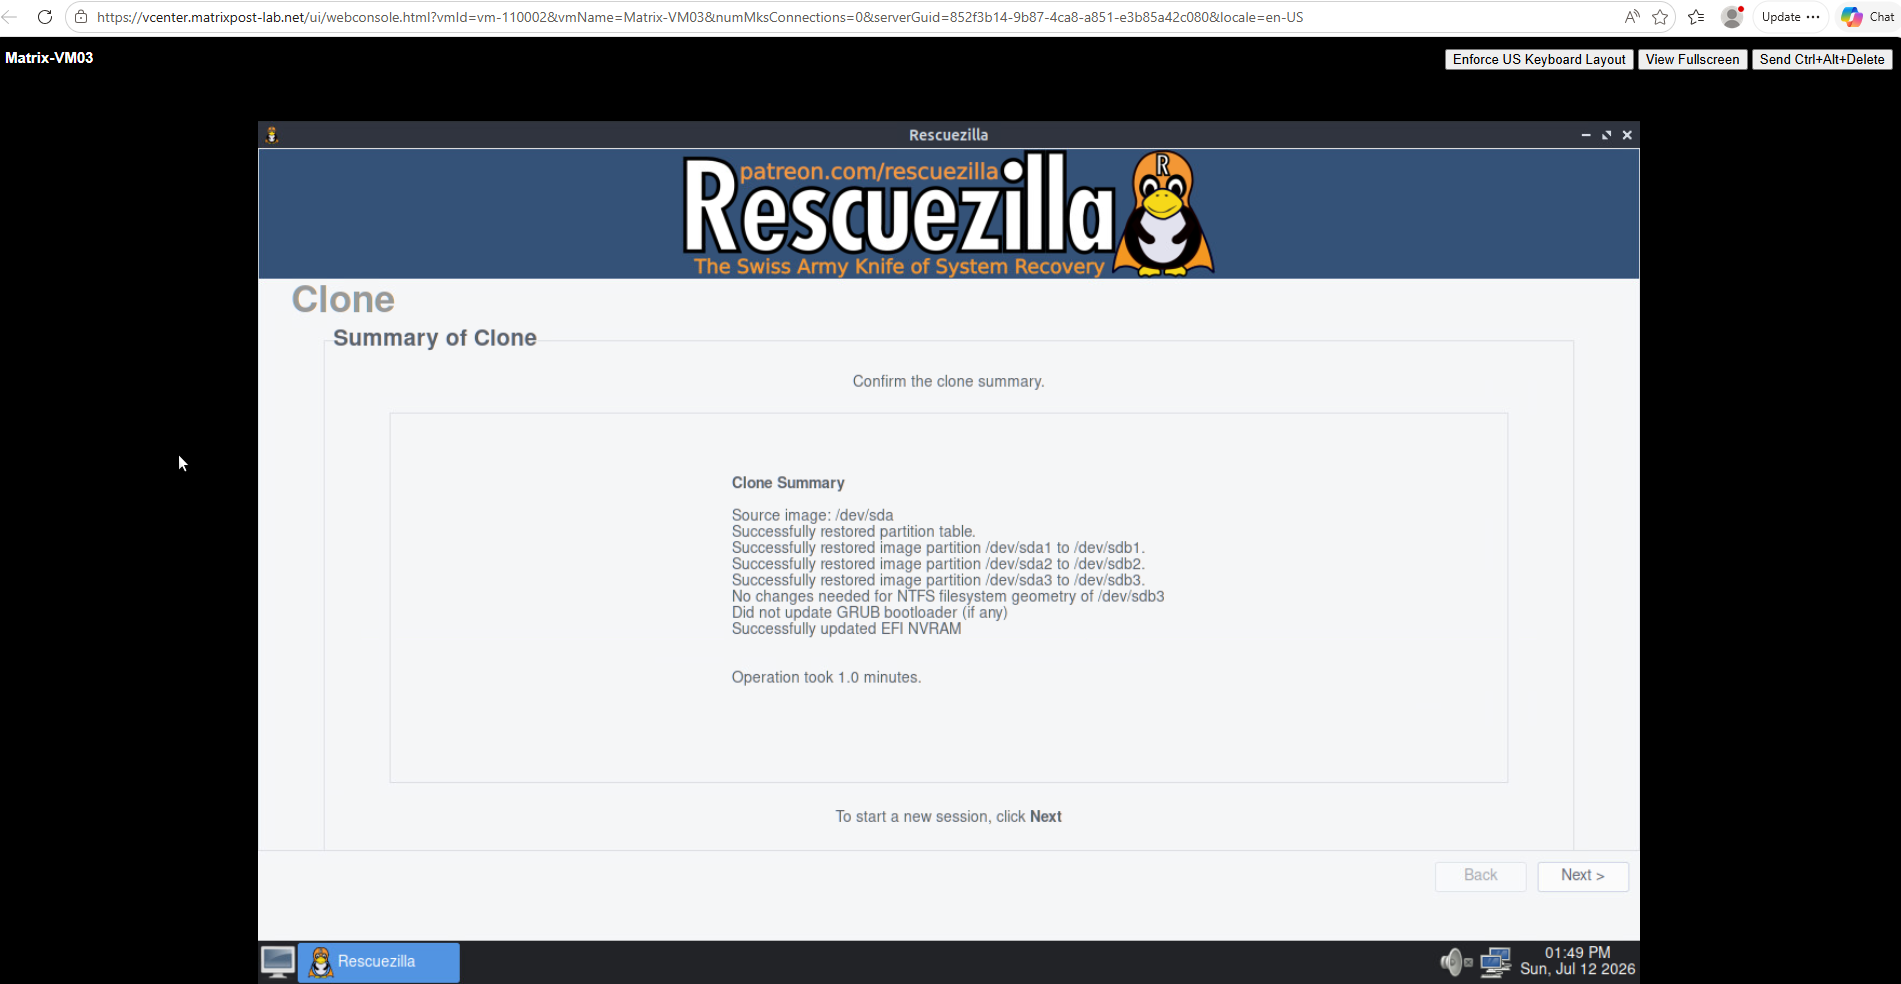
The cloning process completed successfully in approximately one minute. The summary confirms that the GPT partition table and all selected partitions (EFI, Microsoft Reserved, and Windows) were successfully cloned from /dev/sda to /dev/sdb.
Rescuezilla also reports that no changes to the NTFS filesystem geometry were required, no GRUB bootloader was detected or updated (as expected for a Windows installation), and the EFI boot entries (EFI NVRAM) were updated successfully.
No changes to the NTFS filesystem geometry were required, indicating that the cloned NTFS partition already matched the destination partition size and therefore did not require any resizing.
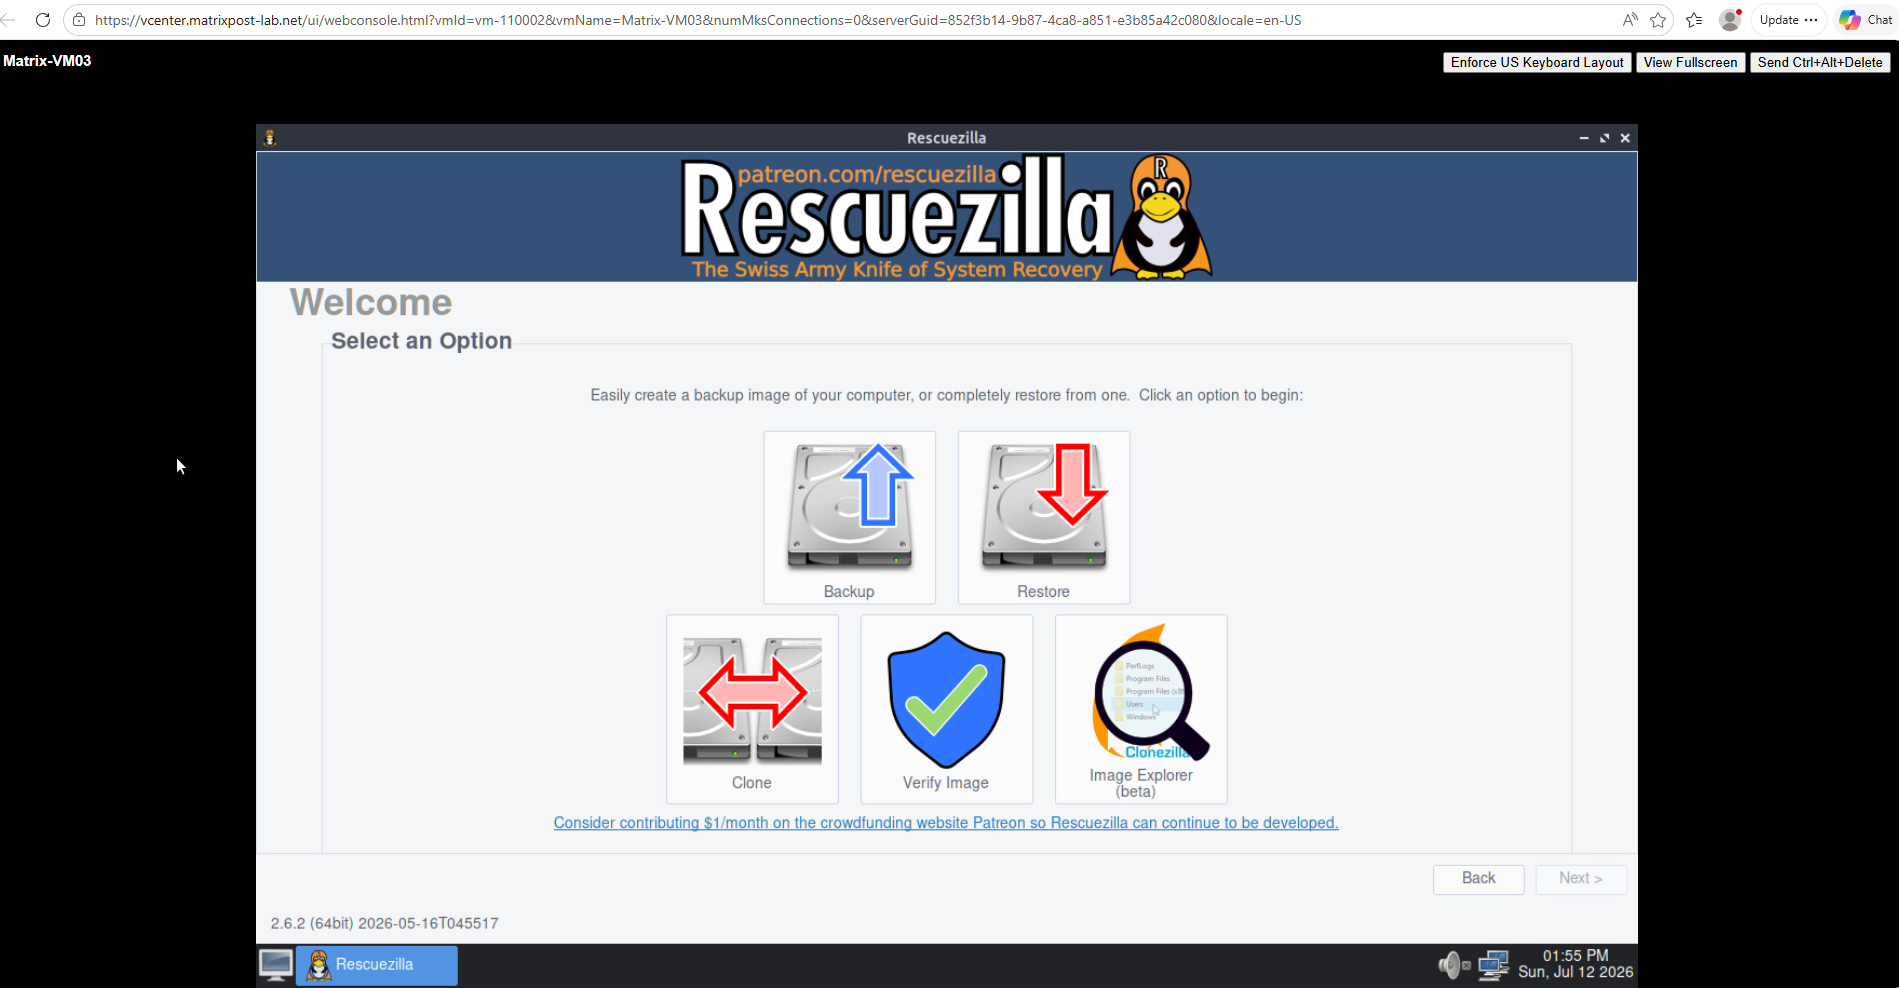
After reviewing the cloning summary and clicking Next, Rescuezilla returns to the Welcome screen. The cloning process is now complete, and the virtual machine can be shut down to proceed with replacing the original virtual disk in VMware vSphere.
Replace the Original Virtual Disk
With the cloning process completed successfully, the final step is to replace the original 60 GB operating system virtual disk with the newly cloned 40 GB virtual disk.
After attaching the cloned disk to the same virtual SCSI controller and device node as the original disk, the virtual machine can be started and the Windows system verified to ensure that it boots and operates correctly.
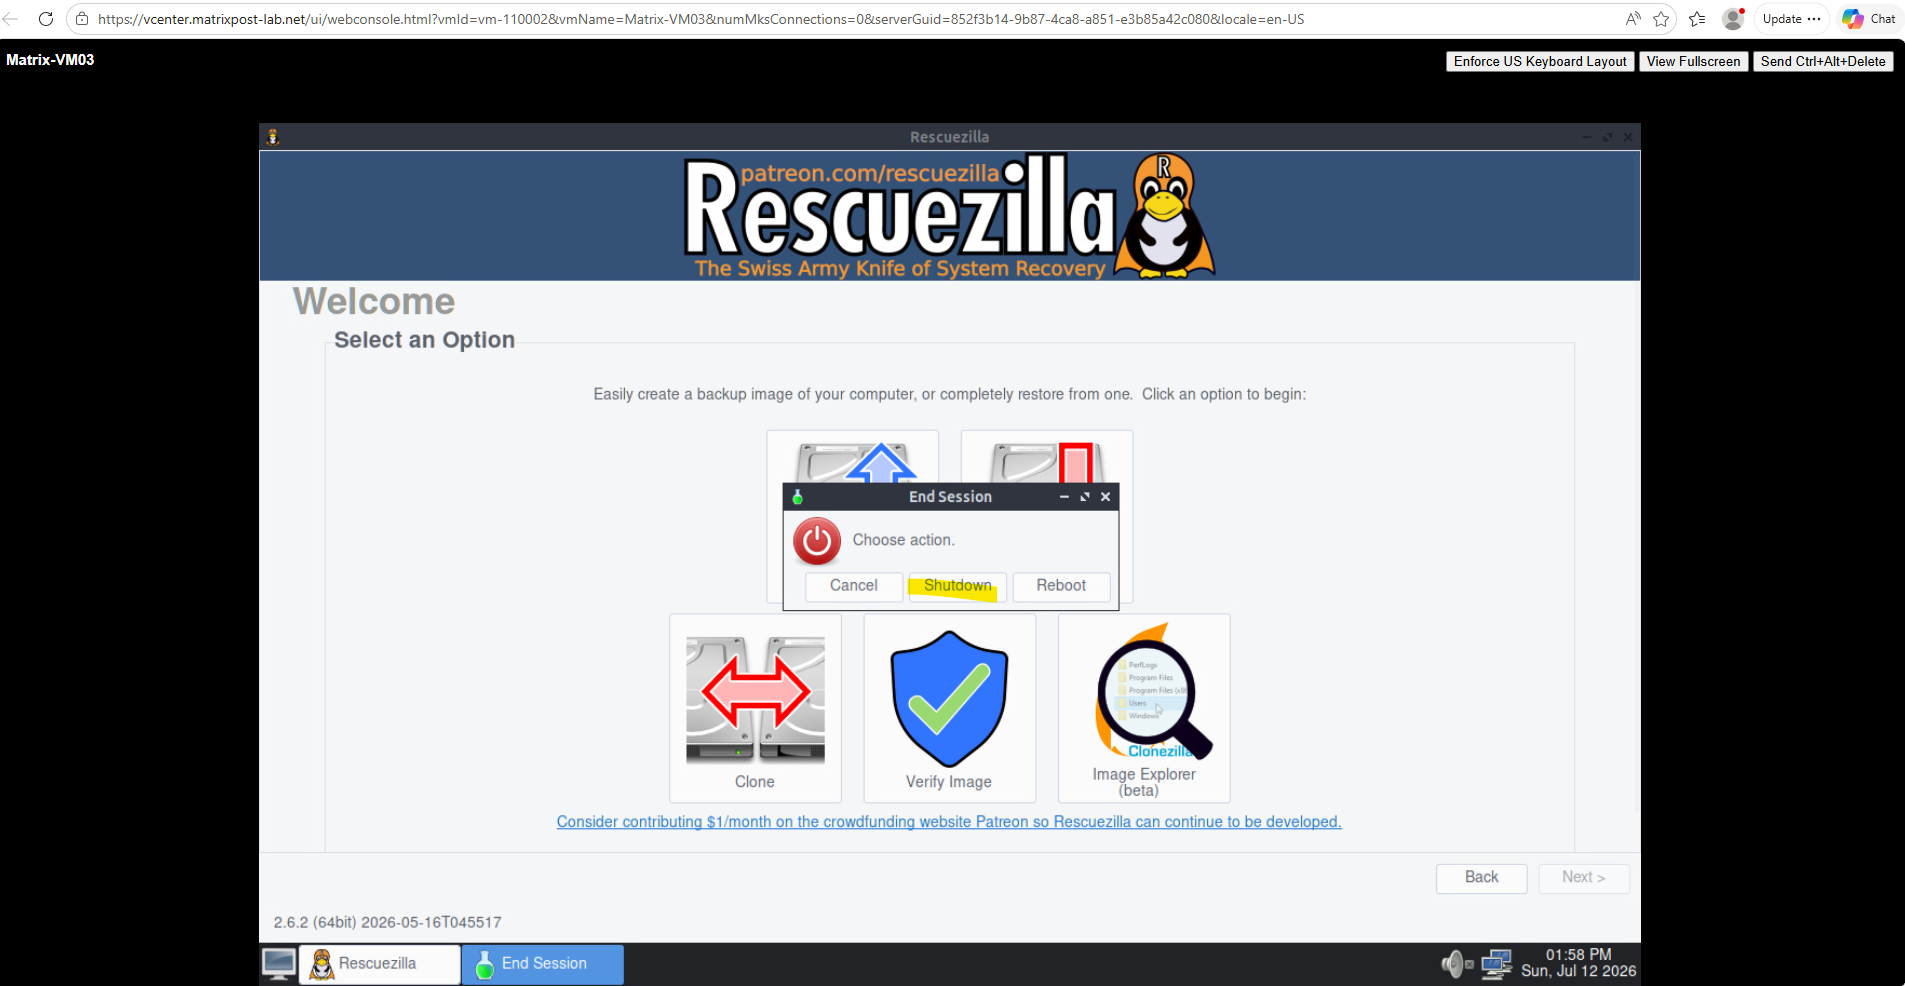
So next we first shut down the VM.
Before replacing the original operating system disk, note the current virtual SCSI configuration.
In my lab, the original 60 GB operating system disk is attached to SCSI (0:0), the 50 GB data disk to SCSI (1:0), and the newly cloned 40 GB virtual disk to SCSI (0:1).
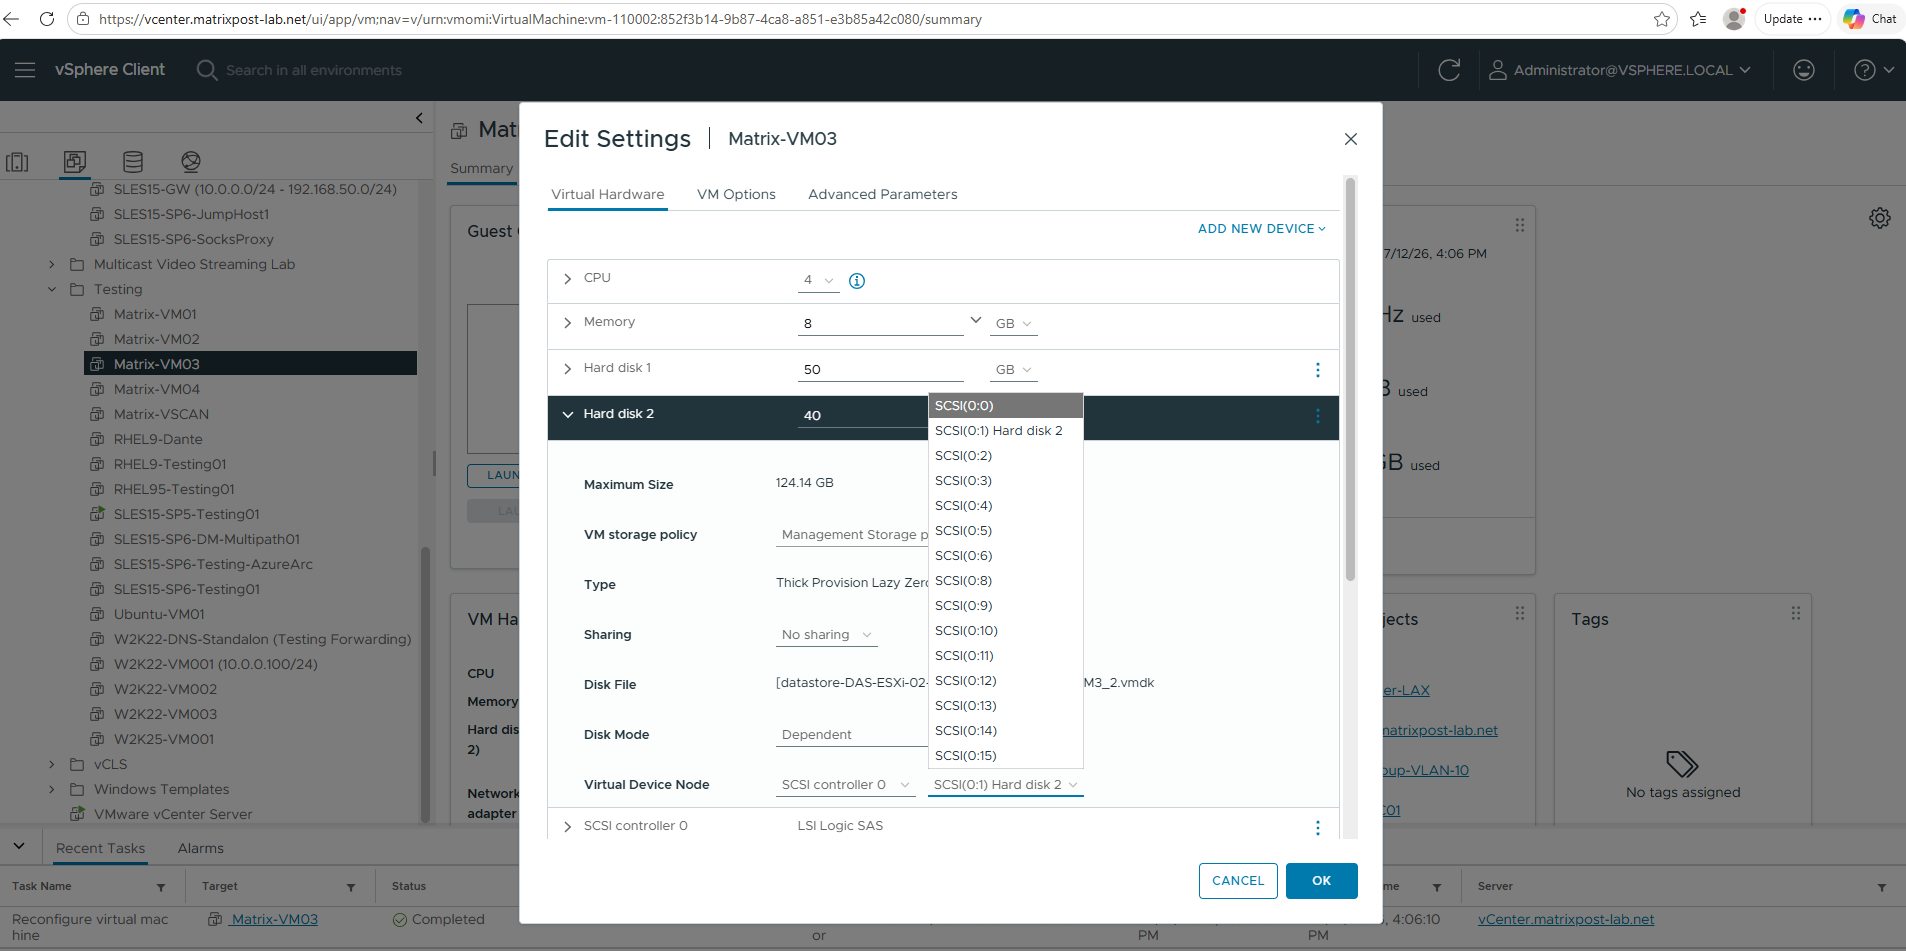
To preserve the original boot configuration, the cloned disk will be moved to SCSI (0:0) after removing the original disk from the virtual machine.
Although modern Windows systems often boot successfully even if the cloned virtual disk is attached to a different virtual SCSI device, it is considered best practice to attach the replacement disk to the same virtual SCSI controller and device node as the original operating system disk. This preserves the original boot configuration and minimizes the risk of unexpected boot or firmware-related issues.
To detach the original 60 GB virtual disk, select it in the virtual machine’s Edit Settings dialog and click Remove Device.
This removes the disk only from the virtual machine configuration while leaving the VMDK file intact, allowing you to reattach the original virtual disk at any time and quickly revert to the previous state if the cloned disk does not boot or operate as expected.
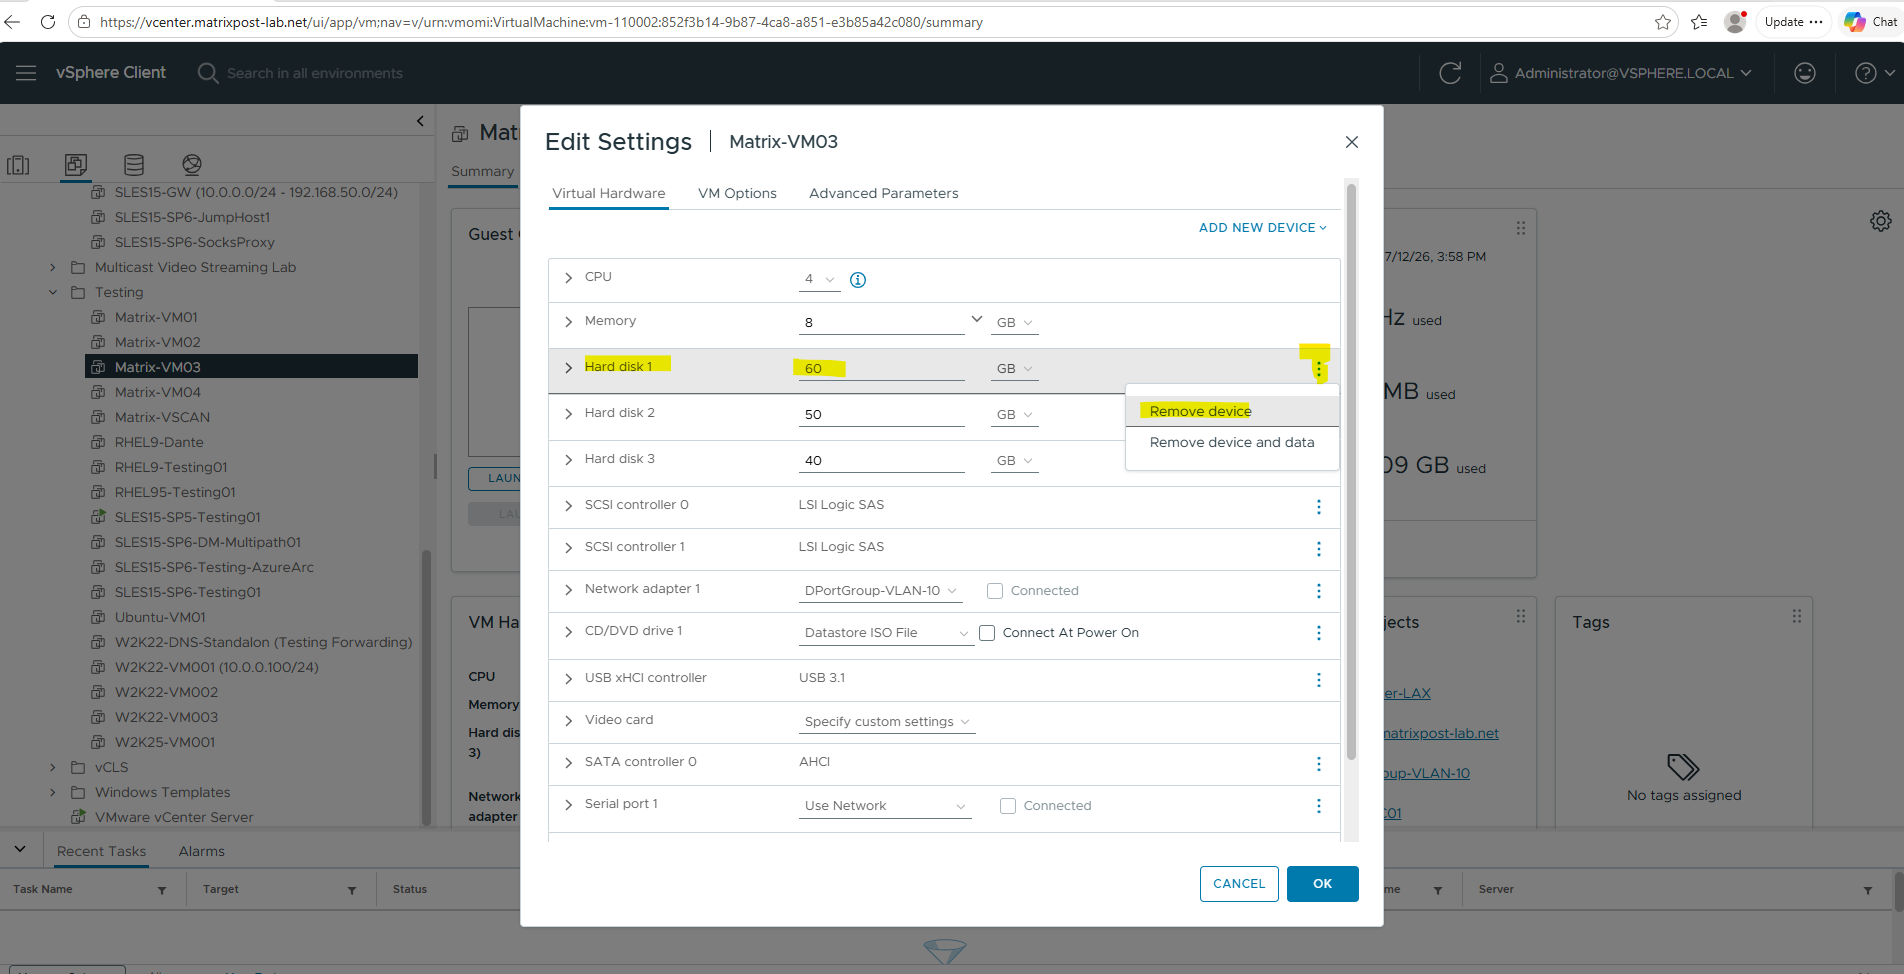
Click on OK finally.
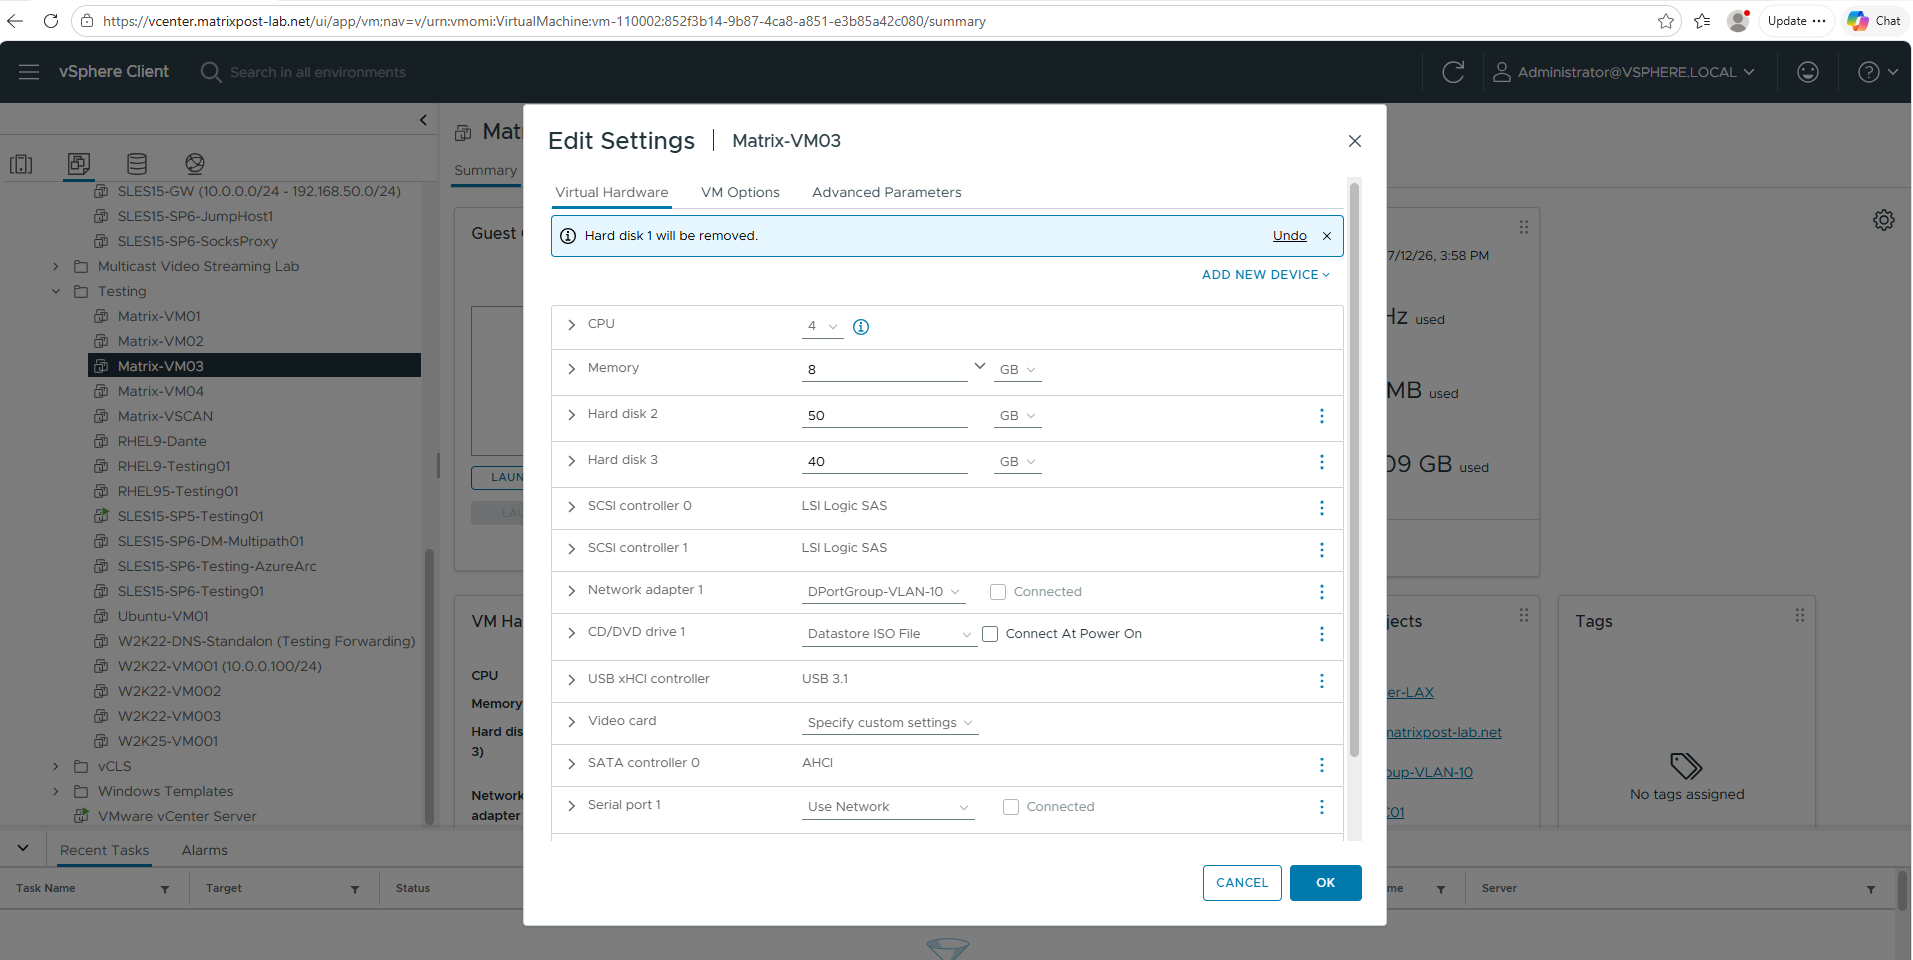
Move the cloned disk to SCSI (0:0.
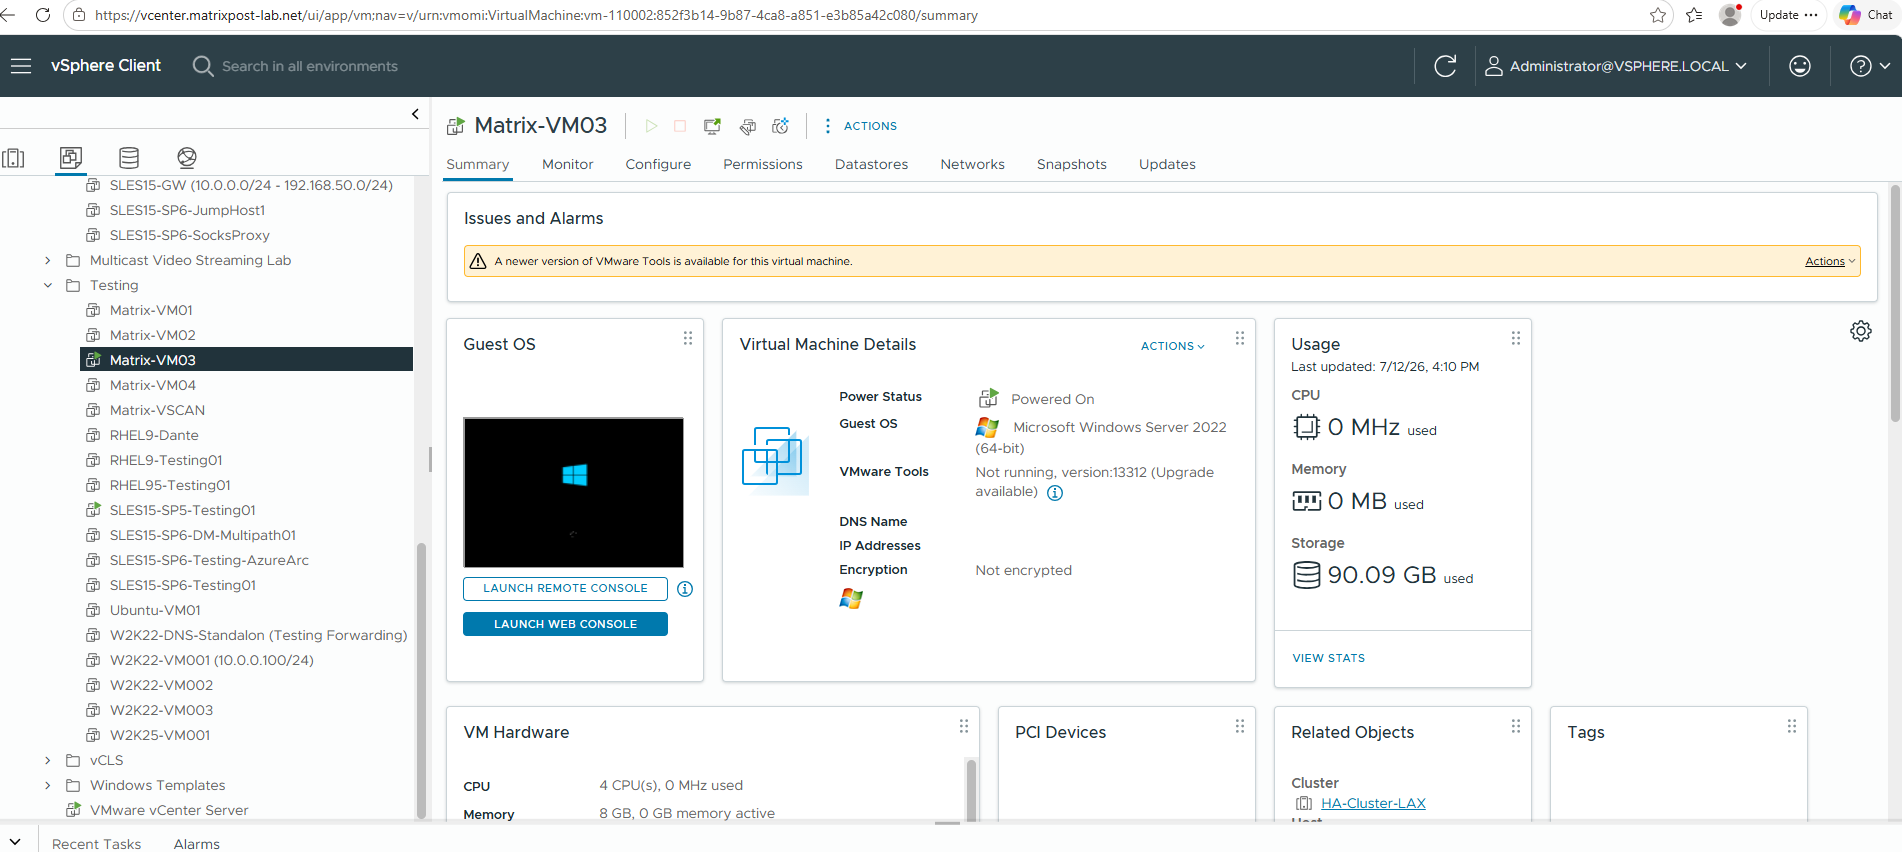
After replacing the original virtual disk, power on the virtual machine. The VMware vSphere console already shows the Windows startup screen, providing the first indication that the cloned 40 GB virtual disk is bootable.
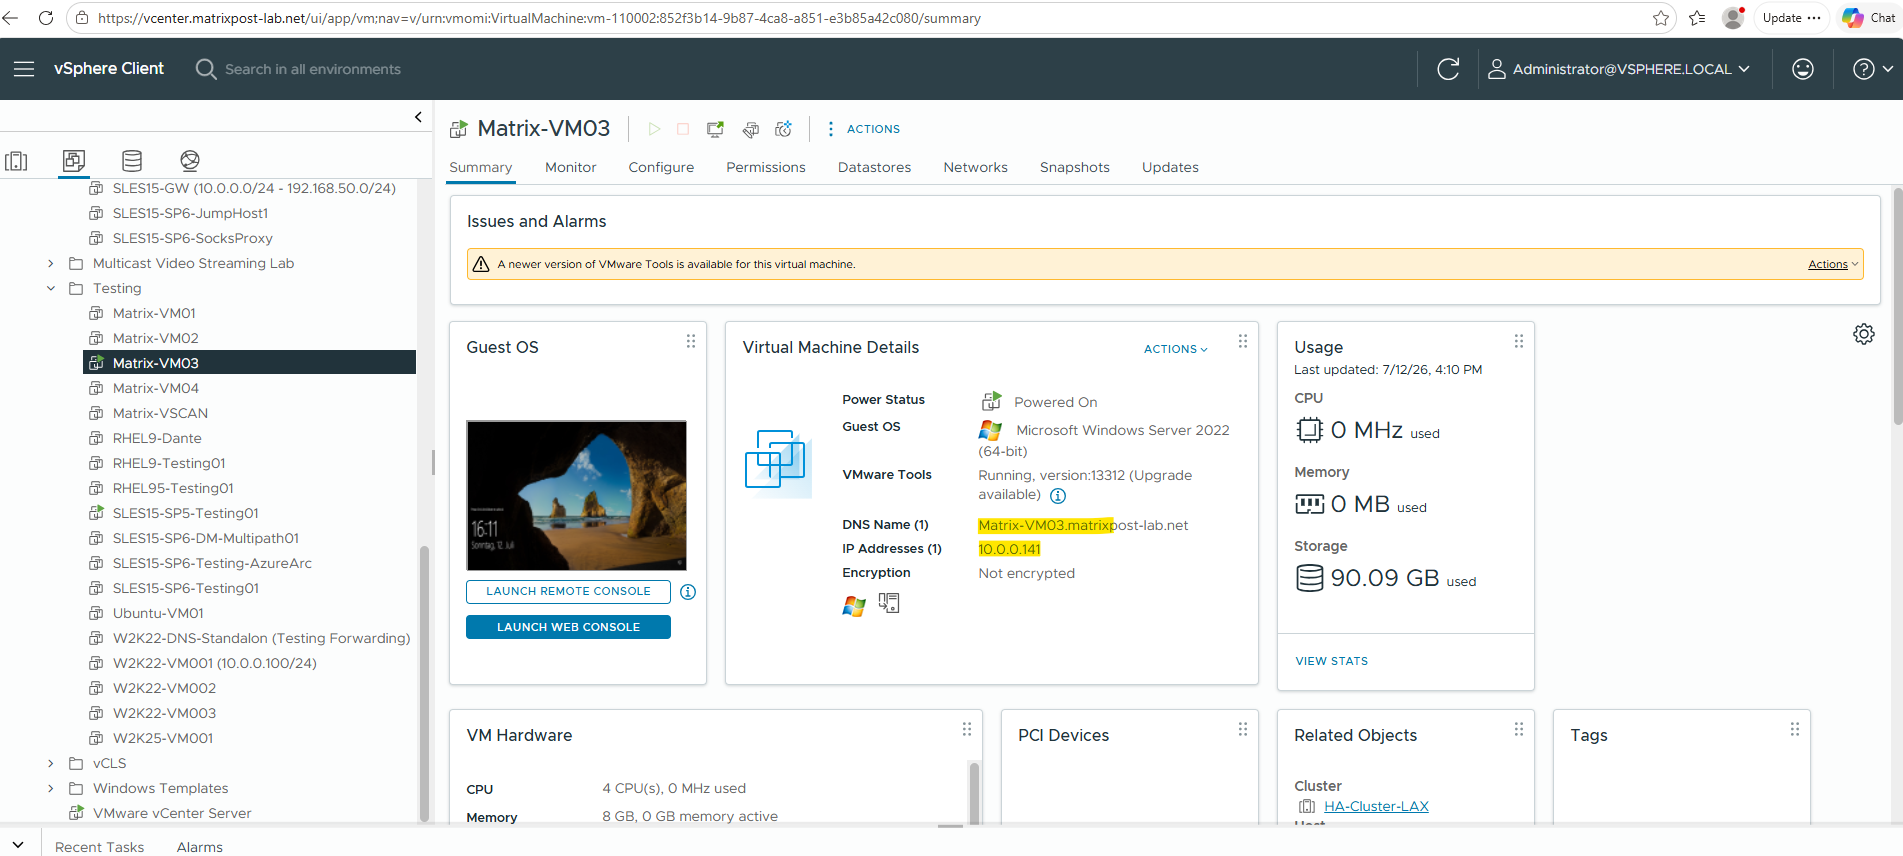
A few moments later, the Windows Server 2022 lock screen appears. In addition to the operating system loading successfully, the displayed DNS host name and IP address confirm that the cloned virtual disk has booted correctly and the Windows system is fully operational.
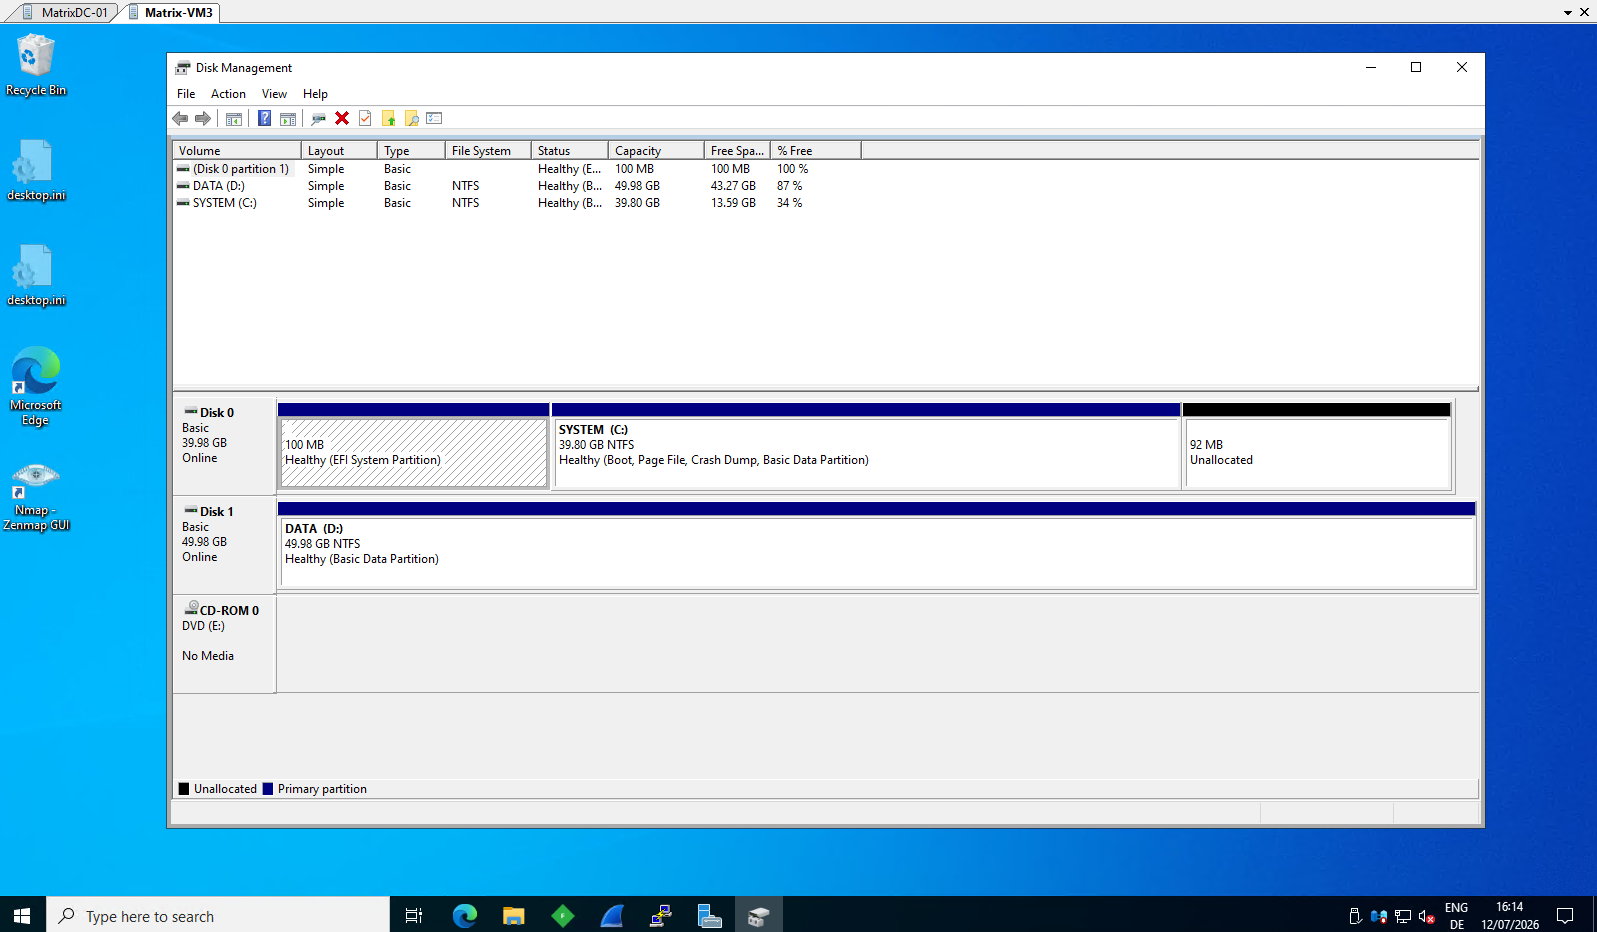
The Disk Management console confirms that the new 40 GB operating system disk contains only the EFI System Partition and the cloned Windows partition, which now occupies approximately 39.98 GB.
The remaining 92 MB is left unallocated due to partition alignment and GPT disk layout requirements. Because this space is located directly after the Windows partition, it can be reclaimed at any time by extending the operating system partition using the Extend Volume option in Disk Management.
Troubleshooting
During my initial attempt, I intentionally tried to clone the disk without first removing the Windows Recovery partition, hoping that Rescuezilla would automatically rearrange the partition layout in the same way as commercial tools such as Macrium Reflect.
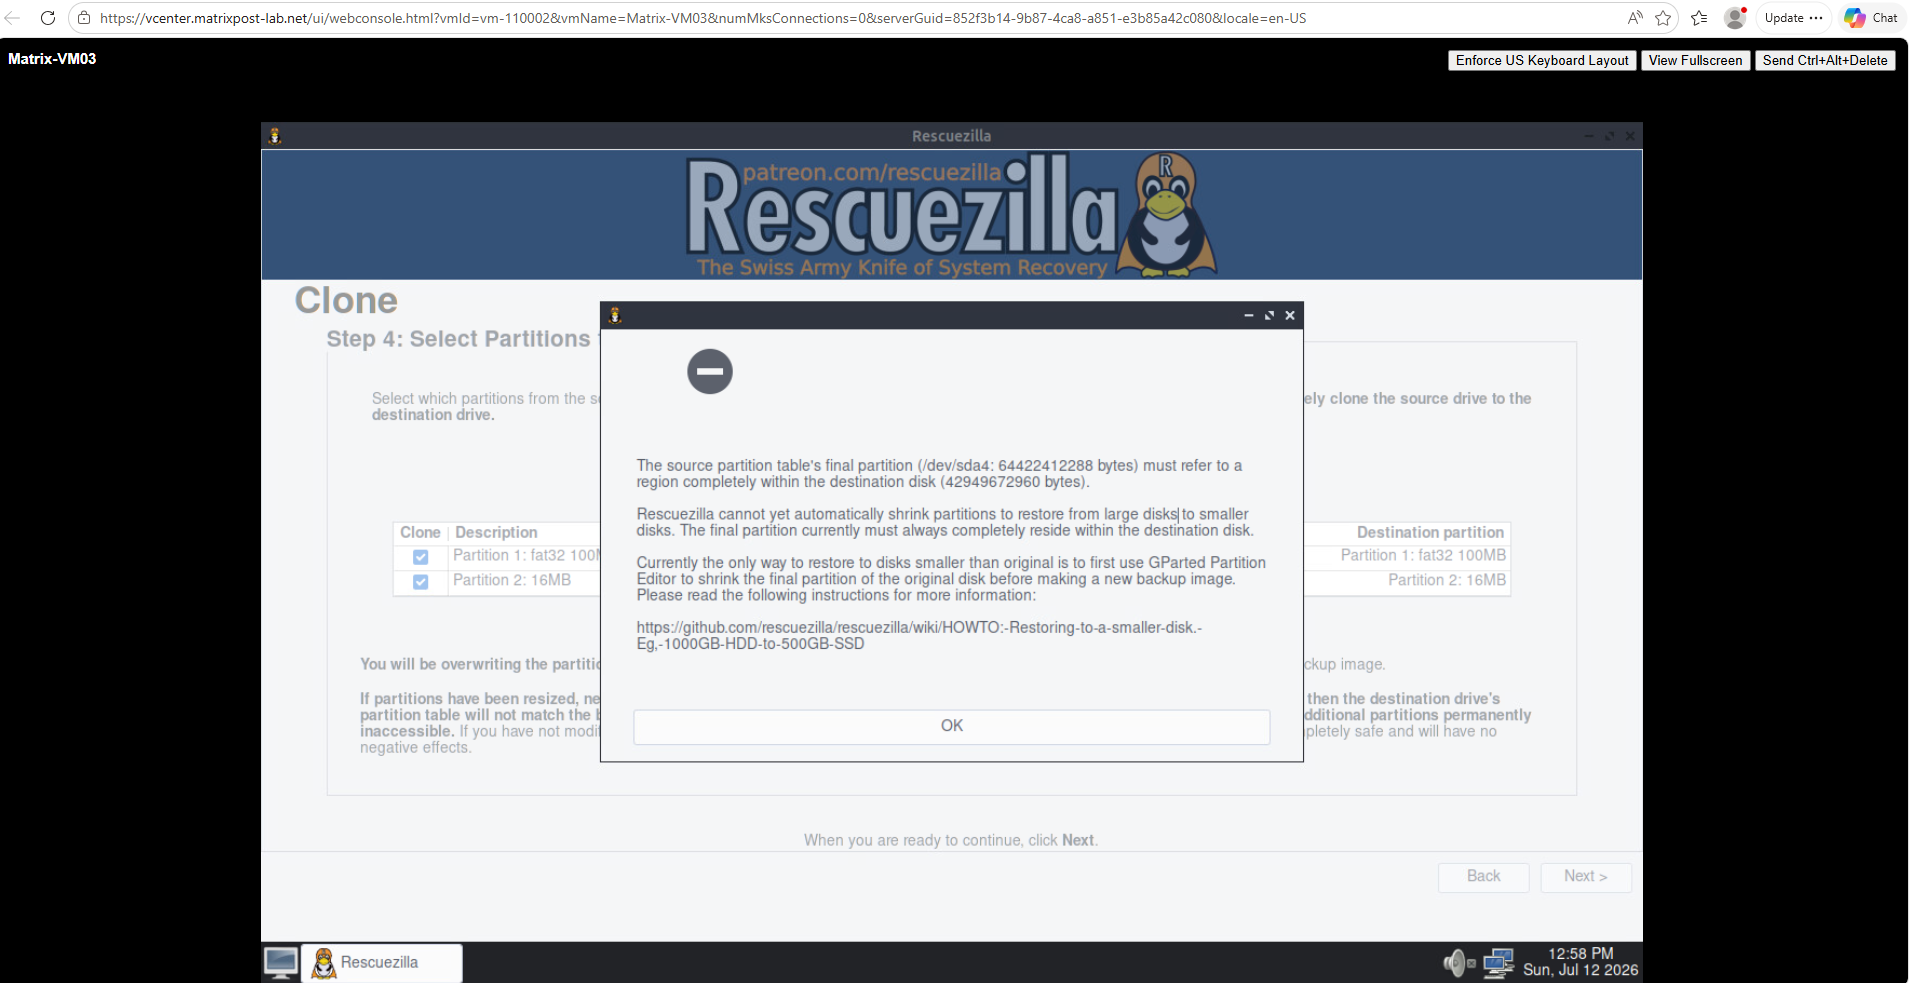
However, as the following error message demonstrates, Rescuezilla preserves the original partition layout and therefore cannot clone the disk to a smaller destination in this scenario.
Once the available disk drives have been identified, the operating system disk, the newly added virtual disk (40 GB number 2), and the data disk are displayed.
Select the existing operating system disk as the source disk to be cloned to the new, smaller virtual disk and click on Next.
In the next step, Rescuezilla prompts you to select the destination drive. Choose the newly added 40 GB virtual disk, which will receive the cloned operating system and boot partitions and click on Next.
Despite Rescuezilla describing itself as “The Swiss Army Knife of System Recovery,” it cannot automatically close the gap created when the C: partition was shrunk.
Because the resulting unallocated space lies between the operating system partition and the Recovery partition, Rescuezilla preserves the Recovery partition at its original position near the end of the 60 GB disk, placing it beyond the boundary of the new 40 GB destination disk.
Commercial tools such as Macrium Reflect can automatically rearrange the partitions and omit this gap during cloning.
The source partition table’s final partition(/dev/sda4: 64422412288 bytes) must refer to a region completely within the destination disk (42949672960 bytes).
Rescuezilla cannot yet automatically shrink partitions to restore from larger disks to smaller disks. The final partition currently must always completely reside within the destination disk.
Currently the only way to restore to disks smaller than original is to first use GParted Partition Editor to shrink the final partition of the original disk before making a new backup image.
Please read the following instructions for more information: https://github.com/rescuezilla/rescuezilla/wiki/HOWTO:-Restoring-to-a-smaller-disk.-Eg,-1000GB-HDD-to-500GB-SSD
Links
Download Rescuezilla
https://rescuezilla.com/downloadHOWTO: Restoring to a smaller disk. Eg, 1000GB HDD to 500GB SSD
https://github.com/rescuezilla/rescuezilla/wiki/HOWTO:-Restoring-to-a-smaller-disk.-Eg,-1000GB-HDD-to-500GB-SSD
