Set up SPF and DKIM for Postfix on Ubuntu
In this post I want to show how to set up the SPF (Sender Policy Framework) and DomainKeys Identified Mail (DKIM) for postfix running on Ubuntu.
Both of them are used in combination with DMARC (Domain-based Message Authentication, Reporting and Conformance) to combat against E-Mail spoofing and phishing.
DMARC itself is just a DNS TXT record which can be used by any receiving email server to authenticate the incoming email based on the instructions published by the domain owner of the sending email domain in this DNS TXT record. If the email passes the authentication, it will be delivered and can be trusted. If the email fails the check, depending on the instructions held within the DMARC record, the email could be delivered, quarantined or rejected.
DMARC extends two existing email authentication mechanisms, Sender Policy Framework (SPF) and DomainKeys Identified Mail (DKIM). It allows the administrative owner of a domain to publish a policy in their DNS records to specify which mechanism (DKIM, SPF or both) is employed when sending email from that domain.
DMARC (Domain-based Message Authentication, Reporting and Conformance)
https://en.wikipedia.org/wiki/DMARC
SPF as the name itself with Sender Policy Framework implies, is also a DNS TXT record but not just. It is also a package (postfix-policyd-spf-python) you have to install on Ubuntu and using by postfix to analyze and check the SPF DNS TXT record from the sending domain.
SPF allows the owner of an Internet domain to specify which computers (IPs and FQDNs are authorized to send mail with envelope-from addresses in that domain, using DNS records.
According the published DMARC policy (DNS record) from the domain owner of the sending email, postfix can deliver, quarantine or reject the email.
Sender Policy Framework (SPF)
https://en.wikipedia.org/wiki/Sender_Policy_Framework
DKIM is also a DNS TXT record and like SPF you also have to install a package (opendkim) on Ubuntu, which will generate a private and public key pair (DKIM signature) used by postfix to sign outbound email messages. Further the package can check the DKIM signature from inbound email messages.
For inbound email messages, postfix then can also use the DMARC policy (DNS record) and the instructions held within, what it will do with the incoming email, reject, quarantine or deliver it.
opendkim
https://wiki.debian.org/opendkimOpenDKIM can add DKIM signatures to outbound mail and check DKIM signatures on inbound mail. It can be configured to reject mail that has missing or invalid DKIM signatures.
For how to set up SPF and DKIM on Ubuntu, all credit goes to Xiao Guoan from linuxbabe.com, which post below I used myself to set up SPF and DKIM on my Ubuntu server.
Part 4: How to Set up SPF and DKIM with Postfix on Ubuntu Server
https://www.linuxbabe.com/mail-server/setting-up-dkim-and-spf
Installing SPF Policy Agent
First we will install and configure the SPF (Sender Policy Framework).
Installing SPF by using the following command.
$ sudo apt install postfix-policyd-spf-python
Configuring SPF Policy Agent
Add the following two lines at the end of the master.cf file
etcpostfixmaster.cf
policyd-spf  unix  -       n       n       -       0       spawn
    user=policyd-spf argv=/usr/bin/policyd-spf
Add the following line at the end of the etcpostfixmain.cf file.
policyd-spf_time_limit = 3600
Also in this file add the following line to your existing
smtpd_recipient_restrictions section.
check_policy_service unix:private/policyd-spf
In my case the smtpd_recipient_restrictions section in the etcpostfixmain.cf file, finally will looks like this.
smtpd_recipient_restrictions =
   permit_mynetworks,
   permit_sasl_authenticated,
   reject_invalid_hostname,
   reject_unauth_pipelining,
   reject_non_fqdn_sender,
   reject_unknown_sender_domain,
   reject_non_fqdn_recipient,
   reject_unknown_recipient_domain,
   reject_unauth_destination,
   check_policy_service unix:private/policyd-spf,
   check_sender_access hash:/etc/postfix/sender_access,
   check_client_access cidr:/etc/postfix/client_access,
   reject_rbl_client bl.spamcop.net,
   reject_rbl_client cbl.abuseat.org,
   reject_rbl_client ix.dnsbl.manitu.net,
   reject_rbl_client sbl.spamhaus.org,
   reject_rbl_client zen.spamhaus.org,
   reject_rbl_client b.barracudacentral.org,
   reject_rbl_client bb.barracudacentral.org,
   permit
Restart postfix
$ sudo systemctl restart postfix
From now on you should see for incoming emails, they published a SPF record, the following email header entry which includes the SPF check from the postfix-policyd-spf-python package.
Received-SPF: Pass (sender SPF authorized).
Installing OpenDKIM
$ sudo apt update
$ sudo apt upgrade
$ sudo apt install opendkim opendkim-tools
Adding postfix user to opendkim group
$sudo gpasswd -a postfix opendkim
Configuring OpenDKIM
$ sudo nano /etc/opendkim.conf
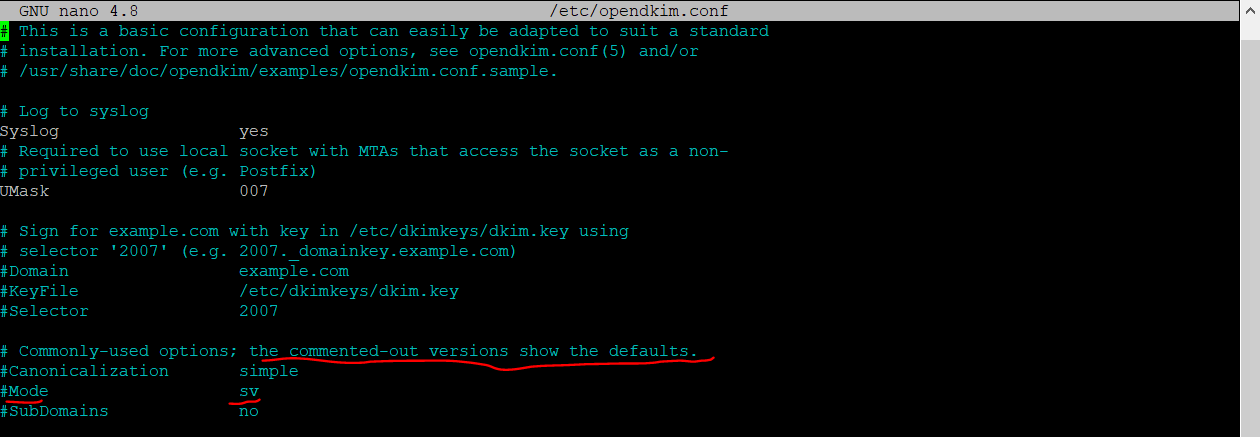
By default, OpenDKIM is set to verification mode (v), which verifies the DKIM signatures of receiving email messages. Changing the mode to sv, will let us activate the signing mode for outgoing emails.
It seems that this has changed, in version 2.11.0 which I installed on Ubuntu, sv is still the default setting and enabled as shown below.
You can check your version by using the command opendkim -V
By default, OpenDKIM logs will be saved in /var/log/mail.log file. Add the following line so OpenDKIM will generate more detailed logs for debugging.
Logwhy yes
The following lines don’t comment out.
#Domain example.com
#KeyFile /etc/dkimkeys/dkim.key
#Selector 2007
For the following lines replace simple with relaxed/simple and comment it out. But as mentioned in version 2.11.0, Mode and SubDomain is still enabled with these parameters.
#Canonicalization simple
#Mode sv
#SubDomains no
Add the following lines at the end of the Opendkim.conf file.
AutoRestart yes
AutoRestartRate 10/1M
Background yes
DNSTimeout 5
SignatureAlgorithm rsa-sha256
#OpenDKIM user
# Remember to add user postfix to group opendkim
# UserID was still on my installation, so I can left this
UserID opendkim
# Map domains in From addresses to keys used to sign messages
KeyTable refile:/etc/opendkim/key.table
SigningTable refile:/etc/opendkim/signing.table
# Hosts to ignore when verifying signatures
ExternalIgnoreList /etc/opendkim/trusted.hosts
# A set of internal hosts whose mail should be signed
InternalHosts /etc/opendkim/trusted.hosts
Create the Signing Table, Key Table and Trusted Hosts File
Therefore we create a directory structure for OpenDKIM which doesn’t comes with the installation by default.
$ sudo mkdir /etc/opendkim
$ sudo mkdir /etc/opendkim/keys
Change the owner and permissions for the directories and make sure only opendkim user can read and write to the keys directory.
$ sudo chown -R opendkim:opendkim /etc/opendkim
$ sudo chmod go-rw /etc/opendkim/keys
Create the signing table
$ sudo nano /etc/opendkim/signing.table
Add the following two lines to the file. This tells OpenDKIM that if a sender on your server is using a @your-domain.com address, then it should be signed with the private key identified by default._domainkey.your-domain.com. The second line tells that your sub-domains will be signed by the private key as well.
*@your-domain.com default._domainkey.your-domain.com
*@*.your-domain.com default._domainkey.your-domain.com
Create the key table
$ sudo nano /etc/opendkim/key.table
Add the following line, which tells the location of the private key.
default._domainkey.your-domain.com your-domain.com:default:/etc/opendkim/keys/your-domain.com/default.private
Create the trusted hosts file
$ sudo nano /etc/opendkim/trusted.hosts
Add the following lines to the newly created file. This tells OpenDKIM that if an email is coming from localhost or from the same domain, then OpenDKIM should only sign the email but not perform DKIM verification on the email.
127.0.0.1
localhost.your-domain.com
Generate Private/Public Keypair
First we will create folder for the domain we want to sign
$ sudo mkdir /etc/opendkim/keys/your-domain.com
Generate keys by using the opendkim-genkey tool
$ sudo opendkim-genkey -b 2048 -d your-domain.com -D /etc/opendkim/keys/your-domain.com -s default -v
The above command will create 2048 bits keys. -d (domain) specifies the domain. -D (directory) specifies the directory where the keys will be stored and we use default as the selector (-s), also known as the name. Once the command is executed, the private key will be written to default.private file and the public key will be written to default.txt file.
Make opendkim as the owner of the private key.
$ sudo chown opendkim:opendkim /etc/opendkim/keys/your-domain.com/default.private
And change the permission, so only the opendkim user has read and write access to the file.
$ sudo chmod 600 /etc/opendkim/keys/your-domain.com/default.private
Publish your Public Key in DNS
In order to determine the public DKIM key you can run the following command as the key is written previously into the default.txt file.
$ sudo cat /etc/opendkim/keys/your-domain.com/default.txt
At your DNS Provider create a new TXT record, enter default._domainkey for the Host part. In the value part copy all from the default.txt file and command above which is between the parentheses.
You have to delete all double quotes and white spaces in the value field

Now we can test if the key works by using the following command.
sudo opendkim-testkey -d your-domain.com -s default -vvv

As with all DNS records you may have to wait a while till they replicated between DNS servers. You can use https://www.dmarcanalyzer.com/dkim/dkim-check/ to check your records.
As you can see above in the screenshot, I was getting the message Key not secure for the test. The reason for is just that DNSSEC is not enabled for my domain.
If you see the query timed out error, you need to comment out the following line in /etc/opendkim.conf file and restart opendkim.service.
TrustAnchorFile /usr/share/dns/root.key
Connect Postfix to OpenDKIM
Postfix can talk to OpenDKIM via a Unix socket file. The default socket file used by OpenDKIM is /var/run/opendkim/opendkim.sock, as shown in /etc/opendkim.conf file. But the postfix SMTP daemon shipped with Ubuntu runs in a chroot jail, which means the SMTP daemon resolves all filenames relative to the Postfix queue directory /var/spool/postfix. So we need to change the OpenDKIM Unix socket file.
Create a directory to hold the OpenDKIM socket file and allow only opendkim user and postfix group to access it.
$ sudo mkdir /var/spool/postfix/opendkim
$ sudo chown opendkim:postfix /var/spool/postfix/opendkim
Edit the OpenDKIM main configuration file
$ sudo nano /etc/opendkim.conf
Find and replace the Socket entry in
Socket local:/var/spool/postfix/opendkim/opendkim.sock
Also check the file /etc/default/opendkim and replace the enabled Socket entry with
SOCKET=”local:/var/spool/postfix/opendkim/opendkim.sock”
Finally to connect Postfix to OpenDKIM we need to add a few lines to our postfix main configuration file /etc/postfix/main.cf
Add the following lines to the end of the main.cf file
# Milter configuration
milter_default_action = accept
milter_protocol = 6
smtpd_milters = local:opendkim/opendkim.sock
non_smtpd_milters = $smtpd_milters
Restart opendkim and postfix
$ sudo systemctl restart opendkim postfix
Testing if DKIM signing works
To check if from now on the outbound email messages from postfix will be signed for DKIM, we just had to inspect the email header on a destination mailbox which SMTP Server is capable to verify DKIM.
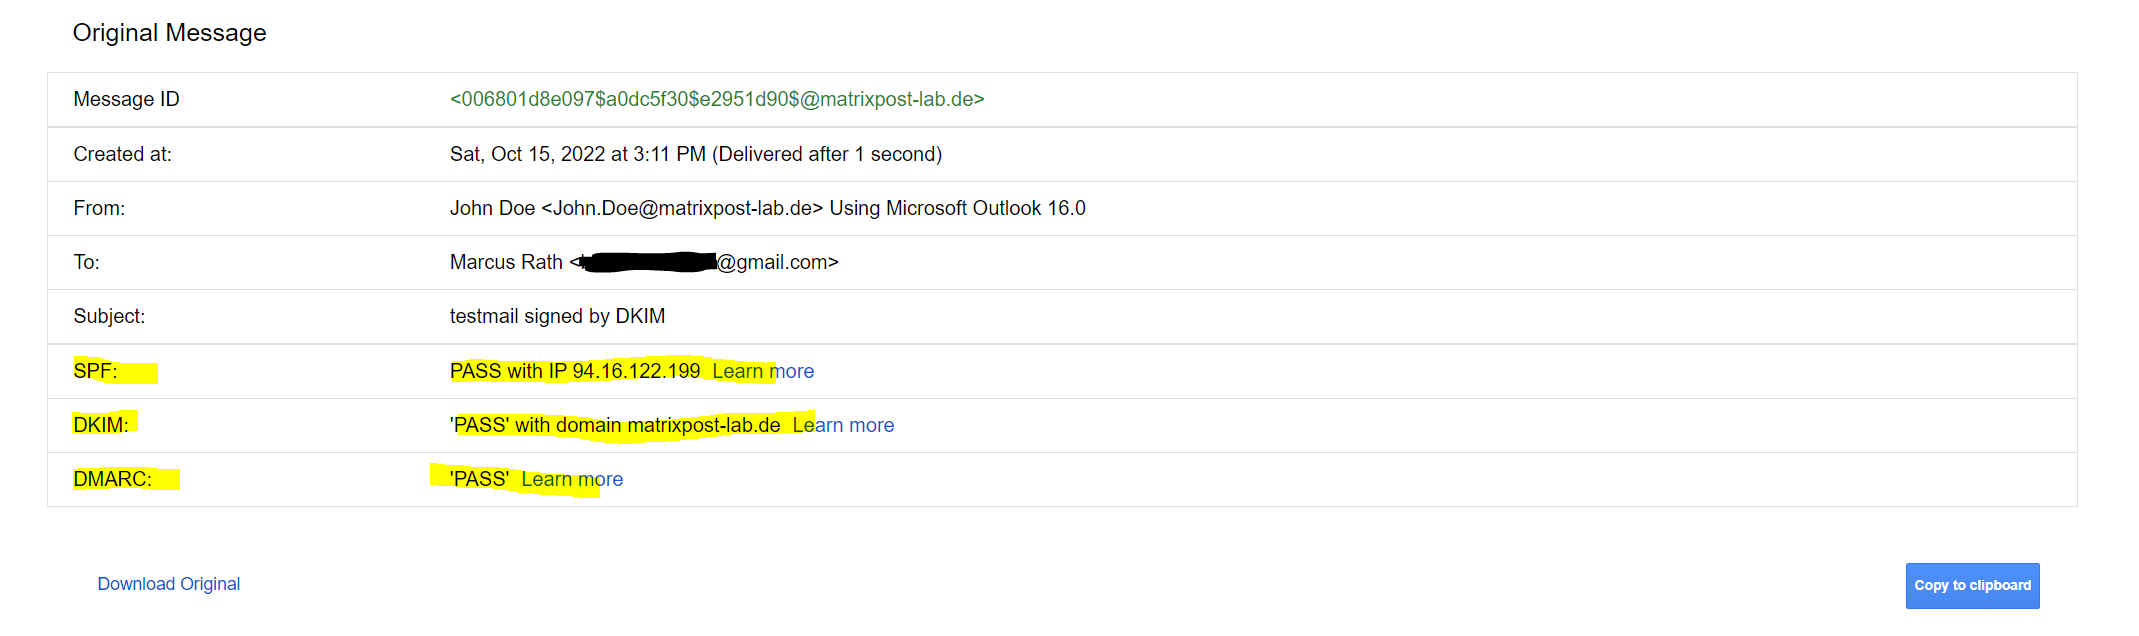
In this case you should see something like below in the email header, the listed IP is from my postfix lab server. You can also see here, that the destination email server (Exchange Online Protection), could verify my SPF record and that my lab postfix server is a permitted sender.
Authentication-Results: spf=pass (sender IP is 94.16.122.199)
smtp.mailfrom=matrixpost-lab.de; dkim=pass (signature was verified)
header.d=matrixpost-lab.de;dmarc=pass action=none
header.from=matrixpost-lab.de;compauth=pass reason=100
Received-SPF: Pass (protection.outlook.com: domain of matrixpost-lab.de
designates 94.16.122.199 as permitted sender)
receiver=protection.outlook.com; client-ip=94.16.122.199;
helo=mail.matrixpost-lab.de; pr=C
Received: from mail.matrixpost-lab.de (94.16.122.199) by
DBAEUR03FT065.mail.protection.outlook.com (100.127.142.147) with Microsoft
SMTP Server (version=TLS1_2, cipher=TLS_ECDHE_RSA_WITH_AES_256_GCM_SHA384) id
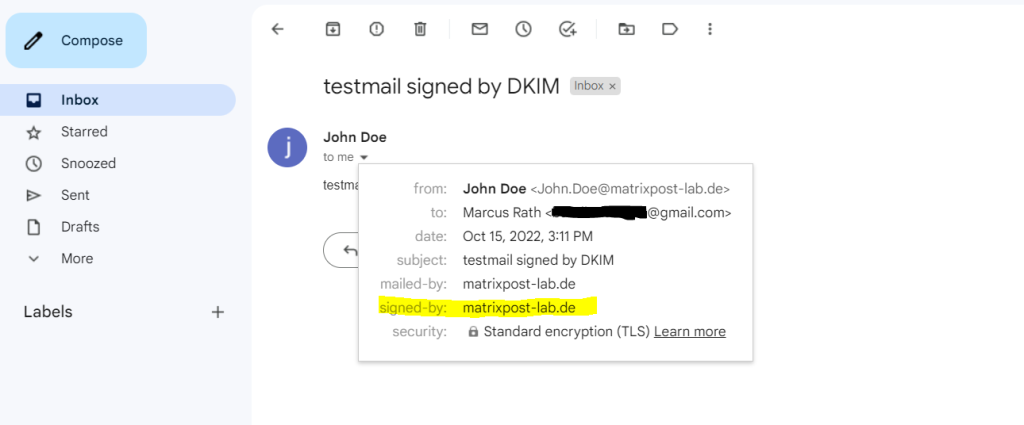
In case you had an Gmail account, you can also send an email message to your Gmail address.
In your inbox select the email and click on to me. If there is in the pop-up as below signed-by: <your domain> listed, your email message was correctly signed with DKIM.
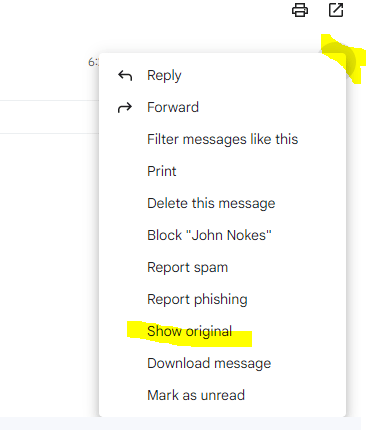
More details you will see when clicking on Show original on the right top three dots from your email like below.

Troubleshooting
Remove OpenDKIM
In case OpenDKIM won’t work as expected and you doublechecked that the configuration is right, you maybe deinstall OpenDKIM complete and do a reinstall.
So remove OpenDKIM including the dependent packages and configuration as follows.
$ sudo apt remove –auto-remove opendkim
$ sudo apt purge opendkim
The remove command is identical to install except that packages are removed instead of installed.
The purge command is identical to remove except that packages are removed and purged (any configuration files are deleted too).
Or just the following command:$ sudo apt purge –auto-remove opendkim
It will remove the opendkim package and all dependent packages and configuration files.
Links
How to Set up SPF and DKIM with Postfix on Ubuntu Server
https://www.linuxbabe.com/mail-server/setting-up-dkim-and-spf
How to interpret SPF authentication verification results
https://help.returnpath.com/hc/en-us/articles/115000460632-How-to-interpret-SPF-authentication-verification-results
DMARC (Domain-based Message Authentication, Reporting and Conformance)
https://en.wikipedia.org/wiki/DMARC
Sender Policy Framework (SPF)
https://en.wikipedia.org/wiki/Sender_Policy_Framework
opendkim
https://wiki.debian.org/opendkim
Tags In
Related Posts
Latest posts
Protecting NetApp ONTAP Workloads with Autonomous Ransomware Protection (ARP) – Part 4 – Detecting and Recovering SMB Workloads from Ransomware
Follow me on LinkedIn