How to Migrate from vSphere Standard Switch (VSS) to vSphere Distributed Switch (VDS) – and Back Again
The vSphere Distributed Switch (VDS) provides centralized network management across multiple ESXi hosts and offers advanced features such as Network I/O Control (NIOC), LACP, NetFlow, Port Mirroring, and centralized port group management. However, many environments still operate successfully with traditional vSphere Standard Switches (VSS), especially in smaller deployments.
Migrating from a VSS to a VDS is usually straightforward when performed carefully, but network migrations are among the most sensitive changes in any vSphere environment. A configuration mistake involving uplinks, VLANs, or port groups can quickly result in loss of connectivity for virtual machines or even ESXi host management interfaces.
In this post, I will demonstrate how to migrate ESXi hosts and virtual machines from a VSS to a VDS, discuss strategies to minimize downtime by migrating physical uplinks one at a time, and show how to safely roll back to a VSS if required.
- Introduction
- vSphere Standard Switch (VSS) vs vSphere Distributed Switch (VDS) – Key Differences
- Lab Environment Overview
- Creating a vSphere Distributed Switch (VDS)
- Add Hosts to VDS
- Migrating first Physical Uplink from the VSS to the VDS
- Migrate VMs to the Distributed Port Groups
- Migrate remaining Uplink(s)
- Rolling Back from VDS to VSS
- Links
Introduction
A network switch in vSphere consists of two logical sections that are the data plane and the management plane. The data plane implements the packet switching, filtering, tagging, and so on. The management plane is the control structure that you use to configure the data plane functionality. A vSphere Standard Switch contains both data and management planes, and you configure and maintain each standard switch individually.
A vSphere Distributed Switch separates the data plane and the management plane. The management functionality of the distributed switch resides on the vCenter Server system that lets you administer the networking configuration of your environment on a data center level. The data plane remains locally on every host that is associated with the distributed switch. The data plane section of the distributed switch is called a host proxy switch. The networking configuration that you create on vCenter Server (the management plane) is automatically pushed down to all host proxy switches (the data plane).
The vSphere Distributed Switch introduces two abstractions that you use to create consistent networking configuration for physical NICs, virtual machines, and VMkernel services.
More about you will also find in my following post.
vSphere Standard Switch (VSS) vs vSphere Distributed Switch (VDS) – Key Differences
Before migrating between a vSphere Standard Switch (VSS) and a vSphere Distributed Switch (VDS), it is important to understand the differences between both networking models.
A vSphere Standard Switch is configured independently on each ESXi host. While this approach is simple and works well in smaller environments, it requires administrators to manually create and maintain identical switch and port group configurations across all hosts. Any changes to VLAN assignments, security settings, traffic shaping policies, or teaming configurations must be performed separately on each host.
In contrast, a vSphere Distributed Switch is created and managed centrally through vCenter Server. The switch configuration is then distributed automatically to all participating ESXi hosts. This significantly simplifies network administration in larger environments and ensures consistent configuration across the cluster.
The following table summarizes some of the key differences:
| Feature | vSphere Standard Switch (VSS) | vSphere Distributed Switch (VDS) |
|---|
| Management | Per ESXi host | Centralized through vCenter |
| Configuration Consistency | Manual | Automatic |
| Port Groups | Created on each host individually | Shared across all hosts |
| Host Networking | Local configuration | Distributed configuration |
| vCenter Dependency | No | Yes |
| Network I/O Control (NIOC) | No | Yes |
| LACP Support | No | Yes |
| NetFlow | No | Yes |
| Port Mirroring | No | Yes |
| Backup and Restore | Host-based | Centralized |
| Scale | Suitable for smaller environments | Designed for larger environments |
More about LACP support you can also read in my post below.
One of the most important operational differences is that a VDS relies on vCenter Server for management. Although ESXi hosts continue forwarding traffic if vCenter becomes unavailable, certain networking operations require vCenter Server.
For many environments, both VSS and VDS provide the same core switching functionality and network performance.
The decision is therefore often driven less by throughput considerations and more by operational requirements, centralized management, advanced networking features, and scalability.
Lab Environment Overview
In my lab environment, all three ESXi hosts are running on Dell XPS notebooks equipped with three USB network adapters each.
About using USB NICs for ESXi hosts you can also read my following post.
About initial network setup using vSphere Standard Switches (VSS), you can also read my following post, this was my old lab environment.
As mentioned all three ESXi hosts contain three USB NICs as shown below for the first ESXi host.
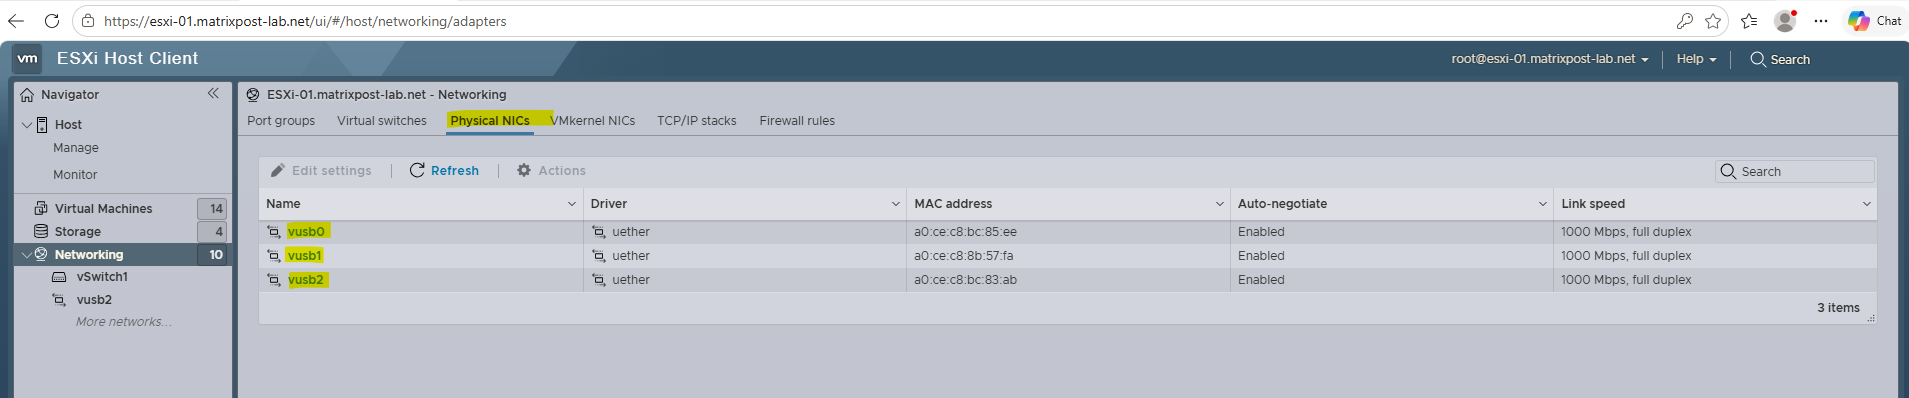
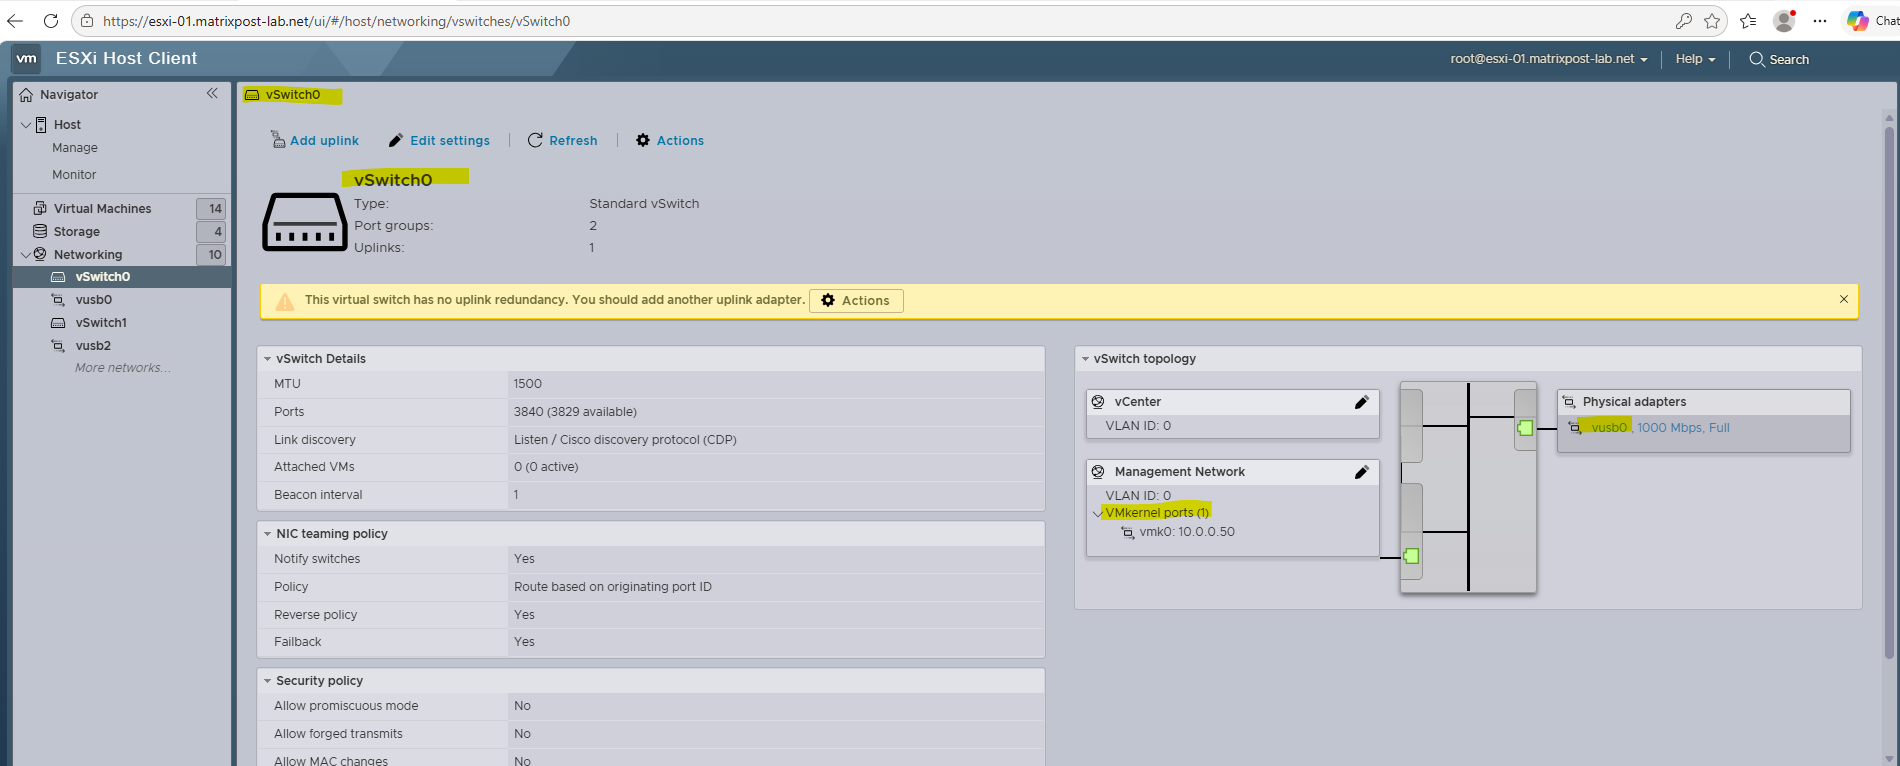
The first USB NIC (vusb0) is dedicated to the VMkernel networking stack (and associated with vSwitch0), including ESXi management traffic, while the remaining two USB NICs are used as uplinks for the virtual machine networks.
The VMkernel is the networking layer of the ESXi hypervisor and provides connectivity for host-level services such as management, vMotion, storage traffic (iSCSI, NFS), vSAN, and Fault Tolerance.
Unlike virtual machine traffic, VMkernel traffic is used by the ESXi host itself to communicate with other hosts, storage systems, and vCenter Server.
An uplink is a physical network adapter assigned to a virtual switch and provides connectivity between the virtual networking environment and the physical network. All traffic generated by virtual machines or VMkernel services reaches the external network through one or more uplinks attached to the virtual switch.
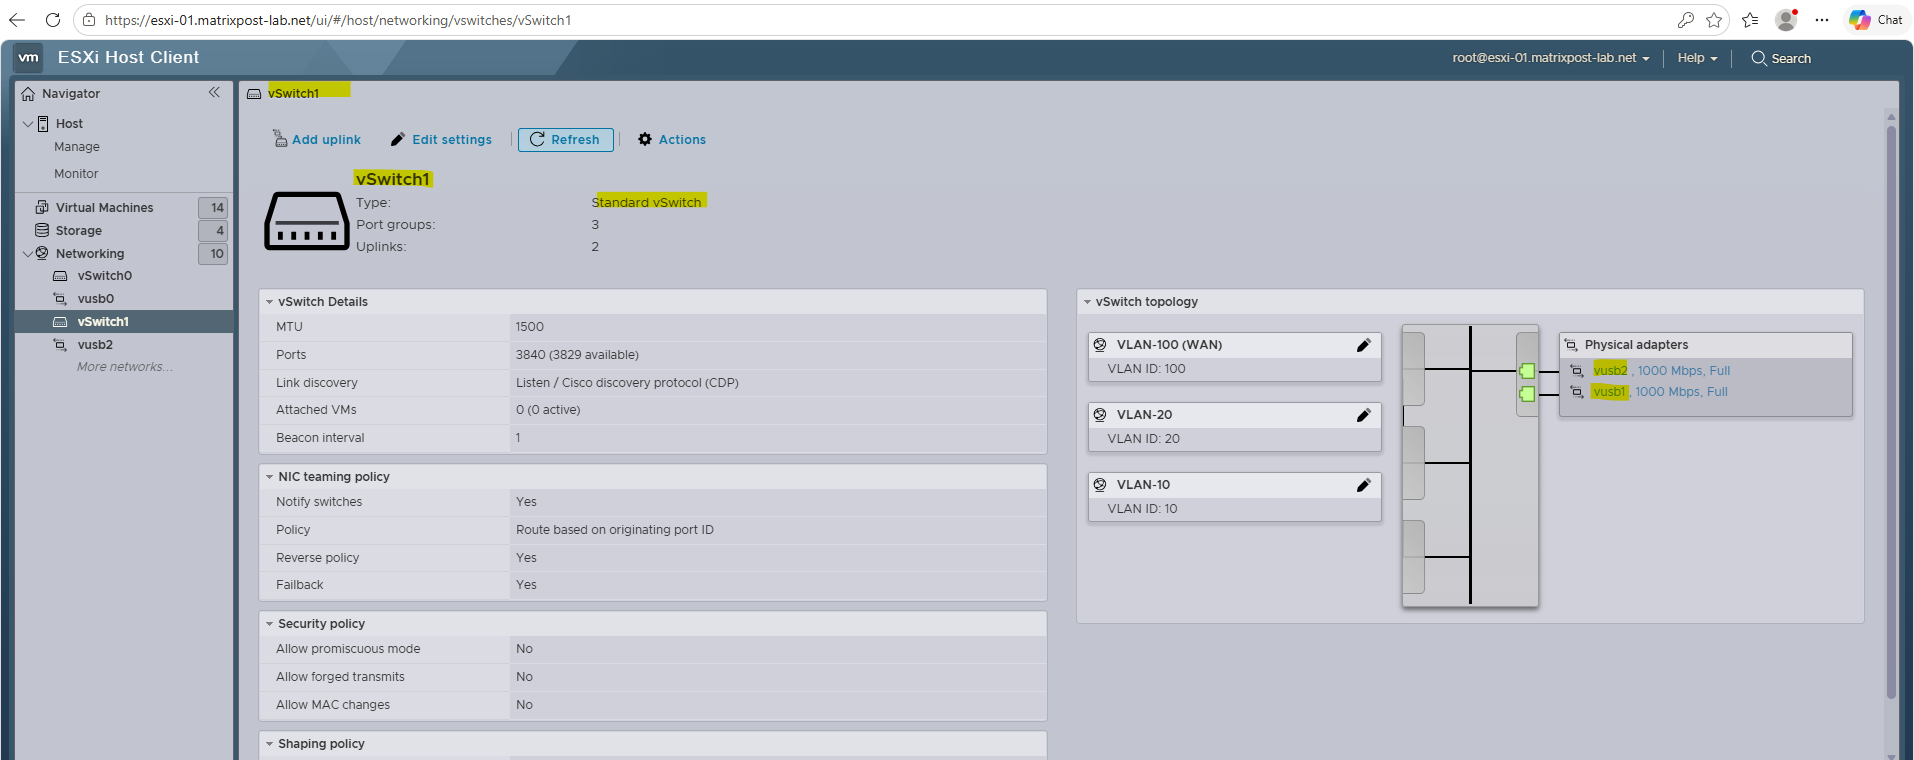
The second and third USB network adapters (vusb1 and vusb2) are assigned as uplinks to the vSphere Standard Switch (VSS) named vSwitch1.
They provide network connectivity for the virtual machine port groups and offer redundancy in the event that one of the physical network adapters becomes unavailable.
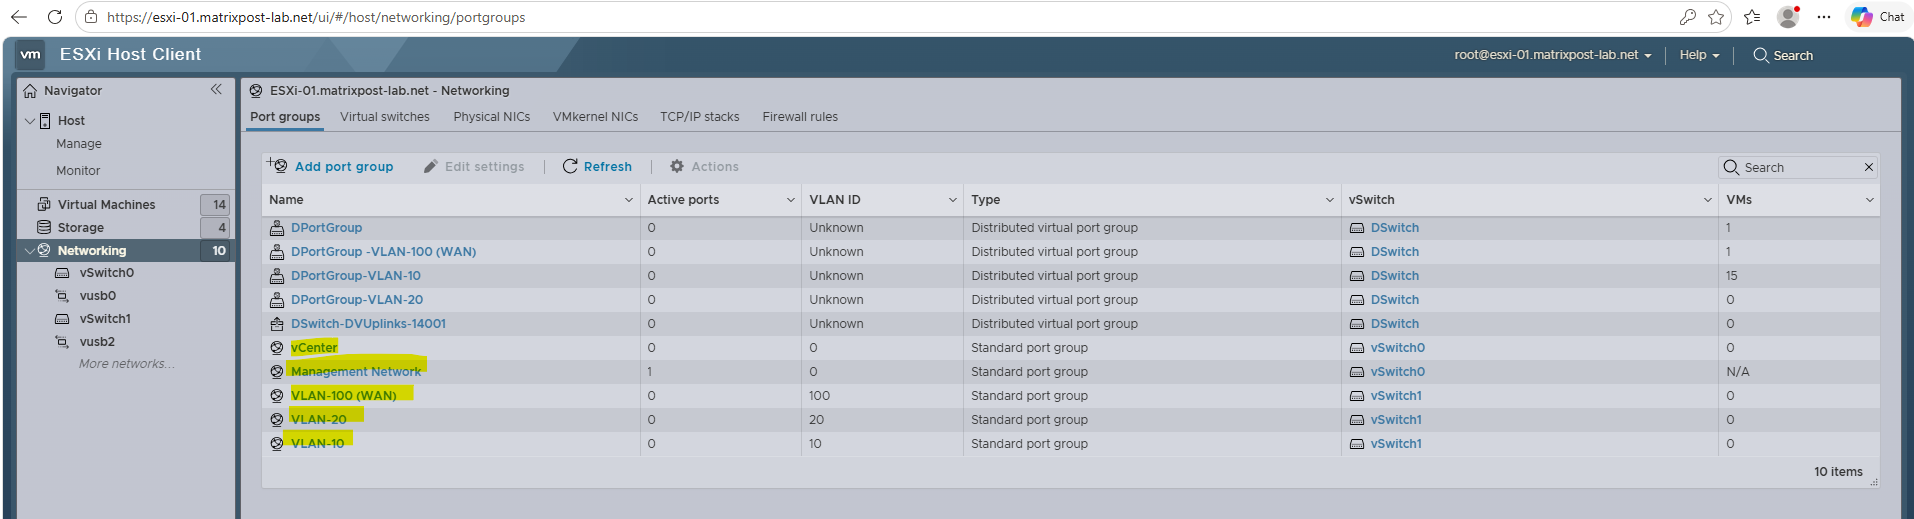
Further below we see the port groups highlighted which are used by the VSS. We can also see some “DPortGroup ….” which are distributed port groups I created when creating a VDS.
I already using a VDS in my lab environment and just don’t wanted to remove it only for this post. So for now ignore it and assume we just have the VSS in our environment.
A port group is another logical layer on top of a vSwitch which lets you define further network settings for the virtual ports on a vSwitch.
Port groups define how a connection is made through the switch to the network. Typically, a single standard switch (vSwitch) is associated with one or more port groups. A port group specifies port configuration options such as bandwidth limitations and VLAN tagging policies for each member port.
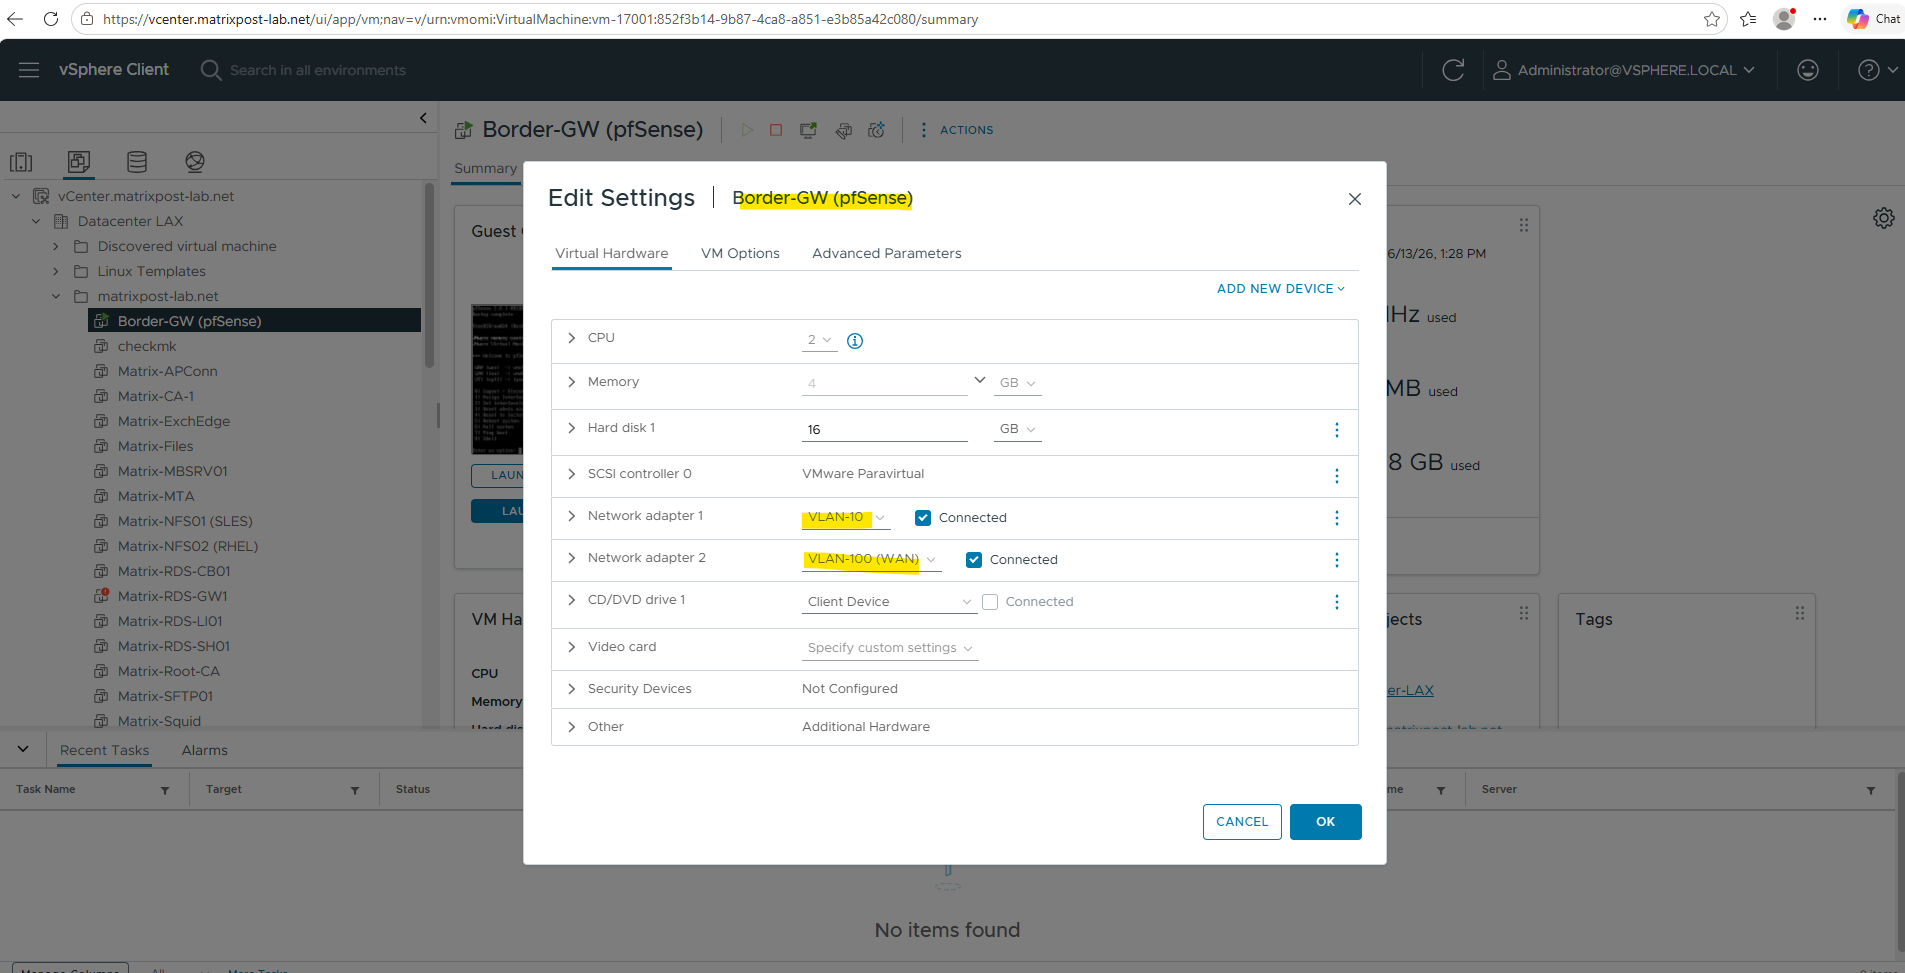
To demonstrate the migration later I will finally just use two virtual machines for them I switched the network adapters to the VSS shown above.
Here the gateway appliance pfSense in my lab environment which provides internet access have two network adapters assigned to. The first connects the VM to the VLAN 10 and subnet 10.0.0.0/24, the main network in my lab environment. The second connects the VM to VLAN 100 in which my FritzBox for the internet runs. Both network adapters are the above shown VSS (vSwitch1) associated port groups.
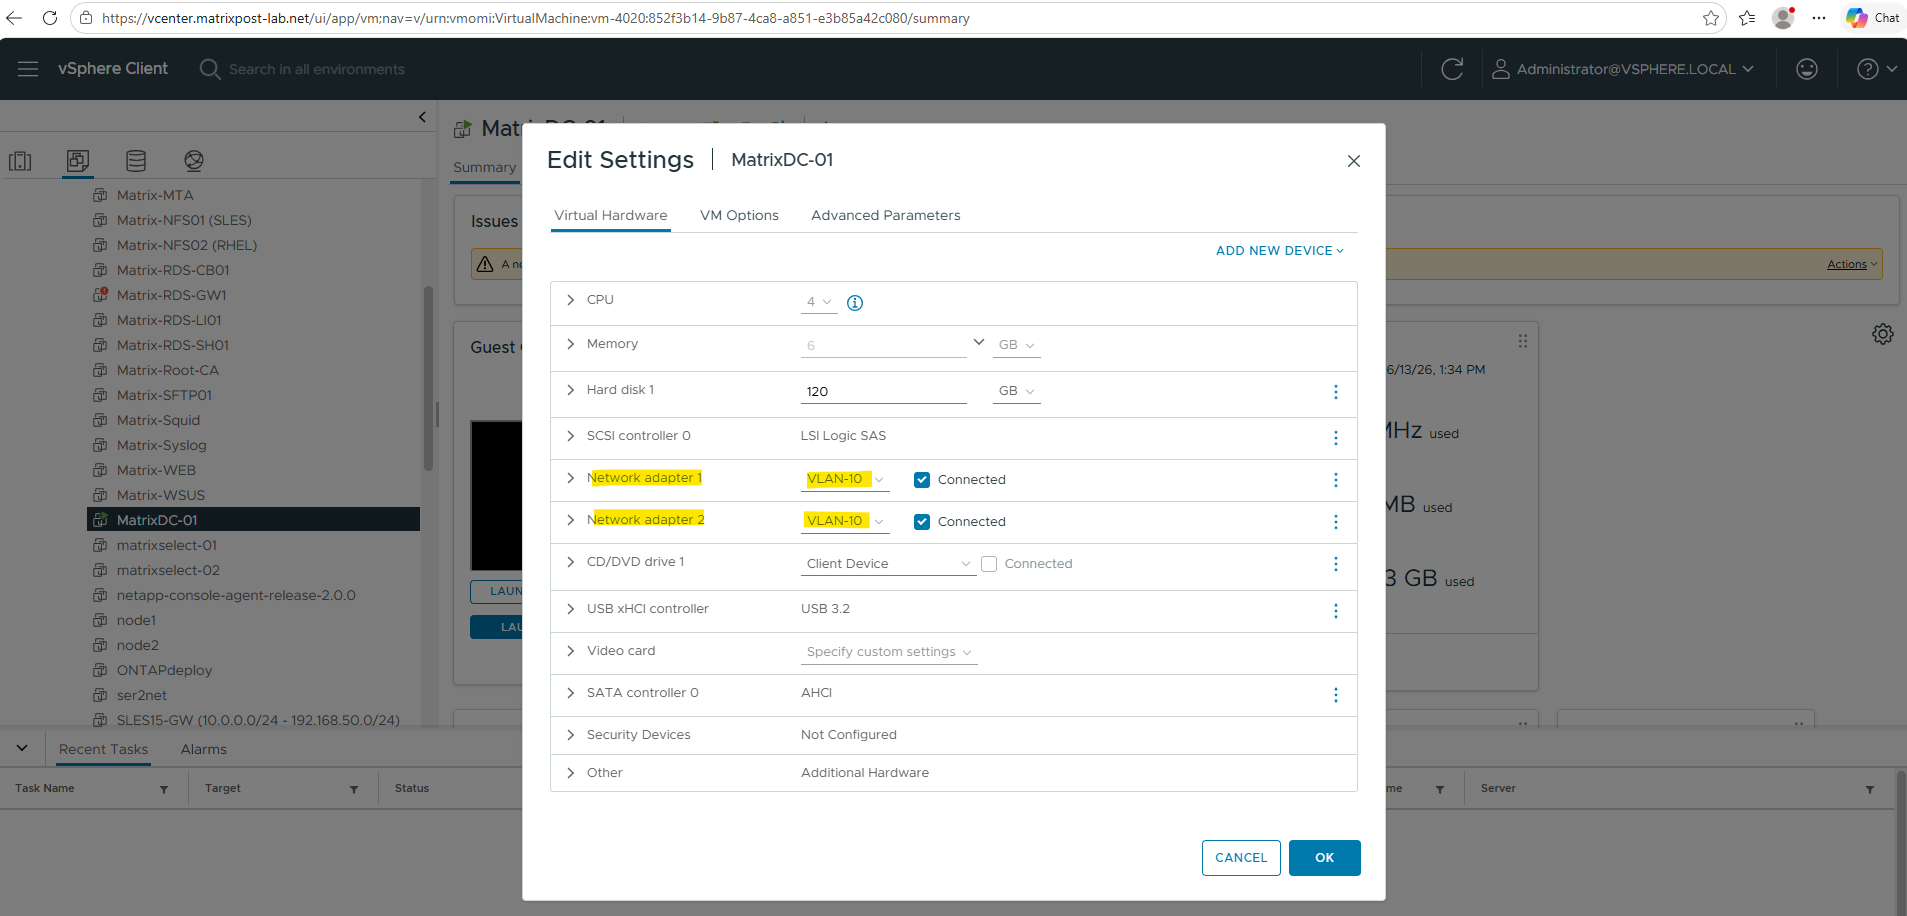
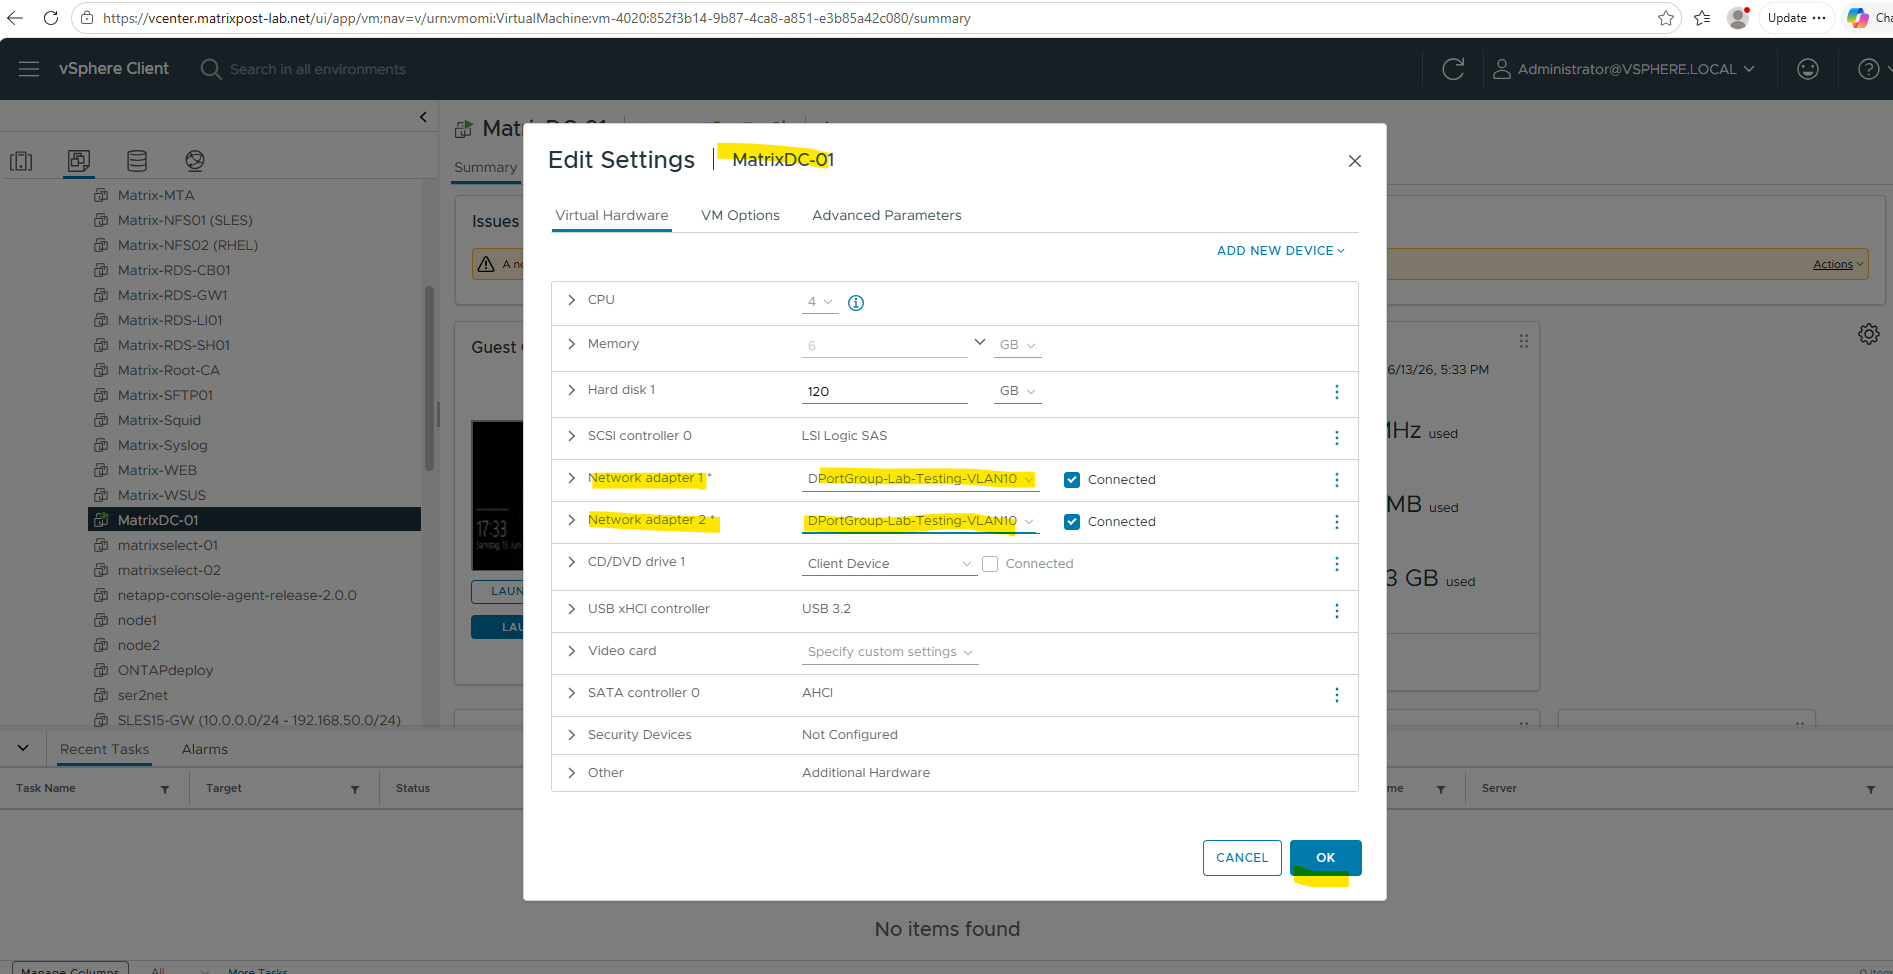
And the second VM my domain controller which have connected two network adapters also for the VLAN 10 and using VSS.
Two network adapters in the same VLAN here by the way just because of demonstrating how to set up split brain DNS in my following post https://blog.matrixpost.net/set-up-split-brain-dns-in-active-directory/.
In the next section I will create a new vSphere Distributed Switch (VDS) to show the migration from VSS to VDS.
Creating a vSphere Distributed Switch (VDS)
Before migrating any physical uplinks or virtual machines, the vSphere Distributed Switch (VDS) must first be created and configured in vCenter Server. During this phase, the VDS and its Distributed Port Groups are deployed alongside the existing vSphere Standard Switch (VSS), allowing both networking configurations to coexist throughout the migration process.
Creating the VDS and its Distributed Port Groups does not affect the running environment. The migration only begins when physical uplinks, VMkernel adapters, or virtual machines are moved from the VSS to the VDS.
About How to deploy a vSphere Distributed Switch in vCenter in detail you can also read my following post.
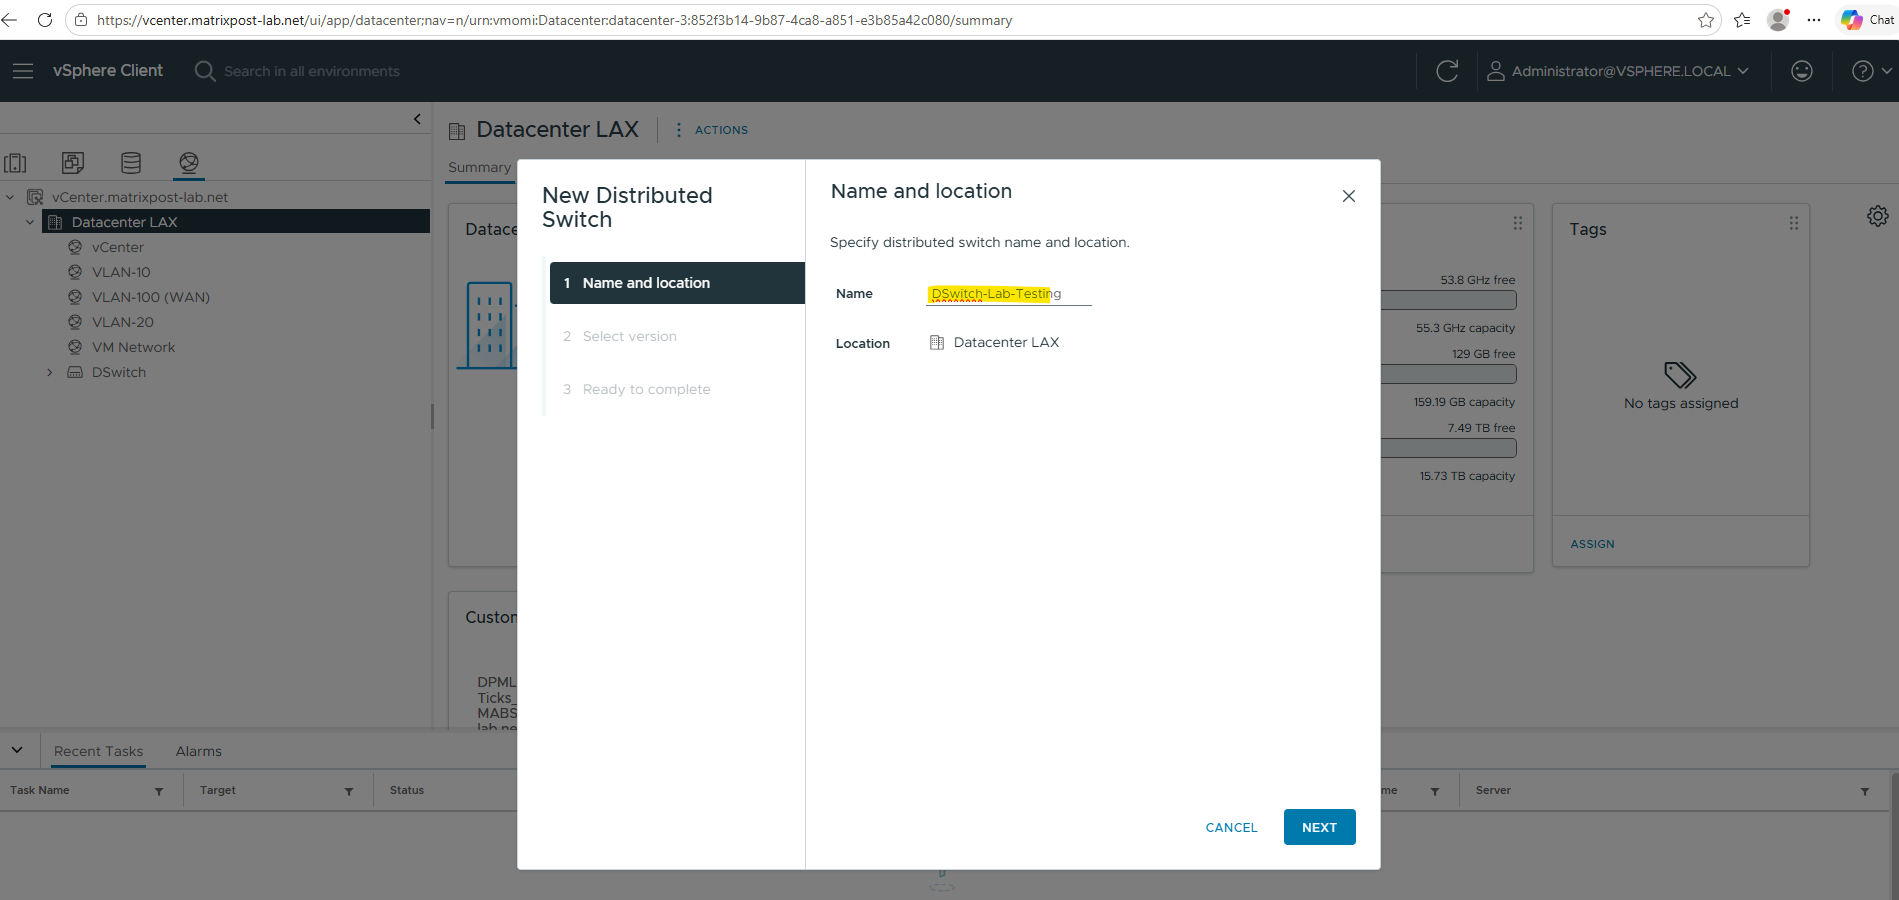
To create a new distributed virtual switch in vCenter right click Datacenter node and select Distributed Switch -> New Distributed Switch.

Enter a name for the new distributed virtual switch.
Select a distributed switch version. In my lab environment all three ESXi Hosts are running on version 8.0.3, so I can leave the pre-selected version 8.0.3 below.
The note with “multicast filtering mode will be configured as IGMP/MLD Snooping“, this mode allows the VDS to intelligently track multicast group memberships and forward multicast traffic only to the virtual ports that have explicitly joined the corresponding multicast groups.

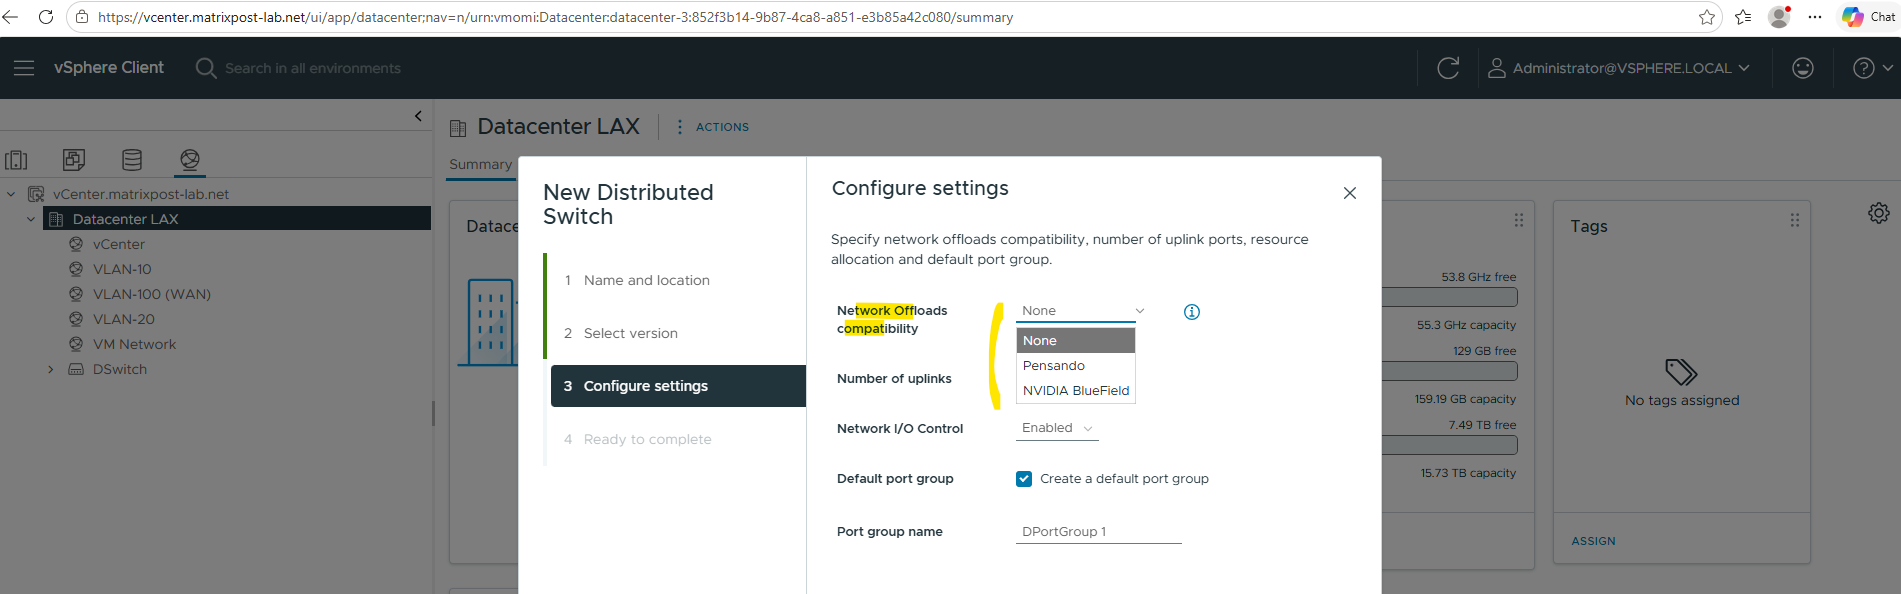
Starting with newer vSphere releases, the VDS creation wizard includes a Network Offloads compatibility option for hosts equipped with DPUs such as NVIDIA BlueField or AMD Pensando adapters.
Unlike traditional network adapters, a DPU includes dedicated processors that can handle networking and security tasks independently of the ESXi host CPU. This allows selected infrastructure services to be processed directly on the adapter, reducing CPU utilization on the host and improving overall efficiency.
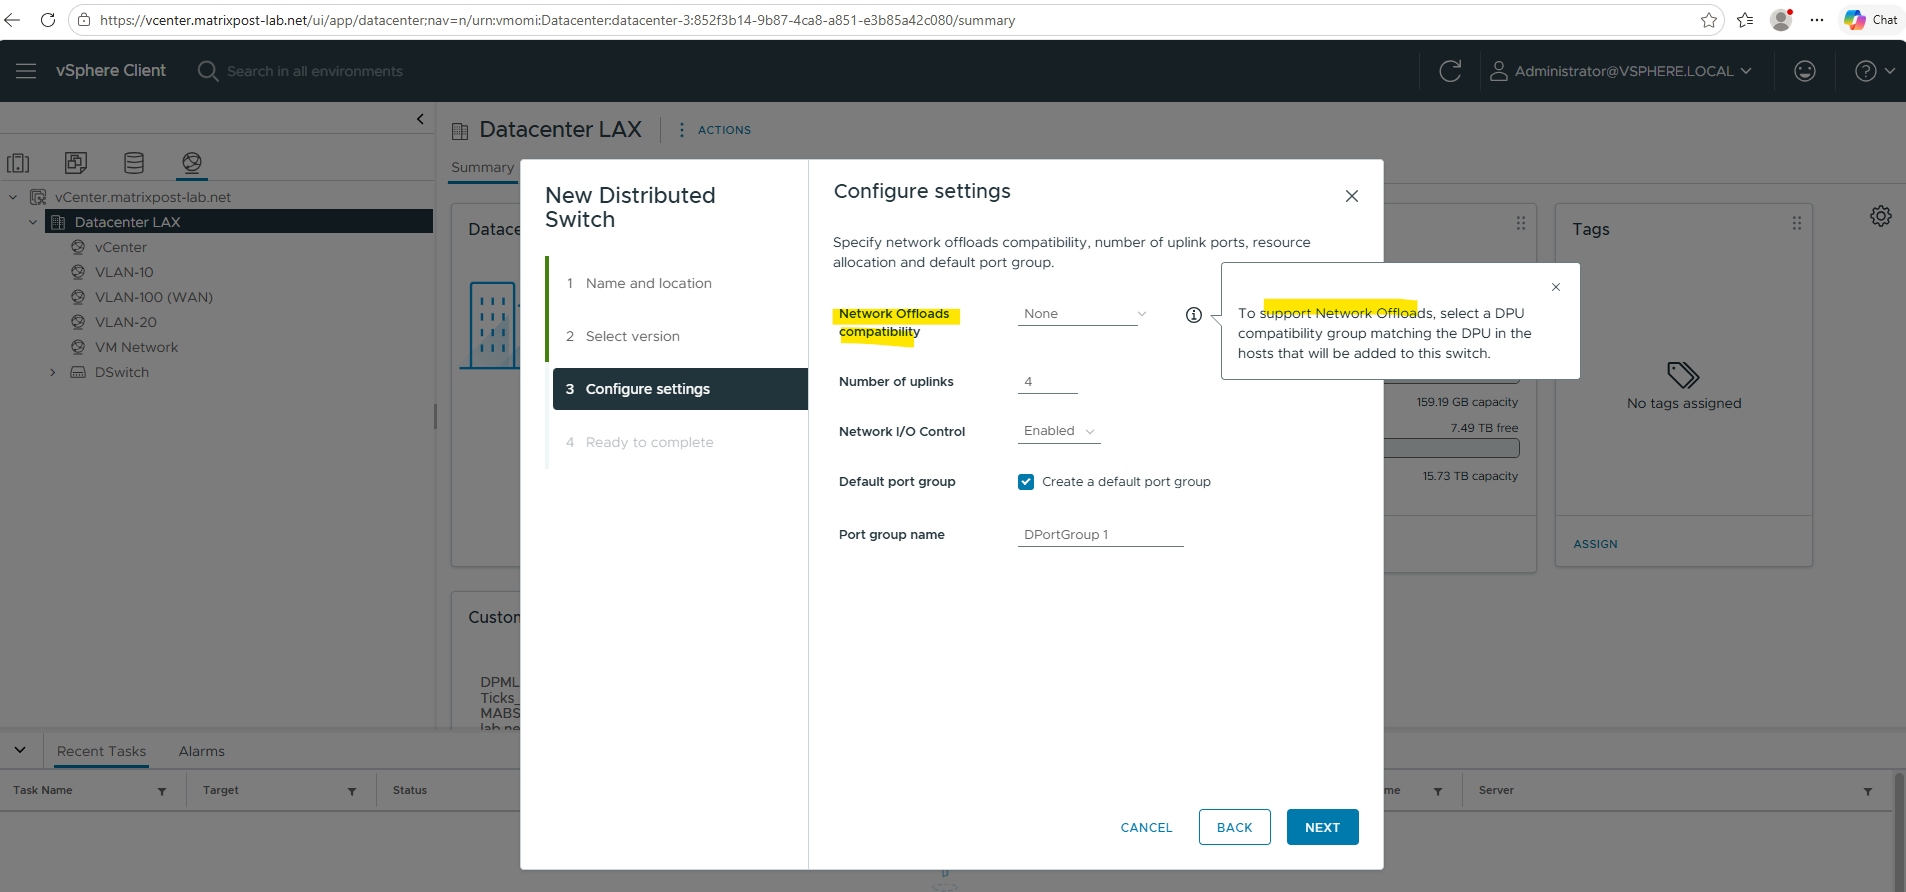
As no DPUs are present in my lab environment, I selected the default value None.
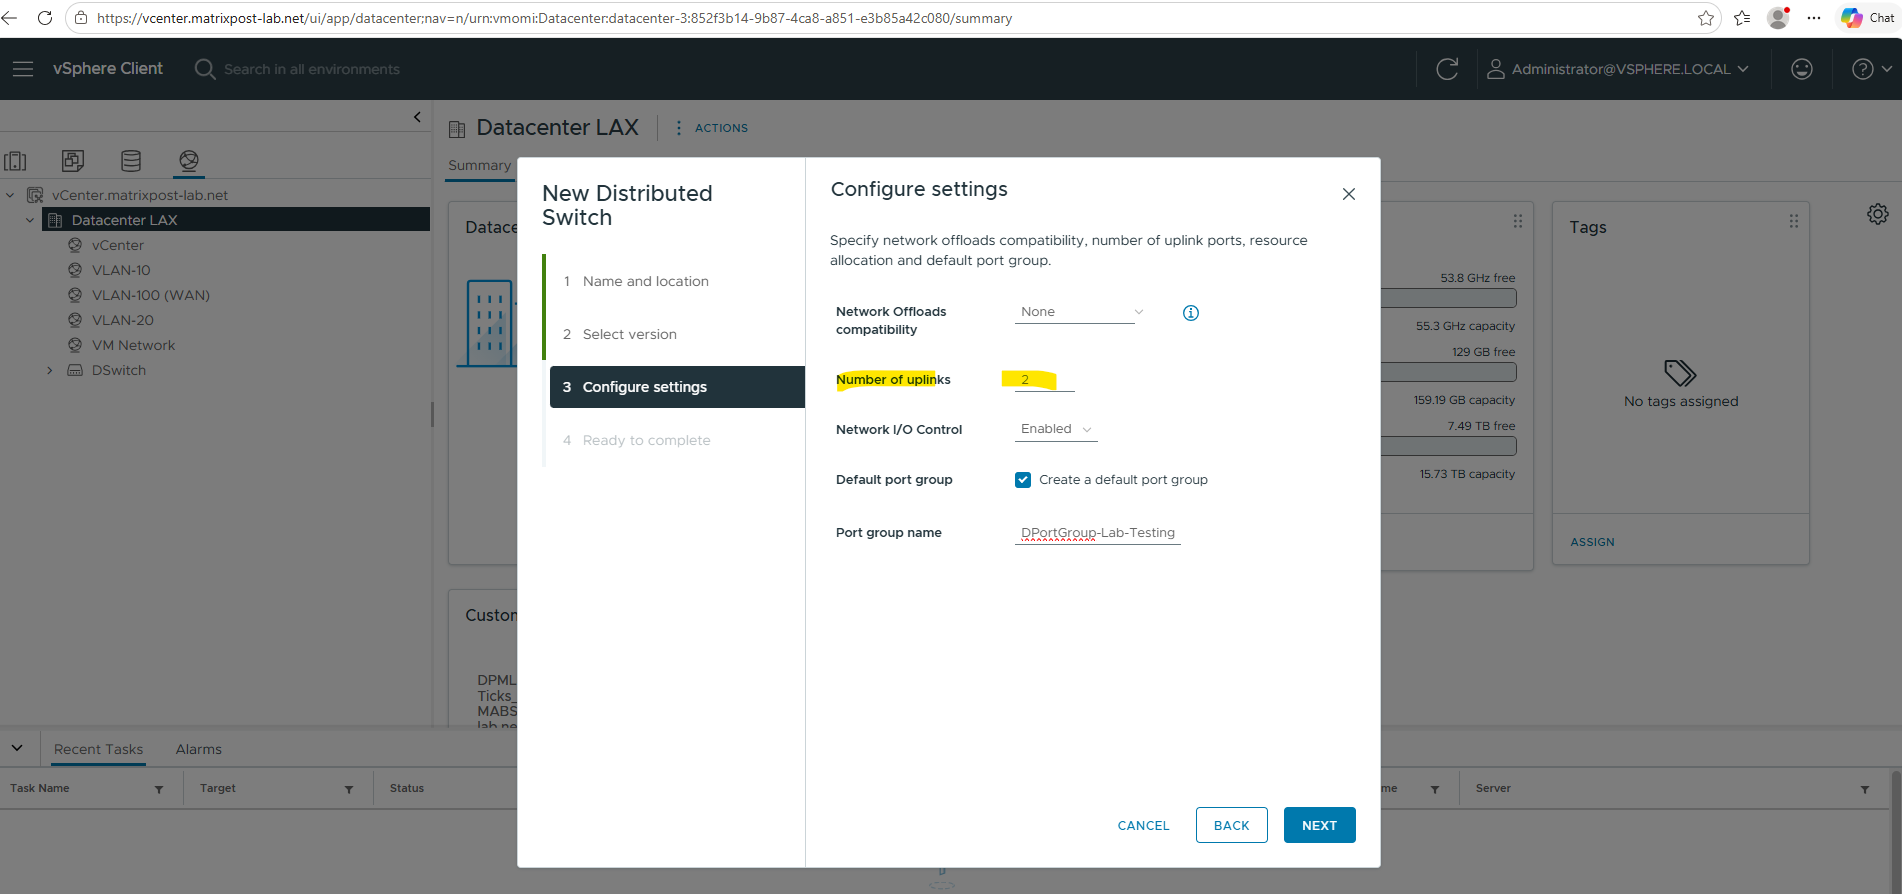
Specify the number of uplink ports below. Best practice is to have at least two uplink ports for the distributed virtual switch and therefore also for the port groups we create later on to provide redundancy in case one NIC will fail.
This will create an uplink port group or dvuplink port group which will consists of at least one uplink. In my case two uplinks will be created below. The number of uplink ports here finally should reflect the number of physical NICs on each ESXi Hosts you want to use for this distributed virtual switch. So each of my ESXi Hosts will have three NICs, one I will use dedicated for the VMKernel network and vMotion and the other two NICs just for virtual machines and therefore this distributed virtual switch.
An uplink is a template that you use to configure physical connections of hosts as well as failover and load balancing policies. You map physical NICs of hosts to uplinks on the distributed switch. At the host level, each physical NIC is connected to an uplink port with a particular ID. You set failover and load balancing policies over uplinks and the policies are automatically propagated to the host proxy switches, or the data plane. In this way you can apply consistent failover and load balancing configuration for the physical NICs of all hosts that are associated with the distributed switch.
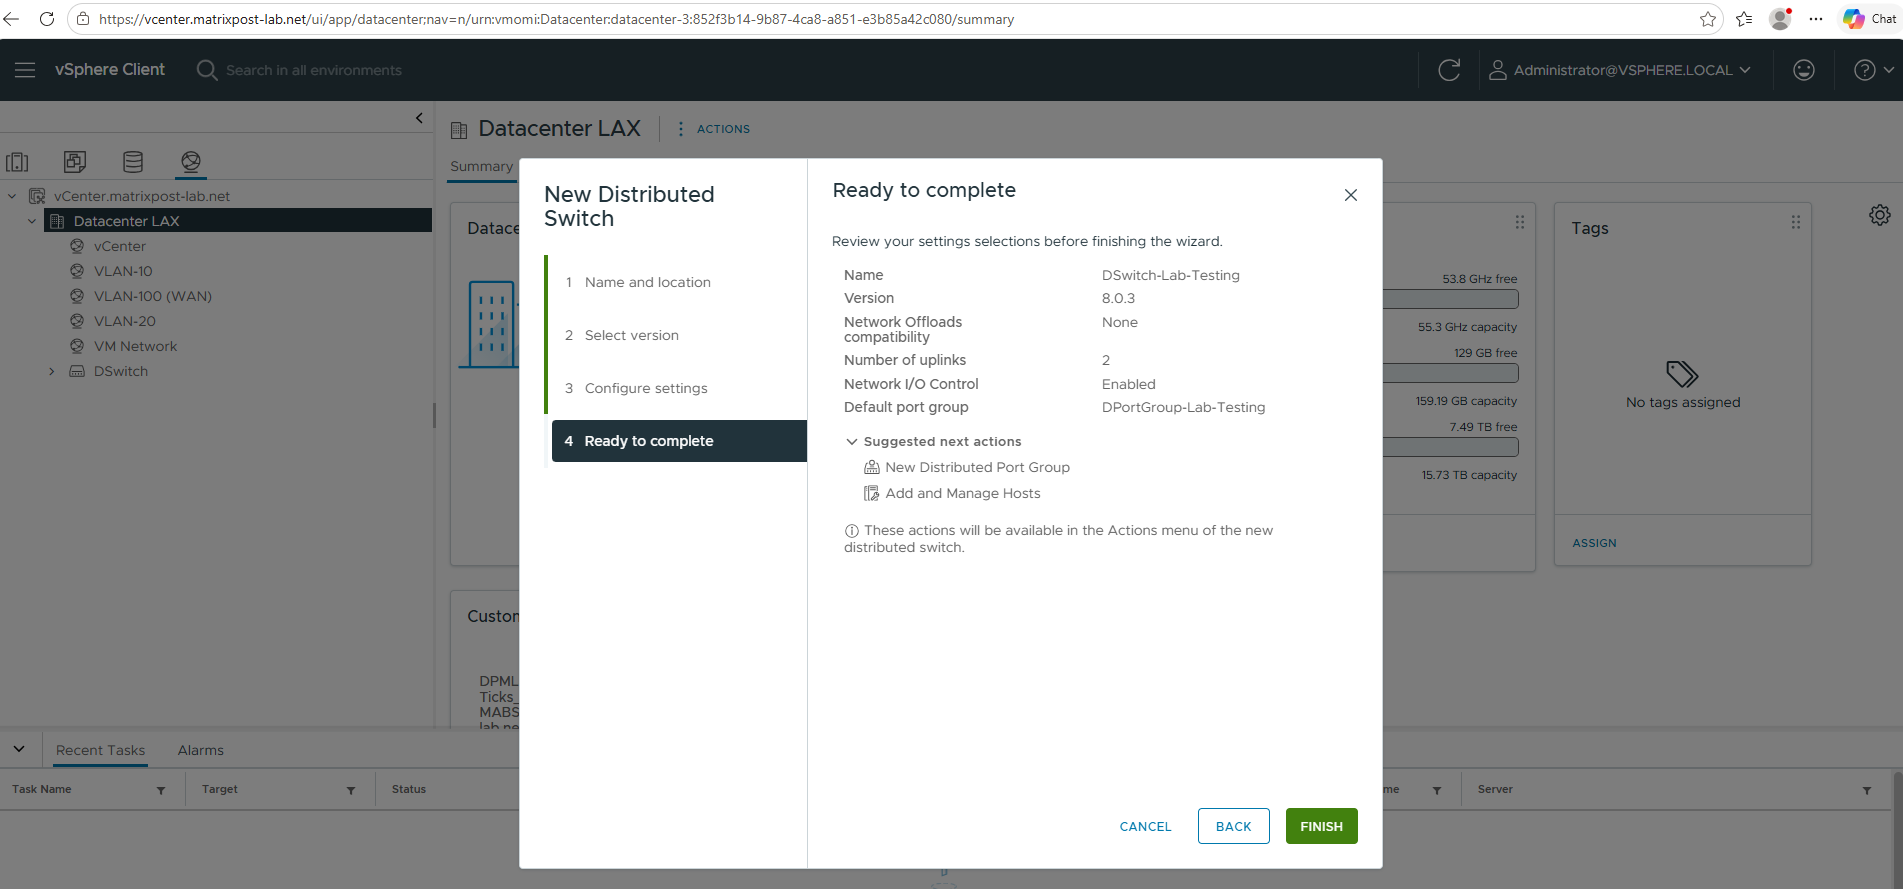
Review the setting and finally click on FINISH.
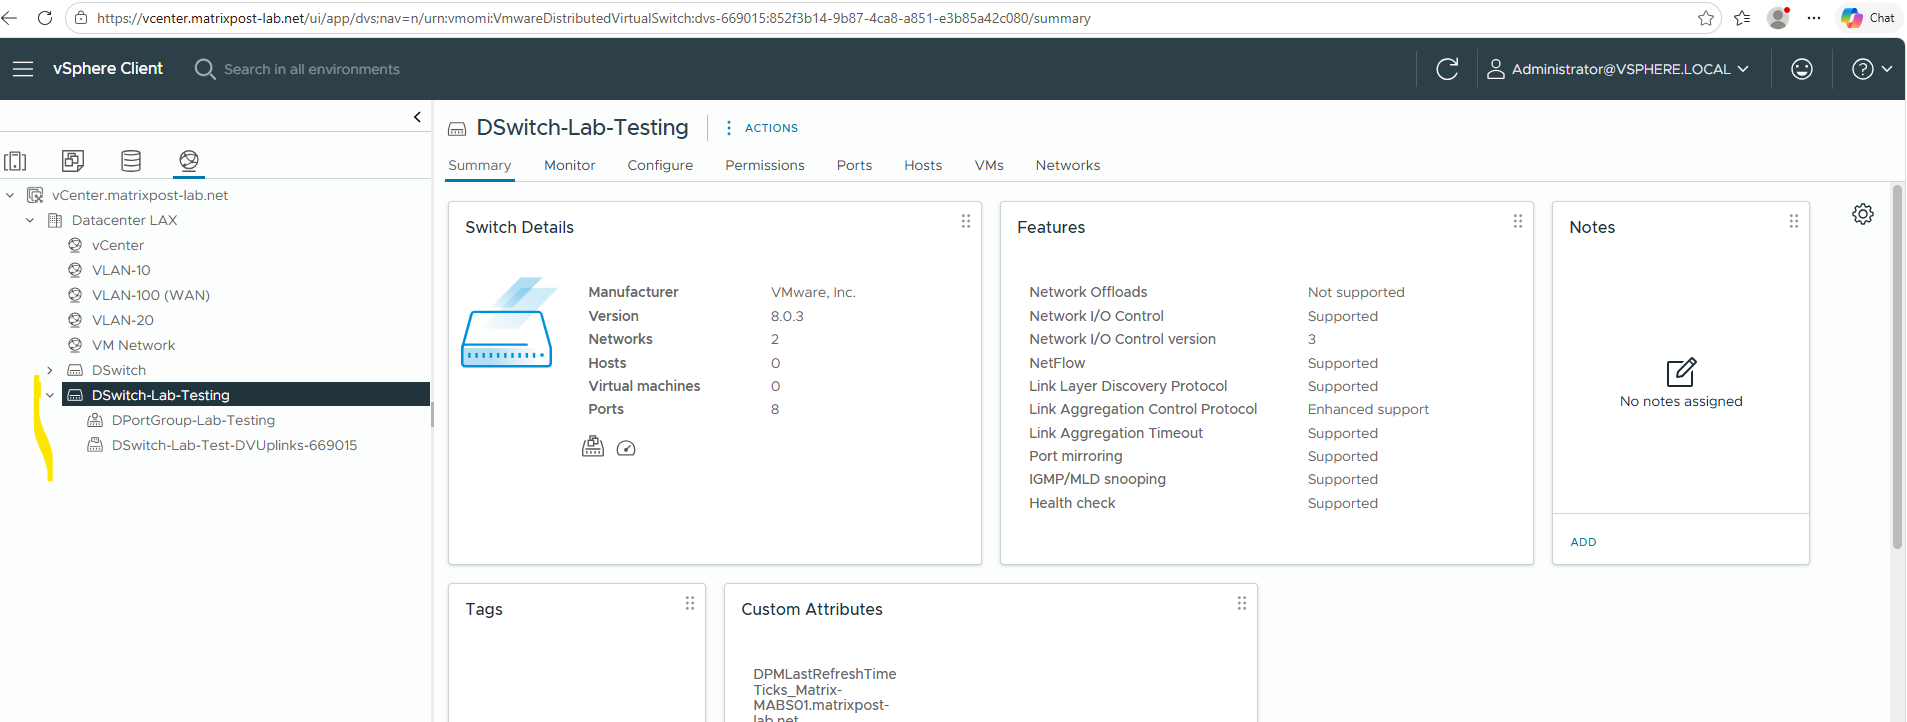
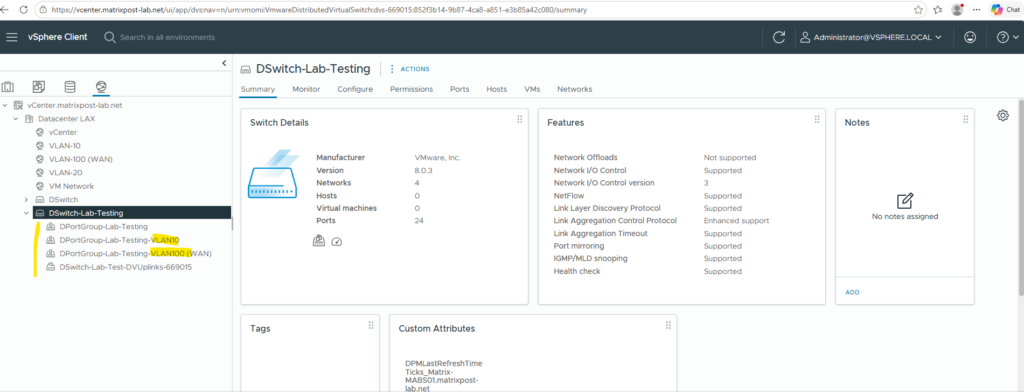
Below you can see that in addition to the distributed virtual switch also as mentioned a default port group and dvuplink port group was created.
The default port group is configured by default without VLAN.
Under Networking -> Datacenter -> <distributed virtual switch> -> Configure -> Properties we can see the settings for our distributed virtual switch.
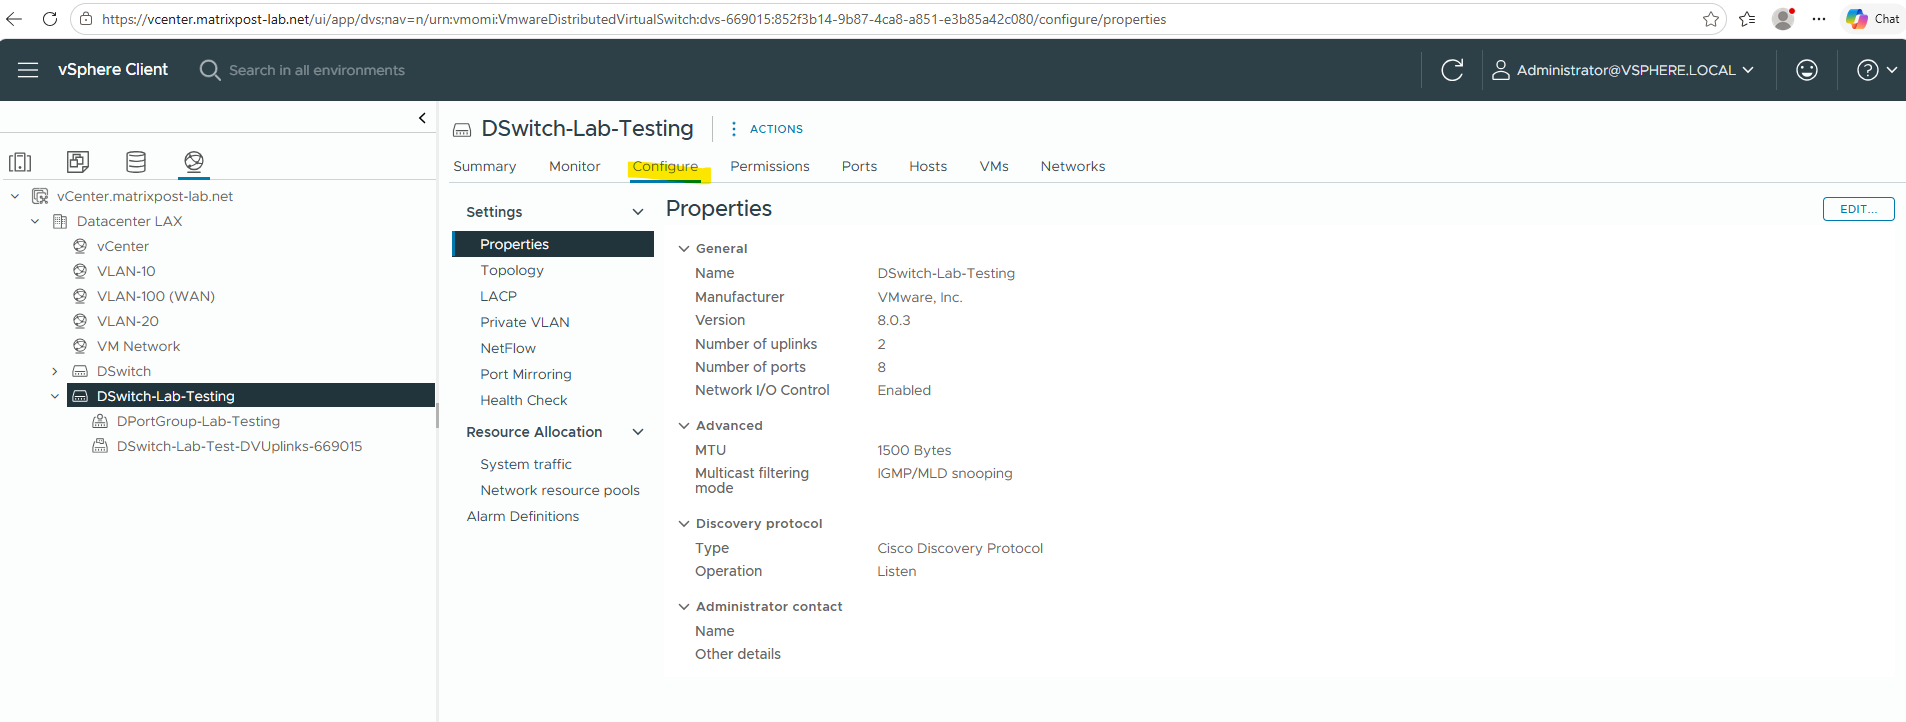
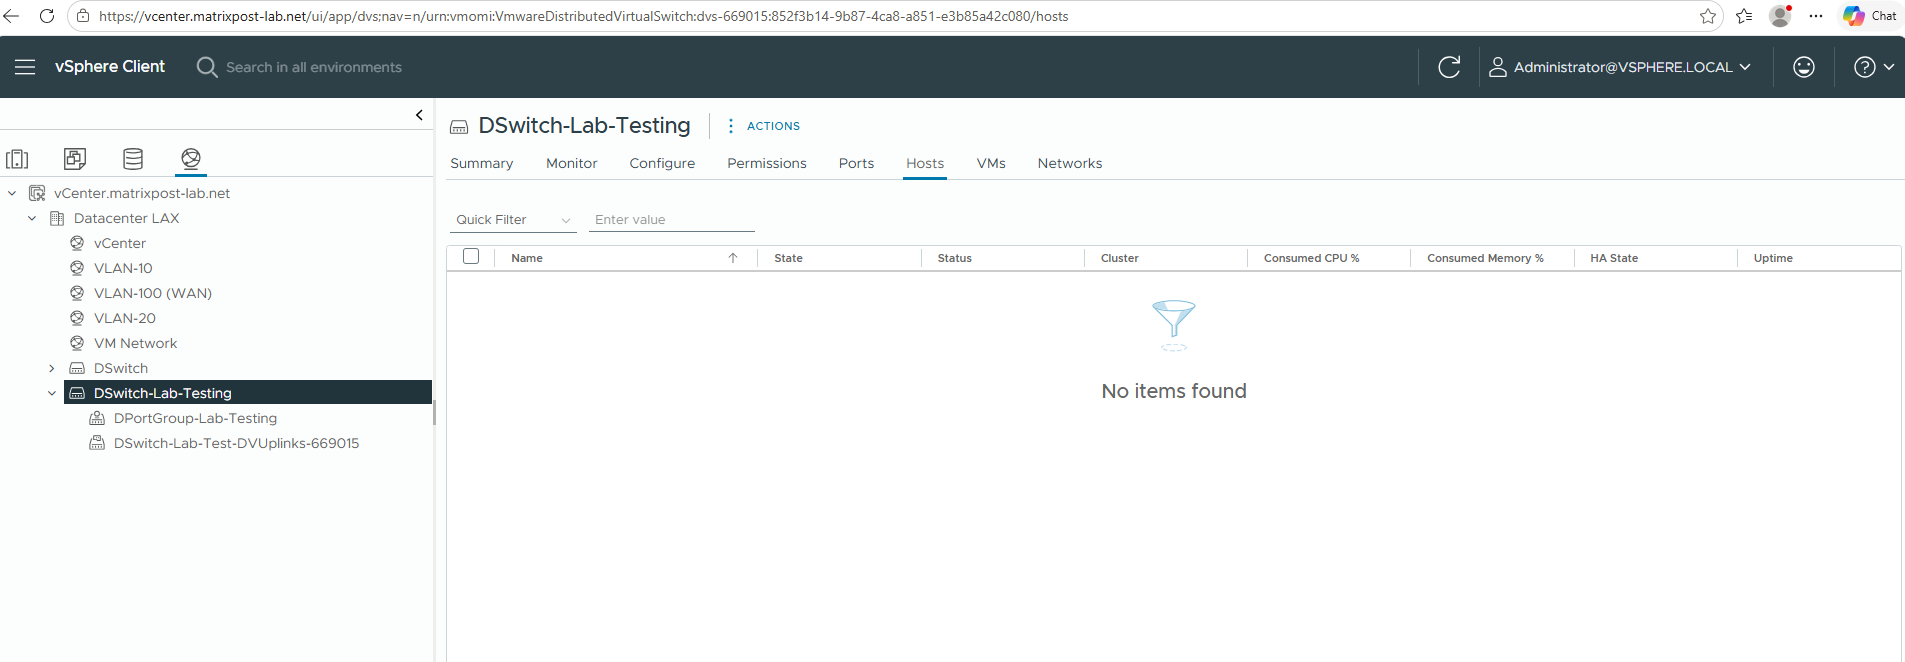
So far our distributed virtual switch is not deployed (associated) to any ESXi hosts in my lab environment and therefore so far also not to any virtual machines.
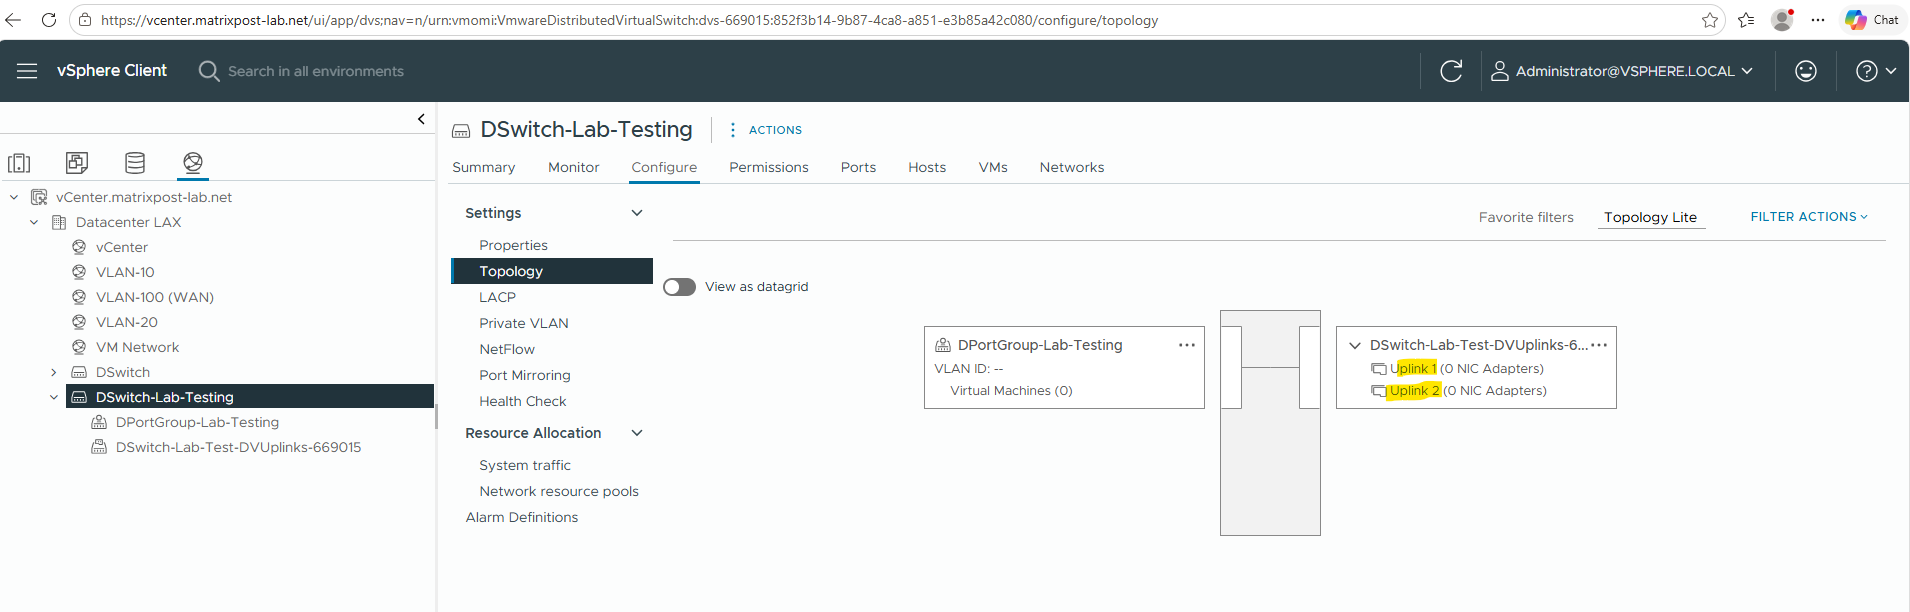
On the Topology section you can see the previously configured uplink ports which later will be associated with the physical NICs of the ESXi Hosts.
As already mentioned, I was configuring two uplink ports. All three of my ESXi Hosts will have three physical NICs, from which I will use two of these physical NICs on each ESXi Host for the distributed virtual switch and connected to these uplink ports. So finally the deployed distributed virtual switch on the ESXi Hosts (so called host proxy switch) will have two physical NICs of the ESXi Host connected to.
Best practice as mentioned is to assign at least two physical NICs to standard virtual switches and distributed virtual switches to provide redundancy in case one NIC will fail.
Creating Distributed Port Groups
The next step is to create the required Distributed Port Groups on the VDS. These will serve as the target networks for the virtual machines and should match the existing VSS port group configuration.
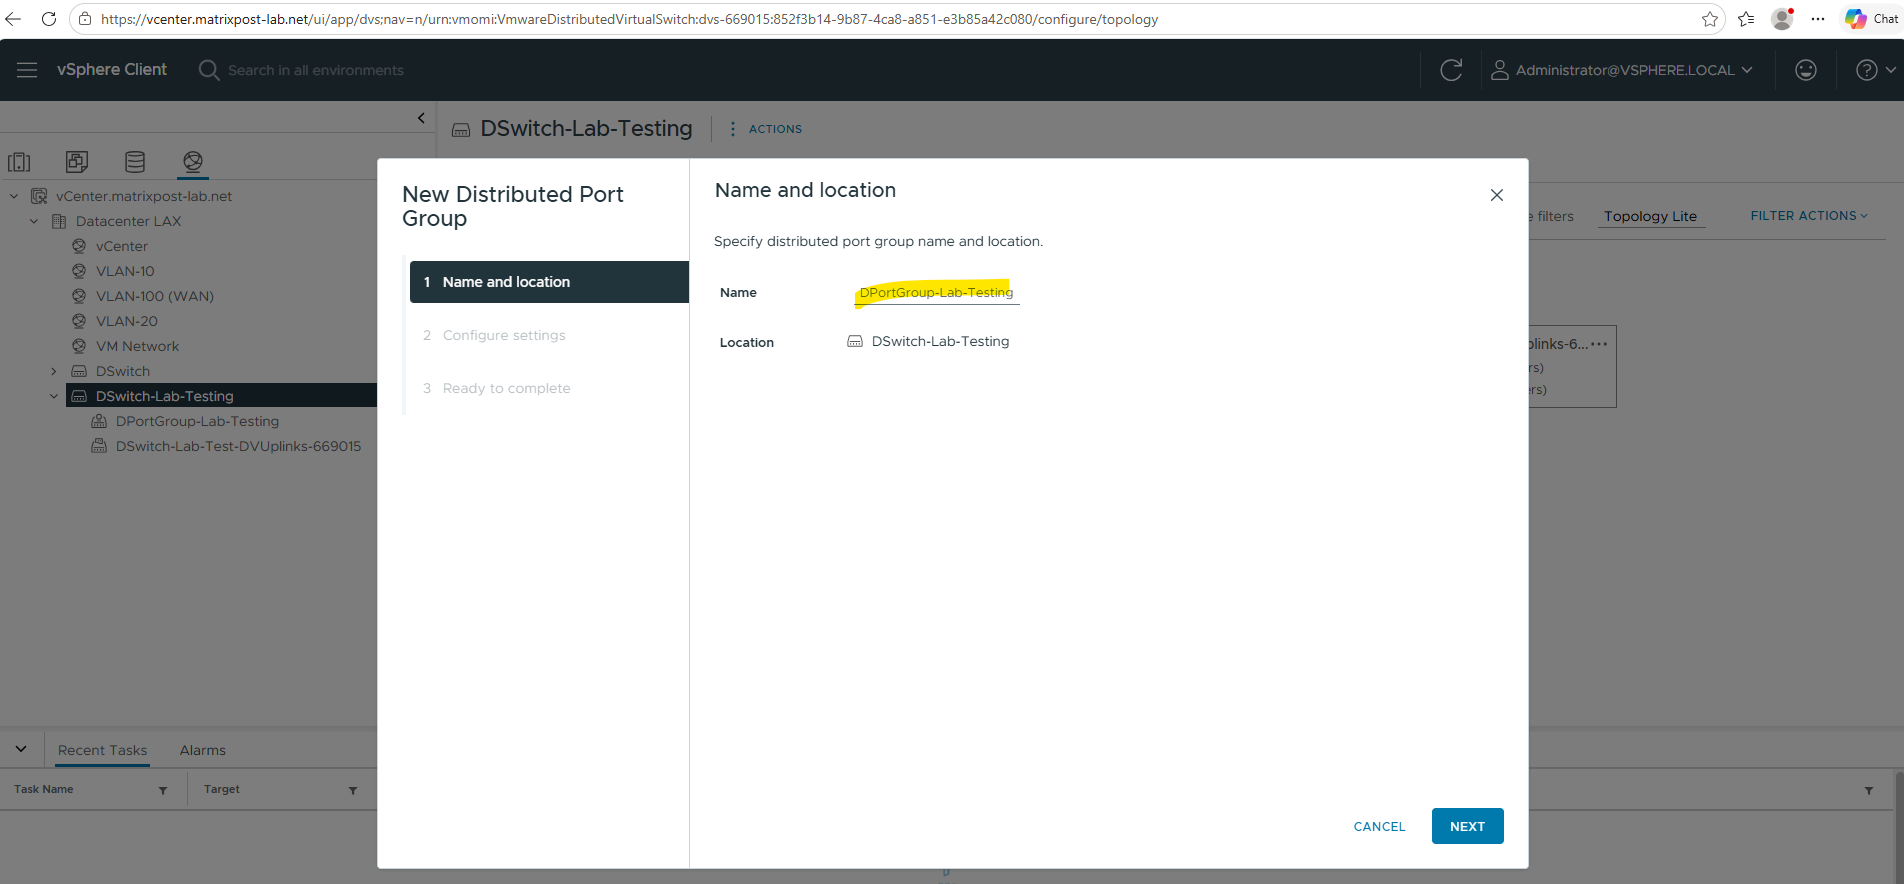
Right click on the VDS and select Distributed Port Group -> New Distributed Port Group …

Enter a name for the new distributed port group.
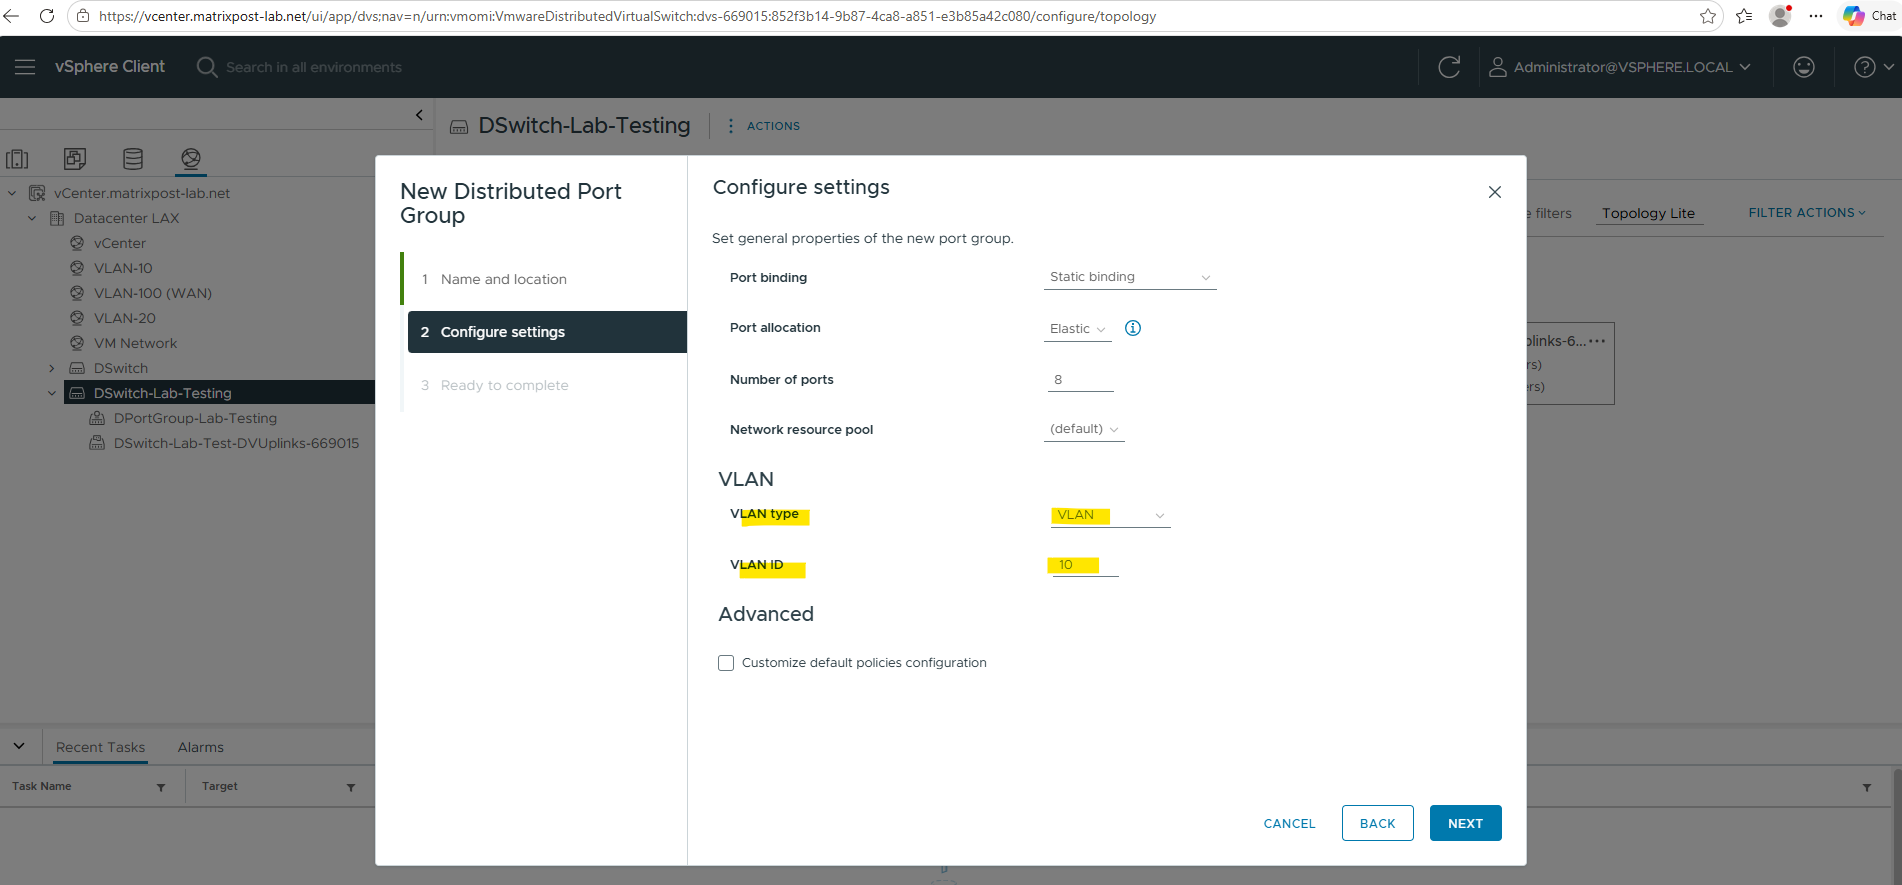
When creating a new Distributed Port Group, several configuration options are available:
- Port Binding – Determines how ports are assigned to virtual machines. Static Binding (default) assigns a port when a VM is connected to the port group and is the recommended option for most environments. Ephemeral – No Binding creates ports dynamically and can be useful for recovery scenarios when vCenter Server is unavailable.
- Port Allocation – Controls how ports are managed within the port group. Elastic automatically expands the number of available ports when needed, while Static uses a fixed number of ports defined by the administrator.
- Number of Ports – Specifies the number of virtual ports available in the port group. The default value is typically sufficient for small environments and can be adjusted later if required.
- Network Resource Pool – Used together with Network I/O Control (NIOC) to prioritize and manage network bandwidth between different traffic types. In most environments, the default resource pool is sufficient.
- VLAN Type – Defines how VLAN traffic is handled. VLAN is used for a single VLAN ID, VLAN Trunking allows multiple VLANs to pass through the port group, Private VLAN provides additional Layer 2 isolation, and None leaves traffic untagged.
For the VLAN type I will use VLAN and set it to VLAN ID 10 which is the main network in my lab environment.
Finally click on FINISH.
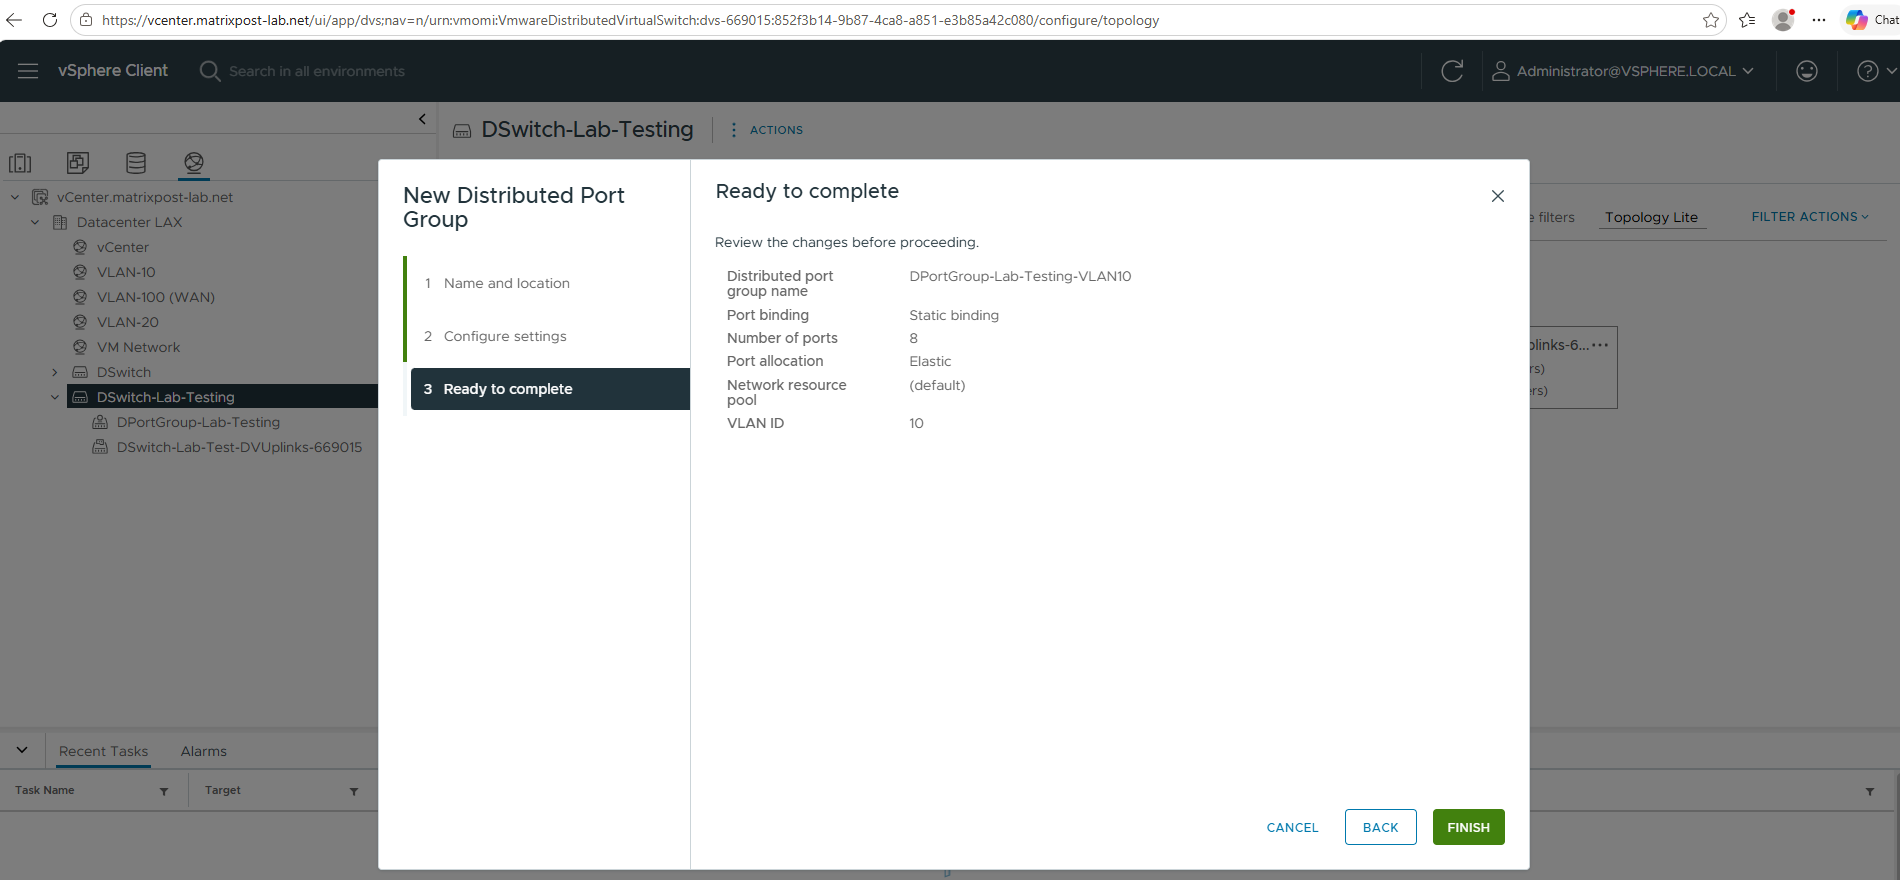
The same I will do for the second distributed port group and configure it for VLAN ID 100 (internet access).
The automatically created DSwitch-DVUplinks- distributed port group serves as the uplink port group for the VDS and is used to connect the switch to the physical network adapters assigned as uplinks.
By default, it is configured for VLAN Trunking with a VLAN range of 0-4094, enabling the transport of all VLAN-tagged traffic across the uplinks.
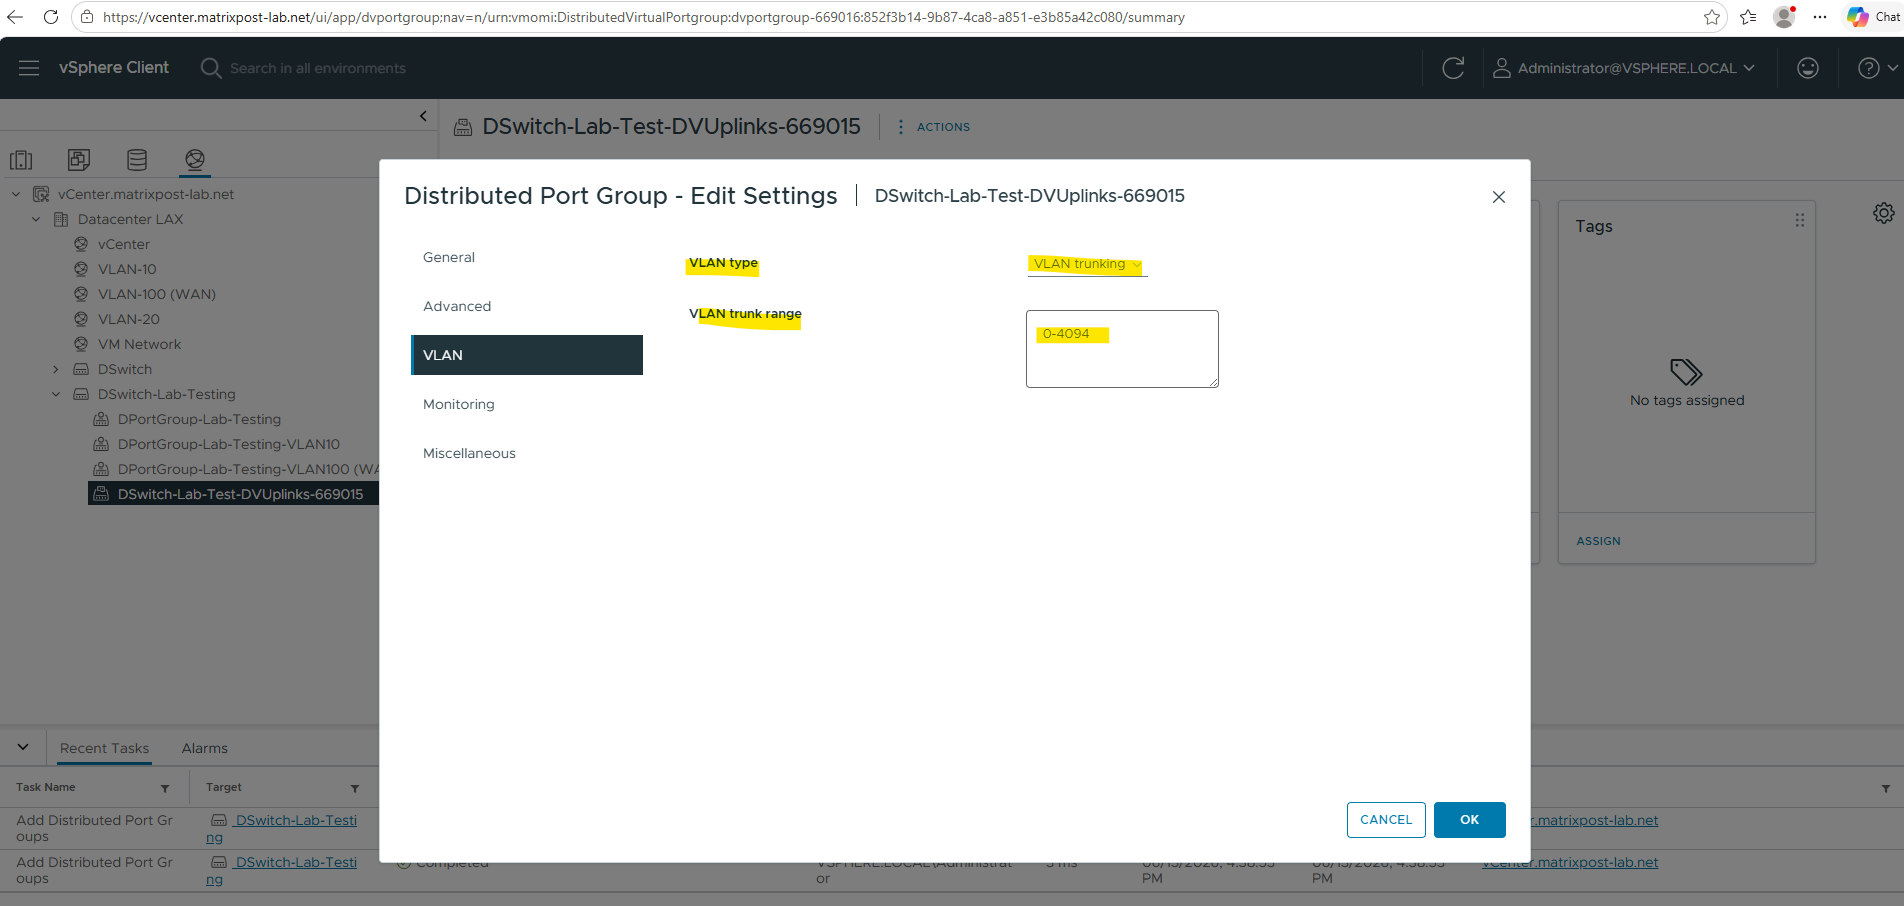
More about virtual local area networks (VLANs), network segmentation, inter-VLAN routing & VLAN ACLs you will find in my following post.
Add Hosts to VDS
The ESXi hosts can now be added to the newly created vSphere Distributed Switch. Simply adding hosts to the VDS does not affect the existing network connectivity, as the migration of uplinks and virtual machine networking is performed in later steps.
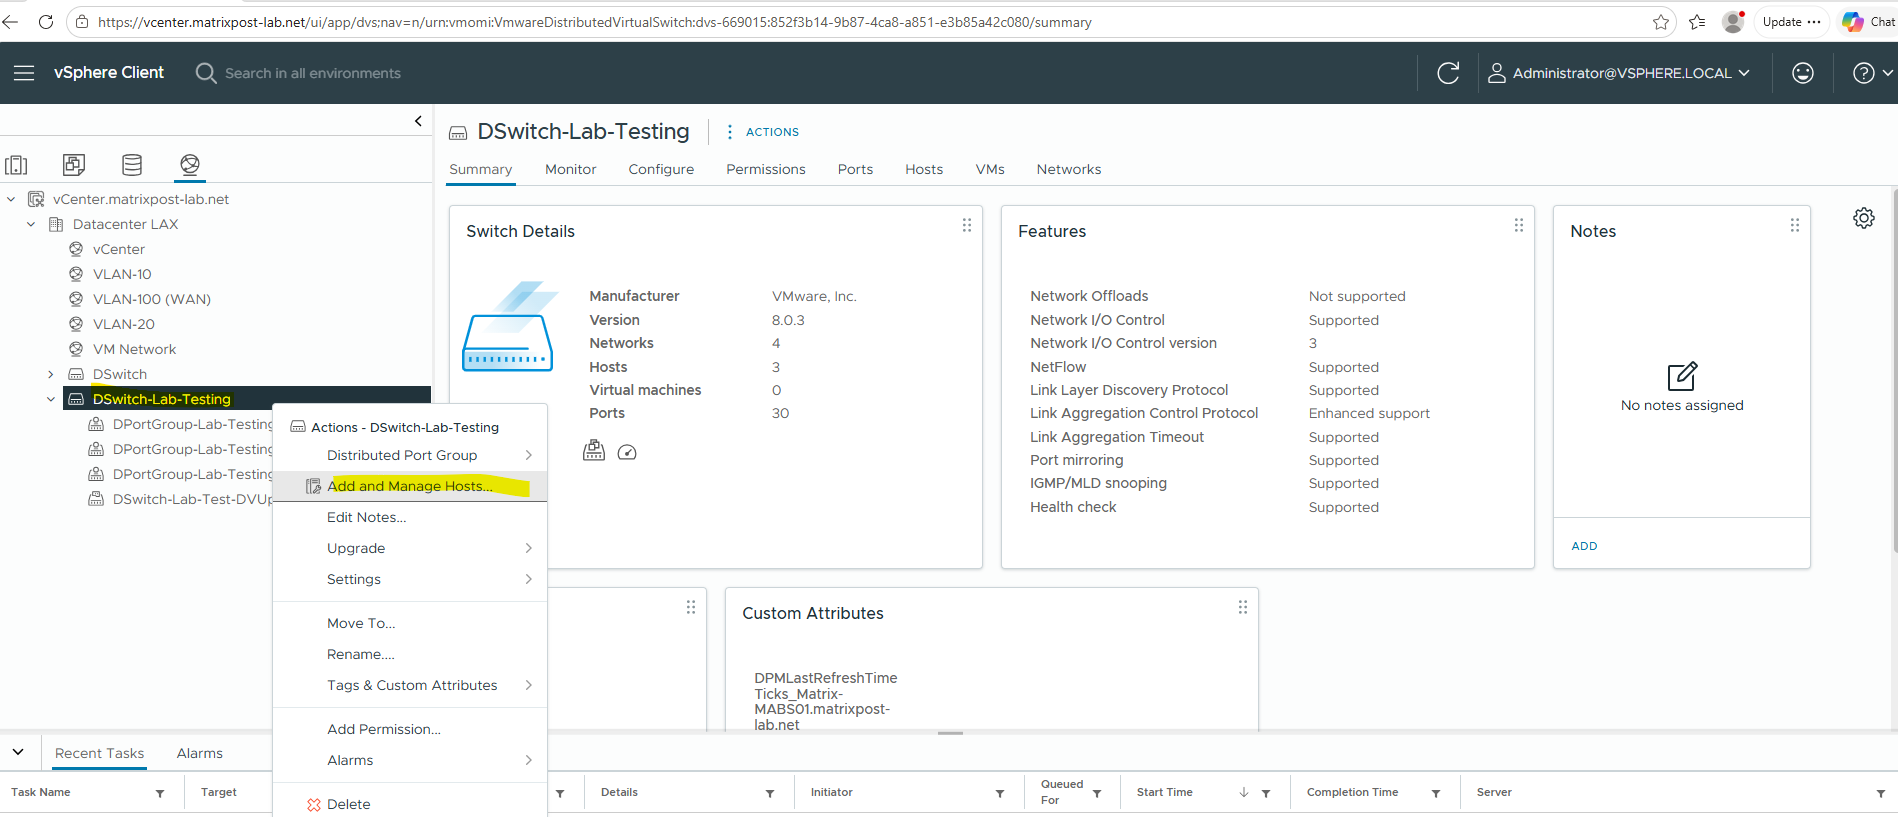
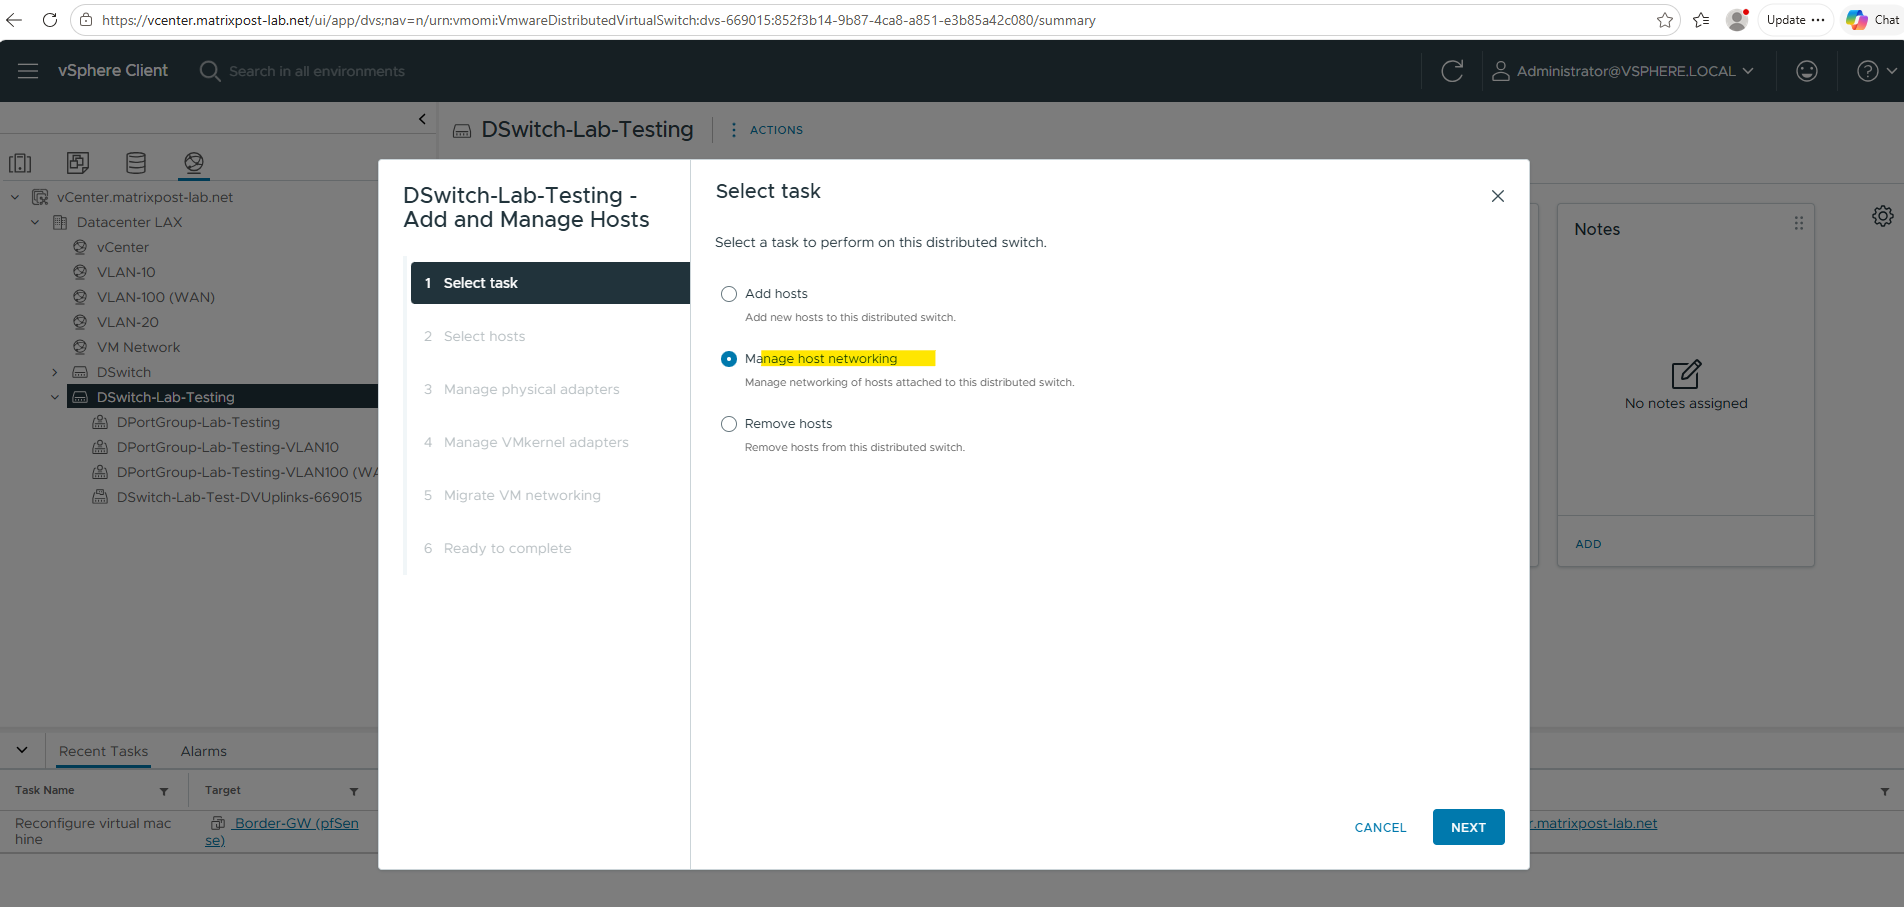
In order to associate our distributed virtual switch with our ESXi Hosts you can right click on the distributed virtual switch and select Add and Manage Hosts … .
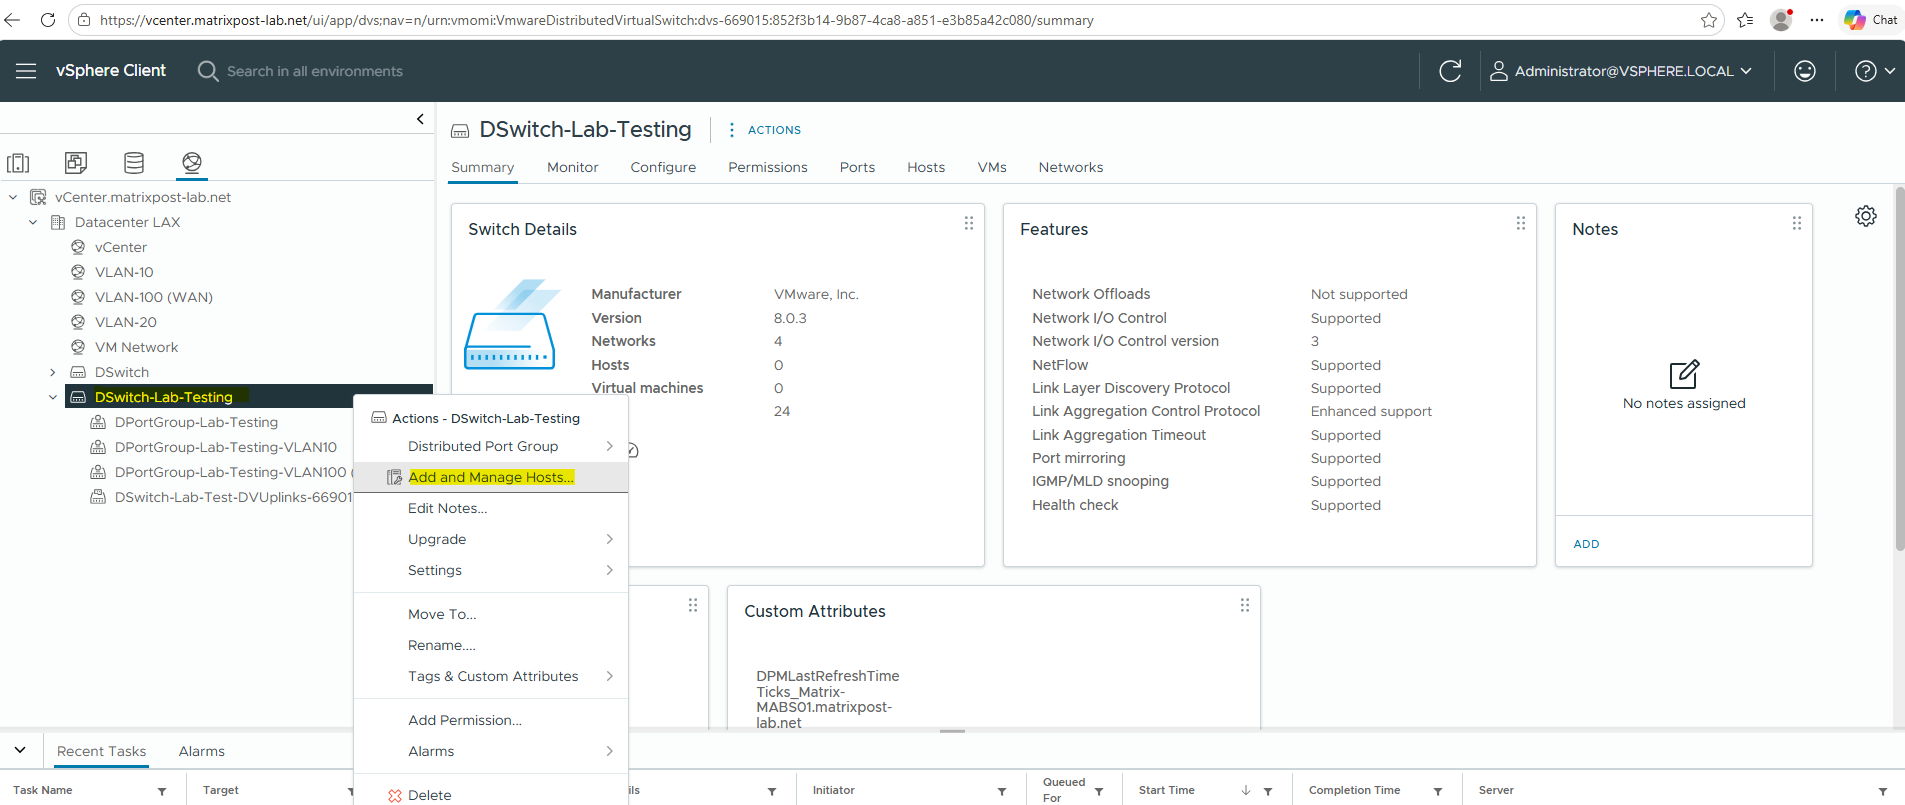
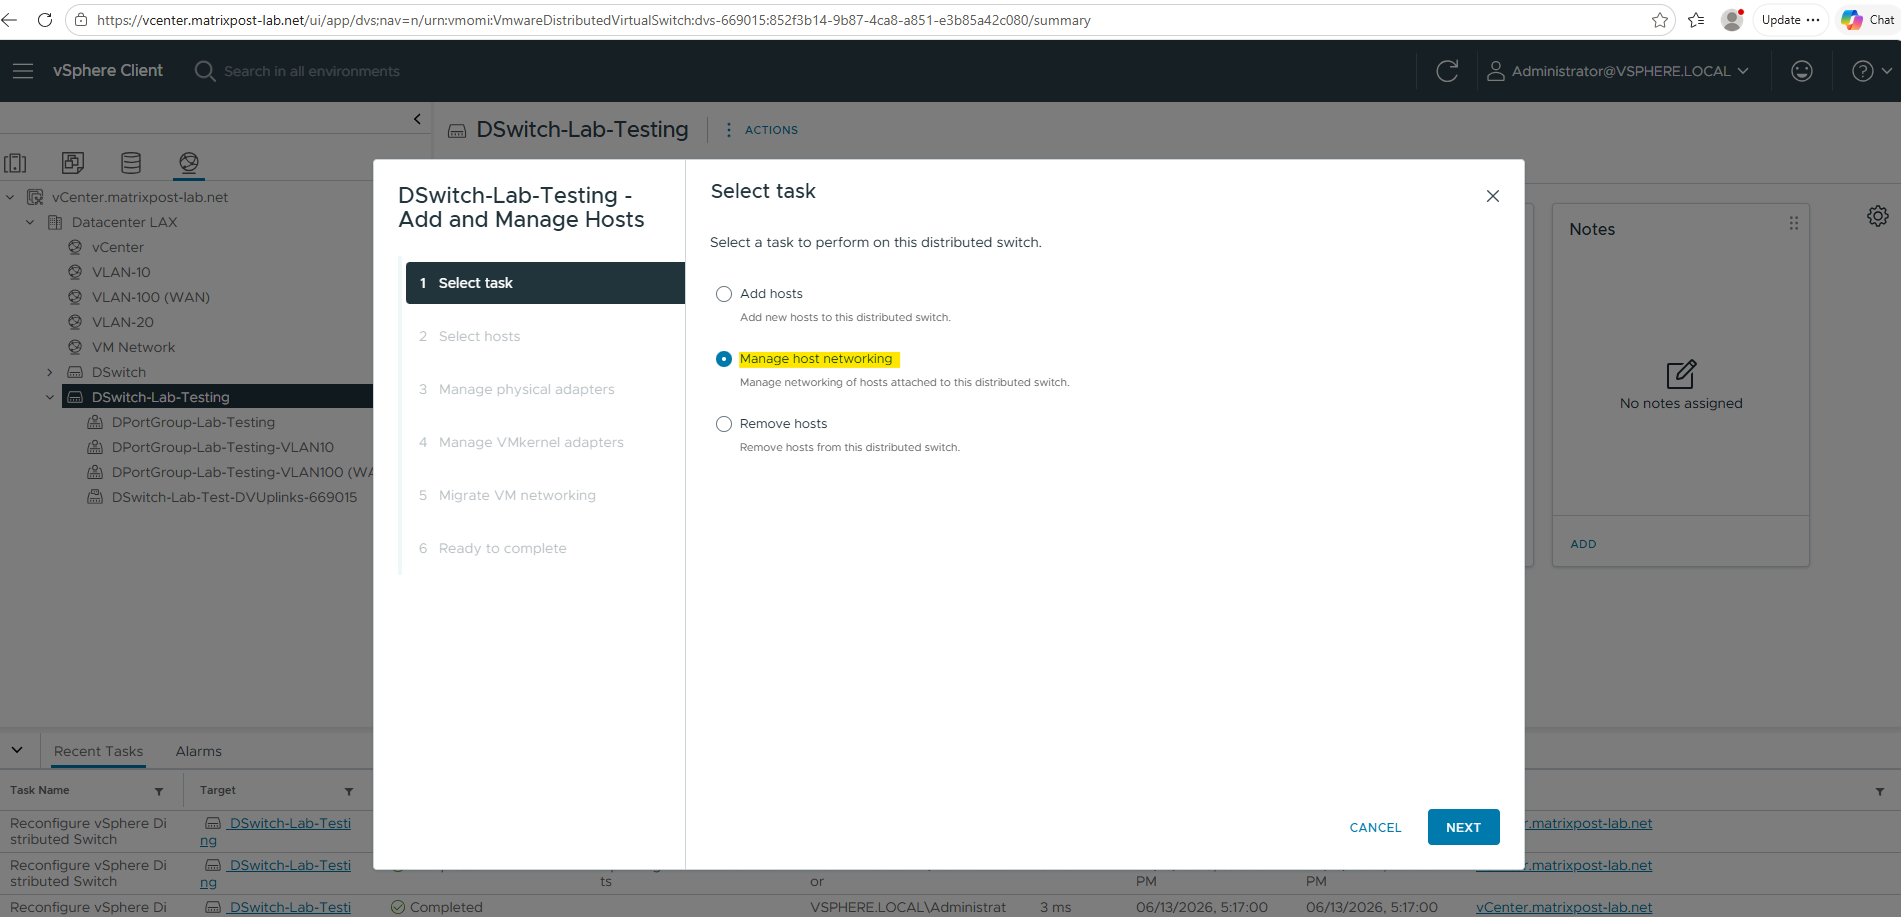
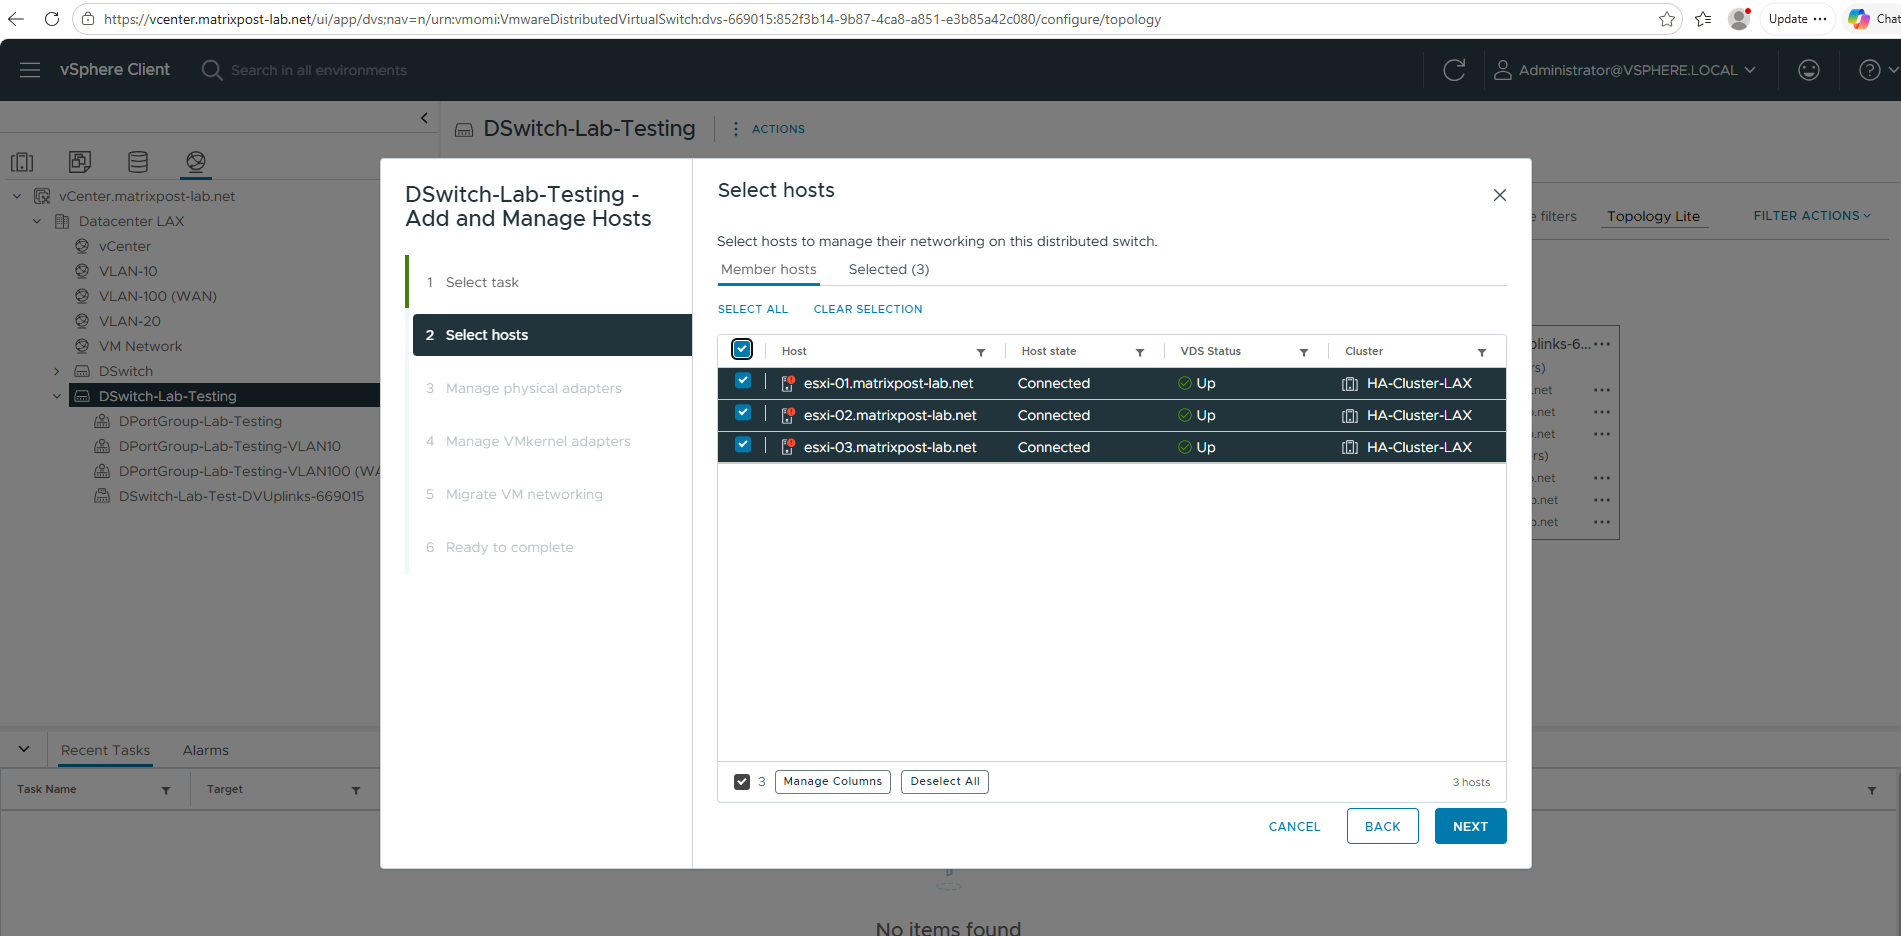
Select Add hosts.

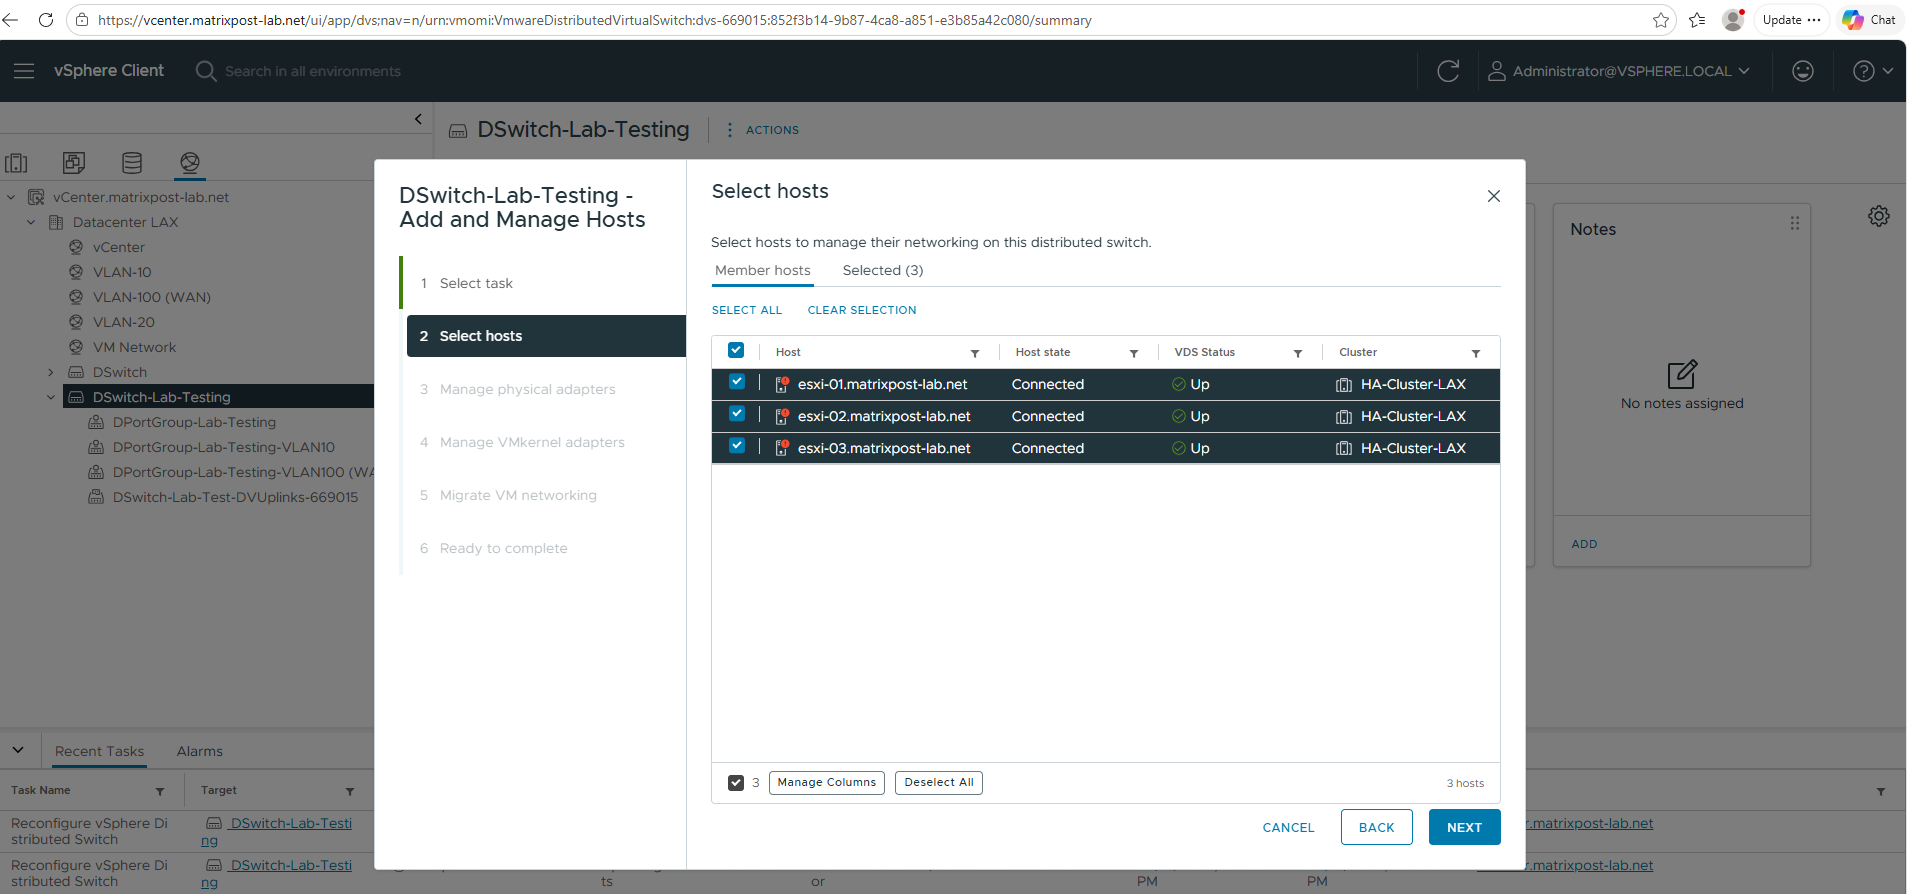
Select the hosts you want to associate with this distributed virtual switch. I will select all three of my ESXi Hosts.

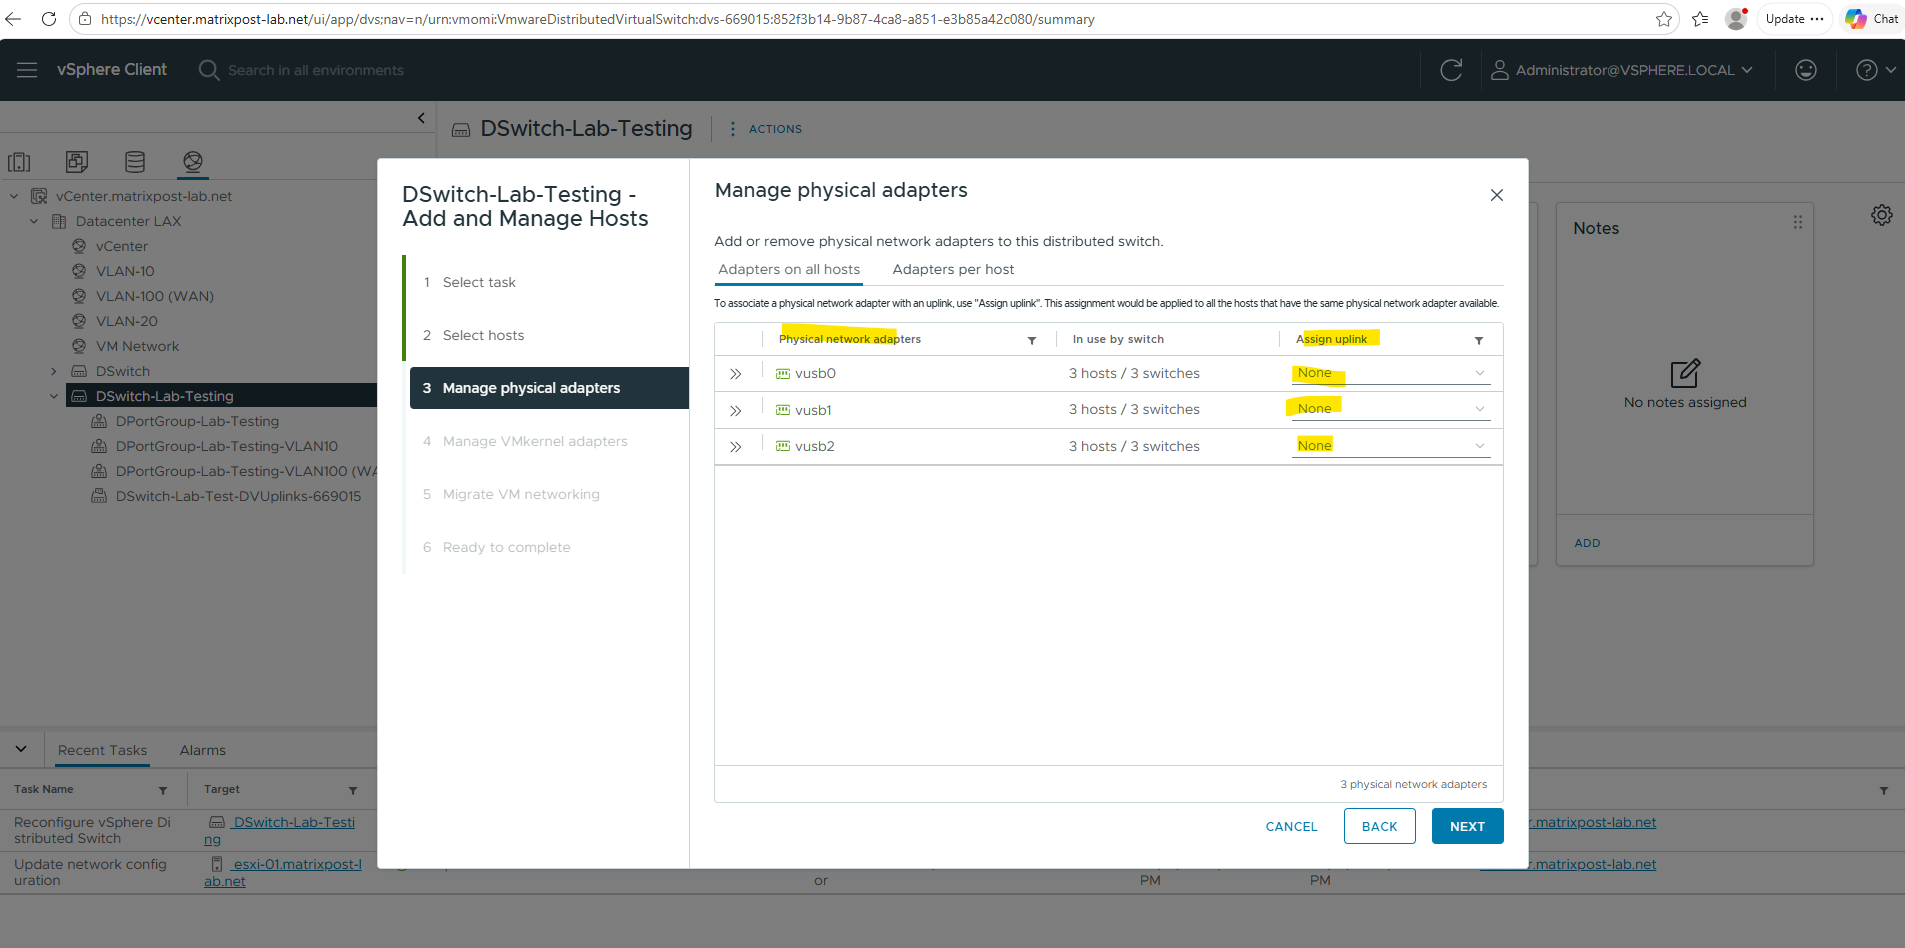
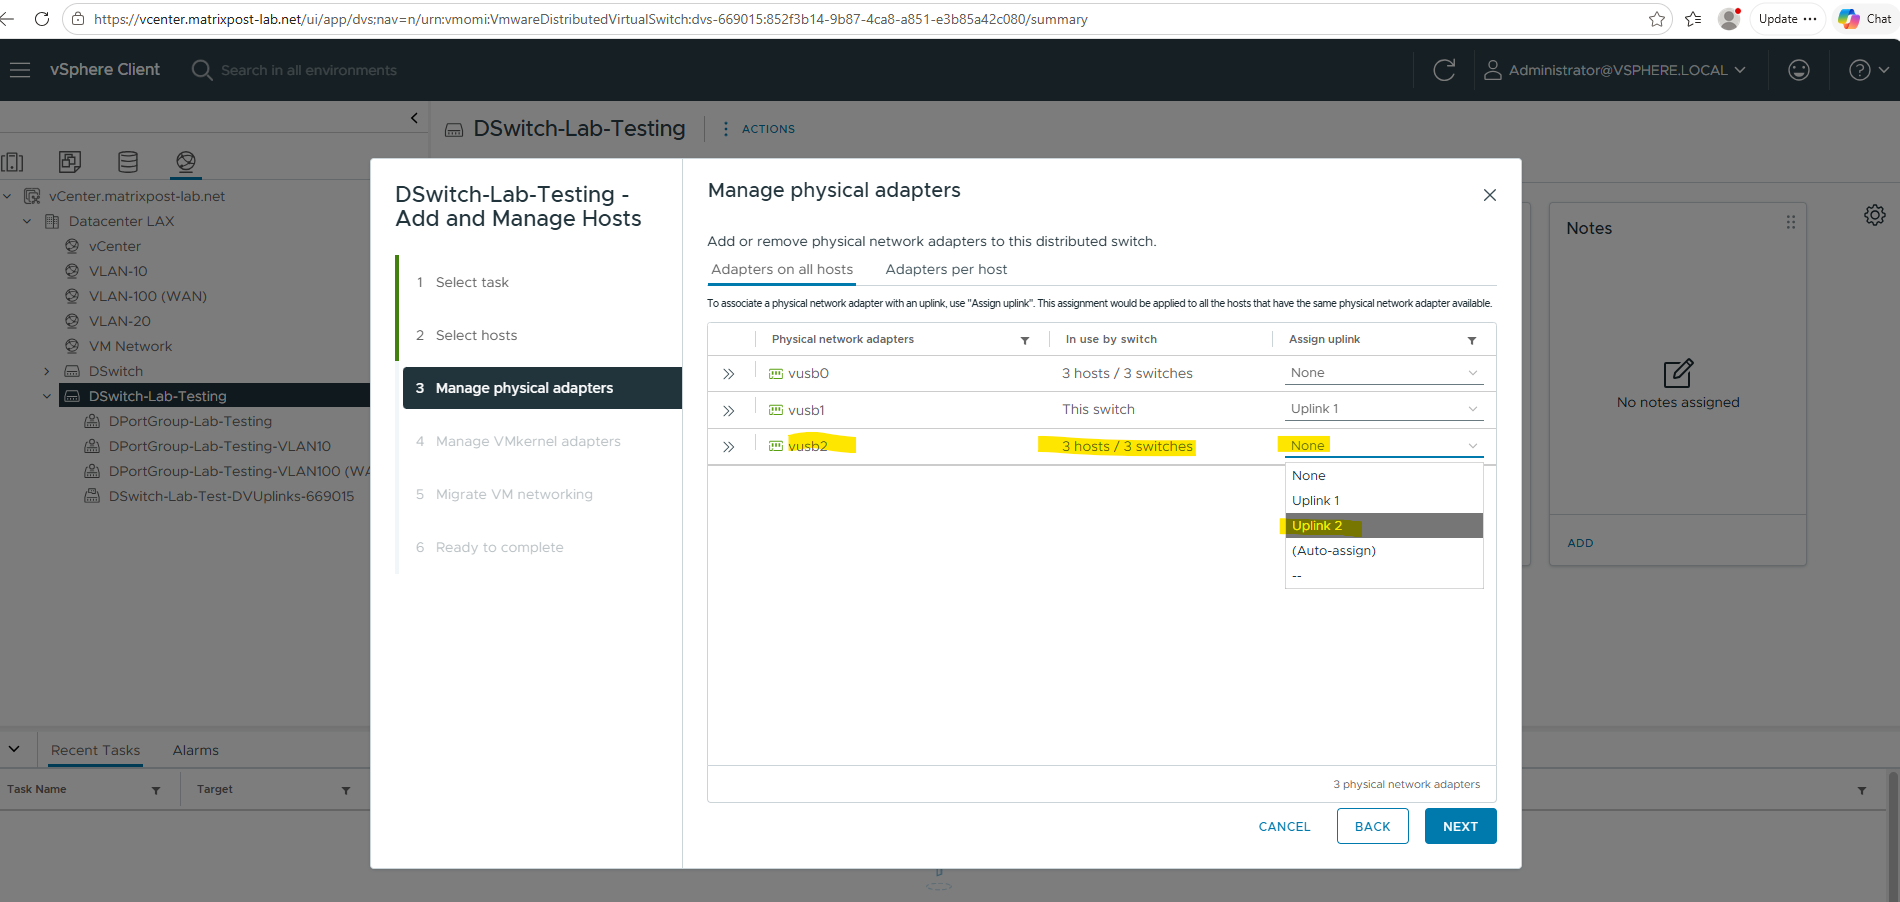
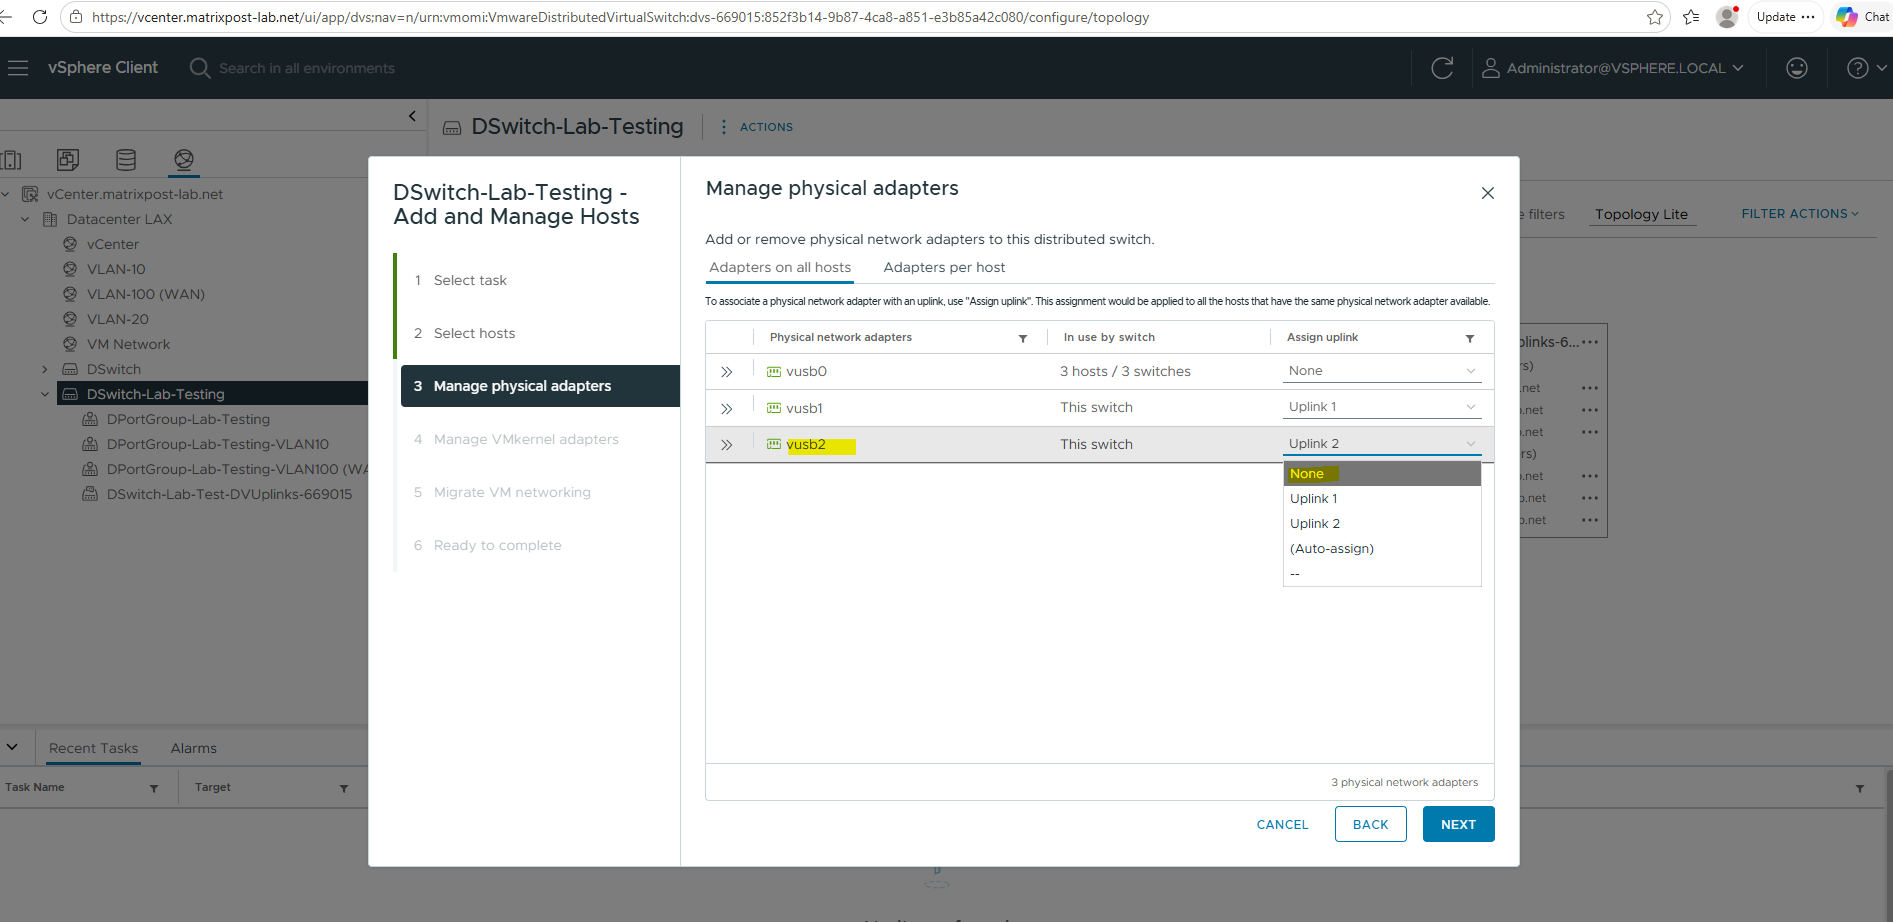
On the Manage physical adapters page we will see all the physical NICs from each previous added ESXi Host. You will see a tab with adapters which are available on all ESXi Hosts and a tab with adapters per host in case they are not the same on each.
In my case all three hosts will have the same physical NICs (USB NICs) installed on and therefore I can use the first tab to configure resp. associate them to the distributed virtual switch.
As mentioned, the 1st NIC is already used for the management network and the vCenter appliance, therefore I will later need to associate my 2nd and 3rd NIC to the distributed virtual switch and its two uplink ports.
!!! Note !!!
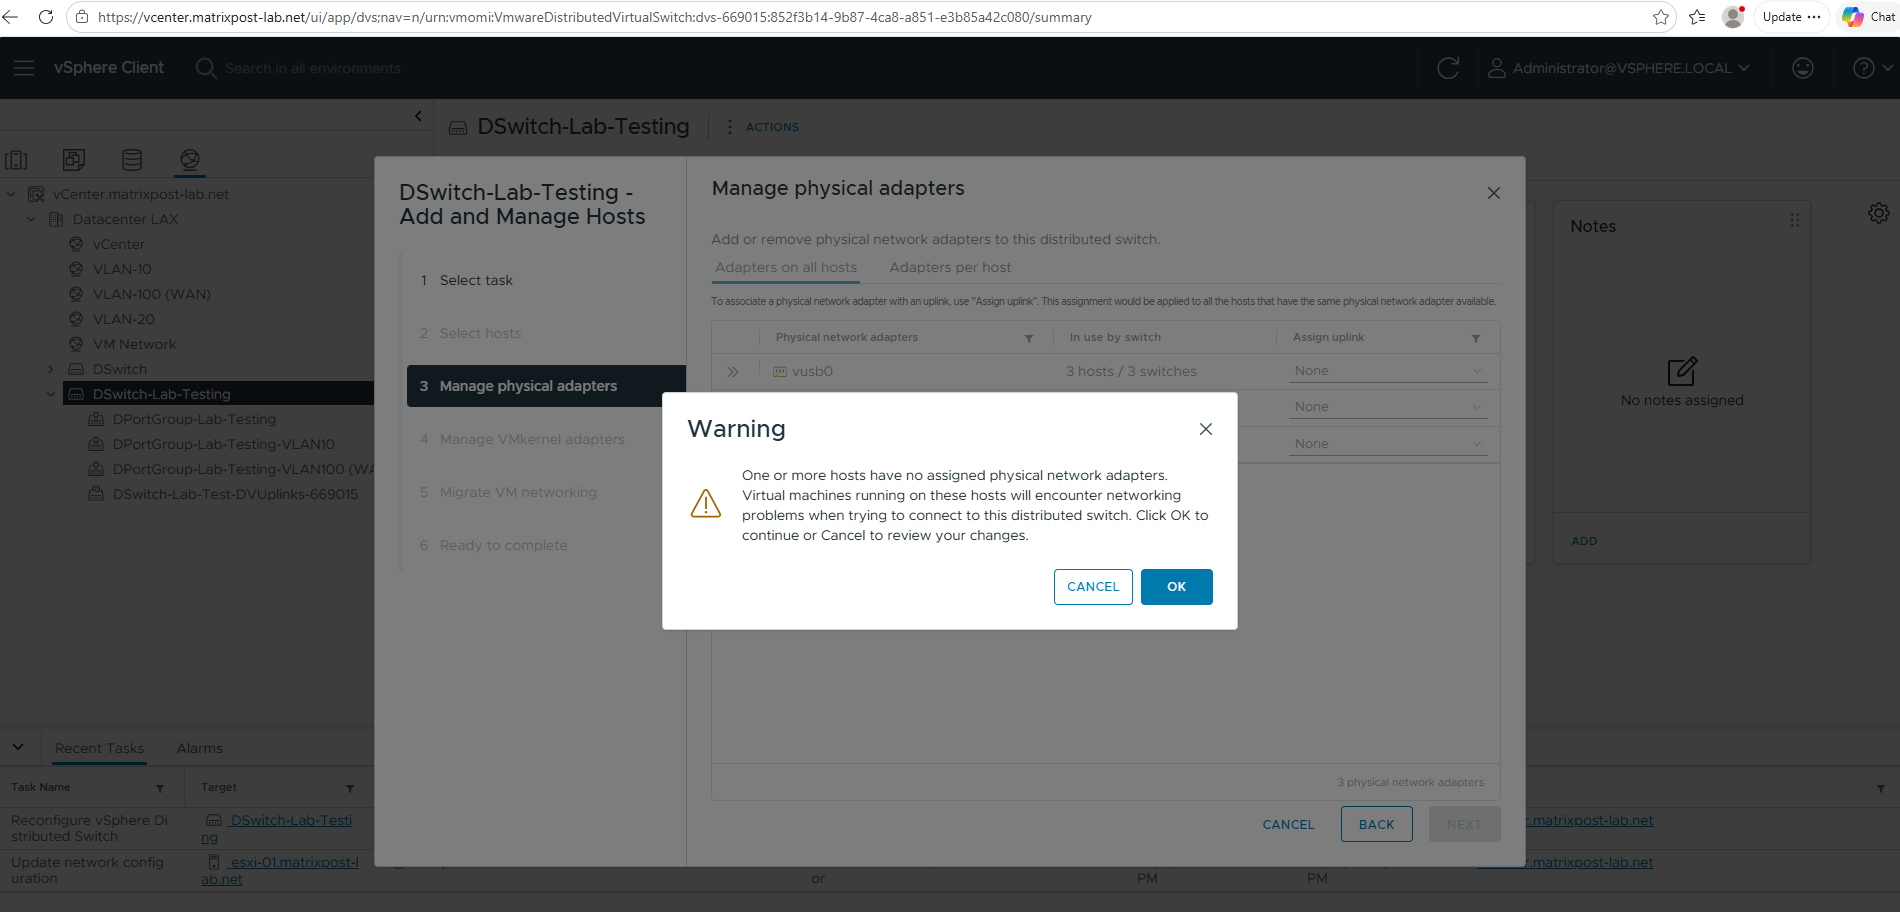
Although the wizard allows physical adapters to be assigned to the VDS during host onboarding, I recommend leaving all uplink assignments set to None at this stage. This ensures that the existing VSS remains fully operational until the VDS configuration has been validated and the uplinks can be migrated in a controlled manner.
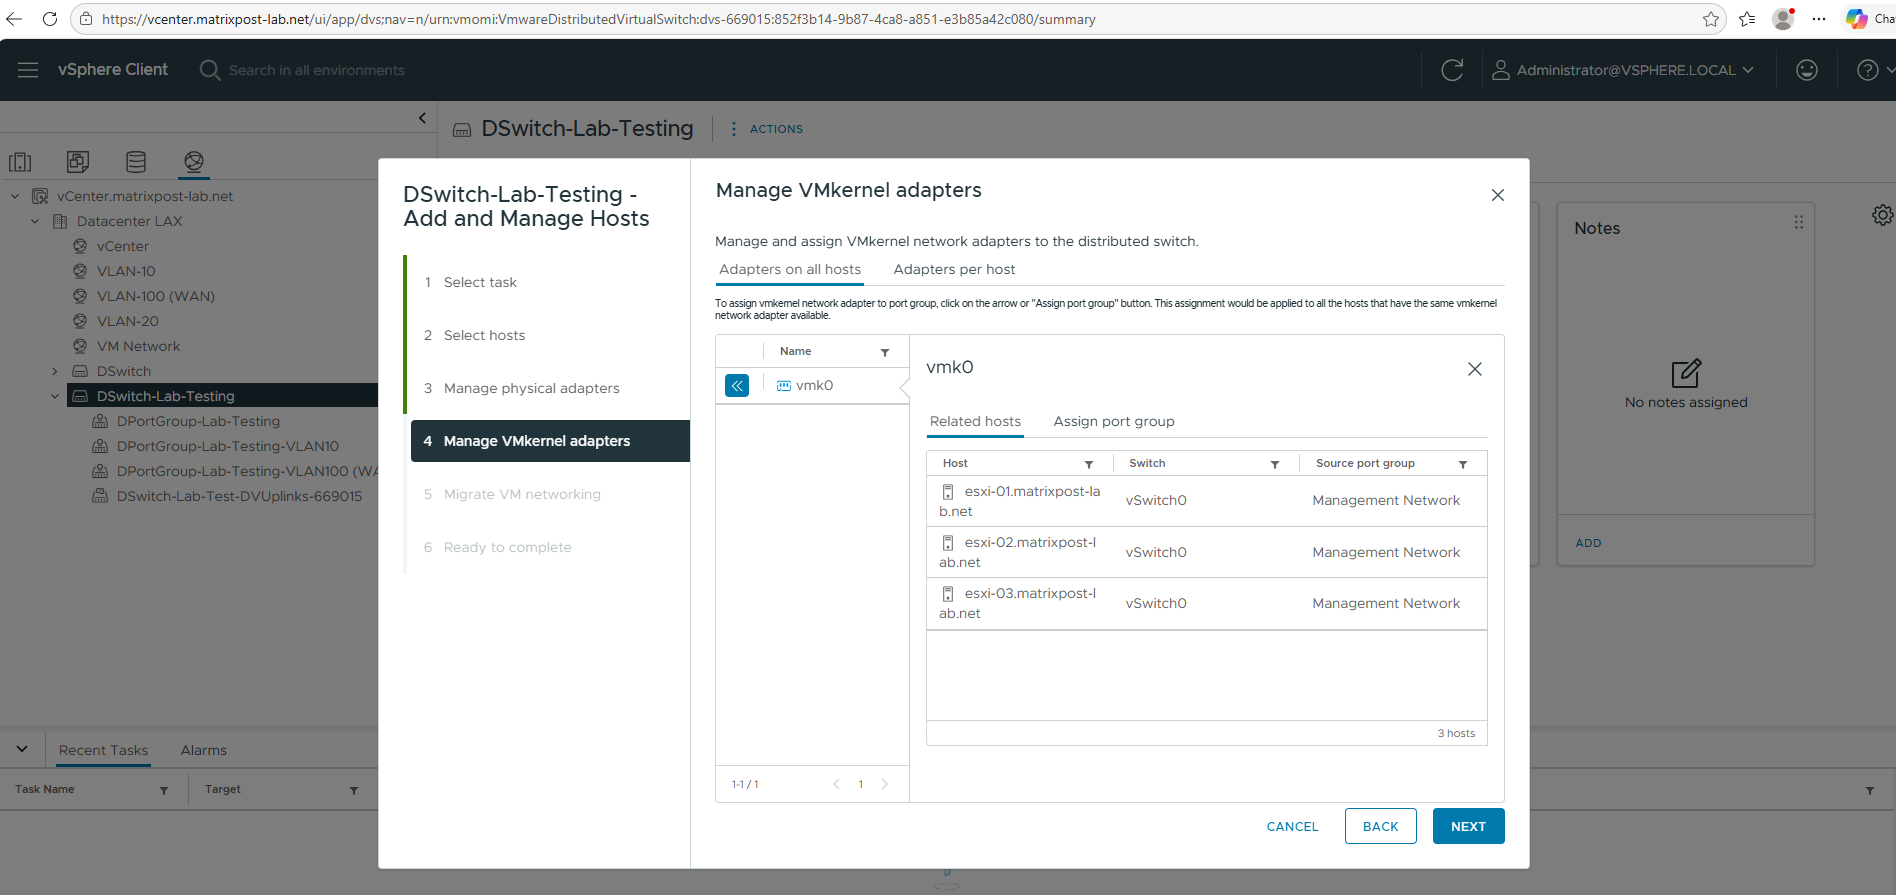
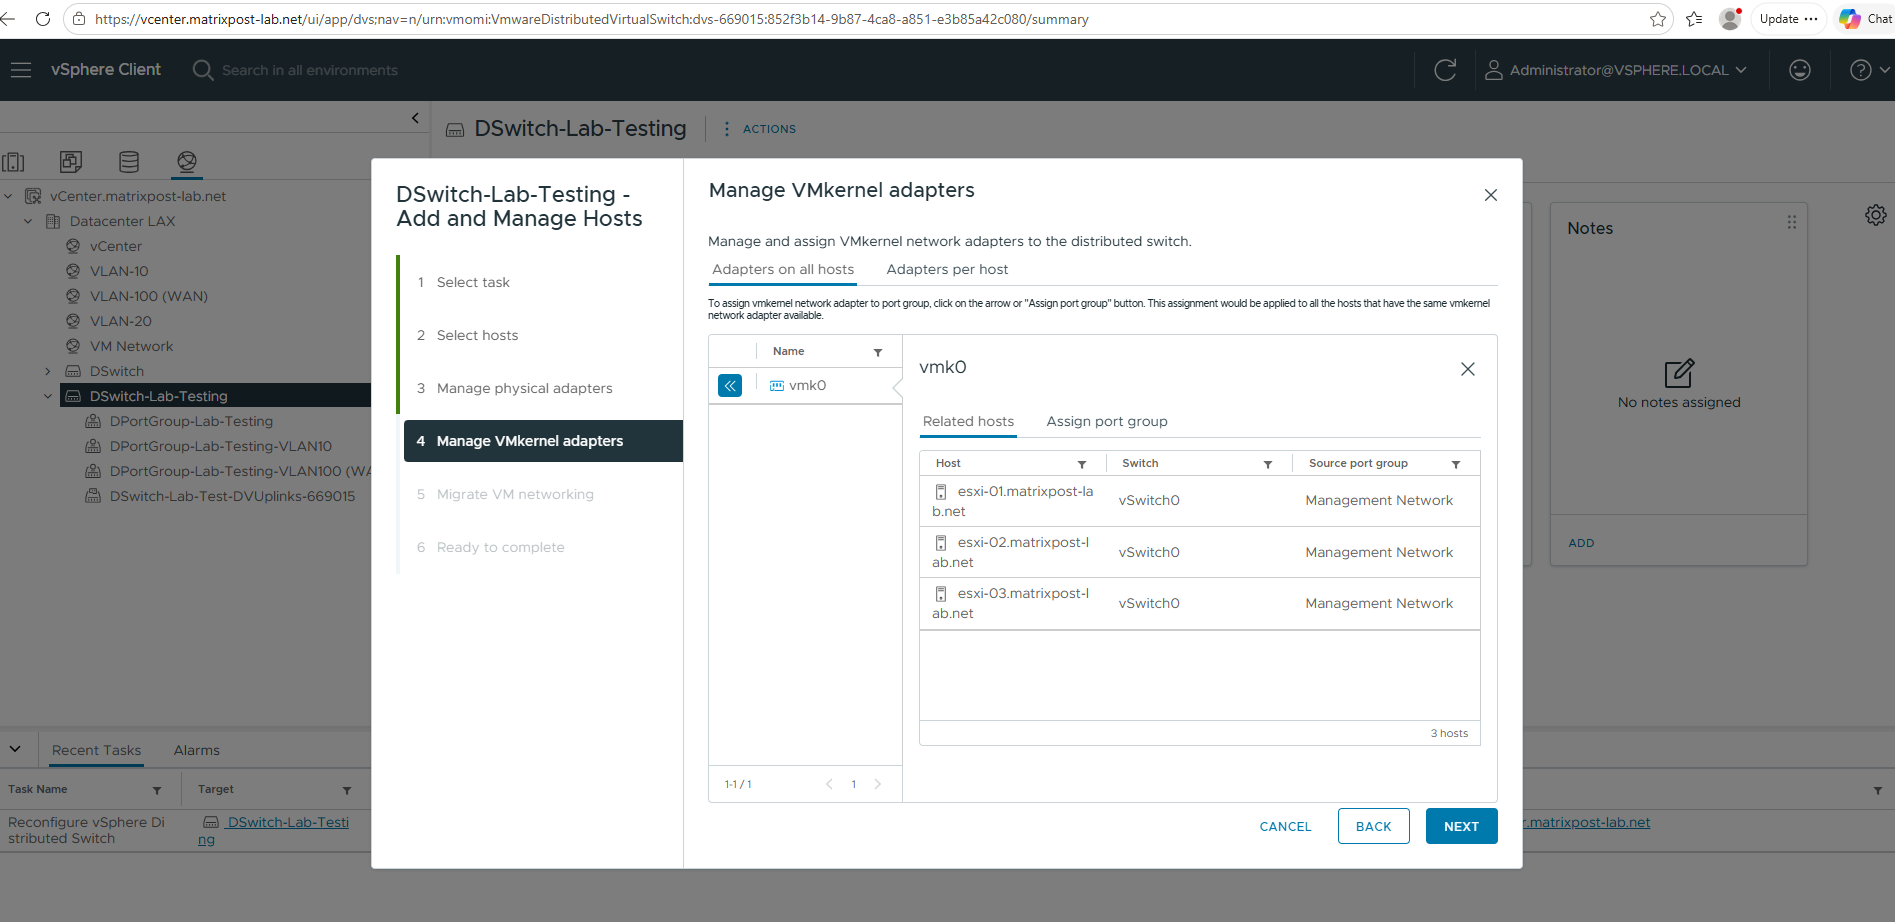
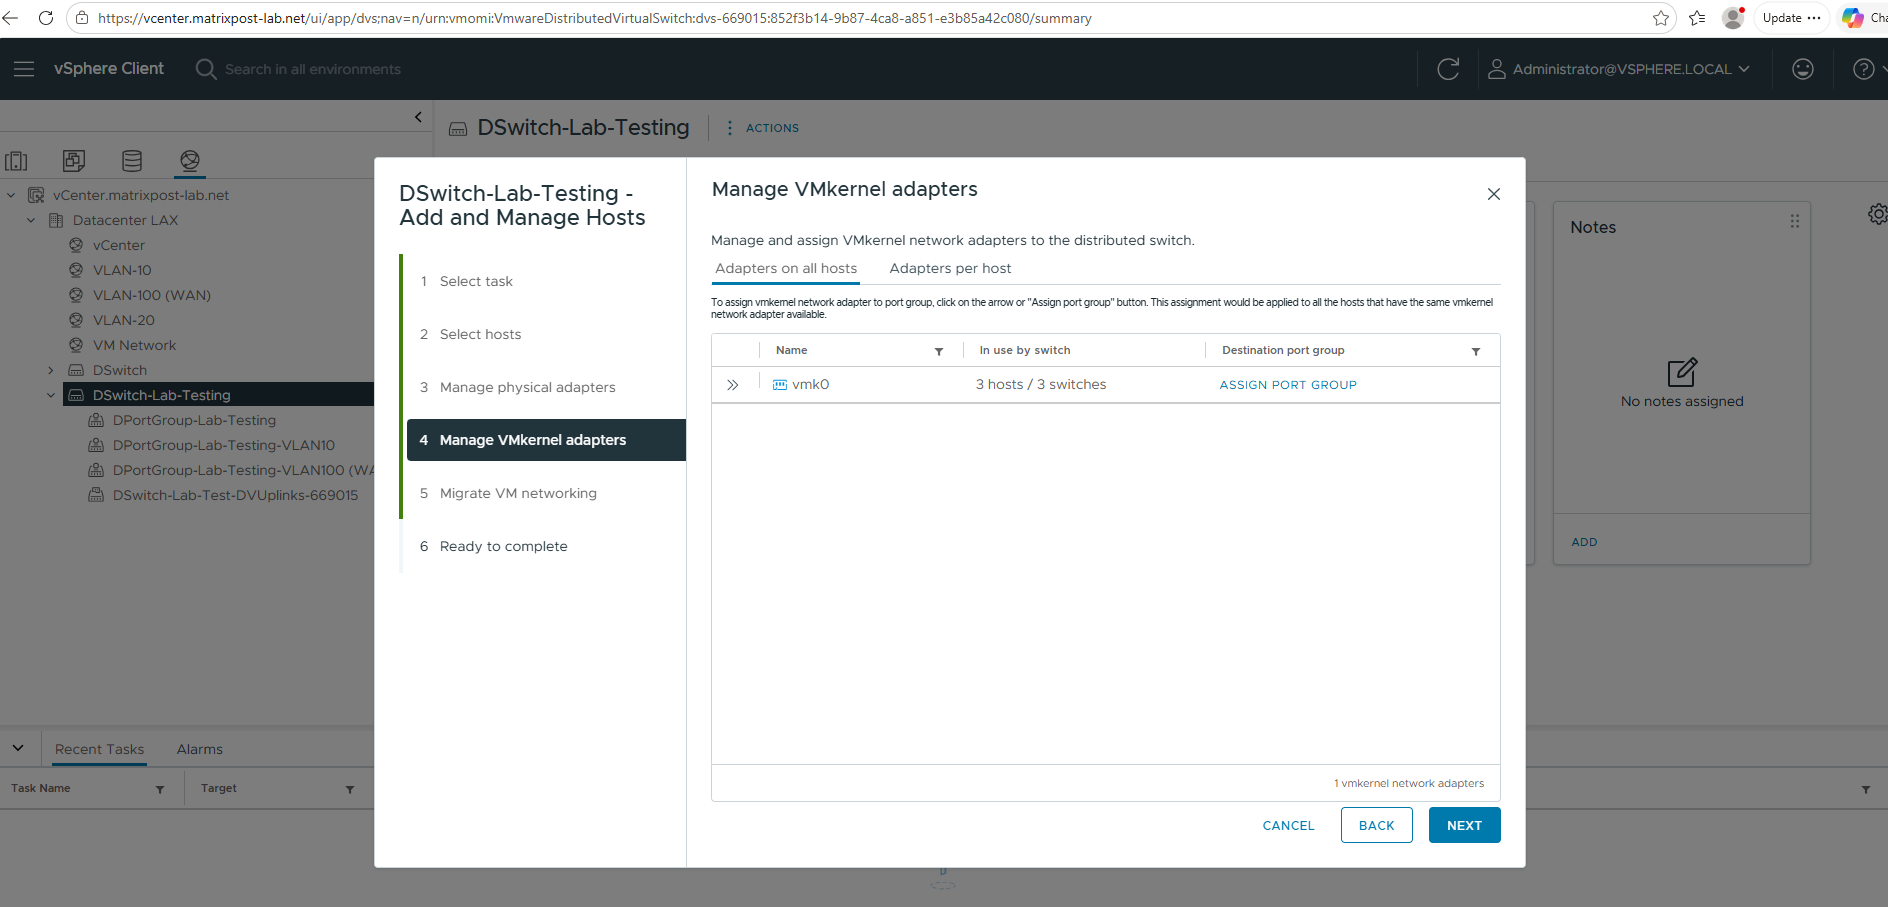
We can also assign vmkernel adpaters to port groups on the distributed virtual switch.
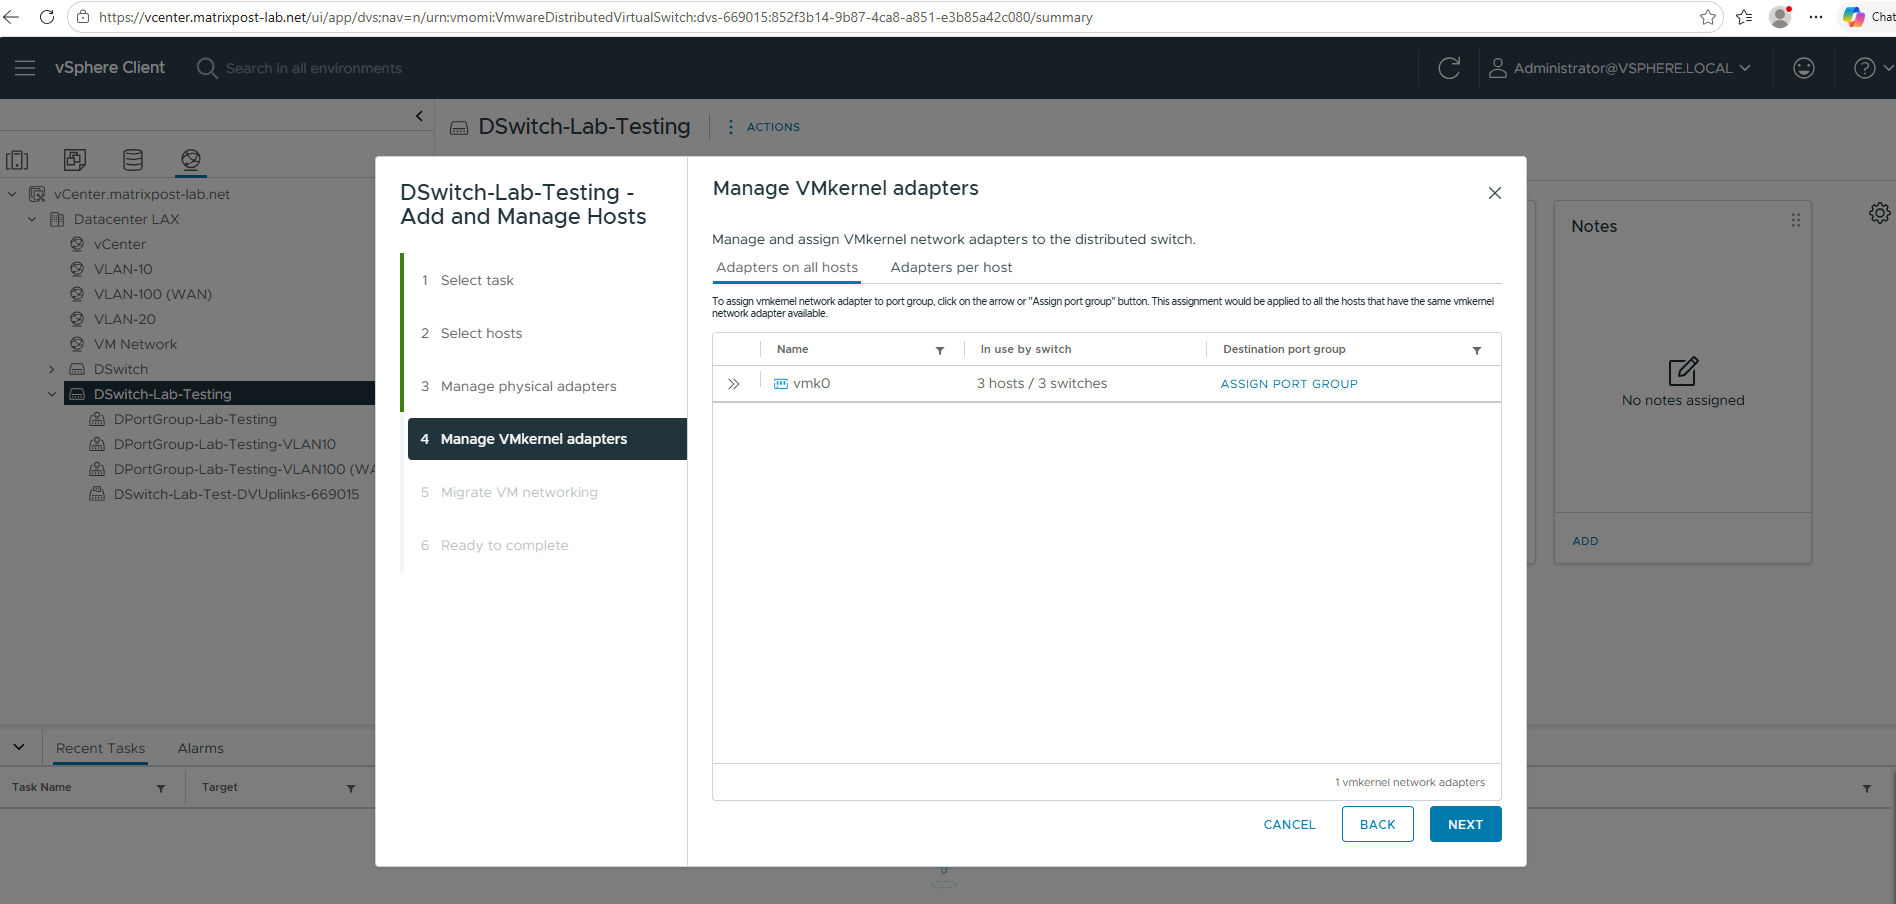
I will left all three standard (default) virtual switches VSS associated to the VMKernel adapters and not assign them to the distributed virtual switch.
The warning we can ignore as we configure the uplinks later as mentioned.
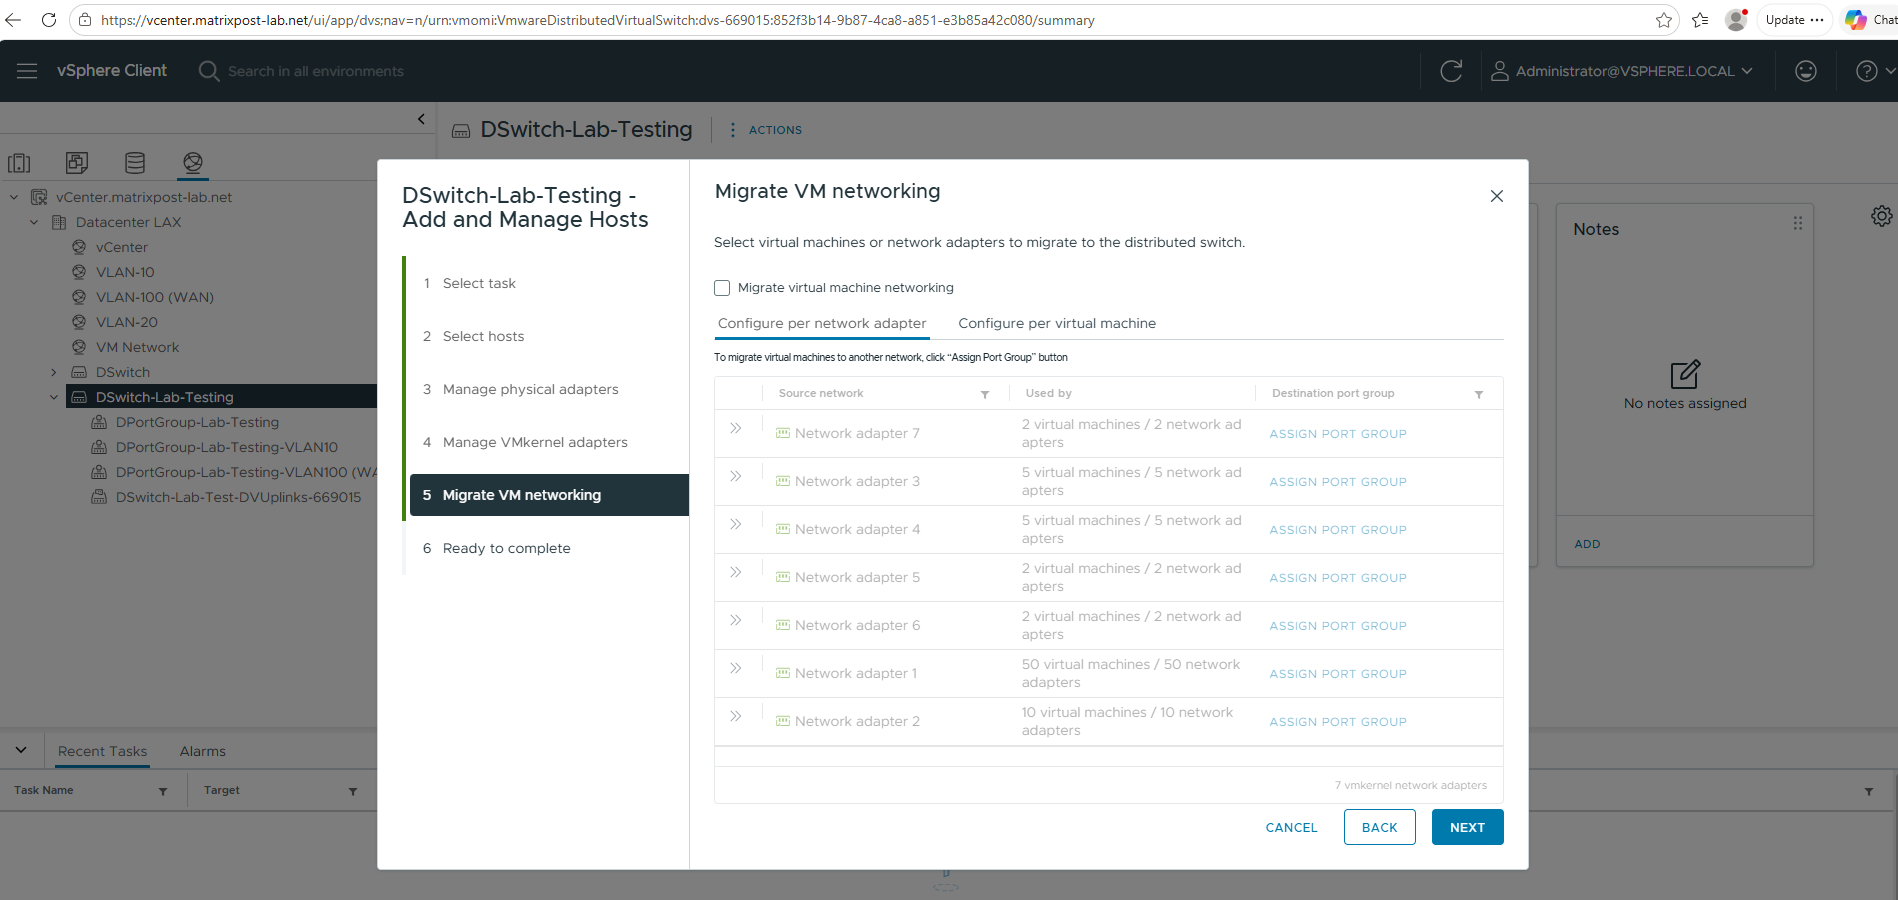
Although vCenter allows virtual machine networking to be migrated during the host migration wizard, I prefer to perform this as a separate step. By first migrating and validating a physical uplink, any networking issues can be identified and resolved before virtual machines are moved to the new Distributed Port Groups.

Finally we can click on FINISH to associate this distributed virtual switch to the ESXi Hosts.

Migrating first Physical Uplink from the VSS to the VDS
With the ESXi hosts added to the VDS and the required Distributed Port Groups already in place, the next step is to migrate the physical uplinks from the existing vSphere Standard Switch (VSS) to the new vSphere Distributed Switch (VDS). Since the uplinks provide the connection between the virtual networking environment and the physical network, this is the first step that can potentially impact connectivity if performed incorrectly.
To minimize risk, I will migrate only a single uplink at a time while leaving the second uplink connected to the VSS. This approach ensures that virtual machine traffic continues to flow through the remaining VSS uplink, providing a simple rollback path should any issues arise. After validating connectivity and confirming that the VDS is operating as expected, the remaining uplink can be migrated as well.
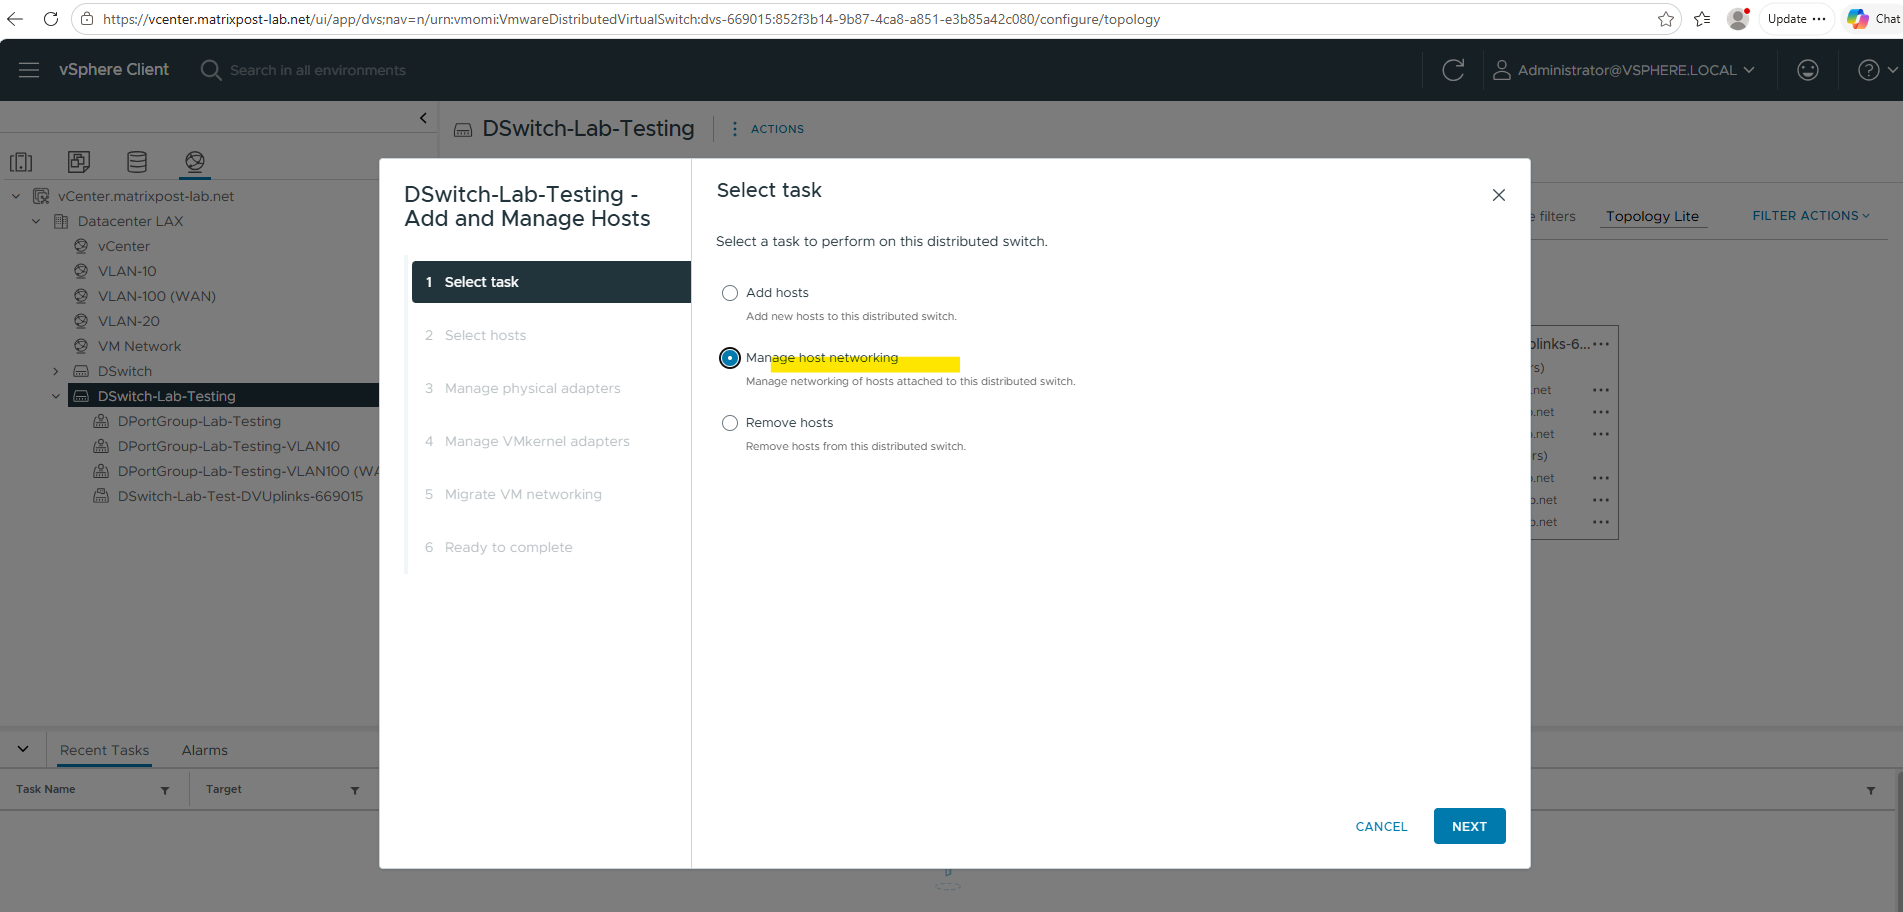
To migrate the first uplink already to the new vSphere Distributed Switch (VDS), right click on the VDS and select Add and Manage Hosts -> Manage host networking.
Select Manage host networking.
Select the ESXi Hosts.
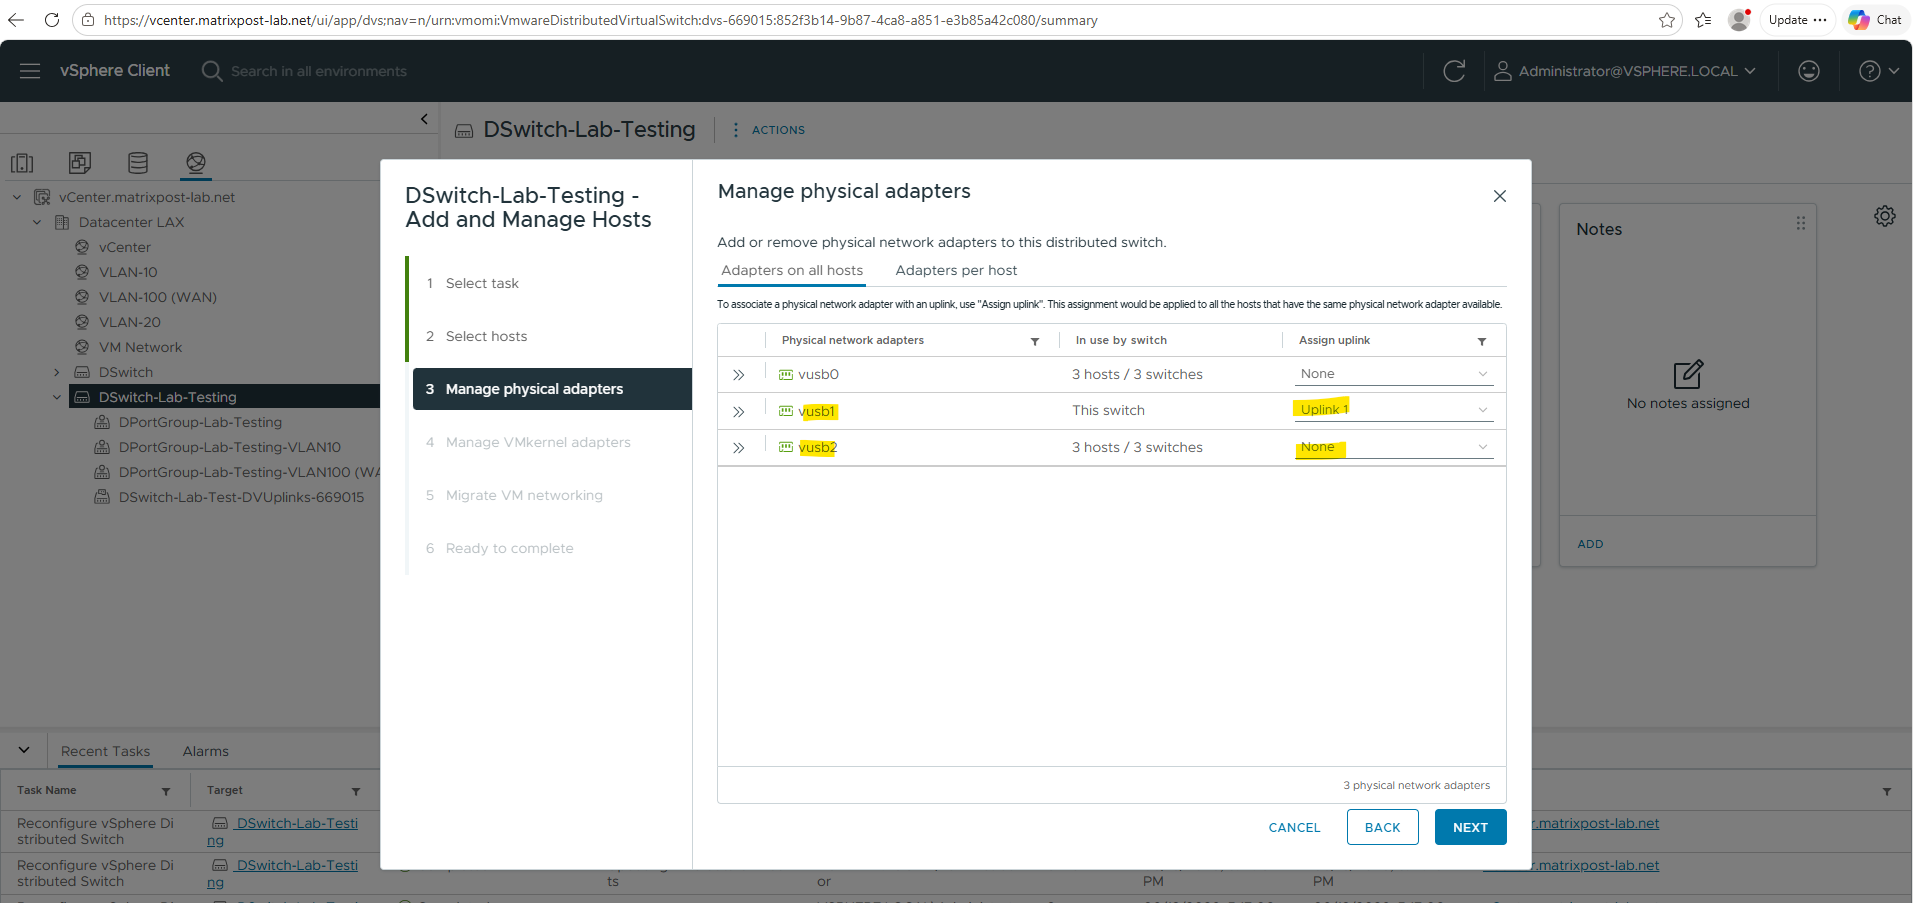
Under Physical adapters, assign:
!!! Note !!!
Leavevusb2on the VSS to ensures that virtual machine traffic continues to flow through the remaining VSS uplink. So far the virtual machines still configured to use the VSS under network adapter and would otherwise lose network connectivity!
vusb1→Uplink1vusb2→None
The VMkernel adapter we left on the VSS as already mentioned.
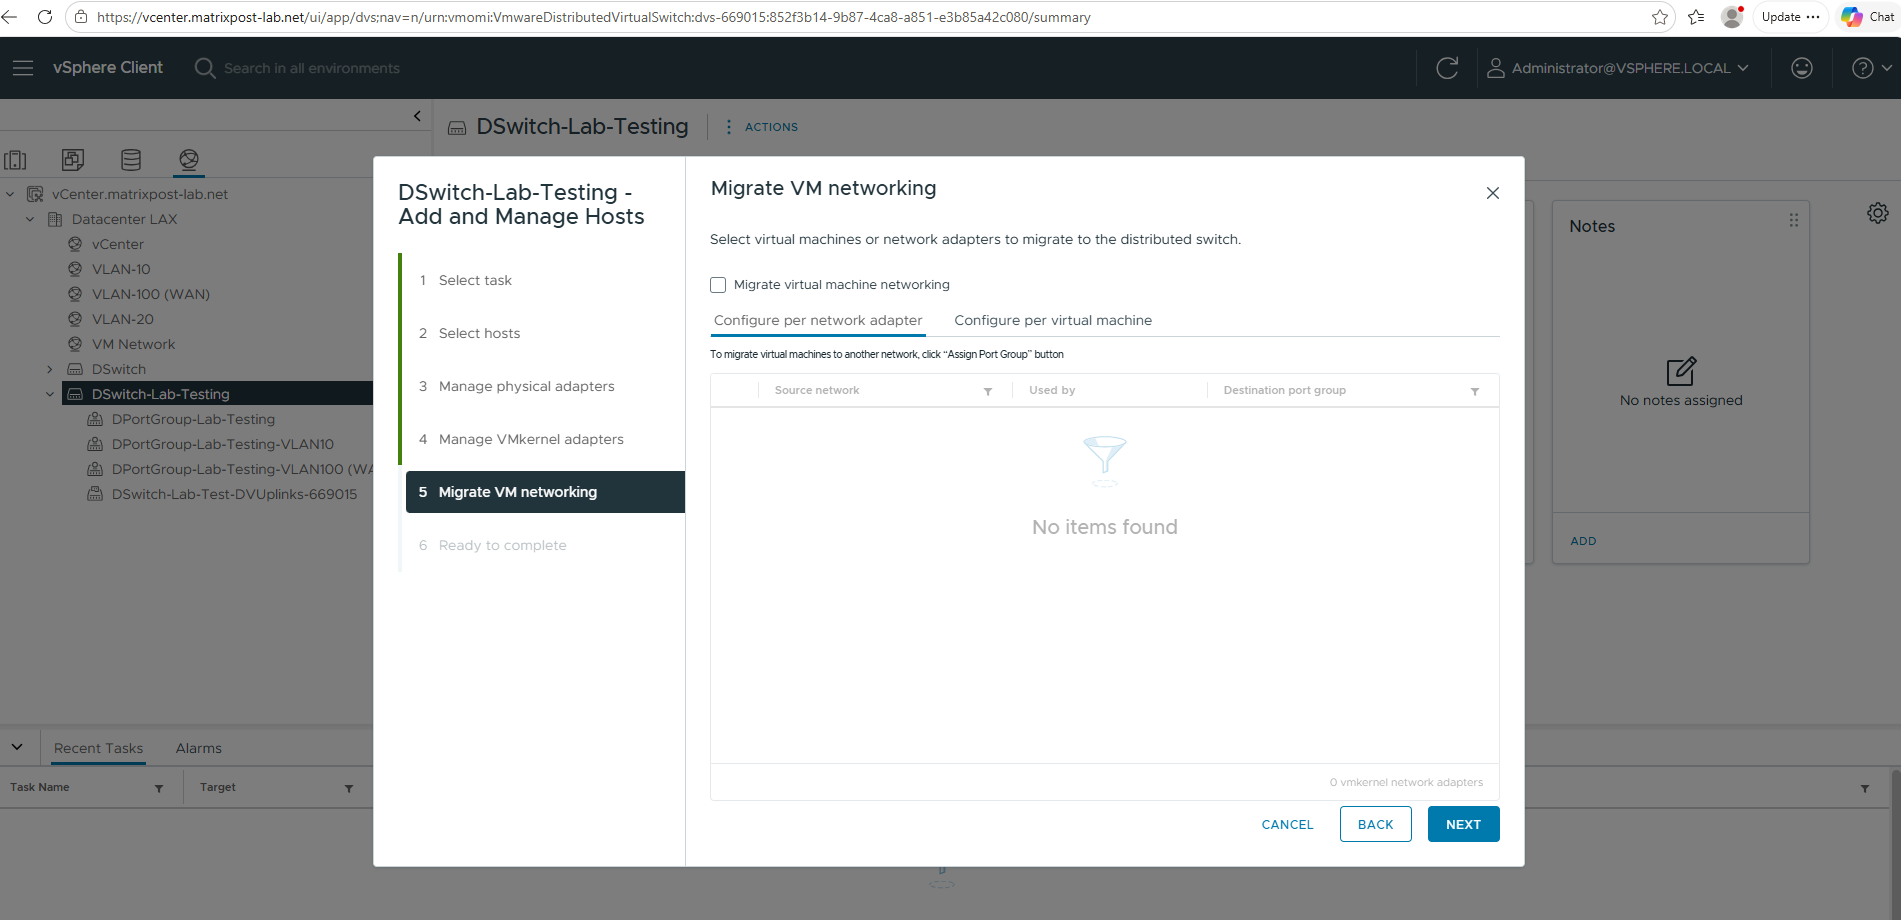
The migrate VM networking we also skip for now. By first migrating and validating a physical uplink, any networking issues can be identified and resolved before virtual machines are moved to the new Distributed Port Groups.
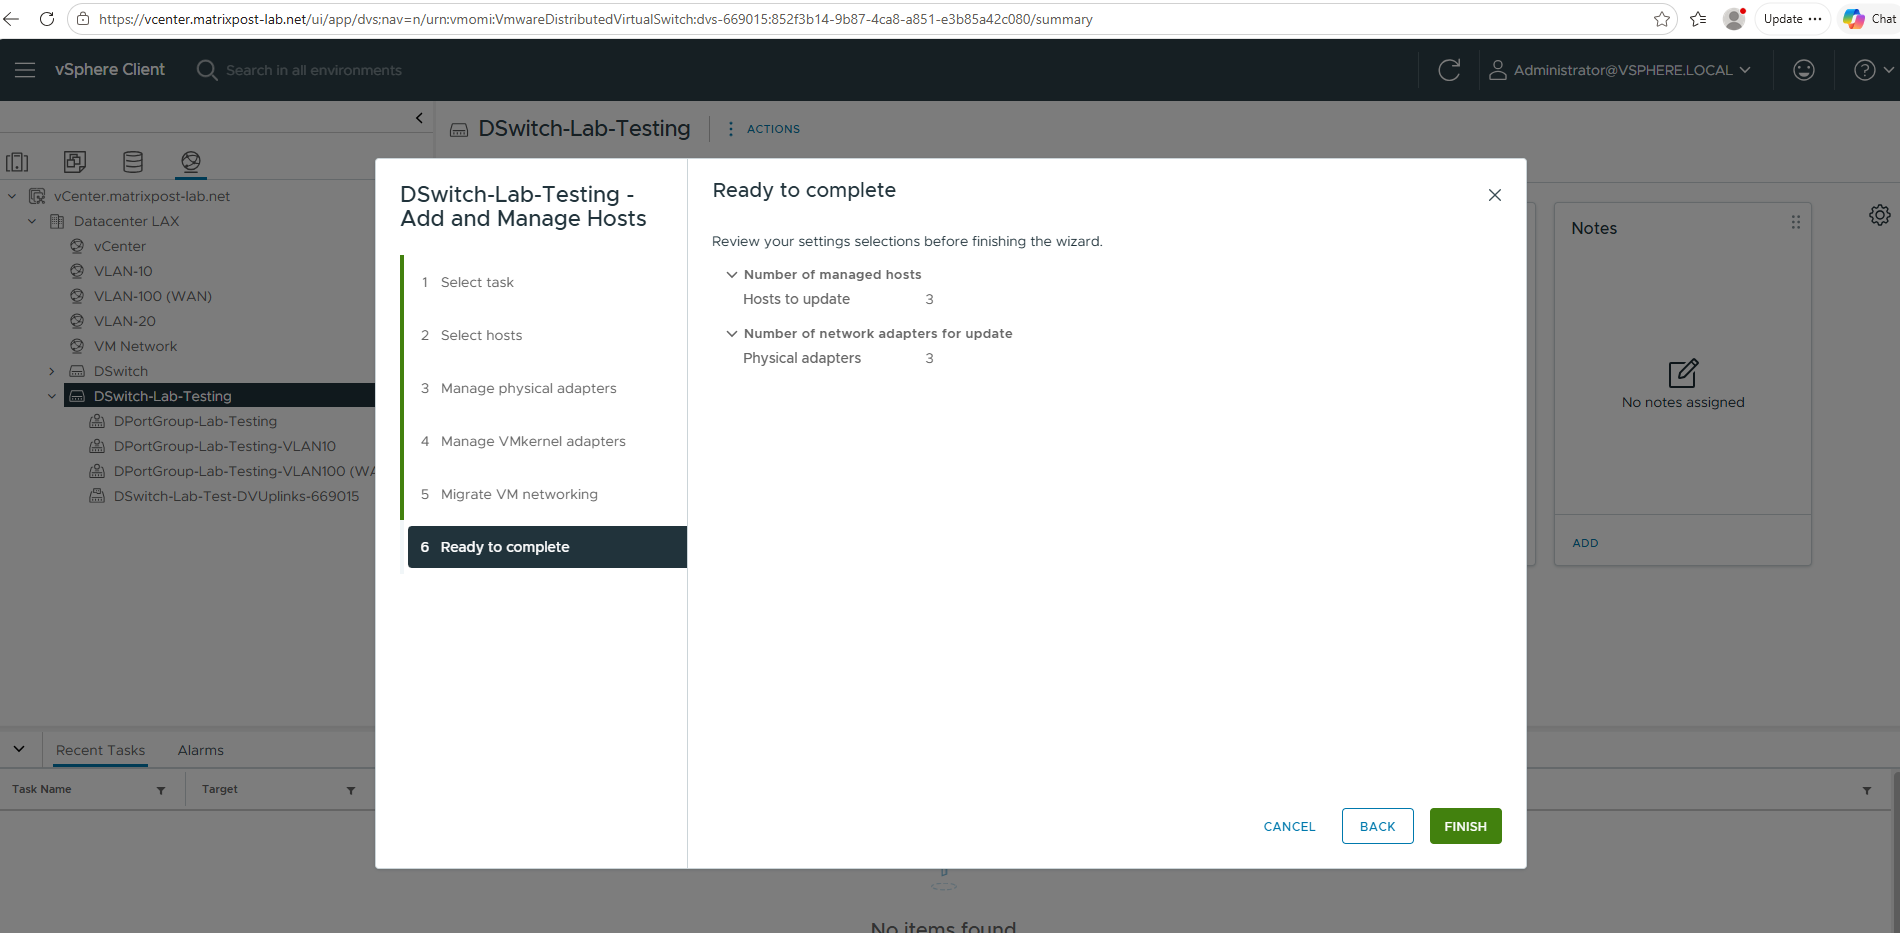
Finally click on Finish to associate the first uplink with our new vSphere Distributed Switch (VDS).
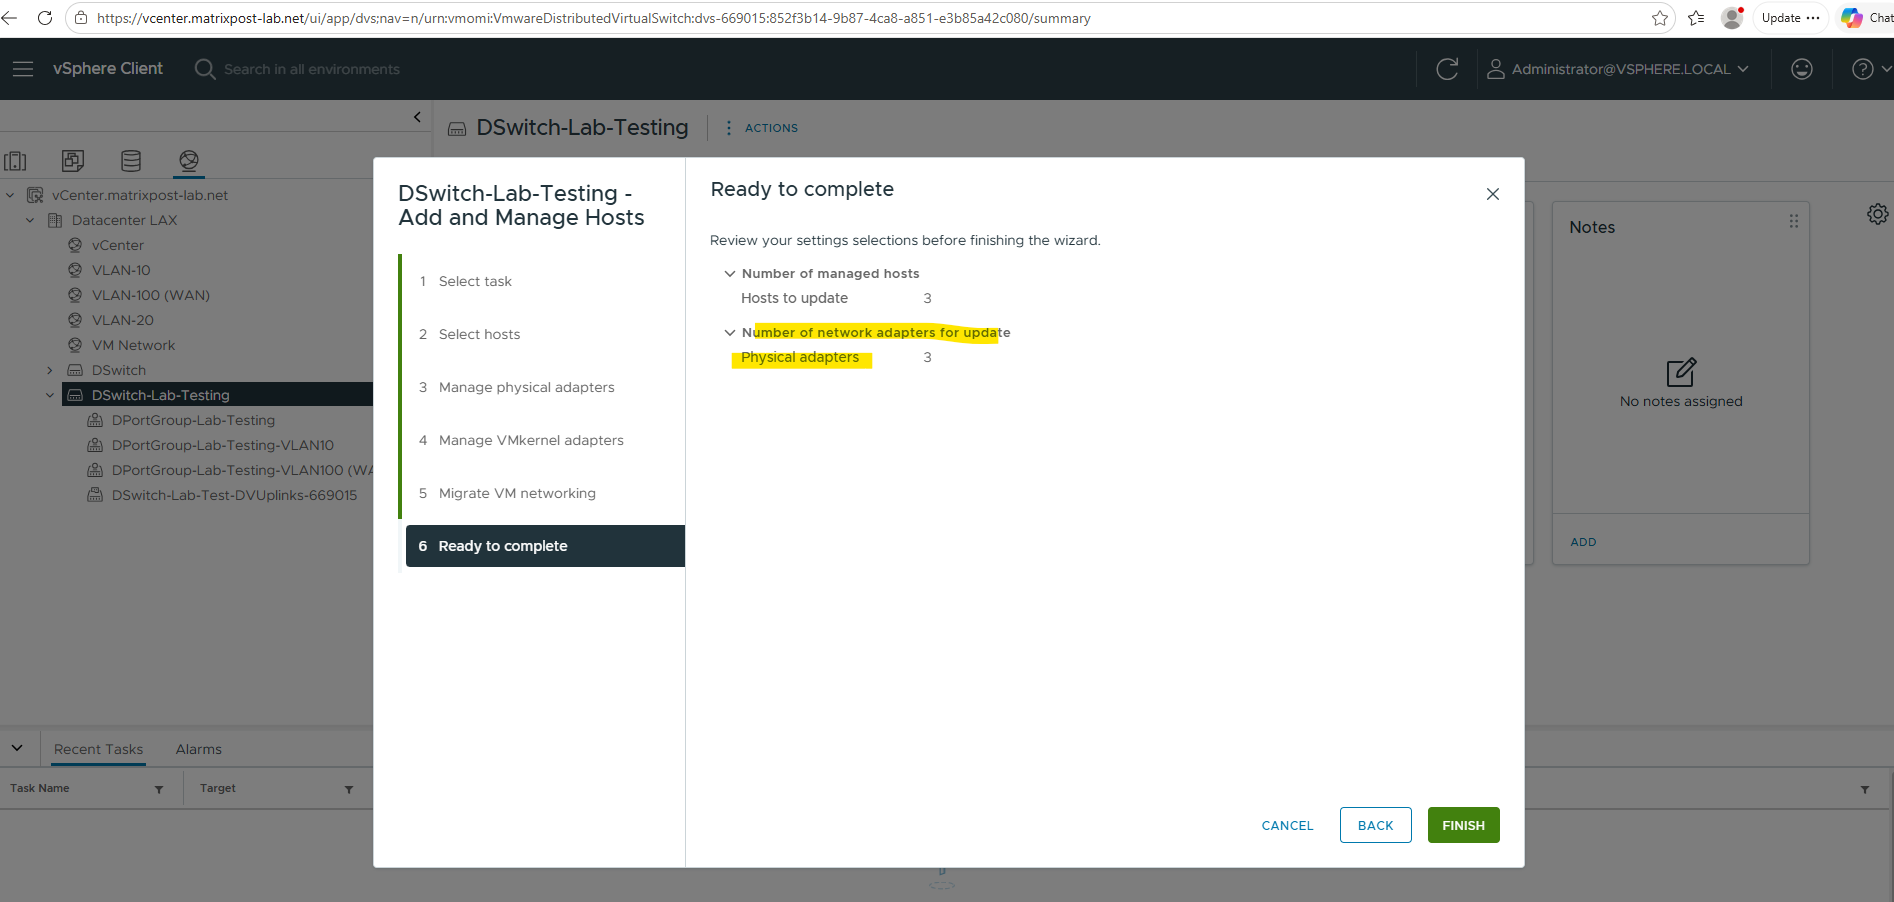
After completing the wizard, the first physical uplink on all three ESXi hosts is now connected to the vSphere Distributed Switch (VDS), while the second uplink remains assigned to the existing vSphere Standard Switch (VSS). Since all virtual machines are still connected to the VSS port groups, the network connectivity remains unaffected at this stage.
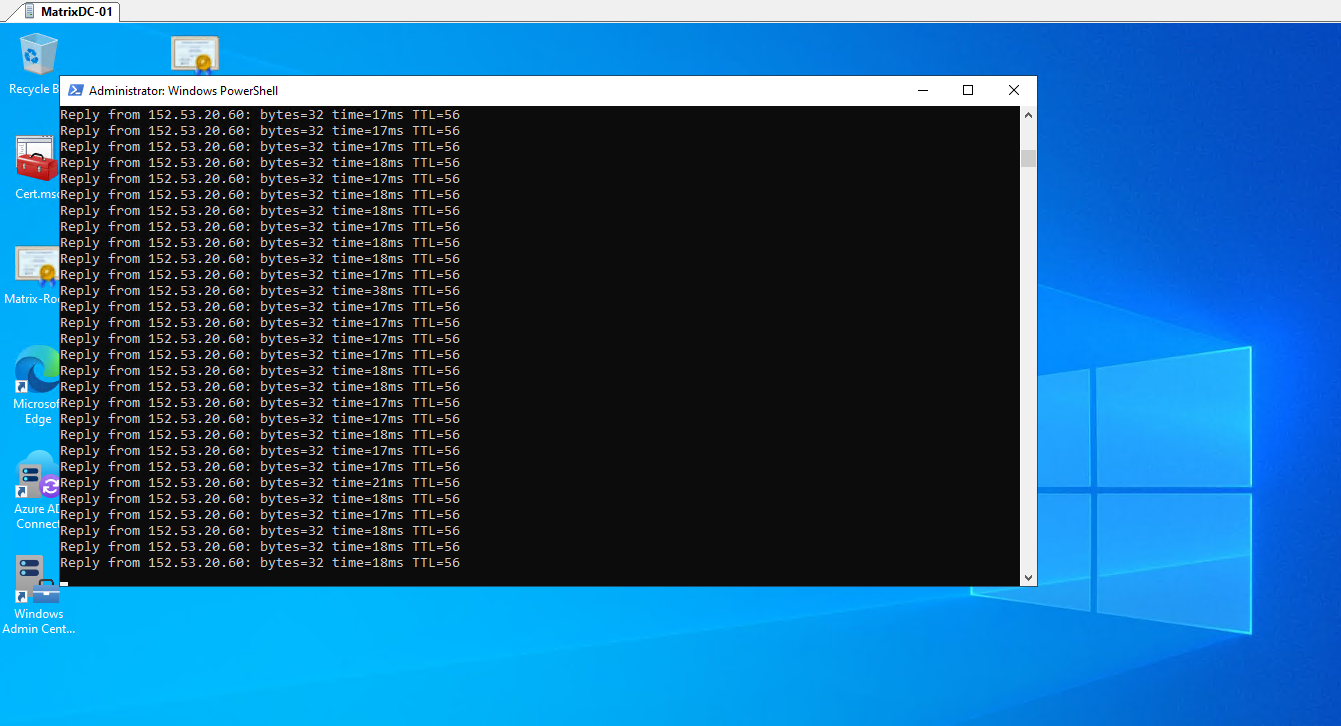
To verify this, I started a continuous ping from a test virtual machine to my blog hosted on the Internet. As shown below, the VM continues to communicate successfully while the VSS and VDS temporarily coexist, demonstrating that migrating a single uplink first provides a safe and low-risk transition path.
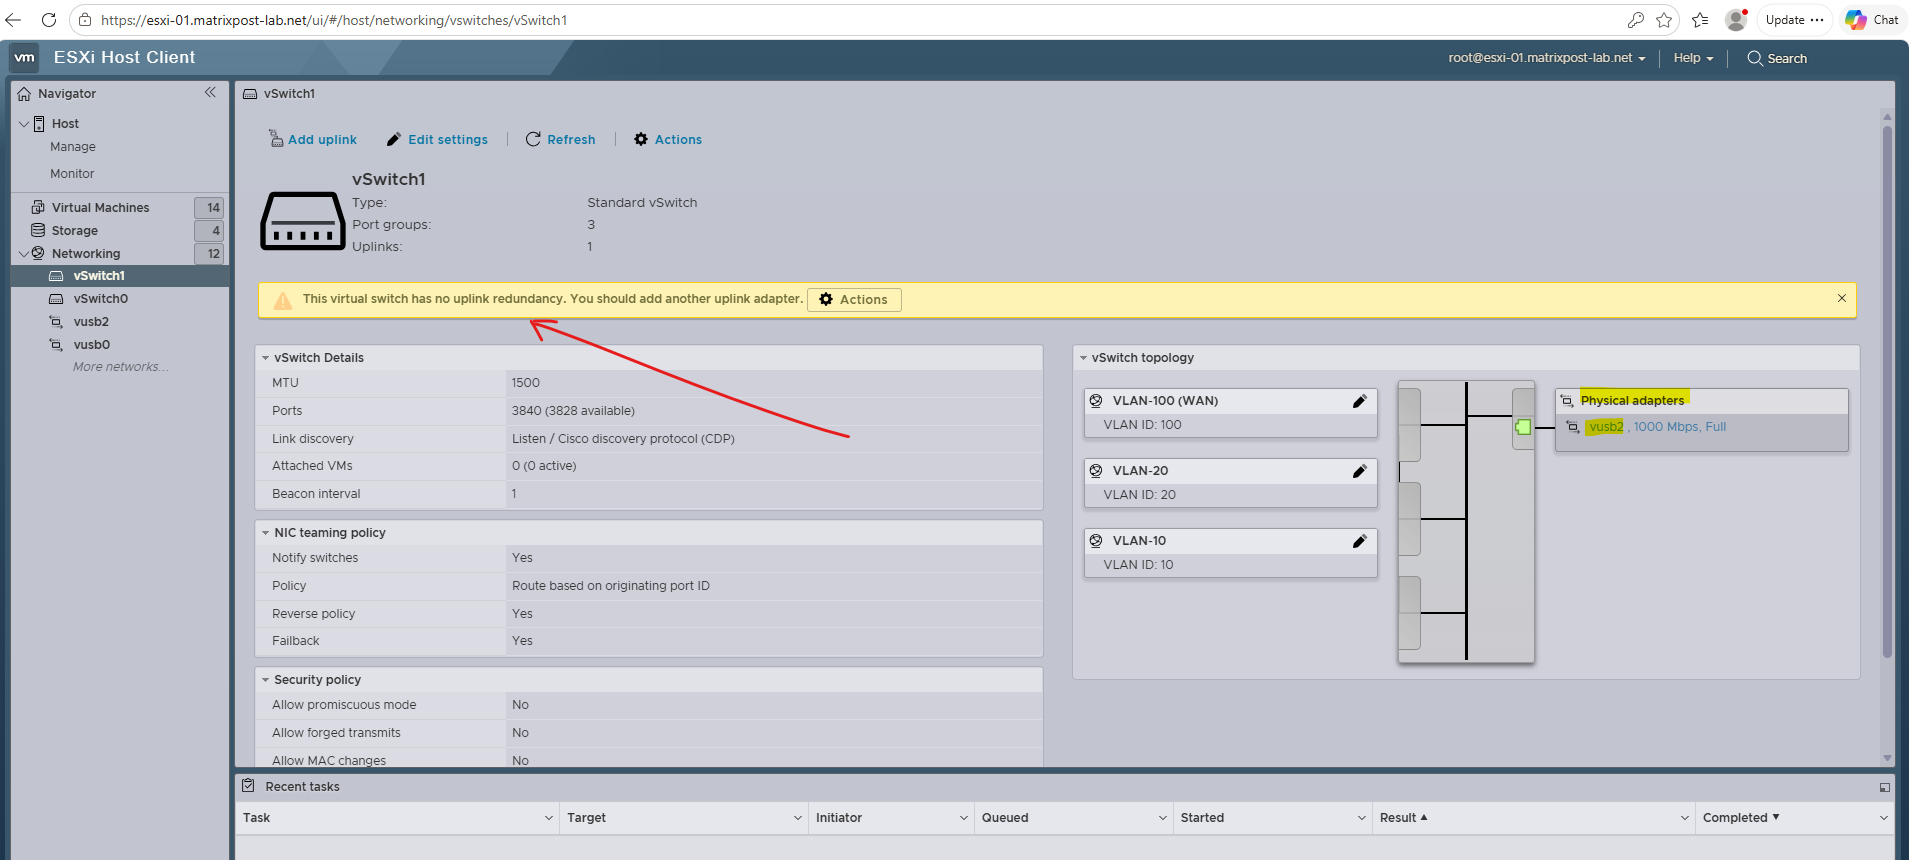
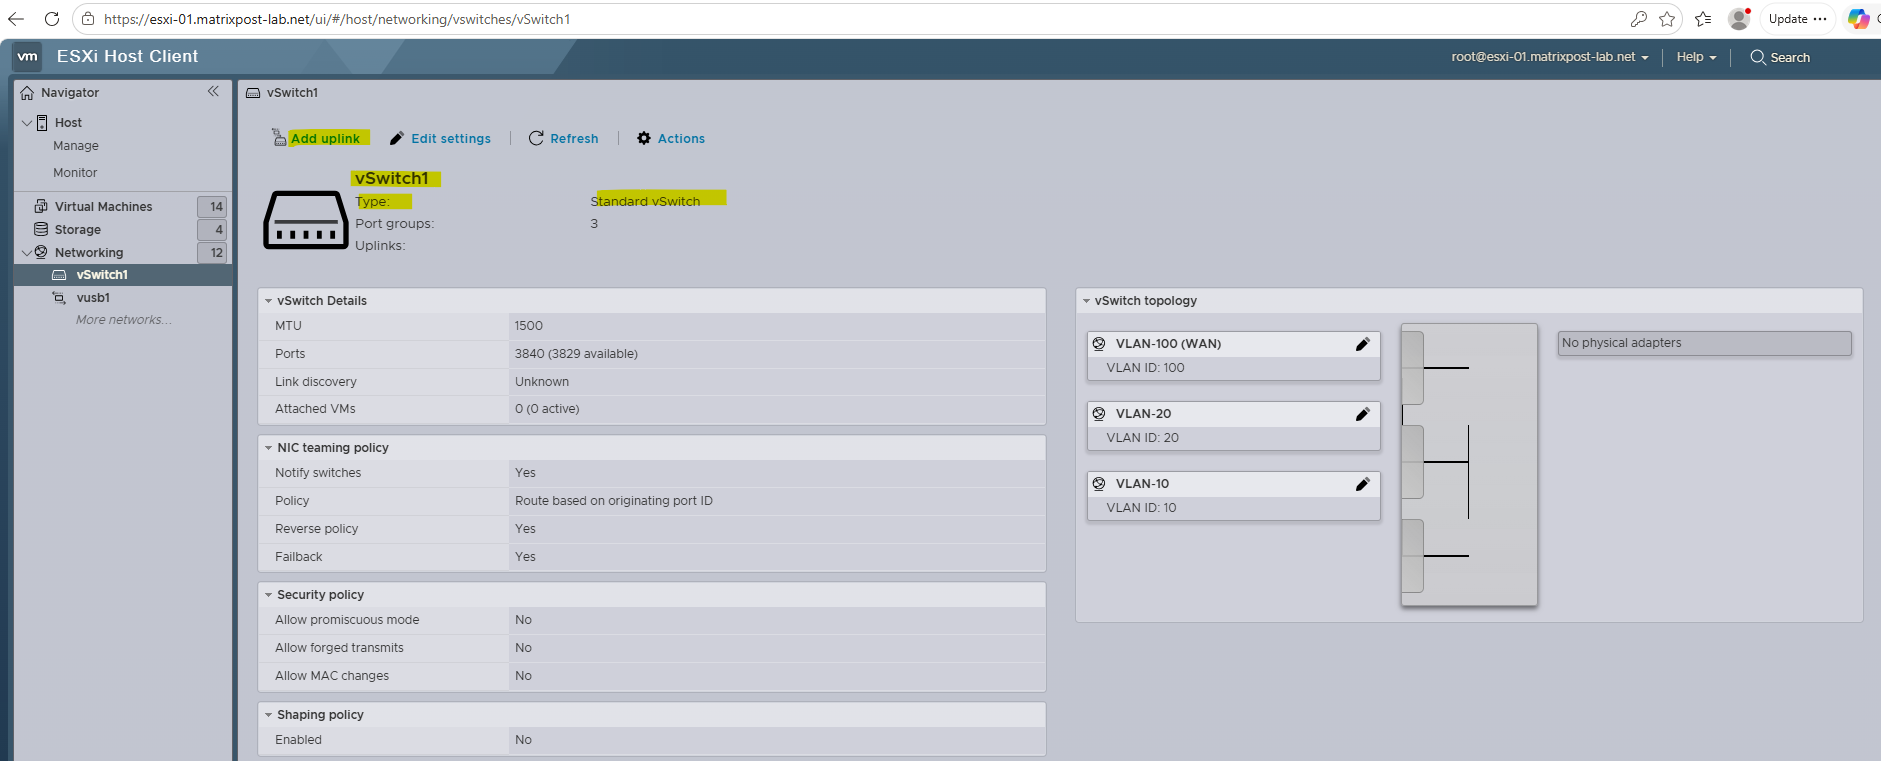
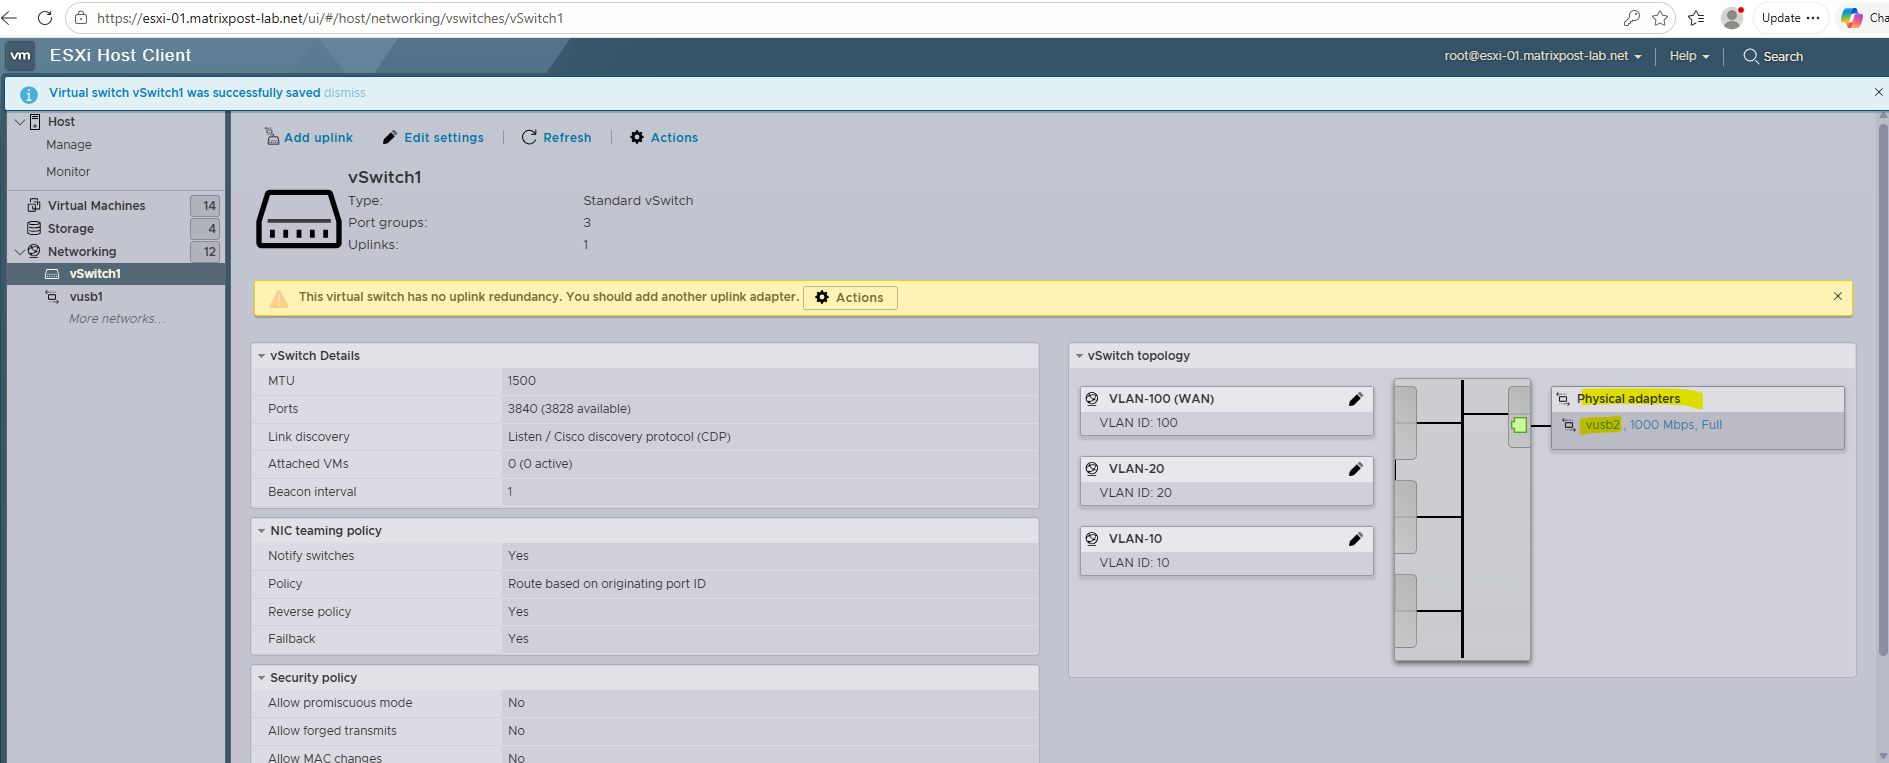
On all three ESXi hosts, the vSphere Standard Switch (vSwitch1) now displays a warning indicating that uplink redundancy has been reduced: “This virtual switch has no uplink redundancy. You should add another uplink adapter.”
This is expected, as the first physical uplink has already been migrated to the VDS. In the topology view, only the remaining uplink (
vusb2) is shown as an active physical adapter, confirming that the VSS continues to provide connectivity for the virtual machines while operating with a single uplink.
Migrate VMs to the Distributed Port Groups
With the first uplink successfully migrated and connectivity verified, the next step is to move virtual machines from the VSS port groups to the corresponding Distributed Port Groups on the VDS.
Before migrating production workloads, it is highly recommended to start with one or more non-critical test virtual machines to validate network connectivity and confirm that the VLAN and port group configuration is correct.
For the initial test, I migrated a virtual machine from the existing VSS port group (VLAN 10) to the corresponding Distributed Port Group (VLAN 10) on the VDS.
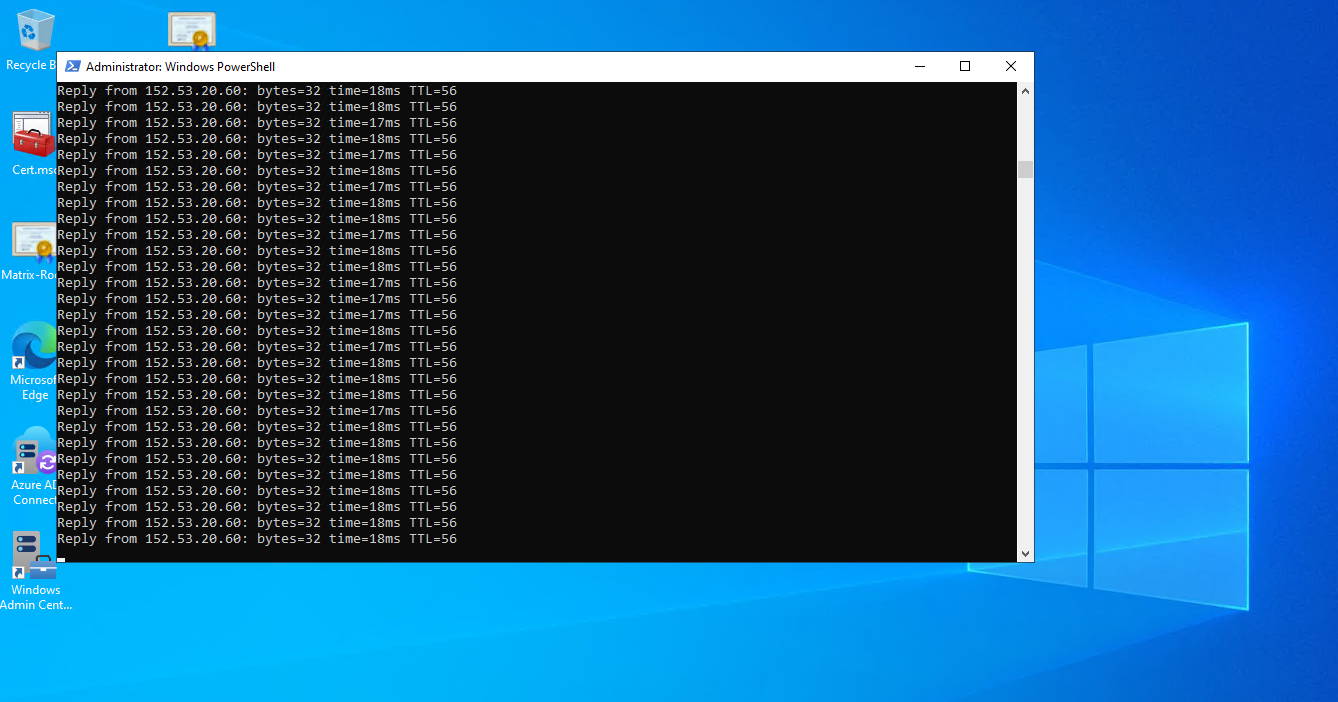
To monitor the impact of the change, I maintained a continuous ping throughout the migration and did not observe any packet loss, demonstrating that the network transition was completed seamlessly in this lab environment.
In my lab environment, the migration completed without any packet loss during a continuous ping test. This is not unusual, as the virtual machine retains its IP and MAC address, and the network adapter is simply reconnected from one port group to another within the same VLAN, often resulting in a transition that is too brief to be noticed by standard ping intervals.
With the migration process validated, the remaining virtual machines can now be transitioned to their corresponding Distributed Port Groups on the VDS.
After all workloads have been successfully moved, the final uplink can be migrated from the VSS to the VDS, completing the migration and re-establishing full network redundancy.
Migrate remaining Uplink(s)
After all virtual machines have been successfully migrated to the VDS and connectivity has been verified, the remaining physical uplink(s) can be moved from the VSS to the VDS. This final step completes the migration and restores full uplink redundancy on the distributed switch.
Right click on the VDS and select Add and Manage Hosts -> Manage host networking.
Select the ESXi Hosts.
In the Manage Physical Adapters step, vusb0 remains unassigned because it is dedicated to the VMkernel management network, which continues to use the existing VSS and its default Management Network port group.
vusb1 is already mapped to Uplink 1 on the VDS from the previous migration step, while vusb2 is still unassigned.
To complete the uplink migration and restore redundancy on the VDS, vusb2 can now be assigned to Uplink 2.
Skip the VMkernel adapters configuration page as previously.
Since all virtual machines are already connected to the appropriate Distributed Port Groups on the VDS, there is no need to perform any additional VM networking migration. The Migrate VM Networking step can therefore be skipped safely.
Finally click on Finish.
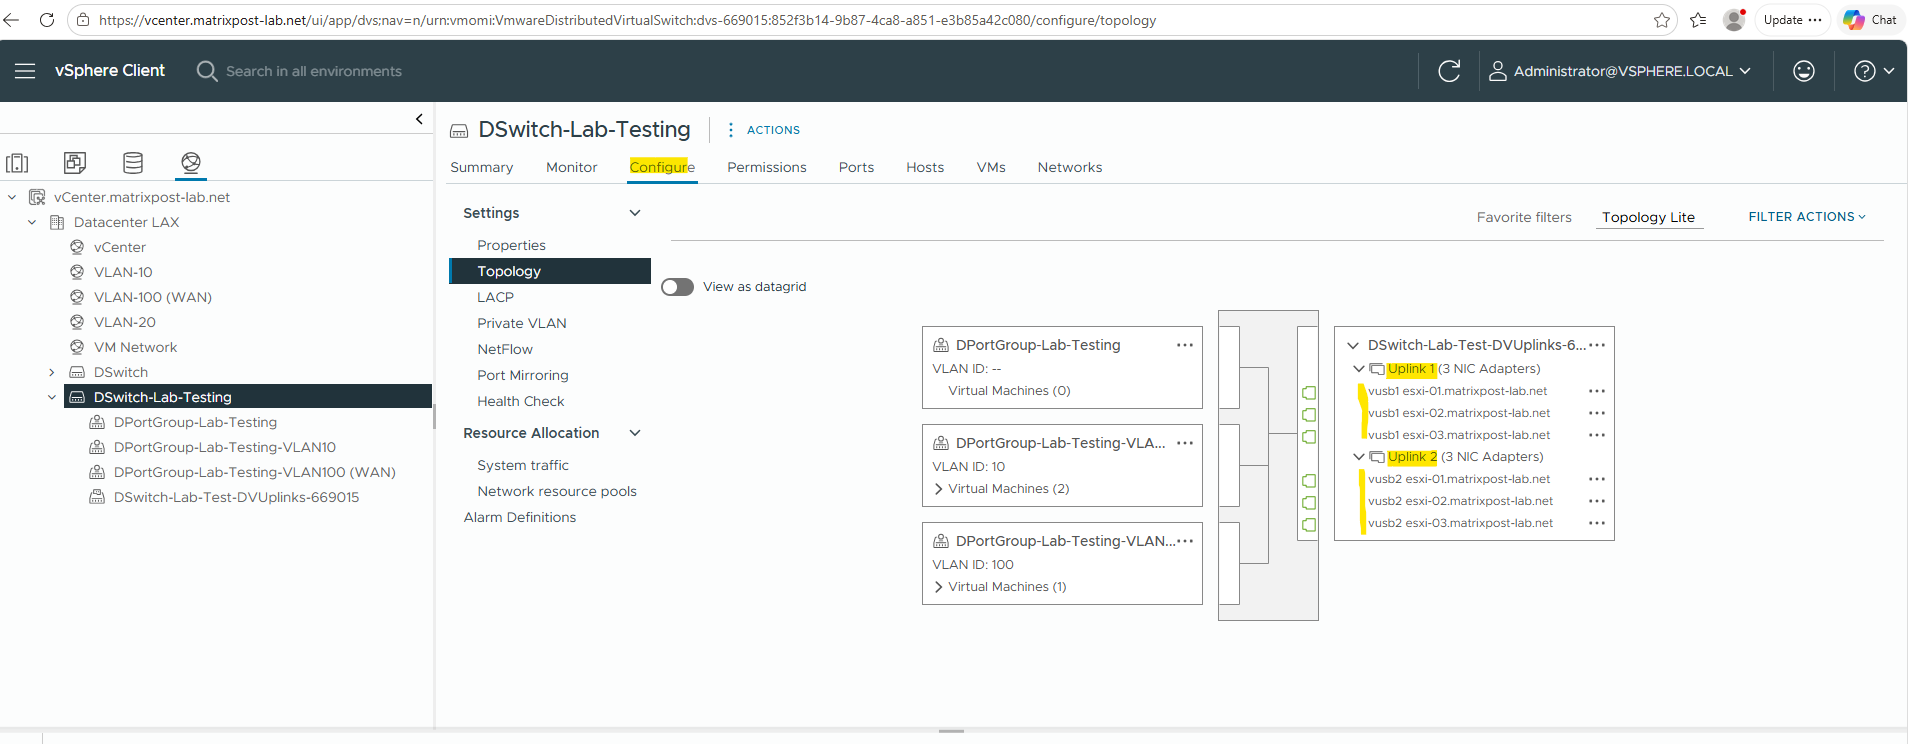
Below the topology view of the vSphere Distributed Switch after the migration has been completed. Both uplinks are now associated with the VDS and mapped to the physical network adapters vusb1 and vusb2, confirming that full uplink redundancy has been restored and all virtual machine traffic is handled by the distributed switch.
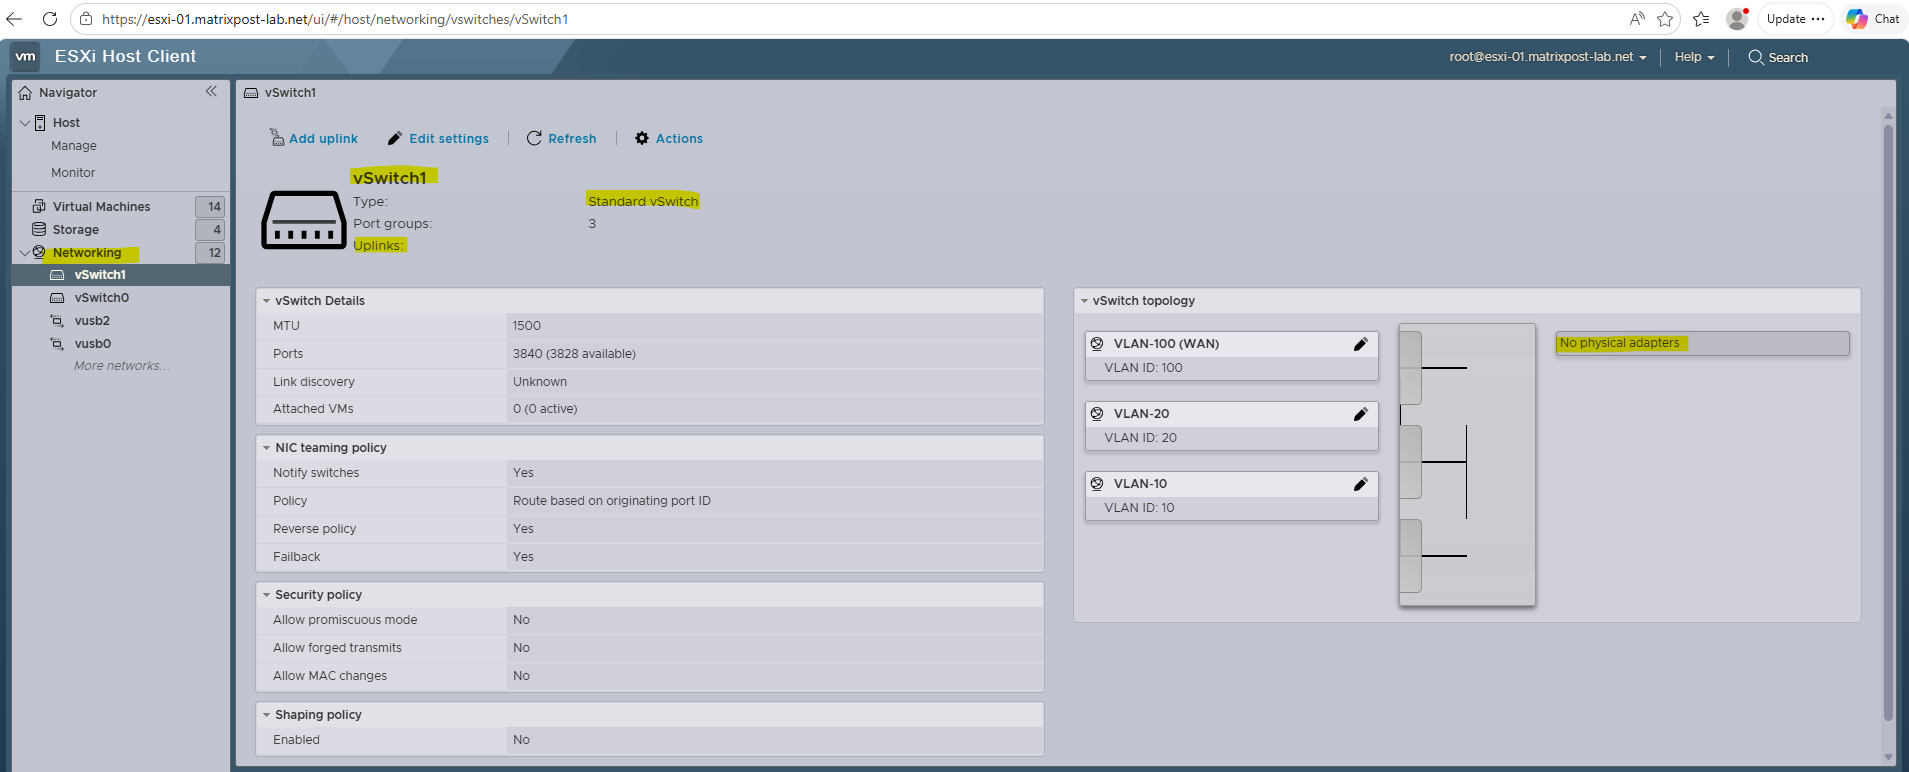
The ESXi Host Client now shows the VSS without any associated physical network adapters, confirming that both uplinks have been successfully migrated to the VDS.
At this point, the VSS is no longer forwarding virtual machine traffic and can be removed if it is no longer needed.
At this point, the migration from the vSphere Standard Switch (VSS) to the vSphere Distributed Switch (VDS) has been completed successfully. All virtual machines are now connected to their corresponding Distributed Port Groups, both physical uplinks are associated with the VDS, and network connectivity has been validated throughout the migration process.
After completing the migration, you may want to verify which physical uplink is actually being used to forward traffic for a specific virtual machine. For a detailed walkthrough, see my following post.
Rolling Back from VDS to VSS
Although the migration completed successfully in this lab environment, it is important to understand how to safely roll back to a vSphere Standard Switch (VSS) should unexpected issues arise. The rollback process essentially follows the migration steps in reverse order and can be performed with minimal disruption when planned carefully.
- Create a new VSS (or use the existing one if still present)
- Recreate the required Port Groups and VLAN IDs
- Migrate one uplink from the VDS back to the VSS
- Verify connectivity
- Move test VMs from the VDS Port Groups back to the VSS Port Groups
- Validate connectivity
- Migrate the remaining VMs
- Migrate the remaining uplinks
- Remove the VDS if no longer required
About Migrate one uplink from the VDS back to the VSS we first need to remove the uplink from the VDS to be available to later select for the VSS.
Select the ESXi hosts.
The rollback begins by removing the first uplink from the VDS and setting its assignment to None on all ESXi hosts. With the second uplink still connected and carrying the production traffic, the environment remains fully operational while the network infrastructure is gradually transitioned back to the VSS.
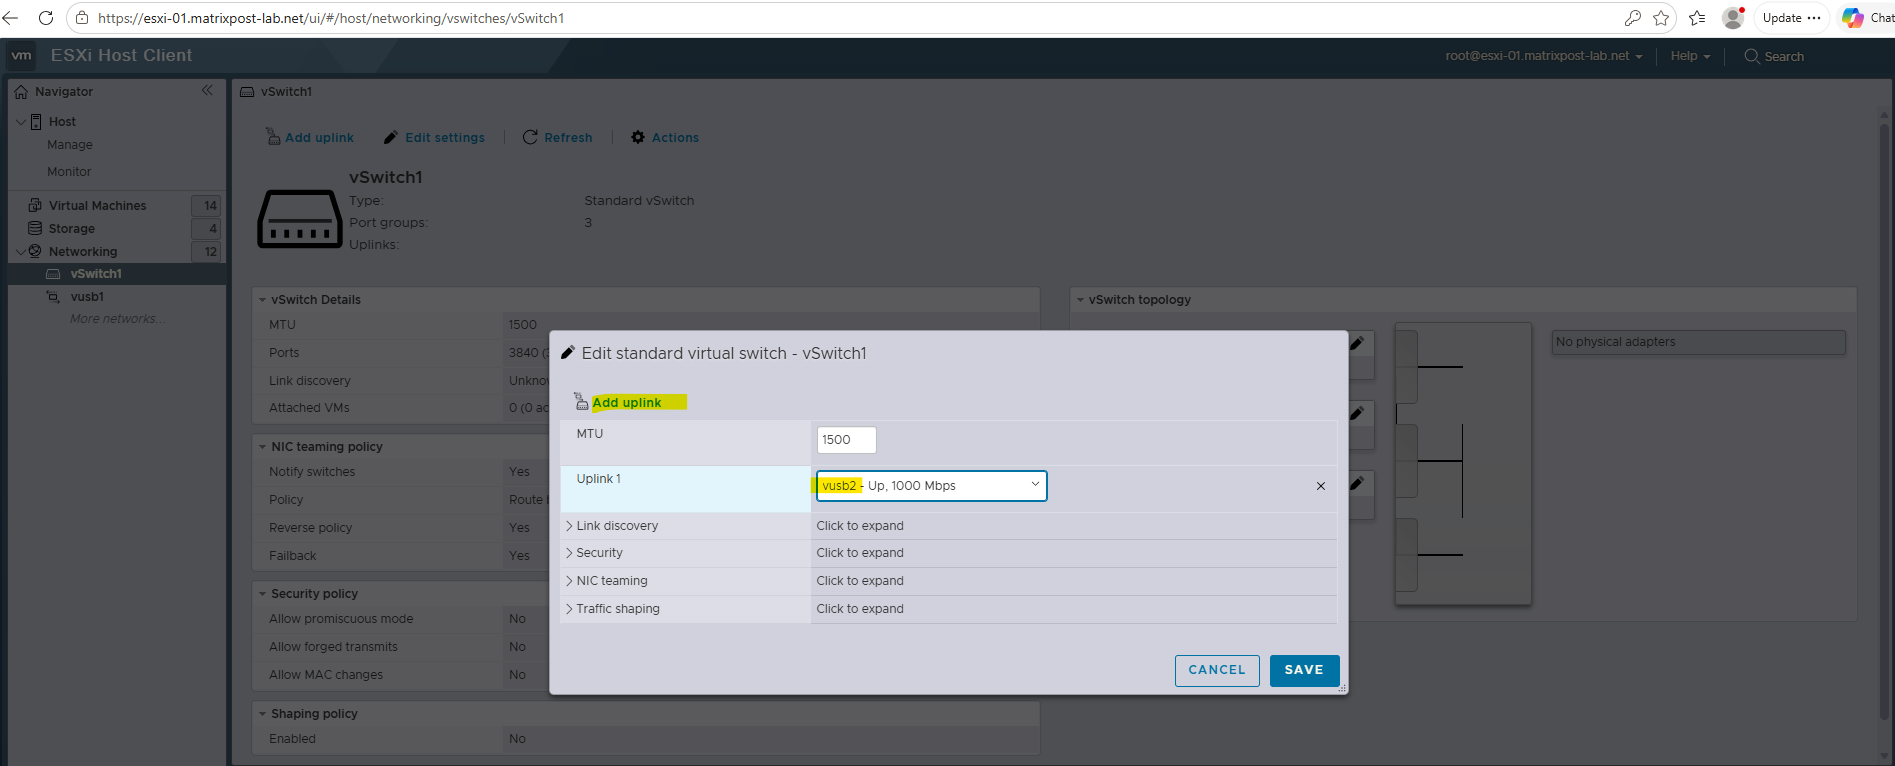
After removing vusb2 from the VDS by setting its uplink assignment to None in vSphere, the adapter becomes available for reassignment on the ESXi host. It can then be added back to the vSphere Standard Switch (VSS) using the ESXi Host Client, re-establishing physical connectivity for the rollback process.
Select vusb2 to add as uplink for the VSS.
Do this for all ESXi hosts and next we can move VMs from the VDS Port Groups back to the VSS Port Groups.
Finally migrate the remaining uplinks back to VSS.
Links
How do I Set Up Networking with vSphere Standard Switches
https://techdocs.broadcom.com/us/en/vmware-cis/vsphere/vsphere/8-0/vsphere-networking/setting-up-networking-with-vnetwork-standard-switches.htmlHow do I Set Up Networking with vSphere Distributed Switches
https://techdocs.broadcom.com/us/en/vmware-cis/vsphere/vsphere/8-0/vsphere-networking/basic-networking-with-vnetwork-distributed-switches.htmlOverview of vNetwork Distributed Switch concepts
https://knowledge.broadcom.com/external/article/324515/overview-of-vnetwork-distributed-switch.htmlVMware Distributed Switch Configuration Best Practices
https://www.nakivo.com/blog/vmware-distributed-switch-configuration/