Blazor Server – Basics Part 10 – MS SQL Server Access and Data Binding
In this post we will see how to bind data to Razor components and Document Object Model (DOM) elements in Blazor apps.
Further I will show how to use a MS SQL Server database to store and request data for the web app.
In the following article from Microsoft you will see the basics how to bind data in Blazor Server.
ASP.NET Core Blazor data binding
https://learn.microsoft.com/en-us/aspnet/core/blazor/components/data-binding?view=aspnetcore-7.0
Further you can also read the following articles to better understand the data binding methods available in Blazor Server.
Data Binding in Blazor
https://www.learnblazor.com/data-bindingOne-way binding
https://blazor-university.com/components/one-way-binding/Two-way binding
https://blazor-university.com/components/two-way-binding/
Ony-way Data Binding
In a nuthshell ony-way data binding means that updates to a value will only occur in one direction.
Below for example when you update the private string field named Message, the update will be rendered within the <p> element.
Message is here a one way bound value.
To bind values in one way we will use the basic razor syntax with prefixing the value item with the @ character.
So updates to the private field will trigger a re-render and updates the state of the razor component or page.

Below I will do the same for the <input> element to bind the private string field to and display the message.

If we now would change the message directly in the <input> element and this change would also update our private string field with the new value, this would be a two-way data binding.
In order to implement this we need to trigger an event handler by using the @bind Razor directive attribute for the <input> element which then will also update our private string field.
So because this will allow to update the value from two directions, it is called two-way data binding and shown below.
The @bind attribute will implement binding between a component’s property and a data field.
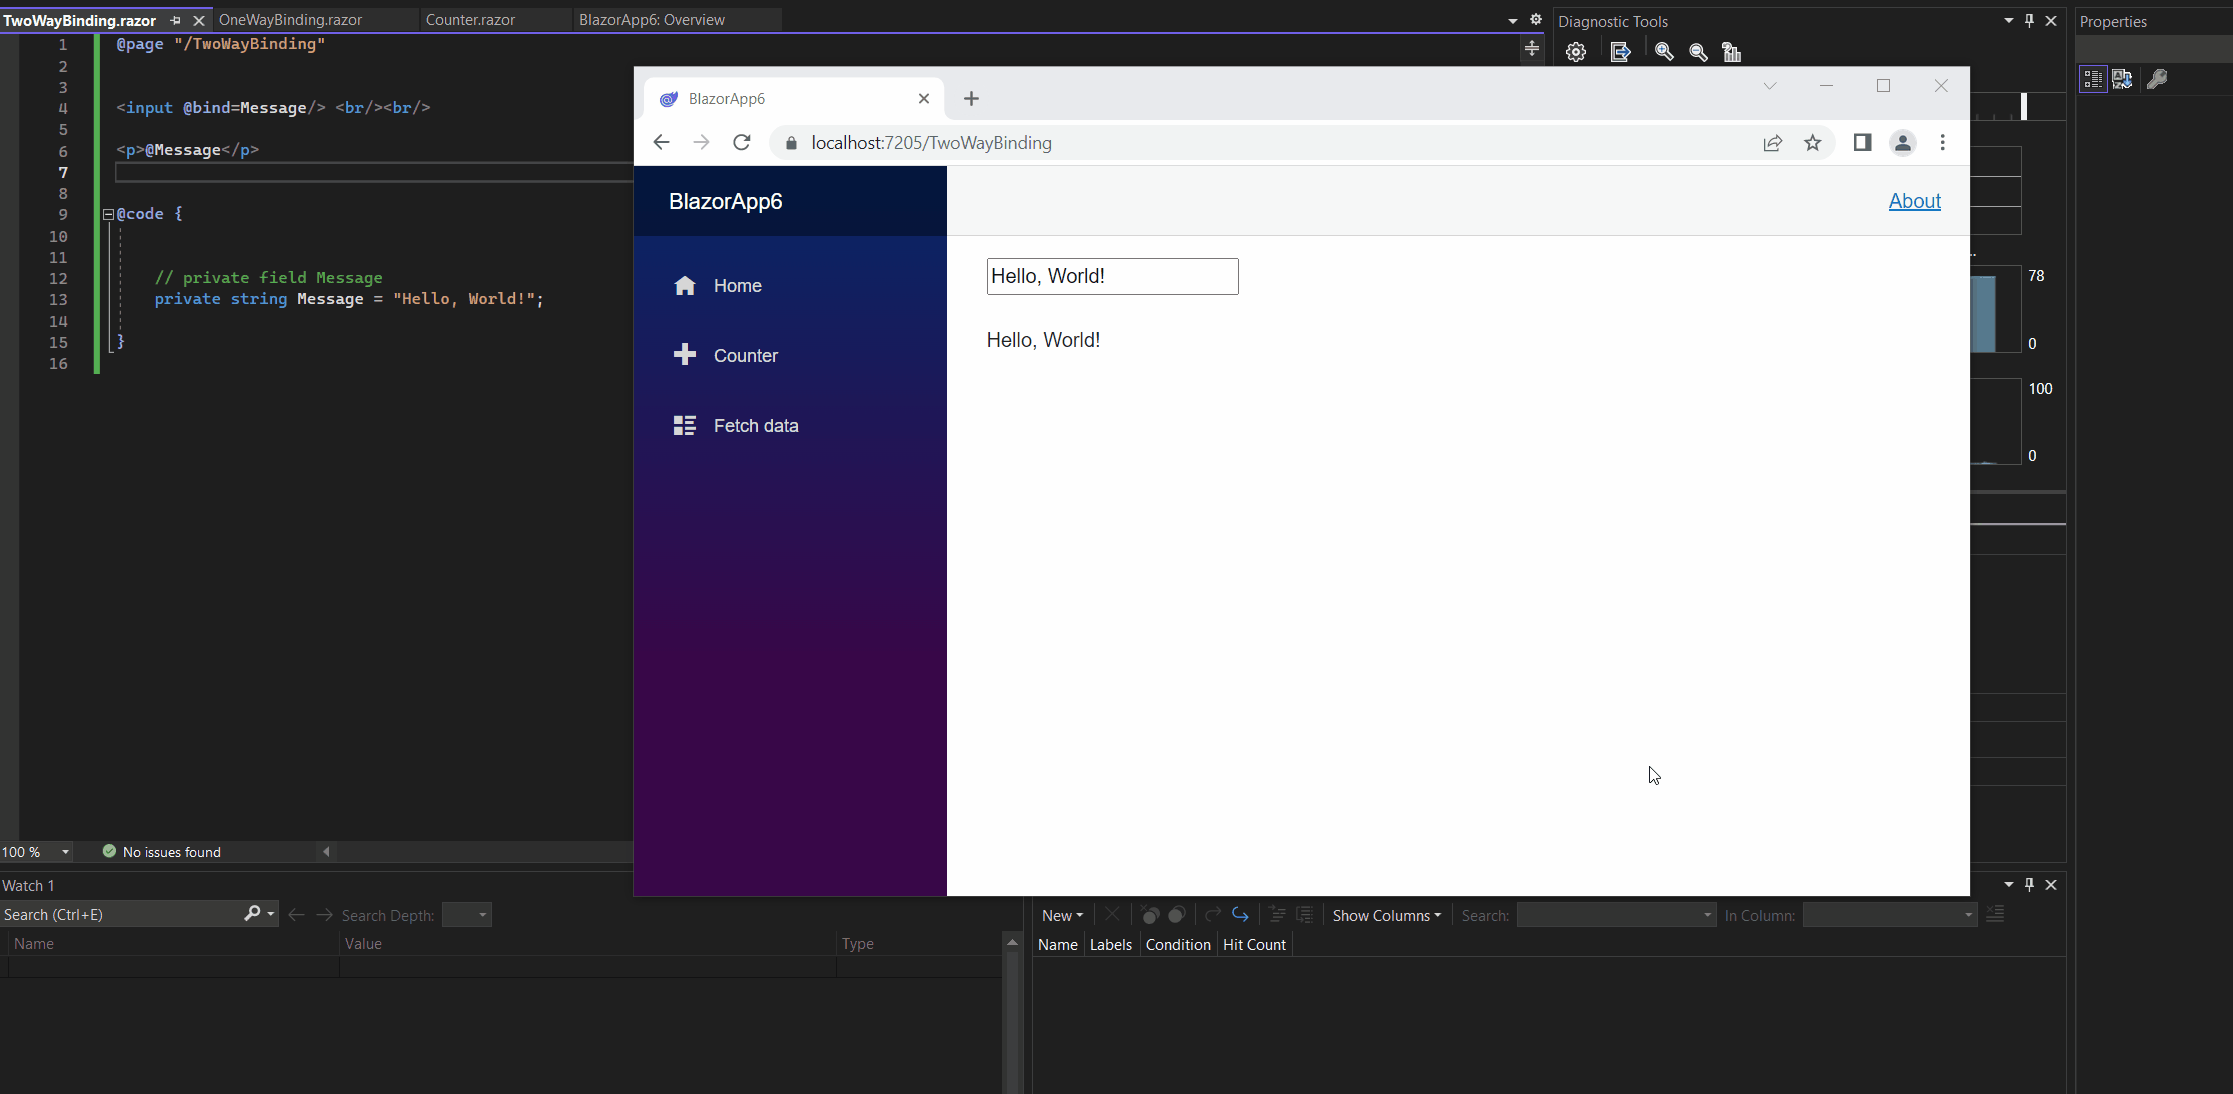
Two-way Data Binding
Here you can see that I will use the @bind Razor directive attribute for the <input> element which will set up in the background an event handler for the onchange event of the <input> element and will update the private string field if it has been changed in the <input> element.
So by just using the @bind attribute without any further event attribute which is the default case like shown below:
<input @bind=Message />
behind the scenes it is the same as the following code line:
<input @bind=Message @onchange=@(e => Message = e.Value.ToString()) />
When the page is first rendered the <input> element will be populated by the private string field.
So updates to the value can be triggered from two directions, from the private string field to the <input> element and from the <input> element to the private string field.
The onchange event (change) fires when the element loses focus.
By default the @bind Razor directive attribute will use the ‘onchange’ event handler in the background.
So when you will using two-way data binding, it is not possible to add your own custom onchange event handler.
When you nevertheless try to add one you will get the following error message in Visual Studio.
The attribute ‘onchange’ is used two or more times for this element. Attributes must be unique (case-insensitive). The attribute ‘onchange’ is used by the ‘@bind’ directive attribute.

You can also use other events for an element and not just the onchange event. So in this case you can use even with the @bind Razor directive attribute your own custom event handler like shown below for the oninput event.
Unlike the onchange event (change), which fires when the element loses focus, oninput (input) fires when the value of the text box changes.
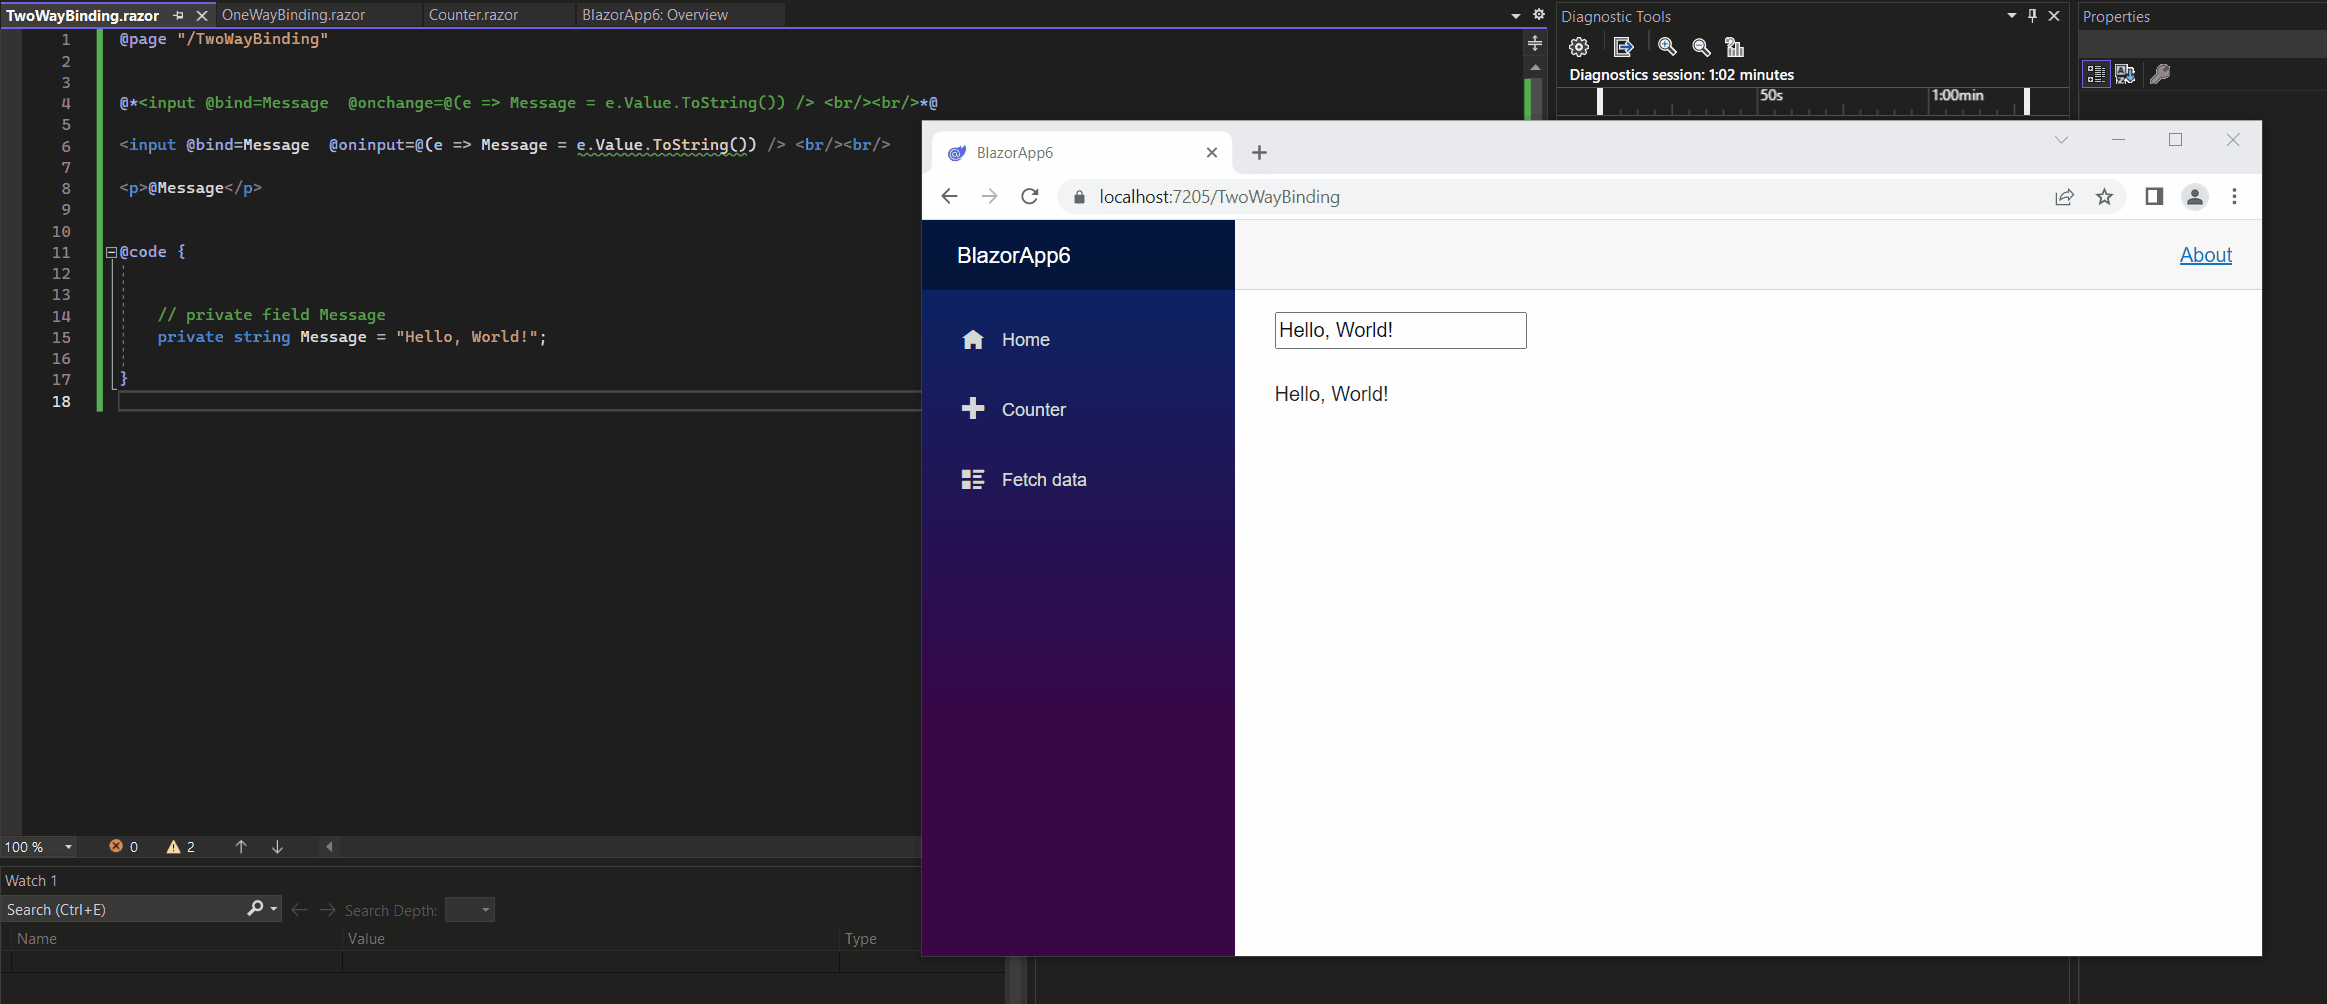
Even it is a custom event handler above, the handler will just update the value on each change, therefore you can also use the built-in @bind:event=”{EVENT}” attribute like shown below.
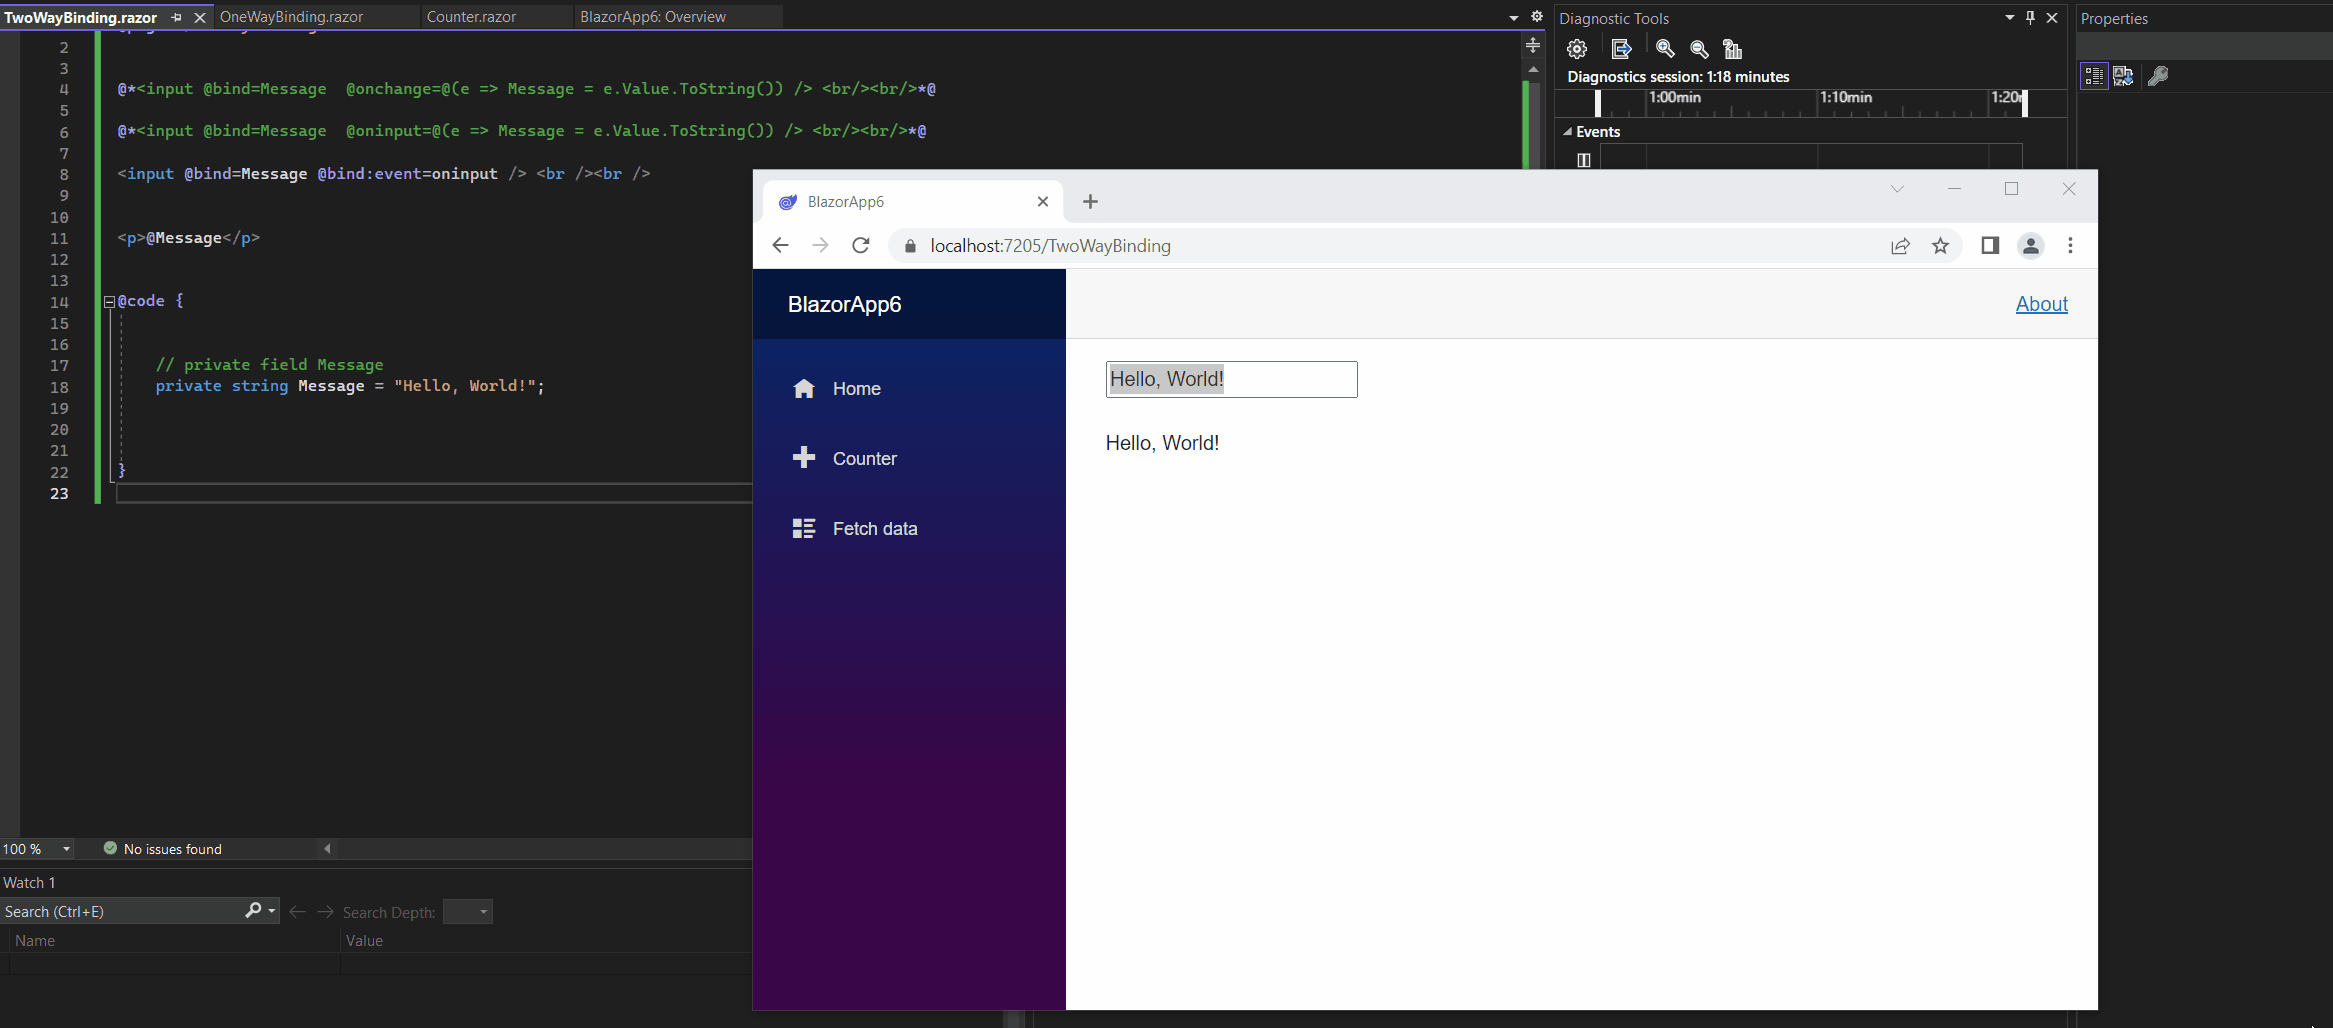
<input @bind=Message @bind:event=oninput />
More in the following article https://learn.microsoft.com/en-us/aspnet/core/blazor/components/data-binding?view=aspnetcore-7.0
You can also create a real custom event handler like shown below. I will use here a lambda expression in order to pass additional attributes to the method (event handler here).
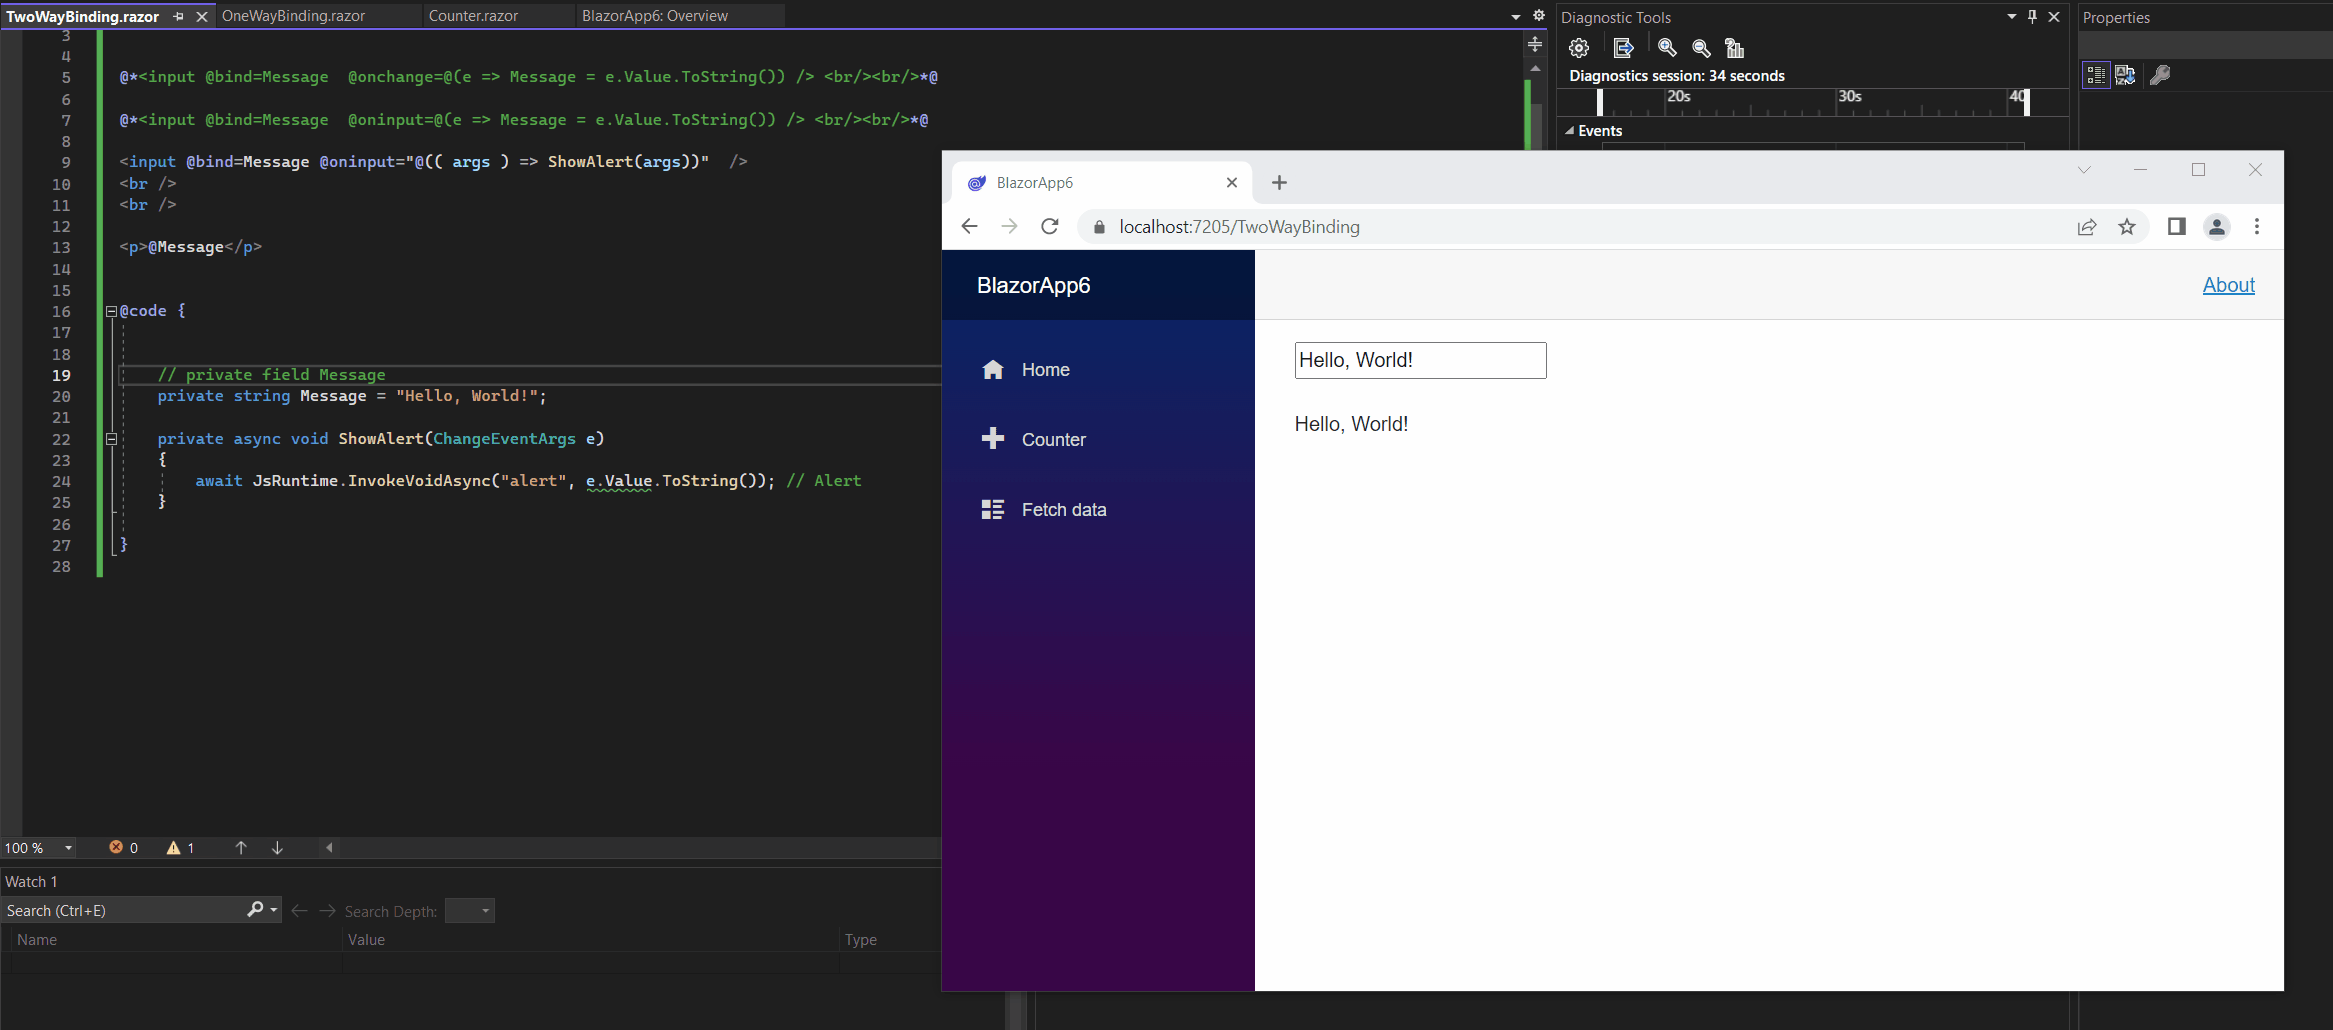
Normally you would specify the following event handler without using lambda expressions. This is the standard way of calling an event handler, but here you can’t pass additional arguments.
<input @bind=Message @oninput=ShowAlert />
There is one more way you can use to execute asynchronous code after binding but with .NET 7.0 there are some issues so far.
You can use @bind:after=”{EVENT}” with a DOM event for the {EVENT} placeholder.
More about in the following Microsoft article https://learn.microsoft.com/en-us/aspnet/core/blazor/components/data-binding?view=aspnetcore-7.0.
When using .NET 7.0 you will get the following error when using them.
Can’t convert from EventCallback<T> to Func<T,Task>
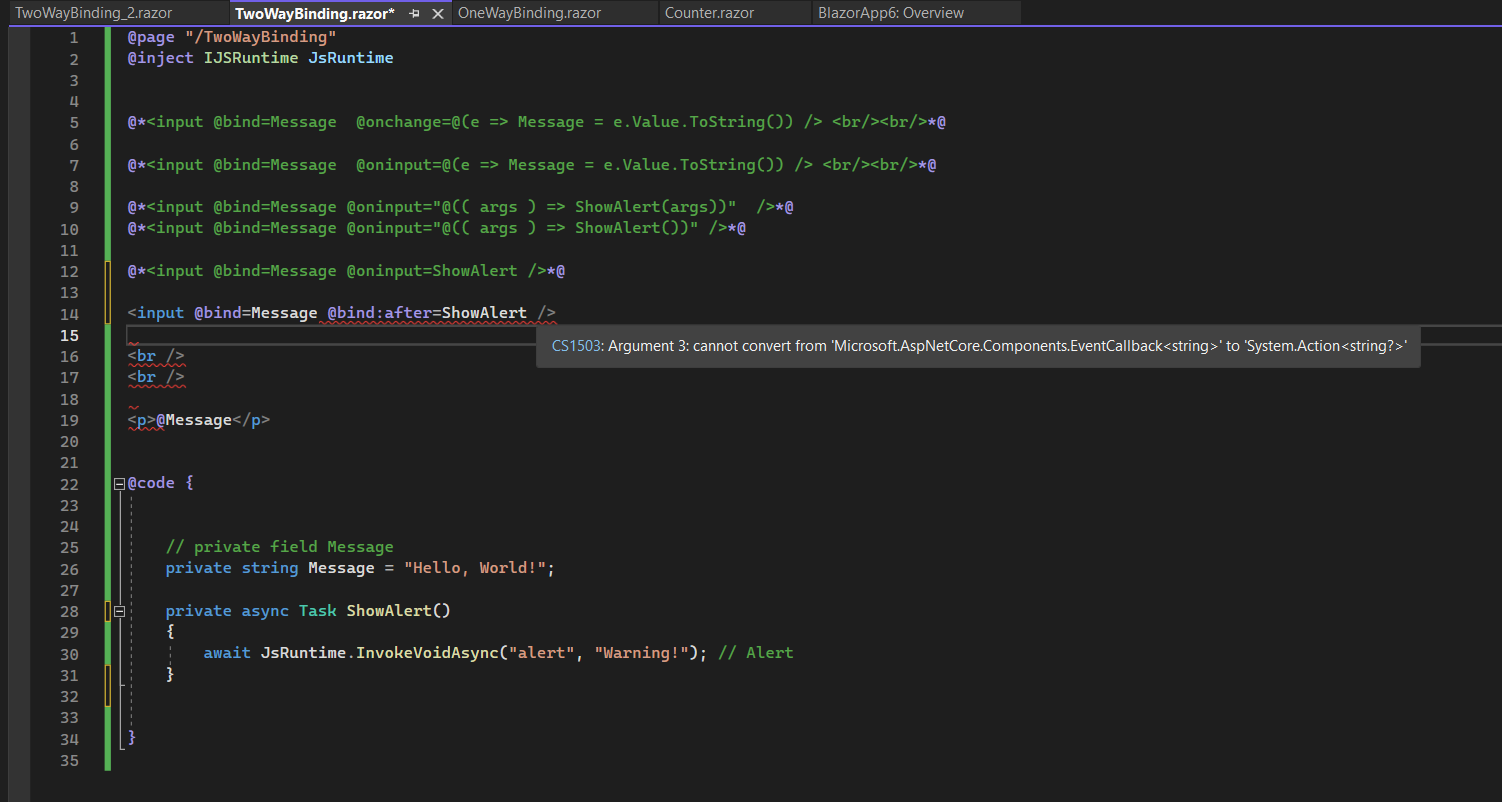
This issue in .NET 7.0 is known and should be solved in the 7.0.1 release.
[7.0] bind get, set, after can’t be used in 7.0 Blazor applications
https://github.com/dotnet/core/blob/main/release-notes/7.0/known-issues.md#70-bind-get-set-after-cant-be-used-in-70-blazor-applications
Using Data Binding in my Time Tracking and Vacation Planning Web App
In Part 9 I was showing how to create easily responsive tags and chips on the project page from my time tracking and vacation planning web app.
In this part I want to show how I am binding the requested data from the MS SQL Server database on this project page and its DOM elements.
For all data binddings in my web app, I will use here the one-way data binding in order to use my own event handler to change the values.
I will go through the separate steps to see what happened here after I will select a project on this page.
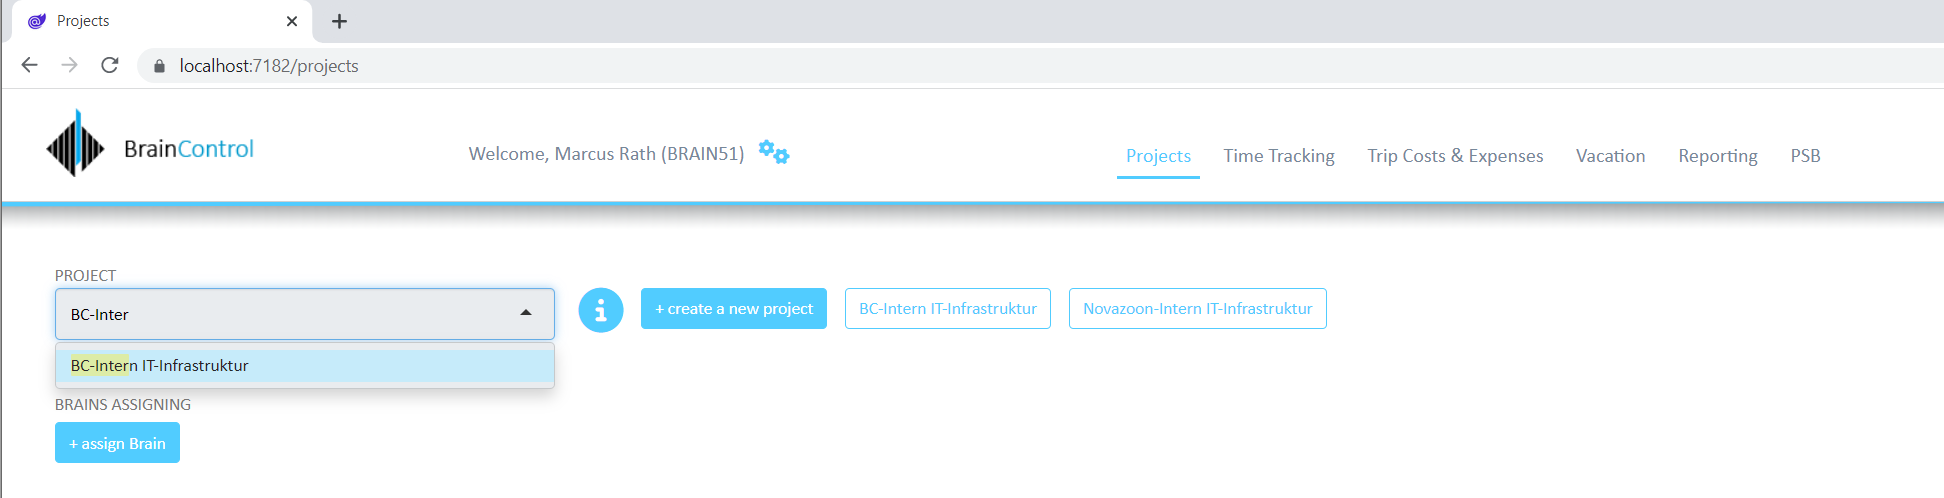
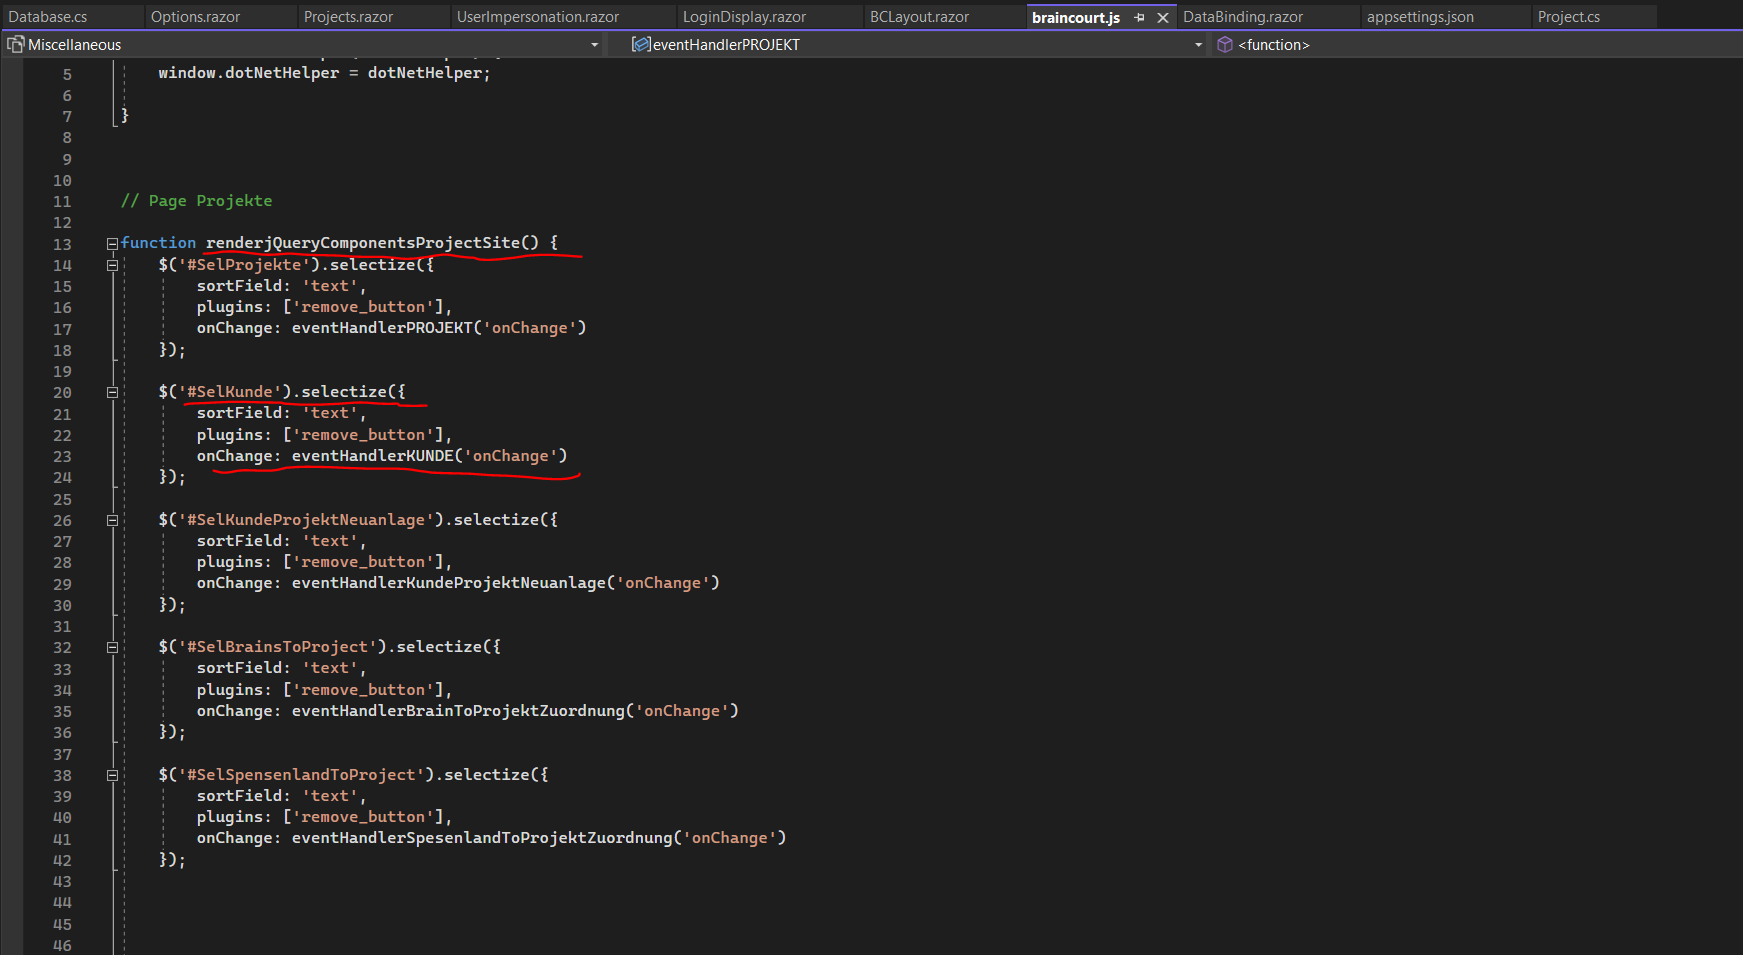
So first I will search for the following BC-intern IT-Infrastruktur project below. As mentioned in Part 8, I will use therefore a hybrid of a textbox and <select> box which is jQuery based.
Selectize
https://selectize.dev/
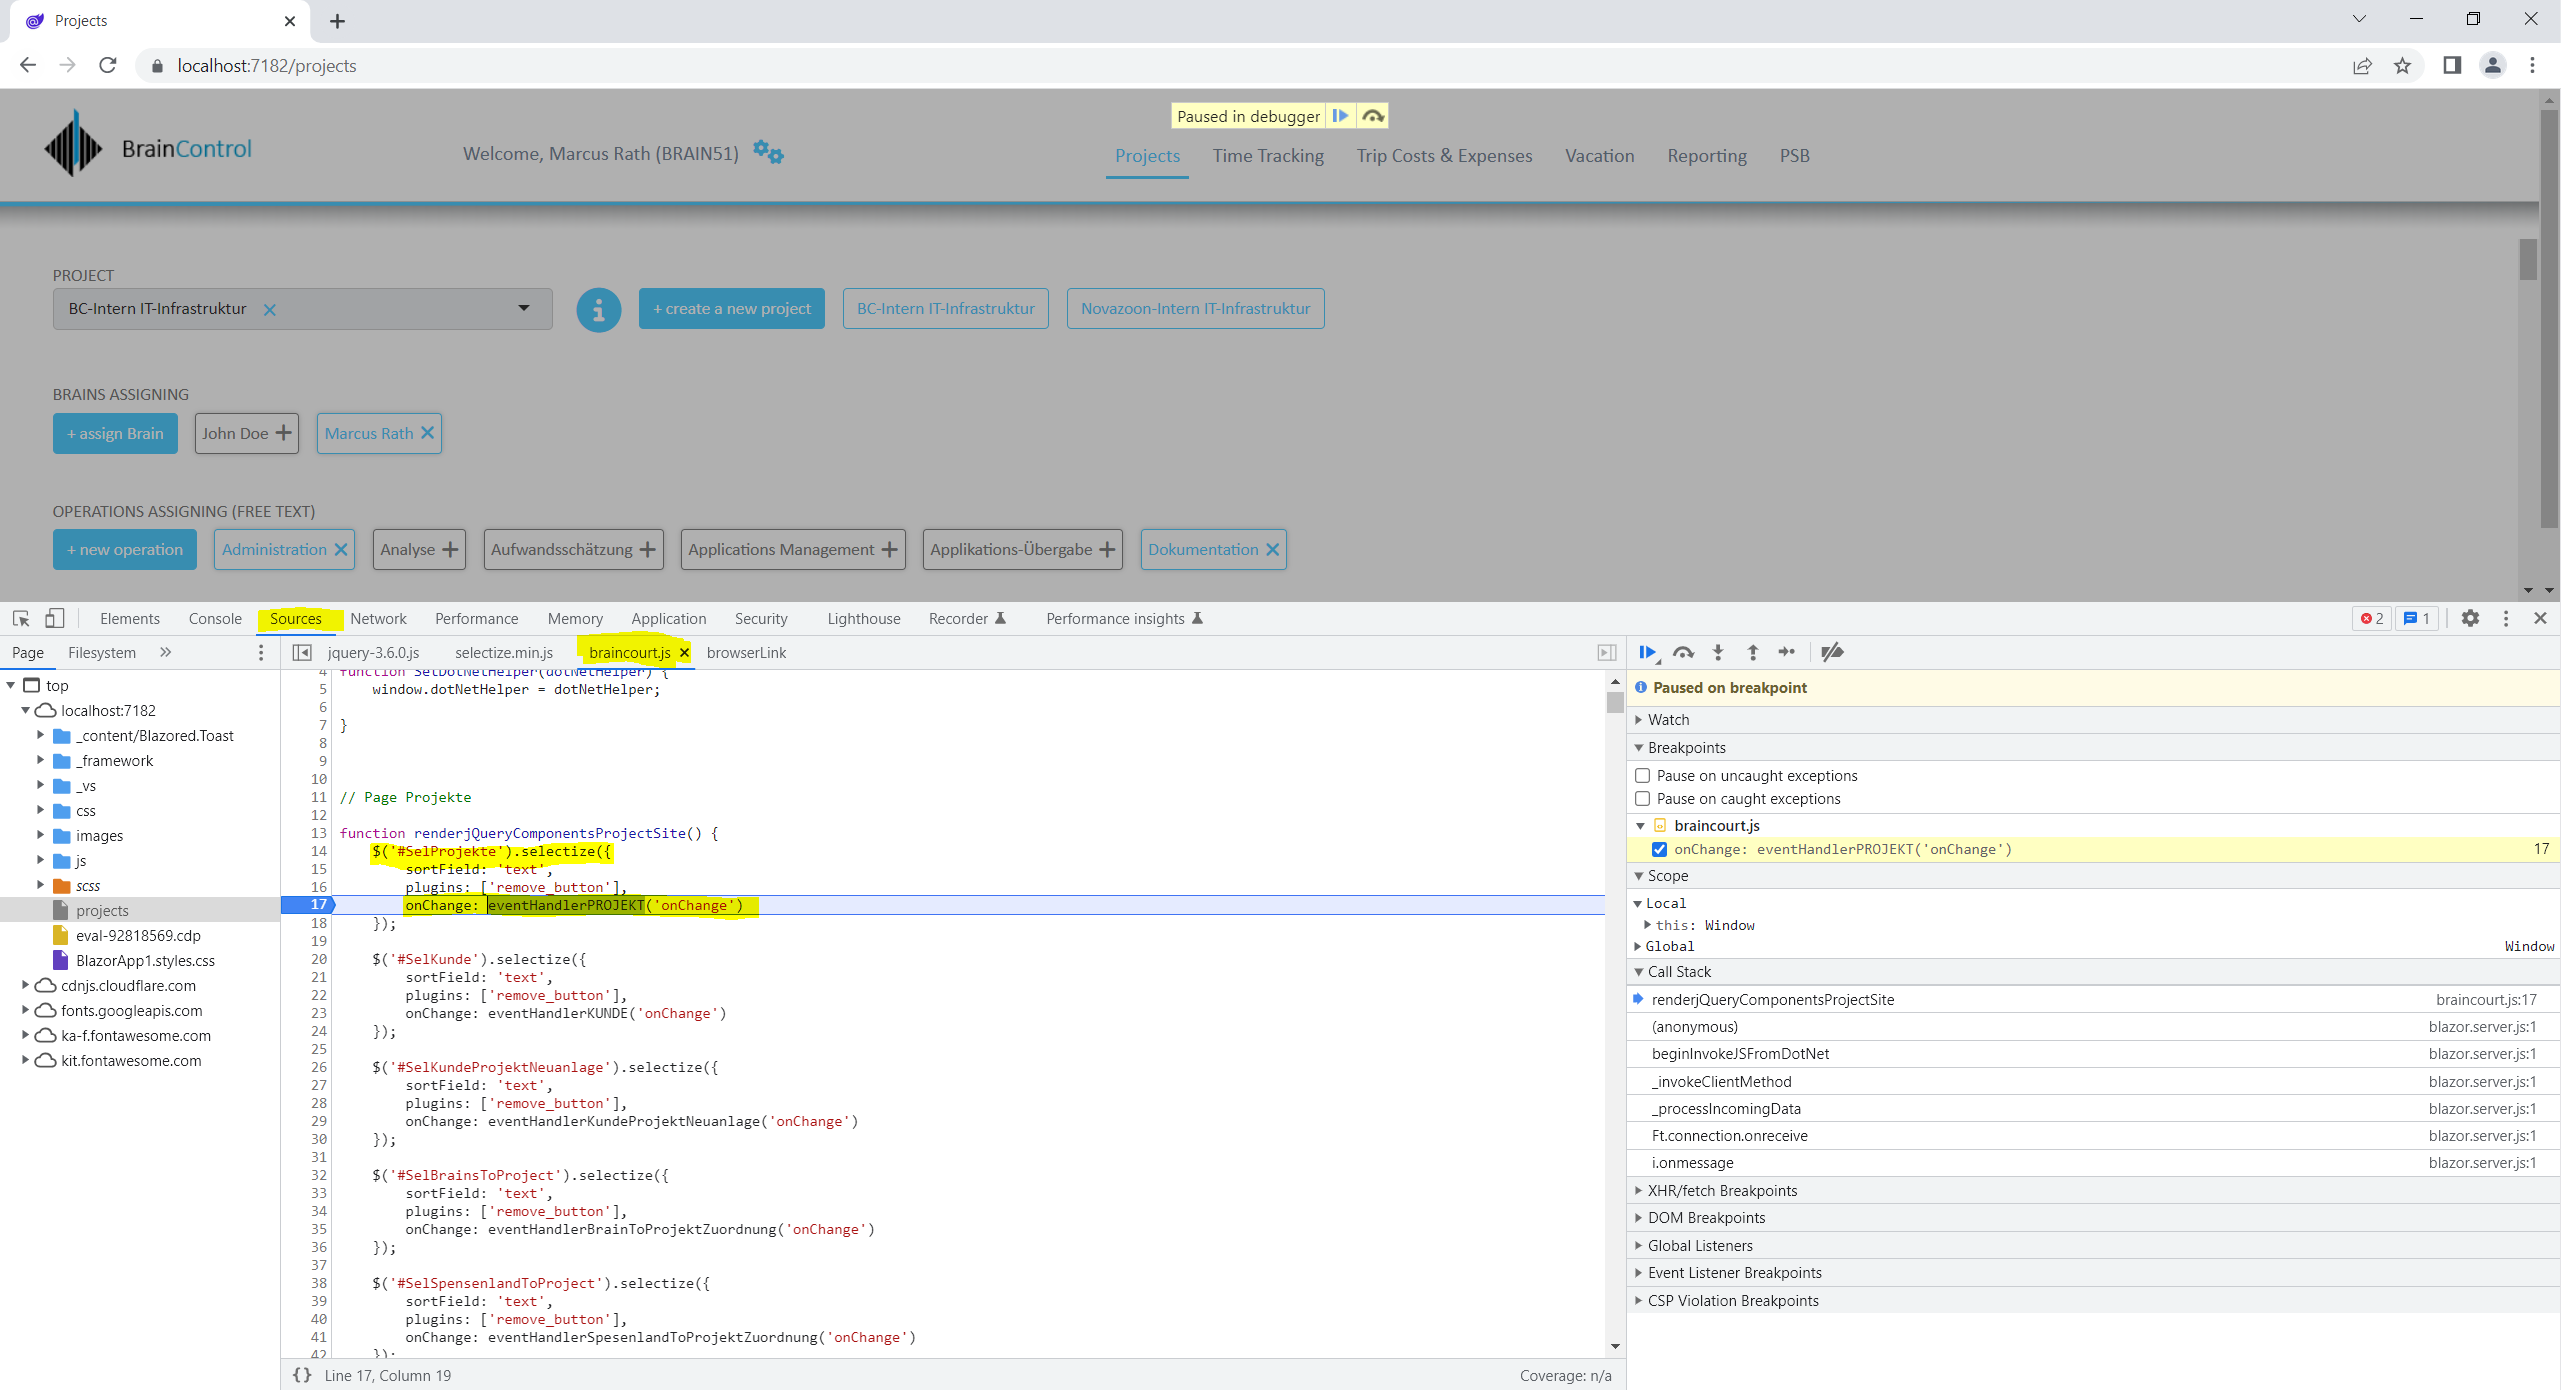
Because I am using for the project selection a hybrid of a textbox and <select> box which is jQuery based, I will first need to debug my custom Java Script file braincourt.js in order to show what here exactly happened.
In order to debug my custom Java Script file I will use the Chrome DevTools by pressing F12 in the browser window. You can also use Visual Studio as usual to debug the Java Script file as shown below.
Chrome DevTools
https://developer.chrome.com/docs/devtools/?utm_source=devtools
Here you can see, that if I will change a project in the select box (selectize), the onChange event from selectize will call the following event handler.
eventHandlerPROJEKT(‘onChange’)
About how to initialize the html select element from the razor page Projects.razor, I was showing also already in Part 8 about JS interop.
Here you can see the code in the razor page where I will define a normal html <select> element and assigning the “id=SelProjekte” to it.
I will bind the data to the <select> <option> elements using the basic razor syntax with prefixing the data item with the @ character, this is called one way binding as mentioned to the beginning. The character is used to render values which you can change dynamically and not intended to be edit as it would be the case with a two way binding.
<select id="SelProjekte" class="BC select" type="text" style="width:400px">

         @foreach(DataRow row in dtProjekte.Rows)
            {
                   string anzeige = @row["TXT"].ToString();
                   string option_value = @row["ID"].ToString();

                   if (option_value != clickedID)
                   {
                         <option value=@option_value>@anzeige</option>
                   }
                   else
                   {
                         <option value=@option_value selected>@anzeige</option>
                   }

            }
</select>
When now the razor page Projects.razor is rendered and send to the users browser, after rendering the following method will be executed as shown in the screenshot below.
protected override async void OnAfterRender(bool firstRender)
Within this method we call the following Java Script function.
await JS.InvokeVoidAsync(“renderjQueryComponentsProjectSite”);
The function will initialize our <select> element by using the assigned ID (SelProjekte). In jQuery you can use the #<myID> selector to get access to html elements.
Now the <select> element gets initialized and therefore manipulated to finally get our hybrid of a textbox and <select> box (named Selectize).
The renderjQueryComponentsProjectSite function (shown in the screenshot above when debugging) will also add the onChange event to our <select> element.
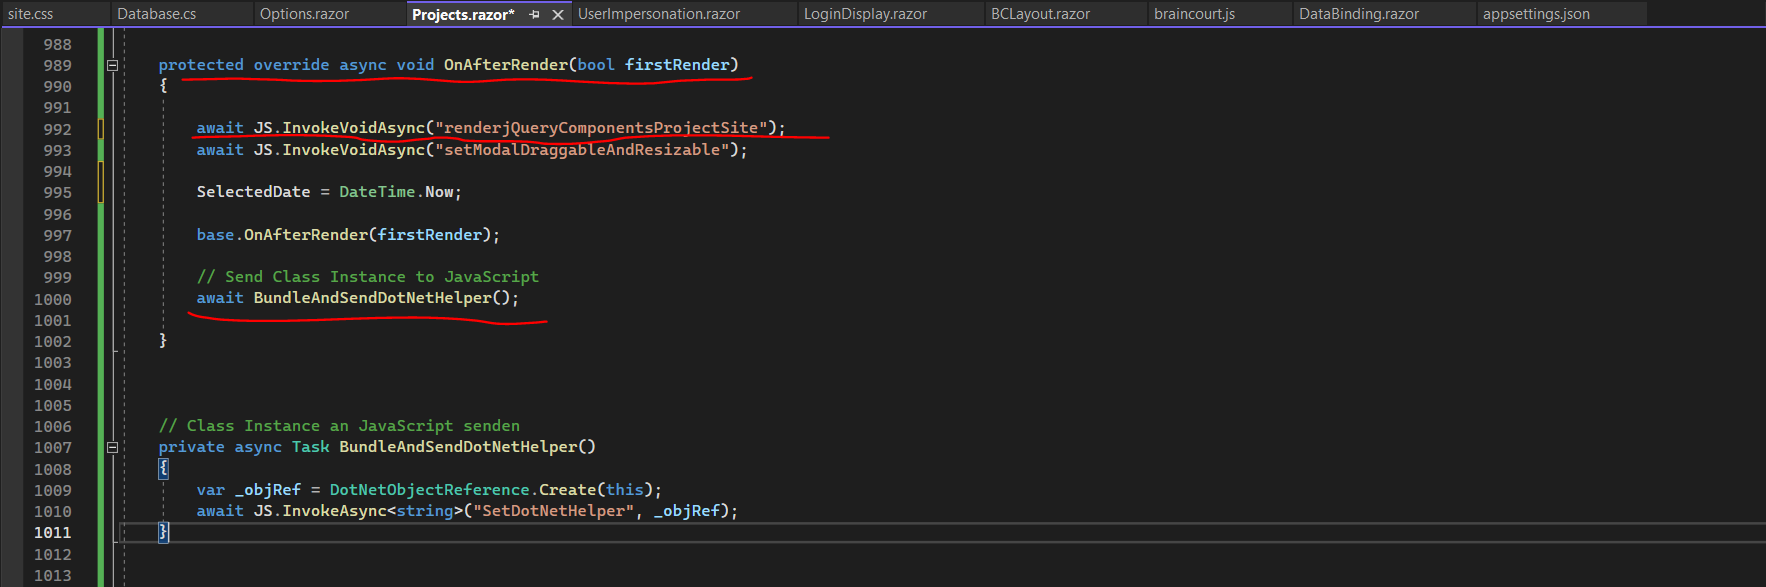
In order to call later .Net methods directly from Java Script, we first need to send an instance of the razor page (class) to Java Script. This is done by calling above also the BundleAndSendDotNetHelper(); method which will call the Java Script function SetDotNetHelper from my custom braincourt.js file.
Finally this stores the class instance we’ve passed from C# in a global variable for using it later in some other Java Script functions to access and manipulate the .NET classes.
Pass a DotNetObjectReference to a class with multiple JavaScript functions
https://learn.microsoft.com/en-us/aspnet/core/blazor/javascript-interoperability/call-dotnet-from-javascript?view=aspnetcore-7.0#pass-a-dotnetobjectreference-to-a-class-with-multiple-javascript-functions


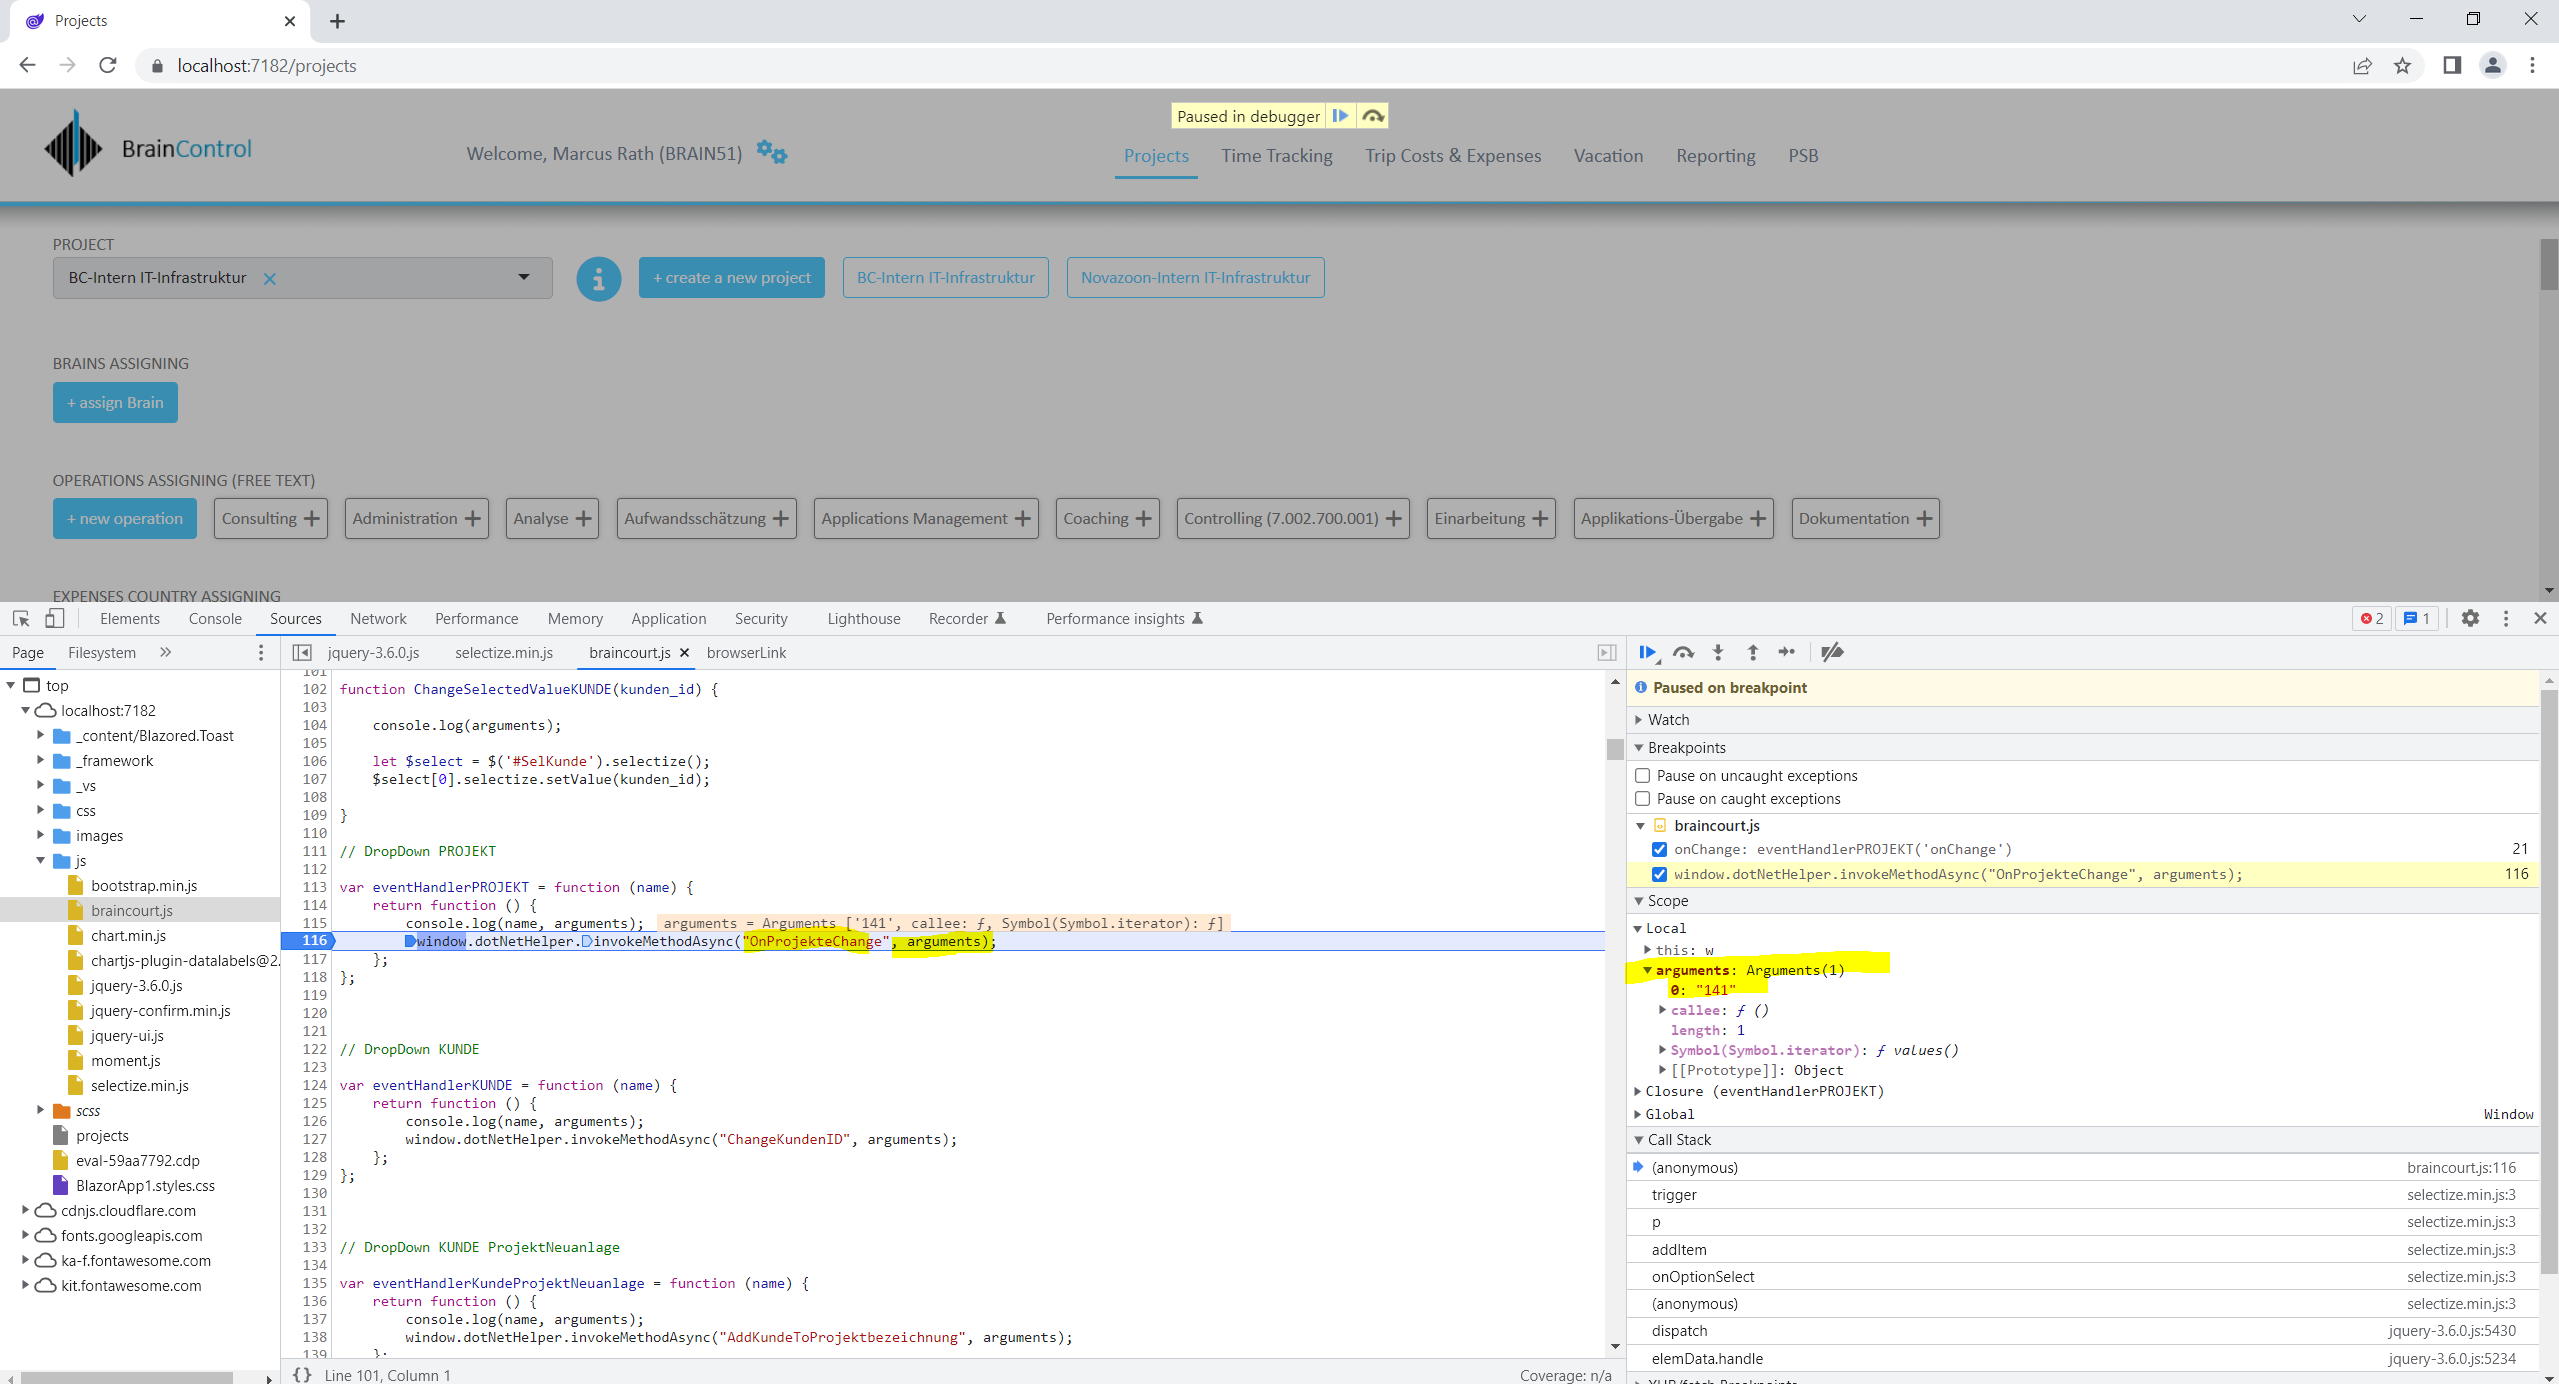
But now back to our onChange event. If a project is selected it will call the event handler named eventHandlerPROJEKT as shown below.

The event handler will get the selected project ID as argument and is then calling the .NET C# method named OnProjekteChange() from the Projects.razor page and passing also the project ID as argument to it.
We can see this below during debugging.
141 is the project id from my BC-Intern IT-Infrastruktur project.
As mentioned you can also use Visual Studio to debug your Java Script files.

Below you can see the .NET C# method from the Projects.razor page we called directly from Java Script and the onChange event from the <select> box.
The .NET method which is called from Java Script must be public, static, and have the [JSInvokable] attribute. You can also use a Task which I will use here instead of a method.
DotNet.invokeMethodAsync (Recommended): Asynchronous for both Blazor Server and Blazor WebAssembly apps.
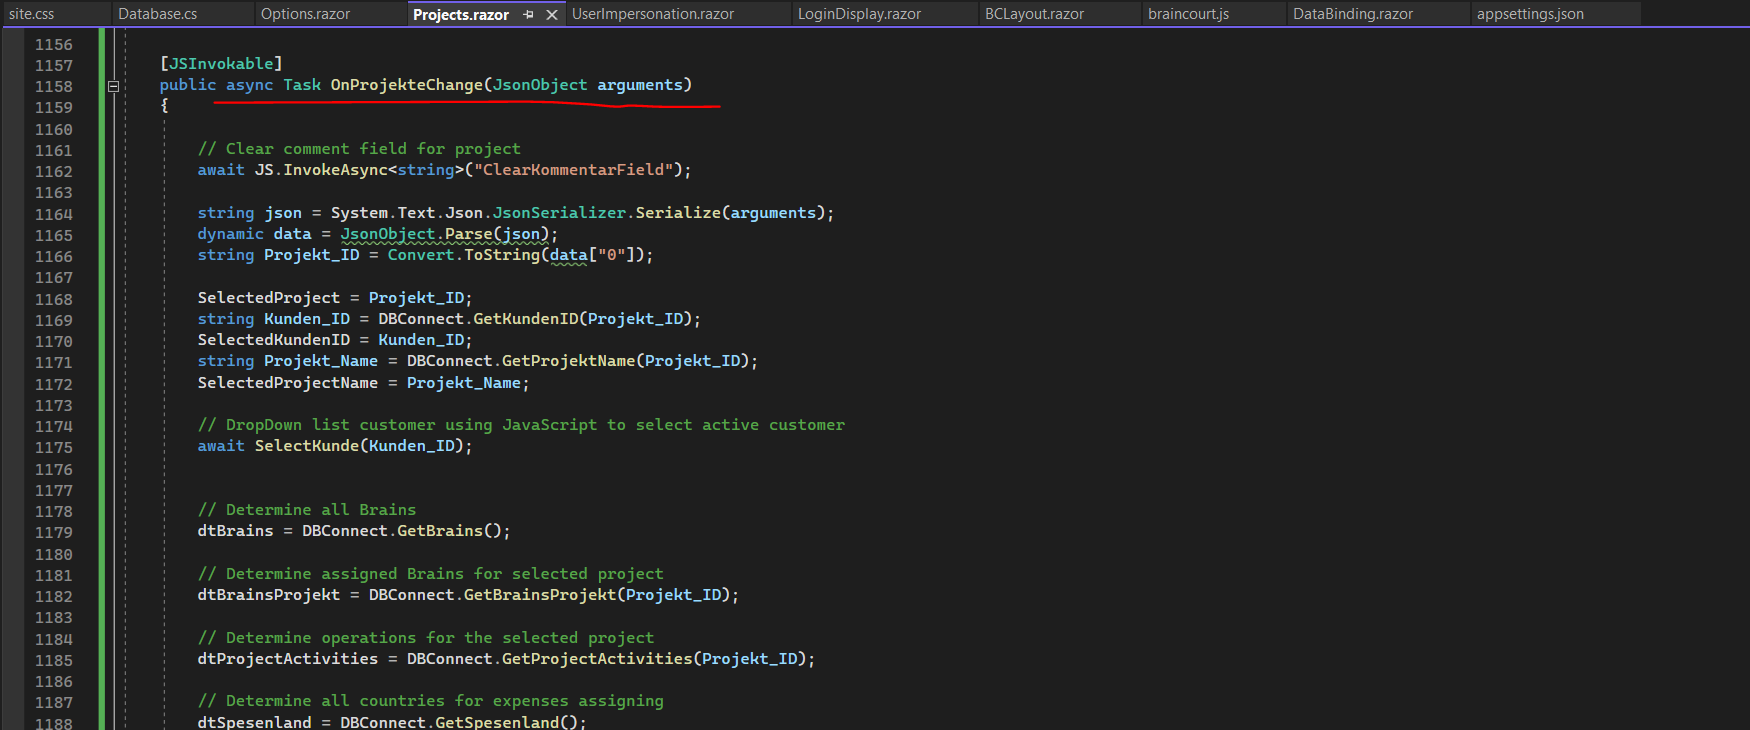
In the above C# method OnProjekteChange() I will initialize all data about the selected project. First I will extract the project ID which is passed as JSON object from Java Script. Therefore I will use the Newtonsoft.Json package which I explained in detail in Part 8.
Btw. sorry that I mixed here in my code constantly german and english for fields, properties and methods, when I was writing this web app, it was not my intention to write a post about afterwards.
Next I will assign the extracted project ID to a property named SelectedProject and then calling two methods shown below to request the corresponding project name and assigned customer.
The SelectedProject property I will use to determine the selected project from all other code blocks within the Projects.razor page.
string? SelectedProject { get; set; } = "";

SelectedProject = Projekt_ID;
string Kunden_ID = DBConnect.GetKundenID(Projekt_ID);
SelectedKundenID = Kunden_ID;
string Projekt_Name = DBConnect.GetProjektName(Projekt_ID);
SelectedProjectName = Projekt_Name;
I will not go through all code lines within the OnProjekteChange() method and therefore pick two examples to show how to access the MS SQL Server database and request data from.
First I will show how I will request the assigned customer for the selected project. Therefore I will call the following method within the OnProjekteChange() method.
string Kunden_ID = DBConnect.GetKundenID(Projekt_ID);
DBConnect is my injected Database.cs class in the Projects.razor page. This custom class will include all code to access the MS SQL Server database and request and store data.
@inject Database DBConnect
Whenever an instance of my Database.cs class is created, the following constructor is called to initialize the SQLConnectionStringBuilder with all parameters needed to access the database.
Constructors (C# programming guide)
https://learn.microsoft.com/en-us/dotnet/csharp/programming-guide/classes-and-structs/constructorsSqlConnectionStringBuilder Class
https://learn.microsoft.com/en-us/dotnet/api/system.data.sqlclient.sqlconnectionstringbuilder?view=dotnet-plat-ext-7.0
using System.Data;
using System.Data.SqlClient;

public class Database
{

        public bool IsInitialized;
        private readonly SqlConnectionStringBuilder builder;

        // Class Constructor
        public Database()
        {

            IsInitialized = true;

            builder = new SqlConnectionStringBuilder
            {
                DataSource = "braincontrol21",
                UserID = "????????????",
                Password = "????????",
                InitialCatalog = "BrainControl21"
            };

        }

 ...
 ...
As you can see above, I am added the System.Data.SqlClient namespace by using the following @using directive.
using System.Data.SqlClient;
For accessing the MS SQL Server, you first need to install System.Data.SqlClient package as shown in Part 8 by installing it as NuGet package.
Now back to our method to get the assigned customer for our selected project.
string Kunden_ID = DBConnect.GetKundenID(Projekt_ID);
This will call the GetKundenID() method from the Database.cs class shown below. The method will return a string type with the customer ID from our selected project.
As you can see, in order to establish a connection with our database, below I will create a new instance from the SQLConnection class and passing for the connection string our previously instanced SqlConnectionStringBuilder class and its property ConnectionString to it.
SqlConnection Class
https://learn.microsoft.com/en-us/dotnet/api/system.data.sqlclient.sqlconnection?view=dotnet-plat-ext-7.0
I will use here directly a Transact-SQL statement with the SQLCommand class. Further down I will also show how to use a stored procedure on the SQL Server and how to populate a DataTable by using the Load() method instead Reader() as below from the SQLDataReader class.
SqlCommand Class
https://learn.microsoft.com/en-us/dotnet/api/system.data.sqlclient.sqlcommand?view=dotnet-plat-ext-7.0SqlDataReader Class
https://learn.microsoft.com/en-us/dotnet/api/system.data.sqlclient.sqldatareader?view=dotnet-plat-ext-7.0
public string GetKundenID(string Project_ID)
{

            string Customer_ID = null;

            try
            {
                using (SqlConnection connection = new SqlConnection(builder.ConnectionString))
                {
                    Console.WriteLine("nQuery data example:");
                    Console.WriteLine("=========================================n");

                    connection.Open();

                    String sql = "SELECT KUNDEN_ID FROM dbo.S_PROJEKTE WHERE PROJEKT_ID = '" + Project_ID + "'";

                    using (SqlCommand command = new SqlCommand(sql, connection))
                    {
                        using (SqlDataReader reader = command.ExecuteReader())
                        {
                            while (reader.Read())
                            {
                                Customer_ID = reader.GetString(0);
                                // Console.WriteLine("{0} {1}", reader.GetString(0), reader.GetString(1));
                            }
                        }
                    }

                    connection.Close();
                }
            }
            catch (SqlException e)
            {

            }

            return Customer_ID;
}
The returned string Customer_ID I will then assign to the SelectedKundenID property in order to use it from all other code blocks within the Projects.razor page like before with the SelectedProject property.
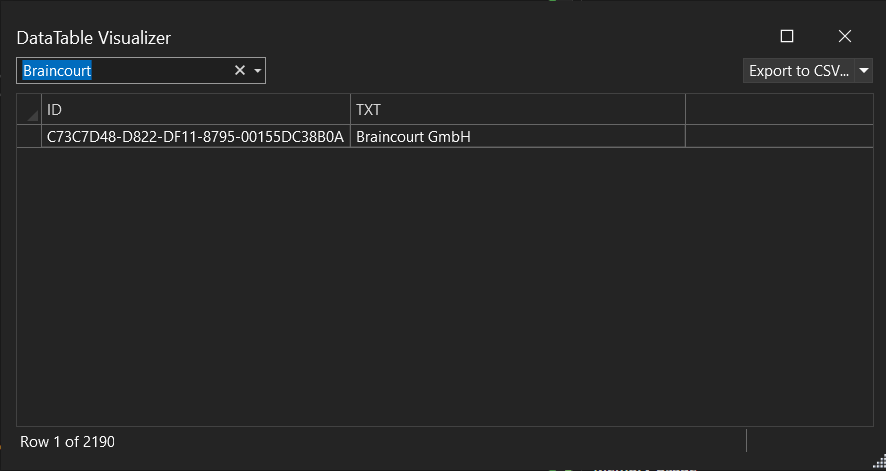
But how will now the assigned customer for the selected project been bind to the cutomer <select> box element as shown and marked below?
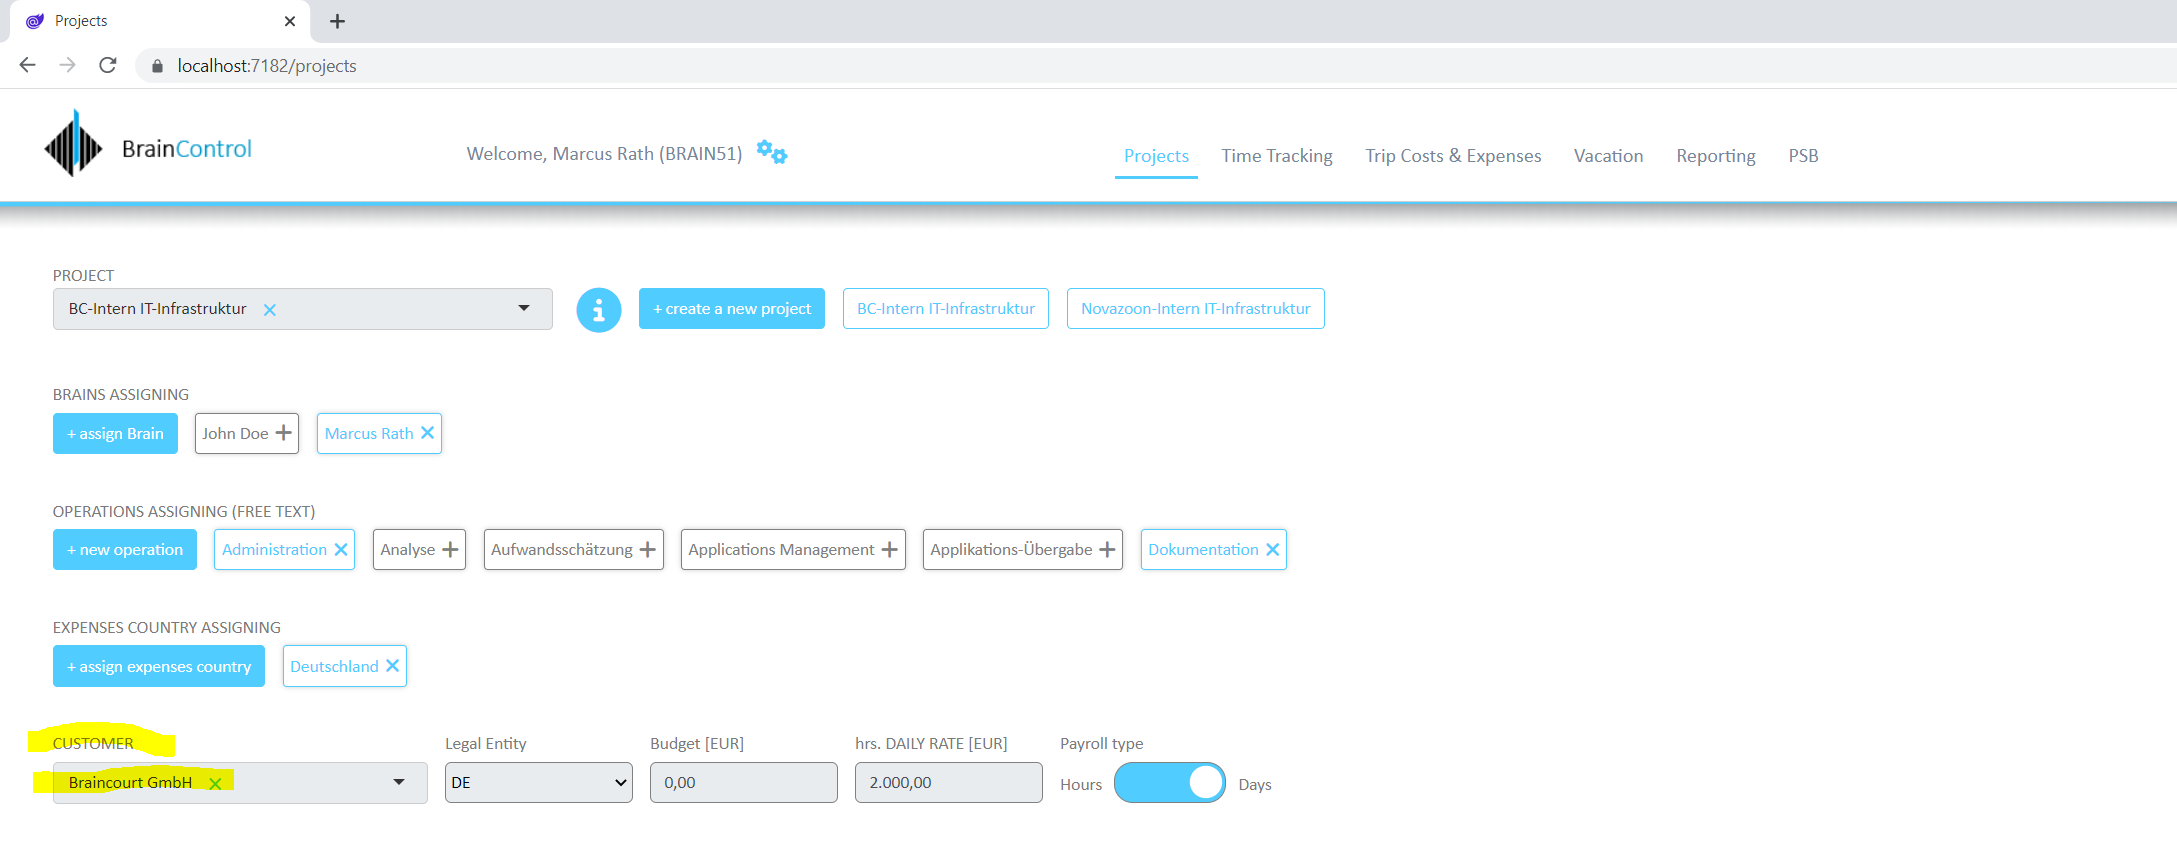
Actually after changing the selected project I will just change the selected customer by setting the option to selected.
option value=@option_value selected>@customer
The binding itself will occur when the page is rendered the first time on the server, here I will iterate through a DataTable with all customers and adding them to the <select> box element.
Btw. this is also our hybrid of a textbox and <select> box (selectize). I will use it in order the users can easily search for other customers in case they need to change it.
This is the code to binding all customers to the <select> box element.
Besides I will do the same for the project <select> box element by using another DataTable and iterating through to populate it.
<select id="SelKunde" class="BC select" type="text" style="width:300px">
                @foreach(DataRow row in dtKunden.Rows)
                    {
                         string? option_value = Convert.ToString(row["ID"]);
                         string? anzeige = Convert.ToString(row["TXT"]);

                         if (option_value != "#")
                              {
                                 <option value=@option_value>@anzeige</option>
                              }
                              else
                              {
                                 <option value=@option_value selected>@anzeige</option>
                              }
                    }
</select>
The DataTable dtKunden with all customers will be initialized and populated within the OnInitializedAsync() task which will call my custom SelKunden() method as shown below.
Component initialization (OnInitialized{Async})
OnInitialized and OnInitializedAsync are invoked when the component is initialized after having received its initial parameters in SetParametersAsync.
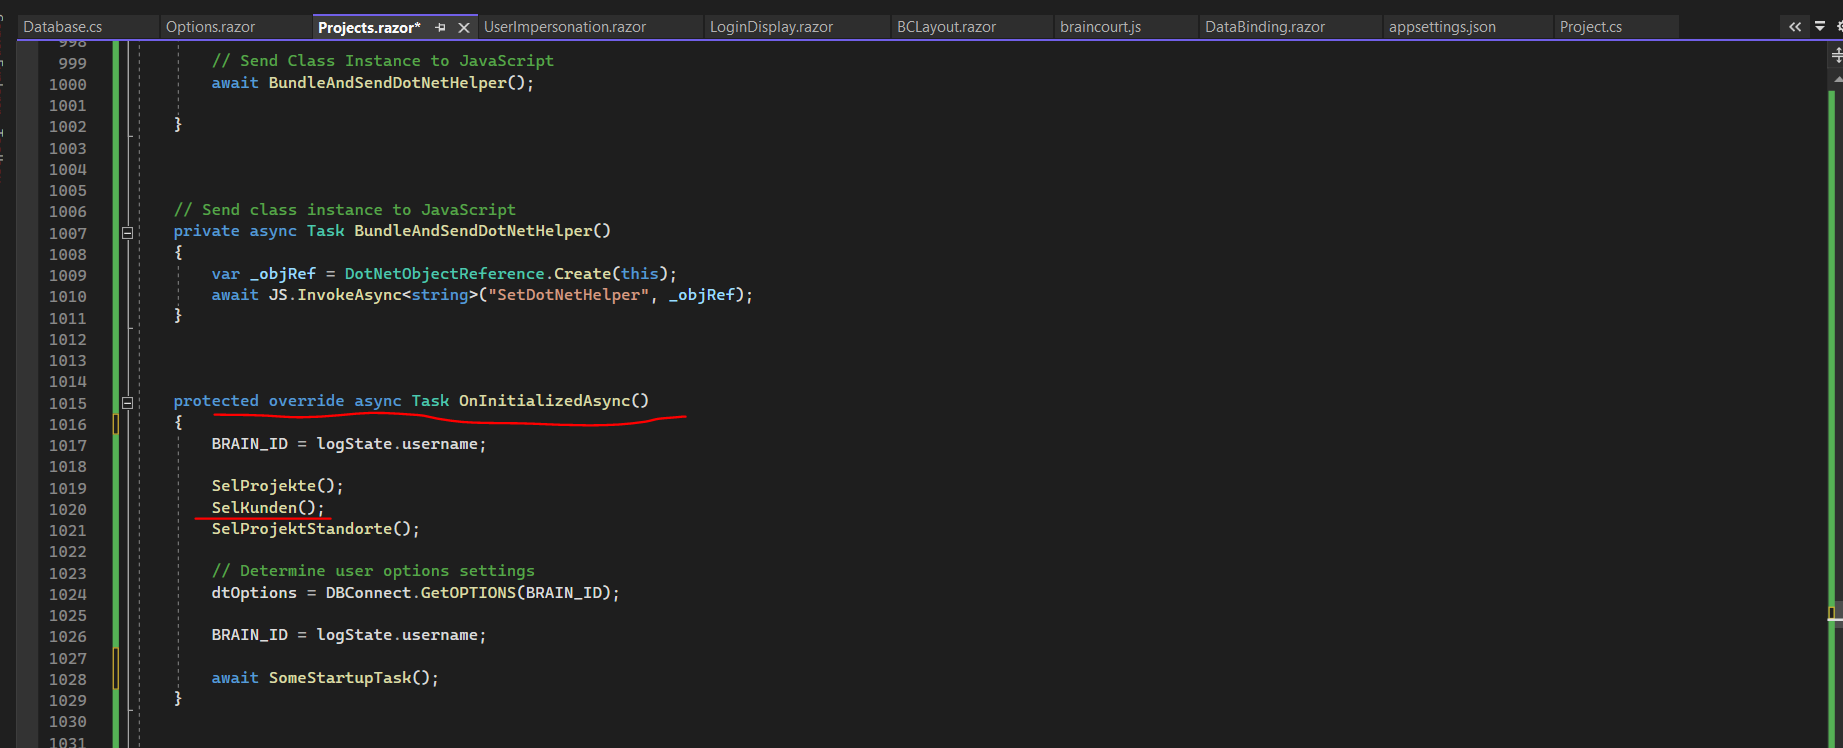
The SelKunden() method will then call the GetKunden() method from my Database.cs class in order to populate the dtKunden DataTable with all customers. The return type from the GetKunden() method therefore must be DataTable.
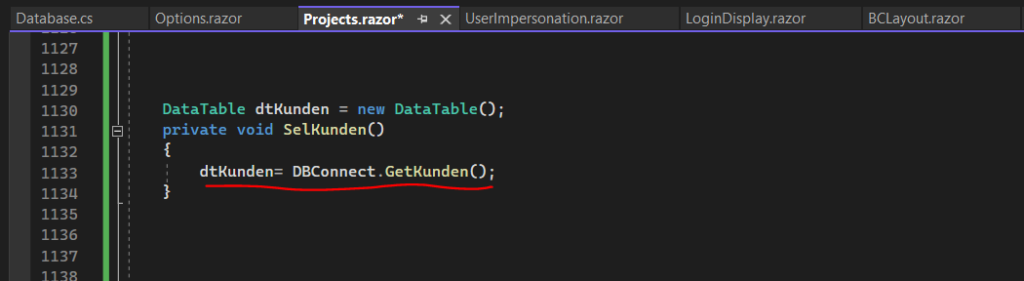
Here you can see the GetKunden() method within my Database.cs class.
public DataTable GetKunden()
        {

            DataTable dtDaten = new DataTable();

            using (SqlConnection connection = new SqlConnection(builder.ConnectionString))
            {
                connection.Open();

                // 1.  create a command object identifying the stored procedure
                SqlCommand cmd = new SqlCommand("CTL.spSEL_cb_KUNDEN", connection);

                // 2. set the command object so it knows to execute a stored procedure
                cmd.CommandType = CommandType.StoredProcedure;

                // 3. add parameter to command, which will be passed to the stored procedure
                // cmd.Parameters.Add(new SqlParameter("@BRAIN_LOGIN", "mrath"));

                // execute the command
                using (SqlDataReader rdr = cmd.ExecuteReader())
                {

                    dtDaten.Load(rdr);

                }

                connection.Close();
            }

            return dtDaten;

}
I will also user here the SqlConnectionStringBuilder class as previously with the initialized connection paramters in order to establish a connection with the database.
This time I will use a stored procedure on the SQL Server in order to populate the DataTable. Therefore I need to define the command type from the SqlCommand class as StoredProcedure as shown below.
For the SQLCommand class I will create a new instance and passing the stored procedure from my database to it.
In case the stored procedure includes additional parameters you can also add them by using the SQLCommand Parameters property as below commented out.
To populate a DataTable we need to use the Load() method from the SQLDataReader class instead the Reader() method we used previously to just assign a string value to a field.
When I now iterate the DataTable when the page is rendered the first time, in order to populate the <select> box element, so far no project is selected from the user.
Therefore the initial selected value should be the text <please select> as shown below which is also returned as data row by the stored procedure and its value is the hashtag symbol #.

So now you understand better what happenend here during the iteration, in case the ID from the customer record in the DataTable is our hashtag symbol #, then the value should be added as selected, the rest which are all customers should be normally added to the <select> box element.
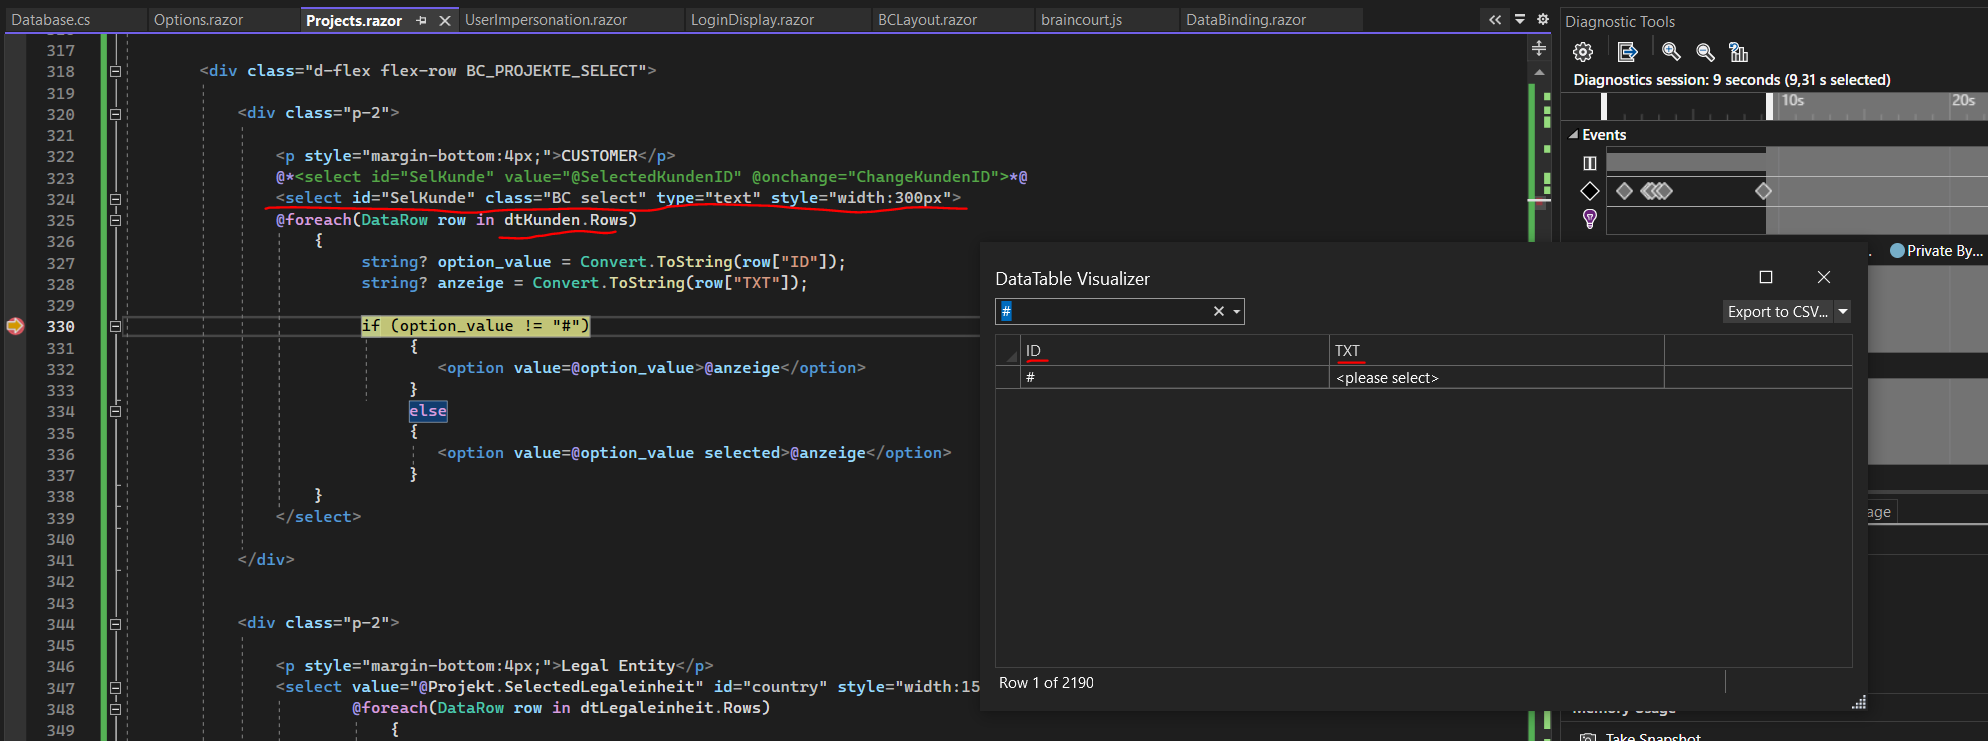
The customer name is stored in the TXT column and its customer ID in the ID column.
The <select> box element with the customers is then also manipulated by Java Script as previously for the project <select> to finally get the hybrid of a textbox and <select> box.
This time to access the html element from jQuery we use the id=”SelKunde”
When now a user wants to change the assigned customer, also the onChange event handler in my custom Java Script file braincourt.js will be executed.
As mentioned to the beginning, I will not go through all code lines within the OnProjekteChange() method and therefore wanted to pick to examples to first request data from the MS SQL Server database and then bind the returned data to html elements.
I want to add an example as shown below, it is also an <select> box element, but this time I will not manipulate it with Java Script as before for the hybrid <select> box.
This time its just html and C# code native. Therefore the event handler onchange here is directly in C# code within the <select> element.
When we need to pass additional arguments to to event handler, here ChangeLegaleinheitProjekt(), we need to use a lambda expression as shown below.
The standard way of calling an event handler is without additional arguments like.
<select @onchange="ChangeLegaleinheitProjekt"> </select>
 <p style="margin-bottom:4px;">Legal Entity</p>
                <select value="@Projekt.SelectedLegaleinheit" id="country" style="width:150px;" @onchange="@(( args ) => ChangeLegaleinheitProjekt(args))">
                        @foreach(DataRow row in dtLegaleinheit.Rows)
                            {

                                string? option_value = Convert.ToString(row["ID"]);
                                string? anzeige = Convert.ToString(row["TXT"]);

                                    if (option_value != Projekt.SelectedLegaleinheit)
                                        {
                                            <option value=@option_value>@anzeige</option>
                                        }
                                        else
                                        {
                                            <option value=@option_value selected>@anzeige</option>
                                        }
                            }
                </select>
The reason for why use here a normal <select> element, is that I dont need a search function because it will include just a few values.
There’s one big disadvantage using the native html <select> <option> element, there are just a few style attributes that can be applied to an <select> and <option> element and all of them depends on the OS system and browser they are running on. So if you want to be more flexible regarding styling you also need to manipulate it with Java Script.

The event handler will finally save the new legal entity for the selected project in the database by calling the SaveLegaleinheitProjekt() method from the Database.cs class.
private void ChangeLegaleinheitProjekt(ChangeEventArgs e)
{
        string LE_ID = e.Value.ToString();
        DBConnect.SaveLegaleinheitProjekt(SelectedProject, LE_ID);
}
SaveLegaleinheitProjekt() method from my custom Database.cs class.
So here you can see how to write data back by also using a stored procedure on the MS SQL Server.
 public void SaveLegaleinheitProjekt(string? PROJKET_ID, string? LEGALEINHEIT_ID)
        {

            try
            {
                using (SqlConnection connection = new SqlConnection(builder.ConnectionString))
                {
                    Console.WriteLine("nStored Procedure example:");
                    Console.WriteLine("=========================================n");

                    connection.Open();

                    // 1.  create a command object identifying the stored procedure
                    SqlCommand cmd = new SqlCommand("dbo.spUPD_Z_LEGALEINHEIT_PROJEKT", connection);

                    // 2. set the command object so it knows to execute a stored procedure
                    cmd.CommandType = CommandType.StoredProcedure;

                    // 3. add parameter to command, which will be passed to the stored procedure
                    cmd.Parameters.Add(new SqlParameter("@PROJEKT_ID", PROJKET_ID));
                    cmd.Parameters.Add(new SqlParameter("@LEGALEINHEIT_ID", LEGALEINHEIT_ID));

                    // execute the command
                    SqlDataReader rdr = cmd.ExecuteReader();

                    connection.Close();
                }
            }
            catch (SqlException e)
            {
                //Console.WriteLine(e.ToString());
            }

        }
The code above is at least the same as before for requesting data and using a stored procedure, only this time we do not need to iterate through the returned data when calling the ExecuteReader() method from the SqlCommand class.
The corresponding stored procedure on the MS SQL Server to update the legal entity for the selected project.
USE [BrainControl21]
GO
/****** Object:  StoredProcedure [dbo].[spUPD_Z_LEGALEINHEIT_PROJEKT]    Script Date: 16.04.2023 16:25:22 ******/
SET ANSI_NULLS ON
GO
SET QUOTED_IDENTIFIER ON
GO

ALTER PROCEDURE [dbo].[spUPD_Z_LEGALEINHEIT_PROJEKT]
(
	@PROJEKT_ID 		AS NVARCHAR(50),
	@LEGALEINHEIT_ID 	AS NVARCHAR(1)

)
AS

declare @ANZ_DS AS INT
declare @DATUM AS DateTime

Set @DATUM = GetDate()

SET @ANZ_DS = (SELECT COUNT(PROJEKT_ID) AS ANZ_DS FROM dbo.Z_LegalEinheit_Projekt WHERE PROJEKT_ID = @PROJEKT_ID)

IF (@ANZ_DS) > 0

BEGIN

UPDATE 	[dbo].[Z_LegalEinheit_Projekt]
SET 	[PROJEKT_ID] = @PROJEKT_ID,
		[LEGALEINHEIT] = @LEGALEINHEIT_ID
WHERE 	[PROJEKT_ID] = @PROJEKT_ID

END

	ELSE

BEGIN

INSERT INTO [dbo].[Z_LegalEinheit_Projekt]
VALUES (@PROJEKT_ID, @LEGALEINHEIT_ID, 1, @DATUM, '9999-12-31 00:00:00.000');

END
Below one last example how I will bind data from the database to html elements and adding some event handler in case they will change or you want to add some action.
Here I will show how to bind the addition-/engagement records on the project page for the selected project.
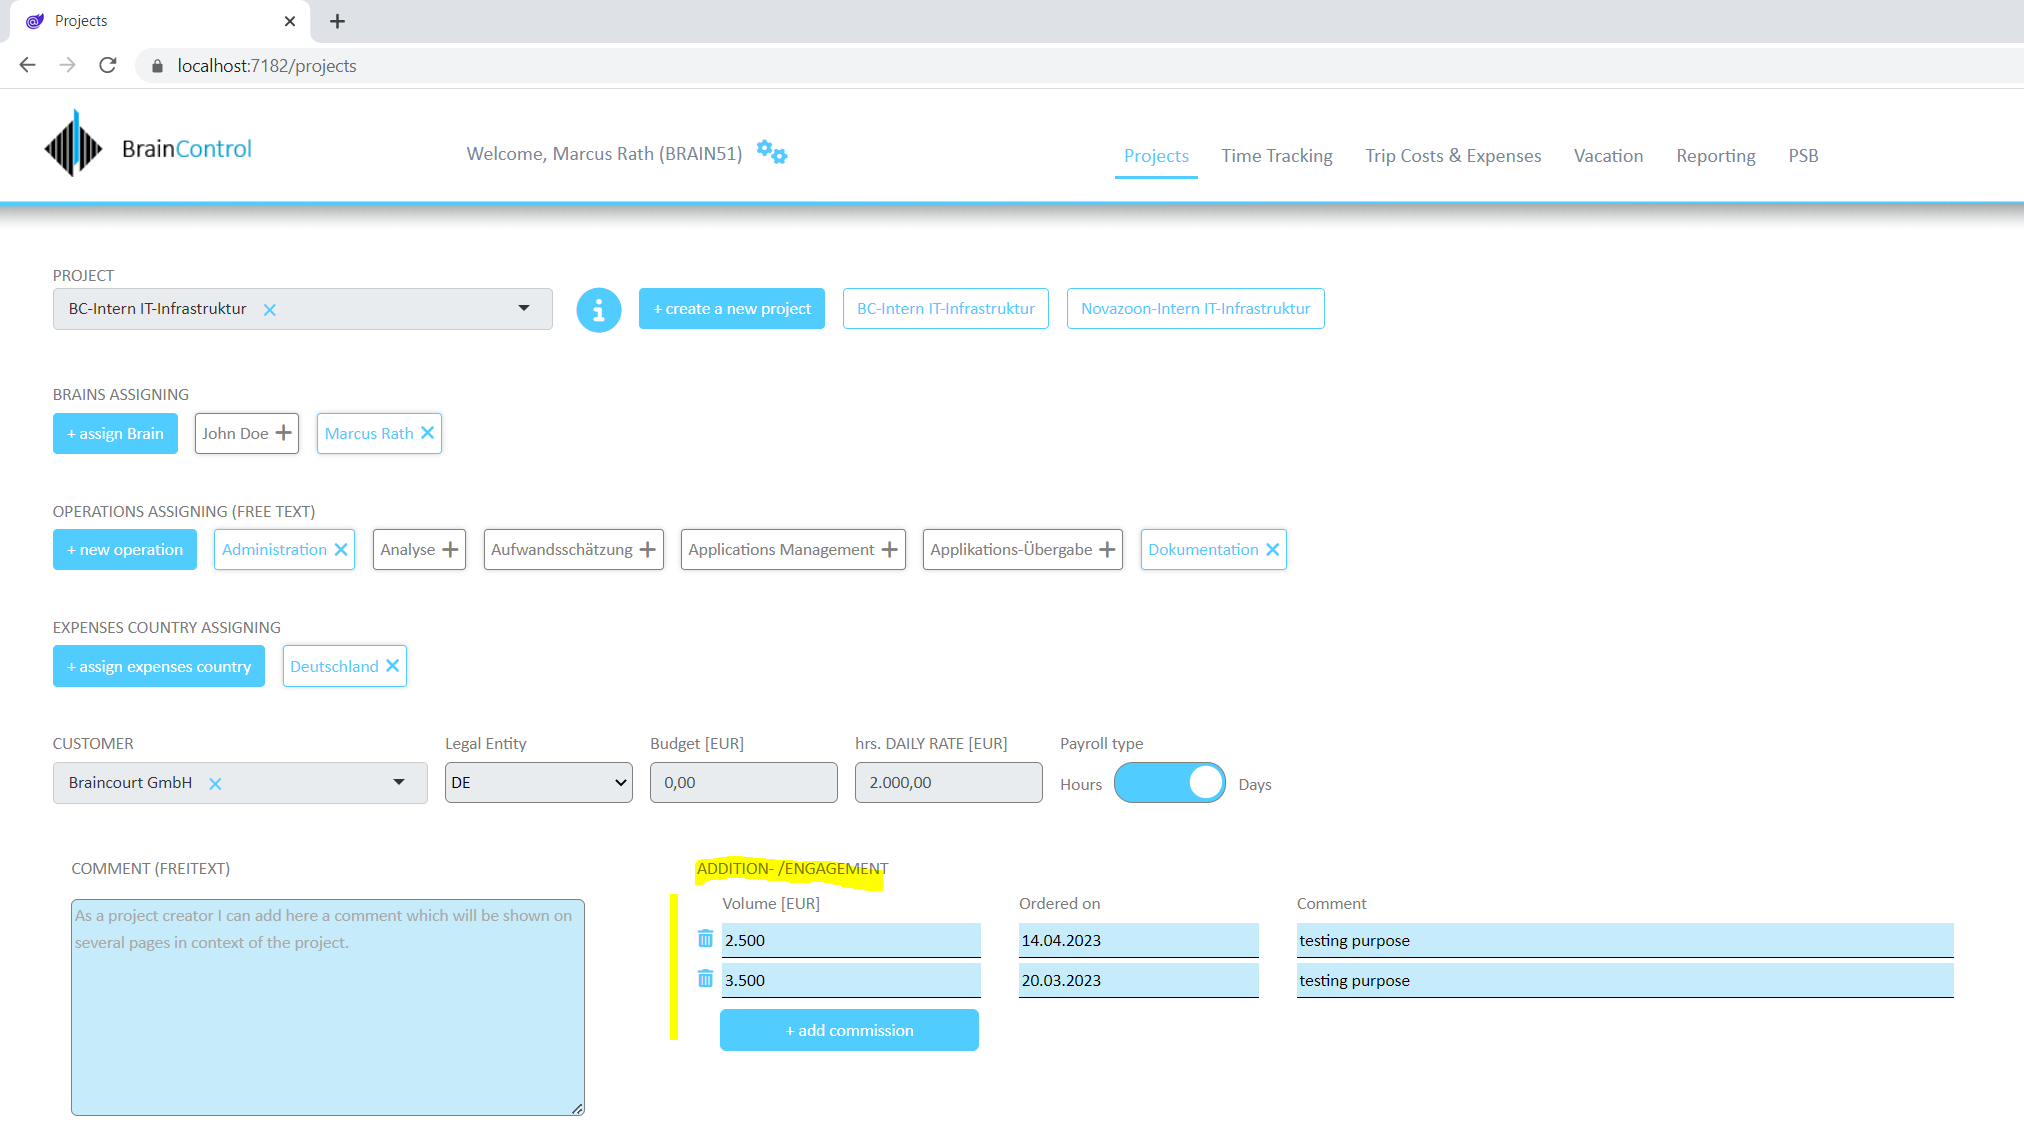
The code in the razor page will looks like this.
At least it’s like before, I will iterate through a DataTable where all corresponding records for the selected project are included and then adding them to the page by using <div> tags and the Bootstrap framework for CSS.
Bootstrap
https://getbootstrap.com/
@foreach(DataRow row in dtZusatzWeiterbeauftragung.Rows)
                    {
                        // Identifier to delete the record
                        int RowID = Convert.ToInt32(@row["ID"]);

                        string? Beauftragt_am = Convert.ToString(@row["Beauftragt_am"]);

                        bool Placeholder = Convert.ToBoolean(@row["Placeholder"]);

                        <div class="row" id="@row["ID"]">
                                <div class="col-md-auto" style="padding-right:0px;">
                                    <div class="NewCommision BC" style="width:100%">
                                        <button type="button" class="bc-btn-main-bg-close" @onclick="() => RemoveCommission(RowID)"><i class="fa-solid fa-trash-can" title="Delete record."></i></button>
                                    </div>
                                </div>
                                <div class="col-md-2" style="padding-left:0px;">
                                    <div class="NewCommision BC">
                                        <input class="BC input" type="text" id="Budget" name="Budget" value="@row["Volumen"]" @onchange="@(( args ) => UpdateCommissionVolumen(RowID, Beauftragt_am, @row["Kommentar"].ToString(), false, args))" style="width:100%" autocomplete="off">
                        </div>
                                </div>
                                <div class="col-md-2">
                                    <div class="NewCommision BC">
                                        <input class="BC input" type="text" id="beauftragt" name="beauftragt" value="@row["Beauftragt_am"]" @onchange="@(( args ) => UpdateCommissionBeauftragtAm(RowID, @row["Volumen"].ToString(), @row["Kommentar"].ToString(), false, args))" style="width:100%" autocomplete="off">
                        </div>
                                </div>
                                <div class="col-md-5">
                                    <div class="NewCommision BC">
                                        <input class="BC input" type="text" id="kommentar" name="kommentar" value="@row["Kommentar"]" @onchange="@(( args ) => UpdateCommissionKommentar(RowID, Beauftragt_am, @row["Volumen"].ToString(), false, args))" style="width:100%" autocomplete="off">
                        </div>
                                </div>
                        </div>


}
I want to focus here on the event handler above, the first is the RemoveCommission() method which will be executed when you click on the recycle bin in front of the record.
@onclick=”() => RemoveCommission(RowID)”
I will also using here a lambda expression in order to pass additional arguments to the method. Here I will pass the row ID which is identifying the record in order to delete it in the database.
Afterwards the DataTable with the addition commissions will be new populated to reflect the change.
private void RemoveCommission(int RowID)
{
        DBConnect.RemoveProjectCommission(RowID);
        dtZusatzWeiterbeauftragung = DBConnect.GetZusatzWeiterbeauftragung_Projekt(SelectedProject);
}
On that page I will also use a so called toggle switch to show the payroll type for the selected project as shown and marked below.
How TO – Toggle Switch
https://www.w3schools.com/howto/howto_css_switch.asp
How you can create a toggle switch as native Blazor UI component in Blazor Server, I will show in Part 11. Therefore we need to use the EventCallback class as shown in Part 7 about events and delegates in C#.
Toggle Switch vs. Toggle Button
Actually for this case to select the payroll type if hours or days, the correct term is toggle button. A toggle switch you usually use for binary options like on or off, for example a light switch to turn the light on or off. A toogle button in contrast usually is used for switching between different options (two or more) and realized for example with two or more controls next to each other where the selected option (control) is highligted.
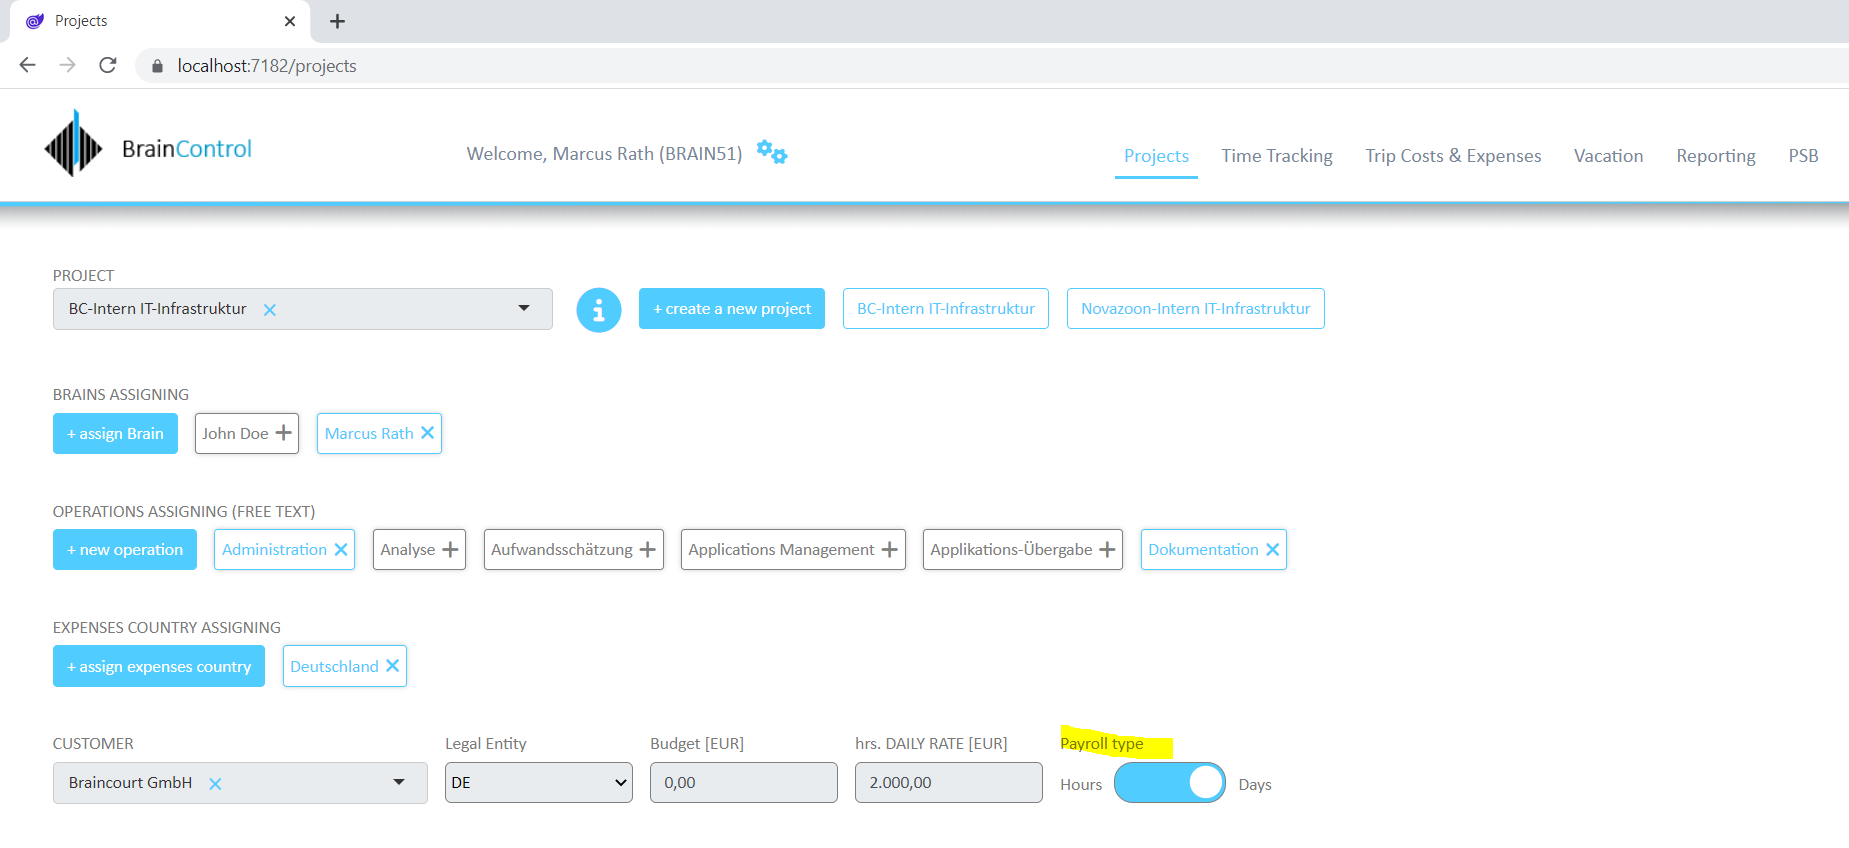
Below you can see the project page in action.
Blazor Server Series
Blazor Server – Basics Part 1
https://blog.matrixpost.net/blazor-server-basics-part-i/Blazor Server – Basics Part 2
https://blog.matrixpost.net/blazor-server-basics-part-ii/Blazor Server – Basics Part 3 – Custom Layout
https://blog.matrixpost.net/blazor-server-basics-part-iii-custom-layout/Blazor Server – Basics Part 4 – Program.cs File
https://blog.matrixpost.net/blazor-server-basics-part-iv-program-cs-file/Blazor Server – Basics Part 5 – Authentication and Authorization
https://blog.matrixpost.net/blazor-server-basics-part-v-authentication-and-authorization/Blazor Server – Basics Part 6 – Query the on-premise Active Directory
https://blog.matrixpost.net/blazor-server-basics-part-vi-query-the-on-premise-active-directory/Blazor Server – Basics Part 7 – C# Events, Delegates and the EventCallback Class
https://blog.matrixpost.net/blazor-server-basics-part-vii-c-events-and-delegates/Blazor Server – Basics Part 8 – JavaScript interoperability (JS interop)
https://blog.matrixpost.net/blazor-server-basics-part-viii-javascript-interoperability-js-interop/Blazor Server – Basics Part 9 – Responsive Tags and Chips
https://blog.matrixpost.net/blazor-server-basics-part-ix-responsive-tags-and-chips/Blazor Server – Basics Part 10 – MS SQL Server Access and Data Binding
https://blog.matrixpost.net/blazor-server-basics-part-10-ms-sql-server-access-and-data-binding/Blazor Server – Basics Part 11 – Create a Native Blazor UI Toggle Switch Component
https://blog.matrixpost.net/blazor-server-basics-part-11-native-blazor-toggle-switch-by-using-the-eventcallback-class-and-css/Blazor Server – Basics Part 12 – Create a Native Blazor UI Toggle Button Component
https://blog.matrixpost.net/blazor-server-basics-part-12-create-a-native-blazor-ui-toggle-button-component/
Links
ASP.NET Core Blazor data binding
https://learn.microsoft.com/en-us/aspnet/core/blazor/components/data-binding?view=aspnetcore-7.0One-way binding
https://blazor-university.com/components/one-way-binding/Two-way binding
https://blazor-university.com/components/two-way-binding/ASP.NET Core Razor component lifecycle
https://learn.microsoft.com/en-us/aspnet/core/blazor/components/lifecycle?view=aspnetcore-7.0