

Enabling Cloud Tiering with Azure Blob Storage for On-Premises NetApp ONTAP Select
NetApp ONTAP Select supports FabricPool to extend local performance-tier storage with a cloud-based capacity tier for inactive data.
In this article we configure Azure Blob Storage as the cloud tier for an ONTAP Select cluster, attach it to a local aggregate, and configure volume tiering policies to automatically move cold data from the local performance tier to Azure.
Note: Compared with Dell storage platforms, ONTAP FabricPool provides integrated capacity tiering that transparently moves cold blocks from active volumes to object storage such as Azure Blob Storage.
Dell Unity provides cloud tiering through the separate Cloud Tiering Appliance (CTA/CTA-VE), primarily for file data, while PowerStore and PowerMax also support block and file workloads but do not provide a directly equivalent FabricPool-style mechanism for transparent cold-block tiering of active primary storage.
Dell cloud-tiering capabilities for these platforms are instead primarily associated with data protection and backup workflows.
The ONTAP Select cluster used in this article runs in my on-premises VMware vSphere lab. For details about deploying ONTAP Select in VMware vSphere and creating the two-node HA cluster used throughout this article, see my previous post.
- Requirements
- Reviewing the Existing Storage Tiers
- Adding Azure Blob Storage as a Cloud Tier
- Configuring Cloud Tiering on the Volumes
- Manually Triggering Cloud Tiering for Testing
- Disabling Cloud Tiering and Moving Existing Data Back to the Performance Tier
- Understanding Block, File, and Object Storage
- Links
Requirements
Before configuring FabricPool with Microsoft Azure Blob Storage, the ONTAP Select cluster should already be discovered and managed through NetApp Console using an on-premises Console Agent.
The Console Agent also requires appropriate Azure credentials and permissions to provision and manage resources in the target Azure subscription.
For details on adding an on-premises ONTAP system to NetApp Console, see my article:
The configuration of the required Azure credentials, Microsoft Entra service principal, and Azure permissions for the on-premises Console Agent is covered in my article:
Additionally, a valid FabricPool license is required for ONTAP Select. We will install the dedicated FabricPool evaluation license later as part of the configuration.
Reviewing the Existing Storage Tiers
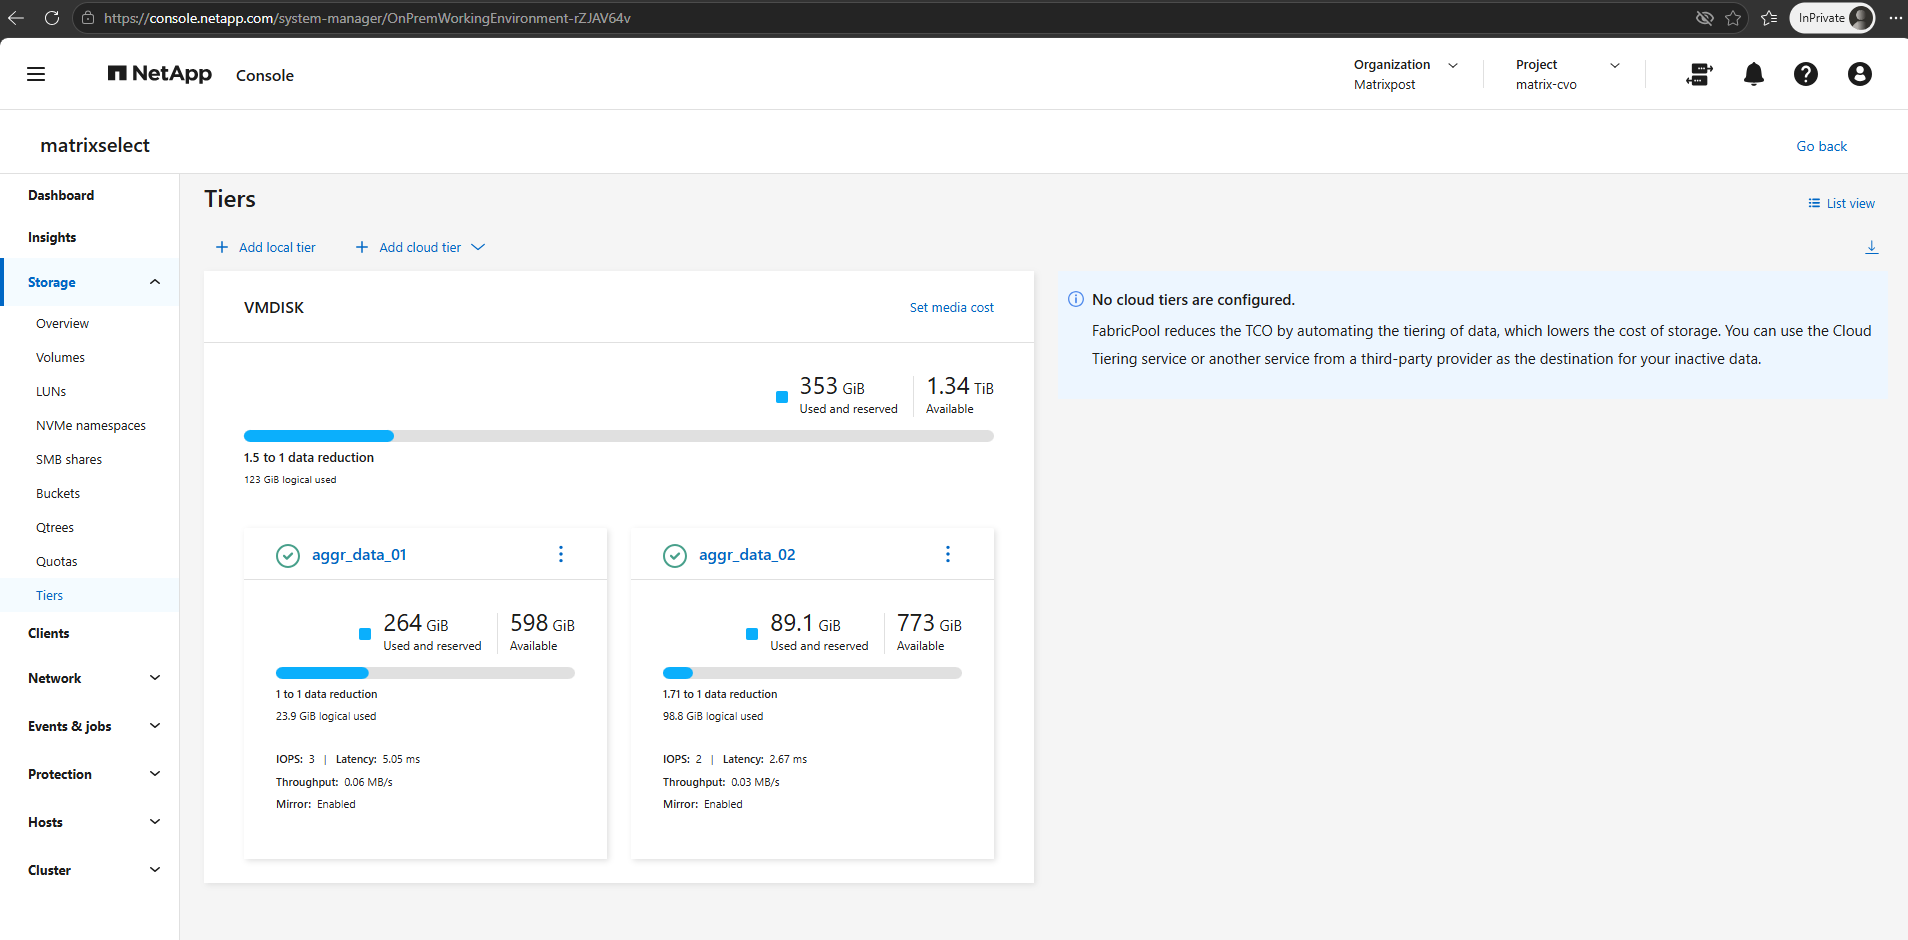
Before configuring cloud tiering, we can review the existing storage tiers in ONTAP System Manager. Currently, both aggregates aggr_data_01 and aggr_data_02 use only the local performance tier, and no cloud-based capacity tier is configured.
At this point, volumes can already have a FabricPool tiering policy such as auto configured, but no data can actually be tiered until an object-storage capacity tier is configured and attached to the aggregate.
Adding Azure Blob Storage as a Cloud Tier
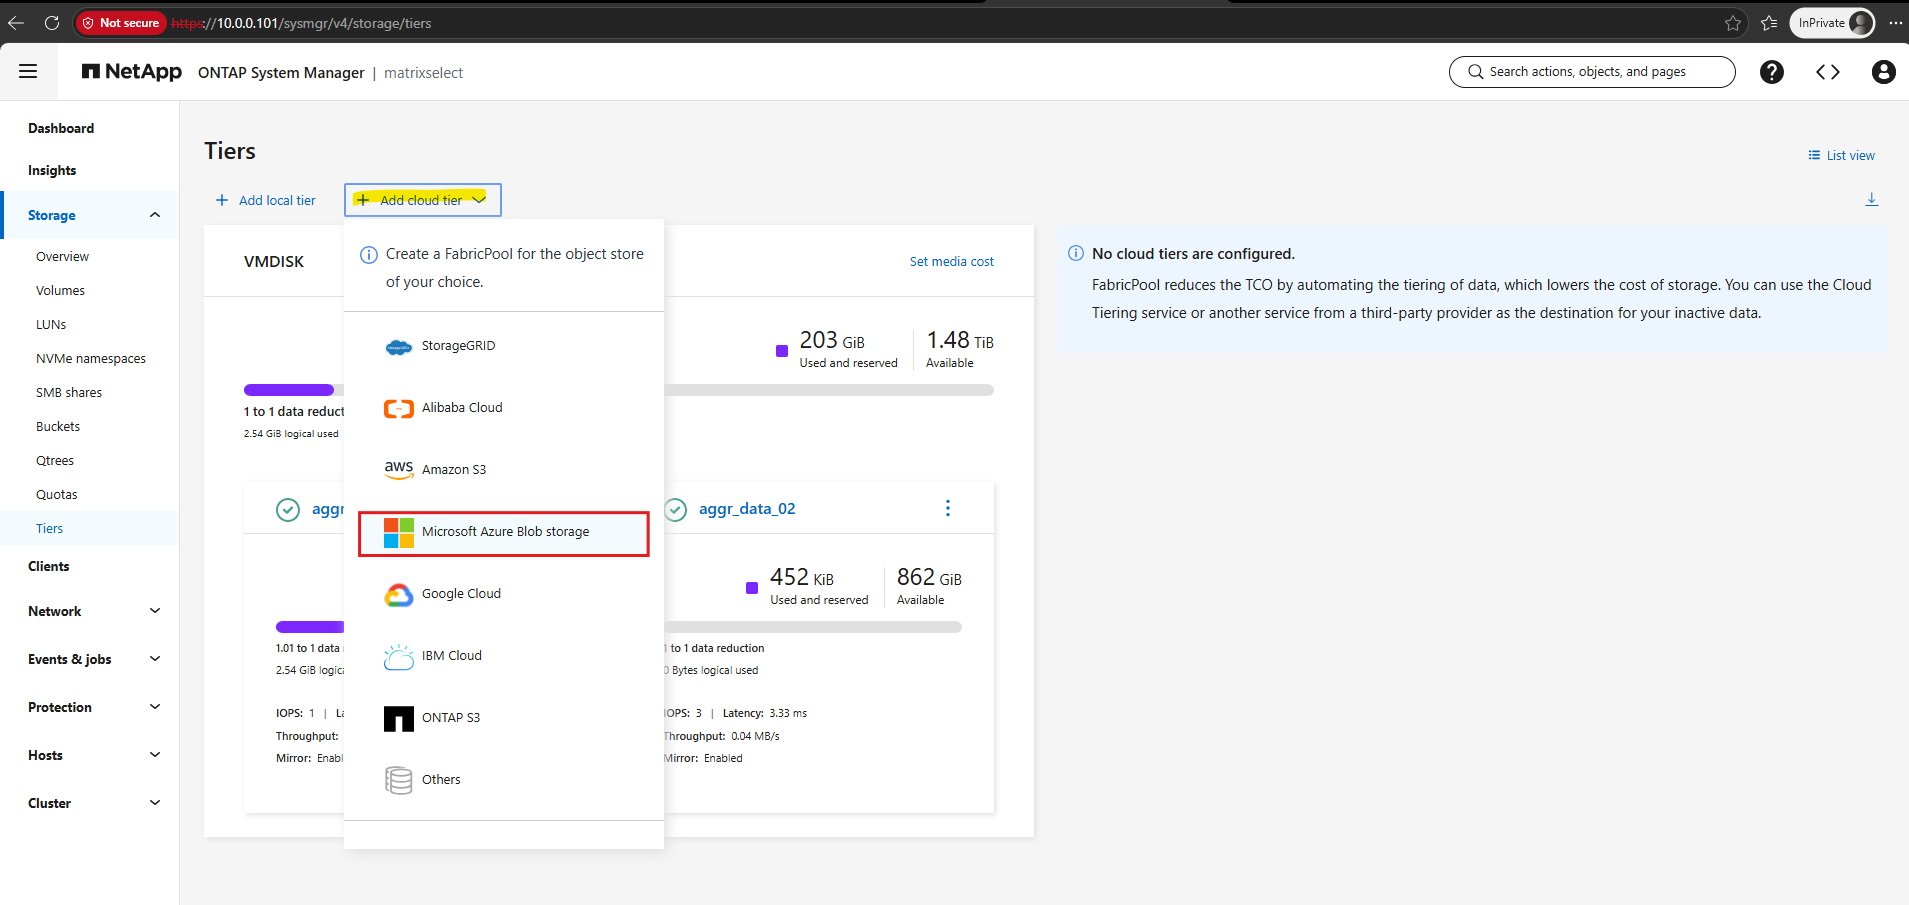
To extend the local ONTAP Select performance tier with cloud-based capacity, click Add cloud tier from the Storage > Tiers page.
In this example, we use Microsoft Azure Blob Storage as the object-storage destination for cold FabricPool data.
As shown below, Microsoft Azure Blob Storage is initially greyed out and cannot be selected as a cloud tier. This is because FabricPool requires a valid license before the Azure object store can be configured.
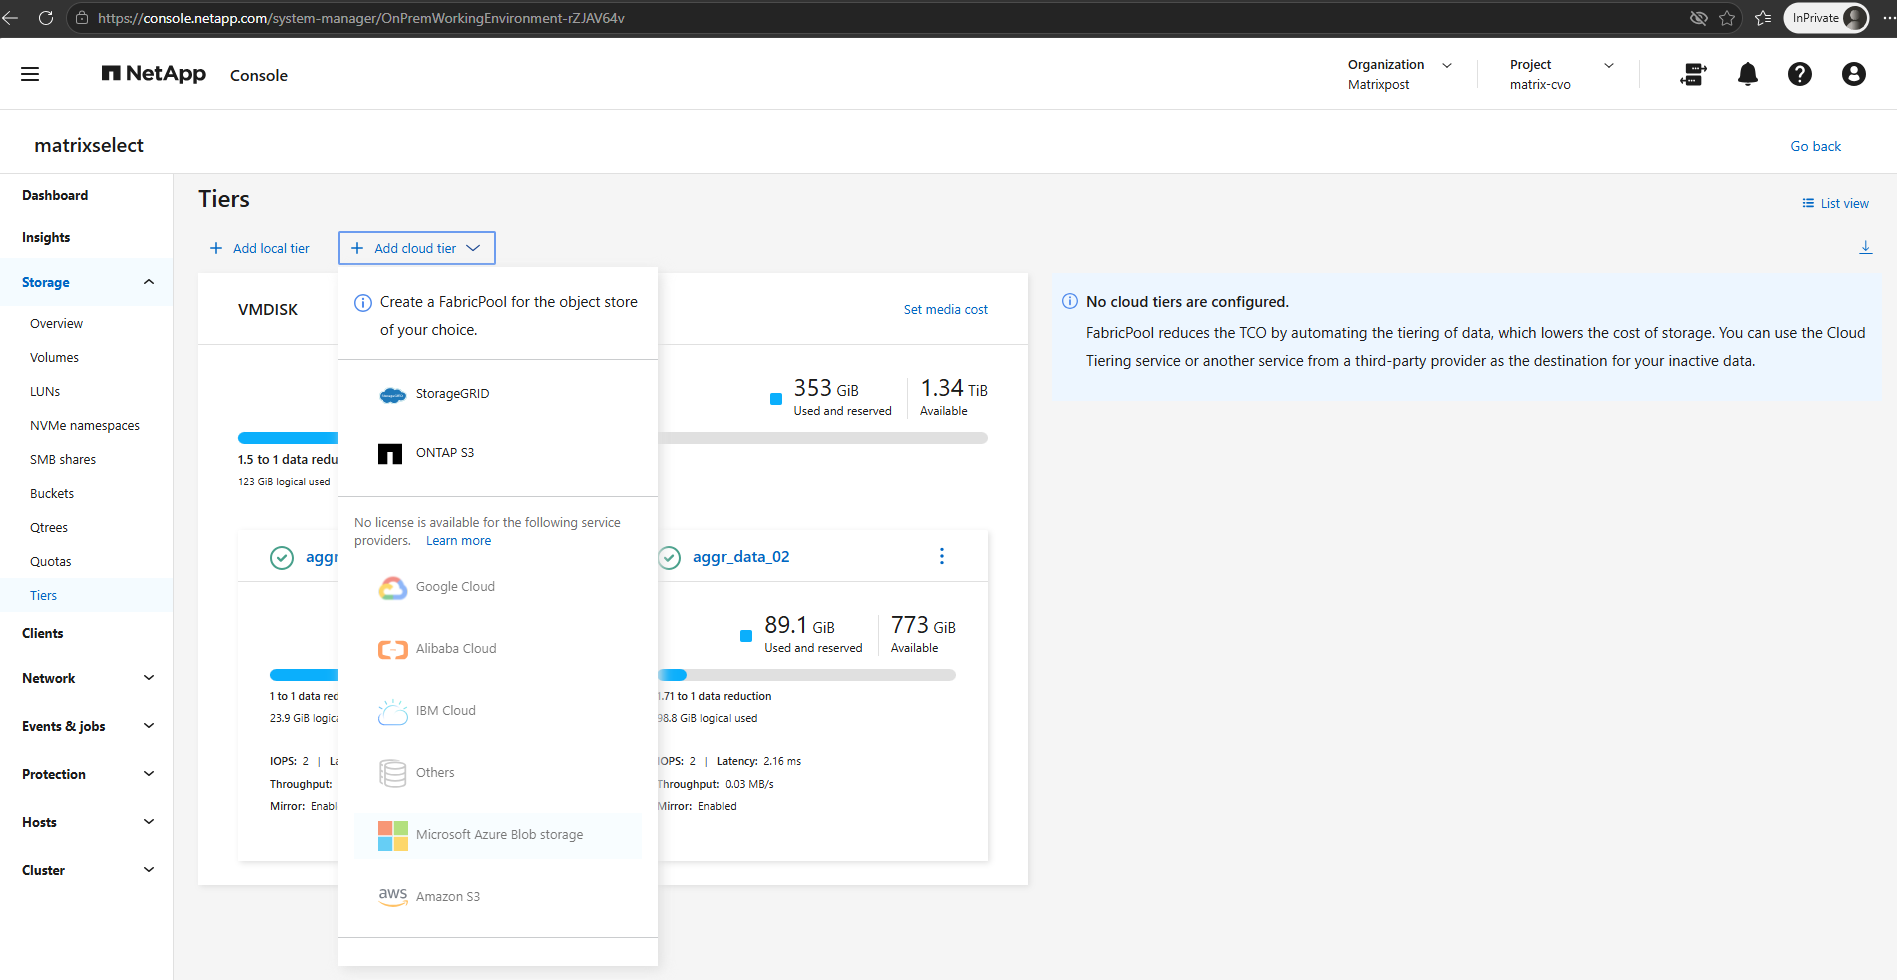
FabricPool requires a valid license before a cloud tier can be configured. For this lab, NetApp was kind enough to provide me with a dedicated 1 TiB FabricPool evaluation license upon request, which is bound to the ONTAP cluster UUID and valid for 60 days.
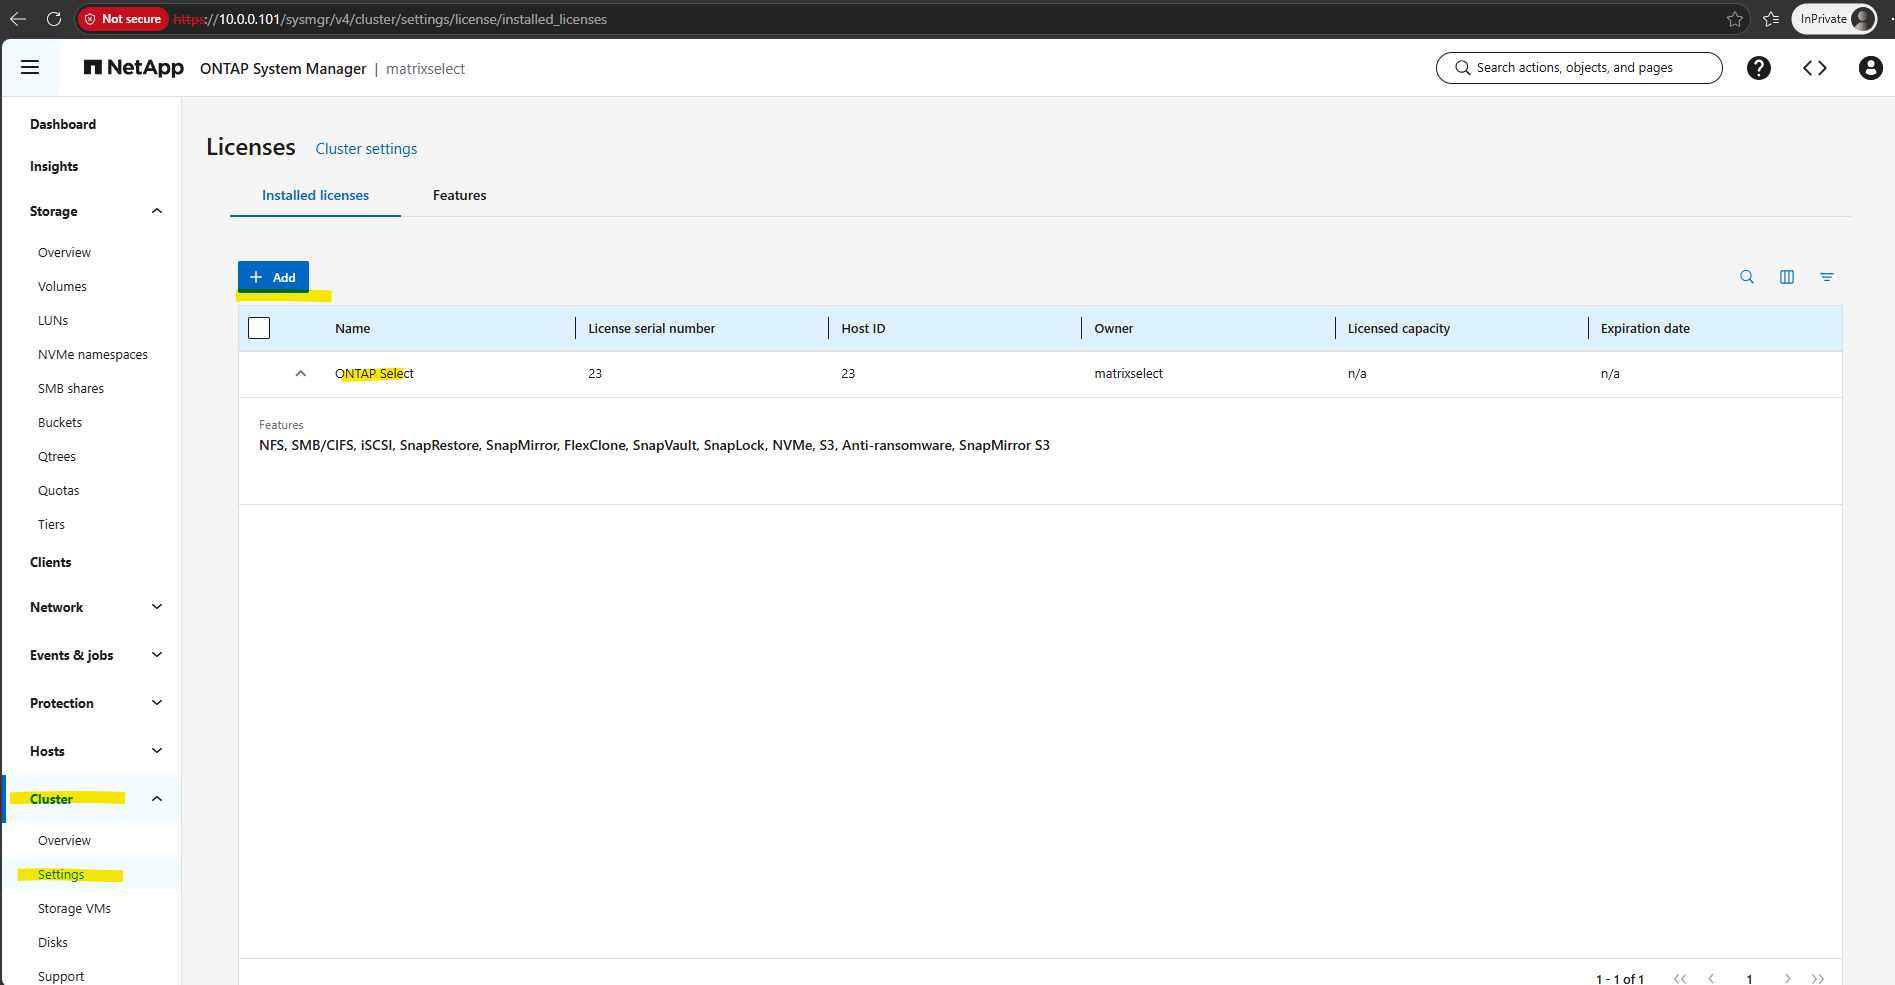
The FabricPool evaluation license can be installed from Cluster > Settings > Licenses in ONTAP System Manager.
Click Add and select the license file provided by NetApp.
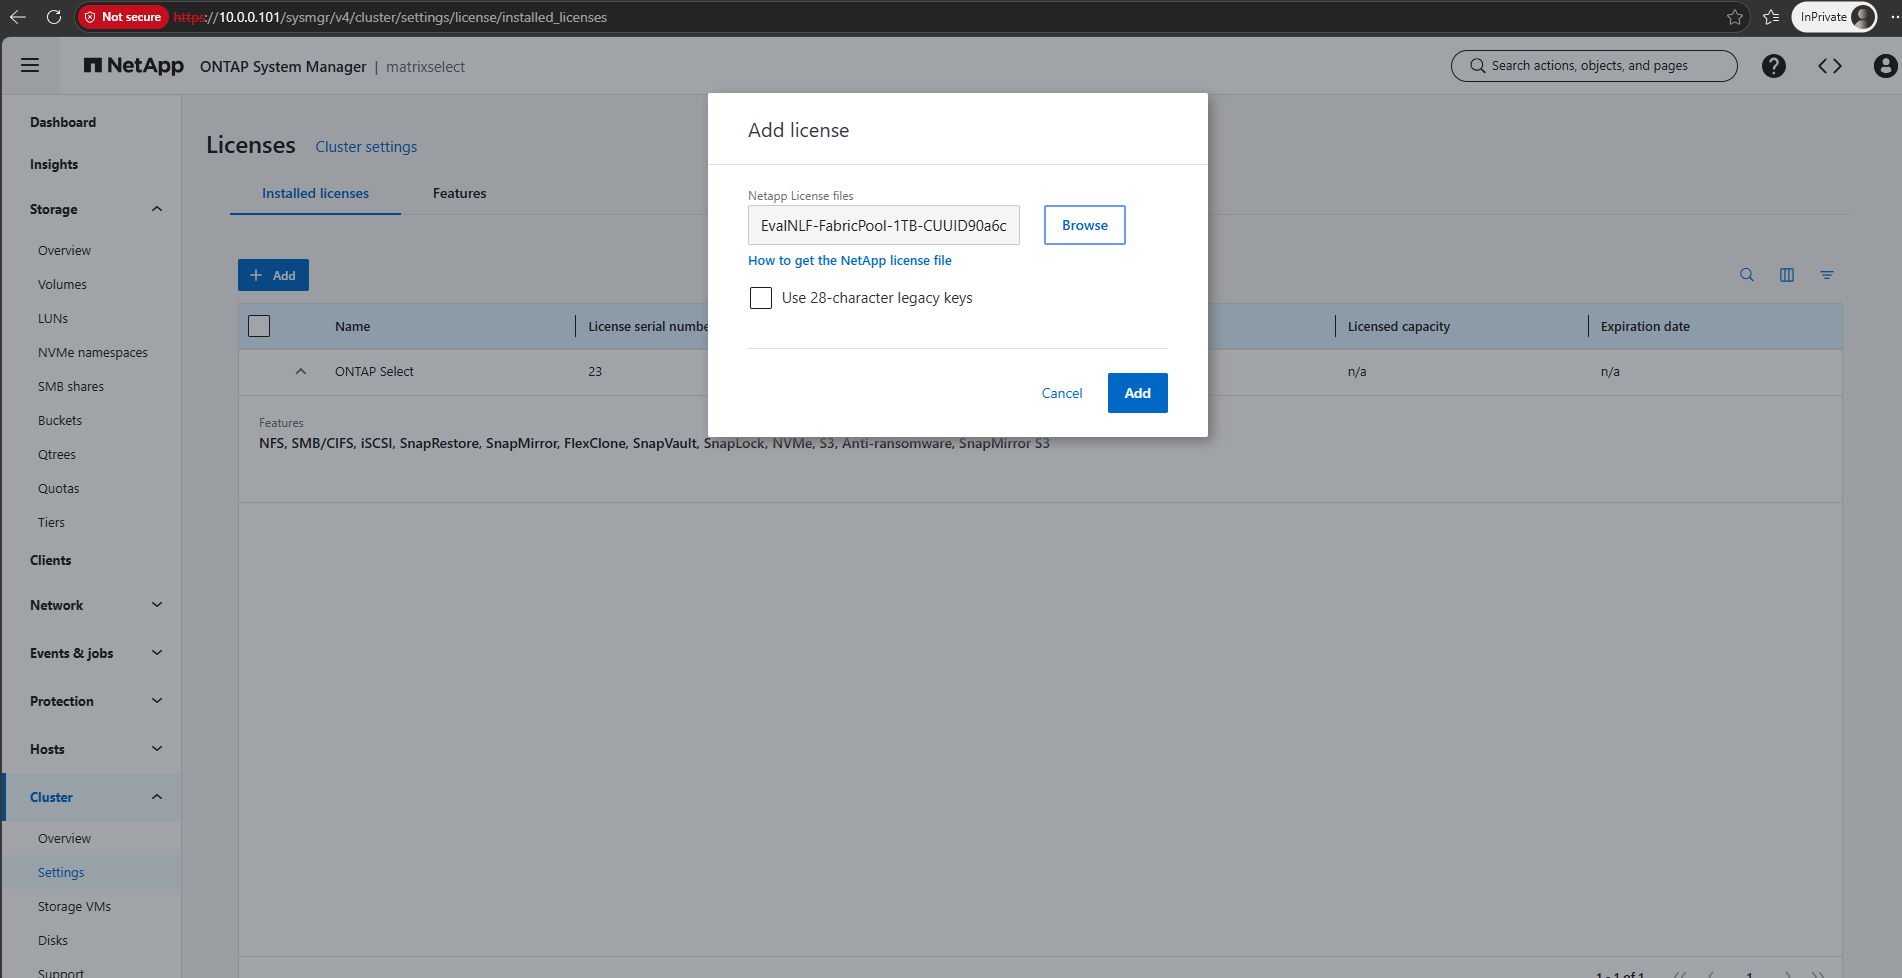
After selecting the FabricPool license file, click Add to install the license on the cluster.
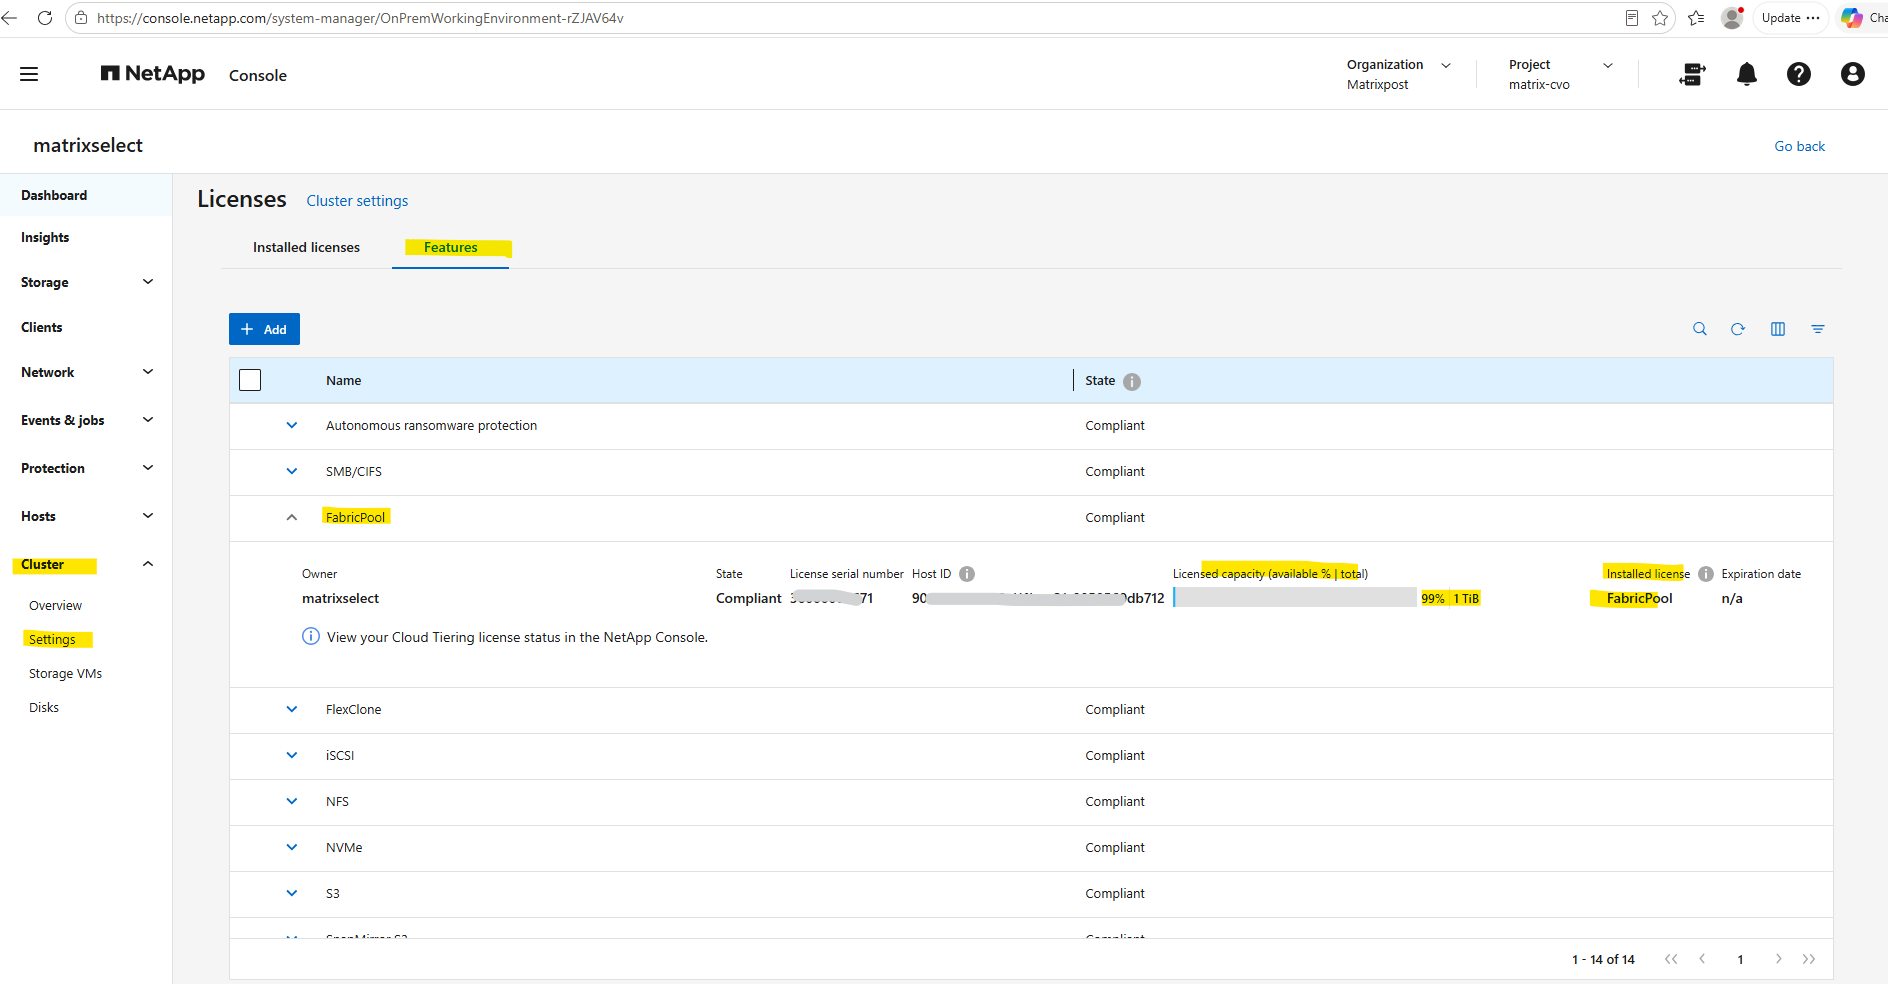
Once installed successfully, the dedicated FabricPool license appears in the list of installed licenses.
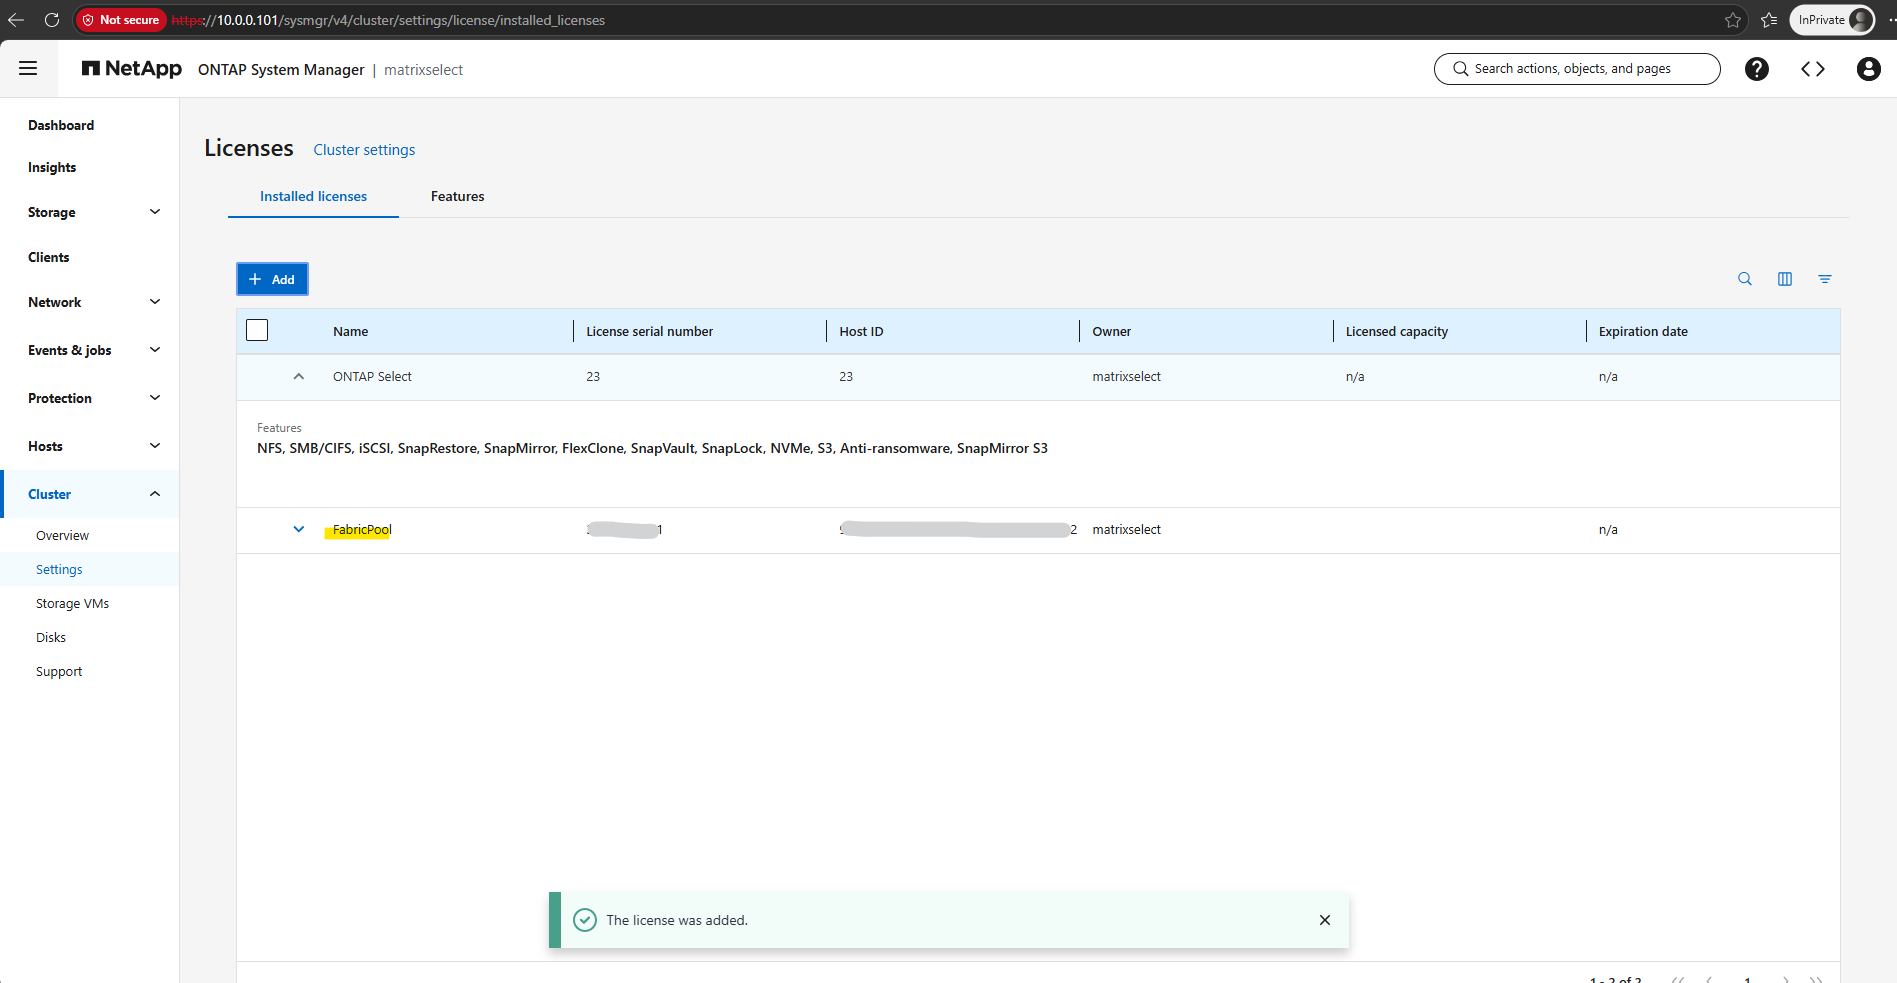
The installed FabricPool license is shown as Compliant in System Manager with 1 TiB of licensed capacity. Although System Manager displays the expiration date as
n/a, the FabricPool license used for this lab was provided by NetApp as a 60-day evaluation license.Many thanks again to NetApp for providing the license and making this FabricPool lab possible.
After installing the FabricPool license, return to Storage > Tiers > Add cloud tier. Microsoft Azure Blob Storage is now enabled and can be selected as the object-store destination for FabricPool.
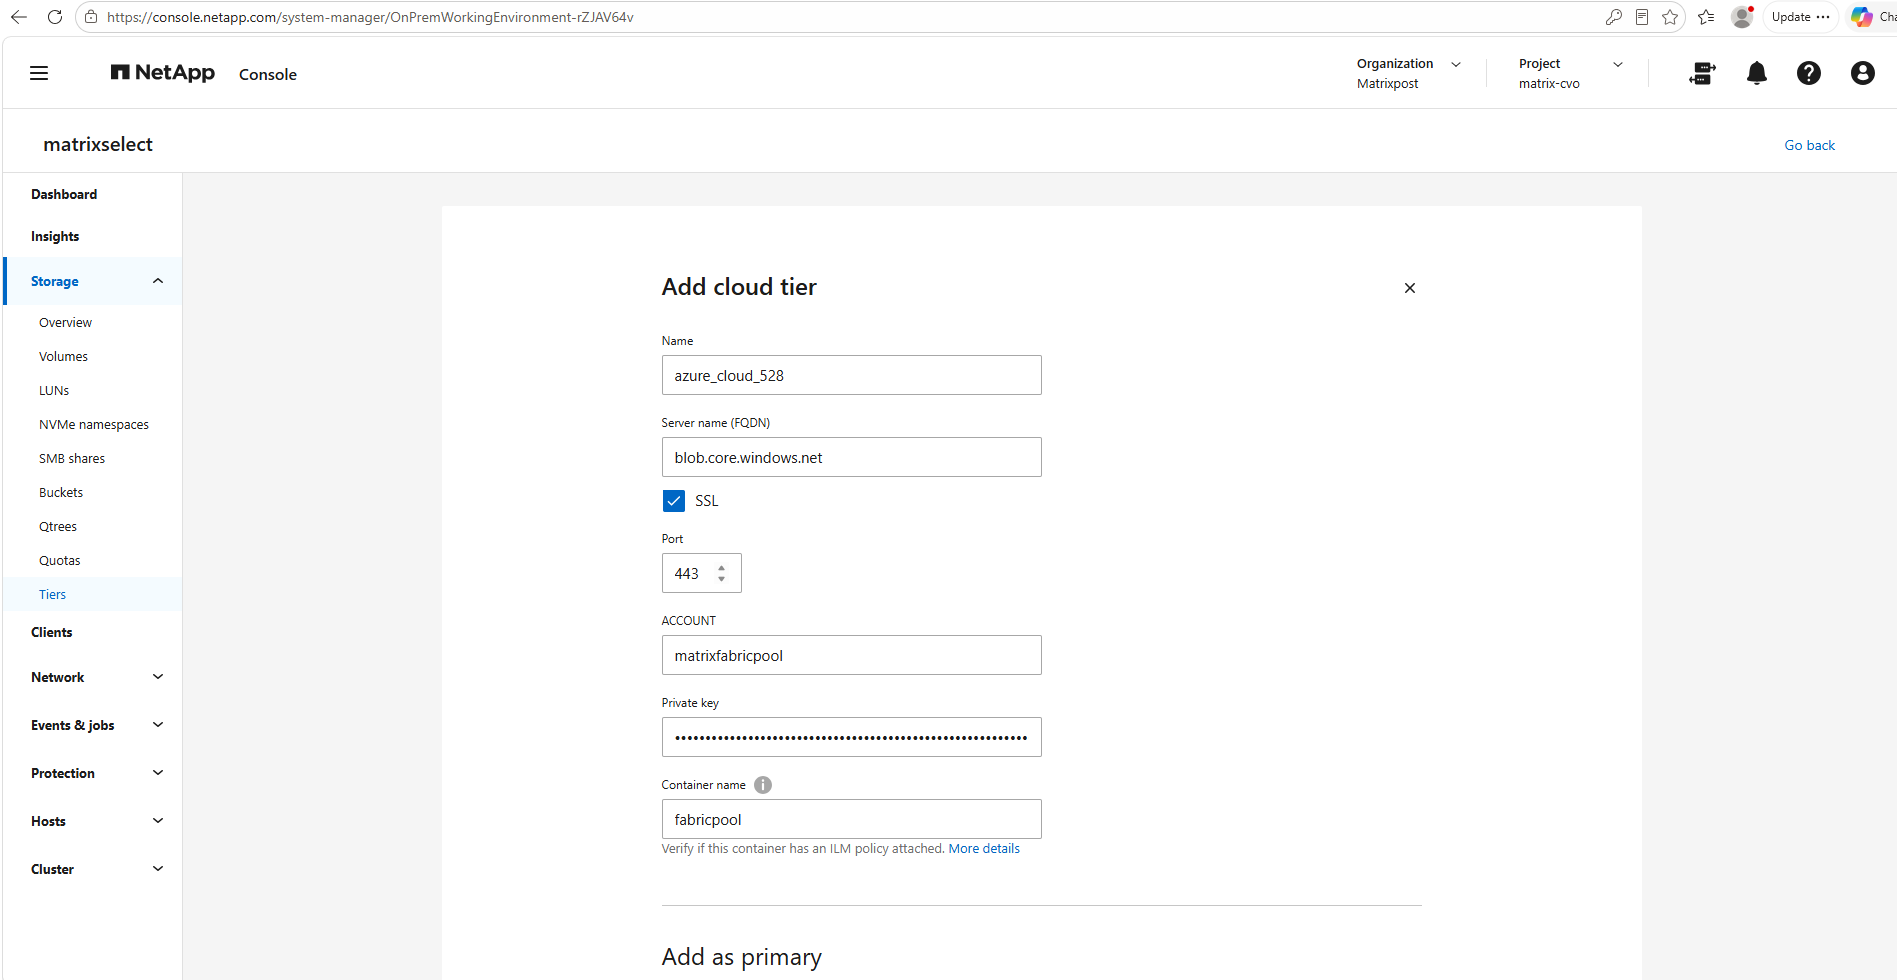
After selecting Microsoft Azure Blob Storage, ONTAP opens the Add cloud tier dialog. Here, specify the Azure Blob Storage endpoint and the credentials and container that ONTAP will use for storing FabricPool data.
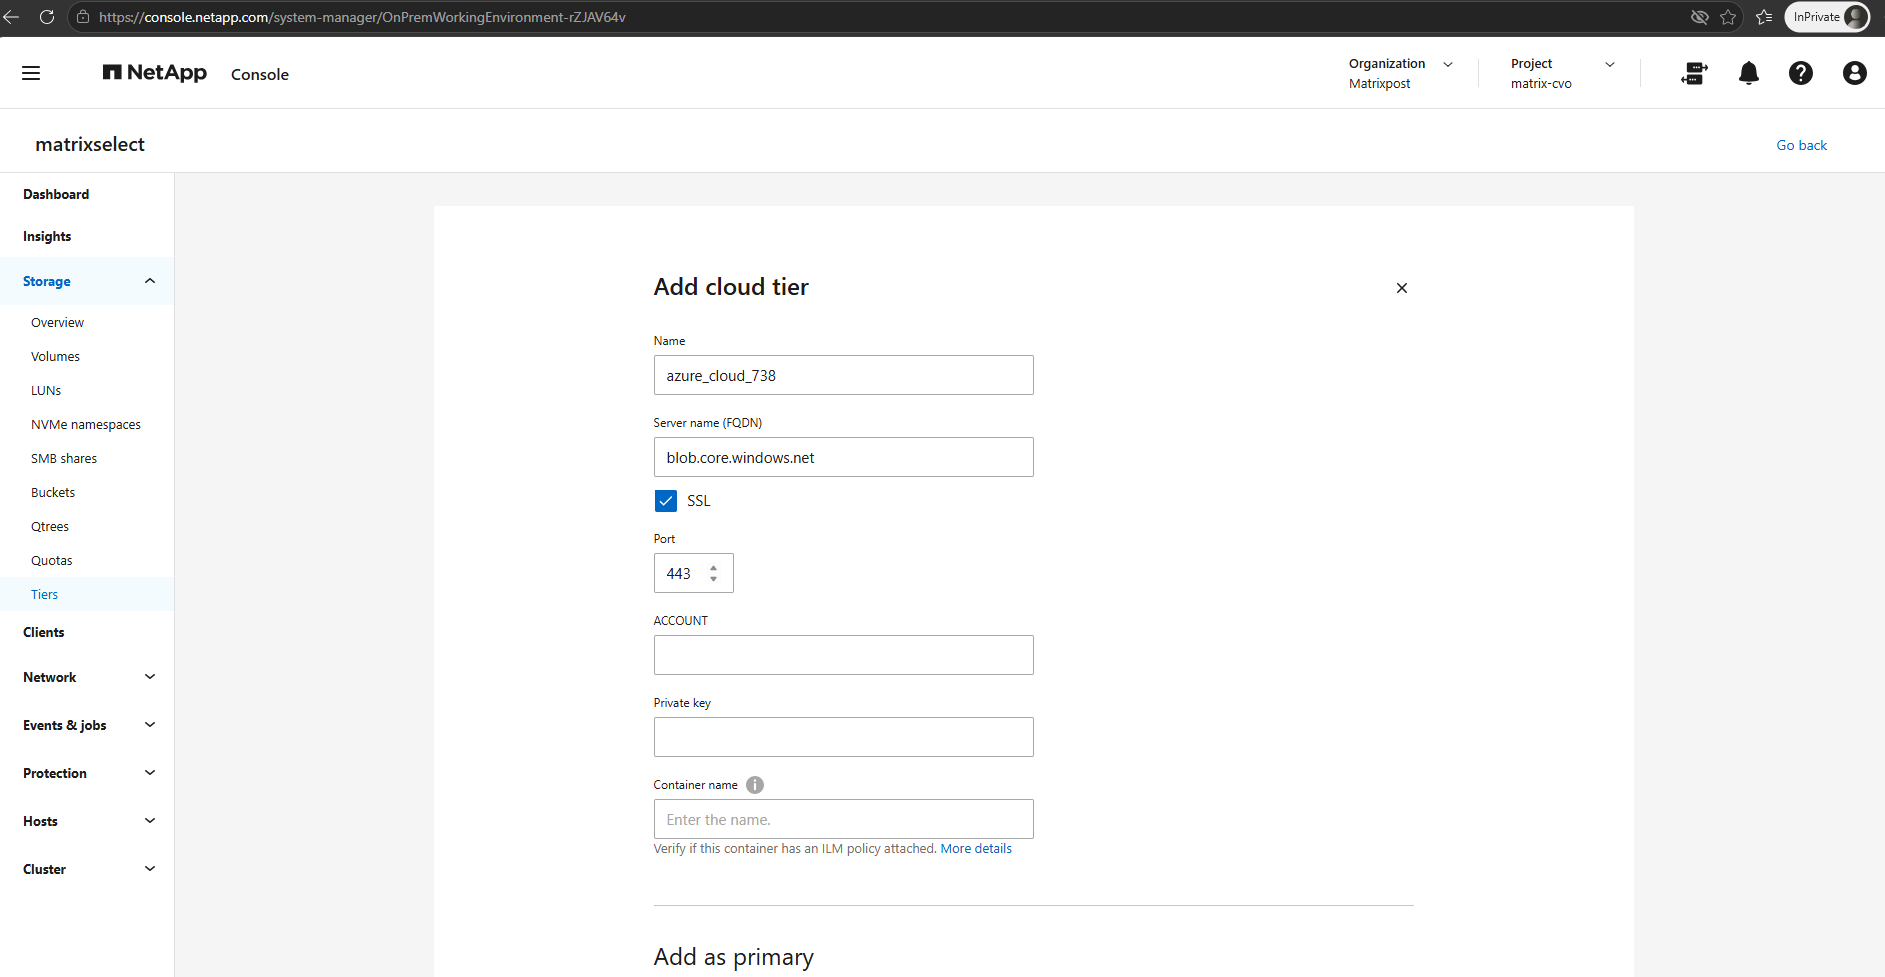
To provide the required information for the Add cloud tier configuration, we first need to create a dedicated Azure Storage Account and Blob container for FabricPool.
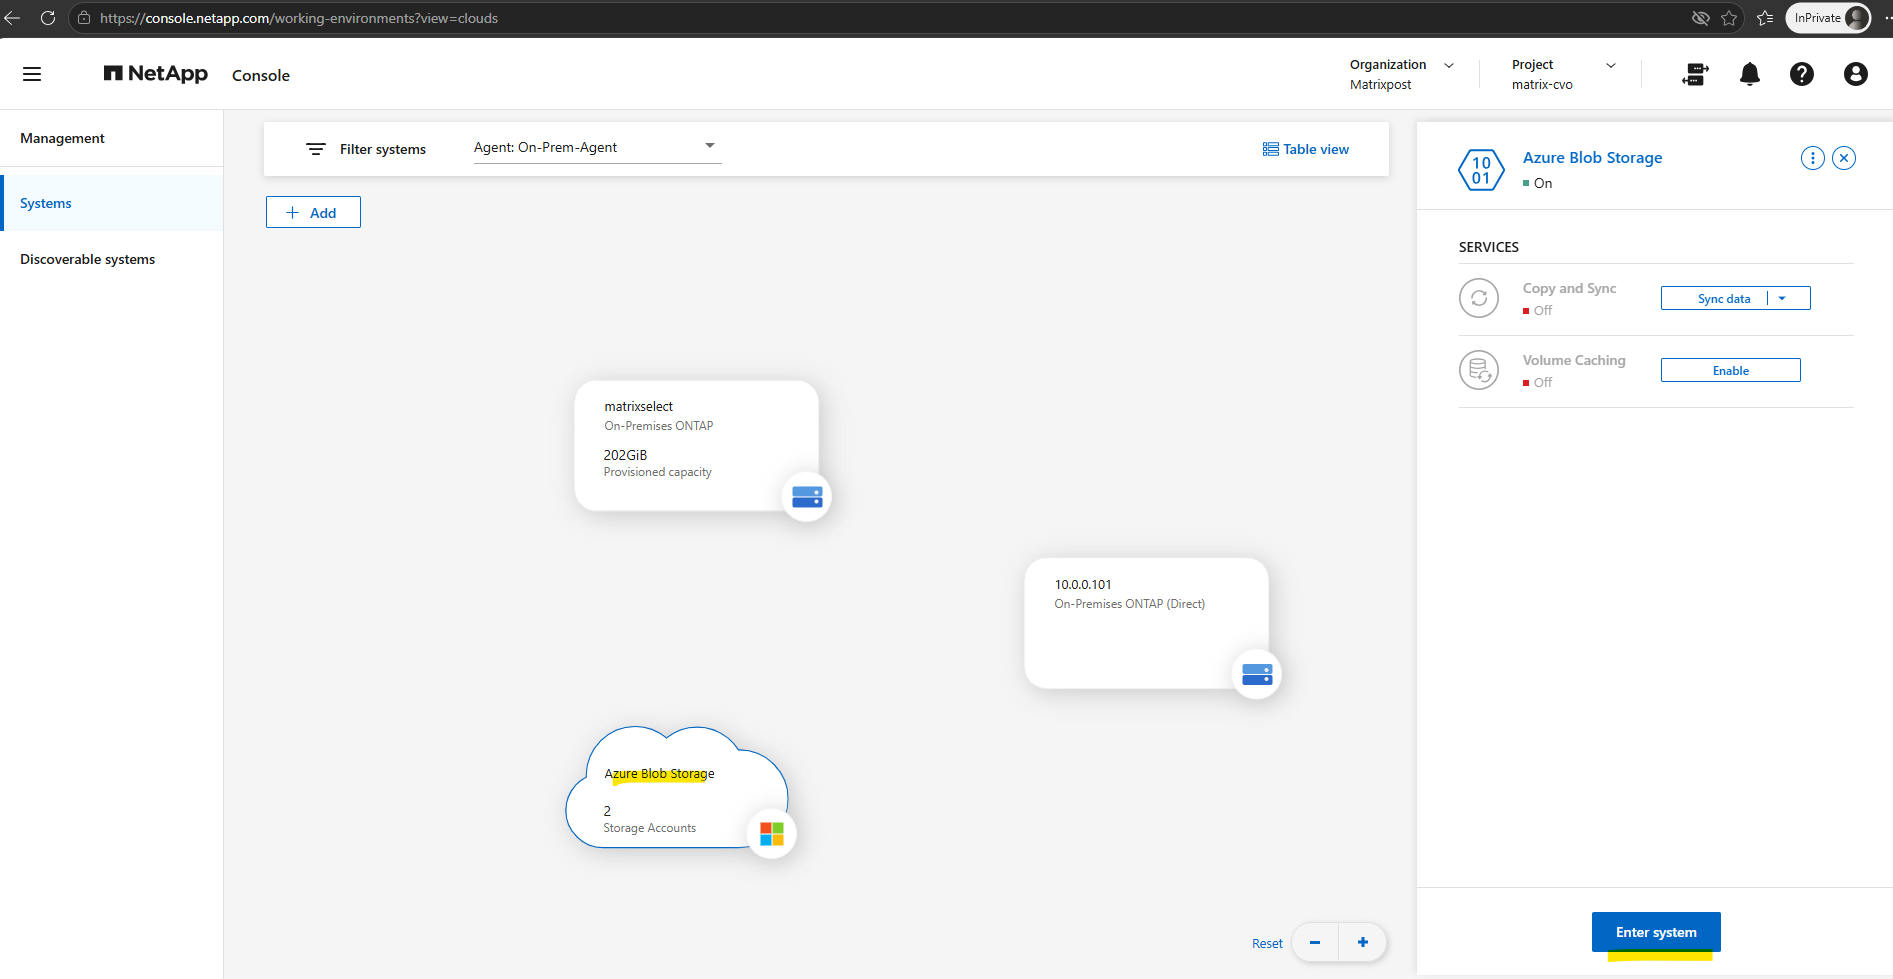
From the NetApp Console Systems page, select the Azure Blob Storage system and click Enter system to manage the Azure storage accounts available to NetApp.
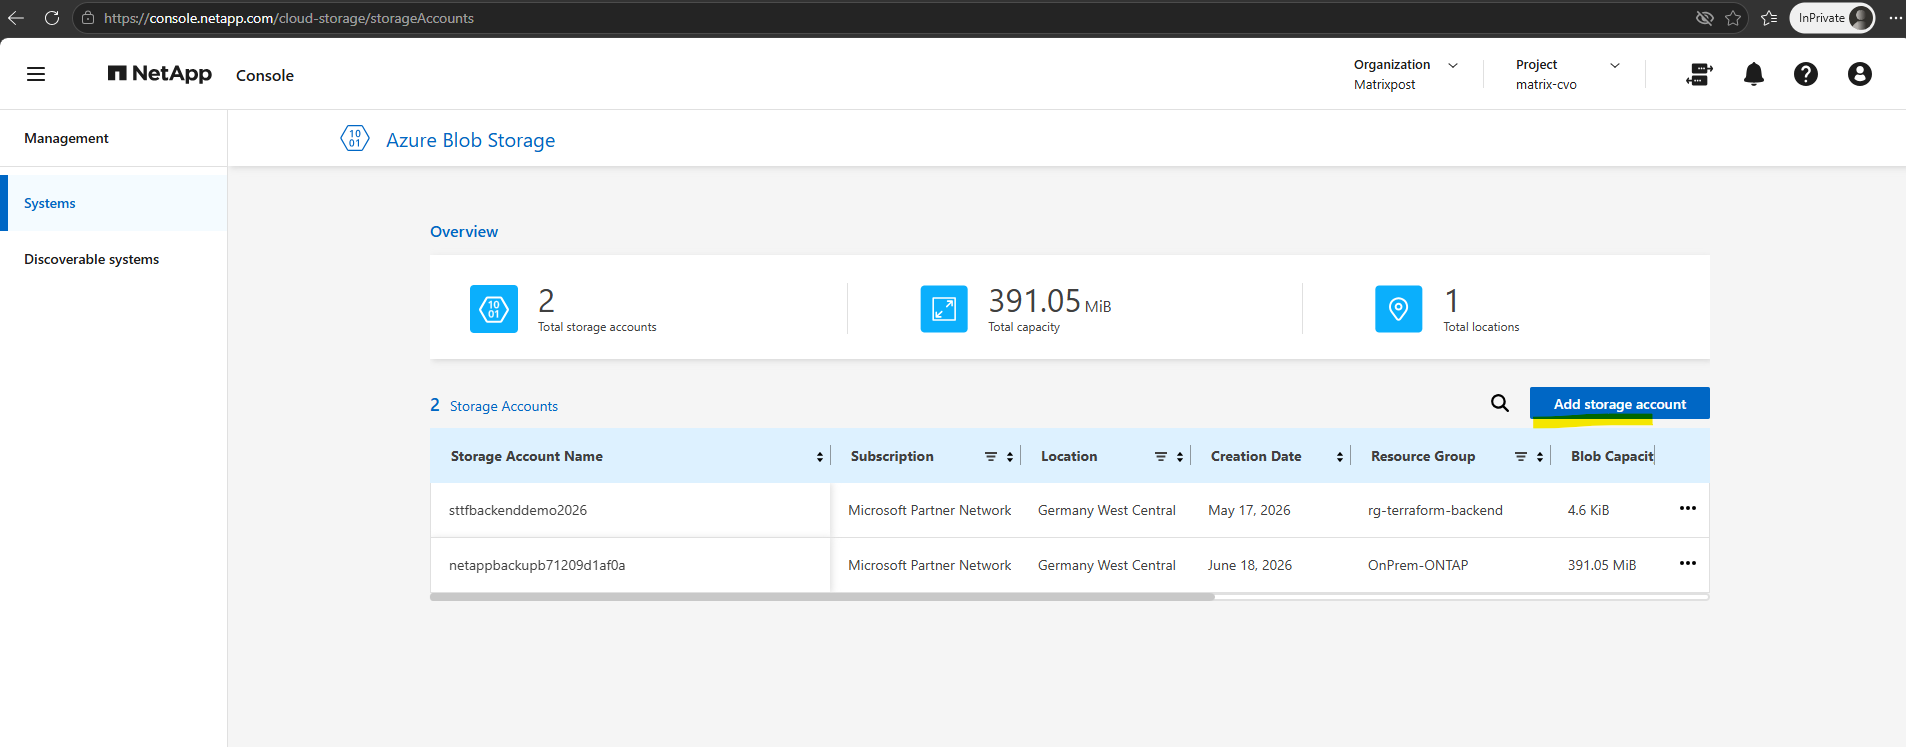
After entering the Azure Blob Storage system, NetApp Console displays the storage accounts available in the connected Azure tenant/subscription, including their location, resource group, and current Blob capacity.
From here, click Add storage account to provision a new dedicated storage account for FabricPool.
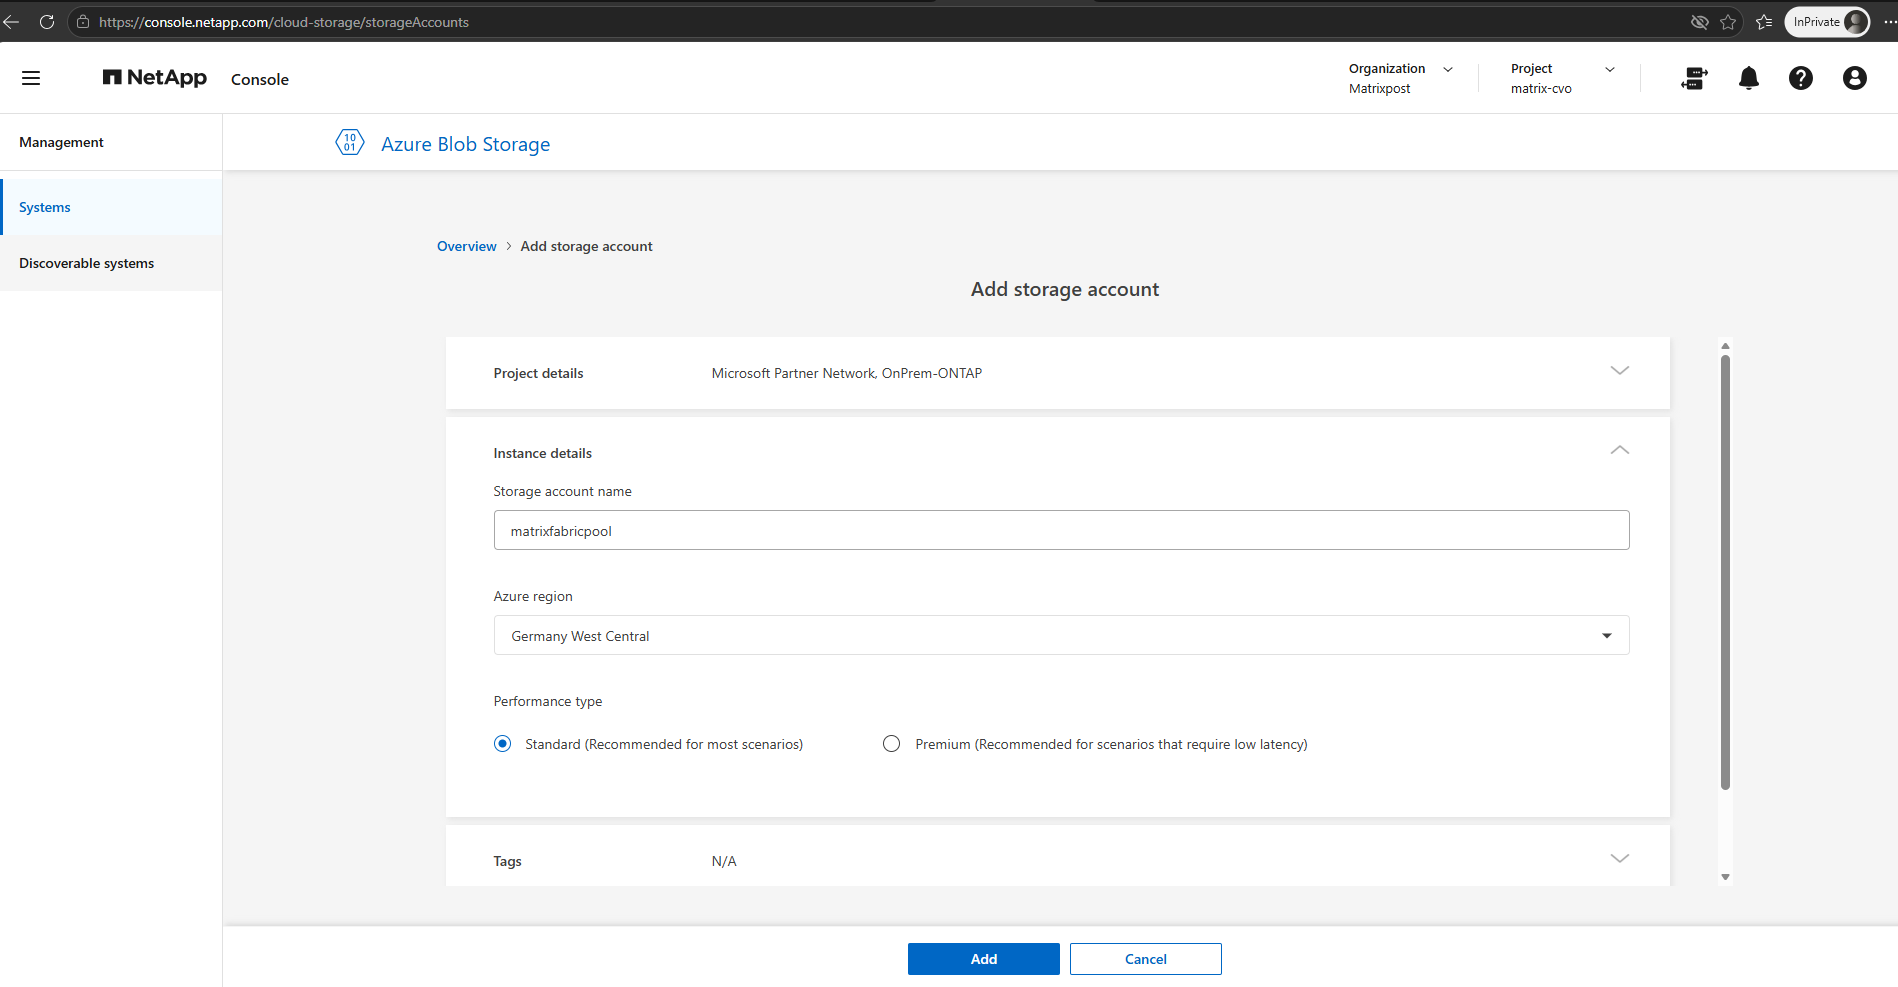
Configure the new Azure Storage Account with a unique name, the desired Azure region, and the Standard performance tier.
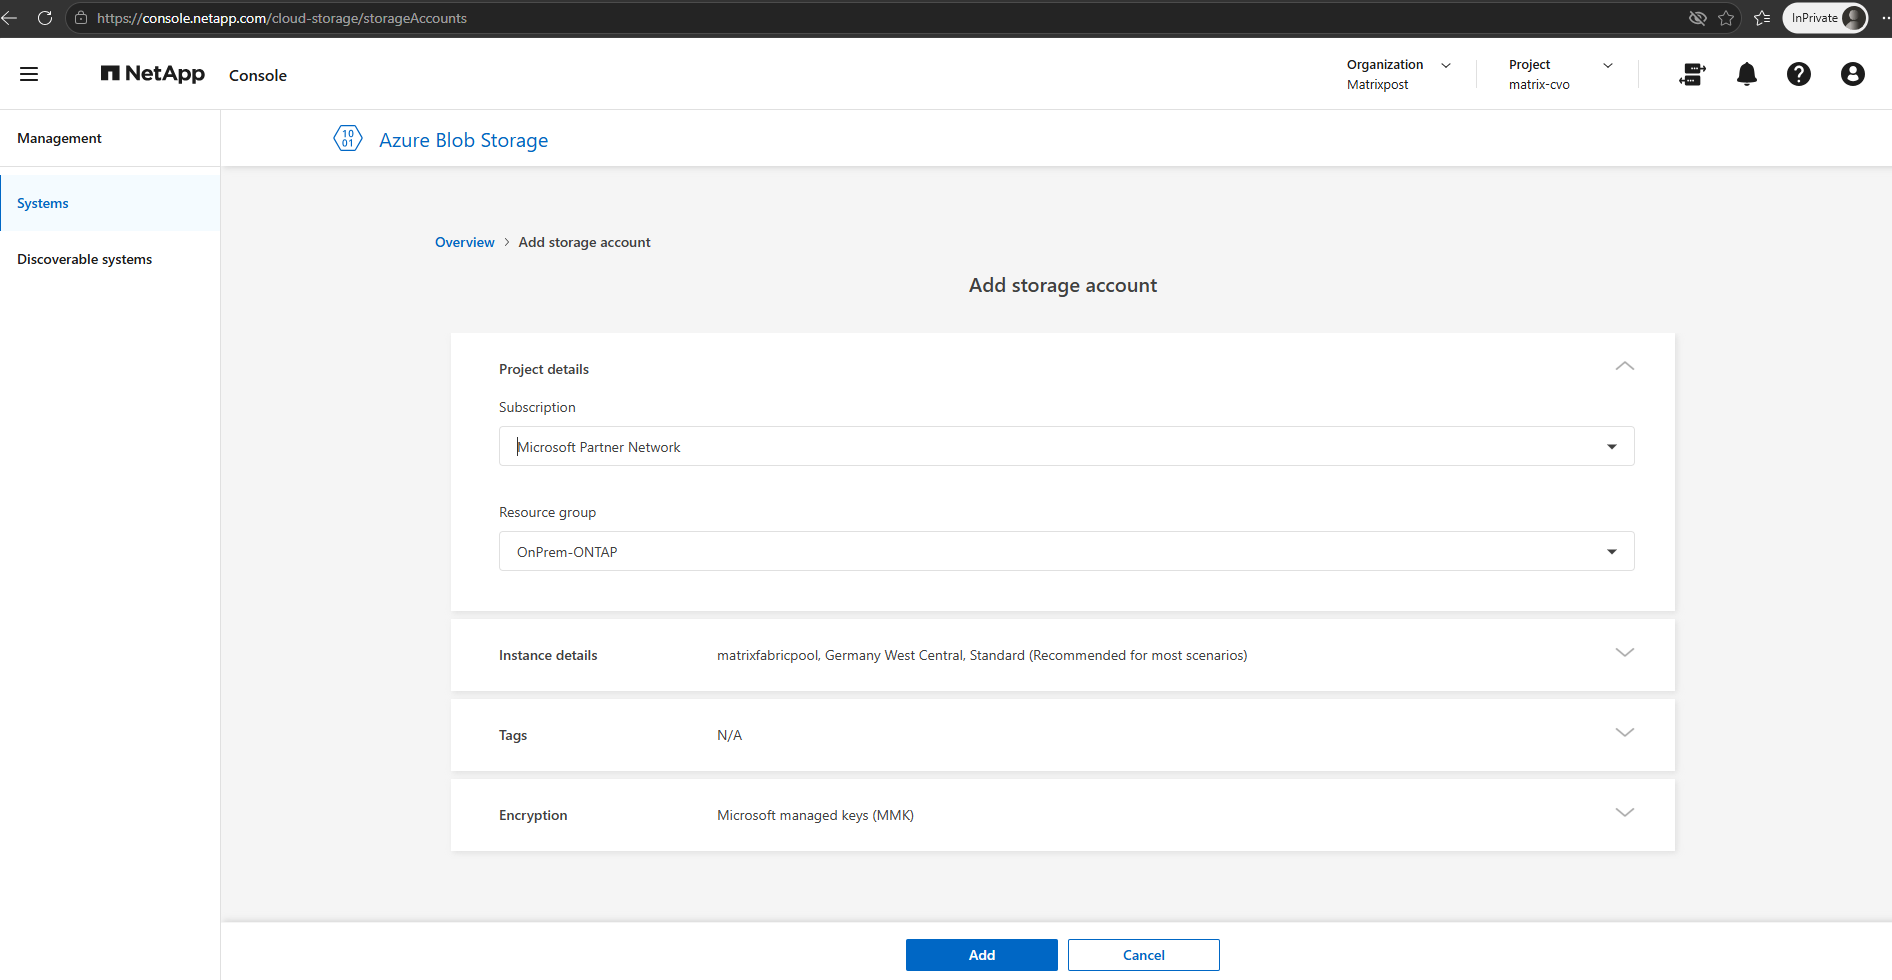
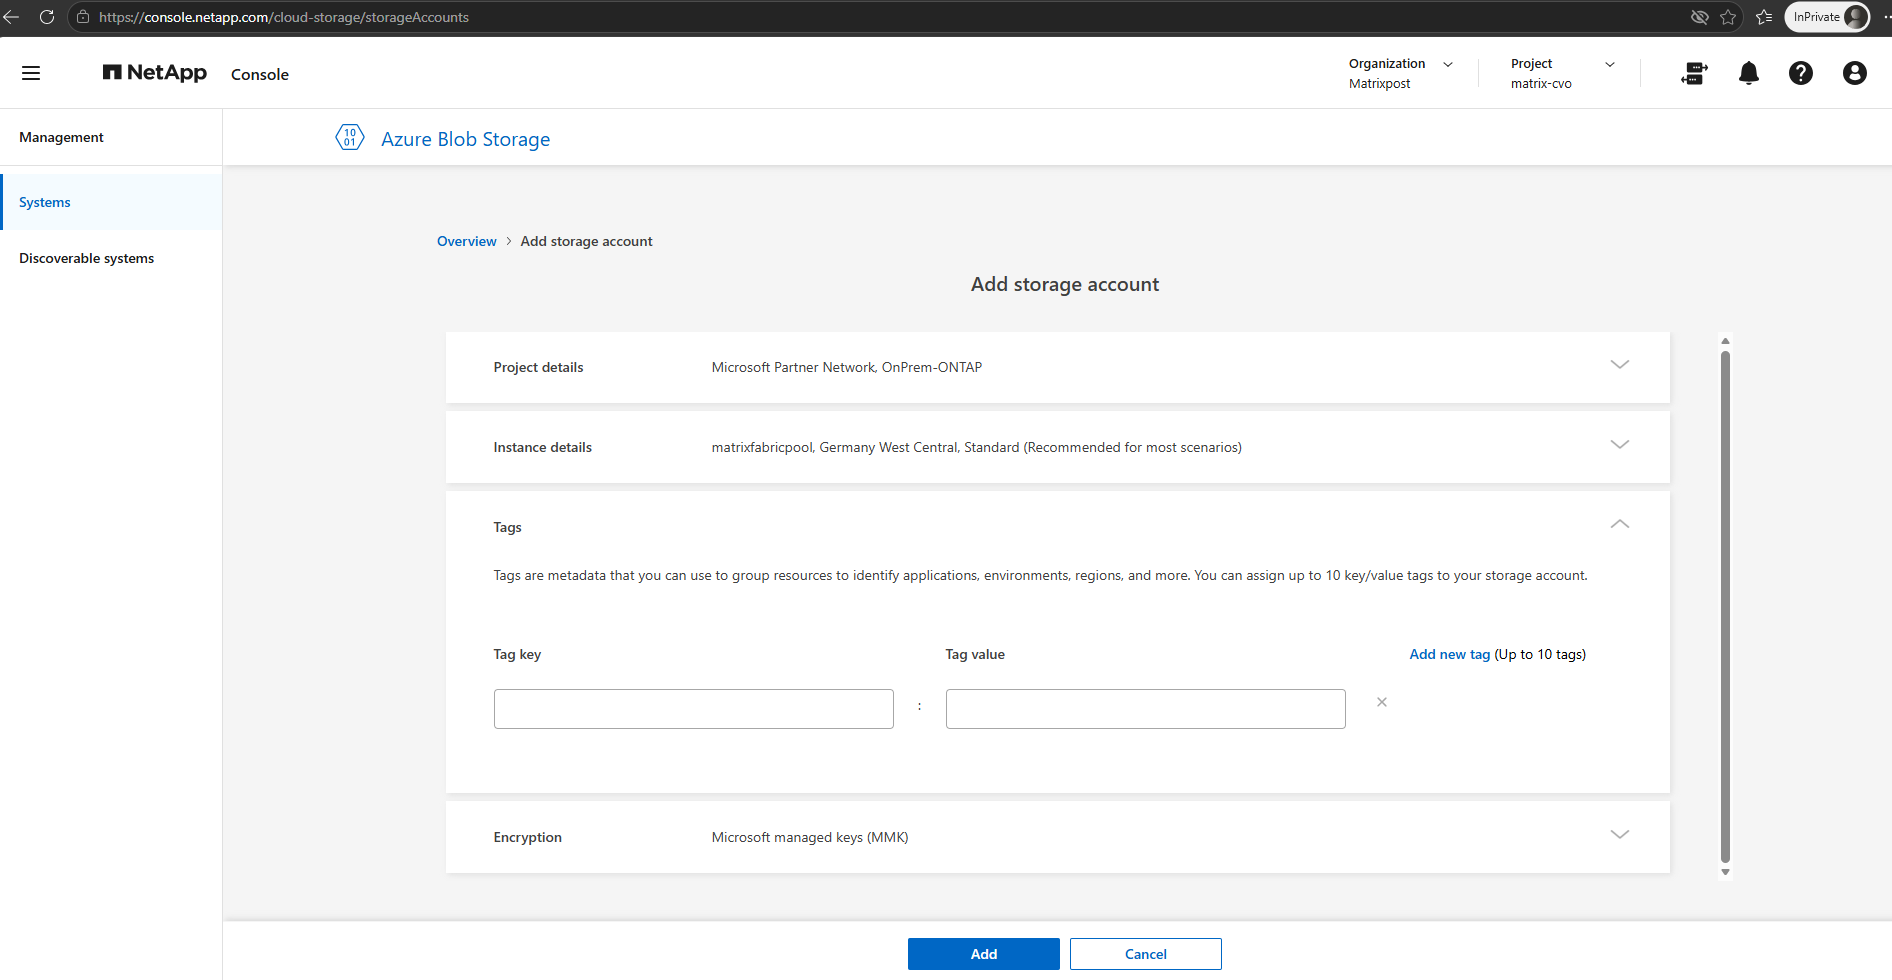
Tags are optional metadata that can be used to organize and identify Azure resources, for example by environment, application, owner, or purpose.
For this lab, no additional tags are required, so I leave these fields empty.
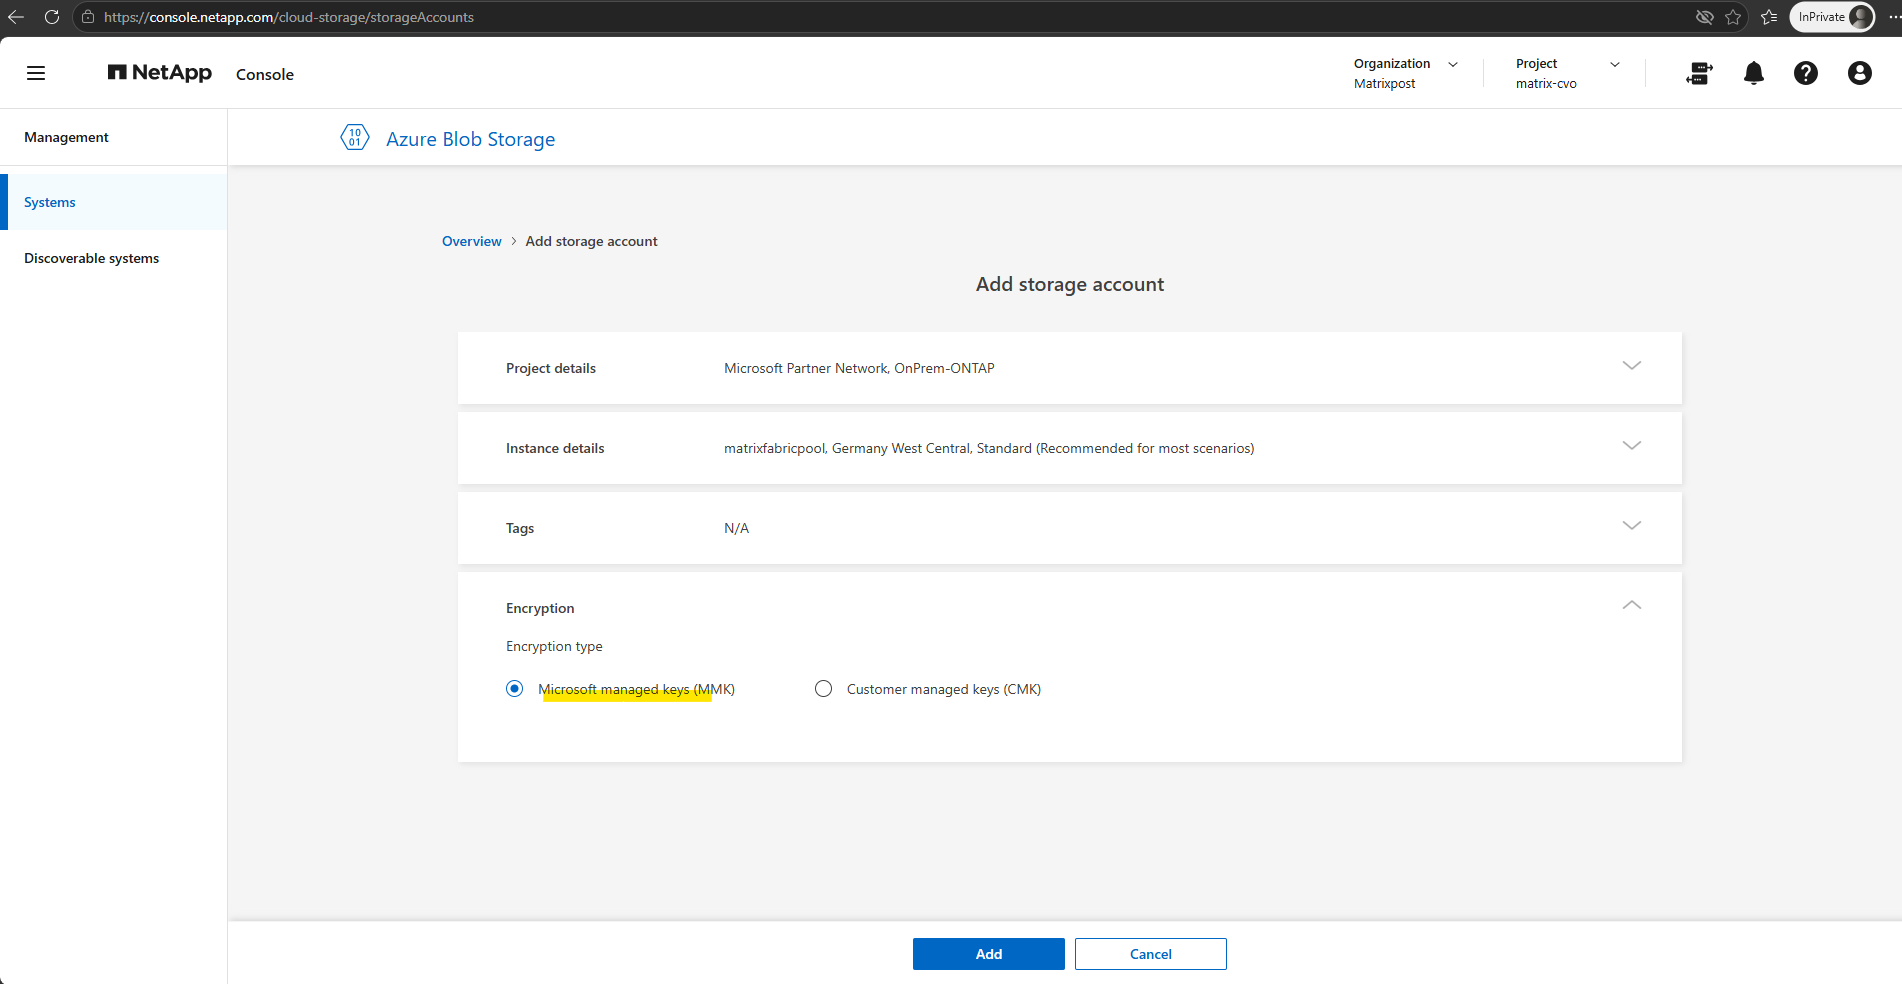
With Microsoft-managed keys (MMK), Azure automatically manages the encryption keys used to encrypt the data at rest in the Storage Account.
For this lab, I keep this default option, as no separate customer-managed key infrastructure is required. Finally click on Add.
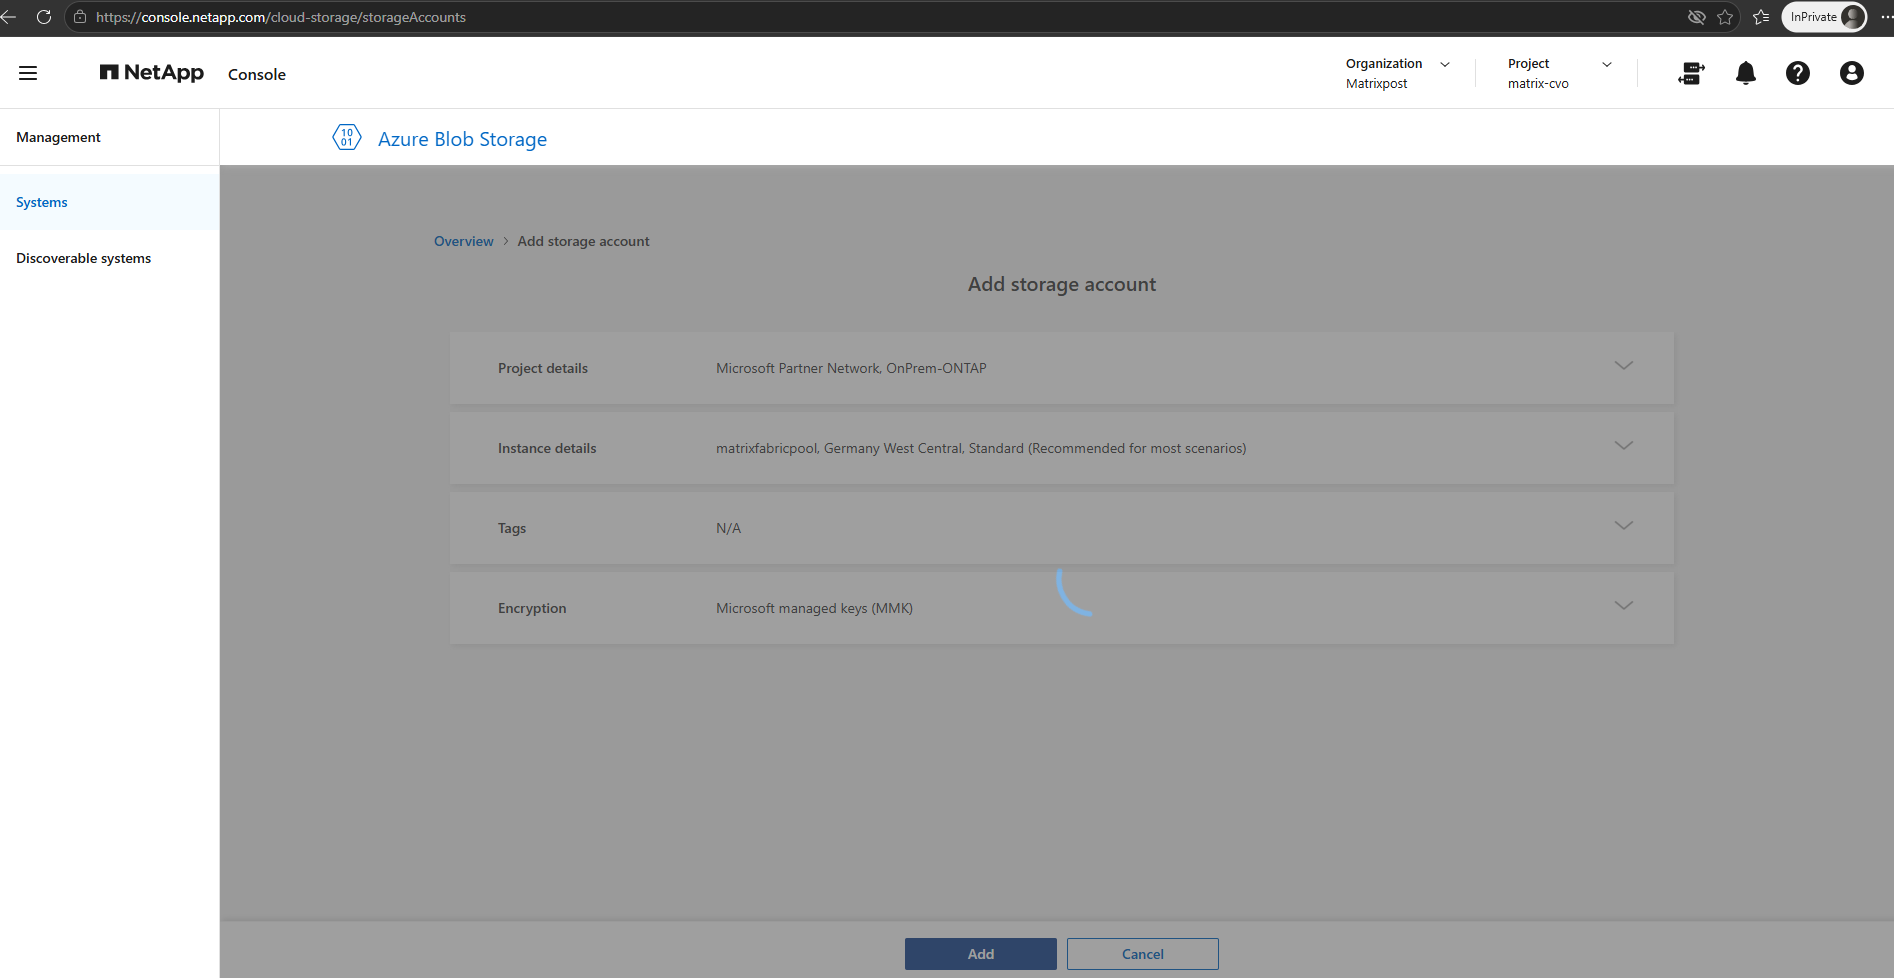
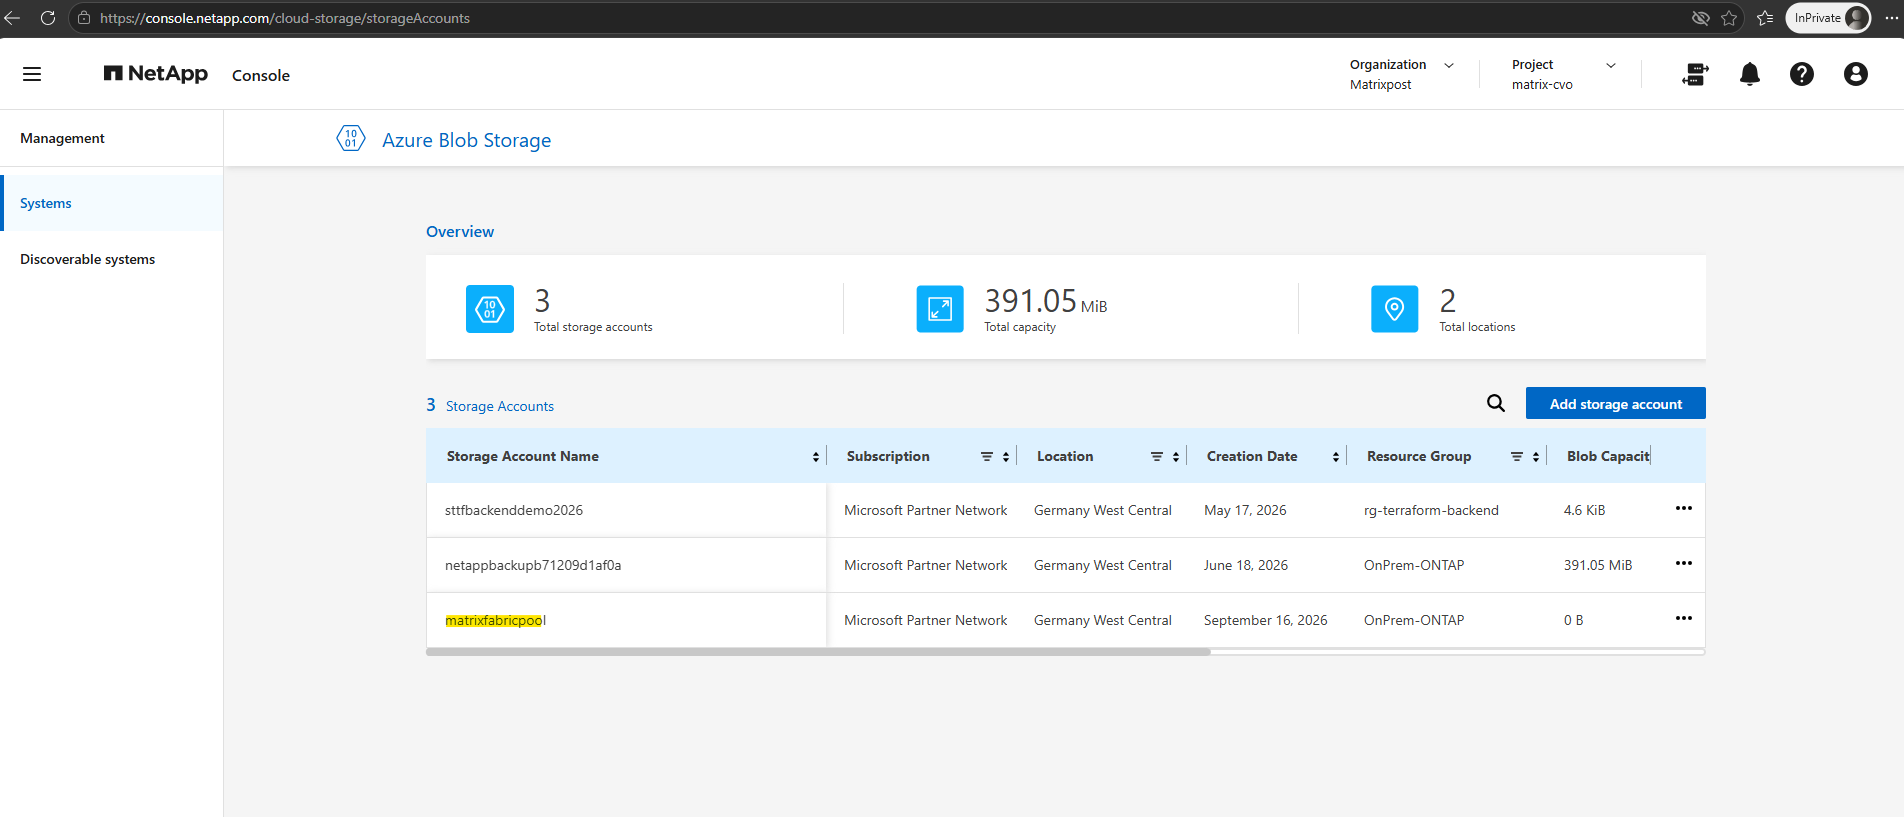
After provisioning completes, the new matrixfabricpool Storage Account appears in the Azure Blob Storage overview in NetApp Console. It currently shows 0 B of Blob capacity because no FabricPool data has been tiered to it yet.
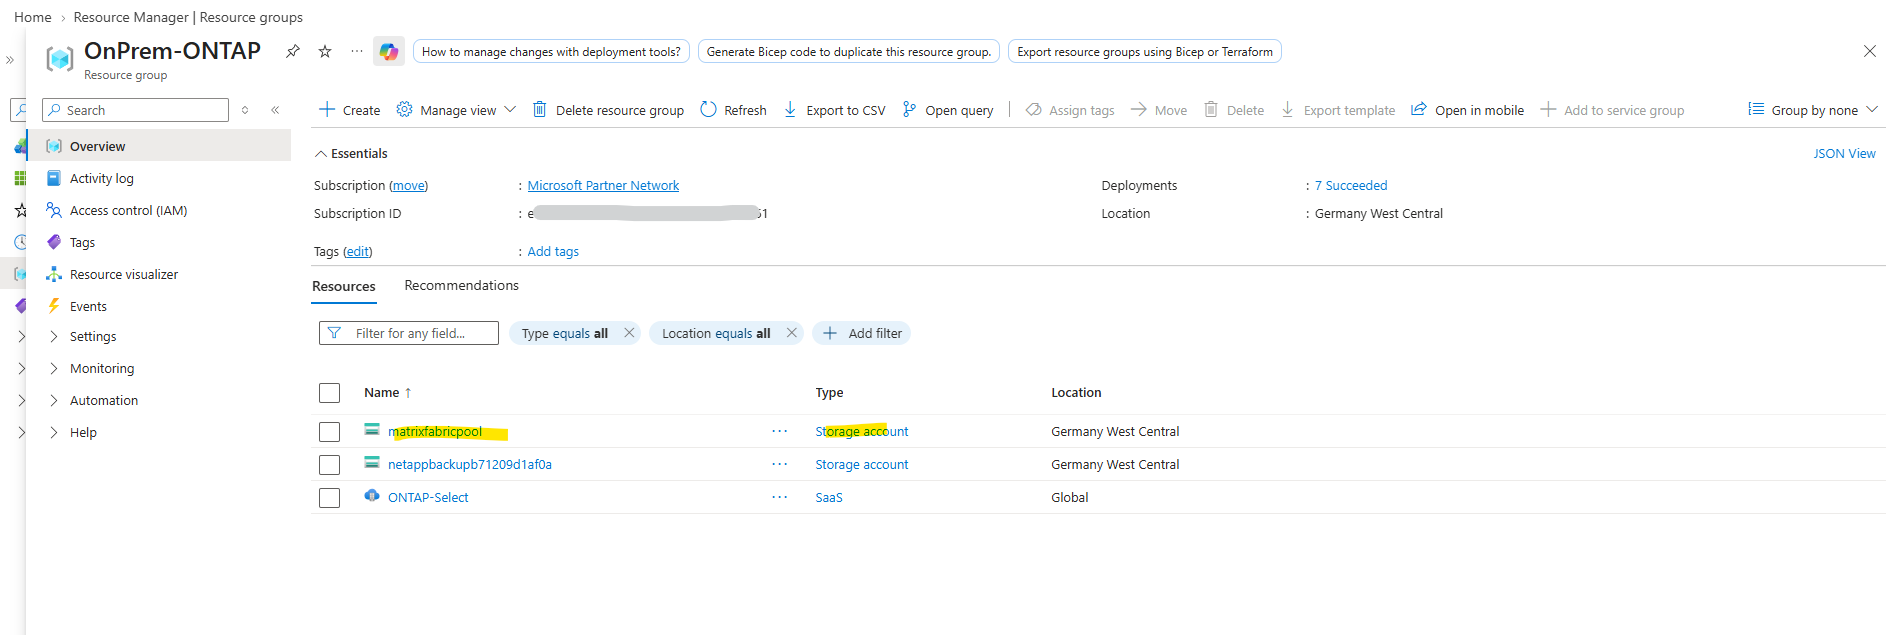
The newly provisioned
matrixfabricpoolStorage Account can also be verified directly in the Azure portal, where it appears in the selectedOnPrem-ONTAPresource group.
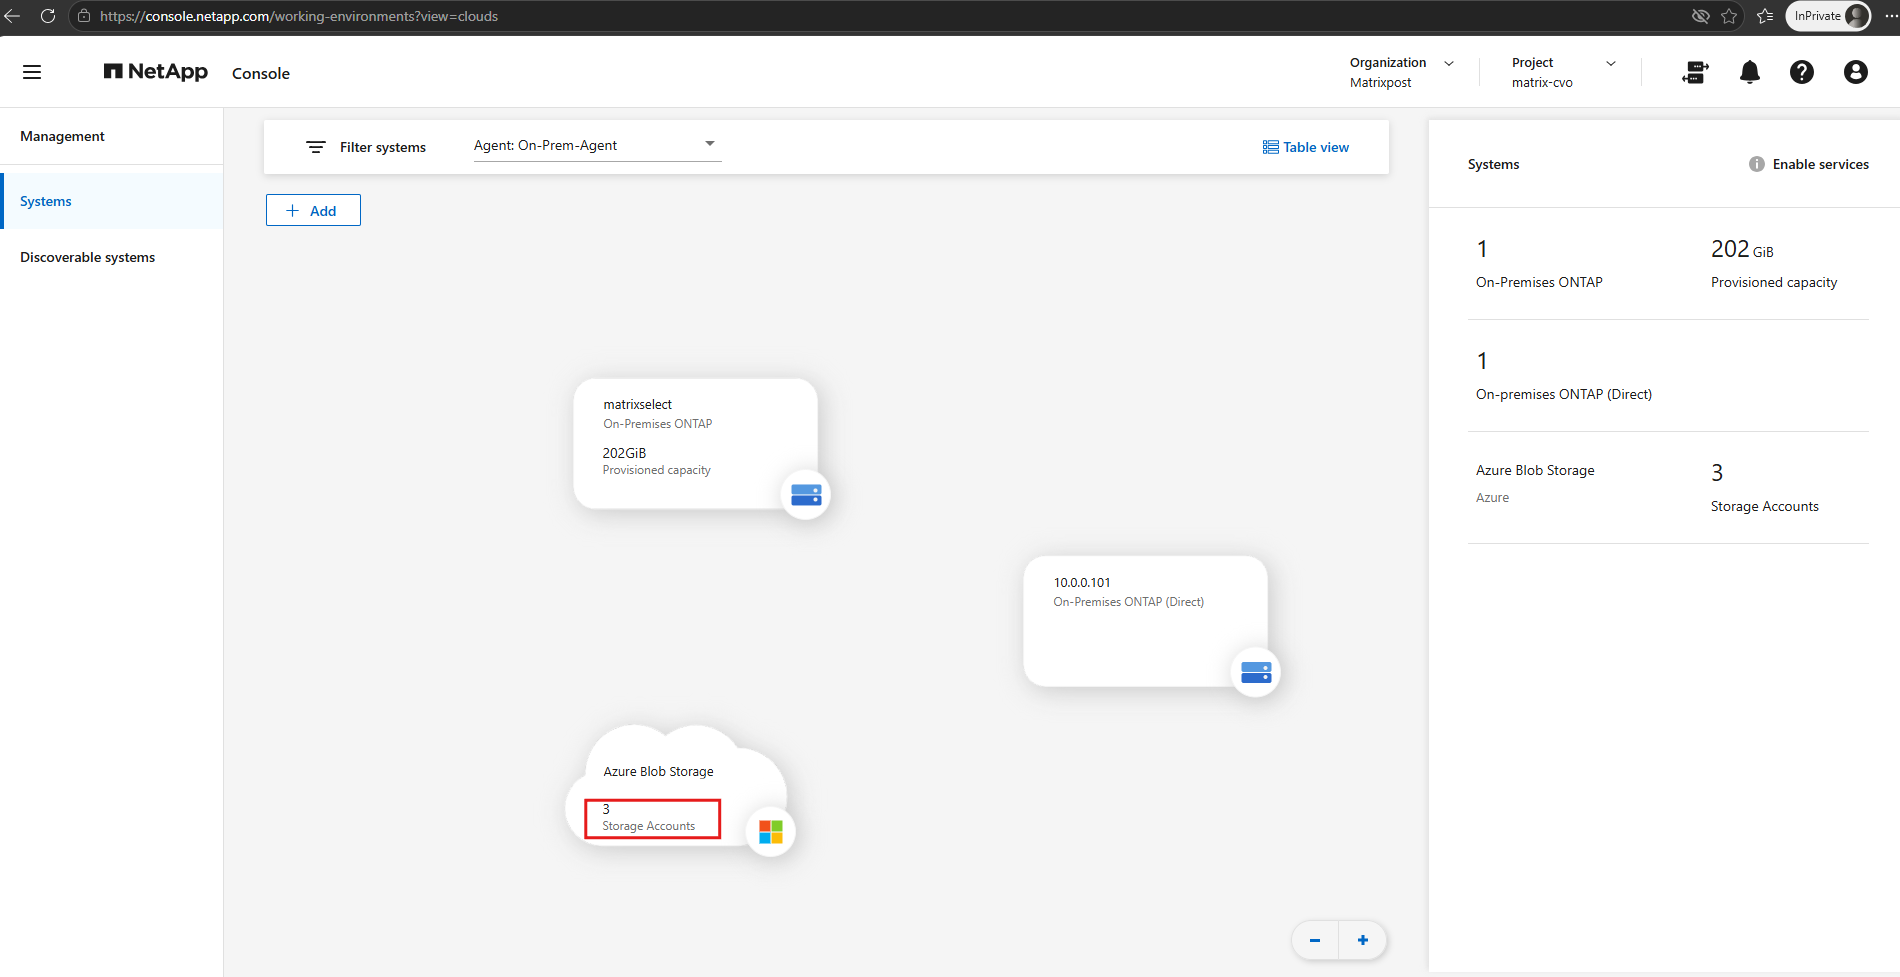
Back on the NetApp Console Systems page, the Azure Blob Storage system now reports three Storage Accounts, confirming that the newly provisioned matrixfabricpool account has been added successfully.
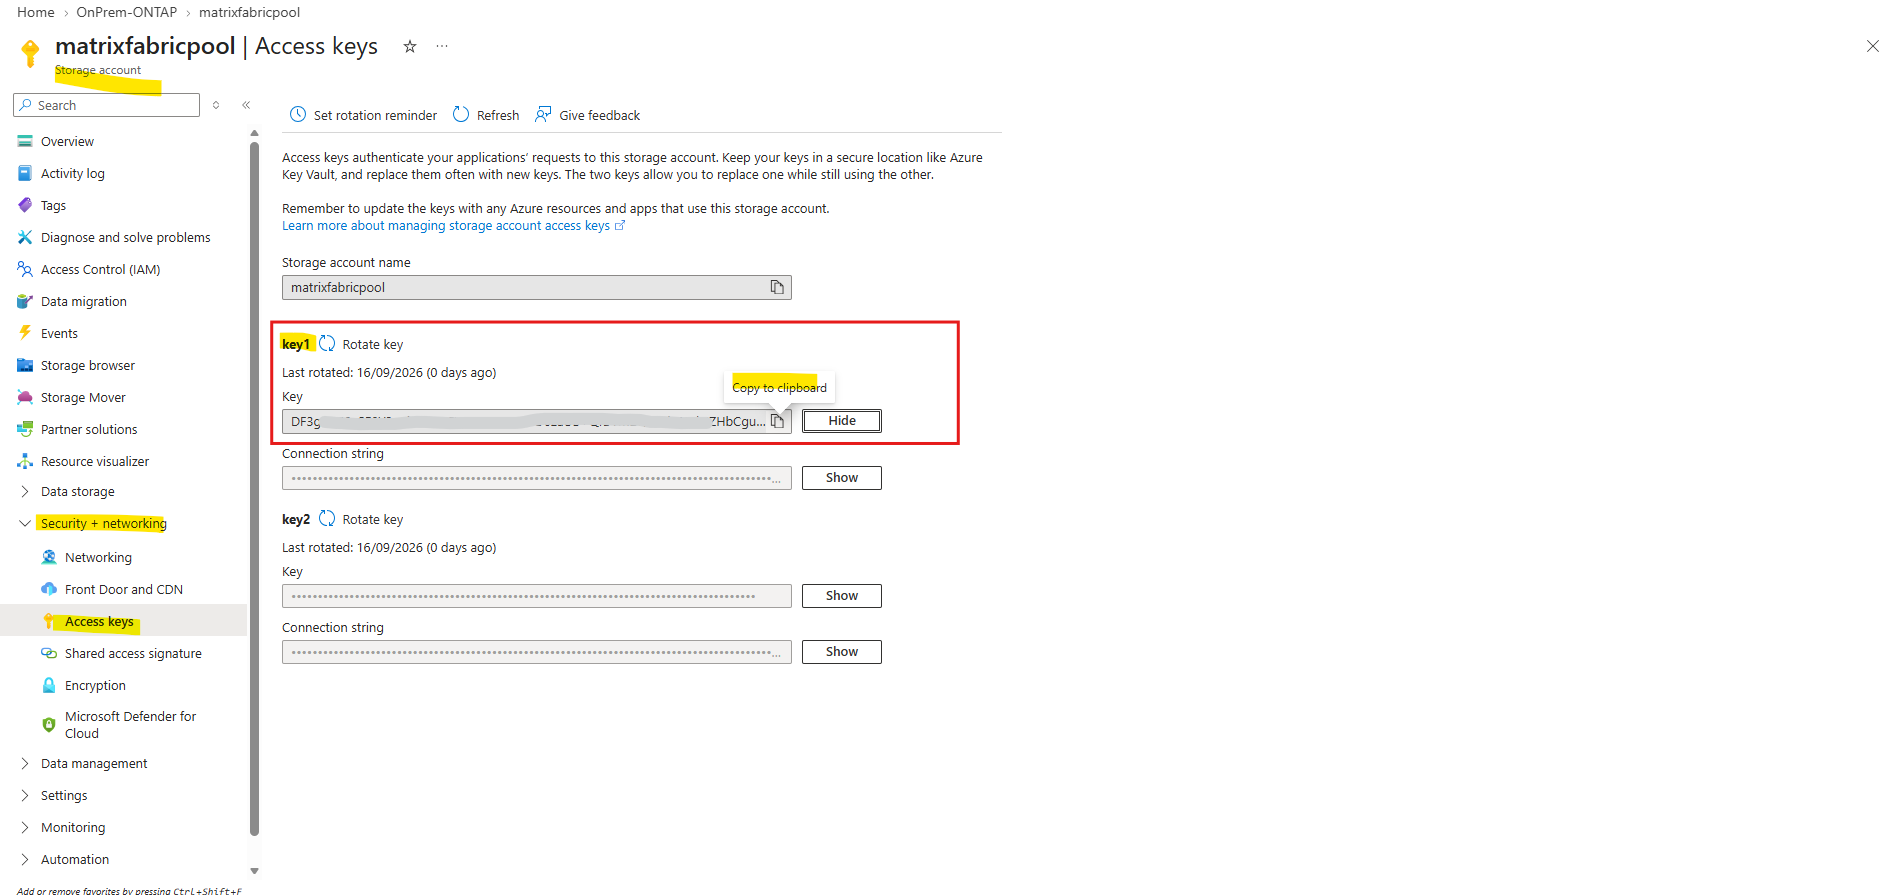
The Private key required by ONTAP corresponds to one of the Azure Storage Account access keys.
In the Azure portal, navigate to Security + networking > Access keys for the
matrixfabricpoolStorage Account and copy eitherkey1orkey2.
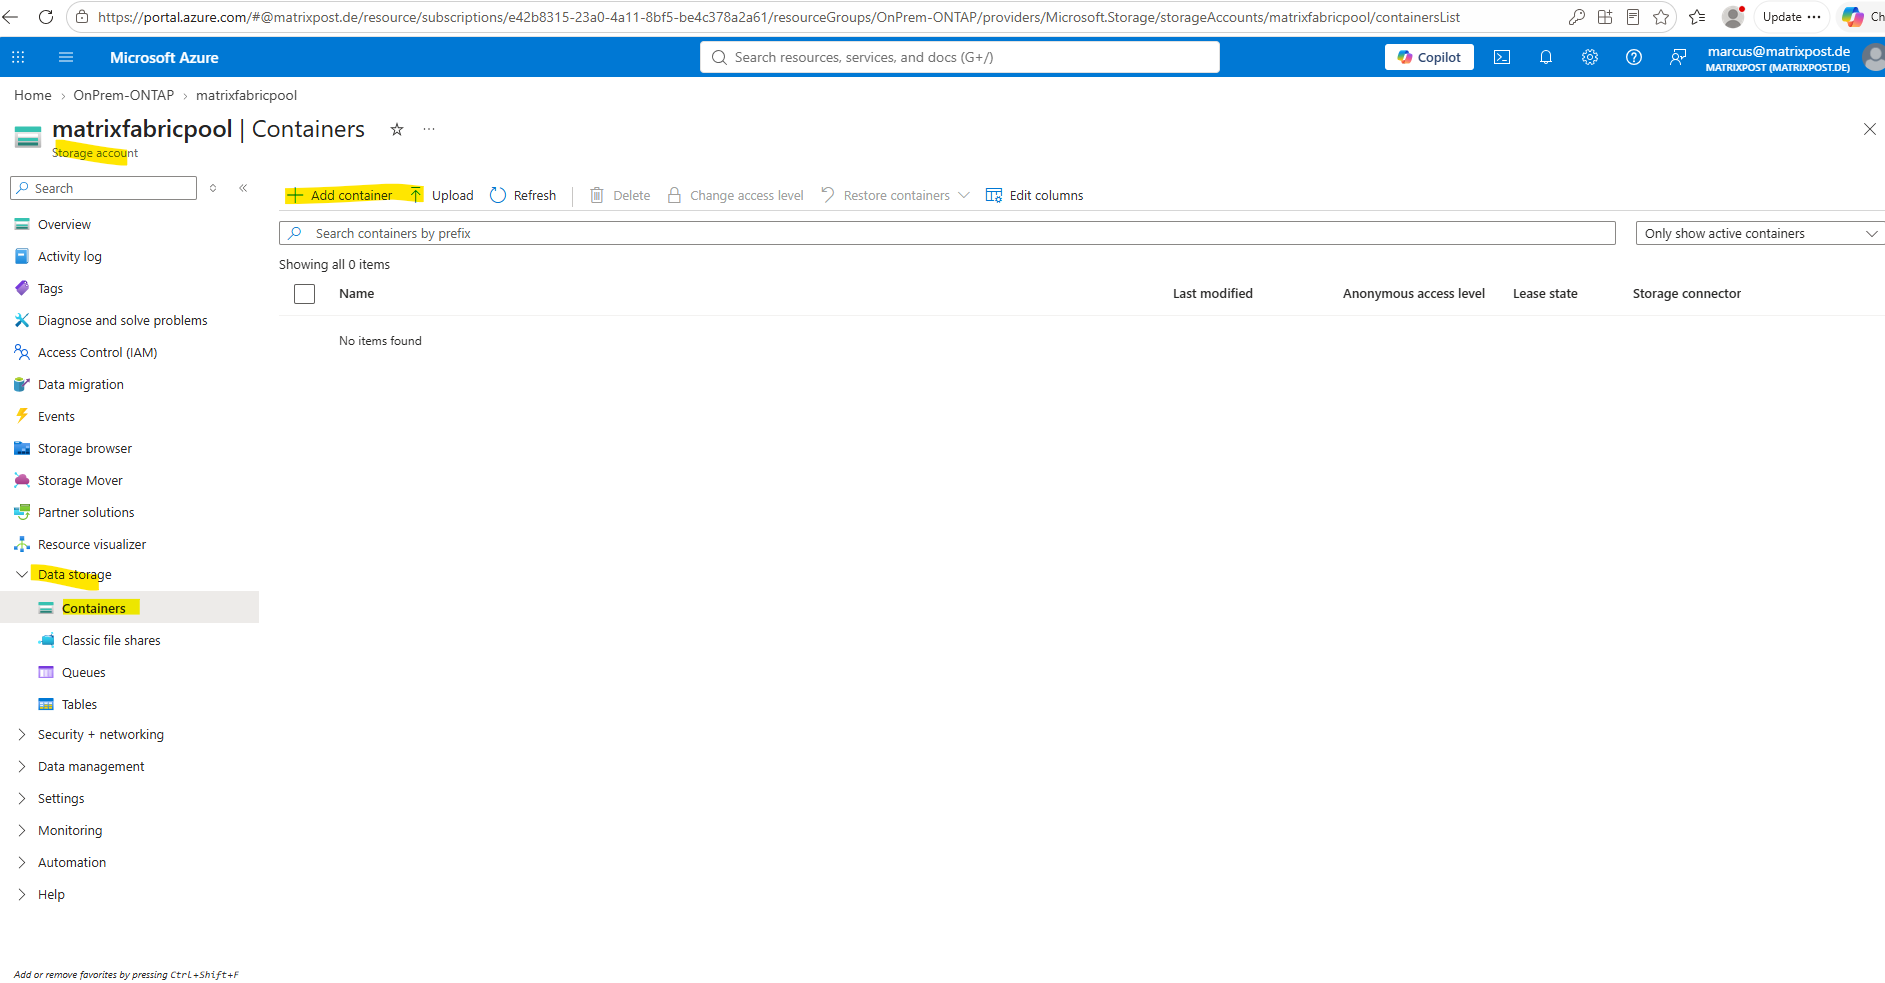
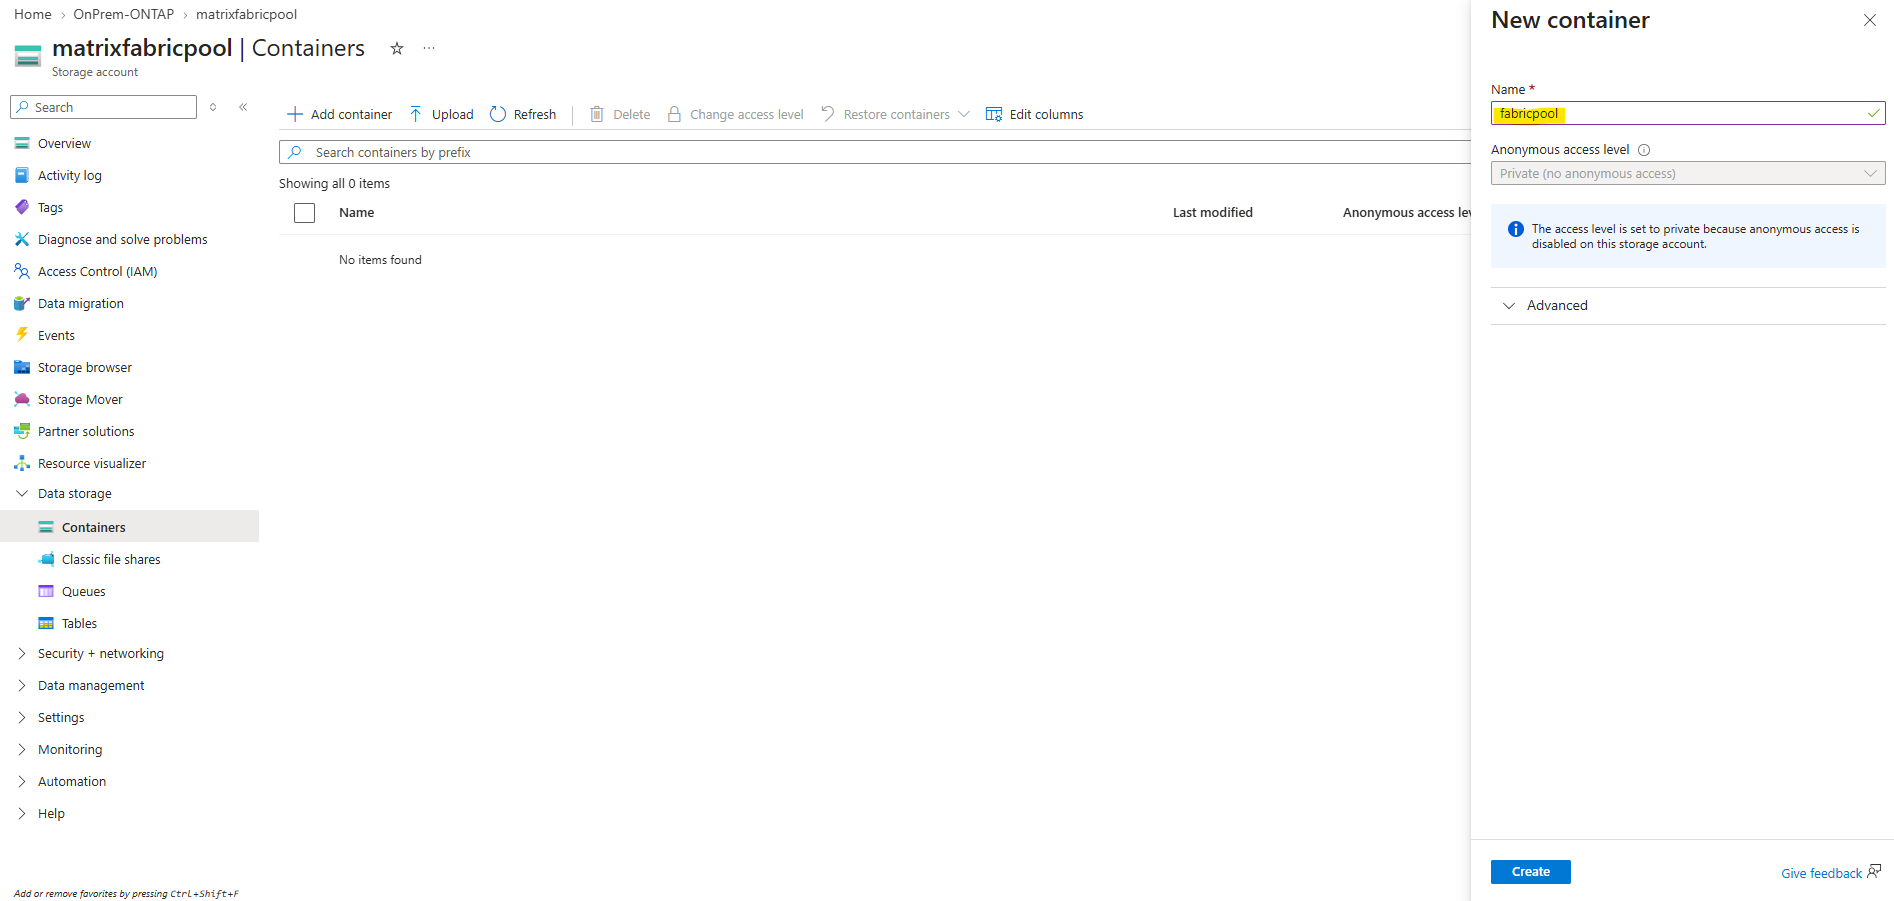
Next, navigate to Data storage > Containers in the matrixfabricpool Storage Account. Since the Storage Account is new, no containers exist yet; click Add container to create the dedicated container that ONTAP FabricPool will use for tiered data.
Create a new Blob container named fabricpool and keep the Anonymous access level set to Private (no anonymous access).
ONTAP does not require anonymous access because it authenticates to the Storage Account using the access key configured for the FabricPool cloud tier.
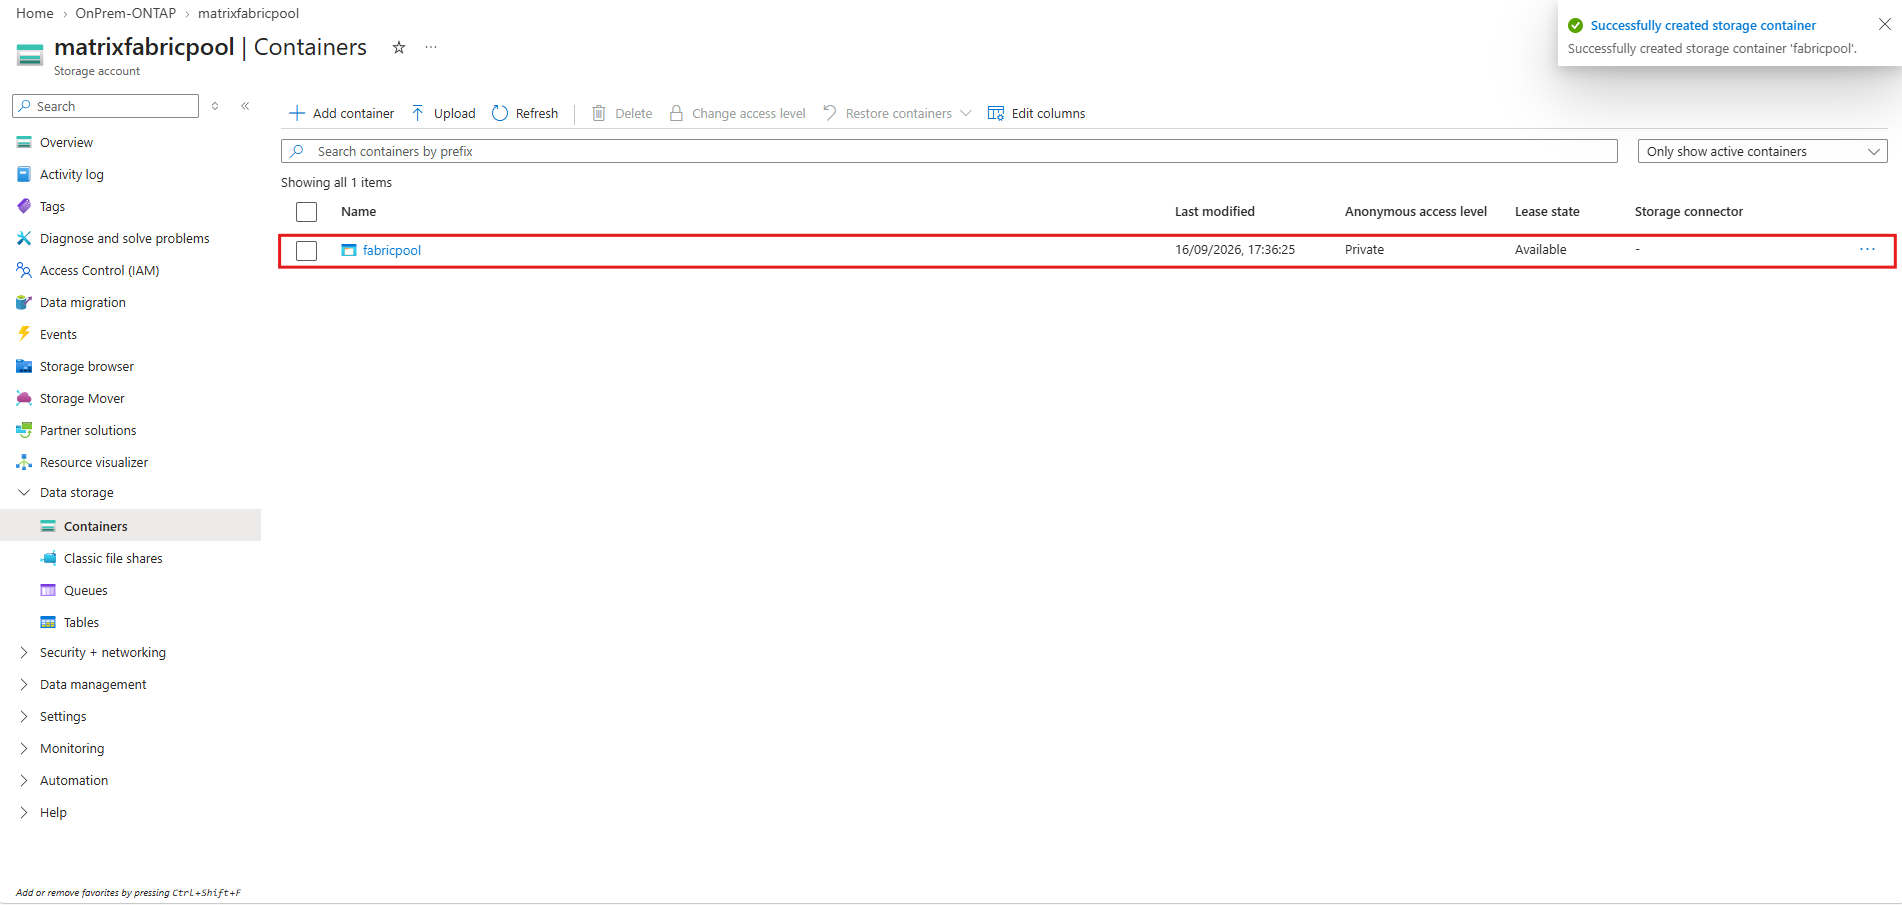
The
fabricpoolBlob container is now successfully created and ready to be used as the object-storage destination for ONTAP FabricPool. The container remains Private, with access provided through the Storage Account credentials configured in ONTAP.
Back in ONTAP System Manager, enter the Azure Storage Account name matrixfabricpool, paste the corresponding Storage Account access key into Private key, and specify the previously created fabricpool Blob container. Communication with Azure Blob Storage uses HTTPS (SSL) over TCP port 443.
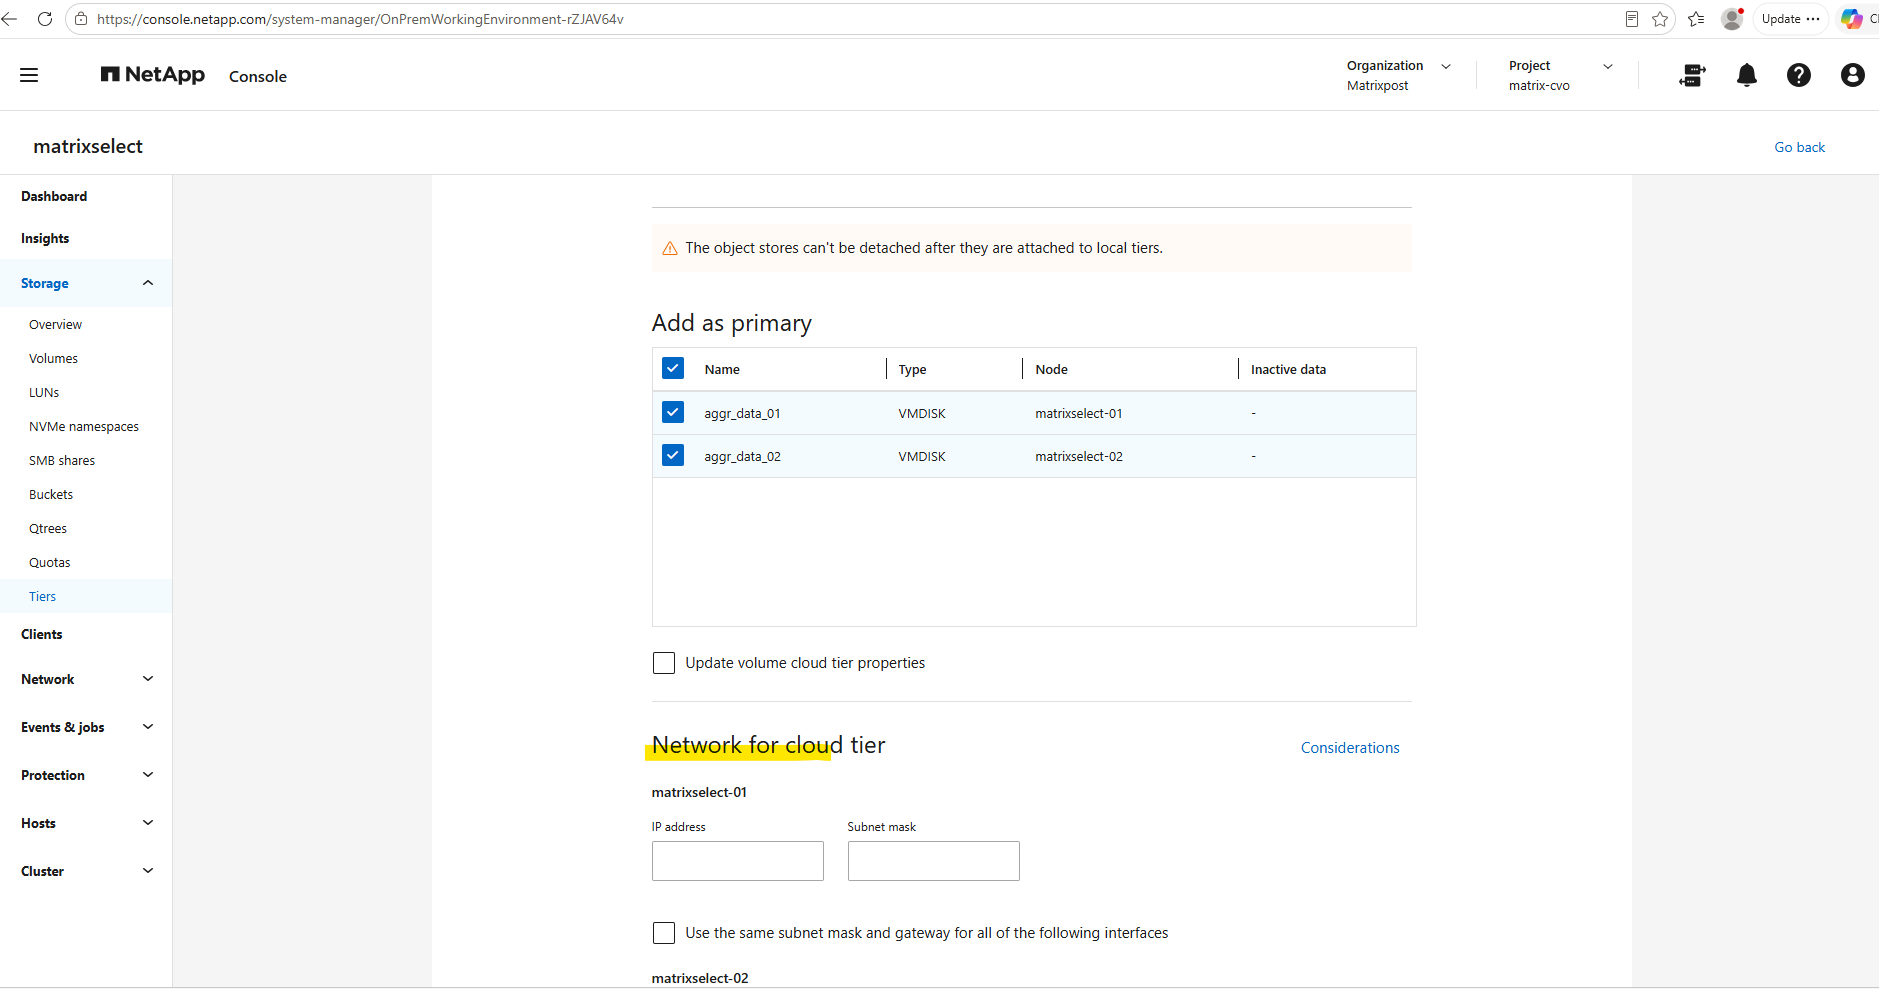
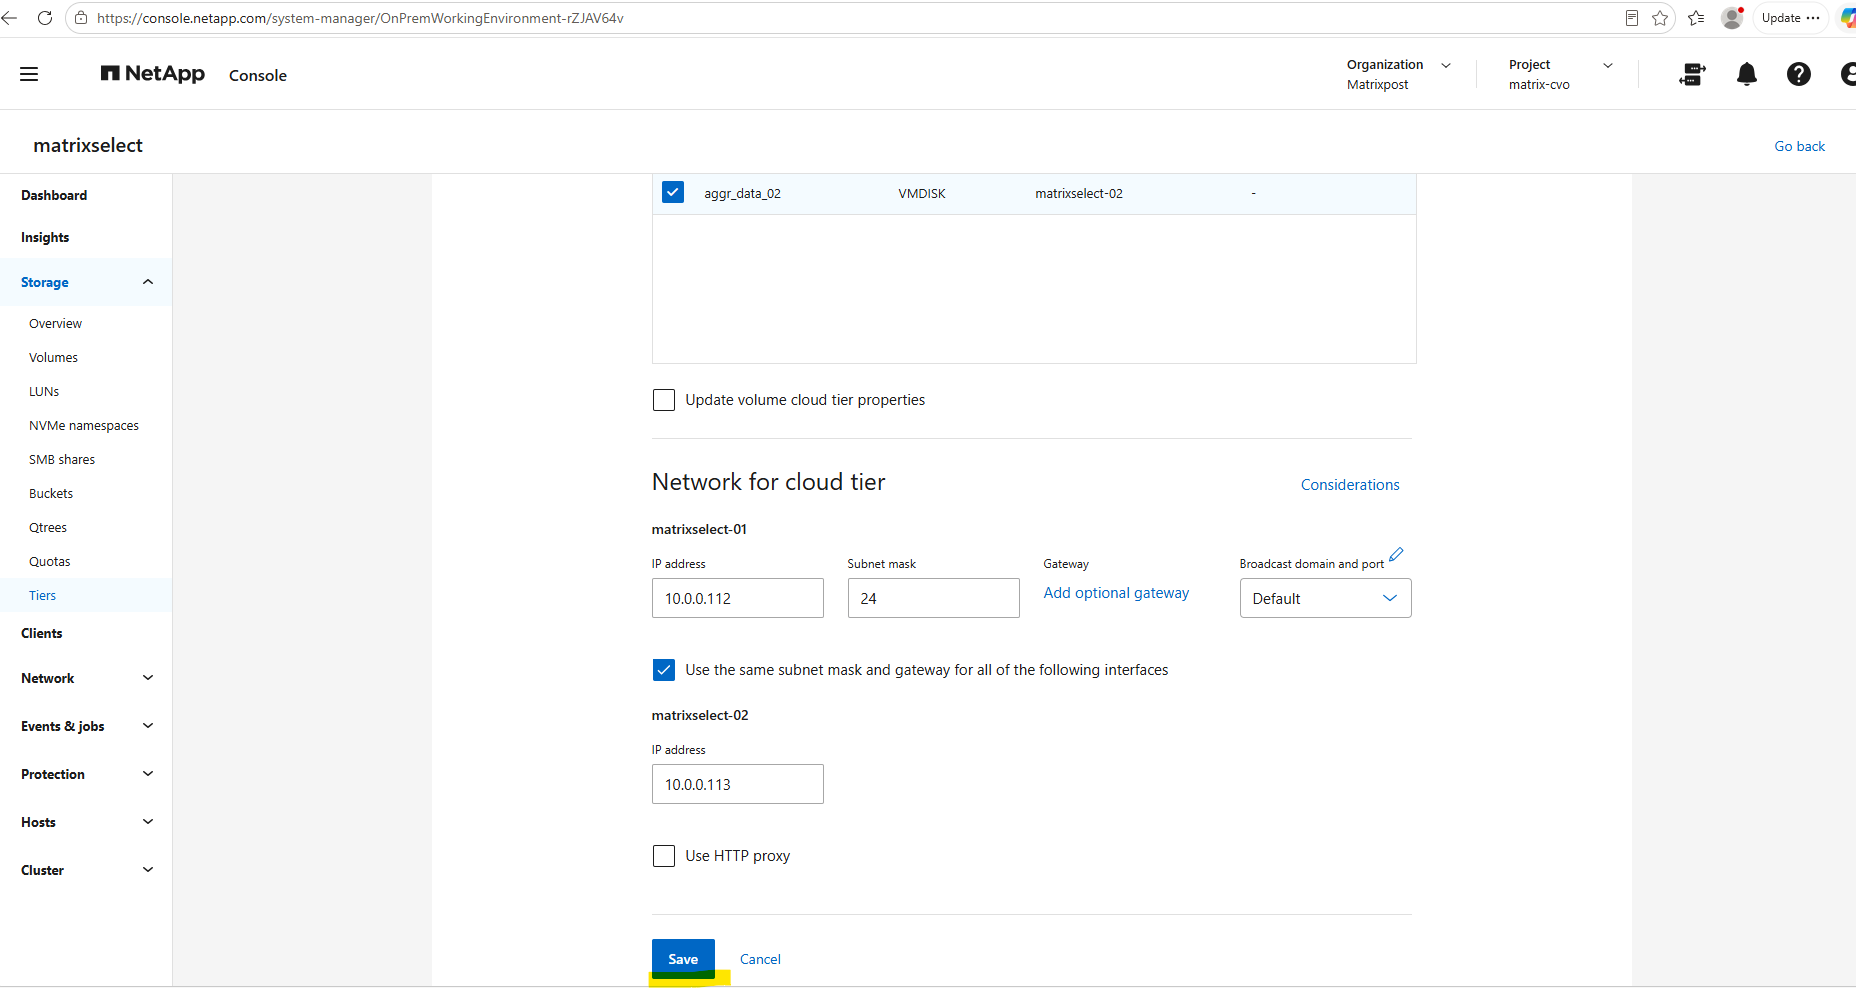
Under Add as primary, select the local tiers (aggregates) that should be attached to the new Azure Blob object store and therefore become FabricPool-enabled aggregates.
Note: The Network for cloud tier section is used to configure the intercluster network connectivity required for FabricPool communication with the object store. When specifying IP addresses here, make sure they are not already assigned to existing LIFs; otherwise, the operation fails with a duplicate IP address error.
Before configuring the cloud-tier network, check for existing intercluster LIFs and their IP addresses. The IP addresses entered in this wizard are used to create the required cloud-tier/intercluster network interfaces. Therefore, do not enter IP addresses that are already assigned to existing intercluster LIFs, as this results in a duplicate IP address error. Instead, specify unused IP addresses from the appropriate subnet for the additional LIFs created by the wizard.
Existing intercluster LIFs should not be removed, because they may already be used by other ONTAP services such as SnapMirror.
For details on intercluster LIFs and how they can be configured manually directly in ONTAP, see one of my previous articles here. For the cloud-tier configuration described here, however, no manual LIF creation is required, as the NetApp Console wizard creates the required intercluster LIFs automatically.
Click on Save.
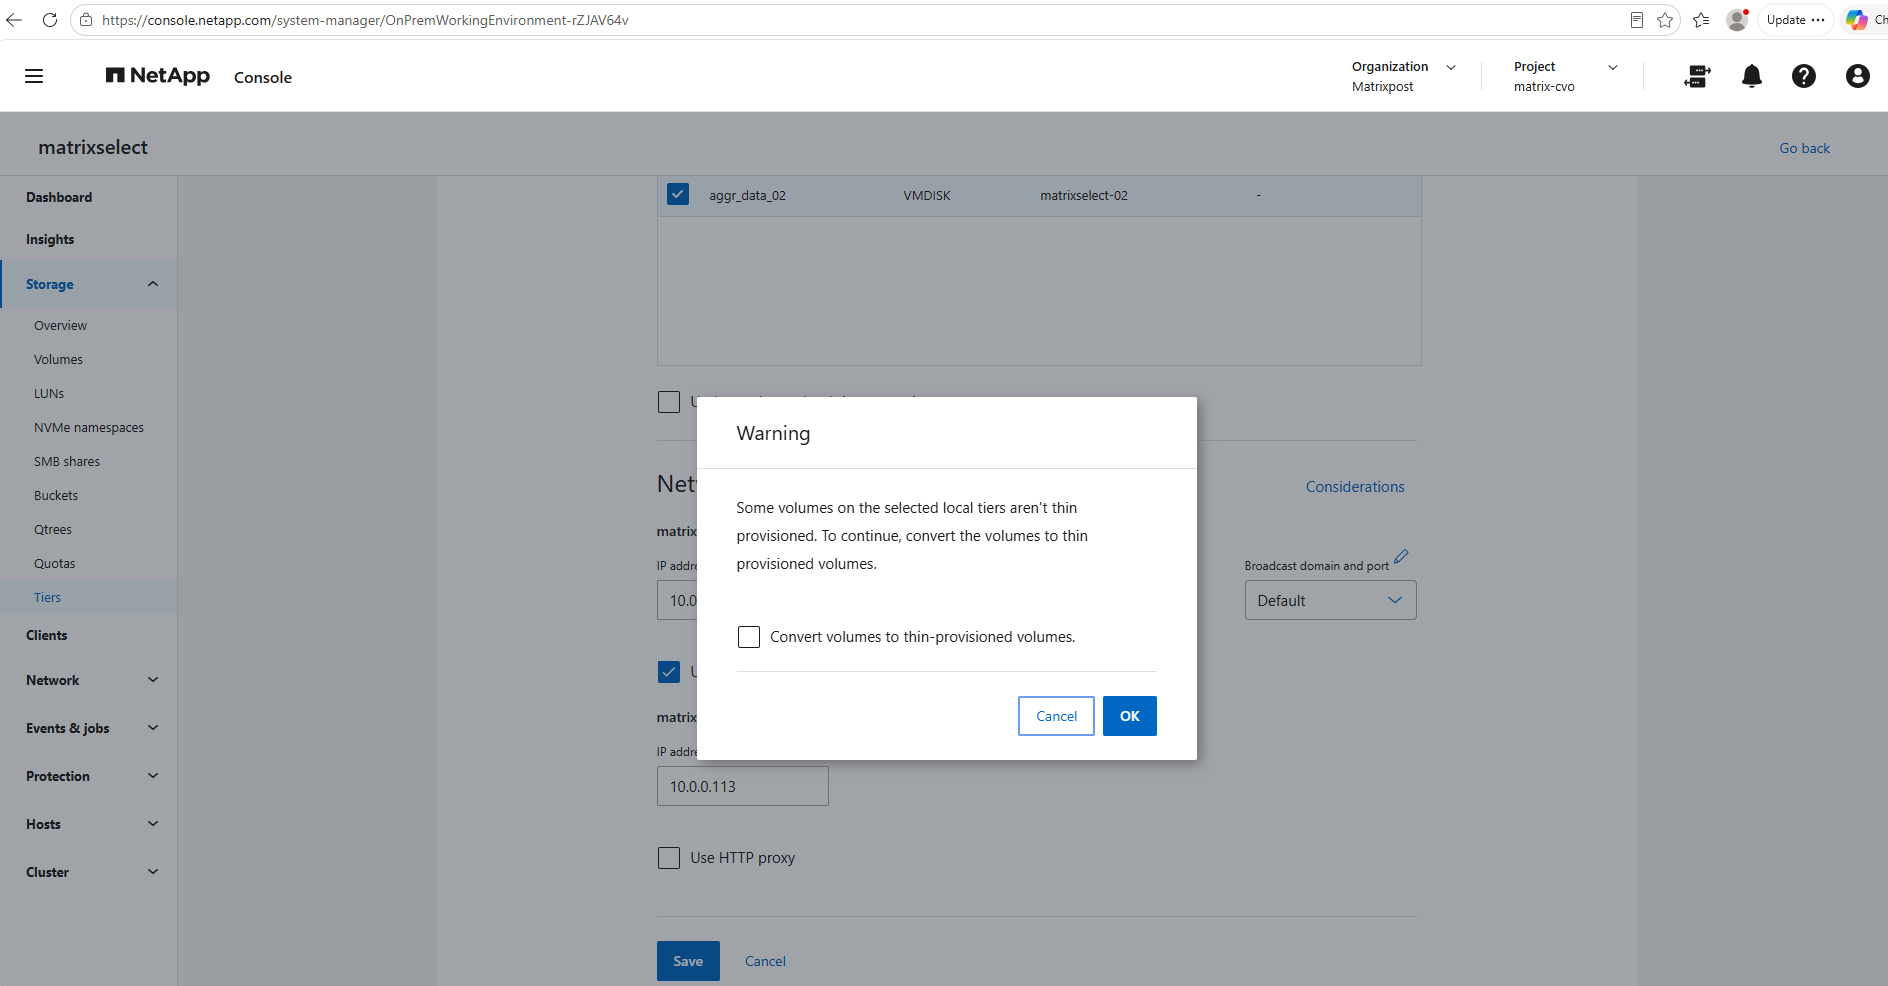
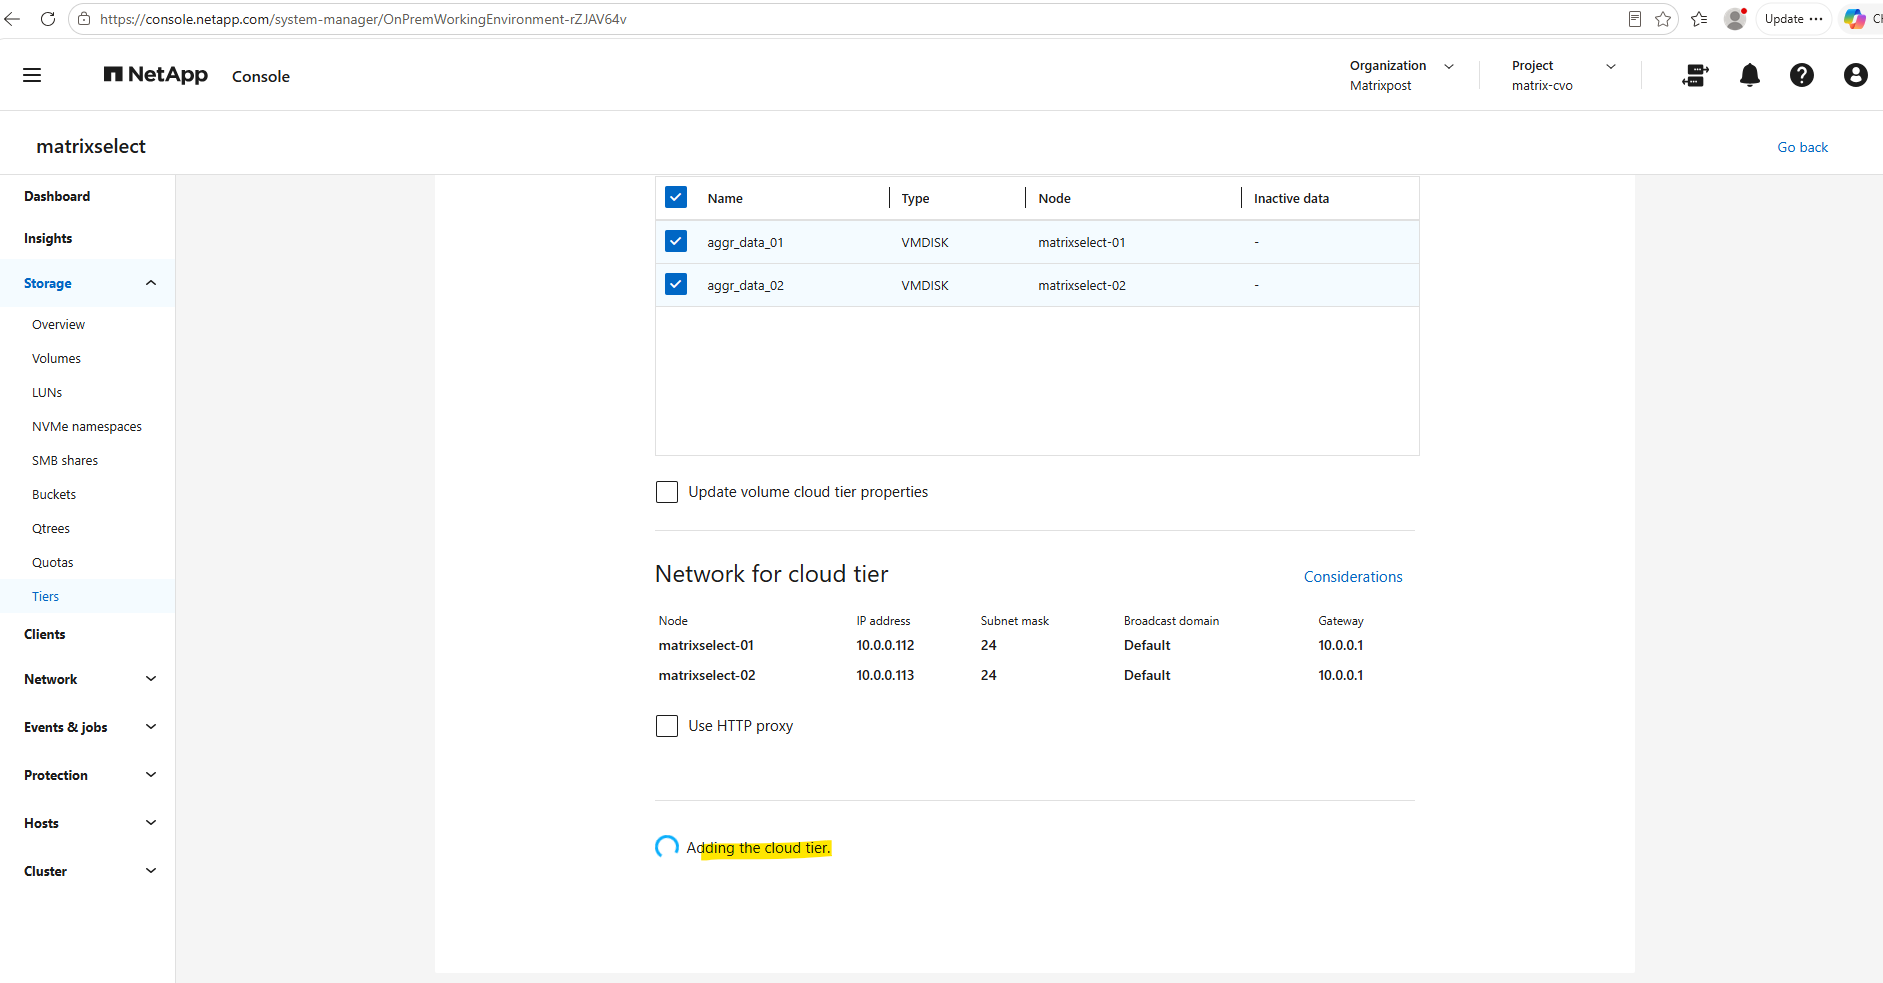
Because some volumes on the selected local tiers are still thick provisioned (space-guarantee volume), NetApp Console requires them to be converted to thin-provisioned volumes (space-guarantee none) before enabling FabricPool.
Select Convert volumes to thin-provisioned volumes and click OK to continue.
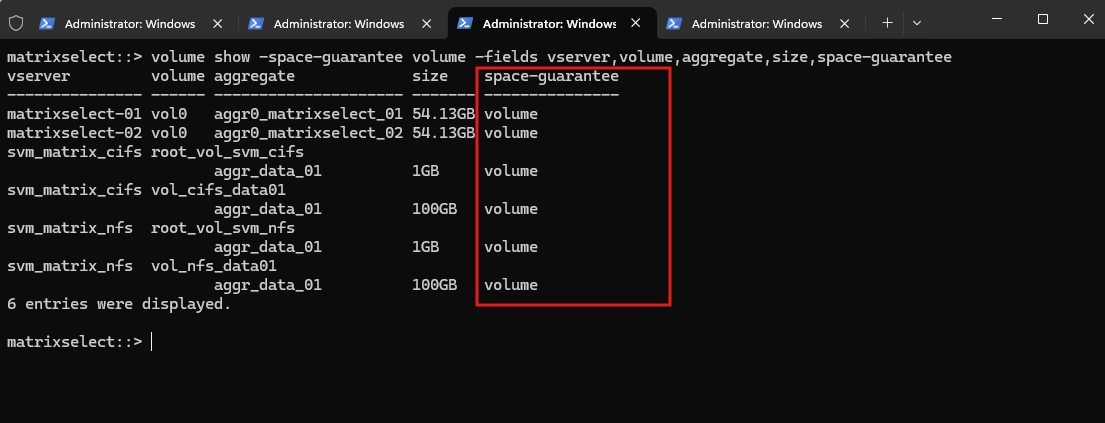
The command confirms that the affected volumes currently use space-guarantee volume, meaning their full configured capacity is reserved from the aggregate.
FabricPool requires thin-provisioned volumes (
space-guarantee none) on a FabricPool-enabled aggregate, which explains why NetApp Console prompts to convert them before continuing.On non-AFF ONTAP systems such as ONTAP Select, read/write FlexVol volumes default to
space-guarantee volume, meaning their configured capacity is reserved from the aggregate.Thin provisioning must therefore be explicitly configured with
space-guarantee noneor, in this case, enabled when prompted by NetApp Console.
volume show -space-guarantee volume -fields vserver,volume,aggregate,size,space-guarantee
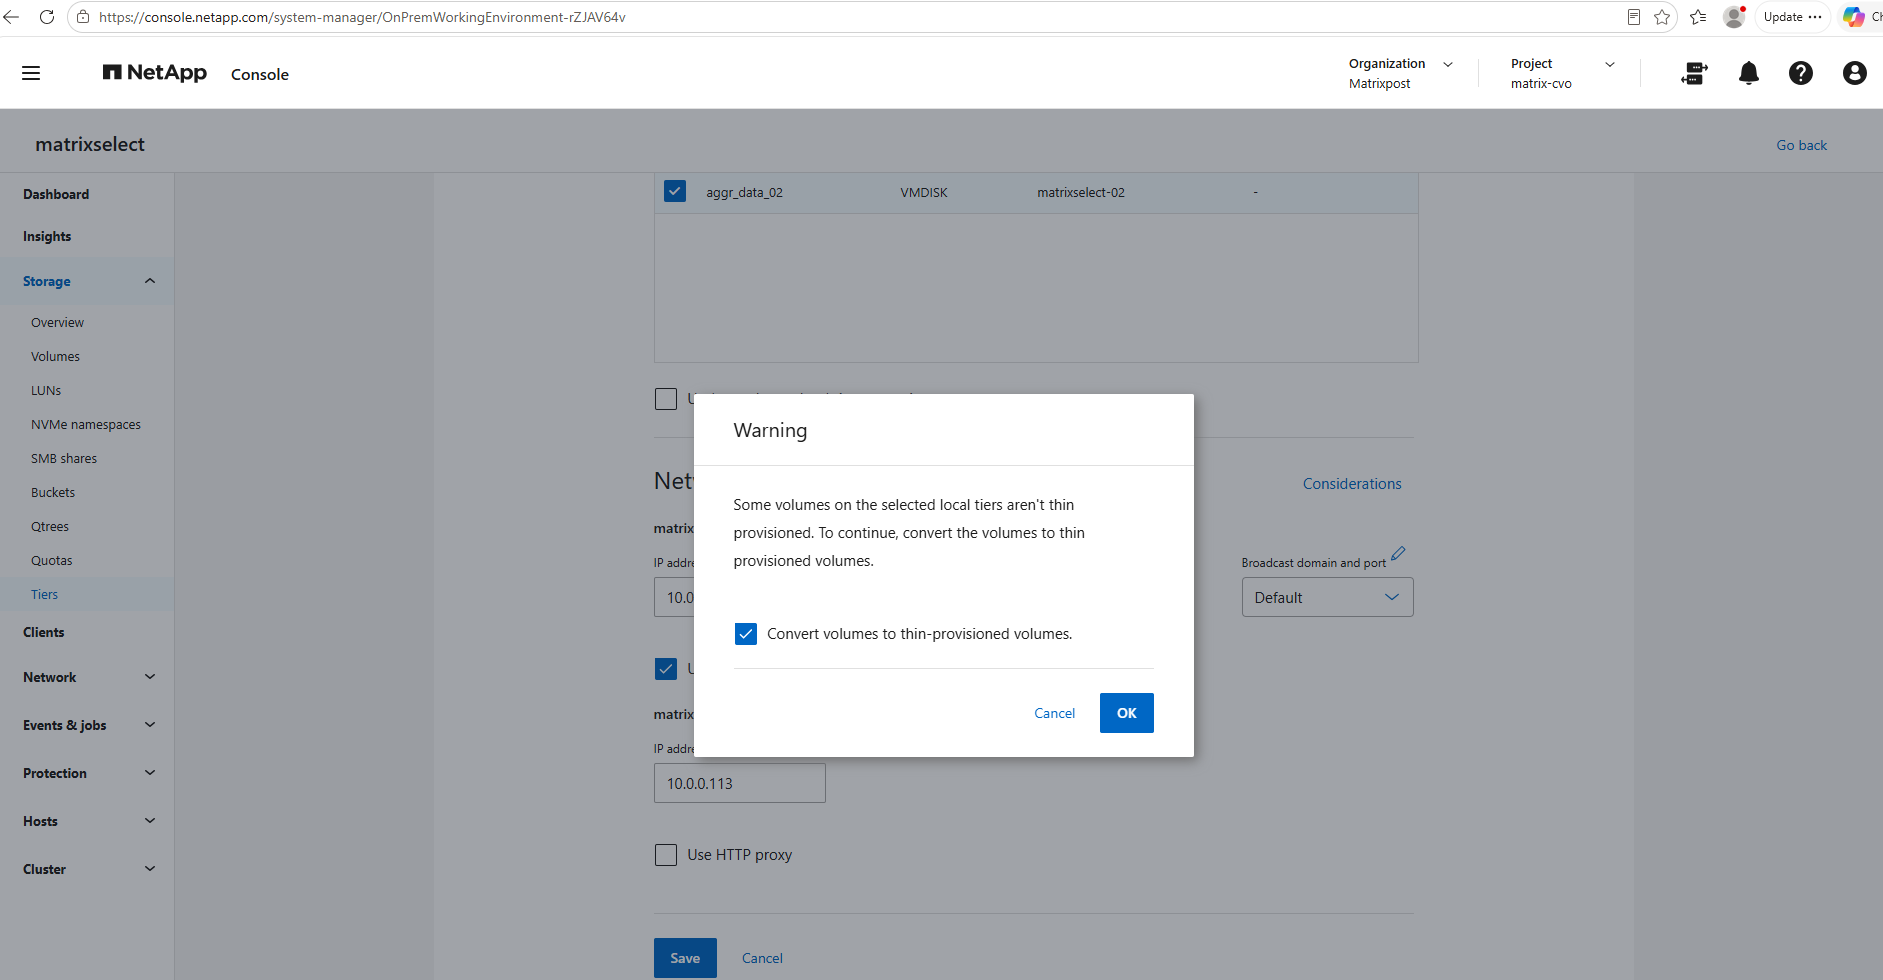
FabricPool requires thin-provisioned volumes (space-guarantee none) because capacity freed by tiering cold blocks to the object store must be reusable on the local performance tier.
A volume-level space guarantee would continue reserving that capacity on the aggregate, defeating the capacity-saving purpose of FabricPool.
Therefore, we select Convert volumes to thin-provisioned volumes and click OK to let NetApp Console change the affected volumes from space-guarantee volume to space-guarantee none, as required for FabricPool.
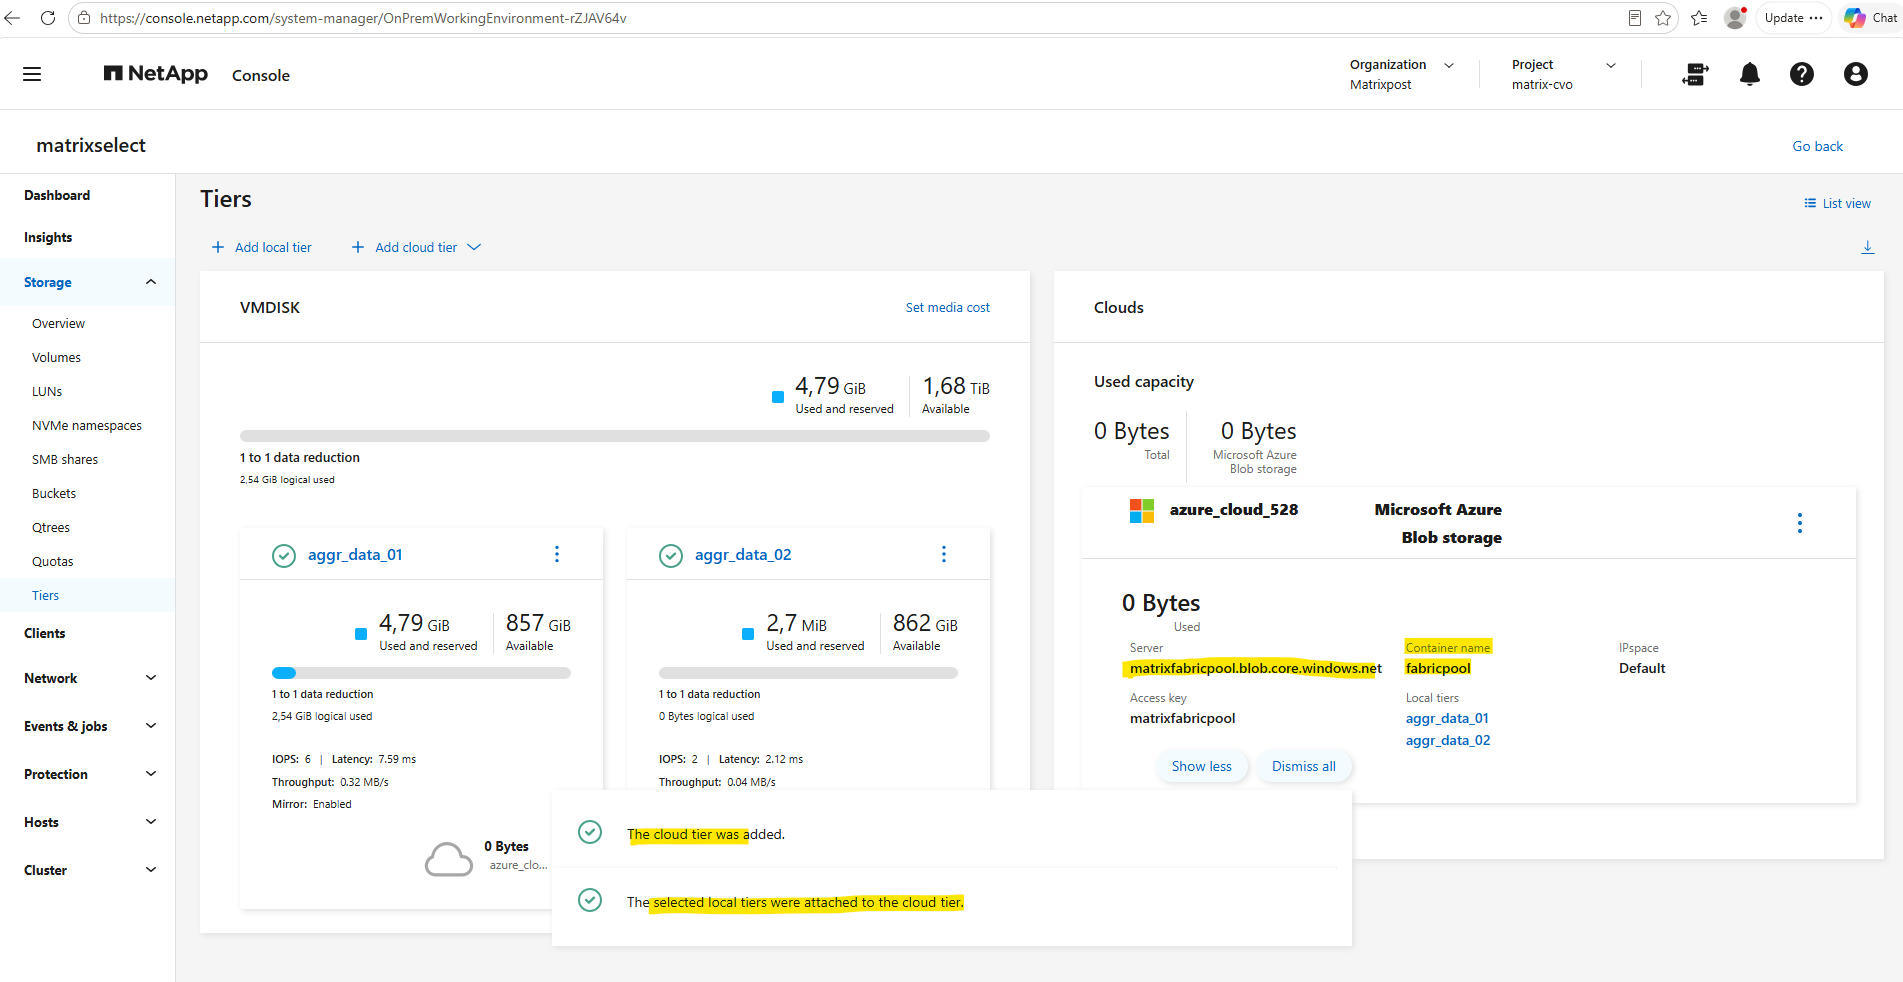
The Azure Blob Storage cloud tier has now been successfully added, and both local tiers (aggr_data_01 and aggr_data_02) are attached to it.
The Tiers overview confirms the Azure object store
azure_cloud_528, thefabricpoolcontainer, and both FabricPool-enabled local tiers.
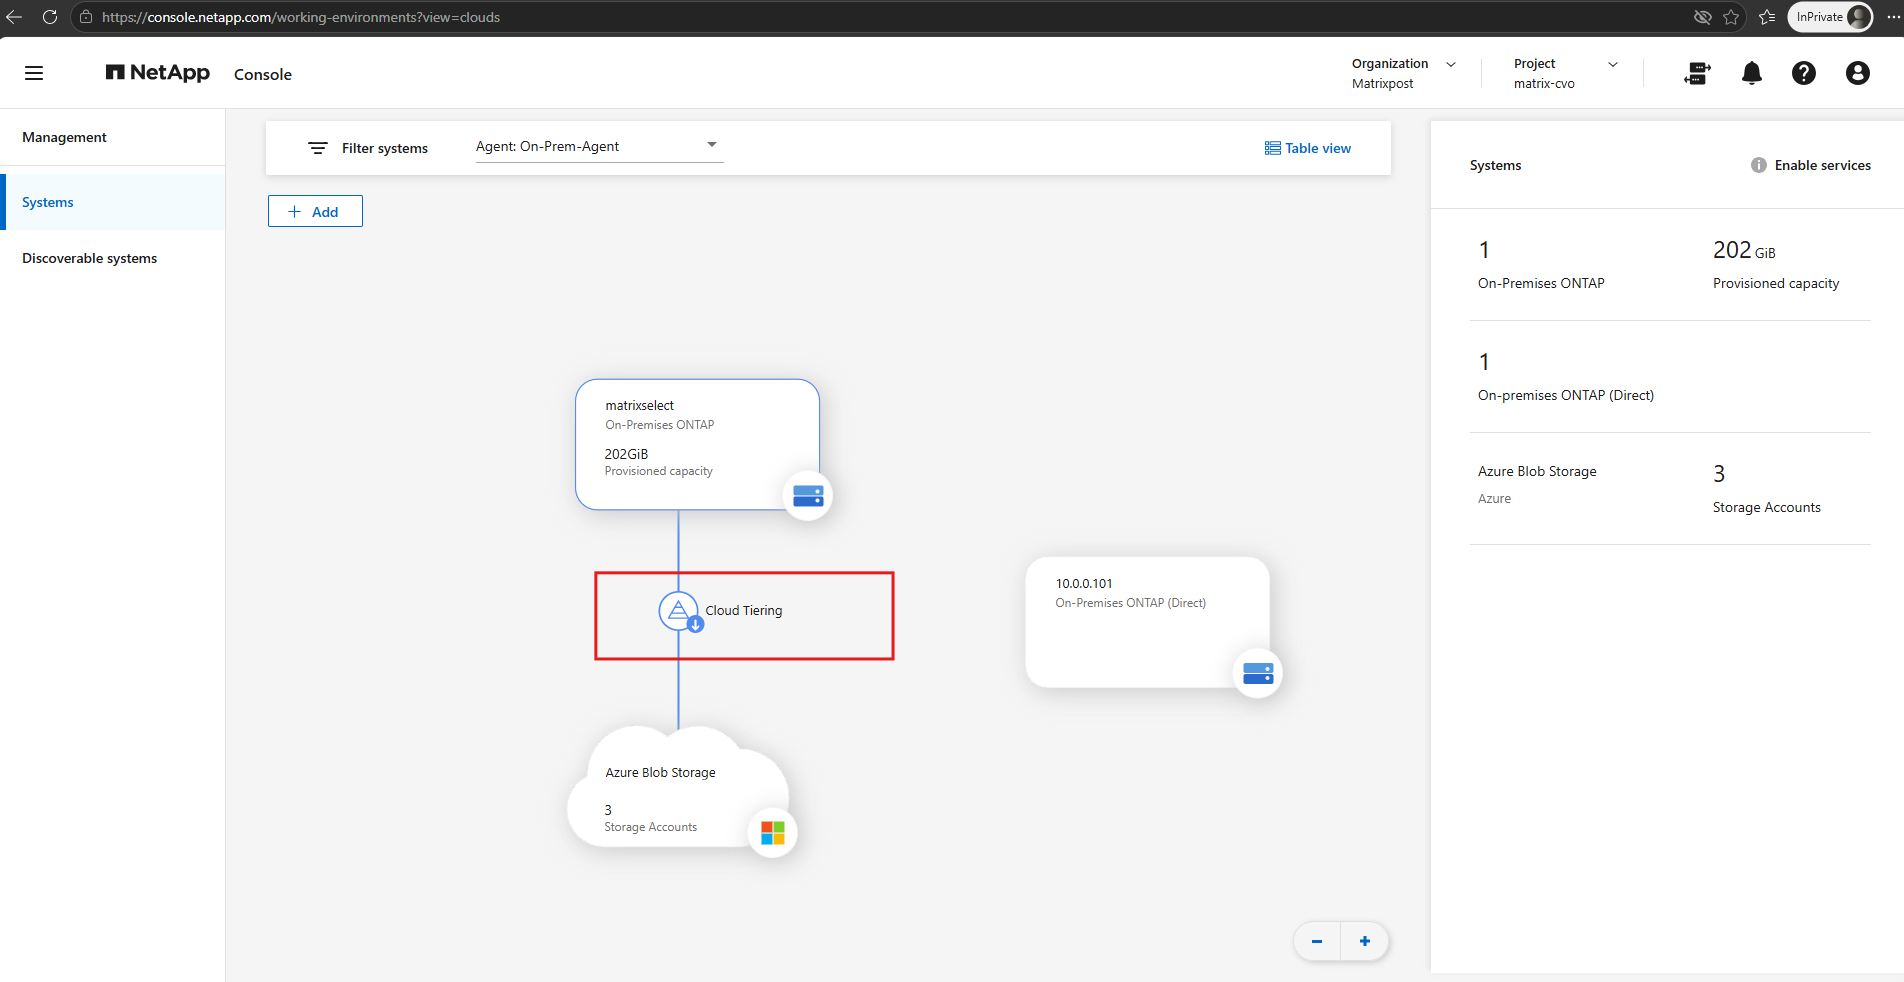
Back in the NetApp Console Systems view, the configured Cloud Tiering relationship is now displayed between the on-premises ONTAP Select system and Azure Blob Storage. This confirms that the ONTAP system has been successfully connected to Azure Blob Storage for FabricPool tiering.
Configuring Cloud Tiering on the Volumes
After attaching the local tiers to Azure Blob Storage, the aggregates are now FabricPool-enabled, but this alone does not cause volume data to be tiered to Azure.
In the next step, we configure the tiering policy on the individual FlexVol volumes to determine which data is considered eligible for movement to the cloud tier.
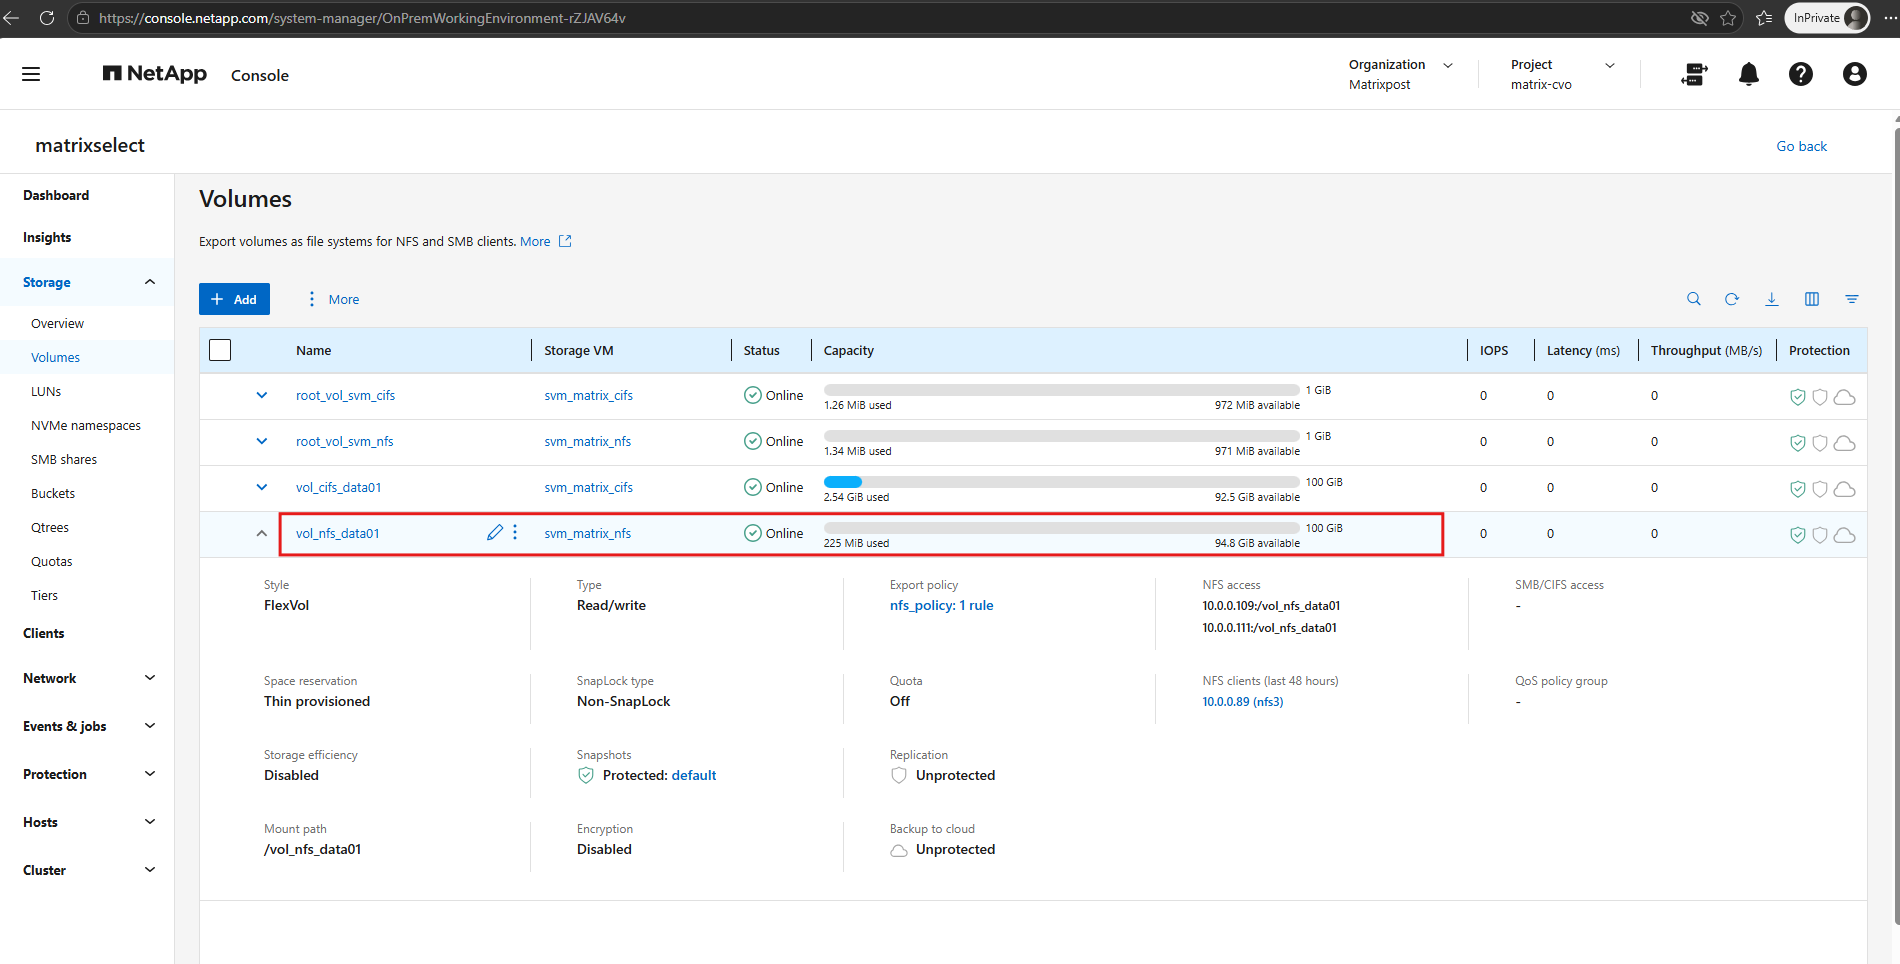
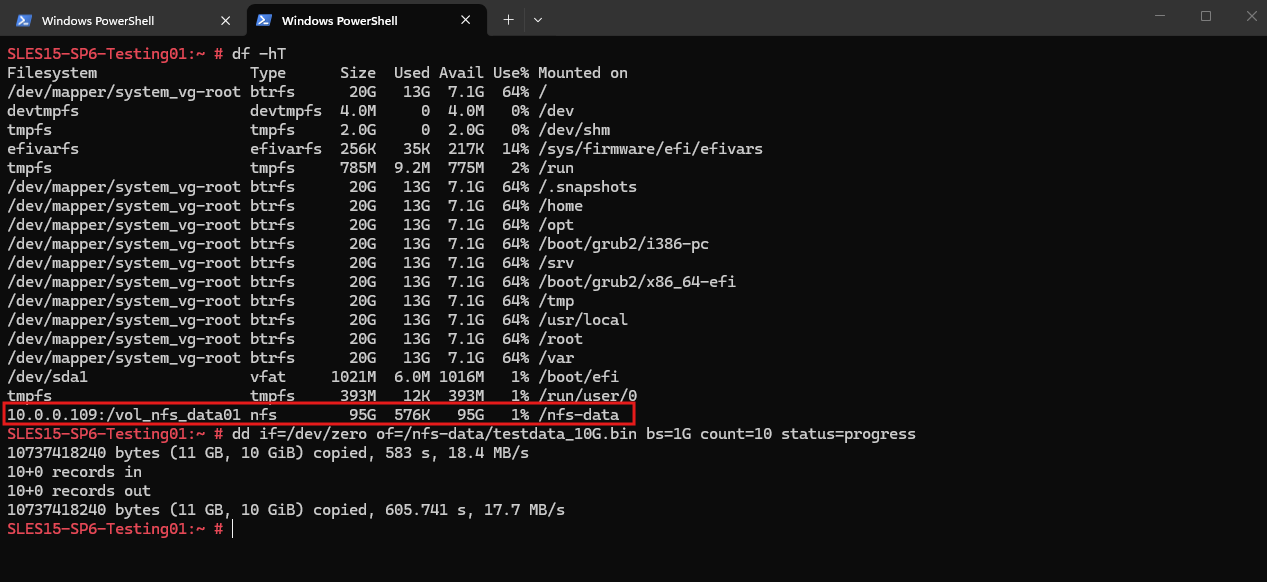
Before configuring a tiering policy, we first write some test data to the NFS volume vol_nfs_data01 to provide data that can subsequently become cold and be moved to the Azure Blob Storage capacity tier.
This allows us to observe the actual FabricPool tiering behavior afterward.
To generate test data, we use dd to write a 10 GiB file filled with zeros directly to the mounted NFS volume.
The
status=progressoption displays the write progress while the file is being created.
dd if=/dev/zero of=/mnt/vol_nfs_data01/testdata_10G.bin bs=1G count=10 status=progress
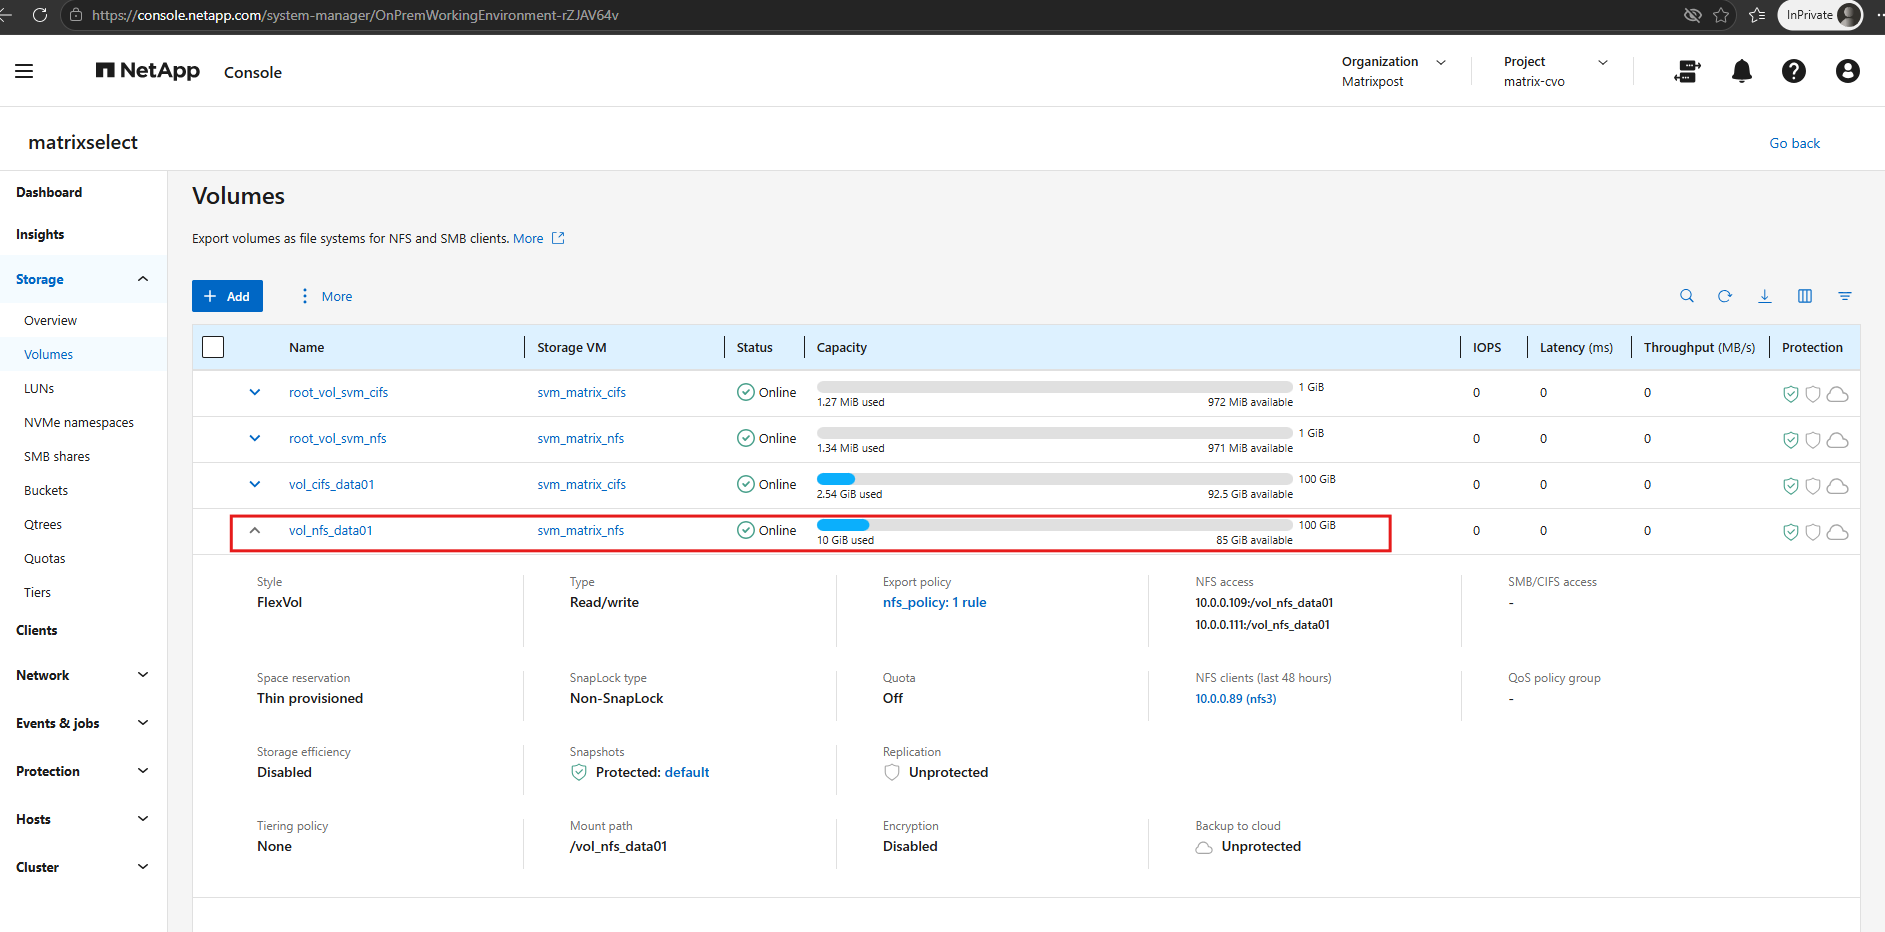
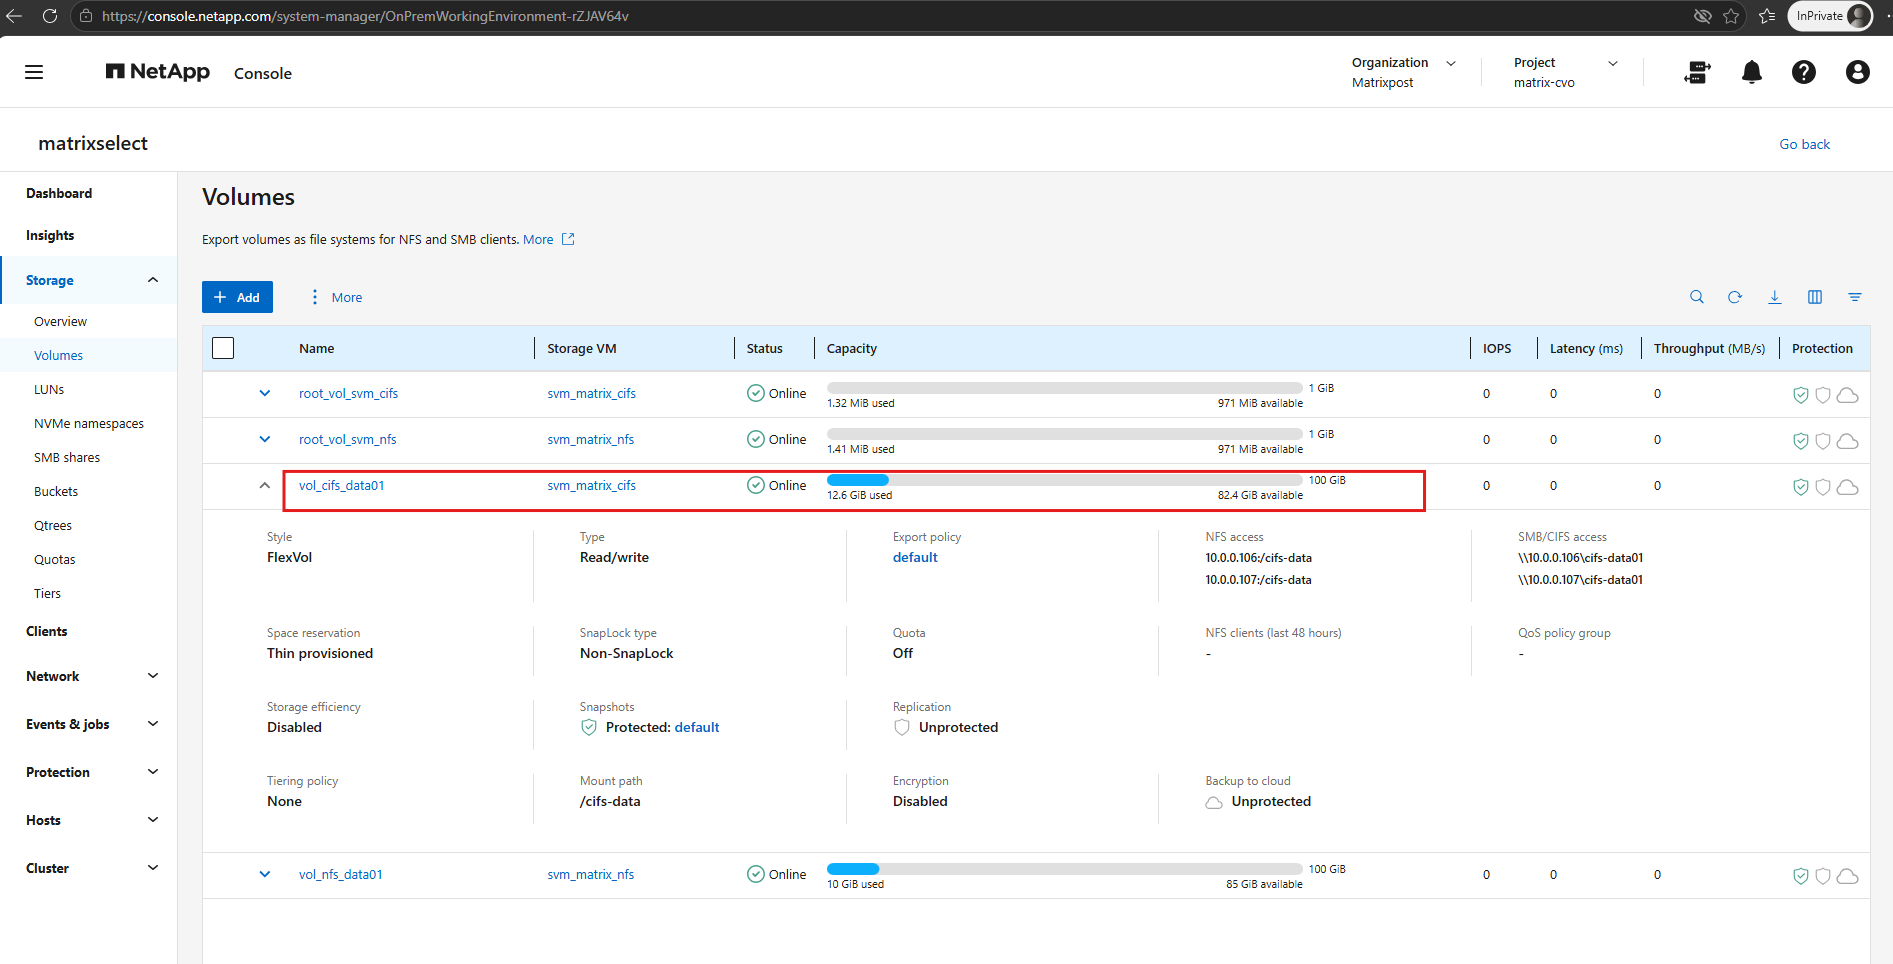
After creating the test file, System Manager shows approximately 10 GiB used on vol_nfs_data01. The volume still has Tiering policy: None, so all of this data currently remains on the local performance tier and provides our baseline before enabling cloud tiering.
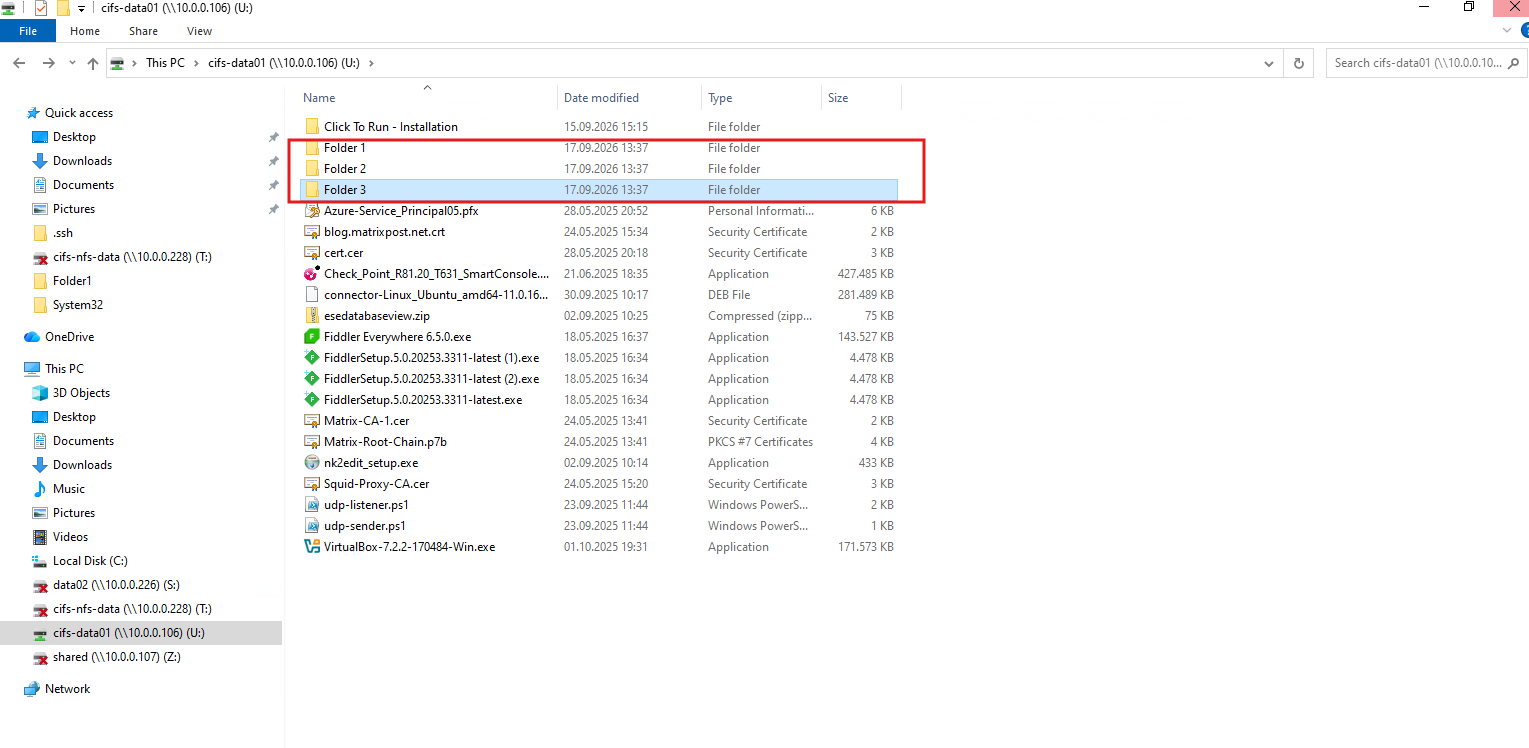
To produce more data on the CIFS volume for the subsequent cloud-tiering test, I created three additional folders and copied the existing content from the volume root into each of them.
However, I initially forgot that ONTAP can perform deduplication, so repeatedly copying the same data does not necessarily result in a corresponding increase in physical space consumption.
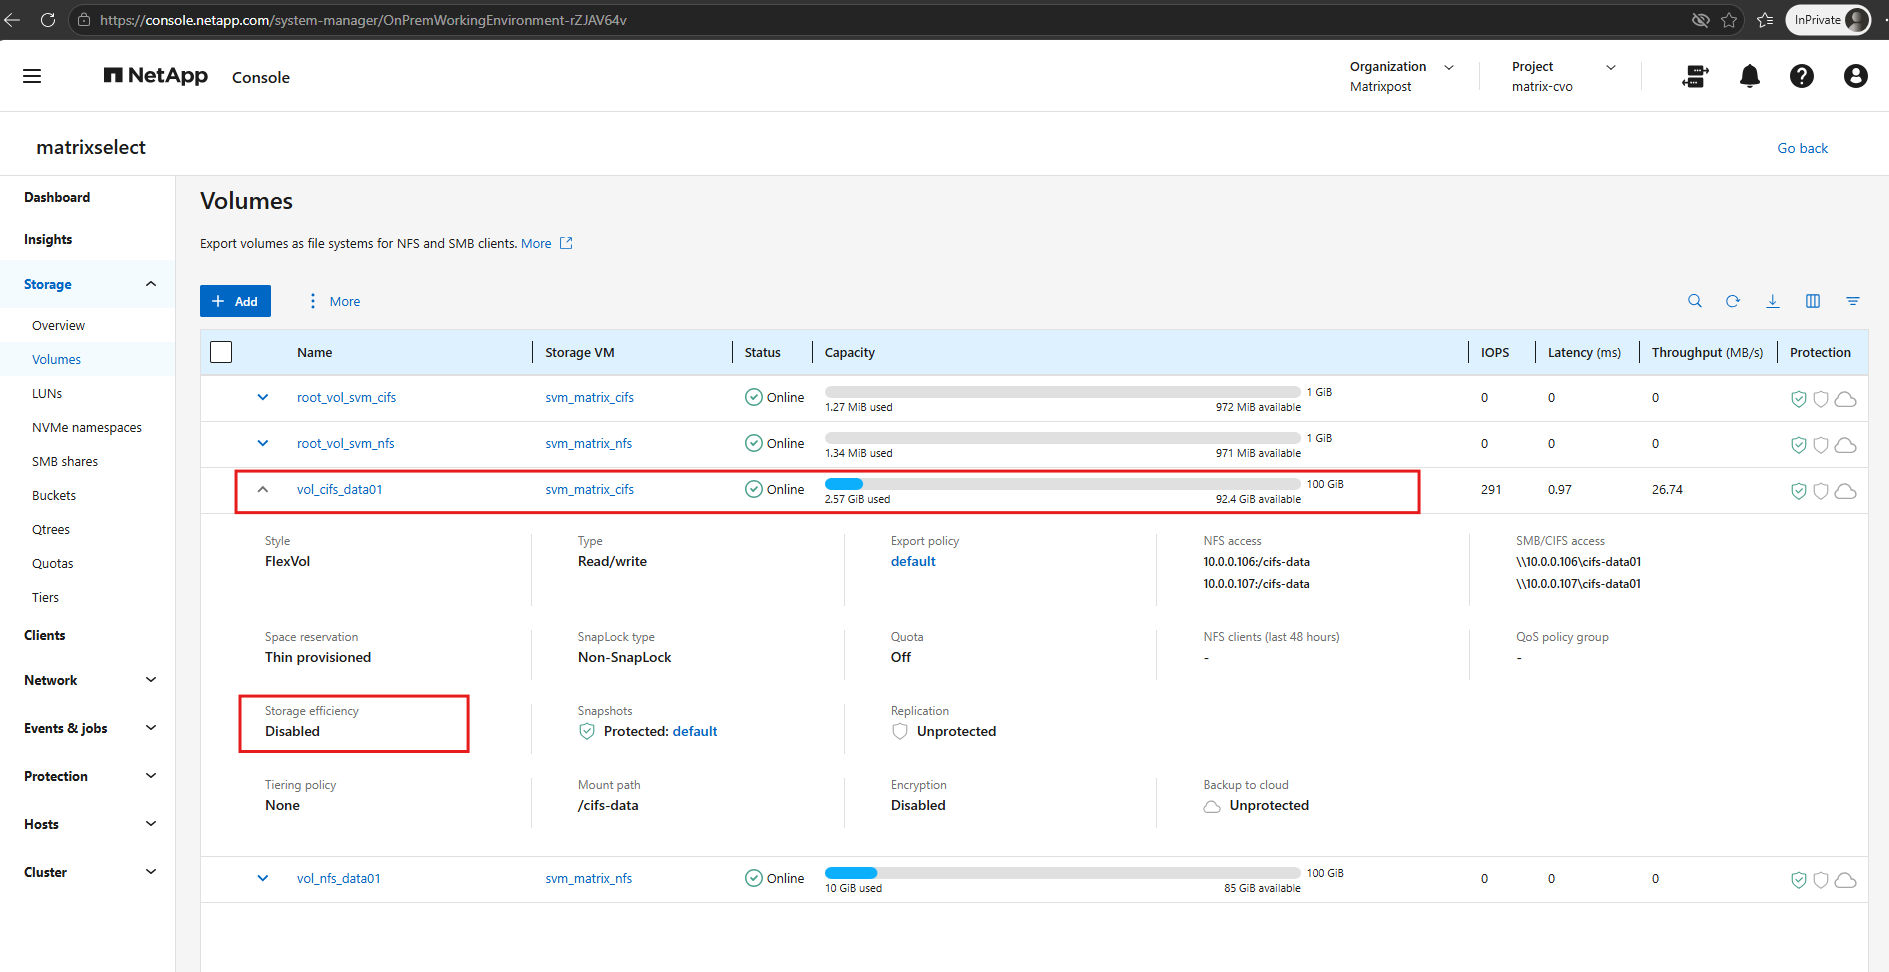
As a result, despite creating three additional copies of the data, the reported used capacity increased only marginally from approximately 2.54 GiB to 2.57 GiB.
Before attributing this specifically to deduplication, however, we should verify the actual storage-efficiency configuration because System Manager currently displays Storage efficiency: Disabled.
Although approximately 10 GiB of logical data is stored on the CIFS volume after creating the additional copies, only 2.57 GiB is physically consumed.
ONTAP reports 7.57 GiB (75%) of deduplication savings, demonstrating why repeatedly copying the same dataset did not produce the additional physical data required for our cloud-tiering test.
Although Storage efficiency is shown as disabled for the volume in System Manager, ONTAP reports 7.57 GiB (75%) of deduplication savings. On supported ONTAP Select configurations, inline and aggregate-level deduplication can be enabled automatically, which explains why copying the same approximately 2.5 GiB dataset three additional times increased the physical volume consumption only marginally.
volume efficiency show -vserver svm_matrix_cifs -volume vol_cifs_data01
volume efficiency show -vserver svm_matrix_cifs -volume vol_cifs_data01
volume show -vserver svm_matrix_cifs -volume vol_cifs_data01 -fields size,used,available,percent-used,dedupe-space-saved,dedupe-space-saved-percent,compression-space-saved,compression-space-saved-percent
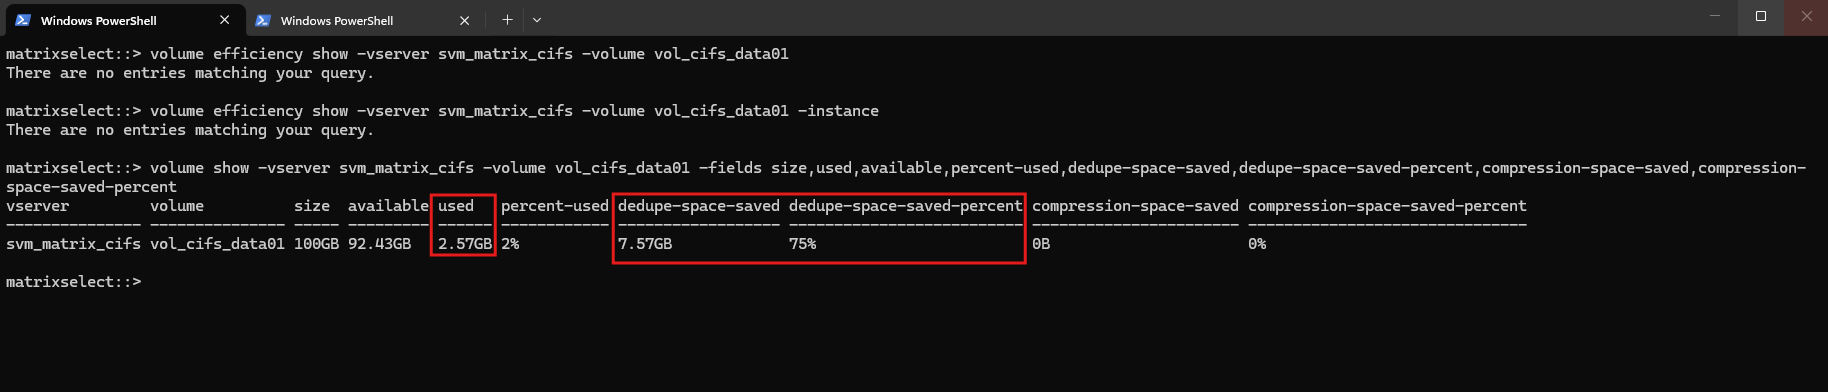
Since copying the same files results in significant deduplication savings, we use PowerShell to generate approximately 10 GiB of unique random data on the CIFS volume instead.
This ensures that additional physical data is consumed on the performance tier and can later be used for our FabricPool tiering test.
$Path="U:\FabricPool-Test"; New-Item -ItemType Directory -Path $Path -Force | Out-Null; 1..10 | ForEach-Object { $File=Join-Path $Path ("random_{0:D2}.bin" -f $_); $fs=[System.IO.File]::Create($File); $buffer=New-Object byte[] (1MB); $rng=[System.Security.Cryptography.RandomNumberGenerator]::Create(); for($i=0;$i -lt 1024;$i++){ $rng.GetBytes($buffer); $fs.Write($buffer,0,$buffer.Length) }; $fs.Close(); $rng.Dispose() }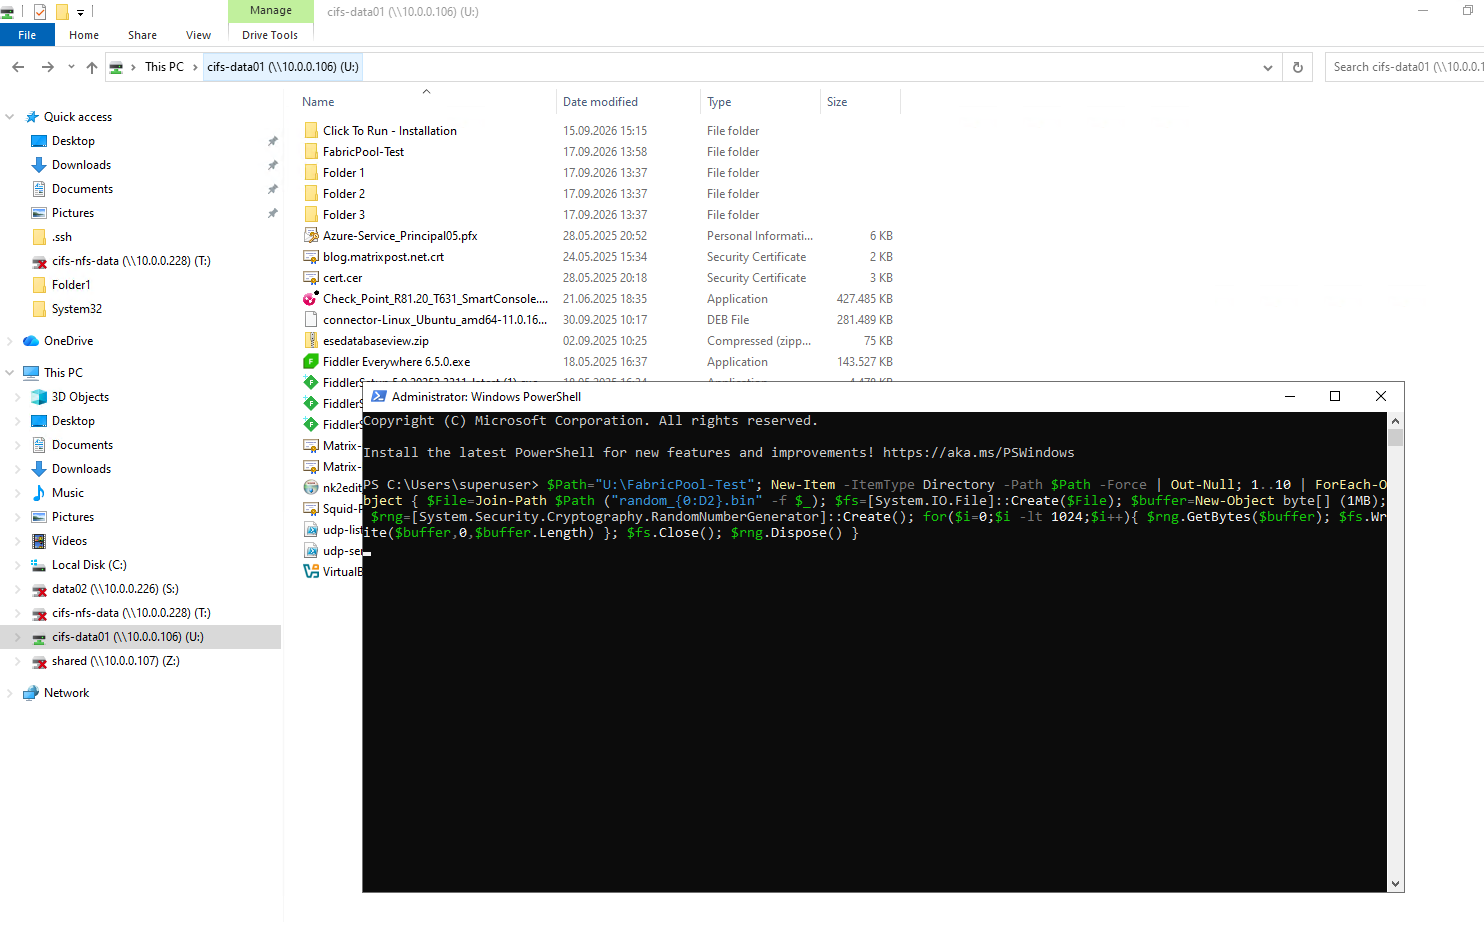
After generating the 10 GiB of unique random data, vol_cifs_data01 increased from approximately 2.57 GiB to 12.6 GiB used, providing enough physical data on the performance tier for the subsequent FabricPool cloud-tiering test.
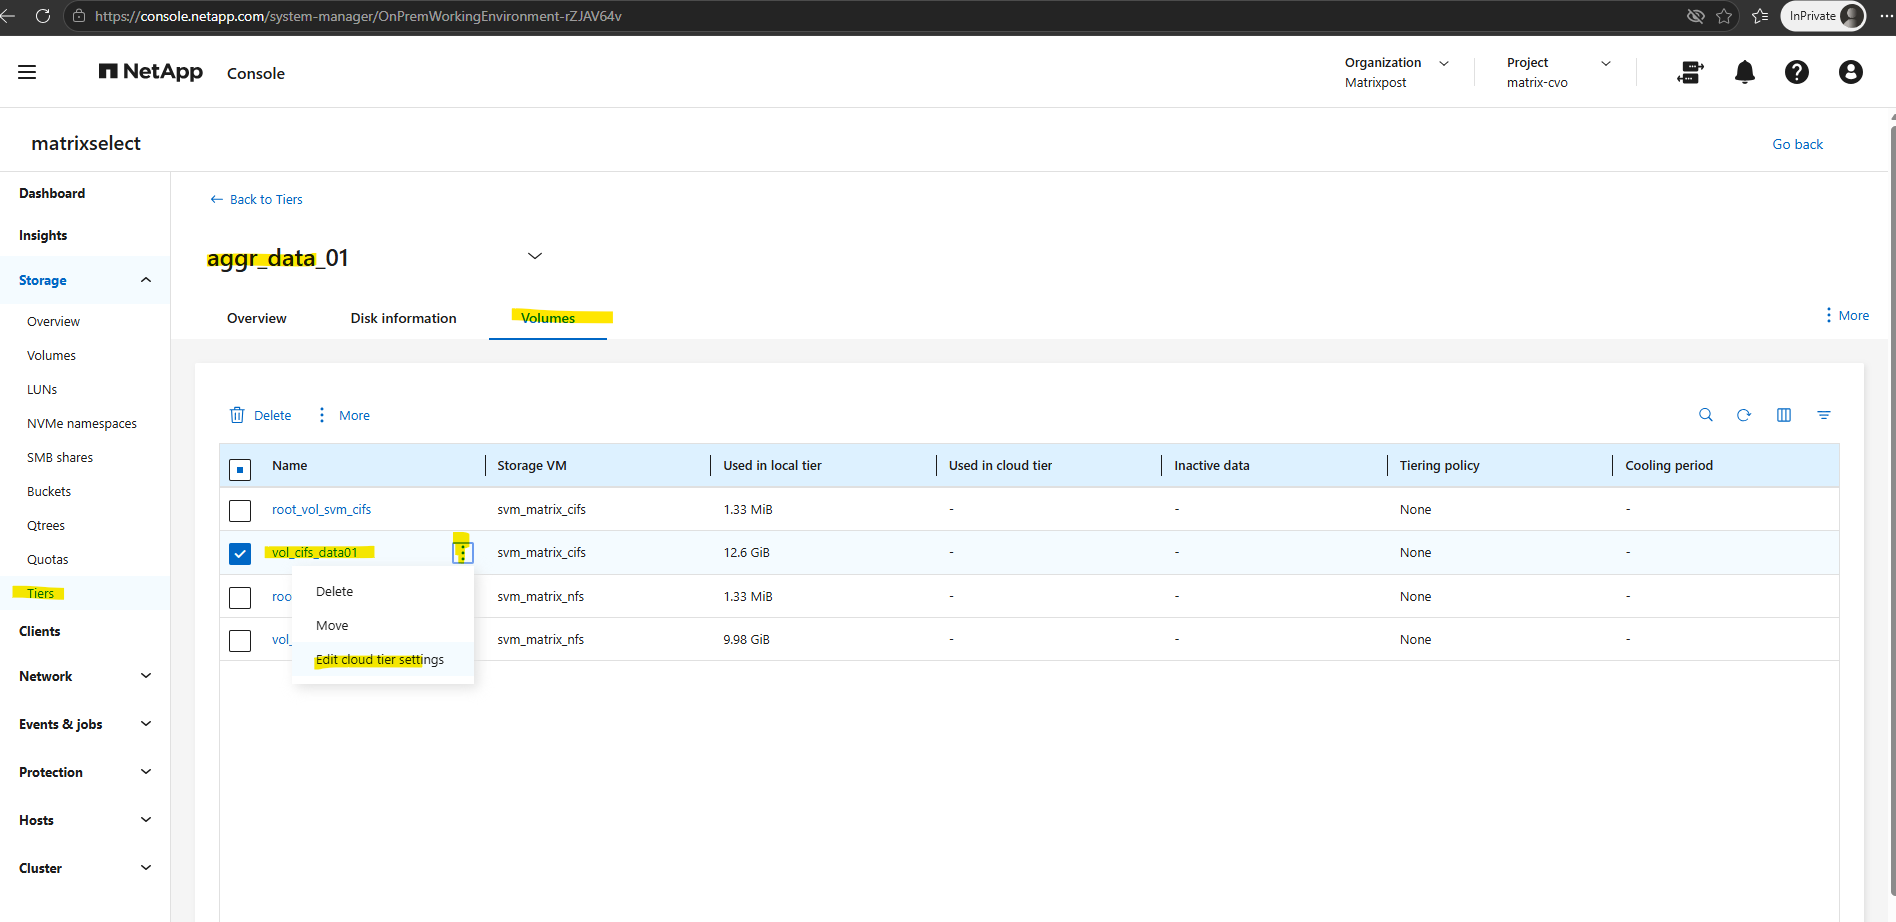
In Storage > Tiers > aggregate > volume, select the Volumes tab, and select the volume to configure. From the volume menu, choose Edit cloud tier settings.
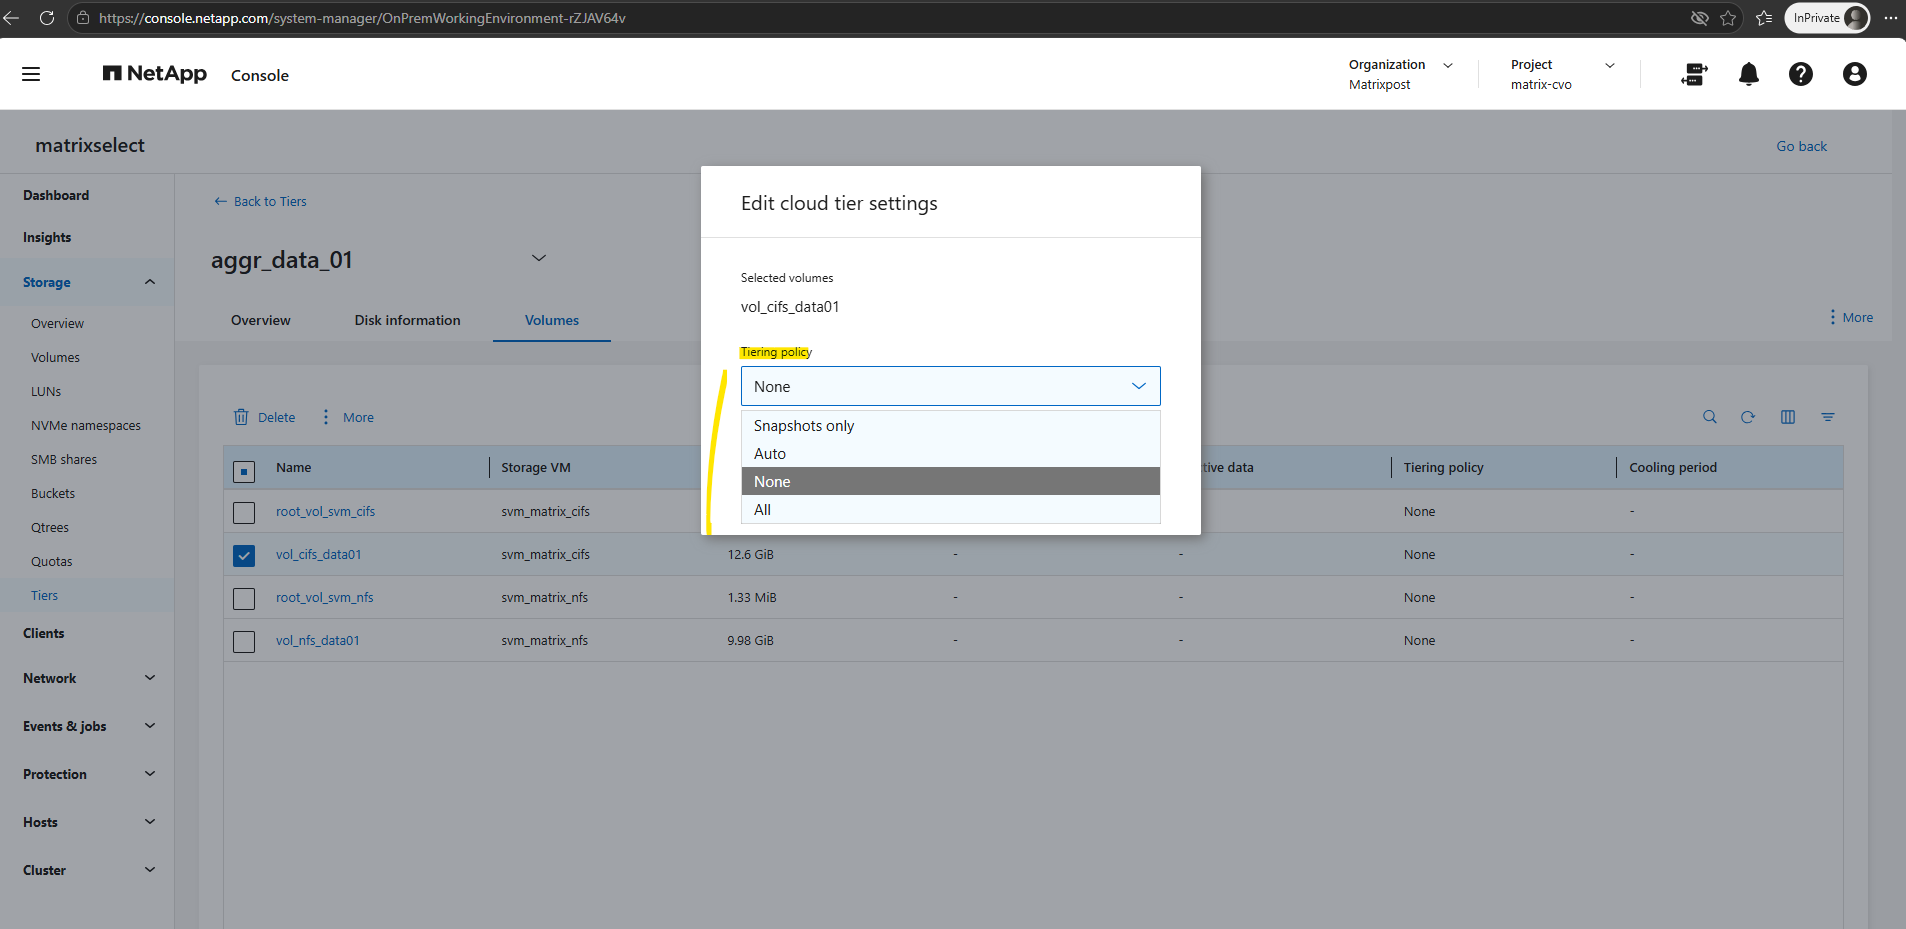
Under Tiering policy, System Manager provides the four FabricPool policies: Snapshots only, Auto, None, and All.
For this test, we select Auto, which allows both cold active-file-system data and Snapshot data to be tiered to Azure Blob Storage.
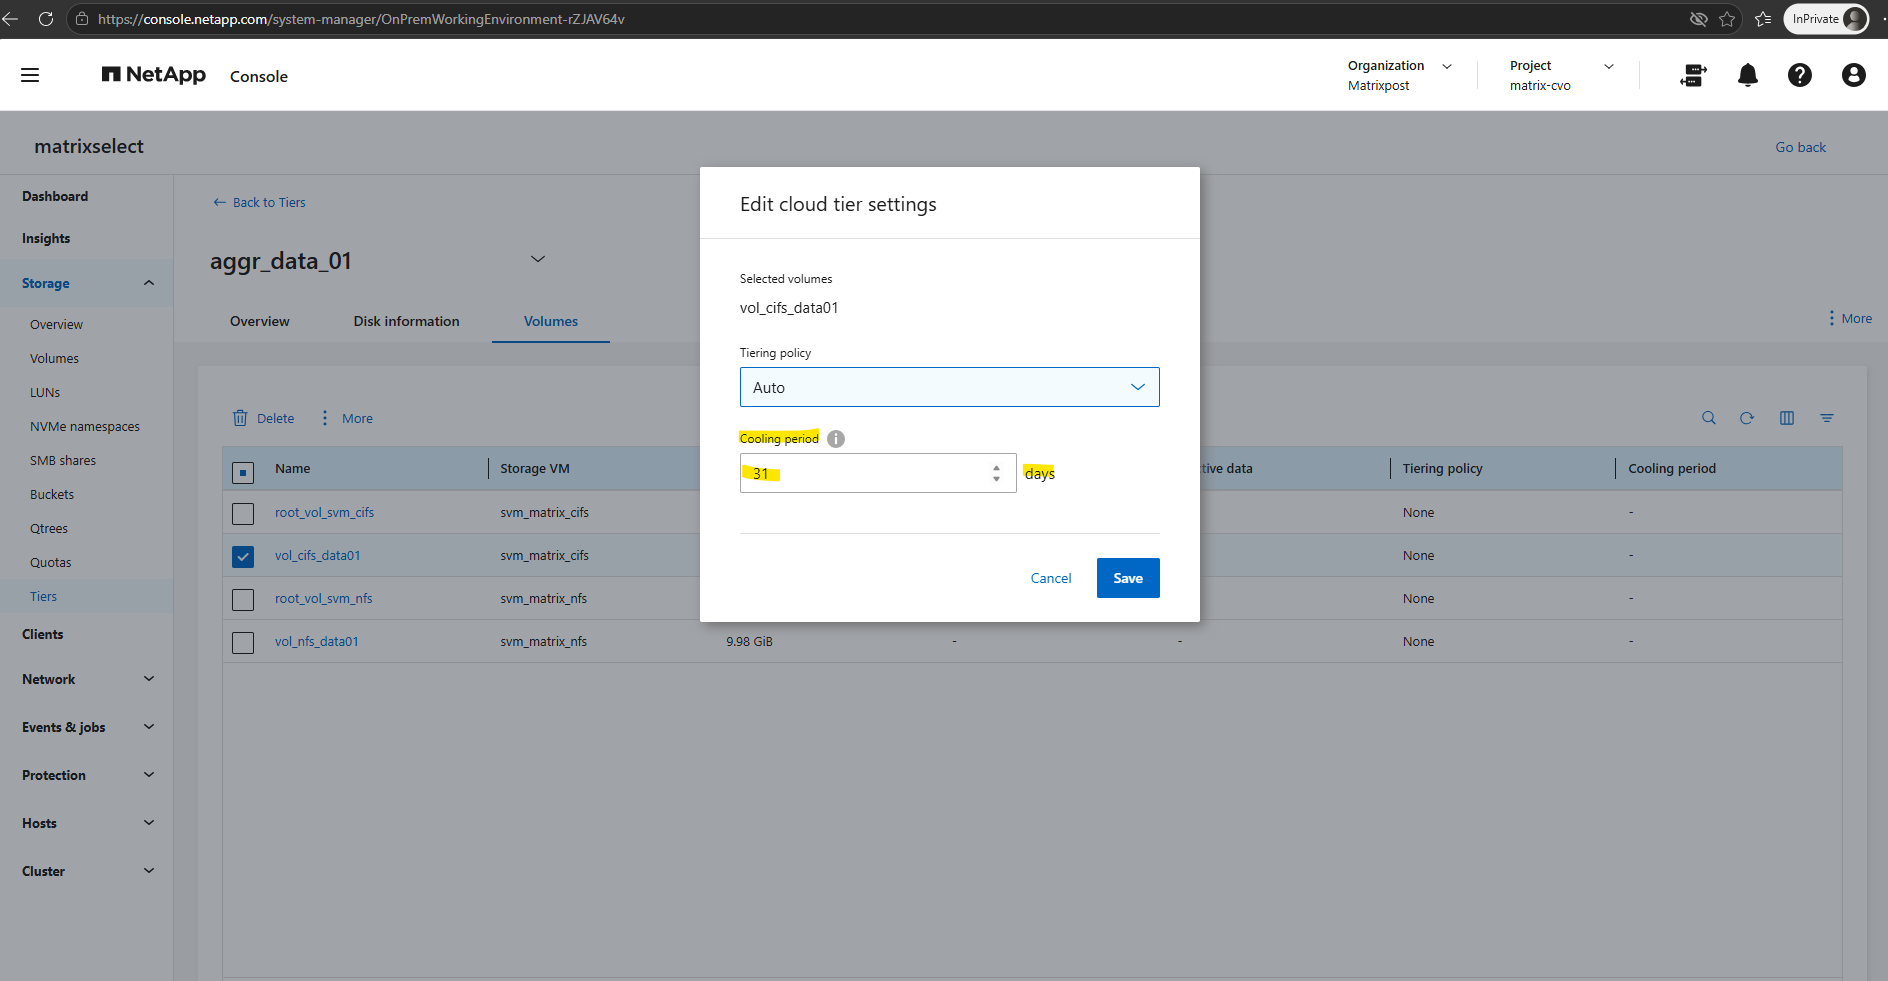
With Auto selected, we can additionally configure the Cooling period, which determines how long blocks must remain inactive before they become eligible for tiering.
The default for the Auto policy is 31 days; for our lab test, we reduce it to the minimum supported value of 2 days.
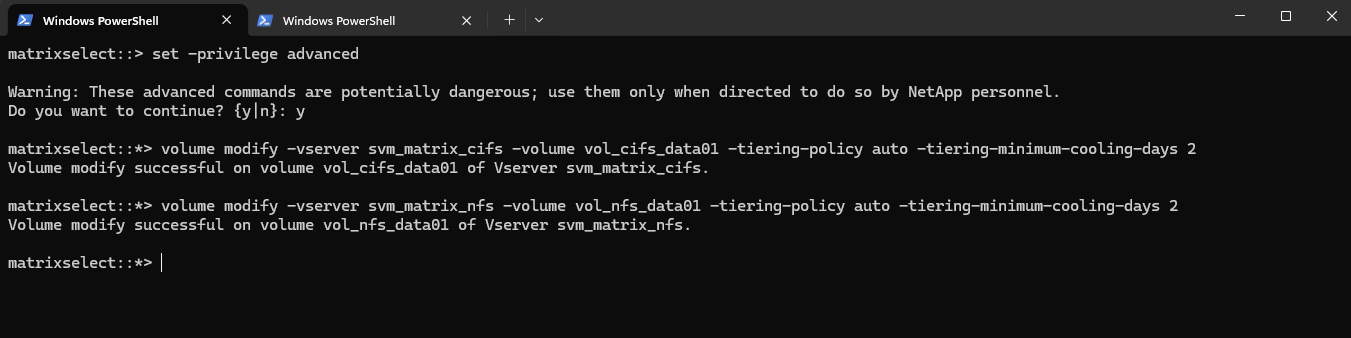
The same configuration can be applied directly from the ONTAP CLI. The cooling-period parameter accepts 2–183 days on current ONTAP releases and is applicable to the auto and snapshot-only policies.
For our CIFS volume:
set -privilege advanced
volume modify -vserver svm_matrix_cifs -volume vol_cifs_data01 -tiering-policy auto -tiering-minimum-cooling-days 2
And for the NFS volume:
set -privilege advanced
volume modify -vserver svm_matrix_nfs -volume vol_nfs_data01 -tiering-policy auto -tiering-minimum-cooling-days 2
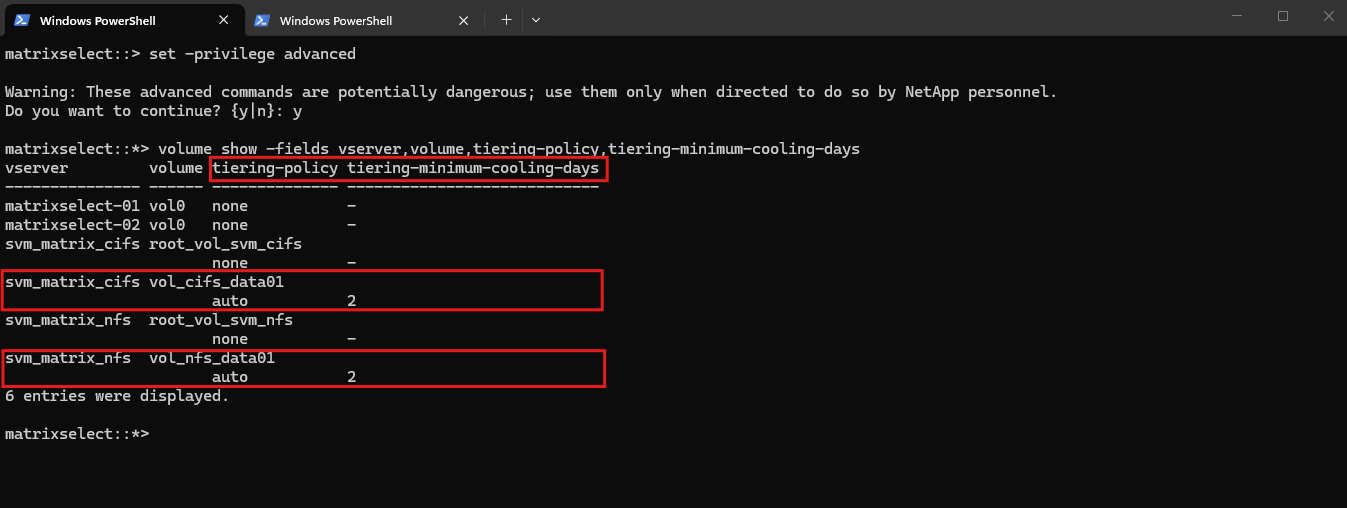
Verify:
Because
tiering-minimum-cooling-daysis an advanced-level ONTAP field, advanced privilege is required both to configure and to display it from the CLI.The output confirms that both test volumes now use the
autotiering policy with a minimum cooling period of 2 days.
set -privilege advanced
volume show -fields vserver,volume,tiering-policy,tiering-minimum-cooling-days
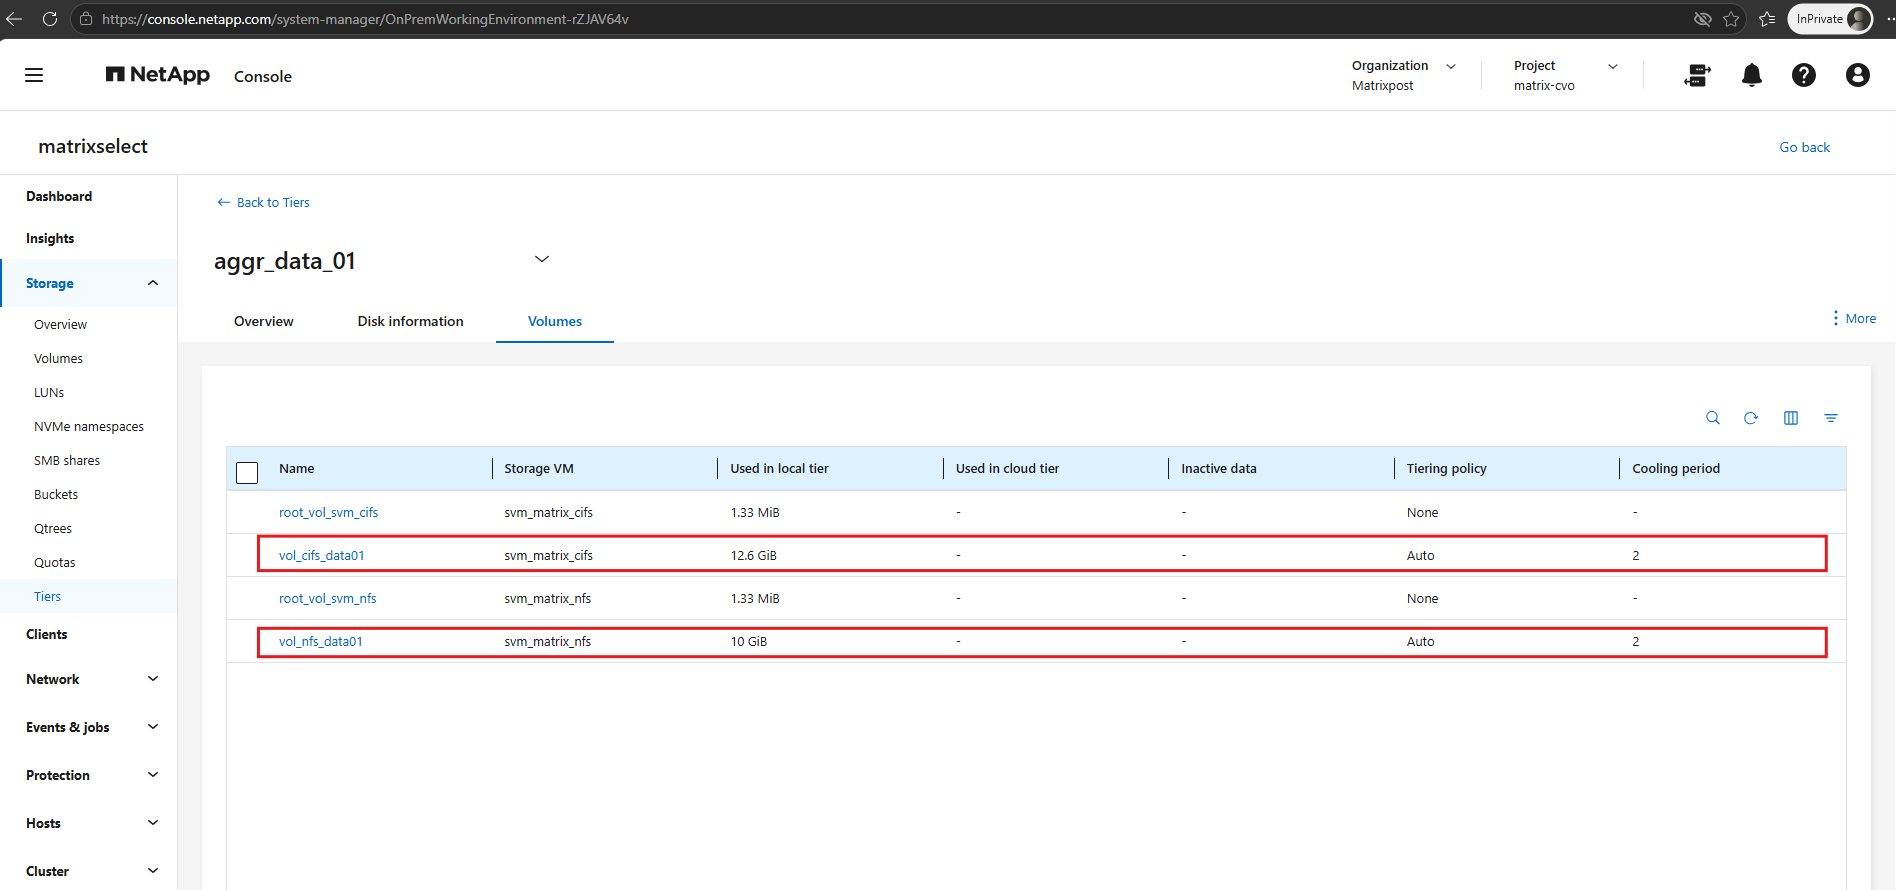
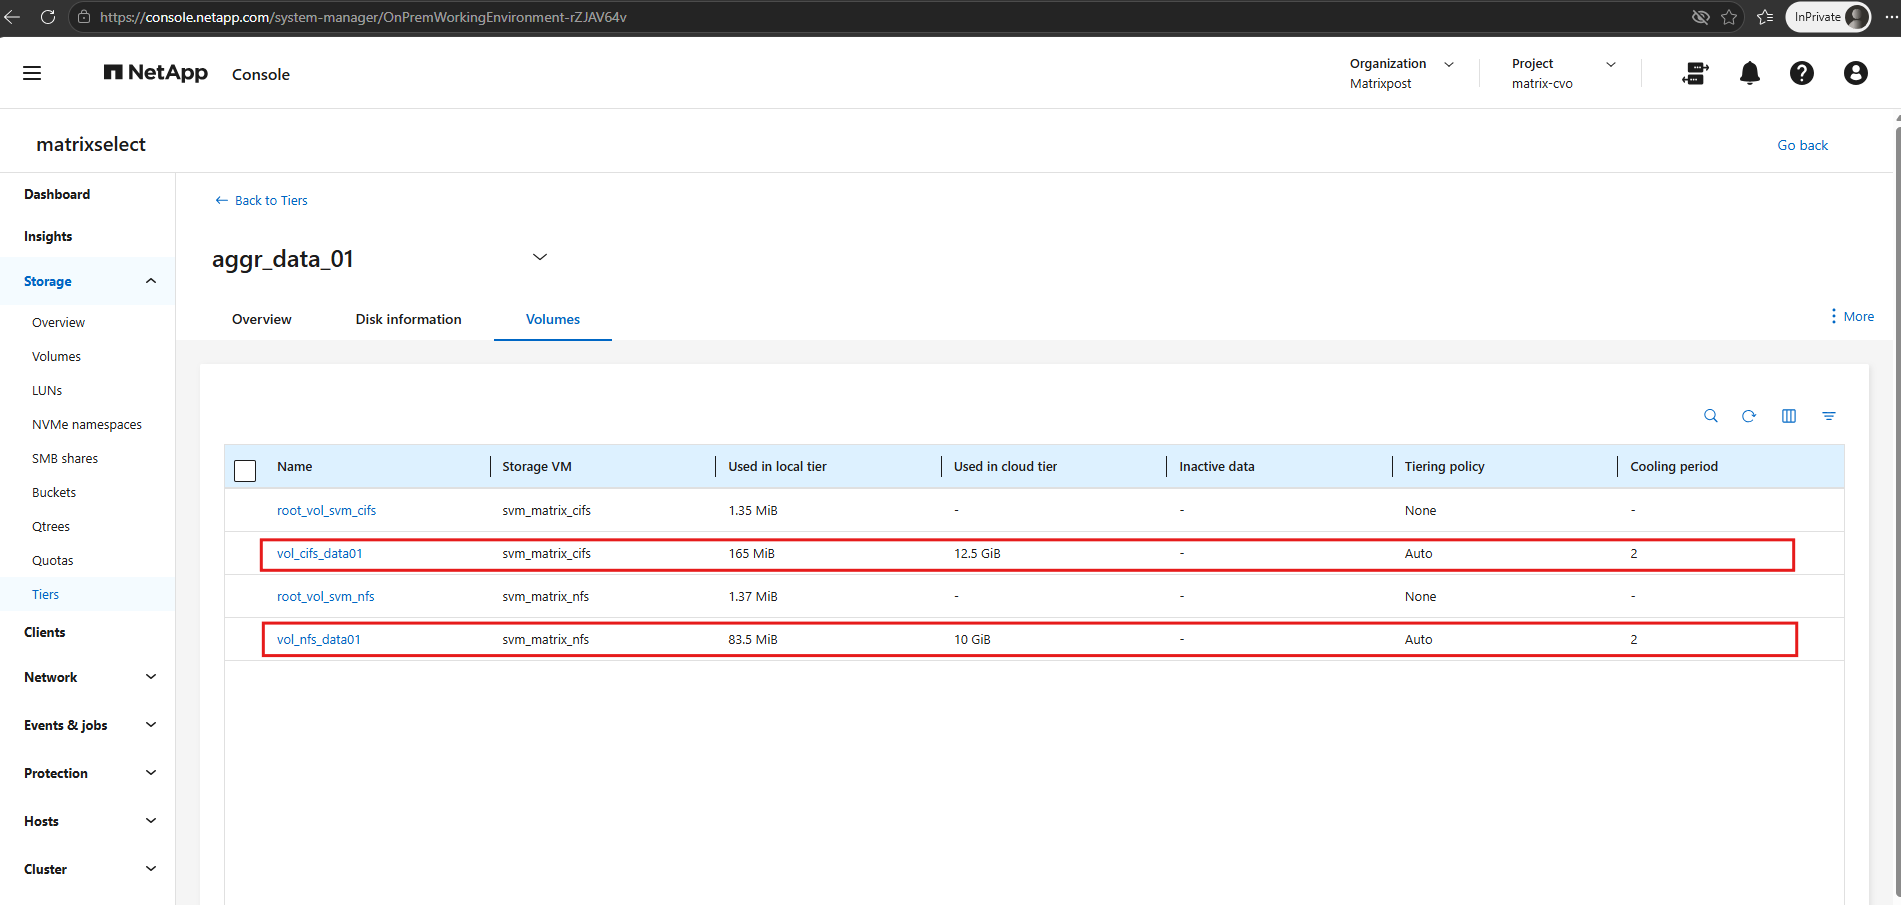
The Volumes view of the FabricPool-enabled local tier now confirms that both vol_cifs_data01 and vol_nfs_data01 use the Auto tiering policy with a 2-day cooling period.
At this point, all test data is still located on the local performance tier; after remaining inactive for the configured cooling period, eligible cold blocks can be moved to the Azure Blob Storage cloud tier.
The current distribution between the local performance tier and the Azure cloud tier can also be verified from the ONTAP CLI using volume show-footprint.
At this point, 12.64 GB of the CIFS volume and 10.07 GB of the NFS volume remain on the performance tier, while 0 B has been tiered to
azure_cloud_528.
volume show-footprint -vserver svm_matrix_cifs -volume vol_cifs_data01 -fields bin0-name,volume-blocks-footprint-bin0,bin1-name,volume-blocks-footprint-bin1
volume show-footprint -vserver svm_matrix_nfs -volume vol_nfs_data01 -fields bin0-name,volume-blocks-footprint-bin0,bin1-name,volume-blocks-footprint-bin1

Manually Triggering Cloud Tiering for Testing
Normally, the auto tiering policy waits until data has remained inactive for the configured cooling period before it becomes eligible for tiering.
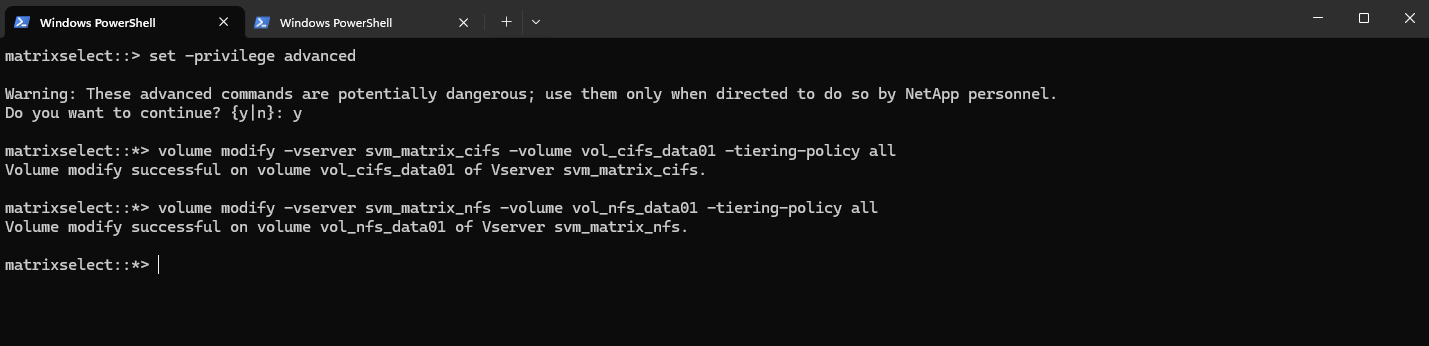
For testing purposes, however, we can temporarily use the all policy and manually trigger a FabricPool tiering scan to move eligible data to the Azure cloud tier without waiting several days.
For the CIFS volume:
set -privilege advanced
volume modify -vserver svm_matrix_cifs -volume vol_cifs_data01 -tiering-policy all
And NFS:
volume modify -vserver svm_matrix_nfs -volume vol_nfs_data01 -tiering-policy all
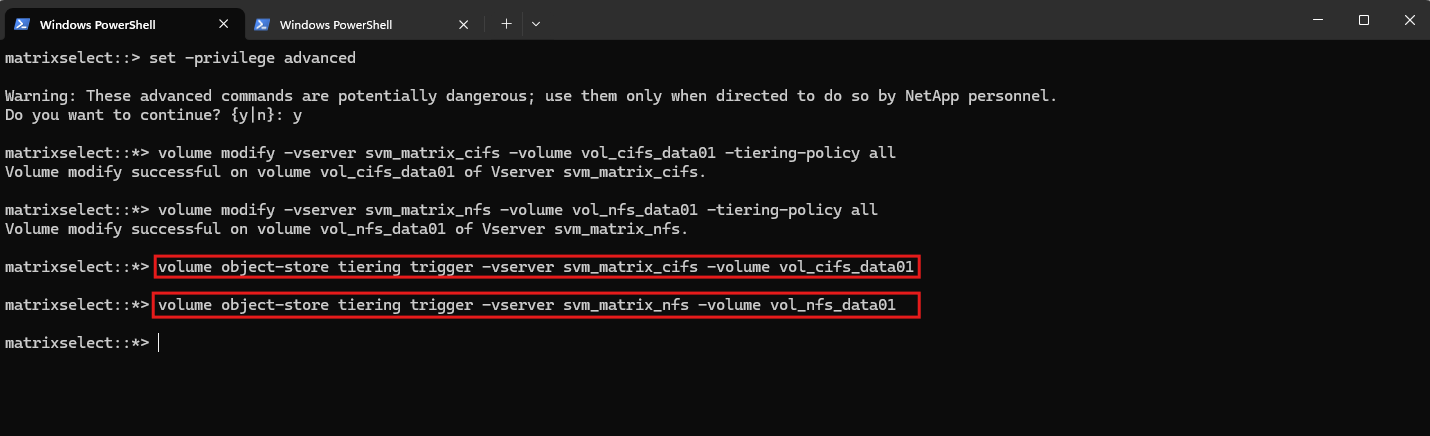
To push the data immediately from the local performance tier to the Azure cloud tier, we manually trigger the FabricPool tiering process for the CIFS volume using the following command.
With the tiering policy set to all, the eligible data can be moved without waiting for a cooling period.
volume object-store tiering trigger -vserver svm_matrix_cifs -volume vol_cifs_data01
volume object-store tiering trigger -vserver svm_matrix_nfs -volume vol_nfs_data01
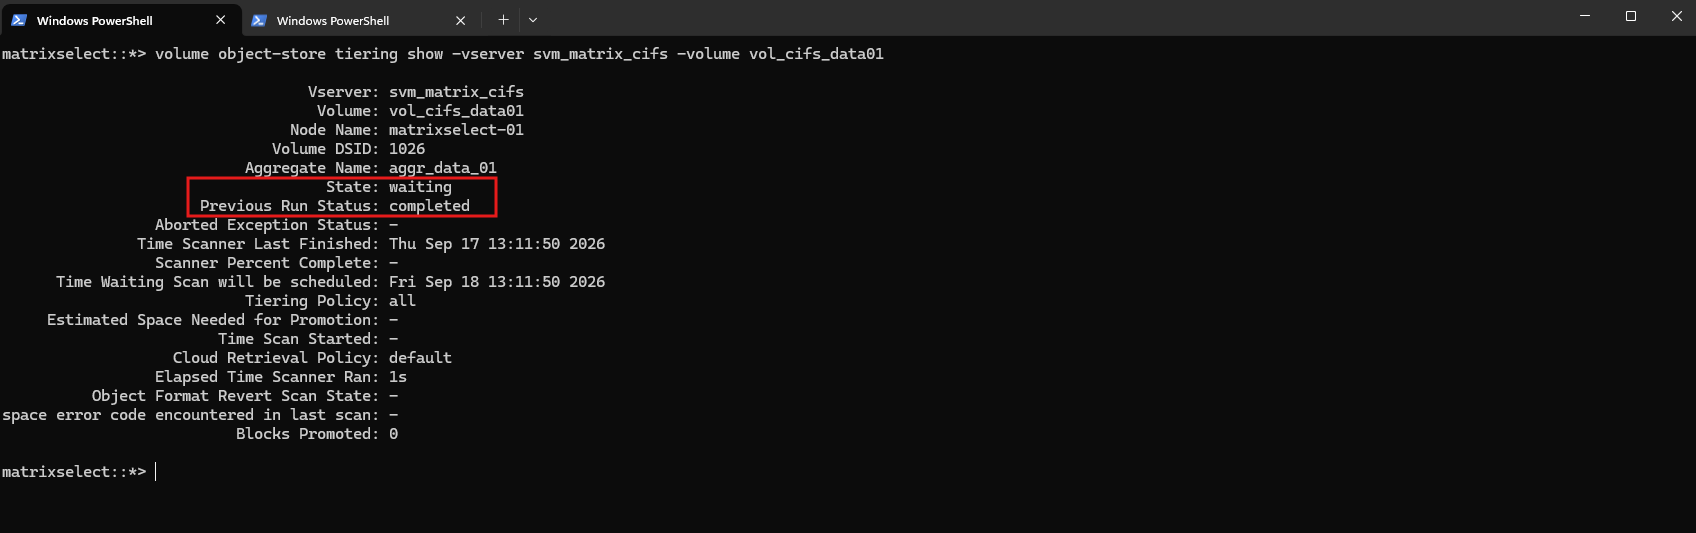
The progress and status of the FabricPool tiering scan can be monitored using volume object-store tiering show.
In our case,
Previous Run Status: completedconfirms that the manually triggered scan finished successfully, whileState: waitingindicates that no scan is currently running and ONTAP is waiting for the next scheduled scan.
volume object-store tiering show -vserver svm_matrix_cifs -volume vol_cifs_data01
To verify how much data was actually moved, we use volume show-footprint, which shows the distribution between the local performance tier and the Azure cloud tier.
The output confirms that 12.53 GB has been tiered to the Azure cloud tier, while only 202 MB remains on the local performance tier.
volume show-footprint -vserver svm_matrix_cifs -volume vol_cifs_data01 -fields bin0-name,volume-blocks-footprint-bin0,bin1-name,volume-blocks-footprint-bin1

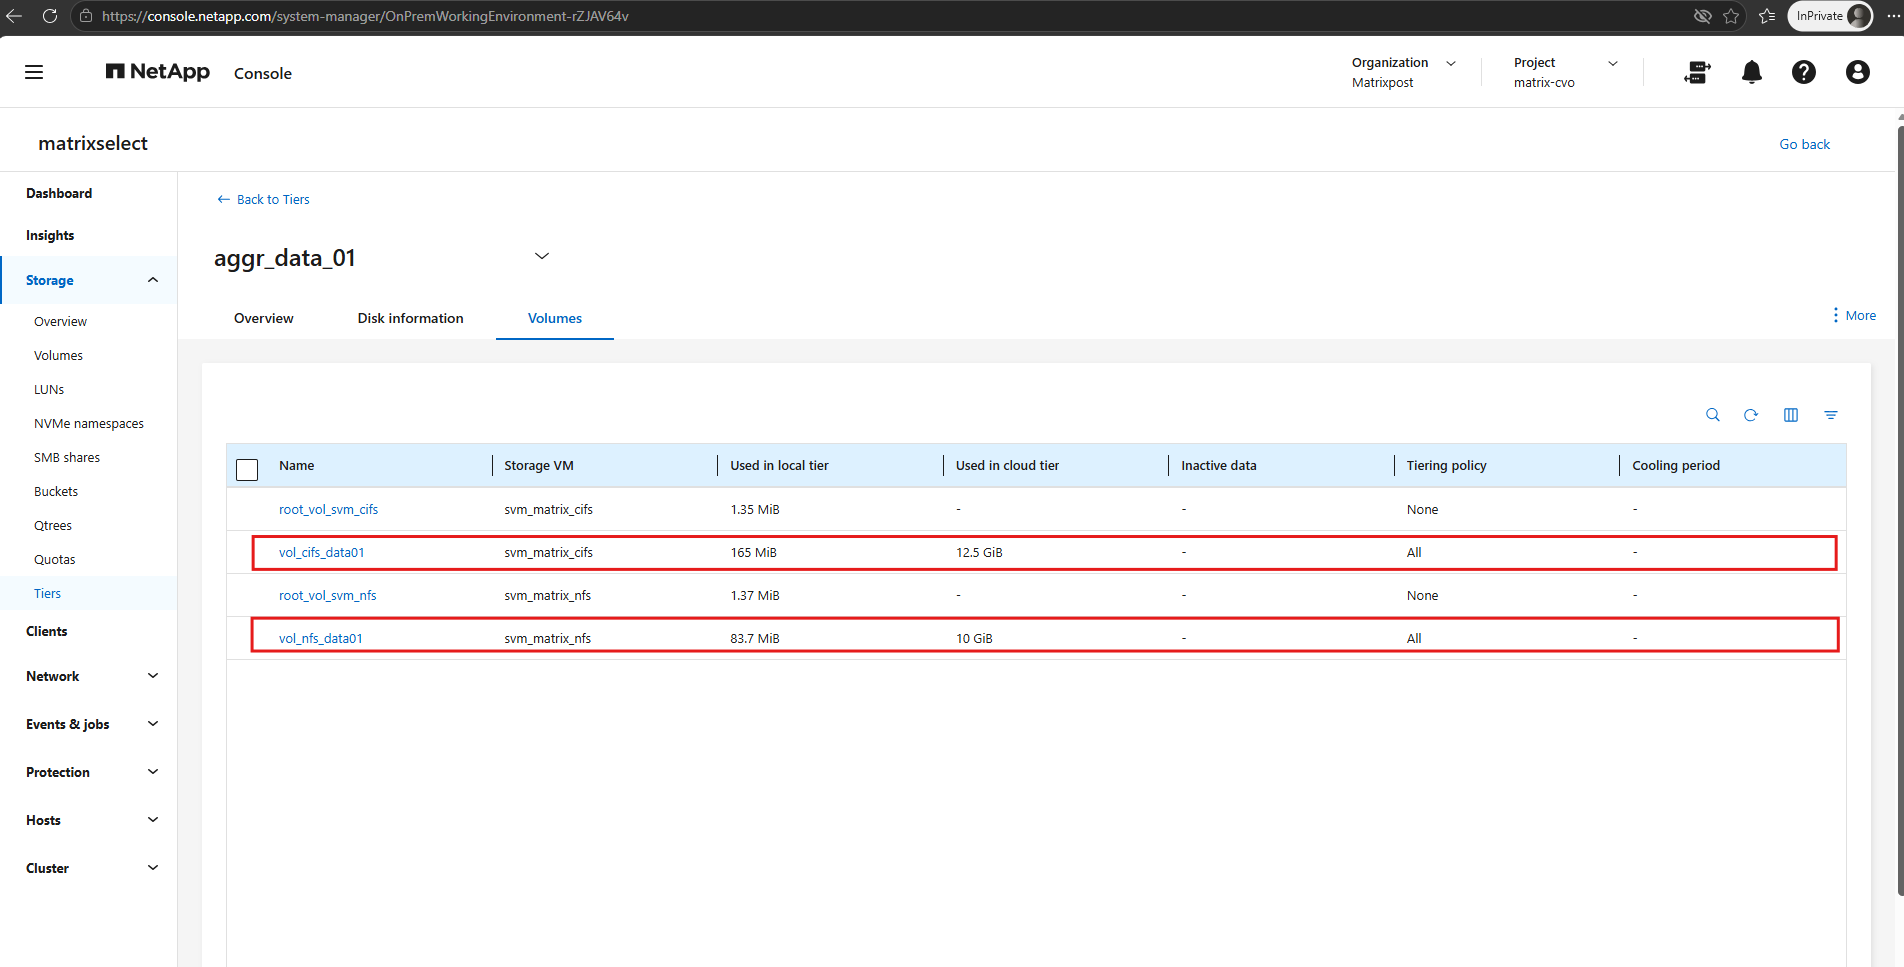
System Manager now confirms the successful tiering operation, showing approximately 12.5 GiB of CIFS data and 10 GiB of NFS data in the cloud tier, with only a small footprint remaining locally.
Since the all policy was used only to demonstrate immediate tiering, we now change both volumes back to the previously configured auto policy with a 2-day cooling period for normal operation.
volume modify -vserver svm_matrix_cifs -volume vol_cifs_data01 -tiering-policy auto -tiering-minimum-cooling-days 2
volume modify -vserver svm_matrix_nfs -volume vol_nfs_data01 -tiering-policy auto -tiering-minimum-cooling-days 2

After completing the manual tiering test, both volumes are changed back to the auto tiering policy with a 2-day cooling period.
The previously tiered data remains in the Azure cloud tier, while future inactive data will become eligible for automatic tiering according to the configured cooling period.
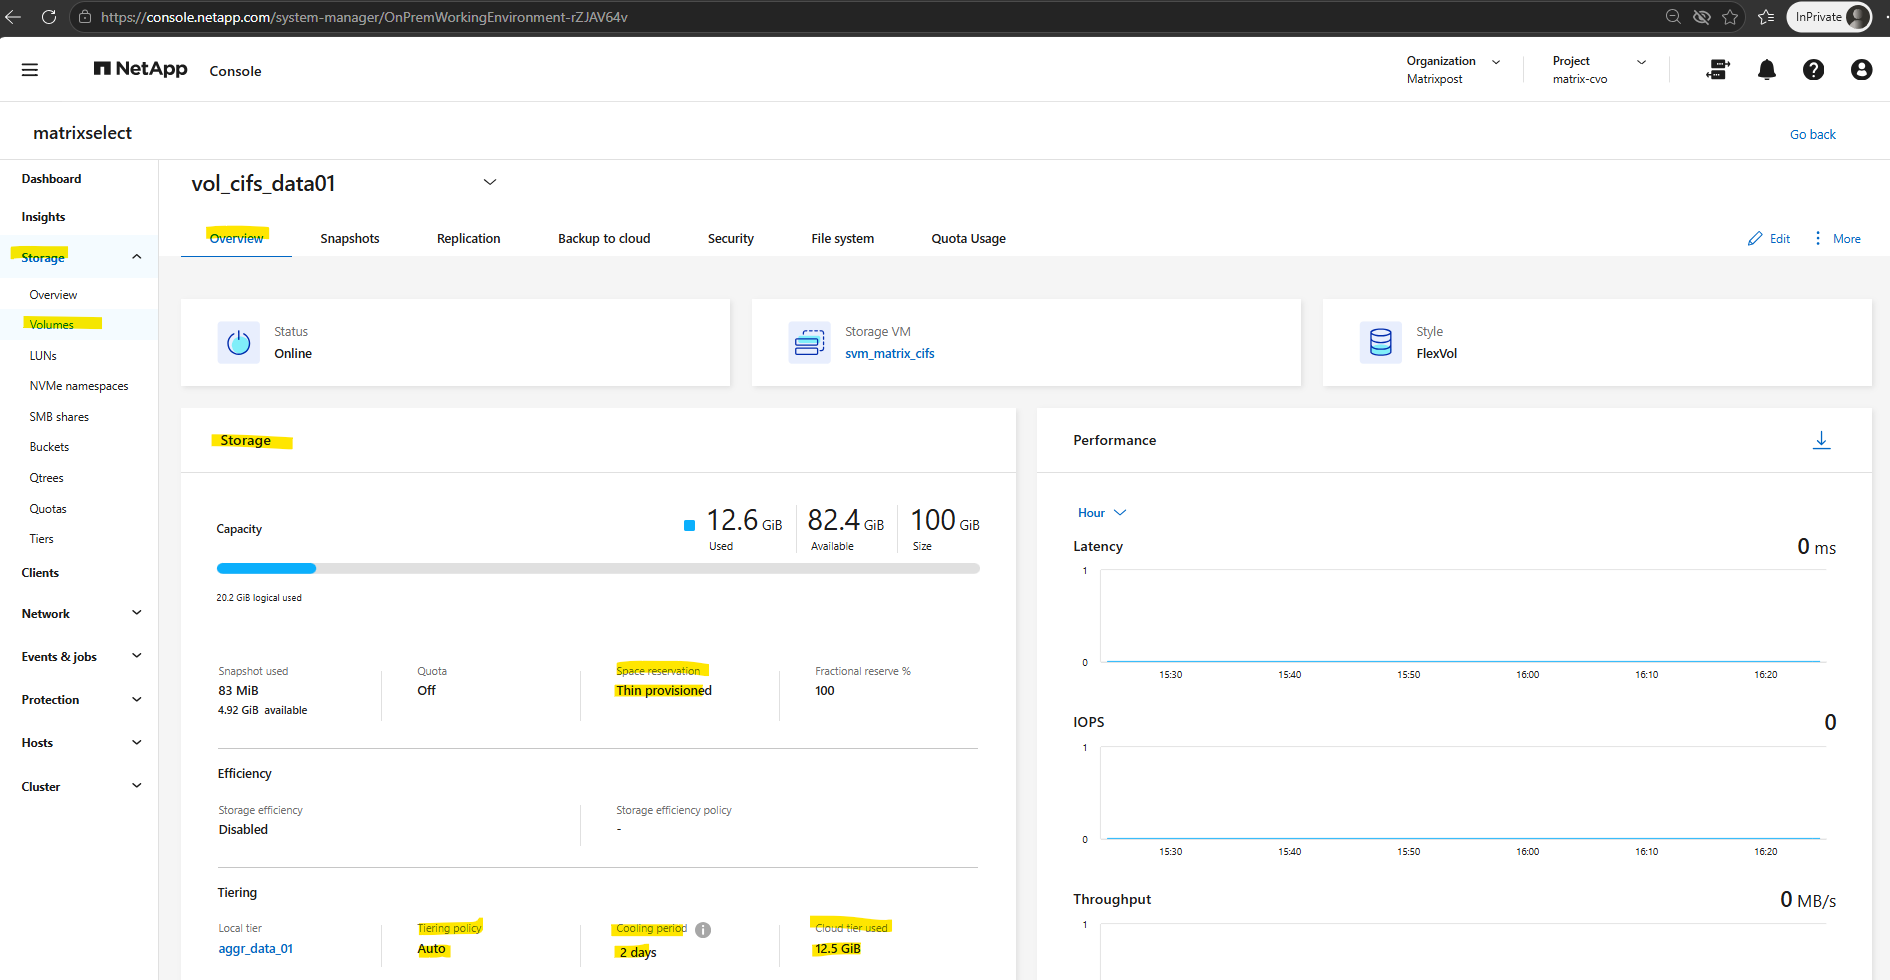
The configured FabricPool settings can also be verified directly from the volume overview in System Manager.
The Storage section confirms that the volume is thin provisioned, while the Tiering section shows the assigned local tier, Auto tiering policy, 2-day cooling period, and the amount of capacity currently used in the cloud tier.
Although volume object-store tiering show reports the manually triggered scan as completed and volume show-footprint already reflects the resulting cloud-tier footprint, the actual transfer to Azure Blob Storage can continue asynchronously afterward.
This can be observed in System Manager as the cloud-tier usage gradually increases while the used capacity of the local performance tier decreases.
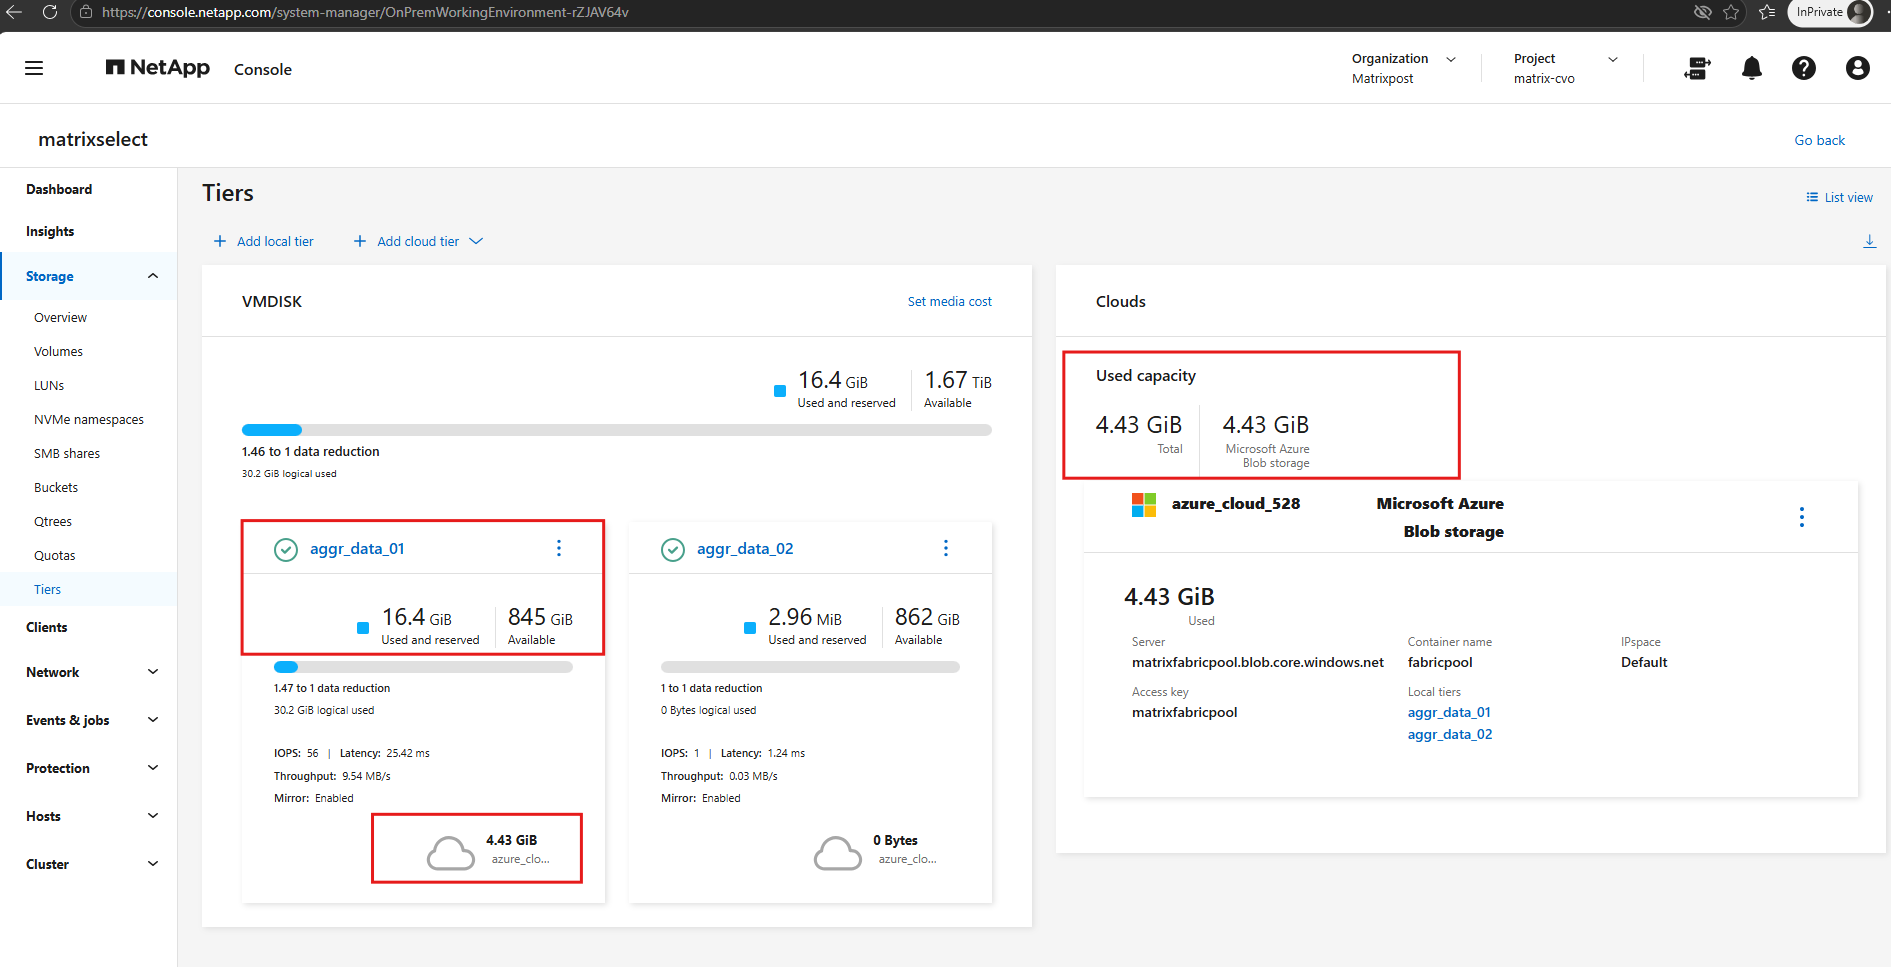
The actual transfer to Azure Blob Storage continues asynchronously after the tiering scan has completed. In System Manager, this can be observed in real time as the used capacity of the local performance tier decreases while the used capacity of the Azure cloud tier increases.
In my on-premises vSphere lab, the Internet connection provides only approximately 40 Mbit/s of upload bandwidth to Azure, so transferring the tiered data takes some time. This makes the asynchronous FabricPool transfer particularly easy to observe as the local performance-tier usage gradually decreases while the Azure cloud-tier usage increases.
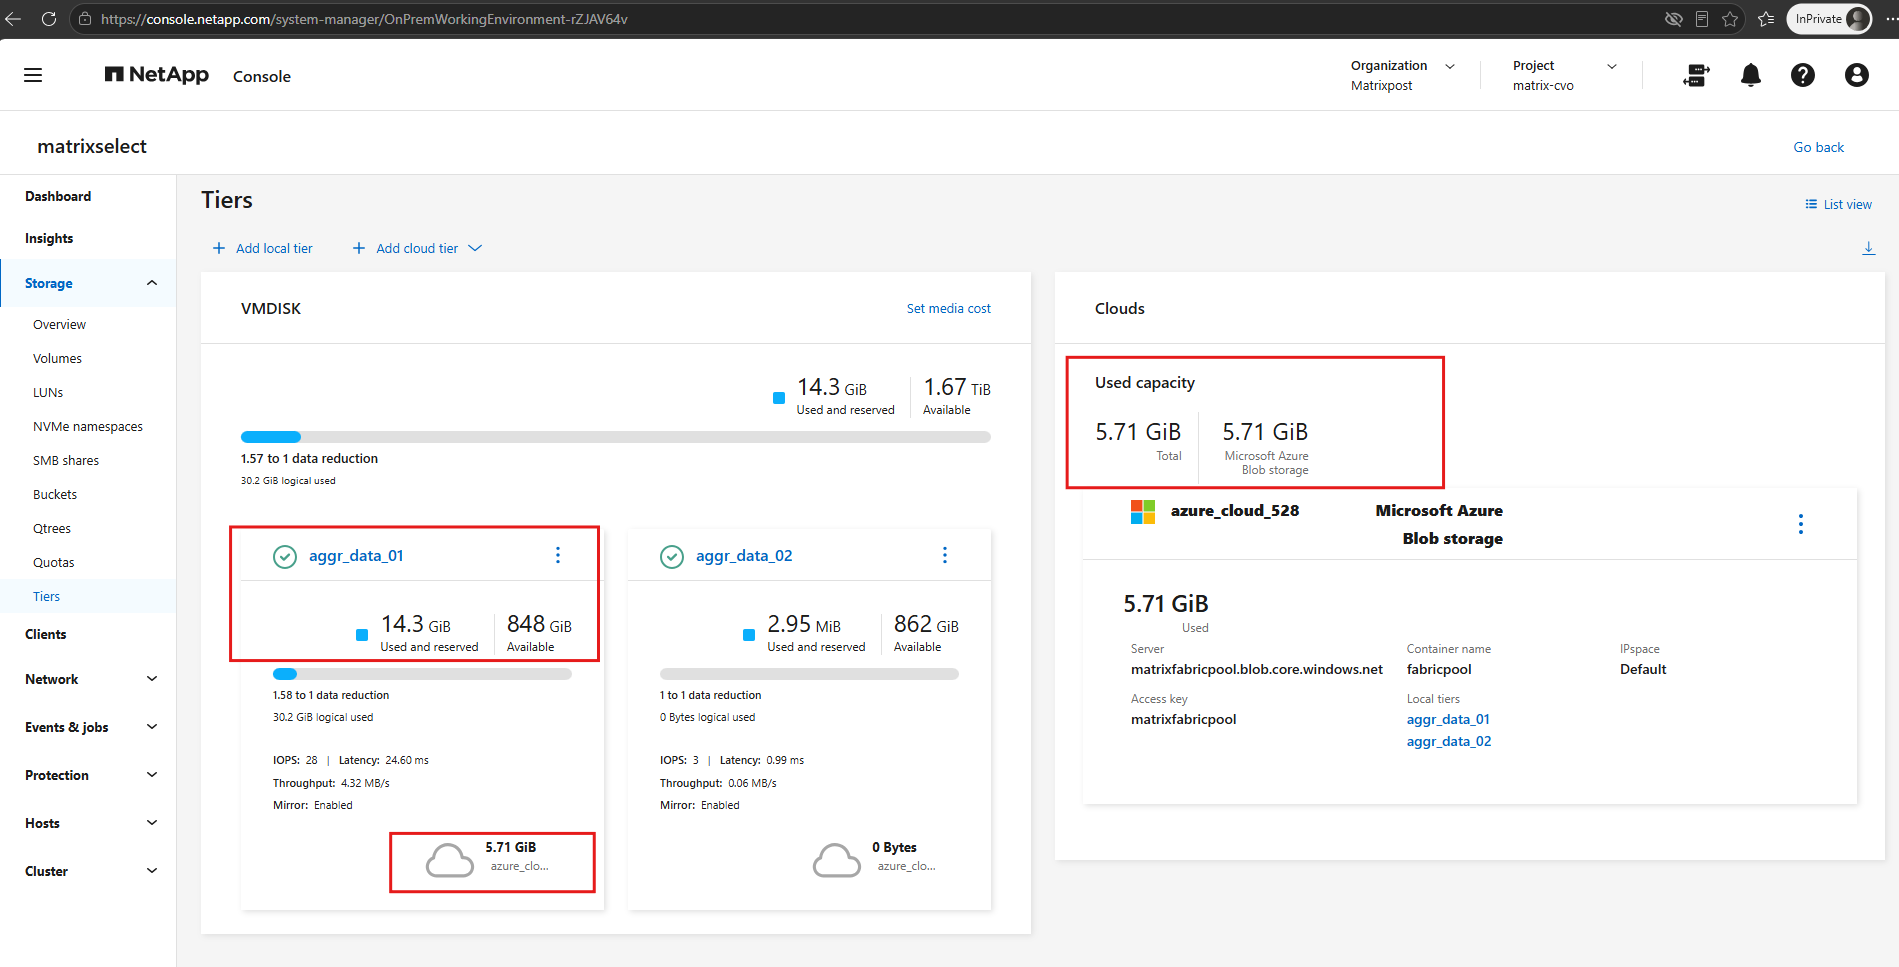
A few minutes later.
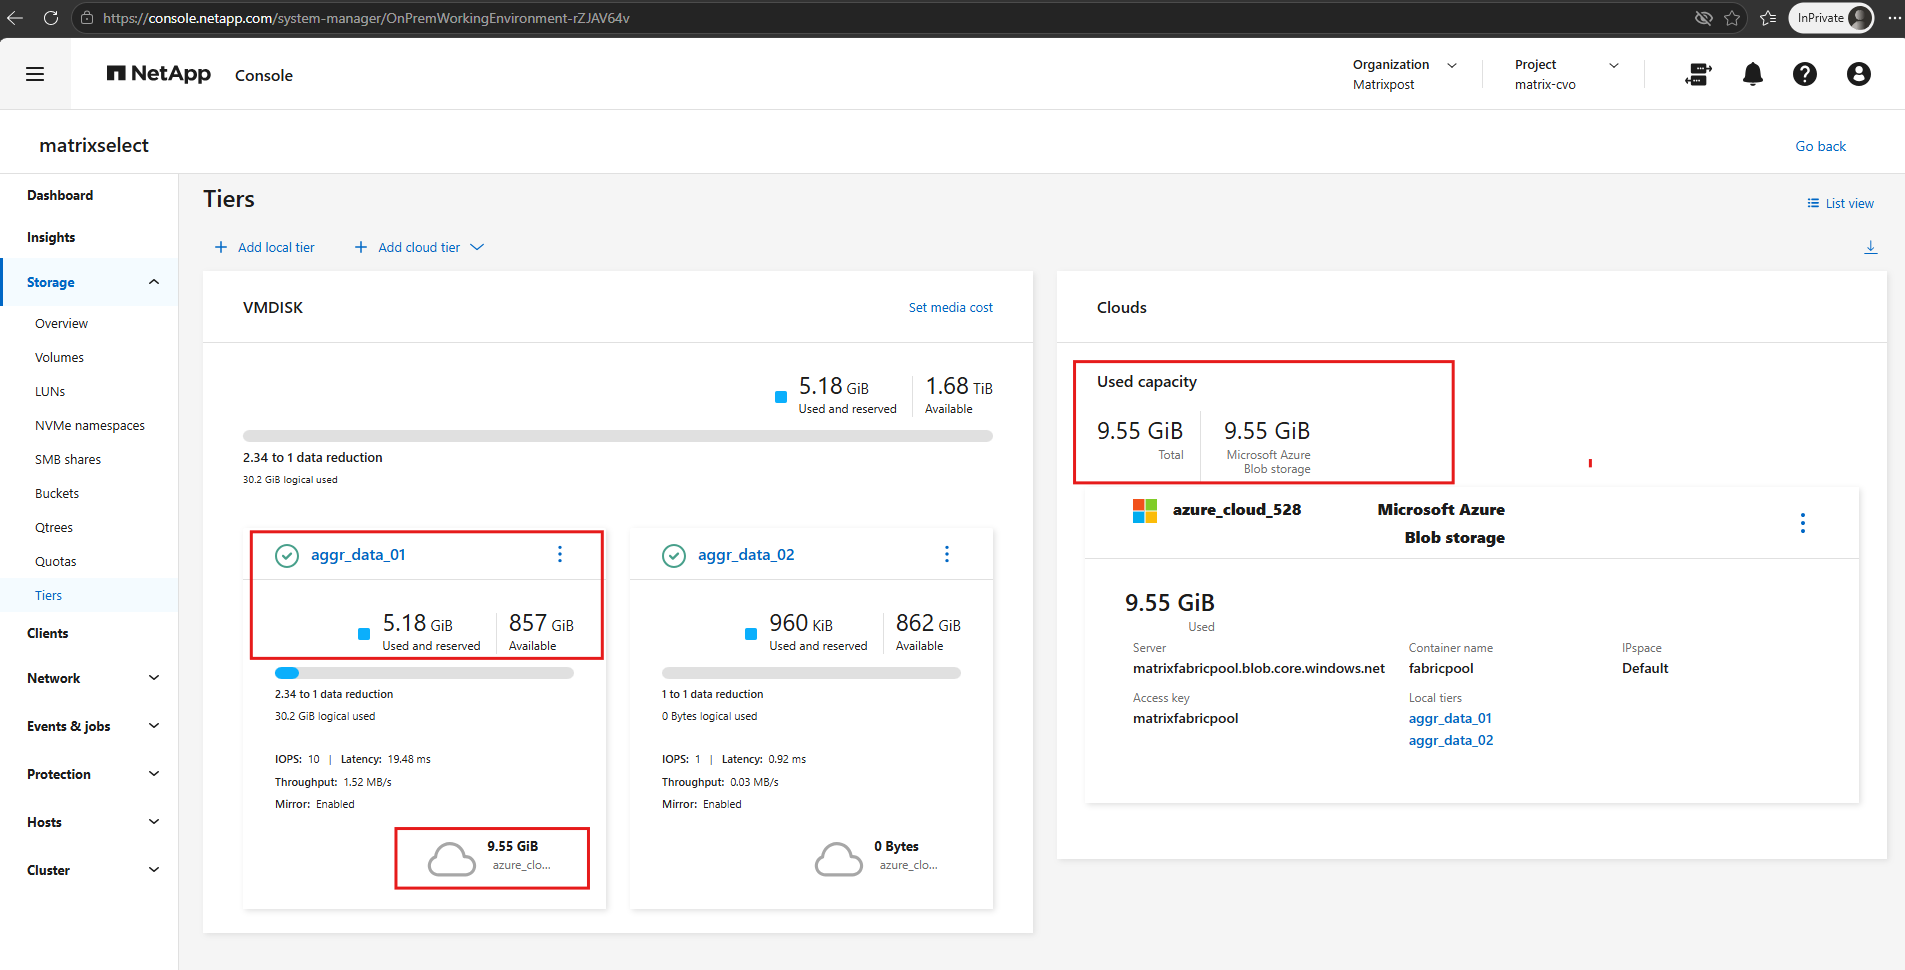
As the asynchronous FabricPool transfer continues, System Manager shows the used capacity of the local performance tier decreasing to 2.82 GiB, while the Azure Blob Storage cloud tier has increased to 12.8 GiB.
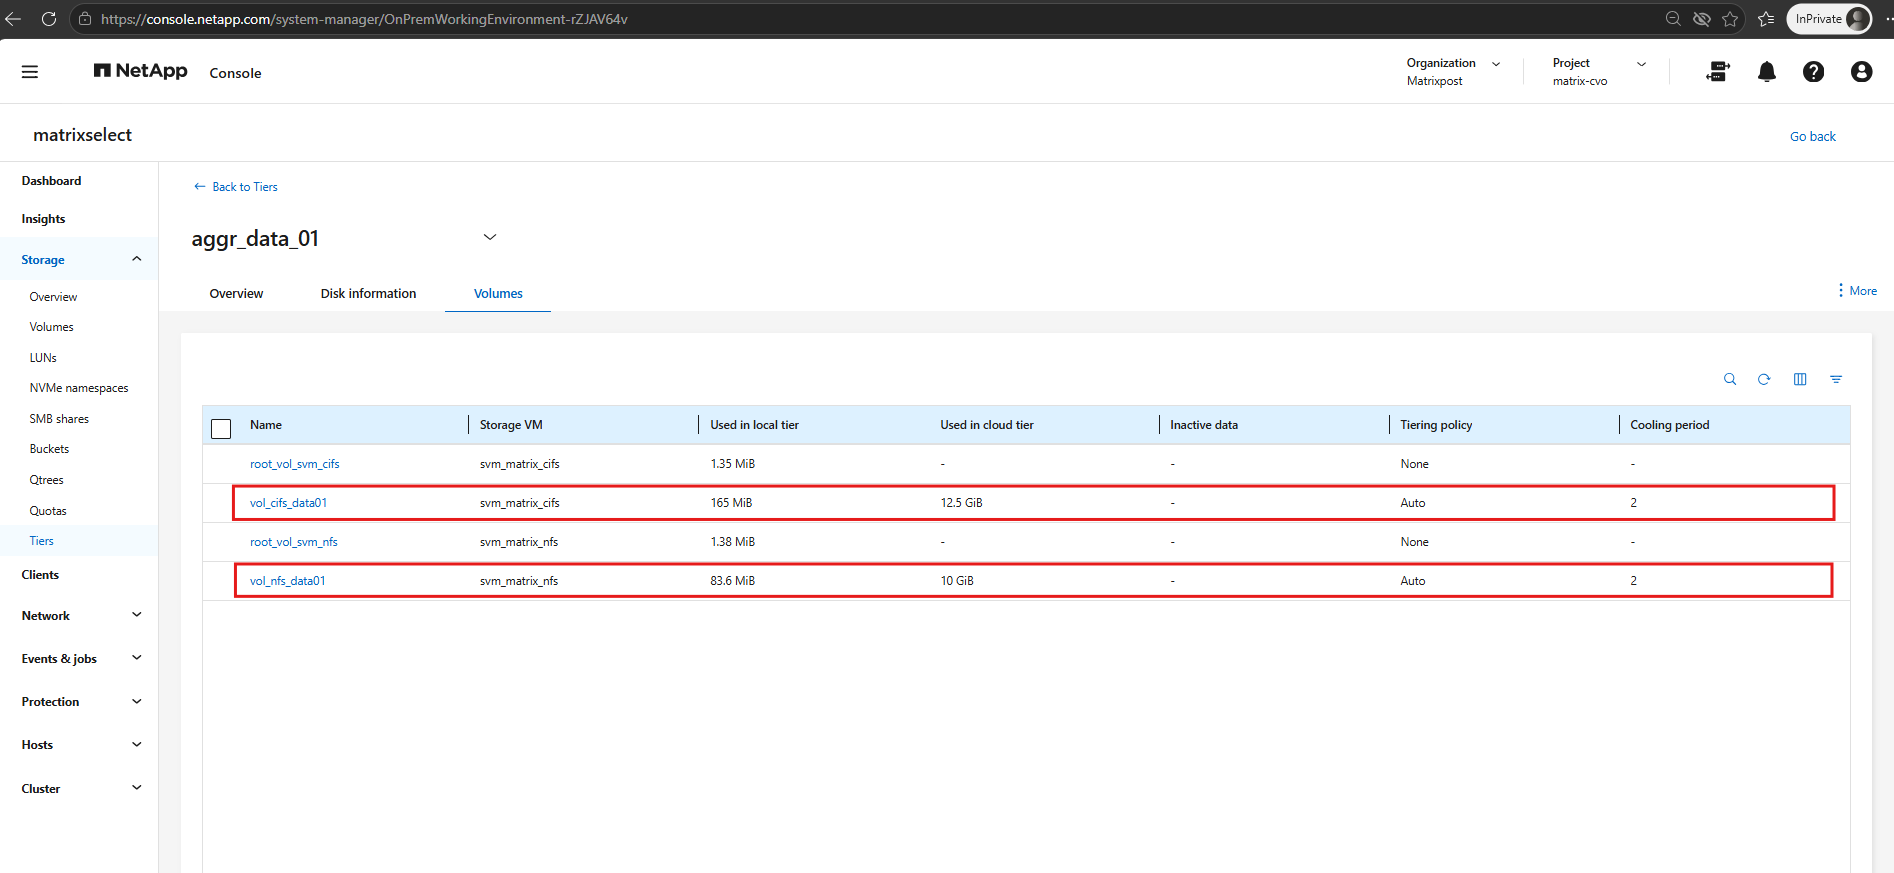
Note: The cloud-tier footprint reported for a volume shown below does not necessarily mean that all of this data has already been physically transferred to the object store.
According to NetApp, the cloud-tier footprint also includes blocks that are staged before being moved to the cloud tier. In our test, the volumes already reported approximately 22.5 GiB in the cloud tier while Azure Blob Storage below showed only 12.8 GiB of used capacity, demonstrating the asynchronous nature of the actual transfer.
The cloud-tier footprint reported for our volumes.
Disabling Cloud Tiering and Moving Existing Data Back to the Performance Tier
If cloud tiering is no longer required, simply changing the volume tiering policy to none only prevents new data from being moved to the cloud tier; data that has already been tiered remains there.
In this section, we disable further tiering and move the existing cloud-tiered data back to the local performance tier.
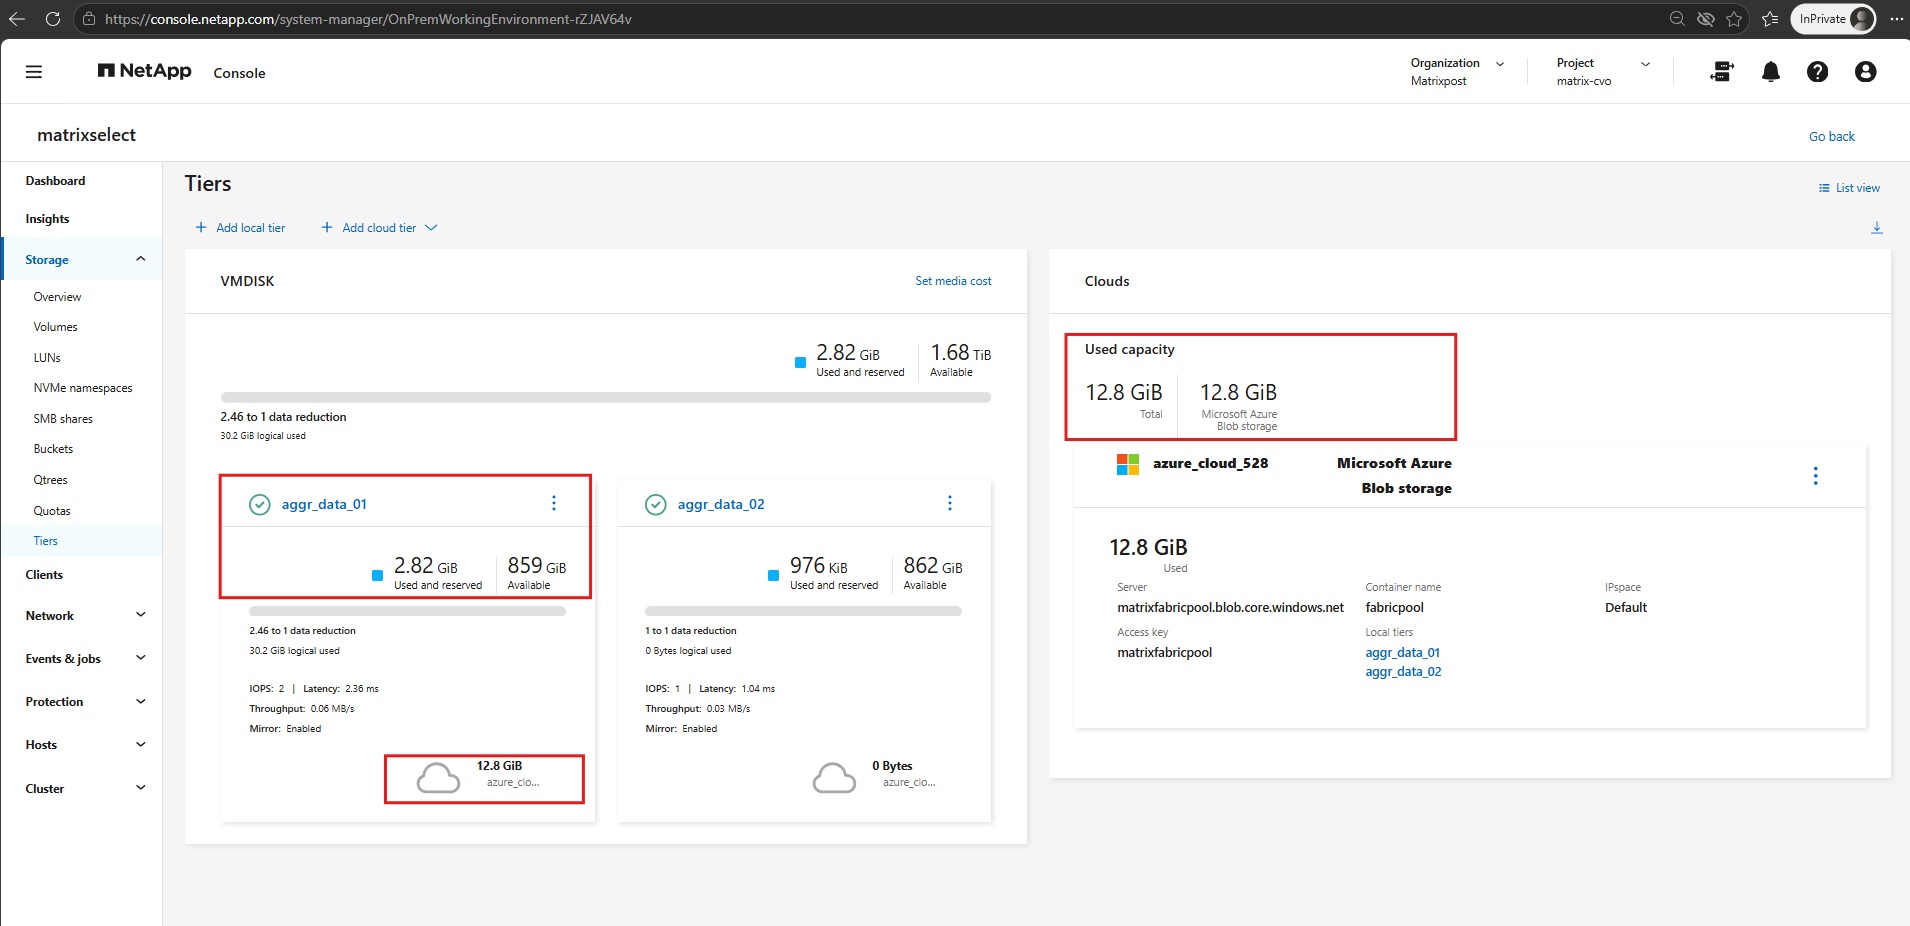
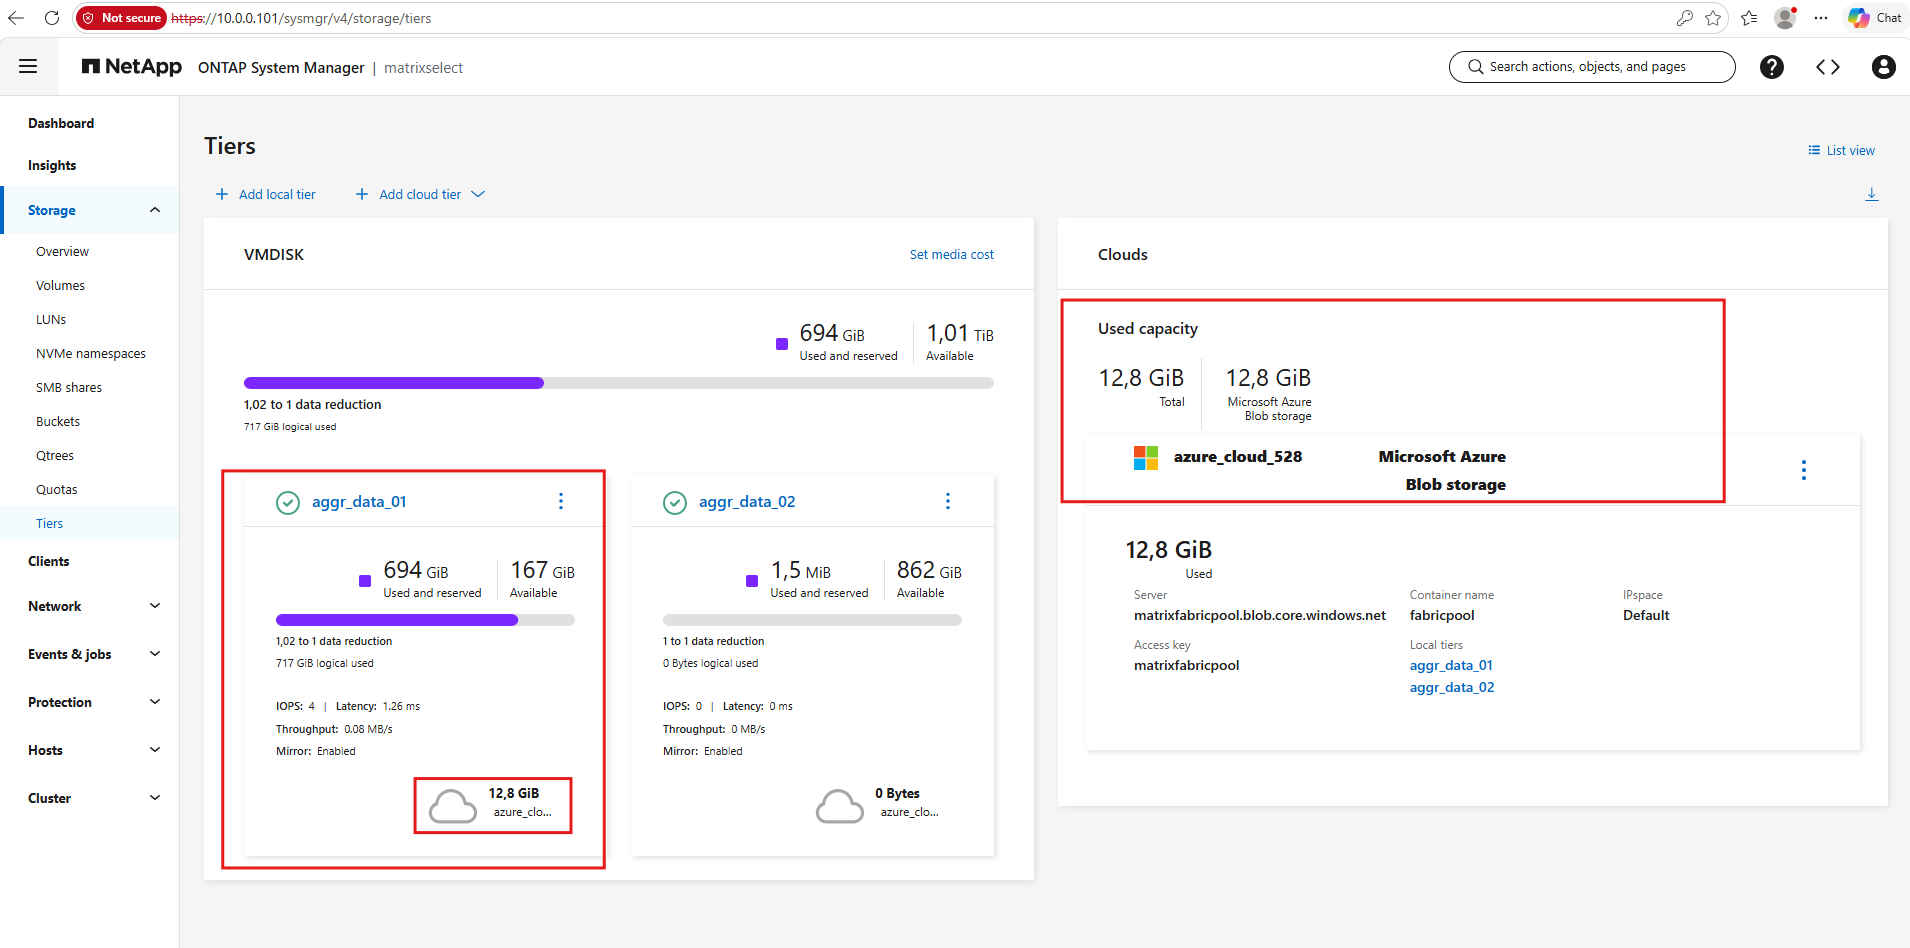
Before moving the tiered data back, the System Manager shows 12.8 GiB stored in the Azure cloud tier for
aggr_data_01, while the local performance tier still has 167 GiB available capacity.
At the volume level, the System Manager shows where this cloud usage comes from:
vol_cifs_data01currently has 12.5 GiB andvol_nfs_data0110 GiB stored in the cloud tier, while only 83.8 MiB and 41.9 MiB, respectively, remain in the local tier.
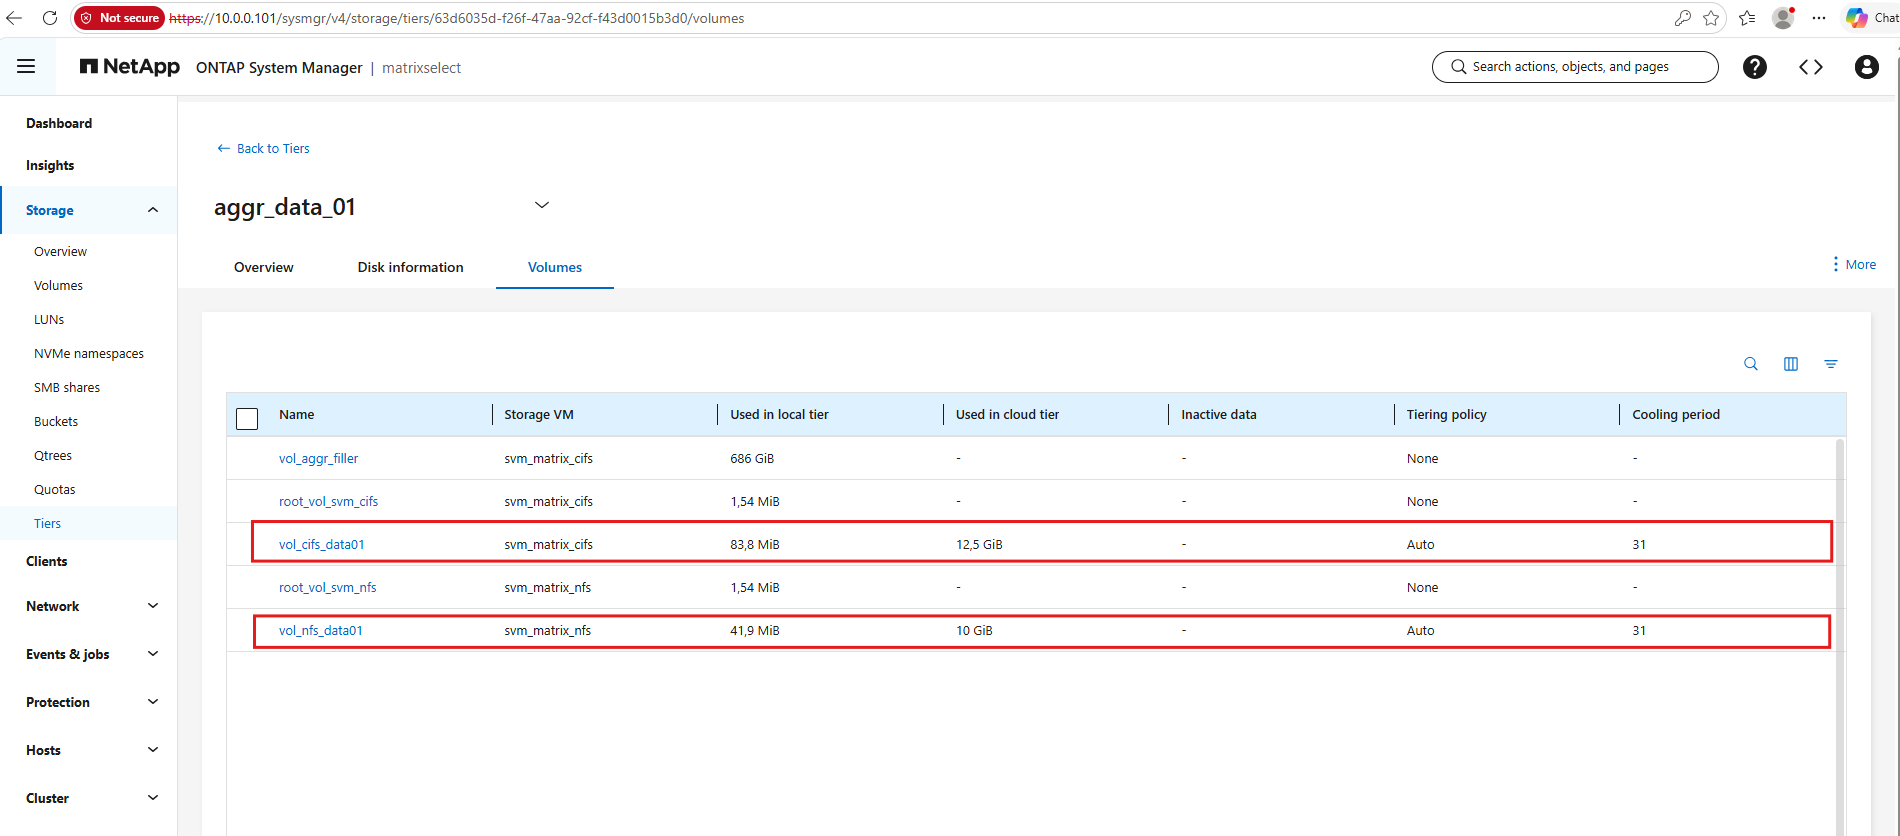
First, we change the tiering policy to none to prevent ONTAP from moving any additional cold data from the performance tier to Azure Blob Storage.
volume modify -vserver svm_matrix_cifs -volume vol_cifs_data01 -tiering-policy none

We can verify the current tiering and cloud retrieval policies with:
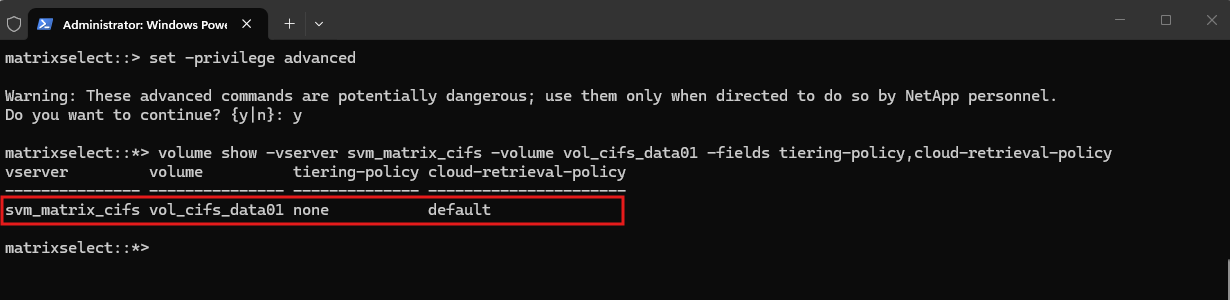
The output confirms that cloud tiering is already disabled with the tiering policy set to
none, while the cloud retrieval policy remains at itsdefaultsetting.Therefore, the data already stored in the cloud tier remains in Azure and is not automatically moved back to the performance tier.
set -privilege advanced
volume show -vserver svm_matrix_cifs -volume vol_cifs_data01 -fields tiering-policy,cloud-retrieval-policy
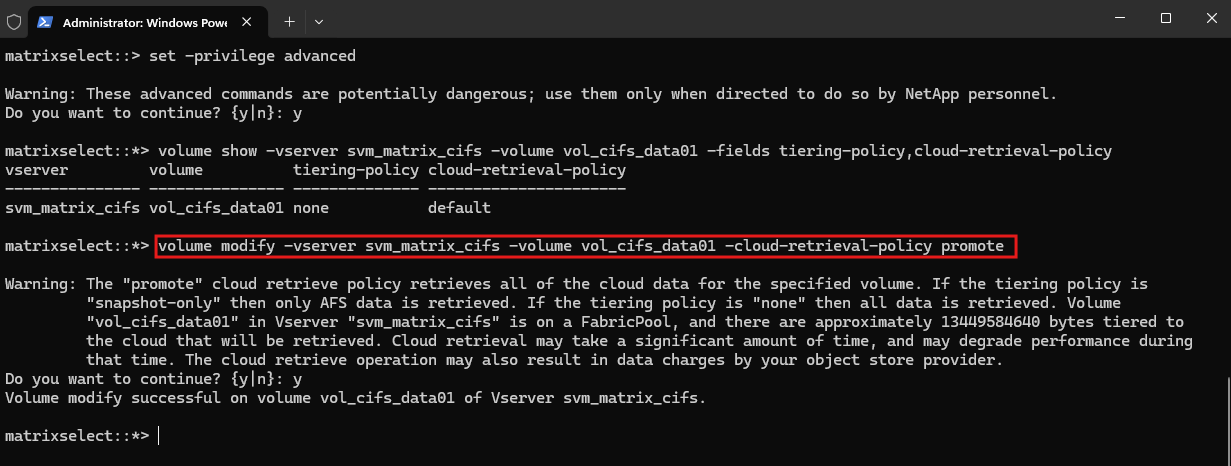
Next, we change the cloud retrieval policy to promote. In combination with the none tiering policy, this instructs ONTAP to move the volume’s tiered data from the cloud tier back to the local performance tier.
ONTAP confirms that the
promoteretrieval policy will move all existing cloud-tiered data back to the performance tier when the volume uses thenonetiering policy.
volume modify -vserver svm_matrix_cifs -volume vol_cifs_data01 -cloud-retrieval-policy promote
We can verify the new configuration with:
After confirming the operation, the configuration now shows the required combination of
none+promote.
volume show -vserver svm_matrix_cifs -volume vol_cifs_data01 -fields tiering-policy,cloud-retrieval-policy
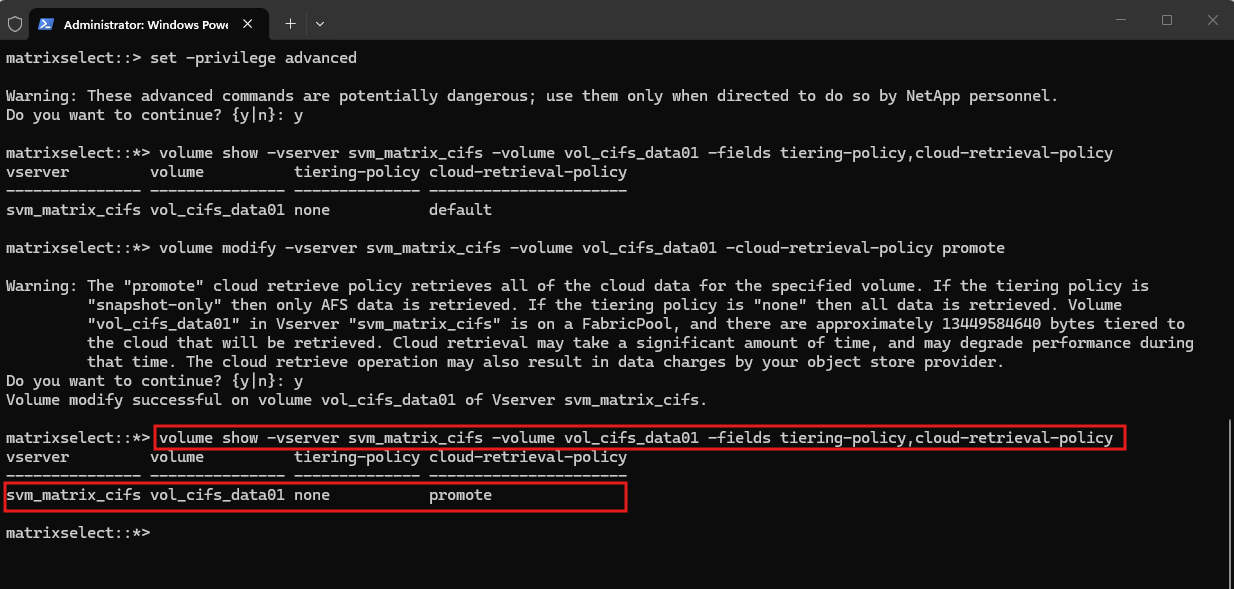
I also applied the same configuration to the NFS volume vol_nfs_data01, so its already tiered data is moved back to the performance tier as well.
The System Manager view clearly shows the process in progress for both volumes, with local-tier usage increasing while cloud-tier usage decreases.
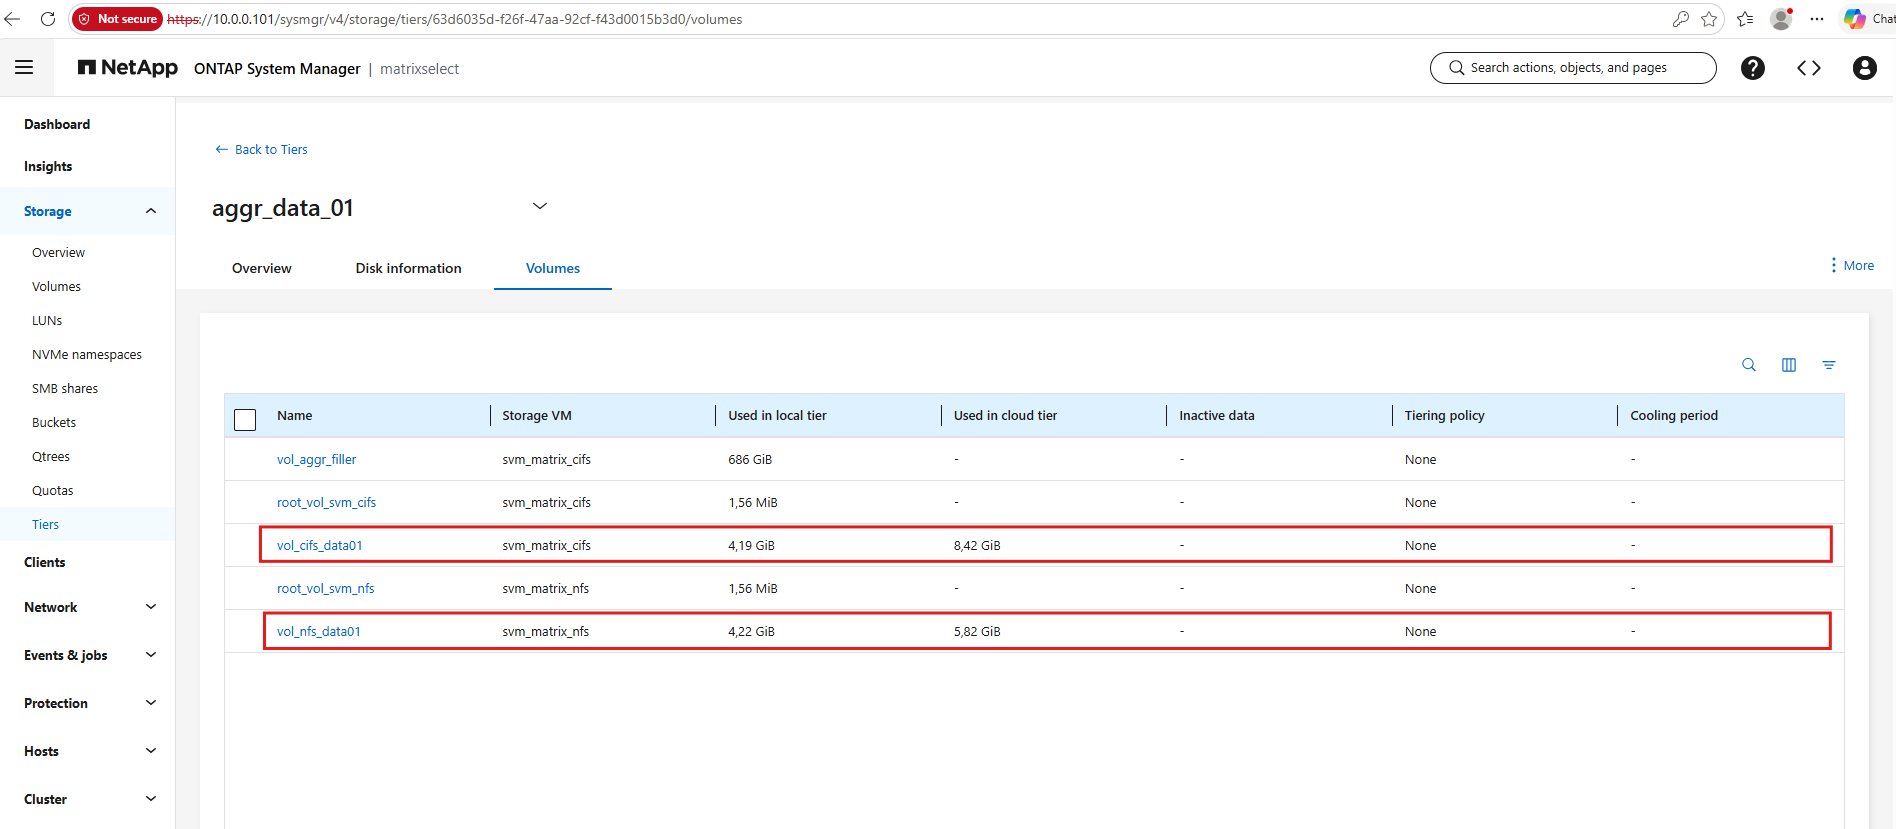
Finally the volume-level view already shows no remaining cloud-tier usage for either volume: vol_cifs_data01 now has 12.7 GiB and vol_nfs_data01 10.1 GiB stored entirely in the local performance tier.
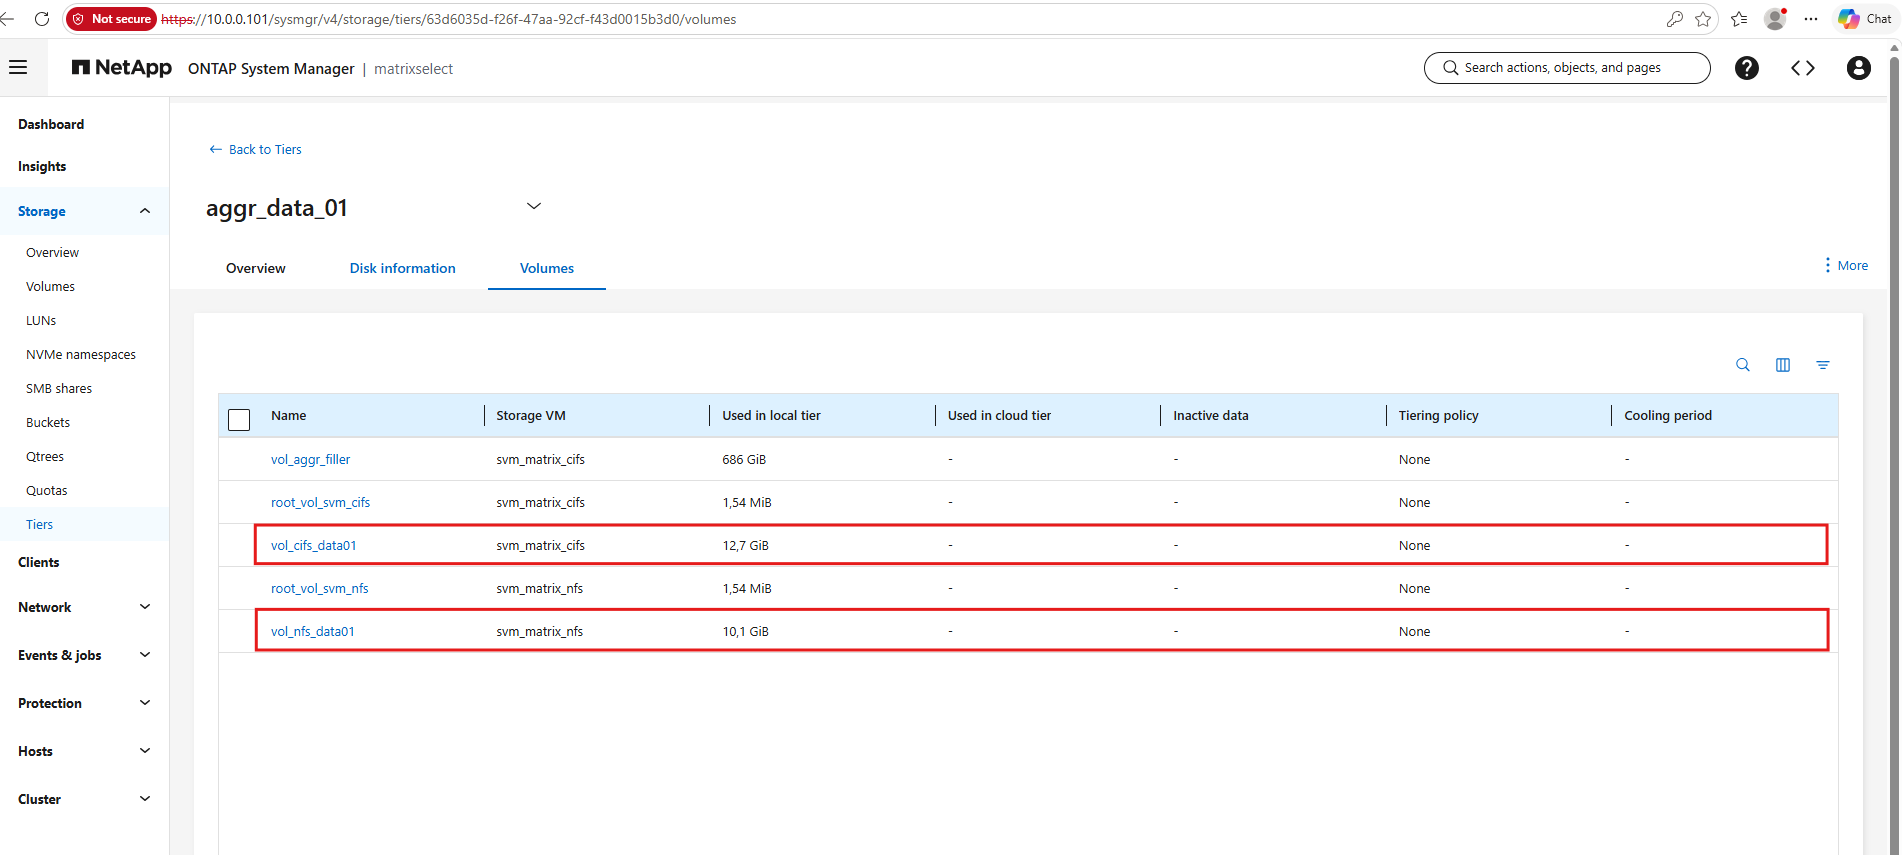
At the aggregate level, the System Manager still reports 1.35 GiB used in the Azure cloud tier. This value can lag behind the more detailed volume-level statistics while ONTAP updates the FabricPool capacity information.
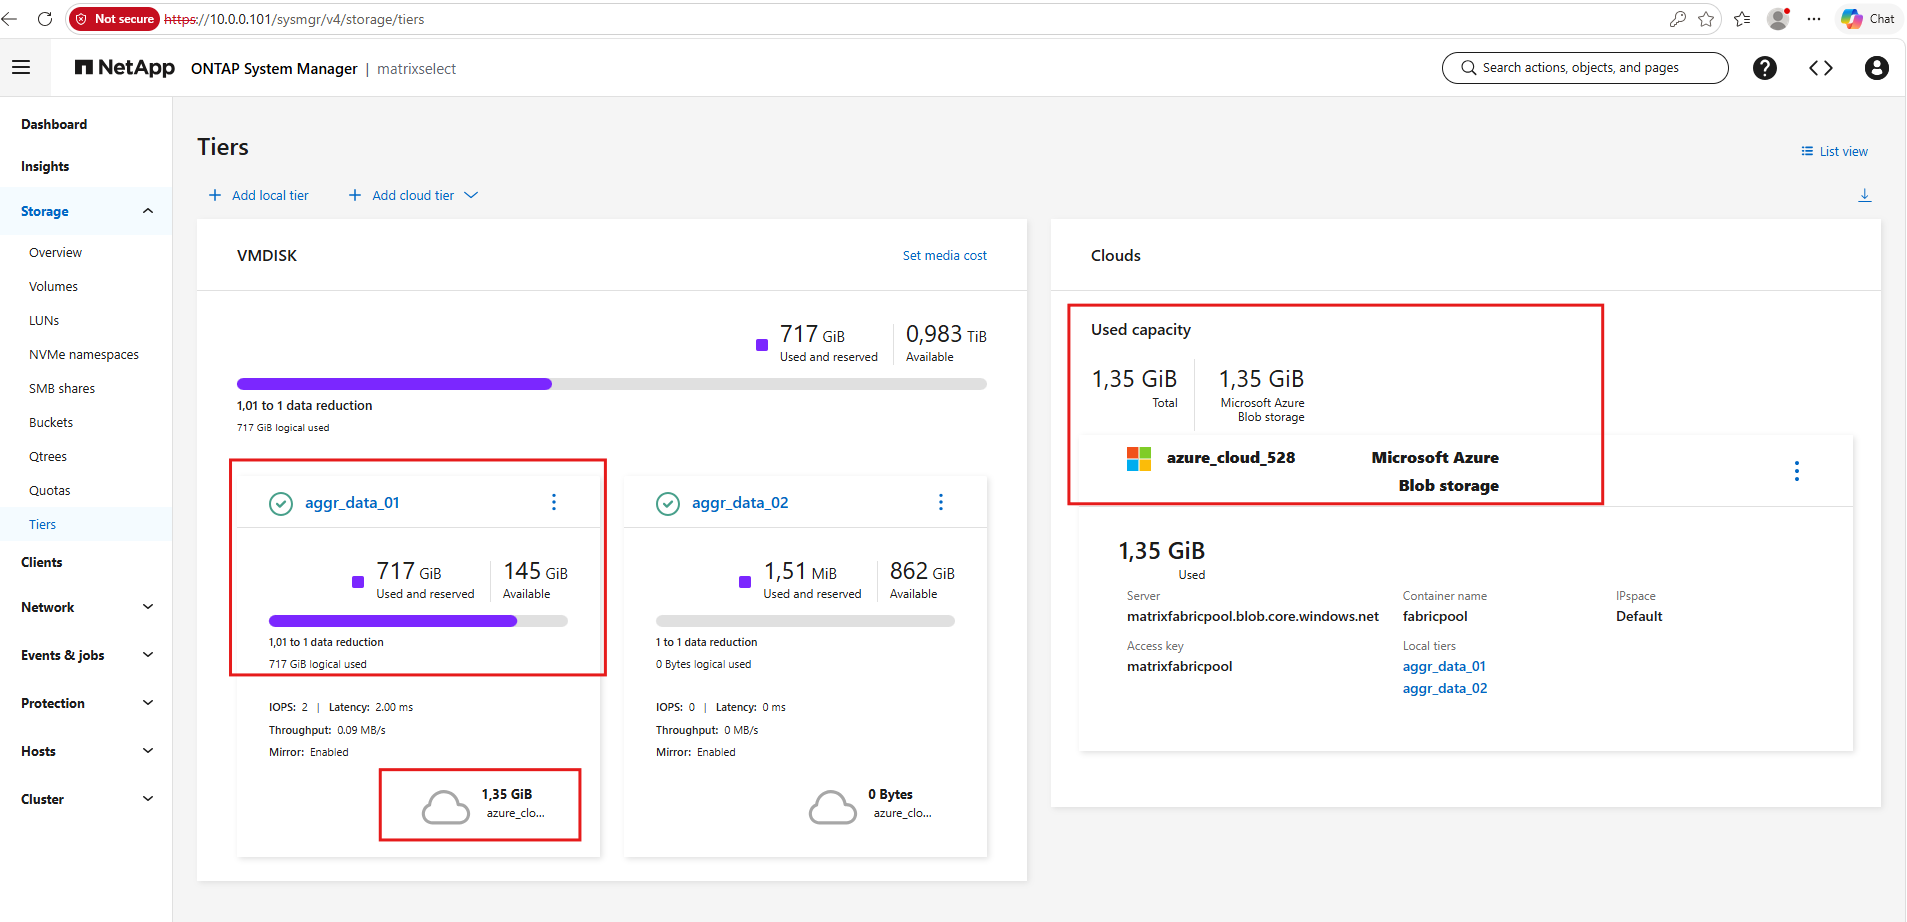
Note: Once a cloud tier has been attached to a local aggregate and the aggregate becomes a FabricPool, the primary cloud tier cannot be detached again.
Cloud tiering can nevertheless be effectively disabled by setting the affected volumes to the
nonetiering policy and, if required, moving previously tiered data back to the performance tier using thepromotecloud retrieval policy.
Understanding Block, File, and Object Storage
As we have used object storage as the capacity tier for FabricPool throughout this article, it is useful to take a closer look at how object storage differs from the other two common storage models: block and file storage.
File storage, by contrast, provides an already existing filesystem and exposes files and directories through protocols such as SMB/CIFS or NFS. The client accesses paths, directories, and files rather than managing the underlying raw block device itself.
Object storage stores data as objects (aka blobs) inside containers or buckets rather than exposing a traditional filesystem hierarchy or raw block device. Each object consists of the data itself together with associated metadata and an identifier; services such as Azure Blob Storage and Amazon S3 are common examples. NetApp similarly describes object storage as organizing objects inside containers/buckets rather than nested filesystem directories.
Block storage divides data into fixed-size blocks that are individually addressed and managed by the storage system. Unlike file storage, there is no filesystem hierarchy of files and directories exposed by the storage system itself. Instead, block storage is presented to the host as a raw block device, on which the operating system can create partitions and filesystems.
A classic example of block storage is a Storage Area Network (SAN). In SAN environments, storage is typically presented to hosts as Logical Unit Numbers (LUNs) using protocols such as Fibre Channel (FC) or iSCSI. From the host’s perspective, a LUN behaves much like a locally attached disk, although the actual storage resides on an external storage system.
The interesting part with FabricPool is that these storage models meet inside ONTAP. FabricPool operates at the WAFL block level, so it can tier cold data regardless of whether clients consume the ONTAP volume through file protocols or through a LUN. ONTAP collects cold 4 KiB blocks, combines 1,024 of them into 4 MiB objects, and stores those objects in the object-storage capacity tier.
The following table summarizes the fundamental differences between block, file, and object storage and how each storage model presents data to clients.
| Storage model | Presented to client as | Typical example |
|---|---|---|
| Block storage | Raw block device | SAN LUN via FC/iSCSI |
| File storage | Files and directories | SMB/CIFS, NFS |
| Object storage | Objects in buckets/containers | Azure Blob, Amazon S3 |
ONTAP Volumes in the Context of Storage Models
An ONTAP FlexVol volume does not itself represent one of the three storage models described above. A FlexVol is a logical volume managed by ONTAP’s WAFL (Write Anywhere File Layout) filesystem, which internally organizes and manages data in blocks. The storage model ultimately depends on how data from the volume is presented to clients.
When a FlexVol is shared through NFS or SMB/CIFS, ONTAP provides file storage, exposing files and directories to clients. When a LUN is created inside a FlexVol and presented through protocols such as iSCSI or Fibre Channel, ONTAP provides block storage, with the host seeing the LUN as a raw block device.
With FabricPool, object storage introduces another layer underneath the FlexVol. ONTAP tracks data temperature at the WAFL block level and can move cold blocks from the local performance tier to an object-storage capacity tier, such as Azure Blob Storage. This process is transparent to the client, the workload continues to access the same NFS share, SMB share, or SAN LUN regardless of whether its data currently resides on the local performance tier or the object-storage capacity tier.
In simplified form:
Aggregate → WAFL → FlexVol → NFS/SMB = File Storage
Aggregate → WAFL → FlexVol → LUN → FC/iSCSI = Block Storage
FabricPool → cold WAFL blocks → objects → Azure Blob Storage = Object Storage capacity tier
Links
Learn about ONTAP storage efficiency
https://docs.netapp.com/us-en/ontap/concepts/storage-efficiency-overview.htmlONTAP Select storage efficiency support
https://docs.netapp.com/us-en/ontap-select/concept_stor_eff_support.htmlONTAP FabricPool volume tiering policies
https://docs.netapp.com/us-en/ontap/fabricpool/tiering-policies-concept.htmlvolume modify
https://docs.netapp.com/us-en/ontap-cli/volume-modify.htmlFabricPool tier management
https://docs.netapp.com/us-en/ontap/pdfs/sidebar/FabricPool_tier_management.pdfvolume object-store tiering show
https://docs.netapp.com/us-en/ontap-cli-991/volume-object-store-tiering-show.htmlObject storage
https://en.wikipedia.org/wiki/Object_storageWhat is Object Storage?
https://aws.amazon.com/what-is/object-storage/What’s the Difference Between Block, Object, and File Storage?
https://aws.amazon.com/compare/the-difference-between-block-file-object-storage/What is object storage?
https://www.netapp.com/data-storage/what-is-object-storage/
